Windows 20H1 Build 19041.208 fixes an NPLogonNotify bug

As the Windows 20H1 development approaches its completion, insider preview build 19041.208 is now live in the Slow ring.

The build does not provide any new app features or enhancements. Instead, it offers a fix that a previous update, build 19041.207, did not include.

Microsoft released build 19041.207 to the Release preview ring last week. It said that the build would be the last as the company prepares to push out the much-anticipated Windows 10 May 2020 Update (20H1).

Little wonder the latest update has no new features.

Upgrade now to address an NPLogonNotify API bug

Win32 app Developers can breathe a sigh of relief as Microsoft said that it resolved a problem with NPLogonNotify API notifications.

The function in question is critical to credential management.

In a typical Winlogon process, the Multiple Provider Router (MPR) invokes the API to tell the credential manager (CM) that a logon event has occurred. Next, the CM sends back a logon script.

With this update, sending NPLogonNotify alerts from the credential provider framework should work as expected.

It is not surprising that preview build 19041.208 fixes only one bug. The reason for this is that the update includes numerous solutions that Microsoft released with build 19041.207 last week.

So if, for some reason, you did not install build 19041.207, try installing the latest update to fix other Windows 10 PC bugs like:

  • The unexpected crashing of the Remote Procedure Call (RPC) service.
  • The malfunctioning of the Device Enrollment Status Page (ESP) on managed devices.
  • The malfunctioning of the rear camera flash on devices with that feature.
  • The update also included security patches for multiple Windows 10 applications, systems, and features.

The persistent screen reader issue

The release notes for 20H1 build 19041.208 include some bad news for Chromium-based Edge browser users with visual impairment.

We are aware Narrator and NVDA users that seek the latest release of Microsoft Edge based on Chromium may experience some difficulty when navigating and reading certain web content. Narrator, NVDA and the Edge teams are aware of these issues.

Meanwhile, affected users can still use the screen readers with the old Microsoft Edge. The legacy version of the browser does not seem to have compatibility issues with Narrator or NVDA.

Also, NVAccess published a solution to this particular Edge problem.

Users expect Microsoft to push the Windows 10 May 2020 Update very soon. The final version will include major upgrades to the OS, apps, and features.


FULL FIX: NBA 2K error codes 0f777c90, a21468b6 and 4b538e50

NBA 2K17/18/19 is a title every basketball fan should play that simulates the experience of playing in the National Basketball Association and includes several game modes.

MyCareer lets you create your own player and guide him through his career.

The MyGM and MyLeague modes allow you to take full control over an entire basketball club, and MyTeam lets you create your own team to challenge other players‘ teams.

Unfortunately, like many other titles, it appears that there are three common errors that affect NBA 2K17’s MyCareer mode and prevent gamers from actually playing.

How do I fix errors 0f777c90, a21468b6 and 4b538e50 on NBA 2K17/2K18/2K19?

Solution 1 – Update NBA 2K17

These three errors most likely occur because you haven’t downloaded the latest game updates.

For some players, this may take longer depending on the size of the download and the speed of your internet connection.

When the download is complete, you’ll be asked to return to the game’s main menu so the update can go into effect.

You can play a series of games in Play Now mode to trigger a faster download process.

These three errors most likely occur because you haven’t downloaded the latest game updates.

For some players, this may take longer depending on the size of the download and the speed of your internet connection.

When the download is complete, you’ll be asked to return to the game’s main menu so the update can go into effect.

You can play a series of games in Play Now mode to trigger a faster download process.

If you’re playing on an Xbox One, you simply need to restart your console and this should fix the problem.

If you use an NBA 2K17 disc, first remove the disc, wait for a couple of minutes and then go back online.

Solution 2 – Select the save file

According to other NBA 2K17 players who contacted 2K’s Support, you can fix errors 0f777c90 and a21468b6 by simply tapping the triangle on MyCareer to select the save file.

If you’ve encountered other NBA 2K17 errors that we didn’t list in this article, try using the same troubleshooting methods listed above.

It appears that the majority of NBA 2K17 errors are triggered by the fact that you’re not running the latest game updates.


For a better gaming experience, we recommend downloading Game Fire for free. It will help with various gaming issues, such as low FPS, lags and slow PC.


Solution 3 – Clean boot your computer

When playing games, it’s important to make sure that your computer’s resources are directed towards running the respective games.

You can disable unnecessary apps, programs, and processes by performing a clean boot. Here are the steps to follow:

  1. Go to Start > type msconfig > hit Enter
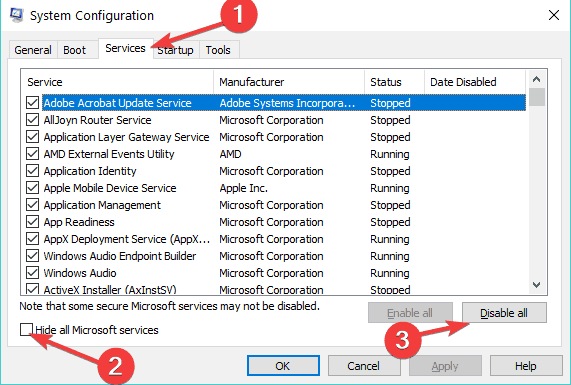
  2. Go to System Configuration > click on the Services tab >  check the Hide all Microsoft services check box > click Disable all.hide all microsoft services
  3. Go to the Startup tab > Open Task Manager.
  4. Select each startup item > click Disable > close Task Manager > restart the computer.disable startup programs

And if you’re thinking about upgrading to NBA 2K18, maybe you should think twice since the game to has quite a plethora of issues.

However, we have an extensive guide on how you can fix most of them. You can use this guide for NBA 2K19 as well.

FIX: Windows 10/11 font is too small

There is an annoying font problem for some Windows 10  users – the font is too small on their devices.

There’s a very simple fix to this problem that we’re going to talk about below.

If you have been struck by the small font problem in Windows 10 here’s what you can do to remedy this problem.

The problem might be caused by high DPI scaling in Windows, so check our previous post with similar working fixes – Chrome Looks Blurry in Windows 10: What to do.

If your issue persists, then here’s how to make the font on your screen larger or smaller, in our situation you want to make it bigger.

How do I make the font bigger in Windows 10?

  1. Change font size
  2. Change display resolution
  3. Press the CTRL key and use your mouse wheel

1. Change font size

You can make the text (and other things like icons) larger without changing the screen resolution of your monitor or laptop screen.

That way, you can make the text easier to see and still keep your monitor or laptop set to the best possible resolution.

How to change font size on Windows 10:

  1. On Windows 10, things are simpler. All you need to do is go to Start > type display > select Change Display Settings.
  2. Under Scale and Layout, you can change the size of text, apps , and other items

display resolution

2. Change display resolution

Another way to increase font size on PC is to change the display resolution.

However, keep in mind that the default resolution of your screen already uses the best possible configuration to display Windows.

Increasing the resolution will indeed make all parts of the UI larger, but some of them will become blurry or will even disappear.

To change display resolution on Windows 10, go to Settings > Display and choose another resolution level from the drop-down menu.

change display resolution

3. Press the CTRL key and use your mouse wheel

If you want to increase font size on various apps and programs or while browsing the Internet, you can simply press and hold the CRTL key on your keyboard and scroll up using your mouse wheel.

The text size on the respective apps and programs will automatically increase.

That’s it, we hope that these suggestions helped. If you’ve got additional tips and suggestions, you can list them in the comments below.

If you’re still using Windows 8.1, here’s how to change display resolution:

  • Open Screen Resolution by swiping in from the right edge of the screen, choose Search, enter Display in the search box, choose Settings, and then Display.
  • Choose Larger – 150%. This sets text and other items to 150% of normal size. This option appears only if your monitor supports a resolution of at least 1200 x 900 pixels.
  • Hit Apply

If you want to change the text size for specific items in Windows 8.1, here’s what you need to do

  • Open Screen Resolution
  • Under Change only the text size, choose the item you’d like to change and pick a text size.
  • Apply

How to fix Save Error 510 in Sims 4 on Windows 10/11 PCs

Sims 4 is one of the most popular sequels of the most popular, so to say, life simulation ever.

Now, EA somehow managed to improve on the old recipe and make it even better with a dozen DLCs and additional content.

Nonetheless, this game has various downsides, including bugs and various errors. The one we’ll try to sort out today goes by the code 510 and it occurs while saving the in-game progress.

In order to resolve this error, we advise you to follow gradually the steps below in order we presented below.

How can I resolve Sims 4 Save error 510 on PC?

  1. Update mods
  2. Remove mods
  3. Clear game cache
  4. Validate the game integrity with Origin
  5. Reinstall the game

1. Update mods

The main reason for basically all save-related errors are mods. They’re mostly provided and administered by third-party sites and they certainly do enrich the overall experience.

However, you’ll need to keep them up to date. A lot of valuable mods a large player base uses in Sims 4 are outdated and not in the sync with the current Sims 4 version.

Because of that, before you completely remove mods, we advise you to update the ones you can.

For that purpose, you’ll need to navigate to the mod supplier’s site and look for the fresh version of all installed mods.

Only the mods that support the current Sims 4 version will be able to run in a seamless manner. Thus, you’ll have a better time with saving the game progress.

2. Remove mods

In case you’re still seeing the same save error 510, the next step you should consider is removing the mods from your installation.

Now, we don’t say to delete them all immediately (even though you can do that, as well).

What we say is to move the mods folder to an alternative location (Desktop is a good choice) and create a new folder with the same name folder.

Now, you can insert mods individually and look for an error trigger. Once you’re certain which mod causes the error, make sure to exclude it from the game.

3. Clear game cache

Now, even though our suspicion is focused on unsupported and/or outdated mods, culprits often come in numbers.

The corrupted cache can also inflict a save error, including the one with the 510 error code.

What you’ll need to do in order to resolve this is to delete certain cache files and move from there.

Of course, before you start meddling with the Sims 4 installation, don’t forget to backup your save files.

Here’s how to clear the cache in Sims 4, and hopefully resolve the save error 510:

  1. Exit the game.
  2. Go to Documents (My Documents).
  3. Open Electronic Arts.
  4. Open Sims 4.
  5. Move your Saves folder to Desktop or an alternative location.
  6. Delete these cache files from Cache folder:
    • localthumbcache.package
    • cache
    • cachestr
    • cachewebkit
    • lotcachedData
  7. Start the game.

For a better gaming experience, we recommend downloading Game Fire for free. It will help with various gaming issues, such as freezes, crashes, low FPS, lags, and slow PC.

4. Validate the game integrity with Origin

In case you’ve acquired the game from Origin client, you can use it to repair corrupted or missing game files and address the problem that way.

Now, this comes once you’ve dismissed mods as the instigators of the problem. The game files can get corrupted, too.

Especially due to malware infection or accidental deletion of one or more essential files.

Here’s how to validate the game integrity with Origin and resolve possible saving stall caused by corrupted/incomplete installation files:

  1. Open Origin client.
  2. Navigate to My Games.
  3. Right-click Sims 4 and click Repair install.
  4. The tool will check your game and repair corrupted or incomplete files.

5. Reinstall the game

Lastly, if you’re still unable to move past the save error 510, we advise you to reconsider game reinstallation as the last resort.

By reinstalling the game, you’ll have the blank, vanilla iteration.

Later on, you can add mods of choice one by one but make sure to add only the ones that are up to date and supported by the last version of the game.

Here’s how to reinstall Sims 4 with the Origin client:

  1. Open the Origin client and select My Games.
  2. Right-click and select Uninstall.
  3. After the process is finished go to the location of installation and delete remaining folders.
  4. Use a 3rd-party tool to clean registry. We recommend CCleaner.
  5. Restart your PC.
  6. Start Origin again.
  7. Find Sims 4 and select Install.

That should be it. We certainly do hope that you were able to finally save your game after applying one of these solutions.

Furthermore, feel free to share your questions or suggestions, and tell us whether the solutions helped you or not. You can do so in the comments below.

How to fix USB code 43 error in Windows 10

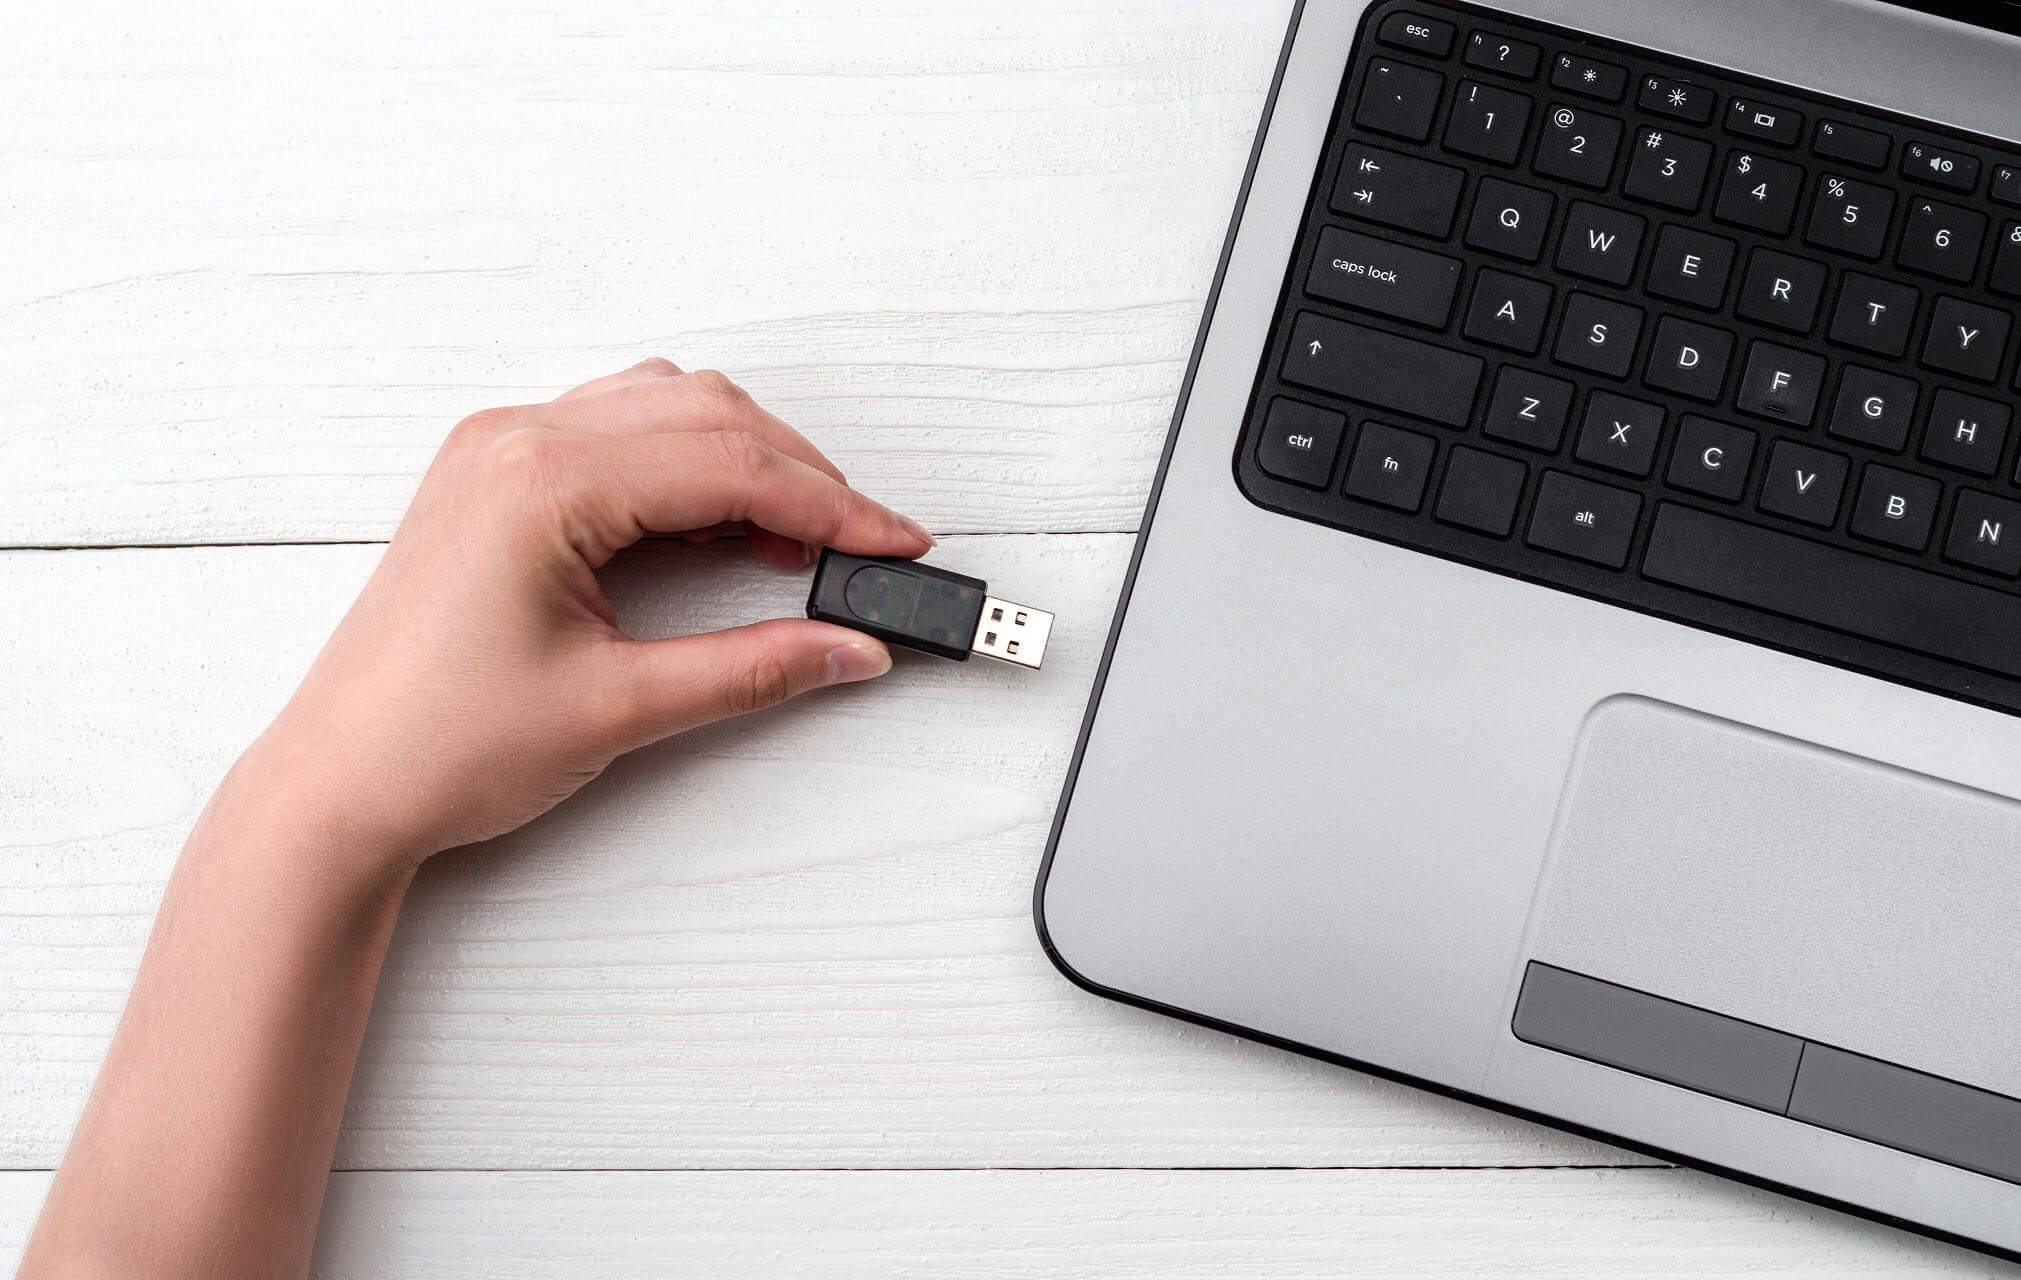
If your USB device fails to work on Windows 10 with code 43 error in Device Manager, then you need to read the following to be able to fix the problem.
usb 3.0 windows 8.1 code 43
There is no news in the fact that there are problems with the USB connectivity in Windows 10.

We have explained in a previous post how to fix slow USB 3.0 problems in Windows 10 and now it’s time to talk about another specific problem – the code 43 error that you see in the Device Manager.

Shared by the Microsoft Windows USB Core Team on a recent posting, this annoying USB problem seems to finally have received an end. Here’s what the team says:

A few USB devices when connected to a port of an Enhanced Host Controller (EHCI) might not enumerate on Windows 8.1 but work on Windows 8. In Windows 8.1, the failure is reported as error code 43 in Device Manager.

One of the reasons is that the device reports itself as supporting a USB version greater than 2.00, but does not provide the required BOS descriptor.

As per the official USB specification, a USB device with version 2.00 or greater must provide a BOS descriptor. In Windows 8, the USB 2.0 driver stack does not validate that requirement.

As a result, a 2.00 or greater device without a BOS descriptor, enumerates successfully when connected to an EHCI controller. In Windows 8.1, the driver stack has been updated and enumeration fails for such devices.

Note: The USB 3.0 eXtensible Host Controller (xHCI) driver in Windows 8 and 8.1 validates that requirement. We are investigating a possible workaround for devices with that problem.

This is a hard nut to crack, as you will be required to do several quite technical things in order to get rid of it.

If the below steps won’t solve your problem, leave your exact device model number with a comment here or on the above-mentioned post from the Microsoft Windows USB Core Team and maybe they will help.

How can I fix USB Code 43 error on Windows PCs?

1. Check the bcdUSB and fid_URB_Hdr_Status values

  • Capture a USB ETW trace for the enumeration failure.
  • Open the trace in the Microsoft Network Monitor application (Netmon)
  • Open the Find Frame dialog (CTRL-F) and search for the USBPort.USBPORT_ETW_EVENT_DEVICE_INITIALIZE event
  • Expand the fid_USBPORT_DeviceDescriptor field in the Frame Details pane and see the value of bcdUSB
  • If the bcdUSB value is greater than 0x200, open the Find Frame dialog again and search for USBPort.USBPORT_ETW_EVENT_COMPLETE_URB_FUNCTION_CONTROL_TRANSFER_EX.ControlTransfer.Urb.SetupPacket.Value_DescriptorType == 0xf. The search returns control transfer completion for the BOS descriptor type of 0x0F
  • Expand the ControlTransfer field in Frame Details pane and view the URB_Hdr_Status value
  • If the fid_URB_Hdr_Status value is anything other than success, the device failed to return a BOS descriptor even though it reports a version greater than 0x200.

2. Unplug all peripherals and restart your computer

Restarting your computer or laptop may fix this error quicker than you may think. But there’s a catch: since error 43 affects your USB connection, you should first unplug all peripherals connected to your device.

Then restart your computer and plug your peripherals back in one by one.

3. Launch the Windows Troubleshooter

Windows 10 comes with a built-in troubleshooter that allows users to quickly fix various issues. Here’s how to use it:

  1. Go to Settings > Update & Security > Troubleshoot
  2. Go to Find and fix other problems > click on Hardware and Devices > launch the troubleshooter
  3. fix usb error 43
  4. Wait until the troubleshooting process completes > check if the issue persists.

4. Remove the problematic USB controller driver

If the solutions above didn’t work, identify the problematic USB controller driver, uninstall it, and then re-install on your computer.

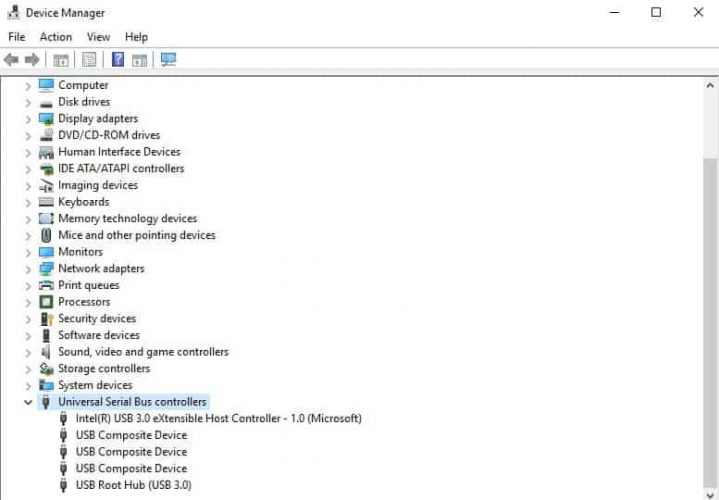
  1. Launch Device Manager > go to Universal Serial Bus controllersUSB error 43 fix
  2. Check if there is a yellow triangle with an exclamation mark there. It should be accompanied by the description Unknown Device
  3. Select the problematic driver > in the new window, go to the Driver tab > click Uninstall to remove the USB controllers driver
  4. Now click on Scan for hardware changes’ to re-install the driver.

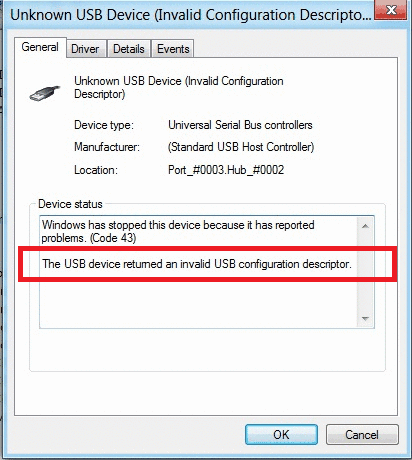
Note: this solution works only for the error message Windows has stopped this device because it has reported problems. (Code 43) is visible under the General tab – Device status.

5. Update Windows

Make sure that you’re running the latest Windows OS updates on your machine.

As a quick reminder, Microsoft constantly rolls out Windows updates in order to improve the system’s stability and fix various issues, including USB errors.

To access the Windows Update section, you can simply type update in the search box.

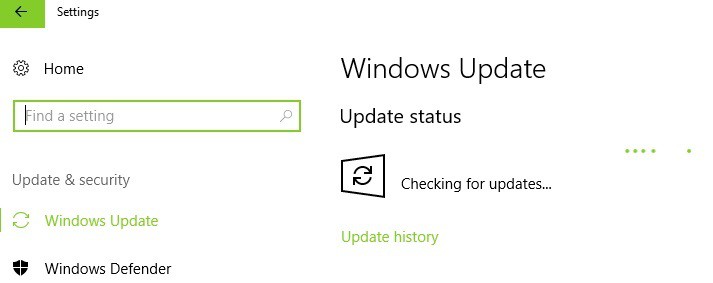
This method works on all Windows versions. Then go to Windows Update, check for updates and install the available updates.

6.  Run a full system scan

Malware may cause various issues on your computer, including hardware errors. Perform a full system scan in order to detect any malware running on your computer.

You can use Windows’ built-in antivirus, Windows Defender, or third-party antivirus solutions.

Here’s how to run a full system scan on Windows 10 Creators Update:

  1. Go to Start > type ‘defender’ > double click Windows Defender to launch the tool
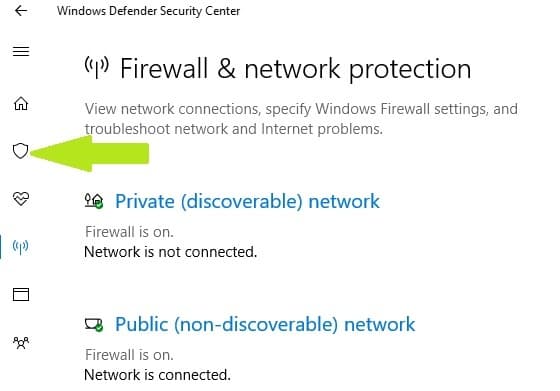
  2. In the left hand pane, select the shield icon
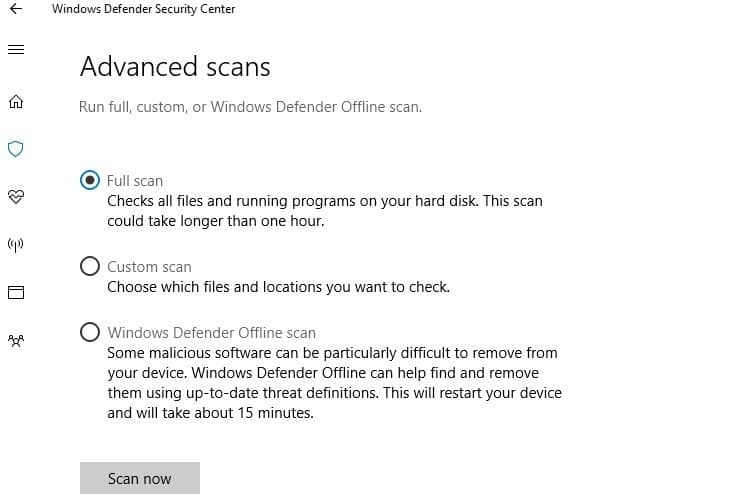
  3. In the new window, click the Advanced scan option
  4. Check the full scan option to launch a full system malware scan.

7. Replace the problematic hardware

If none of the solutions listed above fixed the error, test the problematic USB device on another computer.

If the same error occurs or the device fails to work, this indicates that the device itself is triggering error 43 and you need to replace it.

Let us know if you managed to fix the Windows 7, 8.1, 10USB problem highlighted with code 43 error by following the above steps.

FAQ: Read more about USB issues

  • How do I fix code 43 USB?
Start by unplugging all your peripherals and restarting your computer. If the problem persists, we have the right guide to help you fix it.
  • How do I force Windows to recognize a USB?
You need to uninstall the USB device driver and restart your computer. If the USB device is not recognized, here’s a guide on how to fix that.
  • How do I reinstall USB 3.0 drivers?

You need to change the driver using Device Manager. If you can’t install a driver, read this complete solution to fix the problem.

[wl_navigator]

Windows 10 preview build 19613 fixes Windows Forms issues

Microsoft has responded to the effects of the COVID-19 pandemic in different ways. One of them is by pausing the release of optional Windows 10 updates to users starting in May.

But the company’s Windows Insider program is still releasing beta versions of the OS. The latest one is Windows 10 preview build 19613, which is now available in the Fast ring.

Update 19613.1000 fixes a couple of technical issues. However, the release notes for this build do not mention any particular Windows 10 improvements.

Problems fixed include:

Windows Forms apps

According to Microsoft, build 19613 fixes an issue affecting applications that use Windows Forms. Apparently, the ImmSetOpenStatus() function was not handling the input method editor (IME) service properly with text fields in focus when using the newly introduced Japanese or Chinese IMEs.

The ImmSetOpenStatus() API is for closing or opening up the IME. In turn, the IME lets you input complex characters, for example, the Japanese Kanji, with a standard PC keyboard.

We fixed an issue impacting Windows Forms applications where the ImmSetOpenStatus() API wasn’t changing the IME mode correctly when setting focus to text fields while using the new Japanese or Chinese IMEs.

Visual Studio-Monitor problems

After installing some recent Windows 10 builds, insiders using multiple monitors reported a problem where Visual Studio would not respond to clicks. Microsoft said it fixed that issue with build 19613.

Taskbar/Explorer issues

This update resolves a problem where app icons in the taskbar were not displaying correctly. In some cases, the taskbar would show the default .exe icon instead.

The problem destabilized the explorer.exe app, but affected insiders can install the update to fix it.

Command-line issues

Before installing this fix, you may not successfully use the doskey / listsize command to set the history buffer’s maximum number of commands.

Under normal conditions, invoking the doskey /reinstall command should result in the installation of a new copy of Doskey.exe. It also removes all previous commands from the history buffer.

But instead of working as it should, the command would end the command-line session all together. Affected Fast ring insiders can clear the problem by updating to build 19613.

Settings app

Would your Windows 10 Settings app crash when you were uninstalling a font? That issue should disappear after upgrading.

Do not forget to create a system restore point before updating to build 19613.


16 Best Benchmark Software for Windows 11 (2026 List)

With the best benchmark software for Windows 11, you can test your PC’s real performance under load, compare hardware, and uncover bottlenecks. These tools help you assess your system’s capabilities for gaming, editing, upgrading, or troubleshooting. Please find below the top benchmark tools and their respective use cases.

Top Performance Benchmark Software for Windows 11

1. AIDA64 Extreme – Best for Deep Diagnostics and Hardware Monitoring

AIDA64 offers complete system analysis, thermal tracking, and multi-component stress tests. It reads sensors in real time and displays detailed reports for every component, including CPU, GPU, memory, and storage.

Best For: PC builders, overclockers, system analysts
→ Get AIDA64 Extreme

2. 3DMark – Best for GPU and Gaming Benchmarks

3DMark simulates modern gaming scenarios using real-time 3D rendering and ray tracing. It generates scores based on GPU and CPU coordination under load.

Best For: Gamers, GPU testers, hardware reviewers
→ Download 3DMark

3. Geekbench 6 – Best for Real-World CPU and GPU Compute

Geekbench measures how well your processor handles realistic tasks like image editing, file compression, and machine learning. It generates scores for both CPU and GPU performance.

If you’re comparing performance across GPUs, you may want to reference this GPU comparison tool breakdown to complement Geekbench results.

Best For: Developers, testers, laptop buyers
→ Run Geekbench 6

4. PassMark PerformanceTest – Best All-in-One Testing Suite

Best For: IT professionals, PC tuners, tech-savvy users
→ Try PerformanceTest

5. Cinebench R23 – Best for Content Creation and CPU Rendering

Cinebench tests your CPU with professional rendering tasks from Cinema 4D. It benchmarks single-core and multi-core performance using real production workloads.

Best For: Animators, editors, content creators
→ Download Cinebench R23

6. PCMark 10 – Best for Productivity and Workload Simulation

PCMark evaluates your PC’s performance using tasks like video conferencing, spreadsheets, and photo editing. It gives an overall score reflecting how well your device handles office work.

To explore more tailored options, check out this overview of PCMark for Windows, which includes specific module-based test features.

Best For: Office users, remote workers, students
→ Run PCMark 10

7. CrystalDiskMark – Best for SSD and HDD Speed Tests

CrystalDiskMark benchmarks your disk’s sequential and random read/write speeds. It works for SSDs, HDDs, USB drives, and memory cards.

You can explore other alternatives in this list of hard drive benchmark software for Windows if you want varied I/O testing tools.

Best For: Storage testers, upgraders, IT techs
→ Download CrystalDiskMark

8. UserBenchmark – Best for Fast System Snapshots

UserBenchmark scans your CPU, GPU, RAM, and storage and gives you a full performance breakdown with upgrade suggestions.

Best For: Beginners, casual users
→ Test with UserBenchmark

9. NovaBench – Best Lightweight Full-System Test

NovaBench runs a quick suite of CPU, GPU, RAM, and disk tests and displays easy-to-read results. It’s beginner-friendly and finishes in under five minutes.

Best For: Students, casual testers
→ Try NovaBench

10. OCCT – Best for Stability and Overclocking Stress Tests

OCCT provides intense system stress tests while tracking real-time voltages, clock speeds, and thermals. It covers CPU, GPU, RAM, and even PSU stability.

Best For: Overclockers, performance tuners
→ Download OCCT

11. Unigine Heaven – Best for Visual GPU Stress Testing

Unigine Heaven is a long-running graphics benchmark that uses a beautiful 3D environment to stress your GPU.

Best For: Gamers, GPU overclockers
→ Run Heaven Benchmark

12. AS SSD Benchmark – Best for Advanced SSD Analysis

AS SSD goes beyond read/write speed, offering latency, IOPS, and compression testing. It’s useful for validating NVMe and SATA SSDs under advanced conditions.

For another minimal yet high-precision option, CCSIO Benchmark is a helpful drive speed testing tool that complements AS SSD well.

Best For: Storage enthusiasts, benchmark reviewers
→ Use AS SSD Benchmark

13. HWMonitor – Best for Real-Time Hardware Stats

HWMonitor displays live temperature, fan speed, power usage, and voltages across all key components. It works well alongside stress testing tools.

Best For: PC maintenance, thermal testing
→ Track with HWMonitor

14. RealBench – Best for Real-World Content Workloads

RealBench uses photo editing, video rendering, and multitasking simulations to benchmark system performance under real usage.

Best For: Streamers, creators, ASUS ROG fans
→ Try RealBench

15. Speccy – Best for Hardware Inventory Snapshots

Speccy offers a clean interface that shows CPU, motherboard, RAM, storage, and OS information at a glance.

Best For: Tech support, inventory logging
→ View specs with Speccy

16. ThrottleStop – Best for Fixing CPU Throttling

ThrottleStop helps advanced users unlock performance by adjusting CPU voltage and disabling manufacturer-imposed throttling on laptops.

Best For: Advanced laptop users, performance tuners
→ Download ThrottleStop

Benchmarking Software Feature Comparison

ToolMain FocusBest ForStandout Feature
AIDA64 ExtremeDiagnostics, sensorsOverclockers, system buildersIn-depth monitoring + stress testing
3DMarkGPU/gaming performanceGamers, graphics testersReal-time DX12 and ray tracing tests
Geekbench 6CPU/GPU computeDevelopers, laptop buyersCross-platform results
PassMarkFull system benchmarkIT pros, DIY usersComposite score and hardware ranking
Cinebench R23CPU renderingCreators, editorsUses Cinema 4D engine for realistic stress loads
PCMark 10Productivity simulationRemote work, studentsSimulates real office apps
CrystalDiskMarkDisk read/write speedsSSD/HDD testersLightweight and widely adopted
UserBenchmarkQuick component scoreBeginners, casual usersUpgrade suggestions based on ranking
NovaBenchLightweight overall testCasual testers, laptop usersFast and beginner-friendly
OCCTOverclocking and stabilityPerformance tunersStress test CPU, GPU, PSU, and RAM
Unigine HeavenGPU stress and visualsGamers, streamersReal-time rendering and FPS stats
AS SSD BenchmarkSSD latency and IOPSPower users, reviewersIncludes compression and advanced metrics
HWMonitorHardware stats monitoringTech maintenanceReal-time temps, voltage, and fan speeds
RealBenchReal-world multitaskingContent creators, streamersGIMP, H.264 encoding, multitask simulation
SpeccySystem spec overviewIT, resale, tech supportHardware snapshot in one click
ThrottleStopCPU performance tuningAdvanced users, gamersDisable limits and fix CPU throttling

FAQ

What is benchmark software used for?

Benchmark tools simulate workloads to test your PC’s performance in specific areas like graphics, storage, or CPU. They help detect hardware bottlenecks, confirm upgrade impact, or validate overclocking stability.

Which benchmark tool should I use for gaming?

3DMark and Unigine Heaven focus on GPU performance with gaming workloads. They’re ideal for gamers checking FPS, thermal limits, or GPU health.

Can benchmark tools harm your PC?

Most are safe, but stress testing (like OCCT or AIDA64) pushes your hardware hard. Use them carefully, monitor temperatures, and stop if you see crashes or thermal throttling.

Is UserBenchmark accurate?

UserBenchmark offers quick component rankings, but its scoring system can be biased. Use it for fast comparisons, but validate results with tools like PassMark or Cinebench.

How often should I benchmark my PC?

Run benchmarks after hardware changes, major driver updates, or when diagnosing issues. Regular use isn’t needed unless you’re actively tuning or testing.


Conclusion

Benchmarking your Windows 11 PC doesn’t require guesswork or expensive software. Whether you’re checking CPU thermals, comparing GPUs, or reviewing SSD performance, the tools above cover all major use cases. From casual diagnostics to professional hardware reviews, each tool offers something valuable. Use this guide to choose your toolkit and keep your PC running at its peak.

Windows Terminal v0.11 is out with support for non-English UI languages and various Settings changes

Today marked the last major update before Microsoft releases the 1.0 version of Windows Terminal, the new terminal emulator for Windows 10 that the company unveiled a year ago. According to Microsoft’s Kayla Cinnamon, Program Manager for Windows Terminal, anyone can download the latest terminal from the Microsoft store, or by visiting their GitHub releases page to see what has changed with the latest version of Windows Terminal.

Overall, the new release isn’t packed with brand-new features but rather, it is focused on usability and enhancements to the app’s settings as it moves closer to its production release. Windows Terminal now includes support for non-English UI languages, and Microsoft recommends that you move the settings file out of the app folder to let it generate a new one, and then copy your settings back.

Some other major additions include:

  • The profiles.json file has been renamed to settings.json. This change happens automatically for any existing installations.
  • The new settings file binds the “copy and paste” commands to the Ctrl+C and Ctrl+V shortcuts, and will work alongside any existing key bindings already setup.
  • Copied text will now copy as plain text by default.
  • The Cascadia Code font is now the default font for all profiles automatically generated by Terminal.
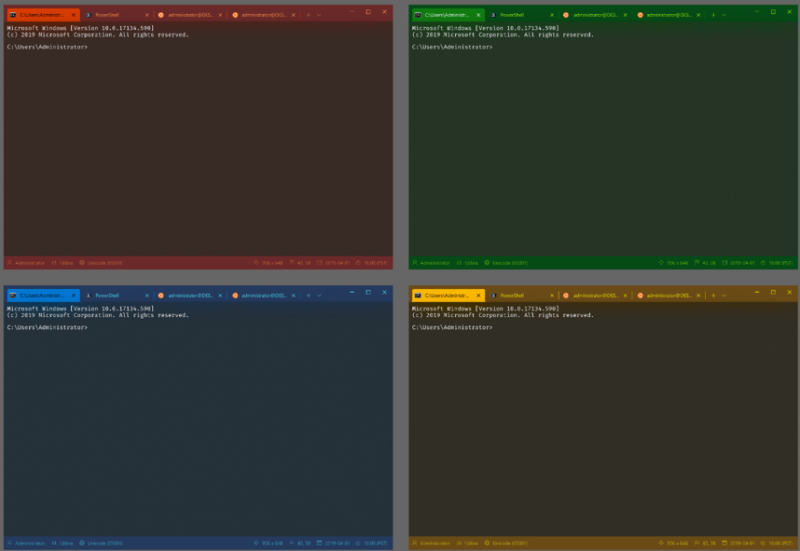
  • Terminal now ships with two new themes -Tango Light and Tango Dark.
Microsoft Terminal Tango Themes
Microsoft Windows Terminals new Tango themes

As Microsoft prepares for version 1.0 of the Windows Terminal, some settings have also been removed as they were deprecated.

  • The “Globals” namespace is no longer supported in the JSON file.
  • The application theme has been renamed.  Microsoft suggests that this change will help clean up naming and providing more flexibility in the future.
  • Copying as a single line has been removed in favor of a new argument that makes it easier to understand.

In March, Microsoft released v0.10 that added new mouse and input support, as well as the ability to have duplicate panes in Terminal. To see a complete list of changes and bug fixes, visit Microsoft’s DevBlog and GitHub page. You can also find the Windows Terminal roadmap here.

5 Best brochure maker software [Online & Desktop]

It doesn’t matter if you’re a small startup or an established enterprise. You’re entitled to look for the best brochure maker software tools. After all, you want to make sure your story reaches out to more people.

Creating professional brochures that reflect your brand without spending a fortune seems to be a difficult task these days.

You’ve come to the right place if you need some help. With our five picks below, you can learn, explore, and have fun while creating catchy and professional brochures in just a few clicks.

What’s the best brochure maker software that you can get today?

Adobe Photoshop

grab Adobe Photoshop

Adobe products have set the industry standards for decades, so there’s no wonder that Adobe Photoshop has gone a step higher in brochure making too.

With designs that are easy to edit, with infinite effects to choose from, and continuous work from both your computer and iPad, Photoshop can be a tremendous help in pretty much any design project.

That’s why it works impressively well for making outstanding brochures. With flexible custom brushes, you can actually control every single element, work intuitively, and surprise people.

Amazing key features that you’ll most likely find useful:

  • Easy to use Properties panel to change document settings and enjoy convenient Quick Actions
  • Precise Object Selection tool at your disposal
  • Modern presets to help you remain organized at all times
  • Better Content-Aware Fill to give you the desired control when it comes to filling multiple areas of an image without leaving the window
  • Vector graphic import is included
  • Photoshop on iPad subscription includes Adobe Fresco too
  • Photoshop on the iPad auto-activates Adobe Fonts when needed
  • Seamless integration with Creative Cloud

⇒ Download Adobe Photoshop free

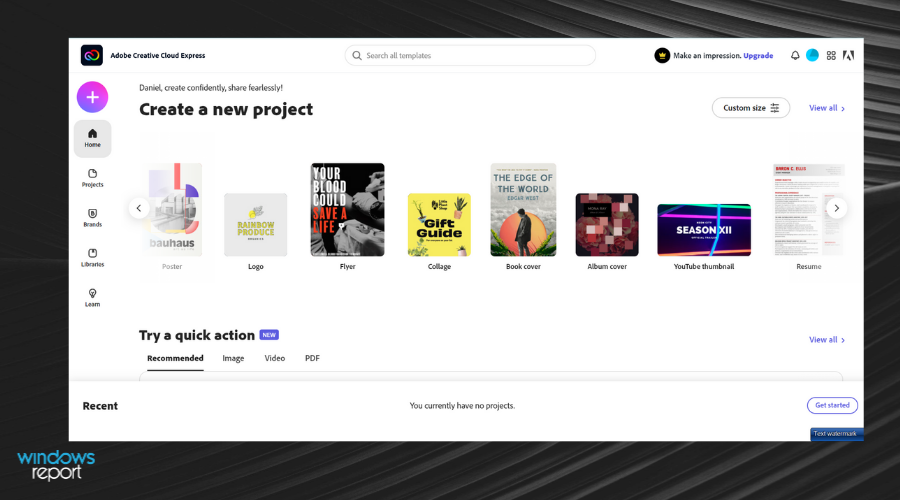
Adobe Creative Cloud Express

Non-designers deserve a chance to make interesting brochures as well. If you find yourself in this category too, then Adobe Creative Cloud Express set of online design tools will come in handy.

Many of you probably used the tool for short projects such as book covers and greeting cards, so you already know how versatile the interface of this program really is.

Moreover, Adobe Creative Cloud Express allows you to get creative in terms of brochure making as well.

Do note that you’ve got a great gallery of free brochure templates that you can easily customize, then print or share with friends and family.

Amazing key features that you’ll most likely find useful:

  • Multiple colors, fonts, and images to make your brochure projects unique
  • Design filters and layout options to help you make a statement
  • It lets you combine video clips, photos, and cinematic motion to create amazing video stories
  • It is not only part of any Creative Cloud plan, but also as a standalone subscription

⇒ Get Adobe Creative Cloud Express

Canva

try out Canva

Canva is a program often recommended for quality graphic designs. It should, therefore, come as no surprise that you may use if for creating brochures even if you lack design skills.

The extensive template library practically gives you a start point that you can take advantage of from the very start.

Then, customize according to your needs and you’ll have the brochure you’ve been dreaming of. And if you’re in a creative mood, no one says that you cannot design your brochure from scratch.

Amazing key features that you’ll most likely find useful:

  • Extensive library of more than 2 million stock photos, illustrations, and icons
  • You may leave comments on the work done, to improve collaborative efforts
  • User-friendly interface
  • Intuitive drag and drop tool

⇒ Get Canva

Lucidpress

try out Lucidpress

Lucidpress may also become your go-to for brochure making. First of all, it has hundreds of professionally-designed, customizable templates waiting to be discovered.

Besides that, easy customization is allowed as the software provides a plethora of intuitive functionalities.

Lucidpress not only enables you to create your own brochures but is also an excellent tool to share documents across any device or assign different roles and permissions to members of your team.

Amazing key features that you’ll most likely find useful:

  • Simple interface for all users
  • Useful team templates to minimize wasting valuable time
  • Real-time collaboration options for all team members
  • Multi-channel distribution options such as direct mail, social publishing, and on-demand printing

⇒ Get Lucidpress

Scribus

try out Scribus

If you are a fan of open-source desktop publishing software that works on Linux, then Scribus is a choice that you will find extremely useful.

Unlike Adobe Creative Cloud Express, you need to know from the very start that it targets professional users only. Brochures will look amazing thanks to the extra control of color display and conversion.

And since the file format is based on XML, repairing damaged files will work like a breeze.

Even if it comes in two versions – stable and development- we strongly advise you against the development option if you want to avoid any unpleasant surprises.

Amazing key features that you’ll most likely find useful:

  • Commercial color systems are complemented by national and government color standards/open-source color collections
  • You are in full control of your data with the code of your desktop publishing tool at your disposal
  • You can create your own Scribus files without even without accessing Scribus
  • It is completely free

⇒ Get Scribus

Simple brochures have no chance to stand out, but you already know how to prevent that. Do you have any questions regarding the five brochure maker software tools mentioned above?

If you do, don’t hesitate to let us know by using the comments section below.

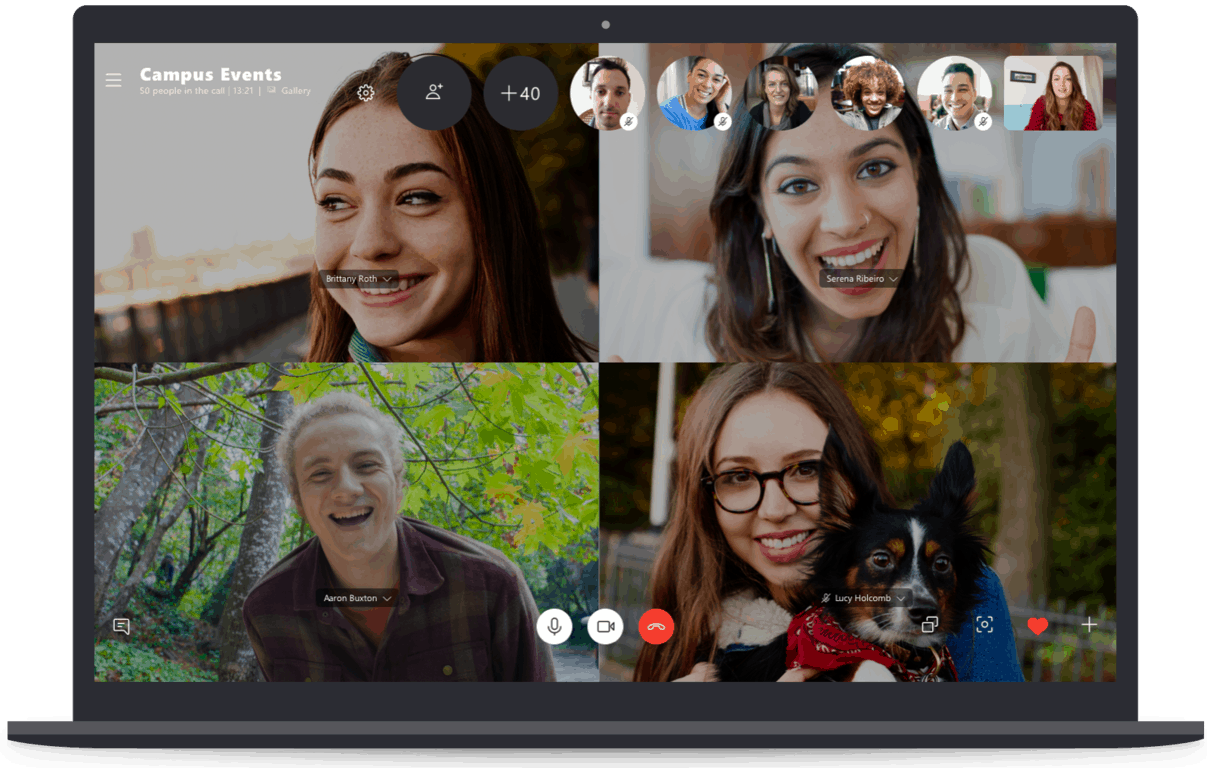
Skype also gets custom backgrounds for video calls with latest update

Earlier this month, we reported that Microsoft had rolled out the ability to set background effects during Microsoft Teams video calls. This week, the company is bringing the same feature to Skype for Windows, Mac, Linux, and the web (via Neowin), and this should be a timely addition after Skype usage grew 70% last month.

Custom backgrounds are now available in version 8.59 of Skype and this feature expands on the existing background blur feature in Skype. For anyone interested to try out the new custom background feature, you can follow the steps mentioned below, though it’s important to note that the new feature isn’t supported on the Microsoft Store version of Skype:

  • During a call, hover over the video button or click the More menu.
  • Click Choose background effect.
  • You can Blur the room you’re in currently, choose an image you previously added, or Add a new image to customize your background effect.

Note: It’s recommended to use images in landscape orientation and the custom image needs to be saved locally on your desktop. Skype for Windows 10 (version 14) supports blur background only.

Besides the new custom backgrounds support, the latest Skype update also brings some notable features including easier access to call controls directly from the chat menu and ability to share files from the Finder app on macOS. Do you think Skype video calls could become cool again? Sound off in the comments below.

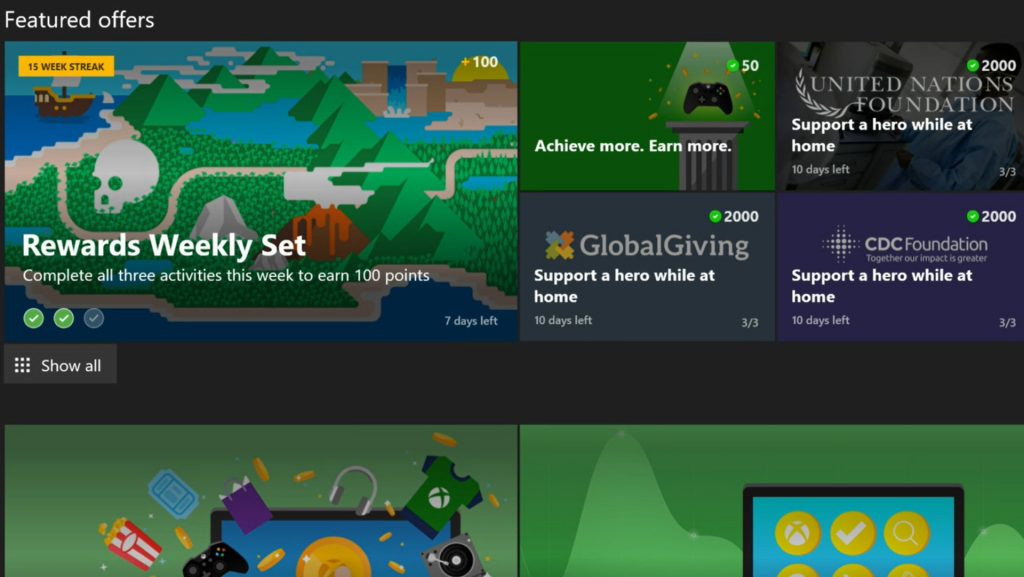
Play Xbox and donate to the United Nations Foundation, GlobalGiving

As everyone is doing their part to help stop the spread of COVID-19 (coronavirus), Microsoft found a way to help gamers give back just by playing games on their Xbox One. We already know that Xbox One owners can use their Microsoft Rewards points to donate to the CDC Foundation to help battle COVID-19. Now, there is another way for Xbox One owners to give back.

As noted in a post on Xbox Wire, there are two other global organizations that Xbox One owners can donate their Microsoft Rewards points to help fight COVID-19; the United Nations Foundation (UNF) and GlobalGiving. Microsoft will match donations of your Microsoft Rewards one-to-one; 1,000 Microsoft Rewards is equal to $1 donated.

Xbox One owners can earn Microsoft Rewards points by playing games, renting and buying TV shows and movies in the Microsoft Store, and completing Xbox game quests via the Microsoft Rewards app on Xbox One. In addition, Minecraft has a similar partnership with the United Nations to share helpful information from the World Health Organization (WHO) about proper handwashing to combat COVID-19.

If you are not already a member of Microsoft Rewards, you can sign up for free through the Microsoft Rewards app on your Xbox One console, or by using microsoftrewards.com.

Connect your Xbox 360, Xbox One controllers to Windows 10/11

Albeit many Windows 10 users have been reporting problems with getting their Xbox gamepads and controllers to work, you should know that the two platforms are officially compatible.
xbox windows 8 controller
Recently, we have shared with you some of the best Windows 10 gamepads to choose if you want to enrich your gaming experience. Now, there are some problems that some of you may encounter with the XBox 360 Game Controller. One customer said the following recently in the Microsoft support forums:

Hi guys, i’ve just purchased a Xbox 360 wireless controller for Windows . I’m using Windows 8 x64, Windows recognizes it automatically and works when I plug it. The problema is when I play games it turns slow in a random way and it fixes just touching the mouse :S. I tried with 2 games so far : Amnesia and Fifa 12 and happens exactly the same with both. Also i’ve installed the software coming with controller but i’ve got the same result.

The compatibility is 100% when it comes to the wired version of the Xbox 360 controller for Windows 10. However, in Windows 10, you might encounter issues with the wireless version, so, you are advised to download and install the latest drivers. Also, check out this guide on how to use the wireless receiver to set up your Xbox 360 controller for Windows 10.

As for the Xbox One controller, unfortunately, it is not yet compatible with Windows 10, but that should be solved any moment now.

UPDATE: The Xbox One controller is now fully compatible with both Windows 10. You can play your favorite games on your computer using your Xbox controller without any problems. Follow the instructions listed below to establish a wireless connection between your PC and your Xbox controller:

  1. Go to Settings > Devices > select Add Bluetooth or other device.add xbox controller to pc
  2. Select Everything else > choose Xbox Wireless Controller > click Done and that’s it.

As a quick reminder, you can connect up to 8 Xbox wireless controllers at the same time to support your multiplayer sessions. If you’re planning to connect more than one controller that has Xbox Chat Headsets attached, keep in mind that you can connect a maximum number of 4 such devices. If your controllers have Xbox Stereo Headsets, you can connect only two of them at the same time.

You can also use an Xbox Wireless Adapter for Windows 10 to connect the two pieces of hardware.

[wl_navigator]

FIX: Microsoft Solitaire error code 124

Most, if not all gamers have come across error messages while trying to play their favorite games whether that’s on their Xbox consoles or Windows computers.

Microsoft solitaire collection error code 124 may be caused by loss of network connectivity, or if the online game service is unavailable.

They may also be displayed when you try to save the game or the game files have become corrupted.

Usually, Microsoft releases the error codes (mostly known), and their corresponding issues, so if your error code starts with 101, there’s something not quite right with the news feature, or a file is missing from the manifest.

An error with the code 107 means something is preventing the game from downloading so you need to check your internet connection, antivirus program and ensure the game is whitelisted.

If you’re getting Solitaire error 124 or error 101_107, it’s probably within that range of issues, but here are some known solutions to help resolve the issue.

How can I fix Solitaire errors 124/ 101_107?

  1. Run App troubleshooter
  2. Run Windows Update troubleshooter
  3. Check that Windows Updates aren’t stuck
  4. Check if Xbox Live is down
  5. Create new user profile and try setting up from there
  6. Uninstall and reinstall Microsoft Solitaire Collection
  7. Make sure your firewall/anti-virus isn’t blocking the app
  8. Clear your Windows Store cache
  9. Uninstall and reinstall the game with a clean Windows Store cache
  10. Clear Disk cache

Solution 1: Run App troubleshooter

This fixes some issues that prevent apps from running such as screen resolution, and incorrect account or security settings.

  • Right-click Start
  • Select Control Panel
  • Go to the top right corner and change View by
  • Select Large iconscontrol panel
  • Click Troubleshooting

troubleshooting control panel

  • Click on View all option on the left panel
  • Select Windows store Apps


Solitaire error 124/ 101_107/

  • Follow the instructions to run the app troubleshooter

Check whether you are able to play Solitaire again. If not, go to the next solution.

Solution 2: Run Windows Update troubleshooter

This tool automatically detects and fixes the most incorrect settings on your computer that brings the Solitaire error 124/ 101_107/and prevent you from running any updates.

  • Click Start
  • In the search field box, type Troubleshooting > hit Enter
  • Click View all in the left pane
  • Select Windows Update


Solitaire error 124/ 101_107/

  • Run Windows Update Troubleshooter and follow the instructions on the screen

Solution 3: Check that Windows Updates aren’t stuck

If you’ve checked for Windows Updates and there was no problem there, try checking if there are some updates that are stuck because some do get stuck for various reasons.

  • Click Start
  • In the search box, type Windows Updates
  • Click Check for Updates

check for updates

  • Click Check Now
  • Click View Details
  • Install any updates you may find that have not been installed including optional ones
  • Restart your computer

Solution 4: Check if Xbox Live is down

Sometimes the network on Xbox goes down, in which case you can check and log in then click Support to see if it says Xbox Service is up or Xbox Service is limited or Xbox Service is down.

It is down or limited, you may not be able to log in to your game till it is fixed.


You might also be interested about the best Solitaire apps for Windows 10 users


Solution 5: Create new user profile and try setting up from there

You can create a new user profile then change settings to administrator privileges, and check if Solitaire error 124/ 101_107/ persists.

Here’s how you can create a new user profile:

  • Click Start
  • Select Settings

Solitaire error 124/ 101_107/

  • Select Accounts

Solitaire error 124/ 101_107/

  • Click Family and other users
  • Click Add someone else to this PC

Solitaire error 124/ 101_107/

  • Fill in the form with the user name and password. Your new user account will be created.
  • Click on Change account type
  • Click the drop-down arrow and choose Administrator to set the account to administrator level
  • Restart your computer
  • Login to the new account you just created

If the issue goes away, then it may mean your other user profile is corrupted. You can try the following in case of a corrupted user profile:

  • On your new account, use it to downgrade your usual account
  • Click Apply or Ok
  • Raise back your old account to its default admin level
  • Rinse and repeat a few times as this will help to remove any corruption
  • Leave your account on as Administrator

Check whether Solitaire error 124/ 101_107/ goes away when using the newly created account. If it does, then you can either Fix the old user account or migrate to the new account.

Solution 6: Uninstall and reinstall Microsoft Solitaire Collection

If you usually don’t log in to Solitaire, uninstalling the app will erase all your games and progress.

If you do log in to Solitaire before you uninstall, all your data will be saved in the cloud, and any saved games will not be lost when you uninstall and reinstall Microsoft Solitaire Collection.

You can then pick up where you left off in the game you’re currently playing.

  • Click Start
  • In the search box, type Microsoft Solitaire Collection

Solitaire error 124/ 101_107/

  • Right-click Microsoft Solitaire collection app tile, and then select Uninstall.

Solitaire error 124/ 101_107/

  • Restart your computer
  • Right-click Start
  • Select Run

Solitaire error 124/ 101_107/

  • Type wsreset.exe, and then press Enter. The Microsoft Store will open so you can reinstall Microsoft Solitaire Collection.

Solitaire error 124/ 101_107/

Solution 7: Make sure your firewall/anti-virus isn’t blocking the app

Sometimes having multiple firewalls, antivirus or malware programs, may at times prevent you from performing certain tasks or run processes on your computer.

If this is the cause of the issue, turn either of the three off temporarily then try to log in again.

Ensure you turn these programs back on immediately after you’re done to prevent hackers, viruses, and worms from damaging your system.

The steps to unblock the game (or any app that needs to access Xbox Live) will vary depending on the antivirus or firewall software you use.

Check the documentation for your antivirus or firewall software to open settings and ensure that the software is not blocking the app.

If your antivirus or firewall has an app whitelist, make sure that your Xbox Live-enabled games are on this list.

Solution 8: Clear your Windows Store cache

  • Right click Start
  • Select Run

Solitaire error 124/ 101_107/

  • Type wsreset.exe and press enter. This will launch Windows Store with a cleared cache. You can check if Solitaire error 124/ 101_107/ goes away after doing this.

Solitaire error 124/ 101_107/

Solution 9: Uninstall and reinstall the game with a clean Windows Store cache

This should be one of the last resort methods. Ensure you’re connected to Xbox and save your game data. If not connected, you may lose all your game progress.

  • Right-click on the Solitaire game app icon and choose Uninstall
  • Right click Start
  • Select Run

Solitaire error 124/ 101_107/

  • Type wsreset.exe  and press Enter
  • The Windows Store will launch for you with a clean cache
  • Go to Settings

Solitaire error 124/ 101_107/


  • In the Settings Menu, go to App Updates

Solitaire error 124/ 101_107/

  • In the App Updates menu, press Check for Updates AND Sync Licenses
  • Press the arrow key at the top left to go back
  • In the search bar at the right, type in the name of the game – Microsoft Solitaire
  • Reinstall the game

Solution 10: Clear Disk cache

This is another last resort method. Connect to Xbox Live and save your data before doing this otherwise you’ll lose all your game progress.

  • Close all your games using ALT+F4 while it is running
  • Click Start
  • Select File Explorer

Solitaire error 124/ 101_107/

  • Click the View tab at the top

Solitaire error 124/ 101_107/

  • Check the box that says Hidden Items

Solitaire error 124/ 101_107/

  • Go to the following folder: C:Users[USERNAME]AppDataLocalPackages[GAMENAME]LocalState
    • [USERNAME] – is the name you use to log in to the computer, for example John Doe
    • [GAMENAME] – is something with the name of the game. Something like this for example: Microsoft.Solitaire_8wekyb3d8bbwe
  • Delete the folder DiskCache.
  • Run the Microsoft Solitaire game again.

Were any of these solutions helpful? Let us know in the comments section below.

  • Is Microsoft Solitaire Collection free?
Solitaire Collection is a free collection that allows you to play 9 challenge Solitaire games. If you can’t run it in Windows 10, read this expert guide to fix the problem.
  • How do I get Microsoft Solitaire Collection?

Microsoft Solitaire Collection is already installed in Windows 10. Did you know that there are other solitaire games out there?

[wl_navigator]

The latest non-security Windows 10 update is now live

Microsoft has rolled out the latest non-security Windows 10 update. KB4550945 belongs to the C category of releases that are usually available the third week of the month.

Recently, the Redmond-based company announced that it would not be releasing such updates starting in May 2020. You will still be getting Update Tuesday releases that address known security issues with Windows 10, though.

Update fixes multiple problems affecting Windows 10 1909 and 1903

Cumulative update KB4550945 does not introduce any new features to the targeted Windows 10 versions.

But it offers numerous improvements and fixes for the operating systems in question. These include:

  • According to the release notes for the CU, KB4550945 fixes a problem that prevented some apps from opening after updating to a more recent version of Windows 10.
  • Notifications for PCs that use a VPN on a cellular network should now work without problems.
  • Some Xbox users could not resume a game on a Windows device after upgrading to a more recent version of Windows 10. That problem is no more.
  • With the update, text boxes with multiple lines of texts should be working well in all scenarios.
  • Changing default application settings should not be generating unusual notifications once you update your PC with KB4550945.
  • If Windows Update crashes when you check for updates, you cannot use it to get optional fixes and improvements like KB4550945. Microsoft says it has fixed that problem too.
  • The update should also correct an issue preventing the printing of content that falls outside the margins of a document.
  • Microsoft announced it had a fixed an issue with the Windows 10 on-screen keyboard during sign-in. Some users had complained that the feature would not come up when the system prompted them to provide their login credentials.

How to get the update

KB4550945 is an optional update, and as such, it does not automatically download and install on your PC. One way to get it is via Settings, Update & Security, and then Windows Update.

While you are there, click the download link in the Optional updates available area to get and install the latest fixes and enhancements for your Windows 10 computer.

You may also go to the Microsoft Update Catalog to manually download and install update KB4550945.

Not all cumulative updates for Windows 10 turn out well, which is why you may want to create a restore point before updating.  Doing that provides a healthy OS status to fall back on in case updating interferes with the performance of your system.


How to fix Winload.efi errors on Windows 10/11

Sometimes, Windows 10 users may get the error message The application has failed to start because its side-by-side configuration is incorrect.

Please see the application event log or use the command-line sxstrace.exe tool for more detail.

Users also reported other similar errors caused by the same problem and luckily have the same solution:

– windows system32 winload efi error code 0xc00000f
– asus zenbook winload efi error
– windows system32 winload exe error 0xc000001
– required file is missing or contains errors winload efi

This error usually occurs when users launch an app after installing the latest Windows updates. So, basically when you have these sorts of issues, you might want to try a system refresh or a system restore.

The only issue is that when users try to perform a system restore or refresh, they get the winload.efi file error.

Fix winload.efi error is preventing me from resetting or refreshing my computer (Windows 8)

There’s no need to panic — in this article, we’ll show you how you can fix the winload.efi error in the shortest time possible.
Fixing the winload.efi error code requires you to boot from the Windows 10 Installation Media disk and follow the steps listed below in the order they are described.

Also, if you do not have an installation media disk for Windows 10, follow the last method listed in this article to get your system up and running.

How can I fix Windows 10 winload.efi errors?

  1. Refresh your PC
  2. Run System Restore
  3. Create your own Windows 10 Installation Media
  4. Disable Secure Boot
  5. Check your disk for errors
  6. Disable antivirus/ firewall protection

1. Refresh your PC

  1. Insert the 10 Installation Media disk into the device.
  2. Reboot the operating system with your Installation Media CD or DVD inside the device.
  3. After the reboot, you will get to a screen where it asks to press any key to boot from the CD or DVD.
  4. Press any button on the keyboard.
  5. You should now have in front of you a window where you need to select the correct time and keyboard type.
  6. Press the Next button after you set the time and keyboard type.
  7. You should now have in front of you the Choose an option screen.
  8. Select the Troubleshoot feature you have on that menu.
  9. From the Troubleshoot menu, select the Refresh your PC option.
  10. Follow the on-screen instructions to complete the System Refresh.
  11. Reboot your operating system.
  12. Check again if you still get the winload.efi error.

2. Run System Restore

Note: Before attempting this step, please create a backup copy of your files and folders.

  1. Start Windows 10 normally.
  2. Move the mouse cursor over to the upper right side of the screen.
  3. From the menu that appears, select the Search feature
  4. In the search dialog box, enter control panel without the quotes.
  5. After the search has finished, select the Control Panel icon (it should be the first result).
  6. In the Control Panel search box situated in the upper side of the window, enter Recovery.DISM.EXE ERROR 1392
  7. Press the Enter key on the keyboard.
  8. After the search has finished, select the Open System Restore feature.
  9. Follow the on-screen instructions to finish the System Restore and bring back your operating system to a previous point in time when you did not have the winload.efi error message.

3. Create your own Windows 10 Installation Media

If you do not have a Windows 10 Installation Media disk, follow the steps below.

  1. Get a USB stick with at least 8 GB of free space and make sure it is blank.
  2. Click on this link to open Microsoft Support.
  3. Connect your USB stick to the device.
  4. In the link listed above, select the Create Media button.
  5. Follow the on-screen instruction to create your Windows 10 Installation Media USB.
  6. Search on the USB stick for the Setup executable.
  7. Right-click on the icon.
  8. From the menu that appears, select the Properties feature.
  9. Go to the Compatibility tab located on the upper side of the Properties window.
  10. Under Compatibility mode, select Run this program in compatibility mode for.
  11. In the drop-down menu, select Windows 7 > hit Apply > OK.
  12. Now double click to open the setup executable file.
  13. Follow the on-screen instructions to finish the setup.

4. Disable Secure Boot

If you own a UEFI computer, try disabling Secure Boot. This setting can sometimes prevent your computer from actually accessing the winload.efi file.

For more information on how to disable this feature, go to your device manufacturer’s website. The UEFI UI is different for every computer mode.

Once you have located and disabled the UEFI setting, exit the user interface, and restart your computer.

5. Check your disk for errors

Disk errors and faulty files may also trigger the winload.efi error code. The quickest and safest way to fix this problem is by checking for disk for errors. Here are the steps to follow:

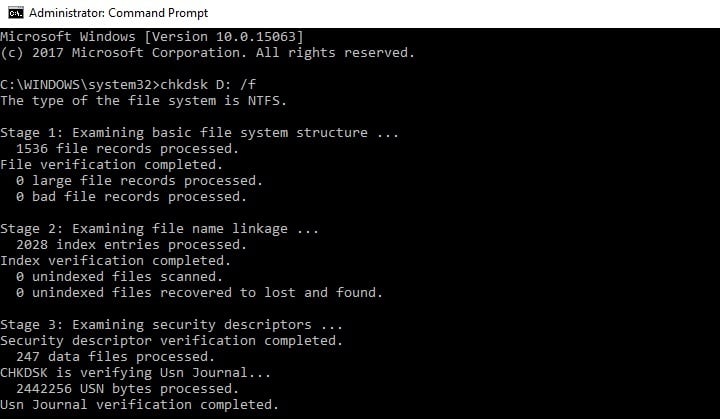
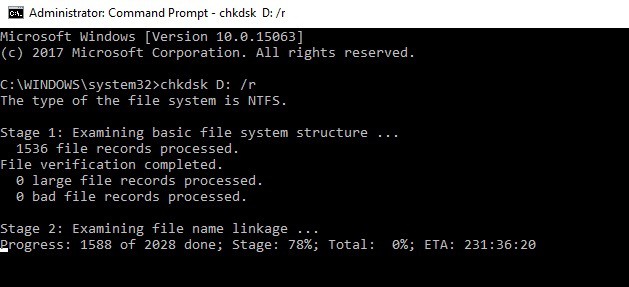
  • Go to Start > start Command Prompt as administrator and type chkdsk C: /f
  • Hit Enter and wait for the scanning process to complete
  • note: Replace C with the letter of your hard drive partition.

If you do not use the /f parameter, chkdsk displays a message informing your that the file needs to be fixed, but it does not fix any errors.

To repair physical issues, run the /r parameter as well.

6. Disable antivirus/ firewall protection

If nothing worked, try disabling antivirus and firewall protection to see if this workaround can fix your problem.

Don’t forget to turn your antivirus and firewall back on as soon as you launched the problematic app.

There you have a few methods to fix your winload.efi error code in Windows 10.

If you do have more questions regarding this subject, you can post a comment in the section below. We will try to help you as soon as possible.

Yakuza Kiwami video game launches on Microsoft’s Xbox One consoles and Xbox Game Pass

Yakuza Kiwami, a modern remake of the original Yakuza video game, launched on Microsoft’s family of Xbox One consoles today.

The game is features a variety of visual and gameplay improvements over the 2005 original in addition to some new story elements and an evolved combat system.

Here’s the official game description:

Yakuza, the first installment in SEGA’s critically acclaimed action series, gets an extreme remake in Yakuza Kiwami.

To save his best friend, Kazuma Kiryu takes the fall for a crime he didn’t commit, and ends up with a 10-year prison sentence. After being released, Kiryu finds himself expelled from his yakuza family, and alone in a world he no longer recognizes.

Events take a turn for the worse when 10 billion yen vanishes from the vault of the Tojo Clan, Kiryu’s former yakuza family, igniting a war in the red-light district of Kamurocho. Together with a mysterious girl named Haruka, Kiryu must fight to survive and uncover the truth hidden amidst the chaos surrounding them.

In addition to being for sale on Xbox One, Yakuza Kiwami is also available to play via the Xbox Game Pass subscription service from today. After more Yakuza gaming on Xbox One? Yakuza 0 also recently launched on the console.

Are you a fan of the Yakuza video game franchise? Let us know what your favorite game is in the comments below and then follow us on Pinterest and Facebook for more Xbox gaming news.

Yakuza Kiwami
Yakuza Kiwami
Developer:
SEGA
Price:
Free


Xbox Game Pass Ultimate

Laptop Was Stolen? Here’s How to Track it & Block Files

Was your Windows laptop stolen? Do you want to get it back, or do you want to secure your personal data?

Well, if you need to know how to find your stolen Windows laptop, you should look below. We’ve tried to explain to you what to do in this unfortunate situation, and also I’ve described the methods to apply to prevent such situations.

Your laptop might get stolen in various ways, especially when you are not paying attention to the people that are around you at some point.

Thieves are always watching, so you should do the same thing;

I know that this might sound a bit too dramatic, but let’s be honest: it’s better to be cautious than confront difficult situations afterward.

Of course, some situations can’t be prevented, so this guide will teach you how to find or track your stolen laptop and prepare yourself for this kind of action.

What can I do if my Windows 10 laptop is stolen?

A stolen laptop can be a big problem, and in this article, we’re going to cover the following issues:

  • How to track a stolen laptop with an IP address – If your laptop is stolen, you can track it with an IP address. Certain applications and services keep track of the IP address of your PC, and you can use that address to track your device. Even if you find the IP address, you’ll need to contact the authorities in order to get the exact location of your laptop.
  • The laptop was stolen how to find it – There are a few ways to find your laptop once it gets stolen. The best way is to install the tracking software on it, but you can also track your laptop using the IP address. However, the IP address won’t give you the exact location of your device.
  • Laptop was stolen what to do – If your laptop is stolen, you need to contact the authorities first. In addition, you can also try to locate your device using one of our solutions.
  • Protect your laptop from theft – Protecting your laptop from theft is important, and in this article, we’re going to share a few tips on how to protect your laptop and your files.

Usually, a common user is using his laptop for various reasons, which means that on the device, there are saved personal data, info, and even accounts.

That’s why it is essential to protect your data and to secure the same, even when your laptop is stolen – so you will have to do it from a distance.

The most important thing to do is to act quickly to avoid unpleasant situations.

So, as soon as you notice your laptop is gone, get to work, track it out, and secure your accounts.

Then, of course, call 112 to make a report about what happened and to communicate with trained persons who can help you track your device.

How to secure your data when your laptop was stolen?

The first thing to do is to ensure that the thieves can’t access your personal data. You don’t want to lose anything important to you, so you should act quickly.

First, it should be clear to you that you can only secure the info stored online through your personal accounts.

Therefore, don’t hesitate and set new passwords for your accounts, and download and erase the online data if possible.

This process should be similar to the one you apply when your Microsoft account has been hacked.

Only now, you have to do the same thing for all your valid accounts, including social media websites and cloud storage services.

Remember your web browser history, passwords, cache, and so on. You should be able to erase all this info only if, on your stolen laptop, you have previously installed a dedicated tool in that matter – we will talk about this during the next section of our guide.

So, use this program from another machine and delete your web browsing history and anything else.

You can even use these tools to erase your folders and apps or display messages on your stolen laptop with your phone number or a reward text in case you have lost your Windows laptop.

If it has been stolen, you send the reward in vain.

How to prepare for unfortunate situations and track a stolen Windows laptop with ease?

First of all, anyone should install tracking software on their Windows laptop. This software can then be used to find your device and secure or destroy your personal data, info, and accounts.

There are also free and paid tools, choose the apps you prefer the most.

For example, you can use LoJack, which will set you back less than £30 inc VAT for a year of coverage.

With this software you will be able to get geolocation data within the Absolute Monitoring Centre; finding your stolen laptop is quite easy in this matter.

You can also use LoJack for erasing all of your data from your computer and for protecting your BIOS – all the major manufacturers (Acer, Asus, Dell, HP, Lenovo, Samsung, and Toshiba).

How to track a stolen laptop with an IP address


Another tracking tool to use can be Prey. Prey will call you on your phone number each time your thief goes online on your stolen Windows laptop.

Prey can be installed for free and offers a detailed report about the state and location of your laptop, which you can access over the web.

Now, on the other hand, you can use tools like LaptopSentry, Laptop Superhero, GadgetTrak, and Snuko, which can all capture images from an available webcam so you will be able to see the thief’s face and also where your laptop is.

Laptop was stolen how to find it

This info will be highly appreciated by Police, so don’t hesitate and install one of the mentioned apps on your device as soon as possible.

LaptopSentry and Laptop Superhero can be used for scare tactics, too; these tools can be set to initiate a loud alarm sound when a laptop is being – in a running matter – disconnected from its power cord.

All these apps, which I have mentioned above, come with various features that can be easily used for tracking down your stolen Windows laptop.

While most of the apps are paid, Pray is free, and it is also recommended for entry-level users.

How can I track my laptop without third-party tools?

If your laptop is stolen, you can track it using its IP address. Many services such as Dropbox, Gmail, Facebook, Hotmail, and others allow you to track your device.

If you’re automatically logged in to these services or if you have Facebook, Dropbox, or Gmail clients running in the background, you might be able to see the IP address of the person who is accessing your account.

To do that, log in to Facebook, Dropbox, or Gmail; in the security section, you should see recent logins.

This section should contain all the recent IP addresses used to access your account.

In addition, you might also get the city’s location, but that information isn’t always the most reliable.

Laptop was stolen what to do

If needed, you can also lock your PC remotely if you use a Microsoft account to sign in to Windows.

If you see that a certain IP address is frequently accessing your accounts, you should take this information to the authorities.

They could then obtain all the necessary information about the IP address accessing your accounts.

Keep in mind that other services might also support this feature, so be sure to check the security section for all your online services and see if they’ve been accessed from any new and unknown locations.

This isn’t the most reliable method to track your laptop since you won’t get the exact location, so you’ll need help from authorities to locate it.

On the other hand, this method doesn’t require you to install any additional applications beforehand, so feel free to try it out.

How to prevent laptop theft and protect your files in the future?

Before we wrap this up, we also want to mention a few ways that you can protect your laptop from theft in the future.

In addition to tracking software, using a cable lock for your laptop is always a good idea.

These locks are relatively affordable, and they will securely lock your laptop and prevent any chance of theft.

We covered some of the best cable locks for your laptop in one of our previous articles, so be sure to check them out. You might also find interesting our article about how to retrieve a laptop with laptop-tracking software.

If you’re concerned about your personal files, you can protect them by encrypting your hard drive. There are many ways to do that, and you can use BitLocker or any other tool.

We covered 256-bit encryption software in one of our older articles, so if you don’t want to use BitLocker, feel free to try any of these tools.

Once you encrypt your hard drive, nobody can access your files or use your PC without a password.

In fact, the only way to remove the encryption and use the PC is to format the entire hard drive and install new Windows on it.

Enable Find My Device and track your laptop

Windows 10 has a helpful feature called Find My Device that allows you to track your device.

This feature isn’t enabled by default, but if you want to protect your laptop in the future, we recommend you enable it. To do that, follow these steps:

  1. Open the Settings app. You can do that by pressing Windows Key + I shortcut.
  2. When Settings app opens, navigate to Update & Security section.
    Laptop was stolen what to do
  3. In the left pane, select Find My Device.
    Protect your laptop from theft
  4. Now click on Change button.
    How to track a stolen laptop with an IP address
  5. Now enable Save my device’s location periodically option.
    Laptop was stolen how to find it

After doing that, you should be able to track your laptop remotely. To do that, go to Microsoft’s website, log in to your Microsoft account, and click Find my device.

Now, you should see the location of your laptop on the map. You can also enable Find My Device on Windows 11. Even though this feature is useful, you must remember that this location on the map isn’t always correct or sometimes, Find My Device is not working.

This is a useful feature, but if it’s not enabled, you won’t be able to use it to track your laptop.

If you manage to locate your laptop using this method, be sure to contact the authorities and forward them the IP address and the location of your laptop.

In the end, the most important thing to do is to secure your Windows laptop as soon as possible.

So, get tracking software and install the same on your device, and don’t wait until someone is stilling your laptop; take action now and prevent these unfortunate situations from happening.

Do use the comments field below if you know other methods by which you can find a stolen laptop, as we will update this guide accordingly.

Windows 10 Twitter app gains DM and multi-account improvements with latest PWA update

The progressive web app (PWA) which powers the web and Windows 10 app versions of Twitter updated with a variety of changes this past month and an official list has finally been released detailing all of the adjustments and fixes that were made.

While a lot of the recent changes are related to improved accessibility in terms of use and readability, the UI for adding and switching Twitter accounts was also changed, and a large number of bugs were squashed.

Here’s the full release notes:

New

  • Accessibility: Focus rings on components will now display with the selected primary color.
  • DMs: Reactions that you’ve sent for DMs will now show as selected in the DM’s footer.
  • Multi-Account: Use multiple Twitter accounts? We’re rolling out improvements to the UI for managing and accessing all of your accounts! Account management along with logout can now be found in the bottom of the sidebar, behind your profile image.

Updated

  • Accessibility: The GIF search gallery now provides accessibility labels for GIFs returned by searching. These labels will be read out by screen readers, providing additional context for search results.
  • Accessibility: Improved accessibility in poll components. Voiceover will now read the selected choice properly. Fixed text color when in high contrast mode.
  • Composer: Inline feedback errors when composing will now provide a “Learn more” link if there’s additional information.
  • Keyboard Shortcuts: Improved KB shortcuts for screen accessibility.
  • Timeline: We’ve made some density and visibility improvements to timeline surfaces.
  • User Profile: When your date of birth is set to be visible to “only you”, it will no longer show up when you navigate to your own profile page.

Fixed

  • Accessibility: When a Tweet is focused, the “U” keyboard shortcut will mute the Tweet.
  • Composer: Moving your cursor off a username or hashtag will now properly close the typeahead or autocomplete dropdown if it was open.
  • Composer: Videos added to the composer which generate an error state will now properly clear the banner when removed.
  • Dialogs: Confirmation dialogs will now consistently show titles and text.
  • DMs: Reaction summary sheet will now properly render at lower resolutions.
  • Home Timeline: The inline composer on the home timeline will now display in both widescreen and narrow screen size configurations.
  • Media: We’ve improved zooming and panning of media on touch devices.
  • Media: Media controls will now be shown properly when you’ve hidden them and then zoomed back out on touch devices.
  • Text: Fixed instances where the text size was being set to the smallest value.
  • Topics: The login sheet that’s displayed when attempting to follow a Topic while logged out will now display text content correctly.
  • Tweets: Emojis added to Tweets via the emoji picker will be saved properly as part of the Tweet draft.
  • Tweets: If you’ve muted a user, re-tweets of their tweets will now be immediately removed from your timeline.
  • Video: Addressed player crashing when attempting to replay.
  • User Avatar: Fixed an issue where avatar borders and backgrounds were not displaying correctly.
  • User Profile: Blank usernames that are populated with the user’s @ handle will now be styled consistently.
  • User Profile: The name field will no longer auto populate when editing your profile.

Do you use Twitter? Make sure to follow us @onmsft for more Windows app and internet news.

Twitter
Twitter
Developer:
Twitter Inc.
Price:
Free

This could be the official logo for Microsoft’s upcoming Xbox Series X next gen console

Some Reddit users (via WC) have just discovered a trademark application made by Microsoft for what is very clearly a logo for their Xbox Series X console that’s due out later this year.

The logo (see above image) is noticeably different than existing Xbox logos, discarding the traditional circular X for a stylized one and a vertical writing of the word “SERIES” next to it.

It’s worth noting that the Xbox Series X console will still have the circular X logo on it for its power button so Microsoft isn’t getting rid of it entirely. This new logo will likely be used on the console’s box and on the game cases of video games that feature enhancements when played on it or are exclusive to the next gen console.

The trademark application does cover almost everything from clothing to magazines and watches but, while it’s likely that we’ll see the logo on a variety of merchandise, most of the items are probably listed on this trademark on a “just in case” basis.

The Xbox Series X will signify the launch of the next generation of Microsoft’s Xbox consoles, following on from the current Xbox One gen. Unlike past console generation launches, the Xbox Series X will debut with support for most Xbox One games and a growing library of Xbox and Xbox 360 titles straight out of the gate. There will likely be some Xbox Series X exclusive titles at launch but, for the most part, the initial aims seems to be to create the ultimate Xbox gaming console. AT least for the first few months or so.

More official details concerning the Xbox Series X are expected to be announced in the very near future so make sure to follow us on Twitter and Facebook for the latest news as it breaks.

Microsoft hires new CVP for expanding health-care vertical

Microsoft announced today that they have hired a new Corporate Vice President to supports it’s growing health-care vertical especially in the midst of the global COVID-19 pandemic. CNBC noted in today’s article that Tom McGuinness was brought in to support Microsoft’s relationships with the healthcare industry including large hospitals, health insurers, and life sciences companies.

The newly hired Corporate Vice President is a veteran of the industry previously serving as the president and CEO of GE Healthcare’s $10 billion imaging business, and who will initially play a key role in helping companies successfully get through the COVID-19 pandemic. As a company, Microsoft is aggressively deploying new services and offerings to help healthcare providers. Just last week, Microsoft made news by offering their AccountGuard service for free for healthcare companies, and recently released a Power Platform solution for healthcare response.

Tom McGuiness
Tom McGuinness hired as new Corporate Vice President at Microsoft.

With the hiring of Tom McGuinness, Microsoft has made another prominent hire in support of their healthcare business and since 2019, the company has also hired other industry leaders including Google Cloud’s Greg More and Samsung’s Chief Medical Officer, David Rhew. While the major cloud providers have been competing for the business of healthcare companies in recent years, Microsoft’s strategy has been to strategically partner with them. Because of the recent COVID-19 pandemic, Microsoft is also seeing increased demand for Azure by healthcare companies looking to use the cloud to better engage with their customers and patients remotely. Today, Azure’s largest healthcare customers include Humana, Novartis, and Walgreens.

Break Reminder Software for Windows 10 [2026 Guide]

Working for too long at a stretch can have its toll on both your mental and physical health. While that applies to all types of work, this is perhaps particularly true for those who have to spend long hours in front of the computer monitor. This is damaging for your eyes besides being taxing on your brain as well. That is not all as having to maintain the same posture for too long can leave you with strained back muscles and so on. Fortunately, there are tech solutions available to set things right in the form of apps that acts to remind you to take a break from work at regular intervals.

Best tools that remind you to take breaks from work

Stretchly

Stretchly software that reminds you to take breaks

The app is designed to remind you to take both micro-breaks or those of longer duration. The app will serve you a pop-up that will show when the next break is due, and then again when it is time to actually take the break.

The micro breaks will be after every 10 mins and last 20 seconds or so while the longer breaks will be after every 30 mins where you will be asked to remain off of your PC for at least 5 mins.

Also, of course, you can customize the duration of the micro as well as the long breaks.

Download Stretchly

Awareness

Awareness software that reminds you to take breaks

It is another free app which, once you have installed on your PC will set up a timer in your menu bar. The timer will let you know (by playing the sound of a bowl) when it is time to take a break.


Looking for the best reminder software for Windows 10? Here are our top picks.


However, if the timer finds there has been no activity on the PC, it will automatically reset to be able to warn when it’s time again to take a break.

Furthermore, if you choose to ignore the warnings and continue working, it will play the next warning sound at twice the volume.

Additionally, you will also be served as a link to a site containing information on how best to spend your breaks.

Download Awareness

Workrave


WorkRave software that reminds you to take breaksIt’s a free app that you will have to install on your PC and will let you customize to flash alerts as to when you should take microbreaks.

Apart from suggesting the time when to take a break, the program will also tell how long the break should be.

It doesn’t stop at that as the program will also tell you the type of exercises you can do while on break.

All in all, quite a reliable solution if you need to be regularly reminded to take some time off of a screen.

Download Workrave

Big Stretch Reminder

Big Stretch Reminder software that reminds you to take breaks

It is a simple reminder app that will prompt you when it’s time for you to take some time off your PC.

This way, you can remain fresh and focused even during long working hours by ensuring timely breaks in between where you can choose to do something else.

Download Big Stretch Reminder

This makes for a nice collection of apps that will help you take regular breaks from your PC every once in a while.

[wl_navigator]

Humble Bundle PS4 deals & how often do they happen

Not only does Humble Bundle offer PC Steam game keys, but also console ones, and we can all agree that the PlayStation 4 is currently among the most popular ones. However, you should know that this happens way less frequently than we’d prefer.

Therefore, every now and then you might be lucky enough to grab a PS4 deal out of Humble Bundle. And the deals are awesome, too! You can get a lot of games at the cost of one decent PS4 release (usually around $15-20 for the whole bundle).

How often does Humble Bundle offer PS4 games?

We don’t know for sure since all the offers are kept under wraps until their very launch date. However, judging by past behavior, we could at least assume that they occur every 6 months or so. Here’s a list of all the previous PlayStation Humble Bundle offers:

  • Capcom PlayStation Bundle – August 23rd, 2016
  • THQ Nordic PlayStation Bundle – April 4th, 2017
  • 2K PlayStation Bundle – August 15th, 2017
  • THQ Nordic Encore PlayStation Bundle – September 26th, 2017
  • Capcom x Sega PlayStation Bundle – April 24th, 2018
  • Indie PlayStation Bundle – January 29th, 2019

Given that at the time being, there has been more than one year since the latest PS4 bundle, we don’t exactly know what to expect. Humble Bundle could either have something awesome in store for us console enthusiasts, or they could postpone it forever. However, notice that the offers don’t follow a clear pattern, so don’t lose hope just yet!

For SIEA PSN accounts only

If there’s something disappointing about these offers, it is that they’ve been region-locked to the US (mostly). More specifically, most of them were offered to SIEA (North America + South America) countries, while some were only destined for NA (North America) accounts.

SIEA countries:

  • Argentina
  • Belize
  • Bolivia
  • Brazil
  • Canada
  • Chile
  • Columbia
  • Costa Rica
  • Dominican Republic
  • Ecuador
  • El Salvador
  • French Guinea
  • Guam
  • Guatemala
  • Guyana
  • Honduras
  • Mexico
  • Nicaragua
  • Panama
  • Paraguay
  • Peru
  • Puerto Rico
  • Suriname
  • United States
  • Uruguay

In other words, if your PSN account didn’t fall under any of the countries mentioned above, you couldn’t grab any of the deals. Moreover, there are slim odds that this geo-restriction will be lifted sometime in the near future. At least we’ve got the Humble Choice thing going on.

Different than the PC bundles

One major difference between the PC and PS4 bundles, besides the obvious (platform), is that the latter didn’t provide you with individual redeemable keys for every game. Instead, the bundle was either split into three tiers, each of which had a different price or was priced as a whole, with no way to separate its content.

Therefore, you could either purchase the whole bundle and receive one code for the entire collection of games it comprised, or purchase a tier and receive a redeemable code for the entire tier. There was no way to gift a key for a single game to someone else if you already had the game in your library.

Does Humble Bundle give Steam keys & how to redeem them

It’s already widely accepted that Humble Bundle and Steam mix well. Like peanut butter & jelly, Tango & Cash, Ping & Pong. You get it. The reason they get along so well is that the games Humble Bundle offers are usually available as Steam keys.

Steam is already a popular game library client and it only makes sense to “partner up” with a service that often gives you the best deal on games. Even though you can download some of the games and keep them on your PC, it’s far more comfortable to keep them organized using Steam.

How to redeem Humble Bundle games on Steam

Assuming that you’ve landed on an offer that holds Steam game keys, you can tackle this situation in two different manners. One of them involves activating the game manually within the Steam client, while the other handles it automatically for you. However, the second method requires you to link your Steam account to Humble Bundle.

Method #1 (activate Humble Bundle Steam keys manually)

  1. Register a Humble Bundle account
  2. Purchase the bundle or Humble Choice subscription of your choice
  3. Access your account menu
  4. Select “Keys” from the dropdown menu
  5. Locate the game you want to redeem
  6. Click the “Reveal your Steam key” button
  7. Copy the key
  8. Launch your Steam client
  9. Select “Activate a Product on Steam…” from the “ADD A GAME” menu
  10. Follow the on-screen instructions
  11. Paste the game key when prompted to and hit “Next”

That’s it! If you’ve followed all of these steps, you should have redeemed the game you selected on Steam. Note that if you already have the game, you won’t get extra giftable copies, so be aware of the titles you buy.

Method #2 (redeem Humble Bundle Steam games automatically)

  1. Register a Humble Bundle account
  2. Purchase the bundle or subscription of your choice
  3. Access your account menu
  4. Select “Keys” from the dropdown menu
  5. Locate the game you want to redeem
  6. Click the “Reveal your Steam key” button
  7. Click the “Redeem” button next to your Steam key
  8. Link your Steam account with Humble Bundle
  9. Agree to the “Steam Subscriber Agreement” terms
  10. Click “Continue”

Now you’re ready to rock and roll! You’ve successfully activated your game by redeeming your Steam key without copying it manually. However, this step requires you to take a leap of faith and link your Steam account to Humble Bundle. We’ve done it a long time ago, and so far we don’t regret it.

Bonus: how to gift a game from your Humble Bundle library

If you constantly buy game packs from Humble Bundle, you’ll inevitably reach a moment when some of the games in the bundle will already be in your library. While this might not be an ideal situation, you can practice your generosity by offering them as gifts. And we’ll show you how to do just that.

  1. Go to your “Keys” library
  2. Locate the game you want to gift
  3. Click the “Gift to a friend” button
  4. Read the “Region Lock Warning” if available
  5. Choose between creating a gift link or sending an email

Now depending on your choice, Humble Bundle will either provide you with a gift link you can send anywhere you like or send a personalized email from you. You can also choose to send your gift anonymously.

Note: Gifting a game will remove the key from your library, so make sure you double-check that you’re giving away the right game.

Fix: Error playing this video when streaming on Hulu

The worldwide popular Hulu service is not short on streaming errors. This is not to say the service is unreliable, only that this is to be expected from time to time.

Hulu errors are numbered, most of the time, for easier reference.  Also, the developer offers practical troubleshooting solutions for most errors, and no expert knowledge is required.

The Error playing this video message is commonly received when the service encounters a problem with the Internet connection or when your device is not working correctly.

Alternative messages for the same error:

  • Error playing this video
  • Sorry, we encountered an error playing this video. Please try restarting the video or selecting something else to watch
  • Error code: 3(-996)

How can I fix the Error playing this video on Hulu?

1. Check Internet connectivity

  1. Turn off all devices connected to your home network.
  2. Close all background apps or other programs.
  3. Then, connect your device to the router using an Ethernet cable.
  4. Also, place the modem or router near your device.

2. Deactivate your device

To deactivate your device, navigate to your Hulu account page and remove your device by logging out completely.

Then, you can log back in by re-entering your credentials. Launch Hulu again and see if the problem is solved.

3. Perform a power cycle

To help improve streaming conditions, switch off your devices (including modem and router). Wait a few minutes, then switch them back on and see if it helps.

4. Update the Hulu app

If you’re streaming videos while using Hulu on an Android device, repeated error messages might pop in because the app is outdated.

You’re likely to run into the webpage is not available error numerous times, even when using an outdated browser. To fix this, go to Play Store, find the Hulu app, and click on Update, if available.

5. Clear cookies and cache

On devices running on Windows, Android, or iOS, cached data is usually found in the storage/privacy section of the Settings menu.

For Windows, use a dedicated PC cleaner software to clean temporary or unwanted files. Such tools will scan your PC and find unnecessary files that take up space for no reason.

They are easy to use and safe. Most of them display a list of all clutter found and let you pick what you want to remove and what you want to keep, so there’s no risk of losing important data.

On Apple TV you have to uninstall and reinstall the Hulu app.

For Xbox One see the following steps:

  1. Go to Menu.
  2. Choose My Games and Apps > Apps.
  3. Highlight the Hulu.
  4. Hit menu on your controller.
  5. Tap on the Manage Apps > Clear saved data.

For Roku:

  1. Select Home in the main menu.
  2. Then, on the remote controller press Home 5 times + press Up + press Rewind 2 times + press Fast Forward 2 times.
  3. It should take a few seconds to clear the cache.

If you have used other workarounds to fix the streaming problem on Hulu, feel free to leave a comment below.

  • 3.0 Mbps for the Hulu streaming library
  • 8.0 Mbps for live streams
  • 16.0 Mbps for 4K content
  • What is Hulu error code P Dev 320?

Hulu error code P Dev 320 is a streaming error that can appear on any device anytime you use the service. To resolve this issue, explore the Hulu error code P Dev 320 guide.

Check out the Hulu Hub from our website, where we provide solutions for more errors Hulu users encounter.

In addition, in the video streaming dedicated section on the website, you might find some helpful articles.

Fix error 0x80070057: The parameter is incorrect

The parameter is incorrect is a fairly frequent error message that pops up for some users when attempting to copy a file or folder from a PC to USB drive or external hard drive.

When that happens, an Error Copying File or Folder window opens stating, The parameter is incorrect or Drive is not accessible, the parameter is incorrect. Consequently, the file or folder doesn’t copy to the storage device.

This might just be due to your target drive not having enough storage space, a corrupted file system or that the file you’re attempting to copy exceeds the maximum file size the external drive can store.

Let’s see how you can fix error 0x80070057, the parameter is incorrect when copying files to an external drive.

How to fix parameter is incorrect on Windows 10

1. Check the Amount of Space on the External Storage Device

First, check how much space is available on the USB drive or external hard disk. You might not have enough storage space for the file you’re copying.

You can check available drive storage space in File Explorer by right-clicking the pertinent drive and selecting Properties. That opens the window directly below which shows both free and used space.

Alternatively, if you need a USB flash drive or an external hard disk with a bigger storage capacity, here are some suggestions:

2. Compress or Split up a Larger File


If there’s enough storage space on the external drive, check the size of the file that isn’t copying. Does it eclipse four GB?

If so, that’s probably why you can’t copy it to the external storage device. Lots of USB sticks, and other storage drives, still have the FAT32 file system that supports file sizes up to four GB only. So you can’t save files larger than four GB to FAT32 external storage.

If the file is larger than four GB, you might be able to fix the parameter error by reducing the file’s size. You can do that either by compressing or splitting it up into smaller pieces. 7-Zip is a freeware utility that you can both compress and split files with.

Click either the 32 or 64-bit Download link on this website page to save the software’s installer to Windows. Once you’ve installed the utility, you can compress and split four GB files as follows.

  • Open 7-Zip in Windows.
  • Browse to the folder that includes the file you need copy.
  • Right-click the file you need to compress, and then select 7-Zip > Add to archive to open the window directly below.
  • Select a compression format from the Archive format drop-down menu. Zip has one of the best compression ratios.
  • Press OK to close the window and save the archive, which saves in the same folder as the original file.
  • To split a file, right-click it and select Split file. That opens the window shown directly below.
  • Select a value to split the file by from the Split to volumes, bytes drop-down menu.
  • You can also choose a path to save to by pressing the … button.
  • Press OK to split the file.
  • When you need to merge the files together again, select them, right-click and click Combine files to open the window below. Press OK to merge the files together.
  • When you’ve compressed or split the file you need to copy, it must be less than four GB. If so, copy the archive, or split files, to the external storage drive.

Feel free to check out this guide to learn what are the best file compression tools for PC.

3. Convert the Storage Device to NTFS

Alternatively, you can convert the storage device to NTFS, which is a file system that supports single files larger than four GB. You can convert external storage drives to NTFS with a partition manager software such as Mini Tool Partition Wizard, Paragon Partition Manager or AOMEI Partition Assistant.

Download the tool of your choice and run the installer on Windows. Run through the setup wizard to add the software to Windows. Then convert the storage drive to NTFS as follows.

  • First, plug the storage drive to convert to NTFS into your desktop or laptop.
  • Open the Partition Manager window.
  • Then you can right-click the required disk drive and select Convert to NTFS.
  • A pop-up dialog box will open. Press OK and click Apply to convert the storage drive to NTFS.

4. Format the Drive to NTFS

Or you can convert the storage drive to NTFS by formatting it. However, formatting drives also erases their files. So if you need to keep the drive’s content intact, back it up before formatting.

Then format the storage device to NTFS as follows:

  • Insert the USB stick or external hard drive to format into a desktop or laptop.
  • Open the File Explorer window.
  • Now you can right-click your external drive, and select Format from the context menu to open the window in the snapshot directly below.
  • Select NTFS from the File system drop-down menu.
  • Press the Start button to format the storage drive.

5. Fix the Drive’s File System

If you can’t copy files less than four GB to the external drive, your storage device might have a corrupted file system. You can fix storage drives with the Check Disk, or Chkdsk, tool in Windows.

That’s a tool that scans file systems on drives, and Check Disk provides repairs for anything that needs fixing. This is how you can scan storage drives with Check Disk.

  • Insert the USB stick or external hard drive into a suitable slot on PC.
  • Open File Explorer and right-click your USB stick or external hard drive to open the context menu.
  • Select Properties on the Context menu.
  • Click Tools to open the tab in the shot below.
  • Press Check to open the window below.
  • Press the Scan and repair drive button to scan the external storage.
  • If the scan reveals anything, Windows will present a repair option to fix the external storage with.

How to fix incorrect parameter errors depending on the programs they occur on

If you’re getting this error on particular programs, such as incorrect format parameter errors, there are specific methods that you can use to fix it.

1. Fix: Failed to properly assess the disk. The parameter is incorrect

This error is specific to Windows 7 and usually occurs when doing a Windows Experience Index performance scan. Many users confirmed that third-party antivirus tools such as Avast and AVG trigger this error. To get rid of this error code, you can either temporarily disable your antivirus or install a new antivirus solution.

Fix 7Zip: The parameter is incorrect

If you’re getting incorrect parameter errors on 7-Zip, this indicates there’s a problem with the RAR format. Make sure you’re using the latest 7-Zip version and the tool supports the respective RAR file format.

Fix Virtual Disk Manager: The parameter is incorrect

The parameter is incorrect on Virtual Disk Manager usually occurs when you assign a new drive letter. To fix this issue, first back up your data, and try removing the partition, reboot your machine, and change the drive letter and path. Once you’ve done that, add the virtual partition again.

Fix Microsoft Word: The parameter is incorrect

This error can also affect the Office Suite and particularly Microsoft Word. The error occurs when users try to open documents in Word.

To fix incorrect parameter errors on Microsoft Word, repair the Office installation folder from Settings > Apps > Apps & features > Microsoft Office. Select Change and let the tool automatically repair Office.

Fix diskpart has encountered an error: The parameter is incorrect

This error occurs due to two main reasons: the file system of the partition got corrupted or the volume encryption driver has been changed. Sometimes, this error indicates that data might have been lost.

To fix diskpar incorrect parameter errors:

  1. Run chkdsk /f /r. For detailed instructions, check out this guide.
  2. Uninstall the USB controller
  3. Check your USB connection and port
  4. Remove writing protection from ComputerHKEY_LOCAL_MACHINESYSTEMCurrentControlSetServicesUSBSTOR. Locate the Start key and change the value data to 3.

Those are a few effective fixes for external drives with parameter errors. In most cases, The parameter is incorrect error is usually due to the drives’ four GB file restriction. So the best fix is probably to convert the storage drive to NTFS.

Windows 10 Camera app gets new Fluent Design icon with latest update

Microsoft has started rolling out a new icon for its Camera app on Windows 10, which is now live in the latest version of the app (2020.127.20.0). The revamped icon is inspired by Microsoft’s Fluent Design guidelines, and it follows other redesigned icons such as Alarms & Clock, Weather, Photos, Mail and Calendar as well as Paint 3D.

Just like all other icons which received a fresh coat of paint recently, the new Camera app icon uses a blue background by default. This means that it will ignore your Windows 10 accent color and probably mess with your beautifully-organized Start Menu, but we can’t always have nice things, right?

While the revamp of app icons in Windows 10 has been happening for the past couple of months, Microsoft initially announced its plans to update their various app icons back in December 2018. However, the rollout is taking quite some time, and the software giant has since expanded on this idea by bringing Fluent Design to mobile devices, starting with the Office apps last year in December. Do you like the new Windows 10 Camera app icon? Let us know in the comments section below.

Windows Camera
Windows Camera
Price:
Free

Microsoft announces Open Data Campaign

Today, GeekWire reported on Microsoft’s efforts to breakdown the data divide by committing itself to share the vast troves of data that are created each day and making it easier to access. The newly announced initiative called the Open Data Campaign is designed to start a much-needed conversation about how the world uses data and is starting with a series of initiatives to help organizations of all sizes realize the benefits of data and the technologies that it powers.

According to Microsoft’s blog post, about 100 companies collect more than 50% of all data generated online and around half of all people with technical AI skills work in the technology sector, giving these same 100 companies an advantage of others and creating a data divide that Microsoft believes poses a serious challenge to society. The Open Data Campaign is a direct response to that data divide and is designed to give organizations, governments, and businesses of all sizes the ability to realize the full of value of the data being generated.

Microsoft’s Open Data Campaign is based on a three-step approach that is designed to help Microsoft create a principled course moving forward, open up new collaborations and make data sharing easier and safer by doing the following:

  • First, Microsoft is publishing new principles that will guide how Microsoft itself approaches sharing our data with others.
  • Second, Microsoft is committing to take action by developing 20 new collaborations built around shared data by 2022. This includes work with leading organizations in the open data movement like the Open Data Institute and The Governance Lab (GovLab) at the New York University Tandon School of Engineering. And we’ll seek to lead by example by making our Microsoft social impact initiatives “open by default,” beginning with sharing data on broadband access from our Airband initiative and combining it with data from others to help accelerate improvements in broadband connectivity.
  • Finally, the company is investing in the essential assets that will make data sharing easier, including the required tools, frameworks and templates.

Microsoft has indicated that they are already seeing some early successes in tackling some of the world’s biggest challenges including COVID-19 and climate change. In support of open data, over the last year, Microsoft has released a series of campaigns including last year’s announced Data Dignity team who focused on giving users more control over their own data. Microsoft will become a founding partner of the Open Data Policy Lab at NYU. Anyone can learn more about Microsoft’s new campaign and the need for open data by visiting their “Closing the Data Divide” microsite, and in the upcoming weeks, Microsoft plans to release more details to help cities around the world share data.


Microsoft may reveal next-gen Xbox “Lockhart” very soon

It’s been quite some time since we last heard about “Lockhart,” the second next-gen Xbox console that could be a low-cost alternative to the Xbox Series X, previously known as “Project Scarlett.” So far, Microsoft never confirmed the existence of Lockhart, though a Kotaku report from last December confirmed that it was still in the pipeline.

According to previous leaks, Lockhart is expected to be a disc-less console that would be less powerful than the Xbox One X, but still deliver a next-gen experience thanks to its faster CPU and SSD. Back in February 2019, a report from French website jeuxvideo.com, which pretty much accurately predicted the Xbox Series X specs, said that Lockhart would feature a similar custom-designed AMD Zen 2 CPU coupled with a custom Navi GPU delivering 4 teraflops of computing power. This same report also mentioned 12GB of GDDR6 RAM for Lockhart (4GB less than Xbox Series X), as well as 1 terabyte of fast NVMe storage.

Today, Jez Corden from Windows Central has shared more information about this Lockhart SKU, which could be unveiled as soon as next month as the replacement for the Xbox One X. “We’re expecting Lockhart to be a 4TF “entry-point” to next-gen gaming, and it should effectively replace the Xbox One X. This system is designed to be affordable but will offer aspects of a next-gen experience currently unavailable to past-gen consoles, presumably in the form of NVME loading speeds and perhaps some limited ray-tracing,” explained Corden.

According to Corden, Lockhart could now be tested at home by Microsoft employees, just like Xbox Series X. “Recently, we heard Lockhart is entering take home stages for Xbox employees to get their hands on the system and begin providing feedback and testing. The timing would indicate to me that rumors of upcoming showcases in early May are likely accurate,” Corden said.

Microsoft has yet to announce anything about an Xbox event in May, but with E3 2020 being cancelled in June, the company is now free to hold the replacement for its E3 press briefing a bit earlier. Interestingly, Corden also heard that Microsoft could soon reveal a new Xbox Wireless headset which would support both Bluetooth and Microsoft’s proprietary Xbox Wireless protocol for maximum compatibility. “It could be Xbox’s answer to the Surface Headphones, albeit with some of the more “premium” features stripped out,” said Corden.

We’ll see what happens next month, but May could indeed be a busy period for Microsoft. The company is also expected to unveil new Surface devices very soon, including Surface Book 3, Surface Go 2, as well as a new Surface dock. It remains to be seen if Microsoft will keep its Xbox and Surface announcements separately, but the ongoing coronavirus has recently forced the company to hold digital-only events, as we’ve seen with the recent Microsoft 365 event and Inside Xbox episode.

Microsoft Teams to show 9 conference participants at once

Up to 250 people can participate in a Microsoft Teams meeting. But only four can appear on a video conferencing screen at once.

Well, that is about to change as Microsoft is working on extending that limit to nine participants.

Microsoft Teams to display up to 9 video conferencing participants simultaneously

Soon you will be able to see up to nine Teams video conferencing participants at once. That will come to pass if a recent Tweet by Microsoft is anything to go by.

The company made a similar promise last week in response to concerns over the inability of participants to see each other during Teams video meetings.

Then, Alex, a Microsoft Teams engineer, responded that the tech giant was working on extending the limit beyond just nine.

We will start rolling out our first update to view nine participants simultaneously by the end of April. In parallel we are continuing work to increase this limit even further. Stay tuned!

Teams user concerns

Team users calling for the increase of video chat participants that appear on the screen are eyeing much more than just collaboration.  They are asking for the ability to see each other and the reactions of others, which can enhance the effectiveness of business communications.

A typical application would be learning where teachers or instructors would like to see everyone in their class. Unfortunately, you cannot see 30 or so members of your class at once via Teams for now.

It is also critical for users to appreciate the fact that a video-intensive conferencing session has higher hardware and bandwidth requirements.

Teams’ competition

Teams recently attained 44 million daily users, partly thanks to the COVID-19 global pandemic. But the platform faces stiff competition from Zoom when it comes to video conferencing.

As at now, Zoom supports up to 49 thumbnail displays of conference participants on a single screen. So, Microsoft has a long way to go before catching up with its main rival.

Nine, though, would not be bad for Teams customers that can only see a maximum of four participants at once currently. You may expect the feature to be available in the next one or two weeks as Microsoft promised.

Xbox One’s Spotify app updates with a new UI for easier music navigation on consoles

The official Spotify app for Microsoft’s Xbox One consoles updated today with a rather surprising new design that’s much closer to the Windows 10 and mobile apps.

This new app retains its original play experience but the main navigation (see above image) now features a side menu of the left side similar to the Netflix and YouTube apps and a wider variety of previously played songs, artists, and playlists to choose from. The support for podcasts has also been improved.

Of particular note is the dynamic background which changes as the user selects different tiles. Overall, this new app makes it much easier to find content than before with the old Spotify design and looks a whole lot better visually on a TV screen.

Do you use the Spotify app on your Xbox One console? Let us know if you like these changes in the comments below and then follow us on Pinterest and Twitter for more Xbox news.

Spotify Xbox - Music and Podcasts

4 compilers to turn a programming language into another

In order to transform the computer code from one programming language to another, you will need to use specialized computer software.

These programs transform the code written in a high-level programming language to a lower level language (machine code, object code, etc.), and allows you to create executable files.

In order to be able to get access to the features offered by compilers, you will need some software that allows you to install the compilers and run them.

This type of software is called IDE (integrated development environment).

And besides helping you transform a source programming language into a target language, this type of software also offers a good range of useful tools to use when programming.

Top 4 compilers to use on Windows 10

Code::Blocks

CodeBlocks - compilers for win 10

Code:: Blocks is a great integrated development environment that can be used freely for different programming languages – C, C++, Fortran, etc.

With the wide range of features and the incredibly easy to understand user interface, CodeBlocks is one of the best compiler software available on the market in 2019.

Because this software is built around a plugin framework, the wide range of features CodeBlocks contains can be extended even more by the use of plugins.

You can find plugins that fit your needs perfectly, and can even create your own if you’re feeling up to the task.

Having its infrastructure built around plugins, CodeBlocks allows you to extend and improve the capabilities of your software without needing to change any lines of code in this software’s source code.

Because anybody can contribute to the plugins database, over time, the number of available plugins has increased considerably.

Check out the list of plugins.

Once you downloaded and installed Code: Blocks, it will automatically scan your system to find any supported compilers.

If you already have compilers installed on your PC, Code: Blocks will configure them to be used. This software can also configure compilers that were not found on the PC.

Here are some examples of the compilers Code:: Blocks supports:

  • GCC (MingW / GNU GCC)
  • MSVC++
  • Clang
  • Digital Mars
  • Borland C++ 5.5
  • Open Watcom

You can find a good list of details about the supported compilers and how to install them on the Code Blocks page.

Here are some of the best features found in Code::Blocks:

  • Can access your computer’s extra cores for parallel builds
  • Can create multi-target projects
  • Supports the importing of MSVC workspaces and projects
  • Imports DEv-C++ projects
  • Great interfaces for GNu GDB, MS CDB
  • Support for code and data breakpoints
  • Great code folding for C, C++, Fortran, XML, etc.

Visit the official FAQ, or have a look at the official forums for more information.

⇒ Download CodeBlocks

Microsoft Visual Studio

Microsoft Visual Studio - compilers for windows 10

A close contender to CodeBlocks, Visual Studio from Microsoft is another great software option that allows you to use compilers to transform source programming language to a target language.

This software was built in such a way that it allows users to experience the full power of this software by using the great looking user-interface.

It can be used to create console and graphic user applications, Windows Forms, WPF applications, websites, and web services, etc.


Looking for the best Software to Use For Linear Programming? Here are the best options.


Because this software was built by programmers, for programmers, it is extremely easy for you to get amazingly accurate results and improve your programming efficiency as well.

One of the best features of Visual Studio is its ability to easily zoom into any details you choose – call structure, related functions, etc.

Some other notable features of Microsoft Visual Studio:

  • Great debug features – allows you to quickly fix bugs across a variety of programming languages
  • Can use profiling tools to diagnose performance – directly from the debugging window
  • Greate test tools that allow you to create high-quality results – plan, execute, and monitor every stage of the test, and create professional tests status reports
  • Works with GitHub, Azure DevOps
  • Features can be extended by choosing one or more plugins from the store
  • Great templates that can be customized without any limits

Here are some examples of decompilers that can be found on the Microsoft Visual Studio Store:

⇒ Download Microsoft Visual Studio

Netbeans by Apache

NetBeans - compilers for win 10

Netbeans is another good software option that can help you transform a programming language into another, giving you the opportunity to create a wide range of applications in Java, JavaScript, HTML5, PHP, C/C++, etc.

Even though this software doesn’t have the power of the 2 previously presented software options, it is still a very useful software, and it’s completely free to use.

Netbeans allows you to quickly edit any source code to fit your project’s needs and can be set up so it automatically highlights source code both syntactically and also semantically.

Here you can find some very useful information regarding how to configure NetBeans to use C/C++/Fortan.

You can find a wide range of other useful tools by visiting the official Netbeans Plugins Store.
Click here to learn how to use NetBeans.

⇒ Download NetBeans

Tiny C/C++ Compiler

Tiny C Compiler - compiler for win 10

As the name suggests, this is a very small compiler for C/C++ programming language that can execute code anywhere you need to. This compiler generates x86 computer code that can compile, assemble and link elements easily.

Here are some of its best features:

  • Any sort of C dynamic library can be used without the editing
  • Full ISOC99 compliance with the ability to compile itself
  • Optional memory and bound checker
  • Easily compile and execute C source without the need to use linking or assembly

⇒ Download Tiny C/C++ Compiler

Conclusion

In this article, we explored some of the best software options on the market that allow you to create, edit, and also manage every aspect of the process of compiling a base programming language into another.

If you want a fully-featured software option that covers all your needs and also offers you a comprehensive and good looking user interface, you might want to start with Code:: Blocks, or Microsoft Visual Studio.

If you need a fast compiler that does not take too make hard-drive space but still gets the job done, you could try Netbeans or Tiny C/C++ Compiler.

We would love to know what software you chose to work with and how it performed for you. Please feel free to let us know in the comment section below.


Yammer app: new features for collaboration

Yammer has recently informed its users through a blog post that the Windows 10 versions of the app has received some new features. Find below more details about this if you’re using the service.

Dubbed as the enterprise social network, Yammer for Windows 10 is a tool for easy access to conversations that are happening across your company.

yammer windows 10
It’s pretty much similar to Lync for Windows 10, only that it lacks the traditional look and feel of an instant messenger.

Besides Windows 10 the Windows Phone, Android, and iOS versions of the Yammer app have also received updates.

Yammer is the enterprise social network for your company that connects you to the people, projects and information you need to get work done.

Discover new company conversations, share ideas with your team, ask questions and respond to updates with this easy-to-use app. Yammer Feed for Windows 8 is designed for the new Windows 8 Experience and is optimized for touch devices.

However, this update doesn’t target the official Yammer app in the Windows Store, but the desktop Windows 10 edition, so it’s not aimed at those using Yammer on Windows 10, or Windows 10, touch devices.

The updated version of Yammer for desktop Windows 10 users brings access to Group Feeds, new notifications, and live tile functionality, as well as the new  Snap option, that lets you snap the Yammer app to the side of the screen.

Now, multitasking is really possible! Follow the links below to download whichever version of Yammer suits you better, the desktop or the touch one.

Yammer key features in Windows 10

Yammer is a great collaboration tool that can help you boost your business and create more engagement among your employees.

It helps you increase transparency in your company and actively engage your employees and collaborators.

This tool is part of Office 365, and allows users to access and manage documents, share notes, as well as organize responsibilities and work tasks.

The fact that 85% of Fortune 500 companies use Yammer confirms the usefulness of this tool.

FIX: CCleaner error when opening files for writing

When you want to clean up or optimize your computer for better performance, there are many tools available that can help you do the job, and well at that.

One of these tools is CCleaner, arguably one of the world’s most popular ones that clear out temporary files clean your Registry and erase browser history among many other tasks.

CCleaner is also compatible with Windows operating system, and has a great user interface, support for Chrome and Internet Explorer, plus added support for programs like BitTorrent, AVG antivirus, Audacity and others.

In short, it is the ultimate tool for cleaning your system, but you still have to make a full system backup and create a new system restore point prior to using it.

Like any other software, CCleaner also has troubleshooting issues that bring up errors in its installation and usage, like the CCleaner error opening file for writing.

This error is associated with installation problems when using the tool if you’re trying to install it without being logged in as an administrator.

Check out the known solutions to resolve the CCleaner error opening file for writing.

How do I fix CCleaner error opening file for writing

  1. Retry running the installer
  2. Log in as an administrator
  3. Use CCleaner Portable

1. Retry running the installer

ccleaner error opening file for writing

If you run the installer, you may get a dialog box when a previous version of CCleaner is running. First, make sure to download the right installer from the official webpage. Then proceed with the process and in case the message shows again, wait for a few seconds and click Retry.

If this doesn’t get it back up and running again, try the next solution.

⇒ Get CCleaner

2. Log in as an administrator

As mentioned earlier, the CCleaner error opening file for writing may be caused when you try to run CCleaner without being logged in as an admin. In this case, you can log in as admin and run it, or contact your system admin for help with this.

If you were able to log in as an administrator and this worked, you can carry on using CCleaner on your system, if not, try the next solution.

3. Use CCleaner Portable

CCleaner Portable is the perfect tool when you need to clean your system on the go or want to carry it elsewhere to do a cleanup on another computer system. This version lets you carry it in your USB flash drive and use it anywhere, though it may have limited functionality if you’re not using an administrator account.  Once installed, you can run CCleaner without logging in as an admin, but it may not clean certain files and folders.

Did this help resolve the CCleaner error opening file for writing? Share your comment in the section below.

⇒ Get CCleaner Portable

FIX: Failed to lock profile on Fortnite

Fortnite is one of the biggest Battle Royale games currently on the market, and it was developed by Epic Games and released in 2017.

It’s been the target of many bugs, issues, and user complaints, but they were quick to patch fix up every single time.

Players around the world are complaining that they are having issues with Fortnite:

I started a new account because I was bored, and after every mission I have to close the game and verify in the fortnite settings so that I can play another mission. This just repeats itself over and over.

As the user describes it, the game seems to forget your profile details between matches.

This forces you to log out after every mission and log back in.

Other users have it more severely, as it forces them to uninstall and reinstall the game.

How can I fix the user authentification error in Fortnite?

Some users claim that you don’t need to reinstall or restart Fortnite.

Apparently, if you just go back to Select Mode and pick Save the World or any other Solo content, the issue should be fixed.

This should be considered more of a workaround the issue, as Fortnite is a multiplayer game.

This means that denying players core game modes inadvertently leads to them leaving the game.

Admittedly, there is no known cause as to why this issue is occurring.

As such, the standard solution is to wait until Epic Games releases a new patch that will fix this issue.

If you’re not the patient type, you could just try playing Fortnite‘s solo game modes instead.

For those of you that are also experiencing this issue, please contact Epic Games customer support for more help.

If you haven’t tried it yet, you’ll need to download the Epic Games Launcher first.

Once that is done, you are all ready to prove who’s the king of the Island.

  • How do you fix fortnite error?

The first thing you should try when you see an error on Fortnite is to simply restart your computer. You might also need to reinstall Fortnite. Here’s how to uninstall it in just a few steps.

[wl_navigator]

How to set up automatic weekly backups in Dropbox

In an age of cloud storage, a service such as Dropbox is probably known by everybody. However, for those of you that aren’t familiar with it, Dropbox is a file hosting service that offers cloud storage, file synchronization, personal cloud, and client software.

This means that you can extend your storage capacity using it, with the extended space being in an online environment.

The advantage of this type of service is that if your hard drive ever crashes, the data stored on the cloud is unharmed.

That being said, it should come as no surprise that these types of services are quite popular.

However, Dropbox does have it’s own limitations. For example, While you may think that to be the case, Dropbox is not an automatic backup service that you can use.

This means that data needs to be uploaded manually, and it won’t come as much use in case of an OS crash.

However, there are a few things that you can do to set up automatic backups in Dropbox.

How do I set automatic backups in Dropbox?

Use Handy Backup

  1. Open Handy Backup
  2. Click Create on the main panel to create a new backup task
  3. Select your dataset for backing it up
  4. Select the Dropbox plug-in .
  5. Click on Create a connection
    1. The program will open a Dropbox account interface so you can enter your credentials
  6. Enter your Dropbox account data in the appearing dialog window.
  7. Give Handy Backup access to your Dropbox
  8. Continue creating a new backup task.
  9. Give your task a name and finish the task creation wizard.

Handy Backup is a dedicated Dropbox plug-in that you can use to copy your data to a Dropbox account as a backup vault, or from this account to another place such as backup to Google Drive.

Handy Backup features a restoration tool that you can use to return Dropbox backups to their original places or set a new location to restore these data. This tool can also be used to copy or move files and folders from backup to any location you need.

Most importantly, Handy Backup allows creating synchronization tasks for Dropbox. This includes relatively complex tasks such as making Dropbox sync Google Drive on a given date.

These tasks often operate with an API of related storage, and this makes it so that they don’t use Dropbox’s sync folder or utility.

⇒ Download Handy Backup

Use Acronis True Image

  1. Start Acronis True Image.
  2. Click Backup.
  3. Click Add backup to add a new backup
  4. Click backup source icon, and then select the type of items you want to back up:
    • Disks and partitions
    • Files and folders
  5. From here you can select a specific disk or partition that you want to back up
    • You can also select files and folders
  6. Click backup destination icon, and then select a destination for the backup
    • This is where you can select Dropbox as the backup destination
    • You need Acronis True Image Advanced or Premium to be able to back up to Acronis Cloud.
  7. Click Back up now or select another start time option

⇒ Download Acronis True Image


By following these steps, you should be able to set up automatic backups of your Dropbox files on a weekly basis.

There are other tools that can perform this task as well, but we’ve decided to include the top ones exclusively.

Know of any other solution that we may have missed out on? Let us know by leaving us a message in the comments section below.


[wl_navigator]

2 Best Xbox Controller Software for PC

Are you searching for the best software for your Xbox controller on a Windows PC? Windows Report has got you covered in this post.

There has been a steady rise in gamers over the years. Casual gamers and professionals have participated in both online and offline gaming. This has also been made more popular with the advent of Steam, which allows the purchase of games at half the cost of the equivalent console.

Nevertheless, the major issue many PC gamers experience is the controller issue. Unlike console gaming, where a particular controller works for all types of games, PC gaming is a lot more dynamic, with different brands of controllers available in the gaming market.

Nowadays, several PC games come with support for different types of controllers but still heavily favor the use of Microsoft’s Xbox controllers – especially for Windows 10 PC users. However, without an Xbox controller, Windows users may be unable to play such games at high standards.

For instance, the Microsoft Xbox 360 controller would play any PC game when plugged in directly, which is not possible with a PS3 controller. This is where an emulator comes in, as it helps to simulate the Xbox controller on your PC, making it possible to run games without the default controller.

If you are searching for such a tool, keep reading this post. We’ll list two of the best Xbox controller software below.

What are the best tools to emulate an Xbox controller on Windows?

TocaEdit Xbox 360 Controller Emulator

TocaEdit Xbox 360 Controller Emulator is one of the best software for Xbox controllers on Windows PC.

This software enables gamers to efficiently configure their default Xbox controller settings and access different games.

The emulator comes in two distinct versions, which are 32-bit and 64-bit version compatible. So, download and install the one that suits your operating system version.

Installation is fast as the installation file is lightweight in size. On installation, the software opens to a simple window. To configure, you need to plug in your controller and launch the software, which detects the controller. Configure the buttons to your preference and click Save.

TocaEdit Xbox 360 Controller Emulator was tested with over 30 games and worked adequately. Suffice it to say, it is the best software for Xbox controllers on Windows PC currently available.

⇒ Download TocaEdit Xbox 360 Controller Emulator

Xbox 360 Controller for Windows

best software for xbox controller

Xbox 360 Controller for Windows is a solution offered by Microsoft to help users configure their settings perfectly. The controller setup is less than 10 Mb and installs in quick time.

The user-friendly interface allows users to configure their Xbox 360 controller settings based on their preferences. However, the tool cannot be used for other controllers, which is a limiting factor.

However, it’s a handy application if you have an Xbox 360 controller. Nevertheless, this is one of the best Xbox controller software for Windows PCs. Plus, it’s free to download from the Microsoft website.

⇒ Download Xbox 360 controller for Windows

Using the Xbox controller software can also help prevent issues like Controller acting like a mouse, for more details, read this guide.

Have you used any of the best software for the Xbox controller on the Windows PC we mentioned above?

Feel free to share your experience with us by commenting below.