Microsoft has just delivered its first set of updates for the year 2020. The Patch Tuesday January 2020 updates bring an entire host of new security updates, as well as a few notable bug fixes.
These are meant to improve and secure the way users experience working with Windows 10.
Speaking of which, this latest set of updates brings a fix to 12 Windows Search Indexer security bugs.
Tens of bugs got fixed
In an effort to get rid of as many security vulnerabilities as possible, over 50 different bugs got fixed, 12 of these bugs were part of the Windows Indexer Service:
All of these bugs have one thing in common: they all fall under the Elevation of Privilege classification.
These types of bugs would allow an attacker with limited access to a system to gain more control over an affected system. In the case at hand, they could elevate this privilege level to that of the Search Indexer service.
If you want to get your hands on the latest Patch Tuesday updates, but don’t know exactly how the process goes, check out this detailed guide on the matter.
Do you think that Windows Indexer Services bugs are a priority? Let us know in the comment section below.
This year Microsoft is starting off strong when it comes to updates.. The Patch Tuesday January 2020 updates bring not only the typical new features, bug fixes, and security patches, but it also marks a turning point for Windows as an OS.
The Patch Tuesday January 2020 updates are the last set of updates that will also include Windows 7, as it has officially reached the end of its life.
This means that the OS will no longer be supported and that now users will have to either continue using an unsafe OS or upgrade to Windows 10, and users are urged to upgrade to Windows 10 immediately.
KB4534310 and KB4534314 changelog
The update notes are general and refer to the security improvements added to various OS components:
Security updates to the Microsoft Scripting Engine, Windows Input and Composition, Windows Storage and Filesystems, and Windows Server.
As you can see, the last Windows 7 Patch Tuesday updates are not so rich in system optimization improvements.
Windows 7 users are getting more EOS notifications
Starting January 15, Windows 7 users will receive regular notifications about the risks of continuing to use an outdated OS.
Starting on January 15, 2020, a full-screen notification will appear that describes the risk of continuing to use Windows 7 Service Pack 1 after it reaches end of support on January 14, 2020. The notification will remain on the screen until you interact with it. This notification will only appear on the following editions of Windows 7 Service Pack 1:
Starter.
Home Basic.
Home Premium.
Professional. If you have purchased the Extended Security Update (ESU), the notification will not appear. For more information, see How to get Extended Security Updates for eligible
Windows devices and Lifecycle FAQ-Extended Security Updates.
Ultimate.
Do you think the notifications will convince users to upgrade sooner? Let us know what you think in the comment section below.
Editor’s Note: If you’re still not sure whether you should upgrade to Windows 10 or not, you’ll find all the information you need to take the right decision in these guides:
January 14 Patch Tuesday is finally here and it brings a lot of security improvements on all Windows 10 versions.
While Microsoft’s latest security vulnerabilities regarding the crypt32.dll component of Windows grabbed all the attention, some people are worried about older threats that are, in one form or another, still present.
I’m surprised I’m not seeing any mention of CVE-2020-0609 and 0610 “Microsoft Windows Remote Desktop Gateway allows for unauthenticated remote code execution“
Yes, that’s right, there are some RDP (Remote Desktop Protocol) vulnerabilities that are getting patched, and they’re very similar with last year’s BlueKeep.
Before you panic, know that they aren’t nearly as big or as dangerous as BlueKeep. For more context, here are the 5 bug fixes that are getting resolved in this months Patch Tuesday:
Remote Desktop Gateway Server – CVE-2020-0609, CVE-2020-0610, CVE-2020-0612
Remote Desktop Web Access – CVE-2020-0637
Remote Desktop Client – CVE-2020-0611
Update your Windows right now to avoid malware attacks
You should know that these vulnerabilitiesmay allow a remote, unauthenticated attacker to execute arbitrary code with SYSTEM privileges on a vulnerable system, so the best thing is to update right away.
While the Remote Desktop Gateway and Web Access services are strictly related to Windows Server, the Remote Desktop Client is present on all Windows versions, so CVE-2020-0611 can be a real threat for anyone.
To avoid any malware, data theft, or any other security risks, update your version of Windows to the latest available. You can do that automatically, through Windows Update, or manually, directly from Microsoft Update Catalog.
Microsoft just rolled out the Patch Tuesday January 2020 updates and, as usual, it brings a host of new features for users to try, as well as several security patches and fixes for Windows 10.
As far as Windows 10 versions 1903 and 1909 go, they are pretty much identical. This is because they share a common core operating system and an identical set of system files.
As a result of the two Windows 10 versions being identical, the new features in Windows 10, version 1909 are the same ones included in version 1903.
Windows 10, version 1903
Note This release also contains updates for Microsoft HoloLens (OS Build 18362.1044) released January 14, 2020. Microsoft will release an update directly to the Windows Update Client to improve Windows Update reliability on Microsoft HoloLens that have not updated to this most recent OS Build.
This security update includes quality improvements. Key changes include:
Security updates to Windows App Platform and Frameworks, Windows Input and Composition, Windows Management, Windows Cryptography, Windows Storage and Filesystems, the Microsoft Scripting Engine, and Windows Server.
Windows 10, version 1909
This security update includes quality improvements. Key changes include:
This build includes all the improvements from Windows 10, version 1903.
In order to get the latest updates as soon as possible, simply use Windows 10’s Windows Update feature. This will automatically scan your PC for all of the missing updates, download them and install them.
However, if you are only interested in a particular set of updates, you can always update them one-by-one by downloading them from the Windows Update Catalog.
If you aren’t aware of how important Patch Tuesday updates are, then you should check out this detailed guide that will explain everything.
Did you find this guide useful? Let us know in the comment section below.
The January 14 Patch Tuesday cumulative updates are finally out, and many users were eager to see if Microsoft’s latest security vulnerabilities will get fixed or not.
While there’s nothing certain for now, there’s no shortage of security improvements for all of the Windows 10 versions, including the original version.
Windows 10 v1507 gets patched for vulnerabilities
Yes, you heard it right, Windows 10 version 1507 is getting some improvements, especially on the security side. More specifically, the new cumulative updates will improve security when storing and managing files.
Also, there are similar improvements for using input devices like mice, keyboards, or styluses. Here are the quality improvements for Windows 10 v1507:
Security updates to the Microsoft Scripting Engine, Windows Input and Composition, Windows Media, Windows Cryptography, Windows Virtualization, Windows Storage and Filesystems, and Windows Server.
Maybe the most important part is Windows Cryptography, which directly leads to the fact that Microsoft is patching the important exploit that affected all Windows versions.
Certain operations, such as rename, that you perform on files or folders that are on a Cluster Shared Volume (CSV) may fail with the error, “STATUS_BAD_IMPERSONATION_LEVEL (0xC00000A5)”.
As a workaround, Microsoft is recommending to perform the operation with administrative rights or perform the operation from a node that doesn’t have CSV ownership.
If you want to get this update, you can do so by automatically download it from Windows Update in your PCs Setting. You can also download it manually from the Microsoft Update Catalog.
This year is starting off strong with a very important set of Patch Tuesday updates. The Patch Tuesday January 2020 updates bring the typical new features, bug fixes, and security patches.
For example, KB4534273updates its support for Google Chrome‘s new cookie policies.
What are Google’s Chrome’s new cookie policies
Google Chrome plans to modify the way cookies work, to the point of totally eliminating them in a maximum of two years.
Google announced that Chrome will soon protect users from cross-site cookies and fingerprinting. The company also plans to launch an open-source ads transparency browser extension.
This latest set of Patch Tuesday updates is set to support this decision. In fact, it is expected that future updates will also support this change in development from the tech giant.
For those that are already users of Windows 10, remember that Patch Tuesday updates are very important and that installing them on a regular basis is the key to staying safe.
You can install the latest Patch Tuesday updates using two methods:
Use Windows 10‘s Windows Update feature to automatically download and install all available updates
It’s Patch Tuesday time again, and Microsoft has just released the first cumulative updates of this year.
These updates are very important, as they will shade some light on the latest security vulnerabilities that affected all versions of Windows. Now, with their release, the company should answer some of the questions surrounding the exploit.
Microsoft is betting big on security, again
While newer versions of Windows are the main focus, Windows 10 version 1709 and 1607 have not been forgotten.
As a quick reminder, Windows 10 v1709 reached end of service on April 9, 2019, while Windows 10 v1607 reached end of service on April 10, 2018, with some Enterprise and Education editions still receiving additional servicing.
With January 14 Patch Tuesday, the big M focused on security. More specifically, both versions got increased security when using input devices like mice, keyboards, or styluses, as well as improved security for file management and storage.
Windows 10 v1607 also got support for Google Chrome’s new cookie policies.
Security updates to the Microsoft Scripting Engine, Windows Input and Composition, Windows Media, Windows Virtualization, Windows Storage and Filesystems, and Windows Server.
Addresses an issue to support newSameSitecookie policies by default for release 80 of Google Chrome.
Security updates to Windows Input and Composition, Windows Cryptography, Windows Virtualization, Windows Storage and Filesystems, the Microsoft Scripting Engine, and Windows Server.
If you want to get your hands on the latest updates, you can do so by using Windows Update from your PC’s Settings. Additionally, you can manually download the updates from Microsoft Update Catalog.
The first Patch Tuesday edition of 2020 is here. This month’s release brings two cumulative updates to Windows 10 October 2018 Update and Windows 10 April 2018 Update, namely KB4534273 and KB4534293.
You can manually download these updates from the Microsoft Update Catalog website by following the link below:
Alternatively, you can automatically download these updates via Windows Update. Simply go to Settings > Update and Security and hit the Check for updates button.
And now let’s see what’s new.
KB4534273 changelog
This update brings support for Google Chrome’s new cookie policies. At the same time, it improves system security when users utilize input devices such as keyboards.
The update brings the following quality improvements:
Addresses an issue to support new SameSite cookie policies by default for release 80 of Google Chrome.
Security updates to Windows App Platform and Frameworks, Windows Input and Composition, Windows Management, Windows Cryptography, Windows Virtualization, the Microsoft Scripting Engine, and Windows Server.
KB4534293 changelog
On the other hand, KB4534293 improve security when storing and managing files. This cumulative update also packs the same security features brought by KB4534273.
KB4534273 known issues
Certain operations on files or folders that are on a Cluster Shared Volume (CSV) may fail after installing this update.
Devices with some Asian language packs installed may receive the error 0x800f0982.
When setting up a new Windows device during the Out of Box Experience (OOBE),some users might be unable to create a local user when using Input Method Editor (IME).
KB4534293 known issues
The first and third issues are affecting KB4534293 as well.
The Patch Tuesday January 2020 updates are here. As always, these updates bring new security features and system improvements to all Windows 10 versions.
KB4534276 improvements
This cumulative update is available for Windows 7 v1709, aka The Fall Creators Update.
The official changelog reads as follows:
Updates to improve security when storing and managing files.
Updates to improve security when using input devices such as a mouse, keyboard, or stylus.
Security updates to the Microsoft Scripting Engine, Windows Input and Composition, Windows Media, Windows Virtualization, Windows Storage and Filesystems, and Windows Server.
In order to get the latest updates, you can use the Windows Update feature. Your computer will automatically scan for updates and install the latest patches as soon as they’re available.
If you installed earlier updates, keep in mind that your computer will download and install only the new fixes contained in this package.
If you are only interested in a particular set of updates, you can download them separately from the Windows Update Catalog.
For more information on Patch Tuesday, check out this detailed guide that will explain everything.
Did you find this guide useful? Let us know in the comment section below.
If you’re looking to play a first-person multiplayer Co-op and PvP game that is themed around pirates and the high seas, then Sea of Thieves is the game for you.
The graphics are superb, and the combat mechanics are incredibly fun to use, and it is also available for Windows 10 and Xbox One.
However, it is a game after all, and no game is without the occasional bug. For example, Sea of Thieves players have been reporting that they cannot truly play the game in fullscreen:
Everytime I put my crosshair where my windows taskbar is , it pops up and If i look all the way up in the game, the game tab shows up (where you can “x” out the game “minimize”, and etc. pls help its really annoying when ur trying to the play the game.
This issue has been playing players for some time now, and there are several ways you can fix it. While admittedly some of the methods are considered workarounds at best, you will at least be able to enjoy Sea of Thieves in fullscreen mode.
Make sure the slider is moved to any setting other than Never
You can’t open Control Panel? Take a look at this step-by-step guide to find a solution.
2. Update the game
The game is installed via the Microsoft Store App, and as such, it can be updated through it.
As such, if you already have it installed, make sure that Sea of Thieves is updated by following these steps:
Open the Microsoft Store App
Press the three dots on the top right of the screen
SelectDownloads and updates from the dropdown menu
PressGet updates
If you don’t like manually updating your Store Apps, you could always set them to update automatically by followingthis guide.
3. Update Windows 10
Store App games such as Sea of Thieves may not work if you’re not running the latest version of your OS. Thus, a good step to fixing the fullscreen issue is updating your WIndows 10.
PressStart
Choose Settings
SelectUpdate & Security
PressCheck for Updates
Reboot the PC
4. Run the Store App Troubleshooter
Press Start
Go to Settings
Select Update & Security
Choose Troubleshoot
From the list select Windows Store apps
Choose Run the troubleshooter
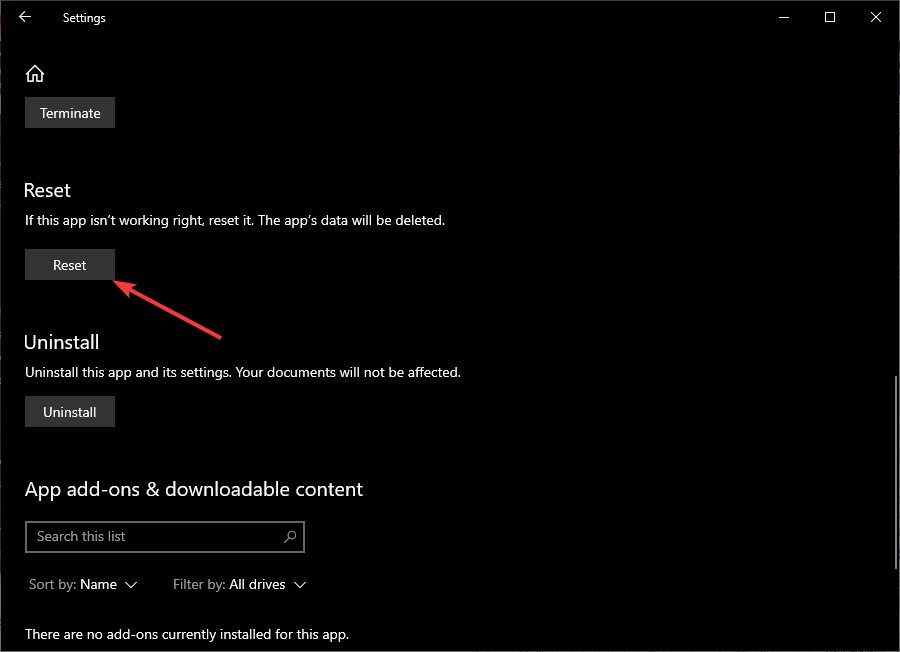
5. Reset Sea of Thieves
PressStart
ChooseSettings
SelectApps
FindSea of Thieveson the list
SelectAdvanced Options
SelectReset
By following this guide, you should be able to play Sea of Thieves in fullscreen mode without interference from Windows 10 UI elements.
Do you know of any other methods to bypass this issue? Let us know in the comment section below.
Microsoft has officially ended support for Windows 7, and now common users and organizations are left wondering what their next step should be. Officially, there are only 3 things that a user can do as of now:
This feature is only available for those belonging to business environments that have Windows 7 Enterprise.
Of course, these are the only option if you plan on continuing using Windows as your personal or your company’s OS. This is because the option of migrating to an entirely new OS is always available.
For example, Microsoft’s biggest competitor in the OS market is Apple’s macOS. Given how popular these two OSes are, we’ve decided to do a breakdown and analyze several aspects:
Windows 7 vs macOS: Which is cheaper for companies?
How to migrate from Windows 7 to MacBook
How to transfer data from Windows 7 to mac
Windows 7 vs macOS: What should I go for?
1. Windows 7 vs macOS: Which is cheaper for companies?
Windows 7 still holds strong popularity among companies, and plenty of them aren’t keen on migrating just yet. As mentioned before, one of the options for companies that wish to continue using Windows 7 is buying the Windows 7 Extended Support for Business.
This feature is quite easy to acquire, but it is only a temporary solution, as it will only buy you up to 3 more years of security support. The only problem is that the costs ramp up quite a lot as time passes by, as you can see for yourself in the table below.
Sr. No
Year
Duration
Cost
(Windows 7 Pro)
Cost
(Windows Enterprise (add-on))
1
Year 1
January 2020 - January 2021
$50 per device
$25 per device
2
Year 2
January 2021 - January 2022
$100 per device
$50 per device
3
Year 3
January 2022 - January 2023
$200 per device
$100 per device
As you can see, a full 3 years of extended support for Windows 7 Pro will end up costing you $350, while 3 years of extended support for Windows 7 Enterprise will cost you $175 per computer.
That is a lot of money for both regular users and companies. This is especially the case when you consider the latter will just end up paying tends of thousands of dollars for an OS they will have to migrate from anyway eventually.
On the flipside, migrating to Mac seems to be a far more attractive offer as far as costs go. For example, Apple’s latest version of the macOS, called macOS Catalina is free of cost. The only downside is that it is free as long as you have the hardware.
Thus, the true question is whether it is cheaper to maintain an old OS, or buy some new hardware and get a free OS for life. The truth of the matter is that if you are still running Windows 7, most likely your hardware is in dire need of replacement anyway.
Because of that, putting hardware costs aside, the only real money sink is in the long run. While Apple kit is expensive, it does come with several advantages:
Hardware tends to last longer before needing replacement
The FreeBSD-based operating system that runs Mac desktops & laptops is still relatively virus-free
The OS running on Macs is free
Plenty of standard software run natively on Mac
The macOS is more reliable and users rarely are ever in need of customer support.
If all of these arguments have got you thinking about migrating, then you should probably know how to get started with the process.
2. How to migrate from Windows 7 to MacBook
Before migrating your data, there are several things you need to assess:
Make sure your Windows 7 PC is updated to the latest version
You need to know the name and password of the admin account of that PC
Connect your PC and your MacBook to the same network, either via Wi-Fi or Ethernet cable
Uninstall OneDrive from your PC
Use the chkdsk utility to make sure your Windows PC doesn’t have any issues.
If everything seems to be in place, you may begin the migration process itself.
You will need to download the right Windows Migration Assistant, which varies depending on the version of macOS on your MacBook:
Follow the on-screen instructions until you reach the migration pane
Select the option to transfer data From a Windows PC
Click Continue
When prompted, enter an administrator name and password
Click Continue
In the migration window on your Mac, select your PC from the list of available computers
Wait for the PC to show the same passcode that your Mac shows
When you see the same passcodes, press Continue
Your Mac will now scan your PC for data that can be transferred
Select the information that you want to migrate to your Mac
Click Continue
Wait for the transfer to complete
Once you’ve followed all of these steps, you should have migrated all of your data from Windows 7 to macOS efficiently.
If you just want to try out macOS before migrating to it entirely, then maybe you should see how to transfer data from Windows 7 to macOS.
Afterward, you can use the data in macOS, and see if you feel more comfortable with this new OS.
3. How to transfer data from Windows 7 to macOS
There are plenty of methods that allow you to transfer data from Windows 7 to macOS. Besides the Migration Assistant mentioned above you can also use one of these methods to transfer data efficiently:
3.1 Portable hard drive or storage device
Simply create backups of your data on an external hard drive or a USB flash drive and then transfer them to your MacBook, similarly to old-fashioned PC-to-PC transfers.
3.2 Burn CDs and DVDs
SImply burning data on a disk and then transferring it to your MacBook is the easiest way to transfer data. By using this method you also get the added benefit of having a spare backup of your data at hand.
3.3. Shared network folders
Using a server to which both a PC and a Mac have access to is another great way of transferring data since now everything is done without the need of any type of hardware.
The only limitation is that both the PC and Mac need to be connected to the same server.
3.4 Email
Small amounts of information like text documents or pictures are not worth having to use an external hard drive, CD, DVD or set up a shared folder. This is when transferring data via Email becomes really handy.
3.5. Via Ethernet cable
If both the PC and the Mac are in close vicinity to each other, you can always use an Ethernet cable to connect the two and share files between them almost instantly.
3.6 Move the hard drive entirely
This is probably the most complicated method of all since PC-formatted hard drives are not always compatible with Macs. Keep in mind though that Mac OS X v10.3 or later can read the contents of an NTFS-formatted drive, but will be unable to save any new files or make changes to existing files without first reformatting the drive.
Conclusion
Now you know the pros and cons of staying with Windows 7 or moving to macOS. Additionally, you now know how to transfer data between a PC and a Mac, or even migrate entirely.
With this information, you will now be able to make a better decision regarding what your next step will be in terms of the OS you will use for both personal use, and within your company.
Will you remain with Windows 7, upgrade to Windows 10, or move on to macOS? Let us know what your choices are in the comment section below.
Sea of Thieves is a first-person multiplayer co-op/PvP pirate game developed for Xbox One and Windows 10. It features a unique art style, great combat mechanics, plenty of story elements, and more.
However, one key aspect of Sea of Thieves is that it is a multiplayer game. This means that players can interact with each other, for trading, partying, PvP and more.
They can do this via either text messages, or by using the game’s built-in voice chat support.
The problem is that some players cannot use this feature since the game is having problems picking up their microphones.
As the title says. Microphone is not working. Voice/chat/VOIP proximity voice it’s a huge flaw in the game. I am not the only one complaining, i see a lot of people here and reddit with problems. And let me say i tried all the fixes available! I use mic in steam/ts/discord and in many many other games without any issue. Here it simply doesn’t work. What’s even worse is that i can see the voice icon appearing in top of other players and i can’t hear what they say. This game is meant to be played with a team and if it’s not possible to use voice chat / mic then this game is not fun to play.
Fortunately enough, there are a few things you can try that will fix this issue immediately. We went along and used them to create this step-by-step guide so that you can finally enjoy voice chatting with your fellow pirates in no time.
As far as the console version of the game goes, there are plenty of solutions that you can try to fix this problem:
2.1 Reconnect audio devices
This solution is as simple as it sounds. Simply disconnect and then reconnect your microphone, headset or Kinect.
For Kinect, there’s a Kinect mic for chat option in the Settings menu while it is connected to the console. This must be set to On to activate the microphone.
2.2 Adjust your Xbox One‘s microphone permissions
Go to Settings
Select Account
Choose Privacy and online safety
Go to Xbox Live privacy
Select Communication and multiplayer
Choose Voice, text, invites
You must then choose App privacy after Privacy and online safety
The Microphone setting can now be adjusted
By following these steps, you should now be able to chat with other players without any further issues.
Did you find this article useful? Let us know in the comment section below.
For more voice chat troubleshooting, see our full guide on Peak voice chat not working and compare solutions.
In 2019, the European Data Protection Supervisor investigated Microsoft’s alleged breach of European data protection laws. That body confirmed it had serious concerns regarding Microsoft’s contracts with European organizations. Microsoft has now published new Online Services Terms for Office 365.
In 2018, the Dutch Ministry of Justice launched its own investigation into MS Office’s hidden collection of telemetry data. In early 2019, the DMOJ claimed Microsoft was breaching the EU’s General Data Protection Regulation on eight accounts. Those breaches of the GDPR more specifically pertained to the telemetry data collection systems of Office 365 and Office Pro Plus. The DMOJ accused Microsoft of collecting personal data on a grand scale without correctly informing users.
That verdict sent alarm bells ringing in Brussels. The European Data Protection Supervisor followed up the original investigation in Holland. Later in 2019, the EDPS stated:
Though the investigation is still ongoing, preliminary results reveal serious concerns over the compliance of the relevant contractual terms with data-protection rules and the role of Microsoft as a processor for EU institutions using its products and services.
In response, Microsoft promised that it would change its cloud service contracts toward the end of 2019. Microsoft ‘s privacy officer stated:
[We] will clarify that Microsoft assumes the role of data controller when we process data for specified administrative and operational purposes incident to providing the cloud services covered by this contractual framework, such as Azure, Office 365, Dynamics, and Intune. The basic promise was to introduce greater transparency about data processing in Microsoft’s OST.
Now Microsoft has just published its new Online Service Terms for Office 365. That new OST is available for download in various languages from the Microsoft website. The new OST includes four key changes to the original. It is a 40-page document that does not authorize Microsoft to process customer data for commercial purposes unless the customer permits it.
Therefore, the new OST document makes it much clearer about how Microsoft Office 365 processes customer data. It will end the big M’s covert processing of customer data with Office 365 and Office Pro Plus.
While browsing records in the Salesforce for Outlook side panel, you may come across a “Not connected” error. Many users have reported a similar error while working with the client.
This issue usually occurs due to incorrect Internet configuration. If you have also bumped into this error, here are a couple of troubleshooting tips to help you resolve this Salesforce syncing error in Windows 10.
What can I do if Salesforce won’t connect with Outlook?
1. Change Internet Explorer settings
Close all Internet Explorer windows if open. Make sure all the programs running on your computer are also closed along with SFO clients.
Press Windows Key + R to open Run.
Type inetcpl.cpl and click OK. This will open the Internet Properties window.
Click on the Advanced tab.
Click on Restore Advanced Settings.
Click Reset to restore default settings. This will open the “Reset Internet Explorer Settings” window.
Check the “Delete personal settings” box and click Reset.
Close the Internet Properties window.
2. Clean Internet Options browsing history
Press Windows Key + R to open Run.
Type inetcpl.cpl and click OK.
In the Internet Properties window, click on the General tab.
Under “Browsing History” section, make sure the “Delete browsing history on exit” option is unchecked.
Click the Delete button.
In the Delete Browsing History window, uncheck the “Preserve favorite website data” option.
Check “Temporary Internet files and website files“, “Cookies and website data“, “History” options.
In the Internet Properties window, click on the General tab.
Under “Browsing history” section, click Settings. This will open Website Data Settings.
Select the “Every time I visit the webpage” option.
Change Disk space to use to 225.
Click OK to save the changes.
Click on the Security tab.
Select Trusted sites option under “Select a zone to view or change security settings:”.
Click the Site button.
On the Trusted Site window, type in https://*.salesforce.com in the “Add this website to the zone”.
Click on the Add button.
Click Close.
From the Security tab, select Trusted sites again.
Click on the Custom Level button.
On the “Security Settings – Trusted Sites Zone” click the Reset to: drop-down menu.
Set it to Low and click Reset.
When prompted to confirm the action, click Yes.
If you need more info on how to add trusted sites in Windows 10, take a look at this detailed guide and learn how to do it with ease.
4. Change Security Settings – Trusted Sites Zone
On the “Security Settings – Trusted Sites Zone” window, locate “Websites in less privileged web content zone can navigate into this zone” option under Settings.
Click Enable.
Now locate “Display mixed content” and set it to Enable as well.
Click Yes if prompted to confirm the action.
Now, look for “Initialize and script ActiveX controls not marked as safe for scripting” and set it to Enable.
Click OK and close Internet Properties window,
Restart the PC to apply the changes.
5. Change privacy settings
Press Windows Key + R to open Run.
Type inetcpl.cpl. and click OK.
On the Internet Properties window, select the Privacy tab.
Click on the Sites button and in the domain name field add Salesforce.com and click on Allow.
Next, click on the Advanced button in the Privacy tab and check the boxes for “Override automatic cookie handling” and “Always allow session cookies“, then click OK.
Again click on the Advanced tab.
Make sure “Allow active content to run in files on my computer ” is checked. Also, uncheck “Check for server certificate revocation“.
Close Internet Properties window.
Restart your computer and check for any improvements.
The Salesforce is not connected to Outlook error occurs due to incorrect Internet configuration. By following the steps in this article you can fix the syncing issue with Salesforce and Outlook.
If you have any other questions or suggestions, don’t hesitate to leave them in the comments section below.
There are numerous file types available and your PC can handle most of them, with proper software of course. Speaking of file types, today we’ll show you how to properly open SMC files on your Windows 10 PC.
How can I open a SMC file on Windows 10?
What is SMC file?
If you ever encountered an SMC file type on your PC, you should know that this file is actually a Super Nintendo Entertainment System file. Basically, this file is an SNES game, and yes, you can run it on your PC.
Are SMC files safe?
Yes, SMC files are safe to use and they don’t contain any malware. If you want to be on the safe side, you can always scan those files with your antimalware software and make sure that the files are clean from malware.
What applications work with SMC files?
Opening these files is easy, and in order to do so, you’ll need a SNES emulator. There are many great emulators for SNES, and if you want to run SMC files, here are few applications that you need to consider:
To open an SMC file, you just need to download and run the appropriate emulator. Once the emulator opens, you should see the Open option from the top menu.
Now you just need to locate the SMC file on your PC, select it, and it should run immediately. Bear in mind that some applications don’t have the option to open individual SMC files. Instead, you’ll need to choose the folder that holds all your SMC files, and then select the SMC file that you want to run from the list.
There you go, this is all you need to know about SMC files. If you found our article helpful, feel free to leave a comment below.
Windows 10 is great for gaming, but sometimes you might encounter Xbox Gaming Overlay while playing your favorite games. This is a built-in Windows 10 feature, but some users are so distracted by it that they want to remove it.
In this article, we’ll show you how to properly remove Xbox Gaming Overlay on your Windows 10 PC.
How do I remove Xbox Gaming Overlay on Windows 10?
1. Disable Game Bar
The fastest way to get rid of Xbox Gaming Overlay is to disable the Game bar feature. You can do that by following these steps:
Open the Settings app. You can do that quickly with Windows Key + Ishortcut.
Head over to the Gaming section.
Select Game bar from the menu on the left and disable Record game clips, screenshots and broadcasting using Game bar option.
After doing that, the Xbox Gaming Overlay should be disabled on your PC.
If you’re having trouble opening the Setting app, take a look atthis article to solve the issue.
If you want to completely remove Xbox Gaming Overlay from your PC, you need to remove its app. This is fairly simple to do, and you can do it by following these steps:
Press Windows Key + S and enter powershell. Select Run as Administrator.
When PowerShell opens paste the following command and press Enter:
After doing that, close the PowerShell and the Gaming Overlay app should be completely removed.
Note: Few users reported that certain games won’t run properly if you remove the Gaming Overlay app. If this happens, you’ll need to install Xbox Game Bar again from the Microsoft Store.
There you go, these are the two ways you can get rid of Xbox Gaming Overlay on your PC. The first method will only disable the Game Bar feature, and it won’t break any games.
The other method will remove the actual app from your PC which may lead to issues with certain games, but that can be easily remedied.
If you have any other questions or suggestions, don’t hesitate to reach in the comments section below.
Microsoft Launcher is the big M’s app launcher for Android mobiles. That app enables users to sync their mobiles with Windows desktops and laptops. Now the big M has released a new Microsoft Launcher 6.0 alpha version on Google Play.
The early access preview of Microsoft Launcher 6.0 has sprung up in Google Play with its own page listing. As it is an alpha version of the app, it is not entirely stable. Microsoft Launcher 6.0’s Google Play page includes a warning that says:
This is an alpha version of the Microsoft Launcher so as such some features may not work properly, or the experience may be unstable.
Nevertheless, the app is freely available and provides a glimpse of some of the new features Microsoft Launcher 6.0 will include. The app’s page states:
This version of Microsoft Launcher has been rebuilt on a new codebase to make new features possible – such as Dark Mode, Landscape Mode, and numerous performance improvements (speed to load, low memory utilization, battery optimization and fluent animation). Additionally, this version only contains a subset of the standard features from the main app.
The most notable new features in ML 6.0 are its Dark Mode and Landscape Mode. The Dark Mode is a new dark theme for Microsoft Launcher 6.0. It will add dark background to the app as shown in the snapshot directly below.
The Landscape Mode is another big new addition to Microsoft Launcher. Landscape Mode enables users to utilize the app with a horizontal mobile orientation. That mode will suit a lot more tablet users who usually hold tablets horizontally.
This is a big update for Microsoft Launcher in a year in which the big M will re-enter the mobile device industry with the Surface Duo. That is a foldable 2-in-1 smartphone and tablet based on an Android OS. However, Microsoft might refine the Android UI design a little bit. The Surface Duo’s home screen might be based on Microsoft Launcher 6.0.
Microsoft has not confirmed when exactly Microsoft Launcher 6.0 will move out of alpha (and then beta). For now, you can click the Install button on the Microsoft Launcher Preview page to try out the early access version. Alternatively, you can add the current version to your mobile by clicking Install on the Microsoft Launcher page.
The first Patch Tuesday of 2020 is right around the corner, and is seems that Microsoft is not starting the year very well.
After a very quiet December 2019 Patch Tuesday with little to no changes, the new update is set to address a very important security vulnerability tied to a core cryptographic component found in all versions of Windows.
Microsoft released a security patch prior to Patch Tuesday
The component is called Crypt32.dll and is responsible for the implementations of most Certificate and Cryptographic Messaging functions in the CryptoAPI:
Crypt32.dll is a module that comes with the Windows and Windows Server operating systems, but different versions of this DLL provide different capabilities.
While this may sound a bit to technical, the most important thing you’ll need to know is that the CryptoAPI helps developers to add more security to Windows apps through cryptography. The encryption and decryption of data is done using digital certificates.
To further confirm this security breach, it seems that the big M supposedly released a patch to fix it before the January 14 Patch Tuesday. It was sent to important customers, companies that work with Internet infrastructure, and branches of the U.S. military.
Of course, Microsoft made sure that none of them can disclose the issue before January 14th through non-disclosure agreements. As a response to KrebsonSecurity , the company stated:
Through our Security Update Validation Program (SUVP), we release advance versions of our updates for the purpose of validation and interoperability testing in lab environments. Participants in this program are contractually disallowed from applying the fix to any system outside of this purpose and may not apply it to production infrastructure.
The implications as well as the security risks are huge, considering the fact that the U.S. military and other high-priority targets were the first in line on Microsoft’s list.
Can this vulnerability affect my Windows PC?
Somewhat confirming the vulnerability, Will Dormann, Vulnerability Analyst at the CERT/CC, shared a very interesting tweet:
I get the impression that people should perhaps pay very close attention to installing tomorrow's Microsoft Patch Tuesday updates in a timely manner. Even more so than others. I don't know… just call it a hunch? ¯_(ツ)_/¯
If you were wondering about first-hand implications, know that the security flaw can affect basic Windows functions, personal data from Internet Explorer/Edge, authentication and login security, and other third-party apps.
This is very concerning, as it can lead to malware attacks and loss of private data.
As a reminder, all Windows versions are affected, including Windows XP and Windows Vista or 7. So prepare yourself for a very bumpy Patch Tuesday and keep an eye on WindowsReport’s January 14 Patch Tuesday articles to find out any new development.
Microsoft has just released the first “Patch Tuesday” updates of the new year. These updates are quite a big deal as they fix a serious vulnerability that has been disclosed by the NSA. This spoofing flaw affects all Windows 10 versions released since 2015 as well as Windows Server 2016, though Microsoft notes that it hasn’t been exploited so far.
“An attacker could exploit the vulnerability by using a spoofed code-signing certificate to sign a malicious executable, making it appear the file was from a trusted, legitimate source. The user would have no way of knowing the file was malicious, because the digital signature would appear to be from a trusted provider. A successful exploit could also allow the attacker to conduct man-in-the-middle attacks and decrypt confidential information on user connections to the affected software,” Microsoft explained on its Security portal.
It’s good to know that this security flaw is now fixed in all versions of Windows 10 as well as Windows Server 2016, and this month’s Patch Tuesday updates seems to be mostly security-focused. Here is what Microsoft detailed in the release notes for Windows 10 version 1909 (build 18363.592) and Windows 10 version 1903 (build 18362.592):
Security updates to Windows App Platform and Frameworks, Windows Input and Composition, Windows Management, Windows Cryptography, Windows Storage and Filesystems, the Microsoft Scripting Engine, and Windows Server.
Microsoft isn’t aware of any known issues with these two cumulative updates, and there’s also nothing to see about the ongoing issues related to Windows Search that some users have been complaining about.
If you’re still running Windows 10 version 1809, you’ll get the build 17763.973 today which includes the following fixes:
Addresses an issue to support new SameSite cookie policies by default for release 80 of Google Chrome.
Security updates to Windows App Platform and Frameworks, Windows Input and Composition, Windows Management, Windows Cryptography, Windows Virtualization, the Microsoft Scripting Engine, and Windows Server.
If you’re running older versions of Windows 10 Enterprise and Education, Microsoft also published the release notes for Windows 10 versions 1803, 1709, and 1507. Patch notes for the versions 1607 and 1703 will be published later on Microsoft’s Windows support website.
Microsoft is “hard at work on E3” this year, according to Xbox head Phil Spencer in a Tweet. This comes as Sony has just announced that it won’t be attending E3 for the second time in a row. “We have great respect for the ESA as an organization, but we do not feel the vision of E3 2020 is the right venue for what we are focused on this year,” said a Sony spokesperson to GamesIndustry.biz.
Our team is hard at work on E3, we look forward to sharing with all who love to play what's ahead for us. Our artform has consistently been propelled by the cross-section of creativity and technical progress. 2020 is a milestone year in that journey for Team Xbox. #XboxE3#E32020
To be clear, while the Redmond tech giant does plan to offer plenty of announcements for E3, it isn’t expected to be attending the event directly. Instead, the company will likely have its own venue near it, just as it did last year at The Microsoft Theater and the Xbox Plaza at LA Live. While we’re still not sure what the team has in store for us this year, this could be the best chance to announce more details of the upcoming Xbox Series X that is expected to ship during the holidays.
Will you be in LA for E3 this year? What are you most excited for? Feel free to share your thoughts and plans below.
With various versions of Windows occupying a billion devices worldwide, Microsoft’s premier operating system paints a rather large target on its back for smaller B2B security firms looking to stay ahead of nefarious parties, while also finding itself in the crosshairs of much larger agencies who might want to weaponize exploits for future data and surveillance collection.
The United States National Security Agency recently chose the former option as it alerted Microsoft about a Windows flaw that could put millions of users in danger of breach or surveillance hack. For obvious reasons, the details of the exploit are relatively vague, but according to the Washington Post, the vulnerability is essentially a mistake in computer code that specifically targets users of Microsoft’s latest Windows 10 operating system. By leveraging Microsoft and Adobe’s Code-signing sync engine, the NSA found an error in the Windows code that normally verifies legitimate signatures but could now ultimately allow hackers to install ransomware or spyware on Windows 10 PCs if exploited.
More specifically,
“The discovery has been likened to a slightly less severe version of the Microsoft flaw that the NSA once weaponized by creating a hacking tool dubbed EternalBlue, which one former agency hack said was like “fishing with dynamite.”
As a bit of a refresher, EternalBlue exploits a vulnerability in Microsoft’s implementation of the Server Message Block (SMB) protocol. The vulnerability exists because the SMB version 1 (SMBv1) protocol in various versions of Windows mishandles specially crafted packets from remote attackers, allowing them to execute arbitrary code on the target computer. The NSA used and, arguably abused the exploit right up until it became widely distributed online five years after they discovered it. The NSA ultimately alerted Microsoft in 2017 and a patch followed in early 2017, but only months before three other major cyberattacks were credited using the tool.
Fortunately, the NSA isn’t holding on to this one and giving it room to breathe like EternalBlue. Instead, by alerting Microsoft quickly, the NSA appears to be exhibiting a shift in prioritization of security and surveillance, for now at least. While Microsoft has had no comment on the matter, the NSA seems confident that the company will have a patch issued Tuesday to address the exploit, at which point Microsoft and the NSA can declare that “it has seen no active exploitation of the flaw.”
The discovery of the exploit comes as Microsoft ends security support for Windows 7 and attempts to shift consumers and businesses still using the soon-to-be vulnerable OS, over to Windows 10.
Grand Theft Auto IV has been pulled from Steam, making it no longer possible for users of the digital game distribution service to purchase it. The move was unexpected due to the lack of warning from Rockstar, the developer of the more than ten-year-old title.
As it turns out, the game was removed due to Microsoft’s discontinuation of Games for Windows Live back in 2014. According to a statement from Rockstar to USgamer, this prevented the company from being able to generate new keys to continue selling the game. Here’s the full statement:
Grand Theft Auto 4 was originally created for the Games For Windows Live platform. With Microsoft no longer supporting Games For Windows Live, it is no longer possible to generate the additional keys needed to continue selling the current version of the game. We are looking at other options for distributing GTA4 for PC and will share more information as soon as we can.
Although the lack of availability on Steam might be disappointing to some who potentially wanted to buy the title that’s even older than the now unsupported Windows 7 operation system, the game should still work for those who owned it prior to its removal from Steam. Luckily, the standalone expansion pack Episodes from Liberty City is still available for purchase on Valve’s platform
Additionally, the fact that the developers are looking into other ways of bringing the game back to PC means that gamers don’t have to be completely without hope. A likely scenario for Rockstar is to remove integration of Games for Windows Live from the game itself, and potentially re-release it for its new game launcher that was released last year.
What do you think about the game’s removal from Steam? Feel free to let us know that you think
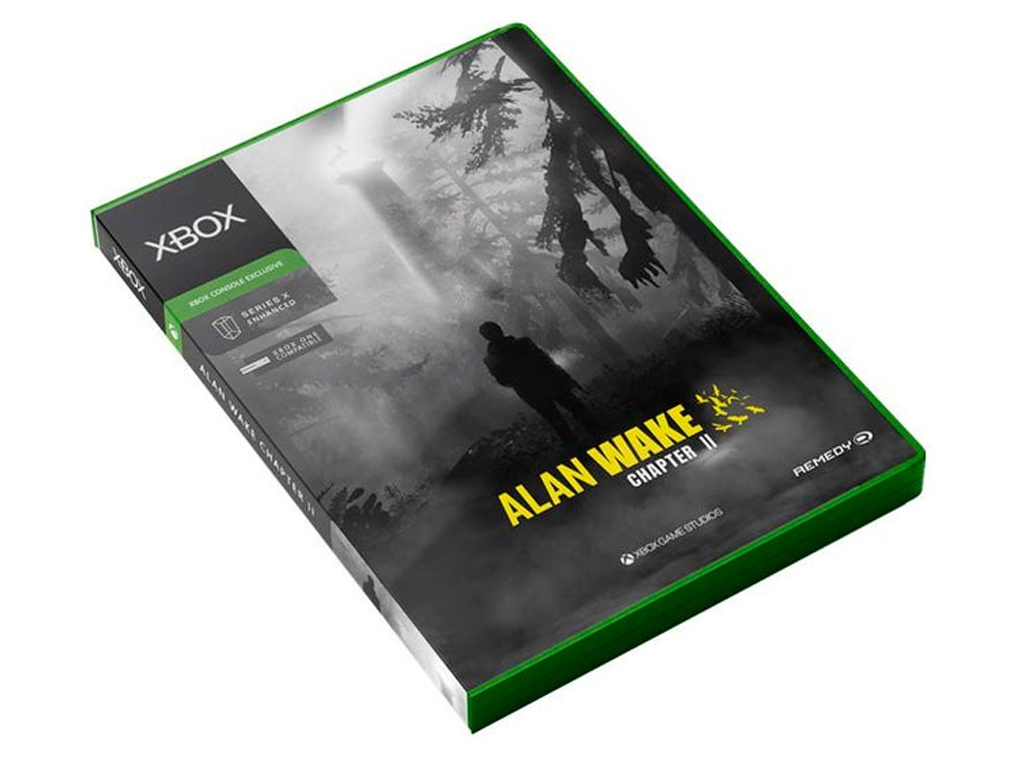
The style of the cases for the Xbox Series X video games has yet to officially be revealed but that hasn’t stop fans from speculating about what they could look like.
One Xbox fan created their own concept image of what they’d like to see (shared on Reddit) and, as you can see in the image above, their dream case design appears very similar to the one currently used with Xbox One games with the main difference being the Xbox logo in the top-left corner as opposed to across the top horizontally.
A nice touch is the separate labels for Xbox Series X Enhanced and Xbox One Compatible which is likely very similar to how Microsoft will market their next generation of video games with it already being confirmed that quite a few, at least in the first year, will be playable on Xbox One consoles and the Xbox Series X.
It’s unclear who made this mock-up so if you know, please let us know down in the comments below so we can properly credit them.
Xbox One owners have been able to customize the wallpaper on their consoles for a while now (simply transfer any image to an Xbox One via a USB drive) but Microsoft hasn’t really provided too many official images for gamers to use. At least not on this scale.
The wallpapers showcase high quality images from a wide range of titles from the Xbox One’s early days through to even some that haven’t released yet such as the upcoming Battletoads video game. There’s even a couple boasting high quality images of the recently revealed Xbox Series X console, that’s due out later this year, and the Day One Xbox One console with its Kinect.
This option is only available for those that belong to a business environment
What fewer users are aware of is that this also marks the end of Windows Server 2008, and SQL Server 2008. However, unlike Windows 7, this isn’t the end of support per se, it is the end of the Extended Support.
Given how important this piece of news is, we’ve compiled a list of the most frequently asked questions regarding the matter and answered them.
Windows SQL Server 2008 Extended Support FAQ
1. Can I still use Windows SQL Server 2008 after 2020?
No. The End of Support date for SQL Server 2008 and 2008 R2 is July 9, 2019. This means that SQL Server 2008 and 2008 R2 will no longer receive any form of updates, neither in terms of features or security.
2. What happens if I continue to use SQL Server 2008 after 2020?
Like any typicalOS, End of Support means that it will not only not receive any patches or security updates, which may cause security and compliance issues, and expose customers’ applications and business to serious security risks.
3. What are my upgrade options?
The best course of action is to upgrade SQL Server 2008 to a newer version, such as 2012, 2017, etc. Additionally, you can also choose to migrate all of your data toMicrosoft Azure.
4. How can I update to a newer version of SQL Server?
The update process of SQL Server 2008 is done using only the tools provided by Microsoft. The process is wizard-guided, and all you need to do is follow the on-screen instructions.
For more information on how to upgrade your Windows Server OS, check out thisin-depthguide.
5. Can I perform in-place upgrades from SQL Server 2008 to a later version?
Unfortunately, no. When you upgrade SQL Server, the previous version of SQL Server will be overwritten. That is why it is a good idea to back up any SQL Server data you have before the upgrade.
You should also keep in mind that you cannot upgrade SQL Server Express or SQL Server Developer, as these are not supported.
6. Why should I migrate my SQL Server 2008 data to Microsoft Azure?
Given that SQL Server 2008 is at the end of the Extended Support, the best incentive that Microsoft Azure offers is that you will get free security updates for 3 more years after the end of support.
Additionally, migrating your data this way can also be performed in-place, allowing you to skip the data backup phase.
7. What are the system requirements for an SQL Server 2008 upgrade?
Fortunately, there isn’t much of a difference between the system requirements of different versions of SQL Server.
Thus, if your hardware meets the minimum settings listed below, you should be able to upgrade effortlessly to any other version.
Processor
Minimum: 1.4 GHz 64-bit processor
RAM
Minimum: 512 MB
Disk space requirements
Minimum: 32 GB
Conclusion
All questions and answers indicate that upgrading SQL Server to a newer version or migrating it to Azure is the best course of action.
Since this program is used primarily for data management, it is the last thing you would want to keep in a vulnerable state security-wise.
Did you find this article useful? Let us know in the comment section below.
Patch 10.1 of the critically acclaimed MOBA League of Legends has hit live, kick-starting the 2020 season of this E-sports giant.
While it does bring plenty of changes, it comes with its own fair share of issues. Since the patch is quite a large one, it goes without saying that a lot of new content has been added as well, creating an ideal scenario for bugs to appear.
That is why we’ve compiled a list of what we think are the most common and serious bugs currently found in League of Legends patch 10.1.
Common bugs and issues in League of Legends patch 10.1
1. Users can’t see their friend list
It would seem that the game’s UI is bugged, and users cannot see any of the information that would usually be found on the right side of the menu.
It would seem that in order for users to encounter this bug, they would have to swap between EUW to EUNE servers during the patching process.
Unfortunately, repairing the client doesn’t work.
Thus, it would be a good idea to wait until the patch is complete before attempting to change the server. Additionally, it seems that if you just play a match, the client will go back to normal on itself.
2. Players cannot pick their Rune pages
Apparently, many players cannot access their created rune pages, and their default rune pages were changed as well.
Unfortunately, no one knows what triggers this bug, nor if there is any known solution to it.
3. Players receive a “password required” message after matches
Apparently, some users receive a message that states the following
A password is required to enter this room” dialogue box appears after every game.
Normally, this would be the message users would receive when trying to join a custom match to which the owner has assigned a password.
4. Users are experiencing packet losses
In general terms, packet losses occur when one or more packets of data traveling across a computer network fail to reach their destination.
In League of Legends, packet losses may lead to NPCs and enemy champions appearing to phase in and out from on destination, as if teleporting.
Unfortunately, there is no current fix for this issue. However, check that your Internet connection is working appropriately may fix this.
5. In-game chat is bugged
Users have reported that in-game, other player’s names appear as random numbers and letters. This makes it extremely difficult to communicate in-game.
Unfortunately, no one knows what causes this, or how to fix it.
Conclusion
That about wraps up the list of the most common League of Legends Patch 10.1 bugs that players have found so far.
While a lot of them are indeed game-breakers, Riot always manages to deliver on their end when it comes to fixing them.
As such, players should expect to see these issues fixed by the next patch update.
Did you also encounter any of these bugs? Tell us about your experience with League of Legends patch 10.1 so far in the comment section below.
This option is only available for those that belong to a business environment
However, fewer Windows users know that the same date also marks the official end of Windows Server 2008’s Extended Support. Similarly to the above-mentioned situation, users are presented with several choices:
Remain on Windows Server 2008 unprotected
Upgrade to Windows Server 2012, 2016, etc
Of course, there are many things users are eager to know about regarding the extended support. That is why we’ve compiled a list of the most frequently asked questions, and provided you with answers for each of them.
Windows Server 2008 Extended Support FAQ
1. Can I still use Windows Server 2008 after 2020?
No. Unfortunately, the end of the Extended Support means that Windows Server 2008 will no longer receive any form of updates, neither in terms of features or security.
2. What happens if I continue to use Windows Server 2008 after 2020?
Like any typical OS, End of Support means that it will not only not receive any feature updates, but it will no longer be protected. This will make your data ideal targets for hackers and cyberthreats.
Given how Windows Server 2008 is most likely used in organizations where data security is crucial, security should be a priority.
3. What are my upgrade options?
Your best bet currently is to upgrade Windows Server 2008 to a newer version, such as 2012, 2016, etc. Additionally, you can also choose to migrate all of your data to Microsoft Azure.
4. How can I update to a newer version of Windows Server?
Upgrading to a newer version of Windows Server is fairly simple. You do not require any third-party tools, as you only need the products provided by Microsoft.
For more information on how to upgrade your Windows Server OS, check out this in-depth guide. You can also download a migration guide from Microsoft’s official homepage.
5. Can I perform in-place upgrades from Windows Server 2008 to a later version?
Yes. In-place upgrading is available when upgrading your Windows Server 2008. However, it is advised that you perform backups just in case.
6. Why should I migrate my Windows Server 2008 data to Microsoft Azure?
Given that Windows Server 2008 is at the end of the Extended Support, the best incentive that Microsoft Azure offers is that you will get free security updates for 3 more years after the end of support.
7. What are the system requirements for upgrading Windows Server 2008?
If you’re planning on upgrading to Windows Server 2012, then you need to make sure your hardware meets these minimum system requirements:
Processor
Minimum: 1.4 GHz 64-bit processor
RAM
Minimum: 512 MB
Disk space requirements
Minimum: 32 GB
Fortunately enough, these happen to be the same minimum system requirements for using Microsoft Server 2019 as well.
Conclusion
As you can see, there are many aspects that need to be taken into consideration when deciding whether to migrate or not. Whatever the case, the bottom line is that an upgrade is mandatory, simply out of consideration for your data’s security.
Did you find this article useful? Let us know in the comment section below.
For those paying attention, Microsoft has been crystal clear about its desire to move the aging Windows 7 user base over to the latest and greatest operating system from the company.
Promotion after promotion and prompt after prompt, Microsoft has tried to bludgeoned the war drum of expiration for Windows 7 and at the end of this week, users of the ten-year-old operating system will be left without support from the company.
Fortunately, for anyone who can’t or won’t move away from Microsoft’s previous flagship OS, Google is offering a tangential lifeboat in the way of extended Chrome support for the next 18 months.
According to its company blog post authored by Chrome’s engineer director Max Christoff,
We have enterprises covered, even if they haven’t yet made the full move to Windows 10. We will continue to fully support Chrome on Windows 7 for a minimum of 18 months from Microsoft’s End of Life date, until at least July 15, 2021. So if you haven’t started your move to Windows 10 yet, or even if your organization is mid-way through migration, you can still benefit from the enterprise capabilities of Chrome.
Understandably, Christoff makes mention of its Chromebook solution for enterprise in this blog post but ultimately steers back to the importance of businesses that rely heavily on Windows 7 by focusing on Chrome being a lynchpin to the upcoming Windows transition of support.
With Chrome holding over 60 percent of the browser market share worldwide, and a not so insignificant portion coming from Windows 7, it’s in Google’s best interest to support ‘holdouts’ for as long as possible.
In the interim, Microsoft is set to continue to pre-load Internet Explorer 11 in a semi-hidden state and use a separate sync engine to bring some interoperability between the two operating systems through a backward-compatible Chromium Edge browser for Windows 7 download.
Coincidently, Microsoft also plans to ship its new Chromium-based Edge browser to the Windows 10 public the same week it ends support for Windows 7.
The appearance of Chromium Edge could be Microsoft’s answer to Christoff’s extended 18-month support pitch for Chrome, as Microsoft seems poised to continue the development of all versions of the CE browser for some time to come.
With CE making its way to Windows 7, Microsoft now has a workaround to its own support deadline of Windows 7, for users and businesses that make primary use of browser-based applications and solutions.
Sea of Thieves is a fantastic new twist on the pirate game genre. This first-person multiplayer Co-op/PvP pirate game has been very popular among the fanbase, and it doesn’t show any signs of stopping.
This is also thanks to the fact that the game is also constantly updated with new content, area,s gears, mini-games, and more.
One of the key aspects of the game is the fact that it is a multiplayer game which, as you probably guessed by now, involves interacting with other players.
The problem is that some users have been reporting having issues with the game, in the sense that they aren’t receiving notifications and invites from other players.
Friends have been trying to invite me on the PC version of the beta, but I can’t seem to receive the invites. Checked the Xbox App on Windows and waited to see if I received an invitation in game, but saw nothing at all. Anything I’m missing here? Any input would be appreciated.
As you can see, this issue seems to be persistent both on the Xbox and Windows 10 versions of the game. Regardless, there are a few things you can try that will fix these issues, and we’ve arranged them all in this step-by-step guide.
How do I fix the Sea of Thieves invitation issues?
1. Make sure notifications are turned on
Sea of Thieves is a Windows 10 game that you can buy, install, update, repair and uninstall from the Microsoft Store App. As you probably know, all games that are managed through the Microsoft Store App will send you notifications through Windows 10’s default notification system.
However, this setting is not always activated by default. As such, you will need to go through these steps in order to allow Sea of Thieves notifications to push through:
One workaround would be to update your PC to the latest version, and see if that changes anything.
Press Start
Select Settings
Scroll down and select Update & Security
Press Check for Updates to make your PC search for any update sit may be missing
If updates have already been found and they were pending, select Download now
Reboot the PC
3. Update Xbox Game Bar
The Xbox Game Bar handles all things gaming-related in Windows 10, from screen recording during games to receiving notifications.
As such, if you already have it installed, follow these steps:
Open the Microsoft Store App
Press the three dots on the top right of the screen
Select Downloads and updates from the dropdown menu
Press Get updates
If you don’t like manually updating your Store Apps, you could always set them to update automatically by following this guide.
4. Use the Xbox App
The Xbox App is a proprietary platform created by Microsoft. It acts as a dashboard for buying, installing, updating, repairing and uninstalling Windows 10 and Xbox games.
You can easily download and install this app, and then install Sea of Thieves through it. This will make the Xbox App handle the notifications aspect of the game, rather than Windows 10 itself.
By following these steps, you should now be able to receive invites and notifications from Sea of Thieves while outside of it.
Did you find this article useful? Let us know in the comment section below.
Those of you who are looking to spice up your life with a bit of adventure in the open seas have probably at least heard of Sea of Thieves. This outstanding first-person multiplayer co-op/PvP pirate game has been quite popular ever since it was launched.
However, like any other game, it has its fair share of issues. For example, there are situations where players say that they cannot even launch the game, let alone play it:
As the title says the game will not launch on my pc. It stays on the splash screen for 5 minutes or so and just closes
Not being able to launch the game does spoil a lot of the potential fun a game can bring. Fortunately enough, there are a few things you could try to bypass this issue.
Since the game is so popular, and this type of issue is quite severe, we’ve decided to create this step-by-step to help you get into the open waters again as soon as possible.
How can I make Sea of Thieves launch again?
1. Make sure your OS is updated
While it is a common problem that many users face, updating your OS to the latest version is frequently the go-to (sometimes the only) solution that you should try.
Press Start
Select Settings
Scroll down and select Update & Security
Press Check for Updates to make your PC search for any update sit may be missing
If updates have already been found and they were pending, select Download now
Reboot the PC
If this solution doesn’t work, please proceed to the next one listed below.
2. Login as an administrator
This solution may sound strange enough at first glance, but a lot of players have reported that logging to Windows 10 with a local Admin Account fixes the majority of cases reported.
When you log into your Windows 10 PC, just make sure you log into an account labeled administrator, and that is pretty much it.
PowerShell is a great overall tool when trying to perform a variety of tasks in Microsoft Windows. In the case at hand, it cna even help you with your Sea of Thieves issue.
Press Windows + R
Type Powershell and press Enter
Copy and paste the following into the PowerShell window and press Enter
This may sound strange enough, but it is a known fact that having a different time setting than the one you are actually in can cause a variety of issue with online content, not just Sea of Thieves. Thus, follow these steps to get rid of any such issues:
Right-click the clock on your Taskbar
Select Adjust date/time
Untick then retick Set time zone automatically
Reboot your PC
By following these steps, you will be able to play Sea of Thieves once more and enjoy the freedom of the open sea. In case you’re having network problems, our latest Alabasterbeard error in Sea of Thieves guide should be able to help.
Google has announced that it will continue providing Chrome support for Windows 7 beyond the Operating System’s end of life on January 14, 2020. The development is a much-needed reprieve to users who are yet to migrate to Windows 10 and are concerned about the cybersecurity risks of not migrating.
Microsoft had promised to keep supporting the Windows XP successor for 10 years from 2019. Withdrawal of support for Windows 7 means that technical assistance and software updates, including security patches, will no longer be available for the OS.
Traditionally, Microsoft provides regular security updates to mitigate specific threats to PCs and information technology (IT) systems. On September 10, 2019, the software-maker released the KB4516033 security-only patch to protect 32-Bit (x86) versions of Windows against vulnerabilities known as microarchitectural data sampling. Such Windows 7 security updates won’t be available for free for much longer, and that’s part of the issues Google is trying to resolve with the Chrome browser.
You can keep using Chrome on Windows 7 safely until 2021
Chrome support for the OS will benefit business users, according to Max Christoff, Engineering Director, Chrome.
We have enterprises covered, even if they haven’t yet made the full move to Windows 10. We will continue to fully support Chrome on Windows 7 for a minimum of 18 months from Microsoft’s End of Life date, until at least July 15, 2021.
With Chrome, enterprises that are still on Windows 7 will be able to address numerous security threats, especially when interacting with web-based applications. The browser includes a range of internet-safety features, such as anti-phishing and advanced password protection.
Site isolation is also a key cybersecurity function that Google promises to deliver with extended Chrome support for Windows 7. The extra layer of protection makes it more difficult for suspicious websites to access or steal data from enterprise applications or sites.
Also, users can look forward to automatic Chrome security updates and proactive protection to secure their cloud-hosted systems. If there’s a significant number of enterprise users on Windows 7 by July 15, 2021, Google might extend Chrome‘s support for the OS beyond this date.
The stalledDueToTarget_MdbAvailability status you’re seeing is such a buzz kill. Maybe you were moving mailboxes from Exchange 2010 to Exchange 2016 using migration batch in EAC and finally noticed that some mailboxes take a long time to complete migration.
Others describe getting the same stalledDueToTarget_MdbAvailability migration error message when transferring a mailbox from Exchange 2013 to Exchange Online and examples may continue.
This is often an indicative of a target database issue. That’s where you’re moving the mailbox to, and it should be an active copy.
There are instances when no unique solution can be given. In this short guide, we’ll though make sure there’s something you can do to fix this.
How can I fix stalledduetotarget_mdbavailability error?
1. Move a single mailbox by using the New-MoveRequest
For troubleshooting this migration error, you should first try to move a single mailbox by using the New-MoveRequest. Don’t hesitate to specify the target mailbox as a new one.
This should work if the issue was indeed caused by a database copy.
2. Increase the number of simultaneous mailbox moves
Open Explorer on the Exchange server.
Go to C:Program FilesMicrosoftExchange ServerV14Bin. This is the default path; the path on your server might be different.
Make a backup copy of the file MSExchangeMailboxReplication.exe.config.
Change these parameters to fix the error: MaxActiveMovesPerSourceMDB = “5” MaxActiveMovesPerTargetMDB = “2” MaxActiveMovesPerSourceServer = “50” MaxActiveMovesPerTargetServer = “5” MaxTotalMovesPerMRS = “100”
Use the following command: Restart-Service MSExchangeMailboxReplication to restart the Mailbox Replication service and keep the changes.
If you see the migration error after successfully moving a few mailboxes, then it may be caused by a limit for the number of simultaneous mailbox moves.
Increase it by modifying some parameters’ value in MSExchangeMailboxReplication.exe.config file.
3. Microsoft Office 365 Support
In case the issue still persists even after performing the steps listed above, then create a ticket within Microsoft Office 365 Support. Other users did the same and the support team suspected it could be an issue with Throttling.
They have decreased the throttling thus solved the problem.
You can always use a third-party email client program that supports Exchange to access and manage your mailboxes. The software will allow you to connect to your Exchange account with your email address and password. In case it won’t be able to detect your server details automatically, you will have to enter them as well in order to use the email client program.
Make sure that this stalledduetotarget_mdbavailability Office 365 migration error isn’t here to stay! Just apply the above tips one by one. For those whom we’ve helped, spread the word as others face the same issue too.
Blizzard released its ever-popular Destiny 2 game on Steam on August 2019 and since then many users have been trying to figure out a way to migrate from Blizzard to Steam.
This is a simple process, but for some users, it can be a nerve-wracking experience, considering the time they have spent playing the game on their PCs.
In this article, we will walk you through the step by step by guide to migrate from Blizzard to Steam and move your Destiny 2 account successfully to it.
How can I transfer a Blizzard account to Steam?
To transfer Blizzard account to Steam, go to Bungie.net. Click the red bar at the top.
If you don’t see the red bar, then go to PC Movepage.
Login to your Blizzard account.
Click on Begin Transfer button on the page.
Select Steam from the list of services.
If you are not logged in, you will be asked to enter the username and password. Enter the details and sign in.
Once signed in, select I’m Done to complete the Blizzard account transfer to steam.
Once the Blizzard account is migrated to Steam, you can play Destiny 2 from your Steam client.
This is a one-time offer from Blizzard that allows the Destiny 2 users to move from Blizzard to Steam. Blizzard discontinued Destiny 2 on its own server and the users are encouraged to move to Steam.
If you don’t have a Steam account, you can create one for free during setup.
Follow the steps above to migrate from Blizzard to Steam once the account is ready.
Steam is a popular platform that distributes digital games. The service offers all the major PC titles under one roof and also allows you to manage all the games from a single source.
What gets transferred to Steam?
If you were wondering what are the Destiny 2 properties from your Blizzard account that will be migrated to the Steam account, here they are:
Cosmetic items like Ghosts, Sparrows, emblems, Weapons and armour, Triumphs
Silver and Bright Dust, Expansions, Annual Pass, DLC
Everything the user had while playing the game on Battle.net will be moved to the Steam account. However, you may have to add your friends individually due to both the platforms having different userbase.
Conclusion
By following the steps in this article you can successfully migrate from Blizzard to Steam while retaining all the saves and game data. Just make sure you follow the steps carefully not to lose any details in the process.
If you have any other questions or suggestions, don’t hesitate to leave them in the comments section below.
If you get the error message No boot device available in Windows 10, you can follow the tutorial posted below and find out how to fix the No boot device available/No boot device found issue.
You will also need to follow the methods in the order they are posted to minimize your debug time on the Windows 10 device.
First of all, before you begin, you will need a DVD or an external memory like a USB device with Windows 10 on it to be able to boot from it. Also make sure the CD/DVD you have with Windows 10 is not damaged in any way thus preventing any errors in the boot process.
No Boot Device Available message can be a big problem, and in this article we’re going to show you how to fix the following issues:
No boot device found Windows 10 Dell – This problem can appear on almost any Windows device, and many Dell users reported this problem on their PCs.
No boot device found press any key to reboot the machine – Sometimes this error message will ask you to press any key to restart your PC. Unfortunately, even after you restart your PC you won’t be able to access Windows.
No Boot Device Available USB, UEFI – Sometimes this problem can occur if you’re using UEFI. To fix this issue, you just need to change your UEFI configuration.
No boot device has been detected – This is a variation of this problem and it can appear if your hardware is faulty. In addition, this issue can appear if your hard drive isn’t properly connected.
Keyboard failure No Boot Device Available – According to users, sometimes this problem can be caused by your keyboard. To fix the issue, you might want to try disconnecting or replacing your keyboard.
No Boot Device Available current boot mode is set to BIOS – This is another relatively common problem. If you’re getting this error message, you just need to switch from BIOS to UEFI and the issue should be resolved.
No boot device connected, found, selected, detected – This is a standard variation of this problem, and many users reported that their boot device isn’t connected or found. This can be a big problem, but you should be able to fix it using one of our solutions.
No boot device SSD – Many users reported that this problem started appearing after using an SSD. This isn’t a serious problem and you should be able to fix it by changing your BIOS settings.
On a side note, this specific error often occurs shortly after migrating from Windows 7 to Windows 10. But it can also occur after installing the latest Windows 10 updates. Judging by the number of reports we’ve come across, Dell computers are particularly affected by this issue. You can use the troubleshooting guide below both for Dell computers, as well as other computer brands.
Place the Windows 10 DVD/USB and reboot the Windows operating system. Note: If you can’t boot from the Windows DVD then you will have to go in the BIOS options of your device and be sure you have the option to boot from the CD/DVD selected and enabled.
After your system boots you’ll get to a Windows setup page. Click the Next button to proceed.
Left click or tap on the Repair your computer option in the next window.
Select the Windows 10 operating system you wish to repair.
Let the automatic repair process run and after it is finished reboot again without the Windows 10 DVD and check if you still get the No boot device available message.
Solution 2 – Run the troubleshooter
Several users claim that you can the problem with No boot device available message simply by running the troubleshooter. If you can’t access Windows normally, you might want to try this solution from Safe Mode.
In the search box write Troubleshooter and select Troubleshooting from the menu.
Select Windows Update from the list and click on Run the troubleshooter button.
After the process is completed reboot your Windows 10 device and check if you still have the same issue.
Keep in mind that this isn’t a universal solution, so it might not work for you.
Solution 3 – Run SFC scan
Press Windows Key + X and choose Command Prompt (Admin) from the menu.
Write in the command prompt the following: sfc /scannow and press Enter to run it.
Let the system file checker process finish and reboot the Windows 10 device.
Check again for the No boot device available message.
If you can’t access your Windows 10 at all, you can run Command Prompt from Advanced Boot Menu. To do that, simply restart your PC couple of times. Now select Troubleshoot > Advanced options > Command Prompt.
When Command Prompt starts, you need to run the following commands:
sfc /scannow /offbootdir=c: /offwindir=c:windows
chkdsk c: /r
chkdsk is giving you headaches? Check out this quick guide to any issues with it.
If those two commands can’t fix the problem, you might have to use DISM scan instead. To do that, just run this DISM /Online /Cleanup-Image /RestoreHealth command.
If the previous command doesn’t work, try using the following commands instead:
These commands will check for file corruption and fix any corrupted files on your hard drive that might prevent Windows from booting. Keep in mind that this isn’t a universal solution, so it might not work if the problem is caused by your hardware.
Solution 4 – Make sure you’re using UEFI
Many users reported No Boot Device Available message after a BIOS update. If you’re getting this error message, the problem might be related to your BIOS. To fix the issue, you need to switch from BIOS to UEFI.
This is a simple process, and in order to do it, you just have to enter BIOS and change a single setting. Since there are many different versions of BIOS, we strongly advise you to check your motherboard manual and see how to switch permanently to UEFI.
After doing that, the error message should be resolved and your PC should start working again.
Solution 5 – Check for loose cables
Sometimes you might get No Boot Device Available message if your components aren’t connected properly. To fix this problem, you need to power down your PC, disconnect it from power outlet and open your computer case.
After doing that, be sure to check all SATA cables and make sure that they are tightly connected to your motherboard and to your hard drive. Several users reported that this problem occurred because their SATA cables weren’t firmly connected to their motherboard.
After connecting everything properly, the issue should be completely resolved.
Solution 6 – Disconnect USB peripherals
Users reported that No Boot Device Available message can be caused by your USB devices. According to users, they were unable to boot to their PC, but after disconnecting their USB devices, the issue was resolved.
Several users reported that their USB keyboard and mouse were the problem, so be sure to disconnect them as well. If your mouse or keyboard are the cause of the problem, try replacing them and check if that solves the issue.
Solution 7 – Set your hard drive as first boot device
According to users No Boot Device Available message can appear if your hard drive isn’t set as the first boot device. However, you can easily fix this issue simply by going to Boot section in BIOS.
From there you need to find First Boot Device setting and set it to your hard drive. After doing that, the issue should be resolved.
Several users are recommending to turn off Secure Boot feature, so you might want to do that as well. You can also try changing the Boot Mode from UEFI to Legacy to see if it helps.
After making these changes, the issue should be completely resolved. To see how to find and change these settings, we strongly suggest that you check your motherboard manual for detailed instructions.
Solution 8 – Fix your MBR
Sometimes damaged MBR can cause No Boot Device Available message to appear. To fix the issue, you need to start Command Prompt like we showed you in Solution 3 and run the following commands:
bootrec.exe /FixMbr
bootrec.exe /FixBoot
bootrec.exe /RebuildBcd
If those commands don’t work, try using these commands instead:
bcdedit /export C:BCD_Backup
c:
cd boot
attrib bcd -s -h -r
ren c:bootbcd bcd.old
bootrec /RebuildBcd
After running these commands, check if your problem is resolved.
The eight methods above are all but sufficient to get your No boot device available message out of the Windows 10 system.
You can also check a detailed guide on resolving boot device detection problems by visiting our Boot Device Not Found guide.
Keep in mind though that you need to follow them in the order they are presented and also be sure not to skip any of the steps presented.
If you have any more questions, don’t hesitate to leave them in the comments section below and we’ll be sure to take a look.
Microsoft’s Surface Neo and Duo aren’t set for release until Holiday 2020, but that doesn’t mean there’s no reason to hype the products up. Recently, both Satya Nadella and Panos Panay were seen showcasing the Surface Neo and Duo.
The most interesting of these moments comes from Surface Chief Panos Pany. Over on his Instagram, Panay showcased the desk and workspace of the Head of Quality over at the Surface team. Obviously, the post reveals how he’s using the Surface Hub 2S as a desktop display, which appears to be a new use case. However, if you look close enough, you can see both the Surface Neo and the Surface Duo on the far left side of the table. This is one of the first times we’ve seen the device on the desk of an employee internally at Microsoft, though we did see the devices out in the wild during Ignite 2019.
Secondly, there is an older Twitter post from Brian Sozzi, the Editor in Chief at Yahoo Finance. Here, we see that Microsoft CEO Satya Nadella himself is showcasing the Surface Duo to him during NRF 2020, the world’s largest retail conference and expo. Nadella is one of the keynote speakers there, but he also seems happy to showcase the Surface Duo, which Sozzi described as a “darn slick device.” It’s unknown if this is Nadella’s personal Surface Duo, but it is great to see that Microsoft’s own CEO is comfortable enough to show the device out in the public with the press.
Holiday 2020 is still well over 10 months away, but now what Microsoft is showcasing its newest devices, the hype is starting to build up. The company even updated its Android launcher today, to a version that many believe will be powering the Surface Duo, so the release date can’t come soon enough.
Sea of Thieves is one of the games which should popularize the multiplatform gaming service that Microsoft is advertising. The game is, for the time being, doing quite well, and we only hope that this co-op multiplayer concept will become the norm in the gaming industry. Now, even though the game is quite good, there are various issues, and most concern Microsoft Store. Namely, a lot of users are unable to update the game via Microsoft Store.
This is a grave problem, especially as there are frequent mandatory patches and fixes for Sea of Thieves. We made sure to collect all viable solutions and put it in a comprehensive list.
How to fix Sea of Thieves update issues in Windows 10
The first thing to do is to restart your PC. For some users, just the casual reboot fixed the problem. However, other users tried out a workaround which worked it out for them. This workaround requires you to restart the update. After the error appears, affected users restarted the PC and, after returning to Microsoft Store, the download process suddenly continued.
After that, they were able to finalize the update procedure and the game is set and ready. There are multiple reports about this procedure being successful but, on the other hand, it might not work for everyone.
2: Download any app to unblock Store’s authentication bug
Since the Microsoft Store overhaul, there seems to be an issue with authorization. Some users resolved it by signing out and signing in again with their account and checking the regional and time/date settings. However, the best solution we come to with the Sea of Thieves update error is to download another application. Any given application will work. Just navigate to the Store and download any given free app.
After that, the authorization bug should be resolved and you can move from there. If the issue persists, continue through the list.
Troubleshooting any given issue in Windows 10 was made easier with the introduction of dedicated troubleshooters. Since Microsoft Store is an essential part of Windows 10, there’s a dedicated troubleshooter for Store and its respective content. Running it might help in this scenario with Sea of Thieves and address the update halt.
Follow these steps to run the dedicated Store troubleshooter:
Press Windows key + I to open the Settings app.
Select Update & Security.
Choose Troubleshoot from the left pane and scroll to the bottom.
Expand Windows Store apps troubleshooter and click on the “Run the troubleshooter“.
4: Clear Store’s cache
Microsoft Store, as any other app, stores cache to speed up the loading speeds. However, piling up of the said cache can inflict various errors. There’s a chance that the cached data stored by the Store is corrupted and you’ll need to reset it in order to resolve the issue.
Resetting the Store’s cache is simple and all you need to do is run a simple command. Here’s how to do it in a few simple steps:
In the Window Search bar, type wsreset.
Right-click on wsreset and run command as an admin.
Open Microsoft Store again and try updating Sea of Thieves.
5: Restart Store installer in Task Manager
This solution showcases well how Microsoft has done a lousy job with Microsoft Store in comparison to Steam, uPlay, or similar third-party launchers. Namely, it seems that the Store’s Installer service tends to fail frequently. As the name itself says, this service covers all installation and downloads in Microsoft Store. As the case has shown, and judging by the frequent reports, this service sometimes stops in the middle of the download process.
Luckily, there’s a way to restart it and, hopefully, the update download will resume where it stopped. Here’s how to restart the Store installer service:
Open Microsoft Store and start updating the game.
When the download stops, right-click on the Taskbar and open Task Manager.
Choose the Services tab.
Find Install Service by pressing the ‘I’ key multiple times.
Right-click on it Install Service and select Start.
6: Use PowerShell command
Installing any application via Microsoft Store has an alternative. Besides the standard approach through the user interface, you can use PowerShell to enforce the update or installation of a certain app. This covers all pre-installed apps, third-party apps, and even games.
Windows 10 updates also bring system optimization improvements meant to help gamers run their favorite games as smoothly as possible. If you’re not running the latest Windows 10 OS build on your device, make sure to check for updates. Install the latest OS updates and then try to update Sea of Thieves as well.
8: Reinstall the game
Finally, if none of the previous steps resolved the error, we can assume that the reinstallation is the only viable solution remaining. We’re aware that this isn’t a quite welcome scenario, as the game in its original form takes up to 20 Gb. With that in mind, it can take a lot of time downloading it, depending on your bandwidth speeds.
Nonetheless, as we already said, it’s hard to find an alternative to this. So, do try to uninstall the game and reinstall it again. With the new installation, you’ll get the latest version of the Sea of Thieves. If you’re still unable to resolve the issue, we recommend sending a ticket to Microsoft support. There were a lot of problems with the game for Game Pass players, but those are seemingly addressed.
That’s it. Don’t forget to tell us whether you’ve managed to resolve the update issue with Sea of Thieves or not. The comments section is below, so feel free to share your thoughts and provide alternative solutions.