Former Windows Insider chief Gabe Aul now works at Facebook

Gabe Aul, the former head of the Windows Insider Program announced on Twitter today that he has joined Facebook after working at Microsoft for almost 27 years. Today is Aul’s first day as Vice President at Facebook, and the former Microsoft employee has yet to share more details about his new job.

Aul started his career at Microsoft in 1992, and his latest role was Corporate Vice President of the Windows Engineering System team. Aul is mostly known for being the man behind the Windows Insider Program, which has become a massive beta testing program over the years with more than 15 million Windows Insiders. In June 2016, Aul passed the Windows Insider Chief torch to Dona Sarkar, which has since taken the program a step further with a new #Insiders4Good arm.

Windows Insiders quickly made Gabe Aul become an Internet meme.

Facebook has been the subject of many controversies in recent months, many of them related to privacy subjects, but the company remains highly attractive for tech veterans. Aul actually isn’t the only high-profile Microsoftee that joined Facebook this month: Clint Rutkas, a former Senior Product Manager focusing on the developer platform announced two weeks ago that he was now Developer Advocate for the big blue app.

We wish both Aul and Rutkas the best of luck at Facebook and hope they’ll be able to help it become a better company.

Update: According to Dona Sarkar, Gabe Aul is actually joining Oculus, the VR company that Facebook acquired back in 2014.

Myplaces.kml not responding Google Earth error [EXPERT FIX]

Google Earth is incredibly useful software, but some users reported Myplaces.kml not responding message. This error could be caused by either myplaces.kml being damaged, either there could be a graphics software issue.

One user described the issue on Google Groups as follows:

Hello. My Google Earth stalls for literally about 10 minutes while it
gives me the message “Loading myplaces.kml, including enabled
overlays”
My Google Earth used to startup and be ready to go in about 3 seconds.
How do I fix this to get it back to the old ways?

Fortunately, we found a few ways of fixing this error, listed below.

What to do if Google Earth isn’t responding on Windows 10?

1. Make sure Windows Firewall isn’t blocking Google Earth

  1. Type in the search box Windows Firewall.
  2. Click Windows Firewall in the search results to open it.
  3. Select Allow an app or feature through Windows Firewall.
    allow an app through windows firewall google earth myplaces.kml not responding
  4. Tick the box next to the Google Earth app > press OK.

2. Clear disk cache

  1. Open Windows Explorer.
  2. Select Organize > click Folder Options.
  3. Go to the View tab > check Show hidden files and folders.
    show hidden files folders and drives file explorer options google earth myplaces.kml not responding
  4. Follow these location C:>Users>username>AppData>LocalLow>Google>GoogleEarth.
  5. Create a back up for myplaces.kml in a safe spot.
  6. Delete the Google Earth folder.
  7. Try loading the Google Earth app.

Alternatively, you can use the Repair Tool:

  1. Open the Google Earth app.
  2. Select Help > click Launch Repair Tool.
  3. If asked which product to repair, select Google Earth Pro.
  4. Keep the Repair Tool open and close Google Earth Pro.
  5. Click Delete my places > select Delete.

Google Earth won’t work on your PC? Fix it with this simple guide!


3. Try to switch the graphics displays

switch to directx google earth myplaces.kml not responding

  1. Open Google Earth Pro.
  2. Select Tools in the top menu > click Options…
  3. Find the Graphics Mode sections and change from OpenGL to DirectX or the other way around if you have DirectX selected.
  4. Select Apply > click OK.
  5. Restart the Google Earth app and see if it works.

4. Disable Atmosphere

disable atmosphere google earth myplaces.kml not responding

  1. Open the Google Earth app.
  2. Click View in the top menu.
  3. Deselect Atmosphere > click OK.

We hope that our simple steps on how to fix Myplaces.kml not responding error in Google Earth. If you have any other suggestions on fixing this error, feel free to leave them in the comments section below.

READ ALSO:

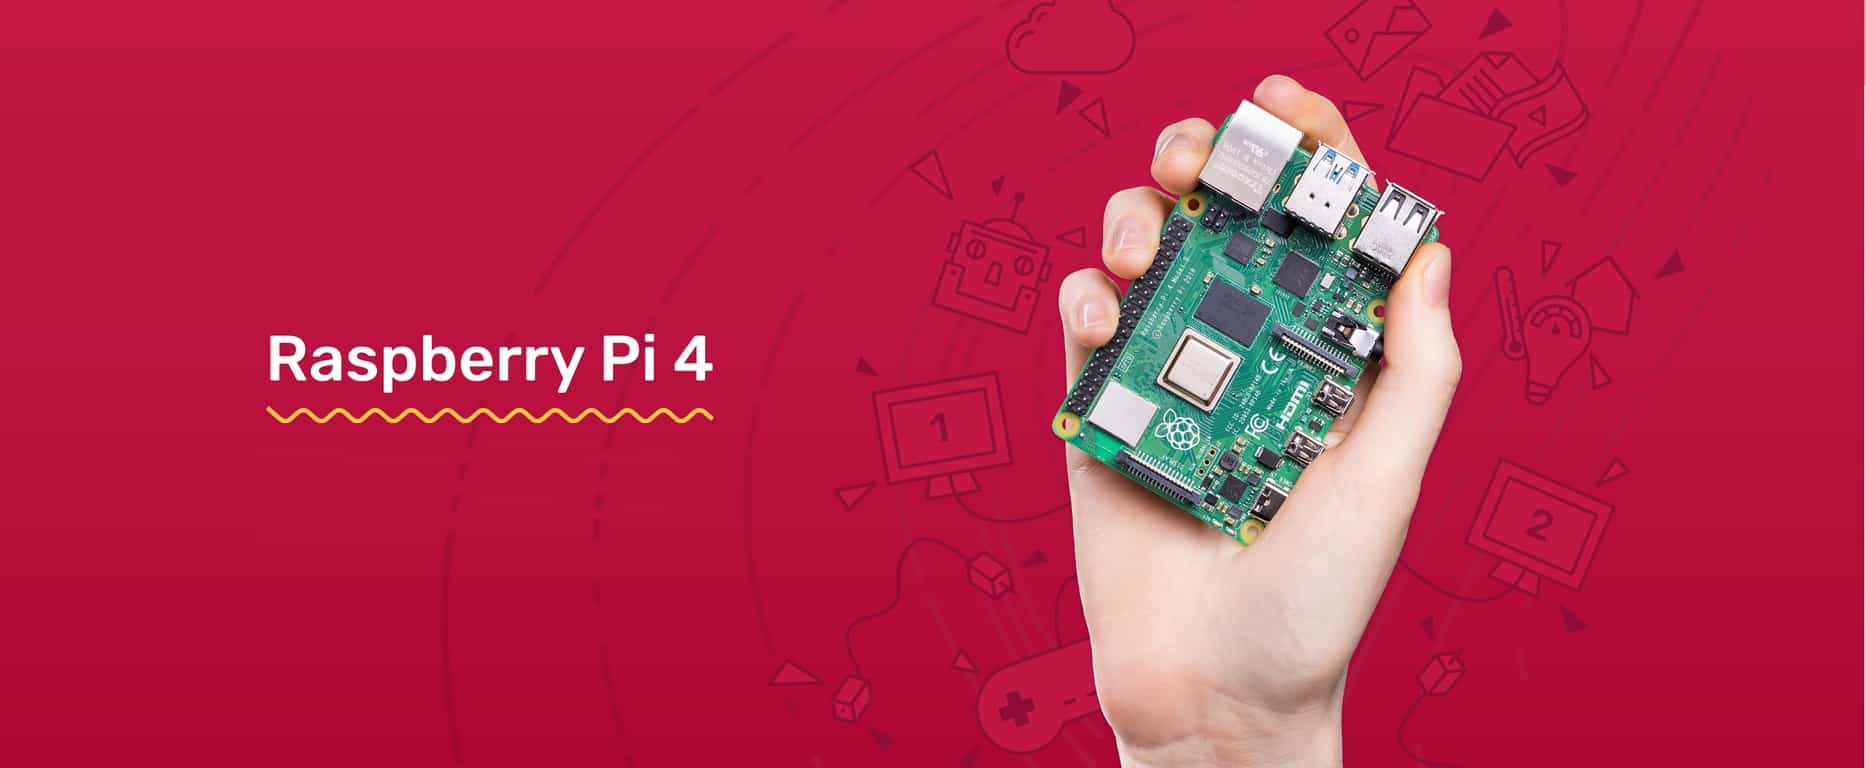
Raspberry Pi 4 released with upgraded specs, starts at $35

The new Raspberry Pi 4 is here with upgraded technical specifications, including 1GB, 2GB, and 4GB RAM versions. The Raspberry Pi 4 pricing starts at $35 (1GB), $45 (2GB), and ends at $55 for the 4 GB DDR4 RAM version. Additionally, the Raspberry Pi 4 is now using USB-C for power, getting rid of the old USB micro-B connector, available in older models.

Two other big changes are the removal of the full-sized type-A HDMI connector in exchange for two Type-D micro HDMI connectors, and the placement of the Gigabit Ethernet jack next to the 4 USB connectors. The Raspberry Pi 4 also sports 2 USB 2.0 ports and 2 USB 3.0 ports. Here’s the video showing off the new Raspberry Pi 4.

As noted in a post on the Raspberry Pi blog, here’s a look at all the updated specifications available in the new Raspberry Pi 4 Model B:

  • A 1.5GHz quad-core 64-bit ARM Cortex-A72 CPU (~3× performance)
  • 1GB, 2GB, or 4GB of LPDDR4 SDRAM
  • Full-throughput Gigabit Ethernet
  • Dual-band 802.11ac wireless networking
  • Bluetooth 5.0
  • Two USB 3.0 and two USB 2.0 ports
  • Dual monitor support, at resolutions up to 4K
  • VideoCore VI graphics, supporting OpenGL ES 3.x
  • 4Kp60 hardware decode of HEVC video
  • Complete compatibility with earlier Raspberry Pi products

Besides the Raspberry Pi 4 upgrades and older models’ legacy support, Raspberry Pi will abandon the legacy graphics driver stack used in previous Raspberry Pi models.

“Instead, we’re using the Mesa “V3D” driver developed by Eric Anholt at Broadcom over the last five years. This offers many benefits, including OpenGL-accelerated web browsing and desktop composition, and the ability to run 3D applications in a window under X. It also eliminates roughly half of the lines of closed-source code in the platform.”

The Raspbian Desktop software is getting revamped too. Based on the upcoming Debian 10 Buster release, the new Raspbian Buster desktop software offers “a modernised user interface, and updated applications including the Chromium 74 web browser.” Head on over to the Raspberry Pi downloads page to download the new Raspbian Buster desktop for yourself. The new Raspberry Pi 4 (4GB RAM) offers enough technical specifications to run full Windows 10.

Buy the Raspberry Pi 4 Model B from the Raspberry Pi Store.

Download Realtek HD Audio Manager for Windows 10 [How To]

Realtek HD Audio Manager is one of the most popular audio drivers available. It provides DTS, Dolby, and Surround Sound support for the user’s audio card.

The audio driver allows users to use different speaker configurations, offering Stereo, Quadraphonic, and 5.1 Speaker support.

What does Realtek HD Audio Manager do?

Realtek HD Audio Manager is basically a control panel for the audio adapters, offering users a wide range of instruments necessary to make all the desired changes.

Right-clicking the audio manager icon in the bottom right corner of the desktop expands multiple options.

realtek audio manager taskbar icon Download Realtek HD Audio Manager

From here, users can access the Volume Control center, their audio devices, the Sound Manager, System Sound Events, Sound Recorder, and Windows Media Player.

Accessing the sound manager allows users to adjust speakers and microphone settings (if available).


1. Speaker Configuration

The Speaker Configuration tab contains an animation displaying all the speakers connected to the system.

speaker configuration realtek HD audio manager Download Realtek HD Audio Manager

From this tab, the user can choose what type of configuration he’d like to choose depending on the audio system.

Having a 5.1 surround system allows users to choose between using a 5.1 speaker configuration, quadraphonic or stereo.

In the Speaker Configuration tab, users can choose which speakers to disable/enable by ticking/un-ticking respective speaker’s boxes.

The Play button near the Speaker Configuration allows users to test the system’s working status.

2. Room Correction

The Room Correction tab is available when having a surround system.

speakers settings Download Realtek HD Audio Manager

It allows their users to manually adjust each speaker’s volume individually.

To be able to make adjustments to the speakers’ volume, the Enable Room Correction box needs to be ticked.

3. Default Format

The Default Format tab allows the user to change the audio adapter‘s sound quality.

default format Download Realtek HD Audio Manager

It also contains a button that restores the default settings. The button is located next to the Default Format options.

How do I get Realtek HD Audio Manager?

Installing Realtek HD Audio Manager requires you to download the installer first from the official website. After you download it, you’re ready to install it.

How do I install the Realtek HD Audio Manager?

Installing Realtek HD Audio Manager is a straightforward task and requires you to perform these steps:

  1. Open the Realtek installer you downloaded.
  2. Click Next and wait for the installation to complete.
  3. Once the installation is done, select Yes, I want to restart my computer now > click Finish.

Besides, if you encounter the Install Realtek HD Audio Driver Failure error, uninstall the current driver first!

We hope our quick guide on how to use Realtek HD Audio Manager was of help to you. Leave a comment in the comment section if you liked this article.

Your System Does Not Use 3D Hardware Acceleration Blender Error [Fix]

Windows 10 users have encountered an issue with Blender not being able to open on their PCs. Error message Your system does not use 3D hardware acceleration. Blender requires a graphics driver with OpenGL2.1 support pops up, leaving users unable to utilize Blender.

The issue causing the Blender error seems to be an OpenGL file missing from the system.

We can provide you with a quick guide on how to fix this error.

Why Blender 3D won’t detect 3D acceleration driver?

To be able to run Blender properly, you will need to manually implement a fully supported OpenGL file on your computer.

The steps below will guide you on how to do this process:

  1. Access the official page.
  2. Choose the version of your OS.
  3. Download the file.
  4. Place the opengl32.dll file in your Blender installation folder, the same folder containing blender.exe.
  5. Open Blender.

After that, you should be able to run Blender without any problem. If you’re, on the other hand, still bothered by the error, consider reinstalling the application from scratch.

Looking for the best alternative for Blender on Windows 10? Here are the best options.

You should be able to resolve the problem by reinstalling the app.

  1. Open Control Panel.
  2. Choose Uninstall a program from the Category View.
  3. Uninstall Blender from the list of installed applications.
  4. Reboot your PC.
  5. Navigate here to download the Blender installation file.install Blender your system does not use 3d hardware acceleration
  6. Install Blender and look for improvements.

This isn’t the only error you can encounter, and many reported that Blender crashes when opening files, but that can be easily fixed.

We hope that this quick guide on fixing Blender’s error message worked for you. If it did, let us know in the comment section below.

How to disable quick access in Windows 10 in just one minute

Windows 10 contains a Quick Access tab in the File Explorer. This option was not available in previous OS versions.

Quick Access contains a list with frequent accessed folders and recent files.

Although Microsoft implemented Quick Access in order to add an extra option for their users, many of them hate it and don’t want it displayed.

If you want to browse This PC, you now have to expand it in the left pane, in order to have easier access to your computer’s drives.

If you want to disable Quick Access, follow the steps listed below.

Tutorial on how to disable Quick Access

Disabling the Quick Access in the File Explorer is not a hard task. Here are the steps to follow:

  • Press the Windows logo key + E on your keyboard to open File Explorer
  • Click File > select Change folders and search options

  • Unckeck the boxes next to Show recently used files in Quick Access and Show frequently used folders in Quick Access

  • Switch Open File Explorer to This PC if you want to completely remove Quick Access

We hope that our quick guide on how to disable Quick Access in Windows 10 helped you out.

If you liked this article, leave us a comment in the comment section below.

READ ALSO:

Windows 10/11 computer turns on by itself? We got the right fix for you

There is a specific Windows 10 issue that left many users confused. Most of them reported that after installing the latest updates, their computers started turning on by themselves for no reason.

Apparently, the Windows update triggers certain system changes that were not set as default before.

The changes that trigger this unusual PC behavior could be related to power management settings or certain features.

In order to help you fix this issue, we came up with this list of fixes.

Stop your PC from booting up by itself

  1. Use professional software for Windows optimization
  2. Attempt to turn off Fast Startup
  3. Turn off Wake Timers
  4. Change Startup and Recovery settings
  5. Restore to default power settings
  6. Turn off Automatic Maintenance
  7. Turn off Reboot Scheduled Task

1. Use professional software for Windows optimization

This issue can have more than one cause, so using reliable software that addresses various system errors is recommended.

Do you think manually repairing Windows bugs and errors is counterproductive? It opens up a lot of human error and oversight.

When your computer boots up for no apparent reason, it could be a registry problem or an update caught in a loop, and you may not be able to stop it manually.

This is only one of the many reasons why you should keep your registry clean and healthy, removing any obsolete, corrupted, or redundant entries.

That’s why we recommend utilizing a third-party repair app that can automatically analyze your device for corrupted or damaged files and then repair them to restore normal operation.

2. Attempt to turn off Fast Startup

Some users reported this issue being caused by the Fast Startup feature.

Disable Fast Startup by following these steps:

  • Open Control Panel > select View by Large Icons
  • Select Power Options
  • Click Choose what the power button does in the left pane
  • Under the Define power buttons and turn on password protection section > select Change settings that are currently unavailable
  • Uncheck the box next to Turn on fast startup (recommended)
  • Click Save changes > restart your computer and see if it made any difference.

3. Turn off Wake Timers

Wake Timers are programmed events that wake the computer up at specific preset times.

Disable the Wake Timers by following these steps:

  • Open the Control Panel > select View by Large Icons
  • Select Power Options
  • Under the Choose or customize a power plan, select Balanced > click Change plan settings
  • Select Change advanced power settings
  • Expand the Sleep section > expand Allow wake timers > select to disable the Setting from the drop down menu
  • Click OK > restart your computer to see if it made any changes

4. Change Startup and Recovery settings

There is a feature that forces the computer to automatically restart upon system failure.

Disable this feature by following these steps:

  • Open the Control Panel > select View by Large Icons
  • Select System
  • Click Advanced system settings in the left pane
  • In the System Properties window, select the Advanced tab > under the Startup and Recovery section, click Settings
  • Under System failure, make sure to have the box next to Automatically restart unchecked
  • Click OK > restart your computer to see if it had any impact.

5. Restore to default power settings

Performing a default power settings restore should bring your system to the pre-update state.

Restore to the default settings by following these steps:

  • Type Command Prompt in the search box > right click Command Prompt > Run as administrator
  • Type powercfg –restoredefaultschemes in the Command Prompt and hit Enter
  • Close the Command Prompt > reboot the PC and see if it fixed the issue.

6. Turn off Automatic Maintenance

Automatic Maintenance is a tool that helps your computer stay in a healthy state by running security checks and virus scans.

Scheduled Automatic Maintenance could turn on your computer in order to perform the preset process.

Disable Automatic Maintenance by following these steps:

  • Open the Control Panel > select System and Security
  • Select Security and Maintenance
  • Expand the Maintenance section > select Change maintenance settings
  • Under Automatic Maintenance, make sure to have the box Run maintenance tasks dailyunchecked
  • Click OK > restart the computer and see if it fixed the issue.

7. Turn off Reboot Scheduled Task

There could also be a scheduled task set to reboot your computer and trigger this unexpected PC power up.

Disable this task by following these steps:

  • Press the Windows logo key + R on your keyboard > type Taskschd.msc in the Run box and hit Enter to open the Task Scheduler
  • Navigate to this location from the left pane: Library/Microsoft/Windwos/UpdateOrchestrator
  • Find the Reboot task and double click it
  • Open the Conditions tab > under the Power section, make sure to have the box next to Wake up computer to run this task unchecked > click OK
  • Right click Reboot > select Disable
  • Type Command Prompt in the search box > right click Command Prompt > Run as administrator
  • Type the following commands in the Command Prompt and hit Enter after each:

takeown /f C:WindowsSystem32TasksMicrosoftWindowsUpdateOrchestratorreboot

cacls C:WindowsSystem32TasksMicrosoftWindowsUpdateOrchestratorreboot /G Your_Username:F

  • Restart your computer and see if it fixed the issue

Eventually, if none of the above solutions worked, make sure to check that your hardware is functioning properly.

You can try unplugging your keyboard and mouse. Keep in mind that if your power button is stuck on your keyboard this may explain why your PC boots up on its own.

Here’s how Project Athena will revolutionize Windows 10 laptops

Intel’s Project Athena created a lot of hype in the tech world. But how does Project Athena make laptops better? Read on to learn more.

What is Project Athena and how it affects me?

But what is Project Athena? Well, it’s a collaboration between Intel and the biggest laptop manufacturers in the industry to create the laptops of the future.

The main goal is to create improved laptop hardware and software, and offer certitude to users.

Remember ultrabooks from back in the day when they first launched? It’s a similar story, but with a lot more guarantees from Intel and OEM manufacturers.

If you’re a normal Windows 10 user or even if you’re a power user, this is great news for you. Project Athena will have some important standards that will have to be met by the laptops.

That means improved performance, faster boot time and startup, stable connections, and enhanced battery life.

Along with all these, there will be an updated annual platform requirements standard, continuous collaboration in an open ecosystem, a comprehensive certification process, and real-world benchmarking.

You’ll no longer see shady benchmarks with the brightness all the way down, no Wi-Fi, muted sound, and very little to none CPU usage. No one uses their laptop this way.

The benchmarks on Windows 10 will be in real-world condition, with real tasks, as a normal user would have.


Speaking of benchmarks, download one of these tools if you want to test your PC’s performance.


This means that when you buy a Project Athena certified laptop, you can expect that the claims regarding speed and battery life are accurate.

If I’m just a normal Windows 10 user, what’s in it for me?

Some of the most important features you can expect on Windows 10 are:

  • Instant-on: inspired by the mobile world, Intel is aiming at a minimum to none boot time. In theory, your Windows 10 laptop should power on instantly, with all the connections available right away.
  • 5G connectivity: all the Athena certified laptops will come with fast, reliable, 5G connectivity.
  • Intel hardware: the certified laptops will also feature the latest and greatest. This means the fastest SSD storage and support for WI-FI 6, along with the latest hardware available.
  • Longer battery life: Intel is aiming at a standard of 9 hours. While this might not seem so impressive, you’ll have to keep in mind that it’s not just a spec on a sheet, but a real-world number that every user owning an Athena certified laptop should achieve.

We also have to mention that not all laptops will be Athena certified. Only those who meet the standards and offer the best experience will pass.

You can expect to see some Project Athena certified laptops to start rolling out in Q3 and Q4 of 2019, but the majority will be launched next year.

If you’re an Windows 10 user, expect great things in the near future. The guarantees that Athena is offering along with the OS optimizations from Microsoft is a big win for everyone, especially for the average buyer.

Opening your PC with Windows Hello will be faster than ever, running Windows 10 apps from the fastest SSD will also be cool, and downloading and uploading on WI-FI 6 will be crazy fast.

This is pretty exciting news. A powerful laptop paired with the latest Windows 10? That sound like a great package, thanks to Intel and Microsoft.

All that remains is to actually test these laptops with Windows 10 on your own.

Are you as excited as we are? Does this new laptop standard means something to you or do you think that it won’t have such a big impact?

Leave your answers along with any other questions in the comments section below.

You may also want to check out these related posts:

Your browser is not compatible with FlowPaper [SOLVED]

FlowPaper (formerly known as FlexPaper) is a web PDF viewer and digital publishing suite. Its main goal is to convert your content into a responsive and interactive online publication.

Sometimes and for some users, the errors like Your browser is not compatible with FlowPaper. Upgrade to a newer browser or download Adobe Flash Player 10 or higher occur.

To see how you can do that, check the guide below.

Fix browser issues with FlowPaper

Solution 1 – Enable Flash Player in your browser

  1. Open Chrome settings. Flowpaper isn't compatible with the browser
  2. Go to Advanced > Site settings.
  3. Now scroll down until you see Flash and click on it.
  4. Make sure it’s enabled.

Solution 2 – Allow Flash Player on the website

  1. In the address bar of your browser, click on the lock icon before the web address.
  2. Select Site settings.
  3. Find Flash and set it to Allow.allow flash Your browser is not compatible with FlowPaper

Solution 3 – Update/Reinstall Flash Player

  1. If your Flash player is outdated, you’ll need to download the latest version.
  2. Go to Adobe Flash Player official website, here, and follow the on-screen steps. Don’t forget to uncheck McAfee offer.download flash Your browser is not compatible with FlowPaper
  3. After downloading and installing the latest version, the FlowPaper issue should be gone.

Solution 4 – Update/Change your browser

Some users are reporting that FlowPaper is working just fine on some browsers, and not at all on other browsers. The development team behind the software addressed some issues with updates, but not all of them.

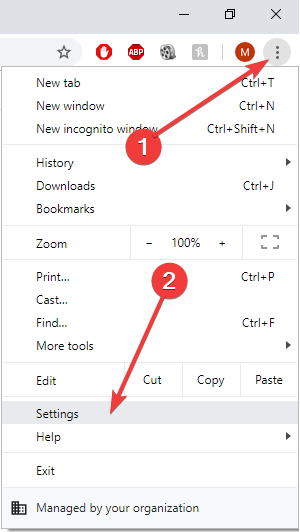
First, update your browser. Again, for example, we’ll use Google Chrome but you can follow similar steps for other browsers. Go to Chrome’s settings, select Help, and then About Google Chrome.

If that doesn’t work, change your browser. It seems like FlowPaper problems are not that common on Internet Explorer or Edge. Or, even better, maybe try a browser that works flawlessly with all kinds of third-party websites while keeping the intrusive ones at bay.

Opera One is the go-to browser choice in terms of apps integrations or free privacy VPN services. This inclusive browser has practical functionalities that allow you to integrate multiple third-party tools.

Check out Opera One now and see for yourself how amazing it is.

Steam update goes backwards [FIXES THAT REALLY WORK]

A very unusual issue occurs while trying to download updates for Steam, users report. It seems that after the download reaches a certain point, it starts going backward, leaving users unable to complete the download. Steam breaks down games/updates into small 1MB chunks. When an update is released, Steam analyzes files, working out how to build the necessary files from those small chunks.

Fortunately, we came up with a series of fixes that impact other causes.

Why does Steam client updates keep resetting?

1. Check your internet connection

  1. Open your internet browser and check to see if web pages load quickly and without interruption.
  2. If you notice your internet running slower than usual, perform a hard reset on your router/modem.
  3. Contact your internet provider if hard resetting the router/modem doesn’t work and let them know about the issue you’re having.
  4. Try using a wired connection instead of Wifi as well. Wireless connections are usually slower and internet spikes could occur more often.

2. Reinstall Steam

  1. Open Start and locate Steam.
  2. Right-click on it and choose Uninstall. This will take you to Control Panel > Uninstall a program section.
  3. Uninstall Steam.
  4. Download the Steam client, here, and install it as an administrator.

3. Clear download cache

  1. Press the Steam button in the top left corner > open Settings.
  2. Go to the Downloads section > Press Clear download cache.
  3. Press OK and re-attempt starting the download.

4. Allow Steam to run through Windows Firewall and disable antivirus

  1. Open the Control Panel > go to System & Security.
  2. Under Windows Defender Firewall, choose to Allow an app through Windows Firewall.
  3. Click Change settings > find the Steam app and make sure it has both Public and Private boxes ticked.
  4. Disable your antivirus temporarily.
  5. Press OK > try reloading Steam and see if it works.

5. Change the download region in Steam

  1. Click Steam in the top left corner > open Settings.
  2. Select the Downloads tab > click the Download region drop-down menu and select a different region > click OK.
  3. Check to see if downloading is now running properly.

6. Repair Library folder

  1. Click Steam in the top left corner > open Settings.
  2. Select the Downloads tab > choose Steam Library Folders.
  3. Right-click on folder > select Repair Folder.
  4. Restart Steam and see if it fixed the download issue.

What to do if the PC goes into Automatic Repair on boot

Automatic repair is a Windows 10 tool developed to repair common issues that could occur when trying to boot the OS. Many users reported experiencing a frustrating issue with the repair tool. It seems that every time they restart the computer, it automatically boots into the repair tool.

In order to fix this issue, we managed to come up with a few solutions that are worth trying. Be aware that, to make an attempt to solve this issue, you need a bootable Windows 10 installation drive. Learn how to create a bootable USB flash drive with the Media Creation Tool, here.

How do I bypass Automatic Repair?

1. Perform a disk check

  1. Boot from the bootable USB drive.
  2. Select Language > click Next.
  3. Click Troubleshoot > Advanced options > Command Prompt.
  4. Type chkdsk /f /r C: and hit Enter – make sure that you input the drive containing the Windows folder – usually installed in C:chkdsk /f /r C: pc goes into automatic repair
  5. Type exit in the Command Prompt and hit Enter.
  6. Reboot your computer and see if it fixed the issue.

2. Rebuild BCD using Command Prompt

  1. Boot from the bootable USB drive.
  2. Select Language > click Next.
  3. Click Troubleshoot > Advanced options > Command Prompt.
  4. Type the following commands in the Command Prompt one by one and press Enter:
    exe /rebuildbcdexe /fixmbrexe /fixbootexe /rebuildbcdexe /fixmbrexe /fixboot pc goes into automatic repair
  5. Type exit in the Command Prompt and hit Enter.
  6. Reboot your computer and see if it fixed the issue.

3. Try to disable Automatic Startup Repair

Sometimes, a system error could cause the Automatic Startup Repair to be enabled without user interference.

Boot from the Windows installation drive and Disable the Automatic Startup Repair by following these steps:

  1. Boot from the bootable USB drive with the Windows 10 installation again.
  2. Select Language > click Next.
  3. Click Troubleshoot > Advanced options > Command Prompt.
  4. Type bcdedit /set {default} recoveryenabled No in the Command Prompt and press Enter.bcdedit /set {default} recoveryenabled No pc goes into automatic repair
  5. Restart the computer and see if it worked. Enabling the Automatic Startup Repair back requires you to type bcdedit /set {default} recoveryenabled Yes in the Command Prompt.

4. Use the Reset your PC tool

  1. Boot from the bootable USB media.
  2. Select Language > click Next.
  3. Click Troubleshoot > choose Reset your PC.
  4. Follow the simple process steps and wait until the process completes.Reset your PC pc goes into automatic repair

We hope that at least one of our solutions could help you fix the booting issue. If you found this article helpful, leave a comment in the comment section below.

PC Goes to Sleep While Streaming Video: How to Fix it

The streaming community seems to be blooming nowadays, but some users reported that the PC goes to sleep while streaming video, even when using reliable streaming software, though the software is not generally the problem.

This leaves the streamers unable to track their stream status. This can be a big problem since you’ll have to wake up your PC and start your stream again. We created a guide on fixing this issue, so let’s get started.

How do I stop the PC from going to sleep while streaming?

1. Change Power settings

  1. Open Control Panel.
  2. Select Large icons from the View by dropdown menu, and click Power Options.
    power options control panel pc goes to sleep while streaming video
  3. Select Change when the computer sleeps on the left pane.
    change when the computer sleeps pc goes to sleep while streaming video
  4. Make sure the Turn off the display and Put the computer to sleep settings are set to Never, then select Change advanced power settings.
    change settings for the plan change when the computer sleeps
  5. Scroll down to Multimedia settings and click the plus sign in order to expand the settings.
  6. Expand When sharing media, change the setting to Prevent idling to sleep, and then click OK.change power settings to fix pc goes to sleep while streaming

That’s it! After you have made the changes, verify whether the PC still goes to sleep while streaming. For most, the problem should be resolved.

2. Prevent Windows from sleeping in UMS (Universal Media Server)

  1. Open the Universal Media Server software.
  2. Navigate to the General Configuration tab in UMS.
  3. Then you need to check the box next to Prevent Windows from sleeping under the Advanced HTTP and system settings, and you should be good to go.ums settings

If the previous solution didn’t help, modifying the Universal Media Server settings should get things running when the PC goes to sleep while streaming. There also must be a similar option in other streaming apps, so make sure you enable it.

As you can see, this problem is quite easy to fix, and you need to adjust your power settings and prevent your PC from going to sleep.

Before you leave, do check some quick tips to extend the battery life of your laptop.

If you liked this article, comment in the comment section below.

Internet connection sharing error: LAN connection already configured [FIX]

Many users reported receiving the error message Internet connection sharing error LAN connection already configured. This usually happens when users try to set up their wireless network and share the active internet connection.

This is how one user described the issue on Microsoft Answers:

Alright, I keep getting this message whenever I try to share my internet through like an Ad-Hoc or anything else at all. “Cannot enable shared access. Error 765 ICS cannot be enabled. A LAN connection is already configured with the IP address that is required for automatic IP addressing.” Meaning I can’t get like my xbox live or anything. Oh, I’m using a wireless internet card from our phone company, and it is installed on my father’s identical laptop, and we share it through an ad-hoc when he is using it, would that be the problem?

In the following guide, we’ll help you fix this error.

What to do if LAN connection is already configured?

1. Run the Internet troubleshooter

  1. Open the Control Panel.
  2. Type troubleshooter in the Search box and press Enter.
  3. Select View All in the left pane.
    view all troubleshooters internet connection sharing error lan connection already configured
  4. Click Internet Connections.
    Internet connections troubleshooter internet connection sharing error lan connection already configured
  5. Wait for the process to complete and see if it fixed the issue.

2. Refresh your IP address

  1. Type command prompt in the Windows search box and hit Enter in order to access the Command Prompt.
    command prompt search internet connection sharing error lan connection already configured
  2. Type ipconfig in the Command Prompt and hit Enter.
  3. To remove your IP address and disconnect from the internet, type ipconfig /release in the Command Prompt.
  4. Wait at least five minutes after you’ve released your IP.
  5. Type ipconfig /renew in the Command Prompt in order to get your IP restored and connect to the Internet.
  6. Close the Command Prompt and see if it fixed the issue.

3. Share Internet connection

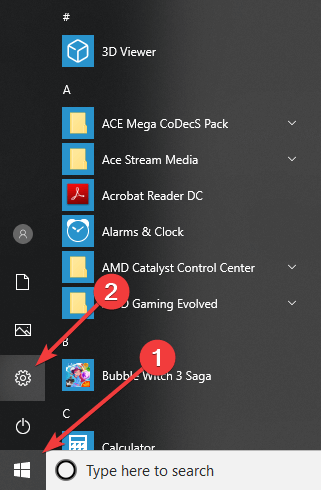
  1. Press the Start button > open Settings.
    settings start menu internet connection sharing error lan connection already configured
  2. Click the Network & Internet.
    network and internet settings app internet connection sharing error lan connection already configured
  3. Select Mobile Hotspot.
  4. Select Edit to add a username and password for the new connection > click Save.
  5. Choose Share my Internet connection with other devices.
  6. Check to see if you can connect other wireless devices to the network.

4. Add the IP address and Subnet Mask manually

  1. Press the Start button and open the Control Panel.
  2. Select Network and Sharing Center > click on your hosted network connection.
    network and sharing center control panel internet connection sharing error lan connection already configured
  3. In the newly opened Network Connection window select Internet Protocol Version 4 > click Properties.
  4. Select Use the following IP Address.
  5. In the IP Address field manually input: 192.168.137.1.
  6. At the Subnet Mask manually input: 255.255.255.0.
  7. Click the OK button to apply the new settings.

We hope that our quick guide could be of help to you. Leave a comment below if this tutorial helped you fix the connectivity issue.

Why does my computer go to sleep while watching Netflix [FIX THIS]

Binge-watching Netflix content is a norm these days. However, some users reported that their Netflix sessions are frequently interrupted by PC going to sleep. It seems that the Sleep mode kicks in in the middle of the streaming, which is, of course, a major problem and quite a vibe-killer.

We managed to come up with a quick guide to help you fix this issue.

How to prevent my PC from going to sleep when streaming Netflix?

1. Change the Power Settings

  1. Open the Control Panel > select View by Large icons.
  2. Click Power Options.control panel why does my computer go to sleep while watching netflix
  3. Under the Choose or customize a power plan > select Balanced > click Change plan settings.
  4. Change Turn off the display and Put the computer to sleep settings, set them both to Never > click Save changes.power settings why does my computer go to sleep while watching netflix
  5. Check to see if this had any effect.

Did you know that certain browsers are better for streaming Netflix than the others? Here are our top picks.


2. Disable extensions

  1. Click the Three button icon on the top right corner of the browser.
  2. Expand the More tools menu > select Extensions.browser settings why does my computer go to sleep while watching netflix
  3. Disable the extensions by clicking the toggle switch next to their name – toggle turning gray means the extension is disabled.
  4. Restart the browser and see if disabling the extensions fixed the issue.

We hope that our guide on how to stop the PC going to sleep in Netflix could help you out. If you found this article helpful, leave a comment in the comment section below.

READ ALSO:

Here’s how to recognize a PWA when you come across one

Back in May, it was announced that Progresive Web Apps (PWAs) were coming to desktops and the Chrome OS.

More so, it was hinted that as far as Windows 10 users are concerned, PWAs will be designed to feel even “more native” to Microsoft’s OS.

What is a PWA anyway?

For those of you who don’t know, Progresive Web Apps are basically the desktop equivalent of an app, as they allow certain websites to be far more accessible through the use of what could be considered a “mini-client”.

The appearance of PWAs nowadays is partially due to websites becoming more and more complex to the point where Internet service providers can’t provide enough bandwidth to allow them to load fast enough.

How did PWAs first appear?

Since researches showed that users will generally never visit a website again if it takes more than 3 seconds to load, or if commands take too long to complete, it’s easy to see why websites opt to new solutions to combat this problem.

PWAs already have complete access to Windows 10 feature APIs and can be installed on pretty much any device from the UWP family without hindering compatibility across browsers or other devices at all.

Considered to be the successors of Hosted Web Apps, PWAs have the advantage of having standards-based support for offline scenarios, courtesy of Service Workers, Cache, and Push APIs.


Did you know that you can now uninstall PWAs from the Control Panel?


Microsoft is working on optimizing PWAs

Many Redditors wondered if the new PWA features are available to all Windows 10 users.

all this talk about pwa’s lately, and i’ve never seen one in the wild, am i just on the wrong websites? how do i even know if a website has it?

The answer came quickly from another Redditor:

Can confirm. This already seems to be in place with Windows 10 version 1903 release preview and Edge Insider Dev. At least on my systems–there’s always a chance they are still a:b testing this.

How can you recognize a PWA?

Imagine having a PWA powered by YouTube. It would allow you to have better connectivity and use less traffic. Since a lot of the data that usually loads each and every time would already be present in the form of a framework that just needs minor updates.

Just like the YouTube app on your phone, you’d first have to add it to the home screen of your desktop, which is pretty much the best giveaway that the website uses a PWA to run.

Those of you reading this may think that this sounds a lot like how many Windows Store Apps work, as most of them are nothing more than locally hosted frameworks that support the content of a website, and you couldn’t be more right.

With that in mind, since Microsoft has already been experimenting with their own versions of PWAs ever since they first started making Store Apps for the Windows 8, it shouldn’t come as a surprise that they would somehow manage to make them feel as if they are native to the Windows 10 OS
altogether.

Interested in reading more about PWAs? Check out these posts:

Name your PC using emojis: Is this a recipe for connectivity issues?

Back in October 2017, the Windows 10 and the Fall Creators Update introduced a new emoji keyboard which made adding emojis to services such as Twitter, Facebook and other similar apps extremely easy.

While this made non-verbal communication all the easier on social media, the recent Windows 10 May Update has made it so that you can now name your PC using emojis.

But wasn’t this one of the things you shouldn’t do?

A lot of the users who’ve discovered this feature started commenting on whether or not this may lead to connectivity problems with their networks, and for good reason.

Traditionally, there are a few rules when naming a computer, which include not using spaces, lowercase letter or using special characters.

The reasoning behind all this is that certain networks will only recognize your device as long as it has at least one uppercase character, and using percent signs, dots, commas and slashes are known to be common causes for network connectivity issues.

Of course this also depends on the hardware settings of your router, such as whether it does only frontend or backend checks to the data you are sending it.

For example, some users managed to successfully connect with an emoji-named PC by sending the emoji bytes directly via an HTTP request and not through the web UI, but this was only possible on a router that only checks the frontend content.


Are you experiencing connectivity issues? These quick tips will help you avoid them in the future.


What does this all mean?

Some users found the new feature to be rather amusing, and they consider that being a network administrator and seeing a PC named ❤??? would spur a few giggles.
However, other situations may not be all that funny, such as when you want to see who is using up all the bandwidth and you can’t figure out who ??? or ??? may be.

RELATED POSTS:

Windows Media Player Cannot Burn Some of The Files [Fix]

Windows Media Player allows users to burn CDs or DVDs directly through the app. However, a few users reported Windows Media Player cannot burn some of the files message.

This issue is somewhat similar to Windows Media Player cannot burn to disc because drive is in use as we covered earlier, but there are a few differences.

We came up with a series of solutions to help you fix this problem, listed below.

Why can’t Windows Media Player burn some files?

  • Incompatible files can cause this issue to occur.
  • Special characters in song details can interfere with the burning process.
  • Settings such as Enhanced Playback and Device Experience can sometimes cause issues.
  • Burning speed can also cause problems in some cases.

What can I do if Windows Media Player cannot burn some of the files?

1. Remove incompatible files

  1. After receiving the error message, click the Blank Disk in the left pane. The list of the files you want to burn will appear.burn files WMP Windows Media Player cannot burn some of the files
  2. An icon with a white X in a red circle will appear next to the files that are not compatible with the Windows Media Player burn.
  3. Click on the icon in order to remove the problematic files and try burning the CD without those files.
  4. Keep in mind that Windows Media Player can only burn audio files that are not longer than 80 minutes.

2. Edit file details

  1. Check the file details by right-clicking on each file and select Properties.Properties Windows Media Player cannot burn some of the files
  2. In the Details tab, make sure that the details containing the Artist Name, Song Name, Album, etc. don’t contain special characters.
  3. If you find different types of symbols, make sure to remove them and apply the changes.

3. Disable Enhanced Playback and Device Experience settings

  1. Click the Organize option in Windows Media Player and select Options.
  2. Open the Privacy tab and uncheck all the options under the Enhanced Playback and Device Experience section.windows media player privacy windows media player cannot burn some of the files
  3. Press OK and now try to attempt the burning process.

If Windows Media Player won’t burn CD, then be sure to try disabling these settings.

4. Change Windows Media Player’s burning speed

  1. Click the Organize option in Windows Media Player and select Options.Options WMP windows media player cannot burn some of the files
  2. Open the Burn tab and under the General tab, change the Burn speed to Medium/Low. Lastly click OK.
change burn speed windows media player cannot burn some of the files

5. Use a third-party app to burn files

  1. Select the New button located in the top left corner of the PowerISO window and click Audio CD.new audio CD windows media player cannot burn some of the files
  2. Press the Add button and then select Add Music Files…add music files to burn windows media player cannot burn some of the files
  3. Choose the files you want to add to the CD and press Open.
  4. Press the Burn button and follow through with the process.

In case you’re having more issues, check our Windows Media Player not working guide for more solutions.

We hope you could find at least one working solution from our guide. If you found this article helpful, comment in the comment section below.

When will Minecraft come to Steam? Here’s what we know so far

In a recent interview, Phil Spencer revealed more information about the plans to bring Xbox Game Pass titles to Steam.

When asked what were the steps that lead to this decision, Phil Spencer replied that was due to Xbox Game Pass’s success ever since its conception in 2017. The Xbox team wanted to see if they could replicate the formula for PC games as well.

Read on if you want to learn when Minecraft comes to Steam.

An open market for PC gaming

As you may already know, there are tons of platforms out there offering PC gamers the chance to download amazing titles, such as Steam, Epic Store or GOG.

All of these game distribution platforms have managed to make a name for themselves in one way or another, either through their exclusive titles, or their periodic rotation of deals, discounts, and bundles.

As such, Xbox’s approach of having a subscription-based service where you would have access to games at discount prices (and sometimes free games altogether) could be considered their very own unique touch to PC gaming.

Phil Spencer stated that he believed in the concept of an open market, and that gamers should have the power of choosing where they get all of their games.

However, he didn’t want to make it seem like Microsoft is trying to establish a foothold in the gaming market by eliminating the competition either.

Thus the idea of bringing Game Pass titles to other game distribution platforms came to be, as it also seemed to be a way of unifying the gaming community even more.

Why was Steam chosen over all the others?

While the best case scenario would dictate that all Microsoft titles should be available on all gaming platforms, this endeavour is limited by each platform’s distribution policy.

For example, some platforms have certain rules regarding the content you can put on them, while other stores have rules against sharing titles with other platforms.

Because of this, Steam was chosen for a potential partnership mainly due to it being the most non-restrictive of all major platforms.

Will all Xbox Game Pass titles be available on Steam?

Phil Spencer stated that, in theory, there should be no problem making all of their games available on Steam, regardless if they are singleplayer and multiplayer.

In fact, he added that besides the additional effort that needed to be put into preparing the servers for extra players, both Microsoft and Steam would greatly benefit from this “merger”.

Of course, ever since Microsoft acquired Mojang in late 2014 and the rights to Minecraft along with it, players have been wondering if the game will become even more accessible.

However, besides a handful of examples that have already been made available on both Steam and the Game Pass, no actual names were given as to what other games will be made available on both platforms.

So, when is Minecraft coming to Steam?

This means that the possibility of having Minecraft available on Steam is neither confirmed, nor is it disproved. Now with the recent announcement that Xbox Game Pass titles are coming to Steam it isn’t hard to see why players are starting to ask these questions again.

Besides, Minecraft’s extended history with the modding community through the Forge Mods, and Steam’s habit of supporting user-created content are both indicators that nothing wrong could happen if the two gaming giants would join forces.

RELATED POSTS:

Microsoft maintains an internally ‘prohibited’ software list and Slack is on it

Back in the day, Microsoft seemingly kept a long list of enemies otherwise known as competitors, as the company’s product portfolio grew in ambition. However, the days of vindictive and arguably petty Microsoft seem to be behind the company as it’s enemies list shrinks and its collaboration roster expands, yet, there are still a few areas in where the company keeps a healthy competitive nature and to that end, some software, services, and companies remain on a figurative and literal blacklist.

According to a report from GeekWire, not only does Microsoft have a figurative blacklist, there is a literal blacklist of products that have been obtained and services from the following companies are frowned upon in internal use by the Redmond-based software company including obvious names such as Amazon Web Services and Kaspersky as well as a few head-scratchers in Grammarly and GitHub.

Perhaps, the most noteworthy exclusions comes from recent IPO darling Slack, to which Microsoft offers a competitor product in its Teams communication service. Unlike its more neutral stance on cross-platform usage and development, Microsoft seems to be taking an active roll in discouraging and even prohibiting the use of Slack by company employees.

Microsoft Teams 2

However, before the anti “M$” stans hit the internet, GeekWire does explain the full context of Slack’s addition to Microsoft’s blacklist. Microsoft does not appear to be arbitrarily picking and choosing software and services to keep its employees from using, but rather justifies the list primarily with security concerns.

According to Microsoft’s reasoning, Slack usage within the company to transmit and receive sensitive data puts could put projects and company divisions at risk.

“It’s not just the risk that Google will try to find trade secrets from data stored on their servers,” said Christopher Budd, who has worked in security technology for 20 years, including past roles in Microsoft security and privacy communications. “When you’re at Microsoft, you’re at risk of state sponsored industrial espionage. These days we generally think of hacking in criminal or traditional geopolitical espionage. But industrial espionage is still out there and brings the full force of nation-state hacking to bear.”

To that end, here is the reasoning Slack, GitHub, AWS, and Grammarly make the list.

Slack Free, Slack Standard and Slack Plus versions do not provide required controls to properly protect Microsoft Intellectual Property (IP). Existing users of these solutions should migrate chat history and files related to Microsoft business to Microsoft Teams, which offers the same features and integrated Office 365 apps, calling and meeting functionality. Learn more about the additional features that Teams can provide your workgroup. Slack Enterprise Grid version complies with Microsoft security requirements; however, we encourage use of Microsoft Teams rather than a competitive software.

GitHub is perhaps the most surprising inclusion on the “discouraged” list, given Microsoft’s ownership of the coding repository. However, it’s not an outright ban. Microsoft cautions employees not to use GitHub “for Highly Confidential types of information, specs or code.”

Amazon Web Services, which competes with Microsoft’s Azure cloud platform, and Google Docs, which competes with Office 365, are both “discouraged for use” and “will require a business justification” to be used, according to the internal Microsoft summary. “It is highly recommended to start a migration plan to Azure prior to engaging the Governance team for new request or renewals,” the summary reads.

Grammarly, the writing and grammar-checking technology, is on the “prohibited” list. “The Grammarly Office add-in and browser extensions should not be used on the Microsoft network because they are able to access Information Rights Management (IRM) protected content within emails and documents,” Microsoft said, cautioning that this could lead to the exposure of sensitive data, and noting that Microsoft security is evaluating what can be done to make the technology secure for use within the company.

While Microsoft may have a valid security concern to put competing software such as Slack on its ‘prohibited and discouraged’ blacklist both companies have publically admitted that they are active and direct competitors in a market. Microsoft finally acknowledges Slack as its main rival in chat communication in its annual 10-K report, despite Slack chipping away at both Outlook and Skype audiences for years. Slack also made note of Microsoft’s presence in chat with both a full-page ad in the New York Times two years ago as well as listing the company as its “primary competitor in IPO documentation last year.

Interestingly enough, there seems to have been a time when Microsoft employees weren’t so forcibly discouraged from using Slack as HoloLens developers had and maintained a pretty trafficked channel on Slack. Presumably, the use of Slack was allowed, if not simply just frowned upon, prior to the rollout of Microsoft’s own homebrewed Teams software and the recent IPO of its competitor.

For Microsoft, the days of petty feuds and industry squabbling seem to be behind mostly the company, but Slack’s recent IPO and Microsoft Teams recent traction with businesses have put the two offerings on a collision path of sorts, and we’ll see how long the two remain relatively civil and keep their rivalry to just internal blacklists.

BS Player cannot download codecs [EXPERT FIX]

BS Player is one of the best multimedia players on the market, but many users reported that BS Player can’t download codecs. This can be a problem, but in today’s article, we’ll show you o how to fix this issue once and for all.

Here’s how one user on the BS Player forum described the issue:

After I upgraded to Windows 10 from Windows 7 BSplayer worked fine. But I wanted to do a complete reinstall from Windows 10 and now I have a problem with the installation of BSplayer. During the installation it needs to download codecs but I get the following error message: “Codec list could not be downloaded. Please check your internet connection.” Of course my internet connection works and I still get the same message after rebooting the computer.

In order to fix this issue, we managed to come up with a few simple solutions that you should try.

What to do if BS Player won’t download codecs?

1. Run as administrator

  1. Locate BS Player shortcut.
  2. Right-click it and choose Run as administrator from the menu.
    run as administrator bs player cannot download codecs
  3. Now try to download the missing codecs.

2. Check your network connection

  1. Make sure that your Internet connection is working.
  2. Open your Internet browser and check to see if web pages load quickly and without interruption.
  3. If you notice your Internet speed is slower than usual, restart your modem/router.
  4. Try using a wired connection instead of WiFi as well. Wireless connections are usually less stable and Internet spikes could occur more often.
  5. Contact your ISP if the network issue is still there.

3. Disable your antivirus

  1. Open your antivirus software and turn it off temporarily.
  2. Check to see if disabling your antivirus had any effect on the issue.
  3. If the issue is still there, consider removing your antivirus.
  4. If removing the antivirus solves the problem, perhaps you should try out different antivirus.

If the file is not located in C:\Program Files, you should perform an antivirus scan with a suitable antivirus solution to remove the malware infection.

A suitable and compatible antivirus program can look for and detect the issue, and if the codec is corrupted, a thorough scan may simply remove the threat.

We also recommend that you remove or quarantine all infected files before completely reinstalling BS Player. The virus may have infected your entire system, and it is now replicating itself with each installation.

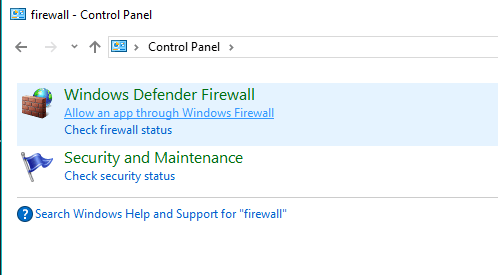
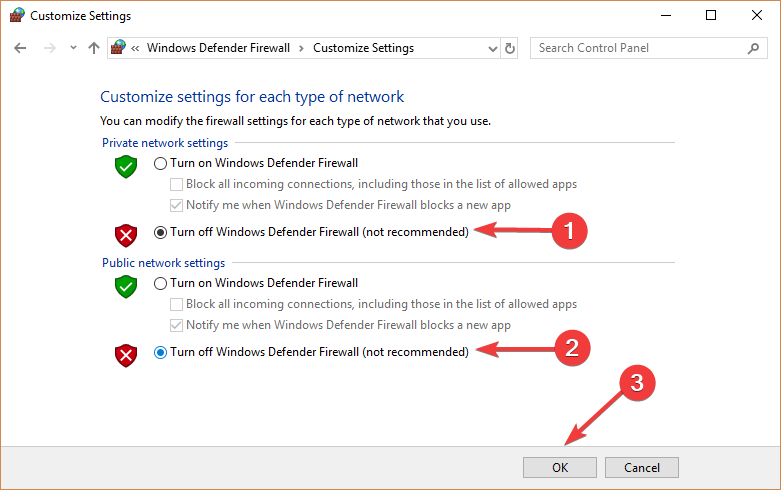
4. Turn off Windows Firewall

  1. Press the Start button and open the Control Panel.
  2. Click System and Security.system and security control panel bs player cannot download codecs
  3. Select Windows Defender Firewall.
    windows defender firewall control panel bs player cannot download codecs
  4. Choose Turn Windows Firewall on or off > Select Turn Windows Defender Firewall off (not recommended).
    turn off windows defender firewall bs player cannot download codecs
  5. Click OK to make sure the changes were saved.

5. Manually download the codecs

  1. Search for K-Lite Codec Pack online.
  2. Download any version of K-Lite Codec Pack and install it.

If you can’t play videos in BS Player due to missing codecs, check out our guide on how to download and install all required codecs for Windows 10.

We hope that our guide on how to fix the BS Player codecs download issue was of help to you. If you found this article helpful, leave a comment in the comment section below.

Where the heck is Windows 10 Insider 19H2? Some thoughts on this first day of summer

Earlier this week, Zac Bowden, who’s apparently been intently watching the calendar and lying in wait, posted his countdown to when Microsoft’s promise of more news about Windows 10 Insider version 19H2 coming “later this spring,” would be, well, late:

To recap, Microsoft has been in a cadence of twice per year updates to Windows 10, but recently has been coy about any discussion of the second release for 2019, known as 19H2.  Instead, Microsoft has been charging ahead with updates for 20H1, the first of two releases scheduled for 2020. In a post on Windows Central, Bowden contends that “Microsoft has fallen behind schedule with its plans for this (19H2) release.”

Bowden goes on to state the obvious, that “Windows 10 is not getting two major feature updates this year,” and contends that Windows 10 19H2 will be “a much smaller cumulative-type update that will essentially sit on top of 19H1.”

There are multiple reasons for that, including as Mary Jo Foley posted back in February, that Windows isn’t its own org anymore, it sits with Azure, and some adjustments in release cycles need to happen:

(T)he impact of last spring’s big Windows reorg which resulted in Windows engineering moving to the Azure team, is starting to manifest. Azure has been using a customized version of Windows 10 Server as the core of the Azure platform for quite some time. But the team behind the Windows core OS — which (confusingly) is not the same thing as WCOS — hasn’t really prioritized Azure up until now. Instead, it’s been prioritizing the needs of Windows client, Server and Xbox.

This is starting to change. Beginning with the next major update to Windows core, which is the guts of Windows (meaning the kernel, file system, networking stack and such), the Azure team at last will be using the most-up-to-date version of Windows core instead of a much older version, my sources say. Moving forward, the Windows core features the Azure team wants will get top billing.

In addition, enterprise clients have been clamoring for a revamping of Microsoft’s twice yearly update pattern, with many calling for a single release per year, at most. Microsoft has steadfastly refused to back off the twice yearly cadence, but did make changes to the licensing agreements, extending H2 updates to 30 month coverage while limiting H1 releases to 18 months. This, along with the lagging appearance of 19H2, strongly suggests that Microsoft is looking at a major/minor release cycle each year.

To say that 19H2 development is “delayed” suggests that there is some kind of technical issue or new feature not quite ready that’s slowing down an announcement of what’s happening with the next release of Windows. We’re not sure at all that’s correct.

Instead, with some 14 million Windows Insiders who are clamoring for new builds and new stuff every week, a new message, and perhaps even a new way of running the Windows Insider program needs to be crafted. What happens when, for half the year, almost nothing new is introduced? (What’s happening now, is that 20H1 testing is being stretched out over the whole year). Has Microsoft handled this messaging poorly, as Bowden says, or is this delay in communication both embarrassing or a disservice to customers, as Paul Thurrott says in his (premium) post this morning? Well, yes and yes.

Microsoft, it appears, is shifting to a cadence more closely aligned with Azure, more in line with a once per year major release, and that’s going to be good news for the enterprise and not so good news for Insiders. Why the company can’t just come out and say that is baffling, and leads to the kind of public hand-wringing we’re seeing coming out of the likes of Thurrott and Windows Central. But what’s delayed is not work on 19H2, only the messaging.

Happy summer to the northern hemisphere!


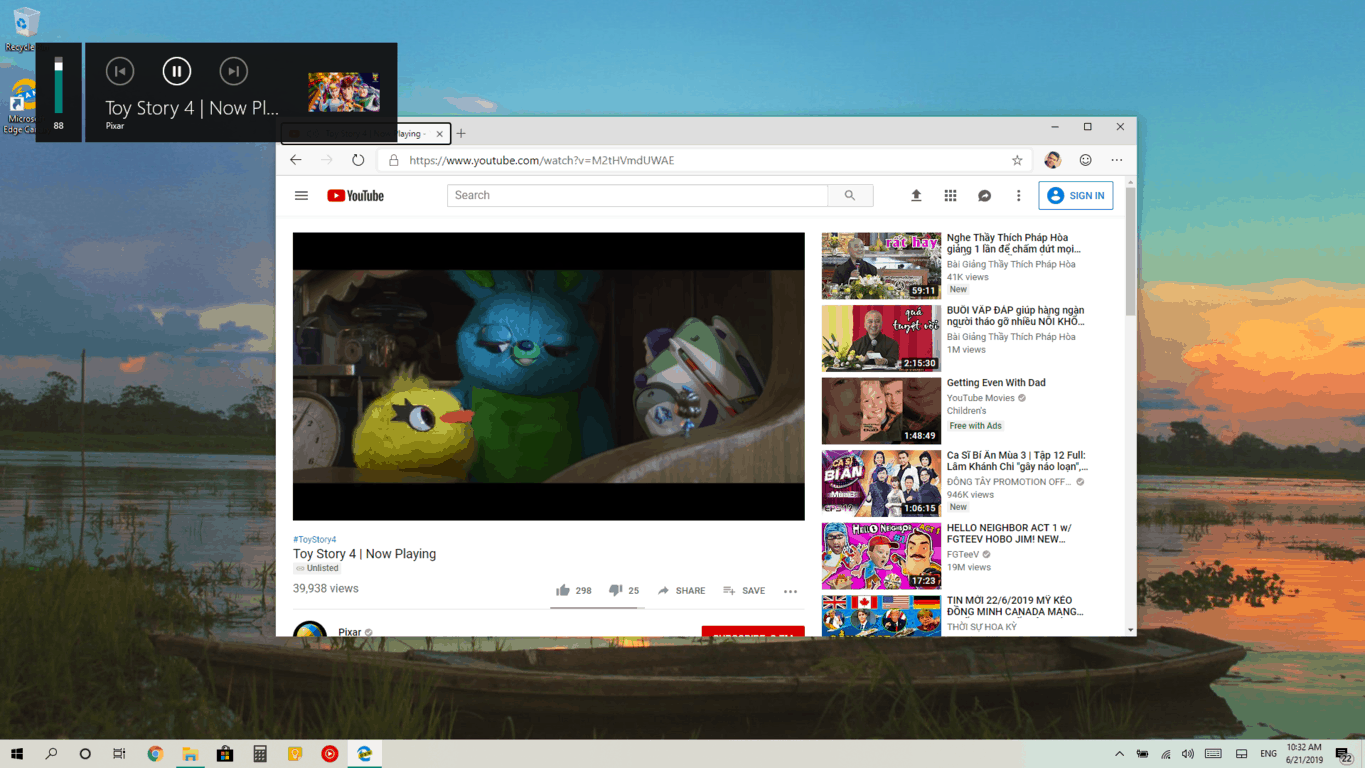
Latest Microsoft Edge Insider builds now show media info in Windows 10 volume overlay

The latest Microsoft Edge Insider builds will now display media info from the top left volume pane in Windows 10 that can be accessed by hitting on of the physical volume key on the device or keyboard (via MSPU). This contrasts to just showing nothing at all, like the old version of Edge, or the less-than-useful “chrome.exe” that is show when playing media from Google Chrome.

This feature works best with YouTube and YouTube Music, showing the video title or song name at the at the larger top line, its uploader or artist in the smaller second line, as well as the video icon on the right. This is definitely useful to those who use YouTube as their primary music streaming application.

Every other website that also supports Windows 10’s media controls also work, although not to the same extent. From other sites, the volume pane will pull the name from the tab, displaying the song’s name and artist in the title in Spotify web player, but just the website’s name in most others. So just seeing “Netflix” while you multitask and watch the Stranger Things season 3 trailer might not be quite as useful, at least it’s there and something that could potentially be fully implemented later.

On the brighter side, this is definitely an important aspect to look at in the growing world of Progressive Web Apps. Multimedia PWAs, in particular, will feel a lot more like real apps once they are fully integrated into Windows 10’s media controls.

Hopefully, other websites will see the value of this new feature and swiftly add the capability into their own apps. Which web apps do you think could best take advantage of the media controls in Windows 10?

Hidden Cortana Beta app in Windows 10 build 18922 appears to be in UWP format and ready for other devices

Two days ago, Microsoft released a new Windows 10 20H1 preview build that contained a couple of hidden features, including a new Cortana Beta app. Once enabled, the app still appears next to Windows Search in the taskbar, but it comes with a revamped design and the same conversational UI that is already available on iOS and Android.

This hidden Cortana Beta app was first discovered by Twitter user Albacore, but Rudy Huyn, the former prolific Windows Phone developer has since revealed more secrets about the new client. According to Huyn, this new Cortana app is a full UWP app that could work on other platforms where UWP apps can already run. However, it appears that the app does rely on a separate Win32 process that can work in the background, as do other UWP apps such as Dropbox (Rudy Huyn had a big role in the development of the Dropbox UWP app, FYI).

In the same Twitter thread, Huyn also added that Cortana Beta is actually a Store app, which means that Microsoft will be able to update it at convenience, in a similar way to the Xbox Game Bar on Windows 10. The existing Cortana didn’t always require a full new Windows 10 build to get new features, as Microsoft has been able to do some server side changes over the years. However, this new Cortana Beta app, which the company has yet to officially announce, could be updated much more frequently.

The Windows 10 May 2019 Update (19H1) finally separated Cortana from Windows Search, it seems that Cortana could finally get some love with the 20H1 Update. The digital assistant has been pretty much stagnating in recent years, and Microsoft can’t really afford to rest on its laurels now that Alexa is available for everyone in the Microsoft Store.

How to report an unsafe or malicious website in Microsoft Edge Insider

This week’s Edge Insider update added the ability to report an unsafe website without leaving the browser. It’s a new menu item which makes it easier for you to help others out if you stumble upon some malicious content online.

First, you’ll need to be on the website which you want to report – Edge prefills the URL in the form and there’s currently no way to change it. Open a new tab to the site and then click the menu icon (“…”) in the top-right of the Edge interface. Hover over the “Help and feedback” sub-menu and click the “Report unsafe site” item.

Screenshot of reporting an unsafe site in Edge Insider

Microsoft’s site report form will open and automatically detect the URL of the site. Click the “I think this is an unsafe website” radio button to confirm your submission. Use the language dropdown menu to indicate the primary language on the website.

Finally, complete the captcha and press “Submit” to file your report.

The whole process should only take a few seconds. Your report will be ingested into Microsoft’s SmartScreen filter, which is used by products including Edge and Windows 10 to identify and block malicious websites. Once your submission has been verified, future visitors to the site may see a SmartScreen notice which warns it could be unsafe.

Screenshot of reporting an unsafe site in Edge Insider

It’s also worth noting you can report false positives using the same form. Although the menu item in Edge is labelled “Report unsafe site,” you can select the “I think this is a safe website” radio button on the reporting form to inform Microsoft that it may be falsely blocking a site. Generally, you should only do this if you have strong reason to believe a site has been incorrectly flagged as malicious.

An individual report won’t necessarily make a direct impact on SmartScreen’s filtering. Instead, each report hints to Microsoft that there may be a problem with a site. A combination of factors, including manual review and automatic AI-powered analysis, are employed alongside user reports when determining whether a site should be blocked.

BS Player won’t download subtitles [5 FIXES THAT REALLY WORK]

BS Player is a popular multimedia player, but many users reported that BS Player won’t download subtitles. The media player says that it checking for subtitles and then stops, saying that no subtitles were found.

Here’s how one user described this issue on BS Player forums:

I am not sure what happened, but BS.Player will no longer download online subtitles. It always says it is checking for subtitles and then immediately says there are none found.

In order to fix this issue, we managed to come up with a few solutions that you should try.

What to do if BS Player isn’t downloading subtitles?

1. Reinstall BS Player

  1. Uninstall BS Player and reinstall it again.
  2. Make sure to download the latest version and check if that solves your problem.

To ensure that BS Player is completely removed, we suggest using uninstaller software to remove all files associated with BS Player.

2. Check your Internet connection

check your network connection bs player can't download subtitles
  1. Open your Internet browser and check to see if web pages load quickly and without interruption.
  2. If you notice your Internet running slower than usual, perform a hard restart on your router/modem.
  3. Contact your Internet provider if hard resetting of the router/modem doesn’t work and let them know about the issue you’re having.
  4. Try using a wired connection instead of Wi-Fi as well. Wireless connections are usually slower and internet spikes could occur more often.

3. Run as administrator

  1. Make sure to run BS Player using a user account that has administrator privileges.
  2. Right-click the application and choose Run as administrator from the menu.
    bs player run as administrator bs player won't download subtitles

4. Update BS Player

  1. Click the Menu button in the BS Player window > select About – or simply press F1 on your keyboard.
    bs player about bs player won't download subtitles
  2. In the About window, press the Check for new version button, this will take to the official website from where you can download the newest BS Player version
check for new version bs player about

5. Try running VLC Player

VLC player bs player won't download subtitles
  1. Download VLC Player.
  2. Run the setup file and follow the instructions.
  3. Once the application is installed, check if the problem is still there.

We hope that you could find at least one of our solutions to fix the BS player subtitles issue. If you know any other working solutions, feel free to recommend them in the comment section below.

READ ALSO:

Windows 10 Twitter app gets a revamped menu in new update

The official Twitter app for Windows 10 devices made a pretty significant change today when it completely revamped its main menu on the left side of the screen.

Previously, the Twitter app would feature the user’s avatar at the top of the menu which could be clicked at any time to navigate to their profile. This link has now been moved to the near-bottom of the menu and has been replaced with the Twitter bird icon which goes to the main timeline.

A new ellipsis icon has also been added to the menu. This opens up the app’s settings screen.

It’s unclear if anything else has been changed as no new release notes have been posted. It’s likely that this change was simply pushed out to the app and official release notes will be posted at a later date after more changes have been made.

Previous Twitter updates added support for multiple accounts and the new quote-tweet gif feature.

Do you like this change to the Windows 10 Twitter app? Let us know why or why not in the comments below and then follow us on Twitter for more Windows news.

This is How You Can Configure Windows Sandbox [Easy Steps]

Since late May 2019, Microsoft has rolled out the Windows 10 version 1903 update to more and more users. That update includes a new Windows Sandbox for the Windows 10 Enterprise and Pro editions.

Windows Sandbox lets users open untrusted programs and files in a secure container. Then, dodgy programs can’t have any impact when opened within the sandbox.

Windows Sandbox doesn’t include any notable configuration options on its window. Thus, at first glance, there doesn’t seem to be any way users can configure the sandbox.

However, users can adjust a few Windows Sandbox settings by saving a WSB configuration file. Users can add a few configuration commands to the WSB file to adjust sandbox settings.

But first, you need to enable Windows Sandbox. Check out this step-by-step guide on how to enable Windows Sandbox.

Once you’ve turned Windows Sandbox on, you can configure it depending on your needs.

How can I configure Windows Sandbox?

  1. To set up WSB configuration file, users will need to open a text editor. Notepad is the default text editor in Windows 10 that users can open by pressing the Windows key + S and entering ‘notepad’ in the search box.
  2. Then click Notepad to open that text editor’s window. However, users can also set up a WSB file with alternative third-party text editors.
  3. Users need to add two configuration tags to the bottom and top of the WSB file. First, enter ‘<Configuration>’ at the top of the file.
  4. Then, a few lines below that, enter ‘</Configuration>’ in Notepad.
  5. Then your text file should look something like the one in the snapshot directly below. Users must enter all the commands between the two configuration tags.
  6. There are four alternative commands that users can configure Windows Sandbox with. Users can enable networking by entering ‘<Networking>Enable</Networking>’ in Notepad.
  7. To disable networking, input ‘<Networking>Disable</Networking>’ as shown directly below.

The virtual GPU is enabled by default, and users can turn that off with the VGpu command. To do that, enter ‘<VGpu>Disable</VGpu>’ in Notepad. Users can enable VGpu again by entering ‘<Gpu>Enable</VGpu>’ in the text editor.

Users can add a Logon command to the configuration file to open a programs when they launch Sandbox. For example, to launch Paint with Sandbox, users would enter ‘<LogonCommand>’ and ‘</LogonCommand>’ in the text editor.

Then they would enter ‘<Command>mspaint.exe</Command>’ inbetween the Logon tags as shown in the snapshot directly below.

There is also a command that enables users to share folders by mapping them. That command specifies the path of the folder to map and whether the folder is read only or not. Users enter ‘<MappedFolders>’ and ‘</MappedFolders>’ tags in the text file to map folders.

Then users enter the full command as shown directly below.

Thus, the ‘<HostFolder>’ tags specify the path of the folder to map. Then users specify whether the folder is read-only by entering ‘true’ or ‘false’ between the ‘<ReadOnly>’ tags.

When users have entered all the configuration tags, click File > Save as in Notepad. Select All Files on the Save as Type drop-down menu. Enter a title for the file in the text box, which must include .WSB at the end.

For example, users could enter something like ‘Sandbox config.WSB’ in the File name box. Then press the Save button.

Overall, the sandbox configuration commands are fairly straightforward. The commands are similar to HTML tags, with users entering page content between opening and closing tags.

So, this is the list of Windows Sandbox commands you can use right now.

With those commands, users can instruct Windows Sandbox in various ways.

If copy/paste is not working in Windows Sandbox, read the highlighted guide for tested fixes. Users who want an alternative tool for isolating untrusted apps can also learn how to use Sandboxie for secure testing on Windows.

Keep in mind that many users reported getting Windows Sandbox error 0x80070002. If you’re experiencing the same issue after configuring Sandbox, use this guide to fix it for good.

How to adjust subtitle speed in VLC media player [EASY GUIDE]

VLC is a free and open-source media player and streaming media server. It’s popularity rose mainly because it’s very easy to use, it’s portable, and more importantly, it works across multiple platforms.

The majority of VLC users resort to the media player to watch videos and movies, and some of them are using subtitles. In some cases, there could be some subtitle delay.

This means that the subtitle doesn’t match the sound. This is quite an annoying issue that can become really frustrating if it happens more than once. Learn how to adjust it with ease below.

How to adjust the subtitle delay in VLC

Method 1 – Adjust subtitle delay through Hotkeys

When you adjust the speed via the keyboard keys, the speed increments are 50 ms. This is a fixed value and cannot be changed.

During the video playback, to change the delay:

  • press g if the subtitle is ahead of the sound.
  • press h if the subtitle is behind the sound.VLC hotkeys subtitle delay adjust subtitle speed in VLC media player

Method 2 – Use the Extended Settings

The Extended setting of VLC offers a more advanced set of options that can be tweaked to best fit your needs. To adjust the subtitle delay from this menu, you just have to play a video and while in playback, go to Tools > Track Synchronization.


 VLC excels in playing the majority of video formats, but is it any good with MKV files? Find out now.


Here, under Subtitle Track Synchronization, you can modify the value by typing it yourself or by pressing the + and – buttons.

You can also adjust the Subtitle speed and the Subtitle duration factor in the same manner.

There is also an Advanced Synchronization option that can be used only when the subtitles are late compared to the audio. To use it, you just need to:

  • Detect the fact that the subtitles are out of sync.
  • Press shift + H whenever you hear a sentence easily recognizable.
  • Use shift + J when you read the same sentence in the subtitles.
  • Press shift + K for the syn correction to take place.advanced subtitle adjustement adjust subtitle speed in VLC media player

That’s it. As you can see, it’s fairly easy to increase the subtitle speed in VLC on Windows 10. Same can be said about the Advanced Synchronization.

What’s your go-to video player and how often do you use it? Leave the answer in the comments section below along with any other question you may have and we’ll be sure to take a look.

[wl_navigator]

RELATED STORIES YOU SHOULD CHECK OUT:

Say what? AMD has 15 security vulnerabilities, Intel got 233?

Recently, a security researcher compared the vulnerability listings of AMD and Intel hardware. The researcher created a Reddit thread to discuss the findings.

The post highlights the surprising fact that AMD has reported only 15 security vulnerabilities until now. However, we can see a total of 233 vulnerabilities on Intel’s listing.

The findings are quite strange because both these companies are currently leading the market. Still, there is a significant difference between the number of reported security flaws.

This issue sparked a detailed discussion on Reddit and people came up with their own explanations as to why this huge difference exists.


In case you want to be secure while surfing the internet, you will need to get a full-dedicated tool to secure your network.  Install now Cyberghost VPN and secure yourself. It protects your PC from attacks while browsing, masks your IP address and blocks all unwanted access.


So, why this huge difference?

Some people believe that hackers are focusing more on Intel. Indeed, Intel has a monopoly on the consumer market and hackers may want to launch more and more attacks on Intel systems.

Therefore, the increased number of attacks lead to more reported issues.

As others have said already, I think it’s because Intel has been dominating for a long time and thus there has been MUCH more research into Intel security flaws.

Some Reddit users suggested that the architecture of AMD is more secure as compared to Intel.

All systems are tested for these vulnerabilities. Please look into some AMD white papers on speculative execution, they actually built bit checkers into the CPU for this reason. They are taking security seriously.

We can not deny the fact that Intel has a popular bounty program that encourages security researchers to find vulnerabilities in its architecture.

Maybe that is the reason why security researchers are focusing more on Intel. However, Intel has been honest about all the security issues reported until now.

The company really wants to keep its consumers’ trust and decided to be transparent about the security vulnerabilities affecting its products.

RELATED ARTICLES YOU NEED TO CHECK OUT:

You can now download Microsoft To-Do for Mac, Planner coming soon

Microsoft has recently released its To-Do app to Mac users. Mac users can now get this application from Apple’s Mac App Store free of cost. 

You will find all the major features of the application on the Mac version of the To-Do app. Users can utilize this application to create new to-do lists, share them with others, set up reminders about those tasks etc.

It is worth mentioning that Microsoft wants to integrate Planner as well in the coming months.

This app has all the necessary features that are currently available in the corresponding versions on other platforms. It will allow users to synchronize their Outlook tasks, import flagged emails and others.

Users can easily create a task and attach up to 25GB of files in the To-Do app.


Don’t really like Microsoft To-Do app? Here are some great alternatives that you can use in 2019.


Microsoft describes the functionality of the app as follows:

Got something on your mind? Get Microsoft To-Do. Whether you want to increase your productivity, decrease your stress levels or just clear up some mental space, Microsoft To-Do makes it easy to plan your day and manage your life.

According to Microsoft, the company used AppKit to develop the Mac version of the To-Do app. Microsoft To-Do was launched back in 2017. Initially, a preview version of the app was only available on three platforms including Windows 10, Android and iOS.

As a matter of fact, the team that developed Wunderlist is the one who developed Microsoft To-Do.

Microsoft decided to shut down Wunderlist in 2017. However, the company wanted to improve the feature list of its To-Do app before going ahead with this decision. 

Previously, Mac users were bound to use To-Do as a Web application. Microsoft’s To-Do app is currently available to the users of all major platforms.

You should check out the Mac App Store and download Microsoft To-Do app  on your devices.

RELATED ARTICLES YOU NEED TO CHECK OUT:

Required video codec is not installed Media Player error [EXPERT FIX]

Sometimes you might encounter Windows Media Player cannot play the file because the required video codec is not installed error on your PC.

This specific error is usually caused by the absence of codecs needed in order to play media files. In order to properly run media files in Windows Media Player, we came up with a few solutions from which you can use.

How to fix missing codecs error in Windows Media Player?

1. Check if Media Player is enabled

  1. Open Control Panel > choose View by Large Icons.
    large icons control panel windows media player cannot play the file because the required video codec is not installed
  2. Access Programs & Features.
    programs and features control panel windows media player cannot play the file
  3. Click Turn Windows features on or off.

  4. Make sure to have Windows Media Player box checked > press OK and see if it fixed the issue
windows media player disable windows features the required video codec is not installed

2. Enable the Download codecs automatically setting

  1. In the Tools menu > choose Options.
    tools options windows media player the required video codec is not installed
  2. Open the Player tab > make sure to have the Download codecs automatically box ticked > click OK.
  3. Try playing the media file, if asked if you want to install the codec, choose Install.

3. Install K-Lite Codec Pack

  1. Visit the K-Lite Codec Pack’s website and go to the Download section.
  2. You can choose between Basic, Standard, Full, Mega.
  3. Getting the standard version should provide enough support for most users, but if you want to some get extra software, you can go for the Full version.
  4. Restart your computer after the install is complete and then try playing the problematic media file.

4. Try using professional media player software

CyberLink’s PowerDVD is an innovative Windows Media Player alternative, with HDR10 support, a wide range of functions, and codecs.

The program supports numerous video formats and codecs, such as MP4, AVCHD, AVI, MKV, 360, and more. Using the TrueTheatre HD option, users can improve the quality of any video, upscaling it to a higher resolution, artifact-free version. You can easily turn a 480p video into a 1080p, change the FPS, reduce the amount of video noise, or employ motion compensation technology.

CyberLink enables you to use 3D video playback and convert 2D movies into a 3D format with ease. To use this service:

  1. Download CyberLink PowerDVD
  2. During playback, click the 3D button on your playback toolbar
  3. Follow the instructions presented on the 3D configuration window that will pop up.

We hope that our guide on fixing the Windows Media Player error helped you fix the issue. If you found this article helpful, leave a comment in the comment section below.

Microsoft opens Immersive Reader to 3rd parties, brings Office 365 to Google Education customers in the US

Microsoft has made two important announcements on its Education blog this morning. First of all, Immersive Reader, the company’s tool to improve reading and writing comprehension in apps like OneNote is now available as an Azure Cognitive Service . This means that third-party developers can integrate Immersive Reader in their apps, and Microsoft shared a list of 15 new parters today.

Immersive is also coming to several Microsoft apps including Forms, Whiteboard, and even Minecraft: Education Edition. “We want to allow all students to engage in Minecraft: EE, and this includes reading signs, boards, in any form or any language,” explained Mike Tholfsen, Product Manager on the Microsoft Education team.

Minecraft EE Immersive Reader.gif

In addition to expanding Immersive Reader to many more apps, Microsoft also announced major news for students and teachers with Google EDU accounts. Starting in the US, Microsoft will allow G Suite for Education users to sign in to Office 365 for free with their Google accounts, and access apps and experiences such as OneNote, Immersive Reader, and Microsoft Teams.

The Customer preview of what Microsoft calls “simpler sign-on” will work with Chromebooks that have already been set up by IT admins, qs the solution will require a new version of Microsoft’s Office Online extension for Google Chrome. “With simpler sign-on, once you sign in to your school’s Chromebook, you can be automatically signed in to Office 365 in just two clicks, without retyping a username or password,” the blog post reads.

Microsoft is acknowledging that Google Education tools are already popular in US classrooms, but the software will make it easy for teachers and students to transition to Microsoft apps. As an example, Microsoft has built a tool to import content from Google Classroom to a OneNote Class Notebook. “You’ll be able to create and distribute assignments in OneNote and push the grades back to Classroom, so you can view all your assignments and grades in one place,” the company explained.

To join the Customer Preview of Office 365 for Google Education customers, Microsoft is inviting school districts and their IT admins to sign up on this page. Microsoft will provide free guidance to school districts and even help IT admins do all the configuration for free.

Windows Media Player Cannot Burn to Disc Because Drive is in Use [FIXED]

Many Windows 10 users reported encountering an issue when trying to burn a CD through Windows Media Player. Error message Windows Media Player cannot burn to the disc because the drive is in use. Wait a few minutes for other burning tasks to complete and then try again pops up when users try to start the burning process, leaving them frustrated.

Users made sure to explain the nature of their problem on the Microsoft Answers forum:

When I try to burn an audio CD, I get the error message “Windows Media Player cannot burn to the disc because the drive is in use. Wait a few minutes for other burning tasks to complete and then try again”. There is no other burning application running and this issue has only started since I upgraded…

After extensive research, we managed to come up with a few solutions that can help you fix this issue, and we’re presenting them to you in order from the simplest one to the most complex one. Be sure to follow our instructions carefully in order to avoid any future problems.

Why Windows Media Player won’t burn a CD?

1. Update/reinstall the driver

  1. Press the Windows logo key + R on your keyboard > type devmgmt.msc in the Run box and hit enter to open the Device Manager.dvmgmt.msc run Windows Media Player cannot burn to the disc because the drive is in use
  2. Expand the CD-DVD ROM drives section in the Device Manager > right-click on your CD/DVD device and select Update.cd/dvd rom driver Windows Media Player cannot burn to the disc because the drive is in use
  3. Wait for the update process to occur > Restart your PC and see if it fixed the issue.
  4. Alternatively, you can right-click on the CD/DVD device and select Uninstall.
  5. Restarting your PC should automatically attempt re-installing the drivers.
  6. If this isn’t the case, download the device drivers from the official manufacturer website.

You can also update your drivers automatically with dedicated driver updating software. Just install the software and let it scan your drivers. It will automatically detect whether your drivers are damaged or outdated and install the best version available. 

2.  Change the burn speed

  1. Click the Organize option in Windows Media Player > select Options. Options WMP Windows Media Player cannot burn to the disc because the drive is in use” style=”width: 366px”>
  2. Open the Burn tab > under the General tab, change the Burn speed to Medium/Low > click OK.
burn speed Windows Media Player cannot burn to the disc because the drive is in use

3. Fix the problematic registry entries

  1. Press the Windows logo key + R on your keyboard > type regedit in the Run box to open the Registry Editor.regedit run Windows Media Player cannot burn to the disc because the drive is in use
  2. Access the following location from the left pane and select the registry:

    HKEY
    _LOCAL_MACHINE\SYSTEM\CurrentControlSet\Control\Class\{4D36E965-E325-11CE-BFC1-08002BE10318}
    .Registry editor Windows Media Player cannot burn to the disc because the drive is in use
  3. Right-click UpperFilters in the right pane > select Delete > click Yes
  4. Close the Registry Editor and reboot your computer to see if it fixed the issue

We hope that you could find our solutions on fixing the Windows Media Player burn error useful. In most cases, you can fix the problem simply by reinstalling your DVD driver from the Device Manager. If that doesn’t work, modifying the registry might help.

There you go, three simple solutions that should help you fix this problem. If you found our solutions helpful, feel free to let us know in the comments section below.

Download Windows 10 KB4503288, KB4503281 to fix UI issues

Microsoft is back with another round of cumulative updates for Windows 10. These patches are rolled out for various versions of Windows 10, including the October 2018 Update and the April 2018 Update.

Microsoft releases new cumulative updates every month as a part of its Patch Tuesday cycle. These updates address existing issues in the operating system. Additionally, they also bring some feature and performance improvements.

More specifically, KB4503281 addresses Windows 10 version 1709 bugs and KB4503288 resolves issues in Windows 10 version 1803. 

In this article, we are going to discuss the major changes and improvements that came along with KB4503288 and KB4503281.

KB4503288 and KB4503281 major changes

Icon leading bug fix

Microsoft addressed an issue with Windows 10 that restricted users from loading new icon files. This issue was caused by those icons that had a bad image file.

Microsoft Edge bug fix

Both of these updates resolve a bug with Microsoft Edge. According to some user reports, the browser didn’t open correctly when they clicked on links within an application.

Calculator application issue fixed

KB4469068 introduced a bug that affected the Calculator application. This issue prevented the app from following the Gannen setting.

Office 365 fix

Microsoft addressed an issue that caused Office 365 applications to stop working when launched. The issue occured when the apps were deployed in App-V packages. 

Data encryption issues resolved

Previously, users experienced some issues related to data encryption. Microsoft says that the issue has been resolved and you can not decrypt data on Windows 10 v1607 and Windows Server 2016 or earlier if it’s protected.

Unresponsive UI bug fixed

Kb4503288 resolves unresponsive UI issues in Windows. The issue was experienced when users scrolled in some windows with many child windows.

Known issues

Microsoft is currently investigating an issue that is caused after the installation of KB4503288. Some users reported getting black screen issues after the first logon. 

Microsoft promised to release a fix with the upcoming updates. Meanwhile, you can get rid of this issue by pressing Ctrl+Alt+Delete. Now click the Power button and select Restart. The problem should be gone now.

RELATED ARTICLES YOU NEED TO CHECK OUT:

KB4501371 fixes a nasty bug breaking audio on Windows 10

Microsoft released a new cumulative update to Windows 10 v1809 PCs. Update KB4501371 bumps the existing version of the operating system to build 17763.592.

This patch addresses a long list of existing issues in Windows 10 version 1809, Windows Server version 1809 and Windows Server 2019.

Most importantly, KB4501371 fixes some annoying bugs affecting Your Phone app, Media Player and improves isolated browsing in Microsoft Edge. Additionally, it resolves some audio issues in Windows devices. 

Let’s take a quick look at the official changelog.

KB4501371 major improvements and fixes

App launch issues resolved

Microsoft fixed the issue that prevented users from launching some applications using cmd.exe.

Your Phone application bug fix

Some users experienced issues while connecting Your Phone application to the internet. Users can now use their apps via a web proxy server.

GDI+ issues fixed

KB4501371 resolved an issue related to the Windows graphics device interface. Microsoft confirmed that GDI+ previously caused issues for various versions of Windows 10.

Media Player bug fix

Some Windows 10 users reported that they were unable to play media files in a loop. Therefore, Microsoft released KB4501371 to fix this bug.

Isolated browsing improved

There were some reports regarding isolated browsing issues when some people used Windows Defender Application Guard in Microsoft Edge. Microsoft released KB4501371 to improve isolated browsing in the browser.

Realtek Bluetooth radio drivers issues

Windows 10 May 2019 Update introduced quite a few bugs of its own. One of those bugs affected Realtek Bluetooth drivers. Microsoft confirmed this issue has been fixed now.

Audio bugs fixed

Microsoft says that Windows 10 users experienced audio issues in some cases. This issue affects when users have not restarted their systems for more than 50 days.

IE11 scrolling issue

There were some user reports about a bug that affected Internet Explorer 11. KB4501371 resolved an issue with scrolling feature in the browser.

KB4501371 known issues

Microsoft acknowledged three known issues in Windows 10 Update KB4501371.

The first issue is related to error code 0x800f0982. Microsoft warns its users that this error is triggered on those devices that have installed some Asian language packs. 

Microsoft is working on fixing the bug. The tech giant recommends its users to uninstall the language packs that have been recently installed on their systems.

RELATED ARTICLES YOU NEED TO CHECK OUT:

Microsoft Edge Insider Canary channel is now officially available on Windows 7, 8, and 8.1

Following the release of Microsoft Edge Insider on macOS, Microsoft has made its new Chromium-based web browser officially available on Windows 7, 8, and 8.1 today. For now, only the Canary channel is available on these older versions of Windows, though Microsoft said today that the Dev channel which gets less frequent updates will be available “soon.”

“Delivering the next version of Microsoft Edge to all supported versions of Windows is part of our goal to improve the web browsing experience for our customers on every device, and to empower developers to build great experiences with less fragmentation,” Microsoft explained today. “Microsoft Edge will have the same always up-to-date platform and the same developer tools on all supported versions of Windows and macOS. This will reduce developer pain on the web, while ensuring all Windows customers have the latest browsing options,” the company commented.

Microsoft also highlighted today that the first Edge Insider Canary builds on Windows 7, 8, and 8.1 have a couple of known issues: Among highlights, dark theme and signing with an Azure AD accounts are currently not supported. The software giant is committed to improve its Edge Insider browser by listening to user feedback, and you can share your thoughts about the new Chromium-based Edge by clicking the smiley face next to the Menu button.

You can download Microsoft Edge preview builds from the new Edge Insider website, where Microsoft also publishes a detailed roadmap with upcoming new features.