3 Best Methods to Solve the Microsoft Sway Error

Microsoft Sway is a valuable service, but some users reported Microsoft Sway sign-in errors while trying to use it. Here’s how one user describes the issue in the Microsoft Tech community:

Hi – I cannot sign in to Sway these last few days. I keep getting:
Sign in
Something went wrong, and we can’t sign you in right now. Please try again later.
The Microsoft account login server has detected too many repeated authentication attempts. Please wait a moment and try again.
Is this a setting issue on my part, or is there an issue with the server?

This can be annoying, so let’s see how to fix it once and for all.

Why is Microsoft Sway not working?

We’re glad you asked. However, please remember that the most common cause of Sway not working is issues relating to Microsoft servers, and Microsoft Sway might be down.

When faced with these situations, sway.office.com would have refused to connect. Thus, you should note that to perform actions like edits, you must be logged in.

Messages you get in Sway, such as your account is not enabled, are a clear sign something is wrong, and we will help you fix that.

Sway asking for sign-in credentials is also a sign, mainly if you are used to the software storing this login information.

Is Microsoft Sway still supported?

Microsoft still supports the Sway service. However, know that the Sway app has been shut down since September 24, 2021.

That said, Sway sites are stored on Microsoft’s servers and tied to the user’s Microsoft account. This means that they can be viewed and edited from any web browser through Office on the web.

Users thought that the service disappeared entirely after receiving the following error message:

Something went wrong and we can’t sign you in right now. Please try again later.

The Microsoft account login server has detected too many repeated authentication attempts. Please wait a moment and try again.

How can I fix the Microsoft Sway error

1. Try a different web browser

If you’re having problems with Microsoft Sway, try accessing it using a different web browser. There are many excellent web browsers on the market, but if you want a fast, reliable, and secure browser, Opera One is just what you need.

Opera One Browser is based on the Chromium engine, so it’s similar to Chrome but has several distinct features. Unlike Chrome, Opera One won’t send your data to Google, and thanks to the advanced privacy and tracking protection, you’ll remain protected while surfing the web.

In addition, this browser has a built-in VPN, phishing protection, and a malware scanner for downloaded files. Plus, it comes with it’s own built-in AI.

Opera One

Log into Microsoft Sway, as well as all other Office products, with the help of this speedy, stable, and secure web browser.
Free Download Visit website

2. Log out of all Office applications

Sometimes you can fix the Microsoft sway sign-in error simply by signing out of all Office applications and logging back to Sway:

  1. Log out of all Office applications.
  2. After doing that, log back into Sway.
  3. Check if the error message still appears.

3. Use the private browsing feature

If you’re having problems with Microsoft sway sign-in error, you might be able to fix it by using the private browsing feature on your browser:

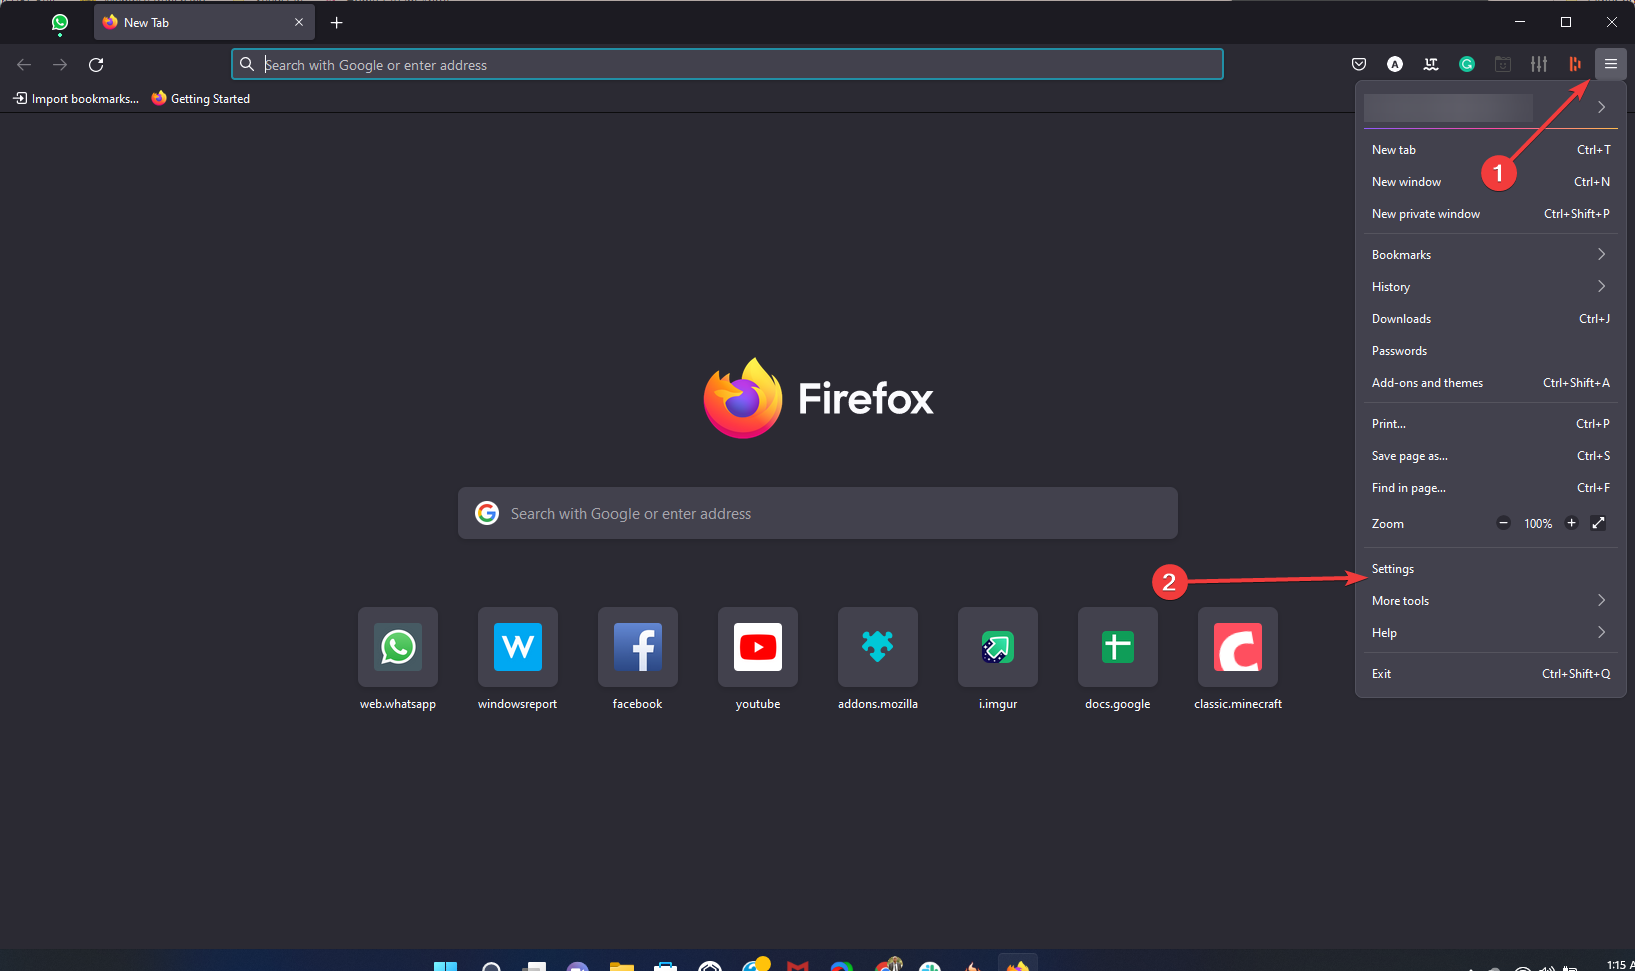
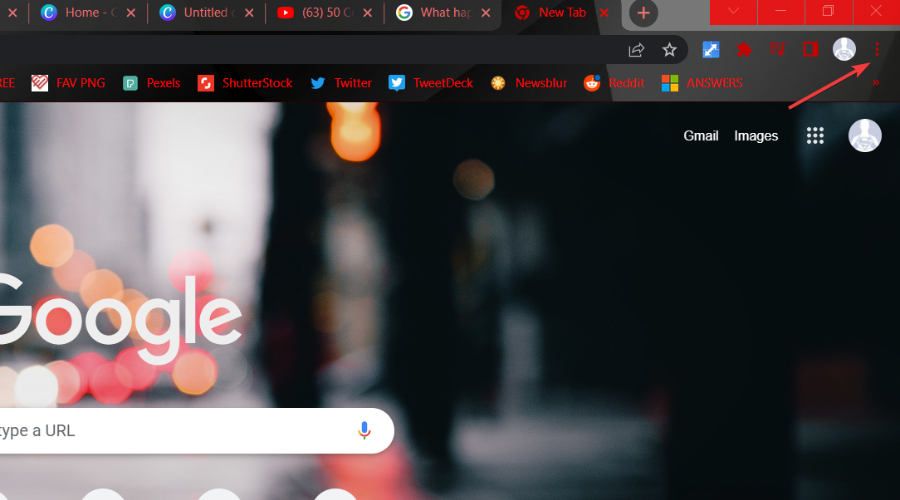
  1. Open your browser and click the Menu icon in the top right corner:
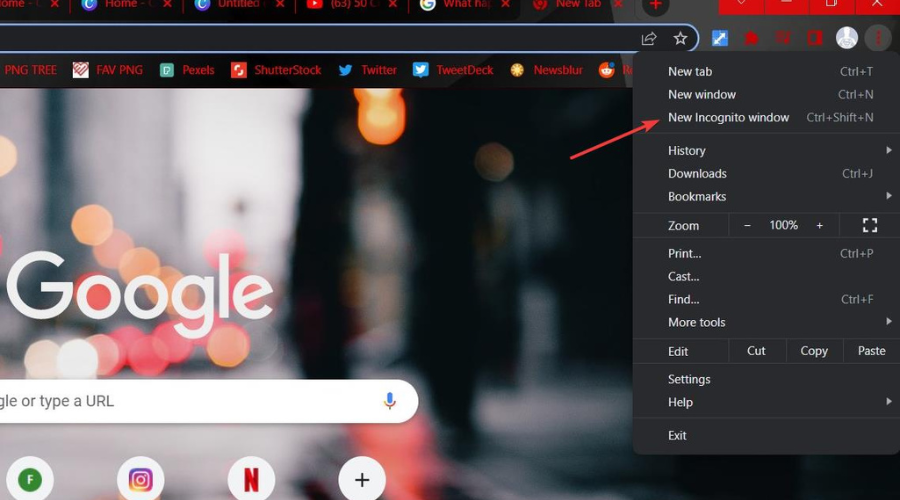
  2. Select New Private Window. Alternatively, use the keyboard shortcut to open it.
    private browsing Microsoft Sway sign in error
  3. Once the new private window opens, try reaccessing Microsoft Sway.

Note: We showed you how to enable private browsing in Firefox, but the process is similar for all major web browsers.

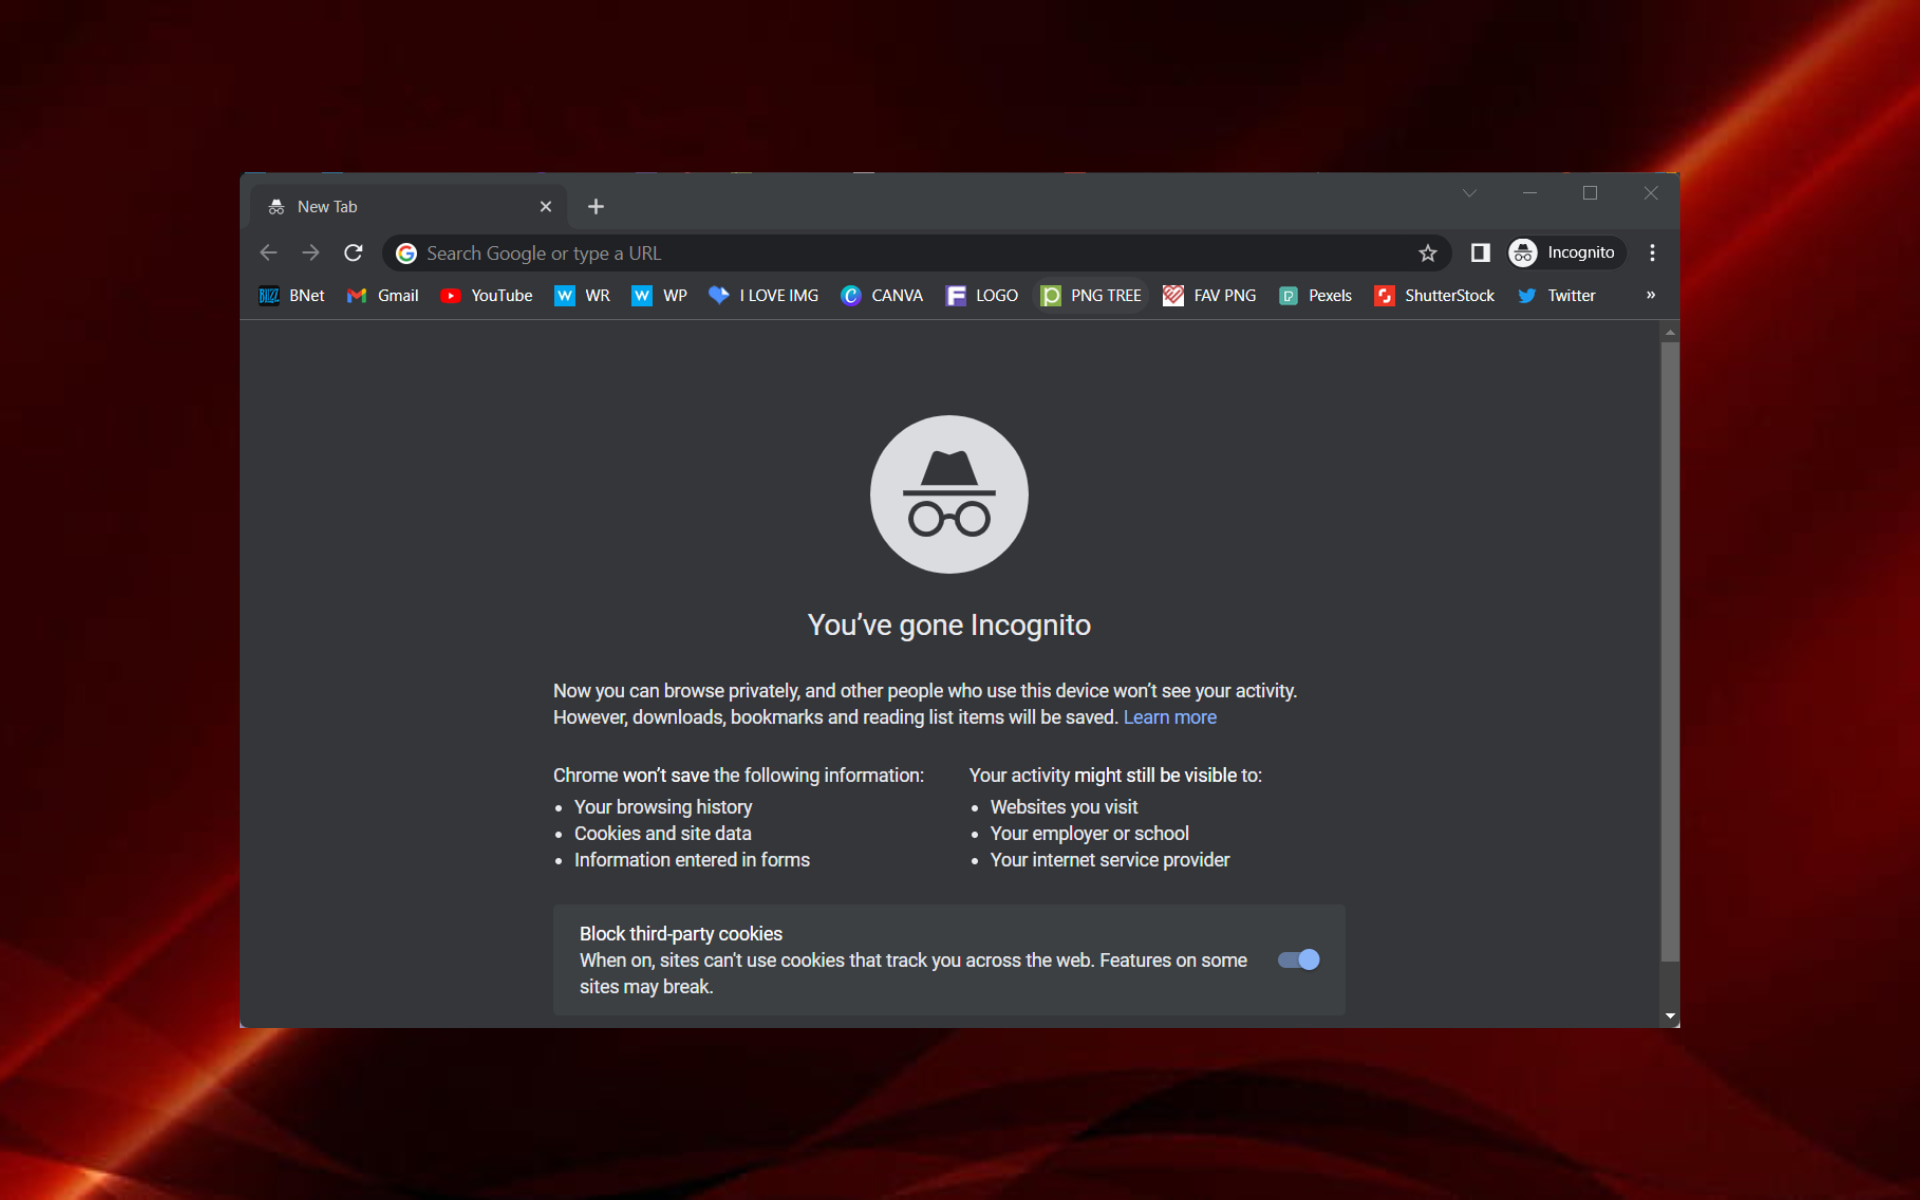
If you encounter Microsoft Sway sign-in error, try accessing in Incognito or Private browsing mode since that’s the solution that worked for most users.

Microsoft sway being down is a clear sign of something going wrong with the tech giant’s servers, so don’t panic; it’s not something on your end.

When faced with this predicament, check the Microsoft sway status. Needless to say that servers not being up will make it impossible to perform any Microsoft sway download.

Many also reported that Microsoft Sway is lagging, but we have a dedicated guide that addresses this issue, so don’t miss it.

Please let us know if you found our article helpful by leaving a comment below.

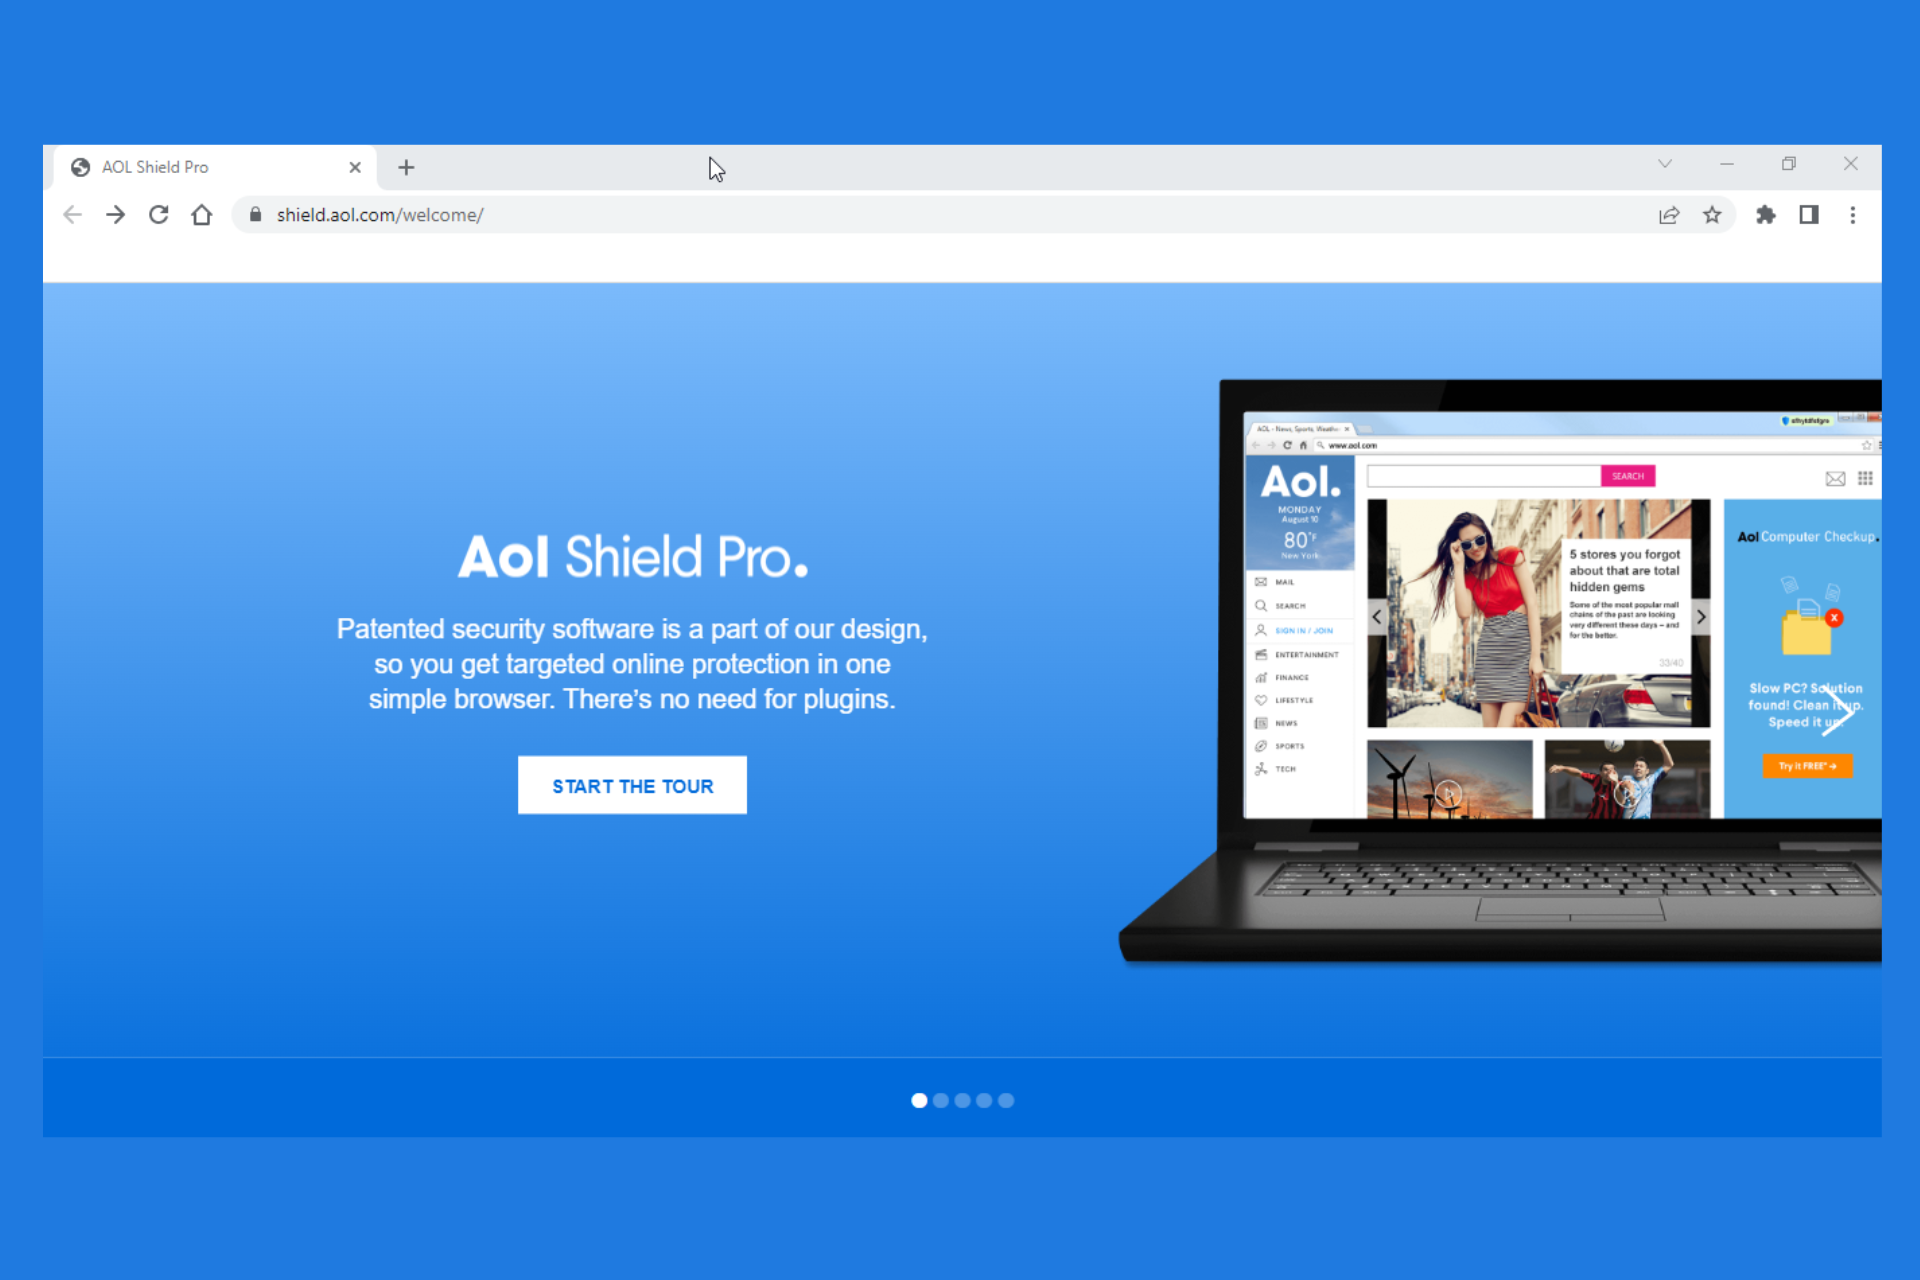
3 Ways to Access & Delete your Saved Passwords in AOL Browser

AOL Browser, also known as AOL Explorer, is a graphical web browser built by AOL, with its first release in 2005. It came as a standalone free browser or as additional software for users installing AOL Instant Messenger.

Just like other browsers, the AOL browser gives users options to save their passwords. However, one of the most common searches online with this browser has been AOL browser deleting the saved password.

So how do you access and delete your saved password in the AOL browser? Before discussing this, it is essential to note that the AOL browser supports tabbed browsing. It is built based on the Trident browser engine from Microsoft.

In 2006, the company released AOL OpenRide and AOL Desktop a year later. Both these two were released as improved versions of the AOL browser.

Does AOL have a password manager?

As discussed above, AOL browser has tried to implement a system that saves their users’ passwords. This is a feature you will find in almost all browsers.

It is great that you do not have to manually enter your usernames, emails, or passwords every time you log into your favorite websites or web applications.

For this feature to work well, it needs an elaborate password manager. This means that the AOL browser comes with its own password manager for users to set the browser how they would like to, especially regarding their passwords.

Where is my AOL password stored?

AOL passwords are stored in the AOL browser password manager. You can access these passwords from the settings tab, disable the manager, or even delete some or all of them.

Quick Tip:

If you encounter problems with the browser password manager, you may want to try using a third-party program with easier management.

RoboForm is a great tool that will allow you to store passwords across any device or browser. Also, it provides you with an additional layer of protection, and it comes also with a random password generator.

RoboForm

A smart and easy way to keep all your passwords safe and secure.
Free trial Visit Website

How do I delete saved passwords in AOL?

1. Clear browsing data

  1. Launch the AOL browser, click on the Menu icon in the top right corner, and select Settings.aol browser delete saved password - settings
  2. Select Privacy and security on the left-hand side.
  3. Click on Clear browsing data.privacy and security
  4. On the window that appears, select Advanced.
  5. Select Passwords and other sign-in data, then click on the Clear data button.Clear passwords - aol browser delete saved password

2. Delete selected password

  1. Launch the AOL browser, click on the Menu icon in the top right corner, and select Settings.AOL settings
  2. On the left-hand side, click Autofill and select Passwords on the menu that appears.Autofill - aol browser delete saved password
  3. To delete a saved password, click on the three dots alongside the password and then select Remove password. AOL remove password

3. Disable password saving

  1. Launch the AOL browser, click on the Menu icon in the top right corner, and select Settings.AOL settings - aol browser delete saved password
  2. On the left-hand side, click Autofill and select Passwords on the menu that appears.AOL autofill
  3. Disable Offer to save passwords.Disable passwords - aol browser delete saved password

How do I delete a username from the AOL login screen?

It is important to note that the username you want to delete from the AOL login screen is not stored on the AOL website but your browser or even as a cookie.

However, the information is on your computer. Therefore, you can delete this username by visiting your browser’s settings, navigating to passwords, and then deleting the username.

The AOL browser has been in existence for almost two decades. However, even though its support was discontinued a few years ago, it is still common among some users.

As seen above, you can access and delete your saved passwords in this browser, just like in other browsers. Let us know how the procedure went for you in the comments area below.

How to Use China Post Tracking App to Pinpoint Your Parcel

The China Post tracking is the most efficient parcel delivery online application, and it can monitor your parcel delivery from day one after you make the purchase until it reaches your doorsteps.

The best way to track a China Post is by using the Ordertracker website application but you can use many other websites that will get you almost the same information.

What is China Post tracker?

If you’re expecting to get something from China, it’s most likely through China Post, a trusted name in the mail, package, and freight delivery industry.

The parcel delivery service is just a part of the business. China Post offers domestic and international postal logistics, distribution of printed media, correspondence, and many more.

China Post has no less than 927,171 employees and was ranked 2nd among all postal companies in 2019 with a revenue of almost $90 million.

How can I track a parcel through China Post service?

You may ask how do I track China Post? It’s extremely easy but you will first need to get in the position to send or receive a parcel.

For instance, after you make a purchase, you will get a unique tracking ID that you will need to use in order to track your parcel from the point of departure to your door.

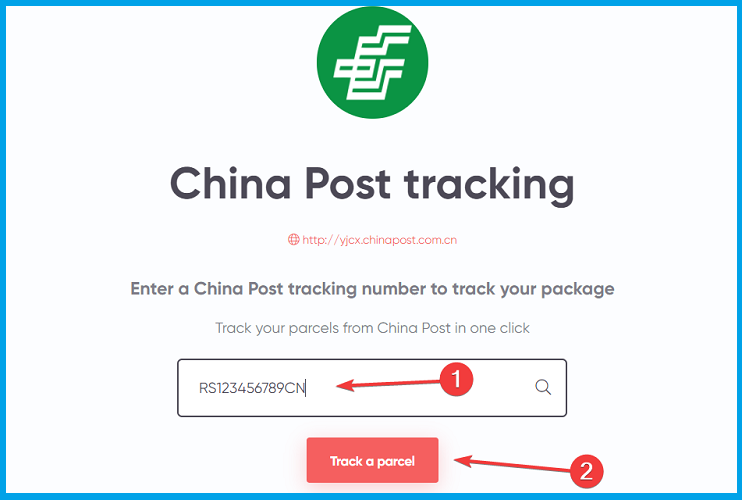
You just need to type or paste the tracking ID into the search window from the app and hit the Track a parcel button underneath.

There are three types of parcels, and all of the IDs have 13 characters (letters and digits):

  • Large packages will have the tracking ID starting with CP, then you will see 9 digits and the CN letters at the end that stand for China
  • Small packages will have a tracking ID that will start with R and another letter, then again 9 digits and the CN suffix
  • Express Mail Services will have the ID starting with E and another letter, followed by 9 digits and the CN or CS letters at the end.

How much time does the shipping takes?

Of course, the shipping time will greatly depend on the means of delivery. If it gets by air it will take a lot shorter than a hybrid or a surface-only method.

That can vary from only a few days for the Express Mail service to up to 3 months for surface delivery. We have an estimated time delivery table for the main regions of the world, provided by the company.

DestinationAir ParcelSurface Air LiftSurface ParcelExpress Mail
China Neighboring Countries7 – 15 days30 – 60 days60 – 120 dayswithin 3 days
European and American Countries10 – 30 days30 – 60 days60 – 120 dayswithin 5 days
Other Countries and Regions15 – 40 days30 – 60 days60 – 120 dayswithin 4 days

Usually, the website where you make the purchase will tell you an estimated time of arrival for the parcel but that is why the China Post tracking app is so important.

You will see exactly where your package is at any moment, and you will be able to estimate when it will reach you.

Of course, nobody will be able to tell you with utmost precision anything from the start because there are such unforeseen events that can alter the delivery time.

China Post package details

It’s important to know that, as you’ve noticed above, the packages are classified as a Small Package or a Large Package according to their size and weight.

The Small Parcel has to be under 2 kg (4.4 lb) and with a size smaller than 90x90x90 cm (35.4×35.4×35.4 in) to be shipped from China to any international destination.

If your package weighs more than 2 kg but less than 30 kg (66.1 lb), it will be classified as a Large Package. The company says that although the package is bigger, the delivery is cheaper than any express delivery.

Both types of packages can be sent over on three types of services: Air Parcel, Surface Air Lift (SAL), and Surface Parcel.

The shortest delivery is achieved by a fourth method, the Express Mail (EMS) delivery that is extremely fast but more expensive than any other method, of course.

The difference between Ordinary and Registered Mail

This is probably the most important aspect of all. Sometimes, you will be able to select between Ordinary or Registered Mail.

The first one is cheaper, but you won’t get any shipment tracking service. That means you won’t be able to see it moving towards the destination.

Moreover, you won’t have any compensation if your item gets lost. That’s why we would recommend only going for the Registered Mail service.

China Post tracker

China Post tracker

Track your China Post parcel from the store to your door with this simple online app.

We have ordered some packages through China Post, and it never failed to deliver in time. And the tracker worked perfectly all through the way to our homes.

Have you used the tracking app from China Post? Don’t hesitate to let us know in the comments section below.

Opera GX Offline Game: How to Get to it With no Internet

If your Internet connection is down, you can always play the built-in Opera GX offline game. If you’re not familiar with it, today we’re going to show you everything you need to know about it.

How do I play Opera GX offline game?

Visit the game’s page

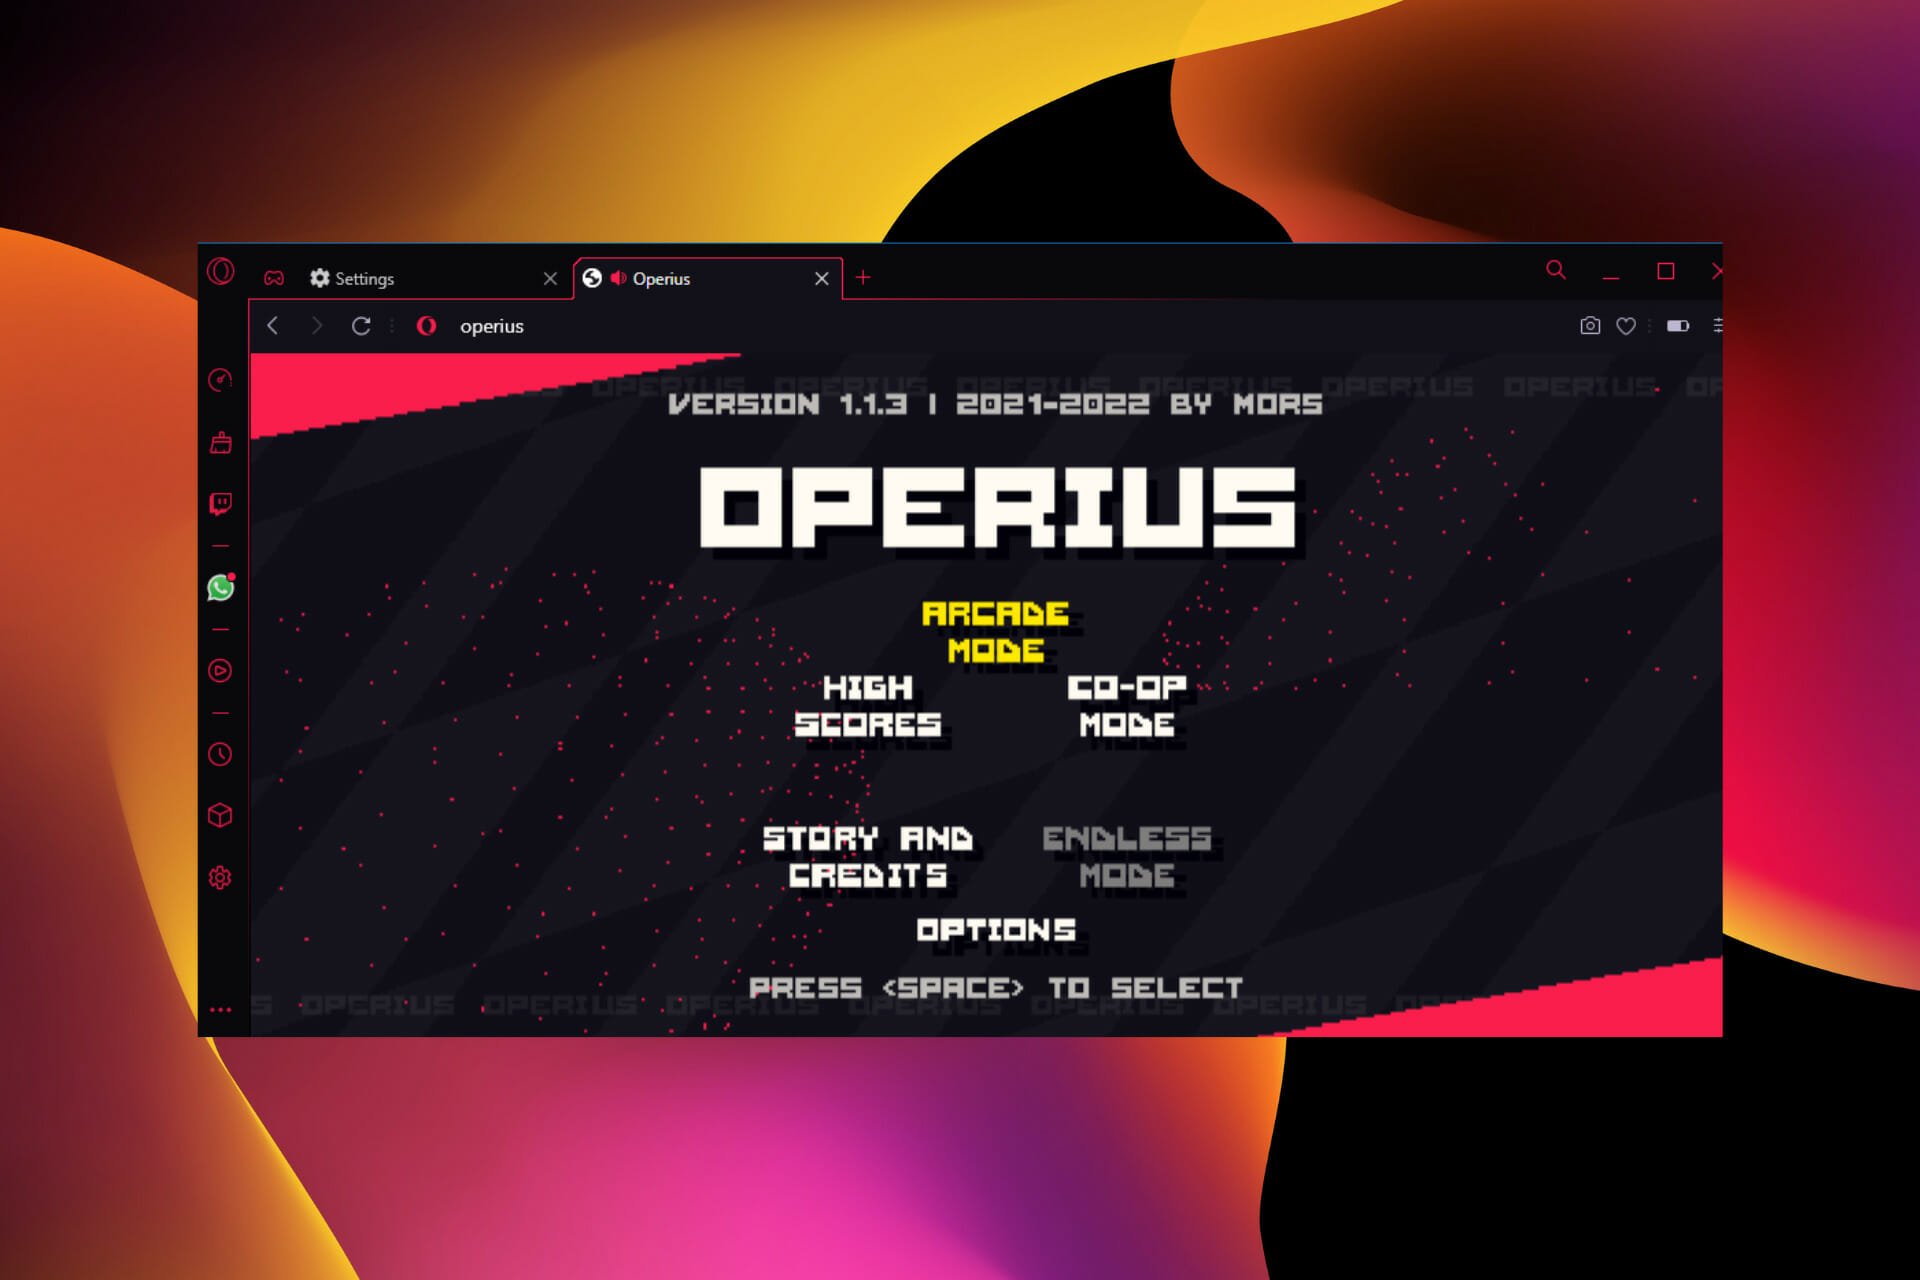
  1. Copy the address below in the Address bar. opera://operius
  2. Use the Arrow keys to navigate to a game type of your choice and the Spacebar to select.
    Operius game main menu
  3. Your task is to hit the flying objects and use the arrow keys to avoid having contact with them.
    Operius gameplay Opera GX

The game is pretty easy to play with detailed instructions. So, it would be best if you got used to it with time.

Can you play games on Opera GX?

Yes, Opera GX has a wide array of games available in the GX Corner. The games are made by the community, but they do require Internet access to load.

Are you facing gaming-related issues on your browser, like Opera GX not streaming on Discord? Check out our detailed guide on fixing it.

We also have a guide that explains what to do if Opera GX is using 100% of your CPU, so don’t miss it. Opera GX has smooth scrolling, and we have an article dedicated to it, so you can check it out.

Let us know in the comments section if you face any problems playing the Operius game.

Bing now has an annotation feature that shows price history & coupons

There are a lot of reasons to be happy nowadays if you’re a Windows operating system user. We don’t know exactly if you head already, but Microsoft added an awesome feature to Bing.

In fact, the tech giant added a ton of new features to its Bing search engine over the past couple of years, with the latest addition to Bing being an annotations function that adds information directly to the search result pages.

Let’s take a deeper dive together and see what all the hype is about, while we discover everything there is to know.

Ethical SHopping is now a Bing search engine feature

When you are shopping for whatever it is you want from the Internet, like sneakers, gadgets, or maybe a new doggy bed, Bing will remind you that coupons are available for specific sites listed in the results.

Furthermore, the search engine may also highlight whether the brand has an ethical shopping rating, as that matters to a lot of people. 

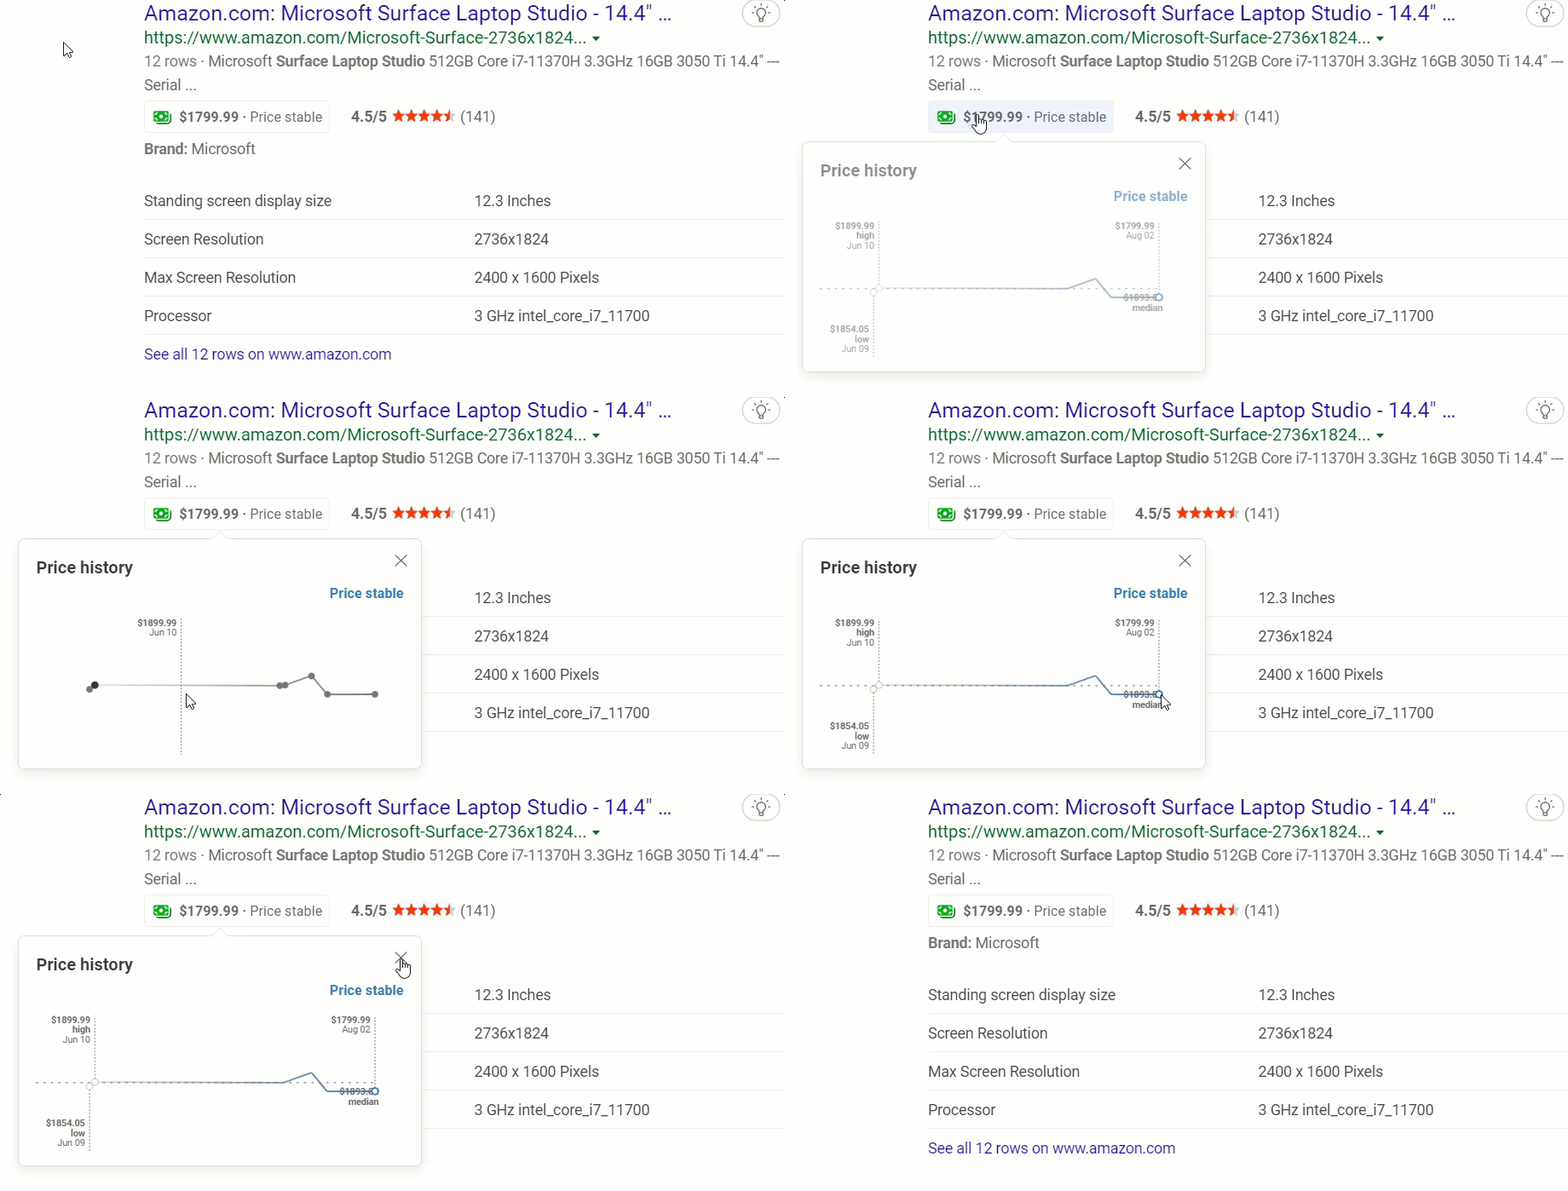
For individual products, you will have the ability to look at the price history directly on Bing’s site, which makes things even easier for you.

The Redmond-based tech colossus also mentioned that all three features are only available in some countries at this moment.

The Microsoft Bing team is excited to announce the addition of time- and money-saving annotations to shopping search results. Ever wondered if you were overlooking coupons or special promotions when you shop online? Or perhaps you didn’t even consider that a discount might be available, and you missed out! Bing now provides you with this information within shopping searches – annotations neatly nested within your search results, without the need to install a browser extension or plugin (third-party cookies must be enabled.)

This coupon annotation actually reveals if coupon codes are available for a specific site, a functionality that will surely make shopping a lot easier, and cheaper.

All you have to do is move the mouse over the available coupons section and they are displayed immediately on the page.

And, even better, each shopping entry will list the discount and the requirements, if you are eligible for any on that specific website.

Keep in mind that the coupon codes are not displayed fully and you need to press the Copy & Go button in order to copy the coupon code to the clipboard and open the site in question to use it.

For the time being, this useful feature is only available in the United States, United Kingdom, Canada, Australia, Germany, and France.

Besides these coupon listings we mentioned, Microsoft Bing may also highlight the Ethical Choice annotation for sites based on Good On You ratings.

When you are hovering with your mouse cursor over the Ethical Choice annotation, an overall rating, using emoticons, and individual ratings for the planet, people, and animals will be displayed.

The third type of annotation we were talking about is related to price history charts on the popular Microsoft search engine.

When you search for specific products, you can therefore see the price history annotation. How awesome is that?

Have you already tested these new Bing features? Share your experience with us in the comments section located below.

Turbo Golf Racing releases its first major update, with new content

Turbo Golf Racing just released back on August 4 as a day one Game Pass game, but already we are seeing its first major update today barely a week after launch. Here is a rundown of everything that’s new in the first Turbo Golf Racing update.

New Levels

  • Rocket Ramp

  • The Snake

  • Bunker Balls

  • Dual Route Dash

  • Neon Raceway

  • A Walk in the Woods

Other new additions

  • New car: Whippy the Ice Cream Truck

  • New cosmetics

  • New emojis (Poop and Yawn replaced by Fire and Luck emojis)

  • New Active Power Core—Stomp

  • New Passive Power Core—Rough Rider

We were also treated to a content roadmap, giving us a glimpse into what we can expect from Turbo Golf Racing in the future.

Some of these features look promising indeed if they do materialize, particularly the cross-platform parties. As you can see, the roadmap also hints at new levels and biomes coming to the game.

Have you had a chance to try Turbo Golf Racing for yourself? If so, what do you think of this arcade sports-racer? Let us know in the comments.


4 Confirmed Methods to Fix FPS Drop in Rocket League

High-powered video games like the Rocket League operate with advanced gaming features. However, there are various issues that users complain about. One of them is the Rocket League FPS drop.

Rocket League is a soccer video game that involves two teams of eight players. It is a game by Psyonix. Many players play the game worldwide, and it is also a multiplayer game. However, the game users complain about issues plaguing the game and not allowing players to enjoy it.

Why is my FPS in Rocket League dropping?

  • Outdated or corrupt graphics driver: Using an outdated or corrupt graphic driver on your computer can cause the Frame rate to drop the issue. Outdated drivers don’t have the strength and capability to power games like Rocket League. Hence, the game encounters some problems with the driver. Likewise, your graphics driver may be corrupt, and not functioning correctly.
  • Interference from the Game DVR: The digital video recorder can cause some interference with the system. Thus, it makes the frame rate drop. The Digital Video Recorder feature in the game utilizes many system resources, affecting the FPS.
  • Outdated Windows: Many users don’t notice that using a computer with outdated Windows can cause many issues, especially with gaming. However, there is a chance that the outdated Windows is interfering with the FPS, which also affects games.
  • Outdated Audio & Network driver: There are several drivers on the computer that help it perform its tasks. However, something wrong with these drivers affects the clients they work for, like games and other software. So, outdated audio & network drivers can cause Rocket League suddenly low FPS issue.

How do you fix FPS drops in Rocket League?

1. Update the Graphics driver

  1. Press the Windows+ R keys simultaneously on your keyboard to prompt the Run window.
  2. Type the following into the search space: devmgmt.msc, then click the OK button.
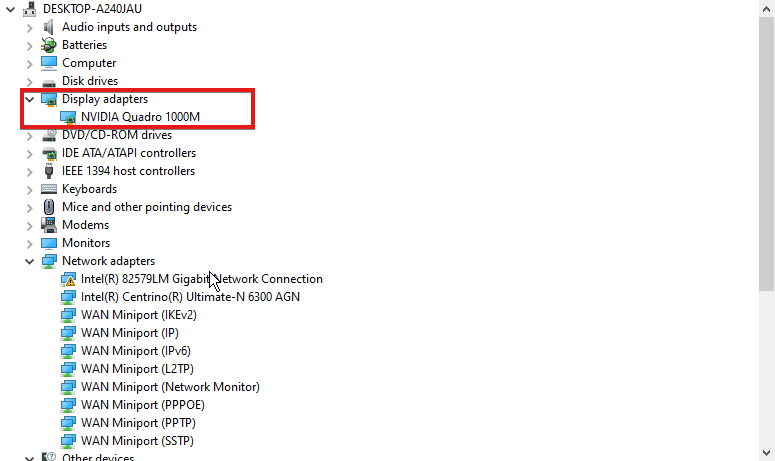
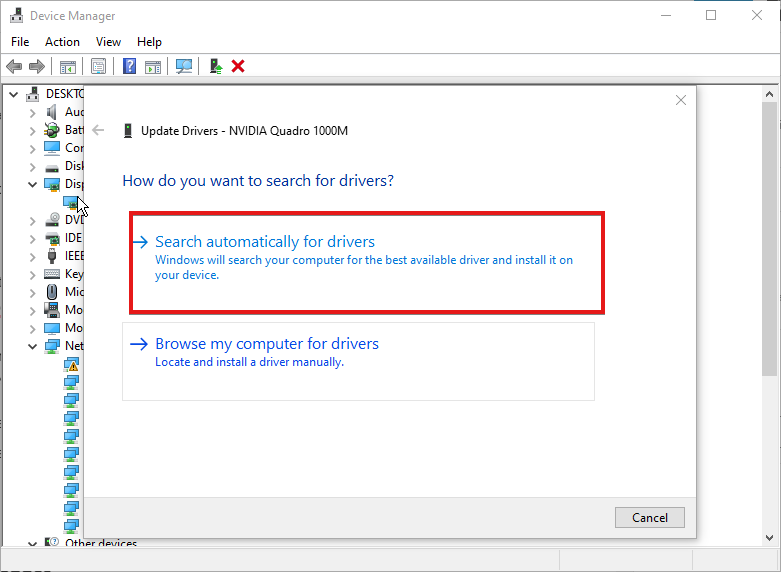
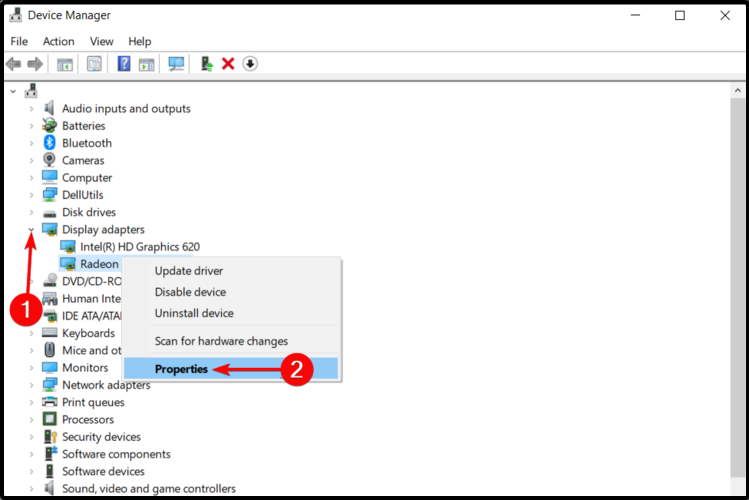
  3. Click on Display adapters from the search results.
  4. Please select the driver from the drop-down and right-click on it.
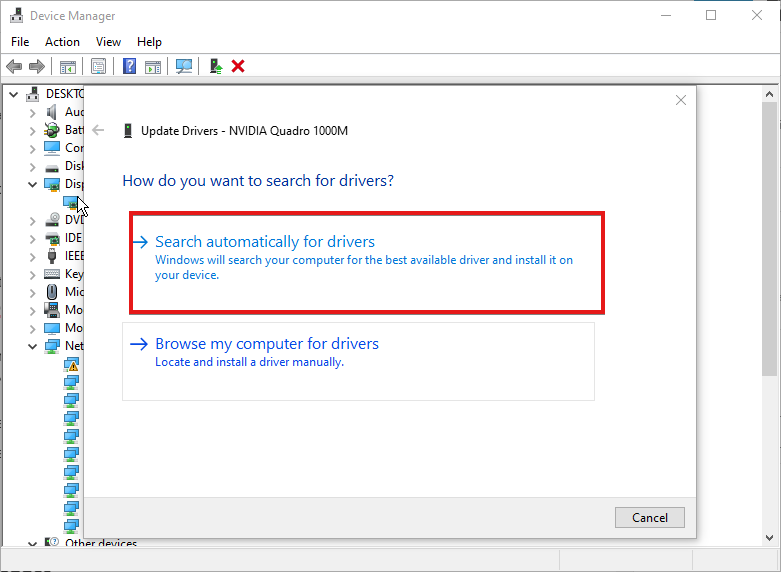
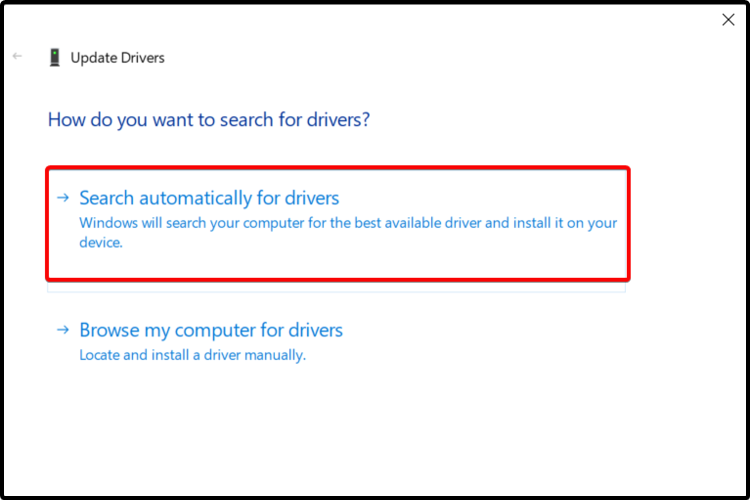
  5. Click the Update Driver Software option, then select Search automatically for drivers.

We recommend that you restart your computer after updating it to run the update correctly. Likewise, it can fix the Rocket League FPS drop when boosting problems.

To make sure your graphics driver is always up-to-date, you can use Outbyte Driver Updater. It’s a lightweight driver updater that scans your system and automatically installs a new driver version when necessary.

The tool can save you time because it can be set to check drivers on a regular basis while quietly running in the background, allowing you to carry out your tasks.

Outbyte Driver Updater

Save yourself time and let Outbyte Driver Updater take care of corrupt and outdated drivers!
Free trial Visit website

2. Update Windows

  1. Click the Start button.
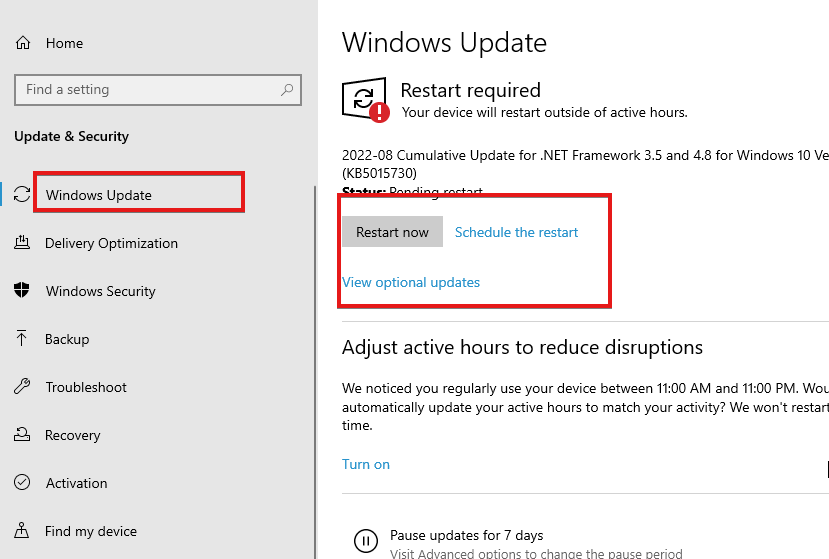
  2. Select Setting and click on Windows update.
  3. On the Windows update page, click Check for updates. If there’s an update available, Windows will automatically search for it and install it.
  4. Restart your computer.

Updating Windows will help keep your computer up to date.

3. Disable Game DVR

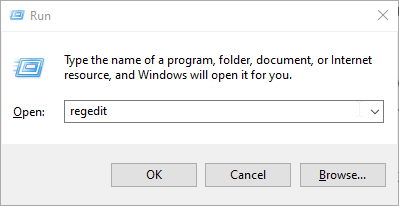
  1. Press the Windows + R on your keyboard to prompt the Run window.
  2. Type Regedit in the search space.
  3. Alternatively, press the Ctrl + Shift + Enter keys to prompt the Registry Editor.
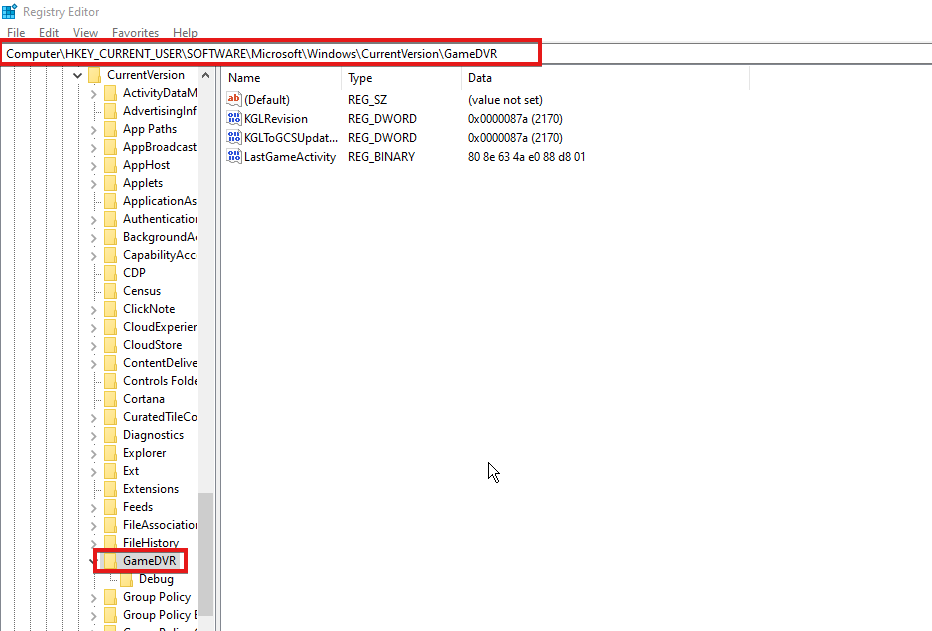
  4. Input the following to navigate your path: HKEY_CURRENT_USER\SOFTWARE\Microsoft\Windows\CurrentVersion\GameDVR
  5. Double-click on the AppCaptureEnabled option and select Modify.
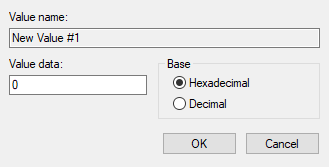
  6. In the Edit DWORD (32-bit) Value tab, change the Value data to 0.
  7. Click OK.

It will disable the DVR. Hence, check and see if the issue persists.

4. Update the Audio driver

  1. Press the Windows + R keys simultaneously on your keyboard to prompt the Run window.
  2. Type the following into the search space: devmgmt.msc, then click the OK button.
  3. Click on the Audio inputs and outputs option, then right-click.
  4. Select Update driver, then select Search automatically for drivers.

Why is my Rocket League so laggy?

  • Network issues: Rocket League may encounter problems if your network isn’t stable. Hence, it can result in the Rocket League being laggy.
  • Rocket League server issues: If there’s a server issue, Rocket League can become slow and stutter. It isn’t expected for this to happen, but it is possible.
  • Background app interference: When you have many tasks running on your computer, it can affect games like Rocket League and make them laggy.

How do I stop Rocket League from stuttering?

1. Restart your device

  1. Click the Windows button.
  2. Select Power.
  3. Click on the Restart option.
  4. Doing this will reboot your computer.

2. Check Rocket League platforms: Peradventure, there’s an issue with the servers; there will be information about it on the official forum. So, all you can do is wait while it is resolved.

3. Change to a Wireless connection: Wired network connection can cause the issue. So, switch to a wireless internet connection to improve your network and help run Rocket League smoothly.

We also recommend that users read our article about reducing input lag on Steam links.

Which tip worked for you? Let us know in the comments area below.

10 Best Offline PC Games to Play in 2026

Looking for offline PC games that actually hold your attention? Whether you prefer solo RPGs, shooters, or strategy titles, there are plenty of solid options you can download and play without an internet connection. All the picks below work on Windows 10 or later and offer full single-player experiences, no logins, no lag, no waiting.

What games can I play on PC offline?

1. Call of Duty: Black Ops 4 – No traditional game modes

call of duty

Call of Duty (CoD): Black Ops 4 is the first-person shooter game from the franchise that doesn’t feature a traditional game mode. However, the blackout mode offers the largest map in CoD’s history.

You can experience both the multiplayer and solo play options offline. All maps are available without an internet connection. You can also adjust the difficulty levels of the bot intelligence.

It doesn’t have a single-player campaign per se, but it features some other type of offline play called the Solo Missions mode.

Whether you want to battle your friends offline in split-screen matches or enjoy the Black Ops universe alone, the native 4K support and new functions will provide you with immersive and exciting gameplay.

Important features:

  • 4 new specialists to play
  • Countless customization possibilities
  • Native 4K support

⇒ Get Call of Duty: Black Ops 4 from G2A

2. The Elder Scrolls V: Skyrim – Long RPG adventure

Skyrim lets customize your character the way you like it. It is heavily inspired by Norse mythology, and it is set in a fictional world where dragons and other beasts freely roam the lands.

This is the 5th installment of the franchise, where you play as the legendary Dragonborn, a hero that can wield the power of dragons against them.

You’ll get the chance to explore vast cities, including all of Skyrim DLC, with a lot of mods available for the game through the Steam Workshop.

Never a dull moment in this offline PC game, and after hundreds of hours in this game, you will not feel like you’ve discovered everything.

Important features:

  • Interesting RPG adventures
  • Enhanced graphics
  • Epic combats

⇒ Get The Elder Scrolls V: Skyrim from G2A

3. Assassin’s Creed Odyssey – Ancient Greece setting

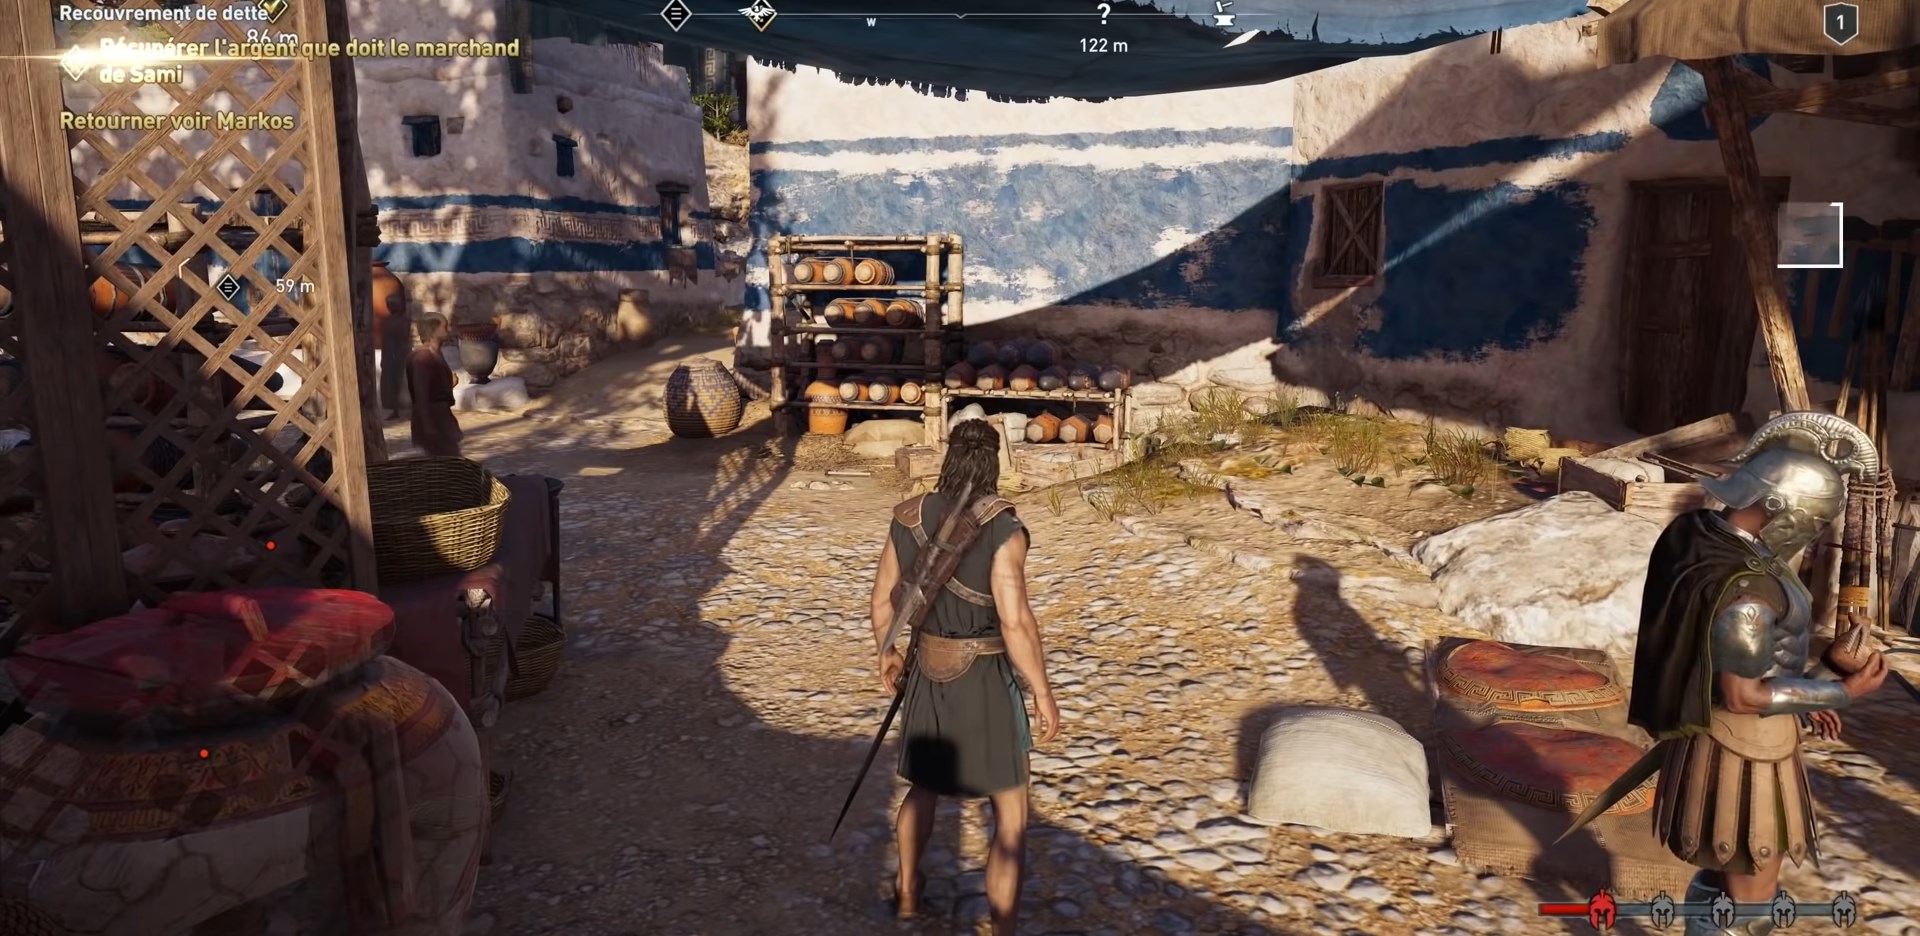
Assassin’s Creed Odyssey is one of the most exciting games if you are passionate about Ancient Greece.

You can become a living legend from an outcast and embark on an odyssey to uncover secrets from your character’s past and change Ancient Greece’s fate.

You can equip different weapons, increase your level through missions, choose whatever playstyle you wish, and most importantly, slay enemies in hand-to-hand combat.

It is pretty hard to get bored of slicing through your enemies with a sword or hurling spears at them, so we recommend picking this game up.

Important features:

  • Bonus quests
  • Six individual episodes
  • Pirates attacks

⇒ Get Assassin’s Creed Odyssey from Green Man Gaming

4. Metro Exodus – Sam’s Story – Ex US marine gameplay

If you need a great Steam offline PC game, the incredible story of Sam will keep you captivated for hours.

You will discover the life of a former US marine who wants to return home. As a player, you will forge Sam’s path through the sandbox survival landscape of Vladivostok while taking a brand new journey through Russia.

The game is set in a post-apocalyptic world after a nuclear accident. Along humans live giant scary creatures as well as mutants.

It is one of our top recommended classic offline games for PC.

Important features:

  • Two endings
  • Multiple creatures
  • Great graphics

⇒ Get Metro Exodus – Sam’s Story from G2A

If you’re searching for a good price deal for Metro Exodus – Sam’s Story, you should know that you can also find it available on Kinguin.

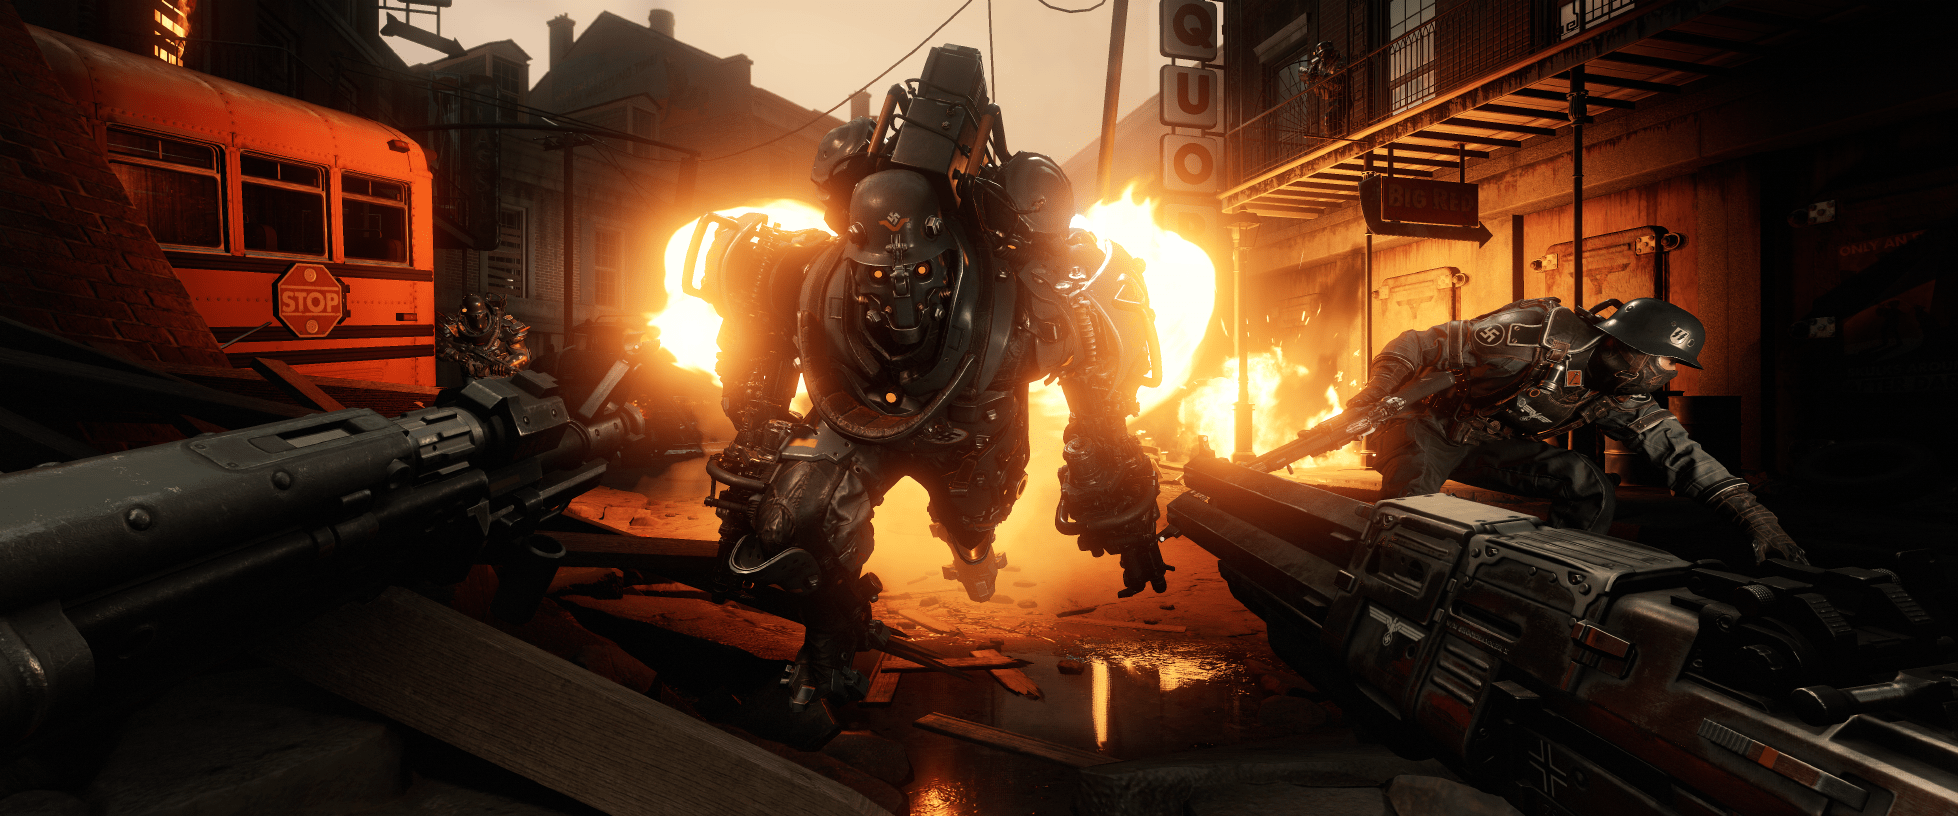
5. Wolfenstein II: The New Colossus – long-running PC game series

Wolfenstein II: The New Colossus is the latest addition to the franchise that picks up from where the New Order left off.

This first-person person blaster features an intriguing alternative history story and all the intense Nazi-busting action that made the series great. It also has an alternative history story with plenty of twists and turns.

Even though it’s based in 1961, the developers have given the game a sci-fi feel by including futuristic weaponry, which players can mix with dual-wielding, and robotic enemies to mow down.

Blazkowicz even makes a trip to Venus! New Colossus also looks frighteningly real with photo-realistic graphics that bring the game to life that much more.

Important features:

  • Great graphic
  • Stabbing, shooting, and killing
  • Great Nazi scenery

⇒ Get Wolfenstein II: The New Colossus from G2A

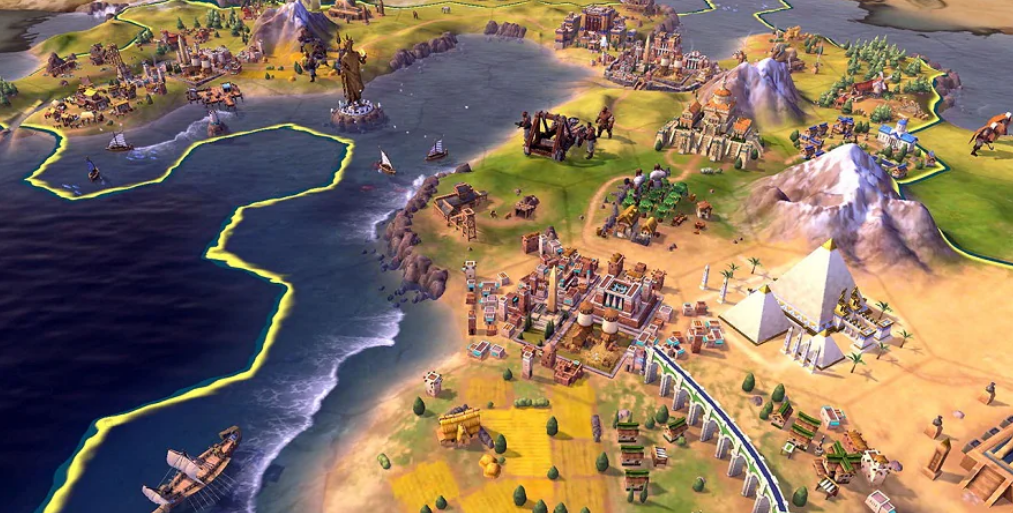
6. Civilization VI – Civilization is a turn-based game

Civilization VI isis perhaps the most fully-featured addition to the franchise to date. You can run the game on Windows and Mac OS X platforms.

Perhaps the most notable is its new city-building system that enables players to build buildings in various types of outer districts.

Civ VI has a modified tech tree that’s much more integrated into the actual geographical terrain of a player’s nation, which adds more depth to the gameplay.

Additionally, the game’s wide range of gameplay systems adds considerable variety to its gameplay. Furthermore, the Civilization VI: Rise & Fall expansion pack has even more dynamic layers to the game.

Important features:

  • Improved diplomacy
  • Rebalanced Culture
  • Unlockable government policies

⇒ Get Civilization VI from G2A

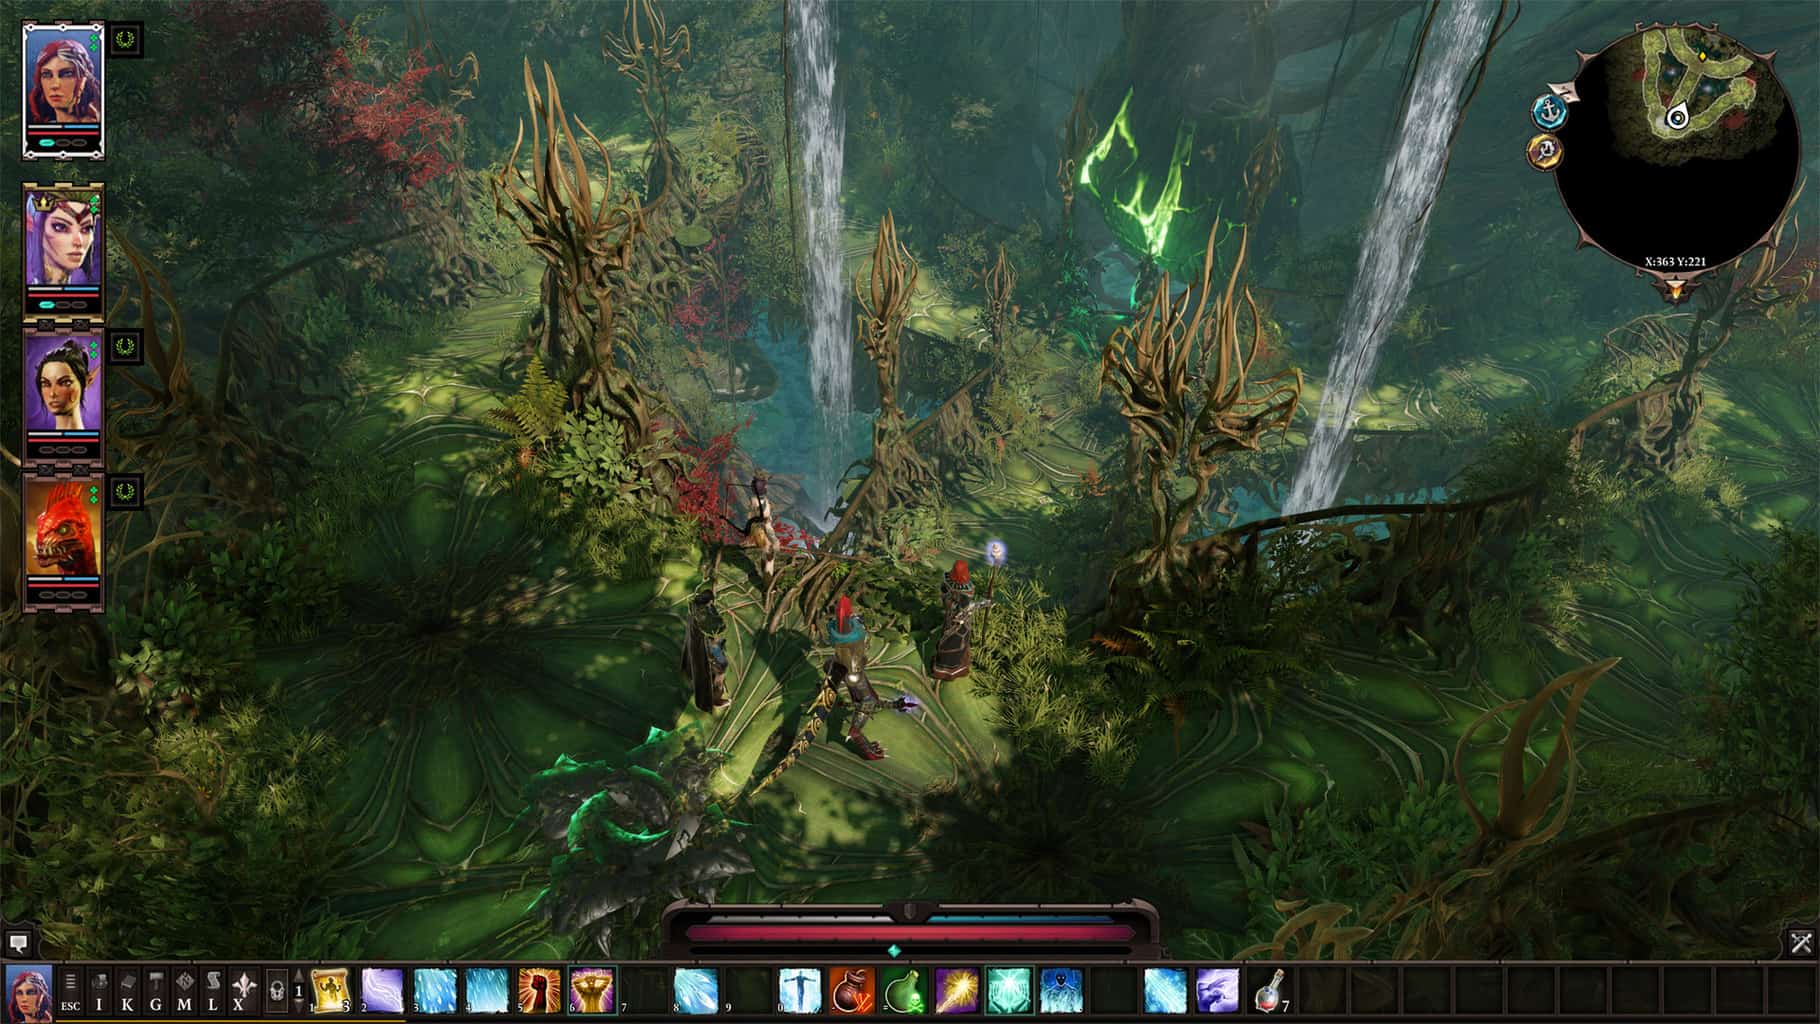
7. Original Sin II – One of the decade’s best games

pc offline games

Divinity: Original Sin II is a single-player and multiplayer PC offline game revitalizing the RGP genre on Windows.

It is a fantasy RGP set in the immersive world of Rivellion that players can freely explore. The game features a deep turn-based combat system that gives its battles unprecedented tactical scope.

This flexible RPG enables players to create their own fully customized characters and even design their own scenarios with the Game Master Mode.

Lastly, it also has terrific music and sparkling graphics; few other RPGs let you do as much as possible in Original Sin II.

Important features:

  • Solo and multiplayer
  • Arena skill test
  • Personalize your character

⇒ Get Original Sin II from G2A

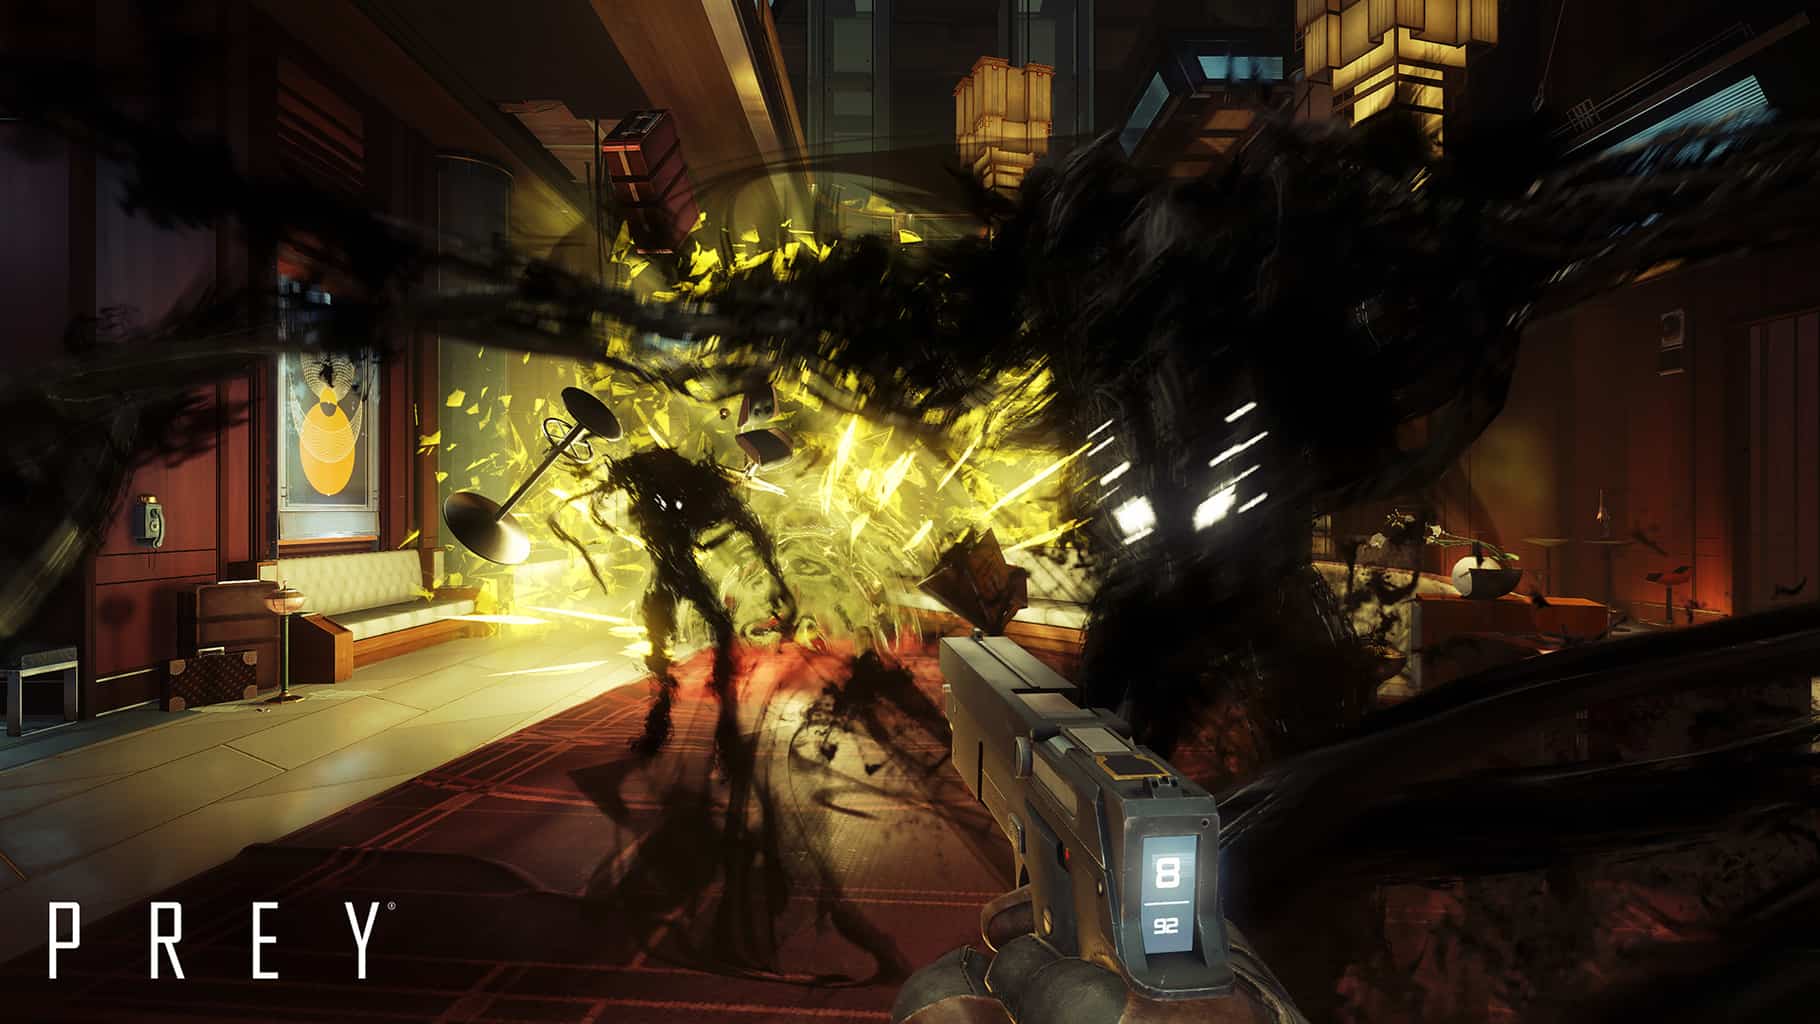
8. Prey – Futuristic single-player game

pc offline games

Prey is a futuristic single-player first-person shooter PC offline game set on a space station orbiting the moon in 2032. It is almost like BioShock in space that imitates that game’s formula within the Art Deco space station of Talos 1.

It stars Morgan Yu, who survives an alien outbreak aboard Talos I. Unfortunately, he does not remember much before the attack and needs to find a way to defeat the Typhon.

The Mimics are shapeshifting Typhon aliens that Morgan must annihilate within Talos 1, and those four-legged spiders are a great addition to the game. You never quite know exactly where they’ll pop out from.

Overall, this game has an expansive setting for players to explore. You’ll also enjoy seriously tense combat and a variety of playing styles.

Important features:

  • Singular setting
  • Unimaginable threat
  • Sci-fi Thriller

⇒ Get Prey from GOG.com

9. Tides of Numenera – Story-driven gameplay

pc offline games

Tides of Numenera is a successor to the classic Planescape: Torment RPG. TIt is based on the science fantasy tabletop RPG series designed by Monte Cooke.

The game is based in the very distant future in a Ninth World age when countless civilizations have risen and fallen before leaving behind remnants of their technologies, which are otherwise Numenera (or magic).

Numenera features an epic story that gives wide choices for players and has plenty of replayability value.

In this game, you’ll discover a genuinely absorbing RPG when you get into it.

⇒ Get Tides of Numenera from GOG.com

10. The Witcher 3 – Nice online and offline gameplay

pc offline games

This highly addictive game features a wide array of weapons and creatures that you need to defeat to go to the next level.

In case you didn’t know, the story was inspired by the famous book series written by Andrzej Sapkowski. The author was also inspired by east-European folklore when he wrote the books.

You will slay beasts, make pacts, solve mysteries, and chase enemies on your horse as one of the mutated humans called the Witchers.

You will enjoy playing as Geralt, one of the best warriors in his guild.

Lastly, depending on the decisions you make, there are 36 possible endings, so choose wisely.

Important features:

  • Goodies pack
  • Blood and wine renders
  • Smooth user interface

⇒ Get The Witcher 3 from GOG.com

When online games fail to establish a connection, you can rely on the extensive catalog of offline games.

For offline PC games, you have to make sure that you have every component fully downloaded, and they also have to be single-player games.

For more details on how to play downloaded Switch games without an internet connection, take a closer look at our dedicated guide.

However, if online games are your thing, then check out these 50 best browser games.

What to play on Game Pass for old school gamers

Don’t know what to play on Game Pass? With literally hundreds of games across just about every genre you can think of, it can be tough to know where to start. But we’ve got you covered with these Game Pass recommendations for all of you old school gamers out there. The games that follow don’t just rely on nostalgia; rather, they take classic game design and give it a good dusting-off to make it shine again. These Game Pass titles prove once and for all that great games never really die.

Battletoads

Watch the trailer on YouTube

This isn’t an old game – in fact it’s quite new, having released in August 2020 – but gamers who fondly remember Rare’s Battletoads franchise from the 8- and 16-bit days will no doubt fall in love with it all over again in this reboot. (Gamers with an Xbox Game Pass membership are also treated to more Battletoads in the 2015 compilation Rare Replay). The game features up to four-player cooperative play and a hand-drawn, cartoony visual style.


Black

This 2006 first-person shooter, released for both PS2 and Xbox, was the spiritual predecessor to Bodycount. It was listed at no. 99 in IGN’s Top 100 Shooters in 2013. While developing the game Criterion stated that they wanted to “do for shooting what Burnout did for racing – tear it apart.” Black indeed did make a lasting impression, and is remembered today as one of the best shooters of its console generation.

Command & Conquer Remastered Collection

Watch the trailer on YouTube

A remaster of the first two Command & Conquer games with sound and graphical enhancements as well as bonus content. Otherwise, the games are pretty much the same real-time strategy classics with only minor tweaks. It includes the The Covert Operations, Counterstrike, and The Aftermath expansions as well as additional missions from the PlayStation and N64 ports.


Double Dragon Neon 

Watch the trailer on YouTube

Double Dragon Neon is at once a reboot of the classic beat ‘em up franchise and an homage to it. It is described as “a very western adaptation” of Double Dragon, though it strives to retain the personality of the classic entries. Series creator Yoshihisa Kishimoto was a consultant during the game’s development. The core gameplay features familiar mechanics, with some refinements of course. Double Dragon Neon’s 2012 release coincided with the 25th anniversary of the series.


The Elder Scrolls III: Morrowind

This massively open world roleplaying phenomenon was something of a game changer when it came onto the original Xbox scene in 2002. With its thoroughly freeform gameplay philosophy and almost unprecedented breadth of scope, few gamer – and even fewer console gamers in particular – had ever seen anything like it. While the game isn’t perfect to say the least ( it is a Bethesda game, after all), it was a genre-redefining title in its time, and one of the original Xbox’s greatest classics.

Fallout

Watch the trailer on YouTube

Set in a post-apocalyptic, retro-futuristic world, the original Fallout is remembered today as a PC roleplaying classic and a spiritual successor to the 1988 sci-fi open world roleplaying game Wasteland. It was among the first games to explore the idea of lending the player moral ambiguity in how they choose to interact with the world and its NPCs. Which, of course, plays a part in shaping the impact the player makes upon the game world with his/her decisions. This is something which Bethesda has carried over to more recent installments of the Fallout franchise.


Grim Fandango Remastered

Watch the trailer on YouTube

This 1998 adventure game has been hailed as deserving a place among the greatest video games of all time. It doesn’t come as much of a surprise when you consider the game’s development pedigree. It was published by Lucas Arts – they that brought us such adventure game classics as Maniac Mansion, Full Throttle, and the Monkey Island series – in partnership with Tim Shafer and Double Fine Productions (think Psychonauts).

The game is often held as representative of video games as an art form, so much so that it was included in the Smithsonian Institution exhibit “The Art of Video Games” in 2012.


Rare Replay

You could think of this as a “Rare’s Greatest Hits” compilation, and that is saying something for one of the most storied game development studios in history. The 30 games featured in this amazing collection span many hardware generations from the ZX Spectrum to the Xbox 360. The games are mostly preserved in their original glory with only minor edits in some instances. A few of the standouts in this compilation are R.C. Pro-Am, Battletoads, Killer Instinct Gold, Banjo Kazooie, and Perfect Dark.


TMNT: Shredder’s Revenge

Watch the trailer on YouTube

Here we have another modern reboot of a beloved classic brawler, and old school gamers who got to experience the TMNT games of the NES days will love it. Shredder’s Revenge is an excellent throwback to those beat ‘em ups of yore with its side-scrolling action and pixel art graphics style, not to mention co-op for up to six players.


Wrap up

We hope you enjoyed that little trip down memory lane. Although the games featured here were really a mix of the old and the new. Are any of your favorites featured here? Be sure to let us know about your experiences with these games in the comments.

It’s good to see games for everyone being offered on Game Pass, and it’s one of the things that makes Game Pass the best gaming service out there right now. If you don’t already have a subscription to Xbox Game Pass, you can sign up here. Right now you can get your first month for only $1. Head over to the Game Pass FAQ page to learn more. And don’t forget to check out our other “What to play on Game Pass” posts to see more Game Pass recommendations.

Featured image courtesy of mixed-news.com. 

Tap to Access Your Instagram Account Scam: How to Avoid It

Internet scams are rampant today. Several users complain about falling for different kinds of scams or fraud online. However, people can fall victim to these online threats in several ways.

For instance, we have phishing, social media scams, online banking fraud, and lots more. Furthermore, the social media scam is one of the most common online scams.

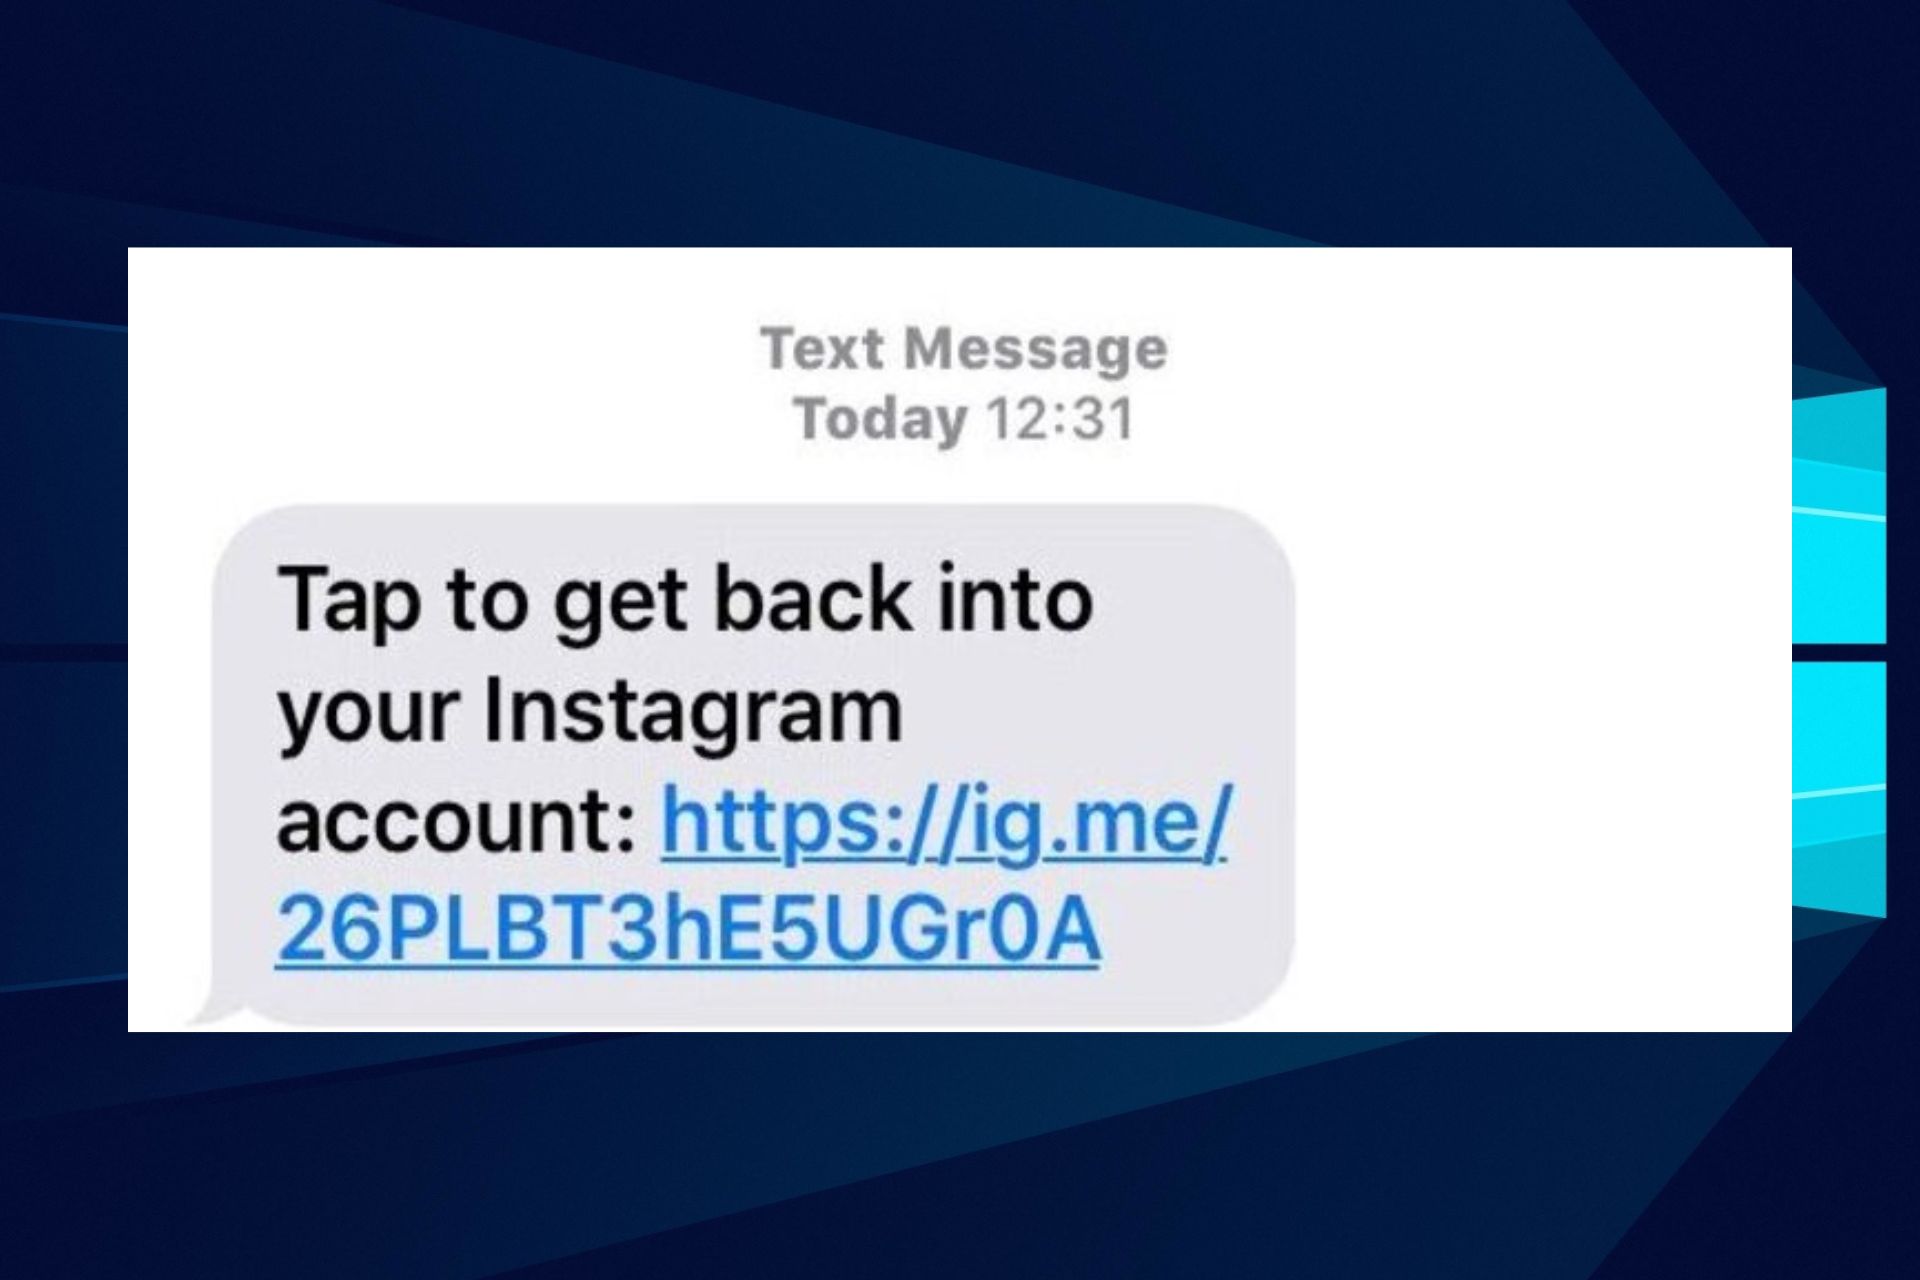
The scammer uses various means to gain access to the victims, after which he steals vital information. Users frequently complain about the Tap to access your Instagram account scam. This kind of scam can be referred to as Instagram phishing.

Furthermore, phishing scams work in a way that the user gets messages or pop-ups that urge him to take action, like using account details.

The scammer posts a pop-up that requests you to tap to access your Instagram account scam from Facebook. Requests like these are not always from trusted sources and can lead to you losing your information or account.

Why did I get a tap to access your Instagram account message?

Users can get the Tap to access your Instagram account message from any platform accessible to the scammer. Platforms like Facebook, websites, and other social media platforms are perfect hideouts for these scammers to post deceptive messages.

However, you get this message because an intruder is trying to get you to tap the link in the message. Afterward, you’ll be asked to input your login information which will give them access to your account.

It happens because the link in the message has been rigged and exposes any activities you do through the link to the scammer.

Hence, whenever you get the tap to access your Instagram account message, it is not to be trusted and can cause immense loss like account hijacking and information theft.

How do Instagram accounts get hacked?

  • Through malicious software: Hijackers can send messages rigged with malicious software to your device, e.g., the tap to access your Instagram account scam. However, the moment you tap the link, it sends the software w your device, creating a loophole for the intruder to enter.
  • In-app scams: Online scammers can take over your account through in-app scam tricks. It involves another Instagram user sending a message asking another user to visit the link in the message. However, people mostly get tricked into this kind of scam when they get offered a certain sum of money.

There are several other ways hijacker’s can take over your Instagram account.

Quick Tip:

To avoid and get rid of cyberattacks, it’s important to use a sturdy security utility. TotalAV has great web filtering capabilities that can detect scams and phishing attempts.

The tool combines multiple types of detection technologies to alert you even about previously unknown threats. It’s a great overall antivirus utility that protects against malware, ransomware, and more.

TotalAV

Remove all vulnerabilities and avoid online scamming with this smart antivirus!
Free Trial Visit Website

What can I do if I get the tap to access your Instagram account scam message?

1. Ignore the message

The first thing to do whenever you get the tap to access your Instagram account scam message is to ignore it. Tapping on the message can instantly leave you at the threat of being scammed or hijacked.

2. Report the account

  1. Tap the three dots above the post.
  2. Tap Report.
  3. Follow the on-screen instructions.

Whenever you get malicious messages from an in-app scammer, you should report such a user so the account can be blocked.

3. Enable two-factor authentication

  1. Launch Instagram on your device and click settings.
  2. Choose Privacy and Security and select Two-factor Authentication.
  3. Click to use either the Text message or an authentication app.
  4. Input your details and save.

Two-factor authentication allows you to set more than one checkpoint for your account before you can access it. It helps protect you from online threats to gain access to your account.

Can someone hack my Instagram if I have two-factor authentication?

Two-factor authentication gives you additional protection for your accounts. It helps you get safe from phishing and hijacking. However, it is almost impossible to hijack your Instagram account without two-factor authentication.

How can you tell a scammer on Instagram?

Instagram will never ask users to click a link to another page while in the app. Hence, any message stating that you should click a link to win treasures or money is a scam.

Likewise, scammers always leave a scent of mischief in their messages. So, you’ll be able to tell a scammer by patiently checking the information sent and the credibility of such messages.

There are several other online scams users can encounter. Hence, we recommend that you check out our article on some and how you can protect yourself against them.

Conclusively, users can read our article about the best anti-exploit software to protect your browser.

Leave your questions and suggestions in the comments section below. We’d like to hear from you.

Free to play sensation MultiVersus Season 1 to launch on August 15

Originally set to launch on August 8, MultiVersus Season 1 will now be releasing on Monday, the 15th after developer Player First Games chose to delay the launch by one week.

With Season 1 comes an all-new Battle Pass, the pre-season Battle Pass having been extended to the new Season 1 launch date. Season 1 promises to see the addition of new game modes and content. Morty (from the animated show Rick and Morty) will be the newest addition to the brawler come August 23.

MultiVersus is a free-to-play crossover fighting game from Warner Bros., in the vein of Nintendo’s Super Smash Bros. series. MultiVersus’ enviable character roster currently includes Batman, Superman, Harley Quinn and Wonder Woman from the DC Universe; The Iron Giant from the classic 1999 animated film; Arya Stark from the Game of Thrones universe; Bugs Bunny and Taz the Tasmanian Devil from Looney Tunes; and many more.

MultiVersus
MultiVersus
Developer:
Warner Bros. Games
Price:
Free

Following its July 19 open beta preview release, the game’s popularity has exploded to make it the most played free-to-play title in both the U.S. and U.K. in early August. This means it beat out games like Fortnite and Fall Guys.

Have you had a chance to delve into the world of MultiVersus yet? If so, what do you think of the game? Let us know down in the comments.

Featured image courtesy of vg247.com. 

How to disable disk checking in Windows 10 or Windows 11

Disk checking is your PC’s way to examine your Windows HDD for errors. If it finds any mistakes with your hard drive, it tries to correct them immediately. However, for a variety of reasons—primarily because of its long completion time—some users prefer to skip the disk checking process altogether.

In this article, we explain how you can disable the disk checking option once and for all. So, let’s dive in right away.

How to disable disk checking on Windows 10 or Windows 11

Open the Command prompt

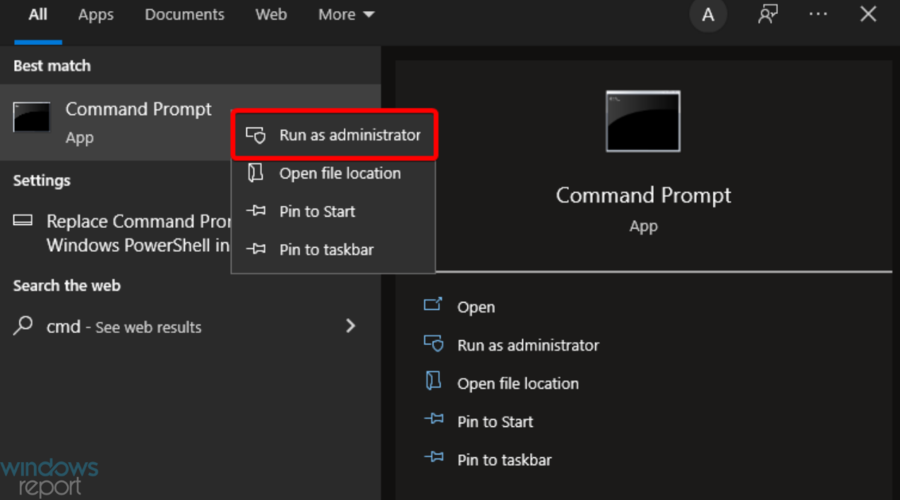
Head to the Start menu search bar, type in ‘cmd,’ and run the Command prompt as administrator.

Enter the command to disable disk checking

Now type in the following command in your drive and hit Enter:
chkntfs /x Drive:
‘Drive’ here represents the drive you’d like to exclude from your scan.

Execute the command

As soon as you execute the above command, your disk checking will be disabled.

Disable CHKDSK using the Registry

If the above method doesn’t work, you can try your luck with the Windows Registry. The registry is a database of information about your PC’s different software and hardware settings.

Unsurprisingly, you can also use the Registry Editor for doing a host of other things; and in this case, this means you can disable your disk checking through it as well. Here’s how you can get started.

  • Head to the Start menu search bar, type in ‘registry editor,’ and select the best match.
  • In the Registry Editor, expand the HKEY_LOCAL_MACHINE key and click on SYSTEM > CurrentControlSet > Control.
  • From there, click on the Session Manager and double-click on BootExecute.
  • Set the Value data in the following dialog box to autocheck autochk k:Drive (where Drive is the drive you’re canceling the ) and click OK.

Disk checking will be disabled as soon as you complete the above steps. And, if you’d like to enable it again in the future, then all you’ve to do is type in autocheck autochk * in the value data exchange again, and everything will be back to normal.

Disabling disk checking on Windows

Running disk checking, or CHKDSK, is a handy way to look for and care for your PC’s health. However, the process takes its time, so if you’re in a hurry, you can follow the above methods to stop any disk checking procedures you might’ve enabled in the first place.

How to use a color filter on Windows 10 or Windows 11

Bored with the dull colors of your PC’s interface? No problem. With the color filter available in your Windows operating system, you can spice things up in a heartbeat.

In this article, we look at the different ways you can use a color filter on your PC and make your Windows experience richer and bright. So, let’s get started.

How to use the color filter on Windows 10

To change the color palette of your screen by using the color filter on your Windows 10, follow the steps below:

  • Head to the Start menu search bar, type in ‘settings,’ and select the best match.
  • In the Settings menu, select Ease of Access > Color filters.
  • Then, toggle on the switch for Turn on color filters.
  • Select a color filter from the menu and pick the filter you’d like to set from now on.

That’s it. The color filter settings will be enabled on your PC.

How to use color filter on Windows 11

You can set up the color filter on your Windows 11 through the Accessibility settings on your PC. Here’s how.

  1. Head to the Settings menu by pressing the Windows key + I icon. Alternatively, click on the Start menu search bar, type in ‘settings,’ and select the match.
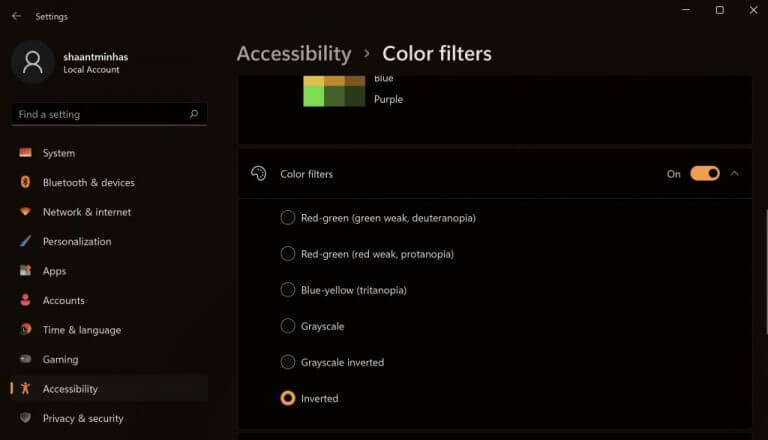
  2. From the Settings menu, click on the Accessibility option. From there, select Color filters.
  3. In the Color filters settings, toggle on the switch for Color filters. Then click on its tab, and you’ll get multiple filter options to pick from.
  4. Select any radio boxes to pick the filer you’d like to use, and your filter will get applied immediately.

color filters

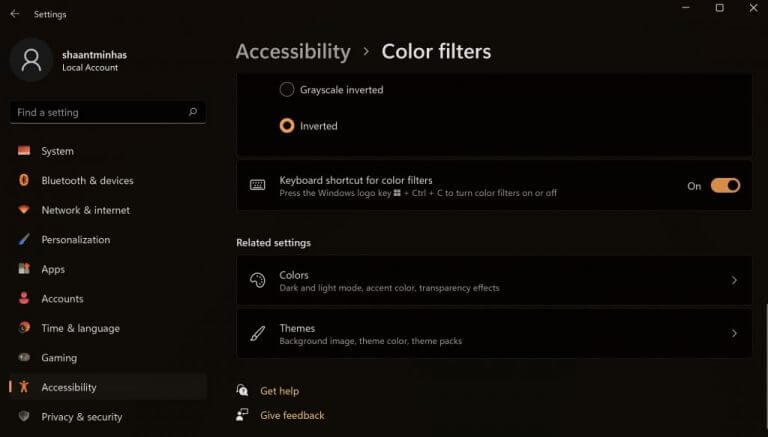
As you can see from above, I’ve toggled on the Color filters tab and picked the Inverted scheme from the various color scheme options available to me. Moreover, you can also enable the keyboard shortcut to manage your color filters from right there. Do that by toggling the switch for “Keyboard shortcut for color filters”.

color filters settings

Enabling the color filter on Windows 11

With the color filters enabled, you can easily change the color settings of your PC, thereby making your settings more streamlined and practical.

Sonic the Hedgehog joins Fall Guys in the game’s latest crossover, “Bean Hill Zone”

Fall Guys’ newest crossover event is now live through the 15th. And it features no less a video game icon the Sonic the Hedgehog.

The crossover event is set within a new level called “Bean Hill Zone,” which is filled with all kinds of nods to Sega’s legendary mascot. Sonic is joined by other characters from the franchise including Eggman, Tails, Knuckles, and Super Sonic.

Bean Hill Zone features a new play mode in which players collect golden rings for points which can be traded for rewards like new skins, outfits, nameplates and more.

This isn’t the first time Sonic has appeared in Fall Guys—a Sonic skin was made available at the start of Fall Guys Season 2 back in 2020.

Featured image courtesy of egames.news. 


How to get started with Microsoft Teams Chat to connect with friends and family on Windows 11

Microsoft Teams Chat gives personal Microsoft account users quick and secure access to connect with friends, family, and even co-workers. You may recognize Teams Chat as the purple “Chat” icon that appears on your Windows 11 taskbar.

Here’s how to get started with Microsoft Teams Chat on your PC.

Microsoft Teams Chat Setup

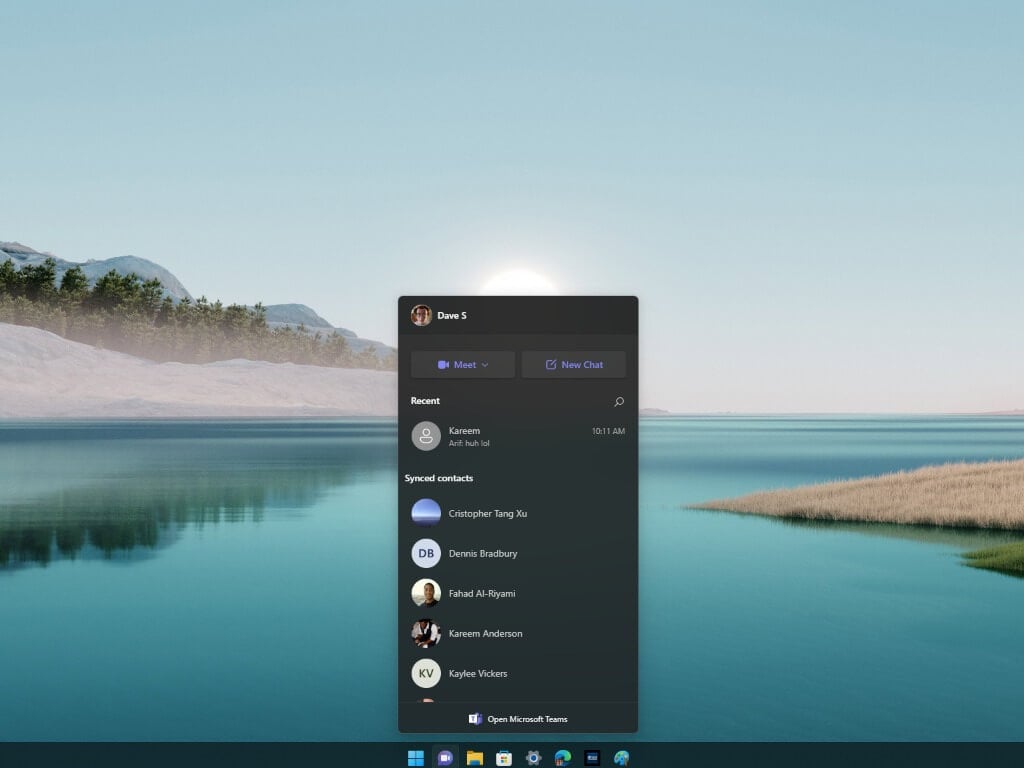
In order to get started using Teams Chat, click the purple chat icon on your taskbar.
MICROSOFT TEAMS CHAT

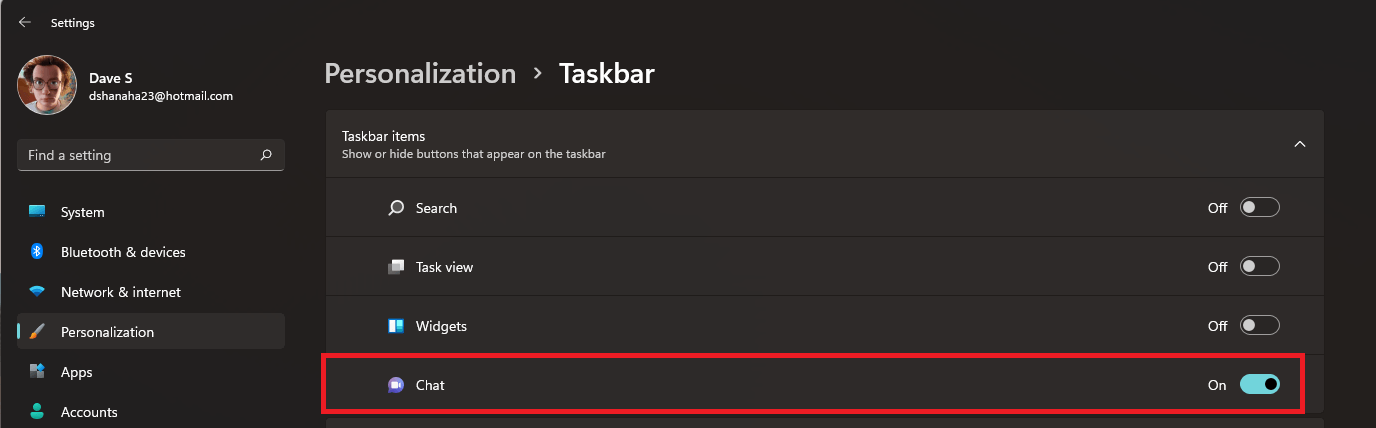
If you don’t see the chat icon, you will need to turn it on in Windows Settings. Here’s what you need to do.

1. Go to Settings > Personalization > Taskbar > Taskbar Items
MICROSOFT TEAMS CHAT
2. Toggle the Chat item to the “On” position

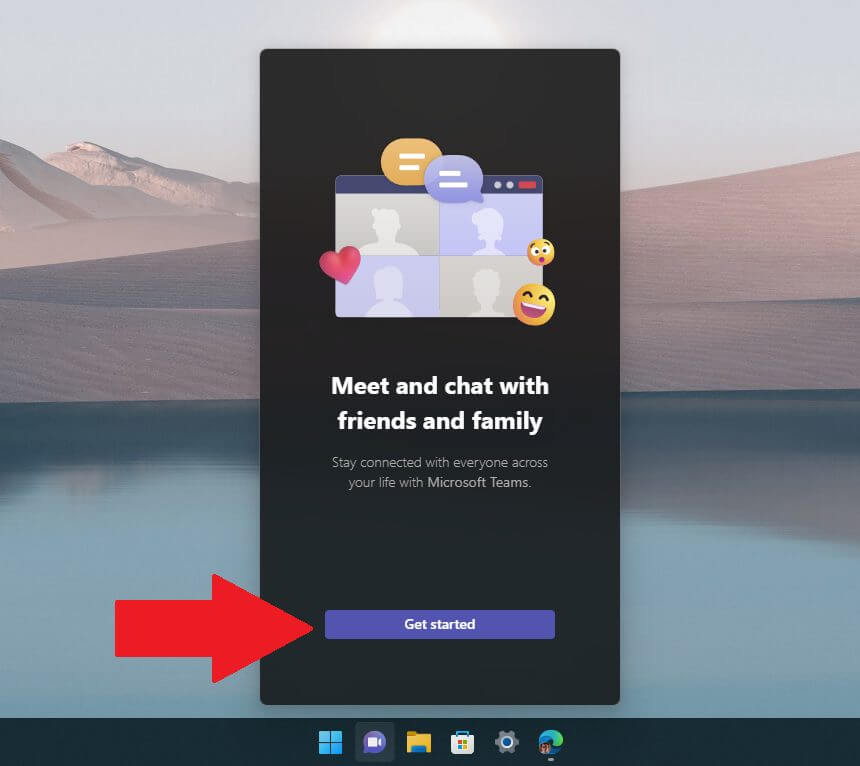
Now that Chat is enabled on your taskbar, click it and a window will pop up. Click Get started.

microsoft teams chat

After clicking Get started, The Microsoft Teams Chat app will open and guide you through the process of linking your personal Microsoft account or creating a Microsoft account if you don’t already have one.

There are a couple of caveats to consider before using Microsoft Teams Chat:

1. In order to chat with your friends and family on Teams Chat, everyone will need to have a personal Microsoft account, no exceptions.
2. You will need to link a personal mobile phone number to your Teams account to use the Chat functionality.

Hopefully, Microsoft will change these requirements in the future to make chatting with your friends and family a whole lot easier.

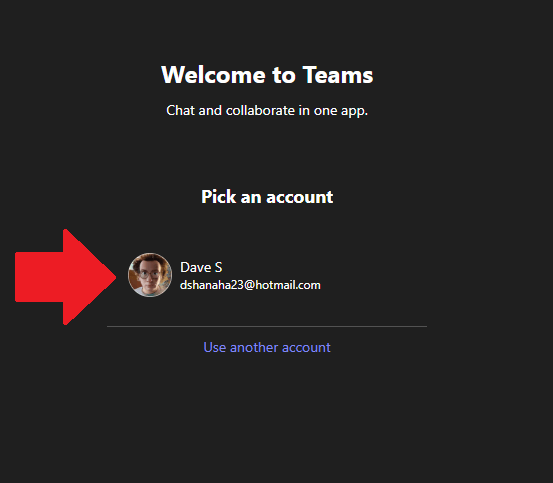
After you click Get started, the last part of the setup is to pick your Microsoft account.

microsoft teams chat

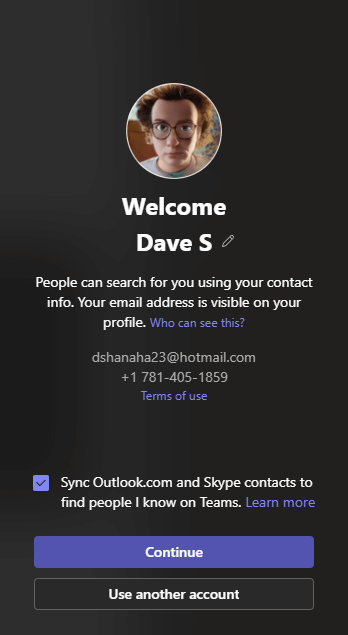
If you need to create a new Microsoft account, you can also pick the name you want to go by in Teams Chat. If you click your personal Microsoft account, you may see a similar welcome screen displaying your Microsoft account email address and phone number.

microsoft teams chat app

Click Continue or Use another account to get started using the app. You can also click to sync your Outlook and Skype contacts to find people you know on Teams automatically.

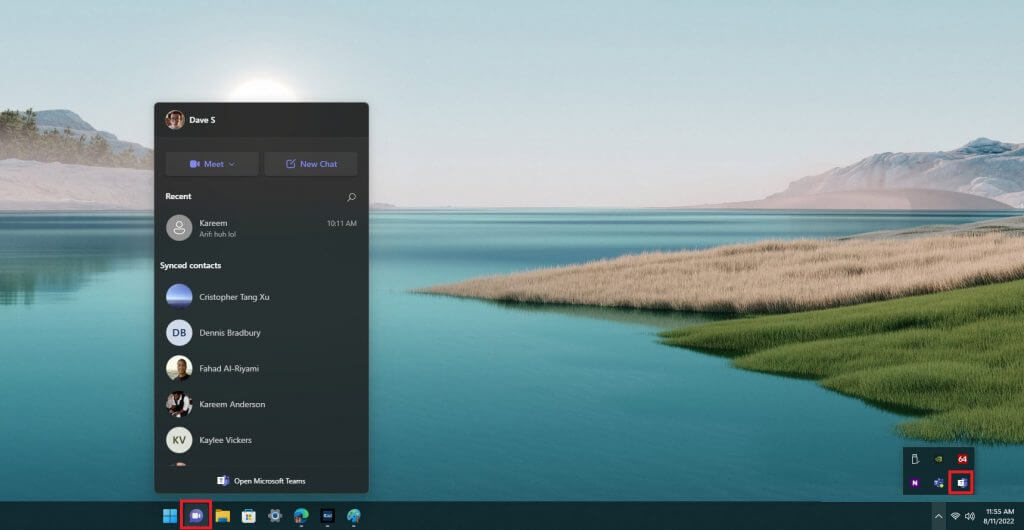
When you close the Teams Chat app, it will automatically run in the background on your PC. If you want to open the app again, you can always click the Chat icon on your taskbar for easier access.

microsoft teams chat

Start a personal Teams Chat

Open the Teams Chat

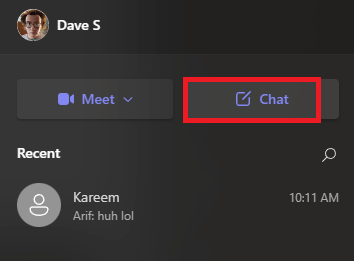
To start a chat with someone, open the Teams Chat by clicking the icon on your taskbar and click Chat.

Enter a name, etc.

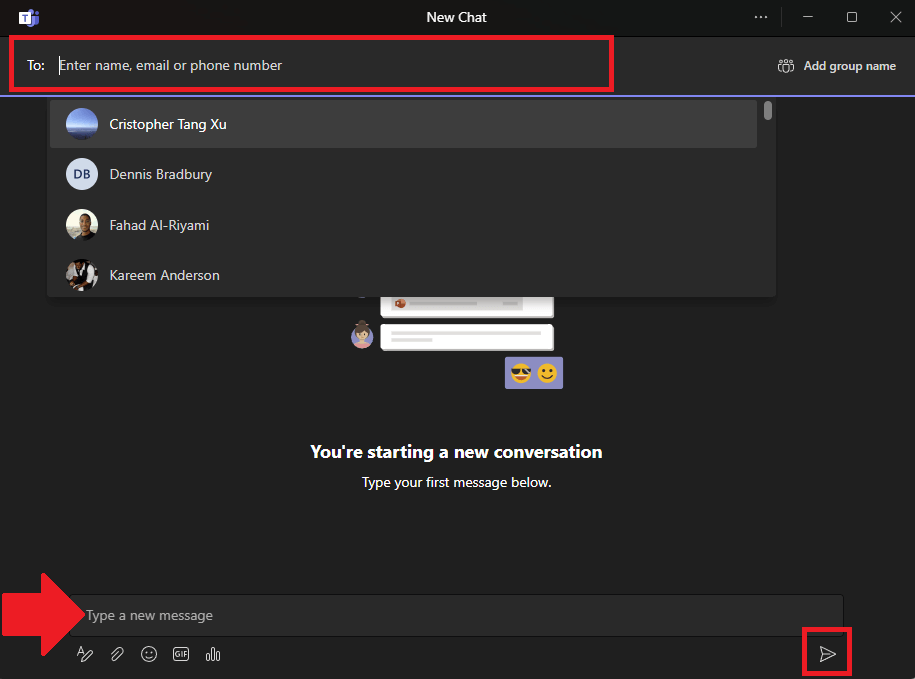
In the new Chat window, you can click the To: field at the top of the window to enter the name, email, or phone number of the person you want to start a new chat with.

Teams will search for the person, but they must have a Microsoft account linked to Teams in order for their name to appear in Teams contact search.

MICROSOFT TEAMS CHAT

You can add additional names, email addresses or phone numbers to add more people to the chat as needed.

Start chatting

To start chatting, click the Type a new message text entry box and type your chat message. When you are finished with your message, click the Send (paper airplane) icon in the lower right to send your message.

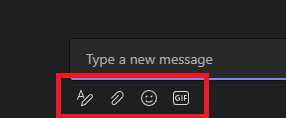
The small toolbar located underneath where you type your messages contains some extra tools to use in chat. Here’s what each tool does.

MICROSOFT TEAMS CHAT
1. Format: Clicking this will allow you to change the color, size, or style of the texct that you send in your chat messages.

2. Attach files: Here you can attach files that will be sent to everyone that is in the chat.

3. Emoji: Clicking this brings up an emoji selection screen to search for and to send emojis in chat.

4. GIF: All Microsoft Teams GIFs are powered by GIPHY. Clicking this opens an animated GIF selection. This is useful for sending GIFs or meme reactions.

When you are done chatting, just close the chat window, and the chat will be saved so you can continue where you left off later.

Additionally, you can have multiple chats going simultaneously and each will be listed each time you click the Chat icon on your Windows taskbar.

Use Meet for video chat

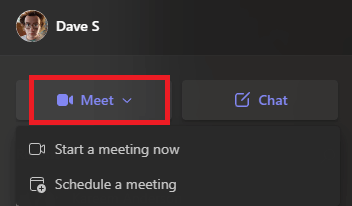
If you prefer to chat with a friend or family member face-to-face, you can start a video chat right away or schedule it for a later time right from the Chat icon too. Here’s what you need to do.

1. Click the Chat icon on your Windows 11 taskbar
2. Click Meet
microsoft teams chat3. Next, a drop-down menu will appear with two options: Start a meeting now and Schedule a meeting. Pick which options you would like to use for your video chat.

That is a certainly a handy option to have right from your desktop!

Microsoft Teams for personal use app

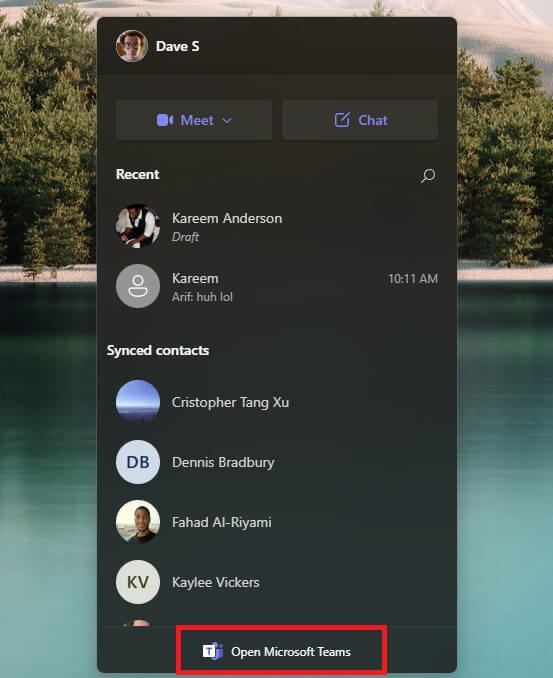
One of the coolest things about using the Chat button on the Windows 11 taskbar is that you are just a few clicks away from opening the Microsoft Teams app for a more robust app experience.

If you want to open Microsoft Teams for personal use directly from the Chat app, here’s what you need to do.

1. Click the Chat icon on your Windows 11 taskbar.
microsoft teams chat
2. Click Open Microsoft Teams at the bottom.

Once Microsoft Teams for personal use opens, you will be able to access extended features, such as the calendar to check personal and work schedules, and add tabs with extra features, such as creating and sharing custom polls with your chat group.

Do you use Microsoft Teams Chat on Windows 11? Tell us why or why not in the comments.

uTorrent Web Browser: Here’s Everything You Need to Know

uTorrent is one of the most popular torrent clients in the world, but did you know that you can use uTorrent in your web browser?

You may download torrents from the internet using uTorrent Web, a torrent client that runs on your browser. Compared to other well-known torrenting clients now available on the market, the uTorrent improved experience is unique.

The web version of the torrent reveals features that are useful to intermediate and advanced users.

That’s right, and in today’s article, we’ll show you how to use uTorrent properly from your web browser.

Is uTorrent a web browser?

uTorrent Web is not a browser, but we understand why many people may mistake it for one. It integrates with most browsers (Opera One, Chrome, Firefox, etc.) and acts like your typical Chrome extension will work, for instance.

It is triggered automatically by your browser when you need to download or play torrents found on the internet.

However, that is as far as it goes; you do not use it to surf the web as you would a browser, or open your emails, etc.

Although uTorrent Web should work with any web browser, for best performance, we recommend using Opera One.

Being lightweight, it’s perfect for any resource-intensive tasks such as streaming. Speaking of steaming, it has a pop-out video player, so you can watch videos while working on other tasks.

Regarding your privacy, Opera One has a built-in VPN. Do note that it is free, and it offers unlimited bandwidth.

An ad blocker is also available, so you won’t have to deal with ads anymore. Additionally, tracking protection is available, and it helps to speed up webpage loading times.

As for availability, Opera One is available on all desktop and mobile platforms, and with its low resource usage and focus on privacy, it’s a perfect browser for using uTorrent Web.

Opera One

Eager to start using uTorrent? It fully integrates with Opera One, so don’t hesitate to download this browser!

How do I open uTorrent in browser?

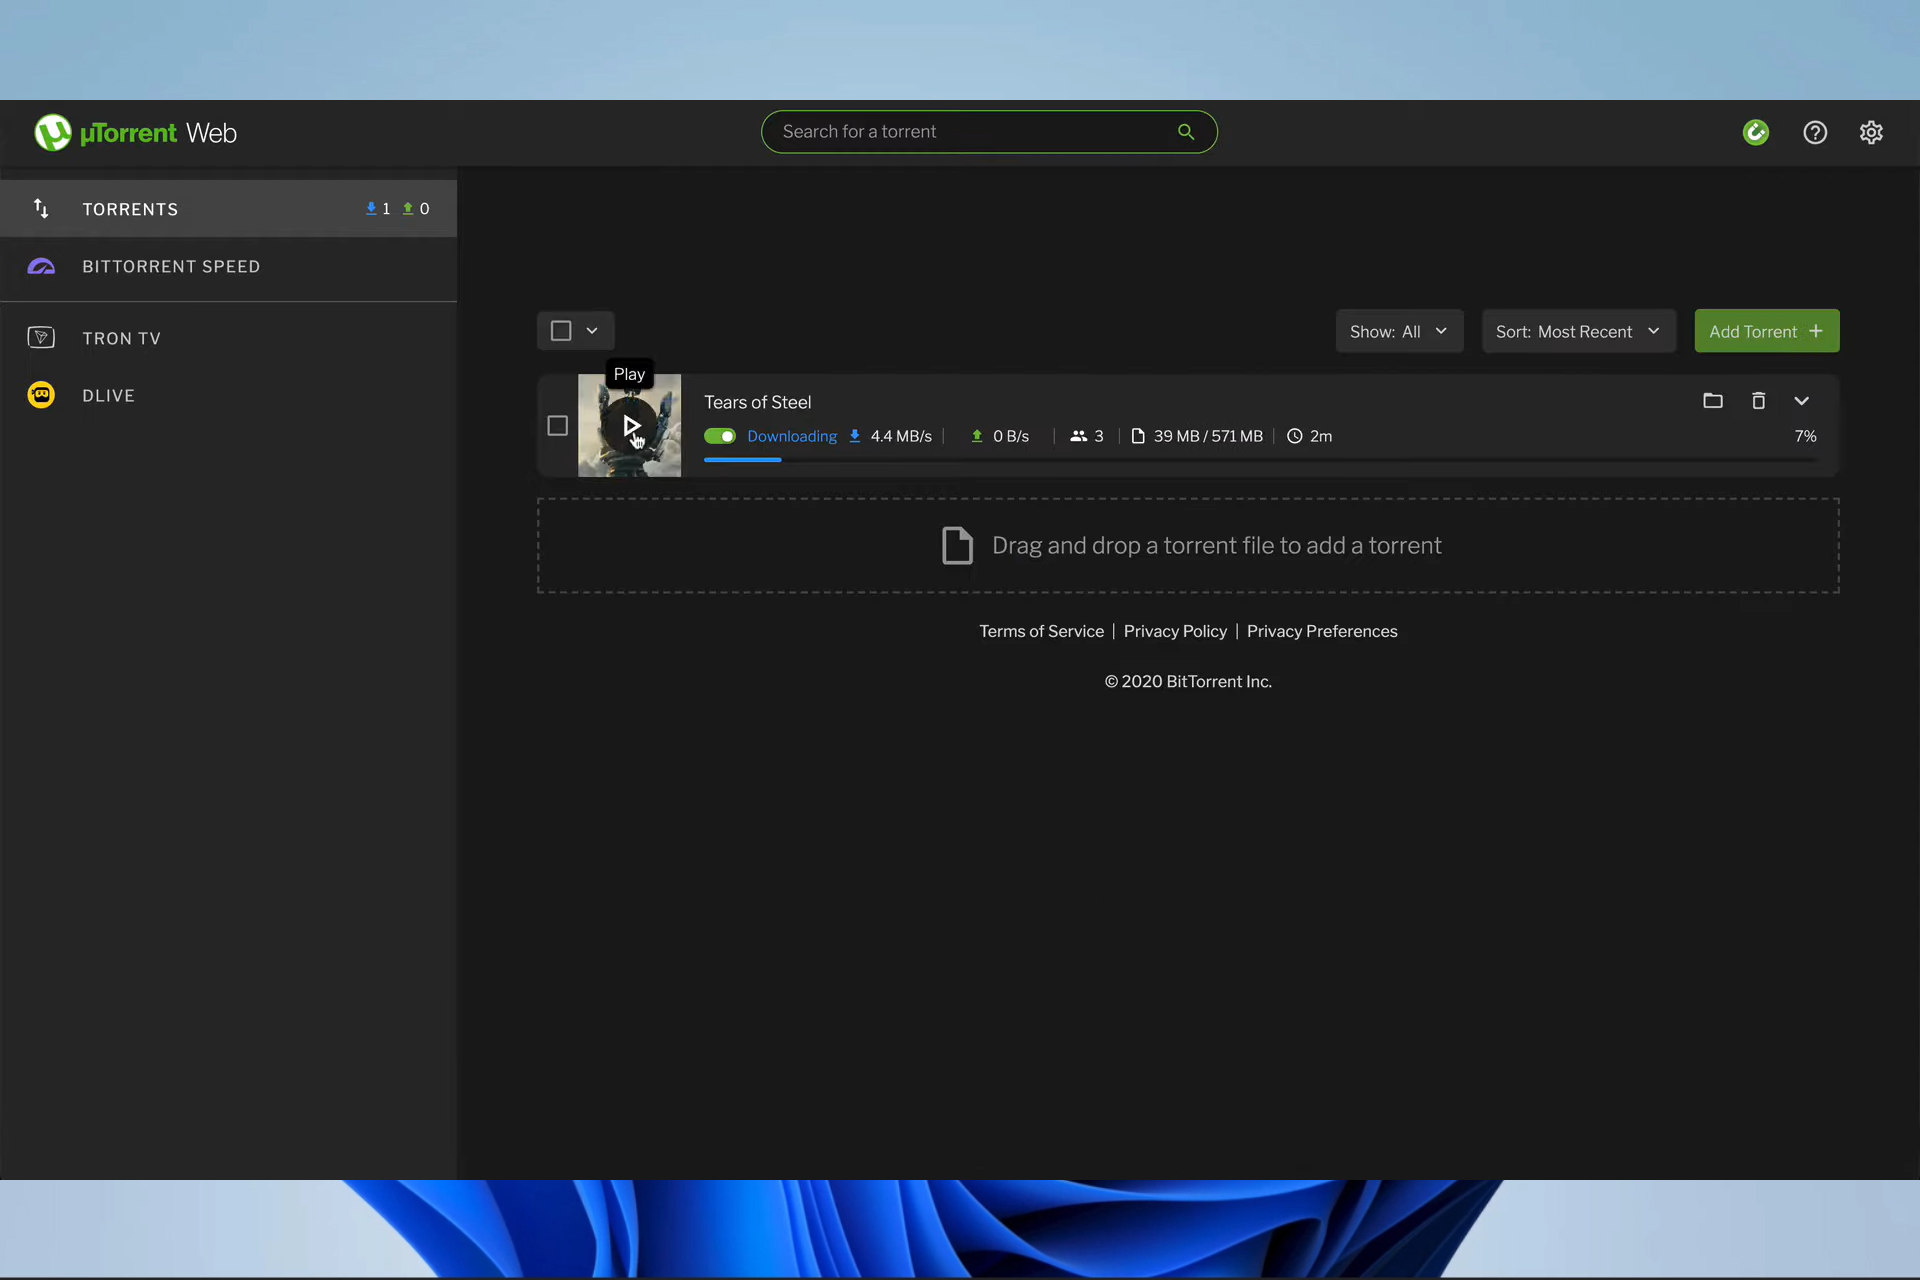
1. Using the web app

  1. Visit the uTorrent website.
  2. Click on the Free Download button.
    utorrent browser
  3. Once the setup file is downloaded, run it, and install the uTorrent browser.
  4. Now start the uTorrent Web.
  5. Search for a torrent using the Search for torrent search field.
    utorrent web search utorrent browser
  6. Once you find it, it should be handled automatically by the uTorrent web.

2. Using the uTorrent browser extension

  1. Navigate to the extension page (we used Chrome in this case).
  2. Click on Add to Chrome.
  3. Click the Add extension button.
    utorrent browser
  4. Search for a torrent, right-click on it and click Add torrent.

What is better uTorrent or uTorrent Web?

With uTorrent Web, all downloading takes place in your browser, which is the primary distinction between it and the regular uTorrent. 

Both the web and desktop versions can play video or audio files before fully downloading; however, unlike uTorrent, the media playback also takes place within the browser.

In comparison to the desktop-based software, uTorrent Web offers several benefits, such as a more straightforward user interface, more accessible customization choices, rapid video playing, and an experience that is more closely connected with your online activities.

Using uTorrent in your browser is incredibly simple, and you can enjoy some of your best movies and music after downloading the torrents with this tool.

Note that torrents may be risky, so we encourage using a good VPN to keep yourself secure and safe online.

What is your torrent client of choice? Let us know in the comments below.

A Problem Occurred in Extended Storage on PS4 [Expert Fix]

PS4 is one of the finest consoles in recent times. But it is not free from errors like the PlayStation network sign-in error.

Now, it is the PS4 extended storage problem that is troubling users. This error occurs when your USB drive isn’t compatible with the system.

However, you can’t just assume that it’s incompatible, especially if you’ve previously used it before the issue with the PS4 error CE-30022-7 extended storage started.

The PS4 can not repair extended storage if it’s corrupt or incompatible with the software. Sometimes, the external drive is fine, but your console causes the issue.

Here is a detailed guide on how to get rid of PS4 extended storage not working and beeping, no matter the cause.

Why is my extended storage not working on PS4?

There are various reasons your extended storage might not be working on PS4. It could be due to issues with the storage or some console glitches. Below are some of the common causes:

  • Incompatible storage
  • Outdated console
  • Faulty drive
  • Minor console issues

How can I repair the PS4 extended storage not working?

1. Force restart the console

  1. Press the Power button and hold it down for around 7 seconds.
  2. The console will beep twice and shut down.
  3. Leave the system off for a while and then power it back on.
  4. Connect the storage device. If it’s still working, we can assume the drive doesn’t meet the PlayStation 4 requirements.

If PS4 is showing errors like cannot find the following application when using extended storage, restarting your console might help fix the issue

2. Check the storage drive’s compatibility

The PS4 extended storage will not work if the disk has insufficient space.

Even though the PlayStation 4 supports various external storage devices, they must meet certain specifications to be compatible.

To use your external storage device on your PlayStation 4, ensure that it meets the following requirements. You are bound to get a PS4 extended storage error if it doesn’t.

Drive PropertyRequirement for PS4
PS4 system software4.50 or newer
Type of USB interfaceUSB 3.0 or newer
Storage capacity250 GB to 8TB
EncryptionNo encryption on storage
Number of partitions1
Drive formatexFAT

You must get a compatible device if your external storage drive doesn’t meet the above requirements.

The factors outlined above are hardware requirements, so you can’t configure anything to fix it. Your only bet is to replace it.

You can start your search on our article about the best external storage drives for Xbox.

If your drive meets the PlayStation4 requirements but still gets the PS4 extended storage errors, proceed to the next solution.

3. Manually update your PS4

  1. Power on the system and go to Settings.
  2. Select the System Software Update option.
  3. If your system has the latest software version, you will see The latest version of the system software is already installed message.
  4. Otherwise, click the Next or Update button to start downloading the update if it finds an available update.
  5. On completion of the update downloading, you will receive a notification.
  6. Click on the Notifications link denoted by i.
  7. Navigate to Downloads on the left-hand panel, and you’ll see your downloaded system software on the right.
  8. Select the file by tapping X on your controller.
  9. Follow the on-screen instructions to complete the system update.

Updating the system software has fixed PS4 extended storage error for many gamers.

We hope it is the case for you as well, but if it isn’t, the following method should do it.

4. Test the storage drive on a computer

  1. Connect the USB drive.
  2. Open the File Explorer and go to This PC.
  3. Your connected storage device should show up under the Devices and drives section.
  4. Double-click on it to open it.
  5. Copy a file onto your device.
  6. Disconnect the device.
  7. Re-connect it and check if the moved file is corrupted/damaged.

If you still haven’t fixed the issue, your PS4 external storage is probably broken. But we can’t tell for sure without testing it on a different system.

To do this, disconnect the external drive from your console and follow the steps above to test it on your computer.

If your PS4 extended storage is corrupted, it is safe to assume that the storage device has more serious issues.

In a case where the PS4 extended storage is broken and not repairing despite several attempts, a message keeps appearing. The only way to resolve the issue is to replace the storage device with a new one.

5. Initialize the external storage drive

  1. Press and hold the PlayStation button on your controller.
  2. Connect the external USB device to your console.
  3. Click on Notifications and select the connected device from the list.
  4. Select the Format as Extended Storage button at the bottom of the page and hit Next.
  5. Click on Format (click Yes to authorize the formatting and wait for it to finish).
  6. Click on the OK button to finish the process.

In rare cases where the external drive is healthy as per the previous solution, and the PS4 error CE-30022-7 extended storage still comes up, you may need to initialize (format) the device. After initializing the drive, your PS4 will set it as the default location for saving data.

There you have it: a comprehensive guide on fixing a problem in extended storage on PS4. Carry out the above troubleshooting solutions listed in this guide, and things should return to normal. You can also contact PlayStation support to get help.

We hope one or more of the methods presented above will get you back to gaming in no time. If the problem persists, we have a guide on how to format PS4 hard drive on Windows 11, so be sure to check it out.

Let us know the solution that worked for you in the comments below.

Windows Defender Browser Protection: Everything You Need to Know

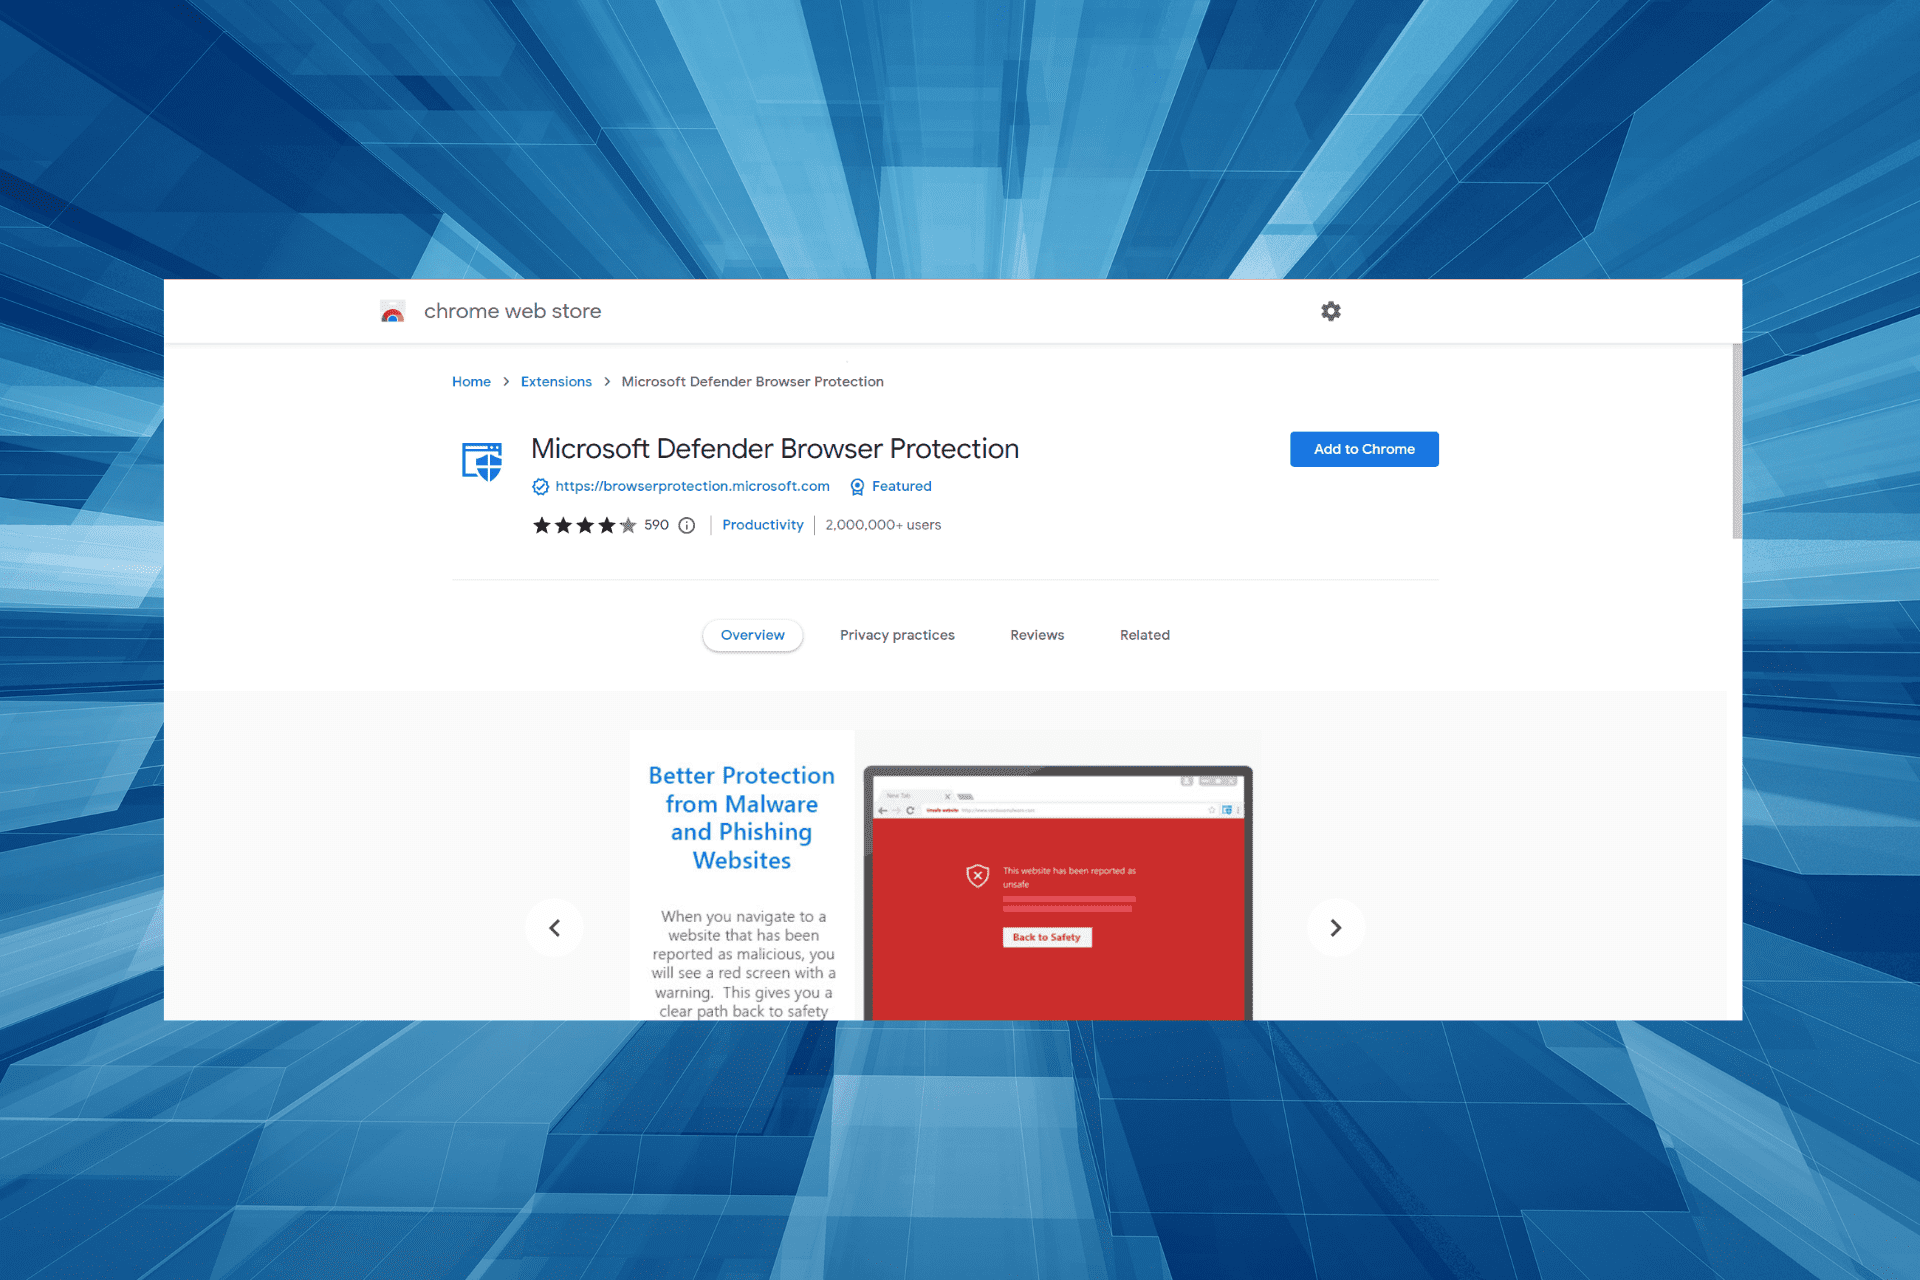
Windows Defender is the default antivirus software on Windows, but Microsoft has also released the Windows Defender Browser Protection extension for Chrome.

The scope of the extension is to provide better phishing and malware protection from various websites using real-time data from Microsoft.

In today’s article, you will find out all about the antivirus extension and the steps to install in the most popular browsers to protect your PC.

Is Windows Defender Browser Protection legitimate?

Yes, the Windows Defender Browser Protection is legitimate and one of the best extensions in the category. It protects you against a wide range of online threats, including phishing attempts and malicious software.

The extension is available for all major browsers. Users prefer Windows Defender Browser Protection over third-party antiviruses since Microsoft developed it. Though, a Microsoft Defender Browser Protection whitelist feature would have come in handy.

If you are concerned about installing it, the extension is legitimate and perfectly safe, but make sure you download the right one.

How can I use Windows Defender Browser Protection?

1. Opera One

  1. Visit the Windows Defender Browser Protection’s Chrome Web Store page on Opera One, and then click the Add to Opera button.add to opera to get windows defender browser protection
  2. Now, click on Add extension in the confirmation prompt.add extension

This browser is based on Chromium, so the extensions from the Chrome Web Store can be installed on Opera One as well.

After doing that, Windows Defender Browser Protection will be installed. It’s worth mentioning that Opera One has a couple of unique features when it comes to security.

First off, there’s a built-in ad blocker that will block tracking scripts and ads and make your browsing experience faster.

For additional protection, there’s a built-in VPN with unlimited bandwidth. Also built-in you’ll find an Ad blocker and an AI

It also comes with various other great ideas and features. Find out more about the browser by clicking the Read more button below.

Opera One

Opera One is a modern browser, focused on privacy and security, which makes it ideal as your default option.
Free Download Visit website

2. Chrome

  1. Visit Windows Defender Browser Protection on the Chrome web store, and then click on the Add to Chrome button.Add to Chrome to get windows defender browser protection
  2. Click on Add extension in the prompt that pops up.add extension

After the Windows Defender Chrome extension installs, it’s ready to be used and will protect you while browsing online.

3. Firefox

  1. Open the Application Guard Extension on the browser, and then click on the Add to Firefox button.add to firefox
  2. Click the Add button to confirm.add to get windows defender browser protection

After doing that, the Microsoft Defender Browser Protection add-on will be installed on Firefox, and your system will be also protected.

4. Microsoft Edge

  1. Press Windows + S to open the Search menu, enter Windows Security in the text field, and then click on the relevant search result.windows security to get windows defender browser protection
  2. Now, click on App & browser control.App & browser control
  3. Click on Reputation-based protection settings.Reputation-based protection settings
  4. Next, make sure that the SmartScreen for Microsoft Edge option is enabled.Smart screen for microsoft edge

The Microsoft Defender Browser Protection is already available in Microsoft Edge by default, and it works as long as the Smart Scan feature for your browser is enabled. So, simple simply enable the feature and you are good to go.

5. Install a third-party antivirus for better protection

Windows Defender Browser Protection is a nice extension that will protect you online, but that will only stop a limited number of threats.

If you want to safeguard your system properly, you will need a full-fledged, third-party antivirus installed on your system.

The tool recommended below is installed by over 110 million users worldwide, so now you can get a measure of how trusted this software is.

Its multi-layered protection system will not only secure your PC but also all your other devices, including the webcam and the router.

⇒ Get TotalAV

How do I get rid of fake Windows Defender security warning?

Several users reported encountering a Windows Defender Browser Protection red screen when browsing the web. In some cases, the warning listed a support helpline number to call for further resolution. Do not call on the number! It’s most likely an ad disguised as a fake warning.

If you see such messages on a particular website, either stop visiting it or use a reliable ad blocker tool. Also, it’s recommended that you run a malware scan on your PC just to make sure no malicious software on it is triggering the error.

Besides, disable any suspicious extensions on the browser, and if none of these methods work, resetting the browser would do the trick.

Windows Defender Browser Protection offers solid protection to your browser, and we hope you’ll consider using it after reading this article.

However, you need to consider that a browser extension is not as powerful as a dedicated antivirus. So, find out the best-unlimited license antivirus for your computer.

If you have any recommendations or suggestions, or you just want to express your thoughts about this extension, leave us a comment in the dedicated section below.

Avast Secure Browser vs Chrome: In-depth comparison

Google Chrome is currently the world’s most popular web browser, but there are many other browsers that are quite similar to Chrome, with some unique features. So let’s see which of the two, Avast Secure Browser vs Chrome, outperforms the others.

Chrome is somewhat minimalistic in terms of features, but browsers such as Avast Secure Browser are trying to change that.

In today’s guide, we’re going to take a closer look at Avast Secure Browser and see how it compares to Google Chrome and tell you which is the better browser for your needs.

Avast Secure Browser vs Chrome, which one is better for you?

A short history lesson

Avast Secure Browser: A more secure version of Chrome

Avast Secure Browser was first released as Avast Safezone Browser in 2016, and it was a part of the paid version of Avast Antivirus.

The browser was rebranded in 2018 as Avast Secure Browser, and it’s now available separately, for free. Regarding availability, this browser is available on Windows, macOS, iOS, and Android.

Chrome: Browsing veteran from Google

Google Chrome was first released in 2008, and since its release, it became a dominant browser on the market.

Currently, Chrome has 66% of the market share, and it’s a dominant web browser on desktop and mobile alike.

Regarding availability, Chrome is available on Windows, macOS, Linux, Android, and iOS.

Quick Tip:

A decent browser simplifies your daily web use, that’s why it is essential that the browser is user-friendly and includes the necessary pre-installed features to ensure a smoother experience.


Opera One is a Chromium-based browser that includes several amazing features out of the box, like an advanced ad-blocker, VPN integration, native AI and built-in WhatsApp and Twitter apps.

Opera One

Get the best out of your online experience with Opera One browser!
Free Download Visit website

User interface

Avast Secure Browser: A clone of Chrome

When you first start Avast Secure Browser, the first thing you’ll notice is how much it looks like Chrome, which is no surprise since both are using the Chromium engine.

The home page has the search bar along with the website shortcuts. If needed, you can easily add any website shortcut to the home tab.

Some basic customization options are available, allowing you to switch to the dark mode right from the home tab.

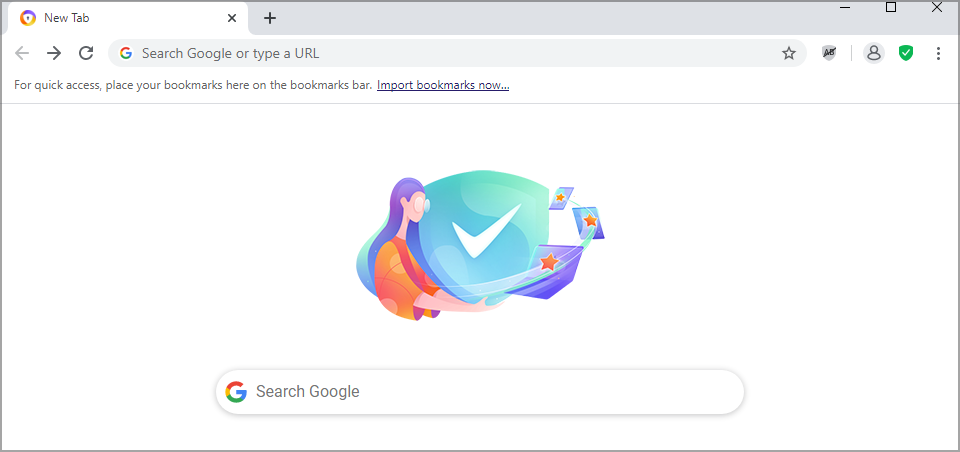
The browser also comes with a couple of icons in the toolbar that let you block ads or activate other browser features.

Overall, the interface is simple and clean and not much different than Chrome.

Google Chrome: As minimalistic as it can be

Google Chrome is known for its simple but highly effective user interface. The main tab comes with a search bar and a list of website shortcuts. Of course, you can add new shortcuts or rearrange your shortcuts any way you want.

The interface can be customized, and you can show the most visited websites instead of shortcuts, or you can hide the whole section if you choose to do so.

Chrome also supports various backgrounds, and you can even add your own from your PC. Regarding the color themes, that are several themes available, but you can also choose a custom-colored theme.

Features

Avast Secure Browser: Chromium-based, optimized for security

Although Avast Secure Browser is similar to Chrome when it comes to features, the browser also focuses heavily on user security and privacy.

The first feature that you’ll notice when you start the browser is its built-in adblocker. By blocking ads, the pages you visit will load faster, plus you’ll be able to browse the web without any distractions.

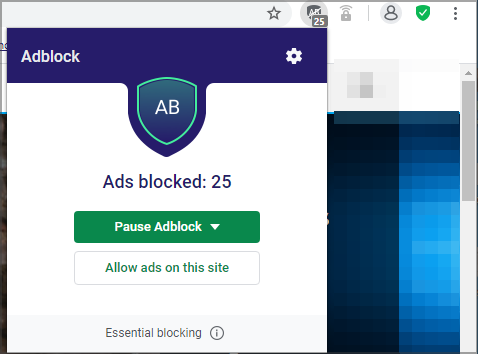
You can enable the adblocker from the toolbar with just a couple of clicks. Once you enable it, you can see how many ads were blocked on a specific page with ease.

If needed, you can pause the Adblock on a specific website or on all websites, and for better control over the ads, you can access the advanced settings with a single click.

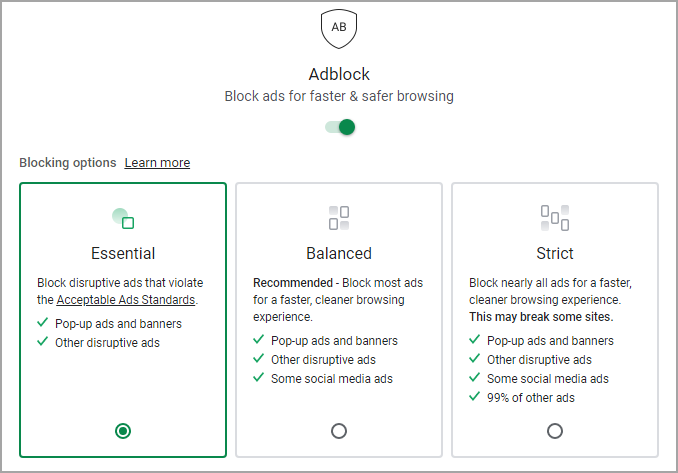
The Adblock feature is based on uBlock, and we have to admit that is highly effective. There are three presets available: Essential, Balanced, and Strict, and you can use any of them.

Each will block different types of ads, and although the Strict preset offers the best protection, it might cause certain websites not to load properly, so keep that in mind while using it.

If needed, you can also add websites to the exclusion list if you want to see ads on that one page, or if the page has trouble rendering after using the Adblock feature.

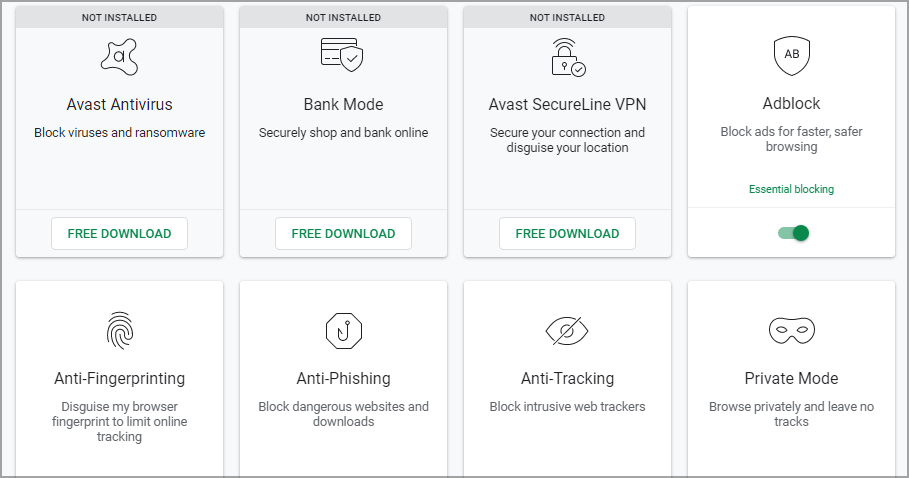
The browser also has anti-fingerprinting, anti-phishing, and anti-tracking features, so you can rest assured that websites aren’t tracking you or trying to steal your login credentials.

We also have to mention that the browser has an extension guard that will block any harmful extensions that you try to install.

Lastly, there’s a webcam protection feature that will make sure that websites don’t have access to your webcam.

Avast Secure Browser also has a Hack Check tool that can scan your email and check if any online accounts that you’ve signed up to with that email have been hacked.

All of these features are available from the Security & Privacy Center and you can access them at any time with just a single click on your toolbar.

Some features such as antivirus, Bank Mode, and VPN are also available, but to use them, you need to download the additional software from Avast.

Overall, Avast Secure Browser offers some great features, and we’re pleasantly surprised by how effective its Adblocker is. As for other security features, they make a great addition, and they will surely improve your online security.

Google Chrome: A web browsing giant

Google Chrome comes with a versatile address bar that is powered by Google and it can provide you with certain information at a glance.

For example, you can check the weather in your city, do simple calculations, or currency conversions right from your address bar. This is a small feature, but it might come in handy to some.

Chrome puts a great focus on synchronization, and once you sign up with your Google account, you can have your bookmarks, passwords, and browsing history available on all other devices.

Tab grouping is one more feature that is extremely useful if you’re multitasking since it allows you to group tabs and minimize them to organize open tabs better.

To make tab navigating easier, Chrome has the Search Tabs feature, so you can easily find any open tab, simply by entering its title in the search field.

Chrome offers multimedia features as well, and you can easily control the multimedia playback from the toolbar. Of course, integration with Chromecast and Stadia is also there.

Regarding security, this browser offers great security to its users, and you can always perform a quick Safety check and make sure that your browser isn’t compromised.

Chrome also has a Safe Browsing feature that will protect you against dangerous websites and downloads.

You can customize this feature, but keep in mind that some settings require you to send your browsing data to Google for analysis.

The browser also has a built-in ad blocker, but it’s not enabled by default, and it blocks only intrusive or misleading ads. However, the feature is located deep into settings, so it will take you a couple of clicks to access it.

Chrome and Avast Secure Browser share many features since they are both based on Chromium, but Avast offers better protection features and ad blocker that is faster and easier to access.

Security comparison

Google Chrome is already a secure web browser, but Avast Secure Browser manages to enhance your security with a couple of unique features.

The built-in Adblock is a great addition since it allows you to modify your settings, and with strict blocking mode enabled, you’ll block even the toughest ads.

On the other hand, Chrome’s ad-blocking feature is primitive and buried in the settings, so it’s rather likely that users won’t ever find it or use it.

Avast Secure Browser has all the security and privacy features right in the toolbar, and with just a single click you can enable all these features in a matter of moments.

Both browsers are secure since they share the same engine, but if we had to pick, we’d go for Avast Secure Browser since it has better privacy options and a reliable ad blocker right at your fingertips.

Performance

During our testing, we had no issues with Avast Secure Browser. We tested the browser with five open tabs and full HD video buffering in the background and got around 75% CPU and 424MB RAM usage on a low-end PC.

While being idle on a home page we got about 1.5% CPU usage and around 160MB RAM usage.

We repeated the same test in Chrome, with five tabs and full HD video buffering in the background and we got up to 85% CPU usage and 414MB RAM usage.

While being idle on the home page, Chrome used almost no CPU and up to 100MB of RAM.

Since both browsers are running on the same engine, we weren’t surprised to see that both are using roughly the same amount of resources.

Keep in mind that in some instances Avast can use a bit more memory compared to Chrome, but that’s nothing to worry about.

We experienced no slowdowns or any other issues with both browsers, so in terms of performance, we can say that they are almost the same, with Chrome having just a bit less memory usage at times.

Conclusion

Google Chrome is a great browser overall, with great security, but it’s not oriented toward user privacy as Avast Secure Browser. Almost all features from Chrome are available in Avast Secure Browser, so it’s just as safe.

Google Chrome: A web browsing standard

Pros
Made by Google
Offers the latest features
Secure
Low memory usage
Tab searching
Cons
Ad blocking feature could be better

Chrome’s minimalistic interface and unique features make it one of the best browsers on the market, and it’s perfectly safe to use.

Unfortunately, the browser doesn’t have too many privacy features, and if you’re extremely worried about your online privacy, Chrome might not be the best choice for you.

⇒ Get Chrome

Avast Secure Browser: Chrome with extra security features

Pros
Secure
Privacy protection features
Great adblocker
Works great with other Avast products
Based on Chromium
Cons
Uses bit more memory than Chrome

On the other hand, Avast Browser also has a couple of unique features of its own, and a great ad blocker combined with privacy features that are available at your fingertips makes this a great browser.

Almost all features from Google Chrome can be found in Avast Secure Browser, with an exception of Tab Searching and a few others.

⇒ Get Avast Secure Browser

What is the safest browser to use?

While there is no dearth of browsers, none offer all the security features required from one. After reading the comparative study of Google Chrome vs Avast Secure Browser, you must have realized that both options are good but lack certain aspects.

If we look at the available options, Opera, undoubtedly, is the safest browser right now. It comes with a built-in tracker blocker that prevents websites from keeping a record of your online activity.

Meanwhile, the ad blocker feature keeps intrusive ads that cover a large part of the screen at bay. Besides, Opera comes with a built-in VPN to reroute your connection, a feature missing in some of the most popular options.

If you were to choose between Avast Secure Browser vs Chrome, both browsers are more or less safe. But if you want a reliable browser that has all the latest features, Chrome is the better option.

On the other hand, if you want a browser that is free from ads and that offers great security and privacy protection, be sure to give Avast Secure Browser a try.

What is your take on Avast Browser vs Chrome? Let us know in the comments section below.

5 Best Sniper Games to Play Online for Free [No Download]

There are numerous gaming platforms that include various categories of web games. Sniper games are among the more popular browser-based games.

Most platforms include a wide range of sniper games online for free. These sniper games work on PC as well as other compatible devices. And in most cases, the sniper games online require no download. You can directly play sniper games online from the browser.

If you fancy a bit of sniping action, check out some of these browser game websites.

Quick Tip:

You can play web-based games with lots of alternative browsers. However, Opera GX is one of the first browsers specifically designed for gaming.

Opera GX includes numerous gaming features, such as its GX Game Corner which keeps users updated with the latest game releases. GX also incorporates system optimization tools, such as its RAM Limiter and Hot Tabs Killer.

Opera GX

If you love gaming, you will surely fall for all the gaming-related features this amazing browser offers.

What are the best online sniper games?

Agame.com – One of the favorites

Agame.com sniper games online

Agame.com is a website that currently includes 104 sniper games for you to play. Among them, it includes some multiplayer sniper games you can play against other players.

Players can also register Agame.com member accounts. With membership, you can watch walkthrough videos for games, leave comments, and bookmark your favorite sniper games on the site.

⇒ Check out Agame

Y8 – The most extensive collection of sniper games

Y8 website sniper games online

Y8.com has a vast collection of sniper games online, free and unblocked, amounting to 359 in total. So, you’ve certainly got plenty of sniper games to choose from on this website.

A lot of those are Flash games, but there are also lots of Unity 3D, HTML 5, and WebGL games on Y8.

The Sift Heads games are among the most highly rated and widely played sniper games on this website.

Sniper Clash 3D and Freefall Tournament are two of the most popular multiplayer sniper games on Y8, which the site’s stats highlight have had more than 35 million plays combined.

⇒ Check out Y8

Silvergames.com – Best for full-screen gaming

Silvergames.com sniper games online

Silvergames.com doesn’t have an especially big collection of sniper games compared with Y8. However, there’s still a reasonable selection of sniper games you can get stuck into here.

This website includes video walkthroughs you can watch without any registration required.

You can also play some of its sniper games at 100% full screen. Sniper Team, Sniper Team 2, and Krunker are among the most highly rated sniper games at Silvergames.com.

⇒ Check out Silvergames

Crazy Games – The best sniper games collection

Crazy Games sniper games online

Crazy Games is another website that doesn’t have a massive number of sniper games, but you’ve got still got 62 to choose from here.

Furthermore, the Crazy Games collection is a compilation of some of the best sniper games online. The website says this:

We collected 62 of the best free online sniper games… They include new sniper games such as Winter Clash 3D and top sniper games such as Rooftop Snipers, Ghost Sniper, and Sniper Attack 3D.

⇒ Check out Crazy Games

Gameflare.com – Offers some thrilling titles

Gameflare.com sniper games online

At Gameflare.com, you can currently play 77 online sniper games. Game-loading times on this site are a little longer primarily because an ad is displayed for about 15 seconds before each game starts up.

However, this website still includes a decent crop of sniping games to play. Stealth Sniper 2, Sniper Team 2, War of Soldiers, Stick Squad, and Sniper Clash 3D are among the most highly rated sniper games on this website. Registered players can also leave comments on Gameflare’s game pages.

⇒ Check out Gameflare

This concludes our list of the best sniper games online unblocked. We have listed the platforms for sniper games in order of the thrill they offer and how well they engage the players, so make sure you follow the same sequence when trying them.

If you have a slow Internet speed, try the best sniper game offline like Sniper Ghost, or search the web for more. Besides, there are several sniper games online in the stickman category that you can try today.

Tell us your favorite pick for shooting games in the comments section below.

Best Browser to Play Darkorbit [Boost the Gaming Experience]

Most Darkorbit players complain about lag when playing the game online using their browser.

When it comes to browser, it’s critical that you choose the best one since it directly affects the game’s performance and, in turn, the gaming experience.

We’ve analyzed all this, and in this article, we will present a list of the best browsers you can use in order to play Darkorbit, so make sure to keep on reading.

What is DarkOrbit?

DarkOrbit, now called Dark Orbit Reloaded, is a massively multiplayer online (MMO) game where players control spaceships in outer space and fight other players and computer characters to survive.

Also, players can join one of the many clans in the game and flourish with the support of their mates.

Developed by Bigpoint Games, DarkOrbit Reloaded has been hugely successful, with over 300 million registered users. DarkOrbit Reloaded offers engaging gameplay, thrilling combats, and exciting rewards to keep players glued.

How to play Darkorbit on a browser?

Opera GX – Browser dedicated to gaming

When it comes to Opera GX, this is the best gaming browser that has been specifically optimized and created in order to get the most out of gaming.

The unique features incorporated solves all of the issues most gamers have to deal with when playing games online, such as lags, popups, long waiting time, and many more.

Opera GX allows full control over RAM consumption, CPU, and network usage so that you can adjust it properly in order to have the best gaming experience.

With the Network limiter feature, you can also set limits when it comes to uploads and downloads so that it won’t take more than needed from your overall bandwidth dedicated to gaming.

Moreover, with the Twitch integration, you will be able to keep in touch constantly, see who is online, and you can select to receive notifications when someone goes live.

Other great features:

  • Twitch and Discord integration
  • GX Control for resource management
  • Ability to instantly close resource-intensive tabs
  • Free and unlimited VPN
  • Support for Chrome extensions

Opera GX

Darkorbit has never felt so good as it does when playing it using Opera GX, the most reliable and customized gaming browser.

Chrome – Boasts of the best performance

Chrome works perfectly for playing online games, including Darkorbit, thanks to the available features it comes with.

The browser is light and easy to use while keeping a strong focus on online privacy and security.

Also, the incorporated tools for browsing, such as password manager, dark mode, and tab management options, allow for smart and fast browsing.

With Chrome, you will benefit from the best of all in terms of a fantastic browsing experience and a flawless gaming experience.

⇒ Get Chrome

Firefox – Fast and seamless

Firefox has been constantly updated, and thanks to all the efforts, it has become one of the most appreciated browsers for playing Darkorbit online.

The Firefox Quantum update made some fantastic improvements in terms of speed and RAM usage.

For gaming, this is a fantastic change as it will allow you to have more RAM memory for playing online games.

Moreover, Firefox is one of the browsers that can process AR and VR content more efficiently when compared to other browsers.

⇒ Get Firefox

Edge – Microsoft’s recommended browser

Edge is an excellent browser that has grown and has been modified constantly over the years in order to get at this point.

The speed and the responsiveness of the browser are simply fantastic, which is also one of the reasons why Edge is great for playing Darkorbit online.

Edge also comes with features that allow for more control and productivity without compromising privacy and online security.

Moreover, the AdBlocker will ensure that you can control and block all annoying popups, which in return, will not interfere with your gaming experience.

⇒ Get Edge

Vivaldi – A lightweight browsers but just as fast

Vivaldi is a powerful browser, with a strong focus on privacy and performance, which is what recommends it for online gaming also.

You can customize Vivaldi from keyboard shortcuts to themes and extensions in order to create it how it works best for you.

Moreover, Vivaldi will not store any kind of data while you are browsing over the internet or playing games online.

This is a feature that not many browsers are offering and is another great selling point for giving Vivaldi a try.

⇒ Get Vivaldi

Can you play DarkOrbit on Android?

Yes, users can play DarkOrbit for Android and iOS devices. All you have to do is download the Puffin Web Browser from the Google Play Store.

Once the browser is installed, set it up, head to DarkOrbit’s official website, and you can start playing the game. The gameplay and experience wouldn’t be as seamless as on the computer, but you can now play the game anywhere.

That’s all for today! You now know the best browser to play Dark Orbit and how to play the game on an android device.

Also, find out the best games you can play online without downloading.

Please share with us in the comments section below which one you have tried or if you have additional suggestions.

Microsoft Sidewinder Precision Racing Wheel Drivers for Windows 10

Even though it’s primarily known for software development, Microsoft made more than one piece of hardware.

Now, one of the most popular gaming wheels in the ’90s was produced by Microsoft as the part of Sidewinder project and it was compatible with Windows 98.

Yes, you read it right. However, there are still users that are willing to take this ancient wheel for a ride, but on Windows 10.

For that purpose, we offer one solution that should, hopefully, enable you to run this wheel on Windows 10. There are no guarantees but it’s worth a try.

As for the Microsoft SideWinder wheel compatible games, after you make it work, with Windows 10, you can virtually play any racing game.

Is Microsoft SideWinder compatible with Windows 10?

First things first. Even though this sturdy Microsoft-produced piece of hardware is still a valid choice, that only goes for hardware.

Sadly, the Microsoft Precision Racing Wheel was made ages ago and it comes with drivers that, at the best, support Windows XP.

Now, we run into some users with have had an easy time using almost 2-decades-old hardware to play racing games on Windows 10.

On the other hand, this still doesn’t mean that you’ll be able to run every given game that’s out there.

An important thing to note is that there are no available drivers for post-XP Windows iterations. So, the Microsoft SideWinder Precision Racing Wheel driver download is not possible.

; microsoft sidewinder precision racing wheel force feedback

Most of them are malware. The only way to run Microsoft Precision Racing Wheel on your Windows 10 PC is to run the installer (and later the application) in the compatibility mode for Windows XP. Some users managed to make it work that way.

How can I use Microsoft Precision Racing Wheel in Windows 10

1. Use compatibility mode

  1. Right-click on the desktop and create a New folder.
  2. Insert the supporting CD you’ve got with the wheel.
  3. Copy all files from the supporting CD to the New folder.
  4. Open the folder, right-click on the Setup and open Properties.
  5. Select the Compatibility tab.
  6. Check the Run this program in compatibility mode for: box and select Windows XP (Service Pack 2) from the drop-down menu.
  7. Check the Run this program as an administrator box.
  8. Click OK.download microsoft precision racing wheel software
  9. Run the installer and restart your PC.

That should do it. In addition, don’t worry if you’re unable to configure the wheel from the system settings.

Most users report states that most of the essential tweaks are within the in-game settings menu.

Technically, you can even use Microsoft SideWinder Precision Racing Wheel with Forza Horizon 4.

Online, you will even find Microsoft SideWinder steering wheel mods but we don’t recommend using them.

2. Use third-party software

As mentioned before, most of the so-called drivers you’ll find on the Internet are either malware or some other dangerous file, so don’t rely on manual search.

Instead, use a trusted third-party driver updater. These apps are secure and they make updating drivers for all of your hardware easy and comprehensive.

Is Microsoft SideWinder compatible with Xbox One?

No, unfortunately, the Microsoft SideWinder Precision Racing Wheel is not compatible with Xbox One.

As we’ve mentioned above, it’s an old racing wheel that was designed back in the Windows XP era.

Does the Microsoft SideWinder work with Xbox 360?

Again, the answer is no. Microsoft SideWinder Precision Racing Wheel. The old wheel was designed for PC, not for video consoles.

We hope this was a helpful read and you were able to use your favorite legacy wheel to enjoy the racing games just like before.

You might also want to take a look at our guide on how to install unsigned drivers because the information may help you.

Don’t forget to tell us if this helped you or to offer an alternative solution. You can do so in the comments section below.

How to Use the Firefox Picture in Picture Mode like a Professional

In this article, we shall explore the Firefox picture-in-picture feature; here is all you need to know.

From the early 90s, browser tech has thrived. From being capable of only the barest tasks, now they are robust systems capable of rendering some of the most complex data types.

The increased capacity of browsers has also seen a boom in their use cases, and the picture-in-picture Firefox feature is one example.

This feature would allow videos to be played in a small overlay on the screen, and users could navigate between tabs and sites without interfering with the playing video using the detached video player.

You can already use picture in picture in other Chromium-based browsers. So far, the feedback regarding the feature has been mostly positive, and Mozilla users are excited to know they will get to try it as well.

Does Firefox have PiP?

Yes, Firefox has now implemented picture-in-picture. So, just like its Chromium-based counterparts, you can dock a video within your main browser frame.

This is great because you do not have to stop watching your videos while scrolling up and down the page.

You will find the Firefox picture-in-picture feature invaluable on YouTube and even on your Android devices.

And before we get to it, note that if the Firefox picture-in-picture is not showing or working, you may need to update your browser to the latest version.

With that said, let’s get into it.

Quick Tip:

Firefox is an amazing browser, yet there is a better alternative that supports this feature. Opera One is a Chromium-based browser that thrives in speed and design.

Opera One comes with some unique features that require no additional downloads. Among those you’ll find the video pop-up player that let’s you detach a video from it’s tab. Also it comes with a native AI.

Opera One

A simple but reliable Chromium-Based browser for all your needs.
Free Download Visit website

How do I enable Picture-in-Picture mode in Firefox?

1. Using the config settings

  1. Launch the Firefox browser.
  2. Type the code below in your Address bar and click Enter.
    about:config
  3. Click on I accept the risk to open the configuration page.
    firefox picture in picture
  4. In the text field just below the Address bar, type in the code below, and make sure the value is set to True:
    media.videocontrols.picture-in-picture.enabled
    firefox picture in picture

Please remember that the Firefox preference media.videocontrols.picture-in-picture.enabled determines whether Picture-in-Picture mode is activated, so it needs to be activated. Turning this value to false will disable the Firefox picture-in-picture feature.

2. From the browser settings

  1. Launch the Firefox browser.
  2. Click on the hamburger menu icon and select Settings.
    firefox picture in picture
  3. Scroll down to the Browsing section on the right pane and tick the Enable picture-in-picture video controls checkbox.
  4. Restart the browser.

Note that you can adjust the Firefox picture-to-picture size by dragging the edge of the docked video.

3. Using hotkeys

  1. Launch your browser.
  2. Navigate to a site with the video.
  3. Start playing it, then on your keyboard, press Crtl + Shift + ].

This hotkey serves as an automatic Firefox picture-in-picture button. It should immediately dock the video to the bottom right corner while you continue scrolling up or down the page or if you open other applications.

Note that if you want the Firefox picture-in-picture to always be on top, you can drag it after using the hotkey.

4. Using the picture-in-picture icon

  1. Launch your browser.
  2. Navigate to a site with the video.
  3. Hover on the video you want to play and click the picture-in-picture icon.

Once you click the icon, the video will open in the Picture-in-Picture interface and display a placeholder on the original site.

The Picture-in-Picture overlay is quite flexible already. You can move it around independently of the tab that hosts the video, and you can resize it as you please, but closing the tab that is the source of the video will also close the Picture-in-Picture window.

It would help if you remembered that the picture-in-picture mode is still in its early stages of development.

As such, the window displays just the pause and play button, and you lack all of the other controls you may expect, such as changing the video’s volume or the quality.

What are your opinions about Firefox introducing picture-in-picture mode? Let us know in the comments section below.
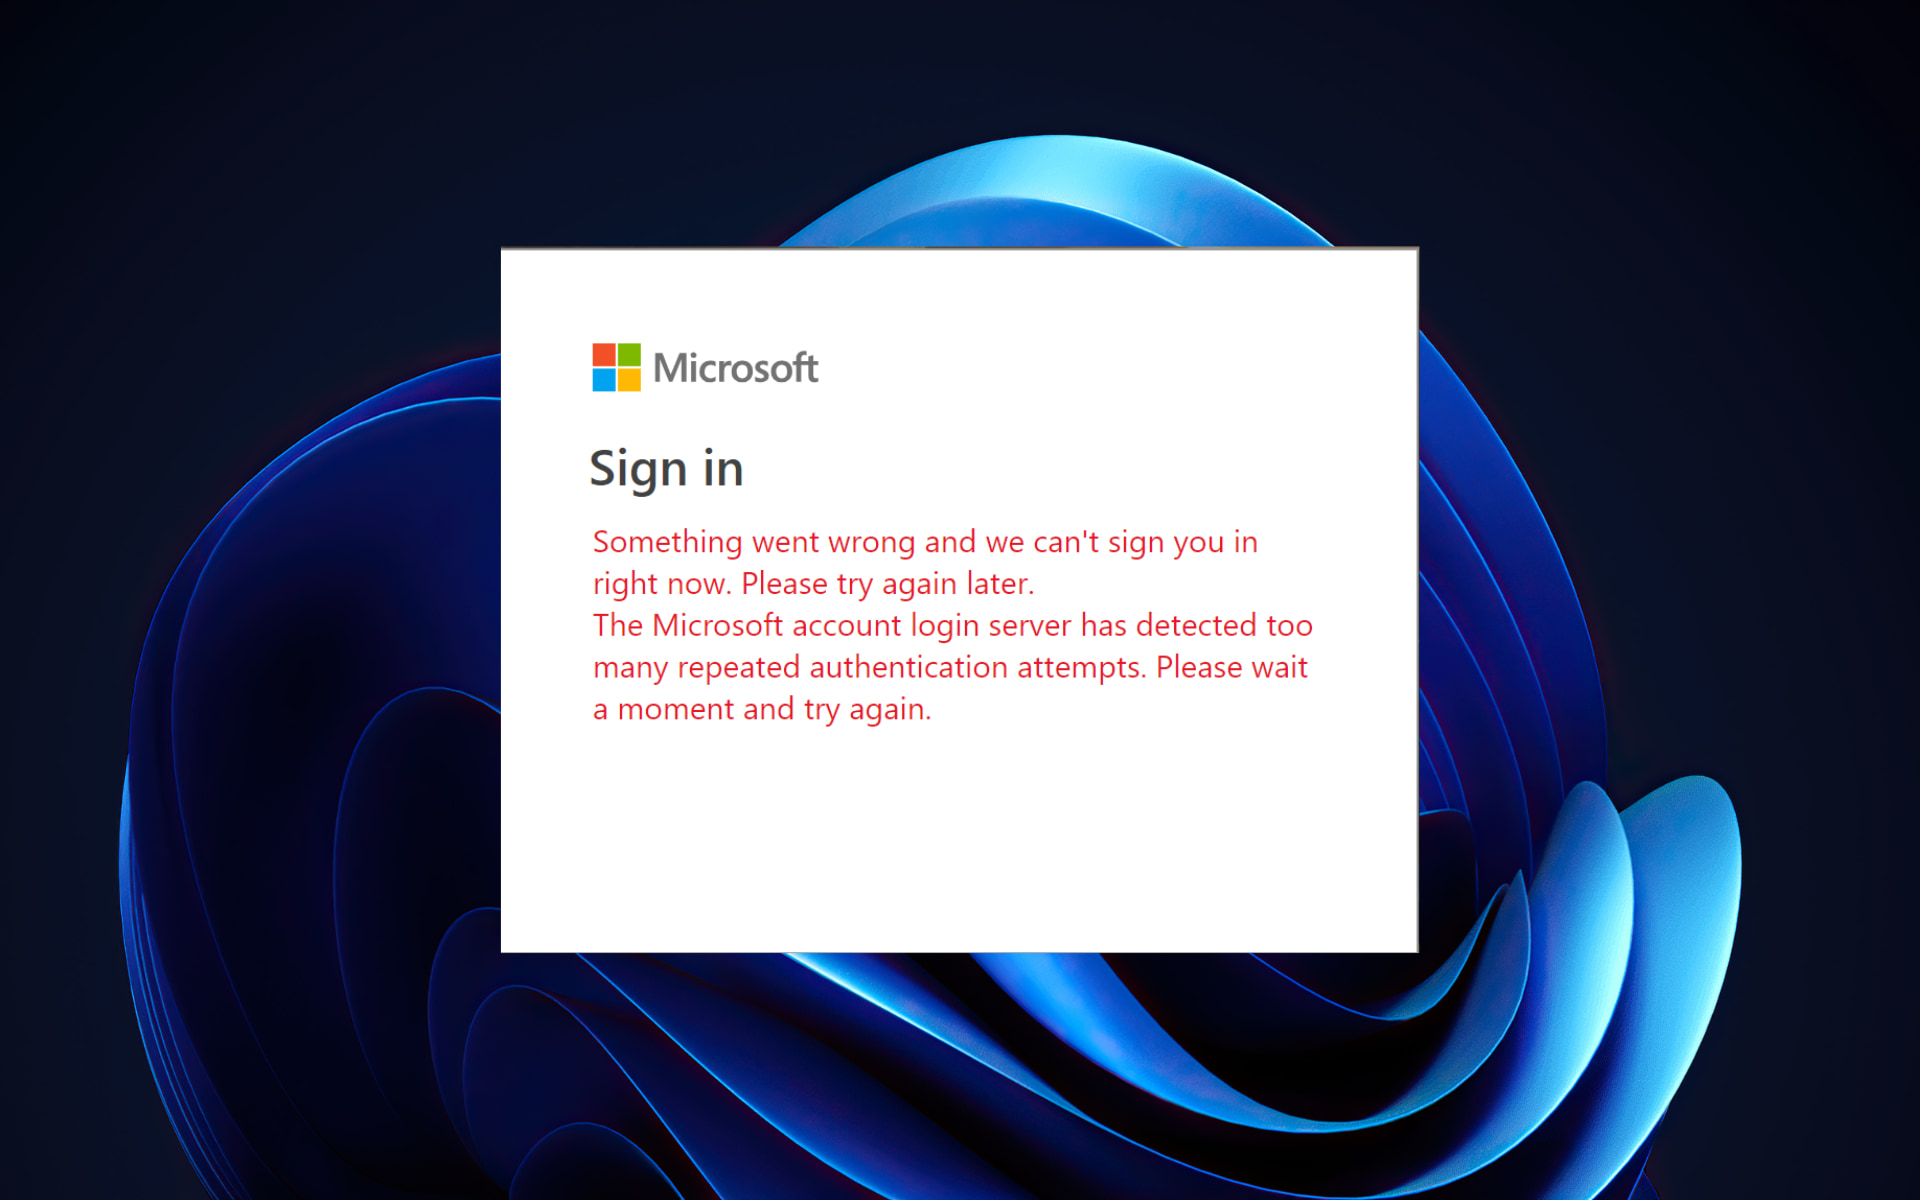
Google adds Xbox Cloud Gaming integration to search results

Google began testing a new front page for its main website with a small selection of users earlier this month. While the biggest change is the addition of widgets, a small addition that seems to have flown under everyone’s radar was the implementation of support for cloud gaming services such as Microsoft’s Xbox Cloud Gaming and Google’s own Stadia.

Bryant Chappel was one of the first to spot this new feature which adds a “Play” button to the search results for games that are playable via the cloud. Upon clicking this new button, the user is taken immediately to the game in the appropriate cloud gaming service and can begin playing almost immediately.

You can see the feature in action in the tweets below.

It’s worth noting that this Xbox Cloud Gaming functionality isn’t live for everyone yet but it is definitely something to keep an eye out for in the near future, especially if you frequently play via the cloud.

In general, this is a pretty great move as this will allow people to simply search for a game in their web browser’s address bar instead of having to go to the Xbox Cloud Gaming website. Sure, it’s just the removal of a single step, but added convenience is added convenience.

These new buttons prominently displayed in Google search results will also expose a large number of people to cloud gaming who likely wouldn’t have heard about the technology otherwise.

Xbox Cloud Gaming is a relatively new initiative by Microsoft that allows people to play video games without having to download and install them or own expensive hardware by streaming the game content in real-time via Microsoft’s servers.

After more Xbox news? Give us a follow on Twitter.

4 Ways to Batch Rename Files in Windows 10/11

Windows 10, and all versions of Windows in particular, feature a very easy way to batch rename files or folders, and in this guide we’re going to show you how to do it.

How to rename multiple files at once with different names on PC?

1. Rename files in Windows Explorer

  1. Locate the files you want to rename
  2. Select all the files you want to rename, right-click it, and select Rename
  3. Now just name your file, and that’s it, the rest of files will have the same name, plus numbers to put them in order
bulk rename files windows 10 1

As we said, the easiest way to batch rename files in Windows is to use the traditional way. You just need to select the files you want to rename, click on the first one’s name, set a new name, and all files will have the same name, plus ordering numbers.

This is the simplest way, but it doesn’t allow you to do anything else, as it automatically assigns numbers to the rest of files.

But if that’s okay with you, look no further. There you go, that’s the easiest way to rename multiple files in Windows 10.

However, if you want some more options, like the ability to add underscores, add numbers without brackets, change file extensions and more, try some of the methods listed below.

For users who only need to change a single item instead of a whole batch, you can follow this step by step guide on how to rename a file in Windows.


2. Rename files using the Command Prompt

  1. Locate the folder with files you want to rename
  2. Hold Shift on your keyboard, right-click anywhere in that folder, and choose Open command prompt here
  3. When to Command Prompt window pops up, add the ren command, along with current file type, and the file type you want to convert it to.
    • Here’s how it should look:
      bulk rename files windows 10 2
  4. Press Enter

Command Prompt offers more flexibility than the regular way, but it still isn’t the most advanced option.

This tool is the most useful if you want to change multiple file extensions at once. So, in case you want to quickly convert, for example, text files to HTML files, just use the Command Prompt.

There you go, after performing this command in the Command Prompt, all your select files are going to be converted from one format to another.

If you can’t run Command Prompt as administrator to test this solution, check out our article about this topic.

We can also help you personalize Command Prompt to your liking.


3. Rename files using Powershell

    The most powerful Windows 10’s built-in tool to batch rename multiple files is PowerShell. This tool allows you to rename all the files in a folder of your choosing at once, according to your commands.

  1. 1. Press the Windows Key and type powershell in the search box.

  2. 2. Select the first result to open the Powershell tool.

  3. 3. Input the command cd along with the location of the folder containing files you want to rename.

  4. 4. Press Enter to run the command.

  5. 5. Now you can add various commands to customize renaming of your files.

  6. 6. For example, we’re going to type a command which replaces blak spaces with underscores (_): Dir | Rename-Item –NewName { $_.name –replace “ “,”_” }

    bulk rename files windows 10 command
  7. 7. Press Enter to run the command.

  8. 8. Your files have all been renamed in the manner you wanted.

This feature offers the most options, but using this method can be time-consuming, and complicated for beginners, which is why we assume that most users will skip this solution.

There you go, PowerShell is the most powerful tool for renaming multiple files in Windows 10.

You can experiment with various options and commands, in case you have some free time, and want to learn more about this tool.

For example, you can remove default apps on Windows 10 using Powershell.


4. Rename files with a third-party program

We’ve shown you the three best built-in ways to batch rename multiple files in Windows 10. However, if you still want some advanced options, but don’t want to mess with command lines, there’s always a third-party solution.

There are numerous programs for bulk renaming files in Windows, but our favorite is the program called Bulk Rename Utility.

Bulk Rename Utility is a simple, easy-to-use tool that allows you to choose between various options for renaming your files. The program is available for free, and you can download it from this link.

bulk rename utility windows

When you open Bulk Rename Utility, just locate the files you want to rename, and select them. Now you can choose a high variety of options for renaming. Some of the options are the ability to replace characters, remove characters, add dates, numbers, and even relocate your files.

If you’re not satisfied with how Bulk Rename Utility works, you can check for some alternatives online, we’re sure there are more good tools to batch rename files in Windows 10.

For those looking to manage system folders or perform advanced tasks like renaming the Software Distribution folder, check out this helpful guide on how to rename the Software Distribution folder in Windows.

FAQs

What tools can I use to batch rename files in Windows?

You can use built-in tools like File Explorer or third-party software like Bulk Rename Utility or Advanced Renamer to easily batch rename files.

Can I use special characters when batch renaming?

Yes, you can use certain special characters like underscores and hyphens. However, avoid using characters that are not allowed in file names, such as slashes or colons.

Is there a way to add a prefix or suffix to all files?

Yes, when renaming, simply type the desired prefix or suffix before or after the base name. Windows will apply it to all selected files.

Can I batch rename files using Command Prompt?

Yes, open Command Prompt, navigate to the folder, and use the ren command to batch rename files with specific patterns or formats.

For more interesting tutorials, you can check out our How-To section.

That should be all for our article about renaming multiple files in Windows. Tell us what in the comments, what do you think about these methods, and what is your favorite.


How to easily install graphics card drivers on Windows 10

Drivers are the most important software components which allow our PCs and apps to run in optimal conditions. Considering this, it is essential to perform a proper installation for them.

There are a few easy ways you should consider when it comes to installing your graphics card drivers on Windows 10.

In this article, you will find a selection precisely of the best-proven solutions regarding this subject. Just take a closer look below.

How can I install the graphics drivers on Windows 10?

1. Install graphics card drivers using third-party apps

Installing your graphics card drivers manually is a time-consuming task. We strongly recommend you to use third-party software, so your work will be simplified much more.

With this option, you’ll not have to bother yourself again with any driver-related action. This tool will help you automatically install, update, and fix your software components.

⇒ Get Fortect Driver Updater

2. Download and install Windows 10 drivers from the manufacturer’s website

AMD drivers

  1. Go to the AMD driver support website.
  2. You can instantly download the free recommendation.
  3. You can either type your exact product name or search for it in the Graphics drivers list.
  4. Download the one needed.
  5. Follow the on-screen instructions to complete the setup.
  6. Restart your PC.

nVidia drivers

  1. Access the Nvidia driver support website.
  2. Identify the appropriate driver for your nVidia product, then click on the Search green button.
  3. After the search is done, select Download.
  4. Follow the on-screen instructions to complete the setup.
  5. Restart your computer.

Intel drivers

  1. Go to the Intel driver download center.
  2. Choose Graphics.
  3. Search for the graphics driver that you need and click on its name.
  4. Choose an option from the available downloads.
  5. Don’t forget to check the detailed description listed on the right side

3. Install drivers for your graphics card using Device Manager

    The easiest way to install drivers for your graphics card is to use the built-in Device Manager. This tool helps you download and install the latest drivers for your GPU.

  1. 1. Open Device Manager.

    device manager windows 10
  2. 2. Expand the Display adapters tab and right-click on your graphics card driver.

    display adapters windows 10
  3. 3. Select Properties from the list of options.

  4. 4. Click on the Driver tab, then select Update Driver.

    windows 10 update driver
  5. 5. Click on Search automatically for updated driver software.

    update drivers windows 10 automatically
  6. 6. Device Manager will now install the latest drivers on your PC. This process can take a few minutes.

Note icon NOTE
If your graphics card is not recognized in Device Manager, then feel free to check our full fix guide.

The presented methods will definitely help you install the graphics card drivers. Also, to keep your software components safe, you can always check how to update drivers in Windows 10.

For any other questions or suggestions, don’t hesitate to leave a comment in the section below. We’re eager to hear your opinion.

How to Enable System Sound on Windows 10

A Windows 10 system sound app might be very useful when you are near the PC but don’t see the monitor.

In this case, you will need a specific sound to tell you when the PC starts, or if you got any new pop-ups regarding some updates for example.

You have the option to enable or disable these system sounds on Windows 10. Many users found out that the sounds are quite helpful when they are not at the computer or when playing games.

This audio feature will notify them about any changes that the operating system is doing without having to close a movie or quit a game.

Is this what you have in mind as well? In such a case, we have prepared a guide for you.

How can I activate sound on Windows 10?

1. Update your sound card driver

  1. First of all,  press the Windows button plus the R button on the keyboard (Windows +R).
  2. Type devmgmt.msc to launch Device Manager.
  3. In the Sound, video, and game controllers, click (left click) on the driver you have there.
  4. Click on Properties.
  5. Click on the tab that says Update.
  6. From here you will need to check if you are able to make an update on the card, if you can do it by following the instructions on the screen see afterward if the system sounds on Windows 10 work.
  7. Reboot the PC.

Whatever the reason might be, Windows 10 comes with several options to update a device driver manually. The first thing that you should in this case do is to update your sound card driver.

For immediate results, you can install the third-party application called Outbyte Driver Updater and update your sound card driver with one click.

Outbyte Driver Updater updating drivers

Besides that, upon installation, this lightweight tool will scan your PC for more out-of-date device drivers that can cause you a lot of trouble.

Outbyte Driver Updater

With a quick push of a button, Outbyte Driver Updater will make your PC use the latest sound card driver.
Check price Visit website

2. Enable sound in Windows 10

    You can easily enable system sound by configuring the Sound settings on your device. From there, you can toggle sound on and off in just a click.

  1. 1. Right-click on a free space on your desktop. A menu will open.

  2. 2. Click on the Personalize option.

    Windows personalize options
  3. 3. In the Personalization window, click on Sounds. This option is situated in the lower side of the window.

  4. 4. In the Sound dialog, navigate to Play Windows Startup.

    play windows startup sound
  5. 5. Check this box to enable sound on your device.

  6. 6. Click on Apply on the lower side of the window.

  7. 7. Reboot the PC and check if the sound works.

You can also access the Sound menu much quicker in this manner: go to Start > type control panel > hit Enter to launch the Control Panel > go to Hardware & Sound > select Change system sounds.

change system sounds windows 10

This is all, you can see a few easy steps above that will help you with the system sounds on Windows 10.

After completing the procedure, do not hesitate to bookmark our Tech Tutorials Hub.

Also, since you seem to be interested in this topic, check out the best software to boost bass sound.

If you have any ideas on how to enable audio in Windows 10, just share your thoughts in the comments below.

How to rotate an object and the view in Paint 3D

In the past, in order to rotate a 3D object, you had to invest in specialized 3D software.

Today you can achieve the same results by simply using the built-in options found inside Paint 3D.

If you want to know how to rotate the view of your 3D project inside Paint 3D, you don’t have to look any further.

Read on to find out how to rotate an object in Paint 3D on your Windows 10 PC.


How to rotate an object in Paint 3D?

    You can easily rotate an object in Paint 3D using the app’s built-in tools. Paint 3D allows you to rotate an object to any direction you want, as well as further modify it afterwards.

  1. 1. Search for Paint 3D on your computer and launch it.

    paint 3d app - Paint 3D how to rotate view
  2. 2. Click the New button to create a new 3D project, or browse for a previously created 3D project.

  3. 3. Select the 3D shapes option from the top menu bar.

    rotate view paint 3d application
  4. 4. Choose a desired shape from the menu found on the right side of your screen. You need to click on it to make the selection.

    how to rotate in paint 3d choose shape
  5. 5. Drag and drop the shape onto your Paint 3D canvas.

  6. 6. You will see multiple semi-circle icons surrounding your shape. Each one rotates the shape to another direction.

    rotate 3D shape - How to rotate view Paint 3D
  7. 7. Click the buttons to rotate your shape as you like.

What is the Mixed Reality tool?

Besides all the cool and yet simple-to-understand features that Paint 3D has to offer, none of them is as interesting as the Mixed Reality view.

This mode allows you to observe, rotate and re-arrange your 3D models inside a 3D space.

Mixed Reality uses the 3D Viewer app found inside your Windows 10.

This app will allow you to observe your 3D project from any angle you choose. Beyond this, you can also apply changes and draw inside the same environment.

Moreover, Mixed Reality makes it easier than ever to create detailed 3D structures with just a few clicks of the mouse.

How to rotate the view in Paint 3D

  1. Open up Paint 3D by searching for it in Cortana.
  2. Select the New button. You can create a new 3D project, or open a previous project of yours.
  3. Add the 3D elements you want to have in your project or edit the previously created ones to your desire.
  4. To see your 3D project from any perspective, press the Mixed Reality button found in the middle of the upper part of your screen.
  5. This will open the 3D Viewer app.
  6. You can now modify, color, add, and delete elements from your 3D project while observing it from any perspective.

Want to move text and objects inside Paint 3D? Here’s how to do it


Note: When working with 3D objects inside Paint (3D text included), you will be able to modify the location and edit the size of the 3D elements at any point.


In today’s how-to article we explored how to be able to change the view and direction of your 3D project inside Paint 3D.

We hope that you found this article helpful. Please let us know by using the comment section below.

READ ALSO:

Full Fix: Deceit game issues on Windows 10, 8.1, 7

Deceit is a multiplayer first-person shooter that will put your instincts to the test. As a player, you wake up in an asylum to the sound of an unfamiliar voice, surrounded by five others.

You realize that a third of your group has been infected with a virus. The only question is: who will escape?

Deceit is a challenging and exciting game, but players report it’s also affected by various technical issues.

Fortunately, the game developers have published a helpful post explaining how to fix the most frequent Deceit bugs that gamers may encounter.

Why is my deceit black screen?

It’s not a secret that some users reported experiencing this issue after returning to the game due to changes from their old settings file.

So, don’t panic; this is a more common thing than you know. There’s no reason to be alarmed because we are about to show you how to fix it in the article below.

Deceit is a unique multiplayer game. However, it has its share of issues. Speaking of issues, here are some common problems that users reported:

  • Deceit game freezes, low fps – According to users, the game can sometimes freeze or encounter fps issues. To fix that, be sure to remove any problematic applications that might interfere with the game.
  • Deceit won’t launch, start, not working, has stopped working – Many users reported that the game won’tuld start on their PCs. This can be an issue, but you can fix it by disabling your antivirus software.
  • Deceit failed to load profile – This is another standard error, and missing components or corrupted game files can cause it. Again, verify the integrity of game files and install DirectX and Visual C++ components, and the issue should be resolved.
  • Deceit game keeps crashing – Crashes can occur due to specific third-party applications. To fix that, be sure to remove those applications altogether.
  • Deceit voice chats not working – This issue can occur due to your audio configuration or drivers. If your microphone is configured correctly, update your audio drivers and check if that solves the problem.

How do I make my Deceit run better?

You could try dropping the resolution while ensuring Vsync is off and playing in true fullscreen.

That being said, you also have to check the system requirements for the game and make sure that the rig you are playing on is strong enough to handle the graphics.

Recommended system requirements:

  • Requires a 64-bit processor and operating system
  • OS: Windows 10 (64-bit)
  • Processor: Intel Core i5 / AMD Ryzen 5 or higher
  • Memory: 16 GB RAM
  • Graphics: NVIDIA GeForce GTX 970 / AMD Radeon R9 290X or higher
  • DirectX: Version 11
  • Network: Broadband Internet connection
  • Storage: 20 GB available space

How do I fix frequent Deceit bugs?

1. Install the latest drivers

Sometimes issues with Deceit and other games can occur if your drivers are out of date. For example, Graphics card drivers usually cause problems, so be sure to sort them out first.

You can download the necessary drivers by visiting your graphics card manufacturer’s website and searching for your model.

However, sometimes other drivers can cause this issue to appear, and to fix it, it’s advised to update all other outdated drivers.

This can be a tedious process if you’re doing it manually, so it’s better to use an automated driver updating solution that will update all your drivers automatically with a single click.

These programs are fully automated, with little input needed from the user himself, and the libraries that back them up ensure that your drivers will always be the latest ones available.

2. Check your antivirus

According to users, your antivirus software is the most common cause of Deceit issues. To fix the problem, it’s required that you add the game to the exclusions list in your antivirus and allow it to go through your firewall.

If that doesn’t work, you can try disabling certain antivirus features or disable your antivirus altogether. If that doesn’t work, your final option is to remove your antivirus.

Remember that your system will be protected with Windows Defender if you remove your antivirus, so there’s no need to worry.

If removing the antivirus solves the problem, you should consider switching to a different antivirus solution.

Finding a better antivirus to protect your system from malware may sound challenging to decide, but you can easily pick one from the best antivirus software for Windows 10.

3. Remove problematic applications

Automaton has already acknowledged the annoying crashes affecting the game and is looking for a permanent fix. Unfortunately, there are also cases where third-party programs are leading to crashes. Such external applications are known to cause issues, including currently NVIDIA ShadowPlay and NVIDIA GameStream.

To fix this problem, removing the problematic applications from your PC is advised. To do this accordingly and without app leftovers, you can now use the best uninstaller software on the market.

If you’re unfamiliar, uninstaller software will remove the selected application and all associated files and registry entries.

Using the uninstaller software will ensure that the application is completely removed from your PC. Once you remove the problematic applications, check if the issue is still there.

Tip icon Tip
Game Fire is a game booster that will get rid of freezes, lags, low FPS and other issues while playing. Download it now (free) for a better gaming experience.

4. Restart Steam

Sometimes this problem can occur due to minor glitches with Steam. However, you need to restart Steam to fix this problem.

Once Steam restarts, try to rerun the game and check if that solves the problem.

5. Install the latest updates

  1. Press Windows Key + I to open the Settings app.
  2. When the Settings app opens, go to the Windows Updates section.windows updates
  3. Click the Check for updates button.windows 11 check for updates
  4. Windows will now check for updates. If any updates are available, they will be downloaded in the background and installed as soon as you restart your PC.

If you’re having issues with the Deceit game, you might be able to solve those problems simply by installing the latest Windows updates.

According to users, sometimes specific bugs on Windows 10 can appear, and to fix them, the best method is to install the missing Windows updates.

Once the latest updates are installed, check if the problem is still there.

6. Make sure that you download the latest patches

Although Deceit has various issues, developers are working hard to fix them. There were several patches released addressing frame rate and stability issues.

To fix this and many other problems, keep the game updated.

7. Download the Universal C Runtime update

If you’re running Deceit on a Windows 7 or 8 computer, make sure you’ve installed the Universal C Runtime update.

You can download the update from Microsoft’s Support page.

8. Edit game.cfg file

According to users, the game is forcing them to use 1920×1080 resolution regardless of their current display resolution. This can be a big problem for some users, and to fix it, you need to change a few lines in-game.cfg file.

This is relatively simple, and you can do it following these steps:

  • Go to this directory:
    • C:UsersYour_usernameSaved Gamesdeceit 
  • Locate the game.cfg file and open it with Notepad.
  • Now locate r_Height and r_Width values and change them to your current resolution accordingly.

After that, save changes, and the game will be forced to start using the resolution you specified.

9. Verify integrity of game files

  1. Open Steam
  2. Go to your Library  and locate Deceit
  3. Right-click it and choose Properties from the menu.steam properties
  4. Go to the Local Files tab and click Verify Integrity of Game Files button.verify game file integrity
  5. The verification process will now start.
  6. This can take about 15 minutes, so don’t interrupt it.
  7. Once the process is finished, try to start the game again.

If you have any issues with the game, that might be because game files are corrupted.

10. Make sure that you have the necessary components installed

Sometimes Deceit won’t run properly on your PC unless you have the essential elements installed.

This is usually Visual C++ Redistributables and DirectX. You can generally find the required components in the game’s installation directory.

Search for vcredist and DirectX directories and run all setup files from these directories.

Alternatively, Microsoft’s website can download the necessary components for free.

11. Use a dedicated graphics card

According to users, they encounter various issues in Deceit, which seem to be related to your graphics card. Many users have integrated and dedicated graphics, which can sometimes lead to multiple problems.

To fix the problem, you need to open your graphics card control panel and set your dedicated graphics card as your default. Alternatively, you can go to BIOS and turn off your integrated graphics. Unfortunately, doing so will force your system only to use dedicated graphics.

You will often run into situations such as:

  • Deceit timer expired
  • Deceit unable to authenticate with Steam
  • Deceit keeps crashing
  • Deceit stuck at the loading screen

That being said, there’s no need to be alarmed, as I showed you the best steps to take when handling such a problem.

You can also look for more information about these problems on the Deceit forums, or the Deceit Discord, where fellow gamers post about these topics.

Deceit is a unique game, but it suffers from various issues. However, we hope this guide was helpful to you when your Deceit has stopped working.

How to find the Windows Update Log in Windows 10

In previous versions of Windows, whenever you performed a system update, the update log would be stored on your PC in the form of a text document that you could open easily.

However, all of these changed when Windows 10 came along. Instead of a typical text file, the Windows Update service now writes a number of Event Tracing for Windows logs.

So actually, there is no Windows update log location. Opening these logs isn’t as simple as it once used to be. However, there are workarounds for this.

How can I find the Windows Update Log in Windows 10?

We’ve compiled this step-by-step guide to show you how you can access the Windows Update logs using 2 different methods.

1. Use PowerShell

  1. Right-click the Start button and select PowerShell (Admin) from the list.
  2. Type in the following command and press Enter to run it: Get-WindowsUpdateLog
    powershell

Once the command finishes running, it will create the classic WindowsUpdate.log file in your Desktop folder.

This folder can be then easily opened with Notepad, and you can troubleshoot any issues you may have with Windows Update.

If PowerShell has stopped working, check out our article and fix the issue in no time.


2. Use Event Viewer

    The update logs on your device can be easily accessed using the built-in Event Viewer. You can select the events you are interested in and read the logs for each one of them.

  1. 1. Press Windows + X to open the WinX menu.

  2. 2. Select Event Viewer from the list.

    Winx menu for Event Viewer
  3. 3. Go to the following path: Applications and Service Logs\Microsoft\Windows\WindowsUpdateClient\Operational

  4. 4. Select the events whose logs you want to see from the middle column.

    event viewer windows 10
  5. 5. Read the log details listed for every event you are interested in.

  6. 6. Close Event Viewer when you finish.

If you want more options, check our comprehensive article to find the best event log viewers that you can use on Windows 10.

By following these two methods you will be able to once again read the Windows Update Log as you used to in previous versions of Windows.

For advanced PowerShell commands to view and export update history, see our detailed tutorial here: Windows Update History with PowerShell.

Please remember that updating your Windows is important, and if you encounter any issues when trying to update, the Windows Update Log can come in handy.

You can also review past release details directly from the Windows 10 update history page.

Do you think that the Windows Update Log was better off being the way it was before Windows 10? Let us know in the comment section below.

Also, leave there any other questions or suggestions that you may have and we’ll be sure to check them out.

Fix: Internet Explorer Tabs Freeze or Open Slowly

Internet Explorer is counting its last days, but it still has many users. And these users are indeed facing some issues with Microsoft’s outgoing browser, even if it’s more stable than ever.

If your Internet Explorer constantly crashes, freezes, or hangs in Windows 10, 8.1, 7, or maybe it won’t even start, you’ve come to the right place.

One of the main concerns of IE users is that their tabs take a lot of time to open or freeze. If you only encounter performance problems within the browser, you should look at your settings.

This issue can be caused by a cluttered browser cache and outdated or malicious browser add-ons. 

We found the most common causes that make your Internet Explorer tabs load slowly or freeze and comprised an easy-to-follow guide on what you can do.

Why does my Internet Explorer keep freezing up?

Buggy toolbars or other browser add-ons commonly cause crashes. You can check if add-ons are the problem by running Internet Explorer without add-ons. To do so, open the Start menu and launch the All Programs > Accessories > System Tools > Internet Explorer (No Add-Ons) shortcut.Feb 6, 2013

  1. Clear IE Cache
  2. Check Your System
  3. Check if the specific add-on is causing problems
  4. Change Internet Settings in Registry Editor
  5. Additional Solutions

How do I stop Internet Explorer from freezing?

Crashes, freezes, or slow responses are usually caused by buggy toolbars, browser add-ons/extensions, corrupted caches, cookies, or slow Internet.

You can check if add-ons are the problem by running Internet Explorer without add-ons, but also delete cache and cookies to be safe.

Quick Tip:

You may also try out a different browser and see how it works with your everyday activities. When Internet Explorer crashes, switch to Opera One and import all of your passwords, bookmarks, and extensions.

Opera One’s built-in ad blocker and VPN will block trackers and prevent cookies and cache overflow in the browser. Moreover, this browser also brings a built-in AI.

Opera One

Avoid sluggishness in your browser with built-in tools designed for day-by-day easy use.
Free Download Visit website

1. Clear IE Cache

  1. Click the Settings icon.Internet Explorer Tabs Freeze or
  2. Select Internet Options.
  3. Under the Browsing history section, click on the Delete button.Internet Explorer Tabs Freeze or
  4. Select what you want to delete and click on the Delete button.Internet Explorer Tabs Freeze or

The browser automatically selects temporary files, cookies, and history as these are the files that take up space and slow down your browser. If you want to keep any of this data or delete something else, tick the corresponding box.

You can also clean Internet Explorer with the help of a third-party cleaning tool. For more information on keeping your system clean, this post will take you through some of the best registry cleaners for Windows 10.

Our top recommendation is CCleaner, a cleanup tool that will erase browsing data and free up disk memory within a few clicks.

The software will enhance your PC’s performance with reliable features like custom cleaning for Internet cache or cookie files.

In addition, you can delete temporary files or duplicates from your system, analyze your disk health, and clean outdated files or broken settings on your PC.

2. Check Your System

Next, you can run sfc/scannow command in the Command Prompt to check your system for errors.

Also, you may scan your system with efficient antivirus software.

And finally, go to Internet Explorer, click Tools, Internet Options, Security, and Reset all Zones to Default level.

If these system tweaks didn’t help you, try some other solutions listed below.

3. Check if a specific add-on is causing problems

Maybe some of your add-ons are giving you a problem.

So, run Internet Explorer without add-ons and see if things improve.

To disable all add-ons in Internet explorer, do the following:

  • open Internet Explorer
  • type about:NoAdd-one in the search bar.
    This command will open Internet Explorer without add-ons, toolbars, or plug-ins.

If it works fine, one of your add-ons is causing problems.

Use the Manage add-ons tool to disable each one after the other to find which add-on is causing the problem. Then, when you notice which add-is the problem, delete it.

You can also disable add-ons if you go to Internet Options, Advanced tab, and click on Reset tab and Restart IE.

This option will reset Internet Explorer, delete all temporary files, disable all add-ons, plug-ins, and toolbars, and set all the settings to default.

This is maybe the quickest way to fix the problem with add-ons; after you perform it, you’ll have to install everything again.

But if the problem is not with your add-ons, try some of the solutions listed below.

4. Change Internet Settings in Registry Editor

If none of the solutions listed above worked, you may try to make a few changes in the Registry.

But make sure to create a backup of your system, because playing with Registry Editor could be dangerous sometimes. Find out more in the post 5 best backup software for Windows 10.

Here’s what you need to do to edit your Registry:

  1. Run Regedit and navigate to the following key:
    • HKEY_CURRENT_USERSoftwareMicrosoftWindowsCurrentVersionInternet Settings
  2. Right-click on the right page and select New
  3. Create a New DWORD value called MaxConnectionsPerServer
  4. Double-click MaxConnectionsPerServer and give the value as 10
  5. Create another new DWORD with the name MaxConnectionsPer1_0Server
  6. Double-click it and give the value as 10
  7. Save and Exit from the registry
  8. Restart Windows

You should also check if the following registry subkey is enabled:

HKEY_LOCAL_MACHINESoftwareMicrosoftWindowsCurrentVersionInternet SettingsUseCoInstall

Suppose it isn’t, no problem. But if it is present and its DWORD value is set at 1, change this value to 0, Click OK, and Exit.

5. Additional Solutions

You can always try Microsoft’s in-house troubleshooting tool, Microsoft Fix It. Just download it, choose the cause of your problem, which is crashing Internet Explorer, in this case, and it will try to fix it.

Microsoft Fix It usually fixes common problems with Internet Explorer, like freezing, running slow, security issues, etc. And it could also be effective this time.

You can also use Software Rendering instead of GPU Rendering and see if the problem still exists. To enable this setting, do the following:

  • go to Internet Options
  • select Advanced Tab
  • check Use Software Rendering instead of GPU Rendering under the Accelerated graphics section.

You can always try a different browser, such as Opera One, if everything else fails. It is light and easy to use, plus it gets constant updates that keep it stable and secure.

Every user can switch to the Opera One browser without effort, importing all information from the old browser in seconds.

There will be many cases where Internet Explorer freezes when opening, which also has to do with the fact that it is an outdated, obsolete browser.

Many users have complained over time that Internet Explorer keeps freezing and have since switched to other, more modern browsers.

You even have situations where the Internet Explorer tab freezes, but that’s all normal when dealing with Microsoft’s defunct browser, unfortunately.

The browser is highly customizable, with many integrated apps and functionalities, a built-in VPN, an integrated adblocker, personalized pinboards and bookmarks, and more.

Windows 11 Device Encryption: How to Enable & Use it

If you want to protect your sensitive data, it’s important to use drive encryption on Windows 11.

Here, we will explain how to encrypt your hard drive on Windows 11 and use BitLocker on Microsoft’s operating system.

How to manage the encryption of my hard drive on Windows 11?

1. Enable hard drive encryption

    You can encrypt your disk on your Windows 11 device using the built-in BitLocker tool from Control Panel. This tool allows users to encrypt their data so that it is only accessible to those who either insert a designated USB drive upon booting, or input the required password.

  1. 1. Click the Search icon on your Taskbar.

  2. 2. Type BitLocker in the search box that opened and click on the app from the results.

    windows 11 start bitlocker
  3. 3. Select Turn on BitLocker.

    windows 11 turn on bitlocker
  4. 4. You will be prompted to select a method to unlock your drive at startup. We recommend using the password method but you can also use a USB key that you need to provide.

    enter password bitlocker
  5. 5. Enter the password and re-enter it, then click Next.

    bitlocker password windows 11
  6. 6. After that, you will be asked to save the key in another way too. You can save it in your Microsoft account, on a file, on a USB stick or just print it.

    save key bitlocker windows 11
  7. 7. The next step is to choose whether you want to encrypt the whole drive or just the used part.

    bitlocker encrypt drive windows 11
  8. 8. Make your selection, then click Next.

  9. 9. Now you need to choose the encryption mode you want to use. As you’re using Windows 11, you can go with the first option, for fixed drives, but you can also select the second one if you plan on moving your drive.

    bitlocker encryption mode windows 11
  10. 10. At last, check the Run BitLocker system check box and then click Continue.

    bitlocker windows 11
  11. 11. You will now be prompted to Restart.

    bitlocker restart windows 11
  12. 12. After the reboot, you will be prompted to enter the password to unlock your drive.

    unlock password bitlocker

2. Encrypt your drive if your PC is not TPM 2.0 compatible

If after you click on the BitLocker drive encryption from Device encryption you see the message that Device encryption is not available for this device, that means your PC is not TPM 2.0 ready.

Don’t worry, we can take care of that with a few easy steps to perform.

  1. Press the Windows key + R to start Run, type gpedit.msc and press Enter or click OK.
  2. In the Group Policy Editor, go to the following path: Local Computer Policy\Computer Configuration\Administrative Templates\Windows Components\BitLocker Drive Encryption\Operating System Drives
  3. Now double click the Require additional authentication at startup key to open it.
  4. Check the Enabled option from the top, then check the Allow BitLocker without compatible TPM (requires a password or a startup key on a USB flash drive) box, then click OK.
  5. Now, repeat the steps from the first solution to enable BitLocker encryption.

3. Disable drive encryption

If you have changed your mind and down want to use drive encryption on your Windows 11 PC, you can do that by following these steps:

  1. Click the Search icon from the Taskbar, type bitlocker and select the app from results.
  2. Now click on Turn off BitLocker.
  3. Confirm your choice clicking again on Turn off BitLocker.
  4. Wait until BitLocker finishes to decrypt your drive before restarting or shutting down your PC.

What is drive encryption, and why do we need it?

Hard-drive encryption is the process of encrypting the data stored on a hard drive using mathematical functions.

This way, essential data will not be seen by anyone who doesn’t have access to the key or password you set up. This is an essential layer of security against ransomware and other online attacks.

Here’s how it works: when a file is written to the drive, it is encrypted automatically with the help of specialized software.

In the same way, when you access a file on the drive, the same tool decrypts it, but only if you can provide the password you set up when you encrypted the drive. Windows 11 comes with Device Encryption and BitLocker Encryption.

There’s a catch! You can’t use BitLocker if your PC has no TPM 2.0 chip installed. However, we have a workaround for that, too, so read on.

FAQ

Why should I enable Device Encryption on Windows 11?

Enabling Device Encryption helps secure your personal data by making it unreadable to anyone who doesn’t have the proper credentials, providing protection if your device is lost or stolen.

How can I check if my device supports Device Encryption?

You can check by going to Settings > Privacy & Security > Device Encryption. If available, it will show as “On.” If not, it may be due to hardware limitations, like the lack of a TPM chip.

Can I disable Device Encryption?

Yes, you can turn off Device Encryption, but it’s not recommended as it reduces the protection for your personal data, making it more vulnerable to unauthorized access.

How do I recover my device if I forget my password or PIN?

If you forget your password or PIN, you can recover it using your Microsoft account credentials or the backup recovery key you created when enabling Device Encryption.

Encrypting the drive is essential for all sensitive data from your PC and will enforce an additional layer of protection against attacks and even prying eyes.

However, this can be a two-way street because if you don’t take all precautions in managing your unlocking keys or your password, you will be unable to access your data yourself. But many, when setting up the feature, found that Device Encryption is missing in Windows 11.

You might also be interested in our guide on how to protect a folder in Windows 11 and only secure certain files. You can check out more with our in-depth comparison of Device Encryption and BitLocker Encryption.

For additional information on securing individual files and folders, you can check out our detailed guide on encrypting files and folders in Windows 10.

We hope our guide helped you enable drive encryption on Windows 11 and that your data is safe now.

If you have any questions or suggestions, write them down in a comment in the dedicated section below, and we will get back to you as soon as possible.

Chrome blocks websites from detecting Incognito mode access

Google released Chrome75 just a few days ago. The search giant is now working to bring some fantastic new features in the upcoming release.

You may be surprised that users can bypass paywalls in the upcoming release. In other words, the new Chrome will fool websites into thinking you’re not using incognito mode. This feature may not go well for websites that highly rely on paywalls and subscriptions.

Currently, users cannot view the articles published on these sites. So, if you try to open articles in Chrome’s Incognito Mode, you can’t view any reports. Instead, users are usually asked to sign in to their accounts to access the full articles.

You’re using a browser set to private or incognito mode. To continue reading articles in this mode, please log in to your Globe account.

What happens if I go Incognito on Google Chrome?

First, you’re not going to get that part you want in your favorite spy movie if you do this, so we’re clear on that.

In truth, while using Incognito, none of your browsing history, cookies and site data, or information entered in forms are saved on your device.

Thus, your activity doesn’t show up in your Chrome browser history, so people who also use your device won’t see your activity.

Quick Tip:

Speaking of browsers, you may also want to learn more about Opera. This privacy-focused web browsing solution blocks third-party trackers natively and ads for a swift browsing experience.

With Opera in Private window, you will double the safety. History, cache, and cookies will be immediately wiped after you’ve closed all private windows following your online session.

Opera

VPN, ad-blocker, and the Private window that gives you that curtain feels when browsing.

How do I enable Incognito mode in Chrome?

  1. Open Google Chrome.
  2. Click on the three dots in the top right corner.chrome options
  3. Select New incognito window.incognito window

How do publishers detect Incognito Mode?

Let’s understand the science behind it. First, websites cannot read or write cookies in Incognito Mode. Therefore, the publisher can not determine if the user has purchased the subscription or utilized the free quota. Hence, a user can get access to an unlimited number of articles.

On the other hand, the websites detect Incognito Mode with the help of a short JavaScript code. When users visit a site in Incognito Mode, the script detects the disabled Chrome browser API and blocks them.

However, Google changed the implementations of the FileSystem API in Chrome 76. The new deployments make it impossible for websites to detect any access in Incognito mode.

Chrome to remove Flash plug-in soon

Following Adobe’s decision to end support for Flash, Google also announced its plans to remove the Flash plug-in from Chrome by the end of next year.

Chrome says HTML5 offers faster browsing as compared to Adobe Flash player. Furthermore, it would help if you visited chrome://settings/content/flash to enable Flash in Chrome 76.

Chrome 76 will also feature a new button in Omnibox, allowing users to download progressive web apps. But, most importantly, there is a piece of good news for dark mode fans. Chrome 76 brings support for dark mode too.

Is Incognito private?

You should know that Incognito or private mode will keep your local browsing confidential, but it won’t stop your ISP, school, or employer from seeing where you’ve been online.

Furthermore, your ISP has access to all your browsing activity, no matter what you do. You can, however, use a Virtual Private Network (VPN) service.

You should keep that in mind when thinking about Incognito, as it won’t make you invisible while online.

Opening an Incognito tab is easy, but keep in mind that there are still rules in place, which we recommend you follow.

You can even make an Incognito mode shortcut if you want this process to become much more accessible.

A rIn the comments section below, report any issues you might have encountered while using the Incognito mode on your browser.

It is pretty much possible that publishers find a way to deal with this new feature. Google is currently testing Chrome 76 and the company plans to release a stable version by the end of July.

Speaking of browsers, you may also want to learn more about UR Browser. This privacy-focused web browsing solution blocks third-party trackers and ads for a fast and secure browsing experience.

Google Chrome Won’t Open? Here’s Why & How to Fix

Google Chrome is the most used browser on the Internet, but people are also having problems with it occasionally. One of the most frequent issues is that Google Chrome won’t open in Windows.

And this problem is definitely the annoying one, especially when you need to search for something on the Internet. Here, Google Chrome won’t open when I click on the icon or try to launch it through any other means.

So, here’s all you need to know about the issue and the most effective solutions for it.

Why Google Chrome won’t open?

When Google Chrome won’t open on my laptop, the first thing to do is to identify the underlying cause. It could be anything, from running an outdated version of the browser to issues with the DLL files or conflicting applications installed on the PC.

Sometimes, it’s a minor bug, and the shortcut you are using might have stopped working. In which case, creating a new shortcut should do the trick.

Besides, problems with the Registry can also trigger conflicts, and Google Chrome won’t open as a result. But no matter which of these is causing the problem, the solutions listed in the next section should get things up and running in no time.

Quick tip:

Even though Chrome’s popularity is unquestionable, Opera One is built as a lightweight browser to enhance opening speed and give the user a more immersive feeling while surfing the web.

Opera One browser offers a smooth experience by providing the user with integrated apps such as Ad-blocker, tracker blocker, VPN as well as a free built-in AI.

Opera One

Opera One is incredibly stable, offering a simple but wholly experience, making itself a worthy alternative to Chrome.
Free Download Visit website

How can I fix Google Chrome if it won’t open?

1. Configure compatibility settings

  1. Right-click on the Chrome shortcut, and then select Properties.properties to fix google chrome won't open
  2. Navigate to the Compatibility tab.compatibility
  3. Now, tick the checkbox for Run this program in compatibility for and then select Windows 8 from the dropdown menu underneath.compatibility mode to fix google chrome won't open
  4. Once done, click on OK to save the changes.ok

When Google Chrome won’t open on my laptop, running it in compatibility mode fixed the issue.

2. Pin a new Chrome icon to Start

  1. Press the Windows key, locate the Google Chrome icon, right-click on it, and select Unpin from Start.Unpin from Start
  2. Now, press Windows + E to open File Explorer and navigate the following path:C:\Program Files\Google\Chrome\Application
  3. Right-click on the chrome.exe file, and then select Pin to start.Pin to start to fix google chrome won't open

Once done, you should now be able to open Google Chrome from the start menu, and it won’t throw errors anymore.

3. Update Chrome

  1. Open Chrome, paste the following path in the address bar, and hit Enter:chrome://settings/help
  2. The browser will now look for available updates and install them.Update chrome

After you have updated Google Chrome, relaunch the browser and check if it runs properly now.

4. Register DLL files again

  1. Press Windows + S to open the Search menu, enter Terminal in the text field, right-click on the relevant search result, and select Run as administrator.Terminal
  2. Click Yes in the UAC prompt that appears.yes
  3. Press Ctrl + Shift + 2 to open Command Prompt.
  4. Now, paste the following command and hit Enter:FOR /R C: %G IN (*.dll) DO “%systemroot%\system32\regsvr32.exe” /s “%G”command to fix google chrome won't open
  5. Ignore any error messages you come across while running the scan, and restart the computer after the scan is complete.

5. Uninstall/reinstall Chrome

  1. Press the Windows + I keys to open Settings and then click on Apps.
  2. In the Apps & features tab on the left, select Google Chrome, and click Uninstall.
  3. Choose the appropriate response in case a confirmation prompt pops up.
  4. Once done, restart the computer for the changes to come into effect.
  5. Now, go to Google’s official website and download the latest version of the browser.download

In case you want accuracy, we strongly recommend uninstalling Chrome using a third-party uninstaller, like IObit Uninstaller. These tools will uninstall Chrome with all its folders and residual files.

One of these methods must have helped fix things if Chrome won’t open on your computer.

Also, find out how to reduce Chrome’s CPU usage in Windows. In fact, it’s an excellent substitute for potentially tricky-to-handle registry fixes. Moreover, you can install Chrome offline if you’re having problems with your internet connection.

If you have some additional comments, suggestions, or maybe other solutions, please feel free to leave your comment in the comments section below.

Fix: Folder Upload is Not Supported by Your Browser

Many users save files and folders on cloud storage instead of their hard drives. OneDrive, Google Drive, and DropBox are three of the biggest cloud storage providers that give users gigabytes of extra storage space. Users upload their files and folders to their storage space with browsers and cloud storage apps.

However, not all browsers support folder upload. Google Chrome was the first to support folder uploads, and in 2014 that remained the only browser users could upload folders.

It took somewhat longer for Mozilla to update Firefox with folder upload support. Thus, older versions of Firefox don’t support folder uploads.

Why is folder upload not supported in the browser?

The Folder Upload is not supported by your browser error message pops up when users try uploading folders to Google Drive with some old Firefox versions and browsers that don’t support folder uploads, such as Internet Explorer 11.

Keep that in mind the next tie you see this error code, just so that you will know what causes it and how to prevent it.

How do I upload a folder to my browser?

Usually, the quickest way to do this is by using the classic drag & drop technique, where you click on the desired folder and drag it to your browser window.
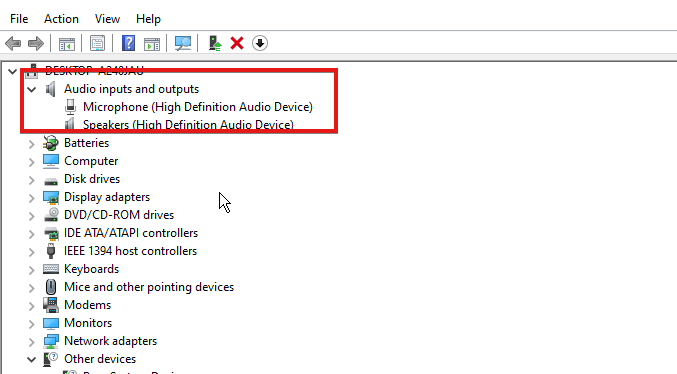
If that doesn’t work for you, you can use all kinds of third-party apps that will allow you to do just that, with upload features.
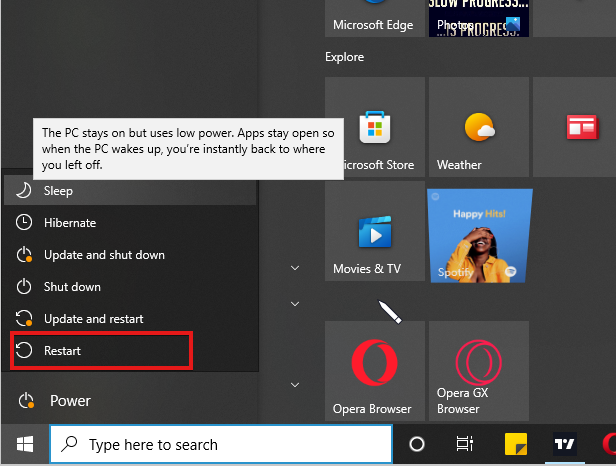
Quick Tip:

Opera One is well-known for its trustworthy advanced options, which you may use to toggle and add files and folders to the My Flow integration right in the sidebar. Sync all your devices and manage them easily.

Moreover, when you send a link, an image, a video, a note, or a file, it is immediately available for download or viewing on your linked devices. If not enough, it also comes with a built-in AI.

Opera One

An excellent web browser through which you can easily download and upload files and folders.
Free Download Visit website

How can I fix folder upload if it’s not supported by the browser?

1. Update the Browser

  1. Firefox users can update Fox by clicking that browser’s Open menu button.firefox options
  2. Click Help and select the About Firefox option.about firefox
  3. Firefox will then automatically download the latest update.
  4. Press the Restart to update Firefox button.
  5. Alternatively, users can update any browser by uninstalling and installing the latest version.
    • To do that, open Run by pressing the Windows key + R hotkey.
  6. Input’ appwiz.cpl’ in Run’s text box and click OK to open the Programs and Features uninstaller.firefox
  7. Select the browser to remove, and click the Uninstall option.
  8. Click Yes on any confirmation dialog boxes that pop up.
  9. Restart Windows after removing the browser.
  10. Then download the latest browser version from its website.
  11. Reinstall the browser with its setup wizard.

Firefox (and even Chrome) users who still see Folder Upload is not supported by your browser error messages need to update their browsers to the latest versions that support folder uploads.

2. Upload Folders With Cloud Storage Apps

OneDrive folder browser does not support folder upload

Alternatively, users can upload folders with cloud storage apps instead of browsers. For example, Google Drive, DropBox, and OneDrive have apps that sync users’ hard drive storage with cloud storage.

Those apps usually set up a cloud storage folder that users can drag files and folders in File Explorer to upload. Then, users can download the syncing apps from their cloud storage websites.

How can I upload a folder without ZIP?

As we said at the beginning of the article, you can use all kinds of third-party applications that can do the job for you.

Alternatively, you need to upload each file individually, enumerate the files in the local directory, and then loop over each and upload.

So, users who need to upload folders to cloud storage can undoubtedly do so by updating Chrome and Firefox browsers. However, users might need to update those browsers if a folder upload error arises.

There will be, however, situations where you cannot upload documents to websites using Chrome, but now you know what to do.

For SharePoint, we can’t upload folders or empty files is also a standard error message, but rest assured we are to help you whenever.

Users utilizing Internet Explorer, and perhaps some other browsers, should switch to Chrome, Firefox, or Edge to upload their folders to cloud storage.

Here are the Best Ways to Use Steam Screenshot Manager

Steam is one of the most used gaming platforms in the world. The service offers a wide range of game genres, and it has become the go-to option for people wanting to download new games or even try the trial versions before the game is officially released.

If you’ve ever played online games, you know how important it is for you to be able to take a screenshot of the action happening on the screen.

This can be useful in various cases, but it is mainly used to keep a visual record of game bugs, gather useful information, etc.

In today’s article, we’ll explore how to use the Steam Screenshot feature, so make sure you read it thoroughly.

How to save Steam screenshots?

To take a screenshot in Steam, you can press the F12 key or Fn + F12 on your keyboard, depending on whether the Function key is locked or unlocked. This will take a screenshot, a thumbnail of it will be displayed near the bottom-right, and the screenshots will be saved.

This handy tool comes as a new addition to the Steam gaming platform, and it allows you to take screenshots, manage, and share them without needing to exit the program.

After you’ve created your screenshots, they can be sorted into specific folders for each game, and you can choose between saving them on your hard drive or sharing them with the Steam community.

You also have the option to keep your screenshots private if you choose to do so.

Where is the Steam screenshot folder on Windows 10?

The screenshots are stored in the Steam folder in Program Files (x86). But since Steam creates a folder with your Account ID, the path is different for all users. Here’s the path for the Steam screenshot folder:C:\Program Files (x86)\Steam\userdata\AccountID\760\remote

Once you navigate the path, there will be several folders in Remote, each with screenshots for a particular game denoted by the game number.

There’s also a simpler way to find the screenshots for any game on your computer listed in the next section.

How can I use the Steam Screenshot Manager?

1. Find screenshots

  1. Launch the Steam app, click on the View menu near the top-left corner, and then select Screenshots.View steam screenshot folder
  2. Click on the Show dropdown menu, and then select the game on which you have captured screenshots.select
  3. Now, click the Show On Disk button.Show on Disk to view steam screenshot folder
  4. The folder with the screenshots for the selected game will now launch.view

This method is more straightforward than manually navigating through the Steam folder in File Explorer looking for screenshots.

2. Change the visibility of screenshots while uploading

  1. Click on the View menu, and then select Screenshots.screenshots
  2. Select the desired game from the Show dropdown menu.select
  3. Click on the Select All button or manually select the ones you want to upload while holding the Shift key.Select all steam screenshot folder
  4. Click on Upload.upload steam screenshot folder
  5. Now, select Private, Friends only, or Public from the Visibility dropdown menu, and then click on the Upload button.change visibility

That’s how you can change the visibility of the screenshots. Setting the visibility to Public will share the screenshots on the web.

How to change the Steam screenshot folder?

  1. Press Windows + E to launch the File Explorer, and navigate to the following path where AccountID is the one for your Steam account:C:\Program Files (x86)\Steam\userdata\AccountID\760
  2. Select the remote folder, and hit the Del key.Delete steam screenshot folder
  3. After you’ve deleted the folder, hit the Windows + S key, type Command Prompt, and then choose to Run as administrator.Command Prompt
  4. Click Yes in the UAC prompt that appears.yes
  5. Type in this command, making sure to change the path of your Steam screenshot folder to fit your needs, then hit Enter:mklink /D "C:\Program Files (x86)\Steam\userdata\AccountID\760\remote" "path_to_custom_screenshot_folder"

In this article, we explored some of the best ways to get access, create, and also manage all the screenshots you took while playing your favorite Steam game. Also, you now know how to change the location of the Steam screenshot folder in Windows 10.

Besides, find out how to optimize the PC for gaming and get the best performance.

Feel free to let us know if the information in this article was helpful to you by using the comment section below.