FIX: uTorrent not working with ExpressVPN [5+ solutions]

Torrenting is among the most popular reasons why people jump on the VPN bandwagon.

The fact that you can download a plethora of content via torrenting while you’re entirely anonymous is awesome.

However, from time to time, certain VPN services may fail to work with some torrenting clients.

For instance, you may find yourself among the unlucky few for which uTorrent is not working with ExpressVPN.

If you look this issue up, you may be able to find it mentioned on numerous forums, which tells us that it’s not exactly uncommon.

Don’t fret just yet. In this guide, we’ll teach you how to fix things if uTorrent doesn’t seem to work with ExpressVPN on your system.

How can I fix uTorrent not working with ExpressVPN?

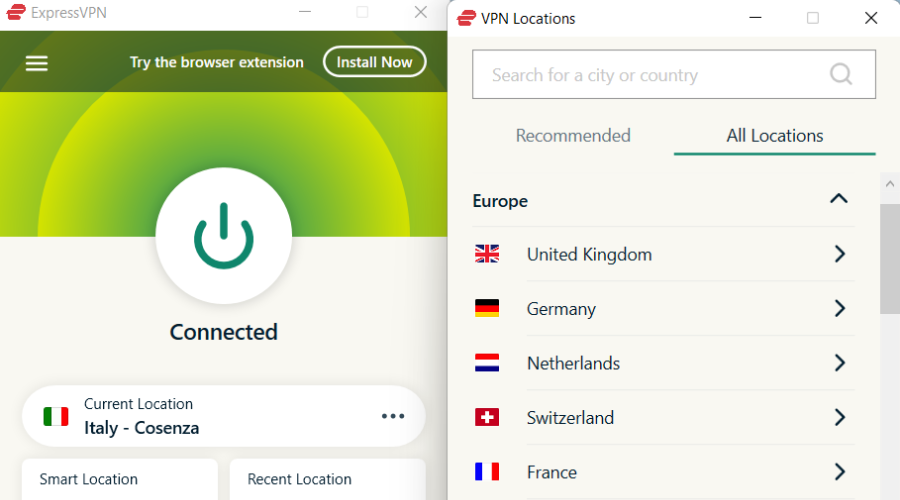
Try another VPN server

Sometimes, certain ExpressVPN servers may become overcrowded.

As a result, your torrenting capabilities might be affected.

Therefore, if you notice that uTorrent suddenly stopped working with ExpressVPN, you may want to change servers and try again.

Furthermore, certain VPN providers can even block torrenting traffic in certain areas, such as the US.

Although ExpressVPN doesn’t mention this specifically in its ToS or Privacy Policy, it may be why you can’t use uTorrent.

For that reason, choose a server in an area with more relaxed laws concerning torrenting, such as the Netherlands.

Switch VPN protocols

If you tinkered with ExpressVPN‘s protocols before, you may know that they can behave wildly different.

For that reason, we recommend you to try going through all protocols before calling it quits.

For the moment, ExpressVPN offers the following protocols:

  • IKEv2
  • PPTP
  • L2TP/IPsec
  • Lightway

SSTP and WireGuard are not supported.

To switch protocols, just open ExpressVPN‘s Options window, and navigate to the Protocol tab.
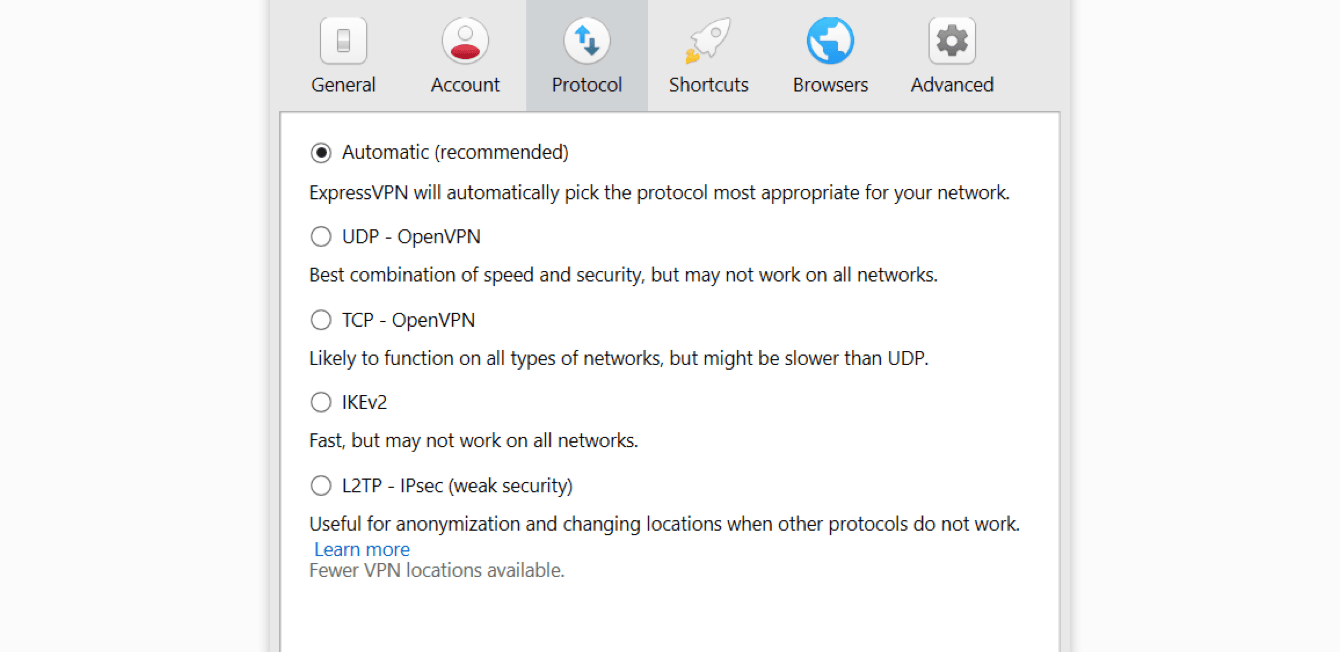
switch ExpressVPN protocols

Select a different protocol, click the OK button, connect to a stable server, and check again.

Use a stealth VPN server

Your ISP may be blocking or restricting your VPN traffic, and as a result, you may not be able to use uTorrent.

Luckily for us, many VPN providers have obfuscation capabilities that hide VPN traffic and make it look like regular traffic.

ExpressVPN makes no exception in this case.

However, there’s a catch: as opposed to other VPN providers, ExpressVPN doesn’t let you toggle the obfuscation feature on and off.

Instead, it offers built-in obfuscation in the form of stealth servers. And here’s the other catch: stealth servers aren’t highlighted in any way.

Therefore, you may need to experiment with various servers or simply contact ExpressVPN’s customer support and ask them for a list of stealth servers.

Flush your DNS

Cached data build-ups can have a negative impact on your connection.

Therefore, it makes sense why getting rid of it may restore the balance of things and make uTorrent work with ExpressVPN once more.

The most common fix is flushing your DNS, which sounds a bit like technical gibberish but trust us, it’s simple.

All you have to do is follow these steps:

  1. Launch a CMD instance with Administrator rights
  2. Type the following commands, in this order, each followed by the Enter key:
    • ipconfig /flushdns
    • ipconfig /registerdns
    • ipconfig /release
    • ipconfig /renew
    • netsh winsock reset
  3. Restart your PC

Now launch ExpressVPN, connect to a fast server, launch uTorrent, and check if there’s any improvement.

Use another VPN

  1. Purchase a VPN subscription (we recommend Private Internet Access)
  2. Download and install the VPN on your PC
  3. Launch the VPN client
  4. Log in to your account
  5. Connect to an appropriate server (PIA supports P2P on all its servers)
  6. Launch uTorrent
  7. Enjoy torrenting without restrictions

Although some VPNs may advertise torrenting support, in reality things may be a bit different.

If you notice that ExpressVPN just doesn’t work with uTorrent, you should try contact the customer support.

Often times, tech support can offer you great troubleshooting advice.

However, if not even ExpressVPN‘s customer support can help you with your uTorrent issue, maybe it’s time to switch providers.

Private Internet Access is a great alternative that provides you with P2P support on all of its servers.

More so, it has over 22,000 servers (and counting) you can choose from in case your current one doesn’t seem to work.

Check out PIA’s main features:

  • Over 22,000 high-speed servers all over the world
  • P2P support on all servers
  • Built-in kill switch to avoid accidental data leaks during torrent connection issues
  • Zero-logging policy
  • Supports OpenVPN and WireGuard protocols
  • Military-grade encryption
  • Split tunneling support
Private Internet Access

Private Internet Access

Need a VPN that works well with uTorrent? Why not give PIA a try?
Check priceBuy it now

Disable IPv6

If IPv6 is enabled on your system, you may be leaking IPv6 traffic that your ISP can use to throttle your connection.

As a result, you may experience various issues, such as uTorrent suddenly not working with ExpressVPN.

Although VPNs often boast about their IPv6 data leak prevention features, many fail to prevent these leaks.

Here’s how you can disable IPv6 on your Windows 10 PC:

disable IPv6 in Windows
  1. Right-click your Start Menu
  2. Go to Network connections
  3. Click the Change adapter options button
  4. Right-click your default Internet connection
  5. Select Properties from the context menu
  6. Make sure Internet Protocol Version 6 (TCP/IPv6) is deselected
  7. Click OK
  8. Restart your PC

Now go to ExpressVPN, open its Options window, and navigate to the Advanced tab. Here, you need to make sure the IPv6 leak prevention option is enabled.

Technically, it should do the same thing as disabling IPv6 on your system to prevent leaks.

However, as we’ve mentioned before, VPNs can sometimes leak IPv6 data, so the best way to avoid that is to disable it altogether from your PC.

Other suggestions

  • Restart uTorrent
  • Reboot your PC
  • Unplug your router/modem from the power line for a minute then plug it back in
  • Reinstall uTorrent
  • Make sure your ExpressVPN client is up to date
  • Enable ExpressVPN’s kill switch
  • Make sure you’re running the latest version of uTorrent
  • Check if your firewall/antivirus isn’t restricting either uTorrent or ExpressVPN

Conclusion

All things considered, if you notice that uTorrent isn’t working with ExpressVPN, there are plenty of things you could do about it.

We recommend you to try our suggested fixes one by one; we’re confident that you’ll find the one that does the trick.

TWINUI not working? Try these solutions [Fixed]

TWINUI is a core component of Windows 10, but many users reported that TWINUI isn’t working for them. Since TWINUI is a core component, it can cause a wide array of issues.

In today’s article, we’re going to show you the best methods that you can use to fix TWINUI and all its related problems.

How do I fix my Twinui problem?

1. Install the latest updates

  1. Open the Settings app and go to the Update & Security section.update and security twinui not working
  2. Now click on the Check for updates button.
    check for updates twinui not working

If any updates are available, they will be installed automatically. Many users reported that updating Windows helped them remove TWINUI from default apps, so be sure to try that first.


2. Reregister TWINUI

  1. Press Windows Key + X and select Windows PowerShell (Admin).
    powershell admin twinui not working
  2. Run the following command: Get-AppXPackage | Foreach {Add-AppxPackage -DisableDevelopmentMode - Register "$($_.InstallLocation)\AppXManifest.xml"}

After the command is executed, TWINUI will be reregistered, and the problem with default windows apps showing as TWINUI will be resolved.

Keep in mind that this method can lead to other issues, so it might be a good idea to create a System Restore point before trying it.


3. Remove contents of LocalState folder

  1. Press Windows Key + R and paste the following:
    %appdata%\..\Local\Packages\Microsoft.Windows.Photos_8wekyb3d8bbwe\LocalState
  2. Click OK or press Enter.
    run window twinui not working
  3. Select all files inside of LocalState folder and delete them.LocalState twinui not working

After doing that, all problems with TWINUI and the Photos app should be fixed.


4. Try using System Restore

  1. Press Windows Key + S and enter system restore. Select Create a restore point from the list.
  2. In the System Properties window, click the System Restore button.
    system restore twinui not working
  3. Click the Next button to proceed.
  4. Check Show more restore points option, if available. Choose your restore point and click Next to proceed.
    select restore point twinui not working
  5. Follow instructions on the screen to complete the process.

Once your computer is restored, the TWINUI problems will be resolved. If the problem is still there, you might want to consider performing a factory reset of Windows 10.

There you go, these are some of the solutions that will surely help you if TWINUI isn’t working or if you’re having other issues with TWINUI.

Is GTA Online Loading Forever? Try out These 5 Solutions

Some users have reported the GTA Online stuck on loading screen issue when playing the game. According to the developers, the issue can occur due to invalid login attempts or connection issues. We have listed some of the best troubleshooting steps to help you resolve the GTA Online stuck on the loading screen on PC.

What do I do if GTA is stuck on the loading screen?

1. Quit and restart

If the game takes more than 3 minutes to load, then you should quit and try again. Waiting any longer usually shows an error forcing you to restart the online session again.

If that fails, try to start a solo session, and once online try to join the crew option. You can further reduce the time if you use the invite-only session to play with other known players instead of waiting to join public lobbies.

2. Try another character slot

According to Rock Star, changing to another character slot can fix the issue. Try loading another character slot to determine whether the problem is happening only on that specific character.

3. Check GTA Online status

Next, be sure to check if you are trying to play GTA Online during the maintenance period.

To check this, go to the RockStar Games service status page and look through the list of games. Under Grand Theft Auto Online, check if the game is highlighted in red for your device.

Also, do a GTA 5 latency test to see if you have a strong connection with the server in your area.

4. Check for update

Firstly, open the game so you can check the version. Click on the 3 dots near the launch game button, and at the end of the menu drop you can see the game version.

GTA updates automatically when you launch the game. However, at times the update can fail. Manually checking for the update can fix any issues that can be causing GTA Online stuck on the loading screen issue.

You can also force an update on Steam. On the Game library, locate and right-click on GTA then select Properties. On the Local Files tab click Verify the Integrity of Game Files.

Steam will check for any issues with the game files and download any pending updates.

5. Reset your respawn location (PS4 / Xbox)

  1. Log into the social club page using your console.GTA Online loading error
  2. Select Settings from the top right corner.
  3. Select Linked Accounts.
  4. Next, unlink the PSN ID or Gamertag or that you have linked to the Social Club account.
  5. Login to the character you were having an issue with and set your spawn location to Last Known Location.
  6. Re-Link the PSN ID or Gamertag to the Social Club account.

Note: Resetting your respawn location is helpful if the first GTA Online load screen gets stuck, but there is still animation, and you can access Xbox Home, etc.

6. Restart your home network

Restarting the router is always a good step to start your troubleshooting when you’re dealing with network issues.

It is a very simple procedure and you can not damage anything. This implies to turn off your router, then unplug all the cables connected to it. After a few minutes, reconnect all the cables as they were before.

Restart your computer, connect again to the internet and check to see if the issue is resolved.

7. Reset your router

If restarting your network did not resolve the issue, try resetting your network device.

Resetting your router should be done as a last resort, as it will delete all the settings including port forwarding configuration, and set it to factory default.

Locate the Reset button on the back of your router and make sure the router is powered on. Use a paperclip or a SIM ejector tool (any pointy object) to press and hold the Reset button for 15 seconds.

Release the button once you see the lights blinking and wait for the router to fully reset and power on.

Once done, reconnect GTA Online to see if the error is resolved.

The GTA Online stuck on the loading screen usually occurs due to connectivity problems or a glitch in the game. Following the steps in this article, one by one should help you to resolve the issue.

Please let us know what worked better for you and what are problems do you face with GTA game.

Get the Windows 10 January Patch Tuesday updates today

The second Tuesday of January is finally here, and this means everyone is expecting Microsoft to roll out their first round of monthly updates for the year 2021.

While 2020 was quite eventful in terms of the development of Windows 10, with Windows 10 v2004 and the 20H2 hitting live and already taking a big chunk of the market share.


A summary of Patch Tuesday updates in 2020

Many things transpired back in 2020, some of which can almost be called historic in nature:

  • Windows 7 came to the End of Service
  • The month of may came with the most popular version of Windows 10 of the moment: Windows 10 v2004
  • The months that followed fixed a variety of issues with the new OS version, as they were expected anyway.
  • October came in with another major update, this time called Windows 10 20H2, or the October update.
  • 202 saw the end of Patch Tuesday updates for Windows 10 v1709, so anyone still using it are advised to upgrade to a newer version.
  • Lastly, 2020 broke the record for the number of CVEs detected, as it already surpassed the numbers from 2019 by the time August arrived.

As a general note, the global pandemic also caused Microsoft to postpone many of their deadlines, and end-of-services, most of them now rescheduled in 2021.


Patch Tuesday in 2021: what to look forward to?

All in all, Microsoft had nothing to say regarding the update process in 2021, or if they plan on changing anything.

However, there are a few other versions of Windows 10 that will meet their end in 2021, like Windows 10 v1803, as stated by Microsoft:

IMPORTANT We have heard your feedback and understand your need to focus on business continuity in the midst of the global pandemic.

As a result, we have decided to delay the scheduled end-of-service date for the Enterprise, Education, and IoT Enterprise editions of Windows 10, version 1803. 

The final security update for these editions of Windows 10, version 1803 will be released on May 11, 2021 instead of November 10, 2020


The updates will be made available, as always at 10:00 AM PST, and you will soon be prompted to update your PC sometimes afterwards.

Alternatively, don’t forget that there are other methods through which you can update your Windows 10 OS. this includes:

  • Using the WSUS (Windows Sevrer Update Service)
  • Downloading each update directly from the Windows Update Catalog
  • Having your System Administrator manually scheduling the update via Group Policies
  • and more…

Are you excited about the first batch of updates of 2021? Let us know what you expect these updates will bring by leaving us your feedback in the comments section below.

[wl_navigator]

FIX: Counter-Strike available memory less than 15MB error

We all love a good first-person shooter, especially when we can play it online. And, when we discuss about first-person shooter games, Counter Strike is still among our top preferences.

However, system errors that can mess your Counter-Strike gaming experience should be addressed as soon as possible. And that’s why today we will detail the Available memory less than 15MB error and the methods in which it can be fixed.

In most situations, this error is not actually caused by a low memory situation. You will most likely receive the alert even when there is sufficient RAM or system memory left on your computer.

In fact, the issue is describing an incompatibility situation between your Windows platform and the Counter-Strike software. So, the troubleshooting process must address this incompatibility issue.

This can be completed differently, depending on each situation – that’s why during the following steps we will try to review the most common methods that can fix the Counter-Strike Available memory less than 15MB error.


How do I fix the Counter-Strike memory alert?

1. Use the default Windows compatibility mode

  1. Go to where you have placed the Counter-Strike executable file, or where the game shortcut is located.
  2. Right-click on that icon.
  3. From the list that’s displayed click on Proprieties.
  4. Switch to the Compatibility tab.
  5. Check the Run this program in Compatibility mode for field.
  6. Select the Windows XP SP2 option.
  7. Save your changes and reboot the system.
  8. Now your game should run without further problems.

2. Use the latest files for your Counter Strike game

If your game is outdated, or some of its patches are not properly updated, you can experience this Counter-Strike Available memory less than 15MB error.

In this case, a solution is to download the latest files for your game and replace the ones that are saved on your computer. For example, users reported that the depositfiles.com/files/7165571 package should replace the original hw.dll file in the CS home directory.

If you don’t know from where to download these patches for your Counter-Strike version, another solution is to reinstall the game from the beginning

If you reinstall the game, make sure you keep all your recent saves and to download the executable file that’s compatible with your Windows system.

3. Check for system updates

  1. Press the Win+I keyboard hotkeys in order to launch System Settings.
  2. From System Settings click on Update & Security.42127 cab archive corrupted
  3. Switch to Windows Update tab and apply any pending patches.
  4. If your Counter-Strike game stopped working after you applying a new Windows update, you can manually remove this patch for fixing the error.
  5. Go to the Windows Update section as shown above and click on the View installed update history link.
  6. From the next window, select Uninstall an update.
  7. In this new window, just select the update patches that you want to remove from your computer and click on uninstall.

Note: Even it’s quite unlikely, a system update might automatically resolve the Available memory less than 15MB error


4. Look for outdated drivers

Outbyte Driver Updater automatically update drivers

An outdated driver might cause compatibility issues on your computer. So, you should make sure that all your drivers are working properly.

The easiest solution to keep your computer drivers up to date is to use software that does this automatically. Outbyte Driver Updater is the best option for the job.

After installation, the tool will start to scan your computer for any outdated drivers. Then, it will download and install the newest patches so you can enjoy better gaming performance.

Outbyte Driver Updater has over 18 million driver files available and new ones are added daily. Also, you can use the schedule manager to perform regular scanning in order to ensure that you always have the newest drivers.

To learn more about this great app, you can check our Outbyte Driver Updater guide.

Outbyte Driver Updater

Outbyte Driver Updater

Update your drivers with one of the best tools and solve the Counter-Strike memory alert.
Check priceVisit website

5. Reinstall Counter Strike

As already outlined, the Available memory less than 15MB error is related with an incompatibility problem. So, a good solution is to uninstall the game from your computer and reinstall it afterwards.

Of course, you should get the Counter-Strike version that has been optimized for your particular Windows platform. Once you do that, everything will work like a charm.

So, there you have it, that’s how you can successfully fix the Available memory less than 15MB error which won’t let you play Counter-Strike on your Windows 10 based computer.

If you have questions, or if you want to share your own experience with us, don’t hesitate and just fill out the comments form available below.

BIOS Code 99: How to Fix it Effectively

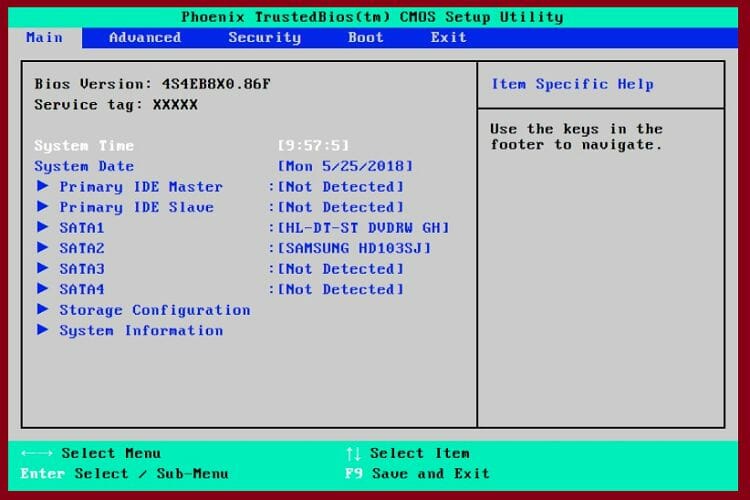
If you try to boot or reboot your Windows device, but you get stuck on a black screen with the motherboard or BIOS error code 99 displayed in the bottom right corner, it means that something isn’t functioning as it should.

No, it’s not a Windows system malfunction but a hardware issue that is preventing the OS from loading properly, and that’s why the boot/reboot sequence cannot be completed.

Simply put, the Windows OS cannot be initiated. The motherboard 99 code is not even an actual error. It shows what stage it’s currently running, and in this case, we are discussing problems within Super IO Initialization.

Of course, the motherboard can cause the issue, but it might be something with the BIOS setup too. In this article, we will try to find the proper fix for PC error code 99 and kidiconnect error code 99, so keep reading.

How can I fix the BIOS error code 99?

Before delving into the solutions in this section, try the troubleshooting steps below:

  • Verify the supply cables and make sure that HDD SATA is properly connected.
  • Check all the other connections from your motherboard and make sure that everything is working by the book.
  • Go to BIOS and check if the HDD is detected or not; if the HDD isn’t shown, you might have a faulty HDD.
  • Disconnect the peripherals before initiating a new reboot – just remove any external devices attached to your Windows device.
  • Try to boot up only the motherboard – unplug everything else besides your keyboard. Also, remove RAM and anything else that might not be required for an initial boot (including audio and USB from the motherboard). Please note that sound cards and NIC cards should be also disconnected.
  • If you built your own PC, make sure that everything is connected as it should and that you didn’t forget anything else. Again, don’t hesitate and ask for an experienced opinion, depending on your own system configuration.

If the issue persists, proceed to the solution below:

1. Set the SATA mode into AHCI

  1. Press the Windows key, and type cmd.
  2. Right-click on Command Prompt, and select Run as Administrator.
    cmd bios code 99
  3. In the Command Prompt, enter the following command and hit the Enter key: bcdedit /set {current} safeboot minimal (ALT: bcdedit /set safeboot minimal)
  4. Restart your PC, and enter BIOS Setup.
  5. Set the SATA mode to AHCI instead of IDE or RAID.
  6. Select Save and exit.
  7. Now, launch Command Prompt as an admin again.
  8. Type the following command, and hit the Enter key: bcdedit /deletevalue {current} safeboot (ALT: bcdedit /deletevalue safeboot)
  9. Restart your PC once more, and Windows will automatically start with AHCI enabled.

If you can go to BIOS, you should start the troubleshooting process by ensuring that the SATA mode is set into AHCI instead of IDE. Moreover, the boot order should follow the UEFI protocol by default.

2. Verify the Time and Date from BIOS

  1. While your PC boots, keep pressing Del or a certain F key to enter BIOS. Usually, there will be a message saying to press a certain key (F1, F2, F10) to enter SETUP. If you can’t find this key, check your motherboard manual.
  2. Once you get to the Main menu, you have to locate the Time and Date section. Navigate to the section by using the arrow keys, and verify the time and date.
    time bios code 99
  3. Select Save and Exit to exit.

3. Reset or update CMOS

You can even choose to reset or update CMOS, as this can easily fix the error code 99. Do note that depending on each manufacturer, the BIOS options might differ.

Updating BIOS without booting into Windows is possible only for newer motherboards, while making a reset can be done by accessing factory settings.

You can also reset the motherboard by removing and re-applying the BIOS battery, though this is a complex process that will imply disassembling your PC, so be careful and try not to mess things up even worse.

Don’t be afraid to ask for more experienced help if you are not a tech expert.

As already outlined, the debug code 99 describes Super IO Initialization issues. So, the fixes should focus on this particular field.

We hope that we managed to fix this problem with the help of the solutions listed above.

If you have any other suggestions or questions, please feel free to access the comment section below, we are very happy to hear from you.

Nearly all of Microsoft’s services are now powered by Azure

Seems no better way to sell you cloud services and products than to use them yourself. Mary Jo Foley over a ZDNet is reporting Microsoft’s chief technology of Azure Mark Russinovich recently spoke about how the company has followed through on its decade long journey to host its own cloud services on its Azure cloud platform.

“Most of Microsoft 365 services, including Teams, SharePoint Online and Office online, as well as Xbox Live services run primarily on Azure infrastructure today. Mailbox storage for Exchange Online and Outlook.com is also in the process of moving to standard Azure infrastructure.”

Russinovich’s statement comes after some digging on Foley’s part to clarify what of Microsoft’s services were precisely running on Azure after a handful of Microsoft ran blogs claimed “all” of its services were running on the cloud platform back in the summer of 2020.

Aside from invoking confidence in its own product, Microsoft’s move to standardize its Office 365, Xbox Live, and Bing Services onto Azure also serves as both a cost-cutting measure and a way to closely monitor outages, inconsistencies, standards compliance, and bugs.

With that being said, there are still significant outliers that Microsoft needs to migrate over to Azure that include Exchange Online and SharePoint which currently run-on Autopilot.  Much of the day-to-day management of these holdouts can be done via virtual machines or other custom instances of Azure, but the underlying databases and mailboxes servers still need to be ported over.

In the grander picture, however, Microsoft is closer than it’s been in almost ten years to actualizing one of its broader sweeping goals, and the feat is impressive, to say the least. Now we’ll just have to check in on CEO Satya Nadella’s goal of having people “love Windows” is going.

Microsoft VP Brad Anderson is leaving the company to join Qualtrics

Microsoft corporate vice president of Commercial Management Experiences, Brad Anderson, is leaving the company after 18 years. As noted in a post on ZDNet, Anderson will join Qualtrics as President of Products & Services. Anderson posted about his decision to leave Microsoft in a post on LinkedIn.

“My new role, as President of Products & Services at Qualtrics brings an opportunity to dig in, learn more & contribute to the category of Experience Management (XM) that Qualtrics is defining and building. It also presents an opportunity to return to my hometown in Utah & help accelerate the growth of the tech sector of Silicon Slopes in addition to Seattle.”

Qualtrics shares two co-headquarters, one in Seattle, Washington and another in Provo, Utah, where Anderson will be moving to join Qualtrics. Harv Bhela, corporate vice president of Microsoft 365 Security and Compliance is rumored to take Anderson’s place. Bhela is another Microsoft veteran, with over 24 years at the company. Anderson will join another former Microsoft employee already working at Qualtrics; Julie Larson-Green left Microsoft in 2017 and now serves as the chief experience officer at Qualtrics. Qualtrics chief executive officer Zig Serafin is another former Microsoft employee.

Microsoft Planner starts rolling out custom background images for plans

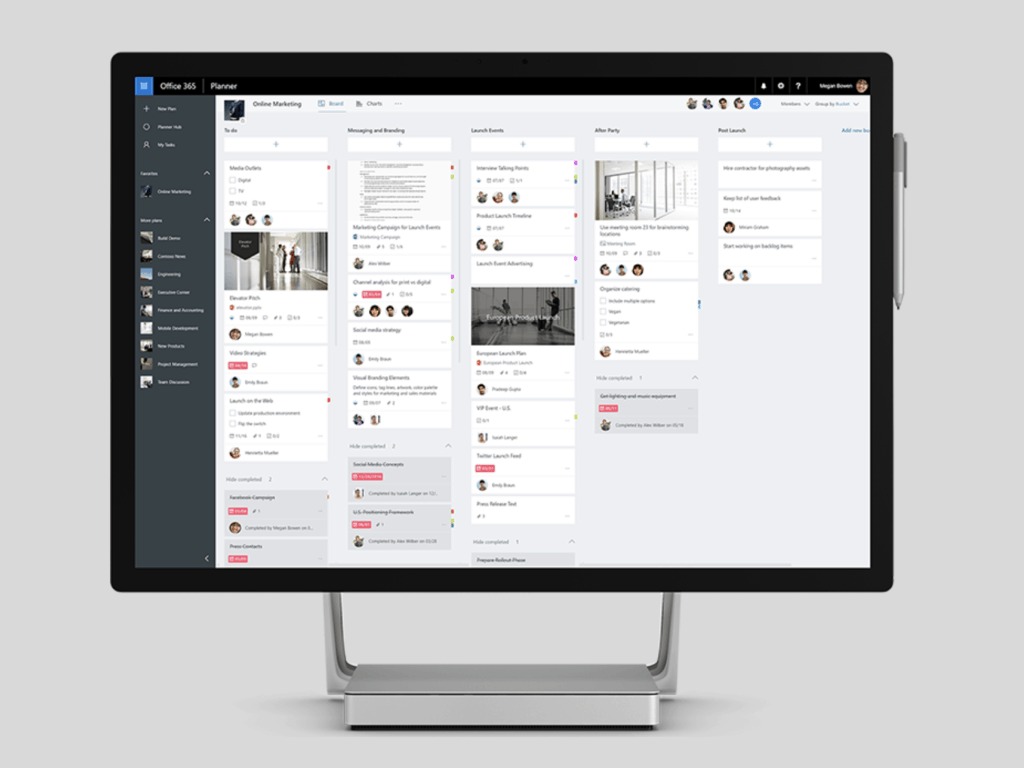
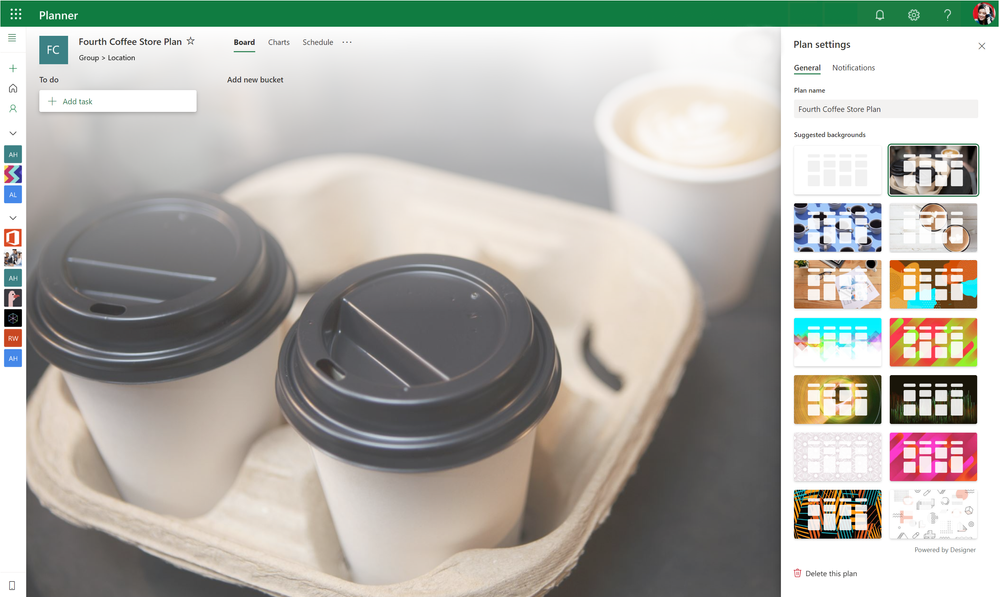
Microsoft Planner users can now try out a new Smart Backgrounds feature that brings the ability to personalize Planner boards. The company has announced that the feature is currently rolling out to all users in the Planner web experience, allowing users to add custom background images to their plans.

“Smart backgrounds is powered by the same Designer feature that suggests creatively designed templates in PowerPoint. Designer works in the background, trying to match the title of your plan with relevant and unique high-quality background images, like a coffee scene for your Coffee Store plan, a business backdrop for your Online Marketing plan, or a city skyline for your Town Hall Meeting plan,” the company explained.

thumbnail image 1 of blog post titled Personalize your plans with smart backgrounds

To try smart backgrounds, you’ll need to click the ellipsis (…) menu and head to “Plan settings.” In Planner settings, select the General tab and choose one of the backgrounds available in the recommendation list. Currently, users can not upload their own images, but we hope that the company will add this capability soon.

Furthermore, the company has also introduced a new Settings UI for Microsoft Planner. The revamped Settings menu is now divided into three different groups, including General, Group, and Notifications. The change makes it easier for users will now be able to find relevant settings. Have you spotted this feature on your PCs? Sound off in the comments down below.

How to split large folder into multiple folders [Full Guide]

These days, it is common to have files that run into 100s of Megabytes or even Gigabytes due to increased media quality. With great quality comes large file sizes that are a bit difficult to move around.

While the compression tools can squeeze a large file into a smaller one, the process is time consuming and can be a little tedious.

Now, what if you want to move large files? Well, one way is to split a large folder into multiple folders.

Splitting large folders into multiple folders is particularly helpful if you are trying to upload files to a file-sharing service that only accepts smaller-sized files.

In this article, we have listed a few tools that can help you large folder into multiple folders on your Windows 10 and other systems.

If you are working with large files, check our detailed guide on how to split large files in Windows 10 instead.

So, without further ado, let’s get started.

How do I split large folder into multiple folders?

WinZip

split large folder into multiple folders

WinZip is a premium file management tool that is popular for its compression and archive capabilities. However, it also offers a split tool that you can use to split large folders into multiple folders.

Apart from its file splitting capabilities, WinZip can unzip all the major formats including GZIP, RAR, Zipx and more. It can also be used as a complete file management solution to move and share files, protect the document with read-only attribute, and share the files with cloud integration.

To split large folders, do the following.

  1. Launch WinZip.
  2. Using the file panel, select the zip folder that you want to split.
  3. Click Add to Zip and select the split option.
  4. Choose the save location and split the folder.

Key features of WinZip:

  • Excellent file split features
  • Compress folder, PDF, and repair zip file
  • Unzip all major file formats
  • Cloud integration with Dropbox, Google Drive, OneDrive and more
WinZip

WinZip

Always easily split large folder into multiple files by using this amazing software today!
Check priceVisit website

Icecream PDF Pplit & Merge

split large folder into multiple folders

Icecream PDF Split and& Merge is a premium file splitting utility that can split large PDF files into smaller files. It is an excellent utility if you extensively work with large PDF documents and move them around frequently.

  1. Download and install Icecream PDF Split & Merge.
  2. Launch the tool and click on the Splitter tab.
  3. Click the Input File button and select a PDF file to split.
  4. Next, you can choose how to split the file. Click Split Equal parts or choose to split the file using the Split Volume option.
  5. Press the Split button to split the files into smaller PDFs.

Key features of Icecream PDF split and& Merge:

  • Split files by a group of pages or volume
  • Combine any PDF documents
  • Supports 50+ languages
  • Encrypt sensitive documents with password
IceCream PDF Split & Merge

IceCream PDF Split & Merge

Transform your large folders into smaller parts by trying the powerful IceCream PDF Split & Merge.
Check priceVisit website

GSplit

split large folder into multiple folders

GSplit is one of the best file splitter available for Windows platform. This lightweight utility can split up large files with ease. However, similar to other splitting software, you can either split a large file directly or create a zip file of your large folder and then split them into pieces.

  1. To split a large folder, make sure to create a zip file for that folder.
  2. Next, download and install GSplit.
  3. Launch the app, click on Browse and select a large file or zip folder.
  4. Next, click on Type and Size menu. Here, you can set the number of pieces you want to create or define volume size.
  5. Once done, click the Split button and select the Destination folder. Depending on the folder/file size, the splitting process may take some time.

GSplit also comes with a GUnite tool that you can use to reassemble the files. Launch the tool, select the folder and click on Unite to merge the file or folder again.

⇒ Try GSplit


Pine File Splitter

split large folder into multiple folders

Don’t want to install a third-party file splitter program on your PC? Take a look at Pine Tool’s file splitter. Split File is an online app that allows you to split large files into multiple pieces.

  1. To split a file or a zipped folder, go to Split Files Online and click on Choose File.
  2. Browse and select the file from your computer and click OK. The file splitter will show the original size of the file.
  3. Under Options, you can choose the criteria to split the files in number or size.
  4. Under the information screen, you can see the information related to the number of pieces of files that will be created.
  5. Click the Split File button to begin. Once done, you can download the files to your computer.

⇒ Try PineTools File Splitter


7Zip

split large folder into multiple folders

7Zip is a popular file manager and compression utility that also comes with File Splitting capabilities. Similar to other mentions here, 7Zip can split a large zip file into multiple files or folders.

  1. To split a folder, download and install 7Zip.
  2. Launch the tool and create a zip archive of your large folder.
  3. Using 7Zip, navigate to the save location and select your file.
  4. Right-click on the file and select Split.
  5. Select a destination and then choose Split to volumes depending on your size requirement.
  6. Click OK to split the file.

⇒ Try 7Zip


Sharing large files over the internet can become difficult if the sharing website has limitations on file sizes. You can use file splitter software to split large folders into smaller folders and share them easily in such a situation.

The recipient can use similar software to unite the files after downloading them.

All the software listed in this article can help you split large archived folders with ease. Go through the list and let us know your favorite tool in the comments below.

Star Wars Jedi: Fallen Order is now optimized for Xbox Series X|S consoles

Star Wars Jedi: Fallen Order is the latest EA and Respawn Entertainment game title optimized for Microsoft’s new Xbox Series X|S consoles. This optimization update improves Xbox’s Backward Compatibility, increased framerate, and improved dynamic resolution range. Star Wars Jedi: Fallen Order launched back in November 15, 2019 on Xbox One and other console platforms. Both the Xbox Series X and Xbox Series S get a better framerate of 60 FPS (up from 45 FPS). However, the Xbox Series S only gets the framerate boost. The Xbox Series X benefits the most from the Jedi Fallen order game optimization update as seen below.

Xbox Series X Performance mode

Framerate has been increased to 60 FPS
Dynamic resolution added in the range of 1080p to 1440p

Xbox Series X Normal mode (non-performance mode)

Postprocessing has been increased to 4K
Dynamic resolution in the range of 1512p to 2160p

The EA Play library is currently available free as part of an Xbox Game Pass Ultimate subscription, and provides access to over 80 EA games including FIFA 20, Titanfall 2, and Star Wars Jedi: Fallen Order, as well as some of EA’s most popular franchises including Battlefield, Mass Effect, and more. Xbox Game Pass Ultimate is a great value for just $14.99/month, and new subscribers can still get their first month of subscription for just $1.

Xbox Game Pass Ultimate

Meeting recap in Microsoft Teams will begin rolling out later this month

Microsoft is adding a new “Meeting recap” feature to its Teams collaboration platform later this month, according to the Microsoft 365 Admin Center. Indeed, the feature is currently set to begin rolling out by the end of January and will be available to all Microsoft Teams users in mid-February.

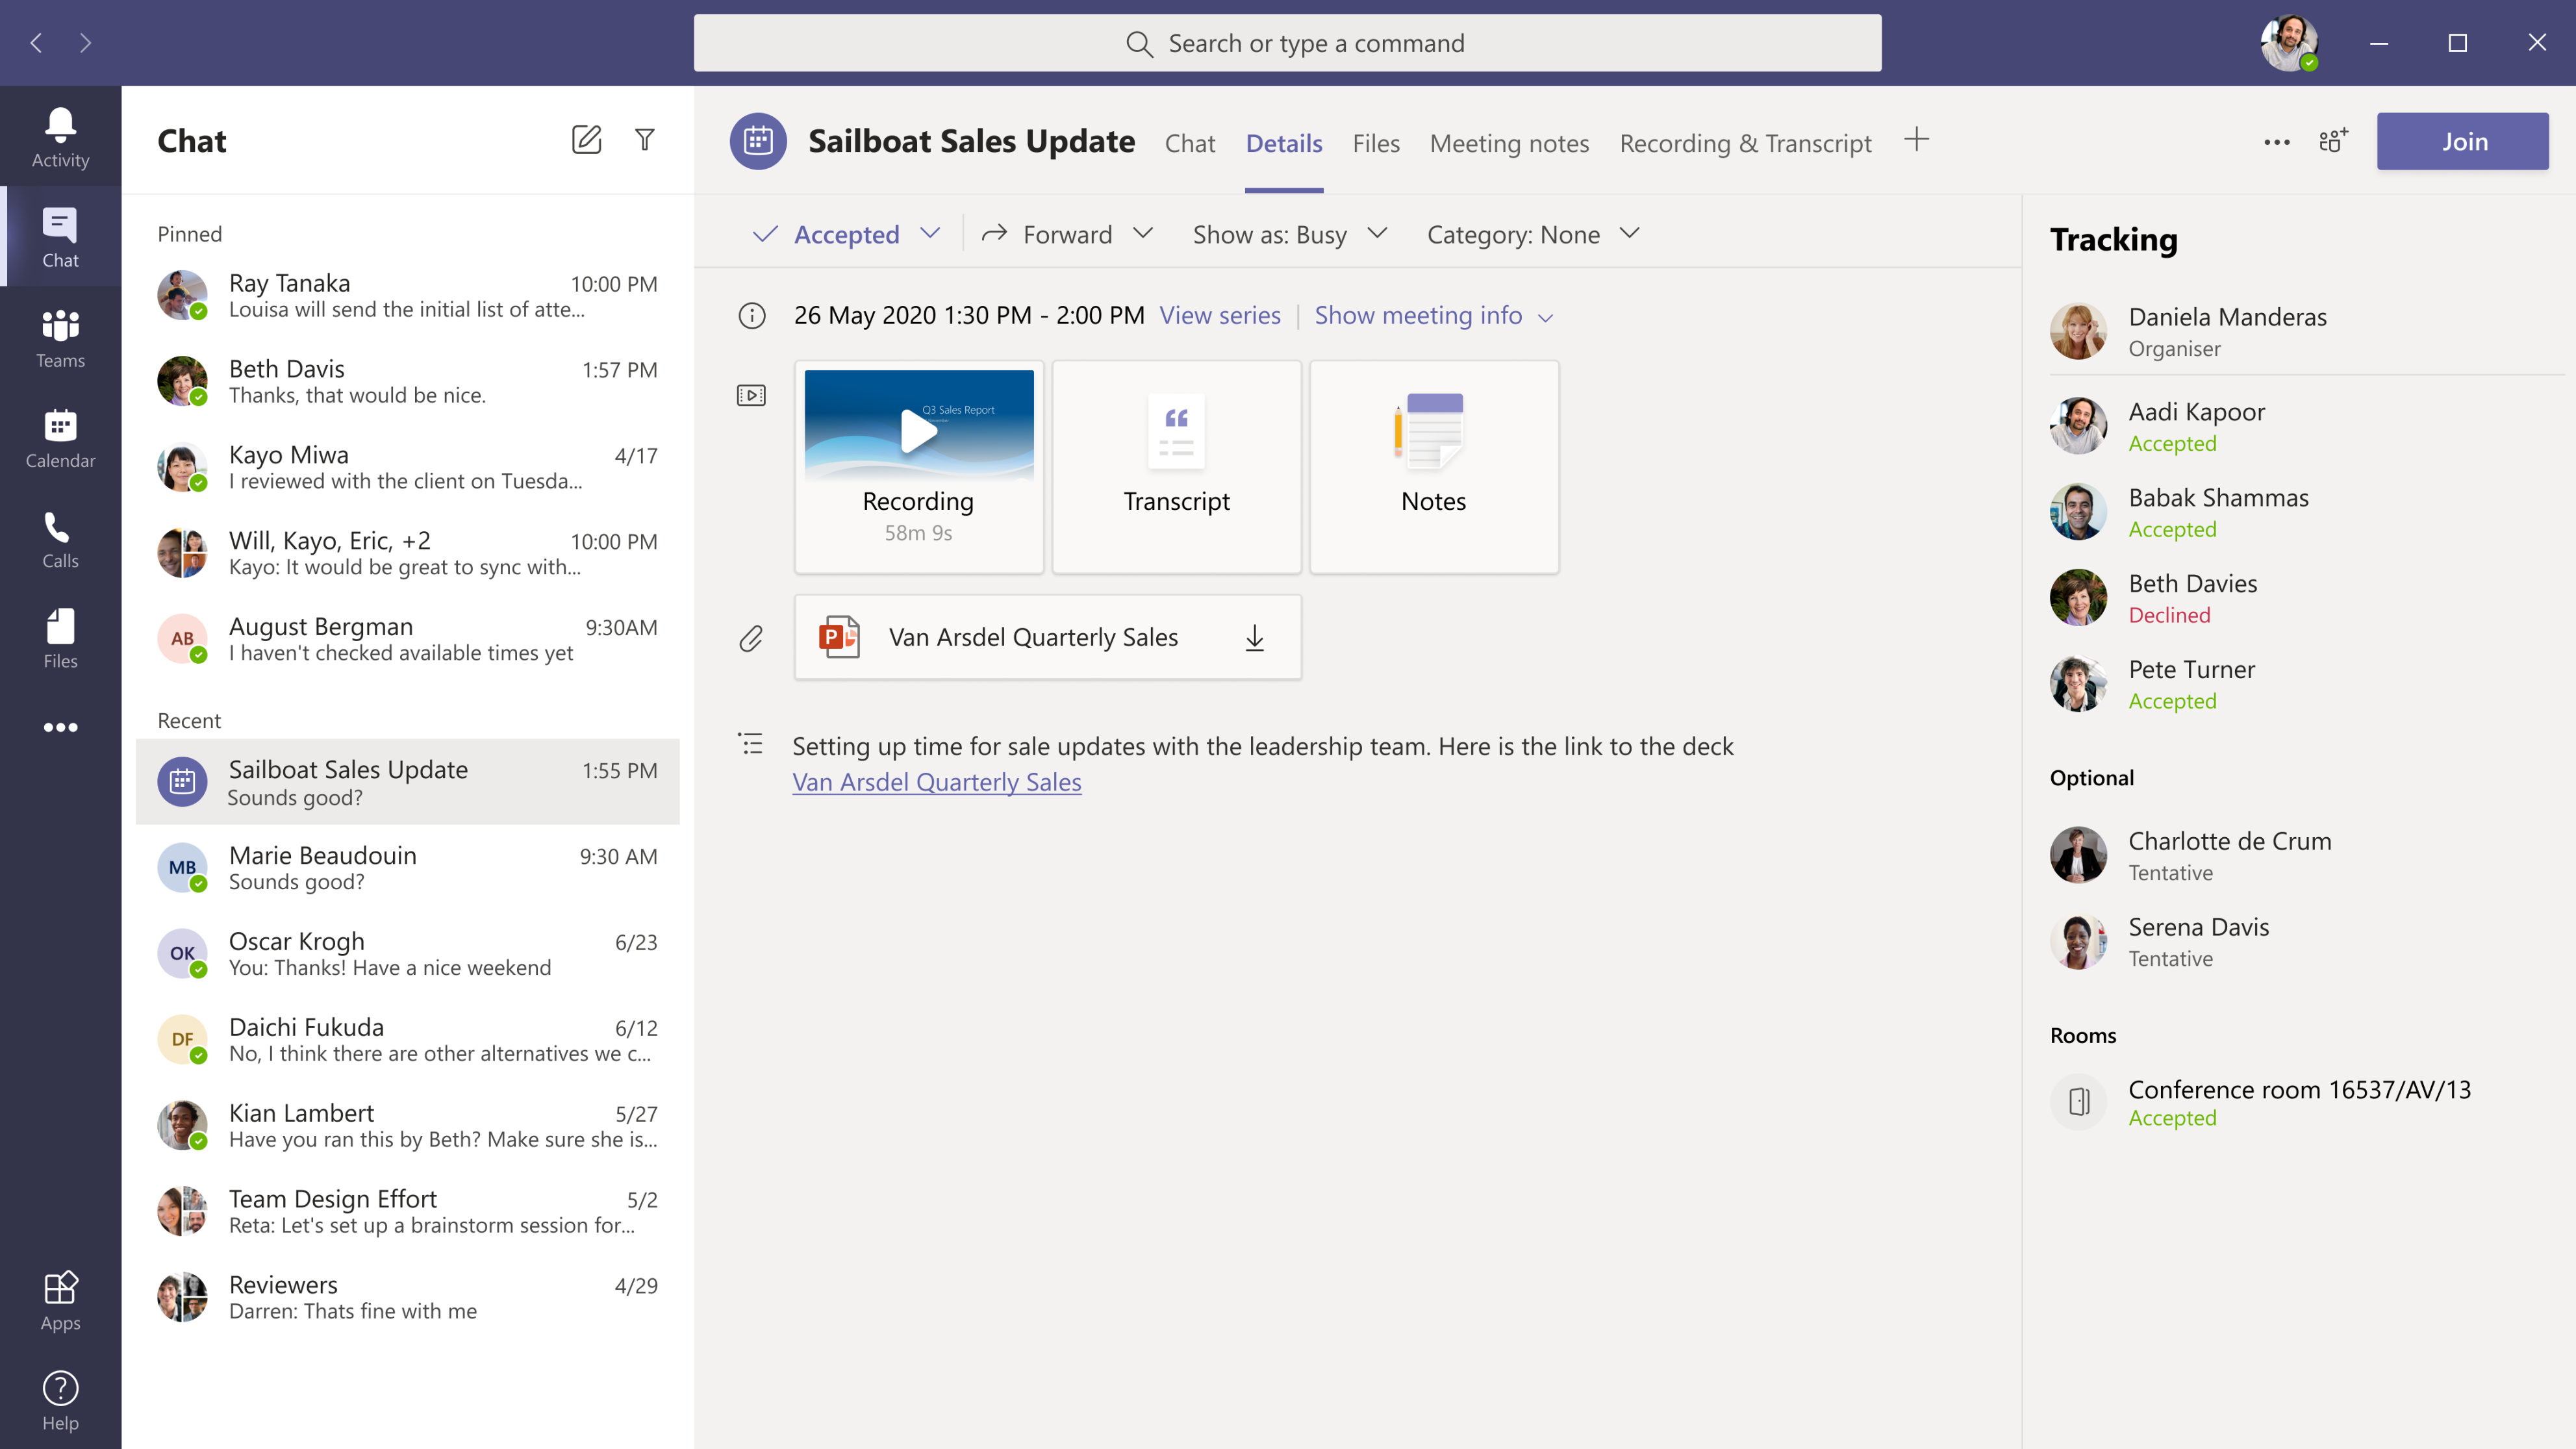
Originally announced in September 2020, this new meeting experience will allow participants or people unable to attend the meeting to access meeting content after it has ended. Microsoft Teams will automatically share the meeting recording, transcript, chat, shared files, and more in the meeting’s details tab.

Meeting summary invitee view

The recap feature could prove extremely useful for Teams users in learning scenarios, making it easier to find everything they need to catch up instead of contacting the organizer of the meeting. The recaps will be accessible for users in Microsoft Teams and from the meeting event in their Outlook calendar.

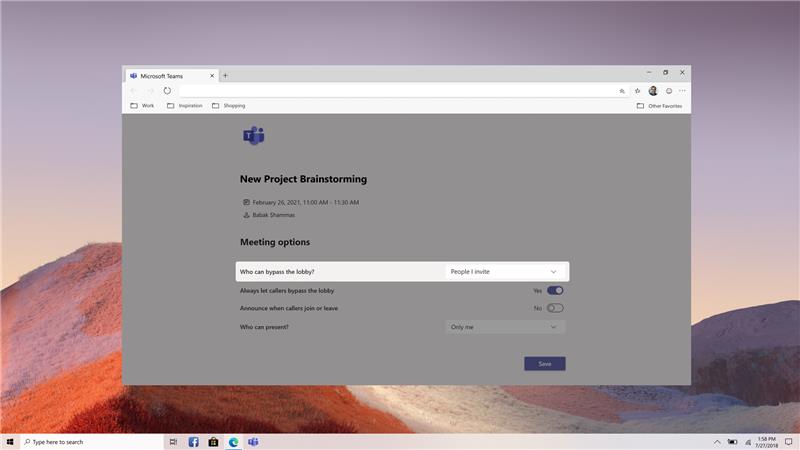
In addition to this, Microsoft has also confirmed another important update that is in development for Teams. The company is introducing a new Teams meeting lobby setting to enable meeting organizers to ensure that only Calendar meeting invited users will be allowed to bypass the lobby after a new meeting is scheduled.

New Lobby settings in Teams

The Microsoft 365 roadmap listing for the feature indicates that it’s currently in development and is scheduled to release in February. At launch, the feature will be available for both Production and GCC environments. This is a minor update, but it should help Teams meeting organizers to have greater control over their meetings.

Fix: An Error Occurred While Updating Counter-Strike

Some Counter-Strike players have stated that An error occurred while updating Counter-Strike error message pops up when they select to play the game via Steam.

The game doesn’t update, and players can’t launch Counter-Strike: Global Offensive.

Does that error message sound familiar? If so, some of the resolutions below might fix it.

How can I fix Counter-Strike update errors?

1. Select an alternative download region

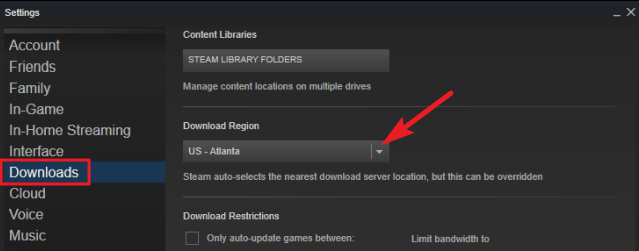
  1. Right-click Steam’s system tray icon and select Settings, in order to select an alternative download region in Steam.
  2. Click Downloads on the left of the Settings window.
  3. Select an alternative region on the Download Region drop-down menu.
  4. Press the OK button to close the window.
  5. Restart Steam after changing the download region.

2. Clear Steam’s Download Cache

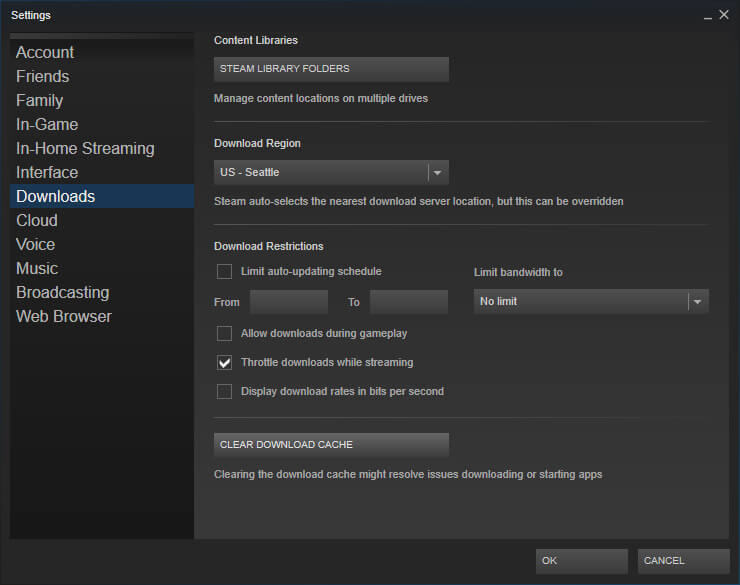
  1. Select Steam, then Settings on Steam’s left client menu.
  2. Select Downloads on the Settings window.
  3. Press the Clear Download Cache button.
  4. Click OK to confirm.
  5. Thereafter, log in to Steam again.

Steam includes a Clear Download Cache option that can fix download issues or games that don’t start. So, that option might come in handy for fixing the An error occurred while updating counter strike global offensive (invalid app configuration) error.

3. Run Steam as Administrator

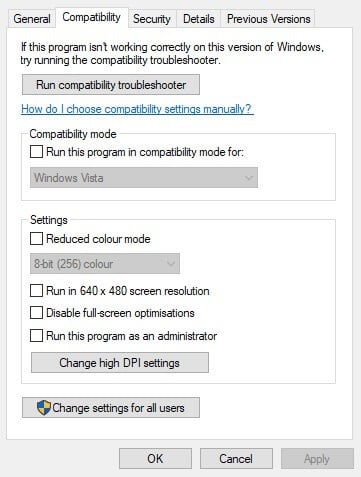
  1. Right-click Steam.exe within the software’s folder and select Properties.
  2. Select the Compatibility tab shown directly below.
  3. Click the Run this program as administrator check box.
  4. Select the Apply button.
  5. Select the OK option.

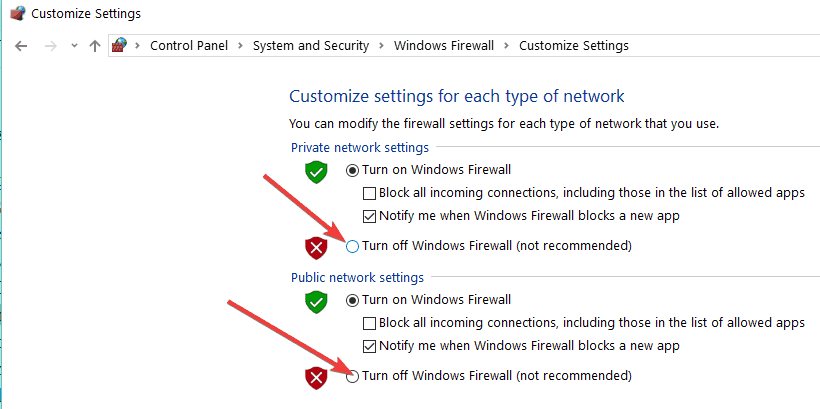
4. Turn off the Windows firewall

  1. Click on the Type here to search button on the taskbar to open Cortana.
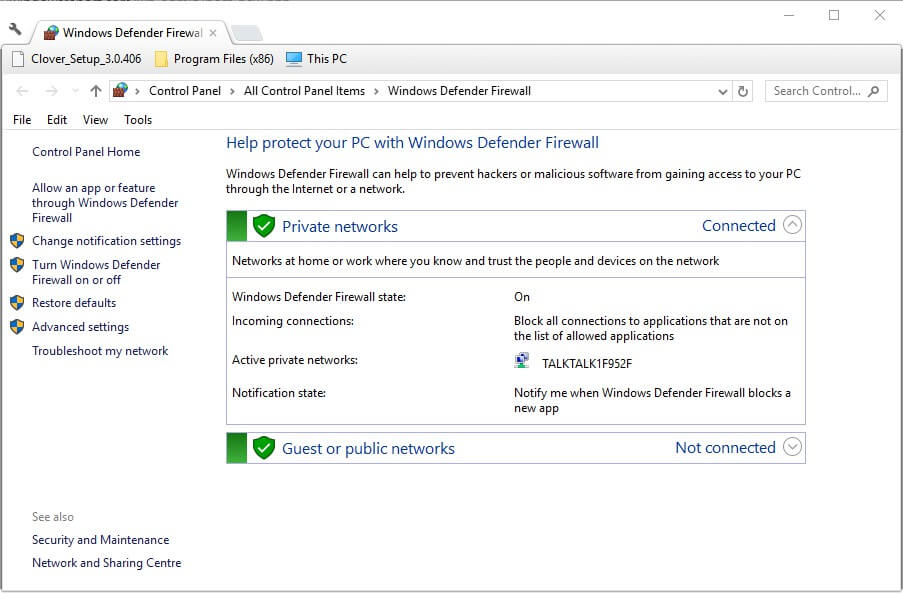
  2. Enter firewall in the search box, and select to open Windows Defender Firewall.
  3. Click Turn Windows Defender Firewall on or off to open the options shown directly below.
  4. Select the Turn off Windows Defender Firewall options.
  5. Click the OK button.

Some Steam users have stated that turning off the Windows Defender Firewall fixed the An error occurred while updating Counter-Strike error for them. So, the error message is often due to the firewall blocking Steam. Users can turn off the firewall in Windows 10.

5. Turn off third-party antivirus software

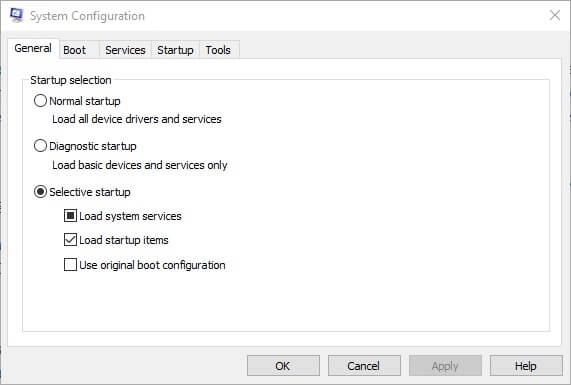
  1. Open Run with the Windows key + R hotkey.
  2. Then open the System Configuration window by entering ‘msconfig’ in Run and clicking OK.
  3. Select the Selective startup radio button.
  4. Uncheck the Load startup items check box.
  5. Select the Load system services and Use original boot configuration check boxes.
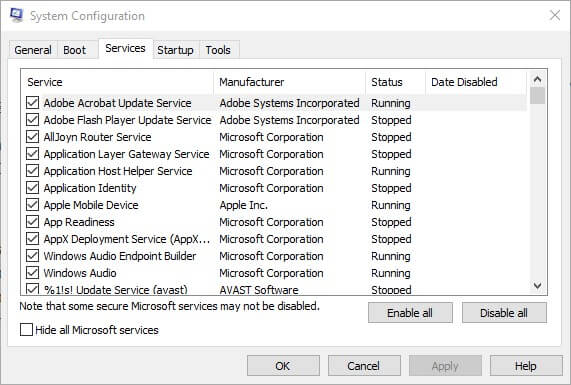
  6. Click the Services tab shown directly below.
  7. Select the Hide all Microsoft services option first.
  8. Then click the Disable all button to uncheck all the third-party services check boxes.
  9. Select the Apply option to confirm the new settings.
  10. Then click OK to close the window.
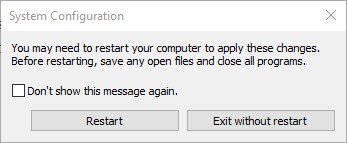
  11. Press the Restart button on the dialog box window that opens.
  12. Open Steam and launch Counter-Strike again. If the game updates and starts, then you probably need to get rid of the antivirus software.

The An error occurred while updating Counter-Strike error can also be due to third-party antivirus software, which include firewalls. Steam users have fixed the issue by uninstalling antivirus utilities.

At the very least, some players might need to disable their antivirus software by right-clicking the utilities system tray icons and selecting a disable or turn off setting.

If that isn’t enough, try clean booting Windows. That will remove third-party antivirus utilities, and other software, from the startup.

6. Delete the Appcache folder

  1. Close the Steam client software if it’s open.
  2. Open File Explorer.
  3. Open the Steam folder, that has the following File Explorer path: C:Program FilesSteam or C:Program Files(x86)Steam.
  4. Select the appcache subfolder and press the Delete button to erase it.

Those are a few of the resolutions that have fixed the An error occurred while updating Counter-Strike for most Steam users. You can also set up a Steam Support account to send a support ticket.

We’d like to hear more from you on this subject, so drop us a comment in the comment section below.

How to fix Steam’s Invalid Depot Configuration error

Some users have posted about an Invalid Depot Configuration error on Steam’s forum. That error arises when users try to install or update a game through Steam.

As a consequence, users can’t install or update Steam games when that issue arises. These are some of the fixes for the Invalid Depot Configuration error.

How can I fix the Invalid Depot Config steam error?

1. Update Steam

check if the game is properly installed

First, check for Steam updates. Open the Steam window, and then click File. Select Check for Steam Client Updates to update the software if required.

If your update gets stuck, follow the simple solutions from this guide to solve the problem easily.


2. Delete almost all files in Steam’s folder

  1. Some users have fixed the Invalid Depot Configuration error by clearing most of the Steam folder. To do that, open File Explorer with the Windows key + E keyboard shortcut.
  2. Open the Steam folder in File Explorer. The default path for Steam will usually be something like this: C:Program FilesSteam
  3. Select to delete all files in the Steam folder with the exception of Steam.exe and the Steamapps and Userdata subfolders.
  4. Press the Delete button to erase the selected files.
    Delete button Steam Invalid Depot Configuration Error
  5. Restart Windows after clearing the Steam folder.

3. Opt out of the Beta program for Steam

  1. Steam beta users have said they’ve fixed the issue by opting out of the beta program. To do that, open the Steam client software.
  2. Click the Steam menu at the top left of the software’s window.
  3. Select Settings on the menu.
  4. Click the Change button for beta participation on the Account tab.
  5. Select the Opt out of all beta programs option on the Beta participation drop-down menu.

4. Enter the Flushconfig command in Run

flushconfig command Steam Invalid Depot Configuration Error

Steam users have also confirmed that the flushconfig command can fix the Invalid Depot Configuration error.

Open Run by pressing the Windows button (left of Alt key) and R. Then input steam://flushconfig in Run, and press the OK button.


5. Erase MountedDepots configuration

  1. First, make sure Steam is fully closed.
  2. Then open the SteamApps subfolder within the Steam folder in File Explorer.
  3. Right-click the appmanifest_[gameid].acf file, select Open with, and then choose a text editor (such as Notepad) to open it with.
  4. Delete all the numbers listed under the MountedDepots section.
  5. Select the File and click on Save options.
  6. Thereafter, Steam will set up a corrected MountedDepots configuration when launched.

Erasing MountedDepots configuration within the appmanifest_[gameid].acf file is another resolution Steam users have fixed the Invalid Depot Configuration error with.


6. Reinstall the Steam Software

  1. As a final resolution, try fully reinstalling Steam with the latest version. To preserve game installations, move the Steamapps folder out of the Steam folder before uninstalling the gaming client.
  2. Open the Run utility by pressing Windows key + R.
  3. Enter appwiz.cpl and click the OK button.The uninstaller window Steam Invalid Depot Configuration Error
  4. Then select Steam, and click the Change/Remove option.
  5. Go through the uninstall instructions to remove Steam.
  6. Restart Windows before reinstalling Steam.
  7. Click Install Steam on the software’s download page to get the latest version.
  8. Open Steam’s setup wizard to add the game client to Windows.
  9. Thereafter, users can move the Steamapps folder back into the Steam folder.

Those are confirmed resolutions that have fixed the Invalid Depot Configuration error for Steam users. With that error fixed, you can then install and update games through Steam.

If you have any other questions or suggestions, don’t hesitate to leave them in the comments section below.

MediaCom Packet Loss: What Is It and How to Fix It

MediaCom is a communication company that delivers Internet, TV, phone, and cable services to its customers.

Just a heads-up, we’ll focus solely on the Internet part.

As with any other ISP, MediaCom customers may experience various technical issues, such as packet loss, from time to time.

Packet loss is a common phenomenon regardless of location, and it can be triggered by many factors.

In this guide, we’ll teach you more about packet loss, what can cause it, and how to fix it effectively as a MediaCom customer.

What is packet loss?

We can’t stress this enough: packet loss is not a MediaCom-specific issue. It can happen everywhere as long as you have an Internet connection.

To put it simply, packet loss occurs whenever packets of data get lost along the way and never reach their destination.

That destination could be either you or a remote server you’re sending/receiving information to/from.

As a result, you may experience various annoying issues, such as:

  • An unresponsive connection
  • Stuttering during VoIP calls
  • Jitter
  • Sluggish video streaming
  • Unplayable online games
  • Unresponsive menus in games
  • Rubberbanding (still talking about games)

What causes packet loss?

Unfortunately, several things can cause packet loss, whether you’re a MediaCom customer or not.

  • Network congestion (this is the most common reason)
  • Poor ISP traffic management (causes network congestion)
  • Not maintaining your connection properly
  • Using Wi-Fi instead of a wired connection
  • Cheap Internet plan (not enough bandwidth)
  • Obsolete hardware (including routers, cables)
  • Router running on an older firmware version
  • Out-of-date drivers on your system
  • ISP throttling your bandwidth

With these potential causes in mind, it’s not difficult to see why packet loss isn’t exactly easy to spot and troubleshoot.

As you can see, some of these factors are directly your ISP’s (MediaCom) responsibility, while others are up for you to handle.

How can I fix MediaCom packet loss?

Use a VPN

  1. Download and install ExpressVPN.
  2. Launch the VPN client and log in to your account.
  3. Connect to a fast server (nearby servers are usually the fastest).
  4. Check if your packet loss issue persists.

More often than not, using a VPN can curb packet loss without too much effort. You fire it up and connect it to a server; moments later, you can see the improvements.

However, there’s also a solid chance that this fix won’t work as intended.

Remember when we said that some of the leading causes of packet loss are directly tied to your ISP (MediaCom)?

A VPN can take care of those by re-routing your connection through a secure, well-maintained, unrestricted tunnel. Therefore, if the issue occurs on your side, a VPN could only worsen things.

The same goes if the remote server (e.g., streaming server, game server) has technical difficulties and discards packets.

The main reason why we recommend ExpressVPN is that it has a huge network of thousands of servers.

Thus, even if you’ve picked a server that doesn’t seem to work well, you can simply choose another one. You have plenty of elbow room.

Check out ExpressVPN’s main features:

ExpressVPN

If you’re struggling with this MediaCom issue, I suggest you try ExpressVPN to solve it right away.
Free Trial Visit Website

Flush your DNS

It’s not a given, but sometimes flushing your DNS can improve your connection’s well-being.

Much like many other types of data, your system can cache DNS information, and these data build-ups can have a negative impact on your connection.

For that reason, flushing your DNS could really improve your connection, especially if you have never done it before, or didn’t do it in a long time.

Here’s how you can flush your DNS on your Windows 10 PC:

  1. Launch a CMD instance with Administrator rights
  2. Type the following commands, one by one, each followed by the Enter key:
    • ipconfig /flushdns
    • ipconfig /registerdns
    • ipconfig /release
    • ipconfig /renew
    • netsh winsock reset
  3. Restart your PC

After your PC restarts, check if your packet loss issue still persists.

Troubleshoot your connection

A well-maintained connection is less prone to experience technical issues such as packet loss.

For that reason, we’ve prepared a brief list of things you can do to make sure your connection is in top shape.

  • Restart your computer, your router, and your modem
  • Check if your router is running on the latest firmware version
  • Update all drivers on your system, especially network adapter drivers
  • Try to disable your VPN temporarily
  • Check if your security software (e.g. firewall, antivirus) restricts the service where you experience packet loss
  • Disable your firewall/antivirus temporarily
  • Upgrade your MediaCom Internet plan if you can (especially if your plan has insufficient bandwidth)
  • Force-stop any bandwidth-hungry app or service on your PC
  • Switch your wireless router’s broadcast channel
  • Always use a wired connection instead of Wi-Fi, if possible (Wi-Fi packet loss happens more frequently)
  • Try to avoid peak hours to bypass network congestion (or use a VPN)
  • Call MediaCom and ask them if they can look into the issue if you keep experiencing it
  • Make sure your cables aren’t damaged at all and replace them if necessary
  • Upgrade your cables if they’re outdated/obsolete (e.g. CAT5 to CAT6)

Although these suggestions may not get you rid of packet loss 100%, they can surely help you keep it to a minimum.

Note that most of our suggestions aim at your end of the connection, which MediaCom might not be responsible for.

For example, an old, chewed-out Ethernet cable could definitely mean packet loss, and MediaCom wouldn’t be to blame.

With that in mind, try as many of our suggestions as you can before blaming your ISP for your packet loss situation.

Conclusion

To wrap it up, if you’re a MediaCom customer and are experiencing packet loss, there are many things you can try to alleviate the situation.

Although using a VPN can usually take care of this problem, it will only work if the issue is caused by MediaCom (e.g. throttling, improper traffic management).

However, there’s a good chance that there’s something wrong on your side of the connection, and that’s when you should try troubleshooting the issue manually.

Roaming Profile not Syncing? 3 Quick Ways to Fix it

PC errors will appear sooner or later, and one error that users reported is the roaming profile not synching or Your roaming profile was not completely synchronized.

This isn’t a serious issue and can be easily fixed, so follow this guide to see how to fix this problem once and for all.

How can I fix the roaming profile not syncing issue?

1. Install the latest updates

  1. Press the Windows key + I to open the Settings app.
  2. Navigate to the Update & Security section and click the Check for updates button.
    windows update your roaming profile was not completely synchronized

Once the latest updates are installed, your roaming profile isn’t synchronized completely with the server error on Windows 10 will be fixed.

2. Export the ExcludeProfileDirs key from the registry

  1. Use a PC that has the latest version of Windows 10 installed.
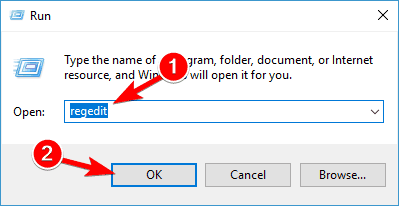
  2. Press Windows key + R and enter regedit. Press Enter or click OK.
    regedit your roaming profile was not completely synchronized
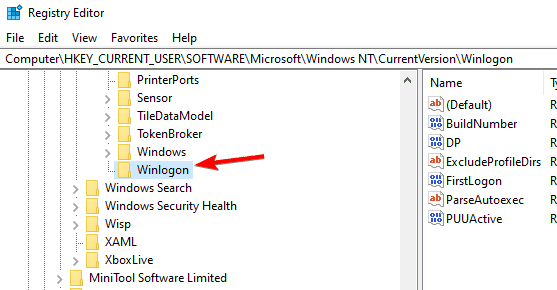
  3. Navigate to the following key in the registry: HKEY_CURRENT_USER\SOFTWARE\Microsoft\Windows NT\CurrentVersion\Winlogon
    winlogon your roaming profile was not completely synchronized
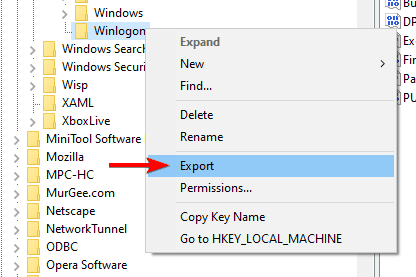
  4. Right-click the Winlogon key and choose Export.
    export winlogon key
  5. Save the file to the desired location.
  6. Copy the file to the affected PC and double-click it.
  7. When a prompt appears, click on Yes.

After doing that, the problem should be resolved. Keep in mind that for this process to work, you need a PC with Windows 10 version that is newer than the one on the affected PC.

3. Modify the Group Policy settings

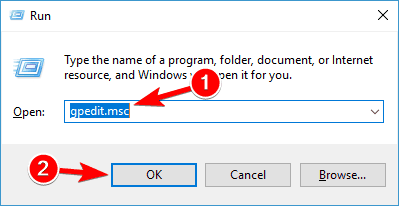
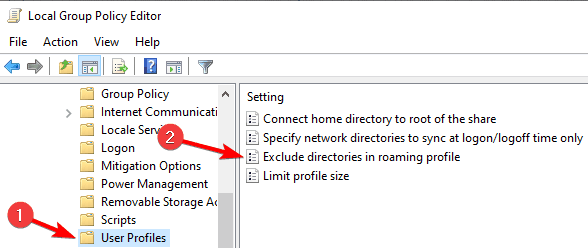
  1. Press Windows key + R and enter gpedit.msc. Press Enter or click OK.
    gpedit.msc Your roaming profile was not completely synchronized
  2. Now navigate to the path below in the left pane: User Configuration > Administrative Templates > System > User Profiles
  3. Double-click on Exclude directories in roaming profile.
    user profiles group policy your roaming profile was not completely synchronized
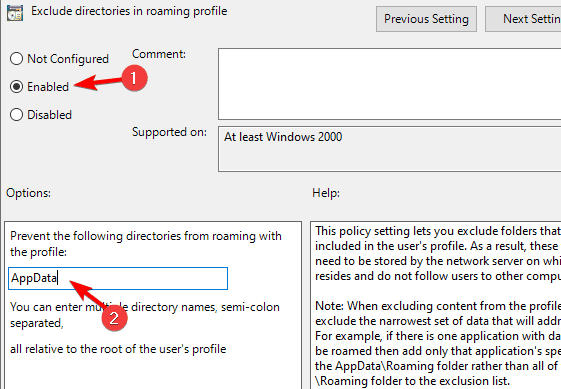
  4. Select Enabled.
  5. Type AppData in the Prevent the following directories from roaming with the profile field. Press Apply and OK to save changes.
    exclude directories your roaming profile was not completely synchronized

After doing that, the problem should be resolved.

Your roaming profile not syncing error can cause certain issues, but the best way to deal with it is to update Windows 10 or use any of our other solutions.

Finally, if your Windows 11 sync settings is not working, check our detailed guide to fix it.

FIX: NordVPN background process not running (6 solutions)

NordVPN is one of the biggest names in the VPN industry. But it’s still prone to errors, like any other piece of software.

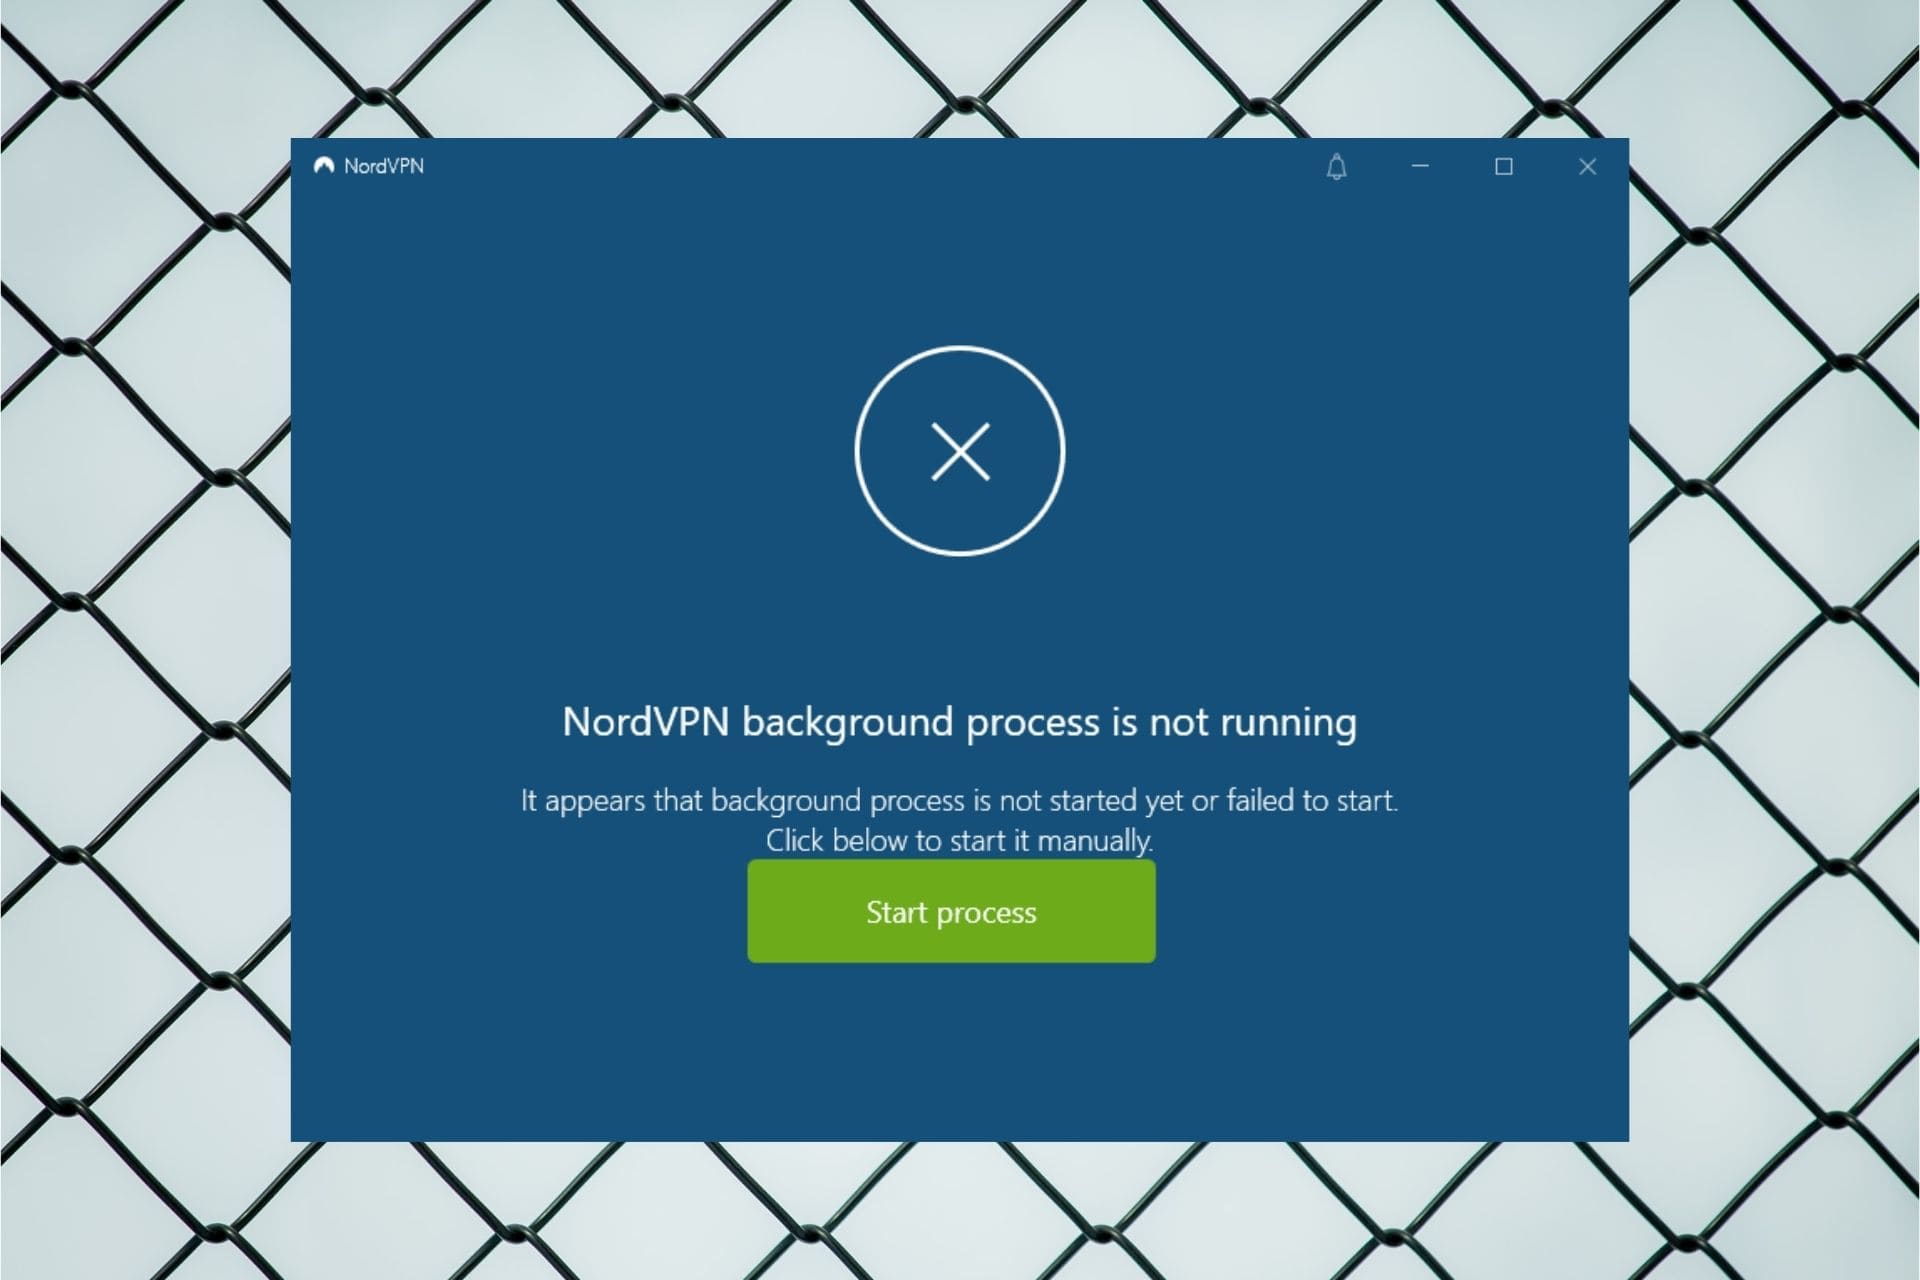
For instance, many NordVPN users report that the background process is not running on their Windows computer.

It usually happens because NordVPN fails to start at every system boot automatically, although the autostart option was enabled by the user.

If you’re looking for an easy fix to this problem, we’re here to help.

How do I fix NordVPN background process not running?

Clear the NordVPN application cache

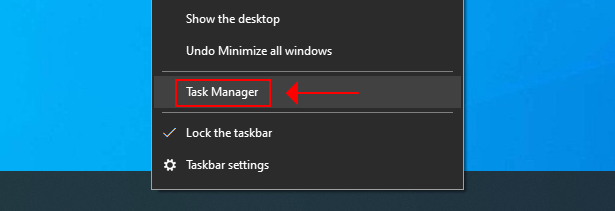
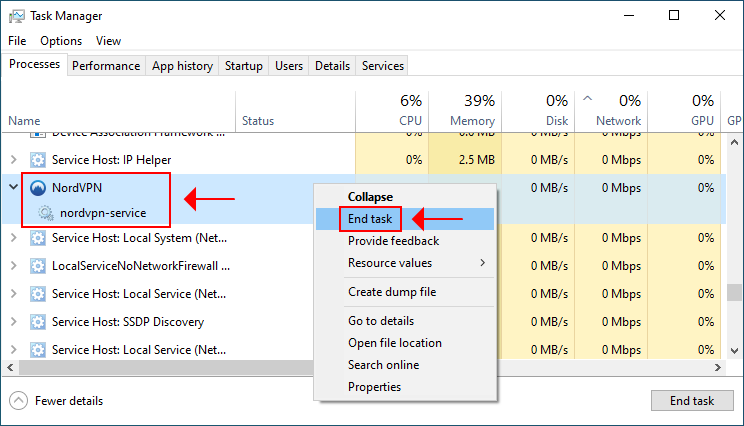
  1. Right-click the taskbar and select Task Manageraccess Task Manager from the taskbar
  2. Find and select nordvpn-service.exe, then click End taskend the NordVPN task
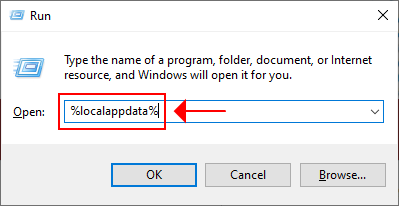
  3. Exit Task Manager, press Ctrl + R, type %localappdata%, and press Enterrun the localappdata command
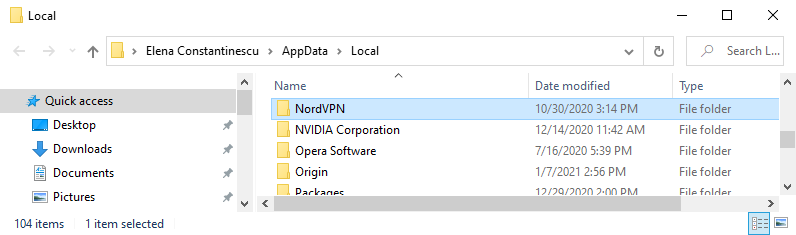
  4. Locate the NordVPN folder in your file browser and delete it to remove the app cachedelete the NordVPN app folder
  5. Launch the NordVPN app

If you still see the NordVPN background process is not running message, click Start process.

Normally, you should only do this once because NordVPN should automatically start the background process on every Windows boot (unless you end the task again from Task Manager).

Allow NordVPN in User Account Control (UAC)

allow NordVPN in UAC

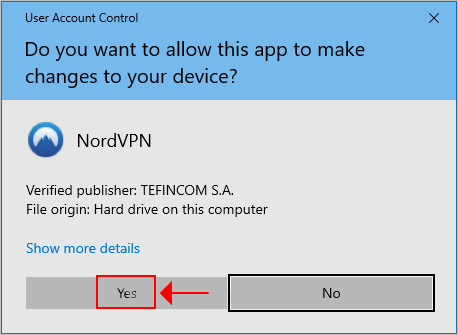
To use NordVPN, you need administrator rights. Furthermore, you must allow access to NordVPN in User Account Control (unless it’s disabled on your computer, which is not recommended). Otherwise, the app’s background process will fail to start.

Find out how to easily manage UAC settings on Windows 10.

Update NordVPN

update NordVPN

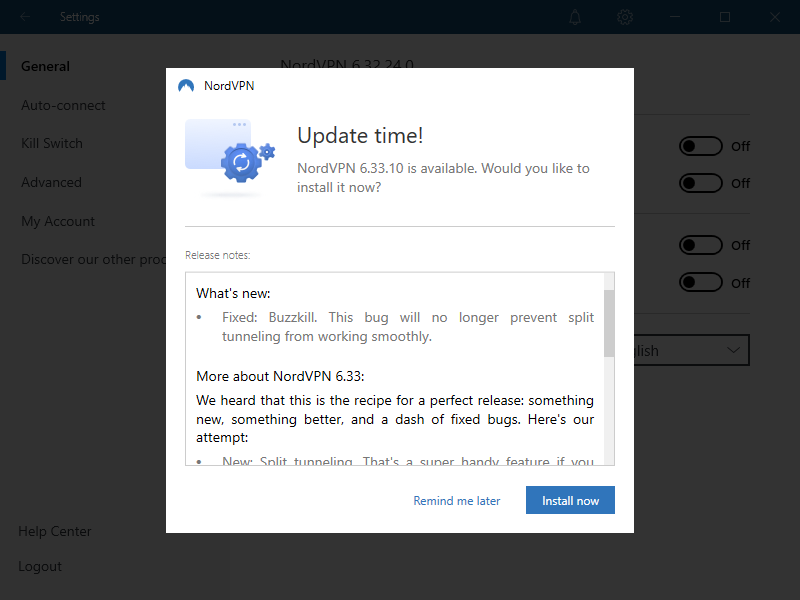
If there are any pending updates, make sure to allow them and update the NordVPN to the newest version.

This way, you can take advantage of new features, improvements and bug fixes, even if there was something wrong with the background process startup.

Reinstall NordVPN

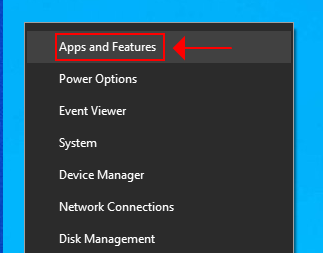
  1. Right-click the Windows 10 Start button and select Apps and Featuresaccess Apps and Features in Windows 10
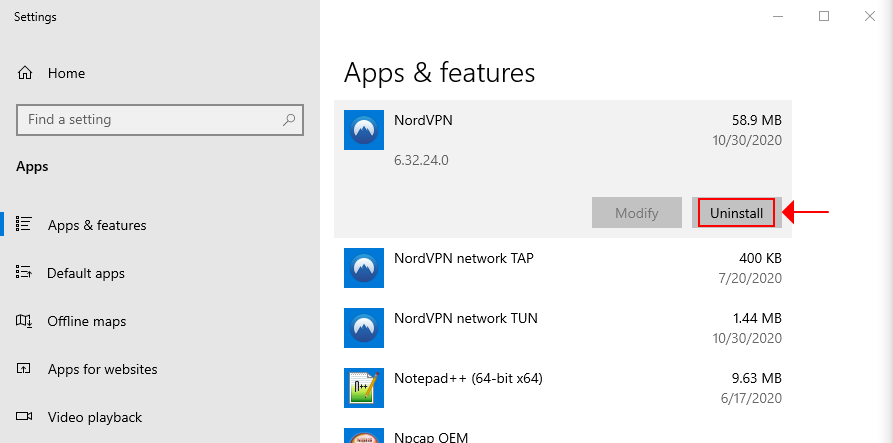
  2. Find and select NordVPN in the Apps & features listuninstall NordVPN
  3. Click Uninstall and then again to confirm
  4. Follow the on-screen instructions to remove NordVPN from your PC
  5. Download the latest NordVPN app for Windows 10
  6. Install the tool and log in with your premium credentials

Reinstalling the NordVPN app should fix any software-related issues, including TAP driver errors which might prevent the background process from running properly.

Remove other VPNs apps from your PC

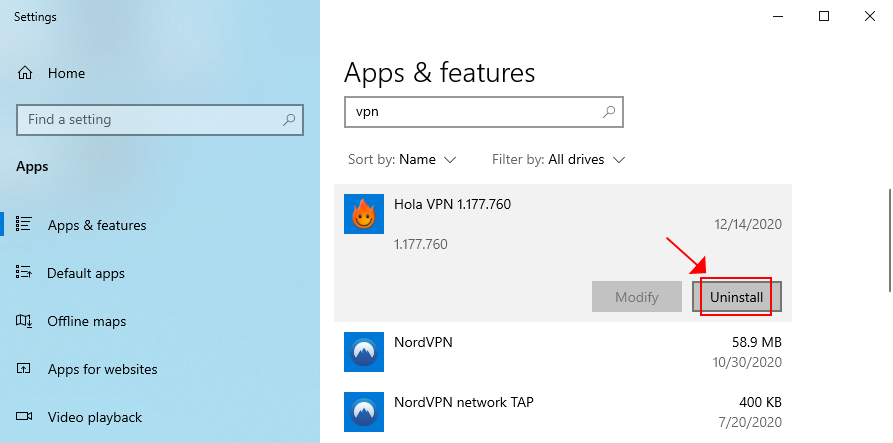
If you have other VPN applications installed on your Windows 10 PC, it could lead to software conflicts that stop NordVPN from running properly.

It’s not enough to end the processes of other VPNs. Make sure to completely remove from from your Windows 10 laptop, desktop or tablet and keep only NordVPN.

Switch VPN providers

PIA

If you can’t get NordVPN to work on your computer no matter what you try, consider switching VPN providers.

It shouldn’t be a problem if you purchased NordVPN in the past month since you can take advantage of the 30-day money-back guarantee.

We recommend using Private Internet Access. It’s a super-intuitive VPN service that permits 10 simultaneous connections, unlike NordVPN which allows only 6.

You can set up PIA on all popular devices, including Windows, Android, Mac, iOS, Linux, and routers.

Moreover, PIA unblocks Netflix US, HBO Max, Peacock, and other streaming services. It has exclusive DNS, split tunneling, native port forwarding, a kill switch, as well as support for the OpenVPN and WireGuard protocols.

What else you should know about PIA:

  • No logs or leaks
  • 24/7 live chat support
  • 30-day money-back guarantee (no free trial)
  • Pay with a credit card, PayPal, or crypto
Private Internet Access

Private Internet Access

Instead of dealing with various NordVPN issues, switch to PIA for a smooth experience.
Check priceBuy it now

Conclusion

To summarize, if the NordVPN background process is not running properly on your device, make sure to clear the app cache and restart NordVPN.

Keep in mind that you must allow the app to connect to the Internet from the User Account Control.

You can also try updating NordVPN to the latest version, reinstalling it, and removing any other VPN apps you have on your PC to eliminate TAP driver conflicts and other software issues.

However, if everything fails, it’s time to consider ditching NordVPN and moving to another VPN provider. And we can’t think of a better solution than Private Internet Access (buy here).

Did you manage to get NordVPN’s process running in the background? What solution did you use? Let us know in the comment section below.

[Fixed] Nvidia in-game overlay not working / won’t turn on

The GPU manufacturer, Nvidia also offers some excellent software utilities with its GeForce Experience tool. The In-game overlay feature allows you to access some shortcuts without leaving the game. However, several users have reported the Nvidia in-game overlay not working issues lately.

This issue can occur due to a missing multimedia package for Windows 10 on your computer. However, in some instances, the issue can also occur due to a corrupt or missing graphics driver.

If you are also troubled by this error, here are a few troubleshooting steps to help you resolve the Nvidia in-game overlay not working issue on Windows 10.

How do I fix my Nvidia game overlay not working problem?

1. Update GPU driver with Outbyte Driver Updater

Outbyte Driver Updater automatically update drivers

If the Nvidia GeForce Experience in-game overlay is not working, try updating your graphics and display driver using Outbyte Driver Updater.

Outbyte Driver Updater is a popular driver updating utility for Windows computers. Using the tool, you can update all your drives with one click, enjoy better gaming performance and access a vast database of over 18 Million drivers.

Upon installation, the tool scans the system for missing and outdated drivers. You can choose to update a single or multiple drivers at once. You can manage all the downloads using the built-in download manager.

Key features of Outbyte Driver Updater:

  • Updates all the system drivers with one click 
  • Huge driver database of over 18 million files 
  • Built-in download manage 
  • Driver backup and schedule manager
Outbyte Driver Updater

Outbyte Driver Updater

Quickly and efficiently resolve the dreaded Nvidia overlay issue with this amazing software.
Check priceVisit website

2. Install the Media feature pack for Windows 10 N

Nvidia in-game overlay not working
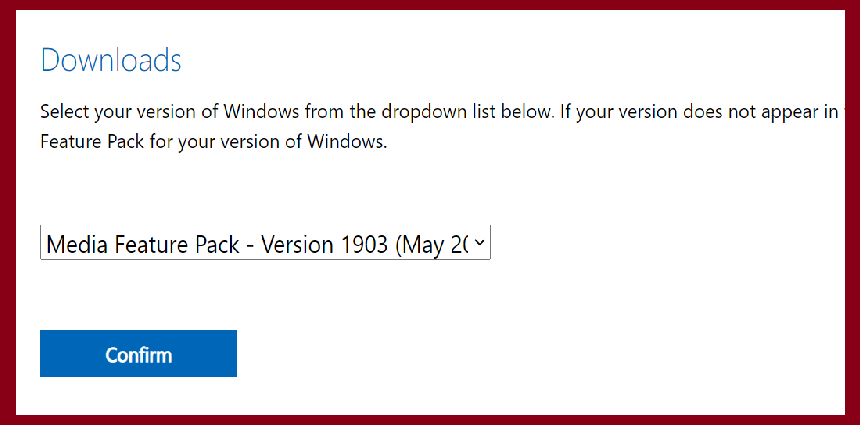
  1. Go to the Microsoft Download Center. 
  2. Under Downloads, click the drop-down menu and select the most recent edition of Media Feature Pack.
  3. Click on Confirm to download the file.
  4. Depending on your Windows edition, click on the 32-bit Download / 64-bit Download button.
  5. Run the downloaded installer and follow on-screen instructions to install the app.
  6. Make sure to restart your PC after Media Feature Pack is installed.
  7. Launch Nvidia GeForce Experience and check for any improvements.

If the Nvidia GeForce Experience overlay doesn’t turn on, this could be due to your system missing the Media Feature Pack for the Windows N version. It provides media players and related technologies on your computer.


3. Reinstall Nvidia GeForce Experience 

Nvidia in-game overlay not working
  1. Press the Windows key + R to open Run.
  2. Type control and click OK to open the Control Panel.
  3. Go to Programs, and click Programs and Features.
  4. Select Nvidia GeForce Experience from the list of installed apps.
  5. Click on Uninstall. Click Yes if prompted by UAC.
  6. Follow on-screen instructions to remove the app.
  7. Download the latest Nvidia GeForce Experience app.
  8. Run the installer and proceed with the installation.
  9. Reboot the PC after the installation is complete.

Nvidia GeForce Experience offers tons of features. You can capture and share videos, take screenshots, and live-stream your gameplay.

However, if the Nvidia game filter won’t turn, it can be due to a buggy driver or corrupted files. 

Try installing the latest Nvidia Geforce Experience version to fix any issues with the in-game overlay app when playing games.

If the problem persists, use DDU to clean install the Nvidia graphics driver.


4. Clean install Nvidia graphics driver 

Nvidia in-game overlay not working
  1. Download and run the Display Driver Uninstaller. 
  2. When the Display Driver Uninstaller launches, click on Select device Type and select GPU.
  3. Next, click Select Device and select Nvidia.
  4. Click the Clean and restart button.

DDU will uninstall GeForce Experience and other Nvidia drivers and restart the computer. After the restart, download GeForce Experience and install the app.

If you can’t turn on in-game overlay GeForce Experience, it could be due to a glitch in the app. Reinstalling the app after uninstalling the app using DDU can fix the problem.


The Nvidia in-game overlay not working issue can occur due to several reasons including corrupted driver files and missing Microsoft Windows package. Follow all the steps in this article one by one to fix the issue.

The Microsoft Store on Xbox consoles can now display supported languages for games

Microsoft may have redesigned its Microsoft Store on Xbox consoles last fall, bringing some speed improvements along the way, but there’s still some room for improvements. Gamers in non-anglocentric markets have been complaining for quite some time that the store listing don’t mention the supported languages for games, but Microsoft seems to have finally listened.

Indeed, some Xbox gamers have noticed that the store listings for some games now include information about supported languages (via Windows Central). Microsoft’s internal studio The Coalition seems to be leading the way, as Gears 5 and Gears Tactics are two Xbox Game Studios titles games that currently provide this information on the Microsoft Store.

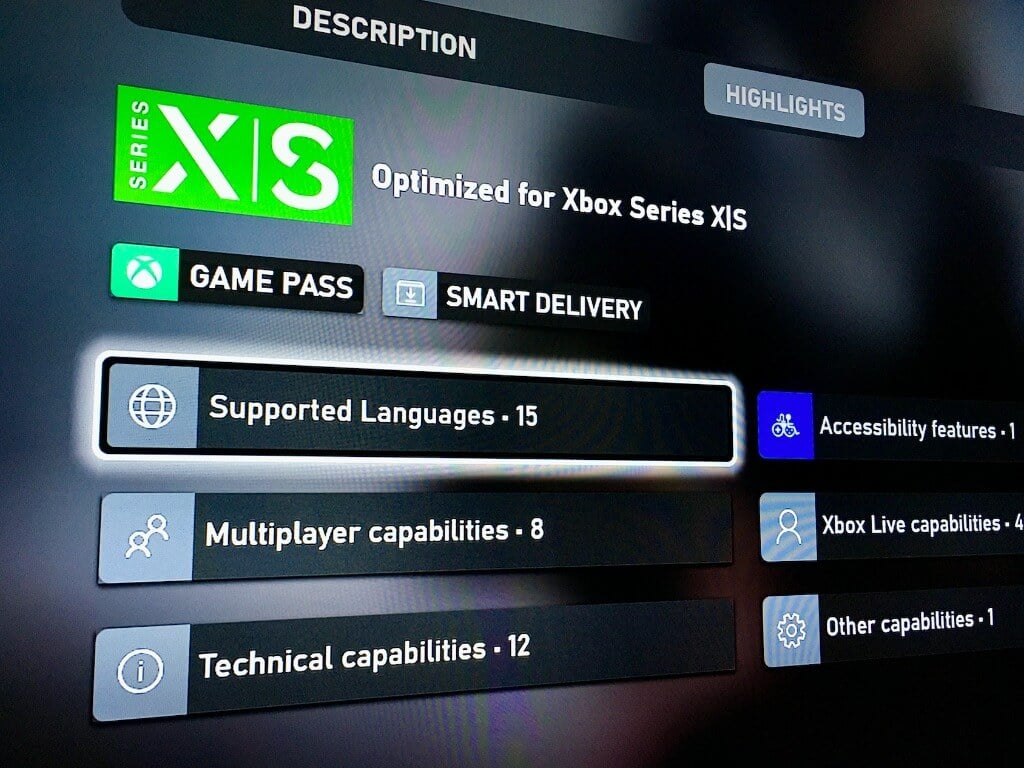
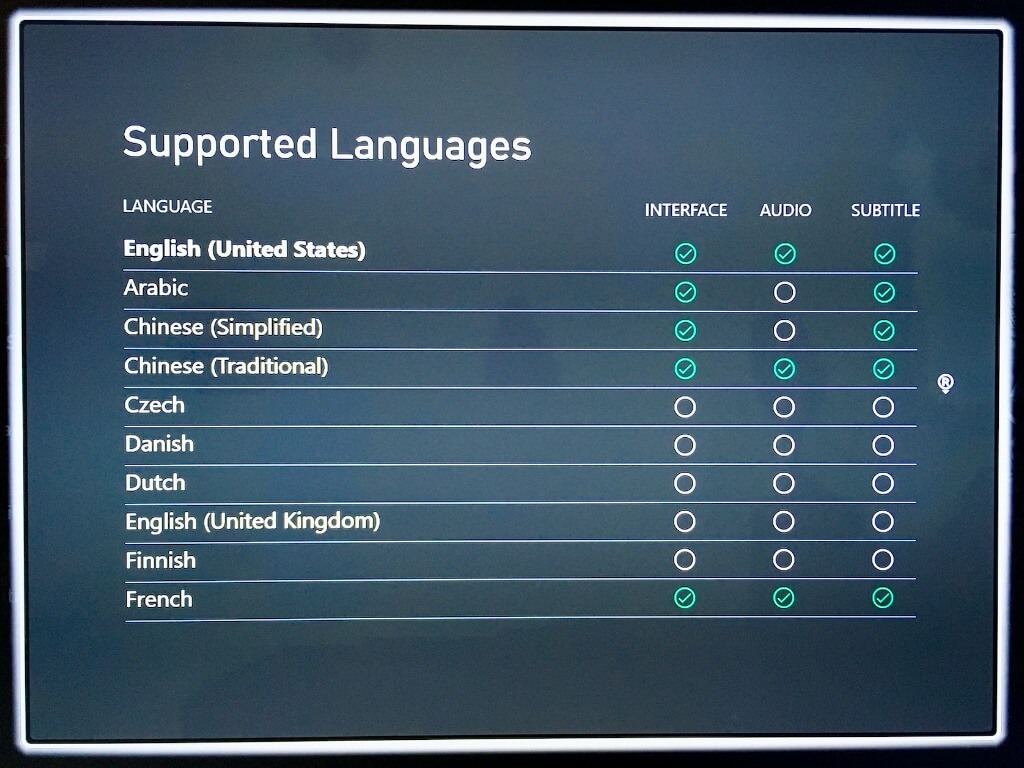
To check if other store listings mention supported languages, you’ll need to scroll down to the details section, press the RB button to go to highlights, and then a “Supported Languages” item may or may not appear below. When the information is available, a pop up will reveal supported languages for the game’s interface, audio, and subtitles.

Supported Languages On Xbox Store

It remains to be seen if more games will add this information going forward, but it’s good to see some improvements on the localization front. With Microsoft aiming to reach 2 billion gamers with Xbox Cloud Gaming, it’s going to be very important for the Microsoft Store to be as exhaustive as possible.

FIX: The service to detect this status is disabled

Computer errors will appear sooner or later on your Windows 10 PC, and if that happens, you should know how to deal with them.

Users reported The service to detect this status is disabled error message on Windows 10, and today we’re going to show you how to fix it.

Here are some similar problems that can be resolved with the same solutions as The service to detect this status is disabled error:

  • The dependency service or group failed to – Users experiencing this error are unable to connect to the internet on any available network.
  • Network list service-disabled – It’s possible for crucial network services to get disabled somehow. We’ll discuss this phenomenon down below.
  • Error 1068 – Another error message that prevents users from connecting to the internet. If you get this error message, you can still use the solutions listed below to resolve the problem.

What can I do if the service to detect this status is disabled?

Table of contents: 

  1. Use Component Services tool
  2. Check if necessary services are running
  3. Run the SFC scanner
  4. Run the Network Troubleshooter
  5. Run DISM

1. Use Component Services tool

If you’re getting The service to detect this status is disabled error on your Windows 10 PC, you might be able to fix it by using the Component Services tool. To do that, follow these steps:

  1. Press Windows Key + R and enter dcomcnfg.
  2. Click OK or press Enter.
    the-service-to-detect-this-status-is-disabled-dcomcnfg-1
  3. Component Services window will now start.
  4. In the left pane navigate to Component Services select My Computer and go to DCOM Config. If you see any notifications, just click on Yes.
    the-service-to-detect-this-status-is-disabled-dcomcnfg-2
  5. In the right pane locate netprofm. Right click it and choose Properties.
    the-service-to-detect-this-status-is-disabled-dcomcnfg-3
  6. Go to Security tab and select Customize in Launch and Activation Permissions section.
  7. Click the Edit button.
  8. Click Add and enter LOCAL SERVICE as object names. Click OK.
  9. In Permissions for LOCAL SERVICE select Allow for Local Launch and Local Activation settings. Click OK to save changes.

Use a third party software

The service to detect this status is disabled error message can be related to the Windows Defender Firewall, so it is a good idea to disable it and use third-party antivirus software.

We recommend you get a reliable antivirus with a high detection rate, as it is essential to find and remove threats as soon as possible.

Thankfully, the market nowadays offers plenty of good options that do not consume too many system resources, so you can keep your antivirus running at all times, thus staying permanently protected.

Features to look for when picking your antivirus include multi-layered protection, parental controls, a powerful firewall, online privacy protection, and offline support.

2. Check if necessary services are running

According to users, this error is related to their network connection, and according to them, in order to fix the problem you need to check if necessary services are running.

If the necessary services are stopped, you need to enable them by following these steps:

  1. Press Windows Key + R and enter services.msc. Now click OK or press Enter.
    the-service-to-detect-this-status-is-disabled-services-1
  2. When Services window opens, look for DNS Client and DHCP Client services.
    the-service-to-detect-this-status-is-disabled-services-2
  3. Double click the service and check if the Service status is set to Running. In addition, be sure to set Startup type to Automatic. Click Apply and OK.
    the-service-to-detect-this-status-is-disabled-services-3
  4. Make sure that both DNS Client and DHCP Client are running and are set to Automatic startup. After that, close Services window and check if the problem is resolved.

Some users are also suggesting to check the following services: Network Connections, Network List Service, Network Location Awareness and Network Store Interface Service.

To fix this problem, you need to ensure that all these services are started. As for Startup Type, you need to set Startup Type to Automatic for all services except Network Connections. As for Network Connections, set its Startup Type to Manual and save changes.

After making the changes, check if the problem is resolved.

3. Run the SFC scanner

If none of the previous two solutions worked for you, we’re going to turn to troubleshooters. The first troubleshooting tool we’re going to try is the SFC scanner.

The SFC scanner is a command-line tool that can resolve various issues in Windows 10. Hopefully, it’ll be helpful here, as well.

Here’s how to run the SFC scan in Windows 10:

  1. o to Search, type cmd, and open the Command Prompt as Administrator.
  2. Type in the following command and press Enter: sfc/scannowthe dependency service or group failed to start
  3. Wait for the process to finish (it will take some time).
  4. Restart your computer.

4. Run the Network Troubleshooter

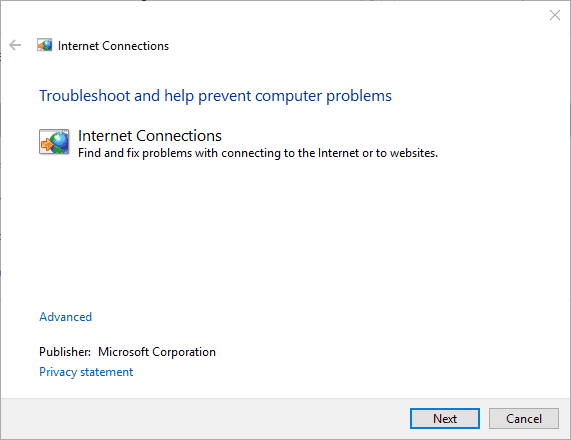
If you’re running at least Windows 10 Creators Update (version 1704), you have a dedicated troubleshooting tool at your service. You can use this troubleshooter to resolve various problems.

Hopefully, it’ll come in handy with this one, as well. Here’s how to run the Windows 10 Troubleshooter:

  1. Go to the Settings app.
  2. Head over to Updates & Security and select Troubleshoot.
  3. Now, click Internet Connections, and go to Run the troubleshooter.network list service windows 10
  4. Follow further instructions, and let the wizard finish the process.
  5. Restart your computer.

5. Run DISM

And finally, the last troubleshooting tool we’re going to try is DISM. Deployment Image Servicing and Management (DISM) deploys the system image ll over again, resolving potential problems on the way.

So, if none of the previous solutions got the job done, you can try with DISM. Here’s how to run DISM in Windows 10:

  1. Type cmd in the Windows search bar, right-click on the Command Prompt and run it as an administrator.
  2. In the command line, copy paste these lines one by one and press Enter after each:
    • DISM /online /Cleanup-Image / ScanHealthnetwork list service disabled
    • DISM /Online /Cleanup-Image /RestoreHealth
  3. Wait until the procedure ends (it might take up to 10 minutes).
  4. Restart your PC.

The service to detect this status is disabled is an annoying error, but you can easily fix it by enabling the necessary services. If that doesn’t work, feel free to try any other solution from this article.

Microsoft Edge Canary makes downloads accessible right from the toolbar

Microsoft Edge Insiders on the Canary channel can now test a new flyout menu that will allow users to access their downloads directly from the toolbar. The improved toolbar experience was first spotted by a Reddit user Leopeva, and it’s apparently available for all Insiders on the Edge Canary channel.

Currently, when Microsoft Edge users click the download option available in the three-dots menu, the browser opens the downloads on a dedicated downloads page. Thanks to the new toolbar experience, Edge Insiders can now add the downloads button to the toolbar that makes it possible to pause and resume a download without having to go to the full page.

Slide Anything shortcode error: A valid ID has not been provided

In addition, the flyout menu includes a submenu that provides quick access to some download management tools. Users can manage downloads, access download settings, clear all downloads history, and hide the downloads button from the toolbar in that menu.

To enable the feature, head over to the three-dots menu, right-click on the “Downloads,” and select the “Show in toolbar option” from the list. Just like with the favorites menu, history, and Collections bar, users can pin the downloads flyout in a pane alongside the browser.

Microsoft continues to update the Edge Canary channel with new features and capabilities, and the company has recently added a search icon for PDFs. Microsoft Edge will also soon be updated with a new Smart Copy option, PDF improvements, and more.

Top 5 tips and tricks to get the most out of Teams on mobile

From chats to channels, and even documents and files, there’s definitely a lot to do in Teams on mobile during the work-from-home life. That’s why, in our latest entry to the Microsoft Teams series, we’ll give you our top-5-tips and tricks to get the most out of Teams on iOS and Android.

Tip 1: Use Cortana

Corana Ios Teams Setup


Our first tip is one of the most simple. While you’re already likely tapping and swiping your way through Teams, did you know that Teams on iOS and Android have support for Cortana? With Cortana in Teams, you can use the virtual assistant to call people, join meetings, check your calendar, send chats, look for files, and even change settings. No tapping or swiping necessary.

To use Cortana, just head to your feed or your chats, and then tap the microphone icon at the top of the screen. We have a guide that explains how you can get the most out of Cortana on Teams.

Tip 2: Join meetings across mobile and desktop

Teams Transfer Meeting Ios

Our next tip is another easy one — joining meetings across devices. Want to start a meeting on your PC or Mac, and then transfer it to your phone? Or how about vice versa? If you’re on your phone already and want your meeting on your laptop or desktop, simply log into teams on that device, you should then see a banner at the top of Teams. Click the purple join button to join. Then follow the instructions on your screen.

If you’re on your PC and want to transfer to your phone, you should see a banner on the top of the Teams app on your phone. It will say In progress with the meeting name. You’ll want to click the Join button. Then, follow the instructions on the screen.

Tip 3: Try a personal account in Teams

Since you’re already using Teams for work and spending a lot of time on your phone with it, why not also use it personally, too? Thanks to some recent changes, it’s now possible to log in with a personal account on Teams on iOS and Android. This allows you to use Teams a bit like WhatsApp or Facebook Messenger. As we covered when we went hands-on with the experience, this makes Teams a great way to not only chat with coworkers but friends, too. You can enjoy things like location sharing, a dashboard with a safe to save files, upload files, and a lot more.

Tip 4: Edit your navigation buttons

Teams Re Order Buttons

Using some of the features in Teams like Calendar, Shifts, Wiki, Calls, or more? You can actually tweak your experience in Teams to suit your needs and give you faster access to the features you use most. Simply tap the . . . more button at the bottom of the screen. Then, choose Reorder. From there, you can drag and drop the functions of Teams you want to appear in the navigation bar. It’s a great way to avoid having to click the . . . more button each time you want to use something in Teams. Just be aware that there is still a 4 button limit.
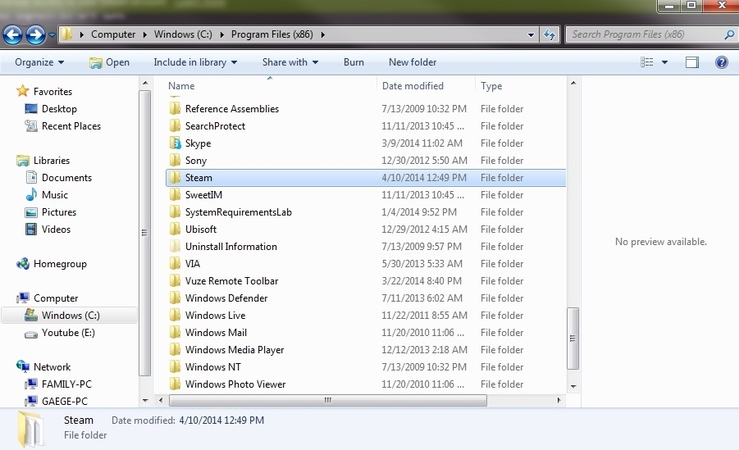

Tip 5: Save space with Teams

Screen Shot 2021 01 11 At 10.37.40 Am

Is your phone low on storage? Well, Teams on iOS and Android has a feature that will help you cut back its footprint a bit. Simply head into the settings menu, and then head to Data and storage. From there, you can change the quality of the images you receive. You also can clear your downloaded files, and clear the cache, if Teams is running slow, too.

Check our our other tips and tricks!

These are just our top five picks for getting the most out of Teams on mobile. We have other tips and tricks, too. We looked at the top 5 ways to customize Teams, the top 5 settins you need to change, and top 5 tips for setting up Teams. Check out our Microsoft 365 hub for more Teams news and information.

Disable Adobe Acrotray.exe from Startup [Safe guide]

Adobe Acrobat is a popular PDF viewer that allows you to view, create, edit and manage PDF files on your computer.

When installed, users will see an AcroTray component that will automatically run with every restart without the need for the app. But, how do you disable Adobe acrotray.exe from Startup?

AcroTray is an Adobe Acrobat extension that is used to convert PDF files to different formats. However, this utility can be annoying as it can make your PC slow, consume system resources and most of the time running for no reason.

In this article, we show you a few ways to disable Adobe acrotray.exe from startup with ease. So, let’s get started.

How do I disable Adobe AcroTray.exe from Startup?

1. Disable from Task Manager

Disable Adobe Acrotray.exe Startup
  1. Press the Windows key + R.
  2. Type taskmgr and click OK to open it.
  3. In the Task Manager window, open the Startup tab.
  4. Scroll through the startups and select AcroTray.
  5. Right-click on AcroTray and select Disable.

Once you have disabled AcroTray.exe from the startup tab, kill the AcroTray running process from the Task Manager as well.

Disable Adobe Acrotray.exe Startup
  1. Open Task Manager.
  2. In the Process tab, locate AcroTray.exe process.
  3. Select and then click on the End button.
  4. Once ended, the AcroTray app icon will be removed from the System Tray as well.

That’s it. You have successfully disabled the AcroTray app from the Task Manager. Restart your PC to see if the AcroTray popup is disabled.

Similarly, if you’re dealing with another background process affecting system resources, learn how to disable CCXProcess.exe.


2. Remove using AutoTurns

Disable Adobe Acrotray.exe Startup
  1. Download Autoruns from Microsoft.
  2. Extract the downloaded file using WinZip.
  3. Open the Extracted folder. Then right-click on the Autoruns64.exe file.
  4. Select Run as Administrator.
  5. In the AutoRuns window, search for Acrobat Assistant in the Everything tab.
  6. If it is checked, uncheck the box beside Acrobat Assitant.
  7. Close AutoRuns and resart your computer.

AutoRuns is a Microsoft utility that allows you to control startup programs in Windows startup. You can use Autoruns if the first method of removing Acrotray using Task Manager did not work.


3. Disable using Windows Services

Disable Adobe Acrotray.exe Startup
  1. Press the Windows key + R.
  2. Type services.msc and click OK.
  3. Search for Adobe Acrobat Update, right-click on it and select Properties.
  4. Click the Startup type drop-down menu and select Manual.
  5. Click Apply and OK to save the changes.
  6. Next, find Adobe Genuine Software Integrity service, right-click, and select Properties.
  7. Set Startup Type to Manual.
  8. Click Apply and OK to save the changes.

Once you have modified both the services, close Windows Service window, restart your computer and check for any improvements.

In this method, we changed some of the Adobe services that are set to run automatically during startup. Making the services to run manually will resolve the issue.


The AcroTray Assistant has more cons than pros. It can not only slow down your computer but also take up a lot of system resources for no real work. In this guide, we have shown you how you can disable Adobe AcroTray.exe from Startup.

To learn more about this software, don’t miss our what is AcroTray guide for more information.

Most of the time, you should successfully disable the process from Task Manager. However, if the issue persists, try to disable the service from Windows Service or use the AutoRuns utility.

Microsoft Teams now lets users add shared Channel calendars

Microsoft has started rolling out a new Channel calendar app for its Teams desktop client that should make it easier to synchronize with colleagues. The improved calendar experience is rolling out gradually, and it should hit general availability by the end of this month.

With this feature, users will be able to add a shared calendar as a tab to each Teams channel to make it available for all Team members. They will be able to see scheduled channel meetings and events in a calendar grid view. Microsoft Teams will automatically send a notification to the channel as soon as any user schedules a new meeting. It will appear in the activity feed, and users will be notified if they haven’t turned off the notifications.

To add the calendar app, you will need to click the new tab+ icon at the top of the channel. In the “Add a tab” window, find and add Channel calendar from the list of available apps. Finally, assign a name and click the “Add” button to add it to the Teams channel.

Indeed, the new calendar experience has been one of the popular requests by Teams users, which received around 20,000 votes on the UserVoice forum. It should help to prevent miscommunications among colleagues. While the feature is currently rolling out to commercial tenants, it’s also coming to GCC customers next month.

Microsoft unveils Pulse Red variant of its new Xbox Wireless Controller

There’s a new Xbox Series X|S controller coming soon. Microsoft announced the new Pulse Red Xbox Wireless Controller on Xbox Wire and the new controller will be available “in most Xbox markets” on February 9, 2021 for $64.99. In China, the Pulse Red controller will be available starting tomorrow, January 12, 2021.

Microsoft will include a 14-day free trial of Xbox Game Pass Ultimate in “select markets.” The Pulse Red Xbox Wireless Controller controller has all of the same controller features introduced with the launch of the Xbox Series X|S, including a USB-C port and a dedicated Share button. The Pulse Red color variant joins the other three color options currently available for the Xbox Series X|S; Carbon Black, Robot White, and Shock Blue.

Microsoft’s Xbox One controllers offer a wide selection of color options and even the option to customize your own with the Xbox Design Lab. From the looks of Xbox Design Lab website, the option to customize the colors of the new Xbox Series X|S controllers may be coming in the near future. As reported earlier, Microsoft is working on fixing connection issues with the new Xbox Series X|S controllers and be sure to check out the real reason Microsoft keeps shipping Xbox controllers with AA batteries.

Escape From Monkey Island on Windows 10: 3 Ways to Run It

Escape from Monkey Island is an adventure game released by LucasArts in 2000. Fourth in the Monkey Island series and the first to use 3D graphics, the game was popular amongst the community. And many are now looking for ways to play Escape From Monkey Island on Windows 10.

While playing old games on Windows has long been tricky, there are ways you can do it. Sometimes, using a gaming client or, in other instances, modifying the app/PC settings. But the bottom line is that it’s possible, and we have listed all the ways to play Monkey Island 4 on Windows 10.

Does Monkey Island work on Windows 10?

Yes, Monkey Island works on Windows 10, but you must check the installer setup. The older 16-bit app installers don’t work on the 64-bit version of Windows, and many users got the same combination.

Luckily, the gaming community has, of late, been active and has made available the compatible installer. So, users can finally run Monkey Island on Windows 10 or any iteration of the OS, for that matter, including Windows 11.

How do I play Escape from Monkey Island on Windows 10?

1. Download the game from Steam

  1. Go to Steam’s official website, and download the gaming client.steam
  2. Once done, run the setup, and follow the on-screen instructions to complete the installation.steam to play escape from monkey island windows 10
  3. Register on the gaming platform using valid credentials.
  4. Now, search for Escape from Monkey Island, and complete the purchase. It’s a paid title but doesn’t cost much.Escape from Monkey Island
  5. Once the purchase is complete, the download should start, and Escape from Monkey Island should now appear in the Steam Library.
  6. Right-click on the game, and select Play from the context menu.play escape from monkey island in Windows

That’s it! This is the easiest way to proceed with Escape from Monkey Island download and play the game.

2. Download from a third-party source

Tip icon Tip
The website offering the game appears reliable, but we recommend you scan it using an effective antivirus and only proceed with the installation. Also, you will need the Escape from Monkey Island CD with the tool.
  1. Head to the third-party website and download the setup for Escape from Monkey Island.setup
  2. Once downloaded, run the setup, and provide the necessary permissions to run it.
  3. Proceed to the window where it asks you to insert the Escape from Monkey Island CD, and then click on Install.install
  4. Wait for the process to complete, and you should then be able to play the game.

Using the setup is another effective way to play Escape from Monkey Island on Windows 10, the only drawback being that you will need the original game CD. If you don’t have it, the Steam option should work perfectly well.

3. Run the game in compatibility mode

  1. Right-click on the Escape from Monkey Island launcher/shortcut, and select Properties from the context menu.
  2. Navigate to the Compatibility tab, tick the checkbox for Run this program in compatibility mode for, and select Windows XP from the dropdown menu.compatibility mode to run escape from monkey island windows 10
  3. Once done, click on Apply and OK to save the changes.save changes

This method works only when you already have Escape from Monkey Island installed on Windows 10. In case you don’t, first download it using any of the two methods listed previously.

If you can work with the lower-resolution gameplay, Escape from Monkey Island has plenty to offer on Windows 10.

Also, before you leave, check the best tips and tricks to optimize Windows for gaming and get the best performance.

For any queries or to share more options, drop a comment below.

Microsoft launches Surface Pro 7 Plus for Enterprise and Education customers

Microsoft has announced this morning a new version of its Surface Pro 7 tablet for Enterprise and Education customers named the Surface Pro 7 Plus. This new model keeps the familiar Surface Pro 7 design with the new USB-C port that was added last year, but adds Intel’s 11th Gen core processors under the hood, a removable SSD M.2 SSD just like on the Surface Pro X or Surface Laptop 3, as well as a bigger internal battery that should provide up to 15 hours of battery life.

The $899 base model will come with an Intel Core i3 processor, 8GB of RAM, and 128GB of storage. The Core i5 model with the same amount of RAM and storage will start at $999 ($899 for Education), and the Core i7 variants will start at $1,599 for the model with 16GB of RAM and 256GB of storage. Microsoft will also offer three Core i5 models with an optional LTE Modem, starting at $1,149. These LTE models replace the microSD car reader under the built-in stand with a nano SIM tray, but otherwise it’s the same selection of ports (1 USB-A port, 1 USB-C, 1 Surface Connect port, and a headphone hack).

Even though Microsoft isn’t calling this new model the Surface Pro 8, this new Surface Pro 7 Plus brings some significant changes under the hood. “We changed the inside quite substantially,” explained Robin Seiler, corporate vice president of program management for devices at Microsoft, in an interview with The Verge. “It actually required us to flip the internals in order for us to put the SSD here, so when we did that we also updated the TDM (Thermal Design Model) to create more space for a larger battery size.”

The Surface Pro 7 Plus will be available for Enterprise and Education customers starting January 15 in the US, Canada, Australia, New Zealand, the UK, and other European countries. Microsoft isn’t saying if the Surface Pro 7 Plus will eventually be available for consumers as well, though Seiler told The Verge that “this is simply an extension of a commercially-focused line.”

Fix: Xbox One Wireless Controller doesn’t Work

Gamers can use Xbox One controllers to enrich their gaming experience on their PCs. Using a console controller for PC games is a great way to make your gameplay more interesting and immersive.

However, since the Xbox One is not built specifically for PC gaming, users may have trouble getting it to work on their Windows OS. So, if your Xbox One controller is not working on PC, you will want to try the fixes below.

This problem is complex, so we also have another guide to fix the Xbox One controller if it doesn’t get recognized in Windows 10.

Speaking of Xbox controllers, if you use an Xbox 360 controller and can’t get it to work, we also have a dedicated troubleshooting guide for this problem.

Follow the steps in the respective article to fix the Xbox One controller if it’s not working on your PC.

What can I do if the Xbox One controller doesn’t work on PC?

1. Make sure you set up your Xbox One controller correctly

For Windows users, usually, all you need to do is plug connect your Xbox One controller to your PC through a micro USB cable. Windows 10 will automatically download the drivers for the controller.

You also do not have to worry about installing the drivers, as Windows will do that also. However, if Windows is not automatically installing your drivers, you must update them manually.

The following fix will show you how to update drivers for Xbox One controllers.

2. Update drivers for Xbox One controller

2.1 Update drivers manually

  1. Press the Windows key + R together at the same time on your keyboard and type in devmgmt.msc.
  2. This should open the Device Manager, which will look like the picture below.
  3. Locate a section labeled Microsoft Xbox One Controller.
  4. Expand the section, then right-click on the subsection with the same label.
  5. A list should appear as you right-click. Click on Update Driver Software. 
  6. Choose the option that will automatically update your driver software.

Out-of-date drivers is probably the most common cause of this issue. Fortunately, it is easy enough to update your drivers by using the steps above.

You can of course alternatively browse your computer for driver software if you know what you are doing. This option can ensure you have the correct update. However, usually, the automatic update will work perfectly fine.

2.2 Update the drivers automatically

Manually updating drivers is fine, but it takes time, a little bit of skill, and you need to repeat the process for every driver. A more speedier solution is a dedicated solution like Outbyte Driver Updater.

It’s straightforward to use, and it can update or fix your drivers in one swift action.

First, you need to download and install Outbyte Driver Updater. It will only take a moment; after that, the software will automatically scan your system for any driver problems.

After a few seconds, you will get a list of the potential drivers and problems, and you will be left with a simple choice: whether you update all of them in a single action or you do that for each driver.

For the latter, you will need to check their corresponding boxes and press their Update buttons. The process is simple and intuitive, so you won’t have any problems.

Outbyte Driver Updater

With Outbyte Driver Updater, you will be able to update all your drivers, not only the one for your Xbox controller in only a few seconds.
Free Trial Download now

3. Change faulty hardware

This may seem like a no-brainer, but it is astonishing how many users forget that their hardware could be causing connectivity issues. If you are unsure whether or not your cable or controller is working, then you can bring it to a computer store to get it tested.

Also, try unplugging and plugging it back in. You’d be surprised how many times that can work.

If you are using wireless controllers, you will want to check if the batteries need changing or recharging. Also, if you can, try using a different Xbox One controller. This can help you identify whether or not the problem has to do with your controller.

If you get to the conclusion that you need a new one, we can help you with this awesome list with the best gaming gear.

4. Using the troubleshooting feature

  1. Type troubleshooting in the Search box and click on the Troubleshoot settings feature from the results.
  2. Locate the section called Hardware and Devices.
  3. Click on Run the troubleshoot under that section. Windows will then automatically scan your hardware for any possible malfunctions and errors.

5. Reinstall while disabling antivirus programs

  1. Turn off both Windows Firewall and any antivirus programs you may have on.
  2. Delete your drivers.
  3. Restart your computer.
  4. Install the drivers again.
  5. Turn your antivirus programs back on.

When users install the drivers of the Xbox One controllers on their PCs, sometimes the firewall and antivirus applications on that computer can prevent the drivers from being installed correctly.

Furthermore, even though Xbox One is from Microsoft, the firewall of Windows may not recognize the device as trustworthy. The fix above is meant to solve issues related to antivirus applications.

There could be multiple reasons why your Xbox One controller is not working on pc. So, naturally, there will be more than one way to fix this issue. Let us know which solution worked for you.

FIX: PS4 Remote Play won’t work on Windows 10/11

PS4 Remote Play is a convenient way of casting and remotely-playing your PlayStation 4 games on a PC that you can easily install if you follow the right steps.

However, as that’s the case with any other service, issues are possible. It could be anything, from connection issues to sound problems.

So in this article, we’re going to explore some of the most common PS4 Remote Play issues, and offer appropriate solutions, that will (hopefully) allow you to seamlessly integrate your console with your PC once again.


How do I fix PS4 Remote Play issues on Windows 10?

1. PS4 Remote Play connection issues

1.1. Register Manually

  1. Open PS4 Remote Play.PS4 Remote Play won't work windows 10
  2. Click Register Manually at the left bottom corner.
  3. You’ll be prompted to enter a code. Go back to your PlayStation 4, and head over to Settings > Remote Play Connection Settings.
  4. Select Add Device, and the codes will appear on the screen. Write down the codes.
  5. Back to Remote Play, enter the codes, and click Register.

1.2. Update controller drivers

  1. Press Windows + X
  2. Select the Device Manager
  3. Go to Sound, video and game controllers
  4. Right-click on your PS4 controller and choose Update driver

Alternatively, you can do it automatically with a third-party tool called Outbyte Driver Updater. which will not only update your older drivers, it will also find the ones that are missing entirely from your PC, and repair the ones that are broken.

All you need to do is simply download the tool, and launch it. This will trigger an initial system scan that will detect all of your outdated, broken, or missing drivers.

With your permission, it will then proceed to download and install all the right ones without you having to provide any further input.

Once Outbyte Driver Updater is done, simply restart your PC to apply the changes.

Outbyte Driver Updater

Outbyte Driver Updater

Update your controller’s drivers so that you can finally enjoy gaming in peace with Outbyte Driver Updater!
Check priceVisit website

1.3. Check your Internet connection

  1. Use a browser to check whether your bandwidth isn’t to slow.
  2. Reboot your router or modem and your PC.PS4 Remote Play won't work windows 10
  3. Use a wired instead of wireless connection.

Looking for the best software to show FPS when streaming PS4 games on Windows 10? Here they are!


2. PS4 Remote Play performance issues

  1. On your PS4, go to Settings > Video Quality for Remote Play.
  2. Set Resolution: Standard (540p) or Low (360p).
  3. Set Frame Rate: Standard.PS4 Remote Play won't work windows 10

3. PS4 Remote Play audio issues

  1. Open the Settings app and go to Update & Security section.
  2. Select Troubleshoot from the menu on the left.
  3. Select Playing Audio from the right pane and click Run the troubleshooter.Play Audio troubleshooter PS4 Remote Play won't work windows 10
  4. Follow the instructions on the screen to complete the troubleshooter.

4. Can’t open Remote Play

  1. Right-click the PS4 Remote Play, and go to Properties.
  2. Head over to the Compatibility tab.
  3. Check Run this program in compatibility mode for:compatibility mode PS4 Remote Play won't work windows 10
  4. Choose a different operating system.
  5. Save changes.

That’s about it, we hope at least one of these solutions helped you resolve the PS4 Remote Play audio driver issues. If you have any comments, questions or suggestions, just let us know in the comments down below.

[wl_navigator]

Microsoft news recap: Minecraft Earth shutting down, Xbox head wants Cloud Gaming games to support separate purchases, and more

Microsoft news recap is a weekly feature highlighting the top Microsoft news stories of the past week. Sit back, grab some coffee, and enjoy the read!

Nintendo execs “laughed” at Microsoft’s attempt to acquire the company 21 years ago

Untold stories of Microsoft’s venture into console gaming have come to light, including details of companies it attempted to acquire back in the day. One of those companies was Nintendo, but execs at Nintendo reportedly “laughed” at Microsoft attempting to purchase the company.

Mario Microsoft Logo

Microsoft to open a new Sales Headquarters office in Washington DC area

Construction work is set to begin in the summer on a new Sales Headquarters for Microsoft in the Washington DC area.

Microsoft Sign Campus

Minecraft Earth will shut down in June 2021

Microsoft’s attempt at an AR-based Minecraft game, Minecraft Earth, will shut down in June 2021. With more people spending time indoors as a result of the COVID-19 pandemic, people aren’t going outdoors to play Minecraft Earth, and therefore Mojang has decided to divert resources to more valuable projects.

Xbox head Phil Spencer wants to make Cloud Gaming (Project xCloud) games available for purchase without a subscription

Microsoft’s cloud game streaming service, Xbox Cloud Gaming (Project xCloud), is currently only accessible if you have an Xbox Game Pass Ultimate subscription. Now, Xbox head Phil Spencer has said that he is wanting to make it so people can buy Xbox games and stream them via Cloud Gaming, similar to Google’s Stadia approach.

Cloud Gaming Project Xcloud

That’s it for this week. We’ll be back next week with more Microsoft news.

5 best VPNs for Kraken to exchange Bitcoin securely

Kraken is a popular US-based Bitcoin and cryptocurrency exchange platform.

Fortunately, the fact that it’s US-based doesn’t mean that you can’t access it from anywhere else in the world.

Yes, there are a few restrictions in place, which we’ll briefly mention below, but that’s not why we’re here.

As with any other online financial service, it’s best to stay secure and private when you access Kraken.

Currently, the best way to protect both your privacy and security is by using a VPN.

What are the best VPNS for Kraken in 2021?

Private Internet Access

Private Internet Access is a great VPN that can protect your online privacy regardless of your activity.

Whether you shop for plane tickets, try to watch a show on Netflix, or exchange cryptocurrency on Kraken, PIA is up for the job.

It also has additional features such as private DNS servers, a VPN kill switch, and a component that blocks ads and malware domains.

You can explore more than 22,000 high-speed servers from all around the world, Military-grade encryption to prevent traffic monitoring, and unblock various geo-restricted services.

More PIA features:

  • Zero-logging policy to protect your personal data
  • Supports OpenVPN and WireGuard protocols
  • Accepts credit card, crypto, and PayPal payment
  • 24/7 live chat support
  • 30-day money-back guarantee (no free trial)
Private Internet Access

Private Internet Access

Use this reliable VPN service to keep your Bitcoin transactions safe on Kraken.
Check priceBuy it now

NordVPN

use NordVPN for work

NordVPN is one of the best VPNs on the market, as it offers speed, security, and reliability in the same product.

It boasts military-grade 256-bit encryption to protect you against traffic monitoring, which makes it perfect for Kraken enthusiasts.

NordVPN lets you use its product on up to 6 devices at the same time.

You can connect to over 5,500 high-speed servers located in 59 countries all around the world. It’s an awesome VPN for cryptocurrency.

Additionally, it features an effective kill switch that cuts your Internet access in case no VPN connection is detected.

More NordVPN features:

  • Supports all popular devices
  • Double VPN, Onion over VPN, and obfuscated servers
  • CyberSec feature that blocks ads and malware hosts
  • 24/7 live chat support
  • 30-day money-back guarantee
  • No free trial
NordVPN

NordVPN

Amp up your online privacy and security by turning to this super-secure VPN when using Kraken.
Check priceBuy it now

Surfshark

use Surfshark for personal use

If you’re not only looking for a VPN solution to secure your Kraken transactions but also to protect the privacy of your entire family, check out Surfshark.

It allows you to set it up on any number of devices using the same account. And you can use the WireGuard and OpenVPN protocols with up to 256-bit military-grade encryption.

Surfshark supports more than 3,200 VPN servers in 65 countries. It runs private DNS on each VPN server.

More Surfshark features:

  • A built-in malware blocker called CleanWeb
  • Kill switch and multi-hop VPN connections
  • Split tunneling and obfuscation mode (Camouflage)
  • A no-logging privacy policy
  • 24/7 live chat and email support
  • 30-day money-back guarantee
  • 7-day free trial for Android and iOS
Surfshark

Surfshark

Secure your network connection when trading on Kraken and also protect your entire family with this reliable VPN.
Check priceBuy it now

CyberGhost VPN

CyberGhost

CyberGhost VPN is an excellent all-around VPN service that can offer you peace of mind while using Kraken, as well as speed and reliability.

It boasts great security and privacy features, as it supports WireGuard and OpenVPN protocols. You can also use this VPN for Binance.

Furthermore, this VPN service offers you private DNS servers, a VPN kill switch, and more than 6,700 servers (and counting).

Last, but not least, CyberGhost VPN is one of the few VPN services that offer free trials.

You can use CyberGhost VPN for free for 1 day on Windows, and 7 days on Android and iOS.

More CyberGhost VPN features:

  • Supports a wide range of devices
  • Allows up to 7 simultaneous connections
  • Doesn’t keep user activity logs
  • 24/7 live chat support
  • More than 6,700 servers worldwide
  • 45-day money-back guarantee
  • Free trial for Windows (1 day) and Android, iOS (7 days) users
CyberGhost VPN

CyberGhost VPN

Take advantage of the 1-day free trial for Windows PC to use this speedy VPN for your Kraken activities.
Check priceBuy it now

Conclusion

ZenMate VPN

ZenMate

ZenMate VPN is a great choice for a VPN tool if you plan on registering a Kraken account and trading cryptocurrency.

It provides you with a great array of security features that can keep your privacy and connection safe.

This VPN service provides you with a large network of fast servers in more than 78 locations. It’s a great VPN for Bitcoin trading.

Last, but not least, you can install ZenMate VPN on as many devices as you like.

More ZenMate VPN features:

  • Strict no-logging policy
  • Supports a wide range of devices
  • Lets you install and use it on unlimited devices (unlimited connections)
  • Fast servers in more than 78 locations worldwide
  • Free ZenMate VPN browser extension
  • Comes with a 7-day free trial
  • 30-day money-back guarantee
ZenMate VPN

ZenMate VPN

Install this handy VPN on all your devices to conveniently access Kraken out of your pocket.
Check priceBuy it now

To sum up, if you’re looking for a simple and secure way to perform crypto transactions on Kraken, we recommend using any of the 5 VPN services above.

If you can’t make up your mind about a particular VPN, we suggest Private Internet Access (buy here) since you can use it for anything.

Come back to this page and leave us your impression about your chosen VPN in the comment section below.

Microsoft Forms now lets respondents get a copy of their responses

Microsoft has released an important update for Microsoft Forms, the company’s popular online survey creator tool. The Microsoft 365 roadmap indicates that Microsoft Forms now supports email receipt and response download options.

With this update, Form designers will be able to turn on two new notification options for respondents. First of all, users will receive confirmation emails to all respondents within their organization, containing a link that will allow them to print a copy of their responses. To use this feature, designers need to turn on the “Allow receipt of responses after submission” option in the form settings.

Thank you

With the confirmation emails enabled, Microsoft Forms will also let all respondents download or print their responses on the “Thank you” page after submission. These options will be available for everyone within and outside of the organization.

Last month, Microsoft Forms also received support for collecting responses from specific users or security groups. The new option is turned off by default, and the Form owner will have to enable it manually in the “Send to Collect Responses” dropdown menu.

Fix: Virgin Media WiFi Connected but no Internet Access

Virgin Media is a UK-based broadband ISP that has experienced some issues with its Wi-Fi service from time to time. During specific periods of the year when online networks become very busy, internet blackouts cause Virgin Media customers to lose connectivity.

Here are a few potential fixes for Virgin Media Wi-Fi connections.

How to fix Virgin Media WiFi connected but no internet access?

1. Update your drivers automatically

Rely on high-quality software like Outbyte Driver Updater if you don’t want to miss an update ever again and enjoy smooth gaming activities at all times.

With this great tool, you can scan your system at a fantastic speed and get a detailed report of what drivers are outdated. You have over 18 million driver files that you can download for your PC to be running like new.

You don’t need to remind yourself to update your drivers because the schedule manager feature is in charge of notifying you about any new patches.

Another essential characteristic that you’ll definitely enjoy is that you can backup your drivers in a compressed zip file.

⇒ Get Outbyte Driver Updater

2. Check Virgin Media Service Status

Virgin Media confirmed the issues about Windows 10 PCs losing their Virgin Wi-Fi connections in December 2016. The issue arose after a Windows update and has something to do with PCs not detecting address systems.

As such, check the Virgin Media service status to find out if there are any known issues about connectivity in your region. (You can click here to open the Virgin Media service status page.)

3. Use a VPN

Another option that is likely to help you access any content is to use a virtual private network service. It will change your IP address and protect your identity.

In consequence, your ISP will not be able to place any restrictions on your traffic.

On top of that, a VPN will let you stream your favorite content across the globe, allowing you to surpass geo-restrictions.

Just make sure to get a VPN with many servers and global coverage. Another thing to look for is a good privacy policy and extra security features such as a killswitch.

4. Open the Virgin Media Page at Downdetector

Downdetector is another good site to check for Virgin Media Wi-Fi issues. This is a website that provides real-time overviews for outages for ISPs and other web services. Click here to open the Virgin Media page on that site.

Even though Virgin was supposed to have fixed its Wi-Fi service by mid-January, its Downdetector page currently highlights that the Virgin Media ISP still has notable internet connection outages.

It also highlights that those in London, Birmingham, Manchester, and York will probably find their connections down. If you’re in one of the red regions, consider contacting Virgin Media customer support for further details about when your Wi-Fi connection will be restored.

5. Restart Your Hardware

You can also try a few fixes yourself. One of the more basic fixes is to restart all your hardware, including restarting both your PC and Virgin Media Hub by switching off the router and then waiting a few minutes to turn it back on. Then, open your browser in Windows again to see if the connection is fixed.

6. Change the Wi-Fi Router Channel

  1. Open this page on the NirSoft website and click Download WifiInfoView to add WifiInfoView to Windows.
  2. Switch your router to a channel that other networks aren’t using so much.
  3. Open the Command Prompt by pressing the Win key + X hotkey and selecting Command Prompt from the menu.
  4. Enter ipconfig into the Command Prompt and press Return. The Command Prompt will list connection details as below.
  5. Copy your Default Gateway number listed in Command Prompt by clicking Ctrl + C. 
  6. Paste Default Gateway number into the URL browser bar and then press Return. That will open your router page as below, which tells you which wireless channel you’re on.
  7. Click Wireless on that page and enter the required authentication.
  8. Select a Basic Wireless Settings tab that includes a Standard Channel drop-down menu.
  9. Click that drop-down menu to choose an alternative router channel from there.

Other wireless networks sharing the same channel as yours can interfere with your signal, so changing the Wi-Fi router channel might fix the Virgin Media connection. This is how you can switch your Virgin Media Wi-Fi router channel.

7. Run the Internet Connections Troubleshooter

  1. Enter troubleshooter into the Cortana search box and select Troubleshooting.
  2. Select Network and Internet to open a list of troubleshooters.
  3. Then select Internet Connections to open the window shown below.
  4. When you press the Next button, the troubleshooter might fix your VM Wi-Fi connection.

Whenever it happens, you notice that even though Virgin Media WiFi is connected, you still have no internet access; you should try one of the solutions we presented in this article.

You can trust that at least one will fix your issue, and your internet connection will be established as soon as possible. Don’t forget to also access Virgin Media’s Help and Support pages.

If you want to update the Virgin Media Hub 3 firmware, the highlighted link will provide the information needed.

We want to hear more from you on this subject, so leave us a comment in the section below.

Windows 10X may be one of Microsoft’s biggest bets this year

2021 is shaping up to be an exciting year for Microsoft with the launch of Windows 10X, a new Windows-based OS that will should make its debut on Chromebook-like devices later this Spring. Windows 10X was initially expected to ship first on dual-screen PCs like Microsoft’s Surface Neo, but this device has now been delayed after Panos Panay, the new head of both Windows client and hardware announced a new focus on single-screen devices for Windows 10X last year.

“With Windows 10X, we designed for flexibility, and that flexibility has enabled us to pivot our focus toward single-screen Windows 10X devices that leverage the power of the cloud to help our customers work, learn and play in new ways. These single-screen devices will be the first expression of Windows 10X that we deliver to our customers, and we will continue to look for the right moment, in conjunction with our OEM partners, to bring dual-screen devices to market,” Panay wrote back in May 2020.

Microsoft has remained pretty quiet about Windows 10X since then, but the company is still testing the new OS internally. However, we learned a bit more information about Windows 10X through reports from Windows Central’s Zac Bowden and ZDNet’s Mary Jo Foley, who painted Windows 10X as Microsoft’s take on Chrome OS. At launch, the OS will reportedly focus on web apps, with the ability for customers to stream Win32 apps until these legacy apps can run securely in containers.

The Chromebooks threat

If it took years for Chrome OS and Chromebooks to be taken seriously, and Microsoft itself ran a series of ads (the infamous “Scroogled” campaign) to mock these devices during the Ballmer era. It was pretty easy to dismiss Chrome OS as a glorified web browser back in the day, but Chromebooks now supports Android apps, Linux apps, as well as virtualized Windows apps thanks to Parallels Desktop for Chromebook Enterprise.

Chromebooks have continued to enjoy real momentum in the US Education market, and despite Microsoft trying new things like Windows 10 in S Mode, Chromebooks remain cheaper and easier to manage for schools. That’s why Microsoft is now repurposing Windows 10X as a Chrome OS alternative, meaning a lightweight version of Windows that can ship on low cost devices that are easy to manage for IT Pros.

That’s a stark departure from the initial Windows 10X presentation we saw when the Microsoft unveiled its Surface Neo back in 2019, though the company still isn’t saying explicitly that Windows 10X is for Chromebook-like devices. Again, the company has remained pretty quiet about Windows 10X since Panos Panay last mentioned it in May, but make no mistake, Windows 10X could be one of Microsoft’s biggest bets this year.

Moving away from legacy Windows components

We all remember the flashy presentation of Windows 10X on the Surface Neo, when the OS looked like something designed from the ground up for dual screen devices. Microsoft followed up by releasing a Windows 10X emulator in early 2020, and our own Cody went hands-on with it.

Windows 10X is based on Windows Core OS, a new modular version of Windows 10 stripped from all the legacy Windows components that have no reason to exist on new form factors. Windows Core OS already powers Microsoft’s HoloLens 2 headset, and Windows 10X is going to be a new expression of it for mobile PCs.

With this new OS, Microsoft will abandon various legacy components such as the Control Panel or the Windows File Explorer, making the OS lighter and easier to update over time. Microsoft is aiming to eliminate everything that can make using a Windows 10 PC cumbersome, and get rid of all the annoyances that Google highlighted in an excellent ad for Chromebooks years ago. This ad was pretty much Google’s version of the “It just works” line from the late Steve Jobs.

Windows 10X will be quite different from Windows 10 on ARM, which is Windows 10 as we know it running on PCs with ARM processors. As it turned out, these PCs are not easier to use than regular Intel-based PCs, it’s actually quite the contrary due to the persisting compatibility issues with legacy Windows apps and drivers. Windows 10X also won’t be able to run legacy Win32 apps natively at launch, though Microsoft is working on a new container technology to make these apps run securely on Windows 10X devices.

If the first Windows 10X mobile devices are expected to use Intel processors instead of ARM-based chips, the OS should run better on low-cost hardware compared to regular Windows 10 thanks to the absence of legacy components. The OS will also be secure by default, just like Chrome OS, and Microsoft has also streamlined the process of installing OS updates, something that Windows users have been complaining about for years.

Enterprise first, Consumers next?

After seeing the flop of Windows RT and Windows 10 in S mode, it’s safe to say that many enthusiasts are wondering if Windows 10X could be another ill-fated initiative from Microsoft. The “Windows 10X” name itself maybe confusing as even though this is going to be a Windows based OS, Windows 10X users won’t be able to install their favorite Windows apps from the get-go.

However, Microsoft may avoid another Windows RT debacle as the first Windows 10X devices will apparently target enterprise/education users interested in a Chrome OS alternative that supports Azure AD accounts. According to Windows Central’s Zac Bowden, Windows 10X devices for consumers will come at a later point.

It’s still unclear if Microsoft will allow Windows Insiders to test Windows 10X and share their feedback on it ahead of its release. Again, the OS will make its debut on new devices for Enterprise and Education customers, and it’s likely not something that Windows enthusiasts will be able to install on their machines. However, some Windows 10X features such as the redesigned Action Center and File Explorer could eventually make their way to the regular Windows 10, which is also expected to receive a big design update codenamed “Sun Valley” later this year.

There’s probably some room on the market for a Chrome OS alternative from Microsoft, though Google has a clear head start with the first Chromebooks being released 10 years ago. Do you think Windows 10X could be too little to late, like Windows Phone was on the smartphone market? Let us know in the comments below.

FIX: Origin cloud sync error

A wide number of Origin users have encountered an Error syncing cloud storage data, whenever they try to access their savegames.

This error syncing cloud storage data has caused a lot of anger and frustration, as some users believed they have lost their entire set of save game data.

Here is what one user had to say about this issue on the EA Answers forums:

It seems saves are not saved either from Origin. Today I received a warning that my local and cloud saves were out of date. I, the user, had to choose which one was valid so I picked the most recent saves. The end result is I lost over 2 hours of gaming. And it seems that the local saves that I could have chosen for are now overwritten.  Can anyone acknowledge this? Or is there any hope?

Read on to find out our solutions to this annoying error message.


What can I do to fix the Origin Error syncing cloud storage data?

1. Use the Restore Save option inside Origin

  1. Open your Origin application.
  2. Click My Games and choose the game that you’re having issues with.
  3. Click View game details, select Cloud Storage and click on Restore Save.
  4. This will allow you to restore any saved games that were mistakenly removed by the error.

2. Clear your Origin cache folders

  1. Press the Win+R keys, then type %ProgramData%/Origin and press OK.
  2. Delete all files and folders but DO NOT delete the LocalContent folder.
  3. Open the Run dialog again by pressing Win+R keys and type %AppData% and press Enter.
  4. Delete the Origin folder found at that location.
  5. Navigate to the AppData, open Local folder and delete the Origin folder found there.
  6. Restart your PC.

Note: To be able to try this method out optimally, please make sure that all Origin software has been closed. To make sure that’s the case, open Task Manager and end these two tasks: Origin.exe, and OriginWebHelperService.exe. 


You can’t sync your data with the cloud? Follow these methods


3. Restart your modem and router


A good number of users have reported good results from trying this method.

Depending on the specific type of modem and router you’re using, the exact steps to follow for this method will vary. Make sure to restart both devices, and then check to see if the issue persists.


4. Update your video card drivers

Check your graphics card
  1. Press Win+X keys on your keyboard and select Device Manager from the menu that appears.
  2. Inside the Device Manager search for the Display adapter section and choose your video card from the drop-down list.
  3. Right-click the device and click on Update driver.
  4. Select Search automatically for updated driver software.
  5. Follow the on-screen instructions to complete the setup.
  6. Restart your PC and try to see if the issue is resolved.

In today’s fix article we found out what are the best methods to try and fix the Origin error syncing Cloud storage data.

We hope that the methods presented in this list have proven helpful for your specific situation.

Please feel free to let us know if you managed to solve the issue by using the comment section below.

Fix: That Didn’t Go As Planned Error in Origin

A wide number of Origin users have seen the error That didn’t go as planned. Origin encountered an issue loading this page starting to appear randomly.

Here is what one user had to say about this issue on the EA Answers forums:

Well, that didn’t go as planned. Origin encountered an issue loading this page. Please try reloading it – if that doesn’t work, restart the client or try again later. Please help me !

In today’s fix article we will discuss the best methods to apply to sort this issue out and get back to playing your favorite games in no time. Read on to find out how to do it.

How do I fix the That didn’t go as planned error in Origin?

1. Clear registry entries using a specialized tool

Registries are not something one should try to fix manually unless they are very skilled with such data files, and since not everyone is an IT technician, it is best to leave these things to dedicated third-party software.

2. Make sure your Origin software can run normally

  1. Click on Cortana search box and type in Windows Defender Security Center -> open it.Windows security - origin error that didn't go as planned
  2. Select Firewall & network protection.
  3. Click the link named Allow an app through firewall.
  4. Click on the Change settings button.
  5. Scroll down and select Origin from the list (or click Allow another app button if you can’t find it)
  6. Make sure that Origin has both Private and Public access by ticking the respective boxes.
  7. Press Ok to save the settings.

It is imperative that your Firewall or Antivirus software is not blocking access to your Origin application.

The steps to whitelist Origin will vary depending on the antivirus software you’re using, but if you utilize the Windows Defender Firewall, you can follow the steps mentioned above.

3. Delete Origin cache files

  1. Click the Cortana search box -> type folder.
  2. Select the first result from the top called File Explorer Options.File explorer options - Origin error that didn't go as planned
  3. Click the View tab inside the newly opened window.
  4. Scroll down and under the Hidden files and folders section -> tick the box next to Show hidden files, folders, and drives.
  5. Press Ok.

To delete Origin cache files:

  1. Navigate to C:Program Data and delete the Origin folder.
  2. Delete the Origin folder found at the location C:Users<username>AppDataLocal
  3. Also, delete the Origin folder from this location on your hard-drive: C:Users <username> AppDataRoaming

In order to be able to delete the Origin cache files, you will need to make hidden folders in Windows 10 visible. 

Note: The <username> entry in the paths above is your PC’s user name.

In today’s fix article, we explored the best methods to fix the That didn’t go as planned error message inside Origin.

We hope that this guide managed to get you back to playing games normally.

Facing other challenges, such as issues with Array.prototype.map() and arrow functions? Get insights and solutions in our guide on solving problems with Array.prototype.map() and arrow functions.

If it did, please feel free to let us know if this guide helped you solve your issue by simply using the comment section found below.