AT&T IP address compromised or hacked? Here is what to do

If you’re an AT&T customer, you’ve probably heard about compromised or hacked IP addresses. If it never happened to you, it might’ve happened to one of your acquaintances, or you might’ve seen it on a forum online.

The gist goes something like this: you’re at home, minding your business when suddenly you receive a phone call. Then the person on the other end or a recorded message informs you that your IP address has been hacked or compromised.

Although it may sound terrifying, this situation is actually way less threatening than it sounds. First of all, you must understand that there’s no such thing as hacking one’s IP address.

It’s exactly the same as someone telling you they’ve hacked your home address. The real danger here is associating your IP address with you (figuring out who’s behind the IP address), since from that point onward you can be targeted by attacks.

It’s more like a privacy invasion if you’d like. Just as you don’t want random strangers to know where you live, letting your IP address be associated with you is best to be avoided. Here are some scenarios you might face.

Possible scenarios of the compromised IP situation

1. You get a call from a tech employee

This one can swipe you right off your feet if you’re not exactly tech-savvy. You receive a call, there’s a voice at the other end informing you about your IP being hacked or compromised. This can be either a real person or a pre-recorded message.

They then give you a fake AT&T phone number you can call and check for yourself. If you do call, you will reach a second person, confirming that the situation, is indeed dire.

Now, this is where things get a bit tricky, as it can go several ways from here. The number could be a premium rate one, and even one minute of conversation can cost you a lot of money.

Another method used by these scammers is requesting money from you so that they can take care of your hacked IP. A red flag you should be aware of is the scammer’s preference towards cryptocurrency.

Note that most of the time, you will be referred to as sir or madam. You can also mark this immediately as a red flag, since companies you signed with usually have your full name, and won’t shy away from using it in a conversation, especially an official one.

2. You receive a mail/message from tech companies

Many scammers will send emails in bulk informing random users about their IP being hacked or compromised. This Hail Mary type of attack is very efficient, as it increases the chances of someone actually buying into the scam.

The content of the email may vary since there’s not just one scammer that will try to pull this off. They might trick you into believing they’re from Microsoft or AT&T, and that there’s something very wrong on your end.

You might be offered a phone number with an invitation to call it and check for yourself. Again, you should steer away from this situation, as the number might be a premium-rate one, and even a minute’s worth of conversation might cost you a lot of money.

Another scenario is when the scammer demands a ransom disguised as payment for tech services. Long story short, they help you un-compromise your IP in exchange for money.

Last, but not least (and this is the most dangerous, believe us), the scammer might request access to your PC. They will even walk you through the process of lowering your defenses (turning off your firewall, enabling remote access, forwarding ports, and so on).

Once they have access to your PC, they can virtually do anything from there, such as plant bugs, infect your device with a remote trojan (RAT), and even leave backdoors to your entire network.

Thus, it leaves your device vulnerable and the perpetrator able to steal credentials, payment details, and even spy on you and blackmail you.

Here is what to do if your IP address is compromised

Like we said before, this is not a real situation. Your IP can’t be hacked or deleted or whatever the scam may say. However, these creepy phone calls and/or messages are very real and they can put you at risk if you don’t exercise caution.

Here’s what you can do to avoid these situations:

  • Don’t answer unknown callers and let them go to voice mail if possible
  • Never try calling the number the scammers will give you
  • If you have doubts, always hang up and try calling AT&T using one of their public numbers displayed on their website
  • Remember that IP addresses can’t be hacked, they can only be used as means of targetting you
  • Never grant anyone access to your computer, no matter how convincing they sound
  • Don’t send money to shady technicians who can magically solve your compromised IP situation
  • Make sure that you’re using a trustworthy firewall/antivirus combo
  • If you’re not hosting a server or something similar, don’t forward (open) ports on your network
  • Change passwords frequently
  • Try not to use the same password for multiple accounts
  • Use a password manager such as LastPass
  • Don’t be afraid to report shady calls/messages to the authorities
  • Check support forums or groups online for problems that might be similar to yours
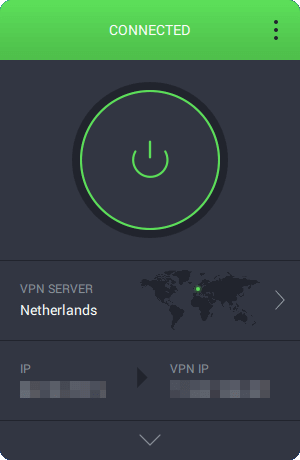
  • Use a VPN service such as PIA to hide your IP address
Private Internet Access

Private Internet Access

Want to keep your IP private? PIA can help.
$2.85/mo. Buy it now

Your AT&T IP address can’t be hacked

All things considered, your IP address can’t be hacked, much like your home address can’t be compromised. Worst case scenario, someone makes it public and random strangers can use it to target you.

But that’s not exactly AT&T’s responsibility, to make sure your IP address is not made public. Therefore, if you want to protect the privacy of your IP address, you can mask it by using a trustworthy VPN service.

If possible, you could ask AT&T if they can assign you a different IP address (if you’re using a static one and fear that someone could target you through it).

[wl_navigator]

The Device Does Not Recognize the Command [Error 0x80070016]

If you’re getting the ERROR_BAD_COMMAND error code with The device does not recognize the command description, follow the troubleshooting steps listed in this article to fix it.

ERROR_BAD_COMMAND is often accompanied by error code 0x80070016 and usually occurs when users attempt a backup, install a new app, or update existing apps. This error affects all Windows versions.

Various elements are triggering this issue:

  • Damaged or corrupted files and folders.
  • Missing EXE, DLL, or SYS files.
  • Deleted registry values.
  • Malware infection.
  • Outdated or incompatible software versions, etc.

How can I fix the device does not recognize the command error?

1. Use third-party software

Some underlying system issues likely cause this bad command error. Oftentimes, these issues are not very easy to identify.  The Windows operating system is complex, and due to regular use, it is expected to have some corrupt or missing files.

The issue itself is not major, but to detect and repair it, we recommend you use a dedicated PC repair and optimization tool.

The process is simple. These tools scan your PC and detect any issues that may cause errors or other performance problems, and automatically remove faulty system files and install new ones.

2. Install Visual C++ 2015 Redistributable Packages

Many users confirmed fixing this error code by installing or reinstalling Visual C++ 2015 Redistributable Packages. The role of this tool is to install run-time components that are required to run C++ applications built using Visual Studio 2015. As a result, app compatibility is enhanced, allowing users to install and deploy apps smoothly.

⇒ Get Visual C ++2015 Redistributable Packages

3. Run a full system scan

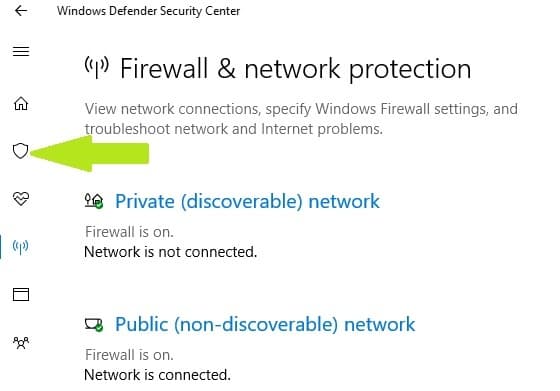
  1. Go to Start > type defender > double click Windows Defender to launch the tool
  2. In the left-hand pane, select the shield icon
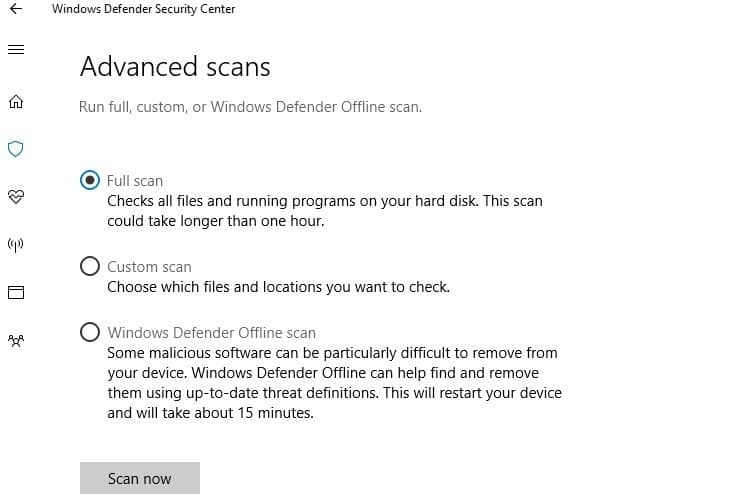
  3. In the new window, click the Advanced scan option
  4. Check the full scan option to launch a full system malware scan.

Malware may cause various issues on your computer, including errors. Performing a full system scan to detect any malware running on your computer is a good way to start. You can use Windows’ built-in antivirus, Windows Defender, or third-party antivirus solutions.

4. Repair your registry

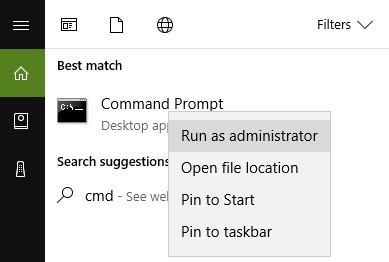
1. Go to Start > type cmd > right-click Command Prompt > select Run as Administrator

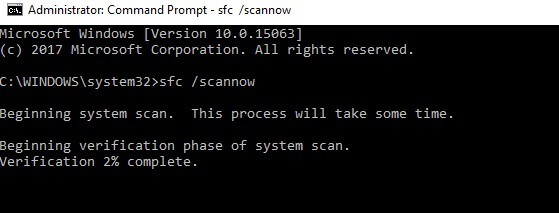
2. Now type the sfc /scannow command

3. Wait for the scanning process to complete and then restart your computer. All corrupted files will be replaced on reboot.

The simplest way to repair your registry is to use a dedicated tool, such as CCleaner. Don’t forget to first backup your registry in case anything goes wrong. If you haven’t installed any registry cleaner on your computer, check out our article on the best registry cleaners to use on PC.

You can also use Microsoft’s System File Checker to check for system file corruption. However, this utility is only available on Windows 10.

5. Update your OS

Make sure that you’re running the latest Windows OS updates on your machine. As a quick reminder, Microsoft constantly rolls out Windows updates in order to improve the system’s stability and fix various issues.

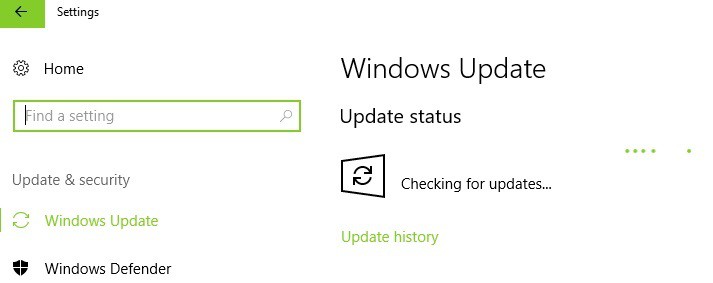
To access the Windows Update section, you can simply type update in the search box. This method works on all Windows versions. Then go to Windows Update, check for updates and install the available updates.

6. Run the Windows Troubleshooter

  1. Go to Settings > Update & Security > select Troubleshoot in the left-hand pane
  2. In the new window, go to the section Find and fix other problems > select the troubleshooter that you need depending on the tool affected by The device does not recognize the command error > Run the troubleshooter

If you run an older Windows version, you can download the Microsoft Easy Fix tool to troubleshoot various software and hardware issues. The tool is compatible with

  • Windows 10 Version 1607
  • Windows 8.1, Windows 8
  • Windows 7 Enterprise
  • Windows 7 Home Basic
  • Windows 7 Professional
  • Windows 7 Ultimate

Go to the official Microsoft Easy Fix tool webpage, and scroll down to select the troubleshooter that best suits your needs, depending on the tool affected by The device does not recognize the command error. When you select the respective tool, your PC will download the troubleshooting software.

Once the tool has been downloaded, double-click it to launch it. Then follow the on-screen instructions to fix your problem.

7. Check your disk for errors

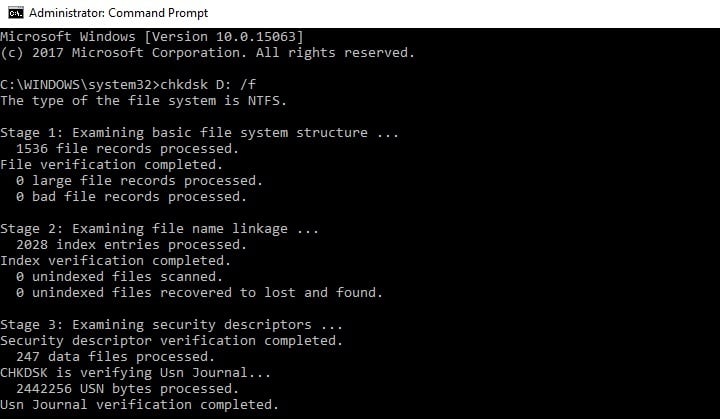
Start Command Prompt as administrator and type the chkdsk C: /f command followed by Enter. Replace C with the letter of your hard drive partition.

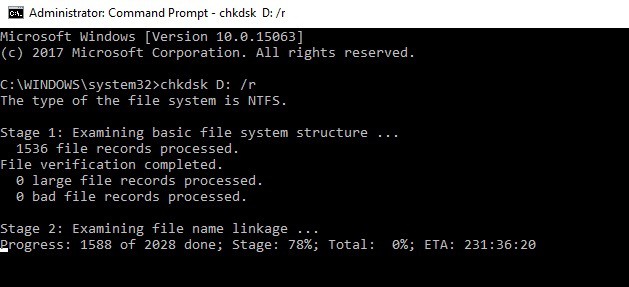
As a quick reminder, if you do not use the /f parameter, chkdsk displays a message that the file needs to be fixed, but it does not fix any errors. The chkdsk D: /f command detects and repairs logical issues affecting your drive. To repair physical issues, run the /r parameter as well.

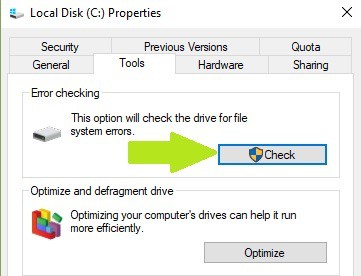
On Windows 10, go to hard drives > right-click the drive that you want to check  > select Properties > Tool. Under the Error checking section, click Check.

8. Clean your temporary files and folders

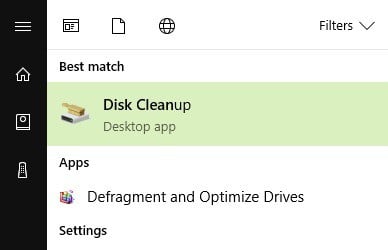
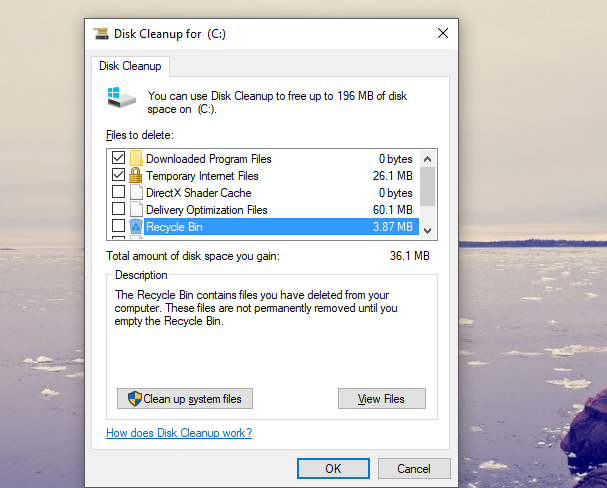
  1. Go to Start > type Disk Cleanup > launch the tool
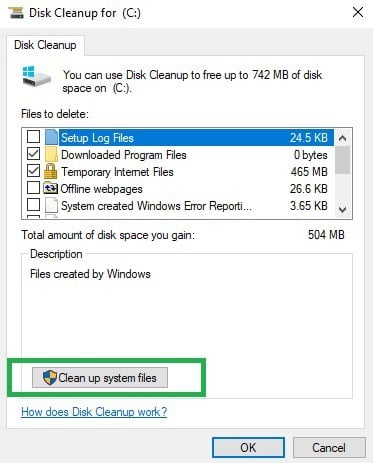
  2. Select the disk that you want to clean > the tool will them tell you how much space you can free up

3. Select Clean up system files.

The simplest and quickest manner to delete your temporary files and folders is to use Disk Cleanup. As you use your computer or browse the Internet, your PC accumulates various unnecessary files.

These so-called junk files may affect your computer triggering various error codes, including the ERROR_BAD_COMMAND error code. Clean your temporary files and then retry the action that first triggered this error.

9. Remove recently installed software

If the ERROR_BAD_COMMAND error code occurred after you installed new software on your computer, try uninstalling it.

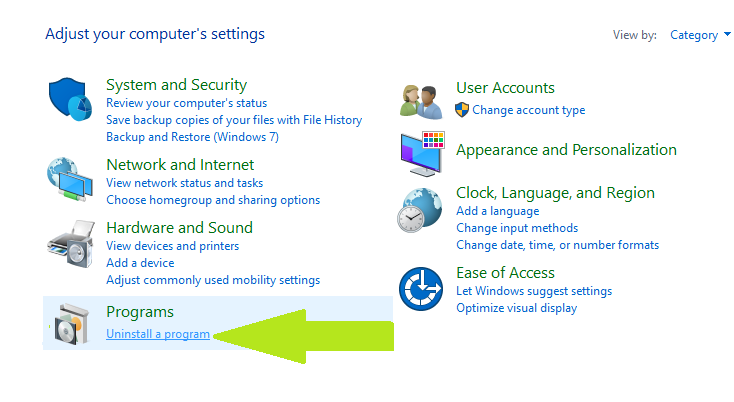
Go to Start > type Control Panel > select the program(s) recently added > click Uninstall. Then restart your computer, and see if the issue has been solved.

10. Boot into Safe Mode

  1. Hold down the shift key and click the on-screen power button.
  2. Select the restart option while holding the shift key.
  3. Select Troubleshoot > Advanced options > Startup Settings > hit Restart.
  4. Wait until Windows 10 reboots, and select Safe Mode.
  5. Retry the action that initially triggered the ERROR_BAD_COMMAND error code> restart your computer > check if the problem still persists.

11. Clean boot your computer

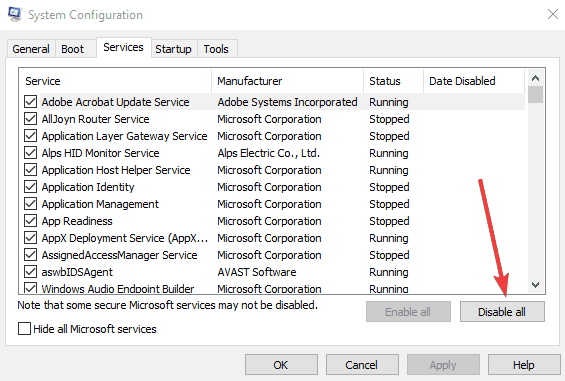
hide all microsoft services windows 10
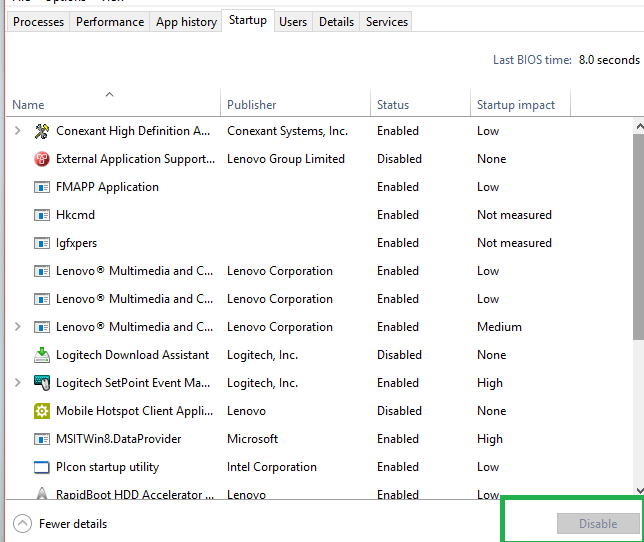
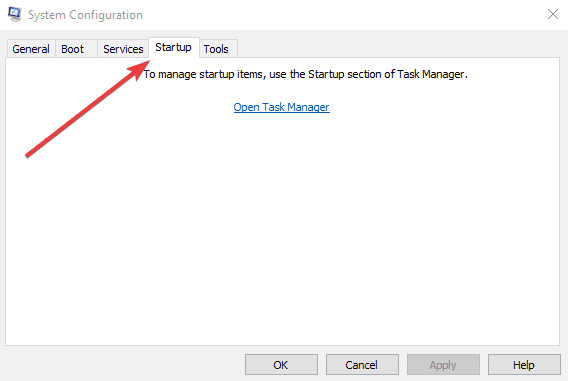
disable start up items windows 10

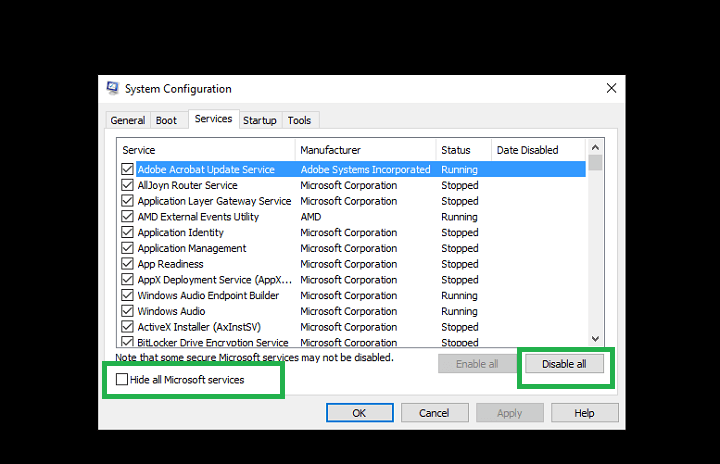
  1. Type System Configuration in the search box > hit Enter
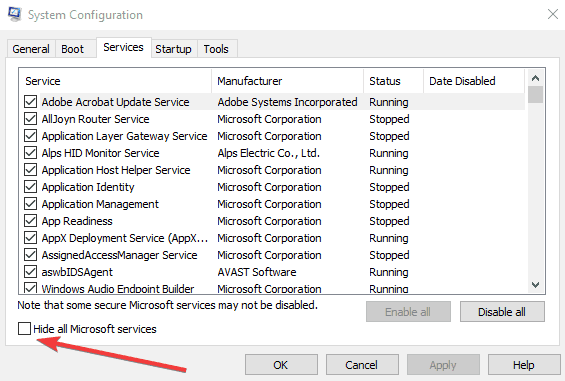
  2. On the Services tab >  select the Hide all Microsoft services check box > click Disable all.
  3. On the Startup tab > click on Open Task Manager.
  4. On the Startup tab in Task Manager> select all items > click Disable.
  5. Close the Task Manager
  6. On the Startup tab of the System Configuration dialog box >click OK > restart your computer.

A clean boot starts Windows by using a minimal set of drivers and startup programs to eliminate software conflicts that may occur when you install a program or an update or when you simply launch a program.


12. Check the permissions on the drive

  1. Log in as Admin > select the problematic drive > right-click it
  2. Go to Properties > select the Security tab >click on the Advanced button
  3. In the new window, click on Users > click on the Change permissions button

4. Select Users one more time > go to Edit. 5. Under basic permissions, check Full control > OK.

In this manner, you’ve changed the permissions to allow full control for all users. This should solve the problem. However, keep in mind that if you restart your computer or switch users, these settings will revert to default.


13. Reset the Windows Update components

If the ERROR_BAD_COMMAND error code occurs when you try to update your OS or a particular app, reset the Windows Update components. Follow the steps listed below and then check if the issue persists.

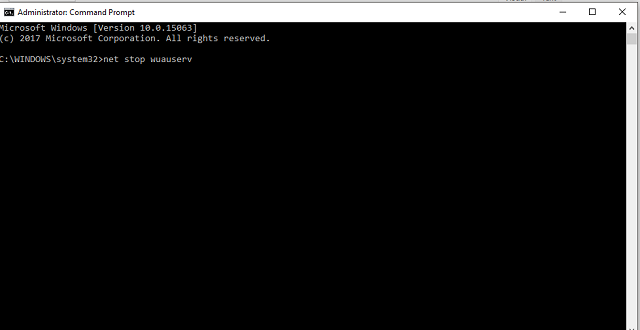
1. Go to Start > launch Command Prompt as Administrator

2. Type the following commands and hit Enter after each one:

net stop bits
net stop wuauserv
net stop appidsvc
net stop cryptsvc

3. Type the following command to delete the qmgr*.dat files, and press Enter:
Del “%ALLUSERSPROFILE%Application DataMicrosoftNetworkDownloaderqmgr*.dat”

4. Type the cd /d %windir%system32 command to repair the corrupted repository.

5. Reregister the BITS files and the Windows Update files by typing the following commands in Command Prompt. Hit Enter after you type each command.
regsvr32.exe atl.dll
regsvr32.exe urlmon.dll
regsvr32.exe mshtml.dll
regsvr32.exe shdocvw.dll
regsvr32.exe browseui.dll
regsvr32.exe jscript.dll
regsvr32.exe vbscript.dll
regsvr32.exe scrrun.dll
regsvr32.exe msxml.dll
regsvr32.exe msxml3.dll
regsvr32.exe msxml6.dll
regsvr32.exe actxprxy.dll
regsvr32.exe softpub.dll
regsvr32.exe wintrust.dll
regsvr32.exe dssenh.dll
regsvr32.exe rsaenh.dll
regsvr32.exe gpkcsp.dll
regsvr32.exe sccbase.dll
regsvr32.exe slbcsp.dll
regsvr32.exe cryptdlg.dll
regsvr32.exe oleaut32.dll
regsvr32.exe ole32.dll
regsvr32.exe shell32.dll
regsvr32.exe initpki.dll
regsvr32.exe wuapi.dll
regsvr32.exe wuaueng.dll
regsvr32.exe wuaueng1.dll
regsvr32.exe wucltui.dll
regsvr32.exe wups.dll
regsvr32.exe wups2.dll
regsvr32.exe wuweb.dll
regsvr32.exe qmgr.dll
regsvr32.exe qmgrprxy.dll
regsvr32.exe wucltux.dll
regsvr32.exe muweb.dll
regsvr32.exe wuwebv.dll

6. Reset Winsock by typing this command:
netsh winsock reset

7. Restart the BITS service, the Windows Update service, and the Cryptographic service. Type the following commands and hit Enter after you type each command:
net start bits
net start wuauserv
net start appidsvc
net start cryptsvc

8. Go to Windows Update and install the latest updates.
9. Restart your computer and make sure that the latest updates have been installed.

We hope that the solutions listed above helped you fix The device does not recognize the command error. If you’ve come across other workarounds to fix this problem, you can help the Windows community by listing the troubleshooting steps in the comments below.

Before you leave, you might want to read our guide on how to resolve AHCI Port0 device error.

Bookmark our System Errors Page and stay updated on the latest fixes and solutions.

Visit the Windows 10 Errors Troubleshooting Hub to learn more.

You can now copy Planner plans into Microsoft Teams groups

If you use Microsoft Teams to facilitate collaboration on projects, then you most probably appreciate the importance of task management within your workflows. Fortunately, Teams requires no third-party app integration to help with this aspect of your work.

That’s because Microsoft Planner, which boasts extensive Office 365 integrations, is available to Teams users. Recently, the app got an update for Teams that lets you copy plans into existing groups or teams.

Microsoft Teams plans update

Microsoft Planner is something of a Teams. So now you can simply pick any existing group or team into which you wish to copy a plan.

Moreover, you don’t have to copy the entire plan because Microsoft Planner allows you to choose specific items.

The integration of Microsoft Teams and Planner is one of the most natural in Office 365, considering that the two are project/task management tools. Even before this update, you could create new plans or view existing ones in Teams. You could also add existing plans in channels.

But with the copy update, you may now quickly replicate a plan across a team. The copied plan includes all the pertinent information on tasks, including late, in progress, and completed assignments.

What’s your experience with Planner in Microsoft Teams? Kindly share your views or any concerns via the comments section below.

[wl_navigator]

FIX: Hard drive missing after Windows 10 update

Well, we are in a bit of a pickle: if you update your operating system to the latest Windows 10 version, you might lose the connection to one or more partitions in your system.

But you don’t need to worry because we can fix this issue in the shortest time possible and bring back your Hard Disk if it disappeared after the update to the latest OS version.

Even if you update to the latest build in Windows 10 version, there are still some bugs that need fixing and one of them being the hard drive disappearing issue.

But with the help of an application, you will manage to find your hard drive partitions again and continue working in Windows 10 as usual.

What to do when hard drive disappears after Windows update?

  1. Run the Hardware and Devices Troubleshooter
  2. Initialize your disk
  3. Update your Disk driver
  4. Connect your hard drive to a different USB port
  5. Run MiniTool Partition Wizard

1. Run the Hardware and Devices Troubleshooter

If you don’t want to download a third-party tool on your computer, you can also try to run the built-in hardware troubleshooter.

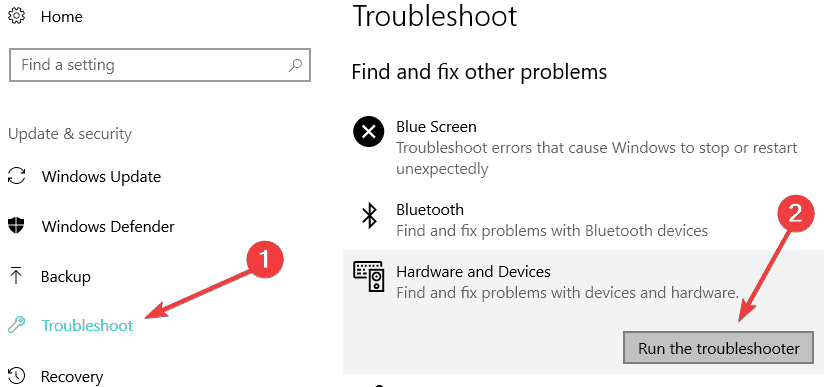
Go to Settings > Update & Security > Troubleshooter > locate and run the troubleshooter.

windows 10 hardware troubleshooter

2. Initialize your disk

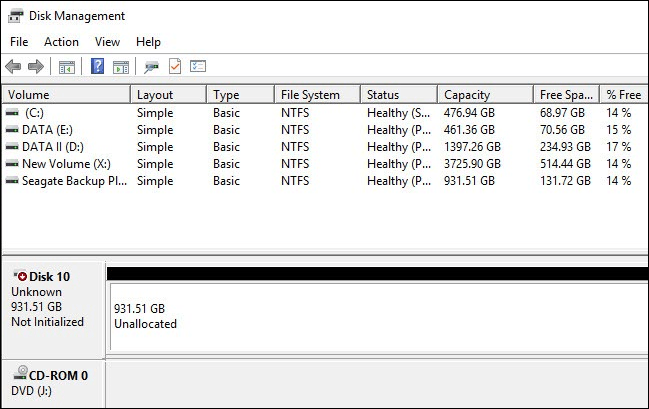
  1. Go to Start > type disk management > double click on the first result to open Disk Management (Create and format disk partitions).
  2. A list of all your hard drives and partitions should appear on the screen. If you find a disk listed as Disk 1 or Disk 5 (or other similar names), you’ll need to localize it.Internal hard drive not showing up Windows 10
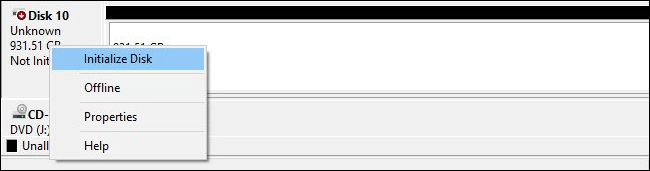
  3. Right-click on that partition > select Initialize Disk.Can't see hard drive Windows 10
  4. Select the GUID Partition Table (GPT) option > hit OK.
  5. The partition should now be listed as Basic and Online but won’t have any unallocated space. To fix this minor issue, right-click on the box > click on New simple volume.External hard drive not showing up
  6. Click Next, and assign a drive letter and then format your new drive. Choose the NTFS file system, and run a quick format.Hard drive won't show up in BIOS

For more ways on how to initialize your drive, check out our detailed article.

3. Update your Disk Driver

Another common reason why your hard drive disappeared after updating your Windows 10 computer is due to missing or incompatible drivers. To fix this problem, you need to install the latest driver version.

The safest and quickest way is to use dedicated driver updater software such as Fortect Driver Updater. It will automatically identify missing, outdated, or damaged drivers and fix them within minutes.

You can also update your disk driver manually, from the Device Manager. Follow the instructions below:
1. Type device manager in the taskbar and open the panel.
2. Select the Disk drivers category from the driver list.
3. Right-click on your driver and select Update Driver.

Windows will automatically search for the newest version of your driver and install it.

If it does not find any new driver, find the name of your hardware and look it up on the manufacturer’s website and follow their specific instructions.

When you finish installing your new drivers, reboot your computer and check if the hard drive is now visible on your machine.

⇒ Get Fortect Driver Updater

4. Connect your hard drive to a different USB port

External hard drives may disappear because of faulty USB ports. You can quickly fix this issue by connecting your hard drive to a different port.

5. Run MiniTool Partition Wizard

  1. Tap on the link posted below in order to download the application necessary for this tutorial.
  2. After the download has finished, go to the directory where it was downloaded.
  3. Double click on the executable file in order to start the installation process.
  4. Left-click or tap on the Yes button if you are prompt by a user account control message telling you to allow access.
  5. Follow the instructions on the screen to finish the installation.
  6. Now double click or tap on the executable file of the MiniTool Partition Wizard Free application.
  7. Once you open the application, your partitions should appear on the screen.
  8. Now, just change the letter assigned to them using this application.
  9. Save the changes and close the application.
  10. Reboot your Windows 10 operating system.
  11. After the system starts you can check if you have your hard disk visible again and ready to use.

MiniTool Partition Wizard Free is the best disk partition software that you can find. That’s why it comes as a top recommendation to solve hard drive missing issues.

With the partitions on the screen, your only task is to just change the letter assigned to them using this partition manager. Results are always guaranteed.

There you have a few simple ways to bring our Hard Disk back if it disappeared after you updated your Windows 10 system.

If you have any additional questions, we remain at your disposal (you can contact us by using the comments section below).

If needed, refer to this article dedicated to Troubleshooter has stopped working issues.

  • How do I fix a missing hard drive?

It is fairly annoying to face this issue. However, this guide on how to fix a missing hard drive will tell you all about initializing your disk, updating the drivers, and other tips.

  • Can you recover data from a dead hard drive?

Yes, you can. Just use any of these recovery software tools for damaged hard drives to retrieve your precious data.

6 Best Browsers for Trading [Stocks, Crypto]

Today we’ll show you the best browsers for trading and what they can do. We picked options with strong cybersecurity features as well as trading-friendly features.

Let’s check them out.

What is the best browser for trading?

Opera – Integrated crypto support

opera one dashboard

Opera has a built-in wallet feature that you can easily enable in just a few clicks. You can easily manage your digital assets right from the browser’s sidebar.

For privacy, Opera has a built-in VPN with unlimited bandwidth. This will add a layer of encryption over your connection, protecting sensitive data.

Overall, if you do a lot of stock trading or crypto trading, or even any kind of online trading, the Opera One browser is the best choice right now. It makes buying, selling, and swapping a breeze.

Opera

Trade and make bank payments safely and securely by using this extremely protected and reliable Internet browser.

AVG Secure Browser – Antivirus shield

avg secure browser dashboard

AVG Secure Browser can guarantee you highly private online transactions and HTTPS web encryption for each cryptocurrency platform.

You can make use of anti-phishing security, web tracking prevention, and data theft attacks while navigating trading and stocks websites.

In addition, this browser works cross-platform so you can sync your mobile and PC trading, making it a great option if you are often on the go.

AVG Secure Browser

Secure your financial data online using cutting-edge private browsing.

Microsoft Edge – Secure navigation

microsoft edge dashboard

Microsoft Edge works with Microsoft Defender SmartScreen keeping security threats at bay when you do trading.

The new Edge is built on Chromium, and it works with Chrome extensions. This version also offers performance improvements, so websites will load faster than before.

It also gives you solid control of your data, and it will automatically block trackers while browsing the web.

⇒ Download Microsoft Edge

Mozilla Firefox – Improved privacy tools

mozilla-firefox-browser dashboard

Using the Enhanced Tracking Protection feature, Firefox will automatically block tracking cookies. The feature will also block most of the ads out of the box, making trading more seamless and even more secure.

Its memory usage is very low, so it’ll offer great performance. You can pay attention to your trading activities without having to constantly wait out for pages to load.

For stock trading or crypto transaction, Firefox is a very safe browser. It also supports extensions, so if you need any dedicated add-ons for your trading or crypto platforms, you can easily install them.

⇒ Download Mozilla Firefox

Google Chrome – Private and speedy

Google Chrome dashboard

Google Chrome has built-in protection features such as site isolation, sandboxing, and predictive phishing protection to keep you safe.

To keep your online accounts secure, Chrome has its own password manager that will generate a secure password for each website that you use.

Chrome also supports extensive customization with thousands of available extensions, and the built-in ad blocker is just icing on the cake.

⇒ Download Google Chrome

Brave Browser – Next level privacy

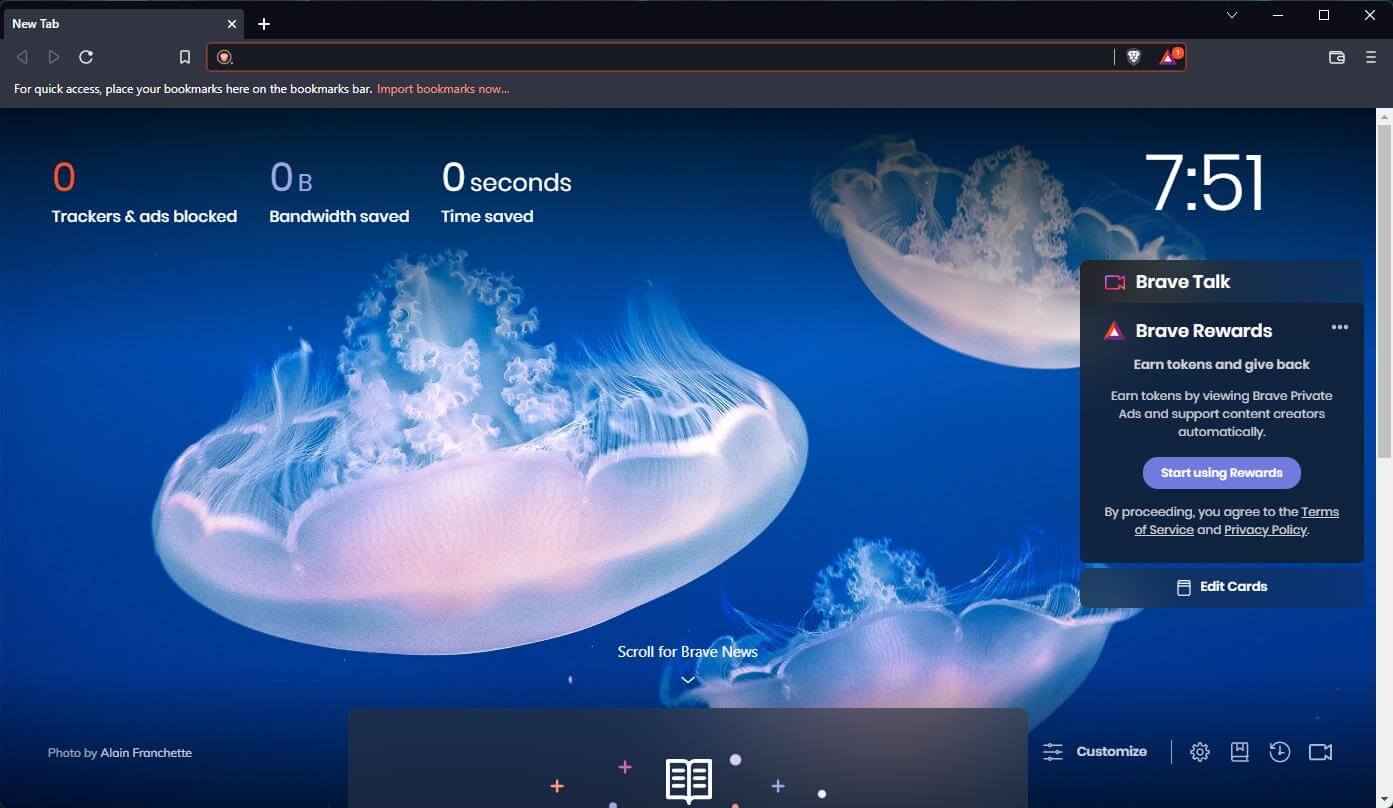
brave browser dashboard

Brave Browser is another security-focused browser that won’t sell your data to advertisers. It blocks ads, tracking scripts, and cookies, so you can rest assured that all your trading sessions are private.

Brave Browser also has Tor integration in a private mode, meaning that your private sessions are confidential, even from your ISP.

It also has a built-in password manager, so you can rest assured that each website uses a unique and secure password.

⇒ Download Brave Browser

Finding a secure and reliable browser isn’t easy, but we hope this article helps you pick the best browser for trading.

If you are using any of these browsers for online trading or have an opinion, feel free to let us know in the comment box.

Microsoft’s return to wearables could include new blood pressure monitoring according to new patent

The Microsoft Band joined the pantheon of extinguished company efforts back in 2016. The fitness-focused smart band had a relatively short shelf life of three years before Microsoft gave the product line the boot but could rival most smartphone watch efforts with the tech the company packed into it.

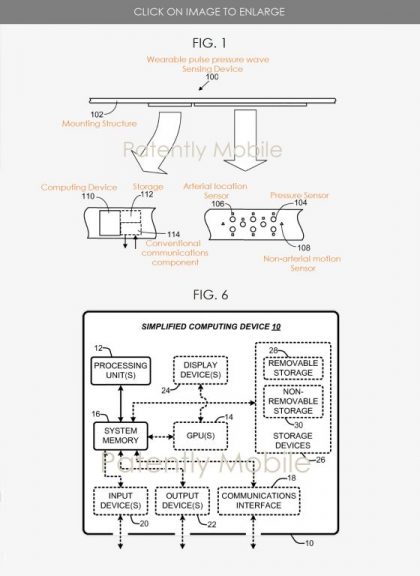
However, it now seems Microsoft may not be quite finished with measuring health metrics via a wearable device. A newly granted Microsoft patent has surfaced which details a conceptual successor to the Microsoft Band 2, which is titled, “Wearable Pulse Pressure Wave Sending Device.”

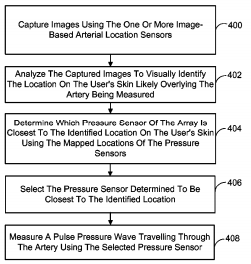
Unimaginative marketing name aside, Microsoft’s new patent aims to address a consumer lack of blood pressure measuring solutions. The WPPWSD is less like the previous smart cuff idea Microsoft used and more a patch with an array of pressure sensors that lay across a specific area (presumably near an artery). The kicker to the patent is that the device will seek out and alert users as to where the best place is to place it for the most accurate reading. Ideally, Microsoft’s artery monitoring system will reduce the number of false-positive reads and inform the users with the most accurate reads on a daily basis.

However, Microsoft does leave room for enough of a display for its new patent to double as a smartwatch if necessary.

A wrist-band takes the form of a so-called  ‘smartwatch’ with all its attendant computing, display and communication capabilities. It is noted that given the user interface capabilities of a smartwatch, the wearable sensing implementations can be configured via conventional means to display information to the wearer. For example, instructions for operating the wrist-band implementations can be displayed to the user, as well as the computed cardiovascular metrics.

Microsoft patent is intended to periodically measure pulse pressure along an artery to help individuals with hypertension or high blood pressure, track their levels.

The general design of the patented device isn’t in the list of images available at the moment, but it seems Microsoft may look to leap past the traditional swiss army knife approach of current smartphone fitness offerings and provide a highly focused health monitor in the near future.

While first introduced in 2014, the Microsoft Band didn’t really hit its fitness-first stride until 2015 when the company dropped the Band 2. The Microsoft Band 2 included early industry iterations of optical heart rate monitoring, galvanic skin response sensors, skin temperature sensor, capacitive sensor, and improved sleep tracking software among other features.

Now it seems, that Microsoft’s new patent could help to revive Microsoft’s interest in wearables once again and with a more focused strategy of health monitoring vs. the endless sea of do-everything smartwatches currently out.

It remains to be seen, what the device could ultimately look like, what OS it would run, and whether or not Microsoft is set to bring this idea to a consumer space or reserve it for medical only applications if the company decides to act on the patent at all.

External drive won’t mount on Windows 10 [Solved]

External hard drives (SSDs included) are of great use for various reasons. Having your data with you at all times is normal these days, especially on storage that is easily accessible and has a lot of storage space.

However, Windows 10, the system which should be a top-notch service, has a lot of issues with external drives.

Besides these minor problems, the users had the worst time with mounting, ejecting, or booting from the external drive.

Because of that, we made sure to provide the appropriate solutions for these issues. If you have been looking for a solution that should fix mount/eject/boot errors, look no further than below.

How can I fix external drive issues in Windows 10?

  1. External drive won’t mount in Windows 10
  2. Mounted external drive won’t eject in Windows 10
  3. External drive won’t boot on Windows 10

1. External drive won’t mount in Windows 10

Mounting an external drive should be quite simple. Plug-and-play is there for ages and the system should have an easy time reading any USB-plugged external drive.

However, seemingly, some users experienced a variety of issues which, eventually, lead to the same conclusion. The system can’t recognize the external hard drive whatever they do.

Now, before we outline the possible solutions for this problem, we need you to try and mount your drive on an alternative PC. That way we’ll eliminate possible hardware issues.

Hardware issues are quite common when it comes to hard drives and USB ports. If you’re sure that the external hard drive works on other machines but it just won’t mount on that one Windows 10 PC, you could:

  • Try an alternative USB port. If your device is USB 2.0, make sure to sure the proper port.
  • Reinstall the driver
    1. Plug in the external drive.
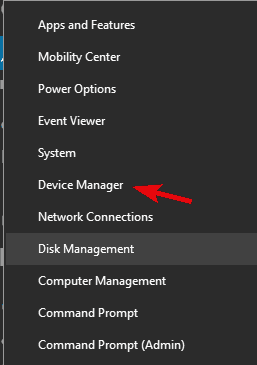
    2. Right-click Start and open Device Manager.external drive won't mount/eject/boot/
    3. In the Main menu, click View and check Show hidden devices.
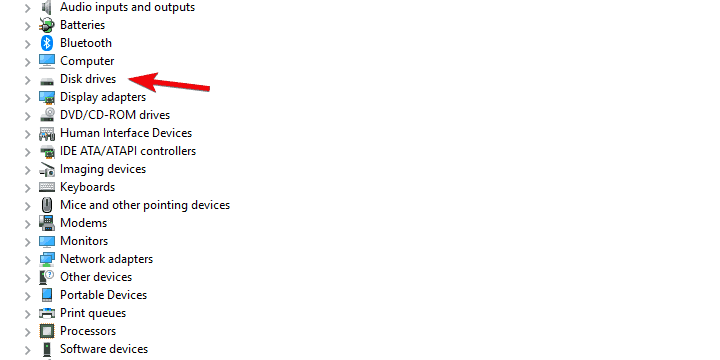
    4. Expand the Disk drives section.external drive won't mount/eject/boot/
    5. Right-click on your external drive and Uninstall device.
    6. Restart your PC and wait until the driver is installed.
  • Change USB power settings
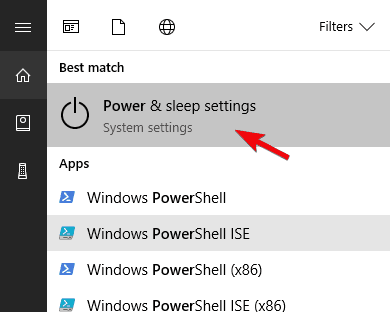
    1. In the Windows Search bar, type Power and open Power & sleep settings.external drive won't mount/eject/boot/
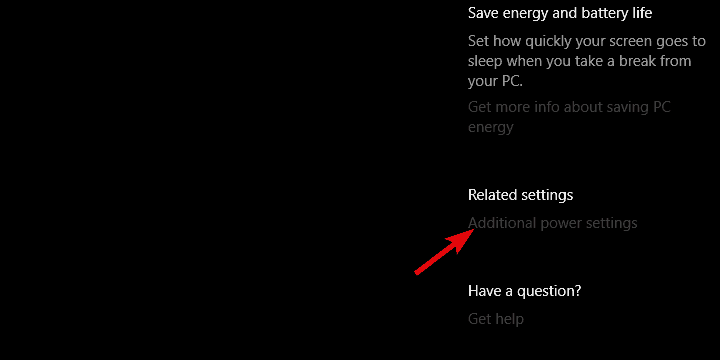
    2. Click on the Additional power settings.external drive won't mount/eject/boot/
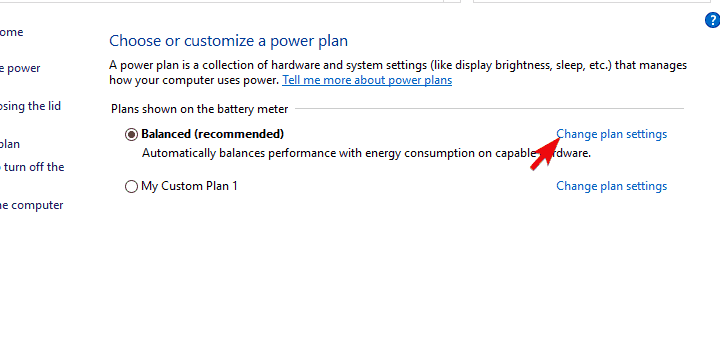
    3. Click on the Change plan settings option beside the Power plan of your choice.external drive won't mount/eject/boot/
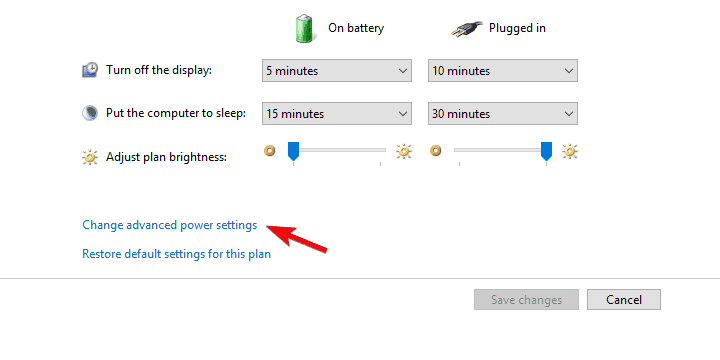
    4. Choose Change advanced power settings.external drive won't mount/eject/boot/
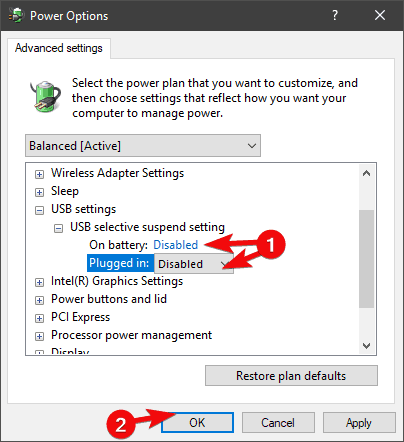
    5. Expand USB settings > USB selective suspend setting.
    6. Disable this setting and confirm changes.external drive won't mount/eject/boot/
  • Create a new volume
    1. Press Windows key + R to open the Rum elevated command-line.
    2. Type in diskmgmt.msc and run it.
    3. You should see a lot of unallocated space.
    4. Right-click on the Unallocated space and choose to create a New simple volume.
    5. Choose the size and confirm the changes.
    6. Unplug the external drive and plug it in again.
  • Format your external hard drive (preferably in NTFS format)

2. Mounted external drive won’t eject in Windows 10

Now, this is rather peculiar. Problems with mounting a certain drive are one thing, and the reasons spectrum is broader.

On the other hand, the issues one can experience with the inability to eject certain external hard drives are mostly provoked by the background processes.

Namely, some background process associated with the mounted drive prevents it from ejecting. Of course, you can unplug it/shut it down without the Safely remove feature.

That can, consequently, lead to more complex errors and further issues. What you’ll need to do is to follow the solutions we enlisted below and look for improvements.

Hopefully, you should be able to eject the mounted drive safely, without any risks of data corruption.

    • Reboot your system
    • Make sure there’s no application in use of data stored in the drive. Close all applications you’ve used to open those files and try ejecting the external mass storage again. Also, temporarily disable the antivirus.
    • Eject it from the This PC
      1. Open This PC/My Computer.
      2. Right-click on the external drive and click Eject.
      3. If you see the error, just continue.
    • Use a third-party safely remove software
    • Troubleshoot the drive
    • Change advanced settings
      1. Plug in the external drive.
      2. Right-click Start and open Device Manager.
      3. Expand Disk drives.external drive won't mount/eject/boot/
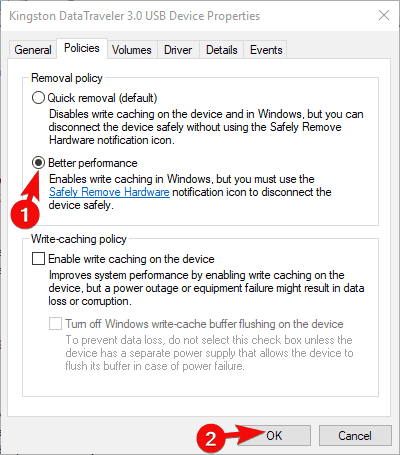
      4. Right-click on the external drive and open Properties.
      5. Under the Policies tab, toggle Better performance and confirm changes.external drive won't mount/eject/boot/
    • Format your drive to NTFS format.

3. External drive won’t boot on Windows 10

Finally, one of the advantages of portable data drives is that you can create a bootable system drive and carry your system around.

However, some user reports outlined the boot issues concerning the external drive. They were unable to boot to Windows 10 from the external drive, even though this worked great on the previous Windows iterations.

When you look at it, it’s quite obvious that the BIOS (UEFI) is the one to blame. However, it doesn’t mean that the BIOS is the only culprit. We enlisted all known troubleshooting steps below:

  • Don’t even try with USB 3.0. Windows 10 can hardly boot from the USB 3.0/3.1 drive
  • Update BIOS
  • Disable Legacy USB in BIOS (UEFI) settings
  • Format external drive in NTFS and create a new bootable drive

That’s a wrap-up. In case you’re aware of any alternative solutions, feel free to share them with us in the comments section below.

Traditional hard disks are long gone, so don’t hesitate to discover the best Western Digital external HDD to get these days.

Also, bookmark this Peripherals Troubleshooting Hub to help you solve any problem with ease.

Microsoft announces first-party Xbox Games showcase on July 23

It’s official, Microsoft will hold its first-party games showcase on July 23. The company has just announced the upcoming event simply named “Xbox Games Showcase,” which will kick off at 9AM PT following a pre-show at 8AM PT with Summer Games Fest host Geoff Keighley.

After Microsoft admitted it set wrong expectations for its May Inside Xbox episode, the company has no choice but to bring out the big guns for its next digital event. This is especially true after Sony’s PlayStation 5 reveal event got a lot of good buzz last month, with 12 million views on YouTube as of this writing.

Microsoft chose to first put the spotlight on third-party games in May, but first-party exclusive games are really what Xbox enthusiasts care about. Halo: Infinite: Hellblade 2, Flight Simulator, and a new Forza game are expected to make an appearance at the show. There are also been rumors about a new Fable game developed by Forza Horizon 4 developer Playground Games, and Rare’s Perfect Dark series may also get a reboot.

We also hope that Microsoft learned a lesson after teasing “gameplay” for its May event, when what we got was a fast-paced series of cinematic trailers with very few gameplay sequences. We hope to see the company truly showcase its next-gen games and highlight next-gen features like ray-tracing and ultra-fast loading times.

Do you expect Microsoft to blow the minds of Xbox fans on July 23? Let us know what you’d like to see during the show in the comments below.

[Solved] Windows 10 creators update not enough disk space

In order to get all the fruits that Creators Update brings to the table, you’ll first need to download and install it. Even though it sounds easy, for thousands of users this task proved as the mission impossible.

Namely, a lot of users were unable to download the Creators Update due to a distinctive error, or, to be more exact, a bug that frequently orbits around Windows Update.

It seems that they were unable to download the update due to a lack of storage space. That would be a proper reason, but, apparently, it mostly occurs with users that have plenty of free space on the system partition.

As we already know, in order to download and install Creators Update you’ll need at least 16 GB of storage space.

So if you meet the requirements but still have this issue haunting you, we prepared a few tips to help you resolve it. Make sure to check them out.

What to do if you don’t have enough disk space to install Creators Update?

1. Reset BITS

Background Intelligent Transfer Service (BITS) is the main Windows Update component.

Basically, its job is to take care of the data transfer from the Windows Servers to your PC, and thus, to regulate and complete the download and installation of the update.

But, on some occasions, it may fail and that can lead to this issue and similar errors.

You can reset BITS manually by using the Command Prompt, with the batch file, or with the Windows Update Troubleshooter that is Windows 10’s exclusive tool.

You can get the tool from this link. After you download it, just run it and follow the instructions. After the completion, restart your PC and try updating again.

2. Clean Temporary Files

In addition, some of the system temporary files may cause a glitch, or confusion if you like it, and that will lead to the corruption of installation files.

Namely, the installer may be misinformed about the realistic storage space available and thus cause the above-mentioned error.

For the storage clean up you can either use the third-party tool or built-in Windows component called Disk Cleanup.

Here’s a quick guide to using the Disk Cleanup tool:

  1. In the Search Windows bar, type Disk Cleanup.
  2. Open Disk Cleanup and select the system partition (most of the time it’s C:).
  3. Click on the ‘Clean up system files’ option and select the system partition again.
  4. Check the boxes beside Temporary files and Temporary Windows Installation files.
  5. Click OK.
  6. After the process is finished, restart your PC. Give another try to Creators Update.

Now, if you’re looking for a professional tool to help you with this job, have a go at this premium optimizer software.

Install Ashampoo WinOptimizer

This powerful system optimizer suite will strengthen your security, build up your privacy, and greatly enhance your system’s performances with just one click.

From removing junk data, corrupted temp files, and broken shortcuts to fixing useless Registry entries and disabling unnecessary services, the WinOptimizer is your very own resource booster!

Free up vital hard drive space, get more memory, enjoy faster startup times, and a smoother overall Windows experience effortlessly.

Let’s quickly look at its key features:

  • Comprehensive dashboard with valuable details on status updates on your Temp Files, Registry, services, or privacy, all neatly arranged
  • New SSD-ready Defrag tool to automate drive analysis and defragmentation
  • Reclaim precious disk space by eliminating redundant temp and log files and superfluous Registry entries
  • Instant notifications on resource hogs and up-to-date data
  • Rids your system of junk data and reduce clutter
  • Live Tuner to provide a smart launch boost to all applications

Ashampoo WinOptimizer

Ashampoo WinOptimizer

Clean, defrag, recover, and repair with a one-of-a-kind system optimization software.
$29.99 Visit website

3. Delete Creators Update installation files

Even though the Disk Cleanup will clear the majority of update files placed under the Software Distribution folder, it’s not safe to say that this will resolve your issue.

Namely, some of the corrupted or incomplete update files may still find refuge in the mentioned folder and provoke errors.

And there we have to use a less subtle, manual effort to clear them out of our system. Follow these instructions to delete the installation files from the system partition:

  1. Go to Search, type cmd, right-click it, and open Command Prompt (Admin).
  2. In the command line type the following commands and press Enter after each:
    • net stop wuauserv
    • net stop bits
  3. Now, navigate to C:WindowsSoftwareDistributionand delete everything inside.
  4. Get back to the Command Prompt, insert two following commands and press Enter after each:
    • net start wuauserv
    • net start bits
  5. Close the Command Prompt and try updating to Creators Update again.

4. Upgrade your system with Media Creation Tool

In the end, if the standard over-the-air approach is inadequate, you can as well use an alternative method.

And this, even though it can be time-consuming, proved as the best solution for all update-related issues. Especially, the storage bug we’re addressing today.

In order to upgrade to the latest patch, in this case to a long-awaited Creators Update, you’ll need a Media Creation Tool, stable bandwidth, and a little dose of patience.

You can obtain Media Creation Tool here. After you download it, just follow the instructions and you’ll be good to go.


These tips should provide you with enough material to resolve the disk space bug.

Don’t forget to share your questions and alternative solutions in the comments section. We would be grateful for your participation.

[wl_navigator]

Fix: There is Insufficient Disk Space to Complete Operation

When you get an error message as you try to open a file and it says there is insufficient disk space to complete operation, it could either be that the file or files are corrupted or device drivers.

This issue has been reported to happen when your computer is running certain antivirus software versions, or if you’re saving to an already full disk.

Sometimes the same error message pops up when you try to save a file, either in Microsoft Office Word or another program and it says there is not enough memory or disk space to complete this operation in Word 2010.

Here are some quick fixes.

How to fix There is insufficient disk space to complete operation error?

1. Reboot your computer

One of the easiest ways to fix the insufficient disk space problem is to reboot your computer. You may have recently installed or upgraded a program, your operating system, or installed updates.

Whatever the case, reboot and see if the problem persists.

2. Boot in Safe Mode

Safe mode starts up your computer with limited files and drivers, but Windows will still run. To know whether you’re on Safe mode, you’ll see the words at the corners of your screen.

If the issue of Shift key not working persists, check whether it occurs while your computer is in Safe mode.

Follow these steps to start your computer in Safe Mode:

  • Click on the Start button
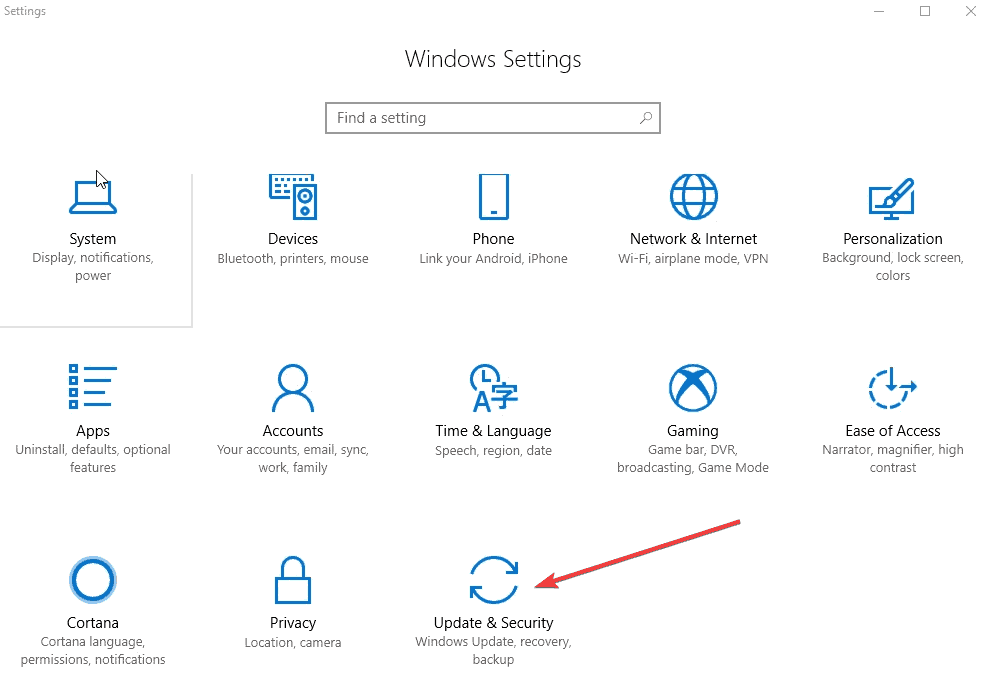
  • Select Settings – the Settings box will open up
  • Click Update & Security
There is insufficient disk space to complete operation
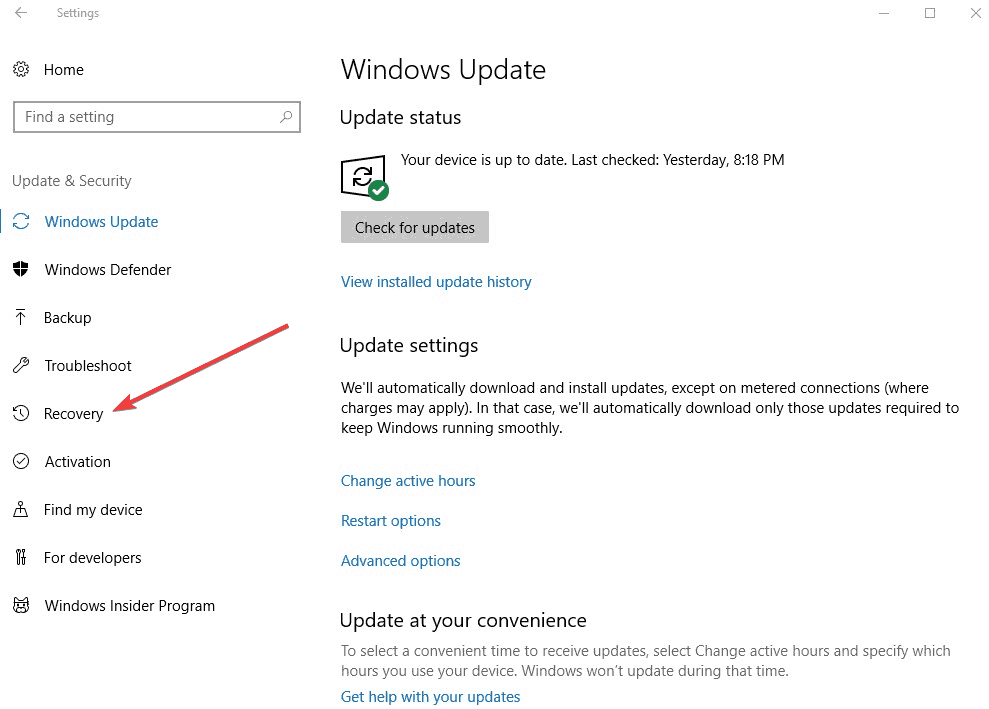
  • Select Recovery from the left pane
There is insufficient disk space to complete operation
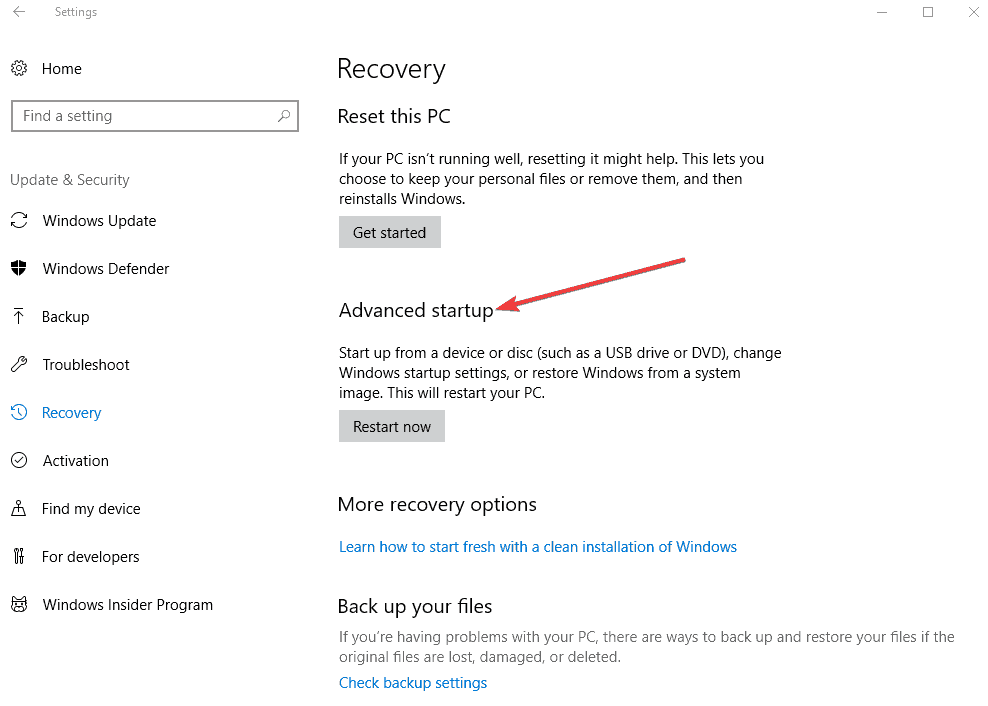
  • Go to Advanced startup
There is insufficient disk space to complete operation
  • Click Restart now
There is insufficient disk space to complete operation
  • Select Troubleshoot from the choose an option screen, then click Advanced options
  • Go to Startup Settings and click Restart
  • Once your computer restarts, a list of options will come up.
  • Choose 4 or F4 to start your computer in Safe Mode

If the issue isn’t there while in Safe mode, then your default settings and basic drivers are not contributing to the issue.

Additionally, if booting in safe mode helped remove any enabled add-ins, delete the add-ins from the registry and see if it helps by doing the following:

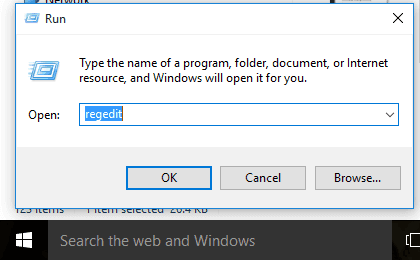
  • Click on Start< Run< type regedit (without quotes) and click Ok.
There is insufficient disk space to complete operation
  • In the registry window browse to the location given below and delete the add-in key:

HKEY_CURRENT_USERSoftwareMicrosoftOffice14.0WordAddins

HKEY_CURRENT_USERSoftwareMicrosoftOfficeWordAddins

HKEY_LOCAL_MACHINESOFTWAREMicrosoftOffice14.0WordAddins

HKEY_LOCAL_MACHINESOFTWAREMicrosoftOfficeWordAddins

Ensure to back up the registry before deleting the keys.

If you had installed a program and the error came after that, you have to reinstall the program on the computer after uninstalling it, because the installation could have been corrupt.

Speaking about the registry, there is an easier way to fix useless, superfluous or broken entries and this implies using a third-party tool.

In order to repair your registry and clean your disk space, it is recommended to use the best registry cleaner tools for Windows 10.

3. Perform a clean boot

This reduces conflicts related to software that can bring up the root causes of the insufficient disk space error as a result of apps and services that start and run in the background when Windows starts normally.

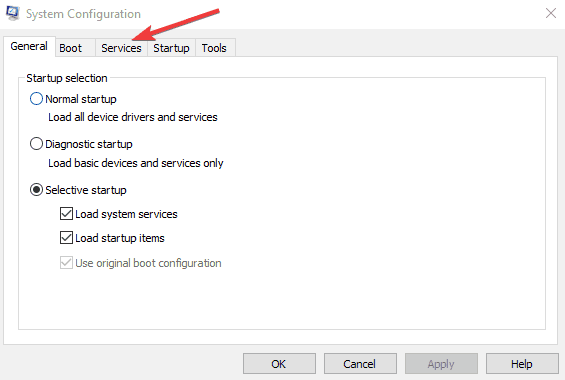
  • Log on as an administrator, and type msconfig in the search box
  • Select System Configuration
  • Find the Services tab
There is insufficient disk space to complete operation
  • Select Hide all Microsoft services box
There is insufficient disk space to complete operation
  • Click Disable all
There is insufficient disk space to complete operation
  • Go to Startup tab
There is insufficient disk space to complete operation
  • Click Open Task Manager
  • Close Task manager then click Ok
  • Reboot your computer

4. Replace the normal.dot template

One of the causes of the error ‘there is insufficient disk space to complete the operation’ is a corrupted normal.dot template. Here’s how to resolve it:

  1. Click on Start
  2. In the Search box type normal.dot. There should be a search option that you can check for ‘search hidden files’, make sure that is checked.  If it does not find it, try searching for *.dot.  It may be hard to find because it is a hidden file.  You may have to go into folder options and be sure “show hidden files” is checked.
  3. Whenever you find normal.dot, rename it old.dot
  4. Restart your computer.
  5. Open your program or file and it will create a new normal.dot template

5. Check the File Allocation Table (FAT)

The File Allocation Table (FAT) uses a 32-bit integer to store the size of the files thus it is called FAT32, which then means that the maximum size it can hold is just under 4 GB.

If your external hard disk is using the FAT32 File System, then it isn’t a limitation of Windows that you could be facing in terms of the insufficient disk space error, it is in fact a limitation of the file system.

In this case, you could either split your files smaller than 4GB (typical limit of formats like FAT32), or reformat the external Hard disk to NTFS it to something that allows for files larger than 4GB.

Note: Reformatting the hard disk will wipe any data you have on the drive. Make sure you back up the data to another storage media.

6. Use Disk compression utility

This helps you add more hard disk space. If you are running antivirus software, try turning it off. If this corrects the issue, contact the manufacturer of your antivirus software for an update or workaround.

You may be able to recover some disk space by quitting programs that you do not need. After you quit the other programs, a few minutes may pass before Windows changes the size of the paging file.

7. Run Disk Cleanup

You can free disk space by deleting files that you do not need, by following these steps:

  • Click Start, and select All Apps
  • Go to Accessories
  • Click System Tools
  • Click Disk Cleanup
  • In the Select Drive dialog box, click to select the drive that you want to clean up, for example, C:, and then click OK.
  • On the Disk Cleanup tab, click to select each of the options for which you want to remove files.
  • Click OK.

You may be able to save your file to a flash drive, network drive, or any storage that has free disk space.

8. Clean %temp% folder

After your reboot, clean up the %temp% folder by doing the following:

  • Right click Start and select Run
  • Type %temp% and press enter, this opens File Explorer in the TEMP folder
  • Select all files by pressing CTRL+A
  • Press DELETE
  • For any files in use, just SKIPthem

9. Disable add-ins

  • Right-click Start and select Run
  • Type winword /safe
  • If the program successfully click on the File menu
  • Select Options
  • Select Add-ins
  • Click on the Go button beside the Manage: Com-in Add option
  • Check if there are any add-ins enabled, if yes then clear the checkbox to disable them
  • Restart the program and check if you are able to launch it successfully without error.

10. Repair Office from the Control Panel

The steps to access the repair tool vary depending on your operating system.

Choose your operating system then do the following:

  • Right-click Start and select Apps and Features on the pop-up menu.
  • Select the Microsoft Office product you want to repair, and select Modify.

Note: This will repair the entire Office suite even if it’s just one application you want to repair such as Word or Excel. If you have a standalone app installed, then search for that application by name.

Depending on if your copy of Office is Click-to-run or MSI-based install, do the following.

  • Click-to-run the program
  • Go to How would you like to repair your Office Programs
  • Select Online Repair to make sure everything gets fixed
  • Select Repair (The faster Quick Repair option is also available, but it only detects and then replaces corrupted files.)

If yours is MSI-based, go to Change your installation, select Repair, and then click Continue. Follow the instructions on the screen to complete the repair.

Should the problems be caused by RAM, read our guide on how to enable or disable Memory Compression on Windows 11.

Recently we covered a similar problem in our Error Handle Disk Full guide, so don’t hesitate to check it out.

Let us know if any of these fixes helped by commenting in the section below.

Windows 10 news recap: Xbox Game Bar gets new widgets, Edge browser rolls out to Education and Enterprise devices, and more

Welcome back to our Windows 10 news recap, where we go over the top stories of the past week in the world of Microsoft’s flagship operating system.

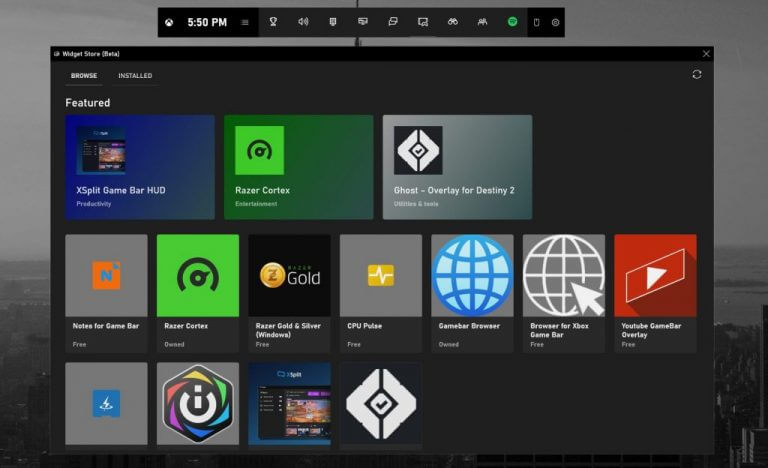
Xbox Game Bar for Windows 10 gets new widgets, including from 3rd parties

Windows 10’s Xbox Game Bar has gained some new widgets, but not just from Microsoft, also from 3rd parties, including XSplit’s Game Bar HUD widget.

Microsoft’s new Windows File Recovery app helps recover deleted data

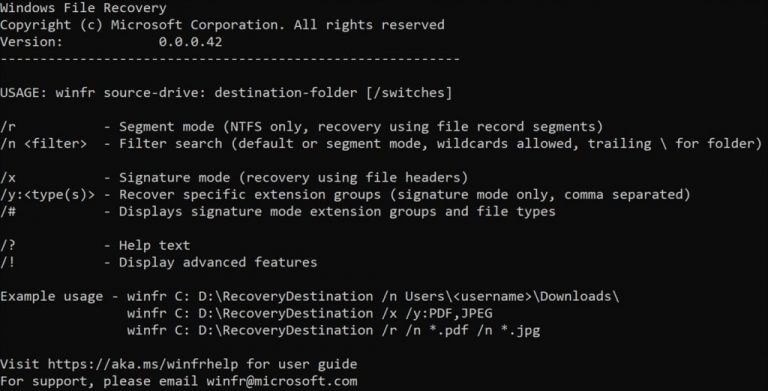
If you’ve accidentally deleted or lost some files on your Windows 10 PC, it may now be easier to try and recover the files. Microsoft has released a Windows File Recovery app that uses the command line to make it easier to recover files.

Windows File Recovery app

Microsoft starts rolling out its new Edge browser to Windows 10 Education and Enterprise devices

The Chromium-based Microsoft Edge web browser is now rolling out to users of Windows 10 Education and Enterprise.

That’s it for this week. We’ll be back next week with more Windows 10 news.

Microsoft Teams phones get People app, live captions

Microsoft Teams has been getting substantial feature upgrades off late, which is no surprise considering how important remote collaboration software has become these days. Most probably, if your employees are unable to report to their designated physical offices, you’re offering them Teams or an alternative like Slack.

But for organizations that already have Office 365, Microsoft Teams phones would be an ideal VoIP telephony solution.

Fortunately, Microsoft recently introduced a whole bunch of new Teams phones features to power business VoIP communication and collaboration.

New Teams phones capabilities

The People app is now available to Teams phones users. And it’s all about letting workmates share and collaborate more closely.

The People app on Teams phones allows you to easily connect and collaborate with teammates, colleagues, friends, and family. Through the app, you can organize your contacts by creating and managing contact groups.

Another notable update is the ability to annotate live video in meetings and group calls. The desktop version of Teams has this feature in preview though.

Also, the raise hand capability is a unique addition to Teams meetings. It’s certainly a conspicuous, yet a non-intrusive way to let people know that you wish to contribute to the ongoing meeting agenda.

And that’s not all. Teams phones users can now more quickly transfer calls, thanks to the new frequent contacts suggestion feature. In a typical customer support scenario, for example, the capability comes in handy when you need to urgently get a colleague or boss to respond to an issue you can’t resolve yourself.

Plus, apart from streamlining the lock and unlock experience for your Teams phone and Teams desktop client, the platform now supports the automatic dismissal of Call ended and Rate my call screens.

Last but not least, Microsoft introduced Teams and Skype interoperability for phones users. This new integration facilitates VoIP communication from Skype for Consumer (SFC).

With all the aforementioned updates, Microsoft wishes to level out the Teams phones and Teams desktop experiences. Are you happy with the new features? Let us know in the comments section below.

[wl_navigator]

Hard Drive not showing up in Windows 10/11 [Fix]

If you tried upgrading your operating system from an older version of Windows to Windows 10, at the end of the installation you might notice that the second hard drive or even the hard drive where the initial Windows OS was installed might not appear in your explorer.

This is a common issue that many users are struggling with but don’t be alarmed because we can do a very quick fix on this that will take you only 10 minutes of your time.

The Windows 10 operating system you installed might not recognize the hard drive for several reasons due to installation errors received from the hard disk.

But there is a built-in feature that you can access and set up your hard drive back to normal in no time.

By following the tutorial posted below you can make your hard drive appear in your explorer window as you had it in the previous version of Windows you were using.

How to make your hard drive show in Windows 10

1. Detect HDD from Control Panel

  1. Tye Control Panel in the search bar and open it.
  2. Type Disk Management in the search box.
  3. It will open Administrative tools.
  4. Choose the Create and Format hard disk partitions option.create disk partition
  5. You should look in there for the disk that is not showing up in your explorer (it should have a yellow icon next to it that has an exclamation mark).
  6. Right-click on the hard disk you are having trouble with and choose Import Foreign disk.
  7. Reboot your device and try to open file explorer again. You should see the missing hard drive and everything will be back to normal.

Note: This tutorial does not fix any hardware malfunctions you can have with your hard drive. If it is a hardware malfunction I recommend going directly to a specialized store or perhaps the electronics store you bought the PC from and try replacing the hard drive.

 2. Try some simple fixes

What you should do before making a decision about what to do with your HDD, are some simple steps that are listed below. They might be basic, but believe me, sometimes they might be the problem.

The full guide on how to deploy all of these steps can be found in our dedicated articles about HDD not showing up. Here are the steps to follow:

  1. Check if the disk is well-connected (yes, this might be the problem in some cases)
  2. Initialize Disk
  3. Check BIOS (BIOS ports especially)
  4. Recover your partition.

3. Use a third-party app to detect HDD

It is possible that some files got corrupted during the OS upgrade or that some PC settings are not right. A dedicated third-party app can efficiently help you to fix all potential problems that affect the optimal functioning of your PC.

Consequently, we recommend using Ashampoo WinOptimizer.

The tool offers in-depth cleaning, system optimization, and diagnosis, in an all-inclusive intuitive screen.

Installation is extremely easy and quick, and the optimization and diagnosis process likewise. The interface brings enhanced system details view,  extensive details on installed hardware, plus dashboards for always up-to-date data and instant feature access.

With just one click, you get optimized hardware detection, as well as an up-to-date PC cleaning process, that eliminates web browsing traces, redundant files, and useless Registry entries that might affect the functionality of your new OS.

So you have above the very easy way to fix your hard drive if it doesn’t show up in your operating system. You can leave us a comment below and tell us if this article was in any way useful to you and what we could do to improve it.

Virgin Media High Latency: 6 Easy Ways to Improve Ping

Virgin Media is one of the leading telecom companies that provide Internet services. Unfortunately, some users are complaining about Virgin Media’s high ping and latency, marring their experience with the service.

Thankfully, we’re here to help you identify the causes of this issue and provide a lasting solution to it.

Why is my ping so high on Virgin Media? Below are some of the potential causes for Virgin Media’s high ping issue:

  • Outdated drivers: One of the major causes of this issue is an outdated network driver. You can fix this quickly by updating your driver.
  • Network issues: This issue can also be caused by a corrupt DNS cache. The solution to this is to flush your DNS and reset Winsock, or even use a VPN that is not blocked by Virgin Media.
  • Low connection strength: Sometimes, the connection you opt for can make you experience ping spikes. If you play games and stream a lot, a 1GB connection is ideal.

How can I fix Virgin Media’s high ping?

Listed below are some preliminary troubleshooting steps to perform before exploring the solutions in this section:

  • Update your router’s firmware
  • Remove any powerline network adapters
  • Switch from wired mode to WiFi
  • Upgrade to a gigabit connection
  • Switch to a different device

If you still can’t eliminate the high latency and ping, you can now proceed to the fixes below:

1. Set the Virgin Media Hub from router to modem mode

  1. Connect your device to Hub 3 using WiFi or wired mode.
  2. Launch your browser, type 192.168.0.1 in the address bar, and hit Enter to log into the Hub 3 admin panel.
    path virgin media high ping
  3. Now, set the Hub 3 password (the default key is written down at the bottom of the Hub 3).
  4. Go to Modem Mode, select Enable Modem Mode, and Apply changes.

You might be experiencing the Virgin Media Hub’s high latency and ping because you are in router mode. Switching to modem mode has fixed this issue for many users, and you should try it too.

Note that your IP address changes from 192.168.0.1 to 192.168.100.1 in modem mode.

2. Update your drivers

  1. Press the Windows key + X and select Device Manager.
    device manager
  2. Double-click the Network adapters option to expand it, and right-click your adapter.
  3. Select the Update driver option.
    update driver
  4. Now, choose Search automatically for drivers and install all available updates.
    search auto virgin media high ping

In some cases, the Virgin Media high ping issue can be due to problems with your network drivers. Following the steps above, you should be able to update your drivers quickly.

Alternatively, you can opt for an automatic driver updater like Fortect Driver Updater. This unique tool scans your PC for missing, outdated, and broken drivers and fixes them accordingly.

With this, you can nib all driver issues in the bud before they cause major problems.

⇒ Get Fortect Driver Updater

3. Flush DNS and reset Winsock

  1. Press the Windows key, type cmd, and select Run as administrator under Command Prompt.
    cmd admin
  2. Type the following commands and press Enter after each: ipconfig /flushdns ipconfig /registerdns ipconfig /release ipconfig /renew NETSH winsock reset catalog NETSH int ipv4 reset reset.log NETSH int ipv6 reset reset.log exit
  3. Restart your computer.

4. Set custom DNS servers

  1. Press the Windows key + R, type ncpa.cpl, and click OK.
    ncpa.cpl
  2. Right-click your active network and select Properties.
    properties
  3. Now, select Internet Protocol Version 4 (TCP/IPv4) and click Properties.
    ipv4 virgin media high ping
  4. Tick the Use the following DNS server addresses.
  5. Next, set your Preferred DNS server to 8.8.8.8 and the Alternate DNS server to 8.8.4.4.
    use the
  6. Finally, click the OK button.

By default, Virgin Media is in charge of your DNS requests. That means that your requests get automatically processed by your ISP. However, if their DNS servers are faulty, it can take a long time to finish processing.

So, to fix this Virgin Media high ping issue, you should switch to a custom DNS server. If using the Google DNS server does not work, you can try the following free and secure DNS servers:

  • Cloudflare
    • 1.1.1.1 preferred (IPv4)
    • 1.0.0.1 alternate (IPv4)
    • 2606:4700:4700::1111 preferred (IPv6)
    • 2606:4700:4700::1001 alternate (IPv6)
  • OpenDNS
    • 208.67.222.222 preferred (IPv4)
    • 208.67.220.220 alternate (IPv4)
    • 2620:119:35::35 preferred (IPv6)
    • 2620:119:53::53 alternate (IPv6)

5. Use a VPN

ExpressVPN is a virtual private network solution that can help fix Virgin Media’s bad ping issues if we’re talking about a server-side problem. By connecting to a VPN server, you hide your IP address, encrypt your traffic, and bypass the ISP servers.

Therefore, Virgin Media is no longer in charge of forwarding your data, so you shouldn’t have to worry about Internet slowdowns anymore.

However, you must rule out all other causes of ping issues, so ensure it’s not a local problem with your device, WiFi, or Ethernet. Otherwise, you can end up doing more damage.

6. Contact Virgin Media customer service

Finally, contact the company’s customer service if you can’t fix your Virgin Media bad ping problems no matter what solution you try, not even when attempting to fix Ethernet problems.

They should send a field technician to diagnose and fix your Internet-related issues.

That is all for the Virgin Media high latency and ping issue. You should now be able to solve the problem if you follow the steps carefully.

If you face VPN issues with Virgin Media, check our detailed guide to fix it quickly.

Let us know the solution that helped you fix this issue in the comments below.

FIX: Netflix not loading / showing up on TiVo box 312

If you own a TiVo, this device probably slowly made its way into your daily routine. Aside from its awesome DVR capabilities that let you record your favorite content, TiVo comes with additional functionalities.

For instance, it has an on-screen schedule guide that lets you record new episodes in certain series (Season Pass), and also a wishlist. The latter lets you locate and record shows based on your interests (actor, category, keyword, title).

As awesome as everything listed above sounds, sometimes even TiVo can mess things up. For instance, Netflix, one of the most popular entertainment platforms nowadays, might not work on TiVo.

And since a lot of users access Netflix through TiVo, things might get heated in no time.

How to fix Netflix app not working on TiVo?

1. Sign out and sign back in

Before trying anything radical, try logging out of your account, and then logging back in.

Some users found that this does the trick, especially if the app recently underwent maintenance, or received an update.

2. Reboot your device

Turn the entire home entertainment system off by whatever means you want. Check your manual for any device-related particularities, such as different menus or ways of shutting it off safely.

It usually helps to unplug the device altogether (but not while they’re still on and running) and waiting for 5-10 minutes before plugging them back in.

Many devices enter a sleep/hibernation mode instead of shutting down completely. This can preserve certain settings and processes in standby and ready to be used, in order to reduce loading times.

Therefore, unplugging the device might actually shut it down, along with any process and saved preferences.

3. Toggle the child protection on and off

  1. Go to your Virgin Media account
  2. Head to the My Apps section of your account
  3. Access the Web Safe option in the My Apps section
  4. Turn the Virus and Child-Safe options ON
  5. Restart your TiVo box
  6. Launch Netflix on your TiVo box
  7. Turn the child-safe option OFF
  8. See if the problem still persists

4. Check if your TiVo box works at all

If your Netflix app doesn’t work on TiVo, chances are that some other apps might also not work. Try loading other apps such as HBO GO, Plex, YouTube, or Hulu, and see if they work.

In case they do, then you’re clearly facing a Netflix-only kind of issue. You might also want to check your Internet connection, firewall, router, or anything between TiVo and the home line.

Ordinary things such as a firewall might be blocking your attempts to connect to Netflix, so it’s worth checking them out thoroughly.

5. Restart your Virgin Internet hub

We recommend trying this fix only if you’ve noticed that none of the Internet-enabled apps on your TiVo work.

The reason they don’t work might have something to do with your Internet connection, so giving the hub a good old-fashioned restart might put the wheels back in motion.

Locate your Virgin Internet hub and shut it down by flipping the A/C switch. It should be located at the back of the hub, but your hub model might lack a switch.

In this case, you might want to unplug it and wait a few minutes (5-10) before plugging it back in.

Wait for a few minutes for the connectivity to be 100% restored, then try loading Netflix again.

6. Put your hub into router mode

  1. Launch your default web browser
  2. Sign in to your hub’s page by typing 192.168.100.1 into the address bar
  3. Type your hub password
  4. Click the Modem Mode button on the left
  5. Choose the Disable Modem Mode option
  6. Click Apply changes
  7. Wait for the device to reboot
  8. Restart your TiVo box
  9. Try launching Netflix and see if it works

You can restore your hub’s modem mode by following steps 1-4, and at step 5, just choose the Enable Modem Mode option before you click the Apply changes button.

Note that in router mode, the gateway address changes to 192.168.0.1, so try using that instead of the one mentioned in step 2.

7. Contact TiVo customer service

Don’t be afraid to call customer service if you’re experiencing difficulties with TiVo.

You can save yourself a lot of time and hassle by addressing the issue to a professional, even though we all can’t stand the waiting song or the “your call is very important to us” bit.

In some cases, the trouble might actually be on their side and it might be in their hands to alleviate the issue.

Netflix errors on TiVo can be easily fixed

Long story short, if you can’t access Netflix through TiVo, don’t fret.

There are a lot of fixes you could try before calling it quits, and the most overlooked one is actually contacting the customer support crew.

If it’s still not working, we suggest Disney+. On this streaming service you can watch the most beloved movies and shows produced by Walt Disney Studios.

⇒ Get Disney+

[wl_navigator]

Xbox Summer Game Fest to let you play unreleased titles

Now that people can’t converge in person to enjoy shows like E3 and PAX, many are turning to digital gaming events, which may have their own element of fanfare and thrill. A case in point is the upcoming Xbox Summer Game Fest.

If you’re an Xbox fan, mark July 21, 2020 in your calendar. That date is the beginning of a week-long event during which you’ll get to play demos of prerelease Xbox games.

Xbox Summer Game Fest offers 60+ downloadable

The event takes place from July 21 to July 27. It may not offer the spectacle of a live in-person event, but it gives you an opportunity to sample your favorite Xbox One games before they come out.

However, these games are a work in progress. And Glenn Gregory, Product Marketing Manager, Xbox, adds that the games will keep evolving before hitting general availability. As such, the final product may look or feel different from the version you sampled during the event.

But you should also note that these games will continue to evolve and be polished as they near release. In other words, think of these as akin to “show floor demos” and not necessarily indicative of the final product.

The Xbox Summer Game Fest demos will be available for free, so don’t hesitate to download your favorite titles when the time comes. Also, keep in mind that the games will disappear once the digital gaming festival is over.

Microsoft confirmed at least 60 titles that will be available during the event, including Cris Tales, Destroy All Humans!, Haven, Hellpoint, and Skatebird. The list may expand to 100 before July 21, 2020.

The Xbox 20/20 is another event that may grab your attention this month. Microsoft created it as an Xbox roadmap that gives a preview of the console’s upcoming features and games. In May, the event showcased next-gen gameplay featuring Xbox Series X-optimized titles.

Are you ready for the Xbox Summer Game Fest? Share your expectations or views via the comments section below.

[wl_navigator]

Attempt to access invalid address [Fix]

Attempt to access invalid address error message usually appears alongside ERROR_INVALID_ADDRESS error. This is a system error and it can prevent you from running certain applications.

Not being able to run applications is a big problem, so today we’re going to show you how to fix this error on Windows 10.

What can I do when getting Attempt to access invalid address?

How can I fix ERROR_INVALID_ADDRESS?

1. Scan your PC for malware

This error message can sometimes appear while trying to run certain apps. As confirmed by users, the cause is none other than a malware infection.

If you require effective antivirus support that includes high detection of malware, you should know that different antivirus tools out there can eliminate major threats.

Even though you can encounter strong malware that infected your PC you shouldn’t despair. With cutting-edge detection functionality, the virus will be detected and fully eradicated.

Hence you should take precautions when you install potentially harmful programs that contain malware and can infect the entire system.

To be always secured, you should consider the most efficient antivirus software out there and stop any risky malware to damage your PC.

2. Edit your registry

  1. Press Windows Key + R and enter regedit. Press Enter or click OK.
  2. Optional: Modifying the registry can cause system stability issues, therefore we advise you to create a backup just in case. To do that, just click on File > Export.

    Set Export range to All and then enter the desired file name. Choose a safe location and click on Save.
    After creating a backup, you can use it to restore your registry to the previous state in case anything goes wrong.
  3. Navigate to the HKEY_LOCAL_MACHINESYSTEMCurrentControlSetControlSession ManagerMemory Management key in the left pane.
  4. In the right pane, locate and open MoveImages DWORD. If this DWORD isn’t available, right-click the empty space in the right pane, and choose New > DWORD (32-bit Value). Enter MoveImages as the name of the new DWORD and open it.
  5. Set the Value data to 1 and click OK to save changes.
  6. Close Registry Editor and restart your PC.

According to users, this error appears while trying to run Internet Explorer and many other applications. It’s worth mentioning that this error affects all versions of Windows, including Windows 10.

To fix the problem, users are suggesting to make a few changes to your registry. This is relatively simple and you can do it by following the above steps.

Other users reported alternative solutions regarding your registry. Some of them claim that you can fix the problem by renaming a single key in Registry Editor. To do that, follow these steps:

  1. Open Registry Editor and create your backup.
  2. In the right pane, navigate to ComputerHKEY_LOCAL_MACHINESOFTWAREMicrosoftWindows NTCurrentVersionImage File Execution Optionsiexplore.exe key.
  3. Right click iexplore.exe key and choose Rename from the menu. Rename the key to iexplore.old.
  4. Close Registry Editor and check if that solves the problem.

Keep in mind that renaming keys can cause problems with certain features, so be sure to create a backup beforehand. If you notice any issues after modifying your registry, simply run the backup file to restore it to the previous state.

3. Remove the MoveImages DWORD

  1. Start Registry Editor. We already showed you how to do that in Solution 1, so be sure to check it for extra information.
  2. Create a backup of your registry just in case. Deleting values from the registry can cause certain problems, so it’s always a good idea to have a backup ready in case anything goes wrong.
  3. Navigate to HKEY_LOCAL_MACHINESYSTEMCurrentControlSetControlSession ManagerMemory Management key in the left pane.
  4. In the right pane, locate MoveImages DWORD, right-click it and choose Delete from the menu.
  5. After deleting this value, restart your PC and check if the problem appears again.

If you’re still having this error, you might be able to solve it by removing MoveImages DWORD from your registry. This is relatively simple and you can do it by following the above steps.

4. Delete the Build folder

Users reported this error while using Axoloti software. According to them, they fixed the issue simply by deleting the Build folder from the Documentsaxoloti directory.

After removing the Build directory, the application should start working without any problems.

5. Set EMET to recommended settings

If you’re having problems starting certain applications due to this error, you might be able to fix it by changing EMET settings. According to users, simply change EMET settings to Recommended and the problem should be resolved.

How can I fix Attempt to access invalid address in Adobe?

1. Configure EMET

Users reported this problem when using Adobe Reader, and according to them, they are unable to start the application.

The problem is EMET configuration, so if you’re using EMET be sure to turn off / on all options for Adobe Reader in EMET.

Alternatively, you can set EMET to Maximum Security settings to fix this problem.

2. Delete Acrobat Reader values from the registry

  1. Open Registry Editor.
  2. In the left pane, navigate to the HKEY_LOCAL_MACHINESOFTWAREMicrosoftWindows NTCurrentVersionImage File Execution OptionsAcroRd32.exe key.
  3. Right-click AcroRd32.exe key in the left pane and choose Delete from the menu.
  4. Now navigate to the HKEY_LOCAL_MACHINESOFTWAREMicrosoftWindows NTCurrentVersionImage File Execution OptionsAcroRd32Info.exe key.
  5. Right-click AcroRd32Info.exe key and choose Delete from the menu.
  6. Close Registry Editor and restart your PC.

According to users, you might be able to fix this problem by removing Acrobat Reader values from your registry.

Removing values from the registry can cause certain issues, therefore we strongly advise you to create a backup of your registry before using this solution.

After doing that check if the error message still appears. Keep in mind that this solution only applies if you have at least one of the aforementioned keys in your registry. If you can’t find any of these keys, you should skip this solution entirely.

3. Try running the application as an administrator

  1. Locate the problematic application and right-click it.
  2. Choose Run as administrator from the menu.

Some Adobe applications can’t run due to this error, and if you’re having this problem, a quick workaround is to run the problematic application as an administrator.

If this workaround works, you’ll have to repeat it every time you want to start this app. Alternatively, you can set the application to always run with administrative privileges.

To do that, follow these steps:

  1. Right-click the problematic application and choose Properties from the menu.
  2. When the Properties window opens, go to the Compatibility tab. Check Run this program as an administrator option and click on Apply and OK to save changes.
  3. After doing that, the application will always start with administrative privileges.

4. Try running the application in the Compatibility mode

  1. Locate the problematic application, right-click it, and choose Properties from the menu.
  2. Navigate to the Compatibility tab, check Run this program in compatibility mode for and choose the desired version of Windows. Now click on Apply and OK to save changes.

Sometimes certain applications aren’t fully optimized for Windows 10 and that can cause this error to appear. To fix this problem, you can run your apps in Compatibility mode.

This is a simple solution, but you might have to experiment with different compatibility options until you find the one that works for you.

5. Update the problematic application to the latest version

There are times when these errors can appear due to certain bugs and compatibility issues.

To ensure that your application is fully compatible with your operating system and bug-free, we strongly advise you to update it to the latest version.

In many cases, the developers are aware of these types of errors, and the problem is usually fixed in the newer version of the software.

If you’re having this problem with any application on your PC, we advise you to update it to the latest version and check if the issue still appears.

6. Turn on User Account Control and run the application as an administrator

  1. Press Windows Key + S and enter user account and choose Change User Account Control settings from the menu.
  2. User Account Control Settings window will now appear. Move the slider to the default position and click OK to save changes.

User Account Control is a useful security feature that prevents applications from performing tasks that require administrator privileges.

Thanks to this feature, you’ll always get a security dialog when trying to perform a task that requires administrator rights.

This is a useful feature, but its security dialogs tend to appear too often, and this is the main reason why many users choose to disable this feature.

However, few users reported that they fixed the problem on their PC by turning on User Account Control. To do that, follow the above steps.

After turning this feature back on, try to run the problematic application as an administrator and check if the error message appears again.

7. Remove your antivirus software

If you’re frequently getting Attempt to access invalid address error message, you might want to try disabling your antivirus.

Users reported some problems with older versions of Bitdefender, so if you’re using this tool you need to disable it and check if the issue still persists.

Several users reported that the cause is the Bitdefender firewall feature, and after disabling it the error was resolved completely.

Speaking of firewall, users reported that Intrusion Detection System (IDS) was the problem, so be sure to disable it as well. If disabling the antivirus doesn’t help, you might have to uninstall it to fix this problem.

Antivirus tools can sometimes interfere with your operating system which can lead to various errors. It’s worth mentioning that antivirus software can leave leftover files even after you uninstall it, so it’s recommended to use a dedicated removal tool.

Almost all antivirus companies have these tools for their software, so be sure to download one for your antivirus.

After removing your antivirus and all its related files, the issue should be resolved. Now you just have to update your antivirus to the latest version or switch to a different antivirus solution.

Even though this error is related to older versions of Bitdefender, other antivirus tools can also cause this error.

Several users reported that Comodo Firewall caused this problem on their PC, so if you’re using that application, you might want to disable it or remove it.

As you can see, different security tools can cause this problem to appear, so even if you don’t use Bitdefender be sure to try this solution with your antivirus software.

8. Install the latest Windows updates

  1. Press Windows Key + I to open the Settings app.
  2. Navigate to the Update & security section.
  3. Now click on Check for updates button.

Windows 10 is a solid operating system, but just like any other operating system, it has few bugs and glitches.

These bugs can sometimes cause various system errors, and in order to fix them it’s highly recommended to keep your Windows up to date.

By default, Windows 10 automatically downloads the updates in the background, but sometimes you can miss an important update. To make sure that your Windows is up to date, you can always check for updates manually.

Windows will now check for updates. If any updates are available, Windows will download them in the background and install them once you restart your PC. After updating your system, the issue should be resolved.

9. Uninstall Chrome

  1. Open Google Chrome.
  2. Once Chrome opens, click the Menu button in the top right corner. Choose Help > About Google Chrome.
  3. A new tab will appear and Chrome will automatically check for updates and download them.

After updating Chrome to the latest version, check if the issue still persists. If the error still appears, you might want to remove Google Chrome. To do that, follow these steps:

  1. Open the Settings app.
  2. Navigate to the Apps section.
  3. A list of installed applications will appear. Select Google Chrome from the list and click on Uninstall.
  4. Follow the instructions on the screen to remove Chrome.

According to users, one of the causes for this error might be Google Chrome. Several users reported that removing Google Chrome fixed the issue for them, so you might want to try that.

Before removing Chrome, we would strongly advise you to check if Chrome is up to date and install the necessary updates.

If you don’t want to use the Settings app, you can remove Chrome by doing the following:

  1. Press Windows Key + S and enter control panel. Select Control Panel from the list of results.
  2. When Control Panel opens, navigate to Programs and Features.
  3. When Programs and Features window opens, locate Google Chrome, and double click it.
  4. Follow the instructions on the screen to remove Chrome.

After you uninstall Google Chrome, check if the problem still appears. If not, you might want to try reinstalling Chrome or switch to a different browser.

10. Set your antivirus to Game Mode

Users reported this problem with Bitdefender, and it seems there’s a quick and simple solution for this problem.

According to users, you can simply set Bitdefender to run in Game Mode and that will allow you to run Adobe apps without any problems.

Game Mode runs with a different set of rules, so if you have the ability to run your antivirus in Game Mode, be sure to try that and check if the issue still persists.

11. Add the problematic application to the exclusions list

As already mentioned, your antivirus can interfere with your operating system and prevent you from running certain applications.

Users reported this problem with Bitdefender and Adobe apps, but the problem can also appear with any other application and antivirus.

To avoid this problem, you can try adding the problematic application to the list of exclusions.

Almost every antivirus software has an exclusions list, so be sure to add the problematic app to the list and check if that solves the issue.

12. Remove the problematic applications

We already mentioned that in some cases Google Chrome can cause Attempt to access invalid address error to appear. However, Chrome is not the only cause of this problem.

Users reported problems with apps such as Deluxe Shield, so if you have this application installed, be sure to remove it and check if that solves the issue.

Keep in mind that other applications can cause this problem as well, so be sure to remove any recently installed or updated applications.

Users reported that Real Player can also cause this problem to appear, so be sure to remove it. Another application that can cause this error is Anagram, so you might want to remove it as well.

In addition, be sure to remove any suspicious applications. Sometimes certain apps can install unrequired and potentially malicious software automatically, so be sure to remove any suspicious or unknown software and check if that solves the problem.

13. Reinstall the problematic application

If this error message keeps appearing, you might be able to fix it simply by reinstalling the problematic application.

In some cases your installation can become corrupted and that can lead to this and many other errors. Users reported that they fixed this problem with Adobe apps simply by reinstalling them, so be sure to try that.

According to a few users, reinstalling the application to a different drive fixed the problem for them, so you can try that as well.

14. Reinstall .NET Framework

Many applications are built using .NET Framework, and sometimes these types of errors can occur if your .NET Framework installation is corrupted.

If that happens, you won’t be able to run applications that require this framework. To fix the issue, you need to uninstall .NET Framework from your PC and reinstall it again.

.NET Framework is available for free on Microsoft’s website, however, there are several versions available. To fix the problem, you need to download the exact version that Adobe Reader uses.

After reinstalling .NET Framework, the error should be fixed.

How can I fix Attempt to access invalid address in Office?

1. Update EMET

EMET is the common cause for this problem, and if you can’t run Microsoft Office applications due to this error, you might want to try updating EMET to the latest version

. Several users reported that updating EMET fixed the issue for them, so be sure to try that.

2. Delete or change MitigationOption DWORD

  1. Open Registry Editor.
  2. Optional: Create a backup of your registry.
  3. In the left pane, navigate to ComputerHKEY_LOCAL_MACHINESOFTWAREMicrosoftWindows NTCurrentVersionImage File Execution Options key and expand it.
  4. Locate Office apps on the list. Look for entries such as excel.exe, winword.exe, etc. Once you find the desired application in the left pane, select it.
  5. In the right pane, double click the MitigationOption to open its properties.
  6. Set Value data to 0 and click OK to save changes. Alternatively, you can just delete MitigationOption DWORD from the registry.
  7. Repeat the previous steps for all Office applications.

If you’re using EMET, it’s possible that one of its registry values is interfering with Office apps and causing this problem to appear. To fix this problem, you need to make a few changes to your registry.

After you’re done, close Registry Editor and restart your PC. Once your PC restarts, the problem should be resolved and you’ll be able to run Office applications without any problems.

How can I fix Attempt to access invalid address in Unity?

Update Unity to the latest version

Many users reported this error message with Unity. It seems that this error appears with older versions of Unity, so if you’re having this problem, update Unity to the latest version and check if the error is resolved.

Many users reported that Unity update fixed the problem for them, so be sure to try that.

Attempt to access invalid address can prevent you from running Adobe and Office applications.

This error is usually caused by EMET or by your antivirus software, but you should be able to solve it by using one of our solutions.

How to watch geoblocked live streaming YouTube [Full Guide]

YouTube is a great way to connect with other people from all around the world. Whether you’re in for the laughs or try to figure out a workaround for a certain issue you encountered, YouTube is there for you.

You can either act as a bystander and witness YouTube’s (and its participants’) awesomeness by watching videos, or you can partake by creating and uploading your own material.

Yeah, YouTube is great and all, but sometimes it just splashes a cold beverage on your face in the form of geo-restrictions.

It’s exactly what it sounds like: some videos or live streams might not be available to you, just because you’re not in the right place.

So what can you do in this case?

How to watch geoblocked live streams on YouTube?

1. Use a VPN

  1. Download Private Internet Access
  2. Install it on your PC
  3. Launch it
  4. Log into your PIA account
  5. Connect to an appropriate server (*)PIA is connected to Netherlands
  6. Try watching the geoblocked YouTube live stream

(*) – try to pick a server located in a country where the stream isn’t likely to be blocked.

You might need to do a bit of research for that, but it shouldn’t be too hard. If you can figure the country of the original stream, that’s the location of the server you should choose.

Private Internet Access is an excellent VPN service brought to you by Kape Technologies. It can help you bypass geo-restrictions without any significant efforts.

Thus, it would make a powerful ally in unblocking geo-restricted live streams on YouTube.

Private Internet Access

Private Internet Access

Can't access geo-blocked YouTube live streams? Try using PIA.
$2.85/mo. Buy it now

However, a trustworthy VPN such as PIA can help you achieve so much more than that. For instance, it can help curb packet loss, improve ping, keep your online privacy safe, and secure your connection.

2. Use a Smart DNS service

Smart DNS services can help you spoof your real location by simply changing your DNS.

What this utility does is remove your ISP-assigned DNS address and hands you another one, stripped of all the metadata that might reveal your real location.

A Smart DNS service is a bit similar to using a VPN, but only when it comes to spoofing your real location. However, this type of service offers you almost none of the benefits that using a VPN does.

For the sole purpose of changing your virtual location, Smart DNS services are better than VPNs, since they don’t affect your Internet connection speed one bit.

On the downside, they offer no actual protection, since your IP still remains the same, and there’s absolutely no encryption.

3. Use a proxy service or server

There are a lot of proxy services online, most of which are free. ProxFlow, for instance, is a web browser extension that can help you unblock geo-restricted content on YouTube as easy as pie.


Is ProxFlow unable to unblock videos? Check out our guide to fix this issue.


But ProxFlow isn’t the only proxy service you can use to bypass geo-restrictions. The only downside is that proxy is way easier to detect than VPNs. Therefore, the chances it will work are kind of slim.

4. Download the stream once it’s over

If you’re lucky enough that the creator of the live stream saved it on their YouTube channel, you can use one of the hundreds of YouTube video downloaders to retrieve it on your device and watch it from there.

The only downside to this plan is that you won’t be able to watch it live. However, you won’t have to worry about bypassing geo-restrictions anymore.

You just pop the YouTube URL in the download field and you’ll have the content on your PC in mere moments.

You can bypass geo-restrictions on YouTube live streams

All things considered, it’s possible that you can watch any geo-blocked YouTube live stream, as long as the creator didn’t make it private.

Whether you choose a VPN, a Smart DNS, or a proxy, chances are you’ll be granted access to it almost instantly. Note that proxy servers are more prone to detection than Smart DNS or VPNs, so they might not work every time.

If you’re not a fan of circumventing geo-restrictions, you may even download the live stream. The only downside to this is that you won’t be able to watch the stream as it happens.

We also have a guide that addresses The uploader has not made this video available in your country error, so don’t miss it.

More so, you can only download a stream if the creator decides to archive it on their channel.

[wl_navigator]

OneDrive now lets you upload up to 100GB files

It seems that collaborative tools like Teams, Slack, and Zoom are getting all the attention as more and more people around the world work from home. But cloud-based storage and sharing solutions like OneDrive are playing a critical role too.

It, therefore, comes as no surprise that Microsoft is expanding OneDrive’s storage limit to 100GB.

You can now store up to 100GB files in OneDrive

Previously, you could only upload a maximum of 15GBs to OneDrive, so 100GB should make a significant difference. It’s certainly helpful if you store and share massive files, such as 3D, CAD, and media, via the cloud.

As of today, we are proud to announce that we have increased the upload file size limit from 15 GB to 100 GB in OneDrive and SharePoint for everyone! This is especially helpful for business users that work in predominately large file types, like 3D, CAD, and media files.

Recently, the Office 365 storage solution rolled out preferential sync, which fast-tracks the uploading of large files. Instead of syncing an entire file, it uploads only the updated parts.

Other enhancements

Microsoft is introducing OneDrive-Teams sharing integration to enhance the sharing experience for Teams users.

So, when you’re sharing a file in Teams, you’ll be able to create sharing links like you do in OneDrive. You may then share links with an individual or a group of people in your organization to give them access to mission-critical documents.

Also, this summer, the cloud platform is getting an update that lets collaborators retain access to documents that move from one shared cloud library to another throughout their lifecycle. As of now, users lose original access to a file after it relocates.

OneDrive competes with rivals like Google Drive and Dropbox. It currently supports multi-page scanning with Android or iOS smartphones, for free.

Are you excited about the expansion of OneDrive storage to 100GB? As always, you can share your views in the comments section below.

[wl_navigator]

How to use Bing daily images as custom backgrounds in Microsoft Teams

Microsoft recently delivered controls for background effects that allow users to upload their own background images for Microsoft Teams meetings. If you’re looking for a good selection of beautiful pictures to spice up your daily meetings, Office 365 MVP Martina Grom recently detailed an unofficial way to grab Microsoft’s Bing Daily pictures and use them as Microsoft Teams backgrounds. The process is a bit technical, but we’ll go through all the different steps below.

Step 1. Download the PowerShell script

The first step before doing anything is to download the ready-to-use PowerShell script file GetDailyBingPicture.ps1 from this GitHub repository. We suggest heading to this link to directly download the script file, then to do a right-click on the browser window, and click Save As to save the file on your PC.

Note: Keep in mind that the Local Group Policy Editor (GPO) that is required to run the script isn’t available in Windows 10 Home editions, and the script that may also not work on some PC configurations.

Step 2. Automate the Bing daily image download process

To get the daily Bing picture in your Teams Uploads folder automatically, follow these steps:

  1. Press the Windows key + R to open the Run command box, type gpedit.msc to open the Local Group Policy Editor (GPO), and press Enter.
  2. Now, navigate to User configuration > Windows Settings > Scripts (Logon/Logoff), as shown below, and double click the Logon option in the right pane.
  3. In the Logon Properties window, select the PowerShell Scripts tab, and click the Show Files button.
  4. The Windows Explorer with the file path C:WINDOWSSystem32GroupPolicyUserScriptsLogon will open on your screen. Copy the downloaded script GetDailyBingPicture.ps1 to the Logon folder.
    Microsoft Teams custom backgrounds
  5. Then move back to the Logon Properties windows, click Add, select the file GetDailyBingPicture.ps1, and finally click the OK button.

use daily bing images as custom backgrounds in teams

Note: You must set the PowerShell Execution Policy from Restricted to RemoteSigned to allow the PowerShell script to run. To do this, press the Win+X keys, select PowerShell as administrator and then run the following command:

Set-ExecutionPolicy RemoteSigned

Once the Local Group Policy Editor (GPO) configuration is complete, log off/reboot your PC to apply the changes.

Step 3: Navigate to the Teams system subfolder

Next up, open the File Explorer, and just copy and paste this address into the bar at the top:

%APPDATA%MicrosoftTeamsBackgroundsUploads

In the Uploads folder, you should see the daily Bing image with a formatted filename containing the image title/date as shown in the screenshot, and your custom background is now ready to be used in your next Teams meeting.

use daily bing images as custom backgrounds

Step 4. Launch Teams to use the new Bing custom backgrounds

Now that you have the file you want, open your Microsoft Teams desktop app, join your meeting, and select the Background effects toggle button next to the mic switch. Your new Bing background will appear now on the right side of your screen. Finally, select and preview the background to see how it looks and then hit the Apply button.

Microsoft Teams custom backgrounds Bing

Have fun with tons of custom backgrounds in Microsoft Teams!

With this trick, you now have endless possibilities of exotic custom backgrounds in Microsoft Teams. However, if you don’t want to fill hundreds of images in your Uploads folder, you need to manually delete all old images from that folder after a while. If you want, feel free to tweak the PowerShell script to use the same file name, and automatically overwrite the daily Bing image for you.

You can also play around with different parameters in the script to explore different customization options under the “Use the Bing.com API” section:

  • The idx parameter determines the day: 0 is the current day, 1 is the previous day, etc. This goes back for max. 7 days.
  • The n parameter defines how many pictures you want to load. Usually, n=1 to get the latest picture (of today) only.
  • The mkt parameter defines the culture, like en-US, de-DE, etc.

If you’re looking for more custom backgrounds options, we invite you to check out our dedicated Teams background Hub where we provide lots of cool background images to choose from.

To play this video authorization is required Kodi [Solved]

The popularity of Kodi can be attributed to the vast availability of official and unofficial Kodi add-ons that makes it the first choice for many video streamers.

However, recently some users have reported To play this video, authorization is required. Visit the link below to authorize the devices on your network error while using the Kodi player.

This error occurs when the user is trying to stream from add-ons such as Exodus, Zen, Salts, Covenant, etc.

As the error suggests you can either visit the website shown in the error message and pair the device or simply disable the message from appearing on your screen.

If you are facing a similar error, here is how you can fix this video authorization Kodi error on your device.

How can I fix the Kodi video authorization error?

  1. Disable Openload URLResolver
  2. Pair your device with Openload
  3. Disable Captcha Hosters
  4. Install Real-Debrid

1. Disable Openload URLResolver

  1. Launch Kodi on your device.
  2. From the Home screen, click on Settings (Cog icon).
    Kodi Player Settings Gear Icon
  3. Select System.
    Kodi Settings - File Manager - Add -ons - System
  4. Go to Add-ons > Manage Dependencies.
    Kodi-addon-manage-dependecies
  5. Under Manage Dependencies, click on URLResolver.
    Kodi-Setting-ResolveURL
  6. Select the Configure option from the list.
    Kodi ResolveURL Configure
  7. Scroll down and look for Openload or other streaming services section under the Resolvers tab. It should be listed under Resolver 3-4.
    Kodi Disable Openload Authorization
  8. Under the Openload section, click the toggle switch to disable the URLResolver for Openload.

If you are experiencing this error with the Openload server, you can try disabling the Openload URLResovler in Kodi settings and stop the Openload pair error from appearing on your streaming list.

Close Kodi and relaunch it. Now try to stream any show and see if the error is resolved.


2. Pair your device with Openload

  1. Connect your smartphone or PC to the same network as your Kodi player is on.
  2. Go to https://olpair.com/.
  3. Under Pair your device to use Openload with 3rd party application check the Captcha box.
    Openload Pair
  4. Click on the Pair button at the end of the page. You should see a Pairing successful message on the screen.
  5. Close the browser and open Kodi on your device. Now try to access the content and check for any improvements.

In case the first method didn’t work for you, or if you want to keep using Openload to stream contents, you can resolve the error by pairing your device with Openload.


3. Disable Captcha Hosters

  1. Launch the Kodi player on your device.
  2. Find and open your preferred Add-on that is showing the error.
    Kodi Yoda Add-on Tools
  3. Scroll down and click on Tools / Settings option.
    Kodi Settings Add-ons Playback
  4. Under Settings, look for the Settings: Playback option.
    Kodi Hosters with Captchas
  5. Scroll down and look for the Hosters with Captchas option and disable it.
  6. Click OK to save the changes.

Another method to fix this error is to disable the Captcha Hosters for the troubling add-on. Doing so will disable the pair error on your Kodi player. Use the above steps in that regard.

Close the settings page and relaunch Kodi Player. Since you have disabled Captcha Hosters, you should no more see the dreaded openload pair error while streaming any content using the Kodi player.

However, on the flip side, disabling the service will disable some streaming servers which you can no longer access.


4. Install Real-Debrid

  1. Begin with registering an account on Real-Debrid. Make sure you turn off any VPN if running.
  2. Make sure you have an add-on with ResolveURL support installed. If not, install Yoda for Kodi or any other similar add-on with ResolveURL.
  3. After the add-on is installed, click on the Gear icon from the home screen.
  4. Click on System.Kodi Settings - File Manager - Add -ons - System
  5. Click on the Standard button until you see the Expert/Advanced option is Activated.
  6. Click on add-ons.
  7. From the right-pane, click on Manage Dependencies and select ResovleURL.
    Kodi-addon-manage-dependecies
  8. Click on the Configure button.
    Kodi ResolveURL Configure
  9. From the left pane, click on Universal Resolvers.
    Kodi Real-Debrid Change Priority 90
  10. On the right pane click on Priority under Real-Debrid.
  11. Change priority from 100 to 90. Use the number pad to type the range.
  12. Click on Done.
    Kodi ResolveURL Configure
  13. Click on the Configure button again and go to Universal Resolvers > Enable Real-Debrid.
    Kodi-Real-Debrid-Reauthorize-my-account
  14. Click on (Re)Authorize My Account. You should see a pop-up window, note down the code displayed beside When prompted to enter.Kodi-Reauthorize-Real-Debrid-Authorization
  15. Visit https://real-debrid.com/device using a browser and enter the authorization code.
  16. On your Kodi player, you should see the ResolveURL. Real-Debrid Resolver Authorized message.
  17. Scroll down and click on URLResolver > Configure > Priority and set the number to 90 from 100. Click OK.
  18. Go to Configure > Universal Resolver >  (Re)Authorize My Account.
  19. Note down the authorization code, open any web browser, and enter the code.

If none of the above-listed solutions helped you can fix the error, try installing Real-Debrid as described above.

This service offers an unrestricted downloading service which reduces buffering for most of the Kodi add-ons but also offers streaming service thus reducing the dependency on other streaming servers.

Has this made any difference? Confirm getting rid of this annoying Kodi issue by using the comments section below.

[wl_navigator]

Google Drive zip failed / stuck on zipping [Full Fix]

Although Google Drive lets you download any Google doc or files with your shared users, the process is not always as smooth as intended.

This can be very frustrating, especially when you urgently need some files, but are unable to download them for one reason or another.

Here’s what you need to do if Google Drive is not downloading after zipping.

How can I fix Google Drive zip failed error?

1. Ensure your files don’t exceed the limit allowed by Google

To ensure a smooth download, Google normally limits the zip files to 2GB and the number of files to 500 per folder.

Exceeding this limit will result in Google Drive zipping files slow or Google Drive not zipping files at all. Google normally splits archives larger than 2GB into multiple zip files.

However, selecting the TBZ or TGZ format for your archive increases the size limit to 50GB, making it less likely for Google to split your archive.

Note that you may need to install special software to unpack a TBZ or TGZ archive.

2. Put the files in one folder

Another workaround that has worked for many users is to put all the files you want to download in one folder and download the folder instead.

The zip should contain the folder and its contents. Though this solution worked great for Windows 10 users, various users reported problems in getting the zip to work on Windows Vista and previous versions.

Did the above methods fix the problem? We would love to hear about your experience in the comments section below.

Later edit: also, please be advised that this kind of error can be temporary. Therefore, if you’re getting the Google Drive Zip failed, Zip creation failed or Zip failed login error, it could be just something with the server, so try again in a couple more hours.

3. Use an alternative Zip application

Experts have explained that Google Drive not downloading zip issues only exist when using Microsoft’s built-in zip utility, so the best way to fix it is to switch the zip application.

Using an alternative Zip application such as WinZip is an effective workaround for this issue as many users on the community forum reported.

WinZip is more than a tool for zipping and unzipping files and folders.

It’s an all-in-one file manager that allows you to compress and decompress to save space on your hard drive, encrypt and password-protect your zip files and folders, manage and organize your files and so on.

Compatible with all major file formats, this tool allows provides you with a complete file management suite to handle your files effortlessly, share them, back them up and protect them according to your wishes.

Here’s a quick guide to zipping a folder with WinZip (and we do mean quick!):

  1. Open the WinZip app
  2. Select the folder you want to compress with the tool’s pane
  3. Click the Add to Zip option
  4. Save your zip file in the desired location

Now, let’s quickly look at its key features:

  • Extract multiple files
  • Repair ZIP files
  • Powerful compression tools
  • Compatible with all major formats including Zip, Zipx, RAR, 7Z, GZ, ISO, TAR, IMG and more
  • Encryption and password-protect ZIP files
  • Archiving tools
  • Integrated File Manager and File Splitter
  • Data back-up and sharing options

”WinZip”

”WinZip”

”The
”Free
&aff_sub2=Native” current_url=”true” button_text=”Get it now” image=”https://windowsreport.com/wp-content/uploads/2016/08/winzip-windows-10-compression-tool-210×160.jpg”]

In addition to the above workarounds, it’s also advisable to clear caches and cookies.

[wl_navigator]

6 Helpful Feature Updates Windows 10 Build 20161 Offers

If you’re a Windows 10 insider, you probably realize that not every prerelease version of the operating system coming to the Dev Channel introduces multiple, major feature upgrades. But Windows 10 build 20161 departs from that tradition associated with some of the latest builds to enter the channel.

Besides offering a broad spectrum of bug fixes, build 20161 comes with a redesigned Start menu and better Taskbar customization. In addition, it gives insiders an opportunity to sample a fresh notification experience and Settings improvements.

There’s also something new for users of convertible Windows 10 tablets.

Without further ado, let’s dive into specifics.

What are the new Windows 10 build 20161 features?

1. Start menu facelift

Start menu with opaque themes

Insiders have for the longest time expected to receive a Windows 10 preview build update with a redesigned Start menu. After all, Microsoft has occasionally teased various versions of the UI component.

Well, a Start menu that applies a semi-transparent accent color to tiles is finally here! The interface provides an ideal background for Microsoft’s Fluent Design icons for Office applications and Microsoft Edge.

Apart from that, the versatile Start design perfectly harmonizes with dark and light Windows 10 themes.

2. Alt + Tab now shows all tabs open in Edge

Alt + Tab command

As the evolution of Microsoft Edge continues, the browser just received a productivity enhancement that changes the way Alt + Tab works for multitaskers.

Typically, the combination comes in handy when you need to quickly get to an app window with multiple other windows open. What about when you’ve got several browser tabs open?

Alt + Tab displays only the active browser tab along with any other open app windows. So you still have to reach for the mouse and click on any inactive tab you need to view.

Thankfully, pushing the Alt + Tab key combination now displays all tabs open in Microsoft Edge, along with other app windows. The feature though is rolling out to only a select group of insiders.

3. Programmable Taskbar

More personalized Taskbar

Windows 10 build 20161 introduces a Taskbar that Microsoft can programmatically manipulate to give you a neater, more personalized experience by default.

Say, you created or signed in to a new Microsoft account right now. You’d get default Taskbar content, thanks to the update. Plus, from this moment, Microsoft remotely tracks your interactions with the feature.

The goal is to eventually give you a personalized Taskbar experience based on your feedback and device signal.

We will evaluate the performance of individual default properties, monitoring diagnostic data and user feedback to assess an audience’s reception. Using this information, we will tune default layouts to minimize clutter and perceptions of bloatware.

Although Microsoft doesn’t state this, this Taskbar feature is probably AI-powered.

4. Notification toast improvements

Windows 10 notifications updates

Windows 10 notification toasts have their fans, although, to be honest, some users miss and wish to revert to the classic balloon alerts.

Nonetheless, each notification toast will now be accompanied by an easy-to-spot app logo indicating its source. In addition, a handy close button on the top right corner lets you quickly dismiss the message.

So, from now on, notification toasts should be less disruptive to your workflow.

Similarly, Focus Assist notification will no longer be on by default. You can revert to the previous configuration via Settings, though.

5. Settings enhancements

Settings improvements

Windows 10 insider preview build 20161 brings an improvement that directly gets you to the system configurations page you’re after. Some Control Panel functions are coming to the Settings page as a result.

For starters, Microsoft is moving any information available on the System page of the Control Panel to the About page under Settings. It’s providing a more straightforward way to check out your device’s specs.

Also, you can now copy your PC’s specs info by going to Settings> System > About > Copy.

6. Convertible device experience update

Windows 10 tablet experiences

If you’re a 2-in-one laptop user, then build 20161 makes it quicker to switch to tablet mode after detaching the keyboard. You got a notification toast asking whether you wanted to go into tablet mode if you tried that previously.

To use the device as a tablet, you said yes. Choosing no, on the other hand, launched the tablet posture experience that Windows 10 version 2004 introduced recently.

But, from now on, you’ll no longer have to deal with the notification toast when shifting from laptop to tablet mode.

There you have it! These are the major Windows 10 build 20161 features that are currently subject to beta tests.

Which one is your favorite? Feel free to share your opinion or ask any question in the comments section below.

How to watch Scrubs in Canada [Streaming Guide]

Scrubs is a US-based medical comedy-drama TV show that aired from 2001 to 2010 on NBC and then ABC. Although the series ended a long time ago, it developed an impressive fan base of Internet users who regularly watch Scrubs reruns.

Is Scrubs available to watch on Canadian Netflix? No, Scrubs isn’t available on Netflix CA. In fact, you can’t find it in any Netflix library, not even Netflix US.

However, if you live in Canada, it’s quite challenging to find a way to watch Scrubs online. Nevertheless, we did the hard work and found the ideal way for you to watch your favorite TV series anywhere in the world.

How can I watch Scrubs in Canada?

  1. Download Private Internet Access (PIA).
  2. Install PIA on your device.
  3. In the PIA main window, click VPN Server.PIA shows the Canada VPN server
  4. Look up United States and select the first city (with the lowest latency).connect to US VPN server in PIA
  5. Click on the large power button to connect to the US VPN server.PIA is connected to US New York City
  6. Go to Hulu and log in with your account*.
  7. Start watching Scrubs on Hulu.watch Scrubs on Hulu with a VPN

*If you don’t have an account, you can pay a Hulu subscription plan with ads ($5.99/month), without ads ($11.99/month), or with ads and live TV ($54.99/month). No matter what plan you choose, the first month is free. So you can cancel your subscription after watching Scrubs for 30 days.

Why choose Private Internet Access

Private Internet Access helps you unblock Netflix

Created by Kape Technologies, PIA is the best VPN for streaming services. You can use it to bypass geoblocks and watch Scrubs in Canada or anywhere else in the world. The tool can hide your IP address and encrypt your data traffic.

By connecting to a VPN server provided by Private Internet Access, you are basically concealing your true identity over the Internet, making it look like you’re trying to access a website from another part of the world. It can redirect your entire network traffic through VPN.

PIA supports OpenVPN and WireGuard protocols, static and dynamic IP addresses, port forwarding, split tunneling, kill switch, and private DNS servers. Plus, it comes with 24/7 live chat support.

More about PIA:

  • Connect to more than 3,300 VPN servers spread across 48 countries
  • Compatible with all major devices, including Windows, Mac, Linux, Android, iOS
  • Allows up to 10 device connections at the same time
  • 30-day money-back guarantee (no free trial)

Private Internet Access

Private Internet Access

Watch Scrubs in Canada and any other part of the world by connecting to the fast and secure VPN servers of PIA.
$2.85/mo. Buy it now

To summarize, if you’re looking for a quick and easy way to watch Scrubs in Canada, use a reliable VPN solution like PIA to get hold of a US IP address and bypass geo-restrictions on the Hulu live-streaming service.

[wl_navigator]

AT&T Doesn’t Recognize Paramount Channel [Solved]

AT&T usually picks up on VPN traffic and blocks it before users can actually access the content or purchase a subscription.

However, occasionally, some VPN users are lucky enough to fall through the cracks and get in. The bright side is that these users can access AT&T services as if they were in the US, for the most part. The not-so-bright side is that, depending on their VPN client, the functionality of the service might be affected. For instance, it’s possible that not all channels will appear within the service.

One of the most common issues we encountered online was related to the Paramount Channel. A while back, AT&T had a channel in their grid called Spike TV. Subsequently, that channel disappeared, and Paramount Network came to replace it. Ever since then, users have complained about Paramount not being displayed/recognized correctly.

How to fix AT&T not recognizing Paramount Channel?

1. Make sure you have the right plan

AT&T provides you with several user plans, and some of them don’t include Paramount Channel in their grid. For that reason, you need to make sure that the plan you’re paying for includes Paramount Channel.

If you’re using TV Now Plus on Kodi, for instance, you might not be able to see Paramount because it’s not included in the plan. The AT&T TV Now Max plan, however, does include Paramount.

So it’s quite important that you check very carefully if the reason why you can’t see Paramount is, in fact, not having it in your plan, to begin with.

2. Use a VPN

Considering a well-researched comparison of the best VPN for AT&T U-Verse, here is our pick and a quick guide on how to install it to solve the issue straight away.

  1. Download and install ExpressVPN.
  2. Install it on your computer
  3. Launch it and log into your account
  4. Connect to a US server (make sure it’s a low-ping one for best results)
  5. Check if the problem still persists

If your Paramount Channel (Network) isn’t displayed in the area you’re in, you’re likely facing geo-restrictions. In this case, using a VPN might solve your problem altogether.

ExpressVPN is an excellent VPN service that can easily bypass geo-restrictions. In order to make it work with AT&T, make sure you select a US server to avoid any geoblocking.

ExpressVPN

Unlock geo-blocked content and make sure your connection is secure with this powerful VPN solution.
Check Price Visit Website

Note that sometimes, different US servers might trigger TV Now or U-verse to display different content. Therefore, if the channel you’re looking for doesn’t appear on the list (even though it should), just switch to another US server.

3. Use a Smart DNS service

As we’ve mentioned above, VPN traffic is usually detected by AT&T and blocked altogether. The same goes for proxy. In fact, a proxy is even easier to detect than a VPN. In order to avoid that, you might consider using a Smart DNS service.

What a Smart DNS does is remove your ISP-assigned DNS address and grants you a new one, stripped of metadata that indicates your real geolocation. As a result, the service you’re trying to access detects you in the DNS-assigned location.

For the strict purpose of circumventing geo-restrictions, using a Smart DNS is oftentimes better than a VPN. For starters, there’s no encryption, and as a result, you benefit from a higher speed.

On the downside, you’re completely exposed to various threatening factors, since your IP isn’t hidden, and traffic isn’t encrypted.

4. Contact AT&T

We understand that this is what you’ve been trying to avoid, but if everything else fails, you might as well address your issue to the ones responsible for allowing it.

If you’re doing everything right, are entitled to access AT&T services (live and are located in the US at the time being) and you’re sure that Paramount Channel should be on your channel list, AT&T should be able to fix it.

Or at least offer you some suggestions on how you might fix the issue.

AT&T Paramount Channel issues can be fixed

If you encounter issues with accessing Paramount Channel on AT&T, you might be able to fix them. Whether by using a VPN or Smart DNS or even contacting AT&T’s support crew, there’s always a way to sort things out.

However, you should understand that using a VPN to access geo-restricted content is usually frowned upon. Therefore, even if you can circumvent this issue by using a VPN, the situation may shift at some point.

And if you’re worried about easily solving AT&T Family Map not working, rest assured that this guide covers all confirmed solutions. Just take a closer look.

Windows 10 Build 20161 Fixes Xbox Controller Bug and More

Windows 10 insider build 20161 has finally hit the Dev Channel. This prerelease version of Windows brings a whole bunch of new, cool features.

One of its most notable is the redesigned Start menu that does away with the solid color accents behind the icons in the app list.

However, beneath all the improvements that Windows 10 build 20161 introduces are multiple bug fixes available to insiders. Let’s take a look at some of them.

Windows 10 build 20161 fixes

  • Addresses an issue triggering error messages when you’re connecting or working with an Xbox controller.
  • Fixes installation failure and crash issues affecting some games and apps.
  • Fixes website navigation issues in Microsoft Edge when Windows Defender Application Guard is on. The last two Dev Channel builds had this problem.
  • Recent builds had a protracted log-off time problem. This update fixes the issue.
  • Patches a graphics glitch triggering bug checks for some insiders.
  • Resolves a Chinese Pinyin IME bug where, after applying a custom IMEI toolbar orientation, you’d be unable to reverse the setting again after rebooting your device.
  • Fixes a Reset this PC malfunction in some recent insider builds.
  • Some of the latest Windows 10 builds had a bug causing certain Bluetooth devices not to indicate their battery level in Settings. Windows 10 build 20161 fixes the glitch.

Other items in the changelog are:

We fixed an issue where Settings would crash if you went to Settings > Privacy > Microphone while a win32 app was recording audio.

We fixed an issue where if Sound Settings showed “no input devices found” in the input dropdown and you clicked it, then Settings would crash.

We fixed an issue where when adding a printer, the dialog might crash if you navigated through to the “Add a printer driver” dialog in recent builds.

Did you successfully update to Windows 10 build 20161? Lets us know in the comments section below.

Microsoft starts rolling out contextual search in Microsoft Teams, here’s how to use it

Microsoft Teams is getting a new contextual search feature that will help users find information faster in the app. The Microsoft 365 roadmap indicates that the feature would hit general availability in June, and Microsoft MVP Linus Cansby noticed that it has now started rolling out on the desktop app.

With contextual search, you can now search for content in a specific Teams channel or chat by using CTRL+F (CMD+F on Mac). At the moment, your search results will only contain chat messages/posts found in the selected chat or channel, and you will still need to use the regular search function if you want to search for files. Here’s a look at how you can use the new contextual feature in Teams.

How to search in channels

Contextual search Microsoft Teams channel

If you want to search something in a specific channel, simply press the CTRL + F buttons simultaneously. You will instantly get the command /find <ChannelName> prefilled in the Search and Command box located at the top of your Teams window. Then, search results from that channel will appear in the left column, and you will be able to click on one of the results to see the conversation in the main window on the right side of your screen.

How to search in chats

Contextual search Microsoft Teams chat

Similarly, the contextual search feature also works for chats in Microsoft Teams. Open the chat window, press the CTRL + F buttons simultaneously, type something to search for a specific message, and the Results pane on the left will show your search results. It’s a great way to get the messages from someone who shared some important details in a chat months ago and eliminates the need to manually scroll through the chat history.

How to search directly in a channel/chat

Contextual search Microsoft Teams chat/channel

Finally, there is also the ability to search directly from the Search and Command box in Microsoft Teams. To do this, type /find, type or select the name of a channel or chat, then type something you want to search for, and finally press the enter button. However, keep in mind that it is not possible to search chat messages/posts in a General channel while searching in this manner and not directly from that channel.

Overall, the feature makes it a lot easier for you to do more within less time and find things like a specific message your colleague left you. If you find the contextual search helpful, feel free to check out our dedicated post on top tips and secrets of the search function in Microsoft Teams.

Tired of annoying channel-wide mentions and notifications in Microsoft Teams? Here’s how to turn them off

One of the features of Microsoft Teams is the ability for users to tag an entire channel. This can be helpful when you want to get the attention of every member of the channel, but if you’re someone who likes to focus on your work, then you might become annoyed when you get spammed with company-wide Teams channel notifications that aren’t related to you. Stephanie Stimac, a Microsoft employee, recently expressed her frustration about this, and today, we’ll be describing how you can turn it off so you can stop the pain.

Visit notification settings

As we described before, you can visit the notification settings in Microsoft Teams to control channel-wide mentions. To get there, click or tap on your profile picture in the top-right corner of the screen. After that, click or tap Settings. Next, head to notifications. From there, you’ll want to click the down arrow next to channel mentions and turn it off. You also should do the same for team mentions too. This will turn off the notification, but if you prefer, you can set it to only show in feed, so you don’t get a tile or banner notification, but rather a silent notification in your Teams activity feed.

…Or use the Progressive Web App instead

As pointed out by Chris Randall on Twitter, sometimes notification controls in Microsoft Teams might not work at all. Or, as pointed out by Lyle Dodge, people might tag the channel they are posting to, so you might end up getting notification badge for that channel.

Though we haven’t experienced it yet (and so can’t verify these two experiences) we assume that even if you change your settings, you might still end up getting a notification. If this is the case, then you might want to use the Microsoft Teams Progressive Web app to avoid channel or team notifications altogether.

Just as we described when we talked about opening multiple Teams channels, you can do this pretty easily. To get started, you’ll want to sign in with your Microsoft Teams account on the web through your browser of choice. This works best in Chrome or the new Microsoft Edge. Once signed in, be sure to dismiss the purple notification that asks about notifications. If you do, you won’t get any notification in Microsoft Teams, which is what we want.

In Microsoft Edge, once done, you can create the Progressive Web App by clicking the . . . button in the top right corner of the screen. After that, click where it says Apps. You’ll then see the Teams logo, and you’ll want to click Install this site as an app. This will then pop-out Teams into its own window, with a purple title bar, and experience similar to the native desktop app.

For Google Chrome, click the downward-facing dots in the top right corner of the screen. After that, click More Tools, followed by Create Shortcut. Be sure to click the Open as window checkbox, and then click Create. You’ll then get a Teams Progressive Web App.

The Teams Progressive Web app will look and feel just like the native desktop app. There isn’t much difference between them. However, since notifications in the Progressive Web App are handled through the web browser, if you dismiss the initial option which asks for them, you’ll have a clean experience, where all your notifications just show up in Activity, without any sounds or alerts.

Other tips

Controlling channel and team mention notifications are just one of the many features you can tweak. Over the past few months, we’ve covered Teams extensively. We talked about how you could use Power Apps, how to create a custom video, speaker, and audio setup, and even looked at some of the settings you might want to change. Our Teams hub has you covered, so be sure to check it out.

Microsoft Teams for Android gets inline chat translator

If your organization lets you share and collaborate with colleagues via mobile devices, you’ve probably encountered or heard about Microsoft Teamsfor Android.

Nowadays, Teams is one of the most highly-sought collaborative tools for enterprises, educational institutions, and other organizations. But the mobile version of the Office 365-based platform lags behind its desktop alternative in multiple key areas.

The capability for on-demand message translation has been one of those, but it’s currently rolling out to Microsoft Teams for Android.

Inline chat translation in Microsoft Teams for Android

According to a recent Microsoft 365 Roadmap entry, you may now start using inline chat translation in Microsoft Teams for Android.

Inline message translation will ensure that every worker in the team has a voice and facilitate global collaboration. With a simple click, people who speak different languages can fluidly communicate with one another by translating posts in channels and chat.

Now, in Teams for Android, you’ll be able to translate any chat or channel message into the language you’ve set for your app.

The feature comes at a time when organizations are increasingly leveraging collaborative software to integrate personnel from different parts of the world. Such remote-working teammates may not always speak the same language, which poses a communication challenge, including when using instant messaging apps.

Nonetheless, you can translate your chats on demand in Teams for desktop provided that the admin has tweaked messaging policies to allow it.

Microsoft recently added a bunch of productivity-focused features to Teams in mobile preview. It appears that the Redmond-based tech giant foresees a future in which the mobile version of the app plays a much bigger role in facilitating remote working or even sharing in informal contexts.

Microsoft Teams, meanwhile, now allows up to 300 people to attend a single virtual meeting.

Are you on Microsoft Teams for Android? Have you received the inline message translation update yet? Let us know in the comments section below.

[wl_navigator]

Mozilla Firefox 78 brings search bug, fix coming soon

Once in a while a new browser version introduces one or two unwanted browsing issues, which is now the case with Firefox 78. The update brought a couple of impressive changes and features, such as accessibility tweaks, privacy protection, and more.

But it also broke search, making it impossible for affected users to use its integrated search engines like Google and Bing.

The good news is that Firefox 78.0.1, which goes live soon, will fix the search issue.

The Firefox 78 search bug

Shortly after the release of Firefox 78.0, a user reported a search issue that resulted from updating to the latest stable version of the browser.

All search engines are gone; list of one-click search engines is empty now. Auto complete in the address bar doesn’t work any longer. Search function on the start page doesn’t start a search any longer.

It appears that affected users no longer see any of the popular third-party search engines that Firefox offers by default. Usually, the browser lets users customize their search experience by adding their favorite search engines, for example, Amazon and DuckDuckGo.

Apart from the search issue, it seems that the browser’s address bar isn’t working any more. Moreover, the start page’s search function is defective right now.

Engineers at Firefox appear to have discovered the root cause of the issue. They’ve identified a couple of bugs that point to a malfunction in the local database that the search service utilizes.

The team started working to resolve the problem shortly after it made it to the Bugzilla forum.

For some reason the local database that we use to store some data is not working. Unfortunately our search service has just switched to using that local database, and as a result isn’t working properly.

Firefox 78.0.1 should address the search problem anytime now.

Have you received the Firefox 78.0.1 search fix? Let us know if it works by leaving us a message in the comments section below.

[wl_navigator]

Your PC will restart several times during updates [Full Fix]

Some Windows 10 users experienced this problem after downloading and installing Windows updates.

Namely, when the update is almost complete, the screen shows the familiar Windows loading animation with a notification that Working on updates 99%; Don’t turn off your PC. This will take a while, and Your PC will restart several times at the bottom of the screen.

However, nothing happens and the PC keeps displaying this message.

This problem could be as a result of corrupt directories, malware infection, and incomplete updates.

If you are wondering how to fix the Your PC will restart several times issue, his guide puts you through 7 solutions to resolve it.

How to fix Your PC will restart several times error?

  1. Run an SFC scan
  2. Run a DISM command
  3. Scan your device with an antivirus
  4. Run the Windows Update troubleshooter
  5. Run System Restore in Safe Mode
  6. Reset the PC
  7. Reset Windows Updates components

1. Run an SFC scan

Sometimes, the updating process fails due to missing or bad system files. That’s why the System File Checker scans for the corrupt or missing files and repairs them.

  1. Go to Start, type cmd, then right-click on Command Prompt and select Run as Administrator.your pc will restart several times
  2. Now, type the sfc /scannow command.run sfc to fix updating problem
  3. Wait for the scanning process to complete and then restart your computer. All corrupted files will be replaced on reboot.

2. Run the DISM command

  1. Press Windows key + X and run Command Prompt (Admin).
  2. Copy and paste the following command on the command line: DISM.exe/Online /Cleanup-image /Restorehealthrun dism command to fix update process
  3. In case the DISM can’t obtain files online, try using your installation USB or DVD. Insert media and type following command: DISM.exe/Online /Cleanup-Image /RestoreHealth /Source:/C:RepairSourceWindows /LimitAccess
  4. Be sure to replace the C:RepairSourceWindows path of your DVD or USB.

Just like the SFC scan, DISM (Deployment Image & Servicing Management) is also a tool for dealing with various system errors, although more advanced errors. Therefore, if the SFC scan didn’t get the job done, your chances are better with DISM.

3. Scan your device with an antivirus

Malware can infect your PC registry leading to the above-mentioned problem. Hence, we recommend using a powerful third-party antivirus to perform an in-depth scan.

So, if the updating process fails to complete, restart your device and install an antivirus tool that is compatible with your PC.

A good antivirus solution will provide you with triple-layer, real-time protection, along with screening signatures for all types of malware anomalies. Any detected malware is quarantined and then neutralized before the infection can even begin.

If the error persists, you should move to the next steps.

4. Run the Windows Update troubleshooter

If you’re running a newer version of Windows 10 or the Windows 10 Creators Update, you can definitely use the Windows Update troubleshooting tool. This tool is suitable for fixing several system-related issues most especially Windows Update problems.

Meanwhile, if you’re not sure how to use the new troubleshooter in Windows 10, just follow the instructions below:

  1. Go to Settings
  2. Head over to Update & Security, then Troubleshoot.
  3. Go to the Additional troubleshooter option.
  4. Find Windows Update, and click Run the troubleshooter.
    run troubleshooter for updates
  5. Follow further on-screen instructions.
  6. Restart your computer.

5. Run System Restore in Safe Mode

  1. In the search bar, type system restore.
  2. The PC will prompt you to choose a restore point. Open the menu and, in the System Protection tab, click on System Restore.
  3. Choose one of the available dates.use system restore to fix update problem
  4. Follow the prompts to revert back to a certain restore point.
  5. Wait for the process to complete, and then reboot.

Safe Mode is a diagnostics mode in Windows that starts your PC in a limited state, with only basic files and drivers running.

However, you can perform a system restore in safe mode to revert back to a certain restore point before the Your PC will restart several times error problem.

Note: Make sure you are able to identify the restore point before the error message display. Also, System restore does not affect any of your files, documents, and personal data.

6. Reset the PC

  1. Open Settings, then Update & Security and go to Recovery.how to reset PC
  2. The Reset this PC option should be the first you see. Click on Get started to proceed.

This option is an advanced recovery option that restores your PC to its factory state.

In a similar manner, but running in Safe Mode you should also be able to revert to a previous version of Windows. An intact Windows.old file (stored in C:Windows.old) is the important precondition for the downgrade.

7. Reset Windows Updates components

Disclaimer: This solution contains steps that are part of modifying the registry. Please note that serious problems may occur if you do this incorrectly. Hence, follow these steps correctly, and carefully.

We highly recommend that you back up the Registry before you modify it. Also, you can restore your PC to a working state in case a problem occurs.

Here’s how to manually reset the Windows Updates Components:

  1. Right-click Start.
  2. Select Command Prompt (Admin).your pc will restart several times
  3. Click Yes when asked for permissions.
  4. Stop the BITS, Cryptographic, MSI Installer, and Windows Update Services by typing the following commands in command prompt (hit Enter after each command you type):
  • net stop wuauserv
  • net stop cryptSvc
  • net stop bits
  • net stop msiserver
  1. Rename the SoftwareDistribution and Catroot2 folder by typing the commands below in the Command Prompt then press Enter after each command you type:
  • C:Windows/softwareDistribution/SoftwareDistribution.old
  • C:Windows/System32/catroot2/Catroot2.old
  1. Restart the BITS, Cryptographic, MSI Installer, and Windows Update Services by typing the following commands in Command prompt:
  • net stop wuauserv
  • net stop cryptSvc
  • net stop bits
  • net stop msiserver
  1. Type Exit in the Command Prompt to close it.

After trying out the steps above run Windows Updates again and follow the prompts to complete Windows Update process.

However, some Windows users reported getting Access Denied prompts when trying the step above. Here’s what to do if your access is denied:

  1. Log in first as administrator or use administrator user account
  2. Stop the Windows Update service and try to rename Software Distribution folderyour pc will restart several times
  3. Right-click on Start.
  4. Select Run.
  5. Type services.msc and press OK or enter.
  6. Scroll down and locate Windows Update service.
  7. Right-click and select Properties.
  8. Stop the service.
  9. Follow the steps again to reset Windows Update Components.

After you complete the process, go to Services window again, now start Windows Update service, and then restart the computer.

Note: We highly recommend that you check the Give me updates menu for other Microsoft products when using Windows update option. Windows Updates downloads and installs updates required to run Windows efficiently.

Let us know if any of these solutions helped fix Your PC will restart several times problem.

Windows 10 build 20161 is out in the Dev channel with big changes for the Start Menu and Taskbar

It was quite a long wait, but Microsoft has finally released a new Windows 10 Insider build with some new features and noticeable changes today. Even the Windows Insider website is getting a new look, though it’s currently only available in en-us English for now.

So, the Windows 10 Insider build 20161 is now available to download in the Dev channel, and it includes several important changes. However, the Windows Insider team said that only a subset of Insiders will see the new features for now so the team can “quickly identify issues that may impact performance and reliability.”

Anyway, the first big change in this build is that the Start Menu is getting Theme-aware tiles, which will replace the solid color backplates that didn’t always look good depending on your accent color. “This refined Start design looks great in both dark and light theme, but if you’re looking for a splash of color, first make sure to turn on Windows dark theme and then toggle “Show accent color on the following surfaces” for “Start, taskbar, and action center” under Settings > Personalization > Color to elegantly apply your accent color to the Start frame and tiles,” the team explained.

Before and After: Windows 10 Start menu in dark theme.

The second big change in this build is that the Alt + Tab experience will now include all tabs open in Edge. You can turn this off in Settings > System > Multitasking if you prefer the classic experience, or you can choose to only show your last three or five tabs when you hit Alt + Tab. This feature will also require a Canary or Dev build of Microsoft Edge (version 83.0.475.0 or higher), Microsoft said today.

All tabs open in Microsoft Edge will start appearing in Alt + TAB!

Starting with this build, Microsoft is also introducing a Programmable taskbar during the out-of-box experience. The idea is to offer a more personalized Taskbar for new users with linked Android phones, or those with Xbox Live accounts on gaming PCs, so the taskbar will add useful shortcuts to Your Phone or the Xbox app when they boot up their new PC.

“Please note that this experience is limited to new account creation or first logon scenarios. We will not use Programmable Taskbar to alter the Taskbar layout on existing accounts,” the Windows Insider team clarified. You can see some examples of this Programmable Taskbar below.

Microsoft has also changed how notifications look like in this new build, with a new app logo at the top showing which app has sent you the notification. Moreover, Microsoft has also turned off the Focus Assist notification and summary toast you usually see after Focus Assist has been automatically turned on. However, Insiders will still be able to revert to the previous behaviour if they prefer seeing these notifications.

The Settings app is also getting more information from the Legacy Control Panel in this build, though the Windows Insider team said that this is still a work in progress. Moreover, it will now be possible to copy your device specifications, and Microsoft has also streamlined information about Windows Security in the Settings app.

The last big change in this build is related to the tablet experience for 2-in-1 devices: The new tablet posture experience that debuted in the May 2020 Update will now be the default when you detach the keyboard on a 2-in-1 device, and users will no longer see the notification asking them if they want to switch into tablet mode. Again, Insiders will be able to change this setting in System > Tablet if they prefer the old experience.

There are two other important things to note about the tablet experience for 2-in-1 devices in this build: Microsoft has removed the tablet mode quick action on non-touch devices to prevent any confusion, and tablet users will also boot into the appropriate mode depending on the presence of the keyboard, or the last mode they were using.

That’s a lot of changes for a single build, but keep in mind that these are all experimental features that may not end up in a future Windows 10 Update. The build 20161 also comes with several fixes and known issues, and you can find the full list below:

Fixes

  • We fixed an issue resulting in Insiders experiencing bug checks when connecting and interacting with an Xbox controller.
  • We’ve fixed an issue causing some games and applications to crash at launch or fail to install.
  • We fixed an issue resulting in Microsoft Edge not navigating to websites when WDAG was enabled on the last 2 flights.
  • We fixed an issue which was increasing log off time in recent builds.
  • We fixed an issue with the Chinese Pinyin IME where after setting your preferred IME toolbar orientation, you may not be able to change it again after rebooting your PC.
  • We fixed an issue causing Reset this PC to always show the error “There was a problem resetting this PC” when launched from Settings in the last few builds.
  • We fixed an issue resulting in some Bluetooth devices no longer showing their battery level in Settings in the last few builds.
  • We fixed an issue where Settings would crash if you went to Settings > Privacy > Microphone while a win32 app was recording audio.
  • We fixed an issue where if Sound Settings showed “no input devices found” in the input dropdown and you clicked it, then Settings would crash.
  • We fixed an issue where when adding a printer, the dialog might crash if you navigated through to the “Add a printer driver” dialog in recent builds.
  • We fixed a graphics related issue resulting in some users experiencing bugchecks.

Known issues

  • We’re working on a fix for an issue causing some systems to crash with a HYPERVISOR_ERROR bugcheck.
  • We’re looking into reports of the update process hanging for extended periods of time when attempting to install a new build.
  • We’re aware of an issue where Notepad might fail to reopen files which were automatically saved during a PC restart (if that option is enabled in Settings). Documents can be recovered from %localappdata%Notepad.We’re investigating reports of the screen becoming dimmer after upgrading to the previous build.
  • We’re aware of an issue where Task Manager reports 0.00 GHz CPU usage in the Performance tab.
  • We’re investigating reports that when you press space while using the Korean IME in certain apps, the last character is deleted.
  • We’re working to fine tune the tile animations in Start to avoid flashes of color.

It’s nice to finally get new features to play with, even though we remind you that only a subset of Insiders who install this build will see them at first. If you’re not an Insider, the Windows Insider team also announced today that the new Windows Calculator graphing mode feature that was released to Insiders in January is now rolling out to the public. We’re getting some existing Insider news a little bit later in the day than usual this week, but we hope the team will soon be back with more new features later this month.

How to fix Bitdefender update failed errors on Windows 10/11

Without a doubt, Bitdefender is one of the best antivirus solutions for both personal devices and PCs. But it needs to be regularly updated for the best results.

Now, a lot of times users have complained of encountering various Bitdefender update errors forcing them to abandon the update process and risking their Windows 10 PCs.

The good news is that you don’t have to give up since most of these errors are easy to fix. Here is how to maneuver around various Bitdefender update errors.


What can I do if the Bitdefender update fails?

1. Make sure Bitdefender update has been properly set up

  1. Open your Bitdefender main window.
  2. Click on the gear Settings.
  3. Click on the Bitdefender’s Update tab and make sure it indicates the correct update location as shown here.Fix Bitdefender update failed errors on Windows 10

This applies to some Bitdefender versions, especially the older ones. Note that for the latest editions, Bitdefender auto-update file location is configured automatically during installation.


2. Try out a different antivirus solution

Users looking for an error-free antivirus experience will most likely appreciate our pick for today.

No matter if you are a regular user or a hardcore gamer, this software offers you the best protection against different types of online threats.

It is an excellent choice for protecting your privacy and is useful for when you use the Internet to shop, for online banking, to work, and to communicate. Use it for your Windows, Mac, Android, and Linux devices.

When it comes to sensitive data, passwords, online payments, webcam,s and smart devices, all of them are secured with this powerful antivirus.

When it comes to online banking, this software offers you a high level of protection so you won’t have to worry about unauthorized access to your computer.

TotalAV

TotalAV protects your computer against viruses, malware, spyware, and unauthorized access.
Check Price Visit Website

3. Verify that Bitdefender isn’t being blocked by the firewall

  1. Click on Bitdefender’s Protection.
  2. Go to the Firewall module then click on the gear/Settings icon to confirm that the firewall is OK.Bitdefender not updating
  3. First, under the Network Adapters option, your network adapter should be set to home/office. Bitdefender failed to update
  4. The next edit is on stealth mode. Still, in the firewall tab, click the edit Stealth settings and set it to off.Bitdefender update error
Note icon NOTE
NOTE: The Firewall module is not available in the Bitdefender Antivirus Plus edition.

Bitdefender comes with its own built-in powerful firewall and thatu2019s should be your next stop if Bitdefender has reported an update error. Here is how to check if the firewall is set and running right:

4. Turn off other firewalls

Well, in some cases, the problem fails to go away even after implementing the first two recommendations so it’s time to turn our attention to other Firewall software.

And here the remedy is straightforward: Just turn off or uninstall any other Firewall software (Including Windows own Firewall) and see if you’ll get lucky.


5. Verify that your proxy settings are properly set up

  1. Open the normal Bitdefender window.
  2. Click on the gear/Settings icon to access the Settings options.
  3. Select the shown Advanced tab.
  4. On the proxy usage option, click on the on/off switch to turn on the proxy.bitdefender free error
  5. Now click on the manage proxies hyperlink to specify how Bitdefender should access the required proxy settings.
  6. Click import proxy settings from the default browser to have Bitdefender automatically detect the current user’s proxy settings from the default browser. Here you might be required to re-enter your username and password to proceed. This is the easiest option route to take although it occasionally refuses to work meaning in you may be forced to specify the settings manually. You will proceed to step 7 to do it manually.bitdefender free update error 2019
  7. Click Custom proxy settings (to manually configure your proxy). Here is the information you will be asked for:
  • Address– this is the IP address of your proxy server.
  • Port– this is the port that Bitdefender will be using to connect to your proxy server.
  • Username– this is the username that the proxy recognizes.
  • Password– this is the password for the specified user account.
  1. Save the changes by clicking OK.Bitdefender update failed error

Bitdefender will now use the specified proxy settings to connect to the Internet for update purposes.

If you use a proxy to connect to the Internet, you must have properly configured Bitdefender with the correct proxy settings for the Bitdefender program updates to work.

In general, Bitdefender antivirus should automatically detect and import the existing proxy server settings from your system.

But there is no guarantee that it will always do this so sometimes a manual configuration is necessary.


6. Manually update Bitdefender

  1. First, download the weekly.exe file and save it on your local hard disk.
  1. Double-click the downloaded file to commence the setup wizard.
  2. Click next to run the programs/updates installation process.
  3. Select I accept the program terms and click Next.
  4. Click Install to start the installation.
  5. Click Finish to wind up the installation.

Bitdefender releases its combined virus definitions (and scan engine updates) on a weekly basis (every Friday) in form of the weekly.exe application and you could still use it though this should everything else prove unsuccessful.

That’s all. Your Bitdefender should now be up to date.


7. Uninstall and reinstall Bitdefender

  1. Use this link to uninstall the program.
  2. Reinstall your BitDefender version.
  3. Now attempt to update (if necessary).

If you are not yet lucky, try uninstalling your BitDefender version then restart the computer.


8. Upgrade to a newer version

  1. Go to the website and download Bitdefender (The latest version).
  2. Install the download and see how it behaves.
Note icon NOTE
NOTE: Run the trial version if your subscription is expired.

You can always upgrade to the newest version of Bitdefender. The process should be free as long as your subscription is still valid.


9. Contact Bitdefender’s support

  1. Open the usual Bitdefender’s interface.
  2. Under the Settings menu, click the Notifications.
  3. Now click the Critical tab to see the exact Bitdefender error message.Bitdefender update in progress stuck

Contacting Bitdefender’s highly professional technical support team could be the way to go if the said Bitdefender update errors still remain.

You need to open a ticket to do this. The technical team will then request the exact error message which you can obtain as described above.


How can I fix Bitdefender Free Update Failed Error 2024?

1. Scan your PC for errors

  1. Click the Start button.
  2. Then get into the search bar and type exe then press enter to search for the command prompt. Right-click and choose run as administrator.
  3. Once the black command screen appears, type the following command and press Enter: sfc/scannow
  4. The system will be scanned and healed of any errors hindering the update.

2. Free up space

Empty the Temp Folder

  1. Click the Start button.
  2. Then get into the search bar and type %temp% then enter to search for the temporary files.
  3. Once the Temp folder opens, select (CTRL+A) to delete all the files here. This could create enough memory space for the update to be executed.

Empty The Prefetch

  1. Click the Start button.
  2. Get into the search bar, type the following command, and press Enter: prefetch
  3. Now delete all the files found here (if any).

3. Manual update

You can as well try to update the Bitdefender virus definition files manually using the steps I highlighted earlier (download the weekly.exe file).

Most of the Bitdefender Update errors are triggered by Internet connectivity issues.

For instance, your connection may have temporarily failed, your proxy settings are wrong, or you have a firewall blocking an ongoing Bitdefender update.


Luckily, as you have seen, all these are problems you can easily beat using the above solutions. Try the above fixes and alert us (via the comments section) if you encounter further problems.
Teams meetings now let you chat with up to 300 people

If you’re currently a remote worker, then you appreciate the significance of cloud-based workforce collaboration tools today. As more and more people work from home due to the COVID-19 situation, organizations are turning to such tech solutions, for example, Teams meetings and chats, to communicate and collaborate.

Instant messaging tools too have become a highly-sought resource as the demand for real-time business communication skyrockets.

Sometime back, Microsoft revealed that 91% of Fortune 100 corporations use Teams. Daily users of the platform have also tremendously increased.

But Microsoft Teams had to develop its capacity to start accommodating the rising demand for remote collaboration tools and digital workspaces.

Little wonder then that the Teams Meetings feature has grown in a few months to the point of supporting up to 300 participants.

Teams meetings support up to 300 participants today

According to a tweet by Mike Tholfsen, Product Manager, Microsoft, the Teams meetings’ limit has increased.

So, as Teams’ capacity for collaborative work increases, the Office 365 tool now lets you have a corporate meeting with up to 300 people. All these participants can take part in chats or they may call in to attend your meeting.

Of course, there’s much more room for improvement in Teams meetings. It’s obviously playing catch up to Zoom’s Large Meeting feature, which under a special license, may allow between 500 and 1000 participants.

Similarly, there are reports that Teams’ gallery view for video conferencing will soon receive an expansion. Teams video will show up to 49 participants at the same time if the improvement comes to fruition.

Besides Zoom, Microsoft Teams faces stiff competition from Slack, which continues to expand its third-party app integrations. The collaboration platform recently got integrated with several AWS resources, including Chatbot, AppFlow, and Key Management Service.

Are you satisfied with the expanded Teams meetings capacity of up to 300 people? Feel free to share your views in the comments section below.

[wl_navigator]

The new Firefox 78.0 helps you protect your privacy

Mozilla wants to catch up with Google and Microsoft by releasing Firefox 78.0, the most important update in a long time for the old browser.

The new version, Firefox 78.0 is available for Windows, macOS, and Linux, and is accompanied by Firefox ESR 78.0, the first major update for the Extended Support Release browser since Firefox 68.

What’s new in Firefox 78.0?

Firstly, the Privacy Protections screen was renamed to Protections Dashboard. But this is not only a cosmetic thing. It also comes with two new interesting features:

  • You will be able to track the number of resolved breaches directly from the dashboard,
  • You can actually check to see if any saved passwords have been exposed in a data breach.

To access the Protections Dashboard, either type about:protections or just click on the little shield from the left of the address bar and select Protections Dashboard from the drop-down menu.

Firefox 78 protection dashboard

They also added a new Refresh button to the uninstaller. You don’t need to uninstall and reinstall Firefox to fix any problems. The Refresh button will reset all add-ons and settings.

Another new improvement, or more like a patch, is that your screen saver will not interrupt WebRTC calls on Firefox anymore.

If you’ve got an Intel GPU and a Windows 10, you’ll be able to enjoy WebRender for improved graphics performance.

Another interesting addition is within the context menu when right-clicking a tab. If you do that you will see the Close Tabs to the Right and Close Other Tabs into a sub-menu called Close Multiple Tabs.

Firefox 78 close multiple tabs

What are the Firefox 78.0 ESR improvements?

We list some of the Firefox 78 ESR improvements as listed by Mozilla:

  • Kiosk mode
  • Client certificates
  • Service Worker and Push APIs are now enabled
  • The Block Autoplay feature is enabled
  • Picture-in-picture support
  • View and manage web certificates in about:certificate

Do you use Firefox? What do you think about the new version? Leave us your opinion in the comments section below.

[wl_navigator]

Microsoft launches emergency security updates to fix codecs

Usually, security updates come in the notorious Patch Tuesday (the second Tuesday of the month), but Microsoft just released two new, out-of-bound security updates.

That is two weeks before Patch Tuesday and gives us some idea about the CVE vulnerabilities importance and the urgency of the updates.

CVE-2020-1425 and CVE-2020-1457 are two security vulnerabilities or remote code execution vulnerabilities as Microsoft calls them.

The vulnerabilities affect the Windows Codecs Library for all Windows 10 versions and Windows Server versions.
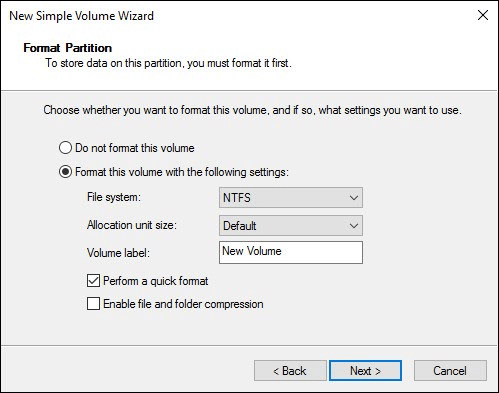
How can CVE-2020-1425 and CVE-2020-1457 be exploited?

Both vulnerabilities exploit a vulnerability in the way that Microsoft Windows Codecs Library handles objects in memory.
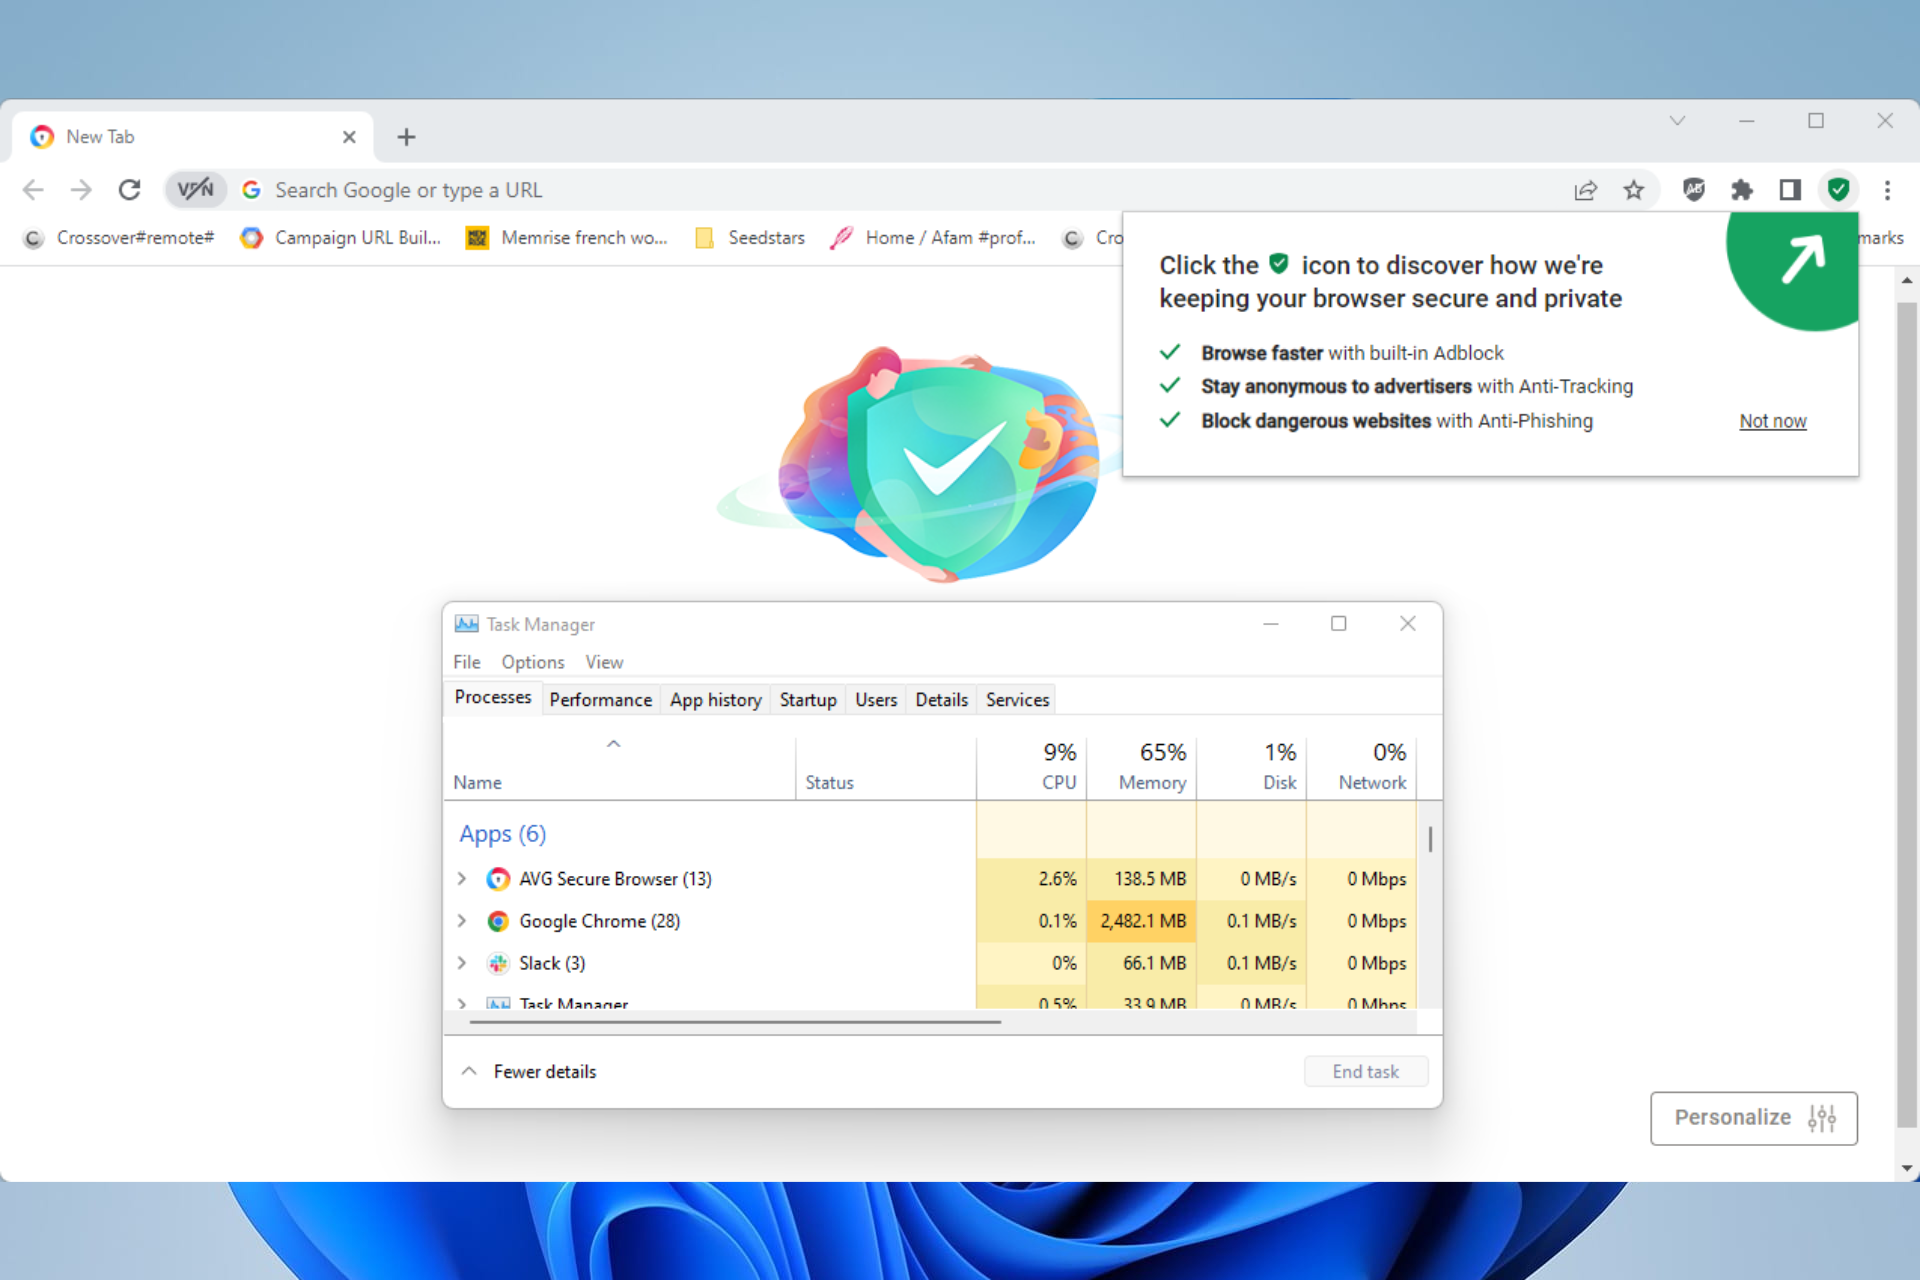
CVE-2020-1425 is a critical vulnerability and the attacker who would exploit it could obtain information to further compromise the user’s system.
CVE-2020-1457 is listed just as important but it sounds just as dangerous as the attacker who exploits this vulnerability could execute arbitrary code.

Microsoft specifies that the vulnerabilities were not publicly disclosed, have not been exploited, and are less likely to be exploited.

What is the exploitation method for the vulnerabilities?

Apparently, to benefit from this bug, the attacker sends a specially crafted image file that needs to be processed by a program on your computer.

The good news is that you don’t need to do anything to patch your system. The Windows Media Codec will be updated automatically through the Microsoft Store.

Affected customers will be automatically updated by Microsoft Store. Customers do not need to take any action to receive the update.

Alternatively, customers who want to receive the update immediately can check for updates with the Microsoft Store App; more information on this process can be found here.

What do you think about Microsoft’s latest updates? Tell us all about it in the comments section below.

[wl_navigator]