Differences between System32 and SysWOW64 in Windows 10/11

If you were ever curious and have browsed the content of your computer from time to time, you may have noticed something interesting.

Those of you that have a 64-bit version of Windows 10 installed have 2 folders labeled Programs, the only difference being that one is also noted with (x86) at the end.

Besides these 2 folders, 64-bit versions of Windows also come with two separate DLL library folders, known as System32 and SysWOW64.

Many of you may be curious as to what precisely is the purpose of these folders. That is precisely why we’ve created this article: to explain the difference between System32 and SysWOW64 folders in Windows 10.

System32 vs SysWOW64 in Windows 10

1. System32

System32 contains Windows system files, both .DLL library files used by programs and .EXE program utilities which are a part of Windows. Additionally, most of the files that are present here belong to the Operating System.

However, third-party applications can come with their own DLL files, and they can be stored here as well.

Finally, regardless of where you actually install a program, the system-wide libraries that they use ar regularly located in System32 and SysWOW64.


For fixes related to missing .DLL files, check out this in-depth guide


2. SysWOW64

The 64 in the name actually refers to the fact that it can also contain Microsoft’s Windows 32-bit on Windows 64-bit software, which is a part of the operating system.

This is what lets Windows to run 32-bit programs on a 64-bit version of Windows.WoW64 automatically redirects file access to ensure programs will work properly.

There are two possible scenarios when installing a program:

  1. If you install a 32-bit program on a 64-bit version of Windows and it tries to write to the C:\Program Files folder, WoW64 directs it to C:\Program Files(x86)
  2. If it wants to access the C:\Windows\System32 folder, WoW64 points it at C:\WindowsSysWOW64
    • Windows does this by itself using a file system redirector

3. System32 and SysWOW64

On a 32-bit computer, the data is stored as follows:

  • 32-bit programs store their files in C:\Program Files
    • The system-wide library location is C:\System32

On a 64-bit computer, the data is stored as follows:

  • 64-bit programs store their files in C:\Program Files
    • The system-wide C:\Windows\System32 folder contains 64-bit libraries
  • 32-bit programs store their files in C:\Program Files (x86)
    • The system-wide folder is C:\Windows\SysWOW64

Why are the names so confusing?

In the end, it seems that it all boils down to habits and hardcoding. 32-bit applications were hardcoded to use the C:\Windows\System32 directory.

When they were recompiled for 64-bit versions of Windows, developers continued to use the C:\Windows\System32 directory. As such, the library kept its name in order to avoid complete coding overhaul.

If you want more articles about the most commonly-asked questions,  let us know in the comments section below.

RELATED ARTICLES YOU SHOULD CHECK OUT:

FIX: Folder isn’t Compressing on Mac

Compressing files and folders is a solid way to save space or to group files that you want to send. However, many Mac users reported that folders are not compressing on their Mac. This can be an annoying problem, but there’s a way to fix it.

What to do if folders won’t compress on Mac?

1. Check the folder permissions

Sometimes this issue can be caused by your folder permissions, and in order to fix it, you need to change them accordingly. To do that, follow these steps:

  1. Locate the folder that you want to compress, and select it.
  2. Choose File > Get Info. Alternatively, you can use Command + I.
  3. Expand the Sharing & Permissions
  4. Click the pop-up menu next to your user name.
  5. If you’re not logged in as an administrator, you’ll need to click the lock icon and then enter administrator name and password.
  6. Now change your permissions to Read & Write or Read only and save changes.

2. Enter Safe Mode and try to compress folders there

Safe Mode is a great way to troubleshoot issues on your Mac, and several users reported that they fixed this problem simply by entering Safe Mode and compressing their folders there. To enter Safe Mode, do the following:

  1. Restart your Mac.
  2. As soon as you restart it, press and hold the Shift key.
  3. Hold the Shift key pressed until you see the login window.
  4. Now enter your login credentials.
  5. Once you enter Safe Mode, try to compress the folder.

If everything works in Safe Mode, restart your Mac and check if the problem still appears.

3. Use the Terminal

Sometimes using the Terminal might be a good workaround for this problem. To compress folders with Terminal, do the following:

  1. Open the Terminal.
  2. Use one of the following commands:
    • zip -r name_of_the_archive.zip path_to_the_folder
    • tar -zcvf name_of_the_archive.tar.gz path_to_the_folder

Bear in mind that using the Terminal is just a workaround, and it won’t fix the core problem.

There you go, several quick and easy methods that can help if you can’t compress folders on Mac. If you found this guide useful, let us know in the comments below.

Windows 7 ATM upgrade will end up costing banks a fortune

Microsoft started the year 2020 by ceasing support to one of their most-used OS: Windows 7.

This change has plenty of ramifications, since now day-to-day users, companies and a variety of machinery are now forced to upgrade to Windows 10.

For example, ATM owners have been warned they should upgrade their machines to Windows 10, or they will risk the security of all of their cards and banking transactions. Criminal activity is not on a down-low.

Hackers are constantly updating their tactics, and choosing to keep ATMs with an outdated OS, such as Windows 7 (or even Windows XP) will turn them into sitting ducks.

The costs of maintaining an ATM on Windows 7

Of course, there is always the option of getting the much more expensive Windows 7 Extended Support if they want to continue being safe.

Unfortunately, migrating is easier said than done since the migration process is not that simple. Not only does it take time to complete, but it is also a very costly endeavor.

However, if ATM owners are to choose between two expenses, they should at least go with the lesser one. Direct sources state that:

[…] although Microsoft has announced that extended support will be available for Windows 7, the cost is rumored to be at least $800 per ATM, per year.

Unfortunately, upgrading to Windows 10 won’t be cheap either. Besides the license costs, manufacturers will also have to do hardware upgrades to their machinery.

As far as upgrades are concerned, banks and credit unions have only 3 options:

  • Replace the ATM’s cores
  • Replace the entire ATM fleet
  • Outsource the ATM fleet

Which method do you think banks and credit unions should take? Leave your opinions down in the comment section below.

Google’s Ditching Chrome App Support For Windows

Come June 2022, and there’ll be no more support for Chrome Apps across all platforms, from Windows and Mac to Linux and Chrome OS, Google has announced. But the end of support for Chrome applications onWindows 10 comes a little sooner—June 2020.

Windows 10 users on Chrome Enterprise and Chrome Education Upgrade may opt to extend support through the end of 2022. Google isn’t withdrawing support for Chrome extensions.

The shift from Chrome apps to PWAs

A big question in the minds of Chrome apps users is why Google would want to ditch the platform when native apps are still very popular. The growing popularity of progressive web applications (PWAs) is a plausible explanation.

When Google launched Chrome Apps, it made it clear that its main objective was to provide a user experience not possible with native apps. In the past, the company has encouraged Chrome App developers to start focusing on PWAs.

While Chrome apps can work on multiple operating systems, they’re still platform-dependent. As such, they have a limited reach. PWAs don’t have such shortcomings as they’re deployed directly on the Web, which is OS-independent, and accessed via browsers.

Google believes that modern browsers have come of age, and PWAs can bring the best of native apps and websites.

The progress of modern browsers puts the Web in a good position to answer the vast majority of use cases…We are confident that the Web can deliver first class experiences on an open platform.

What next for Windows 10 users?

Google continues to collaborate with other stakeholders to develop platforms that leverage open Web standards to deliver better experiences, according to Google. So, as browser technologies advance, Windows 10 app developers are increasingly availing the tools necessary to create solutions that target wider audiences than possible with just native apps or web pages.

On the other hand, PWAs can deliver to Windows 10 end-users the ease of access of the Web and the immersive experiences that native apps provide.

US Homeland Security warns you to stop using IE entirely

Microsoft‘s Internet Explorer Zero-Day  is now the subject of talks in an advisory from the US Department of Homeland Security. The Cybersecurity and Infrastructure Security Agency (CISA) stated in the advisory that attackers can now gain control of devices by maneuvering around a vulnerability within the browser.

As you may already know, Internet Explorer is no longer the default browser that comes with Windows 10. The built-in browser solution is Chromium-based Edge now. Unfortunately, compatibility issues make it so that IE still comes as part of the default installation of Windows 10.

In fact, the Agency went ahead and started urging the population to stop using Internet Explorer entirely. This went on to the point where they slowly started migrating users to the newer browsers themselves.

You need to stop using Internet Explorer

CISA went on and added that:

Microsoft has released a security advisory to address a critical vulnerability in Internet Explorer. A remote attacker could exploit this vulnerability to take control of an affected system. According to the advisory, ‘Microsoft is aware of limited targeted attacks,[…]

The bottom line of CISA’s recommendations is that you switch to a new browser entirely, regardless of which one it is.


Looking for a browser that is safe, secure, and keeps your data private? Check out UR Browser!


The agency further explained:

The Cybersecurity and Infrastructure Security Agency (CISA) encourages users and administrators to review Microsoft’s Advisory ADV20001 and CERT/CC’s Vulnerability Note VU#338824 for more information, implement workarounds, and apply updates when available. Consider using Microsoft Edge or an alternate browser until patches are available,[…]

However, you need to remember that even if you do switch to another browser, you are still vulnerable because of the apps that use Internet Explorer’s engine. Microsoft has taken note of the bug, and is currently in the process of patching it. However, no information on an actual release date is available.

What browser did you switch to after abandoning Internet Explorer? Tell us more in the comment section below.

Windows 10 S mode blocked for thousands of users

If you cannot disable Windows 10 S Mode, don’t panic. There is nothing wrong with your computer, this is just another technical issue on Microsoft’s end.

Thousands of users cannot switch out of Windows 10 S mode

The issues started to affect a large number of users on January 19 and the big M has yet to fix it. This is how one user describes this issue:

Just got a windows surface laptop refurbished. Has Windows 10s . Have tried all the options to switch out and still no luck.
Microsoft store lets me push the GET button but nothing happens. Trying anything around the command prompt is blocked because of S mode. Microsoft store is latest version. All windows and store update done.

However, the good news is that the company officially acknowledged the problem and confirmed its engineers are working on a fix.

We are aware of the reports of people not being able to switch out of S mode right now. Please wait for a day or two and the issue would be hopefully resolved. Appreciate your patience.

Although the OP hasn’t been able to fix this issue by applying the latest updates, some users were luckier. After they contacted Microsoft Support and the support engineers installed the latest updates on their computers, the issue was quickly solved.

I worked with MS Technical Support today and they resolved this issue for me by applying Windows updates to my computer.

So, if you haven’t updated your computer in a while, try installing the latest updates and this quick workaround might solve your Windows S Mode issue.

It seems this Windows 10 S Mode issue is a recurrent problem for Microsoft. As a quick reminder, this bug affected many users in August as well.

We’ll update this post as soon as new information is available.

Microsoft Surface devices are now easier to fix

Microsoft has been sparing no effort to make its Surface line of laptops easier to repair. The repairability of these devices is a major consumer pain point today. But with the unveiling of the much improved Surface Laptop 3 last October, it appears that the world’s leading software maker has started to address the problem.

The main issue with irrepairable Surface devices

According to a professional assessment by iFixit, Laptop Surface 3 predecessors are not designed to be opened or fixed. These devices have a zero repairability rating on the website.

You can’t get inside without inflicting a lot of damage. The CPU, RAM, and onboard storage are soldered to the motherboard, making upgrades a no-go.

With Surface laptops facing stiff competition from devices like MacBook Air, Dell XPS 13, and HP Spectre x360, Microsoft had to do something to remain competitive. The company had to find the perfect balance between elegant design, performance, and repairability. Laptop Surface 3 appears to address these three issues.

What makes Laptop Surface 3 easier to fix

Laptop Surface 3 features several detachable parts, something that lacked in its predecessors. For example, it has removable storage. Instead of soldering internal components to the motherboard, Microsoft uses simple magnets to hold these parts together.

The new Laptop Surface design is music to the ears of hardware technicians and DIY computer repair enthusiasts since it makes it easier to replace or fix removable components. The device is expensive, so lowering its maintenance costs by making it repairable endears it more to many Surface users.

As if to give the thumbs up to the latest Surface design, iFixit gave the device a repairability score of five. That’s way better than any score that Mac devices have ever got on the website. Many users still consider MacBooks to be a lot difficult to open or fix.

Microsoft is undoubtedly on the right path toward reaching the laptop repairability standards that rivals like HP or Dell have set.

READ NEXT:

Top 5 ways to customize your Outlook experience

Outlook is one of the core desktop applications in Office 365. Many businesses and individuals use it daily to send out emails and keep tabs on meetings with clients, coworkers and much more. However, it is also one of the most customizable apps in the Office 365 suite. In this guide, we’ll show you our top 5 favorite ways to customize the Outlook experience.

1: Use the Dark Mode

Dark mode is a common feature on most apps and operating systems, and Outlook supports one too. The Dark Mode option can be enabled in Outlook by heading into the File tab along the top of an open window, choosing the Office Account option, and picking Black from where it says Office Themes. This makes emails a lot easier to read, as it gets rid of all the white space and turns almost all of the user interface inside Outlook into a darker color.

2: Add a Signature

Just like when you sign for a UPS or FedEx package in real life, your signature is your identity. It helps distinguish who you are and is truly personal. Well, you also can also add a signature to your emails to give them a little extra personal touch. You can do this by opening an email as if you were replying to it, going to the Message menu, selecting Signature and choose the Signature option. You can then look for a signature to edit, and choose one, and then press save.  Now, your emails will have a different look to it.

3: Customize your Calendars

Third on our list are some ways to customize your Outlook Calendar. The Outlook Calendar can help keep you organized and manage appointments, but you also can tweak calendars to make Outlook more personal. You can see multiple timezones by clicking the File tab inside the Outlook desktop app, and head to the third option in the window for Calendar. You also can create a secondary calendar to separate out work from personal life. You can do this by opening the Outlook Calendar, clicking the Home button in the ribbon, and then clicking Open Calendar in the ribbon. After you do that, you can select Create a new Blank Calendar and name it in the option that says Create new Folder.

4: Create Contact Lists

Emailing in Outlook involves reaching out to people you’re frequently in touch with, and so you might want to customize your experience with a Contact List in the Outlook desktop application. Thanks to Contact Lists, you’ll be able to logically organize your contacts and find them more easily. You can do this by clicking the People icon in the navigation bar on the bottom left side of the screen. Next, you’ll want to click on Folder, and then the New Folder option on the top right corner of the screen. You can then Fill out the fields, and enter a name for your contact list. You’ll also want to select contact items from the menu that says folder contains.

After you set up a list, you also can send out an email to that list. This will make it easier to send out a bulk email, without having to manually enter in the emails one by one. You can do this by selecting the To box, and then typing in the name of the List. You also can click Address Book from the menu and choose your List from where it says Address Book and then click the To button, to select the names in the List. And when finished, click OK. 

5: Add multiple accounts

Auto Draft

Unlike the web-based version of Outlook, the Outlook desktop application lets you deal with multiple accounts. This means you can add a personal account right alongside your work account, and have one hub for all your emails. You can do this by heading to the File menu in Outlook and clicking on the Add Account button. You can then type in your email address in the pop-up Outlook box. You can end by pressing on the blue Connect button and putting in your password. Once done, you’ll see your secondary account in the Outlook sidebar.

Check out our other guides for more!

This guide just touches on our top 5 tips for customizing the desktop version of Outlook. There’s a lot more than you can do. We’ve covered the topic extensively and have looked at how you can translate emails, solve problems with attachments, dismiss past reminders, and even recall emails. Keep it tuned to OnMSFT, and feel free to share your Outlook tips in the comments below.

How to hide the Bing photo of the day

Bing’s design has changed substantially since its release in 2009. However, the search engine is still easily recognised by its distinctive background images. Each day, the Bing team selects another photo to showcase to the world, usually highlighting a place, animal or cultural event.

Bing homepage on 15-01-2020

While these photos tend to be visually striking, they may also be a distraction depending on where and how you use Bing. If you’re tired of seeing the photos, or they look out-of-place in your office, you’ll be relieved to know they can be turned off.

Screenshot of disabling Bing homepage image

Click the hamburger menu at the top-right of Bing’s homepage to view the search engine’s settings. At the bottom of the list, click the “Show homepage image” button so it toggles into the off position. The homepage image should vanish and be replaced by a flat grey background.

Unfortunately, there’s no way to customise this background any further. That means you can’t opt to add your own picture or use a dark theme that’s easier on the eyes. The choice is between photo of the day or a glaring white expanse when the image is switched off.

photo of the day information on Bing homepage

Bing does you give two other customisation options: Show menu bar and Show news and interests. The menu bar option hides the menu at the top-left of the screen, which includes links to Bing Images and Microsoft’s Office web apps. Hiding the news and interests feed will remove the News ticker at the bottom of the screen.

Even with the homepage background turned off, you can still see what the image of the day is. Just scroll down the homepage with your mouse wheel to see the photo and some information about what it depicts.

Fix Onedrive error code 0x8004de34 with these steps

Microsoft OneDrive client for PC can throw some errors every now and then. One such error is the Onedrive error code 0x8004de34. It occurs when OneDrive fails to recognize the Microsoft account used to set up the client.

Several users have reported a similar error in the Microsoft Community forum:

I have a pop up which keeps demanding I sign into one drive on my pc butg the e-mail it asks for is one I deleted and there is no account under that e-mail so when I type in  the current e-mail account for Microsoft it just circularly directs me back to sign in with the ole defunct e-mail account it gives an error message;error code 0x8004de34.

If you are also troubled by this, here are a couple of troubleshooting tips to help you resolve the OneDirve sign in error.

How can I fix OneDrive error code 0x8004de34 in Windows 10?

1. Unlink and relink the OneDrive account

Onedrive error code 0x8004de34

  1. Launch Microsoft OneDrive if not already running.
  2. Click the small arrow icon on the Taskbar to show the hidden icons.
  3. Right-click on Microsoft OneDrive icon.
  4. Select Settings from the options.
  5. On the Microsoft OneDrive setting window, open the Account tab.
  6. Click on Unlink this PC link.
  7. When a pop-up dialogue box appears, click on Unlink Account.
  8. Next, you will see the setup OneDrive screen.
  9. Enter your email address associated with the OneDrive account and click on Sign in.
  10. Enter your password when prompted.
  11. Complete the setup process and check if the error is resolved.

2. Reset the OneDrive client

Onedrive error code 0x8004de34

  1. Click on Start and select Settings.
  2. Go to Apps > Apps and Features.
  3. Search the OneDrive app using the search bar.
  4. Click on the OneDrive app from the list.
  5. Click on Advanced Options.
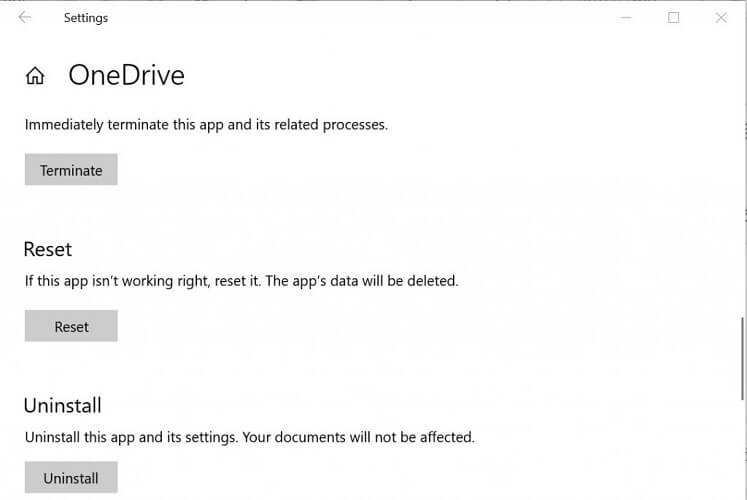
  6. Scroll down and click on the Terminate button. This will kill any OneDrive process that is still running.
  7. Scroll down and click on Reset. When asked to confirm click on Reset again.
  8. Restart your computer and check for any improvements.

If you’re having trouble opening the Setting app, take a look at this article to solve the issue.


You can also reset the OneDrive app using the following command.

Onedrive error code 0x8004de34

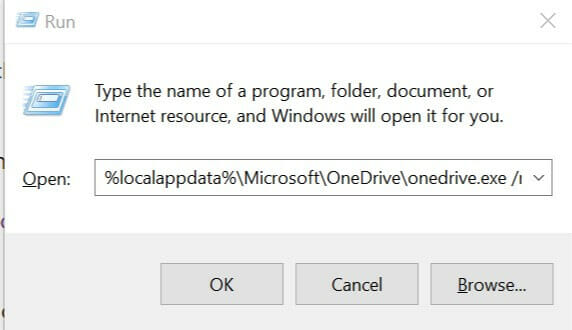
  1. Press Windows Key + R to open Run.
  2. In the Run dialogue box type the following command and click OK to execute it:
    %localappdata%MicrosoftOneDriveonedrive.exe /reset.
  3. Press Windows Key + R again and type the following command:
    %localappdata%MicrosoftOneDriveonedrive.exe /reset.
  4. Click OK to run it.

Resetting the OneDrive client has helped several users resolve connectivity issues related to Microsoft OneDrive.


3. Uninstall and reinstall OneDrive

Onedrive error code 0x8004de34

  1. Click on Start and select Settings.
  2. Go to Apps > Apps and Features.
  3. Search for OneDrive using the search box.
  4. Click on the OneDrive app.
  5. Click on the Uninstall button.
  6. Click on Uninstall when asked to confirm.

Reinstall OneDrive

You can either install OneDrive directly using a OneDrive installer copy saved in the Windows folder or you can download it from the Microsoft Store. Here is how to do it.

Install from the Windows folder

Onedrive error code 0x8004de34

  1. Open the File Explorer and navigate to the following location:
    C:WINDOWS
  2. Next, search for OneDrivesetup.
  3. Double-click on OneDriveSetup installer from the search result and proceed with the installation.
  4. You can also install the latest version of the Microsoft OneDrive client from the Microsoft Store.

Not being able to sync the OneDrive client can be counterproductive for many people. By following the steps in this article, you can resolve the Onedrive error code 0x8004de34 in no time. Let us know which solution helped you resolve the error in the comments.

RELATED STORIES YOU MAY LIKE:

Fix: OneDrive cannot remove file – error code 6009

If you are trying to delete a file from the OneDrive folder, you may encounter the OneDrive cannot remove file – error code 6009 message. This message usually occurs if someone is editing the file you are trying to delete.

However, there can be other reasons for the issue as well. Several users have reported similar issues in the Microsoft Community forum. One user said:

I cannot delete a file. Its showing error 6009. I am the only user and i closed all ms/office apps, signed out of microsoft & restarted my pc — still unable to delete the file.

If you are also troubled by this error, here are a couple of troubleshooting tips to help you fix OneDrive cannot remove file error code 6009 successfully.

How do I fix OneDrive error code 6009?

1. Quit OneDrive

OneDrive cannot remove file error code 6009

  1. Quit OneDrive
  2. Click the small arrow icon on the Taskbar to show the hidden icon
  3. Right-click on the OneDrive icon
  4. Select the Close One Drive option
  5. Now try deleting the file and check if the error is resolved

2. Close MS Office processes

OneDrive cannot remove file error code 6009

  1. Check if other users in your organization have the file open and working on it.
    • If not, close all the Microsoft Office applications and reboot the computer.
  2. After the restart, try deleting the file and check for any improvements.

Windows won’t end a task in Task Manager? Count on us to solve the problem.


3. Boot into Safe Mode

OneDrive cannot remove file error code 6009

  1. Press Windows Key + R to open Run
  2. Type msconfig and click OK to open System Properties
  3. Select the Boot tab
  4. Under Boot Options, check the Safe Boot box
  5. Click Apply and OK to save the changes
  6. When the System Configuration prompts you to restart, click on Restart
  7. After the restart, open the folder and try to delete the OneDrive file
  8. To exit Safe Boot, open System Configuration again
  9. Uncheck the box Safe Boot box and click Apply

Safe mode is not working? Don’t panic, this guide will help you get past the booting problems.

4. Reset OneDrive

reset onedrive


  1. Click on Start and select Settings
  2. Go to Apps > Apps and Features
  3. Search for the OneDrive app
  4. Click on OneDrive and select Advanced Options
  5. Scroll down to the Reset section and click the Reset button
  6. Confirm the action and click on Reset again
  7. Reboot the computer and check for any improvements

If you’re having trouble opening the Setting app, take a look at this article to solve the issue.


Alternatively, you can also reset the OneDrive client by executing the following command:

OneDrive cannot remove file error code 6009

  1. Press Windows Key + R to open Run
  2. In the Run box type the following and click OK:
    %localappdata%MicrosoftOneDriveonedrive.exe /reset
  3. Once reset, reboot the computer and check for any improvements

If none of the above steps helped you, try updating OneDrive. You can do it by launching an Office app and then go to File > Account > Update Options.

Also, check for any pending Windows updates. If the issue persists, uninstall and reinstall the OneDrive app to fix the issues.

The OneDrive cannot remove file error code 6009 error occurs when you try to delete a file that is in use. Follow the steps in this article to end the process and delete the file successfully.

How you ever bumped into error code 6009 while using OneDrive? Tell us what method you used to get rid of it in the comment section below.

RELATED STORIES YOU MAY LIKE:

Fix OneDrive’s sync .ds_store error with these simple steps

At times, Microsoft OneDrive may stop syncing with your Microsoft account and show .ds_store error. Several users have reported similar OneDrive sync .ds_store error in the Microsoft Community forum:

Hi, I have this issue on my mac: onedrive sync is blocked by .ds_store files. Onedrive is up to date. Mac OS is up to date. Using Office for Mac also up to date.

If you are also troubled by this, here are a couple of troubleshooting tips to help you resolve the OneDrive sync .ds_store error in macOS.

What can I do if my OneDrive client shows sync .ds_store error?

1. Fix hidden issues with a terminal command

Onedrive sync .ds_store error

  1. Open your Applications folder.
  2. Click on the Utility folder.
  3. Double-click on Terminal to launch it.
  4. Alternatively, you can also press Command + Spacebar to launch Spotlight. Type Terminal and click on the search result to launch Terminal.
  5. In the Terminal, enter the following and hit enter:
    find /users/username/onedrivepath/ -name “.DS_Store” -depth -exec rm {} ;
  6. In the above commnd “/users/username/onedrivepath” is the path being synchornized for OneDrive, so change it accordingly.
  7. Once the command is executed, relaunch the OneDrive client and check for any improvements.

Note: If you are unable to get the right path for the offending folder, try this. After launching the Terminal, type find and hit enter. Now drag and drop the offending folder onto the terminal window. The terminal will automatically detect the folder path.

2. Stop .sds_store files from syncing

Onedrive sync .ds_store error

Note: This step requires you to have Office 365 admin access.

  1. Quit OneDrive if running.
  2. Open OneDrive Admin Center on your browser.
  3. In the One Drive Center, go to Sync Settings.
  4. Check the “Block Syncing of Specific File Types” option.
  5. Next, enter .ds_store in the given field.
  6. Save and exit the account.
  7. Now go to Applications > Utilities.
  8. Double-click on Terminal to open it.
  9. In the Terminal type the following command and hit enter:
    defaults write com.apple.desktopservices DSDontWriteNetworkStores true
  10. Now launch a web browser and log in to your OneDrive account online.
  11. Search for all the .ds_store files and delete them.

By following the second step you can eliminate any possibilities of getting the error again.


3. Manually delete the files

Onedrive sync .ds_store error

  1. If the issue persists, try to delete the .ds_store files manually from the OneDrive folder.
  2. Open the OneDrive folder and then find all the .ds_store files.
  3. Delete the problematic files from the folder.
  4. If you are unable to delete the files, do the following.
  5. Create a new folder and move all the sub-folders and files onto the new folder.
  6. Once the files are moved, delete the offending folder completely.
  7. Now try to sync again and check for any improvements.

The ds_store files generated by the OneDrive for Mac results in the Onedrive sync .ds_store error. By following the steps in this article, you can resolve the error in no time.

If you have any additional questions or suggestions, don’t hesitate to leave them in the comments section below.

RELATED STORIES YOU MAY LIKE:

Fix: Server does not support current authentication protocol

While trying to access any of the Microsoft Office apps, you may encounter this server does not support authentication protocol error. The full error reads: The server you are trying to access is using an authentication protocol not supported by this version of office.

This error can occur with the OneNote app or on OneDrive for Business during the synchronization process. Several users have reported similar issues in the Microsoft community forum as well:

I have windows 10 pro and office 2016 with this problem, it won’t syncronise ondrive buiseness nor OneDrive private , i have another pc with windows 10 home and office 2016 where syncronising works fine, please help!
If you are also troubled by this error, here are a couple of troubleshooting tips to help you resolve this error on your PC.

How do I fix the server authentification protocol error?

1. Add Office 365 account

server does not support current authentication protocol

  1. Start an Office application apart from the one you are experiencing the problem with
    • So, if you are getting the error with OneDrive client, open MS Word
  2. Click on File and select Account
  3. Under the User Information section, click on Switch Account
  4. Next, click on Add Account
  5. Enter the details for your Office 365 account that is associated with OneDrive for Business
  6. Sign out for any accounts other than the Office 365 account that uses OneDrive for Business
  7. Close MS Word
  8. Click the small arrow icon in the Taskbar
  9. Right-click on OneDrive for Business and select Exit
  10. Relaunch OneDrive for Business from the Start menu
  11. Right-click the OneDrive for Business cloud icon in the taskbar
  12. Select Sync now
  13. Check if the server not supported error is resolved

Looking to increase your productivity? Check out this article and find the top 5 Microsoft Office features to hel you with that.


2. Remove and re-add the accounts

server does not support current authentication protocol

  1. Start an Office application apart from OneDrive or OneNote app
    • For example, start MS Word
  2. Click on File and select Account
  3. Under Connected Services, click on Remove all the services that is not related to Office 365 account
  4. Exit the MS Word application
    • You also need to exit the OneDrive for Business if it is open
  5. Click the small arrow icon in the Taskbar
  6. Right-click on OneDrive for Business cloud icon and select Exit
  7. Open OneDrive for Business app
  8. Right-click the OneDrive for Business cloud icon on the taskbar
  9. Click on Sync Now and check for any improvements.

Try following the above steps in case the first method didn’t resolve the issue.

To make the OneDrive library sync successfully, you may have to remove all accounts that are signed in except the Office 365 account.

3. Update Microsoft Office

server does not support current authentication protocol

  1. Start an Office application like MS Word
  2. Click on File and select Account
  3. Under Office Updates, click on Update Options
  4. Select Update Now
    • Windows will download and install any pending updates for the Office
  5. After the installation is over, launch OneDrive or OneNote and check for any improvements

According to Microsoft, this error occurs due to a software glitch. By removing and re-adding the account, you can resolve it quickly. If not, install the latest version of Office to fix it.

Do you know any other methods to solve the issue that we may have missed out on? Let us know in the comment section below.

RELATED STORIES YOU MAY LIKE:

Can’t Sign into Onedrive on Android: 3 Ways to Fix it

The OneDrive Android app allows users to sync, share, and upload files to their OneDrive account. However, some reported that they couldn’t sign into OneDrive on the Android app, and the error message read, We couldn’t sign you in, please sign in later.

The error arises due to bad connectivity or cache issues. Keep reading to find out the solutions!

How do I fix We couldn’t sign you in on OneDrive in Android?

Before we move on to the complex solutions, try these quick tricks first:

  • Restart the device.
  • Make sure you are connected to the Internet. In case you are using Wi-Fi, switch to mobile data, and vice-versa.
  • Disable any active VPN on the Android device.
  • Make sure the OneDrive servers are not down. You can verify this from the official Microsoft Service Health page.

If none work, head to the fixes listed next.

1. Force stop the OneDrive app

  1. Open Settings on the phone, scroll down to the Apps section, and tap on Manage Apps.
  2. From the list of apps, locate OneDrive and tap on it.
  3. Tap the Force stop option and then tap OK to confirm the action.force stop to fix can't sign into onedrive android
  4. Open the OneDrive again and check for any improvements.

Force closing the app can fix minor bugs that are creating issues with the functionality, including when you can’t sign into OneDrive on Android. Once done, verify whether the We couldn’t sign you in message disappears.

You can also follow our guide on fixing OneDrive stuck on signing in for additional solutions that apply on Windows.

2. Clear cache and app data

  1. Open Settings, go to Apps, and tap on Manage Apps.
  2. Find and tap on the OneDrive app.
  3. Now, tap on Clear Data.
  4. Here you will see two options. First, tap on Clear cache.clear cache
  5. Now open the OneDrive app and check for any improvements.
  6. If the issue persists, select Clear all data this time.
  7. This will delete all the saved data (not your files), like passwords and other temporary items for the OneDrive app.
  8. Open the OneDrive app again and check for any improvements.

Often it’s the corrupt app data that causes problems, and, as a result, you can’t sign into OneDrive on the Android phone. This also helps with Southwest Error: 500120309.

3. Reinstall the app

  1. Open the App Drawer and tap on the OneDrive app.
  2. Select Uninstall and confirm the action.
  3. Once the app is successfully uninstalled, reboot the phone.
  4. Open Google Play Store, search for the OneDrive app, and install it.install OneDrive
  5. Install the app and check for any improvements.

The OneDrive Android app login error may occur due to an incorrect installation, and reinstalling the app should fix the problem. And for those who couldn’t sign into OneDrive on Android earlier, things should now be up and running!

Before you leave, find out how to increase the file upload speed in OneDrive.

For any queries or to share more solutions with us, drop a comment below.

How to open files with Preview instead of Adobe

You aren’t the only one looking for a way to open files with Preview instead of Adobe. Preview comes as the default PDF viewer in Mac OS X.

Just launch Adobe on your Mac and you’ll see that bold prompt asking if you want to set it as the default PDF viewer. Many websites direct you to use Adobe Acrobat Reader to open PDFs, that’s true.

If you hit the Yes button, however, any time you click on a PDF, it will open in Adobe Reader. Using Preview is recommended as it’s both faster and more stable than Adobe.

If you’re not convinced, those user-friendly annotation tools might make you change your mind. See that by yourself.

How can I open files with Preview instead of Adobe?

1. Change Default PDF Reader to Preview

  1. Click on any PDF file in the Finder to select it.
  2. Go to the File menu.
  3. While here, select Get Info.Get Info
  4. In the Get Info dialog box that opens next, use the dropdown menu of applications under Open With to select Preview.
  5. Hit Change All to set all PDFs to open with Preview.Hit Change All
  6. Finally, confirm your change. Remember you can always open a specific PDF file within Adobe Reader, if you’d change your mind.

Note: If you’re tired of having media files open in iTunes on your Mac, then don’t hesitate to change the Default for other file types as well.

Using Preview as the default for .jpg and .png files could save you a lot of time next time when you’re trying to take a look at your awesome vacation photos.


2. Select Preview for individual files

  1. Look for the file in your Finder.
  2. Then, right-click on it to access the contextual menu.
  3. Choose Open with.
  4. Simply select Preview from the menu of suitable applications that you now see.

select Preview

Don’t you like the idea of making Preview the default app in the first place? You may still open individual files in Preview rather than whatever you have set as the default. Just use the steps detailed above to make it happen.

The file association for PDFs on your computer might be changed to Adobe, but who says that it should be your final choice?

Change the Default PDF Reader to Preview, then later set whether Preview opens multiple image files in separate windows or in the same window, and more.

For any other questions or suggestions, don’t hesitate to reach for the comments section below.

READ NEXT:

Windows 10 news recap: Display issues affecting HoloLens 2 being investigated, 95% revenue share for Microsoft Store silently removed, and more

Welcome back to our Windows 10 news recap, where we go over the top stories of the past week in the world of Microsoft’s flagship operating system.

Microsoft is investigating display issues affecting some HoloLens 2 units

Reports about display issues on the HoloLens 2 have been increasing recently. Microsoft has now responded saying that it’s working with customers affected by the issue so that it can understand the underlying cause.

Microsoft quietly removes pledge to share 95% of app revenue on the Microsoft Store

Microsoft’s revenue model of giving 95% of app revenue to developers has been silently removed from its developer agreement.

Microsoft goes all-in on education with new Windows 10 devices, Always Connected PCs, and new features for OneNote, PowerPoint

As part of Microsoft’s renewed push into education, the company is bringing new Windows 10 devices for education, as well as adding new features to both OneNote and PowerPoint that are focused on education. Find out more here.

That’s it for this week. We’ll be back next week with more Windows 10 news.

How to fix common Minecraft Realms issues on Windows 10

Microsoft Realms is one of the most valuable additions to the Minecraft family. The concept is clear: cross-platform servers that let you and your friends enjoy and compete in the private world.

Even though the Windows 10 version of the game is solid in many regards, there are still some issues that need to be addressed.

In order to help you in locating and fixing the most common issues, we prepared a list of solutions and workarounds that should get you started.

If you’re experiencing anything uncommon in the gameplay, make sure to check the list below.

How can I fix common Minecraft Realms issues on Windows 10?

1. Can’t log in

  1. Check the network settings.
  2. Check the live server status, here.fix minecraft realms on windows 10 - MC
  3. Make sure that you’re running the latest version of the game and the server.
  4. Sign out on all devices and try signing in again.
  5. Report the bug, here.

This is more of a general issue than something we can relate exclusively to Realms. Every multiplayer game has its share of issues, and Minecraft isn’t an exclusion.

This solution won’t help you if you can’t log into Minecraft realms, but it will let you determine if the problem is on your end or on the server-side.

2. Can’t connect or join a realm

  1. Use the wired, LAN connection rather than the wireless.
  2. Let Minecraft communicate through Windows Firewall.
  3. Sign out and sign in again.
  4. Forward your ports.
  5. Make sure you have an active subscription.
  6. Disable background programs hogging on the bandwidth.fix minecraft realms on windows 10 - MC
  7. Change your location in the in-game settings.
  8. Load new world.
  9. Send a bug report ticket to Mojang.

The introduction of Realms simplified the online co-op game, with more stable servers that support up to 10 (+1) players in one dedicated world.

It’s always online and it’s a cross-platform feature so you can create or access your realm both with PC or pocket handheld devices. However, certain users bumped into an obstacle when trying to load the realm or join it.

By using this set of guidelines you should be able to fix slow connections in Minecraft Realms, so be sure to follow them.

If you want to increase your bandwidth on Windows 10, take a look at this handy guide.

3. Chat issues

  1. Restart the game.
  2. Sign out and sign in again.
  3. Try an alternative Xbox Live account.fix minecraft realms on windows 10 - MC
  4. Make sure you have needed permissions (parental consent).
  5. Send a ticket to Mojang.

A lot of users reported a quite repetitive problem that concerns the in-game chat. Namely, the only thing they’re able to see is hash signs instead of letters (#####).

This has something to do with a word filter that’s there to block the offensive language. Users that have had issues with the chat are mostly writing in non-English languages, so it seems that the prevention filter is wrongly calibrated.

4. Can’t create a free realm

fix minecraft realms on windows 10 - MC

The main purpose of Realms is to create your own world and play with friends online. There’s a 30-day free trial realm available for newbies, and it should be enough for you to get a hold of the things.

Nonetheless, a lot of users weren’t able to create a free realm due to certain limitations imposed on their Xbox Live account.

Furthermore, the affected users received this message: “You cannot play on Realms because of how your Xbox Live account is set up. This can be changed in your privacy and online safety settings on Xbox.com”

So, the best way to resolve this is to check your privacy and online safety settings. If you’re a minor and need parent consent, make sure to acquire it before proceeding to the creation of the realm.

Finally, if the problem is persistent, make sure to post your problem to the dedicated support site, here.

5. Game is lagging

There are some parts of the Minecraft universe that are quite commonly plagued by laggy behavior and bugs. Requirement-wise, this isn’t a demanding game and it can be run on rather outdated machines by modern standards.

Furthermore, Minecraft Realms isn’t exactly known for lags, as it accompanies dedicated servers. There’s a high probability the problem is on your side, and it’s commonly related to high latency and slow bandwidth.

Game Fire is a game booster that will optimize your system resources for gaming mode and will get rid of freezes, lags, low FPS and other issues while playing. Download it now (free) for a better gaming experience.

So, make sure to check your network settings, restart your router and/or modem, and, contact your ISP if there are additional issues. You can check your speed and latency levels locally (with Command Prompt) or with the Speedtest.

If you’re having issues with a bad connection in Minecraft Realms, you should be able to fix the issue with one of the tips that we mentioned above.

6. Game crashes

Update graphics drivers

  1. Right-click on the Start button and open Device Manager.
  2. Expand Display adapters.
  3. Right-click on your main GPU device and update its drivers.fix minecraft realms on windows 10 - MC

Updating drivers manually can be a hassle, but you can speed this process by using specialized software such as PC HelpSfot Driver Updater. This software will scan your PC and give you a list of drivers that you can update.

The software is automated, and you’ll get access to a database of more than 18 million driver files. Using the application is simple, and you can update all outdated drivers with a single click.

Fortect Driver Updater is a great tool, and if you don’t want to manually search and install drivers, be sure to use Fortect Driver Updater to keep all your drivers up to date.

The tool is fast, easy to use, and very accurate. It uses its own driver database of over 18 million driver files to provide you a perfect match with any device. You can schedule scans and updates and keep your drivers in check at all times.

⇒ Get Fortect Driver Updater

Reallocate extra RAM

  1. Open the game Launcher > Edit Profile.
  2. Check the JVM Arguments box.
  3. In the command line, replace –Xmx1G with -Xmx2G.

Change video settings

  1. Start the game.
  2. Open Options.
  3. Select Video Settings.
  4. Enable Vsync and disable VBOs.
  5. Save changes and restart the game.

Reinstall the game:

  1. Update the game
  2. Reinstall the game
  3. Send a ticket to Mojang.

Another rare but critical issue is game crashing. Taking into account all relevant information, the most common culprits for this are incompatible display drivers, allocated RAM, and certain in-game video settings.

With that, we can conclude this list. We hope that our solutions were helpful if you were unable to connect to realm in Minecraft on Windows 10.

Did we miss a solution that worked for you? Let us know in the comments below.

Microsoft news recap: Mixer nearly has as many channels as Twitch, Xbox working hard on E3, and more

Microsoft news recap is a weekly feature highlighting the top Microsoft news stories of the past week. Sit back, grab some coffee, and enjoy the read!

Microsoft’s Mixer video game streaming service now has almost as many active channels as Twitch

Mixer, Microsoft’s own video game streaming service, is catching up to its largest rival, Twitch, as it now has nearly as many active channels as Twitch itself. Not to mention the number of Twitch streamers that have moved over to Mixer in recent times.

Ninja vidoe game streamer on Mixer.

Microsoft expands Xbox Console Streaming Preview to more markets

Xbox Console Streaming, in preview, is now available in more markets. Xbox Console Streaming allows you to use your Xbox One console as the hardware to run the game, but then play the game on another device, such as an Android phone.

Microsoft announces $1 billion climate fund, plans to remove more carbon than it emits by 2030

In a more environment-focused world, Microsoft has announced that it plans to remove more carbon than it emits by 2030. It feeds into Microsoft’s overall environmental policy and the company is setting aside a $1 billion climate fund to help it achieve its goal.

Xbox team is “hard at work on E3” while PlayStation skips it again

Whilst Sony has announced that PlayStation is yet again skipping out on E3, Xbox is working hard on its own E3 event, confirming Xbox’s presence at the event this year.

That’s it for this week. We’ll be back next week with more Microsoft news.

Fix: Windows Update error 0x8024a105

Keeping Windows 10 updated to the latest version ins extremely important. Not only do you get the latest features as soon as they are made available, but you also benefit from the latest security patches as well.

The update process itself is mostly done via the Windows Update feature which automatically and constantly scans your PC for any missing components.

However, the update process doesn’t always go all that smoothly, and you may encounter the occasional error.

Such would be the case of users that are reporting to have encountered an error message 0x8024a105 when using the Windows Update feature.

Receiving error code 0x8024a105 when attempting update of Windows 10 using automatic update. This update has failed every day for the last two weeks. Tried shutting off anti virus and firewall, but has no effect. Restarted the computer several times and still no success. Not a tech expert so don’t want to work in the registry – any other ideas?

How do I fix Windows Update error 0x8024a105

1. Use the Windows Update Troubleshooter

  1. Press Start
  2. Go to Settings
  3. Select Update & Security
    • This will open the Windows Update menu
  4. Go to Troubleshoot
  5. Select Run the troubleshooterwindows update troubleshooter

2. Reset the Software Distribution Folder

  1. Press Start
  2. Type in PowerShell 
    • This also works with Command Prompt
  3. Right-click it and run it as an administrator
  4. In PowerShell, enter these lines, and hit Enter after each one:
    • net stop bits
    • net stop wuauservcommand prompt distribution software
  5. Press Windows + R and type in the following:
    • C:Windows SoftwareDistribution
  6. Delete all the files in the folderdelete software distribution
  7. Go back to PowerShell, and enter these lines, and hit Enter after each one:
    • net start bits
    • net start wuauserv
  8. Restart your PC

3. Use the DISM tool

  1. Run PowerShell as administrator
    1. This also works with Command Prompt
  2. Type in the following line, and then press Enter:
    • Dism /Online /Cleanup-Image /CheckHealthdism
  3. Once the scan is complete, restart your PC

4. Reset the Catroot2 Folder

  1. Run PowerShell as administrator
    • This also works with Command Prompt
  2. Type in the following lines, and hit Enter after each of them:
    • net stop cryptsvc
    • md %systemroot%system32catroot2.old
    • xcopy %systemroot%system32catroot2 %systemroot%system32catroot2.old /s
  3. Press Windows + R and type in the following:
    • C:WindowsSystem32catroot2
  4. Delete all the files in the folder

catroot

5. Reboot the PC

  1. Press Start
  2. Press the Shutdown button
  3. Select Restart
  4. After the restart, run Windows Update once again

6. Check your Internet Connection

  1. If you are using a Wi-Fi connection, switch to wired
  2. If you are using a wired connection, switch to Wi-Fi
  3. Additionally, you can try unplugging the cable or restarting the router

If all else fails, the most drastic (but efficient) solution is to simply reinstall Windows 10

By following these steps, you will be able to fix Windows Update error 0x8024a105.

Admittedly, some methods are a bit more complicated than others, but keeping your Windows 10 PC can be more damaging in the long run.

For more similar articles about Windows errors, write down what would you like to read about in the comment section below.

RELATED ARTICLES YOU SHOULD CHECK OUT:

Microsoft AU Daemon: What it is and how to remove it

Keeping your programs updated is extremely important. This goes for both your OS, as well as all apps that you have installed on your system. Some programs may even have dedicated sub-programs whose only purpose is to update the base program.

That would pretty much be the story behind Microsoft AU Daemon.

Since not many users know about the program, and since they most probably see it everyday running in the background while they look through the Task Manager, it is easy to understand why some may have their concerns regarding it.

What is Microsoft AU Daemon?

Microsoft AU Daemon is the Microsoft AutoUpdate program that keeps your installation of Microsoft Office up to date. It runs in the background continuously monitoring Microsoft’s servers to see if any update to Office has appeared yet.

It comes installed for each component of the Microsoft Office Suite, which includes:

The reason Microsoft AU Daemon comes installed with each of them is that users may not choose to have the entire suite installed, and thus it is the only way to make sure that at least one instance is available.

How can I remove Microsoft AU Daemon?

Since Microsoft AU Daemon is vital for the functioning of Micorosft Office programs, there is no way you can install it. However, the closest thing to an uninstall that you can do is to disable it. This is good if you are running with limited bandwidth, or if you just don’t want your MS Office updated.

  1. Launch an Office program of your choice
    • In our case, we chose Microsoft Word
  2. Create a blank document
  3. Go to File in the top-left corner
  4. Select Account
  5. A new Windows should now appear
  6. Select Update Optionswindows updates
  7. Select Disable Updates
  8. Confirm your action by clicking Yes
  9. Restart Windows 10

By following these steps, not only will you disable Microsoft AU Daemon for Microsoft Word, but for all other MS Office programs associated with your account.

However, keep in mind that MS Office programs also receive security patches, not just feature updates, so choosing to disable Microsoft AU Daemon comes with its own set of risks.

Do you keep Microsoft AU Daemon running in the background, or do you chose to update your MS Office on your own? Let us know in the comment section below.

Why Windows 7 ATMs need to upgrade to Windows 10/11

Since Microsoft started off the year 2020 by ceasing support for Windows 7, many home users, companies and other machinery are now left using an unsupported OS.

For those still using Windows 7, they should know that they are left with 4 choices:

Whichever the case may be, some users and machines need to do something as soon as possible.

Such is the case with ATM machines that are still running on Windows 7. Since the Windows 7 EOL basically means the end of security updates, security patches, and non-security hotfixes, ATMs will now become ideal targets for hackers.

ATMs need to migrate from Windows 7 immediately

Since these machines work with your credit cards, any break in security could mean that personal and financial information can get leaked. This includes, but is not limited to: your banking credentials, personal information, social security code, credit card PIN, and more.

Upgrading ATMs to Windows 10 comes with plenty of advantages, including:

  • Consistent security updates
  • Your machines will be PCI-ready and up to standards
  • Member experience will benefit from to update
  • You’ll avoid the costs of maintaining an outdated OS
  • You will know your ATMs will be safe and secure until the end of support for Windows 10 in 2026.

Outdated operating system are very appealing targets to hackers. Today’s cyber attacks are getting more and more complex and running an unsupported OS version only increases the risk of getting hacked.

Windows 10 features improved security capabilities, such as Device Guard, that can block malware from infecting ATMs. Moreover, the OS offers excellent ATM fleet management features.

What are your opinions about the machines that perform regular bank transactions still being on Windows 7? Let us know what you think in the comment section below.

Windows 10 gets a new built-in graphing calculator this year

Users of the Windows Insider program have finally received the latest Preview Build, called Build 19546.

Among the many security updates and bug fixes, it also comes with a neat set of features. Besides the Indexer Diagnostics app, Windows 10 Preview Build 19546 brings a graphing calculator for the Windows 10 Calculator app.

When asked about the new feature, a Microsoft official stated that:

It’s a Store update independent of the OS. Goal is to release this to Insiders in the Slow ring who are on 20H1 in a bit.

This being said, no one really knows if the new feature will be part of the 20H1 release, or if it will be postponed some later release.

A graphing calculator that is efficient and looks great

windows 10 graph

Despite the fact that there are plenty of tools and web services that perform pretty much the same, the graphing calculator in Windows 10 is very attractive and also looks very efficient and straightforward.

Now you won’t have to download any third-party tools or visit any website in order to plot or one or more equations on the graph.

Windows 10 Graph Calculator features

The tool has several basic functions that make using such apps easier:

  • You can plot multiple equations at a time
  • You can manually adjust plots
  • Color coding plots is also an option
  • The ability to add a second variable and the list goes on

Admittedly, the app is not probably going to be something everyone will be using regularly. However, it looks attractive enough to make it worth giving a shot out of pure curiosity.

What other new features are you expecting in future Windows 10 builds? Let us know in the comment section below.

Windows 10 Build 19546 bugs: Install issues and driver errors

Windows 10 Build 19546 has already been released for those that are part of the Windows Insider program. This build currently contains the latest features and bug fixes among all available Windows Builds.

On the flip side, it is also the build with the most bugs and issues, and that is why it was first released to users that are part of the Fast Ring, and not straight to Live.

Speaking of which, users have already detected the first round of bugs with Windows 10 Build 19546. That is why we’ve created this article so that you can see for yourself what are the bugs present in the latest Windows 10 Preview Build.

Windows 10 Build 19546 reported bugs

1. Internet Explorer 11 cannot download files

Users reported issues with using Internet Explorer to download any type of file:

IE 11 is still broken. Cannot download and save file. Clicking on “Save” or “Save as” option does nothing.

This is an issue that has been present for a while now. However, keep in mind that Microsoft is slowly migrating users to Microsoft Edge anyway.

2. Issues with the uaspstor.sys driver

The uaspstor.sys driver, a vital component for Windows drivers, is having issues as of the latest Windows 10 Preview Build:

Error message: This device cannot start (Code 10) Not enough quota.
USB attached SCSI Device NS106X
USBVID_2537&PID_1068MSFT300123456789ABCDE

3. Some users are taking a lot of time to update

Despite being just a mere update like any other, some users have reported it took them upwards to 26 minutes to download and 55-minutes to install. While this isn’t an uncommon issue, it is nonetheless bothersome.

4. Some users cannot install the update

A few users have reported that the installation process for Windows 10 Build 19546 suddenly stops at some point:

I can’t get pass %62 in installing it hung up at 62

5. Update download pauses at 6% for some

Several users have reported that their update download would pause somewhere around the 6% mark, and then it would resume without issues.

My desktop machine had some trouble downloading the update this time. It sat unexceptionally long at 6% downloading. I looked at the Perf mon and saw a fault there. TimeZone Sync Task stopped working.


This is more of an inconvenience rather than a problem since the download would resume and proceed normally afterward.

6. This update sends some users into the Windows Recovery environment

Once installed, Windows 10 will not reboot normally back to itself. Instead, it will send the user into the Windows Recovery environment

it’s not letting me install this build like the last one. after windows update downloads and installs it once i restart my PC it starts into the recovery enviorment with “troubleshoot” and “turn off PC” as the only options availible. once i restart the PC it will boot back into windows

Conclusions

These are the most significant issues that have been currently discovered by users of the Windows Insider program regarding Windows 10 Preview Build 19546. Some of the issues are more severe than others, but keep note that the Fast Ring is supposed to receive the versions with the most bugs and issues.
Which of these bugs do you find the most frustrating? Share your opinion with us in the comment section below.

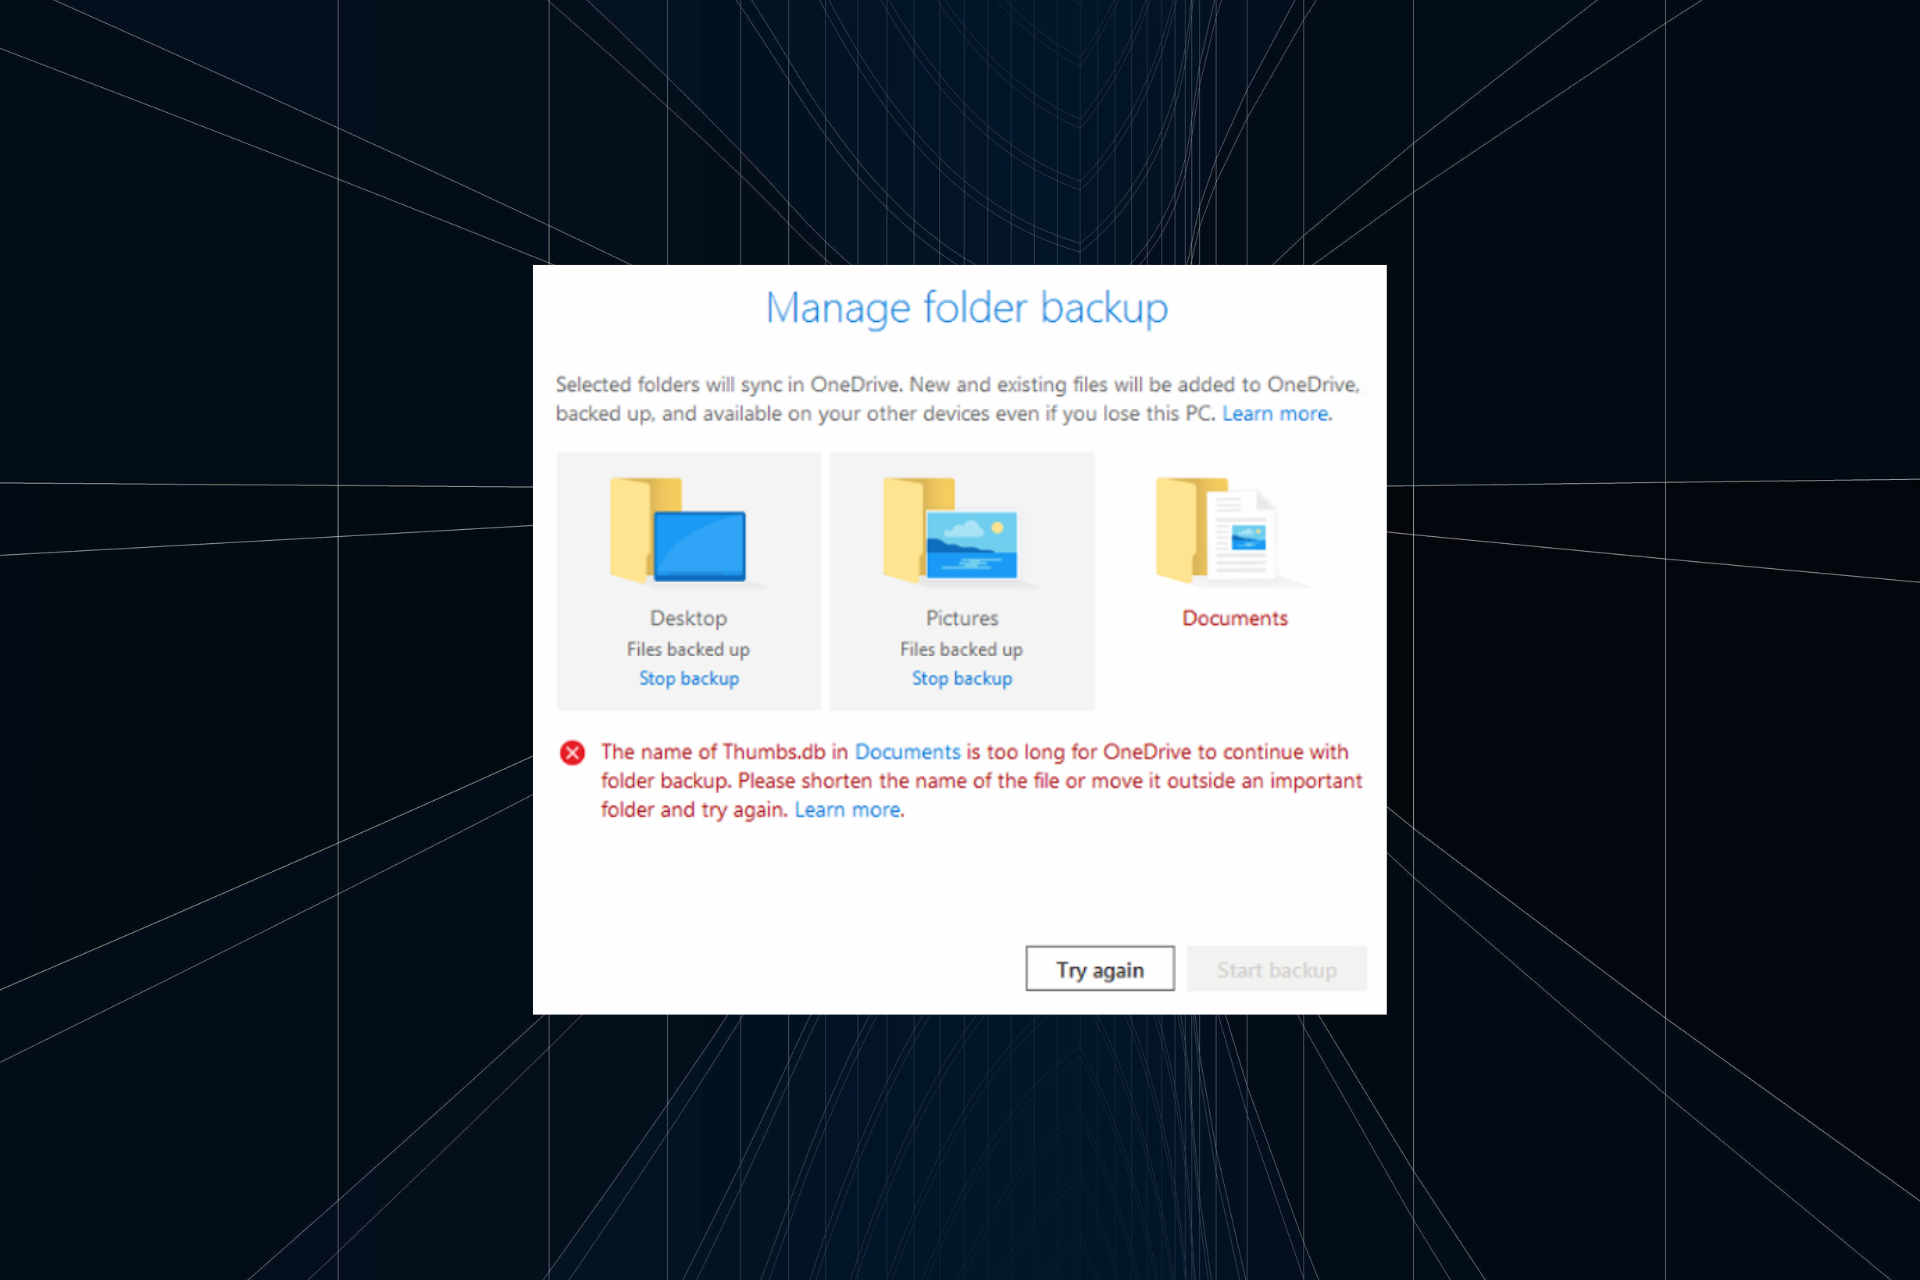
Thumbs.db OneDrive Error: 4 Ways to Fix it

When the OneDrive desktop client encounters sync issues, it may throw the OneDrive thumbs.db error. This error usually occurs due to the invalid file types that OneDrive fails to upload.

The thumbs.db error is often encountered in SharePoint, and the same concept applies to it. Keep reading to find out the solutions that work for both!

How do I force delete OneDrive thumbs.db files?

Before we move to the slightly complex solutions, here are a few quick tricks:

If none work, move to the fixes listed next.

1. Directly from the OneDrive folder

  1. Press Windows + E to open File Explorer, and navigate to the OneDrive folder.
  2. Thumbs.db files are invalid file types and are usually hidden by default. So, click on View, and select Options.
  3. Go to the View tab and choose Show hidden files, folders, and drives and click OK to save the changes.show hidden files
  4. Find all the thumbs.db files in the folder and delete them.
  5. Relaunch the OneDrive client and try to sync.

Since the Thumbs.db files are invalid file types, deleting any file with the extension will resolve the issues related to OneDrive sync.

2. Check for pending updates

  1. Launch the Microsoft Store app and search for OneDrive.
  2. Navigate to the Library, and install any pending updates.update to fix onedrive thumbs.db error
  3. Relaunch the OneDrive client and check for any improvements.

If the issue is occurring due to a bug in the Microsoft OneDrive desktop client, check if Microsoft has released an update to fix the problem.

3. Reset the OneDrive client

  1. Press Windows + R, paste the following command, and hit Enter:%localappdata%\Microsoft\OneDrive\onedrive.exe /resetreset onedrive
  2. Wait for the reset the complete.

Launch the client, proceed with the setup process, and check whether the OneDrive thumbs.db error is fixed.

4. Reinstall the OneDrive client

  1. Press Windows + I to open Settings, go to Apps, and then click on Installed apps.
  2. Click the ellipsis next to OneDrive, and select Uninstall.uninstall OneDrive
  3. Again, click Uninstall in the confirmation prompt.
  4. Restart the computer for the changes to come into effect.
  5. You can reinstall the OneDrive app from the Microsoft Store.

And that’s how you can get rid of the thumbs.db error in OneDrive for good.

Before you leave, find out how to speed up file uploads in OneDrive.

If you have any other questions or suggestions, leave them in the comments section below.

How to fix Outlook can’t upgrade your database error

The can’t upgrade your database error arises specifically for Outlook for Mac. Outlook for Mac users have posted on the Microsoft forum about a Please upgrade the Outlook database dialog box message.

When they click the Upgrade button on that dialog box, an Outlook can’t upgrade your database error message pops up. Consequently, users can’t launch Outlook for Mac when that issue arises.

How can I fix the Outlook database error?

1. Add a new profile

  1. Users have confirmed they’ve fixed the Outlook can’t upgrade your database error by adding a new Outlook profile. To do that on a Mac, click Go on the menu bar.Go menu outlook can't upgrade your database
  2. Select Applications to open the window shown directly below.Applications window outlook can't upgrade your database
  3. Right-click Microsoft Outlook and select the Show Package Contents option.
  4. Click the Contents and SharedSupport folders.
  5. Then click the Outlook Profile Manager to open the window shown directly below.Outlook Profile Manager outlook can't upgrade your database
  6. Click the + button there, and enter a profile title.
  7. Click the cog button icon to select the Set as Default button.
  8. Close the Outlook Profile Manager window.
  9. Open the Outlook for Mac application. Then you can set up an email account for the new default profile.

2. Run the Microsoft Database Utility

  1. The Microsoft Database Utility, which fixes the Office database, might also resolve the Outlook can’t upgrade your database error. First, close Outlook for Mac if it’s open, along with any other Office applications.
  2. Press and hold the Option key and click Outlook on the Dock to open the Microsoft Database Utility.
    Microsoft Database Utility outlook can't upgrade your database
  3. Select the default database on that window.
  4. Then click the Rebuild button.
  5. Click Done after the database rebuilding.

There aren’t many resolutions for the Outlook can’t upgrade your database error. However, adding a new Outlook profile as outlined above is widely confirmed to fix the error. Users who have fixed the same error with alternative methods are welcome to share their resolutions below.

Also, if you have any other questions or suggestions, leave them in the comment section and we’ll be sure to check them out.

RELATED ARTICLES TO CHECK OUT: 

Microsoft takes more jabs at Slack with new NFL Playoffs ad for Teams

As Microsoft Teams becomes more popular, Microsoft wants to solidify the collaboration tool as a better solution for the workplace when compared to Slack. In what The Verge calls a first, the company will be airing a new TV commercial for Microsoft Teams this weekend during the NFL Playoffs, which you can watch below.

The 30-second ad is titled “The Power of Microsoft Teams,” and begins by highlighting how much the “boring” meeting and conference room has evolved over the years. It then shifts to show that, with Teams, employees and companies can invite everyone they work with to meetings, and “be seen, be heard, and be there when you’re not.”


Several features of Teams can be seen throughout the ad, all of which are highpoints of the service when compared to Slack. That includes its integrations and sharing files with Office 365, Microsoft Whiteboard, the background blur feature, and native support for sharing GIFs. Naturally, the video even shows off instances of how Teams complements other Microsoft products in the modern office, such as the Surface Laptop 3, Surface Pro X, and the Surface Hub 2S. The video ends with a tagline obviously aimed at Slack: “When you’re ready to unleash the power of your team, open Teams.”

The ad comes after software company AvePoint announced it secured $200 million in funding to move more customers to Teams, and away from Slack. Slack also previously accused Microsoft of ripping off their ad, so this might as well mark a new moment in the collaboration software rivalry.

How to fix OneDrive’s document library synchronization error

OneDrive sync errors can occur for several reasons. While Microsoft offers a built-in repair tool with OneDrive for Business, it may not be able to fix all the errors. One such bug is An error occurred while attempting to synchronize this document library.

Several users have reported similar errors in the Microsoft community forum as well:

Hi, I am receiving this error when attempting to synchronize my OneDrive for Business library – and I have no idea why.

If you are also troubled by this error, this is the article that you need. In this guide, we have listed a couple of troubleshooting tips to help you resolve syncing issues with OneDrive for Business.

How do I fix the document library sync error in OneDrive?

1. Update the OneDrive client

1.1 Update with Office 365

error occurred while attempting to synchronize this document library

  1. Launch any Microsoft Office app like MS Word
  2. Click on File and select Account
  3. Under Office Updates, click Update Options.
  4. Select Update Now
  5. Wait for Microsoft Office updates to download and install
  6. Launch OneDrive and check for any improvements

1.2 Update standalone installer

error occurred while attempting to synchronize this document library

If you have installed a standalone installer, you may have to install the updates manually:

  1. Click on the OneDrive icon on the taskbar
  2. Click the arrow icon to show hidden icons
  3. On top of the panel, check if it says updates are available
    • Download and install the updates if available.
  4. If it says OneDrive is Up to date, skip the step

After installing the update, reboot the computer before relaunching the OneDrive client.


2. Clear OneDrive cache

error occurred while attempting to synchronize this document library

Note: These steps are for OneDrive for Business users. We haven’t tested it with OneDrive consumer client.

  1. Make sure you have the backup of unsynced files on the OneDrive folder
  2. Click the small arrow icon on the Taskbar to show hidden icons
  3. Right-click on OneDrive and select Pause Sync
  4. Right-click on the OneDrive icon again and select Close OneDrive
  5. Open the Task Manager and close all the Microsoft Office processes
  6. Open File Explorer and navigate to the following location:
    C:UserstashreefAppDataLocalMicrosoftOffice
  7. Now click on the numbered folder, which indicates the office version
  8. Next, open the OfficeFileCache folder
  9. Delete all the files inside the OfficeFileCache folder.
    • Don’t delete the folder itself, but only the files inside
  10. Close File Explorer and open OneDrive client and check for any improvements

3. Reset OneDrive clientreset onedrive


  1. Click on Start and select Settings
  2. Go to Apps > Apps and Features
  3. Search for OneDrive
  4. Click on OneDrive and then click on Advanced
  5. Scroll down and click on Reset
  6. Click Reset again to confirm the action
  7. Alternatively, you can also reset OneDrive by running a command
  8. Press Windows Key + R to open Run
    error occurred while attempting to synchronize this document library
  9. Type the following command and hit enter:
    %localappdata%MicrosoftOneDriveonedrive.exe /reset
  10. Open OneDrive and check for any improvements.

If you’re having trouble opening the Setting app, take a look at this article to solve the issue.


The An error occurred while attempting to synchronize this document library issue can occur due to an outdated version of OneDrive or because of the bad cache. Carefully follow the steps in this article to fix the OneDrive sync issue quickly.

Have you also encountered this OneDrive error? Tell us how you managed to fix it in the comment section below.

RELATED STORIES YOU MAY LIKE:

How to run Windows 10 on a Chromebook

Chromebooks don’t officially support Windows, but this doesn’t mean that you cannot run Windows on a Chromebook. Let us assure you that there are a couple of workarounds to use Windows desktop programs on a Chromebook too.

Google is constantly updating its Chrome OS with new features, but it cannot be compared to Windows, Mac, or even some Linux distributions. That’s why this thought of running Windows 10 on your Chromebook gives you no peace of mind.

Even if Chromebooks ship with a special type of BIOS designed for Chrome OS, you can install Windows on many Chromebook models. We just hope you’re not afraid of those unofficial ways to run Windows.

However, if getting your hands dirty isn’t the best option for you, access to the Office suite might sound like a great alternative. Here we’ll give you detailed steps for both options.

How can I run Windows 10 on a Chromebook?

1. Get the Office suite

  1. Access the official Microsoft Office site from your Chrome browser.official Microsoft Office site


  2. Click on Use Free at Office.com.
  3. Click on Sign In.
    Click on Sign In
  4. You are now asked to enter your Microsoft Account ID and Password.
  5. Up next, you will be taken to the office.com page.office.com page
  6. Click on the application that you wish to use.
  7. You will be redirected to the website of that particular application. Start using the online application there.

If you’re only after getting the Office suite, that’s the easiest solution we’re recommending. Be though prepared for giving up on all other apps offered on Windows 10.

2. Install Windows on your compatible Chromebook

  1. Turn off your Chromebook and flip it over.
  2. Unscrew all the screws at the bottom to remove the plastic panel and gain access to the motherboard.
  3. You must now find the write-protect screw. Remove it.write-protect screw
  4. Then, re-attach the bottom cover of the Chromebook.
  5. You may now press Esc+Refresh+Power while the Chromebook is still powered off.
  6. Your Chromebook will boot up and display a message saying that Chrome OS is missing or damaged.
  7. Press Ctrl+D and Enter to turn OS verification OFF. Then, you’ll boot into developer mode.
  8. You are now ready to flash your Chromebook’s BIOS From within Chrome OS. To open a terminal window, press Ctrl+Alt+T.
  9. In the terminal, type shell and hit Enter to access the more powerful Linux shell environment.type shell
  10. In the terminal window run this command: cd ~; curl -L -O https://mrchromebox.tech/firmware-util.sh; sudo bash firmware-util.sh. This downloads the script file, and runs it with root privileges.
  11. Select the Custom coreboot Firmware (Full ROM) option by typing 3 and Enter.Custom coreboot Firmware
  12. Enter Y to agree to flash your firmware.
  13. Then, enter U to install the UEFI firmware.enter U
  14. The script will offer to create a backup copy of your Chromebook’s stock firmware and place it on a USB drive for you. Agree to that.
  15. After the backup process is finalized, the script will download the replacement Coreboot firmware and flash it onto your Chromebook.
  16. Power the Chromebook off.
  17. You may re-install the write-protect screw if you want.
  18. Go to the microsoft.com website.
  19. Click on Download tool now.
  20. Select Create installation media for another PC, and download an ISO file.ISO file
  21. Download and run the PowerISO processing tool.
  22. Plug a USB drive into the PC.
  23. Select your USB, then GPT partition scheme for UEFI and NTFS.
  24. Select the downloaded Windows 10 ISO image.
  25. Click on the Start button to create a Windows USB drive installation media.
  26. You’re now ready to install Windows on the Chromebook, so insert the USB drive into the Chromebook.
  27. Switch it on. It should now boot from the USB.
  28. Up next, connect either a USB mouse or a USB keyboard or both to your Chromebook.
  29. Normally install Windows like on any other PC.
  30. Remove your USB drive when the Windows installer restarts.
  31. Then, restart your Chromebook. It will boot Windows from your Chromebook’s internal drive and will complete the setup process.

Note: Windows doesn’t ship with hardware drivers for various pieces of hardware incorporated into many Chromebooks. Look for third-party drivers that could give Windows support for these components.

As you can see above, you need to install a replacement BIOS for your Chromebook. This can only be done on supported Chromebook models, so first check if your Chromebook is supported or not.

A PC running Windows to create the USB installation media is not optional either. Moreover, the built-in keyboard and mouse of your Chromebook won’t work in the installer. So, you’ll also need a USB keyboard and mouse to complete the installation.

No less important, you’re obviously about to wipe your Chromebook. Make sure not to take any action before backing up anything important stored on it.

Have you successfully completed the above procedure? Remember that we’re here to answer any questions you might have. Just reach for the comments section below.
Microsoft Ignite gets new conference location, heads to the ‘Big Easy’ in 2020

For the past few years, Microsoft has hosted its comprehensive technology conference during the fall in Orlando, FL, however, that tradition is coming to an end as the company looks to move it to New Orleans for 2020.

Microsoft Ignite has been the company’s showcase conference for ideas and tools designed to power big data, empower IT professionals and support near-future cloud infrastructures; and until this year, the company used to invite attendees to the Orange County Convention Center in Orlando, FL to be a part of it.

According to the official Microsoft Ignite registration page, from September 21-25, the conference will be hosted in the Big Easy, aka New Orleans, LA.

Learn innovative ways to build solutions and migrate and manage your infrastructure. Connect with over 25,000 individuals focused on software development, security, architecture, and IT. Explore new hands-on experiences that will help you innovate in areas such as security, cloud, and hybrid infrastructure and development.

Even though there is a place to pre-register for the conference, there is sparse information about the exact location of this year’s Ignite conference.

Presumably, Microsoft will use a similar convention center set up for the conference which could include attendees booking lodgings in and around the Ernest N. Morial Convention Center near the French Quarter.

Should I upgrade from Windows 7 to Linux?

After 10 years of service, Microsoft has finally decided to cease support for Windows 7. This means that the OS will no longer receive any type of updates and that anyone still using it will be exposed to online threats.

Given this change, many users are left wondering what they should do. Most think that they are limited to just three choices:

However, what users need to be reminded of is that there are other operating systems out there as well, such as macOS or Linux.

Now that Windows 7 is no longer supported and they should upgrade anyway, maybe it is time to migrate to a whole new OS entirely and see how that feels.

Why you should upgrade to Linux

1. You save money

There are plenty of differences between the two OS, even down to the most basic of components. However, there are many pros in favor of Linux if you are considering an upgrade.

For starters, the hardware you need in order to install Windows 1o needs to be quite good. Here’s a quick look at the minimum system requirement for Windows 10:

  • 1 GHz processor
  • 1 GB for 32-bit or 2 GB for 64-bit RAM
  • 16 GB for 32-bit OS or 20 GB for 64-bit OS
  • A 800 x 600 resolution display

Besides the cost of the hardware upgrade itself, let’s not forget that you also need to pay for the OS as well. Fortunately enough, most PCs now come with Windows 10 pre-installed, but the license is OEM.

This means that it is bound to that particular machine, and if anything were to happen with the hardware, you’ll be off shopping for Windows 10 again.


 Looking for a hardware upgrade anyway? Check out these premium laptop offers!


2. Linux is more lightweight

On the flip side, Linux is an open-source operating system that’s completely free to use. Additionally, it prioritizes being a lightweight OS above all else.

In fact, this is taken to the point where it’s the OS of choice for embedded systems, smart home devices, and IoT. Even the Android OS that you use every day on your phones and tablets is also based on Linux. 

3. Linux is more versatile

Everyone knows that Windows 7 or Windows 10 comes in just a handful of editions:

  • Home
  • Pro
  • Pro Education
  • Education
  • Pro for Workstations
  • Enterprise

Out of the 6, half of them aren’t even used by the vast majority of consumers. On the other hand, since Linux is open-sourced, it has branched out into a variety of versions, each focusing on different aspects of running a PC.

Some are made for gaming, some for desk work, others are made to run on older PCs, etc.

4. Linux is more secure

Because Linux is open-source, it benefits from a vast community of developers that are more than happy to develop new security features for their beloved OS.

Keep in mind that certain distros are updated more frequently than others, so if security is your number one priority, do some research before making your pick.


For better security on Windows 7, check out our picks for antivirus programs!


How do I migrate from Windows 7 to Linux?

1. Pick your distro

The first thing when considering a migration to Linux is choosing a good distro that will fit your needs. One of the most popular distros out there is Ubuntu. Not only is it easy to use, but it is also supported by a lot of apps.

If style and innovation are more of your thing, then you might want to opt for Solus. You will get most of the tools that you will eve need at installation as well.

If you are curious which are the best distros in use today, check out this official ranking.

2. Install Linux

Because of how lightweight it is, installing Linux will take only a few minutes from start to finish, even on very old machines. You can pretty much use the same methods as you would with a Windows install, either via direct download or through removable media.

Conclusion

As you can see, there are many benefits to installing Linux over Windows 10. These range from reduced expenses to a much smoother PC experience.

All things considered, it doesn’t matter if you choose to go for Windows 10 or a Linux distro, as long as you stop using Windows 7.

Do you think Linux is a much more efficient OS than Windows 10? Let us know what you think in the comment section below.

RELATED ARTICLES YOU SHOULD CHECK OUT:

The Elder Scrolls Online: Greymoor content is now available for Xbox One players

The latest expansion for The Elder Scrolls Online, Greymoor, is now available to pre-order and pre-purchase on Xbox One consoles with certain content being playable today before the rest of the content arrives on June 2nd.

Essentially, while The Elder Scrolls Online: Greymoor doesn’t officially launch until June, those who buy it before then will unlock the Holdbreaker Warhorse for use within the main The Elder Scrolls Online immediately. This is being referred to as a pre-purchase bonus.

Pre-release buyers will also be rewarded with a variety of exclusive digital content once the game launches. These are being referred to as pre-order bonuses and work the same as the pre-purchase one but players can’t access them until June 2nd.

The pre-order bonuses include Jarl Finery, Sacrificial Pocket Mammoth, Nightfall Preview Crown Crate, Western Skyrim Treasure Maps, Jarl Crown, and Two XP Scrolls.

Current owners of The Elder Scrolls Online can upgrade via the following:

Those who don’t own the base game can buy these digital versions:

A physical version is also available in select retailers called The Elder Scrolls Online: Greymoor Physical Collector’s Edition.

Which version of The Elder Scrolls Online: Greymoor are you going to buy for Xbox One? Let us know in the comments and then follow us on Pinterest and Twitter for more Xbox gaming content.


All 3 versions of the Dragon Ball Z: Kakarot video game are now live on Microsoft’s Xbox One

Dragon Ball Z: Kakarot is now available to play on Xbox One. The title is a completely new Dragon Ball Z video game but, as a lot of other games based on the franchise have done, revolves around a kind of retelling of the main storyline from the manga and anime series.

Here’s the official game description:

Relive the story of Goku and other Z Fighters in DRAGON BALL Z: KAKAROT! Beyond the epic battles, experience life in the DRAGON BALL Z world as you fight, fish, eat, and train with Goku, Gohan, Vegeta and others. Explore the new areas and adventures as you advance through the story and form powerful bonds with other heroes from the DRAGON BALL Z universe.

Dragon Ball Z: Kakarot is available in a regular version, a Deluxe Edition, and an Ultimate Edition. The Deluxe Edition contains the full game plus a special stat-boosting item and the season pass for future DLC while the Ultimate Edition comes with everything in the Deluxe Edition plus a special music compilation pack and the The Tao Pai Pai Pillar when they launch in Spring 2020.

Are you a Dragon Ball Z fan and have you had a chance to play Kakarot yet on your Xbox One console? Let the community know if it’s worth buying in the comments below and then follow us on Pinterest, YouTube, Twitter, and Facebook for more Xbox gaming content.


How to delete a page in Google Docs

If you ever need to work on a text document, create a spreadsheet, or even a presentation, the first thing that may come to your mind is to use the Microsoft Office Suite.

While it may indeed contain incredible programs such as Microsoft Word, Excel, PowerPoint, and other of the sorts, they usually come at a hefty price.

However, Google has created for some time now a web service called Google Docs, as part of the Google Drive services. These services are 100% free, and all you need to access them is an Internet browser and a Google account.

One of the most popular components of Google Docs is the text editor, which has almost the same functionality as the much more expensive Microsoft Word.

However, there are a few differences between the two, such as how you can delete pages. That is why we’ve created a step-by-step guide that will show you precisely how you can delete pages in Google Docs.

How do I delete a page in Google Docs?

  1. Go to the Google Docs website
  2. Go to File
  3. Select Open
  4. Load a document from either a cloud service or by uploading from your hard drive

Now that you have a document in front of you, you can go ahead one of the methods listed below.

1. Select and delete

  1. Move your cursor to the beginning of the text in the page you want to delete
  2. Drag it down to the bottom by holding left-click pressed
  3. Once the entire text is selected, press Backspace or Delete

2. Adjust the page margins

  1. Select the ruler in the upper part of the screen
    • If you cannot see the Ruler, go to View, and select it from the menu
  2. Adjust the arrows at the sides of the page until any unwanted pages disappearmargins

Sometimes extra pages (even blank ones) appear when there is too much spacing at the edge of a page. Adjusting it to a smaller size might fix the issue.

3. Check and delete unwanted page breaks

  1. Go to the page after the one you want delete
  2. Place your cursor before the first letter on a page
  3. Press Delete

This will delete any blank page that may have appeared before it.

By following these steps, you should be able to delete any page in Google Docs. While none of the methods actually delete the pages themselves, they pretty much do the same thing.

What other methods do you know for deleting pages in Google Docs? Share your tricks with the other users in the comment section below.

RELATED ARTICLES YOU SHOULD CHECK OUT:

How to Uninstall Fortnite in Just a Few Steps

Fortnite is currently one of the world’s most popular Battle Royale games on the market. It has millions of players and makes tens of millions in revenue every year just from selling skins.

Players spend hours and hours fighting to the death in the digital battlefield using whatever resources they can muster, on an island that is getting smaller and smaller. The match eventually stops when only one player is left standing.

However, regardless of how engaging and fun a game may be, there comes a time when you don’t feel like playing it anymore. For a game like Fortnite, this also means that you may also want to know how to uninstall it, given how it takes up so much disk space.

That is why we’ve created this short step-by-step guide that will show you the quickest way you can uninstall Fortnite, and clear your hard disk for good.

How do I uninstall Fortnite?

  1. Launch the Epic Games Launcher
  2. Select the Library tab in the left pane
  3. Click on the Settings button next to Fortnite
    • It looks like a set of gears
  4. Select Uninstalluninstall fortnite
  5. Confirm your action

As you may know, the only way to install, update, and launch Fortnite is by launching the Epic Games launcher first. Following this trend, uninstalling Fortnite also requires that you make use of the Epic Games Launcher.

By following these steps, you should be able to completely delete Fortnite from your hard drive. However, keep note that this operation will not delete the Epic Games folder from your hard disk.

In order to do that, you will need to uninstall the Epic Games Launcher as well.

Once you’ve uninstalled Fortnite, it would be a good idea to perform a standard disk cleaning, given how much storage space has suddenly been freed up.

Uninstalling the game will not affect your ability to download it later in the future, as you can also repeat the steps above to uninstall it again.

Do you have issues uninstalling Fortnite? Let us know in the comments section below.

Download Indexer Diagnostics to fix Windows Search issues

Many users were disappointed when they saw that the January round of Patch Tuesday updates did not contain a fix for the File Search issues.

These issues were around for 3 months already, and they were preventing functionality of some very basic Windows features.

However, it seems that Microsoft has finally addressed this particular issue since it released an Indexer Diagnostics utility to help users troubleshoot and, in some cases, fix the issue.

How does the Indexer Diagnostics utility work?

While the existence of this utility is indeed good news, it is still in Beta testing. It works by detecting potential issues affecting the Search Indexer service.

It does so by making it possible to check if your files are indexed and what paths are indexed.

Regarding the file indexing process, Microsoft stated that:

Indexing is the process of looking at files, email messages, and other content on your PC and cataloging their information, such as the words and metadata in them[…]
When you search your PC after indexing, it looks at an index of terms to find results faster.

Additionally, it seems that advanced users such as system admins can also use the Indexer Diagnostics utility to track a device’s resource usage. It does this by collecting resource traces when the indexer uses too many resources from the app’s Performance tab.

The utility is available through the Microsoft App store and it is completely free. The decision to make it available this way stems from the desire to make the utility much more readily available.

Given how all you need to do to get a store app is downloaded and then launch it, this seemed like the perfect course of action.

Do you think that a solution for the File Search issues has been a long time coming? Tell us what you think about the Indexer Diagnostics utility in the comment section below.

SURVEY: 44% of Windows 7 users risk having their money stolen

If you’re using Windows 7 for online shopping or online banking, your risk more than having your data stolen by hackers. Attackers can go as far as stealing your money simply because Windows 7 is no longer a safe OS for doing any activities that involve money and online payments.

If you continue to use Windows 7, you should know that you’re exposing yourself to a lot of risks. Banking and online shopping on Windows 7 is no longer safe.

Windows 7 users doing online shopping and banking are sitting ducks for hackers

Because it will no longer receive any support, hackers will now have free reign over those that still use the now-dated OS.

Getting access to personal information will be increasingly easier for them. That is why it is recommended that you refrain from performing any type of online shopping and banking transactions.

Windows Report recently conducted a survey on the website whereby 2684 persons agreed to answer our Windows 7-related questions. Interestingly enough, 24%  of users still use Windows 7 for online shopping, while 20% use it for banking.

That means 44% of users risk having their information and money stolen from them, as you can see from the screenshot below.Windows 7 banking

Hackers can end up stealing your data, and that can lead to a whole world of problems. Even the British government has warned its people to stop using Windows 7 because of the increased security risks.

Microsoft is slowly but surely encouraging the population to grate to the next better OS, either by advertising the benefits of Windows 10 or by slowly ceasing support for all Windows 7 apps.

Get ready for EOS security mayhem

The first Patch Tuesday release of 2020 is actually the last Patch Tuesday rollout for Windows 7. Microsoft ended mainstream support for the OS and will no longer push security updates to Windows 7 computers, leaving users an easy target for hackers.

As such, users are left with one of 3 choices:

If you still use Windows 7, what will you do now that support for it has ended? Tell us what course of action you will take in the comment section below.

RELATED ARTICLES YOU SHOULD CHECK OUT: