Benchmark tests show Intel CPUs use 4 times more energy than AMD CPUs

The never ending (although silent) battle between AMD and Intel continues, and will probably go on for a very, very long time. Going blow for blow doesn’t seem to suffice for any of the competitors.

With that in mind, a new Blender benchmark graph slightly shook the Windows community as it shows the total energy used by both Intel and AMD CPU‘s for a specific task.

CPU battle: What processors use more energy? AMD or Intel?

Here’s the OP’s screenshot:CPU energy usageThis info quickly filled the forums with controversy, as AMD and Intel fans debate the use scenarios for certain CPU‘s and how could this new benchmark results affect them.

Here’s what one user is saying:

I think in specific use cases this could be a superior benchmark. I’d imagine server owners in particular would like this benchmark, as it shows a realistic estimate of consumption vs. finishing a task at hand.

While this is half true, you’ll have to understand a couple more things to get the big picture:

Servers are sold in large part on energy per task, but this benchmark here is somewhat misleading because you can decrease the energy per unit of work by decreasing total performance (since power consumption increases faster than clockspeed)

Don’t forget that despite a very high efficiency, ARM CPUs haven’t had much success in the server world.


Overclock your Intel CPU in just a couple of simple steps. Check out this useful guide and find out how you can do it!


This somewhat surprising result has it’s rooted in the manufacturing process. While most of the CPUs from Intel are 10 nm or above, AMD CPUs are working with 7 nm processors for a while now.

Basically, that means that AMD is using smaller transistors and packing more stuff into the same place/smaller place. This leads to higher core count, lower heat/power consumption, and higher clock speeds.


Looking to overclock your AMD CPU? Take a look at this list with the best overclocking software tools available today!


If these results will have an impact in the future of CPU manufacturing or not, it remains to be seen.

Who’s your bet: AMD or Intel? Leave your answer along with any other questions you may have in the comments section below and we’ll continue the talk.

HERE’S SOME MORE JUICY CPU INFO THAT YOU MIGHT NOT KNOW:

Microsoft is blocking the Windows 10 May 2019 Update on Surface Book 2 devices with Nvidia GPUs

After fixing three separate issues on July 12, Microsoft is now putting yet another block in place for some consumers hoping to upgrade to the Windows 10 May 2019 Update. This time, it is owners of Surface Book 2 13″ and 15″ models with Nvidia GPUs  who are impacted (via Windows Central.)

The issue is well documented on Microsoft’s support page, which explains that after updating to the May 2019 Update, certain apps, and games on the Surface Book 2 that need the power of the Nvidia GPU might close or fail to open. The dedicated GPU might also occasionally disappear from device manager. As a result, the company is placing what it calls a “compatibility hold” on Surface Book 2 devices with Nvidia dGPUs until the issue is resolved.

If you happened to have already upgraded to the Windows 10 May 2019 Update and are experiencing issues with the dedicated GPU on your Surface Book 2, Microsoft has a workaround: The company recommends to open the device manager, and restart the Nvidia GPU, or select the “Scan for hardware changes” button in the Action menu or on the toolbar.

It is not recommended that you manually update to the Windows 10 May 2019 Update with the “Update now” button or the Media Creation Tool until the issue has been fixed. No word from Microsoft yet on how long it will take for this issue to be resolved, but the company is working on a resolution and says it will “provide an update in an upcoming release.”

How to install and use Foobar2000 VST plugin [EXPERT GUIDE]

Foobar2000 is a very useful and powerful audio player that can be customized with a VST plugin. The VST (Virtual Studio Technology) plugin allows you full control over the applied audio effects.

This software is extremely efficient when it comes to audio and video decoding, allowing you to customize the way this software works and sounds. Besides the VST plugin, you can also apply a wide range of other modules/plugins in order to get access to additional features.

Even though its modular structure gives Foobar2000 one of its biggest advantages, it can become overwhelming to manage all the plugins and each of their capabilities. For this reason, in this article we will look at different aspects of using Foobar2000 with the VST plugin. Read on to find out more.

How to install Foobar2000 VST plugins? Installing a VST plugin for Foobar2000 is quite simple and you just have to download Foobar2000 VST 2.4 adapter and Kjaerhus Audio VST pack. To install the plugins, open the Foobar2000 settings window and add the plugins to the Components section.

How can I install Foobar2000 VST plugins on Windows 10?

How to download and install Foobar2000 VST plugin?

  1. In order to download the Foobar player, you will need to visit the official Foobar2000 download page. Then click on the download button under the Latest stable version section.download foobar Foobar2000 VST plugin
  2. Save the executable file on your hard-drive, and then open the installer.
  3. Go through the entire installation process, and then click Finish.
  4. Download the Foobar2000 VST 2.4 adapter.foobar2000 vst download
  5. Next, you need to download the Kjaerhus Audio VST pack.
  6. Open Foobar2000, then click on File from the top menu and select Preferences.foobar2000 preferences how to install VST plugin foobar
  7. Drag and drop the first archive you downloaded (foo_vst_0903.zip), into Foobar2000 components list.
  8. Click the Apply button, and restart Foobar2000.
  9. Extract the files from the Kjaerhus Audio VSTs archive.
  10. Inside Foobar2000, click on File > Preferences > Advanced > Components > VST Plugins > Add.VST plug-ins preferences Foobar2000 VST plugin how to insatall
  11. Double-click on one of the .dll files extracted from the Kaerhus Audio archive > click Apply > restart Foobar2000.

How to use the VST plugin?

  1. In order to view the VST window, you need to click on File > Preferences, and under the Playback tab, you will find the DSP Manager.DSP manager Foobar2000 VST plugin install
  2. In the Available DSPs list, you will be able to find the .dll file you installed previously (Step 11). In my case, it is a file called GAC-1.GAC-1 enable Foobar2000 VST plugin
  3. In the Active DSP list, click on the three dotted lines to see the VST.GAC-1 settings Foobar2000 VST plugin
  4. If you followed the steps above correctly, you should be able to see this type of window after clicking the dotted lines.GAC-1 main window Foobar2000 VST
  5. All done! Now you are ready to edit and customize every aspect of your audio experience on Foobar2000.

In this article we showed you the best way to set up Foobar VST plugin on your PC. The process might be a bit lengthy, but as long as you follow the instructions carefully, you shouldn’t have any problems. Please feel free to let us know if this guide helped you in the comments section below.

READ ALSO:

How to recover Guest account on Windows 10 [QUICK GUIDE]

Windows 10, much like previous versions of Windows, offers the provision to create a guest account. That way users can log in to the system and use the same but won’t generally have administrator status. A Guest account can also be seen as sort of a temporary arrangement for someone you know to have access to your PC.

In Windows 10 guest account is viewed as a security threat and is the reason it is disabled by default. All of this also makes it imperative that you have the means to recover all the info created via the guest account.

Now with the guest account itself gone, recovering the info created using the account might seem daunting. However, on the contrary, it’s as easy as it can get. Here are the steps.

How can I recover Guest account on Windows 10?

1. Use Windows Explorer

Navigate to the guest folder under local disk to recover guest account on windows 10

  1. Click on Start > Windows Explorer. Alternately, you can also press Windows key + E from the keyboard.
  2. Click on This PC from the options on the left and double click on Local Disk (C:).
  3. Open the Users folder.
  4. In the Users folder, there should be another folder named Guest. Double click on it to open the same.
  5. Consent to any authentication window that might open up seeking user permission.
  6. Under the Guest folder, navigate to the My Documents folder as well.
  7. Look for the files that you are looking for and copy them to a safe location.
  8. Repeat the same process with every other folder under the Guest folder to recover files present therein.

Want to quickly manage user accounts on your PC? Try using net user command!


2. Use Command Prompt

Enable guest account to recover guest account on windows 10

  1. Launch Command Prompt window. Do that simply by typing cmd in the Cortana search box and selecting from the search result.
  2. In the Command Prompt window, type net user guest /active:yes and press Enter.
  3. Click on Start.
  4. Click on your Account Name from the option on the left of the Start Menu and select Sign out.
  5. See if you can access the Guest account.
  6. If yes, log in and retrieve the files you need.
  7. If not, follow the method described in the first step above to gain access to the files saved under Guest account.

That’s it. The methods described above should be enough to recover the info stored under Guest account. Meanwhile, here are some related articles that you might want to go through.

READ ALSO:

Try opening this project again Microsoft Photos error [EXPERT FIX]

Microsoft Photos in Windows 10 allows you to create videos using your photos. It is a little handy feature as long as it works, which it does most of the time. However, at times you may face some errors while using the Microsoft Photos app. Users have reported about Try opening this project again, The project didn’t open. wait a few moments and try again error while trying to open their project.

One user shared his concerns on Microsoft Answers.

I am trying to create a video in Microsoft Photos.  Everything was going well until I was unable to open the video project anymore.  It says “Try opening this project again.  The project didn’t open.  Wait a few moments and try again.”
Been waiting and trying to open again for the longest time and still could not open it.  How do you fix this?

Learn how to fix the error by following the steps below.

Why won’t my Microsoft Photos project open?

1. Terminate and Reset Microsoft Photos App

  1. Click on Start and select Settings.
  2. From the Settings menu, click on Apps.
  3. Click on Apps and Features tab.
  4. Now search for the Photos app and click on it.
  5. Click on Advanced Options.
    Advanced Options - Photos Apps
  6. Scroll down and click on the Terminate button. It will kill all the process related to the Photos apps and help you fix any problem related to the app.
    Terminate Photos Apps to fix Try to open this project again
  7. Now try to open the project again and check if the error is resolved.

Tired of Microsoft Photos being lackluster in video and photo editing tasks? We’ve got a few worthy alternatives.


If the issue persists, try to reset the Photos app. Here is how to do it.

  1. Go to Start > Settings > App > Apps and Features.
  2. Click on the Photos app and select Advanced Options.
  3. Now scroll down and click on the Reset button. When a dialog pops-up click on Yes.
    Fix Try to opening the project again by Resetting Photos app
  4. Resetting the Photos app will delete any preferences and sign in details associated with it.
  5. Again repeat the steps to Reset the Photo app. Make sure you do it twice before accessing the project again.
  6. Close the Settings window and open the Photos app. Open the project and check if the error is resolved.

2. Re-install and Register Photos App

  1. Press Windows Key + R to open Run.
  2. Type cmd and press OK to open the command prompt.
  3. In the command prompt, copy and paste the following command and press enter.
    PowerShell -ExecutionPolicy Unrestricted -Command “& {$manifest = (Get-AppxPackage *Photos*).InstallLocation + ‘\AppxManifest.xml’ ; Add-AppxPackage -DisableDevelopmentMode -Register $manifest}”
  4. Wait for the command to execute and complete successfully.
    Reregister Photos app with command prompt
  5. Now open the Photos app again and check if you are able to open the project without any error.

RELATED STORIES YOU MAY LIKE:

Remix3D shuts down in 2020, download your 3D models now

Microsoft is planning to shut down its popular Remix3D.com service very soon.

Microsoft watcher WalkingCat announced the news on Twitter. WalkingCat actually found evidence that Remix3D will end on the 10th  of January next year.

The notice recommends Windows users to download their 3D models as soon as possible so that they don’t lose them.

Shutdown_Banner:”We will be retiring Remix3D.com on January 10, 2020 and all user content will be deleted. Please download any of your 3D models that you want to save. “,Shutdown_Banner_WebBlends:”Microsoft’s 3D content service is changing. “

No word on Paint 3D

However, the notification is not available to users yet. Most importantly, users are now concerned about the fact that how this decision will impact the future of Paint 3D. The company has not shared any details regarding Paint3D yet.

Previously, Microsoft decided to deprecate the default Windows 10 paint application. This decision was followed by huge criticism that forced the company to change its plans. The tech giant confirmed that the Paint app will continue to be part of the Windows 10 OS.

New 3D model upload will be unavailable starting August 7

Furthermore, Microsoft stated in the FAQs of its support website that the Remix3D.com site would not allow Windows 10 users to upload new 3D models starting August 7.

Moreover, you will also lose access to your Remix3D.com accounts. The tech giant made it clear that the Remix3D.com site will be closed on January 10, 2020. Hence, all links from Microsoft apps to the site will stop working.

The Remix3D.com service was initially launched with the release of Windows 10 Fall Creators Update. It is an online community where users can store their 3D models to use them in Windows Mixed Reality devices along with the 2D apps.


In love with 3D images? Get one of these 3D design software for beginners and advanced users


People are not giving up on Remix3D

Apparently, Windows 10 users are not happy with this decision and they are wondering why Microsoft wants to retire the service just a few weeks before launching the Minecraft AR app.

Why on earth would they retire this when they are about to launch a Minecraft AR app, seems like they could work well together.

Moreover, others think this is the right decision from Microsoft because Remix3D only got worse with the passage of time.

What do you think about this decision? Do you think that Remix3D service is useful? Comment below.

RELATED ARTICLES YOU NEED TO CHECK OUT:

Windows 11 Can Only be Installed to GPT Disks [Fix]

Anyone attempting to install Windows 11 is likely to have come across the message claiming, Windows can only be installed to GPT disks. The issue is quite simple to tackle, and a few quick tweaks are all it would need to set things right here.

For the uninitiated, GPT or GUID Partition Table is, in reality, a partition structure and is the more advanced one. No wonder newer operating systems, such as Windows 11, will only get installed on disks with the GPT partition structure.

What to do if Windows can only be installed to GPT disks?

1. Use Diskpart

  1. Insert the Windows installation disk or the USB stick if the installation media is in a USB drive.
  2. Reboot your PC.
  3. When the Windows 10 installation window appears, press Shift + F10 to launch the Command Prompt window.
  4. Type the following command and hit Enter: diskpartdiskpart to fix windows can only be installed to gpt disks windows 11
  5. Execute the following command to view the available disks, their size, and partition style: list disk
  6. Identify the non-GPT disk that you will now have to reformat. Reformatting will remove all files from it, so you might want to back them up beforehand.
  7. Run the following command where X represents the number allotted to the affected disk: select disk X
  8. Paste the following command and hit Enter:clean
  9. Run this command: convert gpt
  10. Close Command Prompt and continue with Windows installation. When asked to identify the disk where you wish to install Windows 10, select the one you have just formatted to GPT.

When Windows 11 can only be installed to GPT disks, a quick fix is to rely on DISKPART, a built-in tool, to change the disk partition style to GPT.

2. Use Disk Management

  1. Press Windows + X to open the Power User menu, and select Disk Management.disk management
  2. Right-click on the partition and select Delete partition or Delete Volume.delete partition
  3. Repeat this step until you have deleted all partitions on the disk.
  4. After all, partitions have been deleted, right-click on the disk and choose Convert to GPT Disk. The option to convert to GPT disks becomes available only after all partitions have been deleted.
  5. After the disk has been converted to GPT, right-click on it and select Create partition. Create a few or as many as you desire.
  6. Install Windows in the partition of your choice.

That’s it! If Windows can only be installed to GPT disks in Windows 11 or the previous iteration, you may also go with Disk Management to convert the disk to GPT.

And once you have installed the latest iteration, check the best security settings in Windows 11 for a safer experience.

For any queries or to share what worked for you, drop a comment below.

How to turn system icons on and off in Windows 10

System icons are any icons that are displayed in the system tray; the system tray is located on the right of the Windows 10 taskbar. Just in case you don’t know what or where the taskbar is, the taskbar is located along the bottom of your Windows 10 display by default. The only time you won’t see the taskbar is when you are using an app or browser in fullscreen mode. If you need help with taskbar settings, how to change the taskbar position in Windows 10 is a helpful guide.

The system icons that you will usually see in Windows 10 include Clock, Volume, Network, Power, Input Indicator, Location, Action Center, Touch keyboard, Windows Ink Workspace, Touchpad, and Microphone. These system icons can change based on what Windows 10 version your PC is running and what apps and programs you have installed. Sometimes, apps and programs that you allow to run in the background will also appear in the system tray. You will need to change the settings within individual programs to remove their icons from the system tray.

Microsoft turns on all system icons by default on the assumption that most people will look to use them at one time or another. However, there is a way to toggle them on or off depending on your preference. It doesn’t make sense to be distracted by unnecessary icons in the system tray. Turning system icons on and off in Windows 10 is easy, just follow these steps:

1. Go to Settings (keyboard shortcut: Windows key + i).
2. Go to Personalization.

3. Go to Taskbar.

4. Go to Notification area, choose Turn system icons on or off.

5. Turn system icons on and off in Windows 10.

It’s important to note that if you turn off the Location system icon, you are not turning off the location for your PC. Learn how to change the privacy settings of your Windows 10 PC. Personally, the only icons I need in the system tray are Clock, Power, Network, and Action Center. Changing the number of icons in your system tray can greatly reduce distractions when you are looking to be more productive in Windows 10.

Microsoft backs off on pulling Internal Use Rights for Partners after all

Apparently, Microsoft didn’t want to face the hornet’s nest of complaints from partners at next week’s Inspire conference, as it has backed off and now says there will be no changes to the Microsoft Action Pack subscriptions available to partners after all.

As noted by Mary Jo Foley, this morning Microsoft’s head of channel Gavriella Schuster posted a note on the Microsoft Partner Network site, backing off on the earlier changes:

Your partnership and trust matters to us. Given your feedback, we have made the decision to roll back all planned changes related to internal use rights and competency timelines that were announced earlier this month. This means you will experience no material changes this coming fiscal year, and you will not be subject to reduced IUR licenses or increased costs related to those licenses next July as previously announced.

We listened to you, and we have acted.

About a week ago, Microsoft quietly announced changes to the Microsoft Action Pack subscription, which has granted partners “internal use rights” for years for Microsoft software and services. Those changes were to have eliminated the rights, which allowed partners to use the software and services for free within their own organizations. As recently as yesterday, Microsoft was sticking to its guns on the changes, but this morning they had a change of heart, apparently.

At least Inspire will be a bit less contentious!


Microsoft’s new Azure Kinect DK camera is now available to buy online

Microsoft’s new Kinect camera, the Azure Kinect DK, is now widely available to purchase from the official Microsoft Store website.

The Azure Kinect DK is very much the next gen entry in the Kinect series with superior tech and functionality. As its name suggests though, it’s targeted at developers rather than gamers and the average consumer.

This new Kinect camera will not work with existing Xbox consoles and will unlikely work with Xbox Project Scarlett. This device is not designed for Just Dancers.

The Azure Kinect DK boasts a 1MP depth camera, a 360˚ microphone array, a 12MP RGB camera, and an orientation sensor. It’s currently retailing for $399 and is currently only available for developers in the United States and China. Other regions are expected to be supported in the near future.

Many expected Microsoft to bury the Kinect brand after it stopped manufacturing the Xbox One/Windows 10 generation last year so its reveal during Mobile World Congress 2019 in February came as a big surprise.

Are you impressed with the Azure Kinect DK and do you think you’ll get one for one of your upcoming projects? Share your thoughts with the community in the comments below and then follow us on Twitter for more Microsoft news.

Valkyria Chronicles 4 Complete Edition video game launches on Xbox One consoles

A special Complete Edition of the Valkyria Chronicles 4 video game is now available to buy and play on Microsoft’s family of Xbox One consoles.

This version of Valkyria Chronicles 4 comes with the base game and all of its downloadable content (DLC) that had been released post-launch. For those that already own the main game, a Valkyria Chronicles 4 DLC Bundle has also been released that contains only the DLC.

Here’s the official game description for Valkyria Chronicles Complete Edition:

Valkyria Chronicles 4 takes place in the same timeframe as the original Valkyria Chronicles, but focuses on Squad E of the Federation. Commander Claude Wallace and his childhood friends set out to fight for freedom in this desperate war, but bone-chilling blizzards, waves of imperial soldiers, and the godlike powers of the Valkyria stand between them and victory.

Are you a fan of the Valkyria Chronicles video game series or will this be your first time playing one of them? Let us know in the comments below and then follow us on Pinterest for more Xbox content.

Valkyria Chronicles 4 Complete Edition
Developer:
SEGA
Price:
$49.99


Valkyria Chronicles 4 DLC Bundle
Developer:
SEGA
Price:
$24.99

Minecraft Earth needs more players for its closed beta testing

Microsoft’s upcoming Minecraft Earth video game has been accepting close beta applications since May but it looks like more are needed as the official Minecraft YouTube channel today published a new video promoting the testing period.

The video shows the viewer what the Minecraft Earth app does on iOS and Android smartphones, detailing how it can be used to get resources and build Minecraft creations in the real world. Check it out below.

Interested gamers with a smartphone running at least Android 7 or iOS 10 can apply to partake in the closed beta here. All applications will receive a unique Minecraft skin which can be used in the main Minecraft games.

No specific release date for Minecraft Earth has been given yet, however, the closed beta is said to be starting in select locations soon.

Are you interested in playing Minecraft Earth or are you over the whole augmented reality mobile game craze? Share your thoughts with the community in the comments below and then follow us on Pinterest for more Minecraft content.

This game doesn’t allow recording on Windows 10/11 Xbox App

The Xbox Game Bar is a game recording utility in the Windows 10 computers that allows the users to record gameplay from the game that you run through the Xbox app. One can easily access the game bar by pressing Windows Key + R.

However, some users have reported that they are unable to access the Game bar by pressing the shortcut key and instead get the This game doesn’t allow recording error message. One user shared his concerns on the dedicated subreddit.

“This game doesn’t allow recording“|
What is this, I have taken screen shots before how come I can’t anymore is this only happening to me or more? I’m on win 10 pc.

In order to solve this for good, check the steps below.

Why this game does not allow capturing on Xbox App?

1. Enable Game bar game recording

  1. Click on Start and select Settings.
  2. Click on Gaming and select Game bar.
  3. Under “Record game clips, screenshot, and broadcast using Game bar” turn on the game bar recording option by toggling the switch.
    Make sure game bar recording is turned on
  4. Close the settings page and press Windows Key + G to open the game recording option.
  5. Try to click the record button and check if the error is resolved.

Record your gameplay smoothly even on low-end PCs with these tools.


2. Download Game DVR Config File

  1. Close the Game DVR or Xbox app if running on your Windows system.
  2. Now go to Github page for GameDVR_config file.
  3. Under Assets, click on GameDVR_Config.exe download link to download the file to your computer.
  4. Double-click on GameDVR_Config.exe file to run the program.
  5. Now right-click on the downloaded GameDVR_Config.exe file and select Run as Administrator. This will open a Game DVR Config window.
  6. Check “Force software MFT (16 FPS + VBR)” box and close the window.
    Enable Force Software MFT
  7. Right-click on the Taskbar and select Task Manager. 
  8. In the Processes tab, look for “Broadcast DVR Server“.
  9. Right-click on Broadcast DVR server and select End Task.
  10. Close the Task manager and open the Xbox app again.
  11. Now press Windows Key + G to open Game bar.
  12. Click the recording button and check if the “this game doesn’t allow recording” error is resolved.

3. Other Solutions to Try

Workarounds to fix Game bar error

  • Make sure you have the latest update installed for the Windows OS which usually also includes patches and bug fixes for apps like Game bar etc.  You can check for the update by navigating to Settings > Start > Update and Security > Windows update.
  • End Broadbact bar server from the Task Manager. Type Task Manager in the search and select it. In the Process tab, look for Broadcast bar server (bcastdvr.exe) process and then select End Task.
  • Close the task manager and restart the game. Open Game bar by pressing Windows Key + G and try to record the gameplay.

RELATED STORIES YOU MAY LIKE:

Sorry this video cannot be edited YouTube error [EXPERT FIX]

YouTube has an on-site video editor that allows the youtube creators to re-edit their videos for adding notations, card, music, etc and then publish on their channel.

However, some users have reported Sorry this video cannot be edited YouTube error when trying to edit their videos. Here’s what one user shared on the dedicated subreddit.

Sorry, this video cannot be edited.
I am trying to use the “remove song” feature and it keeps giving me this error

Follow our instructions below to fix the issue now.

Why can’t I edit my YouTube video?

1. Check if the Previous Edit is in Progress

Check Video Edit Progress Youtube

  1. One common cause of this error is the previous edit that is still in progress and the user tries to make a new edit. When the user clicks on edit, YouTube shows the Sorry this video cannot be edited error.
  2. First thing you should do is check if you made any recent changes to the YouTube video and if the processing is completed. You can only edit the video again once it is completely processed.

Stream, upload, or edit YouTube content effortlessly with these browsers.


2. Use Old YouTube Studio

  1. If the error is occurring on the newly revamped YouTube studio, try to go back to the old YouTube Studio and then edit the video. Users have reported that they were able to fix the error using the old YouTube studio app. Here is how to do it.
  2. Login to your YouTube account.
  3. Click on your Profile (top-right corner) and select YouTube Studio.
    Edit Video in Old YouTube Studio
  4. From the left pane, click on the Creator Studio Classic tab.
  5. YouTube will ask you for a reason, you can either give a reason or simply click on the Skip button to proceed.
  6. This will take you to the old YouTube Studio.
  7. Select your video and click on Edit. Check if the error the Sorry this video cannot be edited is resolved.

3. Delete and Reupload the Video

  1. If nothing seems working, you may have to delete the current video and re-upload it. However, doing so will also delete any views and stats for the video as well.Re-upload Video to fix the error
  2. This is usually important if you receive any copyright strike and you are unable to edit the video. In such a situation, you may need to make the video as private or simply delete and re-upload the edited version.
  3. It can also be a temporary issue. Users have reported that they were able to edit the video again and the error message went away by itself after a week or two. So, if it is a temporary issue that has affected your account, you may want to wait for a few days after making the video private before trying to re-edit and re-upload the video.

RELATED STORIES YOU MAY LIKE:

FIX: Windows 10/11 Firewall is blocking Skype [SIMPLE GUIDE]

Windows Firewall comes pre-installed with the Windows OS and offers extra layer protection again malware and other threats. However, at times this protection program can create issues with VoIP services like Skype.

Some users have reported the Windows Firewall is blocking skype application or some functionalities of the app on the Microsoft Answers forum.

My firewall is blocking some features of Skype. What do I have to do to allow access so I can use Skype?

Fix this by following the steps below.

How do I allow Skype through my Firewall on Windows 10?

1. Add Skype to Exception List in Firewall

  1. Press Windows Key + R to open Run.
  2. Type firewall.cpl and press OK to open Windows Firewall settings.
  3. From the left click on Advanced Settings. This will open Windows Fender Firewall with Advanced Security window.
  4. In the new window, select Inbound Rules option.
  5. From the right pane click on “New Rule” option.
    Inbound Rules - New Rule Skype Firewall
  6. In the  Inbound Rule Wizard, select “Program” option and click Next.
  7. Select “This program path:” and click the Browse button.
    This Program Path - Skype Firewall
  8. Navigate to your Skye installation folder which by default should look like this: C:>Program Files (x86)>Skype>Phone
  9. Select the skype.exe file and click Next.
    Skype exception list - Allow the connection
  10. In the next page keep all the option as it is and click on Finish.
  11. Note that you can only add Skype to exception list if you have Skype classic installed. If you have installed Skype from the Windows Store, you won’t able to access the required .exe file.
  12. Close the Windows Defender Firewall window and check if the error with your Skype application is resolved.

Learn what exact program or port is blocked by Firewall in this dedicated guide.


2. Change Network Location Awareness Properties

  1. Press Windows Key + R to open Run.
  2. Type services.msc and press OK to open the Services window.
  3. In the Services window look for Network Location Awareness Properties.
  4. Right-click on Network Location Awareness and select Properties.
  5. For the start-up type, select the drop-down menu and set it to  “Automatic Delayed”.
  6. Click Apply and OK to save the changes.
    NLA Properties Delayed Restart - Skype Firewall issue
  7. Close the Services and check if you are able to connect to your Skype account.
  8. Changing the Network Location Awareness Properties will help if the issue has occurred due to a slow connection between the SQL servers etc.

3. Issues with Third-party firewall

  1. If you are using a third-party Firewall then you need to make changes accordingly. Since there are so many antivirus and firewall programs, you need to find the right settings to add Skype to the exception list by the searching for your  Firewall program.
  2. For Malwarebytes users, you can find the appropriate option in the Settings tab.
    Add Skype to Exception List Malwarebytes
  3. Go to Settings and click on the Exclusion tab.
  4. Click on Add Exclusion, select “Exclude an application that connects to the internet” and clicks Next.
  5. Then select the Skype application and make necessary changes depending on your requirement.

RELATED STORIES YOU MAY LIKE:

Stay away from July Patch Tuesday updates to avoid black screen issues

Microsoft already released the July 2019 Patch Tuesday updates for different versions of Windows 10. Well, the company recently acknowledged the updates are affected by frequents black screen issues.

The official support page confirms that the issue affects all Windows 10 versions, including Windows Server v1809 and Windows Server 2019.

The good news is that only a small number of devices are affected by this issue.

We are investigating reports that a small number of devices may startup to a black screen during the first logon after installing updates.

Many users complained about these problems on different forums. Once Windows 10 users installed the recent updates, they got a black screen during the first logon.

When someone asked on Reddit:

Does anyone have the black screen problem?

Other Redditors quickly confirmed they experienced the same problem:

Yep, currently trying to do a system restore point


Windows 10 May Update is also plagued by black screen issues. Check out this post to learn more about this problem.


Patch coming soon

Microsoft is currently investigating the reports. The company has not shared any details about the root cause behind the issue.

At the moment, it is too early to say when the hotfix will be available. However, we expect Microsoft to roll out the patch in a few days’ time.

Meanwhile, you can try a temporary workaround until a permanent fix is available. Redditors used the system restore feature to restore their systems to an earlier stable build.

As a quick reminder, this is a time-consuming process but there is an easy way to deal with this issue.

If you are experiencing similar issues after installing the Windows 10 July 2019 updates, you can follow these steps:

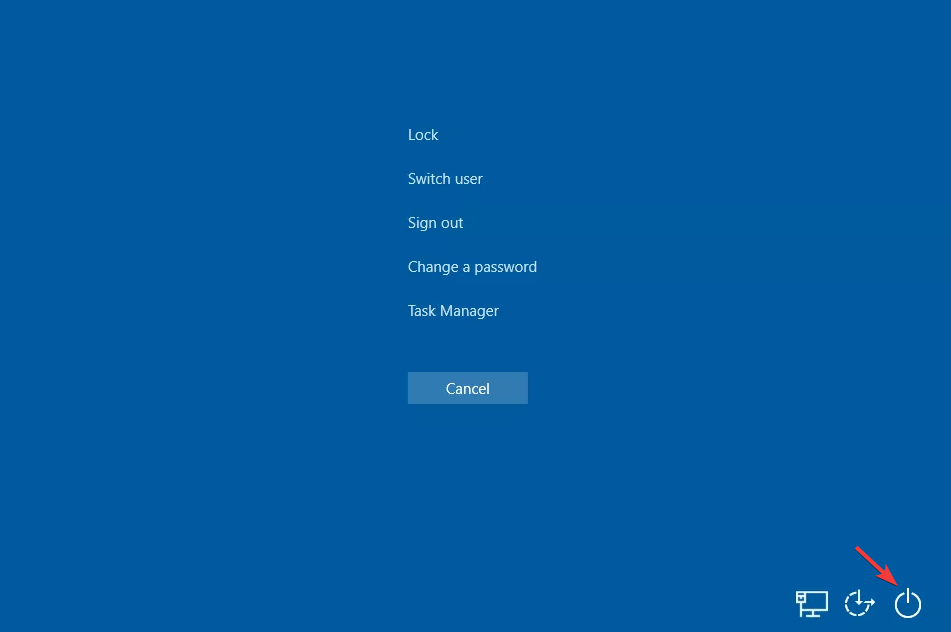
  1. As soon as you see a black screen, press and hold Ctrl+Alt+Delete keys on your keyboard.
  2.  Once you are navigated to the login screen, click the Power button available at the right bottom and select Restart.

Your PC should now start without any issues. It seems like the recent updates are plagued by many other issues. Microsoft warned its users against a bunch of other problems as well.

Have you experienced any such issues on your system? How did manage to get rid of them? Comment down below to help others.

Don’t forget to bookmark this page in case you’re getting other black screen issues:

Windows 7 KB4507449 brings more issues than fixes

This month’s Patch Tuesday updates brought a few bug fixes and enhancements to Windows 7 users.

Windows 7 KB4507449 is now availabel to all Windows 7 Service Pack 1 and Windows Server 2008 R2 Service Pack 1 users.

Keep in mind that you need to install the latest servicing stack update (SSU) on your Windows 7 PC before downloading KB4507449.

As a matter of fact, the SSU will help you to mitigate potential issues experienced during the installation process. The latest servicing stack update i.e KB4490628 will be available automatically via Windows Update section.

Alternatively, you can visit the Microsoft Update Catalog to download it.

Surprisingly, the KB4507449 changelog comes with a single fix. It improves the overall security of the OS and some individual built-in modules.

KB4507449 improvements and fixes

General Security updates

Update KB4507449 specifically addresses major issues introduced by the previous KB4503277 update. This update brings a series of general security updates for Windows Kernel, Windows Storage and Filesystems, Windows Server, Windows Shell, Microsoft Graphics Component and Windows Input and Composition.

KB4507449 known issues

Fortunately, KB4507449 brings a single known issue to the table. Microsoft acknowledged the fact that the company is currently working with McAfee to resolve an issue with McAfee security products.

The bug affects the systems running McAfee Host Intrusion Prevention (Host IPS) 8.0, McAfee Endpoint Security (ENS) Threat Prevention 10.x and McAfee VirusScan Enterprise (VSE) 8.8.

Please note that after installing KB4507449, your system may completely fail to respond at startup. It is also possible that the startup process is slower than usual.

Microsoft is currently investigating the issue and promised to release a patch very soon.

Download KB4507449

KB4507449 is available as an automatic download. Go to the Settings menu to check for the latest updates. You also have the option to download the update manually on your system.

RELATED ARTICLES YOU NEED TO CHECK OUT:

Inspire 2019: Microsoft Teams crosses 13 million daily active users

Microsoft has revealed new usage data about Microsoft Teams today ahead of its Inspire partner conference, taking place July 14-18 in Las Vegas. A little more than two years after its initial launch, Microsoft Teams has now crossed 13 million daily active users and 19 million weekly active users, and it’s the first time that’s Microsoft is sharing daily and weekly active usage metrics.

Earlier this year, Microsoft announced that Teams was now being used by more than 500,000 organizations worldwide, including 91 Fortune 500 companies.

Teams app remains one the fastest growing apps Microsoft released in recent years, and it’s slowly but surely catching up to Slack which is currently in use with 600,000 organisations. Microsoft Teams is now available in 52 languages across 181 markets, and it’s included for free with Office 365 Business and Enterprise subscriptions. Microsoft also made Teams free to use with a personal MSA account to compete with Slack’s free tier, though this free version of Teams aimed at small-to-medium businesses has some limitations to get users on board with the paid version.

How to create an email alias for your Outlook.com account

Are you in need of a second email address? You don’t have to create a whole new email account. Instead, you can add an alias to your existing Outlook.com inbox. You can send and receive email using the alias and have it show up in your regular inbox, without switching account or using multiple mailboxes.

To get started, head to the Outlook.com web interface. Click the Settings icon in the top-right and then click “View all Outlook settings” at the bottom of the Settings pane.

Screenshot of adding an alias to a Microsoft account

An overlay window will appear containing Outlook’s settings. From the navigation menu, click Email > Sync email. Scroll down the page to the “Email aliases” heading and click the “Manage or choose a primary alias” link.

Screenshot of adding an alias to a Microsoft account

You’ll now be redirected to your Microsoft account and may have to verify your identity with a Microsoft Authenticator prompt. You’ll then land on the “Manage how you sign in to Microsoft” page of your Microsoft account settings. Here, you can see all the existing aliases attached to your account.

Screenshot of adding an alias to a Microsoft account

Under “Account aliases,” click the “Add email address” link to add a new alias. You can either add an entirely new address (provided it’s available), or choose to link an existing email address to your Microsoft account. Type the address and click “Add alias.”

Screenshot of adding an alias to a Microsoft account

The email address will be added to your account immediately. Emails received to the address will show up in your Outlook.com inbox. You can also choose to send mail from the alias using the dropdown menu next to the “From” field in the Outlook.com editor. This works in the Outlook desktop client too – restart Outlook to see your alias appear as an option in the From menu.

Screenshot of adding an alias to a Microsoft account

You’re now ready to start using your alias. Optionally, you can convert it to the default email address for your account (the one which is used for outgoing mail by default) by clicking the “make primary” link back on the “Account aliases” page. Otherwise, continue using your mailbox as normal and select the alias as the From address when you need to send email from it.

Microsoft isn’t relenting on cutting off internal user rights for Microsoft Partners

Earlier this week, just a week before Microsoft’s annual Inspire Partner conference, word got out that the company was cutting a long-standing perk for partners as part of an annual Microsoft Action Pack subscription available to them. For years and years, partners were able to gain “internal use rights” for software from Microsoft, meaning that with an Action Pack you could use the software to run your business. The idea apparently was to make it easy for partners to be running the Microsoft software they were helping to sell.

Some partners were quite incensed by the change in policy, which is to take effect at the beginning of Microsoft’s next fiscal year on July 1, 2020. In response to the complaints, company execs held a Partners only AMA webcast, attended by some 230 partners, according to a post by Mary Jo Foley outlining details of the webcast. According to Foley, “Microsoft officials held fast to their stance, saying the company had to make some trade-offs in order to deliver on other priorities, such as making it easier for partners to connect with more users, partners and sellers.”

Details of the costs and benefits of a Microsoft Action Pack are locked behind Partner Network gauntlets, but a 2014 post by RedmondMag, detailing a 44% rate hike in the costs of the Action Pack, revealed that for 10 licenses, partners would pay $475 per year. This included “full licenses for Windows desktops and servers, as well as other server products, such as SQL Server, Exchange Server, SharePoint Server and Lync Server…  internal-use seats of Office 365, Dynamics CRM Online and Windows Intune and Windows Azure usage credits…. (and) technical support, developer tools, marketing campaign materials and services and $100 in Bing advertising credits for the subscriber and $500 for the subscriber’s customers.”

So, for example, taking these 2014 numbers, a small business joining the Partner program could get full licenses for Windows, Office, and a number of server products, Office 365, Intune, and Azure credits (the post doesn’t detail how much credit was included), and technical support and other perks for 10 seats, for a price of less than $4/mo per seat. That’s an amazing deal, and it’s not beyond reason to believe that at least some companies realized that becoming a partner and subscribing to an Action Pack was an extremely cost effective way to get Microsoft products, regardless of any “partner” work they did (getting into the Partner program has some criteria, but it’s not that hard).

For whatever reason, Microsoft has decided to pull the plug on this perk of the program, and after next year partners are going to have to rethink their product licensing. For Microsoft, that may be the point, to cull out partners that are in the program for the cheap software as opposed to helping the company sell software and services more effectively.

We expect to hear some more about the kerfluffle at Inspire, but don’t expect Microsoft to back down on this one.

Can’t Unpin From Taskbar: 4 Ways to Permanently Fix it

The Taskbar has always been one of the most loved features of the Windows platform, but many users reported that they can’t unpin items from Taskbar.

This isn’t the only issue, and many reported that Taskbar is not working on their PC, but today we’re going to focus solely on pinning issues.

Not being able to unpin apps can be a problem, and in today’s article, we’ll show you how to fix it.

Why can’t I unpin from Taskbar?

  • The damaged software installation will cause issues with the unpinning feature.
  • Problems with the registry can cause issues with pinning apps.
  • Tablet Mode on Windows 10 can sometimes cause problems with Taskbar.

How do I permanently unpin something from my Taskbar?

1. Uninstall and re-install the app

  1. Click on Start and select Settings. Then choose  Apps.
  2. Select the app and click on the Uninstall button.
  3. Now install the application again.
  4. Try to unpin the app from the taskbar by right-clicking on it and selecting the Unpin from taskbar option. However, if issues persist, try the next method.

2. Run script file

  1. Open Notepad. (Simply type Notepad in the Cortana search box and select from the search result).
  2. Copy and paste the following four lines of text.
    DEL /F /S /Q /A "%AppData%\Microsoft\Internet Explorer\Quick Launch\User Pinned\TaskBar\*"
    REG DELETE HKCU\Software\Microsoft\Windows\CurrentVersion\Explorer\Taskband /F
    taskkill /f /im explorer.exe
    start explorer.exe


  3. Click on Files on the top left corner and select Save.
  4. In the Save As dialog box, set Save as file type to All Files.
  5. Choose any file name of your choice but provide it with the extension .bat.
  6. For instance, it can be like Unpin from taskbar.bat.
  7. Double-click on the batch file you just created for the commands to take effect.
  8. Reboot your PC.

If you can’t remove icon from Taskbar on Windows 10, running this little scrip can help.

3. Unpin from Start menu

  1. Click on Start.
  2. The app you wish to unpin from the taskbar should also be there on the Start menu as well.
  3. Right click on the app and select More and choose Unpin from taskbar.
  4. The app should be gone from the taskbar. If not, try the next method.

4. Switch to Desktop mode from Tablet mode

  1. For those who aren’t aware of the same, the concept of Taskbar is relevant only in the Desktop mode.
  2. So if you have the Tablet mode enabled on your PC, toggle it off to invoke Desktop mode.
  3. To toggle off Tablet mode, click on Notification center at the bottom right corner and disable Tablet mode.

This should be all you need to do if you are unable to unpin an app from the taskbar.

In case you want to learn more, we have a great guide on how to hide the Taskbar, so you might want to check it out.

Speaking of Taskbar and apps, we also have a guide on what to do if unpinned apps keep coming back on Windows 11, so don’t hesitate to check it out.

What methods did you use to fix this problem? Let us know in the comments below.

How to see the diagnostic data Windows 10 is sending to Microsoft

With the Windows 10 April 2018 update, Microsoft finally reduced some of the secrecy around its Windows 10 telemetry collection. You can now view the diagnostic data which your PC is sending home to Microsoft, although it won’t necessarily be easy to understand.

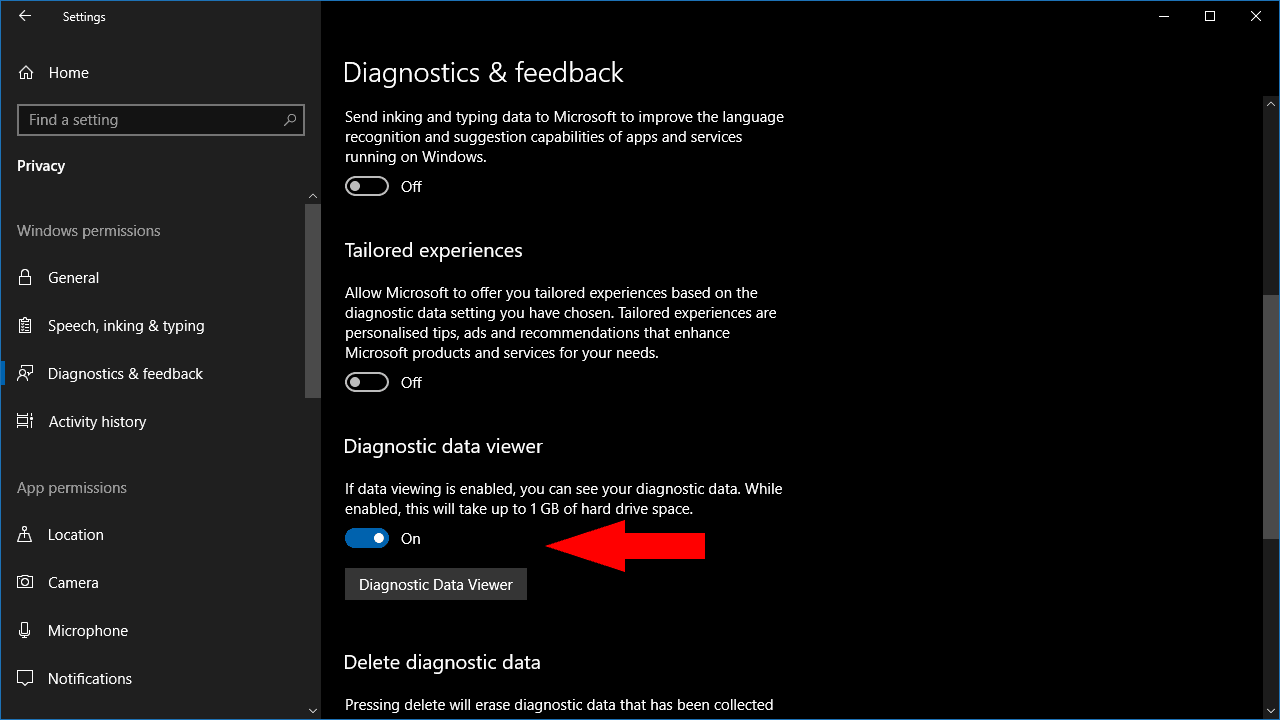
First, you have to explicitly enable diagnostic data viewing from the Settings app. Open Settings and navigate to Privacy > Diagnostics & Feedback. Scroll down the page to the “Diagnostic data viewer” section.

Enabling Diagnostic Data Viewing in Windows 10

Under this heading, turn the toggle button to the on position. Diagnostic files will now be retained on your device, so you can view them. This will consume additional space – Microsoft estimates up to 1GB – as diagnostic files are normally removed after they’re uploaded to the cloud.

Although you’ve enabled telemetry viewing, the Settings app doesn’t provide a way to actually access the files. Instead, you’ll need a separate app, “Diagnostic Data Viewer,” from the Microsoft Store. Click the “Diagnostic Data Viewer” button to open a link to the Store. Click the blue “Get” button to download the app.

Screenshot of Windows 10 Diagnostic Data Viewer app

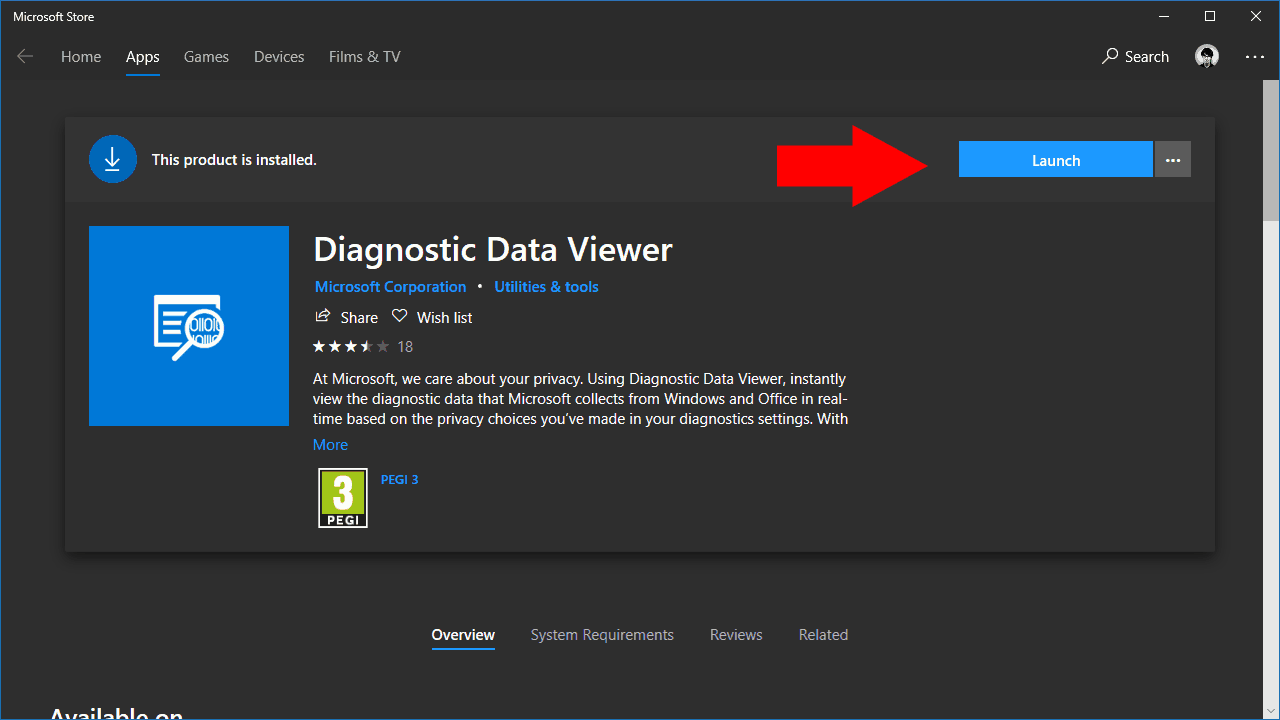
Once the app has installed, click the blue “Launch” button on the Microsoft Store page to open it. Alternatively, search for the app in the Start menu.

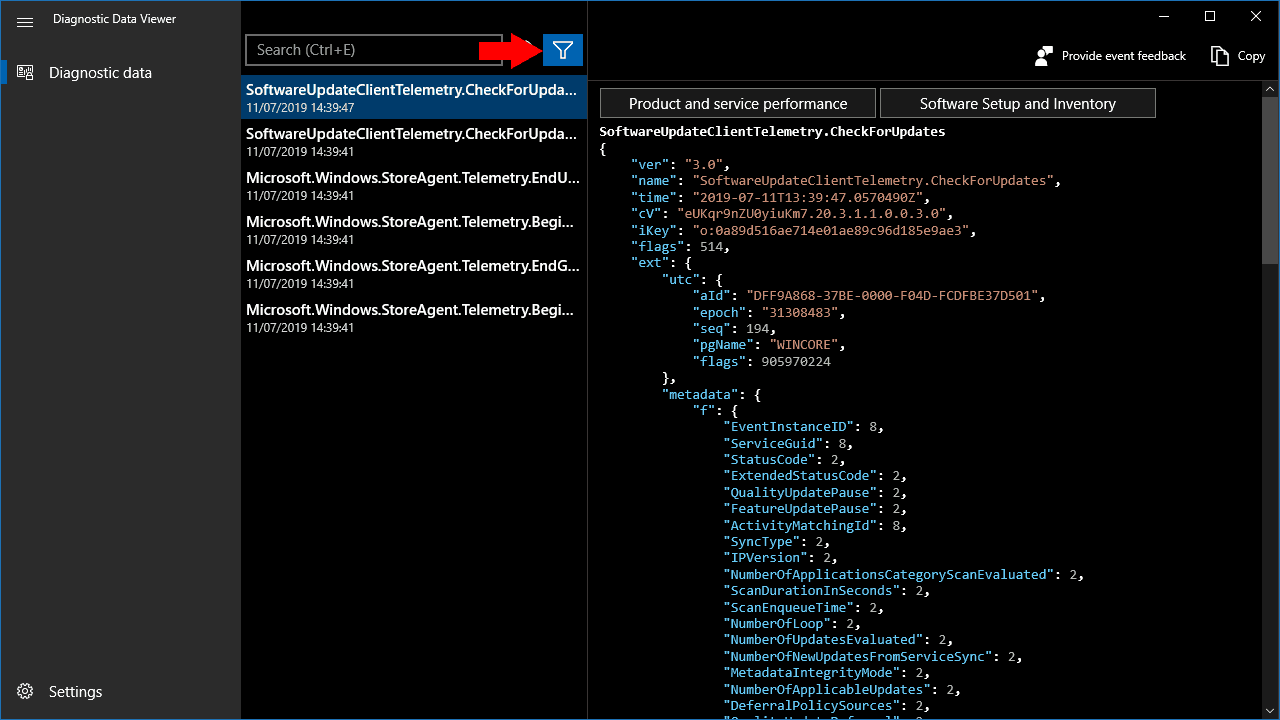
The app has a simple two-pane layout. On the left, you’ll see a list of all the diagnostic files on your device; on the right, the contents of each file appears when it’s selected. If you’ve only just enabled diagnostic viewing, there may not be many files to show – it will take time for diagnostic logs to be created and stored on your device.

Screenshot of Windows 10 Diagnostic Data Viewer app

You can filter the diagnostic data using the filter button at the top of the interface, next to the search bar. This lets you choose to view a specific category of telemetry information, which might be helpful when investigating a particular problem on your device.

Unfortunately, you may find the diagnostic data hard to interpret, unless you’re already fairly familiar with Windows internals. The data is presented in its raw JSON format. If you were hoping for a readable breakdown of what’s being sent, you’re still out of luck. The telemetry contains a wealth of your data about your device and the events occurring on it, but the lack of explanation may leave you none the wiser when it comes to understanding what Microsoft is collecting.

Word Document Small on Screen: How to Restore Normal Size

A number of users have reported that whenever their Word document is too small on screen when they open it. This issue seems to affect all versions of Microsoft Word, so this indicates that the problem is local.

In this article, we will explore a quick way to fix this annoying error. Read on to find out more.

Why is my Word document small?

Listed below are some of the reasons your Word document might be small on screen:

  • Wrong settings – Sometimes, the Microsoft Word app might be set to open minimized. This leads to the small window you see when your open any document. You need to change the settings to allow Word to run a maximized window.
  • Closing Word minimized – If you closed Word in a small window the last time you used it, it will open in that size when you open another document. So, ensure you maximize it before closing the document you are working on.

Now, if you are wondering how you can fix the default window size for Word documents, proceed to the next section of this guide.

How do I get my Word document back to normal size?

1. Change settings from the properties window

  1. Click on the Cortana search button, type in Word, right-click it and select Open file location.Open file location Word - Microsoft Word Opens small window
  2. This will open the folder in which your Microsoft Word is installed.
  3. Right-click the Microsoft Word icon and select Properties.
  4. Inside the Shortcut tab, click on the drop-down menu next to Run, select Maximized, and click OK.
    Run maximized Word - Microsoft Word opens small window
  5. Check to see if this fixes your problem. If it doesn’t, please follow the next method.

2. Maximize the window before closing Word

  1. Open your Word Document normally.
  2. Drag and drop the edges of the Word document to the desired size (or maximize it by clicking the Maximize button).
    maximize
  3. Close the document.
  4. When opening the document again, it should have remembered the size that the window had before it was closed.
  5. If this doesn’t solve your issue, please follow the next method.

3. Use the Ctrl key on your keyboard

  1. Open your Microsoft Word document.
  2. Resize the window to the desired size by dragging and dropping the edges of the window, or by selecting the Maximize button (see Method 2 step 2).
  3. Press and hold the Ctrl key on your keyboard and close the Word document by clicking the X button in the upper right corner of your screen.
    close word document small on screen
  4. Re-open the Microsoft Word document to see if the issue is solved.

In this article, we explored the best ways to deal with the problem caused by Microsoft Word opening in a small window, no matter what settings you applied to it before closing the document.

Similarly, if you can’t zoom word documents for some reason, check our detailed guide to rectify it.

Please feel free to let us know if any of these methods helped you solve your issue by using the comment section below.

Microsoft’s Azure AD begins public preview of FIDO2 security keys, enabling passwordless logins

Microsoft’s Azure Active Directory (Azure AD) this week began its public preview of support for FIDO2 security keys.

The implementation of FIDO2 technologies allows users to sign into devices and services without the use of a traditional password. In this case, developers will now be able to offer FIDO2 login solutions for Azure AD-connected apps and services.

“Every day, more and more of our customers move to cloud services and applications. They need to know that the data and services stored in these services are secure. Unfortunately, passwords are no longer an effective security mechanism,” Microsoft’s Alex Simons explained in an official blog post. “We know from industry analysts that 81 percent of successful cyberattacks begin with a compromised username and password. Additionally, traditional MFA, while very effective, can be hard to use and has a very low adoption rate.”

“It’s clear we need to provide our customers with authentication options that are secure and easy to use, so they can confidently access information without having to worry about hackers taking over their accounts. This is where passwordless authentication comes in. We believe it will help to significantly and permanently reduce the risk of account compromise.”

To coincide with the added support for FIDO2 security keys, Microsoft, today, also announced a partnership with Feitian Technologies, HID Global, and Yubico, three companies that specialize in the creation of modern secure login hardware using biometrics, NFC and USB security keys, and smart cards.

All three companies are currently offering discounts on their hardware for organisations interested in investing in bulk. Details on each offer can be found here.

Microsoft began working with the FIDO organization way back in 2013 and has since been an active party in developing newer and more secure technologies. The company’s own Windows Hello login method gained FIDO2 certification in May.

Microsoft’s Xbox One consoles just got a fishing video game that’s completely free to play

The video game, Fishing Planet, launched today for Xbox One and Windows 10 and it’s completely free for anyone to play on both platforms.

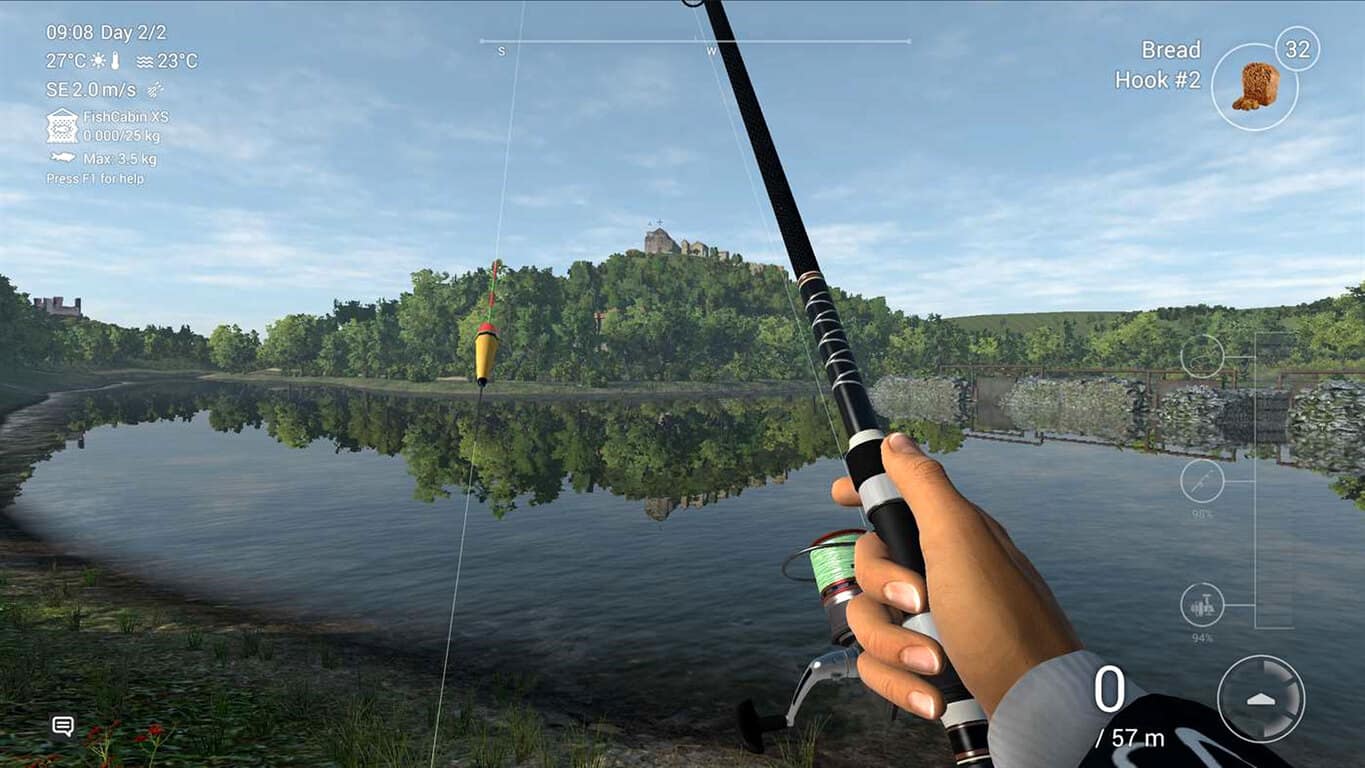
The game, as its title suggests, is a fishing game that lets players fish on a lake during different seasonal conditions and times of day.

Fishing Planet is impressively detailed with rods, lines, and reels that can break according to their actual specifications, lures and retrieves that act differently depending on the environment, and dynamic weather conditions.

Here’s the official game description:

Fishing Planet is a unique and highly realistic online first-person multiplayer fishing simulator developed by avid fishing enthusiasts for anglers to bring you the full thrill of actual angling! Choose your lures, make your trophy catches, discover new possibilities and sharpen your real angling skills anywhere, anytime with your friends!

The game is FREE to play and just a download away!

Fishing Planet isn’t just another game about fishing. Stunning eye-candy graphics, superb hydro and aerodynamics, realistic tackle behavior and damage based on actual simulation physics and, most importantly, fish with artificial intelligence for completely lifelike behavior make this a true-to-life fishing simulator that can help you improve your actual angling skills! The combination of unique graphics, realistic game physics and sophisticated AI will bring the realistic world of fishing directly to your screen!

Fishing Planet supports online multiplayer with up to 64 players and also plays in 4K Ultra HD when played on an Xbox One X console. The game is an Xbox Play Anywhere title which means that game progress can transfer between the Xbox One and Windows 10 versions.

Do you like fishing video games? Let us know what your favorites are in the comments below and then follow us on Pinterest for more Xbox gaming content.

Fishing Planet
Fishing Planet
Developer:
Fishing Planet LLC
Price:
Free

Final Fantasy VII Remake video game is coming to Xbox One according to a social media goof

The official Xbox Germany social media team sent Final Fantasy fans into a bit of a frenzy yesterday when a post on the Xbox Germany Facebook page showed footage from the Final Fantasy VII Remake video game, a title that’s only officially been announced for release on Sony’s PlayStation 4 console.

The post was quickly deleted, however, and Xbox Germany’s marketing communications and social lead, Maxi Gräff, has since tweeted out that the entire thing was one big misunderstanding.

“We did an internal mistake in the Social Team. We took the video off immediately. Sorry, no announcement on our side. Big apologies for this,” she said in a tweet.

In a separate tweet, she also explained exactly what happened and what led to the confusion. “It actually happened yes,” she explains. “In that video were multiple FF games and the remake happened to be in there by mistake from the editorial team where we didn´t check the exclusivity on the specific one. We make sure this doesn´t happen again.”

While a lot of Final Fantasy video games are on the Xbox One, there are also several that aren’t so Final Fantasy VII Remake’s absence isn’t too shocking or surprising for Xbox gamers.

Still, the game is highly anticipated by many who would love to play it on Xbox One so this retraction of what was initially thought to be an announcement or reveal will definitely feel like salt in a wound to those wanting the news to be real.

Do you think Final Fantasy VII Remake will get a release on the Xbox One? Share your thoughts with the community in the comments below and then follow us on Pinterest for more Xbox gaming content.

Enable Multicast in Firewall on Windows 10 [How to]

At times, the Multicast streaming may not work if you have your Firewall enabled, so in today’s guide, we’ll show you how to enable multicast in Windows 10 if it’s blocked by the firewall.

If you’re not familiar, we have a great guide on how to cast Windows 10 to TV, so you might want to familiarize yourself. As for the issues, they can be fixed as long as you follow these steps.

How do I know if multicast is enabled in Windows 10?

  1. Press Windows key + X and choose Windows PowerShell (Admin).
  2. Run the following command: ifconfig eth0 | grep -i multi
  3. After doing that, you should see the status of multicast.

Remember to replace eth0 with the name of your connection.

How do I enable multicast on Windows 10 if it’s blocked by a firewall?

1. Check for VM Network Adapter

  1. If you or your client has Virtual Machine installed, it will also install the Host-Only network for the VM. This network adapter can create issues with Multicast streaming and Firewall.
  2. Try to disable the Network adapter from the control panel and check if that resolves the error. Here is how to do it.
  3. Press Windows Key + R  to open Run.
  4. Type control and press OK to open the Control Panel. 
  5. In the Control Panel, go to Network and Internet > Network and Sharing Center.
  6. From the left pane click on Change Adapter Settings.
    Disable Virtual machine Network Adapter
  7. Right-click on the VM installed Network adapter and select Disable.
  8. Now start the stream and you should be able to start Multicast streaming.
  9. From the Control Panel, right-click on VM network Adapter again and select Enable.
  10. Right-click on the Network Adapter again and select Properties.
  11. Double-click on Internet Protocol Version 4 (TCP/IPv4).
    Virtual Machine Network Adapter Advanced Settings
  12. Click the Advanced button at the bottom of the window.
    Network Adapter Advanced Settings Change Metric
  13. Uncheck Automatic Metric and set the value to 0 for ethernet or wireless if required and 1 for VM.

2. Add Application to the Windows Firewall Exception List

  1. If you haven’t already, you can add an application on the Windows Firewall exception list and allow it to receive all incoming traffic from that application. This is the easiest but not the safest method to resolve this issue. Here is how to do it.
  2. Press Windows Key + R to open Run.
  3. Type firewall.cpl and press OK to open Windows Defender Firewall window.
  4. From the left pane click on Advanced Settings.
  5. Click on Inbound Rules options.
  6. On the left pane click on New rule.
    Defender Firewall Inbound Rules - New Rule
  7. Under Rule Type select the option Program and click Next.
  8. Select the option This Program path.
    browser Program Path - defender Firewall
  9. Now browse the program that you want to add to the exception list. Program‘s .exe file is located in C:\program Files (x86)\Program Name
  10. Select the Allow the connection option.
    Allow the Connection in Defender Firewall
  11. Click Next and leave all the options as it is. Click Next again.
  12. Add a name for this rule so that you can identify it easily and click Finish.
  13. Now try to start the stream and check if you are able to connect without any issues.

After doing that, check if the issue is resolved.

3. Other workarounds to try

  1. Allow incoming traffic from the IP addresses of all the server running the Streaming. While this can be a time-consuming task, it is safer than adding the program to the exception list.
  2. You can also configure the Windows Firewall to allow UDP traffic only from the specified ports. To do this you need to change the Windows Media Player settings or server configuration.
  3. Lastly, you can enable rollover to a TCP-based protocol on all Windows Media Server publishing points that streams. This is the most secure but resource-hungry method.

There you go, these are just some of the solutions that can help you enable multicast on Windows 10.

To learn more about this feature, visit our guide on mDNSResponder.exe for more useful information.

What method did you use? Let us know in the comments below.

Follow these steps to change Chromium Edge themes manually

After the Chromium Edge browser recently got support for dark mode, it now offers the option to change themes manually. This change is applicable only for Windows for the moment.

Since Microsoft Edge is Chromium-based, any update to the browser also extends to other browsers supported by the OS.

Apart from the dark theme mode, the Chromium-based Edge browser also adopted the looks and composition of the Windows 10. Which means that Edge transformed its visual style based on the settings you used in Windows 10.

Having said that, the operating system already features a dark mode.

Hence, while working on the dark theme for Edge, Microsoft wanted the browser to sync thoroughly with the Windows 10 browser.

That is to say, Microsoft Edge can automatically replace the theme to the selected mode and match the visual set up of Windows 10. It does so to get more regularity across the operating system.

The downside of the previous Dark Mode

The downside of the dark mode was, that you could not select a different theme that’s not featured in the OS. So, using the light theme in the browser with the dark mode in the Windows 10 wasn’t a choice in Edge.

However, the current update fixes that downside by launching a theme switcher for Microsoft edge Canary.

How to manually change themes in Chromium Edge

The current version of Edge allows you to select just the theme you want in your browser, despite the default settings of the OS.

Which means you can change to literally any desired mode regardless of your current Windows 10 configuration.

Here are the steps to follow:

  1.  Go to “Settings”
  2. Select “Appearance”
  3. Go to Theme dropdown (new switcher) which now comes with three choices – Light, Dark, and System.change edge browser themes manually
  4. Select “System” and your Edge adopts the visual style of the operating system.

No reboot is required for the changes to be effective. However, this feature is only limited to the latest
Microsoft Edge Canary build.

The company plans to extend it to the Dev version soon. Given that Microsoft Edge is still being worked upon, it’s getting the new feature updates quite frequently. Microsoft is yet to ship the first beta build.

READ MORE ABOUT CHROMIUM EDGE:

Gold Bars Not Showing Up in RDR2: How to Claim Them

Red Dead Redemption 2 is an amazing game, but it’s not without issues. And speaking of which, many reported that RDR2 gold bars are not showing up.

This is just one of the problems you can encounter, and many reported low FPS in Red Dead Redemption 2, but we covered this issue in a separate guide.

However, the issue with gold bars can be fixed, and we’ll show you how to do it properly.

Why are RDR2 gold bars not showing up?

  • You have reached the limit of 500 gold bars.
  • Temporary glitches with the game can also cause this issue.

What can I do if RDR2 gold bars are not showing up?

Spend your current gold bars

  1. Open your inventory.
  2. If you already have a stack of gold bars, be sure to deposit them.
  3. After doing that, additional gold bars will appear.

If gold bars are not showing up in RDR2 online, then this quick workaround might help you fix it.

There’s no solution for this bug, but the best way to avoid it is to spend your remaining gold bars so the new stack can appear.

This is a glitch, and it will hopefully be fixed with the latest update, so be sure to keep the game updated at all times.

So, as you can see, it is simple to overcome this glitch; to fix it, you need to spend your previous stack for more gold bars to show up.

Alternatively, make sure that you keep the game up to date since this is just a minor but annoying issue.

Unfortunately, this isn’t the only issue, and many reported Red Dead Online packet loss, but we covered that issue in a separate guide.

Was this workaround helpful to you? Let us know in the comment section below.

.NET Framework Blocking Issues in Windows 10: How to Fix it

.NET Framework is a software framework developed by Microsoft that offers the necessary components to run apps on your Windows computer. But many found that the .NET framework installer says Blocking issues in Windows 10.

The entire message reads, The .NET Framework (version) redistributable does not apply to this operating system. Please download the .NET Framework (version) for your operating system from the .NET Framework download page.

Keep reading to find out the solutions!

How do I fix .NET Framework blocking issues in Windows 10?

1. Enable .Net Framework

  1. Press Windows + R to open Run, type control, and then click OK.control panel
  2. Click on Programs, and then select Programs and Features.
  3. From the left pane, click on Turn Windows features on or off.
  4. Check .NET Framework 3.5 and then click OK to install it.
    Fix Net Framework blocked issues
  5. Wait for the installation to complete, and then restart the computer.
  6. If the service was already checked, uncheck .NET Framework 3.5 and then recheck it again. Try to run the installer again and check for any improvements.

A quick fix when you come across .NET Framework 4.8 blocking issues in Windows 10 and it’s subsequently not installing, is to get it via the optional features.

2. Run .NET Framework Setup Verification Tool

  1. Go to Microsoft .NET Framework Setup Verification Tool User’s Guide.
  2. Download .NET Framework setup verification tool.download
  3. Extract the Netfx-setupverifier-view zip file.
  4. Open the extracted folder and then run netfx_setupverifier.exe.
  5. Click Yes to confirm.
  6. In the .NET Framework Setup Verification Utility window, click on the Verify Now button.Net Framework Verification
  7. If everything works right, the Current Status should show Product verification successful.
  8. If it shows an error, download the Microsoft .NET Framework Repair Tool.
  9. Run the NetfxREapirTool.exe file. 
  10. Select the terms and conditions box, click Next, and then follow the on-screen instructions to complete the process.
    Use Net Framework Repair tool

That’s it! The .NET Framework Setup Verification Tool and .NET Framework Repair Tool should help when you are facing blocking issues while installing the framework in Windows 10.

Before you leave, find out the key differences between .NET 6 and .NET 7 and identify which one works best.

Tell us which fix worked for you in the comments section below.

Direct download links for Windows 10 July Patch Tuesday updates

Microsoft just released the July Patch Tuesday updates for all the Windows 10 versions currently supported.

Just like the previous updates, the recent batch brings some minor enhancements. Furthermore, these updates also fix a series of bugs introduced by the previous versions.

The Patch Tuesday updates are released to fix Windows security vulnerabilities. This time, the packages brings non-security patches as well.

Some of the major security enhancements target Windows kernel, Microsoft Graphics Component, Windows Wireless Networking, the classic Microsoft Edge, Windows App Platform and Frameworks, Internet Explorer.

Don’t forget to back up your system

Unfortunately, the history of Windows 10 cumulative updates is not that bright. Most of the times, these updates are nothing more than a headache for Windows 10 users and IT Admins.

They often trigger major issues including download stalls and slow installation issues. Most importantly, there are times when the updates fail to install on your systems.

Windows 10 May 2019 Update brought a defer update feature that allows you to delay the installation for some time. You can use this feature to wait until all the major update issues have been fixed.

However, in case you decide to go ahead with the installation, a complete backup of your system is highly recommended. Remember, you can always use the backup to rollback to a stable version if anything goes wrong.

Install Windows 10 June Patch Tuesday updates

These updates are also available as automatic downloads via Windows Update. But you can also use the following links to manually download and install the latest Windows updates on your system.

We will keep an eye on the Windows forums to keep you updated about the Patch Tuesday Updates.

Keep visiting Windowsreport.com for the latest news.

RELATED ARTICLES YOU NEED TO CHECK OUT:

EA Access 10 hour trial glitch: This is how you can solve the issue

Many users encountered a problem with the 10-hour trials for EA games on Xbox. The platform is counting down time even when gamers are not playing.

So, you play a trial version for 2 hours, you like the game and decide to come back tomorrow for another session. But when you log in again, you discover that your trial time is up.

Of course, you’ll not even consider buying a full version after this, despite the fact that you really enjoyed the first and only session.


Got a tight budget? Try these cheap and perfect games for Xbox!


You don’t want this to happen, so how can you avoid that?

Unfortunately, there’s no fix for this, but there is a workaround. Make sure you quit from the game when you are finished. This way the program knows when to stop the countdown.

Here are the steps to follow:

  1. So, to do this properly, press the Guide button from your Xbox controller.
  2. Highlight the game from the list.
  3. Then, press the Menu button, highlight Quit and press A.

As you can see, the issue has a very simple workaround. Just don’t forget to quit the game to enjoy every second from that 10-hour trial period.

Did this quick tip work for you? Let us know in the comment section below.

RELATED GAMING ARTICLES:

Posted in Fix

Apex Legends coins don’t work? We’ll show you how to solve that

After the worldwide success of PUBG and Fortnite, Apex Legends came as a contender for these two and made a name for itself in the gaming community.

Despite that, some bugs are still creating big waves and are annoying to a lot of gamers.

That’s the case with the coins bug. Players are complaining that after a purchase of  Apex Coins, the in-game currency doesn’t show up in their wallet. Here’s what some users are saying:

I bought apex legend coins after game installed and it charged my bank but apex legend coins not showing. Bought the 10$ for 1000 apex coin thing, havent recieved them in and its been a few hours.

The problem is pretty common, and more users are complaining about it every single day. If you’re on the same boat, there’s a few things that you could try to get your coins back.

How can I get my Apex Coins back?

1. Wait a bit longer

In-game currencies may take some time to be fully processed. Sometimes it may be the servers at fault, other times your internet connection.

Just to make sure, wait some time before taking any further action.


The internet connection destroys your gaming sessions? Fix it now with these easy steps.


2. Restart your game

  1. Press the Xbox button and open the guide.
  2.  On the left side, highlight the game you want to close and press the Menu button on your controller.
  3. Select Quit.

After that, open Apex Legends again and see if your coins are in the wallet.

3. Restart your console

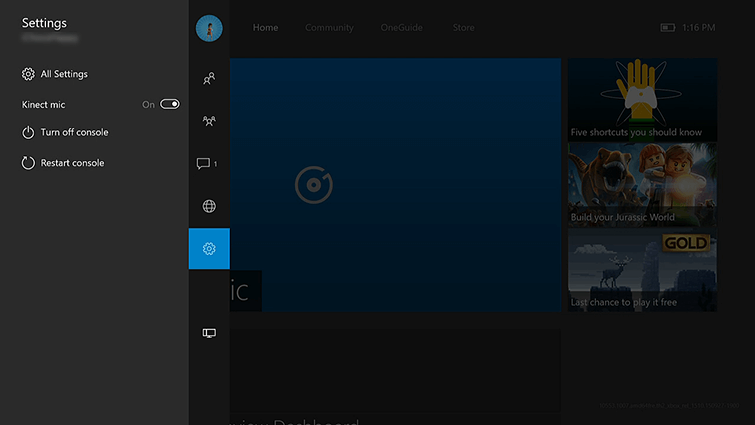
  1. Press the Xbox button and open the guide. Go to System > Settings.All Settings xbox
  2. Select Restart console.
  3. Select Restart.

If none of the solutions work, then your best bet is to wait it out. The Apex team is aware of the bug and they’ll certainly solve the issue as soon as possible.

Although the solutions above use Xbox console as an example, they work similarly on other platforms, including Windows 10. With that in mind, you can check out our detailed guide on how to fix common Apex Legends bugs on PC.

What’s your favourite Battle Royale game? Leave your answer along with any other questions in the comments section below.

READ ALSO:

New agreement to bring Microsoft’s broadband access initiative, Airband, to 4 million in Indiana, Ohio, and Illinois

Microsoft’s plan to leverage TV white space to bring low-cost broadband to areas is expanding to include service to four million people across Indiana, Illinois and Ohio by July 2022. The formal Microsoft Airband Initiative will partner with Watch Communications to deploy connectivity technologies, with an emphasis on wireless adoption to “50 counties in Indiana, 22 counties in Illinois and most counties in Ohio,” according to a recent press release from Microsoft.

“Every person deserves the same opportunity. But too often and in too many places, these opportunities are limited by where people live and their access to reliable and affordable broadband access,” said Shelley McKinley, general manager, Technology and Corporate Responsibility, Microsoft. “Microsoft is working across the country to close this gap. We’re partnering with Watch Communications to improve broadband access in Indiana, Illinois and Ohio and build on the incredible work being done by state and local leaders on this issue on behalf of their citizens.”

The specifics of Microsoft and Watch Communications’ approach include a mix of new and old technologies to bolster wireless connectivity through unused TV frequencies in lower population density or rural areas to improve support. Ideally, Microsoft’s Airband Initiative could help the combined $38.5 billion dollars agricultural value of farmers in the Ohio, Indiana, and Illinois areas.

Improved connectivity will bolster economic, educational and telehealth opportunities for everyone in the region, and could be particularly impactful for this region’s farmers. Together, Indiana, Illinois and Ohio account for more than $38.5 billion in agricultural value, with all three ranking in the top 16 states by agricultural output, according to the USDA. With broadband access, farmers can take advantage of advanced technologies such as precision agriculture which can help better monitor crops and increase yields.

While it’s relatively good news that two public-private sector businesses are coming together to improve the economic, educational, and “telehealth” opportunities for residents in rural areas across the U.S., it should be noted that the government has abdicated the responsibility to provide what is becoming a basic necessity to roughly 21 million people who have no access to broadband internet connectivity.

What is it Windows Information Protection? [EXPERT GUIDE]

Because of the increase in a number of cases in which employees use their own devices inside your enterprise, the cases of accidental data leaks through their apps and services has increased as well.

The data leaks can happen through different apps and services – email, social media, public cloud, etc. Because these elements are outside of the control of your company, they can cause serious issues.

To help tackle these issues, the developers at Windows released the Windows Information Protection (WIP). This service helps you protect your enterprise data and apps from accidental leaks.

In this article, we will explore the WIP service in more detail, and we’ll also discuss how to use it for your enterprise. Read on to find out more.

How do I set Windows information protection?

What is WIP?

windows information protection logo - windows information protection
WIP is the MAM (mobile application management) system for Windows 10. This handy tool gives you the power to manage all aspects of data policy enforcement for both apps and documents.

WIP also allows you to remove access to the data of your enterprise both from your enterprise devices, and personal devices, making the environment more secure. This service allows employees to create content by using an enterprise-protected device, and they can choose if they want to save it as a working document.

If that option is chosen, WIP automatically encrypts and stores the data locally, to be easily and safely accessed by the enterprise manager. The enterprise manager can set custom access to apps and other restrictions, and also keep a log of all the changes made in the system.

This allows you to always keep on track with the latest changes, and also to stop any actions that you deem unsuitable or risky. If the changes happen, the data stored in the WIP logs will give you a clear answer as to who performed the change and what they did with the data in question.


How to use Windows Information Protection?

Microsoft Intune - Windows information protection
In order to set up a Windows Information Protection policy and deploy it in your enterprise, you will need to use Microsoft Intune.

To get Microsoft Intune for your enterprise, please visit the official Microsoft website, and check out the available pricing plans.


Want to protect your PC from data theft? Check out one of these USB control applications!


After getting Microsoft Intune, please follow these steps to set it up:

1. Configure the MDM/MAM provider

  1. Sign in to the Azure portal.
  2. Select Azure Active Directory -> Mobility (MDM and MAM) -> Microsoft Intune.
  3. Click Restore Default URLs (or enter your preferred MDM or MAM settings) -> click Save.mobility provider settings - windows information protection policy

2. Create a WIP policy

  1. Sign in to the Azure portal.
  2. Open Microsoft Intune -> select Client apps -> App protection policies -> Create policy.Create app protection policy - Windows information protection
  3. Inside the App policy screen -> Add a policy -> fill out the fields required (name, description, etc.).add a mobile app policy - windows information protection
  4. Select Protected apps -> Add apps.
  5. You can choose from Recommended apps, Store apps, Desktop apps. (click the respective link for detailed information on how to set them up).

In this article, we discussed what the Windows Information Protection (WIP) service is, and how to set it up for your enterprise.

We would love to know if this guide helped you understand what the WIP service is. Please feel free to let us know by using the comment section found below.

READ ALSO:

Microsoft’s Edge Insider browser gets new autoplay media blocker as experimental feature

The Microsoft Edge announced last month that the new Chromium-based Edge would soon get the same autoplay media settings currently available in EdgeHTML, and Edge Insiders can now limit media autoplay in the web browser starting today. The experimental feature is now live in both the Canary and Dev channels, and you can turn it on by opening edge://flags/#edge-limit-autoplay in the address bar.

It’s worth noting that the algorithm used for this feature won’t block all autoplaying videos you can find while browsing the web, and Microsoft says that “most popular websites will remain affected.” Still, this should be useful to remove some of the most annoying video ads used by some websites.

Another new feature from the old Microsoft Edge that has now made its way to Edge Canary is the ability to customize font sizes and background themes while using Reading View (via Reddit). This is a definitely a nice usability improvement, and you can turn on this feature right now by checking edge://flags/#edge-reading-view-text-preference in the latest Canary build.