Microsoft isn’t relenting on cutting off internal user rights for Microsoft Partners

Earlier this week, just a week before Microsoft’s annual Inspire Partner conference, word got out that the company was cutting a long-standing perk for partners as part of an annual Microsoft Action Pack subscription available to them. For years and years, partners were able to gain “internal use rights” for software from Microsoft, meaning that with an Action Pack you could use the software to run your business. The idea apparently was to make it easy for partners to be running the Microsoft software they were helping to sell.

Some partners were quite incensed by the change in policy, which is to take effect at the beginning of Microsoft’s next fiscal year on July 1, 2020. In response to the complaints, company execs held a Partners only AMA webcast, attended by some 230 partners, according to a post by Mary Jo Foley outlining details of the webcast. According to Foley, “Microsoft officials held fast to their stance, saying the company had to make some trade-offs in order to deliver on other priorities, such as making it easier for partners to connect with more users, partners and sellers.”

Details of the costs and benefits of a Microsoft Action Pack are locked behind Partner Network gauntlets, but a 2014 post by RedmondMag, detailing a 44% rate hike in the costs of the Action Pack, revealed that for 10 licenses, partners would pay $475 per year. This included “full licenses for Windows desktops and servers, as well as other server products, such as SQL Server, Exchange Server, SharePoint Server and Lync Server…  internal-use seats of Office 365, Dynamics CRM Online and Windows Intune and Windows Azure usage credits…. (and) technical support, developer tools, marketing campaign materials and services and $100 in Bing advertising credits for the subscriber and $500 for the subscriber’s customers.”

So, for example, taking these 2014 numbers, a small business joining the Partner program could get full licenses for Windows, Office, and a number of server products, Office 365, Intune, and Azure credits (the post doesn’t detail how much credit was included), and technical support and other perks for 10 seats, for a price of less than $4/mo per seat. That’s an amazing deal, and it’s not beyond reason to believe that at least some companies realized that becoming a partner and subscribing to an Action Pack was an extremely cost effective way to get Microsoft products, regardless of any “partner” work they did (getting into the Partner program has some criteria, but it’s not that hard).

For whatever reason, Microsoft has decided to pull the plug on this perk of the program, and after next year partners are going to have to rethink their product licensing. For Microsoft, that may be the point, to cull out partners that are in the program for the cheap software as opposed to helping the company sell software and services more effectively.

We expect to hear some more about the kerfluffle at Inspire, but don’t expect Microsoft to back down on this one.

Can’t Unpin From Taskbar: 4 Ways to Permanently Fix it

The Taskbar has always been one of the most loved features of the Windows platform, but many users reported that they can’t unpin items from Taskbar.

This isn’t the only issue, and many reported that Taskbar is not working on their PC, but today we’re going to focus solely on pinning issues.

Not being able to unpin apps can be a problem, and in today’s article, we’ll show you how to fix it.

Why can’t I unpin from Taskbar?

  • The damaged software installation will cause issues with the unpinning feature.
  • Problems with the registry can cause issues with pinning apps.
  • Tablet Mode on Windows 10 can sometimes cause problems with Taskbar.

How do I permanently unpin something from my Taskbar?

1. Uninstall and re-install the app

  1. Click on Start and select Settings. Then choose  Apps.
  2. Select the app and click on the Uninstall button.
  3. Now install the application again.
  4. Try to unpin the app from the taskbar by right-clicking on it and selecting the Unpin from taskbar option. However, if issues persist, try the next method.

2. Run script file

  1. Open Notepad. (Simply type Notepad in the Cortana search box and select from the search result).
  2. Copy and paste the following four lines of text.
    DEL /F /S /Q /A "%AppData%\Microsoft\Internet Explorer\Quick Launch\User Pinned\TaskBar\*"
    REG DELETE HKCU\Software\Microsoft\Windows\CurrentVersion\Explorer\Taskband /F
    taskkill /f /im explorer.exe
    start explorer.exe


  3. Click on Files on the top left corner and select Save.
  4. In the Save As dialog box, set Save as file type to All Files.
  5. Choose any file name of your choice but provide it with the extension .bat.
  6. For instance, it can be like Unpin from taskbar.bat.
  7. Double-click on the batch file you just created for the commands to take effect.
  8. Reboot your PC.

If you can’t remove icon from Taskbar on Windows 10, running this little scrip can help.

3. Unpin from Start menu

  1. Click on Start.
  2. The app you wish to unpin from the taskbar should also be there on the Start menu as well.
  3. Right click on the app and select More and choose Unpin from taskbar.
  4. The app should be gone from the taskbar. If not, try the next method.

4. Switch to Desktop mode from Tablet mode

  1. For those who aren’t aware of the same, the concept of Taskbar is relevant only in the Desktop mode.
  2. So if you have the Tablet mode enabled on your PC, toggle it off to invoke Desktop mode.
  3. To toggle off Tablet mode, click on Notification center at the bottom right corner and disable Tablet mode.

This should be all you need to do if you are unable to unpin an app from the taskbar.

In case you want to learn more, we have a great guide on how to hide the Taskbar, so you might want to check it out.

Speaking of Taskbar and apps, we also have a guide on what to do if unpinned apps keep coming back on Windows 11, so don’t hesitate to check it out.

What methods did you use to fix this problem? Let us know in the comments below.

How to see the diagnostic data Windows 10 is sending to Microsoft

With the Windows 10 April 2018 update, Microsoft finally reduced some of the secrecy around its Windows 10 telemetry collection. You can now view the diagnostic data which your PC is sending home to Microsoft, although it won’t necessarily be easy to understand.

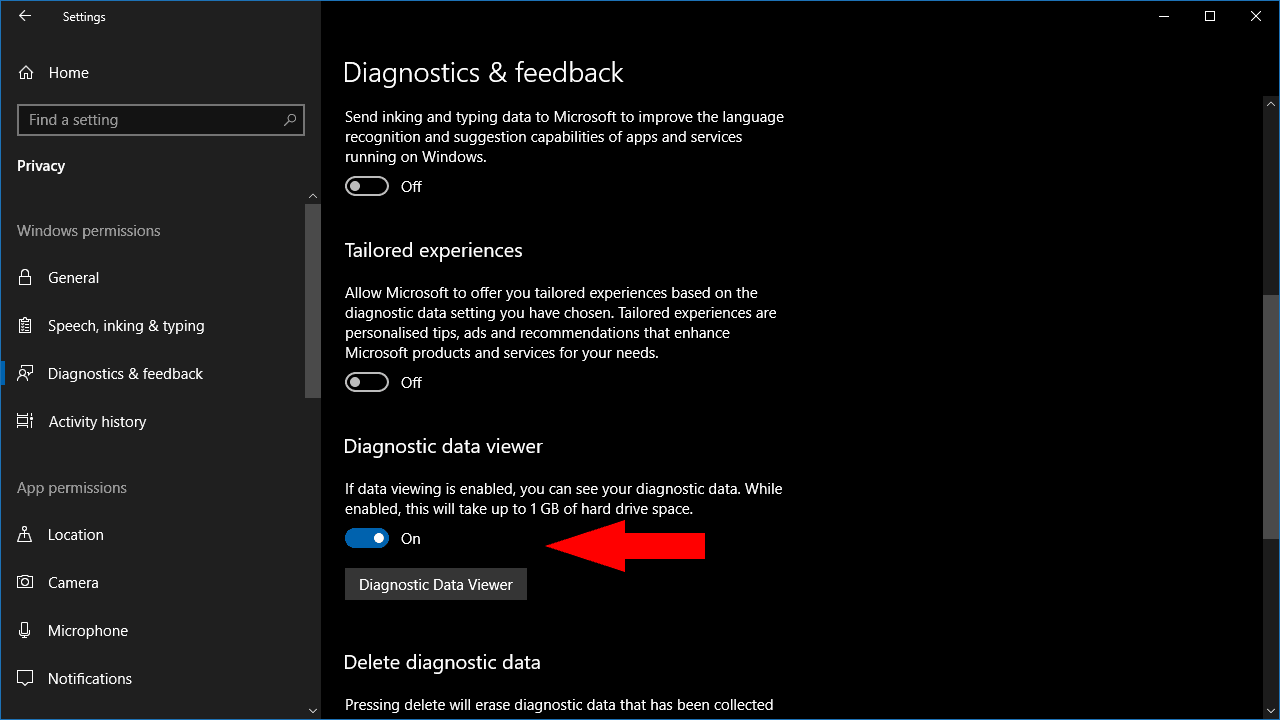
First, you have to explicitly enable diagnostic data viewing from the Settings app. Open Settings and navigate to Privacy > Diagnostics & Feedback. Scroll down the page to the “Diagnostic data viewer” section.

Enabling Diagnostic Data Viewing in Windows 10

Under this heading, turn the toggle button to the on position. Diagnostic files will now be retained on your device, so you can view them. This will consume additional space – Microsoft estimates up to 1GB – as diagnostic files are normally removed after they’re uploaded to the cloud.

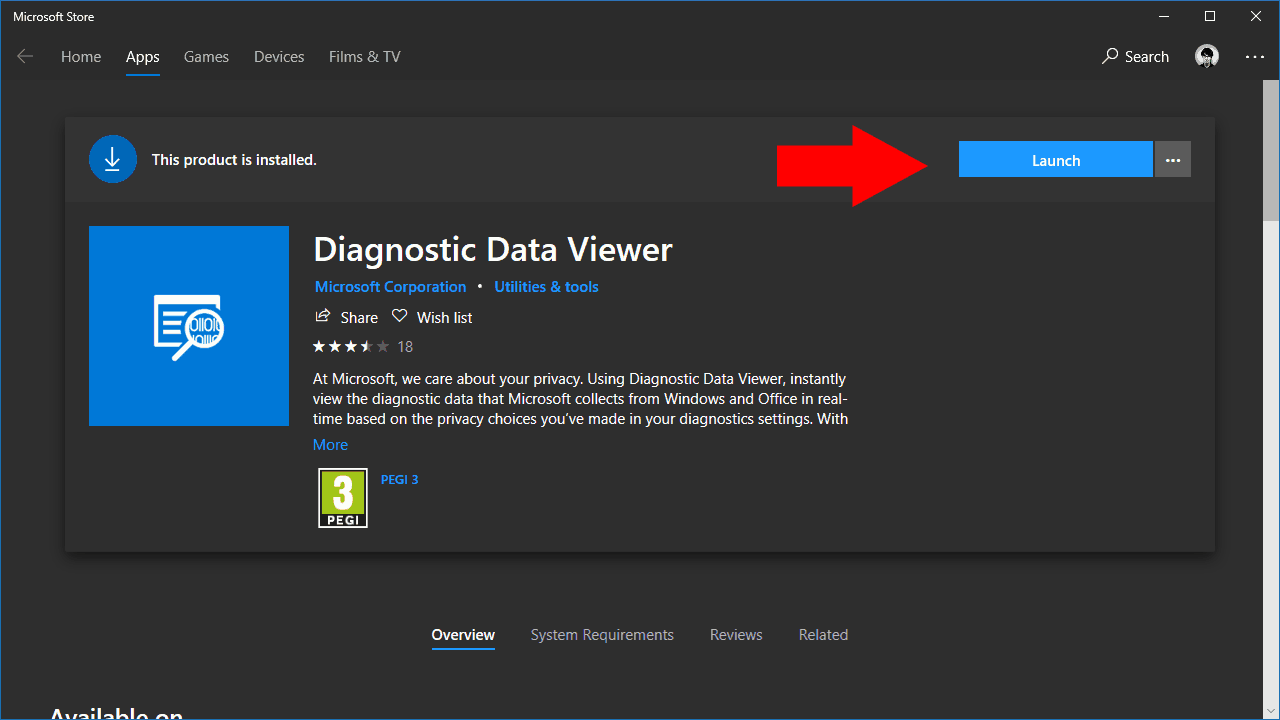
Although you’ve enabled telemetry viewing, the Settings app doesn’t provide a way to actually access the files. Instead, you’ll need a separate app, “Diagnostic Data Viewer,” from the Microsoft Store. Click the “Diagnostic Data Viewer” button to open a link to the Store. Click the blue “Get” button to download the app.

Screenshot of Windows 10 Diagnostic Data Viewer app

Once the app has installed, click the blue “Launch” button on the Microsoft Store page to open it. Alternatively, search for the app in the Start menu.

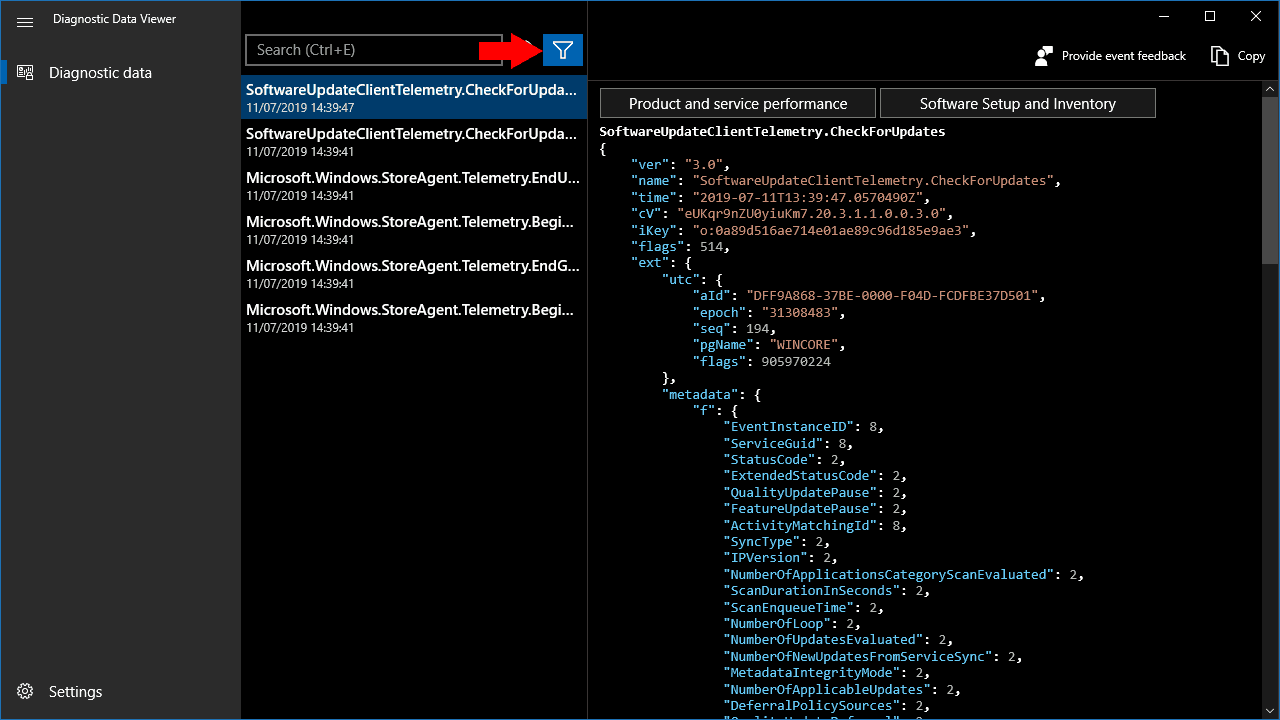
The app has a simple two-pane layout. On the left, you’ll see a list of all the diagnostic files on your device; on the right, the contents of each file appears when it’s selected. If you’ve only just enabled diagnostic viewing, there may not be many files to show – it will take time for diagnostic logs to be created and stored on your device.

Screenshot of Windows 10 Diagnostic Data Viewer app

You can filter the diagnostic data using the filter button at the top of the interface, next to the search bar. This lets you choose to view a specific category of telemetry information, which might be helpful when investigating a particular problem on your device.

Unfortunately, you may find the diagnostic data hard to interpret, unless you’re already fairly familiar with Windows internals. The data is presented in its raw JSON format. If you were hoping for a readable breakdown of what’s being sent, you’re still out of luck. The telemetry contains a wealth of your data about your device and the events occurring on it, but the lack of explanation may leave you none the wiser when it comes to understanding what Microsoft is collecting.

Word Document Small on Screen: How to Restore Normal Size

A number of users have reported that whenever their Word document is too small on screen when they open it. This issue seems to affect all versions of Microsoft Word, so this indicates that the problem is local.

In this article, we will explore a quick way to fix this annoying error. Read on to find out more.

Why is my Word document small?

Listed below are some of the reasons your Word document might be small on screen:

  • Wrong settings – Sometimes, the Microsoft Word app might be set to open minimized. This leads to the small window you see when your open any document. You need to change the settings to allow Word to run a maximized window.
  • Closing Word minimized – If you closed Word in a small window the last time you used it, it will open in that size when you open another document. So, ensure you maximize it before closing the document you are working on.

Now, if you are wondering how you can fix the default window size for Word documents, proceed to the next section of this guide.

How do I get my Word document back to normal size?

1. Change settings from the properties window

  1. Click on the Cortana search button, type in Word, right-click it and select Open file location.Open file location Word - Microsoft Word Opens small window
  2. This will open the folder in which your Microsoft Word is installed.
  3. Right-click the Microsoft Word icon and select Properties.
  4. Inside the Shortcut tab, click on the drop-down menu next to Run, select Maximized, and click OK.
    Run maximized Word - Microsoft Word opens small window
  5. Check to see if this fixes your problem. If it doesn’t, please follow the next method.

2. Maximize the window before closing Word

  1. Open your Word Document normally.
  2. Drag and drop the edges of the Word document to the desired size (or maximize it by clicking the Maximize button).
    maximize
  3. Close the document.
  4. When opening the document again, it should have remembered the size that the window had before it was closed.
  5. If this doesn’t solve your issue, please follow the next method.

3. Use the Ctrl key on your keyboard

  1. Open your Microsoft Word document.
  2. Resize the window to the desired size by dragging and dropping the edges of the window, or by selecting the Maximize button (see Method 2 step 2).
  3. Press and hold the Ctrl key on your keyboard and close the Word document by clicking the X button in the upper right corner of your screen.
    close word document small on screen
  4. Re-open the Microsoft Word document to see if the issue is solved.

In this article, we explored the best ways to deal with the problem caused by Microsoft Word opening in a small window, no matter what settings you applied to it before closing the document.

Similarly, if you can’t zoom word documents for some reason, check our detailed guide to rectify it.

Please feel free to let us know if any of these methods helped you solve your issue by using the comment section below.

Microsoft’s Azure AD begins public preview of FIDO2 security keys, enabling passwordless logins

Microsoft’s Azure Active Directory (Azure AD) this week began its public preview of support for FIDO2 security keys.

The implementation of FIDO2 technologies allows users to sign into devices and services without the use of a traditional password. In this case, developers will now be able to offer FIDO2 login solutions for Azure AD-connected apps and services.

“Every day, more and more of our customers move to cloud services and applications. They need to know that the data and services stored in these services are secure. Unfortunately, passwords are no longer an effective security mechanism,” Microsoft’s Alex Simons explained in an official blog post. “We know from industry analysts that 81 percent of successful cyberattacks begin with a compromised username and password. Additionally, traditional MFA, while very effective, can be hard to use and has a very low adoption rate.”

“It’s clear we need to provide our customers with authentication options that are secure and easy to use, so they can confidently access information without having to worry about hackers taking over their accounts. This is where passwordless authentication comes in. We believe it will help to significantly and permanently reduce the risk of account compromise.”

To coincide with the added support for FIDO2 security keys, Microsoft, today, also announced a partnership with Feitian Technologies, HID Global, and Yubico, three companies that specialize in the creation of modern secure login hardware using biometrics, NFC and USB security keys, and smart cards.

All three companies are currently offering discounts on their hardware for organisations interested in investing in bulk. Details on each offer can be found here.

Microsoft began working with the FIDO organization way back in 2013 and has since been an active party in developing newer and more secure technologies. The company’s own Windows Hello login method gained FIDO2 certification in May.

Microsoft’s Xbox One consoles just got a fishing video game that’s completely free to play

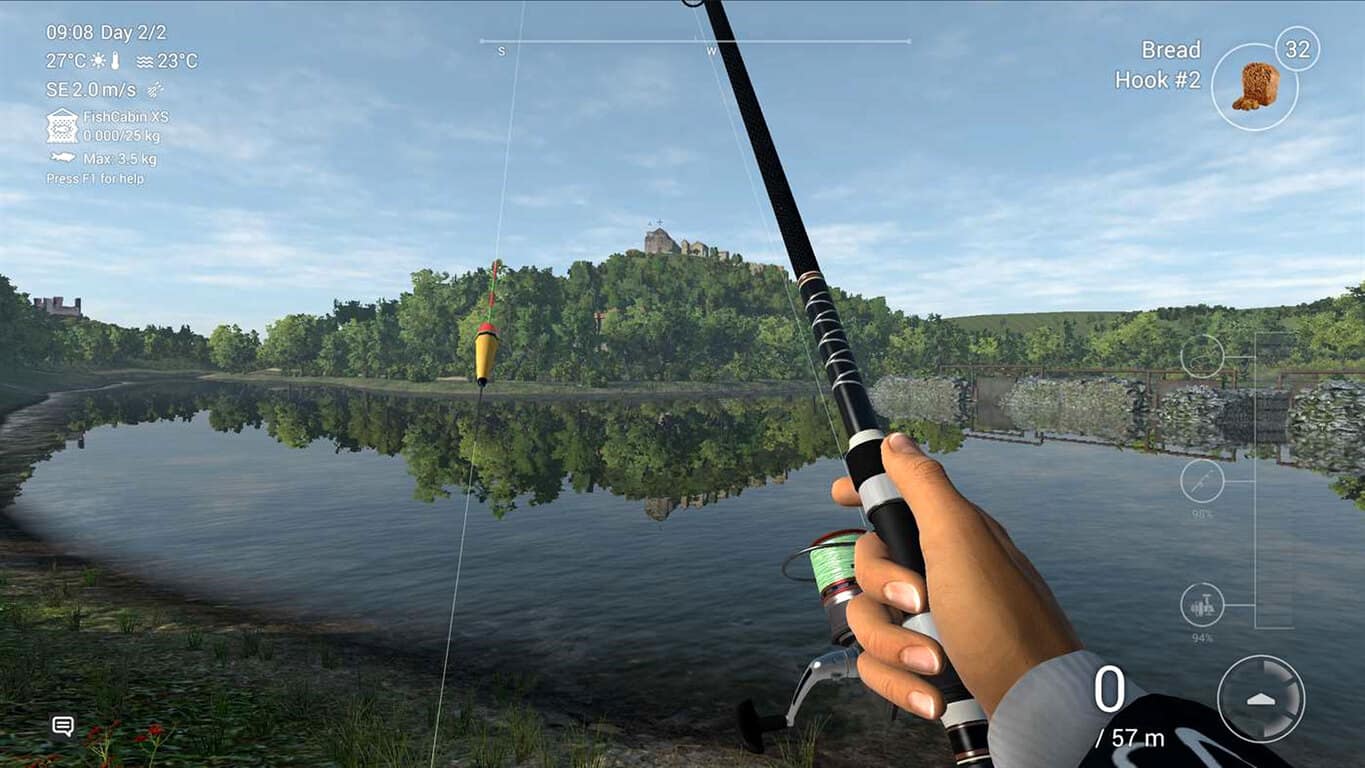
The video game, Fishing Planet, launched today for Xbox One and Windows 10 and it’s completely free for anyone to play on both platforms.

The game, as its title suggests, is a fishing game that lets players fish on a lake during different seasonal conditions and times of day.

Fishing Planet is impressively detailed with rods, lines, and reels that can break according to their actual specifications, lures and retrieves that act differently depending on the environment, and dynamic weather conditions.

Here’s the official game description:

Fishing Planet is a unique and highly realistic online first-person multiplayer fishing simulator developed by avid fishing enthusiasts for anglers to bring you the full thrill of actual angling! Choose your lures, make your trophy catches, discover new possibilities and sharpen your real angling skills anywhere, anytime with your friends!

The game is FREE to play and just a download away!

Fishing Planet isn’t just another game about fishing. Stunning eye-candy graphics, superb hydro and aerodynamics, realistic tackle behavior and damage based on actual simulation physics and, most importantly, fish with artificial intelligence for completely lifelike behavior make this a true-to-life fishing simulator that can help you improve your actual angling skills! The combination of unique graphics, realistic game physics and sophisticated AI will bring the realistic world of fishing directly to your screen!

Fishing Planet supports online multiplayer with up to 64 players and also plays in 4K Ultra HD when played on an Xbox One X console. The game is an Xbox Play Anywhere title which means that game progress can transfer between the Xbox One and Windows 10 versions.

Do you like fishing video games? Let us know what your favorites are in the comments below and then follow us on Pinterest for more Xbox gaming content.

Fishing Planet
Fishing Planet
Developer:
Fishing Planet LLC
Price:
Free

Final Fantasy VII Remake video game is coming to Xbox One according to a social media goof

The official Xbox Germany social media team sent Final Fantasy fans into a bit of a frenzy yesterday when a post on the Xbox Germany Facebook page showed footage from the Final Fantasy VII Remake video game, a title that’s only officially been announced for release on Sony’s PlayStation 4 console.

The post was quickly deleted, however, and Xbox Germany’s marketing communications and social lead, Maxi Gräff, has since tweeted out that the entire thing was one big misunderstanding.

“We did an internal mistake in the Social Team. We took the video off immediately. Sorry, no announcement on our side. Big apologies for this,” she said in a tweet.

In a separate tweet, she also explained exactly what happened and what led to the confusion. “It actually happened yes,” she explains. “In that video were multiple FF games and the remake happened to be in there by mistake from the editorial team where we didn´t check the exclusivity on the specific one. We make sure this doesn´t happen again.”

While a lot of Final Fantasy video games are on the Xbox One, there are also several that aren’t so Final Fantasy VII Remake’s absence isn’t too shocking or surprising for Xbox gamers.

Still, the game is highly anticipated by many who would love to play it on Xbox One so this retraction of what was initially thought to be an announcement or reveal will definitely feel like salt in a wound to those wanting the news to be real.

Do you think Final Fantasy VII Remake will get a release on the Xbox One? Share your thoughts with the community in the comments below and then follow us on Pinterest for more Xbox gaming content.

Enable Multicast in Firewall on Windows 10 [How to]

At times, the Multicast streaming may not work if you have your Firewall enabled, so in today’s guide, we’ll show you how to enable multicast in Windows 10 if it’s blocked by the firewall.

If you’re not familiar, we have a great guide on how to cast Windows 10 to TV, so you might want to familiarize yourself. As for the issues, they can be fixed as long as you follow these steps.

How do I know if multicast is enabled in Windows 10?

  1. Press Windows key + X and choose Windows PowerShell (Admin).
  2. Run the following command: ifconfig eth0 | grep -i multi
  3. After doing that, you should see the status of multicast.

Remember to replace eth0 with the name of your connection.

How do I enable multicast on Windows 10 if it’s blocked by a firewall?

1. Check for VM Network Adapter

  1. If you or your client has Virtual Machine installed, it will also install the Host-Only network for the VM. This network adapter can create issues with Multicast streaming and Firewall.
  2. Try to disable the Network adapter from the control panel and check if that resolves the error. Here is how to do it.
  3. Press Windows Key + R  to open Run.
  4. Type control and press OK to open the Control Panel. 
  5. In the Control Panel, go to Network and Internet > Network and Sharing Center.
  6. From the left pane click on Change Adapter Settings.
    Disable Virtual machine Network Adapter
  7. Right-click on the VM installed Network adapter and select Disable.
  8. Now start the stream and you should be able to start Multicast streaming.
  9. From the Control Panel, right-click on VM network Adapter again and select Enable.
  10. Right-click on the Network Adapter again and select Properties.
  11. Double-click on Internet Protocol Version 4 (TCP/IPv4).
    Virtual Machine Network Adapter Advanced Settings
  12. Click the Advanced button at the bottom of the window.
    Network Adapter Advanced Settings Change Metric
  13. Uncheck Automatic Metric and set the value to 0 for ethernet or wireless if required and 1 for VM.

2. Add Application to the Windows Firewall Exception List

  1. If you haven’t already, you can add an application on the Windows Firewall exception list and allow it to receive all incoming traffic from that application. This is the easiest but not the safest method to resolve this issue. Here is how to do it.
  2. Press Windows Key + R to open Run.
  3. Type firewall.cpl and press OK to open Windows Defender Firewall window.
  4. From the left pane click on Advanced Settings.
  5. Click on Inbound Rules options.
  6. On the left pane click on New rule.
    Defender Firewall Inbound Rules - New Rule
  7. Under Rule Type select the option Program and click Next.
  8. Select the option This Program path.
    browser Program Path - defender Firewall
  9. Now browse the program that you want to add to the exception list. Program‘s .exe file is located in C:\program Files (x86)\Program Name
  10. Select the Allow the connection option.
    Allow the Connection in Defender Firewall
  11. Click Next and leave all the options as it is. Click Next again.
  12. Add a name for this rule so that you can identify it easily and click Finish.
  13. Now try to start the stream and check if you are able to connect without any issues.

After doing that, check if the issue is resolved.

3. Other workarounds to try

  1. Allow incoming traffic from the IP addresses of all the server running the Streaming. While this can be a time-consuming task, it is safer than adding the program to the exception list.
  2. You can also configure the Windows Firewall to allow UDP traffic only from the specified ports. To do this you need to change the Windows Media Player settings or server configuration.
  3. Lastly, you can enable rollover to a TCP-based protocol on all Windows Media Server publishing points that streams. This is the most secure but resource-hungry method.

There you go, these are just some of the solutions that can help you enable multicast on Windows 10.

To learn more about this feature, visit our guide on mDNSResponder.exe for more useful information.

What method did you use? Let us know in the comments below.

Follow these steps to change Chromium Edge themes manually

After the Chromium Edge browser recently got support for dark mode, it now offers the option to change themes manually. This change is applicable only for Windows for the moment.

Since Microsoft Edge is Chromium-based, any update to the browser also extends to other browsers supported by the OS.

Apart from the dark theme mode, the Chromium-based Edge browser also adopted the looks and composition of the Windows 10. Which means that Edge transformed its visual style based on the settings you used in Windows 10.

Having said that, the operating system already features a dark mode.

Hence, while working on the dark theme for Edge, Microsoft wanted the browser to sync thoroughly with the Windows 10 browser.

That is to say, Microsoft Edge can automatically replace the theme to the selected mode and match the visual set up of Windows 10. It does so to get more regularity across the operating system.

The downside of the previous Dark Mode

The downside of the dark mode was, that you could not select a different theme that’s not featured in the OS. So, using the light theme in the browser with the dark mode in the Windows 10 wasn’t a choice in Edge.

However, the current update fixes that downside by launching a theme switcher for Microsoft edge Canary.

How to manually change themes in Chromium Edge

The current version of Edge allows you to select just the theme you want in your browser, despite the default settings of the OS.

Which means you can change to literally any desired mode regardless of your current Windows 10 configuration.

Here are the steps to follow:

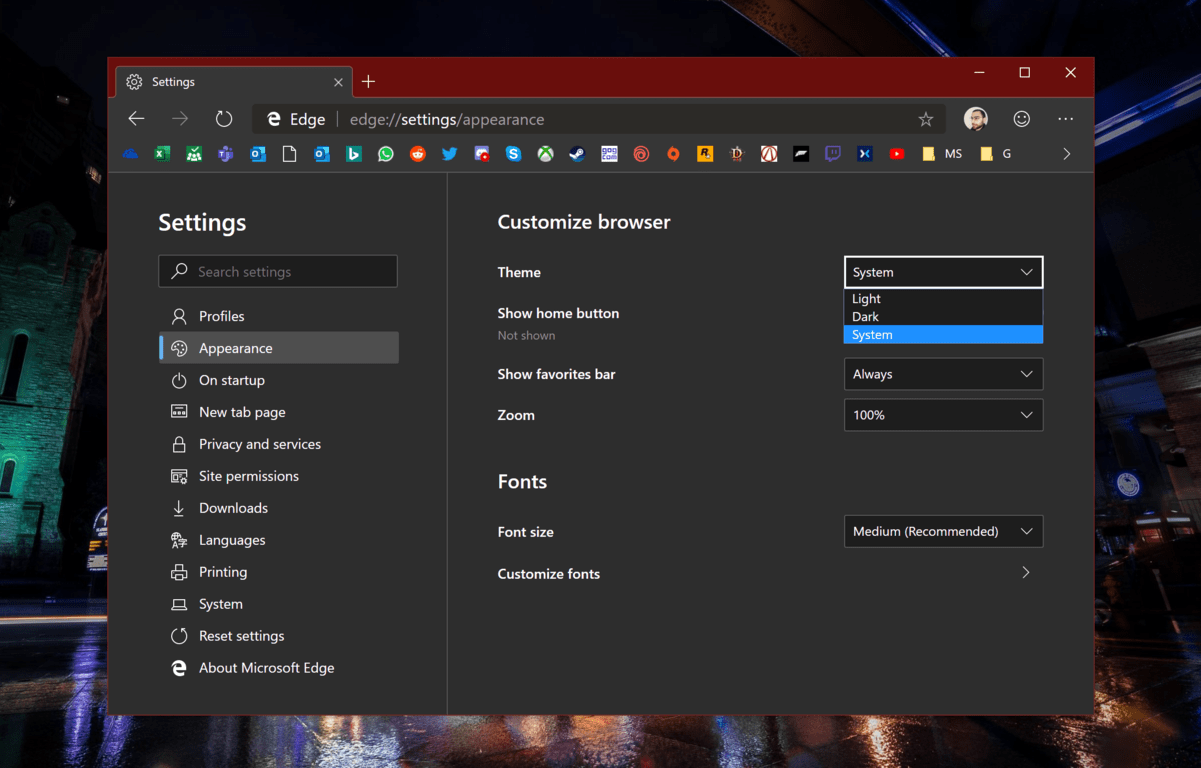
  1.  Go to “Settings”
  2. Select “Appearance”
  3. Go to Theme dropdown (new switcher) which now comes with three choices – Light, Dark, and System.change edge browser themes manually
  4. Select “System” and your Edge adopts the visual style of the operating system.

No reboot is required for the changes to be effective. However, this feature is only limited to the latest
Microsoft Edge Canary build.

The company plans to extend it to the Dev version soon. Given that Microsoft Edge is still being worked upon, it’s getting the new feature updates quite frequently. Microsoft is yet to ship the first beta build.

READ MORE ABOUT CHROMIUM EDGE:

Gold Bars Not Showing Up in RDR2: How to Claim Them

Red Dead Redemption 2 is an amazing game, but it’s not without issues. And speaking of which, many reported that RDR2 gold bars are not showing up.

This is just one of the problems you can encounter, and many reported low FPS in Red Dead Redemption 2, but we covered this issue in a separate guide.

However, the issue with gold bars can be fixed, and we’ll show you how to do it properly.

Why are RDR2 gold bars not showing up?

  • You have reached the limit of 500 gold bars.
  • Temporary glitches with the game can also cause this issue.

What can I do if RDR2 gold bars are not showing up?

Spend your current gold bars

  1. Open your inventory.
  2. If you already have a stack of gold bars, be sure to deposit them.
  3. After doing that, additional gold bars will appear.

If gold bars are not showing up in RDR2 online, then this quick workaround might help you fix it.

There’s no solution for this bug, but the best way to avoid it is to spend your remaining gold bars so the new stack can appear.

This is a glitch, and it will hopefully be fixed with the latest update, so be sure to keep the game updated at all times.

So, as you can see, it is simple to overcome this glitch; to fix it, you need to spend your previous stack for more gold bars to show up.

Alternatively, make sure that you keep the game up to date since this is just a minor but annoying issue.

Unfortunately, this isn’t the only issue, and many reported Red Dead Online packet loss, but we covered that issue in a separate guide.

Was this workaround helpful to you? Let us know in the comment section below.

.NET Framework Blocking Issues in Windows 10: How to Fix it

.NET Framework is a software framework developed by Microsoft that offers the necessary components to run apps on your Windows computer. But many found that the .NET framework installer says Blocking issues in Windows 10.

The entire message reads, The .NET Framework (version) redistributable does not apply to this operating system. Please download the .NET Framework (version) for your operating system from the .NET Framework download page.

Keep reading to find out the solutions!

How do I fix .NET Framework blocking issues in Windows 10?

1. Enable .Net Framework

  1. Press Windows + R to open Run, type control, and then click OK.control panel
  2. Click on Programs, and then select Programs and Features.
  3. From the left pane, click on Turn Windows features on or off.
  4. Check .NET Framework 3.5 and then click OK to install it.
    Fix Net Framework blocked issues
  5. Wait for the installation to complete, and then restart the computer.
  6. If the service was already checked, uncheck .NET Framework 3.5 and then recheck it again. Try to run the installer again and check for any improvements.

A quick fix when you come across .NET Framework 4.8 blocking issues in Windows 10 and it’s subsequently not installing, is to get it via the optional features.

2. Run .NET Framework Setup Verification Tool

  1. Go to Microsoft .NET Framework Setup Verification Tool User’s Guide.
  2. Download .NET Framework setup verification tool.download
  3. Extract the Netfx-setupverifier-view zip file.
  4. Open the extracted folder and then run netfx_setupverifier.exe.
  5. Click Yes to confirm.
  6. In the .NET Framework Setup Verification Utility window, click on the Verify Now button.Net Framework Verification
  7. If everything works right, the Current Status should show Product verification successful.
  8. If it shows an error, download the Microsoft .NET Framework Repair Tool.
  9. Run the NetfxREapirTool.exe file. 
  10. Select the terms and conditions box, click Next, and then follow the on-screen instructions to complete the process.
    Use Net Framework Repair tool

That’s it! The .NET Framework Setup Verification Tool and .NET Framework Repair Tool should help when you are facing blocking issues while installing the framework in Windows 10.

Before you leave, find out the key differences between .NET 6 and .NET 7 and identify which one works best.

Tell us which fix worked for you in the comments section below.

Direct download links for Windows 10 July Patch Tuesday updates

Microsoft just released the July Patch Tuesday updates for all the Windows 10 versions currently supported.

Just like the previous updates, the recent batch brings some minor enhancements. Furthermore, these updates also fix a series of bugs introduced by the previous versions.

The Patch Tuesday updates are released to fix Windows security vulnerabilities. This time, the packages brings non-security patches as well.

Some of the major security enhancements target Windows kernel, Microsoft Graphics Component, Windows Wireless Networking, the classic Microsoft Edge, Windows App Platform and Frameworks, Internet Explorer.

Don’t forget to back up your system

Unfortunately, the history of Windows 10 cumulative updates is not that bright. Most of the times, these updates are nothing more than a headache for Windows 10 users and IT Admins.

They often trigger major issues including download stalls and slow installation issues. Most importantly, there are times when the updates fail to install on your systems.

Windows 10 May 2019 Update brought a defer update feature that allows you to delay the installation for some time. You can use this feature to wait until all the major update issues have been fixed.

However, in case you decide to go ahead with the installation, a complete backup of your system is highly recommended. Remember, you can always use the backup to rollback to a stable version if anything goes wrong.

Install Windows 10 June Patch Tuesday updates

These updates are also available as automatic downloads via Windows Update. But you can also use the following links to manually download and install the latest Windows updates on your system.

We will keep an eye on the Windows forums to keep you updated about the Patch Tuesday Updates.

Keep visiting Windowsreport.com for the latest news.

RELATED ARTICLES YOU NEED TO CHECK OUT:

EA Access 10 hour trial glitch: This is how you can solve the issue

Many users encountered a problem with the 10-hour trials for EA games on Xbox. The platform is counting down time even when gamers are not playing.

So, you play a trial version for 2 hours, you like the game and decide to come back tomorrow for another session. But when you log in again, you discover that your trial time is up.

Of course, you’ll not even consider buying a full version after this, despite the fact that you really enjoyed the first and only session.


Got a tight budget? Try these cheap and perfect games for Xbox!


You don’t want this to happen, so how can you avoid that?

Unfortunately, there’s no fix for this, but there is a workaround. Make sure you quit from the game when you are finished. This way the program knows when to stop the countdown.

Here are the steps to follow:

  1. So, to do this properly, press the Guide button from your Xbox controller.
  2. Highlight the game from the list.
  3. Then, press the Menu button, highlight Quit and press A.

As you can see, the issue has a very simple workaround. Just don’t forget to quit the game to enjoy every second from that 10-hour trial period.

Did this quick tip work for you? Let us know in the comment section below.

RELATED GAMING ARTICLES:

Posted in Fix

Apex Legends coins don’t work? We’ll show you how to solve that

After the worldwide success of PUBG and Fortnite, Apex Legends came as a contender for these two and made a name for itself in the gaming community.

Despite that, some bugs are still creating big waves and are annoying to a lot of gamers.

That’s the case with the coins bug. Players are complaining that after a purchase of  Apex Coins, the in-game currency doesn’t show up in their wallet. Here’s what some users are saying:

I bought apex legend coins after game installed and it charged my bank but apex legend coins not showing. Bought the 10$ for 1000 apex coin thing, havent recieved them in and its been a few hours.

The problem is pretty common, and more users are complaining about it every single day. If you’re on the same boat, there’s a few things that you could try to get your coins back.

How can I get my Apex Coins back?

1. Wait a bit longer

In-game currencies may take some time to be fully processed. Sometimes it may be the servers at fault, other times your internet connection.

Just to make sure, wait some time before taking any further action.


The internet connection destroys your gaming sessions? Fix it now with these easy steps.


2. Restart your game

  1. Press the Xbox button and open the guide.
  2.  On the left side, highlight the game you want to close and press the Menu button on your controller.
  3. Select Quit.

After that, open Apex Legends again and see if your coins are in the wallet.

3. Restart your console

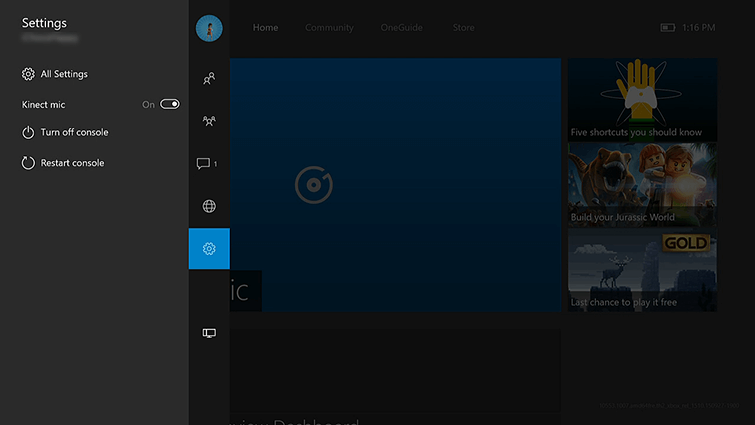
  1. Press the Xbox button and open the guide. Go to System > Settings.All Settings xbox
  2. Select Restart console.
  3. Select Restart.

If none of the solutions work, then your best bet is to wait it out. The Apex team is aware of the bug and they’ll certainly solve the issue as soon as possible.

Although the solutions above use Xbox console as an example, they work similarly on other platforms, including Windows 10. With that in mind, you can check out our detailed guide on how to fix common Apex Legends bugs on PC.

What’s your favourite Battle Royale game? Leave your answer along with any other questions in the comments section below.

READ ALSO:

New agreement to bring Microsoft’s broadband access initiative, Airband, to 4 million in Indiana, Ohio, and Illinois

Microsoft’s plan to leverage TV white space to bring low-cost broadband to areas is expanding to include service to four million people across Indiana, Illinois and Ohio by July 2022. The formal Microsoft Airband Initiative will partner with Watch Communications to deploy connectivity technologies, with an emphasis on wireless adoption to “50 counties in Indiana, 22 counties in Illinois and most counties in Ohio,” according to a recent press release from Microsoft.

“Every person deserves the same opportunity. But too often and in too many places, these opportunities are limited by where people live and their access to reliable and affordable broadband access,” said Shelley McKinley, general manager, Technology and Corporate Responsibility, Microsoft. “Microsoft is working across the country to close this gap. We’re partnering with Watch Communications to improve broadband access in Indiana, Illinois and Ohio and build on the incredible work being done by state and local leaders on this issue on behalf of their citizens.”

The specifics of Microsoft and Watch Communications’ approach include a mix of new and old technologies to bolster wireless connectivity through unused TV frequencies in lower population density or rural areas to improve support. Ideally, Microsoft’s Airband Initiative could help the combined $38.5 billion dollars agricultural value of farmers in the Ohio, Indiana, and Illinois areas.

Improved connectivity will bolster economic, educational and telehealth opportunities for everyone in the region, and could be particularly impactful for this region’s farmers. Together, Indiana, Illinois and Ohio account for more than $38.5 billion in agricultural value, with all three ranking in the top 16 states by agricultural output, according to the USDA. With broadband access, farmers can take advantage of advanced technologies such as precision agriculture which can help better monitor crops and increase yields.

While it’s relatively good news that two public-private sector businesses are coming together to improve the economic, educational, and “telehealth” opportunities for residents in rural areas across the U.S., it should be noted that the government has abdicated the responsibility to provide what is becoming a basic necessity to roughly 21 million people who have no access to broadband internet connectivity.

What is it Windows Information Protection? [EXPERT GUIDE]

Because of the increase in a number of cases in which employees use their own devices inside your enterprise, the cases of accidental data leaks through their apps and services has increased as well.

The data leaks can happen through different apps and services – email, social media, public cloud, etc. Because these elements are outside of the control of your company, they can cause serious issues.

To help tackle these issues, the developers at Windows released the Windows Information Protection (WIP). This service helps you protect your enterprise data and apps from accidental leaks.

In this article, we will explore the WIP service in more detail, and we’ll also discuss how to use it for your enterprise. Read on to find out more.

How do I set Windows information protection?

What is WIP?

windows information protection logo - windows information protection
WIP is the MAM (mobile application management) system for Windows 10. This handy tool gives you the power to manage all aspects of data policy enforcement for both apps and documents.

WIP also allows you to remove access to the data of your enterprise both from your enterprise devices, and personal devices, making the environment more secure. This service allows employees to create content by using an enterprise-protected device, and they can choose if they want to save it as a working document.

If that option is chosen, WIP automatically encrypts and stores the data locally, to be easily and safely accessed by the enterprise manager. The enterprise manager can set custom access to apps and other restrictions, and also keep a log of all the changes made in the system.

This allows you to always keep on track with the latest changes, and also to stop any actions that you deem unsuitable or risky. If the changes happen, the data stored in the WIP logs will give you a clear answer as to who performed the change and what they did with the data in question.


How to use Windows Information Protection?

Microsoft Intune - Windows information protection
In order to set up a Windows Information Protection policy and deploy it in your enterprise, you will need to use Microsoft Intune.

To get Microsoft Intune for your enterprise, please visit the official Microsoft website, and check out the available pricing plans.


Want to protect your PC from data theft? Check out one of these USB control applications!


After getting Microsoft Intune, please follow these steps to set it up:

1. Configure the MDM/MAM provider

  1. Sign in to the Azure portal.
  2. Select Azure Active Directory -> Mobility (MDM and MAM) -> Microsoft Intune.

  3. Click Restore Default URLs (or enter your preferred MDM or MAM settings) -> click Save.mobility provider settings - windows information protection policy

2. Create a WIP policy

  1. Sign in to the Azure portal.
  2. Open Microsoft Intune -> select Client apps -> App protection policies -> Create policy.Create app protection policy - Windows information protection
  3. Inside the App policy screen -> Add a policy -> fill out the fields required (name, description, etc.).add a mobile app policy - windows information protection
  4. Select Protected apps -> Add apps.
  5. You can choose from Recommended apps, Store apps, Desktop apps. (click the respective link for detailed information on how to set them up).

In this article, we discussed what the Windows Information Protection (WIP) service is, and how to set it up for your enterprise.

We would love to know if this guide helped you understand what the WIP service is. Please feel free to let us know by using the comment section found below.

READ ALSO:

Microsoft’s Edge Insider browser gets new autoplay media blocker as experimental feature

The Microsoft Edge announced last month that the new Chromium-based Edge would soon get the same autoplay media settings currently available in EdgeHTML, and Edge Insiders can now limit media autoplay in the web browser starting today. The experimental feature is now live in both the Canary and Dev channels, and you can turn it on by opening edge://flags/#edge-limit-autoplay in the address bar.

It’s worth noting that the algorithm used for this feature won’t block all autoplaying videos you can find while browsing the web, and Microsoft says that “most popular websites will remain affected.” Still, this should be useful to remove some of the most annoying video ads used by some websites.

Another new feature from the old Microsoft Edge that has now made its way to Edge Canary is the ability to customize font sizes and background themes while using Reading View (via Reddit). This is a definitely a nice usability improvement, and you can turn on this feature right now by checking edge://flags/#edge-reading-view-text-preference in the latest Canary build.

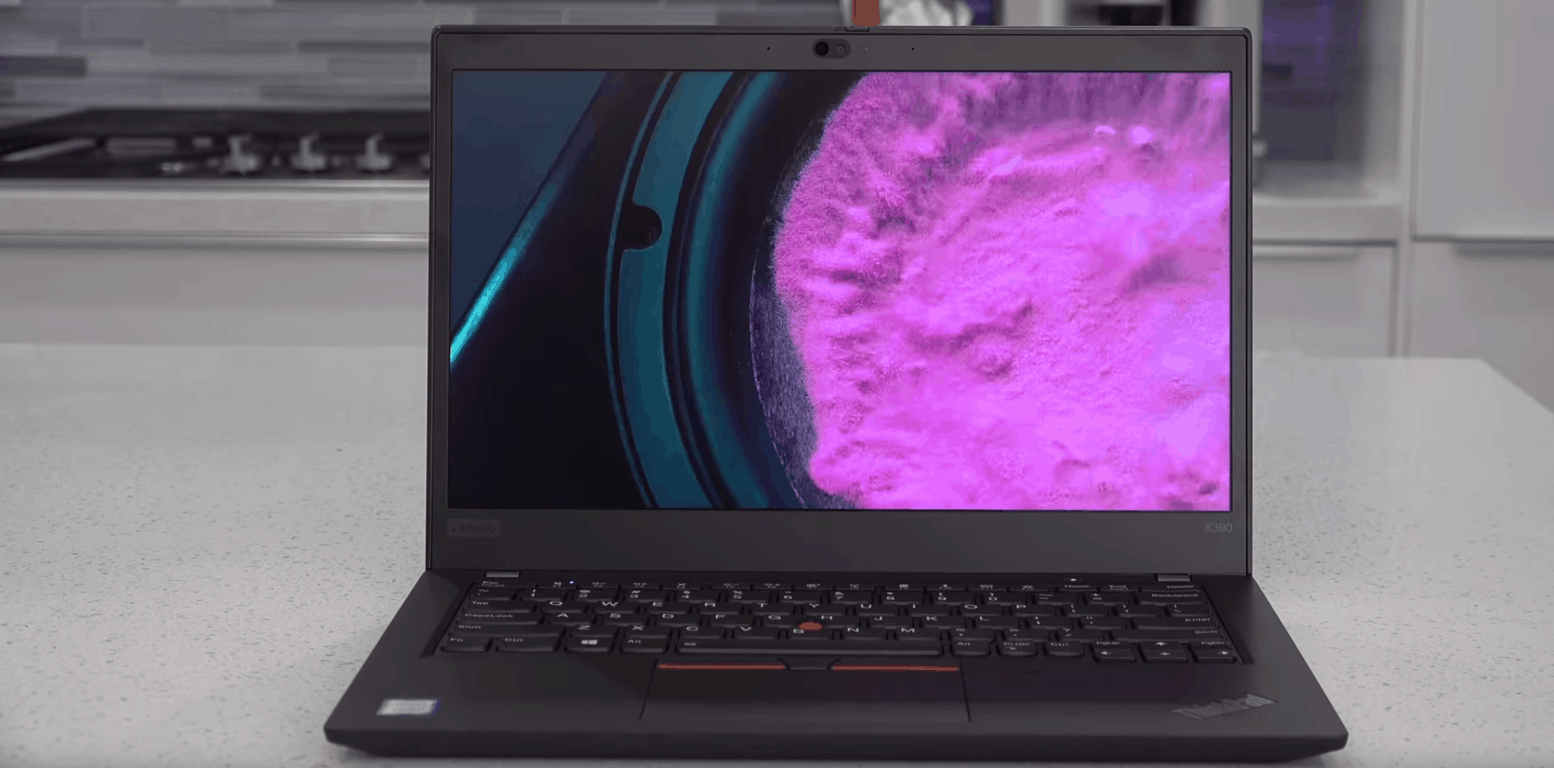
Lenovo ThinkPad X390: Lenovo muddies the waters with an upgraded screen size

Starting at $749.25

While many who shop in the PC universe laud the selection choices the myriad of manufacturers offer, the comes a time when even a niche offering has to be called into question and I think Lenovo just stumbled across that threshold with the Thinkpad X390.

For Thinkpad fans, the X390 might feel like a bit of a head-scratcher as Lenovo’s numeric scheme would imply a rather significant jump from last year’s X280 model.

However, it seems Lenovo is justifying the leap by doing more than a simple chip and GPU swap, but instead, redesigning the display parameters to support an all-new 13.3 – inch screen in its relative 12-inch frame and this new design is where the company will need to explain why buyers will now have to choose between the X390 or it other, very similar ThinkPad T490 lineup.

Prior to the upgraded display, the X-series represented a portable post netbook device that became Lenovo’s smallest screen offering at the time. At 12.5-inches, the X280 easily became the device developers would use to spin up VMs for remote work environments for visiting guest or multi-user hotspots for open office use.

Now it seems in keeping up with the times and users demand, Lenovo has expanded the screen, reduced the bezels and refreshed the internals but to the detriment of offering a clear distinction in its product line.

Taking a break from the continuing convolution of the product line, Lenovo has actually done a decent job art offering another decent ThinkPad device.

3rd Party USB-C Protection and Battery Performance

The new X390 (my review unit) comes with an Intel Core i5 (8th generation) processors with Thunderbolt 3 and “Anti-Fry” protection as well as rapid charge support out of the box. Lenovo’s Anti-Fry protection is something new USB-C converts will appreciate as it helps guard against 3rd party cables from sending compromising voltage to the device. Anti-Fry is something other companies such as late-to-the game  Microsoft should invest in with their upcoming projects.

Following its lineage of “long-lasting” battery performance, the X390 also comes with Rapid Charge to help top off those quick access moments of work. Personally, I found this to be table stakes as most manufacturers are already offering this feature, and the amount of time to get an 80% charge seemed to be pretty standard. In the end, the X390 lasted shy of 7 hours under my standard workload and about 2 and a half hours shorter than the T490 and hour shy of its predecessor the X280 surprisingly.

With a larger panel to power, the 48Wh battery that came in the X280  just isn’t enough to power the X390 the same way. While my workload differed day to day, many of the variables remained the same from brightness level to time off of a charger. It should be noted that I enrolled the X390 into the Windows 10, Office 365 and Skype Insider programs as well as used the new Chromium Edge browser as my only internet portal. I suspect anyone making use of Chrome, those numbers my shrink even further.

Build quality and Display

The X390 comes with the same mil-spec designed previous ThinkPad devices have become synonymous with, including the matte black magnesium bottom chassis as well as a reinforced carbon-fiber plastic lid or a reinforced glass-fiber lid (offered as alternative lid option in some regions.) Despite Lenovo’s claim of a slimming of the chassis by 5%, the X390 feels about as heavy as last years model.

Speaking of the display, which is arguably the biggest change from the X280, Lenovo is offering up to four different options for configurations that include an HD TN (1366×786), FHD (1920×1080), QHD (2560×1440) and a 4K UHD (3240×2160).

For the model I tested, I got the 13.3 FHD with a measly 300 nits of brightness, but supports an Anti-Glare coating and 10-point multitouch, despite the X390 hinge set up only folds back 180-degrees.

While the bezels were reduced on the X390, Lenovo still increased the overall size of the laptop which means the devices is now roughly as bigs as other PCs in the company’s lineup and being offered at roughly the same price now.

With a slightly larger chassis, Lenovo only iteratively updated its already outstanding keyboard, in the best ways by increasing the area of the touchpad and supporting Microsoft’s arguably better Precision Touch drivers. For more precise movement, Lenovo also packs the iconic red “nipple” (aka TrackPoint) in the lower center of the keyboard.

Summary

As I do with almost all ThinkPad reviews, I apply the caveat that these devices are rarely sold as individual purchases and will likely go through some IT Admin’s budgeting portfolio before an end-user gets the final product.

Lenovo’s IdeaPad, All-in-Ones, Yoga’s and Legion laptops are the devices most consumers and tech enthusiasts will come into contact with on a regular digital or physical store shelf.

With that being said, this ThinkPad X390 doesn’t stray too far from its X280 predecessor despite the numbering convention implying that it might. The X390 sports the same great build quality, I/O selection, communication and security features and color accurate displays as most modern ThinkPads. The device runs relatively cool and quiet unless installing a new Insider build, charging a below 10% battery or a photo editor while also working on six Excel docs chalked full of macros.

As mentioned prior, the only real downside to the X390 is that Lenovo offers the ThinkPad T490 which comes in at $846.75 with a slightly larger screen in a relatively small housing.

Obviously, Lenovo has the telemetry on how well their new line up of its devices should fare but I personally think the company needs to streamline its lineup. In the meantime, the X390 looks and feels like a modest upgrade over the X280 equipped with up to 16GB DDR4-2400 memory and a 512GB SSD it’ll make for a solid workstation for most employees but doesn’t move the excitement meter in either direction.

Star Wars Battlefront II video game to get special item unlocks every week this month

The Star Wars Battlefront II video game will be getting a month-long celebration of the Prequel Era movies and TV series this month with weekly in-game quests that will reward players with exclusive items that can’t be obtained anywhere else.

These rare items include new animated victory poses and dialogue lines for Darth Maul, Yoda, Obi-Wan, and General Grievous which can be unlocked and claimed after certain tasks are met by the community.

For example, if the entire Battlefront II playerbase performs a certain amount of kills with Darth Maul between July 11th and the 20th, a new victory pose will be unlocked. If the community performs an unspecified number of chokes on opponents within that timeframe, the new voice line will be made available.

Specific details on each quest is said to be revealed before each event begins so the exact number of required kills and chokes have yet to be revealed. What is known is the character poses and lines that will be given away each week.

Here’s the confirmed list:

  • July 11th – 20th: Darth Maul
  • July 18th – 27th: Obi-Wan Kenobi
  • July 25th – August 4th: General Grievous
  • August 1st – August 11th: Yoda

Every Wednesday in July will also be a Double XP event where players can earn more experience in all game modes for all characters, troopers, and vehicles.

Star Wars Battlefront II is really kicked things up a notch with its updates recently. Last month saw the addition of Droideka, new hero skins, a new vehicle for the clone army, and Naboo to the Capital Supremacy game mode. Little is known about future content but it has been confirmed that the planet Felucia will be coming soon and hints of Padme and Ahsoka have been found in the game files.

Do you play Star Wars Battlefront II on your Xbox One? Let us know what you think of this new content in the comments below and then follow us on Pinterest for more Xbox gaming content.

Edge Dev Channel build 77.0.211.2 is now live with new PDF Read Aloud feature

Build 77.0.211.2 is now live for Edge Insiders on the Developer Channel. This latest build introduces the a variety of new features like the Read Aloud option for PDFs, SafeSearch for Bing searches, added security for payment card data, and support for the HEVC decoder.

Here’s the full release notes:

New features and behavior:

  • Read Aloud enabled for PDFs
  • Enable secure receipt of payment card data.
  • Enable Application Reputation from SmartScreen by default
  • Fix to support Dolby audio on Windows 8.
  • Family safety feature has a flag in edge://flags.
  • Direct launch for ClickOnce applications has been enabled.
  • Support for HEVC decoder has been added.
  • Enable Windows Defender Application Guard by default
  • Now we sort extensions into “From Microsoft Store” and “From other store” categories
  • Added “Recent” category in History management page
  • Disabled InPrivate browsing for profiles managed by Family Settings
  • Added tracking prevention under a flag in edge://flags.
  • Added ability to Save pages as MHTML from reading view
  • Work to support single sign on (SSO) and Azure Active Directory (AAD)
  • Work to support DRM in PDF
  • Localization into 11 languages (more coming)
  • Enabling SmartScreen on macOS by default
  • Enabling SafeSearch functionality for all Bing searches.
  • Support for keyboard shortcuts for extensions.

Fixes for improved reliability:

  • Fix for TouchBar on macOS when in YouTube fullscreen mode.
  • Multiple fixes to sync engine
  • Improved the crash reporting and uploading
  • Fixed a crash on URL load
  • Fixed an error when sync was turned off and on repeatedly.
  • Fixed a crash when trying to write to a read only date attribute
  • Fixed a crash when moving tab between two windows on separate screens.
  • Fixed a crash that occurred when sync occurred before sign-on completed
  • Fixed a crash that occurs on some navigation requests.
  • Fixed a crash on pop-up windows
  • Fixed crash on launch of Microsoft Edge of macOS Sierra and High Sierra versions
  • Enabled ability to automatically repair extensions by default.
  • Fixed an issue with guest more support on privacy and services settings page.
  • Fixed crash on launch of Microsoft Edge of macOS

Fixes for improved behavior:

  • Improvements to dark mode in various controls and pages
  • Select the last used Chrome profile by default when importing from Chrome.
  • Move multiple controls to Fluent UI
  • Improve the cleanup logic in the installer
  • Limit New Tab Page content for Education SKUs and Windows 10s.
  • Fixes to new WebView control rendering
  • Fixes for importing defaults from Microsoft Edge and Internet Explorer
  • Fixes for Reading View toolbar
  • Fixes for importing pinned tabs and settings during First Run Experience
  • Fix to use user preference for font size rather than preset default.
  • Automatically move keyboard focus to address bar after First Run Experience
  • Fixed the swipe gesture for History on macOS
  • Fixed the sync icon badge on the user flyout.
  • Audio offload fixes to improve performance and battery life.

The Dev Channel typically gets a new Microsoft Edge test build once a week but this will be the first one in a fortnight due to many Microsoft employees taking several days off last week for the July 4th celebrations.

The Canary Channel also received a new build today. That update added the light and dark theme settings to Microsoft’s upcoming new browser.

Are you an Edge Insider or are you simply waiting for the proper release of the new Edge browser? Share your thoughts with us in the comments below and then follow us on Twitter for more Microsoft app news.

Minecraft video game updates with sound and gameplay improvements

A new update for the popular Minecraft video game is now available for Windows 10 and consoles such as Microsoft’s Xbox One.

This latest update, which brings the Bedrock (multi-platform) version of Minecraft to Version 1.12.0, features a host of improvements and bug fixes.

Most-notable is the increase in volume and occurrence of the ambient mob sounds, the addition of Wandering Trader sounds, the Store being renamed as Marketplace, new permission settings for Realm owners, and improved game performance near villages and when opening inventory.

Here’s the official list of changes made with this update. The full release notes, which are too long to include on this page, can be read here.

  • Increased the frequency and volume of the ambient mob sounds made during raids, to make them easier to locate
  • Added new Wandering Trader sounds (MCPE-41191)
  • Updated the main menu splash text
  • Updated the default main menu panorama from Aquatic to Village & Pillage
  • The “Store” button on the main menu has been renamed to “Marketplace”
  • Realm owners can now set relevant permissions for players invited to their Realm
  • Default settings can be set for all new members entering a Realm
  • The owner can set permissions for an invited player to either visitor, member or operator
  • When resetting a world, or uploading a new world, already set permissions stay in place

Minecraft continues to receive updates on a very regular basis. Last month it was announced that the game would be getting a revamp of its combat system in the near future while new skin packs were added based on Disney’s Toy Story movies.

Do you play Minecraft? Let us know which platform you play on the comments below and then follow us on Pinterest for more Minecraft content.

How can I enable Windows Spell Checker in Google Chrome?

Microsoft is currently working on an exciting new feature for Chromium browsers. Windows Spell Checker support is now available on Google Chrome and all the other Chromium-based web browsers.

Microsoft is really working hard to add new features to Chromium Edge. Some of the latest additions are Google Earth support, video info overlay, and a new search box.

Furthermore, the tracking prevention feature blocks malicious trackers in Microsoft Edge.

A new commit confirmed that the tech giant is now adding support for Windows Spellchecker to Chromium browsers.

As a quick reminder, a built-in spellchecker named Hunspell speller is already available in Chromium. OpenOffice, Opera, and other browsers currently use the Hunspell speller.

Microsoft describes the Windows Spell Checker feature as follows:

We need to implement platform agnostic interfaces to integrate windows spellchecker into Chromium. We also need to refactor some code to enable runtime switch between Windows spellchecker and hunspell spellchecker.

As a part of these efforts, Microsoft is currently implementing the SpellCheckHostChromeImpl and spellcheck platform interface. If you are interested in giving it a try, follow the steps listed below.

Steps to enable Windows spell checker in Google Chrome

Before moving on to the next step, you need to make that you have installed Google Chrome Canary version 77.0.3847.0. T

he Windows spell checker is only available on this build.

  1. Navigate to the start menu and open Google Chrome.
  2. Now go to the address bar and type the following code to open the experimental flags configuration page: chrome://flags
  3. Navigate to the top of the screen and use the search bar to find the flag named Use the Windows OS spellchecker. Alternatively, you can paste the following link in the address bar to speed up the process.    chrome://flags/#win-use-native-spellcheckerWindows spellchecker
  4. You will see that the feature is by default disabled in Chrome Canary. You can use the drop-down menu available besides the flag to enable the spell checker feature.
  5. Finally, click the drop-down menu and click enabled.

Now you should restart your system to apply the latest settings. The spell checker should now work in the browser.

Windows spell checker in Google Chrome is still a work in progress and Microsoft is currently working to improve its capabilities.

We expect to see a better version in the final release very soon. There are many third-party spell checkers that work with Chromium browsers.

However, this built-in feature is expected to provide users with better results.

RELATED ARTICLES YOU NEED TO CHECK OUT:

Chrome lets thousands of trackers spy on you. Is there a safe alternative?

Many users already know that privacy on the internet is somewhat relative, but it seems that Chrome takes this to a whole new level.

“Google’s web browser has become spy software“, said a Washington Post journalist in a recent article.

Over a recent week of Web surfing, I peered under the hood of Google Chrome and found it brought along a few thousand friends. Shopping, news and even government sites quietly tagged my browser to let ad and data companies ride shotgun while I clicked around the Web.

This is hardly news for people, as one Reddit user said:

Sorry to tell you this but Google’s web browser has always been spy software.

Also, another Reddit user said that the browser‘s spying capabilities are nothing compared to an Android phone with Google Play. For example, Google knows your location when you search something on Chrome, even if your location sharing is disabled.

Moreover, Chrome is becoming more and more intelligent and it is known that Google unified users accounts to a single profile.

This attitude helps companies to predict your decisions, such as where will you go on a vacation or what will you buy.

Is there a better option?

Yes, there is. For example, Firefox still uses Google as the default search engine, but Mozilla doesn’t collect your data as Google does (at least from what we know).

Also, the privacy features that Firefox will soon receive indicate that Mozilla has an anti-tracking approach.

Fortunately, the web browsing world doesn’t stop at Chrome, Firefox, Opera One and others.

In terms of privacy, UR Browser is the safest browser out there. This is a lightweight and user-friendly browsing tool that comes with an entirely new notion of surfing the internet.


Not convinced about UR Browser? Read our comprehensive review to find out more about it!


So, if you’re worried about user data privacy while surfing the web, make sure to use a privacy-focused browser.

The good news in all this Chrome spying on users story is that Google started implementing new user data privacy features. For example, Chrome’s new Privacy Mode relies on DuckDuckGo to protect your data.

All in all, if users keep on switching to privacy-focused browsers, Google has no choice but to comply with users’ demands.

What’s your take on Chrome‘s spying capabilities? Let us know in the comments section below.

If you want to keep your data safe while browsing the internet, you may also want to check out these guides:

Remote Desktop plagued by black screen issues on Windows 10 [FIX]

Microsoft released Windows 10 version 1903 in May. The much-awaited feature update was affected by many bugs in its early days.

For example, many users experienced various issues and error codes during the installation process.

However, you are wrong if you think that all of these issues have been resolved by now. Indeed, Microsoft fixed many of them as a part of the recent cumulative updates. Unfortunately, many Windows 10 users are still reporting new issues on Microsoft’s forums.

Recently, someone reported that Windows 10 May 2019 Update is affected by black screen issues. The bug often occurs when users enable Remote Desktop connections.

I upgraded my secondary machine from 1809 to 1903. When I access it now using Remote Desktop all I get is a black screen in the RDP windows. I then upgraded my primary machine to 1903 hoping that would help, but no. Fortunately I also have GoToAssist installed so I was able to log into the secondary machine that way and checked for updates, still no help. Finally I reverted it back to 1809 and Remote Desktop once again works. I could keep using GoToAssist but RDP over my local LAN is much faster.

It is not the first time that this issue is reported on Windows forums. Many users running Windows 10 v1903 confirmed that they have experienced a similar problem when trying to connect to Remote Desktop.


If you’re tired of black screen issues on Remote Desktop, try these alternative remote desktop software.


Microsoft’s employee, Denis Gundarev confirmed that this is a known issue. According to him, the issue is caused by some of the old display drivers.

Display drivers report some of their capabilities upon load. In previous Windows versions this reported data wasn’t used or verified. Because of that, some of the old versions of the legacy display driver may report invalid data and it would be ignored. Starting with Windows 10 1903 RDP uses this data to initialize the session.

Microsoft confirmed its engineers are working on a permanent fix. Meanwhile, you should contact your hardware manufacturer to update your display driver.

You can also follow this step-by-step guide to resolve the problem. Once you are done with the process, the bug should be fixed in no time.

Comment down below if you have also experienced this issue.

RELATED ARTICLES YOU NEED TO CHECK OUT:

The Module MSCOMCTL.OCX Failed to Load [Fix]

Users have reported encountering this error message The module mscomctl.ocx failed to load when they tried restarting their domain on Windows Server.

This error can cause a lot of problems, as not being able to restart the service also means you can’t get access to the data stored on your server.

This error message appears when multiple applications are using the same .ocx file. When one of the apps is removed from your PC, then the .ocx file gets removed as well. This error code also appears when the incorrect .ocx file is being used or placed in the wrong directory.

In this article, we will explore a quick fix relating to this issue!

How do I fix The module mscomctl.ocx failed to load error?

1. Replace the MSCOMCTL.OCX file

  1. Download MSCOMCTL.OCX.Download ocx file -the module mscomctl.ocx failed to load
  2. Move the .ocx file to the location of the program you’re having issues with.
  3. If step 2 doesn’t solve the issue, move the MSCOMCTL.OCX file to the system directory (C:\Windows\System32).
  4. Check to see if this fixes your issue.
  5. If the issue persists, please follow the next method.

In order to avoid the error message we described above, it is recommended that you replace the file with another version when mscomctl.ocx is missing.

2. Register MSCOMCTL.OCX using PowerShell(Admin)

  1. First, move the MSCOMCTL.OCX file to the following location: C:\Windows\sysWOW64sysWOW64 folder - the module mscomctl.ocx failed to load
  2. Press Windows + X and select Windows PowerShell (Admin).
    PowerShell admin - the module mscomctl.ocx failed to load
  3. Inside the PowerShell window, type the following command: regsvr32 c:\windows\sysWOW64\mscomct2.ocxPowerShell with command - the module mscomctl.ocx failed to load
  4. Press Enter and wait for the process to complete.

In this guide, we explored the reasons behind The module mscomctl.ocx failed to load error, and the methods listed earlier will surely help you move past this problem.

Before you leave, do check our curated list of the best PC repair tools and get one today to automatically eliminate such issues.

We would love to know if this guide helped you solve your issue. Please feel free to let us know if it did by using the comment section found below.

Latest Chrome Canary build adds light or dark theme settings

Microsoft is bringing a manual toggle for the light/dark mode setting to its new Chromium-based Edge Insider browser (via Neowin). The toggle has already made its way to the Canary channel, allowing users to change the theme straight from within the browser settings.

Dark mode in the Edge Insider browser isn’t entirely new, as the browser already could adjust the theme mode automatically based on the system settings on either Windows 10 or macOS. However, now users can choose the theme manually, or leave it on automatic if they prefer. This setting is especially useful on older versions of Windows, namely 7 and 8.1, which don’t natively support dark mode.

Those who have the Canary version of the browser (currently at 77.0.213.1) can try the new feature now. With any luck, we could see it reach the Dev version soon, which provides a slightly more stable experience than the Canary builds. Do you prefer the light theme of Chromium Edge, or do you prefer being on the dark site? Feel free to leave your thought down in the comments area below.

Failed to Contact The Steam Product Key Server [Fix]

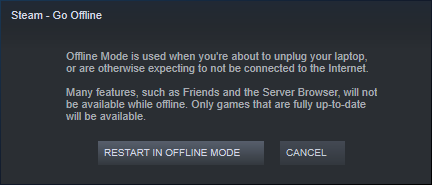
Failed to contact the Steam product key server error can appear if you try to play a Steam game offline.

This error can be rather annoying, and it can prevent you from playing certain games offline. However, there’s a way to fix this problem.

Why am I getting Failed to contact the Steam product key server error?

  • The game you’re trying to start isn’t available for offline play.
  • You haven’t run the game online at least one time.
  • There are issues with your Steam account.

How can I fix Failed to contact the Steam product key server error?

1. Make sure the game is available to play offline

  1. Not all games are available for offline play in Steam.
  2. In order to play a certain game offline, you need to check if this option is available.
  3. This varies from game to game, and some developers keep allowing you to play their games offline while others don’t.
  4. If the game doesn’t have offline play feature enabled by default, there’s not much you can do.

2. Run the game online at least once

  1. Make sure that you have an active Internet connection.
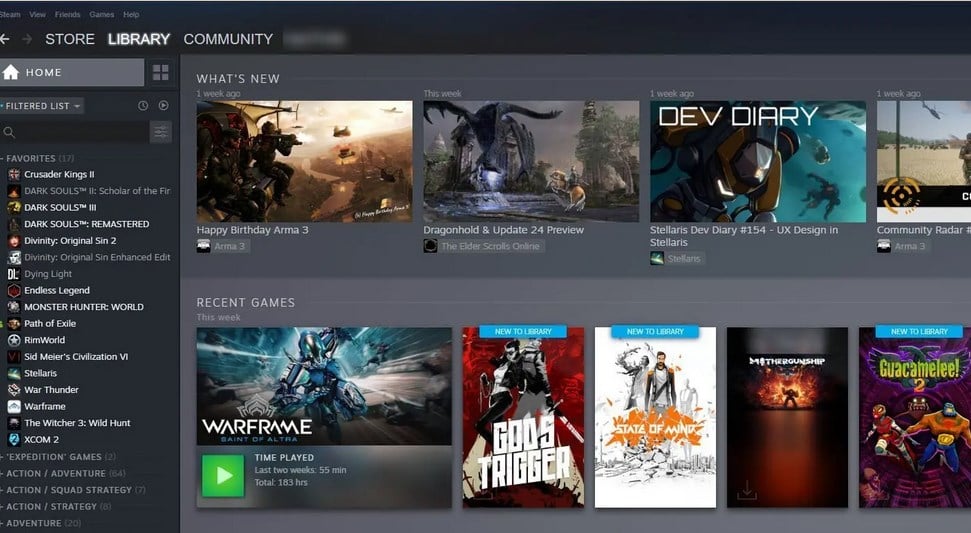
  2. Log in to Steam and go to your Library.
  3. Start the game you wish to play while online.
  4. After a few minutes of gameplay, turn the game off.
  5. The game will now be available for offline play.

3. Wait or contact Steam support/developers

  1. In some instances, this problem can occur due to issues with the server.
  2. If that’s so, try waiting for an hour or so or for 24h.
  3. In case the problem is still there, contact Steam support or the game developer.

Sometimes contacting the developers might be the best way to fix this issue, so don’t hesitate to contact them.

4. Set up a temporary Steam account

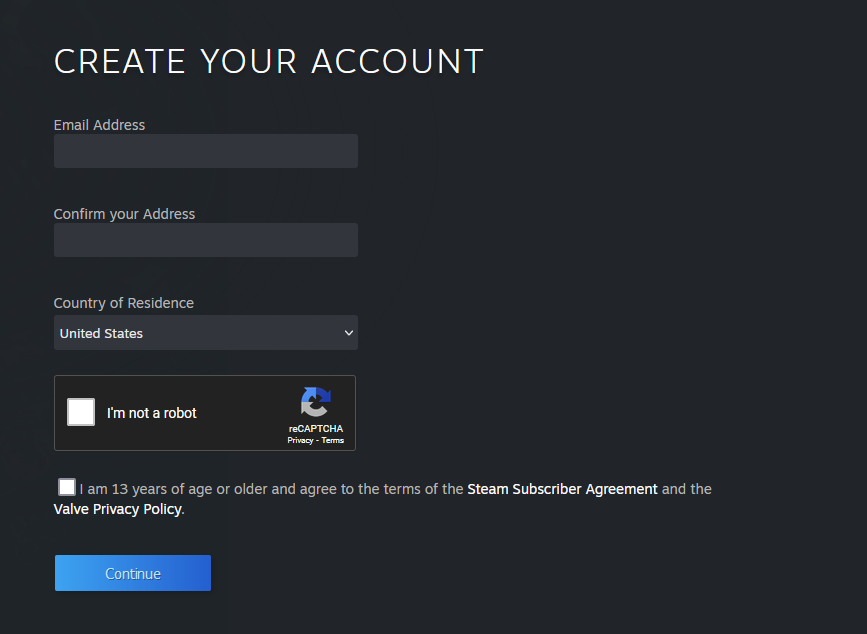
  1. Set up a new Steam account.
  2. Try to launch the game from the new account.
  3. Uplay client should now start, and you’ll be able to play the game.
Note icon NOTE
This is just a workaround, and it only works with UPlay games or games that use third-party launchers.

There you go, four quick and simple solutions that might help you fix Failed to contact the Steam product key server error.

This isn’t the only issue you can encounter, and we have already covered Steam content servers unreachable error in the past.

If these solutions worked for you, please let us know in the comments section below.

How to customise the contents of Windows 10’s File History backups

Windows 10 retains the File History backup feature which was introduced with Windows 8. File History saves copies of your files periodically, giving you the ability to go back in time and recover earlier versions.

By default, File History is configured to backup a set of commonly used folders. After you enable the feature, you’ll find your libraries and user profile folders are automatically copied to your backup destination. If you want to add more directories to the backup, read on to be shown how.

File History is one of Windows’ features which still has its settings spread across the Settings app and the traditional Control Panel. Only the Settings app contains the option to add extra folders to your backup – the Control Panel won’t even update to show you’ve included the new locations.

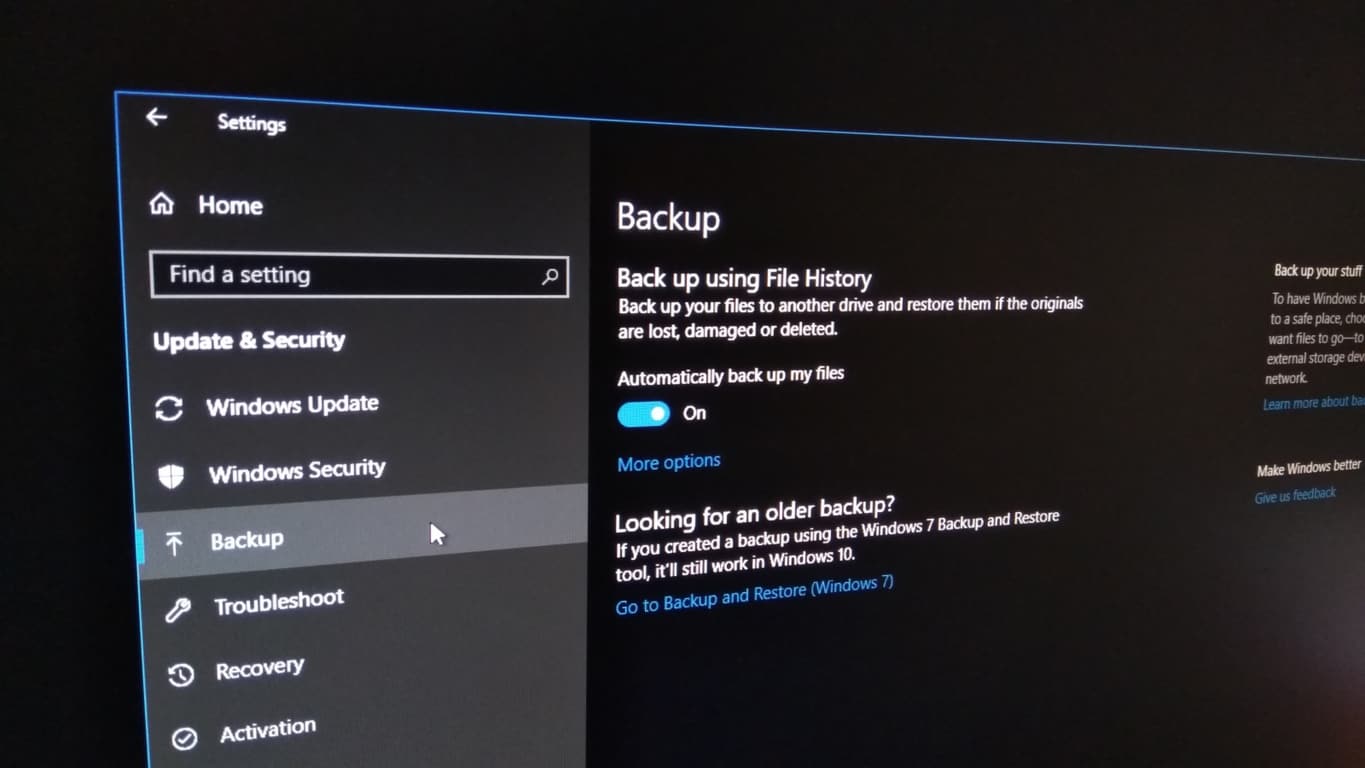
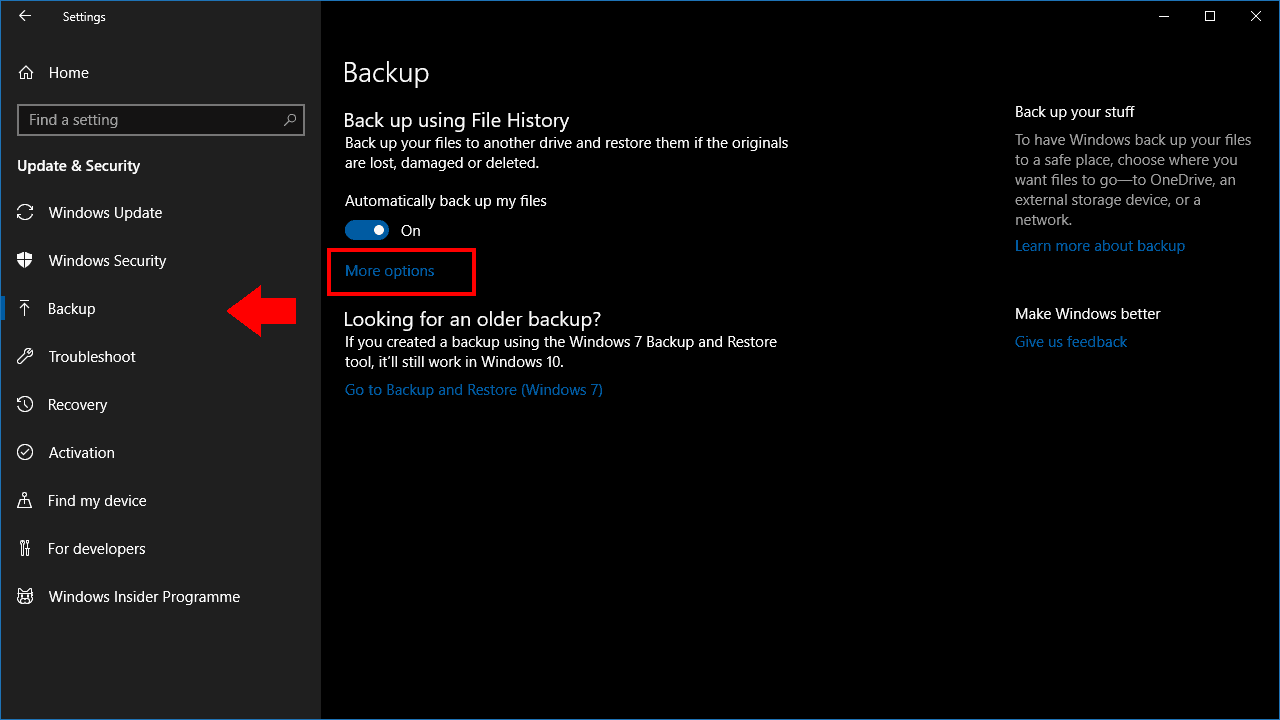
Open the Settings app from the Start menu and click the “Update and security” category. Choose the Backup page from the sidebar. We’ll assume you’ve already setup File History; if not, toggle the “Automatically back up my files” button to enable the feature.

Screenshot of File History settings in Windows 10

Click the “More options” link on the Backup page. Here, you can customise File History’s operation. Under “Back up these folders,” you’ll see a list of the locations which are included in your backup. Click the “Add a folder” button to add another directory.

Repeat the process to add further directories. We recommend including any folders which contain personal files, as well as folders which store application configuration files (these are usually C:ProgramData and C:Users%userprofile%AppData). Click the “Back up now” button at the top of the page to immediately run the backup and copy the new files.

Screenshot of File History settings in Windows 10

The rest of the options on this page let you finetune File History’s operation. You can change the backup schedule, restrict File History’s disk usage on the backup drive, or blacklist folders with the “Exclude these folders” section at the bottom of the page.

Some of these options are also available through the File History page in the Control Panel. However, we recommend using the Settings app to manage File History. The Control Panel interface is dated and doesn’t expose all the available options. In addition, some changes made in the Settings app (such as extra backup folders) aren’t reflected in the Control Panel, which could lead to confusion if you need to adjust the options in the future.

Microsoft is retiring these 6 classic Windows XP, ME, and 7 video games soon

Microsoft has confirmed in a new forum post (via MSPU) that they will be retiring all of their Microsoft Internet Games titles which were released on the older Windows XP, ME, and 7 operating systems.

The six video games being affected are Internet Backgammon (XP/ME, 7), Internet Checkers (XP/ME, 7), Internet Spades (XP/ME, 7), Internet Hearts (XP/ME), Internet Reversi (XP/ME), and MSN Go (7).

Windows XP and ME users will lose access to these titles on July 31st this year, which is just three weeks away, while Windows 7 users will have until January 22nd next year.

“We truly appreciate all the time and passion you’ve put into Microsoft Internet Games. This has been a great community,” the official post reads. “However, the time has come for us, along with our hardware and software partners, to invest our resources towards more recent technologies so that we can continue to deliver great new experiences.”

With most people having made the jump to Windows 10, and Microsoft having already released a variety of newer video games for casual players in the Microsoft Store, it’s unlikely that these six classic games had a large enough playerbase to justify continued support. Those who are still playing will likely be disappointed though.

Have you been playing any of these games on your Windows computer? Let us know which ones in the comments below and then follow us on Pinterest for more Windows gaming content.

Xbox One’s Attack on Titan 2: Final Battle video game features 40+ playable characters

The Attack on Titan 2: Final Battle Upgrade Pack is out now on Microsoft’s Xbox One family of consoles. This new release comes with the main Attack on Titan 2 video game plus a large number of downloadable content (DLC) that adds playable storylines from the first three seasons of the popular anime series, over 40 new characters, new gear, and a new Territory Recovery game mode.

Gamers who buy this release before August 1st will also get a variety of extra costumes for customizing characters in-game.

Here’s the official store description:

Attack on Titan 2: Final Battle Upgrade Pack contains the latest content for the tactical hunting action series based on the hit anime series Attack on Titan.

  • Includes the stories from seasons 1~3 of the anime!
  • More than 40 playable characters join the battle!
  • Experience the thrilling action of “ODM Gear”!
  • New equipment “Thunder Spear” and “Anti-personnel Omni-directional Mobility Gear” have been added!
  • The new mode “Territory Recovery Mode” has been added!

Are you an Attack on Titan fan and will you pick up this latest video game release? Share your thoughts with the community in the comments below and then follow us on Pinterest for more geek culture content.

Telegram app updates on Windows 10 with new animated sticker feature

The official Windows 10 Telegram app updated to Version 1.7.13 earlier today, adding Telegram’s new animated stickers in addition to support for strikethrough and underline text formatting.

These new animated stickers use the .TGS file format which allows for high quality images and 60 frames per second for each sticker. Like Telegram’s regular stickers, anyone can create and upload their own animated stickers for use either personally or for use by the general public.

Here’s the official release notes:

  • Send ultra-lightweight high-quality animated stickers to express emotion with motion.
  • Receive animated stickers instantly on any connection at just 20-30 KB per sticker.
  • Enjoy smooth animations at 60 frames per second.
  • Create new animated sets and upload them to @stickers for everybody to use.
  • Try out these sample stickers: t.me/addstickers/hotcherry
  • Use strikethrough and underline formatting

Telegram’s previous updates added other options for chats in addition to the new location-based communication tool.

Do you use Telegram or do you prefer another chat app? Let us know in the comments below and then follow us on Twitter for more tech news.

The app was not found in the store. ?

IP Helper Service is Not Running: How to Turn it on

At times, you may see Windows flashing IP helper event error saying that the IP helper service is not running.

This can cause various problems such as unreachable IP address, and in today’s guide, we’re going to show you the best ways to fix this problem.

What is the IP helper service?

  • IP Helper is designed to help with the administration of the local computer.
  • It allows applications to retrieve information regarding network configuration.
  • IP Helper provides notifications to the application when a network configuration change is detected.

How do I turn on IP helper?

1. Set DHCP Client to Automatic

  1. Press Windows Key + R to open Run.
  2. Type services.msc and press OK to the Service window.
  3. In the Services window, search for DHCP Client.
    DHCP Client Service Set Automatic
  4. Right-click on DHCP Client and select Properties.
  5. Make sure the startup type is set to Automatic. If not, click the drop-down menu and select Automatic.
    Set DHCP Client to automatic to start IP Helper
  6. Click Apply and OK to save the changes.Service set to Manual
  7. Next, look for WinHTTP Web Proxy Auto-Discovery Service. Right-click on it and select Properties.
    Set WinHTTP Web Proxy Auto-Discovery Service to manual to start IP Helper
  8. Make sure the Startup type is set to Manual. If not, click the drop-down menu and select Manual.
  9. Click on Apply and OK to save the changes.
  10. In the same Services window, right-click on IP Helper and select Properties and check if you can set it to Automatic.

2. Boot into Safe Mode for Diagnosis

  1. Click on Start.
  2. Now press and hold the Shift key and click on Power > Restart.
    Safe Mode - Shift - Restart - IP Helper
  3. The computer will restart again and show the Choose an Option screen.
  4. Click on Troubleshoot and then select Advanced Options.
  5. Go to Startup Settings and click on Restart.
  6. The computer will restart again and show multiple options. Press F4 or 4 to boot into Safe Mode or preferably F5 or 5 to boot into Safe Mode with Networking.
    Windows 10 Safe Mode - IP Helper
  7. After the restart check if the IP Helper error still appears or if you are able to restart it from the services.
  8. If you are able to restart it successfully or if the error does not appear, you may have a third-party program that is creating a conflict with the service.

Finding the conflicting program 

  1. Finding conflicting software can be a tricky task. Your best bet is to check if you have installed any software recently and try to uninstall it. Or try to perform a System Restore using Restore Point option to restore your PC to an earlier point.
  2. Programs that are known to create IP Helper issues are game-boosting software or Game boost modes offered by antivirus software like Bitdefender etc.
  3. So, if your antivirus has a game profile or game boost mode, disable it. Also, uninstall any game-boosting software that you might be using. The same is the case with Drive booster from IObit etc.
  4. If the issue persists, temporarily disable the antivirus and then try to restart the IP Helper service.

As you can see, it’s relatively simple to fix the IP helper service is not running error message on your PC, as long as you follow our guides.

If you want to learn more about IP addresses, we have a great guide on how to find IP address on your PC, so be sure to read it.

What methods did you use to fix this error? Let us know in the comments below!

Microsoft Internet Games supports for Windows XP/7 ends next year

Microsoft recently announced its plans to end support for Microsoft Internet Games on Windows XP, Windows ME, and Windows 7 next year.

This news was pretty shocking for many Windows fans because, let’s admint it, we’ve all have been playing these games for years. Microsoft explains in a recent post:

We truly appreciate all the time and passion you’ve put into Microsoft Internet Games. This has been a great community. However, the time has come for us, along with our hardware and software partners, to invest our resources towards more recent technologies so that we can continue to deliver great new experiences. Current players may enjoy the games until the dates above, when game services will cease, and the games listed will no longer be playable.

The company made it clear that support for Microsoft Internet Games services on Windows 7 ends on January 22, 2020. As a quick reminder, this is the date when the big M will officially end support for the good old Windows 7 OS as well.

Moreover, Windows XP and ME users can have some extra time to enjoy these games until July 31, 2019. According to the post, Microsoft plans to end support for these popular games on all three platforms.

  1. Internet Backgammon (Windows XP/ME, 7)
  2. Internet Checkers (Windows XP/ME, 7)
  3. Internet Spades (Windows XP/ME, 7)
  4. Internet Hearts (Windows XP/ME)
  5. Internet Reversi (Windows XP/ME)
  6. MSN Go (Windows 7)

Most of these games were used for educational purposes back then. As kids, many of us learned to use basic mouse functions by playing Solitaire.


Speaking of Solitaire, here are some of the best Solitaire games that you can play in 2019.


Moving Further, Spades and Checkers helped students to improve their IQ level. Most importantly, these games were free from any type of violence. We can see that today many online games promote violence among young kids.

Don’t worry, you can find many alternatives to these games by doing a quick search on the Microsoft Store.

You can find thousands of games by typing “Solitaire” or “Spades” on the Store.

What’s your favorite childhood game on Windows XP or Windows 7? Comment below.

RELATED ARTICLES YOU NEED TO CHECK OUT:

Steam games fail to launch with error 0x800f0805 [QUICK FIX]

Many gaming platforms have emerged during the past few years. However, the gaming community has always preferred the Steam/Windows 10 combo.

Steam‘s library offers a huge variety of popular titles and games that attract towards the platform. However, there are some players who reported that some games fail to launch on their systems.

Oftentimes, the games fail to launch with the error code 0x800F0805.

Bought the game from the steam sale, saw some issues online after but don’t know if this is the same problem? Game won’t start and initialization fails after the error code, tried loading from the expansions too but no luck. Is the my computer or the game? Can’t find much about the error code online. Any help would be appreciated. 🙂

This situation is frustrating for many gamers because there is no workaround to fix the bug.

Steps to fix error 0x800f0805 on Steam

1. Verify  the integrity of your game files

Many such issues occur when the installation files are either corrupted or some of them are missing. Therefore, you need to verify the integrity of game files in such cases.

During this process, Steam compares the files downloaded on your system to those available on the game servers. When a file is missing or corrupted, it is downloaded again on your PC.

There are some simple steps that you need to follow to fix the issue.

  1. Reboot your Windows 10 PC and launch the Steam game engine.
  2. Navigate to the Library section and find your game.
  3. Now right-click on the specific game and click Properties.
  4. Go to the Local files tab and hit the Verify integrity of game files button. Steam properties
  5. Steam will start the game verification process. You may need to wait for a few minutes.

Finally, reboot your system and launch the game again. The game should now start without any issues.


You can automatically repair corrupted files on Windows 10 with these software solutions.


2. Update your graphics drivers

Sometimes, outdated graphics drives prevent games from running on your system. If you have not updated your graphics drivers yet, you should install the latest version now.

Otherwise, your games may fail to initialize or launch properly.

For more information on how you can update outdated drivers, check out this step-by-steps guide.

3. Reinstall the game

If none of the above-mentioned solutions worked, you need to uninstall the game, delete relevant files on your system, and redownload the game.

Have you experienced any such issues on your system? Let us know in the comments section below.

RELATED ARTICLES YOU NEED TO CHECK OUT:

Posted in Fix

Found unauthorized changes on the firmware [QUICK FIX]

Have you recently tried to boot up your computer but before anything else you get hit by the message System Found Unauthorized Changes on the Firmware?

We know this might be frustrating, but there is no need to panic. We found a few solutions and possible reasons for this that we will share with you in the next article.

My system found unauthorized changes on the firmware

1. System restore point

  1. Insert the Windows installation media and boot from it in the beginning.Found unauthorized changes on the firmware
  2. In the first window that pops up, press Repair your computer.
  3. After the tool scans your operating system, it will give you the option to Restore to a previous point.
  4. After that, follow the steps in the prompt and select a system restore point dated before the occurrence of the issue.

However, by using this method, it is likely that you will encounter the issue again after a while.

It is advisable that you do not update your operating system for a while until a new fixed version occurs.


Are you still stuck on the Boot screen with the Unauthorized changes error? Resetting your system should help.


2.Disable the Secure Boot

  1. In order to do so, you will need to access your BIOS or UEFI settings. Doing this can be slightly different, depending on the motherboard. If you are having trouble with accessing BIOS, you can read more about how to do it by accessing this link.
  2. After you manage to access the BIOS/UEFI, you will need to search for a Boot section. Under it, you should find an option called Secure Boot. As soon as you find it, you will have to change the OS Type to Other OS.
  3. This way, your Secure Boot should be disabled and your startup should work flawlessly.Found unauthorized changes on the firmware

READ ALSO:

Xbox Game Pass is fair for developers, these Gamelab panelists agree

Two years after Xbox Game Pass made its debut on Xbox One, Microsoft’s gaming subscription service has recently launched on PC with a catalog of over 100 games. Xbox Game Pass was preceded by other services from Sony and EA, but it seems that Microsoft’s initiative is the one that had the biggest impact on the video games industry so far.

During a panel hosted by GameIndustry.biz at Gamelab 2019, several developers have voiced their enthusiasm about Xbox Game Pass. Microsoft never really discussed how it was remunerating developers and publishers who agreed to release their games on Xbox Game Pass, but it’s clear the Redmond giant definitely has the resources to bring several AAA games on the catalog. In recent months, we’ve seen recent blockbuster games such as Shadow of the Tomb Raider or Wolfenstein 2: The New Colossus join Xbox Game Pass, and Metro Exodus, a game that was an Epic Games Store exclusive on PC is also playable with the new Xbox Game Pass for PC.

We may never get details about Microsoft’s deals with game publishers, but Fredrik Wester, Executive Chairman of the Board at Paradox Interactive and one of the panellists at Gamelab 2019 referred to Spotify and Netflix to explain the different business models that subscription services can use. The Spotify business model, where artists get more money depending on their song’s popularity may be more interesting for live service games, but Microsoft apparently opted for personalized deals with developers and publishers.

“Spotify pays you depending on how many times your song is played,” Wester said. “Netflix pays you a fixed fee, depending on what it thinks your TV series is worth. They are fundamentally different things, and that’s what you see [with Game Pass] as well.

“OnLive, for example, they said, ‘You can have your game on our service, we’re going to attract a lot of customers, and we’re going to deliver you money based on how many hours people play your game.’

“Now, at Paradox we love that business model, because people play our games for 3,000 or 4,000 hours… While the Game Pass model — to us — is still a decent model, but we think we’re not getting paid enough, because people play our games more than they play very single-player, narrative-driven games.”

Even though the Netflix-like business model may not be ideal in the “game as a service era,” it still seems like third-party studios interested in Xbox Game Pass can still strike some pretty good deals with Microsoft. Dino Patti, Co-Founder and former CEO of Playdead and now Executive producer and Co-Founder of Jumpship said during the panel that Microsoft understands what developers really need.

“For me — and I might be a bit biased — but I think the way the business is with Game Pass is the first time subscription is what could be considered fair for developers,” he added. “All other business models that have been suggested with subscriptions have never worked out, because they didn’t know what developers actually need.
“With Game Pass, Microsoft is doing it correctly, I feel, for the developers.”

Game subscription services are still quite new in the video games industry, but the competition is already heating  with the upcoming launch of Ubisoft’s Uplay+, Apple Arcade and Google Stadia this Fall. According to Wester, this is a great opportunity for game developers and publishers to make more money. “People are throwing money at everything, and if you can’t make money today in the games industry then you probably will never be able to make money, ever, in this industry — if you’re an established company, because new companies always struggle,” he explained.