Microsoft to unbundle Teams from Microsoft 365 and Office 365 in EEA and Switzerland.
Microsoft will unbundle Teams from its Microsoft 365 and Office 365 suites in the European Economic Area (EEA) and Switzerland starting October 1, 2023. This decision follows an investigation by the European Commission, which raised concerns about unfair competition.
Customers in these regions can now purchase these suites without Teams, saving €2 per month or €24 annually. Microsoft also plans to improve interoperability and support for application developers, making it easier for competitors to utilize its functionality. Microsoft aims to strike a balance between competitors and European business interests while remaining engaged with the European Commission’s concerns.
Microsoft is looking to expand its Xbox gaming AI team.
Microsoft is delving into the realm of AI-driven gaming innovation, as indicated by a recent job listing titled “Principal Software Engineer, Gaming AI.” The listing, posted in July, seeks an experienced software engineer to explore and create groundbreaking Artificial Intelligence/Machine Learning (AI/ML) features, tools, and services within the Xbox Gaming AI team.
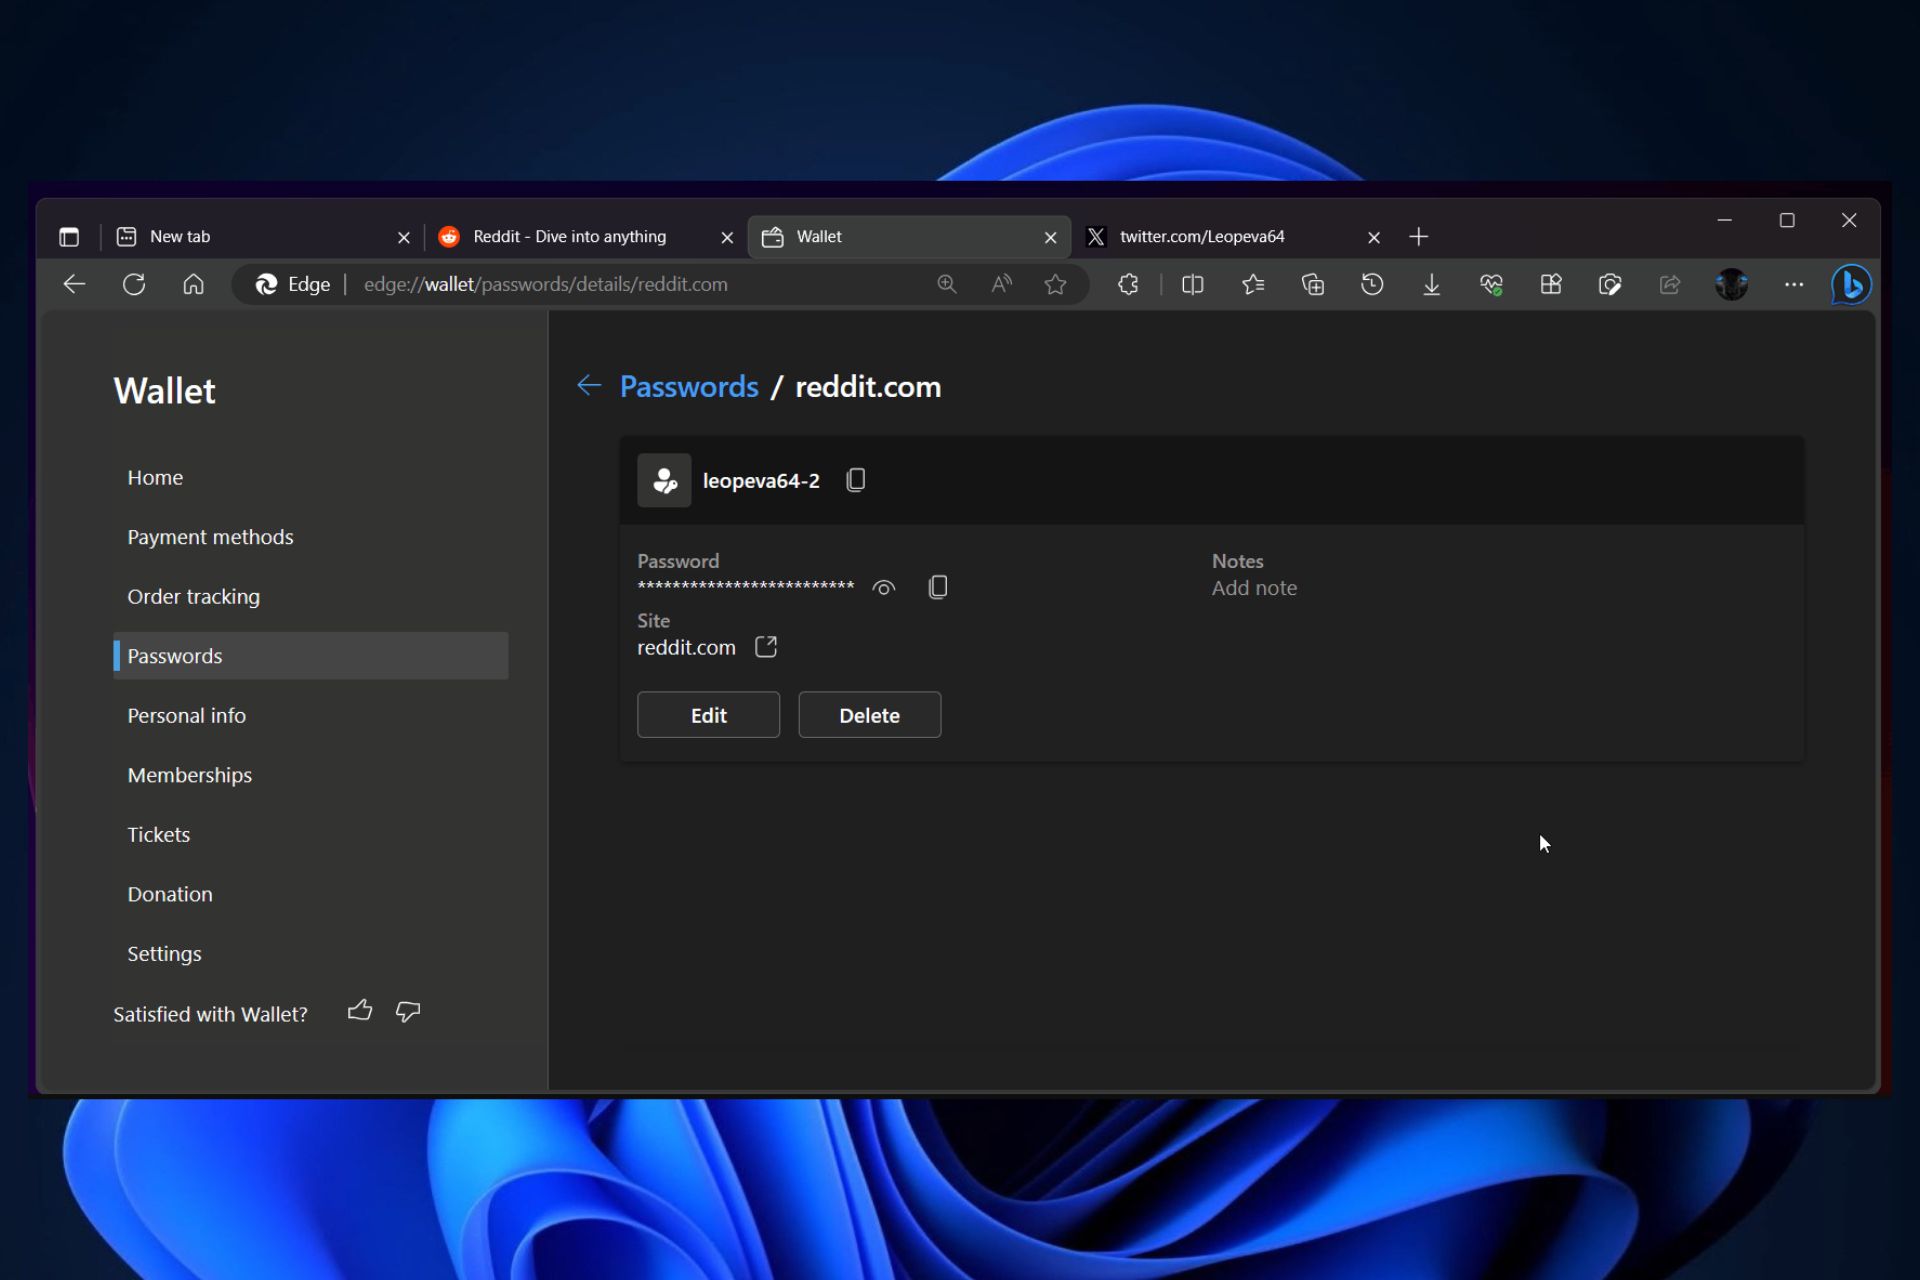
Microsoft is working on redesigned password management for Edge.
Microsoft is reportedly giving its Edge web browser a makeover by redesigning its password manager. This update will introduce a feature allowing users to add notes to their passwords, similar to Chrome’s functionality. While the release date is unclear, this improvement is set to enhance password management, making it easier for users to keep track of their credentials and offering a more secure and user-friendly experience.
That’s it for this week. We will be back next week with more Microsoft news.
The Touch Keyboard and Handwriting Panel service brings touch features and handwriting functionality to compatible devices.
If the service isn’t working, certain Windows apps might not work, and in today’s guide, we’re going to show you how to enable or disable it on your PC.
How do I enable the Touch Keyboard and Handwriting Panel service?
1. Use the Services window
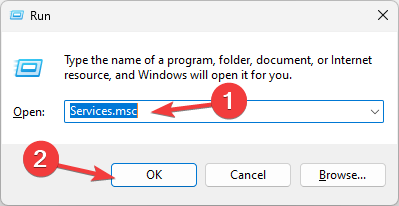
Press Windows key + R and enter services.msc.
Locate the Touch Keyboard and Handwriting Panel service, right-click it, and choose Start.
Alternatively, double-click the service.
Next, set the Startup Type to Automatic and click on Start.
Click Apply and OK to save changes.
If you want to disable the Keyboard and Handwriting Panel service, repeat the same steps, but set the Startup type to Disabled or Manual and click on Stop to stop the service.
2. Use the Command Prompt
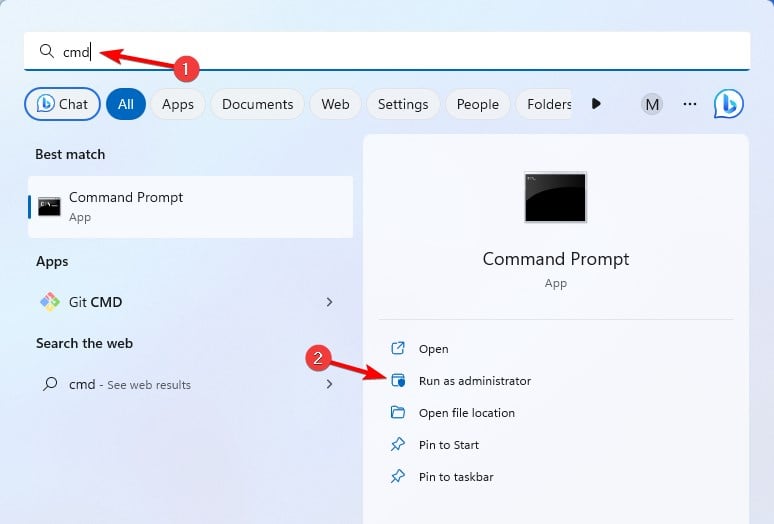
Press the Windows key + S and enter cmd. Select Run as administrator.
Now run the following command: sc queryex state=all type=service
The list of all services will appear. Locate the Touch Keyboard and Handwriting Panel service and check its service name. It should be TabletInputService.
Now run the following command to start the service: net start "TabletInputService"
To stop the service, you can use net stop "TabletInputService"
To disable the service run the following command: sc config "TabletInputService" start=disabled
If you want to enable the service and set the startup type to Automatic: sc config "TabletInputService" start=auto
For different startup types, you can use the following parameters:
Manual startup: start=demand
Automatic delayed: start=delayed-auto
To start the service immediately, use the sc start "TabletInputService"
3. Use the PowerShell
Press Windows key + S, enter powershell, and choose Run as administrator.
Enter the following command to get the list of all services on your PC: Get-Service
Look for the Touch Keyboard and Handwriting Panel service. Its name should be TabletInputService.
To start the service, run the following command: Start-Service -Name "TabletInputService"
You can stop the service with this command: Stop-Service -Name "TabletInputService"
To disable the service, use this command: Set-Service -Name "TabletInputService" -Status stopped -StartupType disabled
To enable the service, use the following command: Set-Service -Name "TabletInputService" -Status running -StartupType automatic
Touch Keyboard and Handwriting Panel service is missing on Windows 11
Keep Windows up to date, or try performing an in-place upgrade.
Start PowerShell as administrator and run Get-AppxPackage -allusers | foreach {Add-AppxPackage -register “$($_.InstallLocation)\appxmanifest.xml” -DisableDevelopmentMode}
The service is also associated with fingertip handwriting, and if you want to know more about it, we have a guide on how to enable fingertip handwriting in Windows 11.
If you have any questions regarding this service, let us know in the comments below.
Crave is a video-on-demand streaming service intended mainly for Canadian residents. It houses numerous exciting movies and TV shows including content from Showtime, HBO, and lots more.
As with many popular streaming platforms, Crave is geo-restricted. This means that viewers outside the borders of Canada need a VPN to access it.
However, over time, there have been numerous complaints about VPN not working with Crave.
Trust me, I know there’s nothing more annoying than seeing that ugly error message saying Sorry, this content is not available in your region.
In fact, many die-hard lovers of the streaming service have had to seek alternatives when they couldn’t get past that block even with a VPN.
But not to worry, I figured out the cause of the issue and this article will help you fix any problems you’re experiencing with Crave.
So, stay glued to this piece.
Crave not working with VPN? Try this!
The following fixes will help you solve the issue:
1. Update your VPN
One of the major reasons why Crave is not working with a VPN is using an outdated app.
VPNs often roll out updates to their apps in a bid to fix bugs and improve their services.
Therefore, your first course of action should be to update your VPN app.
To do this, simply go to your VPN’s official website and download the latest version.
2. Delete browser cookies
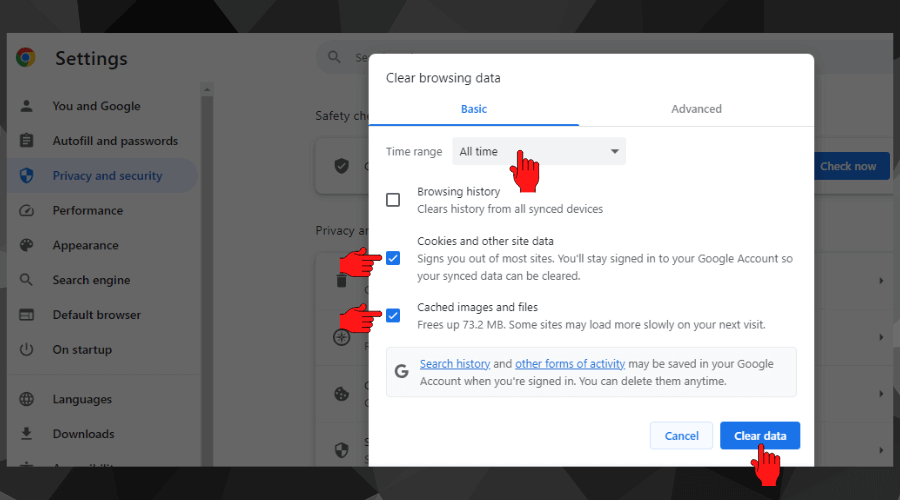
Follow these steps to delete your browser cookies:
Open your browser and navigate to Settings
Click on it to open and select Privacy and Security
Select Clear browsing data.
Set the duration of cookies to clear, then click the Clear data button.
Your browser stores certain information in its cookies which includes your location.
Geo-restricted websitesuse these cookies to determine your actual location, causing them to block your access if you’re from an unapproved location.
Deleting that data can help you access Crave freely.
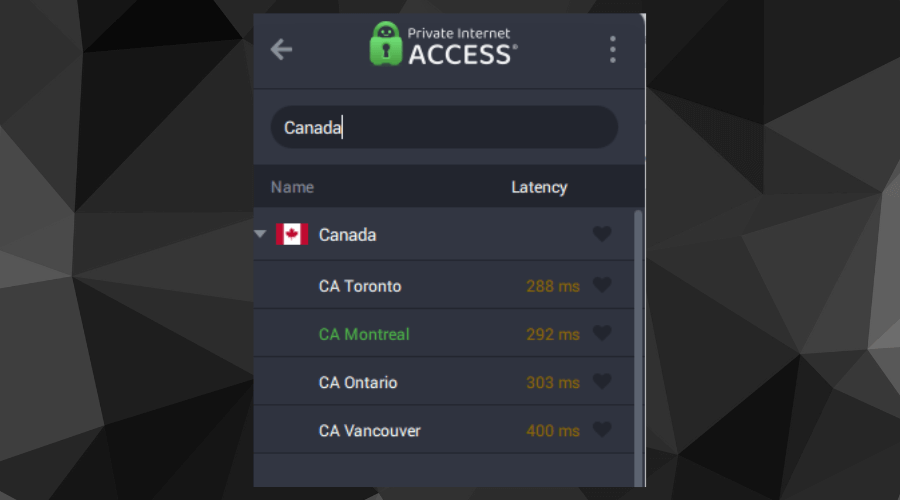
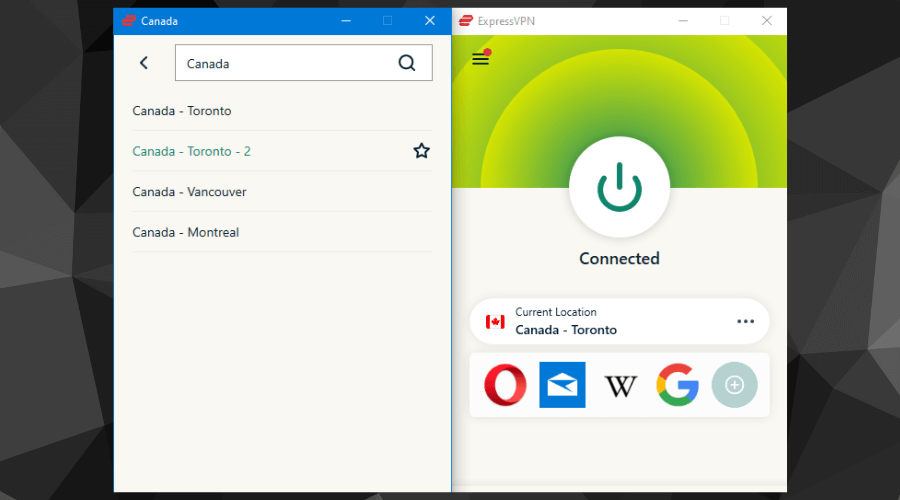
3. Change Servers
Here’s how to do that:
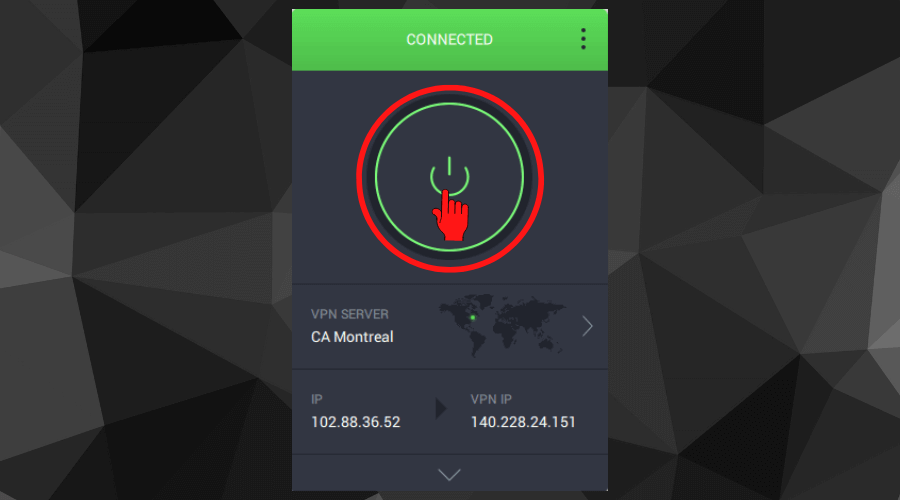
Open your VPN app and disconnect from the server you’re currently connected to.
Close the software and wait for a few minutes.
Launch the app again and connect to another Canadian server.
Check if it’s working well with Crave now.
If you can’t unblock Crave even when your VPN connection is active, then it’s safe to assume that the problem is from the server you’re connected to.
This is because Crave can detect and block individual VPN servers. When this happens, all the IP addresses associated with that piece of hardware become useless.
In this case, the best solution is to connect to another Canadian server.
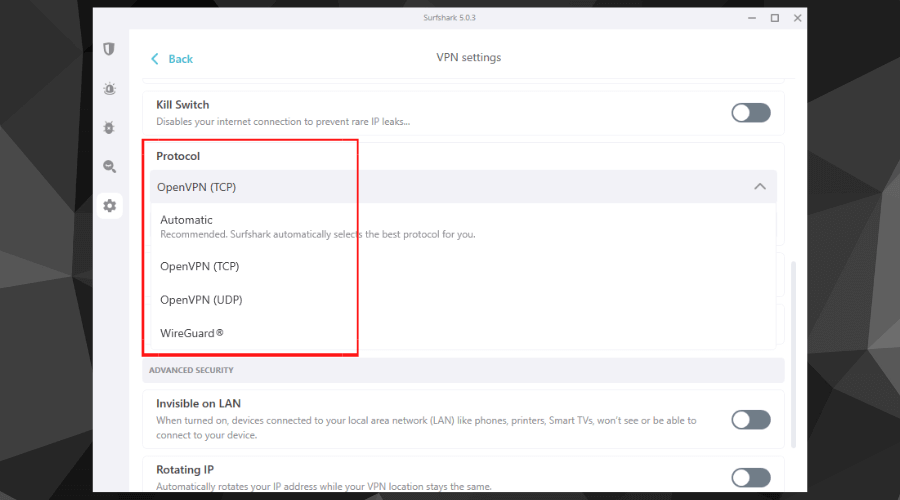
4. Use a different VPN protocol
Here’s how to change your VPN protocol:
Open your VPN app and go to Settings.
Click the VPN Settings tab.
Click the Protocols drop-down menu and select a different connection protocol.
Close the settings page, then connect to a server to confirm if it works.
This usually works because different protocols have different uses. Some are great for bypassing region locks but less than ideal for speed and security. Meanwhile, others are optimized for streaming and torrenting.
So, changing things around can make a big difference and get Crave to work with your VPN.
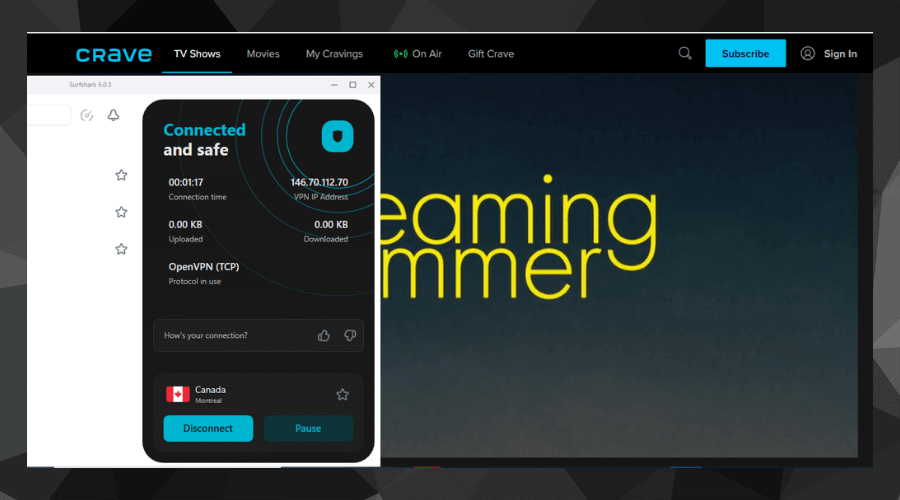
In my case, Surfshark refused to work on my PC for the longest time. I tried everything possible without getting a break.
However, the solution turned out to be as simple as changing the protocol setting from Automatic to OpenVPN.
Therefore, take it from someone with lots of experience with VPNs – this solution works.
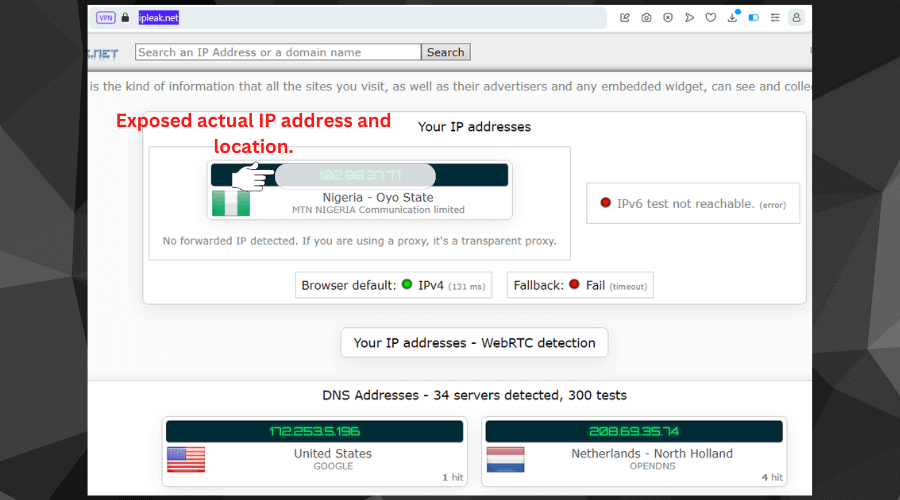
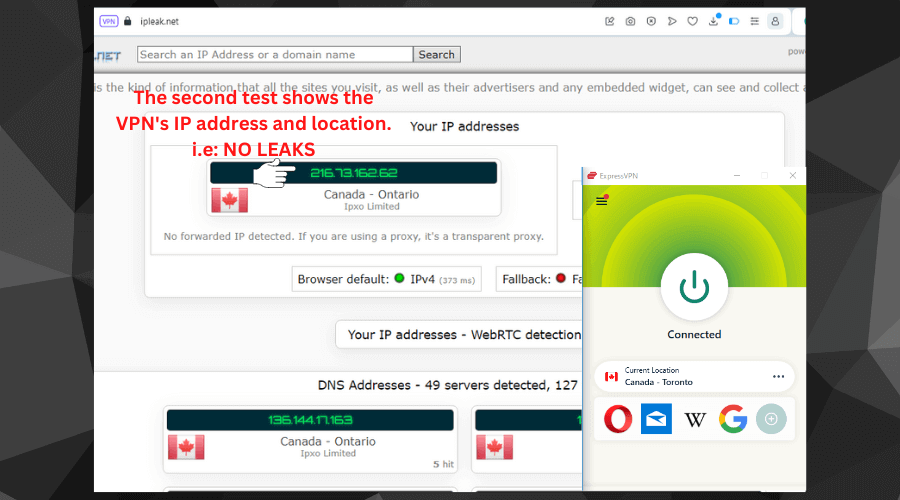
Go to ipleak.net and run a leak test. Note your actual IP address from the results.
Connect to a VPN server and rerun the test.
Compare the results from both tests.
If you get similar results, it means you have a leak.
Leaks are security vulnerabilities that cause websites to discover your true IP address even when using a VPN.
If your VPN happens to have leaks, then the next two solutions are your best bet to fix it:
6. Contact the VPN support team
Yes, they’re in the best position to help you solve most of the technical issues causing Crave to not work for you.
They’ll provide you with the necessary information you need to resolve your issues.
However, if they can’t help you, then you should definitely:
7. Change your VPN provider
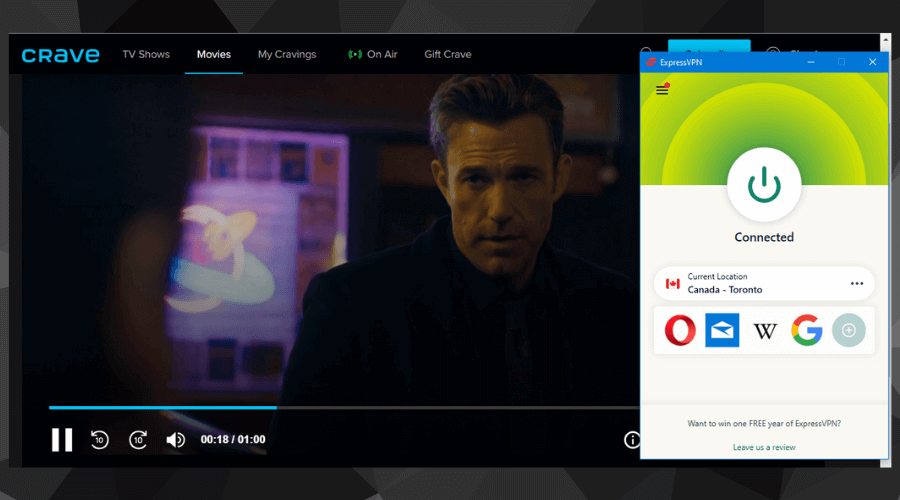
If all the solutions above fail, it’s in your best interest to ditch your current VPN. Instead, switch to a better and more reliable provider like ExpressVPN.
Sign in to your Crave account and enjoy streaming your favorite series with a VPN that actually works.
You don’t want to use free VPNs for Crave!
Your VPN determines how well and easily you’ll connect to and enjoy certain internet services, especially streaming platforms.
ExpressVPN is one of the best premium providers on the market right now. It’s been tested and reviewed countless times with evidence available online to back these claims.
It cuts through all the noise and gives you exactly what you need to unblock Crave.
That includes an array of streaming-optimized Canadian servers, strong unblocking protocols, and a PrivateDNS feature that keeps your activities speedy and anonymous.
Does Crave block VPNs?
Yes, Crave blocks the use of VPNs on its platform.
It’s geo-restricted due to copyright laws and its broadcasting licensing agreements.
Therefore, ithas to regulate access to its content in order to avoid legal issues.
However, premium VPNs have tons of IP addresses that can easily help you spoof your location and evade detection on the website.
So, even if one IP gets blocked or blacklisted, you can always get another one by switching servers.
How does Crave detect my VPN?
It’s a fact that streaming websites, including Crave, use VPN detection tools and technologies like GeoIP databases.
These databases provide Crave with different IP addresses known to belong to VPNs, so the platform is automatically able to tell where those connections are coming from and block them.
Also, when there are numerous requests coming from a single IP address, it arouses suspicions that cause Crave to block access to that address.
This usually happens with free VPNs, which are typically overcrowded.
Does Crave work with a VPN?
Yes, Crave works with VPNs.
The key is to use a premium VPN that has all the features required to bypass its geo-blocks.
The problem is that free providers often struggle to replace their blocked servers.
On the other hand, premium services like ExpressVPN and Surfshark are flexible enough to quickly provide other working options when they get blocked.
So, let’s check out some of the top options in more detail:
Best VPNs for Crave
After a lengthy search and lots of tests, here are the best VPNs you can use with Crave:
1. ExpressVPN – best-in-class for speed and privacy
Wonder why ExpressVPN tops this list? It’s due to its versatility and overall functionality, especially for unblocking different streaming sites.
With over 3000 servers in 94 countries, including hundreds from 4 Canadian locations, getting Crave to work is an easy task.
Its PrivateDNS feature helps to process DNS requests faster and more securely, which translates to streaming speeds of up to 10GB/s.
Beyond streaming, ExpressVPN comes with the AES 256-bit encryption for data protection.
In addition, it has inbuilt IPv4, IPv6, and DNS leak protection for better privacy.
But that’s not all, it also protects against WebRTC leaks, a security weakness that allows video content websites to learn a user’s true identity through browser data.
Furthermore, ExpressVPN has an automatic kill switch that prevents accidental leaks when your VPN connection drops.
Above all, the service operates a strict no-logs policy that guarantees your complete anonymity and privacy online.
ExpressVPN allows 8 simultaneous connections and has apps for Android, iOS, MacOS, Windows, and Linux.
Pros:
Super-fast connection
Top-notch security and privacy features
Allows anonymous payments
Unblocks numerous streaming platforms
Cons:
A bit pricey compared to rivals
ExpressVPN
Unblock Crave in no time and enjoy high-quality streaming with this top VPN.
Surfshark is an amazing solution because it offers above-standard features at super-affordable prices.
First of all, it has over 3200 servers in 100 countries including 3 options in Canada. And all of them offer great speeds ranging between 1GB/s and 10GB/s, providing a smooth streaming experience.
It unblocks Crave using connection protocols like WireGuard and OpenVPN.
You also get best-in-class 256-bit AES encryption, DNS and IPv6 leak protection, an inbuilt kill switch, ad-blocker, and malware scanner.
In short, Surfshark is the complete package, but that’s not all:
It also comes with top features like the NoBorders mode that allows you to bypass the toughest censorship anywhere in the world.
In addition to that, it has a rotating IP feature that makes your connection harder to detect, and a camouflage mode that disguises your VPN connection like regular internet traffic.
Surfshark has apps for Android, MacOS, Linux, Windows, and iOS. It also allows manual configuration on selected internet routers.
Pros:
No logs policy
Fast streaming
Strong security features
Unlimited simultaneous device connection
24/7 live chat support
Cons:
Slow response time from their support team
Surfshark
Make quick work of geo-restrictions and stream on all your devices with Surfshark.
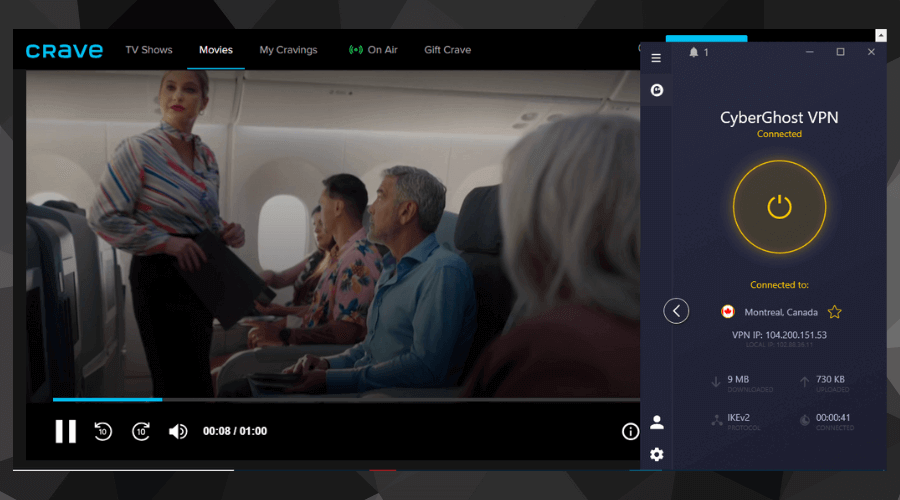
3. CyberGhost – best for privacy and anonymous streaming
CyberGhost has a network of 9650 servers across 91 countries, including 480 in 3 Canadian locations.
The best part is that it offers numerous streaming-optimized servers dedicated to popular platforms for easier connections.
As with every other VPN on this list, it uses military-grade AES-256-bit encryption to securely tunnel your data.
In addition, it has other interesting security features like an automatic kill switch that blocks leaks on poor networks, an automatic malware scanner, and IPv6 and DNS leak protection.
CyberGhost upholds a high standard of privacy as it doesn’t log any identifiable user information.
Above all, its 10GB/s server connection speeds make accessing Crave from abroad possible without breaking a sweat.
You can use CyberGhost to unblock Crave on Android, Windows, iOS, Linux, and macOS.
And it allows manual installation on selected routers.
Pros:
Enhanced security
Streaming-optimized servers
Fast and easy unblocking
Cons:
Limited control for advanced users
CyberGhost
Benefit from streaming-optimized servers and quickly unblock Crave with CyberGhost.
DLL or Dynamic Link Library files are critical to any Windows installation. Multiple applications often share these simultaneously, and issues with one can cause the related program to crash. One such DLL that often throws an error is winmmbase.dll.
In some cases, users found that winmmbase.dll was missing or could not be found. The winmmbase.dll crash error message reads, C:/WINDOWS/SYSTEM32/ winmmbase.dll is either not designed to run on Windows or it contains an error.
So, what is winmmbase.dll? Microsoft developed the file as part of the Base Multimedia Extension API DLL library to support the operating system and the software running on it. Also available as a 32-bit file, it’s considered a Win32 DLL.
Here are the reasons you come across a winmmbase.dll error in Windows 11:
Corrupt files: If the system files are corrupt, you may experience issues with the stored DLLs.
Malware or virus: Often, a virus or malware infection can render the DLL unusable.
Bad sectors: Issues with the storage drive can also trigger the error where the DLL becomes inaccessible.
Keep reading to find out how to install winmmbase.dll when it’s missing!
How do I fix winmmbase.dll crashing on Windows 11?
Before we proceed to the slightly complex solutions, try these quick ones first:
Registry issues can also trigger a DLL error. So, if you recently made any changes to the Registry Editor, revert them. Or use an effective Registry cleaner to get rid of conflicting entries.
If none work, move to the fixes listed next.
1. Replace the DLL
The winmmbase.dll, a critical component, comes bundled with the default Windows installation. The file size is 170 KB, and the file location is: C:\WINDOWS\System32
System32 folder
So, your primary approach when winmmbase.dll is corrupted or not found should be to replace it.
Get the DLL from another computer running the same architecture of Windows, be that 32-bit or 64-bit, copy it to a flash drive, and then transfer it to the System32 folder on the affected PC.
2. Repair the corrupted system files
Press Windows + R to open Run, type cmd, and hit Ctrl + Shift + Enter.
Click Yes in the UAC prompt.
Paste the following three DISM commands individually, and hit Enter after each: DISM /Online /Cleanup-Image /CheckHealthDISM /Online /Cleanup-Image /ScanHealthDISM /Online /Cleanup-Image /RestoreHealth
Now, execute this command for the SFC scan:sfc /scannow
Once done, restart the computer and check whether the error is fixed.
In case the SFC scan returns, Could not reproject corrupted file \??\C:\WINDOWS\SysWOW64\winmmbase.dll; source file in store is also corrupted, pair it with the DISM commands or perform an in-place upgrade as detailed in the last solution.
Repairing corrupted system files can be done easily when using a specialized repair tool. These tools will scan your system and repair any broken files they encounter.
3. Manually update the audio and Bluetooth drivers
A few users found that their audio and Bluetooth drivers relied on the winmmbase.dll file for functioning. And simply replacing the DLL with a fresh copy didn’t work as system processes were constantly using it, though that’s not always the case.
When dealing with drivers, it’s always recommended to use specialized software. Such tools will scan your system and identify your missing or out-of-date drivers in no time. The best driver updater software will also download and replace the drivers for you.
4. Reinstall the affected application
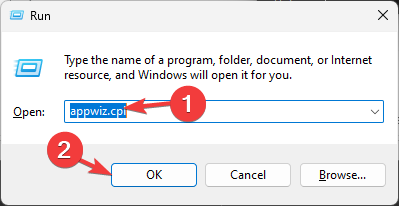
Press Windows + R to open Run, type appwiz.cpl in the text field, and hit Enter.
Select the application that throws the error, and click Uninstall.
Follow the on-screen instructions to complete the process, and then restart the computer.
Now, reinstall the application from an official source, either the website or Microsoft Store.
In some cases, the winmmbase.dll error in Windows appears due to a faulty application and not an issue with the OS. Reinstalling the app should help here.
Go to Microsoft’s official website, choose the product language and OS edition, and download the Windows 11 ISO.
Double-click the ISO file, and click Open in the prompt.
Run the setup.exe file.
Click Yes in the UAC dialog box.
Click on Next to proceed.
Now, click Accept to agree to Microsoft’s license terms.
Finally, verify that the setup reads Keep personal files and apps, and then click on Install.
Wait for the Windows 11 repair upgrade to complete.
Since winmmbase.dll is a Windows operating system file, an in-place upgrade will help when the DLL is missing or corrupt. When you perform a repair upgrade, all OS files are replaced without affecting the stored data or installed applications. It’s basically like reinstalling Windows.
The winmmbase.dll shouldn’t ideally throw errors, but when it does, things are easy to fix! While some go with the manual methods, we recommend using a dedicated DLL repair tool to get things running quickly!
For any queries or to share more solutions with us, drop a comment below.
Drive failure is a serious problem, and it can make your files unrecoverable or your boot drive unable to work, so many users choose to create a mirror volume on Windows 11 to prevent that.
In case you’re not familiar, mirror volume is an exact copy of another drive, and it works as a backup in case the disk failure occurs. It’s a great backup solution, and today, we’ll show you how to create it on your PC.
What are the prerequisites for setting up a mirror volume?
Two dynamic disks that are similar in size. The mirror drive can be larger than the source drive.
RAID support, which is available on almost every modern PC.
The mirror drive should be unallocated and without any volumes.
How do I create a mirror volume in Windows 11?
1. Use Disk Management
Press the Windows key + X and select Disk Management.
Locate the primary disk, right-click it, and choose Add Mirror.
Select the secondary disk that you want to use in the dialog box. The drive should be unallocated.
Follow the instructions on the screen to create a mirrored volume on Windows. It might be necessary to format the mirror drive, so use the same settings you used for the source drive.
2. Use the Storage Spaces feature
Press the Windows key + I to open the Settings app.
Navigate to Storage.
Select Storage Spaces.
Next, click on Create a storage pool and Storage Space and set the name for the storage pool.
Select the two drives you want to use and click on Create.
Enter the desired name for the mirror, set resiliency to Two-way mirror, and click on Create.
Next, specify the name of the label, set the drive letter set the file system as NTFS, and click on Format.
After the process is done, the new drive will appear on your PC.
Press the Windows key + X and choose Windows Terminal (Admin).
Run the following command: diskpart
Next, run the following command: list disk
Locate the disks you want to mirror. In this example, we’ll use disk 0 and disk 1.
Type select disk 0
Next, use this command to convert the basic disk to the dynamic disk: convert dynamic
Repeat steps 4 and 5 for disk 1 as well.
Run the following command to create a mirror volume on the desired disk: create volume mirror disk=1
Lastly, run the following to add the other disk to the mirror: add disk=0
After doing that, exit diskpart and restart your PC.
This is an advanced method that is suitable for users who are already familiar with diskpart. Use this method with extra caution.
Why can’t I create a mirrored volume?
One of your drives isn’t a part of the storage pool.
Your disks aren’t configured as dynamic.
The mirror disk is smaller than the source disk.
It’s pretty simple to create mirror volume on Windows 11, and we recommend using Disk Management or Storage Spaces to achieve this since it’s the most straightforward method. This feature is available on older versions as well, and we have a guide in how to mirror a hard drive on Windows 10.
The exFAT file system continues to be widely used for external drives, given its enhanced compatibility and support for large storage. These drives work on both Windows and MacOS. But there are instances when exFAT drives do not show up in Windows 11.
Also, users found the exFAT is unavailable when formatting drives in Windows 11, though the problem is usually linked to the USB flash drive and not the OS. Extensible File Allocation Table or exFAT has reportedly been problematic for many.
So, why is exFAT not working in Windows 11? Here are the possible reasons:
Drive letter not assigned: When the driver letter is not assigned, the external drive won’t appear in File Explorer, though it would be listed in the Device Manager.
Changes to the OS: Windows 11 interacts with the file system slightly differently, and this, sometimes, leads to exFAT not working on Windows.
Outdated or incompatible drivers: Problems often arise with external drives, be it in NTFS, exFAT, or the FAT32 file system, if the installed drivers don’t work.
Malfunctioning drive: A few users found that the external storage device itself was malfunctioning or had some physical damage.
How do I get Windows 11 to recognize my exFAT drive?
Before we head to the slightly complex solutions, here are a few quick ones to try:
Reconnect the drive to another port. Check if there’s one on the back side of the CPU and connect the exFAT formatted drive to it.
Connect the drive to another computer to identify whether the problem lies with the flash drive or the earlier PC.
If changes to an exFAT drive don’t reflect in File Explorer, rename the folder or add or remove files. This will trigger Windows 11 to register the change.
Make sure you are running the latest version of Windows.
Check for any physical damage to the hard drive, or take the drive to a repair shop.
If none work, move to the fixes listed next.
1. Mark the drive as active and assign a drive letter
Press Windows + S to open Search, type Create and format hard disk partitions in the text field, and click on the relevant result.
Locate the exFAT formatted external drive, right-click on it, and select Mark Partition as Active.
Choose the appropriate response in case a confirmation prompt appears.
Again, right-click on the external storage device, and then select Change Drive Letter and Paths.
Click the Add button.
Choose Assign the following drive letter, select one from the default menu or go with the the default choice, and then click OK.
Often, after initially formatting and setting up an external drive using the exFAT file system on MacOS, it may not show up on Windows 11 due to some inconsistencies. And simply marking it as active and assigning a drive letter should do!
2. Reformat the drive
Tip
We have listed two ways to format the drive: via Disk Management and the Diskpart utility. Go with the latter only if the format fails to work with the former. Make sure to create a backup of the data beforehand or move it to another PC where the USB drive is readable.
2.1 From Windows Disk Management
Press Windows + R to open Run, type diskmgmt.msc in the text field, and hit Enter.
Right-click on the problematic external drive, and select Format.
Now, enter a Volume label in the text field, select exFAT from the File system dropdown menu, choose 128K as the Allocation unit size, then untick the checkbox for Perform a quick format, and click OK.
After the drive is formatted, check whether it’s now readable on Windows 11.
2.2 Using Diskpart
Press Windows + R to open Run, type cmd, and hit Ctrl + Shift + Enter.
Click Yes in the UAC prompt.
Paste the following command and hit Enter: diskpart
Now, run this command to view the available disks: list disk
Identify the ID assigned to the external drive, and then execute the following command while replacing X with the assigned number: select disk X
Run this command to clear the disk and delete any files: clean
Now, create a partition using this command: create partition primary
Execute this command to set exFAT as the file system: format fs=exFAT
Use this command to assign a drive letter: assign
When exFAT is not showing up on Windows 11, reformatting the drive will do the trick! And with Diskpart, you can eliminate any trivial bugs that are preventing the format from going through.
3. Update the driver
Press Windows + X to open the Power User menu, and select Device Manager from the list of options.
Expand the Disk drives entry, right-click on the affected USB drive, and select Update driver.
Now, choose Search automatically for drivers and wait for Windows to install the best one stored locally.
When it’s incompatible or outdated drivers to blame for the exFAT drive not recognized in Windows, updating the drivers should work. Also, if Windows can’t find one, head to the manufacturer’s website, locate the latest version, and manually install the driver.
On the other hand, you can successfully update any driver on your PC with a leading driver solution that securely updates old or incompatible drivers.
Press Windows + R to open Run, type cmd, and hit Ctrl + Shift + Enter.
Click Yes in the pop-up window that appears.
Now, paste the following DISM commands individually and hit Enter after each: DISM /Online /Cleanup-Image /CheckHealthDISM /Online /Cleanup-Image /ScanHealthDISM /Online /Cleanup-Image /RestoreHealth
Next, execute this command to run the SFC scan: sfc /scannow
Corrupt system files are known to trigger a range of issues, including cases where Windows exFAT is not recognized. So, if the file system doesn’t appear when formatting a flash drive, simply run the DISM commands and the SFC scan.
Tip
If the exFAT drive is not showing up on Mac, run this command: sudo pkill -f fsck
Can I format exFAT on Windows 11?
Press Windows + E to open File Explorer, go to This PC, right-click on the drive you want to switch to exFAT, and select Format.
Select exFAT from the File system dropdown menu, tick the checkbox for Quick format, and click OK to start the process.
Wait for the format to complete.
Yes, you can format USB flash drives with the exFAT file system drives in Windows 11. We have a special guide that explains how to change exFAT to FAT32 on your USB drive, so don’t miss it.
If exFAT is unavailable as a File System, check whether the drive in question is a built-in hard drive. exFAT shows up for most flash drives and external hard drives, but it’s not recommended for internal HDDs or SSDs.
Lenovo has officially unveiled their new gaming handheld, the Legion Go, at IFA Berlin 2023. The company also announced an array of other gaming accessories that will perfectly complement the console, thus confirming all of Windows Report’s initial leaked info about these devices.
First, let’s backtrack a bit:
At the end of July, the initial rumors about a Lenovo gaming handheld surfaced
Lenovo has officially revealed the Legion Go alongside other gaming accessories at IFA, confirming all of our initial leaked data. The console is going up against the likes of Valve’s Steam Deck, ASUS’ ROG Ally, AYANEO’s handhelds (with the KUN on the way), and the Nintendo Switch, combining some of the best features of each.
It is a bit heavier than the competition, coming in at 854g, but the 8.8-inch QHD+ screen more than makes up for that. The Legion Go is similar to the ROG Ally, sporting an AMD Ryzen Z1 Extreme, 144Hz display, a 49.2WHr battery, and 16GB of RAM. Here’s the full specifications:
Operating System: Windows 11
CPU: Up to AMD Ryzen Z1 Extreme with AMD RDNA Graphics
Ports: 3.5mm audio combo jack, 2x USB Type-C (top and bottom), 1x microSD card reader
And that’s not all, as Lenovo also confirmed the console will come with Hall Effect joysticks, eliminating drift and dead zones. That’s great news for most of the gamers out there, especially for the hardcore ones.
But maybe the biggest news is the price: the Legion Go is set to hit the market at a very aggressive $699 in the US, which means it’s a direct competitor for the ROG Ally but with many more features. You’ll be able to buy it sometime at the end of October. Until then, you can see how it stacks up against its biggest competitors, the Steam Deck and ROG Ally.
Lenovo also launched a series of laptops & accessories
Besides the Legion Go, Lenovo also revealed the Legion AR Glasses and the Legion E510 in-ear gaming headphones that should take your on-the-go gaming experience to the next level.
Regarding laptops, the powerhouse Lenovo Legion 9i will also be available sometime in October, but at a hefty price. Maybe the top specs and the incredible build quality will make the price easier to digest.
But what do you think? Leave us your thoughts on the Legion Go and how you think it will go up against the Steam Deck and ROG Ally in the comments section below, and we’ll continue the talk.
AirPlay is a feature that allows Apple users to stream audio and video content wirelessly between their devices.
Many people use VPNs with AirPlay for better speed and to bypass content restrictions. However, in some cases, it seems that the VPN is blocking the AirPlay connection.
In that case, you may not be able to pair your devices or the connection will be poor.
Fortunately, we’ve detailed simple troubleshooting steps to try when your VPN is blocking AirPlay.
Can you AirPlay with a VPN?
Yes, you can AirPlay with VPN, but it has to be configured correctly.
While AirPlay itself doesn’t have an anti-VPN policy, there are various reasons why VPN use can interfere with its functionality.
For example, some VPNs don’t support multicast traffic which is the transmission of data from one sender to multiple receivers simultaneously.
This type of traffic is essential for AirPlay to function properly, as it allows audio and video content to be streamed from one device to another without delay or buffering.
Additionally, network restrictions, cookies, and underperforming VPN servers can also lead to AriPlay not working with your VPN.
That being said, there are several steps you can take to resolve the problem and enjoy uninterrupted streaming.
What to do if your VPN is blocking AirPlay?
If you’re experiencing issues with AirPlay while using a VPN, the following are steps you can take to resolve the issue.
1. Change your VPN server
When your VPN is blocking AirPlay, it could be due to a particular server or location being blocked. To resolve this issue, you can try switching to a different server by following these steps:
Disconnect from your current VPN server.
Open your VPN app and select a different server location.
From the list, connect to the new server and try using AirPlay again.
Now try to use AirPlay again. If the server was the actual problem, then the connection should work now.
2. Clear your browser data
Sometimes, clearing your browser data on your apple device can help resolve issues with AirPlay not working with your VPN. Here’s how to do it:
Safari
Open Safari on your Mac.
Click on Safari in the top menu bar and select Preferences.
Look for an option to clear your browsing data, such as cache and cookies.
Select the data you want to clear and click Clear.
Restart your browser and try using AirPlay again.
iPad/iPhone
Go to the Settings app on your device.
Select Safari from the list of apps.
Choose Clear History and Website Data.
Try using AirPlay again with your VPN.
Chrome
Open Chrome.
Click on the three dots in the top-right corner of the browser window.
Navigate to your cookie preferences.
Click on Privacy & Security and select Site Settings.
Scroll down to find Cookies and other site data and click on it.
Scroll further down and click on See all site data and permissions.
Click on Clear Data to delete the selected data.
Restart your browser and try using AirPlay again.
Clearing your browser data can help remove any old settings or preferences that may interfere with AirPlay.
Note that the steps for clearing your browsing data on Google Chrome are similar to other popular web browsers like Microsoft Edge, Opera, or Mozilla Firefox.
3. Switch to a better VPN
Some VPN providers may not work well with AirPlay to provide a reliable or stable connection.
If none of the above-mentioned suggestions work and your VPN is still blocking AirPlay, it may be time to switch to a better VPN.
For a reliable AirPlay experience, we recommend using ExpressVPN because it offers fast and secure connections.
Launch the app and sign in using your ExpressVPN account details.
Choose a server location that is optimized for streaming.
Connect to the server and try using AirPlay again.
In addition, ExpressVPN has a wide range of servers located worldwide (90+ countries), so you can easily bypass any VPN blocking issues and use AirPlay to stream your favorite content.
With ExpressVPN, you can stream your favorite content using AirPlay without interruptions.
ExpressVPN
Use ExpressVPN for error-free screen mirroring on all devices connected to your AirPlay!
While a VPN can block AirPlay, simple solutions exist to overcome this issue. Try changing your server, clearing browser data, or switching to a VPN that supports AirPlay.
Using a reliable VPN can ensure seamless AirPlay functionality and unrestricted streaming.
With these steps, you can bypass VPN blocking and enjoy uninterrupted AirPlay streaming on your Apple TV.
RSS feed support is natively available in Outlook, but what if you need to remove certain RSS feeds from Outlook?
Sometimes you just want to stop following certain sources, and if that’s the case, we’re pleased to say that this is pretty simple to do in Outlook, and today we’re going to show you how to do that.
Why do I have an RSS Feeds folder in Outlook?
The RSS feeds folder in Outlook helps you manage and follow RSS feeds. This is a default folder in Outlook and it’s available even if you don’t use RSS feeds.
How do I remove an RSS Feed from Outlook?
1. Manually remove the desired feed
Expand the RSS Feeds folder.
Locate the source that you want to remove and right-click it. Choose Delete Folder.
Confirm that you want to remove that feed from Outlook.
The steps are the same for all versions of Outlook, regardless of the version you’re running.
2. Change Outlook settings
For Outlook 2010 and newer
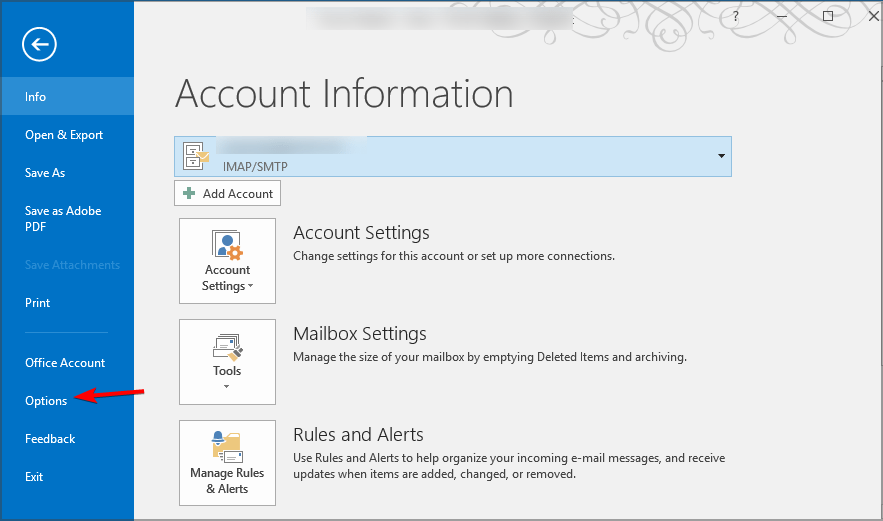
Click on File and select Options.
In the left pane, click the Advanced tab.
Locate the RSS Feeds section. Next, you need to both Any RSS Feed item that is updated appears as new and Synchronize RSS Feeds to the Common Feed List (CFL) in Windows options.
Save changes.
For Outlook 2007
In Outlook, click on Tools and select Options.
Now head to the Other tab and click the Advanced Options button.
Uncheck the Sync RSS Feeds to the Common Feed List and Any RSS Feed item that is updated appears as a new item options.
Click the OK button to save changes.
3. Modify the registry
Press the Windows key + R and enter regedit.
Navigate to the following path: HKEY_CURRENT_USER\Software\Microsoft\Office\16.0\Outlook\Options\RSS
In the right pane, look for Disable DWORD. If it’s not available, right-click the right pane and choose New and then DWORD (32-bit Value). Name the new DWORD Disable.
Double-click the Disable in the right pane.
Set the Value data to 1 and save changes.
The steps are the same for all versions of Outlook, and the only difference is the path. For Outlook 2007 the path is the following:
For years, anyone who has used Notepad.exe can explain the discomfort of being prompted always by a dialogue box asking to save changes to open text files. The particular quirk of Notepad, a tool with a reputation for being indispensable yet stubbornly outdated, has been its defining feature for over forty years. Now, however, change seems to be on the horizon.
In a bid to update its traditional applications, Microsoft has at last accommodated the request for an autosave functionality in Notepad from its users. Microsoft’s Dave Grochocki, in a blog post on the Windows Insider Program, informs users that following updates, Notepad will now automatically save your session, leading to a more streamlined user experience.
The upgrade negates the necessity of manually saving every individual file before closing Notepad, enabling users to resume work right from where they left off. In addition to this, Notepad will reinstate previously open tabs, along with unsaved content and edits, when it is reopened.
Importantly, the saved session file will not interfere with the user’s control over their content. Decisions to discard or save the unsaved changes in files remain firmly in the hands of users.
Although modest, the enhancement carries enormous importance for countless Notepad users globally, particularly those who favor it as a primary note-taking tool for its straightforwardness and speed.
Now, Notepad.exe, along with newfangled upgrades like tabs, dark mode, and the small spinning gear concept, looks set to step gracefully into the modern computing era, headed by the all-important AutoSave feature.
Along with this, the Windows Snipping Tool also gets a facelift. Users can now bypass the screenshot toolbar and go directly to screen recording via a new, more efficient keyboard shortcut, according to Microsoft.
Use the Print Screen or Win + Shift + S keyboard shortcuts to open the capture bar for snipping, where you will continue to find the familiar snipping modes, or try the new Win + Shift + R keyboard shortcut to open the capture bar for recording.
Enhancements also include a default audio source option that can capture mic input and computer audio.
At present, these newly minted features are available to users subscribed to the Canary and Dev channels as part of the Windows Insider Program. For those keen on early adoption, the features can be checked out immediately via the program.
Microsoft has released the latest version of its much-adored toolset, Microsoft PowerToys. The new update, Microsoft PowerToys v0.73.0, is packed with exciting new features, robust stability, performance enhancements, and refined user experience.
It is perfect for users who want to take their Windows operating system to the next level, with unparalleled productivity and customization options. Let’s take a more in-depth look at the main highlights and changes that Microsoft PowerToys v0.73.0 brings to the table:
What’s new in Microsoft PowerToys v0.73.0?
Besides the main highlights, Microsoft PowerToys v0.73.0 sees several general severals and fixes. The ‘Always On Top’ feature now has border transparency, improving the visual appeal of prioritized windows.
Other tools such as File Locksmith, File Explorer add-ons, Installer, Mouse Highlighter, Mouse Pointer Crosshairs, Peek, PowerToys Run, Registry Preview, Runner, Screen Ruler, and Settings have been given an upgrade to amplify functionality and fix issues.
Expanded Keyboard Management with Numpad Support
Arguably, the standout feature of this release is the extension of the Keyboard Manager’s abilities. Numpad support grants users comprehensive control over their keyboard shortcuts and key mappings. This increases flexibility in customizing key combination assignments and usage, offering a more personalized user experience.
Crop And Lock: A Fresh Face in the Line-Up
In this release, Microsoft PowerToys v0.73.0 rolls out a new utility called ‘Crop And Lock’. This user-friendly tool gives users the autonomy to manage their workspace better by cropping an operational application into a more compact window or creating a thumbnail. This can be especially useful when juggling multiple tasks or maintaining close tabs on several applications concurrently.
FancyZones and ImageResizer: Powered Up
In this iteration, FancyZones, the robust window layout, and multitasking tool, receives an overhaul with major code improvements and software optimization, resulting in a more fluid performance. Similarly, ImageResizer sees a complete revamp of its user interaction design, making it remarkably easy to resize images precisely.
PowerRename: Now Even More Powerful
PowerRename, a utility tool purpose-built to simplify bulk file renaming, gets a significant upgrade with advanced counter functionality. The upgrade enables it to rename multiple files with consecutive numbers seamlessly.
Additional features such as remembering the last window size logic and optimized item sorting enhance the user experience, making file organization and batch operations a breeze.
With enhancements across the board, could this be the go-to set for any Windows user aspiring for a powerful, efficient, and customized operating system experience? Let us know your thoughts on this.
Microsoft is taking a big step forward in the world of wearables with its latest design of an AI-powered backpack. The US Patent and Trademark Office (USPTO) recently approved this patent filing that reveals a backpack concept equipped with smart sensors.
The futuristic backpack, which was first noticed by MSPowerUser, looks like it came straight out of a science fiction movie.
Meet the Backpack of The Future
At its core, the patent illustrates the “artificial intelligence-assisted wearables.” However, the mentioned prototype chiefly revolves around an intelligent backpack. The smart luggage is a game-changer in the wearable tech industry, boasting a wide range of sensors in the arm straps.
The sensors, strategically placed to face forward like the wearer, may include cameras, microphones, GPS, and compasses. Adding a layer of dynamism, these elements are expected to be supplemented by LEDs and speakers. Moreover, the straps may also contain a haptic actuator, providing a whole new level of interactive experience.
Onboard Processing Power
The backpack, powered by real-time processing capabilities, will potentially house numerous recognition modules encompassing image, text, speech, facial, and cognitive domains.
Additionally, it will come equipped with storage capabilities for recording, wireless connectivity, and a provision for battery charging.
The AI-driven system built within the backpack is expected to provide unprecedented benefits to the wearers. These include advanced object identification and analysis, nearby device interaction, and contextual insights.
Users may interface with the backpack’s onboard AI using voice commands or by interacting with the sensors on the straps. It is a versatile accessory that serves many practical purposes in everyday life.
For instance, it can guide the wearer while trekking or point out the direction they are facing. It employs advanced scanning technology to evaluate the surroundings and notify the user if the direction is not feasible.
The AI-assisted backpack design indicates the role of digital assistants beyond the confines of homes and offices. This innovation aligns with the current trend of dedicating AI acceleration hardware to PC processors.
If you notice a process ngen.exe or Microsoft Common Language Runtime Native Compiler is causing high CPU usage, this guide can help! We will discuss the expert-tested methods to fix the issue right after explaining the causes.
Microsoft Common Language Runtime Native Compiler (ngen.exe) plays an essential component of the .Net Framework, and it creates a Runtime environment that supervises the operation of apps written for the .Net platform, irrespective of their programming language.
It handles various tasks such as converting code into machine language, garbage collection, exception handling, and thread management to enhance the performance of managed apps in Windows.
If you see high CPU usage due to this process, here are some of the reasons for the same:
The process is scheduled to run as a part of system maintenance.
Incorrect configuration settings.
Multiple apps are using the process for compilation.
The process is running in the background with other system resources.
Corrupted system files or services
Malware disguising as the process
How to stop CLR Native Compiler’s high CPU usage?
Before engaging in advanced troubleshooting steps, you should consider performing the following checks:
Restart your computer.
Wait for the process to complete the compilation process.
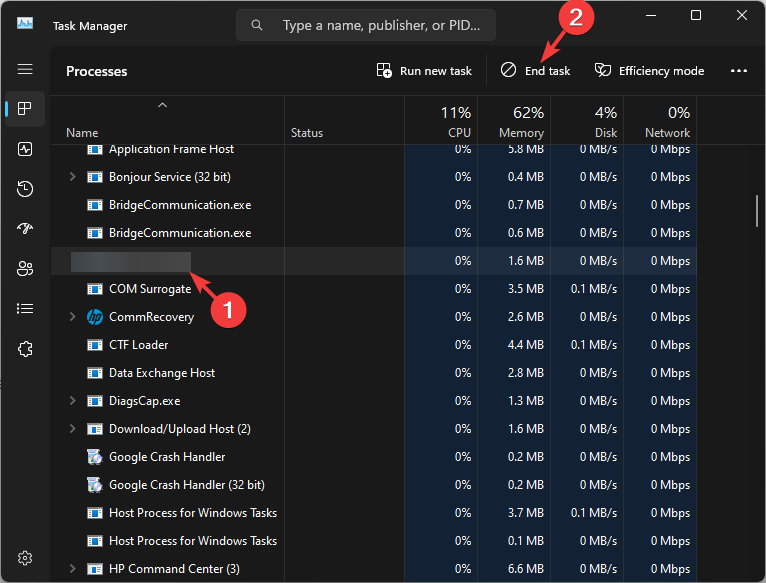
Go to the Processes tab, locate Microsoft Common Language Runtime Native Compiler or ngen.exe, select it, and click End task.
Closing the process causing performance issues is a workaround that you can follow before moving to other solutions. You can apply the same approach to other processes, such as Runtime Broker.
2. Restart the service
Press Windows + R to open the Run dialog box.
Type services.msc and click OK to open the Services app.
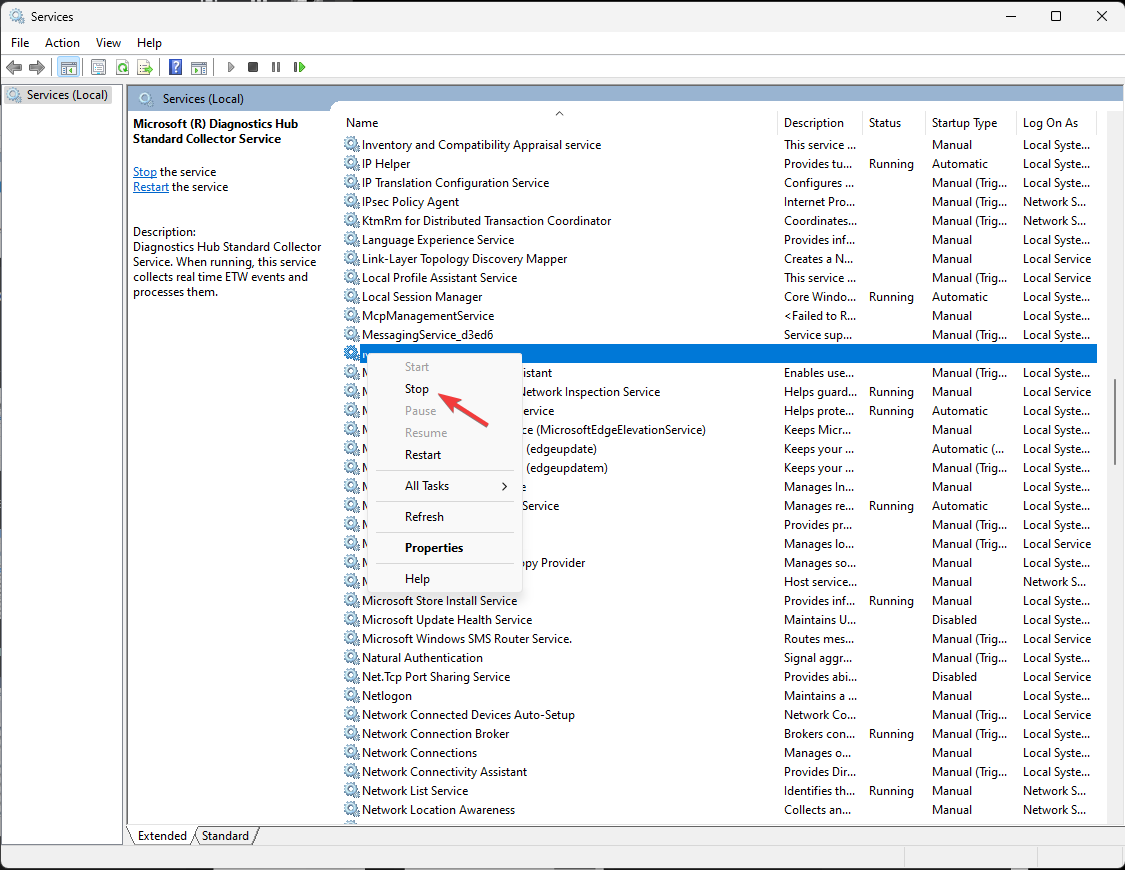
Locate and right-click Microsoft Common Language Runtime and click Stop.
Wait for the service to stop, then close the Services window.
3. Reset the NGen cache & change the priority settings
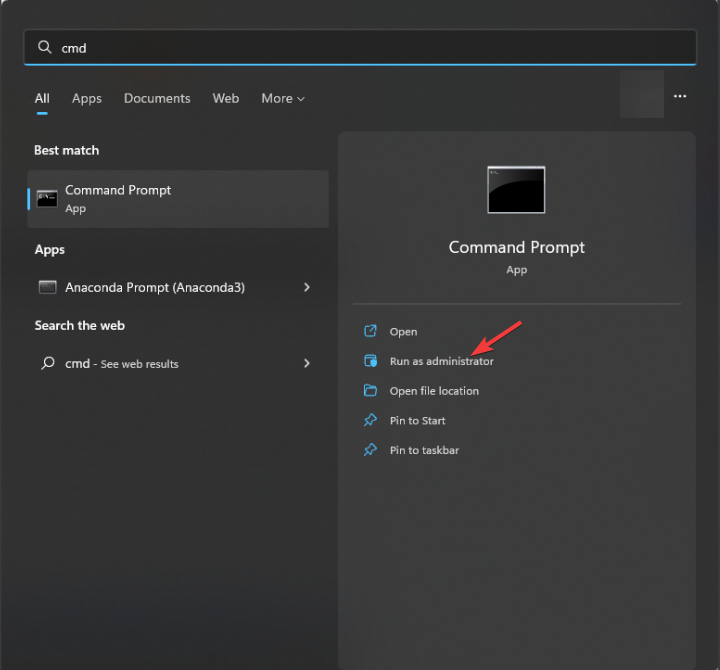
Press the Windows key, type cmd, and click Run as administrator.
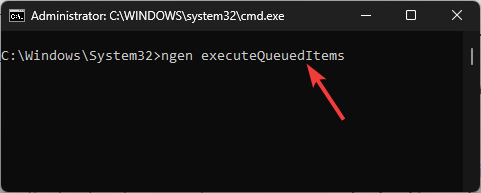
Type the following command to reset the NGen cache to resolve conflicts and corruption and hit Enter: ngen executeQueuedItems
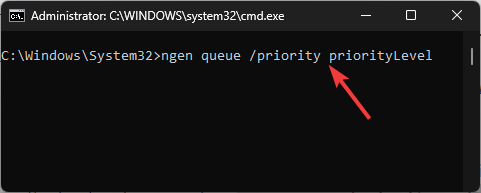
Copy & paste the following command to adjust the priority and scheduling of the process to reduce the load and press Enter: ngen queue /priority priorityLevel
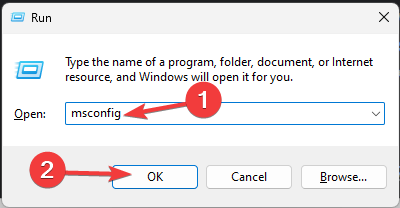
Type msconfig and click OK to open the System Configuration window.
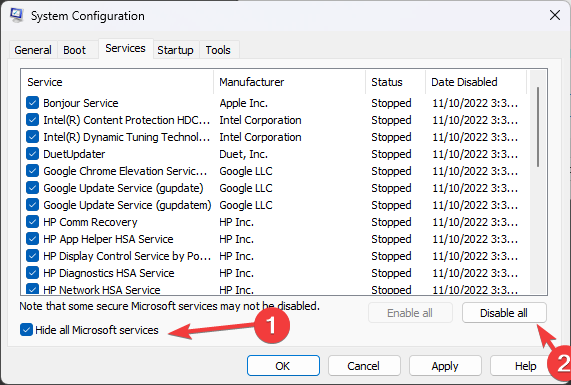
Go to the Services tab, click Hide all Microsoft Services, then select Disable all.
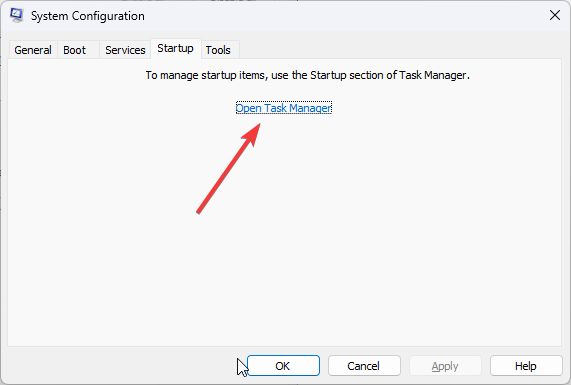
Switch to the Startup tab and click the Open Task Manager link.
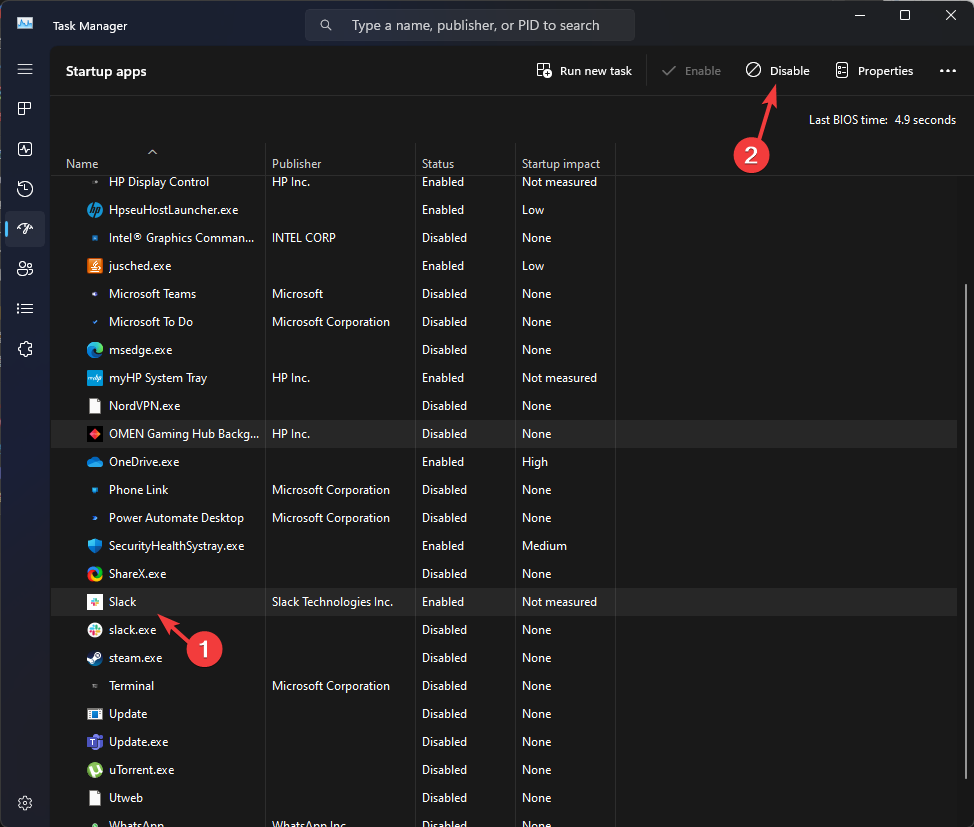
On the Task Manager window, locate each Enabled task and click Disable.
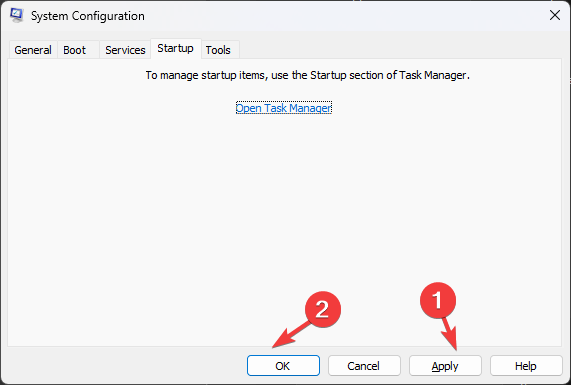
Close Task Manager, click Apply, then OK on the System Configuration window.
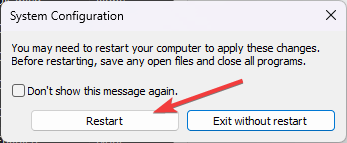
Click Restart.
Your computer will restart with limited functionalities so that you can identify the third-party software or service causing the conflict. Once done, follow the steps above to undo the changes and restart your computer normally.
5. Run SFC & DISM scans
Press the Windows key, type cmd, and click Run as administrator.
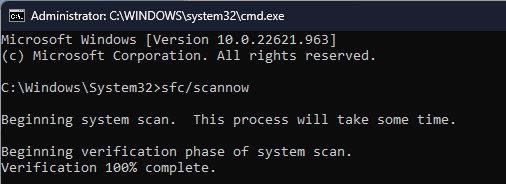
Copy & paste the following command to repair system files and press Enter: sfc/scannow
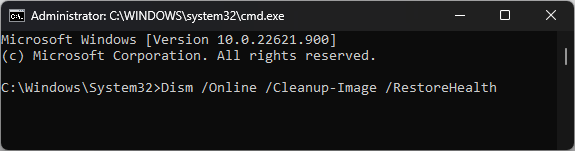
Wait for the scan to complete, then type the following command to restore the Windows OS image and hit Enter: Dism /Online /Cleanup-Image /RestoreHealth
Once the command is executed, restart your computer.
6. Delete a registry key
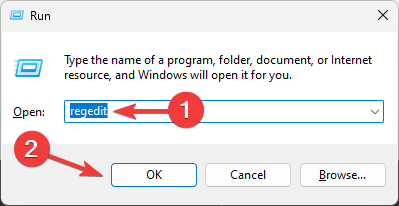
Press Windows +R to open the Run dialog box.
Type regedit and click OK to open Registry Editor.
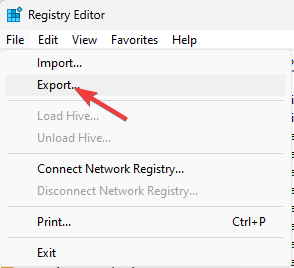
First, take a backup, go to File, then select Export. Save the file in .reg format on your computer in an accessible location.
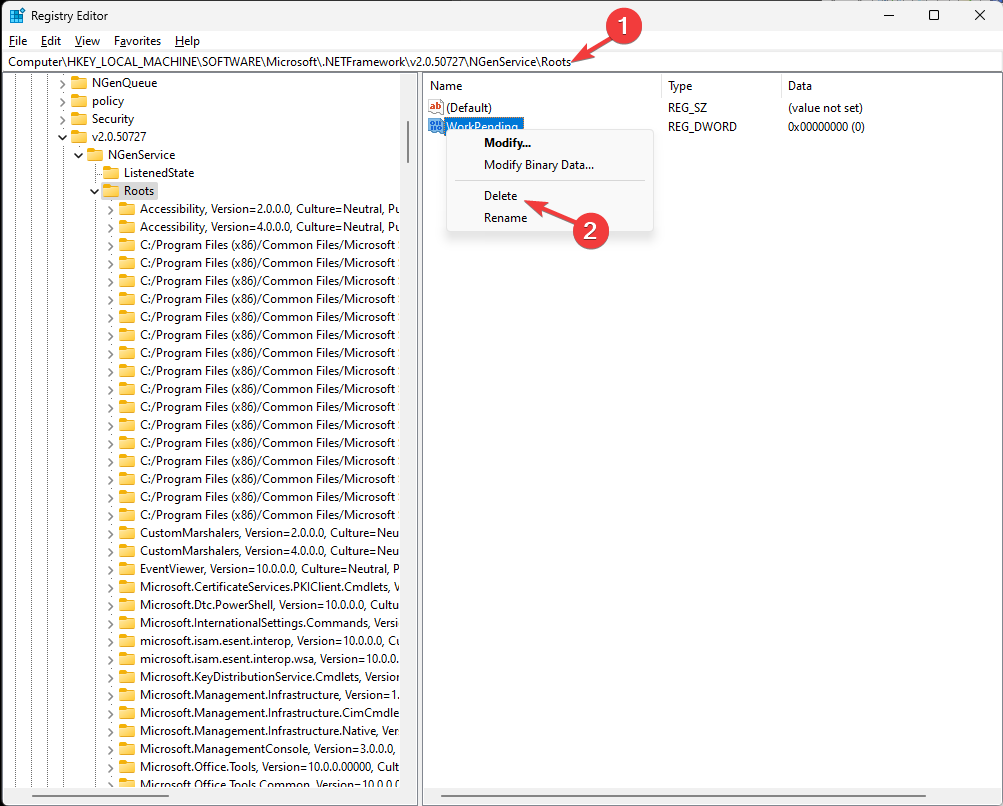
Navigate to this path: Computer\HKEY_LOCAL_MACHINE\SOFTWARE\Microsoft.NETFramework\v2.0.50727\NGenService\Roots
Right-click and select Delete to remove all the entries for the Roots folder and close the Registry Editor.
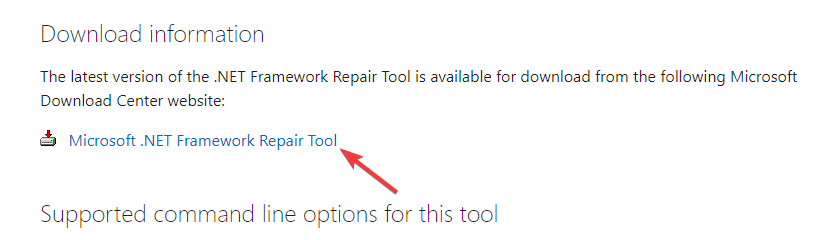
Once the setup is downloaded, go to the file location, and double-click it to initiate the installation.
Click Install, and wait for the process to complete.
To avoid high CPU performance issues, including the Microsoft Common Language Runtime Native Compiler has stopped working issue, make sure to allow the ngen.exe process to run when your system is in an idle state and keep your system & software up to date.
Bumped into any issues, or do you need more info about Microsoft Common Language Runtime Native Compiler? Don’t hesitate to leave a comment in the section below.
A license type of Windows 11 determines the limitations and benefits associated with it. If you are looking for a way to check your Windows 11 license type, this guide can help.
We will mention the step-by-step instructions to find out the Windows license type and also explain the difference between them.
There are three types of licenses:
OEM(Original Equipment Manufacturer) – Intended for computer manufacturers and system builders, and it comes preinstalled with the machines that are sold by manufacturers.
Retail license – Designed for individual consumers and businesses and can be bought online or in retail stores. It comes with a product key, and the user can activate Windows 11 on a single device.
Volume – Intended for businesses, educational institutions, and organizations who want to use Windows on multiple devices.
How do I know what license I have on Windows 11?
1. Use Command Prompt
Press the Windows key, type cmd, and click Run as administrator.
Type the following command to know the license type and press Enter: slmgr /dli
Wait for a couple of seconds; you will see a small Windows Script Host dialog box, including a partial product key.
I have the OEM key; that’s why it says OEM_DM. For Retail, it will say Retail Channel, and for Volume, it will be Volume_KMS.
Press the Windows key, type powershell, and click Run as administrator.
Copy & paste the following command to know the license type and hit Enter: slmgr /dlv
Wait for a while; you will see the Windows Script Host page with all the licensing information.
Once you know the license type, ensure you link your product key to your Microsoft account. If you don’t know how to do it, you must check this post for detailed steps.
Once you link the product, a digital license links your computer to your Microsoft account, which offers an easy way method activate a Windows without entering a 25-character product key during reinstallation.
What’s the difference between OEM, Retail, and Volume?
To know the difference between OEM, Retail license, and Volume, you can check some factors like activation, distribution, transferability, and more. For more information, check the table below:
Category
OEM
RetailLicense
VolumeLicensing
Distribution
Sold to hardware manufacturers & comes preinstalled with new computers.
Can be bought directly by end-users.
Bought by organizations & businesses.
Transferability
Can’t be transferred to another computer.
Can be transferred to any compatible computer, but can be active on only one computer at a time.
Can be transferred to a PC within the organization & can be activated on multiple computers.
Activation
Ideally activated automatically during the initial setup of the computer
Activated manually by inserting the product key while installation
Uses Multiple Activation Key (MAK) or Key Management Service (KMS) activation method
Binding
License is tied to a specific hardware
NA
NA
Support
Support is provided by a computer manufacturer and is not eligible for direct Microsoft Support.
Direct Microsoft Support is provided.
Have access to dedicated support channels.
Cost
Cheaper than retail licenses as it comes with new hardware purchases.
Expensive than OEM and Volume licenses.
Cost-effective for businesses.
Limitations
Need to reactivate or get a new license after a major hardware change.
Can be activated on a single machine. If you try to use it on more than one, it will be deactivated on the previous machine.
Volume license key requires minimum purchase requirements, which is why suitable for larger organization
Knowing the license type of Windows you own is important, especially if you need any technical support or want to transfer the license to another device.
Remember that you must always check & save the Product ID, Serial Number, Product key, and license type of your Windows 11 computer in an accessible location for emergencies.
With robust features, highly customizable options, and seamless integration within the Microsoft ecosystem make Microsoft Outlook one of the most robust and popular email clients globally.
In this comprehensive guide, we will explore the email client market share and historical trends and compare it with its major competitors.
With over 400 million users worldwide, Microsoft Outlook is one of the most extensively used email services.
More than 347 billion emails are exchanged every day.
Current Market Share of Microsoft Outlook
Global Market Share
Microsoft Outlook has been persistent with its productivity-enhancing features and is becoming simpler to use and personalize.
According to SimilarWeb, with a global ranking of 3, Microsoft Outlook boasts over 3.17 million companies using the email client.
It maintains a dominant market share of 40.28%, followed by Gmail at 35.69 %, MailChimp at 8.33 %, and Microsoft Office 365 at 4.56% in the email management category. Here are some other competitors with their market share:
Technology
Domains
Market Share
Microsoft Outlook
3,158,566
40.28%
Gmail
2,811,083
35.69%
MailChimp
656,378
8.33%
Microsoft Office 365
356,859
4.56%
SendGrid
164,433
2.09%
Zoho Mail
126,579
1.61%
Mailgun
122,274
1.55%
Mimecast Mailbox Continuity
87,735
1.11%
SendinBlue
84,320
1.07%
However, if we talk about the most used email clients worldwide, Apple and Gmail have surpassed Outlook.
According to the latest data, Apple Mail is 58.09%, Gmail is 28.72 %, and Outlook holds a 4.14% market share in most used email. Here are the details:
Email client
Market Share(Most used category)
Apple
58.09%
Gmail
28.72%
Outlook
4.14%
Yahoo! Mail
2.55%
Google Android
1.59%
Outlook.com
0.66%
Thunderbird
0.25%
Samsung Mail
0.14%
Web.de
0.06%
Windows Live Mail
0.05%
The global website rank was 700 in May 2023 but decreased to 787 in three months, which suggests a shift in online popularity.
It also indicates potential changes in user engagement or competitive dynamics within the digital landscape.
However, it has successfully maintained its category rank, demonstrating its continued relevance and ability to stay competitive within its niche.
Regional Market Share
Microsoft Outlook boasts a diverse customer base across various geographic locations worldwide.
With its calendaring and other productivity features, Outlook has gained popularity in email management across different continents, with 1,505,729 customers in the United States, 306,088 in the United Kingdom, and 154,088 in Germany. Here are more details:
This widespread adoption across different geographies showcases Outlook’s impact in improving user communication and organization.
If we segregate the data further, we can see that 32.54 % of customers in the United States use a Desktop to log in or use Outlook.com, followed by 5.59% in the United Kingdom and 3.64 % in France.
Country sending traffic to Outlook.com on Desktop
Percentage
United States
32.74%
United Kingdom
5.59%
France
3.64%
Japan
3.37%
Canada
3.13%
Others
51.53%
According to a report by Similar Web, Outlook.com has a 56.83% male audience and 43.17% female. If we talk about the age distribution, the age group that visits it mostly is 25-34 on desktop. Here are the details:
Regarding Device distribution, the monthly visits percentage via the mobile web is 92.34% worldwide, and 7.66% of people use the website on a desktop.
Over 85% of Outlook users check their emails from their mobile devices.
Microsoft Outlook is a popular choice for email management in the Information Technology and Services industry. The primary users of its services are the companies with 50-200 employees and with revenue ranging between 1M and 10M dollars. Here are other details:
Industry
Distribution of companies
Information Technology & Services
10457
Hospital & Health Care
7419
Construction
6301
Computer Software
5677
Financial Services
5063
Real Estate
4135
Nonprofit Organization Management
4069
Retail
3920
Education Management
3153
Higher Education
3067
According to enlyft, Of companies using Microsoft Outlook, 35 % of them are small, i.e, less than 50 employees, 47% are medium-sized, and 17% are large, i.e, more than 1000 employees. Here is the graph to help you understand the percentage of companies using the service :
If we talk about the percentage of companies using Microsoft Outlook based on the revenue they generate, 69% of the companies are small (<$50M), 15% are large (revenue – >$1000M), and 9 % are medium.
More than 87% of Fortune 500 companies rely on Microsoft Outlook, which indicates its reliability and powerful influence.
Historical Trends in Outlook’s Market Share
With the shift in trends and technology, Microsoft Outlook’s market share and stats have been experiencing fluctuations over the past few years.
Though it managed to maintain its place in the world’s top ten most-used email clients, it has faced a decrease in the percentage of users. According to Litmus, 2014, it was 9%, and in 2023, it reached 4.14. Here are more details:
The rank of the email client has also changed, ranging from 4th to 6th place for years. 2014, it held the 4th rank, then dropped to 5th place in 2015 and remained there for three years.
In 2022, Microsoft Outlook rose above in ranks and is in 3rd position and has maintained the position in the subsequent year, while Outlook.com is in 6th place.
If you think Outlook is complicated and want to check out another email client, check out this guide for options.
Outlook’s Major Competitors
Introduced in 1997, Microsoft Outlook has always been helpful as an email client and task management tool, but there are others in the competition, too.
Gmail by Google and Apple Mail by Apple.Inc., are its formidable competitors and capture a vast market share in the email management industry. Here is the list of competitors of Outlook recorded in 2023:
Benefits and Drawbacks of Microsoft Outlook Compared to its Competitors
Microsoft Outlook has been in the race for a long time and has undergone many changes. It has the upper hand over its competitors due to its seamless integration and productivity features but also has a few drawbacks when compared to others. Here we are comparing it with its top two contenders:
Category
Outlook
Apple Mail
Gmail
User interface & design
Clean & professional interface with customizable themes.
Sleek & user-friendly design consistent with the Apple ecosystem.
Modern and intuitive design with the ability to customize the look.
Integration with ecosystem
Seamlessly integrates with Microsoft’s ecosystem and lets you access Office 365, OneDrive, and Teams, promoting collaboration.
Works well within the Apple ecosystem, syncing with iCloud, Calendar, & other Apple services.
Integrates well with Google Workspace services like Google Calendar, Google Drive, and Google Docs.
Email management
Offers Advanced filters, Rules, and categories to organize emails how you want. It also has a Focused Inbox option to separate essential email messages.
Has smart mailboxes, VIP tagging, and threading to organize & prioritize emails.
Features tabs, labels & filters to manage emails, and a tabbed inbox to segregate emails into Primary, Promotional, and Social tabs.
Calendaring & Scheduling
Features Shared Calendars, Scheduling Assistant, and comes with the ease of sending meeting invites.
Integrates with Apple Calendar and offers event creation, & seamless integration with other Apple services.
Features Google Calendar integration, with scheduling, reminders, and smart suggestions options.
Security & privacy
Equipped with advanced security features, including encryption, secure attachments, and phishing protection. It also offers to wipe lost devices remotely.
Offers end-to-end encryption for Apple-to-Apple communication and has inbuilt privacy features.
Comes with robust spam filters, two-factor authentication, and powerful spam filters.
Collaboration
Integrates with Microsoft Teams, which allows quick collaboration within emails.
Lacks direct integration but can share attachments via iCloud.
Integrates with Google Workspace, offering real-time collaboration on Google Sheets, Docs, and Slides.
Platform compatibility
Available for Windows, Android, iOS, and macOS.
Designed only for iOS, iPadOS, and macOS.
Available for Windows, Android, iOS, and macOS.
Complexity & learning curve
The extensive features of Outlook could lead to complexity as you have to invest time to understand and master the functionalities.
Simple to use.
Easy to use.
Resource intensiveness
Consumes a considerable amount of system resources.
Lighter than Outlook.
Light on system resources.
Cost
To use Microsoft Outlook to its full potential, you need to get a Microsoft 365 subscription plan.
No cost.
Available for free.
Limited Cross-platform support
The features and performance might be different for every platform.
Consistent on all compatible platforms.
Consistent on all platforms.
In the digital landscape, efficient communication is essential, and with rapid growth in the Email market, the email client market share will continue to change.
With its extensive range of features, seamless integration with Teams and Office 365, and compatibility with mobile devices, Outlook enhances productivity, helps users with efficient email management, and will likely stay in the game for a long time.
Its substantial market share and user statistics are evidence of people’s reliance on the email client. Another popular product by Microsoft is Windows, and if you want to know about its latest iteration’s market share, user base, and other insights, read this post.
If you know any other interesting facts about Microsoft Outlook or want to share your experience using its desktop or mobile app, feel free to mention them in the comments section below.
Outlook remains one of the most popular email clients and is used extensively in organizations. The seamless functioning and wide array of features are what sets it apart from the rest. And today, you will find out all about printing Outlook contacts.
Outlook stores the email address and other information of users in the dedicated Contacts folder.And you can both access and print the contact list seamlessly. Keep reading to find out how!
How do I print my Outlook address book?
1. Print individual Outlook contacts
Launch Outlook, go to the People tab from the navigation pane, and select the Contact folder on the right.
Double-click the contact that you want to print.
Go to the File menu from the top left and select Print.
Select the desired printer from the dropdown menu, configure the Print Options, and once done with the setup, click the Print button.
Individual contacts can be printed in Outlook, but you are not offered many customizations. Though the process is quick, and you can also print downloaded Outlook contacts in no time!
Also, you can print Outlook contacts exported to Excel or any similar app.
2. Print the entire list of contacts in Outlook
In Outlook, go to People from the left, and then select the Contact folder.
Click on the File menu, and then select Print.
Select a printer from the dropdown menu, or click Add Printer to configure another one that’s not listed here.
Next, choose the desired print style for Outlook’s contact list. You have the following options:
Card style
Small booklet style
Medium booklet style
Memo style
Phone directory style
If you want to change the paper type, format, size, or orientation, it can all be done via Print Options.
After selecting the desired print style, configuring print options, and choosing a printer, click the Print button.
When printing all Outlook contacts in one go, you can select from a range of print styles. Check the preview to identify which styling works best for you. Also, if you want to print Outlook contacts with notes, choose Memo style as the layout.
But, we would recommend keeping things simple as changing too much, especially the page setup, may affect the print’s clarity.
3. Export Outlook contact as a PDF to print later
Tip
Before you proceed, make sure Microsoft Print to PDF is selected as the default printer in Outlook.
Go to the People section in Outlook.
Once the contact list is displayed, right-click on the one you want to export as a hard copy, and then select Quick Print.
Go to the desired location, enter a name for the file, and click on Save.
The contact will now be saved in PDF format.
If you just want to store Outlook contacts offline in the PDF format, doing so is even easier in Outlook. And you can always print these later!
Can you sort & print Outlook contacts by category?
Open the contact list in the People section on Outlook.
Go to the View menu, and click on View Settings.
Click the Sort button.
Select how you want to sort the contacts from the dropdown menu, choose whether to display them in Ascending or Descending order, and finally, click OK.
Yes, you can sort and print Outlook contacts by category. The email client offers a wide array of parameters to sort contacts, be it First name, Full name, Surname, Job title, or Office address, amongst others. Do that before printing, and you will have a personalized address book.
Besides, you can filter contacts in Outlook and then get a hard copy of only the required ones.
Now that you understand all about sorting and printing Outlook contacts, it is just as important to know how to print emails to work effectively on the email manager. And if you find some people missing from the list, make sure to update the global address list before proceeding.
Do tell us your experience printing contacts and if you faced any issues.
If you’re someone who forgets their passwords often, then we have good news for you. Microsoft Edge will soon allow you to add notes to your password, and these notes can also be clues for your literal password, in case you don’t remember it.
The feature, which was spotted by the Windows enthusiast @Leopeva64, is now available in the Canary channel within the Microsoft Edge Insider Program. Chrome already has this useful feature, and now Edge is getting it too.
Basically, whenever you save a password to your Wallet app inside Edge, you can access it by going to the Wallet app. Once you’re there, you’ll be able to add notes to your password, for every platform that you’ve saved passwords.
These notes will help you to remember the password, down the road, and it can be useful, especially when you don’t want to go through the stressful process of changing your passwords every time you forget them.
How to add notes to your passwords in Microsoft Edge
First of all, as we mentioned earlier, every password that you use for every platform that you’re getting on can be saved in your Wallet.
Open your Microsoft Edge, then go to Settings.
Once you’re there, you should see your Microsoft Wallet at the bottom of the page.
Click on Passwords, and here you’ll have all the passwords that you have saved over time.
If you’re in the Canary Edge, you should see the option to Add notes, right next to the password that you selected.
Once you click on it, you’ll be able to add notes to your passwords.
We recommend using this feature to add clues to every password that you save. However, go for personal clues, clues that only you would know about, in case your Microsoft Edge ever becomes compromised.
Are you excited about this new feature coming to Microsoft Edge? Let us know.
Dealing with multiple tasks and emails is often overwhelming, and it’s no surprise that many are wondering how to set a reminder in Outlook in order to better manage their tasks.
By using reminders, you’ll never forget to answer an important email or miss an event. In case you’re not familiar with this feature, in today’s guide we’ll show you everything you need to know about it.
Where are my reminders in Outlook?
Unfortunately, it’s not possible to see all reminders in Outlook in a single place since there are different types of reminders, and each type is located in its respective category.
How do I add or remove a reminder in Outlook?
1. Add a reminder to an email message
Click on Message and choose Follow Up.
Select the desired reminder time.
Save changes.
How do I remove a reminder from an email message?
Open the list of sent messages.
Locate the one that has the follow-up flag.
Right-click it and choose the Clear flag to remove follow-up reminders.
2. Add a reminder to the Calendar
Navigate to Calendar in Outlook.
Select New Appointment or New Meeting.
Now, expand the Reminder drop-down menu and select the desired interval.
Fill in other event information and click on Save & Close to save the event reminder.
How do I remove a reminder from the Calendar?
Open the Calendar and double-click the desired event.
Locate the Reminder menu and set it to None.
Click on Save & Close to save changes.
3. Add a task reminder
Open Outlook, and click the To Do icon.
Click on Remind me in the task information and select the desired time.
Save the changes.
How do I remove a reminder from a task?
In Outlook, navigate to the To Do section.
Locate the task that has a reminder and click it.
Click the X button next to the Remind me section to remove a reminder.
Now you know how to remove a reminder in Outlook, but keep in mind that each reminder needs to be removed from the appropriate section.
Why can’t I set a reminder in Outlook?
A corrupted Outlook profile might have issues setting up new reminders.
In case your date and time aren’t correct, you might have issues with reminders.
The Reminders folder on your PC might be corrupted.
You might have reminders disabled or set to be dismissed.
Reminders are natively available in Outlook and you can add them to events, emails, or tasks. You can even customize Outlook reminder sounds if you want to.
Starfield will be out on September 1st for Early Access, meaning that if you purchased the Premium Edition, you’ll be able to play it a week earlier than its intended release. If you don’t have access to it yet, and you have to wait until next time, then make sure to use this time to get accustomed to its complex control scheme.
But on other notes, and speaking of them, Starfield’s director, Todd Howards, released an emotional note chronicling the time it took to develop Starfield, and the challenges the team faced, including some tragic moments as well.
Windows Central received the note, which was verified by Microsoft, and it revealed some important details about Starfield. The game has been in development for 10 years, starting in 2013. Everyone was on board with the idea of exploring space in a virtual manner.
When the team finally started to work on the game, in the middle of development, the pandemic happened, then Robert Altman, one of Bethesda’s founding figures, unfortunately, passed away, and then Bethesda got acquired by Xbox. Howards goes on to say that despite the harsh challenges, Startfield is the biggest IP Bethesda has worked on, and he’s grateful to bring such a vast story to the gaming community everywhere.
Read the whole note below.
A note from the Starfield director, Todd Howards
I knocked on Robert Altman’s door. “Got a few minutes?”
“Sure.”
It was early 2013, we were developing Fallout 4, and Skyrim was still enjoying enormous success. I was there to pitch him on our next game. It would not be a sequel to our current games, (he looked concerned), but a grand space RPG and our first new IP in over 25 years (looks curious). It would delve into creation and the search for our place in the universe (slight twinkle). You would explore the galaxy in ways only video games can do. And it would be called – Starfield. (Smile)
“Sounds fantastic.”
Robert would be the very first to believe in us, no matter the situation. Our path to creating Starfield would be a long and winding one where we made other games along the way (Fallout 4, Skyrim SE, Fallout Shelter, Skyrim VR, Fallout 76, Skyrim again…). The core development from 2020 to 2023 saw enormous changes in our lives. A global pandemic, Robert’s passing, and becoming part of Xbox.
It’s incredible to be at the moment where Starfield is finally launching this week. It only exists because everyone else believes as well. We’ve been supported for decades by everyone at ZeniMax, all doing their best work yet. Special thanks to our publishing teams who aimed to create not just another release, but something that would capture the minds and inspire gamers everywhere. And to our partners in QA who had the difficult task of testing a game where anything can (and will) happen. And thanks to Jamie Leder and our Admin/HR teams who supported everyone during the most challenging years any of us have faced.
And of course, there is Phil Spencer. His support of every game and every player has been unwavering and fierce. Joining Xbox brought us closer to so many we had worked with for over 20 years. I cannot imagine a better place to create games, where the diversity of studios, creators, and games are allowed to flourish. This support came from the entire Xbox leadership team and all areas of publishing and dev support. Special thanks to the magicians at ATG whose spells and incantations helped make this our best performing game.
Most importantly, is the team I work with at Bethesda Game Studios. It’s an incredible blessing to be surrounded by so many talented and inspirational people every day. Moments like this make you reflect back. Some of us have been together for decades, some joined more recently, but everyone has the same passion. I could not be prouder of their continued dedication to create something truly special.
Lastly, a huge thanks to all of you within the Xbox and Bethesda family. Your enthusiasm and encouragement have meant the world to us. Creating this game has been one of the most challenging and thrilling experiences of our careers – a journey we’ll never forget. And as we come to the end of this chapter, we pass it along to you. Each of you is receiving the game with Early Access, and can begin playing this Friday Sep 1st, but since it’s one global time you can actually play Thursday evening (Thanks New Zealand!).
We hope you get a chance to play, and that your journey is as rewarding as ours.
All our best,
Todd
Starfield is nonetheless a title that will both define the Xbox consoles in the years to come and will be remembered as the first convincing try to explore the starts, even virtually, of course.
If you’ve been following us, you know that this game has been met with a wave of huge excitement, across the world. People on Reddit have been buying Xbox consoles solely for playing this game, and the community around it has also grown over the months.
We know what you think: With great expectations come great disappointments. However, we’re inclined to think that Starfield is going to be the title of the year.
Multiple accounts on the computer allow us to configure personalized settings and install the required apps for all users. However, conflicts or performance issues often arise when another profile is logged in. In this case, you will need to sign out other users in Windows 11.
While the process is simple, you may run into an error while removing other users, especially when not logged in with an administrator user account. These accounts have administrative rights and can make critical changes to the OS.
The following section details how to remove other signed-in users on Windows 11.
Press the Ctrl + Shift + Esc keyboard shortcut to open the Task Manager, and go to the Users tab from the navigation pane.
Locate the user profile you want to log out, right-click on it, and select Sign off.
Click Sign out user in the confirmation dialog box that appears.
The simplest way to sign out other users in Windows 11 and have the current user logged in is through the Task Manager. It’s quick, and the best part is that we are already used to operating the Task Manager.
For a complete walkthrough on logging out from your own profile, see this step-by-step guide on how to sign out of Windows 11.
2. Using the Command Prompt
Press Windows + S to open Search, type Command Prompt, then right-click on the relevant search result, and select Run as administrator from the context menu.
Click Yes in the UAC prompt.
Paste the following command and hit Enter to view the list of the current user sessions: query session
Identify the ID for the user you want to log out, then run the following command while replacing X with the account’s assigned user ID: logoff X
While the Task Manager works fine in most cases, users adept with the command line would find Command Prompt (or Windows Terminal) more efficient to sign out other users in Windows 11.
Right-click on the downloaded ZIP file, and select Extract all.
Check the path for extracted files, click Browse to change it, then tick the checkbox for Show extracted files when complete, and click on Extract.
Right-click on the procexp.exe file and select Run as administrator.
Click Yes in the prompt.
Go to the Users menu, hover the cursor over the profile you want to sign out, and select Logoff.
Process Explorer can be called an advanced version of the built-in Task Manager. It lists all the active tasks/DLLs and helps verify the digital signature, in addition to logging out users.
If you get an Error logging off session: Access denied message while signing out other users in Windows 11, the administrative privileges are missing.
As a quick tip, if other accounts invade your privacy and you are wondering how to hide apps from other users Windows 11, delete all the app shortcuts and files from the dedicated user profile and the Public folder in the following location: C:\Users
Also, a few apps during the setup offer an option to install it only for the current user profile. You could choose that, or if you missed it, reinstall the app and select the option the next time. While taking about apps, you may consider removing accounts used by other apps for better performance.
Besides, to restrict access to other users in Windows 11 and prevent them from viewing or editing critical system files, change the account type to Standard user. They would then lose administrative privileges and couldn’t make any critical changes.
Why should you sign out other users on Windows 11?
Boost performance: When multiple user accounts are signed in, they will hog the system resources with their individual processes and slow down the PC.
Eliminate conflicts: Often, during the installation of an app, you get an error when it’s already installed on a user profile that’s signed in.
Enhanced privacy: Any logged-in user account can be a privacy risk if you have not set up optimal security measures for the active account.
Now that you know how to sign out other users in Windows 11, it will undoubtedly enhance privacy. Another trick is to lock the Windows 11 PC every time you step away. Or, if you are concerned about other users, remove their accounts from Windows 11.
When receiving multiple emails on a daily basis, it’s pretty easy to miss an important email, and this is why many users want to know how to view the next unread message in Outlook.
Not seeing an important email can be a problem, and you might miss a meeting, a deadline, or important information. In this guide, we will show you several ways never to miss an email again in Outlook email client.
How do I go to the next unread message in Outlook?
1. Use a keyboard shortcut
Navigate to the folder tab for unread messages in Outlook. You should now see the message list.
Next, use the Ctrl + > shortcut for next email message in Outlook.
Alternatively, you can use the Ctrl + < to go back to the previous message.
2. Create a new search folder
In Outlook, go to Folder and select New Search Folder.
Select Unread mail and click OK.
Now you can view the unread emails easily simply by using the unread folder you just created.
3. Customize the quick access toolbar
Get to the email folder that contains the unread messages, and open an email message.
In the message window, right-click the Quick Access Toolbar. After that, choose the Customize Quick Access Toolbar option from the drop-down menu.
Set Choose commands from to All Commands.
Choose Next Unread Item from the menu and click on Add.
Lastly, click on OK to save changes.
Now you just need to open an email message from that folder and you can read next Outlook message with a click of a button.
Why is Outlook not showing all unread emails?
You are using a Focused Inbox that shows you only the most important messages.
Using filters in a view will prevent you from seeing certain emails.
If you’re using a shared mailbox, you might have the privilege of seeing private items.
If you want to view the next unread message in Outlook, you can use the existing folder list, or modify the quick access toolbar. Unfortunately, there’s no dedicated Outlook keyboard shortcut for it, but we hope that Microsoft will change that in the future.
In case you want to organize emails better in the future, you can always use mark all emails as read option, and follow the guidelines from above to never miss an email again.
What method do you use to view unread messages in Outlook? Share them with us in the comments section.
Oracle is a popular Relational Database Management System (RDBMS) developed by the Oracle Corporation. It’s used extensively worldwide, but some administrators came across OPatch failed with error code 73 while installing a patch or during an Oracle upgrade.
The problem is widely reported for certain updates, but it’s usually an issue at the user’s end to blame for the inability to apply interim patches.
For those wondering what is error code 73, it indicates that the patch is incompatible with the current installation or another process is blocking it. Here are the common reasons behind it:
Incorrect path
Insufficient permissions
Another Oracle Universal Installer is running
Inventory issues
Running the incorrect Oracle Interim Patch Installer
How do I fix OPatch failed with error code 73?
Before we head to the slightly complex solutions, try these quick ones first:
Restart the computer and then try running the Oracle patch again.
Make sure you are installing the correct patch. Check whether it’s applicable to your system.
Verify you are installing the Oracle patch with an administrator account.
Check whether the ORACLE_HOME/.patch_storage directory is locked. If that’s the case, restore it and then delete the patch_locked lock file.
Download the patch again, in case it’s the corrupted patch files to blame.
If none work, move to the fixes listed next.
1. Terminate all other Oracle processes
Press Ctrl + Shift + Esc to open the Task Manager and locate all Oracle processes.
Right-click on each individually, and then select End task.
After you have terminated them all, retry the patch installation.
Often, when you see OPatch failed with error code 73 19c, it’s another Oracle process to blame, and terminating it should get things running.
2. Reconfigure the permissions
Head to the ORACLE_HOME/.patch_storage folder, then right-click on it, and select Properties.
Go to the Security tab, and then click on Edit.
Select Administrators or the active user profile from the list, then tick the checkbox for Full control under Allow, and click OK to save the changes.
Alternatively, you could modify the ownership for the subdirectory of oraInventory and configure it correctly.
3. Re-register Oracle Home
When OPatch LsInventory returns the OPatch failed with error code 73 message, it’s likely that we are pointing to an incorrect OPatch inventory location or that Oracle Home is not attached to it.
To fix things, run the following commands: % cd $ORACLE_HOME/oui/bin %./attachHome.sh
4. Manually move the files
When the CPU patches are not being installed, manually move the following files from the OPatch installation directory to the dedicated OPatch directory:
opatch.install
opatch.log
opatch.license
opatch.manual
opatch.properties
opatch.scripting
opatch.service
opatch.settings
opatch.version
5. Change the location of Oracle Home
A system administrator reported getting the OPatch failed with error code 73 message with Weblogic 12c when Oracle Home was not set up correctly. Simply changing its location did the trick.
It should initially be in: /oracle/DRD/11203
Move Oracle Home to: /oracle/DRD/112_64
And do make sure that the ORACLE_HOME environment variable is stored in the same directory as Oracle.
6. Use the ignoreSysPrereqs switch
Press Windows + S to open Search, type Command Prompt, then right-click on the relevant result, and select Run as administrator.
Click Yes in the UAC prompt.
Set up the OPatch installation folder.
Now, run the following command: OPatch -ignoreSysPrereqs
Wait for the command to execute and check whether the OPatch installation completes successfully.
7. Contact Oracle support
When nothing else works, the last option is to contact Oracle support. Maybe it’s a bug in the latest patch, and if others, too, have reported the same, the support team would know.
Even otherwise, they are well equipped to handle such queries and know what issues could trigger the OPatch failed with error code 73 message.
While there are a lot of underlying causes behind the error, including a few patch conflicts, things are usually easy to fix.
Remember, it’s better to download updates over a stable and fast Internet connection to avoid missing critical files or corrupting any in the process.
Tell us what helped you fix the error in the comments section below.
I knocked on Robert Altman’s door. “Got a few minutes?”
“Sure.”
It was early 2013, we were developing Fallout 4, and Skyrim was still enjoying enormous success. I was there to pitch him on our next game. It would not be a sequel to our current games, (he looked concerned), but a grand space RPG and our first new IP in over 25 years (looks curious). It would delve into creation and the search for our place in the universe (slight twinkle). You would explore the galaxy in ways only video games can do. And it would be called – Starfield. (Smile)
“Sounds fantastic.”
Howard continued by saying that “Robert would be the very first to believe in us, no matter the situation.”
Altman, who was one of Zenimax’ co-founders, passed away in 2021. And while he didn’t live to see the project come to fruition, Howard made sure to give recognition to Altman and all those without whom Starfield would never have happened, saying “It’s incredible to be at the moment where Starfield is finally launching this week. It only exists because everyone else believed as well.”
Indeed the launch of Starfield will mark one of the most important occasions in Bethesda’s history, and both Xbox and Bethesda have a lot riding on the game, which is one of the most anticipated releases of the last decade.
In the letter Howard also acknowledges Microsoft Gaming CEO Phil Spencer specifically, thanking him for his support of “every game and every player.” The letter ends with a thank you to the “Xbox and Bethesda family.”
Your enthusiasm and encouragement have meant the world to us. Creating this game has been one of the most challenging and thrilling experiences of our careers – a journey we’ll never forget.
Starfield reviews are about to go live as the embargo lifts later today. No matter the outcome, the release of a game of the size, scope and ambition of Starfield is a monumental achievement for Bethesda Softworks and the team at Xbox. Here’s hoping it lives up to our expectations!
Xbox Free Play Days returns with yet another exciting lineup of games for Xbox Live Gold and Xbox Game Pass Ultimate subscribers to try out. This week’s Free Play Days event runs from Thursday through Sunday, September 3. Let’s go ahead and jump into the list.
Engage in a tactical team-based shooter where superior planning and execution triumph. Tom Clancy’s Rainbow Six Siege features 5v5 attack vs. defense gameplay and intense close-quarter combat in destructible environments. This is a great opportunity for new players to try the full game for free, including all maps and modes. All your progress and Operators will carry over if you decide to upgrade to the full game. Save up to 75% off for a limited time!—Xbox Wire.
Welcome to Bricklandia, home of a massive open-world LEGO driving adventure. Race anywhere, play with anyone, build your dream rides, and defeat a cast of wild racing rivals for the coveted Sky Trophy! Unkie’s Emporium is open for business during Free Play Days, and any in-game purchases will be available during the event. When the event ends, any purchases made will only be available if you purchase LEGO 2K Drive and log in with the same 2K Account you originally used to make those purchases.—Xbox Wire.
There’s no better time to step into The Fog. Dead by Daylight is free to play this weekend with up to 50% discounts on the base game and select DLCs until September 12. In addition, the Alien Chapter is now available on Xbox, featuring a new Killer – the Xenomorph, and a new Survivor – Ellen Ripley.—Xbox Wire.
Learn more about Xbox Free Play Days
Xbox Free Play Days brings a new slate of games nearly each and every week for members. Learn more about the program over on the Xbox Free Play Days FAQ page.
Microsoft’s Edge web browser has introduced a useful and relatively unknown feature called “Copy Video Frame.” This feature enables users to capture screenshots of web-based videos, even when the video is not in full-screen mode, in full resolution. It is particularly useful for users who need to capture specific frames from videos without losing quality, especially those found on YouTube.
This feature was discovered by a Reddit user named u/MrElectrifyer, who noticed it while trying to switch to Picture in Picture mode. This user found that the “Copy Video Frame” option captures the video frame in its original resolution. It could be particularly useful for content creators or anyone who wants to share high-quality stills from videos.
In addition, Microsoft revealed more features to its Edge browser. One upcoming feature is the Smart Find, set for a September release. This feature improves user search experiences by suggesting related words and phrases, even if the initial search term is misspelled. This could potentially save users time and effort when searching for information online.
In a move to ease the backup and restore, Microsoft has introduced a new Windows Backup app for Windows 11 and 10 users. The app, which is currently available only for Windows Insiders, aims to simplify the backup process by allowing users to securely store their data in the cloud, ensuring that their valuable information remains accessible and protected.
In this guide, we will learn how to install and use the new Windows Backup app on Windows 11 and Windows 10.
What is the Windows Backup app?
The Windows Backup app is a recently launched utility designed to facilitate seamless data backup and restoration for Windows 11 and Windows 10 users. This innovative application empowers users to protect their critical information by securely storing it in the cloud, ensuring that it remains readily accessible and shielded from potential data loss scenarios.
Prerequisites for installing Windows Backup
To fully capitalize on the benefits of the Windows Backup app, it’s essential to ensure that you’re utilizing the appropriate environment. Microsoft has seamlessly integrated this app into the latest build.
On Windows 11, you need to install at least Windows 11 Insider Preview Build 23466. Whereas on Windows 10, you need to be at least on Windows 10 KB5029331 version.
How to use the Windows Backup app
Leveraging the Windows Backup app is a user-friendly process that simplifies the complexities of data protection and restoration. To effectively utilize this app, follow these step-by-step instructions:
Step 1: Enable Windows Backup from Settings
Before launching and starting back up using the Windows Backup app, launch Windows settings and navigate to Accounts > Windows backup. Here, turn on the Remember my apps and Remember my preferences options.
Step 2: Open the Windows Backup App
Start by launching the Windows Backup app, which can be found within the Windows operating system. You will be able to search and open the app only if you have installed the minimum required version of Windows 11 or 10.
Step 3: Check What Categories are being Backed up
Upon accessing the app, you’ll be presented with a list of categories that will be backed up. These categories encompass various folders such as Desktop, Documents, Pictures, Videos, Music, and even app preferences. Importantly, the app seamlessly syncs data with your OneDrive account, ensuring that files are stored safely in the cloud.
Step 4: Initiate the Backup Process
Now, proceed by clicking the Back up button at the bottom right. This action triggers the app to initiate the backup process. Allow the application some time to efficiently save the chosen files to your OneDrive account.
Step 5: Effortless Data Restoration
In scenarios where data restoration is required, whether due to data loss or the setup of a new system, the Windows Backup app provides a straightforward process. Users have the option to choose the source PC from which they wish to restore data. This feature is particularly useful when migrating to a new computer and desiring the familiarity of your previous setup.
As you can see, the Windows Backup app extends its functionality beyond file backup. It also encompasses crucial Windows settings, including accessibility preferences, language configurations, personalization choices, and even Wi-Fi network credentials. This comprehensive approach ensures that both files and essential system configurations are backed up.
What are the limitations of the Windows Backup app?
Despite its merits, the Windows Backup app does exhibit certain limitations that users should be aware of:
Limited Control Over App and Setting Selection: In comparison to some third-party backup solutions, the app doesn’t offer extensive control over which apps and settings are included in the backup. Users are unable to individually select apps or settings for backup, making it a more basic backup solution.
Restore Process Lacks Specific Folder Selection: While users can toggle specific folders for backup, this option is notably absent during the restore process. Consequently, users are unable to selectively restore specific folders, potentially causing inconvenience.
Exclusion of Desktop Apps from Backup: Notably, the app excludes desktop apps available on the Microsoft Store and Android apps installed on your computer from the backup process. This exclusion could present challenges, particularly for users who rely on specific work-related apps that would need to be set up anew.
Exclusively Supports Personal Microsoft Accounts: The Windows Backup app solely caters to personal Microsoft accounts and is incompatible with Work or School accounts. This limitation restricts its applicability in professional environments.
Keep your system backed up
While it may not be a comprehensive solution for all backup needs, the Windows Backup app is a step towards ensuring the security and accessibility of valuable data for users across the Windows ecosystem. Its features offer convenience and essential backup options, but it does come with limitations, such as limited app and setting selection and exclusion of certain app types. As this is an early version of the app, it’s hopeful that Microsoft will continue to refine and enhance its functionalities based on user feedback.
With the advent of improved industrial designs, smaller chips, quieter fans and improved battery technologies, large consumer-grade laptops are coming back into style and HP is joining the crowd with the release of the HP Pavilion Plus 16 laptop.
While the Spectre line tends to encompass HP’s attention for consumer offerings, the new Pavilion Plus 16 will offer customers a similar level of creature comforts as the more mainstream laptop such as a 16-inch 2.5K WQXGA display panel powered by Intel’s latest 13th Gen Core i7 processors that are also Evo certified, or an AMD Ryzen chips with optional AI engines onboard.
To help take advantage of the larger real estate, HP is stuffing an NVIDIA RTX 3050 GPU in the Pavilion Plus 16 which should make content creators, graphics designers, architects, and data scientist students happy.
HP is also offering a 5MP web cam that’s Windows Hello enabled for quick logins and security convenience as well as up to 16GB of LPDDR5x-5200RAM to start with.
The entire package comes in at 4.19 lbs. and will retail starting at $849.99 when it hits shelves in October.
Every individual seeking convenience in productivity and efficiency in workflow might find great interest in a recent announcement from the tech giant Microsoft. It declared its new AI-powered assistant, Microsoft 365 Copilot, an innovative technological addition to its office-related suite of applications and services.
Microsoft has presented Copilot as a powerful tool that can enhance productivity. “It turns your words into the most powerful productivity tool on the planet,” claims the tech giant. Quite a fascinating proposition, considering that typing is practically second nature to us today.
The Magic of Copilot
Copilot is an AI-powered tool that can assist users in completing repetitive tasks that we often find time-consuming. It can help in tasks such as writing lengthy documents, summarizing lengthy emails, or preparing detailed presentations.
It uses the latest GPT-4 language model, which is similar to the technology available on Bing Chat. With its advanced AI technology, Copilot can significantly enhance productivity and make work less of a chore.
One of the notable features of Copilot is the Business Chat. Integrated throughout the Microsoft 365 applications, this bot will scan and peruse your business data and applications to find relevant data you require.
With Business Chat, searching for information becomes a thing of the past as Copilot takes the manual labor out of data retrieval and tracking.
How to enable Microsoft 365 Copilot in Business Chat
Locate the Copilot icon positioned on the chat window and click on it.
Provide Copilot with the necessary permissions to access your apps and data.
Once these steps are completed, you can begin interacting with Copilot using natural language commands.
How to use Microsoft 365 Copilot in Business Chat
Business Chat is a highly interactive tool that integrates across various platforms like LLM, Microsoft 365 apps, and your personalized data – from your calendar to emails, chats, documentation, meetings, and contacts. This enables unique functionalities that were previously unattainable.
For instance, a simple instruction such as “Kindly update my team on our modified product strategy” can trigger Business Chat to create a comprehensive status update, incorporating inputs from the day’s meetings, emails, and chat discussions.
It can be accessed on Microsoft365.com, Bing, and inside Microsoft Teams. And using it is as simple and as natural as chatting. You can input your questions just as you would to a human, and the bot will understand and respond accordingly.
How It Works
When a query poses in natural language within a Microsoft application or Business Chat, the system starts processing it while enriching the prompt with relevant databases retrieved from emails, meetings, files, or various other sources leveraging the Microsoft Graph.
An enriched prompt, now fortified with original questions and additional data, is sent to a Large Language Model, or ChatGPT, a cutting-edge AI system. It formulates an appropriate response to the question, tailoring it further to the original prompt’s context.
Thus, the response you get varies from Teams, Word, and Excel. All these features are managed under one sophisticated architecture termed “The Copilot System.”
For users, this means quick access to information and data with minimal effort, allowing you to concentrate on key aspects of your business operations. It helps create an unparalleled customer experience, combining advanced technology consisting of natural language processing, machine learning, and data analytics.
A new feature has come to the Xbox Insider Program’s Alpha and Alpha Skip-Ahead rings that will allow users to upload game clips and screenshots to OneDrive cloud storage.
As reported by The Verge, the new feature will also let users upload existing captures to OneDrive as well, with the option to upload your entire capture library or only selected captures. By default, video clips will upload to the videos folder in OneDrive, with screen captures going to the pictures folder. 4K video uploads are being excepted in current testing.
As with any feature that gets tested in the Xbox Insider Program, this isn’t guaranteed to reach a public launch, though it seems likely. The ability to access captures through OneDrive’s cloud storage would add a whole new layer of convenience for Xbox players. Alternatively, captures can be accessed in a similar manner across devices via the Xbox App on mobile and PC platforms.
We also wanted to let you know that starting September 6 we will be increasing the price for PlayStation Plus 12-month subscriptions globally across all benefit plans. This price adjustment will enable us to continue bringing high-quality games and value-added benefits to your PlayStation Plus subscription service.
These price changes are as follows:
PS Plus Essential: $80 annually (up from $60)
PS Plus Extra: $135 (up from $100)
PS Plus Premium: $160 (up from $120)
These considerable price hikes take effect starting on September 6. For current PS Plus members, they’ll take effect upon annual subscription renewals on or after November 6. Monthly and quarterly subscriptions don’t seem to be affected by the change. Even with the price increase, these annual subscriptions will still be less expensive than paying monthly over the course of a year.
The move comes just a couple months after Microsoft elected to increase the cost of its Xbox Game Pass service. Also, it announced that Xbox Live Gold will transition into a new (slightly more affordable) Game Pass tier known as Xbox Game Pass Core. This change will also take place in September.
It seems the wait for the mighty Lenovo Legion 9i is nearly over, with the laptop targeted for an October 2023 unveiling, possibly at IFA 2023 Berlin.
We are positively buzzed to piece together all the technical specifications, availability, price, and of course, the latest product imagery of the 16-inch laptop. But first, let’s dive into its groundbreaking cooling system.
Lenovo Legion 9i: Liquid Cooling
What sets the Legion Coldfront, Legion 9i’s self-contained liquid-cooling system, apart from other competitors like the CyberPowerPC Tracer VII Edge is its integrated cooling pump which requires no external attachment. The device could be available for €4,499, as reported by MSPowerUser.
It is purportedly the first such assembly in a 16-inch laptop, with a staggering 230-watt thermal design power (TDP). Backed by a triple-fan air cooling system furnished with 6,333 individual intake vents, the laptop ensures the perfect conditioning for a high-stakes gaming session.
With the complete cooling system housed in a 2.56kg laptop, Lenovo needed to design a dedicated A-cover case out of forged carbon chips, a testament to their expert engineering prowess.
Sight and Sound: Display and Audio Features
You’re in for a visually stunning treat with Lenovo’s PureSight 3.2K Mini-LED 16:10 display, boasting a 165 Hz Variable refresh rate. The alternating between DCI-P3 and sRGB is made easy with the pre-installed X-Rite software. The LA-2 AI chip powers SmartFPS, dynamically adjusting the GPU and CPU in response to real-time frame rate monitoring.
Enhancements are not just restricted to sight but sound too. With the Tobii Horizon software’s gearless head tracking, the immersive nature of gaming is significantly heightened.
Lenovo Legion 9i: Specs to Swoon Over
Information about Legion 9i specs has been floating around for a while, but here’s the final roundup, comprising everything a buyer might want to consider.
While similar in some ways to the Lenovo Legion 7i, the Legion 9i has conspicuous advantages, including superior cooling, higher display resolution, and reduced weight. And now, for the grand reveal of the complete specifications:
Processor | 13th Generation Intel Core i9-13980HX |
Graphics | NVIDIA GeForce RTX 4090 Laptop GPU 16GB GDDR6 (150W+25W Boost) |
Display | 16″ 3.2k Mini LED 16:10 165 Hz |
Memory | Up to 64GB 5600Mhz Dual Channel DDR5 |
Storage | Up to 2TB PCIe 4.0 NVMe SSD |
Operating System | Windows 11 Pro/Windows 11 Home |
Battery | 99.99WHr, Rapid Charge |
Weight | Starting at 2.56kg (5.64 lbs) |
Cooling | Legion Coldfront Liquid Cooling |
Aesthetic Excellence
Beyond these eye-popping specs, the Legion 9i is a piece of art, featuring a futuristic, forged carbon-chipped luster adorned by a backlit keyboard. Lenovo’s audio enhancement software, Nahimic by SteelSeries, ensures high-quality in-game sound.
Lenovo’s Vantage tool, to eke out every bit of the system’s performance, coupled with Lenovo Arena, for easy game management, sweetens the deal further. The icing on the cake is the three-month subscription of Xbox Game Pass Ultimate that comes bundled with the machine.
All eyes are now on the IFA 2023 Berlin. The Lenovo Legion 9i promises to be a heavyweight contender in the laptop world with its advanced features and ground-breaking design. Will it live up to the hype? Only time will tell.
Keyboard shortcuts are the quickest way to navigate Windows 11 and its apps, especially when multitasking. The same applies to programs and apps, Outlook being a prime example. Many users work in at least one other app while using Microsoft Outlook.
That makes quick actions and shortcuts necessary, and productivity takes a big hit when these fail. That’s the case with some Outlook users complaining of shortcut problems in the Outlook desktop and web app.
We’ve researched the topic and found some working methods to fix this problem, but first, let’s see what’s causing it.
Common causes of shortcuts not working in Outlook:
Outlook Add-ins Conflicts: Some add-ins might conflict with Outlook’s default settings.
Keyboard Language Settings: Incorrect keyboard language settings can lead to unresponsive shortcuts.
Corrupted Outlook Profile: A damaged user profile might be the culprit.
Outdated Software: Running an older version of Outlook might cause compatibility issues with shortcuts.
How do I fix shortcuts that aren’t working in Outlook?
1. Disable conflicting add-ins
Open Outlook.
Click on File. Then, go to Options > Add-ins.
In the Manage dropdown, select COM Add-ins and then click Go.
Uncheck the boxes for any suspicious add-ins.
Click OK and restart Outlook to see if the problem is resolved.
2. Check keyboard language settings
Open Search and type language, then click Edit language and keyboard options.
Under Preferred languages, click on the three dots next to your commonly used input language > Language options.
Now, check if all the language features are installed. If some are missing, download and install them by clicking on Install.
Scroll down and under Keyboards, make sure the selected input methods support keyboard shortcuts. If not, add another layout from the Add a keyboard button.
Restart the computer and check if the problem is solved.
Open Search, type Control Panel, and click on the first result.
Go to User Accounts > Mail (Microsoft Outlook).
In the new window that opens, click on Email Accounts.
Under Name, click on the profile that needs repairing.
Click on Repair.
Follow the on-screen instructions, complete the process, and restart Outlook.
4. Update Outlook to the latest version
NOTE
We recommend trying this only as a last resort, as some upgrading to the latest version caused the problem in the first place.
Open Outlook and click on File.
Go to Office Account > Update Options > Update Now.
Wait for the update to complete, then restart Outlook.
Using one or more of the above methods should help you solve the problem and return to your daily routine as soon as possible. Know that this issue is common enough, and you might also bump into it on Microsoft Word; if that’s the case, we’ve also found some quick solutions to fix it.
After fixing the issue, take your productivity to the next level with the 50 most used Windows 11 shortcuts. These will help you in Outlook and all other daily programs. For more information on shortcut issues, we advise you to check our Ctrl + D shortcut is not working guide.
If you found other ways to fix your keyboard shortcuts when not working in Outlook, share them with the community in the comments section below.
In this piece, we’ll show you how to check your monitor model on Windows 11 as well as related specs.
Besides the monitor name and the graphics card it’s connected to, you may need information related to the Active signal mode, Bit depth, Color format, and Color space.
All this can be found in the display settings, but a third-party tool is usually more helpful. Let’s learn about both!
How do I find my display information on Windows 11?
1. View the Display settings
Press Windows + I to open the Settings app, and click Display on the right in the System tab.
Scroll down and click on Advanced display under Related settings.
You will now find the various configurations listed under the monitor name set as Display 1. This includes:
Desktop mode: Available display resolution and refresh rate
Active signal mode: Current display resolution and refresh rate
Bit depth: Number of bits required to indicate the color of a single pixel in an image. The higher it is, the better. Modern monitors have it at 8 or higher.
Color format: Current color format. It should be RGB in most cases.
Color space: Signifies the array of colors the monitor can display. It could be Standard Dynamic Range (SDR) or High Dynamic Range (HDR).
If you want to view the screen resolution or monitor information for another display, choose the monitor name from the Select a display to view or change its settings dropdown menu.
To access the monitor settings in Windows 11, click on Display adapter properties for Display X, where X is the number assigned to the monitor.
The advanced display settings are one of the easiest ways to view the screen resolution settings and monitor details. Remember, it works for wireless displays as well.
2. Check the System Information app
Press Windows + S to open Search, type System Information in the search box, and click on the relevant result.
Expand Components from the navigation pane, and then select Display.
You will now find the display Resolution, Bits/Pixel, Color Table Entries, and Color Planes. Besides, there will be details for the available graphics adapter, including Adapter RAM and display Driver Version.
The System Information app is a built-in tool that lists everything about the PC in an orderly manner. Apart from the monitor details, you will also find information related to Sound, Network, Storage, and Printing, amongst others.
3. Use a third-party software
Go to Speccy’s webpage and download the free version of the tool.
Run the setup and follow the on-screen instructions to complete the installation.
Launch Speccy, head to Graphics from the navigation pane, and you will find the monitor name and other relevant details listed here.
While the built-in settings do the job, you could use Speccy, a reliable PC information software, to find the display information, monitor name, and specs in Windows 11.
If you want to find out more details about the monitor, say compatibility, various features, or things only advanced users require, head to the manufacturer’s website and open the monitor’s official page. It will list out all the information you would ever need.
Even third-party sellers and e-commerce platforms provide device details, so you could check that as well. But we wouldn’t blindly rely on the information provided on these websites.
How do I rename my monitor on Windows 11?
Tip
The process requires editing the Registry. We recommend you be extra cautious and create a restore point before proceeding to revert the changes if something goes wrong.
Press Windows + X to open the Power User menu, and select Device Manager from the list of options.
Expand the Monitors entry here, right-click on the monitor name you want to change, and select Properties.
Head to the Details tab, and from the Property dropdown menu, choose Driver key.
Right-click on the alpha-numeric string that appears, and select Copy.
Now, press Windows + R to open Run, type regedit in the text field, and hit Enter.
Click Yes in the UAC prompt.
Paste the following path in the address bar and hit Enter: Computer\HKEY_LOCAL_MACHINE\SYSTEM\ControlSet001\Enum
Select the Enum key in the left pane, press Ctrl + F, paste the Driver key you copied earlier, and click on Find Next.
You will now be redirected to the registry keys for the monitor. Double-click the FriendlyName string, enter the desired name in the Value data text field, and click OK.
Once done, head back to Device Manager, click the Action menu, then select Scan for hardware changes, and the new monitor name should now reflect.
It’s neither that easy to change the name of the built-in display or an external monitor in Windows 11, nor do we recommend that you do it frequently. But just as you can rename the PC, you can also change the monitor or display name in Windows 11.
With proper knowledge of the monitor details, specifications, and other display information, you would be in a far better position to asses things. Besides, you may want to check the other PC specifications for an even deeper understanding of the computer.
Do tell us in the comments section what prompted you to check the display information in Windows 11 and whether the methods listed here proved helpful.
Performing repetitive tasks or running a series of commands might be essential to your computing routine, but it can take a lot of time. That’s where creating a Batch (.bat) file on Windows 11 comes to the rescue.
In this guide, we will discuss step-by-step instructions to create a batch script file on Windows 11 to automate tasks while reducing errors and saving time.
Batch files can be beneficial for novice and experienced users:
Automate repetitive tasks and streamline workflows, saving significant time & effort.
Consistent execution of tasks, reducing human error and improving efficiency.
Carry out specific tedious tasks like backups, system configuration, software installation & more.
Help you execute commands on multiple computers at the same time.
Can carry out complex procedures that involve multiple steps.
Are portable and can be shared with other computers.
How do I create a batch file in Windows 11?
1. Create a basic batch file
Press the Windows key, type notepad, and click Open.
Type the following lines:
@ECHO OFF
ECHO Hi, this is my first batch file.
PAUSE
Here @ECHO OFF – Disables the display prompts & shows content; ECHO – Prints the text after the space; PAUSE – Keeps the window open after executing commands.
Go to File and click Save as.
Name the file Test.bat, and for Save as type, select All files, then click Save.
Once created, locate the file and double-click to open it. On the Command Prompt window, you will see the Hi, this is my first batch file message.
You can also save the .reg files in .bat file format to automate the modification of your registry files, which can minimize the risks involved.
2. Access network drives and folders
Press the Windows key, type notepad, and click Open.
Type the following line after replacing the driver letter F with the one you want: Echo Create new F: drive mapping
Copy & paste the following command after replacing the Network path with the path you want to map to: @net use F: \Network path /persistent: yes
Repeat the process if you want to add multiple drives. Type the following lines:
: exit
@pause
Click File, then choose Save As. Now name the file and add a .bat extension. For Save as type, select All files, then click Save.
Once the file is created, locate and double-click it to execute the task.
To create a batch file that takes user input and displays a customized message, follow these steps:
Press the Windows key, type notepad, and click Open.
Type the following script:
@echo off
: start
set /p input = Enter the Name:
echo %input% We are thrilled to welcome you to the event!
pause
go to start
You can change the Enter the Name instruction and the personalized message you see after that as per your task & preferences.
Click File, then Save As. Name the file, add a .bat file extension and for Save as type, select All files, then click Save.
Once the file is created, locate and double-click it to open it in the Command Prompt & execute the task.
4. Automate repetitive tasks
Press the Windows key, type notepad, and click Open.
Here, we will show you how we automated the process of opening frequently used apps on our computer.
This is the script we used to open Google Chrome, Word, Slack, and ShareX:
@echo off
cd "C:\Program Files\Google\Chrome\Application\chrome.exe"
start chrome.exe
start – "C:\Program Files\Microsoft Office\root\Office16\WINWORD.EXE"
cd "C:\Program Files\ShareX\ShareX.exe"
start ShareX.exe
Exit
You can use the script, but replace the app path with the one you want to open. Click the File menu and choose Save As.
Name the file, add a .bat extension, for Save as type, select All files, then click Save.
5. Edit lines of code with the command window
Press the Windows key, type notepad, and click Open.
This script can help you replace lines in a simple code; let’s assume you have a file named code.txt, which has oldtext mentioned multiple times, and you want to replace it with newtext.
For that, you can use this script:
@echo off

setlocal enabledelayedexpansion

set "inputFile=code.txt"
set "outputFile=code_modified.txt"
set "oldText=oldtext"
set "newText=newtext"

if not exist "%inputFile%" (
    echo Input file not found.
    exit /b
)

(
    for /f "usebackq delims=" %%a in ("%inputFile%") do (
        set "line=%%a"
        set "line=!line:%oldText%=%newText%!"
        echo !line!
    )
) > "%outputFile%"

echo Lines with '%oldText%' replaced by '%newText%' have been written to '%outputFile%'.

endlocal
You need to change code.txt with your file name and replace oldtext and newtext with the lines you want to use.
Now save the file using these steps:
Click File and choose Save As. Name the file, add a .bat extension, for Save as type, select All files, then click Save.
Locate and double-click the file to open it in the Command Prompt window & execute the task.
To edit a batch file, you can open Notepad and click File>Open, or you can locate and right-click the file and choose Edit from the context menu.
You can make the required changes once the file is opened in Notepad. Once edited, click Ctrl + S to save the changes.
To run the batch file in Windows 11, you can locate it in the File Explorer window and double-click it or open Command Prompt and use the cd command to go to the folder where the batch file is located, then type the batch file name and press Enter.
You should always save the batch script file to an accessible location like your user account’s Document or Desktop folder.
Remember that the batch files can execute commands, interact with your system, automate tasks, and edit simple codes; however, if you want to do sophisticated editing or code manipulation, we suggest you use a programming language like Python or PowerShell.
What tasks would you carry on using batch files? Feel free to mention them in the comments section below.
Like other many other video games, GTA Online is banned in some countries, such as United Arab Emirates, Thailand, Saudi Arabia, and Malaysia.
On top of that, it’s necessary to opt for proper security tools to protect your network traffic from getting intercepted by deceptive users.
That’s where VPNs come into play; they arrange the perfect gaming environment by providing a safe, lag-free experience plus bypassing bans imposed by governments.
Unfortunately, many users report facing connectivity issues when attempting to play GTA Online through a VPN server.
To be specific, when they try to play a game after connecting to a VPN, they have issues such as the game failing to connect to the server or experiencing extremely high ping.
Although frustrating, the regarded issue is arguably manageable. Keep reading to find out why the error surfaces and how to fix it.
Why is GTA Online not working with your VPN?
The gaming companies do not want gamers to use VPNs to circumvent their rules; thus, you’re running into problems.
Here are a few reasons behind GTA Online not working with VPN:
Blocked VPN traffic: Most popular gaming companies implement VPN-prohibiting laws to bypass IP Bans, regional pricing, etc. As a result, it is possible that the GTA Online developers have blocked the VPN you are using from accessing the game’s servers.
Lack of quality servers: If your VPN is having trouble connecting you to GTA Online, it’s either very slow or it’s actually not doing a great job in actually hiding your data.
Insufficient virtual locations: Gaming companies block known VPN IP addresses to prevent users from misusing such services. That is why it’s best to pick a reputable VPN provider that offers thousands of servers from different countries.
Now let’s see how to fix the issue once and for all.
How to fix GTA Online not working with VPN?
Although it’s already clear how to work around the error, let’s dive into the walkthrough and fix it together.
1. Connect to a different server
As mentioned, many gaming companies, including GTA Online, restrict VPN use on their platform by blacklisting the servers.
So, it’s best to test different servers until you find one that works.
It is worth noting that one of the main advantages of premium VPNs is their obfuscated servers which bypass VPN-detecting systems.
So, your chances of finding a working server during your initial attempts are higher.
Here’s how it goes:
Click on the Start Menu, type your VPN provider’s name, and press Enter.
Click the Arrow icon, scroll down to the server list, and select one.
You’ll now get connected!
Note: Changing server locations is somewhat the same for all VPN programs. Please get in touch with your provider for further assistance.
Switching servers is the most straightforward solution in this article. So, repeat the steps above until you find a server that works with GTA Online.
2. Clear your browser cookies
Although cookies primarily aim to help websites provide a better user experience, they collect information like your IP address.
So, it’s best to clear these cookies so websites can no longer recognize your previous IP.
Here’s how to do so:
Click on the Start Menu, type Chrome, and press Enter.
Select the Ellipsis icon from the top right corner.
Hover over More Tools and hit Clear browsing data.
Pick the Time range, check the box next to Cookies and other site data, and choose Clear data.
Note: Clearing browser cookies is somewhat the same for all browsers. Please get in touch with your support line for further assistance.
While browser cookies mean well, they can save errors and display formatting and loading issues on websites even after fixing them.
3. Change your VPN provider
Low-tier VPN providers negatively impact your performance and often get you banned from the game or blocked by websites.
In contrast, a reputable provider delivers high-quality servers and advanced security measures.
One of these features includes ObfuscatedMode, which hides the fact that you’re using a VPN and avoids getting restricted on services like GTA Online.
Here’s how to download and install NordVPN:
Go to the NordVPN order page and pick the desired subscription period and the security package among Standard, Plus, and Complete.
Choose a payment method and click Continue to purchase the license.
After receiving an activation email, go to the NordVPN download page and hit Download App.
Launch the downloaded file and follow the on-screen instructions to Install it.
When the program loads, choose login and enter your credentials.
Click the Arrow icon, scroll down to the server list, and select one. Enjoy!
NordVPN is a premium choice for gamers looking to enhance their experience. It provides 5500 high-quality servers in 59 countries that won’t get you blocked on platforms like GTA Online.
It is worth noting that, NordVPN is great for GTA and a tested way to fix online mods like RAGE MP connectivity issues.
NordVPN
Switch to this top-tier VPN to get rid of any GTA Online issues without being detected!
Reinstalling computer programs resets them to their default configuration and removes possible conflicts. Accordingly, it’s best to do so with your VPN software to resolve connectivity issues and access GTA Online.
Here’s how to uninstall and reinstall your VPN.
Right-click the Start Menu and select Settings.
Click on Apps and open Apps & Features.
Find your VPN from the list, click on the three dots to open the drop-down menu, and choose Uninstall.
Go to the VPN’s download page and hit Download App.
Launch the downloaded file and follow the on-screen instructions to Install it.
Your VPN now runs with default configurations and should connect you to GTA Online servers with no hassle.
5. Contact a support team through your VPN
If you have yet to find a way to fix GTA Online not working with VPN even by using the guidelines in this article, you have no choice but to contact your provider and discuss the matter with them.
Go to your VPN’s contact page and choose Let’s Chat or Email Us to contact support.
Explain the error clearly and wait for a response.
After receiving an answer, follow the instructions provided by the support team to get rid of the error once and for all.
Wrap up
When GTA Online isn’t working with VPN, it can be extremely upsetting for fans of the game whose countries have banned it.
Alternatively, they may wish to play GTA lag-free and stay safe from DDOS attacks.
To fix this problem, all you need to do is try different servers to find the right that works for you, clear browser cookies, change your VPN provider to a reputable one, or reinstall the VPN software.
And finally, as a last resort try contacting your VPN provider support line. Follow the steps above and these methods will certainly solve your problem.
OneDrive is a popular file hosting service developed by Microsoft. While it works fine for most users, a few persistently face issues with the service. And recently, some users came across a problem where OneDrive always opens two instances.
The two instances are visible in both the system tray and the navigation pane of the Windows File Explorer. In some cases, the first instance was logged in, while the other was not, and the latter basically had no files to show. It didn’t sync files or display the linked email address.
For those wondering, OneDrive is opening twice because you have set up both a personal and work/school account. The personal account has a greyed-out icon in the system tray, while the one configured for business/education is blue.
Also, incorrect Registry entries are often to blame when OneDrive is opening multiple times. Besides, a few who contacted Microsoft support were informed that it was a bug in the recently rolled-out OneDrive version and that a patch should be released soon.
Keep reading to find out how to fix two instances of OneDrive in Windows!
How do I stop OneDrive from opening twice?
Before we head to the slightly complex solutions, try these quick ones:
Restart the PC.
Make sure you are running the latest version of Windows.
Update the OneDrive app.
Check with the system administrator if they have set up OneDrive for Business.
In case none work, move to the fixes listed next.
Tip
The first two solutions require making changes to the Registry Editor, which is tricky. So, we recommend you create a restore point to be able to revert the changes in case something goes wrong. Also, follow the steps as it is, and do not modify or delete any other keys/entries.
1. Delete the related Registry key
Press Windows + R to open Run, type regedit in the text field, and hit Enter.
Click Yes in the UAC prompt.
Paste the following path in the address bar and hit Enter: HKEY_CURRENT_USER\SOFTWARE\Microsoft\Windows\CurrentVersion\Explorer\Desktop\NameSpace
Locate any additional keys under NameSpace in the left pane, select each individually, and check what’s listed under the Data column on the right.
If there are multiple keys with the same entry under Data, right-click on each, and then select Delete.
Click Yes in the confirmation prompt.
Restart the computer for the changes to apply.
Also, if OneDrive is running twice, and has distinct names, OneDrive – Personal and OneDrive Business Accounts, make sure you delete the desired registry key, i.e., whichever OneDrive account you don’t want appearing in the Windows Explorer.
2. Modify the Registry
Press Windows + S to open Search, type Registry Editor in the text field, and click the relevant search result.
Click Yes in the prompt.
Now, click the Edit menu, and select Find from the list of options.
Enter OneDrive in the text field, select only Data, then tick the checkbox for Match whole string only, and click Find Next to initiate a search.
Keep pressing F3 or Fn + F3, depending on whether the Function key is locked, until you find the System.IsPinnedToNameSpaceTree DWORD. It should be listed under either HKEY_USERS or HKEY_CURRENT_USERS.
Double-click the DWORD, enter 0 under the Value data field, and click OK to save the changes.
Restart the computer for the changes to apply.
The System.IsPinnedToNameSpaceTree DWORD could be stored under different paths in the Registry Editor, so we recommend you perform a search instead of manually locating it.
And if OneDrive still opens two instances, change the Value data back to 1 head to the next solution.
3. Unlink the other OneDrive account
Choose the unwanted OneDrive entry in the system tray, click the gear icon, and then select Settings.
Now, go to the Account tab, and click on Unlink this PC.
Click Unlink account in the confirmation prompt that appears.
When OneDrive opens two instances, and one reads OneDrive while the other reads OneDrive – Company Name, unlink the account you don’t want to show up in Windows 11.
4. Reset the OneDrive desktop app
Press Windows + R to open Run, type the following command, and click OK: %localappdata%\Microsoft\OneDrive\onedrive.exe /reset
Once the reset is complete, verify whether OneDrive still shows up twice.
Press Windows + S to open Search, enter Create a restore point, and click on the relevant search result.
Click the System Restore button.
Select the Choose another restore point option, and click Next.
Pick a restore point from the list, preferably the one created the earliest, and click Next to proceed.
Verify the restore details, and click Finish to start the process.
If the OneDrive folder shows twice in File Explorer and has two instances in the taskbar, the last option is to perform a system restore. It will revert any recent changes to the PC that triggered the error without affecting the personal files.
How do I delete all OneDrive instances?
To delete all OneDrive instances, you could unlink the PC for all configured accounts. Another option is to set the Value data to 0 for the System.IsPinnedToNameSpaceTree DWORD in Registry found for the different accounts.
OneDrive remains a popular cloud file storage service, but issues with it on desktop and mobile devices seem to bother many, especially if it opens two instances or when OneDrive is not syncing on Windows.
A few also found OneDrive not opening, a problem triggered by misconfigured settings or local policies. So, unless it’s set up by the administrator, you can always switch to a more user-friendly option.
If you know any other fixes that work when OneDrive opens multiple times, drop them in the comments section below.