Windows 10 Insider build 20226 brings Storage health monitoring to Dev Channel Insiders

Microsoft has just announced the release of the Windows 10 Preview build 20226 for Insiders in the Dev Channel. This minor update introduces a single new feature, which is Storage health monitoring to protect user data.

“This feature is designed to detect hardware abnormalities for NVMe SSDs and notify users with enough time to act,” the Windows Insider team explained. After installing this build, the OS will now send notifications when a drive failure could be imminent, and clicking on the pop up will allow Insiders to back up their data.

Image of toast notification sent to users when NVMe SSD abnormalities are detected.

In case of a drive failure, the Storage settings page (Settings -> System -> Storage -> Manage disks and volumes -> Properties) will also provide additional details for the affected drive, including estimated remaining life.

In addition to this new feature, this new build will also disable theme syncing for some users, and fix some issues affecting the Settings app, WSL2, File Explorer, Focus Assist, and more. You can find the full list of changes, bug fixes, and known issues in the build 20226 below:

Changes and Improvements

  • We’re starting to roll out a change that will turn off theme syncing. As part of that, you will no longer see “Theme” as an option in Sync your settings, and changes made to your background will not sync across device. If you have been using theme synchronization, when setting up a new PC or account there will be a one-time download of the last saved synchronized desktop background to %LOCALAPPDATA%MicrosoftWindowsWallpaperBackup if you need to access it.
  • Thanks for your patience – after making some reliability improvement, we’re re-enabling the ability for Notepad windows to persist update and restarts (if “Restart apps” is enabled in Sign-in Settings).
  • When you have a PWA installed from Microsoft Edge, Task Manager will now correctly display it under Applications instead of Background Processes in the Processes tab, and will show the app icon associated with the PWA.
  • We’re updating File Explorer so that if you right-click on a zipped OneDrive file that was set to online-only, you’ll now see an Extract All option, same as if the file was available locally on the PC.
  • We’re updating the new DNS options in settings to make a statis DNS required when entering a static IP, and to make gateway not a required field.
  • We’re updating the N’Ko keyboard layout so that pressing Shift + 6 will now insert ߾ (U+07FE ) and pressing Shift + 7 will now insert ߿ (U+07FF).

Fixes

  • We’ve resolved an issue resulting in Settings crashing for some Insiders when opening Manage Disks and Volumes.
  • We fixed an issue affecting Windows Subsystem for Linux 2 distros where users can receive the error: “The remote procedure call failed” on startup. See this GitHub issue for more details.
  • We fixed an issue where activating Speech Recognition under Ease of Access in Settings was unexpectedly requiring admin permissions.
  • We fixed an issue where after turning off “Drop shadows for icon labels on the desktop”, and opening Task View, the drop shadows would unexpectedly reappear.
  • We fixed an issue where pressing F7 in the File Explorer search box would bring up a dialog asking to enable caret browsing.
  • We fixed an issue where Focus Assist was considering Screensaver to be a full screen app and suppressing notifications when it was running.
  • We fixed an issue impacting explorer.exe reliability for some Insiders in the last few flights.
  • We fixed an issue where some of the apps in the Windows Accessories folder in Start’s all apps list, would unexpectedly display the name Windows Accessories when pinned to the Start menu in recent builds.
  • We fixed an issue impacting taskbar performance and reliability on 2-in-1 convertible devices.
  • We fixed a few issues impacting Action Center reliability.
  • We fixed a couple of issues impacting Settings reliability.
  • We fixed an issue where the Settings icon was unexpectedly small when pinned to the Start menu and using the small tile size.
  • We fixed an issue in Touchpad Settings where the header for the Taps section was unexpectedly missing in the last few flights.
  • We fixed an issue with Meet Now resulting in the flyout crashing if you pressed the Esc key while it was open.
  • We fixed an issue that if Meet Now was opened before opening a jumplist from the taskbar, then ShellExperienceHost would crash.
  • We’ve made some fixes to improve accessibility of the Meet Now flyout, including updating the tab order, marking the image so it’s not read out by Narrator, adjusting the contrast of the buttons, making the arrow keys navigate between the buttons, and fixing an issue where focus wasn’t returning to the previous location in the taskbar after pressing the Esc key.
  • We fixed an issue from the last few flights resulting in some apps failing to install, citing a lack of internet connectivity, when IPV6 was enabled.
  • We fixed an issue with the new DNS options in Network Settings where switching back from a custom DNS to automatic would result in a loss of connectivity.
  • We fixed an issue resulting in not being able to insert the full-width question mark when typing with the Pinyin IME in recent builds.
  • We fixed an issue that could result in the Japanese IME crashing on initialization.
  • We fixed two issues with the Bopomofo IME impacting Shift and Ctrl key usage in apps when the IME was active.
  • We fixed an issue with the Turkish one-handed touch keyboard layout, where it was missing keys for ü and ö.
  • We fixed an issue when using the Japanese touch keyboard layout that could result in the spacebar UI appearing stuck in a pressed state.

Known issues

  • We’re looking into reports of the update process hanging for extended periods of time when attempting to install a new build.
  • We’re working on a fix to enable live preview for pinned site tabs.
  • We’re working on enabling the new taskbar experience for existing pinned sites. In the meantime, you can unpin the site from the taskbar, remove it from the edge://apps page, and then re-pin the site.
  • We’re working on a fix for an issue where some Office applications crashing or missing after updating to a new build.
  • We’re working on a fix for an issue causing some devices experiencing a KMODE_EXCEPTION bugcheck when using certain virtualization technologies.
  • We’re working on a fix where some devices are experiencing a DPC_WATCHDOG_VIOLATION bugcheck.
  • We’re investigating a bug where the vEthernet adapter in Windows Subsystem for Linux 2 distros becomes disconnected after a period of use. For full details please follow this GitHub thread.
  • We’re working on a fix for an issue where after taking this build some users receive a Compatibility Assistant notification that “Microsoft Office is no longer available”. Despite the notification, Office should still be there and working fine.

The Windows Insider team released this new build a bit earlier than usual today, but that’s to get prepared for the Windows Insider Anniversary webcast that will kick att at 10 AM PDT on Twitch. That’s right, the Windows Insider program kicked off six years ago, and Windows 10 has definitely evolved a lot since the release of the first-ever Insider build.

How to fix DHPC error on Kindle Fire HDX [Easy Guide]

Amazon Kindle owners have been reporting DHCP error on Kindle Fire HDX devices. The error is triggered when the user tries to connect to their WiFi network.

The issue seems to be with the Kindle Fire firmware and can be fixed by changing the IP address type to static from dynamic.

If you are also troubled by this error, here is how to fix the DHCP error on Kindle Fire HDX for good.

How can I fix the DHCP error on Kindle Fire HDX and what is it?

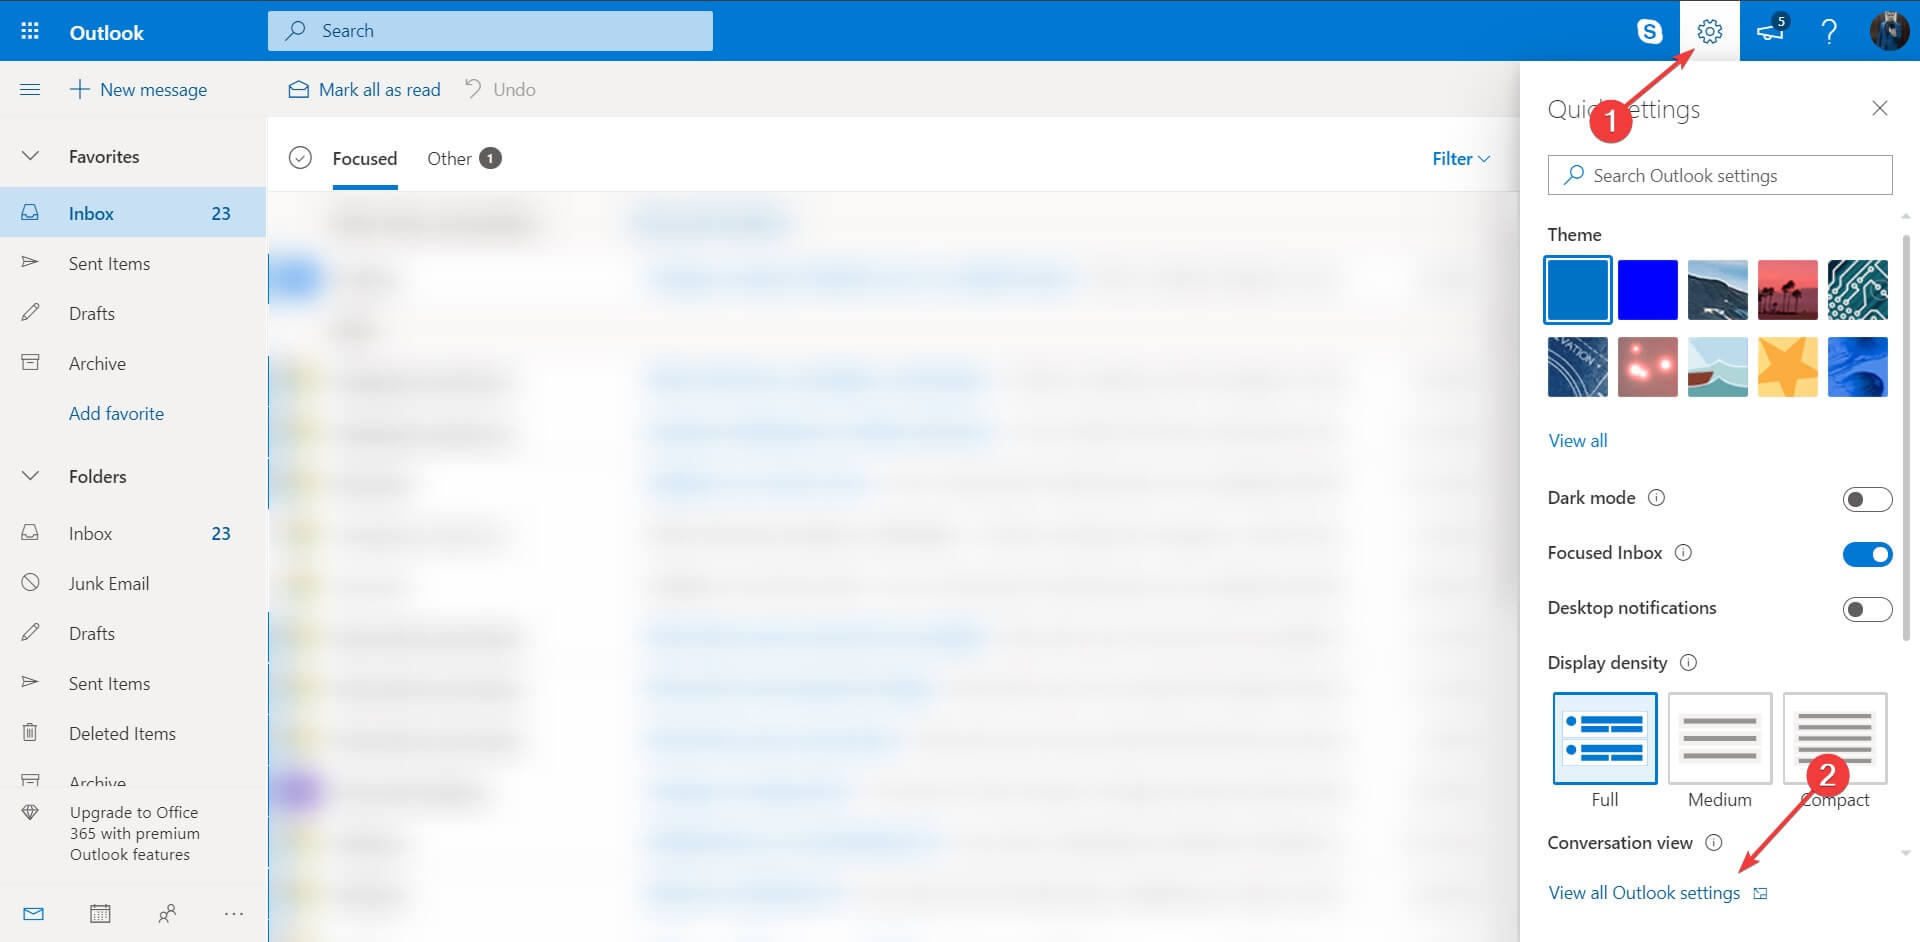
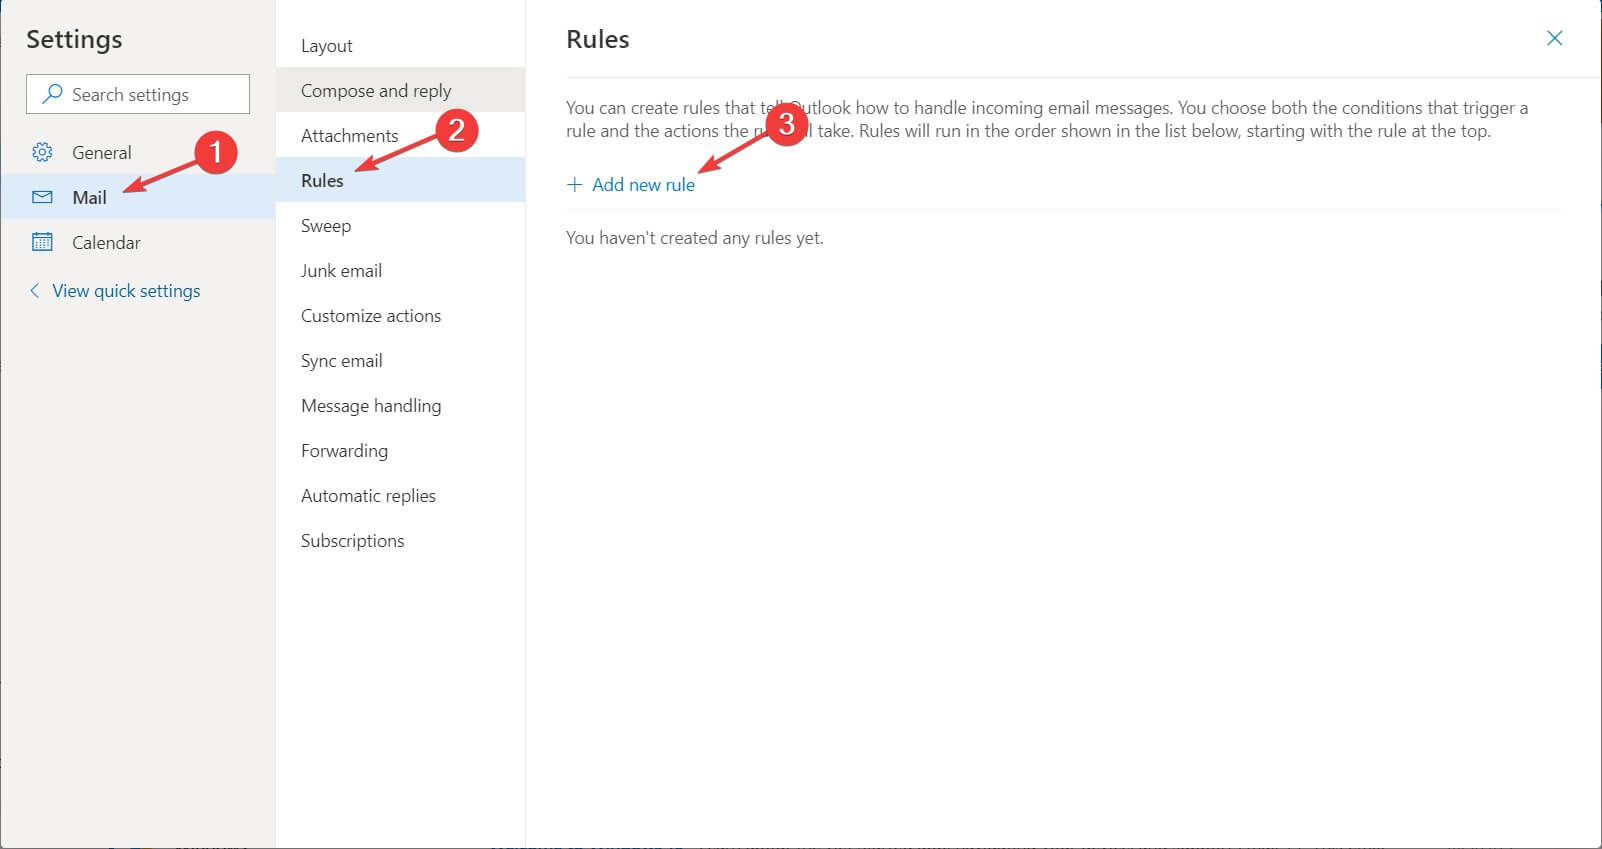
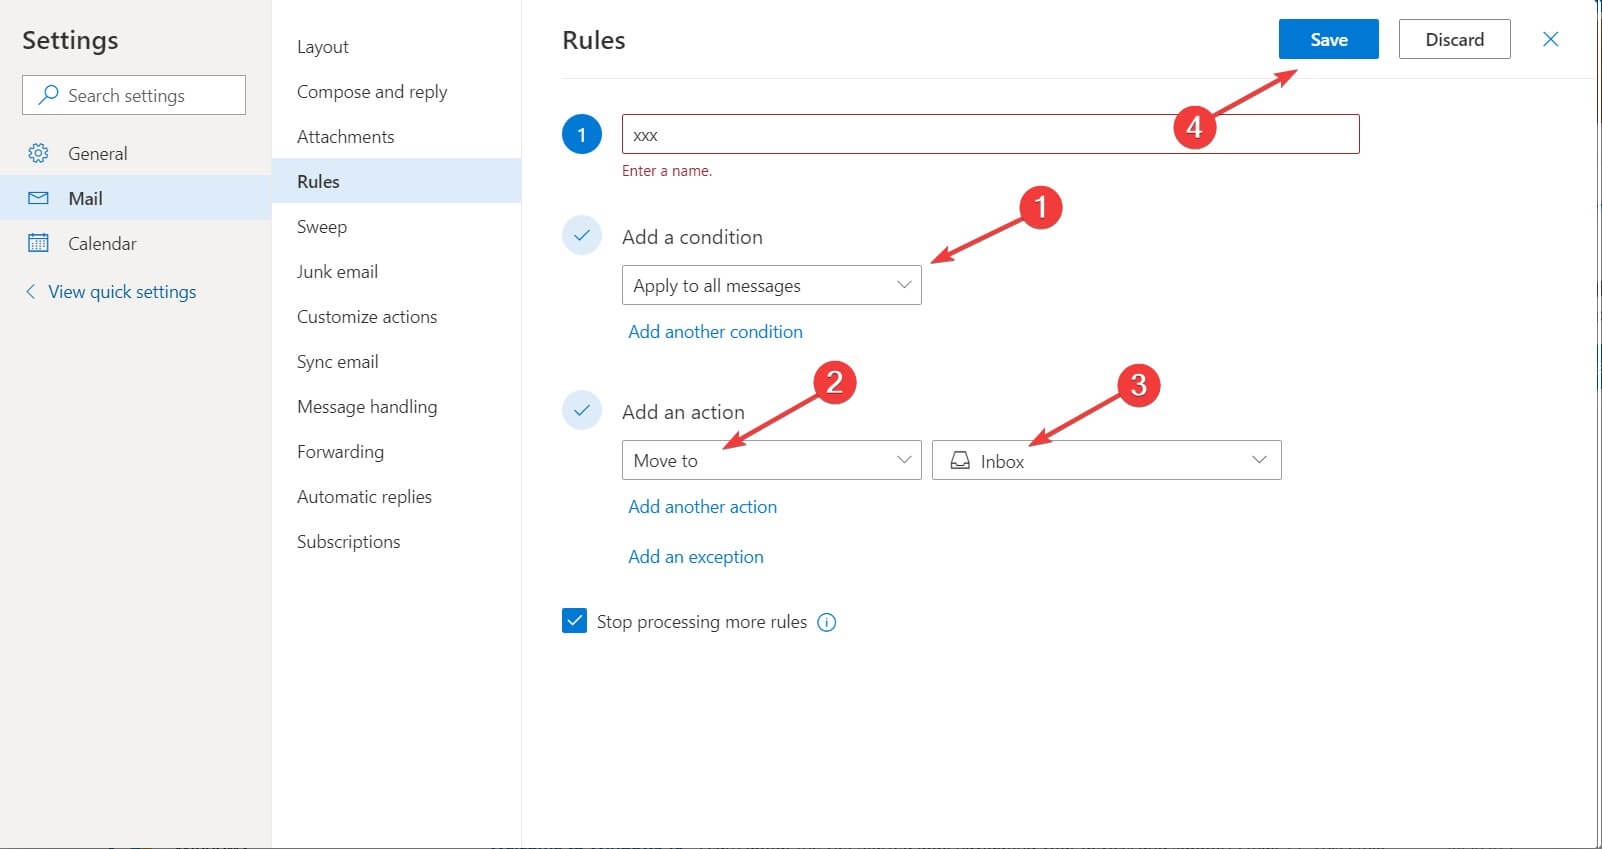
1. Change the IP type to Static

Kindle DHCP error

  1. Open Settings.
  2. Select WiFi.
  3. Press and hold the WiFi network you are connected to and select Modify Network.
  4. Scroll down and tap on Show advanced options.
  5. Select Set IP Settings to Static.
  6. Note down the IP address shown under the IP address section.
  7. Type in the IP address in the field.
  8. Enter the gateway IP in the Gateway field.
  9. Set the following address:
    37.37.37
    185.37.37.39
  10. Tap on Save to save the changes.

Restart your Kindle. After the restart, try connecting to the same WiFi network and check if the DHCP error is resolved.

Forget WiFi Network

Kindle DHCP error

  1. Open Settings.
  2. Open WiFi settings.
  3. Tap and hold on the WiFi network and select Forget.
  4. Scan and reconnect to the WiFi network.

Forgetting and reconnecting to the WiFi network can fix any temporary issues with the network or your device.


2. Update Kindle Fire

Kindle DHCP error

  1. Make sure the tablet is connected to your WiFi network.
  2. Open Settings.
  3. Tap on Device Options.
  4. Select System Update.
  5. Tap on the Check Now button manually search for the pending updates.
  6. Select to download and install any available updates.

If updating to the latest firmware did not fix the error, check if the error is triggered by your WiFi router.


3. Troubleshoot WiFi router

Kindle DHCP error

  1. Make sure the WiFi router is powered on.
  2. Pull the ethernet and power cable from the WiFi router.
  3. Leave the router idle for a few minutes.
  4. Reconnect the cables and power the router on.
  5. Wait for all the LED lights to stop blinking and then connect your Kindle tablet to the network.

If performing a power cycle did not help, try resetting the router.


4. Reset WiFi router

Amazon Fire tablet WiFi error

Note: Resetting your WiFi router will erase all the custom settings made to the network device.

  1. Use a paperclip or a sim ejector tool and press the Reset button on the back of the router.
  2. Press and hold the Reset button until you see all the LEDs blinking.
  3. The router will restart once the reset is complete.
  4. Reconfigure the router and connect your Kindle tablet.

Resetting your WiFi router can fix DCHP error in Kindle tablets. However, if the issue persists, check for a firmware update.

Update router firmware

Amazon Fire tablet WiFi error

Note: Instructions for TP-Link routers. Refer to your router guide for specific instructions.

  1. Go to the Download Center of the TP-link website of your region.
  2. Select your Router Type and Model Number to download the latest firmware upgrade.
  3. Extract the Zip file to a folder.
  4. Login to your TP-Link router’s web management page.
  5. Go to System Tools > Firmware Upgrade.
  6. Click on Browse/Choose and select the extracted firmware file.
  7. Click the Upgrade button to initialize the installation process.

Once installed, you may have to reconfigure your router.

The Kindle DHCP error when connecting to the WiFi can be resolved by changing the IP address type to Static from Dynamic. If not, you can perform a reset to fix the error.

[wl_navigator]

Windows 10 on ARM PCs will be able to emulate x64 apps later this year

Windows 10 on ARM is finally getting support for 64-bit legacy apps later this year. Microsoft’s Chief Hardware Office announced the news today on a blog post about the evolving the role of Windows PCs since the beginning of the coronavirus pandemic, highlighting the fact that Windows 10 on ARM PCs are starting to get real traction.

“We are excited about the momentum we are seeing from app partners embracing Windows 10 on ARM, taking advantage of the power and performance benefits of Qualcomm Snapdragon processors,” wrote Panay. Microsoft launched its own ARM-based Surface Pro X last year, though the app compatibility issues and poor performance offered by emulated 32-bit apps has been an ongoing problem.

“We will also expand support for running x64 apps, with x64 emulation starting to roll out to the Windows Insider Program in November,” Panay said today. Microsoft will also continue to push more developers to recompile their apps for the ARM64 architecture, and the company is leading the way with new versions of Microsoft Edge and Visual Studio code that run natively on Windows 10 on ARM. An ARM64 version of Microsoft Teams is also in the works, which should provide improved performance and reliability.

“For organizations, we’re committed to helping them ensure their apps work with Windows 10 and Microsoft 365 Apps on ARM64 devices with App Assure. We are working closely with Acer, HP, Lenovo, Samsung and Surface to bring these Windows 10 on ARM innovations and products to our shared customers,” Panay also said today. It’s still early days for Windows 10 on ARM, but Microsoft seems to do the right things to make sure the platform can finally take off.

ExpressVPN not working with Hulu [How to fix the issue]

A VPN is the best software you can use to access geo-restricted content through streaming media like Hulu and others.

However, even with this functionality, not all VPNs are able to access such content streaming sites as these sites block such unauthorized access in locations with such restrictions to their content.

Ideally, a VPN should help you access the sites while hiding your identity and location details, but when your VPN gets blocked, you need to find a way around it fast.

Despite being one of the best, ExpressVPN can still get blocked by Hulu, a concern that its users have raised before. But, before you dismiss it just yet, there are ways to fix the ExpressVPN blocked by Hulu problem.

When this happens, you may get an error message that says: You seem to be using an unblocker or proxy, OR, You’ll need to disable your anonymizer.

If you are getting the ExpressVPN blocked by Hulu error, here are solutions you can use to resolve it.

How to fix Hulu not working with ExpressVPN

1. Preliminary checks

If you get an error message saying: You seem to be using an unblocker or proxy or You’ll need to disable your anonymizer when trying to access Hulu, contact your VPN tech support team.

They should be able to provide for direct assistance before trying the solutions below.


VPN does not work over 3G networks? We have the answer here.


2. Check your IP address

If your ExpressVPN service has been blocked by Hulu, check your IP address for information such as your city or region (country) next to the location you selected when you connected with ExpressVPN.

If it shows a location near you, it means you’re not connected to an ExpressVPN server location. Try and connect again.


3. Change your VPN

There are a handful of VPN services that still work with Hulu and other similar content platforms even today.

So, if ExpressVPN simply won’t work with Hulu, you might want to try a completely different tool. And why not go for the very best?

Install Private Internet Access

Private Internet Access

PIA offers its users top-notch protection and access to all manner of geo-restricted services. If your current VPN service is being blocked by Hulu, then you should consider switching to Private Internet Access.

Many users have mentioned that ExpressVPN causes a proxy error on Hulu, and if you are one of them, then the solution can be as simple as switching to a different service.

PIA is best equipped for streaming and has made a mission of eliminating online censorship.

And by all means, it has everything you could possibly think of to do so including lightning fast download speeds, servers located all over the world, best-in-class encryption for your traffic data and to top it all, a strict no-logs policy to guarantee that your navigation traces vanish into thin air.

What’s more, you can forget all about ISP throttling or lagging and buffering while streaming since PIA gives you nothing more and nothing less than unlimited bandwidth and secure VPN connections.

Apart from getting rid of the Hulu proxy error, PIA has many more benefits for its subscribers.

Let’s quickly look at its key features:

  • Military-grade encryption
  • More than 3000 servers located in over 45 countries
  •  Protection for up to 10 devices at once
  • SOCKS5 Proxy support
  • P2P support
  • No-log policy
Private Internet Access

Private Internet Access

Private Internet Access will give you access to all the Hulu content you want. Enjoy a major discount right away!
Check priceBuy it now

4. Check your internet connection

Disconnect from ExpressVPN and try accessing a website the usual way to test if your Internet connection is working.

If you cannot access the internet even when disconnected from the VPN, check your internet connection.

However, if you can access it while disconnected from the VPN, try the next solution.


5. Try connecting to another ExpressVPN Location

If you can access the internet when disconnected from ExpressVPN, but cannot connect to a server location, choose a different server location from the list of locations.

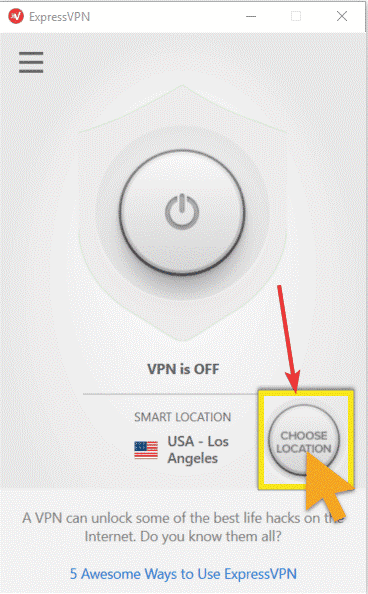
  1. Click Choose Location to get the list of locationsExpressVPN blocked by Hulu
  2. Click on the server location to connect
  3. Click ON button or double-click on the location
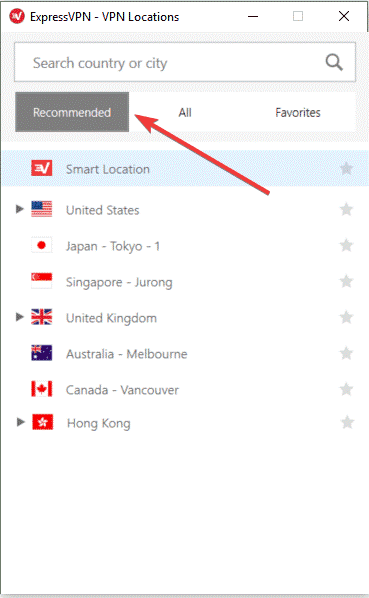
  4. Under the Recommended tab, check the list of top VPN picks to connect toExpressVPN blocked by Hulu
  5. Click the All tab to see the list of VPN server locations by region
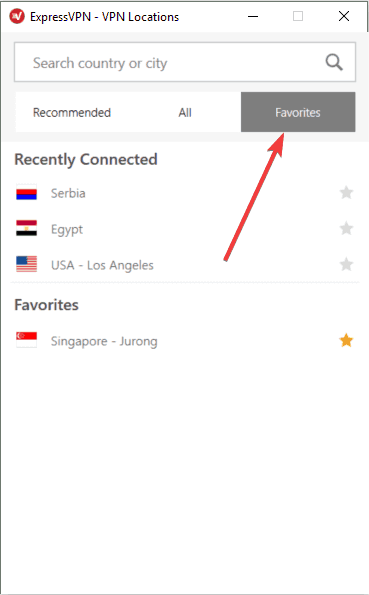
  6. Click the Favorites tab to show the locations you saved as favorites. It also shows the three Recently Connected locations you connected toExpressVPN blocked by Hulu
  7. Go to the search bar by pressing CTRL+F, then type the name of your desired server location and double-click on it to connect
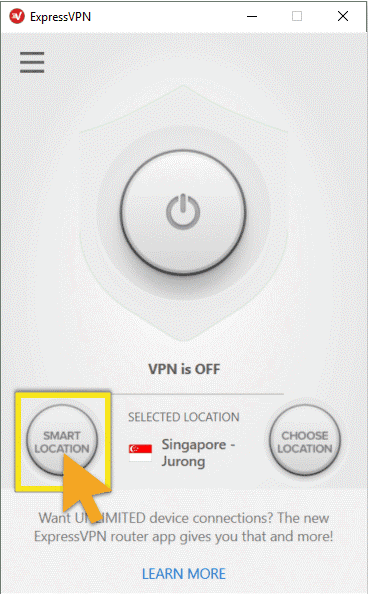
  8. Once you disconnect from the location you selected, you can go back to your smart location by clicking on Smart Location
ExpressVPN blocked by Hulu

6. Disable your security software

  1. Configure the program blocking the connection to allow ExpressVPN. You may need to change the security level from High to Medium (depending on the program) and grant exceptions to ExpressVPN or UDP ports 1194-1204, or set it to Trust ExpressVPN.
  2. If you have the option to reinstall the security software or program blocking ExpressVPN connection, install it after the VPN is already installed so that it allows the VPN to connect by first uninstalling ExpressVPN, then uninstall the program blocking the connection, install ExpressVPN again, then reinstall the program blocking the connection.

Try and disable your firewall or antivirus as these may block your VPN connection.

Check if you can connect again and try to access Hulu.


VPN not working with Kodi? Find out how to fix it easily.


7. Change the protocol

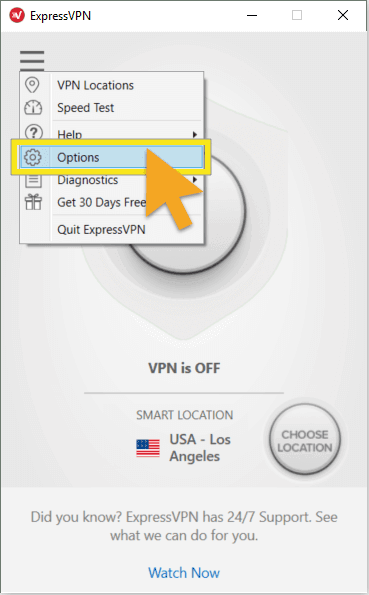
  1. Go to the ExpressVPN window and click on the hamburger menu
  2. Select Options (while disconnected from the VPN)ExpressVPN blocked by Hulu
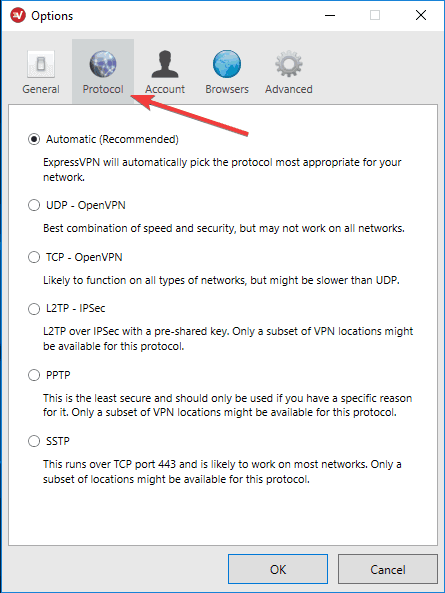
  3. Find the Protocol tab then select the protocol you want to useExpressVPN blocked by Hulu
  4. Click OK

Your device connects to ExpressVPN servers using VPN protocols, the default one being the UDP protocol, which in some countries like the Middle East, is blocked. Change the protocol, which will also help you achieve faster connection speeds.

For better performance, choose the OpenVPN TCP first, then L2TP, and finally PPTP protocols in that order. ExpressVPN doesn’t recommend using PPTP as it offers minimal security.


8. Manually configure DNS settings

Your computer may not automatically connect to ExpressVPN DNS servers, so you need to configure it with ExpressVPN DNS servers’ IP addresses, manually.

Manually configuring your computer with other DNS server addresses helps you access Hulu and other blocked sites, and enjoy faster connection speeds.

Here’s how to do it in Windows:

Step 1: Open Network Connections settings

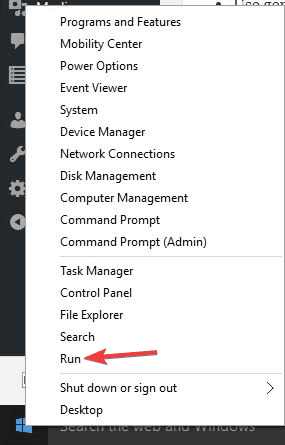
  1. Right-click Start and select RunExpressVPN blocked by Hulu
  2. Type ncpa.cpl and click OK
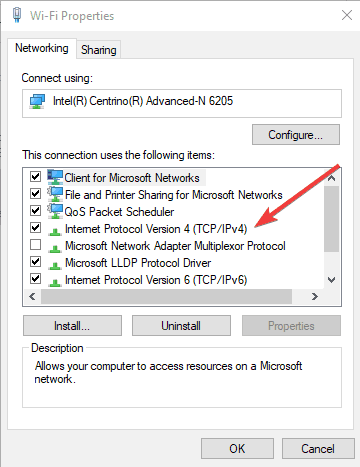
  3. Under the Network connections window, find your usual connection, either LAN or Wireless network connection.
  4. Right-click the connection and select Properties

Step 2: Set the DNS server addresses

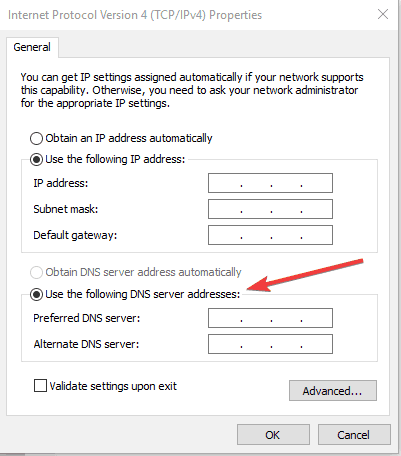
  1. Double click Internet Protocol Version 4 (IPv4) or just Internet ProtocolExpressVPN blocked by Hulu
  2. Select Use the following DNS server addressesExpressVPN blocked by Hulu
  3. Type these Google DNS server addresses
    • Preferred DNS server 8.8.8.8
    • Alternate DNS server 8.8.4.4
  4. If Google DNS is blocked, try the following:
    • Neustar DNS Advantage (156.154.70.1 and 156.154.71.1) enter and press OK
    • Level3 DNS (4.2.2.1 and 4.2.2.2) enter and press OK

Step 3: Set ExpressVPN DNS settings

For ExpressVPN 5.X/4.2/4.1/4.0

  1. Click the three dots and select
  2. Select Advanced tab
  3. Uncheck the Only use ExpressVPN DNS servers while connected to the VPN box and click OK

For ExpressVPN 3.X

  1. Go to Options
  2. Uncheck the Only use DNS servers set by the VPN option

Once you have configured your computer for ExpressVPN DNS servers, flush old DNS entries again as described in solution 7 above.

9. Manually configure proxy settings

  1. Click Tools
  2. Select Internet Options
  3. Go to the Connections tab
  4. Click LAN settings
  5. Uncheck all the options except Automatically detect settings and click OK for all

A proxy server is the go-between your computer and the internet and is used to hide your real location so you can access websites like Hulu, that would otherwise be blocked.

If you have internet connection issues, it is possible that it has been set to use a proxy server.

Ensure your browser is set to auto-detect proxy or no proxy, then use the instructions to manually configure proxy settings for your browser.


10. Flush the DNS

  1. Click Start
  2. Select All Apps
  3. Click Accessories
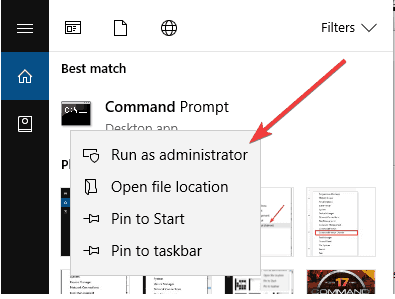
  4. Type CMD in the search box, and right-click Command Prompt, and select Run as administratorExpressVPN blocked by Hulu
  5. Type ipconfig /flushdns and press Enter. You should get a confirmation that says: Windows IP Configuration Successfully flushed the DNS Resolver Cache.

In some countries, DNS entries saved from your ISP on your computer may be intentionally wrong, as an additional method of blocking Hulu and other sites.

In this case, flush your DNS cache so your computer can automatically access ExpressVPN’s DNS for the proper/correct entries.


11. Download the latest ExpressVPN version

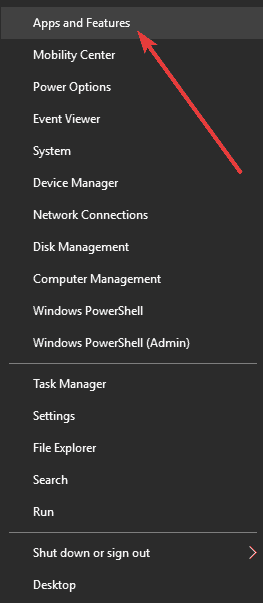
  1. Right-click Start and select Programs and FeaturesExpressVPN blocked by Hulu
  2. Find ExpressVPN from the list of programs and select Uninstall
  3. In the Setup Wizard, click You’ll get a notification after a successful uninstall, so click Close to exit the wizard.
  4. If the ExpressVPN is still listed as available after uninstalling it, right-click Start and select RunExpressVPN blocked by Hulu
  5. Type ncpa.cpl and press Enter to open the Network Connections window
  6. Under Network Connections, right-click on the WAN Miniport labeled ExpressVPNExpressVPN blocked by Hulu
  7. Select Delete
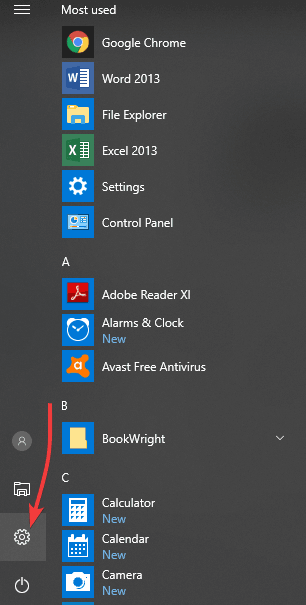
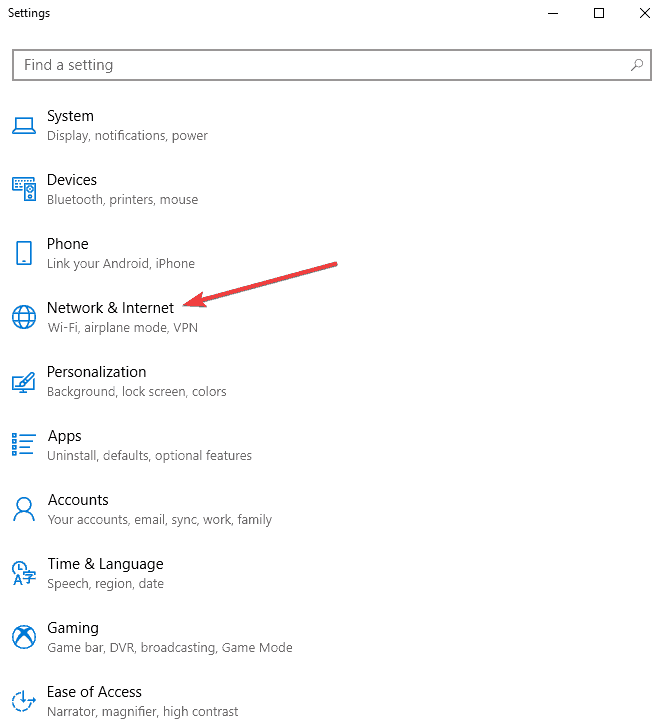
  8. Click Start and select Settings
  9. Click Network & InternetExpressVPN blocked by Hulu
  10. Select VPN. If you see ExpressVPN as available, delete it

Uninstall the ExpressVPN app you’re running, then sign in to your ExpressVPN account and select Set up ExpressVPN. Find the latest version for your device and then connect again, then see if you can access Hulu.

Connect again to ExpressVPN and see if you can access Hulu.

There you go, you should be all set now.

Let us know if any of these solutions helped fix ExpressVPN blocked by Hulu error by leaving a comment in the section below.

How to Fix a Windows 10 PC That Doesn’t Detect Your Lumia Smartphone

If your Lumia phone isn’t showing up on your Windows 10 laptop, don’t worry. This guide will walk you through quick fixes to get it recognized again and let you access your files.

What can I do if the Lumia smartphone is not recognized?

1. Reinstall the Lumia USB driver

  1. Make sure that your phone isn’t connected to your computer.
  2. Press Windows Key + X and choose from the menu.
    Windows phone charging but not connecting to PC
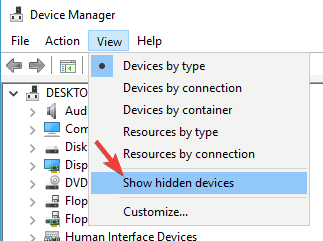
  3. Go to View and click on Show hidden devices.
    PC doesn't recognize Nokia Lumia
  4. Expand Universal Serial Bus Devices.
  5. Locate Lumia USB driver and right-click it.
  6. Choose Uninstall device.
    Windows phone not detected in Windows 10
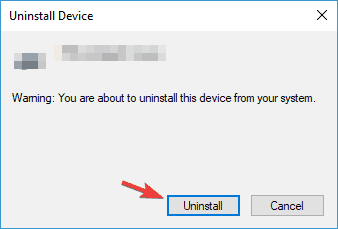
  7. Click Uninstall.
    Windows phone charging but not connecting to PC
  8. Restart your computer.
  9. Connect your Lumia device, wait for the driver to install, and check to see if the issue is resolved.

A simpler way is to use software like Fortect Driver Updater. It ensures you get the newest drivers without the risk of installing the wrong ones.
Just download and install Fortect Driver Updater — it runs automatically and scans your system.
Then, select the drivers to update and click Install.

⇒ Get Fortect Driver Updater

2. Check your antivirus

If your laptop doesn’t recognize the Lumia smartphone, the issue might be your antivirus.

Many antivirus applications are designed to scan any USB devices that you attach to your PC, and in some instances, an antivirus can block your USB device.

To fix this problem, open your antivirus and make sure that USB devices aren’t scanned or blocked. In addition, you might want to try disabling other features or even disable your antivirus altogether.

If that doesn’t solve the problem, you might have to uninstall your antivirus. Certain antivirus tools can interfere with your system, and the only way to fix the problem is to remove that antivirus.

Once you remove your antivirus, check if the problem is still there. If not, it’s advised that you switch to a different antivirus solution.

Keeping your PC safe is essential, so make sure to get a Windows 10 compatible antivirus that won’t interfere with your system.

3. Turn Xbox Music Cloud Collection off

  1. Go to Music +Video app on your phone.
  2. Choose Settings.
  3. Turn off Xbox Music Cloud Collection.
  4. Reconnect your Lumia smartphone to your computer.

4. Change the General settings of your USB device

  1. Make sure that your Lumia smartphone is connected.
  2. Click on the USB icon from the Taskbar.
  3. Choose Open devices and printers.
  4. Double click the Lumia device icon.
  5. Click on Change General settings.
  6. Click on the drop-down box and select When this device connects open Windows Explorer to view files.
  7. Click OK.
  8. Disconnect your phone and restart your computer.
  9. Connect your phone to see if it works.

5. Perform a soft reset

To perform a soft reset on Lumia, you just need to press and hold the Volume Down button and the Power button for 3-5 seconds.

After doing that, your phone will perform a soft reset and it should be recognized by your laptop.

Some users are suggesting that you can perform a soft reset simply by holding the Power button for about 10 seconds, so you can try that as well.

The process might be slightly different for different Lumia models, so we suggest that you check your instruction manual for detailed information.

6. Turn off and turn on your phone while it’s connected to your computer

If your laptop doesn’t recognize Lumia, you might be able to fix this issue simply by turning the phone on and off while it’s connected to your PC.

After your phone starts, it should be detected by the PC automatically.

7. Install Media Feature Pack for N and KN versions of Windows 10

Windows phone 10 not connecting to PC

In case your Laptop doesn’t recognize the Lumia smartphone, the issue might be the lack of a Media Feature Pack.

In case you don’t know, European and Korean versions of Windows 10 lack certain media features, and if you’re using one of these versions, you most likely don’t have these features installed.

Due to the lack of a Media Feature Pack, your PC might not be able to recognize your phone.

Although this can be a big problem, you can easily fix it simply by downloading Media Feature Pack for N and KN versions of Windows 10.

8. Replace your charging cable

According to users, one possible cause for this problem can be your charging cable. USB cables can break after a while, so if your laptop doesn’t recognize Lumia smartphone, it’s possible that your cable is broken.

To fix this issue, the simplest solution is to get just a different USB cable.

It’s also worth mentioning that there are two types of USB cables, and sometimes you might get a USB cable that is designed just for charging.

To ensure that your Lumia works with your laptop, be sure to get a USB cable designed for both charging and data transfer.

9. Install the latest updates

  1. Open the Settings app using the Windows Key + I shortcut.
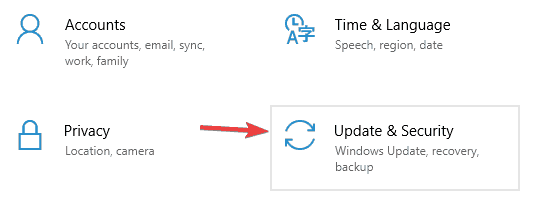
  2. Go to the Update & Security section.
    Windows phone not detected in Windows 10
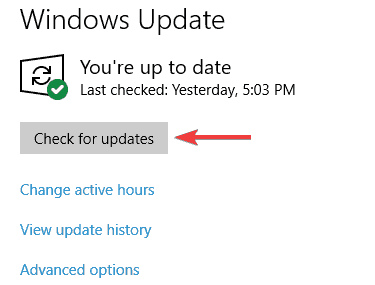
  3. Click Check for updates button.
    PC doesn't recognize Nokia Lumia

Windows will now check for available updates and download them automatically in the background. Once the updates are downloaded, restart your PC to install them.

After your system is up to date, the problem with Lumia should be resolved.

In addition to updating Windows 10, it’s also important to update the system on your phone. Once you update the system to the latest version, check if the issue is still there.

Whether you’re dealing with Windows 11 not detecting your Android phone both issues have clear fixes.

If your laptop doesn’t recognize the Lumia smartphone, that can be a big problem, but you should be able to fix this annoying issue by using one of our solutions.

If you have any other suggestions, leave us a line in the comments section below.

Mail app Error 0x80048830: Use These 4 Methods to Fix it

Error code 0x80048830 is a sync error that prevents the Windows 10 Mail app from loading messages from the server.

While there are a series of potential causes for this issue, it is not the most difficult to fix, as shown in this guide.

What causes error code 0x80048830?

Listed below are some of the causes of the Mail app sync error code 0x80048830:

  • Interference from security software: Your antivirus or firewall might be preventing the Mail app from syncing. The solution to this is to disable your antivirus software and firewall.
  • Outdated PC: In some cases, this issue might occur if your operating system is obsolete. You need to update your PC to solve the problem.

How can I fix the 0x80048830 error?

Before proceeding to the solutions in this section, try the following troubleshooting steps:

  • Relaunch the Mail app
  • Remove and re-add the account you are trying to sync

If this does not solve the problem, you can now proceed to the solutions below:

1. Try a different mail app

With so many email clients available on the market, wasting time trying to fix the one you have is not worth it.

Thus, moving to a different, maybe even better, alternative is the most time-efficient solution.

That’s why we recommend you try Mailbird, you can download it on your Pc or use the web client via browser, and you’ll enjoy the sleek and responsive UI that you can customize to your every need anyway.

All your emails can be centralized into a single window, and managing them, even in the hundreds, will never be more straightforward.

2. Allow access to SVCHOST.EXE

  1. Press the Windows button, type Firewall, and select Windows Firewall with Advanced Security to open it.
    firewall 0x80048830
  2. On the left pane, find Inbound rules and click on it.
  3. Now on the right panel, find and select New Rule under the Actions group.
    inbound rules
  4. On the left pane of the new window that opens, select Program and click Next.
    program
  5. Click on This program path, and in the text box below, type in the following: c:/Windows/system32/svchost.exe
  6. Now, click the Next button.
    path
  7. The system will likely produce a warning about svchost. Ignore the warning message and click on Yes.
  8. On another dialogue that opens, click on Allow the connection and proceed to check all of the following boxes.
  9. Add a name to the Inbound rule and click on Finish to complete the process.
  10. Now, on the right pane of the Windows Firewall with Advanced Security window, find and select New Rule under the Actions group.
  11. Click on Protocol and Ports and select Specific local ports.sync error 0x80048830
  12. On the textbox next to Select local ports, type in the following ports:
    • 6412
    • 993
    • 56161
    • 56161
    • 56164
  13. Specify which connects to allow and click on Allow the connection, and proceed to check the following boxes.
  14. Finally, add a name to the rule and click on OK.

The first and most straightforward solution you need to try is to allow access to svchost.exe on Windows Firewall. Follow these steps:

This should ideally fix the Mail app sync error 0x80048830 if it doesn’t, move on to the next solution.

3. Disable Windows Firewall and Antivirus

  1. Press the Windows key, type windows defender, and select the Windows Defender Firewall option.
    windows defender 0x80048830
  2. On the left pane, find and click on Turn Windows Firewall on or off.
    turn windows
  3. Now, in the Customize Settings window, select the Turn off Windows Firewall radio buttons for both the Private and Public network settings.
  4. Click OK to disable Windows Firewall.
    turn off 0x80048830
  5. Next, press the Windows key, type virus, and select Virus & threat protection.
    virus
  6. Click the Manage settings link.
    manage settings 0x80048830
  7. Finally, toggle the switch under Real-time protection backward to disable it.
    real-time

If error code 0x80048830 no longer shows up, the culprit is your antivirus and firewall programs.

In this case, the best thing to do is to disable the security software temporarily. Then, make sure you enable it after your Mail app finish syncing.

4. Update Windows

  1. Press the Windows key, type update, and select Windows Update settings.
    windows update
  2. Click on Advanced options.
    advanced options
  3. Now, toggle the switch for Receive updates for other Microsoft products when you update Windows.
    receive updates 0x80048830
  4. Next, go back to the Windows update page, and click Check for updates.
    check for
  5. Finally, download and install all available updates.

Microsoft frequently releases small and big updates for Windows 10, and with the patches that fix errors such as the error code 0x80048830. So it is wise to make sure that updates are automatically installed.

Hopefully, one of these solutions helped you fix this error and helped you get the Mail app syncing again.

If the Mail app is not working on your PC, check our detailed guide to fix it.

Feel free to let us know the solution that helped you fix the issue in the comments below.

Send to Mail Recipient not working in Windows 10 [TROUBLESHOOT]

The Send to Mail Recipient is used to add attachments to your email directly from the contextual menu. However, after the Creator update, users have reported that this feature is not working anymore in File Explorer.

Is Send to Email recipient in Windows 10 missing? Firstly, try repairing the Microsoft Office. Outlook, as the vital part of the suite, might be the problem. Furthermore, try setting it Microsoft Outlook as your default email client. In addition, try deleting the DLL file that configures Outlook‘s integration.

Find a detailed explanation of each step below.

How do I enable email recipients in Windows 10?

  1. Repair Microsoft Office
  2. Set Microsoft Outlook as the default mail client
  3. Delete MSMAPI32.DLL
  4. Try an alternative to Microsoft Outlook
  5. Reinstall Microsoft Office
  6. Other solutions to try

1. Repair Microsoft Office

  1. Press Windows Key + R to open Run.
  2. Type Control and hit enter to open the Control Panel.
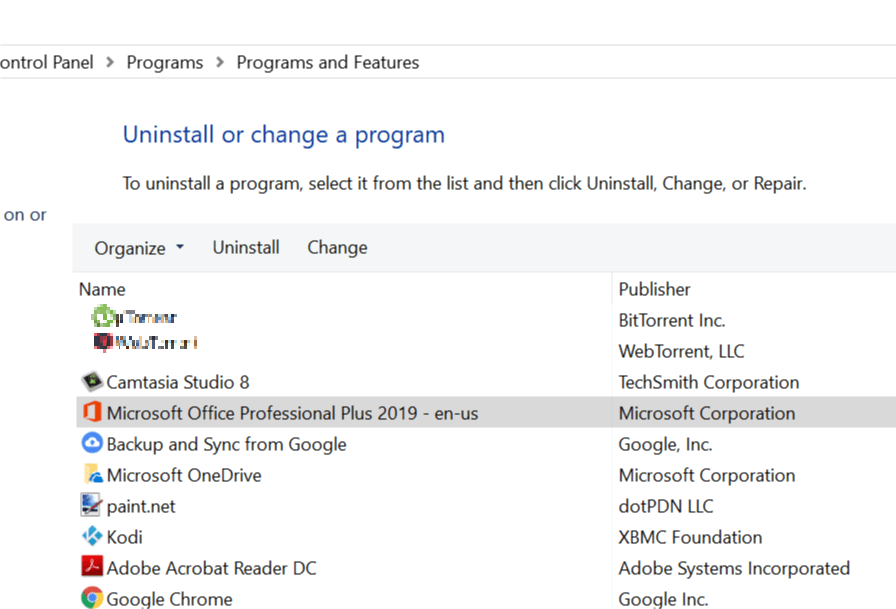
  3. Go to Programs > Programs and Features.
  4. Select  Microsoft Office from the installed programs.
    Windows 10 - Programs and Features - Uninstall- Office
  5. Click on the Change button (beside the Uninstall option).
    Microsoft Office Repair Option
  6. The Office Repair Interface will show two repair options.
    • Quick Repair – Select this option first. It fixes the most issue quickly without the need for an internet connection.
    • Online Repair – If the Quick Repair option did not work, try Online Repair. It fixes all issues, but takes a little longer and requires an internet connection to work.
  7. Select the Repair option and click on Repair to proceed.
  8. The Office Repair tool will look for the problems and fix them automatically.

Microsoft Office comes with a built-in option to perform a quick repair of the program files in case something goes wrong with the app.

2. Set Microsoft Outlook as the default mail client

  1. Click on Start and select Settings.
  2. Click on Apps.
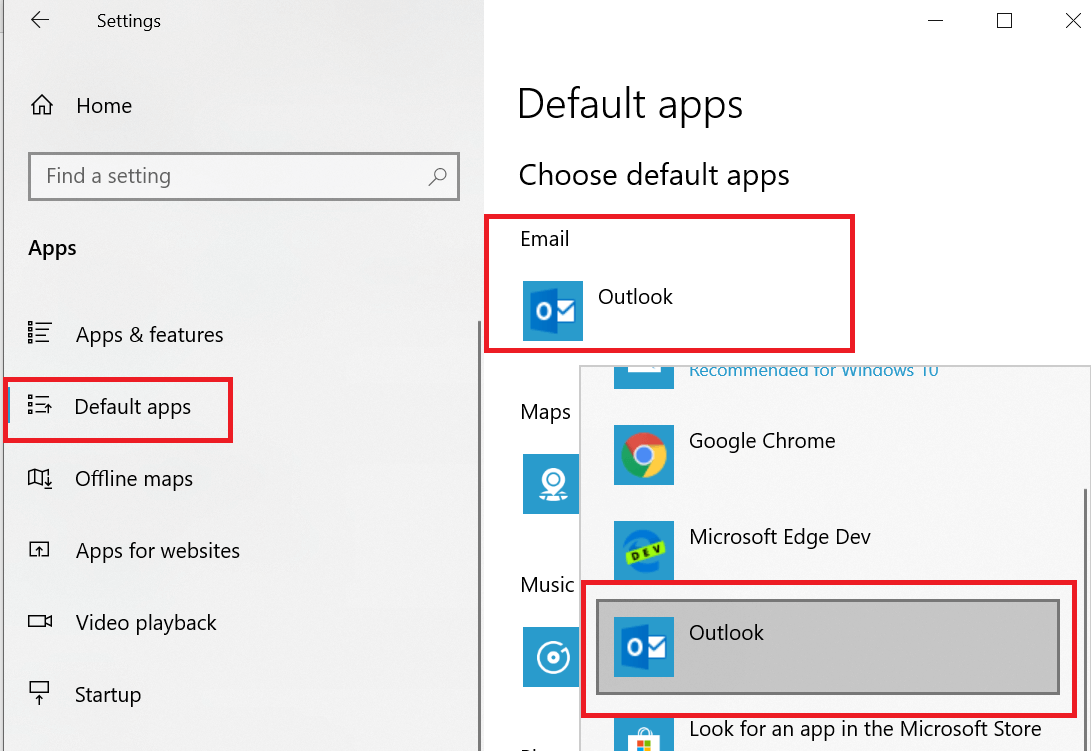
  3. Click on Default Apps.
    Windows 10 - Default Apps - Mail Client
  4. In the right-pane, click on Mail client and select Outlook from the options.
  5. Close the Settings and also close the Outlook app if running.

Windows by default set the Mail app as the default Mail client. If you are using Outlook, you may encounter File Explorer error if the Outlook client is not as the default mail client on your computer.

3. Delete MSMAPI32.DLL

  1. Open File Explorer.
    Delete MSMAPI32 _dll delete
  2. Navigate to the following location in your c: drive based on your Windows edition.
    • For 32-bit:
      • C:Program Files (x86)Common FilessystemMSMAPI1033
    • For 64-bit:
      • C:Program Files (x64)Common FilessystemMSMAPI1033
  3. If you can’t find the MSMAPI file in the above location, navigate to this location:


    • C:Program Files (x86)Common FilessystemMSMAPI1033
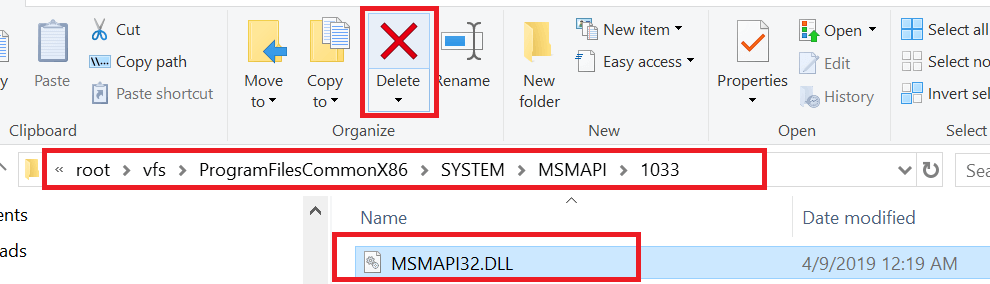
  4. Inside the folder, locate Msmapi32.dll. Right-click on Msmapi32.dll and select Delete.
  5. Close the File Explorer.
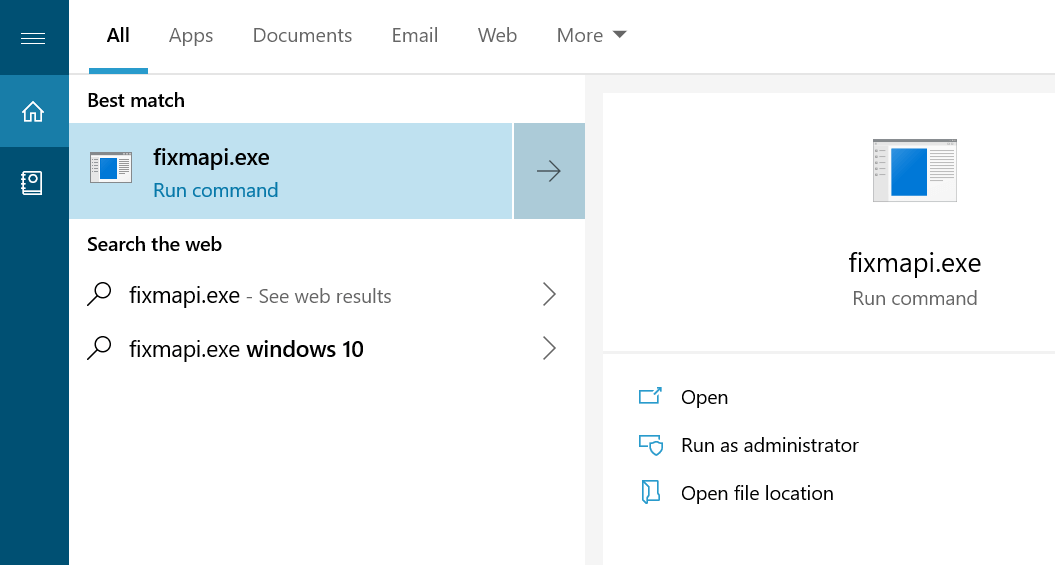
  6. In the Cortana/search bar, type fixmapi.exe.
  7. Select Run Fixmapi.exe.
    Fixmapi_exe Run command
  8. Relaunch Outlook. Outlook will recreate the msmapi32.dll file and launch.

The next step is to delete the MSMAPI.32.DLL files from the installation drive. This file is associated with the Microsoft Outlook client. After deleting the file, Outlook will recreate a new file in the same location.

Try to send an attachment from Send to > Mail Recipient again and check if the error is resolved. If the issue persists, try restarting your system and check back for any improvements.

4. Try an alternative to Microsoft Outlook

Before trying to repair Microsoft Outlook, you should consider replacing it altogether with a better alternative.

One such choice is Mailbird. Just like Outlook, both are available as both a downloadable client and as a web client.

However, Mailbird is superior in terms of designs and customization, being less rigid than Outlook, and a lot more fun to use.

Mailbird is also lightweight and frequently updated, so errors will not be there for long if they ever even happen.

5. Reinstall Microsoft Office

  1. Press Windows Key + R, type control and hit enter to open Control Panel.
  2. Click on Programs > Programs and Features.
    Windows 10 - Programs and Features - Uninstall- Office
  3. Select your  Microsoft Office version and click on Uninstall.
  4. The office will ask you to confirm the process, click on Uninstall to remove the program.
  5. Now you need to download and install a fresh copy of the Microsoft Office, and that should resolve the error.

You can also fix this issue by reinstalling Microsoft Office. Uninstalling the Microsoft Office app will remove any corrupted files in the system and fix the issue after a fresh install.

6. Other solutions to try

Create a new user account and log in to it. Check if the Send to > Mail Recipient feature is working. Also, you can try restoring your system to a previous restore point.

If you have multiple languages for Office installed, change the display language in Outlook to your second language and check if that resolves the error.

To learn more about frequent Outlook issues and their solutions, visit our Outlook Fix Hub.

Need help finding a better email client? read all about them on our Email page.

Where Can I Watch Avatar: The Last Airbender in 2022?

Avatar: The Last Airbender is a popular animated TV series that follows a young boy who recently woke up from a hundred-year slumber and can manipulate the elements of nature.

The world is on the brink of destruction, so the protagonist of the show naturally tries to stop that from happening by using its awesome powers.

If you’re a fan of superpower, Chinese martial arts animated series, then you should really give Avatar: The Last Airbender a try. The series only has 61 episodes and the last episode aired in 2008.

Therefore, if you didn’t see it, you have a lot of catching up to do.

Is Avatar: The Last Airbender on any streaming service?

We’ve prepared a list of platforms where you can stream Avatar: The Last Airbender TV series:

Streaming AppsBest dealSeasons
Amazon Prime14.99$ per month3
Disney+11$ per month3
Hulu12.99$ per month3
Paramont+99.99$ per year – save 16%3
Apple TV4.99$ per month3

As you can see, there are quite a few options, compared to other TV series that are exclusive to certain platforms. You can also find Avatar: The Last Airbender on Crunchyroll to stream, and the JustWatch TV guide provides you with even more streaming alternatives.

However, this doesn’t mean that you can just sign up for an account, purchase a subscription, and just stream the series.

Most of these platforms are geoblocked, which means that you can only access and use them from certain countries in the world. Alright, alright, you can only stream Avatar: The Last Airbender on these platforms if you’re in the US.

However, here’s how you can watch these animated series, even if you’re not in the United States.

How can I watch Avatar: The Last Airbender online from anywhere?

1. Get a VPN optimized for streaming

  1. Purchase a premium VPN subscription (we recommend Private Internet Access).
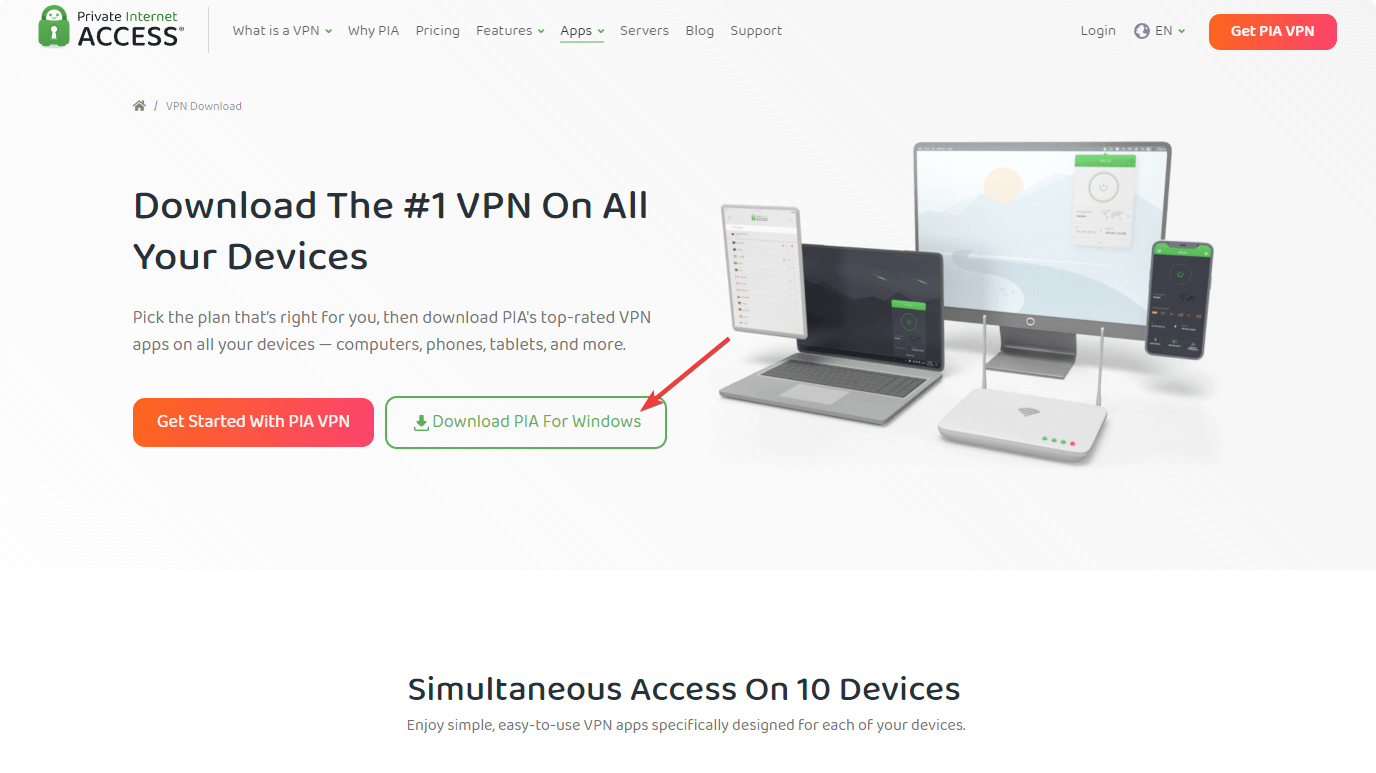
  2. Download and install the VPN on your device. download-pia
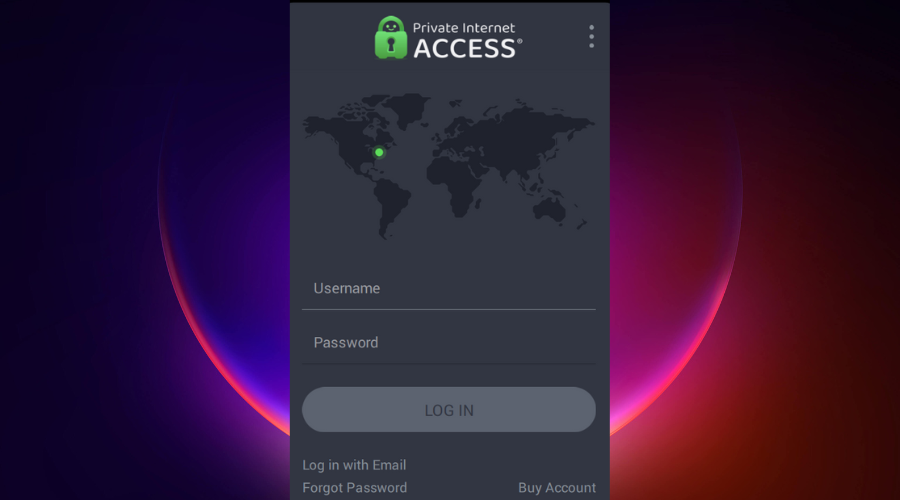
  3. Launch the VPN client and log into your account. premium content not available
  4. Connect to a US server (preferably one that’s not too crowded).

Kape Technologies’ Private Internet Access is an excellent VPN service that can easily unblock geo-restricted content on various platforms.

This VPN service provides you with a huge network of servers (more than 11,000 servers) that you can easily switch between, in case some of them don’t work as intended.

Last, but not least, it’s one of the few VPN services that offer 24/7 live chat support to their customers.

Private Internet Access

Stream Avatar: The Last Airbender anywhere thanks to this utility providing a large server network for streaming.
Check price Visit website

2. Subscribe to a streaming platform

  • Exclusive Amazon original TV series
  • Early access to deals
  • Free delivery to thousands of items
  • Access to music & games from the Amazon library
  • Requires Amazon membership & credit card details

You can choose any streaming platform we’ve mentioned above. At this moment, you can watch Avatar: The Last Airbender on any platform at HD quality, so it’s really a matter of choice.

If you don’t know where to start or which platform to choose, Amazon Prime seems to be the most popular choice. Even if you binge-watch Avatar: The Last Airbender (it only has 61 episodes), you can still watch some other great shows.

Amazon Prime also provides you with a 30-day free trial, but there’s a catch: you’ll need to provide it with valid credit card details in order to get the trial.

3. Enjoy your TV show

We didn’t need to tell you this, but once your VPN is up and running and you have your subscription plan, you can go ahead and start watching Avatar: The Last Airbender.

Note that sometimes the show might not even appear in the library of your current streaming service. If that happens, take the following steps:

✅Make sure your VPN connection has been successfully established.

✅Disconnect from the VPN and connect to the same server.

✅Switch the VPN server (but remember to pick a US-based one).

✅Enable the VPN’s obfuscation feature (if available).

✅Choose a different VPN protocol.

✅Clear your browser’s cache and cookies.

✅Flush your DNS.

Bonus: choose an obfuscation-ready VPN

Sometimes, streaming services can get smart and block VPN traffic, which is quite easy to detect. If that’s the case, you could switch to a VPN service that offers obfuscation features.

Some providers may call them stealth VPN, obfuscated servers, or even CHAMELEON. What this obfuscation feature does is it takes VPN traffic and disguises it as regular traffic, making it incredibly more difficult to detect and block.

If you’re interested in such a VPN but don’t know where to start, check out our list:

?Private Internet Access with WireGuard protocol from Kape Technologies.

?ExpressVPN with stealth servers from Express VPN International Ltd.

?NordVPN with obfuscated servers from Tefincom & Co., S.A.

?SurfsharkVPN with camouflage mode from Surfshark LTD.

?IPVanish with scrambled OpenVPN traffic from StackPath, LLC.

All things considered, if you want to watch Avatar: The Last Airbender, the good news is that there are several streaming platforms where you can do that. The downside is that most (all) of those platforms are geo-restricted.

Check out our VPN Troubleshooting Hub if you’re experiencing any issues with your VPN. Visit our Unblocking Hub for more guides on unblocking restricted services with a VPN.

However, geoblocking can be easily bypassed with VPN services. Worse comes to worst, you may have to switch to an obfuscation-ready VPN service that can mask your traffic, but that should definitely take care of everything with minimum hassle.

Android Repair Tool for PC: 5 Best We Tested in 2026

Sometimes your phone can encounter certain issues, and in order to fix them, you might need to use specific software.

Speaking of which, in today’s article we’re going to show the best software to fix Android phones, so let’s get started, shall we?

What is the best software to fix Android phones?

Tenorshare ReiBoot

Tenorshare ReiBoot is a repair software for Android phones that lets you boot into Bootloader mode on any Android device with a single click, so there’s no need to use the key combination to access fastboot.

In addition to Bootloader, you can also access Recovery Mode just as easily with a single click. If you tend to flash your ROM or Kernel, you’ll be pleased to know that you can also access Download or Odin mode.

Tenorshare ReiBoot can also be used to clear system cache or partition cache from your phone and make your device snappy again.

As for compatibility, this software works with 600+ Android devices, regardless of the manufacturer or your carrier.

Tenorshare ReiBoot is a great software if you want to fix all sorts of Android issues, so we strongly suggest that you consider it.

Tenorshare ReiBoot features:

  • Supports over 600+ different devices
  • Can fix over 50+ different Android issues
  • Ability to boot to fastboot, Recovery Mode, Download/Odin mode with a single click
  • Can delete system/partition cache
  • Can fix slowdowns

Tenorshare ReiBoot

Tenorshare ReiBoot is powerful Android repair software that can fix over 50 different issues on your phone.
Check Price Visit website

FoneLab Broken Android Data Extraction

If you’re looking for software to fix Android phones and extract your data, you should consider using FoneLab Broken Android Data Extraction.

The software can fix your Android device with a couple of clicks, and you can also use the software to recover files from your phone’s SD card.

The software can recover all sorts of data including photos, music, contacts, messages, videos, documents, call history, and WhatsApp data.

The application can also help if your device isn’t responding or if you’re experiencing system crashes, black screen, reboot loop or any other similar problems.

FoneLab Broken Android Data Extraction is a great software for data extraction, and it’s optimized for Samsung devices, so be sure to consider it.

FoneLab Broken Android Data Extraction features:

  • Ability to extract data from the SD card
  • Can recover photos, music, contacts, messages, videos, documents, call history, etc.
  • Can help with system crashes, reboot loops, black screen, and other issues
  • Supports a wide array of Samsung devices
FoneLab Broken Android Data Extraction

FoneLab Broken Android Data Extraction

FoneLab Broken Android Data Extraction can repair your Android phone, but it can also help you recover lost files.
Free trial Visit website

PhoneRescue

PhoneRescue is another great software that can fix your Android phones. Speaking of phones, the software works with SAMSUNG, HUAWEI, LG, Google, and devices from all other manufactures.

The software allows you to easily restore all accidentally deleted data including your messages, contacts, call logs, and calendar.

PhoneRescue can also recover hidden files that are stored deep inside of your device. This includes media files, but also various application data.

Using this software, you can also remove the lock screen and access the locked device once again. Keep in mind that this feature only works for supported models and not all Android phones.

PhoneRescue is great software, and it’s a perfect choice if you want to recover phone data or gain access to a locked device, so be sure to try it out.

PhoneRescue features:

  • Supports a wide array of Android devices
  • Allows you to easily restore deleted data
  • Can restore hidden files
  • Ability to remove lock screen on supported devices
PhoneRescue

PhoneRescue

PhoneRescue is great software that can restore deleted data and repair your Android phone.
Free trial Visit website

FonePaw Android Data Recovery

FonePaw Android Data Recovery software to fix android phones

Another software that might help you fix your Android phone is FonePaw Android Data Recovery. The software is specialized in data recovery, so you can easily retrieve the data from your phone.

As for the type of data that you can recover, the application can recover contacts, messages, call logs, Whatsapp data, photos, videos, music, and documents.

FonePaw Android Data Recovery is faster than its competitors, and it can retrieve files without any additional file loss. In addition, you can preview files before you recover them, which can be useful.

The application is simple to use and it can help you with accidental file deletion, OS crashes, SD and SIM card issues, rooting errors, ROM flashing problems, and malware issues.

Overall, FonePaw Android Data Recovery is a simple but powerful software that should be able to recover your files in case of an emergency.

FonePaw Android Data Recovery features:

  • Ability to restore contacts, messages, call logs, photos, music, and other data
  • Ability to preview files
  • Faster than its competitors
  • Simple to use
  • Supports over 6000 phone models

⇒ Get FonePaw Android Data Recovery

MiniTool Mobile Recovery for Android

MiniTool Mobile Recovery for Android software to fix android phones

If you’re having issues with your Android phone, you might want to try MiniTool Mobile Recovery for Android. The software comes with a simple and friendly interface, so it’s incredibly simple to use.

The application is optimized for data recovery, and it can recover lost, deleted, and corrupted data from various Android devices. In addition, you can use this software to recover data from SD cards as well.

As for the data that you can recover, MiniTool Mobile Recovery for Android will recover messages, contacts, call history, as well as photos, videos, music, and other multimedia data.

We also have to mention that this software might come in handy if you’re experiencing system crashes, or if you’re having problems with a forgotten password, virus attacks, OS errors, and other issues.

MiniTool Mobile Recovery for Android is simple to use, and it can be used to recover all sorts of data, so you might want to try it out.

MiniTool Mobile Recovery for Android features:

  • Simple to use
  • Ability to restore lost, delete, and corrupted files
  • Can recover messages, contacts, photos, videos, music, and other files
  • Can help with system crashes, virus attacks, OS errors, and other problems

⇒ Get MiniTool Mobile Recovery for Android

Fixing your Android phone doesn’t have to be a tedious task, and you should be able to do it as long as you use the proper software to fix Android phones.

FIX: FIFA 17 stops working on PC [Startup Crash]

FIFA 17 is an improvement compared to its predecessor in many ways. With better-established AI and an upgraded Story Mode, we have a more realistic and immersive soccer simulation.

Additionally, you can test your skills against friends and other players worldwide with the Ultimate Team feature.

However, optimization issues seem to have a large impact on PC players. The game suffers from the same problems as earlier versions. The special emphasis goes to older PC configurations.

One of the most frequent issues is the game crashing. On some occasions, the game crashes while playing offline/online. On other occasions, FIFA 17 can’t even start.

So, if these problems bother you as well, we’ve prepared some of the most common solutions for this problem.

How do I fix FIFA 17 crashing on Windows 10?

1. Update GPU drivers

All modern games are highly dependable on GPU drivers. That is the case with FIFA 17, too. It doesn’t matter how powerful a graphics card you own if the drivers are not up to date.

So, be sure to check out your drivers and update them accordingly. If you are using older GPUs with legacy drivers, be sure to check if FIFA 17 is on the list of playable games.

In addition, your card must support DirectX 11 in order for the game to work.

In order to prevent PC damage by installing the wrong driver versions,  we suggest doing it automatically by using Outbyte Driver Updater.

This is a tool that you install on your device and allow it to scan your system. The software will find all outdated drivers and show a list of recommended new ones.

You can then choose whether you want to update all at once, or just one of them.

Therefore, you will resolve every driver matter easily following through the process and optimizing your system devices to work without interruptions.

⇒ Get Outbyte Driver Updater

2. Run in Compatibility mode for older Windows OS

  1. Open the FIFA 17 installation folder.
  2. Find Fifa17.exe and right-click to open Properties.
  3. In the Compatibility tab, check Run this program in compatibility mode for box.fifa 17 crashes on pc
  4. Select Windows 7 SP 1 or Windows 8.1.
  5. Check Run this program as an administrator box.
  6. Save and try running the game.

FIFA 17, as stated by developers, will work only Windows 7/8.1/10 with 64-bit architecture. Make sure to meet all the minimum system requirements, though.

3. Try out windowed mode

On older PC configurations, FIFA 17 can crash because of a resolution bug in the full-screen mode. If you are not annoyed with the windowed mode, set it up.

The first step is ALT + ENTER combination. This should change your game from full-screen to windowed mode. Nonetheless, on some occasions, this won’t work.

You can force the game to start in windowed mode by following these steps:

  1. Go to the FIFA 17 desktop shortcut.
  2. Right-click the Fifa17.exe and open Properties.
  3. Select the Shortcut tab.
  4. In the Target,  you will see the destination to Fifa17.exe
  5. After quotation mark, press space and write -window.
  6. Save your settings and start the game.

4. Install the latest DirectX, VC++, and NET Framework

Besides the GPU drivers, you probably want to check the DirectX, Visual C++ redistributables, and NET framework.

All of them are valid reasons for some FIFA 17 crashes, so make sure you have them installed.

You can download all the apps here:

5. Use the Origin client to fix corrupted files

  1. Go to your Origin client.
  2. Find FIFA 17.
  3. Right-click on the game and select Repair Game.
  4. The tool will scan and fix corrupted game files.
  5. The process shouldn’t take long and your saved games are safe, so don’t worry.

If you used Origin to obtain your digital copy of FIFA 17, you can also use it as a repair tool. This feature has proved useful multiple times.

So if files are corrupted or incomplete, the tool will surely find and fix them.

6. Reinstall the game

Another option for you, if the game keeps being unresponsive or crashes often, is reinstallation.

To proceed with this, you should first uninstall the game completely, and the method to do that correctly is by using one of the best uninstaller software available on the market.

Afterward, if you have a hard copy of the game, insert it into your PC, and start the process.

On the other hand, if you are installing from Origin, the game needs to be downloaded and installed from the client. Keep in mind that the process can be lengthy, depending on your download speed.

7. Install the Dual Core software solution

Since the game is primarily designed for four or more cores, many players encountered problems while trying to play with dual-core processors.

This is one of those optimization issues that demand newer hardware acquisitions for players. However, there is an application that can save you money.

Dual Core is a software solution that can help you optimize your CPU and let you play the latest games. You can download it here. To install it, follow these steps:

  1. Right-click and run Extreme Injector v3.exe as administrator.
  2. Click on the Add Dll button on the left.
  3. Add the two dlls dualcore.dll and EasyHook64.dll (both should be automatically ticked/enabled after you have added them).
  4. Run FIFA 17 as normal, keep the Injector open, click on the Select button, and click on the “Fifa17.exe” process within the process list window.
  5. Click Inject.

Disclaimer: This is an unofficial download mirror for the Fifa 17 The Division Dual Core fix. WindowsReport is not responsible for the download or the installer package.

To conclude, your best bet for playing FIFA 17 without bugs, crashes, and other issues is to meet the recommended system requirements.

In most of the crash-reported cases, the game functions with unreliable configurations.

If you’re interested in reading about other issues affecting the FIFA game, check out our articles on FIFA 18 and FIFA 19 bugs.

We also have a guide on what to do if FIFA 17 is not launching, so don’t miss it.

What other problems have you encountered in FIFA 17 (or newer) and how did you solve them? Leave your answers and any other questions you may have in the comments section below.

Surfshark silently rolls out Wireguard protocol feature

Surfshark teased the implementation of the Wireguard protocol in their VPN service for quite a while. Word around the block is that the new feature‘s ETA was sometime in the second half of 2020, and it seems we’re already there.

According to a Reddit user’s post, Surfshark already included Wireguard as one of their protocols without saying a word. Here’s what they said:

So I just noticed that Surfshark now has the Wireguard protocol. When was it rolled out?

What is Wireguard?

Wireguard is a promising open-source protocol that the Linux kernel already uses as a module but has been adapted to work on popular platforms, such as the abovementioned ones. It’s published under the GPLv2 license.

It aims to offer greater speed, more performance, and lower power consumption than its OpenVPN and IPsec analogs.

Wireguard comprises a lightweight code that can be audited quickly and easily. Furthermore, it can keep your data safe by encrypting it with modern, thoroughly-tested cryptographic primitives and protocols.

Surfshark now supports Wireguard on multiple platforms

It’s currently unclear which came first, or the exact time Wireguard rolled out on each platform, but one thing’s certain. It’s here for the long haul and shows a lot of promise in terms of speed, flexibility, and security.

What we do know is that Surfshark now offers Wireguard as a protocol of choice on multiple platforms. Namely:

  • Windows
  • macOS
  • Android
  • iOS

More so, it would appear that Android and iOS users who would leave their protocol settings on Automatic may be switched to Wireguard, by default.

Surfshark to release a Wireguard safety article

As far as Surfshark’s implementation of Wireguard goes, reportedly an official article regarding the safety of this new protocol is in the works.

On the downside, no ETA was announced, but we can expect it to be posted sooner, rather than later.

[wl_navigator]

How to compress a .mov file on Windows 10 & Mac quick & easy

Because video files can be very large, this can cause a lot of problems when uploading them on different websites or when hosting them.

For example, a 1-min uncompressed 1080p video can take up to 120-130 MB which is a lot considering that a .mov file lasts more than one minute.

If having the highest possible resolution on your .mov files is not a must, then making them smaller can be a better solution.

This will reduce both bandwidth and uploading speed, with less buffering on the viewer’s end.

Compressing a large video might take up some time, but once is done it will surely free up some space on your device.

In this article we will show you some easy steps you can make in order to compress your .mov files in both Windows 10 and Mac, so make sure to keep reading.

How can I compress a .mov file on Windows 10 or Mac?

1. Use a dedicated software


One of the great things about WinZip is that it offers some really useful features, such as sharing, editing, or moving the files stored on your PC or in the cloud service.

This software is more than just a simple compression tool, due to its options that allow you to share, manage, protect, and even backup your files.

Using WinZip is extremely easy. Once the tool has been downloaded and installed on your device, you’ll need to right-click on the .mov file and choose Zip from the menu.

All that is left to do is choosing the desired location for where the Zip file to be stored.

WinZip supports the following compression formats: Zip, Zipx, RAR, 7z, TAR, GZIP, VHD, XZ, and more.

Now, let’s have a quick look at its key features:

  • Multiple files extraction.
  • ZIP file repair.
  • Password protection.
  • File Manager and File Splitter features.
  • Data back-up and sharing options.
  • Connects with Dropbox, Google Drive, OneDrive etc.

”WinZip”

”WinZip”

”Compress
”Free”
&aff_sub2=Native” current_url=”true” button_text=”Get it now” image=”https://windowsreport.com/wp-content/uploads/2017/11/WinZip-button-210×160.png”]

2. Compress the file using VLC

compress mov file to smaller size with vlc

  1. Download VLC and run it on your device.
  2. Open VLC and go to the File menu.
  3. Next, select the Convert option.
  4. Click the Add button and then select the video you want to convert.
  5. Next, click on the Convert/Save button.
  6. In the Profile section, select Video – H.265+ MP3 (MP4).
  7. Click on Destination and select the place where you want the file to be saved.
  8. Next, click Open.
  9. Finally, click on Start and wait for the conversion process to be finished.
  10. The compressing process can take a few minutes. Don’t close the window as this could compromise the whole process making the output video corrupt.

Note: In the settings window you can modify parameters like codec, frame rate, resolution, etc to change the video file size. Our recommendation here is not to change the aspect ratio parameters, as this will modify the original quality of your video and make it unusable.


3. Convert the .mov file online

compressing .mov files for email
There are various websites where you can convert the .mov files and is a great option to use especially when you don’t have a lot of time on your hands.

It can be the case though, that you will not be given the option to choose which MP4 technology is being used and there could be a limit in what file size you can upload.

Wondershare is such a website, where you can easily convert your .mov file to different file formats, just as long as the file size is 100 MB or smaller.

Converting your file is a pretty simple process. All you need to do is to upload your file and simply wait to be prompted to download the file. This does not take more than a few minutes usually.

As a side note, we recommend you install antivirus software on your PC, if you don’t have one already, taking into consideration you will be downloading the file over the Internet.

As you can see, compressing a .mov file does not have to be a tedious process or take much of your time. It can be done in just a few steps, using our recommendations above.

If you have additional suggestions and recommendations, please let us know in the comments section below.

[wl_navigator]

F.lux Not Working on Windows 10 [STEP-BY-STEP GUIDE]

F.lux is a cross-platform program that is used for adjusting your display’s color temperature, but many users reported that F.lux is not working on their PC.

The main feature of the software is the reduction of eye strain for the user, especially when you’re on your machine at night.

As you can see, this software is incredibly useful, and in today’s article, we’ll show you some troubleshooting tips.

I’ve noticed f.lux isn’t working on later versions. It is a predecessor to built in Night Light but with a feature to turn down brightness which really is the point for me. Any solutions?

What can I do if F.lux isn’t working?

1. Update your graphics card drivers

The importance of constantly updating your drivers has been a part of many online conversations lately and it is because of all these potentially related issues.

That’s our recommendation for you today as well, in order to make F.lux work again. Of course, you can visit your graphics card manufacturer’s website and download the latest drivers for your model.

Alternatively, you can use a third-party tool such as Outbyte Driver Updater to automatically update drivers with ease and avoid all risks from the very start.

Moreover, this tool truly lets you update all your PC drivers with just one click. And best of all, discovering every single missing driver is done in mere seconds.

⇒ Get Outbyte Driver Updater

2. Turn off Windows Night light

  1. From your Start Menu select Settings.
  2. Now head on over to System and click on Display.
    display settings Flux not working on windows 10
  3. Select Night light settings, and in the Schedule area you can set custom hours or turn in off.

3. Run a malware scan

It’s not impossible to imagine having a virus of any kind that prevents F.lux from working. When updating the drivers made no difference, you need to perform a full system scan.

If it’s the case, don’t postpone removing any malware. On top of that, consider switching to a reliable antivirus, to begin with.

In case you don’t have a powerful one already, there are multiple options you can choose to get complete malware protection.

Plus, to assure your digital security at its best you should consider the most efficient antivirus with high detection rate.

4. Upgrade your DirectX

  1. Make sure that you have the latest version of DirectX installed.
  2. If you’re using DirectX 9 on your PC, you’ll have to upgrade to DirectX 10 in order to use F.lux.

5. Switch to a Display Port

  1. If you have the ability to switch to Display Port, please do so.
  2. Just connect your monitor to the Display Port and check if the issue is still there.

These are just a couple of solutions that you can try if F.lux isn’t working on your PC. They may also be applied when F.lux is not working on the second monitor.

Feel free to try them all and let us know in the comments section which solution worked for you.

Lenovo’s long-awaited foldable PC is finally available

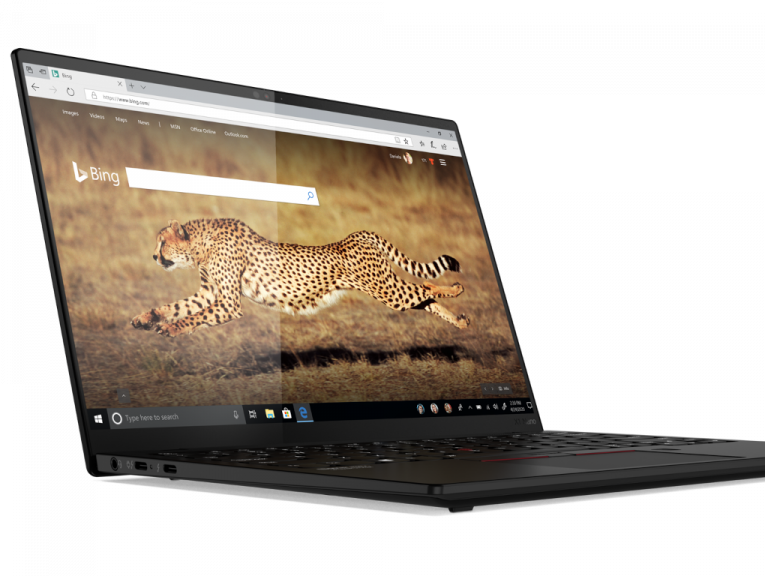
In May of 2019, Lenovo teased its ThinkPad X1 Fold right around the same time Samsung was introducing smartphone users to bendable glass. Fast forward a year and Samsung is leading the charge for semi-accessible foldable with the second titration of its Z Fold lineup and Lenovo is finally putting its ThinkPad X1 Fold in the hands of users.

Earlier today, Lenovo announced that its ThinkPad X1 Fold is now available for order, starting at a whopping $2,499.

Yes, just like most early bendable tech, the X1 Fold is coming in at a staggering upsell price, however, at just shy of $2,500 buyers get an Intel Lakefield powered processor, 5G support, two USB-C ports, 8GB of RAM, and 1TB of storage in a package roughly 2lbs in weight.

Other features of the X1 Fold include a 50Whr battery with claims of up to 11 hours of power on a single charge, Integrated UHD 11th Intel graphics flexible QVGA OLED 13.3 panel with up to 300 nits of brightness, Wi-Fi 6, Dolby Atmos Speaker System array and Windows 10 Pro with some Lenovo tweaks for optimizing the folding experience.

The extra $1,000 people will be paying for is the folding hardware and tech behind the X1 Fold that will open broader use cases for fields like medical, farming, construction, shipping, and more.

X1 Fold Lifestyle Photography

Flying lower under the radar was Lenovo’s other hardware announcements that included the more practical ThinkPad X1 Nano which offers a refined experience to the X1 lineup. Lenovo’s new X1 Nano comes in under 2 lbs and is certified under Intel’s ultra-Ultrabook standards dubbed Evo. Intel’s Evo platform dictates a new classification of PC that’s intended to offer even-longer battery life than the previous Ultrabook platform as well as a mandate for fast charging, instant wake support, Thunderbolt 4, and Wi-Fi 6 (Gig+) support.

Specifically, the Nano will sport Intel’s 11 Gen processor with possible i7 configurations, up to 16GB RAM, 1TB of SSD storage, Iris X graphics, an IR camera with human presence section, a fingerprint reader, and a battery that should last roughly 17 hours.

Linux’s fans should be happy to hear Lenovo is offering the same chassis with an option to configure Windows 10 Pro or Linux out of the box.

03 Tp X1 Nano Cropped

Another nice new feature of Lenovo’s ThinkPad X1 Nano is the screen to chassis manipulation that offers customers a 2K 13-inch display with the coveted 16:10 aspect ratio in a relatively compact footprint.

The X1 Nano starts at a more reasonable price of $1,399 and should be available for order later this year.

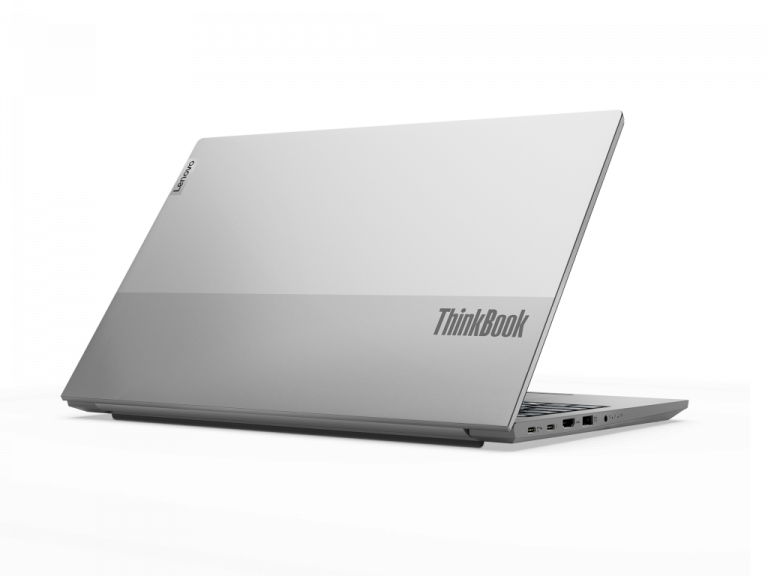
Lenovo also announced the availability of additions to its ThinkBook lineup that includes the ThinkBook 13s Gen 2, ThinkBook 14s Yoga, ThinkBook 15 Gen 2, and their AMD powered counterparts. The new ThinkBook line up comes with Intel’s latest 11 gen chips that usher in the company’s Evo platform standard so customers should be welcoming longer battery life, Wi-Fi 6 and 5G support as well as improved sleep/wake experiences with the new offerings

Starting prices for the ThinkBook rage from $569 to $729 in the US for both AMD and Intel models beginning in October 2020.

14 Thinkbook 15 Cropped

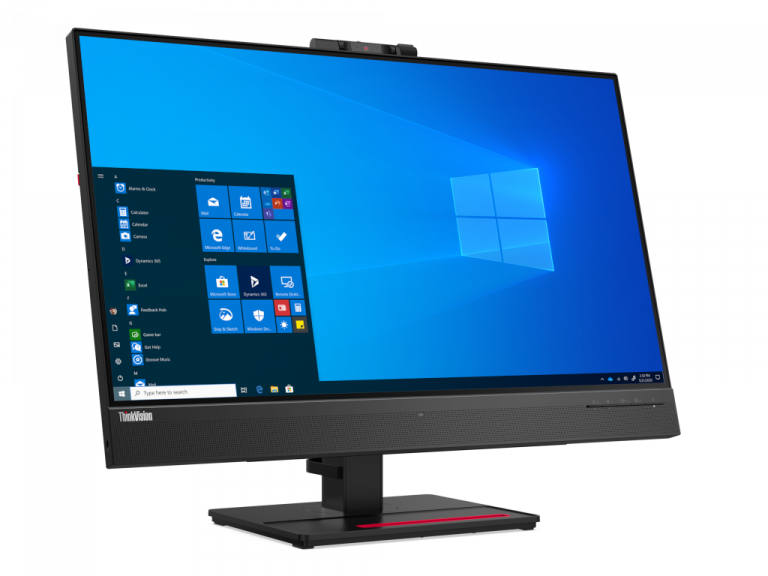
Lastly, Lenovo introduced its ThinkVision T27hv-20 which should be available during the holiday season for anyone still looking to redo their home office with a stylish new computer monitor.

05 Thinkvision T27hv 20 Cropped

The ThinkVision T27hv is a 27-inch almost bezel-less display with an integrated 1080p webcam for the avalanche of Zoom calls people are receiving as of late. Other features include a USB-C hub and smart guard for improved privacy among the 20 or so listed by Lenovo.

Still running Windows XP? Leaked source code is a red flag

Reports have constantly emerged during the past few days regarding the source code of Windows XP and other operating systems. As confirmed by Microsoft, it has indeed leaked online.

Microsoft is aware of the incident and an official statement reveals their plans:

We are investigating the matter.

While the leak does have an impact on certain privacy-conscious users, it poses no real threat to software developers.

In fact, while this seems to be a big problem for many, some users aren’t at all affected by the leaked source code. Here’s what one of them said:

Much of my equipment is older and the software only supports up to XP. With XP being the best operating system, I don’t really mind.

Which Microsoft Windows source codes have been leaked?

Windows XP source code leaked

The sources under discussion were initially published last week on a file-sharing site called Mega (4chan), with the actual OS codes packed in a torrent file that weighs in at just under 43GB.

Then, they got leaked all over the Internet. Besides Windows XP, the pack includes the source code for a variety of older Microsoft operating systems as well:

  • Windows Server 2003
  • Windows 2000
  • MS-DOS 3.30
  • MS-DOS 6.0
  • Windows CE 3
  • Windows CE 4
  • Windows CE 5
  • Windows NT 3.5
  • Windows NT 4
  • Windows Embedded 7
  • Windows Embedded CE

As you can see, none of the platforms included in the leaked file are modern.

For example, Embedded used to be Microsoft’s connected experiences platform currently replaced by Windows IoT.

Even Windows XP hasn’t been supported by Microsoft since 2014. However, it’s still there and this means one thing.

Vulnerabilities of all kinds do exist on the millions of computers that still run it, even if Windows XP has a tiny market share.

Therefore, are you willing to break the old habit and try something new or do you intend to keep on using Windows XP and risk hackers create new exploits targeting this OS?

[wl_navigator]

Could Not Initialize Direct3D: Why and How to Fix

One of the worst things that can happen to you if you’re a PC gamer is that you cannot start your favorite video game.

Some users have reported an error message saying that there has been a problem initializing Direct3D in Windows 10.

If you’re a gamer with this problem, you might want to check the following solutions.

What can I do if I can’t initialize Direct3D on Windows 10?

  1. Update drivers automatically
  2. Run the inbuilt Hardware & Device troubleshooter
  3. Update your graphics card driver
  4. Check for display driver updates in Optional Updates
  5. Uninstall and reinstall the display driver
  6. Install an older driver
  7. Change the game’s resolution
  8. Reinstall Visual C++ Redistributables
  9. Remove the problematic update
  10. Rename the problematic DLL file

1. Update drivers automatically

Suppose you need to initialize Direct3D in Windows 10, but you don’t know what causes the issue that prevents you from doing so. First of all, you’re entitled to suspect graphics card driver issues.

How to solve them easily? Well, Outbyte Driver Updater is your safest choice since it has a growing database of drivers for a wide variety of devices.

In case you don’t have the necessary skills to update your drivers manually and you fear of damaging your computer by downloading the wrong driver version, let Outbyte Driver Updater do its magic.

Outbyte Driver Updater updating drivers

This tool is the best-automatized solution since it can update all your drivers at once or only the ones that you select, not to mention that you can create backups before any update.

⇒ Get Outbyte Driver Updater

2. Run the inbuilt Hardware & Device troubleshooter

  1. First, press Windows + S keys on your keyboard to open the search option.
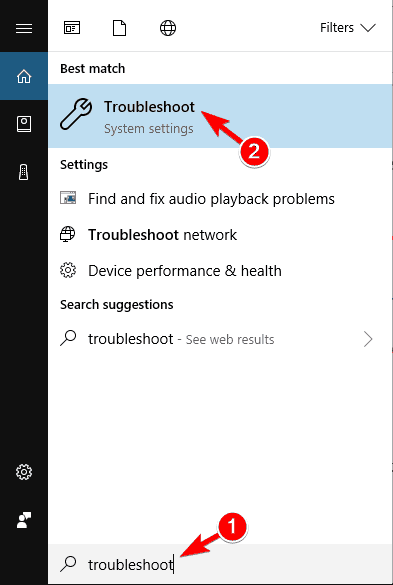
  2. Enter Troubleshoot and click Troubleshoot.
    Cannot initialize Direct3D device troubleshooter system settings
  3. Click on Hardware and Devices and then click on Run the troubleshooter button.
    Initializing Direct3D VirtualBox run the hardware and devices troubleshooter
  4. Follow the instructions on the screen to complete the troubleshooter.

This is a pretty simple solution, and it will automatically check if your new hardware installed properly. After the troubleshooter is finished, check if the issue still persists.

3. Manually update your graphics card driver

  1. Press Windows Key + R. In the Run prompt, enter devmgmt.msc and then press OK button.
    Initialization of Direct3D device failed device manager
  2. In Device Manager, you need to find Display adapters section and click it to expand it.
  3. Find your display driver from the list, it should be the only one available, and right-click the display driver and then click Update driver.
    Failed initialize Direct3D with current settings update gpu driver
  4. Select Search Automatically for Updated Driver Software.
    Error initializing Direct3D device is not available search automatically for updated driver software
  5. Windows will now search and update the selected driver automatically.

As already said, problems with initializing Direct3D can be caused by your graphics card driver. To fix the issue, you can also update your driver by following the above steps.

Once your driver is updated, the problem with Direct3D should be fixed.

4. Check for display driver updates in Optional Updates

display driver updates
  1. Open the Start screen/menu and type Windows Update.
  2. Click on Settings on the right side and then select Install optional updates from the left results.
  3. Windows Update control panel should open and then all you need to do is to click Check for Updates on the top left corner in order to receive the latest updates.

After downloading the necessary updates, the issue should be fixed.

5. Uninstall and reinstall the display driver

  1. First, open Device Manager.
  2. Find Display adapters and click to expand it.
  3. Right-click the display card driver and click Uninstall device in the context menu.
    Direct3D error code 38 uninstall device
  4. Windows will ask you to confirm the removal of the device, so click Uninstall to remove the driver. If available, be sure to check Delete the driver software for this device option before you uninstall your driver.
    Direct3D unable to create device delete driver software uninstall device GPU
  5. After the uninstallation is complete, you’ll need to restart the computer in order to load the default display drivers.
  6. Now you just need to visit your graphics card manufacturer’s website and install the driver for your graphics card.

If you want to completely delete all files associated with your graphics card, you might want to check our guide on how to use Display Driver Uninstaller.

This is a free tool that will remove all files and registry entries associated with your display driver.

6. Install an older driver

If you have problems initializing Direct3D while trying to run certain games, you might want to install an older driver for your graphics card.

Simply uninstall the currently installed driver and download the older version from the manufacturer’s website.

Installing the latest drivers is usually better, but some older games might have issues with them, so try installing older drivers and see if that helps. This is a simple solution, so be sure to try it out.

7. Change the game’s resolution

Sometimes problems with initializing Direct3D can be caused by your game’s configuration. Several users reported that they were unable to start their game while using a specific resolution.

To fix the problem, simply change the game’s resolution from its configuration app and try to run it again. If that game doesn’t have a configuration app, try changing its resolution in configuration files or in the registry.

This isn’t the most user-friendly solution, but few users reported that they solved the problem by using this method.

Several users also reported that they fixed the problem by setting the game to run in Windowed mode. After enabling Windowed mode the issue should be completely resolved.

8. Reinstall Visual C++ Redistributables

  1. Press Windows Key + S and enter Control panel. Select Control Panel from the list of results.
    Error initializing Direct3D device is not available control panel
  2. When Control Panel opens, click on Programs and Features.
    Cannot initialize Direct3D device
  3. List of all installed applications will now appear. Double click the desired Redistributable in order to remove it.
    Initializing Direct3D VirtualBox uninstall redistributables

To fix this problem many users are recommending to reinstall your Visual C++ Redistributables. This is relatively simple, and you can do it by following the above procedure.

After removing the problematic Redistributable, you need to reinstall it again. You can download all Visual C++ Redistributables from Microsoft’s website for free.

Many games also come with Visual C++ setup files, so you don’t have to download anything.

Simply open the installation directory of the game you want to run, locate the vcredist directory, and install all files from it. After doing that, the issue with Direct3D should be resolved.

It’s also worth mentioning that sometimes you don’t have to reinstall Visual C++ Redistributables.

Sometimes you might not have the necessary Redistributable installed, and you just need to download it or install it from the vcredist directory to fix the problem.

You can’t open Control Panel? Take a look at this step-by-step guide to find a solution.

In order to always download and install the latest Visual C++ Redistributables, check out this dedicated article.

9. Remove the problematic update

  1. Press Windows Key + I to open the Settings app.
  2. Now navigate to the Update & security section.
    Direct3D out of memory update & security
  3. Click on Update history.
    Direct3D could not be correctly initialized update history
  4. Now click on Uninstall updates.
    Initialization of Direct3D device failed uninstall updates
  5. Locate the problematic update and double click it to uninstall it.
    Failed initialize Direct3D with current settings uninstall updates windows 10

Sometimes you might have problems initializing Direct3D due to problematic updates. If this error started occurring after installing a Windows 10 update, be sure to remove it.

If removing the update fixes the issue, you might want to prevent this update from installing automatically.

We already wrote a guide on how to block automatic Windows updates, so be sure to check it out for detailed instructions.

If you’re having trouble opening the Setting app, take a look at this detailed article to solve the issue.

10. Rename the problematic DLL file

  1. Go to the game’s installation directory and locate d3d9.dll and d3d11.dll.
  2. Right-click d3d9.dll and rename it to oldd3d9.dll.

After doing that, the game will be forced to use d3d11.dll and the issue should be resolved. Keep in mind that this is a crude workaround, so it won’t work with all games.

If you have issues initializing Direct3D, the problem might be a specific DLL file. Users reported this error while trying to run certain games.

In order to fix this issue, you just need to rename a single file. To do that, follow the above steps.

Problems with Direct3D prevent you from enjoying your favorite video games. There are various Direct3D problems that can occur, and in this article, we’ve covered the following issues:

  • Initialization of Direct3D device failed – This is a common problem with Direct3D on Windows. However, you can easily fix this issue by using one of our solutions.
  • Failed to initialize Direct3D with current settings – Another common error that can occur with Direct3D. To fix the problem you might have to reinstall the necessary Visual C++ Redistributables.
  • Error initializing Direct3D device is not available – Few users reported a message saying that the Direct3D device isn’t available. This problem usually appears due to issues with your drivers.
  • Cannot initialize Direct3D device – This is just a variation of the previous error, and it’s most likely caused by your drivers.
  • Initializing Direct3D VirtualBox – This error can appear in Windows, but it can also appear while using virtualization apps such as VirtualBox.
  • Direct3D error code 38 – Several users reported Error code 38. This can be a big problem, but you should be able to fix it by using one of our solutions.
  • Direct3D unable to create the device, set display mode – Some users reported that Direct3D is unable to create a device or to set display mode. To fix this issue, be sure to check your graphics card drivers.
  • Direct3D out of memory – This is also a relatively common problem with Direct3D. If you’re getting this error, make sure that the application you’re trying to run is installed properly.
  • Direct3D could not be correctly initialized – Another error that can occur with Direct3D. This error can be a big problem since it will prevent you from accessing the desired applications.

Just like many other issues, initializing Direct3D in Windows 10 problem is probably caused by incompatibility between a graphics driver, so refer to our below tips.

For any more suggestions and questions, go to the comments section below. You’ll find us there, so do share your opinion with us.

How to send large files via Gmail without Google Drive

For sure, at least one time in our lives we all had to deal with that moment when, after we finished working on an important project, we wanted to hit the Send button on only to see the file is too big and can not be sent?

Unfortunately, most email accounts have size limitations when it comes to how big the file you are trying to send out can be. For example, Gmail can only support files up to 25 MB.

Moreover, a large file can occupy a lot of storage space, even if it’s only sitting in your Sent folder.

If you are wondering what ways there are to send a large file without using Google Drive the traditional Gmail way, we’ve got you covered.

In this article, we will show you the fastest and easiest way to do that, in just a few minutes.

How can I send a file over 25mb on Gmail without Google Drive?

1. Use a dedicated tool

One way to solve this issue is to reduce the size of your email messages and attachments. You can do this pretty fast by compressing them, using a dedicated tool.

In this matter, we recommend you use WinZip. This is especially a great tool if you have multiple files and sending them in one email could be troublesome.

The process of adding new files to the archive is extremely simple. All you need to do is drag and drop them and allow for the compression process to complete.

This tool is great for saving time and space while ensuring your files remain intact.

The fact that WinZip can integrate itself into Dropbox, OneDrive, GoogleDrive, makes it easy for you to work on any of your documents directly from the folder.

WinZip is more than just a simple compressing tool. You can share, manage, protect, and even backup your files within minutes.

The WinZip files can be easily opened on any device, as long as the program is installed there as well, so you won’t have to worry about this aspect.

Using this tool only takes a few minutes, but it mostly depends on how large the files are. You need to download and install it on your device, locate the files you need to compress, and simply right-click on them and choose WinZip from the menu.

Here are some of its key features:

  • Archiving tools.
  • File Splitting and File Manager options.
  • ZIP files repair.
  • Extracts multiple files.
  • Security and password protection feature.
  • Data back-up and sharing options.
  • Supports multiple compression formats: Zip, Zipx, RAR, 7z, TAR, GZIP, VHD, XZ, and more.

”WinZip”

”WinZip”

”Send
”Free”
&aff_sub2=Native” current_url=”true” button_text=”Get it now” image=”https://windowsreport.com/wp-content/uploads/2017/11/WinZip-button-210×160.png”]

2. Use Dropbox

Dropbox is pretty great when it comes to it and you can upload and keep all your important files here. This is actually a very popular method for sharing large files with others.

With Dropbox, you can upload the file and afterward send a web link via email or text to your recipient, by clicking on the Share option.

Through this link, they will be able to access your file and you can even set a time period for how long the sharing is available.

Moreover, the Dropbox for Gmail Chrome extension will allow you to send, preview files and links without having to leave your Gmail window.

Unlike other similar programs, where users on both ends need to have access to the same programs, that will not be the case here. Your recipient won’t have to necessarily be a Dropbox user in order to access your file.

3. Use a free online service

Another popular service for sending large files is WeTransfer. The process of sending your files using this web-based option is very simple.

You will need to go to the WeTransfer website, upload your file. Make sure to type your email address, the recipient email, and the body of your email into the browser window. 

There’s no need to create an account on the website in order to use it and you can upload for free, files up to 2 GB.

Perhaps one of the most important factors when choosing which method to use is how much time does it take in your emailing process.

We hope that one of your suggestions will help you send your large files easily via Gmail.

If you have additional comments or suggestions, please let us know in the comments section below.

How to send a large file through Outlook?

Outlook is being used all over the world by millions of users and it’s a great email client with some amazing features.

It does have some downsides though, such as the 20 MB size limit when it comes to how large can a file be when sending it through Outlook.

If you tried to send a file that exceeds this limit, then you probably get the error message The file you’re attaching is bigger than the server limit.

Unfortunately, this error message appears even if you are sending some individual files, that don’t exceed 20 MB.

The size limit is cumulative, therefore, if an additional file is being added to the email, that can cause the error.

There are several workarounds that will allow you to send files that exceed the imposed limit size and we will present them to you in this article, so keep reading.

How can I send files larger than 25mb through Outlook?

1. Use a dedicated tool


Reducing the size of the attachments or files you need to send is an option that will allow you to send them via Microsoft Outlook.

A great tool that we strongly recommend due to its amazing features is WinZip. Especially, if you have multiple files, sending them in one email could be troublesome but with this tool, you can easily add and compress them.

You can rest assured that your files will remain intact and there will be no quality loss in the process.

Moreover, WinZip can integrate itself into Dropbox, OneDrive, GoogleDrive. This will facilitate your work on any documents directly in the folder.

The WinZip files can be easily open on any device, as long as the program is installed there as well, so you won’t have to worry about this aspect.

It does not take long to compress your files, but it depends of course on how large the files are. After you install WinZip on your device, locate the files you need to compress and simply right-click on them, and choose WinZip from the menu.

Here are some of its key features:

  • Advanced ZIP compression.
  • File Splitting and File Manager features.
  • ZIP files repair.
  • Efficient cleaner tool to identify and delete unused files.
  • Documents protection with password.
  • Supports multiple compression formats: Zip, Zipx, RAR, 7z, TAR, GZIP, VHD, XZ, and more.

”WinZip”

”WinZip”

”Send
”Free”
&aff_sub2=Native” current_url=”true” button_text=”Get it now” image=”https://windowsreport.com/wp-content/uploads/2017/11/WinZip-button-210×160.png”]

2. Use the automatic resizing option

send larger files through Outlook
In order to use this feature, all you need to do is click on the File tab and select the Resize the large images when I send this message.

It’s important to mention that the images or the files will be resized only when you press on the Send button. therefore, you will not be able to reduce the size of the file using this method.

What the automatic resize option does, is that it reduces the size of the images you are sending, which will increase the likelihood of them being accepted by the recipient’s email system.


3. Use Microsoft OneDrive

sending large files in outlook with one drive
Another great option for sending large files is uploading them in a cloud service and then sharing the link. One such sharing cloud service is Microsoft OneDrive.

It’s built into Windows, if you have a Microsoft account then you can store up to 15 for free on your OneDrive account.

You will see the OneDrive could in your Windows File Explorer. Here you can create as many folders as you need and you can organize and manage them as you see fit.

In order to share the folders via OneDrive, all you need to do is drag and drop them in the desired folder. Once this step is completed, you can right-click on the folder name and select More OneDrive Sharing Options.


Copy the link that will come up in the Share box in order to share the file via Microsoft Outlook.

You can now simply open a new message window and copy/paste the link you’ve received in the previous step. All is left to do is press the Send button.

These are several workarounds that can help you send a larger file through Outlook.

If you have additional suggestions or recommendations, please let us know in the comments section below.

[wl_navigator]

Best way to send large files via Email [Easy Guide]

Sending files over email is a pretty simple and straight process, except when the files or folders we are trying to send exceed the size limit accepted.

Depending on your email client account, you may have noticed there are some limitations in regard to how big the files you want to send can be.

If you are using Gmail then you have seen for sure that you can only send messages up to 25 MB, including the message’s text, while the size limit in Outlook is 10 MB.

With all these limitations there are still plenty of ways that will allow you to send large files over email. in this article we will explore each, so keep reading.

How can I send a large file through email?

1.Use a third party software

When it comes to sending large files over email, the best way to do this is by using a file compression process.

This kind of tool will compress your files and reduce their size without compromising on quality. If you have multiple files to send, then just use the compression program to fit them in your email.

Using the tool is fairly simple. All you need to do is go to the file you need to compress, or folder if there is more than one, right-click and reduce your files.

What will happen next is that your file will be compressed and you will be able to send it over email without getting the error message, stating that the file is too big.

If you are working with Dropbox, OneDrive, GoogleDrive then we have great news for you. Using the right tool, you can surely integrate these cloud storage apps and backup your data on the cloud.

That being said, you can efficiently manage large files using the best file compression tools for Windows PCs.

2. Upload your files to a cloud storage service

One of the easiest and most popular methods for sending large files over email is using a cloud storage system, such as Google Drive, Dropbox, or Microsoft OneDrive.

Depending on your email provider you will have one of these cloud storages system integrated. For example, if you are using Gmail then GoogleDrive is the cloud storage you can use. For Outlook the corresponding cloud system storage is OneDrive.

Every time you will try to send an attachment within Gmail, you’ll rapidly see the integrated GoogleDrive button. All you need to do is press it, chose which file you want to send, and then send it like a normal attachment.

If you’re sending an attachment within a provider like Gmail, you’ll see the Google Drive button already integrated. Simply press it, choose your file, and then send it like a regular attachment.

If you are using Dropbox, then you will be able to share the file from the website. Locate the file you want to send, right-click on it and then select the Share link.

3. Use a free online service

There are many available services that allow you to send large files, such as WeTransfer or Jumpshare.

Sending your files using the web-based option is very simple and usually, all you need to do is access the website you want to use and simply upload your file there.

You’ll have to type your email address and the recipient email as well and then you will be provided with a link to share the files.

There’s no need to create an account on the website in order to use it and you can upload for free, files up to 2 GB.

Perhaps one of the most important factors when choosing which method to use is how much time does it take in your emailing process.

The recipient doesn’t need to have an account created on the website in order to download the files. They will receive the link over the email address you indicated, and all they need to do is click on the link.

If you are sending over sensitive files make sure to check out the website security policy just as a safety precaution.

As you can see there are several ways you can use to send large files over email. Choosing one method over the other depends on how comfortable you feel with the process and how much time you need to invest.

If you have other additional suggestions or recommendations, please let us know in the comments section below.

Microsoft Family Safety app gets new premium features with Location Alerts and Drive Safety

Microsoft quietly announced yesterday an update for its Microsoft Family Safety app for iOS and Android, which now supports two new premium features that the company announced earlier this year. The Microsoft Family Safety app launched in preview in May and became generally available in July, and it can give parents more control over what their kids can do with their different devices.

“Microsoft Family Safety mobile app users with a Microsoft 365 Family subscription can now access two new features—Location Alerts and Drive Safety—empowering families to create healthy habits and protect what matters most with both physical and digital safety,” the company said yesterday. Drive Safety can provide parents insights on how their kids behave behind the wheel, while Location Alters will send push notifications when a family arrives or leaves a specific location.

These two new premium features are only supported on Android as of today, and Drive Safety is only available in the US, UK, Australia, and Canada. Microsoft is still working to bring digital safety features to iOS devices, though there’s no ETA yet. You can download the Microsoft Family Safety app on your iPhone or Android phone from the links below.


Microsoft Family Safety

How to convert Mini DV to DVD the easy way [Windows 10]

If you have used an older camcorder to record videos, you most likely want to create a backup of the files as the Mini DV tapes get degraded with time. The best way to preserve these tapes is to convert Mini DV to DVD.

Since the Mini DV tapes cannot be connected to the computer directly, you need to use your camcorder to create backups. If you don’t have a camcorder, consider third-party transfer services.

In this article, let’s take a look at how to convert Mini DV to DVD in a Windows computer and also explore the tools and services you can use.

How do I convert Mini DV to DVD in Windows 10?

1. Use the WinX HD Video Converter Deluxe

convert Mini DV to DVD

WinX HD Video Converter Deluxe is a premium HD and 4K video converter utility that supports over 370+ input and 420+ output formats. It is an excellent tool for encoding clips and offers the largest library of conversion and optimization profiles.

Apart from the conversion tools, WinX HD Video Converter Deluxe also offers editing tools such as cut, crop, merge volume booster, and the ability to add subtitles.

To convert Mini DV files to DVD, launch WinX HD Video Converter Deluxe, click the DVD icon. Drag and drop the Mini DV file to the timeline.

You can use the preformatted templates and enhance the video by adding subtitles. Once done, select the output destination and click on Run.

⇒ Get WinX HD Video Converter Deluxe

2. Extract video file with Windows Movie Maker

Note: Make sure to use a Windows 7 or XP running system. These steps may not work on Windows 8 and newer versions due to Firewire connector incompatibility issues.

convert Mini DV to DVD
  1. Connect your Camcorder to your system using a Firewire connector. In case your system does not have support for Firewire cable, use a USB adapter to connect.
  2. Launch Windows Movie Maker on your system.
  3. Go to Tools and select Options.
  4. In the Options window, open the Advanced tab.
  5. Select Video Properties and then choose NTSC or PAL format.
  6. Click OK.
  7. From the primary screen, click on Tasks and select Capture.
  8. Enter any details required and click Next.
  9. Select Digital Device Format from the video settings and click Next.
  10. Here, you can choose to capture the entire video or select part from the video.
  11. You can use the Start capture and Stop capture option to capture the video.

Once you have the video captured and saved, you can convert it to a DVD using WinX HD Video Converter Deluxe. Here’s how to use it.

3.  Convert using a DVD recorder

  1. Using the available connection cable, connect the output of your camcorder to the DVD recorder’s input.
  2. Insert a blank DVD into your DVD record.
  3. Make sure you have inserted the Mini DV taper into your camcorder.
  4. Press play on the camcorder and record on the DVD recorder simultaneously. The DVD recorder will start recording your MiniDV tape.
  5. Once the recording is complete, stop your DVD recorder and camcorder.

4. Mini DV conversion service

If you want to convert Mini DV to DVD without a camcorder, consider using Mini DV conversion services. The Mini DV conversion services like South Tree and Scan Corner offer high-tech videotape conversion via mail-in service.

You can choose to get back the converted files through digital download or thumb drive/ disc set for an extra charge.

Other benefits of using a third-party conversion service are the ability to transfer video at 1:1 speed, optimized image and sound quality, color correction, and digital noise reduction.

To transfer Mini DV to DVD, you can use a DVD recorder as Mini DV to DVD converter or connect the camcorder directly to your computer. If you don’t have a DVD recorder or camcorder, consider the third-party conversion services.

To convert Mini DV to DVD, you can connect Camcorder and capture via Windows Movies Maker, record using a DVD recorder, or use a third-party service.

FIX: Can’t install Asus Smart Gesture driver on Windows 10

If you want your laptop or computer to work properly, you need to have the appropriate software installed. Speaking of software, Asus users reported a similar situation.

It seems that they can’t install the Asus Smart Gesture driver on Windows 10, so let’s see how to fix this issue.

What can I do if I can’t install the Asus Smart Gesture driver?

  1. Remove Asus Smart Gesture and reinstall the driver
  2. Run the driver setup file as an administrator
  3. Download Touchpad Synaptics instead
  4. Repair the driver and install the newer version
  5. Reset Asus Smart Gesture settings
  6. Load BIOS Defaults
  7. Update BIOS
  8. Reset Windows

1. Remove Asus Smart Gesture and reinstall the driver

According to users, in order to fix this problem, you need to manually remove the Asus Smart Gesture driver.

To do that, simply search your computer for Asus Smart Gesture and delete all files related to it. Then, to make sure that you delete all related files, you may want to use an uninstaller.

Check out this list with the best uninstallers available right now. Bear in mind that those files won’t disappear until you restart your PC.

After restarting your PC go to the Asus website and download the touchpad driver for your computer.

After downloading the file, click the Disable3fun.exe and extract all folders. Once you’re done, run the SetupTPdriver.msi and install a new driver.

Restart your PC once again. Now you just need to open Device Manager and locate your touchpad, right-click it, and choose the option to Update the driver.

Windows 10 should download the latest version of the driver for you. If updating the driver manually from Windows doesn’t work, do it automatically by using specialized driver updating software.

There are some good reasons to update drivers and you already experience some unfortunate repercussions of not considering this rule.

Updating them takes no more than a few clicks and you don’t even have to worry about looking for the right versions or identifying the culprit.

2. Run the driver setup file as an administrator

Users reported that they are unable to install the Asus Smart Gesture driver on Windows 10, but you can easily fix this issue by running the setup file as an administrator.

To do that, locate the setup file, right-click it and choose Run as administrator from the menu.

asus-smart-gesture-run as administrator

3. Download Touchpad Synaptics instead

If you can’t install the Asus Smart Gesture driver on Windows 10, users are suggesting installing Synaptics Touchpad driver instead.

According to them, Touchpad Synaptics for Windows 8.1 works perfectly on Windows 10, but be sure to download the Windows 10 version if it’s available.

Alternatively, some users are suggesting installing Sentelic drivers instead.


4. Repair the driver and install the newer version

  1. Go to the Asus website and download the same version of the Smart Gesture driver that you have installed. After you download the driver, run it, and extract the setup files.
  2. Now open Programs and Features. To do that press Windows Key + S shortcut, enter programs and features, and select Programs and Features from the list.
    asus-smart-gesture-programs-features
  3. A list of installed software will appear. Select Asus Smart Gesture driver and click Repair or Change.
    asus-smart-gesture-repair
  4. Locate the driver setup file and select it.

To fix this problem you need to repair the Smart Gesture driver that you have installed on your PC. To do that follow the above procedure.

After repairing the driver, you should be able to uninstall it and install the version for Windows 10.


5. Reset Asus Smart Gesture settings

  1. Go to Control Panel.
  2. Find Asus Smart Gesture, and open it.
  3. Click Set all to default.
  4. Restart your computer.

There’s a chance you’re not able to update because something’s wrong with Asus Smart Gesture settings. So, we’re going to reset the settings and try to install updates once again.


6. Load BIOS Defaults

Now, let’s move on to BIOS-related solutions. Although it’s not quite often the case, your BIOS settings may actually block certain updates from installing.

So, the first thing we’re going to do now is load BIOS defaults. Since this process isn’t identical on all computers, I can’t exactly tell you how exactly how to perform it.

All in all, the point is to enter BIOS (probably by pressing DEL on the boot) and go to the option for loading BIOS defaults.

If you don’t know how to do this, google your motherboard for a more detailed explanation or check the link below.

If Windows skips BIOS, take a look at this useful guide to solve the problem quickly.

We have additional guides on what to do if Windows skips BIOS and how to access the BIOS.


7. Update BIOS

If resetting your BIOS settings didn’t get the job done, we’ll try a more serious measure – updating your BIOS. There’s a good chance you’ve never done this in your life before.

And that’s fine, updating BIOS isn’t something you do every day. And it should be like that. Because updating BIOS is quite risky.

One mistake can render your BIOS, and therefore your computer useless. So, you should really approach the whole process with extra care.


8. Reset Windows

If none of the solutions from above managed to solve the problem, the only thing left to do is reset your Windows operating system.

There are multiple ways to reset Windows 10, but if you’re not sure how to perform any, everything is explained in the link below.


Here are some more examples of this problem:

  • Asus Smart Gesture there is a problem with this Windows installer package – This issue appears when you’re not able to install Asus Smart Gesture drivers using the official installer.
  • Asus Smart Gesture another installation is in progress – This error prevents you to install the drivers, even if another installation is not in progress.
  • Asus Smart Gesture source file not found – Another driver installation issue, that appears when the installer is unable to locate the source of the driver file.
  • Asus Smart Gesture not working / Can’t uninstall Asus Smart Gesture – Besides the driver installation problem, Asus Smart Gesture can also cause uninstallation issues to some users.
  • Asus Smart Gesture problem with Windows installer – Another issue that affects the Asus Smart Gesture driver installer.
  • Asus Smart Gesture the specified account already exists – Although this issue tells you that something’s wrong with your user account, it can be resolved with a simple update.
  • Asus touchpad driver – That’s another problem that users complain of. If you’re one of them, Fortect Driver Updater can help you out.

Installing Asus Smart Gesture driver on Windows 10 can sometimes be problematic but, hopefully, you managed to install it after using one of our solutions.

If you have any other suggestions or questions, leave them in the comments section below and we’ll be sure to take a look.

Get paid for your photos with Trove, a Microsoft Garage project

Ever wanted to make money for taking some super simple photos? Well, now you can. Microsoft recently announced a big update for Trove, a Microsoft Garage project. Now, anyone with the app can get paid via PayPal for uploading photos to AI projects in the Trove marketplace.

Available for download on Android, here, or on the web here, Microsoft officially expanded the service beyond what was announced in May 2020 when it launched. It’s still only available in the United States, but Trove is simple to use. All you need to do is download the app, and then find a list of projects that will pay you for your photos. Then, you submit your photos from the camera roll or gallery, and it will be approved by Microsoft after a few days.

As an example, currently, there is an open project for Rubber Stamps. Simply take photos of stamps, submit it, and then await payment from Microsoft in PayPal after connecting your accounts. Average pay is about 50 or 60 cents per photo, depending on what project you’re contributing to.

But what is Trove? According to Microsoft, Trove is a marketplace app. It essentially allows people to contribute photos to open AI projects. Developers can then take the photos and use them to train machine learning models.

Doom Eternal, Forza Motorsport 7 and more are coming to Xbox Game Pass in October

Microsoft has just revealed the next games coming to Xbox Game Pass in October, which include the previously announced Doom Eternal. The sequel to the critically-acclaimed 2016 reboot will be available on Xbox consoles and Android devices (via Cloud Gaming) on October 1, and the PC version will be available on Xbox Game Pass for PC later this year.

Doom Eternal is likely the first in the series of new Bethesda games coming to Game Pass following Microsoft’s acquisition of parent company ZeniMax Media for almost 8 billion dollars. In addition to new Bethesda games, Xbox Game Pass Ultimate members will also get access to the EA Play Library on Console starting November 10, with Windows 10 to follow in December.

In addition to Doom Eternal, the coop village building game Drake Hollow is the second new game that will be available on October 1, though this one will be PC-only. Three more games will follow on October 8 with Brütal Legend (Console), the ID@Xbox game Ikenfell (Console & PC), and Forza Motorsport 7 on Console, PC, and Android. The latter has been released three years ago and will join the popular Forza Horizon 4 on the catalog.

Along with these new Xbox Game Pass titles, the Xbox team also revealed today that the following games will leave the catalog on October 15:

  • Felix the Reaper (Console & PC)
  • Metro 2033 Redux (Console & PC)
  • Minit (Console & PC)
  • Saints Row IV Re-Elected (PC)
  • State of Mind (PC)

Microsoft will likely announce more games coming to Xbox Game Pass in the second half of October, as it usually does every month. If you have yet to subscribe to Xbox Game Pass, we remind you that you can get your first month of subscription for just $1.

Xbox Game Pass Ultimate

Microsoft outlines new Web Capture tool improvements coming to Microsoft Edge

Recently we reported that Microsoft has started testing a new Web Capture tool that allows users to take a screenshot of a webpage in Microsoft Edge. Now, the company has officially announced this feature and confirmed that it’s working to enhance it with extra capabilities further.

The Web Capture tool is an improved version of the web notes tool, which was present in the legacy Edge browser that was previously bundled with Windows 10. Right now, users can only grab a screenshot of a webpage, and copy it to the clipboard or preview it. Even though the Web Capture tool is a great built-in feature, there’s still room for improvement.

Microsoft says that it has adopted user feedback to implement some additional functionalities to improve the tool in future updates. More specifically, users will soon be able to ink on the screenshots, capture full webpages, and highlight different sections. The company also plans to bring annotation support for Edge Insiders.

In a related announcement, Microsoft also said that users now have an option to pin it directly to the browser’s toolbar. To do so, simply right-click on the “Web Capture” option available in the More menu (…) and select the “Show in toolbar” option. The tool should now appear at the top right corner of the toolbar.

The feature is now available for all users in the latest Dev and Canary builds, and we hope that it will make its way to the beta channel soon. However, there’s no ETA as to when it could go live in the production builds.

Microsoft 365 suffered 5 hour login breakdown yesterday

Yesterday afternoon Pacific time (officially from 2:25pm PDT to 7:25PDT), Microsoft 365 users were unable to log in to multiple Microsoft 365 services that use Azure Active Directory, including Outlook, Microsoft Teams, Office.com, Power Platform, and Dynamics 365. Users who were currently logged in to services were not affected, and the services themselves continued to run, but anyone logged out was unable to log in during most or all of the 5 hour window.

Microsoft updated its Microsoft 365 admin center Service Health page last night to report a final status, that “(a)fter extended monitoring of our service, we have confirmed that the issue has been fully mitigated and is running within optimal service levels.”

Microsoft is still investigating a root cause, with a post-incident report promised within 5 business days, but did post a preliminary cause, after initially ruling out a code change that was rolled back early in the outage, without success:

Preliminary root cause: A code issue caused a portion of our infrastructure to experience delays processing authentication requests, which prevented users from being able to access multiple M365 services.

We’ll keep you posted on any further reports.

Gears Tactics for Xbox appears in the Microsoft Store along with new Xbox Series X and S categories

The official listing for the Xbox version of Gears Tactics has been spotted (via AL) and it seems to be one of the first games to feature details relating to the upcoming Xbox Series X and Xbox Series S consoles.

As can be seen in the image above, the listing features a prominent mention of Gears Tactics being optimized for both next gen consoles alongside the Smart Delivery logo. Smart Delivery is essentially support for cross-buy between Xbox consoles. Those who buy Gears Tactics on Xbox One will get the Xbox Series X version for free and vice versa.

Also of note is the addition of an Xbox Series X/S category which displays the official store icon for the Xbox Series X console. Clicking on this category link also shows both Marvel’s Avengers and Control Ultimate Edition, both of which now also have the X/S labelling.

Xbox Series X Microsoft Store game details.

More titles will naturally be added to the above category as we get closer to the November launch date of the Xbox Series X and Xbox Series S consoles.

Do you like the design of these new next gen feature labels? Share your thoughts with the community in the comments below and then follow us on Pinterest and Twitter for more Xbox gaming news.

Gears Tactics - Xbox
Developer:
Xbox Game Studios
Price:
Free


Control Ultimate Edition
Developer:
505 Games
Price:
Free

Microsoft’s Surface Duo Bumper cases are now available in four colors

All four color variants of Microsoft’s bumper cases are now available (via WC) for the company’s recently launched Surface Duo smart device.

These bumper cases, like most smartphone cases, are designed to protect the Surface Duo from falls or impacts but are specially constructed to fit the Duo without affecting its foldable dual-screen functionality.

The four colors available are Glacier, Ice Blue, Ember, and Graphite.

Here’s the official Microsoft Store description. Orders can be placed here.

Added protection for your device, this sleek silicone bumper is specifically designed for Surface Duo and the 360° hinge. It adheres to the edge of Surface Duo and supports full mobility of the hinge, while allowing easy access to all controls and the USB-C port, fingerprint reader, and SIM tray. Available in Glacier, Ice Blue, Ember, and Graphite.

Are you a Surface Duo owner and would you ever put a case on it? Let us know in the comments below and then follow us on Twitter and Pinterest for more Surface Duo news.

Microsoft is giving Xbox Series X consoles and other prizes to this generation’s biggest gamers

Microsoft today announced a special Xbox Hall of Fame promotion, a competition designed to reward those Xbox One enthusiasts for all of their gaming over the current console generation.

Any Xbox users can participate simply by going to this website and logging in with the same Microsoft account that they use on their console. Those with the most Xbox Achievements, highest Gamerscore, or most-played Xbox Game Pass titles have the potential to win an Xbox Series X console, a special Xbox Hall of Fame trophy, and other prizes such as Xbox merchandise.

A number of Xbox Trials tasks are also available to complete for those who don’t see themselves as being in the top of the above categories. Gamers in a wide number of countries such as the USA, Australia, New Zealand, Mexico, and others are able to participate.

Full details and rules can be read here.

As an added incentive, everyone who registers will earn one Microsoft Reward point for every Gamerscore earned between October 1st through to the 19th. The limit is capped at 10,000 Microsoft Reward points but that’s still pretty good as that many points can be redeemed for around $10 in gift cards.

Are you going to enter? Do you think you stand a chance of reaching Xbox Hall of Fame status? Let us know in the comments below and then follow us on Pinterest and Twitter for more Xbox gaming news.

Apple Magic Mouse Won’t Connect to Windows 10/11 [Quick Fix]

The Magic Mouse from Apple is one of the most high-tech mouse peripherals in the world, but many users reported that the device won’t connect to Windows 10.

This can be a big problem, but, there’s a way to fix this issue.

When we installed windows 10 the wireless Apple mouse and keyboard installed fine. I accidentally removed the mouse in the Bluetooth devices in settings. Now I can only use my keyboard and I’m unable to get the mouse to successfully pair again.

Sometimes windows finds it, but when I attempt to pair it, it says it didn’t work, and then it doesn’t display again. I then reboot windows and try again […].

What can I do if Magic Mouse isn’t working on Windows 10?

1. Check for the latest Bluetooth driver

  1. Press Win Key + X on your keyboard, and select Device Manager.device manager magic mouse won't connect to windows 10
  2. Search for the Apple Magic Mouse, right-click it, and select Update driver.update driver magic mouse can't connect to Windows 10
  3. The process of searching automatically for the driver will start.
  4. As soon as the update process is completed, it is recommended that you restart your PC.

Alternatively, you can use third-party tools such as Fortect Driver Updater to update all your drivers automatically with just a few clicks.

It’s much safer because you don’t risk of downloading and installing a wrong or infected driver on your PC.

Download and install Fortect Driver Updater, then start the application. The tool will automatically start scanning your system for any potential driver problems.

When the process ends, you will get a list of recommended drivers for you to install.

It’s not necessary but it’s a lot easier to click the Select All box and update all in a single step. The alternative is to check the individual boxes for each driver and then click on their corresponding installation button.

⇒ Get Fortect Driver Updater

2. Check if Bluetooth connections are possible

  1. Activate Bluetooth on your PC, and turn on the MagicMouse(green is visible).
  2. Make sure that the battery of your Magic Mouse is at least 50% to avoid any unnecessary complications in the process of pairing.

3. Pair your Magic Mouse with Windows for the first time

  1. Right-click on the Bluetooth icon from the Taskbar.
  2. Select Add a Bluetooth device.add a bluetooth device magic mouse won't work windows 10
  3. Choose Add a Bluetooth device again.add a bluetooth device magic mouse won't connect to windows 10
  4. Search for the Magic Mouse in the list of available devices, and select it.
  5. Follow the on-screen instructions to complete the pairing process.

In this article, we explored a quick way to get everything set up, and then be able to easily pair your Apple Magic Mouse on your Windows 10 PC.

Using this guide will surely get you on track, and you will be able to start using your Magic Mouse in just a few minutes.

Please feel free to let us know if this guide helped you by using the Comment section found below this article.

Outlook keeps sending emails to Junk or Spam Folder [FULL FIX]

Microsoft Outlook is a personal information manager and it comes with Microsoft Office suite. Although is mainly used as a email client, it also contains a calendar, a note taking app and some other useful features.

Outlook works with Microsoft Exchange Server and Microsoft SharePoint Server for multiple users that can have shared calendar and mailboxes, but it also can be used as a stand alone app.

It has continuous support and development from Microsoft. Despite that, issues with Outlook come up pretty often and one of the most important ones is that the app is sending legitimate email to Junk.

A lot of users complain about this problem and today we will try to fix it.

What can I do if Outlook keeps sending emails to Junk or Spam Folder? You can quickly solve the issue by marking a certain email or a sender as Not Spam/Junk. This problem sometimes occurs because an email sender is marked as Junk/Spam. After that, add a certain sender to the Safe Senders List and check your mailing rules.

To do that, follow the steps below.

How do I stop Outlook from moving emails to Junk?

  1. Mark a certain email as Not Spam/Junk
  2. Add a sender to the Safe Senders List
  3. Check mailing rules
  4. Create a rule that will bypass the Junk mail filter
  5. Consider using a different email client

1. Mark a certain email as Not Spam/Junk

One of the easiest solutions is to mark a certain email or a certain email sender as Not Spam/Junk. In this way you will let Outlook know that that email is of interest to you. To do that, follow the steps:

  1. Go to the Junk email folder.
  2. Select the email of interest to you.
  3. Now go to Home tab, click on Junk and from the list that appears choose Not junk.
  4. A Mark as Not Junk window will appear. Check the Always trust email from [email protected].

That’s it. Emails from the marked sender should now come in inbox and past the Junk folder filtering.

2. Add a sender to the Safe Senders List

  1. Select a email from the sender of interest to you.
  2. Right-click it. In the menu that appears click on Junk > Never Block Sender.
  3. A new window with the message The sender of the selected message has been added to your Safe Senders List.
  4. Click OK.

You can do the same process from the Junk email options in the Outlook menu. Alternatively, you can go to Outlook.com and click on Settings > View all Outlook settings > Mail > Junk email and add Safe senders and domains or Safe mailing lists.

3. Check mailing rules

  1. Go to your Outlook account.
  2. In the upper-right corner click on Settings > View all Outlook settings. outlook moves email to junk settings
  3. In the new window choose Mail, then Rules.
  4. Check if there are any forwarding rules to your Junk folder and erase the ones of interest to you.

In some cases, you or anyone else with access to your account could have created a rule to forward emails to your Junk Email folder.

4. Create a rule that will bypass the Junk mail filter

  1. Go to your Outlook account.
  2. In the upper-right corner click on Settings > View all Outlook settings.outlook sends email to junk settings
  3. In the new window choose Mail, then Rules.outlook add new rule
  4. Click on Add new rule.outlook create new rule and save
  5. In the Add a condition section select Apply to all messages.
  6. In the Add an action section select Move to and Inbox.
  7. Create the rule.

This solution is not recommended because all of your emails, including junk and spam, will be downloaded and you will heavily rely on your desktop email client to sort them out properly.

5. Consider using a different email client

Outlook, although being a free program that works with the majority of browsers, may occasionally create a slew of issues. In this light, we suggest considering switching to a different email client, such as Mailbird.

This tool is available as both a downloadable client and as a web client, and both are equally good at delivering top-notch email services.

The main UI is designed to bring together the content of multiple accounts for better bulk management, and the flexible UI makes it customizable to anyone’s needs.

Their service is also extremely reliable, and their tools are frequently updated, so issues with Mailbird are next to nonexistent.

Mailbird

Mailbird

An excellent alternative to AOL as it is far more stable, less prone to bugs and issues, and has many more features incorporated.
Free trial Visit website

That’s it. Hope that one of these solutions worked for you, and now the emails of interest to you don’t get automatically sent to the Junk Folder.

If you have more questions or solutions, just reach out to the comments section below.

Also, try one of the 6 best antivirus with antispam to get rid of all the junk emails.

How to torrent with PIA [Fast and Safe]

Torrenting is one of the most frequent reasons why regular PC users turn to VPN services such as Private Internet Access. The fact that torrenting traffic is easy to spot by ISP plays a huge part in this scenario.

But are VPNs such as PIA really crucial to torrenting or they’ve merely become a necessity due to an increasing number of privacy violations?

Is PIA good for torrenting?

It’s possible to engage in P2P activities such as torrenting without using Private Internet Access. It won’t affect the functionality of the torrenting client. In fact, you may even get higher download/upload speeds.

However, without any extra security layers, your traffic is fully exposed. As a result, your ISP, government, or even a malevolent agent such as a hacker can easily see what you’re doing.

A VPN can hide torrenting traffic and is considered one of the best security/privacy tools to be used with torrent clients. One of the best torrenting VPNs in our case is Private Internet Access.

So, just to recap: do you need a VPN for torrenting? No. Should you use a VPN while torrenting? Definitely, you should.

How to torrent with PIA?

1. Launch Private Internet Access

  1. Purchase a Private Internet Access subscription planPIA
  2. Download the PIA installer
  3. Deploy the VPN on your computer
  4. Launch PIA and connect to your account
  5. Select a suitable server (nearby servers are generally faster)

2. Enable PIA’s killswitch

Look around your VPN‘s configuration settings for an option resembling a kill switch. Many VPNs, including PIA, call it just that for your convenience. Now, make sure that the kill switch is enabled, just like in the screenshot below.How to enable VPN killswitch

What a killswitch does is it automatically interrupts your Internet connection if it’s not VPN-secured. Sometimes, the VPN connection might fail, which is when your PC automatically switches to your default, insecure connection.

While torrenting, this has the potential to reveal your real identity and uncloak your encrypted traffic. PIA’s kill switch prevents that by blocking any incoming/outgoing traffic if the VPN connection is severed.

3. Launch your torrenting client

The last step is simply launching the torrenting client and engaging in P2P activities as you normally would. The client should work almost exactly as it would without PIA.


Torrents not downloading with VPN? Check out our guide and learn how you can fix it.


The only difference you might notice is speed-related. As you probably know, VPNs encrypt your traffic and re-route it, which can take a toll on your connection’s speed. Usually, the farther a server is to your physical location, the slower your connection might get.

[wl_navigator]

Microsoft 365 services login down – recent change rolled back, doesn’t help, still down

(Update: the login services came back after 5 hours)

This afternoon (Pacific time) about 2:30pm, some Microsoft 365 services, including logins to Microsoft 365 “work or school” accounts and the Azure Portal, went down, failing to authenticate and returning a number of error messages instead. Status.office.com began reporting problems, saying users could be “unable to access Outlook.com, Microsoft Teams including Teams Live Events, and Office.com. Additionally, Power Platform and Dynamics365 properties are affected by this incident.” The status report was then updated to say that a recent change may have affected logins, and that the company was rolling back the change. However, the report was updated again, saying:

Current status: We’ve identified that reverting the recent change did not alleviate impact to Microsoft services as expected. We’re working to explore additional options for mitigation.

The outage is affecting login services, and Azure Virtual Machines (like the one we’re running here at OnMSFT.com) and other Azure services are unaffected, although it’s not possible to log in to the Azure Portal, or to connect to other Microsoft 365 services. We’re currently connected to our Teams account, and it’s running fine, but an attempt to log in to the service would likely fail.

These outages do happen from time to time with almost all online services, and reporting them is sometimes more trouble than it’s worth, as the services come back up before we’re able to report on the outage. It’s been two hours now, however, and appears to be widespread.


Latest Windows 10 updates may downgrade your drivers

Updating your system drivers is an operation that accounts for the impeccable functionality and, in the long run, the lifespan of your device.

After drive compatibility issues that Microsoft has acknowledged, users now noticed that their list of optional driver updates includes very old drivers.

Should I install updates of old drivers?

More specifically, a user mentioned an INTEL -System driver update dated 01/01/1970. On some devices, even older drivers’ suggestions are displayed.)

microsoft lists old drivers updates

These updates can be seen in Settings > Updated & Security > View optional updates.  Here you have to expand the drop-down list with optional updates.

how can i view optional updates

Note that the issues can’t be reproduced on any device.

On the other hand, it’s also been reported that suggestions of certain driver updates keep reappearing, even though the same driver has recently been updated.

The obvious question here is whether you should install these updates or not.

As mentioned, driver updates are essential, but let’s just say that these are included in the optional list, so you might as well take them with a pinch of salt.

Besides, users point out that for such updates, it’s always a good idea to check the manufacturer’s website. Somebody mentioned they have had serious trouble with installing the wrong Realtek-suggested driver.

Fortect Driver Updater

A simple, safe, and reliable way to keep all the necessary driver updates in check.
Check Price Visit Website

Additionally, we would also suggest using dedicated third-party software to help you with this operation.

Fortect Driver Updater, for instance, is such a tool, that will suggest not just the latest, but also only the compatible drivers for your device.

Have you also noticed these driver update suggestions? Tell us about your experience in the comments sections below.

Error 42125 ZIP archive is corrupted? Here’s how to fix it

Like expected, ZIP archives aren’t without their problems. Issues can range from not being able to open the compressed files to getting the error message 42125 ZIP archive is corrupted.

Assuming that’s your case too, rest assured that you’re in the right place. There are different causes that potentially play their part in getting this error from the start.

Some confirm encountering it due to faulty graphics card drivers, while others blame the incomplete recovery of deleted ZIP files or the improper compression.

In the lines below, we will go through all the causes as to why error 42125 ZIP archive occurs and how to solve it as soon as possible.

How to fix error 42125 ZIP archive is corrupted?

1. Try out WinZip


Before we start telling you all about time-consuming procedures that may or may not work, depending on the culprit, it is worth to find out more about one of the most well-known archivers around.

As you can see, the error 42125 ZIP archive is corrupted may be a sign that there are some issues with your compression/decompression program.

We’re not here to tell you to forget all about archived files. They take up less storage space and can be easily transferred to other PCs, so you should stick to your old habit.

However, why not give a try to WinZip? This tool can be used to compress files into many other compressed formats and no corrupted files are on the menu.

You also get several useful additions besides the archiver itself – cloud support, banking-level encryption to protect your privacy, and a pleasant interface that can be easily understood even by newbies.

Just keep in mind that it adapts itself to suit both touchscreen devices and mouse + keyboard setups or, so wouldn’t you want that instead of looking for ways to deal with corrupted archives?

⇒ Get Winzip

2. Uninstall the graphics card drivers

  1. To begin the procedure, click on the Start button.
  2. In the search box, type devmgmt.msc, and then press Enter.
  3. Select the graphics card device and right-click on it.
  4. Up next, select Properties.
  5. In the properties window, under the Driver tab, you just need to click on the Uninstall button.
  6. If you want the driver completely removed from the computer, check the option that says Delete the driver software for this device.
  7. Confirm your action by clicking OK.

Users tend to point a finger to outdated graphics card drivers and they aren’t entirely wrong. Even if the culprits’ list is far more generous, uninstalling the graphics card drivers may help.

Refer to the above procedure in that regard and then, don’t forget to reinstall the latest driver version from the manufacturer’s website.

Outbyte Driver Updater updating drivers

If you question the result since you lack the experience to choose the appropriate driver, just give a try to Fortect Driver Updater. That’s the quickest and safest way to update all your drivers at once.


Yes, the tool will give you a detailed report of all of your out-of-date device drivers, so it is up to you to take care of this issue right away.

Moreover, that’s your ticket to a generous database of 18 million driver files. It’s simply impossible to match the tool’s efficiency at this chapter by manually looking for all the necessary drivers!

3. Check your antivirus


Users also describe starting a bootup scan which eventually leads to the following error:

C:\Documents and Settings\mrsmart\Application Data\SuperAntispeare.com\SuperAntispyware\Quarantine\Quarantine.db\<data error 42125{zip archive is corrupted}

There are indeed times when the antivirus installed in your system might display such error messages.

Due to malware attacks, chances are your valuable ZIP archive got corrupted and hence you cannot access essential files compressed in it.

However, there are also exceptions to this rule and the antivirus that you’ve installed may simply interfere with the password-protected ZIP archives.

To confirm this option, we can only encourage you to reconsider your initial option. You need an antivirus that has a limited impact on your system while keeping it safe from real threats.

If that’s what you have in mind too, don’t hesitate to check out out list of the best antiviruses available today!

Chances are you’ll forget all about this issue and your computer will be protected from viruses, spyware, Trojans, rootkits, phishing attacks, and all other cyber threats that appear out of nowhere.

Have you completed the above solutions for the error 42125 ZIP archive is corrupted? For more suggestions and questions, feel free to use the comments section below.

You’ll find us there and we’ll continue trying to get to the bottom of this issue together.

How to Get Xbox Game Pass Ultimate for Just 1$

Console players who love bargains and the Xbox console are probably well aware of the Xbox Game Pass. Of course, there are multiple types of Xbox Game Pass subscriptions:

  • Xbox Live Gold
    • Price – US $9.99/month
    • Allows online multiplayer along with free games every month through Games with Gold.
  • EA Play
    • Price – US $4.99/month
    • Library of older games published by EA, with new games being added within 6 to 9 months after release.
  • Game Pass for PC/Console
    • Price – US $9.99/month
    • Game subscription service providing access to over 200 Microsoft and third-party games.
  • xCloud
    • Price – N/A
    • Cloud game streaming service for mobile access to select Game Pass titles.
  • Game Pass Ultimate
    • Price – US $14.99/month
    • Includes Xbox Live Gold, EA Play, Game Pass for PC, Game Pass for Console, and xCloud in one package.

However, for a limited time only, you can now enjoy the benefits of getting Xbox Game Pass Ultimate for just $1.

How do I get Xbox Game Pass Ultimate for just $1?

The main idea is that Microsoft lets you convert your Xbox Live Gold time and Game Pass for PC or Console time to Game Pass Ultimate time at a 1:1 ratio.

However, the catch here is that you can only do it for up to 36 months, paid in advance, and it only applies for $1 or $14.99 payments.

It revolves around buying 3 years’ worth of Xbox Live Gold, redeeming it to your Microsoft account, and converting it to Game Pass Ultimate time.

Without further ado, here’s how you can get Game Pass Ultimate for the least amount of money:

  • Go to your Microsoft account
  • Turn off any existing recurring billing for Game Pass or Xbox  Live
  • Purchase 3 12-month Xbox Live cards
    • You don’t have to buy 3 years worth of game time, but this way you save the most money
  • Go to redeem.microsoft.com and redeem each Xbox Live card.
    • Remember to  turn off the recurring billing toggle before you click Submit
    • This applies to each key individually
  • Double-check to see if your account has least 36 months of both Xbox Live and Game Pass time
  • Go to the Xbox Game Pass page for your region and click Join Now
  • Click Join for $1 under Ultimate
  • Follow the instructions and fill in the payment forms
  • Your Game Pass and Xbox Live time now says upgraded to Game Pass Ultimate in your Microsoft account.

Note: Using the method listed below, the conversion process should help you save an estimated ~$360 in the long run.

Take advantage of this offer while it still stands and enjoy monthly games, free titles, member discounts, and more at just $1 a month. Once the offer expires, we have a great guide on how to cancel Xbox Game Pass on PC that can help you end your subscription.

Elsewhere, if you’re online shopping, but your Novafam2023 coupon code is not working, refer to our article on what to do.

If you want more details about this process, leave us a message in the comments section below, and we’ll answer.