If you’re currently looking to install Office 365 on your Windows 10 PC, there’s two ways you can get it done. One way involves downloading through the Microsoft Store on Windows 10, and another involves direct downloads from Microsoft through a code from a retailer. While both methods will give you the same end result, there are quite a few differences between the two. In this guide, we’ll help you make sense of which download method is best for you.
Office 365 in Microsoft Store is more convenient
The Microsoft Store is home to many Windows apps and games, and if you’re looking for a easy way to grab Office 365, this is your best bet. Installing will just take a few steps and searching for “Office 365 Home” or “Office 365 Personal” from the Store. You won’t need to visit websites, deal with entering product keys, or have to worry about activation.
By downloading through the Microsoft Store, the processes is seamless, taking just a few clicks. As a bonus, you’ll also be able to pay for Office 365 using your Microsoft Account balance, or Microsoft gift cards if you’ve been using Microsoft Rewards. Payment is also much seamless process, as everything is already linked to your account.
Another reason to download through the Microsoft Store is if you’re using a device with Windows 10 in S Mode. With this mode, you only can install apps from the Microsoft Store. This means the typical .exe Office installer won’t work on your PC. As each Office app will install individually through the Microsoft Store, some may find this more simple than having to use the installer.
Keep in mind, though, that the Microsoft Store in Windows 10 is sometimes known to have its fair share of issues from time to time, so it might not always be as reliable as a direct download. You also won’t get access to the complete suite of Office products. Only the core apps like Word, Excel, PowerPoint, Outlook, Publisher, Access, and the OneNote UWP are included with the Windows Store version.
Office 365 in the Microsoft Store
Office 365 retail download is for those who are more technical
Installing Office on the Microsoft Store might be the easy way to go, but for more technical people, the retail download is the better option. With the retail version, you can install and activate Office on multiple PCs if need be. That’s something that is not possible with the Microsoft Store version. It is more useful for large organizations and for IT departments.
Another benefit of the retail download is that it comes with tools that can help you if you’re having install issues. Microsoft has an offline office installer that is available from the Office.com website. This tool will help you in cases where the retail installer fails, or gives you an error code.
The retail version also grants you access to some additional Office 365 apps. That includes Access, as well as Publisher. If these are important, then this is the way for you to go.
Office 365 Icons
Which version will you use?
These are just some of the differences between the retail version of Office 365, and the Microsoft Store version. Which version do you think is right for you? Fell free to check out our other Office 365 content, and let us know your thoughts in the comments below.
I’ve been using Surface Headphones throughout my day-to-day life since I first picked them up on the day they launched in November. However, I most recently put them to the ultimate test during my three-day long vacation to Los Angeles. I left my usual Sephia Noise Isolating in-Ear Earphones at home in New York, as I figured it’d be the perfect chance for me to write a full-on review.
Keep in mind, I’m not a audiophile. I will mention some specs, but this is primarily a non-technical and “on the road” review of how Surface Headphones fit in with my life during my vacation.
Also, I won’t lie, I’m a big Microsoft fan. From Xbox, to Windows Phone, to Surface, I want to have it all. That’s why, when Microsoft announced Surface Headphones, I was quite excited and passionate.
For the first time, Microsoft expanded the Surface lineup past the typical laptop, tablet, 2-in-1, or mouse and keyboard, or pen accessory. This was a new territory for the now-famous Surface brand. It was something Microsoft has never been done before, and so I went out and happily purchased it.
The design will get you noticed
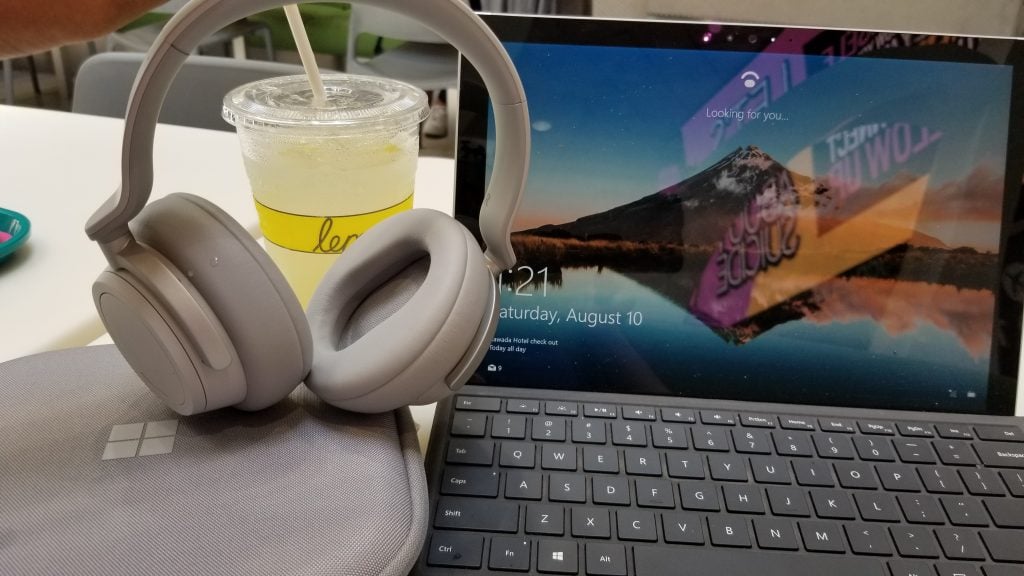
One of the first things that stuck out to me with the Surface Headphones is its design. Inspired by the other devices in Microsoft’s lineup, the light grey headphones fit right in with my Surface Pro 4. Compared to the typically colorful or black headphones offered from Beats, it contrasts against my shirt when hanging around my neck. When worn on my head, meanwhile, it looks a bit bulky. That’s mainly due to the way that the control dials stick out from the sides. Dimensions are 8.03 x 7.68 x 1.89, if you’re curious.
In fact, with my Mets jersey and Surface Pro 4, I had quite a few people at LAX airport come up to me and ask me about the headphones around my neck. When sitting at the gate, one woman asked me if I was a DJ. I’m assuming these folks never seen Surface Headphones in the wild before, just like how Surface Pros were once a rarity in coffee shops and libraries across America.
Aesthetics wise, Surface Headphones feature aluminum extenders (that hold the cups) and a steel headband. A reflective Microsoft logo on the tips of the yokes also adds a touch of fanciness. The cups, meanwhile, are primarily made of a plastic, but at 0.64 pounds, it feels very light in the hands. I was quite surprised at how light it when I initially took it out of its box, but overtime, it was something I got used to. For my time moving around L.A. that lightness made it easy to quickly pull on and off and down to my neck as I walked between my destinations.
Elsewhere, Surface headphones feature a plush memory foam material on the ear cuffs, and a rubbery material on the headband. With most other over-the-ear headphones, my ears would normally get “locked” in, and I would experience some discomfort over long periods of wear. That wasn’t the case with Surface Headphones, as I was able to wear it comfortably for a six-hour long cross-country flight. I found the materials to be very cozy, as it didn’t put too much pressure on ears or the top of my head.
Wearing the Surface Headphones
Dial out the noise
Airports and airplanes can be quite noisy, and for me, Surface Headphones saved me from the chaos. My return flight from New York from Los Angeles was delayed by over five hours, so I had to make a new home at the airport. Sitting at a little marketplace inside LAX, I put on Surface Headphones to separate myself from the rest of the world to try and get some peace of mind. It worked.
Surface Headphones feature 13 points of active noise cancellation. What makes the noise cancellation unique and simple, though, is the way it is controlled. The rounded dial on the left ear cup controls the noise cancellation levels in two pre-set options. There’s no need to fiddle with buttons or switches. Touching the dial will also pause, play, or skip music, or even activate Cortana.
When I gave my parents a call on WhatsApp, noise cancellation was very effective. It felt like I was back home and they were talking right into my ears. Their voices were clear and concise, and I didn’t need to turn the volume on my phone past 50% to hear them. From the other end, my parents also told me my voice was clear, despite the noisy background. According to Microsoft, Surface Headphones support up to 30 dB for active noise cancellation. It’s accomplished with a total of eight microphones on board.
Left side of Surface Headphones
During my flight, I found that the maximum noise cancellation level was perfect. My seat was conveniently right next to the airplane engine, a personal favorite spot of mine. That said, Surface Headphones were able to filter out the constant “whirring” noise experienced when flying. It also muted out the passengers around me, including the chatter from flight attendants serving coffee and other snacks.
Interestingly, there’s also a passive noise cancellation setting. This goes up to 40 dB, and is activated by turning the dial on the left cup all the way to the bottom. I found this useful for listening to PA announcements from the captain, or when I wanted to eavesdrop on conversations happening next to me. When I turned the dial down, and the ambient voices around me were suddenly more prevalent. When my music was playing too loud, though, it was a bit hard to make out the noises around me on on this setting. I had to pause my music to get the most out of this feature.
Wearing Surface Headphones
Control and rock out to your music with a touch
On the right side of Surface Headphones is another dial dedicated to controlling the volume, and summoning Cortana. You’ll also find the USB C port for connectivity, as well as the AUX jack, mute button for the microphone on this side as well. The AUX jack is a nice option for when the battery drains, but hooking up to it will also disable Cortana (which only works via Bluetooth) and the touch features of the dial, unless you’re connected via USB and AUX to a PC. While connected via AUX when riding public transit around L.A., I noticed that the audio quality is slightly more washed out than when connected via Bluetooth.
Anyway, during my stay in the airport, and during my flight I found the dials quite useful. A tap on the dial quickly paused music, allowing me to talk to flight attendants, or someone asking me questions at the gate. A triple tap will skip through music, double tap to go back to a previous song, which I found useful mid-flight. It is quite cool, as I was able to keep my phone in the pocket in the seat in front of me and control my music.
The right side of Surface Headphones
I should also note that if you pull the headphones off your head, it will auto-pause the music. This was amazing to me, and it helped avoid awkward situations. In one instance, a JetBlue employee approached me and asked to see my ticket, and had to suddenly pull off my headphones. Thanks to auto-pause, loud music wasn’t blaring in front of her, as it would have if I were using any other pair of headphones.
Sound quality overall is fairly great. I’m not an audiophile, but the audio was just as good as what I experienced with my Sephia in-ear earphones. When listening to the opening of The Cab’s Angel with Shotgun, I felt the bass rocking through both my ears. The 40 mm edge speakers really deliver on Microsoft’s promise for clear audio. When customizing the sound profiles to “pop” via the Cortana App on Android, I also got a truly lively and energetic experience when listening to MKTO’s American Dream. The headphones really were able to highlight the vocals, and the songs constant beats.
The left side of Surface Headphones
Battery to last you all day
As I said before, my flight was delayed by 5 hours when coming back home to New York City. I needed to check out from my hotel at around 9 AM PT, so I was at the airport by 10 AM PT. My flight didn’t end up leaving until 7 PM, and I didn’t arrive home in NYC until around 1 AM PT (that’s +1 day in NYC time.) All that time, Surface Headphones were connected to Bluetooth to my phone. My phone needed to be charged one time in between, but the Surface Headphones outlasted it.
Microsoft rates Surface headphones with a 15 hour battery life, and based on my experience, I can say it’s true. With the headphones just taking two hours to charge via USB-C, that battery life is really impressive. However, it might fall behind what you can get with other products like Sony’s 1000x M3 headphones.
Surface Headphones with my Surface Pro 4
Cortana’s here to help
Another big feature of Surface Headphones is Cortana. You can summon the assistant with a long press on any of the two dials. Cortana has always been limited compared to other voice assistants, but it’s the core part of Surface headphones. Whenever I turned the headphones on, Cortana greeted me with battery estimates, and the name of the device I am a connected to. That’s great, especially since I didn’t have the time to head into the dedicated app to see battery levels during my rush to get to the airport.
Cortana also can be used for certain tasks like calling someone or playing a specific song, setting a meeting, or reminders. I never really used Cortana for meetings or reminders, but i used Cortana to call my mom without touching my phone. Cortana also picked up my voice very well when I asked her to play Coldplay’s Paradise. She’ll even dim the music you’re listening to so you can hear her answers more clearly.
Some of the settings on the Cortana App
Pairing and Connectivity
To connect and pair with Surface Headphones via Bluetooth on iOS and Android, you’ll need to download the Cortana app. Pairing on Windows 10 or MacOS involves using the standard Bluetooth pairing procedure. There’s also a special Cortana Devices app on Windows 10, which helps manage the device once paired. I would have liked to see a separate Surface Headphones app on iOS and Android too, but I’ve been using the Cortana app for a while now, so it wasn’t an issue for me. The interface is informative. At a quick glance, it will show information on battery and noise cancellation.
Pairing is quick, and the headphones can be used with up to 10 devices. I paired with my phone and Surface, and was easily able to switch between the two by turning Bluetooth off on the device I didn’t need anymore. It proved useful for when I was listening to music on my phone, but then wanted to switch over to my Surface to watch a Mets game.
Elsewhere with connectivity, I was also able to stay about 30 feet away from my phone with the headphones before it disconnected — which was basically equal to a quick trip to the lavatory in the airplane. As a side note, Microsoft is still using Bluetooth 4.2 with these headphones though, which is behind the Bluetooth 5.0 you can get with other headphones.
More Cortana Settings
It’s easy to pack and go … sometimes
One of the hardest things to do before going on vacation is packing, and, Surface Headphones didn’t make that easier for me. I love technology, and alongside Surface Headphones, I traveled with my Surface Pro 4. Fitting that all in my carry-on bag, with extra clothes and souvenirs for my return trip, proved quite tricky.
The carry case for the Surface Headphones is very huge. It’s thick along the sides, and the top, which makes it hard to fit in a jam packed book bag like I traveled with. There is a “loop” to clip the case to the side of a bag, but I didn’t trust it enough to hang on my bag. In fact, I just ended up putting the case in my bag, and hanging the headphones around my neck, just because it was more convenient.
Reliability issues, and the end
Really bummed out right now. I'm a big Surface fan, but my Surface Headphones just died on me. No sound coming from the right ear. Reset it, paired it, tried everything, and it's still broken. I hope this isn't a quality control issue.
At the end of the day, the Surface Headphones make for a nice accessory to pair up with any Microsoft device. Despite me having to exchange my headphones once for an issue with the right side audio (I got a free replacement from Microsoft,) it was absolutely reliable for me during my trip to LA.
At $250 for the Sony WH-1000X M3, and $300 for the Bose QuietComfort 35 II Wireless Bluetooth Headphones, other headphones are cheaper and have better noise cancellation. However, no other Headphones will fit into the Microsoft ecosystem like Surface Headphones do. From the power of Cortana, great noise cancellation features, touch controls, as well as a very comfortable design, this is all I could have asked for in premium Microsoft headphones.
An HP printer making noise when not in use is quite common, which HP acknowledges as a bug with some printer models.
The company, however, explains these printer noises are a known issue with laser printers in general and not just from HP, which means the solutions mentioned here apply to just about any laser printer.
What can I do if the HP printer is making noise when not in use?
1. Check the cartridge ink level
Launch the printer application and select Maintenance.
Click on the tab that lets you see the estimated ink level remaining. It could be a separate tab, or one included under Maintenance.
Check if the ink level is less than 20 percent.
Generally, according to HP, the cartridges are usable up to 75 percent.
The noise is created if the ink level falls below 25 percent. In that case, replace the cartridge immediately.
Check to see if the noise is eliminated.
Modern HP printers come with HP Instant Ink service, which checks ink levels automatically, so this step may not be available.
2. Re-install the cartridges
Remove all the cartridges and re-insert them again.
Make sure you plug the printer in directly to the mains and not to a UPS, power strip, and such.
Also, printers have definite power ratings. Ensure you are matching the voltage rating for it to perform optimally.
You will also do well to turn off the printer, remove the power cables, and connect it again to see if this solves the issue.
4. Remove stuck paper or other debris
Turn the printer off.
Gently remove the paper tray (if it’s detachable) or bring out the paper sheets.
Check if any paper is stuck inside. If so, remove the paper. You can tilt the printer if needed for this operation.
Also, check if any debris or a foreign object is lodged inside. If so, remove them.
You might also need to open the cleanout door underneath the printer to check for jammed paper or debris.
Reattach the panel after you are done.
Similarly, open the cartridge door to check for any foreign object that might have intruded the space and is hampering normal functioning.
Reattach the panel after you have cleaned the section.
5. Ensure the carriage path is devoid of obstructions
For this, you will need to turn the printer on.
While the printer is still turned on, remove the power cable from the rear of the printer. It’s extremely vital to disconnect the power source from the printer to prevent the chances of an electrical shock.
Check if any paper stuck or other foreign objects are restricting the carriage’s free movement.
Also, move the carriage manually to ensure free movement later on.
For instance, if the carriage is stuck on the right, move it to the left and vice-versa.
Move the carriage to the right if it is stuck in the middle.
Check if the carriage can be moved freely.
Reconnect the printer and print a test page.
This is pretty much all you do if your HP printer is making a buzzing noise when not in use. However, if the sound is still persisting, get in touch with the support staff.
Projectors can be quite useful for presentations or media sharing, but many users reported that the projector lamp is not turning on.
This seems like a big problem, and if this happens, the projector won’t show the computer screen or anything else. As you can see, it’s crucial to fix this issue as soon as possible and today we’re going to show you how to do that.
How do I know if my projector lamp is blown?
A popping noise followed by a dark image is the clearest indicator that your lamp is broken.
An indicator message will appear alerting you that there are issues with your lamp.
Dim light from the projector is an early sign that something is wrong with your lamp.
Color changes can appear on your projection if the lamp is having issues.
Image flickering is a clear sign that something is wrong with your lamp.
What can I do if my projector lamp is not turning on?
1. Check the bulb light
Your projector comes with some LED indicators that can help you to understand what’s the issue with your projector.
Check the image above that shows the LED indicators and what it means.
Now if the Lamp LED is flashing red, it means the Lamp has a problem.
If it is flashing orange, you need to replace the Lamp.
If the Lamp LED is off, that means the problem is with the sensor or the fan.
If the Lamp LED is flashing orange, there is an obstacle around the projection window. Remove the obstacle or clean the obstacle sensors.
If the Lamp LED flashing Red, it is an internal Project error.
2. Other solutions to try
Make sure the power cable is connected properly to the projector. Check the power cord for issues.
Check if the projector’s buttons are locked for security reasons. Unlock if locked.
Check the projector has entered sleep mode.
If the Projector’s lamp has turned off and the Power and Temp lights are on, it means the projector has overheated and shut down to protect the projector from any damage.
If nothing seems working, send the projector for repair if it is under warranty.
If the projector lamp is not turning on, it’s most likely a glitch or a hardware issue with your projector.
To avoid these types of issues, always be sure to properly connect the projector to a PC and ensure that everything is working properly.
We hope that this guide helped you fix the projector light that was not working. In case you found a different solution that worked for you, share it with us in the comments below.
It’s Patch Tuesday again and Microsoft will start releasing the August 2019 cumulative updates.
Download links for every version of Windows 10
The Redmond giant is releasing updates for the latest Windows 10 May update as well as versions 1809, 1803, 1709, 1703, 1607, and the original version of Windows 10.
Here are the direct download links to the Microsoft Update Catalog website:
With KB4512508 come some bug fixes and improvements, but no new features. If you’re on the latest Windows 10 feature update, you can download build 18362.295 that includes the following fixes:
Addresses an issue that may prevent devices from starting up or cause them to continue restarting if they are connected to a domain that is configured to use MIT Kerberos realms. Domain controllers and domain members are both affected.
Security updates to Windows App Platform and Frameworks, Windows Storage and Filesystems, Microsoft Scripting Engine, Windows Input and Composition, Windows Wireless Networking, Windows Cryptography, Windows Datacenter Networking, Windows Virtualization, Windows Storage and Filesystems, the Microsoft JET Database Engine, Windows Linux, Windows Kernel, Windows Server, Windows MSXML, Internet Explorer, and Microsoft Edge.
There are also some known issues in this update, as follows:
Windows Sandbox may fail to start with “ERROR_FILE_NOT_FOUND (0x80070002)” on devices in which the operating system language is changed during the update process when installing Windows 10, version 1903. – Microsoft is working on a resolution and will provide an update in an upcoming release.
Devices that start up using Preboot Execution Environment (PXE) images from Windows Deployment Services (WDS) or System Center Configuration Manager (SCCM) may fail to start with the error “Status: 0xc0000001, Info: A required device isn’t connected or can’t be accessed” after installing this update on a WDS server. – For mitigation instructions, see KB4512816. We are working on a resolution and will provide an update in an upcoming release.
Install Windows 10 August Patch Tuesday updates
Don’t forget that the update is automatically available on your system. You just have to go to the Settings menu and click the Check for updates button.
To avoid any unwanted bugs, remember to back up your data before updating, just to be safe. You can always roll back to the previous version in case something goes wrong.
Keep visiting Windowsreport.com to learn more about this month’sPatch Tuesdayupdates.
After recently revealing the July round-up of updates for Power BI, Microsoft now has introduced five new Power BI Premium Capacity settings.
Power BI admins now have more control over capacities
These new settings are mainly aimed at administrators, to better control the capacities and to avoid any potential issues on the way.
Also, the Power BI admins can now set limits to Max Offline Dataset Size, create a more performant capacity, and prevent reports from affecting others using the capacity.
Here’s the detailed description of each of the five new capacity settings and how they work in a real-world scenario:
Setting Name
Description
Scenario
Max Offline Dataset Size (GB)
Maximum size of the offline dataset in memory. This is the compressed size on disk. Default value is set by SKU and the allowable range is from 0.1 – 10 GB
When users are experiencing slowness due to a large dataset taking up memory resources , admins would very often end up in the similar cycle of first identifying the culprit datasets, contacting the owner or migrating to a different capacity. With this new setting, admins can now configure the dataset size and prevent report creators from publishing a large dataset that could potentially take down the capacity and secondly save the admin from the painful cycle of identifying and mitigating.
Query Memory Limit (%)
Applies only to DAX measures and queries. Specified in % and limits how much memory can be used by temporary results during a query.
Some queries/calculations can result in intermediate results that use a lot of memory on the capacity. This can cause other queries to execute very slowly, cause eviction of other datasets from the capacity, and lead to out of memory errors for other users of the capacity. Without this setting, capacity administrators would find it challenging to identify which report/query is causing the problem, so that they could work with the report author to improve the performance. With this new setting, admins can better control impact of bad or expensive report on others using the capacity.
Query Timeout (seconds)
An integer that defines the timeout, in seconds, for queries. The default is 3600 seconds (or 60 minutes). Note that Power BI reports will already override this default with a much smaller timeout for each of its queries to the capacity. Typically, it is approximately 3 minutes.
When users are experiencing spinning on the report primarily due to another expensive report, admins would sometimes have to move the workspace to a different capacity. With the new settings, admins can better control expensive queries so that they have less impact on other users of the capacity.
Max Intermediate Row Set Count
The max number of intermediate rows returned by DirectQuery. Default value is set to 1000000 and allowable range is between 100000 and 2147483647
When a query to a DirectQuery dataset results in a very large result from the source database, it can cause a spike in memory as well as a lot of expensive processing of data. This can lead to other users and reports running low on resources. This setting allows the capacity administrator to adjust how many rows can be fetched by an individual query to the data source in a dataset.
Max Result Row Set Count
Defines the maximum number of rows returned in a DAX query. Default value is set to -1(no limit) and allowable range is between 100000 and 2147483647
Sometimes, a user can execute an expensive DAX query that returns a very large number of rows. This can cause a lot of resource usage and affect other users and reports executing on the capacity. This setting allows the capacity administrator to limit how many rows should be returned for any individual DAX query.
If you’re a Power BI admin, you can access these settings on the Admin Portal. There, you’ll have to go to the Capacity settings page and under the Management tab, expand the Workloads section.
If you want to learn more about Power BI Premium and its capacities, you can access Microsoft’s official link.
In a recent post made by Microsoft, the monthly recap of all major Power BI improvements has been published, this time for the month of July.
Here’s a list of the most notable changes and improvements:
Paginated reports are becoming available for non-premium datasets
Power BI aggregations are becoming generally available
The entire On-premises data gateway July Update
The ability to send refresh failure notifications to others
Power BI Premium capacity testing tool and the complementary resources
A preview of the Service availability notifications
A preview of Power BI service’s new look
Power BI’s first African region made available
Power BI mobile’s report page tooltips
Roadmap updates made public
What does this all mean?
One of the key features showcased is the support for non-premium datasets for paginated reports. This allows you to connect to datasets, which previously was a feature only available to those with a premium subscription.
However, those with non-premium subscriptions cannot publish their created paginated reports.
Additionally, Power BI aggregations were also given general availability over the course of July, which translates into better overall efficiency in both costs and performance management.
Another highlight of the July recap is the overall update for the on-premises data gateway. This major update includes a .NET framework update, a fix for the well-known encrypted connection bug, and a better mashup engine.
They also greatly improved the service’s notification system, improving the way you can send multiple users refresh failure notifications.
Premium subscribers get their hands on a new capacity testing tool
Those of you with a premium subscription will now also gain access to a new feature, namely the Power BI Premium capacity testing tool.
This feature will help test automated loads in a simulated environment. A GitHub repository was created especially for this new feature, and it can be used to reliably host the tools and its utilities.
Users that live in Johannesburg should know that the Power BI service will finally be available in their region. This now brings Power BI’s coverage to 19 regions in Microsoft’s public cloud.
Last but not least, the Business Application Release Notes has also been updated and made available for the general public.
What do you think about these Power BI improvements?
Share your thoughts in the comments section below and we’ll be sure to continue the talk.
Both Netflix and the InPrivate browsing mode are great. However, these two don’t make such a good team.
Many users complained that they can’t watch their favorite shows while going incognito.
This is a delicate issue because privacy is crucial for many people.
One user reported the following on the Reddit forum:
What added the my frustration is that they let me use incognito to log in, browse and select something to watch. Only after I was finally excited to watch something did they block me….
So, the OP complained that he can access the account and choose the show. Only after that, this error appears.
What’s worse is that the error appears on many browsers, including Chrome, Firefox, and Internet Explorer.
Fortunately, there are solutions to this problem.
Netflix error while going incognito? Here’s how to fix that!
1. Close all browsers
Closing all your browsers (including the one with the Netflix error) might solve the issue. Then, open the browser again and try to watch Netflix.
2. Check for available storage
Press the Windows Key.
In the Search Menu, type “settings”.
Select Settings.
Click on System.
Select Storage.
Free up space if you have below 100 MB.
3. Clear browsing data
In Chrome, you can delete your browsing data following these easy steps:
Press Ctrl + Shift + Delete to open the Clear browsing data menu.
Choose theAdvanced tab.
SelectAll time under the Time range.
Check theCookies and other data site box.
ClickClear data.
In other browsers, such as Firefox or Microsoft Edge, the steps are somewhat similar.
4. Use Opera to open Netflix
If the issue seems to persist, we suggest you switch up your browser. When it comes to streaming platforms, Opera is your best bet because it is light and has great speed rates.
On top of that, Opera can also help you access geo-restricted content. It has a built-in VPN that you can turn on and off in just one click. Select your location of choice and access shows all across the globe.
Other features that make Opera our top recommendation are its anti-tracking shield and adblocker. Plus, you can customize it to your liking and access all your favorite apps and platforms directly from the browser, without needing to switch between apps.
So, you can have both: privacy on the Internet and a great Netflix experience. Just try our easy solutions and while you’re at it, install UR Browser to surf the Internet safely and without issues such as the Netflix InPrivate browsing error.
Did our solutions solve the problem? Do let us know in the comments section below!
Your Lexmark printer can stop printing suddenly for many reasons, including outdated printer drivers, Windows update glitches, etc. In addition, several users have reported the Lexmark printer is not communicating with a computer error in the Microsoft Community Forums.
Follow the troubleshooting tips listed in this article to fix issues with your Lexmark printer in Windows.
Why is my Lexmark printer not connecting to the computer?
From user interaction, we gathered that a few things might be the trigger if your Lexmark printer is not connecting to your computer. Here are some possible causes:
Connection issues – One of the most common causes is connectivity issues. This can be due to a loose or disconnected cable or a problem with your wireless network connection.
Driver issues – Outdated or missing printer drivers can also cause your Lexmark printer to not connect to your computer.
Printer settings – Incorrect printer settings can also cause connectivity issues. This could be a configuration problem with your printer’s network settings or an issue with the printer’s hardware.
Printer offline – Your printer may be offline, so it will only connect to your computer once you change the setting.
What can I do if my Lexmark printer not communicating with the computer?
1. Run the Printer Troubleshooter
Press Windows + I to open the Settings app, then click Update & Security.
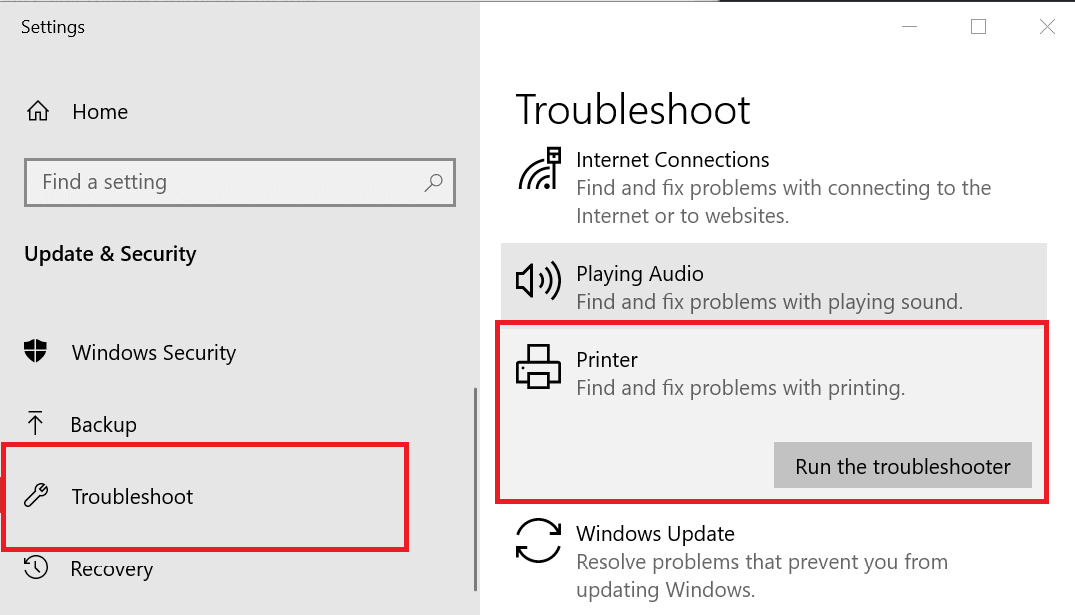
Select Troubleshooter, scroll down to the Printer section, click on it, and select Run the Troubleshooter.
Windows will scan the system for issues affecting the printer functionalities and recommend appropriate fixes.
Apply the fixes and reboot the system. Try to print any document and check for any improvements.
2. Update the Printer Driver
Press Windows + R, type, and select hit Enter.
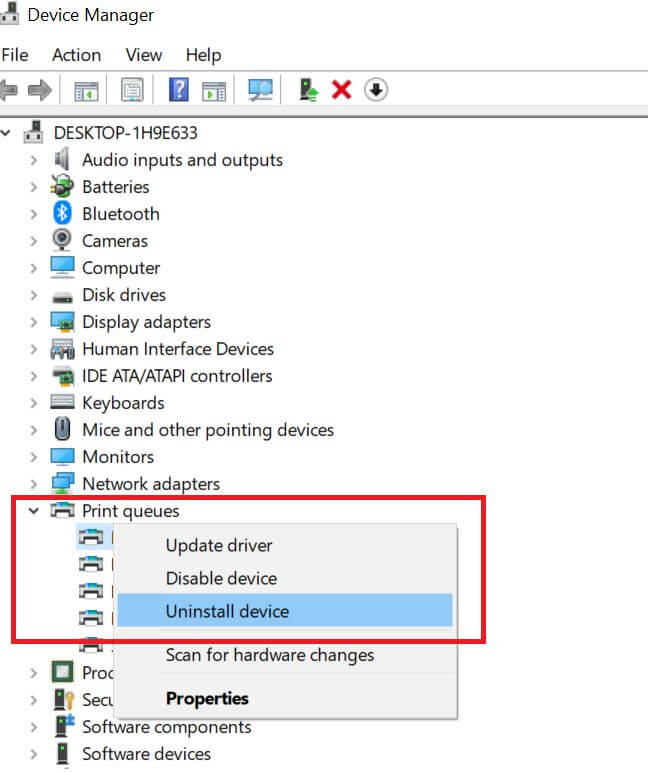
In the Device Manager, expand the Printer section, right-click on your Printer, and select Update Driver.
Select the Search automatically for drivers option.
Windows will now look for any pending driver update and download it.
After the installation is over, restart the computer if prompted to.
Check if your computer detects the printer and can print from it.
If the manual method somehow doesn’t work for updating your printer driver, there is specialized software you can opt for.
Fortect Driver Updater is a tool specifically designed to locate the latest updates for all your device drivers from a regularly-examined database.
Go to Hardware and Sound, then select Devices and Printers.
Select your printer and click on PrinterServer Properties (on top).
Go to the Drivers tab. Select all the drivers for your printer and click the Remove button.
3.4 Install the Printer
Now turn off the printer and unplug all the cables from the computer and the wall outlet for the printer. Restart your computer.
Wait a few minutes, replug the printer power cable, and connect it to your computer.
Wait for Windows to recognize the printer and automatically install all the drivers. Then, give a printing job and check for improvements.
A Lexmark printer not connecting to a computer can be a frustrating experience, but several potential causes and efficient fixes exist.
Following the recommended solutions, you can resolve the most common issues and get your printer back up and running. However, if you continue to experience problems, please get in touch with Lexmark customer support for further assistance.
In a surprise announcement, Seattle Sounders FC announced this morning that 11 new families including current and ex Microsoft execs were joining the club’s ownership group. Former Microsoft exec Terry Myerson and his wife are leading the group of new investors which also includes Microsoft CEO Satya Nadella and his wife, CFO Amy Hood and her husband, as well as CVP of Experiences and Devices Joe Belfiore and his wife.
The 11 new families also include celebrities with direct ties to Seattle such as musicians Ciara and Macklemore, Seattle Seahawks six-time Pro Bowler Russell Wilson, and other tech and media veterans including former Pandora, aQuantive, Microsoft, and ABC Sports exec Brian McAndrews and his wife, and former Microsoft exec Soma Somasegar and his wife. You can check the full list of Sounders FC’s new group of investors on the press release.
Terry Myerson, who is described in the announcement as the “driving force” behind this new group of investors wrote a long blog post on LinkedIn to explain why the soccer club could be a great investment opportunity for his family, Microsoft colleagues, and other personalities who share a deep love for Seattle.
I am honored to now be part of this club, with its great heritage, and so much future potential as a pillar of our great city of Seattle. Soccer has so much to offer all of us – lessons in teamwork, perseverance and hard work – and the opportunity for boys and girls, whole families, and friends to bond together across all walks of life and across generations. I look forward to the day when we bring our next championship home to Seattle, bringing together our entire Seattle community for a shared moment of pride and celebration.
Sounders FC had some existing ties with Microsoft as Xbox used to be a jersey sponsor for the club until January 2019, when it was replaced by online retailer Zulily. Today’s new is an important new milestone in the club’s 45-year history, and Sounders FC founding Owner Joe Roth also announced today his departure from the club.
Sounders FC was born right here in Seattle, and for more than 40 years, the club has forged a meaningful legacy that is deep and far-reaching,” said Sounders FC Majority Owner Adrian Hanauer. “Today’s news is a testament to what our community has accomplished, as 11 new families have joined with the broader Sounders family as fans and invested stewards of our club.”
Microsoft announced its sixth annual ID@Xbox Open House event to take place on August 29. As per the company’s Xbox Wire blog post, the event will feature more than 50 games, some of which are from the independent developers that will also take part in the occasion. Here’s what the company says you can expect:
Talk to the independent developers bringing their games to Xbox One (which you can play!)
Meet some of the Microsoft teams behind your favorite gaming franchises
Mingle with the Xbox Ambassadors and learn what it takes to be a positive force in gaming
Join us for panels and let us tell you a tale (or two) in an auditorium-style setting
Streamed content, including interviews and more
Meet the ID@Xbox team!
A whole lot of free pizza and a few fun surprises
Additionally, there are expected to be thirteen announcements for new game titles, and Microsoft says that “every-single-one will be playable.” The list includes:
Demon’s Tilt (Flarb LLC / Wiznwar)
Exhausted Man (E-Home Entertainment / Candleman Games)
Freshly Frosted (The Quantum Astrophysicists Guild)
Genesis Noir (Fellow Traveller / Feral Cat Den)
Hypnospace Outlaw (No More Robots / Tendershoot, Michael Lasch, ThatWhichIs Media)
Kine (Chump Squad / Gwen Frey)
Levelhead (Butterscotch Shenanigans)
Moving Out (SMG Studios)
She Dreams Elsewhere (Studio Zevere)
Skater XL (Easy Day Studios)
Spectrum Break (Jason Hein)
Superliminal (Pillow Castle)
Touhou Luna Nights (Vaka Game Magazine, Agm Playism / Vaka Game Magazine, Team Ladybug)
If you’re interested, the event will be hosted at the Microsoft Conference Center on August 29, beginning at 5:00 PM and ending at 9 PM pacific time. Registrations are open right now, so it might be a good idea to do that sooner rather than later.
Will you be taking part in the ID@Xbox event? Feel free to share your thoughts in the comment area below.
It is very annoying when that pesky There is no disk in the drive error starts popping up on your Windows computer every time you want to use a particular application.
It’s like when your Edge browser keeps freezing. And just to add to the obvious irritation, clicking the cancel, continue, or try again buttons won’t get rid of the error message as promptly as it should.
This error will lock you out of your other programs. Until you fix the error, you have to pretty much stop everything you are doing. You have to keep hitting that continue button for what will seem like a million times. It is super annoying and will literally drive you mad. Is there a fix for this error?
There is no disk in the drive — What causes this error?
The problem is difficult to diagnose as the error message always seems to be triggered by background processes, or issues with third-party applications that only the developer can fix.
But before you do anything, you want to make sure what you are currently doing does not require there to be a removable disk in one of the removable disk drives. But this is not usually the case.
Oftentimes, this error occurs because a feature on a software program, a game, or add-on you use on your computer interferes with your OS.
In other cases, the error pops up while you are doing the same old tasks you have been doing on your computer when you are not even attempting to use the said drive. An example is a simple act of saving a Notepad document to your local drive.
How can I fix There is no disk in the drive error?
The Notepad bug mentioned above is likely the result of a Drive C: that’s been wrongly reassigned to a removable disk drive. It is also not uncommon for your computer to execute certain tasks in the sequence you have habitually followed, even in cases where that isn’t what you intend.
It will not matter that you are only saving to your local drive, your computer will first try to save it to the removable drive you always saved to. A simple way to troubleshoot this is to put a storage medium in the said disk drive.
Of course, it is important to know what this disk drive is. The error message will itself tell you what the offending disk drive is. This is a typical message you will get with this error.
These drives could a conventional USB flash disk drive, an external hard disk drive, or anyone of the several card reader drives that can be on your computer. If it is the flash disk drive, for example, just put a flash disk in there and see if the error still pops up.
For the error in the image above, the problem drive is Drive 3. To see which drive it is, use this command sequence from startup:
Control Panel > Administrative Tools > Computer Management > Disk Management.
The disk drive numbers and their corresponding letters will be listed as indicated by the red arrow in the image below.
Locating the disk drive concerned should lead you to the first and easiest fix of this error.
Identifying the disk drive generating the error message presents an easy fix. If it’s a card reader, just get an SD card and slot it there. Maybe it is a removable USB flash drive! Get your memory stick and stick it in there.
But you could have more than several card readers on the computer, which would make this fix somewhat impractical. Again, is this something you want to do all the time you use the affected application? Maybe not.
3. Disable the error message in the Registry Editor
Disabling a disk drive is an option. But, clearly, isn’t the best fix for this problem. There is a chance you will still want to use the same drive in the future. besides, deleting pre-installed software isn’t something you want to make a habit of. The software is there for a reason.
Because of this, it is perhaps better to muzzle the error message itself so it does not appear on your screen. Here, you are basically disabling the error message right in the Windows Registry. Be careful though, changing the wrong things can mean you end up with more problems than you have fixed.
Editing the Windows Registry isn’t an ideal fix. But it is still better than disabling the whole disk drive, a rather drastic action that some may be driven to take. Here is how to execute the Regedit fix.
Click the Windows start icon and click type regedit into the Run dialog box and hit Enter. Once in the Registry Editor, follow the following steps.
Double click HKEY_LOCAL_MACHINE, like this
Look down to locate the SYSTEM folder and double-click it,
Find the ControlSet001 and choose the Control folder and double-click it as well, you will get this.
Scroll down the list and find the Windows folder. Double click it to reveal this screen.
Look for the Error Mode entry and double-click it. This popup box will appear.
Change the number 0 to 2. While there, also change the Base from Hexagonal to Decimal.
Refresh and go back to try again. The error message shouldn’t pop up again.
A possible downside of the Regedit fix is it may end up blocking messages that display other types of errors. There are hard drive system error messages you need to see. Ignoring these, because they are blocked, may cause more serious, unintended problems for your computer.
Renaming the disk drive with a different letter is perhaps a better fix. It somehow stops this error message from popping up. But importantly, you will still be able to see messages reporting other hard drive errors you need to attend to.
We have discussed already how you can identify the disk drive generating the error. But if you are running Windows 8 or 10, the WIN+X keyboard shortcut is a quicker way to get to Disk Management. To rename the disk drive with a different letter, follow the steps below:
Locate the disk drive indicated by the error message and right-click on it,
Choose the Change Drive Letter And Paths option from the sub-menu.
From there, check the Change button.
You will be shown a window to Assign the Following Drive Letter window. Choose any one from the dropdown list,
Select Yes to the warning that this change may cause software programs installed on it to stop running. This is rarely an issue because it is the removable disk drives that usually give this error message.
You should be good to go and shouldn’t see the error message popping up again.
The perplexing thing about the There is no disk in the drive error is you can choose to suffer through it, and then it can disappear without you ever attempting a fix.
As if the built-in Calculator app in Windows 10 wasn’t already pretty capable enough, it’s about to get even more useful. Windows Insiders on the Fast Ring are getting a new option that will make it a lot easier to use while multitasking between multiple windows at any given time.
When enabled, Always on Top mode keeps the Calculator front and center of what you’re doing, allowing you to stay on task without having to switch back and forth. The senior program manager of the app, Dave Grochocki, confirmed the new feature on Twitter:
Even though the Calculator might be only available to Windows Insiders of the Fast Ring for sake of limited testing, the app is updated on the Microsoft Store independently from Windows updates, so hopefully it won’t be long before it reaches to all Windows 10 users. If you are on the Fast Ring, be sure to check the Store for updates, and let us know what you think of the new feature in the comment area below.
Owners of GLAS smart thermostats were notified of the upcoming change this week. A copy of the notice obtained by SG states that the “Microsoft Cortana voice assistant will no longer work on your device” and that “Moving forward, you will still have access to other voice assistants to control your thermostat through the Works with functionality of Amazon Alexa and the Google Assistant.”
Microsoft’s Cortana was built directly into the GLAS device while functionality for Amazon’s Alexa and Google Assistant are only possible by a separate smart speaker.
No reason for the removal has been given but the whole situation is rather similar to how Microsoft removed Cortana from its own Xbox One consoles after adding support for Alexa. It does make one wonder if Microsoft is planning to sunset Cortana completely or if demand for the service simply isn’t there.
Encountering the Windows no longer detects a HomeGroup on this network is an extremely annoying error message. This means you will not be able to share your files on your network.
The HomeGroup option inside Windows allows you to connect all the PCs you have in one location to a single network, thus allowing you to share files and printers between them.
The error message appears whenever a user with several Windows devices upgrades some or all the computers to Windows 10, while the HomeGroup is activated.
In today’s article, we will explore some of the best ways to deal with this issue. Read on to find out more.
What to do if Windows can’t detect a HomeGroup on this network?
1. Temporarily disable antivirus and firewall on your PC
Because of the conflict caused by upgrading your PCs to Windows 10 while the HomeGroup is active, it is very important that we eliminate any other possibilities that the process is blocked.
For this reason, you should turn off all your antivirus and firewall software, and try to connect to the HomeGroup.
If this method doesn’t work, please try the next one.
2. Exit the HomeGroup only on the computer that was used to create the group initially
Open up the PC that you used to create the HomeGroup.
Leave the HomeGroup that contains all the computers in your home.
Create a new HomeGroup from the same PC.
Note the password of the new HomeGroup.
Open up all the other computers in the network and connect them with the newly created HomeGroup.
If this option didn’t fix your issue, follow the next method.
3. Remove every last bit of the problematic HomeGroup and create a new one
Note: To be able to find the folder mentioned below, you will need to activate the Show hidden files and folders option. You can do so by clicking on the View tab inside Windows Explorer -> and check the box next to the Show hidden files option.
Open up every computer that is part of the old HomeGroup session, navigate to the following directory: C:\Windows\ServiceProfiles\LocalService\AppData\Roaming\PeerNetworking
Delete all contents from the PeerNetworking folder.
Press Windows Key+R keys on each of the computers part of the network -> type services.msc -> press Enter.
Inside the Services manager window ->right click the HomeGroup Provider -> select Stop.
Turn off all the PCs.
Turn on one PC that was not the one used to create the first HomeGroup -> create new HomeGroup.
Connect all the other PCs to the newly created HomeGroup.
In this guide, we explored some of the best methods to deal with the Windows no longer detects a HomeGroup on this network error.
Please let us know if this guide helped you by commenting below.
The special release contains all of the content from all six The Walking Dead video games released by Telltale Games with most of them receiving graphical upgrades and gameplay improvements.
The Walking Dead: The Telltale Definitive Series also comes with a variety of behind the scenes content and a special music player for listening to all of the music from the series.
Here’s the official game description:
The Walking Dead: The Telltale Definitive Series contains all 4 Seasons, 400 Days, and The Walking Dead: Michonne, which includes over 50 hours of gameplay across 23 unique episodes. With graphical enhancements, behind the scenes bonus features and faithful recreations of classic menus, this is the definitive way to experience Clementine’s journey and find out how her story ends.
Graphical Enhancements: “Graphic Black” art style brings Season 4’s enhanced visual style to all previous seasons of the acclaimed series. Will also include full dynamic lighting to episodes that previously did not receive this upgrade.
Behind the Scenes Bonuses: Exclusive looks at the making of the game from the developers, VO artists, and other team members that brought Clementine’s story to life. This includes over 10+ hours of developer commentary and “Return of the Walking Dead” documentary short.
Gameplay Improvements: Character performances, lip syncing, and other gameplay and UI enhancements make this the definitive Telltale’s The Walking Dead experience.
Even more digital bonuses: Music player that includes 40+ tracks across all seasons, art gallery, 3D model viewer with playable voice lines, and new 3D front end that still includes the original menus and music from all past seasons.
The Walking Dead: The Telltale Definitive Series is currently selling for $49.99 on Xbox One, a pretty good price considering how much content is in it.
A few days ago, Microsoft announced that as of October 1, 2019, any customer coming aboard with a Windows Server and SQL Server license will now not be able to transfer to dedicated cloud providers such as Alibaba, AWS, Azure, or Google with the only exception being purchases of service with Software Assurance plans.
Customers can somewhat mitigate the new restrictions with Azure Hybrid Benefit which coincidently reduces the price of an integrated Microsoft stack with Windows Server and SQL Server.
As CRN is reporting, the president of Interlink Cloud Advisors, Matt Scherocman thinks the new licensing policy is justified, “They know that whichever platform gets the first workload from a customer, it’s way more likely to get the second and the tenth workload.”
“For our practice, anything that helps drive Azure helps us do more business with our client.”
In addition to welcoming the change, other partners also point out some of the hypocrisy in Amazon and Google’s “leveraging” arguments, with CEO of Cumulus Global, Allen Falcon bringing up AWS’ Toy’s R Us exclusivity deal that wound up giving Amazon the e-commerce chops to eventually compete in the toy distribution sector.
Senior Microsoft practice directors at Green Pages, David Barter was a bit glibber in his rationale of the new policy stating,
“Apple and Oracle and all the big tech giants around the world have made it abundantly clear that they’re self-serving, Amazon and Google Cloud are not any different. Amazon has achieved its current market position by leveraging the ability to provide state-of-the-art e-commerce hosting on a platform easy to consume and manage. And Google has often leaned on its powerful Search engine to spur cloud sales.”
Despite Amazon and Google running to the mountain tops to admonish Microsoft’s recent Azure restriction, it seems the company’s partners are having little issue with the move and in some instances highlighting the hypocrisy of competitor complaints.
Yet another bait+switch by $MSFT, eliminating license benefits to force MS use. 1st, MS took away BYOL SQL Server on RDS, now no Windows upgrades w/BYOL on#AWS. Hard to trust a co. who raises prices, eliminates benefits, + restricts freedom of choice. https://t.co/h4RkFHzcjP
Over time both Amazon and Google have shown the propensity to leverage either their e-commerce and search platforms to add seats in its cloud portfolio, however, without having a foot in either market, Microsoft seems comfortable utilizing its own significant presence enterprise solutions to bolster its cloud portfolio.
It would seem that at the end of the day, Microsoft partners are seeing a tangible benefit with the new policy as a majority of the businesses who are using a public cloud option aren’t doing it with Microsoft’s existing licensing model. Furthermore, “customers who are multi-tenant and upgrade to new server versions gradually,” will not be impacted, according to a Microsoft spokesperson.
While the projectors allow the users to view their favorite flick on a large screen, things can get messy if the projector not focusing.
This can be a problem and completely ruin your viewing experience. This isn’t as serious as the projector screen won’t go back up issue, but it can still cause a lot of trouble.
Luckily, there are ways to fix it, and today we’re going to show you how.
Why is part of my projector blurry?
Your projection room has too much light that interferes with the projection quality.
The lens isn’t properly adjusted, so it needs manual configuration.
A scratched or dirty lens can cause your picture to be blurry.
Your projector isn’t properly positioned or connected.
How do I fix a projector that won’t focus?
1. Check the room conditions
One of the reasons why your projector is failing to find the right focus could be because of the room you are using the projector in.
Make sure you don’t leave any shades open that is letting the outdoor lights in.
Also, turn off any lights in the room that can interfere with the projector and make the image look blurry.
These are some basic guidelines if the projector is not focusing, so be sure to follow them closely.
2. Check and clean the lens
Another common reason that can cause the projector to go out of focus is dirty or defective project lenses.
Try to adjust the focus using the adjustment ring, swiveling back and forth until you find the perfect focus.
If that did not help, remove the lenses carefully and use a clean cloth to clean any dirt in the lenses.
Make sure to clean it gently so that you don’t scratch the lens which will create more issues.
Also, check the lens for any scratches. If there are any scratches, you mostly need to replace the lens to fix the focus issues.
After checking the lens, the projector not focusing issue should be gone.
Begin with checking if the cables that are used to connect the projector to the source device is working properly.
It is always recommended to use the Projector and the source device with close proximity (less than 10 feet) to avoid any distortion.
For the screen resolution, make sure you match the video projection resolution to the native output of the projector to avoid any distortion.
4. Other solutions to try
Position the projector close enough to the screen.
Check the projection angle and make sure you compensate for the uneven surface for the best image quality.
Turn on automatic keystone adjustment from the Projector’s menus to get the best result.
When the projector is connected to a computer, use the Auto button on the remote control to automatically adjust the sync and tracking.
These are just a couple of simple solutions that you can use if the projector not focusing properly while connected to your PC.
This is just one of many issues that you can encounter, and speaking of which, many reported that the projector won’t turn off for them. Luckily, we covered this in a separate guide.
What solution did you use to fix this problem? Share it with us in the comments below.
The Lumia 650 was the last Windows mobile phone Microsoft announced back in 2016. Since then, Windows phones have slumped to an extent that the big M has had to pull the plug on Windows 10 Mobile. Windows 10 Mobile reaches its end of support date in December 2019. However, one designer has shown us what a new Microsoft Lumia X phone featuring a Modern OS could have been like with a series of concept design images.
The designer Mr. Estep has displayed a series of concept designs for a fictional Lumia X mobile on his website. The Lumia X is based on a new modular Modern OS platform instead of a redesigned Windows Mobile OS. The detailed designs show both images for the Modern OS and the Lumia X phone design, which is a reinterpretation of the Lumia 1020.
The Modern OS designs include a new Start menu that users can access by swiping up. The Start menu provides suggested actions from calendar appointments and apps. In addition, users can search the menu with its search fab.
Modern OS also incorporates Cortana with a redesigned UI and new trigger. Cortana’s conversation UI showcases detailed visuals with more info than what the current app provides.
Mr. Estep’s lock screen designs for the Modern OS are another interesting concept. The phone’s lock screen displays whether, calendar, and notification details. In addition, the lock screen on the Modern OS incorporates music controls so that users can play music directly from there without unlocking the mobile.
The Lumia X also supports Microsoft Continuum. That enables users to project the phone’s display on a desktop VDU with adapter or screen mirroring. Then users can utilize the phone more like a desktop.
Mr. Estep’s designs also show off a stylish Lumia X phone that comes in white, black, and yellow colors. The phone boasts a 6-inch OLED display with 2K resolution. It also incorporates a 64-megapixel back camera and 48 megapixel snapper at the front.
Such design concepts, however, are merely the stuff of dreams for Microsoft at the moment. Microsoft has got increasingly left behind in the mobile device industry after the demise of Windows 10 Mobile. Although there have been many rumours about the big M releasing a foldable smartphone codenamed Andromeda, such plans have yet to come to fruition. Since 2018, there has been some speculation that the big M has scrapped, or at least postponed, the Andromeda mobile.
However, there have been a lot more recent rumours surrounding a Centaurus mobile device that Microsoft might have up its sleeve. That is expected to be a foldable dual-screen device which users can utilize as a tablet, laptop with touchscreen keyboard, or notebook with stylus pen. There has been some speculation that a Surface hardware team has already shown off a dual-screen device internally at Microsoft. Yet, the big M has not confirmed a Surface Centaurus device.
So, it remains to be seen what Microsoft actually has in store for the mobile device industry in the next few years. However, the big M’s next mobile device will probably not be much like the Lumia X dreamed up by Mr. Estep. In the meantime, the clock is ticking on Windows 10 Mobile; and Microsoft has already told its users to switch to Android and iOS devices.
Steam is one of the biggest gaming platforms in the world, and it’s used by a lot of Windows 10 users for their daily gaming sessions.
Now, millions of Windows 10 gamers could be at risk because of a “zero-day” securityvulnerability that affects Steam.
Steam’s security might be compromised
The issue was found by a security researcher, Vasily Kravets, who stated that the vulnerability could open the affected PCs to malware attacks, data and password stealing, and more.
45 days have gone since the initial report, so I want to publicly disclose the vulnerability. I hope this will bring Steam developers to make some security improvements. So, now we have a primitive to take control on almost every key in the registry, and it is easy to convert it into a complete EoP (Escalation of Privileges). After taking control, it is only necessary to change ImagePath value of the HKLMSYSTEMControlSet001Servicesmsiserver key and start “Windows Installer” service. The program from ImagePath will be started as NT AUTHORITYSYSTEM.
Escalation of Privileges in Steam may lead to data and password loss
This is a privilege escalation vulnerability that allows an attacker with minimal access permissions to get system admin permissions. This means that malware with these raised privileges could affect your privacy and personal data:
Some of the threats will remain even being run without administrator rights. […] the high rights of malicious programs can significantly increase risks, programs could disable antivirus, use deep and dark places to hide and change almost any file of any user, even steal private data.
This issue with the Steam Client Service is pretty big and could lead to many unwanted problems.
Share your thoughts about Steam‘s “zero-day” securityvulnerability in the comments section below and we’ll continue the talk.
A large number of users have reported that their Xbox consoles don’t recognize their Gold accounts even if they have one.
This issue varies a lot when it comes to the way this affects your gaming experience, but in most of the cases, the Gold subscriptions are still available, and also the content that comes with the Gold account.
In this article, we will explore some of the best troubleshooting steps that you can try to fix this issue once and for all.
What to do if Xbox One Gold membership isn’t recognized?
1. Check the Xbox Live Status web-page
The first step you will need to take when encountering this error message is to check if the Xbox Liveservers are up and running.
In order to do so, you can simplyclick this linkto visit the official Xbox Live page. If the servers are marked with a green checkmark then it means that the servers are running normally.
Follow the next method to solve the issue mentioned above.
2. Try the ‘unplug’ method
Unplug the power cord from your Xbox.
Hold the power button pressed for 30 seconds.
Plug all the cables back in and try to see if the issue is resolved.
3. Reset your Xbox Live profile and re-sync the data
To reset your profile follow these steps:
Press the Xbox button on your gamepad.
Select Settings -> All Settings.
Under the Account tab -> select Remove accounts.
Choose the account that you want to remove.
Select Remove to confirm your decision.
After the process is finished -> select Close.
Restart your Xbox.
To re-sync your data follow these steps:
Press the Xbox button on your gamepad again.
Inside the Sign in tab -> scroll down and select the Add & manage option.
Log into your Microsoft account and check to see if the issue persists.
4. Reset your console to factory defaults
Press the Xbox button on your gamepad.
Select System -> Settings -> System -> Consoleinfo.
Select Resetconsole.
On the Reset console screen -> choose Reset and keep my games & apps.
After the console is reset -> log into your account normally (the process of erasing the data will take some time but should solve your problem).
In this guide, we discussed the best methods to solve the Xbox Live Gold membership issue. Please feel free to let us know if this guide helped you by commenting below.
Skype is, without a doubt, the most popular messaging service, and although millions of users use it daily, some aren’t pleased with some of its features. One feature that users are complaining about is spell check, and they want to disable it in Skype.
Today we’re going to show you how to disable Skype autocorrect in Windows 10 and other iterations of the OS.
Should I disable spell check in Skype?
Autocorrect is a useful feature if you sometimes misspell certain words. With autocorrect turned on, all your words will be automatically corrected if they aren’t properly spelled.
This can be useful, but sometimes autocorrect might be wrong and replace the misspelled word with some completely different word, thus making you enter the same word again. This applies to both the standard version of Skype and Skype for Business.
If English is not your native language, say using Skype in Spanish or French, autocorrect can sometimes change the words from your native language to English, causing even more problems. These are just some minor inconveniences that can occur with autocorrect, so it’s no wonder many want to disable spell check in Skype.
How do I turn off Skype spelling check?
1. Change typing settings
Click the Start button and choose Settings app.
Go to Devices, and choose Typing.
Turn off Autocorrect misspelled words and Highlight misspelled words options.
According to users, the simplest way to turn off Skype autocorrect is to change the Typing settings in the Settings app.
Remember that the autocorrect feature is based on your keyboard input language, so keep a close eye on which keyboard input language you are using.
2. Uncheck Autocorrect in Skype
Tip
The option is only available in the earlier version of Skype. For those running the latest versions, move to the next method.
Open Skype.
Go to the Tools menu, and select Options.
Go to IM & SMS, selectIM Settings, and click on Show advanced options.
Uncheck Auto correct and highlight misspelled words.
After unchecking this option, click the Save button to apply the changes.
3. Edit the registry
Press Windows + R, type regedit, and click OK.
Navigate to the following path: Computer\HKEY_USERS\S-1-5-21-2072414048-1790450332-1544196057-1001\Software\Microsoft\TabletTip\1.7
In the right pane, double-click EnableAutocorrection DWORD, set its Value data to 0, and click OK to save the changes.
Repeat the same steps for EnableSpellchecking DWORD.
After you’re done, close Registry Editor and check if the problem is resolved.
According to users, for some unknown reason, the Typing tab in settings might not be visible, but you can circumvent this limitation by editing the Registry.
Autocorrect is a useful feature, but sometimes it can be a hindrance, so you might want to disable spell check in Skype. It’s simple and easy!
Security researchers found new vulnerabilities in more than 40 drivers that have been certified by Microsoft.
The problem is in the driver code that enables communication between the OS kernel and the hardware, providing a higher permission level than a normal user or an administrator.
The driver vulnerabilities could affect millions
The list of hardware manufacturers affected include huge companies like Intel, Nvidia, Huawei, Toshiba, and Asus. Here’s how the cybersecurity team at Eclypsium, who found the vulnerabilities, describe them:
All these vulnerabilities allow the driver to act as a proxy to perform highly privileged access to the hardware resources, such as read and write access to processor and chipset I/O space, Model Specific Registers (MSR), Control Registers (CR), Debug Registers (DR), physical memory and kernel virtual memory. This is a privilege escalation as it can move an attacker from user mode (Ring 3) to OS kernel mode (Ring 0). The concept of protection rings is summarized in the image below, where each inward ring is granted progressively more privilege. It is important to note that even Administrators operate at Ring 3 (and no deeper), alongside other users. Access to the kernel can not only give an attacker the most privileged access available to the operating system, it can also grant access to the hardware and firmware interfaces with even higher privileges such as the system BIOS firmware.
This means that the faulty drivers could allow malicious apps gain kernel privileges, affecting directly the firmware and the hardware. Furthermore, reinstalling the OS won’t solve the problem.
This is the case with BIOS and UEFI firmware that once affected, can’t be repaired by a OS reinstall.
All versions of Windows are affected
It’s worth mentioning that over 40 drivers were affected, and the issue applies to all versions of Windows, not just Windows 10.
Microsoft is strongly advising its customers to use Windows Defender Application Control to block unknown software and to turn on memory integrity for capable devices in Windows Security.
According to Rose, indie games like Descenders really benefit from all the exposure that Xbox Game Pass games on the Xbox One dashboard:
“Being on Game Pass means that you basically have constant featuring on Xbox. You’re game is on the dashboard all the time… People are seeing our game every day.
“And because of that, during launch month, our Xbox sales — we didn’t do any discounts on it or anything — quadrupled, and have now settled to about three times as much as before. It’s essentially an advert; a straight up advert.
“And now Xbox is asking, ‘Oh, can we feature Descenders in more of the Game Pass advertising?’ Yes, you can. Of course you fucking can.”
Despite the fact Xbox Game Pass really helped Descenders to reach 600,000 players since launch, Rose still isn’t totally convinced that game subscription services are the future of digital distribution. “What happens is it peaks and then it dips, because at that point the saturation kicks in,” Rose explained. “You’d imagine, in a year’s time all these people with subscription models will be offering less money to join them. Because why do they need to pay as much? You’d imagine the numbers will go down, which makes it less worth it to people, but then at that point everyone’s on it, so you have to be on it.”
It’s worth reminding that Descenders launched first in early access on Steam and Xbox One, but having the game launch on Xbox Game Pass on its release day certainly helped to bring a lot of new players. We’re seeing more and more indie developers embracing Game Pass as part of their go to market strategy, though others continue to stay away. Cuphead, one of the biggest indie successes in recent years which also received a big marketing push from Microsoft has yet to come to Xbox Game Pass. It probably won’t happen anytime soon as the game crossed 4 million copies sold earlier this month.
Do you think it makes sense for indie devs to put their games on Xbox Game Pass to get increased exposure, or do you understand other devs who are more worried about protecting their work? Let us know below.
iPhone PC mouse apps are extremely useful tools that allow the users to use their iPhones as mice on PCs running Windows. This is obviously handy when you don’t have a mouse and are in desperate need for one.
There are various iPhone PC mouse apps on the market these days but we want to make your choice easier, and that’s why we narrowed your options to the best five tools that allow you to use your iPhone as a mouse with a multi-touch function on your PC running Windows.
Check out these tools and their sets of features and after that decided which one is the best for your needs and preferences.
If you ever wondered if there is a mouse app for iPhone, you probably haven’t heard about Remote Mouse. If you have to perform a presentation, or if you plan to watch an online movie or transfer photos in just a few seconds, this can be easily done via an app that allows you to use iPhone as a mouse for a PC.
Remote Mouse is one of the greatest apps that will enable you to turn your iPhone, Apple Watch, or iPad into a wireless user-friendly remote control for your PC running Windows. This app is so easy to use that even the newbie users will get the hang of it in no time.
You will be more than surprised by a fully simulated touchpad, keyboard, and featured remote panels that will definitely make your remote experience as efficient and as simple as possible.
Check out the best features that are included in this tool that lets you control your PC:
Using the Remote Mouse app, you will be able to enjoy a fully simulated mouse.
Other great features include the Magic Trackpad, Multi-Touch Gestures, Function Keyboard in Landscape Mode, Key Combination Input and more.
This tool supports Windows Media Player, Windows Photo Viewer, PowerPoint and iTunes for Windows.
The physical volume buttons offer control to adjust the computer’s volume and also to change the presentation slides.
You can shut down, sleep, restarts and loge off remotely from your computer using this app.
You will also get the chance to type with your voice remotely.
The app provides password protection, a customizable interface, customizable wallpapers.
Remote Mouse works under Wi-Fi and 3G/4G networks.
In order to get started with the app, you have to make sure that your mobile device is connected to the very same Wi-Fi or 3G hotspot as your computer running Windows.
This high-quality app is sometimes better than a real mouse, considering its tons of features. You can find out more useful data on this app and download Remote Mouse from App Store for free.
If you want to use your iPhone as a mouse for a PC, you might want to consider Air Keyboard Lite. This application works primarily as a remote keyboard, but it also has a touchpad functionality.
Here are some of the features that Air Keyboard Lite offers:
9 different keyboard layouts
Customizable keyboard layout designer that allows you to create custom keyboard layouts with ease.
Support for macros – using this feature you can create various sequences that include key presses, mouse movement, scrolling, etc.
Mobile Mouse is a mouse app for iPhone, iPad, and Apple Watch, and it will transform your device into a wireless trackpad, keyboard, remote, and even more for your PC running Windows.
This is a full-featured tool, and you can use it to do anything that you are normally able to do with a keyboard and mouse.
Check out more exciting features that are included in this app:
You can use the built-in keyboard to type, and the app’s switcher is also a great addition.
You will not have to navigate to the taskbar or dock your PC anymore because Mobile Mouse supports multitouch gestures and it also comes with a special mode for using it as a Keynote and a PowerPoint remote.
This app is ideal for anyone who is looking for a multimedia remote because it packs a multimedia mode and assignable hotkeys.
It works exceptionally smoothly, and it also has a quick response time.
This app works on all Windows versions, and the software is available for free.
If you need to control your computer without a mouse, then you might want to consider Remote: Mouse/Keyboard/Presentation/Trackpad. Some of the features that this app offers are the following:
Application launcher and switcher
Siri support
Virtual keyboard, mouse, and trackpad
Compatible with Windows and Mac devices
Support for iOS7 dark and light keyboard
Ability to emulate Mac function keys
Support for Apple gestures
Easy to connect with a single press of a button. Fast connect and auto-reconnect features are also available.
Ultimate Control allows you to use iPhone as a mouse for PC. This software is available for PCs running Windows, and it packs a few useful features.
Here are some of the best functionalities that you will be able to enjoy while using this app:
You can connect your mobile device seamlessly via Wi-Fi or Bluetooth.
This tool is straightforward to use, and its interface is intuitive enough even for beginners.
You will be able to turn your iPhone into a wireless mouse, keyboard, remote control, and gamepad as well.
First of all, you will need to install the Ultimate Control Receiver on your PC running Windows, and this lightweight server program will allow the mobile app to find your computer and connect to it.
Ultimate Control also includes a security mechanism, and it’s highly recommended that you enable authentication in order to be able to control your computer.
The encryption system makes the communication anonymous, and this enhances security.
The built-in gestures will allow the user to perform common actions much easier.
Check out more features that are packed in this app and download Ultimate Control from its official website.
Xbox Gamepass ultimate is a new subscription-based offering from the software giant Microsoft that allows the Xbox and PC users to enjoy unlimited access to over 100 high-quality games along with Xbox Live Gold access. The pass allows you to access games on both your PC and Xbox without having to purchase the game separately.
Nevertheless, recently some users are reporting that their Game Pass subscription is not working. Xbox community forums and Reddit forums. Your Game Pass can stop working due to many reasons including a temporary glitch. In this article, we take a look at the possible fixes to resolve Game pass ultimate doesn’t work issue.
Why isn’t Game Pass Ultimate working?
1. Temporary Issue
First thing you should do if your Game Pass Ultimate subscription is not working is to check the Xbox community forums and Reddit Forums to see if other users also affected by the issue.
If other users also affected by the problem, then the problem could be at the Xbox end and the developers are probably working on a fix.
In this situation, you can do nothing but wait for the problem to resolve itself. Make sure you reach out to the Xbox developers with the issue to resolve the issue ASAP.
If you bought the Game Pass Ultimate subscription from an online store like Bestbuy and getting an error while redeeming the subscription code, then you should contact the seller on their official support forum.
The support staff will ask you for your contact and purchase information and should be able to help with the error in a better way.
3. Perform a Power Cycle or Physical Power Cycle
On your Xbox One / Xbox 360 screen, press and hold the Xbox button on the Controller to open the Power Center.
From the Power Center, select Restart Console option.
Select the Restart option and wait for the console to restart.
After the restart, check if you are able to access your Game Pass Ultimate account. If the issue persists, do the following.
When your Xbox is turned on, press and hold the power button on the Xbox console for a few seconds until the console shuts down completely.
Leave the console idle for a few minutes and then press the Power button again to restart it.
Microsoft Office Word documents are commonly used in business and schools, but not everyone might have an Office 365 subscription, or the software to view .Docx files on a computer. There’s no need to worry though as it is easy to convert Word documents into PDFs for a more universal file sharing and viewing experience. In this guide, we’ll take a look at how you can do just that, on both Windows, macOS, and though other software.
With Word on Windows 10
If you’re already using Microsoft Word on Windows 10, converting the file to a PDF just takes a few simple steps. To get started, open your word document. Then, click on the File tab. Next, select Save As from the list on the left. You’ll then want to select where you’ll be saving your file, and then navigate over to the Save as Type box. Click the arrow next to the Save button and then scroll through the drop down list and select PDF (*.pdf). The file should then automatically open up.
With Word On MacOS
Granted you’re running Microsoft Word on MacOS, converting files to PDF is a similar process. Once the file is open, you’ll want to click the File button in the top menu-bar. After that, click on Save As. Name your file, and then choose its location to be saved. Finally, in the File Format box choose PDF. You’ll then want to click the Export button to end.
With Google Drive
If you don’t have Office on Windows 10 or MacOS, and just received a word document and want to convert it to PDF for viewing or sharing, Google Drive will make your life easier. Simply visit the website here, login, and then click on the New button on the side. Then, click File Upload and select the document you want to convert.
Once it is uploaded to Google Drive, you’ll see a pop up on the lower right telling you that it is complete. Next, double-click that notification to open. Along the top, click on Open With, an choose Google Docs. In the new tab, visit the File tab and click Download As and then choose PDF from the list. Your browser will then save a copy of the word Doc as a PDF to your computer for sharing.
With Online Tools
The inbuilt save feature in Word might be the best way to go, but there are many other tools that you can use to convert Office documents to PDFs as well. Some good examples include online tools like freepdfconvert.com, pdf2doc.com, as well as smallpdf.com. Let us know which method you find best in the comments below.
Microsoft has announced a long-term alliance with Jio to accelerate India’s digital transformation. The announcement was made at the Annual General Meeting of Reliance Industries by Mukesh Ambani, the company’s Chairman and Managing Director.
Reliance Jio, a subsidiary of Reliance Industries Limited (RIL), is India’s leading carrier with over 340 million users and has transformed the country’s telecom landscape with affordable data connectivity.
The 10-year comprehensive commitment combines the world-class capabilities of both companies to offer a detailed set of solutions comprising connectivity, computing, storage solutions, and other technology services for Indian businesses. The strategic effort will aim to enhance the adoption of data analytics, AI, cognitive services, blockchain, Internet of Things, and edge computing among small and medium enterprises.
As part of this new agreement, Jio will move its internal workforce to productivity and collaboration tools available with Microsoft 365 and will migrate its non-network applications to the Microsoft Azure cloud platform.
Jio’s connectivity infrastructure will promote the adoption of the Microsoft Azure cloud platform within its growing ecosystem of startups, as part of Jio’s cloud-first strategy. The company will build new custom solutions on Microsoft Azure for large enterprises and leverage Microsoft’s speech and language cognitive services for its device ecosystem, providing support in 13 Indian languages, with the flexibility to add other languages.
The company will also set up datacenters in locations across India, consisting of next-generation compute, storage, and networking capabilities. Microsoft will deploy its Azure platform in these datacenters to support Jio’s offerings. The initial two datacenters are being set up in the states of Gujarat and Maharashtra and are targeted to be fully operational in 2020.
A large number of users have reported encountering the error message saying Windows 10 error response from daemon drive sharing seems blocked by a firewall.
This means that you can not use Docker like you normally would. Having this issue can be extremely annoying, especially because of the entire access restriction caused in this case.
One of the most common causes for this error is the Norton Antivirus Firewall, and in today’s article, we’ll show you how to fix the issue.
How to fix Error response from daemon drive sharing is blocked by a firewall?
3. Use PowerShell (Admin) to set the DockerNAT service to private
Press Windows Key+X keys on your keyboard -> select PowerShell (Admin).
Inside the PowerShell window -> type in the following command and press Enter: Set-NetConnectionProfile -interfacealias "vEthernet (DockerNAT)" -NetworkCategory Private
Open Docker and navigate to the Settings window.
Enable drives C and D for sharing.
4. Reset the Norton Antivirus firewall service
Open Norton Antivirus software -> click on Settings.
Inside the Settings window -> clickFirewall.
In the General Settings tab -> click Reset in the Firewall Reset row.
Check to see if this solved your issue.
5. Allow DockerNAT executable through the firewall
Click on the Cortana search box -> type firewall -> select the first option in the list.
In the Firewall settings -> select the option Allow an app or feature through Windows Defender Firewall.
Search for DockerNAT on the list and make sure to permit connections (incoming and outgoing).
Save the settings and check if the issue is resolved.
In this guide, we explored the best methods to deal with the issue caused by the error Response from daemon drive sharing seems blocked by a firewall on Windows 10.
Please feel free to let us know if this guide helped you by commenting below.
Power BI allows the users to explore their reports and other data to Power BI desktop format for better accessibility. While the export features work most of the time, sometimes you may face issues with the export. The full error Can’t export to Power BI Desktop format We couldn’t export to .pbix format is reported by the users in the Power BI community.
Follow the steps given in this article to fix can’t export to Power BI desktop format.
How do I export a PBIX file from Power BI?
1. Update Power BI Desktop
The Power BI Desktop Client before November 2016 did not support Download Report.
So, if the Download Report Menu option in Power BI service is greyed out, it means you need to update the client before attempting to export any report to desktop format.
Once you have the latest version installed, follow the next set of steps to download the .pbix file.
Download the Report as a .pbix File
Launch Power BI Service and open the file that you want to download.
Click on File in the Menu and select Download Report.
The file will now be downloaded to your computer.
When you open the file, you may see “report layout differences might exists” message showing some features may not be available in Power BI Desktop.
If the issue persists, check the associated limitation for exporting a file from Power BI Service below.
To download any file, the user must have edit access to the report.
The report must have been created using Power BI Desktop and since been published to the Power BI Service.
Reports older than November 2016 are not downloadable.
You won’t be able to download the report if it was originally created in the Power BI Service.
Make sure you have the latest version of Power BI Desktop installed before opening .obix files, as older version may not support the current file format.
If you don’t see download/export feature in the dashboard, ask the administrator to turn it on.
You cannot download Dataset with incremental refresh as a .pbix file.
3. Server Issues at Power BI
If the issue is at the Microsoft Power BI end, wait for a few hours before attempting any other solution.
In this situation, the issue will resolve once the Power BI team fixes the issues on their end.
Try to export the file after a few hours or in the meantime try to contact the Power BI support for more information.
Sorry we are currently experiencing high demand in this region on Azure in the error message a lot of people have encountered.
Even though this error message doesn’t make sense considering that it is being used as a local emulator, this issue is more common than you might think.
This error message seems to appear whenever the user wants to add a new collection to their database. Even if no limitations for the number of collections is specified prior to using this software, there seems to be one.
In today’s article, we will discuss the reasons for encountering this issue, and also a quick guide about how to fix it in a few steps. Read on to find out how to do it.
How can I fix Experiencing high demand in this region Azure error?
This issue is caused by the number of partitions set when creating the emulator server. Depending on the version of Microsoft Azure that you’re using, there is an actual limit of partitions available.
If you use Azure Cosmos DB SDKs you will be able to create up to 25 fixed size containers, and in the case of Azure Cosmos Emulator, you can create 5 unlimited containers.
This operation can be performed by modifying the PartitionCount value when setting up the emulator.
This value can be set to any number that doesn’t exceed 250 fixed size containers or 50 unlimited containers. (one unlimited container = 5 fixed size containers.
Although this is the top limit, it is not recommended that you create more than 200 fixed size containers. Doing this will allow you peace of mind regarding the speed at which your emulator can work at.
The error mentioned above appears when you’ve already exceeded the current partition limit set.
Launch your emulator by setting the value to the PartitionCount flag <= 250. (Ex.C:\Program Files\Azure Cosmos DB Emulator\CosmosDB.Emulator.Exe\PartitionCount=100).
In this guide we discussed the reasons for the Sorry we are currently experiencing high demand in this regionerror when trying to use Azure, and also mentioned a method to fix it.
Please feel free to let us know if this guide helped you by commenting below.
Power BI allows the users to access conditional formatting for tables. It allows you to specify customized cell colors based on cell values and other values or fields. However, some users have reported that that can’t find conditional formatting in Power BI services and Desktop client in the PowerBI community forums.
Hi All
As far as I’m aware, conditional formatting finally appeared in the May update of PBI Desktop. I now have the June update and I can’t see it anywhere ! I’ve got some data with some averages that I’d like to apply conditional formatting to, but when I select the down arrow beside the measure I want to format (or right click the field), there is no Conditional Formatting option.
Follow the troubleshooting tips in this article to fix Power BI Conditional formatting issues.
Why there’s no conditional formatting option in Power BI?
1. Only Tables Support Conditional Formatting
Conditional formatting is only supported by tables with columns of the whole numbers or decimals only.
Making sure that you are using numbers with the tables, click the Drop-down menu and you should see Conditional Formatting option.
If you don’t see the conditional formatting option, make sure that the data type for the selected column is in decimals.
Also, make sure that you create a table visual or matrix visual, as other visual chart does not support conditional formatting.
If you want to apply conditional coloring for Visual Type do the following.
Open the Visual document that you want to apply conditional coloring.
Click the Paintbrush icon.
Under Data Colors, you can apply conditional coloring.
A wide range of people using Zoom Room have reported that all of a sudden, the software shows an error message saying Zoom Room is not configured for this account.
This error message can be extremely annoying, and it can also stop you from accessing the full list of features this service has to offer. You will not be able to make calls or participate in any kind of meeting.
For these reasons, in this article, we will explore some of the best troubleshooting methods to deal with this issue.
What to do if Zoom Room is not configured for this account?
1. Check Windows Defender Firewall/ antivirus firewall
Click on Cortana search button -> type Windows Defender -> select the first option.
Click on Allow an app or feature through Windows Defender Firewall.
Search for the Zoom Room app inside the list -> activate both incoming and outgoing connections.
For checking the firewall in third-party antivirus software you will need to allow all connections. These settings will vary depending on the software you’re using, but here are the steps for BitDefender:
Double-click the BitDefender icon found in your taskbar.
Choose Protection -> click on Settings under the Firewall tab.
Find Zoom Room in the list and allow both incoming and outgoing connections.
Close the BitDefender app and try to see if the issue persists.
2. Edit permissions for specific accounts from Zoom Room dashboard
Login to zoom.us and go to User Mangement -> Role Management.
Select the account that you’re having issues with -> select Edit.
Make sure that the permissions of this account allow you access to the Zoom Room features you need.
Check to see if the Room Name is identical with the one you’re trying to use. (if not, change it).
Click on Save.
Try to log into your Zoom Room software again and check to see if the issue persists.
In this article, we explored some of the best troubleshooting methods to solve the issue caused by your Zoom Room account not being allowed access.
We hope this guide helped you solve your issue. Please feel free to let us know if this guide helped you in any way by using the comment section below.
All the projectors allow the users to customize the screen size. However, at times you may notice that the projector is not showing full screen.
This can be a problem since you won’t be able to see your whole presentation. The issue is somewhat related to a duplicate screen not working problem that we covered not long ago, so you might want to check it as well.
Fixing this problem is simple, and in this guide, we’re going to show you how to fix it.
Why is my projector only showing part of the screen?
The aspect ratio of your PC or projector isn’t fully supported.
Your projector can’t fully handle your PC resolution thus causing the error.
Your projector might not be zoomed in properly.
The projector isn’t properly placed thus causing this issue.
How do I get my projector to show full screen?
1. Check source device display and project screen ratio
Your projector screen and the source display aspect ratio should match before you can fill the whole screen.
First, check the aspect ratio of your system display/monitor. Most modern displays come with 16:9 aspect ratio.
If the projector is not fitting the whole screen, it means it is set to a 16:10 aspect ratio.
You can easily change the aspect ratio of the screen using the Projector’s remote control.
First, turn on the projector and switch to the image source (connect to your laptop or mobile device).
Press the Aspect button on the remote control until you find the perfect aspect ratio.
2. Try to duplicate the screen from Windows system
Connect your projector to your computer and turn on the projector
Open the Action Center from the taskbar.
Click on the Project option.
Click on Duplicate option.
Follow the on-screen instructions if prompted.
This should send the full screen to the projector.
If the issue persists, verify the screen resolution settings.
Click on Start and select Settings.
Go to System and click on Display.
Click on Advanced Display Settings.
Set the resolution to your native display resolution.
If not, change the Resolution from the Display section.
Changing the resolution should help you with the projector not showing full screen, so be sure to try it.
HDMI connection will automatically select the correct resolution. However, if you use a VGA connection, you may require to set up the resolution manually.
Make sure that the projector is fully zoomed out using the remove. In case the projector zoom is inadvertently adjusted, it will create issues with the screen ratio.
Check if the projector placement is right. Turn on the projector and note the blue screen that appears during the startup. This should give you a brief idea about the projector placement. If the blue screen is not filled, you may need to move the projector forward / backward depending on the placement.
These are just a couple of solutions that you can use if the projector is not showing full screen. In case you’re having further issues, our Something went wrong with the projection error guide might be able to help.
Did you find a different solution to this problem? If so, share it with us in the comments section below.
Power BI is a great tool for many people who want to organize and visualize their data efficiently. However, the program is plagued by many problems
Some of the most well-known issues are value errors. There are different types of value errors in Power BI and today we will show you how to fix them.
One user reported the following on the official forum:
there is some UI error in PBI Desktop. I am connected to internal analysis services. Whenever I want to create New Measure and don’t select the dimension where to put the new measure and start creating the new measure, I immediately get this error:
Also, you cannot delete the new measure created, nor you can create a new measure until you remove the faulty one.
Another error encountered by quite a few users refers to “the value is not a cube” message. A user described the issue in this way:
I created a report based on local CSV-files and SAP BW queries. When I refresh data in Desktop, it works totally fine. However, when I schedule a data refresh in the Service, I get notified that ‘The value is not a cube’ and it relates to a table (“Lijst met afnemers”) that is based on a SAP query. This is the error:
So, this is an issue that appeared only in Power BI Service while refreshing data. However, the error did not appear in Power BI Desktop.
Many people encountered a problem with duplicate values as well, as one user said on the official forum:
I’m having an issue refreshing my data and get the following error: “…..contains a duplicate value….and this is not allowed for columns on the one side of a many-to-one relationship or for columns that are used as the primary key of a table.”
The data does contain duplicate reference numbers, but this issue shouldn’t appear.
Today, we will show you how to get rid of these problems permanently.
Here’s how to fix Power BI value errors
1. Unexpected error value cannot be null
The “Unexpected error value cannot be null” is a message that appears on older versions of Power BI Desktop. Update your program to get rid of this issue for good.
2. The value is not a cube
If you encounter “The value is not a cube” error message, then your Power BI is outdated. Update the app to the latest version to solve the issue.
As you can see, these issues can be severe, but there are simple ways to avoid them. Keep Power Bi updated to the latest version and choose the right settings for your project.
Did our solutions help you? Do let us know in the comments section below!
Microsoft Power BI is a collection of software services, apps, and it connects data from multiple sources to present visually immersive and interactive insights. However, some users have reported “power bi we can’t finish signing you up, Your IT department has turned off signup for Microsoft BI. Contact them to complete the signup.” error while trying to sign up for the service.
Following the steps given in this article to troubleshoot the Power Bi, we can’t finish the signing you up error.
Why can’t I sign up for Microsoft Power BI?
1. Contact the Administrator
As the error states, seems like your Office administrator has closed the sign up for Power BI.
The best thing you can do here is to contact your office 365 administrator.
The administrator needs to provide a license in Office 365 Admin center for you to be able to access Power BI.
If the Office administrator has already done their part, follow other troubleshooting tips below.
2. Force Logout from the Microsoft Account
If the issue persists, try to log out and log in to your Microsoft again to fix the issue.
If you are unable to log out from the Microsoft Account, try the following URL to do the same. Log out from Microsoft Account
Once you are logged out from the Microsoft account, relaunch the browser and log in again.
3. Use the Organization’s Email Account
Power BI doesn’t work with the personal email address of the user.
If you have received access to Power BI, your organization may have also given you the email address that uses their custom email account alias.
Use the email address provided by your School or Organization such as @companyname.com.uk or @schoolname.co.edu to login.
If you don’t have access to any such email address it is time to contact your office administrator again.
4. Use PowerShell Command
If you are the administrator, use the following PowerShell command to allow your existing users to sign up for Power BI.
Right-click on the Start button and select PowerShell (Admin).
In the PowerShell command prompt enter, the following command and press enter to execute. Set-MsolCompanySettings -AllowAdHocSubscriptions $true
Wait for the command to execute and now ask the users to log in and again check for any improvements.
As a side note, if you prefer working in the web-based environment we highly suggest using the safest and the most private browser there is. We at WindowsReport thoroughly tested it over a span of a few months and can say only good things about Opera One Browser.
In terms of performance, Opera One also has a unique Turbo feature that can be used when you have an extremely slow connection, such as airport wifi.
When turned on, it can load pages much faster on a slower connection by using an algorithm that removes images and other heavy content, allowing you to see the basics of the page.
Opera One also offers data savings through compression technologies that are not seen in other browsers. Plus, this browser comes with built-in AI, VPN and Ad blocker.
The difficulty to sign in to Power BI is not an unsolvable challenge. How did you deal with it and resolve it? Share your thoughts in the comments section below.