FIX: Thumbs Folder Keeps Appearing on Windows 10 Desktop

The Microsoft Support community forums are full with people complaining about various problems with their Windows 10 or Windows 8.1 devices. We go and select the most relevant ones and try to find a working fix together.
thumbs folder desktop windows 8
There are plenty of various errors reported with Windows 10, Windows 8 and one of the latest ones is related to a small, but rather annoying problems that some users have been reporting. And while there were only a few to report this problem, there are many out there who haven’t voiced their concern. So, the purpose is to get more users express their problem and, why not, maybe find out a solution together. Here’s what the affected user has been saying:

Why is this folder always showing-up on my Desktop every time i reboot my PC. Delete it afterwards and then clean up Recycle Bin and then restart and that folder is on my Desktop again.

This is a rather annoying problem and I guess you’re curious in hearing out a workaround. Here’s what we have managed to gather so far on this, but we will keep searching for working fixes.

— RELATED: Fix: Destination Folder Access Denied in Windows 10, 8.1

How to remove Thumbs folder from Windows 10 desktop

If the thumbs folder keeps appearing on desktop, follow the steps listed below to get rid of it for good.

  1. There could be situations when this is nothing more but a virus, so make sure that you have performed an antivirus scan or that you have a reliable software installed. Also, it could be a malware, so also check for that.
  2. There are apps and programs which save the thumbnail pictures in a location apart from the music files. Make sure that it is not set to desktop
  3. Boot the computer in a clean boot mode to see whether there isn’t a problem in the start-up
  4. Upgrade to the latest Windows 10, 8.1 version which fixes many of these bugs
  5. You can also customize your UI settings from Control Panel so that the OS won’t display thumbnails. So, launch Control Panel > go to File Explorer options > click on the View tab. Go to Files and Folders and simply check the button Always show icons, never thumbnails. Confirm your choices.
  6. If the issue persists, run Disk Cleanup to remove unwanted files from your computer, including the Thumbs folder from desktop. For more information on how to use Disk Cleanup, you can check out this guide.

RELATED POSTS TO CHECK OUT:


Fix: Computer won’t shut down in Windows 10/11

Some users who upgraded their system to Windows 10 reported that they’re unable to shut down their computers normally. A couple of things could cause this issue, and I’ll try to cover all of them in this article.

But first, here are some more examples of this problem:

  • Laptop won’t shutdown or restart, hibernate, lock –  Many users reported various problems with their laptop. According to users, their laptop won’t shutdown, restart, hibernate or lock. This can be a big problem, but you should be able to fix it using our solutions.
  • PC won’t shutdown keeps restarting –  Several users reported that their PC won’t shut down. Instead of shutting down, their PC just restarts.
  • PC won’t shutdown with power button –  Few users reported this problem while trying to turn off their PC with the power button. This issue is caused by your power settings and it can be easily resolved.
  • Laptop won’t sleep, turn off – Sometimes your laptop won’t sleep or turn off at all. This issue can cause many problems, but you should be able to fix it by changing your power settings.
  • Laptop will not shut down when lid is closed – According to users, their laptop won’t shut down when the lid is closed. This is a minor problem and it can be fixed by changing your power settings.

What to do if the computer won’t shut down

Table of contents: 

  1. Change boot order in BIOS
  2. Adjust Power Settings
  3. Update Intel Management Interface driver
  4. Disable or uninstall a certain program or process
  5. Disable Hybrid Shutdown
  6. Perform a Full Shutdown
  7. Run the SFC scan
  8. Run the Troubleshooter
  9. Disable Intel Rapid Technology service

Fix: Can’t shut down the computer in Windows 10

1. Change boot order in BIOS

The boot order is a BIOS feature that controls which component of your computer starts first. If your HDD is not first in order, you may have some problems with starting as well as shutting down your computer. So, to fix this issue, we have to set your HDD drive first in the Boot order.

But, something even simpler is restoring your BIOS values to default, because it will certainly set your HDD as the first boot option, and may solve some other BIOS problems, as well. To set your BIOS values to default, do the following:

  1. Turn off your computer (you’ll probably have to force it to shut down, otherwise you wouldn’t read this article)
  2. Turn it back on and press Del (Or whichever button that enters a BIOS for your computer)
  3. In BIOS, look for an option which sets your BIOS values to default
  4. Press the appropriate key, save changes and exit BIOS

When you turn on your computer, you should try to shut it down again and see if there are any changes.

2. Adjust Power Settings

If resetting the BIOS values didn’t solve the shutdown problem, maybe changing a couple of power settings will do the job. Fast startup is enabled by default in Windows 10, and this feature could sometimes cause problems with shutdown. So, turning this feature off will hopefully solve the problem. Here’s exactly what you need to do:

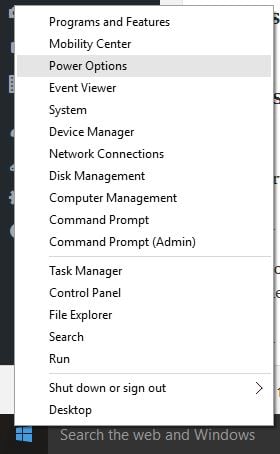
  1. Right-click on the Start Menu button and go to Power Options.
  2. Select Change what the power button does from the left pane.
  3. Click on Change settings that are currently unavailable.
  4. Uncheck Turn on Fast Startup.Laptop won’t sleep, turn off
  5. Click OK.

Now try to power off your computer, and see if the problem is solved.

3. Update Intel Management Interface driver

If you’re having this problem on your laptop, try updating the Intel Management Interface driver. Here’s how:

  1. Press Windows Key + X to open Win + X menu and choose Device Manager from the list.
  2. When Device Manager opens, locate Intel(R) Management Engine Interface and double-click it to open its properties.
  3. Go to Power Management tab. Uncheck Allow the computer to turn off this device to save power option and click OK to save changes.

If that doesn’t help, you might have to uninstall Intel Management Engine Interface. To do that, follow these steps:

  1. Locate Intel Management Engine Interface in Device Manager and right click it. Choose Uninstall device from the menu.
  2. When the confirmation dialog appears, click on Uninstall.

3.1 Update drivers automatically

If you don’t want the hassle of searching for drivers on your own, you can always use a tool that will do this for you automatically. Of course, as you’re not able to connect to the internet at the moment, this tool won’t be useful. However, once you get online, it will help you to keep all your drivers up to date, so you won’t be in this situation anymore.

Through specialized applications, you can automatically upgrade drivers and avoid PC damage caused by the installation of the incorrect driver version.

⇒ Get Outbyte Driver Updater

4. Disable or uninstall a certain program or process

It is well known that a third-party program could prevent your computer from shutting down normally. If that’s the case, the computer will tell you which program prevents it from shutting down, so go and disable or uninstall that program, and your computer should be able to shut down normally after that. The procedure is the same if a certain system process prevents the normal shutdown. But, since the fix is not the same for all processes, you should go online and search for the solution for the problem with a specific Windows process.

5. Disable Hybrid Shutdown

The next thing we’re going to do is disable Hybrid Shutdown. Here’s how to do that:

  1. Go to Search, type control panel and click on Control Panel from search results. Now select Power Options from Control Panel.
  2. On the left side of the window click on Choose what the power button does.
  3. If needed, click on Change settings that are currently unavailable, under Define power buttons and turn on password protection.
  4. From the enabled options under Shutdown settings section, uncheck Turn on fast startup (recommended) checkbox to disable Hybrid Shutdown. Click Save changes button to save the modified settings.
  5. Close Power Options window when done.

6. Perform a Full Shutdown

Since you’re not able to shut down your computer normally, let’s try the Full Shutdown. Here’s how to do that:

  1. Right-click the Desktop background.
  2. Go to New and click on Shortcut.
  3. For Type the location of the item input this:
    • shutdown -F -T ## -C “Your message here” (## can be any number from 0 and 315360000, and “Your message here” could be any text you want)).
  4. Click Next.PC won’t shutdown keeps restarting
  5. Name the shortcut as you want and click on Finish.
  6. Optional: Right-click the shortcut on from your desktop and click Properties. Change the icon of the shortcut by your desire, just for the aesthetic reasons.
  7. Optional: Pin the shortcut to your start menu and you’re good to go.

7. Run the SFC scan

Now, let’s try one troubleshooting tool. Of course, we’re talking about the SFC scanner. This tool can basically resolve numerous system issues, and troublesome shutting down may be one of them.

If you’re not sure how to run the SFC scan in Windows 10, follow these instructions:

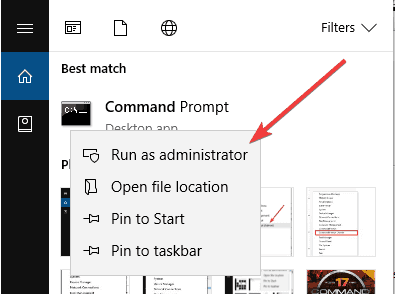
  1. Go to Search, type cmd, right-click Command Prompt, and select Open as Administrator.
  2. Enter the following command, and press Enter: sfc/scannowPC won’t shutdown with power button 
  3. Wait for the process to finish.
  4. Restart your computer

8. Run the Troubleshooter

There could be a faulty update that actually prevents your computer from shutting down. In that case, let’s try to resolve this issue with Windows 10’s Update Troubleshooter.

Here’s how to run the Update Troubleshooter in Windows 10:

  1. Go to Settings.
  2. Head over to Updates & Security > Troubleshoot. 
  3. Select Windows Update, and go to Run the Troubleshooter. Laptop will not shut down when lid is closed
  4. Follow further on-screen instructions and let the process finish.
  5. Restart your computer.

9. Disable Intel Rapid Technology service

And finally, let’s try and disable another Intel’s service, Intel Rapid Technology. Here’s how to do that:

  1. Press Windows Key + R, enter services.msc and press Enter or click OK.
  2. When Services window starts, locate Intel Rapid Technology service and double-click it.
  3. Now set the Startup type to Disabled and click the Stop button to stop the service. Click Apply and OK to save changes.

That’s about it. We certainly hope at least one of these solutions helped you resolve the problem with shutting down your computer properly. If you have any comments, questions, or suggestions, just let us know in the comments below.

How to keep Windows Defender definitions up to date in Windows 10

Windows Defender is the built-in antivirus in your Windows 10, Windows 8.1, Windows 7 devices and it’s quite good, at least for me. The purpose of this article is to keep an easier to understand changelog of the latest updates that have been made available.

If you don’t feel like you want to install another antivirus program on your Windows 10, Windows 8.1 device, then you can rely on Windows Defender as it seems to be performing its job quite well.

windows defender update changelog

However, if you have decided to stick with it, then make sure you get the latest updates, as soon as possible. Of course, the easiest way to do that is to set to receive updates automatically, but if you’re curious to learn what they are about, you will want to set that to manually. And here, we are going to review the updates as often as we can an provide an easier to understand changelog.

Windows Defender on Windows 10

Microsoft completely revamped Windows Defender in Windows 10. The tech giant added a series of important new features and improvements that make Windows Defender one of the best antivirus solutions to use in 2018. As a matter of fact, AV-Test, a reliable third-party testing company, recently placed Windows Defender on the first position when it comes to blocking real-life cyber threats, including ransomware attacks.

Here are some of the most important changes that Windows Defender received on Windows 10:

Download the latest Windows Defender version on Windows 10


Windows Defender on Windows 8.1

Before Windows 8, Windows Defender featured antispyware capabilities. It included a number of real-time security agents that monitored several common areas of Windows for changes which may be caused by spyware. It also included the ability to easily remove installed ActiveX software. Also integrated support for Microsoft SpyNet that allows users to report to Microsoft what they consider to be spyware, and what applications and device drivers they allow to be installed on their system. In Windows 8, functionality has increased to offer antivirus protection as well. Windows Defender in Windows 8 resembles Microsoft Security Essentials and uses the same virus definitions.

So, as we can see from the above description, along with the release of Windows 8, the Windows Defender utility has been made much stronger and similar to how Microsoft Security Essentials works. You can configure the program for real-time protection options, Internet Explorer integration and, of course, to scan files on your system whenever you want. At the moment, Windows Defender only works in desktop mode, and it’s unlikely, at least for now, that it will be released for the modern, touch interface of Windows 8.1.

Download Windows Defender for Windows 8.1 [version 1.173.831.0]

download windows defender windows 8.1

This current version has been made available on 29 April, 2014 and you can go ahead and get it by updating Windows Defender or by using the Windows Update function. Or you can follow this link and get it manually. As for the update itself, it fixes a lot of severe security problems, most of them being trojans and backdoor viruses, as follows:

  • Trojan:BAT/CoinMiner.A
  • Exploit:Java/CVE-2013-1488.I
  • VirTool:Win32/Obfuscator.AES
  • Trojan:JS/Redirector.NS
  • TrojanDownloader:Win32/Upatre.O
  • Backdoor:Win32/Zegost.AF

So, go ahead and install the latest update in order not to fall prey to these security vulnerabilities.

RELATED STORIES TO CHECK OUT:

How to Save File Copies Automatically in Windows 10, 8.1

Windows 10 and Windows 8.1 both come with many new settings that most of us aren’t even aware of. For example, one such setting is the automatic saving of your files. Read below on how you can easily make use of this feature.
save copies of windows 8.1 files automatically
Just like before, Windows Windows 10, 8.1 come with the tool that lets you save copies of your files so that you can get them back in case they are lost or damaged. Thus, to keep a history of your files, you will need an external drive to match the amount of data in your device and here are the steps on you can easily and automatically save copies of your current files in Windows 8.1 by accessing the file history option.

Save file copies automatically in File History

1. Open the Search function – press Windows logo + W key or just go with your mouse or finger to the top right corner of the screen.

2. Now, type in there ‘PC Settings‘ and click on it; after that select from there ‘Update and Recovery’.

3. In the Update and Recovery menu, you will need to click on the ‘File History‘ sub-menu.

4. Here, you can tweak the settings and turn on or off the File History function. However, you need to make sure that you have connected a external drive prior to that if you really want to back everything up.

save copies of files windows 8.1

Just make sure that there is indeed a drive connected or you will end up waiting for hours.

File History is available on Windows 10 as well. Microsoft revamped the UI of the Settings page as well as the steps to follow to enable this feature.

  1. You need to go to Settings > Update & Security > Backupfile history backup windows 10
  2. You can then use File History to back up your files to another drive and restore them if the original files get damaged, corrupted or deleted.

You can also have a look at our previous article on how to change OneDrive sync settings in Windows 8.1, Windows 10, if you are interested in more back-up features.

RELATED STORIES TO CHECK OUT:


Change Sign in Options on Windows 10: How to do it

When you turn on the computer, the first Windows screen appears for the sign-in. It lists the various user accounts, and some quick options to Shut Down or Restart the PC. Most users are wondering how to change the sign in options on Windows 10.

It’s not tricky and wouldn’t take more than a minute if everything else is properly in place. So, let’s get right to it!

How do I change the sign in options on Windows 10?

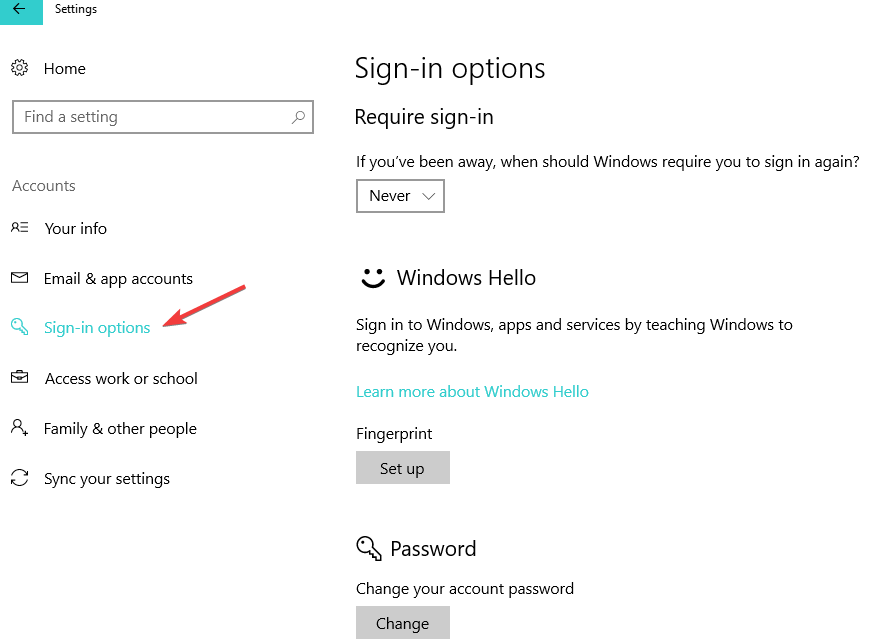
  1. Press Windows + I to open Settings, go to Accounts, and then Sign-in options.windows 10 sign in options
  2. You’ll see a series of sign-in options that you can edit.
  3. You can enable the option Require sign in so that Windows 10 requires you to sign in again if you’ve been away.
  4. Also, you can change password or set up a fingerprint, PIN, and picture password settings.

The most interesting option is probably the picture password, as it allows you to protect your Windows 10 touch device by enabling gestures that are known only to you.

That’s all for now! With this information, you can quickly change the sign in options in Windows 10 and set up what works best for you.

Before you leave, find out how to set up passwordless login on a PC.

For any queries or to share what worked for you, drop a comment below.

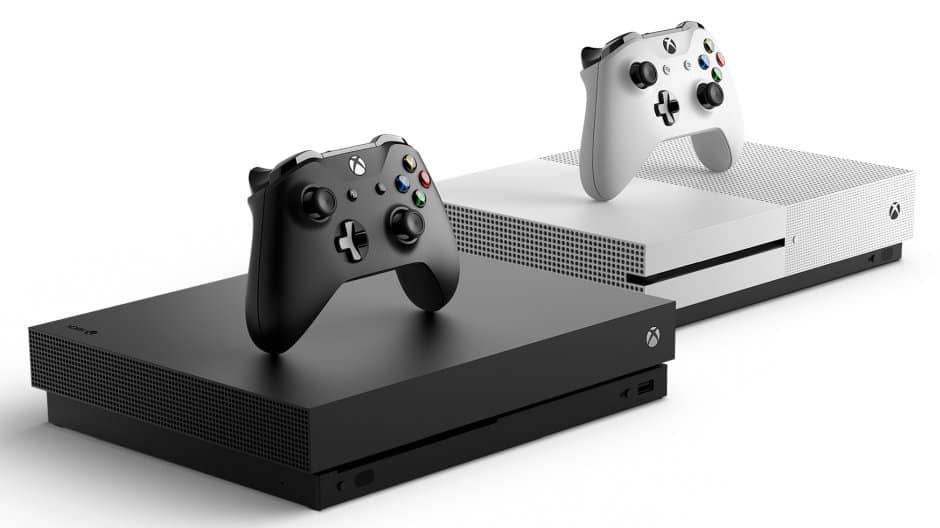
Microsoft’s Xbox One Controller is now properly supported on Android Pie

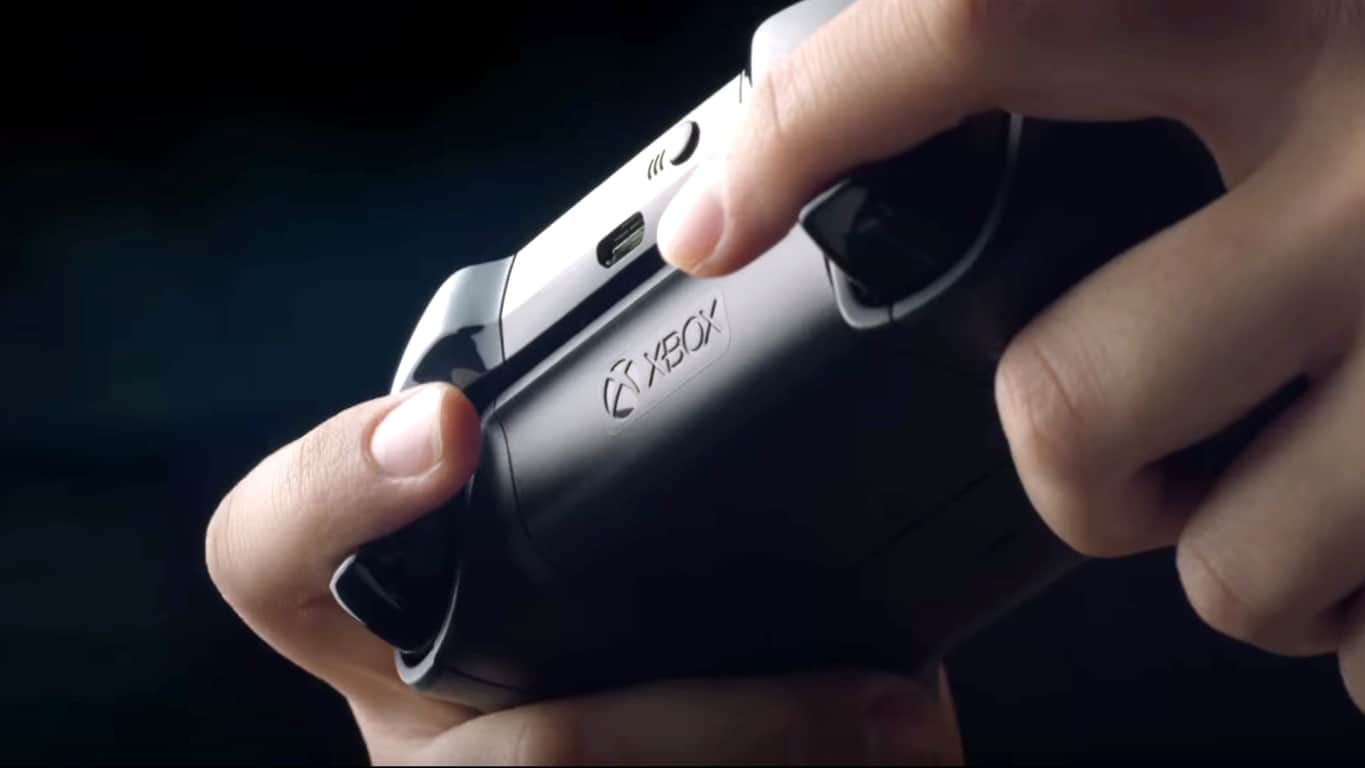
The Xbox One controller is one of the most popular gaming controllers out there, especially since the latest revision finally added Bluetooth support for easy pairing with PCs and mobile devices. However, using the controller to play games on an Android phone wasn’t a great experience until now, especially because of button mapping issues when connecting the controller via Bluetooth.

Two years ago, Android users warned Google of the lack of controller mapping for the Xbox One controller. The company has finally fixed the issue in Android Pie, which was officially released earlier this month (via XDA-Developers). If you have one of the few Android phones that has already received Android Pie, the Xbox One controller should now work as expected when you connect it via Bluetooth (you can also connect the controller via USB, but a wireless connection is preferable for many).

You may not see many people playing smartphone games with a controller, but this may well change soon now that you can play PUBG, Fortnite and PC/console games on your phone. Unfortunately, you still can’t use an Xbox One controller with an iPhone or iPad since these devices only work with “Made for iPhone” controllers that have been certified by Apple.

Windows 10 Insider build 17743 is now available for HoloLens

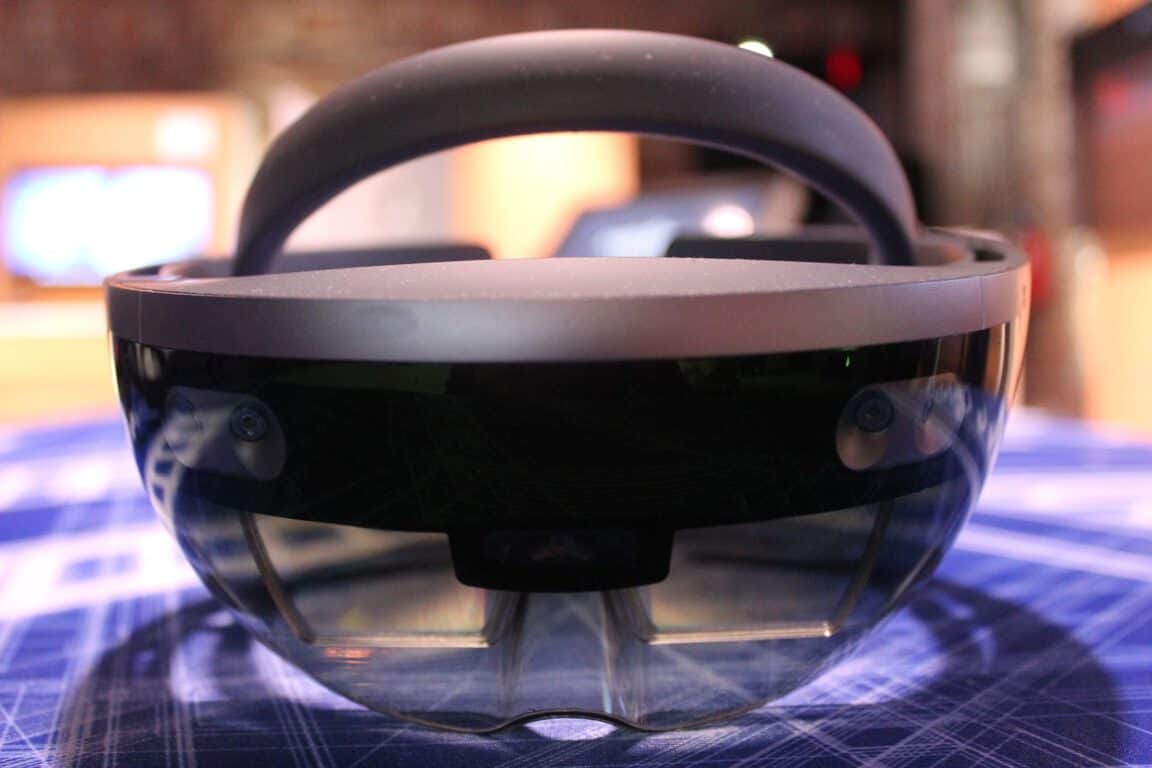
If you have a HoloLens headset enrolled in the Fast Ring, then you now have a new release to play with. As noted by Windows Central, Windows 10 Insider build 17743 is now available for HoloLens.

This release is again fairly minor and doesn’t pack any big features. There’s only a single fix for an issue where certain users would not receive notifications for incoming calls on Remote Assist. There are also no known issues documented in this release, drawing in comparison to the last Redstone 5 build for HoloLens, which came with a small list of fixes and issues.

As we noted a few weeks ago, HoloLens is already picking up several new features with the Redstone 5 update. Miracast support, video capture from the Start or quick actions menu, responding to toast notifications, and the share button in Edge have all been confirmed for Redstone 5 on HoloLens.

Grab your headphones and check out these official Xbox playlists on Spotify

If you’ve finally moved on from Groove Music and found a new home on Spotify, you might want to grab your headphones and check out the official Xbox Spotify profile for some goodies. Indeed, team Xbox has put together a nice playlist featuring tunes themed towards some of the latest hit Xbox games.

The playlist can be found here and includes some songs themed towards Forza, State of Decay 2, PUBG, and Ori and the Blind Forest. Our personal favorite happens to be the Forza Horizon 4 playlist, featuring an electric mix of songs from CHVURCHES, Foo Fighters, and the Killers. The Ori and the Blind Forest playlist is also pretty interesting, featuring some relaxing tunes from the game that’ll likely put your mind at ease in stressful times.

We’d like to remind you that Xbox’s own Major Nelson already had a public playlist on Spotify, so this is not the first time Microsoft has dipped into the Spotify goodness. Feel free to check out these tunes for yourself, and let us know in the comments below if you’ve found a song that you like.

Xbox Insiders on the Beta Ring can now test the latest Xbox One system update

Microsoft released yesterday the first 1810 preview build to members of the Xbox One Preview Beta ring, in the form of the build 1810.180819-1920. This is the same build that previously rolled out to the Xbox One Preview Alpha – Skip Ahead and Preview Alpha rings earlier this week, and Beta Insiders should notice a couple of important changes.

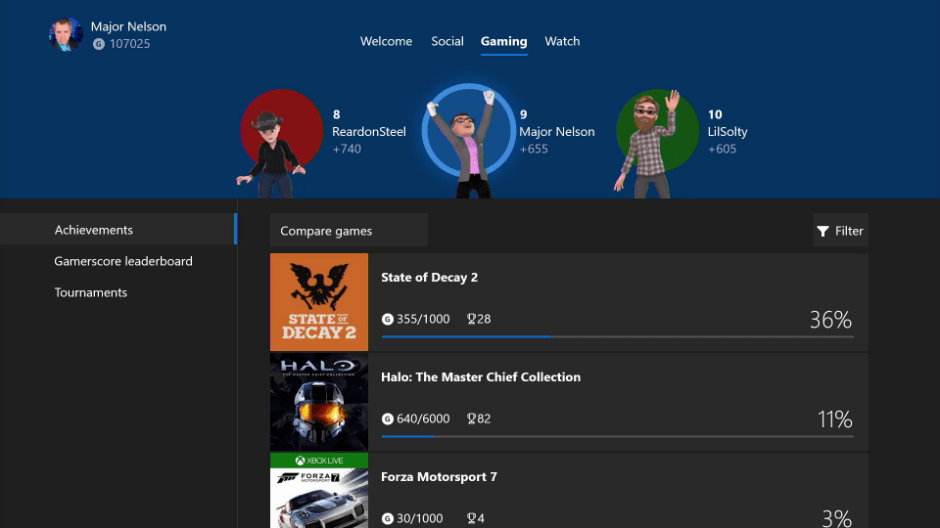
The latest Xbox One system update, which is due for release this Fall will bring the redesigned Xbox Live Avatars on the Xbox One Dashboard. Preview Beta Insiders already had access to the new Avatar system, but after installing this build they should see a new Avatar Store with lots of new cosmetic items to purchase.

Mixer streamers will also be able to test a new option allowing them to broadcast their entire Xbox screen, including the Xbox dashboard when a game isn’t running on the console. This option will be off by default, and be aware that you won’t be able to use it for streaming protected content coming from Netflix or other video apps.

Microsoft also announced that the Xbox One 1810 update will bring support for Dolby Vision Video Streaming across the Xbox One X and the Xbox One S, though that feature isn’t available for testing yet. Dolby Vision is a proprietary HDR format developed by Dolby Laboratories, and it’s often seen as a better version of the HDR 10 standard that Microsoft and other tech companies has been backing in recent years.

You can learn more about what Microsoft has in the pipeline for the next Xbox One system update on the Xbox Insider blog, though Microsoft previously said that a subset of Xbox Insiders may also get access to some experimental features. We had an recent example with the new shopping cart feature for the Xbox Store, which has now been taken offline to allow the team to make fixes and improvements.

Microsoft accused of bribery and corruption in Hungary

According to a report from the Wall Street Journal, Microsoft is being investigated by the US government for possible bribery and corruption in Hungary. The software giant apparently sold some of its office programs at cheaper rates to middleman companies but then charged the Hungarian government higher rates for the same (via Engadget.)

The sales reportedly happened between 2013 and 2014, and the US Securities and Exchange Commission and the Justice Department are both currently investigating the case. The government organizations want to see if Microsoft used the difference in pricing between the middleman companies and the Hungarian government as kickbacks, which is illegal under the U.S. Foreign Corrupt Practices Act.

Wall Street Journal also reports that Microsoft partners in five other countries also bribed government buyers, but it is not clear if the US is investigating those cases as well. A Microsoft spokesperson issued a statement:

“As soon as we became aware in 2014 of potential wrongdoing in our Hungarian subsidiary, we moved quickly to pursue a detailed investigation and hold people accountable…We fired four employees and terminated our business with four partners, and we’ve been defending ourselves against legal claims they raised as a result.”

Microsoft previously faced similar charges back in 2013, then for kickbacks in China. The US Justice Department and the Securities and Exchange Commission did not issue statements about the investigation.

Microsoft Store adds new wish list option for all Windows 10 users

The Microsoft Store appears to have updated on the web and in the Microsoft Store app on Windows 10 devices to include a new wish list option on video game and app product pages. It’s not showing up on Xbox One consoles nor Windows 10 Mobile Windows phones yet.

The wish list link, which is just a text link and not a button, appears under the game or app’s title next to the share link. Clicking on the wish list link doesn’t appear to do anything right now and there’s no visible way to actually view a user’s wish list so it’s likely that the full functionality has yet to roll out to everyone.

A wish list is something that Windows and Xbox users have been wanting to see for years now so it’s good that Microsoft is finally adding it for people to use. Have you been waiting for the wish list feature to arrive? Do you see it yet in your Microsoft Store? Let us know in the comments below and then follow us on Twitter for more Windows news.

Official Mega Man Xbox One Controller announced by Hyperkin

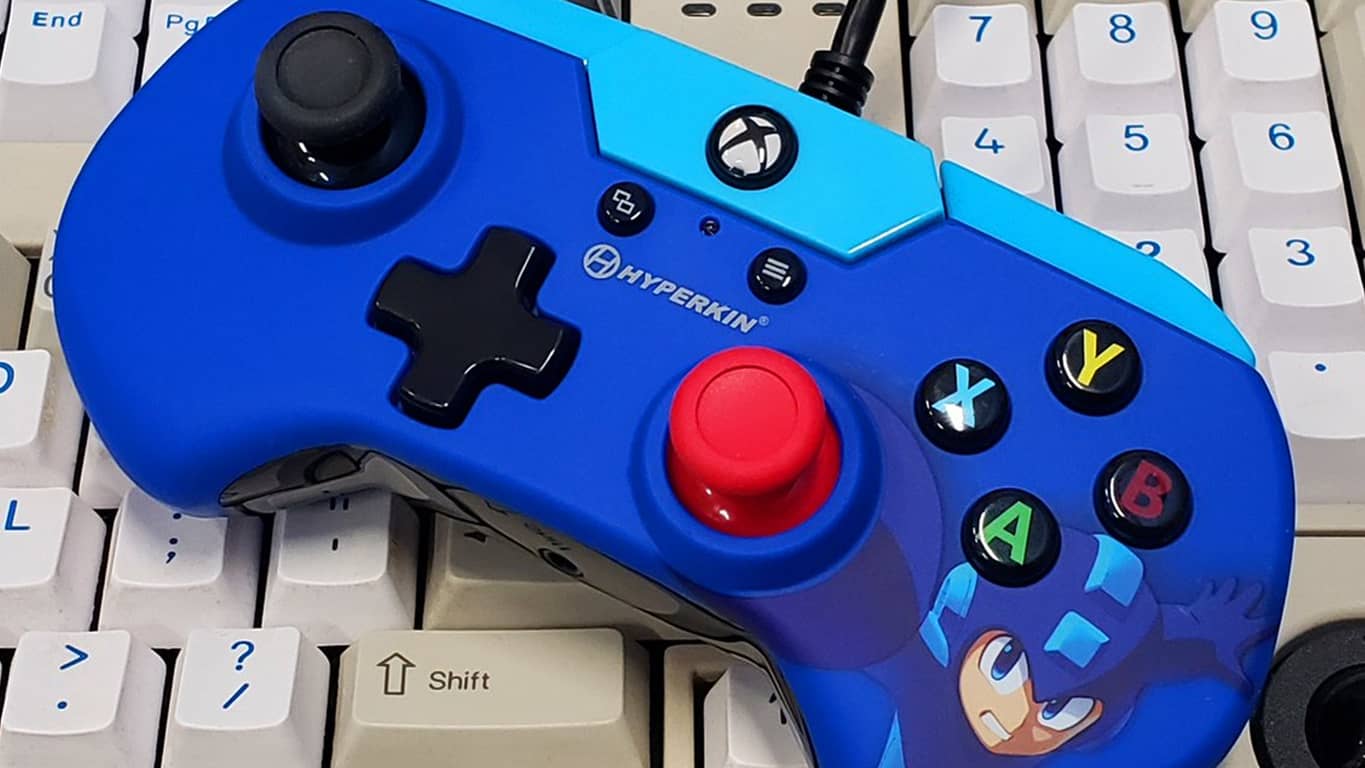
Hyperkin has officially announced their Xbox One Controller inspired by the upcoming video game, Mega Man 11.

The controller features all of the buttons and triggers that are used on the official Xbox One Controller but boasts a smaller size and a blue Mega Man design. This official Xbox One accessory is due for release on October 2nd this year and it can currently be pre-ordered from GameStop.

At $29.99, this Mega Man Xbox One Controller isn’t expensive but it’s worth pointing out that it’s completely wired and features no wireless connectivity at all.

Are you interested in getting this controller? Let us know in the comments below and then follow us on Pinterest for more Xbox One content.

Mega Man 11
Mega Man 11
Developer:
CAPCOM CO., LTD.
Price:
Free

Change Autoplay Settings in Windows 10: Set the Best Ones

Just like the earlier iterations of the OS, Windows 10 also has the Autoplay feature. But if you want to be in complete control, it’s critical to change the Autoplay settings in Windows 10 and configure them for the best performance.

Over the years, the AutoPlay feature has remained the same, popping out a notification whenever you insert a CD, DVD, or even a USB stick. If you were wondering how to access its settings to turn it off or tweak it further, here’s our step-by-step guide.

How do I enable AutoPlay in Windows 10?

  1. Press Windows + S to open Search, type AutoPlay settings, and click on the relevant search result.
  2. Now, enable the toggle under Use AutoPlay for all media and devices.enable autoplay

That’s it! Enabling AutoPlay in Windows 10 is the easier part. It wouldn’t take you more than a few seconds. What’s tricky is getting the settings right. Let’s find out more about that!

How do I change the AutoPlay settings in Windows 10?

Once in the AutoPlay settings, you can tweak them for a personalized experience. Here are a few changes you can make:

  1. If you would like AutoPlay to stop notifying you, you can easily turn it off.
  2. Next, you will have a list of all the external drives that you have connected. According to the type of device, you can enable various actions to take place.
  3. For a removable USB drive, you can choose from the following:
    • Configure storage settings
    • Take no action
    • Open folder to view files (File Explorer)
    • Take no action
  4. For a memory card, you have the following options:
    • Play video files (with the video media player that you have installed)
    • Import photos and videos
    • Play
    • Take no action
    • Open folder to view files (File Explorer)
    • Ask me every time

That’s all for now! You should understand the various AutoPlay settings and how these can be changed in Windows 10. The options are pretty much self-explanatory. Just choose whichever one has the desired effect.

Before you leave, find out how to make your Windows 10 PC run faster than ever.

For any queries or to share your favorite AutoPlay settings with us, drop a comment below.

Download the latest Winamp version for Windows 10

We have just kickstarted a new type of article on the website, where we download the latest version of popular desktop apps and talk about them. Now it’s time to talk about Winamp, a software that needs no introduction.
download winamp windows 8.1To make it all clear from the beginning – there isn’t currently an official Winamp app on the Windows Store, and I’m not sure if it will ever be, because unlike VLC, it comes with very specific looks which would be hard to reproduce on the Modern touch user interface.

But since most of us who use Windows 8, 10 don’t stick to the touch face only, we have to deal with many desktop apps, as well. I’ve been using Winamp for as long as I remember, so I will now be keeping a log with all the updates that it will receive for Windows 8 and Windows 8.1, 10.

By using Winamp on Windows 8, 10 you can open such files as MP3, MIDI, MOD, MPEG-1 audio layers 1 and 2, AAC, M4A, FLAC, WAV and WMA. There are many skins that you can use to customize its looks, but many, just like me (have a look at the above screenshot), will choose to stick with the good old classic menu. But, without further ado, for those who aren’t yet running the latest version of Winamp for Windows 8, 10 or they just don’t know what it is about, let’s have a look.

Download latest version of Winamp for Windows 10

What you need to know is that currently, Winamp & SHOUTcast have sold their product to Radionomy, so changes will be applied in the future.
But from what we’re aware, here is the latest version and some important features in the changelog for you to download.

Important update

It needs to be pointed out that AOL has decided to close the Winamp media player on December 20, 2013, which was just a week after the update that we talked about below. Therefore, you need to know that this is the reason why the latest version is this old. We will be following news and will update once another version gets released.

UPDATE 2 added in August 2018

If you are waiting for some big news about Winamp, you should know that there will be a new version available for Windows 10, 8.1 users, with a lot of bug fixes, improvements and a lot more. But, at the time being, there is no release date published. Until then, you can get notified when it will come out at winamp.com, just subscribe with your email address.

The site is up and running and it looks great, with a new design and you can listen there your local radio stations and some popular ones too in the Shoutcast section. Sadly, the download section will redirect you to a forum where you can keep up with the news about an eventually release date. The Winamp downloads and Winamp Pro purchases will be temporarily unavailable
whilst code licensed to/by the previous owner is removed/replaced.

The devs are working to make the app 100% freeware again, which means replacing all 3rd-party/aol-licensed code with open source/free alternatives.

New Winamp features announced:

  • mp3 & aac decoders (more details to come later)
  •  removing ms drm support from in_wm (wow, heh)
  • cd ripping
  • albumart retrieval
  • OpenH264 decoder

You can still download an older version of the famous app for Windows 10, 8.1 and here’s a link to help you out with.

You can read the original report below

Download Winamp for Windows 8, 10 [Version 5.666, Size: 16.37MB, updated December 13, 2013]

Improved

Reset button to clear history in the Open/Add URL dialog
Option to disable the mouse wheel from altering the volume
More commandline switches (run: winamp.exe /? to see full list)
All menus now use the skinned style when option is enabled in ML settings
Disable all online features when no internet connection selected in Prefs
High DPI & text scaling compatibility fixes for dialogs & library views
Increased notification area tooltips up to 128 chars (instead of 64)
Library views now optionally group the ‘Play’ and ‘Enqueue’ buttons
Mass metadata editor from library now also available in Playlist Editor
Retry UAC prompt if user previously selected “No” (for relevant settings)

Fixed

Agent not using Winamp window if a clone is already running (eg. KMPlayer)
Fallback issue with lang packs when loading accelerator tables
Length not being read when set to read titles on load
Ratings-related freeze on right-clicking large selections in playlist editor
Saving to wrong extension for the ‘Save As’ action in the Alt+3 Artwork tab
Unicode characters not displaying in taskbar when some old plugins are present
Various issues with aero-peek and docking of freeform skins as an appbar

RELATED STORIES TO CHECK OUT:

How to Easily Minimize and Close Apps in Windows 10

If you are new to the concept of Windows 8.1, 10, then you will probably be expecting the Modern interface to behave just like the desktop one. So, naturally, you want your apps to minimize and close really easy. While that wasn’t too hard with the initial release of Windows 8, it has become even easier now.
close minimize apps windows 8
In order to easily minimize and close Modern apps from the Windows Store (some users prefer to still refer to them as Metro apps), I’m afraid that the best solution would be to get the latest Windows 8.1 Update. Why I’m saying I’m afraid? Because if you haven’t already installed it, you might get some naughty errors during the installation process, but I hope it won’t be the case with you. The best solution to easily, hassle-free close and minimize Windows 8.1, 10 apps is this one.

Read Also: Fix: iPhone, iPad, iPod Not Syncing with iTunes on Windows 8

So, if you have managed to successful update to the Windows 8.1 Update, then closing and minimizing apps on the Modern interface is pretty much self explanatory and doesn’t need a step-by-step guide per se. Just go ahead and open any app that you want. Actually, this doesn’t work only with apps that you download or are built-in inside Windows 8, but also for various settings. So, whenever you will open something in the Modern interface, be it an app, program or setting, just by hovering your mouse or moving your finger to the top of it, you will be able to see “close” and “minimize” buttons. Just like in my screenshot from below.

minimize close apps windows 8.1

Besides the minimize and close buttons, you can also split to left, right, maximize and close, as well. These are the commands that are available on the top left of the item that you open on the Modern interface.

windows 8 close minimize apps

If you have minimized them, you will seem them on the good old taskbar, where you can choose to open them, pin them to the taskbar or close.

close apps minimize windows 8Read Also: Windows 10 builds minimize desktop games, users can’t restore them

While you have below a great guide to follow in order to minimize and close apps on Windows 10, some users encounter serious problems with Minimize, Maximize or Close buttons. If you experience problems with that, just follow the solutions from our dedicated guide on how to fix minimize/maximize/close button won’t work.

Let us know in the comment section if this guide helped you and we will create more useful articles for Windows community.

Download CyberLink PowerDirector 16 on Windows 10/11

There are enough apps in the Windows Store to manage your multimedia collection, but CyberLink thinks there’s room for just one more and that’s why it has released the new ASUS PowerDirector app. Read below for more details about it
power director windows 8 app
The title of the application has been changed from “PowerDirector” to Asus PowerDirector as Asus is probably sponsoring the launch. We’ve seen the same thing happen with the official Windows 10, 8.1 app of the musical store 7digital. The Asus branding is also present inside the app itself. CyberLink has previously released the official “PowerDirector Mobile” app, but it is available at $15, and the new Asus PowerDirector app seems to be identical, just that you can download it completely free. We don’t know whether this app is designed for Asus devices only or if it’s made free thanks to Asus, but you should go ahead and download it while it doesn’t become paid.

PowerDirector app becomes free on Windows 10, 8.1

Enjoying multimedia on-the-go has never been so easy. PowerDirector Metro brings the award-winning features of PowerDirector to your mobile device so that you can watch movies, view photos, and listen to music in the best quality, wherever you are!

power director app windows 8

The app comes with a size of slightly more than 100 megabytes will work on Windows 10, 8.1 desktop and touch devices: no Windows RT support, alas. The app brings one of the best video editing software in the world in front your hands and will let you do a bunch of things such as on-the-spot video editing, slideshow video creation along with a selection of Magic Style pro-designed templates. The PowerDirector app for Windows 10, 8.1 is really useful for those who need reliable software to edit videos as quickly as possible, without compromising the quality.

There are are two Easy Editor & Slideshow Creator modes and the editing includes video scene trim, photo rotate and crop, and scene re-ordering. You are able to load, preview, save and produce projects to file and directly share videos to Facebook and YouTube. There’s also real-time production preview and hardware encoding support. So, go ahead and grab the download link from below.

Download PowerDirector app for Windows 10, Windows 8.1 

UPDATE

Limitations of CyberLink PowerDirector 16

• 30-day trial version
• Limited template pack
• NewBlue effect pack limited to 10 effects
• Does not include CyberLink WaveEditor
• Importing and producing H.264 video files is only supported on Windows 10/8.1/8/7 systems or hardware platforms offering independent H.264 encoding and decoding
• Watermark appears at the beginning of produced videos (5 seconds)
• 2K/4K resolution H.264 video files are not supported
• Importing and producing H.265 video files is not available

RELATED STORIES TO CHECK OUT: 

How to Change Narrator Settings in Windows 10, 8.1

Windows 10 and Windows 8.1 comes with some really useful ‘Easy of Access’ features and one of them is Narrator, for the persons who have hearing disabilities. We talk about its features, and how to turn on or off Narrator in Windows 8.1, 10.
windows 8.1 narrator
I remember that one of the first features that I discovered as a kid was the Narrator feature in Windows XP. For me, it represented one of the first steps in hearing English and interacting with it. Windows 8.1 and Windows 10, this feature is also present, of course, with some improvements and updates. So, here are the steps that you need to take to access and manage it, turn it off or on and see how it can help you make better use of Windows 8.1.

Read Also: Best text-to-speech apps for your Windows 10 device

Narrator for Windows 8.1, 10: what cool features does it have?

There are some really cool improvements to the Narrator feature in Windows 8.1, and we’re going to talk about them below in our detailed step-by-step guide.

1. First, you will need to press the Windows logo + W key to open the Search function or open the Charms Bar by moving your mouse or swipe the finger to the top right corner.windows 8 narrator settings

2. Type ‘PC Settings‘

3. Choose the sub-section ‘Ease of Acces‘

windows 8.1 narrator settings

4. Manage the settings of the Narrator feature, as follows:turn on off narrator windows 8.1

  • Turn it off or on; sometimes if Narrator keeps turning on, just turn it off and perform a restart.
  • Let Narrator start automatically when you start the PC
  • Choose a voice from the following – Microsft David, Microsoft Microsoft Hazel and Microsoft Zira and also change the speed and pitch levels.
  • Change the sounds you hear – hints for controls and buttons, characters and words you type, lower the volume of other apps when Narrator is running and play audio cues
  • Cursor and keys – highlight the cursor, have insertion point follow Narrator and activate keys on touch keyboard when you lift your finger off the keyboard

Narrator in Windows 10: what’s new?

Narrator is a cool Windows app and Windows 10 update brought brand new features to this app. It now has Scan Mode, Verbose Mode (gives you characteristic about the text), Punctuation Modes, Faster text-to-speech. Another update from Windows improved its performance, usability, and the reading.

Try now this cool app and let us know in the comments your thoughts. You can also use the magnifier tool for more accessibility.

Read Also: Windows 10 build 14951 improves Narrator’s reading experience

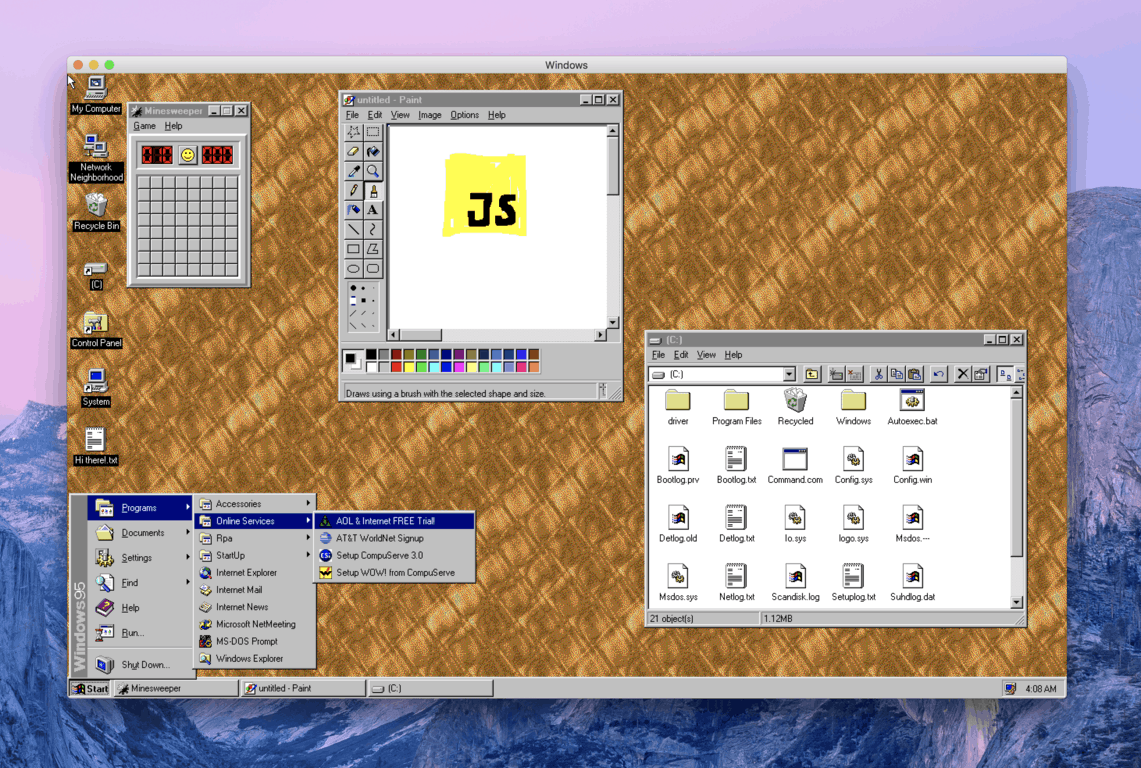
Take a trip down memory lane with this full blown Windows 95 app for Mac, Linux, and Windows

Support for Windows 95 may have been phased out by Microsoft way back in 2001, but the operating system still holds a big place in the heart of many Windows and Microsoft fans. That’s why Slack developer Felix Rieseberg crafted up a neat little app which lets you play around with Windows 95 and its famous stock programs in full glory. (via The Verge.)

Download links and the source code for Riseberg’s application can be found here on his GitHub. The file is a little over 120 MB in size, and there are versions available for macOS, Windows, and Linux.

Please be aware this isn’t a full-blown version of Windows 95, but rather just a fun application. It’s still pretty remarkable and you can run multi-task and run certain apps like Notepad, and Minesweeper, the Phone Dialer, Paint, and more. Internet Explorer is also present in this app but obviously won’t work.

All in all, this neat little app makes for a nice trip down memory lane. It’s definitely not as technical as running Windows 95 on the Apple Watch or on Microsoft’s Xbox One, but it still is pretty fun. Feel free to check it out and let us know your thoughts in the comments below.

How to Manage ‘Quiet Hours’ in Windows 8.1, 10

Windows 8.1 has taken inspiration from Windows Phone and has introduced a new feature that lets you get some “silent” time if you don’t want your Windows 8 device to be turned off. So, let’s see how you can access this feature and enable it.
windows 8.1 quiet hours
The new Quiet Hours feature in Windows 8.1 has been made available mainly to accommodate those who are using especially their tablets quite heavily and they want to make sure they don’t receive annoying notifications. That could be when you are at work, sleeping or taking nap, or any other moment when you don’t want your Windows 8.1 device to annoy you. If you will, it’s a feature that’s similar to how you turn mobile phones to the Silent mode.

Read Also: How to Change Privacy Settings in Windows 8.1

So, let’s have a look at all the steps that you need to take in order to enable this really useful feature. Enable it to stop receiving app notifications, calendar events, messages and email alerts, and even Skype calls.

1. Press the Windows logo + W key to open the Search function or open the Charms Bar by moving the mouse or by swiping the finger to quiet hours windows 8.1the top right corner.

2. In the Search bar type ‘PC Settings‘ and then click or tap on it.

3. Choose ‘Search and Apps‘ from the menu.

quiet hours windows 8

4. Click or tap on ‘Notifications‘.

quiet hours on windows 8.1

5. From there, go to the ‘Quiet Hours’ sub-menu and choose whether you want the feature to be enabled or disabled. Choose the period when you don’t want to receive notifications and you can also choose not to receive calls during the quiet hours, as well.

Many users had some unpleasant situations when important third-party services or software gets blocked by Quiet Hours. This might be a problem as some users were in a situation where they had to choose between disabling the tool or not. However, now the app should work fine and will not block these notifications anymore. We hope you are one of the lucky users who didn’t encounter this issue.

Read Also: Top 10 timer apps for Windows 10 to boost your productivity

Xbox One hardware sales keep going up in the US according to NPD

2018 continues to be a year of growth for the video games industry in the US, with hardware spending showing a 19% year-over-year growth according to the NPD Group. Mat Piscatella, US Video Games Industry Analyst at the market research company shared some interesting facts about the US video games market in July, which saw the Nintendo Switch once again beat the Playstation 4 and the Xbox One as the top-selling hardware platform.

The 19% YoY growth in hardware spending in July was “driven by Xbox One, Switch and Plug N Play devices such as the NES Classic,” Piscatella said, adding that Xbox One hardware sales grew nearly 50% in value last month. This is certainly a good sign ahead of the holiday season.

Xbox One accessories are also doing well in the US, as the standard Xbox One white controller was the best-selling gaming accessory in July. Still, the PS4 black controller remains the most popular gaming accessory to date according to the NPD Group.

As you may know, Microsoft stopped sharing details about Xbox One sales years ago to focus on Xbox Live engagement, and this was probably for good reason. Sony’s PlayStation 4 remains the best-selling console in this generation, and it shouldn’t be long before the Nintendo Switch eventually beats the Xbox One and claims the #2 spot. Still, the Xbox One is doing well for Microsoft, which said that its gaming revenue increased 39% during the past quarter.

Now that pretty much all Xbox One exclusive games are available on PC, it’s quite amazing to see that Microsoft still manages to remain competitive in the gaming market. Besides having the most powerful console with the Xbox One X, this may well be the results the company’s forward-thinking approach with features like Xbox One Backward Compatibility, Xbox Play Anywhere, and a new push for crossplay multiplayer support in cross-platform multiplayer games.

How to Change Privacy Settings in Windows 10, 8.1

These days, privacy is one of the most talked about topics, and Microsoft wants to make sure that it pleases Windows 8.1 and Windows 10 users with the settings that it offers. Here are the options that let you be in control of your privacy on Windows 8.1
windows 8.1 privacy settings
You have probably noticed that just like on other mobile platforms, such as iOS or Android, the apps that you install from the Windows Store to your Windows 10 and Windows 8.1 device can access various features of your system. You are probably ignoring this aspect, but you really need to know that you can be in control of your privacy settings. With the enlisted steps from below, we quickly share the tips and explanation of privacy options in Windows 8.1.

Important note: For Windows 10 users, type ‘Privacy Settings’ in Windows 10 search bar in the bottom left of your desktop and you will get the same menu options as in Windows 8.1.

Read Also: Microsoft gets BigBrotherAward 2018 for infringing user privacy

If you know your way already on Windows 8 and Windows 8.1, then you can know how to access PC Settings. From there, you just choose the Privacy option. But here’s the detailed guide for those who are new to the concept.

1. Press the Windows logo + W key to open the Search function or open the Charms Bar by moving your mouse or swipe the finger to the top right corner.

windows 8.1 privacy settings 1

2. In the Search bar type ‘PC Settings‘ and then click or tap on it.

windows 8.1 privacy settings 2

3. Choose ‘Privacy‘ from the menu.

windows 8.1 privacy settings 3

4. In the ‘General‘ subsection, you can change the following:

  • App access to your name, picture and other account info
  • Apps can access your advertising ID, you can turn it off to reset it
  • SmartScreen filter for the web content that apps are using
  • Text suggestions
  • Websites provide locally relevant content by accessing the language list

5. In the ‘Location‘ subsection, you can allow Windows and apps to use your location. If you don’t like certain apps to use your location, then you can disable this manually.

windows 8.1 privacy settings 4

6. In the ‘Webcam‘ subsection, you can do the same things as in the Location one, meaning you can disable the access of certain apps and Windows, as well. Only choose the apps that you know are really safe to use.

windows 8.1 privacy settings 5

7. In the ‘Microphone‘ sub-menu, you already know what you can do from the previous settings. Again, disable the apps that you don’t trust.

windows 8.1 privacy settings 6

There’s also the ‘Other devices’ subsection, where you will probably see other devices, such as a pen or any other external devices.

Privacy settings security issues in Windows 10?

In may 2018 we have written about the new privacy settings that Windows 10 April Update will bring. They have been criticized for collecting information and many users were not happy about that. Some of them reported that the privacy settings disappeared in Windows 10.

But the most discussed problem was the inability to change the settings of the data collection process. This problem raised concerns even on a political level. If you still think that your personal information is fully secured, here’s a proof that Windows 10 ignore user settings.

Read Also: Disable Timeline in Windows 10 April Update to protect your privacy

Fix: Windows 10/11 update error 0x800f0816

Before the eagerly awaited Creators Update hits Windows 10, we will be prompted with obligatory updates. However, many users report a large variety of issues related to updates themselves. In this situation, you might wonder how to fix the overall system when the method of obtaining the fixes doesn’t function, as in error 0x800f0816 which completely blocks the Update feature. The good thing is that every illness has its medicine and we’ve prepared a few workarounds for this annoyance.

How to fix update error 0x800f0816 in Windows 10

Table of contents:

  1. Try and fix it with Windows Update Troubleshooter
  2. Reset Windows update components with script file
  3. Manually download and install latest KB update
  4. Run DISM
  5. Run the SFC scan
  6. Restart Windows Update components manually
  7. Make sure the Windows Update service is running
  8. Make sure the BITS service is running
  9. Uninstall previous updates
  10. Disable antivirus
  11. Perform a clean reinstallation of Windows

Fix – Update error 0x800f0816 in Windows 10

Solution 1 – Try and fix it with Windows Update Troubleshooter

The first thing we’re going to try is running the built-in Update troubleshooter. Simply because it’s the easiest thing to do, and it may turn out to be the most helpful one, as well. Here’s how to run the Update troubleshooter:

Here’s how to run Windows 10’s built-in troubleshooter:

    1. Go to Settings.
    2. Head over to Updates & Security > Troubleshoot. 
    3. Select Windows Update, and go to Run the Troubleshooter. 
    4. Follow further on-screen instructions and let the process finish.
    5. Restart your computer.

Solution 2 – Reset Windows update components with script file

There is an abundance of built-in tools designed for error fixing. You can use them one by one or, with this specific batch file, run them all at once. Thanks to Windows enthusiasts, you can obtain the file or even create it by yourself.

Using this script is perfectly safe and does the following:

  • Removes outdated Windows update folders.
  • Resets the network connection.
  • Re-registers Windows Update files.

In order to get this script and use it to fix update error, do as follows:

  1. Download Windows Update Reset Script from here.
  2. Use WinRAR (or any other archiver) to extract the WUReset.bat on your desktop.
  3. Right-click and choose Run as administrator.
  4. Once the process is finished, restart PC and check for updates.

Solution 3 – Manually download and install latest KB update

On some occasions, the latest KB update may be corrupted or incomplete. That can vastly impact your update or even the overall system. You can also download any KB update manually from the internet and install it on your own. This goes for major updates and builds, as well.

In order to obtain latest KB update and install it, follow these instructions:

  1.  In Search Windows box type View installed updates.
  2. Open the View installed updates panel.
  3. Find the latest update and write down numbers after KB.
  4. Open web-browser and go to this site.
  5. Copy saved numbers and past them in the search box.
  6. Click download and select version if offered.
  7. Save the file and click twice for installation to start.

This is applicable for every suspicious update and can help you overcome various update errors.

Solution 4 – Run DISM

If the aforementioned troubleshooter failed to resolve the problem, we’re going to try another one. Or two. The first one is DISM (Deployment Image Servicing and Management). As its name says, this tool deploys the system image all over again. Hopefully, this will resolve our problem.

Here’s how to run DISM in Windows 10:

  1. Open the Command Prompt as shown above.
  2. Enter the following command and press Enter:
      • DISM.exe /Online /Cleanup-image /Restorehealth
  3. Wait for the process to finish.
  4. Restart your computer.
  5. In case the DISM can’t obtain files online, try using your installation USB or DVD. Insert media and type following command:
      • DISM.exe /Online /Cleanup-Image /RestoreHealth /Source:C:RepairSourceWindows /LimitAccess
  6. Make sure to replace ”C:RepairSourceWindows” path of your DVD or USB.
  7. Follow further on-screen instructions.

Solution 5 – Run the SFC scan

The second command-line tool we’re going to try is the SFC scan. This tool basically scans your computer for possible issues, and resolves them if possible.

Here’s how to run the SFC scan in Windows 10:

  1. Go to Search, type cmd, right-click Command Prompt, and select Open as Administrator.
  2. Enter the following command, and press Enter: sfc/scannow
  3. Wait for the process to finish.
  4. Restart your computer.

Solution 6 – Restart Windows Update components manually

If the troubleshooting tools failed to deliver, we’ll have to come back to doing things on our own. So, the next thing we’re going to try is resetting crucial Windows update compnents. Here’s what you need to do:

  1. Start Command Prompt as administrator.
  2. When Command Prompt starts, run the following commands:
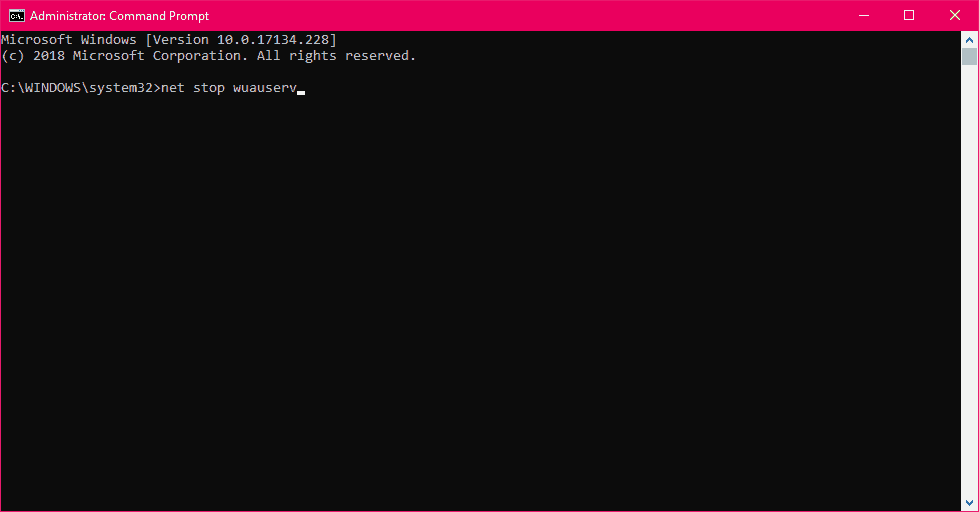
  • net stop wuauserv
  • net stop cryptSvc
  • net stop msiserver
  • ren C:WindowsSoftwareDistribution SoftwareDistribution.old
  • ren C:WindowsSystem32catroot2 Catroot2.old
  • net start wuauserv
  • net start cryptSvc
  • net start msiserver

Solution 7 – Make sure the Windows Update service is running

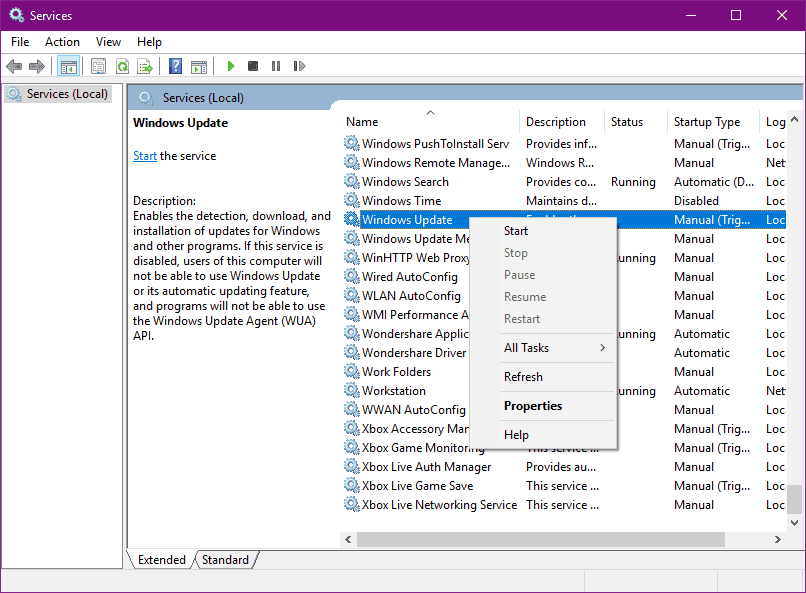
Everything in Windows runs through so-called “services”. And if the Windows Update service is not running, we won’t be able to download any updates. So, make sure the Windows Update service is on:

  1. Go to Search, type services.msc, and open Services.
  2. Find the Windows Update service. Right-click and open Properties.
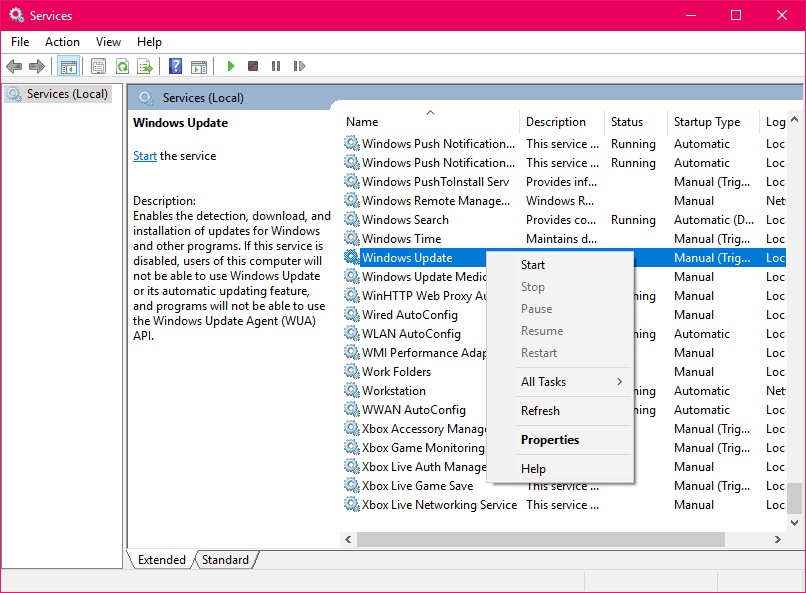
  3. On the General tab, find Startup type and choose Automatic.
  4. If the service is not running, right-click and choose Start.
  5. Confirm selection and close window.

Solution 8 – Make sure the BITS service is running

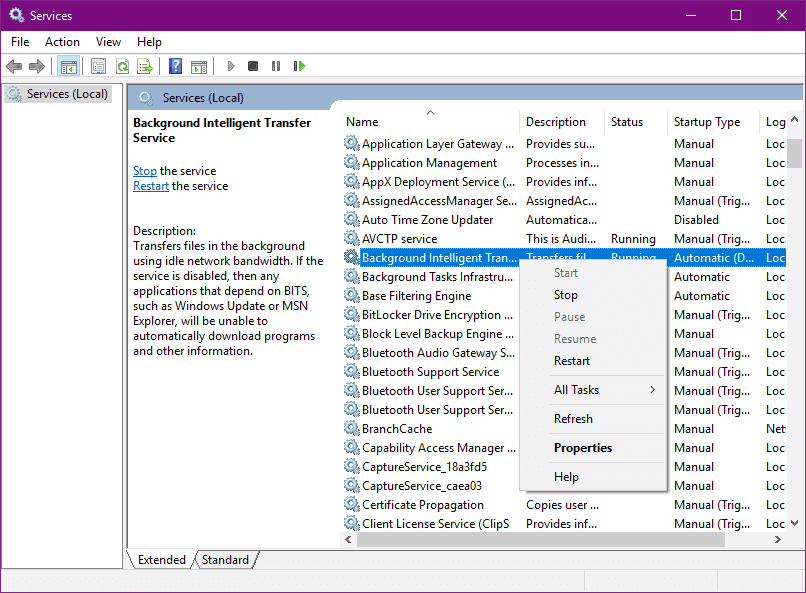
The same thing goes for another crucial service for delivering Windows Updates, Background Intelligent Transfer Service:

  1. Go to Search, type services.msc, and open Services.
  2. Find Background Intelligent Transfer Service. Right-click and open Restart.
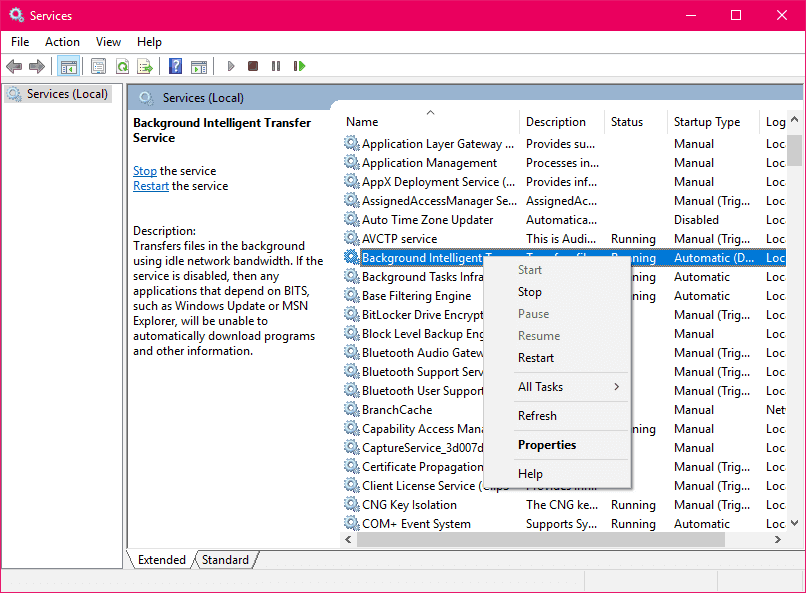
  3. Wait for the process to restart.
  4. Now, on the General tab, find Startup type and choose Automatic.
  5. If the BITS is not running, right-click and choose Start.
  6. Confirm selection and close window.

Solution 9 – Uninstall previous updates

Windows Updates are a strange kind. Even though these patches are supposed to make your system better, it’s not always the case. Sometimes, a certain update may disrupt something inside Windows. So, it’s quite possible that the very last Winodws update you installed is preventing you from installing new updates. In that case, your best bet is to simply delete that update.

In case you’re not sure how, just follow these steps:

  1. Go to Settings.
  2. Head over to Updates & Security > Windows Update.
  3. Go to Update history > Uninstall updates.
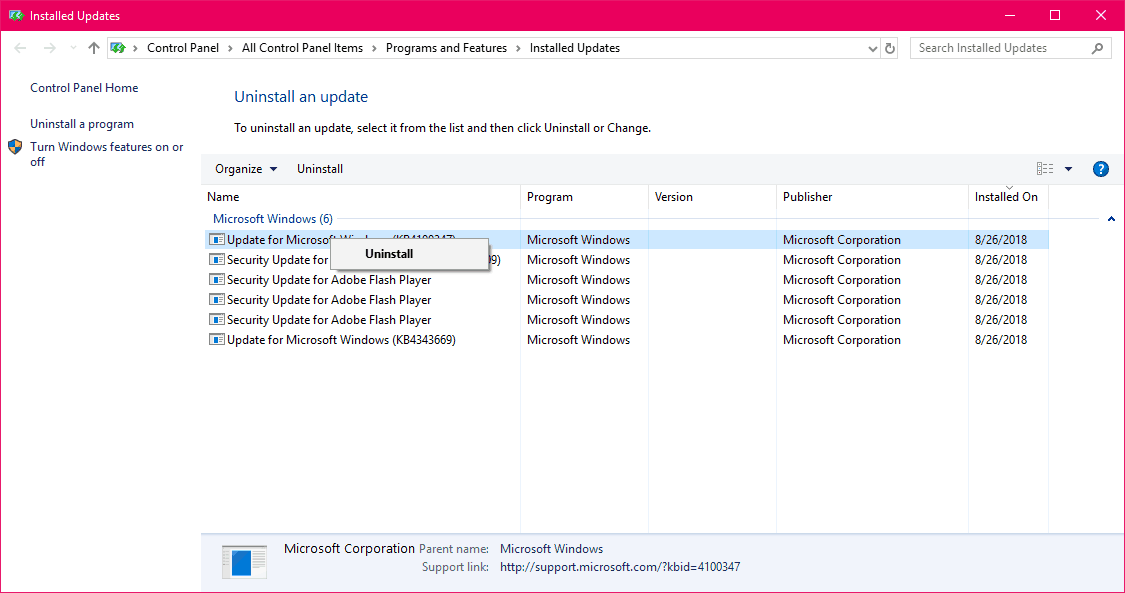
  4. Now, find the latest update installed on your computer (you can sort updates by date), right-click it, and go to Uninstall.
  5. Restart your computer.

Solution 10 – Disable antivirus

It’s also possible for your antivirus program to block Windows updates. So just in case, disable your antivirus and try installing the update once again. If the update installs without any issues, your problem is solved.

Solution 11 – Perform a clean reinstallation of Windows

Sadly, sometimes the system update gets stuck and there is no way to repair it no matter what you do. Most of the time, you’ll be able to fix the update errors but other times, computing sometimes has a mind of its own.

Because of that, you should reinstall the system from scratch. Even though Microsoft offers upgrades from previous systems (7, 8.1), it is alway better to perform the clean install. It will take you about an hour or so to finish the complete procedure. The important thing to remember is to back your files up from system partition and have your license key at the ready.

In case you have any questions related to this subject, do not hesitate to ask in the comment section below!

RELATED STORIES YOU NEED TO CHECK OUT:

Latest AdDuplex numbers break down Windows 10 and Surface version popularity

AdDuplex has just published its Windows Statistics Report for the month of August 2018, once again giving us an approximate idea of the popularity of Windows 10 versions and Surface devices worldwide. As usual, the company’s numbers only take into account Windows 10 PCs running Windows Store apps using the AdDuplex SDK, so that’s just a sample, and maybe a skewed one, of the global Windows 10 userbase.

Anyway, the Windows 10 April update is now running 86.7% of all Windows 10 PCs AdDuplex measured this month. That’s a very small growth compared to the 84% of Windows 10 PCs the company observed in July, but the rollout of the latest major update for Windows 10 is now almost complete.

AdDuplex also shared some new data about the Surface family of devices today: The brand new Surface Go already showed up on their radar this month with a 1.24% usage share, landing between the Surface Laptop and the Surface Studio. Again, this data is only about Surface devices running AdDuplex ads, and it doesn’t reflect the complete Surface user base.

The Surface Go was released on August 2 in the US, but it will start shipping in many more markets starting August 28. The 10-inch tablet is the most affordable Surface ever, and it should really appeal to Microsoft fans who have yet to buy a Surface device. Microsoft doesn’t share any hard data about its Surface sales, but it will be interesting to see if Surface Go can boost Microsoft’s Surface revenue in the next quarter.

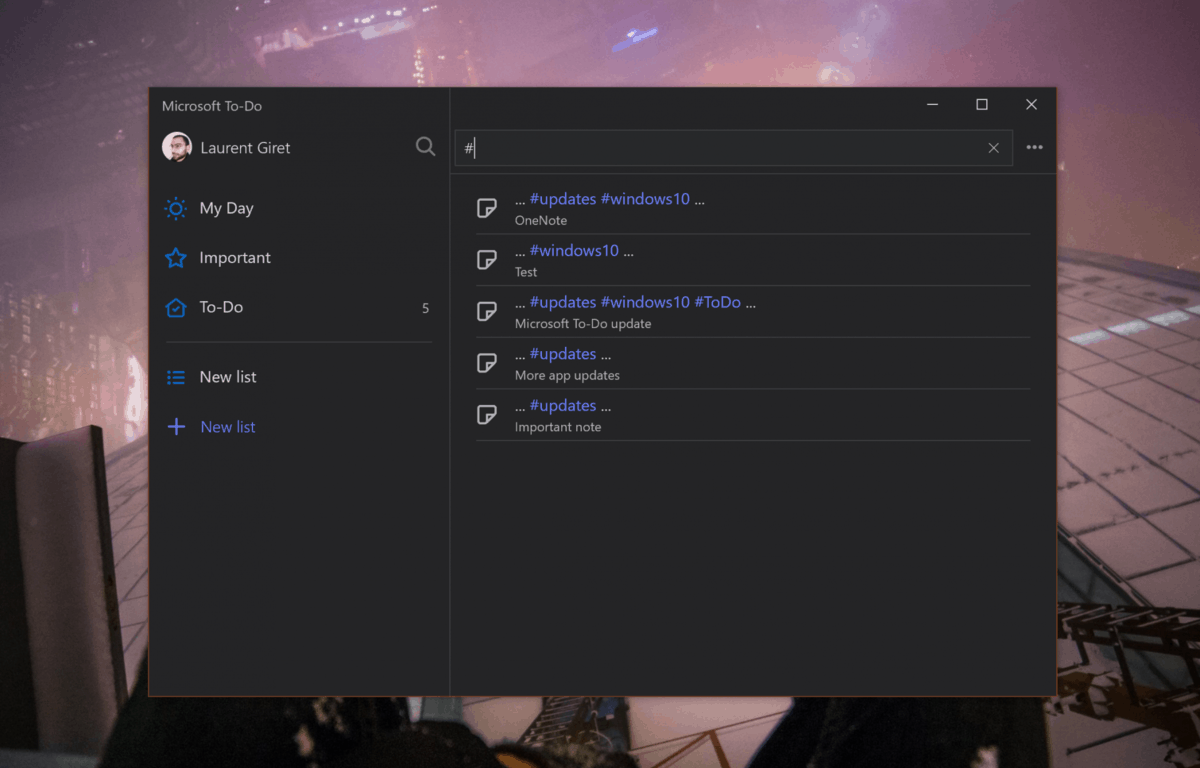
Microsoft To-Do Windows 10 app now lets you add hashtags to your tasks

Microsoft To-Do already provides many way to organise your notes, including a recently-added “Star” feature, but the Windows 10 version of the task manager app now lets you add hashtags to your tasks for even more flexibility (via All About Windows Phone). When you create a new task, you can now add any #hashtags you want in the title, as well as in the bottom “Notes” section of a task.

Selecting an hashtag will surface all the related tasks, and you can also search for hashtags in the app’s search bar, as seen in the screenshots below:

In addition to adding hashtags support, the latest version of Microsoft To-Do for Windows 10 (1.38.1808.20001) also adds a new option in the account menu for fixing your account when you encounter syncing issues or other error messages in the app. These changes are only available on Windows 10 and Windows 10 Mobile for now, but they should presumably show up on all other platforms soon.

Fix: Windows 10/11 update error 0x800705b3

It’s hard to expect your system to function in a seamless manner if your drivers are inappropriate. Back in the day, you would install the drivers provided by the hardware producer, but in Windows 10, the system update covers this department.

And that’s too often a fruitful soil for a lot of issues. One of the frequent errors that occur due to unfitting drivers is known by the code 0x800705b3. This error occurs when Windows Update is unable to install the fitting software for its hardware counterparts.

So, if you’ve got in contact with this error and your updates are stalled, you should check the list below where we enlisted the best-suited workarounds.

How to resolve Windows 10 update error 0x800705b3

  1. Update your drivers manually
  2. Run Update troubleshooter
  3. Prevent the driver auto-updating
  4. Run the SFC scan
  5. Run DISM
  6. Reset Windows Update components
  7. Make sure the Windows Update service is running
  8. Make sure the BITS service is running
  9. Change DNS settings
  10. Perform a clean reinstallation

How to fix Update error 0x800705b3 in Windows 10

Solution 1 – Update your drivers manually

As we stated so many times before, in order to make everything function as intended, you’ll need to get the drivers yourself. Drivers that are updated over the air are not always best suited for the job. Additionally, some of the devices may be outdated so you’ll need to find a proper legacy driver to get them going.

If you’re unsure how to get valid drivers, follow the instructions:

  1. Right-click the Start menu and open the Device Manager.
  2. Navigate to the troubled driver and uninstall it.
  3. Right-click the driver and open Properties.
  4. Under Details tab, locate and copy HardwareID.
  5. Paste the values in the search bar of your web browser to locate the proper drivers.
  6. Make sure to locate the proper drivers provided by the OEM’s.
  7. Install the drivers and restart the PC.

It’s the highest priority to download the drivers from trusted sources in order to escape malware or critical damage to your system.

Update drivers automatically

In order to prevent PC damage by installing the wrong driver versions, we strongly suggest doing it automatically by using a dedicated tool.

This tool is approved and tested by our team and will help you update all outdated drivers safely. After several tests, our team concluded that this is the best-automatized solution. Below you can find a quick guide on how to do it.

In addition, you can set up driver backups and go back where you started with your drivers, in case anything wrong occurs in the process.

Hence, managing your drivers with this practical tool will provide an automatic scan for missing or outdated drivers, optimizing the hardware with their latest drivers’ versions.

⇒ Get Fortect Driver Updater

Solution 2 – Run Update troubleshooter

One of the additions that rolled with the Creators Update is a unified troubleshooter that should be of more use than the previous built-in solutions. So, you can navigate to the new unified menu and troubleshoot the issues at hand. In this exact event, you can troubleshoot Updates, plus the Hardware and Devices, just in case.

Follow the instructions to do so:

  1. Press Windows key + I to access the Settings app.
  2. Open Update & security.
  3. Under the left pane, click Troubleshoot.
  4. Run Update troubleshooter.
  5. Optionally, run Hardware and Devices troubleshooter.
  6. Restart your PC and check for changes.

However, if the problem is still persistent, make sure to check the steps below in order to resolve it.

Solution 3 – Prevent the driver from auto-updating

Even though it’s quite hard to disable some of the update features and prevent a certain device from updating, there is a way. More than one, to be exact. And you can find those with thorough explanations in this article.

Additionally, there are reports that some older devices can interfere with the update procedure so make sure to unplug the device and uninstall the driver. Later on, you can find some alternative legacy drivers that should get you going. That’s one of the few fallacies of Microsoft’s latest addition: some older devices are simply not supported. And a lot of folks, due to professional needs of outdated printer or scanner, decided to roll back to Windows 7 just because of that.

Solution 4 – Run the SFC scan

Another troubleshooting tool worth trying is the SFC scan. This is a command-line tool that basically scans your computer for potential issues and resolves them on the way. Here’s exactly what you need to do:

  1. Right-click on the Start Menu button, and open Command Prompt (Admin).
  2. Enter the following line and press Enter: sfc/scannow
  3. Wait until the process is done (it may take a while).
  4. If the solution is found, it will automatically be applied.
  5. Now, close the Command Prompt and restart your computer.

Solution 5 – Run DISM

The next tool we’re going to try is DISM. Here’s how to run DISM in Windows 10:

Here’s how to run DISM in Windows 10:

  1. Open the Command Prompt as shown above.
  2. Enter the following command and press Enter:
    • DISM.exe /Online /Cleanup-image /Restorehealth
  3. Wait for the process to finish.
  4. Restart your computer.
  5. In case the DISM can’t obtain files online, try using your installation USB or DVD. Insert media and type following command:
    • DISM.exe /Online /Cleanup-Image /RestoreHealth /Source:C:RepairSourceWindows /LimitAccess
  6. Make sure to replace ”C:RepairSourceWindows” path of your DVD or USB.
  7. Follow further on-screen instructions.

Solution 6 – Reset Windows Update components

If none of the troubleshooting tools managed to resolve the problem, let’s try with resetting crucial update components. Here’s what you need to do:

  1. Start Command Prompt as administrator.
  2. When Command Prompt starts, run the following commands:
  • net stop wuauserv
  • net stop cryptSvc
  • net stop msiserver
  • ren C:WindowsSoftwareDistribution SoftwareDistribution.old
  • ren C:WindowsSystem32catroot2 Catroot2.old
  • net start wuauserv
  • net start cryptSvc
  • net start msiserver

Solution 7 – Make sure the Windows Update service is running

The most crucial service for receiving updates in Windows 10 is the Windows Update service. If this service is not running properly, well, you won’t be able to get any updates. So, make sure it runs by doing the following:

  1. Go to Search, type services.msc, and open Services.
  2. Find the Windows Update service. Right-click and open Properties.
  3. On the General tab, find Startup type and choose Automatic.
  4. If the service is not running, right-click and choose Start.
  5. Confirm selection and close window.

Solution 8 – Make sure the BITS service is running

Background Intelligent Transfer Service (BITS) is an essential service for Updates. On some occasions, due to various reasons it can crash and stop working. What you need to do is restart the service and see if there is an improvement in the Update protocol. Here’s how:

  1. Press Windows key + R. In search line type services.mscand press Enter.
  2. Look for Background Intelligent Transfer Service (BITS) and double-click it to open its properties.
  3. If the service isn’t running, click the Start button.
  4. Choose Recovery tab and make sure that First failure and Second failure are set to Restart service.
  5. Confirm selection and check for updates.

Solution 9 – Change DNS settings

If none of the previous workarounds resolve the problem, we’ll try and change the DNS settings. Here’s how to do that:

  1. Go to Windows Search, type control panel, and open Control Panel.
  2. Go to Network and Sharing Center, and click on Change adapter settings from the left pane.
  3. Choose the network you’re currently using, right-click it, and choose Properties.
  4. Scroll down to Internet protocol version 4 (TCP/IPv4), and choose Properties.
  5. Now, choose Use the following DNS Server addresses
  6. Enter the following values:  DNS Server – 8.8.8.8 and Alternate DNS Server – 8.8.4.4
  7. Save changes, and restart your computer

Solution 10 – Perform a clean reinstallation

In the end, if everything falls short and you’re still looking at the error creeping on you from the screen, the clean reinstallation is a logical action. Luckily, is never been so easy to perform a clean reinstall like on Windows 10.

A detailed explanation can be found in this article. In addition, make sure to backup your data on the non-system partition and take good care of your license key.

With that, we think that you’ll have enough material to resolve this update issue. In case you need additional help or have an alternative solution, make sure to tell us in the comments section.

How to Create, Name Groups of Tiles in Windows 10, 8.1

What many haven’t noticed when Windows 10, Windows 8.1 was released officially is the fact that the process of renaming groups of tiles has been really simplified and is now easier than ever. Follow our quick guide from below to learn how to do it.
name groups of tiles windows 8.1
We have already explained how you can easily minimize and close apps in Windows 8.1, and a set of another simple, yet important things to do. A new setting has been simplified with the launch of Windows 8.1 and really polished with the latest Windows 8.1 Update. We’re talking about the naming and creating of a group of tiles in Windows 8.1. You can also have a look at our previous article on how to manage more settings for live tiles.

Read Also: Official Reuters App Released for Windows 8, Download Now

Creating and naming groups of tiles is essential to an efficient management of all your installed. And if you’re like me, then you have at least 50 of them installed. The easiest way to find all in their place is to group by the category they belong to, like games, social, entertainment, work, tools and whatever denominator you think will be good. Here’s how you can quickly do that.

How to group Live Tiles on Windows 8.1, 10 PC or laptop?

1. Go to your Start screen and make sure that you have at least around 10 apps there to make sure that you experience with more groups. If you don’t have enough, just scroll down and choose from there and then pin them to the start screen.

name groups of tiles windows 8.1

2. Now simply right-click anywhere on the screen and choose from there “Name groups“.

name group of tiles windows 8.1

3. If you want to create more groups, simply hold whatever live tile you want and move it to the right. It will now create a new “column and you will be able to rename it.

name group of tiles windows 8.1 how

This is all, and if you knew how to do it in Windows 8, then you realize that the process has been simplified quite a lot.

Important note: This method works for Windows 10 as well. You can group tiles by using the same method without any issues. We have a great guide for all ‘artistic people’ that would like to customize their Start Menu with Live Tiles. You can play with their size and their positioning as you want. Let us know in the comments if you could customize your live tiles using our guide.

Read Also: Microsoft to bring Live Tiles improvements to Windows 10

Windows 10 Live Tiles: Tweak the Settings

Windows 10, 8.1 brought some much needed and important new features over Windows 8 and with the release of the latest Windows 8.1 Update, we’ve got even more options and settings to make use of. One of them represents the settings that let you toggle with live tiles.
windows 8.1 live tiles
If you own a Windows 10 or Windows 8.1 device, then you are probably well acquainted with the term of live tiles – those “icons” that are glued to the start screen of your desktop or touch Windows device. There are certain settings that you can change in order to make live tiles better suit your own needs. We’re going to tell you how you can quickly change settings for live tiles and also how to understand the impact of the changes that you have made.

Read Also: Solve ‘Alt Tab’ Not Working in Windows 8, 8.1

How to change Live Tiles settings on Windows 10 pc or laptop?

Here are the quick steps for easily accessing live tiles settings:

1. Go to the Start Screen of your Windows 8.1, 10 device by pressing the Windows logo on your keyboard, as you can see in the above screenshot.

2. From there, swipe your finger or mouse to the right and choose from there Settings.

3. Now, from the drop-down menu, select ‘Tiles’.

windows 8.1 live tiles settings
4. Now you can change the settings with the following options:
windows 8.1 live tiles tweak

  • Show more tiles on the Start screen – this will automatically add more space and will reduce the size of apps that are currently on the start screen
  • Show more apps in Apps view – this will let you see more of your apps when you scroll down
  • Show administrative tools – this will open up a small menu of commands when right clicking on a live tile
  • Clear personal info from my tiles – for example, if your Facebook live tiles is showing you feeds of your friends’ activity, you can turn that off.

Windows live tiles hints and tips

Live tiles are really amazing, and in Windows 10 you can customize them even better. You can easily create your own start menu from live tiles according to your needs and apps you use the most. After the last big update Live Tiles received from Microsoft, you have even more options to customize them.

For some people, there might be some problems with Live Tiles, especially with the weather app. This problem may be fixed easily by clicking on the previous link. Let us know in the comments if you arrived to customize your Live Tiles as you wanted.

Read Also: Windows 8 Security Apps: Selection of Best From Windows Store

Trials Rising video game pre-orders now open on Xbox One consoles

Trials Rising is now available to digitally pre-order on the Xbox One. The game is the newest entry in the Trials series and features more motorbike stunts and racing with new locations, a new mode, and support for local and online multiplayer.

Here’s the official game description and trailer:

Explore over-the-top action and physics-bending motorcycle racing in Trials® Rising, the latest edition of the Trials franchise. All new features, more competitions, and more tracks mean new challenges! Ride challenging tracks around the world – from the Great Wall of China and New York City to the Eiffel Tower and everywhere in between. With the new hilarious Tandem Bike mode, partner with a friend and try to control one bike with two riders. From your local backyard to worldwide stadiums, defeat all your opponents online and rise to glory. Create unique levels in Track Central using hundreds of different components. The possibilities are endless – and so is the fun! Pre-order now to receive the Jungle Rider Pack and the Wild West Ride Pack!

Trials Rising will be released in a regular version and a Digital Gold Edition that contains the main game plus the Expansion Pass and two Expansion Item Packs. Pre-orders of both versions will also come with the Jungle Rider Pack and Wild West Ride Pack.

Are you excited for Trials Rising on Xbox One? Let us know if you’re going to pre-order it in the comments below and then follow us on Pinterest for more Xbox One gaming content.

Trials® Rising - Standard Edition


How to Quickly Rename PC in Windows 10, 8.1

As we have previously told you, in Windows 10, 8.1, the traditional My Computer’ has been renamed into ‘This PC’. But this isn’t actually the name of your PC, and if you want to change it, here is the easy step-by-step guide that you need to take to do just that.
rename windows 8.1 pc
There are some quick things that you can learn inside Windows 8.1 and 10, such as seeing your PC Info, change Narrator settings, enable Quiet hours and many, many others. In our short guide, this time, we’ll explain how you can quickly, in under a minute, change the name of your PC. If you have been using Windows 10 or Windows 8.1 for a while now, you’re probably aware of this, but here is is our step-by-step short tutorial for those who are fresh to the idea of Windows 8 and how it operates.

Read Also: My Cortana app lets you rename Cortana in Windows 10

Of course, you can still change the name of your PC by following the old way that applies to the desktop interface, but this time we’re only talking about the Modern aspect, because it’s much cooler! So, here we go.

How to change your PC/laptop name in Windows 8.1, 10?

1. Open the Charms Bar (swipe finger or mouse to the top right corner or press Windows logo + W) and from there choose the search button and type rename pc windows 8.1there ‘PC Settings‘.

2. From the ‘PC Settings’ menu, choose the ‘PC and Devices‘ sub-section.

3. From the ‘PC and Devices’ menu, select the PC info section.

rename your pc windows 8.1

4. Rename your PC by choosing a combination of letters, hyphens and numbers. This isn’t like choosing a password, therefore, you can use something personal, just like I did.

windows 8.1 rename pc

So, that’s about it. Leave your comment below and let us know what name have you picked for your computer, and you can also leave your screenshot, as I’m always curious to see how folks baptize their systems.

Renaming elements on Windows PC

Isn’t it boring having a usual name not only on your PC but also on your folders? Let’s try to animate your PC a little bit. After renaming it successful, we have to mention that you can do that with your files and folders. Here’s a list of related guides:

  1. 12 of the best file rename software for Windows PCs
  2. How to Rename a Network in Windows 10 (Oh yeah, make fun of your neighbors!)
  3. How to rename multiple files in Windows 10, 8.1
  4. How to rename multiple files at once in Windows 10

Here you go, now you can manipulate your files and folders names however you want. Let us know in the comments if this article was helpful.

Read Also: Quickly rename multiple files in Windows 10 using the Tab key

Xbox All Access: Xbox Live Gold, Game Pass, and consoles to be bundled in new plans

According to separate reports by The Verge and Windows Central, Microsoft is planning to release Xbox One console bundles that buyers will be able to pay off on a monthly basis.

Called, Xbox All Access, each bundle will contain either the Xbox One X or S console, two years of Xbox Game Pass, and a two year Xbox Live Gold subscription. The Xbox One X bundle is said to cost $34.99 a month over a two year period, after which the buyer would own the console outright and would then need to renew their Xbox Live Gold and Xbox Game Pass subscriptions if they so choose. The Xbox One S bundle would cost around $22 a month.

On average, this monthly payment plan would only be slightly more expensive (around $15) than buying the console and separate subscriptions outright with an Xbox One X currently costing $499 and two years of Xbox Game Pass and Xbox Live Gold costing around $240 and $120 respectively.

The main appeal of Xbox All Access will likely be the convenience of possessing an Xbox One console immediately without the need for paying the entire fee up front. Microsoft will have some competition in this department though as several companies, such as AfterPay, are already offering this service at a large number of online and offline stores and with a greater level of customizability. Many shoppers may opt to just pay off an Xbox One X console with a rival service instead of being forced to pay off additional membership subscriptions with Xbox All Access.

Microsoft has yet to officially announce Xbox Game Pass or confirm any of this information publicly so some of these stated details may change.

What do you think about Xbox All Access? Would you use it? Share your thoughts with the community in the comments below and then follow us on Pinterest for more Xbox news.

Power Plans Missing in Windows 10: How to Get Them Back

In Windows, a power plan is a set of hardware and system options that define how power is used and preserved by your device. But for some users, one or more power plans are missing in Windows 10.

The three built-in power plans include Balanced, Power Saver, and High Performance. All these can be customized for your systems, or you can create new plans based on the existing ones or a completely new power plan from scratch.

Also, a few users found that the power options are greyed out, a problem that stems from the same underlying cause. So, let’s find out how to get things up and running!

What are the different power plans in Windows?

Here are all the power plans available on your Windows PC:

  • Balanced: A balanced plan offers full performance when needed and saves power when you don’t need it.
  • Power saver: As the name suggests, it saves power by reducing performance and screen brightness, thus extending the battery life.
  • High performance: It maximizes your screen brightness and increases performance. Remember, it uses more energy.
  • Ultimate Performance: This is only available by default in Windows 10 Pro for Workstations edition, but users can enable the Ultimate Performance plan for the best speed and OS response in Windows.

Any changes you make to the settings of any power plan affect all users that chose the same plan as their default power scheme.

For Windows 10, a new user interface allows you to change the power related options. While all this is said and done, sometimes, much to your dismay, you may notice that in Windows 10 Power Options, one of the power plans goes missing. Keep reading for solutions!

How do I restore missing power plans in Windows 10?

1. Create a Power Plan

  1. Right-click Start, and select Power Options
    Windows 10 missing power plans
  2. Click on the Additional power settings link in the Related settings area.
    Windows 10 missing power plans
  3. Click the Create a power plan link.
  4. Select High performance.
  5. Specify the name of your new plan.
  6. Click Next and choose the appropriate values for each of the parameters.
  7. Then, click on Create. The new power plan will be added and activated.
  8. To customize it, click on the Change plan settings link.
  9. Click on Change advanced power settings. 
  10. Click OK

Often, creating a new power plan is the best way out when power plans are missing in Windows 10. This way, instead of spending hours identifying and eliminating the underlying cause, you simply work around the problem.

2. Restore default power plans

  1. Press the Windows key, type Command Prompt, right-click on the entry, and select Run as administrator.
    Windows 10 missing power plans
  2. To restore the Power saver scheme, use this command: powercfg.exe -duplicatescheme a1841308-3541-4fab-bc81-f71556f20b4a
  3. Now, to restore the Balanced scheme, use this command: exe -duplicatescheme 381b4222-f694-41f0-9685-ff5bb260df2e
  4. To restore the High Performance scheme, use this command: exe -duplicatescheme 8c5e7fda-e8bf-4a96-9a85-a6e23a8c635c

When only the balanced power plan is available in Windows 10, you can quickly enable the other plans with their dedicated command.

3. Check the Power Options settings

  1. Click Start, and select Settings.

  2. Select System
  3. Click Power Options.

Check if your power plans are listed under Power Options. It includes the Additional Power Settings link under Related Settings.

4. Run Power Troubleshooter

  1. Press Windows + R to open Run, paste the following command, and hit Enter:msdt.exe -id PowerDiagnosticpower troubleshooter
  2. When the troubleshooter opens, follow the on-screen instructions and make the recommended changes.troubleshooter to fix power plans missing windows 10

If the high performance power plan is missing in Windows 10, a quick solution is to run the dedicated Power troubleshooter to get things running in no time.

5. Change Registry settings

  1. Right-click Start, and select Run.
  2. Type regedit and press Enter to open the Registry Editor.
  3. Go to the folder: HKEY_LOCAL_MACHINE\SYSTEM\CurrentControlSet\Control\Power
  4. On the right, double-click the key named CsEnabled.
  5. Enter 0 under Value data and click OK to save the changes.modify registry to fix power plans missing windows 10
  6. Restart your computer.
  7. Check if your power plans are back.

If none of the above methods helped when power plans are missing in Windows 10, modifying the Registry should do the trick. Though, be cautious with the process and follow the steps as it is without making any other changes.

Before you leave, do check some quick tips to get the best power efficiency in Windows.

For any queries or to share more solutions with us, drop a comment below.

How to Quickly Check App Size on Windows 10, 8.1

Windows 10, Windows 8.1 brought along the Windows Store and this allowed for apps to be downloaded both on touch enabled Windows 10, Windows 8.1 and Windows RT tablets, but also on desktop devices. We now share a quick tip on how you can check the size of all the apps you’ve installed.

Most of the Windows 10, Windows 8.1 apps from the Windows Store come with a small size, but there are some that can really consumer your storage space. And even if you download small sized apps, but you download plenty of them, then naturally, you will see that soon, your disk space will need to be cleaned.

So, here’s a quick tip on how you can see the size of your apps, and, of course, if you no longer need them, or if you feel they’re taking far too much space, you can uninstall them.

How to display Microsoft Store app size information

So, here are the steps that you need to take in order to have access to the settings where app size information is being enlisted.

1. Open the Charms Bar by swiping the mouse to the top right corner and choose from there the magnifying glass to search. Or, you can press directly the Windows logo + W key, which is a quick hotkey for accessing the search feature.

check app size windows 8

2. Type there PC Settings

check app size windows 8.1

3. After that, click or tap on “Search and apps“

check app sizes windows 8.1

4. Choose App sizes from there. Depending on how many apps you have installed and how big these are, this might take a while, so let the process run in the background while you mind your own business.

app sizes windows 8

5. Proceed with the uninstall of your apps, as they are enlisted in a descending order with the first one being the one with the biggest size. You will see that when you will try to uninstall an app or game, it will notify whether you want to uninstall all the information from synced PCs. Follow this guide to read more on this.

app sizes windows 8.1

How to check app size details on Windows 10

Windows 10 displays app size information next to the list of apps as well. In order to access app size details, you need to go to Settings > Apps and select Apps and Features. The app size is listed in the right-hand pane, next to the apps.

app size information windows 10

It’s a pity that you don’t get to see how much time has left until a certain app or game has been uninstalled, but from my experience, I’ve seen that this process is pretty fast. Another feature that could be improved is the option to let you choose multiple apps and let them uninstall in the same time.

Speaking of uninstalling apps and programs, if you need a dedicated program for this task, you can check out this list of the best software uninstaller tools to use in 2024.

You can also estimate software size effectively through functionality assessment, and we have a guide that shows you how to do that properly.

RELATED STORIES TO CHECK OUT:

How to Change Windows 10, 8.1 Spelling Settings

Most of the system settings are easily built into Windows 10, Windows 8.1 and Windows 8 can be accessed right away, but if you’re a beginner with the latest Windows version, then we’re explaining how you can access and manage the spelling settings.
windows 8 spelling settings
There are plenty of Windows 10, Windows 8.1 spell checking apps and we have featured some in the past that you can use on your Windows 10, 8, Windows 8.1 or even Windows RT tablets. But, did you know that there are some spelling settings that you can enable or disable in Windows 10, 8 itself? Also, if you’re interested in typing and words, maybe you can have a look at some of the most resourceful Windows 10, 8 dictionary apps. Ok, now, back to our quick tip on how you can change spelling settings.

Autocorrect and highlight misspelled words on PC

So, here are the steps that you need to take to get into the autocorrect and highlight misspelled words settings:

spelling settings windows 8.1

  1. Open the Search charms bar, by swiping your finger to the right corner or moving your mouse there, or by pressing the Windows logo + W.
  2. Type there PC Settings
  3. Then choose PC and Devices
  4. From there, choose Typing and then you will have access to the spelling settings

The steps to follow in order to edit spelling settings on Windows 10 are more intuitive. All you need to do is go to Settings > Device > Typing. You can then enable or disable the following two options:

  • Autocorrect mispelled words
  • Highlight mispelled words

change spelling settings windows 10

So, here, if you find annoying the fact that misspelled words are being highlighted, you can disable or, on the other hand, enable it. There are also third-party grammar checker tools that you can install on your computer. For more information on the best grammar software available on the market, you can check out this guide.

RELATED STORIES TO CHECK OUT:
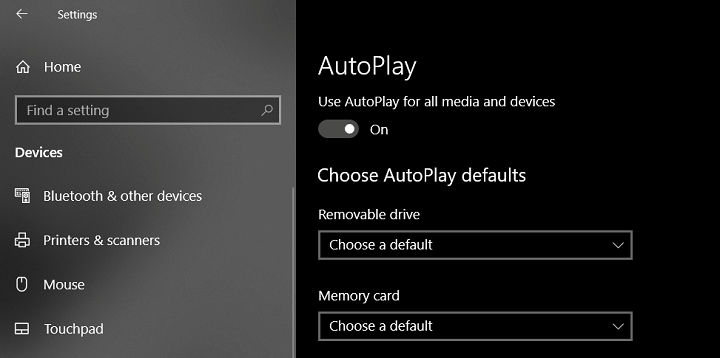

How to Check PC Specs in Windows 10

In Windows 10, the vast majority of system settings have remained the same as in the previous iterations, But we often need to check the PC specs in Windows 10, and there are slight changes there.

Finding out the PC specifications helps identify whether the system meets the minimum requirements for a program or how much RAM should be added, both critical to the performance. Besides, it’s a step toward knowing the PC better.

Keep reading to find out how to check the full PC specs in Windows 10.

How do I find my full PC specs?

1. Open System Information

  1. Press Windows + S to open Search, type System Information in the text field, and click on the relevant result.
  2. You will now find the basic PC specs in the System Summary tab.system summary to check PC specs in Windows 10
  3. To view detailed information, head to the dedicated tab.

The System Information utility in Windows 10 allows users to check the full PC specs pertaining to hardware, software, or components.

2. Check PC specs with CMD

  1. Press Windows + R to open Run, type cmd, and hit Ctrl + Shift + Enter.
  2. Click Yes in the UAC prompt.
  3. Now, type the following command and hit Enter:systeminfocmd
  4. It will now list the PC specs.

For those wondering how to check the PC specs in Windows 10 via CMD, a quick command will list all the vital parameters.

3. View PC specs in Settings

  1. Press Windows + I to open Settings, and click on System.
  2. Now, navigate to the About tab to view information about the installed version of Windows and the basic PC specs.about

Windows will then list all the necessary information on your computer specs and OS version. It also shows what edition of Windows you are currently running and if it is activated.

These are some ways you can check PC specs in Windows 10, both a brief summary and a detailed report. For specific specs like checking your graphics card, we have a separate article on that.

Before you leave, check the best system information tools for curated and user-oriented details of the various aspects.

For any queries or to share your favorite of the three, comment below.

Overwatch will be free to play on Xbox One this weekend

The popular online shooter will once again be free to play this weekend, the Xbox team announced earlier this week. Being an online game, you’ll need an active Xbox Live Gold subscription to take part in this Free Weekend which will run from August 23–27.

This is the third time this year that Blizzard is offering an Overwatch weekend on Xbox One, Playstation 4 and PC. As usual, you’ll have access to the full list of heroes, game modes and maps, and any progress you make during this free weekend will carry over if you decide to buy the full game later.

You can already download the Overwatch Free Weekend client from the link below, though be aware that you won’t be able to start playing until tomorrow, August 23 at 11:00 AM PDT. In case you don’t have an active Xbox Live Gold subscription, we also remind you Microsoft is currently offering one month of Gold for just $2 for new subscribers.

Overwatch® 2
Overwatch® 2
Price:
Free

Microsoft to make “easier, faster” updates starting with Windows 10 version 1809

As noted by Computer World, Microsoft is looking to make monthly Windows updates smaller starting with Windows 10 version 1809. The company first mentioned the upcoming change in a blog post this month and says that they’re aiming for an updated design which “creates a compact update package for easier and faster deployment.”

Specifically, Microsoft engineer Maliha Qureshi explained that— starting with Windows 10 version 1809—the company will be creating an update type which is meant to be smaller in size and easier for IT pros to manage. It has multiple benefits over the current types of Full, Delta, and Express updates, though Microsoft already announced the discontinuation of Delta updates earlier this month.

Keep in mind these changes are for quality Windows Updates (grouped by Microsoft as B, C, and D,) which most usually are released on Patch Tuesday for security and bug related fixes. Microsoft explains the update packages in this new design will come over Windows Update, as .CAB files, and as .MSU files from the Microsoft catalog.

Other benefits of the new update type seen below:

  • Organizations that get full updates from Windows Server Update Services (WSUS) or from the Microsoft Update Catalog will seamlessly save network bandwidth thanks to the smaller size of the update.
  • Organizations that have been using delta updates to manage the size of quality updates will no longer have to monitor the update status and history of their devices to determine which devices are eligible for delta updates.
  • Since this new quality update package will be redistributable, organizations that utilize express updates via WSUS, System Center Configuration Manager (SCCM), or a third-party management solution that supports express updates will experience enormous savings in network bandwidth and cache size on their distribution points or update servers.
  • In addition, devices with the next major version of Windows 10 will be 40% more efficient while updating since there will be no behind-the-scenes computing of the optimal differentials required to download express updates.

This is just the latest change, as Microsoft previously announced that they were also looking to fix Windows Update so your PC would not reboot while you’re busy. All changes are coming beginning with Windows 10 version 1809, so you’ll also expect to see them in the next 19H1 release of Windows 10 as well. You can learn more by checking this Microsoft website.