Convert EXE to MSI for Microsoft Endpoint: 5 Best Tools

MSI files are a type of installation package for Windows software. Windows Installer uses MSI files to install the software. The advantages of the MSI format are that it has a standardized GUI, installation on demand, and enables unattended installation.

As such, there are a few EXE to MSI converters for Microsoft Endpoint and other use that allow developers to change their installer format. These are some of the programs with which you can convert EXEs to the MSI format.

What are the best EXE to MSI converters?

EXE to MSI converter free – Best free converter

EXE to MSI Converter Free is a straightforward freeware program for converting EXE installers to MSI alternatives. You can add it to Windows by pressing the Download free edition button on its official website.

As this software hardly has any configuration options for converting EXE files to MSIs, you can set up an MSI file in just a couple of clicks.

The software includes a Test Installer button to check how the installer works. Aside from that, the program doesn’t have any other settings.

⇒ Get EXE to MSI converter free

MSI Wrapper – Excellent UI design

MSI Wrapper is an EXE to MSI converter with a step-by-step wizard UI design. The software has a freeware and professional version retailing at $198.

You can launch Wrapper Professional with command line parameters, and the pro version also enables you to incorporate macros within the wrapped MSI setup.

Press the Download Free MSI Wrapper button on this page to add the freeware version to Windows.

Exemsi has designed MSI Wrapper more like a wizard so that users can set up an MSI package in about five steps. The software lets you specify extra info for your installation packages, such as manufacturer and version details.

Furthermore, you can add extra help, update, or hyperlinks to the installers with this software. You can also specify extra command line arguments for the installer in the pro version.

⇒ Get MSI Wrapper

PC Remote Software Deployment – Converter for network distribution

PC Remote Software Deployment is an installer converter primarily designed for network administrators. The software is ideal for setting up MSI installers for network distribution.

Remote Software Deployment is retailing at $95-$695 and is compatible with Windows platforms from XP to 8.

The most unique aspect of Remote Software Deployment is that it enables users to convert EXE installers to MSI files with snapshots of their systems.

The system snapshot captures all the required file system or registry details for the MSI installer. This software isn’t just limited to installers; you can also set up uninstaller packages.

This application also enables users to automate software deployment on remote PCs.

⇒ Get PC Remote Software Deployment

PACE Suite – Built-in MSI editor

PACE Suite is an advanced packaging tool with which you can set up Windows Installer and virtual packages. You can convert EXE installers to MSI and alternative packages with this software.

The PACE Suite Freelancer Edition is available at 1,199 euros with one-year maintenance. However, you can also try out a full demo of the software for a month. This software is compatible with Windows 10, 8, and 7.

PACE probably has all the tools most will need for converting EXE files to MSI format. The software’s MSI Generator enables users to capture installations with snapshot or monitoring methods.

Aside from converting an EXE to MSI, you can also set up an MST or App-V package with PACE. Furthermore, PACE includes an MSI Editor with which you can further edit a Windows Installer.

With the MSI Editor, you can adjust the application’s details and edit the installer package’s files, registry entries, shortcuts, etc. This software also has fast repackaging speeds.

⇒ Get PACE Suite

EMCO MSI Package Builder – Easy to use

The EMCO MSI Package Builder is software in that you can convert EXE installations to MSI, manually set up MSI packages, and customize installations.

Package Builder has a Professional and Enterprise edition, which includes extended EXE to MSI conversion options and supports more installation resources.

The pro version is available at $599 on the publisher’s website and is widely compatible with Windows platforms from XP up.

MSI Package Builder has an intuitive UI design incorporating wizards to guide you through converting EXE installers to MSI format.

The software’s EXE to MSI automated repackaging is based on installation-capturing technology that captures registry and file system changes.

You can also set up installer packages manually with the software’s visual editor. Package Builder users can further customize MSI packages’ files, registry keys, and shortcuts with the installation authoring tool.

⇒ Get EMCO MSI Package Builder

Those are a few EXE to MSI converters that provide invaluable tools and options for developers and network administrators to set up MSI packages.

Of those programs listed above, PACE and MSI Package Builder probably have the most comprehensive options and tools for repackaging software. If you need a list of the best installer package software, check out our software guide.

How to Display the Current Time in the Title Bar of Any App

It would be handy to include a clock on the title bars of app windows for those who often need to watch the time.

Windows already has a system tray clock. However, not everybody always keeps the taskbar’s clock at the bottom of the desktop. If you usually keep the taskbar off the Windows 10 desktop with the Automatically hide the taskbar option, add a new clock to your apps’ windows with Titlebar Date-Time.

How can I display current time in the app title bar?

Add the Date and Time to app Title Bars with Titlebar Date-Time

Titlebar Date-Time is a freeware program that adds a clock to the top of the active (selected) window. The software includes numerous customization options to adjust the date and time format, font, background color and title bar position of the clock with. You can display the current time in app title bars with Titlebar Date-Time.

  • You can add this software to Windows by clicking Download TBDTSetup.exe on the program’s web page.
  • Open the TBDT setup wizard to install Titlebar Date-Time.
  • When you’ve installed Titlebar Date-Time, open the software’s window shown in the snapshot below.
  • Click the Settings button to open the software’s customization options as below.
  • If the Show Date-Time on Titlebar option is not already selected by default, click that setting’s check box.
  • If you only need a clock without a date included, select Hide Weekday, Hide Month (and Date) and Hide Year from the top three drop-down menus.
  • Select a 12 or 24-hour time option from the fourth drop-down menu.
  • If you selected 12 Hour Time, select an a.m. or p.m. option from the fifth drop-down menu.
  • Click the Text Color drop-down to customize the font.
  • Click the Background color drop-down menu to choose an alternative background color for the clock.
  • Click OK at the bottom of the Settings window.
  • Open the Weather app by entering ‘weather’ in Cortana’s search box. Select to open Weather, which will now include a new clock on its title bar as in the snapshot directly below.
  • Return to Titlebar Date-Time’s Settings window, and select the Full Weekday, Full Month and Four Digit Year options from the drop-down menus.
  • The Weather app’s clock will include a date when you press the OK button on the Settings window.
  • You can also add custom text to the clock by pressing the Advanced button and clicking the Characters tab.
  • Enter ‘the date and time is’ in the weekday’s Before text box, and press the OK button. The Weather app’s clock will then include the custom text as shown below.
  • To adjust the clock’s title bar position, click the Display tab shown below. Enter negative or positive numbers in the Move Left/Right text boxes to move the clock left or right on the windows.
  • Press the OK buttons on both the software’s windows to apply the new clock position settings.

Display Current Time on app Title Bars With CapTime

Titlebar Date-Time has a good variety of customization options for title bar clocks. However, CapTime is an alternative freeware program that also adds the time and date to software windows. Add clocks with various time formats to the title bar and edit window titles with CapTime. The software is widely compatible with Windows platforms, and you can download it from Kobi.

Who needs the system tray clock? Now, you can add an alternative clock to app windows with Titlebar Date-Time or CapTime. You can add new clocks and calendars to the Windows 10 desktop with the gadget packs mentioned in this software guide.

To personalize your desktop experience, you can also change the title bar color and window border, read this guide to learn the steps.

Best software for editing subtitles for Windows

These days audiovisual entertainment (music & video) has migrated from our living rooms to our computers. People are now watching movies and all kinds of TV series on their computers. So there’s got to be also a ton of community-prepped subtitles to go along.

But, sometimes these subtitle releases are very different from their counterpart video releases. For instance, if the encoder decides to cut off an annoyingly long theme song, the subtitle needs to reflect this. If you’re lucky, you will find a solid subtitle online. But if the film you are trying to watch is not that popular, the chances are slim that the subtitle will be appropriate. But don’t worry, as we’re here to your rescue.

It’s time you learn how to improvise with subtitle editing software. We’ve prepared you ten tools that will help you edit subtitles on your computer. All these will turn out to be very efficient when personalizing subtitles. Subtitle-editing tools will come in handy for various occasions’ you’ll see.

SubtitleCreator

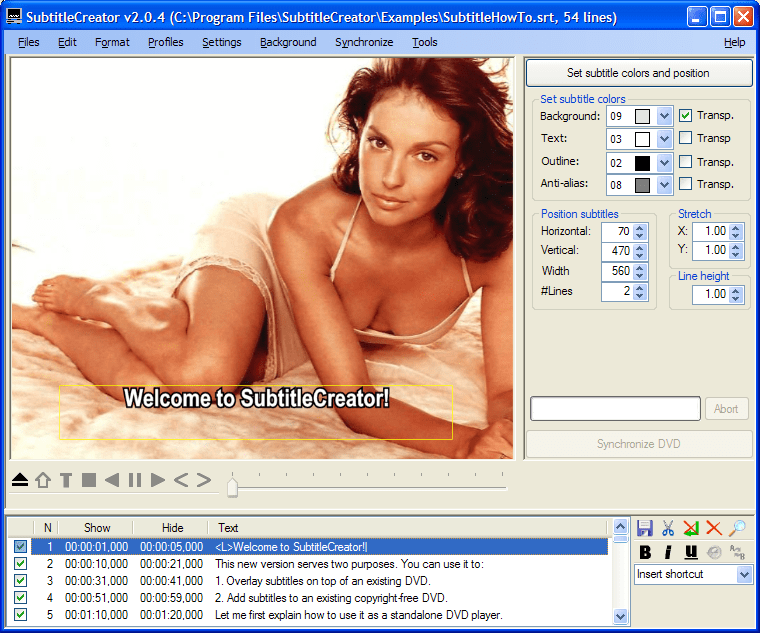
SubtitleCreator is a potent tool for editing subtitles that allows you to create new subtitles for your DVDs. It has a Wizard interface, advanced sync features, DVD preview, support for Karaoke and a simple WYSIWYG editor.

This tool converts ASCII-based text files in SRT or SUB formats to the binary SUP format, and it allows you to shift or change the colors of existing subtitles. More than that, in case you don’t own the copyright of the DVD, you will be able to overlay subtitles on top of it. The tool has a built-in DVD Authoring Wizard function that will let you add a new subtitle to a previously copied DVD.

Take a look at the main features of this tool:

  • You can convert SubRib (*.srt) or MicroDVD (*.sub) files to IfoEdit (*.sup) files
  • The software uses the line breaks you defined in the *.srt source, such that the dialogs stay on different lines.
  • You can now also use <i>italic</i>, <b>bold</b>, or <u>underlined</u> subtitles. You can also use <L>, <l> and <s> for LARGE, large, and small text.
  • You can sync the subtitles by using the original subtitle *.sup file; by selecting a few matching subtitles in the text and original subtitle files, all subtitle start times will be re-adjusted linearly.
  • You can preview and position your subs.
  • You can use profiles for default font and subtitle position settings.
  • You’ll be able to join multiple subtitle files and sync the subs using time-shifting, frame rate conversion, or by watching the original DVD.
  • You can stretch subs in horizontal and vertical and search for a string.

SubMagic

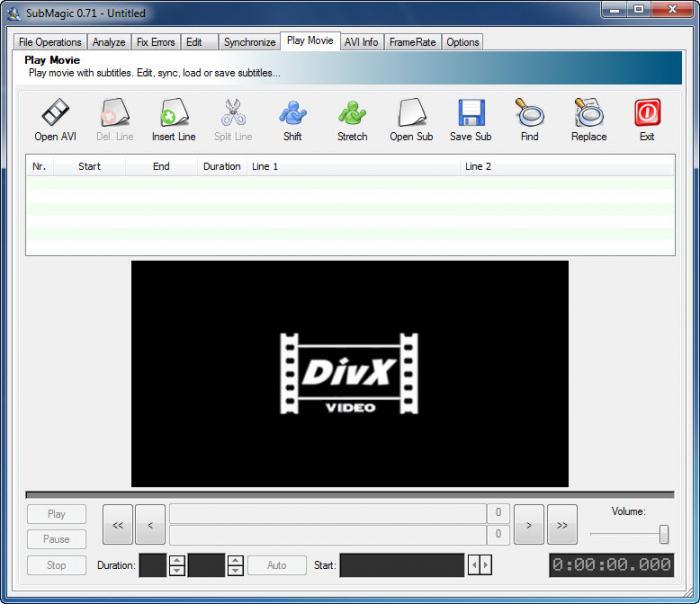
The program includes various tools for working with subtitle files letting you convert them to different formats, sync them with a particular movie and more. After you install and launch the app, you first need to import the desired subtitles file into the program’s interface. After that, the tool will automatically analyze each text line, and it will quickly display all errors.

Here are the key features of the app:

  • By selecting the Fix Error tab, you will be able to repair a broken subtitle file, and you will have a great number of options available.
  • Besides fixing subtitle files, the program also lets you edit all the text lines included inside a subtitle file, and you will also be able to customize them freely.
  • The tool is also useful for correcting spelling mistakes.
  • The program allows synchronizing a subtitle file or only certain lines with the dialog from the video.
  • After you edit the subtitle file, you will be able to test it straight in the program’s interface by loading the movie file.

The only downside of the program is the fact that it can be a bit difficult to understand by first-time users.

Jubler

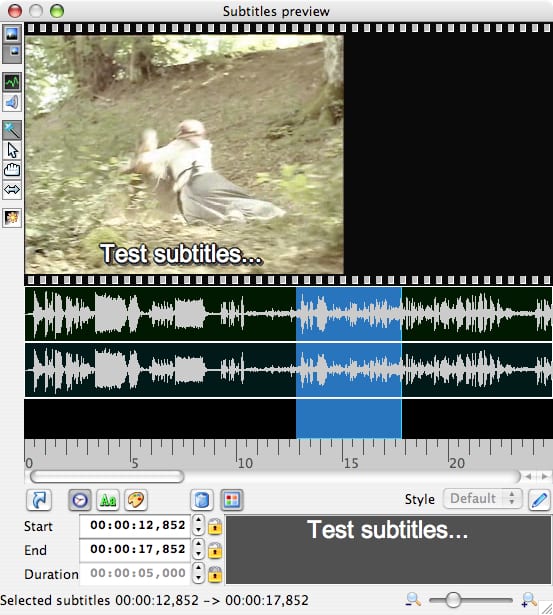
This is a free text-based subtitle editor which is used for creating new subtitles. You can also use this tool to transform, convert, correct and also refine already existing subtitles. With this program, you will be able to fix the inconsistencies, such as overlapping, by using a built-in algorithm. The tool works with almost all popular subtitle formats (Advanced SubStation, SubStation Alpha, SubRip.  SubViewer (1 and 2), MicroDVD, MPL2 and Spruce DVD Maestro file formats) and it also allows you to preview subtitles in real time or at design time.

Here are more of its essential features:

  • It also supports all encodings supported by Java, and you will be able to select from a list of preferred encodings to load the localized subtitle files.
  • The tool features GUI internalization support via gettext utilities.
  • It supports translating modes, and it has both parent and child editors.
  • It provides a graphical display of the subs, and these can be moved and resized.
  • You will be able to test and play the subtitles file using a video player, such as MPlayer for instance. While you’re in playing mode, you will be able to freely edit the subs, add a new subtitle in real time or sync subs with the movie.
  • You can mark subs with different colors, in real time while the video is playing or when you are editing them.
  • The program also offers you spell checking and support for dictionary selection.
  • You can install it as easy as possible, and you should know that it comes with an update app.

Here are the key editing features:

  • Editing individual subtitles
  • Splitting text
  • Joining texts together
  • Time shifting
  • Automatic frame rate conversion by user request or using a free user factor
  • Fixing time inconsistencies (such as overlapping with an optimization algorithm)
  • Undo and redo
  • Cut, copy, paste, delete areas
  • Clear areas used for hearing impaired

POP Subtitle Editor

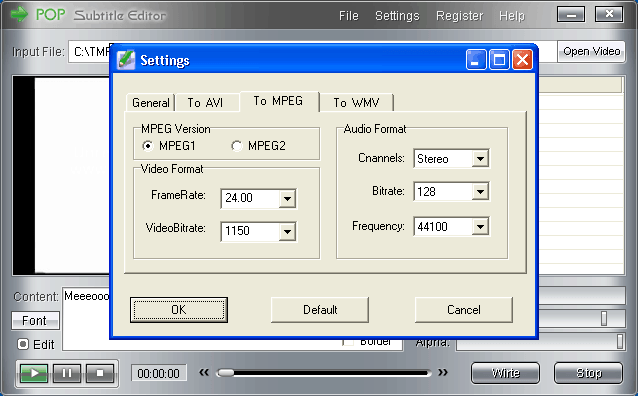
This is a straightforward tool that allows you to write and add your subtitles to any video file. Check out its most notable features below:

  • You can write your texts on the fly while also previewing the movie.
  • You will be able to select both start and end times by using the same function key.
  • You can customize the fonts, their size, color, and the position of the subtitles and you can generate AVI, MPEG and WMV files with a single click.

The program’s downside is that you have to be an experienced user of this kind of software. As you’re not allowed to make mistakes with his tools. The program will not give you the possibility of changing the text of a subtitle once you enter it and the editor accepts it, and this can get quite annoying.

More than that, in case you have selected the wrong start and end time, you won’t be allowed to change these anymore. You cannot delete subtitles, but if you missed one, you could add it to the list anytime. And it will be shown on the selected frames.

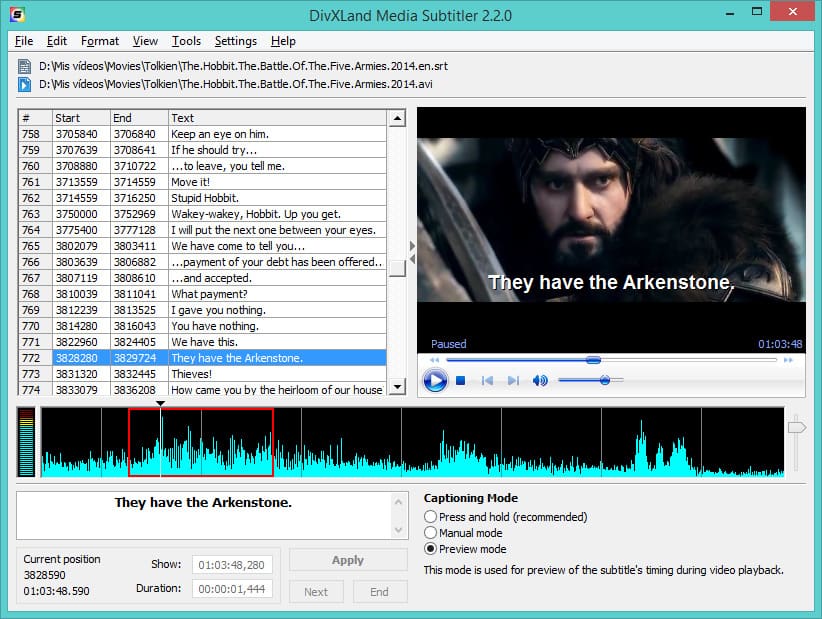
DivXLand Media Subtitler

This is a freeware and Multilanguage subtitle editor that allows you to create and edit external subtitle files for AVI, WMV, and MPG and all types of videos. To create subtitles, you’ll need a plain text file containing the dialog lines in sequential order. You should apply these lines as subtitles into the opened media file during the video playback. You can do this with just a single click.

This editing tool supports all popular subtitle formats including the following: Adobe Encore, Advanced SubStation Alpha, CSV (Excel), DKS, DVD Subtitle System, DVD Subtitle,  FAB Subtitler, JACOSub 2.7, Karaoke LRC, MacSUB, Mac DVD Studio Pro, MPlayer, PowerPixel, Spruce DVD Maestro, Spruce Subtitle, SubViewer 2.0, TurboTitler, ViPlay, ZeroG, and so on.

Check out its essential features:

  • You can create subtitles from clipboard contents or simple text.
  • You will get an instant preview of the subtitled video without saving it.
  • You can save partially edited files to resume the subtitling process later.
  • The tool offers multiple subtitling modes.
  • The program also features automatic caption timing set and correction.
  • You will get support for basic text formatting.
  • You can use keyboard shortcuts for an easy control of the subtitling process.
  • It provides a multi language spell checking feature.
  • You will be able to embed subtitle files into AVI videos.
  • You can extract audio streams from AVI and MPG videos into MP2, MO3, and WAV file formats.

Subtitle Edit

This is a free video editor that lets you adjust a subtitle if it is not synchronized with the video. You can do much more with it, and you have to know that for Windows XP users it requires the Microsoft. NET Framework version 2.0 or later versions.

Check out its key features:

  • It has Google translation built-in.
  • It provides spell checking.
  • It offers the following effects: typewriter and karaoke.
  • You can open subtitles embedded inside Matroska files.
  • You can compare subtitles.
  • It offers multiple searches and replaces.
  • You can visually sync/adjust a subtitle (start/end position and speed).
  • You can create/adjust subtitle lines.
  • The tool also offers a translation helper (for manual translation).
  • You can convert between SubRib, MicroDVD, Substation Alpha, SAMI, and more.
  • You can import VobSub sub/idx binary subtitles (code is ripped from Subtitle Creator by Erik Vullings/Manusse).
  • The tool can read and write UTF-8 and other Unicode files (besides ANSI).
  • The program can show texts earlier/later and Merge or split subtitles.
  • You can also adjust display time.

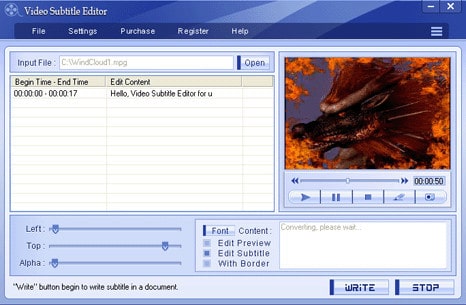
Video Subtitle Editor

With the help of this tool, you will be able to edit subtitles for movies in the most efficient manner. Check out its key features:

  • It supports almost all video formats, like iPod, AVI, MPEG, WMV, DivX, XviD, MP4, MOV, RM, 3G2, MPEG-4, and so on.
  • It supports converting iPod, AVI, MPEG, WMV, DivX, XviD, MP4, MOV, RM, 3G2, MPEG-4 to FLV.
  • You will be able to cut any segment of the video into smaller video clips by specifying the beginning and the ending time of the conversion.
  • You can convert with high quality and fast speeds.
  • The tool also supports a preview mode.
  • The program’s interface is very straightforward, so everybody can use it without having to be an expert.

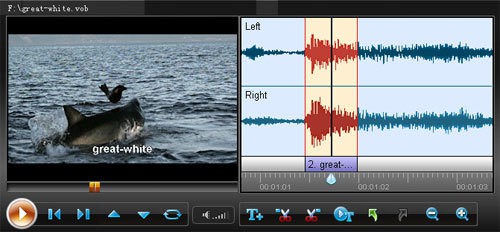
Womble Easysub

This is a DVD subtitle editor for creating, editing and managing subtitle text within DVD video files. It has an embedded video player that lets you preview subtitle text with all the necessary details in real time.

Check out the most important features of this program:

  • The sound waveform display will give you a visual help to locate a voice segment and to set the exact time for your text.
  • You can also import subtitles from an existing .srt subtitle file into the subtitle list and then you will be able to manipulate it freely.
  • The program offers a convenient tool for your previewing of a DVD subtitle, and you can also preview your edited subtitle in real time.
  • The subtitle text list allows you to create new subtitles, such as the creation of your native language translation for a foreign movie.
  • You can modify, replace, and delete any subtitle list in a DVD movie.
  • Due to the Unicode implementation, the tool works for all languages and displays all fonts.
  • You can add various subtitle streams with different languages.
  • You can delete the unwanted streams in the video very quickly.

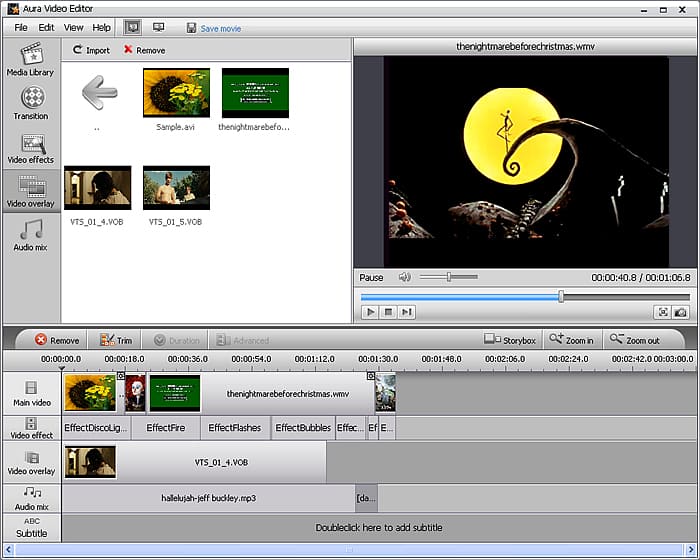
Aura Video Editor

This is a professional video editing software that will enable you to create your video, movies, and slideshows. You will be able to make professional looking videos with various ououtstanding transitionsnd effects.

Take a look at its numerous key features:

  • The program has a very user-friendly interface: you can edit videos on a single video editing timeline and story box panel.
  • You can just drag and drop video files onto a graphical timeline.
  • The tool is efficient to edit videos, overlay video, trim video and audio, mix audio, add subtitles and watermark.
  • All edits can be previewed in real time without having to render the entire project.
  • You can burn to a DVD that can be played on your DVD-ROM or DVD player.
  • You can create an entertaining slideshow with photos, music, and videos.
  • You can create video movie with pictures, music, transitions, and effects.
  • The program supports all popular video formats, soundtracks, and images.
  • You can apply lots of video effects and transitions to videos.
  • You can create high-quality MPEG4, HD video, MPEG2, FLV and other formats video.

Gaupol

This is a straightforward and also very efficient tool targeted to help you create and edit subtitle files for your favorite movies and TV series. The software app is very intuitive, and it will make the tasks of subtitle editing and translation much easier.

Here are the most remarkable features of this program:

  • Even if you cannot customize the interface a lot, you will get the opportunity to set the width and the height of the main window to your preferred size.
  • You will be able to fit the app next to a video player easily.
  • The interface is straightforward, and the layout is ergonomically organized.
  • You can open more subtitle files due to the tabbed interface.
  • All the parameters of the subtitles are straightforward to edit, and you will be able to make modifications quickly.
  • You can set the start and end time, the duration or the main text of the subtitles.
  • You can add new lines after the selected subtitle.
  • You can add missing text, and you can also split a subtitle line in two to correctly sync it with the movie.
  • The program lets you select your favorite movie player, and you will be able to use it for previewing your projects.
  • The tool has a built-in spelling checker, and this will let you create quality content.

All in all, the program is a very inspired choice, and you don’t even have to be an expert to use it.

These were our top ten choices for subtitle editing software. When you’re downloading movies from the Internet, the videos will usually come together with subtitle files tucked in the same folder. But sometimes, the subtitles are not correct, or they are missing altogether, and you can go on and look for them manually online. All these tools will help you fix a subtitle and make it suitable for your movies. Take a good look at all these tools’ features and try the one that seems the most appropriate for your needs.

RELATED STORIES TO CHECK OUT:

Microsoft Planner app is everything you need to get your tasks done

Are you looking for an easy yet simple way to collaborate and share tasks with your team? The Microsoft Planner app helps you do just that, and more.

Since its introduction, the Microsoft Planner app has assisted various teams across the world by helping them create new plans, organize and assign different tasks, share documents, discuss via chat what each person is currently working on, and get progress updates on each task.

Simply put, the app provides a visual way to organize teamwork, and stay updated on progress for various tasks.

The app is built for Office 365, but is only available only to users with Office 365 Enterprise (E1-E5), Business Essentials, Business Premium, and Education subscription plans.

This means it is not available for government subscription or personal use.

Some of the tasks you can fulfill with Microsoft Planner app include:

  • Collaborating with your team
  • Attach files, photos, documents or links
  • Add checklists to tasks
  • Add comments to tasks
  • Flag tasks with labels
  • Set and update progress for tasks
  • Set or add preview picture for tasks
  • View the progress of your plans
  • View all tasks and plans
  • Receive emails about tasks and plans
  • Delete tasks or plans
  • Track progress from anywhere, on any device

How to create a plan on Microsoft Planner app

Microsoft Planner lets you create a plan, organize and build your team, assign tasks and get progress updates.

Users who are new to Microsoft Planner can get started by visiting tasks.office.com, create plans in the web app, then view and update their plans on mobile.  Existing users can get Planner via the web or mobile platforms.

To get you started, follow these simple steps below:

  1. Sign in
  2. Create a plan
  3. Add a task
  4. Set a date for your task
  5. Categorize your tasks
  6. Add people from your team
  7. Assign tasks to different team members
  8. Keep track of progress

Step 1: Sign in

Microsoft planner app sign in

As mentioned earlier, Microsoft Planner is only available for work or school subscriptions, so in order to sign in, you need your work or school account login credentials.

It is important to note that you do not need any software installs on your PC or other device to use the app. You simply connect to it through your web browser.

Once you sign in, you are able to do the following:

  • Access your work or school Planner site
  • View, edit and create plans
  • View, edit and create tasks
  • Chat with team members
  • Keep track of progress on plans and tasks

Here’s how to sign in to Microsoft Planner:

  1. Open web browser
  2. On the address bar, type https://office.com/signin or https://portal.office.com
  3. Press Enter button on your keyboard
  4. Choose the account you want to sign in with
  5. Enter your email address and password for the account you have chosen
  6. Sign in

Note: if you already signed in, or have the Office 365 environment for your workplace, you can connect directly to Microsoft Planner through the app launcher.

Follow these steps to execute this:

  1. Select app launcher on your browser window
  2. Choose the Planner tile on the home page, or app pane
  3. Connect to Planner

connect app launcher on microsoft planner app

Creating an account with Microsoft Planner

In order to sign in, your work or school institution needs to have signed up for an eligible Office 365 plan, then your administrator gives you an account.

If you’re not able to sign in despite this, check with your work or school’s help desk.

Step 2: Create a plan

Microsoft Planner app create a plan

Once you’ve signed into Microsoft Planner, you can access the site and thus be able to see the plans available for each of your Office 365 groups.

There are two different types of plans: public, and private.

Public plans are visible to everyone in your work or school organization meaning they come up whenever anyone in the organization searches for plan, whereas private plans are visible to specific people added to the plan.

Note: If you make your plan public or private, your Office 365 Group is also made public or private.

In order to create a plan, follow these steps:

  1. Choose a plan by going to Favorite plans or All plans (you can also start a new plan by selecting New Plan
  2. If you select New Plan, give your plan a namecreate a new plan with Microsoft planner app
  3. Choose who can see your plan
  4. Select Options in order to:
  • Add a description
  • Decide whether to automatically subscribe new members to notification
  1. Create a Plan

Note: creating a new plan also creates a new Office 365 Group. This eases collaboration both in Microsoft Planner, and other applications such as Outlook, and OneDrive, among others.

Once you create a plan, the next step is to add tasks.

Step 3: Add tasks, set dates, and categorize

how to add a task on microsoft planner app

So you’ve successfully signed in, created a plan, and now you want to add tasks to your plan.

Adding tasks is simply breaking down what needs to get done and by whom.

Here’s how to add tasks to your plan:

  1. Under the To do box, enter a task name
  2. Select Add task (you can add several tasks by typing a task name then press enter, and keep typing to add more. If you cannot see the To do box, click on the + plus sign to show the box, then add a task

You can add more details to your tasks and determine the appearance on the Board.

Microsoft Planner allows you to do the following with the tasks you create:

  • Set a preview picture for each task. To do this, attach a file, photo or link to the task, or add a checklist.

add preview on microsoft planner app

The first photo, file or link you attach becomes the preview. If you want to use a different attachment as your preview, or use a description instead, select the task, then select Show on card. To remove the preview, uncheck the Show on card box.

  • Add task start and due date. To do this, select a task, then add a start date, and a due date.

add task date on microsoft planner app

The dates can also be added whenever you create a new task by selecting Set Due Date.

If you find a date is red, it means the task is overdue even if it’s still in progress.

  • Flag tasks with labels. Labels help you quickly spot traits shared by different tasks such as location, timing, and task requirements.

add labels to microsoft planner app

To add labels to your tasks, go to the Board, select a task, choose the colored boxes on the right, then choose the flag you will use and name it.

Step 4: Add people to your team

In order to add people to your team, follow these steps:

  • Go to Planner
  • Select Members
  • Enter the name of the member you want to add

Note: currently you can only add people within your organization. However, there is a plan in development to enable users add people outside of their organizations. You can view more features currently in development on the Office 365 Roadmap.

Once you add people, you can then assign tasks to them.

If you need to remove someone from the list, or no longer need someone in your plan, follow these steps:

  1. Select the arrow next to Plan members
  2. Point the person you want to remove
  3. Select the three dots
  4. Choose Remove

Step 5: Keep track of progress

  • Set and update task progress. Microsoft Planner app categorizes tasks into not started, in progress, and completed.

You can update progress by choosing the task, then use the Progress drop down menu.  You can use a checklist to keep track of progress on tasks. However, if you’re looking for a broader plan, or to view overall progress of tasks, the Charts view will provide this for you. Once you’re done with a task, mark it as completed by pointing to it, and selecting the check mark.

Note: you can view completed tasks by scrolling down the task list and choose Show completed.

Once your tasks are set, you can organize them into buckets and add those you will be collaborating with as you work.

How to get email notifications on tasks

email notifications on microsoft planner app

Sometimes you want to keep track of your tasks on the go, and this is made possible through the email notifications on the Microsoft Planner app.

Email notifications are activated once you create a plan, when you are added as a member of an existing plan, if another member comments on a task you commented on, if the plan’s owner turns on task activity notifications, or if you are subscribed to a plan.

Plan owners can also send notifications through the app, to the plan’s feed whenever a task is assigned, or marked as completed.

Notifications are usually off by default, so in order to receive them you need to turn them on.

To get email notifications, here’s what you need to do:

  • Select the three dots on the right of your plan
  • Choose Edit planedit plan microsoft planner app
  • Select Send notifications about task assignment and task completion to the plan’s conversation feed
  • Check the box to turn on notifications (to turn the notifications off, uncheck the same box).

email notifications microsoft planner app

To subscribe to a plan, select the three dots on the right of the plan, then choose Follow plan in inbox. Do the same to unsubscribe, but choose Stop following plan in inbox.

Pros and Cons of Microsoft Planner app

Pros

  • Organize teamwork and get more done
  • Easy to use as you can launch it with one click
  • Organize work visually
  • Visibility and transparency
  • Seamless collaboration with your team
  • Email notifications about tasks and plans
  • Work across all your devices
  • Available channels for sending feedback in case of any troubleshooting issues with the app

Cons

  • Not available for personal, or government use
  • App not fully developed like other team collaboration apps such as Asana, because some features are still under development

Download the Planner app from the Microsoft Office Store.

Share with us your experience using Microsoft Planner app in the comments section below.

RELATED STORIES TO CHECK OUT:

Microsoft looks to makeover server admin with a new GUI called Project Honolulu

I hope you’re ready for some sexy server admin GUI talk because Microsoft just turned down the lights and put on its Project Honolulu track.

Project Honolulu is Microsoft’s new browser-based graphical management tool that stands in opposition of most of its efforts to make Windows 10 less GUI-dependant as it explores expansions into new environments such as IoT and Nano Servers.

According to a report from ArsTechnica, Microsoft will soon be making available a preview of its Windows Server version 1709 that will host this new Project Honolulu GUI. As of right now, that’s all that’s all the news that has surfaced about this new project, but we’re expected to hear more details during Microsoft’s Ignite conference happening later this month.

Despite the move to the cloud with emphasis on machine learning and voice activated digital assistances, there are still quite a few instances where fully thought out and imperatively functional GUI is necessary to get things done quickly and Microsoft’s Project Honolulu appears to be an attempt at such a task.

Cyanide & Happiness video game funded, could come to Xbox One

Cyanide & Happiness has been one of the most popular webcomics – and web series – out there, for quite a while. Bringing to the table a unique style and a sense of humor that has resonated with plenty of audiences. In an effort to bring the series into a new world, the creator has put up a Kickstarter project for a Cyanide & Happiness video game.

The new project will be an adventure game, and its advertising smacks of the South Park: Stick of Truth style that was popularized years ago. It seems to adapt the comic’s art style perfectly and has the same comedic qualities that made the series beloved in the first place. You can check out the trailer above to see if you’re interested in throwing a few dollars at the project.

According to the stretch goals on the Kickstarter, there’s a chance that the C&H game might be coming to the Xbox One. With 20 days left in the campaign, it’s absolutely possible for these other stretch goals to become a real possibility. Keep an eye out on the Kickstarter page for updates on the stretch goals – if we catch wind of an Xbox release becoming feasible, we’ll let you know.

Microsoft introduces Azure confidential computing, available in Early Access

Today, Microsoft introduced Azure confidential computing, available now in Early Access. Azure confidential computing adds an extra layer of cloud security for enterprise customers that not only protects the data from hackers, but can also secure the data from government data collection efforts.

Azure confidential computing creates a virtual black box where customers can store their most coveted and secret data, to keep out of hackers’ reach. Microsoft is the first company to offer this cloud data encryption security capability.

With this new security layer, data processed in the cloud is directly controlled by the customer and the customer only. Microsoft was able to create Azure confidential computing with the help of the Azure team, Microsoft Research, Windows, and Developer Tools group, along with Intel Corporation in an effort that was created over the past four years.

Microsoft, Azure, confidential computing, cloud security
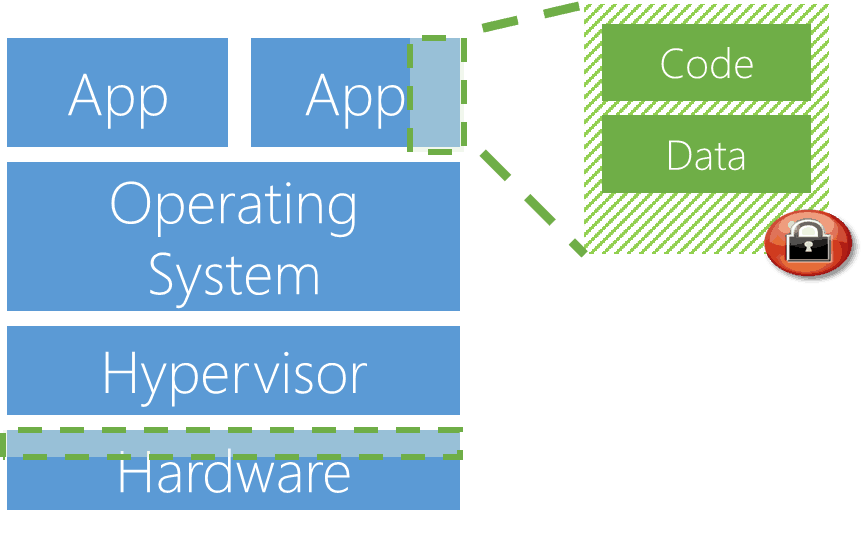
A visual of how Azure confidential computing works.

Shown in the figure above, Azure confidential computing uses a protected space, called a Trusted Execution Environment (TEE), where data is available for efficient processing. TEEs provide a protected space where there is no way to view the data or operations performed from the outside the TEE. Only those with a special access code will be allowed access to the data within the TEE. The TEE also ensures extra security; if code to access the data is altered or tampered with in any way, the operations are denied and the environment is disabled. The TEE protections are set by the execution of code that is created within the TEE.

Data breaches are becoming a more common occurrence nowadays, including Equifax’s recent data breach that affected approximately 143 million American customers. As reported in the Wall Street Journal, Equifax is blaming the data breach on the exploitation of “a vulnerability with U.S. website application Apache Struts.”

Microsoft Azure confidential computing protects pertinent data from the following threats:

  • Malicious insiders with administrative privilege or direct access to hardware on which it is being processed
  • Hackers and malware that exploit bugs in the operating system, application, or hypervisor
  • Third parties accessing it without their consent

Azure confidential computing can also protect Microsoft too. As Bloomberg reports, Microsoft won’t be forced to turn over any customer data to the US government through any warrants or subpeonas.

“The new service also means that Microsoft won’t have the capability to turn over data in response to government warrants and subpoenas, an issue at the heart of a current Microsoft lawsuit against the U.S. government fighting the requirement to turn over client data, sometimes without the customer’s knowledge.”

While Google and Amazon are working on their own technologies to try to protect customer data in the cloud, Microsoft Azure confidential computing is available for customers right now. If you are interested in Azure confidential computing Early Access, sign up here.

New app launcher experience coming to Office 365

Microsoft today announced that they will be launching a new Office 365 app launcher experience over the next couple of months. Compared to the current experience, the new launcher is much more personalized and is aimed at helping users find and open the apps they use most frequently.

Although the visual look of the launcher experience is changing, users will still see the apps which are available to them based on their licenses. There is also more emphasis on most used Office 365 apps and apps which are more relevant to the user. You can check the video below for the complete rundown and visual preview of the new app launcher.

Microsoft mentions that the user’s main view will still list all default apps, and apps the user has opened in the previous 45 days. Additionally, with the new launcher, access to the Mail, Calendar, People and Tasks tiles have also been merged into one main tile called “Outlook.”  Calendar and Tasks will be accessed from the switcher in the outlook app, and direct access is available by pinning to the main view.

Given that Microsoft announced a redesign of the launcher at this same point last year, it is apparent that the company is always listening to user feedback. So, if you would like to get an early look at the app launcher, you can join the first release program and let Microsoft know your thoughts on the new experience.

Microsoft Pix updated to handle whiteboard captures, more

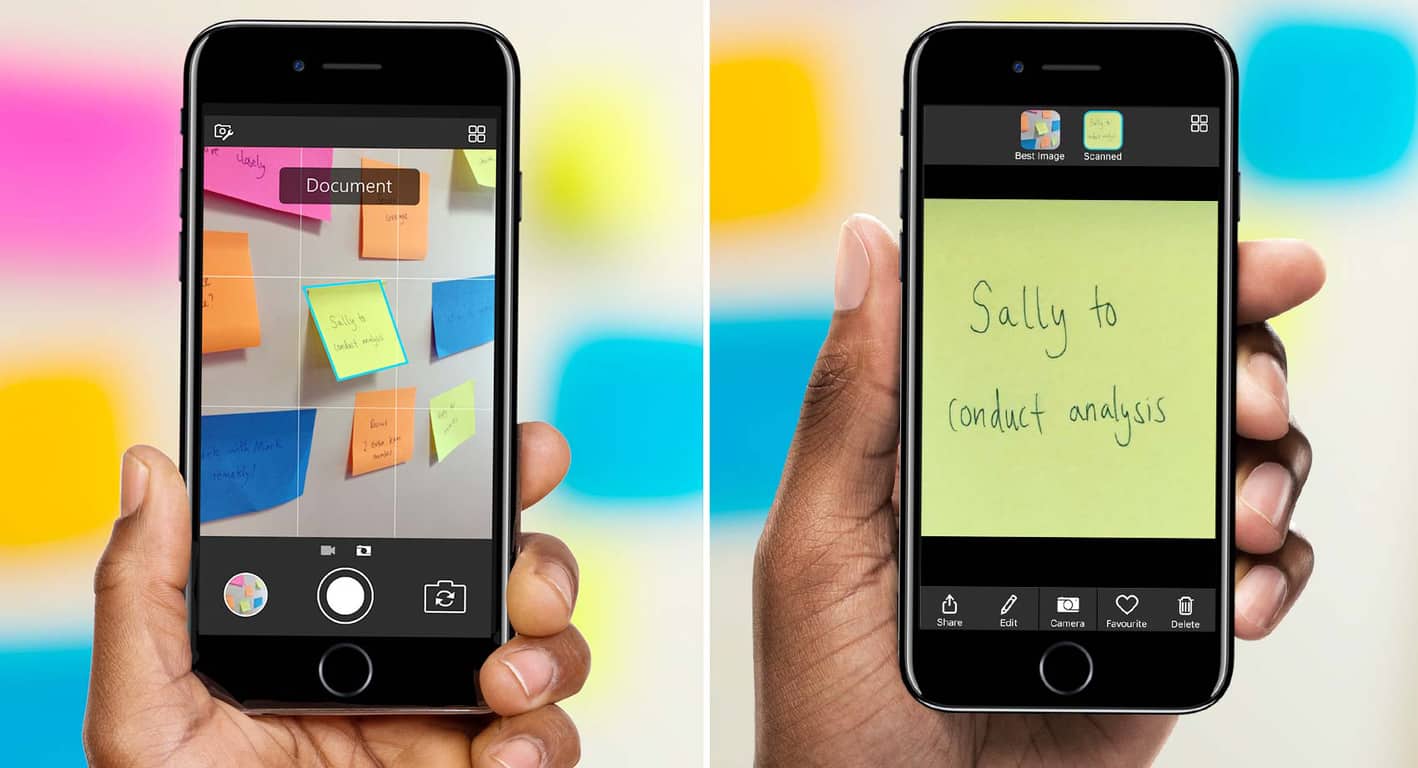
Microsoft Pix, the company’s AI-powered camera app for iPhone has just become much more versatile. The app can still automatically improve photos of your friends and family by tweaking settings and using some AI magic, but you’re now invited to use it to take pictures of documents, whiteboards and business cards.

Here is everything that’s new in the version 1.1.3:

  • Pix now recognizes documents, whiteboards and business cards, and provides a “scanned” image along with the original picture
  • New Styles for your scanned images to add lined paper, crumpled paper and other document-related effects. Tap a scanned image then Edit > Effects to apply a new Style
  • iCloud support
  • Pix will no longer stop music playing when you take a picture

As Microsoft explained in a blog post today, Microsoft Pix is becoming a nice complement to the company’s Office Lens app. “Office Lens remains the best tool to easily integrate productivity images across the suite of Office products, while Microsoft Pix is out front pushing the boundaries of using AI to take better pictures of everything from a snapshot of your kid in new sneakers to the whiteboard in your morning meeting.”

Microsoft Pix is still an iOS exclusive for now, but Microsoft says that “the research thrust behind Microsoft Pix informs innovation across apps, including Office Lens.” You can download the app from the download link below, be aware that it now requires iOS 10 or later.

‎Microsoft Pix
‎Microsoft Pix
Price:
Free

Path of Exile gest a massive update on Xbox One

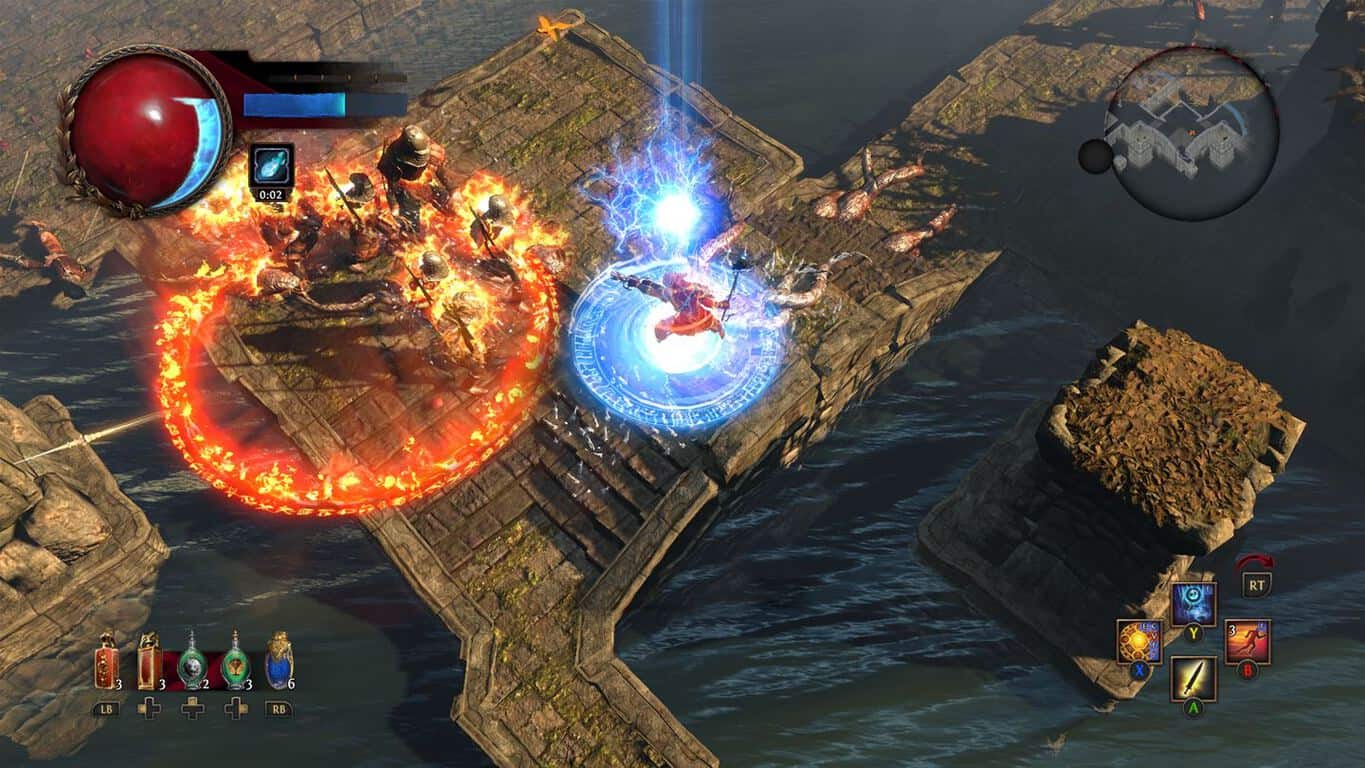
Following its release on the Xbox One last month, the popular online action-RPG Path of Exile (not to be confused with Conan Exiles) is receiving a pretty big update today. The patch 3.0.1b brings a lot of new features and gameplay improvements including greater degree of control to movement, new item filters, various updates to world areas and more.

You can find below the list of new features, and we invite you to check the lengthy release notes on the the game’s forum to learn more about Harbinger improvements, balance changes and other bug fixes:

New Features:

  • Updated the Currency Stash Tab to include new slots for new currencies. Slots have been added for Orbs of Annulment, Annulment Shards, Chaos Shards, Regal Shards, Exalted Shards and Mirror Shards.
  • Added a greater degree of control to movement. You will now move shorter distances if you only partially move the control stick in a direction.
  • Updated the look of the Passive Skill Tree cursor.
  • Added the Portent and Harbinger supporter packs.
  • Various improvements have been made to world areas, including the Ossuary and Highgate. A larger set of improvements will be coming in a later patch.
  • ‘Abandon Mission’ will no longer be highlighted by default when accepting a Masters mission.
  • Added controls information to the Trade Market screen.
  • Added the ability to rearrange your stash tabs. Press LB or RB to move your current tab left or right respectively.
  • Added a range of new item filters as designed by community member Neversink.
  • Added the ability to display server messages such as countdowns to server restarts.
  • Added a message that informs the player of loss of privilege when they are forced to leave a group
  • You can no longer rebind skills while viewing the Help Panel.
  • Hideout decorations are now placed in front of the player when used.
  • Added error messages to the map device.
  • The Challenge Panel now displays the number of challenges you have completed.
  • Seeking a new prophecy now correctly highlights the new one.
  • Other inputs will now be ignored while resizing the user interface.
  • Updated the controls that are displayed while in the Options menu.
  • Updated the controls that are displayed while viewing a Premium stash tab.
  • Updated the controls that are displayed while viewing an Essence stash tab.
  • Updated the controls that are displayed while using the Map Device.
  • Updated the controls that are displayed while using the Trade Market.
  • Added a display for the controls available while navigating the Cosmetics panel.
  • Added controls information to the Help Panel screen.
  • You must now activate the Labyrinth device with A (rather than with X).
  • Players will no longer see other users in town areas if their Xbox privileges restrict them
  • Updated Tasuni’s Divination Card user interface.
  • You can no longer change between panels while in Socketing Mode on an item.
  • Lore text no longer overlaps with the control display at the bottom of the screen.
  • Added filter options for the Divination Card stash tab.
  • Added the option to move directly to the Cosmetics panel from the Shop screen.
  • Added the ability to navigate the Cosmetics and Inventory panels using the D-Pad.
  • Currency items are now prioritised while looting.
  • Updated the Russian and Brazillian Portuguese localisations.
  • Unique Fragments now follow the “Map to Maker” rule for allocation.
  • Updated class portraits for the Scion and the Ascendant classes.

The award-winning title is currently one of the best free-to-play games you can play on your Xbox One, assuming you’re into the action RPG genre. If you have yet to try it, the game is a 9.19GB download and you can install it on your Xbox One using the download link below.

Path of Exile
Path of Exile
Developer:
Grinding Gear Games
Price:
Free

Pre-orders for the Dell Visor Windows Mixed Reality Headset are now open

At IFA 2017, Microsoft’s partners showed off Windows Mixed Reality headsets which will be heading to store shelves this holiday season. Today it has been revealed that the Dell Visor, one of the many headsets unveiled at IFA 2017, is now available for pre-order (via Venture Beat.)

The futuristic looking Mixed Reality headset can be pre-ordered directly from Dell for the price of $359.99, and there is also a pre-order option which comes with the motion controller bundled in for $459.99. Although Microsoft has said that the headset will also be available in the Microsoft Store and BestBuy, if you pre-order now from Dell, your headset will ship on October 17th.

Dell’s Visor headset is designed to take advantage of the same technology used in the Microsoft HoloLens, including inside-out tracking cameras, with a 360-degree panoramic view. It comes with a white finish, a flip-up visor, well-cushioned head and face padding, thumbwheel band adjustment for personalized comfort, and smart weight balancing that takes pressure off the nose and cheeks.

The headset was called “future proof” by Dell since it can scan surroundings with a camera instead of using sensors throughout the room. So, if you’re tempted to buy, be sure to pre-order now, and guarantee your chance to have the headset in your own hands come late October! Microsoft has released a Mixed Reality PC check app to make sure your PC is ready for the new headsets, or if it’s time to upgrade.

Microsoft releases new Windows Mixed Reality PC Check app on the Windows Store

On October 17, the first Windows Mixed Reality headsets from Acer, ASUS, Dell, HP, and Lenovo will be available to purchase, with prices starting as low as $299. This will coincide with the release of the Windows 10 Fall Creators Update, which will start rolling out to all PCs on this same day.

As we’re just a few weeks away from the big date, it appears that Microsoft has quietly released a new app called Windows Mixed Reality PC Check on the Windows Store (via Aggiornamenti Lumia). As its title hints, this simple app will check your PC specs and tell you if it’s ready for those upcoming Windows Mixed Reality headsets. Whether you pass the test or not, the app will also show you a link to Microsoft’s website where you can learn more about the platform and the first headsets from partners.

To play with Windows Mixed Reality, your PC will need a recent Intel dual-core chip with integrated graphics (DirectX 12 support is mandatory), at least 8GB of RAM and 10GB of storage, a USB 3.0 port and bluetooth 4.0 support for motion controllers. You can learn more about the minimum specs on this page.

We expect Microsoft to communicate more about Windows Mixed Reality over the next few weeks, especially since both Apple and Google are already pushing hard mobile AR on iOS and Android devices. If you’re interested, you can get this Windows Mixed Reality Check app from the download link below.

Dell launches the world’s first VR-ready Precision 5720 All-in-One in India

Dell has announced the launch of the Precision 5720 All-in-one, the newest addition to its flagship line of Precision devices, in India. 2017 marks the 20th anniversary of Dell’s Precision line in the industry.

The Dell Precision All-in-One 5720 is one of the world’s first VR-ready all-in-one workstation, equipped with AMD Radeon Pro graphics (WX 7100 or WX 4150), and sports a 27-inch UltraSharp 4K Ultra HD display (available with touch option). It can support up to three additional 4K displays at 60Hz or an additional 1x 5K and 1x 4K at 60Hz.

The all-in-one is powered by Intel Kaby Lake and Sky Lake processors – Core i5 or i7, as well as Xeon E3-1200 v6.

The launch of the Precision 5720 All-in-One is a testimony to our belief in the legacy of Dell’s Precision range, which offers the best-in-class experience for creative minds to bring their ideas to life. We are proud to offer the world’s first VR capable AIO supporting professional graphics and staying true to Precision’s legacy of powering some of the greatest projects, for customers who depend on quality design for success – and what better time to do this than the 20th anniversary of the product line.

– Indrajit Belgundi, General Manager – Client Solutions Group, Dell India

Aimed towards creators and power users, the Dell Precision 5720 All-in-One is available in India at a starting price of ₹1,09,000, and is available for purchase on www.dell.co.in.

Xbox One consoles to get 1080p video game recording

Microsoft has announced that first-gen Xbox One consoles and Xbox One S consoles will be getting the ability to record 1080p video game footage and save it (if they choose) onto an external hard drive. Currently both consoles can record 720p gameplay footage which is restricted to being saved on the console itself.

The new capability is also being tested today with Xbox Insiders who have installed the new Preview Alpha build available (1710.170910-1900) that began to roll out this morning. Regular Xbox One owners will be able to record 1080p recording later in the year. Microsoft’s upcoming Xbox One X console has already been confirmed to support 4K video game footage.

Do you record your gaming directly on your console or do you use another method? Let us know in the comments below.

Windows 10 build 16288 bugs: Install fails, Edge freezes, and more

Microsoft recently rolled out a new Windows 10 build, after taking a long break of one week. Windows 10 build 16288 is the first build to feature version number 1709, which is the official version number of the Windows 10 Fall Creators Update. As far as new features are concerned, this build release brings absolutely no new features, focusing instead of fixing the existing bugs.

Despite Microsoft’s efforts to squash all the bugs affecting Windows 10 Fall Creators Update’s early versions, there are still a few issues affecting Insiders. Here are the most common Windows 10 build 16288 bugs reported by Insiders.

Windows 10 build 16288 reported issues

Build 16288 won’t install

If you can’t install build 16288, don’t worry, you’re not the only one. Many Insiders reported that they can’t install the latest Windows 10 build on their PCs due to an error message informing them that their devices are not quite ready yet.

I am running Build 16281 and try to install Build 16288 and I am getting error message An update is being prepared for your device, but it’s not quite ready yet. We’ll keep trying or you can try again now. Can anyone help?

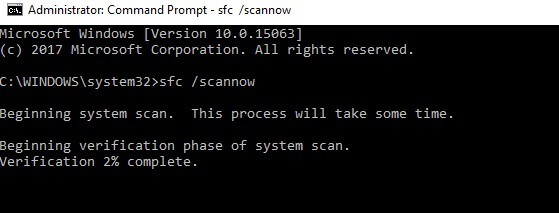
Now, if there is an error message preventing you from installing build 16288, try the following solutions: run the sfc /scannow command in Command Prompt, run the Windows Update Troubleshooter, and clear the Windows update download folder.

Microsoft Edge crashes

Insiders also report that build 16288 breaks Edge. The browser often freezes or closes all of a sudden. If you want to enjoy a smooth browsing experience on build 16288, the best solution is to temporarily switch to another browser.

Start Menu issues

The Start Menu is affected by a series of issues on build 16288. Insiders confirm that often there is no click functionality, and various elements are missing.

I had some problems with 14291 and had rolled back, installed 295 last night (3/26) now I have no left click functionality on start button, can’t get to settings, not even through defender. Worst problem right now is that I can’t roll back
Isn’t there an option to repair or roll back somewhere else besides the “new” settings app?

These three bugs are the most frequent issues reported by Insiders. As you can see, build 16288 appears to be quite stable and reliable. This comes as no surprise as Microsoft is now adding the finishing touches to the OS. As we approach the Windows 10 Fall Creators Update release date, Windows 10 builds will feature fewer and fewer issues.

Have you installed build 16288 on your device? Did you encounter any other issues? Let us know in the comments below.

RELATED STORIES TO CHECK OUT:

Windows 10 KB4038782 install fails for many users

This month’s Patch Tuesday edition brought a series of useful Windows 10 updates. Cumulative update KB4038782 for Windows 10 version 1607 fixes a bevy of issues, including Internet Explorer bugs, Windows driver errors, and more.

Just as it happens with every new update, KB4038782 also brings issues of its own. Many users reported that the update install process often fails. This is by far the most frequent problem currently affecting users.

KB4038782 fails to install

As stated above, many Windows 10 Anniversary Update users are still struggling to install KB4038782. The install process fails with error 0x800706ba or simply freezes.

Here’s how two different users describe this issue:

I then checked for windows updates however it always states that the updates have failed saying Error 0x800706ba – the updates being
– Update for Windows 10 Version 1607 for x64-based Systems (KB4033637). (comes up twice)
– 2017-09 Cumulative Update for Windows 10 Version 1607 for x64-based Systems (KB4038782).
– 2017-09 Security Update for Adobe Flash Player for Windows 10 Version 1607 for x64-based Systems (KB4038806).


2017-09 Cumulative Update for Windows 10 Version 1607 for x64-based Systems (KB4038782) Failed to install on 9/12/2017″ is all I get. The update downloads, prepares to install, then asks me to restart the computer. I restart, it installs to about 21%, then gives up. It then undoes the changes and uninstalls.

If you can’t install KB4038782 on your PC, try using Microsoft’s Windows Update Troubleshooter. Indeed, updating Windows 10 can often turn into a nightmare. This tool will help you solve various Windows Update errors and unlock the update process.

If the Windows Update Troubleshooter fails to solve the annoying KB4038782 install issues, check out our dedicated article on “How to address common issues with Windows Update“. We’re sure that one of the solutions available in this article will help you install KB4038782.

RELATED STORIES TO CHECK OUT:

Recent Office 365 updates cause Outlook to freeze?

Is Outlook working fine for you? If the answer is positive, you’re lucky. Because apparently, it’s not working as intended for everyone. And what’s worse, we don’t know what exactly is the cause of this problem.

One user recently reported on Reddit, that he’s unable to use Outlook for some time now, because it constantly freezes and crashes. Here’s what he said:

“Since Early September my environment has been having freeze ups and not responding to the simplest of tasks in Outlook 2013/2016. All of these pc’s are running windows 10. I can’t locate any recent updates of win 10 or office that would be causing them. I have verified that my Office updates are up to date. Removing the profile and account and creating a new one has been hit and miss on success. Anyone else seeing this or know of this? Anyone know a solution? I’ve spent days researching this. Thanks for reading !!!”

As you can see, all his Office apps are up to date. So, it’s possible that some of the previous updates actually caused this issue. In fact, it’s very likely that this issue was caused by some of the previous Office 365 updates. Let’s face it, updates for Windows and its related products are prone to causing issues.

Since the Patch Tuesday was yesterday, there’s a chance Microsoft actually released the fix for this problem. However, the user who reported it hasn’t said anything yet, so we can’t confirm anything for now.

We can only recommend you to check our article about Outlook issues in Windows 10, if you think you can deal with this problem on your own.

And of course, if you know something more about this issue, please let us know in the comments below.

RELATED STORIES YOU NEED TO CHECK OUT:

Popular collaboration tool Trello is coming to the Windows Store

Perhaps, feeling the pressure from competitors such as Slack and Microsoft Teams expansion of their native integrations across platforms, web based collaboration tool Trello is making the jump from browsers to the desktop.

Trello is making the move from being a mostly browser based solution to getting native app status on Windows and Mac operating systems.

Announced today, Trello users will now be able to get the same level of quality they received from using the service via the web, as well as native functionality such as desktop notifications, card creation using keyboard shortcuts and Touch Bar support on MacBooks.

As Trello CEO Michael Pryor puts it, “The desktop app has been on our roadmap and something we’ve wanted to do, but as a scrappy startup we couldn’t do everything at once so we decided to focus on making our mobile and web experiences great for our users.”

Now, it would seem that Trello has grown beyond scrappy startup status and has its eyes set on even larger goals as the desktop app reveal is part of a larger integration announcement.

Trello now has support for Stride audio and video conferencing from within the app as well as easier Bitbucket, Dropbox, Paper, and Confluence Cloud set ups.

The macOS version of the app is available now with the Windows app coming tomorrow.

Windows 10 KB4038788 bugs: install issues, Edge crashes, BSoD, and more

The Patch Tuesday September updates are now available for download. Windows 10 KB4038788 is one of the many updates that Microsoft rolled out yesterday. This particular update fixes a long list of problems, including graphics issues, Start Menu bugs, sleep issues, and more.

Windows 10 KB4038788 also brings issues of its own, as users report. Some of them are quite severe, preventing PC owners from using their devices, while others are minor issues.

In this article, we’re going to list the most common KB4038788 bugs reported by users to give you an idea of what to expect in terms of issues.

Windows 10 KB4038788 issues

KB4038788 won’t install

Many Windows 10 users can’t install the latest Windows updates on their PCs. The install process starts, but doesn’t seem to progress and then suddenly stops.

[…] everytime an update comes up, my Windows 10 will always fail to install the update. […]  I’ve tried both system and catalogue, none of them worked. It’ll just come up failed after restarting. […] The update that i now have problem with is the latest one (KB4038788)
Another thing that i noticed is that during the restart sequence, it doesn’t show any percent, just the text and it gives up

Edge constantly crashes

If Microsoft Edge is your main browser, you may want to postpone installing the latest Windows 10 updates. Many users reported that Edge constantly crashes after they installed KB4038788. Strangely enough, some users also say that although the browser doesn’t appear to have crashes, the  Event Viewer displays a lot of Edge errors.

Hi, same issue, odd thing is the browser does not appear to crash, but if you open Event Viewer there will be lots of errors showing Edge has crashed. This started after this latest update.

Black screen issues

It appears that KB4038788 also messes up PC graphics. Users reported that sometimes the screen goes black, flashes, and then remains completely black.

It seems like this cumulative update messes up my laptop: after installing the updates, I get a normal login screen, but when logging in, the screen turns black, with cursor, I’m able to get into task manager etc. etc., have already tried to uninstall graphics drivers etc., nothing helps until I pick a restore point.

Blue Screen of Death

KB4038788 may sometimes cause BSOD errors, preventing PC owners from using their devices.

[…] Bluescreened. Can’t get to any “feedback hub capture” because it won’t boot. Wiping and reinstalling from backup after lunch. Will not try these on any other system for a month or so, maybe whatever it is gets fixed.

These are the most common bugs triggered by KB4038788. If you’ve encountered other issues apart from the ones listed above, use the comment section below to tell us more about your experience.

RELATED STORIES:

Windows 7 KB4038779 and Monthly Rollup KB4038777 released by Microsoft

It’s time for another Patch Tuesday! As always, Microsoft releases new cumulative and security updates for each supported version of Windows. This time, Windows 7 received two updates – security-only update KB4038779, and Monthly Rollup KB4038777.

Both updates mainly focus on system improvements and bug fixes. Of course, there are no new features with these updates.

Here’s the complete changelog of Windows 7 Monthly Rollup KB4038777:

  • “Addressed issue where applications that have LDAP referral chasing options enabled use a TCP dynamic port connection that doesn’t close until the applications close or the calling OS restarts. With sufficient time and volume, these applications may completely consume all TCP dynamic ports. If that occurs, network communications will fail for any protocol or operation that uses dynamic ports. This issue was introduced by the July and August 2017 cumulative updates, starting with KB4025337 and KB4025341.

  • Updates to Internet Explorer 11’s navigation bar with search box.

  • Addressed issue in Internet Explorer where undo is broken if character conversion is canceled using IME.

  • Addressed issue in Internet Explorer where graphics render incorrectly.

  • Addressed issue in Internet Explorer where the Delete key functioned improperly.

  • Re-release of MS16-087- Security update for Windows print spooler components.

  • Security updates to Microsoft Graphics Component, Windows kernel-mode drivers, Windows shell, Windows Hyper-V, Windows kernel, Windows Virtualization, and Internet Explorer.”

And here’s the complete changelog of the security-only update KB4038779:

  • “Addressed issue where applications that have LDAP referral chasing options enabled use a TCP dynamic port connection that doesn’t close until the applications close or the calling OS restarts. With sufficient time and volume, these applications may completely consume all TCP dynamic ports. If that occurs, network communications will fail for any protocol or operation that uses dynamic ports. This issue was introduced by the July and August 2017 cumulative updates starting with KB4025337 and KB4025341.

  • Re-release of MS16-087- Security update for Windows print spooler components.

  • Security updates to Microsoft Graphics Component, Windows kernel-mode drivers, Windows shell, Windows Hyper-V, Windows kernel, and Windows Virtualization.”

You can download both updates simply by checking via Windows Update. This feature will download them automatically on your computer. For more info about the new updates, as well as manual download links from Microsoft Catalog, you can check Microsoft’s Update History page.

Have you already installed the new updates? Are there any issues so far? Let us know in the comments below.

RELATED STORIES YOU NEED TO CHECK OUT:

Microsoft’s newest browser gets a significant boost with EdgeHTML 16

Microsoft’s Edge browser has seemingly been playing a perpetual game of catch up to industry titans such as Chrome, Firefox, and Safari, and that’s mainly due to its relative age but also it’s lack of features for both developers and users.

With the upcoming set of EdgeHTML 16 updates, it seems the developer team is ready to shorten the competition gap as well as bringing new experiences to Windows 10 users.

New Edge features include:

CSS Grid Layout

Microsoft Edge now supports the unprefixed implementation of CSS Grid Layout. Grid Layout defines a two-dimensional grid-based layout system which enables more layout fluidity than possible with positioning using floats or scripts. The example below uses CSS Grid Layout to create the structure for a basic web page.+

CSS object-fit and object-position

EdgeHTML 16 introduces support for CSS properties object-fit and object-position. These properties control the position and size of replaced content within the content box.

In addition to a new CSS grid layout, developers can also look forward to a handful of new tools such as refactored efforts to improve extensibility, ancestor event listeners, DOM mutation breakpoints, CSS at rule support and more.

As for the more consumer facing additions, EdgeHTML 16 enables developers to implement payment request with a new Payment Request API now open to all. Developers can also create more native functioning services without having to dedicate time to solely to the Windows Store by implementing Service Workers.

Service Workers

Service Workers are event-driven scripts that run in the background of a web page. Service workers enable functionality previously only available with native apps like intercepting and handling requests from the network, managing and handling background sync, local storage, and push notifications. Support for service worker is still in development, but you can test out your PWA in Microsoft Edge with our experimental service worker support by enabling the service worker feature in about:flags.

Lastly, Microsoft’s push into VR via its Windows 10 OS can now be seen in the browser development with WebVR.

WebVR has also been optimized to support two different types of experiences.+

Windows Mixed Reality PCs – Desktops and laptops with integrated graphics. When plugged into these devices, our immersive headsets will run at 60 frames per second.
Windows Mixed Reality Ultra PCs – Desktops and laptops with discrete graphics. When plugged into these devices, our immersive headsets will run at 90 frames per second.

To get a full list of APIs being offered in EdgeHTML16, head over to the Microsoft Edge blog for details. On a side note, Windows 10 Insider Previews for the last couple of releases have had bits and pieces o new EdgeHTML 16 elements sprinkled throughout its code as the engineers prepare for a fuller release of these features during the Creators Fall Update release later this year.

Microsoft Teams to be among the first Progressive Web Apps to hit the Windows Store

Insert [It’s happening meme] here.

During the Microsoft Edge Summit today, news surfaced that the company was in the processing of implementing a change that could help boosts the Windows Store app numbers for the better.

According to Microsoft MVP Ryan Hayes, Microsoft will now crawl the web looking for reputable progressive web apps to fill the Windows Store.

Furthermore, the Microsoft Edge team echoed Hayes’ post by issuing one of their own.

While the news is projected over the coming months, the Microsoft Edge team also noted that the company’s newest collaborative messaging software Teams is one of the first of these PWA’s soon to be available via the Windows Store.

For the past few years, recent Microsoft platforms have shared in a single collective disadvantage. Be it Windows 8, Windows RT, Windows Mobile or Windows 10 and now Windows 10 S, the single narrative that has plagued their growth potential has centered around a lack of apps.

However, with PWA’s making it to the Windows Store over time, the sales pitch of Windows 10 S becomes that much easier for the company as it can now direct a similar looking Chromebook crowd used who has become used to PWAs, to now reconsider a Windows 10 S device.

Windows 10 update KB4038788 fixes a bunch of issues and bugs

Another month, another Patch Tuesday. This time, Microsoft released the new cumulative update KB4038788 for Windows 10 version 1703.

This is a regular cumulative update for the system, which means it brings no new features. Its main focus is improving the overall stability, and of course, fixing some of the known issues caused by previous updates. And this time, cumulative update KB4038788 indeed brings a handful of bug fixes.

Here’s the complete changelog of update KB4038788 for Windows 10:

  • “Addressed issue where the color profiles do not revert to the user-specified settings after playing a full-screen game.

  • Updated HDR feature to be turned off by default in the OS.

  • Addressed issue where you can’t open the Start menu when you add a third-party IME.

  • Addressed issue with scanners that rely on inbox driver support.

  • Addressed issue in a Mobile Device Manager Enterprise feature to allow headsets to work correctly.

  • Addressed issue where some machines fail to load wireless WAN devices when they resume from Sleep.

  • Addressed issue where Windows Error Reporting doesn’t clean up temporary files when there is a redirection on a folder.

  • Addressed issue where revoking a certificate associated with a disabled user account in the CA management console fails. The error is “The user name or password is incorrect. 0x8007052e (WIN32: 1326 ERROR_LOGON_FAILURE)”.

  • Addressed issue where LSASS is leaking large amounts of memory.

  • Addressed issue where enabling encryption using syskey.exe renders the system unbootable.

  • Updated the BitLocker.psm1 PowerShell script to not log passwords when logging is enabled.

  • Addressed issue where saving a credential with an empty password to Credential Manager causes the system to crash when attempting to use that credential.

  • Updates to Internet Explorer 11’s navigation bar with search box.

  • Addressed issue in Internet Explorer where undo is broken if character conversion is canceled using IME.

  • Addressed issue with the EMIE where Microsoft Edge and Internet Explorer repeatedly switched between each other.

  • Addressed issue where a device may stop responding for several minutes and then stop working with error 0x9F (SYSTEM_POWER_STATE_FAILURE) when a USB network adapter is attached.

  • Addressed issue where some apps cannot be opened because the IPHlpSvc service stops responding during the Windows boot procedure.

  • Addressed issue where spoolsv.exe stops working.

  • Addressed issue where the Get-AuthenticodeSignature cmdlet does not list TimeStamperCertificate even though the file is time stamped.

  • Addressed issue where, after upgrading to Windows 10, users may experience long delays when running applications hosted on Windows Server 2008 SP2.

  • Addressed RemoteApp display issues that occur when you minimize and restore a RemoteApp to full-screen mode.

  • Addressed issue that sometimes causes Windows File Explorer to stop responding and causes the system to stop working.

  • Addressed issue that causes the Export-StartLayout cmdlet to fail when exporting the layout of tiles at startup.

  • Addressed issue where the option to join Azure AAD is sometimes unavailable during the out-of-box experience.

  • Addressed issue where clicking the buttons on Windows Action Center notifications results in no action being taken.

  • Re-release of MS16-087- Security update for Windows print spooler components.

  • Security updates to Microsoft Graphics Component, Windows kernel-mode drivers, Windows shell, Microsoft Uniscribe, Microsoft Edge, Device Guard, Windows TPM, Internet Explorer, Microsoft Scripting Engine, Windows Hyper-V, Windows kernel, and Windows Virtualization.”

To download this update, simply go to Settings > Updates & security, and check for updates.

Besides KB4038788 for Windows 10 version 1703, Microsoft also released cumulative updates for all other supported versions of Windows 10: KB4038782 for Windows 10 version 1607; KB4038783 for Windows 10 version 1511; KB4038781 for Windows 10 1507 (initial July 2015 release).

For more info about Windows 10 cumulative update KB4038788, as well as all other updates released this Patch Tuesday, visit Microsoft’s Windows 10 Update History page.

Have you already installed this update? Are there any issues already? Let us know in the comments below.

RELATED STORIES YOU NEED TO CHECK OUT:

What’s new in Windows 10 build 16362 for Skip Ahead Insiders: Improved Boot Experience, Narrator Improvements

After releasing build 16288 for Fast Ring Insiders yesterday, Microsoft is once again pushing out a new build, this time for Windows Insiders who have chosen to Skip Ahead. Build 16362 comes with an improved boot experience and narrator improvements. As always, you can read up on what’s new in this build by checking below.

What’s new in Build 16362:

  • Only available on PCs that are not managed by enterprises: Improved Boot Experience: Use sign-in info to apply settings after a restart or update: Building on our work seen in Build 16251, if you stay on the lock screen for a few seconds before signing in, you will now see your lock screen personalization (such as Windows Spotlight, and/or status information from Cortana, Calendar, Mail, and more). As always, you can customize your lock screen experience using the settings listed under Settings > Personalization > Lock screen.
  • Opt-out: Under the Privacy section of the Sign-in options page of your Settings, you can disable and re-enable the feature.
  • Narrator Improvements: You can now select the desired audio channel for Narrator speech output! Simply go to Settings > Ease of Access > Narrator and you’ll find a new option to do this at the top of the “Sounds you hear” section.

As always, you should be finding this build now under Windows Update if you’re a Fast Ring Windows Insider who has opted to Skip Ahead. We wish you well in your downloading, and remind you to keep your feedback coming to Microsoft!

Skype leverages Microsoft’s Family feature to easily connect you with family members

Microsoft’s Family feature, which was recently improved with a shared Family Calendar on Outlook.com has just received some Skype love today. If you’re already a part of a Microsoft Family, all your family members who are on Skype will automatically be added to your Skype contact list. Additionally, a “My Family” Group chat will also appear in the messaging app to make it easier to reach out.

“This new Skype feature creates a central location for everyone to send a quick message or jump on a group video call,” the Skype team explained, highlighting the fact that there is no setup required. “Family members will receive a notification when the group is created, and that group will appear in everyone’s conversation history on whatever device they’re using Skype.” If you’re wondering, you can leave this family group or remove family members anytime, without any impact on family membership.

If you have yet to create a Microsoft Family, you can do so on this page. Sound off in the comments if you think this is a nice complement to the Family Calendar on Outlook.com.

Poll: Were you able to install build 16288?

Yesterday, Microsoft released Windows 10 build 16288 to the PCs of Fast Ring Insiders across the world. Unfortunately, things did not go as planned, and the Windows Insider team later followed up on Twitter to reveal that there was an issue where some Insiders were unable to download the build.

It was not shared exactly what was causing the issue, but the Windows Insider team provided an update late last night, telling Insiders that a fix has been deployed, and each variant of the build will go live as it finishes publishing. An initial 2 hour time period was given for the build to become available after the fix was deployed, but as of this morning, some Insiders have still not received the build.

So, did you receive build 16288? Or are you still seeing an error code? Did you try anything complex or registry changes to see if the build would download to your PC? Check out this week’s poll and let us know.

Dona Sarkar has said that Insiders should wait until the end of the day today for the fix to update the issue, so if you’re not able to download or install the build now, you might be able to soon. Be sure to vote in the poll above, and let us know your thoughts on this situation in the comments below.

Windows Template Studio updated to version 1.3

In addition to fresh new Windows 10 Insider builds, Microsoft also released the version 1.3 of Windows Template Studio yesterday. The company’s new UWP app creation tool now supports in app scheme launch, and it also introduces several Template, Wizard and Process improvements. You can find a summary of everything that’s new below, and we invite you to check the dedicated GitHub page for more details about this new release:

New Feature:

  • Scheme to launch app (aka myAwesomeApp://myDeepLinksIntoMyApp?foo=bar)

Template improvements:

  • Default Windows theme support added to template
  • Files are now UTF-8 with BOM to make sure all cultures are supported
  • Accessibility support in templates

Improvements to the Wizard:

  • Accessibility support in Wizard drastically improved
  • Lots of under the hood bug fixes and code improvements
  • All needed parts for localization are built-in now (looks like we missed window to get actual localized files)
  • Initial VB engine work was added in.
  • Bug fixes

Process improvements:

  • StyleCop enforcements across Template and Wizard code bases
  • Appveyor added for pull requests to be sure we have proper continuous integration checks
  • Required work for .NET Foundation

If you already installed it in Visual Studio 2017, the Windows Template Studio extension should be automatically updated on your PC, but you can force the update by going to Tools->Extensions and Updates. Otherwise, you can download the Windows Template Studio extension on this page. According to Microsoft, Fluent Design in the templates, Visual Basic Support and more are coming in future releases, and you submit your ideas or feature requests on the dedicated GitHub.

How to boost Windows 10 low FPS for AMD PCs

Some AMD graphics cards might be among the best cards for Windows desktops. However, that doesn’t guarantee that games running on updated AMD systems will always have a higher FPS (frames per second) rate. Major updates for Windows can reduce FPS rates, and AMD released a dedicated driver update for the Creators update. This is how you can raise low frame rates on AMD desktops and laptops.

1. Increase the FPS Rate with Frame Rate Target Control

The AMD Catalyst Control Center includes a Frame Rate Target Control (FRTC) setting. That enables you to set a target frame rate of up to 95 FPS for most DirectX games. As such, the FRTC is the first control center setting to check as you can increase frame rates with it.

  • First, right-click the Windows desktop and select AMD Catalyst Control Center from the context menu.
  • Click the Performance tab, and then select Frame Rate to open the FRTC.
  • Select the Maximum Target Frame Rate check box.
  • If the FRTC bar is at a low frame rate, drag it further right. You can drag it up to 95 FPS.
  • Press the Apply button on the AMD window.

2. Lower the Resolution

Lowering graphical settings can enhance FPS rates, so consider reducing the display resolution. This will reduce the graphical detail, but lower resolutions can either dramatically or marginally increase FPS rates dependent on hardware. A lower resolution will, at least, certainly speed up the gameplay. It might be better to adjust the resolution with the games’ graphics settings. However, you can also configure the overall resolution in the AMD control center as follows.

  • Open the AMD graphics control panel by right-clicking the desktop and selecting AMD Catalyst Control Center.
  • Select Desktop Management > Desktop Properties to open resolution settings.
  • Now select a resolution listed under Desktop area.
  • Click Apply to confirm the new settings.

3. Configure the Vertical Sync Setting

Vertical sync is AMD’s equivalent of G-sync that matches FPS with a VDU’s refresh rate to eliminate tearing. If your FPS has dropped to something like 10-20 frames per second, it might be better to switch Vertical sync on as most VDUs have higher refresh rates than 20Mhz. However, Vsync can also restrict frame rates that could be somewhat higher than 60Mhz. So switching Vsync off, if it’s currently on, could boost your frame rate.

  • To switch Vertical sync on or off, open the AMD control panel.
  • Click the Gaming tab on the left of the AMD window.
  • Select 3D Applications under Gaming to open 3D options.
  • Scroll down to the Frame Rate Control settings, which include a Wait for Vertical Refresh option.
  • If Vsync is restricting your FPS rate, select Always off from the Wait for Vertical Refresh drop-down menu.
  • Press the Apply button at the bottom right of the control center window.

4. Update the AMD Graphics Card Driver

4.1 Update drivers manually

Low FPS rates can be due to outdated AMD drivers. AMD releases driver updates to fix graphic card issues, which might include low FPS rates. That’s especially the case after big Windows updates. AMD even has its own software for you to update drivers with. This is how you can update them with AMD Driver Autodetect.

  • Press the Download button on this website page.
  • Click Run on the browser’s web prompt. Then the AMD Catalyst AutoDetect window will open automatically after download.
  • The software scans your system and tells you what the best graphics card driver for it is. Press the Download Now button to save the new driver to Windows.
  • Thereafter, the driver’s installer will automatically open. Press the Install button to open the Install Manager window.

Alternatively, you can manually download a graphics card driver from the AMD website and then install it. Open this website page, and select graphics card and platform details from the drop-down menus there. The Device Manager window, which you can open from the Win + X menu, includes graphics card details under Display adapters. You can also find the 32 or 64-bit platform detail required by selecting System from the Win + X menu.

4.2 Update drivers automatically

However, you should consider using advanced tools that will simplify the operation and prevent PC damage that might appear when installing the incorrect version of the driver. 

In addition, once you have selected the correct driver version for your device, the application will update them individually or in groups at a glance.

⇒ Get Fortect Driver Updater

5. Reinstall the AMD Graphics Card Driver

Your graphics card driver might be corrupted if your FPS rate has dropped down by a substantial margin. Then you’ll need to reinstall the driver. You can delete the AMD driver with the AMD Clean Uninstall Utility.

  • To add AMD Clean Uninstall Utility to Windows, open this website page. Click the AMD Clean Uninstall Utility link there to download the software.
  • When you run the software, a window opens stating, “This will remove all AMD driver and application components.”
  • Press the OK button to confirm and uninstall the driver.
  • An AMD CleanUninstall Utility window opens after the uninstallation. Press the Finish button on that window.
  • Press the Yes button on the CleanUninstall Utility window to restart Windows.
  • Windows will automatically reinstall a graphics card driver after restart.

6. Optimize system resources for games

Finally, always close background software to ensure you get more RAM for the game to maximize the FPS rate. This will, at the very least, speed up the gameplay a little. Remove a software from the Windows startup to make sure it never automatically open. Task Manager is the best utility in Windows to close programs and third-party software services with.

  • Press the Win key + X hotkey, and select Task Manager from the Win + X menu.
  • First, click the Start-up tab. Select some programs listed there and press the Disable button to remove them from the Windows startup.
  • Thereafter, click the Processes tab to open a list of apps and background processes.
  • Select all the listed apps and press the End task button to close them.
  • You can close background processes much the same. However, don’t terminate any Windows processes.
  • You can also disable services with MSConfig. Press the Win key + R hotkey to open Run.
  • Enter ‘MSConfig’ in Run to open the window below.
  • Click the Services tab to open a list of background services.
  • Select the Hide all Microsoft services check box to exclude more essential OS services.
  • Deselect the selected service check boxes, and press the Apply button.
  • Click OK to close MSConfig. Then you can also select a Restart option to reboot the OS.

Raising the FRTC frame rate target, adjusting the Vsync setting, lowering the resolution, and optimizing system resources will probably boost FPS rates for AMD desktops or laptops. Update or reinstall the AMD driver if your frame rate has dropped by a considerable margin. Moreover, you can also overclock hardware with overclocking software to boost FPS.

Fix: The System Cannot Find the Device Specified 20 (0x14)

If you’re getting the ERROR_BAD_UNIT code with 20 (0x14) The system cannot find the device specified, it would lead to trouble identifying a device.

And though it seems complex, things are easy to troubleshoot. Keep reading to find out!

What is error 20 0x14?

The system cannot find the device specified error message, also known as error 20 (0x14), occurs when PCs fail to detect external devices connected to the system.

Sometimes, not all Windows utilities fail to detect the device. There are cases when Computer Management shows details of the respective device, yet when users right-click it in Disk Management, they get the message 20 (0x14) The system cannot find the device specified.

There are various elements triggering this issue, including corrupted files and folders, broken EXE, DLL errors, or SYS files, malware infection, outdated software versions, faulty external devices, and more. Let’s find out how to fix things!

How do I fix error the system cannot find the device specified?

Before we head to the slightly complex solutions, here are a few quick ones to try:

  • Restart the computer.
  • Plug the device into another port on the PC.
  • Install any pending Windows updates.

If none work, move to the fixes listed next.

1. Run a full system malware scan

Malware may cause various issues on your computer, including errors. Perform a full system scan to detect any malware running on your computer.

Running a Full Scan in Windows Security

You can use Windows’ built-in antivirus, Windows Defender, or third-party antivirus solutions.

2. Repair your registry

1. Go to Start, type cmd, right-click Command Prompt, and select Run as administrator.

2. Now type the following command and hit Enter:sfc /scannow

3. Wait for the scanning process to complete, and then restart your computer. All corrupted files will be replaced on reboot.

Another way to repair your registry is to use a dedicated tool. If you haven’t installed any registry cleaner on your computer, check out the best registry cleaners to use.

3. Run the Hardware Troubleshooter

1. Go to Settings, click on Update & Security, and select Troubleshoot in the left-hand pane

2. Select Hardware and Devices, and run the troubleshooter.

4. Use diskpart

  1. Go to Start, type Diskpart, right-click the relevant search result, and click on Run as administrator.
  2. Type this command to identify all the available devices:list disk
  3. Your external device should be visible, but there is no drive letter assigned to it
  4. Type the following command and hit Enter (replace X with the volume number assigned to the device):select volume X
  5. Execute this command (replace Y with the letter that you want to assign to the device):assign letter Y

There are cases when the external device no longer appears listed on your PC after 20 (0x14) The system cannot find the device specified error message was triggered. In this case, you can use the diskpart command. 

Diskpart is a powerful tool for hard drive management, and using it can cause damage to your system. Be extra cautious when using this command, and keep in mind that you’re using it at your own risk.

5. Run System Restore

  1. Go to Search, type System Properties, and open it.
  2. Go to System Protection and click on System Restore.
  3. Click Next, and choose the preferred restore point in the new window.
  4. Once you’ve selected your preferred restore point, click Next, and then Finish.
  5. Your PC will restart, and the restoring process will start.

If the problem started recently, run System Restore. Also, if this issue occurred after you installed new software on your computer, try uninstalling the recently added apps and programs. Restart your PC and see if the issue persists.

The System Restore option allows you to restore the previous well-performing system configuration without losing any files, except for a few customizable features and settings.

6. Reset the PC

  1. Go to Settings, click on Update & Security, and then select Recovery under the left pane.
  2. Click on Get Started under Reset this PC, and choose to Keep your files.
  3. Follow the on-screen instructions to complete the reset.

Windows 10 offers a series of advanced recovery option allowing users to clean install the OS. If you’re a Windows 10 user, you can also use the Reset this PC recovery option.

There you go. We hope the solutions listed above helped you fix 20 (0x14) The system cannot find the device specified error code. 

Before you leave, find out how to make Windows run faster.

If you’ve come across other workarounds to fix this problem, you can help the Windows community by listing the troubleshooting steps in the comments below.

Ronggolawe malware: what it is, how it works, how to prevent it

A few years ago, ransomware was scarce and not that big of a threat as it’s nowadays. After Petya and WannaCry crisis, we saw what potential it has and people suddenly started caring. Ronggolawe is not as widespread as Petya and WannaCry, but it’s still an immense threat for all web-based companies and web sites.

But, what’s Ronggolawe and how to protect from it? We’ll try to provide a valuable insight below so make sure to check it out.

What it is and how to protect from Ronggolawe ransomware

What is Ronggolawe and how it works

Ronggolawe or Ronggolawe.A (”A” refers to a variation of malicious software) is ransomware firstly introduced a year ago. It was introduced as an open-source code and uploaded to GitHub by an alleged cyber security company from Jakarta, Indonesia. No one can be sure what they intended to do with it, but you can guess that cyber criminals find it quite handy. Since it’s easily obtainable and requires minimal effort for adaptation to malicious purposes, it’s one of the most common ransomware tools nowadays.

Ronggolawe’s main use is to target files stored on web servers and look for a security loophole of a kind. Once it gains the control over users’ data, it encrypts it and then, the perpetrators ask for money in order to decrypt it again. Then, they’ll offer a ”fair trade” and prompt you to contact them via the listed e-mail address. Obviously, even though you pay, there’s a risk that you’ll never see your data again.

It can come in various ways, but mostly via third-party plug-ins for supported sites, like WordPress, Magento, Blogger and similar web sites. Alternatively, it spreads via spam e-mails and links. In order to get in, Ronggolawe ransomware changes .htaccess file and reconfigures the service. Once it’s in, it produces an interface for attacker where he is able to encrypt and decrypt your files by choice. You’re immediately prompted with this pop-up web page:

That’s the moment you’ll know that the problem is real. There’s nothing you can do in the aftermath, except to pay. And still, no one can guarantee that you’ll get your data back. However, there are some ways you can protect yourself from Ronggolawe.

How to protect from Ronggolawe and ransomware in general

”Better safe than sorry” should be the mantra for all that have even the slightest chance to be affected by ransomware. Modernized hijackers have tools and knowledge to take your valuable data without too much effort. Ronggolawe is just one of the threats you can expect in everyday use, so you need a proper protection 24/7. These are some precautionary measures you should take into consideration:

  • Install and keep up-to-date anti-malware software at all times. Either Windows Defender or a third-party solution.
  • Keep Windows Firewall always ON.
  • Enable the Cloud-based protection ON.
    1. Open Windows Defender.
    2. Choose Virus & threat protection.
    3. Select Virus & threat protection settings.
    4. Enable Cloud-based protection.
  • Don’t install plug-ins from unknown sources.
  • Don’t open spam e-mail. Delete it right away.

That should conclude this article. We hope you found what you were looking for. Don’t forget to tell us about your experience with Ronggolawe in the comments section below.

RELATED STORIES YOU NEED TO CHECK OUT:

The drive cannot locate a specific area or track on the disk [FIX]

If you’re getting ERROR_SEEK with the ‘The drive cannot locate a specific area or track on the disk‘ description, follow the troubleshooting steps listed in this article to fix it.

ERROR_SEEK: What it is and why it occurs?

ERROR_SEEK occurs when users try to copy, move or delete data from their drives. In rare cases, this error also occurs when users try to access and launch various apps located on the respective drive.

Microsoft explains that ERROR_SEEK occurs mainly because the disk may be damaged, unformatted, or simply not compatible with the operating system.

Fix the ‘The drive cannot locate a specific area or track on the disk’ error

Solution 1 —Unplug and re-plug the external drive

If you’re getting this error with removable storage, unplug the storage device. Close all software on your taskbar and plug the external storage back in. You can also restart Windows before you plug the external HDD back in. Then, retry the action that triggered the ERROR_SEEK error.

Solution 2 — Reinstall external hard drives

Reinstalling the storage device might also fix this issue. Of course, you can’t do that for HDDs with Windows on them, but you can reinstall external storage drives with the ERROR_SEEK error.

  1. Go to Start > type ‘device manager’ to launch Device Manager.
  2. Click Disk drives to expand that section > right-click the external disk drive to fix.
  3. Select the Uninstall option on the context menu.
  4. Press the Scan for hardware changes button to reinstall the disk drive.

Solution 3— Check your disk for errors

On Windows 10, you can run a disk check using Command Prompt.

Start Command Prompt as administrator and type the chkdsk C: /f command followed by Enter. Replace C with the letter of your hard drive partition.

As a quick reminder, if you do not use the /f parameter, chkdsk displays a message that the file needs to be fixed, but it does not fix any errors. The chkdsk D: /f command detects and repairs logical issues affecting your drive. To repair physical issues, run the /r parameter as well.

On Windows 7, go to hard drives > right-click the drive that you want to check  > select Properties > Tool. Under the ‘Error checking’ section, click Check and check the ‘Automatically fix system file errors’ option.

Solution 4— Clean your temporary files and folders

The simplest and quickest manner to delete your temporary files and folders is to use Disk Cleanup. As you use your computer or browse the Internet, your PC accumulates various unnecessary files.

These so called junk files may affect your computer’s performance and also trigger various error codes, including the ERROR_SEEK error code. Clean your temporary files and then try to use your drive again.

Here’s how to use Disk Cleanup on Windows 10:

1. Go to Start > type Disk Cleanup > launch the tool

2. Select the disk that you want to clean > the tool will them tell you how much space you can free up

3. Select “Clean up system files”.

Here’s how to use Disk Cleanup on Windows 7:

  1. Go to Start > type Disk Cleanup > open Disk Cleanup.
  2. In Disk Cleanup’s description section, select Clean up system files and select the drive that you want to clean up > click OK.
  3. On the Disk Cleanup tab, select the check boxes for the file types that you want to delete > click OK > select Delete files.

Solution 5 — Use the previous drive letter/ change the drive letter

If the ERROR_SEEK error code occurred after you changed the letter of your drive, try restoring the previous letter.

1. Go to Search > type “disk management” > select the first result > launch the tool
2. Select the problematic drive > right-click it > select Change driver letters and paths

3. Click on the Change button > restore the previous driver letter > click OK.

Solution 6 — Run a full system scan

Malware may cause various issues on your computer, including errors. Perform a full system scan in order to detect any malware running on your computer. You can use Windows’ built-in antivirus, Windows Defender, or third-party antivirus solutions.

Here’s how to run a full system scan on the latest Windows 10 version:

  1. Go to Start > type ‘defender’ > double click Windows Defender to launch the tool
  2. In the left hand pane, select the shield icon
  3. In the new window, click the Advanced scan option
  4. Check the full scan option to launch a full system malware scan.

Solution 8 — Repair your registry

The simplest way to repair your registry is to use a dedicated tool, such as CCleaner. Don’t forget to first backup your registry in case anything goes wrong.

You can also use Microsoft’s System File Checker to check for system file corruption. The utility verifies the integrity of all protected system files and repairs files with problems when possible. Here’s how to run an SFC scan:

1. Go to Start > type cmd > right-click Command Prompt > select Run as Administrator

2. Now type the sfc /scannow command

3. Wait for the scanning process to complete and then restart your computer. All corrupted files will be replaced on reboot.

Solution 9— Format your hard drive

If the solutions above didn’t work, try formatting the problematic drive. Formatting and restoring the default drive settings should fix this error. Keep in mind that formatting your drive means deleting all the files and folders stored on the respective drive.

You can format your drive using Command Prompt:

1. Go to Start > type cmd > right-click the cmd search result > select “Run as administrator”
2. Type format C: /FS:exFAT > hit Enter to begin formatting the C drive as exFAT. Replace C: with the letter of the problematic drive.

You can also format your drive using the Disk Management utility:

1. Go to Start > type ‘disk management‘ > select the Disk Management utility

2. Right-click the drive that you want to format > select the Format option

3. Follow the on-screen instructions to further customize the format process > click OK on the warning window.

4. Once the format process finishes, you can use your drive. Try to install the updates again to see if this action fixed the problem.

We hope that the solutions listed above helped you fix the ERROR_SEEK error code. As always, if you’ve come across other workarounds to fix this problem, you can help the Windows community by listing the troubleshooting steps in the comments below.

RELATED STORIES YOU NEED TO CHECK OUT:

Here’s how to remove Genius Box adware from your PC

Genius Box is a potentially harmful program developed by TGF Interactive. It is an adware that displays advertisements in the form of banners and pop-ups with the label “Ad by GeniusBox” or “TGF Interactive”. The developers of this program claim that it is a “downloadable app”, but most often the program gets installed in your system unknowingly, without your prior consent.

The developers of this application say that it is a perfectly legit and safe application to install, and even go on to claim that it will actually enhance your search experience. Here’s the full description by TGF Interactive:

Genius Box is a downloadable application that is designed to enhance your search experience. With Genius Box installed, you can quickly and easily view the most relevant search results from all your favorite websites and search engines without having to open additional windows / tabs, or going to multiple sites and then performing the same searches on each of them. To enable its features, GeniusBox installs as a local proxy and interprets content from encrypted web pages.

Although it hasn’t been labeled as a virus, experts throughout the Internet label Genius Box as a potentially harmful application, owing to the deceitful nature of its installation and the discomfort it creates later. Right after it has been installed in your system, you will start getting too many intrusive ads on your web browsers.

These ads may appear as banners in your search results or as pop-ups. Furthermore, this application may redirect you to sponsored links and unknown websites, making your web browsing experience a nightmare. Furthermore, the pop-ups and redirects created by Genius Box may get you involved with other adwares or actual malwares that can do harm to your system.

It is recommended that you take the necessary steps to remove this application as soon as you get the early signs of its presence. Early removal can prevent future damages to your system. In order to completely remove Genius Box and its components from your computer, you’ll have to follow the two stage procedure listed below.

Remove Genius Box from your PC

Step 1 : Uninstall Genius Box from Windows

The quickest and easiest way to uninstall Genuis Box from Windows is via the Control Panel. Follow these steps:

Add or remove program genius box

  1. Press the Windows key and on the search bar type Control Panel, and click on it,
  2. Under programs, click on Uninstall a program,
  3. You will be taken to the Uninstall or change a program window,
  4. Find Genius Box, click on it and select Uninstall,
  5. Follow the on-screen instructions,
  6. Also do the same for any suspicious/unfamiliar programs that were recently installed (will appear on the top of the list).

Step 2 : Reset Your Web Browsers

Chances are, your web browser’s search settings and homepage were modified by Genius Box. To remove these changes, you will have to reset your web browsers.

2.1. Reset Google Chrome

  1. Open Google Chrome, and navigate to the Chrome menu,
  2. Click on Settings,
  3. Scroll down to the Search section, and click on Manage search engine,
  4. The search engine of your choice should be on the top of the list of default search engines,
  5. If not, click on the three dots next to your preferred search engine and select Make default,
  6. Also click on the three dots next to any suspicious looking/unfamiliar search engine and select Remove from list,
  7. Back on the Settings page, scroll up to the Appearance section, and click on Show Home button
  8. If a web address appears below, remove it and select New Tab Page,
  9. Restart Chrome to apply changes.

2.2. Reset Mozilla Firefox

  1. On the top of the window, find the Firefox button, and navigate to the Help sub menu,
  2. Select Troubleshooting Information,
  3. Click on Refresh Firefox, and then again in the confirmation window,
  4. The window will close, and Firefox will reset,
  5. A window will reappear and display a list of information that were imported,
  6. Click on Finish and Firefox will reopen.

2. 3. Reset Microsoft Edge

If you’ve got Windows 10 Fall Creators Update, you can reset Edge from the Settings app. Follow these steps:

  1. Open Settings, and go to Apps > Apps & features,
  2. Find Microsoft Edge on the right side and select it,
  3. The Advanced Options link will show up, click on it,
  4. On the newly opened dialogue, click on the Reset button to reset Edge,
  5. Edge should now be reset to its default settings.

2.4. Reset Microsoft Internet Explorer

For those of you still sticking to the old favorite MicrosoftInternet Explorer, follow these steps to remove Genius Box components:

  1. On Internet Explorer, select the Tools button and click on Internet options,
  2. Select the Advanced tab,
  3. Click on Reset,
  4. Also select the Delete personal settings check box,
  5. Once the default settings have been applied, click on Close, and then on OK,
  6. Restart Internet Explorer to apply changes.

We hope that the solution listed above helped you remove Genius Box from your PC. As always, if you’ve come across other solutions to completely uninstall Genius Box, you can list the steps to follow in the comments below.

RELATED STORIES YOU NEED TO CHECK OUT:

Your PC might register preview 16288 as the Fall Creators Update, it’s not warns the Windows team

As Fast Ring Insiders complete the download of preview build 16288 the Windows team would like to issue as word of caution:

On Build 16288, you will notice that the watermark at the lower right-hand corner of the desktop has disappeared. You will also see that the OS now reports as “Version 1709” which is the official version number for the Windows 10 Fall Creators Update release. However, this is NOT the final build as we’re not done yet. We’re just now beginning the phase of checking in final code to prepare for the final release. So we will have more builds to release to Windows Insiders between now and then. And the desktop watermark may re-appear in these builds.

For those attempting to read the Windows 10 tea leaves, it would seem the engineering team would rather be blunt and clear. Be there no confusion about it, there will be at least another build hitting devices before Windows 10 Fall Creators Update is said and done.

On a side note, there does appear to be an issue with the download of preview 16288 that users should be aware of.

Visit the link here for more details.

XCOM 2 War of the Chosen issues: Crashes, sound problems, and more

The latest big expansion pack for XCOM 2, War of the Chosen was released some time ago. This is not a minor patch, as the new update actually brings a lot of new features and content to the game. Therefore, it’s considered a huge and significant expansion by fans and experts.

However, even though War of the Chosen brings so many new features to the game, it also brings a lot of issues along. Over the course of last few days, a lot of players have been reporting various issues caused by the latest XCOM 2 expansion.

We’ve wandered Steam forums, in search for these problems, and the hunt was (un)successful. So, keep reading this article to find out what bothers players who recently installed XCOM 2 War of the Chosen.

XCOM 2 War of the Chosen problems roundup

Unable to install the DLC

The very first problem (literally the first one) players encountered is the issue that prevents XCOM 2 War of the Chosen from downloading. Namely, a few players experienced the same problem. Here’s what some of them said on the Steam forums:

I bought the DLC yesterday and so far I can’t play it. Here are my problems; when I try to install it, it takes way too long. Installing 30 GBs aparently takes anywhere from 3 hours to “over a year.” Before you ask its not my internet, I’ve reset the router and updates for other games complete much quicker. Other posts I read suggested changing the download region from Washington DC to somewhere foreign. I tried Sweden, Veitnam, West Africa, all places people recommended and all had the same result,” said PMBoz on Steam forums.

Unfortunately, we don’t have a confirmed solution for this problem. So, if you know something more, please let us know in the comments. Because you can’t even get to experience other issues without actually installing the game.


Unable to install the DLC on Xbox One

As it appears, Xbox One players are actually most affected by this issue. As a lot of people complain on Reddit about not being able to download the game.

“The DLC was supposed to release at midnight, however me and so far a lot of other people can’t access it. We have it downloaded but the dlc file is only 17MB and the game doesn’t even recognize that we own the dlc. Can anyone please help?”


Can’t load the DLC

Problems of accessing the game continue even for those who managed to install it. Namely, some players reported that they’re unable to load the game using the official launcher:

“I choose War of the Chosen DLC when the launcher start, but it send me to the vanilla one instead WotC one. no features from WotC available. what should I do,” said Synsky1412 on the Steam forums.

“Hey all, xcom 2 has always worked fine on my PC, but the expansion simply does not launch. I get the splash screen, switch to war of the chosen, and press PLAY, and then nothing happens. After a few seconds steam no longer displays me as ingame. Anyone else get this and how did you fix it?” said Freelancer.


Possible memory leaks

There are some users who noticed that the new expansion actually causes memory leaks. Here’s what one of them said on the forums:

“Anyone know why WOTC plays fine for an hour or so and then loses performance until it’s a choppy jerky unplayable game? I was thinking perhaps a memory leak? If no one else is experiencing this perhaps it’s a problem specific to my setup – Ryzen CPU, 16BG ram, R9 GPU. Anyone else suffer this?”

Although the issue was never confirmed, a lot of people actually think that XCOM 2 causes memory leaks in general, not just after installing the new expansion. If you want to know more about memory leaks, and how to deal with them, we have an article about that.


Controller issues

Another player says that he’s unable to use his Xbox 360 controller in the game, after installing War of the Chosen:

“Hello I just started the new x com 2 game war of the chosen. I usually play with controller. But seems is not working right. In xcom 2 it supported the controller fine. Now with war of the chosen is just emulate the Mouse and Keyboard. I have 360 controller. Any help or infos appreciated.”


Game crashes

The game also appears to be crashing for some players after installing the expansion. One player said on the Steam forum that the game crashes for him as soon as he starts a mission:

“I’ve started a war of the chosen iron man campaign and got a strange bug. The game crashes as I just started a mission and tried rotating the soldiers to take difference actions to no avail. Am I screwed?”

Unfortunately, nobody from the forums had a proper solution for this issue.


Sound problems

Another problem that appears to be quite widespread is the sound issue. Namely, many players reported this problem on the forums. Here’s what some of them say:

“Since I started playing the expansion, the sound in the game crashes at random and i can only have it back by restarting the game. Did anyone has the same problem,” said Steam user Kindredblades.

“This happened with the base Xcom and its expansion Enemy Within, but there isnt any sound coming out from the game. Before you ask, sound is turned on and there is no headphones plugged in(was just playing Xcom 2 and didnt realize you had to choose a different option for War of the Chosen), so does anyone know what the trick was to get the sound to start working,” said templar0122.

One user said that the problem can be solved by disabling all unused sound devices. So, go to Sound settings, and disable each sound device, except the one you’re using. Hopefully, that will solve the problem.


Black screen

And finally, there are also many users who reported sudden black screens during the gameplay. Here’s what some of them said on the forums:

“So I’ve disabled all my mods, uninstalled them to be sure, yet the game loads all the logos fine but rather than loading the main menu a black screen comes up. Music plays in the background but it just stays black for a few minutes before it goes white. Ive moved XCOM files out of documents, verified game cache and still nothing works. Any ideas?”

Unfortunately, nobody had a proper solution for this issue.


That’s about it. As you can see, the list of issues is actually quite long for an expansion. And if it continues like this, developers will probably have to think about following the expansion release with a fixing update.

Have you experienced any issues while playing XCOM 2 War of the Chosen yet? Let us know in the comments below. 

RELATED STORIES YOU NEED TO CHECK OUT:

[Updated] Windows 10 Insider build 16288 is apparently “not quite ready yet,” won’t download

Shortly after unleashing Windows 10 Insider build 16288 for Fast Ring (not Skip Ahead) Insiders, the build has apparently run into some problems. The Windows Insider team just tweeted on the issue:

When trying to access the latest build on a Surface Pro 4 currently on 16281.rs3_release here, Windows Update sees the new build, begins initializing for just a few seconds, and then bails out to this message:

Windows 10 Insider 16288 not ready

Not sure whether this message is the cause of the concern, or if the build has been pulled while the team investigates. Have you been able to successfully download and install build 16288?

9/12/13 9:22 PM PT Update: Microsoft has revealed that a fix for this issue has been dispatched. Each of today’s build variants will go live as it finishes publishing, and an estimated time of launch for the variants is about 2 hours. or 10:30 PM PT Microsoft time.

Patch Tuesday September 2017: Download the latest Windows updates

Microsoft is expected to release a series of new Patch Tuesday updates today — get ready to install them. As usual, these updates won’t bring new features to the table, focusing instead on improving the overall system stability and patching the existing bugs.

UPDATE — Microsoft finally released this month’s Patch Tuesday updates. Here are the most important updates:

You can read the original story below.

For the time being, there is no information available regarding the change log of the upcoming updates. As is Microsoft’s habit, the company will most likely roll out the updates first, and publish the patch notes a few hours afterwards.

Patch Tuesday September edition: What we expect to see

First off, some of the previous updates bring a few issues of their own. For example, installing KB4034674 on Windows 10 PCs may change Czech and Arabic languages to English for Microsoft Edge as well as other apps. We expect Microsoft to fix this problem in this months’ Patch Tuesday edition.

On the other hand, Windows 7 users who installed KB4034664 have experienced a series of issues. For example, if your PC has more than one monitor connected, some apps may be affected by rendering issues. Also, the WordPad application can sometimes crash on launch after installing KB4025341. Of course, these bugs are affecting only a limited number of users, but they’ve been around for about one month now and it’s time that Microsoft fixed them once and for all.

Speaking of issues, Microsoft recently acknowledged the gaming issues in Windows 10 Creators Update. The company also confirmed that it has a fix for one of them in the Windows Insider build. Hopefully, the Redmond giant will release it as soon as possible and thus put at end to gamers’ suffering.

However, it’s highly unlikely that Microsoft fixes these Windows 10 gaming issues on this Patch Tuesday edition. The bugs have been affecting players ever since the Creators Update landed, and seem too complex for Microsoft to fix them that quickly. But you know what they say: hope dies last.

In order to install the latest Patch Tuesday updates, make sure you’ve enabled automatic Windows Update. Don’t forget to check for updates from time to time.

Speaking of updates, what are your expectations in terms of fixes? What issues do you hope that Microsoft will fix today? Let us know in the comments below.

Editor’s note – We will update this article as soon as new information is available.

RELATED STORIES YOU NEED TO CHECK OUT: