How to Download f.lux on Windows [Microsoft Store]

Windows offers many built-in tools and settings to personalize the user experience. But for features, users rely on third-party apps, given the advanced functioning and simpler UI. And that’s the reason f.lux became a popular download choice in Windows.

The app, though, has an alternative built-in setting in Windows, i.e., Night Light, which remains a favorite amongst users. The app, f.lux, is quick to download, set up, and use. It works on all iterations of the OS, including Windows 7, Windows 10, and Windows 11.

What is F Lux software used for?

In case you don’t know, F.lux is an app that helps you protect your eyes when using a computing device by warming up the display and eliminating blue light, the type of light responsible for strained eyes and other issues with sleep and vision.

It is indeed helpful for the eyes, especially if you’re the type who uses a computer for 5-6 hours daily.

F.lux released its app in the Microsoft Store a while back. Meanwhile, Windows got itself updated with Night Light. Users have a choice.

The easiest one is to use the already built-in Night light settings from Windows. Installing F.lux, however, offers a bit more options and functionality.

How do I download f.lux in Windows?

  1. Open any browser, go to the official page of f.lux on Microsoft Store, and click on Get in Store app.f.lux
  2. Click Open Microsoft Store in the prompt that appears.
  3. Click the Get button to download the app.get f.lux for windows

While it hasn’t been updated in a while, the app still works as intended. If you configure and use f.lux, make sure to disable Night Light. They don’t work together well!

Besides, you can download f.lux from the official website as well though we recommend the Microsoft Store since it will list out any compatibility issues or similar problems.

And once you have downloaded f.lux in Windows 10, all that’s left is to set the time and colors. The app will do the rest!

Before you leave, find out the best Windows apps you must download today for a better OS experience.

For any queries or to share your feedback on f.lux, drop a comment below.

The device is unreachable: error 0x80070141 [FIXED]

System errors, such as ERROR_DEVICE_UNREACHABLE, can affect almost any PC. This error usually appears when trying to transfer files from smartphone to your PC.

You can easily recognize this error by its The device is unreachable error message, and today we’re going to show you how to fix it on Windows 10.

How can I fix ERROR_DEVICE_UNREACHABLE error?

Solution 1 – Check your phone settings

According to users, this error message appears when trying to connect your iPhone with a Windows 10 PC.

To fix this problem, users are suggesting checking your phone settings. To do that, navigate to Settings > Photos & Camera section and enable Photo Sharing feature on your phone.

Some users are also recommending turning on both My Photo Stream and iCloud Photo Sharing features in the Photos & Camera section.

After doing that, you should be able to transfer files from your iPhone without any problems.

If you’re looking for an alternative solution to transfer files between your iPhone and the PC, check out this list with the best software that will certainly help you transfer data fast and securely.

Solution 2 – Connect your phone to a USB 2.0 port

If you’re getting The device is unreachable error message while trying to transfer files from your phone, you might want to try using USB 2.0 port instead.

Some older phones might not be fully compatible with USB 3.0, and if that’s the case, you’ll have to transfer your files using USB 2.0 port.

Keep in mind that USB 2.0 is significantly slower, but at least you should be able to transfer your files without any errors. Users reported this problem with iPhone 5S, but it can also appear with any other smartphone.

If your USB 3.0 isn’t working properly or is not recognized by your Windows 10 PC, check out this guide to fix it.

Solution 3 – Copy the files directly to your PC

Users reported this error while trying to copy files from their phone to a NAS drive. As a potential workaround, users are suggesting to copy your files directly to your PC and then move them to NAS.

This process can take longer because you have to move your files twice, but it’s a decent workaround so be sure to try it out.

Solution 4 – Rename files or directories

According to users, they experienced this error while trying to access files using Calibre app. It seems that the problem is the long file path, and you can fix it by changing the file path or renaming the file you’re trying to access.

Windows has a certain limitation in terms of file path length, and if you’re exceeding this limitation you’ll encounter this and many other errors.

To fix the problem, rename your files or move them to a different directory and try to access them again.

Solution 5 – Try a different USB cable

If you’re experiencing this problem, we advise you to try a different USB cable. Sometimes your cable might be damaged and that can cause this and other errors to appear.

To check if your cable is the problem, we strongly recommend you to try using a different cable. In some cases certain devices work best with their default USB cable, so try using the original cable and check if the problem still appears.

If that doesn’t work, you might want to consider purchasing a new USB cable.

Solution 6 – Set your phone to work as a Media Device

Users reported this error message while trying to transfer files from their Android devices. According to them, the issue occurs because their device is set to connect to a PC as a camera.

To fix the problem, you need to navigate to Settings section on your phone and look for Storage option. From there you can choose Connect as a Media Device option for your device.

Keep in mind that these options might be available only if your device is connected to a PC, so be sure to connect it beforehand.

Solution 7 – Reinstall your device

According to users, this error occurs when trying to transfer files from iPhone to Windows 10. As a workaround, users are suggesting reinstalling your device. To do that, follow these simple steps:

  1. Make sure that your phone is connected to your PC.
  2. Press Windows Key + X and choose Device Manager from the menu.
  3. When Device Manager opens, click on Scan for hardware changes icon. You might have to repeat this step a few times before your iPhone is listed in Device Manager. In addition, you might want to try uninstalling your iPhone from Device Manager and scanning for hardware changes.
  4. Optional: Make sure that iTunes is updated to the latest version.
  5. Restart your PC and reconnect your phone.
  6. Make sure to set this PC as trusted device once you connect your phone.

Now you should be able to transfer files without any problems. If this error appears again, you might want to try reconnecting your iPhone to your PC.

If that doesn’t work, you should try repeating this solution. As you can see, this is a temporary solution, so you might have to repeat it if the error occurs again.

Solution 8 – Use PhotoSync app

If you’re constantly getting this error message while trying to transfer files from your phone, you might want to try using the PhotoSync app. This is a simple application that allows you to transfer files from your phone to PC by using a Wi-Fi connection.

Keep in mind that this is just a workaround and that transferring files via Wi-Fi is significantly slower than transferring them over a USB connection.

Solution 9 – Try connecting your phone to a different USB port

Users reported this error message while transferring files from their iPhones. According to users, one potential workaround requires you to disconnect your iPhone and connect it to a different USB port.

To do that, disconnect another USB device and connect your iPhone to its port. After doing that, the issue should be resolved. This is an unusual solution, but it works according to users, so be sure to try it out.

We have to mention that this is just a workaround, so you’ll have to repeat it if the error occurs again.

Solution 10 – Copy files one by one

According to users, this problem only appears when trying to copy multiple files at once. However, you should be able to avoid this error by copying files one by one.

This is just a workaround and it’s useful if you want to copy just a couple of files. However, if you need to copy dozens of files, you might want to consider using a different solution.

If copy-paste doesn’t work on your Windows 10 PC, you may want to take a look at this article that will help you solve the problem.

The device is unreachable error can prevent you from transferring files from your smartphone to a PC. This isn’t a serious error, and you should be able to fix it by using one of our solutions.

If you have any more questions, don’t hesitate to leave them in the comments section below.

Popular Red Dead Redemption 2 video game is now playable for free for Xbox Game Pass subscribers

Arguably the biggest video games coming to Microsoft’s Xbox Game Pass subscription service this month is Red Dead Redemption 2 and it’s live right now for all active subscribers.

Red Dead Redemption 2 launched on Xbox One consoles back in October 2018 and quickly earned over $725 million in its first three days of launch and sold over 17 million copies within its first week.

The game is an open-world action-adventure title which has won acclaim from players and the gaming media for its immersive environments, impressive graphics, and amount of gameplay content that can be explored. Red Dead Redemption 2 also comes with the Red Dead Online multiplayer game which allows players to interact with each other and explore the world of Red Dead together.

Are you going to give Red Dead Redemption 2 a try now that it’s on Game Pass? Let us know in the comments and then follow us on Pinterest for more Xbox gaming news.

Xbox Game Pass Ultimate


Red Dead Redemption 2
Developer:
Rockstar Games
Price:
Free


Windows 10/11 is no longer supported on this PC [FIXED]

Windows 10 Creators Update has the potential to become the most controversial and revolutionary update for Windows 10 so far.

Even before the update was officially released, it was clear that Microsoft plans to shift the course and motivate its users to consider changes in their hardware department.

In order to keep up with the latest trends.

First, it’s clear that the Creators Update is aimed at touch-enabled devices, with all the new 3D and design features.

Therefore, it also promotes Microsoft’s touchscreen devices like the Surface Book or Surface Pro 4 to users of regular PCs and laptops. But that’s a discussion for another time.

What we’re going to talk about here is the issue that still prevents the Creators Update from installing on some computers. Almost four months after its official release.

That problem is the error message Windows 10 is no longer supported on this PC. Uninstall this app now because it isn’t compatible with Windows 10.

This issue hit the Windows 10 world by storm these days, as everyone seems to be talking about it lately.

If you’re unfortunate enough to be affected by this problem, keep reading this article to find out what’s going on. If you’re not affected by this problem, keep reading this article to find out what’s going on.

What does it mean?

Long story short, the Creators Update doesn’t support Intel Clover Trail processors. So, if your computer is powered by one of the processors from this series, unfortunately, you won’t be getting new updates for Windows 10.

The error message is a bit confusing. It tells you to uninstall this app, but there’s no app at all. It’s the hardware problem solely, as Microsoft already cut support for Clover Trail-based computers.

Although everyone is shocked by this error code, it should come as no surprise, as Microsoft announced that the Creators Update won’t support processors from this series earlier this year.

It just seems that nobody actually paid attention to the statement, until now.

Here’s the complete list of now-unsupported Intel Clover Trail processors:

  • Atom Z2760
  • Atom Z2520
  • Atom Z2560
  • Atom Z2580

However, Microsoft isn’t the only side to blame in this dispute. Namely, all of the above-mentioned processors are already on Intel’s End of Interactive Support list.

This means the manufacturer won’t be releasing any driver or firmware updates for these CPUs in the future. 

Windows 10 processor
image source: ZDNet

Microsoft’s philosophy here is obvious. The company simply doesn’t want its latest software to run on hardware unsupported by manufacturers.

Redmond even promised it will try to find a solution that satisfies everyone, by working with Intel on potential updates.

But as we lack more details on this matter, it all seems unlikely now.

Will you keep getting security updates?

It had been previously known that Microsoft will support Windows 10 version 1607 (Anniversary Update) until the first quarter of 2018. That implemented a sort of panic into heads of users of income devices.

However, Microsoft recently announced it will extend support for Windows 10 version 1607 until 2023. 

That means you’ll be able to receive all security patches and updates, just like users of other Windows 10 versions. You just won’t be receiving any new features for the system, that will come with the future major updates.

If you ask me, that’s enough time for you to upgrade your configuration or get a new computer.

Whether you like it or not, using an Intel Clover Trail computer in 2023 will probably be impossible, because all the apps, programs, and services will probably require a stronger configuration.

What can you do about it?

The most straightforward answer would be to upgrade your configuration or get a new one. As I already mentioned above, you have no other choice. And if you don’t feel like upgrading now, you have three more years to do so. First of all, security will become an issue.

We live in a dangerous era for our online security, and the last thing you want is having a completely unprotected computer. And another problem is, of course, possible incompatibility with apps and services.

Unfortunately, there’s no way to install Windows 10 Creators Update on Intel Clover Trail-powered computers right now. Once again, Microsoft said it will look for the compatibility solution, but we can confirm none of that right now.

So, if that does happen, and Microsoft and Intel find a way to deliver you the Creators Update, you should get it through Windows Update automatically. At the end of the day, all you really can do is wait.

Will the problem affect computers in the future?

All of this gives us a strong reason to believe that the same scenario will repeat with other hardware in the future.

We already know that Microsoft isn’t a fan of old hardware, so as soon as a manufacturer stops supporting a certain piece of hardware, we should expect Microsoft to react quickly, and remove Windows 10 support for computers powered by that hardware.

Perhaps the best way to track if your hardware is still eligible for future Windows 10 major updates is to be on the lookout for how long will a manufacturer support your current CPU.

What do you think about Microsoft’s strategy of not supporting older hardware? Is your computer at risk of not receiving future updates? Let us know in the comments below.

  • When did Windows 11 come out?
It didn’t and we still don’t have any information on when a new Windows OS will be launched. Until then, Microsoft has promised major updates every 6 months.
  • Can you install Windows 10 on old computer?
It doesn’t really matter how old is your computer as long as it has the minimum requirements to run Windows 10. If you’re looking for a new computer but you’re low on budget, look at our list with cheapest Windows 10 laptops.

[wl_navigator]

Microsoft video shows you everything that’s new with Surface Book 3

Microsoft Mechanics released a new video this week showing you everything you wanted to know about Surface Book 3, and it shows you that this is one powerful machine. Available for preorder now, the new Surface Book 3 is designed to give users the most power in any Surface device along with the flexibility and versatility that comes along with the Book 3’s unique detachable design.

The video wants you to know that this machine is for professionals. It’s fast, powerful and in its most powerful configurations can support complex 3D designs, produce graphical content with real-time ray tracing and advanced shading, and even run GPU-intensive machine learning and AI workloads locally on the device. Surface Book 3 has options for discreet GPUs with Nvidia GeForce or more powerful Nvidia Quadro GPUs for businesses that require specific certifications for professional-grade apps.

Like most laptops being released today, the new Surface Book 3 uses Intel’s newest 10th generation Core i5 or Core i7 processors along with options to choose up to a whopping 32 gigabytes of RAM. Of course, processors and RAM aren’t the only hardware changes as the Surface Book 3. The Book 3 now includes a new USB-C 3.1 Gen 2 port and an updated Surface port that supports 120-watt power delivery. With the new Surface port, users can now connect 2x4K displays using the new Surface Dock.  You also get faster SSD drives, a new TPM 2.0 security chip for enterprise security,  as well as Wi-Fi 6 and Bluetooth 5.

Whether you choose the 13-inch or 15-inch model, both sizes include the Surface Book’s familiar hinge and detachable display that now uses an improved detachable mechanism that is up to 2 times faster compared to previous models. The video does point out that the detachable tablet also includes Intel’s Iris Plus graphics and houses a color-calibrated 3000 by 2000 pixel display for the 13-inch model and 3240 by 2160 pixel resolution for the 15-inch model.

The new Surface Book 3 wasn’t the only new Surface device unveiled this week. Be sure to check out our post about the Surface Go 2 and let us know if you consider either one of these devices.

FIX: Sling TV error 8-4612 & error 5-419

Sling TV is an obvious choice when you put a high price on channel flexibility and reliable streams. However, Sling TV errors such as 8-4612 and 5-419 are nothing out of the ordinary.

They can make you question your decision to replace your cable subscription with this video streaming service.

Many users complain about the fact that they cannot connect to Sling over Wi-Fi. The Sling TV error 8-4612 that they are seeing often points to an Internet issue.

Others get a 5-419 error instead and no channel will load. One case or another, don’t let these problems pile up and change your otherwise pleasant Sling TV experience.

Here are the suggested steps you should follow in order to solve Sling TV 8-4612 and 5-419 errors.

How can I fix Sling TV error 8-4612 & error 5-419?

1. Make sure that Sling TV is not down

possible Sling TV outage
Don’t imagine the worst when a simple Sling outage may lead to 8-4612 and 5-419 errors. Verify if that’s your case too.


2. Restart Sling TV

try to restart Sling TV

Play by the book and continue with an easy troubleshooting tip that works most of the time. Even if Sling is not down, occasional streaming issues do happen.

All you need to do is to close out of the Sling app and then relaunch it. This should make any temporary streaming hiccups go away.


3. Force stop Sling TV app processes

  1. Press Ctrl+Shift+Esc keyboard shortcut to open the Task Manager.open Task Manager
  2. A list of all running applications and background processes on your system are found in the Processes tab. While there, select the Sling TV app process.
  3. Click on End Task next.
  4. Relaunch the app and see if the error is still there or if you can go back to your action and adventure plans.

Sling TV app

The above steps may be applied on your Windows 10 PC. However, the procedure slightly varies if you are enjoying Android TV.

You basically need to open Settings, select Apps, then the Sling TV app. Press the Force Stop button, then launch the app back.

When it comes to Apple TV, press the Home button on your remote. Scroll through the app and swipe up when you see Sling TV.

Finally, return to the home screen and relaunch the app.


Can’t open Task Manager? Don’t worry, we’ve got the right solution for you.


4. Check your Internet connection when getting Sling TV error 8-4612

check Internet connection

If available, try using a wired Internet connection and see if things are any better. Anyway, if only wireless is available, try connecting to a different Wi-Fi network.

The Internet speed is also essential if you want to properly enjoy that great selection of Sling TV channels. You need to get streams of over 1.0 Mbps, so a quick test will give you the answers you’re looking for.

You should better use the best tools to test Internet speed if you want accurate results.


5. Reload channels when getting Sling TV error 5-419

Sling TV reload channels

Check if you get the Sling TV error 5-419 on every single channel. If not, a trick that has been confirmed to work is to remove the channels in question, reboot your Internet router and reload the channels.

Are things any better now? If you know any other solutions, feel free to share them with us in the comments area below.

[wl_navigator]

Inside Xbox recap: Did Microsoft over-promise and under deliver?

Microsoft just wrapped up its much-anticipated Inside Xbox livestream, which was a bit shorter than an hour. Overall, Microsoft showed a lot of unannounced games shipping on Xbox Series X, but Xbox fans looking to see real gameplay footage may have been a bit disappointed, to say the least.

Indeed, most of what we’ve seen during today’s livestream was cinematic trailers, not live demos of Xbox Series X games. Microsoft’s promise of first “Xbox Series X gameplay reveal” was a bit ambiguous, but Xbox fans probably expected more than cutscenes captured in-engine.

The Game Awards creator Geoff Keighley took the temperature with a Twitter poll, and as of this writing 44.6% of respondents gave the show a “D or Lower” grade. Twitter user Arun-1910 seems to have captured the global sentiment: “A lot of what was shown didn’t look next gen or was just cinematics/cutscenes.”

Well, to be fair, the livestream started really well with a trailer for Bright Memory Infinite, a brand new futuristic FPS from FYQD-Studio in China. This is definitely the type of photorealistic graphics we expect from next-gen games, and this title in particular looks like Titanfall 2 on steroids.

This is one of the few “real” gameplay trailers we saw today, and you can watch it below:

Microsoft also showed today an interesting trailer for the upcoming racing Dirt 5, which also had some extra time at the end of the stream with an interview with Development Director Robert Karp. Dirt 5 will feature various environments with changing weather, which are visible in the trailer below. Again, this is a cinematic trailer captured in-engine, with no real gameplay footage.

Interestingly, Dirt 5 will support four-player split-screen, something that has become really rare on console games. Moreover, the game’s Development Director mentioned that the Xbox Series X version of the game will allow players to choose between 4K/60FPS or 120FPS at a probably lower resolution.

Second Extinction is another impressive-looking game that was announced today. The 3 player co-op FPS will let you fight off mutated dinosaurs, and the trailer was one of the few featuring real gameplay footage

Ubisoft’s much-anticipated Assassin’s Creed: Valhalla also had its “World premiere of gameplay debut” today, but again, what we got was a cinematic trailer with “footage representative of expected Xbox Series X gameplay.” It was pretty disappointing, and you can watch it for yourself below:

Microsoft showed many other games today, but some of them didn’t really look like next-gen games, such as the top-down Action RPG The Ascent. We understand that Microsoft didn’t want to focus exclusively on AAA developers today, but gamers were probably expecting the contrary: ambitious, photorealistic games that really show what next-gen consoles can deliver.

Microsoft highlighted today that the biggest developers are already working on Xbox Series X games, and we should expect “hundreds” of new titles optimized for the new console in 2021

We have no doubt that Xbox Series X games are going to look better than ever, but overall, it seems that Microsoft probably over-promised and under-delivered today. There was a segment about Madden NFL 21 with no gameplay footage, and gamers were probably expecting to see previously-announced games like Cyberpunk 2077 or Watch Dogs: Legion today, but that didn’t happen. But again, what was really disappointing is the lack of more real Xbox Series X gameplay footage, despite Microsoft teasing it repeatedly ahead of the event.

Unfortunately, Microsoft set today a pretty low-bar for all the upcoming digital events planned for this spring and summer, and it will be interesting to see if Sony does thing differently with its PlayStation 5 reveal. We hope the Xbox 20/20 July update that will focus on Xbox Game Studios titles will be more interesting, but Microsoft really needs to listen to Xbox fans: less trailers, more live gameplay, please?

4 best preamplifier software plugins

The best preamplifier software solutions help individuals boost the low level signals of a device to the baseline level of your recording equipment. For example, you can amplify the gain of your microphone signal.

However, you shouldn’t confuse preamplifier software with hardware. A software solution isn’t as powerful as physical gear, so you shouldn’t expect great results using this method. Nevertheless, you can experiment with some interesting dedicated plugins.

Before proceeding, you should know that a preamplifier (preamp, the hardware term) is a type of amplifier that increases the volume of very weak signals before applying gain.

It’s useful for producing a powerful output signal with high gain from low noise and distortion, which can be further processed or forwarded to an amplifier and loudspeaker. For example, you can amplify your voice.

In this article, we listed 4 preamplifier software tools that you can experiment with on your Windows PC to get the best possible sound out of your microphone.

What are the best preamplifier software plugins to grab?

Waves Scheps 73

Waves Scheps 73

Waves Scheps 73 is a preamplifier software plugin for microphones, which can be used for recording, mixing or mastering music. With mono and stereo preamp components as well as a three-band equalizer, it was modeled after the classic 1073 preamp and its original specifications.

To be more precise, it comes with a fixed high-frequency band of 12kHz and a high-pass filter of 18dB/octave. Furthermore, you can toggle low and mid-range bands with cut and boost controls.

A mid-range band of 10kHz was identified in the 1073 preamp’s design, but it could only be used on the channel strip of the 1078 successor until it was successfully integrated into this plugin.

To resemble the original preamp, Waves Scheps 73 features authentic saturation and harmonic distortion, ranging from pleasant warmth to heavy drive.

And, to closely examine the audio processing source, you can take advantage of an advanced monitor for the left, right, mono, and stereo channels.

Plus, you can apply various equalization settings to the middle and side stereo content. It’s all thanks to Waves MS Matrix, a plugin that can create MS output from left-right input, or the other way around.

Neve Preamp

Neve Preamp

Neve Preamp is also a preamplifier software plugin modeled after the original 1073 preamp, simulating its characteristics and equalization settings. It’s available for all users who wish to record, mix or master a clean and warm sound through an UA Audio Interface.

Delivered in a simple graphical interface with two knobs, the plugin gives you the possibility to control the preamp through a red knob and the output through a grey one. To toggle microphone and line input mode, you just have to flip a switch.

Recordings can be made with low DSP usage, which means that you can create classic Neve consoles from any DAWs. The plugin may also be used by those who own UAD-2 hardware and wish to mix music and customize equalization options for tone shaping.

Neve Preamp promises to bring the original sound, grit, and behavior of the 1073 preamplifier. It emphasizes your music with saturation and elaborate non-linear circuit behaviors, whether you’re processing acoustic guitar, vocals, drums, bass, or synths.

IK Multimedia EQ73

IK Multimedia EQ73

The 1073 preamp was so popular and heavily used throughout music recording history, that it was incorporated into many preamplifier software plugins, including IK Multimedia EQ73. It faithfully reproduces the sound, clarity and warmth of the classical 1073 preamp.

The plugin proposes a DAW software solution by emulating all the 1073’s original features, including equalization curves, tone shaping, saturation, grit, distortion, circuit designs, gain stages, preamp behavior, as well as interaction between the preamplifer and equalizer.

The equalizer of the IK Multimedia EQ73 comes with three bands to breathe life into any type of tracks, like high-end air or low-end punch. It works with any audio source and type, such as guitars, vocals, snares, overheads, kicks, and bass.

The plugin supports up to 192kHz sampling rates, full-latency compensation, and high-quality oversampling. It’s compatible with the T-RackS CS standalone software program and can be integrated with a VST 2, VST 3 or AAC host.

Acustica Audio GOLD3

Acustica Audio GOLD3

Acustica Audio GOLD3 is a preamplifier software suite with rich features. It comes with 6 distinct equalizers, 7 preamplifiers, 2 compressors, and enhanced routing control. The components of the package can be used as separate plugin processors.

The standalone module with preamps is called GOLD3 PRE and includes a total of 52 preamplifiers.

Based on a wide range of rare preamplifier hardware equipment, the preamp plugins enrich your sound with vintage warmth brought by the harmonic distortion and frequency/phase response of the associated circuits.

The first audio processing task of GOLD3 PRE involves the input preamp. There are three mutually exclusive preamplifiers available for the line, mic and bus, along with an option to switch it off.

This processing stage is followed by output preamps and controls. Each plugin included in the Acustica Audio GOLD3 package has a zero latency version (called “ZL”) which can be enabled during tracking.

Conclusion on the best preamplifier software

Although the power of a piece of equipment can’t be matched by a software solution, you can experiment with the preamplifier software plugins on the list to find the vintage and warm sound you’re looking for.

Therefore, you should check out the plugins on this list when it comes to Waves Scheps 73, Neve Preamp, IK Multimedia EQ73, and Acustica Audio GOLD3.

[wl_navigator]

How to sign up and preview Microsoft’s new Family Safety App on iOS and Android

When Microsoft introduced the rebranded Microsoft 365 subscriptions a few months ago, it also announced a new app known as Family Safety. Designed to help parents and adults track their children and keep them safe, the company promised a preview would be coming soon. Now, that time is approaching so here’s how you can sign up and preview the app once it becomes available.

What are some features of Family Safety?

Before getting into anything, we’ll just explain some things the app can do for you once you successfully sign up for the preview. The biggest feature of the app is content filters, you’ll be able to create a safe space for your kids to explore online, and set web and search filters on Microsoft Edge. You’ll also have the chance to set screen time limits on apps and games. There’s even activity reporting, as well as location awareness to help you track the location of where your family members are heading.

Step 1: Create a family group

Before you’re able to sign up for downloading the app, you’ll have to create a family group under a Microsoft Account. You can do that by clicking here, and selecting Create a family group. Once you do that, they’ll be a couple of prompts to follow, where you can input the phone numbers and emails of anyone you want to join the group. This process shouldn’t take long, and the person who you’re sending the invite to the family group will need to have a Microsoft Account. If they don’t have one, you can create one for them here.

Step 2: Fill out a preview form

Family group created, you can now sign up for the preview of the Family Safety app. To do this, you’ll want to click this link here. You should only fill out the form once. Acknowledge that you created a family group, and then provide your family and device information such as email, and type of phone and the number of members you want to use the app. When done, you’ll have to click Submit. Microsoft will then reserve a spot for you and the members of your family, so make sure you got the emails correct.

Step 3: Wait!

With the form filled out, you’ll have to wait a bit for Microsoft to email you with the invite and links to download the app. The company says that there are a few restrictions, so not everyone might get an invite. The preview is currently limited to 10,000 users on iOS and 10,000 users on Android. It also isn’t available in China, Japan, countries and regions with right to left written languages, and U.S. embargoed countries and territories. If you and your family get selected, each member of the family will get an email with instructions to download the preview. Invites are sent on a rolling basis, so not everyone might get their invites right away.

Send feedback when you download

If you get selected and are able to download the app, it’s important that you give your feedback to Microsoft. As part of previewing the app, the company requests that you give your feedback on how it is working for you. If you encounter a bug or other issue, you can shake your device, or tap Menu, and then Help & Feedback.


CCleaner Problems With Windows 10: Best Ways to Fix Them

CCleaner is one of the most popular tools for cleaning and optimizing your Windows computer. Unfortunately, quite a number of users are facing some CCleaner problems with Windows 10.

In this article, we’ll list the most common CCleaner issues you may encounter on your PC, as well as the corresponding workarounds to help you get the tool up and running again.

Is CCleaner OK for Windows 10?

Inevitably, a lot of dead weight accumulates on your computer: temporary files, broken shortcuts, corrupt files, and other problems.

Hence, it would be best to have a top PC cleaner in CCleaner to keep your Windows 10 device clean and prevent technical issues. This not only prevents problems but also creates valuable spaces for other activities.

How can I fix CCleaner problems with Windows 10?

1. CCleaner not opening

1.1. Disable antivirus and firewall

  1. Press the Windows key, type windows defender, and select the Windows Defender Firewall option.
    windows defender ccleaner problems with windows 10
  2. Find and click Turn Windows Defender Firewall on or off on the left pane.
    turn windows
  3. In the Customize Settings window, select the Turn off Windows Defender Firewall (not recommended) radio buttons for both the Private and Public network settings.
  4. Click OK to disable Windows Firewall.
    turn off
  5. Next, press the Windows key, type virus, and select Virus & threat protection.
    virus and ccleaner problems with windows 10
  6. Click the Manage settings link.
    manage settings
  7. Finally, toggle the switch under Real-time protection backward to disable it.
    real time

If CCleaner is not opening on your computer, disable your antivirus and firewall. If you have a third-party antivirus, you can turn it off by right-clicking the icon on the taskbar and selecting Disable.

1.2. Remove CCleaner entries from your registry

  1. Press the Windows key + R, type regedit, and click OK.
    regedit ccleaner problems with windows 10
  2. Navigate to the path below in the left pane: HKEY_LOCALMACHINE\SOFTWARE\Microsoft\Windows NT\CurrentVersion\Image File Execution Options\path
  3. Now, right-click the CCleaner key and select Delete.

Sometimes, you might be dealing with the CCleaner not opening problems on your Windows 10 PC because of leftover CCleaner files in your registry.

2. CCleaner will not uninstall

2.1. End CCleaner process Task Manager

  1. Press the Windows key + X and select Task Manager.
    task manager
  2. Right-click all CCleaner processes.
  3. Now, select End task.
    end task ccleaner problems with windows 10
  4. Finally, try uninstalling the app again.

2.2. Use its uninstaller.exe

  1. Press the Windows key + E to open File Explorer.
  2. Navigate to either C:\Programs files or C:\Program files(x86).
  3. Now, open the CCleaner installation folder and locate uninstall.exe or uninst000.exe.
    uninstall
  4. Finally, run the file and follow the instructions.

Some users have been having problems trying to uninstall the CCleaner on Windows 10. With the two solutions above, you can remove the app easily.

3. CCleaner is not responding

3.1. Run the app as an admin

  1. Right-click the CCleaner icon.
  2. Select the Run as administrator.
    run as
  3. Finally, check if the app works well.

3.2. Disable antivirus temporarily

Another solution, if you are dealing with CCleaner not responding problems, is to disable your antivirus and firewall temporarily. We have shown how to do this in solution 1.

4. CCleaner is not working

  1. Right-click the CCleaner icon and select Properties.
    properties ccleaner problems with windows 10
  2. Click the Security tab at the top.
  3. Now, click the Edit button.
    security
  4. Check the box before Full Control under the Allow section.
    full control
  5. Finally, click the OK button.

In some cases, CCleaner might not work correctly if it does not have the necessary permissions. The solution is to grant it complete control and restart the app.

If this does not work, you can temporarily disable your antivirus and firewall.

5. CCleaner keeps starting with Windows

5.1. Disable from within the app

  1. Launch CCleaner and click Options in the left pane.
  2. Now, select Settings.
  3. Finally, uncheck the box for Run CCleaner when computer starts.
    run option ccleaner problems with windows 10

CCleaner has a built-in option that allows it to start with your PC. It would be best if you disabled this option to stop it from doing so.

5.2. Stop it from Settings

  1. Press the Windows key + I and select the Apps option.
    apps ccleaner problems with windows 10
  2. Click Startup in the left pane.
  3. Now, toggle the switch for CCleaner backward to disable it.
    disable option

If CCleaner keeps starting with Windows 10, it is because it is part of your startup apps. The solution to this is to remove it from there.

That’s for the common CCleaner problems on Windows 10 and their fixes. Most of these solutions work interchangeably for other issues. So, you can always try them.

Similarly, if CCleaner won’t install on your PC, check our detailed guide to fix it quickly.

Feel free to let us know the solution that helped you solve the problem in the comments below.

Windows Media Player cannot find the file [TECHNICIAN FIX]

Windows Media Player cannot find the file is an error message that some Windows 10 users reported encountering.

Apparently, this error message pops up, especially while trying to burn a CD, although it might happen when users try and play a media file.

After inserting a CD into the CD-ROM, Windows Media Player does not allow the user to go through with the process.

Here’s how one user described the error on the Microsoft Answers forum.

When I insert a CD into my drive I get the following message: Windows Media Player cannot find the file. If you are trying to play, burn, or sync an item that is in your library, the item might point to a file that has been moved, renamed, or deleted.

In order to fix this issue, you should follow the steps we provided below.

Why Windows Media Player can’t find the file when burning music?

1. Perform a file format check

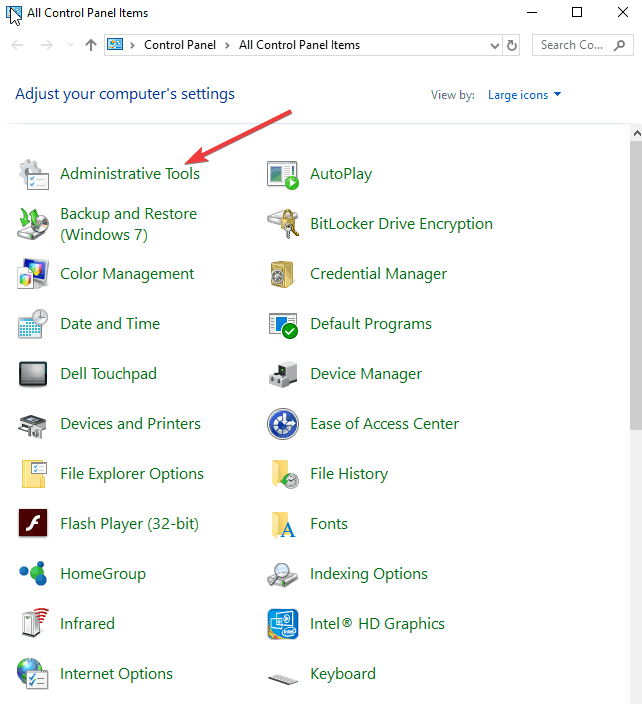
  1. Open the Control Panel > select View by Large Icons.
  2. Click Administrative Tools.PC softAdministrative tools windows media player cannot find the file
  3. Open Services.
  4. Find Windows Media Player Network Sharing Service, right-click on it and select Stop.Windows Media Player Network Sharing Service windows media player cannot find the file
  5. Open the following location C:Users your username AppDataLocalMicrosoftMedia Player.
  6. Find these files: CurrentDatabase_***.wmdb and LocalMLS_*.wmdb and delete them.
  7. Go back to the Services window > right click on Windows Media Player Network Sharing Service and select Start.
  8. Open the Windows Media Player and see if this made any change.

Looking for the best free software to burn your music files and finally ditch WMP? Here are the best options.


2. Check the music location

  1. Press the Organize button located in the top left corner and select Options.Options WMP windows media player cannot find the file
  2. Open the Rip Music tab > under the Rip music to this location section you will find where your ripped music is stored.
  3. If there is no valid location to rip the music, click Change, and select a valid location.

change default rip location windows media player cannot find the file

If this doesn’t work you’ll need to include a folder manually. To do so, follow these steps:

  1. Open This PC.
  2. In the left pane, right-click Music > select Proprieties.Music Properties windows media player cannot find the file
  3. Open the Location tab > click Move.
  4. Select the folder where you store your music and then apply changes.
  5. Open Windows Media Player and see if you can now rip your CD.

We hope that you found our quick guide on fixing the Windows Media Player error helpful. If you liked this article, leave a comment in the comment section below.

  • Why my Windows Media Player is not working properly?
Try to close the process from Task Manager and open the program again.
  • How do I fix corrupted files?
If you have reasons to believe that you have corrupted files, you will need to run an SFC scan. If you don’t know how to do that, read our System File Checker guide.

[wl_navigator]

FIX: Hulu keeps buffering, freezing and crashing

Hulu is one of the best alternatives to Netflix for online movies. Yet, like any streaming service, Hulu’s video playback can buff (or freeze) intermittently for some users.

Videos can become unwatchable when they keep on buffering with regularity. If you need to fix Hulu video buffering, check out some of these potential resolutions for Hulu buffering.


This is how you can fix Hulu video buffering in Windows

1. Power cycle the router

First, try power cycling your router when a Hulu video buffs. Turn off your desktop or laptop. Power off and unplug the router. Wait a few minutes before plugging the router back in and turning it on.

Then turn on your Windows PC again.

Router hulu keeps buffering

2. Clear brower cache data

Corrupted browser data can generate Hulu playback issues within browser software.

  1. To clear Chrome’s cache data, click the Customize and control Google Chrome button.
  2. Press the Ctrl + Shift + Del keyboard shortcut to open the Clear browsing data options shown directly below.
    Clear browsing data options hulu keeps buffering
  3. Select All time on the Time range drop-down menu.
  4. Click the Cached images and files option there to select it.
  5. Select the Cookies and other site data option.
  6. Click the Clear data button.

3. Reinstall the Hulu app

If you’re utilizing the Hulu UWP app, trying reinstalling it to ensure its update.

  1. Click Windows 10’s Type here to search button to open that utility.
  2. Input apps in the search box.
  3. Select Apps & features to open Settings as in the shot directly below.
    Apps & features tab hulu keeps buffering
  4. Select the Hulu app listed there, and click the Uninstall button for it.
  5. Restart Windows before you reinstall Hulu.
  6. Then click Get on the Hulu’s MS Store page to install the latest version of that app.

4. Disable VPN

VPN connections can generate laggy video playback.

  1. To disable VPN, right-click the Start button and select Run (or press the Windows key + R hotkey).
  2. Type ncpa.cpl in the Open box, and click the OK option.
    Network Connections tab hulu keeps buffering
  3. Next, right-click your VPN connection to select Disable.

5. Give your internet connection a boost

Hulu buffering can often be due to a slow internet connection. To check your net speed, open the fast.com page. That page will tell you what your connection’s speed is as in the snapshot below.

Fast.com page hulu keeps buffering

The minimum recommended internet speed for Hulu is 3.0 Mbps and 8.0 Mbps for its live streams. If your net speed is below 3.0 Mbps, try to give it a boost.

To do that, turn off any other devices you might have connected to internet, such as mobiles and consoles. Close superfluous background software in Windows with Task Manager.

If you have an Ethernet cable, connect your PC to router with that cable for an Ethernet connection.


6. Update Windows and browser software

Keep your system and browser software as update as possible to ensure compatibility with the latest Hulu services.

  1. To check for Chrome updates, click the Customize and control Google Chrome button in that browser.
  2. Click the Help submenu.
  3. Select the About Google Chrome to check for updates. The browser will automatically update if it’s not the latest version.
  4. Then restart Google Chrome after the update.
  5. To update Windows 10 to the latest build, open the search utility.
  6. Input the keyword updates in the Type here to search box.
  7. Click Check for updates to open the Settings tab as shown directly below.
    Check for updates option hulu keeps buffering
  8. You can click Check for updates to download any available patch updates.
  9. If there’s a new build update available, click Download and install to upgrade to the latest Windows 10 version.

Those are some of the ways you can feasibly fix, or at least reduce, Hulu video buffering. Then Hulu video playback will be somewhat smoother with less buffering.

However, the best way to eradicate Hulu buffering is to invest in high-speed Wi-Fi if your current connection isn’t a fast one. This can save you from this and other connection errors.

Hence, if Hulu still does not respond, we suggest checking out the Disney+ streaming platform, which provides high-quality videos on a wide range of TV shows, originals, movies from Pixar, Marvel, Star Wars, Disney, National Geographic.

The streaming platform will automatically adapt to the device in use and the internet connection speed, delivering the best way to enjoy watching beyond failures.  

⇒Get Disney+ now


[wl_navigator]

Error 0x800710d2 on Windows 10/11: Here’s how to fix it

Errors in Windows 10 aren’t uncommon. Occasional system crashes, BSoDs, system slowdowns, and update problems are only a few among the many problems a Windows 10 user may have to deal with.

In this long list of Windows 10 problems, one of the less common problems is the error code 0x800710d2.

You may come across error code 0x800710d2 if you’re using a PIN password to log into your Windows account. Normally, this error shows up when trying to boot the system or wake it up from Sleep mode.

But it may also show up when trying to do something else, such as trying to create a provisioning package. The reason this error shows up is because of failure in the transmission of resource data.

The natural solution here, or so it would seem, would be to remove the PIN code and use regular passwords instead. However, there are many benefits to using PIN codes.

Not only are PIN codes easier to remember and log in with (because they are only 4 digits long), supplementing your Windows account password with a PIN code is also considered to be a great security measure to prevent unauthorized access to your account.

The solution? Restart the system, login with your password, and reset the PIN code. That’s the short version. Here’s a detailed step by step guide on how to do that:

  1. Press the Windows key and in the search bar, type Control Panel. Select and open Control Panel,
  2. Navigate to Control Panel > Power Options > Change plan settings,
  3. Look for Put the computer to sleep option and expand the drop-down menu on its right,
  4. Select Never and hit Save changes to confirm the change.

Power & sleep

Normally, disabling the sleep mode will help resolve the issue altogether.  But it is wise to reset the PIN code too.

  1. Press the Windows key and in the search bar, type Settings. Select and open Settings,
  2. Navigate to Settings > Accounts > Sign-in options,
  3. Look for the PIN tab and select Remove to remove the current PIN password,
  4. You will have to confirm this decision by entering your regular password in the confirmation window. Once you’re done, hit OK to finish the process.
  5. To add a new PIN code, click on the Add button in the PIN section,
  6. Enter a new PIN code (twice) and press OK to set it up,
  7. Once you’re through, your PIN password will have been reset.

  • What is my windows pin?
On the log screen in Windows, click your username and hit the I forgot my password text under the field. If you use a PIN to sign in, you can reset your PIN instead.

[wl_navigator]

Mortal Kombat 11: Aftermath (with RoboCop!) is now live on Microsoft’s Xbox One consoles

The first-ever major expansion for a Mortal Kombat video game, Aftermath, is now live for Mortal Kombat 11 owners on Xbox One.

This downloadable content (DLC) contains a new story, three skin packs, and three new characters including Sheeva, Fujin and the classic RoboCop voiced by the actor who played him in the original film, Peter Weller.

Those who already own the main game can buy the Aftermath content by itself while a new Mortal Kombat 11: Aftermath Kollection is also now available for those wanting to buy the main game, the Aftermath DLC, and the other previously released DLC all in one package.

Are you excited for this Aftermath content? Let us know what excites you the most in the comments below and then follow us on Pinterest and Twitter for more Xbox gaming content.


How to Retrieve Files From a Damaged Windows Laptop

Let’s assume that your laptop broke down, but you want to recover your personal files from it. In this tutorial we will show you how to recover your files from a broken laptop, assuming that your hard drive is still working.

You can use this guide to recover your files if your laptop won’t turn on, or if your display is damaged, but we have to mention that this guide won’t help you recover your files if your hard drive isn’t working. Before we start, you’ll need an external USB enclosure for 2.5″  hard drives.

retrieve files bricked computer

How to recover files from a broken laptop

  1. Install Stellar Data Recovery Professional
  2. Remove your hard drive
  3. Buy an external USB enclosure
  4. Install your HDD
  5. Connect your HDD to a functional PC
  6. FIX: Access is denied to external hard drive

STEP 1: Install Stellar Data Recovery Professional

Stellar Data Recovery software is a great tool that help you restore photos, videos and files that you accidentally deleted. It can even help you restore files from a lost Windows partition!

If your laptop can still be turned on and used, it’s the fastest way. Install the software, choose the location and then move all your recovered files on an external drive.

If that laptop is unusable, download and install this software on a different device, follow the next steps in this article to connect your old drive to your new device and run Stellar Data Recovery on the old drive to recover anything that you need.

It runs on Windows 10 as well as older versions of Windows and has very little system requirements (minim 2GB RAM, 250MB of disk space and a Pentium process are listed).

This means you can use almost any device, new or old, to recover data from the broken laptop.

Of course, you can use the software for even more things such as: recover emails from .PST files (Microsoft Outlook), recover files from other media such as SSD, USB sticks, CD/DVD or other optical media.

Download Stellar Data Recovery Professional here

STEP 2: Remove your hard drive

Firstly, you’ll need to remove the hard drive from the laptop. If the hard drive has mounting brackets or caddy you’ll have to separate them from the hard drive. As for the hard drive type, most laptops use 2.5” hard drives, and they can be IDE or SATA hard drives. We’ll show you the difference between the two in the following pictures.

2.5″ IDE HARD DRIVE

The IDE hard drive connector has two rows of pins.

ide hard disk drive wind8apps

2.5″ SATA HARD DRIVE

The SATA hard drive has two flat connectors. One of these connectors is used for data and one for power.

We also have to mention that same type of connectors are used in 3.5″ SATA desktop hard drives which means that you can connect a 2.5″ hard drive from your laptop directly to a desktop PC using same cables.

sata 2.5 inch wind8apps

STEP 3: Buy an external USB enclosure

If you don’t have external USB enclosure for 2.5″ hard drive, you’ll have to purchase one, just keep in mind that your purchase IDE or SATA enclosure depending on the type of your hard drive, since IDE enclosures aren’t compatible with SATA hard drives and vice versa.

We recommend NexStar brand but any other brand should work too. For IDE hard drives you can use NexStar 2.5″ IDE HDD enclosure. For SATA hard drives you can use NexStar 2.5″ SATA HDD enclosure.

STEP 4: Install your HDD

Install your IDE or SATA hard drive into the enclosure.

STEP 5: Connect your HDD to a functional PC

Now you can connect your hard drive enclosure with a working PC via USB. After connecting hard drive enclosure with your PC, it should be detected by the computer automatically and the external hard drive will appear in My Computer/This PC.

Now you can access it, and save any files you need from your laptop. We have to mention that Windows XP, Vista and Windows 7 keep user files in different locations, so here are few tips how to find them.

In Windows XP, you’ll find user files using the following path:

  • C:Documents and SettingsUser Account

In Windows Vista and Windows 7 you’ll find user files using the following path:

  • C:UsersUser Account

Remember, C: is the main system drive, but the external hard drive will have a different letter, but the path to user files will remain the same.

Sometimes, you may also need a file recovery program as you may not have access to all the files stored on the hard drive. If you’re in this situation, remember our recommendation in Step 1. You can also check out this list of the best file recovery software to use on your computer. Obviously, if you can immediately access all the files and folders once you’ve connected the HDD to a functional computer, then you don’t need to install any file recovery software.


Damaged USB flash drive? Our guide help you recover files from it.


FIX: Access is denied to external hard drive

While accessing user files you can get Access is Denied error message, this happens because your user account on the broken laptop was protected by a password, but there’s a way to fix that.

In order to get access to user files on the external hard drive you’ll have to take ownership over the user folder. In order to take ownership over Users folder (if you had Windows Vista or Windows 7 installed) or Documents and Settings folder (if you have Windows XP installed) you’ll need to follow these steps.

Solution: Replace the owner of the files

STEP 1

  1. Find the files located on the external hard drive and right click on the Users folder (if you have Windows Vista or Windows 7 installed) or right click on Documents and Settings folder (if you had Windows XP installed) and after that click on Properties.
  2. Head over to the Security tab in User Properties windows.
  3. Now click on Advanced button.

STEP 2

  1. Click on Owner tab in Advanced Security Settings for Users window.
  2. Now click on Edit button.

STEP 3

  1. Left click on Administrators group.
  2. Check the Replace owner on subcontainers and objects box.
  3. Click OK button.

STEP 4

When Windows Security pops up, click Yes. We have to warn you that the process of taking ownership might take a while. This depends on how many files you have in Users or Documents and Settings folder, so you might have to wait for a bit. After this process is done, you should be able access to all of your files.

0xc004f014 Windows Activation Error: 4 Fixes You Can Use

Upgrading from a regular Windows OS version to a Pro version can sometimes be tricky. Although the upgrade process is straightforward, various errors could occur when users want to switch to Windows 10 Pro. The 0xc004f014 Windows activation error is one such example.

If you have encountered this error, this article is for you. We explore causes as well as some of the best solutions.

What is 0xc004f014?

This error code shows a problem activating a licensed version of the operating system. Users have observed that a range of factors may trigger the error. Some of these causes include the following:

  • Bad product key – The product key you use for activation may be invalid, and it will trigger the error.
  • Hardware changes – If there are changes to specific hardware components, like the motherboard, you may experience an activation error.
  • Network issues – A bad connection is also a factor, as it can prevent the activation from completing.
  • Firewall software – These are essential tools since they keep your computer safe. However, they may block out legitimate and essential processes.
  • Date and time settings – These are connected to your computer’s ability to communicate with a network. When they are off, users may get an activation error.

Since we now have a grip on possible triggers, let us explore your best solutions.

How do I fix error code 0xc004f014?

Before going into the solutions, you should take the following actions:

  • Verify the product key – Since the wrong key can trigger this problem, double-check that you have inputted the correct one.
  • Check your connection – You may have to switch to a different network connection, which may save you any further troubleshooting.

1. Activate Windows with a phone call

  1. Press the Win key + R to open the Run window.
  2. Type in slui 4 and press Enter.
    0xc004f014
  3. The window will open, asking you to choose the region you’re residing in.
  4. Windows will now make an automated call.
  5. During the call, you’ll need to read your Installation ID. Once you read it, you’ll be provided with a Confirmation ID. 
  6. After that, you’ll have to read the Confirmation ID out loud to ensure you got everything right.
  7. Click the Activation button, and follow further instructions o finish the activation process.
  8. End the call and restart your computer.

Windows 10 users can activate the OS using a free call regardless of the location. This is a great way to solve this and similar Windows update errors.

2. Use the default product key

  1. Press Windows + R, type notepad, and hit Enter.
  2. Paste the generic registration key for Windows 10 Pro shown below and your new Windows 10 Pro registration key. Then save the file on your desktop.
    VK7JG-NPHTM-C97JM-9MPGT-3V66T
  3. Type network on Windows search, and click Network and Sharing Center.
    0xc004f014
  4. Click Change adapter settings.
  5. Disable all network devices on your computer by right-clicking them and selecting Disable.
  6. Reboot your computer.
  7. Press Windows + I to open the Settings app.
  8. Navigate to Updates & Security.
  9. Click Activation in the left pane, and select Change product key.0xc004f014
  10. Open the text file you saved on your desktop, and copy the generic registration key and paste it in the box, then click on the Next or Start Upgrade button, then Activate.
    0xc004f014
  11. Wait for the upgrade process to complete. Your computer will reboot several times during the process.
  12. Re-enable the network connections you disabled in step 5, by right-clicking them and selecting Enable.
  13. Return to your Setting’s Activation window from step 9.
  14. This time, your Windows Edition should be Windows 10 Pro. Open the text file with the product keys, and copy your new Windows 10 Pro registration Key.
  15. Click on the Change Product Key button.
    0xc004f014
  16. Paste your new Windows 10 Pro registration Key into the textbox and click Next.
    0xc004f014
  17. After a minute or two, a message will appear informing you that your copy of Windows 10 Pro is legitimate.

3. Use Windows Activation troubleshooter

  1. Press Windows + I to open the Settings app.
  2. Navigate to Updates & Security.
  3. Click Activation in the left pane, and if your copy of Windows is not activated correctly, you’ll see the Troubleshoot button. Click it.
    0xc004f014
  4. The troubleshooting wizard will now scan your computer for possible problems. If it finds the solution, follow further instructions to activate Windows.

One great thing about Windows 10 is its built-in troubleshooter for almost any problem. And the 0xc004f014 activation error is not an exception. So, if the previous solutions failed, try the troubleshooter.

4. Change the product key

4.1 Using the Settings app

  1. Press Windows + I to open the Settings app.
  2. Navigate to Updates & Security.
  3. Click Activation in the left pane, and select Change product key.
    0xc004f014
  4. Input a different product key.
  5. Restart your computer and retry the process.

You can also use the Command Prompt to activate Windows 10. Below are the steps.

4.2 Using the Command Prompt

  1. Press Windows + R, type cmd, and hit Ctrl + Shift + Enter to open an elevated Command Prompt.
  2. Change the product key by running the script below (replace new product key with the actual product key).
    slmgr.vbs /ipk <new product key>
  3. Enter the script below and hit Enter to activate the key.
    slmgr.vbs /ato

There you go. Regardless of the activation error causes, we hope at least one of these solutions helped you resolve the 0xc004f014 problem.

If you have any comments, questions, or suggestions, just let us know in the comments below.

Best AI Software for PC Available for Anyone in 2026

There is all sorts of AI software for PC, and finding the right tool might not be as simple as you think.

Luckily, this guide should help you find the right application for your needs, so keep on reading.

Top 5 free AI software to build smart applications

Braina – Best overall

Braina is an artificial intelligence software solution that can perform loads of tasks on Windows 10. It’s also an incredible virtual assistant that can help you accomplish various operations quickly and easier.

Braina, aka Brain Artificial, is a human language interface, automation, and voice recognition software that flawlessly works on computers running Windows.

This software lets you interact with your Windows 10 PC using voice commands. You can also convert speech to text in more than 100 languages.

Find out more about this free AI software solution by reading our Braina review.

Here are the key features of Braina:

  • Voice controlled.
  • Designed to help users with their tasks.
  • Can be accessed from anywhere on the same Wi-Fi network.
  • Outstanding speech recognition.
  • Can work with other apps, websites, and more.

Braina has a free version called Braina Lite.

⇒ Get Braina Lite

H2O.ai – Great for machine learning

H2O.ai was named a leader among the 16 vendors that are included in Gartner’s 2018 Magic Quadrant for Data Science and Machine Learning Platforms, and this is excellent.

H2O.ai is an amazing platform for enterprises that packs many extremely useful features and functionalities. It also offers a free AI software solution to test its functionality.

Here are the H2O.ai key features:

  • About to create and train machine-learning models.
  • Can design and deploy AI apps.
  • Executives can analyze data sets and extract insights.
  • Doesn’t require any extensive knowledge.

H2O.ai has a free trial.

⇒ Get H2O.ai

Inbenta – Offers powerful search

Inbenta is a conversational platform that is able to deliver incredible and real results. It offers a free AI software solution and has industry-leading self-service rates of more than 90%.

The AI and lateral language processing aims to boost customer happiness at all times. Every brand means a lot to its customers; the best AI software is aware of this and acts in consequence.

Here are the key features of Inbenta:

  • InbentaBot customer agent that is 24/7 available.
  • Supports more than 25 languages.
  • Powerful search technology that can read between the lines.
  • Highly conversational skills.
  • Seamless integration.

Inbenta has a free trial.

⇒ Get Inbenta

NVIVO – Offers better information organization

NVIVO is another excellent artificial intelligence software product. It targets qualitative data analysis but also offers a free AI software solution.

Whether you are working in a team or individually, you’re new to research or have lots of years of expertise behind you, you will definitely find an NVIVO option that will suit your needs and skills as well.

Here are the key features of NVIVO:

  • Storing information.
  • Fast and easy to use.
  • Smarter insights.

NVIVO has a free trial.

⇒ Get NVIVO

Apache PredictionIO – Completely open-source

Apache PredictionIO is a bit different compared to the other artificial intelligence software tools on this list. It’s a free AI software solution and an open-source Machine Learning Server.

It means you can download, modify, and implement the Apache PredictionIO code into your products and services at zero cost.

It’s built on top of a fantastic open-source stack for developers and data scientists to create the most predictive engines for machine learning tasks.

Here are the key features of Apache PredictionIO:

  • Quickly build and deploy an engine as a web service.
  • Respond to queries in real time.
  • Evaluate and tune more engine variants systematically.
  • Unify data from more platforms in real-time for predictive analytics.
  • Speed up the machine learning modeling with processes.

Apache PredictionIO is free and open-source.

⇒ Get Apache PredictionIO

These were our top 5 free AI software solutions you can use to build your own artificial intelligence applications. They come packed with sophisticated and unique features.

Before making your final decision, we recommend visiting these tools’ official websites to learn as much about them as possible.

This way, you will make a well-informed decision based on your AI-related needs and skills. And since AI software tools go hand in hand with other tools, we’d like to shift your attention toward SciSpace Copilot, which is also an AI-powered tool that helps simplify scientific content.

Before you leave, don’t miss our guide on the best open-source AI content generators and best AI websites for more information.

If you have any other suggestions or questions, please leave them in the comments section below.

Face Recognition Software for Windows 10: Best for 2026

Using facial recognition software tools, you can access your Windows 10 PC quickly and securely, without typing your username and password. All you need to do is look at your webcam and the tool will unlock your session.

Microsoft has an excellent built-in tool for this, but Windows Hello doesn’t always work. If you’re looking for an alternative, you’ve come to the right place.

In this article, we’re going to list the 5 best face recognition software for Windows 10 (free download), including their key features to help you decide which tool to install.

What’s the best face recognition software for Windows 10?

1. KeyLemon


KeyLemon is a desktop app that allows to unlock your Windows session using your camera. This software is highly accurate and secure. The spoofing detection feature prevents intruders from tricking the system by using a photo of the legitimate user.

The photo face recognition software for Windows 10 also lets users add strong additional challenge-responses with limited time to be performed. These include eye blink, head movement and a combination of eye blink and head movement challenges.

KeyLemon stores and encrypts your biometric model on the local system. The software keeps your personal data confidential and does not send it to a server.

Unfortunately, the face recognition photo software is no longer supported, but you can still download KeyLemon and use it with its limitations.


If you want to sing in to Windows 10 without a password, check out this guide.


2. TrueKey

True Key is a powerful and versatile tool that uses your face or fingerprint to sign you in without having to type any passwords.

Multi-factor authentication is a standard requirement with the True Key app. In other words, you’ll need to pass through at least two authentication levels before being signed in.

Of course, you can add more authentication factors to make your profile safer.


Fingerprint recognition doesn’t work on Windows 10? Don’t worry, we’ve got the right solution for you.


You can also opt to use only one authentication factor on the devices you trust. If you want to quickly access your PC, you can enable only face recognition.

You can also use this free face recognition software as a password manager. True Key auto-saves and enters your passwords, allowing you to quickly access the pages that you’re interested in.

Rest assured, your passwords are always safe with True Key thanks to the strongest encryption algorithms that it uses.

The True Key free version syncs across all your devices and lets you store 15 passwords for free. If you need more space, you can upgrade to the Premium version for $19.99/ year.


3. Rohos Face Logon

Rohos Face Logon uses any Windows-compatible camera to log you in. There is no need to press any keys or perform additional authentication steps. Once the software has recognized your face, it automatically unlocks the desktop.

This tool also allows you to combine both face recognition and a USB stick for login. The multi-user support feature lets you register the faces of several users for any user account.


If you want to block facial recognition on Windows 10, follow the steps from this simple guide.


Rohos Face Logon is eco-friendly and one of the best face recognition software solutions for Windows 10. It immediately stops the camera when there is no one in front of it.

Unlike the other face recognition tools listed above, Rohos Face Logon is compatible with all popular Windows versions, including Windows XP.

You can download Rohos Face Logon for free and test it for 15 days. After the trial period expires, you can purchase the tool for $10.00.


4. Blink!

Luxand’s Blink! allows you to log into your Microsoft account in the blink of an eye. The tool supports multiple computer users and automatically adjusts for varying lighting conditions.

If you recently changed your look, the smart identification algorithms can quickly adjust to the changes. Blink! will recognize you and let you login even with a grown beard, heavy makeup or glasses.

Blink! is compatible with Windows Vista and Windows 7 only. It does not support Windows 10.

You can download Blink! from Luxand’s official website.


5. AMD Face Login

AMD makes it easier for you to access your PC thanks to AMD Face Login. It’s among the best face recognition software for Windows 10.

You can also use this software on select AMD A-Series processor-based systems to log on to your favorite sites using facial recognition algorithms.

AMD Face Login features a series of options that allow you to enhance login security. For example, by setting the accuracy level to high, you have to blink to log in. Naturally, intruders won’t be aware of this detail and they won’t be able to login.

The face-out feature automatically puts your PC to sleep or lock the screen when you leave your computer. ​

You can download AMD Face Login right away. It’s compatible with Windows 10, 8 and 7.


Conclusion

This brings us to the end of our list. The facial recognition software solutions above are perfect for Windows. You can unlock your PC using your facial signature instead of a password, which automatically increases your computer security and privacy.

Some of them also support extra features such as password managers. Forget about typing long passwords and install the face recognition tool that best suits your needs.

And, if you can’t log in Windows 10, check out our quick fixes.

If you have any more questions, feel free to drop them in the comments section below.


How to create a scheduled or instant meeting in Microsoft Teams

Creating a meeting with Microsoft Teams is a good way to stay in contact with your coworkers on projects while you work from home, or whenever you’re working remotely. Assuming you or your organization is a Microsoft 365 customer, you are already taking advantage of all of the app integration Microsoft provides. Here’s how to create a meeting in Microsoft Teams.

Create a meeting

Here are three ways to create a meeting in Microsoft Teams.

  1. Choose the Calendar icon underneath the Teams chat box to create a meeting with your coworkers in Teams. If the Calendar icon is missing, check with your organization’s IT administrator.
  2. Choose Calendar on the left side of the Microsoft Teams desktop app and choose New meeting in the upper right corner.
  3. Choose a range of time in the Calendar.

Once you do any of the three above-mentioned options, a calendar form will pop open to edit the meeting information. Use the Scheduling Assistant to help schedule a meeting time that works for everyone, provided that their work schedules and existing meetings are already set up within the Microsoft Teams Calendar. Once you are finished filling out the time, optional attendees, locations (physical or virtual meeting rooms with locations already set up in Teams), and meeting details, click Save. Teams will send a Microsoft Teams meeting notification or email a link to all meeting attendees.

If you add a Teams channel to your meeting, you will need to send a link to the meeting if there are people invited to your meeting from outside your organization.  Choose Send when finished. Teams will automatically send an invite to all the invited attendees via a notification in Microsoft Teams or via email if they are outside your organization.

Invite people from outside your organization

Microsoft Teams also allows users to invite people to their Teams meetings from outside their organization. In order to invite someone from outside your organization, you will need to know their full email address and once you’ve created a Teams meeting link, you can share it with them.

Choose Add required attendees. If anyone is an optional attendee, choose Add Optional attendees instead.

Type the person’s full email address (i.e [email protected]). Select Invite (email address). The email address you provide will receive an email with an invite link to the Teams meeting.

Schedule a meeting from Outlook

Microsoft Teams Outlook add-in

When installed, Microsoft Teams can install an Outlook add-in with your permission. The Outlook add-in allows you to create new Teams meetings directly from Outlook. This way, you don’t need to switch between Outlook and Microsoft Teams, users can view, accept, reject, or join meetings, from within either app.

Create an instant meeting

If you want to set up a quick meeting at the last minute, you can create a quick meeting in Teams. This is for instances where you are in the Calendar or in a Teams channel and want to meet with a coworker for a quick 10-minute meeting to exchange ideas or give a quick update on your progress for a project.

Within the Calendar

When you are in the Teams Calendar, instead of choosing New meeting, choose Meet now.

Meet now
Join now
join now people
get join info link

From there, you will be able to add a meeting title, choose whether you want to use video or not, and pick your preferred audio source. Once you are ready to start the meeting, choose Join now.

In the upper right corner a box marked People will open up to allow you to invite someone to your instant meeting. Just start typing the name of the person or people that you want to invite to your instant meeting. They will receive a call in Microsoft Teams to join your meeting.
If you choose, you can also copy the join info link to your clipboard and send the invite link in an email if the person or people are outside your organization. If your email recipients do not have Microsoft Teams, they can join the instant meeting just by using their internet browser.

This is a great option to use if you do not have meeting the scheduling capability in Outlook or Teams. Meet now works just like scheduled meetings in the Teams Calendar. Everyone in the Meet now meeting can access everything that is shared in the meeting, including the meeting chat, the recording, and any files or documents that are shared in the meeting.

In a Teams channel

If you are in a Teams channel and want to start an instant meeting, go to the Posts tab and go where you type new messages in the channel and choose the Meet now icon.

meet now

Once you choose the Meet now icon, an instant meeting will open right in the comment thread.

You can use the Meet now button to start an instant meeting to get clarification on an issue that cannot be resolved via messaging. Just reply to any comment thread in your Teams channel and choose Meet now to continue the conversation. Once you choose Meet now everyone in the comment thread will be invited to the instant meeting.

Do you have any issues creating a meeting in Microsoft Teams? Let us know in the comments.

Want step-by-step instructions on scheduling directly from Outlook? Check out this guide on how to schedule a Microsoft Teams meeting in Outlook. 

Microsoft to open new data center region in New Zealand

Microsoft today announced its plans to build its first data centre region in New Zealand which will accelerate digital transformation opportunities across the country. The construction of a new data centre will provide New Zealand customers local access to Microsoft 365, Power Platform, Dynamics 365, and Microsoft Azure. In addition, the Redmond giant also aims to launch educational skilling programs to train the people of New Zealand.

With this announcement, the company reiterated its commitment towards privacy, noting that customer data remains stored locally in New Zealand. The press release also mentions that Microsoft has been collaborating with The Collaborative Studio and Massey University to launch an educational program called i4 Accelerator. Notably, the program offers targeted workplace-based training to address the shortage of skills in primary industries including technology and manufacturing in the region.

“Technology is driving transformation in agrifood and fibre at an incredible speed, so it’s vital we move quickly to ensure the education system meets the requirements of what businesses need to be innovative. It’s especially important for the agrifood and fibre sector to remain competitive for years to come and capitalise on brighter thinking and bigger ideas,” said Anne Taylor, Microsoft education lead today.

It is noteworthy that, Microsoft seeks approval from the Overseas Investment Office to proceed with this plan. However, if the OIO gives the green light, it would be a notable addition to Microsoft’s existing 54 Azure regions across the globe. In case you missed, Microsoft has also announced a $1 billion digital transformation plan for Poland yesterday which includes the contribution of a new data centre in the country.

DayZ, Final Fantasy IX, and Fractured Minds are coming to Xbox Game Pass in May

Microsoft already announced that Red Dead Redemption 2 will join Xbox Game Pass for Console tomorrow, May 7, but three new Xbox One games will also be added to the catalog in May. Good news for fans of survival adventures, the open-world multiplayer game DayZ, which was released on Xbox One a year ago, will be playable starting tomorrow along with Red Dead Redemption 2.

Two more games will be available on Xbox Game Pass next week, starting with Final Fantasy IX on May 14. This one is actually an Xbox Play Anywhere game, so you’ll be able to play it on both Xbox One and Windows 10. Fractured Minds, an immersive puzzle game with RPG elements will also follow on May 19.

Microsoft also announced some new bonus perks for Xbox Game Pass Ultimate members in May: Subscribers in the US and UK can get six months of Spotify Premium for free, while subscribers in France, Germany, Australia, Mexico and Brazil can get 3 free months of Spotify Premium. This offer is only available for new Spotify Premium members, the Xbox team said today.

Xbox Game Pass Ultimate Perks can be redeemed in the Xbox Game Pass mobile app or the Xbox beta app for Windows 10. As a reminder, those of you who never subscribed to Xbox Game Pass can still get their first month of Xbox Game Pass Ultimate for just $1.

Microsoft announces Surface Dock 2 and other new accessories

If a series of rumors of leaks have been suggesting the imminent launch of new Surface products this spring, and the company has finally delivered this morning. Indeed, the Surface Book 3 and Surface Go 2 are now official, along with the Surface Earbuds and a new version of the Surface Headphones. But there are also a couple of new accessories including a new version of the Surface Dock, which hasn’t been updated since 2015.

Details about the Surface Dock 2 actually leaked last month, but today’s press release pretty much confirms what we knew. The new Dock keeps the proprietary Surface Connect port to provide compatibility with existing Surface devices, though Microsoft says the new accessory provides faster charging and higher data transfer rates than its predecessor.

To make it more versatile, Microsoft included four USB-C ports on the Surface Dock 2, though the two USB Type-A ports, audio jack, and Ethernet port are still there. Moreover, the new peripheral has been designed to sit behind your device and seems like a more compact docking solution than the older dock.

The Surface Dock 2 will be available to pre-order in select markets today, and it will be priced at $259.99. Microsoft also other accessories today including a $99.99 USB-C Travel Hub, along with two new keyboard and mouse bundles: the $89.99 Microsoft Ergonomic Desktop and the $59.99 Microsoft Bluetooth Desktop. The USB-C Travel Hub can be seen below, and it includes various ports including one USB-C port, one USB-A port, 1 HDMI port, 1 VGA port, 1 Ethernet port, and a headphone jack.

“We hope these new products will not only help people be more productive from wherever they are currently working and learning, but also help people find moments of focus and relaxation,” Microsoft said today.

Windows And Office Genuine ISO Verifier: How to Use it

Windows and Office Genuine ISO Verifier is a lightweight tool that helps you determine whether you have genuine Microsoft Office and Windows ISO files.

This is especially important if you got these files from third-party sources and not directly from Microsoft. To avoid these types of problems, be sure to check our guide on how to download Windows ISO properly.

In case you want to verify your ISO file, keep on reading.

How do I know if my Windows ISO is genuine?

  1. When downloading the ISO, notice the MD5 hash on the download page.
  2. Once the download is finished, start PowerShell as admin by pressing Windows key + X and choosing PowerShell (Admin).
  3. Next, locate the download directory. You can do that with cd ~/Downloads
  4. Lastly, run: Get-FileHash Win10_2004_English_x64.iso | Format-List
  5. If the value matches the one from step 1, your ISO is genuine.

Alternatively, you can use the software mentioned in this guide.

How can I use Windows and Office Genuine ISO Verifier?

The installation and interface of the tool is as straightforward as it comes in a portable package. You can set up the program up quickly by decompressing the archive in the target location on your hard disk.

Its user-friendly interface won’t give you a hard time when navigating the application, either.

The tool’s UI consists of a single window with intuitive fields for quick access. Once you specify the input file, the program does the rest of the task without your intervention.

Windows and Office Genuine ISO Verifier also supports various versions and languages of Office and Windows.

The tool’s major selling factor is its ability to recognize various hashes associated with Windows and Office. It is able to compare file SHA-1 even to Office 95 and Windows XP.

The tool is most helpful if you want to reinstall Windows or Office on your PC with no legal complications. If you are unsure whether your file is genuine, then the Windows and Office Genuine ISO Verifier provides the answer.

Are you currently using the Windows and Office Genuine ISO Verifier to check whether your Microsoft files are legitimate? What is your experience so far? Let us know.

EventID 10016 error in Windows 10/11 [FULL FIX]

Many Windows 10 users complain that after each boot, the Event Log displays intriguing application-specific permission errors.

These errors started to appears soon after users upgraded to the Anniversary Update.

Since there is very little information available as to why Windows 10 displays this type of errors, many users quickly rolled back to their previous OS.

Those who haven’t, are still struggling to understand why this error appears and how to fix it.

Windows 10 users report that this error also appears when they install the latest OS updates. Fortunately, we’ve found a possible solution to remove this error once and for all.

Windows 10 EventID 10016 error

After the anniversary updates, I’m getting the same error as everyone else.  Microsoft, this is inexcusable given the new Windows 10 update strategy that you have implemented.

The application-specific permission settings do not grant Local Activation permission for the COM Server application with CLSID
{8D8F4F83-3594-4F07-8369-FC3C3CAE4919}
and APPID
{F72671A9-012C-4725-9D2F-2A4D32D65169}
to the user NT AUTHORITYSYSTEM SID (S-1-5-18) from address LocalHost (Using LRPC) running in the application container Unavailable SID (Unavailable). This security permission can be modified using the Component Services administrative tool.

How can I fix EventID 10016 error?

1. Go to Regedit > search for {F72671A9-012C-4725-9D2F-2A4D32D65169}
2. Right-click > Permissions and Advanced.
3. On the top line, click Change and add Users in the white box >  tick the little box underneath > click OK
4. Back in the permissions window, tick ‘Full Control‘ for Administrators and Users.
5. Go to Component services >the box shouldn’t be greyed out.
6. You’ll see 3 tables: Launch and Activation Permissions, Access Permissions, Configuration
7. Go to Launch and Activation Permissions > Click Customize > add System if it’s not there.
8. Tick all 4 boxes > click OK.
9. In regedit, restore CLSID permissions back to SYSTEM and APPID permissions back to TRUSTED INSTALLER, which should be NT SERVICEtrustedinstaller.
10. Reboot your computer and the EventID 10016 error should be gone.

Windows 10/11 privacy issues: What you need to know?

We live in the age when our privacy is more vulnerable than ever and we’re in constant fear if somebody is watching what we are doing on the internet.

Prior to that, we’re becoming more and more skeptical of the new products that big companies are offering to us, and we try to find ways in how to increase privacy on windows 10
windows 10 privacy wind8apps

Does Windows 10 attend to your personal privacy or it has privacy policy issues?

When Microsoft released Windows 10 Technical Preview this fall, they also presented the new Privacy Policy to go along with the operating system.

The new Privacy Policy states that Microsoft will use certain methods to collect information about software performance and bugs, in order to make the final release of Windows 10 as reliable as possible.

When you acquire, install and use the Program, Microsoft collects information about you, your devices, applications and networks, and your use of those devices, applications, and networks, the privacy policy stated.

Examples of data we collect include your name, email address, preferences and interests; browsing, search and file history; phone call and SMS data; device configuration and sensor data; and application usage.

Microsoft provided four examples, one of which clearly states that when entering text into any application, Microsoft may collect those typed characters. Why? So that the company can fine-tune the spell check and autocomplete features.

Again, the Technical Preview is not ideal on machines used for everyday purposes unless users don’t care about this character collection.

But this Privacy Statement and Microsoft’s method of collecting personal information have disturbed a lot of users. People just don’t want to share their personal information and what they do and where they go on the internet with Microsoft.

And reactions from them are mixed. Some of them accept Microsoft’s method of collecting data by saying that the purpose of the preview is to collect as much data as possible in order to make a good and stable operating system.

While others often don’t refrain from curses when reporting about their disagreement with Microsoft.

But at least, Microsoft was fair for saying all of that in the Privacy Statement, so you cannot say that you haven’t been warned and that Microsoft is spying on you against your will, because it is completely up to you whether you’ll use Technical Preview and expose your personal info to Microsoft, or not.

But Microsoft is aware that people don’t like its way, so they don’t recommend you to install Windows 10 Technical Preview on computers that you use every day.

What can you do for minimizing the impact of collecting your personal data?

In case you are one of the persons who are highly concerned about their personal data, you can always stay anonymous while surfing the internet. You can use a proxy server or a good VPN.

If you suppose that Microsoft already collected some of your personal data, you can avoid anyone uses it against your digital profile.

From all VPN services out there that can hide your computer’s IP, keep you safe from attacks and hackers and keep your data secured and encrypted, Cyberghost is the best in terms of quality-price.

Available at $2.75 per month, you have plenty of great features in it and keeps your digital traces anonymous.

[wl_navigator]

Download Skype for Desktop in Windows 10/11

If you have been let down or you are annoyed by the functionality of the touch version of Skype for Windows 10.

Or you just want to use it on a non-touch device, then feel free to download the desktop version of Skype for Windows 10.

Skype has become one of the most used  IM clients of all and its name is synonymous with video calls. M

any Windows 10 and Windows 8.1 users out there that used to use Skype to keep in touch with their friends want to know how to download and install Skype as a desktop app.

download skype desktop windows 10


While Microsoft was kind enough to provide us with a Skype app for Windows 10, Windows 8 that replaced Windows Live Manager, many users don’t seem to like it (yours truly included).

They prefer the desktop alternative, as it has a very simple user interface and we are all accustomed to it. So, for those who want to download Skype for Windows 10, Windows 8, or Windows 8.1, here’s how you do it.

How do I download and install Skype for Windows 10, 8, 8.1?

If you are using a Windows 8 or Windows 8.1, Windows 10 computer, you noticed that on the Skype website the download button will forward you to the Microsoft Store to download the app.

However, if you look closely, there is a link to the desktop version also. If you follow that link, you will see the Skype desktop installer page.

Once you’ve downloaded the SkypeSetup.exe file to your drive, you can proceed to the classic install of Skype.

After the wizard finishes, you will have the desktop version of Skype installed on your Windows 10 computer.

If you already upgraded to Windows 10, Skype is already installed on your computer. The app comes as a built-in app and you can use it without any problems.

install skype windows 10


And this is how to get the Skype desktop app on any Windows 8 and Windows 8.1, Windows 10 computer. The confusion surrounding this must have started with the forward from the Skype website to the Windows Store.

If so, check the link located below the Windows 8, Windows 10 download button on the website, and it will let you download the desktop app.

I personally find that Skype for desktop is easier to use than the specially designed app for Windows 8, Windows 10 touch screen devices.

Therefore, if you don’t have a touch screen machine, it’s better to use Skype for desktop in Windows 10, Windows 8.

If you’re planning to use Skype for business purposes, you can then download and install Skype for Business.

As its name suggests, this version of Skype brings a series of dedicated features and options that focus on collaboration. For example, you can quickly join meetings by using a simple meeting link.

skype for business

With one click, anyone can join your online meeting, from any device. You can choose to meet right away, or schedule from Outlook for later. The meeting URL is personalized just for you.

Should you encounter any bugs during the download process, let us know in the comments below and we’ll try to find a solution as quickly as possible.

How to set up a flowchart with the LibreOffice Draw

Flowcharts are diagrams that system designers and software developers design IT systems and programs with. There are numerous diagram software applications you can set up flowcharts with.

The open-source LibreOffice Draw is one diagramming application that you can utilize for flowcharts.

It includes all the basic, and some more advanced, options and tools you’ll need to set up diagrams for system design or software algorithms.

This is how you can set up a flowchart with Draw.

1. Download the LibreOffice Draw flowchart designer tool

If you don’t already have the LibreOffice suite installed, you can save its wizard from this webpage. Select either Windows X86 (32-bit platform) or Windows X86_64 (64-bit platform) from the drop-down menu.

Press the Download button to save LibreOffice’s installer. Open LibreOffice’s Installation Wizard window to add the suite to Windows. Then open Draw’s window.

Libre Office

2. Adding Shapes to Flowchart Diagrams

First, add some shapes to the flowchart. Draw’s toolbar includes a Flowcharts button you can press to select shapes more specifically for flowchart diagrams.

Press that button’s small arrow to expand its list of shapes as shown directly below.


Now select the first flowchart shape to add to the diagram from there. Hold the left mouse button and drag the cursor on the diagram sheet to expand the shape.

Then you can resize the shape by selecting it and dragging its border points.


To alter shapes’ colors, select Color from the Area/Styling drop-down menu. Then select a color from the adjacent drop-down menu.

Alternatively, you can add a gradient effect to the shape by selecting Gradient from the Area Style drop-down menu as shown in the snapshot directly below.


Shadow is another shape formatting option that adds flat shadows to the symbols. Select a shape to add the shadow to. Then press the Shadow button to add a shadow effect to the symbol as below.

3. Connecting Flowchart Symbols

When you’ve added and positioned more flowchart symbols on the diagram, you’ll need to connect them with arrows. Although you can add them with the Lines and Arrow option, it’s better to press the Connector button.

This will ensure that the arrows connect to the shapes. When you press Connector, you’ll see four connection points on the flowchart’s shapes as in the snapshot directly below.

Flowchart in Libre Office
Click the small arrow beside the Connector button, and select the Straight Connector ends with arrow option.

Then hover the cursor over a connector point on one shape, hold the left mouse button and drag the cursor to a connector point on the second shape.

That will connect your flowchart’s shapes with straight-line arrows as shown in the shot directly below. As you’ve added connector lines to the diagram, the arrows will move if you alter the shapes’ positions.


You can choose alternative arrow styles by selecting an arrow on the diagram and then clicking the small arrow on the Arrow Styles button.

That will open the drop-down menu below from which you can choose alternative arrowheads. Select an arrowhead listed there to alter the selected arrow.


To select an alternative color for an arrow, first, click an arrow on the diagram. Click the small arrow on the Line Color button to open the palette below.

Then you can choose another arrow color from the palette.

4. Adding Text to Flowchart Diagrams

  • Finally, you’ll need to add some text to each shape within the diagram. Press the T (Text) button to open the text toolbar.
  • Then hold the left mouse button and drag the cursor to expand a text box.
  • Enter something in the text box, and then resize and drag the box onto a shape in your flowchart.

Enter text for flowchart

  • Then you can format the text entered by selecting the Bold, Italic, Shadow, Font Color or Underline options on the toolbar. Click the Font Size drop-down menu to adjust the font’s dimensions, and you can choose alternative fonts from the Font Name drop-down menu.

5. Add 3D to Flowchart Symbols

To give your flowchart a little more visual impact, you can convert the 2D symbols to 3D shapes. Then you can rotate the shapes and add extra 3D effects to them. This is how you can add 3D shapes to flowchart diagrams in Draw.

  • First, right-click a shape on the diagram and select Convert > To 3D from the context menu. That will convert the selected shape to 3D as below.

  • To rotate the symbol, position the cursor in the center of the shape and left-click. The cursor will then become a curved arrow.
  • Now hold the left mouse button with the cursor within the shape to rotate it.

  • To add further 3D effects, right-click the flowchart symbol and select 3-D Effects from the menu. That will open the window shown in the snapshot directly below.

  • There you can select to add shading, geometry, illumination , and material effects to the 3D symbol. For example, click the Shading button, select the 3-D Shadowing on/off option and press the Assign button to add a 3D shadow effect to the shape as in the shot below.

Moving 3D objects
So you can set up flowcharts with Draw’s Text Box, Flowcharts, and Connector tools and add some groovy effects to them with the application’s 3D options. The application probably has most of the tools and options you’ll need for flowcharts.

However, you can also set up flowcharts with the diagram software included in this software guide.

What’s up with that Deceptive site ahead! warning in Chrome?

Lately, the internet became a dangerous place, as the population of daily users grows and cyber-criminals are rather productive.

The majorities’ go-to tool for browsing through the interwebz is Google Chrome.

However, there are some bewildering things in Chrome. Like the sudden warning about the dangerous site ahead, or rather a deceptive one.

This requires some light-shedding and we made sure to do so today. If you ever bumped into a Deceptive site ahead warning screen while navigating to a site, make sure to check the explanation below.

What’s Deceptive site ahead security warning on Chrome?

Google pays a lot of attention to users’ online safety, and that’s the inclusive concept of the Chrome browser, as well. They might invade your privacy occasionally, but phishing and malware sites are immediately identified.

Thus, even without the third-party antivirus’ online protection, you’ll probably run into one or more security warnings along the way. Especially if you roam around the obscure parts of the internet or click on pop-ups or ads.

They are characterized by the red alert screen informing you that the link you’re trying to follow is:

  • Containing malware
  • Leading to a deceptive site
  • Trying to load scripts from the untrusted source.

Concerning the Deceptive site ahead warning, most of the time those are the treacherous sites trying to steal your personal data, especially passwords. Milder versions come with dozens of ad pop-ups.

When something like this happens, you can send a report, close the tab and avoid the site in the future, or just open it if you know you can trust it.

These protective measures are there to prevent phishing and malware infections. Also, Chrome will automatically prevent all downloads from unauthorized sources.

How to disable warnings about unsafe sites in Google Chrome

We found out some false reports saying that this is a browser hijacker or malware infection at hand. It’s not.

It’s an integral part of Chrome that can be disabled if you like to do so. Read more about Google’s official Transparency Report.

Here’s how to disable the Deceptive site ahead prompt in Chrome:

  1. Open Chrome.
  2. Click on the 3-dot menu in the far right corner and open Settings.Deceptive site ahead
  3. Scroll down and expand the Advanced section.
  4. Navigate to Privacy & security.
  5. Disable Protect you and your device from dangerous sites.Deceptive site ahead

We recommend using an AdBlocker to surmount pop-ups and antivirus for online protection.

Windows Defender will suffice most of the time, but if you want to make your browsing extra-safe, we recommend using a reliable third-party antivirus solution for complete protection. 

A powerful antivirus program keeps your data safe while you are online and protects your device against cyber attacks and malware.

⇒ Get TotalAV

With that, we can conclude this article. If you have some unanswered questions concerning the Deceptive side ahead prompt and similar subjects, make sure to tell us in the comments section below.

Google Chrome is the most used browser so we wrote a plethora of articles about it. Find them in our Google Chrome section. If you have a website, you should take a peek at our Site Owner Hub for lots of tips and guides on how to manage it better.

How to install BBM app (Blackberry Messenger) on Windows

BlackBerry Messenger or BBM app, is an Internet-based, instant messaging and videotelephony app that allows you to connect with your contacts, whether friends, family, or workmates.

This app works in a similar way to WhatsApp or WeChat and is available for download to users on Windows phone, iPhone, Android, and BlackBerry.

Some of the tasks you can fulfill with BBM app include:

  • Instant chatting with your contacts either individually, multiple people, or in groups. The app also allows you to broadcast messages at one go
  • Picture or photo sharing
  • Quickly share voice notes
  • Sharing contacts and location/maps
  • Update your status to let people know how you feel, or what you’re up to

Its functionalities are also similar to other popular instant messaging apps, such that you can see when your contacts are typing responses, have access to a variety of emoticons for every mood and emotion so you can express yourself.

You can also set timed messages, retract messages, choose how to share your information, and even control your privacy settings.

The app also has the BBM Channels feature, which lets you create your own channel where you can post messages, share pictures, initiate conversations, and communicate directly with brands and subscribers.

This article describes how you can download and install BBM on your Windows devices such as your Windows phone, or Windows PC.

How to install BBM app on Windows Phone

BBM app for Windows Phone

In order to install BBM on your Windows Phone, you can download it directly from the BlackBerry webstore.

Alternatively, you can download BBM for free from the Windows Store.

How do I install BBM on Windows PC?

There are three ways to install the BBM app on Windows PC:

  1. Install BBM directly to PC
  2. Install BBM using Bluestacks
  3. Install BBM using Genymotion

1. Install BBM app directly to Windows PC

If you’re using Windows 8, you’ll need an Android SDK bundle, and BBM apk so as to install BBM directly to Windows PC, then follow these steps to set BBM up on your PC.

  • Go to the extracted Android SDK bundle folder
  • Open SDK Manager.exe file
  • Select Tools>Manage AVDs
  • Create an Android Virtual Device (RAM of 512 MB or greater)create android virtual device for BBM app
  • Start the created Android Virtual Device
  • Copy the BBM.apk file you downloaded so that it reads sdk/platform-tools/BBM.apk
  • Go to the sdk/platform-tools folder using File Explorer
  • Choose File>Open command prompt within platform-tools folder

If you’re using Windows 7, follow these steps to install BBM on your Windows PC:

  • Press and hold down Shift key, then right-click on the platform-tools folder
  • Click Open Command Window Here
  • Enter the command adb install BBM.apk
  • After a few minutes, BBM will be installed on your virtual device
  • Open BBM app from App launcher, and use the app

2. Install BBM app using LDPlayer

LDPlayer is an Android emulator and is the recommended option if you want to download and install BBM on your Windows PC.

In order to do this, you’ll need to download the updated version of LDPlayer, and BBM apk from Google Play, then follow these steps to install:

  • Download and install LDPlayer
  • Open the BBM apk
  • Install BBM apk in LDPlayer
  • Open BBM from the emulator app launcher and start using it on your PC

3. Install BBM app using Genymotion

Genymotion is one of the top free Android emulators that is powerful, easy to use, and can emulate most Android phones.

It not only automatically detects your PC’s keyboard and mouse, but also allows geolocation enablement, and adjustment of the emulator window when you launch Android applications.

In order to install BBM using Genymotion, you’ll need to download the Genymotion Android Emulator for Windows, then follow these steps:

  • After downloading Genymotion Emulator, open and sign in to Genymotion cloud
  • Choose Galaxy S4 HTC One Xperia Z – 4.2.2 virtual device from the list (BBM works only with this)
  • Download the virtual device
  • Click Play to start the virtual device
  • Click on Google Play store to download BBM
  • Once download is complete, click on the BBM app
  • Sign in to your BBM account and use it on your PC

Advantages of BBM app

  • Can be installed on up to ten Windows 10 devices
  • Can be used in the same way as other instant messaging apps
  • Can be used on PC, and mobile devices
  • Takes up little storage space (size 15.88 MB)

There you go, follow the steps listed above to install BBM on Windows.

3 best Xbox One USB external storage devices to use

Xbox One‘s 500GB or 1TB of storage doesn’t seem like much, especially if you have newer AAA games.

If you stick to Xbox’s original hard drive, you’ll eventually have to delete some content in order to free the space for new games, which is pretty annoying especially if you regularly play all your games.

But don’t be discouraged by Xbox One‘s default capacity because there’s a solution. And in this case, the solution is getting an external hard drive that will provide enough space for your stuff.

Luckily, Xbox One supports basically any external hard drive with 256GB of space or more.

You just need to pick a good external drive, connect it to your Xbox One, and you’ll be able to install as many games as you want.

But even a simple decision like picking up an external drive for your Xbox One can turn out to be complicated.

To help you decide what’s best for you, we made the full guide for choosing and setting up the perfect external hard drive for you.

The best external hard drives for Xbox One

WesternDigital MyBook

WesternDigital MyBook is perhaps the best external drive for your Xbox One. This device is our number one pick mostly because of what it offers for the price.

You get 4TB of storage for just $120, which is $30 per Terabyte.

This hard drive also provides an exceptional performance boost compared to the internal hard drive. You’ll notice increased speeds of both game loading and downloading.

The drive needs an AC adapter, but that’s basically the case with all external drives from this range.

So if you want significantly more storage on your Xbox One along with enhanced performance, the WesternDigital MyBook is the best choice.

Toshiba 1TB Canvio

xbox one external storage toshiba digital

storage

Toshiba’s drive is for those who don’t need a huge drive and would like to avoid an AC adapter. The Toshiba Canvio brings 1TB of additional storage to your console for a great price.

You can get Toshiba Canvio for as low as $55. Yes, the WesternDigital My Book has a better price per terabyte, but this is basically the best 1TB hard drive you can get for the price.

You can use a USB cable to connect the Toshiba Canvio with your Xbox One, so installation can’t be simpler.

When it comes to improved performance, this device also provides installation and loading speed enhancements. Not as much as WesternDigital, but still quite satisfying.

⇒ Get Toshiba 1TB Canvio

HGST Touro S 1TB

xbox one external storage HGST Touro S 1TB

The HGST Touro S is for those who want increased performance but are not so obsessed with having multiple terabytes of storage space.

It is powered by USB and doesn’t contain an AC adapter, which can be a deal-breaker for some users.

Besides its limited capacity of just 1TB, the HGST Touro S provides a solid performance boost to Xbox One. You’ll notice faster loading and installation times.

So, if 1 TB is enough for you and you want some more speed, the HGST Touro S should be in the conversation.

⇒ Get HGST Touro S 1TB

How to set up an external hard drive on Xbox One

Connecting your new external drive to your Xbox is fairly easy. Just plug in the drive and wait for the initialization wizard to start.

The Xbox One doesn’t necessarily have to be turned off while connecting your drive but it won’t hurt if you power the console off.

Once your Xbox One recognizes the external drive, it will ask you if you want to set up the external drive. Choose Yes and carry on with the process.

Your drive will then be formatted for use on Xbox One.

Keep in mind that once you format the external drive for Xbox One, it can only be used on the console so you can’t connect it with, for example, your PC or PS4.

And finally, you’ll be asked to name the drive and choose whether you want new apps and games to be installed on it by default.

As we already pointed out, this is a good idea because the external hard drive provides better performance for installing and loading your content.

Move your existing games and apps to the external hard drive

You’ll probably want to move all your frequently used apps and games to the new hard drive. Moving content from drive to drive in Xbox One is quite easy, here’s exactly what you need to do:

  1. Go to the My games and apps menu
  2. You’ll notice the two sorting options. One sorts games and apps by size, alphabet, and recent use, while the other sorts them by the storage location. Click on the second storing option and choose Internal. This will put all games stored on Xbox One‘s internal drive before others.
  3. Select the game you want to move, press the Start button, and select Manage game
  4. Now, select Internal, and Move allxbox one external storage
  5. The console will start relocating the game to the new address immediately. You can repeat the process for each game you want to move, but since it’s annoying and time-consuming, you can simply select all games you want to move first, and then move them. Xbox One will automatically move game by game, without any interruptions.
  6. And when you’re finally done, get back to the menu, and switch the sorting option back to All or External, to make sure all your games are displayed.

You now know why using an external hard drive is important, What the best external hard drive to use on your Xbox One is, and how to set it up. If you have any comments, questions, or suggestions, don’t hesitate to let us know in the comments below.

  • How do I access my external hard drive on Xbox One?

You just need to open the guide go to the Storage menu. If Xbox didn’t detect your external drive, read our complete guide to solve this issue.

  • Will any external drive work with Xbox one?
No, not really. Any external drives must be at least 256GB and support USB 3.0 on Xbox One. Xbox One also has a top limit at 16TB but it’s unlikely you will get over that. We made a list of the best USB 3.0 Hard Drives.

CredentialsFileView: access decrypted Credentials files

In case you want to see what’s inside a Credentials file in Windows, you don’t need to be an expert programmer, just use a third-party program.

A new application from Nirsoft, called CredentialsFileView allows you to decrypt Windows credential files, and display what’s stored in it.

In case you’re not familiar with this type of file in Windows, the system uses credentials for storing data and sensitive info securely.

How can I use CredentialsFileView?

Credentials can store various types of data, including remote computer login passwords, mail accounts passwords, Windows Live session information, Windows Messenger passwords, or Internet Explorer/Microsoft Edge passwords.

To keep these data secure, credential files are encrypted.

The program is very simple to use. You just need to enter the Windows login password, and it will automatically detect all information.

Without the Windows login password, the program isn’t useful, because it only shows encrypted info.

When you open CredentialsFileView for the first time, it will automatically detect all credentials files, based on the path you enter. Once the setup is done, all files will be listed in the main screen of the program.

Here, you can click on each file individually, to show its decrypted content in the lower half of the interface.

Information is shown as a full hex dump by default, but you can switch the view mode to strings, for better understanding.

It also allows you to change any password in a credential file, so if you want an application to use a different password, you can use this program to change it.

How can I download CredentialsFileView?

CredentialsFileView is compatible with every version of Windows from Windows XP to Windows 10. So, whatever system you’re currently on, you can use this program to access decrypted credentials files on your computer.

This program will be of most use mainly to system administrators, but you may also use it to remind yourself of a certain app password.

CredentialsFileView is available, and you can download it for free.

Steam Cleaner clears temporary data and duplicate files

Steam is one of the popular distribution platforms for digital games along with Origin, uPlay, and Gog.

Players can access a large library of games containing a list of game manufacturers and prices using Steam.

As it is a huge repository of digital games, Steam has the tendency to leave behind a massive number of junk files.

This happens because installing games on Steam and other gaming platforms also brings with it redistributable packages as a system requirement. After the installation is complete, these temporary files are no longer of any use.

However, some gaming platforms retain the files for quite a while. Depending on the games you have downloaded and installed, these unnecessary files can consume hundreds of megabytes of storage space.

For gamers lucky to have terabytes of free storage, this by no means poses a problem. But for those who use a solid-state drive, freeing up space is necessary.

How can I use Steam Cleaner?

With Steam Cleaner, gamers can now delete huge volumes of unwanted files left behind by gaming platforms. The tool requires no installation or configuration after the download process.

Simply click the download file and Steam Cleaner runs.

The software will automatically scan all the installed games on your platform and display on its dashboard all the unnecessary files.

The list contains the program path, file name, and the total program size. Click the trash icon to initiate the cleanup process in just a few seconds.

Steam Cleaner not only removes unnecessary files from your gaming device but also deletes the junk from your hard drive. It also lets users set the program path if platform detection fails.

There’s also an option to store the files in another location, though users might ignore this feature.

Where can I download Steam Cleaner from?

The tool is available to download from GitHub. Before downloading the tool, make sure your computer has Microsoft .Net Framework 4 installed to run Steam Cleaner properly.

Acronis True Image for imaging Windows 10/11 SSD drives

Restore Windows 10 to different hardware with Acronis True Image

Acronis True Image is one of the best PC backup full disk image software to be used for your Windows 10 device and not only. It’s not exactly common knowledge that Acronis True Image can restore to dissimilar hardware. That means you can perform a backup copy on one device and restore it on an entirely new one. This perk can be greatly useful especially if you decide to upgrade your old computer.

Without further ado, here’s our step-by-step guide showing you how to restore Windows 10 to different hardware with Acronis True Image:

  1. Validate your backup (the one you want to restore from) by performing one of the following actions:
    1. While using Acronis True Image, click the angle button associated with the backup and click Validate
    2. If you’re using bootable media, right-click the backup and select Validate Archive
  2. Prepare the necessary drivers for your new hardware. Make sure you have the drivers for the chipset and your new HDD or SSD controller. Note that Acronis Universal Restore won’t deploy sound, video, or plug & play drivers
  3. Create bootable media by using the Acronis Universal Restore Tool (having this tool is crucial if you want your new hardware to boot your old system)
  4. Connect the bootable media you’ve just created to your computer
  5. Restart your PC
  6. Restore your system
  7. Once the recovery process is over, start your new PC
  8. Use the Universal Restore feat to make your old system bootable on your new PC

That’s it! Your old system should now be functional on your new system, and you can start working with it without any issues. Make sure that during the Universal Restore step you add a folder with the drivers you previously prepared. Otherwise, the new hardware might not be capable of booting your old system.

Download Acronis True Image

Acronis is one of the most reliable software solutions used by thousands worldwide when it comes to providing PC backup support and many other features.

⇒ Get Acronis True Image

For one Windows 10 computer, the license costs $59.99 and for three computers it will cost $89.99. There is also a trial version available that you can use for 30 days. You can find all of them on Acronis’ official website.

More than half a decade ago, Acronis Disk Director has received important compatibility updates for Windows 10. As an important piece of the Acronis suite, the Acronis Disk Director really needed this update and the users warmly received the news. Thus, you can use it without any fear that it could crash or not be getting the job done.

In case you are searching for a full guide on how to backup your data in Windows 10 with Acronis, you can find an excellent step-by-step guide right here. If for some reason, Acronis does not fit your needs, we have a list of other backup software that will replace Acronis and help you store your important data while restoring or making any kind of experiments with your OS or PC.

Install Windows 10/11 on Mac without Bootcamp [Full Guide]

If you’re using a Mac computer, but still want to see how Windows 10 looks like, we have some great news for you.

With Parallels Desktop 15 for Mac, you’ll be able to install Windows 10 on the virtual machine on your Mac.

Parallels announced that recently that its virtual machine software for Mac computers, Parallels Desktop 15 got a very important update in the form of experimental support for Microsoft’s Windows 10 operating system.

You can use Mac and Parallels to reinstall Windows or to do a Windows job.

This software offers the best privacy settings for Windows 10 through Parallels 11 on Mac and will allow users to test the latest version of Windows 10.

All that without overwriting their existing Boot Camp or creating the new partition just for the system, but to safely install it on Parallels’ virtual machine.

This update will give you the ability to try the new preview of Microsoft Office for Windows 10, which includes the improved versions of Word, Excel , and PowerPoint, and other new features of Windows 10.

Parallels Desktop 15 also gives Mac users the chance to try Microsoft’s personal assistant, Cortana, and compare it with Apple’s VA, Siri, which is great if you like to experiment with your system.

Installing operating systems on the virtual machines before installing them on actual computers has become a trend lately.

But it is indeed a more practical way to determine which operating system fits you.

Maybe using Microsoft Windows 10 Technical Preview on Parallels Desktop 15 will not change your choice of the operating system, but it will certainly give you the insight in other OS and all it’s good and bad sides.

But unfortunately, Parallels Desktop 15 is not free, it is available to purchase from the Parallels’ website for $79.99.

There is also a special pricing plan for students and users of previous versions of Parallels Desktop. But you can always try a free trial version, which can be downloaded from here.

Best Rugby Analysis Software for Your Team [Great Picks]

Rugby is played with an oval ball by two teams of 15 players (in Rugby Union play) or 13 players (in Rugby League play).

Both versions have their origins in the style of football player at Rugby School in England.

The basis of the game was well established by the early 1900’s, about the same time that the foundation was laid for baseball. Since then, the game has constantly evolved.

With the development of video cameras, the game has become an incredibly strategic sport thanks to video analysis software.

They say a picture is worth a thousand words, but when it comes to video, the information obtained by coaches and scouts is worth considerably more.

Video analysis uses motion recording in order to improve the techniques the players use, identify problems related to movement, and more.

Behind every successful athlete, there is whole team of professionals that make sure he/she always performs at top peak performance.

The data gathered through video analysis allow physiotherapists and rugby coaches to polish the skills of their athletes.

In this article, we will explore some of the Rugby analysis software for rugby matches analysis.

Which are the best 6 rugby analysis software?

NacSport Analysis Pro

NacSport Analysis Rugby

Another Rugby analysis software that offers a wide array of features no matter your level, budget, and sport.

NacSport Analysis offers a wide range of versions:

  • Basic suitable for ‘rookies’ in video analysis:
    • Basic customized analysis
    • Powerful video player
    • Add extra info to your clips
  • Basic + for in-depth analyses:
    • Advanced customized analysis
    • Easy access to detailed info
    • Dashboard and reports capabilities
  • Scout + for high-end features with the capability to use 5 different videos in your                                          presentation:
    • Customized limitless analysis
    • Big volumes of detailed data
    • Analyze without video source
    • Add extra info to your clips
    • Two video angles at a time
  • Pro + for high-end processes for professional analysts aimed at elite teams:
    • Panel Flows for templates (maximum 3)
    • Big volumes of detailed data – an unlimited number of videos
    • Dynamic matrix-based insights or submatrix with the capability to export to Excel
    • Analyzing without a video source
    • Adding extra info to your clips – text notes, ratings, draw, compare actions
    • Two video angles at a time
    • Dashboard and reports that can be shared with charts and labels in real-time
    • Powerful search tools
  • Elite offers all the features of Pro+ and some extras:
    • First-class video analysis
    • Unlimited video analysis options
    • Immediate feedback
    • Registration tools that allow you to compile a high amount of data
    • Richer perspective for your clips
    • Up to 4 angles at a time
    • Live stats and reports
    • Stream videos and data
    • Wirelessly share video and data

The software has multiple price plans but we have found a downloadable trial version for our readers and you can get it from the link below.

NacSport Analysis Pro

NacSport Analysis Pro

Nothing beats using a dedicated tool for any given job, and when it comes to sports analysis, NacSport Analysis Pro is the very best.
Check priceVisit website

Optapro Rugby SuperScout

OptaPro Rugby Super Scout

Opta is the global leader in rugby performance data and statistics, covering all major rugby competitions.

SuperScout allows you to search, view and create your own time-stamped video footage by collecting data about the ball event in each game, and assisting each action with a corresponding X, Y pitch co-ordinate.

The tool can import video and XML feeds to other analysis platforms with data from other sources like GPS. SuperScout has the ability to also recover 2D graphics data from the review video.

Opta has collated the most comprehensive database of player performance data across the major global rugby competitions for domestic and international level from : Aviva Premiership, Super 15, Top 14, Rabo Direct Pro 12, Heineken Cup, Amlin Challenge Cup, LV Cup, ITM Cup, RBS 6 Nations, IRB Rugby World Cup, Autumn Internationals, Summer Tours and selected age grade and Women’s International fixtures, Stobart Super League and NRL.

Multiple SuperScout licences are available that include some powerful features:

  • Summary match stats
  • Detailed home and away team reports
  • Season to date team
  • Player comparison reports
  • Tournament and referee reports
  • Video and SuperScout XML data
  • Player analysis and reports dating back to 2005
  • Performance data
  • Timestamp events
  • Plot kicking data on a 2D graphic
  • Video review

⇒ Get Opta

StatsPro

StatsPro Rugby

StatsPro offers a quality service regarding data gathering from any rugby match. You can also send the videos to them and have them analyzed or do it yourself by buying an annual licence to use this software.

You can use software for free if you want them to code the games for you.

StatsPro key features:

  • KPI Dashboard – one page overview of game data, ruckspeed, return to play time, etc.
  • Player match report and Player Matrix – feedback for your players with pass, kicks and tackles ratings
  • Line-out Analysis – feedback for lineout formations
  • Video Feedback – export selected clips, individual video clips of players

⇒ Download StatsPro

Rugby Assistant

Rugby Assistant

Rugby Assitant is a free software that allows you to redistribute/modify it under the terms of the GNU (General Public License).

Rugby Assistant  key features:

  • Future match analysis – discover recursive patterns in opponents
  • Matches made analysis – player stats and self-assessment
  • Medical stuff -take control of injuries and players availability
  • Ability to check the most involved playes with stats.

⇒ Download Rugby Assistant

Avenir Sports – Sportscode

Avenir Sportcode Rugby

Because video analysis is the first and most important step in improving your Rugby’s team performance, Avenir Sports offers a very powerful and easy to use software to fit any analysis situation, packed into a software called SportsCode.

With Sportscode, you can analyse rugby matches from 2 or more angles to give you a more informed insight into your team’s performance. You can analyze aspects of movement of players, running lines both on and off the ball, and more.

It is worth mentioning that 6000 Elite Sporting Organisations around the world currently use SportsCode.

Sportscode key features:

  • Easy to use coding/tagging templates
  • You can upload footage from anywhere – Digital video camera, TV, DVD, etc.
  • Multiple angle analysis using stacking feature
  • No limitations on how many code buttons can be included
  • HD footage support
  • Can generate a spreadsheet-style analysis report
  • Data link to video for qualitative analysis
  • Real time sharing for coded data and reports
  • Timeline feature that allows you to combine many games together in order to see patterns
  • Ability to play back video in slow motion, frame by frame, etc.
  • Drawing tools to highlight different aspects of play
  • Annotation feature with specific times chose by you
  • Capture video live
  • Review features without stopping the recording
  • Key-moments easy flagging
  • Offline analysis integration
  • HUDL  app – allows players access to the analysis information from any device.

⇒ Get Avenir Sports Sportscode

Coach Logic

CoachLogic Rugby

This coaching software improves the use of video in performance analysis. It brings the teams closer by offering engagement capabilities and combines the best coaching practice by making players central to the analysis process for optimum results.

Coach Logic key features:

  • Streamlined video analysis – easily accesible tools
  • Upload, view, analyse, discuss and share limitless match and training videos
  • User-friendly interface
  • Saves time by completing match analysis collaboratively
  • Upload, move and learn anywhere features by using cloud based phone and web apps
  • It allows players to access the information at any time and respond with comments
  • You can easily create playlists
  • Notifications that keep coaches and players up to date with any information needed
  • Video tagging, match review and video filters
  • Offline analysis integration

⇒ Download Coach Logic

We’ll end this list here. If you have any questions or suggestions related to this post, feel free to let us know in the comments below.

Steven Sinofsky is authoring a book about his time at Microsoft

The former head of Windows and Office, Steven Sinofsky, is working on an upcoming memoir titled Hardcore Software: Inside the Rise and Fall of the PC Revolution. Today, Fast Company released an excerpt from Sinofsky’s draft in a Q&A format on its site.

Reflecting on the 20th anniversary of the ILOVEYOU virus that ravaged the PC landscape, Fast Company published its inside account of how Sinofsky and the Office teams handled the crisis as well as other insights from his time at Microsoft.

Fast Company: The story of the Concept, Melissa, and ILOVEYOU viruses is sort of the end of the age of innocence when it came to security for businesses and consumers, and maybe a little bit for Microsoft, too. And yet it’s relevant today as companies wrestle with trade-offs between ease of use, power, and security, and get user pushback regardless of where they land. Given how much higher the stakes are now than they were in the 1990s, should the industry be better at anticipating threats and preventing them?

Steven Sinofsky: In many ways this was the earliest of the battle between “techie” computer people (a phrase popularized by The Wall Street Journal’s Walt Mossberg) and everyone else, whom we always just called “humans.” When we tried to make the PC safer, it inherently meant making it more difficult to do anything you wanted to the PC—such as run any code from anywhere or to script or customize every program. With each restriction we put in, techies would push back. The real tension for Office came about when these customizations were also used to do useful business functions—for example, most early CRM solutions were built as customizations on top of Outlook.

While the released excerpt was in the light of Sinofsky’s handling of the ILOVEYOU virus at Microsoft, there were some interesting reflections shared that include his new appreciation of trust earned. According to Sinofsky, the way Microsoft was able to navigate the ILOVEYOU virus was compounded by its waning trust with customers. Even seemingly transparent communication between Microsoft and customers was distorted by distrust, but that was only part of the issue. The other was the company’s inability to internalize its deteriorating position with its customers.

As reflected in the following years, Microsoft repositioned itself as mostly an enterprise company with a concentration on security, which incidentally, is the same view most people had already perceived it as. Since his departure following the company’s unfortunate Windows 8 debacle, Sinofsky has been among the staunchest critics of Microsoft’s consumer-facing decisions and perhaps justifiably so, as someone with insider experience into the former decision-making process as well as a new bird’s eye view of the computing market outside of the Microsoft garden.

Sinofsky hasn’t been afraid to point out where Microsoft’s recent computing efforts have fallen short with consumers, despite being head of the team that fumbled the company’s transition into modern computing interfaces. It’ll be interesting to see where Sinofsky delineates between the rise of the iPhone, his team’s mishandling of Windows 8, and the company’s Windows 10 predicament.