Hands-on with Minecraft Dungeons: is it Minecraft for the rest of us?

Minecraft developer Mojang was one of Satya Nadella’s first big acquisitions after the Microsoft veteran took the reins of the company back in 2014. In hindsight, this $2.5 billion deal was a brilliant move. Indeed, the software giant acquired what has since become the most popular video game of all time, with 180M copies sold and 480 million players as of November 2019.

Minecraft is available on all platforms today, and it’s also being used by teachers as a vehicle for learning. The game remains incredibly popular with kids, and you can also find tons of gameplay videos on YouTube, or gamers streaming it live on Twitch.

Still, there are probably a lot of consumers and gaming enthusiasts who never got into Minecraft. How could a game with such dated (some would say hideous) graphics remain so popular after all these years? Well, the Mojang’s game is finally getting ray-tracing support on Windows 10 this year (a beta is now available), but there’s no denying that Minecraft is still not a game for everyone. It’s quite difficult to get started without reading tutorials, and unlike other game genres, the sandbox game isn’t something that’s immediately fun and gratifying.

As you may know, Microsoft recently showed that it’s willing to push Minecraft in other directions, starting with the AR game Minecraft Earth last year. This one didn’t exactly set the world on fire as Pokemon Go did years ago, but Minecraft Dungeons, a new Minecraft-themed dungeon crawler to be released on May 26, could be a whole different story. We went hands-on with the closed beta this week, and it does seem to provide the immediate sense of fun that regular Minecraft still lacks.

The most accessible Minecraft game ever?

Minecraft Dungeons has often been compared to Blizzard’s Diablo series, and there’s definitely some truth to that. It’s a dungeon crawler, which is playable in solo or multiplayer with up to 4 people. During the campaign, you’ll have to complete different levels that are procedurally generated, and the world map in the beta includes 9 different biomes in total.

Except for the tutorial, only two missions are available in the closed beta, and they happen in two different biomes called “Creeper Woods” and “Pumpkin Pastures.” Before starting a mission, though, you’ll first have to create your character: There are no character classes in Minecraft Dungeons, so the only way to customize your character is by choosing a skin, and then finding loot.

Once you’ve chosen your character skin, you’ll start in a village where you can choose your mission, and you can also find merchants in the village for trading emeralds earned during missions in exchange for randomized loot. The two missions in the closed beta are pretty straightforward, and I finished them in a couple of minutes. You’ll be given mission objectives such as freeing villagers, and of course, you’ll find a lot of Minecraft-themed monsters along the way: zombies, spiders, and skeletons are all there, though the evil villagers (“illagers”) will probably offer a better challenge.

To be clear, there’s no building or crafting in Minecraft Dungeons. You’ll just have to kill monsters again and again and find better loot to upgrade your equipment and capabilities. You can also equip three artifacts that give you special abilities, with each of them having a cooldown period. As an example, I found a flaming quiver giving me burning arrows, as well as magic boots giving me a speed boost for a couple of seconds.

The progression system in Minecraft Dungeons is quite different from the one in Diablo: instead of unlocking new active and passive abilities with every new level, you’ll unlock enchantment points for your gear. As an example, I used an enchantment point to unlock a chain enchantment for my weapon, which gave me a 30% chance to chain close enemies and keep them bound for a short time. I also used another point to unlock a potion barrier enchantment for my armour, allowing me to take 90% less damage for a short duration when using healing potions. Moreover, I upgraded my bow with a multishot enchantment giving me 20% chances to fire five arrows at once.

Personally, I think a Diablo-like class system with clearly differentiated characters probably offers more depth and replayability, but the loot and enchantment system in Minecraft Dungeons should still provide lots of customization options and possibilities. Because Minecraft Dungeons has been designed as a family-friendly game (for ages 10 and up), the gameplay is quite easy to understand, and the game itself is pretty easy, too: there’s no game over, and when you die you’ll just respawn not far from the monster that killed you.

Is it fun to play?

I only played the Minecraft Dungeons closed beta in solo, and I did find the game more fun than regular Minecraft. Dungeons plays great with a controller (mouse and keyboard controls are also supported on Windows 10), and even though you often end up mashing the attack button and the right trigger for shooting arrows, killing monsters feels satisfying. The game uses the popular Unreal engine, and even though Mojang artistic direction may not please everyone, Minecraft Dungeons does look pretty unique.

Again, there are just two levels you can play in this closed beta, and you can complete them multiple times in higher difficulties to gain more valuable loot. Creepers, the common green mobs that follow you around and explode when they’re really close to you, are still as dangerous as ever, though unlike in regular Minecraft, their explosions won’t create huge holes into the ground.

The same can be said for TNT crates, which are pretty rare to find but very effective for quickly dispatching enemies. It’s pretty fun to see enemies flying around after a TNT explosion, but again, what would have caused a huge crater on the ground in regular Minecraft doesn’t affect the procedurally generated Dungeons levels in any way, unfortunately.

The lack of crafting and building mechanisms also seem to be a missed opportunity. A game like Fortnite made building a key element of the gameplay for protecting yourself from others and accessing special areas, but Minecraft Dungeons has none of that. It’s possible that the game could become repetitive pretty quickly, especially if multiplayer is only restricted to a co-op mode.

A promising casual game Xbox Game Pass

Overall, if you’re a hardcore Diablo III fan, it’s clear that Minecraft Dungeons doesn’t play in the same category. Keep in mind that this is just a $20 game, and for that price, it does seem to offer a decent amount of fun. Minecraft Dungeons should be great filler content for Microsoft’s Xbox Game Pass service, and it already seems much more interesting than previous Xbox Game Studios titles such as Bleeding Edge or Crackdown 3.

Minecraft Dungeons will also be released on PlayStation 4 and Nintendo Switch next month, and Mojang plans to enable cross-play multiplayer at some point. Unfortunately, the Xbox One version won’t support Xbox Play Anywhere, so you’ll have to purchase the Windows 10 separately or play it for free with Xbox Game Pass for PC.

If you want to get access to the private beta on Windows, you can still sign up on this page. If you’re selected, you’ll also get three invite keys to send to your friends while the closed beta is still live.

Minecraft Dungeons
Minecraft Dungeons
Developer:
Xbox Game Studios
Price:
Free

Fix: XPS option is not enabled error

Printer errors such as The job was not printed because the XPS option is not enabled. Contact System Administrator to enable XPS on this device are not uncommon, especially when you are trying to connect to the printer via Wi-Fi.

This specific issue is usually related to class drivers or system conflicts. This is extremely inconvenient, so in this guide, we’ll show you a few potential fixes for the error.

What to do if the job was not printed because the XPS option is not enabled?

1. Reconnect the printer’s power supply

remove power cord

The first thing you’re going to try is to turn the printer off and remove the power cord from the wall outlet. Then, pull out the power cord from the power supply.

After one minute, reconnect the power cord into the power supply and then plug the power cord into the outlet. You may turn the printer back on and see if the issue persists.


2. Download the PS driver for your device

uncheck option

That error typically means a class driver is being used on Windows 8 or Windows 10. Luckily, there is an easy fix if you’re still seeing it after reconnecting the power supply. You need to determine if you are using a class driver, so check the installed printers.

If there is one that is XPS, or a Class Driver, uninstall or remove it. Up next, navigate to the support page for your machine and select the Drivers & Downloads tab. Download the PS driver for your device.

Then, make sure that Query the printer and automatically select the driver to use is not checked when installing the driver. If it is checked, note that you will not be asked to use the driver you just downloaded and extracted. Finally, you may restart your computer and print.


3. Enable XPS option on your PC

enable XPS

  1. Quickly open the Control Panel.
  2. Click on Programs next.
  3. Click on Turn Windows features on or off.
  4. In the Windows Feature, look for XPS Service. After finding it, just click the checkbox next to it.
  5. Click OK.
  6. Wait until the configuration process completes.
  7. Once done, go to Control Panel > Devices and Printers and check if the Microsoft XPS Document appears.

Your printer does not support XPS unless you paid for that feature. The Microsoft XPS Document Writer (MXDW) is a print-to-file driver that steps in when it comes to enabling a Windows application to XPS files.

Follow these steps to enable the XPS option on your Windows 10 PC connected to the printer.


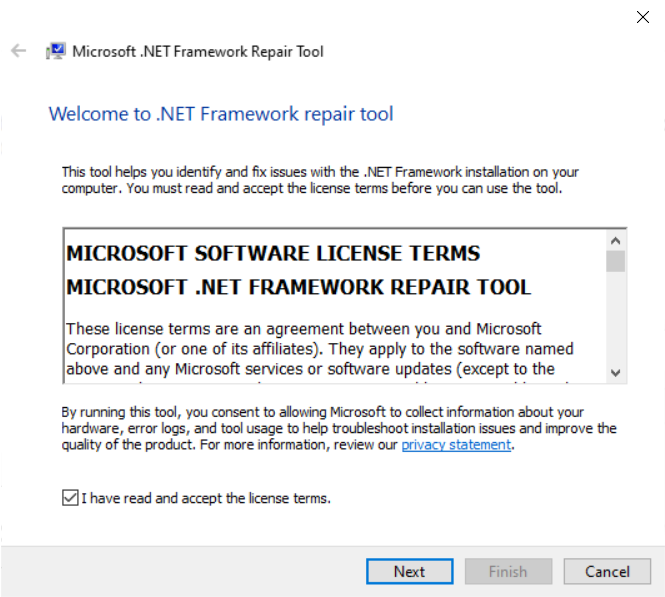
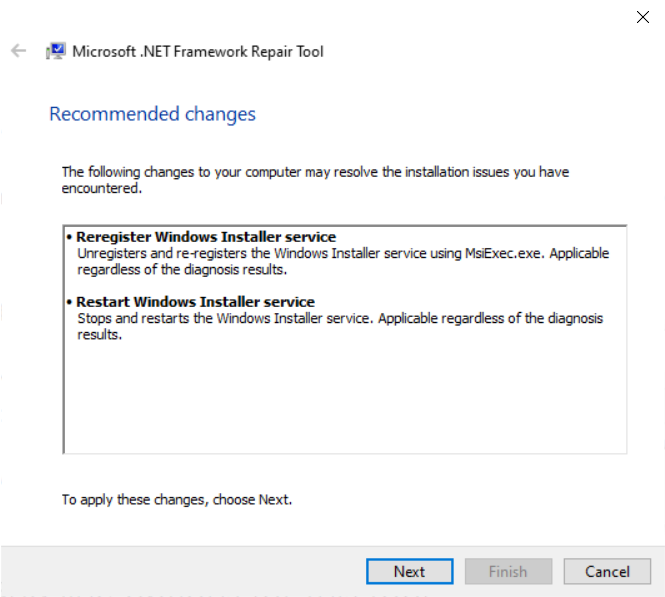
4. Update the printer driver software

update driver software

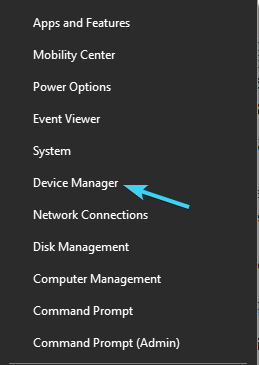
  1. In the search box on the taskbar, enter Device Manager.
  2. After that, select Device Manager.
  3. Select a category to see names of devices, then right-click the printer you’d like to update.
  4. Select Search automatically for updated driver software.
  5. Finally, just select Update Driver.
  6. If any updates are available, they will be downloaded automatically in the background. Once the updates are installed, check if the problem is still there.

One aspect that doesn’t usually get much attention is updating the printer driver software. Printer drivers are software programs, and their function is to convert the data you command to print to the form that is specific to the installed printer.

Even if Windows 10 usually installs the missing updates automatically, it cannot hurt to look for any missing updates by following the above steps.


5. Use the troubleshooter to fix all emerging problems

fix all emerging problems

  1. Press the Windows logo key + R keyboard hotkey to open the Run dialog box.
  2. Type control in the Run dialog box and hit Enter.
  3. In the Search box in Control Panel, type troubleshooter.
  4. Up next, click Troubleshooting.
  5. Under the Hardware and Sound item, click Use a printer.
  6. Enter an administrator password or provide confirmation when prompted.
  7. Press Next and let the troubleshooter scan for problems.
  8. Fix all emerging problems.

If you can’t get rid of this error, using the troubleshooter might help to solve the problem. This will restart your printer and drivers and check for any errors. Your printer must be connected during this procedure.


If you’re trying to print and encounter the XPS option not enabled error, we’ve listed some solutions on how to fix it. If you found our article useful, feel free to let us know by leaving a comment below.

Also, keep in mind that there are various other posts on printers. Just use the search function to find the articles you need to fix your printer issues or take a peek here.

[wl_navigator]

Digital pre-orders open for the new Spongebob Squarepants video game on Xbox One

SpongeBob SquarePants: Battle for Bikini Bottom: Rehydrated is now available for digital pre-order and pre-download on Xbox One consoles ahead of its June 24th release date.

The game is a remake of the classic SpongeBob SquarePants: Battle for Bikini Bottom which originally came out on the original Xbox console way back in 2003. Versions were also released on Windows, PlayStation 2, GameCube, and the GameBoy Advance.

In addition to getting a massive graphical overhaul, this new Rehydrated version of the game will also feature 2-player multiplayer, extra game content, and a new horde mode.

Here’s the full game description and trailer:

Are you ready, kids? The cult classic is back, faithfully remade in spongetastic splendor! Play as SpongeBob, Patrick and Sandy and show the evil Plankton that crime pays even less than Mr. Krabs. Want to save Bikini Bottom from lots of rampant robots with your mighty bubbles? Of course you do! Want to underpants bungee jump? Why wouldn’t you! Want to join forces in a brand new multiplayer mode? The battle is on!

GAME FEATURES

  • Play as SpongeBob, Patrick and Sandy and use their unique sets of skills
  • Thwart Plankton’s evil plan to rule Bikini Bottom with his army of wacky robots
  • Meet countless characters from the beloved series

REMAKE FEATURES

  • Faithful remake of one of the best SpongeBob games ever created
  • High-end visuals, modern resolutions and carefully polished gameplay
  • Brand new horde mode multiplayer for up to two players, online and offline
  • Restored content that was cut from the original game like the Robo Squidward boss fight and more

Were you a fan of the original or will this be your first time playing SpongeBob SquarePants: Battle for Bikini Bottom? Share your thoughts with the community in the comments below and then follow us on Pinterest for more Xbox gaming content.

Let’s cross this one off your list [Disable alert]

We all know that Microsoft wants Windows 10 users to install the latest updates on their computers as soon as they’re available.

To make sure that users don’t forget to regularly update their machines, the OS displays a series of messages on the screen, inviting users to check for updates.

We’re sure that many of you have already encountered the following messages:

  • The newest Windows feature update is here
  • What’s new in this update
  • Windows Feature Update is ready to install
  • Let’s cross this off your list
  • We’ve got an update for you
  • Important updates are pending.

Of course, if you’re busy working on your computer, you definitely don’t work to be interrupted by update invites.

As a matter of fact, many Windows 10 users prefer to wait for a few days or even weeks before installing the latest updates.

Windows update issues are quite frequent, so users prefer to postpone the updates in order to buy more time for Microsoft to identify and fix potential bugs.

windows feature update
Another issue is that these update pop-ups tend to behave in a pushy manner. More specifically, there is no little X button in the upper right corner to allow users to get rid of them.

The pop-up window roughly displays two options: update now or update later. But getting rid of the alert for good is not an available option.

Moreover, users are also bothered by the fact that the pop-up takes control of the desktop, preventing them from accessing their running apps.

Of course, there are also security concerns as well. When something pops out of the blue on your screen, the first thought that crosses your mind is a malware infection.


Looking for the best tools to solve Windows update issues? Here are the best options.


Let’s cross this one off your list

let's cross this off your list windows 10
Among all these update notifications, this one really got our attention.

There are many user reports suggesting that the OS installed bloatware after this update message appeared on the screen.

What’s even more annoying is that the alert sometimes appears on the screen every five minutes, as users report on Microsoft’s forum.

This is popping up every 5 minutes.  The update actually installed Candy Crush Soda Saga!!!

This usually happens if your game updates are enabled in the Windows Store.

Update alerts also pop up if you have yet to upgrade to the Fall Creators Update (Windows 10 version 1709). Microsoft explains that:

Windows 10 Fall Creators Update is available since October last year, some computers only started getting this message because of the staggered distribution dates.

Indeed, if you really don’t want to update your computer, you should cross these alerts off your list.

Fortunately, there are few quick solutions that you can use to disable Windows 10 update notifications.

So, if the Windows 10 update alerts are bothering you, keep reading this article to learn how you can get rid of them.


Windows update is turning itself back on? Here’s what you need to do!


How to disable Windows 10 update alerts/notifications

  1. Disable automatic Windows Store app updates
  2. Defer  updates from Settings (Windows 10 Pro)
  3. Block Windows 10 updates on Windows 10 Home
  4. Stop the Windows Update Service

1. Disable automatic Windows Store app updates

Make sure that your Windows 10 Store update settings are turned off.

If these settings are turned on, your computer will automatically download game updates — and devs roll them out quite frequently, as this user reports.

my computer downloaded 19 updates for two days running nonstop of GAMES they’re pushing.

windows store updates
Remember that user who said that his computer update alert actually downloaded Candy Crush Soda Saga?

Most likely, he had uninstalled the game but didn’t completely remove game leftovers.

As a result, Windows 10 quickly displayed an update pop-up and reinstalled the game alongside the latest Candy Crush Soda Saga updates.


Epic guide alert! Everything you need to know about uninstalling Windows 10 Update Assistant!


2. Defer updates from Settings (Windows 10 Pro)

Windows 10 Pro allows you to defer major updates for up to 365 days. Yes, this means that theoretically, you’ll get rid of these annoying update notifications for a whole year.

Here are the steps to follow:

  1. Go to Settings > Update & security
  2. Now, go to Advanced optionsadvanced update options
  3. In the new window, enable the options that allow you to block updates:
    • you can defer feature updates for up to 365 days
    • you can block security updates for up to 30 days
    • you can pause all updates for up to 7 days

block windows 10 updates
3. Block Windows 10 updates on Windows 10 Home

If you’re running Windows 10 Home, you don’t have too many options to block or pause updates. So, you need to show Windows that your system is not technically capable of downloading the latest updates.

To do this, set your computer on a metered connection.

  1. Go to Settings > Network & Internet
  2. Now, go to Change connection propertiesset internet metered connection
  3. Toggle Set as metered connection on.

metered connection windows 10
4. Stop the Windows Update Service

You can use this quick solution to stop the Update Service on all Windows 10 versions.

  1.  To to Start > type ‘run’ > launch the Run window
  2. Type services.msc > hit Enter
  3. Locate the Windows Update service > double click on it to open itstop windows update service
  4. Go to the General tab > Startup Type> select Disableblock windows update service
  5. Restart your computer.

This is actually one of the safest methods to use if you want to block Windows updates. No updates should be installed on your computer until you turn the Windows Update service back on.


Important Updates are pending: here’s a handy guide on how to disable the pop-up.


Conclusion

we've got an update for you
We hope that this article cast some light on the annoying Windows 10 feature update notifications that the OS sometimes displays on its own.

The four solutions listed above will help you pause or block updates for a while. If you’re running Windows 10 Pro, you can defer updates for up to 365 days.

However, none of the methods listed in this article allow you to permanently block updates.

Speaking of blocking updates, keep in mind that Microsoft regularly rolls out new patches and hotfixes to improve system performance and stability, as well as patch security vulnerabilities.

Blocking updates also means exposing your computer to threats. So, think twice before deciding to block Windows 10 updates.

You can tell us more about your Windows 10 update experience in the comments below.

FIX: The serial number you entered has been revoked Adobe

Adobe Creative Cloud users describe the following situation: whenever they try to open any product, it asks them for their serial number. Doing so makes no difference as they keep getting the same error.

The error message states: The serial number you have entered has been revoked. This product cannot be licensed.  Please contact customer support.

If that’s happening to you as well, you do know that your version is licensed and no one denies it. However, ignoring the problem won’t make it go away.

Panicking over the situation is not recommended either. What you can do instead and is to follow the below solutions to correct the issue as soon as possible.

What can I do if getting Serial number has been revoked?

1.  Get the latest Adobe Creative Cloud version

download Adobe Creative Cloud

You’re most likely getting this error because you have older software. A glitch in the validation checking service is causing the Serial number has been revoked error message to pop up over and over again.

As unpleasant as it is, at least you know what’s the easiest fix to apply – downloading and installing the most recent Adobe Creative Cloud version.

This will not only bring new and enhanced features but will also help you get rid of any serial number inconveniences.

⇒ Download Adobe Creative Cloud


2. Confirm that you have an authorized product

There are times when completely genuine customers experience a glitch in the validation checking service.

However, there are also unfortunate situations regarding unauthorized copies or anti-piracy systems that get false positives from time to time.

Users share over forums how they’ve dismissed the first notification and waited for the second one to shop up.

This notification should include a link to the Adobe landing page, with a unique ID number to use as a reference and a number to contact the Adobe Genuine Helpline to call for assistance.

You can do the same as it is the easiest way to confirm that you truly have genuine software.


3. Disable the Adobe Genuine Software Integrity Service

Adobe Creative Cloud users have confirmed a quick tip that helped them get past the Serial number has been revoked issue.

They’ve simply turned off the Adobe Genuine Software Integrity Service under Control Panel/Administrative Tools. You may also try to check if that helps.


You can’t open Control Panel? Take a look at this step-by-step guide to find a solution.


After following all the steps mentioned above, you should no longer see the Serial number has been revoked error.

Remember to keep your distance from shady methods of selling invalid or counterfeit software. As always, if you have any other suggestions or questions, leave them in the comments section below.

[wl_navigator]

FIX: Error code 50382 WM1 in Monster Hunter World

Monster Hunter World is a popular action role-playing game and comes with an online multiplayer mode as well. However, while inviting other users or joining the match lobby, you may encounter the error code 50382 WM1.

The error is not exclusive to Windows computers and is reported on other gaming platforms, including PS4 and Xbox One. This error can occur if the UPnP is not supported by your router, issues with the network connection, or the Capcom server.

If you are also troubled by this error, here are a couple of troubleshooting tips to help you resolve the error code 50382 WM1 Monter Hunter World error in Windows.


How do I fix the error code 50382-WM1?

1. Change launching parameters

Error code 50382 WM1

  1. Launch Steam.
  2. Right-click on Monster Hunter: World.
  3. Select Manage > Create a Desktop Shortcut.
    • Skip these steps and jump to step 4 if you already have a Desktop Shortcut for the game.
      Error code 50382 WM1
  4. Right-click on the desktop shortcut and select Properties.
  5. In the Properties window, open the Shortcut tab.
  6. In the Target field, add the following at the end of the existing target text:
    • –nofriendsui -udp
  7. Click Apply and OK to save the changes.
  8. Double-click Monser Hunter World shortcut to launch the game and check if the error is resolved.
  9. If the issue persists, open the Properties window again.
  10. Add the following at the end of the target:
    • nofriendsui -tcp
  11. Replace the above parameter with the previously added parameter.
  12. Click Apply to save the changes.
  13. Try launching the game using the desktop shortcut and check for any improvements.

Changing the launching parameters for the game has reportedly helped other Steam users in fixing the issue. The applied parameters will force the Steam client to use the old Friends UI and UDP/TCP protocol instead of the new protocols.


Want to play local multiplayer games on Steam over the internet? Here’s how to do it!


2. Disable Wi-Fi Network

Error code 50382 WM1

  1. If you are using both the wireless and wired network connection, try disabling the Wi-Fi network to see if that resolves the issue.
  2. Several users have reported that disabling the Wi-Fi connection on their laptop has helped them resolve the error.
  3. Try disabling the Wi-Fi network and check if the error is resolved.

3. Modify the In-game server browser ping

Error code 50382 WM1

  1. Launch the Steam client.
  2. Click on Steam and select Settings.
  3. Open In-game option.
  4. Scroll down to the In-Game server browser: Max pings/minute section.
  5. Click the drop-down menu and change the settings to Automatic (5000).
  6. Click OK to save the changes.
  7. Launch Monster Hunter: World again and check if you can join the lobby again.

Changing the in-game server browser ping can prevent the error from occurring if a slow internet connection is causing the issue.


4. Forward Monster Hunter Wolrd ports

Error code 50382 WM1
Note: These steps are for a TP-Link router. The port forwarding process may vary depending on the router you are using.

  1. Press Windows Key + R to open Run.
  2. Type cmd and click OK to open Command Prompt.
  3. In the Command Prompt window, type the following command and hit enter:
    ipconfig
  4. The above command will display Ethernet adapter information.
  5. Copy the Default Gateway address (Router address).
  6. Do not close the Command Prompt yet.
  7. Open your web browser and paste the IP address copied from the Command Prompt and hit enter.
  8. Enter your username and password to access the network admin dashboard.
    • By default the username is admin, and the password is 1234.
    • If the default credentials do not work, refer your router’s manual.
      Monster Hunter World error
  9. Now from the Command Prompt window, copy the IPV4 address.
  10. In the network admin dashboard of your router, click on the Forwarding tab.
  11. Click on Virtual Server > Add new.
  12. Add the connection ports required by the game, as listed below, with your IPV4 address.
    • TCP: 27015-27030,27036-27037
    • UDP: 4380,27000-27031,27036
  13. Click on Save to apply the changes and close the router’s admin page.
  14. Try relaunching the game and check if the error is resolved.

The error code 50382 WM1 Monster Hunter World error code is triggered by network issues. Follow all the steps in this article and check if the error is resolved. Do let us know which method helped fix the error in the comments.

FIX: Error Check Activation in Adobe Digital Editions

When facing the Error! Check Activation in Adobe Digital Editions, chances are all your plans get interrupted. Are you looking for a way to quickly fix it and get back to a pleasant reading experience?

We couldn’t agree more with you. That’s why we’ve decided to tell you more about the quickest solutions to your current problem.

How can I fix Error! Check Activation in Adobe Digital?

1. Install the latest Adobe Digital Editions version

latest version of Adobe Digital Editions

If you’re tired of seeing this message, try installing the latest Adobe Digital Editions version. You clearly won’t regret taking such a decision.

Adobe Digital Editions is supported by a large list of portable eBook devices including Nook or Sony Reader and is compatible with the EPUB 3 format.

This basically means that you can enjoy support for interactive quizzes, better rendering of math formulas, and dynamic image resizing without zero clarity loss.

Since you cannot refuse this package, don’t let all those Error! Check Activation issues keep you away from the application’s true potential.

⇒ Download Adobe Digital Editions


2. Give a try to Icecream Ebook Reader

grab Icecream Ebook Reader

If tackling this issue sounds rather unpleasant, what do you say about trying out a great Adobe Digital Editions alternative?

You’ll most likely appreciate the fullscreen mode that will help you make the most of your EPUB reader and the bookmarks. Use them whenever you intend to go back to the most important parts of your book.

Best of all, no activation errors will ever give you a hard time.

⇒ Download Icecream Ebook Reader


3. Deauthorize and authorize Adobe Digital Editions back

  1. To begin the procedure, make sure that Adobe Digital Editions is opened.
  2. Up next, just press Control+Shift+D keyboard shortcut to deauthorize Adobe Digital Editions.
  3. Select Erase Authorization.
  4. Click OK to confirm your action.
  5. Then, you may quit Adobe Digital Editions.
  6. Finally, open Adobe Digital Editions and reauthorize.
  7. If you have a book open, please click Library to return to the Library view.
  8. Finally, click Help > Authorize computer.

Another quick way to solve the annoying Error! Check Activation in Adobe Digital Editions is to reauthorize it. Following the above procedure is very simple, that’s true.

However, many users complain that the erasing operation gets denied by the application itself. If this happens to you as well, you have no other choice but to try out another fix.

Which of these solutions helped you get rid of the annoying Error! Check Activation message? Let us know by using the comments area below.

[wl_navigator]

Here are the different types of admin roles in Office 365/Microsoft 365 and what they mean for you

If you’re just setting up your Office 365 or Microsoft 365 subscription, one of the steps towards completion will be to assign admin roles. Admin roles gives the people in your organization permissions to handle certain tasks in the admin center and control elements of your subscription.

Along with yourself, Microsoft recommends for you to set at least 2 to 4 global admins. There are also other roles too, including Helpdesk admin, Office Apps admin, and more. In our latest Microsoft 365/Office 365 guide, we’ll take a look a some of these roles, and explain what they mean for you.

Some notes on roles

Before getting into anything, we just want to mention a couple of notes. Admins in Microsoft 365 and Office 365 have access to sensitive data, so it’s recommended that you follow some guidelines to keep your data secure. Of note is the fact that you should only have 2 to 4 global admins.

According to Microsoft, this is because only another global admin can reset a global admin’s password, so having more than one will avoid account lockout. It’s also worth noting that since the global admin has access to all of the settings for Office 365, you should not have more than 4 to keep your account safe. Other tips can be seen below.

  • Always assign the least permissive role: You’ll want to do this when you want to give admins the access to stuff they only need to get the job done. An example is giving someone a limited admin role instead of a global admin role if they need to access passwords for users.
  • Require multi-factor authentication for admins: To keep an account of a user who has admin privileges out of the wrong hands, you should use multi-factor authentication on their accounts. This verifies their identity, which is especially important because some admins will have access to sensitive data.

To change roles in Office 365 and Microsoft 365 you’ll have to visit the Microsoft 365 admin center. Once you are there, you can click Roles in the sidebar. This will show you a list of roles, and a brief explanation of what each one does. You can edit the roles by clicking the downward-facing dots and then choosing Assign admins and then clicking the Add button followed by the user’s name.

The most commonly assigned roles

Microsoft Office 365 icons

The list of roles in the Microsoft 365 admin center is quite long, but we will be discussing the most common ones first. These include Global, Exchange, Groups, and Helpdesk. In the admin center, you’ll see these as show suggested roles.

The Global admin is for the person you want to give the most privileges. Anyone with this role will have access to management features and data across Microsoft 365. They also have access to reset passwords for all users and add and manage domains. The person who signed up for Microsoft services automatically becomes a Global admin.

Next up, there’s the Exchange admin. This role can be assigned to users who need to view and manage users’ email mailboxes, Office 365 groups, or Exchange Online. If you want to have a user help someone recover deleted items in a mailbox, or set up “Send As” or “Send on behalf” delegates, this is the role for them.

Third, there’s the Groups admin. This role lets a person manage all group settings across Microsoft 365. They’ll be able to create, edit, delete, and restore Office 365 groups. They also can create and update group creation, expiration, and naming policies.

Also on the list is the Helpdesk admin. This role will allow a person to help users reset passwords, force users to sign out, manage service requests, or monitor service health. Just keep in mind that the Helpdesk admin can only help non-admin users and users assigned as Directory reader, Guest inviter, Helpdesk admin, Message center reader, or Reports reader.

Some of the other roles can be seen below. These include Office Apps, Service, SharePoint, Teams service, and User. We’ve included a summary of these below.

  • Office Apps admin: Best assigned for users who need to use the Office Cloud Policy service, Create or Manage Office service requests, manage what’s new content in Office or manage service health.
  • Service admin: Best assigned as an additional role to admins or users whose role involves opening and managing service requests, or view and share message center posts.
  • SharePoint admin: Best assigned to users who need to access and manage the SharePoint Online admin center, create and delete sites or manage site collections and global SharePoint settings.
  • Teams service admin: Best assigned for users who need to access and manage the Teams admin center. Users with the privilege can manage meetings, manage conference bridges, manage all org-wide settings, including federation, teams upgrade, and teams client settings.
  • User admin: The user admin role is for users who need to assign licenses, add users and groups, manage user properties, create and manage user views, update password expiration values, or manage service requests.

Again, these are the most common admin roles. These cover most of the day-to-day operations in Microsoft 365. Our next section takes a look at some of the other roles you might come across.

Other roles

When looking through the Microsoft 365 admin center, you can click the Show all roles button to show additional roles. You also can use a search bar at the top to find a more specific role, if needed. There is even a filter option to help you separate out the roles between collaboration, devices, global, identity, or security. This is where you might find some of the other roles which we discuss below.

  • Application admin: A user with this role will have full access to enterprise applications, application registrations, and application proxy settings.
  • Authentication admin: Can require users to re-register authentication for non-password credentials
  • Billing admin: A user that can make purchases, manages subscriptions, manages service requests, and monitors service health.
  • License admin: Allows users to Assigns and removes licenses from users and edits their usage location.
  • Security admin: Gives users the option to control the organization’s security. The user can also manage security policies, review security analytics and reports and monitor the threat landscape.

Again, the roles we’ve discussed here are not ALL the roles you can assign in Microsoft 365 or Office 365. These are just some of the most commonly assigned roles. You can check the full list here at Microsoft, under the All Roles section for more information.

One step in setting up your subscription

Setting up admin roles in Microsoft 365/Office 365 is just one step in setting up your subscription. There are still many other things you can do on the road ahead. Setting up Outlook, Teams are just some other steps you can take. We’ll be diving deeper into that later, so be sure to keep tuned to OnMSFT for all your Microsoft 365 news and information.

Fix Power BI an error has occurred with these steps

The Power BI service can be accessed from both the web app as well as the Power BI desktop client.

However, some users have reported a Power BI error has occurred issue while trying to access the service from the web client.

This is a common issue and can occur due to several reasons including corrupt browser cache and more as reported in the Power BI community forums.

When I open https://app.powerbi.com/  I have the following error:
A problem has occurred.
Try again later.
TECHNICAL DETAILS
An unknown error has occurred. If this error persists, provide the following information when requesting assistance.
Date and Time: 2018-05-08 01: 24: 13Z
Activity ID: 7fca0722-72d2-44d9-8c36-63b713dbad8a

If you are also troubled by a similar Power BI error that has occurred issue, here is how to troubleshoot the issue with minimal effort.

How can I fix Power BI an error has occurred message?

1. Clear Browser Cache

Begin with clearing the browser cache to resolve the issue with the Power BI service.

For Google Chrome 

  1. Launch the browser and click on the Menu.
  2. Click on Settings.
  3. Click the Advanced button.
  4. Scroll down to the Privacy and Security section.
  5. Click on Clear browsing data.
    Power BI an error has occurred clear browsing data
  6. Select the Time Range and then select the Cookies and other site data and Cached images and files options.
  7. Click the Clear data button.
    Power BI an error has occurred clear browsing data settings
  8. Close and relaunch the Chrome browser. Try to access the Power BI Service and check if the error is resolved.

2. Check VPN Software

  1. If you are using VPN on your desktop, check if it is connected when the Power BI error occurs.
  2. At times, Power BI service may refuse to connect to the service due to a sudden change of the region of the user.
  3. Disable the VPN client and try to access the Power BI service and check if the error is resolved.
  4. You may need to clear the browsing data and cookies again after disabling the VPN to access the Power BI Service.

3. Other Solutions to Try

  1. Try to access the Power BI service using Incognito Mode in your browser. If the error does not occur in the Incognito Mode, it could be one of the plugins that are creating the issue.
    disable extensions Power BI an error has occurred
  2. Launch Chrome  (or the browser you use), click on the Menu > Extensions. Try to disable the most recently installed extension. Relaunch the browser and check if the error is resolved. If the issue persists, try disabling other extensions one by one until the issue is resolved.
  3. Some users have reported that the Power BI error occurred issue resolved automatically after a day. So, check if the issue is temporary or at the Power BI end by contacting the support.

Alternatively, you can try using a different browser such as Opera One Browser.

If you need additional security, you’ll be pleased to know that there’s a built-in VPN available as well as phishing protection.

It’s a considerably lighter package than Chrome and using add-ons like the VPN and built-in ad-blocker results in a faster and more responsive internet experience.

Furthermore, using a VPN in tandem with decent antivirus software is only the beginning of a safe web experience. Opera One also comes with a built-in AI.

Opera One also offers data savings through compression technology that is not found in other browsers.

Opera One is fairly comparable to Chrome, and you can use the majority of Chrome extensions with Opera One, even transfer login credentials and bookmarks. It has good memory management, allowing you to open a large number of tabs without experiencing memory saturation or lag. 

⇒ Get Opera One

By following the steps in this article you should be able to fix Power BI an error has occurred issue with your Power BI service. Also, these will help when you find msmdsrv.exe using all the memory

Do let us know what you did to fix the error in the comments below.

FIX: Hyperx Cloud 2 microphone not working / quiet

The HyperX Cloud 2 headset is designed to give impeccable comfort, and crystal clear sound, and let you be fully immersed in your game for a stellar experience.

In this series is the HyperX Cloud 2, which comes with virtual 7.1 surround sound, providing you with the best in audio precision.

It also brings comfort from interchangeable leatherette and velour earpads, as well as an advanced USB audio control box with a built-in sound card that amplifies your audio, and your voice.

This piece of engineering is definitely one of the best 360º sound microphones that you can buy.

One of its salient features, however, is its mic, which is detachable, cancels out any noise, and ensures your voice is loud and clear enough to be heard, always.

In order to keep you on top of your game, here’s what you can do when your HyperX Cloud 2 mic is not working.

How can I fix HyperX Cloud 2 mic not working on Windows 10/ Xbox One?

1. Check HyperX Cloud 2 your connections

Ensure all your connections are rightly plugged in, including the control box and/or extension cable connections. For the microphone, ensure it is plugged in all the way and not hanging loosely. It should fit into the headset.

2. Verify HyperX Cloud 2 audio connections

This could be one of the reasons your HyperX Cloud 2 microphone is not working. Check your audio connections to verify that they are working, by using an alternate mic or speakers.

For more information on how to fix audio issues, check out this troubleshooting guide.

3. Enable audio devices

From your audio settings, enable the speakers and mic, making sure they are not muted or the volumes are not too low or turned down altogether. Most times the mic is disabled or muted.

4. Disable HyperX Cloud 2 audio software

If you have any audio software, especially that of your audio adapter, or you have third party software, disable these and enable the default audio controls for your operating system.

Note icon NOTE
If you’re using the control box, you may not be able to adjust the mic volume on Windows OS – you can only adjust from the control box. If the volume on the mic still doesn’t adjust from the control box, get in touch with the manufacturer (see solution 7).

If you use Windows 10 and are having an issue with HyperX Cloud 2 mic not working, here’s how to resolve the issue:

  • Check if the mute switch is off
  • Right-click Start
  • Select Control Panel
  • Go to Hardware and Sound
  • Click on Sound
fix HyperX Cloud 2 mic
  • Go to Playback tab and check that the dongle is available as the default device
  • Click Recording tab to check for your headset mic. If it’s not visible, go to the next step
  • Right click anywhere in the space and confirm that both Show Disable Devices and Show Disconnected Devices boxes are checked
  • Right click and select headset mic as your default device

Note: if you find that the Device Manager shows Realtek sound drivers, do the following:

  • Unplug the HyperX Cloud 2 headset
  • Unplug your web cam
  • Download and install the newest Realtek drivers
  • Reboot your machine
  • Reinsert the headset
  • Test your headset on Voice Recorder by recording your voice
  • Go to Cortana and type Voice Record
  • Click Mic and talk
  • Click again (this will make it stop)
  • Click on the play (triangle) to playback your recording

Note: Realtek audio software sometimes overrides your Windows settings, so you need to do the following to correct this:

  • Go to Cortana search box
  • Type Microphone Privacy Settings
HyperX Cloud 2 fix
  • Click on Microphone Privacy Settings to open the settings preview
HyperX Cloud 2

Check that the Let apps use my Microphone setting is ‘On’

Click the apps that can use the microphone

Test whether the microphone is working using test calls like on Skype, or Mumble.

5. Check HyperX Cloud 2 volume on your control box

Volume may not just below or turned off on your audio settings, but also your control box. If you are using the control box, ensure you turn up the volume on it as well.

However, you need to know that this volume setting is meant for the headphones alone. Also check whether the mute switch on your control box is not on mute.

6. Check HyperX Cloud 2 audio settings in the game app you’re using

Sometimes the issue may not be on your audio or control box settings, but in the game or app you use instead. Check the audio settings in the game, or in the app, then confirm whether this will work for your mic.

7. Contact HyperX Cloud 2 manufacturer for troubleshooting

If any of the above solutions do not work, contact Kingston technical support for further assistance.

Microsoft now offers real-time translation for ten Indian languages in Microsoft Translator and other products

Microsoft India has announced that Microsoft Translator will now offer real-time translation in five additional languages – Gujarati, Marathi, Kannada, Malayalam, and Punjabi.

Microsoft Translator allows users to translate real-time conversations, menus and street signs, websites, documents and more using the Translator app for Windows, iOS, Android and the web. This takes the total number of Indian languages supported to 10, including Bengali, Hindi, Tamil, Telugu, and Urdu.

Language translation is a core part of Microsoft products and services. These languages are available now on all Microsoft Translator apps, add-ins, Bing Translator, Microsoft Office and through the Azure Cognitive Services Translator API for businesses and developers. Microsoft provides APIs on Azure that organizations can use in their products to conduct their business across the country and globally in different languages.

They will also be rolled out to the new Microsoft Edge browser and other Microsoft products, like the SwiftKey keyboard, in the coming days.

The incorporation of Deep Neural Networks into translating complex Indian languages brings more accuracy and fluency to translation. While Statistical Machine Translation is limited to translating a word within the local context of a few surrounding words, Deep Neural Networks has the capability of encoding more granular concepts like gender (feminine, masculine, neutral), politeness level (slang, casual, written, formal), and type of word (verb, noun, adjective). Using multilingual neural machine learning, the Translator team has leveraged data from languages belonging to the same family to build and refine these models and greatly enhance their quality.

Microsoft has been consistently working to provide local language computing in Indian languages for over two decades since the launch of Project Bhasha in 1998. Through its global Local Language Program (LLP), Microsoft provides people access to technology in their native language.

Microsoft claims that with the recent announcement, the service will now allow over 90% of Indians to access information and work in their native/preferred languages. Sundar Srinivasan, General Manager, Microsoft India (R&D) Pvt. Ltd. believes that the latest cutting-edge machine learning tech will help democratize access to information for everyone in India.

KMS Activation Errors: 4 Ways to Fix Them

If you’re dealing with KMS activation errors in Windows, keep reading. The latest Windows 7 updates, including KB4480970, brought quite a long list of bugs, but we’ll help you fix them.

So, if your network drive doesn’t work, SMBv2 sharing often stops, or the database format isn’t recognized, the steps below will come in handy.

How can I fix Windows 7 KMS activation errors?

Method 1: Tweak SoftwareProtectionPlatform settings

  1. Go to Windows Update > check the list of installed updates > uninstall KB971033
  2. Restart your computer for the changes to take effect
  3. Go to Start > launch Command Prompt as administrator
  4. Enter the following commands:
    • net stop sppsvc
    • del %windir%system327B296FB0-376B-497e-B012-9C450E1B7327-5P-0.C7483456-A289-439d-8115-601632D005A0 /ah
    • del %windir%system327B296FB0-376B-497e-B012-9C450E1B7327-5P-1.C7483456-A289-439d-8115-601632D005A0 /ah
    • del %windir%ServiceProfilesNetworkServiceAppDataRoamingMicrosoftSoftwareProtectionPlatformtokens.dat
    • del %windir%ServiceProfilesNetworkServiceAppDataRoamingMicrosoftSoftwareProtectionPlatformcachecache.dat
    • net start sppsvc
    • lmgr /ipk 33PXH-7Y6KF-2VJC9-XBBR8-HVTHH
      • Note: Use a key that’s compatible with your environment. The example above is a key for Win7 Enterprise. For more information on the keys to use, go to Microsoft’s support page.
  5. slmgr /ato

Method 2: Use a MAK product key

If there is no KMS server available, you can use the MAK key instead.

  1. Launch Command prompt as an administrator and enter this command:
    • slmgr -ipk xxxxx-xxxxx-xxxxx-xxxxx-xxxxx (enter your MAK product key after ipk)
  2. Hit Enter and wait for the command to take effect.

Method 3: Configure a KMS host server

KMS activation errors often occur because there is no valid KMS server for your clients to activate against. In this case, you need to install and activate a KMS server.

Once you’ve set up a computer to host the KMS software, you can go ahead and publish the Domain Name System (DNS) settings.

For detailed information on the steps to follow, you can check out the following Microsoft support pages:

Method 4: Create a KMS SRV record in MS DNS server

Here’s what you can do if your client cannot locate a KMS host on the network:

  • Verify that your KMS host is installed and has been activated with a KMS key registered in DNS.
  • Verify the registry to make sure the KMS host server is registering with DNS.

For a step-by-step guide, go to Microsoft’s support page.

Additionally, you can also assign a KMS server manually. If this action didn’t help, you can automatically publish KMS in multiple DNS domains.

Now KMS activation errors should be gone. If you have any more questions, feel free to ask in the comments below.

FIX: Trello syncing issues

Trello is a popular visual tool for organizing your work and life. One of the core functionality of Trello includes syncing new Trello calendar entries with other third-party services like Google Calendar and Outlook.

However, several users have reported Trello synching issues after adding calendar entries into Trello.

The Trello calendar not syncing with Google Calendar and Outlook issue can occur due to several reasons, including network problems or issues with Google Calendar.

In this article, we have listed a couple of troubleshooting tips to help you resolve the Trello syncing issues with Google Calendar and Outlook clients.


How to fix Trello not syncing with Google Calendar and Outlook issue?

1. Use Cronofy for Trello

Trello Syncing Issues

  1. Open Cronofy for Trello.
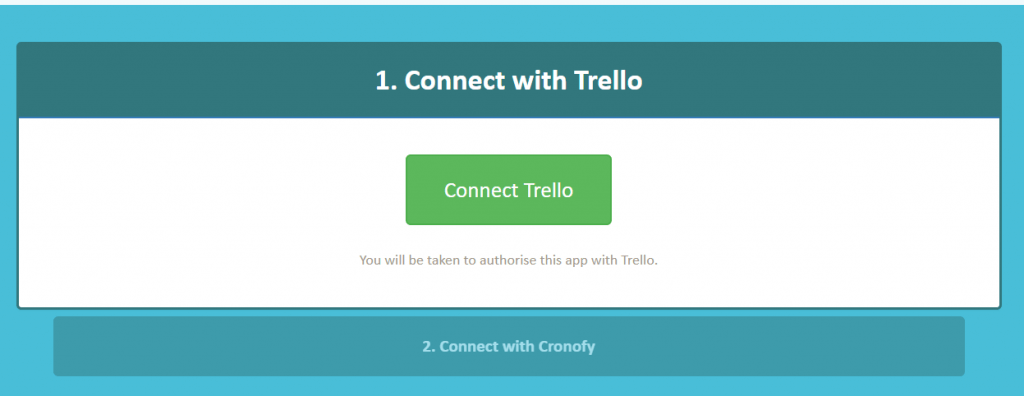
  2. Tap on Connect Trello under the Connect with Trello section.
  3. Next, you need to give access to Cronofy to access your Trello account.
  4. Click the Login button at the end of the page. If not, click the Allow button.
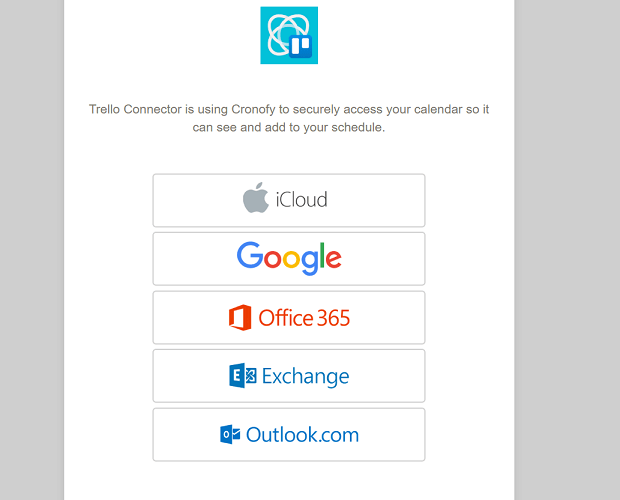
  5. Under Connect your calendar, click the Connect Your Calendar button.
    Trello Syncing Issues
  6. Select your Calendar service from the options to proceed.
  7. Check the box to agree to the terms and conditions and click on Link Google Account.
  8. Once linked, you can customize the connector, and it will sync your board to your calendar without any issues.

Cronofy for Trello is a third-party integration connector. It allows for two-way sync and making updates in Trello or your calendar. The app is free for one board, which means you can get started for free.


Want to link Slack to Trello? This is how you do it.


2. Clear app cache

Trello Syncing Issues

  1. On your Android phone, open Settings.
  2. Go to Apps.
  3. Search Trello and open it.
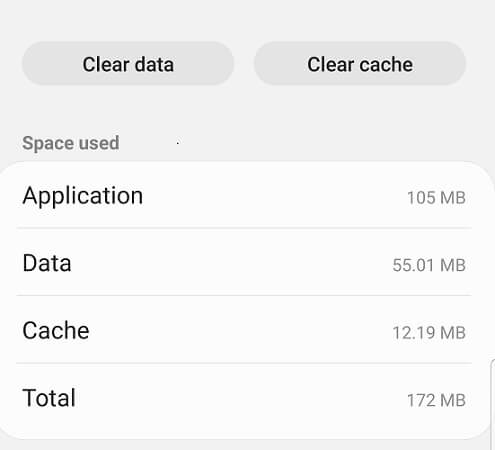
  4. Tap on the Storage option.
  5. Tap on Clear cache.
  6. Close Settings and launch Trello.

At times, the bad cache data can create issues with the functionality of the app. Clearing the app cache can help you resolve Trello calendar not syncing with Google Calendar and Outlook issue.

Update Trello

  1. Open Play Store or Apps Store.
  2. Search for Trello.
  3. Install any pending updates by tapping on Update.

If the syncing issue has affected a large number of users, the developer may release an update to fix the bug that is causing syncing problems.


PUBG Push-to-Talk button not working [FIXED]

Gamers of the most played battle royale title on Steam, PlayerUnkown’s Battlegrounds (or PUBG), can experience their Push-to-Talk feature not working in-game.

When this issue happens, you can hear your teammates, but they can’t hear you back, even if your microphone is working fine. Follow our guide to check the solutions for this problem.


How do I fix Push-to-Talk in PUBG?

1. Check your Steam settings to enable Push to Talk

  1. Open Steam and head over to Settings icon located at the chat overlaysteam overlay settings pubg
  2. Go on Voice settings and make sure to select your microphone under Voice Input Devicesteam char overlay voice
  3. Select your microphone Voice Input Device and under Voice Transmission Type, make sure it’s set Push-to-Talk, then select your Push-to-Talk key

2. Make sure the latest patch is installed

  1. Sometimes the microphone does work in-game due to a bug.
  2. Check for updates in your Steam client for PUBG to fix the issue in this case
  3. To do that, make sure PUBG is closed, then head over to your Steam client and check at the bottom of the page where it says Downloadscheck for steam downloads
  4. Click on Downloads, then check if there’s any update for PUBG pending. If there is, simply start the update
  5. After the game was updated, open PUBG again and check if the issue has been resolved

3. Make sure Push-to-Talk is enabled in PUBG

  1. To check this, make sure the PUBG video game is open, then head over to the Settings menupubg enter settings
  2. Select the Sound tab, then under My Voice, make sure Push-to-Talk is chosen as the option
  3. The key you should press to talk is T by default, however, you can change it in the same menupubg push to talk
  4. Click on Apply and test out if this fix works for you

4. Check your Windows Audio Settings

  1. Head over to the bottom-right side of your Taskbar, then right-click on the Sound icon and select Sounds
  2. Under the Playback tab, select your default Speakers/Headphones
  3. Head over to the Recording tab, then select your default Microphone
  4. Next up, right-click your input device and choose Propertieswindows microphone properties
  5. Go to the Advanced tab and make sure that Allow applications to take exclusive control of this device is unchecked
  6. Click Apply and then OK, and open up the PUBG video game again to see if the issue has now been solvedwindows microphone advanced pubg

5. Check if your Sound Card Driver is updated

  1. Type in Device Manager under Windows Search
  2. Head over to Sound, then click the drop-down menu icon and right-click your audio device
  3. You’ll now be prompted with a menu, just select Update driverupdate sound driver windows
  4. Select the Search automatically for updated driver software option, then Windows will automatically download and install the latest sound driver
  5. After any updates have been applied, please restart your computer, then open PUBG to check if the issue has been fixed

These solutions should fix your microphone in PUBG and allow you to use Push-to-Talk to communicate with the other players. If you’re still experiencing issues with using voice chat in the game, the microphone on your headset might not be working properly.


In case your microphone is not working at all, check out our list for the best gaming headsets of 2020.


[wl_navigator]

Change the Recycle Bin Icon in 2 Quick Ways

The Recycle Bin has been a Windows feature for over two decades now. It offers a safety net for users and is a handy tool for recovering accidentally deleted files in Windows 10.

Recycle Bin is displayed as two icons on Windows 10, one for when the bin is empty and the other for when it contains files.

How do I change my custom Recycle Bin icon?

1. Changing the icons using Desktop Icon Settings

  1. Head over to the bottom-left of your Taskbar, select the Search bar, then type in Themes.
  2. Choose the first option.
    search for themes windows 10
  3. Click on Desktop icon settings on the right side of the screenwindows 10 desktop icon settings
  4. Choose the Recycle Bin (full) icon, then select Change icon.change the recycle bin full icon
  5. You can now select another Windows icon in its place or click Browse and choose another image (in this case, the Windows 7 Recycle bin icon).
  6. To save it, click OK.choose new recycle bin full icon
  7. Repeat the same steps by choosing the Recycle Bin (empty) icon, then choose Change icon.change the recycle bin empty icon
  8. Choose the Recycle Bin (empty icon), then click Change icon. The new icon needs to be a .ico file, as Windows will not accept other image file typesnew recycle bin empty icon.
  9. Select Apply, then click OK. Your Recycle Bin icons should now be changed to the images you selected.
    apply change icon windows 10

The first option to change your recycle bin icon on Windows 10 is to go through the Settings app. This method is pretty simple and straightforward.

2. Restore the icons to the default ones

  1. Type in Themes again in your Search bar, then click on the first option.
  2. Head over to Desktop icon settings.
  3. Select the Recycle Bin (full) icon, then click on Restore Default.restore the default icon windows 10
  4. Repeat the same action with the Recycle Bin (empty) icon.
  5. Click OK to save the settings and exit the menu.
  6. Your Recycle Bin icons should now be set back to the default Windows 10 ones.

Changing the Recycle Bin icons is fairly straightforward and not very difficult for a user to do. The methods presented above will work for changing any Windows 10 icon to a different one or the default one.

Aside from the icon, you can also change your Recycle Bin settings to suit your taste, and if your Recycle bin icon is not refreshing, check our detailed guide to fix it.

Feel free to let us know the method you enjoy using in the comments below.

Setting default apps gets easier with Windows 10 build 19608

Assigning certain file types to specific applications makes for a superior Windows 10 user experience. That is why Microsoft has been making gradual improvements to the way you configure your default apps.

With Windows 10 Insider Preview build 19608, it is now much easier to find file types and set the apps with which you wish to be opening particular files. The update includes fixes to multiple Windows 10 issues.

Searching file types, applications, and protocols

Microsoft has announced the arrival of build 19608 in the Fast ring. Select insiders can now explore the enhancements that have come to the Settings app.

Over the years, we’ve made a number of improvements to Settings based on your feedback, and we’re happy to share the next one is starting to roll out. We’re adding the ability to search the lists of file types, protocols, and apps when setting a default.

If you are among the 50% of insiders that get to test the improvements, you can now quickly look up file extensions, protocols, and apps on your PC. This way, it is much easier to assign specific files to your preferred Windows 10 apps.

The Settings app is a work in progress given the features and refinements it keeps getting from time to time. It will certainly get better as insiders test it and send feedback to Microsoft.

In the meantime, if you are having trouble changing or setting default apps, try our recommendations.

Fixes

Build 19608 brings the following solutions:

  • You can now seamlessly move Sticky Notes windows.
  • For some users, language packs would fail to install on the previous build. Some sections of the user interface would not display in the user’s preferred language as a result. This problem is no more.
  • The Task Manager will now be displaying the correct icon for Microsoft Edge Canary.
  • If you open the Snip & Sketch App via pen click, it will be launching on top of all Windows as expected.
  • Microsoft has corrected a problem where the slider volume control (flyout) on the Taskbar moved in the opposite direction of the pressed arrow key.
  • The Windows Update history page will be loading more smoothly.

Acknowledged problems

Microsoft also listed multiple issues it is yet to fix. For example, some insiders are reporting that the process of updating to a recent Windows 10 build is hanging for longer than usual.

As the company looks into the problem, there are practical fixes you may try if your Windows 10 update keeps hanging.

Microsoft’s Paint 3D app updates on Windows 10 devices with a shiny new icon

The Windows 10 Paint 3D app is the latest Microsoft app to gain a new app icon. The new app icon is now live within the Microsoft Store app store and has started rolling out to some users but isn’t live for everyone just yet.

The new app icon for Paint 3D (see above image) flips the old one so that the paint drop is falling down rather than upwards and uses four distinct colors rather than the gradient fill in the original.

Here’s the old version of the icon for comparison.

Paint 3D old app icon

While the revamp of app icons has been happening for a while, this past month has seen Microsoft Whiteboard and several other apps finally pick up their new icon looks.

Do you like these new app icons? Let us know in the comments below and then follow us on Pinterest and Facebook for more Windows app news.

Paint 3D
Paint 3D
Price:
Free

Google Drive not syncing. Here are 7 solutions to fix this

Because of enhanced data safety and accessibility, cloud storage emerged as a leading solution for both individual and organization users.

Google Drive is at the top of the list because of its good set of options and security.

Even though the competition is challenging, the Google Drive solution is leading in many categories.

The free plan brings out 15 Gb of free space, and upgrades to the business plan are not too expensive (up to 30 Tb of storage can be obtained).

Therefore, Google Drive is a reasonable option for many users. But, as it’s the case with any existing software, issues may occur. We found reports of a syncing problem in Windows 10.

After reinstalling Windows, some users had issues with syncing their desktop files with Google Drive.

It is quite a mischief, but you don’t need to worry because we found a few solutions for you.

How can I fix sync problems with Google Drive in Windows 10?

Many users use Google Drive, but certain syncing issues can occur once in a while. Speaking of Google Drive issues, here are some of the most common problems that users reported:

  • Google Drive unable to connect, can’t connect – According to users, sometimes Google Drive can’t connect. This is a big problem, and we already covered it in our Google Drive unable to connect article.
  • Google Drive won’t sync Windows 7, 8 – This issue affects older versions of Windows as well. Even if you’re not using Windows 10, you should know that our solutions are applicable to Windows 7 and 8 alike.
  • Google Drive sync won’t start, run – In some cases, Google Sync won’t even start or run. If that happens, you might have to reinstall your Google Drive client.
  • Google Drive won’t sync all files, some files – Users reported that Google Drive won’t sync some of their files. This can be an issue, but you might be able to circumvent it by using the web version of Google Drive.
  • Google Drive won’t sync with desktop – Sometimes your Google Drive won’t be able to sync with your desktop PC. This can occur due to your antivirus software, so if you’re having this issue, be sure to disable your antivirus and firewall and check if that helps. In worst case scenario, you might have to switch to a different antivirus solution.
  • Google Drive folder not syncing
  • Google Drive desktop not syncing
  • Google Drive not syncing android
  • Google Drive file stream not syncing
  • Google Drive not syncing with computer

There are a few ways to resolve this issue. We enlisted them here so you can look them out and try to solve this malfunction.

Solution 1 – Reinstall Google Drive

The first thing we’re going to try is simply reinstalling Google Drive. That way, the service will completely reset, and occasional bugs may disappear.

In case you’re not sure how to reinstall Google Drive, follow these instructions:

  1. Quit Google Drive. You will do this by opening the icon in the notification area.
  2. Uninstall Google Drive.
  3. Rename your Google Drive folder on your local storage whatever you like.
  4.  Download the latest version of Google Drive and install.
  5. Syncing should work now.

There are several ways to uninstall Google Drive, but the best one is to use uninstaller software.

Many applications can leave certain registry entries or files behind after you remove them, and those files can still interfere with your system and cause issues to occur.

In order to ensure that these bugs don’t appear, we strongly recommend downloading and installing the latest version of Google Drive.

Solution 2 – Turn off Windows Firewall and disable Antivirus

Sometimes Firewall and antivirus programs can slow down or even block your syncing. Try to disable them and it may work.

  1. Press Windows Key + S and enter firewall. Select Windows Defender Firewall from the list of results.
    Google Drive unable to connect
  2. In the left pane, click Turn Windows Defender Firewall on or off.
    Google Drive won't sync Windows 7
  3. Now select Turn off Windows Defender Firewall (not recommended) and click OK to save changes.
    Google Drive sync won't start

It’s worth mentioning that your antivirus can also interfere with Google Drive and cause syncing issues to occur.

To fix that, you need to open your antivirus settings and try turning off certain features. If that doesn’t work, your next step would be to turn off the antivirus completely.

In the worst-case scenario, you would have to remove your antivirus entirely.

If removing the antivirus solves the issue, you should consider switching to a different antivirus solution.

There are many great third-party antivirus tools, and most of them won’t interfere with Google Drive and other apps in any way.

Consider looking for other antivirus software that is more suited for your PC and will also assist you if you are unable to connect to Google Drive due to risk.

Solution 3 – Install the previous version of Google Drive

If your current version doesn’t work, you may want to try some of the past ones. To try that, do as follows:

  1. Uninstall Google Drive from your system.
  2. Use trusted third-party cleaner to clean registry.
  3. Download past version from this link.
  4. Install chosen version.

If you are sure that some of the past versions worked fine and the problem occurred after the update, this is a good way to do it.

Solution 4 – Restart Google Drive

According to users, if Google Drive won’t sync, you might be able to solve the problem simply by restarting the application.

Keep in mind that this is just a workaround, but many users reported that their files started syncing once they restarted Google Drive.

It’s also worth mentioning that this isn’t a permanent solution, so you might have to repeat it if the issue reappears.

Solution 5 – Run Google Drive as administrator

Several users reported that they solved syncing issues with Google Drive simply by running the application as an administrator.

This is a simple workaround, but it works according to users, so we encourage you to try it out. To start Google Drive as administrator, do the following:

  1. Locate Google Drive shortcut or .exe file on your PC.
  2. Right-click the file/shortcut and choose Run as administrator from the menu.
    Google Drive won't sync with desktop

If this workaround works, you can set Google Drive to always start with administrative privileges. To do that, follow these steps:

  1. Go to Google Drive’s installation directory and locate Google Drive .exe file.
  2. Right-click Google Drive and choose Properties from the menu.
    Google Drive can't connect
  3. When Properties window opens, go to Compatibility tab and check Run this program as an administrator option. Now click Apply and OK to save changes.
    Google Drive won't sync Windows 8

After doing that, Google Drive will always start with administrative privileges and the issue should be resolved.

Solution 6 – Temporarily pause Google Drive

According to users, you might be able to fix syncing issues in Google Drive with a simple workaround.

To fix the problem, you just have to temporarily pause syncing, wait a few seconds and then enable it once again.

This is rather simple and you can do it by right-clicking the sysbar icon. This isn’t a permanent solution, and if you encounter issues with syncing, you might have to repeat these steps.

Solution 7 – Use the web version

Google Drive won't sync all files

If you have problems with Google Drive client and you can’t sync certain files, you might want to try using the web version as a workaround.

The web version has its flaws, and it won’t sync your files in real-time, which can be a problem for some users.

However, if you just need to sync a couple of files, the web version might be the right choice for you.

Simply open the web version of Google Drive and drag and drop your files to the desired directory. If you prefer, you can also use the upload interface.

As we previously mentioned, this is just a workaround that might be useful if you’re planning to sync a couple of files.

If you want to sync files in real-time, then this workaround might not work for you.

Those were our possible solutions to your problem. We hope that you’ll manage to make it work. If you have other solutions, please tell us in the comments.

NFL gets even cozier with Microsoft, using Teams for the NFL Draft

By now, it is no secret that the NFL and Microsoft have a mutually beneficial business partnership going on as evidenced by the number of Surface Pro’s that are seen at the desks of commentators, sidelines and practice fields during the football season.

Despite the relative uncertainties of the National Football League’s 2020 season amid the COVID-19 pandemic, it seems the league is going full steam ahead with the use of another Microsoft product for its NFL Draft for the year.

In light of social distancing recommendations issued in the US, the NFL will be making use of Microsoft Team to help facilitate a remote draft for freshman players entering the league this year.

According to Peter King of NBC Sports, teams and players will make use of Microsoft’s new communications software by funneling trade decisions, player selections and conference calls all in real-time through Teams.

“Each team’s designated drafter will be connected to the league’s official Microsoft Teams private and encrypted draft channel, and will make the pick through that channel. There are two fail-safes: A GM can call [NFL’s vice president of player personnel Ken] Fiore or a member of his team directly by landline or cell with the pick. Also, there will be a conference call for the length of the draft with club officials muted; the club official designated to make the pick can unmute his/her line and announce the pick. If the pick is made through Microsoft Teams, Fiore or his representative will announce on the conference call that a pick has been made and the next team is on the clock.”

While Microsoft Teams will help facilitate a virtual draft, the degree of difficulty conducting a high stakes event like the NFL draft is not lost on the league and National Insider for the NFL Network Ian Rapoport lays out the details of a mock draft the league will commission leading up to the actual event to iron out any potential kinks.

Microsoft Teams will do part of the heavy lifting for the league, but owners, players, and managers will need to work out how to handle rapid-fire phone calls and conference meetings amid 10-minute windows of draft selections and potential Wi-Fi issues.

7 best oscilloscope software for Windows

Oscilloscope is an electronic test instrument that allows observation of constantly varying signal voltages , usually as a two-dimensional plot of one or more signals as a function of time. Other signals which can be converted to voltages and displayed.

Meanwhile, oscilloscope is ideal for designing, diagnosing, learning, and working with electronics. Moreover, it is difficult to obtain a quality digital oscilloscope because of high costs, and even professionals are often limited in equipment access to designated engineering spaces.

Oscilloscope software has come a long way with this software able to analyze other signals from circuits or devices. Most of the oscilloscope software available are spectrum analyser which read input signals and give FFT viewing mode in which users can read the frequency, crest factor, peak voltage and other perimeters.

Best oscilloscope software for Windows PCs

Winscope


best oscilloscope softwareThis is an oscilloscope software that allows users to analyse input signal.

This input signal is received through the 3.5mm audio jack of a PC and is converted to graphical presentation of signal spectrum, measure frequency, plot Lissajous patterns and FFT spectrum.

Winscope has an easy interface users can start analysing signal by clicking theplay button on the interface of Winscope. This will open to a page to view the signal spectra.

The user interface of this Oscilloscope software, also gives various options to analyze input signal.

Features:

  • FFT mode: This gives users the access to Transforms the input signal to display amplitude vs time spectra in amplitude vs frequency spectra .
  • Spectrum analyser: Winscope has a well optimised spectrometer which is compatible to meter and store commands. Users can activate the spectrometer when click on the FFT button to display channels such as Y1 channel and optionally the phase curve as Y2 channel. Users can also displays only amplitude spectrum using   YT Single Trace mode or display both amplitude and phase curves using YT Dual Trace.
  • Trace modes. Winscope enables three trace modes which are three spectra trace modes which are YT Single Trace, YT Dual Trace, and XY Mode.

⇒ Download it here


Capture sounds like a real technician with these great tools!

Soundcard Oscilloscope


best oscilloscope softwareThis Oscilloscope software receives its data from Soundcards with 44.1kHz and 16 Bit resolution. Sound card oscilloscope has lots of features specifically being a signal generator and having other tools.

Users can also change the spectra plot parameters to view and analyze real-time signal spectra carefully. The channel amplitude for both channels can be set separately or both channels can be synced for common channel amplitude.

Features:

  • Trigger modes can be configured by users to off, automatic, normal and single shot signals of the two channels can be increased or decreased
  • New user interface with cursors to measure amplitude, Frequency and time in the main window
  • Saved cards can be selected in the settings tab for multi soundcard system.
  • Signals source for the oscilloscope can be internal to the computer or from external sources like microphone

⇒ Download it here

Oscilloscope


best oscilloscope softwareThis is a simple oscilloscope software that basically shows the XY spectra of a signal. Users can input signal by using the 3.5mm audio jack or through a PC’s mic, this software can also be used to view a view the waveform of an audio file. It is very compatible with many audio file formats.

The major drawback of this software to users is the inability to analyze signal but the software gives some useful options whereby users can change certain parameters like stroke weight, hue (color), intensity and waveform scale.

Features:

  • New improved 3D interface (side-by-side and anaglyph) when playing 4-channel files
  • New Stereo Mic input
  • The software supports both Windows and Mac OS X (32bit)
  • Image sequence can now be exported after gotten
  • Supports new audio file format and existing ones like fav and mp3

⇒ Download it here

Real-time Spectrum


best oscilloscope softwareThis is an oscilloscope software that displays a real-time spectrum of signal inputs. Real-time spectrum detects input signal from the 3.5mm audio jack of users PC.

It also gives users access to displays real-time waveform and FFT waveform of input signals. Users also have flexible control over parameters like the dynamic range of the graph frequency and frame rate,

Features:

  • Users can view waveforms from either left or right and from both channels
  • Selection of various graph such as Smoothed Spectrum, Filterbank, or Auditory Filterbank, spectrum

⇒ Download here

VisualAnalyser


best oscilloscope softwareThis is a popular and premium oscilloscope software. This oscilloscope software has lots of features and tools which helps with signal spectra analyser. Users will discover extensive tools to view signal data. Users will also know the values of various parameters, measure frequency, apply filters.

The unique interface on the software gives users a two signal spectra with one displaying the usual signal spectra, while the other displays FFT spectra

Users can tweak the zoom factor, ms/d value, positions of X and Y plots, etc. Certain values, such as: frequency, mean value, crest factor, peak voltage, and ZRLC. There are new options to capture spectrums.

Users can apply various filters on the input signal, then measure values and view spectra.Users can Set different filters for Channel A and B. The software comes with preloaded FIR low pass, FIR high pass, FIR band pass, FIR band reject, and IIR Notch. Users can also apply custom FIR filters to it.

Features:

  • Offers Spectrum Analyzer with amplitude and phase display
  • Users can use filters
  • Values are computed in real-time

⇒ Download it here

Digilent’s new Analog Discovery 2

best oscilloscope software

This software builds on the success of the first Discovery module with new features and great performance.

The Analog Discovery 2  contains a 2-channel 14-bit oscilloscope function with a sample rate of 100 MS/s, bandwidth beyond 30 MHz, a voltage range of ±25 V, and a max buffer size of 8,192 samples.

Features:

  • Analog discovery 2 is a decent performance oscilloscope, with features such as an integrated 2-channel 14-bit arbitrary waveform generator, logic analyzer, pattern generator, voltmeter, programmable power supply, network analyzer, spectrum analyzer.It is capable of handling most projects.

For a moderate cost of 300 dollars, analog discovery 2 gives nice money value, the Analog Discovery 2 comes with free software, unlike other USB oscilloscopes.

⇒ Get Analog Discovery 2

FrequencyAnalyzer


Interface of Frequency AnalyzerFrequency Analyzer is an oscilloscope software that uses audio input from a microphone connected to a PC and displays a real-time signal spectrum.

The software can also be used to analyze audio files in WAV or BMP format.

Features:

  • Frequency Analyzer gives users a flexible configuration to change waveform parameters and scales. Users can choose from 8 or 16 bits per sample, FFT speed, points per transform and sampling frequency.
  • The process of analyzing by frequency Analyzer begins with the microphone converting the sound to the voltage the sound card of the pc then acts as a digital voltmeter which measures the sound signal up to 43000.The number of measurements -per-second parameter can be set and controlled using a drop-down combo box.
  • The Fast Fourier Transform speed can be controlled as users can select the number of samples that go into a single transform using the “Points per Transform” combo box.

Looking for the best microphone there is? This guide will surely help you find it!

In conclusion, this post has highlighted the best oscilloscope software for Windows PC. And also the oscilloscope software list above gives great value and is the best available with quality features of their functionality.


FIX: Google Hangouts video camera problems

Getting in touch with close ones has never been easier since the Internet arrived. More so, programs of all kinds have emerged that include instant messaging features, video calling, and more.

One great example of such programs is Google Hangouts, a communication software product developed by Google that you can easily access through your web browser.

Unfortunately, even a service from a software giant like Google is not safe from the occasional issues.

For example, users have been reporting that they are having issues with their video camera feed when using the service.

My webcam is working properly with other app except Google Hangout. Hangout says camera is starting, but doesn’t work at the end. I already checked whether I didn’t allow Hangout to access my webcam, which I did, so, I think it is not a problem. Please help. Not sure it is related but I can’t share my screen thru Hangout, either.

Since Google Hangouts is quite popular, we’ve decided to look over a few troubleshooting steps so that you can finally enjoy using this tool to the full extent of its capabilities.


How do I fix google hangouts camera not working?

1. Make sure your hardware isn’t to blame

  • Make sure your microphone, camera, and speakers are plugged into your computer and turned on.
    • In case you have video feed but no sound, make sure the mic is not muted
  • If you connect any of your hardware using USB, check if you need to install software or any drivers from the device manufacturer.
  • Make sure no other programs on your PC are using the camera or microphone when using Google Hangouts
  • Look at the bottom of the Google Hangouts video call window and make sure you’ve turned on the microphone or camera.

2. Make sure that your Hangouts settings are set properly

  1. Open your browser and launch Google Hangouts in a new tab
  2. At the top of your video call window, choose Settings 
  3. Ensure that the correct device is selected for each settings
    • You can change it using by using the Down arrow
      • Camera
        • If your camera is working, you’ll see your video on the top right
      • Microphone
        • To test your microphone, speak out loud and ask if the other person can hear you
      • Speakers
        • To test your speakers, click Test

3. Perform a PC reboot or simply restart the call

  1. Exit your current video call
  2. Close your browser
  3. Launch your browser again
  4. Go back to a Google Hangouts window and try to call the person again
  5. If that doesn’t work, simply restart your PC

Your browser can also be the reason that Hangouts is having issues. Try some of these alternatives!


4. Make sure that the other person is not the one with video issues

If you tried all the methods mentioned above, then maybe the issue is not with you but with the person that you are trying to talk to.

That being said, simply ask them to follow the same troubleshooting steps mentioned above, and try performing a video call with them afterward.

If you’re still having problems, visit the Hangouts forum to get help from knowledgeable people who use Hangouts.


If none of the steps mentioned above yield any results, then a good idea would be to report the issue.

  1. At the top of your video call window, click More
  2. Select Feedback
  3. On the left, choose whether you want to include a screenshot.
    • This can greatly help with the technical problems.
    • You can highlight or blackout any areas of the photo.
  4. Describe your problem and try to be as specific and to the point as you can
  5. Click Send

  • Does Google Hangouts show your phone number?

Google Hangouts will only show your verified phone number when you make the calls on your Android or iOS device. However, you can change this setting so that only those that already have you in their phone’s contact list can see you.


[wl_navigator]

Can’t send messages on Google Hangouts? Here’s the solution

Google has outdone itself with a wide range of web-based services that it provides. Besides Google Drive and the Google Docs services, they have also included a communication software product called Google Hangouts.

You can use the service to send messages, make audio and video calls and conferences, send files, and more, all from the comfort of your web browser.

Unfortunately, some users have reported having issues with Google Hangouts as they cannot send messages with it.

Everytime I try to send a message it says “sending failed”. And I get a red exclamation point next to the message that didn’t send.

Since not being able to send messages basically nullifies Google Hangouts, we’ve decided to create this troubleshooting guide to help you get past the problem.

What can I do if my Google Hangout messages are not delivered?

1. Clear your browser’s Cache

Since Google Chrome supports all the Google services, we will be looking over how to clear its cache in particular.

  1. Open Google Chrome
  2. Press Shift + Ctrl + Delete
  3. This will open the Clear browsing data menu.
  4. Select All time as the time range.
  5. Select to delete Cookies, Cached Images and Files, and other site data.
  6. Click on the Clear Data button.clear cache
  7. Restart Google Chrome
  8. Go back to the Google Hangouts website, and try chatting with a person again

2. Use a different browser

Unfortunately, not all web browsers support Google services efficiently, as you can see below:

  • Chrome
    • Supports all G Suite features and functionality.
    • For customers entitled to support, Google also provides one-to-one support for Chrome core functionality
  • Firefox
    • Works well with G Suite but does not support:
      • Offline access to Gmail, Calendar, Docs, Sheets, Slides
  • Safari
  • Microsoft Edge
  • Internet Explorer
    • Works well with G Suite but does not support:
      • Offline access to Gmail, Calendar, Docs, Sheets, Slides
      • Desktop notifications in Gmail

That being the case, if you are using any other web browser than the ones listed above, then you are bound to have issues with Google Hangouts.


3. Make sure your Internet connection is stable

this may seem like an obvious step, but you should check whether you are still connected to the Internet if Google Hangouts fails to send messages. Simply open another tab and try to load a different website and see if that works.

By following these steps, you should be able to send Google Hangouts messages without any further issues.

And if the issue persists, try other collaboration software. To start you off, we’ve compared Google Chat vs Slack so you can see what you’re missing.

If you know of any other fix to this problem that we may have missed on, let us know by leaving a message in the comments section below.


[wl_navigator]

Download Microsoft .Net Framework Repair Tool

After a lot of incurrent problems with the .NET Framework, Microsoft released the .NET Framework Repair Tool that can detect such issues and fix them quickly.

The tool will attempt to repair any possible corrupted installations of the .NET Framework or will apply possible fixes.

The tool has an easy-to-use, wizard-based user interface (UI). It also supports command line usage together with more advanced options.

What is the .NET Framework Repair Tool?

As we implied above, .NET Framework Repair Tool is a software application that was created by Microsoft to fix potential issues with .NET Framework in Windows.

To be more precise, the tool supports Microsoft .NET Framework versions 4.8, 4.7.2, 4.7.1, 4.7, and 4.6.2. In other words, it will do a great job fixing the aforementioned versions.

The latest release of the software is v1.4, version 4.8.04072.00 from 11/11/2019.

How to get the .NET Framework Repair Tool?

It’s extremely to get the software from Microsoft’s website by following the link below. It has only 1.2 MB and once it’s downloaded, you can click it to install.

Immediately after the installation, the tool will start diagnosing your system and the process will only last a few seconds.

⇒ Get .NET Framework Repair Tool

How does it work?

The .NET Framework Repair Tool will run under a four-step process after its installation:

  1. First, it tries to fix any setup issues
  2. Applies the fixes if you agree
  3. Attempts to repair the already installed .NET Framework versions
  4. It gathers data from your system. This step also requires your permission

Of course, the software will have one or more changes for your .Net Framework installments. In the example provided within the screenshots, it made modifications to the Windows Installer.

However, it can also fix some issues with corrupted update registration for instance, or reset the DACLs on some folders.

Supported line-commands for .Net Framework Repair Tool

The tool can be used as it is, without any line commands but if you want to perform precise actions on more computers at the same time, you can use the table below.

Standard optionDescriptionUsage
/? OR /helpIt shows you information about the software and system.NetFxRepairTool.exe /?
/q OR /quietThe command to trigger the Quiet mode. The tool will try all fixes/repairs and will save the log file. It’s ideal for deployment to more systems at the same time.NetFxRepairTool.exe /q
/p OR /passiveThe command will trigger the passive mode. You will only see the progress bar.
The /q and /p exclude each other o you can only use one at a time.
NetFxRepairTool.exe /p
/a OR /addsourceThis is the command to start the offline repair mode. It copies the setup redistributable files from a shared, network source or a local path. You can use this mode when you are operating in a disconnected environment.NetFxRepairTool.exe /a <path of the folder>
/r OR /repairThis command can be used to repair a specific .NET Framework version. if it is used together with the None value, the software will only apply fixes and skip running repair for any product baseline. It can only be used in Quiet and Passive modes.NetFxRepairTool.exe /r <version1>; <version2> Supported version values: .net35, .net4, .net45, .net451, .net452, .net46, .net461, .net462, .net471, .net472, .net48, none
/l OR /logsThis parameter will set a folder path for the logs file cabinet (FixDotNet*.cab) generated by the tool. Its default location is the desktop folder of the current user.NetFxRepairTool.exe /l <folder path>
/c OR /collectonlyThis mode will allow for the collection of logs relevant to .NET Framework setup. However, keep in mind that when you use this mode, the tool will not perform any fix operations. You can only use it in Quiet and Passive modes.NetFxRepairTool.exe /q /c
OR
NetFxRepairTool.exe /p /c
/n OR /noceipconsentYou can use this attribute if you don’t want to send feedback to Microsoft and it works only in Quiet and Passive modes.NetFxRepairTool.exe /q /n
OR
NetFxRepairTool.exe /p /n

We can’t help but notice that you asked a lot of questions about the .NET Framework so we took the time to answer your most frequent inquiries.

Is .NET 4.5 installed?

To check if the .NET Framework 4.5 is installed on your computer, you can verify that in the Registry. You will find it under the key: HKEY_LOCAL_MACHINESOFTWAREMicrosoftNET Framework SetupNDP

What does the .NET Framework do?

.NET Framework ensures the interoperability of different programming languages. The framework also allows Microsoft to develop run apps and services based on .NET technologies.

Is .NET Framework 4.5 backward compatible?

.NET Framework 4.5 and newer versions are all backward compatible with the apps built on earlier Framework versions.

However, some older apps may require a special configuration file to run on new Framework versions. So if some apps fail to launch and throw the mscorlib.dll-related errors, you can download a different version.

We hope that our guide helped you learn more about .NET Framework Repair Tool and you managed to fix your issues quickly.

If for some reason, you don’t have the right or latest version, we also have an excellent guide on how to install the .Net Framework in Windows 10.

If you have any other suggestions or advice, leave us a comment in the dedicated section below and we will get back to you.

Pentagon’s Inspector General finds JEDI contract award to Microsoft “consistent with standards”

Bloomberg released an article today confirming that the Defense Department’s watchdog has cleared Microsoft’s win over Amazon for the JEDI Cloud Computing contract and found that the White House did not play a role in the Pentagon’s decision to award Microsoft with the $10 billion contract.

The newly released 317-page Inspector General’s report was notable for several reasons. The Inspector General’s office found that awarding the JEDI contract to a single company was consistent with the Pentagon’s acquisition standards and that the DoD personnel who evaluated the proposals were not pressured in any way by senior leaders.

“We believe the evidence we received showed that the DoD personnel who evaluated the contract proposals and awarded Microsoft the JEDI Cloud contract were not pressured regarding their decision on the award of the contract by any DoD leaders more senior to them, who may have communicated with the White House.”

One potential concern raised by the Inspector General’s office is that the White House limited cooperation in the inquiry and that due to “presidential communications privilege” officials were not able to answer questions about communications pertaining to the JEDI contract between the DoD and White House.

The report says, “despite our investigative authorities and our assurances to safeguard the information, DoD Inspector General officials restated that they did not control the privilege and that the White House had not authorized the Secretary, Deputy Secretary, or other DoD officials to disclose to the Inspector General communications between the White House and DoD officials related to the JEDI contract.”

Since the announcement that Microsoft had been awarded the JEDI contract, Amazon has pursued legal attacks towards the U.S. Department of Defense including a lawsuit alleging that President Trump viewed Amazon Chief Executive Jeff Bezos as a political enemy, which played a role in the Pentagon’s decision.  Amazon recently won an injunction to halt any future business between the Pentagon and Microsoft related to JEDI while the proposal process is reviewed, but today’s report, and an article by our friends at MSPowerUser, raises some other questions about how Amazon obtained the information used in their lawsuit.  The report indicates that Amazon received confidential information from the DoD and out of the 265 questions that were raised by Amazon in the legal filings, 114 of those questions came directly from Microsoft’s proprietary information.

DoD provided AWS with detailed information regarding the strengths, weaknesses, and deficiencies of the Microsoft proposal, which is inconsistent with the DoD Source Selection Procedures Debriefing Guide.

While the JEDI contract is reviewed, the Pentagon has continued moving forward with Microsoft, recently announcing the deployment of Microsoft Teams as part of the Department of Defense’s Defense Enterprise Solutions Contract.

For anyone interested in reading the report you can find it here.


Top five ways Office 365/ Microsoft 365 can boost your productivity

If you’re a small, medium, or large business alike, productivity for yourself and your workers is essential. Even if you’re not, and you’re just a student or parent, or worker, you’ll also likely need to be constructive to get your assignments done and sort out your day.

With Office 365, soon to be known as Microsoft 365, you can do just that. The Microsoft subscription service offers a lot that can help you balance out your day, and get more work done. Here’s a look at the top five ways in which Microsoft 365 can boost your productivity.

Microsoft Teams to help you keep in touch with your coworkers

Our number one pick for how Microsoft 365 can boost your productivity relates to Microsoft Teams. Best known by many as Microsoft’s take on Slack, the popular cloud-based proprietary instant messaging platform lets you communicate with your coworkers remotely. It’s included for no added cost with most Microsoft 365 business and education subscriptions, and a consumer version is on the way, too.

Teams has become especially popular recently due to the Coronavirus, and there’s a good reason. When an office isn’t available, you can use Teams to chat and have fun with coworkers, host meetings, add apps to boost your productivity, and keep the workflow moving. Teams also plug in nicely with the rest of Microsoft’s products, which we discuss here and gives you one hub for all things productivity.  We’ve covered Teams extensively here at OnMSFT, so check out our dedicated hub for more ways in which Teams can help you be productive!

Collaboration features in Word, Excel

It’s one thing to work on your own on a particular document or assignment, but with Microsoft 365, there are collaboration features that can help you, too. Number two on the list are some features in Word and Excel.

With a Microsoft 365 subscription, you’ll be able to add comments to a document in Word to help simulate a meeting, and to get direct feedback from coworkers. You also can right-click cells in Excel to add comments to data sets. Outside of the dedicated apps, specific Word, Excel documents can also be “pinned” to a channel or a chat in Teams for quick access. Finally, If the document is uploaded to OneDrive, which we describe next, multiple people can even edit it at the same time.

OneDrive to share your files

Next up is OneDrive. Thanks to the power of OneDrive, you can store your files and share almost anything you work on with your coworkers instantly. When logged in with a Microsoft 365 account, you’ll be able to share a link to your file and allow your coworkers to download and share it, too. You also can get up to 1TB of space, with specific Microsoft 365 plans, which means anything is possible.  You can even back up your phone’s camera roll, save your email attachments to OneDrive, and back up your PC, too.

Outlook to organize your emails, calendars

Build a better schedule with our tips and tricks for Office 365 Calendar in the Outlook Web App

Fourth on the list is Outlook. With Outlook, you’re able to manage your emails and calendars to stay productive. Included with most Microsoft 365 subscriptions, there’s the dedicated Outlook app on Windows and Mac. It allows you to add multiple email accounts, create contact lists, customize your calendars, and more. You also can use Outlook calendar from within the app to email calendars, print calendars, and more. All of this can help you manage your time and stay on top of your work when you need to.

And, if you have a Samsung Galaxy Watch or an Android phone, a dedicated app lets you extend the experience to your wrists. Of course, Outlook is not limited to just the app. There’s a web app, too, which gives you access to your calendars and emails. We’ve previously looked at some tricks for the web app, and some of our other tips and tricks for Outlook, too.

OneNote to take notes, drawings, and more

OneNote UWP

Last, but not least on our list is OneNote. A digital notebook, OneNote can be used to take notes, organizer thoughts in a journal, and a lot more. The desktop (non-Microsoft Store version), known as OneNote 2016, can plugin with Outlook and let you send emails to a Notebook so you can mark them up. You also can use OneNote to create Outlook tasks to help you manage your daily workflow. The Microsoft Store version of the app also has some added features like changing the paper color, solving math problems, and more.

Microsoft 365 has a lot of value.

We’ve just given a top-five look at how Microsoft 365 can boost your productivity. There are many other ways that we haven’t discussed. Feel free to check out our Microsoft 365 News Hub for more, and drop us a comment below to let us know how you are using Office 365.

Mediatek Wireless LAN Driver For Windows 10: How to Download

Driver issues are somewhat common, so it’s important to keep drivers up to date. In today’s guide, we’re going to show you how to update Mediatek Wireless LAN driver on Windows 10.

The process is similar to the one described in our guide on how to update outdated drivers, but it has a few minor differences. So without further ado, let’s get started.

Do I need to download Wi-Fi driver?

  • In most cases, Windows will recognize your wireless adapter and install the drivers automatically.
  • However, when using a newer operating system, it’s possible that your hardware isn’t recognized.

What should I know about Mediatek Ralink 802.11n wireless driver?

In order to obtain this rare driver, you should forget about the HP Assistant tool or Windows 10 Update.

The problem is that the driver you’re using is recognized as the latest iteration by those two. They’ll avoid updating since the current driver is probably asserted as the latest one.

That’s, of course, valid for some users while others won’t be able to connect to Wi-Fi. You’ll need to download and install the driver manually. Once you’ve installed it, it should enable you to connect via Wi-Fi again.

The driver we provided below supports both 32-bit and 64-bit Windows 10 architecture. These are the supported adapters:

  • Ralink RT3090 802.11b/g/n WiFi Adapter
  • Ralink RT3290 802.11b/g/n Wi-Fi Adapter
  • 802.11n Wireless PCI Express Card LAN Adapter
  • Ralink RT3592 802.11a/b/g/n WiFi Adapter
  • Ralink RT5390 802.11b/g/n WiFi Adapter
  • Mediatec MT7630E 802.11bgn Wi-Fi Adapter
  • Ralink RT5390R 802.11b/g/n WiFi Adapter

How do I download Mediatek wireless LAN driver on Windows 10?

Use Device Manager

  1. Download and extract Ralink Mediatec WLAN driver, from HP’s official website.
  2. Right-click on the Start button and open Device Manager.mediatek (ralink) wireless lan adapter driver windows 10
  3. Click on the View in the menu and check the Show hidden devices option.
  4. Expand Network adapters.
  5. Right-click on the WLAN driver and open Properties.mediatek (ralink) wireless lan adapter driver windows 10
  6. Under the Driver tab, click Update driver.
  7. Click on Browse my computer for driver software.mediatek (ralink) wireless lan adapter driver windows 10
  8. Use Browse to navigate to the extracted Ralink Mediatek driver and select it.mediatek (ralink) wireless lan adapter driver windows 10
  9. Click Next and wait until the driver is installed.
  10. Restart your PC and look for changes.

That’s it. If you’re still unable to connect, we advise you to inspect the hardware and, if the Wi-Fi radio is faulty, replace it accordingly. You might need the help of a professional, so have that in mind.

Installing and updating your drivers manually can be a time-consuming task and confusing for a first-time try. We suggest you use a professional driver updater tool that can help you install drivers and update them in seconds.

Also, a viable alternative is an external Wi-Fi USB adapter. They’re affordable and should come cheaper than the replacement of outdated hardware. Check out the list of Wi-Fi adapters to make the wisest decision!

If you’re another HP user in trouble, don’t forget to share your experience or post questions in the comments section below.

Gears Tactics and several ID@Xbox games are coming to Xbox Game Pass this month

Microsoft has just announced the next wave of games coming to Xbox Game Pass for Console and PC this month. This was already known, but the Xbox Game Studios title Gears Tactics will be available on Windows 10 on launch day, April 28. You may already have seen the game’s launch trailer that published two days ago, but here it is in all its glory.

Before Gears Tactics hits Xbox Game Pass for PC next week, the ID@Xbox game The Long Dark will be available for both Console and PC subscribers, tomorrow, April 16. This first-person survival game supports Xbox Play Anywhere, meaning that you can start playing on Xbox One and pick up where you left off on a Windows 10 PC.

More ID@Xbox games will be available next week on console and PC, starting with the Metroid-like Gato Roboto on April 21 and the sci-fi thriller Deliver Us The Moon on April 23. Two more ID@Xbox games will be available on Xbox and PC on April 30 with HyperDot and Levelhead, and PC gamers will get one additional ID@XBOX title with the adventure game Machinarium.

Several games will also leave Xbox Game Pass on April 30: The Banner Saga 2, Bomber Crew, Full Metal Furies, Ruiner, Silence: The Whispered World 2, and Smoke and Sacrifice will disappear from both the Console and PC catalogs. Lastly, Fallout 4, Wolfenstein: The New Order, Braid, and Metal Slug 3 will also leave Xbox Game Pass for Console on this same date.

If you have yet to subscribe to Xbox Game Pass, we remind you that you can get your first month of Xbox Game Pass Ultimate for just $1. This bundle includes Xbox Game Pass for Console, Xbox Game Pass for PC, and Xbox Live Gold in a single package, and it’s really great value.

Fallout 76’s massive free Wastelanders update is now live on Microsoft’s Xbox One consoles

Fallout 76’s latest free update, Wastelanders, is now live on Xbox One and other platforms. This rather large update adds a new main story and quests, NPC factions and characters, new allies, events, and more.

Here’s the official list of highlights for the Fallout 76 Wastelanders update. You can read the full notes here:

  • People Are Back!: Whether in search of rumored fortune, or mere survival, people have returned to Appalachia in droves. Get to know them through the new dialogue system.
  • New Main Story: Experience the new story that Wastelanders brings to Fallout 76 by completing all-new main quests.
  • Meet the Factions: Who will you side with: The Raiders at Crater, or the Settlers at Foundation? Aid them in their endeavors to earn Reputation and unlock new items.
  • Recruit an Ally: Certain NPCs can come to live in your C.A.M.P., help defend it, and offer you daily quests. Some also bring story quests and romance opportunities.
  • More Events and Dailies: Take on challenging new events, like Riding Shotgun and Radiation Rumble. There are also four new daily quests to explore.
  • New Items and Enemies: Hunt down the monstrous Wendigo Colossus or a pack of Floaters, but don’t forget to pack your new Gauss Minigun!
  • New and Updated Locations: New arrivals in Appalachia are certainly making their mark on the world. Discover new and updated locations as you quest and explore.

To help reinvigorate the playerbase, a new version of the game, named the Fallout 76: Wastelanders Deluxe Edition, has been released in the Microsoft Store with the latest update already added and a host of additional in-game content.

Here’s the extra content that players can expect:

  • Mine Car Planter – A small planter for your crops when no dirt is available; buildable in your C.A.M.P.
  • Raider C.A.M.P. – Change the look of your Vault-Tec C.A.M.P. deployable to give it a Raider edge
  • Raider Stash Box – Raider-themed Stash box for the C.A.M.P
  • Raider Faction Flag – New flag for a player’s C.A.M.P. that show their allegiance with Crater
  • Raider Pathfinder Outfit – Look like another resident of Crater with this outfit; includes mask and bandanna
  • Raider Conquest Loot Bag – Raider-style Loot bag, complete with skull
  • Raider Pillager Backpack – A Raider-style backpack
  • Raider Marauder Power Armor Skin -Unique appearance based on the Crater Raiders
  • Garden Truckbed Trailer – A small planter for your crops when no dirt is available; buildable in your C.A.M.P.
  • Settler C.A.M.P. – Change the look of your Vault-Tec C.A.M.P. deployable to give it a Settler appearance
  • Settler Stash Box – Settler-themed Stash box for the C.A.M.P.
  • Settler Faction Flag – New flag for a player’s C.A.M.P. that show their allegiance with Foundation
  • Settler Mechanic Outfit – Look like another resident of Foundation with this outfit; included hat
  • Settler Traveler Loot Bag – Settler-style Loot Bag; looks like a travel case
  • Settler Relief Backpack – A Settler-style backpack
  • Settler Vigilante Power Armor Skin – Unique appearance based on the Foundation Settlers

Do you own Fallout 76 and has this latest update encouraged you to jump back in? Share your thoughts with the community in the comments below and then follow us on Pinterest for more gaming content.

One or more folders in your mailbox named incorrectly [FIX]

Microsoft Outlook is a reliable email platform, but sometimes users encounter annoying or even blocking errors when trying to access their mailbox.

One such error is the one that informs users their mailbox folders are named incorrectly:

The name of one or more of your folders includes the character / or more than 250 characters. Folders with names that include this character can’t be downloaded to your IMAP e-mail program. Please rename these folders [name of the folder].

It is worth mentioning that this error often invokes Calendar folders, therefore don’t forget to also check these folders when troubleshooting.

How can I fix incorrect mailbox name issues?

  1. Delete the folders mentioned by the error message (look for them in the Calendar tab and in the mailbox folders).
  2. Empty the Trash folder.
  3. If the issue hasn’t been fixed after performing the actions mentioned at steps 1 & 2, create a new Outlook profile.

As simplistic as this solution may first seem, users confirmed it worked.

This looks to have worked…  Thanks for your help.  The bit that worked was emptying the Trash folder

Speaking of Outlook issues, there is an interesting tool out there that promises to fix a series of Outlook and Office issues.

The Microsoft Support and Recovery Assistant tool can both fix issues or share information on how to manually perform a fix yourself.

Here’s a full list of the issue this tool can fix:

  • Outlook stops responding
  • Outlook keeps asking for my password
  • Outlook keeps saying Trying to connect… or Disconnected
  • Can’t receive emails
  • Shared mailboxes or shared calendars don’t work.
  • I can’t sync my email
  • Email app keeps asking for my password
  • I can’t activate Office
  • I need help setting up my Office 365 email in Outlook
  • I can’t sign in
  • I can’t find Outlook on the web
  • I can’t install, connect, or enable CRM for Outlook

You might also want to read our article on how to rename the email in Outlook for more information about this procedure.

Freel free to use the comments section below for any questions or suggestions you might have.

Outlook couldn’t complete your search? We got the solution!

Microsoft Outlook is a popular email client for Windows users, providing lots of features that help home users or companies manage projects and work.

Sometimes, while searching for emails or media, users may encounter Something went wrong, and your search couldn’t be completed Outlook error.

Several users have reported similar errors in the Reddit community.

On click-to-run installs in 2016, several users complaining they cannot search today with the error Something went wrong and your search couldn’t be completed.

The following error can be triggered due to a faulty update or issues with the Outlook client.

If you are also troubled by this error, here are a couple of troubleshooting tips to help you fix Something went wrong, and your search couldn’t be completed outlook error in Windows.

How can I fix Something went wrong, your Outlook search couldn’t be completed error?

1. Install pending updates

  1. The issue seems to be with one of the Windows KB updates. If you have not installed any updates recently, check if any update is pending that needs to be installed.
  2. Click on Start and select Settings.
  3. Go to Updates and Security.
  4. Under Windows Update, select Check for updates to see if any are available.
  5. If you can, download and install the updates.
  6. Restart the computer and check if the Outlook search is working now.

Are you having problems with your Outlook login? Here’s a thorough article dedicated to fixing Outlook if it keeps asking for your password.

2. Uninstall Windows 10 KB updates

  1. If you have installed new KB updates, you may want to uninstall them to fix the issue.
  2. Click on Start and select Settings.
  3. Go to Updates and Security.
    Something went wrong search couldn’t be completed outlook
  4. Click on View Update History.
    Something went wrong search couldn’t be completed outlook
  5. Click on Uninstall updates.
    Windows updates
  6. Select the most recently installed Microsoft Windows update and click on Uninstall.
  7. Restart the computer and check for any improvements.

Wait for Microsoft to release new updates or a hotfix before installing the uninstalled updates.

3. Access your Outlook files via a third-party email program

1. Open Mailbird and click Settings.
2. Go to the Accounts tab and select Import.
3. Click Add a mail account.
4. Enter your full name and Outlook email address.
 5. Click Continue to complete the process.

Outlook offers IMAP/SMTP access to your account, enabling you to connect to your emails using a third-party program, like Mailbird.

This advanced tool can automatically detect your settings and lets you access your Outlook files from desktop software.

Mailbird

Mailbird

Access your email files in a fast and secure way with this modern, all-in-one tool!
Check priceVisit website

4. Remove third-party Outlook add-in

  1. Open Outlook and go to File and Options.
  2. From the left pane, click on the Add-ins tab.
  3. At the bottom, click the drop-down menu for Manage, select COM Add-ins, and click Go.
  4. Now select the recently installed Add-in and click on Remove.
  5. Relaunch Outlook and check if the error is resolved.
  6. If not, remove all the add-ins one by one till you find the problematic add-in.

Another reason for the Outlook search issue can occur due to third-party add-in creating conflict with indexing. Disable any third-party add-in installed for Outlook and try again.

5. Repair Microsoft Office installation

  1. If the issue persists, run Microsoft Office troubleshooter from the Control panel.
  2. Press Windows Key + R key to open Run.
  3. Type control and click OK to open Control Panel.
  4. Go to Programs, then Programs and Features.
  5. Select Microsoft Office and click on Change.
  6. From the repair tool, select Quick Repair. This will quickly find and fix minor issues with the Outlook client.

  7. If the issue persists, use Online Repair.
    • This option requires a working internet connection.
  8. Close the troubleshooter and check for any improvements.

5. Rebuild indexing

  1. Press Windows Key + R to open Run.
  2. Type control and click OK.
  3. In the Control Panel, search for index.
  4. Click on Indexing Options.
    Something went wrong search couldn’t be completed outlook
  5. Click the Advanced button.
  6. Under Troubleshooting section click the Rebuild button.

That’s about it for this article. We hope that these solutions helped you solve the Something went wrong search couldn’t be completed error.

Outlook is not the best mail service out there. Thankfully, we’ve got a great list of the best Email clients on the market in case you want to switch to another one.

Feel free to give us any feedback regarding the subject in the comment section below, or any suggestions if you think they will help.

Slow ring Windows insiders can now download update KB4550936

As Windows 10 build 20H1 gets closer to the Release Preview ring, it has received yet another cumulative update (CU).

As such, testers in the Slow ring can now download CU KB4550936 or Windows 10 Insider Preview build 19041.207.

This update does not introduce new system or app features to build 20H1. Instead, it brings a couple of quality enhancements that streamline the user experience.

Build 20H1 quality improvements

The enhancements Microsoft announced today include:

  • Solution to the unexpected crashing of the Remote Procedure Call (RPC) service. Affected users had to restart their devices.
  • The Device Enrollment Status Page (ESP) on managed devices should now function well even if you have installed a policy that requires you to restart your device.
  • Your device’s rear camera flash should have no problems now that Microsoft has fixed a known issue with it.

Security update

Earlier today, Microsoft released the usual Patch Tuesday updates that fix known security issues with Windows 10. Likewise, CU KB4550936 fixes a couple of security flaws affecting several Windows 10 apps and features.

It also includes the latest security updates to the Microsoft Scripting Engine, Windows Kernel, Windows App Platform and Frameworks, Microsoft Graphics Component, Windows Media, Windows Shell, Windows Management, Windows Cloud Infrastructure, Windows Fundamentals, Windows Authentication, Windows Virtualization, Windows Core Networking, Windows Storage and Filesystems, Windows Update Stack, and the Microsoft JET Database Engine.

Microsoft released 20H1 Build 19041.173 to the Slow ring last week. While the beta Windows 10version fixed a couple of issues, it did not address the Narrator and NVDA flaws affecting users of the new Chromium-based Edge browser.

The bad news for the visually impaired is that the latest update to this build does not solve the problem either. As a result, these users may have to continue using the old version of Edge that works well with the affected screen readers.

Meanwhile, NVDA users can download a solution to the identified problem with Edge.

It is in the best interests of Microsoft to sort out any such issues by the time Windows 10 version 2004 hits general availability sometime in May.

Outlook Error: Your Account Settings are Out of Date

Many PC owners use Outlook as their email service, but sometimes issues with it can occur.

Windows 10 users are reporting the Your Outlook account settings are out of date message and today we’re going to show you how to fix that problem.

What does it mean when it says Your email account settings are out of date?

It’s possible that when you log in to your Windows computer, you’ll suddenly see this notification flash up on the right side of the screen at the bottom corner.

An incorrect date and time, an invalid or incorrect password, or an invalid security certificate are all potential reasons for this problem.

Try restarting your device and logging in with your Microsoft account to determine whether or not this resolves the issue of the notifications showing.

Otherwise, follow the solutions below in order to fix this issue and get access to your emails as soon as possible.

How do I fix Your Outlook account settings are out of date error with these solutions?

  1. Click the Fix button
  2. Log in using your Microsoft Account
  3. Check your password
  4. Turn off Internet Time
  5. Add a PIN to your PC
  6. Install the latest updates
  7. Change the time synchronization server
  8. Disable PIN
  9. Disable certain types of notifications
  10. Delete your Outlook account and add it again
  11. Delete your profile folder
  12. Click Change account settings
  13. Use the winsock reset command

1. Click the Fix button

According to users, you can easily fix the problem with a single click of a button. When the Your Outlook account settings are out of date message appears, click it.

That will open the Mail app. You should see the same message but this time, a Fix account button as well.

Click the button and Windows 10 will try to fix the problem. After doing that, the problem should be completely resolved.

Sometimes the quickest and simplest solutions are the best, and although this isn’t a guaranteed solution, several users reported that it worked for them, so you might want to try it out.

If this solution fails, feel free to try the next one.

2. Log in using your Microsoft Account

If you have a Microsoft account, be sure to use it to log into Windows 10. If you use your local password or a PIN, you might encounter this or some other similar problem.

To fix the Your Outlook account settings are out of date message, log out of Windows 10 and log in with your Microsoft account.

If you’re using a local account, you can convert it to Microsoft account by following these steps:

  1. Press Windows Key + I to open the Settings app.
  2. Go to the Accounts section and click on Sign in with a Microsoft account instead.
  3. Enter the password of your local account if required and click Next.
  4. If you have a Microsoft account, enter your login information and click Next.
  5. You might be asked to verify your account. Choose the verification method from the menu and click Next.
  6. You should receive a confirmation code. Enter the code and click Next.
  7. If everything is in order, click the Switch button.

After doing that, log out of your account and log back in with a Microsoft account and check if the problem is resolved.

Some users suggest that you can fix this problem by switching to a local account. This is rather simple and you can do it by following these steps:

  1. Open the Settings app and navigate to the Accounts section.
  2. Click on Sign in with a local account instead.
    sign in with a local account instead Outlook account settings
  3. Enter your account password and click Next.
    Outlook account settings switch to a local account
  4. Now enter the desired username for your local account. Click Next.
    new user Outlook account settings
  5. If everything is in order, click the Sign Out button and sign in again with your local account.

Several users report that you can fix this problem by using a local account to remove your Outlook account from Mail app.

After removing the Outlook account, be sure to add it again. We wrote a detailed guide on how to remove or add an account in Mail app in Solution 10, so be sure to check it out.

3. Check your password

The Your Outlook account settings are out of date message can appear if you changed your Outlook password recently.

If you changed your password online, the Mail app won’t use the new password and won’t be able to connect to Outlook.

To fix this problem, be sure to update your password in Mail app and check if that fixes the problem.

After updating your password in the Mail app, check if the problem is still there.

If you’re using a different email client, you’ll need to check your account settings in that application and add a new password to your account settings.

4. Turn off Internet Time

According to users, the Your Outlook account settings are out of date message can appear if your clock isn’t correct or if you’re using Internet Time synchronization.

To fix the problem, you need to turn off Internet Time synchronization by doing the following:

  1. Press Windows Key + X to open the Win + X menu and choose Control Panel from the list of options.
    control panel win + X menu outlook settings out of date
  2. Choose Date and Time from the list of options.
    date and time control panel outlook account settings
  3. Go to the Internet Time tab and click on Change settings button.
    internet time outlook account settings
  4. Uncheck Synchronize with an Internet time server option and click OK to save changes. The hotmail account settings out of date error will be fixed.
    syncchronize with an Internet time server outlook account settings out of date

Alternatively, you can stop time synchronization by using the Settings app. To do that, follow these steps:

  1. Right-click the clock in your Taskbar and choose Adjust time/date from the menu.
    adjust date/time Outlook account settings
  2. Turn off the Set time automatically option. If needed, adjust your date and time.
    set time automatically outlook settings problems

Both these methods will achieve the same results, so feel free to use any of them. After you disable time synchronization, the problem should be fixed.

If this solution fixes the problem, you can try enabling time synchronization again and check if the problem is resolved.

5. Add a PIN to your PC

Many users set PINs in order to protect their account from unauthorized access.

In fact, a few users reported that they managed to fix the problem by attempting to add a PIN to their account. To do that, follow these simple steps:

  1. Open the Settings app.
  2. Navigate to Accounts > Sign-in options.
    add PIN outlook account settings problem
  3. In the right pane, navigate to PIN section and click the Add button.
    password field outlook settings
  4. Enter your account password and click on Sign in button. The Outlook settings out of date issue will be resolved.

According to users, you can now stop the PIN creation process and close the window.

After entering your account password, the problem should be resolved so there’s no need to complete PIN creation process.

If the issue still persists, try repeating the process and adding a PIN to your account.

6. Install the latest updates

Microsoft frequently releases new updates and many of these updates address both hardware and software issues.

If you’re getting the Your Outlook account settings are out of date message, you might be able to solve it by installing the latest updates.

Windows 10 automatically downloads updates but if needed you can check for updates manually too. To do that, follow these steps:

  1. Open the Settings app.
  2. Go to Update & security section > Windows Update.
  3. Click the Check for updates button. Windows 10 will now check if updates are available. If so, it will download and install the updates automatically.
    check for updates button outlook settings

7. Change the time synchronization server

If you’re getting Your Outlook account settings are out of date message, you might be able to fix it simply by changing the time synchronization server.

This is rather simple, and you can do it by following these steps:

  1. Follow steps 1 to 3 from Solution 4.
  2. Once you open Internet Time Settings window, choose a different server from Server menu. Click Update now to update the time and then click OK to save changes.
    time server outlook account settings problem

After changing the server, the problem should be fixed completely.

8. Disable PIN

Even though a PIN-based login is useful, it can cause certain issues. One of these issues is the Your Outlook account settings are out of date message.

To fix the problem, you need to remove your PIN by doing the following:

  1. Open the Settings app.
  2. Navigate to Accounts > Sign-in options.
  3. In the PIN section click on Remove button.
  4. If you see a confirmation message, click the Remove button again.
  5. Now enter your Microsoft account password and click OK.

After doing that, your PIN will be removed. Now you just need to log out then back in using your Microsoft account. Once you log back in, check if the problem is resolved.

Users report that while the same message can appear once in a while, you should be able to remove it by following the steps from Solution 1.

9. Disable certain types of notifications

This is a simple workaround that might be helpful to some users.

Keep in mind that this solution won’t fix the problem, but it will prevent the Your Outlook account settings are out of date message from appearing.

To permanently remove this message, simply right-click one of these notifications and choose the option to not receive notifications from this app.

As we already mentioned, this solution won’t fix the core problem but it will prevent this message from appearing.

10. Delete your Outlook account and add it again

If you’re getting the Your Outlook account settings are out of date message, you might be able to fix it simply by deleting your Outlook account from the Mail app.

This is rather simple and you can do it by following these steps:

  1. Start the Mail app and go to Settings > Manage accounts.
  2. Select your Outlook account and choose Delete account option.
  3. After deleting your Outlook account, click on the Settings icon and choose Manage accounts.
    manage accounts outlook settings
  4. Now click on Add account option.
    add account outlook settings
  5. Scroll all the way down and select Advanced setup option.
    advanced setup settings out of date
  6. Now select Internet email option.
    internet email account settings out of date
  7. Enter the required information and select IMAP4 as the Account type. After you’re done, click Sign in button.
    internet email account settings

Several users suggest that you can fix this problem by adding an Exchange account instead. To do that, follow the same steps, but instead of Advanced setup, be sure to choose Exchange from the menu.

exchange account outlook account settings

After doing that, follow the instructions on the screen to add an Exchange account.

11. Delete your profile folder

According to a few users, they managed to solve the problem with the Your Outlook account settings are out of date message simply by removing a single folder.

To do that, you need to follow these steps:

  1. Press Windows Key + E to open File Explorer.
  2. Once File Explorer opens, paste %APPDATA%MicrosoftProtect and press Enter.
    protect directory account settings
  3. You should see your profile folder. Create a copy of your profile folder on your Desktop and delete the original folder from Protect folder.
  4. After doing that, restart your PC.

If everything is in order, you’ll be asked to enter your Microsoft account login information in the Mail app. After you do that, the problem should be fixed.

Several users also reported that deleting the %LOCALAPPDATA%Comms folder also fixes the problem, so you might want to try that as well.

Before proceeding, be sure to create a copy of Comms folder on your Desktop.

12. Click Change account settings

If you’re having problems with your Outlook.com account, you should be able to fix them simply by clicking on Change account settings.

This will open https://account.microsoft.com/ and ask you to log in. After logging in with your Outlook account, the issue will be resolved.

If you use a different Microsoft account to log into Windows 10, you should be automatically logged into that account. To fix the issue, log out and sign in using your Outlook email account.

According to users, this issue usually appears when you change your account password. If you changed your password recently, be sure to try this solution.


You might also be interested in our article about the top 6 Windows 10 Password Managers to use


13. Use the winsock reset command

According to users, you can easily fix the Your Outlook account settings are out of date message. To do that, you just need to run few commands in Command Prompt.

You can do that by following these steps:

  1. Press Windows Key + X and choose Command Prompt (Admin) from the menu.
    command prompt outlook settings
  2. When Command Prompt starts, enter the following commands:
    • netsh winsock reset
    • netsh int ip reset

After both commands are executed, the problem should be resolved.

Users reported that this is just a temporary workaround, so it’s possible that the message will appear again after some time. If that happens, you’ll need to apply the same solution again.

The Your Outlook account settings are out of date message can be rather irritating, but we hope that you managed to fix the problem by using one of our solutions listed above.

Let us know how it worked out for you!

Also, you can try the best Windows 10 Email Clients and Apps to Use from our comprehensive list.

Was this guide useful to you? Let us know by leaving a comment in the section below. Thanks for reading!

Dropbox full/almost full alerts [SOLVED]

For those of you experiencing syncing issues on your Dropbox, we recommend that you patiently go through this guide. We’ll show you what to do in order to fix Dropbox file sync issues in just a few minutes.

While Dropbox offers an amazing and convenient file-sharing service, the platform may sometimes fail to sync with your computer.

Here are a few solutions you can use to fix the Dropbox full alert. Let’s go through the basic checks first before going into the more complicated ones.

How can I fix Dropbox is full notification

Solution 1: Check your Dropbox process

Make sure that your Internet is working properly. Now, confirm that the Dropbox process is running on your system.

Go to the Taskbar, click on the up arrow and you will find the Dropbox icon.

If you can’t find the Dropbox process in the taskbar, do the following:

  1. Check the Task Manager in Windows to find the Dropbox process.
  2. Right-click on the Windows Taskbar and then select the Task Manager.Task Manager windows 10
  3. On the Task Manager menu, search for the Dropbox process in the list.
  4. If you find the Dropbox process, select it, then right-click and finally click on End task.
  5. After ending the task, restart it by making use of the desktop icon or menu item.

Note that the Dropbox process may get interrupted, so, restarting should take care of that.

Solution 2: Check the problematic files

Corrupted files may sometimes trigger sync issues even when  Dropbox itself doesn’t care what kind of file it handles.

  1. Move or hover your mouse over the Dropbox icon to confirm its sync status. It should display 100% sync or just an error.
  2. Confirm that the file you are uploading is not open on your system.
  3. Make sure that the file name does not have any special character such as “”, etc.
  4. Confirm that the file can be open in another application, after your confirmation, close the file.
  5. Delete the file from the Dropbox folder and try copying a new version of it.

Repair corrupted files automatically with these software solutions.


Solution 3: Disable Selective Sync

This is a feature on Dropbox that allows you to select the kind of files or folder that you want to back up. This feature can be easily overlooked or turned on without you knowing.

So, what you need to do is:

  1. In the Windows Taskbar, right-click on the Dropbox icon.
  2. Make a selection on the Preferences and then Advanced.
  3. Mark the Selective Sync.dropbox selective sync settings
  4. Make sure that the folder containing the file is not marked.

Solution 4: Empty Dropbox cache

At times, the Dropbox cache gets full or unreadable. This can cause files not to sync. The cache can be cleared in just a few seconds.

  1. Open the Dropbox folder.
  2. Look for .dropbox.cache in the folder.delete dropbox cache
  3. Select all the files in the cache folder and delete it.
  4. To confirm if it has been deleted you can repeat the process.

Still experiencing Dropbox syncing issues? Go through this quick checklist:

  • Are your files in a shared folder?

Maybe the files that are not syncing are in a shared folder. There are two major reasons for this: you are no longer a member of that shared folder or there is a different version of the file in the folder.

  • Confirm if you are signed in to the same Dropbox account on your devices

Note that sync can only work when you are signed in to the same Dropbox account on all your devices.

To confirm this:

  1. Click on the Dropbox icon on the menu bar, go to Preferences and finally click on Account to check the information.
  2. On the Dropbox website, click on your name at the top right corner.
  3. Check out if the addresses are the same, if not correct the addresses. Or log out and sign in with the correct account information.
  • Check if your computer has enough space in the hard drive to synchronize

Note that if a computer is low on hard drive space, files won’t sync on Dropbox. Check your hard drive space. If the computer has insufficient space on the hard drive, that means you need to free up storage space for Dropbox to sync.

There you go, your Dropbox files should sync now. In case you have any other methods of solving this issue, feel free to list them in the comments below.

[wl_navigator]

KB4550922 offers security updates for 13 software products

In the new April Patch Tuesday, Microsoft includes major security updates for a lot of software products.

The new KB4549951 includes security updates for the Microsoft Scripting Engine, Windows Kernel, Windows App Platform and Frameworks, Microsoft Graphics Component and Windows Media.

Other security updated software includes Windows Shell, Windows Management, Windows Cloud Infrastructure, Windows Fundamentals, Windows Core Networking, Windows Storage and Filesystems, Windows Update Stack, and the Microsoft JET Database Engine.

The new KB4550922 patch also presents a problem affecting 1507, 1703, 1709 and 1803, versions of Windows 10.

The devices on a domain might be unable to install apps published using a Group Policy Object (GPO). However, Microsoft specifies that this issue only affects app installations that use .msi files.

That means that this issue doesn’t affect any other installation methods, such as the ones from the Microsoft Store as they are not installed with .msi files. 

How to get the latest Patch Tuesday updates

The malware attacks and threats have increased in number and the scammers are trying to benefit from every single breach that they can exploit in our systems. It is, obviously, very important to understand how these security patches work. The next reasonable step is to read about the best way to apply the patches safely.

The best ways to download the latest Patch Tuesday updates, recommended by Microsoft are Windows Update and Microsoft Update, Microsoft Update Catalog  and Windows Server Update Services (WSUS).

If you want to get the standalone package for this update, go to the Microsoft Update Catalog website.

Note: It is very important to install the updates and patches, but before doing that, start by performing a back-up of your data.

KB4549951 improves security in Microsoft Office products

Microsoft just released the April Patch Tuesday updates and it seems that, in the light of the new developments, they decided to prioritize their efforts on security updates.

The company added that starting next month, they will pause all optional non-security releases for all the supported versions of Windows client and server products (Windows 10, version 1909 down to Windows Server 2008 SP2).

Therefore, the new update is dedicated exclusively to security. Precisely, the new KB4549951 patch is improving security in all Microsoft Office products. Additionally, it will improve security when Windows performs basic operations.

Microsoft also mentions that KB4549951 contains an update for storing and managing files. We have to mention that these updates are available to 1903 and 1906 versions of Windows 10.

How to get the latest Patch Tuesday updates

In these troubled times, security is the most prized possession of our systems. The malware attacks and threats have risen so more than ever, we need to focus our attention on how these security patches work. Once you’ve done that, you can read up on the best way to apply them.

The best ways to download the latest Patch Tuesday updates, recommended by Microsoft are:

  • Windows Update and Microsoft Update
  • Microsoft Update Catalog
  • Windows Server Update Services (WSUS)

If you don’t want to install the whole patch and you are interested only in certain cumulative updates, go for the Windows Update Catalog.

Note: Remember to always backup your data before installing updates like the ones from Patch Tuesday.

Dying Light Dockets: how to get the best weapons in the game

Dying Light is one of the best-known zombie-survival games of recent years and the developer, Techland, has managed to keep the game alive years after its initial release by constantly adding new content.

Now they keep players coming back and attracting new ones with Dying Light dockets.

Dockets are codes hidden within videos, images and press releases that you can redeem for in-game top-tier weapons which will fuel your brain-splattering addiction.

How do I get Dying Light dockets?

1. Follow Techland’s social media pages

First thing you want to do is follow Dying Light developer, Techland on their social media platforms. They are constantly releasing new dockets hidden away in community events and promotional materials. Here are the main pages you want to keep an eye on:

  1. Dying Light Facebook page
  2. Dying Light Twitter page
  3. Dying Light YouTube page
  4. Dying Light Instagram page
  5. Official Techland news page
  6. Techland Facebook page
  7. Techland Twitter page
  8. Techland YouTube page
  9. Techland Instagram page

2. Follow the Dying Light subreddit

dying light weapon dockets

The Dying Light Reddit community is active and always on the lookout for new dockets. Once they are discovered, you’ll be sure to see the dockets pop up on the subreddit within a few hours.

Keep in mind that dockets expire after a few days, so you will need to act quickly and visit the page every day to get the latest Dying Light dockets.


3. Keep an eye on the Steam community page

Just like the Dying Light subreddit, the Steam community also keeps a close eye on the latest Dying Light dockets. Here, you will find a complete list of all expired dockets as well as all the active ones you can still redeem.

In addition to live dockets, you can find news and guides on Steam, which makes it an invaluable resource.

To check the status of the latest active Dying Light dockets, head over to this Steam guide and you will see all the previous codes and which ones can still be redeemed.


Steam not responding on your PC? Try these simple solutions to quickly fix it


4. Take part in community events

community event dying light

Techland has maintained a lively community in Dying Light (pun intended) by keeping its fans engaged with content drops, DLC and community events far more than other development studios.

During these community events, you are rewarded with in-game items which can be redeemed for dockets. For example, the Easter Egg Hunt where players could search the Slums, Old Town and the Countryside for eggs.

These community events are regularly added to the game and it helps keep its player base engaged.

Keep in mind that there are other dockets available in Dying Light, such as the Bozak Dockets which you receive from playing the Bozak Horde DLC. Depending on how far you get in the trials, you will receive dockets for blue, purple, orange or gold-tier weapons.


5. How to redeem Dying Light dockets?

how to redeem dying light dockets

  1. Go to the dockets website
  2. Log in or create an account
  3. Link your account to either Steam, Xbox Live or PlayStation Network
  4. Copy the code and in the text box and click Redeem
  5. Start the game
  6. Go to the nearest quartermaster to redeem the in-game rewards:
    1. The Slums –  he is located in the Tower (first floor)
    2. Old Town – you will find him in the Library (north-west)
    3. Countryside –  there is only Bilal at the Gas Station (north-west)

[wl_navigator]