Full Fix: Session5_initialization_failed BSOD error

Found your old Windows XP or 7 laptops and encountered the session5 initialization failed error? This Blue screen of death error was a common issue on the last-gen Windows OS.

This BSOD error can occur due to several reasons. While the ZoneAlarm app is known to have triggered the error for many users, you may experience the error due to other third-party apps as well.

Other reasons for the error include bad sectors in a disk, hardware failure, or damaged system files.

In this article, we take a look at the best solutions to help you resolve the session5 initialization failed BSOD error in Windows computers.

How do I fix the session5 initialization failed BSOD error?

1. Update your drivers 

A major cause of the session5 initialization failed BSOD is incompatible hardware drivers. If you have installed a new device recently, try updating the driver to see if that helps you resolve the problem.

Outbyte Driver Updater is a popular driver update utility compatible with Windows 10 and the older XP version running system.

It can find corrupted, outdated, and missing drivers with a quick scan and offers multiple options to update the driver.

It comes with an easy-to-use interface with a well-structured layout. Using the backup and scheduler manager, you can automate the update and backup tasks with ease.

In addition, you can manage your drivers effortlessly and fix incompatible drivers within minutes. It is also possible to create restore points before you proceed with installing new drivers.

That being said, an effective way to resolve this BSOD error on your computer is by keeping drivers updated on a regular basis.

⇒ Get Outbyte Driver Updater

2. Boot to the Last Known Good Configuration 

session5 initialization failed
  1. Close any unsaved work and shut down your computer.
  2. Next, power on the system and start pressing the F8 key to bring up the Advanced Boot Options. Start pressing the key when your laptop manufacturer’s logo appears. In some laptops, you may also need to hold down the Fn key as well.
  3. Use the arrow keys in the Advanced Boot Option screen to highlight the Last Known Good Configuration (advanced) option.
  4. Hit enter to select the option.
  5. Windows will now use the backed-up snapshot to boot the system without any issues.

In the older version of Windows OS, the Last Known Good Configuration is a recovery option available under the Advanced Boot Options. It helps in recovering your PC after a fatal crash, failed update, or driver installation.

3. Use System Restore to restore to an earlier time 

session5 initialization failed

Note: To use System Restore in Windows XP, make sure to log in as the administrator. The below-given steps are for Windows XP. 

  1. Click on Start and select All Programs.
  2. Open the Accessories folder.
  3. Go to System Tools and then choose the System Restore option.
  4. In the Welcome screen, select Restore my computer to an earlier time option and click Next.
  5. In the Select a Restore Point screen, select the date you want to restore your computer. Dates coloured in Blue on the calendar means you have a restore point available for that date.
  6. Select one of the available restore points and click Next.
  7. Confirm the action by clicking on Next.

Windows will restore your computer to the selected time. After the restore is complete, check if the Windows 2000 Professional setup session5_initialization_failed error is resolved.

4. Use the System File Checker tool 

session5 initialization failed
  1. In Windows XP, click on the Start Menu.
  2. Go to Accessories and then choose Command Prompt from the options. In Windows XP, the Command Prompt by default opens with administrative privilege, so you don’t have to do it manually.
  3. In the Command Prompt window, type the following command and hit enter to run the System File Checker tool:
    Sfc /scannow 
  4. The System File Checker tool will begin the scan. As indicated, this process may take some time. Wait for the verification to complete 100% and close the Command Prompt window.

The System File Checker tool is activated with the SFC /scannow command. What it does is scan for the corrupted system files and replace them with new files to resolve the problem triggered due to bad image files.

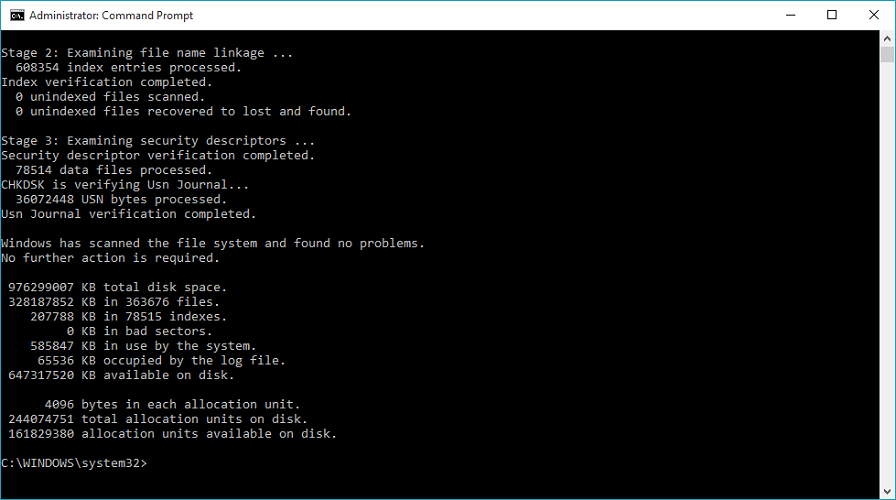
If the issue persists and the System File Checker did not find any problem, run the Check Disk tool to fix problems occurring due to bad sectors in the disk.

Run Check Disk utility
session5 initialization failed
  1. Open the Command Prompt window as an administrator.
  2. In the Command Prompt, type the following and hit enter to execute:
    chkdsk c: /f
  3. The command will repair the errors on your disk without scanning for any bad sector type. This process may take hours to complete, so wait till it is done.

Once finished, reboot the computer and check if the Windows XPsession5_initialization_failed Blue Screen of Death error is resolved.

The session5 initialization failed error in Windows XP, and 7 running computers occur due to hardware issues or corrupted system image files.

Feel free to get into contact with us by using the comment section below this guide.

How to watch blocked YouTube videos [Best tools to use]

Most of us, especially users outside the US or UK, have bumped into a video or two which isn’t available in our country. This large network which unites the global internet society still has creator-imposed limitations due to the advertisement or conflict of interest policies.

And, even though we can understand that on one side, it’s still bothersome. Luckily, there’s a way (there always is on the interwebz) to avoid geo-restrictions and stream any video you like.

Today, we’ll show you the 3 solutions, with a focus on newbies and casual users. So, if you’re keen to avoid geo-restrictions and only need a tool to do so, look no further. The tools below should help you in your endeavors.

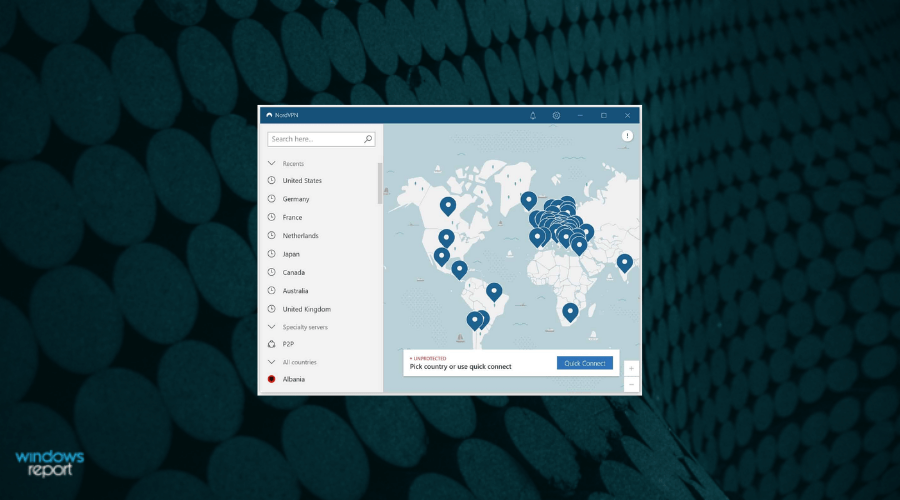
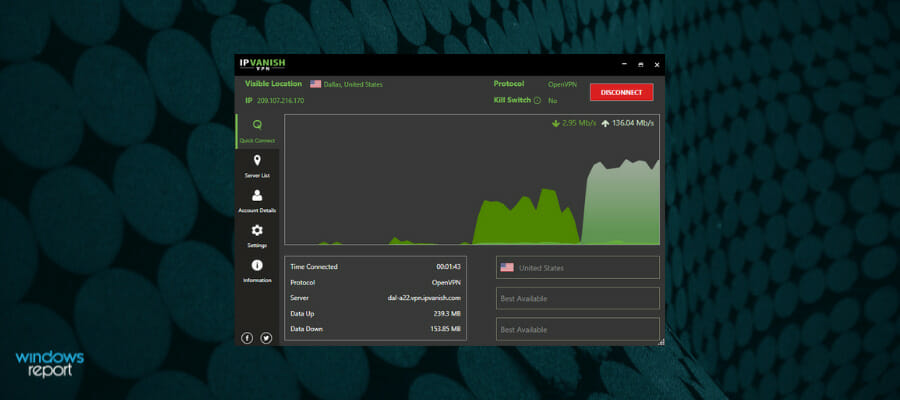
Give Virtual Private Network a go

Now, VPN is where things get more serious. Besides the simple middleman-like manipulating of your physical IP address, Virtual Private Networks give you so much more. But, let’s concentrate on avoiding YouTube‘s geo-restrictions before we spread our focus on the broader use of VPN as a tool.

Most VPNs (at least premium ones) offer a lot of servers for you to choose, with hundreds of IP addresses in various locations all around the globe. Also, the bandwidth speed and data package latency are adequate, in comparison to free VPN solutions and proxies/extensions.

Here are the advantages of using a VPN over some other solutions:

  • It covers all applications on one device and multiple devices in one network (multiplatform support is also a thing)
  • It has a myriad of servers all around the globe so you can choose the one which suits you the best
  • It’s fast and reliable and offers encryption for maximum privacy and data protection

However, there’s also the question of whether to use a free-of-charge VPN solution or a premium, subscription-based VPN.

How to access blocked and geo-restricted YouTube videos from anywhere

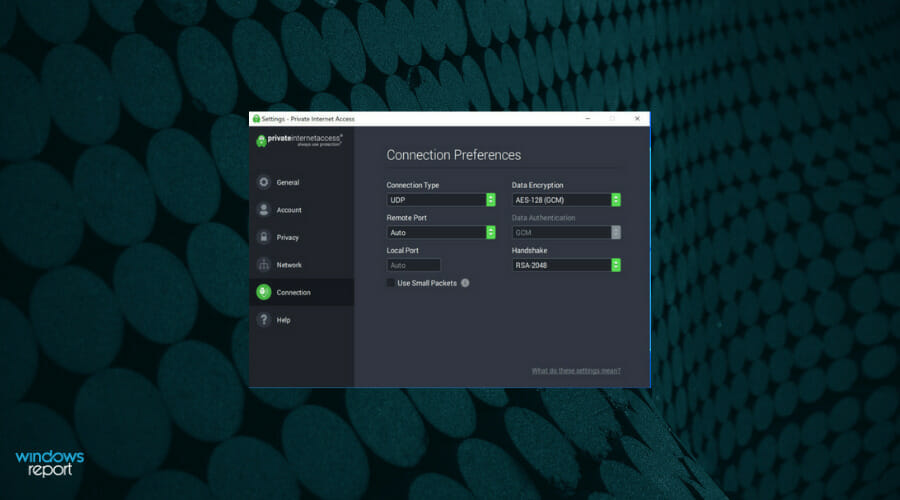
Private Internet Access (Editor’s Choice)

Private Internet Access

Kape Technologies owned PIA is a world-class VPN service with one major goal, which is to free the internet for you.

Cleverly bypassing geo-restrictions, ISP throttling, proximity to servers issues, and more, PIA is your trusted partner in fighting online censorship.

Perfectly optimized for streaming, PIA provides lightning-fast download speeds, unlimited bandwidth, and an impressive global network of 3292 + servers for you to choose from.

This means that do distance however big will stand between you and the content you want to access, be it on Youtube or any other platform or streaming service including Netflix, Disney Plus, Amazon Prime Video, or HBO GO.

P2P torrenting is also not a challenge for this barrier-shattering VPN that you will love using for unblocking one restricted website ofter another.

Let’s quickly look at its key features:

  • Private IP address allocation for anonymous browsing
  • Protection against your ISP and more with a strict no-logs policy
  • Liberate streaming, bypass censorship and unblock geo-restricted websites and content
  • Highest download speeds and unlimited bandwidth without any buffering or slow loading times (ideal for streaming, gaming and P2P torrenting)
  • Access to servers from all over the world (3292 + servers in 46 locations)
  • Secure Protection on Public Wi-Fi and military-grade encryption for your traffic data
  • Block ads, trackers, and malware
  • Secure VPN Protocols and tunneling technology
  • Protects up to 10 devices simultaneously with just 1 subscription
Private Internet Access

Private Internet Access

Enjoy a fully liberated web experience and stream Youtube video with PIA!
$2.69/mo. Buy it now


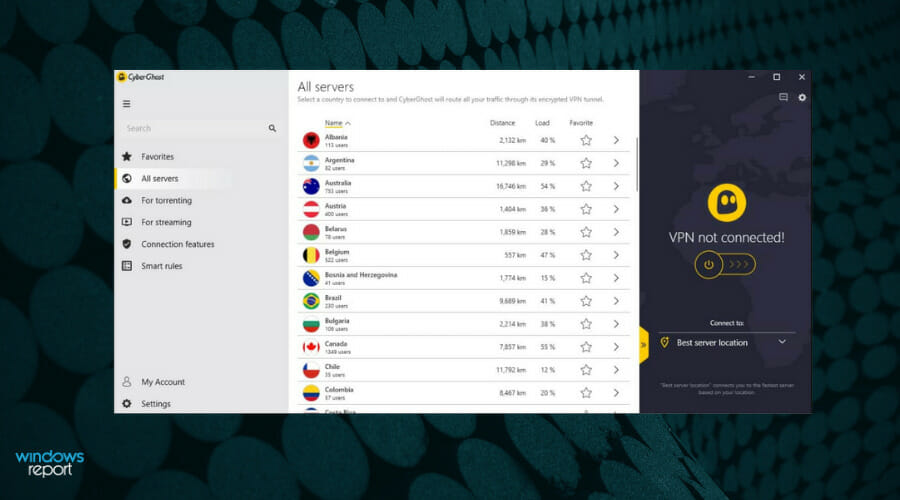
Cyberghost VPN

CyberGhost

With over 15 years of expertise in bypassing digital censorship, CyberGhost VPN is another trustworthy solution that allows you to stream and browse without limitations.

Blocked Youtube videos? Not a problem! Avoid geo-restrictions and closedowns like a true ghost and enjoy all the content and otherwise limited websites safely with Cyberghost.

Whatever your focus is from gaming, sporting events or shows, music, films, and documentaries, you will be able to unblock streaming services, enjoy safe P2P torrenting, and play region-locked games regardless of your location.

Speaking of location, yours will never risk being exposed as CyberGhost VPN anonymizes your browsing by hiding your IP address.

Moreover, your online identity and traffic and personal data are shielded from all prying eyes thanks to its no-logs policy and military-grade encryption.

You can choose from over 6479 servers in 90+ countries, and enjoy fast speeds and unlimited bandwidth for secure, reliable, and ISP throttling-free connections every time.

Let’s quickly look at its key features:

  • Automatic Kill Switch and DNS and IP Leak Protection
  • Highest possible speed and unlimited bandwidth
  • Access to over 6479 servers worldwide
  • Strict No Logs Policy
  • 256-bit AES Encryption
  • Secure VPN protocols (OpenVPN, L2TP-IPsec, and PPTP)
  • Simultaneous connections on up to 7 devices
  • Compatible with all major OS
  • Whopping 45-day money-back guarantee
CyberGhost VPN

CyberGhost VPN

Get the most of Youtube content, restriction-free with Cyberghost!
$2.75/mo. Buy it now

Tor

Tor

Finally, if you’re not willing to spend money on circumventing geo-restrictions on YouTube, you can also use the Tor Onion Browser. This hippie browser is, in comparison to mainstream browsers, a real deal when it comes to privacy.

It offers encryption and switches your IP address with the alternative one. Also, some folks use it to connect to a Dark or Deep Web, which is often construed as the core of all evil on the internet.

In regards to YouTube, you should have an easy time streaming any video (for some you’ll need an account, though). The configuring and using Tor Onion Browser is as simple as using any other conventional browser, with some minor tweaks.

Once you download it, it should be simple to set it up and connect to the internet in a more secure manner. However, speed-wise, expect some slowdowns.

If you’re willing to give it a try, it’s an open-source project and it’s free to use.

⇒ Download Tor here


That should do it, you are equipped to watch any video, from anywhere in the world using these tools.

Just in case you know an alternative way to avoid geo-restrictions on YouTube, make sure to share them with us in the comments section below. We look forward to hearing from you.

FIX: Shockwave Flash Player freezes in Windows 10/11

Many websites use Shockwave Flash, so it’s unfortunate that some Windows 10 users have reported issues with the player.

According to them, it seems that Shockwave Flash keeps crashing on Windows 10, so let’s see if we can fix that.

Shockwave Flash freezes on most browsers and this ruins the user experience for many because they are unable to surf the web without constant issues.

Although this is quite frustrating there are some solutions that might help. Take a closer look at the fixes listed below. 

What to do if Shockwave Flash Player is crashing in Windows?

1. Use a different browser

This problem affects most browsers, as users worldwide confirm these days. In spite of that, there is an exception that you should know about. 

The browser recommended below isn’t only one of the most popular choices around, but it’s also the browser that has no incompatibility issue with Shockwave Flash Player.

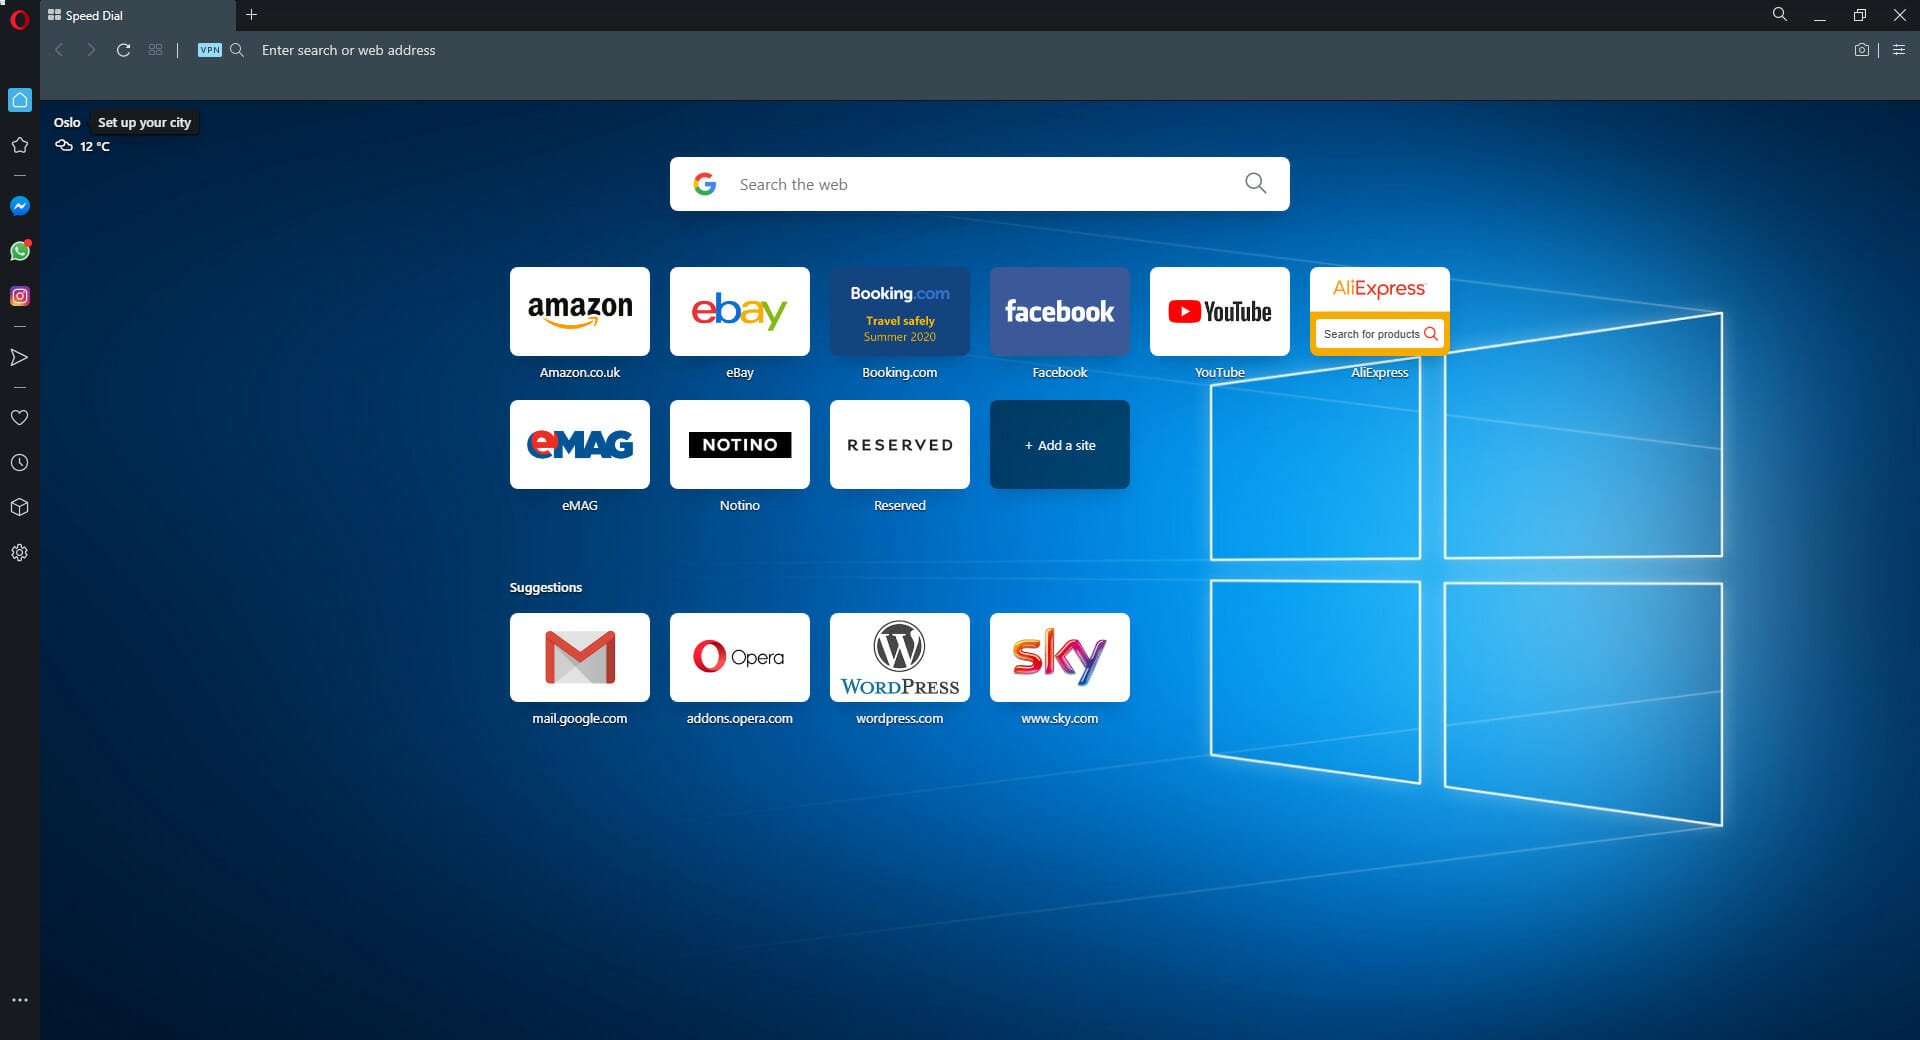
You can simply switch to this tool and rest assured that the free VPN will eliminate online tracking, comes with both dark and light themes, and a battery-saver mode.

Opera

Opera

Give a try to Opera and all current Shockwave Flash Player crashing issues on Windows 10 will turn into a thing of the past.

2. Update the drivers

2.1 Update the drivers manually

  1. Go to Device Manager. You can start it by pressing the Windows Key + X on your keyboard and choosing Device Manager from the menu.
  2. Next, you need to locate your audio driver in Device Manager.update audio driver
  3. After you’ve found your driver, right-click it, and choose Uninstall.
  4. Make sure that you check Delete the driver software for this device and then click OK.
  5. After the driver has been uninstalled, restart your computer and Windows 10 should automatically install the default audio driver.

According to some users, it seems that some Windows 10 issues are triggered by Flash and your audio drivers.

Therefore, the best solution might be to uninstall your current audio drivers and use the default ones. Follow the instructions above in that regard.

Another alternative to update the drivers manually is to visit your manufacturer’s website for latest drivers, download them and install them.

2.2 Update your drivers automatically

Now you also need to know that updating drivers manually can be tricky, time consuming and if you don’t get the exact driver for your component, you can make things worse.

The alternative is to use a dedicated software like the one below to do all that a lot safer and without any headaches.

The tool recommended below updates and repairs all your drivers, including your audio and sound drivers automatically and in just one go.

⇒ Get Outbyte Driver Updater

3. Change the sound format

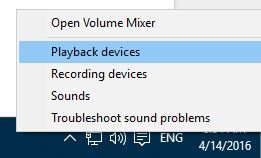
  1. Click the speaker icon in the bottom right corner.
  2. Select Playback Devices and choose Headphones (or Speakers if you’re using speakers).playback-devices
  3. Click on Properties.
  4. If you have a Dolby Audio tab go there and set Dolby Audio to On. If not, skip to the next step.
  5. Go to the Advanced tab, and set Default Format to 2 channel, 16 bit, 44100 Hz (CD Quality). We have to mention that sometimes you need to experiment with different values of Default Format in order for this to work.
  6. Click Apply to save the changes.

When Shockwave Flash Player freezes in Windows 10, another quick tip to take into consideration includes changing the sound format.

The Default Format set to 2 channel, 16 bit, 44100 Hz (CD Quality) is often the best choice, so don’t hesitate to apply the above steps right away.

4. Update your browser

update your browser

Since you already updated your OS and audio drivers, it’s time to update your browser as well. Make sure that you’re using the latest browser version.

Also, if you use any browser extensions or add-ons, temporarily disable all of them and check if the issue persists.

As you can see, most Shockwave Flash issues are related to your current browser and audio drivers. Let us know in the comments area below if our solutions proved helpful.

5 Best Nagios Alternatives for Windows [IT Pro]

Nagios is good monitoring software that is useful for organizations to identify and solve any infrastructure issues that can arise.

Although the tool does the job is supposed to, it can be a bit difficult to integrate into an automatic provisioning process.

This can be easily done though with other tools and the entire process does not necessarily have to be as difficult also.

Therefore, in this article, we’ve put together a list of the best Nagios alternatives for your Windows 10 device.

What are the best Nagios alternatives for Windows?

ManageEngine OpManager

network traffic monitoring software Linux

ManageEngine OpManager is another great integrated network management solution for efficient network monitoring.

This tool is very easy to use, comes with an intuitive interface and with integrated features to better monitor your network performance

ManageEngine OpManager provides server, VM, WLC and storage capabilities monitoring and many more.

This is the perfect tool that will help you quickly find the root cause of any problem and fix it quickly, before it becomes a bigger problem.

Key features of ManageEngine OpManager:

  • Mapping, grouping, and bulk configuration features.
  • Real-time network monitoring.
  • Dashboards and widgets.
  • Support for a wide range of network devices.

<strong>ManageEngine OpManager</strong>

Efficiently monitor your network with this highly intuitive tool.
Free Trial Visit Website

PRTG Network Monitor

network traffic monitoring tools for Linux

PRTG Network Monitor is a great tool, known for the complex infrastructure management features.

Your IT infrastructure will be monitored using advanced technologies, such as SNMP, WMI, Sniffing, REST APIS, SQL and others.

Thanks to these features, PRTG Network Monitor that enables IT Pros will help you locate problems throughout the entire network.

Moreover, the real-time alerting system will make it easier for you to detect and resolve the found issues before they escalate into business-critical problems.

Key features of PRTG Network Monitor:

  • Network segments scan by pinging defined IP ranges.
  • Multiple User Interfaces.
  • Custom maps excellent for data display.
  • Flexible alerts and notifications.
  • Available for Android, iOS, and Windows Phone.

PRTG Network Monitor

The PRTG Network Monitor is an excellent alternative to any other network monitoring solution for you IT infrastructure.
Free trial Visit website

Solarwinds Network Performance Monitor

SolarWinds Network Performance Monitor will help you to successfully monitor the performance of your entire network.

Thanks to the built in features available you’ll be able to track the availability, response time, switches and many more.

Moreover, you will be able to easily see which network application is using the most bandwidth and make the desired adjustments if necessary.

SolarWinds Network Performance Monitor will allow you to drag and drop performance metrics on the dashboard and you can customize it as needed

Key features of Solarwinds Network Performance Monitor:

  • Customizable reports with delivery path included.
  • Intelligent and flexible alerts and notifications.
  • Monitor the logical component of the SDN environment.
  • Detailed monitoring of F5 BIG-IP family of products.

⇒ Get Solarwinds Network Performance Monitor

WhatsUp Gold Network Traffic Monitor

WhatsUp Gold Network Traffic Monitor is yet another perfect alternative for Nagios, that we have tested and we’d like to recommend you give it a try as well.

This is a tool that will make it simple to collect data about your network traffic and see where the bandwidth is being consumed and by what users or applications.

Moreover you can track unauthorized bandwidth and see if anything out of the usual is happening quickly, before it turns into a bigger problem.

You’ll have access to monthly reports and complex data gathered from all the crucial points in your IT infrastructure.

Key features of WhatsUp Gold Network Traffic Monitor:

  • Monitor network traffic.
  • Flexible and easy to use alerts and notifications.
  • REST API to integrate network monitoring data.
  • Complex analysis and reports.
  • Comprehensive Top Protocols, Top Senders, Top Application reports.

⇒ Get WhatsUp Gold Network Traffic Monitor

Obkio Network Performance Monitoring

One of the easiest and yet extremely good and performant tool we’ve tested is Obkio Network Performance Monitoring.

This tool will allow access to all kinds of data, including end to end performance, bandwidth usage and more.

What makes this tool so amazing is that it uses synthetic traffic to measure network performance while providing you with a detailed overview of your network’s performance and health.

Firewalls, routers and even switches are devices that can be easily monitored using this tool.

Moreover, with the help of alerts and notifications you’ll know quickly where there is a potential issue and you’ll be able to fix it before it affects the end user.

Key features of Obkio Network Performance Monitoring:

  • VoIP Monitoring Solution.
  • Network and Internet monitoring.
  • MPLS performance monitoring.

⇒ Obkio Network Performance Monitoring

These are one of the best Nagios alternatives for Windows 10 and you can see they come with exquisite features and integration.

Which one have you tested and how did it work? We would love to hear your thoughts about them in the comments section below alongside other recommendations or suggestions.

How to group tabs in Google Chrome [Easy Guide]

Google is currently testing the tab grouping feature in Google Chrome. This feature is meant to offer a seamless experience while you are handling multiple tabs.

It means that once the feature is publicly released, Chrome will make it easier to organize tabs in groups, thus you will be able to look for specific tabs quickly.

As mentioned earlier, this feature is currently in the testing process and tab grouping is by default disabled in the browser. However, if you are you can enable it manually if you want.

At the time of writing this article, the feature is currently available only in the latest Chrome versions. Therefore, it is recommended that you download the latest browser version.

Before going ahead with any troubleshooting steps, you should first consider the possibility of using an entirely new browser.


Quick tip:

If the reason you chose Chrome Canary was because of its Chromium build and because it has the latest features, we recommend you switch to Opera, a browser that has all of the above and more.

As for tab arranging, Opera lets you group up your favorite tabs by category, and you can even set them to open all at a time, or whenever the Opera is launched.

Opera

A very fast and reliable web browser that features all the tools that Chromium-based browsers have, and more.

How do I enable the tab grouping feature in Google Chrome?

  1. Head towards the start menu and search for Google Chrome Canary browser.
  2. Click the first result from the list to launch it.
  3. Navigate to the address bar, type the following, and hit the Enter key:
    • chrome://flags
    • You will be navigated to the advanced configuration page.
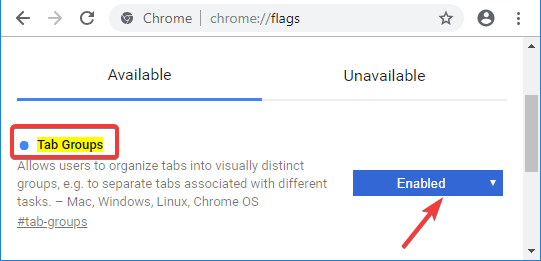
  4. Go to the search box available at the top of your screen and type Tab Groups to look for the respective flag.
  5. Alternatively, you can directly move to the flag by typing the following code in the address bar:
    • chrome://flags/#tab-groups
  6. Now use the drop-down menu available in front of the flag and change its default state to Enabled.
    • It will enable the tab groups functionality for you. enable Chrome tab groups
  7. You need to restart Google Chrome in order to save the settings.
  8. Click the Relaunch now button to relaunch the browser.

Now the tab grouping feature should be enabled in your Google Chrome. Remember that you can always disable the feature whenever you want.

Simply use the same drop-down menu to change the value to Default and relaunch Google Chrome.


The tab grouping feature should now be available in Google Chrome Canary. You will see that multiple web pages from a domain will now automatically appear in a single group.

That was a quick fix to an easy problem. Make sure you leave us any feedback regarding the subject in the comment section below.


Hands-on with Milestones and Bulletins — the newest tools in Microsoft Teams

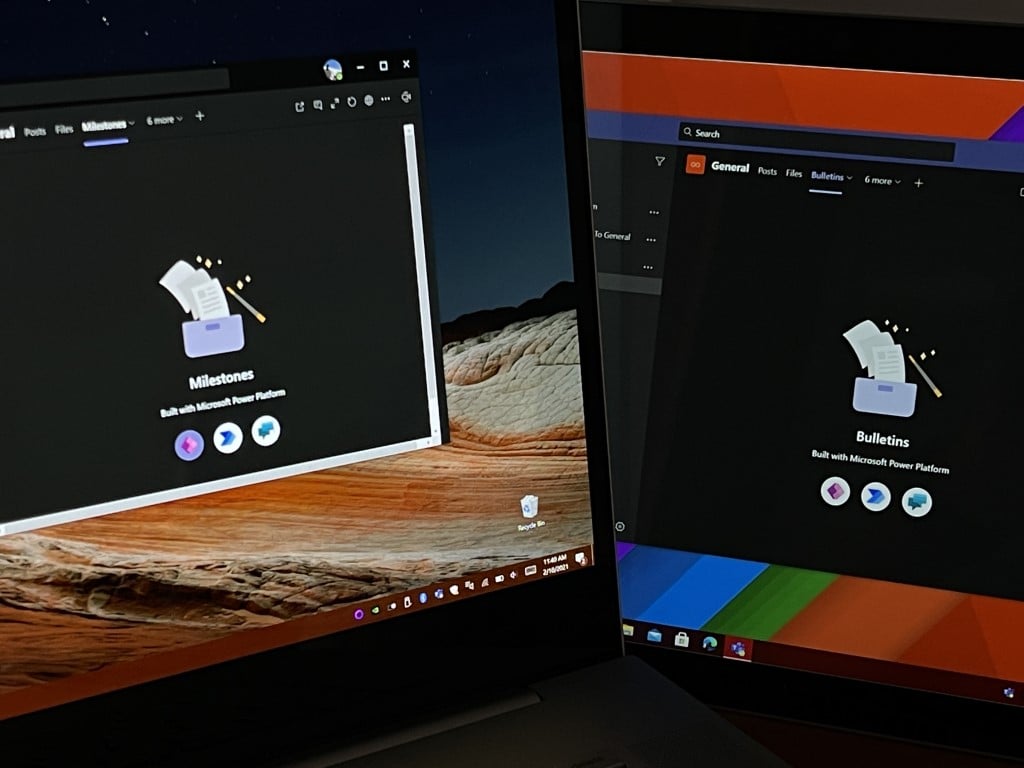
We recently published an article that compared Microsoft Planner with To Do and Project, but since then, Microsoft’s come out with two more tools for Microsoft Teams. The latest are known as Milestones and Bulletins.

These two tools are built on both the Microsoft Power Platform and Dataverse for Teams, which means they can integrate within Teams directly, to help you collaborate and focus on group projects. So, here’s a look at both tools, and what they can help you accomplish if you’re hoping to get started with them.

Introduction to the Milestones App

First off, we’re starting with the Milestones app in Teams. This app is all about tracking tasks and keeping you updated on tasks such as system rollouts, training, research, applications, feedback, and more. The app also has a 360-degree view, which lets you see the overall project that you’re working on. Other features of the Milestones app can be seen below.

  • Managers can easily set up projects, and work items.
  • Assign work items to employees.
  • Classify work items by milestones.
  • Configure work item categories, priorities, and status options.

According to Microsoft, what’s special about Milestones is the extensibility of it. You can update labels, add fields, business process flows, and a lot more. There’s currently a sample app that you can use, via the link in our title above. It’s free to add to Teams, but it in preview.

Hands-on with Milestones App

Milestones In Teams 1

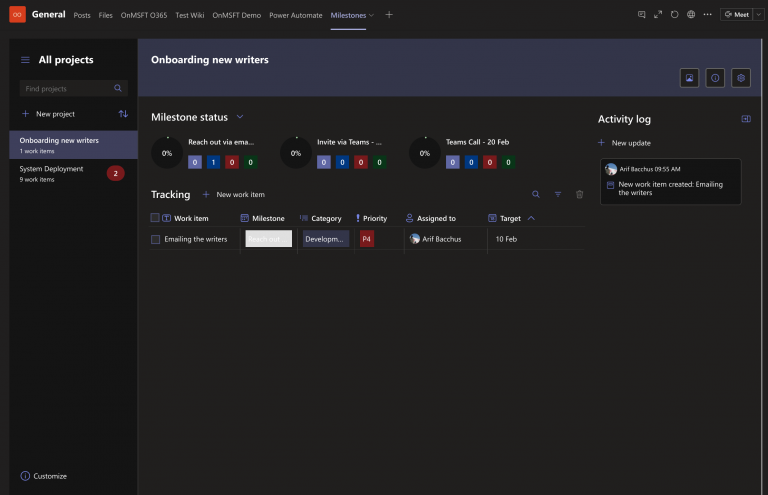
Once you install Milestones in Teams, then set it up and launch it, you’ll be thrown into a quick and easy to understand interface. You’ll see a search box on the top left letting you search for projects. You can also create a new project with the New Project Button. Then, under that. you’ll see project lists. If you’re hoping to customize Milestones more, you also can click the customize button, too. Just be aware this will open up Power Apps Studio, outside of Teams.

In the middle of your screen, meanwhile, you’ll see Milestone Status icons. Here, you’ll see color-coded counts of the work items added for each team member. Next to that will be a toggle button to switch between a summary view and a more in-depth view. Keep in mind that you’ll also see a Project work items box under this, which will let you create, read, update, and delete work items associated with the project.

Finally, to the most right-hand side of the screen, you’ll see a couple of things. Up top will be three buttons. These buttons (left to right) are for selecting a theme, showing information about the app, and changing app settings (reserved or managers only.)  Under that, will be some buttons for adding activities to the log such as status updates.

Adding Items In Milestone

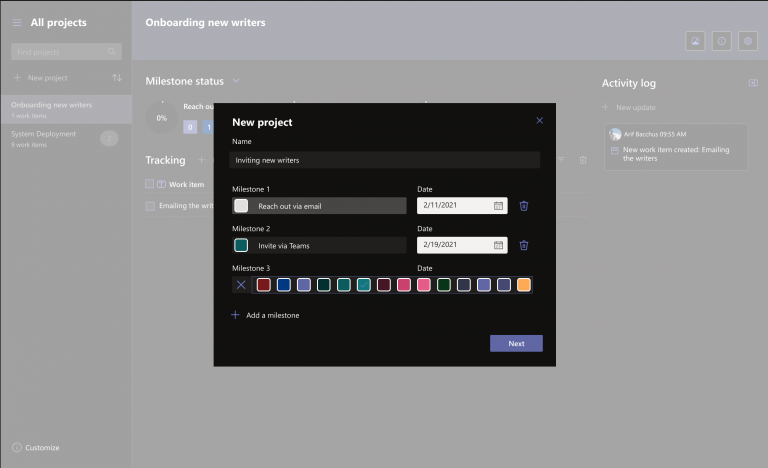
With those basics understood, you can create a new Project. It’s as simple as clicking the New Project button, and then entering in a name, and adding some milestone moments (or themes) such as Orientation, Training, or Mentor, as well as the due dates. You can change the color for milestones by clicking the tile icon. These colors will show up in the main view, later on. After that, from there, you can select to add team members to the project, and then press the create button.

If you’d like you can select a theme by clicking the photo icon on the top rail, next to the information button. It’s also required to add work items, too. You can do this by selecting a project, and then choosing new work item. From there, you can add things such as Name, Description, values for Assigned to, Milestone, Status, Category, Priority, and Target date. Be sure to add a theme or category, as well.

From here onwards, the project can be tracked, and you can make changes as you see fit. When an item is done, you can check it off in the Tracking section. You can always add new tracking items to show progress on a milestone, and you can add to the activity log as you go for managers to see your progress.

Introductions to the Bulletins app

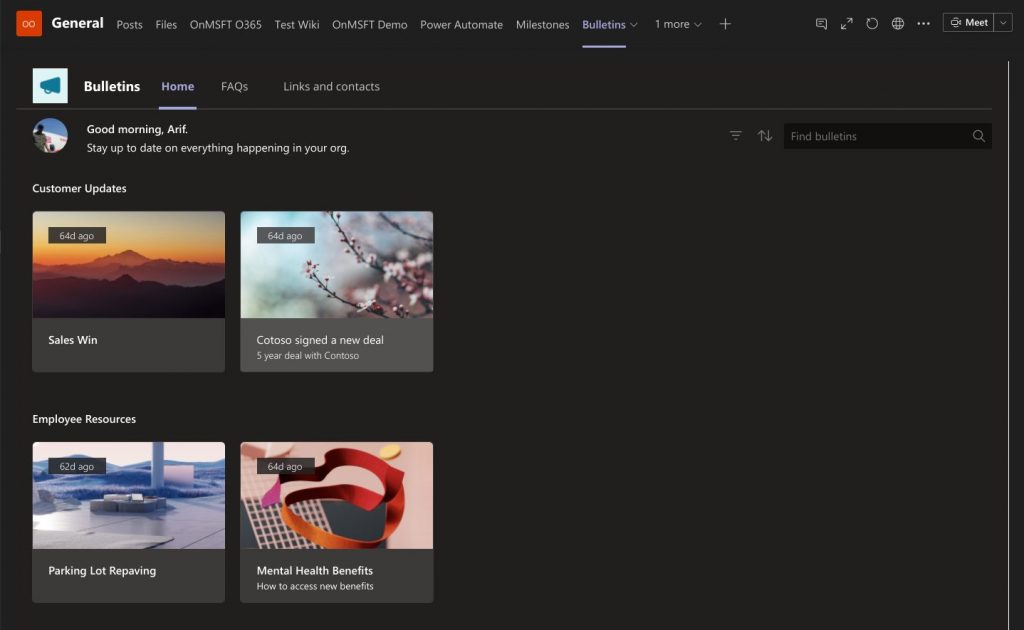
While Milestones is all about task tracking, Bulletins for Microsoft Teams is more of an app that’s designed around company communication. It is designed to be a space where you can read memos, announcements, and other company news. You can even create and categorize bulletin news, search for posts, and bookmark them for later. Keep in mind there are two experiences for Bulletins.

There’s Manage Bulletins, which is the manager experience for Bulletins, and then there’s the Bulletins app. With manage bulletins, managers can create, edit, and publish posts for all to see. This includes Links, contacts, news bulletins, and more. The Bulletins app, meanwhile, is for everyone else to use, where they can see the stuff managers have posted.

Hands-on with the Bulletins and Manage Bulletins app

Bulletines 1

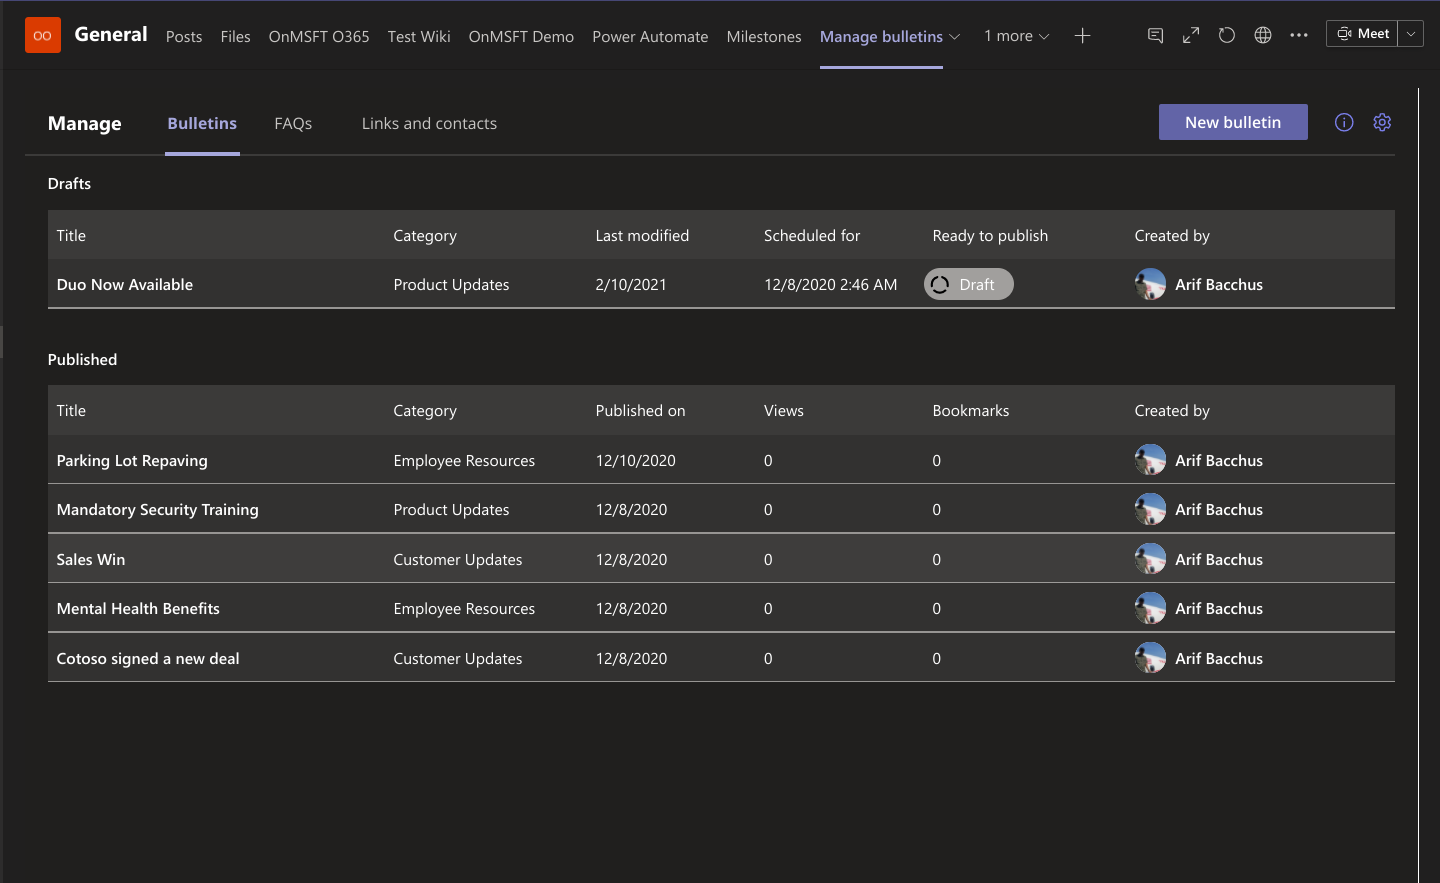
As we said before, there are two experiences for Bulletins. If you’re a manager with admin privileges, then you’re going to deal with manage bulletins. Here, you can add a new bulletin by clicking the New Bulletin button on the far-left of the screen.

Note that to get here, you’ll need to toggle into the Manage Bulletins app from the top bar in Teams. Anyway, from here, you also can see all created bulletins with the bulletin tab on the top left and then create FAQs with the FAQs tab, and then categorized links and contacts, too.

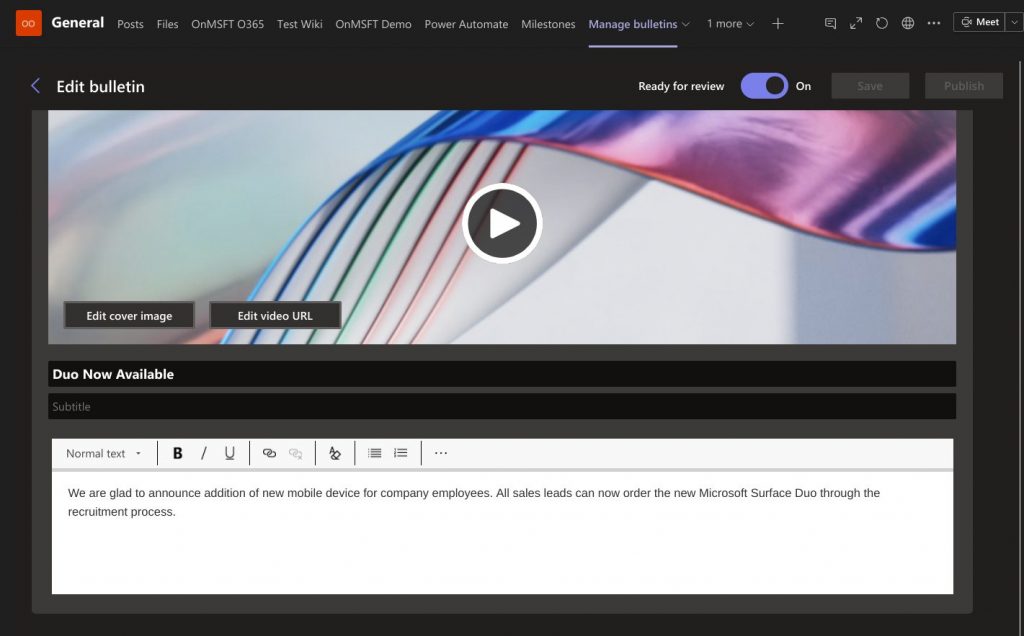
Creating a bulletin is straight forward. Just click the button and fill out the form. Be sure to choose a category, or if you want to make it appear as a featured post with the make it featured button. You also can schedule it for later. Add a video or cover image if you want, and then add a title or subtitles. You also can add a button to link to a website, and enter the URL. When ready to post, click Save, and then toggle ready for preview. You can preview the post, and then post it with publish.

You also can create a FAQ or Link and Contact in the same way, just choose FAQ or Links and Contacts, and fill out the form. You also can view statistics for your posts. You’ll see statistics about the number of views and bookmarks for the bulletin. You can also change the filter to show the statistics of the last 7 days, 30 days, or 6 months.

Bulletins 2

Finally, there’s the regular Bulletins experience, from the main Bulletins app. From here, you’ll see the main dashboard. Featured bulletins will show up in the middle of your screen, and other categories will show under featured posts. On the top eight, you can search for bulletins, and filter. Then, from the top left, you can toggle between your home feed, FAQs, as well as links and contacts. Just click a post to view it!

Screenshot 2021 02 10 At 11.19.31 Am

Keep in mind that both Bulletins and Milestones are Preview features. While you’re free to use it, these aren’t meant for production use and may have restricted functionality. Microsoft notes that, “these features are available before an official release so that customers can get early access and provide feedback.”

The power of Teams and Power Apps!

Both Bulletins and Milestones are built on Teams and Power Apps, so it means that both are fully customizable. You can customize the apps to meet the needs of your own business if it ever comes to that. Let us know what you think in the comments below, and check out our other Microsoft 365 guides right here.

Yandex Browser vs Opera: Which one is a better choice?

Choosing a proper browser isn’t an easy task since you have to consider all the features that the browser can offer.

Various search engines are becoming quite popular all over the world, so today we’re going to compare Yandex browser vs Opera, and find out which one is better.


Which one is better, Opera or Yandex Browser?

1. Opera

1.1 What is Opera?

Opera has been present in the browser market for more than 20 years, and it has changed a lot.

The newest version of Opera comes with various privacy and security features that should make your browsing experience more secure and enjoyable.

1.2 What features does Opera have?

Opera is focused on user privacy, and it comes with a built-in adblocker that will remove all ads and tracking cookies. As a result, your webpages will load up to 90% faster and you won’t be bothered by unwanteds ads.

The browser also has a built-in VPN that provides an extra layer of security. It’s worth mentioning that the VPN is completely free and it doesn’t have any bandwidth limitations.

In addition to these features, Opera also allows you to import bookmarks from other browsers and sync your browsing data easily.

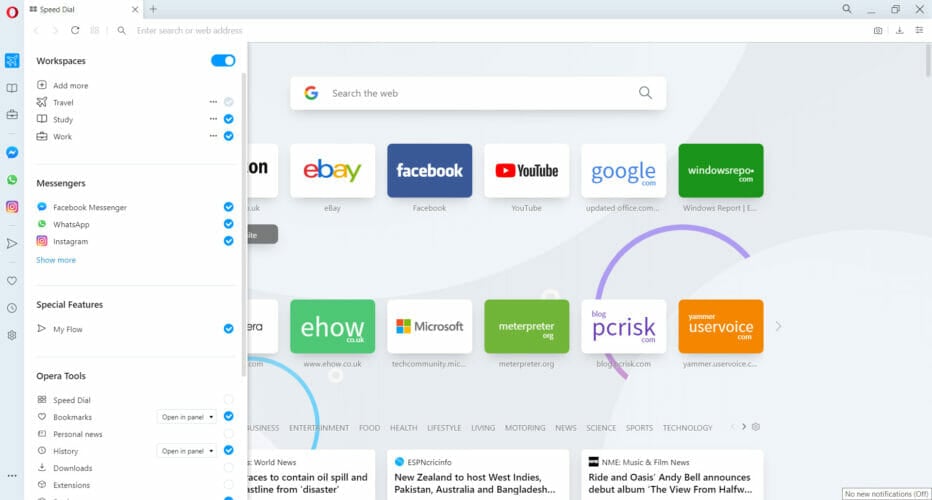
Features such as workspaces, customizable start page, and battery saver, integrated messenger, and tab search are also part of Opera and will make your browsing experience even greater.

1.3 What are the pros and cons of Opera?

Main features:

Opera is known to be a popular browser especially to the fact that runs at high speed and offers really good security thanks to the built-in VPN.

However, there are certain aspects that would need improvement such as the fact that it lacks a social-media sharing tool.

Another function that would bring this search-engine close to perfection would be an incorporated reading mode or reading list which sadly is missing.

  • Built-in adblocker
  • Unlimited and free VPN
  • Available on all major platforms
  • Advanced tab management
  • Visual bookmarks
Opera Browser

Opera Browser

No adds-in, free VPN with unlimited bandwidth and the highest level of protection. Get it all with the best browser!

2. Yandex Browser

yandex download page yandex browser vs opera

2.1 What is Yandex Browser?

Yandex Browser is developed by a Russian company Yandex and it’s a relatively new browser. The browser is available for both desktop and mobile platforms.

2.2 What features does Yandex Browser have?

The browser comes with a side panel and you can use the side panel to save notes or quickly search your bookmarks, history, or notifications.

There’s also a built-in ad blocker, so you won’t have to deal with ads anymore.

Regarding security, there’s malware protection that will warn you about malicious pages or files. Of course, the browser has a built-in password manager so you won’t have to memorize your passwords.

As for additional features, there’s a Video pop-up, credit card manager, and ability to group tabs into folders. Yandex Collections integration is also available allowing you to save interesting articles and web pages.

Considering these features, we can say that comparing Yandex vs Opera, we can say that they are pretty similar regarding additional functions, however the ladder tends to be more complex.

2.3 What are the pros and cons of Yandex browser?

Main features:

When it comes to the Yandex browser there are various features that deserve praise such as the increased online protection and the user-friendly interface that makes this browser a go-to for all types of users.

On the other hand, the extension support could be better since many people want their search engine to be as multi-functional as possible and make the best of their browsing experience.

Maybe the biggest down-side of this browser is that it lacks an integrated VPN and because of that you’re very vulnerable to trackers.

  • Built-in ad blocker
  • Malware protection
  • Optimized for online shopping
  • Customizable user interface
  • Support for mouse gestures

⇒ Download Yandex Browser


3. Opera vs Yandex Browser: The final verdict

Yandex Browser offers decent features and solid support for customization. On the other hand, Opera offers better privacy protection and security, as well as better speed.

Another perk of Opera is that it also comes in the form of a gaming platform, so if we were to make a comparison, Opera GX vs Yandex, we’d say that the first one is far more versatile.

Lastly, the built-in VPN in Opera is a game-changer, and if you want to be completely safe while browsing the web, the Opera browser is the way to go.


So after this detailed analysis of these search-engines, Yandex browser vs Opera, what is your final choice?

Let us know your opinion on this matter in the comment section below.


[Fixed] Macrium Reflect clone failed to boot error

Macrium Reflect is a system cloning software used to backup whole partitions or individuals and folders into a compressed file.

That said, when cloning your HDD to an SSD, you may encounter the Macrium Reflect clone failed to boot error.

The failed to boot error usually occur due to bad sectors in the drive. Third-party antivirus at times can also create conflict with the software files resulting in the error.

In this article, we take a look at the most effective solutions to help you resolve the Macrium Reflect clone failed to boot error in Windows computers. 

How do I fix the Macrium Reflect clone failed to boot error?

1. Update Macrium Reflect 

Macrium Reflect clone failed
  1. Launch Macrium Reflect on your computer.
  2. Open the Other Tasks menu.
  3. Choose Check for updates. Macrium Reflect will scan for the pending updates and prompt you to download. Download and install the update and check if the error is resolved.

Outdated or incompatible version of Macrium Reflect may cause the Macrium Reflect error code = 9 error when cloning hard drive. Check for the pending updates and install them to resolve the error.

If Macrium Reflect fails to detect any pending updates, check the official site for updates.

If a new update is available, you would have to download and install the update manually. Make sure to uninstall the software before installing the updated version.


2. Reinstall Macrium Reflect 

Macrium Reflect clone failed
  1. Press the Windows key + R to open Run.
  2. Type appwiz.cpl and click OK to open the Control Panel.
  3. Select Macrium Reflect from the list of installed apps.
  4. Click on Uninstall. Click Yes when prompted by UAC to confirm the action.
  5. Once uninstalled, go to Macrium Reflect download centre and download the latest version of the tool. 
  6. Once downloaded, run the installer and follow the on-screen instruction.

To apply the changes, restart your computer. After the restart, check if the Macrium Reflect clone failed error is resolved.


3. Check disk for bad sectors with Chkdsk utility 

Macrium Reflect clone failed
  1. Press the Windows key, and type cmd.
  2. Right-click on Command Prompt and choose Run as Administrator from the context menu.
  3. In the Command Prompt window, type the following command and hit enter:
    Chkdsk /r
  4. If prompted to check after a restart, press the Y key on your computer. It will restart your computer, and upon restart, the chkdsk tool will scan the disks for bad sectors.
  5. Once the scan is 100% complete, and the bad sectors are removed, try cloning the storage device again.

The check disk utility scans your disk for errors and fixes various file system errors. Depending on the disk size, the process can take hours to complete. So, be patient till the verification is 100% complete.

Additionally, you can also run the diskpart utility to clean the structure of your destination drive. This will help you fix the problem that may have occurred due to corrupt file systems.

Run the Diskpart utility

Macrium Reflect error code = 9
  1. Open the Command Prompt as administrator.
  2. In the Command Prompt window, type the following command one by one and hit enter to execute:
    Diskpart
    List disk
    Select disk [disk number of the destination drive]
    Clean all
  3. A DiskPart succeeded in cleaning the disk message will appear indicating the process is completed successfully.

Close the Command Prompt window and restart your computer.

After the restart, run Macrium Reflect and check if the Macrium Reflect clone failed error 9 bad file descriptor error is resolved.


4. Disable third-party antivirus 

Antivirus programs are designed to block apps that try to alter the system functionalities.

At times, your antivirus solution may block even genuine actions from apps like Macrium Reflect, resulting in an error.

To resolve the issue, try disabling your antivirus solution temporarily. Expand the system tray icon, right-click on your antivirus icon and choose the disable temporarily option.

Some antivirus may require you to exit the app to prevent conflict.

Once disabled, launch Macrium Reflect and try cloning the disk drive again. Make sure to enable the antivirus once the cloning process is complete to prevent security-related issues.


5. Check for a loose connection 

Macrium Reflect clone failed

Another common issue for the Macrium Reflect clone failed to boot error can be loosely connected disk drives.

If you are using an external drive, unplug HDD’s USB cable and then replug it to make sure it is firmly connected.

If you can access the internal drives, check if the SATA connection is connected correctly. Apart from loose connections, damaged cables can also cause this error.


6. Try creating an image instead of cloning 

Macrium Reflect clone failed
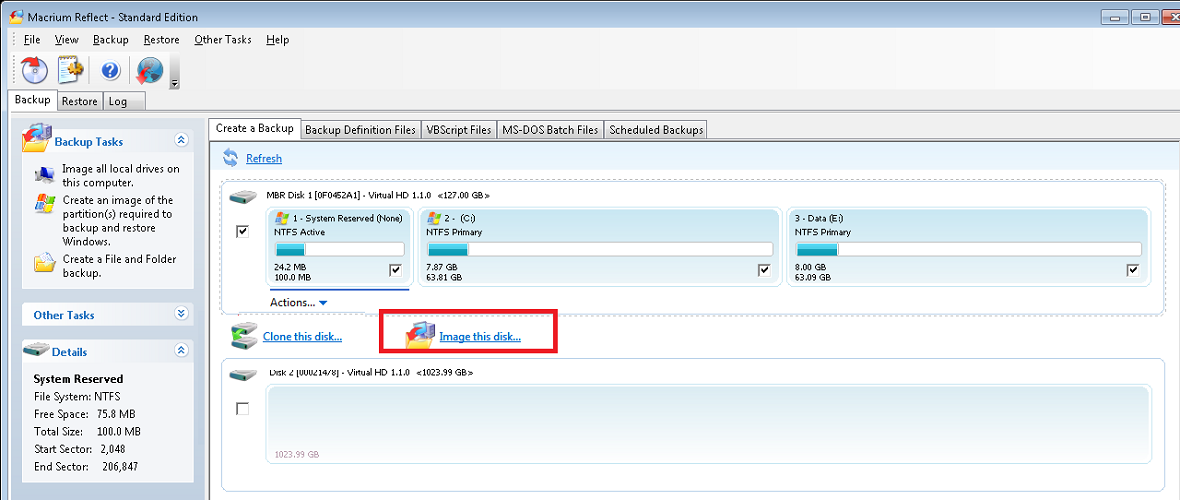
  1. Launch Macrium Reflect and wait for the system drives to show.
  2. Choose the drive that you want to image.
  3. Click the Image this disk link at the near bottom.
  4. Click the browse button and navigate to the location where you want to save the image. Next, click OK to save the selection.
  5. Next, choose a template for your backup, and click the Finish button to begin the image creation process.

Along with the cloning option, Macrium also offers an Image creation feature.

While cloning involves creating one to one copy of the drive, a disk image creates a backup copy of a hard drive’s content.

You can choose this option temporarily to create a backup until the cloning failed error is resolved.

How to use QR codes shown by Windows 10’s BSODs

Windows’ dreaded blue screens of death, otherwise BSODs, scare users the world over.

The BSOD is an error message that appears with a blue screen, instead of pop-up window, which can amount to a more serious system error.

In the worst-case scenarios, users might not be able to log in to Windows after blue screen errors.

To troubleshoot BSODs, users will usually need to note down the error messages and codes contained within them. However, Microsoft has also added QR codes to BSOD error messages in Windows 10.

Those are codes that direct users to website pages that provide troubleshooting details and potential fixes for the BSODs.

Users can scan the QR codes with iOS and Android phone cameras, which will then redirect them to the blue screen of death webpages.


How can I use BSoD QR codes?

1. Scan the BSoD QR codes with an Android phone

  1. Then enter QR Code Reader in Play’s search box.
  2. Open the QR Code Reader app page in Google Play.
    The QR Code Reader page how to use QR codes shown by Windows 10 BSODs
  3. Click the Install button to add QR Code Reader to the mobile.
  4. When a BSOD error arises, open QR Code Reader on the Android mobile.
  5. Then point the phone’s back camera at the QR code.
    A QR code how to use QR codes shown by Windows 10 BSODs
  6. Center the QR code in the middle of the screen so that it fits within the square’s four corners.
    • The mobile will then scan the code.
  7. Tap the link provided by the code to open the troubleshooting page.

To scan BSoD QR codes with Android mobiles, users need to add a QR scan app to their phones. To do that, open Google Play on an Android mobile.


2. Scan the BSoD QR codes with an iPhone

  1. Then tap the Camera app button to utilize the camera.
  2. Point the iPhone’s primary back camera at the QR code to center the code on the mobile’s display. Thereafter, the camera should scan the QR code.
    A BSOD QR code how to use QR codes shown by Windows 10 BSODs
  3. A Safari notification will appear that provides a link to the code’s webpage. Tap that link to open the BSOD webpage.

Apple iPhone users don’t need additional scan apps as their mobiles already incorporate built-in QR code scanners. When a blue screen of death error occurs in Windows, turn on an Apple iPhone.

Thereafter, users can have a look through the potential resolutions provided by the blue screen of death pages.

However, the QR codes might often link to Microsoft’s Troubleshoot blue screen errors webpage, which is a general troubleshooting page for BSOD issues.

Users can open that page in their mobiles’ browsers without needing to scan QR codes. For more specific BSOD error pages, users can note down the error messages included in them; and then enter their error messages and codes in Google.


So, it’s debatable how much use the QR codes really are. Nevertheless, the pages the QR codes link to might still include resolutions that will resolve BSOD errors for some users.

6 quick fixes for Black Screen of Death on Windows 10

The annoying Blue Screen of Death has been a major headache for Windows users ever since the Windows XP era. But it seems that wasn’t enough, as its brother, the Black Screen of Death started to bother users.

Apparently, Windows 10 isn’t immune to BSOD errors either, and some users reported this issue sometime after they upgraded their system.

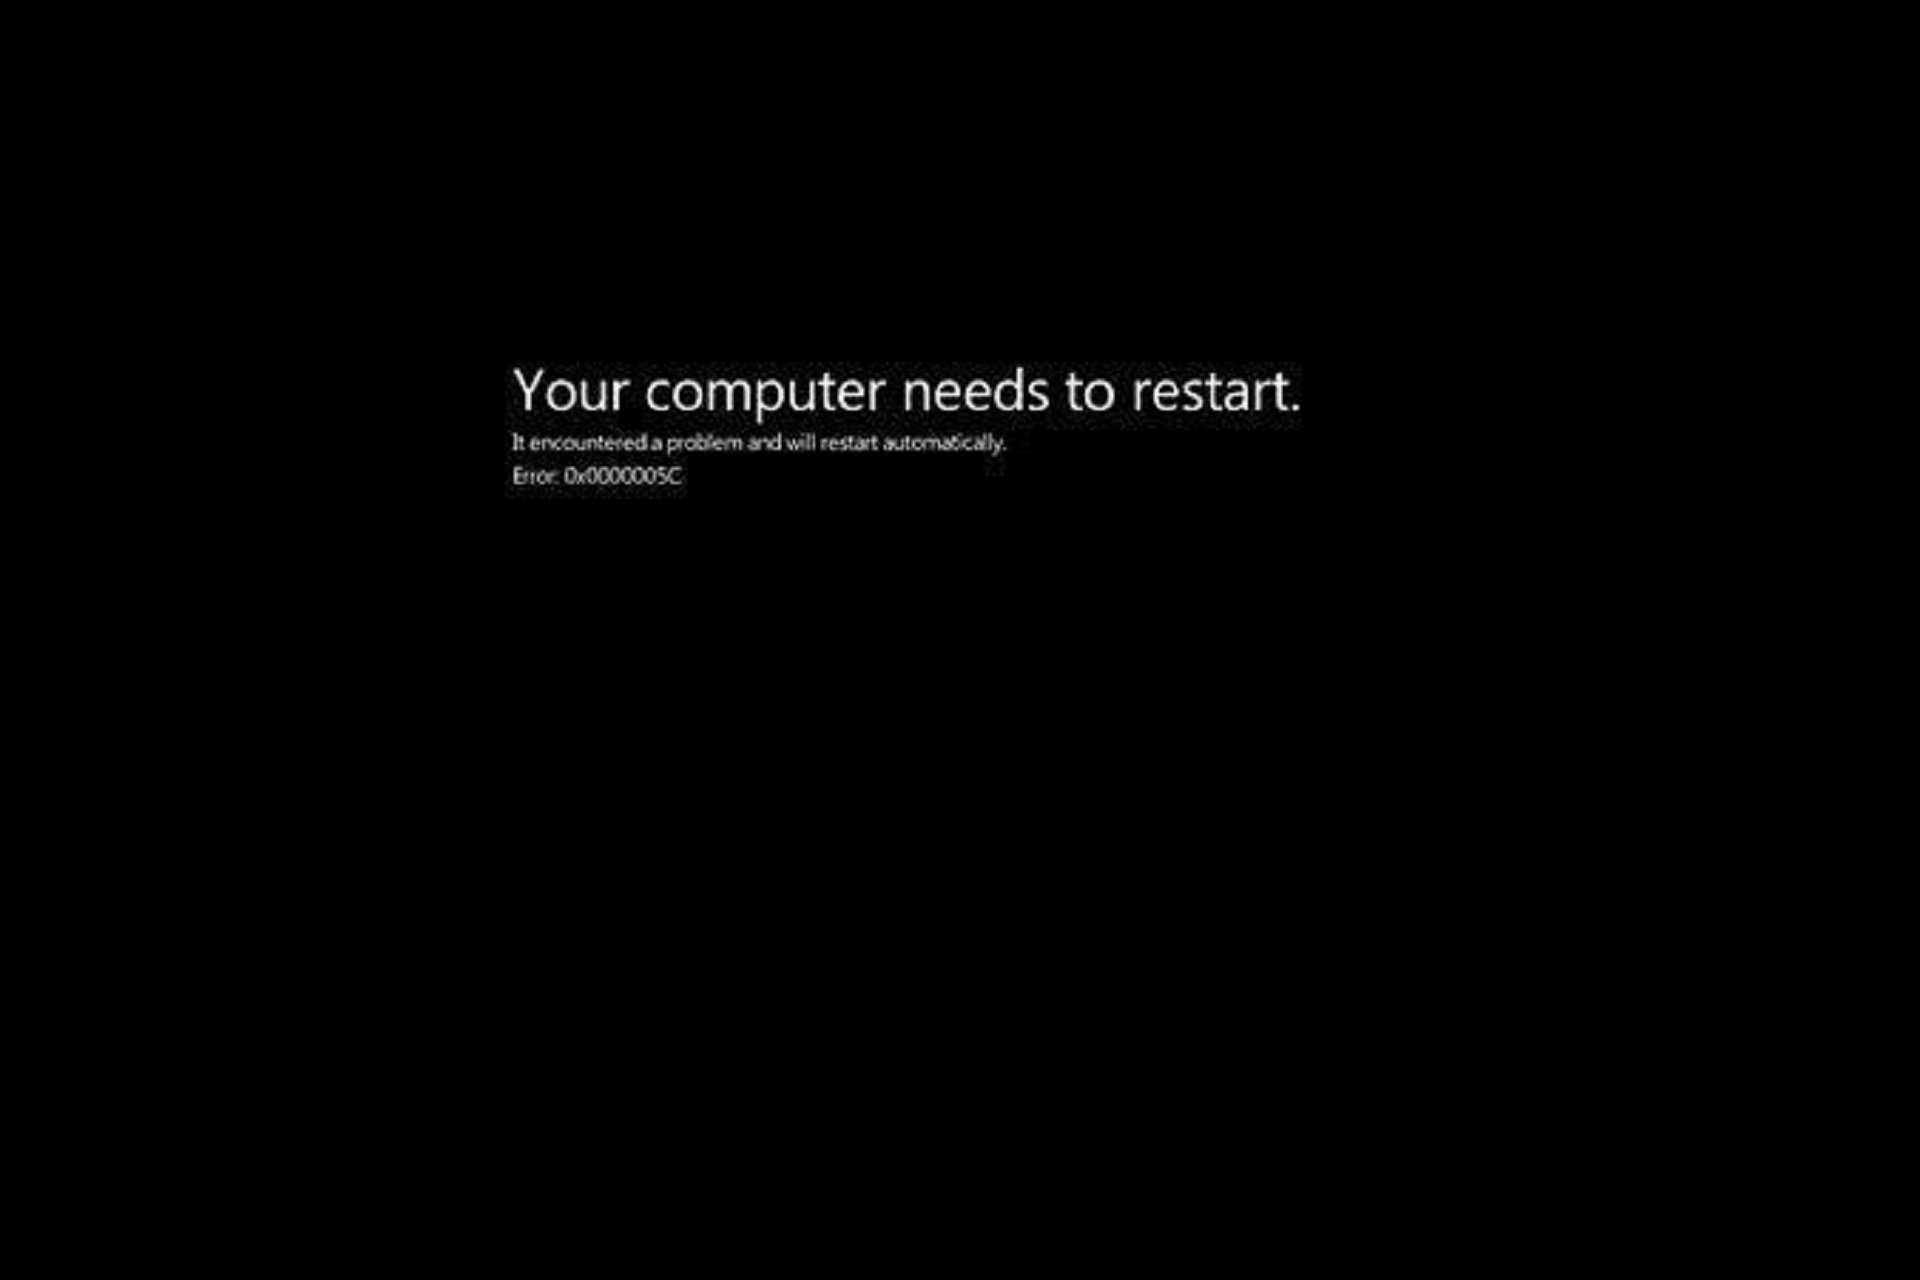
Unlike Blue Screen of Death, which represents a critical hardware issue in your computer, the Black Screen of Death represents a software issue, which is reportedly easier to fix. But even a B(Black)SOD could be caused by some more serious problems, and it certainly requires your attention.

Various things could cause this issue, from driver problems and incompatibility to overheating, and we will cover all the causes and solutions for BSOD in this article.

How do I fix Black Screen of Death in Windows 10

  1. Use dedicated software to fix Windows errors
  2. Fix software incompatibility issues
  3. Fix driver problems
  4. Fix overheating issues
  5. Run the built-in troubleshooter
  6. Additional troubleshooting methods

1. Use a dedicater tool to fix Windows issues

Specialized software takes the guesswork out of PC maintenance by allowing you to diagnose and fix issues before you get to the black screen of death phase. All you need to do is start the scan and watch it do its magic.

2. Fix software incompatibility issues

  1. Right-click on the icon of the program you want to start
  2. Go to Properties > Compatibility 
  3. Click on Run compatibility troubleshooter.

Whilst most software incompatibilities have been already resolved, there are still some programs out there that don’t work with Windows 10.

So in most cases, when you try to run an older program that is not compatible with Windows 10, it won’t even start. But in some cases, it might cause the Black Screen of Death, as well.

The only thing you can do to resolve this issue and prevent BSOD from appearing in the future is to run the Compatibility Troubleshooter.

What this does is check if the program can be opened in compatibility mode with a previous version of Windows. 9 times out of 10, this will solve the issue.

3. Fix driver problems

windows 10 manual driver update
  1. Right-click on the Start button
  2. Open Device Manager
  3. Go through the list of the main components (CPU, Chipset, GPU)
  4. Right-click on the device
  5. Select Update Driver
  6. Follow the wizard

Additionally, a black screen can appear if your graphics card driver is not working correctly. If your CPU has an integrated graphics card, disconnect your monitor from the dedicated GPU and plug it in the integrated one.

If the issue disappears, then uninstall your GPU drivers and reinstall them from scratch. You can use a specialized utility like DDU to completely uninstall a GPU driver.

Drivers are the most common causes of both blue and black screen of death. You should take the time to update your drivers to their latest versions as this greatly improves system stability and performance.

In case you need more automated support to update drivers correctly, you can get the latest drivers or fix corrupted ones with software like Outbyte Driver Updater.

4. Fix overheating issues

If you’re using Windows 10 on a laptop, you might face the Black Screen of Death issue because of overheating problems.

If that’s the case, turn off your computer, wait some time until it cools off, and then turn it on again. We also recommend getting an external cooler for your laptop because it is very helpful in preventing it from overheating.

Dust ingress is the main cause of overheating. If you’re handy with a screwdriver, you can take the back panel off and clean the inside of the laptop of any dust. Dust tends to accumulate around the vents and inside the fans.

Of course, if you are not confident in doing this, we highly recommend taking your system to a specialized technician to be cleaned.

One thing to mention is to always keep your laptop/PC on a solid and elevated surface. This allows the air to circulate and cool the system.

On the other hand, if you’re sure that overheating is not a problem, and it didn’t cause the BSOD on your laptop, you can try some of the solutions listed above.

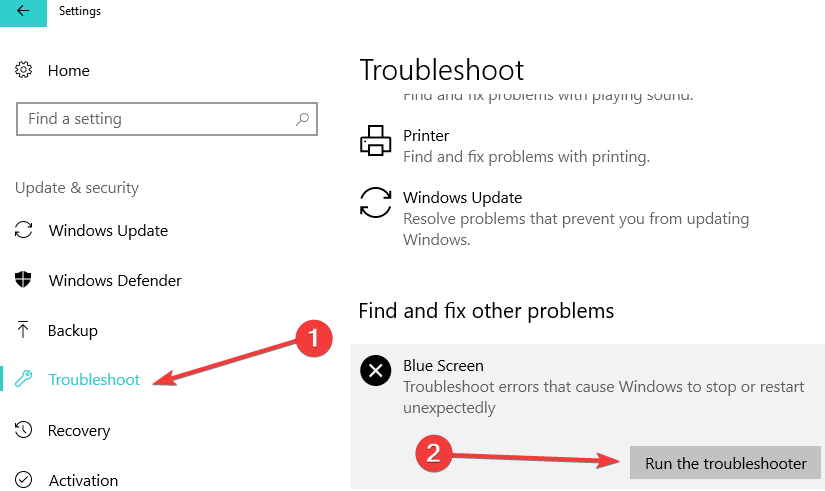
5. Run the built-in troubleshooterblue screen troubleshooter

  1. Go to Settings
  2. Update & Security
  3. Run the troubleshooter

Windows 10 also comes with a built-in Blue Screen Troubleshooter. While this guide focuses on how to fix black screen issues, it is still a good idea to run the Blue Screen Troubleshooter as well.

This tool troubleshoots errors that cause Windows 10 to stop or restart unexpectedly and may help you to fix your black screen issues too.

6. Additional troubleshooting methods

  1. Listen for any beeps. Some systems will have an auditory signal when an error occurs, which can point you to the faulty component.
  2. Disconnect all your peripherals and restart your computer. Sometimes, your external peripherals may trigger this problem so you need to identify the problematic device.
  3. Remove recently installed programs, especially if this problem occurred shortly after you downloaded new apps and programs.
  4. Disable Fast Startup from the Control Panel.
  5. Remove your laptop battery.
  6. Disable your antivirus software.
  7. Go to Event Viewer > Windows Logs > System and check for the reported cause of the error.

If you know about any other methods to fix a black screen on a Windows 10 system, let us know in the comments section below.

Fix: Deus Ex: Invisible War crashes/freezing/black screen

Numerous players have posted on Steam’s forum about Deus Ex: Invisible War not working on Windows 10.

For these players, Deus Ex: Invisible War won’t start. Players have said Deus Ex either crashes to desktop (or freezes) on its loading screen or the game‘s screen goes black when they try to start new games.

How can I fix Deus Ex: Invisible War crashing on startup?

Deus Ex: Invisible War crashes at the loading screen

1. Select a single CPU core

  1. Start Deus Ex as usual.
  2. When the game crashes at loading, press the Ctrl + Shift + Esc hotkey.
  3. Click the Details tab on the Task Manager window that opens.
    Details tab deus ex invisible war crash
  4. Right-click the DX2Main.exe and select Set affinity to open the Processor affinity window shown directly below.
    Processor affinity window deus ex invisible war crash
  5. Deselect the All processors checkbox.
  6. Then select just one CPU checkbox on the Processor affinity window. It doesn’t matter which one you select, but you must select just one.
  7. Click the OK button to close the Processor affinity window.

Note: The above fix is for Windows PCs with multi-core processors.


2. Clean boot Windows

  1. Press the Windows and R keys at the same time, which will open Run.
  2. Type msconfig in Run’s text box and click OK to open the MSConfig utility.
    The System Configuration window deus ex invisible war crash
  3. Select the Selective startup radio button, and deselect the Load startup items checkbox.
  4. Select the Load system services and Use original boot configuration options if they’re not checked.
  5. Click the checkbox for the Hide all Microsoft services option on the Services tab.
    Services tab deus ex invisible war crash
  6. Press the Disable all button to deselect the non-Microsoft services.
  7. Click the Apply option, and press the OK button to exit.
  8. Press the Restart button on the System Configuration dialog box that opens.
  9. After restarting Windows, try playing Deus Ex again.

Note: If clean booting works, that probably means Deus Ex was crashing because of a conflicting program or service. Players have confirmed that CDviewer, Skype, and Skype for Business are among the conflicting software that can cause the game to crash.


3. Check the wait chain for Deus Ex

  1. Launch the Deus Ex game.
  2. Open Task Manager with the Ctrl + Shift + Esc hotkey when Deus Ex crashes on loading.
  3. Next, select Task Manager’s Details tab.
  4. Right-click dx2main.exe on the Details tab and select Analyze wait chain.
    Analyze wait chain window deus ex invisible war crash
  5. The Analyze wait chain window might list some programs that are stopping Ex Deus running (crashing it). Note down the programs listed on the window, and click Cancel.
  6. Close all the programs listed on the Analyze wait chain window by selecting them on the Processes tab and clicking End Task.
  7. Then launch Deus Ex after you’ve made sure none of the programs that were on the Analyze wait chain window are running.

Deus Ex Invisible War black screen

1. Close Logitech apps and background processes

  1. To fix the black screen issue for Deus Ex, right-click Windows’ taskbar and select Task Manager.
  2. Look for any Logitech processes on the Processes tab.
    Processes tab deus ex invisible war crash
  3. Terminate all Logitech apps (such as SetPoint.exe) and background processes by right-clicking them and selecting End Task.
  4. Then try running Deus Ex after you’ve closed all Logitech apps.

2. Play the game within a new Windows 10 user account

  1. Click the Type here to search button on the taskbar in Windows 10.
  2. Enter accounts in the search box, and click the Add, edit or remove users button.
    The Add someone else to this PC option deus ex invisible war crash
  3. Click the Add someone else to this PC button.
  4. Click I don’t have this person’s sign-in information to open the window shown directly below.
    Microsoft account window deus ex invisible war crash
  5. Select the Add a user without a Microsoft account option.
  6. Enter the required new user account details in the text boxes, and click the Next button.
  7. Log out of Windows 10, and then sign in to the new user account.
  8. Then try playing Ex Deus within the new user account you just set up.

Players have confirmed the above fixes can resolve Ex Deus crashing on loading and black screen crashes.

Also note that Ex Deus: Invisible War is an old game originally launched for Windows XP.

Some of the tips in our How to Play Old Games post might also fix some Ex Deus issues for Windows 10.

Fix: Windows 10 Video Editor Export is Not Working

Windows 10 Photos app is a handy application with slideshow and video editing features. Unfortunately, some users have reported Windows 10 Photos app video export stuck problem.

The error message associated with this issue reads something went wrong, We couldn’t export your video. This problem can occur due to many reasons, including corrupted Photos app.

You can find similar issues in the Microsoft community:

I choose the medium setting on export and then it starts to save until it reaches 17% through and it comes up with a message saying ‘something went wrong. We couldn’t export your video’ 

This troubleshooting guide will help you to fix the Photos app video export stuck issue in Windows 10, so keep reading.


What can I do if Windows 10 video editor export is not working?

1. Use an alternative program for exporting videos

If you had enough of Microsoft Photo’s mishaps, then maybe it is time to move on to a different tool to fulfill your video exporting needs. That being said, no tool can do the job better than Adobe Premiere Pro.

This product is an industry-standard in terms of video editing, and its versatility in terms of supported file formats allows it to handle pretty much any time of video file.

However, if you aren’t interested in video editing, you can simply use it as a file converter and exporter, allowing you to transform to and from any format.

Adobe Premiere Pro

Adobe Premiere Pro

Try Adobe Premiere Pro now to stop having problems with video editing exports.
Free trialVisit website

2. Run the Microsoft app troubleshooter

  1. Click on Start, and select Settings.
  2. Go to Update and Security.
  3. From the left pane click on Troubleshoot.
  4. Scroll down to the end, and click on Windows Store Apps.
    Windows 10 Photos app video export stuck
  5. Click the Run the troubleshooter button.
  6. The troubleshooter will scan the Windows Store apps for any issues. If found, it will recommend some fixes.
  7. Apply the fixes and check for any improvements.

Windows 10 comes with built-in Microsoft apps troubleshooter. The troubleshooter will scan the system for any issues and fix them.


3. Terminate and reset the Photos app

  1. Click on Start and select Settings.
  2. Go to Apps.
  3. Search for the photos app and click on it.
  4. Click on Advanced Options.
    Windows 10 Photos app video export stuck
  5. Scroll down and press the Terminate button. This will kill any process related to the app.
  6. Click the Reset button, and press Yes to confirm the action.
  7. Once the Reset is complete, search and launch the Photos app.
  8. Try to export the video and check if the Windows 10 Photos app video export stuck issue is resolved.

If the issue persists, resetting the app can fix any temporary issues with the app.


4. Update or reinstall the Photos app

1. Update the Photos app

Windows 10 Photos app video export failed
  1. Check if new updates are available for the Photos app.
  2. Open the Windows Store app, and search for the Photos app.
  3. If a new update is available, download and install it.
  4. After the update is installed, try exporting a video.

2. Reinstall the Photos app

  1. Right-click on Start.
  2. Select the Windows PowerShell (Admin) option.
    Windows 10 Photos app video export failed
  3. In the PowerShell window, enter the following command and hit Enter: get-appxpackage *Microsoft.Windows.Photos* | remove-appxpackage
  4. This will uninstall the Photos app from your PC.
  5. Restart your PC.
  6. After the reinstall, launch the Microsoft Windows Store.
  7. Search for the Photos app, and install it.
  8. Check if the photos and videos appear in the Photos app.
  9. If not, double-click on the videos that you want, and it will start appearing in the Photos app.
  10. Try to export the video and check for any improvements.

As a last resort, you may try to uninstall the Photos app to fix the issue. This should help you resolve any issue that is embedded in the Photos app, causing an issue with video export.

5. Disable the graphics card adapter

  1. Press the Windows key + X and select Device Manager from the list.
  2. Double-click the Display adapters.
  3. Double-click on the name of your adapter and select the Driver tab.
  4. Click on the Disable Device button.
  5. Windows will use generic drivers without using hardware acceleration.
  6. Restart your PC and export your video.

After you’re done exporting your video you can reenable your video driver by reversing the actions in this solution.


You can fix video export failed issues with the Photos app in Windows 10 by following the steps in this article. Do let us know which fix helped in the comments.


Best Mesh Routers To Buy For Seamless Coverage Everywhere

In order to create a wireless network that covers your entire home, many users are using mesh routers.

These types of routers are usually a bit more expensive, especially if you need to cover a larger area, but they are easier to set up.

If you want to set up a mesh network and eliminate dead Wi-Fi spots once and for all, here are the best mesh routers to consider.

Note: Deals are subject to change. Keep in mind that the price tag often varies. We recommend going to the vendor’s website to check the price.

Some of the products may be out of stock by the time you’ve made your purchasing decision. So, hurry up and hit the buy button.


What are the best mesh router deals to get right now?

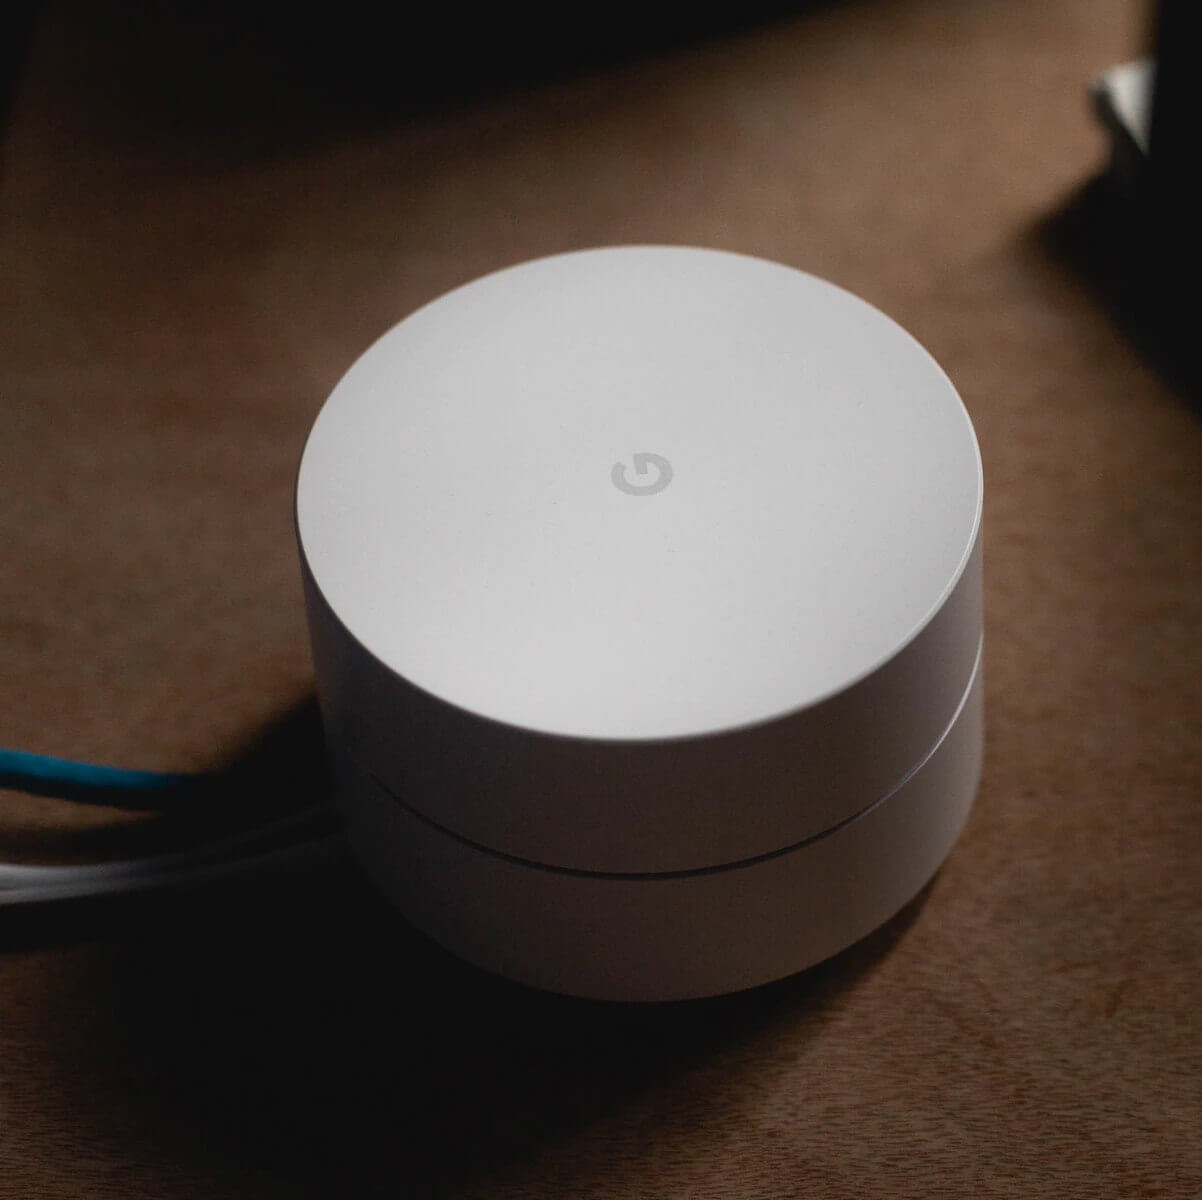
Google Wi-Fi

  • Up to 1,500 feet range
  • Dual-band
  • Expandable mesh Wi-Fi
  • Dedicated app that lets you control your network
  • Family Wi-Fi controls
  • Issues with NAT if you’re using multiple Google WiFi devices

The first item on our list is the Google WiFi mesh router. This is a dual-band device and it works with 2.4GHz and 5GHz frequencies. As for the speed, it can deliver up to 1200Mbps.

The device has a range of up to 1,500 square feet, and thanks to a dedicated app, you can set up and control your network with ease.


Eero

  • 1,500 feet range
  • Simple to set up
  • Speeds up to 550 Mbps
  • Dual-band Wi-Fi, MU-MIMO, beamforming
  • Potential signal issues when using multiple Eero devices

Eero is another great mesh router that has a range of up to 1,500 feet. Of course, you can easily expand the range by using another Eero device. The device uses TrueMesh technology in order to avoid any connection issues.

This is a dual-band device and it supports speeds of up to 550Mbps. As for additional features, there’s 2×2 MU-MIMO and beamforming as well as WPA2 encryption.

The setup is also quite simple thanks to the dedicated mobile app so you should give it a try.


TP-Link Deco

  • 2,000 feet range
  • Uses AC1200 standard
  • Dedicated app for parental controls and network management
  • WPA/WPA2 encryption
  • Minor connection issues with certain devices

This mesh router is more affordable than our previous entries, but despite its price, it still offers solid features.

A single device can provide you with a range of 2,000 feet, but you can easily expand it with additional Deco devices.

The router provides speeds up to 1200Mbps and it can be set up easily thanks to the dedicated app.

The app itself offers advanced parental controls, easy management and the ability to create guest networks for visitors.


Synology MR2200ac

  • Extra security with WPA3-Personal, WPA3-Enterprise, and OWE
  • Tri-band 2.13Gps router
  • Easy setup and remote management
  • Minor firmware issues

Synology MR2200ac is a tri-band 2.13Gbps router and just like other entries on our list, it’s easy to set up thanks to the dedicated app or web client.

Regarding the security, this device supports WPA3-Personal, WPA3-Enterprise and OWE standards.

This router also has advanced parental controls so you can easily create different rules for different users.

There’s also a real-time traffic control so you can see the bandwidth usage for each device and application.


Linksys Velop Home

  • 1,500 feet range
  • Easy setup and management with a dedicated app
  • Dual-band support with speeds up to 867Mbps and 400Mbps
  • Minor issues with initial setup

Linksys Velop Home is a mesh router with a range of up to 1,500 feet. This is a dual-band device and it offers speeds of 867Mbps and 400Mbps.

The router comes with a dedicated app that is used for setup and network management.

Regarding network management, this router supports guest access, parental control, device prioritization, and voice control features.


Mesh routers are perfect if you have dead Wi-Fi spots in your home and you want a simple and easy way to get rid of them.

We hope that you found our list helpful and that you managed to find the perfect device for your needs.

This specific deal is part of our bigger selection of the best router deals you can find.

You might also want to check out our dedicated Black Friday hub for tech deals.

FIX: Inet_e_resource_not_found error in Microsoft Edge

The inet_e_resource_not_found error is one that pops up with browser tabs for some Edge users. The inet_e_resource_not_found error message is included under details on Edge’s Can’t reach this page tab.

When this browser issue occurs, Edge users can’t open the required page. Some Edge users have stated that the error first emerged after the Creators Update.

This is how you can fix an Edge browser that returns the inet_e_resource_not_found error code.


How can I fix the inet_e_resource_not_found Edge error?

1. Use Opera

While Microsoft Edge is indeed quite revolutionary because of the Chromium engine, its stability is still up for debate.

Speaking of the Chromium engine, Opera is also built around it, so if you need an alternative to Edge, Opera is your best bet.

In fact, Opera can be considered to be exactly like Edge, but with a few extra tools. for example, their extensions are cross-compatible, although not 100%, but Opera’s dedicated library is far vaster.

More so, if you prefer the browser in its native form, without extensions, then you’ll be glad to know that Opera is one of the fastest browsers around in that state.

Put that into perspective when you also consider just how insignificant the system requirements and RAM use is, even with multiple tabs opened.

Opera

Opera

If you value fast browsing, low system requirements and advanced security features, then look no further than Opera!

2. Reset the Edge browser

  1. Press the Cortana button on the Windows 10 taskbar to open that app’s search box.
  2. Input apps in Cortana’s search box to select Apps & features.
  3. Next, enter Edge in the search box shown in the shot directly below.
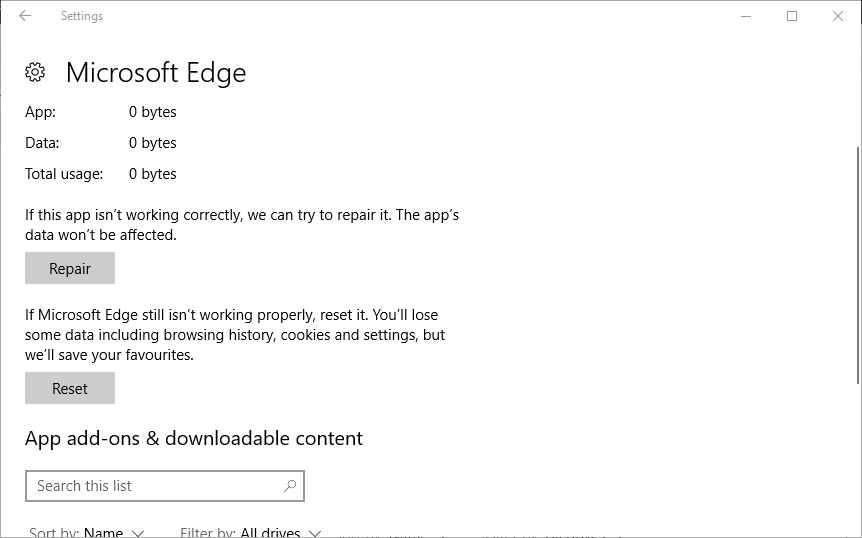
  4. Select Microsoft Edge and click Advanced options to open the options in the snapshot directly below.
  5. Press the Reset button. A box opens with another Reset button on it that you can press to confirm the selected option.

There’s also a Repair option that you can select to fix the Edge inet_e_resource_not_found error with without clearing data.


3. Flush the DNS

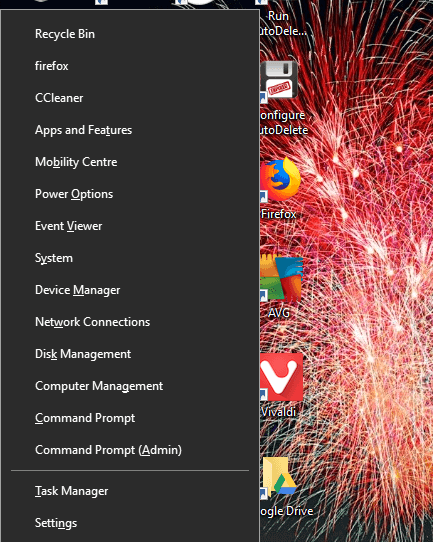
  1. Open the Win + X menu shown in the screenshot directly below with the Windows key + X hotkey.
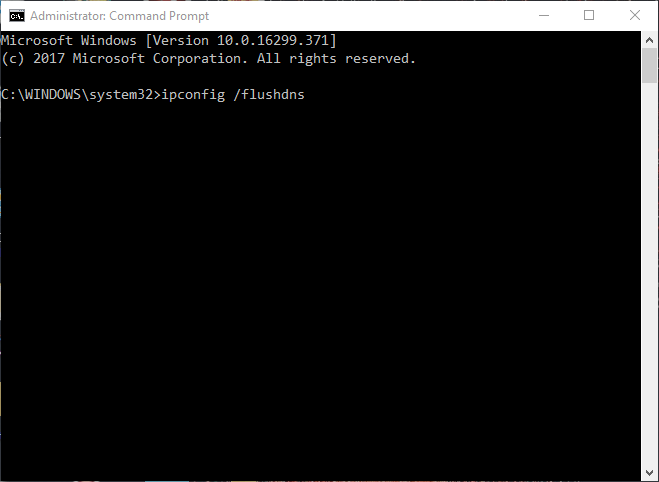
  2. Select Command Prompt (Admin) to open the Prompt as admin.
  3. In the Command Prompt‘s window type the code below then press the Return key: ipconfig /flushdns

4. Adjust the User Account Control Settings

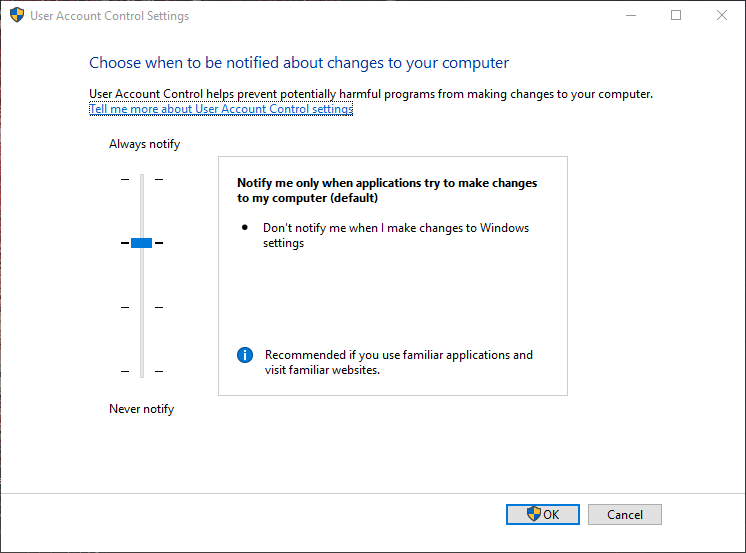
  1. Enter UAC in Cortana’s search box.
  2. Click Change User Account Control settings to open the window shown directly below.
  3. If the bar slider is at Never notify, raise it so that it’s at least one down from Always notify.
  4. Click the OK button to confirm.

Adjusting the User Control Settings can be done in just a few clicks and it may solve the the Microsoft Edge inet_e_resource_not_found issue.


5. Adjust the DNS server addresses

  1. Open the Run accessory by pressing the Windows key + R hotkey.
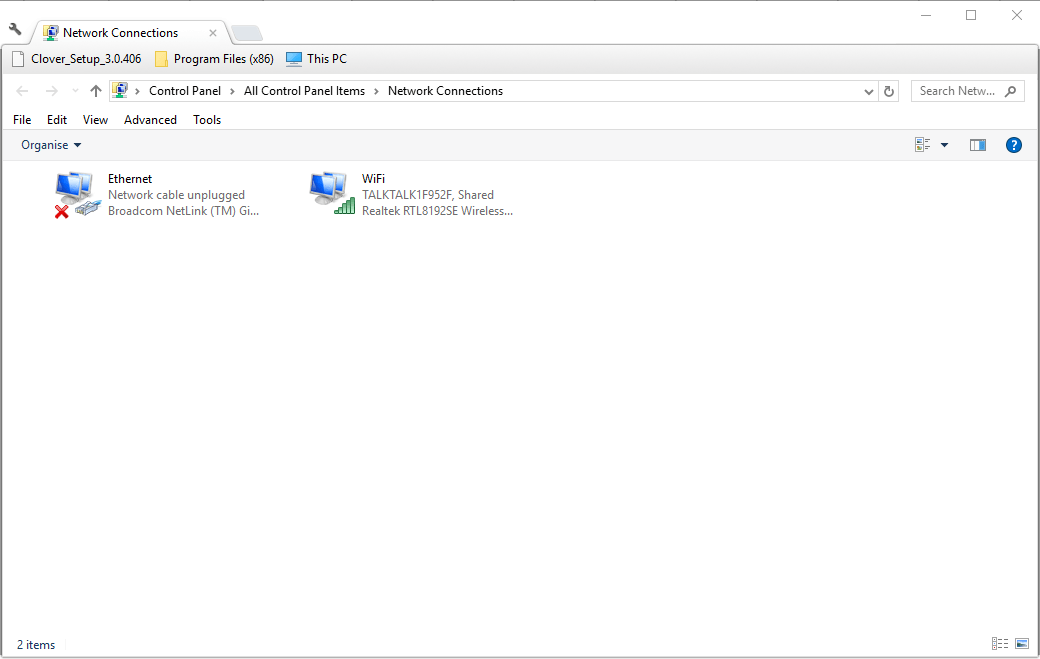
  2. In Run‘s text box enter the code below then click OK to open Network Connections in the Control Panel: ncpa.cpl
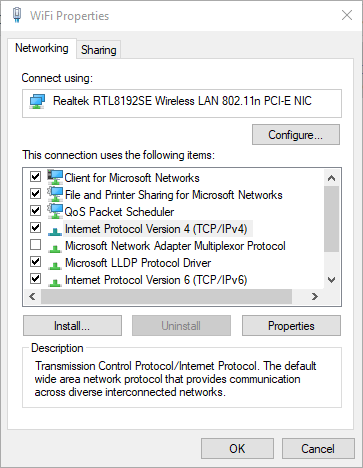
  3. Right-click your network adapter and select the Properties option.
  4. Select Internet Protocol Version 4 (TCP/IPv4) on the Networking tab, and press the Properties button.
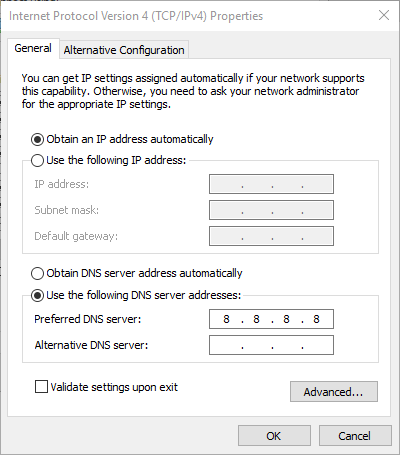
  5. Select the Use the following DNS server addresses option on the General tab.
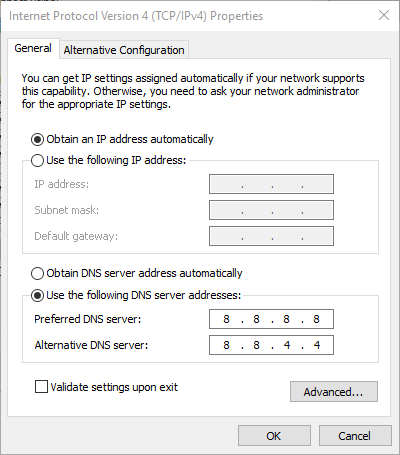
  6. Enter the value 8.8.8.8 for the Preferred DNS server.
  7. Then input 8.8.4.4 for the Alternative DNS server as shown in the shot directly below.
  8. Click the OK button to close the Internet Protocol Version 4 (TCP/IPv4) Properties window.

After completing these the inet_e_resource_not_found dns error should be solved. However if you still find that the problem persists, just try our next solution.


6. Reinstall the Wi-Fi adapter driver

  1. Press Windows key + X hotkey and selecting Device Manager to open the window directly below.
    device manager
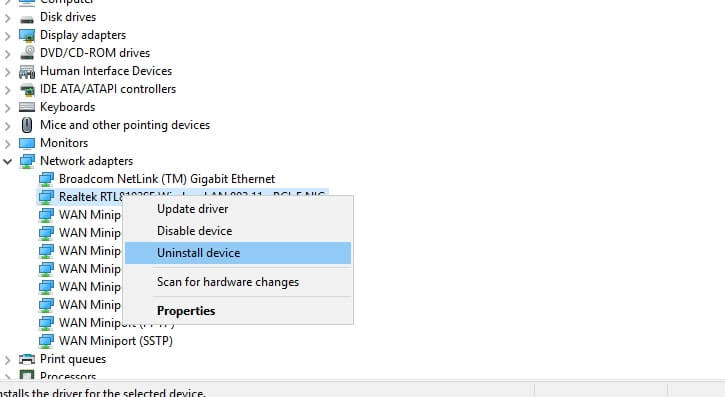
  2. Double-click Network adapters to expand that device category.
  3. Right-click your network adapter and select Uninstall device.
  4. Press the Uninstall button to further confirm.
  5. Windows will reinstall the driver when you restart the desktop or laptop.
  6. Note that you’ll also need to re-enter Wi-Fi password after restarting Windows.

Reinstalling the driver for the Wi-fi adapter can be done in just a few steps and it might fix the Microsoft Edge inet_e_resource_not_found error.


7. Reset Winsock

  1. Enter CMD in Cortana’s search box.
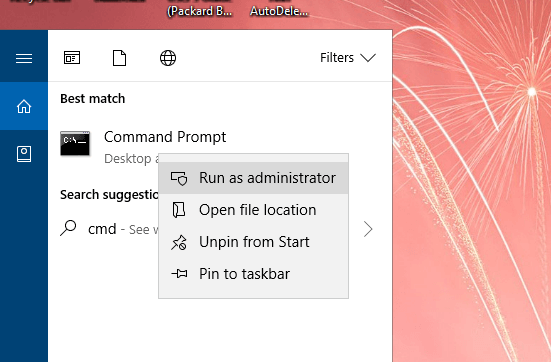
  2. Right-click the Command Prompt and select Run as administrator to open its window.
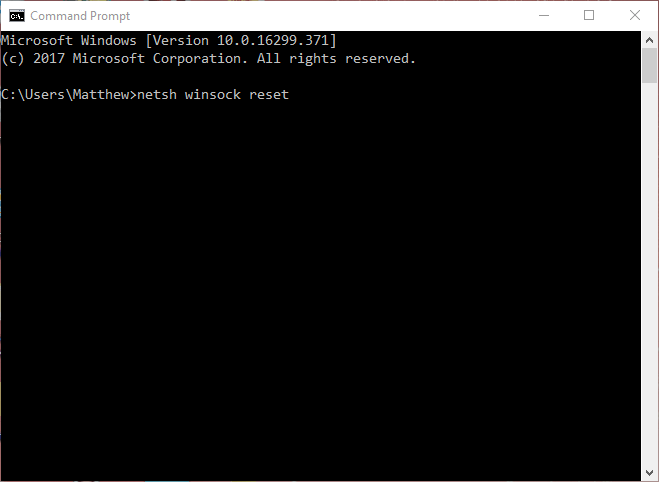
  3. In the Prompt’s window input the code below and press Enter: netsh winsock reset
  4. Restart the Windows platform.

These are a few of the resolutions that might fix the inet_e_resource_not_found in Windows 10, so that you can open the required website pages in Edge again.

We’d like to know more from you on this subject so drop us a comment in the comment section below.


KB4601319 fixes issues that prevented user from using chkdsk

The Patch Tuesday updates for the Month of February have just been rolled out by Microsoft, and they bring plenty of fixes, enhancements, and new features to all versions of the Windows 10 OS.

This includes older entries like Windows 10 v1507, up to the latest, which is currently Windows 10 v20H2.

We’ve already written an article where we included detailed changelogs for each cumulative update, as well as direct download links.

However, some cumulative updates stood out from the rest, either through the major changes that they brought, or the major issues encountered in them.

Such would be the case of KB4601319 that applies to Windows 10 v20H2/ and 2004.


Windows 10 v20H2/v2004 users can finally use chkdsk again

Since the last updates, it was discovered somewhere along the way that many users would experience startup issues or even file damage after running a chkdsk /f.

Considering that a Chkdsk scan is usually among the go-to solutions to fix system files, this issue was quite ironic indeed.

Fortunately enough, those of you that have Windows 10 v20H2 or v2004 installed on your PC should no longer worry about the issue, since according to Microsoft, it has been successfully been taken care of.

Unfortunately, the update has failed to fix an issue discovered during the February 2nd update, where users reported issues with Discord App overlay:

Microsoft and Discord have found incompatibility issues with some games using Direct3D 12 when the in-game overlay feature of Discord is enabled. When attempting to open affected games you might receive an error, or the game might close silently.

More so, during last month’s Patch Tuesday updates, it was discovered that those running Windows 10 v 20H2 and v2004 might experience system and user certificate losses post-update, and the issues still seems to be persisting.


This concludes our short briefing of KB4601319, and we hope that it has given you enough information to help you make a decision regarding downloading or postponing the instalation of this update.

While these changes alone would warrant installing the updates, don’t forget that the main focus of the Patch Tuesday updates is the improvements in terms of security.

That being said, if you don’t use other means of avoiding malware attacks, go ahead and install the updates at once, since these updates can be obtained in the same way as regular updates:

  • Via the Windows Update menu
  • Via the Windows Update Catalog
  • Via the Windows Server Update Service
  • Via Group policies set up by your network administrator

Don’t forget that there are some measures that can be taken to further ease the update process, so don’t forget to follow them as well.

Will you update your PC as soon as the updates become available in your region? Let us know by leaving your feedback in the comments section below.

KB4601318 fixes 11 different Windows service errors, among others

The Patch Tuesday updates for February have finally arrived, and, like always, they bring a host of new features that enrich the Windows 10 OS.

More so, these updates include enhancement to already-existent features and fixes to issues that have been around for a shorter or longer period of time.

Whichever the case, the updates are here and they are ready to download, although you must know that certain cumulative updates do have some issues associated with them.

Such would be the example of KB4601318 that applies to Windows 10 version 1607


KB4601318 fixes high CPU use, fatal error messages, and more

Among this month’s cumulative updates, KB4601318 addresses the most issues, according to the Microsoft changelog:

  • Addresses an issue with a Service Host (svchost.exe) process that causes excessive CPU usage in some Input Method Editor (IME) language environments, such as Traditional Chinese. This issue occurs when you try to add an input method in Control Panel.
  • Corrects historical daylight savings time (DST) information for the Palestinian Authority.
  • Addresses an issue with German translations of Central European Time.
  • Addresses an issue that causes LSASS.exe to stop working because of a race condition that results in a double free error in Schannel. The exception code is c0000374, and the Event Log displays Schannel event 36888, fatal error code 20, and error state 960. This issue occurs after installing Windows updates from September 2020 and later.
  • Addresses an issue that might cause systems that use BitLocker to stop working and display the error 0x120 (BITLOCKER_FATAL_ERROR).
  • Addresses an issue that prevents scheduled tasks that have multiple actions from running again if you have previously disabled them while they were running.
  • Addresses an issue that fails to log events 4732 and 4733 for Domain-Local group membership changes in certain scenarios. This occurs when you use the “Permissive Modify” control; for example, the Active Directory (AD) PowerShell modules use this control.
  • Addresses an issue that incorrectly reports that Lightweight Directory Access Protocol (LDAP) sessions are unsecure in Event ID 2889. This occurs when the LDAP session is authenticated and sealed with a Simple Authentication and Security Layer (SASL) method.
  • Addresses an issue with Server Message Block (SMB). This issue incorrectly logs the Microsoft-Windows-SMBClient 31013 event in the Microsoft-Windows-SMBClient or Security event log of an SMB client when an SMB server returns STATUS_USER_SESSION_DELETED. This issue occurs when SMB client users or applications open multiple SMB sessions using the same set of Transmission Control Protocol (TCP) connections on the same SMB Server. This issue most likely occurs on Remote Desktop Servers.
  • Addresses an issue that causes the LanmanServer service to stop unexpectedly. This issue occurs if the OptionalNames registry value is set and the service restarts.
  • Addresses an issue that causes stop error 0x54 in SRV2.SYS.

While the two fixes regarding German and Palestinian localizations could be considered minor, the other issues that resulted in common error codes were probably the most expected among users.


Given the sheer number of fixes showcased, it is highly advisable that you get the latest Patch Tuesday update s as soon as they becopme available in your region.

Remember that installing these Patch Tuesday updates is important purely for security reasons.

More so, the identified issues only happen in a handful of cases, and not everyone that gets the cumulative update will automatically experience the.

If you do decide to install the latest Patch Tuesday updates, you can get them through multiple means, including:

  • The WIndows Update Catalog
  • The Windows Update menu in Windows 10
  • The Windows Server Update Service (WSUS)
  • Through Gorup policies set up by your network administrator

On the flip side, you can choose to postpone the updates for up to 35 days until the bugs and issues that you are trying to avoid are hopefully solved.

Let us know whether you decided to install the latest cumulative update or not by leaving us your feedback in the comments section below.

A disc burner wasn’t found [Error fixed]

Many Windows users have downloaded ISO files and then burned them using their computer’s optical drive to a CD or DVD. However, some of them have encountered the error: Disc burner not found.

This usually happens whenever you want to save important content while using the native Windows application isoburn.exe.

If your DVD ROM doesn’t have the necessary writing capabilities, then you will receive this annoying error message.

Another cause for this issue may be a common glitch in your operating system. There are also instances when explorer.exe can encounter problems and send this error message.

If your optical unit has a corrupted driver, then the DVD writer will not function as it should. Some users have discussed about this error on Microsoft forums:

When I try to burn an image, I get the following message: A disc burner wasn’t found. Make sure that a burner is installed properly, and you have the appropriate permissions to burn the disc.

How do I enable the native image burner?

We have researched this issue and prepared several solutions that should prove useful to you. Just read our following section and learn how the disc burner not found error can be solved.

How can I fix the disc burner was not found error?

1. Use a reliable 3rd party software

If you want to burn a disk image (an ISO file) to a USB drive, you will no longer use isoburn.exe. This native Windows software will only function when you use disks.

As iso burn will not allow you to burn iso files on a flash drive; you will need to find a viable alternative. An option worthy to consider in this regard is to use a top 3rd party application.

You may also mount an ISO file on your current operating system if you wish to use it as a virtual CD or DVD at some time, and you can build backups of your own discs by converting them to ISO format.

If you merely wish to preserve the ISO file as-is on a DVD, you must use a DVD burning tool to make a data disc for storage.

ISO files, on the other hand, refer to a disk image bundled into a single file that may be used to duplicate the original system. If this is what you want, then you must burn the ISO on a DVD with a reliable free DVD burner.

2. Verify if the DVD unit has writing capability

  1. Open File Explorer and navigate to This PC.
  2. Verify the name of your DVD drive in the right section of your screen.DVD Writer drive
  3. Ensure that its name finishes with RW (Read-Write).

If the answer is yes, then this abbreviation lets you know your DVD unit has the capability of burning disks using the isoburn.exe utility.

If you own a ROM drive, then you won’t be able to use it for copying data on CD or DVD. Also, in the case of a normal optical drive, the solutions from this section will not work.

3. Restart explorer.exe file

  1. Press Ctrl + Alt + Delete to launch Task Manager.
  2. Choose Processes, locate and right-click on explorer.exe from the list.
  3. From the newly appeared context menu select End Task.
  4. Press Windows key + R to open Run and type in cmd inside the box.
  5. Press Ctrl + Shift + Enter to open Command Prompt.
  6. After the User Account Control (UAC) notifies you, click Yes.
  7. Type in the following command and press Enter in Command Prompt: explorer.exe
  8. Navigate to and right-click on the ISO file location in File Explorer.
  9. Select Burn disc image from the newly appeared menu.
  10. Configure and launch the utility, then verify if the error still appears.

Use this solution to close all Windows Explorer instances. Then, you need to open this section again from Command Prompt.

After launching Windows native writer, the Burn Disk Image, the disc burner software not found error should disappear.  

4. Reinstall the DVD writer drivers

  1. Press Windows key + R to open Run and type in devmgmt.msc.
  2. Press Enter to open Device Manager and wait for a notification from the User Account Control (UAC).
  3. Select Yes to grant UAC administrator privileges.
  4. In Device Manager expand the CD/DVD-ROM section.
  5. Right-click on the problematic DVD writer and click Uninstall.
  6. Click Yes to start the uninstallation process.
  7. Restart your computer.

When the next startup takes place, the operating system will have to install a new driver to replace the one you have previously uninstalled.

After the startup has been completed, burn the ISO file again to verify if the problem has been solved.

In certain cases, the disc burner or software not found error message on Mac or Windows 10 can be caused by inconsistency with your DVD writer drivers.

By using the Device Manager feature and uninstalling the old driver, you will force Windows to install the newest one at the next startup.

The disc burner not found error message may appear when you want to write an ISO file on a DVD or CD. It can be generated by multiple causes, but we prepared several solutions to fix this issue.

You must first verify if your DVD unit has writing capabilities, restart File Explorer, or use the professional PowerISO software. This detailed list includes even more burning software options to pick from.

Read carefully our previous section, apply the solutions we have specified there, and leave us a comment to tell us which one worked for you as well. We’re eager to hear from you.

FIX: Gpapi.dll error in Windows 10

As an essential component that ensures Windows 10 programs operate properly is not a surprise that any errors related to the gpapi.dll files can create headaches.

Not to mention how time-consuming can be trying to figure out why they appeared and how to fix it. Usually, the error messages related to gpapi.dll files indicate that the file may have been incorrectly installed, corrupted, or even removed.

We’ve gathered in this article a list of easy to perform steps that will help you solve the gpapi.dll error in no time so check it out.

What can cause a gpapi.dll error?

  • Due to an error that may lead to losing data, the gpapi.dll file is inaccessible or damaged.
  • The antivirus software may have blocked the gpapi.dll file’s access.
  • The Windows registry’s database is damaged.

Common gpapi.dll errors include:

  • gpapi.dll is missing
  • gpapi.dll error loading
  • gpapi.dll crash
  • gpapi.dll was not found
  • gpapi.dll could not be located
  • gpapi.dll Access Violation
  • The procedure entry point gpapi.dll error
  • Cannot find gpapi.dll
  • Cannot register gpapi.dll

How can I fix the gpapi.dll error in Windows 10?

1. Perform a system file checker

  1. Go to Search, type cmd in the Search box, and then right-click on Command Prompt.
  2. Next, click on Run as administrator.
  3. At the Command Prompt, type the following command: sfc /scannow
  4. Type Enter and allow the process to continue.

If your DLL file is provided by Microsoft, running the System File Checker will replace the corrupted copy of the dbghelp.dll file with the cached one.

2. Reset your device

  1. In the Windows search box enter reset this PC.
  2. Click on Reset this PC and press on the Get started button.
  3. Select the Keep my files option from the displayed list.
  4. Finally, press the Next button and Reset to confirm.

Problematic applications or even outdated drivers can cause the gpapi.dll error and you can easily fix this problem by following the steps indicated in this article.

3. Use a dedicated DLL repair tool

The fastest way of solving the gpapi.dll error is to find and download the file into the original folder. You can do this by accessing a dedicated DLL library, and downloading the correct igdumdim64.dll file based on your device.

These libraries are usually updated frequently and by searching the file based on your system details( 64-, or 32-bit) you should have no problems in finding the right one.

If you want to save some time and make sure you get a smooth experience, you can use dedicated DLL management and repair software.

4. Scan your device

Sometimes the gpapi.dll error is prone to happen due to a virus or a malware infection on your device. A malicious program could intentionally corrupt the DLL files in order to substitute them.

Running a virus scan using your antivirus program in order to determine if your system is virus-free is recommended

5. Update drivers

You can manually update the drivers for the associated program where the gpapi.dll error appears but this can be a bit time-consuming.

Also, making sure you don’t install the wrong drivers is essential, in order to avoid more damage to your device.

In order to avoid all this from happening, we would recommend using a dedicated third-party tool that will do this for you automatically.

We definitely hope that following the steps indicated in this guide has managed to help you resolve the gpapi.dll error.

Don’t hesitate to share with us in the comments section below any other recommendations or suggestions you may have.

3 best SolarWinds User Device Tracker alternatives [Tested]

For network administrators, it is important to locate users and devices on the network in order to better decide on other network resources, and this process can be improved by using specialized software.

Such monitoring software has the specific purpose of putting together data about users, ports, and network devices while allowing switch port monitoring as well.

We’ve compiled a list of the best SolarWinds User Device Tracker alternatives that have been tested by our experts, so make sure to keep on reading.

What are the best User Device Tracker alternatives that I can use?

PRTG Network Monitor

Microsoft Network Monitor alternatives

PRTG Network Monitor is our first recommendation for one of the best choice when it comes to User Device Tracker monitoring.

This fantastic tool allows you to track multiple devices, switch port monitoring, and data to help you see their location at all times.

Moreover, PRTG Network Monitor works with all the biggest manufacturers and all the important features are included without any additional costs.

The 3 types of sensor available will make it easier SNMP sensors, Packet Sniffer Sensor and the NetFlow/sFlow/jFlow sensors.

Thanks to the SNMP preconfigured sensor you will know exactly the CPU load in your switch and the memory available as well.

PRTG Network Monitor

PRTG Network Monitor

The most reliable and performant User Device Tracker with incorporated features that are designed to keep you updated at all times.
Free trialVisit website

ManageEngine OpManager

router temperature monitoring software

ManageEngine OpManager is yet another comprehensive tool that provides traffic analysis, network monitoring, bandwidth analysis and is a great alternative for SolarWinds User Device Tracker.

The software comes with a new monitoring module which makes it the perfect choice for inspecting the network traffic.

Thanks to this feature you will gain real time access to bandwidth monitoring and detailed traffic reports which will let you know where you stand at all times.

The reporting profiles available are also a great addition since they come with customization options so that you could see all the needed data at a glance.

Key features of ManageEngine OpManager:

  • Ease to use and install on your device.
  • Temperature, power, and voltage monitoring.
  • Network Maps, category-wise Device Maps, and List viewsReports on hardware health status.
  • Multi-vendor support with over 650 device templates.

ManageEngine OpManager

Inspect network traffic and get real-time reports with ManageEngine OpManager.
Free Trial Visit Website

Nagios Network Analyzer

Nagios Network Analyzer is our last recommendation but definitely not the least. With this tool, you will easily be able to have access to detailed traffic analysis.

As a great alternative for User Device Tracking, Nagios Network Analyzer will offer a central view of network traffic in a comprehensive home dashboard.

The integrated features will help you keep track of specific subsets of network information, maintain historical network flow data or monitor the network usage for specific applications.

Moreover, you’ll be able to have a central view of the bandwidth data and network traffic. And with the use of the advanced alerting and reporting features you’ll stay updated at all times.

⇒ Get Nagios Network Analyzer


These are the 3 best SolarWinds User Device Tracker alternatives that we have also tested and we would recommend you give them a try as well.

In conclusion, there are several great alternatives to SolarWinds User Device Tracker, offering powerful network monitoring features. For more on free network monitoring tools, visit our guide on Free Network Monitoring Tools.

If there are other recommendations or suggestions that you have tried and worked best for you, we would love to hear them in the comments section below.

Get the Windows 10 February Patch Tuesday updates today

Now that February 9th is here, it means that Windows 10 enthusiasts will be receiving their monthly Patch Tuesday updates that they waited for since the beginning of the year.

As always, these updates are expected to bring much-needed fixes, tweaks, and updates to the Windows 10 OS, as well as much-needed security improvements against common malware and CVEs.


What the February Patch Tuesday updates might bring

Back on January 12th, Patch Tuesday brought many fixes, but some of the cumulative updates also caused issues with the system and user certificates, problems that weren’t fixed with the minor updates from February 2nd.

Speaking of which, not only was the issue not fixed, but some of the cumulative updates from February 2nd affected the way Windows 10 behaves with certain games:

Microsoft and Discord have found incompatibility issues with some games using Direct3D 12 when the in-game overlay feature of Discord is enabled. When attempting to open affected games you might receive an error, or the game might close silently.

As expected, most users, especially gamers, will be looking forward to a fix for this issue. On the other hand, one could also simply get the latest version of the Discord app installed.


Whichever the case, the Patch Tuesday updates will hit live in just a couple of hours at 10 AM PST, so be ready to receive the latest changes and enhancements for your OS.

Don’t forget that there are many ways through which you can update your PC with the Patch Tuesday update:

  • Having your System Administrator manually scheduling the update via Group Policies
  • Downloading each update directly from the Windows Update Catalog
  • Updating your PC normally through the Windows Update menu
  • Using the Windows Server Update Service

What changes and fixes are you expecting this month from Microsoft? Let us know by leaving your feedback in the comments section below.

How to save a webpage as a PDF [Chrome, Firefox, Edge]

Sometimes you need to save a certain webpage to read it later, and many users choose to save the webpages they need as PDFs.

This is quite simple to do in Windows 10, and in this guide, we’re going to show you how to do it without any third-party tools.

How can I save a webpage as a PDF?

1. How do I save a webpage as PDF in Chrome, Firefox?

Save as PDF in Chrome
  1. Open the webpage.
  2. Press Ctrl + P.
  3. In the new window, in Chrome from Destination select Save as PDF, while in Firefox we select Microsoft Print to PDF.
  4. The Print button is the last one needed to finish the process. Click on it and a new file will show on your computer.

Note: The process is similar in most browsers. The hotkey Ctrl + P is a universal combination that is a shortcut for the print command.

It works just as well in Word documents, PDFs, and it’s the fastest way to save a webpage to PDF.

2. Here’s how to save webpages as PDF in Internet Explorer

  1. Open a webpage you want to save as PDF with Microsoft Edge.
  2. Click on the dotted menu, and choose Open with Internet Explorer.
  3. In Internet Explorer, click on Tools (gear icon), and choose Print.
  4. Choose Microsoft Print to PDF, under Select Printer.print in windows 10
  5. Click on Print.
  6. Choose the location of your PDF document, and give it a name.
  7. Wait a couple of seconds, and your PDF document will be saved.

Note: This method is pretty simple, and it’s the easiest way to save a page in Internet Explorer on Windows 10.

3. How do I save a webpage in PDF in Microsoft Edge?

  1. Open the webpage you want to save as PDF.
  2. Press Ctrl + P or click the three-dot menu and select Print.
  3. Select Microsoft Print to PDF to save the respective webpage as a PDF file.microsoft edge print to pdf
  4. Hit Print.

Note: And just when I wanted to write a report about that, and tell you that you can save a webpage to PDF in Edge normally now, I dug a little deeper, and I found out that the issue is still here for many users.

Fortunately, I did find some solutions to this problem, and I’ll list them below.

4. How do I fix the Microsoft Edge Save Print to PDF not working?

1. Use a different browser

Most people who have this problem, also say that saving a webpage as PDF works in other browsers.

We recommend installing the Opera browser as an alternative to Microsoft Edge. Opera is a reliable browser that will always protect your privacy — a crucial characteristic in today’s world.

Making the switch to Opera is quite easy. Once you install it, you can easily import all of your bookmarks from Edge, Chrome, or Firefox.

Then, you can start using the browser and see how faster web pages will load. Because it comes with a built-in ad blocker, you will see fewer ads and better loading speeds.

Other really useful features are readily available: integrated messengers, free and unlimited VPN, grouping tabs together using Workspaces, or sharing content with your other devices using My Flow.

The browser also supports printing web pages to PDF. To print webpages to PDF on the Opera browser, press CTRL + P and select Save as PDF.

Opera

One of the best browsers available, with AdBlocker and security features. Opera is a great solutions to save a webpage as PDF.

2. Repair or reset Edge

  1. Open the Settings app by pressing the Windows key+I keys combination.
  2. Go to Apps.
  3. Select Apps and Features.
  4. Scroll down to Microsoft Edge.
  5. Select the browser and click on Advanced Options.
  6. First, click on Repair.
  7. If the issue persists, click on the Reset option.

3. Install a much better tool for HTML-PDF conversion

  1. Download Adobe Acrobat and install it.
  2. Open your browser, go to the page you want to convert to PDF, and copy the URL.
  3. Open Adobe Acrobat, and go to Tools.
  4. Click Create PDF.
  5. Click Webpage.
  6. Go to Advanced Settings and click OK.
  7. Paste the URL and click Create.

Note: Third party-solutions are pretty much the best course of action regardless of what you are trying to do since they are usually created to do specifically that in a manner that is extremely simple for the user.

Such would be the case with Adobe Acrobat, an iconic software tool that has become almost synonymous with PDF files. Thus, it is a great idea if you use Adobe Acrobat to convert HTML pages to PDFs as well.

Do you have this issue with printing PDF in Microsoft Edge? Or do you maybe have a solution for us?

If you have a solution to this problem, please write it down in the comments, our readers who are facing this issue will surely appreciate it.

FIX: Igdumdim64.dll error in Windows 10/11

Without any doubt, the igdumdim64.dll can be quite frustrating as they can happen at any time, and without any further indications for what to do next.

There are various reasons and factors that could affect how the igdumdim64.dll files are working on your Windows 10 device.

In this article we will explore some of the most efficient and easiest ways to solve this error, so check it out.

What is igdumdim64.dll?

The igdumdim64.dll file is associated with User Mode Driver for Intel(R) Graphics Technology. This type of file is used to run User Mode Driver for Intel(R) Graphics Technology-based applications.

You will see that for certain, more sophisticated and complex video games and software are using the igdumdim64.dll to get access to certain API functionality.

Igdumdim64.dll error messages

  • The program can’t start because igdumdim64.dll is missing from your computer.
  • This application failed to start because igdumdim64.dll was not found.
  • The code execution cannot proceed because igdumdim64.dll was not found.
  • Cannot start {program}. A required component is missing: igdumdim64.dll. Please install {program} again.

How can I fix the igdumdim64.dll error on my Windows 10 device?

1. Download igdumdim64.dll file

Ensuring that you have the compatible and latest version of the DLL files your system needs can be easily done by using specialized DLL fixing software.

The great thing about this type of software is that it is updated frequently and you should not have any trouble finding the right DLL file, and have it on your system with just a few clicks of your mouse.

It doesn’t matter if your PC has corrupted or just missing .dll files; with this multifunctional software, you will resolve the issue using effective support.

The process will also work automatically, and you only have to select the files to be fixed. After this, the tool you want will find new DLL files to replace your problematic ones in minutes.

2. Scan your device

Before moving forward with any other step, we would recommend that you scan your device for any malware or virus threats.

It’s possible that some igdumdim64.dll files are associated with a virus or malware infection on your device, which has actually caused the file to not work properly.

If that’s the case, running a virus scan using your antivirus program in order to determine if your system is virus-free is the best way to proceed at this point.

3. Reinstall the program

In case you receive the igdumdim64.dll error when running a specific program, then reinstalling it will substitute the missing file, the registry entries, and of course the correct igdumdim64.dll file.

Make sure to first reinstall it, and then proceed with the new installation of the program. A restart of your device may be required in both situations.

4. Reset your device

  1. Open Windows search box and enter reset this PC.
  2. Click on Reset this PC and press on the Get started button.
  3. Next, select the Keep my files option.
  4. Press on the Next button and Reset to confirm.

5. Update drivers

Updating the drivers for the associated igdumdim64.dll files is our next recommendation. You can do this manually although this could be time-consuming and you may also risk not installing the correct ones.

In order to avoid this, we would suggest that you use a dedicated tool that will automatically do this for you and it will also maintain your device drivers updated at all times.

One such reliable tool that our team recommends using is Outbyte Driver Updater. This software will prevent your device from any damage caused by installing the wrong drivers.

Another good reason to use this software is represented by increased system performance and better speed for your operations.

Hence, using the latest driver versions improve your overall PC performance and also keeps you away from device errors.

⇒ Get Outbyte Driver Updater

6. Install Windows updates

  1. Press Windows Key + I  to open the Settings app.
  2. Navigate to the Update & Security option.
  3. Next, click on Check for Updates button.
  4. In case there are new updates found make sure to install them.

The igdumdim64.dll error can be caused by outdated drivers or problematic applications, and you can easily fix this problem by following the steps indicated in this article.

We definitely hope that one of the above solutions helped you solve the igdumdim64.dll error.

If you have any other recommendations or suggestions, don’t hesitate to write them in the comments section below.

FIX: Libmysql.dll missing/was not found [File Error]

The libmysql.dll files are essential system files of the Windows 10 operating system.

Usually, they contain a set of procedures and driver functions and are indispensable components that ensure the Windows programs are working properly.

Anytime the libmysql.dll file is missing this can potentially have a negative impact and consequences on how the associated software works.

There are multiple reasons for the appearance of a libmysql.dll error, including registry issues, malicious software, faulty applications, incorrect installation of the file, and more.

We will explore in this article a few easy steps that will help you solve the file error, so make sure to keep on reading.

Libmysql.dll error messages

There are several ways on how the libmysql.dll errors can appear on your device.

  • libmysql.dll is missing
  • libmysql.dll error loading. The specified module could not be found
  • libmysql.dll crash
  • libmysql.dll was not found
  • libmysql.dll could not be located
  • libmysql.dll Access Violation
  • The procedure entry point libmysql.dll error
  • Cannot find libmysql.dll
  • Cannot register libmysql.dll

How can I fix the ibmysql.dll missing / was not found [File error]?

1. Restore the libmysql.dll file

The easiest way to find and restore the libmysql.dll file is to use dedicated software that will do this automatically.

Thanks to the online libraries that this kind of tool uses to compare the data found in your device. After the scan is complete, the software will start downloading and replacing any faulty registries, DLL files, or any damaged files found during the scan.

2. Restore the file using Recycle Bin

Although it may not be so easy to believe, the easiest cause for a missing libmysql.dll file can be due to being mistakenly deleted.

If you have even the slightest suspicion that you may have accidentally deleted the DLL file, then make sure to check the Recycle Bin.

If the file is found there, simply select Restore and the file will be replaced in its initial folder.

3. Reinstall the program

If the above solutions failed then we would recommend that you simply reinstall the program that has the libmysql.dll file missing.

By doing that, all the initial packages of the file will be reinstalled on your device, which will also include the DLL file.

4. Update Windows

Since Microsoft is regularly releasing new updates in order to improve the OS performance, checking to see if there are any new ones to install on your device is our next recommendation.

Usually, updating the DLLs is included in the new releases which would help you solve the problem.

5. Run a malware scan

The libmysql.dll not found file error can be due to a virus or a malware infection on your device that has damaged the DLL file.

Moreover, it is possible that the libmysql.dll error is related to a hostile program on your device.

A simple scan of your device will help you quickly fix the issue by detecting and removing any possible threats or infections. Make sure to restart your device after the scan process is finished.

6. Perform a system rollback

  1. Go to the search bar and type System Restore.
  2. Select Create a restore point.
  3. Next, click System Restore button.
  4. Select Choose a different restore point and click Next.
  5. Select a date for restoration before the issue occurred, then click on Next.
  6. Enter your password if asked and follow the on-screen steps to choose a restore location
  7. Reset your device.

We hope that one of the solutions presented here helped you solve the libmysql dll missing file or any other DLL-related issues.

If you have additional recommendations or suggestions we would love to hear about them in the comments section below.

How to play 2 player browser games

There is nothing better than playing your favorite game with your friends. Today, most games support multiplayer, but what about browser games?

A gaming search engine that allows 2 player browser games should have some key characteristics like RAM and CPU limiters, a video pop-out, or an integrated messenger app.

For a long time, browser games were designed for the single-player experience, but today we’re going to show you how to play 2 player games in your web browser.

How can I play 2 player browser games?

1. Use Opera GX

Playing games online with your friends is pretty straightforward, but for best performance in games, it’s advised to use a gaming browser such as Opera GX.

This browser comes with a built-in ad blocker, which will come in handy when dealing with those annoying ads. The ad blocker will also block various tracking scripts and make websites load faster.

Opera GX has a Control GX feature that allows you to allocate your hardware resources. By doing so, you’ll ensure that both your browser and other processes are running smoothly.

It’s a powerful feature that comes in handy if you’re playing Steam games, 2 player online browser games, or other installable games.

The browser also has a built-in messenger that supports several popular services, which can come in handy if you want to play with your friends.

Other features include a highly customizable user interface, Twitch integration, a pop-out video player, and a free VPN with unlimited bandwidth.

Opera GX

Use Opera GX gaming browser if you want to have some great online fun engaging in 2 player browser games!

2. Use Multiplayer Games for Chrome

If you want to have faster access to multiplayer games that you can enjoy in your browser, you should download the dedicated extension for Chrome.

Google Chrome is a popular browser for two-player games thanks to the fact that it incorporates plenty of features that allow this type of online fun.

Thanks to its customizable security features you can be sure that your gaming sessions with your friend are safe from any annoying cyber-threats or dangerous websites.

You’ll also benefit from the fact that Google Chrome facilitates a fast-speed web browsing experience so you can stay productive and get your job done in no time.

3. Play them on gaming websites

  1. Visit any website that hosts online games.
  2. Look for 2 Player category or enter 2 player in the search field.
  3. Select the desired game.
  4. Once the game loads, click Play to start it.

Some of these games will allow you to play together on a single PC, while others will support remote play. It all varies from game to game.

Regardless of what website you use, the process is almost the same on all web browsers.

Engaging in 2 player browser games is simple, and you can do that on any website that hosts online games. If you found this guide helpful, let us know your opinion in the comment section below.

Microsoft Project vs Microsoft Planner vs Microsoft To Do — which project management tool is right for you?

In the Microsoft world, there’s a lot of different programs or apps you can use to manage your project for your small business. As part of your Microsoft 365 subscription, you might have heard of Microsoft Planner, but you also might have heard of Microsoft To Do as well, especially with the recent rebrand of the “Tasks” app in Teams.

And, if you’re looking for a more extensive solution, there’s Microsoft Project, too. So, which tool is right for you?  And how are these three Microsoft tools different from each other? What if you’re doing a solo or a team project? Are you depending on anyone?

Each of these tools can answer those questions, and today, we’ll explain the differences between each tool, and which one you might want to consider using.

Microsoft Project & Project Online

To begin, we’ll start Project Online and Microsoft Project. Project Online is a web-based experience and a paid add-on for Microsoft 365 plans. It’s designed for medium and large businesses primarily for creating schedules, tracking projects, portfolios, and creating timesheets. Microsoft Project (the desktop app) is more about creating a standalone project plan, and organizing works into phases.

This project management tool is one of the most extensive from Microsoft and is best if you’re a larger operation, looking for a more concise solution with a broader focus. Some features can be seen below.

  • Starting in a centralized view, create new projects easily, quickly access important, top-of-mind projects, or open projects most recently worked on.
  • Plan and manage projects, using an ordered list of tasks.
  • Visually track project tasks for better workflow and status, using out-of-box and custom task boards.
  • Track and understand dates, assignments and the relationships of project tasks in visual timeline view
  • Work together on projects, using Microsoft Teams.
  • Work together with stakeholders and team members to edit and update task lists, project schedules, and more simultaneously.
  • Includes familiar scheduling tools to assign project tasks to team members and use different views like Grid, Board, and Timeline (Gantt chart) to oversee the schedule

Microsoft Project Online is priced at $10 per user per month. However, you also can opt for Project Plan 3 or Project Plan 5. These are $30 a user per month, or $44 a user per month. These plans come with a desktop client. They come with the benefit of building roadmaps, timesheets, managing resources. Note that the top-end plan also has access to portfolio selection and optimization, demand management.

Microsoft Planner

Next, there’s Microsoft Planner. Unlike Microsoft Project, Planner is included as part of Microsoft 365 for no extra cost, and it’s a lot simpler to learn to use. That said, it is designed for smaller operations and is for quickly creating plans, assigning tasks, and collaborating. Planner plugs in with Teams and the rest of Microsoft 365, too. Some features of Planner are below.

  • With a familiar getting-started experience, you can create new Kanban boards in minutes, without expert help.
  • Plans are comprised of content-rich task cards that contain expected elements like due dates and extra elements like files and labels. Everything is in Planner, so you can search less and work more.
  • Planner automatically visualizes task status into pie and bar charts for you with no setup required.
  • Planner has iOS, Android, and web apps
  • Planner and Teams work well together. The Tasks app in Teams combines all your Planner and To Do tasks and pairs team and personal to-dos with advanced collaboration tools.

Note that unlike Project which has a desktop app, Planner is only web-based on Windows 10, though there are mobile apps for iOS and Android. It is also designed around Teams and can plug in with Teams to help you track things while you collaborate with coworkers. While it’s not as extensive as Microsoft Project, for most people it will get the job done.

It’s also worth noting that Planner is going through a rebrand, at least in Teams. Microsoft recently renamed the Planner app in Teams to “Tasks” as part of putting both Planner and To Do front and center on the collaboration platform. They’re looking to merge the two at some point.

Microsoft To Do

Last on the list is Microsoft To Do. This is one of the most lightweight of the project management tools.  According to Microsoft, To Do is all about “prioritizing and completing the most important things every day.” To Do has both a consumer version which you can use in your personal life, as well as a work version. You can see some of the features of To Do Below.

  • Set yourself up for success with My Day, intelligent and personalized suggestions to update your daily to do list.
  • Enjoy To Do across iOS, Android, MacOS, Windows, and the web
  • Shared to do lists help keep you connected with friends, family and colleagues.
  • Break tasks down into simple steps, add due dates, and set reminders for your daily checklist to keep you on track

Note that Planner and To Do plug into Microsoft Teams better than Project does. So, if you’re already using Teams, then you might want to consider To Do or Planner instead. You can learn more about To Do here. 

Again, keep in mind that Microsoft is looking to centralize its tools a bit, so To Do is getting pushed into the “Tasks” app in Teams, as part of a three-phase effort. The name change is purely cosmetic though, and the functionalities are still the same in Teams.

Microsoft Lists, and The best of Microsoft 365

To end, we also want to make note of Microsoft Lists. While this isn’t really a project management tool, it shares a lot of its heritage with To Do, Planner, and Project. Lists is intended as an app to share and track information. With lists, users are able to track information such as workflow issues, contacts, issues tracking, and status reporting within Microsoft Teams, SharePoint, and Outlook. There’s also a Lists mobile app, too.

If there’s one thing in common between these three tools, it is that they’re all part of Microsoft 365. Though we think that Project and Project Online is one of the most extensive project management solutions from Microsoft, Planner, and To Do seem to be the one for most small businesses. We’ve been covering this over the past few months in our “Getting Started” series, so feel free to check it out.

5 best dead nodes monitoring software

Managing the node activity and seeing which ones are live and which ones are dead allows you among other things to measure the quality of node to node communication.

There are many possibilities that will allow you to gather data regarding the node activity and thankfully you do not have to test them all in order to make the best decision.

We have tested them and in this article we will present you the best dead nodes monitoring software so keep on reading.

What are the best dead nodes monitoring software I can use?

PRTG Network Monitor

Microsoft Network Monitor alternatives

PRTG Network Monitor comes with excellent performance and features to better optimize and manage all the network traffic details.

This tool will allow you to monitor the nodes and see which ones are live and which are dead nodes.

Moreover, this tool allows you to view your network stats in real-time and can monitor all devices, traffic and all applications that exist in your IT infrastructure.

SNMP, WMI, Packet Sniffing, and NetFlow. PRTG are among the supported features. They are great for both personal and professional usage.

Key features of PRTG Network Monitor:

  • Analyzes data packets and monitors all data traffic.
  • Monitors IP, UDP, and TCP traffic.
  • Extensive server monitor.
  • Application and bandwidth monitor.
PRTG Network Monitor

PRTG Network Monitor

A fantastic dead nodes monitoring software that will offer comprehensive and detailed data for all the network traffic.
Free trialVisit website

Solarwinds Network Performance Monitor

Solarwinds Network Performance Monitor is perfect when it comes to monitoring dead nodes in your infrastructure.

The network monitoring features will allow you to create different data including charts, alerts and reports and also a map of managed nodes.

Moreover, you can define manually the relationship and connections between the nodes. Once you create and activate the map it should start to automatically display the current status of the nodes.

Having all this information available at a glance will allow you to quickly see and decide where a problem may be occurring and how to best solve it.

Key features of Solarwinds Network Performance Monitor:

  • Customizable topology and dependency-aware intelligent alerts.
  • Dynamic wired and wireless network discovery and mapping.
  • The capacity of forecasting, alerting, and reporting.
  • Detailed monitoring of F5 BIG-IP family of products.

⇒ Get Solarwinds Network Performance Monitor


ManageEngine OpManager

ManageEngine OpManager is our next recommendation thanks to its powerful features that will allow you to easily monitor all dead nodes alongside the network traffic from your infrastructure.

The software will provide you with real-time metrics, and thanks to the dozens of integrations it should work with all the latest services.

Moreover, the alert functionality is of great help for making sure that you will identify, detect, and troubleshoot all critical network issues before turning into a serious issue.

Key features of ManageEngine OpManager:

  • Temperature, power, and voltage monitoring.
  • Uses SNMP to collect hardware health data.
  • Reports on hardware health status.
  • Alerts to quickly detect and identify network issues.

ManageEngine OpManager

Analyze real-time metrics and benefit of powerful integration with this professional tool.
Free Trial Visit Website

Zenoss CiscoMonitor ZenPack

With its included features, this tool allows you to monitor all your physical and virtual network.

It collects and stores data for in-depth analysis, where the collection of metrics, events, logs, streaming and model data will ensure you see the current status of each element.

Thanks to this tool you will increase the performance of your business since it’s been built with the modern IT infrastructure in mind.

Key features of CiscoMonitor ZenPack:

  • Intuitive and performant management platform.
  • Unified monitoring of all physical and virtual systems.
  • Integration and monitoring of SNMP traps.
  • Simple to install with minimal configuration required.

⇒ Get Zenoss CiscoMonitor ZenPack


WhatsUp Gold Network Traffic Monitor

WhatsUp Gold Network Traffic Monitor offers a range of impressive features and traffic monitoring that makes it perfect for monitoring the dead nodes as well.

This software could not be left out from our list as it allows for allows for real-time bandwidth monitoring. This will help you identify interfaces, applications, or links and how much they are occupying the bandwidth.

The built-in functionalities will allow you to easily study the traffic patterns over a selected period of time. You can set for the software to do this as well, automatically, and then it can identify trends in bandwidth usage.

Key features of WhatsUp Gold Network Traffic Monitor:

  • Discover, map and visualize device dependencies automatically.
  • Flow, and sFlow to monitor network bandwidth.
  • ToS verification available.
  • Top Protocols, Top Senders, Top Application reports.

⇒ Get WhatsUp Gold Network Traffic Monitor


We hope that the details offered in the list above helped you decide on which dead node monitor to choose next. As you can see monitoring the dead nodes is not at all difficult with the right tool.

In conclusion, exploring alternatives to SolarWinds User Device Tracker can enhance your network monitoring experience. For more on dead nodes monitoring software, visit our guide on Free Network Monitoring Tools.

We would love to know if you have additional recommendations or suggestions, so don’t hesitate to leave them in the comments section below.

5+ best browsers for Schoology and Google Classroom

Online learning platforms such as Schoology and Google Classroom are quite popular, but to use them, you need to have a proper browser.

These platforms are optimized for all major browsers, and in today’s article, we’re going to show you the best browser for Schoology and Google Classroom.


What is the best browser for Schoology/ Google Classroom?

Opera One

Opera One has a long history, and it has been present on the market for 25 years. The latest version of Opera One is Chromium-based, and it even supports Chrome extensions.

The browser supports workspaces and tab islands, allowing you to easily manage your tabs. Speaking of tabs, there’s also an advanced search feature that lets you search for open tabs.

Opera One also has an integrated messenger, snapshot tool, ad blocker, tracking protection, and a free and unlimited VPN.

Opera One is fast, lightweight, and overall a great browser, so if you need a reliable browser for online learning, Opera One might be the right choice for you.

Other great features:

  • Built-in unit converter
  • Opera Flow feature to send files and links
  • Battery saver feature
  • Video pop-out player
  • Native AI

Opera One

For a smooth and pleasant experience in Google Classroom or Schoology, Opera should be your top choice.
Free Download Visit website

UR Browser

Ur Browser is one of the safest browsers you can get out there. In fact, the main focus of this browser is providing you with the safest internet environment.

To be precise, the browser has toggles for many protection-related features. You can opt for strong protection or a low one, depending on preference.

Ur Browser will keep you safe and your identity private. Your classroom projects will be safe while you’re using it. One other cool thing about this browser is that it is really fast, having optimized bandwidth usage.

Here are some of its key features:

  • Highly customizable
  • Really fast browser
  • Safe
  • Keeps your identify private
  • Downloads up to 4x faster
  • Personalized homescreen
Ur Browser

Ur Browser

Attend to your online classrooms and present your projects safely with Ur Browser.

Microsoft Edge

Microsoft edge best browser for schoology / google classroom

If you’re using Windows 10, then you’re probably familiar with Microsoft Edge. The browser has been revamped, and it now comes with a Chromium engine and support for Chrome extensions.

The new version of Edge brings you improved performance as well as better privacy control. With newer versions you can see how your browsing data is collected, so you can choose what to share.

Regarding safety, Microsoft Edge works with Microsoft Defender SmartScreen to protect you online against all sorts of threats.

Microsoft Edge went through some major changes, and if you don’t feel like switching to a new browser, be sure to give Microsoft Edge a try.

Other great features:

  • Available on Windows, macOS, iOS, and Android
  • Support for themes and Chrome extensions
  • Screenshot highlight feature
  • Coupons and discounts feature

⇒ Download Microsoft Edge


Mozilla Firefox

firefox logo best browser for schoology / google classroom

Firefox is a well-known web browser that comes from a non-profit organization, so it won’t ever sell your personal data to advertisers and third parties.

The browser has built-in tracking protection, so websites such as Facebook and others won’t be able to collect any data regarding your browsing activity.

As for protection, Firefox will give you an alert if you try to visit a breached website, and thanks to the built-in password manager, you don’t have to worry too much about your online accounts.

Firefox is private, reliable, and lightweight, so it’s a perfect browser for Schoology and Google Classroom alike.

Other great features:

  • Available on all desktop and mobile platforms
  • Highly customizable user interface
  • Pop-out video player
  • Tracking protection
  • Cryptomining blocking

⇒ Download Firefox


Vivaldi

vivaldi browser best browser for schoology / google classroom

Another great browser with a focus on privacy is Vivaldi. The browser comes with a built-in ad blocker, so you won’t ever have to deal with pesky ads.

The browser supports extensive tab management, and you can easily display tabs side by side, stack them or display them vertically for quick access.

The built-in sidebar is a welcome feature that allows you to pin your favorite websites and web apps for quick and easy access.

Vivaldi is a powerful web browser that offers great tracking protection and performance, and it’s a great choice for online learning and other browsing needs.

Other great features:

  • Customizable keyboard shortcuts
  • Quick commands
  • Notes
  • Support for Chrome extensions
  • Built-in screenshot tool

⇒ Download Vivaldi


Google Chrome

google chrome logo best browser for schoology / google classroom

Chrome is a well-known browser, and currently, it’s the most popular browser in the world. The browser is built by Google, so it fully supports Google Translate, Google Play, and Chromecast.

As for security, Chrome will keep track of your passwords, and it will warn you if your password has been compromised.

The browser will also flag harmful extensions, so they won’t be able to cause damage to your PC.

Additionally, Chrome can detect phishing websites and malicious files, and keep your PC safe from all online threats.

Other great features:  

  • Privacy controls
  • Frequent updates
  • Available on almost all desktop and mobile platforms
  • Phishing and malware protection
  • Sync feature

⇒ Download Google Chrome


Schoology and Google Classrooms are great e-learning platforms, and they are even better if you use them with one of the web browsers from this article.

If you have recommendations regarding one or the other when used with E-learning programs, share your opinion with us in the comments.


Microsoft Network Monitor Replacements & Alternatives [Tested]

Microsoft Network Monitor was a popular packet analyzer tool that enabled capturing, viewing, and analyzing network data and decoding network protocols.

However, Microsoft has archived the tool now, and the existing users are looking for the best Microsoft Network Monitor alternative.

Fortunately, there are a few good Microsoft Network Monitor alternatives available for IT professionals and system admins. These third-party packet analyzers offer similar if not better monitoring and network analysis features.

In this article, we have handpicked the best Microsoft Network Monitor replacement and alternatives and tested them to help you find the best packet analyzer tool depending on their implementation, usability, and reliability.

What are the best Microsoft Network Monitor alternatives?

PRTG Network Monitor

Microsoft Network Monitor alternatives

PRTG Network Monitor is the ultimate all-in-one network monitoring solution for capturing packets. It can monitor all the major protocols, including IP, UDP, TCP traffic. It can also monitor data traffic and data packets with the help packet sniffer.

PRTG Network Monitor uses different packet sensors such as Packet Sniffer, NetFlow, and sFlow to monitor web traffic, Cisco router, and switches while putting less strain on your network. The jFlow sensor is often used for Juniper Network devices.

Additionally, PRTG Network Monitor also offers features such as custom sensors that allow you to choose the types of data you wish to capture, a clean user interface and dashboard, and a top list for each sensor’s overview.

Key features of PRTG Network Monitor:

  • Monitor data traffic and analyze data packets
  • Monitors IP, UDP, and TCP traffic 
  • Supports several sensors and custom sensors 
  • Clean user interface and dashboard 

PRTG Network Monitor

This powerful software offers you even more network monitoring capabilities than Microsoft alternatives, with great customization options.
Free trial Visit website

NetFlow Analyzer by ManageEngine

Microsoft Network Monitor alternatives

NetFlow Analyzer by ManageEngine is a flow-based network traffic monitoring tool for in-depth traffic analysis. It leverages flow technologies to provide real-time visibility into the network’s bandwidth performance. 

Using the continuous stream mining engine technology, you can detect a broad spectrum of external and internal security threats. NetFlow Analyzer can also help you with tracking network anomalies and zero-day intrusions.

Other notable features of NetFlow Analyzer include app-centric monitoring to share app traffic, capacity planning, and billing, the ability to monitor voice and video data effectively, and support for flow technologies.

Key features of NetFlow Analyzer:

  • Bandwidth monitoring and traffic analysis 
  • Network forensics and security analysis 
  • Capacity planning and billing 
  • Effective voice and video data monitoring 

<strong>NetFlow Analyzer</strong>

Detect security threats and monitor data effectively with this powerful tool.
Free Trial Visit Website

Omnipeek Network Protocol Analyzer

Microsoft Network Monitor alternatives

With its rapid-fire analytics and insights, Omnipeek Network Protocol Analyzer allows you to quickly make better decisions about your network health, including security and performance.

While decoding over 1000 protocols, Omnipeek Network Protocol Analyzer can provide real-time analysis for various types of network segments from 1 to 100 gigabit, 802.11 WiFi, and voice and video over Internet Protocol.

All the data captured by the analyzer is presented in an intuitive graphic display and visualization, allowing for faster resolution of network and network and application performance.

Key features of Omnipeek Network Protocol Analyzer:

  • Can decode over 1000 protocols 
  • Support various types of network 
  • Great graphics display and data visualization 
  • Good network analysis workflow 

⇒ Get Omnipeek Network Protocol Analyzer

NetworkMiner

Microsoft Network Monitor alternatives

NetworkMiner is an open-source Network Forensic Analysis Tool for Windows and works on Linux and macOS platforms.

It can be used as a passive network snipper or packet capturing tool to detect sessions, hostnames, IOS, and open ports while putting less strain on your network.

NetworkMiner makes it easy to perform advanced NTA (Network Traffic Analysis) using extracted artifacts. The data presentation makes it easy to analyze and regenerate transmitted files and certificates from PCAP files.

Key features of NetworkMiner:

  • Live sniffing 
  • Parse PCAP and PcapNG giles 
  • Support multiple protocols 
  • Compatible with Windows, macOS, and Linux 

⇒ Get NetworkMiner

Wireshark

Microsoft Network Monitor alternatives

Wireshark is a network packet analyzer and presents captured packed data in detail on the dashboard.

It can be used to troubleshoot network problems, examine security problems, verify network application and debug protocol implementation.

Wireshark is available on both Unix and Windows systems. It can capture live packet data from a network interface, and open files containing packet data capture with tcpdump/WinDump, Wireshark, and other packet capture programs.

Besides this, you can also import packets from text files containing hex dumps of packet data.

Due to its deep packet inspection and ability to monitor live captures and offline data, Wireshark is one of the most widely used packet analyzers on the market.

Key features of Wireshark:

  • Compatible with Windows and UNIX platform
  • Capture live packet data from a network interface
  • Open packet data captured files from tcpdump/WinDump and Wireshark 
  • Save capture packet data
  • Colorize packet display with filters

⇒ Get Wireshark

The Packet Analyzers are an essential tool used by the network administrator and security engineers to troubleshoot network problems, learn network protocol internals and debug protocol implementations.

All the tools listed in this article can be used as Microsoft Network Monitor alternatives for Windows users.

Rsaenh.dll error corrupted file in Windows 10/11 [Fixed]

Rsaenh.dll is a Dynamic Link Library system file for the Microsoft Enhanced Cryptographic Service Provider.

When that DLL file is corrupted, various Rsaenh.dll error messages can pop up in Windows for different software. These are some of the rsaenh.dll error corrupted file messages:

C:windowssystem32rsaenh.dll is either not designed to run on Windows or it contains an error.
The file rsaenh.dll is missing or corrupt.
Failed to load rsaenh.dll.

Users can’t usually utilize software those DLL errors arise for. Although those messages have some variations, they all basically mean your PC needs a new rsaenh.dll. A corrupted rsaenh.dll is no good for software that requires it.

How can I fix corrupted file Rsaenh.dll errors?

1. Replace the corrupted file

Being able to quickly and efficiently replace any corrupted DLL files on your system can make a huge difference both in the sense of time expenditure and security.

While it might seem easy to download a DLL file, getting the wrong one can cause your system to malfunction entirely, thus it is recommended that you use specialized software to do so with ease of mind.

2. Scan system files

  1. To open the search tool, press the Windows and S keys at the same time.
  2. Enter cmd in the search tool that opens.
  3. Make sure you right-click Command Prompt and select Run as administrator to open it.
  4. Press Enter after inputting this Deployment Image Servicing scan command: DISM.exe /Online /Cleanup-image /Restorehealth
  5. When the Deployment Image Servicing scan is complete, type this command in the Prompt’s window: sfc /scannow
  6. Press the Enter key to start the System File Checker scan.
    The System File Checker command rsaenh.dll error
  7. Thereafter, wait for the System File Checker to complete its scanning.
  8. Restart Windows if the scan reports that Windows Resource Protection has repaired system files.

3. Reinstall software the rsaenh.dll issue arises for

  1. Right-click your Windows 10 Start button to select the Run accessory.
  2. Select Run’s OK option after entering this command in its Open box: appwiz.cpl
  3. Thereafter, select a program where the rsaenh.dll error arises.
    The uninstaller utility rsaenh.dll error
  4. Click Uninstall and Yes on any confirmation prompts to remove the software.
  5. Restart your desktop or laptop after uninstalling the software.
  6. Reinstall the latest version of the software you just uninstalled.

4. Register the DLL file

  1. Open your Windows search utility with the Windows + S keyboard shortcut.
  2. Type in cmd to find the Command Prompt.
  3. Next, right-click Command Prompt and select the Run as administrator context menu option.
  4. Then type in the command: regsvr32 rsaenh.dll
    The regsvr32 command rsaenh.dll error
  5. Press the Enter key to register the DLL file.

5. Roll Windows back to a restore point

  1. First, press the Windows and X keys at the same time.
  2. Select Run on the Win + X menu.
  3. Press the OK button after entering this command: rstrui
  4. Next, click the Choose a different restore point button on the System Restore window that opens.
  5. Click Next to open your list of restore points.
    The Show more restore points option rsaenh.dll error
  6. Select the Show more restore points setting to fully expand the list of dates.
  7. Choose a restore point that will roll back Windows to a date when there wasn’t a rsaenh.dll error on your PC.
  8. Click Next and hit the Finish button to initiate the Windows rollback.

Note: You can also click the Scan for affected programs button to see what software gets deleted for a restore point.

6. Run a malware scan

Your rsaenh.dll might be corrupted because of malware. Or there might be a malware DLL file on your PC. In either case, running a malware scan with a decent anti-malware utility can resolve the issue.

In order to have strong protection from viruses on different websites, the best idea involves malware scanners.

Hence, take initiative for your online safety and see how efficient website malware tools will prevent your PC from getting infected.

Those are some of the best ways you can fix corrupted rsaenh.dll errors on your PC.

You might also be able to fix corrupted rsaenh.dll issues with some of the resolutions within our How to fix DLL errors guide.

MSVCR90.DLL missing or not found [Error fixed]

DLL (Dynamic Link Library) file errors are relatively common on Windows.

Some users have posted on Microsoft’s forum about an msvcr90.dll missing error that arises when they try to run certain software.

One of the most common msvcr90.dll missing error messages states:

The program can’t start because MSVCR90.dll is missing from your computer. Try reinstalling the program to fix the problem.

What is msvcr90.dll?

Msvcr90 is a Dynamic Link Library file associated with Microsoft Visual Studio 2008. It’s part of the Visual C++ 2008 service pack, and the msvcr90.dll missing error will often arise for older software made with the Visual C++ 2008 development framework.

How can I fix the msvcr90.dll missing error?

1. Install the Visual C++ 2008 Service Pack 1

  1. Open either the Visual C++ 2008 32-bit or Visual C++ 64-bit download page in a browser depending on your system requirements.
  2. Press the Download button on the Visual C++ 2008 page.
    Visual C++ 2008 download webpage msvcr90.dll missing
  3. Open the Visual C++ 2008 Redistributable Setup window.
  4. Click Next on that window to install Visual C++ 2008.

2. Repair Microsoft Visual C++ packages

  1. Launch Run with the Windows + R keyboard shortcut for that accessory.
  2. Type in this run command for opening Programs and Features: appwiz.cpl
  3. Click the OK option to open the uninstaller window in the snapshot directly below.
    The Programs and Features applet msvcr90.dll missing
  4. Right-click a Visual C++ package to select its Change option.
  5. Then click the Repair option.
    The Repair option msvcr90.dll missing
  6. Repeat the above steps for all Visual C++ packages you can select a Change option for.

3. Repair applications the msvcr90.dll missing error arises for

The Change button msvcr90.dll missing

Some applications, such as those of the MS Office suite, have their own repair options.

If the DLL error arises for an MS Office application, try selecting its Change and Repair options via Programs and Features.

You can do much the same as outlined for Visual C++ packages in resolution two.

4. Restore files in the Recycle Bin 

  1. Click the Recycle Bin icon on the Windows desktop.
    The Restore all items option msvcr90.dll missing
  2. Then press the Restore all items button.
  3. Alternatively, you can enter msvcr90.dll in the search box. If you find it, select msvcr90.dll and click Restore the selected items.

5. Restore Windows to an earlier date

  1. Launch the Run accessory.
  2. Enter this System Restore command in the Open text box: rstrui
  3. Click OK to open the System Restore window.
  4. Then select the Choose a different system restore radio button, and click the Next button.
    System Restore utility msvcr90.dll missing
  5. If System Restore includes a Show more restore points checkbox, select that option.
  6. Choose a date that will restore Windows to a time when there wasn’t an msvcr90.dll missing error on your PC.
  7. Click the Next option to continue.
  8. Press the Finish button to confirm your chosen restore point and initiate the system rollback.

Note: You won’t be able to select restore points as outlined above if you haven’t enabled System Restore on your PC. Also, note that restore points delete software installed after their dates. Click the Scan for affected programs button in System Restore to see what software a restore point deletes.

6. Reinstall software the msvcr90.dll error arises for

  1. Open Run’s window.
  2. Type this command in Run’s Open text box: appwiz.cpl
  3. Press the Enter keyboard key to open the Windows uninstaller utility.
  4. Select the software that displays the msvcr90.dll missing error message.
  5. Click the Uninstall button for the selected software.
  6. Select the Yes option on any confirmation prompts that might appear. 
    A confirmation prompt msvcr90.dll missing
  7. Restart your desktop or laptop after you’ve uninstalled the software.
  8. Download the latest version of the software from its webpage.
  9. Reinstall the software with its downloaded installer.

7. Scan system files

  1. Press the Windows and S keys at the same time to open a search box.
  2. Type cmd in the search utility’s text box.
  3. Right-click Command Prompt in the search results and select Run as administrator.
  4. Input this Deployment Image Servicing command in the Prompt and press Enter: DISM.exe /Online /Cleanup-image /Restorehealth
  5. Thereafter, input this System File Checker command and hit Enter: sfc /scannow
    The sfc /scannow commandmsvcr90.dll missing
  6. Wait for the System File Checker to finish scanning.
  7. Restart your desktop or laptop if the scan reports it repaired files.

The above resolutions will probably fix most msvcr90.dll missing errors.

Some of the resolutions in our general How to fix DLL errors guide might also help resolve msvcr90.dll issues.

Fix error 3002 on your MagicJack device

As a voice over Internet Protocol (VoIP), MagicJack provides the same services as a phone does, only that instead of an actual phone line it uses an Internet connection.

Many users have recently complained about getting the 3002 error on their MagicJack device. This error usually appears when trying to plug the device into a modem trying to use it on Windows 10.

Fortunately, there’s a way to fix this error, and today we will explore in this article how you can do it in just a few easy steps.

How to fix error 3002 on MagicJack?

1. Restart your router

try to restart your router

In order to see if you are dealing with a IP/TCP inconsistency, the first thing to do is to restart your router and recreate the connection.

Many users reported that this is a common issues, especially at the first try of attempting to configure the device.

In case the 3002 error code is the result of an issue regarding network inconsistency, then this action will flush the DNS IP and also clear the temp data which may have something to do with the error.

To perform this action, locate the Power button, turn it off and wait for 30 seconds before powering it back on. Next, restart both the router and your device and check if the error is still there.


2. Disable the firewall

  1. Press Windows key + R keyboard shortcut to open up a Run dialog box.
  2. Next, type appwiz.cpl inside the text box and press Enter.
  3. In the Programs and Features menu, locate the security program and choose Uninstall.
  4. Follow the given indications to complete the process.
  5. Finally, restart your device and reconnect your MagicJack device.

To get more answers, check out this quick guide dedicated to users who want to know for sure if Windows Firewall is blocking a port or a program.

This could be the case too, so don’t hesitate to follow the above procedure and disable the firewall if it’s indeed the culprit.


Isn’t the Windows key working? Then, count on us to solve the issue in no time!


3. Check your Internet connection

Low Internet connection speeds or unstable network connections can easily cause the 3002 error. In order to avoid this from happening, we recommend a minimum upload speed of 3 Mbps.

In case you don’t have this kind of Internet connection speed, then adjusting it is essential. After doing this, make sure to check once again if the MagicJack error 3002 is still there.


4. Contact customer care

If you have completed all the above steps and you still experience the issue, then another solution we recommend is to contact the MagicJack customer care service.

On their support page you will need to select the category, where the issue you are experiencing fits and further you will have the option for Live support from their side.


Not being able to use MagicJack can be a problem, but we hope that you found this guide helpful and that you managed to fix this issue.

If you have additional recommendations, don’t hesitate to let us know in the comments section below.

Disney Plus Not Working on Fire Stick [Unavailable/Stuck]

Is Disney Plus not working on Firestick for you? If that’s the case, you’re not alone, since many have encountered the same problem, but there are way to fix it.

Why is Disney Plus not working on my Firestick?

Missing updates or temporary glitches with Firestick can cause this problem. Issues with cache and the Disney Plus app can also lead to issues.

How to make Disney Plus work on Fire Stick?

Before we start fixing the issue, check if the service is working on other devices, other than Firestick.

1. Try to restart the Fire Stick

  1. Go to the Home screen and select the Settings icon.
  2. Select My Fire TV.
    settings disney plus not working on firestick
  3. Press on Restart.
    restart disney plus not working on firestick
  4. Within a couple of seconds, the Fire Stick will automatically restart.
  5. Wait for it to start again and check if the issue is still there.

2. Log out and log into Disney Plus

  1. Launch Disney+ and select the Settings option.
  2. Click the Log-out option.
  3. Now, wait for the process to complete, relaunch the app and log in again.

3. Update Firestick

  1. Go to the Home page and click the Gear icon.
  2. Select the My Fire TV option.
    settings disney plus not working on firestick
  3. Now, select About.
    about
  4. Finally, click the Update option.

4. Clear the cache

  1. Press on the Home button of your Fire Stick.
  2. Go to the Settings page.
  3. Select Applications from the list.
    settings app disney plus not working on firestick
  4. Next, choose Manage Installed Applications.
    manage installed apps
  5. Select Disney+ and press Clear Cache.
    disney+
  6. Restart the app and see if the issue has been solved.

5. Uninstall Disney Plus

  1. Go to the Home screen and select the Settings icon.
  2. Choose the Applications option.
    application
  3. Now, select Manage Installed Applications.
    manage installed apps
  4. Finally, click Disney+ and choose the Uninstall option.
    disney+

Try uninstalling and then reinstalling the Disney Plus app. Once the process is finished, make sure to restart your device. Afterward, go back and look for Disney Plus and proceed to install it once again.

Again, make sure that once Disney Plus is reinstalled, you restart the device again before trying to see if the Fire Stick issue has been solved.

⇒ Get Disney Plus now

6. Factory reset Firestick

  1. Go to the Home page and select the Settings option.
  2. Select My Fire TV.
    settings disney plus not working on firestick
  3. Now, click the Restore to Factor Defaults option and follow the onscreen instructions to complete the process.
    reset default disney plus not working on firestick

That is what you can do to make Disney Plus work again on your Fire Stick. So, be sure to try out each of the solutions. Hopefully, you don’t have to resort to the last option before you can get your device to start working.

If your Firestick is not booting up properly, check our detailed guide to fix this issue. There are other issues with Disney Plus and we have a guide on what to do if Disney Plus keeps buffering.

Before you go, don’t miss our guide on Disney Plus login not working for more information.

Please let us know which solutions worked best in the comments section below.

Adblock Doesn’t Work in Crunchyroll [Full Fix]

If you are an anime fan, you are for sure familiar with the Crunchyroll website. It is the best anime-streaming service around, and you can find tons of popular shows.

You can watch most of the anime on Crunchyroll for free, but you will have to tolerate many ads. With a paid account, you can access the entire library of anime, manga, and drama unlimitedly and without ads.

Crunchyroll applies many techniques to overcome the most known ad blockers. In this article, we will guide you on how to watch Crunchyroll without ads if your AdBlock is not working.

How can I stop ads on Crunchyroll if AdBlock is not working?

1. Use a browser with a built-in ad blocker

The best solution to avoid installing and reinstalling adblockers is to have a browser with a built-in feature for adblocking.

Opera One is a great browser that fits the description. Its built-in blocker detects and blocks ad scripts the moment you request a webpage.

To activate the feature, you have to go to OperaOne’s Settings and enable the AdBlock feature. You can use the ALT+P keys combination to open Settings fast.

Opera One

This browser will guarantee that watching Crunchyroll content will go unhindered by annoying ads.

2. Update your AdBlock extension lists

  1. Open the Google Chrome browser and click on the Action Menu.
  2. Click on More Tools and then Extensions.
  3. Activate Developer Mode from the right side.
  4. Click on Update button to update the extensions and lists.
  5. Restart Chrome and then open Crunchyroll to check if ads are blocked. 

3. Reinstall your adblocking extension

  1.  To open Google Chrome Extensions follow steps 1-3 provided at the first solution.
  2. Locate AdBlocker and click on Remove button.
  3. Restart the browser and then go to Chrome web store.
  4. Search for your AdBlocker and add it to Chrome.
  5. Relaunch Chrome and check if ads are still displayed on Crunchyroll.

If updating your extensions didn’t solve the problem, then reinstalling them may solve it.

4. Use a different adblocker

Crunchyroll is quite successful in applying techniques to overcome ad blockers.
Maybe your adblocking extension is not able to cope with Crunchyroll techniques. In this case, changing your Adblocking extension is a good idea.

The following extensions are known to work for Crunchyroll ads:

  1. AdBlock
  2. AdGuard
  3. StopAll Ads
  4. Ublock
  5. Ublock Origin
  6. Adblock Plus

Install one at a time, restart your browser, and see if it is working. If not, remove it and try another one from the list.

All of the above solutions will help you bypass those annoying ads on the Crunchyroll website. They also work for other different websites that display ads.

Of course, the best solution by far is to buy a premium account if you can afford it. The prices start from 7.99 $/month and you can access the entire library of anime without ads.

4 best VPNs to use while in Japan for security & speed

Japan is, without doubt, one of the most technologically advanced countries in the world, with the number of internet users only a few percentages short of being absolute (93% of the adult population).

The country is, by a long stretch, the most tech-inclusive country in the Far East. As such, there is little to no form of censorship or restriction on internet usage/access.

However, with the state of tech advancement in Japan (and the Western world) there is an increased risk of hacks, snoops, and cyber-theft — which, for the past decade, have become severely critical.

In light of this, the issue of internet security (and privacy) has been given more attention like never before. And one such is the advent of Virtual Private Networks aka VPN.

Although most durable VPNs offer paid services, you are afforded the opportunity of using them for free, albeit for a limited period of time. This article brings you a succinct compilation of some of the best VPN for Japan. Read on!

Looking for a free VPN for Japan?

Private Internet Access (recommended)

In the case of Japan, you will probably be looking for a VPN service that prioritizes encryption, security, and the removal of adware.

One VPN service that meets those criteria, and many more for that matter, is Private Internet Access.

This exceptional VPN service owned by Kape Technologies is a world leader in Internet privacy, allowing you to browse the Internet unhindered.

The service will provide you with a secure VPN account along with Wi-Fi encryption and support for up to 10 devices.

This means that both you and your family and friends can enjoy Japan without having to worry about security when browsing the Internet.

Of course, you don’t need to think about bandwidth issues, since the subscription includes an unlimited amount of it.

Additionally, the 3300 servers located in 46 countries mean that you will be completely hidden, even from your own ISP.

Here are some of the perks of using Private Internet Access:

  • 3300 servers in 46 countries mean geo-location is near impossible
  • You are provided with a secure VPN account
  • You receive support for up to 10 devices
  • Your traffic logs will not be stored
  • You get multiple VPN gateways
  • You can encrypt your Wi-Fi
  • Easy to use and set up
  • and more…

Private Internet Access

Keep your browsing habits private with this amazing VPN, now at a discounted price for a limited time only!
Check price Visit website

CyberGhost

The foremost VPN brand/service provider is arguably Cyberghost. This VPN provider, a Romanian-based Internet-security firm, stands out as one of the best across the board. In terms of coverage, speed and connectivity, security protocols, ease of use, and more significantly, affordability.

Cyberghost hosts the best obtainable encryption protocol in the industry, in reference to the 256-bit AES protocol. This provides you with an impregnable connection to any site, especially geo-blocked or censored sites.

Basically, Cyberghost offers one of the most extensive VPN server coverage with over 3000 proxy servers in about 65 locations across the globe. In fact, Cyberghost hosts numerous servers in the Far East (Asia), with about 10 local servers in Japan alone.

With this, the 100 million+ internet users in the country (tourists and citizens alike) are afforded the opportunity of connecting to the “home servers” with convenience.

In addition, Cyberghost hosts an extensive set of security and geo-encrypting features.

Some of these include an automatic kill switch, no logging policy, OpenVPN protocol, unrestrained server switching, unlimited bandwidth, industry-class authentication (MD5 HMAC), 3100+ IPs, and more.

Other notable features of Cyberghost include cross-platform compatibility (for mobile and desktop devices), multiple simultaneous support (up to 7 connections), and more.

The most significant feature, however, is its 45-day refund policy, which enables you to reclaim your money within a 45-day grace period.

For this reason, we included CyberGhost on this list.

CyberGhost VPN

Need a great VPN to use in Japan? CyberGhost VPN is a great choice.
Check price Visit website

NordVPN

NordVPN is one of the best VPN service providers in the market, which offers free service to its users across the globe. As such, this service provided by Tefincom & Co., S.A. makes our list of best free VPN for Japan.

This VPN is best known for its dual encryption protocol, which ensures that your connection is secure end-to-end.

In terms of coverage, NordPVN can stand toe-to-toe with any VPN service provider. It has a server presence in more than sixty countries worldwide, with servers numbering well over 5,200.

Also, NordVPN features the best encryption/security and connection protocols in the industry. Specifically, these include the standard AES 256-bit, 2048-bit SSL, STP, IPSec, PPTP, and more.

Key features of NordVPN include:

  • P2P sharing
  • Internet Kill switch
  • Multiple simultaneous connections (maximum of 6)
  • Optimized servers and dedicated IPs
  • Cross-platform support (Windows, Mac OS, Android, etc.)
  • 30-day money-back guarantee

NordVPN’s hosted features ensure that you are easily able to override any form of geo-restriction and access your favorite sites, without revealing neither your identity nor your location.

With this, you are provided with absolute privacy on the web. Interestingly, you can enjoy all these for free.

NordVPN is made available to US subscribers for free. Users in Japan and other countries can also enjoy the VPN’s service for free, albeit for only a limited period of time.

Specifically, new users can use NordVPN on a free trial, for a period of 7 days.

Meanwhile, you can still enjoy NordVPN’s service for free for an extended period. This is made possible by the money-back guarantee feature, which allows you to reclaim your money within 30 days of subscription.

NordVPN

Keep your browsing habits private with this amazing VPN, now at a discounted price for a limited time only!
Check price Visit website

IPVanish

IP Vanish, distributed by StackPath, LLC, like CyberGhost and NordVPN, is not outrightly available for free. However, it provides new users with free access (limited) to its service for a brief period of time.

This VPN has a physical presence (servers) in over 60 countries across the globe, with an average of 20 servers in each location. Some of these servers are available in Japan and other Asian countries.

IPVanish is especially suited for small teams and emerging businesses, as it has the capacity to support up to ten connections at a time.

This means you can secure all your team members’ connections to every site (even restricted site), with a single IPVanish account.

Other key features of IPVanish include 24/7 customer support, 40,000+ shared IPs, multiplatform compatibility, zero traffic logging, optimized speed, P2P traffic (unlimited), connection protocols (IPsec, OpenVPN, etc.), money-back guarantee and more.

IPVanish’s free trial version is available to only customers using iOS devices. For others (Windows, Mac, and Android), there is a 7-day money-back guarantee on the cancellation of subscriptions. As such, you can use IPVanish for free for a period of one week.

IPVanish paid (subscription) plans starts at a relatively affordable rate. Other plans include the annual plan, the 3-month plan, and the monthly plan.

IP Vanish

IPVanish can help you protect your privacy no matter where you are.
Check price Visit website

Conclusion

There are tons of free VPN services out there. However, virtually all these VPNs cause more harm than good, as most of them are designed to siphon (to third parties) the data they are meant to protect. Hence, it is strongly recommended to stay away from them.

The reviewed VPNs while being paid services, allow you to use their services for free, albeit for a limited period of time, ranging from one week to one month to one-and-half months.

After this period, you can decide to subscribe to one of the paid plans, which are offered at affordable prices.

Free*: In this guide, ‘free‘ means being able to use the software for free for a limited period of time. There is a tremendous effort behind every VPN tool. Companies need to cover these costs via paid subscriptions.

5 best DVD-VHS combo players to watch old videos

Many users still manifest a fascination for watching movies the classic way, directly on film or sometimes feel like taking a walk down the memory lane and watch those old VHS home made videos.

The digitalization of multimedia technologies has made VCR players almost obsolete. Most people have chosen to have their VCR tapes converted to DVD-s because they found it that this is a more practical to conserve their old videos.

However VCR players offer a type of experience that resides in nostalgia.

If you still find yourself drawn to this type of feeling then this article will give you the most comprehensive guide to the best DVD-VHS combo players of the moment.


What is the best VCR DVD combo?

Sony SLV-D380P

  • CD, MP3, and JPEG playback
  • VHS, CD, DVD card slot
  • Audio, video input for watching videos form camcorder
  • No HDMI support

Sony introduces a high-quality VCR-DVD combo that set itself apart with a progressive output (480p) for DVD-s, precision drive 3, fast/slow playback with sound and many other versatile features.

You can watch your favorite DVD while recording a VCR of your favorite TV show. Feel free to create your own TV archive by pop-in a VHS tape,turning on source component and press record.

This device also allows you to rewind a T-120 tape in no time, approximately 120 seconds. Another perk that you’ll surely love is the multi-brand TV remote control.


Toshiba SD-V296 

  • Audio D/A Converter: 192KHz, 24-Bit for an excellent sound quality
  • OSD Language: English, French, Spanish
  • Digital to analog video converter
  • No DVD Recorder

A VCR-DVD combo that provides video D/A converter 108MHz/14-Bit and a Color Stream Pro component video output.

If versatility is what you’re looking for then this device is what you’re looking for. You can enjoy the benefits of playing a variety of multimedia files like DVD, DVD-R , DVD RW, CD, CD-R, CD-RW or VCD.

You are into for a great cinema experience with this VCR-DVD player thanks to the Dolby Digital DTS compatible 3D surround sound, that will offer you that crystal clear audio quality to your music or videos.


Emerson ZV427EM5

  • HDMI 1080p output
  • 6 hours of tape recording thanks to a 5-speed feature
  • Progressive scanning characteristic
  • No coaxial input

Thanks to the HDMI output with a capacity of 1080p, this device is ideal for watching DVD-s or VHS tapes at a high-quality.

With DVD progressive scanning you can produce a videos in different formats such as 480p (NTSC) or 576p (PAL). The 5-Speed feature allows you to record VHS tapes of up to 6 hours long.

A lightweight practical device that weighs only 12.6 pounds and uses 2AA batteries making it energy efficient.


Samsung DVD-V9700 

  • Parental control
  • Modern sleek design
  • HDMI cable included
  • No tuner

A device from Samsung that comes with a DVD progressive scan player and a VHS HiFi Player making it a perfect piece of technology for a versatile video experience.

The HDMI has a capacity of 1080p which means that it provides playback flexibility for both audio and video. The player is DIVX compatible, so you can watch videos that come in older digital formats.

With this device you also get to enjoy the perks of a DTS decoder for an excellent audio playback quality.


GoVideo DV2140

  • EZ Play for skipping the DVD menu and going to the start of the movie
  • Progressive scanning for sharp video images
  • Dolby Digital and DTS Digital outputs
  • No remote control

This device comes with progressive-scan DVD output for excellent, flicker-free images on high-definition and high definition TVs sets.

One very interesting aspect is that this DVD-VCR player was developed to work even with older TVs, it passes DVD as well as VHS signal through both composite-video RCA and RF coaxial outputs.

This device ensures a full multimedia experience thanks to its versatile abilities to play multiple multimedia formats like DVDs, DVD-R/RW, DVD+R/RW, MP3/WMA CD, JPEG image CD, and VHS tapes.


In this article we presented you with the best DVD-VCR combo players that are suitable for playing those old videos you love at optimum quality and we sure hope that our selection covered your needs.

We want to keep in touch with you so please give us your opinion on this subject in the comment section below.

Forgot PDF Password? 4 Ways to Open Locked PDFs

There are various pesky situations that every user confronts. One of the most common is forgetting the password to certain personal accounts or important password-protected files.

Being cautious about the information that you store in a PDF document often means setting a password and restricting certain features such as printing and editing. If you forgot the password for PDF files, stay with us.

Unfortunately, it is not possible to recover a password in order to open a document in Adobe DC. You can’t do so even if you are the author and you will have to recreate the file.

How can I edit my PDF file if I forgot the password?

However, there are ways to edit a secured PDF document and we are going to offer you handy solutions on how to open a PDF with a forgot password code.

1. Use Passware PDF Key

  1. Start by downloading and installing Passware Kit to your PC.
  1. Open the software, and click on Recover Password.
  2. Locate your PDF file, select it, and click Open.
  3. Select Run Wizard and follow the step-by-step prompts.

As you probably know, that’s the ideal choice when it comes to viewing, signing, collecting feedback, and sharing PDFs.

Besides all these, you may use it to open PDF files if you forgot the password by applying a few nifty steps, as described above.

This way, nothing stops you from sharing these files to consolidate comments from multiple reviewers in a single online PDF and keep the workflow as high as intended. If you need to quickly edit a password-protected PDF, there’s no better tool than Acrobat Reader for this task!

2. Unlock the file with PDF Password Remover software

  1. Download PDF Password Remover and install it on your PC.
  1. Add the encrypted PDF document to the app.
  2. Select a destination folder to save the unlocked PDF file.
  3. Click the Start button to begin unlocking the PDF.

Assuming that you want a lightweight and easy-to-use tool, rest assured that PDF Password Remover is worthy of your full attention.

Once you know the password, feel free to remove it and prevent entering it every time you open the encrypted document. Be aware that you can also test other PDF password remover tools if you’re not satisfied with the one above.

3. Get a copy of the file from your Google Drive account

  1. Open Google Drive and sign in to your account.
  1. Access the Google Drive Settings menu.
  2. In the pop-up Settings window, choose Convert uploaded files to Google Docs editor format.
  3. Upload your PDF file to Google Drive, select the target PDF, and right-click the program.
  4. Pick Open with Google Docs option.
  5. Go to the Google Drive Menu and download your PDF document as a Word file.

As users confirm, getting a copy of the file from Google Drive is another inspiring option to consider. Just follow the above steps if you’d like to do the same.

At the same time, you can use dedicated web platforms to recover your forgotten PDF password online.

4. Unlock PDF with an online tool

It is also possible to unlock your PDF with an online tool if you forgot your password. Here’s how you can try to accomplish that:

  1. Go to the pdfFiller website, select Functionality index, and then PDF Collaboration for Teams.
  1. Select Unlock PDF and drag and drop your locked PDF to upload the file.
  2. Choose Tools, then Protect>Encrypt option.
  3. Select Remove Security and save your unlocked PDF.

    How to open PDF if you forgot the password using Chrome

    If Google Chrome is your browser of choice, you can use it to open your password protected PDF file. All you need to do is open the file in Chrome and then save it as PDF to remove the protection.

  1. 1. Open Google Chrome.

  2. 2. Drag your PDF file into the browser.

  3. 3. Click Change to change the print destination.

  4. 4. Select Save as PDF from the options.

  5. 5. Click Save. The PDF file is now no longer password secured.

  6. 6.. Open the PDF file.

Refer to the above procedure and you’ll achieve your goal in no time.

There are various ways in which you can still edit your PDF-encrypted document and in this article, we’ve demonstrated a few handy and user-friendly solutions to this predicament.

Make sure to keep your PDF files secured, without worrying about forgetting the password. If this happens, you at least know what to do about it.

For Excel sheets, refer to our article on how to remove passwords.

We want to know your opinion on the subject as well, so feel free to use the comments section below in that regard.