How to Fix the Instagram App Not Working on Windows 11 PCs

Is the Instagram app not working on your PC, or the website won’t load in your browser? On Windows 11, users often face black screens, stuck logins, or endless loading when using the Microsoft Store app or accessing Instagram via Chrome or Edge. This step-by-step guide will help you fix the issue.

How to fix Instagram not working on PC app or browser

Fix Instagram Windows App Not Working

1. Run Windows troubleshooter on the Instagram app

  1. Press Windows key + I keyboard shortcut to open Settings.
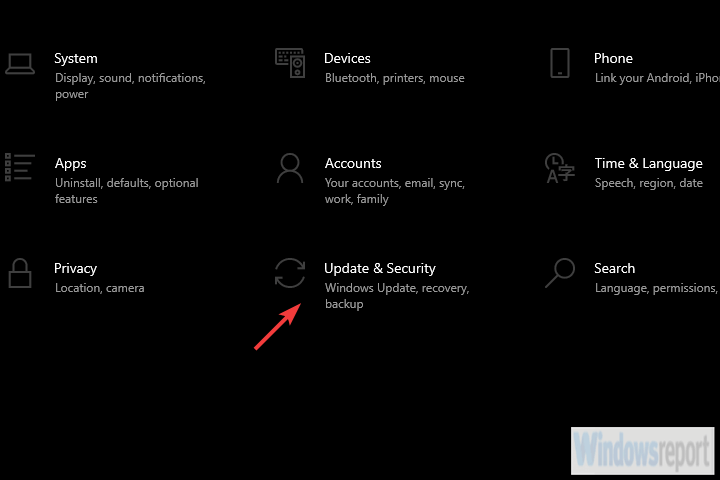
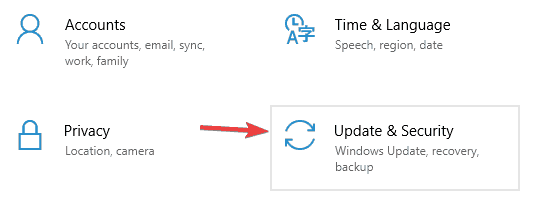
  2. Choose Update & Security.
    settings update & security win 10
  3. Select Troubleshoot from the left pane.
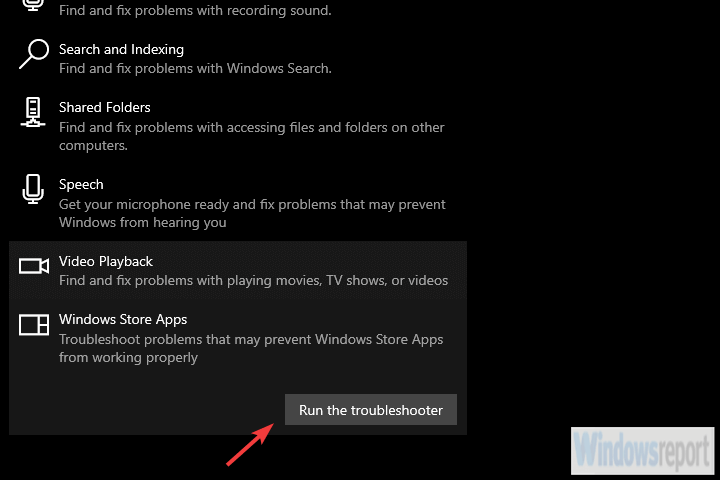
  4. Expand the Microsoft Store Apps troubleshooter.
  5. Click Run the troubleshooter.
    run windows store apps troubleshooter

2. Reinstall the app

  1. Open Start and find Instagram under the application list.
  2. Right-click on Instagram and uninstall it.
  3. Restart your PC.
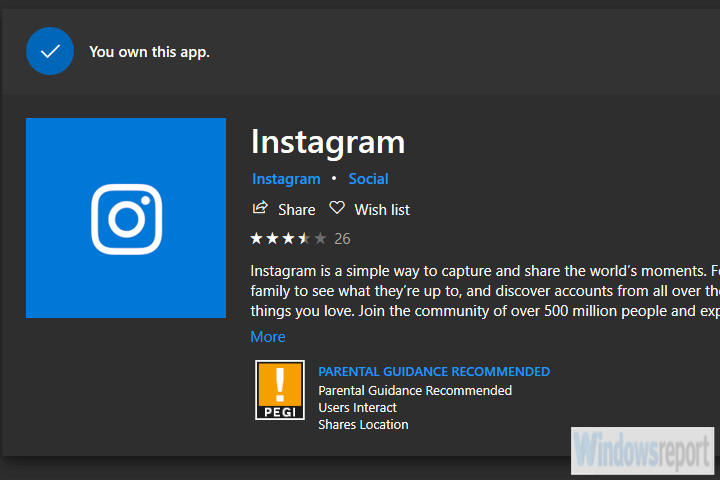
  4. Open the Microsoft Store and install Instagram again.
    instagram microsoft store

If you want to entirely uninstall the app from your PC without leaving any leftovers, it’s a good idea to look for the best uninstaller software on Windows.

3. Reset the Instagram app to factory values

  1. Open Settings.
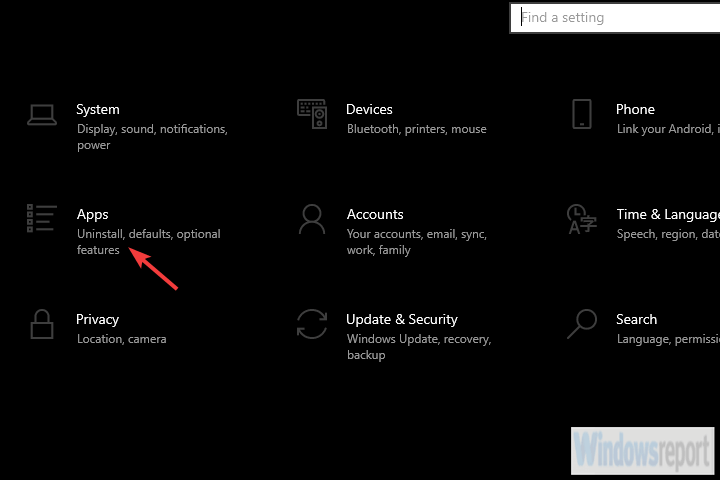
  2. Choose Apps.
    settings apps win 10
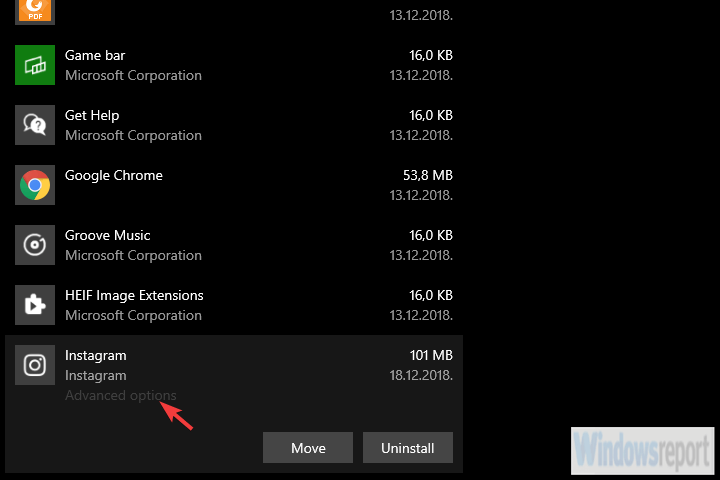
  3. Select Instagram under the Apps & features section and open Advanced options.
    instgram app advanced options windows 10
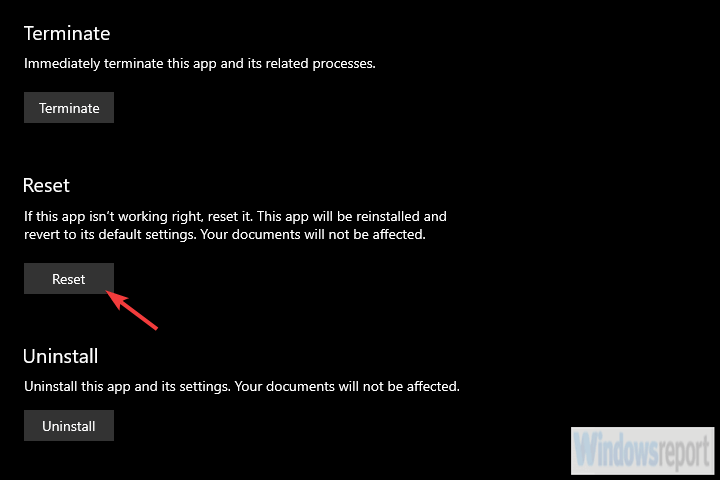
  4. Scroll down and click Reset.
    reset app to factory settings win 10

Another viable option is resetting the app to default values and starting from scratch. This action will erase all cached data and allow you a clean slate to start with.

4. Clear Microsoft Store Cache

If your Instagram app is stuck loading, clearing the Store cache may help:

  1. Press Windows + R, type wsreset.exe, and press Enter.wsreset.exe in run
  2. The Command Prompt will flash briefly; wait for the Microsoft Store to relaunch.
  3. Check if Instagram is now working.

5. Disable VPN, Proxy, or Security Software

Seeing “Check your connection” when your internet is fine? That may be due to:

  • VPNs or proxies masking your IP (Instagram flags unusual traffic).
  • Windows Firewall blocking the app.
  • Fix it by disabling VPN/proxy, or going to Windows Security > Firewall & network protection > Allow an app through firewall and ensuring Instagram is allowed.
  • Also, disable third-party antivirus temporarily and test again.

6. Switch to a New Local Profile

If nothing loads in the app or login doesn’t work:

  1. A corrupted user profile may be the cause.
  2. Go to Settings > Accounts > Other users > Add account, create a new local user, and test Instagram there.add account

Fix Instagram Not Working in Browser (Chrome, Edge, etc.)

1. Clear Browser Cache and Cookies

If Instagram is not loading on browser, or shows “Oops, something went wrong”:

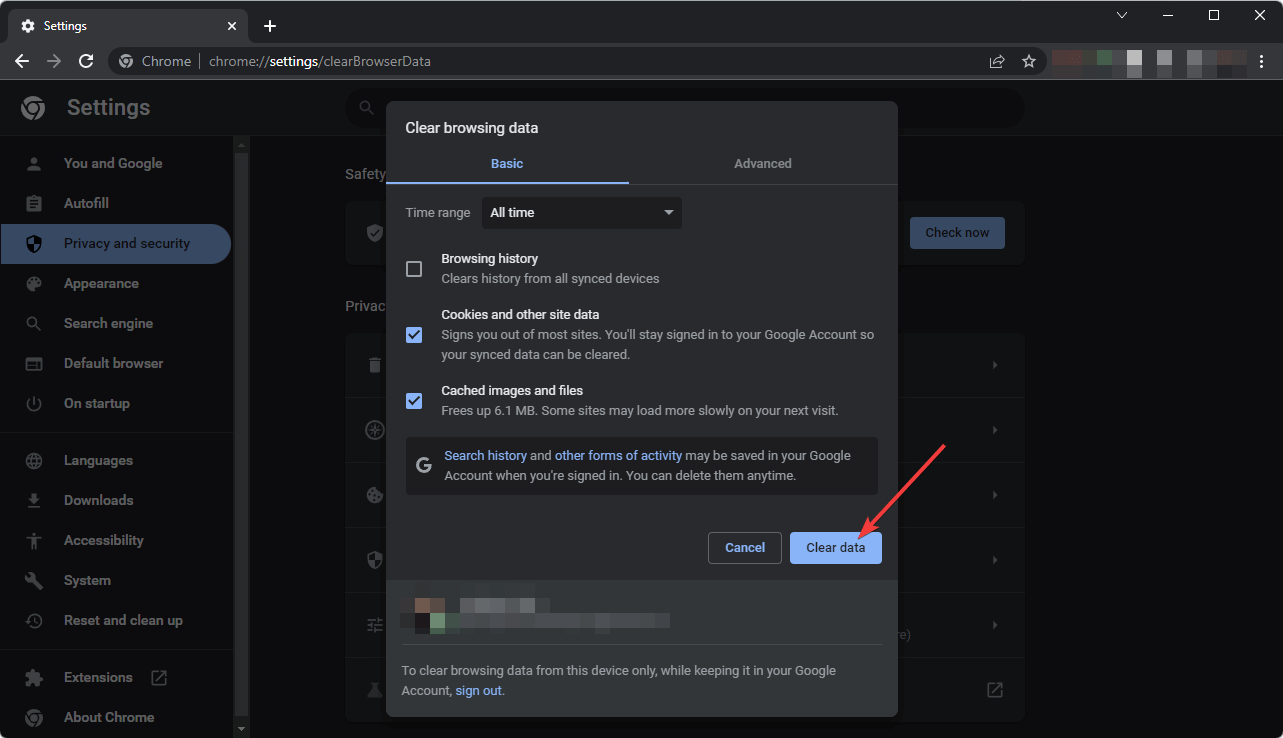
  1. Press Ctrl + Shift + Delete in Chrome or Edge.
  2. Clear Cookies and Cached images/files.clearing cookies and cached files chrome
  3. Restart your browser and try again.

2. Disable Extensions or Try Incognito

If DMs don’t work, buttons won’t respond, or the feed keeps spinning:

  • Disable all browser extensions—especially ad blockers or privacy tools.
  • Or use Incognito Mode (Ctrl + Shift + N) to bypass cached sessions and conflicting scripts.

3. Enable JavaScript and Turn Off Hardware Acceleration

If the site won’t load properly or certain features are missing:

  • Ensure JavaScript is enabled:
    In Chrome: Go to Settings > Privacy and security > Site Settings > JavaScript → Select “Sites can use JavaScript.”
  • Disable hardware acceleration:
    Go to Settings > System > Use hardware acceleration → toggle it off → restart the browser.

4. Update or Switch Browser

If Instagram won’t load page, or uploads and Stories fail:

  • Check for updates in Chrome, Edge, or Firefox under Settings > About.
  • Switch browsers to see if the problem is isolated to one. A good error free Option we highly recommend is Opera.

5. Flush DNS Cache

For browser errors like “This page isn’t available” or random loading failures:

  • Open Command Prompt as Administrator.
  • Type ipconfig /flushdns.
  • Press Enter.
  • Wait for the process to complete and restart Instagram.

Common Problems & Why They Happen

SymptomLikely Cause
App shows white/black screenCache corruption, driver conflict
“Check your connection” on appVPN interference, bad DNS, firewall blocks
Can’t upload or post via browserFile size/format not supported, limited permissions
Messages not sending in browserServer bugs or app/browser restrictions
Login keeps loopingExpired session, bad cookies, or stuck tokens
Feed won’t refresh on app or webCache issues or server problems
Page isn’t available in browserDNS fail or content removed

Conclusion

If you’re struggling with Instagram not working on PC, whether it’s the app or browser, this guide covers all the likely causes and proven fixes. Whether it’s a black screen, login errors, or a browser version that won’t load, applying these steps should restore access. If all else fails, access Instagram Web via a different device until the issue is patched.

FAQs

How do I fix the Instagram app stuck on a white or black screen?

Try restarting the app, clearing Microsoft Store cache, or resetting the app under Settings > Apps > Installed apps.

Why won’t Instagram load in my browser?

Check for browser cache issues, disabled JavaScript, or broken extensions. Also, try a different browser or Incognito Mode.

Is Instagram down right now?

Visit DownDetector or IsTheServiceDown to see if there’s a global outage affecting Instagram.

Can I fix Instagram on Windows 11 without reinstalling it?

Yes. Try updating the app, clearing the cache, running the Windows Store troubleshooter, or switching user profiles first.

Windows 10X will reportedly focus on web apps, with option to stream Win32 apps

Windows 10X, the new lightweight version of Windows 10 that Microsoft originally developed for dual-screen and Chromebook-like devices, may be less ambitious than what we expected. Microsoft announced back in May that the new OS and its launch device, the dual-screen Surface Neo, had been delayed as Microsoft was now refocusing its efforts on Windows 10 users. Today, Windows Central’s Zac Bowden has more information about the current state of Windows 10X at Microsoft, which will apparently launch as a Chrome OS alternative.

As you may recall, Microsoft’s Chief Design Officer Panos Panay announced back in May that the company was now focusing on “single-screen Windows 10X devices that leverage the power of the cloud to help our customers work, learn and play in new ways.” Well, the “power of the cloud” takes a new meaning today as Bowden is reporting that Windows 10X won’t have the ability to run legacy Win32 apps in containers at launch. However, Windows 10X will support UWP apps from the Microsoft Store, and it will also be able to stream Win32 apps when necessary.

“The pivot to single-screen PCs is what drives this change,” explained Bowden. “Originally planned as an OS for flagship premium PCs in the foldable space, Windows 10X will now be launching at the very other end of the spectrum, on low-cost tablets and laptops designed for the education and enterprise markets.”

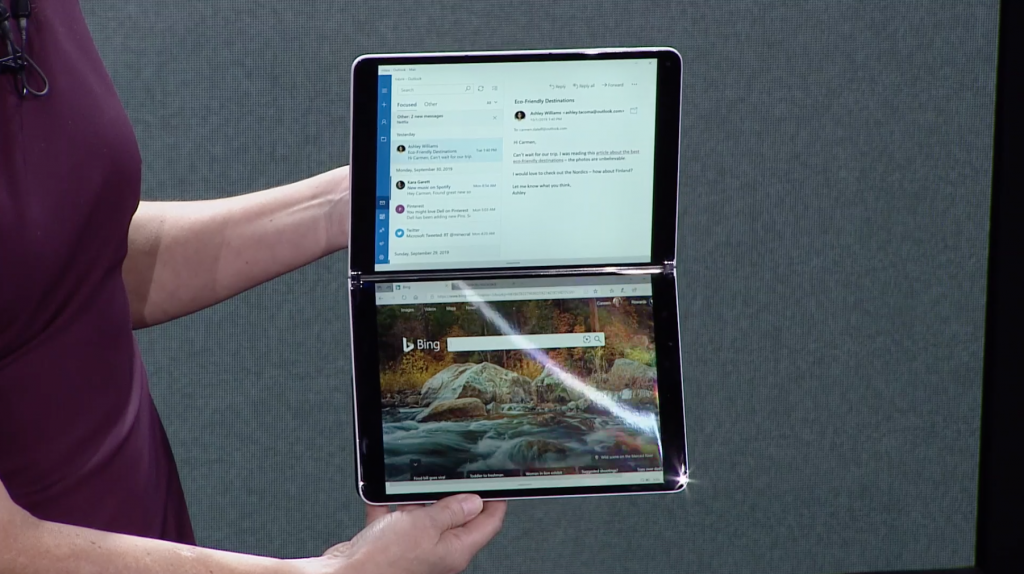
We first saw Windows 10X on the dual-screen Surface Neo.

In a separate report, ZDNet’s Mary Jo Foley wrote that “Microsoft hasn’t given up on running Win32 apps in containers on 10X, but likely not until 2022 at the earliest.” Foley also suspects Windows 10X to significantly impact Microsoft’s Windows 10 roadmap, with the first half of 2021 marking the release of Windows 10X, and the second half of that year the release of a big feature update for regular Windows 10.

Microsoft may end up releasing just one feature update per year for Windows 10 starting in 2021 in order to free up more engineers to be able to focus on both Windows 10X and Windows 10 , I’m hearing from my sources. If that’s accurate, this would mean Microsoft will deliver Windows 10X releases in H1/spring seasons and new Windows 10 feature updates in H2/fall, moving forward. As I’ve reported previously, Microsoft is expected to bring some features it is building for Windows 10X, such as UX elements and possibly containerization and security technologies, over to regular Windows 10.

According to Foley, the first dual-screen devices running Windows 10X will native support for Win32 apps may ship in the first half of 2022. Overall, the development of Windows 10X looks to be quite chaotic: Microsoft initially designed the OS for Chromebook-like devices, before exploring premium dual-screen devices like Surface Neo. Ultimately, the company went back to its original plans of single-screen Chromebook-like devices, and it’s a bit hard to see how Windows 10X could succeed by following Google’s footsteps after so many years.

We’ll see what happens, but it’s important to note that all the work Microsoft is doing on Windows 10X should eventually benefit Windows 10 users. There should be some synergies between the two operating systems, and it also would be nice to have Windows 10X’s container technology on Windows 10 PCs.

Do you think it makes sense for Microsoft to repurpose Windows 10X for Chromebook-like devices, or do you think the OS is doomed to fail after showing up so many years after Chrome OS? Let us know in the comments below.

[Solved] Samsung Data Migration not responding

A large number of users reported that they have trouble with the Samsung Data Migration software.

The problems occur mainly when they are trying to transfer or clone data from an old hard drive to a new Samsung SSD, mostly 840 EVO or 850 EVO. Namely, the Samsung Data Migration cloning process runs extremely slow and even gets stuck at some point.

If you’ve been in this situation and want to know how to go around it, you’ve come to the right place. We’ll guide you through the process in this article.

Before we continue, make sure that you have the latest version of the migration program.


How do I fix the Samsung Data Migration cloning process?

1. Fix the unresponsive HDD/SSD

It is true that the Samsung Data Migration software is designed to help users migrate their data from an existing storage device (e.g. HDD) to a new Samsung SSD.

However, it is possible that the process gets stuck because some files in your system got corrupted or that some PC settings are not right.

A dedicated third-party app can efficiently help you to fix all potential problems and prepare HDD for a smooth migration.

Consequently, we recommend using Ashampoo WinOptimizer.migrate hdd to samsung ssd
The tool offers in-depth cleaning, system optimization, and diagnosis, in an all-inclusive intuitive screen.

With just one click, you get optimized hardware detection, as well as an up-to-date PC cleaning process, that eliminates web browsing traces, redundant files, and useless Registry entries that might affect the functionality of your HDD.

Ashampoo WinOptimizer

Ashampoo WinOptimizer

Use Ashampoo to restore essential settings of your PC and optimize the system in no time.
$29.99 Visit website

The installation is extremely easy and quick, and the optimization and diagnosis process likewise. The interface brings enhanced system details view,  extensive details on installed hardware, plus dashboards for always up-to-date data and instant feature access.

Try transferring your HDD to the Samsung device after running the optimization feature provided by Ashampoo. It will most likely solve the problem. If otherwise, see the next steps as well.


2. Run the chkdsk command

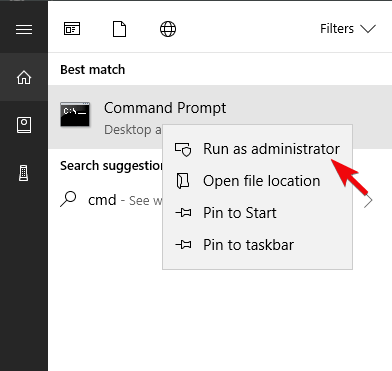
  1. Type Command Prompt in the search bar and select Run as administrator.
  2. Now, type CHKDSK C: /X (replace X with the letter corresponding to the drive where your system is stored).repair samsung ssd migration with chkdsk command
  3. Hit the Enter key and wait for the process to finish. You could do the same for the SSD.
  4. After the CHKDSK process, restart your PC.

You should run this command if you’re unwilling to go with the first solution and prefer to stick with the solutions available at hand. Running this command should repair disk-related errors.

Try migrating the data again, afterward.


Can’t run Command Prompt as admin? See this handy guide to get the process running in no time.


3. Check the SATA-to-USB cablefix samsung ssd migration gets stuck

The migration process might get stuck because of a loss of connection. In most cases, this is caused by a faulty SATA-to-USB cable or adapter.

Try to connect the Samsung SSD with a computer built cable instead of SATA-to-USB cable. Or, try a different SATA cable and SATA port.


4. Check the available space on SSD


Ideally, when transferring data from an HDD to a Samsung SSD, the original data should take only 75% of the target disk. 

Also, it is possible that the process freezes because you have oversized files in your system. try copying them to another source and restore it to the cloned Samsung SSD afterward.


If you found this guide helpful, don’t hesitate to get into contact with us by using the comment section below.


[Solved] This site may be hacked – Google Search error guide

While querying something through Google Search, you may encounter a result with a message underneath that reads This site may be hacked.

What does this mean? How is this going to affect you if it’s your website that the warning appears under? In this guide, we’ll answer this question and more.

How can I fix the site may be hacked Google error?

As more people have adopted the internet as their primary means to shop and interact with each other, cyberattacks have become almost commonplace.

As a means to keep users safe, Google evaluates websites for any cyber security-based vulnerabilities.

If Google detects that a site has any security breaches, it will affix a warning label that reads This site may be hacked.

This site may be hacked by google- how do they determine this?

google-search-hacked-warning-label
The Google Search engine crawls through millions of web pages daily.

Google assesses websites for any hacked content using a set of algorithms and user-reported data collected through Google Safe Browsing.
If you’re running a site and it gets flagged for hacked content, it can be detrimental to your business. Some of the types of hacking or hacked content Google looks out for includes:

  • Redirects: Content, links, or overlays that refer you to harmful websites for phishing purposes or advertising.
  • Injected content: Malicious content injected directly into your website, usually in the form of JavaScript code.
  • Added content: Content that’s usually added for the purpose of tricking visitors of a website through false information. These can be in the form of links or new pages.
  • Hidden content: Used primarily to trick search engines. An example of this is malicious information cloaked as wholesome content.

In addition to this, Google will scan through websites to find any malware or social engineering designed to extract information from its users. If you’re using Google Search and come across this warning label, then it’s best to avoid that website.

What to do if you accidentally click on this site may be hacked?

harmful-software-web-page
What if you accidentally click on this website? No need to worry.

In most cases, Google offers an additional layer of protection by redirecting users to a web page with a warning message that reads Deceptive site ahead or site ahead contains harmful programs.

Despite this, it is advised that you invest in some good website security software, especially if you’re an avid online shopper.

However, if it’s your website that has been flagged, then there are a few steps you can take to remedy this.

How do you remove this site may be hacked warning?

google-search-console-review-request
If you haven’t already, you’ll need to register and verify your website on Google Search Console. You can then proceed with the following solutions.

Identify and fix security issues with Google Search Console

  1. Sign in to Google Search Console.
  2. Click on the overview page. If you have any security issues, they will be displayed near the top of the main screen.
  3. Click on OPEN REPORT, next to the security issues alert.
  4. Expand the security issue description panel next to the issue you want to solve.
  5. Click on the Learn more link at the end of the description to see more details about the issue.
  6. Use the sample URLs to see an example of how you can troubleshoot and fix your issue.
  7. If you’re satisfied that you’ve solved all issues on your website, go back to the security issues section of the Google Search Engine and click on the button marked Request Review.
  8. Click on the All issues were fixed checkbox.
  9. Fill out the description box by describing what you’ve done to fix the issues on your website.
  10. Click on SUBMIT REQUEST.

There are a host of great website malware removal tools out there. However, if you find that you can’t solve a particular issue yourself, it’s always advisable to ask a professional.

It’s also important to scan your website for issues or hacked content that may not be included in the Google Console report. Once you’ve fixed all issues and submitted a review request, Google will send you a report via email.


If you’ve successfully resolved all security issues pertaining to your website, then Google will remove the ‘This site may be hacked’ label from its search results.

For casual users, it’s always important to take the right steps and precautions to ensure your safety on the Internet. Tell us what you do to ensure your safety online in the comments below.

What’s syscheckup.exe and how to remove it?

In the sea of third-party uninstallers, there’s always a chance you’ll get yourself the one that is more of a burden than a tool that helps you maintain your system.

One of those tools might be the System Checkup uninstaller, which is, seemingly a quite suspicious piece of software.

It works in the background, with the process syscheckup.exe being its executable service.

With that in mind, we decided to explain what syscheckup.exe is, is it a threat, and how to remove it if you decide to do so. Make sure to continue reading in order to find out.

What’s SysCheckup and its related process?

There are a lot of nasty, fraudulent applications that are there for only one purpose: to steal your money.

We don’t want to point our fingers, but the System Checkup application, which seems to be an uninstaller and registry cleaner, is quite suspicious, to say the least.

So, with that said, we can’t advise you not to try it out but we highly recommend being cautious while doing so.

How it works, you might ask? Well, it seems that it’s only installed with consent. Basically, it’s not a part of scam bloatware that tends to install without your knowledge.

It works in the background and starts with the system. Therefore, you should be able to locate it in the Task Manager’s process list.

SysCheckup.exe is its executable file. It does have a valid interface, as any other application does.

However, the grey area of System Checkup’s functionality lies in the background process which isn’t exactly needed, concerning we’re talking about a third-party uninstaller and registry cleaner.

Also, one thing which is more important concerns the overall functionality of the application.

Namely, it seems that it doesn’t work as it was marketed, and it’s, seemingly, discontinued for various reasons.

So there’s also that, conveying a lot of reasons why you’ll probably want to avoid it and get rid of it.

There is a simple, fundamental way to delete it since we are talking about the application.

And there’s also a secondary step, which includes dealing with the possible malware infection which might’ve come with the application itself.

So, the first thing to do is to uninstall it from your system, the second step should be to clean all SysCheckup.exe remaining files.

And also, you can run a third-party tool to clean possible adware infections.

How can I remove syscheckup.exe malware for good?

1. Clean all System Checkup remaining files

A lot of software leaves unwanted leftovers after you uninstall them and if you want to make sure you got rid of any System Checkup remaining files, we recommend CCleaner.

It’s a professional uninstaller that automatically scans for such leftovers and can force the uninstall of any software program.

Too much unnecessary data can lead to hard disk fragmentation, which can impact negatively on the system’s overall performance.

CCleaner safe uninstaller is very handy in this situation. You can simply erase useless data from your PC with a few clicks, and CCleaner performs a great job at it.

Health Check in CCleaner assesses and improves your PC in only a few clicks. CCleaner not only does a basic clean to free up space and permanently remove the syscheckup.exe malware, but it also upgrades the software installed on your PC.

This closes any security gaps and removes software that is set to start automatically but isn’t required, making your PC boot faster.

Read more about the key features of CCleaner:

  • One-click software update
  • Faster Computer
  • Fewer Errors & Crashes
  • Quicker Startup
  • Free installation

⇒ Get CCleaner

2. Uninstall System Checkup from your system

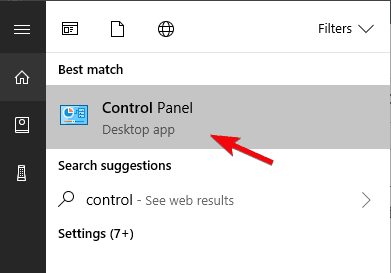
  1. In the Windows Search bar, type Control and open Control Panel from the list of the results.syscheckup.exe
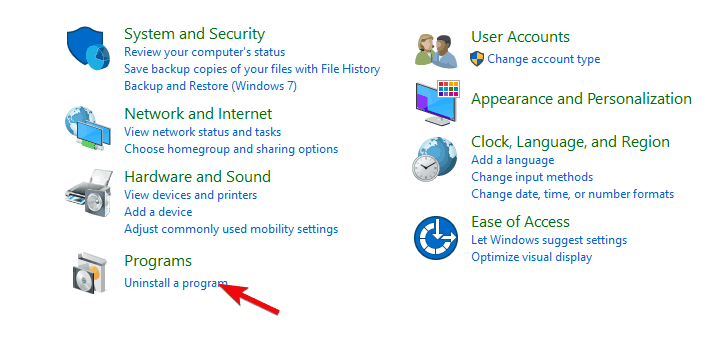
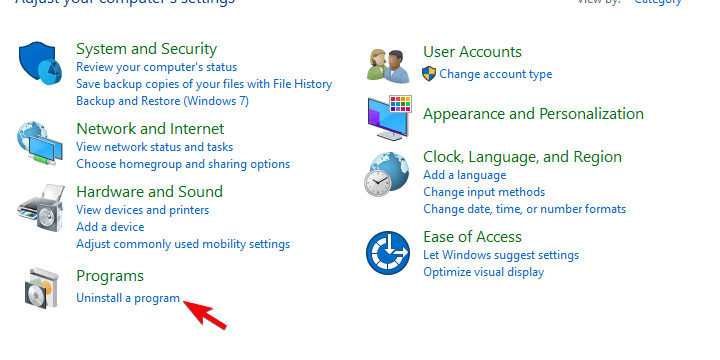
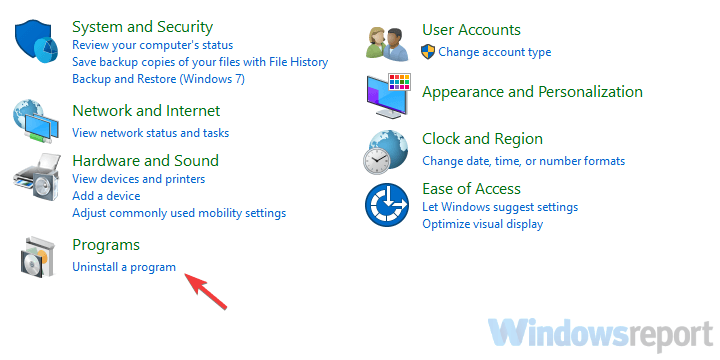
  2. Select Uninstall a program under the Programs section.syscheckup.exe
  3. Locate System Checkup and uninstall it.
  4. Restart your PC.
  5. Right-click on the Taskbar and open Task Manager.
  6. Look whether the syscheckup.exe is still working in the background. If it does, move to a cleaning procedure.

3. Scan for malware and adware

Since the System Checkup application is a source for adware and malware, we recommend cleaning your computer using the Malwarebytes anti-malware removal tool.

It’s very important to mention that Malwarebytes is not your average anti-virus because it uses multiple layers of security to deal with a lot more possible threats.

The tool offers real-time protection warnings to stop anything from worms, spyware, rogues, trojans, rootkits, dialers, adware, and other forms of malware from harming your PC.

Learn about its main key features:

  • Uses artificial intelligence to identify emerging threats
  • Real-time protection against phishing scams and malicious advertising
  • Protects you from advanced ransomware infections that encrypt your files and force you to pay to get them back
  • Minimal impact on your computer performance
  • Removes all traces of malware on your device so you can be sure your device is clean
Malwarebytes

Malwarebytes

With its artificial intelligence-based virus detection and unmatched removal power, you will rest assured that your computer and data are completely safe!
Free Trial Visit website

That should do it. In case you have any questions or opinions regarding the System Checkup and its validity, please do share them with us in the comments section below.

Fix: Your device is being protected error on Windows 10

Windows 10’s built-in security solutions proved to be rather competitive in the anti-malware market.

In addition to that, Windows Security Center is the hub of everything, from security to maintenance and performance.

But, regardless of its functionality, it’s not flawless. There were recent reports about Windows Defender being stuck at the home screen with the Your device is being protected prompt.

All the options were gone and the only thing the affected user could do is closing the Center/the Defender.

For that purpose, we prepared some solutions which should come in handy. In case you’ve experienced something similar with Windows Security Center and Windows Defender, go through the steps below.

How can I fix Your device is being protected error for Windows Defender?

  1. Remove the third-party antivirus
  2. Reset the dedicated service
  3. Run SFC and DISM
  4. Update Windows 10
  5. Turn to recovery options

1. Remove the third-party antivirus

If you decide to use a third-party antimalware tool, the system will disable Windows Defender automatically.

However, Windows Security Center should stay active regardless of whether you run the Defender or the 3rd-party antivirus or not.

On the other hand, there are some reports saying otherwise. Namely, certain multifunctional antivirus suites tend to block the Windows Security Center.

They’re basically similar applications, with a variety of monitoring and maintenance tools included in the suite.

Therefore, chances are that your third-party antivirus solution blocks Windows Security Center. If you, for some reason lean forward to the built-in solution, the best way to avoid this is to uninstall the antivirus completely.

You can do so by following the instructions below:

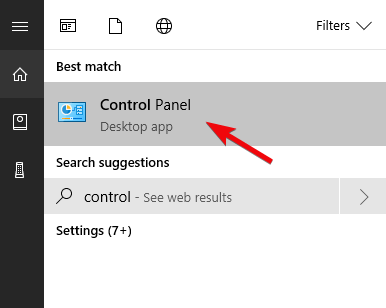
  1. In the Windows Search bar, type control and open Control Panel.your device is being protected windows 10
  2. From the Category view, click Uninstall a program under Programs.your device is being protected windows 10
  3. Right-click on the third-party antimalware solution and Uninstall it.
  4. Use dedicated uninstaller software to clean all remaining files and registry entries the antivirus made.
  5. Restart your PC.
  6. Try opening Windows Security Center again.

It is not mandatory to use uninstaller software, but it surely helps. Removing all leftover files and registry entries will significantly decrease the possibility of getting any more errors.

Plus, this type of utility keeps your system clean. Leftover files are generally small, but they add up and take memory space if you never get a chance to remove them.

Uninstallers are usually very straightforward. Similarly to the Windows uninstaller, it displays a list of all the apps on your PC. You just select it and wait for the process to complete.

2. Reset the dedicated service

As the Windows Action Center and its subsidiary part, Windows Defender, are essential built-in pieces of Windows 10 platform, you can’t reinstall them.

What you can do, when it comes to troubleshooting errors or tackling issues concerning Windows Action Center is resetting its dedicated service. Once you’ve reset the service, Windows Action Center should start working as intended.

You can do so by following the instructions provided below:

  1. Press Windows key + R to open the Run command-line.
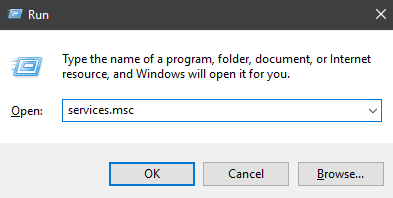
  2. In the command line, type services.msc and press Enter or click OK.your device is being protected windows 10
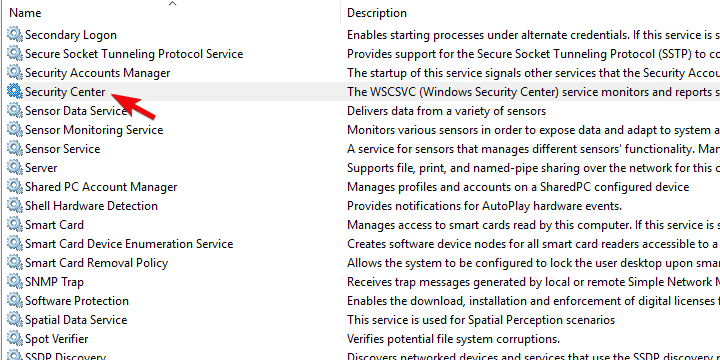
  3. Navigate to Security Center service, right-click on it, and open Properties.your device is being protected windows 10
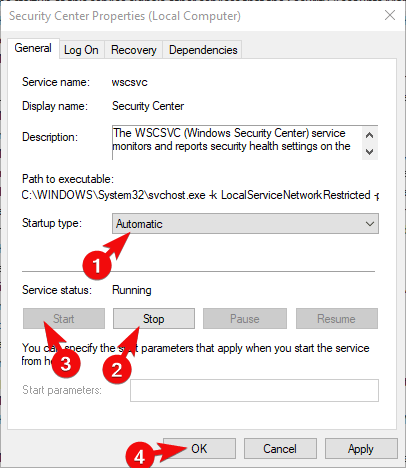
  4. Under the General tab, select Automatic as the Startup type.
  5. If the service is running Stop it and Start it again. If it’s stopped, just start it.your device is being protected windows 10
  6. Confirm changes and close Services.

3. Run SFC and DISM

When an essential system component fails, there’s a chance of system errors. Critical system errors mostly occur due to system files corruption, because of the virus infection or misuse.

However, another major problem lies in major updates that tend to break the system. One way or another, we recommend running 2 in-built system tools in order to possibly address the error at hand.

The first tool is System File Checker and its main purpose is to check the integrity of system files and apply fixes if needed. Here’s how to run it in Windows 10:

  1. Type cmd in the Windows Search bar.
  2. Right-click on Command Prompt and run it as administrator.windows 10 can't be installed on gpt partition
  3. In the command line, type sfc/scannow and press Enter.your device is being protected windows 10

On the other hand, the Deployment Image Servicing and Management tool is similar but a step up in comparison to SFC.

It uses Windows servers to download the missing or corrupted system files. As same as SFC, it runs through Command Prompt, and these are the steps you should follow to run it in Windows 10:

  1. Open Command Prompt with administrative permissions.
  2. In the command line, type the following commands and press Enter after each:
    • DISM /online /Cleanup-Image /ScanHealthyour device is being protected windows 10
    • DISM /Online /Cleanup-Image /RestoreHealth
  3. Wait until the scan/repair procedure ends.

4. Update Windows 10

We already stressed the negative impact certain updates have had on Windows 10. Luckily, due to the reports via Feedback Hub, a lot of major system issues were resolved in short terms.

Therefore, we suggest updating the system as soon as possible. This especially applies to Windows Insiders which run into similar errors frequently.

As we all know, the updates are distributed automatically on Microsoft’s latest system iteration. On the other hand, you can check for available updates manually by following these steps:

  1. Right-click Start and open Settings.
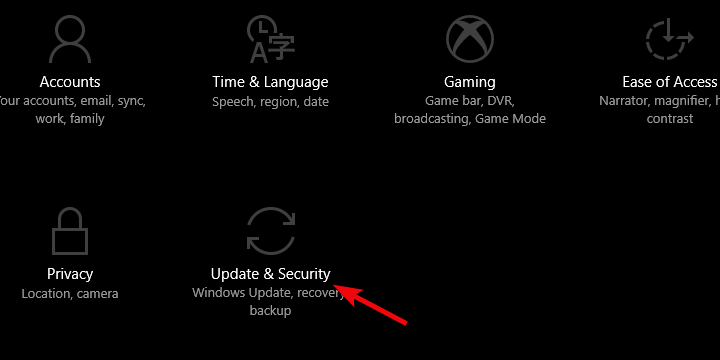
  2. Choose Update & Security.your device is being protected windows 10
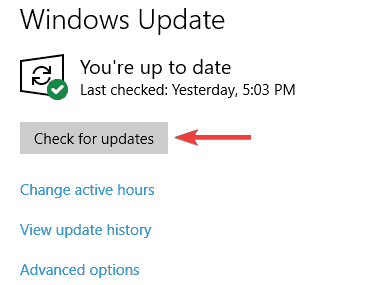
  3. Under Windows Update, click on the Check for updates button.your device is being protected windows 10

5. Turn to recovery options

Finally, if none of the previous steps provides the definitive solution for the issue at hand, recovery options are the only thing crossing our mind.

You can use the System Restore option to roll back, but this only works if you’ve set restore points previously. Our go-to solution in these scenarios is the factory reset.

You get to preserve your files and apps while you also get to renew the system. The clean system reinstall has its advantages, but this recovery is probably the most compromising one.

You can reset your PC to default values by following the steps we provided below:

  1. Firstly, it’s essential to back up your data on an alternative partition or cloud storage.
  2. Once you’ve done that, press Windows key  + I to open the Settings app.
  3. Open the Update & security section.your device is being protected windows 10
  4. Select Recovery in the left pane.
  5. Click on the Get Started button under the Reset this PC section.your device is being protected windows 10
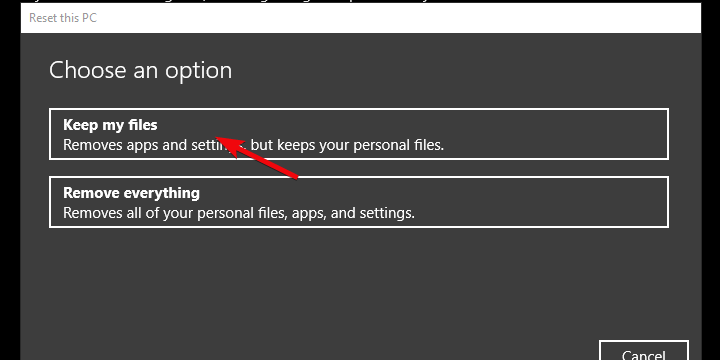
  6. Choose to Keep your files and click Next.your device is being protected windows 10

That’s a wrap-up. If you still have the same issues, the only remaining solution is starting from scratch with a clean reinstall.

In case you get hold of an alternative workaround for the Windows Defender issues, feel free to share it with us in the comments section below.

SOLVED: Can’t change Windows 10 default apps

Changing the default app to associate with a certain type of media or file extensions should be a walk in a park. However, numerous Windows 10 users have had a hard time replacing the built-in apps with third-party alternatives.

It seems that the affected users can’t change Windows 10 default apps whatever they do.

If that’s the case for you, we advise you to check the steps we enlisted below. The complete resolution is in Microsoft’s hands, but these workarounds should get you going for the time being.

What to do when default apps won’t change in Windows 10

  1. Set them individually from the contextual menu
  2. Reinstall the app
  3. Remove and re-set your Microsoft account
  4. Rollback Windows 10

1. Set them individually from the contextual menu

This whole issue seems to be caused by Windows Update. The Anniversary Update had a similar bug and it was (kind of) sorted out with the next update. The same goes for the October Update (version 1809).

The Control Panel approach doesn’t stand anymore, as Microsoft decided to further enforce the Settings menu. If you navigate to Control Panel > Programs > Default programs, you’ll be redirected to Settings and that’s of no use whatsoever.

So, now that we know what we can and can’t do, let’s get back to essentials and try to individually change the associated apps.

This might take some time if you have a dozen extensions, but it’s the most reliable way to change default apps on the current build of Windows 10.

Here’s how to do it:

  1. Navigate to the file extension you want to be run by another app.
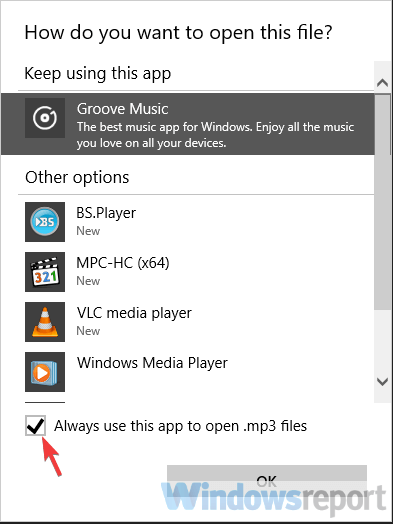
  2. Right-click on the file and choose Open with > Choose another app from the contextual menu.can't change windows 10 default apps
  3. Select the default app you want to associate with that file format and check the Always use this app to open ___ files box.
  4. Repeat this for all file extensions.

2. Reinstall the app

Here’s how to reinstall a third-party application on Windows 10:

  1. Search for Control Panel in the Windows Search bar and open it.
  2. Choose Uninstall a program under the Programs section.can't change windows 10 default apps
  3. Use dedicated software to clean all remaining files and registry entries the app made.
  4. Right-click on the installer and run it as admin.
  5. Install the app and try setting it as the default app again.

Now, using an uninstaller tool is not mandatory obviously, however it does guarantee you get the job done correctly in the first place and that no software remnants will be left behind to clutter your computer.

This type of tool will remove any leftover files and registry entries, and it can also force uninstall malicious apps.

With that in mind, just to be sure that everything is fine on your side, we suggest reinstalling that ghost application which isn’t shown in the Default apps settings menu.

3. Remove and re-set your Microsoft account

Here’s how to remove and set again your Microsoft Account:

  1. Press Windows key + I to summon Settings.
  2. Choose Accounts.can't change windows 10 default apps
  3. Select Your info from the left pane.
  4. Click Sign in with a local account instead.can't change windows 10 default apps
  5. Remove your active Microsoft account and restart your PC.
  6. Get back to Settings > Accounts and choose to sign with a Microsoft account.
  7. Sign in and look for changes.

There’s only so much you can do when something as critical as this occurs. Some users were able to resolve the problem on the Anniversary Update by resetting their Microsoft account associated with Windows 10.

We can’t say with certainty whether this will work or not on the machines running the latest iteration of Windows 10. But, it’s still worth a try.

4. Rollback Windows 10

Here’s how to rollback Windows 10:

  1. Open Settings.
  2. Choose Update & Security.
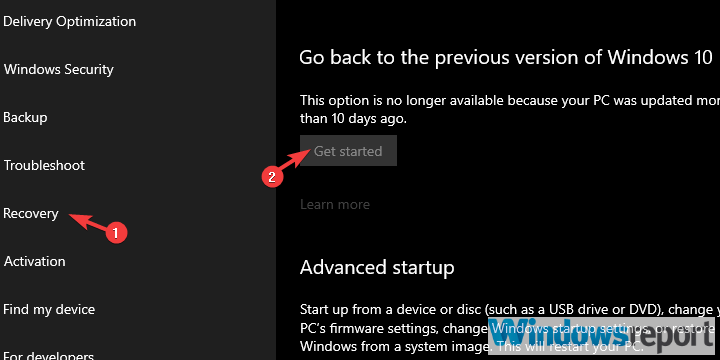
  3. Select Recovery from the left pane.
  4. Click on the Get started button under the Go back to the previous version of Windows 10.can't change windows 10 default apps

Finally, if none of the solutions helped you, we suggest rolling back to the previous version of Windows 10.

And on that note, we can wrap it up. In case you have any questions or similar issues to report, feel free to share them with us and other readers. The comments section is just below.

3 best Lakefield processor laptops to buy

Laptops are evolving to be faster, stronger, lighter, and slimmer, and one testimony to that is the new generation of laptops that sport Intel’s new Lakefield hybrid laptops. Lakefield processors are considered hybrid because they combine one powerful core with four lower-power cores, thus totaling a  total of five cores and five threads. This new approach in processor technology now allows portable devices to offer multithread-capabilities without using too much power and killing off the device’s battery. Since these devices show great promise, we’ve decided to create a list of best laptops that sport the new Lakefield processors

What are the best Lakefield laptops that I can buy?

Samsung Galaxy Book S

The Samsung Galaxy Book S is the first laptop to hit the market right now sporting the new Lakefield processors, and it does it in excellent fashion.

Weighing in at 2 pounds and 0.7 inches at its thickest, this device is meant to be an epitome of what it means to be sleek, slim, and modern.

Of course, this laptop isn’t just for show, as the incorporated Lakefield processor is the equivalent of a modern-day i5.

Given the size, weight, and power of the laptop, your main concern now is probably how long the battery will last. At 42Wh, this device is meant to last you a pretty long time, up to 17h to be more precise

The laptop is available in both Wi-fi and LTE versions.

  • Latest generation Intel® Core™ i5 Processors
  • Features the new Intel® Hybrid Technology
  • 256GB storage that can be expanded to 2TB
  • Wi-Fi is 3x faster than previous generations
  • The battery lasts for up to 17 hours
  • 8GB of RAM
  • Ultra-thin
  • Doesn't have many USB ports, so you may need a separate USB hub.

Does your device lack USB ports? Check out this list of the best USB hubs that you can buy.


Lenovo ThinkPad X1 Fold

While we’re on the topic of cutting-edge technology, this discussion would be incomplete if we didn’t mention the Lenovo ThinkPad X1 Fold. This amazing device brands itself as the world’s first foldable PC.

This device can be used as a PC, a tablet, a laptop, or a phone, depending on how you fold it and how you configure the screen.

Sporting 13.3-inch display, this device is made with lightweight materials so that all that power can fit inside your hands without being too much of a burden.

Like all other entries here, this too features the Intel® Hybrid Technology processors.

Surface Neo

This entry is a bit of a middle ground between the previous too, as it features a double-screen and a hinge down the middle that allows you to fold the device, but it is not quite like the Lenovo ThinkPad X1 Fold.

Sporting 2 9-inch screens, this device also advertises itself as being perfectly capable of operating as a laptop, tablet or a phone.

The screens can be made to display 2 different pages and windows independently from one another, so not only is this device portable, but it allows multitasking as well.

It too is made from materials that perfectly balance strength and a small weight, allowing portability like never before.

As for power, it goes without saying that since it is on the list, it too features the Intel® Hybrid Technology Lakefield processors.


That pretty much wraps up out list of the best laptops that you can buy that feature the new Intel® Hybrid Technology Lakefield processors.

This list will be expanded in future updates since the list of devices that will sport the new processors will most likely grow.

Which one of these devices are you most excited on getting your hands on? Let us know by leaving us a message in the comments section below.


[wl_navigator]

How to fix the SteamVR Home has stopped working error

SteamVR is Valve’s virtual reality system that most Steam users have lots of fun with.

However, some users have stated on forums that SteamVR crashes on launch when they start games for it with error messages along the lines of SteamVR has stopped working or Steam not found.

These are a few potential resolutions if SteamVR Home isn’t working for you.

How can I fix SteamVR Home issues?

  1. Verify the SteamVR Tool Cache
  2. Run the Steam Software as an Administrator
  3. Optimize Windows for SteamVR
  4. Uninstall Conflicting Third-Party Software
  5. Update the Graphics Card Driver
  6. Reinstall the SteamVR Software

1. Verify the SteamVR Tool cache

VR

SteamVR won’t work with corrupted or missing files. Verifying the integrity of the SteamVR Tool cache replaces corrupted or missing files. You can verify the tool cache as follows.

  • Click Library in the Steam client software to open a drop-down menu.
  • Then select Tools on the drop-down menu to open the Tools library.
  • Right-click SteamVR and select Properties on its context menu.
  • Select the Local Files tab on the window that opens.
  • Press the Verify Integrity of Tool Cache button.

2. Reinstall the SteamVR Software

Some Steam users have fixed SteamVR by reinstalling it. You can do that by opening the Library drop-down list within the Steam client software.

  • Click Tools on the drop-down menu.
  • Then you can right-click SteamVR on the Tools drop-down menu to open its context menu.
  • Select the Properties option on the context menu.
  • Select the Local Files tab, which includes a Delete Local Tool Content option.
  • Press the Delete Local Tool Content button to uninstall SteamVR.
  • Before reinstalling SteamVR, unplug the Vive control box.
  • Then plug the headset back in again to reinstall drivers.
  • Thereafter, double-click SteamVR listed in the Tools library to reinstall it.

To reinstall the software properly, first, you need to uninstall it properly. You can struggle with the regular means or otherwise consider dedicated uninstalling tools.

In order to successfully uninstall any application from your computer, it’s not always enough to perform it manually from your Windows.

You have multiple software that can deliver great support for uninstalling any programs from your device, including all file leftovers like temporary files.

Hence, take advantage of the most effective uninstaller programs if you need reliable support for fully erasing SteamVR software.

3. Run the Steam Software as an Administrator

Running the Steam client software as an administrator might kick-start SteamVR. To do that, right-click Steam.exe in its folder. Select the Run as administrator option on its context menu.

4. Optimize Windows for SteamVR

There are a few ways you can optimize Windows to ensure SteamVR games run more smoothly.

If your laptop or desktop has an Nvidia GPU, you can configure the power management mode for max performance with Nvidia Control Panel options.

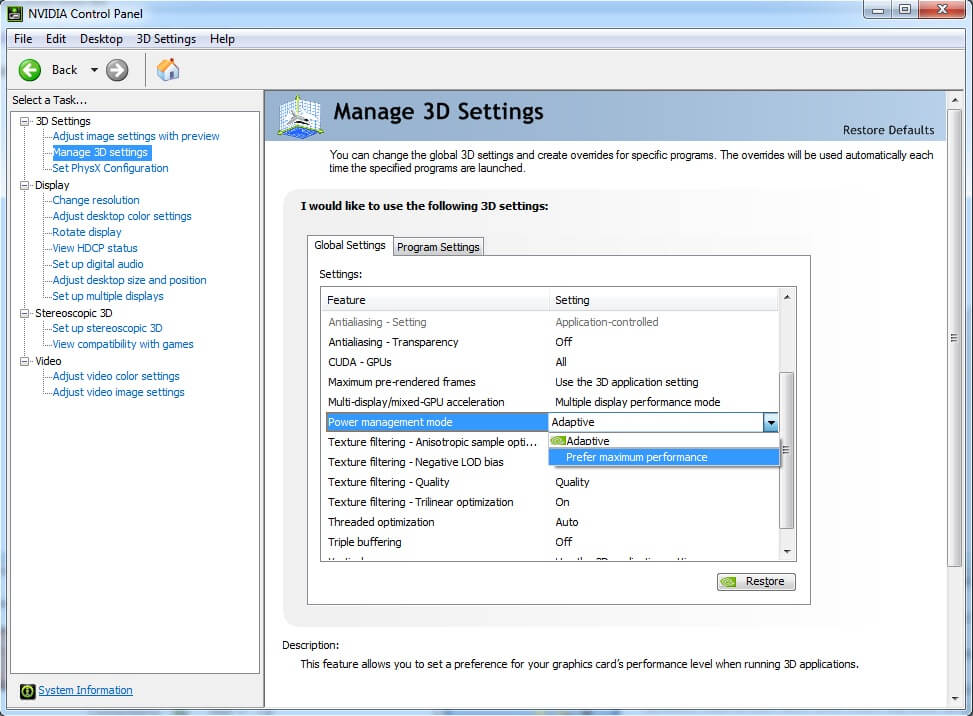
This is how you can optimize Windows for SteamVR with the Nvidia Control Panel’s 3D settings.

  • Right-click the Windows desktop and select Nvidia Control Panel.
  • Click 3D Settings to expand that tab category.
  • Then select the Manage 3D Settings tab shown in the snapshot directly below.
  • Select Prefer maximum performance from the Power management mode drop-down menu.
  • Press the Apply button.

5. Uninstall Conflicting Third-Party Software

There are a few programs that Valve has confirmed conflicts with SteamVR.

The Asus AI Suite, JDSLabs ODAC USB Audio device, TP-LINK 300Mbps Wireless N PCI Express Adapter, and Apple Cinema displays are some of the software that conflicts with SteamVR.

If you have any of that software installed, uninstall it and then restart Windows.

Some Steam users have also stated that uninstalling GeForce Experience and Avast anti-virus helps revive SteamVR.

6. Update the Graphics Card Driver

SteamVR has stopped working error messages can often be due to driver compatibility issues. For instance, SteamVR stopped working for some users after the Windows 10 Creators Update.

As such, updating your graphics card’s driver might fix SteamVR. You can update a graphics card driver as follows.

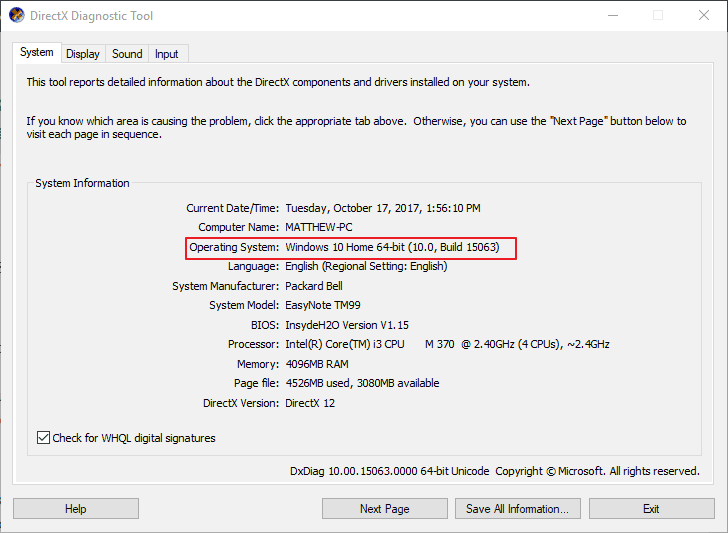
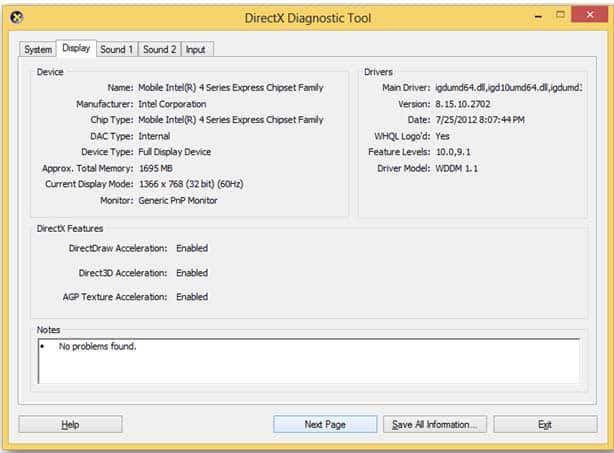
  • First, you’ll need to note down platform and graphics card details. Press the Windows key + R hotkey and enter ‘dxdiag’ in Run’s text box to open the window shown directly below.
  • Note down the operating system listed on the General tab.
  • Click the Display tab, and note down the graphics card listed there.
  • Next, open your graphics card manufacturer’s website in a browser.
  • Open the driver download section on the manufacturer’s website.
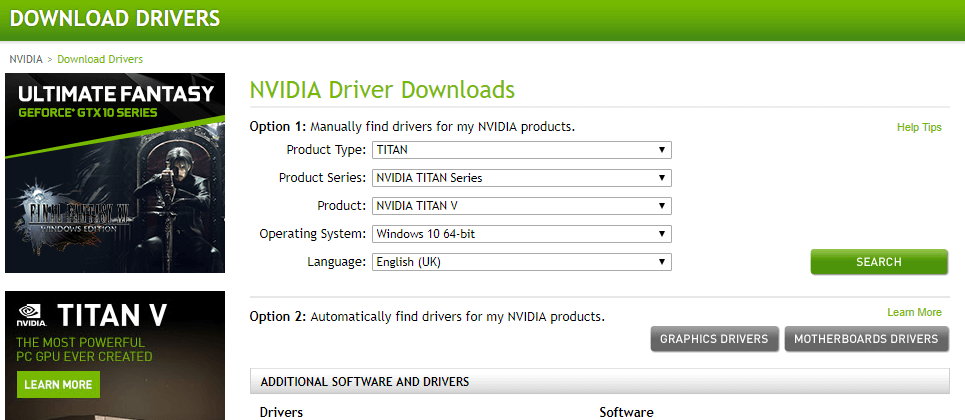
  • Both the Nvidia and AMD websites have drop-down menus with which you can find drivers for your graphics card. So select your graphics card model and operating system from the drop-down menus.
  • Then click the Download button for your graphics card’s latest compatible driver.
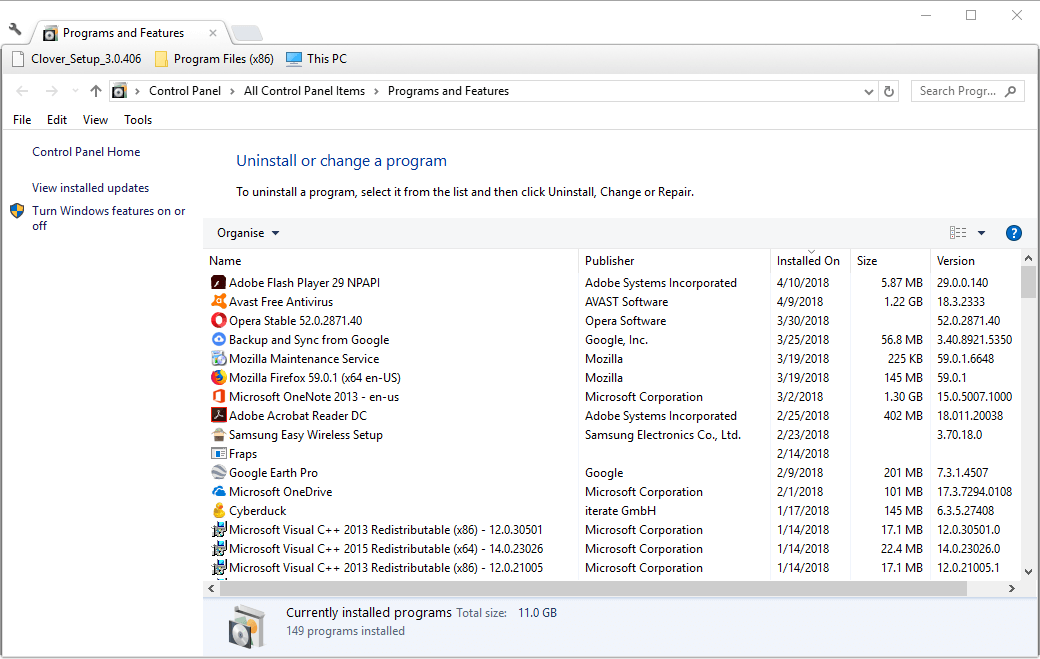
  • Uninstall the current graphics card driver by entering appwiz.cpl in Run, selecting the graphics card driver to remove and pressing the Uninstall button.
  • Thereafter, open the folder you saved the new driver to.
  • Open the graphics card driver’s setup file as an administrator to launch its installer. Then you can go through the installer to add it to Windows.
  • Restart Windows after updating the driver.

Those are some of the fixes that might get SteamVR up and running for you. If you’re getting a Vive 208 error, here’s an expert guide to fix that problem.

If you have other resolutions for SteamVR not working, feel free to share them below.

Windows 10 news recap: OneDrive Windows app to lose Fetch files feature, Microsoft Sudoku gets a massive update, and more

Welcome back to our Windows 10 news recap, where we go over the top stories of the past week in the world of Microsoft’s flagship operating system.

New Windows Search experience is now rolling out on Windows 10 version 1809 or newer

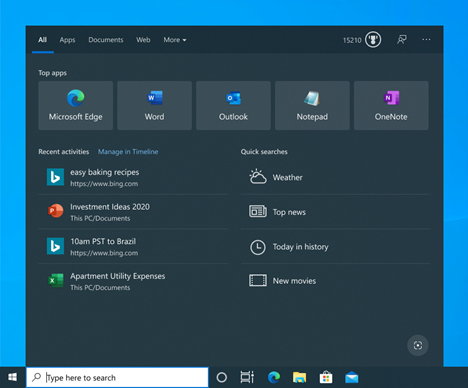
Users of Windows 10 version 1809 or newer are set to receive a new Windows Search experience as it begins to roll out this week. It provides a new two-column layout to allow for easier readability and faster access to quick searches, such as accessing the weather.

New Windows Search experience

OneDrive for Windows app to lose Fetch files feature later this month

The Windows app for OneDrive will be losing the Fetch files feature this month. This feature allowed users to visit the OneDrive website to access files on other Windows PCs that were running the OneDrive desktop client.

Microsoft Sudoku gets a massive revamp on Windows 10 with new features, themes, and more

This one is for Sudoku fans – Microsoft Sudoku has received a revamp on Windows 10. As part of this update, there are new visual themes to play with, new Ice Breaker daily challenged, and more.

That’s it for this week. We will be back next week with more Windows 10 news.

Is Putlocker safe & legal? Streaming guide [Must-read]

Putlocker was a popular movie and TV series streaming website originating in the United Kingdom in 2011. After Megaupload was shut down, Putlocker started to receive millions of daily visits.

As you probably figured out, Putlocker wasn’t exactly on the right side of the law. Streaming pirated content was, is, and probably will remain illegal for a long long time.

That’s exactly why in 2016, a High Court order made it possible for Putlocker to be blocked in the UK. In the same period, Alexa ranked Putlocker as one of the top 250 most visited websites in the whole wide world.

And it doesn’t stop here, either. The MPAA (Motion Picture Association of America) reported the website as a major piracy threat.

All that remains right now are clones and copies of the former website since the original has been put off indefinitely.

Now here we are, wondering whether it’s safe and/or legal to use Putlocker. First thing’s first.

Streaming guide

Is Putlocker safe?

No. We’ve mentioned it above, Putlocker isn’t exactly live anymore. Instead, you can access copies and clones of the former website, and for all you may know, those websites could be run by anyone.

Even hackers could turn a formerly popular (yet illegal) service such as Putlocker into a honeypot. You get drawn in by the possibility of streaming endless hours of content and end up with your credit card information stolen.

Most of these Putlocker-like services have no registration or monthly fee. Therefore, they rely entirely on donations and/or ads to keep the service running.

While donations aren’t evil, ads are widely-known for being malware-ridden. At least some of them are.

You can even get caught red-handed if authorities seize the servers of these clones and trace you. Which brings us to our next problem.

No, and it never was, hence its shutdown a few years ago. Many agencies teamed up to fight against piracy, and that’s what comes out of it. Websites get shut down, and that’s merely a fair warning.

Sure, you might not get arrested for watching a bunch of streaming content every now and then. But you might, however, receive a notice in your mailbox (virtual or otherwise) from your friendly neighborhood ISP.

While these notices are mostly toothless, repeated offenders could get their Internet suspended, fined, or even dragged to court, depending on the severity of the offense.

So, to sum it up nicely, Putlocker isn’t safe, nor legal.

Putlocker alternatives

Now, these are not exactly alternatives, but they do offer a wide range of content. The downside is that you’ll have to pay a monthly fee to use them, but at least you won’t have to worry about their safety and legitness.

  1. Netflix
  2. Hulu
  3. Amazon Prime Video
  4. HBO GO
  5. Disney+
  6. ESPN+
  7. CBS All Access

Some of these services also offer 30-day trials, so you can take them for a test run before ruling them out forever.

Besides, high-quality streaming for a monthly fee surely beats skipping ads for an SD-quality free stream of your favorite movie, right?

Use a VPN to unblock geo-restricted content

  1. Download Private Internet Access
  2. Install it on your computer
  3. Launch it
  4. Log into your PIA account
  5. Connect to a suitable server*
  6. Enjoy unlimited streaming

* – connect to a location where the streaming service is available.

If the streaming service you’re interested in isn’t available in your country, you can bypass this georestriction by using a VPN. Kape Technologies’ PIA, for instance, is a great all-round VPN that passed our tests successfully.

Private Internet Access

Private Internet Access

Want to unblock georestricted content? PIA could help.
$2.85/mo. Buy it now

It has a wide network of fast servers, has a zero-logging policy, offers great protection, and provides you with 24/7 customer support.

Additionally, you can also use it to improve packet loss and decrease in-game ping.

Unfortunately, if Putlocker used to be your only source of entertainment, you’ll probably have to find another website.

Not only is Putlocker illegal, but it’s also unsafe, considering that the original website has been shut down and all you can find nowadays are copies of it.

So, to sum it up nicely, Putlocker isn’t safe, nor legal. If you still want to try accessing it, check our full guide on how to fix Putlocker when it’s not working.

On the bright side, there are a lot of streaming services that could easily replace Putlocker.

However, you’ll have to pay a monthly fee to use them. Even so, it still beats fighting an army of ads just to watch an illegal stream of your favorite movie in standard definition.

Windows 10/11 segment heap stretches CPU resources, tests show

Microsoft introduced segment heap in Windows 10 for Win32 apps to use RAM more efficiently. Its Chromium-based browser, Edge, is one of the beneficiaries of the memory-saving technology.

But a recent discovery by an Intel engineer appears to throw cold water on all the optimism Windows 10 segment heap has elicited among browser users so far. According to the engineer, the technology sacrifices processing performance for RAM efficiency.

Chrome 85 drops Windows 10 segment heap

Chrome has a well documented RAM hogging history. That’s why Google was quick to embrace the memory-saving technology that Windows 10 introduced recently.

But a Chrome developer, Bruce Dawson, now says that segment heap introduces an unacceptable CPU cost. So, they’re disabling the feature for the upcoming Chrome version 85.

The CPU cost (10% slowdown on Speedometer 2.0, 13% increase in CPU/power consumption) is too great for us to keep.

In other words, tests show that any Windows 10 app that starts using segment heap gobbles up more CPU power than before.

Dawson adds:

We are taking the decision to revert this change (for now) very seriously. I think that the increased CPU cost is enough that it will harm battery life. I’m sure it won’t be postponed for long.

Did Microsoft know this? One might wonder. According to the company’s internal tests, the new technology enables apps to cut memory use by up to 27%.

With that said, Microsoft Edge could still use this level of RAM efficiency as an alternative to RAM-hogging browsers.

But how do apps find a balance between CPU and RAM efficiency?

Perhaps developers should consider supporting Windows 10 segment heap as an opt-in feature. This way, users get more control over how their apps utilize the mission-critical system resources.

Have you experienced the impact of the new Windows 10 RAM-saving feature with Edge or any other Win32 app? You can let us know in the comments section below.

[wl_navigator]

Install NordVPN on FireStick with these easy steps

VPNs are often regarded as being these amazing privacy-protection tools. But they’re so much more than that. For instance, did you know that you can use a VPN to access geo-restricted content?

For instance, NordVPN can help you watch US Netflix without being anywhere near the USA.

As you know, computers aren’t the only devices that can stream. You can also use your gaming console, or a smart device called Fire Stick that you plug into your TV‘s HDMI port and use it to access entertainment content.

For that reason, VPN providers such as NordVPN started to expand their range of supported devices. Thanks to them, you can now install VPNs even on your router, TV, console, or the Fire Stick we’ve mentioned above.

However, some users have a difficult time deploying the VPN to their Fire Stick device. Although the process underwent some changes lately, it’s still quite easy to perform. And we’ll show you just the way.

How to install NordVPN on FireStick?

1. Use the Amazon Appstore

  1. Purchase a NordVPN subscription
  2. Plug your Fire Stick in the HDMI port of your TV
  3. Load the Fire Stick’s home screen
  4. Type NordVPN in the search bar (magnifying glass icon)
  5. Choose the NordVPN app from the list
  6. Hit the Get button
  7. Wait for the download/install process to finish
  8. Click the Open button once it becomes visible
  9. Type your NordVPN username and password
  10. Choose a server of your choice
  11. Enjoy limitless, private streaming

Note that these steps also apply for any other FireStick-compatible VPN service. You just have to replace the name in the search bar and install the corresponding app.

Additionally, you can also use this method to install NordVPN on Fire TV. Or, as we mentioned above, any other VPN that works with Fire TV/Stick.

2. Install NordVPN manually

  1. Access the Fire Stick’s Settings menu
  2. Scroll right and choose Device
  3. Select Developer Options from the menu
  4. Toggle Apps from Unknown Sources ON
  5. Go back to the home screen
  6. Click the magnifying glass button
  7. Search for an app called Downloader and install it
  8. Launch the Downloader app
  9. Use its browser to navigate to NordVPN’s Android downloads page
  10. Hit the Download .apk button
  11. Once the download completes, click the Install button

After NordVPN finishes installing on your FireStick, you can launch it from the Settings menu. Open the Settings menu, then head to Applications, and select Manage installed applications.

Select NordVPN from the list and click Launch application when ready.

Note that you won’t be able to control the app with the Fire Stick default remote. Therefore, you might need to purchase a BlueTooth mouse or install a third-party controller on your phone such as remote for Fire TV.

You can use NordVPN with Kodi on your FireStick

  1. Turn on your FireStick
  2. Make sure you’ve enabled Apps from Unknown Sources (see above)
  3. Install the Downloader app
  4. Launch the Downloader app
  5. Locate and type the Kodi APK links in the app (see below)
  6. Click the Download button
  7. Hit the Install button when ready

The Kodi APK download links are as follows:

Now you’ve got Kodi and NordVPN on your FireStick. The best part is that NordVPN is lightweight enough not to eat too many resources. Thus, even if you want to stream with Kodi and stay private at the same time, it’s totally possible.

[wl_navigator]

How to open encrypted files in Windows 10

Windows has a built-in encryption utility that is meant to protect your files from being accessed through opening, reading, or modification by other users and/or computers.

This makes it easy for individuals and businesses alike to secure their private and sensitive information and files. However, opening such files requires an encryption key, plus you have to be logged in as an administrator.

With encryption keys all around us today, there’s a need to protect our sensitive and private data and information, so this is the best way to do it.

But the question most people will ask is how to open encrypted files because once these are protected with a password, there are only a few ways that can open it, besides knowing the password.

So if you don’t know the password of the encrypted file, you forgot or just don’t have it, we’ll show you how to open encrypted files in Windows 10.


How to open encrypted files in Windows 10

  1. Use a dedicated program
  2. Use Certificate Manager
  3. Convert the file then open it
  4. Take ownership of the file or folder
  5. Grant access to the encrypted file

1. Use a dedicated program

There are different programs used to encrypt files that marked afterward so that you know that they are password-protected. The encrypted files can be opened, but you sometimes have to use the same programs that encrypted them.

WinZip is one such program, and one of the most popular.

The encryption option allows you to zip your files with certified 128- or 256-bit AES encryption, keeping your files safe from unwanted eyes. Plus, with WinZip, you can create read-only PDFs and add watermarks to deter copying.

However, to open an encrypted WinZip file you will also need the password. WinZip can’t help with the recovery of lost zip file passwords.

If you’re using the 256-bit AES encryption method, there is no other way of opening the file other than knowing the password. For the 128-bit or weak Zip 2.0 (Legacy) encryption, you can try using a password recovery tool available online.

Now, in order to avoid such an uncomfortable situation, we recommend having a password manager at hand to keep all your codes and passwords.

”WinZip”

”WinZip”

”Use
”Try
&aff_sub2=Native” current_url=”true” button_text=”Get it now” image=”https://windowsreport.com/wp-content/uploads/2017/11/WinZip-button-210×160.png”]

2. Use Certificate Manager

  1. Log in to the user account that encrypted the file you want to access
  2. In the search box, type certmgr.msc and press Enter to open the Certificate ManagerHow to open encrypted files in Windows 10
  3. Open the Personal category in the left paneHow to open encrypted files in Windows 10
  4. Click Certificates
  5. Under Issued To, select the certificate that corresponds with your account name
  6. Open Action menuHow to open encrypted files in Windows 10
  7. Go to All TasksHow to open encrypted files in Windows 10
  8. Select Export and follow the prompts in the Export wizard
  9. Click Yes, export the private key and Personal Information Exchange when prompted
  10. Type a password for the certificate, and click Finish
  11. Transfer the certificate file to the computer you want to open the file on
  12. Open Certificate Manager on that computer
  13. Select Personal
  14. Open Action menu
  15. Go to All Tasks and select Import
  16. Follow the prompts in the Import wizard. Select the certificate file you moved, type the password and check the Mark this key as exportable box
  17. Select Personal as the location for placing the certificate
  18. Click Finish
  19. Double click the encrypted file to open it. The certificate you transferred will give you access to the file.

Looking to open TGZ files in Windows 10? Here’s how to do it


3. Convert the file then open itconvert file to open encrypted file

If you used EasyCrypto to encrypt a file, you won’t be able to convert it to any other format as the program doesn’t give a method of converting the files.

However, if you have any files that you want to be converted, and they’re inside the .encrypted file, decrypt them and then use a free file converter to change them.


4. Take ownership of the file or folder

  1. Open File Explorer and find the file or folder you want to take ownership of.
  2. Right-click the file or folder, click Properties
  3. Click the Security
  4. Click Advanced, and then click the Ownerchange ownership of a file
  5. Click Change, and then do one of the following:
    • To change the owner to a user or group that is not listed, click Other users and groups and, in Enter the object name to select (examples), type the name of the user or group, and then click OK.
    • To change the owner to a user or group that is listed, in the Change owner to box, click the new owner.

Note: You can change the owner of all subcontainers and objects within the tree, by selecting the Replace owner on subcontainers and objects checkbox. This is optional.

The owner of a file or folder controls the permissions set on the file/folder and to whom these are granted. The take ownership permission, or restore the files and directories user rights are the minimum requirements needed to perform this procedure.

An admin can take ownership of any file on the computer. However, assigning ownership may require you to elevate permissions by using User Access Control.

A user who has the Restore files and directories privilege can double-click Other users and groups and choose any user or group to assign ownership to.

Note: The Everyone group no longer includes the Anonymous Logon group.


5. Grant access to the encrypted file

  1. Right-click the file to bring up the selection menu and click Properties
  2. Select Advanced from the properties menu, which will open the Advanced Attributes section of Properties.grant access to an encrypted file
  3. Click Details, which will display all of the encryption information. Select Add. This will open an add users window.
  4. Select the user (yourself) to give access to the encrypted file. Click OK until you return back to the Properties window. Once to this window, click Apply. This will apply the changes. Click OK again to close out the properties window.
  5. Double-click the encrypted file. It will now be opened.

Speaking of encrypted files, we also have a great guide on how to convert ENC file into another format, so you might want to check it out.

Are there other ways you use to open encrypted files in Windows 10? Let us know what works for you, and if the methods above helped, by leaving a comment in the section below.

Windows vulnerability triggers Homeland Security reaction

Despite Microsoft being focused on privacy and security improvements, there are still crucial vulnerabilities to be attended to. And Cybersecurity and Infrastructure Security Agency (CISA) demand that they have to be patched now!

The Federal authorities refer to the Windows DNS Server Remote Code Execution Vulnerability code-named CVE-2020-1350.

On July 14th, Microsoft issued a security update to address this critical Windows vulnerability together with other 138 other vulnerabilities.

Microsoft had previously urgent updates to patch some vulnerabilities out of the blue like some apparently harmless codecs.

And let’s not forget that not long ago, NSA already warned about another vulnerability, CVE-2020-0688 that affected Microsoft Exchange servers. 

What is CVE-2020-1350 and what does it do?

The CVE-2020-1350 vulnerability is also known as SIGRed and it is a remote code execution that affects Windows Server versions 2003 through 2019.

The problem is that this vulnerability received the maximum severity rating of 10 out of 10.

The severity rating also comes from the fact that SIGRed is workable. That means that an exploit can extend throughout the network to vulnerable computers automatically, without any human help.

And as happens with most vulnerabilities, this is not a new one, it existed for over 17 years and it impacts all Windows Server versions 2003 through 2019.

Luckily, Microsoft issued a Registry workaround for this vulnerability but it has to be applied to the vulnerable servers at once.

What are the CISA’s recommendations?

The emergency directive from CISA recommends all agencies to update all endpoint computers running Windows Server within 24 hours (by 2:00 pm EST, Friday, July 17, 2020).

These requirements apply to Windows Servers in any information system, including information systems used or operated by another entity on behalf of an agency, that collects, processes, stores, transmits, disseminates, or otherwise maintains agency information.

The Federal authority also makes a clear statement about the gravity of the potential exploitation of this vulnerability:

CISA has determined that this vulnerability poses unacceptable significant risk to the Federal Civilian Executive Branch and requires an immediate and emergency action. This determination is based on the likelihood of the vulnerability being exploited, the widespread use of the affected software across the Federal enterprise, the high potential for a compromise of agency information systems, and the grave impact of a successful compromise.

If you have any thoughts about this, please lay them down in our Comments section below.

[wl_navigator]

How to Fix the ZIP File Association in Windows 10

ZIP is a compressed file format that you can archive files with in Windows 10. File Explorer is the default file manager utility for extracting and opening ZIPs in Windows.

However, third-party file archive software can automatically replace Explorer as the default program for opening ZIPs. A third-party file archive utility can remain the default program for opening ZIPs even after uninstalling it.

As such, ZIP files might not open after uninstalling a default third-party file archive utility. Then you’ll have a broken ZIP file association. This is how you can fix the ZIP file association in Windows 10.

How can I fix the ZIP file association issues on Windows 10?

1. Reset to default apps

  1. Press the Windows button, type default apps, and open the app from the results.
  2. Then press the Reset button to restore all the default apps in Windows.

You can usually fix the ZIP file association by restoring File Explorer as the default utility for ZIP archives.

The Settings app includes options for adjusting default apps. This is how you can quickly restore the default associations for all file formats with the Settings’ Reset option.

2. Use WinZip

WinZip is one of the most used compression tools for Windows 10. Aside from compressing, WinZip also allows you to manage, share, and back up your files. Based on our in-depth analysis, we would recommend that you use WinZip as the best alternative to the default app.

The formats that WinZip unzips are RAR, GZIP, VHD, XZ, ZIP, ZIPX, and more. The tool also allows you to share your files via several social media channels.

With WinZip, you have easy access to convert your PDF files, manage your archives, and integrate them with cloud services.

Here are some of the cons of using WinZip:

  • Merges your file.
  • e-Signatura.
  • Easy to organize and manage files.
  • Option to convert your files and PDF’s
  • Good privacy of data.

WinZip

With WinZip you can manage all your files and extract, encrypt or share them via social media.
Free Trial Visit Website

3. Adjust the open with settings for ZIP files

  1. If you prefer not to restore all files to their default app associations, you can adjust the Open with settings specifically for ZIP archives. To do that, right-click a ZIP and select the Open with option.
  2. Click More apps to open a list of programs to open the ZIP with.
  3. Then select File Explorer as the default utility.
  4. Select the Always use this app to open ZIP files option, and then press the OK button.

4. Fix ZIP files with Remo Repair ZIP

If you still can’t open a ZIP, it might be the case that the specific ZIP file is corrupted. Try opening alternative ZIPs to see if they open.

Remo Repair ZIP is a third-party Windows utility that repairs corrupted ZIP files and recovers files from archives. You can try out a demo of that software by pressing the Download Now button on this webpage.

When you’ve got Remo Repair up and running, you can click its Browse button to select a ZIP to repair. The software will weave its magic when you press the Repair button. Then you can choose a path to save the repaired file to.

Those are a few Windows 10 resolutions that will probably repair the ZIP file association so that you can open ZIPs in File Explorer.

Remember that Explorer only opens a few file archive formats, so it’s better to have a third-party archive utility if you need to open other archive formats such as RAR, GZ, WIM, etc.

Xbox Game Pass launch brought over 1 million new players to No Man’s Sky since June

No Man’s Sky gained over 1 million new players since the game launched on Xbox Game Pass for Console and PC on June 11. The game’s creator Sean Murray announced the good news on Xbox Wire, along with the release of the new “Desolation” free update for the space exploration game.

“Last month we welcomed over a million new players into No Man’s Sky by virtue of Xbox Game Pass and the Windows 10 release. This, together with our cross-play update, meant that we are seeing some of our biggest ever in-game numbers, all playing together regardless of their gaming platform. It is genuinely humbling, nearly two years after first releasing on Xbox One, that there are still so many people interested in exploring our universe,” Murray wrote.

No Man’s Sky has been enjoying a successful renaissance since its Xbox One release back in 2018, which coincided with the release of the game’s “Next” free update that introduced a full multiplayer experience. Desolation, the latest free content update brings improvements to the combat experience and spices up the spatial exploration with procedurally generated abandoned starships.

With more than 10 million subscribers, Xbox Game Pass is surely becoming harder to ignore for both small and big developers. Project xCloud, Microsoft’s cloud gaming service will soon provide access to over 100 Xbox Game Pass titles to Xbox Game Pass Ultimate members in select markets, which will allow game developers to reach mobile gamers interested in playing console-quality games on smartphones and tablets.

If you have yet to try Xbox Game Pass, you can get your first month of Xbox Game Pass Ultimate for just $1 and play No Man’s Sky for free on Xbox One and PC. Many other great games have been added to the catalog in recent months, including The Witcher 3 and Red Dead Redemption 2.

Unable to delete folder, access denied in Windows 10 [Fix]

We know some Windows 10 users are having issues deleting a folder or a specific file within the operating system.

If that is also your case, you are in luck. The tutorial below will show you exactly how to fix the Unable to delete folder due to access denied issue.

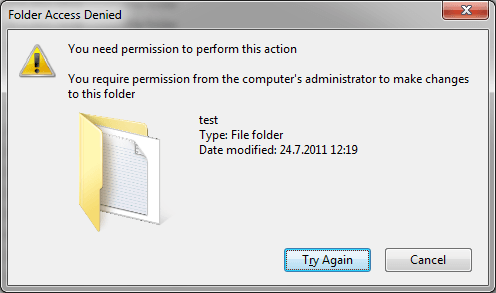
First of all, if you are unable to delete a specific folder in Windows 10, it might be because you don’t have enough administrative privileges on your current user. Or perhaps the file or folder is in use by another application you accidentally left open.

What can I do if I am unable to delete a folder open in another file or place?

  1. Log in as administrator
  2. Use dedicated software
  3. Close active apps using the folder
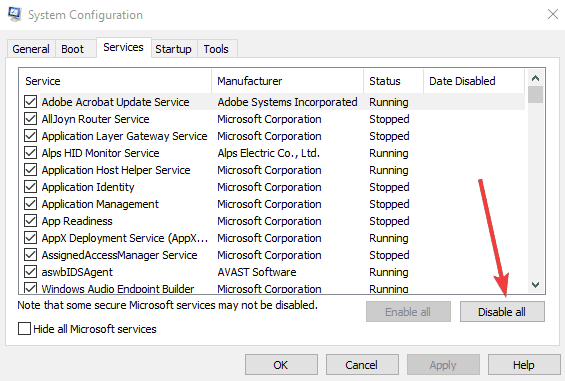
  4. Clean Boot your PC
  5. Additional troubleshooting solutions

1. Log in as administrator

Fix unable to delete folder in WIndows 8 or WINdows 10

You will first need to find out if you have enough privileges on your  Windows 10 device to delete a specific folder.

  1. Reboot your Windows Windows 10 device.
  2. Log in with your administrator account and password.
  3. Go to the directory where the folder is and try to delete it.
  4. If you are prompted by a UAC window, you will need to left-click on the OK button.

2. Use dedicated software

If you’re unable to delete user folders in Windows 10 using conventional methods, you might want to try a different, more professional approach.

Using dedicated file erasure software comes with many advantages. You will be able to permanently erase files that are beyond the scope of data recovery.

This type of software will delete undeletable files by unlocking or force removing them from your PC. The process is very easy for the user, you just have to select what you want to remove.

You can even schedule file erasure and generate comprehensive reports of erasure with perfectly scalable and cost-effective results.

3. Close active apps using the folder

Make sure you don’t have an application that uses the folder you are trying to delete.

Example: If you have a movie or music in the folder you are trying to delete and the files are used by a media player, then you will not be able to delete that specific folder until you close all the applications that use those files.

Note: If you closed the applications and you still have the same error message while trying to delete the specific folder, then you should reboot your Windows 10 device and try again.

4. Clean Boot your PC

Try Entering the Safe mode feature in Windows 10 and try to delete the folder from there.

You might have an application that is present in the startup feature of Windows and by using the safe mode feature your system will start only with the programs necessary for Windows 10 to run.

5. Additional troubleshooting solutions

If the problem persists, here are some additional workarounds that may help you fix it:

  • Check your antivirus: Sometimes your antivirus software may prevent you from deleting particular files or folders. You can try to temporarily disable it, delete the respective files/ folders and then, re-enable your antivirus.
  • Delete the file/folder with Command Prompt: Launch Command Prompt as admin and enter del alongside the location of the folder/file you want to delete, and hit Enter.  Eg: del c:usersMarkDesktoptext.txt
  • Use Microsoft’s Troubleshooter

There you have it, you don’t really need to be a computer specialist to perform the steps above and delete your files and folders in Windows 10 in just a couple of seconds.

Feel free to leave your questions or suggestions regarding this post in the comments section below.

How to Transfer Files Using FTP in Windows 10

Many Windows 10 users want to create their own private cloud, upload files they can share, and transfer files of any size (up to 1000GB), without restrictions.

The solution: building an FTP (File Transfer Protocol) server! It’s straightforward to build one, and users will have full control of the server. They will even create multiple accounts so their friends and family can access those files.

Today, we’ll teach you how to install an FTP server on a Windows 10 PC.

How do I transfer files using FTP?

1. Use Windows’ built-in FTP features

1.1. Install an FTP server on your computer running on Windows 10

  1. Click and hold down the Windows key + X keyboard shortcut
  2. When the Power User menu will appear, you will select Programs and Features
  3. Click the Turn Windows features on/off-link, then expand Internet Information Services
  4. Check the FTP Server option, and after expanding FTP Server, you will check the FTP Extensibility option.
  5. In continuation, you’ll check Web Management Tools and keep the default selections, then click OK to begin the installation and then on Close.

1.2. Create an FTP site on Windows 10, which will be used to send and receive files:

  1. Again, open the Power User menu using the same method and select Control Panel.
  2. Then, open Administrative Tools and double-click Internet Information Services (IIS) Manager.
  3. After expanding right-clicking Sites on the Connections pane, select Add FTP Site.
  4. Now, choose the name of the new FTP site, enter the path to the FTP folder that will be used to send and receive files, then click Next.
  5. When you see Binding and SSL Settings, choose only the SSL option to No SSL, then click Next.
  6. Check the Basic option on Authentication, and on Authorization, in the drop-down menu, select Specified users.
  7. Enter the email address of your Windows 10 account or local account name so that you will gain access to the FTP server.
  8. Finally, check Read and Write, then click Finish.

2. Use a third-party product

The easiest way to transfer files via FTP is to use a third-party tool that can do it for you in a simplified manner.

One software that comes to mind when it comes to filing transfers is WinZip. Not only will it archive your files quickly and efficiently, but it can also secure them via encryption or password protection.

Once that is done, you can use WinZip to transfer your archives between different PCs, networks, or even clouds. As an added bonus, it also has integrations with many social media platforms, so sharing your archives has never been simpler.

WinZip

Send files to different PCs, networks, clouds, or social media platforms using this amazing tool.
Free trial Visit website

The steps mentioned above can also prove helpful if you’re also interested in the following:

Set up FTP to transfer files – Both the software and the steps listed above will help you set up an FTP to transfer files anywhere.

In case you want to share files locally, why not check our guide on how to connect two Windows 11 PCs?

What are your other preferences when creating an FTP server? Leave us a comment in the area below.

How to Archive Emails in Windows Live Mail

Microsoft discontinued the Windows Live Mail client to make way for the Windows 10 Mail app. However, there are millions of Windows users who continue to use Windows Live Mail.

Now if you are one of those and want to know how to archive email in Windows Live Mail, this is the article you need.

Being able to archive your emails allows you to save them locally on your system. This comes in handy if you want to remove emails from the mail server to free up space but don’t want to delete them permanently.

This can also be used as a backup option. In this article, we discuss how you can archive Windows Live Mail emails to keep them safe.

How I can archive Windows Mail emails?

1. Prepare the folders for archiving

archive Windows Live Mail emails
  1. Start the Windows Live Mail client if not already running.
  2. Make sure the Storage Folder are shown in the sidebar.
  3. If not, you can easily add them by clicking the View tab
  4. Click on the Storage Folders option.
  5. Next, you need to create a local Archive folder to save your emails.
    archive Windows Live Mail emails
  6. Right-click on the Storage Folders and select New Folder.
  7. Enter a name for the folder. Make sure you enter a name that is easy to recognize for you.
  8. Click OK to create the folder.
  9. Under Storage Folders, you should see your newly created Archive folder.

2. Move the emails to the archive folder

  1. To move your emails to the archive folder you can either drag and drop them, or you can right-click on the email and select Move to folder option.
  2. Select your newly created archive folder as the destination folders.
  3. You can also select multiple emails and move them simultaneously.

3. Use Gmail as an archive account

If you want to save your archived emails online, you can move the archived emails to a Gmail account. For this to work, you need a POP account and then configure a Gmail account.

To move the emails, you can either drag and drop the emails to the archive account or use the Move to Folder option. Since every Gmail account comes with 15GB of free storage you can use your Gmail account as a backup for your Windows Live Emails.

4. Consider using an alternative to Windows Mail

Windows Mail has always been a reliable email client, but like all built-in products that come with Windows, they pale in comparison to what a third-party dedicated tool such as Mailbird can do.

You get a unified inbox so that Mailbird can act as a centralized email client for all of your email addresses, including Gmail, Yahoo, Outlook, and more.

The Mailbird team complies with strong ethical standards when it comes to user privacy and security. It is apparent that Mailbird is regarded as a business that values customer privacy, allowing them to continue developing the finest communication hub ever for Windows.

That’s quite cool, and you can rest assured that your emails are encrypted and that all of your data is saved solely on your computer.

More so, no tool can compare to Mailbird when it comes to the email management department, allowing you to better organize yourself.

As far as archiving messages go, this is just one of the many tools that Mailbird provides, as your emails will be kept forever in a separate location so that you can unclutter your outbox and inbox without having to delete them.

Archiving your email has many advantages; following the steps in this article, you can archive emails in Windows Live Mail. You can free up space in your online mail server and keep a backup saved offline.

If you know of any other interesting way of archiving your Windows Live Mail messages, let us know by commenting in the section below.

Windows 10/11 keeps failing to upgrade, to users’ chagrin

As successful Windows 10 upgrade comes with the promise of better features, improved system security, and sometimes, new apps.

But lately, due to a broad array of issues, many users are unable to successfully install their favorite version of the Windows 10 operating system. They’re instead reporting all manner of update error codes, from 0x80242016 to 0x0000005.

Why Windows 10 installation keeps failing

Most of the update bugs that users are reporting, such as, error 0x80242016, have something to do with corrupt system files, registry problems, and other similar issues.

For example, one user reported the following error message on the Microsoft Answers forum:

Windows Update

Feature update to Windows 10, version 2004

We couldn’t install this update, but you can try again (0x0000005)

Much to their dismay, the user got no definitive diagnosis even after running the Windows Update Troubleshooter.

On Reddit, another user says that they’re getting the 0x80242016 error code each time they try to update. Interestingly, the user claims that the upgrade goes smoothly until the system reboot phase.

The windows update suddenly reboots and throws me back to version 1903 with error “0x80242016” in my error logs.

It appears that these issues are also affecting users that try to do it the ISO way using the Microsoft Media Creation tool.

This particular user, for instance, was told to wait until Windows starts supporting their current system configurations.

Windows 10 won’t let me upgrade to the 1909 version using media creation tool and I keep getting this error every time I try to update, any idea on how to fix it please?

There are different ways to fix Windows 10 upgrade bugs. For starters, users of non-supported machines can wait until Microsoft delivers a compatible update via Windows Update.

But if you’re getting errors like 0x80242016, troubleshooting is necessary to determine the root cause of the problem. Sometimes, a clean boot and checking/fixing corrupt system files before reattempting to upgrade does help.

If you’re experiencing any Windows 10 upgrade issues, drop us a message in the comments section below.

Windows 10 Calendar preview has a refreshed text editor

The Windows 10 Calendar preview arrived with the launch of insider build 19564 back in February.

Then, the app came with multiple feature enhancements including 30+ themes. It also introduced a cleaner, better-organized user calendar interface.

In addition, Microsoft announced that it would be adding more features to the beta version of the app each month. Well, a visually and functionally refreshed text editor is one of the latest improvements to come to the Windows 10 Calendar preview.

The New-look Windows 10 Calendar preview

If a recent tweet by Alumia_Italia is anything to go by, the Redmond-based firm is making good on its promise about the Calendar preview.

The Twitter user posted an animated GIF demo showcasing how to format text when creating events on the app. Overall, the application looks stunning, especially with the dark theme and the pink tones on the command buttons.

But the app’s text box is the highlight of the GIF demo. Looking at the feature, it gives the impression of a fully-fledged text editor, complete with all the formatting options you may need.

As you can see in the demo below, clicking a button at the bottom left of the text editor pops up common formatting options like bold and font color. You may also use the strategically-located menu to insert your links and add text to display.

It now shouldn’t take you too long to add an event and do all the necessary formatting on the Windows 10 Calendar preview.

Last month, Alumia_Italia posted another GIF demonstrating a new search feature that Microsoft had added to the Calendar app.

If Microsoft wanted to simplify event creation on the application, then the text editor helps a great deal with that.

The tech giant affirms:

Our goal is to empower our users with a simple, fast, and beautiful calendar experience.

What do you think about the new-look Windows 10 Calendar preview? Kindly reach for the comments section below to let us know.

[wl_navigator]

How to make Windows 10/11 connect to VPN before login

If you’re interested in protecting your online privacy and digital identity, you can make Windows 10 automatically connect to a VPN as soon as you turn on your computer. However, this happens only after you log in with your Windows account.

Connecting to a VPN as soon as the Internet connection is established is a much safer solution, especially if you typically use a public, unprotected Wi-Fi at work, at a restaurant, or while traveling.

In that case, it’s a better idea to make Windows 10 connect to the VPN before login since it provides a higher level of protection against hackers and other Internet dangers.

Check out our step-by-step instructions below to find out how to auto-connect to a VPN before signing into your Windows 10 PC. Although you can do this without having to install any additional software, we suggest getting a premium VPN subscription for better privacy and security.

How do I make Windows 10 connect to VPN before login?

Add a VPN connection

add a VPN connection in Windows 10

  1. Right-click Start and open Network Connections.
  2. Choose VPN and click Add a VPN connection.
  3. Specify the VPN connection details.
  4. Write down the Connection name, User name, and Password.
  5. Click Save.

Don’t know what VPN details to add? Discover how to create a VPN connection in Windows 10.


Create a BAT file

Create a BAT file to auto-connect to VPN

  1. Launch the Notepad app in Windows 10 (press Ctrl + R, type notepad, press Enter).
  2. In the empty document, paste the following code:c:windowssystem32rasdial.exe YourConnectionName YourUsername YourPassword
  3. Replace the info above with the VPN details you wrote down.
  4. Save the Notepad document (press Ctrl + S) and exit.
  5. Rename the Notepad file to change the TXT format* to BAT.
  6. Store the document in a safe place.

*If the file formats are not displayed, you must show file extensions in Windows 10 to be able to change them.

Create and schedule a task

  1. Hit the Win key and type Task Scheduler*.
  2. Press Enter to launch this app.
  3. Go to the Actions panel on the right side.
  4. Click Create Task (not Create Basic Task).
  5. General tab
    • Write a task name, such as WindowsReport VPN.
    • At Security options, select Run whether user is logged on or not.
    • Enable Run with highest privileges.
    • Set Configure for to Windows 10.create a task in Task Scheduler
  6. Triggers tab
    • Click New.
    • Set Begin the task to At startup.
    • Make sure the Enabled box is checked.
    • Click OK.set triggers in Task Scheduler
  7. Actions tab
    • Click New.
    • Set Action to Start a program.
    • Click Browse and select the BAT file you created.
    • Click Open and then OK.set actions in Task Scheduler
  8. Conditions tab
    • Deselect all options.deselect all conditions in Task Scheduler
  9. Settings tab
    • Enable Allow task to be run on demand.
    • Disable Stop the task if it runs longer than.
    • Click OK.configure task settings in Task Scheduler
  10. Enter your user account information to confirm.

*You can find out everything about the Windows 10 Task Scheduler to master this application.

At every system startup, Windows 10 will connect to the VPN before logon. To disconnect, you just have to press the Network icon in the systray, select the VPN connection, and press Disconnect.

To temporarily disable the task, open the Task Scheduler app, select the task, right-click it, and press Disable. To permanently remove it, press Delete instead of Disable. You can also edit the task settings.

However, keep in mind that, if you wish to use a different VPN server, you must manually edit the VPN connection details in Windows 10 (at Step 1, where you added the VPN connection).

If you also change the VPN connection name, username or password, then you also have to update the BAT file you created (at Step 2 after updating the VPN profile in Windows 10).

How about connecting to a VPN client before logon?

Unfortunately, using Task Scheduler to schedule a VPN client to run before logon doesn’t work the same way as scheduling a manual VPN connection. Regardless of the settings configuration in Task Scheduler, a VPN client can’t run earlier than logon.

However, you can obtain the manual connection details of your VPN service to create a connection using the Windows 10 built-in VPN provider, such as Private Internet Access. Then, by following the instructions we provided above, you can make Windows 10 connect to the VPN before login.

Why use Private Internet Access

PIA is the best VPN for Windows 10

Private Internet Access (PIA) is a premium virtual private network solution and the best VPN for Windows 10. A product of Kape Technologies, PIA can hide your IP address, encrypt your entire network traffic, and keep you safe from hackers.

Furthermore, unlike Windows 10 that offers native support for few VPN protocols, PIA includes OpenVPN and WireGuard, which offer the best security features for your computer.

You also use native port forwarding without having to configure router settings, as well as set up an emergency kill switch to preserve your online anonymity.

Additionally, PIA supports exclusive DNS servers, up to 10 simultaneous device connections, split-tunneling mode, together with a malware and ad blocker.

It’s compatible with all major platforms, has a user-friendly interface, and provides manual configuration settings for OpenVPN, PPTP, L2TP, and SOCKS. 

More about PIA:

  • +3,300 VPN servers in 48 countries
  • A zero-logging policy
  • No IP or DNS leaks
  • 24/7 live chat support
  • 30-days money-back guarantee (no free trial)
Private Internet Access

Private Internet Access

Use this fast VPN to secure your browsing sessions, access blocked websites, watch online streaming, and more.
$2.85/mo. Buy it now

To sum up, you can make Windows 10 connect to a VPN before login if you manually create a VPN connection and add its details to the Task Scheduler.

In older Windows versions, it was also possible to view the VPN connections on the logon screen and choose to connect or not (including Windows 8). But it doesn’t seem to work on Windows 10 anymore.

Nevertheless, by using the workaround we described above, you can instruct Windows 10 to automatically connect to a VPN before you get the chance to sign in with your user credentials.

To maximize security, though, we recommend signing up for a premium subscription service like PIA and obtaining the manual configuration settings for PPTP or L2TP. PIA’s VPN servers facilitate a higher level of security for your home PC.

[wl_navigator]

Microsoft Edge v84 rolls out to the Stable channel with improvements for full screen mode, Collections, and more

Version 84 of Microsoft Edge has finally arrived in the stable channel. This release is bringing improvements for full-screen mode, the Collections feature, and more. Here’s a look at what you need to know.

We’ll start first with the new stuff. Microsoft says that Edge now provides full-screen mouse support when in full-screen mode, to access the address bar, and other items. In addition, users can now add custom nicknames to saved debit or credit cards. Finally, with Collections, Microsoft has added the ability to leave notes on Collections, and change the background color of notes. You can have a look below for other improvements and new features.

  • Read Aloud for PDF lets users listen to PDF content while carrying out other tasks that may be important for them
  • Now you can save an edit made to a PDF back to the file instead of saving a copy each time you edit the PDF.
  • This version of Microsoft Edge provides improved site list download times for Internet Explorer mode. We’ve reduced download delay for the Internet Explorer mode site list to 0 seconds
  • Microsoft Edge now allows users to sign-into the browser when it’s “run as administrator” on Windows 10.
  • TLS/1.0 and TLS/1.1 are disabled by default.
  • Microsoft Edge now enables Translation in the Immersive Reader. When a user opens the Immersive Reader view, they get the option to translate the page to their desired language.

In addition to the new features, Microsoft has also added support for The Storage Access API. Developers will also see some new DevTools updates, including support for customizing keyboard shortcuts to match VS Code and viewing the DevTools in high contrast. Of course, there are new policies too, for a total of 7. We invite you to read more about those here, as well as the other new things for developers and security updates.

Today is the first major version 84 release in the Stable Channel, but you can expect subsequent updates to follow later on. Version 83 of Microsoft Edge received a total of 8 patches after its initial release to Stable, so you can expect more of the same here, as Microsoft is always working to improve Edge. In fact, security researchers recently found that it beats out Chrome and Firefox when it comes to preventing and catching malware.

Best AES 256-bit Encryption Software to Protect Your Files

File encryption is important if you want to protect your files from unauthorized access. There are different types of encryption, but one of the most used is 256-bit encryption.

Encrypting your files is rather simple, and today, we will show you the best 256-bit encryption software.

Some users wonder what the difference is between 128-bit and 256-bit encryption. Basically, they are the same; the only difference is the length of the encryption key. Generally speaking, the key with the longest length is more secure. Thus, 256-bit encryption is stronger than 128-bit.

Encryption can be encrypted by a software program installed on your computer, such as the recommended one, or by a hardware chip. In this case, we usually refer to this as AES 256-bit hardware encryption.

So here we go, the best AES encryption software.

What’s the best 256-bit encryption software for PC?

WinZip – Best 256-bit encryption software

With WinZip, you get two advantages in one single package. First, you can create zip archives with multiple files. This way, it is easier to move them or share them, or it just makes it easier to organize yourself. Moreover, compressing the files will take up less storage.

Secondly, you have the option of encrypting your zip archive. WinZip offers the option to encrypt the files that you’ve selected to add to the archive with a strong 256-bit AES encryption. You can also choose 128-bit encryption.

Other great features besides the ability to encrypt the files are:

  • converting files to PDF
  • merging multiple PDFs into a single file
  • e-signature support
  • Windows Shell integration
  • support for a lot of different formats

WinZip

Encrypt your files and make use of powerful archiving tools with this professional software.
Check Price Visit Website

Folder Lock – Create password wallets


Another professional tool that can encrypt your files, folders, and drives is Folder Lock. Using this tool, you can easily lock any folder and prevent other users from accessing it. The application supports on-the-fly AES 256-bit encryption, allowing you to encrypt any file easily.

The application also works with removable storage, optical media, and email attachments. In addition to file encryption, you can create password wallets and store important information, including credit card data and passwords. Lastly, you can permanently delete your files using the shredding feature.

Folder Lock is a great tool that can protect any file, folder, or drive with 256-bit encryption. The application offers a friendly interface, so it’s perfect for first-time users. The trial version is available for download, but if you want to continue using this tool, you need to purchase a license.

Folder Lock

Keep your documents safe by encrypting entire folders with this powerful tool.
Free Trial Visit Website

AES Crypt – Very easy to use

If you’re looking for multi-platform 256-bit encryption software, AES Crypt might be perfect. This tool is available for Windows, Android, MacOS, and Linux, so you won’t have problems using it on different platforms. The application is simple to use, and you can encrypt a file simply by right-clicking it and choosing the desired option.

All encrypted files are protected with a password, so unauthorized users won’t be able to access them. It’s worth mentioning that there’s also a command-line version available, which is perfect if you’re an advanced user and you want to encrypt your files quickly.

AES Crypt is a solid tool, and it’s perfect for both first-time and advanced users alike. The application is completely free and available on several different platforms. As a result, even if you don’t use Windows, you can use AES Crypt without any issues.

⇒ Get AES Crypt


VeraCrypt – Perfect for advanced users


Another free 256-bit encryption software is VeraCrypt. This is a multi-platform tool, and it’s available for Windows, MacOS X, Linux, and even Raspberry Pi. VeraCrypt offers advanced encryption features, so it’s more secure than other encryption tools on the market.

The application supports 256-bit encryption, and it will protect all your files with a password. Remember that you won’t be able to access your files if you lose your password, so be sure to remember it.

The application is relatively simple to use, and you have to create a virtual volume and choose a safe location for it. After that, you must set different parameters such as encryption and hash algorithm. Lastly, you need to set the volume size and its password. After doing that, your encrypted drive will be ready, and you have to mount it from VeraCrypt. Once you mount your encrypted drive and enter its password, you can access your files without problems.

VeraCrypt is a great encryption software, and if you need to protect your files with 256-bit encryption, consider this tool. The application also offers some advanced features, so it’s perfect for advanced users. VeraCrypt is relatively simple to use and completely free, so be sure to try it out.

⇒ Get VeraCrypt


AxCrypt – Integrated file exploration


If you’re looking for simple encryption software, AxCrypt might be just what you need. The application offers 128-bit and 256-bit encryption, fully supporting cloud sharing services.

There’s also support for collaboration, so you can easily work with other users on encrypted files. AxCrypt also supports password management, so you can store passwords and other important data.

It’s worth mentioning that the application supports folder encryption, so you can encrypt individual folders or files with ease. The application supports the drag-and-drop method, so you can easily encrypt your files. The tool also supports File Explorer integration allowing you to encrypt files simply by right-clicking them.

The application is rather simple to use, and you can access encrypted files simply by double-clicking them. The application has no backdoors, so if you lose your password, you won’t be able to access your files. We must mention that AxCrypt is a portable application, so you can run it on any PC without installing it.

AxCrypt offers a simple interface, so you should be able to encrypt your files easily. We have to mention that this tool has two versions available, Free and Premium. The Free version offers 128-bit encryption, while the Premium version offers 256-bit encryption.

In addition, the Premium version offers other features, such as support for secure folders, mobile apps, password management, etc. If you’re looking for a simple file encryption tool, AxCrypt will be perfect, but it’s biggest flaw is the lack of 256-bit encryption in the Free version.

⇒ Get AxCrypt


BitLocker – Windows native encryption


If you don’t want to use third-party solutions for encryption, you might want to consider BitLocker. This feature was available on Windows since Windows Vista and is also available on Windows 10. This feature supports both 128-bit and 256-bit encryption, and it’s available on Pro, Enterprise, and Education editions of Windows 10.

This tool doesn’t offer individual file or folder encryption which can be a flaw for some users. On the other hand, the application supports volume encryption, so you can easily protect an entire volume. If you want to encrypt individual files, you can create a new volume and move the desired files.

As for encryption, the device supports three modes: transparent, user authentication, and USB key mode. The transparent mode utilizes TPM chip for authentication, however this authentication method is vulnerable to cold boot attacks. User authentication allows you to access encrypted drives using your PIN code or password. Lastly, a USB Key Mode allows you to authenticate using a USB flash drive.

BitLocker offers solid protection, and it’s available on certain versions of Windows 10. The only flaw of BitLocker is the inability to encrypt individual files and directories, but that isn’t a major problem.


Gpg4win – Allows you to encrypt emails


Another great tool that allows you to encrypt your files is Gpg4win. This tool lets you encrypt folders or files from the File Explorer. To do that, right-click the desired file and choose the encrypt option from the menu. In addition to encryption, the application allows you to create checksums and use them to verify file integrity.

Besides files and folders, this tool also allows you to sign and encrypt your emails in Outlook. Using this tool, you can encrypt email messages and attached files. This feature is rather straightforward, allowing you to decrypt messages in Outlook easily. In addition, you can also manage certificates by using this tool.

Gpg4win is a great tool, and it offers advanced features such as email encryption, which can be rather useful. As for file encryption, you can easily encrypt your files simply by right-clicking them. If you’re looking for a powerful encryption tool with some advanced features, try Gpg4win.

⇒ Get Gpg4win


7-Zip – Support for command line


7-Zip is a small and lightweight file archiver, but it also supports archive file encryption. This tool can create archives in a 7z format that offers a high compression ratio. In addition, the tool can also unpack 30 different file types, and you can create 6 types of archives with this tool.

The application supports self-extraction for 7z format and full integration with Windows Shell. There’s also a built-in file manager as well as support for the command line. It’s worth mentioning that there’s support for 256-bit encryption for 7z and ZIP formats, so you can easily encrypt your files.

7-Zip is a lightweight and completely free file archiver, and it also offers solid file encryption features. You can’t use this tool to encrypt your system drive or an entire partition, which is its only flaw. However, if you’re looking for powerful archiving software that supports encryption, we strongly recommend considering 7-Zip.

⇒ Get 7-Zip


DiskCryptor – Can encrypt CDs and DVDs


Another free application that can encrypt your partition is DiskCryptor. This tool allows you to encrypt any partition, including your system drive. DiskCryptor supports AES, Twofish, and Serpent encryption algorithms while offering 256-bit encryption. According to the developer, the tool offers high performance as well as transparent encryption for disk partitions and full support for dynamic disks.

In addition, the tool offers high performance and support for hardware AES acceleration. We have to mention that DiskCrytor can also encrypt CDs and DVDs as well as USB storage devices. If you need extra security, you should know that you can easily combine two or more encryption methods.

DiskCryptor is a great tool, and it offers extra security to its users. The application is completely free, so be sure to try it out.

⇒ Get DiskCryptor


Challenger – Portable application


Another great application for file encryption is Challenger. The application can encrypt files, folders, and entire drives. We have to mention that you can use this tool as a portable application, so there’s no need to install it on your PC.

The tool is relatively simple to use; you have to select the desired files and drag and drop them to the application. Of course, you can also choose the desired files from the dialog.

The application supports multiple passphrases to protect different types of files with different passwords. In addition, you can easily manage all your passphrases from this application. You can also set your favorite files and folders to access them quickly if needed.

Once the application encrypts your files, it will change their extension, so you won’t be able to access them. In fact, the only way to access a file is to unlock it from Challenger. You can add a Challenger option to the context menu if needed to encrypt files more easily.

This is a decent tool, but it might take a while to get used to it, especially if you’re unfamiliar with file encryption tools. We also have to mention that this tool doesn’t have a list of encrypted files, making decrypting harder than needed.

The free version offers 128-bit encryption and doesn’t support network drives. You must purchase the full version if you want to use 256-bit encryption. Challenger is a solid application, but due to its design, it might be hard for some users to manage their encrypted files.

⇒ Get Challenger


Cryptainer PE – Encrypt by drag and drop


Another great tool that can encrypt your files is Cryptainer PE. According to the developers, this tool offers 448-bit encryption, which is impossible to break. The application will create an encrypted drive, which you can use to store any files on it.

Each encrypted drive can be up to 25GB in size, which is more than enough for most users. In addition, you can easily encrypt any file, directory, removable or optical drive. You can install the application to a USB flash drive and use it on any PC if needed.

Besides file encryption, you can also encrypt your emails for extra protection. This tool is simple to use, and thanks to the drag-and-drop method, it’s perfect for all users. We have to mention that Cryptainer PE isn’t free, but you can download Cryptainer LE for free.

This version is completely free and offers the same features, however, LE version can only create drives that are 100MB in size, which is a major problem for some users. If you want to encrypt larger files with this tool, you must purchase the PE version.

⇒ Get Cryptainer PE


Kruptos 2 – Cloud support


If you’re looking for a professional application with 256-bit encryption, Kruptos 2 might be perfect. Using this tool, you can easily encrypt any file from your hard drive, regardless of size.

The application also offers auto encryption to automatically encrypt your files once you’re done editing. It’s also worth mentioning that this tool can encrypt file names, making unauthorized users unable to see the names of your files.

The application works on multiple platforms, and you can easily work with encrypted files on Windows, Mac, Android, or iOS devices. There’s also cloud support to easily upload encrypted files to Dropbox, Google Drive and OneDrive. The application also offers Windows integration, allowing you to encrypt files by using the context menu.

Kruptos 2 also has a file shredder feature that permanently deletes your files. As for additional features, there are email attachment encryption and secure notes. We also must mention that this tool can create self-decrypting files, which can be useful.

Kruptos 2 is a powerful encryption tool that offers an amazing user interface and a wide range of features. The application is available for a free trial, but if you want to continue using it, you’ll need to obtain a license.

⇒ Get Kruptos 2


CryptoForge – Built-in file shredder


Another great tool that can protect and encrypt your files using 256-bit encryption is CryptoForge. The application is rather simple to use and can work with files up to 16TB in size. As for encrypted files, you can easily share them with others.

Regarding decryption, the receiving party can decrypt received files without using CryptoForge. If you’re concerned about the safety of your files, you should know that this tool supports multiple encryption methods that will secure the files even further.

The application can encrypt files and directories on any kind of drive, including network drives. There’s also a built-in file shredder and compression feature available that can help you save some space.

In addition, the tool offers file name encryption, so it will keep the file names hidden from unauthorized users. Lastly, the tool is perfect for advanced users since it offers command-line encryption allowing you to encrypt files with just a single command easily.

CryptoForge doesn’t contain any backdoors, so you won’t be able to restore your password if you lose it, therefore be extra cautious. The application is available for a free trial, but if you want to continue using it, you’ll need to purchase a license.

⇒ Get CryptoForge


SafeHouse Explorer – Uses personal vaults to encrypt files


If you’re looking for lightweight and free software with 256-bit encryption, this one might be perfect. This application offers 256-bit Twofish encryption, and it can easily protect any file or directory.

The application uses personal vaults to encrypt your files, and you can create an unlimited number of vaults that are 2000GB in size. The application can run from USB flash drives and create self-extracting encrypted vaults.

SafeHouse Explorer is simple and completely free, but paid Personal and Professional versions are also available. The professional version offers 448-bit encryption, and it supports AES, Blowfish, and other encryption methods. In addition, both Professional and Personal versions offer command-line support so that they might be more suitable for advanced users.

⇒ Get SafeHouse Explorer


Privacy Drive – Doesn’t have any backdoors


If you need simple encryption software, you should definitely consider Privacy Drive. The application uses virtual disk and on-the-fly technology so you can easily encrypt your files. In fact, the application is so simple to use that you can encrypt files by using the drag-and-drop method. As for encryption, we have to mention that this tool supports both AES 128-bit and AES 256-bit encryption, so your files will remain safe at all times.

The application is rather fast, and there’s no limit on how many files you can encrypt. It’s worth mentioning that encrypted volumes don’t have any signatures, so they can’t be identified as encrypted volumes or containers. In addition, the application doesn’t have any backdoors, so your data will remain protected from unauthorized access.

Privacy Drive is simple, fast, and reliable encryption software, and it’s available for a free trial. You must obtain a license if you want to continue using this tool.

⇒ Get Privacy Drive


Advanced Encryption Package 2017 – Use USB to store encryption keys


Protecting your files is important, and if you’re looking for professional file encryption software, you might be interested in this application. The application offers 20 encryption algorithms, such as AES, Blowfish, Twofish, GOST, and others. There’s also Windows integration to encrypt files from the Windows context menu easily.

The application can encrypt any file or directory, and if you need extra security, you can use your USB flash drive to store encryption keys. There’s also a file shredder feature that can delete any file and make it completely irrecoverable. It’s worth mentioning that the application supports both symmetric and asymmetric encryption. If you’re an advanced user, you’ll be pleased to hear that this application supports a command-line interface, so you can easily encrypt files using the command line.

The application also allows you to share encrypted files easily and create self-decrypting files or encrypted optical discs. Lastly, the application also has a Clipboard Encryptor feature that can easily encrypt any text from your clipboard, so it’s perfect if you want to send completely secure text data.

Advanced Encryption Package 2017 is simple to use, and it offers some advanced features, so it’s perfect for both basic and advanced users alike. The application is available for a free trial, but if you want to continue using it, you’ll need to purchase a license.

⇒ Get Advanced Encryption Package 2017

Security of your files is rather important, and if you want to protect them from unauthorized access, be sure to try one of these 256-bit encryption tools.

In case you want to open the ENC file, you can use any of the tools now to decrypt the file and then use Word or Notepad to read it.


Can VPN be overloaded? How to fix an overloaded VPN?

We’re living in a world where seemingly private activities such as accessing a website from the comfort of your own home can be made public. There are several third parties that can get between you and your online whereabouts.

For instance, your ISP is just a few clicks away from getting a full report of your online activities. Sure, it can’t read emails or see your account passwords, but it knows what websites you visited and files you downloaded.

And that’s already too much.

However, things don’t need to be that way. Nowadays, there’s a huge selection of privacy tools that can help you protect your privacy. And the best, most powerful ones are, without a doubt, VPNs.

VPNs can easily help you put some walls between you and whoever feels like spying on you. It redirects your traffic through a secure tunnel, but not without encrypting it first.

Thus, even if someone were able to take a peek inside that tunnel, your traffic would look like gibberish.

However, what happens if the VPN server can’t take it anymore? Let’s find out.

How does a VPN work?

From a workload standpoint, a VPN is similar to any regular server. It can house a certain number of connections and, as the number of users reaches the limit, it becomes more and more difficult for it to allocate resources.

First and foremost, keep in mind that you’re almost never alone on a VPN server. That’s why providers mention shared IP addresses. After connecting to a VPN server, your default IP address is replaced by the server‘s address.

But many other users who use the same server will have the same address.

So, it’s really not rocket science to figure out that VPN servers can’t keep accepting connection requests forever and have to stop at some points. That’s why the best VPN services have huge networks in the first place.

Can VPN get overloaded?

Yes, there’s no way to sugar coat it, VPNs can and do get overloaded regularly. Much so during unfortunate events such as natural disasters and pandemics, when a lot of people need to work from home and generally spend more time indoors.

Considering that a VPN should fix issues such as packet loss and network congestion, an overloaded server could be quite inconvenient.

Additionally, we’ve already explained how VPN affects Internet speed. Thus, it should be no surprise that an overloaded VPN server can affect your Internet speed even more.

What to do if your VPN is overloaded?

  • Choose a VPN with a large network of servers
  • Use split tunneling to manage VPN traffic efficiently
  • Switch the server if you’re on a crowded one
  • Change the location (if convenient and possible)
  • Use a different protocol (it might be faster)
  • Try using a wired connection instead of WiFi

Although these are not exactly ways to solve an overloaded VPN issue, they can help you alleviate problems that an overloaded server can cause you.

VPNs with large server networks

We’ve put together a list of our recommendations for the best VPNs that have large server networks. Take a look:

Product NameNumber of serversCompany Name
CyberGhost VPN7,100Kape Technologies
NordVPN5,200Tefincom & Co., S.A.
Private Internet Access3,300Kape Technologies
ExpressVPN3000+Express VPN International Ltd.
Surfshark VPN1700+Surfshark LTD

Keep in mind that the number of servers shouldn’t be the only thing you judge a VPN after. However, for the purpose of avoiding an overload situation, this is quite a strong criterion.

Private Internet Access

Have a try with this proficient VPN solution with a great number of servers and increased stability.
Check price Visit website

Yes, VPN can get overloaded

To wrap it up, it’s true that VPN can get overloaded, much so during natural disasters and pandemics. This, in turn, could lead to other issues such as slow Internet speed, packet loss, and jitter.

However, bypassing a VPN overload is quite simple, compared to other potential issues. Merely switching the server you’re currently on or changing the location should take care of things for good.

FIX: Too many simultaneous connections Outlook error

Many Outlook users reported Too many simultaneous connections message while trying to check their email.

This can be a big problem and prevent you from receiving new emails, but there’s a way to fix this issue, and in this article, we’re going to show you how to do it.

How can I fix simultaneous connections error in Outlook?

  1. Use a different desktop client
  2. Disable Send & Receive All schedule
  3. Check your antivirus
  4. Install the latest updates
  5. Sign out from certain devices or applications
  6. Check your password
  7. Change Server Timeout value
  8. Use webmail

1. Use a different desktop client

Too many simultaneous connections message is usually caused by your email client, most notably Outlook, and if you keep getting this error, you might consider switching to a different email client.

There are many great email clients, no one can deny it. However, if you want one that works and feels like Outlook, we suggest that you try using eM Client.

Keep in mind that it is being constantly updated, so expect to enjoy an error-free experience. Other than that, it’s compatible with both Windows and Mac OS.

eM client

eM client

Experiencing repeated Outlook connection errors is frustrating. Try out Em Client and you’ll forget all about them!
Get it free Visit website

2. Disable Send & Receive All schedule

  1. Click on File > Info > Options in Outlook.
  2. From the left pane pick Advanced. Now click on the Send/Receive button.
  3. Send/Receive Groups window will now appear. Disable Schedule an automatic send/receive every option and click Close.
  4. Save changes.

If you’re getting Too many simultaneous connections Outlook error, the problem might be your settings.

As you know, Outlook has a certain schedule and it checks for new emails every few minutes.

However, sometimes you might not be able to receive your emails due to certain settings.

According to users, in order to fix this problem, you just need to disable Send & Receive schedule in Outlook. To do that, you need to follow the above steps.

After disabling this option, the problem with Outlook should be resolved. We have to warn you that by disabling this option Outlook won’t check for new messages automatically, so you’ll have to do that manually.

This is a solid workaround, so feel free to try it out.

3. Check your antivirus

Having a good third-party antivirus is important if you want to protect your PC from online threats.

However, sometimes your antivirus can interfere with Outlook and it can cause Too many simultaneous connections Outlook errors to appear.

To fix this problem, it’s advised to disable certain antivirus features and check if that helps. In case that doesn’t work, your next step would be to disable your antivirus entirely.

In several instances, users had to remove their third-party antivirus in order to fix this problem, so you might have to do that as well.

If removing your antivirus solves the problem, you should consider switching to a different antivirus solution.

There are many great antivirus applications, but if you want maximum protection that won’t interfere with your system, you should then try TotalAV.

4. Install the latest updates

  1. Use Windows Key + I shortcut to open the Settings app.
  2. In the Settings app, go to the Update & Security section.
    outlook error too many simultaneous connections
  3. Now click Check for updates button.
    outlook error too many simultaneous connections

If you’re getting Too many simultaneous connections errors in Outlook, the problem might be the missing updates.

To ensure that this issue doesn’t appear, it’s advised that you update Outlook to the latest version and check if that solves the problem.

In addition to Outlook, it’s important that you update Windows as well.

By default, Windows 10 downloads the updates automatically, but you can also check for updates manually, as described above.

Windows will now check for available updates and download them automatically in the background. ]Once you download the updates, restart your PC to install them. Once your system and Outlook are up to date, check if the problem is still there.

5.  Sign out from certain devices or applications

  1. Open Gmail in your browser.
  2. Scroll all the way down and locate Last account activity. Now click Details.
    outlook error too many simultaneous connections
  3. A new window will now appear. You should be able to see all your current sessions. Click Sign out all other web sessions.
    outlook error too many simultaneous connections

Too many simultaneous connections message can appear due to certain limitations in Gmail.

In case you don’t know, you can have 15 simulations connections to your Gmail account, and if you exceed this limit, you’ll get the aforementioned error message.

It’s worth mentioning that certain applications can use two or more connections to access Gmail, so if you have several email clients or multiple devices connected to your Gmail account, it’s possible to quickly exceed this limit.

To fix this problem, it’s advised to sign out of certain email clients on your PC, phone, or tablet.

After you sign out on a couple of clients, the problem should be resolved, and you’ll be able to access Gmail once again.

If you want, you can also sign out of all sessions. However, you’ll have to log back in again in every client manually.

After doing that, you’ll be signed out from Gmail on all other devices and the issue should now be resolved.

Keep in mind that you’ll need to sign back in manually on each email client, but that shouldn’t be a big problem.

6. Check your password

Too many simultaneous connections Outlook errors can occur if your password was changed or if it’s expired. This can be a problem, but you can fix it simply by resetting your password.

Once you reset your password you need to make changes in Outlook and change your login credentials accordingly.

After doing that, the problem should be completely resolved and everything should start working again.

7. Change Server Timeout value

  1. In Outlook open Account Settings.
  2. Go to the Advanced tab and lower the Server Timeout value.
  3. After doing that, click OK to save changes.

Too many simultaneous connections error message can appear due to Server Timeout value, and in order to fix this issue, you need to make a couple of adjustments.

Apparently, if the Server Timeout value is too long, the client will try to make additional connections causing this error to occur.

After making these changes, check if the problem is still there.

8. Use webmail

If you keep getting Too many simultaneous connections Outlook error, you might be able to fix the problem simply by using webmail.

Almost all email providers offer webmail, so if you keep getting error messages in Outlook, you might want to try using webmail for the time being.

Webmail doesn’t have many problems that desktop clients have, so if you have any issues, we suggest that you try using webmail as a temporary solution.

Too many simultaneous connections Outlook error will prevent you from receiving any new email messages, but you should be able to fix this problem using one of our solutions.

Use them when dealing with these issues too:

  • Too many concurrent connections opened in Outlook. Cannot open Gmail – If you are also experiencing this issue, we’d suggest trying out a different desktop client.
  • Outlook 365 too many active sessions connected to this mailbox – We investigated this particular issue and it seems that creating a different throttling policy is the quickest solution.
  • IMAP too many simultaneous connections in Outlook – A quick fix for the IMAP server failure caused by the high number of simultaneous connections is resetting your password. You should also check if it works in webmail, as described above.


Outlook email fails after Windows 10/11 upgrade [Fixed]

Email is a crucial part of our lives and it can be quite frustrating for you if you find yourself not being able to send emails.

Speaking of which, it seems that Outlook won’t send emails after upgrade to Windows 10, so let’s explore this issue.

Users have reported that they are unable to send emails using Outlook on Windows 10, and this issue seems to affect various versions of Outlook.

In order to fix this issue, we have a couple of solutions for you.

What can I do if Outlook email fails?

1. Change your email client

enjoy Mailbird

We know that switching to a different email client isn’t easy, especially if you’re used to the same Outlook for a long time.

However, if none of these solutions help, maybe you should consider switching to an alternative email client.

There are many free ones available and most of them will do perfectly as an Outlook replacement. We would strongly suggest you Mailbird as one of the leaders on the market.

It is a friendly user choice and best of all, it has many great features that will be very helpful in mailing management and using all your favorite apps from one place.

Mailbird

Mailbird

When Outlook email fails after a recent upgrade, the well-designed Mailbird is a great alternative to try out.
Get it free Visit website

2. Run System File Checker scan

SFC scan

  1. Right-click on the Start button and click on Command Prompt (Admin). If for some reason Command Prompt isn’t available, you can choose Windows PowerShell (Admin) instead.
  2. When the Command Prompt opens you need to type sfc /scannow.
  3. Press Enter and wait for the process to complete. System File Checker can take about 20 minutes on a regular hard drive, so make sure that you do n0t interrupt it.
  4. When the scan finishes it will inform you whether it was successful or not.
  5. Restart your computer and check if the problem is solved.

If you’re not familiar System File Checker is a scan that will scan your Windows 10 for any corrupted system files, and it will repair those files if possible.

To perform a System File Checker scan, complete the above steps.


scannow command has stopped before the process finished? Don’t worry, we’ve got an easy fix for you.


3. Perform a clean install of Windows 10

Windows 10 install

If the System File Checker was unable to help, maybe you should perform a clean install of Windows 10.

Just make sure that you create a backup for your important files and not delete them by accident. In that regard, use these great local data backup software tools.

Reinstalling Outlook might also help. If you’re not sure how to do this, ask someone to help you out, or hire someone to do it for you.

Also, keep in mind that the above solutions are ideal when no images appear in emails after Windows 10 upgrade. That’s a similar issue that many Outlook 2010 complain about.

Are things any better now? Let us know via the comments area below.

[wl_navigator]


Windows 10/11 2004 audio issues not gone just yet

When Microsoft realized that some devices weren’t ready for Windows 10 2004, it put them on a compatibility hold. It usually does that to preserve the user experience.

However, avoiding a Microsoft compatibility hold doesn’t always guarantee that a machine will have no compatibility issues with the Windows 10 May 2020 Update. That’s the hard fact that some users have come to accept after the OS caused audio issues with their PCs.

Windows 10 2004 sound issues

Recently on the Microsoft Answers forum, a user reported that they kept losing their Windows 10 2004 PC audio. It seems that they’re using NVDIA and Sony audio devices, both of which tend to disappear from the device manager list.

I have a sony x800 with nvidia 1080ti. For some reason, since going to 2004 version of win 10, i keep losing the sound device in the listing. The only way to get it to come back is to pull the video cable and put it back in.

Windows 10 2004 audio complications date back to the OS’ prerelease days.  A couple of months ago, a Windows insider claimed on Reddit that their system lost sound after updating to a beta version of Windows 10 2004.

Another user on the Answers forum laments:

My audio is still not working after the recent Windows 10 version 2004 update. It causes the system to auto lockdown after initial booting and the audio functions are now totally lost.

Here’s yet another recent May 2020 Update audio concern:

After the update, it no longer finds the Realtek sound card, as if it is not connected at all.

But the machines in question should be compatible with Windows 10 version 2004, which is why Microsoft offered them the OS in the first place.

The good news is that some of the affected users resolved the issues after troubleshooting their audio device. Updating sound card drivers also seems to work for others.

What’s your experience with the May 2020 Update so far? Any sound card issues? Talk to us via the comments section below!

[wl_navigator]

Latest Skype update brings predefined backgrounds, 3×4 grid view for video calls

Microsoft has released a new Skype update on all platforms which brings some interesting new platform-specific functionalities (via Neowin). On the desktop, Microsoft has now made it possible to choose from a library of pre-selected images, in addition to uploading your own custom backgrounds for video calls.

To customize your background, follow these steps:

  • Start a call, hover over the video button, or click the More menu.
  • Now, click Choose background effect, and you should see an option to choose an image from the predefined backgrounds.

Skype custom backgrounds

The recent update also includes a new grid view that brings the ability to see 12 participants at once on desktop, and 9 attendees on mobile during a video call. To switch views during a Skype video call on desktop, click the Switch View button, and select the 3×4 Grid view from the menu.

Lastly, Microsoft noted that it has rolled out improved message sync experience, as well as some general improvements on all platforms. Microsoft has also added the ability to blur your background during video meetings when using Skype on iPhone and iPad.

Microsoft Outlook Crashing [Exception Code 0xc0000005]

Those of you that use Microsoft Outlook may have noticed a sudden increase in crashes and error messages whenever they try launching the app.

More precisely, we are talking about an error code 0xc0000005, and it can later be displayed in the event viewer.

This issue was even confirmed by our own users that commented:

I did the microsoft update, restarted and now outlook crashes. Obviously it was the update.

Apparently, this issue is most likely related to the July 2020 MS Office release. Luckily enough, if you too are experiencing any similar crashes with Outlook, we’ve compiled this guide to help you solve the issue in no time.

How do I fix Outlook error code 0xc0000005?

1. Perform an MS Office rollback to the June 2020 version

  1. Press Start, and type in CMD
  2. When the Command Prompt window opens type in the following line, and then press Enter:
    • cd "\Program Files\Common Files\microsoft shared\ClickToRun"
  3. This will open the ClickToRun folder. Type in the following line, and then press Enter:
    • officec2rclient.exe /update user updatetoversion=16.0.12827.20470
  4. Wait for Microsoft Office to download and install that version
  5. When a window appears stating that Downloads were installed, you may press Close

Note: If this method doesn’t work for you, use this command line instead of in step 3: officec2rclient.exe /update user updatetoversion=16.0.12527.20880

2. Start Outlook in Safe Mode

  1. Hold the Ctrl key pressed, and launch Microsoft Outlook
    • You will be asked whether or not you want to start it in Safe Mode.
  2. Select Yes
    • This will start Outlook in its most basic form, without any interferences from outside programs of add-ins.

Note: This particular solution was confirmed by some of our readers:

Irepaired the net. framework with a microsoft tool. after that i can open outlook in safe mode

By following this step, you should be able to now use Microsoft Outlook without any more issues.

It should be noted that this isn’t the only time error code 0xc0000005 has appeared, having affected different applications in the past as well.

Thankfully enough, we’ve covered that issue as well in this detailed troubleshooting guide.

Let us know which method helped you by leaving us a message in the comments section below.

How to recover deleted/archived Outlook messages [Guide]

Are you wondering how to recover some deleted archive Outlook messages? There’s no need to be alarmed, we have got the solutions for you.

Microsoft Outlook is a component of the Microsoft Office suite. It is normally used as an email application and can sync with any POP3 or IMAP webmail server.

Other Microsoft Outlook features include calendar, contact manager, journal, task manager, and web browsing.

Sometimes, you can accidentally or intentionally delete archived Outlook messages from your mailbox; however, it is possible for you to recover the deleted messages but not permanently deleted items.

We have compiled solutions for different Outlook versions which you can use to recover the deleted archive folders in Outlook 2016 and not only.

How can I recover deleted/archived messages in Outlook?

1. Recover in Microsoft Outlook app for Windows

  1. Launch Microsoft Outlook and login to the email account.
  2. Click on the Mail Folder tab and then Deleted Items.recover deleted archive outlook
  3. Now, right-click on the deleted archived message and select Move to folder option.recover deleted archive outlook
  4. Then, click on Inbox to move the deleted message to the Inbox”and wait for the process to be completed.recover deleted archive outlook

The simplest way to recover deleted archive messages on your Outlook mailbox is to undelete from the Deleted Items folder.

This folder consists of messages which have not been permanently deleted, so use the above steps with no hesitation.

However, if you are unable to find the specified message in the Deleted Items folder, you may need to access the Recoverable Items folder.

Recoverable Items folder is a hidden folder in Microsoft Outlook which consists of items that have been cleared from the Deleted Items folder.

Here’s how to access the Recoverable Items folder:

  1. In the Outlook account display, go to your email folder list, and then click Deleted Items.
  2. Click on the Home tab, and then click on Recover Deleted Items From Server.
  3. Now, select the deleted archive Outlook messages you want to recover.
  4. Click Restore Selected Items, and then click OK.

You cannot recover items deleted from the Deleted Items folder if you do not have an Exchange account in Microsoft Outlook.

However, we have an additional guide on how to recover your Outlook emails using OST to PST Converter that will fix this problem in a fraction of the time.

2. Get back your Outlook messages by using a dedicated tool

Do note that there are some Windows friendly programs that you can use to recover deleted archive folders in Outlook.

With the number of free programs available for card making, you can clearly find a good fit to your interests and needs. For example, we recommend trying out Stellar Outlook Repair.

This utility is specially designed to extract mailbox components from corrupt PST file in intact form. This includes emails, contacts, photos, and all other attachments.

On top of that, this high-rated tool restores them in a new PST file that can be easily imported back in Outlook.

Stellar Outlook Repair

Stellar Outlook Repair

Looking for a powerful software to recover deleted/archived Outlook messages? Stellar Outlook Repair is the best pick!
Get it free Visit website

3. Recover in Microsoft Outlook web app

  1. Go to the Outlook and then Sign in to your account.
  2. In your email folder list, click on the Deleted Items tab.recover deleted archive outlook
  3. Locate the specific message, right-click on it, and then click Move > Inbox.recover deleted archive outlook

Another way of recovering deleted archived Outlook items is by accessing the Outlook website and undelete from the Deleted Items folder.

Alternatively, if you can’t find the message in the Deleted Items folder, you need to look for it in the Recoverable Items folder. Here’s how to access the Recoverable Items folder:

  1. Go to the Outlook Web App, and then Sign in to your account.
  2. In your email folder list, right-click on the Deleted Items tab.
  3. Now, click Recover deleted items.recover deleted archive outlook

In addition, you can also use the search box to find the deleted archived message you want to recover. After locating the item, select it, and then click Recover.

To learn more about archiving, we have a great guide on how to apply AutoArchive settings to subfolders in Outlook that you might want to check out.

In conclusion, the methods and program listed above can help you to recover deleted archive Outlook messages on your Windows PC. Feel free to comment below if you have any questions.

I used the consumer features in Microsoft Teams for one week, and it’s better than you’d think

In these times, there’s a lot of ways to communicate with friends and family. From Facebook Messenger, WhatsApp, iMessage, and so much more, there are no shortages of ways to talk to people.

But riding the momentum of Microsoft Teams in the enterprise and business space, Microsoft recently brought Teams over to the consumer world to enter the fray of messaging platforms. The company envisions Teams as not only something you can use for work, but also for friends and family.

With a beta of these features recently making their way over to the iOS version of the Microsoft Teams app, I thought I’d try it out. I really had my doubts, but after a week of using Teams consumer features, I loved it. Here’s my story.

The setup

Much like signing up for WhatsApp or other services, setting up Teams for consumer was quite easy. For most people who aren’t already using Microsoft Teams in their work — and are trying Teams for the first time — this will be an important step. Luckily, Microsoft makes it simple.

Since I already use Teams for work at OnMSFT, I simply went into the hamburger menu, and under accounts and orgs, signed in with my personal Microsoft Account then confirmed my phone number. I also opted to sync my contacts, too, as I wanted to see if anyone else was using Teams. I was then good to go.

Coincidently, an old college friend of mine (who now lives in Kazakhstan) was already using Teams’ consumer features. After I synced my contacts, I noticed that her name and number showed up when I went to create a list of messages in the chat. My colleague at OnMSFT also showed up too, and we used the app to talk instead of our usual method of communication, WhatsApp, and iMessage. I spoke to both these people on Teams throughout my week with the app thus far, and it is still ongoing.

I even convinced my mother to give Teams a try. As a first-time Teams user, she found the setup process quick and easy. She clicked the Sign up for free button, signed up with her phone number, confirmed it, added a profile picture, synced her contacts, and was good to go!

The chat experience

Just like Teams for business and enterprise, the core experience of Teams’ consumer features is the chat experience. As someone who is quite used to messaging on WhatsApp and iMessage, I must say this is where Teams’ consumer experience is just as good.

In the chat, you not only can send out text messages, but you also can record and send voice audio messages. This is a feature that has been present in iMessage and WhatsApp for quite some time, and it’s something that I am glad made its way to consumer Teams, too. After all, there are situations where written words are not right.

Another thing I liked about the chat experience is how similar it is to WhatsApp. The locations for the user interface are almost exactly the same. A plus icon to the left of the compose box to send files and GIFS, or location. There’s also a camera to the right to quick-send a photo, and then the microphone to record audio.

Composing messages, meanwhile, is the same as WhatsApp. If you opted to sync contacts, you’ll see everyone with Teams appear under the compose box. You can also add someone to a group chat without them already having Teams. Just tap their phone number, and add them. They’ll be sent an invite link via text to download and join Teams.

The same goes for a chat, too. If you want to chat with someone on Teams who doesn’t yet have the app, just tap their number and they’ll be sent a unique link to join the later. (This is possible in WhatsApp, but the recipient of the invite won’t be able to automatically join the group chat or the chat you had for them.)

As my mother told me when she tried it out, most people will feel right at home when using Teams. There’s not much learning curve to using it. In my one week so far, chatting with my colleague and friend has been as natural as it is on WhatsApp and other apps. Not to mention, the emoji reactions (which aren’t on Whatsapp) have made for some funny moments and some more prolonged conversations between myself and my friends.
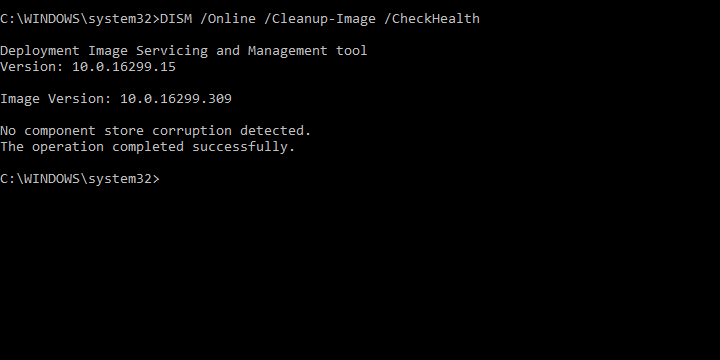
But there are some advanced features in chat that can only be found in Teams. This includes a formatter to bold, italics, and underline things in your messages. There’s also the ability to @mention someone to get their attention (outside of a group chat) or use the Task and the Safe features. Keep in mind, WhatsApp doesn’t support these, which is why I will dive deeper into these next.

The Dashboard has lots of cool uses

Asides from chat, another thing that makes Teams consumer unique is the Dashboard. From here, you’re able to use Teams for consumer features to your advantage. There’s a lot to get into, including the Safe, location sharing, uploading files, and more. As a summary, though: the dashboard is essentially a hub, showing you all the things that happened within a chat or group chat.
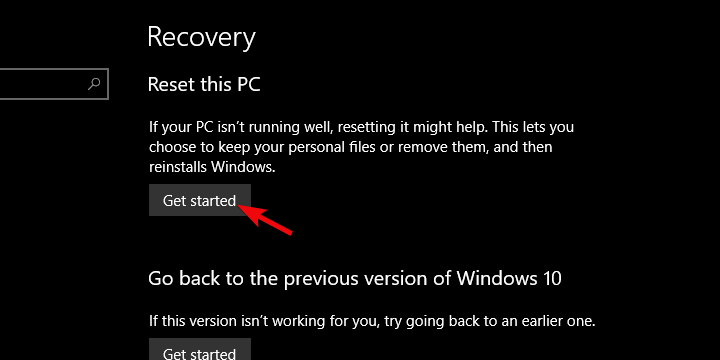
I’ll start first by talking about location sharing. This was one of the features Microsoft spoke a lot about when it first unveiled Teams for consumers. Just go to a chat, then tap the Dashboard, then choose Share location. You’ll be able to share the location for 30 mins, 1 day, or always on. If your contact is also sharing location, you even can pull up a map to see a comparison of where you are in comparison to each other. You can stop sharing at any time with a Stop Sharing button in the UI.
Alas, the point is the person in the chat will be able to see exactly where you are. I used this with my mother to show her where I was when I left the home one day, but it’s a feature I think will be useful for families, and keeping kids safe. Say, a kid leaving school, etc. It’s not exactly exclusive, though, as WhatsApp has the same exact feature, though, as do iPhones with the “Find My” app.

But what is exclusive to Teams is the Safe. Setting this up is simple, as you’ll need to enter a PIN (and store an encryption key for it on your MSA.) You’ll then need to grant your contact access to your safe, and they’ll be able to access it in real-time (or vice versa, too.) This is a great way to share information like passwords, passports, memberships, and more. Once you share your safe, the contact will be able to access it, too, and add content. I used it with my mother to share step by step instructions on how to do things in Teams and to give her the WiFi password. This is quite nifty, and Safe is even locked behind FaceID or TouchID for extra security. I have yet to see something like this on other messaging platforms, and it’s really Teams’ big potential.

Then there are the other features. You can create a shared calendar so you and contact can plan an event. You also can create a shared task. This one was useful for me and my mother, as I left her a grocery list, and she was able to check things off as she went to the store. Meanwhile, as I was home and was able to see the things she picked up from the store as she checked it off the list. Again, something that can be useful for families and giving children tasks or chores to do.

Finally, there is the ability to upload files. If you and the person you’re sharing the file with both share or have a Microsoft 365 subscription, you can edit and co-edit the documents together by viewing the file in Teams, and then opening it through the Office app. This is great, as it combines the power of Office with Teams, allowing you to get your maximum productivity.

Still some faults, but still great

After one week, I’m now a believer in Microsoft Teams being used by consumers. Although most features are already on iMessage, WhatsApp, and other platforms, it’s great to see Teams expand its reach. After all, most people already likely use Teams for work, so why not bring it into their homes, too?

But, not everything is perfect. Currently, Teams’ consumer features are only available on the mobile apps. There is no way to enjoy it on the desktop. Photos, videos, and other content sent on Teams don’t easily transfer to desktop, as they would with enterprise and business.

Also, switching between work and personal accounts could lead to some serious problems. It really annoyed me to get double notifications, from both work and my personal account when using a single app for communication

This experience is still in beta, so more changes could be coming soon. Until then, I am a believer. Here’s to hoping that Teams become just as popular as WhatsApp.

Microsoft removes Windows 10 May 2020 Update compatibility hold related to Thunderbolt docks

Microsoft acknowledged a bunch of compatibility issues hitting the Windows 10 May 2020 Update since launch, with one of them causing a compatibility glitch with Thunderbolt docks. Some Windows 10 users have been unable to install the latest feature update so far while Microsoft was investigating blue screen of death errors triggered due to “plugging or unplugging a Thunderbolt dock”.

Microsoft has recently confirmed that it has removed the compatibility hold that was in place for PCs with certain settings and a Thunderbolt dock, and these machines can now install the Windows 10 May 2020 Update normally. Following the release of the July Patch Tuesday updates earlier this week, Microsoft updated the Windows 10 Health Dashboard to indicate that the KB4565503 cumulative update includes a fix for this issue (via Bleeping Computer).

If you haven’t been able to get the latest feature update on your PCs with Thunderbolt ports yet, you should be able to grab it now via Windows Update. Microsoft noted that the “safeguard hold is estimated to be removed in the coming days,” so it can take up to 2-3 days before the Windows 10 May 2020 Update will show up on your device.

However, since the problem has been resolved now, Windows 10 May 2020 Update through the Media Creation tool should now be possible. Notably, the Windows 10 Health Dashboard still lists 8 known issues affecting the latest feature update, and hopefully, these will get fixed too in the coming weeks.

Xbox Series X will drop support for Kinect, including Kinect games

Microsoft’s Kinect accessory won’t be supported on the company’s next-gen Xbox Series X console launching later this year. The news came from Xbox head Phil Spencer today in a blog post that also mentioned the free inclusion of Project xCloud with Xbox Game Pass Ultimate in September.

“It’s our intent for all Xbox One games that do not require Kinect to play on Xbox Series X at the launch of the console. And because of the unprecedented power of Xbox Series X, most of your favorite games will load faster and look and perform many times better on the new console,” Phil Spencer explained.

“There’s no way for Kinect to work,” the head of Xbox also said in an interview with The Verge. That’s a bit surprising, as the Xbox Series X will apparently use the same OS as the Xbox One S and Xbox One X consoles, which still support Kinect via a USB adapter. However, that accessory has been discontinued in 2018, one year after Microsoft stopped manufacturing the Kinect 2.0.

The original Xbox One console that launched in 2013 included a Kinect in the box, with Microsoft hoping that making the accessory broadly available will push more game developers to create Kinect games. That ultimately didn’t happen, and Microsoft started offering cheaper Xbox One bundles without its Kinect 2.0 accessory a year later.

Microsoft’s Kinect technology lives on in other products such as the Azure Kinect DK camera, which developers can use to build computer vision and speech models. Kinect fans will still be able to use the accessory on Xbox One consoles, but Kinect voice commands can now be replaced by Xbox skills for Alexa and the Google Assistant.

PowerToys for Windows 10 gets another maintenance update

Microsoft has released PowerToys version 0.19.2 this week which fixes more bugs affecting the collection of Windows 10 tools. The patch resolves a high CPU load issue and addresses additional problems affecting the PowerToys Run and FancyZones tools.

Here’s the full list of improvements and fixes in PowerToys version 0.19.2:

  • #4578 – WinKey for launcher throws a lot of false positives
  • #4521 – Improving performance of Adding and Removing Packaged Apps
  • #4694 – FancyZone Windows Snap Behind Top Mounted Windows Task Bar

Microsoft has acknowledged that PowerToys version 0.019.2 didn’t fix all previously reported bugs, and the recurring issue that has been preventing users from opening PowerToys Settings when it’s minimized in the taskbar still persists in this release. The software giant noted that the bug will be resolved in PowerToys version 0.20. In the meantime, if you want to get the latest stability improvements, head over to the GitHub releases page to download the recent version.