Recently there is an mandatory update and im trying to update my xbox one s the update stops at 47% and this error code 0x8B05000F 0x00000000 0x90070007 comes what’s the problem can anyone help please I’m experiencing it from last 3-4 days.please help
This error could be caused by Xbox software or hardware issues.
Fixing this issue requires you to follow our solutions.
Here’s how to fix update error code 0x8b05000f on Xbox One
1. Switch to a wired connection
If you’re using a Wi-Fi connection, try switching to a wired connection instead, since it’s usually more stable.
In case you’re already using a wired connection, try restarting your router or switching to Wi-Fi connection instead.
2. Perform a power cycle on your console
Press the Xbox power button on your console until it shuts down.
Leave the console rested for at least one minute.
Turn the Xbox back on and see if it can perform the update properly.
3. Remove additional hard drives
If you have any external hard drives connected to your console, remove them while the console is turned off.
Power the Xbox back on and see if the update takes place in normal conditions.
Press the power button on your console until it shuts down.
Unplug the power cord for 30 seconds and connect it again.
Press the Xbox power button.
Hold down the Bind button (find it on the side of the console, next to the USB port), and the Eject button at the same time (find the Eject button on the front of the console next to the disk slot).
Keep the Bind and Eject buttons pressed until you hear a second power up chime.
Choose Reset this Xbox One
Select if you want to fully reset the console or keep your saved contents
Wait for the reset process to take place and then attempt to start the update.
If none of the solutions above worked for you, then you might be dealing with a damaged HDD. Ask for professional advice in order to get a correct diagnosis. A hard disk replacement might be needed.
We hope that our solutions helped you fix the update issue. If you liked this article, leave a comment in the comment section below.
An annoying error prevents printers from printing files on the Windows 10 operating system, and they find that the printer is in use. When attempting to initiate the printing process, the error messageAnother computer is using the printerpops up.
This specific issue is usually related to outdated drivers, system conflicts, or incorrect system settings. If you’ve encountered this issue and looking for a way to avoid it, consider checking our tested solutions.
How can I fix the Printer in use error?
1. Reset the Print Spooler service
Press the Windows + R on your keyboard, type services.msc, and press Enter.
Search for the Print Spooler service in the right pane, right-click on it, and select Stop.
Now, right-click on it again and select Start.
Close the Services window and restart your computer to see if this fixed the issue.
2. Perform a printer power cycle
Turn off your computer and your printer.
Unplug your computer and printer from the power socket.
Let it rest for a minimum of 2 minutes.
Plug them back in and turn them on.
Once done with the reset, verify that the Printer is in use error is fixed.
3. Update or reinstall the printer driver
Press the Windows + R, type devmgmt.msc and click OK.
In the top menu, click View and select Show hidden devices.
Expand the Printers menu, right-click on the available device, and select Update driver.
Alternatively, you can select to Uninstall driver, restart the computer, and it will automatically reinstall the printer‘s driver.
You can also use a dedicated driver updater such as Fortect Driver Updater. Using a resourceful driver database, it can find the best driver for your hardware and automatically download and install it to your PC. It can regularly scan and keep all your drivers in check.
Let it complete the process and restart your computer if it finds any updates.
After rebooting your PC, check if updating Windows fixed the issue
We hope that you can fix the Printer is in use error issue by following our guide. Before you leave, check the best printer management software for seamless operations.
If you found this article helpful, comment in the comment section below.
The Windows OS is keeping a list of paths to the location of the most accessed programs called Windows Environment Variables and it can access them easily. Sometimes, this list gets corrupted or messed up and that’s when a request is not recognized as an internal or external command, operable program or batch file.
Before anything else, look in the System32 folder to see if the program you’re trying to access exists. If it’s there and you can’t run it, then go to the solutions.
How do I solve Windows Environment Variables errors?
Solution 1 – Set the path in Windows Environment Variables
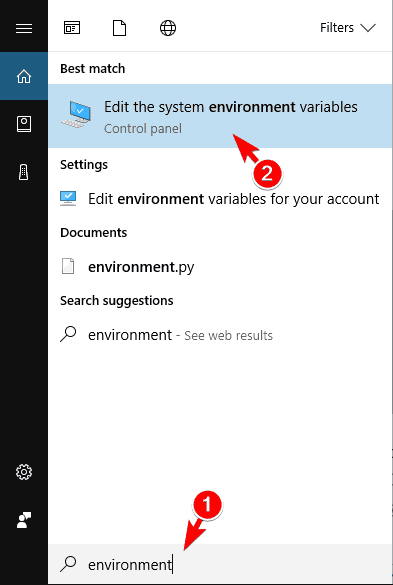
In the Windows search box type environment and click on the first result(Edit the system environment variables).
On the Advanced tab, in the bottom right, click on Environment variables…
Under System variables, in the list, locate Path and click on it. Then click Edit.
Optional step: copy all the paths there and put them in a notepad for safekeeping, just in case something goes wrong.
Now check to see if the directory path of the program you’re trying to access is there. If it’s not, you’ll have to add it.
Click on New and type the directory path of the program you’re trying to access (for example C: >Windows >System32).
Click OK on all windows and then restart your PC.
After the restart, if you added the directory path properly, everything should work fine. Keep in mind that you can add new directory paths but you can also edit the old ones that are no longer valid.
Solution 2 – Set the value of PATHEXT Environment Variable
In the Windows search box type environment and click on the first result(Edit the system environment variables).
On the Advanced tab, in the bottom right, click on Environment variables…
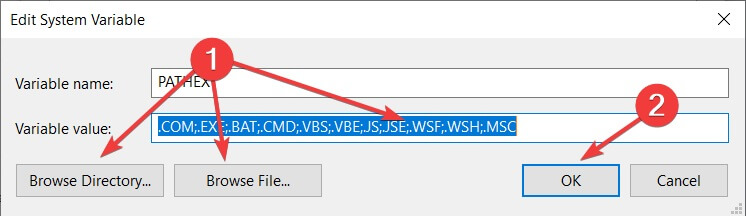
Under System variables, in the list, locate PATHEXT and click on it. The click Edit.
Under Variable value, you can add or delete a new extension manually. You also have the options to Browse Directory… or Browse File… to add new extensions.
Check the file extension of the program you’re trying to access and then add it to the PATHEXT list of default extensions.
Click OK on all windows and then restart your PC.
After you set the correct values of the environment variables, everything should work fine and you’ll be able to access your programs on Windows 10 without any problems.
If you have any more questions, feel free to reach for the comments section below.
Many users have experienced the Windows Media Player Green Screen on some occasions. In this article, we will discuss the different solutions on how to fix this problem.
Here’s how one user described the issue on Microsoft Answers forums:
windows media player wont play, either will windows media center. they just goto green screen, there is sound
How can I fix Windows Media Player green screen problems?
1. Edit Media Player Settings
Open the Windows Media Player.
On the Tools menu, Click on Options and then press the Alt key.
Click on Performance.
Finally, uncheck the Turn on DirectX video acceleration.
2. Update Display Driver
Open the Device Manager.
Expand the Display Adapter tab.
Double click on your display adapter.
Click on the Driver tab and then click on the Update Driver option.
Select the desired option and follow the instructions on the screen.
Alternatively, you can use a third-party toolto update all your drivers automatically with just a few clicks.
Fortect Driver Updater keeps your system running smoothly by upgrading its drivers. This utility examines your system and discovers outdated drivers that cause outbreaks.
However, a solution like Fortect Driver Updater not only downloads and installs drivers, but also manages them by troubleshooting, backing up, and restoring them. As a result, it is worthwhile to use it!
It works with all versions of Windows and makes upgrading drivers a breeze. You may rely on Fortect Driver Updater to make such enhancements to ensure a proper update with the most recent graphics card drivers.
3. Update codecs
Go to Microsoft website and download codecs.
After downloading the setup file, run it to install the codecs.
First, right click on the particular video that is showing green screen.
Go and select Settings from the menu.
Locate Enable hardware acceleration and untick the box.
Exit the window and restart it
5. Register Windows Media Player Again
Start Command Prompt as administrator.
In the Command Prompt, type regsvr32 wmvdecod.dll and press the Enter button.
6. Make Sure DirectX is Updated
Press Windows Key + R to open the Run dialog.
Type dxdiag in the command prompt window and press the Enter button.
A window will appear. Browse through to where the version of DirectX is stated and ensure that you write it down.
Open your web browser and go to the DirectX official website. If the version on the site is a newer version of the one you wrote down, download it.
Open the downloaded file and Install the software on your computer.
There you go, use these solutions to fix the problems with Windows Media Player green screen on your PC. If these solutions worked for you, feel free to let us know in the comments section below.
It is quite usual for printer drivers to become corrupted though strangely enough, there are no specific reasons for that happening. If that is not weird enough, it can happen anytime, and during most of the time, without any warning either. The visible symptoms of your printer drivers becoming corrupted aren’t specific too, though what’s common is that the printer is going to behave erratically.
So, if you are faced with a printer that is behaving in a manner you can’t explain, you should consider removing the drivers for the same as those are most likely to have become corrupted.
How to get rid of corrupted printer drivers
1. Remove the printer
Click on Start -> Settings -> Devices.
Select Printers & scanners from the options on the left panel.
You will get to see the list of printers or scanners installed on your device. Click on the one that is bothering you.
Click on the Remove device
Consent to any confirmation box that seeks to double check your decision.
Follow on-screen instructions that appear.
2. Uninstall printer software
Launch Print Management. To do that, you just have to type Print Management in the Cortana search box, hit Enter and select from the search result.
In the left panel of the Print Management window, select Drivers.
You will get to see a list of printer drivers shown on the right panel.
Select the printer driver that you wish to uninstall. You can make multiple selections at one go.
Right click on the selected drivers and click on Remove Driver Package.
Click the Delete button in the next confirmatory window that pops up.
That’s it. You have now completely removed all drivers related to the printer you are having issues with.
On the right, under Related Settings, click on the Print server properties
In the Print Server Properties window, under the Drivers tab, your printer should already be listed.
However, if your printer isn’t listed, click on the Add
This will launch the Welcome to the Add PrinterDriver
Click on Next.
In the Processor Selection dialog box that opens, select the device’s architecture.
Click on Next.
In the PrinterDriver Selection dialog box, select the printer manufacturer from the left panel.
Select the printer driver from the right panel.
Click on Next > Finish.
Follow on-onscreen instructions.
Click on Start > Settings > Devices.
In the Devices page, select Printers & scanners from the left panel.
In the Printers & scanner page, select Add a printer or scanner.
Follow on-screen instructions.
If you want to save time and automate the above-mentioned steps, you can use a driver updater tool such as Fortect Driver Updater. It will check, update and repair your drivers on a regular basis.
This should be all you need to deal with a corrupted printer driver.
Meanwhile, here are some related resources for your reference.
It would be extremely frustrating to start translating a long text from a PDF written in English in a sentence-by-sentence style. This can cause you to make a lot of mistakes, and overall, it’s not an efficient way of solving this matter.
It would be much easier to be able to upload the file that needs translation into specialized software that will automatically translate it into the required language, without losing any of the data, or modifying the layout.
In this article, we will explore the best software options that allow you to simply upload your PDF file with English text inside, and download a finished PDF with every part of the text translated into Hindi. Read on to find out which one is the best for this task.
Translate English to Hindi with these 3 PDF file translators
DocTranslator
DocTranslator is an incredibly useful online application that allows you to translate the entire Eligh’s text found in a PDF, into Hindi.
This tool works instantly, and in the process of translation, it doesn’t change any aspect of your document format or layout.
DocTranslator supports a wide range of languages (104 in total), and you don’t need to sign up or download anything to use it.
The Multilizer PDF Translator is another great tool that allows you to easily translate your Eglish PDF, to the Hindi language.
If you want to use it, you simply have to download the installer and run it on your PC like you would any other app. Al that’s left to do is to upload your English PDF, select any output settings you want, and click on ‘Translate’.
The process of translation is very fast, as in my case, a 30-page English document was translated to Hindi in less than 40 seconds.
Google Docs is another free software to use in order to translate your PDF file/s into the Hindi language. This program comes backed up by the entire database of Google, making it a very fast and reliable translator as well.
This software allows you to keep the layout of your PDF exactly the same as it was before the translation, and also doesn’t remove any images from the file.
If you don’t have a Google Docs account, you can visit this page to sign up. It only takes a couple of minutes.
After you’ve signed up, you can easily open Google Drive, upload the PDF you want to translate to Hindi, and then customize the options of the resulted PDF file. The process of translation usually works instantly but will take a bit longer if the PDF is extremely big.
Conclusion
In this article, we explored some of the best software found on the market in 2019 that allows you easily translate entire PDF files into the Hindi language.
Our top pick is DocTranslator. This software offers you access to a wide range of customization options for your output file, and the translation quality is very good. A close second, Multilizer PDF Translator is almost as powerful as our top pick, but with fewer customization options.
If you don’t want to download any software and are worried about installing third-party applications on your PC, you can always use the trusted Google Docs to translate your files.
Please feel free to let us know if this article helped you, by using the comment section below.
ASM files are programs written in a low-level programming language. These types of files can be used to create the ‘scaffolding’, based on which your programmed machine will work. In order to be able to program your microcontroller, remote controls, or office machines, you will need to transform ASM files to HEX.
HEX files are the language in which your specific device (engine control system, an office server, etc.) reacts to the task it was set up to do. HEX files contain all the information needed in order to configure, set up, and use your machine, and can be stored on your hard-drive both in binary or in text format.
Do you want to convert your ASM files to a HEX file in order to program your device? If the answer is ‘Yes’, then you came to the right place.
In this article, we will explore some of the best software options on the market that will help you convert your ASM files to HEX with ease. Read on to find out more.
Convert ASM to HEX files with these 4 tools
MPLAB X IDE
MPLAB X IDE is a great Integrated Development Environment software that allows you to build different applications for microcontrollers, and also digital signal controllers.
This software offers you an incredibly wide range of tools to create, modify, and present your projects at a professional level. You can also use this software to convert your ASM files to HEX files, and then apply them to your machine.
The process of transforming ASM to HEX files is not as easy as the following software options, but this software has an incredible range of useful features.
You will need to be an experienced user to get the full effect of this software. If you feel a bit overwhelmed by all the customization options, you can try some of the next software options we will discuss in this article.
Here are some of the best features found in MPLAB X IDE:
Supports Live Code templates
You can configure your custom Code Format Style
Fast navigation
Fully customizable workspace
Can extend functionality with MPLAB IDE Plug-in manager
In order to start the conversion process, open your ASM file and run the quick-build option inside MPLAB. This will compile the entire range of data into one HEX file that you can easily export and use to program your machine.
ASM to HEX Converter is another very useful tool that enables you to easily transform .asm files to HEX, and export it in order to give life to your machine.
Compared to the previously mentioned software, ASM to HEX Converter doesn’t have a wide range of customization options, but it does offer a quick and easy way to perform your desired conversion. This software is small but does its job nicely.
ARM Converter is another light-weight converter tool that can help you transform your ASM files to HEX files. The customization options for your output file is not nearly as complex as in the case of our top choice but does the job fast.
One other good thing about ARM Converter is that the impact it has on your system is unnoticeable.
In this article, we explored some of the best software options that allow you to transform your ASM files into HEX files. Using this type of software allows you to create perfectly detailed instructions for your machine.
If you are an experienced programmer, you might want to try MPLAB. This software offers a wide range of customization options.
If you only need to transform a few files to HEX, then you can choose one of the 3 light-weight software options we presented in this list.
Please feel free to let us know if this article helped you in any way by using the comment section below.
When working on your Active Directory Users and Computers or ADUC, on your Windows Server, you might be faced with the You do not have sufficient privileges to delete or this object is protected from accidental deletion type of error.
Join us while we take a closer look at this issue and show you the best ways to fix it.
Why does You do not have sufficient privileges to delete message appear?
You’ll encounter this message in several instances:
If the object is protected from accidental deletion in ADUC.
Your account doesn’t have inheritable permissions.
Date parameters are wrong.
Issues with the custom date classes.
Problems with the network connection.
How can I fix You do not have sufficient privileges to delete error?
1. Use Advanced Features on ADUC
Firstly, click on View and select Advanced Features.
Now right-click on the OU you want to remove and then select Properties.
Click on the Object.
Simply uncheck the Protect object from accidental deletion.
Now try to remove the OU in question.
By making these changes, you should be able to fix You don’t have sufficient privileges to delete or this object is protected from accidental deletion error.
2. Active Account solution
Head over to the account‘s Security tab.
Click on the Advanced button, and then we’re going to uncheck the Include inheritable permissions from this object’s parent box.
Simply click OK afterward to close the properties dialog. Now you can go ahead with deleting the object again.
3. Convert date parameters
Convert your date and time parameter.
Try setting your date and time parameters to a String type in your units.
Save changes.
After doing that, check if the error message is gone.
Head over to the unit’s properties and remove the custom data classes.
Remove any embedded units in the report using the Microsoft Report Builder.
Save the changes.
5. Check your connection
Make sure that you are connected to the correct data source.
Ensure you’re connected to the one with the tables you need.
Ensure you have permission to access that data source in question.
There you go, these are a couple of solutions you might use to fix You do not have sufficient privileges to delete or this object is protected from accidental deletionerror.
The Microsoft Store pages for Gears 5, the latest entry in one of the biggest first-party Xbox franchises, are now live and they confirm a variety of information fans had been wondering about in addition to reiterating some of what was said during the E3 2019 Xbox conference.
Gears 5 will release on September 10th, as an earlier leak had suggested, and will be available in a regular version and an Ultimate Edition. The Ultimate edition comes with the regular version of the game plus the Ultimate Edition Character Pack, 30 days of Boost, and four days of early access.
The game will support Xbox Play Anywhere which means that buying it on Xbox One will unlock it on Windows 10 and vice versa. Gears 5 will also support cross-platform multiplayer between Xbox One and Windows 10 versions.
Like most first-party Microsoft video games, Gears 5 will be added to the Xbox Game Pass library on Xbox One consoles in addition to the new Xbox Game Pass PC service. This means that subscribers to either (or both if they have the Ultimate subscription) will be able to play Gears 5 for free on launch day. Well, in addition to the Game Pass subscription fee that is.
Gameplay wise, Gears 5 will support local multiplayer for up to three players and online multiplayer matches with up to 10 players. It will also play in 4K UHD when played on an Xbox One X console.
As a special incentive to get people to pre-order, anyone who makes a digital pre-order of Gears 5 or pre-install Gears 5 with an active Xbox Game Pass membership before launch will receive the Terminator Dark Fate Character Pack. This exclusive DLC unlocks the characters of Sarah Connor and the T-800 Endoskeleton plus seven days of Boost.
Are you a Gears fan and are you excited for Gears 5? Which version will you buy and one what platform? Share your thoughts with the community in the comments below and then follow us on Pinterest for more Xbox gaming content.
Watch Dogs: Legion is now available to pre-order digitally on Xbox One. The game is the third in the popular Watch Dogs video game franchise and garnered a lot of buzz at this year’s E3 conference when it was officially confirmed that this entry would shy away from the single character narrative of its two predecessors and allow players to play as almost any character in the game.
The Watch Dogs: Legion reveal trailer showcased several different character options that gamers could take control of but by far the most-entertaining option shown was that of an elderly woman. You can check out the gameplay in the video below.
Watch Dogs: Legion is due out on Xbox One consoles on March 6th next year and will come in a regular version, a special Gold Edition, and an Ultimate Edition. The Watch Dogs: Legion Gold Edition comes with the regular version of the game plus three days of early access and the season pass for future downloadable content (DLC). The Ultimate Edition has everything in the Gold Edition plus four weeks of VIP status.
Pre-orders of any version will unlock the Golden King Pack DLC which adds gold skins for a pistol and vehicles in-game.
Here’s the official game description:
Pre-order now and get the Golden King pack featuring a mask and golden skins for a pistol and vehicles!
Receive up to three days early access and the season pass with the Gold Edition, including new story content and iconic heroes with unique abilities! Build a resistance from virtually anyone you see as you hack, infiltrate, and fight to take back a near-future London that is facing its downfall. Welcome to the Resistance.
Microsoft’s next generation Xbox console, currently referred to by the temporary codename Project Scarlett, will be launching during the Holiday season in 2020 but the company is already planning for its successor according to Xbox’s Phil Spencer in an interview with Giant Bomb.
“We’re not planning for Scarlett to be our last console,” Spencer said in the interview, seemingly putting to rest speculation from gamers that console generations would soon be a thing of the past. “The thing for us post Scarlett is what that next inflection point of experience. Would that actually be meaningful?”
Understandably, Spencer doesn’t give a timeframe for when Microsoft’s next nextXbox console would launch and it seems right now that they’re still trying to predict what form a console could even take several years from now. For example, with the announcement of xCloud, could it be a purely streaming console?
Also, in the interview, Spencer stated that he thought E3 this year was weaker without Sony’s presence and confirmed that Microsoft still hadn’t locked in a final name for Project Scarlet, something that will likely be decided by next year’s E3 conference.
You can watch the complete 50 minute interview below.
Google Chrome users must have seen chrome.exe on their Windows 10Lock Screen. This executable file often appears when you are listening to music on YouTube.
You may not know that there is a specific flag in the Chrome browser that forces chrome.exe to appear on the lock screen. This flag is named as Hardware Media Key Handling.
Many users hate this feature and want to disable it. But don’t have any idea that they can get rid of the popup from their lock screen in just a few clicks. In this article, we are going to discuss the entire process in detail.
Steps to remove chrome.exe from Windows 10 Lock Screen?
Launch Google Chrome and type the following command in the address bar.
chrome://flags
Search for the Hardware Media Key Handling with the help of the search bar located at the top.
Go to the address bar and paste the following code to highlight the flag.
chrome://flags/#hardware-media-key-handling
Now you can disable Hardware Media Key Handling flag by using the drop-down menu beside it. Click on the drop-down menu and select the disabled option.
Restart the browser to apply the latest changes.
Once you have restarted your browser, chrome.exe will not appear on the lock screen again. That’s it, no more Chrome.exe on the Lock Screen.
But, before moving on, you should probably know that there’s an alternative to Chrome that’s worth your time. Namely, we are referring to Opera One, a browser that brings everything major browsers do without sacrificing the often-neglected but vital part of the browsing experience, and namely your privacy.
This modern browser delivers lots of great functionalities that make it very unique, such as messaging apps integrated with your sidebar or a built-in VPN to keep your online identity safe.
More so, you benefit from ad-free services and great connectivity features designed for anyone who needs to be always connected.
Lastly, this Chromium-based browser also comes with a built-in AI and modular AI-ready design, to help you integrate AI technologies, current or future.
Some users spot a few 0-byte files on their hard drives. However, users have also said that they can’t delete 0-byte files within File Explorer. FileExplorer returns error messages stating Files do not exist and cannot be deleted for those users when they try to delete the 0-byte files.
Learn how to remove those pesky empty files by following the steps below.
How to delete a file that doesn’t exist in Windows 10?
1. Delete the 0 Byte Files With the Command Prompt
Command Prompt will usually erase 0-byte files that File Explorer doesn’t delete. To erase 0-byte files with the Command Prompt, press the Windows key + X hotkey.
Click Command Prompt (Admin) to open the CP.
Before entering a command, right-click the taskbar and select Task Manager. Then right-click explorer.exe (Windows Explorer) in the Processes tab and select End task.
Enter cd byte file path in the Command Prompt and press Enter. Replace ‘0-byte file path’ with the actual folder path of the file.
Thereafter, enter del file.extension in the Command Prompt, and press the Return key. Replace ‘file.extension’ with the actual file name and its extension.
Some users have also said that they needed to add a wildcard (*) to the del command to erase 0-byte files. So, some users might need to enter a wildcard command like this: del file*.
Return to the Task Manager window, select Windows Explorer, and click Restart.
Alternatively, users can clickFile > Run new task in Task Manager, enter ‘explorer.exe’ in Run, and click OK to restart File Explorer.
2. Check out Wise Force Deleter
Alternatively, try deleting 0-byte files with Wise Force Deleter, which erases files that Windows seemingly can’t delete. Click the Free Download button on the Wise Force Deleter page.
Open the Wise Force Deleter installer to add the program to Windows.
Open the Wise Force Deleter window.
Select the Add file option to select the 0-byte file to erase.
Press the Unlock & Delete button, and click Yes to confirm.
So, users can delete 0-byte files via the Command Prompt or with third-party software such as Wise Force Deleter. This post also provides further tips for erasing files when the usual file deletion options don’t work.
The Security key in Windows is a relatively new feature, which is designed to facilitate user access into Microsoft accounts without a password and/or username.
However, some users are getting the Your browser or operating system does not support this security key error when trying to use a security key to log in.
Users shared their concerns:
Am trying to install a security key on my microsoft account and receive the message Your browser or operating system do not support this. Am using Edge and Windows 10 version 1809 which Microsoft itself says should be used.Have successfully installed the keys with Google and Facebook, so why is this not working with Microsoft? Any advice would be welcome.
Resolve the problem by closely following the steps below.
Why won’t my security key work with this browser and OS?
1. Make sure to set up a proper security key
Open your Microsoft Edge browser and paste the following URL link in the address bar:
In the log-in window, sign in to your Microsoft account (as appropriate).
Locate and select Windows Hello and Security Keys.
Select Set up a Security Key (FIDO2-based).
Select hardware option: “NFC” or “USB”. This action will prompt Windows to redirect the setup window.
Slot in the security key.
Log into your account again (if prompted).
Generate a FIDO2-based PIN (minimum of 4 characters) for your key and follow on-screen commands to finish up the setup.
Exit program.
Sign back in; using your security key.
If you are unable to set up a security key via this procedure, you can go ahead and employ one or both of the solutions in this tutorial to fix the error.
2. Troubleshoot Security Key (YubiKey)
Insert the key into your PC via the USB port, and check if the LED light turns on.
Navigate to Control Panel > Hardware and Devices. Check if the key is recognized; you’ll see the tag – “Yubico OTP+FIDO+CCID” (or similar). If it’s recognized; you are all good; otherwise, proceed.
Suppose one of the USB interfaces (OTP/FIDO/CCID) is missing. In that case, you can check if it’s disabled and then re-enable it: download Yubikey Manager, launch it, and follow prompt commands to enable/disable an interface.
Also, run the U2F test: navigate to https://demo.yubico.com/u2f/ and follow the prompt commands to validate your device.
You can also run the “OTP Credential” test.
Try signing into your Microsoft account with the security key.
3. Try an alternative browser
Alternatively, you can try and switch to a browser that won’t cause you issues. Even though Edge is Microsoft’s product, it seems that it’s quite too often lackluster.
A browser that’s not lackluster is Opera One Browser. We assure you that this privacy-oriented Chromium-based browser will fit all your needs as soon as you get a hold of it.
If you want a reliable, well-designed, and, most of all, safe browser with Opera One Browser, you can’t go wrong. Using add-ons like the VPN and built-in ad-blocker results in a quicker and more responsive internet experience and energy savings for your laptop.
These features, together with optimized shortcuts and a variety of other features, can help you navigate the internet quickly.
In terms of performance, Opera One also has a unique Turbo option that may be used when you have a really sluggish internet connection and when switched on. Plus it comes with its own AI.
Opera One also offers data savings through compression technologies that are not seen in other browsers.
If you are still getting the Your browser or operating system does not support this security key error message, contact support. You can get in touch with theYubikey support team here or go ahead and disable the USB security key altogether.
Just days after Microsoft stormed E3 with news about its Stadia competitor in xCloud, its new subscription service and the specs of its upcoming PlayStation 5 rival, Project Scarlett, news has surfaced that the architect behind the company’s recent next consoles has moved on.
John Sell, the chief architect of next-gen consoles system on chip (SoC) for Xbox One, Scorpio and Project Scarlett has left Microsoft and taking his talents to Intel, according to sources close to the matter and his LinkedIn profile.
Sell will only be working tangentially on projects related to his previous project portfolio at Microsoft in that he will be tasked with helping Intel’s security wing with coming up with solutions to breaches and major exploits such as the recent Spectre and Meltdown fiascos.
Sell spent 14 years at Microsoft and will be using his knowledge of SoCs design for the company’s rather secure gaming hardware on top of his career experience at AMD, 3DO, and Apple, but now applying them at Intel.
It is not clear how Sell’s departure will affect Microsoft’s roadmap for its release of Project Scarlett, if at all, but for Intel, the move is largely a positive and should hopefully help secure the future of all devices brandishing Intel chipsets.
“In this all-new expansion for Forza Horizon 4 you are invited to explore a LEGO-themed world, with full seasonal changes. You’ll complete LEGO Brick Challenges, build and race amazing new LEGO Speed Champions cars including the McLaren Senna, the Ferrari F40 Competizione, and the 1967 Mini Cooper S Rally. You can explore an entire LEGO city, stunt park, crashed UFO site, pirate’s cove, speedway and a dinosaur graveyard,” explained Mike Brown, Principal Game Designer at Playground Games.
Microsoft, like many other companies that offer devices reliant on peripherals, is constantly looking for the most convenient and logical way to transport those gadgets to help support their main device offering.
Recently, Microsoft pioneered the magnetic attachment area on its Surface Pro to help hold the Surface Pen in place when not in use and not it seems the company has an evolved idea about where the pen can go and be of secondary.
Based on a recently revealed patent, Microsoft may be looking into producing a less rigid Surface Pen that would double as a possible Bluetooth communication device when not being used to draw or sign documents on the Surface Pro.
The Abstract of the patent is as follows:
A computer peripheral includes a stylus having a capacitive stylus nib and an earpiece dock. An earpiece is removably dockable at the earpiece dock. The earpiece includes a speaker, an earpiece battery, and a wireless radio configured to communicatively couple with a host device. The computer peripheral further includes a charger configured to receive power, and while the earpiece is docked, to use the power to charge the earpiece battery.
Based on the description notes and the images, users will be able to flex the pen in an over the ear fashion to get the pen to comport to a Bluetooth tool capable of receiving and sending audio.
Microsoft’s vision is that the Surface Pen will retain all of its previous benefits when built completely rigid, such as inductive charging, magnetic attachment, and integrated battery while also offering new functionality in a bone conductive speaker and laser pointer hardware support.
Once again, we’re reminded these are just patents and may never see the light of day beyond that. However, it would a sort of game changer if Microsoft can pull this one off.
When browsing the web, your device can accumulate scores of third-party tracking cookies which help advertisers target you across different websites. Although there’s no definitive way to prevent yourself from being monitored online, using the built-in privacy options in the new Chromium-powered Edge can give you some extra protection. We’ll walk you through configuring Edge to give you more privacy online.
First, launch the Edge browser and click the three dots menu icon (“…”) in the top-right. From the menu which appears, click “Settings.” You’ll land on the Settings homepage. Head to the “Privacy and services” section linked in the left navigation bar.
The first option to change here is “Send ‘Do Not Track’ requests.” Enable this option to send these requests. When activated, Edge will ask websites you visit not to track you on subsequent visits. Although there’s no guarantee that websites will respect the request, some might obey and stop tracking you.
You can also stop Edge from sending information about how you use the browser to Microsoft. This is controlled by the “Improve Microsoft products by sending data about how you use the browser” and “Make searches better by sending info about websites you visit in Microsoft Edge.” Although this won’t stop websites from tracking you, it gives you peace-of-mind that Edge isn’t sharing your usage details with its maker. However, remember that Edge Dev/Canary are in testing, and the browser data can help to improve the product.
Next, switch to the “Site permissions” section of the Settings menu. This screen lets you control which sites can access individual hardware and software features of your device. We’re interested in the first “Cookies” section.
On the Cookies page, we recommend enabling the “Block third-party cookies” option. This should disable most trackers present on webpages, since they’re usually loaded from third-party servers (such as Google Analytics). Bear in mind that some webpages might break with this option enabled, since the content might depend on third-party cookies being present.
The options on this page also give you granular control over which sites can set cookies. You can blacklist and whitelist sites, or configure a site to always have its cookies cleared when you close the browser. If you want to, you can ban all cookies, although this is generally inadvisable since it will cause many sites to break. Blocking third-party cookies should let you avoid the majority of online trackers, while still being able to access most websites and apps.
These steps should be your first actions when tightening security in Edge Insider. However, you may also want to use the “Site permissions” controls to blacklist sites from using certain features – for example, if a site keeps pestering you with notifications, you can turn them off by going to “Site permissions > Notifications.”
Increasing your privacy in Edge Insider isn’t difficult, although it’s a shame Microsoft has opted not to apply some of these settings by default. Since privacy preferences can be a highly personal choice, our recommendations might not necessarily work for you. If that’s the case, just adjust the settings which make sense for you, using the menus we’ve detailed.
Microsoft has announced its first edition of IoT in Action conference in India to be held on June 18 in Mumbai.
The daylong ‘Solution Builder Conference’ is part of a worldwide series aimed at exploring the tremendous possibilities with IoT technologies and has covered 7 countries, 8 cities over the last 18 months with over 4000 attendees and 70+ partner showcases.
The India edition will host 600 participants, including data scientists, students, developers, government elites, start-ups, and Microsoft experts.
The event will give actionable insights into high-value IoT topics, including business transformation through new IoT business models, IoT security, the hybrid cloud, building on the intelligent edge, and leveraging cognitive services to enable innovative IoT solutions. Additionally, it will include discussions on how to use industry-aligned solution accelerators to build scalable repeatable solutions that get your IoT solution to market faster.
The in-person event will showcase how you can leverage the investments Microsoft is making with its partners to reduce development complexity and speed time to market. There will also be a Partner Solution Expo to showcase solutions in Industrial IoT, Smart Building, Intelligent Edge, and Azure Sphere and an onsite Partner-Customer Matchmaking program that will give a platform to companies and developers to connect.
BitLocker is a vital component on Windows for some users, allowing them to encrypt their partitions. However, this feature isn’t available on all Windows iterations and editions. Basically, that’s the probable reason why you don’t have BitLocker on your Windows edition. However, if you deem it necessary, we have a few things to suggest.
Windows 10 versions (editions) that have the built-in BitLocker are Windows 10 Pro, Windows 10Enterprise, and Windows 10 Education. And if you’re unsure how to find which edition you run on your PC, navigate to Settings > System > About and scroll down. You should be able to see the exact edition and iteration of Windows 10 there.
Why my Windows 10 doesn’t have BitLocker?
1. Upgrade your Windows OS
On your taskbar, right-click on the Action Centre.
Double-click on the executable file and follow the prompts to install the program.
Now, use the newly installed program to encrypt your drive.
With those steps, we can conclude this article. Whether you choose to upgrade Windows 10 to a more advanced option or decide for third-party software, it’s your choice. We suggest the latter option as there are much more advanced tools then the built-in encryption tool that comes with the system. Albeit, BitLocker is not all that bad.
Tell us in the comments section below about your choice.
Microsoft rolled out a new series of Patch Tuesday cumulative updates to all Windows 10 versions. These updates fixed some known issues introduced by the previous builds.
Soon after Microsoft pushed KB4503293, Windows 10 users started to complain about booting issues on Microsoft’s forums. At the time of writing this article, there is no official workaround for this bug.
Therefore, if you have not installed the update yet, it is better to pause the updates for a few days. Otherwise, you may experience some serious issues after installing KB4503293.
Quite a few Windows 10 users who installed KB4503293 on their systems reported running into startup issues.
The users stated that their systems were previously working fine with Windows 10 v1903. Here’s how one user described this problem:
I have a trouble after updating my PC with the package “Cumulative Update for Windows 10 Version 1903 for x64-based Systems (KB4503293)”. Then the PC could not boot anymore, what I see and hear are:
– 4-long-beep cycle.
– No display, keyboard and mouse sign.
– Removal of RAMs and GPU board did not change status.
Screen brightness adjustment issues
It seems that KB4503293 introduced some screen brightness issues as well.
BUT yesterday after 2019-06 Cumulative Update KB4503293.. the change in brightness NO LONGER adjusts when the machine is plugged or not plugged in.
Actually, this is not a new issue as such problems existed in previous builds as well. The tech giant released the necessary patches to fix the bug at that time.
We’re sure Microsoft is working on fixing these issues. However, you need to wait a few more days until the company releases the hotfixes.
Speaking of screen brightness issues, here are two troubleshooting guides that may come in handy:
Heads up Windows Insiders, Microsoft has just released the Windows 10 20H1 build 18917 for those of you in the Fast Ring. This update brings four new features, the first first big one being Windows Subsystem for Linux 2. This new architecture should provide the same experience as WSL 1, but with much faster performance and full system compatibility.
The other interesting new update feature is for Windows Ink Workspace, which has now been redesigned to use less screen real estate. Additionnally, you’ll find a new option to throttle the bandwidth used by Delivery Optimzation for users with low connection speeds, as well as Data Table reading improvements with Narrator.
You can read more details about all these new features below.
New download throttling options for Delivery Optimization
We’ve heard from our users with very low connection speeds that setting download throttling as a percentage of available bandwidth isn’t providing enough relief in reducing the impact on their network. That’s why we’ve added a new option to throttle the bandwidth used by Delivery Optimization as an absolute value. You can set this separately for Foreground downloads (downloads that you initiate from Windows Store for example) or background downloads. This option already exists for IT Pros who use Group Policies or MDM policies to configure Delivery Optimization. In this build, we’ve made it easier to set via the settings page.
You can access this option via Settings > Update & Security > Delivery Optimization > Advanced Options
Narrator improvements
Data Table Reading Improvements: We’ve optimized the information you hear with Narrator when navigating a table using table navigation commands. Narrator now reads the header data first, followed by the cell data, followed by the row/column position for that cell. Additionally, Narrator only reads the headers when the headers have changed, so you can focus on the content of the cell.
Windows Subsystem for Linux 2
WSL 2 is a new version of the architecture that powers the Windows Subsystem for Linux to run ELF64 Linux binaries on Windows. This new architecture, which uses a real Linux kernel, changes how these Linux binaries interact with Windows and your computer’s hardware, but still provides the same user experience as in WSL 1 (the current widely available version). WSL 2 delivers a much faster file system performance and full system call compatibility, which lets you run more applications like Docker!
As we mentioned last week, you may notice that Windows Ink Workspace has changed on your PC. That’s because we’re updating the Windows Ink Workspace experience and starting to roll it out to some Insiders.
As part of this, Windows Ink Workspace now takes up less screen real estate, and we’re converging our whiteboarding experiences with a new direct link to our Microsoft Whiteboard app. Microsoft Whiteboard is a freeform digital canvas where ideas, content, and people can come together. It includes an infinite canvas, optional backgrounds (including graph paper and solid dark grey) to choose from, rainbow ink support, multiple pages, and generally addresses much of the feedback you shared with us about Sketchpad. If you used Sketchpad, don’t worry – we saved the sketch you were working on in your Pictures folder.
We heard your feedback, and we’ve streamlined the Windows Ink Workspace for you. Stay tuned as we continue to evolve! Once the new experience arrives on your PC, please take a moment to try it out and share feedback via Feedback Hub under Desktop Environment > Windows Ink Workspace. If the Windows Ink Workspace icon isn’t visible in your taskbar, you can show it by right-clicking the taskbar and selecting “Show Windows Workspace Icon.”
As usual, this new build brings a couple of bug fixes and improvements, and it also addresses an issue where some Insiders experienced a 0x8007000E error code while downloading the previous build due to high RAM consumption. The new Search experience in File Explorer (which is still rolling out to Fast Ring Insiders) will also now be dark when dark theme has been set in Settings. Please check out our separate post for more details about the other fixes and known issues in this build.
Cumulative updateKB4503267 is now available for download on PCs running Windows 10 v1607. This June 2019 Patch Tuesdayupdate bumps Windows 10 to build version 14393.3025.
Apart from the security updates for Edge, and other Windows Components, KB4503267 fixes some annoying authentication issues affecting Windows Hello.
Unlike the other Patch Tuesday updates released this month, KB4503267 brings a bundle of known issues. Microsoft says that they are working to fix all of them.
However, you need to wait until the next release to get rid of all these issues.
And now let’s quickly review some of the key changes and fixes included in KB4503267.
KB4503267 improvements and fixes
Authentication issues fixed
Microsoft addressed an issue with Windows Hello for Business that triggered authentication issues. The issue affected the program when Server Core was installed on Windows Server 2016.
Device startup bug resolved
KB4503267 resolved a bug that caused premature termination of your connection to the WDS server. The issue basically trigged because the Preboot Execution Environment (PXE) failed to start a device from the WDS server.
Internet Explorer 11 launch issues fixed
Internet Explorer 11 is often affected by bugs and issues. The previous cumulative update introduced a new bug in IE11 but KB4467684 fixed the problem.
Alternatively, if you’re tired of IE’s limitations, you can switch to a new browser. If you’re looking for a fast, privacy-focused browser, then UR Browser is the right choice for you.
Microsoft recently rolled out KB4503279 to Windows 10 version 1703 PCs. This new patch brings Windows 10 to build version 15063.1868.
This Patch Tuesday Update resolves connection issues with Bluetooth devices. Furthermore, KB4503279 brings security updates for IE11 as well as other Windows components.
As far as the bugs are concerned, as you all know, Microsoft has a bad history of Windows updates. Luckily, Microsoft didn’t acknowledge too many issues affecting this patch. In other words, the update process should go smoothly for most users.
In this article, we are going to quickly list some of the key changes and quality improvements included in KB4503279.
What’s new in KB4503279?
Windows Update will just download new fixes on your device if the previous updates are already installed on your machines.
Security vulnerability issues fixed
Microsoft fixed a security vulnerability issue that prevented connection requests between Bluetooth devices and Windows OS.
If you experienced the same issue, you need to also contact your Bluetooth device manufacturer to get the specific update for your device.
Internet Explorer 11 issues resolved
KB4503279 fixed the issue that restricted users from opening IE11. You need to install KB4503279 on your device to fix the bug.
Alternatively, if you’re tired of IE’s limitations, you can switch to a new browser. If you’re looking for a fast, privacy-focused browser, then UR Browser is the right choice for you.
This patch brings a bundle of security updates for various components of the Windows 10 operating system. The complete details are available on the official support page.
Download KB4503279
Microsoft recommends its users to install the latest servicing stack updates (SSU) on your PC before downloading KB4503279.
SSUs improve the reliability of the update process to mitigate potential issues while installing the LCU.
Your system will automatically download the update. You can still manually force your system to check for update via Windows Update section.
Microsoft released KB4503284 for Windows 10 version 1709 as part of the June 2019 Patch Tuesday Edition. This update bumps the current version of Windows 10 to build 16299.1217.
As a quick reminder, Microsoft stopped releasing updates for Windows 10 v1709 Home, Pro, Pro for Workstation, and IoT Core editions on April 9 this year.
Microsoft recommends users to install the latest Windows 10 version so as to be eligible for monthly security and quality updates.
Let’s have a look at some of the major improvements and fixes that came along with KB4503284.
KB4503284 changelog
Security updates for Windows components
Update KB4503284 addresses many security vulnerabilities in various components such as Internet Explorer and Microsoft Scripting Engine.
Internet Explorer 11 bugs fixed
Microsoft acknowledged a bug that prevented users from opening Internet Explorer 11. The company kept its promise and fixed the issue in this release (KB4503284).
Alternatively, if you’re tired of IE’s limitations, you can switch to a new browser. If you’re looking for a fast, privacy-focused browser, then UR Browser is the right choice for you.
Some users encountered a bug preventing Windows from establishing a connection with certain Bluetooth devices. Microsoft fixed this issue with KB4503284.
KB4503284 known issues
Surprisingly, Windows 10 cumulative update KB4503284 is affected by the same issue acknowledged in KB4503286.
Microsoft says that Windows 10 users may fail to perform some specific operations on Cluster Shared Volume (CSV) files and folders. This bug is triggered when a process lacks administrator privileges while performing an operation.
Download KB4503284
The latest updates are automatically available via Windows Update. Check for updates and your PC will automatically download and install the latest Windows 10 cumulative updates.
This update focuses on improving the overall security level of your system. More specifically, it blocks Bluetooth connection that are not secure and adds some general security improvements to Windows 10’s main components.
At the same time, KB4503293 also brings a few issues of its own. The good news is that these bugs are far and few between.
KB4503293 reported issues
KB4503293 won’t install
There are some Windows 10 users who are still struggling to install this patch on their machines. The update process suddenly stops for a few minutes, then resumes only to fail again a few minutes later.
The first download got to 73% downloaded and stopped. No disk, CPU or ethernet activity. I left it an hour and then it failed with no error given. It suggested restart and I did, but the restart continued and I left that an hour. Eventually I used hard shutdown and rebooted. This time it missed the download, just installed and completed successfully.
Windows Sandbox error 0x80070002
Windows Sandbox may fail to start for some with the following error code: ERROR_FILE_NOT_FOUND (0x80070002).
This problem mainly occurs on devices in which the OS language was changed during the update process when users initially installed Windows 10 version 1903.
Microsoft is working on a fix which should be deployed in an upcoming update release.
These are the only issues reported so far.
As you can see, if you manage to install KB4503293 in the first place, then everything should go smoothly.
Just in case you’re experiencing performance issues after installing this update, use this troubleshooting guide to fix your PC.
Did you encounter any other issues after installing KB4503293? Do let us know in the comments below.
Folks, it’s Patch Tuesday time. Microsoft started rolling out this month’s security updates via the Windows Update Service.
If you’re running Windows 10 v1903, you can now download and install cumulative update KB4503293 on your machine.
As far as the changelog if concerned, there are only two main improvements.
The first one is a security improvement that blocks all Bluetooth connections that are not secure. The patch also adds a series of general security improvements and fixes to various OS components such as Windows Media, Windows Shell, Windows Server, Windows Authentication, and more.
KB4503293 changelog
Here’s the official changelog as listed on Microsoft’s website:
Addresses a security vulnerability by intentionally preventing connections between Windows and Bluetooth devices that are not secure and use well-known keys to encrypt connections, including security fobs. If BTHUSB Event 22 in the Event Viewer states, “Your Bluetooth device attempted to establish a debug connection….”, then your system is affected. Contact your Bluetooth device manufacturer to determine if a device update exists.
Security updates to Windows Virtualization, Microsoft Scripting Engine, Internet Explorer, Windows App Platform and Frameworks, Windows Input and Composition, Windows Media, Windows Shell, Windows Server, Windows Authentication, Windows Cryptography, Windows Storage and Filesystems, Windows SQL Components, the Microsoft JET Database Engine, and Internet Information Services.
Keep in mind that KB4503293 may break Windows Sandbox. So, if you’re using this feature, you should wait for a few more days until Microsoft has fixed this bug.
In case you’re experiencing performance issues after installing this update, use this troubleshooting guide to fix the problem.
Microsoft’s new Chromium-based Edge Insider browser will soon get the same autoplay media settings that are currently available in Edge UWP on Windows 10. Kyle Pflug from the Microsoft Edge team confirmed on Twitter yesterday that the feature was coming, adding that it will have “global and per-site setting” matching what’s currently available in Edge UWP.
We’re working on adding a global and per-site setting similar to what we have in the current version of Edge ????
Following the release of the Windows 10 October 2018 Update, Microsoft finally allowed Edge users to control whether sites can autoplay media. The option is currently available in “Advanced Settings,” and it’s a pretty great feature in an era when more and more websites use autoplaying video ads.
More control over autoplay videos isn’t the only Edge UWP feature that Microsoft wants to bring to the new Chromium-based Edge. The software giant is also working to implement more syncing options including history, open tabs, and other settings, and improving scrolling performance is another big focus for the Edge Insider team. Lastly, we learned at Build last month that the new browser would get a Fluent Design update, as well as a new Collections feature, additional privacy controls, and a new IE mode.
Are you using a widescreen monitor? Do images get distorted on it? If your answer to both questions is yes, you came to the right place.
Oftentimes, when this error occurs, the problem is erroneously attributed solely to “issues with video cards or drivers”. However, the issue actually has a lot to do with Windows’ awful scaling on widescreen high-res monitors which is, truthfully, getting better with each new update.
In any case, we’ve come up with a handful of plausible solutions to this issue, and these have been outlined in the next section.
Fix: Photos distorted on a widescreen monitor
1. Update Your Display Driver
Press Windows Key + X to open Win + X menu.
Select Device Manager from the list.
Locate the display adaptors driver.
Right-click on it and select Update device from the menu.
Wait for the update procedure to be complete.
Restart your computer to confirm the changes.
Alternatively, we strongly recommend a third-party tool to automatically download all the outdated drivers on your PC.
Fortect Driver Update is a simple and light option that is able to update your outdated drivers and fix the damaged ones. It is easy to use and can be set up to regularly scan and update your drivers.
Extract the downloaded driver to a specified folder on your PC.
Press Windows Key + X and select ‘Device Manager’ from the list.
In ‘Device Manager’ window, locate the device that you want to update. Right-click the device and choose Update driver.
Select the Browse my computer for driver software option. This option will enable you to install the driver software manually.
Choose Let me pick from a list of device drivers on my computer option.
Click the ‘Have Disk’ button.
Install from Disk window will now appear. Click on the Browse menu and locate the driver on your hard drive. After you select the driver, click the OK button.
After doing that, the driver will be automatically installed to your PC.
4. Run Windows Updates
Go to Start > type “update” in the search box and then click on “Windows Update” to proceed.
In the Windows Update window, check for updates and install the available updates.
After the update is complete, restart your Windows PC.
Some Windows users have complained that the computer consistently boots in Safe Mode. This can be an issue, since it will prevent you from using your PC normally.
Many issues can force Windows to start in Safe Mode, and in this guide, we’re going to take a look at what causes this issue and how to fix it.
So without any further ado, let’s get started.
Why does my computer keep starting in Safe Mode?
Safe Mode boot is enabled in System Configuration window.
System corruption can force your PC to boot to Safe Mode.
How do I fix my computer consistently booting into Safe Mode?
1. Check System Configuration
Click on Start and choose Run. (Alternatively, Press Windows + R keys).
In the Run box, type msconfig to bring up the System Configuration window.
In the System Configuration window, navigate to the Boot tab.
If selected, uncheck the Safe boot tick box.
Click Apply and then OK.
Restart your computer.
2. Use Command Prompt
Right-click on the Start button and then click on Command Prompt (Admin).
In the Command Prompt window, run the following command: bcdedit /deletevalue {current} safeboot
Afterward, restart your computer.
This is a simple solution, so be sure to try it if your computer always boots in Safe Mode.
Windows 10 users have been complaining about the Windows Update process ever since the OS was initially released back in 2015.
Thankfully, Microsoft is now determined to improve the way Windows updates are installed on your machines.
Microsoft plans to give Windows users more control over the download process starting with Windows 10 20H1. Microsoft is currently testing a new feature named Advanced Bandwidth Settings in one of the latest Insider builds.
You must be thinking that Windows 10 users can currently adjust bandwidth limits. So what’s new about this feature? Users can now set an absolute value to restrict the download speed in the Windows Update section.
Twitter user Albacore spotted the feature in the recent Fast Ring Insider Preview builds. As you can see, users need to enter the value in Mbps to enable this new feature.
New hidden Delivery Optimization settings in Windows 10 Build 18912, letting you limit download speeds with absolute Mbps values pic.twitter.com/hJfzTZBT8b
Windows 10 20H1 allows users to limit the bandwidth consumed during the Windows Update process. However, these controls are not enabled by default and users need to manually enable this new Windows Update feature. Microsoft explains that:
By default, we’re dynamically optimizing the amount of bandwidth your device uses to both download and upload Windows and app updates, and other Microsoft products. But you can set a specific limit if you’re worried about data usage.
Windows 10 19H2 is scheduled for release in the next few months.
What does this mean for users?
Your entire bandwidth will not be consumed for Windows updates once you adjust these advanced bandwidth settings.
The feature allows you to set a specific percentage of your bandwidth that Windows Update can use. The feature can be a lifesaver for users who are using slow internet connections.
Many Windows 10 users often complain about slow speeds while updating their Windows 10 PCs on Wi-Fi. Many Windows 10 users are eagerly waiting for this feature to hit the general public. As one Twitter user said:
That’s awesome! I don’t need to use third party program to limit Internet speed.
If you want to access the new Windows 10 20H1 preview builds, you need to enroll in the Windows Insider program.
Certain users have had a hard time with their Windows 10 PCs after the system reset. Namely, it seems that there’s an error after they choose the Keyboard Layout, as soon as the system reset to the default settings is done. It just says Something went wrong and they are unable to successfully boot into Windows 10 and get stuck in a boot loop.
One user shared the problem online, on the dedicated Microsoft Answers forum.
I just bought a used Lenovo T460 and reinstalled Windows 10 so that I could use it with a “clean slate”. The system restore process went smoothly (I chose option: restore without keeping any data). However, now that system recovery is being finalised I have to choose the keyboard layout, after I choose my preferred keyboard layout I get a message saying: ‘Something went wrong but you can try again’. After I press the ‘try again’ button, I get the same error.
In order to fix this, follow the steps below.
How do I get past Choose keyboard layout?
1. Try booting in the Safe Mode and install all drivers
Restart your PC 3 times to summon the Windows Recovery menu.
Choose Troubleshoot.
Open Advanced options.
Select Startup settings and then click Restart.
Once the PC reboots, choose Safe Mode with Networking.
Right-click Start and open Device Manager.
Install all missing drivers and reboot your PC.
2. Use Startup repair
Reboot your PC 3 times to access the Windows Recovery menu.
Choose Troubleshoot.
Select Advanced options.
Click on the Startup Repair and follow the instructions.
3. Reinstall Windows 10
Backup your data, this process will wipe out all the data from your system drive.
Create a Windows 10bootable USB drive by following the steps provided in this article.
Boot from the USB.
Press Shift + F10 to open the Command Prompt in the initial window.
In the command line, type the following commands and press Enter after each:
DISKPART
LIST DISK
SELECT DISK 0 (providing Disk 0 is the drive you want to install Windows 10 on)
CLEAN
CONVERT GPT
EXIT
After that, boot with the USB bootable drive again and reinstall Windows 10.
We hope that these solutions were of help to you to address the Something went wrong error after you choose the Keyboard Layout.
It’s Patch Tuesday again! Microsoft will start releasing the June 2019 Patch Tuesday cumulative updates within the next few hours.
Those of you who are running earlier versions of Windows 10 should update their machines as soon as possible in order to get the latest cumulative updates.
The upcoming Patch Tuesday updates are expected to fix security and non-security issues within the operating system. Microsoft specifically aims to address the existing vulnerabilities in Windows 10 OS and its components.
Additionally, the tech giant is releasing monthly cumulative updates for Windows 7 and Windows 8.1. These updates will also bring security-only updates along with some security and non-security enhancements.
Microsoft highly recommends users to upgrade to Windows 10 before January 2020. That is the only way you can stay safe online and enjoy the latest features available in Windows 10.
Install Windows 10 June Patch Tuesday updates
These updates will be automatically available on your system. You just need to visit the Settings menu and click Check for updates.
Last month, Microsoft released the Windows 10 May 2019 Update. We’re sure the company will address the bugs introduced in the recent update.
As you already know, all new Windows 10 updates bring some bugs to the table. Therefore, you need to take the necessary precaution measures and backup your system. You can always roll back to the previous version in case something goes wrong.
We will keep an eye on the Patch Tuesday Updates as update this post as soon as the rollout begins.
Keep visiting Windowsreport.com to learn more about this month’s Patch Tuesday updates.
Microsoft finally shared the first details about its next-gen console at E3 2019, which is codenamed Project Scarlett. Just like Sony’s PlayStation 5, Scarlett will come with a fast SSD and support 8K graphics, though we probably won’t have the full list of specs for both consoles for a couple of months.
In case you missed the reveal video, Microsoft said that Project Scarlett will come with a custom-designed processor leveraging AMD’s Zen 2 architecture, high bandwidth GDDR6 RAM, and its next-gen SSD should deliver more than 40x times performance increases over the current generation.
Among other highlights, Microsoft mentioned support for up to 120FPS in games, variable refresh rate, and hardware-accelerated ray-tracing. Overall, Microsoft says that Project Scarlett should be four times more powerful than the Xbox One X and its six teraflops of computing power, and this should represent a much more significant shift compared to the transition from 7th gen to 8th gen consoles.
If Google Stadia will be the first next-gen gaming platform to launch this November, it seems that both Project Scarlett and the PlayStation 5 will surpass it in terms of pure performance. At launch, Stadia will deliver 10 teraflops of computing power and make all games playable at 60FPS in 4K (if you have a fast internet connection), but Google will certainly improve Stadia’s performance over time to catch up with next-gen consoles.
This is also something that Microsoft plans to do with its Project xCloud game streaming service, with Microsoft replacing the ageing Xbox One S consoles in server blades with the much more powerful Project Scarlett hardware. “Project Scarlett and all of its power and all of its performance is the foundation of our future in console and the formation of our future in cloud,” Xbox head Phil Spencer said earlier this week.
After Sony announced that its PlayStation 5 will be backwards compatible with all PlayStation 4 games, Microsoft announced something even better for Project Scarlett: the new hardware will be able to play games from all three past generations of Xbox consoles, it will also come with a disc drive and support existing Xbox One accessories.
“We definitely want to make sure that we were compatible across all the generations, not just with the games but with the accessories. Obviously Xbox Live will continue, and you are who you are across the whole ecosytem. It’s really us respecting the purchases that our gamers have made on our platform,” explained Xbox head Phil Spencer during yesterday’s Inside Xbox episode.
The fact that existing accessories including Xbox One controllers will work on Project Scarlett is pretty big news. As you may know, Microsoft ignored Bluetooth on the Xbox 360 and Xbox One, choosing to create its own Xbox Wireless protocol instead. All controllers released after the Xbox One S also support Bluetooth in addition to the Xbox Wireless protocol, and Microsoft also added Bluetooth support to its new Xbox Wireless Elite Controller Series 2.
See what makes it more Elite than ever. Look under the hood of the Xbox Elite Wireless Controller Series 2. #InsideXboxE3
This new Elite controller is the first model to use an USB-C port instead of the older micro-USB port, and it also comes with a built-in battery delivering up to 40 hours of battery life. It’s still not clear if Project Scarlett will come with a brand new controller, but there’s a high probability that it will.
Around the release of the Xbox One back in 2013, we learned that Microsoft had spent over $100 million to create the Xbox One controller. During the development process, the company experimented with integrated displays and scent-emitters, features that were ultimately scrapped.
The Xbox One controller remains one of the best options on the market these days, but Microsoft may well need take some inspiration from the competition. Sony’s PS4 controller has a button dedicated to game captures and streaming, while the Google Stadia controller added another button to summon the Google Assistant during gameplay.
Can Microsoft create something better than the new Xbox Elite controller?
If an improved controller with USB-C port is highly likely, we also expect some changes on the connectivity front. We hope that the console will support Bluetooth accessories, but we’re also wondering if Microsoft will keep the HDMI in port to connect other devices, including set top boxes. Microsoft made quite a big deal of this HDMI passthrough feature ahead of the Xbox One launch, but this may no longer be seen as a killer feature for most Xbox One owners.
After Microsoft received lots of criticism for focusing too much on multimedia feature with the original Xbox One, Project Scarlett appears to be a comeback to a pure gaming console with all the bells and whistles hardcore Xbox fans expect. Previous reports suggested that Project Scarlett would be accompanied by a cheaper “Lockhart” SKU, but Microsoft didn’t mention this second console at all during E3 2019. It remains to be seen if Microsoft will reiterate the current two consoles approach with the Xbox One S and Xbox One X, but these days the company seems to be all about offering more choice to games. That’s why we now have Xbox Game Pass on PC, and why the company is also working on Project xCloud.
Project Scarlett already looks like an incredibly powerful console, but raw power may no longer be the killer feature in the console market. The underpowered Nintendo Switch has been enjoying some real momentum since launch, with many third-party developers porting their AAA games on the system. But as Xbox head Phil Spencer reiterated in a recent interview with The Verge, Microsoft is no longer obsessed about selling the most Xbox units.
“The business isn’t how many consoles you sell. The business is how many players are playing the games that they buy, how they play. So if somebody bought an original Xbox One from us on launch day, and they’re buying and playing games, I don’t need to sell them an S. I don’t need to sell them an X. If they want to stay on the Xbox One they have and stay as a great member of our community or subscribe to Game Pass, that’s a great business for us.”
This is exactly why Microsoft stopped reporting Xbox One sales years ago, choosing to focus on Xbox Live engagement instead. Microsoft certainly isn’t the only company to prefer selling services instead of making razor-thin margins on hardware, but that doesn’t mean Project Scarlett could be the last Xbox console for Microsoft. “I think for years and years the best way to play a game on a console will be to download that game and play it,” Spencer said after Microsoft announced Project xCloud last Fall.
Microsoft didn’t spend a lot of time discussing Project Scarlett and Project xCloud during its E3 press briefing this year, but there were some xCloud hands-on session ahead of the first public trials in October. Project Scarlett won’t be released until 2020, and we the Redmond giant may well reveal the final design at E3 next year ahead of an holiday 2020 launch. That should give the company plenty of time to complete work on backwards compatibility, and prepare an excellent line-up of launch titles beyond the much-anticipated Halo: Infinite.
Lenovo is constantly updating and refreshing its product lines, sometimes even twice in a calendar year depending on the feedback, it gets from consumers.
At its NXT BLD convention in London, Lenovo took the wraps off its updated precision ThinkPad P73, P53, P1 Gen 2 and 53s, 43s workstations all running Microsoft’s Windows 10 Pro operating system.
ThinkPad P73
Imperceptibly similar to the ThinkPad Extreme line up the ThinkPad P series also represents a push for the overabundance of productivity feature sets and the P73 brings a 17.3 inch screen with a 9th generation Intel Core or Intel Xeon multicore processor as well as NVIDIA Quadro 5000 series RTX graphics that support real-time 3D and VR rendering.
At 17.3 inches the P73 also comes with an optional 4K UHD (3840 x 2160) screen supporting 400-nits of brightness and 100% Adobe color accuracy as well as X-Rite Pantone Color Calibration Service and Dolby Vision for that sweet high dynamic range support.
As with most ThinkPads the P73 also comes MIL SPEC up to 200 quality checks for use in extreme conditions that include hot and cold temps as well as passing dust, water or drop tests.
The P53 is the 15.6 version of the P73 bringing much of the same performance and specs. Differences arise in the battery department where the P53 loses the quick charge technology of its 17-inch brethren.
ThinkPad P43s & P53s
The s-line up represents the more affordable versions of the regular P53 and new P43 SKUs where the company offers a slightly more limited version of the device where 1080p panels are the norm and maximum of 48 GB of RAM on 2TB SSDs.
ThinkPad P1 Gen 2
While all of the above options pack more power than most average people need, the ThinkPad P1 Gen 2 is the perfect compromise of raw power and conventional sleekness.
Lenovo’s updated P1 Gen 2 brings the same sort of thinned out design as the original P1 and X1 but with the same sort of specs as the beefier P73 and P53.
Gen 2 comes with the same Dolby Vision HDR 4K UHD OLED panel with X-Rite Pantone calibration in a super packed screen with reduced bezels. Creators, processors, IT, factory workers and executives alike should all enjoy the various certification standards the P1 Gen 2 meets that include ISV, ArcGIS, AutoCAD, Creo, Decision Space, McKesson, Revit, SolidWords and 3dsMax to name a few.
A little bit of future proofing went into the P1 Gen 2 with support of Wifi 6 for up to 9.6 Gpbs, 3 Thunderbolt ports, optional Windows Hello IR camera and more.
ThinkStation P940 & P720
Lastly, Lenovo unveiled its ThinkStation P940 and P720 towered workstations that also sport Quadro GPUs and Intel Xenon processors. Obviously less portable, but the P920 and P940 can handle up to RAID capable M.2 PCIe solutions and 60TB of HDD storage.
More importantly, the P920 can support Flex Trays drives per bay alongside the towers unique air ventilation architecture which employs air baffle and the use of fewer fans in its design.
The ThinkPad P series isn’t your typical laptop or tower consumer play and Lenovo is rightfully targeting people who work in oil, gas, energy industries who need process gigabits of data per minute. I may not be comparing a ThinkPad P1 up against a Huawei Matebook anytime soon, but I can’t wait to push one of these laptops to my limits.
Pricing and availability vary with the ThinkStation P920, P720, and P72 only sporting price tags. The P73, P53, and P1 Gen 2 just have a coming soon header above their selections at Lenovo’s dedicated P series website.