TeamViewer Database Error: 5 Ways to Fix Sign In Issues

When you try to sign in to TeamViewer or configure the Grant Easy Access setting, it often results in a Database error. The message reads, Database error. Please try again later or Authorization failed – ResponseCode: UnspecifiedError – ErrorMessage: Database error.

The TeamViewer Database error in Windows and Linux arises due to server issues, network problems, a misconfigured DNS address, or third-party apps triggering conflicts.

Recently, on October 8, 2024, thousands worldwide reported the Database error while trying to sign in to TeamViewer. Luckily, the issue was resolved in a few hours, indicating a server downtime. But that’s not always the case!

How can I fix the Database error on TeamViewer?

1. Check the TeamViewer’s server status

Your primary approach when faced with Database error or any other sign-in issues on TeamViewer should be to check the server status. This can be verified using TeamViewer’s official status page.

teamviewer server status
TeamViewer’s server status depicting the recent outage

If any of the services are down, wait for TeamViewer to resolve the problem. It typically takes a few hours at the maximum.

Also, if the outage is not yet reflected on the official website, check a third-party monitoring service like Downdetector, which reports such issues in real-time.

2. Whitelist TeamViewer in Windows Firewall

  1. Press Windows + S to open Search, type Windows Defender Firewall, and click on the relevant result.
  2. Now, select Allow an app or feature through Windows Defender Firewall from the left pane.windows firewall
  3. Click the Change Settings button.
  4. If TeamViewer or related services are listed here, make sure both the Private and Public checkboxes are ticked.whitelist to fix teamviewer database error
  5. In case TeamViewer is not listed or the problem remains unresolved, click on Allow another app.
  6. Click the Browse button.
  7. Head to the TeamViewer’s launcher in the following path: C:\Program Files\TeamViewer
  8. Select the TeamViewer.exe file, and click Open.add-teamviewer
  9. Now, click on Add.
  10. Tick the checkboxes for Private and Public, and then click on OK to save the changes.teamviewer in firewall
  11. Finally, reboot the PC and check for improvements.

Often, when Windows Firewall is blocking an app or port, TeamViewer won’t be able to connect to its servers, and you must manually whitelist it to fix the Database error.

3. Reset the network settings

  1. Press Windows + I to open Settings, go to Network & Internet from the left pane, and then click on Advanced network settings.advanced network settings
  2. Scroll down and click on Network reset.
  3. Click the Reset now button.network reset to fix teamviewer database error
  4. Finally, click Reset in the confirmation prompt and then restart the PC.

4. Reinstall TeamViewer

  1. Press Windows + R to open Run, type appwiz.cpl in the text field, and hit Enter.
  2. Select TeamViewer from the list of applications, and click on Uninstall.uninstall to fix teamviewer database error
  3. Restart the computer, and then download and reinstall TeamViewer from the official website.

If a quick uninstall didn’t fix Teamviewer’s Database error, I recommend using a top-rated uninstaller software to delete all leftover files, including cache and Registry entries, which often turn out to be the reason for such issues.

5. Contact TeamViewer support

When nothing else works, the last option is to contact TeamViewer support. You can share your problems through both online chat or give the support team a call.

Mention all the relevant details concerning the TeamViewer Database error, i.e., the time it started and the functionalities affected, and then wait for a resolution.

In case such problems keep appearing for you, discover our top picks for remote screen-sharing tools for Windows!

If you know of more fixes for the error, share them with our readers in the comments section below.

Microsoft Outlook Contacting the Server for Information [Fixed]

Have you encountered a Microsoft Outlook error saying “Contacting the server for information?” Read on to fix this annoying error right now.

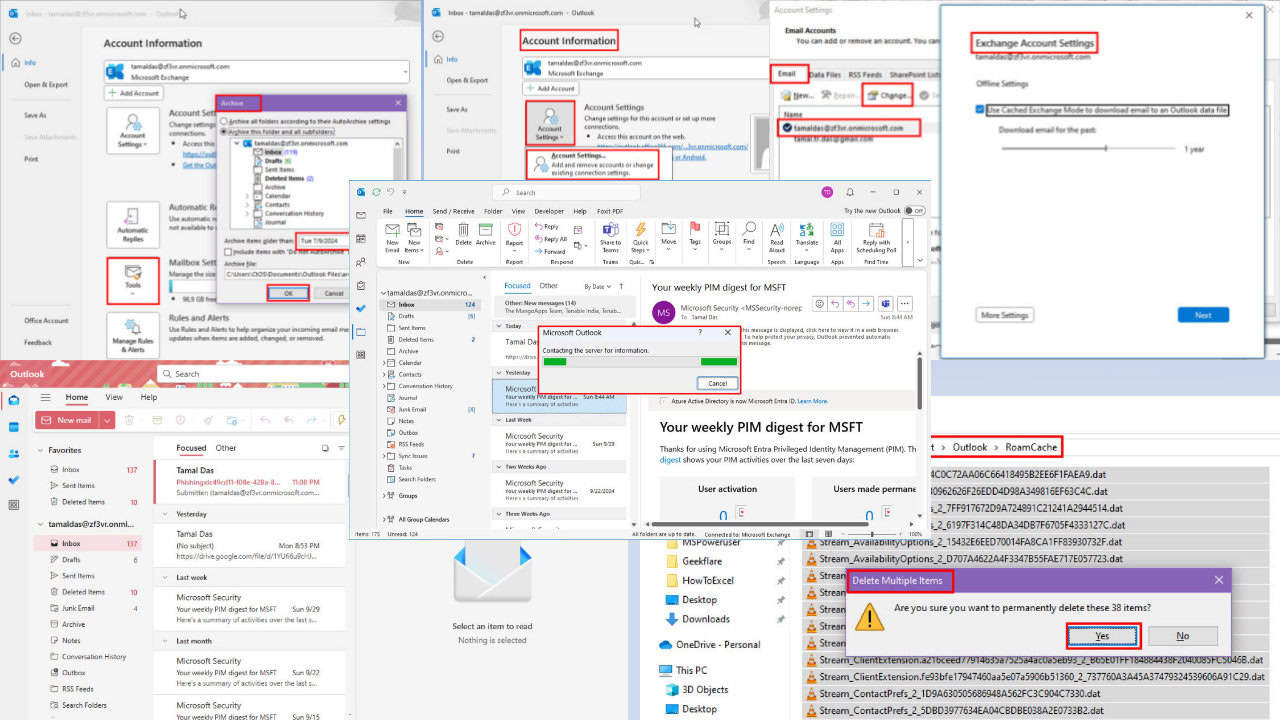
The Outlook desktop app intermittently shows a message when you open email attachments, media, or update the mailbox. It’s trying to check with the server for further data to grant you access to the content you need.

This message is normal once in a while. However, if you repeatedly face the same warning, there are some DIY troubleshooting approaches you can follow for a quick resolution.

Why Is Microsoft Outlook Contacting the Server for Information?

Here are the most common causes of this error:

Microsoft Outlook Contacting the Server for Information
  • You’re using an on-premise mail server that isn’t functioning for Outlook mailboxes.
  • Microsoft 365 is trying to contact a remote server, like Google Drive for email attachments.
  • Outlook is trying to download images from an HTML email.
  • The internet network has a low bandwidth or it’s not working.
  • Outlook is unable to access the local cache.
  • The PST file is corrupted.

How To Fix Microsoft Outlook Contacting the Server for Information

Now, let me show you the simple methods you can follow to fix this annoying error message for good:

Basic Checks

Try the following quick fixes before moving ahead with more time-consuming ones:

  • End the Outlook process: Press Ctrl + Shift + Esc to open Task Manager. Under the processes column, find Outlook, right-click, and choose End task from the context menu.
End task
  • Restart PC: Reboot the PC to fix glitches in memory, software, background processes, network, etc.
  • Restart router: Switch off and on the router to fix any internet connectivity issues.
  • Free up bandwidth: If you’re currently downloading or streaming content, stop those tasks. This will allow the Outlook app to use more bandwidth to fetch content from the remote server.
  • Reduce mailbox size: Go to the Tools menu from the File tab and select the Clean Up Old Items option. Select a cut-off date prior to which you’d like to archive all emails. Click OK. Use the file location given in the Archive file field to access archived emails in the future.
archive emails

Use Outlook for the Web App

When you need to access an email and its attachments right now but the ‘Microsoft Outlook: Contacting the server for information’ error is stopping you, do the following:

  1. Visit the Outlook web app.
  2. Log in with the same email credentials as for the desktop version.
outlook web

Clear the Outlook Cache

  1. Close the desktop app.
  2. End its process from the Task Manager.
  3. Press the Windows + R keys together to launch the Run dialog.
  4. Enter the following command in the Open box:
%localappdata%\Microsoft\Outlook
  1. Hit Enter.
Run dialog
  1. The Microsoft Outlook local cache directory will open.
  2. Access the RoamCache folder.
  3. Delete everything inside this location.
delete cache

Disable Syncing With Microsoft Exchange

  1. Click on the File tab to go to the Account Information screen.
  2. Choose Account Settings from the drop-down menu.
Account Settings
  1. Select your Microsoft account from the Name list on the Email tab.
  2. Click Change above the Name table.
  3. You should now see the Exchange Account Settings dialog.
Change email
  1. Uncheck the box for Use Cached Exchange Mode…
Exchange Account Settings
  1. Click Next and hit the Done on the Account successfully updated dialog box.
Account successfully updated

Use Cached Exchange Mode

If you’ve already been using the non-cached Microsoft Exchange mode, you can try turning this setting on.

Simply follow all the steps mentioned in the previous method.

When you arrive at the Exchange Account Settings dialog box, checkmark the box for the Use Cached Exchange Mode… setting.

Click the slider in the Download email for the past section and drag it to the left side to reduce the cut-off to three days.

Download email past

Click Next and hit Done on the window that pops up to save the setting.

Remove Any Additional Email Accounts

If there’s more than one Microsoft or third-party email account set up in the Outlook desktop app, try removing all except the one you’re currently using. Keep the account where you’re facing the ‘Microsoft Outlook: Contacting the server for information’ error. Here’s how:

  1. Go to the Outlook File menu and click the Account Settings button.
  2. Select Account Settings again in the drop-down menu that opens.
  3. You should see a list of all the synced email accounts.
  4. Select an email you wish to remove from the Name table.
  5. Click on the Remove button in the Email tab toolbar.
Remove Any Additional Email Accounts
  1. Follow Outlook’s on-screen instructions to complete the removal process.
  2. Repeat the above steps for other emails except for the default, primary, or Microsoft 365 work account.

Tweak the Trust Center Settings

A safety setting disallows images and other media to load on all incoming emails, especially those coming from new email domains or third-party servers. If it’s enabled, the error often shows up.

Here’s how to disable it in the Trust Center:

  1. On the desktop app, press the Alt + F + T keys together to bring up the Outlook Options dialog box.
  2. Click on the Trust Center menu on the left-side navigation panel.
trust center
  1. Select the Trust Center Settings button below the Microsoft Outlook Trust Center section.
trust center settings
  1. Uncheck the boxes for the following settings:
    • Don’t download pictures automatically in standard HTML email messages, meetings, or RSS items.
    • Don’t download pictures in encrypted or signed HTML email messages.
  2. Click OK to save.
trust center settings

Close Outlook from Task Manager and re-open to check if you resolved the issue.

Launch Outlook in Safe Mode

Outlook Safe Mode disables all integrations and add-ins. It’s one of the best ways to determine if any third-party or Microsoft Office add-in is the root cause behind this error message. Here’s how to launch it:

  1. Close the desktop app.
  2. Check the Task Manager Processes column to ensure that it’s closed completely.
  3. Now, press the Windows and R keys together to bring up the Run command.
  4. Enter outlook.exe /safe in the Open box and hit Enter to execute the code.
  5. A dialog box will prompt you to select a profile.
  6. Select the default Outlook profile by clicking the drop-down menu.
  7. Click OK to approve.
outlook safe mode
  1. You’ll see a default view of the desktop app running no third-party add-ins.
outlook in sade mode
  1. Now, check if accessing any email or its attachments shows an error message or not.

If the issue is fixed after accessing Outlook in Safe Mode, you should uninstall the most recent add-in. Or, you might need to remove all of the installed add-ins. Here’s how to do that:

  1. Close Outlook Safe Mode.
  2. Relaunch normally.
  3. Go to the Developer tab and click on the COM Add-Ins command button inside the Add-ins command block.
  4. Checkmark the add-ins you want to remove in the COM Add-ins dialog box.
  5. Click the Remove button and follow the on-screen instructions.
Remove add ins

Repair the Outlook Installation

This method involves repairing the whole Microsoft 365 installation if you’re using the latest Microsoft Office software package. For earlier editions, the steps are almost the same. However, you’ll get to repair only Outlook instead of all MS Office apps. Now, follow these steps:

  1. Press Windows + I to launch Settings.
  2. Click on Apps to go to the Apps & features screen on the Windows Settings app.
  3. In the Search this list field, type in Microsoft 365 and hit Enter.
Search MS 365
  1. Click on the Microsoft 365 Apps for enterprise card below the search box.
  2. Click on the Modify button and choose the Online Repair option.
  3. Hit Repair and follow the on-screen instructions.
Repair
  1. Ensure you’re connected to a reliable internet network for seamless repair of the Microsoft 365 installation package.

Update to the New Outlook Desktop App

If you’re okay to move to the New Outlook experience, follow these steps:

  1. Open the desktop app.
  2. Click on Try the new Outlook toggle button in the top-right corner.
toggle new outlook
  1. Select Switch on the dialog box that pops up.
  2. The New Outlook will open.
new outlook app interface

If you don’t wish to use the new app even if that fixes the issue, skip this method and move on to the next.

Remove and Re-Add the Primary Email

  1. Go to the Email Accounts dialog box through File > Account Settings drop-down menu > Account Settings.
  2. Select the primary email.
  3. Click on the Remove button.
remove email
  1. Select Yes on the confirmation dialog box.
  2. Close Outlook.
  3. Open it again and click on the Sign in button located in the top-right corner.
Sign in outlook
  1. Enter your email in the Email address field and hit Connect.
Enter email
  1. Click Done on the Account successfully added dialog box.
Account added successfully
  1. The Loading Outlook dialog box will show up.
  2. Allow it a few minutes to retrieve your emails from Microsoft Exchange Server and create a local backup copy.

Raise a Service Request From Microsoft 365 Admin Center

If you’re the admin of your Microsoft 365 subscription or domain, follow these steps to raise a support ticket:

  1. Log in to the Microsoft 365 admin center.
  2. Click on Show all in the left-side navigation panel.
  3. Now, click on the Support drop-down menu.
  4. Select Help & support from the expanded menu.
help support
  1. In the field below How can we help? on the right-side panel, type in the issue you’re facing.
  2. Hit Enter.
type issue
  1. Scroll down to the bottom and click on the Contact support button.
  2. You can choose Phone or Email options.
Contact support mode
  1. Pick one and follow the on-screen instructions.

Summary

These are some of the proven ways to fix the ‘Microsoft Outlook: Contacting the server for information’ error on a Windows PC.

Were you able to resolve the issue by following them? Do you know of a better method than the ones I’ve listed? Comment below to share your experience.

How to Download PC Turbo Cleaner For Windows 10

When your PC isn’t running as fast as it did earlier, or there’s not enough free storage even though you have a handful of files or apps installed, third-party tools often come to aid. One such is the PC Turbo Cleaner, which you can download for Windows 10!

The PC Turbo Cleaner tool claims to both optimize the computer’s performance as well as fix any errors. It does so by checking the RAM and CPU, clearing unused non-critical files, and cleaning the Registry Editor, often the source of most issues. Besides, the tool wipes your Internet history and erases traces of web activity, ensuring total privacy.

How can I download PC Turbo Cleaner For Windows 10?

Note icon NOTE
Windows Report is not associated with PC Turbo Cleaner or CNET Download and can’t guarantee the effectiveness or security standards of the tool. I recommend you use an effective antivirus solution to scan the downloaded files and eliminate any threats.
  1. Go to CNET Download’s website, and click the Download Now button under PC Turbo Cleaner. I am using a third-party website because the tool’s official website doesn’t work anymore.
  2. Close any prompt for additional software, and again click on Download Now.
  3. Once done, go to the Downloads folder on your computer, and run the pcturbocleaner_setup_0.1.1209.exe file.
  4. Click Yes in the UAC prompt.
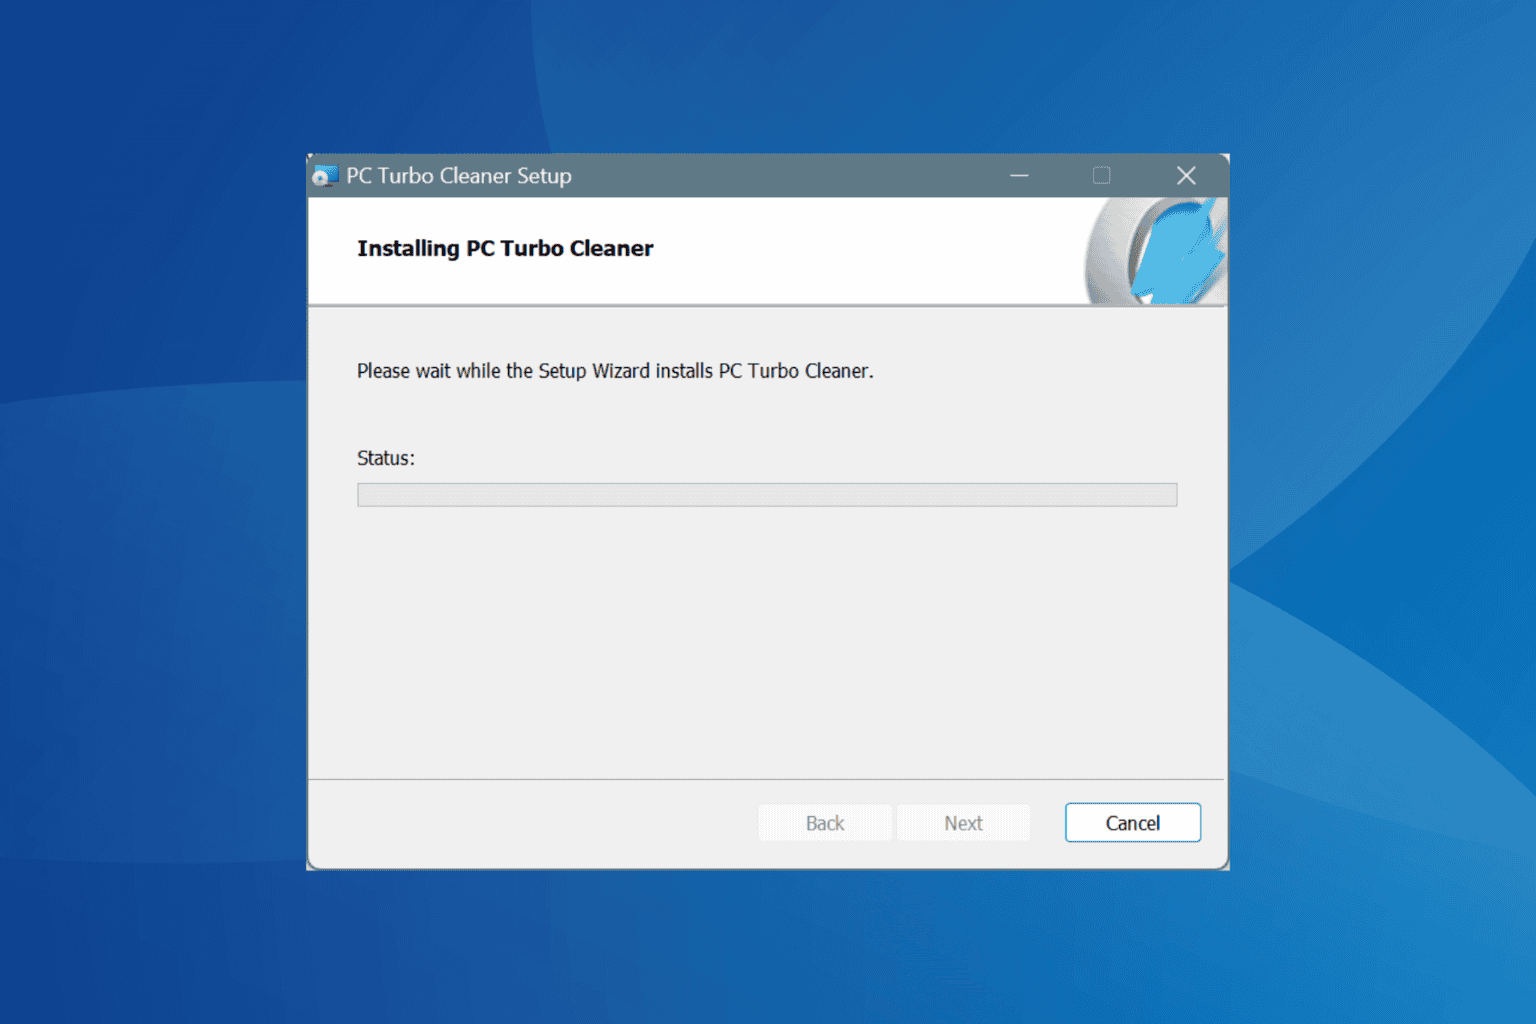
  5. Agree to the software terms by ticking the checkbox for I accept the terms in the License Agreement, and then click on Install.pc turbo cleaner download for windows 10
  6. After installation, you should be able to launch PC Turbo Cleaner and optimize the computer.install pc turbo cleaner

As seen earlier, you can easily download PC Turbo Cleaner by Creative Media Marketing on Windows 10 within minutes. Running it, too, is simple!

Although, the tool has been flagged by several users, based on reports from different sources that monitor such software. It has reportedly been found to infect the PC with malware. Also, for some users, it installed additional tools.

So, you must check for these things and run a full system malware scan after installing the tool!

Do I need PC Turbo Cleaner for Windows?

When it comes to PC optimization, you usually don’t have to install third-party tools, especially the not-so-popular ones that make tall claims. Most of the performance optimizations measures in Windows can be enforced through the built-in apps made available by Microsoft.

For instance, if you want to clear storage space, use the Disk Cleanup utility. Or for regular automatic cleaning, configure Storage Sense. Then, to check for RAM issues, you can run Windows Memory Diagnostic.

As for the Registry cleaning function, it’s recommended that stay away from it. Registry cleaners often inadvertently delete critical keys, causing more issues on the PC. The only time you may have to edit the Registry is when facing major issues with the PC or after uninstalling an app on Windows 10.

That’s my take on PC Turbo Cleaner, listing the download process for Windows 10, as well as highlighting why using such a tool wouldn’t be in your best interest.

If you still wish to go with an third-party tool to improve the PC’s performance, discover our tops picks for Windows optimizer software!

For any queries concerning the installation or to share your review of PC Turbo Cleaner, drop a comment below.

Viva Engage will prioritize recommended comments to encourage collaboration

Microsoft Viva will enhance the comments section of the platform with a new capability called recommended comments. This will allow users to filter reactions to posts and easily access those with the greatest significance to the topic.

According to the latest post in the Microsoft 365 Roadmap, this new enhancement will arrive in Viva Engage in January 2025. The Redmond-based tech giant says it’s a new way to encourage collaboration and productivity.

It’s worth mentioning that the new enhancement will not change the layout of the Comment, reply, and reaction panels. However, the platform will be redesigned to be more in tune with the other Microsoft apps, but it’s independent of this feature.

Here’s what the entry says:

Viva Engage will offer a new way to see contributions from close contacts and leaders within conversation threads. In the home feed and More for You feed, users see two comments that are meaningful to them and the overall conversation. Users can see the rest of the conversation with one click. There are no changes to the comment, reply, or reaction experiences with this new feature.

In other news, Viva Engage will be enhanced with a Unified Create Button this month, centralizing all the platform’s posting abilities into a single click.

How To Make a YouTube Short on PC in 5 Simple Steps

If you’re wondering how to make a YouTube Short on PC, the process is simple. It’s become popular for sharing brief, engaging videos.

Usually, people use their mobile devices for that, but you can easily create them from your computer. I’ll show you how to upload YouTube Shorts directly from your PC.

Let’s begin!

How To Make a YouTube Short on PC

Follow the below procedures:

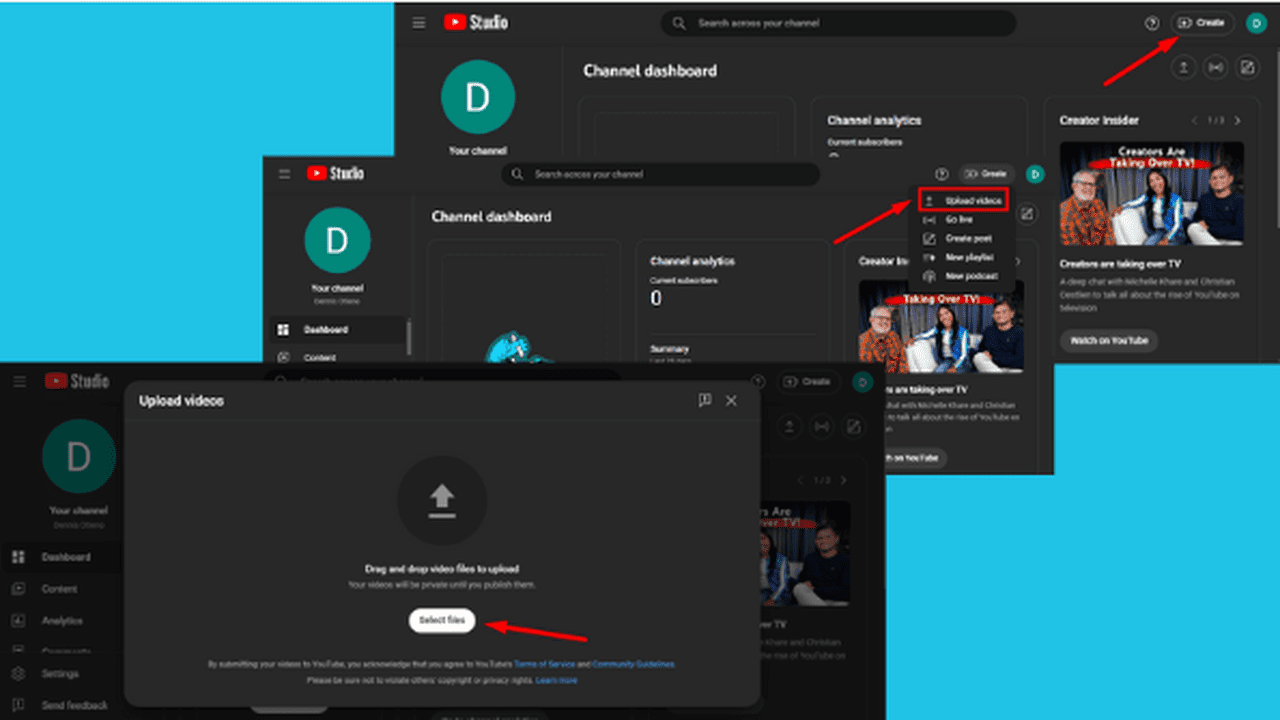
  1. Log in to YouTube Studio.
  2. Tap the Create button on the top right corner.
Create button
  1. Click Upload videos.
Upload videos
  1. Upload your short by dragging and dropping or clicking Select files. Ensure the video is at least 60 seconds long and has a square and vertical aspect ratio.
Select files
  1. Include #Shorts in your title or description for better visibility throughout YouTube.

Before uploading a Short, make sure you are signed in; follow this quick guide to login to YouTube so you can access YouTube Studio on your PC.

That’s it! Simple, right?

Knowing how to make a YouTube short on PC can help you share your creativity online. So, create your video, follow the guide, and start making engaging content that resonates with viewers.

Also, learn to fix YouTube if it’s not working or slowing down Firefox. Moreover, if you need an editing app to finetune your Shorts, we can help you out. Or, if you want to go live and stream on the platform, we’ve got you covered.

How to Download WipeDrive Home for Free on Windows 10

WipeDrive is a popular and effective option to delete all data on your hard disk, especially when you are getting rid of it. The tool employs advanced methods and algorithms to wipe all the data, including any personal information, making it unrecoverable. But how do you download WipeDrive Home on Windows 10?

After Blancco acquired WipeDrive in June’22, the tool is no longer hosted by its initial developer, White Canyon, and downloading it remains tricky. A quick web search doesn’t lead to the official download page. Yet, you can still install your favorite WipeDrive Home tool in no time!

How can I download WipeDrive Home on Windows 10?

Note icon NOTE
Windows Report is not associated with WipeDrive Home or Download CNET and can’t guarantee the effectiveness or security of the tool. I recommend you install a top-rated antivirus solution and scan the downloaded files before proceeding.
  1. Go to Download CNET’s website, and click on the Download Now button under WipeDrive Home.
  2. Close any prompts for additional software downloads, and again click on Download Now.
  3. Go to the Downloads folder on your PC, and run the wd-install-home.exe file.
  4. Click Yes in the UAC prompt.
  5. Enter the product activation key, if you have one, and click on Next.wipedrive home download for windows 10
  6. Select the drive that you want to wipe from the dropdown menu, and click on Next.drive selection
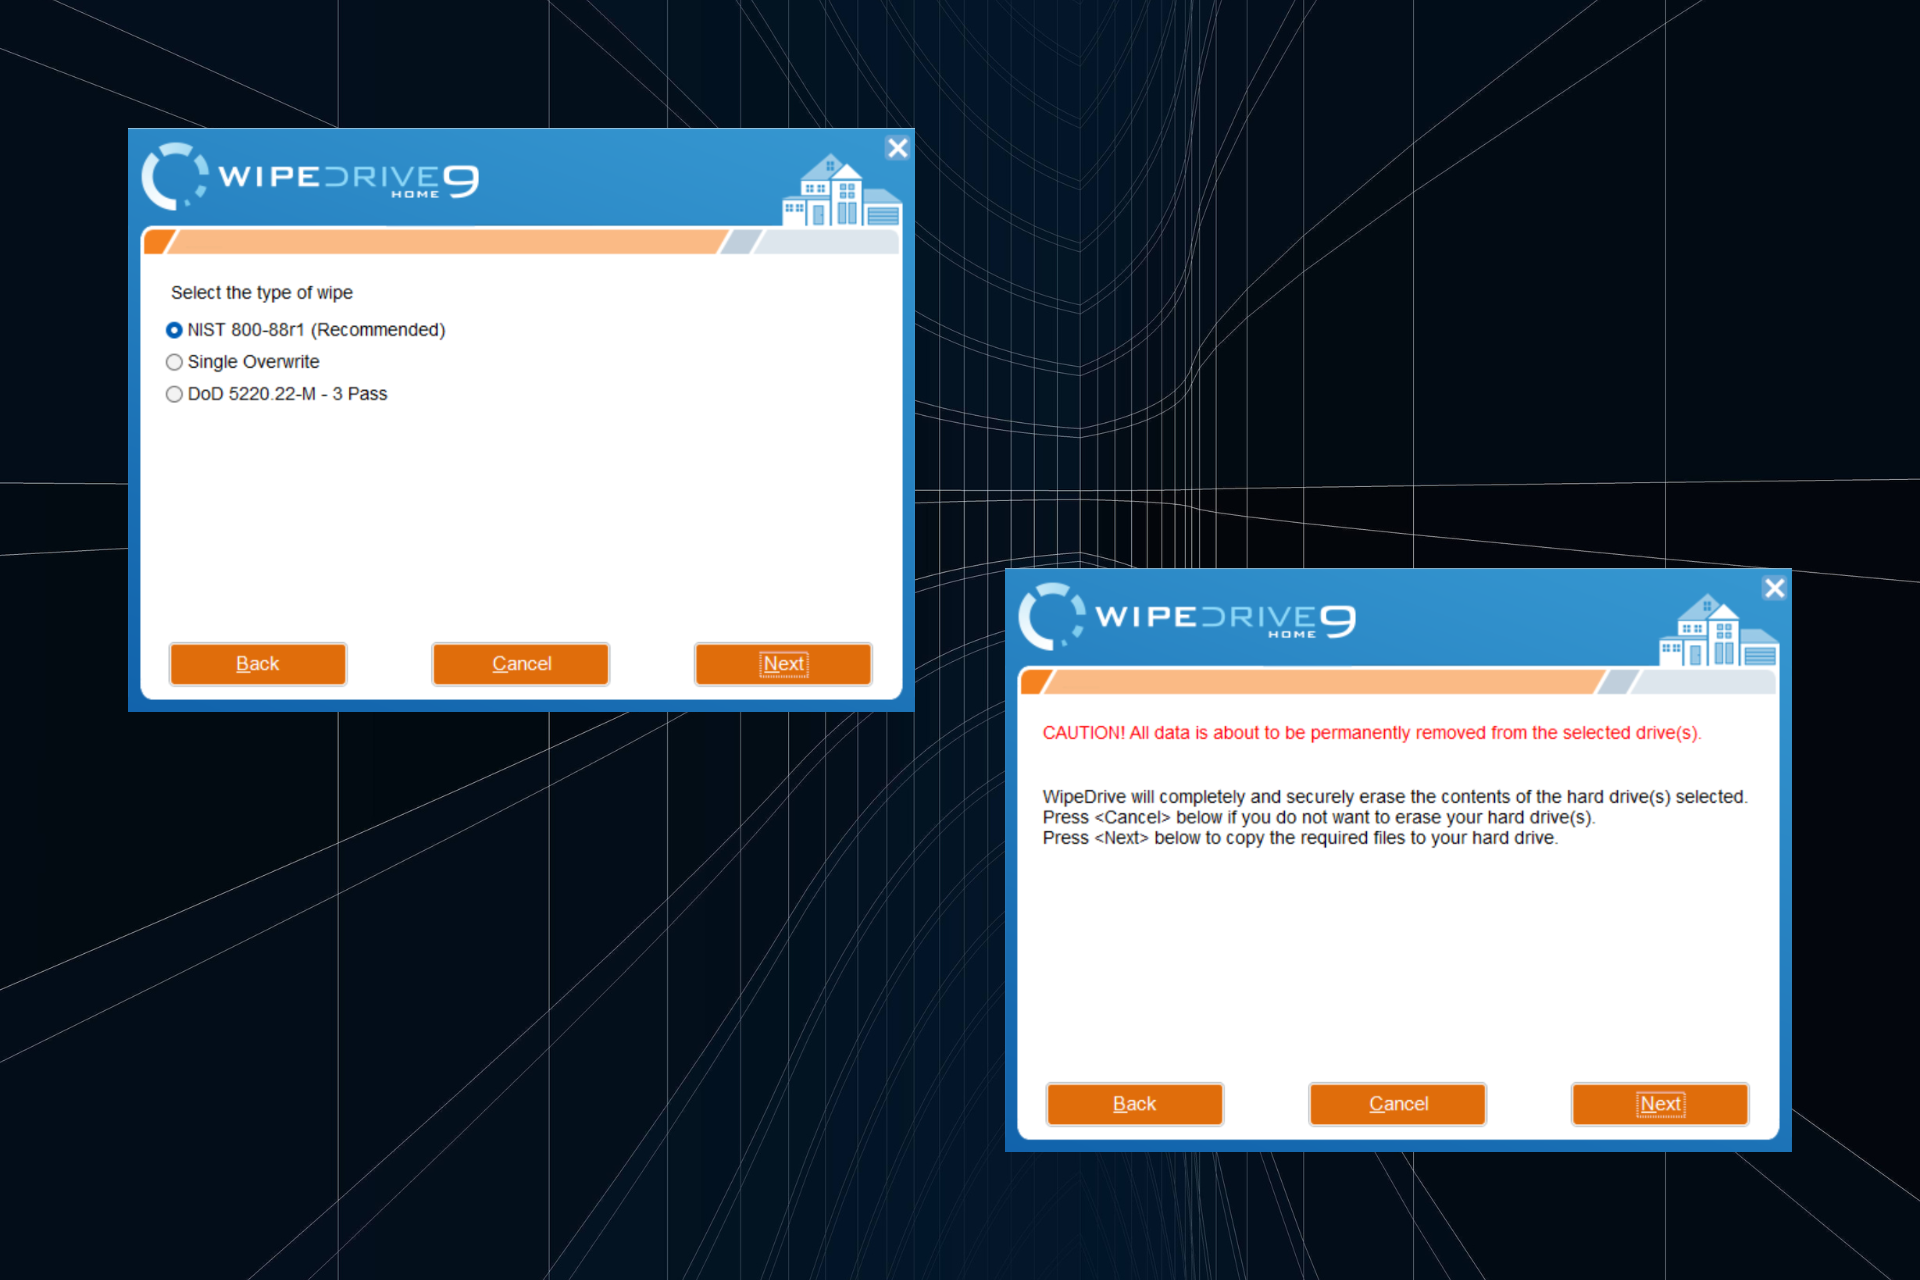
  7. Choose the type of wipe, be it NIST 800-88r1, Single Overwrite, or DoD 5220 .22M – 3 Pass, and click on Next.wipe type after wipedrive home download for windows 10
  8. Follow the remaining on-screen instructions to complete the WipeDrive’s drive-clearing process.

You can easily download WipeDrive Home on Windows 10 and clear all the contents and personal information on your drive.

Remember, data once deleted through WipeDrive Home is almost unrecoverable, even using the most advanced tools. So, you must proceed with caution and only wipe drives that are no longer useful.

Is WipeDrive Home good?

WipeDrive Home is undoubtedly an effective drive cleaning solution if you want to delete every last piece of data and make its recovery impossible. The best part is that the tool is easy to use and can be set up in no time!

Also, WipeDrive Home offers three advanced types of wipes, although it recommends the NIST 800-88r1 method. Back when the tool was still owned by White Canyon, it boasted of meeting the NIAP’s (National Information Assurance Partnership) EAL 4+Standard.

WipeDrive checks for every last bit of data on the selected disk, including remapped sectors and hidden areas, and effectively wipes it clean.

The only issue with WipeDrive Home is the limited number of wiping methods available. To overcome that, you can use WipeDrive Enterprise. It offers 19 wipe types, including some at par with the most technologically advanced techniques worldwide.

wipe types in wipedrive enterprise
Wipe types in WipeDrive Enterprise

In case you have yet to choose a solution, discover our top picks for hard drive eraser software and get one today!

If you faced any issues during the installation or want to share your review of WipeDrive Home on Windows 10, drop a comment below.

Microsoft will finally let OneDrive users to import files from Google Drive, and Dropbox

The Microsoft OneDrive platform has been updated to include new AI and productivity features designed to enhance the user experience.

The new features include Copilot Agents, which allow users to create custom AI assistants to handle repetitive tasks, and expanded file comparison and search capabilities.

In a blog post, Microsoft says the new features will roll out to commercial customers over the next few months.

OneDrive is also getting a performance boost with faster web experiences and improvements to the mobile app. The mobile app is being redesigned to prioritize photos and includes new search capabilities that allow users to conduct natural language searches.

A new feature called File Import is coming to the OneDrive mobile app. It will allow users to import photos, videos, and documents from Google Drive, Google Photos, and Dropbox.

Microsoft says the updated mobile app is rolling out to Android users starting today and will be available for iOS users in November.

For Microsoft 365 Personal and Family subscribers, Microsoft is introducing 5TB and 10TB storage tiers beyond the current 2TB limit, plus the ability to finally color the OneDrive folders in Windows File Explorer, as you can see in the image below.microsoft onedrive

Finally, Microsoft says that it’s working to bring the OneDrive photo experience to other platforms, including the web and Mac, and that it plans to integrate its Copilot AI features into the Windows and Mac file browsers, allowing users to take advantage of Copilot’s capabilities across multiple cloud storage services.

Microsoft will enhance Windows 11 to support Third-Party Passkey Providers

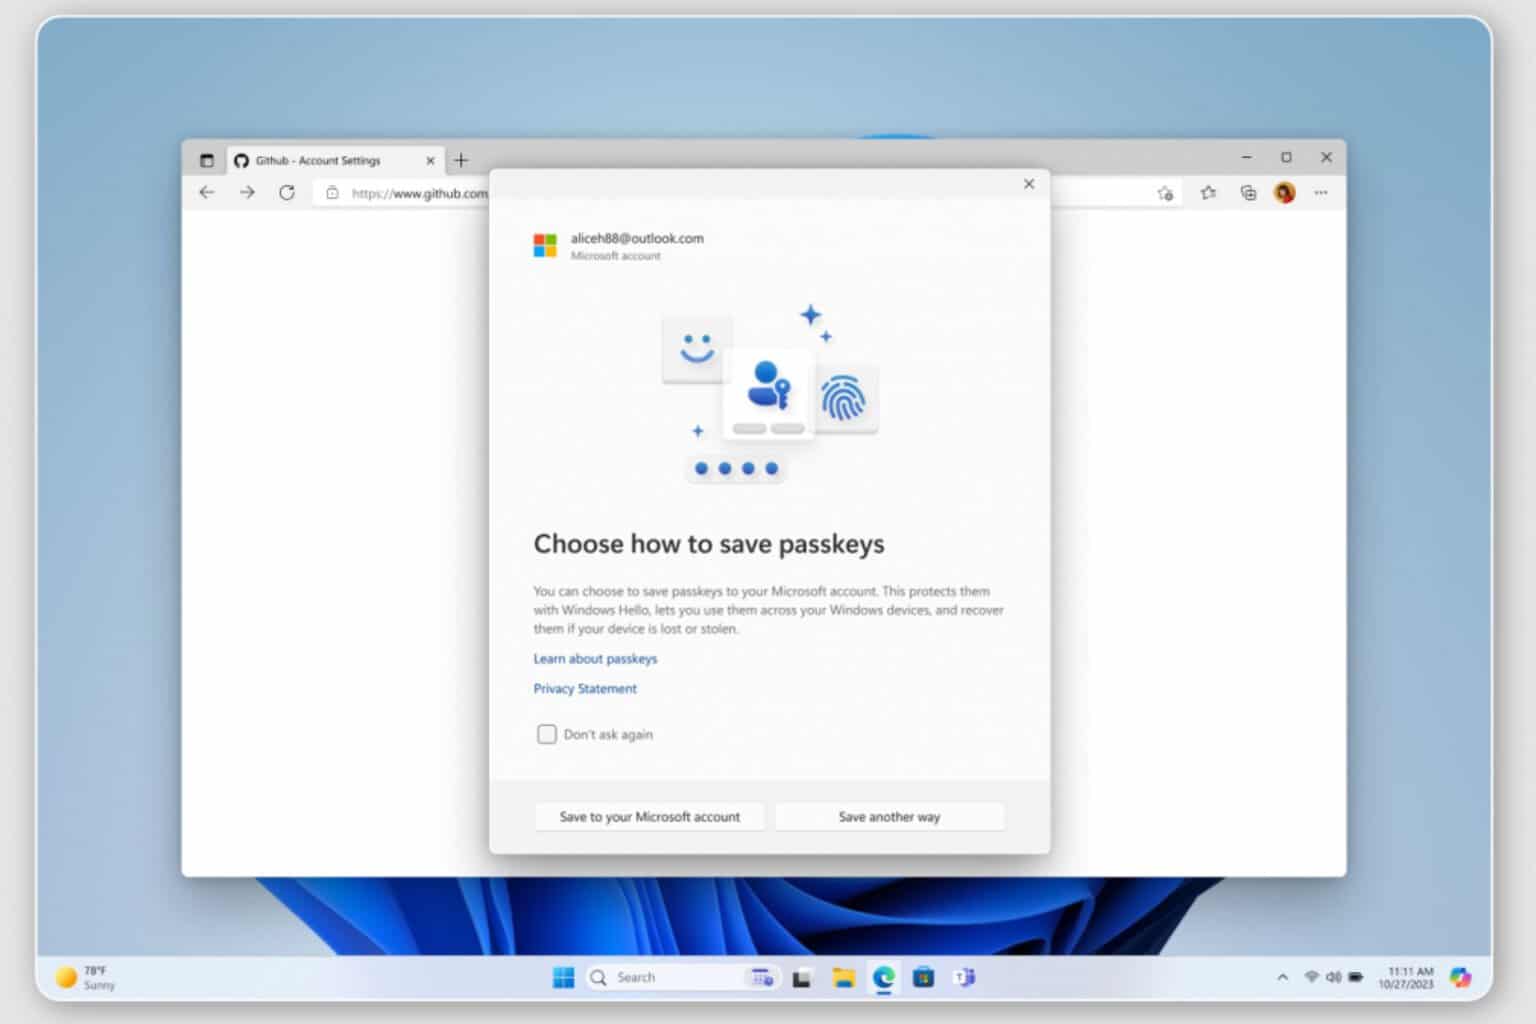
Microsoft is advancing in its mission to create a passwordless future. The company is working to make passkeys a more native experience on Windows 11, with support for third-party passkey providers.

Following the launch of passkeys in Windows 11 earlier this year, Microsoft has announced it will soon allow third-party passkey providers to integrate with the operating system. That means users will soon be able to seamlessly use passkeys created with a third-party provider on Windows 11 and vice versa.

In a blog post, Microsoft says it’s working with many passkey providers to bring this capability to Windows 11. Among the companies involved are 1Password, Auth0, Axcess, Bitwarden, Dashlane, Keeper Security, LogMeIn, NordPass, Okta, Passportal, Saaspass, Secret Double Octopus, Stytch, and Yubico.

With this update, Microsoft is working to create an easy, cross-platform passkey user experience that prioritizes user choice and control. We’ve been working with industry partners to ensure that Windows Hello, the Windows passkey platform, and passkey provider apps work well together.

Microsoft says the new passkey provider support will be part of the Windows Insider program in the coming months.

In addition to third-party passkey provider support, Microsoft is updating the built-in passkey experience on Windows 11. The company is introducing a new “reimagined” passkey setup flow, making it easier to set up and use passkeys with a Windows Hello-compatible device (e.g., a webcam or fingerprint reader).

When you navigate to a website that supports passkeys, the Windows Hello passkey experience will pop up to help you create a new passkey or effortlessly sign in with your existing ones.

You can save your passkey with Windows Hello and sync it to use it on another Windows 11 device. Learning to use passkeys in Windows 11 is not exactly hard, and it can be a more secure way to access the operating system.

What do you think about it? Is this a good way to stay protected, or are the passwords still the norm?

How to Download & Install Bytescout PDF Suite on Windows 10

There are many PDF editing applications, and if you’re looking for reliable software that can create and view PDF files, today we’re going to show you how to download Bytescout PDF Suite for Windows 10.

How can I download Bytescout PDF Suite on Windows 10?

How do I install PDF Suite?

  1. Navigate to the Bytescout download page.
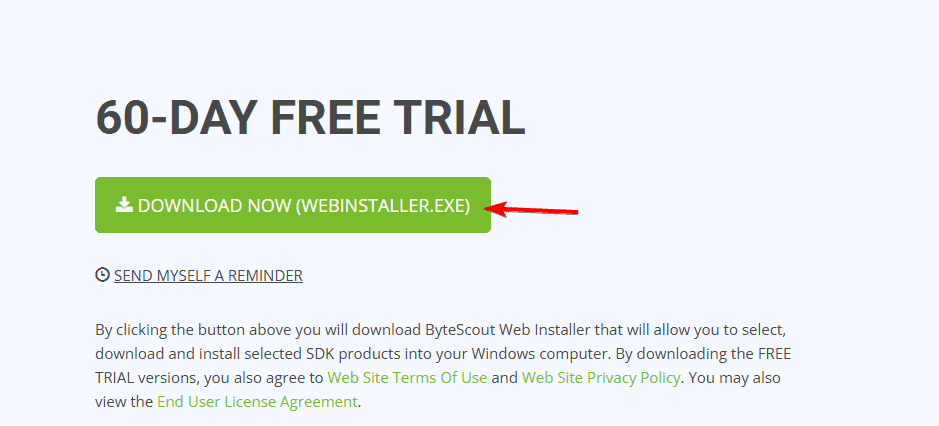
  2. Next, click on Free Trial.
     free trial bytescout
  3. Lastly, click on Download now.
    download now bytescout
  4. Wait for the application to download.
  5. Run the setup file.
  6. Follow the instructions on the screen to complete the process.

Is ByteScout free?

No, ByteScout isn’t free, but it does come with a 60-day free trial that you can use. To continue using the software, you’ll need to purchase a license.

Is PDF Suite better than Adobe?

Adobe Acrobat offers more features when working with PDF files and it’s available on various platforms compared to Bytescout PDF Suite. However, Adobe Acrobat subscription is slightly higher.

If you’re looking to download Bytescout PDF Suite for Windows 10, you can do that right from the official website, but keep in mind that the software isn’t free. On the bright side, you’ll get a 2-month free trial.

To learn more about PDF files, we have a great guide on how to convert multiple files to PDF, so don’t miss it.

Did you know that you can lock a PDF file and prevent editing? All that you have to do is change PDF security settings, and we have a guide that shows you how to do that.

AMD Ryzen 7 7800x3D: Everything you Need to Know

At the moment we’re writing this article, AMD Ryzen 7 7800x3D is regarded as the best CPU/SoC for gaming. And that is not only due to its basic specs but also thanks to the AMD 3D V-Cache technology that has a low latency in games. Here’s all we know about it to help you decide if you want to upgrade.

AMD Ryzen 7 7800x3D

1. Technical specifications

As usual, we’re going to start with the raw data provided by AMD for their AMD Ryzen 7 7800x3D SoC.

SpecificationDetails
ArchitectureZen 4 (Raphael)
Cores / Threads8 / 16
Base Clock4.2 GHz
Max Boost ClockUp to 5.0 GHz
L1 Cache64 KB (per core)
L2 Cache1 MB (per core)
L3 Cache96 MB (shared)
TDP120 W
SocketAM5
Process Size5 nm
Transistors11,270 million
Memory SupportDDR5-5200 MT/s, Dual-channel, ECC supported
PCIe SupportPCIe Gen 5, 24 Lanes
Integrated GraphicsRadeon Graphics
Launch Price$449
Release DateJanuary 4, 2023
Max Temperature (tJMax)89°C
VirtualizationAMD-V, AVX, AVX2, AVX-512

As we highlighted in the beginning, AMD Ryzen 7 7800x3D shines in gaming thanks to the V-Cahe, or 3D Vertical Cache. The technology is all about adding an extra 64 MB of cache on a separate silicon layer, positioned directly above the Zen 4 CCD’s 32 MB on-die L3 cache.

These layers are interconnected using TSVs (through-silicon vias), allowing the additional cache to operate at the same speed as the on-die L3 cache. The result is a seamless 96 MB L3 cache block that the software and OS recognize as a single entity, rather than two separate chunks.

By placing a large, fast cache close to the processing logic, this setup significantly boosts gaming performance. However, this is also adding a little bit more heat because the cooling solution will struggle to reach the deeper layer. AMD recommends a liquid cooling system for this CPU. We would add that a 280 mm water cooler should suffice.

Thanks to the 8 core/ 16 threads and mainly to this huge amount of speedy cache, AMD Ryzen 7 7800x3D tops even the fastest of Intel’s 13th Gen Core Raptor Lake processors at gaming.

2. Integrated GPU

AMD Ryzen 7 7800x3D is a SoC, meaning that it comes with an integrated GPU. The RDNA 2 integrated GPU has a 4 ACE and 1 HWS compute units and will clearly bottleneck the powerful and fast CPU cores so you will need a discrete graphics card if you want to get the most out of this SoC.

Don’t get us wrong, everything will work fine, but it’s like having a horse carriage attached to a rocket. Also, the iGPU can’t access the L3 cashe will being on the I/O die, so you will get the same performance as from the regular Ryzen 7000 processors.

3. Switching to AM5 socket and a new motherboard

The newer Ryzen 7 SoCs use the AM5 socket LGA 1718 which borrows the clamping system from Intel. Now, you won’t need 3 hands to install a cooler as it happened on AM4 sockets, and the retention bracket only presses on the middle of the chip. Now, you don’t need to detach the backplate which makes installing the chip a lot easier.

The downside of the new AMD Ryzen 7 7800x3D is that it only works with DDR5 memory, so you won’t be able to use an older AM5 socket motherboard if it has DDR4 memory slots. That means buying a new motherboard and, of course, new RAM modules. DDR5 600 memory would work perfectly with the AMD chip.

4. Best graphics card choices for AMD Ryzen 7 7800x3D

Right off the bat, we would recommend pairing your AMD Ryzen 7 7800x3D with the AMD Radeon RX 7900 XTX OC graphics card.

Just as an example, the ASUS build comes with 24 GB of GDDR6 video memory, and covers the Display Port and HDMI port connections. This behemoth is right there for your 4K gaming needs, especially if you supply a suitable monitor.

The downside is that you will also need to bring a 900 W PSU to the party if you want everything running smoothly.

AMD Ryzen 7 7800x3D will also play nice with the NVIDIA RTX 4080 or RTX 4070 GPUs, but the former will drain your budget a bit because it is currently more than double the price of the SoC.

5. Gaming benchmarking is off the charts

We didn’t test AMD Ryzen 7 7800x3D ourselves, but most of the benchmarks we found online put this SoC in top positions for games such as Elden Ring, Far Cry 6, F1 2021, Hitman 3, Microsoft Flight Simulator 2021, Red Dead Redemption 2, Watch Dogs Legion and many others, ahead of Intel’s Core i9 13900K.

Credit: TechPowerup

To be fair, in the TechPowerup extensive benchmark tests, Core i9 setups prevailed in terms of FPS in games like Age of Empires IV and Counter-Strike: GO, or God of War. However, if you take into consideration the prices of the two CPUs, Intel’s CPU is a bit less expensive.

According to the PassMark benchmarks, AMD Ryzen 7 7800x3D is very close to Intel Core i9 14900KS and over the performance of Intel Core i9 13900KS.

6. Pricing

AMD released the SoC in 2023 at $450, but at the moment we wrote this piece, the lowest price on Amazon was $584. The best price we’ve found for AMD Ryzen 7 7800x3D was from techINN store at $467.

This proves that there is a lot of hype around AMD’s offering. In fact, most of the online stores we’ve checked didn’t have the SoC in stock so you might as well give them a call to check first.

In turn, we’ve found Intel Core i9 13900K at $416 on Amazon. However, that was a 34% discount price. Its original launch price was $589.

Is AMD Ryzen 7 7800x3D good for gaming?

All facts lead to the conclusion that AMD Ryzen 7 7800x3D is one of the best choices if you want to build a gaming PC right now. It will get you that high FPS count doubled with a low latency you were looking for. However, it has become so popular that it’s hard to get at a reasonable price.

We also remind you that AMD launched this SoC in 2023 and there are already rumors that the next x3D is around the corner for a late 2024 launch. Will you pay the extra to get this one, wait for the next version or opt for a Core i9 instead? It’s a tough choice, but whatever you will decide, you will still have a powerful gaming PC.

What is the Mozbar Extension For Firefox & How to Install it

If you own a site and desire to scale it to the next level, then you need to install the Mozbar extension for Firefox. You will gain useful insights that will help you boost your online presence.

What does the Mozbar extension do?

Of course there are other SEO reporting software but the beauty of Mozbar is that it is a browser extension. You therefore get to save on storage space and it is activated on every page you visit with real-time metrics unlike other standalone tools.

Mozbar for Firefox is meant to give you important SEO metrics such as keyword difficulty score, link and link metrics. The idea behind it is you’ll check the page’s ranking and how they’re using their keywords, link placement and many other attributes to help rank yours better.

In simpler terms, it’s analyzing what your competitors are doing and tweaking your site for an even better ranking score.

How do I install the Mozbar for Firefox extension?

Unfortunately, the Mozbar extension is no longer supported on newer versions of Firefox. And it’s not just Firefox. On Chrome, you can still install it but there’s a warning that This extension may soon no longer be supported because it doesn’t follow best practices for Chrome extensions.

If you still wish to proceed, you’ll have to download an earlier version of Firefox then install the Mozbar extension. While this may work, the limitations outweigh the benefits since you’re exposing your device to security risks by using outdated software.

The extension may also not work as expected because it is no longer getting updates and its functions have been deprecated.

To install it;

  1. Launch your Firefox browser and go to the Firefox Browser add-ons website.
  2. Search for Mozbar, select it from the search results.
  3. Next, click Add to Firefox. The extension is free so you won’t have to purchase anything.
  4. The extension will be downloaded and installed. Click Add to allow the extension to access browser tabs, and browser activity during navigation.
  5. You might also get a prompt to allow this extension to work in a private session. To enable it, place a checkmark and click Okay.

If you don’t wish to go through all this, there are other Mozbar alternatives that work just as well or even better. You can scan through the add-ons site and check the reviews.

Before you leave, don’t miss our latest guide on the Vimium Firefox extension to learn how to install it properly.

That’s brings us to the end of this article but do let us know your experience with Mozbar extension for Firefox. Did you get around to installing it? Was it worth the trouble? Let us know in the comment section below.

Microsoft will support Windows 11 24H2 Home and Pro until 2026

Microsoft has recently released the support dates for Windows 11 Home and Pro, the company’s latest incarnation of the Windows operating system.

Windows 11 Home and Pro will be supported according to Microsoft’s Modern Lifecycle Policy. This policy applies to the following editions: Home, Pro, Pro Education, Pro for Workstations, and SE. It offers at least five years of mainstream support and five years of extended support.

The lifecycle support for Windows 11 Home and Pro began on October 4, 2021, and will be available in several releases. The first version, 21H2, is no longer supported, and the next one, 22H2, has been removed from support this week.

According to Microsoft’s Windows as a Service (WaaS) Lifecycle FAQ page, Windows 11 Home and Pro will be supported until October 13, 2026, with the latest version, 24H2, which was released widely on October 1, and received its first wave of Patch Tuesday updates.

VersionStart DateEnd Date
Version 24H2Oct 1, 2024Oct 13, 2026
Version 23H2Oct 31, 2023Nov 11, 2025
Version 22H2Sep 20, 2022Oct 8, 2024 (No longer supported)
Version 21H2Oct 4, 2021 Oct 10, 2023 (No longer supported)

As part of the lifecycle policy, Windows 11 24H2 will receive security updates, bug fixes, new features, and support for new hardware.

It’s important to note that Windows 11 Pro offers additional capabilities, such as running virtual machines, added security features, and more control over Windows updates.

Windows 11 Home is the standard edition of the OS, offering features like the redesigned Start menu, new Snap layouts, and virtual desktops.

As Microsoft continues to work on the OS, it is expected to receive more updates and new features beyond the 24H2 version. The company is also developing a new Windows 11 SE edition for education and first-line worker devices.

Microsoft’s October 2026 Patch Tuesday Fixes 5 Zero-Days, 118 Flaws in total

Microsoft’s October 2024 Patch Tuesday updates address 118 security vulnerabilities, including five zero-day flaws.

All of these vulnerabilities happen across different platforms, including Microsoft Office, Microsoft Edge, Visual Studio, Azure CLI, Microsoft Defender for Endpoint, Windows Storage, Windows Remote Desktop, DeepSpeed, and various components of Windows 10, 11, and Windows Server

  • 3 vulnerabilities are critical
  • 108 are important
  • 7 are low-severity

The three critical flaws are all remote code execution vulnerabilities, which, if exploited, could allow an attacker to run arbitrary code on your device. They include remote code execution bugs, elevation of privilege flaws, denial of service issues, spoofing vulnerabilities, and security feature bypass bugs. Thus, installing the October 2024 Patch Tuesday updates becomes essential, and it should be done ASAP.

Microsoft also fixed a critical zero-day RCE vulnerability in the Microsoft Management Console (MSC), a Windows component used to create, save, and open administrative tools called consoles, such as the Device Manager or the Event Viewer. The zero-day, tracked as CVE-2024-43572, could be exploited by an attacker to execute code on your device by convincing you to open a specially crafted malicious MSC file. The Redmond-based tech giant confirmed it had been exploited in the wild.

Another actively exploited zero-day is a Windows MSHTML platform spoofing vulnerability identified as CVE-2024-43573.

The MSHTML platform is part of Microsoft’s Trident engine, previously used by Internet Explorer and the old version of Microsoft Edge. Although Microsoft has retired both browsers, the company continues to support some of its components in the new Edge.

Other zero-days addressed by Microsoft in the October 2024 Patch Tuesday updates include:

  • CVE-2024-20659: A UEFI security feature bypass vulnerability in Windows Hyper-V.
  • CVE-2024-43583: A Windows Winlogon elevation of privilege vulnerability that could be exploited to give an attacker system privileges. This bug requires the presence of a first-party Microsoft IME to be fixed.
  • CVE-2024-6197: A remote code execution vulnerability in libcurl, the popular open-source client-side URL transfer library, fixed in Windows’ bundled version of the tool.

To install the October 2024 Patch Tuesday security updates, visit Settings > Update & Security > Windows Update and click the Check for updates button.

Take a look at the complete list of security flaws addressed with October 2024 Patch Tuesday updates:

TagCVE IDCVE TitleSeverity
.NET and Visual StudioCVE-2024-38229.NET and Visual Studio Remote Code Execution VulnerabilityImportant
.NET and Visual StudioCVE-2024-43485.NET and Visual Studio Denial of Service VulnerabilityImportant
.NET, .NET Framework, Visual StudioCVE-2024-43484.NET, .NET Framework, and Visual Studio Denial of Service VulnerabilityImportant
.NET, .NET Framework, Visual StudioCVE-2024-43483.NET, .NET Framework, and Visual Studio Denial of Service VulnerabilityImportant
Azure CLICVE-2024-43591Azure Command Line Integration (CLI) Elevation of Privilege VulnerabilityImportant
Azure MonitorCVE-2024-38097Azure Monitor Agent Elevation of Privilege VulnerabilityImportant
Azure StackCVE-2024-38179Azure Stack Hyperconverged Infrastructure (HCI) Elevation of Privilege VulnerabilityImportant
BranchCacheCVE-2024-43506BranchCache Denial of Service VulnerabilityImportant
BranchCacheCVE-2024-38149BranchCache Denial of Service VulnerabilityImportant
Code Integrity GuardCVE-2024-43585Code Integrity Guard Security Feature Bypass VulnerabilityImportant
DeepSpeedCVE-2024-43497DeepSpeed Remote Code Execution VulnerabilityImportant
Internet Small Computer Systems Interface (iSCSI)CVE-2024-43515Internet Small Computer Systems Interface (iSCSI) Denial of Service VulnerabilityImportant
Microsoft ActiveXCVE-2024-43517Microsoft ActiveX Data Objects Remote Code Execution VulnerabilityImportant
Microsoft Configuration ManagerCVE-2024-43468Microsoft Configuration Manager Remote Code Execution VulnerabilityCritical
Microsoft Defender for EndpointCVE-2024-43614Microsoft Defender for Endpoint for Linux Spoofing VulnerabilityImportant
Microsoft Edge (Chromium-based)CVE-2024-9369Chromium: CVE-2024-9369 Insufficient data validation in MojoUnknown
Microsoft Edge (Chromium-based)CVE-2024-9370Chromium: CVE-2024-9370 Inappropriate implementation in V8Unknown
Microsoft Edge (Chromium-based)CVE-2024-7025Chromium: CVE-2024-7025 Integer overflow in LayoutUnknown
Microsoft Graphics ComponentCVE-2024-43534Windows Graphics Component Information Disclosure VulnerabilityImportant
Microsoft Graphics ComponentCVE-2024-43508Windows Graphics Component Information Disclosure VulnerabilityImportant
Microsoft Graphics ComponentCVE-2024-43556Windows Graphics Component Elevation of Privilege VulnerabilityImportant
Microsoft Graphics ComponentCVE-2024-43509Windows Graphics Component Elevation of Privilege VulnerabilityImportant
Microsoft Management ConsoleCVE-2024-43572Microsoft Management Console Remote Code Execution VulnerabilityImportant
Microsoft OfficeCVE-2024-43616Microsoft Office Remote Code Execution VulnerabilityImportant
Microsoft OfficeCVE-2024-43576Microsoft Office Remote Code Execution VulnerabilityImportant
Microsoft OfficeCVE-2024-43609Microsoft Office Spoofing VulnerabilityImportant
Microsoft Office ExcelCVE-2024-43504Microsoft Excel Remote Code Execution VulnerabilityImportant
Microsoft Office SharePointCVE-2024-43503Microsoft SharePoint Elevation of Privilege VulnerabilityImportant
Microsoft Office VisioCVE-2024-43505Microsoft Office Visio Remote Code Execution VulnerabilityImportant
Microsoft Simple Certificate Enrollment ProtocolCVE-2024-43544Microsoft Simple Certificate Enrollment Protocol Denial of Service VulnerabilityImportant
Microsoft Simple Certificate Enrollment ProtocolCVE-2024-43541Microsoft Simple Certificate Enrollment Protocol Denial of Service VulnerabilityImportant
Microsoft WDAC OLE DB provider for SQLCVE-2024-43519Microsoft WDAC OLE DB provider for SQL Server Remote Code Execution VulnerabilityImportant
Microsoft Windows SpeechCVE-2024-43574Microsoft Speech Application Programming Interface (SAPI) Remote Code Execution VulnerabilityImportant
OpenSSH for WindowsCVE-2024-43615Microsoft OpenSSH for Windows Remote Code Execution VulnerabilityImportant
OpenSSH for WindowsCVE-2024-43581Microsoft OpenSSH for Windows Remote Code Execution VulnerabilityImportant
OpenSSH for WindowsCVE-2024-38029Microsoft OpenSSH for Windows Remote Code Execution VulnerabilityImportant
Outlook for AndroidCVE-2024-43604Outlook for Android Elevation of Privilege VulnerabilityImportant
Power BICVE-2024-43612Power BI Report Server Spoofing VulnerabilityImportant
Power BICVE-2024-43481Power BI Report Server Spoofing VulnerabilityImportant
Remote Desktop ClientCVE-2024-43533Remote Desktop Client Remote Code Execution VulnerabilityImportant
Remote Desktop ClientCVE-2024-43599Remote Desktop Client Remote Code Execution VulnerabilityImportant
Role: Windows Hyper-VCVE-2024-43521Windows Hyper-V Denial of Service VulnerabilityImportant
Role: Windows Hyper-VCVE-2024-20659Windows Hyper-V Security Feature Bypass VulnerabilityImportant
Role: Windows Hyper-VCVE-2024-43567Windows Hyper-V Denial of Service VulnerabilityImportant
Role: Windows Hyper-VCVE-2024-43575Windows Hyper-V Denial of Service VulnerabilityImportant
RPC Endpoint Mapper ServiceCVE-2024-43532Remote Registry Service Elevation of Privilege VulnerabilityImportant
Service FabricCVE-2024-43480Azure Service Fabric for Linux Remote Code Execution VulnerabilityImportant
Sudo for WindowsCVE-2024-43571Sudo for Windows Spoofing VulnerabilityImportant
Visual C++ Redistributable InstallerCVE-2024-43590Visual C++ Redistributable Installer Elevation of Privilege VulnerabilityImportant
Visual StudioCVE-2024-43603Visual Studio Collector Service Denial of Service VulnerabilityImportant
Visual Studio CodeCVE-2024-43488Visual Studio Code extension for Arduino Remote Code Execution VulnerabilityCritical
Visual Studio CodeCVE-2024-43601Visual Studio Code for Linux Remote Code Execution VulnerabilityImportant
Windows Ancillary Function Driver for WinSockCVE-2024-43563Windows Ancillary Function Driver for WinSock Elevation of Privilege VulnerabilityImportant
Windows BitLockerCVE-2024-43513BitLocker Security Feature Bypass VulnerabilityImportant
Windows Common Log File System DriverCVE-2024-43501Windows Common Log File System Driver Elevation of Privilege VulnerabilityImportant
Windows Cryptographic ServicesCVE-2024-43546Windows Cryptographic Information Disclosure VulnerabilityImportant
Windows cURL ImplementationCVE-2024-6197Open Source Curl Remote Code Execution VulnerabilityImportant
Windows EFI PartitionCVE-2024-37982Windows Resume Extensible Firmware Interface Security Feature Bypass VulnerabilityImportant
Windows EFI PartitionCVE-2024-37976Windows Resume Extensible Firmware Interface Security Feature Bypass VulnerabilityImportant
Windows EFI PartitionCVE-2024-37983Windows Resume Extensible Firmware Interface Security Feature Bypass VulnerabilityImportant
Windows Hyper-VCVE-2024-30092Windows Hyper-V Remote Code Execution VulnerabilityImportant
Windows KerberosCVE-2024-43547Windows Kerberos Information Disclosure VulnerabilityImportant
Windows KerberosCVE-2024-38129Windows Kerberos Elevation of Privilege VulnerabilityImportant
Windows KernelCVE-2024-43502Windows Kernel Elevation of Privilege VulnerabilityImportant
Windows KernelCVE-2024-43511Windows Kernel Elevation of Privilege VulnerabilityImportant
Windows KernelCVE-2024-43520Windows Kernel Denial of Service VulnerabilityImportant
Windows KernelCVE-2024-43527Windows Kernel Elevation of Privilege VulnerabilityImportant
Windows KernelCVE-2024-43570Windows Kernel Elevation of Privilege VulnerabilityImportant
Windows KernelCVE-2024-37979Windows Kernel Elevation of Privilege VulnerabilityImportant
Windows Kernel-Mode DriversCVE-2024-43554Windows Kernel-Mode Driver Information Disclosure VulnerabilityImportant
Windows Kernel-Mode DriversCVE-2024-43535Windows Kernel-Mode Driver Elevation of Privilege VulnerabilityImportant
Windows Local Security Authority (LSA)CVE-2024-43522Windows Local Security Authority (LSA) Elevation of Privilege VulnerabilityImportant
Windows Mobile BroadbandCVE-2024-43555Windows Mobile Broadband Driver Denial of Service VulnerabilityImportant
Windows Mobile BroadbandCVE-2024-43540Windows Mobile Broadband Driver Denial of Service VulnerabilityImportant
Windows Mobile BroadbandCVE-2024-43536Windows Mobile Broadband Driver Remote Code Execution VulnerabilityImportant
Windows Mobile BroadbandCVE-2024-43538Windows Mobile Broadband Driver Denial of Service VulnerabilityImportant
Windows Mobile BroadbandCVE-2024-43525Windows Mobile Broadband Driver Remote Code Execution VulnerabilityImportant
Windows Mobile BroadbandCVE-2024-43559Windows Mobile Broadband Driver Denial of Service VulnerabilityImportant
Windows Mobile BroadbandCVE-2024-43561Windows Mobile Broadband Driver Denial of Service VulnerabilityImportant
Windows Mobile BroadbandCVE-2024-43558Windows Mobile Broadband Driver Denial of Service VulnerabilityImportant
Windows Mobile BroadbandCVE-2024-43542Windows Mobile Broadband Driver Denial of Service VulnerabilityImportant
Windows Mobile BroadbandCVE-2024-43557Windows Mobile Broadband Driver Denial of Service VulnerabilityImportant
Windows Mobile BroadbandCVE-2024-43526Windows Mobile Broadband Driver Remote Code Execution VulnerabilityImportant
Windows Mobile BroadbandCVE-2024-43543Windows Mobile Broadband Driver Remote Code Execution VulnerabilityImportant
Windows Mobile BroadbandCVE-2024-43523Windows Mobile Broadband Driver Remote Code Execution VulnerabilityImportant
Windows Mobile BroadbandCVE-2024-43524Windows Mobile Broadband Driver Remote Code Execution VulnerabilityImportant
Windows Mobile BroadbandCVE-2024-43537Windows Mobile Broadband Driver Denial of Service VulnerabilityImportant
Windows MSHTML PlatformCVE-2024-43573Windows MSHTML Platform Spoofing VulnerabilityModerate
Windows NetlogonCVE-2024-38124Windows Netlogon Elevation of Privilege VulnerabilityImportant
Windows Network Address Translation (NAT)CVE-2024-43562Windows Network Address Translation (NAT) Denial of Service VulnerabilityImportant
Windows Network Address Translation (NAT)CVE-2024-43565Windows Network Address Translation (NAT) Denial of Service VulnerabilityImportant
Windows NT OS KernelCVE-2024-43553NT OS Kernel Elevation of Privilege VulnerabilityImportant
Windows NTFSCVE-2024-43514Windows Resilient File System (ReFS) Elevation of Privilege VulnerabilityImportant
Windows Online Certificate Status Protocol (OCSP)CVE-2024-43545Windows Online Certificate Status Protocol (OCSP) Server Denial of Service VulnerabilityImportant
Windows Print Spooler ComponentsCVE-2024-43529Windows Print Spooler Elevation of Privilege VulnerabilityImportant
Windows Remote DesktopCVE-2024-43582Remote Desktop Protocol Server Remote Code Execution VulnerabilityCritical
Windows Remote Desktop Licensing ServiceCVE-2024-38262Windows Remote Desktop Licensing Service Remote Code Execution VulnerabilityImportant
Windows Remote Desktop ServicesCVE-2024-43456Windows Remote Desktop Services Tampering VulnerabilityImportant
Windows Resilient File System (ReFS)CVE-2024-43500Windows Resilient File System (ReFS) Information Disclosure VulnerabilityImportant
Windows Routing and Remote Access Service (RRAS)CVE-2024-43592Windows Routing and Remote Access Service (RRAS) Remote Code Execution VulnerabilityImportant
Windows Routing and Remote Access Service (RRAS)CVE-2024-43589Windows Routing and Remote Access Service (RRAS) Remote Code Execution VulnerabilityImportant
Windows Routing and Remote Access Service (RRAS)CVE-2024-38212Windows Routing and Remote Access Service (RRAS) Remote Code Execution VulnerabilityImportant
Windows Routing and Remote Access Service (RRAS)CVE-2024-43593Windows Routing and Remote Access Service (RRAS) Remote Code Execution VulnerabilityImportant
Windows Routing and Remote Access Service (RRAS)CVE-2024-38261Windows Routing and Remote Access Service (RRAS) Remote Code Execution VulnerabilityImportant
Windows Routing and Remote Access Service (RRAS)CVE-2024-43611Windows Routing and Remote Access Service (RRAS) Remote Code Execution VulnerabilityImportant
Windows Routing and Remote Access Service (RRAS)CVE-2024-43453Windows Routing and Remote Access Service (RRAS) Remote Code Execution VulnerabilityImportant
Windows Routing and Remote Access Service (RRAS)CVE-2024-38265Windows Routing and Remote Access Service (RRAS) Remote Code Execution VulnerabilityImportant
Windows Routing and Remote Access Service (RRAS)CVE-2024-43607Windows Routing and Remote Access Service (RRAS) Remote Code Execution VulnerabilityImportant
Windows Routing and Remote Access Service (RRAS)CVE-2024-43549Windows Routing and Remote Access Service (RRAS) Remote Code Execution VulnerabilityImportant
Windows Routing and Remote Access Service (RRAS)CVE-2024-43608Windows Routing and Remote Access Service (RRAS) Remote Code Execution VulnerabilityImportant
Windows Routing and Remote Access Service (RRAS)CVE-2024-43564Windows Routing and Remote Access Service (RRAS) Remote Code Execution VulnerabilityImportant
Windows ScriptingCVE-2024-43584Windows Scripting Engine Security Feature Bypass VulnerabilityImportant
Windows Secure ChannelCVE-2024-43550Windows Secure Channel Spoofing VulnerabilityImportant
Windows Secure Kernel ModeCVE-2024-43516Windows Secure Kernel Mode Elevation of Privilege VulnerabilityImportant
Windows Secure Kernel ModeCVE-2024-43528Windows Secure Kernel Mode Elevation of Privilege VulnerabilityImportant
Windows ShellCVE-2024-43552Windows Shell Remote Code Execution VulnerabilityImportant
Windows Standards-Based Storage Management ServiceCVE-2024-43512Windows Standards-Based Storage Management Service Denial of Service VulnerabilityImportant
Windows StorageCVE-2024-43551Windows Storage Elevation of Privilege VulnerabilityImportant
Windows Storage Port DriverCVE-2024-43560Microsoft Windows Storage Port Driver Elevation of Privilege VulnerabilityImportant
Windows Telephony ServerCVE-2024-43518Windows Telephony Server Remote Code Execution VulnerabilityImportant
WinlogonCVE-2024-43583Winlogon Elevation of Privilege VulnerabilityImportant

In other news, the October 2024 Patch Tuesday updates are also the first released to Windows 11 24H2, which still doesn’t fix the ongoing Roblox issue. Windows 10 has also received them, although some versions of this operating system are no longer eligible for Patch Tuesday updates.

How to Download SysAid Server for Windows 10 & Install it

Many users are looking to download SysAid for Windows 10, and if you’re not sure how to do this, this guide will show you a few methods that you can use.

How do I download and install the SysAid server for Windows 10?

Use the official website

  1. Visit the SysAid download page.
  2. Next, choose the New Installation (x64) to download the setup file.
    new installation sysaid
  3. Once the setup file is downloaded, run it.
  4. Follow the instructions on the screen to complete the process.

Is SysAid free?

No SysAid isn’t free, however, the company does offer free trials for all of its services.

What does SysAid cost?

The company hasn’t disclosed its pricing, however, you can get its current prices by entering your business email on their website.

What are the disadvantages of SysAid?

There are several disadvantages when it comes to SysAid, most notably the user interface which can feel complex and less intuitive.

Customization is fairly limited and there are some issues with integrations with other systems.

As you can see, it’s pretty simple to download SysAid for Windows 10, and it can be installed just like any other application.

If you work with servers, you might be interested in our guide on how to download and install RSAT on Windows 11.

We also have a guide on how to download Jira on Windows 11, as well as an article on how to install PerfMonitor on Windows 11 to keep an eye out for your performance, so don’t miss them.

How to Download Monday.com App for Windows 11

When it comes to project management, monday.com is trusted by thousands of organizations worldwide. It allows them to create task-oriented applications and project management software for effective tracking and streamlining of the processes. And you can now download the monday.com app for Windows 11!

The monday.com app is available for both Windows and macOS and can be downloaded via Microsoft AppSource and Mac App Store, respectively, in addition to the official website. The entire process shouldn’t take more than a few minutes.

How can I download monday.com for Windows 11?

  1. Go to monday.com’s official website, and click on the Desktop app for Windows option.download monday.com for windows 11
  2. Head to the Downloads folder on your PC and run the monday-win-latest.exe file.
  3. Choose whether you want to install the app only for the current user or all users on the PC and click Install. The option, Only for me, is selected by default.select installation settings
  4. Once done, click on Finish with the Run monday checkbox ticked.
  5. Now, sign in to the monday.com desktop app using your work account, and it should be up and running.

As you can see, it’s easy to download and set up the monday.com desktop app on Windows 11. Similarly, you can download it on Windows 10.

Also, for IT administrators, monday.com offers an MSI installer, which allows mass installation and deployment of the desktop app across several PCs through a quick command, all in one go!

In case you want to download monday.com from Microsoft AppSource, head directly to the product page, sign in with a work or school account, and proceed with the download and installation.

monday.com on microsoft appsource
monday.com on Microsoft AppSource

For those concerned about the pricing of monday.com, it has a free plan that works for up to 2 users. On the other hand, the Basic, Standard, and Pro paid plans are priced at $9, $12, and $19, respectively. If you have an even bigger user base, contact their sales team and enquire about the Enterprise plan.

For those yet to pick an option, discover our top-rated business planning software and get one right away!

If you have any queries concerning the installation process or want to share your review of monday.com, drop a comment below.

Microsoft releases Windows 11 October 2026 Patch Tuesday Updates with KB5044284, KB5044285, and KB5044280

Microsoft has rolled out the October 2024 Patch Tuesday updates for all supported versions of Windows 11 — including Windows 11 24H2, 23H2, 22H2, and 21H2. The updates are KB5044284, KB5044285, and KB5044280, respectively.

Here’s what’s new in each release:

24H2 (KB5044284): This update addresses security vulnerabilities and includes improvements shipped in last month’s update.

23H2 (KB5044285) and 22H2 (KB5044285): This update addresses security vulnerabilities.

21H2 (KB5044280): This update addresses security vulnerabilities and includes improvements from last month’s update.

In addition to the above updates, Microsoft released a servicing stack update for Windows 11 24H2 (KB5046306), improving the component responsible for installing Windows updates. The update has no known issues.

One known issue with KB5046306 is that players cannot download and play Roblox on ARM devices via the Microsoft Store on Windows 11 24H2. Instead, they can download the title directly from the Roblox website.

If you prefer to install updates offline, you can grab KB5044284, KB5044285, and KB5044280 here.

You can read the full KB5044284 changelog here.

Microsoft recommends installing the latest cumulative updates when they become available. Keeping your system up to date is an excellent way to ensure you receive patches for potentially serious vulnerabilities actively exploited by attackers.

And there’s another reason to keep your device updated: Microsoft has confirmed that Windows 11 24H2 will be supported for 36 months. That’s three years before you consider upgrading to the next version of Windows 11, assuming you’re OK with the end of Windows 11 Home and Pro support on October 14, 2027.

Microsoft releases KB5044273 / KB5044277 / KB5044293 / KB5044286 for Windows 10 as part of the October 2026 Patch Tuesday updates

Microsoft has released the latest cumulative updates for various supported Windows 10 and Windows Server 20H2 versions as part of the Patch Tuesday cycle.

The updates are now available for the latest supported versions, 20H2, 21H2, and 22H2. They are being distributed under KB5044273, bumping up the builds to 19044.5011 and 19045.5011.

The highlight of today’s release is, as always, security fixes. Here’s the list of addressed vulnerabilities for Windows 10 22H2:

  • This update addresses a vulnerability in how Windows processes JPEG XR images, which could allow an attacker to gain access to sensitive data.
  • This patch addresses a vulnerability in Windows when the Network security: Allow Local System to use computer identity for NTLM security policy is configured, which could allow an attacker to elevate their privileges.
  • This update addresses a vulnerability in Windows that could allow an attacker to bypass the user mode Code Integrity (UMCI) policy on an affected device.

As for the known issues, if you have a dual-boot setup for Windows and Linux, you might face issues booting Linux after installing today’s Windows 10 updates. Microsoft advises people to refer to the workaround mentioned on the Windows release health site for this issue.

You can check out KB5044273’s support page here.

Microsoft also released KB5044277 for Windows 10, version 1809, KB5044293 for Windows 10, version 1607 (Long-Term Servicing Channel), and KB5044286 for Windows 10, version 1507 (Long-Term Servicing Channel).

It is noteworthy that Windows 10 20H2 and Windows 10 1909 reached the end of servicing. Non-LTSC editions of 21H2 have also reached the end of servicing.

15 Discord Easter You Should Check Out Now

With an ecosystem of servers, bots, and different channels, Discord always has something new for you to discover. In this guide, we will discuss Discord Easter eggs that can enhance your experience, induce creativity, and add fun to your conversations. Before that, first, let us know what Discord Easter eggs are.

What are Discord Easter Eggs?

Discord Easter eggs are hidden features or playful elements within the Discord platform that you can discover. These Easter eggs can take different forms, such as playful animations, quirky responses from bots, special commands, and more, and are designed to add fun and improve engagement.

Different types of Discord Easter Eggs


1. Discordo – Works with Discord’s desktop and web apps

Discordo is a fun way to add a startup sound to your Discord app on your computer. Once activated, you can hear the Discordo sound effect whenever you open the app using this easter egg.

To enable it, you can open the chat app or go to Discord on the browser, then locate Discord logo from the top left and click it 16 times repeatedly, you will hear the Discordo sound effect. Now close the app and relaunch it to hear the sound.

If you want to disable it, go to Discord logo and click  Discord logo and click it 16 times. For confirmation, you will hear the same sound, when you leave that channel.

2. SNEK Game

Do you remember the popular Snake game from the old Nokia phones? Wondering how to get that. For that, you need to access a webpage on Discord website, which is not available, once you go to that page, you will see “Wrong Turn?” 404 error page. You will also see a ramen shop with 404 number on it and with snake sign drawn on a board, tap it to open the Discord SNEK game.

To play the game, use the arrow keys on your keyboard and control it. If you are not able to access the game from the error page, press up, up, down, down, left, right, left, right, B, A keys in this order.

3. AMOLED dark theme ( works on Android phone only)

If you use Discord on mobile, you are in for a treat. This is useful for people who like their apps in black color. As you know, Discord has two color themes by default, light, and dark, but dark is greyish rather than black. With this Discord Easter egg, you can switch to black theme.

To enable it, launch the app, locate the profile picture from the bottom and tap it. Go to Appearance option in Settings. Locate and tap Dark 10 times repeatedly to get the darker theme. Once done, you will see Experimental AMOLED Mode activated on the Settings page.

4. Copy Username Tag

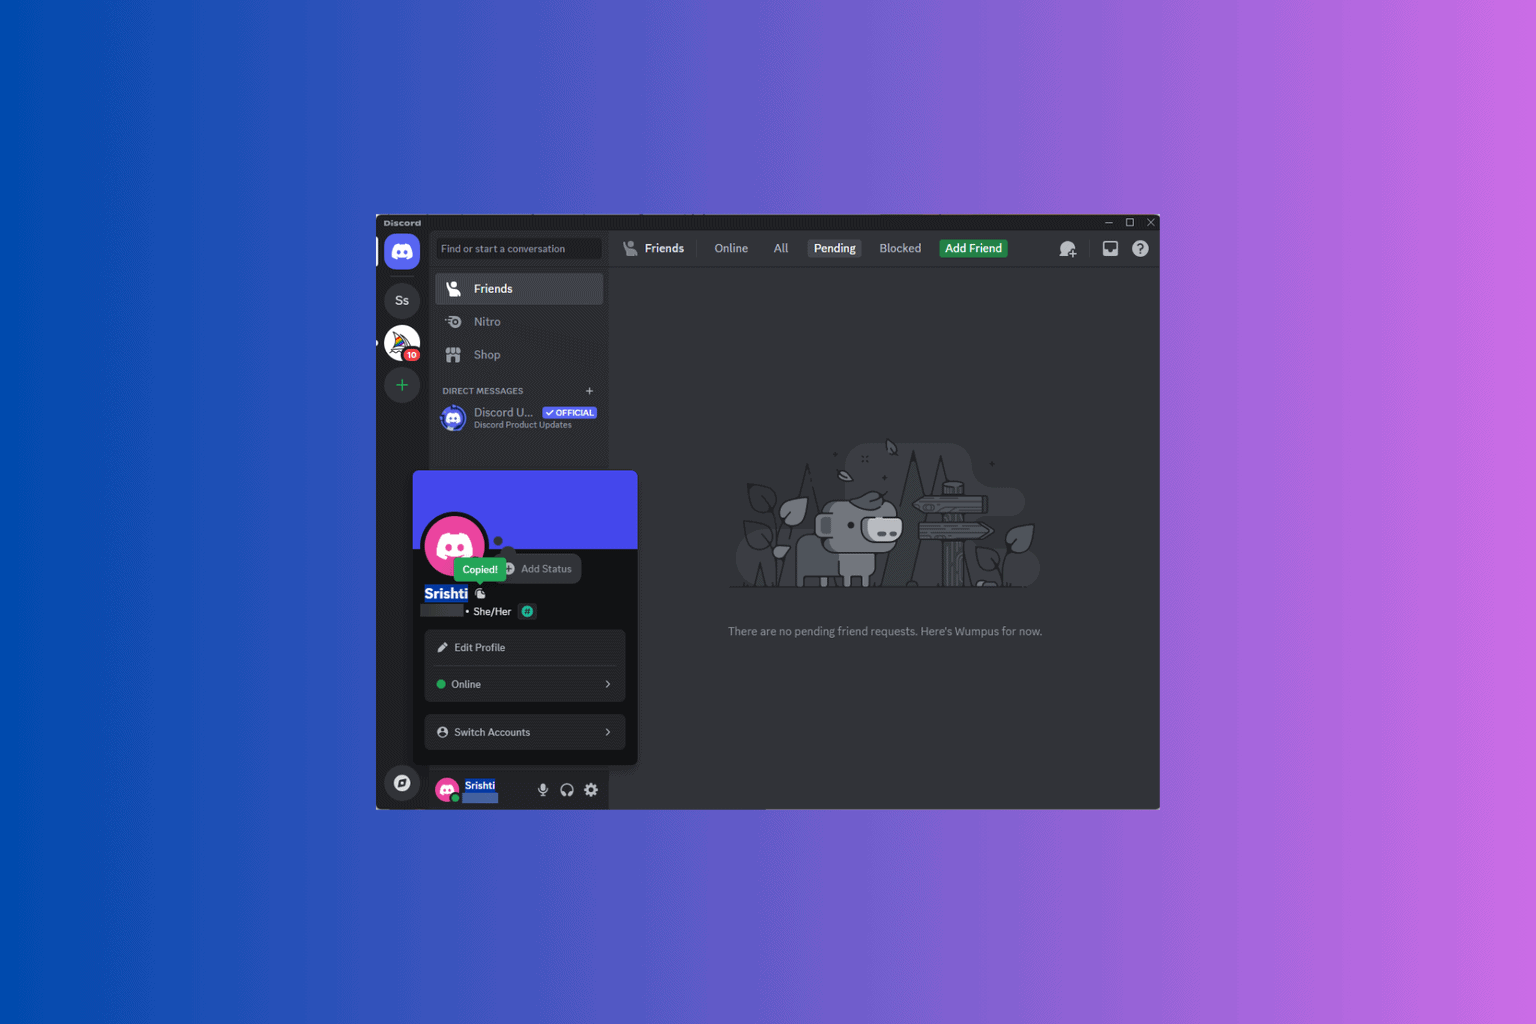
When you click on your username to copy it in Discord, the app shows a Copied prompt, and if you continue clicking to copy the username multiple times, the prompts will update.

To do so, launch the Discord app, locate your username from the bottom ledt corner and tap it. When you see a pop-up, tap on your username repeatedly, then you will see these messages in the same order:

  • Copied!
  • Double Copy!
  • Triple Copy!
  • Dominating!!
  • Rampage!!
  • Mega Copy!!
  • Unstoppable!!
  • Wicked Sick!!
  • Monster Copy!!!
  • GODLIKE!!!
  • BEYOND GODLIKE!!!!

5. Akuma Raging Demon

Do you remember Akuma from Street Fighter? With this Discord Easter egg, you can use Street Fighter’s first Ultra Combo attack – Raging Demon.

To access this, press Ctrl+/ (Windows) or Cmd+/  (Mac) to launch the keyboard shortcuts panel and press these keys in the same order as mentioned: H, H, right arrow, N, K

Once you are done, you will see a flicker on the keyboard shortcuts screen and the Akuma’s Raging Demon attack like animation will appear on the screen.

6. Confetti

When you buy Discord Nitro and unlock new features on  Discord, that’s calls for a celebration and there is a easter egg for just that. When someone boosts a Discord server, you see a prompt: [username] boosted the server in the chat window.

The message will also show the Nitro crystal icon which shoots confetti when you hover your cursor over it. And, if you continuously rub the crystal with the cursor, you will see Discord’s mascot Wumpus as part of celebration, isn’t it great!

7. Dance Revolution

Dance Revolution - Discord easter eggs

Discord has also tributed Dance Dance Revolution, a video game series produced by Konami, by including a musical note arrow keys as its Easter egg.

To check it out, press Ctrl+/ (Windows) or Cmd+/  (Mac) to launch the keyboard shortcuts panel and press any of the four arrow keys and play the musical notes.

8. Broken magnifying glass or empathy banana

Discord has an interesting way of doing things, one of them is showing the No results found page in gaming chat app when it searches for something in a server, comes back empty handed. However, you don’t get to see the same image every time, sometimes you see an empathy banana and sometimes you get a Broken magnifying glass.

Here are the following messages you see:

  • We dropped the magnifying glass. Can you try searching again?
  • No results found. Empathy banana is here for you.

9. Pencil shake

Pencil shake is a Discord Easter egg, which appears if you have been on the User profile for 90 mins. To see this, you need to click the Settings option from the bottom left corner, and go to Profiles, then wait for 90 mins and the pencil next to User profile will start shaking. As the time passes, the pencil will start shaking aggressively.

10. Long User name

If you choose a username which is weird and long, your Discord app will judge you. To experience it, go to Settings option from the bottom left corner, then My Account. Locate Username, and click Edit. Enter the long username and you will see a dispproval emote instead of Edit.

11. Light theme (only Android app)

Discord Android app also comes wtih a light theme easter egg. To enable it, launch the app, locate the profile picture from the bottom and tap it. Go to Appearance option in Settings. Locate and tap on the Light theme option six times consecutively.

Once done, you will see that the entire screen is white, the flashlight turned on with a prompt When Light theme isn’t enough.

12. Humans

Humans discord easter eggs

If you click the discord.com/humans.txt link, you will be redirected to a page, wherein you will see the Discord logo with Discord name in ASCII art. You will also get the About page on the webpage.

13. Turkey emoji

If American Thanksgiving is approaching, the emoji picture will replaced by a turkey. If you want to check it out, change the time and day on your device to the Thanksgiving day.

In case you want to learn more on how to create Discord emojis, add PS5 Emojis to Your Discord or  Turn Off Automatic Emojis on Discord for PC & Mobile: we have separate guides for you; check them out.

14. New account

If your account or someone else account is one week old and you click on their user profile, you will see a flair popup with Wumpus prompting I’m new to discord, say hi! with six different head accessories:

  • Without a hat (may have question marks)
  • A wizard hat with a yellow star on the front
  • A red Pokémon Trainer cap with a green logo on the front
  • Pikachu’s ears with the blush marks on his cheeks
  • A Mario and Luigi hat both with mustaches
  • A green Link cap with Link’s blonde hair

15. No more Super Reactions (mobile only)

If you click on Super Reactions button on your mobile app, and you don’t have any  Super Reactions, you will get to a screen saying, A better way to react and informing that you don’t have enough Super Reactions. You will see bubble reaction with different Wumpuses like emojis, here are the options:

  • A Mario hat and mustache
  • A Luigi hat and mustache
  • Pikachu ears
  • A Link hat and hair
  • A Pokémon Trainer hat
  • No hat
  • A wizard Hat

Overall, these Easter eggs make using Discord enjoyable and encourage users to explore the platform more. You can try these out and demonstrate the cool hidden tricks in front of your friends to boast your skills.

If the Discord app is not opening on your Windows computer, the issue could be your outdated Windows OS; read this guide to learn more about the issue.

In case you are new to Discord and want help in creating account on the platform: we have a detailed guide with step-by-step instructions.

Which Discord Easter eggs do you use often? Share the names with our readers in the comments section below, and let’s start the conversation.

Developer Tab in Excel: How to Enable, Use Or Remove It

The Developer tab in Excel is a feature for advanced users and developers who want to access tools for creating custom forms, macros, and other interactive content in their workbooks.

The tab is not visible on the menu bar of Excel by default, but you can easily enable it to enhance your productivity by allowing you to automate tasks and build complex apps. In this guide, we will discuss the steps to enable or disable the Developer tab and its various features.

How can I enable the Developer tab in Excel?

  1. Press the Windows key, type excel in the search bar, and click Open.
  2. On the Home page, click Options. If you have any workbook open, click File, then Options.
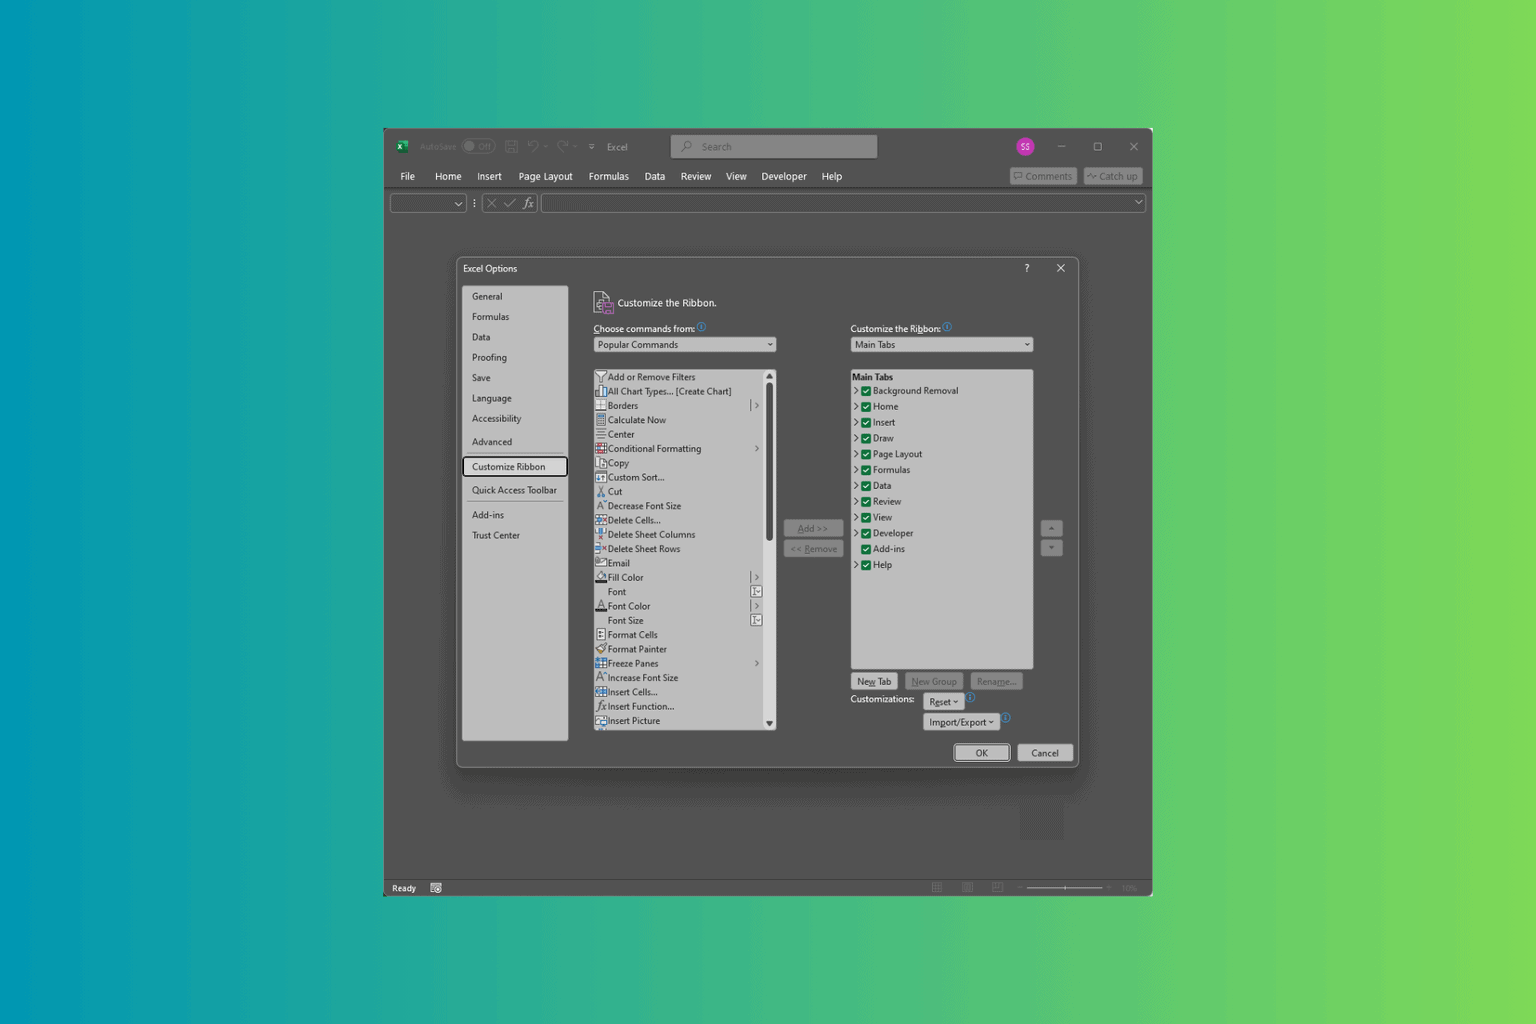
  3. Select Custom Ribbon from the left pane. Developer tab EXCel
  4. For Customize the Ribbon, select Main Tabs from the drop-down, then from the list of tabs, place a checkmark next to Developer, then click OK.

You will see the Developers tab with the list of main tabs. If you ever want to disable it, reverse engineer these steps.

What can I do with the Developer tab in Excel?

  • Create & manage macros: You can record actions in Excel and automate repetitive tasks. You can also modify recorded macros or write new ones using Visual Basic for Applications (VBA).
  • Access Visual Basic for Applications: You can write and edit complex code to customize Excel’s functionality. You can also design interactive data entry forms, smoothing user interactions.
  • Insert controls: You can add buttons, checkboxes, dropdown lists, and other interactive elements to your workbook. There are also advanced controls for more customization.
  • Import/Export XML data: You can work with XML files, which is useful when handling structured data and integrating it with other systems.
  • Build custom add-ins: Develop and share custom Excel add-ins for better functionality.
  • Access and manage COM Add-ins: You can manage and enable or disable third-party add-ins to extend Excel’s capabilities.
  • Work with formulas and functions: To extend the in-built capabilities of Excel, you can create user-defined functions (UDFs).
  • Design custom ribbon interfaces: You can add buttons or features to the ribbon to personalize your Excel interface and for quicker access.
  • Control workbook protection: To secure your data and control who can access your workbook, you can set password protection.
  • Show XML mapping pane: You can integrate and map XML data to cells within your Excel workbook.

Why can’t I add a developer tab in Excel?

First, restart your computer and check if the Developer tab in Excel is enabled using the steps mentioned above.

1. Check the Trust Center

  1. Launch Excel and go to File.
  2. Click Options from the bottom of the interface.
  3. Choose Trust Center and select Trust Center Settings.Excel Trust center settings  developer tab excel
  4. Go to the Macro Settings, and go through the options to ensure they are not restrictive.Macro settings
  5. Next, navigate to ActiveX Settings and check the same.
  6. Once you made the changes, click OK to save them.

2. Check the add-ins

  1. Launch Excel and go to File.
  2. Choose Options from the bottom left pane.
  3. Select Add-ins.COM add-ins - Developer tab excel 
  4. Locate Manage and select COM Add-ins from the drop-down.
  5. Click Go.
  6. Go through the Add-ins, uncheck the suspicious add-ins, and click OK to save the changes.add ins remove

Sometimes, you are unable to type in Excel. There could be several reasons for this, including interfering add-ins; read this guide to learn more about it.

3. Repair Microsoft Office

  1. Press Windows + I to open the Settings app.
  2. Go to Apps, and click Installed apps.    Apps - Installed apps
  3. Locate Microsoft Office or Microsoft 365 Apps, click the three-dot icon, and select Modify.Modify
  4. Click Yes on the UAC prompt.
  5. Select Quick Repair and select Repair.Repair
  6. Follow the on-screen prompts to complete the process.

If you want to recover corrupted Excel files in Windows, you can run a malware scan or use the Open and Repair option. Read this guide to learn more.

4. Update Microsoft Excel

  1. Launch Excel and go to File.
  2. Click Account.
  3. Locate Update Options, and select Update Now from the drop-down menu.Update options
  4. Follow the on-screen instructions to complete the process.

5. Reinstall Microsoft Office

  1. Press Windows + I to open the Settings app.
  2. Navigate to Apps, and click Installed apps.Apps - Installed apps
  3. Locate Microsoft Office or Microsoft 365 Apps, click the three-dot icon, and select Uninstall.Uninstall (2) excel developer tab 
  4. Click Uninstall.
  5. Now login to your Microsoft account and go to Services and Subscriptions.
  6. Scroll down to find Microsoft Office, and click Install apps.Reinstall - Excel developer tab
  7. A .exe file will be downloaded to your computer; double-click it and follow the on-screen prompts to complete the installation.

Reinstalling Microsoft Office can also help you fix other issues, like Microsoft Excel not opening on Windows. To learn other ways, don’t forget to check this article.

The Developer tab in Excel can help you access tools for creating macros, managing add-ins, designing interactive forms, and writing complex VBA code.

If you encounter difficulty adding the Developer tab, you can try checking the add-ins, repairing or reinstalling Office, or checking the Trust Center settings.

In case your Excel file is not opening on double-click, the Office installation might be corrupt; to learn more about ways to fix it, check out this detailed guide.

If you have any concerns or suggestions about the Developer tab in Excel, feel free to mention them in the comments section below.

Microsoft Planner vs. Jira: Which is Best For Your Team?

When it comes to project management software, there are several available options, both free and paid. Two that stand out for their extensive and user-oriented feature set are Microsoft Planner and Jira, although they don’t command significant market shares individually!

Choosing between the two can often be confusing, but with a proper understanding of each software, identifying the pros and cons, and ascertaining your team’s requirements, you can make an informed decision.

This is precisely what the following sections intend to do: draw a comparison between Microsoft Planner and Jira, and list out the advantages, disadvantages and applications of each!

Microsoft Planner vs. Jira: A quick comparison

AspectMicrosoft PlannerJira
Availability of featuresSomewhat limited, but you get all the basic task and progress-monitoring featuresOffers a wide array of features, and can much more effectively monitor progress
IntegrationSeamless integration with Microsoft 365 apps, including Teams, SharePoint, and Office, amongst othersAtlassian marketplace has thousands of apps available for easy integration, including Zoom and Slack, besides other task-oriented tools
Ease-of-use Offers a user-friendly interface, features are easy to understand for everyoneSlightly complex, may require basic training for the non-tech-savvy team members
Performance and speed Decent performanceExcellent performance and efficiency, even in much larger teams
Initial setup complexityEasy and seamless, should be up and running quickly Installing Jira is slightly complex, takes time, requires someone with knowledge of the process
Compatibility with devices Works across Windows, macOS, Android and iOSCan be accessed through the browser and all major operating systems
Scope for future expansionCan be expanded but more suitable in smaller setupsHighly scalable
Best forSmaller non-tech teams, those familiar with other Microsoft 365 products Large tech, marketing, operations, and bug-tracking teams, very effective at the job
PricingIncluded with Microsoft 365, additional features start at $10 per user/monthFree for up to 10 users, plans start at $7.16 per user/month
Market share~ 0.02% (Unofficial figures)~ 5%, Higher in specific segments, say bug tracking software (Unofficial figures)
Microsoft Planner vs. Jira

Which is better for me, Microsoft Planner or Jira?

Picking one between Microsoft Planner and Jira can’t be subjective but depends on the team’s requirements. So, before you make the choice, answer these questions:

  • What is the team size: For larger teams and organizations, say with over a hundred members, Jira is a better choice.
  • What is the team’s role: For a smaller, non-tech team managing operations, Microsoft Planner would be the wise choice. But if your organization has several divisions, includes teams like software development, bug tracking, operations, marketing, and sales, and pushes out regular updates, Jira would be the perfect pick.
  • Can you hire someone to manage the tool: If you can’t set aside resources to hire an expert, go with Planner. It’s easy to set up and use. For teams that can afford an additional member, Jira would be a good choice.
  • What approach does the team follow: If it’s an agile approach, pick Jira. For simpler task management, pick Planner.
  • Are you aiming for future expansion: If there are plans for expansion in the foreseeable future, pick Jira. Otherwise, go with Planner.
  • Which tools do you plan to integrate? Planner can be integrated with other Microsoft 365 products and is a part of the package, making it more suitable for organizations that already have a Microsoft 365 subscription. Jira, on the other hand, has Confluence and BitBucket, amongst other utilities from Atlassian. Also, the Jira and Confluence combination is said to be unbeatable, according to users who worked with both.
microsoft planner
Microsoft Planner (Image source: Microsoft)

Besides all this, remember to run a quick survey amongst the team members, because it’s them who will ultimately have to use the tool. Jira, due to its feature-rich interface, can be a little tricky. And you don’t want teams to spend weeks getting used to the project management software. Although if it’s a development or technology-oriented team, you are all set!

jira software
Jira (Image source: Atlassian)

Microsoft Planner vs. Jira: The final verdict

As I have repeatedly said and demonstrated earlier, there’s no winner in the Microsoft Planner vs Jira debate. Each project management software offers unique advantages and works perfectly under different conditions.

While Planner may be the software for some, others will find Jira to be a more viable option, depending on the present requirements, future plans, and available budget.

One thing absolutely clear is that Microsoft Planner is much simpler to use, while Jira is more customizable and better at tracking and monitoring, especially when it comes to bugs and patches.

If you go with the former, learn the best practices for Microsoft Planner to make the most out of the software. And for those of you who go with the latter, make sure to use a browser fully compatible with Jira for streamlined performance!

In case you are still unsure, discover the best, top-rated collaboration software for small teams.

Which one do you support in the Jira vs Microsoft Planner debate? Share with our readers in the comments section.

ZoomInfo Chrome Extension – Here’s How To Install It

The ZoomInfo Chrome extension is a useful tool for directly accessing valuable business insights, contact information, and company details from your browser. It makes it easy to find the data you need with just a few clicks. I’ll show you how to install and use this extension efficiently.

Let’s jump right into it!

How To Install ZoomInfo Chrome Extension

Follow these steps to get it on your browser:

  1. Open Chrome Browser, and visit Chrome Web Store.
  2. Type “ZoomInfo” in the search bar and press Enter. 
  1. Click on the ZoomInfo extension and tap the “Add to Chrome” button. 
Add to Chrome
  1. A confirmation window will appear. Click “Add Extension” to proceed and install it.
Add Extension
  1. Visit the website of the company you’re researching, and the ZoomInfo extension will automatically detect it. Tap on the icon, log in, or sign up if you’re new to the platform.

However, note that you’ll need a business email to sign up.

Log in, or sign up

You can now access contact information for key company decision-makers, including job titles, emails, and phone numbers.

Overall, ZoomInfo Chrome extension is an essential tool for anyone in sales, marketing, or business development. The steps above will help you install and use it to streamline your prospecting process.

Also, learn how to back up and remove malicious Google Chrome extensions.

To learn more about other extensions, our latest guide covers Skip Redirect extension, so don’t miss it for more information.

Dell Command Update: Download on Windows 11

Drivers ensure your Windows 11 PC is operating efficiently and downloading a dedicated program like the Dell Command Update specific for your model and can be more efficient and reliable.

Even though there are different ways to update your drivers like via Device Manager and Windows Update, the Dell Command Update provides tailored updates that optimize performance and compatibility while reducing the risk of errors or conflicts that can arise from generic updates.

What does Dell Command Update do?

Like many driver updater software, Dell Command Update ensures:

  • Up-to-date drivers – The program works in the background by checking for any damaged, missing or outdated drivers in your system and promptly updates them with the latest versions.
  • Tailored updates – With Windows Update and Device Manager, there’s a high possibility that your device may end up being matched with the wrong driver or a generic one that is not compatible with your system. The Dell Command Update ensures your device is matched with drivers specifically designed for it.
  • Optimize system performance – With the right drivers, your system is secured from bugs, BSoDs, poor performance, slowdowns and any other performance issues that may arise from driver incompatibility.

How do I download the Dell Command Update for Windows 11?

  1. Navigate to your browser and go to the Dell Update page.
  2. Enter your Dell product and click on Check for compatibility.
  3. Next in the drop-down menu, select Windows 11 and click on Submit.
  4. Now scroll down and click on Download.
  5. Wait for the download to complete, locate it in the Downloads folder, double-click on the file to run it.
  6. Follow the on-screen prompts to complete installation. You may have to restart your PC after the installation.

Troubleshooting common issues

  • Dell command update not opening – This is probably an issue with the installation files. They may have been corrupted somehow so simply uninstall the program along with all leftover files then do a reinstallation.
  • No updates available – Before downloading the program, ensure your device passes the compatibility test and your Windows version is supported.
  • Updates not installing – You require a strong internet connection to complete driver updates so resolve any connection issues or switch to a different connection. You can also download the drivers manually straight from the Dell website or update your drivers without an internet connection.

Finally, if you’re not a Dell user, other manufacturers also have their own dedicated driver updater software. For instance, Intel users can benefit from the Intel Driver and Support Assistant. The AMD driver update tool will also come in handy for AMD users.

Aside from keeping your drivers updated, you also need to apply some tips and tricks to improve your PC’s overall performance.

That’s a wrap from us but do let us know if you’ve downloaded the Dell Command Update tool. Also, let us know whether it does what it is supposed to do in the comment section below.

How to Download iCUE For Windows 11: All You Need to Know

Many use iCUE software on their PC, and if you’re looking to get this application, today’s guide will show you how to properly download CORSAIR iCUE for Windows 11.

How can I download iCUE on Windows 11?

Use the official website

  1. Navigate to the CORSAIR download page.
  2. Click the Download button next to CORSAIR iCUE.
     download iCUE
  3. Choose the option to skip this step.
    skip this step
  4. Select the download location.
  5. Once the download is finished, run the setup file to install it.

Is CORSAIR iCUE free?

Yes, this software is free to use, and as said earlier, it’s available from CORSAIR’s download page.

What is iCUE compatible with?

The software is compatible with a wide array of products, but for complete information, we advise you to check the official compatibility list.

Does Corsair iCUE only work with Corsair products?

iCUE works with both CORSAIR and ASUS products, but to ensure that your ASUS device is supported, be sure to check its compatibility beforehand.

Do I need to keep my iCUE running?

No, iCUE has a device memory mode that allows products to operate in a hardware state without having to rely on iCUE software.

Do I need iCUE for my Corsair RAM?

Using other RGB software with CORSAIR RAM might cause interface driver issues and the lighting configuration might be affected. Other than that, your RAM will continue to fully operate.

We hope that this guide helped you to learn how to download iCUE for Windows 11 properly.

If you encounter any issues, we have a great guide on what to do if iCUE is not detecting devices or if iCUE is not working after the update, so feel free to check them out.

Telegram Free Download for Windows 10: How To Install It Safely

If you’re looking for a Telegram free download for Windows 10, you can choose between the official website or third-party sources. It’s a popular messaging app that provides fast, secure communication across devices. 

I’ll show you the steps to download Telegram directly from its official site to ensure you have the safest and latest version. I’ll also touch on third-party sources, though it’s not always the most secure choice.

Let’s begin!

How To Download Free Telegram on Windows 10

Here are the methods:

Using the Official Website

Follow these steps to ensure you’re getting the most up-to-date and secure version of Telegram:

  1. Open your browser and go to the official Telegram website.
  2. Click “Apps” in the top menu, scroll down, and select “Telegram for Windows/Mac/Linux” under Desktop apps.
Telegram for Windows/Mac/Linux
  1. You’ll be redirected to the Windows version download page. Click “Get Telegram for Windows x64” (or x32 if you have a 32-bit system).
Get Telegram for Windows x64
  1. Once the download is complete, tap the Downloads icon on the top right corner to access the file. Click it to run the setup.
Downloads icon
  1. Follow the installation prompts to complete the process.

Now, open Telegram, enter your phone number, and follow the verification steps.

Using Third-Party Websites

Uptodown

While it’s possible to download Telegram from third-party websites, you should choose a reputable site like uptodown. However, this method has certain risks, including outdated software or malware. 

Also, always verify the downloaded file with antivirus software before installation. Still, I recommend you prioritize your device’s security by sticking to the official site whenever possible.

So, now you know how to get Telegram as a free download for Windows 10. For Windows 11 users, we have an article on how to download Telegram too.

Also, learn how to use Telegram Web on any browser and fix it if it’s not working in Chrome.

How to Download Chrome Remote Desktop for Windows 11

Whether you want to access your PC from a different location and retrieve some files or troubleshoot issues on another, you need to download the Chrome Remote Desktop for your Windows 11 to facilitate this task.

Of course there are other ways you can control your PC remotely but Chrome Remote Desktop is the real deal because it doesn’t require much in terms of system requirements, works with multiple OSes and the connections are encrypted guaranteeing the security of your data.

How do I download Chrome Remote Desktop for Windows 11?

1. Download Chrome Remote Desktop

  1. On your browser, navigate to the Chrome Remote Desktop page and click the download icon.
  2. Once the download is complete, click on Accept & Install.
  3. Click on the installer file and hit Run.
  4. Wait for Windows to finish the configuration.
  5. Create a name for your PC, or use the default one.
  6. Enter a PIN that will allow you to access the PC remotely.
  7. To access another PC, follow similar steps to set up, and when sharing, you’ll be asked to generate a code as the other user will need it to access your screen. The same applies to when you want to access their screen.
  8. You can stop sharing your screen at any time.
  9. Note that both computers must be connected to the Internet for Chrome Remote Desktop to work.

2. Install the extension

  1. Launch your Chrome browser, and in a new tab, go to the following location: chrome.google.com/webstore/category/extensions
  2. In the search bar at the top left, type Chrome Remote Desktop and hit Enter.
  3. Click on Add to Chrome.
  4. Confirm by clicking Add extension.

What are the benefits of using Chrome Remote Desktop?

  • Chrome Remote Desktop doesn’t have stringent requirements like the Windows 11 Remote desktop that only works on select editions. All you need is a Google account and works with different OSes.
  • You can use Chrome Remote Desktop without needing another party to be on the other end. This is referred to unattended access.
  • You can beef up the security for remote access by setting up a PIN especially with unattended access to secure your data. Consequently, you can also check whether someone else has remote access to your PC.

Although there are benefits of using the Chrome Remote Desktop, it has its drawbacks. For instance;

  • It is dependent on a strong internet connection and limited to the Google Chrome browser. And while you can install Chrome extensions on other browsers, the Chrome Remote Desktop is incompatible with other browsers.
  • The features are pretty basic and even actions like file transfer are absent.
  • It also doesn’t allow multiple sessions simultaneously which makes it unsuitable for collaboration. You’re only limited to one session at a time and even that is capped at 30 minutes which has to be renewed.
  • May not work well with graphic-intensive programs since it doesn’t allow monitor resolution upscaling.

Among other issues, the Chrome Desktop may be unresponsive or display a black screen but this is something we’ve already covered in our comprehensive guides.

In such cases, if the issue persists, you can try other remote control software that come with advanced features. Speaking of controlling your PC, did you know you can also use your phone to control your PC?

You can try other remote access tools that offer more advanced features, including NoMachine for Windows, which provides faster performance and more control options.

We also have a guide on what to do if Chrome Remote Desktop got blocked by admin, so don’t miss it for more solutions. Before you leave, don’t miss our guide on how to use Chrome Remote Desktop in Guest Mode without a Google account.

It’s worth mentioning that Chrome Remote Desktop can work with multiple accounts, but this feature is fairly limited, so keep that in mind.

Have you downloaded the Chrome Remote Desktop on your Windows 11? What was your experience? Would you recommend it to other users? Let us know in the comment section below.

How to Download & Install Square ODBC Driver on Windows 10

To connect to Square live data from apps that support ODBC connectivity, you will need to download the Square ODBC driver on Windows 10. But given the plethora of available options, it becomes confusing to pick the perfect one!

Most Square ODBC driver options work on a standalone basis and don’t require third-party software or additional libraries to complement their functionality. Besides, these work for both 32-bit and 64-bit apps, in addition to supporting multi-language environments.

How do I download Square ODBC driver in Windows 10?

  1. Go to Devart’s official website, and click on the Download button.square odbc driver download windows 10
  2. Click on the Get Trial button next to ODBC Driver for Square .EXE.
  3. Sign up for Devart.
  4. Now, click the Download button next to ODBC Driver for Square .EXE.driver setup download
  5. Head to the Downloads folder on your PC, and then run the DevartODBCSquare.exe file.
  6. Click Yes in the UAC prompt.
  7. In the ODBC Driver for Square Setup, click Next to proceed.setup
  8. Now, select the I accept the agreement entry, and click Next.
  9. Choose a path for the driver and then click on Next.
  10. Proceed with full installation. This means that you get to download and install both the 32-bit and 64-bit ODBC drivers for Windows 10.download 32-bit and 62-bit ODBC driver for Windows 10
  11. Choose whether you want a Start Menu shortcut for the ODBC driver for Square and click Next.
  12. Verify the installation settings, and click on Install.download and install square ODBC driver for Windows 10
  13. Choose the Trial option if you don’t yet have an activation key. You get a 30-day free trial of Devart ODBC driver for Square.
  14. Finally, click on Finish and reboot the PC to apply the changes.

This way, you can download both 32-bit and 64-bit ODBC drivers for Windows 10. If you want just one, select the Custom installation option, and pick the version you want to install.

How can I fix Square ODBC driver issues?

When facing issues after downloading the Square ODBC driver for Windows 10, you must verify whether the installation went through successfully.

To verify that, press Windows + S to open Search > type ODBC Data Source Administrator in the text field > click on the relevant result > go to the Data tab > check whether Devart ODBC Driver for Square is listed.

installation check

If it’s not listed there, then you will have to run the driver installer again. This time, make sure you are signed into an administrator account on Windows. But if everything goes through on the first attempt, you can proceed to the Square ODBC driver setup.

Also, don’t forget that for the effective functioning of Square ODBC driver for Windows, you will need these critical components:

Besides, for those of you looking for alternatives, here are the other popular options to download Square ODBC driver on Windows 10:

For those facing problems after driver installation, discover expert-recommended fixes for ODBC issues on Windows 10!

If you have any queries or want to share your favorite Square ODBC driver developer, then drop a comment below.

How to Download Dropbox For Windows 11 & Set it up

Do you want to run Dropbox on your system? If so, today we’re going to show you how to download Dropbox for Windows 11, so let’s get started.

How do I download Dropbox on Windows 11?

1. Use the Dropbox website

  1. Visit the Dropbox download page and click on Install.
    install dropbox button
  2. If you have a Dropbox account you can sign in now or you can skip this step.
  3. The download will now start.
  4. Once the download is finished, run the setup file and follow the instructions on the screen.

2. Use Microsoft Store

  1. Press the Windows key + S and type store. Choose Microsoft Store from the list.
    Microsoft Store searh
  2. Search for Dropbox and select the Dropbox app from the menu.
     
  3. Next, click on Get to start the process.
    dropbox get button
  4. Wait for the download to finish.

How do I add Dropbox to Windows 11?

Dropbox can be installed just like any other application. You can use the Dropbox website or the Microsoft Store to obtain it, as shown above.

Is Dropbox free for Windows?

Dropbox has a free tier that is available for all platforms, including Windows.

How to set up Dropbox?

To use Dropbox, first, you need to create a Dropbox account and then install the client. Once the client is installed, log in with your account and that’s it.

What is the downside of Dropbox?

Dropbox has the encryption key to your account, so even if your files are encrypted, Dropbox employees can open them at any time without your knowledge.

We hope that this guide has helped you download Dropbox for Windows 11. To learn more, we have great guides on how to add Dropbox to File Explorer as well as how to remove files from Dropbox without deleting them on PC.

If you’re a fan of built-in solutions, then OneDrive might be your cloud storage of choice, and we have a OneDrive vs Dropbox guide that will help you pick the right service for you.

Windows 11 24H2 is causing some huge issues with Internet connectivity

Windows 11 24H2 has been out for more than a week, and while it was hugely anticipated, its release hasn’t come without issues. Whether we’re talking about cable or Wi-Fi, the update seems to render devices with network issues.

Some users reported that while these devices recognize Internet connections, they cannot access the network, resulting in no Internet. Updating drivers and firmware or resetting network settings doesn’t solve the issue either.

While it’s not officially touted as a known error, the issue is widespread in devices recently updated to Windows 11 24H2. It affected both personal devices and those connected to a server.

Users also reported that while on the initial restart, Windows 11 24H2 devices could connect to the Internet just fine; a simple restart triggered the issue, causing them to lose that ability.

The same problem for the entire network. When I first logged in, I had no internet either on WiFi or Ethernet. Even with manual IP and it still doesn’t work. At the stations that had functional Windows at the first restart, after the second restart we ended up in the same non-functioning situation. The only solution was rollback to 23H2. So it is not a DHCP problem, nor could it be a DHCP problem because even when you wanted to select the WiFi network, the option did not appear. Only bluetooth no WiFi connection to select.

Other people reported that the Windows 11 24H2 update removed the wireless icon from the system tray.

We have several machines that after upgrade to 24H2, the wireless connecting capability in the OS is completely missing. It is missing from the system tray and also not able to “connect” from the network control panel. Configuration of static IP accomplishes nothing because the wireless will not connect. This is a pretty horrendous problem for Microsoft to have inflicted on us. And yes, we have done complete resets and full reinstalls of all the drivers.

The solution? It would be best to update Windows 11 24H2 immediately and wait for the first Patch Tuesday updates to be released later this week.

However, if you have updated your device and encountered this issue, it would be best to try still to update drivers.

If that doesn’t work, the best solution is to roll back to Windows 11 23H2.

Some reported that the rollback might not be possible or would not fix the issue, but most affected users stated that it worked, so it’s worth a try.

Windows 11 24H2 has also been causing significant issues with NVIDIA’s Digital Vibrance, but fortunately, it’s not the update’s fault. NVIDIA’s latest driver updates are causing the problem, but installing the Windows update will also automatically update the drivers.

It’s worth mentioning that Windows 11 24H2 has only been out for a week, and these Internet errors will eventually be fixed. Having said that, it’s still better to update if you want to have access to the latest features.

5 Best Actually Free Screen Recorders to Use in 2026

It’s pretty hard to find an actually free screen recorder out there. Some are cluttered with ads, some will put a watermark on the recording and many of the so called free tools limit your recording time at 5-10 minutes. That is why we decided to find the few ones that are truly free and do their job without messing with your caption.

What are the best free screen recorder tools?

1. OBS Studio – For professional content creators

OBS Studio is the go to app for any content streamer out there and, of course, you can use it only for screen recording if you want.

Frankly, it is incredible how such a complex tool is free, but we don’t want to jinx it. You can caption any window, add your webcam, change the background, mix audio and edit the video afterwards.

Basically, you can do anything you want in terms of captioning your screen and even stream it on YouTube, Twitch or some other platform, download the clips and share them.

The only downside is that, as we mentioned above, it’s a complex tool and you will need a couple of minutes to get accustomed to the menus and options. It’s not recommended if you want to create a simple short clip and you’ve never touched such a tool. But if you’re starting to create video content for your video channel, OBS Studio is definitely the right choice.

Get OBS Studio

2. ClickUp Clips – Easy to caption and share

ClickUp is a project management cloud app at its core, but it also has a feature called Clips that is completely free.

After you create a free ClickUp account, you just need to go to the Clips tab and hit the New Clip button.

You can caption the full screen a tab or any window you have opened on your PC. It’s that simple. You may even select the mic input so you can make a guide or tutorial for your workmates. However, you can just download the clip on your PC and use it for a montage later on, or share a public link to anyone.

The developer created it as a tool for better communication on ClickUp, but you may use it for anything you want. If we were to complain about something is that Clips doesn’t allow you to select a certain portion of the screen to record, like other tools do.

Get ClickUp Clips

3. Free Cam – Limited to 760p

Free Cam is indeed a free software you can download on your PC. You can select a recording area or record any open window. It even has options to highlight clicks and trimming your clips.

And when you’re done, you can download the clip on your PC or share it directly on your YouTube channel.

However, the free version of this tool has a few downsides. It doesn’t record your webcam, and it’s limited to a 760p resolution. If you want to get all of the above and a Full HD resolution, you will have to get the Cam Pro version.

However, you can still record unlimited number of clips of any length without any watermark, so that’s why we included it in our selection.

Get Free Cam

4. Microsoft Clipchamp – For quick and easy recordings

Microsoft Clipchamp is a free video editor that also has screen caption capabilities. However, we should tell you from the start that the recording is capped at 30 minutes in Full HD resolution.

However, that is a pretty reasonable time limit for a tutorial and if you need more, you can record other pieces and clip them together using the same tool.

The app is pretty easy to use too and it’s preinstalled on Windows 11. Once you’re done, you can download the clip or share it on social media platforms or on your YouTube channel easily.

And yeah, if you were wondering, it can record the screen and webcam at the same time, and Microsoft weirdly recommends checking that there’s nothing in your teeth before starting the recording.

If you need 4K recording and content backup, you will have to pay for a premium plan.

Get Microsoft Clipchamp

5. Snipping Tool – Quick and easy to use

Snipping Tool is another preinstalled Microsoft Windows tool and it’s not so bad for taking screenshots, which is its main purpose.

However, it can also record a defined portion of your screen in MP4 format with sound from the PC and the mic separately or at the same time.

Now, Snipping Tool has very limited capabilities. Don’t even think about 4K resolution or recording your webcam. It’s just an app that it’s there if you want a quick caption of your screen you want to show someone. We really don’t recommend it for complex tutorials or content creation. But it’s at your fingertips and it’s free.

Get Snipping Tool

As you can see, there are not so many truly free screen recorders out there. We also have a list of the best screen recorders for Windows 11, but only a few of them are completely free.

You may also want to check the CamStudio freeware screen recorder because it is a genuinely free option without watermarks or time limits.

If you know about any such tools that don’t have limitations in their free versions, tell us about them in the comments below.

1Password Chrome Extension – Quick Installation Guide

The 1Password Chrome extension lets you manage and access your passwords directly from the browser. This tool simplifies the login process while maintaining strong password protection. Read on and I’ll show you how to install and use it!

Let’s get into it.

How To Install the 1Password Chrome Extension

Follow the below steps:

  1. Launch your Chrome browser and go to the Chrome Web Store. 
  2. Type “1Password” in the search bar.
Type "1Password"
  1. Tap on the official extension, “1Password – Password Manager.” Click on the Add to Chrome button. 
Add to Chrome
  1. A popup will appear requesting permission. Click Add extension to confirm.
Add extension
  1. Once installed, you’ll have to sign in or create an account to complete the setup.
Sign in

How to Use the 1Password Chrome Extension

Here’s how to use the 1Password Chrome extension:

  1. After signing in, visit any website where you have an account.
  2. When adding personal information, the add-on will prompt you to save it. Tap on Save in 1Password.
Save in 1Password
  1. After creating your account, try logging in. The 1Password extension will autofill your credentials.
Autofill password
  1. You can also access all your saved passwords by tapping on each item.
saved passwords
  1. It also suggests strong passwords when signing up for new accounts. To add it, simply tap on the suggested password that pops up in the field.
 Suggested strong passwords

The 1Password Chrome extension makes it easy to manage and secure your passwords without leaving your browser. By following the steps above, you can quickly install the add-on and start saving, auto-filling, and generating passwords for enhanced security and convenience.

Also, learn how to fix 1Password if it can’t verify your web browser’s identity or if it stops working properly.

The latest KB5043168 to the Dev Channel significantly improves hotspot Internet connections

Microsoft released the Windows 11 Insider Preview Build 26120.1912 (KB5043168) to the Dev Channel, which brings several changes and a variety of fixes, though many of them are still being slowly rolled out.

The update includes a small set of general improvements and fixes that improve the overall experience for Insiders running this build on their PCs.

By far, the most significant improvement is the enhanced 6 GHz connection, now supported by the Windows Mobile Hotspot. The new band requires chips that support the feature and updated drivers; not all chips that support 6 GHz Wi-Fi will support the 6 GHz mobile hotspot.

The change will be visible under Settings > Network & internet > Mobile hotspot when you edit the mobile hotspot properties, as seen in the featured image. The mobile hotspot will only use 6 GHz when explicitly enabled for compatibility with existing devices.

This new enhancement will allow faster Internet speeds when connecting to hotspots. So, if you’re connecting your Windows 11 laptop to a mobile phone with 5G speeds, you’ll see significant improvements.

The new 6 GHz connection can now be enabled with ViveTool using a special command, according to popular Windows Insider, @phantomofearth, who also provided it:

vivetool /enable /id:40466470

KB5043168 also includes the following fixes: attribution has been added to .txt files for Rust OSS components. The Settings page in Task Manager will no longer display a white background. Task Manager used to stop responding when switching from a high-contrast theme to a normal one, but now it’s fixed.

KB5043168 also fixes the WebView2 apps; they wouldn’t detect input from Xbox 360 and Bluetooth controllers.

However, it’s worth mentioning that the patch has known errors: if you click or tap on a letter on the Start menu’s All Apps list, the All Apps list may break. Microsoft recommends rebooting or restarting explorer.exe to fix it.

You can read KB5043168’s full changelog here.

In other news, the most recent build to the Dev Channel also introduced a new (and easier, if you ask us) way to sign out of Windows 11.

MBR vs GPT: Which is The Best to Use On Your PC?

When it comes to storage, you’ve probably heard about MBR and GPT, but which one is better? Today we’re going to take a look at the differences between the two and tell you which one should you use.

Which is better GPT or MBR?

MBR vs GPT, main differences

MBR is an older standard, developed in the 1980s, and it’s designed to work with older systems that use BIOS firmware.

This scheme has certain limitations, it can handle drives up to 2TB, and it allows you to have up to 4 primary partitions on your device.

MBR stores the boot loader at the very beginning of the disk, in the first 512 bytes, and if this section gets corrupted, the entire disk will become unreadable.

GPT is a newer standard and it improves on limitations of MBR. It requires UEFI firmware to boot, which most modern PCs have.

It supports drives larger than 2TB, and it allows you to have up to 128 primary partitions. It also has better protection against corruption as it stores boot data at several different locations on the disk, so if one boot record is corrupted, the disk can always use another.

Regarding compatibility, the GPT scheme is fully compatible with Windows Vista and newer. While MBR is supported by all operating systems, Windows 11 can’t boot from it, as it needs a GPT disk.

We explored this subject in our guide on running Windows 11 on MBR partition, so don’t miss it for more information.

How to check if a disk is MBR or GPT?

  1. Press the Windows key + X and choose Disk Management.
    disk management win + x menu
  2. Locate your drive, right-click it, and choose Properties.
  3. Go to the Volumes tab and look for the Partition style value.
    Partition style of Bootable disk

Alternatively, do the following:

  1. Press the Windows key + S and type cmd. Choose Run as administrator.
    CMD elevated dsetup.dll
  2. Type diskpart.
  3. Next, type list disk.
  4. Check if your disk has an asterisk symbol in the GPT column. If so, this means that this is using GPT schema.
    gpt diskpart

Should I format my hard drive to MBR or GPT?

Regardless if you’re using a hard drive or SSD, GPT is always a better choice on modern PCs since it’s more reliable and can handle drives that are more than 2TB in size.

Should I change MBR to GPT?

In most cases, you should change MBR to GPT. The latter is better in every way, and if you’re using a PC with UEFI and a system newer than Windows Vista, GPT is an obvious choice.

Keep in mind that changing from MBR to GPT with certain methods will make you lose your data, but there’s a way to go around it.

Can you convert MBR to GPT without erasing data?

Yes, it’s possible, and you can do it using the MBR2GPT tool. You can use other methods as shown in our guide on how to convert MBR to GPT without data loss.

Can I use both MBR and GPT?

Yes, you have both MBR and GPT drives on your system. However, older systems might not boot from GPT while newer ones, such as Windows 11 won’t boot from MBR.

Is GPT backward compatible with MBR?

No, GPT isn’t backwards compatible with MBR. The former requires UEFI to boot. GPT also uses different structures for partitioning information that don’t work with MBR.

GPT is a newer standard and it removes the limitations of MBR schema which makes it a superior choice. If you’re using legacy hardware that doesn’t support UEFI, then you stick with MBR, but most PCs fully support UEFI, which makes GPT an obvious choice.

How to Download PDFLite on a Windows 11 PC

If you want a free, all-in-one, open-source PDF viewer, editor, and convertor, PDFLite is the preferred choice for many. And you can now download PDFLite for Windows 11!

As the name suggests, PDFLite is a lightweight PDF solution that’s absolutely free. It allows you to convert any document or image to PDF format and offers an easy-to-use interface, making it a viable solution.

But is PDFLite the best option? Let’s find out along with the issues you might face during installation.

How can I download & install PDFLite on Windows 11?

Note icon NOTE
WindowsReport is not associated with PDFLite. So, I recommend you have a top-rated antivirus solution active during the download and scan the files using it.
  1. Go to PDFLite’s listing on Download CNET, and click the Download Now button. I am using a third-party website because the download link on PDFLite’s official website fails to work.pdflite download for windows 11
  2. Again, click on the Download Now button to confirm.
  3. Run the downloaded setup (.exe file).
  4. Click Yes in the UAC prompt.
  5. Follow the on-screen instructions to complete the installation. On the Choose Components page, make sure you select all the required components to install.installer setup pdflite
  6. If prompted to update PDFLite, click on Download and then install the latest version.update pdflite

While PDFLite for Windows 11 undoubtedly offers a user-friendly interface and performs the intended job well, its download remains a hassle. The official website is flagged as unsecured by every browser due to missing certificates, which could also be the reason downloads are blocked.

While the official website does suggest installing PDFLite from Download CNET, the version available on the latter is outdated, missing several key features and bug fixes. This, I consider a key drawback of downloading PDFLite for a Windows PC.

What are PDFLite alternatives for Windows?

If you are unsure about PDFLite, there are several effective and free PDF editors available for download, including pdfFiller, Soda PDF, and Adobe Acrobat Reader, amongst others. These provided, more or less, the same functionality as PDFLite but are secure!

For simpler PDFLite alternatives, consider getting a lightweight PDF reader for Windows. This includes PDFelement, Nitro PDF Reader, and Xodo PDF Reader, amongst others.

Also, remember that you don’t have to install a software for merely viewing PDFs. Most available browsers allow you to view PDF documents natively without additional support. Although you can install the best PDF editor Chrome extensions, for enhanced functionalities!

In my opinion, PDFLite, though user-friendly, should be avoided on Windows 11 for now due to the security risks. Once the developers fix these issues, you can go ahead and install this simple, open-source, and lightweight PDF editor and convertor.

Before you leave, discover expert-recommended tips to repair corrupted PDFs in Windows and never lose files anymore!

For any queries or to share your review of PDFLite for Windows 11, drop a comment below.

Microsoft Word is deleting files with capitalized extensions or # in the title

Microsoft Word users may be experiencing a concerning issue in version 2409. If Word users save a file with a title containing a capitalized file extension (like .DOCX, .RTF) or the symbol #, the file may be deleted.

This issue happens when a user edits a file, saves it when prompted, and tries to close Word.

Thankfully, there are a few workarounds available. For one, they can manually save their document before closing it or find and restore the deleted file from the recycle bin.

In a support page, Microsoft says it is aware of the problem and is investigating and says current tests show the issue occurs after saving when prompted by clicking X to close Word. If you manually save the file before closing it, this error doesn’t occur.

Users can also enable the option “Don’t show the Backstage when opening or saving files with keyboard shortcuts.”. This can be enabled by going to File > Options > Save > Don’t show the Backstage when opening or saving files with keyboard shortcuts.

It’s unclear when the fix will be shipped, but we’ll update you.

Do you save files with capitalized extensions or # in the title? Have you had any issues?

Microsoft enhances OneNote with Fountain Pen and Brush Pen

Microsoft has just announced the addition of two new pens to its OneNote app on Windows: the Fountain Pen and the Brush Pen.

These pens are designed to give users more ways to create handwritten notes. The update also introduces new pen icons for OneNote to bring a consistent look to the app’s inking tools.

In a blog post, Microsoft says these pens aim to give users more precise control when creating notes with their digital stylus. The fountain Pen can be used to make thinner lines and detailed lettering. Users can also use speed and pressure to control the thickness of their writing when using the Fountain Pen.

The directional Brush Pen is designed to let users create artistic letters with minimal effort. Its thickness updates automatically based on the direction of the stroke.

These new pens are available to Insiders running OneNote on Windows Version 2408 (Build 18011.20000) or later. If you’re an Insider and the pens don’t appear on the Draw tab, you can add them by selecting the “Add Pen” button and choosing the pens you want to add.

In addition to the new pens, Microsoft has expanded the color palette for the Highlighter. You can now choose from 20 colors and transparencies to highlight your notes.

If you want to define a custom palette for the Highlighter, the Fountain Pen, or Brush Pen, you can select the pen and then choose “More Colors” or the Eyedropper tool.

Microsoft says these new features should be available now to Insiders running OneNote Version 2408 (Build 18011.20000) or later.

Earlier this year, Microsoft enhanced OneNote with Eyedropper and Interactive Ink. The first one lets users create colors for their notes, while the second one allows them to create a font out of their handwriting.

How to Watch YouTube TV Multiview on PC

Yes, you can watch up to 4 streams at the same time in Multiview mode on YouTube TV on any platform including your PC. Here’s how to use YouTube TV Multiview on PC.

How do I watch YouTube TV Multiview on PC?

  1. Open YouTube TV on a browser or the dedicated app.
  2. Scroll to find the Watch on Multiview section of streams.
  3. Select one of the programs and you will see the option to Build a multiview.
  4. The multiview builder will then let you select up to 3 more streams that will be suggested based on the content of your first stream.
  5. After you complete your selection, you will see all the streams on the screen that is split in 4.
  6. By default, you will hear the sound from the first stream, but you can select another stream with your mouse to change the sound source.
  7. You also have the option to enlarge one stream on the entire screen.

Watching YouTube Multiview on your TV or on mobile is exactly the same, but you will make the selections by using your remote or by touching your phone’s screen.

We remind you that YouTube Multiview doesn’t work on any stream. Google is actively making a selection of content and converts it for the Multiview section.

How to watch NFL Sunday games in multiview?

For instance, they have made a dedicated selection called NFL Sunday Ticket. If you subscribe for this section, you will be able to select the NFL Sunday games with up to 30 minutes before the games start.

If you signed up for the NFL Sunday Ticket with NFL RedZone, your multiview options will include both out-of-market games and RedZone.

However, you may also watch some of the games in multiview with a YouTube TV Base Plan. Google says that the games are algorithmically pre-determined for your local market.

YouTube TV Multiview is launching on October 10th and Google promises to gradually extend their selection of multiview stream options.

What do you think about YouTube Multiview? If you have any issues, let us know in the comments below.