Microsoft news recap: Soundscape finds its way to Sony’s LinkBuds, Teams coming to OneDrive, and more

Microsoft news recap is a weekly feature highlighting the top Microsoft news stories of the past week. Sit back, grab some coffee, and enjoy the read!

Microsoft plans to fully reopen Redmond campus on February 28th after more than 2 years of pandemic closures

After more than 2 years of closures due to the pandemic, Microsoft is planning to reopen its Redmond campus on February 28th. This plan comes after several previous dates to reopen that were then subsequently pushed back.

Microsoft logo at conference

Microsoft Teams is coming to OneDrive with new “Your Teams” section

A new “Your Teams” section for OneDrive is being worked on, aiming to make it quicker to get to your Microsoft Teams whilst in OneDrive.

Microsoft Teams is coming to OneDrive with new "Your Teams" section - OnMSFT.com - February 14, 2022

Microsoft’s Soundscape technology helps power Sony’s latest set of earbuds

Soundscape, a Microsoft audit technology from Microsoft Research, has found its way into the lower-end of headphones, Sony’s new LinkBuds earbuds, despite the two companies being competitive on the higher-end of headphones.

That’s it for this week. We will be back next week with more Microsoft news.

Windows 11 not detecting docking station? Here’s what to do

Some users like having a multi-screen setup with up to three monitors. A docking station allows you to turn your laptop into a desktop computer. Your system connects to a printer, monitor, backup drives, mouse, storage, local area network, and a mouse simultaneously. 

You can experience docking hitches when you upgrade to Windows 11 or when you connect to the second monitor. 

The major issues with this problem are screen resolution, monitor display, charging, connection, and audio. Many users have reported different specific problems. 

You might be asking yourself why you experience docking station issues and how to fix them. Well, this article will give you answers to these questions and resolve all your docking nuisance. Let’s get started. 

Why does Windows 11 fail to detect the docking station?

Various things can cause docking station issues on Windows 11. For example, dust and particles in the system, external devices, and the computer itself often lead to connection problems.

Sometimes, a simple hitch may be the cause which can be resolved by just rebooting your system, disconnecting and connecting your cables, or you just need to buy the best docking station for Windows PCs.

A second monitor that is not connected to power or poor cable connection will affect your dock, and it won’t work. 

Random bugs, settings on your computer, or issues with your monitor may cause detection problems on your Windows 11 PC. 

What can I do if Windows 11 is not detecting the docking station?

1. Restart your PC

As we stated earlier, if Windows 11 is not detecting the docking station, this can be caused by temporary bugs. 

This issue may be fixed by restarting your system. It is a general rule for simple problems on any system that you turn off and then on and see if the issue is solved. 

If the problem is not resolved, you might be dealing with a more complicated hitch that needs more skills and time. 

2. Reinstall the graphics driver

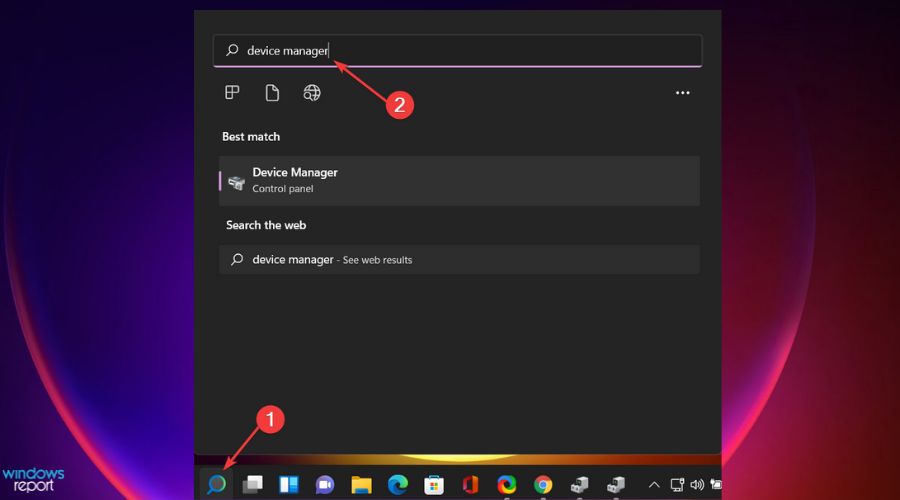
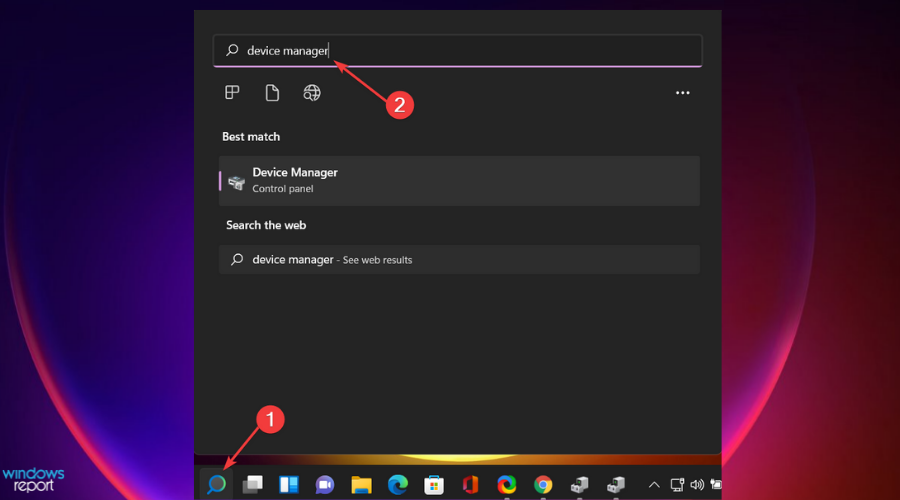
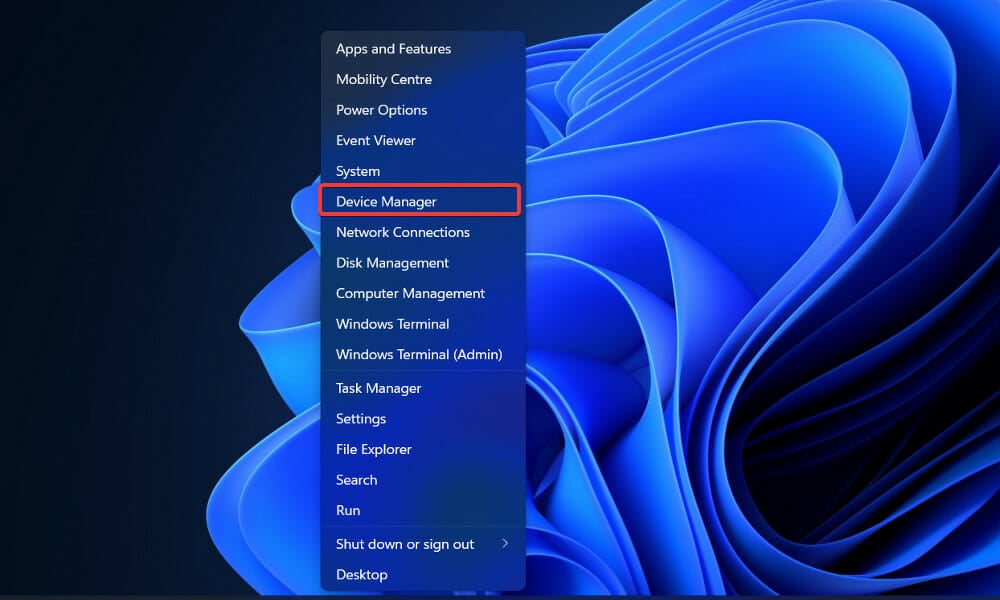
  1. Type device manager on the search box and press Enter.
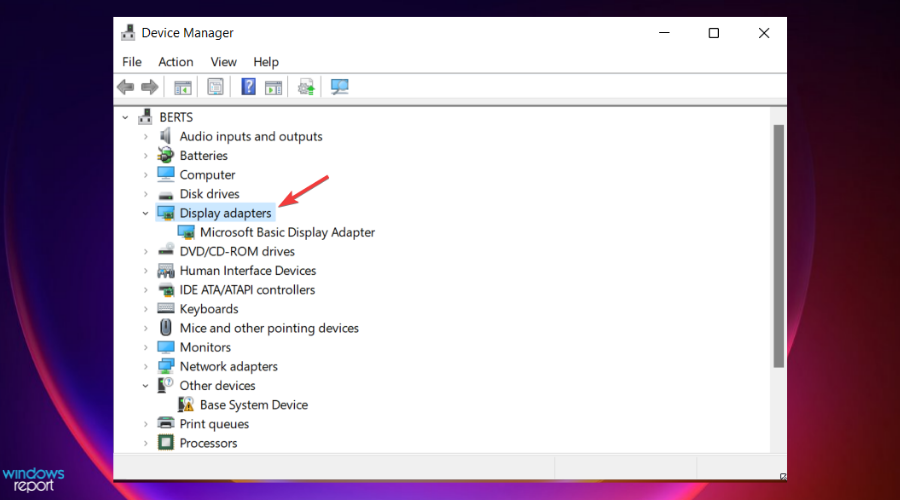
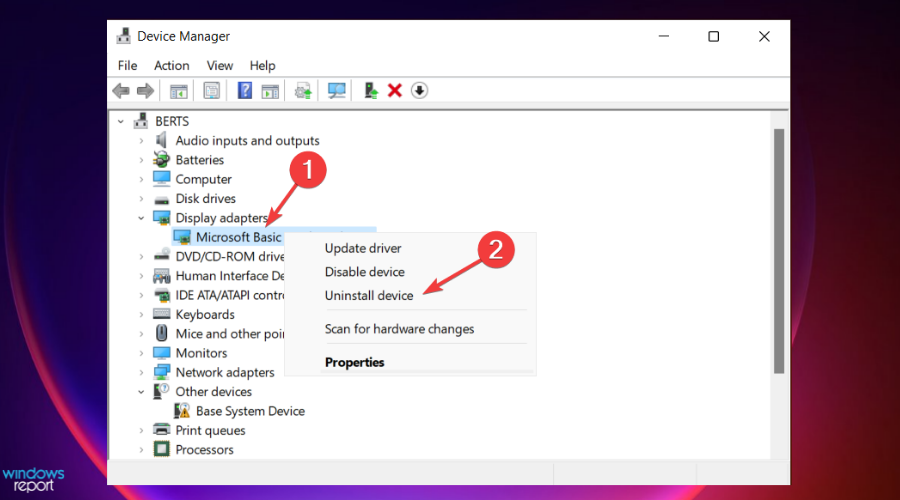
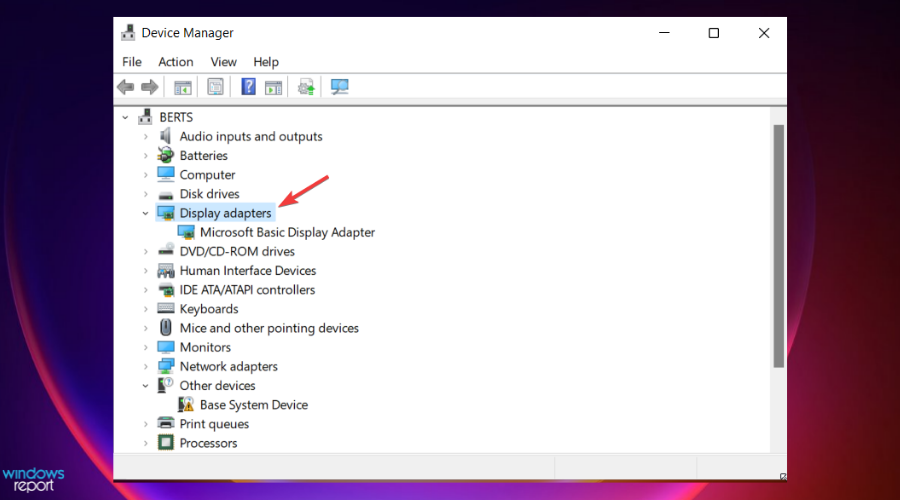
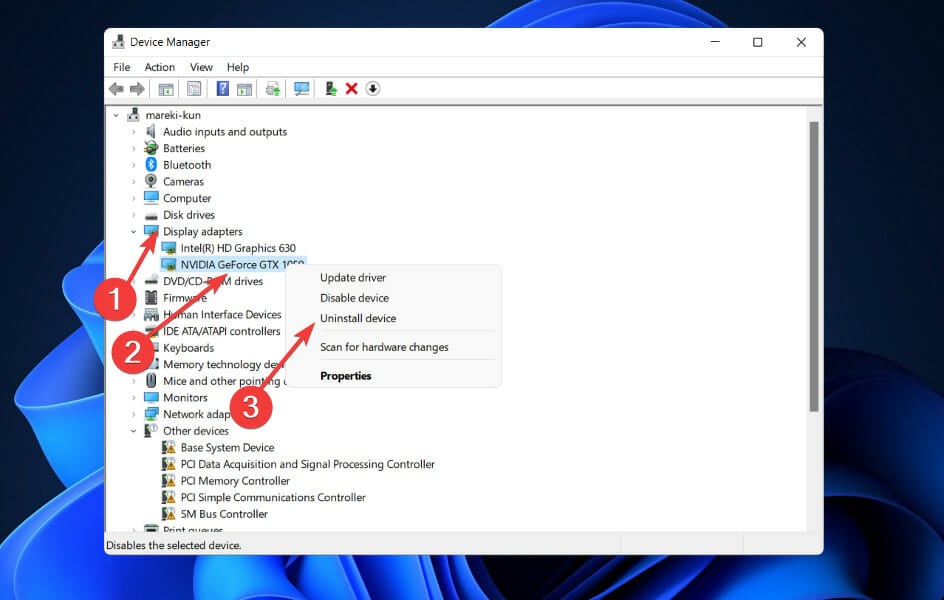
  2. Double-click on Display adapters. This will open the graphic cards list on your system.
  3. Right-click on each graphic card and select Uninstall device. This will uninstall the graphic drivers.
  4. Reboot your PC.
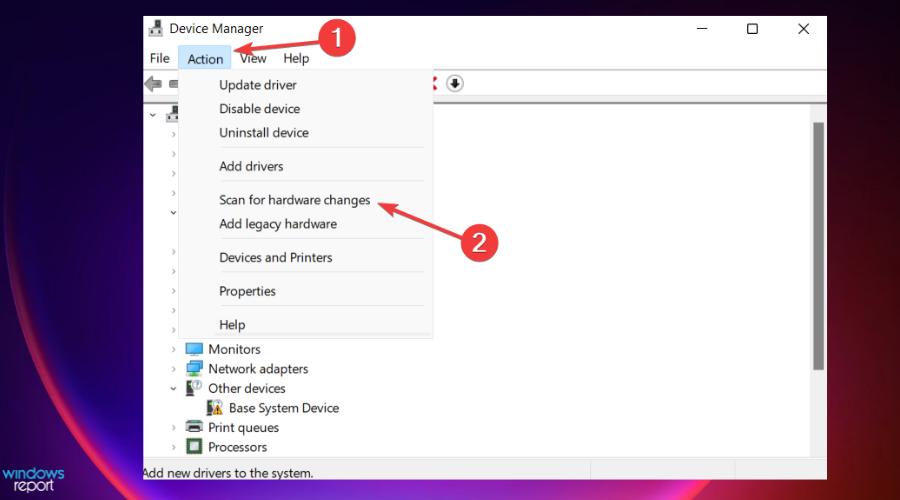
  5. Open Device Manager using step 1. Hit the Action tab and click on Scan for hardware changes. This will install back your graphic drivers on your computer. 

3. Remove the dock and reconnect it

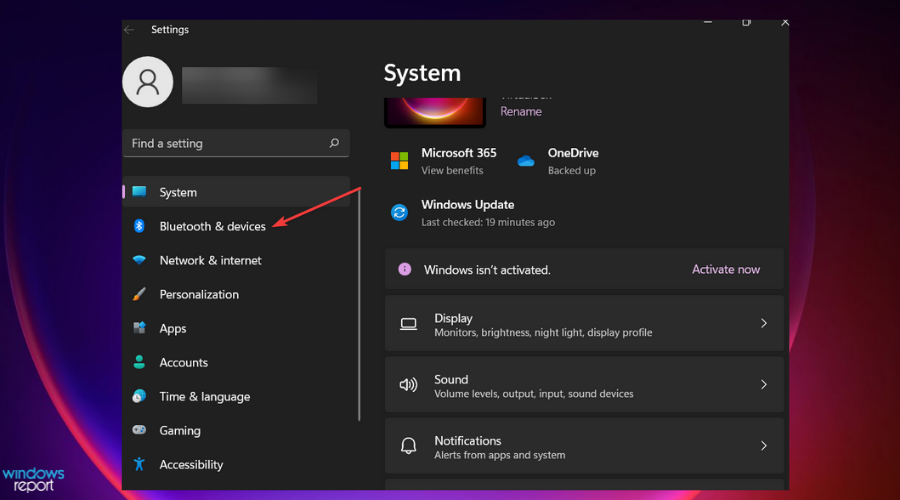
  1. Press Windows key + I to open the Settings and select Bluetooth & devices.
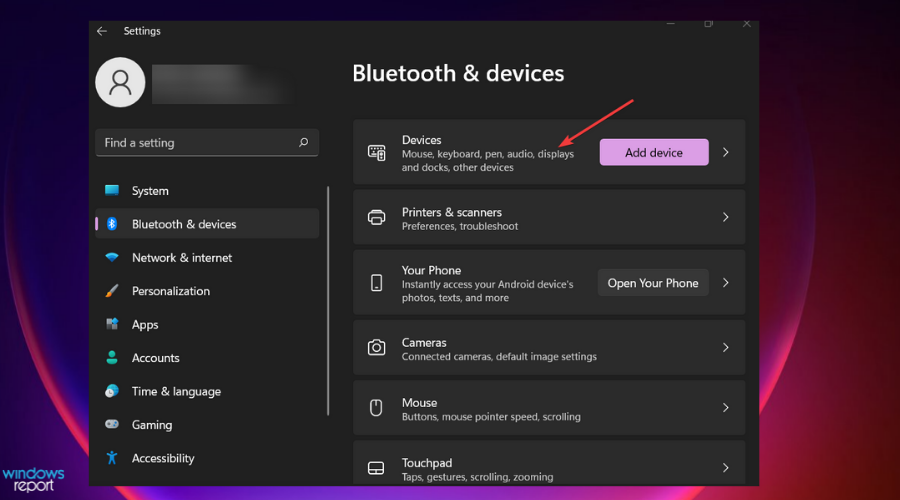
  2. Click on Devices.
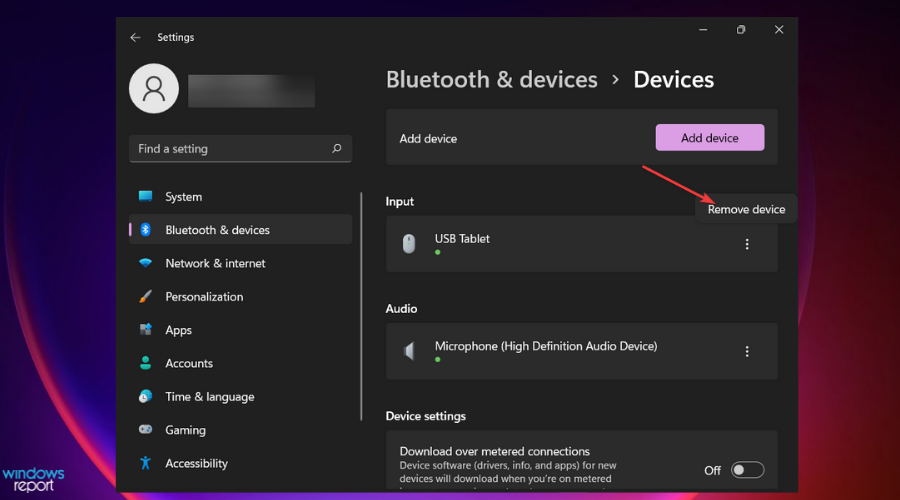
  3. Under Wireless displays & docks, choose the More options tab, which is found on the three vertical dots next to the dock, adapter, or wireless display you want to disconnect. Select Remove device.
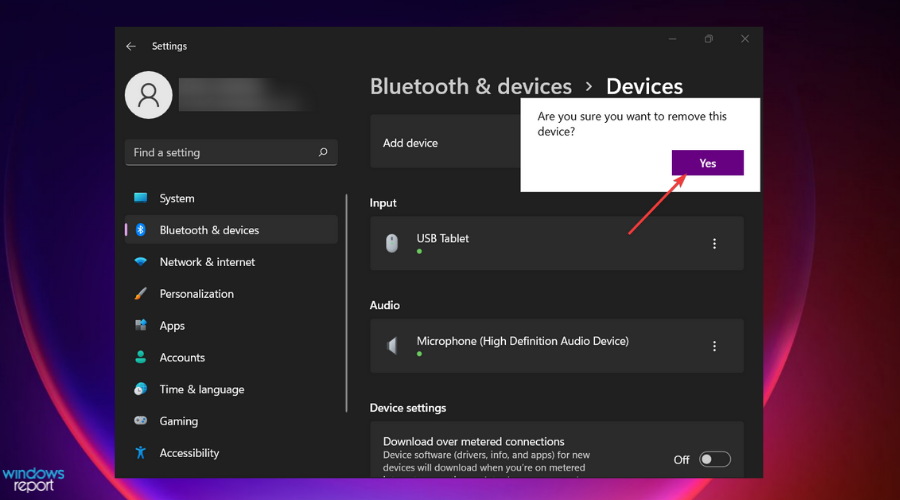
  4. Click on Yes to confirm the action.
  5. Reconnect your device again and see if working. 

4. Check your monitor

Checking the second monitor you want to connect to is also important. First, apply simple procedures like connecting the monitor to power.

Cable connection is so essential to the docking station. The commonly used cables are VGA, USB Type-C, HDMI, etc. Verify the connection on your monitor and PC, and see whether it’s working. 

If your computer monitor has different connecting ports, you need to exchange the cable to another port. For example, some systems and monitors have two HDMI ports. You might consider changing your HDMI cable from one port to another in the monitor or the laptop. 

5. Update your graphics driver

  1. Type device manager on the Search box and press Enter. 
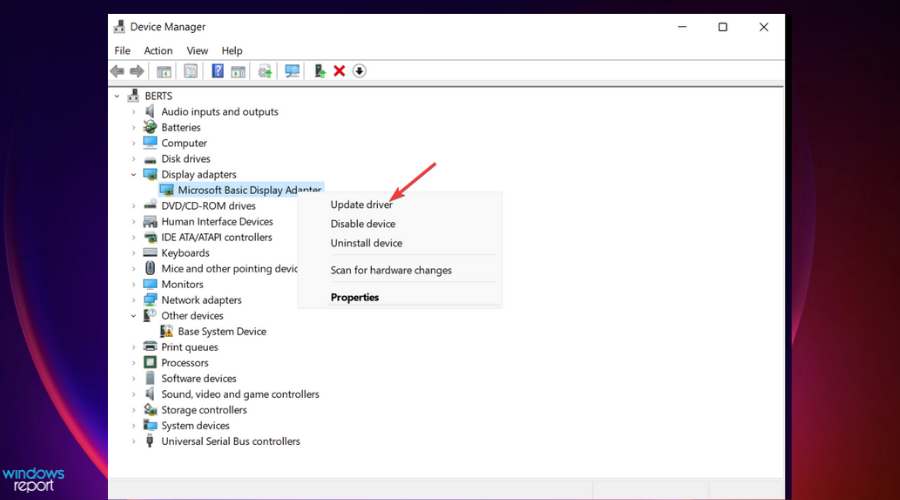
  2. On the Device Manager, double-click on Display adapters. This will open a list of all the graphics on your computer.
  3. Right-click on each graphic card on the list and select Update driver.
  4. Once you update all of them in step 3, restart your PC. 

Manually updating the driver can be time-taking. That’s why we recommend using a dedicated tool, as it will scan the web for the latest version and install the proper updates for every single driver on your system.

Before moving on, you can also confirm that Windows detects your dock correctly by checking this guide on how to find your docking station in Device Manager. It helps ensure the system recognizes your dock before you continue troubleshooting.

Can I use a docking station for the desktop?

If you want to use a docking station for a desktop computer, it’s pretty the same procedure as you apply when using a laptop. 

However, you might need to consider some other things. For instance, you will need to think about placing your docking station on your computer desk. 

Desktop computers have multiple ports, making docking stations less unnecessary. However, some users get away with this by acquiring simple adapters to get the extra ports they need. 

Users have reported that the above fixes worked for them to resolve the issue of Windows 11 not detecting the docking station. 

However, if the fixes didn’t work for your case, you might be dealing with a substantial technical problem that needs a technician. Do not hesitate to learn more about docking station issues on Windows 11.

We would love to know which solution worked for you in our comments section.

Fix: Canon Printer not Detected in Windows 11

A popular name in the printing sector, Canon is best known for its highly optimized low-cost personal printing solutions, which are available at an affordable price. However, some printer owners have expressed concern about an issue in which Windows 11 is not detecting their Canon printer.

Having your own printer can save you significant time and money in the long run. When you print your documents at home, you might save the money you would have spent on printing over the years.

You don’t need to be concerned if you are a user who has had problems with your printer as well. You can resolve the situation with a few straightforward methods that we have listed below right after we see why you should get a home printer. Follow along!

Should I get a home printer?

There’s no doubt that technology has improved significantly in a relatively short period of time. Our information, from images to vital documents, can now be stored in our pockets; our bills are now all paperless, and legal documents may even be signed online.

Though physical copies of vital papers are becoming increasingly rare, it is still critical that they are produced and kept in a secure location.

Consider the following scenario: You have a car accident and need to find your insurance documents in a hurry, but it has been so long since you renewed that you can’t remember the company’s name to search through your inbox.

Having these documents printed and stored together in a safe place at home will significantly reduce the amount of stress you will feel during this situation.

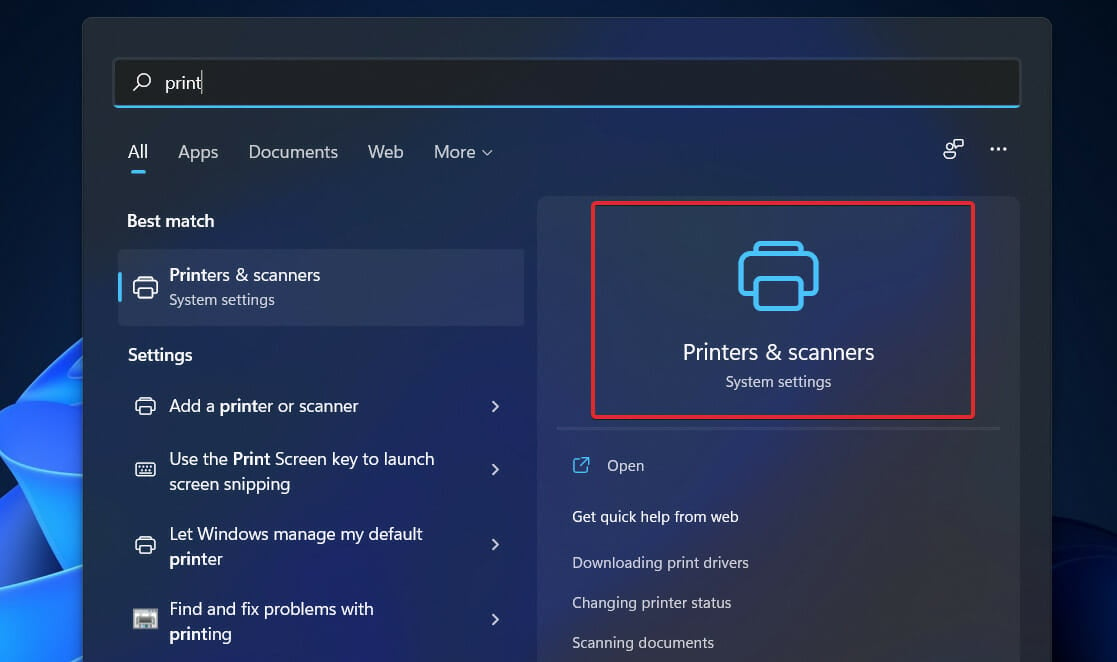
search printer windows 11 not detecting canon printer

It is simple and convenient to store and edit documents on the Internet. Because of this, it is rather simple for someone who knows how to gain access to and edit your papers on the internet. This has the potential to generate a slew of issues. Hardcopy documents are by far more difficult to modify.

We can now carry around all of our most precious memories in our pockets at all times. Even though the vast majority of us will back up these priceless images on our laptops or USB sticks, what would we do if the files were to become corrupt?

Home printers are ideal for generating tangible copies of our most prized memories, which can then be preserved in scrapbooks and photo albums, protecting them from any potential technological concerns and conserving them so that they can be cherished for years.

They are also helpful if you want to make a unique gift for someone special on a particular occasion. A handcrafted scrapbook filled with memories for someone’s birthday is a thoughtful and memorable gift to make.

What can I do if Windows 11 is not detecting the Canon printer?

1. Check drivers

  1. Head to Canon’s official website then click on the specific model of your printer. Note that the first link is for Europe only. For the US version, click on the latter link.printer-series windows 11 not detecting canon printer
  2. Now go to the Drivers section, select the Windows 11 OS, and download any drivers that you are being shown.drivers-11 windows 11 not detecting canon printer

Users recommended that you double-check the printer model that you select as they have made the mistake of not paying enough attention resulting in their printer not being detected. In case that does not help, we recommend using a specialized driver updating tool that will scan your PC and update missing or outdated drivers.

2. Run the printer troubleshooter

  1. Press the Windows key + I to open the Settings app, and click on System in the left panel, followed by Troubleshoot from the right side of the window. Here, you will find a list with all the troubleshooters. troubleshoot-menu-option windows 11 not detecting canon printer
  2. Now that you are inside the Troubleshoot menu, tap on the Other trouble-shooters option to open the full list.othertroubleshoot windows 11 not detecting canon printer
  3. Scroll down to the Printer troubleshooter then click Run next to it in order to start the process.printer-run windows 11 not detecting canon printer

As soon as it has finished searching for problems, the troubleshooter will display the specific bug that has occurred, along with detailed instructions on how to resolve it. Remember to carefully read and follow the directions displayed on your computer screen at all times.

3. Update Windows

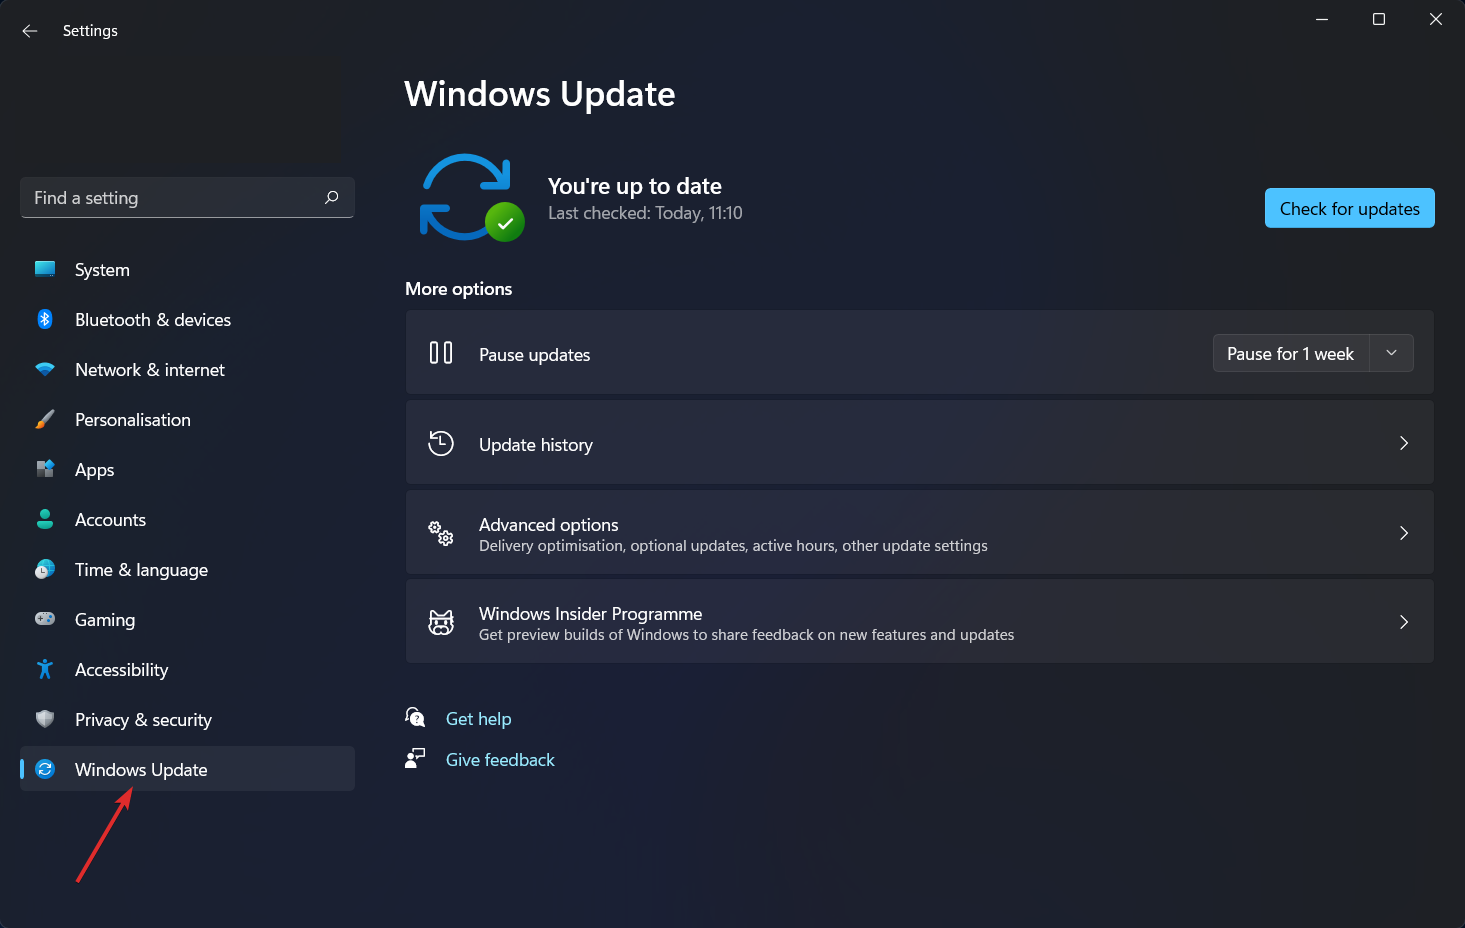
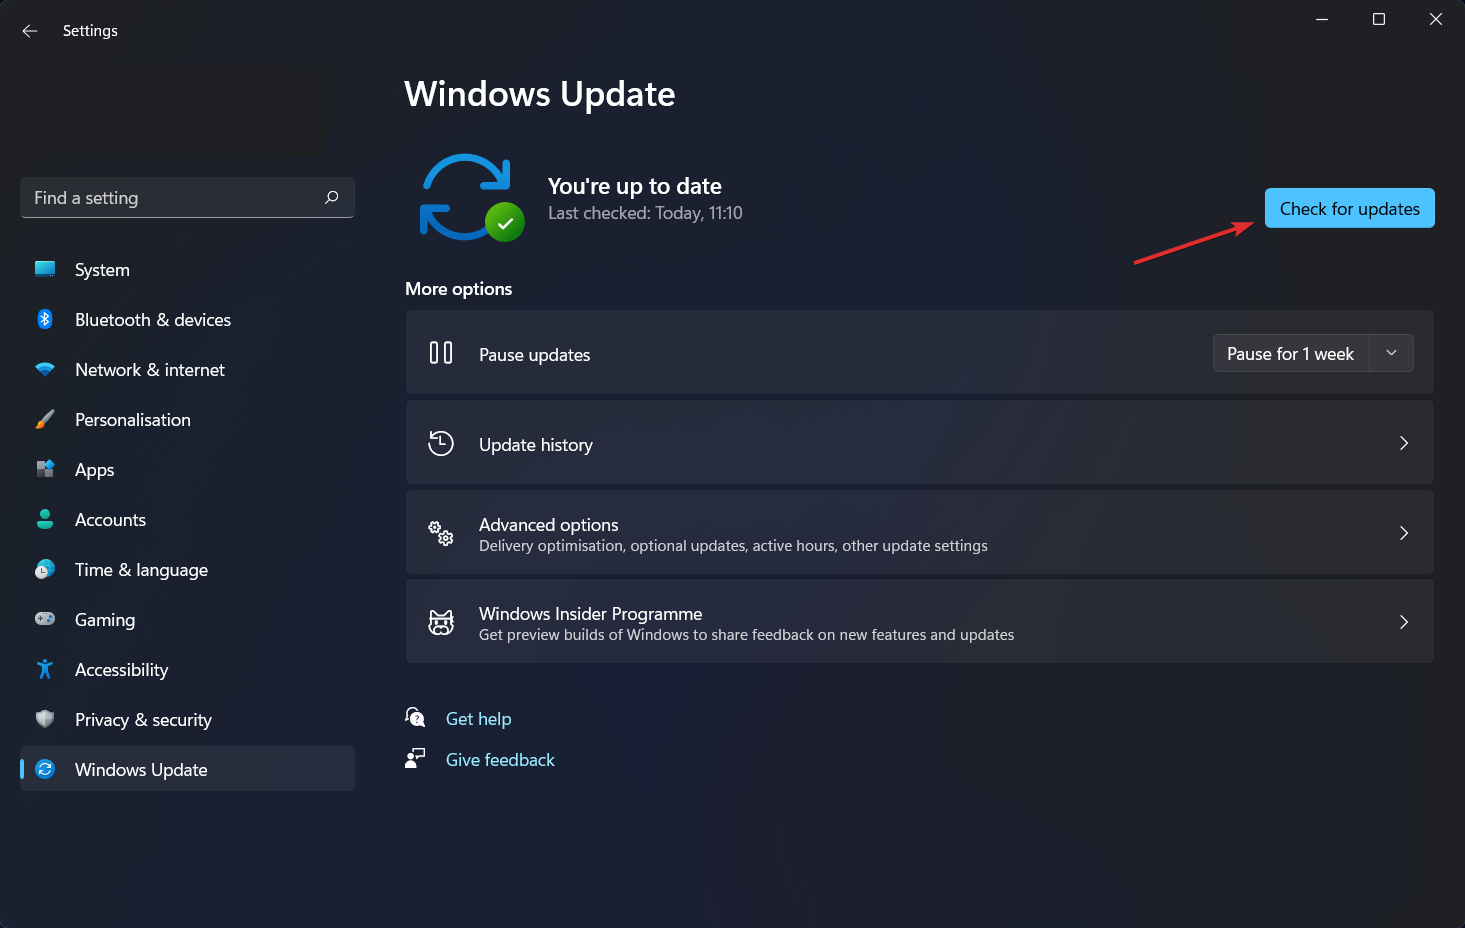
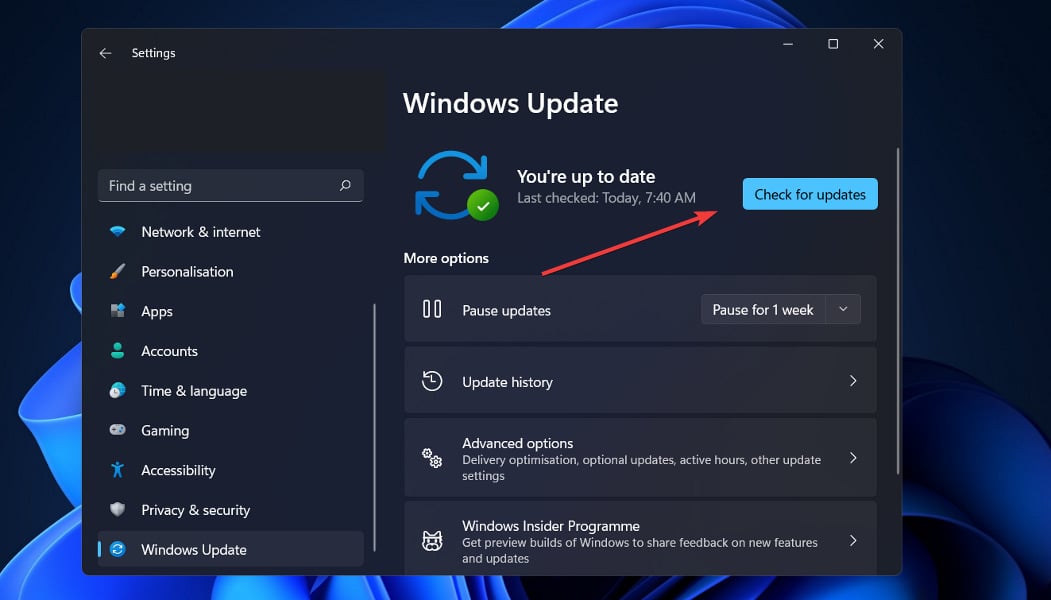
  1. Press the Windows key + I to open the Settings app. Now navigate to Windows Update from the left-hand navigation bar.windows-update windows 11 dynamic refresh rate not working
  2. You may either use the Install now option to determine whether or not any new updates are necessary to be downloaded or you can use the Check for updates button to discover whether or not any new updates have been provided.check-for-updates windows 11 dynamic refresh rate not working

If you are encountering this problem, it is likely that you are using an older version of Windows, which is what is causing the problem. It is possible that upgrading to the most recent version of the OS will address the problem.

Is it worth it to get a printer?

It’s time to close your eyes, take a big breath, and stop expecting printers to work because it would make sense in a world where a touchscreen supercomputer can fit in your shirt pocket. You’ll be happier if you embrace printers for what they indeed are: janky money holes.

Like most things in life that you have no control over, accepting printers for what they truly are will make you happier. There will be something about any printer you purchase that you will despise, and you can do nothing to change it.

There will be times when your printer won’t print and you can’t do anything about it.

Your printer is worth significantly more than you currently pay for it. Seriously, your printer has incredibly complex equipment, including printheads, ink, and mapping software, which a computer must manage.

You take your printer for granted, but in a matter of seconds, that box can cover a piece of paper with millions of dots of precisely positioned, color-matching ink perfectly matched to the paper.

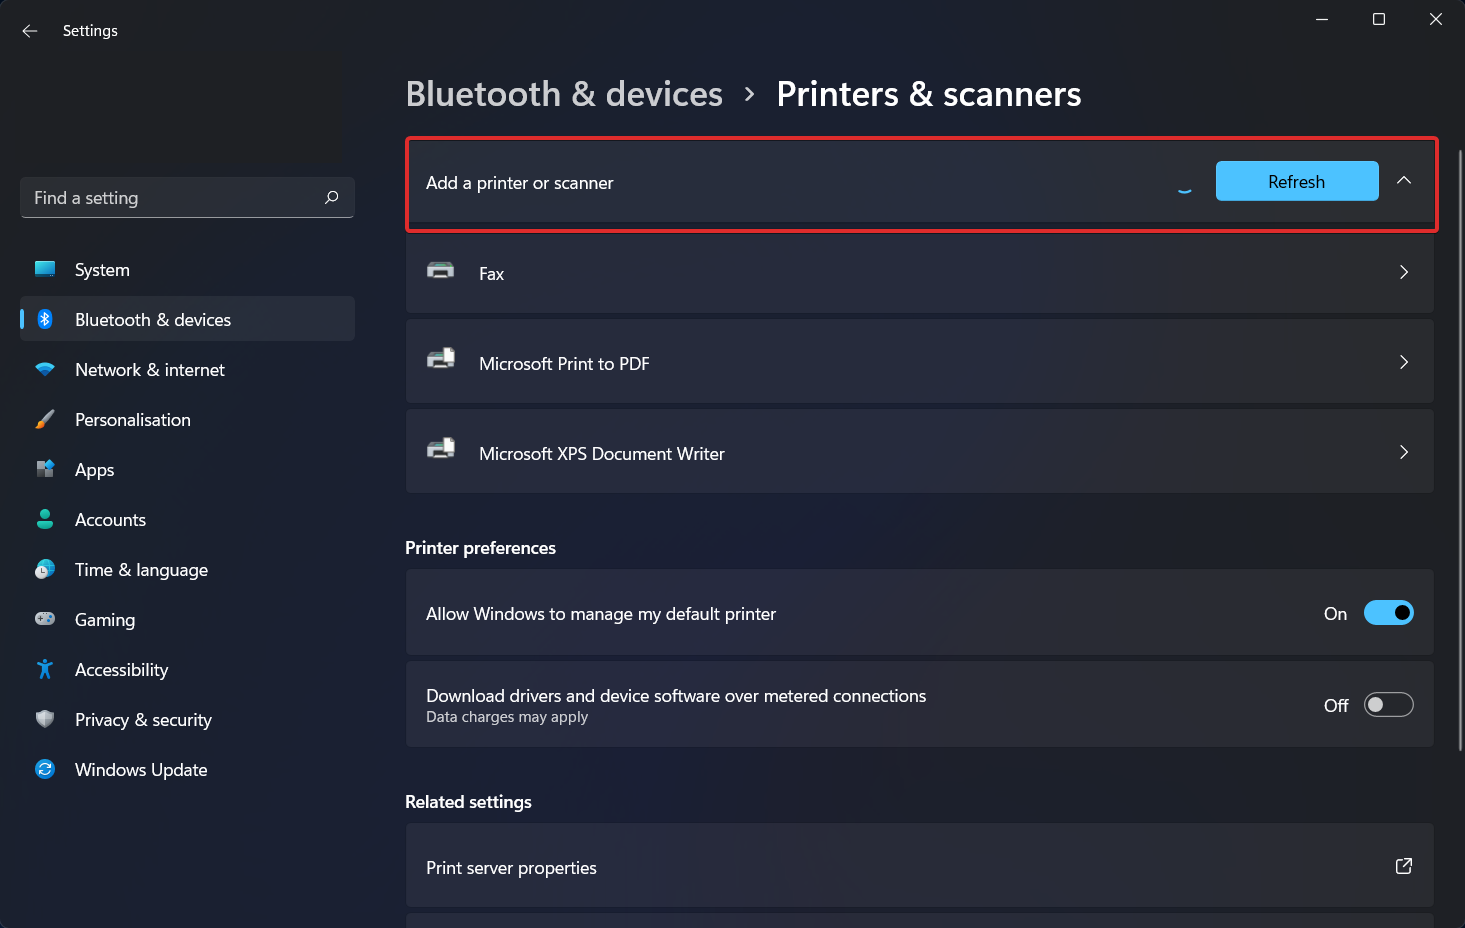
refresh windows 11 not detecting canon printer

Most likely, you’re purchasing the printer to cover the cost of parts and distribution, which means the manufacturer is effectively subsidizing the device on the assumption that you’ll recoup your research and development expenditures (as well as the rest of their overhead) from your ink purchases.

You should not expect a positive experience if you use counterfeit ink cartridges. A research and development component is the development of ink with the appropriate physical qualities to work with printheads.

It is possible that knockoff ink does not possess certain characteristics and, as a result, does not perform as well. Furthermore, as we just discovered, the printhead for most inkjet printers marketed for household use is really incorporated within the cartridge itself.

The majority of low-cost printers don’t have a permanent printhead. Thus, you may be purchasing substandard ink and printheads. Attempting to refill a cartridge with imitation ink will almost certainly result in the introduction of inferior ink into a container with a burned-out printhead.

Also, let’s get back to the subsidy issue. According to what we’ve read, some printer manufacturers purposefully design their printers to shut down if you attempt to use third-party cartridges completely. You may not agree with them, but from their point of view, they are safeguarding their investment.

If you encounter more printer errors, take a look at our guide on how to fix the printer not working error on Windows 11.

Another useful guide is our post on what to do if Windows cannot connect to the printer. Make sure not to miss out on it if you face the same issue!

Also, if you have the same device, download the Canon MF3010 driver, and all printing issues should be resolved.

Users reported that their Canon printer won’t scan in Windows 10/11 to which we have responded with a thorough article on what to do to fix it.

And lastly, don’t gloss over our post on Canon printer not connecting to Wi-Fi, since it is a common problem people encounter. Bookmark the article for the gloomy days that may come.

Was this guide helpful for you? Don’t hesitate to let us know in the comments section below. Thanks for reading!

Dragon Age 4 could be released soon

Dragon Age 4, or whatever it ends up being called, was first announced at the game awards, but we haven’t really heard anything about it since then.

It didn’t feature during EA Play Live last July, though the company did say that the team “didn’t want to rush a demo” and would only share more information when the time was right.

But it seems that the developer is making some good progress with the upcoming sequel. The news comes from a recent report that claims that things are going well for the project.

That said, Dragon Age 4 has had its own issues, with a variety of delays since it was first announced. 

It’s now believed to be releasing soon on both current and next-gen platforms, which would make sense given that the developer said recently that it needs a little more time with the game.

There are new insights about Dragon Age 4’s development in the latest podcast. According to the podcast, work on the game is now sufficiently advanced that it may even be released earlier than expected.

The gamer

At The Gamer, its story also notes that the potential release window aligns with what we’ve heard from other reports concerning the project. 

There’s a lot to take in there. For one thing, it would seem that Dragon Age 4 is finally in good shape and on track for a release window. 

It would also appear that Dragon Age 4 is going to be a cross-gen game, which means it’s going to be releasing on Xbox Series X/S and PS5 as well as Xbox One and PS4. It’ll likely make the jump to PC too, given the popularity of the franchise on PC.

It’s not that we don’t know anything about Dragon Age 4; it’s just that the only reports we’ve seen so far are rumor-based. There are, however, plans to drop multiplayer.

We don’t have many details on Dragon Age 4 at this point, but we’re looking forward to seeing more.

We will keep you posted about any official new information about EA Play Live.

What do you think about all this? Are you excited for Dragon Age 4? When do you expect to see it release? Let us know in the comments.

Will websites survive version 100’s additional browsers

Browser numbers are usually unimportant, but with Chrome and Firefox both hitting the century mark at the same time, the big question is: will websites cope?

The problem is that many sites are hard-coded with the assumption that if a browser is over 99 it must be very old indeed. In fact, some may go even further and assume that if a browser has a major version number greater than 99 it will not support certain modern features at all.

Over time websites have been able to progressively add new features because older browsers simply ignored code they didn’t understand. But now developers have to think about how to use JavaScript feature detection rather than relying on browser numbers to know what a site can do.

For end-users, this means that websites should work consistently across the three main browsers. But for developers and webmasters, this means something else entirely: they have to make sure their sites are ready for the new versions.

Website memory

Memory is short in the web industry; remember when Opera reached version 10 in 2009, causing problems, and just three years later, Firefox 10 faced similar issues.

One issue is that websites often explicitly block older versions of browsers. Some are blocked because they are simply too old to be secure, but others are blocked because they do not support features that the websites need to work properly.

 In some cases, the website will tell a user that their browser is out of date and offer a link to download a new version. However, if an older browser cannot run newer versions of Flash or Java, that link may be broken as well.

Each time a major version number changes, websites find new ways to break. On some sites, you can’t log in; on others, critical functions just stop working. These problems are almost always minor and temporary, but they happen every time the major version number changes.

Web testing

Web developers are unlikely to want to change all their code – even though the change required would be simple – so the issue will likely persist.

One web developer who is already testing a 100-version browser has already run into problems with sites that check for browser versions.

 In some cases, the browser changed its user agent string from 99 to 100 but was still unable to load sites that checked for a specific version number.

If you’re a web developer or just a very keen browser user, you may have noticed that the release schedules of the major browser vendors are going to be rather exciting in the next few months

The problem is that a lot of websites have been programmed to check which browser users have installed by examining the browser’s string (user-agent) and seeing whether it contains “Firefox/99” or “Firefox/100”, for example.

If it does, then the site might refuse to work with that browser. And as Microsoft now uses a flavor of Chromium, this also affects Edge and the company is checking.

Chrome will soon be updating to a new version, putting it a major version ahead of Firefox and Safari. However, by the time all three browsers are on the same major version, most sites should have updated their software to work with the new version.

Are you excited to see how the new browsers will work on the website? Let us know in the comments section.

Dangerous Microsoft Teams attack method

In the past, malicious emails were a common way for hackers to infect corporate networks with malware. Today, more and more companies use collaboration tools such as Microsoft Teams for internal communication. 

In addition, these tools are increasingly used by companies for remote work during the COVID-19 pandemic. 

Now, attackers have recognized the potential of this tool (and others) and are using it to spread malware. Because employees rarely expect to be targeted through these channels, they tend to be less cautious than usual, which makes them easy targets.

This blog post describes how attackers are exploiting these vulnerabilities and what users can do to protect themselves and their organizations against such attacks.

How they attack

Microsoft Teams, a collaboration platform included in the Microsoft 365 family of products, allows users to do audio and video conferencing, chat in multiple channels, and share files.

Many companies around the world have adopted the use of Microsoft Teams as the core tool for their remote employee collaboration during this pandemic.

There are no known vulnerabilities in the channel chat that could be exploited to inject malware into a user’s system. However, there is an existing method that could be used for malicious purposes.

 Microsoft Teams allows file sharing as long as the file size does not exceed 100 MB. An attacker can upload any file to any public channel in Microsoft Teams and anyone having access to the channel will be able to download it. 

From a cybersecurity perspective, it sounds like a goldmine: From any one Team channel, you can access all conversations and information, including sensitive information or intellectual property. 

Since Teams allows you to access all the conversations across different channels that might contain very sensitive information or intellectual property. It also might contain sensitive files shared between its users. 

Yet financially motivated cybercriminals can also benefit from Teams, since they might be able to catch interesting data inside Teams, which might allow them to commit more fraud, like obtaining credit card information for example.

The attackers are said to begin with targeted spear phishing emails that contain malicious links. If those are clicked on by members of organizations using.

When an attacker is trying to access a company’s enterprise resource planning system, the only thing needed for access is valid credentials for one of the employees. A common way to gain such credentials is by running a phishing campaign on users that are in the target organization.

Once an attacker has gained access to a victim’s email account, they can log in via Microsoft Teams and then use the feature that allows users to import documents from other sources. 

The attacker can then upload an HTML document that contains malicious JavaScript and link it to another document that will run when opened by other employees who have access to it.

Attacks may also be carried out against users by purchasing valid credentials from an initial access broker or through social engineering.

Users infected via Teams

The attacker can directly access all confidential communication channels between employees, customers and partners. In addition, the attackers are also able to read and manipulate private chats.

The attacks come in the form of malicious emails that contain an image of an Invoice document. This image contains a maliciously crafted hyperlink that is invisible to the naked eye but is active when clicked.

Microsoft Teams has seen thousands of attacks every now and then. The attacker drops executable malicious files into different Teams conversations. These files are trojans and can be very malicious to computer systems. 

Once the file is installed on your computer, the computer can be hijacked to do things that you didn’t intend it to do.

We do not know what the attackers’ ultimate goal is. We can only suspect that they want to get more information about their target, or full access to computers in the targeted network. 

This knowledge might have given them the ability to pull off some kind of financial fraud or cyberespionage.

No link detection

What makes Microsoft Teams vulnerable is that its infrastructure is not built with security in mind. As such, it does not have a malicious link detection system and only has a common virus detection engine.

Because users tend to trust what’s on the platform their companies provide, they can be vulnerable to sharing malware and getting infected.

A surprising level of trust makes users feel safe about using a new platform. Users can be much more generous with their data than they usually would be.

Attackers can not only trick people by putting infecting files or links into chat channels, but they might also send private messages to users and trick them with social engineering skills.

Most users will not care about saving the files on their hard drives and running antivirus or threat detection products on them before opening the files.

The number of cyber-attacks on a daily basis will continue to increase as more organizations become involved in this type of activity. 

Protection plan

For starters, users should take precautions to protect their email addresses, usernames and passwords.

In order to help address the Team structure threat, it is suggested that you;

  • Enable two-step verification on the Microsoft accounts you use for Teams.
  • If files are dropped on the Teams folders, add more security to those files. Send their hashes to VirusTotal to make sure they aren’t malicious codes.
  • Add extra security for links shared on Teams and make sure to use reputable link-checking services.
  • Make sure employees are aware of the risks involved in using communication and sharing platforms.

Is your organization using Microsoft teams? Has anyone experienced cyberattacks on the platform? Share your views in the comments section.

You need 16GB of RAM to run Android apps smoothly on your Windows 11 desktop

Most of us have witnessed firsthand how this project went from a dream to a dream come true. And yes, we are talking about native Android support for Windows 11.

Now that the feature is available for users everywhere, there are some compatibility facts that we have to take into consideration if we are planning to download and install our favorite Android applications.

The Redmond-based tech giant published a list of requirements for running this type of software on your Windows 11 machine.

Are you ready to run Android apps on Windows 11?

Yes, towards the end of January, Microsoft promised a major upgrade for Windows 11, and a couple of days ago, the company delivered on that. 

Among the several other features that this February update brought, is the introduction of the Amazon Appstore Preview, which is now available on the Microsoft Store.

Android apps can now be downloaded on Windows 11 via the Amazon Appstore but the feature sadly is only available in the U.S., for now.

And according to the tech giant’s decision, Android support for Windows 11 will require at least 8GB of RAM. But if you want to have the smoothest experience, then 16GB of RAM is recommended.

RAM8 GB (minimum)
16 GB (recommended)
Storage typeSolid State Drive (SSD)
ProcessorIntel Core i3 8th Gen (minimum) or aboveAMD Ryzen 3000 (minimum) or aboveQualcomm Snapdragon 8c (minimum) or above
Processor architecturex64 or ARM64
Virtual Machine PlatformThis setting needs to be enabled. For more info, go to Enable virtualization on Windows 11 PCs.

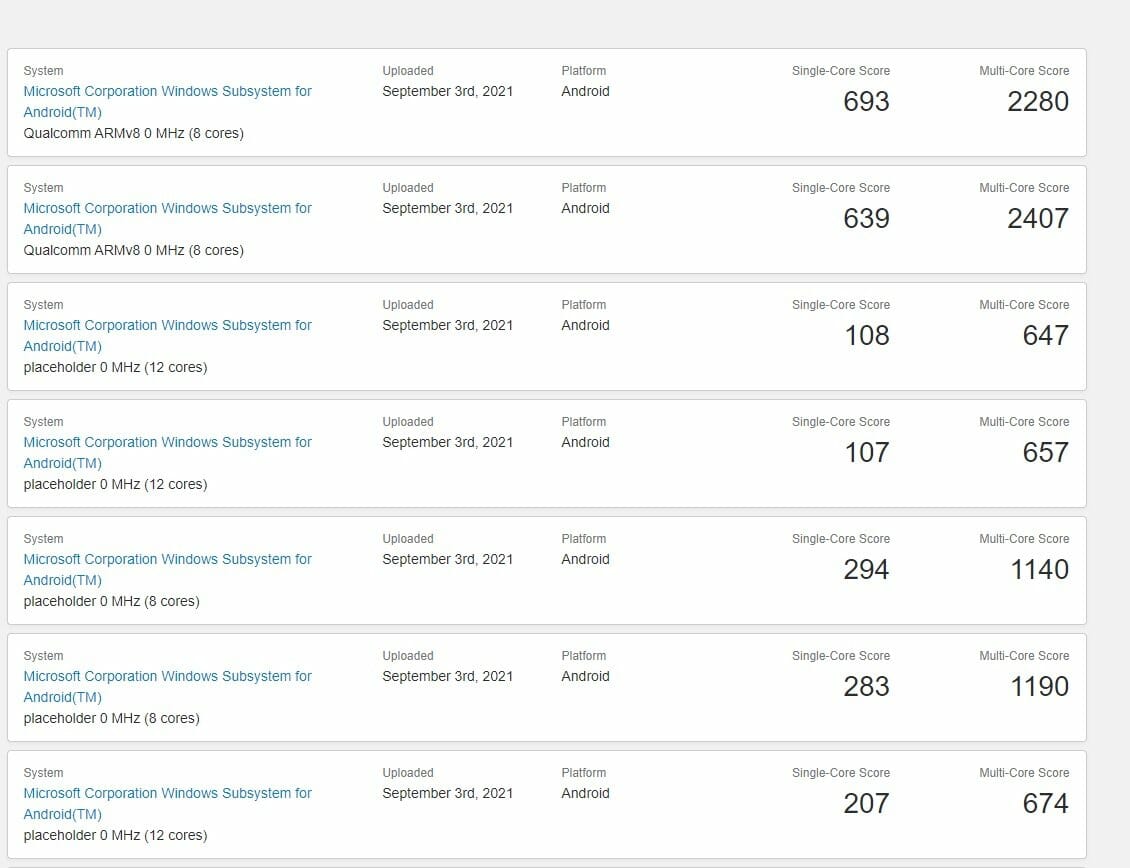
Recent benchmark scores have been published on Geekgench, giving users their first glimpse at the performance of Microsoft’s long-rumored Android Subsystem.

As you know, this whole setup is based on Windows Subsystem for Linux and Microsoft’s Project Astoria (for enabling Android apps support on Windows Phones).

We don’t know for sure yet, but these tests, along with Microsoft’s Store listing also seem to indicate that a high-end configuration is required to run mobile apps smoothly on Windows 11.

Redmond officials are also planning to use unknown virtual machine technology to address issues with Android Open Source Project (AOSP) and eliminate the need for Google Play Store services.

That being said, during last year’s Game Awards, Google took to the stage to reveal that Google Play games are coming to Windows next year.

But now only for Windows 11 users, as Windows 10 will also get this interesting feature, thus introducing Android software to the latest OS’ predecessor as well.

With the helo of AOSP, integration, most applications will work fine on the desktop operating system, so we don’t have to worry too much, hopefully.

What we do know is that Android apps will work on Intel, AMD, and Qualcomm (ARM) devices.

As far as Intel PCs go, Microsoft is planning to use Intel’s Bridge Technology feature, which is a run-time post compiler to enable applications that are not compiled to run natively on x86-based devices.

Excited about this new functionality for your Windows PC? Share your thoughts with us in the comments section below.

Can you play Elden Ring with friends from different platforms? [Answered]

Yes, we are always on the lookout for some new and inspiring games, ones that would lead us on an adventure of a lifetime. We’re talking about titles that keep gamers hooked until the last second.

But, unfortunately, one game is not as good as the other, and although there are tons of awesome titles to choose from, a truly remarkable game is a bit harder to come by.

Now, however, gamers worldwide are hoping that Elden Ring will fill the void left by legends such as Elder Scrolls, Gothic, The Witcher, and others.

But there’s one question that lingers. Can you play Elden Ring with players from other platforms? You’ll find the answer today, and an extra tip we have for gamers who like specialized browsers.

No cross platform gameplay for Elden Ring

Unfortunately, the answer is no, you can’t. While Elden Ring does offer crossplay support, it does not offer a cross-platform option.

We’re about to explain what that means so that there isn’t any confusion. In principle, this means PlayStation 4 and PlayStation 5 players can game together, same as Xbox One and Xbox Series X|S co-op support.

However, PS gamers will not be able to co-op with PC or Xbox players, as an example of Elden Ring’s cross-platform limitations.

Thus far, neither Bandai Namco nor From Software have confirmed this might change. However, there is always a chance the developer could add a feature like cross-platform in Elden Ring through an update.

We know that exploring the vast, dangerous open world of Elden Ring can be scary alone, and you would rather do it with one or multiple friends.

That’s why we urge you to make sure you make the right decision on which platform you are getting Elden Ring so that you can actually play with your friends.

The co-op side of Elden Ring allows you to summon other players into your game using summoning signs, similar to what you might have experienced in the Dark Souls series.

When you use the Furlcalling Finger Remedy, found in the multiplayer menu, you’ll see summoning signs on the floor, which represent other players who are willing to connect with you online.

However, the future could still hold surprises for us and you never know when something like this will become possible.

Also, if you were wondering about the crossplay features that Diablo 2 Resurrected has, we got your back.

Will you be snatching Elden Ring from the shop on day one? Share your opinions with us in the comments section below.

Opera 84 brings new ways to protect your online data

Opera Software released Opera 84.0 final today to the Stable channel of the web browser. The new version is available on the official Opera website and through the built-in update functionality of Opera.

Opera users who run a manual check for updates right now will receive an update to version 84 of the browser right away.

The new version includes improvements to the browser’s Cookie dialog, Paste Protection, and more extensions in the sidebar.

Opera users who run a manual check for updates right now will receive an update to version 84 of the browser right away. The new version includes improvements to the browser’s Cookie dialog, Paste Protection, and more extensions in the sidebar.

The new stable version is not an urgent update from a security perspective, but it does introduce a new option that improves security in the browser.

Paste protection

Opera blog highlights paste protection as one of the main features of the new browser. In short, it prevents websites from accessing text that users copy to the clipboard; it limits the feature to select inputs only so that text can be pasted into those elements but not read by scripts on sites.

The main use case for Paste Protection is password fields; the feature is enabled on all password fields by default and prevents the automatic pasting of passwords into those fields.

The new feature is available in the stable version of Opera Stable which users can download from opera.com or update using the browser’s built-in update functionality.

How it works

Paste Protection is enabled by default in Opera 84; users who copy data such as banking account numbers or crypto wallet identifiers are informed by the browser if the content is manipulated. 

Malware may target these specifically so that transactions are hijacked if the user does not pay attention to the target addresses. Paste Protection warns users only so that they are aware of potential manipulations. 

Paste Protection informs users about potential manipulations when attempting to paste data such as banking account numbers, crypto wallet identifiers, or other sensitive data on websites in the browser.

The information popup contains details about the data that is pasted, and what it was changed to if it was modified before it was pasted in the browser.

Opera Software plans to add more functionality and options to Paste Protection in future versions of Opera. It notes that it is still work-in-progress and not all scenarios are covered yet at this point in time.

The changelog

Opera provides a link to the complete Opera release notes but does not reveal additional information about the release itself.

The feature works by checking the pasted text against a list of data types and patterns. If a match is found, the user will be alerted with a pop-up window. This feature can be disabled in Settings if needed.

Other improvements in the release include the added support for Windows 11 snap layout popups and there appear to be some changes in regards to the DRM system Widevine as well in the release.

Naturally, Chromium, the base that Opera shares with browsers such as Chrome, Vivaldi, Edge or Brave, has been updated to a new version.

Opera now includes support for Windows 11 Snap Mode and updates Chromium to a new version.

Otherwise, the new version is comparable to the previous one. The changelog lists reductions of crashing and leaking memory.

Have you installed the new version of Opera? If so, what are your initial impressions? Share your views in the comments section below.

Halo Infinite update makes Big Team Battle changes

Halo Infinite has had some issues since its launch. More than anything, this has been a result of the game’s engine, which was delayed and then rushed into release.

After a series of setbacks, 343 Industries released a patch for Halo Infinite recently. The patch is intended to address several problems that players have encountered while playing the game, including issues with syncing games in Big Team Battle mode.

A few modifications were made on the Custom Browser to help players find games with their preferred settings. Players can now filter by name, description, or map name using specific key words or phrases. 

An advanced search option was also implemented, which allows players to filter by map type, game mode and other parameters such as score limits and rounds per match among others.

No setbacks

The game was hit by various bugs and performance issues at launch, though 343 Industries has been quick to respond with several new updates that fix these problems and make other improvements.

The update brings several improvements, including fixes for the BTB server browser and an issue that could cause players to become stuck in the matchmaking flow after a matchmaking session ends.

Some of the issues that have been resolved include;

  •  Local Area Network multiplayer, a new feature in the game, takes effect when a match begins.
  • To prevent crashes in Radeon RX 500 series-enabled games, Radeon Software will automatically turn on the Async Compute feature for supported configurations.
  • Players can now play the latest version of Halo Infinite offline, and then connect to the internet once they reach the main menu in order to continue playing online.
  • Additionally, the game now shows the correct border decorations when you launch it in windowed mode from Steam.

A phenomenon may occur that could affect gameplay when you connect to the Internet in some scenarios after launching the game. The only fix is to restart the game.

Halo update

The Xbox 360 and PC versions of the game will each receive a 1.1 GB update. Steam users will receive a 142 MB update.

The latest Halo Infinite update is not yet live on Steam, but the team says that it will be there soon.

In addition to addressing the issues with Battle Tank Blast, adjustments will also be made to Scorpion Tanks and Wrath spawn rates in Battle Tank Blast maps. In return, this will create room for more frequent drops to be made onto the battlefield.

Improvements to the Battlefield are being made with the recent update. The changes include adjustments to the Scorpion Tank and adjustments to the Wrath spawn rates on the Battlefield maps. In addition, players will see an increase in drops across the board.

The update is aimed at fixing some of the issues that had been reported by the game’s community. The most notable one is regarding the Big Team Battle issues. These include frequent disconnections and balancing.

In addition to gameplay changes, there are some controller fixes players can look forward to as well. While 343 Industries says it will continue making changes like these on a regular basis, there’s still no word on when Halo Infinite will be released.

What feature would you most like to see in BTB? Share your thoughts with us in the comment section below.

How to Remove TikTok in Windows 11

Using apps, or programs can be tremendously entertaining. Many of their functions are beneficial, and they’re also extremely stimulating. However, as with all good things, we will want to get remove them. Thus, today we will show you how to remove TikTok.

There are several reasons why users may lose interest in or become tired of them. The app may cease working as well as it used to, or it may be causing havoc on the operating system.

We have prepared for you a list of ways in which you can remove TikTok from your Windows 11 computer. In the end, we have added a link to a guide on how to reinstall it if you change your mind.

But first, let’s see why TikTok was installed on your OS. Follow along!

Why is TikTok installed on Windows 11?

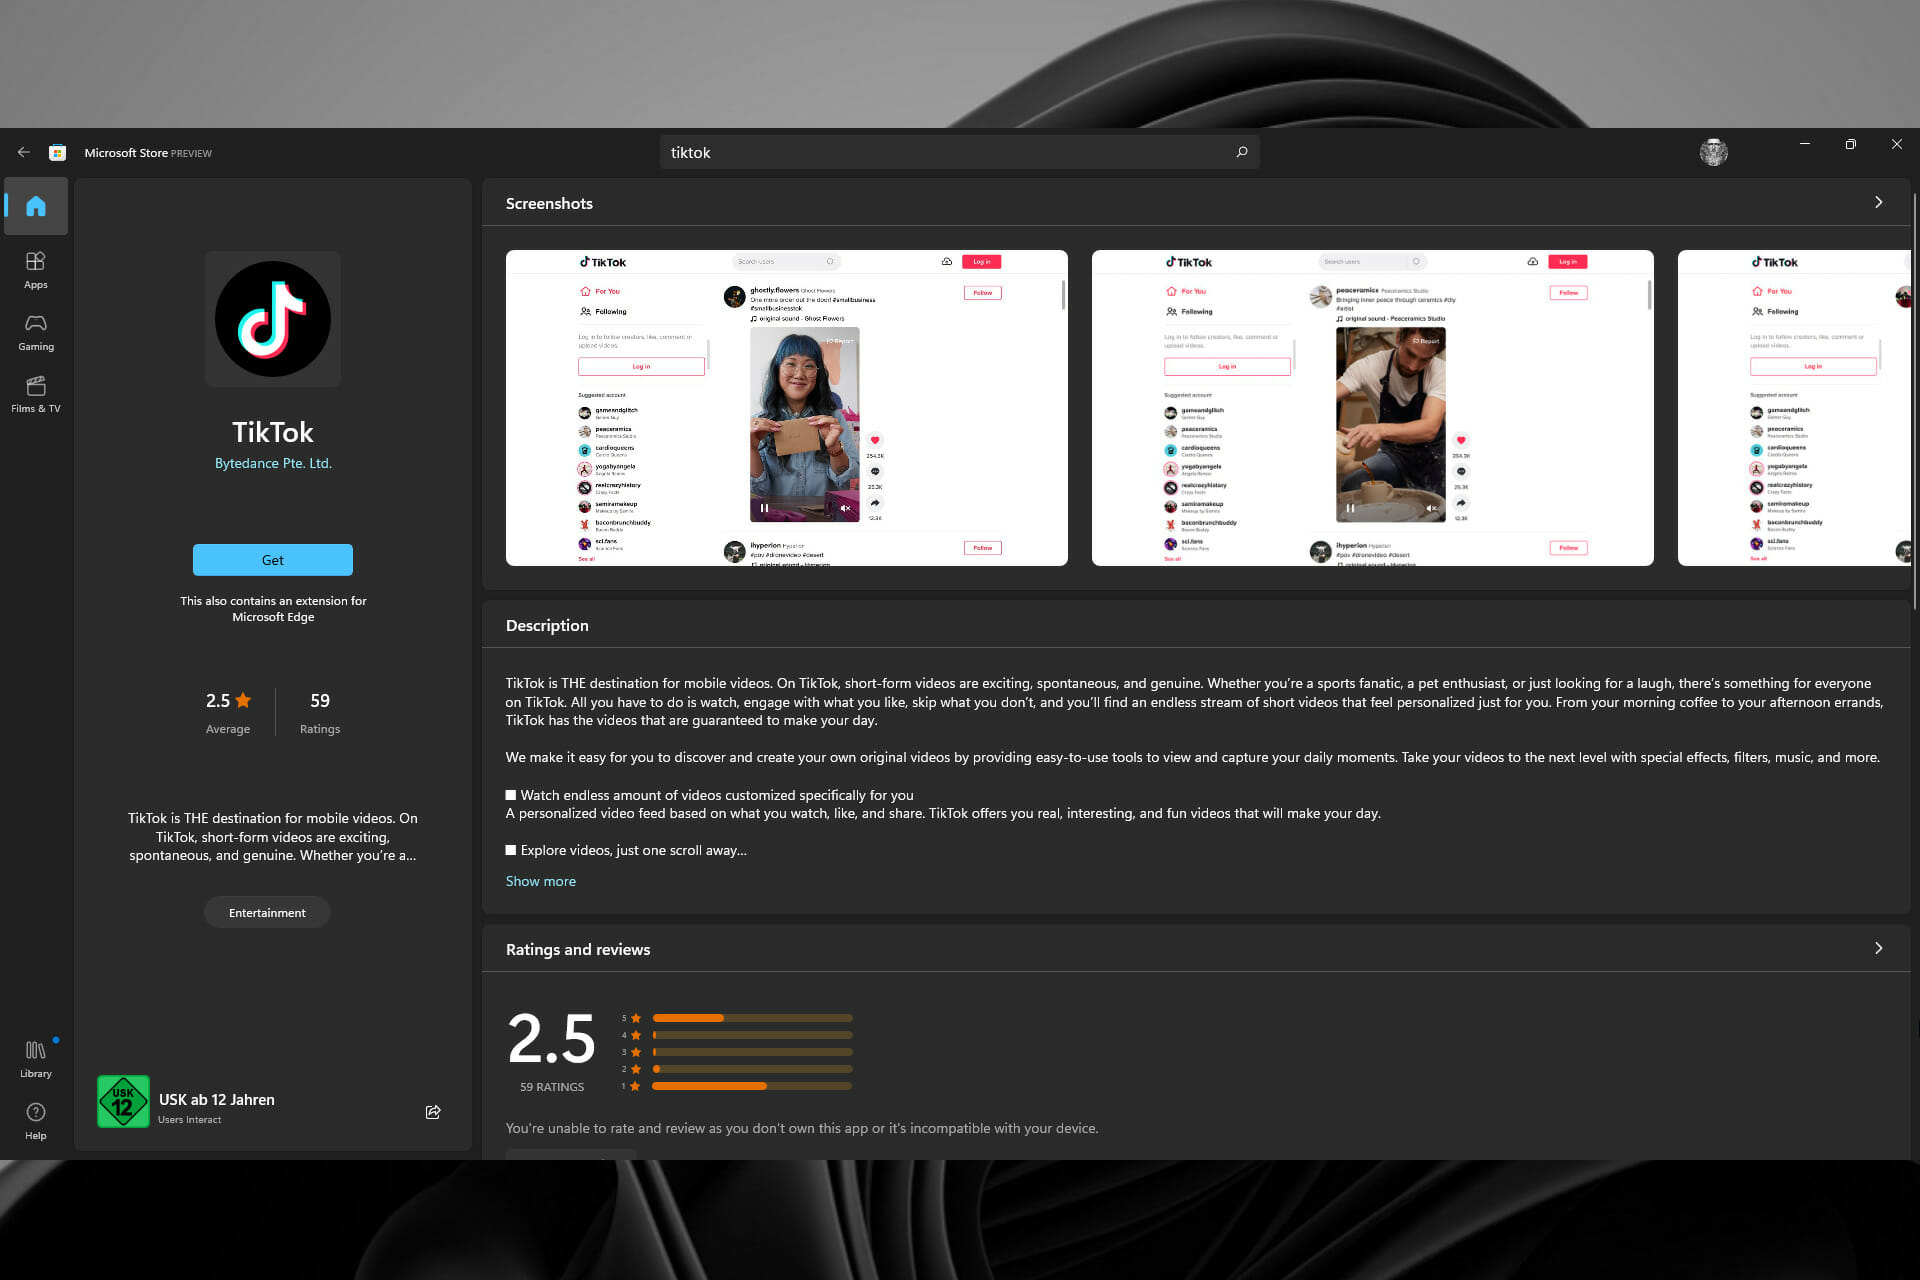
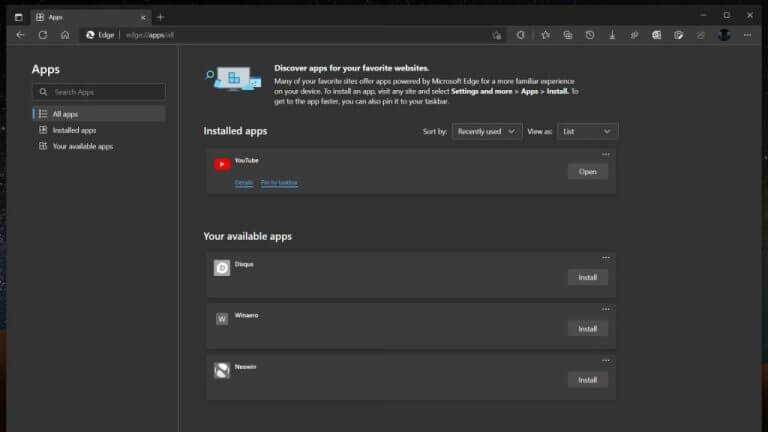
TikTok has appeared on the Microsoft Store for Windows 10 and Windows 11 users. It is not a native application, but rather a progressive online application.

A similar method is used by the official Twitter and Facebook apps, which both use Microsoft Edge to power their respective user interfaces.

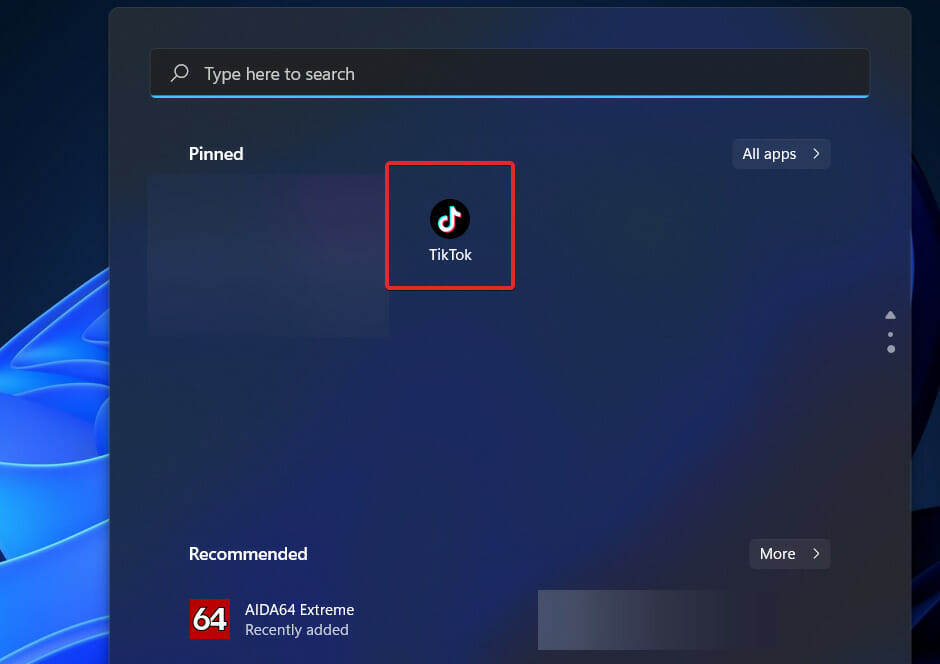
pin windows 11 remove tiktok

The app, on the other hand, is quite useful. You cannot only log into your account but also send direct messages to other members and even post videos.

Also included are common features such as For You, Following, LIVE, and Suggested accounts, allowing you to squander hours at work when you should be working on Microsoft Office instead of on social media.

The only thing lacking from TikTok is a dark mode, which is a feature that many other apps offer. On a laptop or PC, the bright white background can be a little overbearing, but it may be able to improve this functionality shortly.

Because it is a web-based application, it allows the company to make changes to the app on the fly without requiring users to download and install an update from the App Store.

Progressive web applications (PWAs) are becoming increasingly significant in filling the vacuum left by the lack of native Windows mobile applications. Even Instagram, according to reports, is getting set to finally allow users to submit photos via the web, thanks to its PWA.

How can I remove TikTok from Windows 11?

1. Use Settings

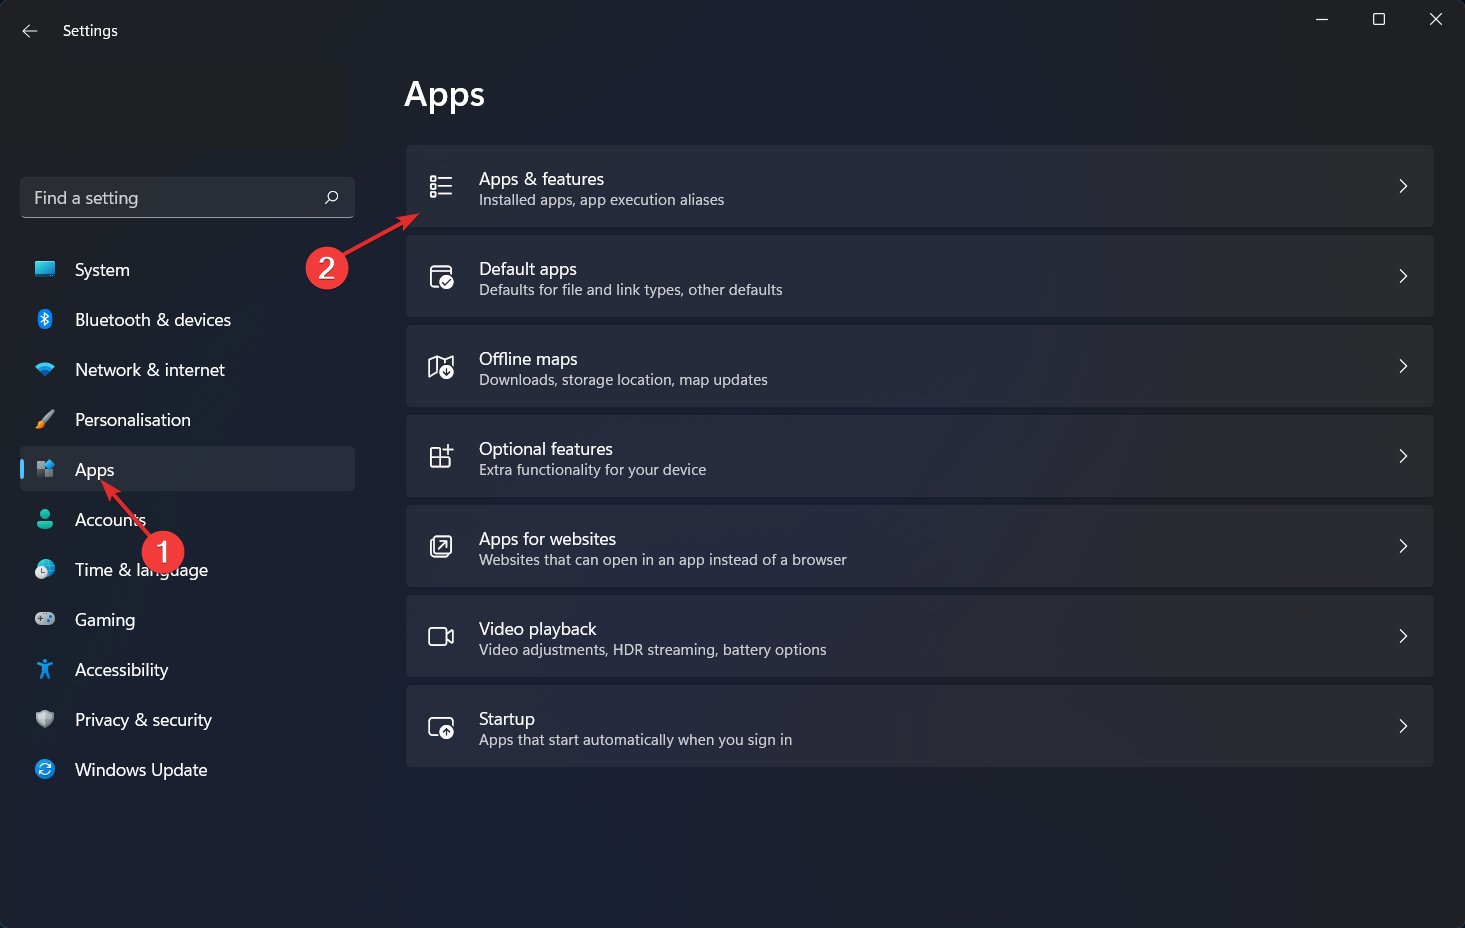
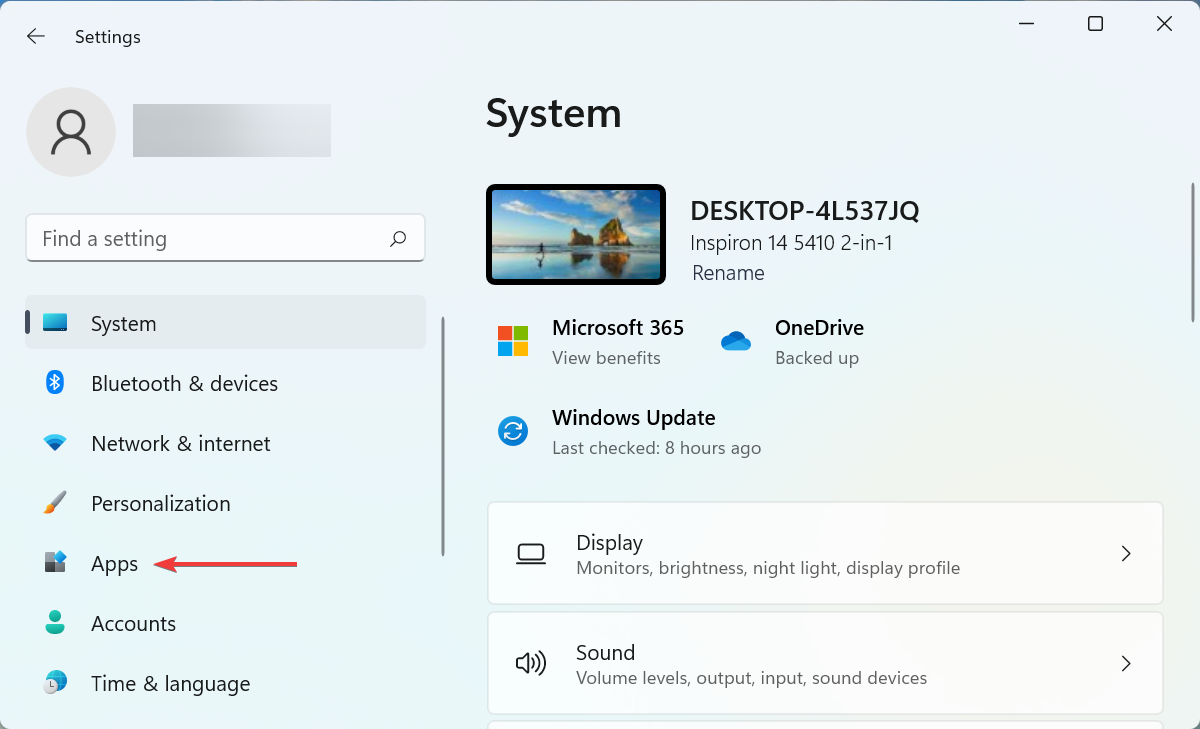
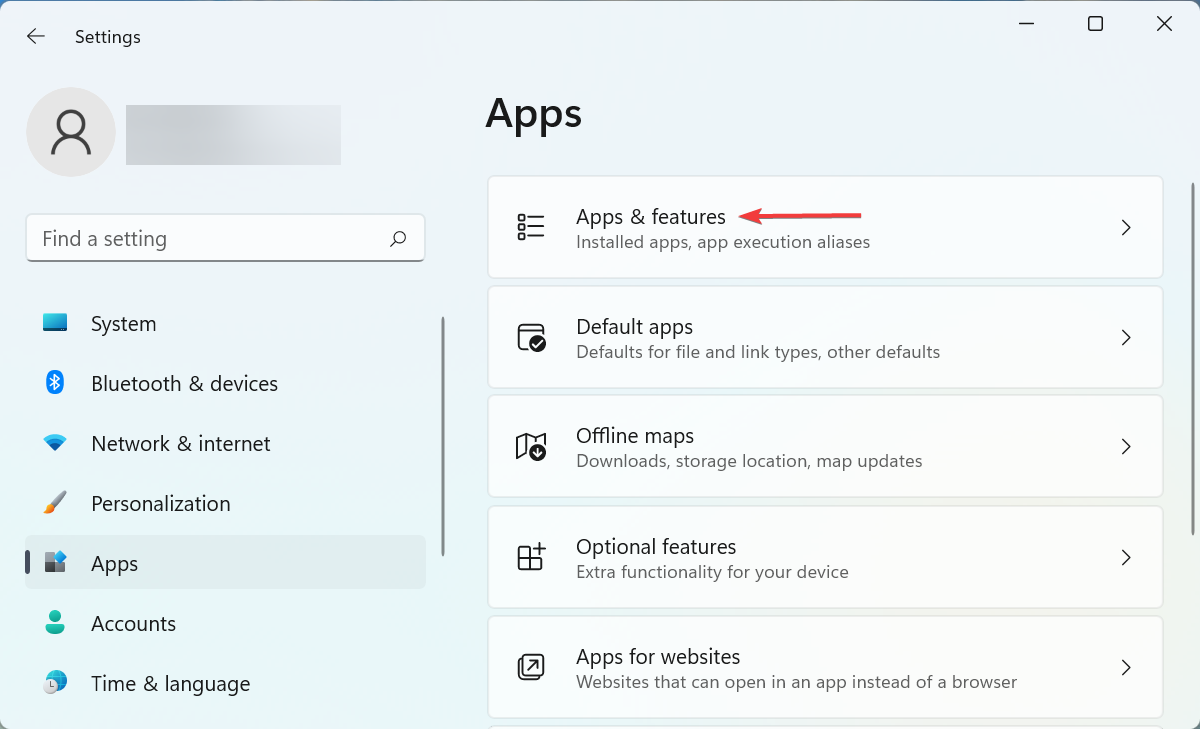
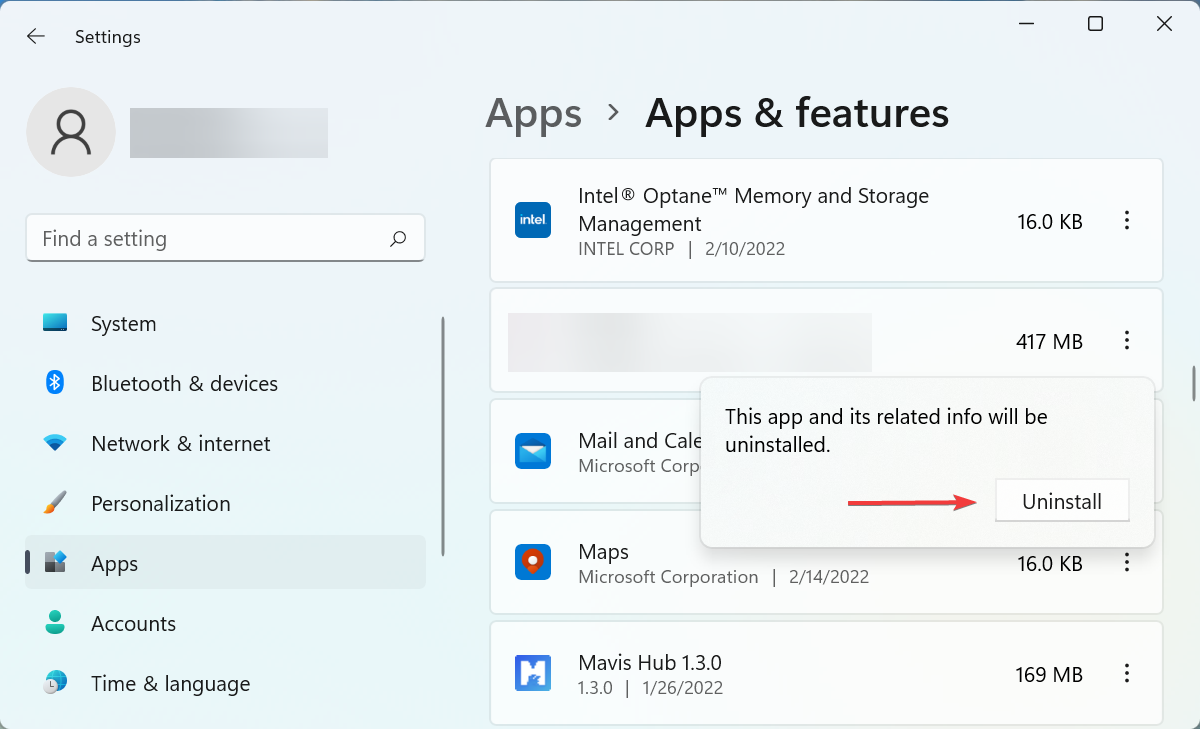
  1. Press the Windows key + I to open the Settings feature and navigate to Apps then Apps & features in order to find the culprit.apps-apps&features windows 11 remove tiktok
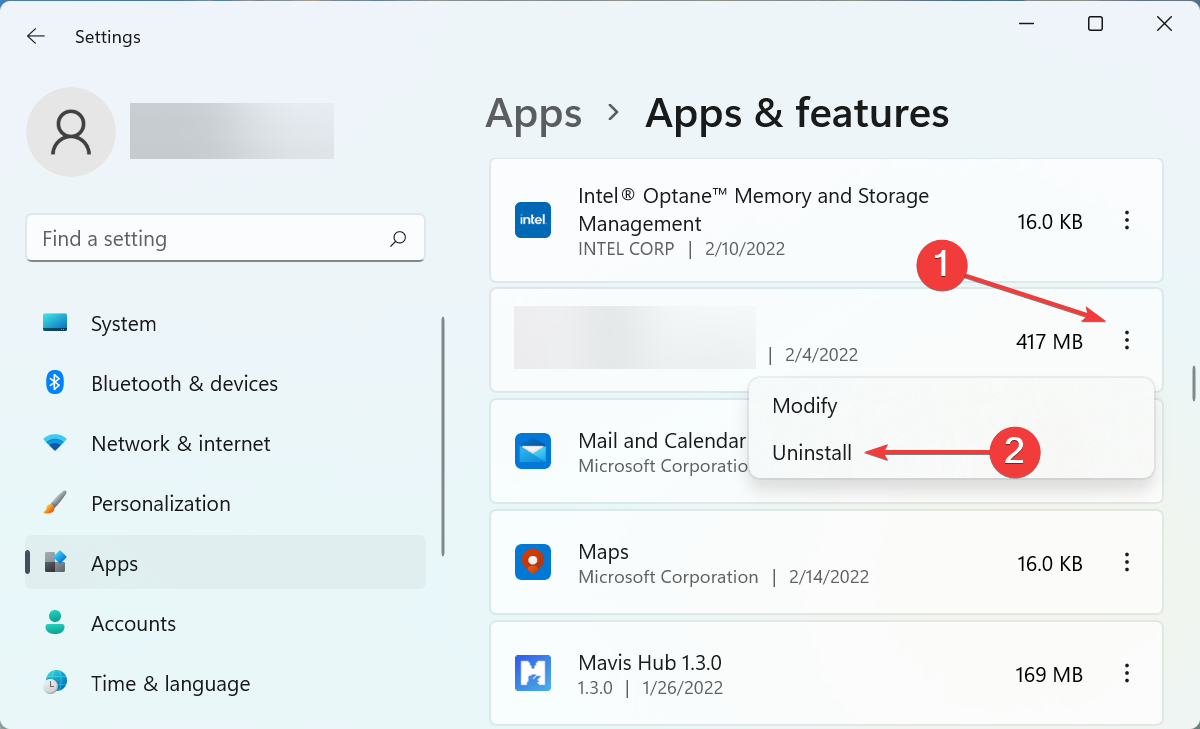
  2. Search for the TikTok app by typing it in the search bar on your screen then tap on the three-dot menu to choose Uninstall. tiktok-uninstall windows 11 remove tiktok

When you uninstall an app in this manner, all of the data that was stored with it will be deleted as well. Some users may be required an additional reboot. Simply restart your computer if you get prompted with that message.

2. Use Start menu

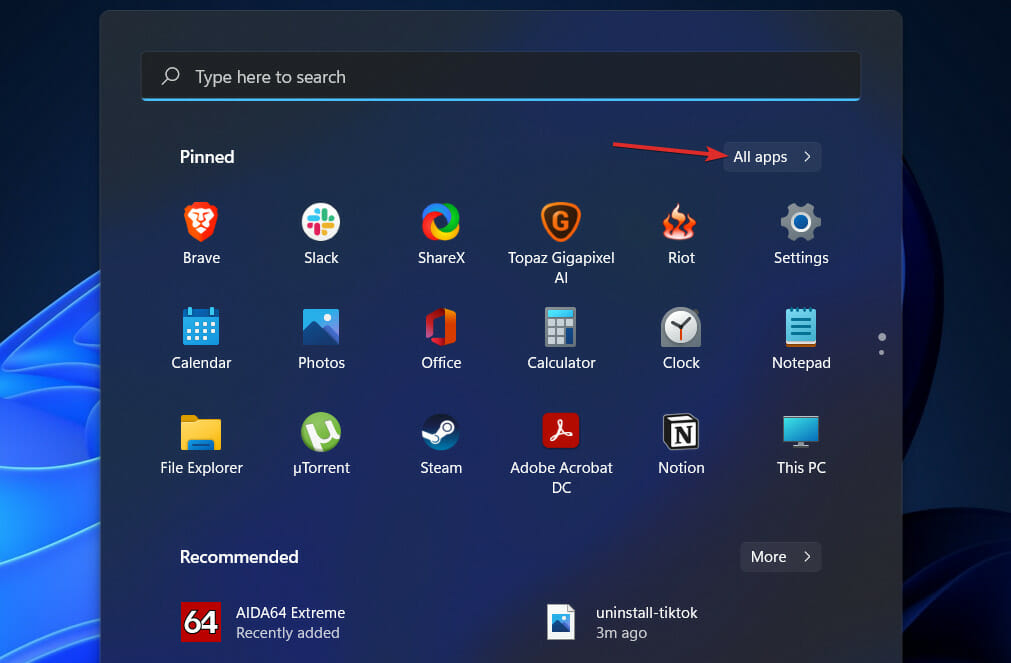
  1. Click on the Window button from your keyboard to open the Start menu then click on All apps.all-apps windows 11 remove tiktok
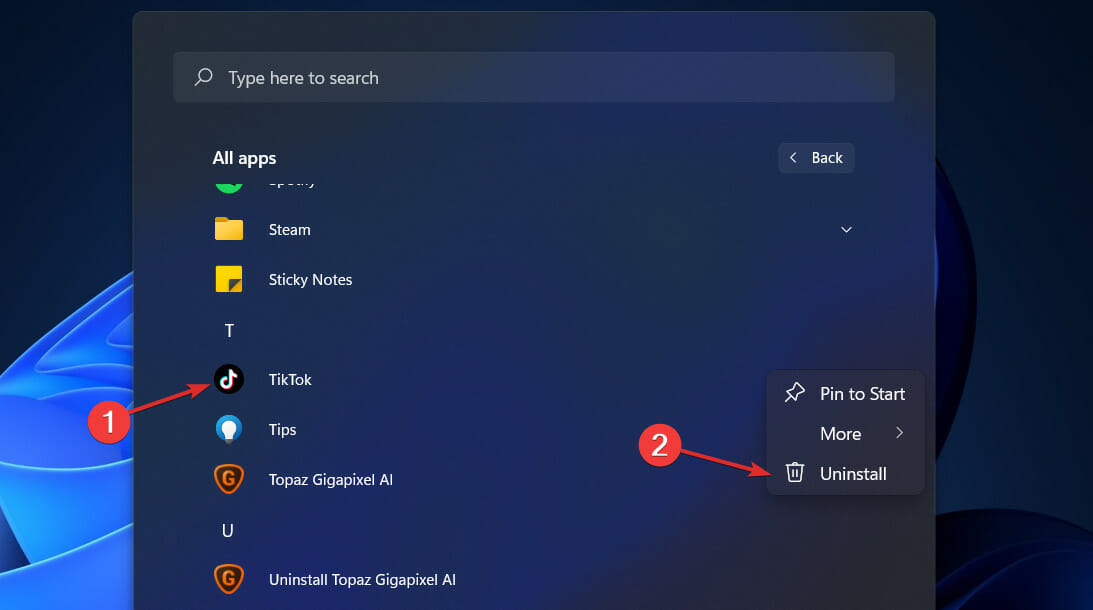
  2. Now look for TikTok then right-click on it and choose Uninstall. That’s it!tiktok-remove windows 11 remove tiktok

3. Use search engine

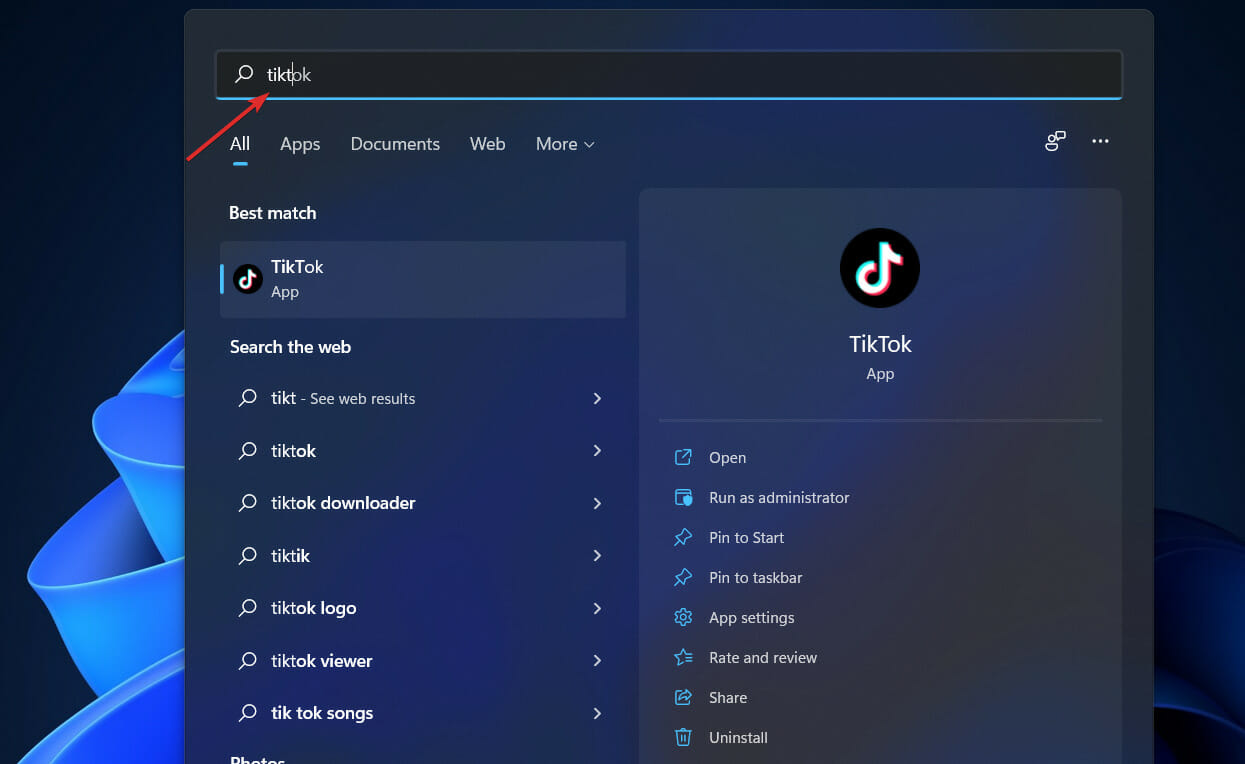
  1. Press the Windows + S key to open the Search function. Now type in TikTok.search-tiktok windows 11 remove tiktok
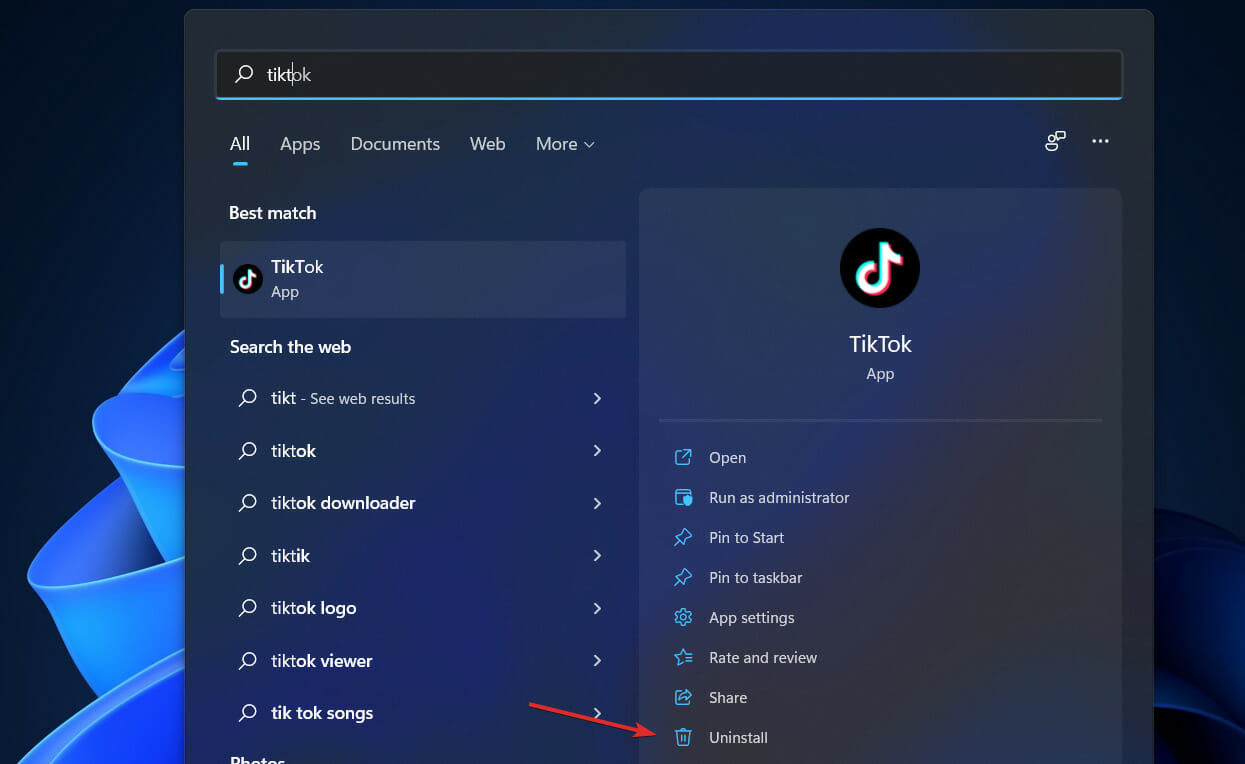
  2. On the right side you will find an Uninstall button under the TikTok section. Click on it to remove the app.uninstall-tiktok windows 11 remove tiktok

Why should I delete TikTok?

TikTok is a video-sharing app similar to Snapchat and Instagram that allows users to upload clips that are 15 to 60 seconds long and are frequently set to music or film dialogue. It is a popular alternative to Snapchat and Instagram.

It was originally known as Musical.ly, which gained fame as a lip-syncing application. The app was purchased by the Chinese business ByteDance in 2018, and it was relaunched with extra features.

Since then, it has skyrocketed in popularity, becoming the most downloaded app on the planet in the first quarter of 2020. Overall, it has been downloaded approximately 2 billion times, and its user base is predominantly youthful, with 41% of its users between the ages of 16 and 24.

There are three main issues to be concerned about. Given that ByteDance, the parent firm of TikTok, is situated in China, there is concern that the corporation may disclose user data with the Chinese government, either intentionally through data requests or accidentally through monitoring software.

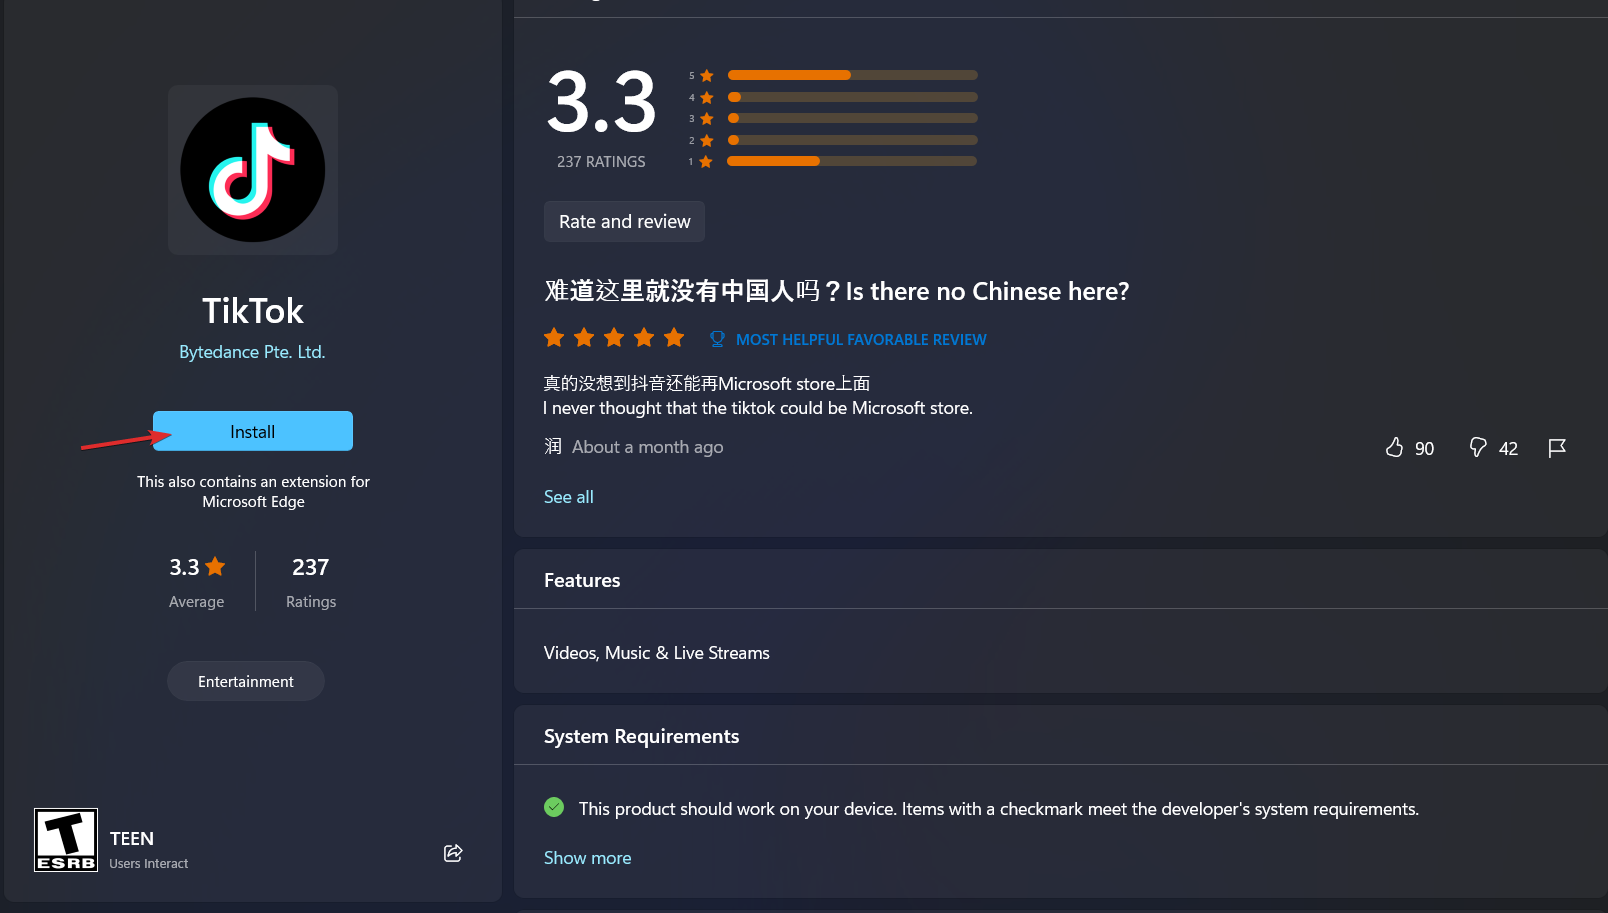
tiktok install windows 11 remove tiktok

When it comes to how much data the app collects from user devices, there are some legitimate privacy issues. People’s whereabouts and what they are up to maybe revealed to others through the app, according to Chris Morales, head of security analytics at cybersecurity firm Vectra.

Aside from that, there are issues about the programming used by the company, with experts concerned that it could allow for privacy and security breaches.

TikTok patched several major flaws, including one discovered in January 2020 that would allow an attacker to take control of someone else’s account and upload unauthorized videos, make private videos public, and delete existing videos.

It also patched several minor flaws, including one that would allow an attacker to take control of someone else’s account and upload unauthorized videos, make private videos public, and delete existing videos.

China is far more aggressive than other governments in compelling companies to share information, and ByteDance has collaborated with local police forces in Xinjiang, where Beijing is accused of detaining 1 million people belonging to religious minorities in re-education camps and prisons.

However, if you want to reinstall the app on your computer, check out our article on how to download and install the TikTok app on Windows 10/11.

Alternatively, a guide on how to use TikTok on your browser may be helpful for those who wish to continue using it without downloading it.

And lastly, take a look at the ten best Android apps on Windows 11 to use your OS’s potential to its fullest and enjoy your free time.

Was this guide helpful for you? Let us know in the comments section below as well as whether you will remove other social media apps too. Thanks for reading!

How to Fix Unarc.dll Errors in Windows 10/11

Unarc.dll is one of Windows’ DLL (Dynamic Link Library) files that’s needed to run certain programs.

A unarc.dll cannot be found or unarc.dll is missing error message, or something similar might pop up when the unarc file is missing or corrupted.

The exact error messages might vary, but they will all include references to the unarc file. The unarc DLL error code 1, might be due to your antivirus settings. Disable it and check for the problem.

Some users have stated that a unarc.dll error message pops up when they try to install or run games in Windows 10. Consequently, the games don’t run or install when the error occurs.

In this case, the error message you may see states that An error occurred when unpacking: archive corrupted! Unarc.dll returned an error code:-7. You can also see some variations of this message

Counter-Strike, Civilization 5, PlayerUnknown’s Battlegrounds, and Far Cry 4 are just a few of the games that require the unarc file.

This is how users can fix unarc.dll error messages in Windows 10.

How do I fix unarc.dll errors?

1. Fix missing DLLs with specialized software

Manually editing DLL files is risky, also some websites where you can download those files can harm your PC with malware and viruses. The safest way to fix DLL errors is to use a 3rd party software.

There are various Dynamic Link Library fixer software for Windows 10, designed more specifically for resolving missing DLL error messages.

These utilities typically scan for and restore corrupted and missing DLLs and enable users to download DLL files. The software we tested is safe to use and will fix your DLL errors in no time.

2. Run a System File Checker scan

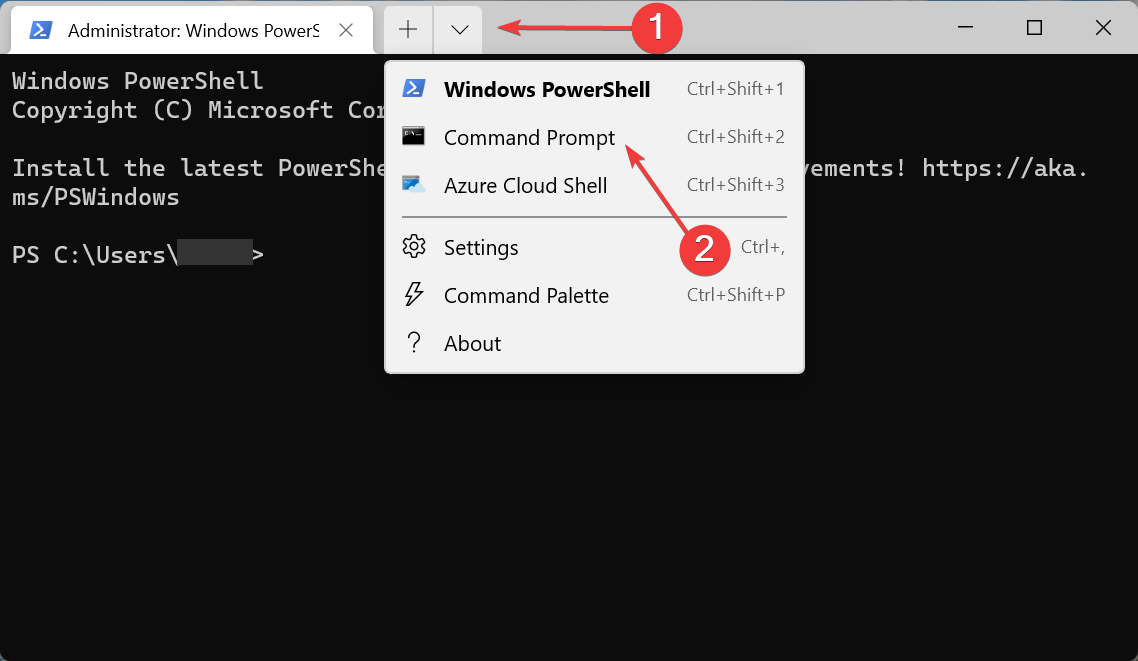
  1. Click Cortana’s Type here to search taskbar button, and enter cmd in the search box.
  2. Right-click Command Prompt and select the Run as administrator option.
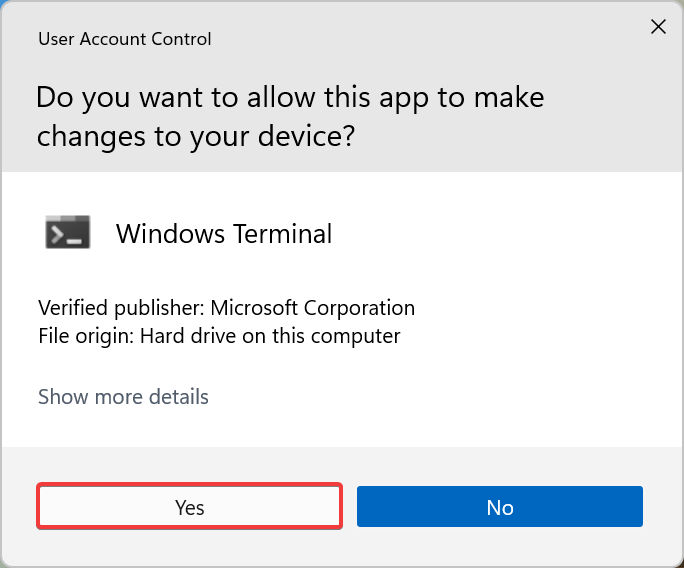
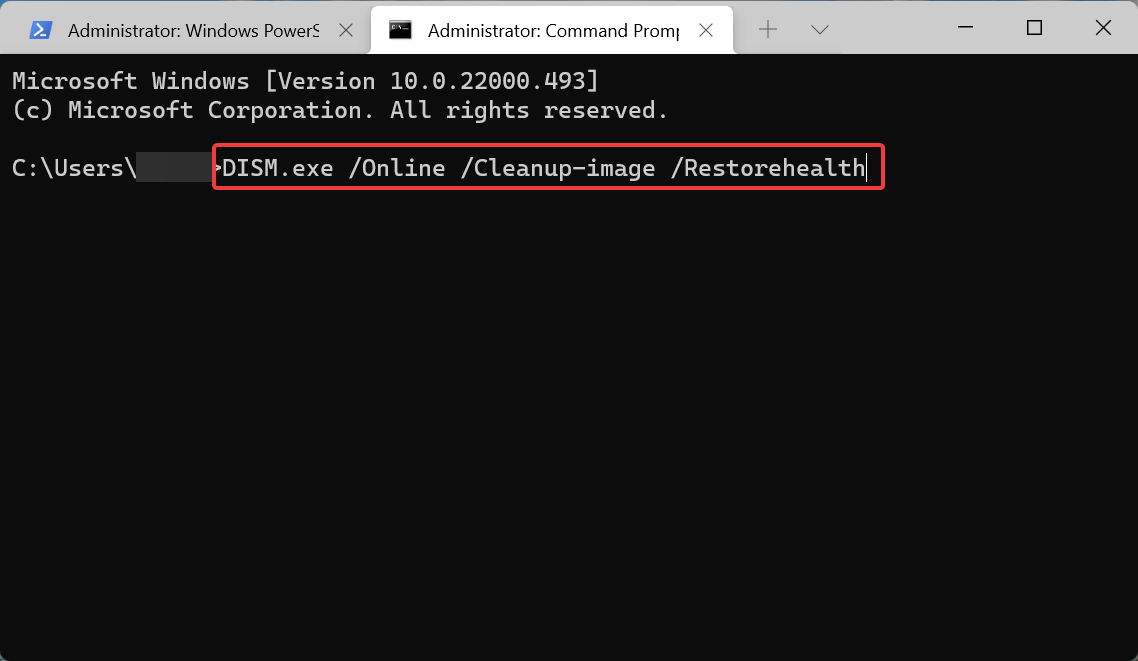
  3. Before running a system file scan, enter the following command end press Enter: DISM.exe /Online /Cleanup-image /Restorehealth
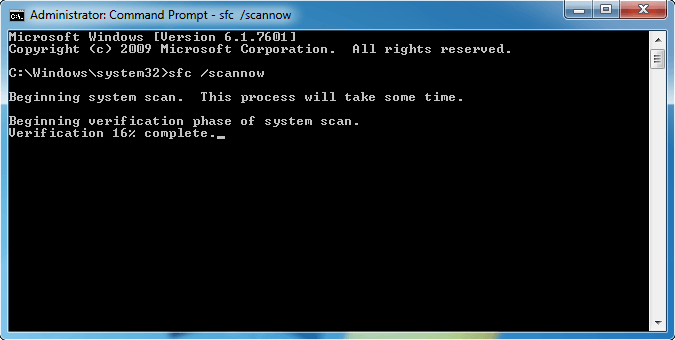
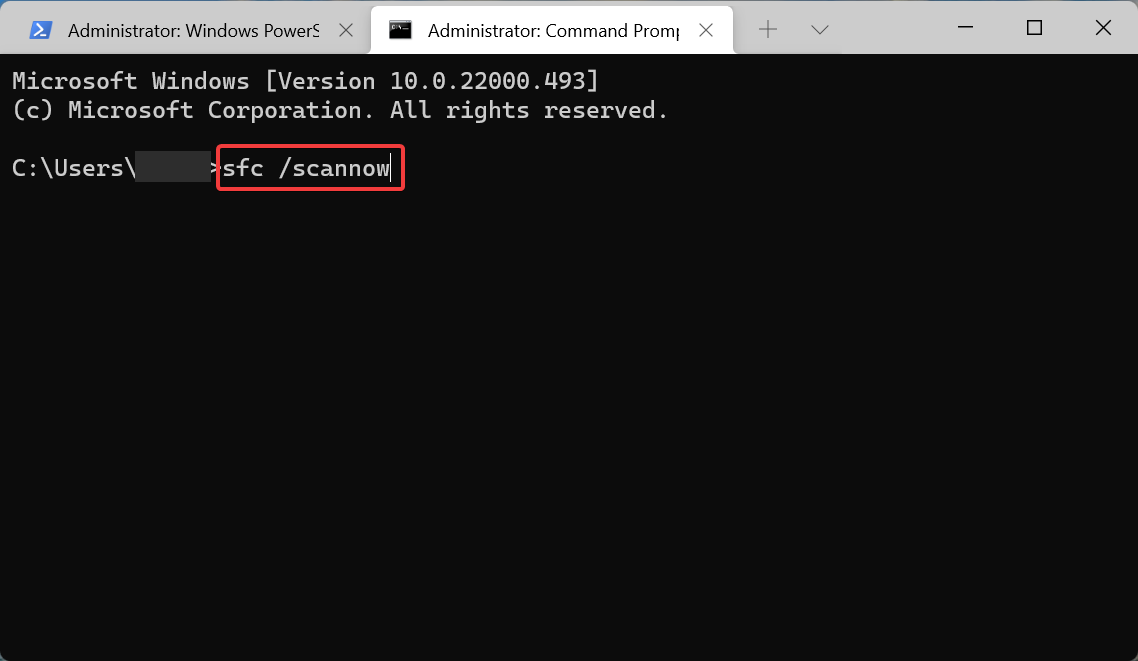
  4. Thereafter, input sfc /scannow in the Prompt’s window and press Enter to initiate the SFC scan.
  5. The SFC scan might take about 30 minutes. Restart Windows 10 if the Command Prompt states Windows Resource Protection found corrupt files and successfully repaired them.

Note: The System File Checker is one utility that can potentially fix numerous DLL error messages. That utility can repair corrupted DLL system files, such as the unarc.dll. 

3. Reinstall the software

When the unarc.dll error message pops up for the specific installed game, reinstalling the game could fix the issue. Reinstalling the software will update the target folder with a missing DLL file.

Users can uninstall games and other software by pressing the Windows key + R hotkey, entering appwiz.cpl in Run, selecting the software to remove on the Programs and Features window, and clicking Uninstall.

Thereafter, reinstall the game with its disc or by opening its installer from a folder.

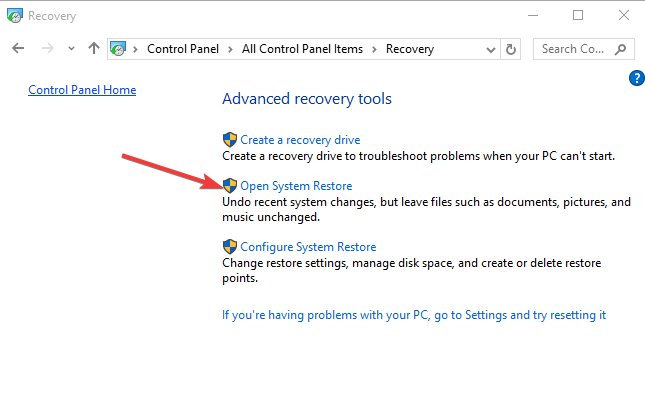
4. Roll back Windows 10 with System Restore

  1. First, open Run by pressing the Windows key + X hotkey and clicking Run.
  2. Enter rstrui in the Open text box, and press the OK button.
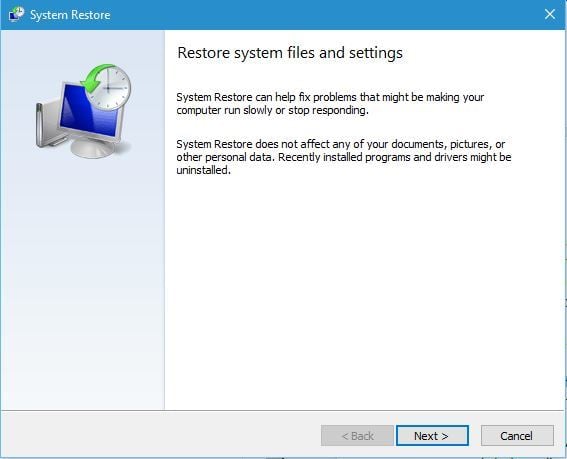
  3. Click Next on the System Restore window that opens.
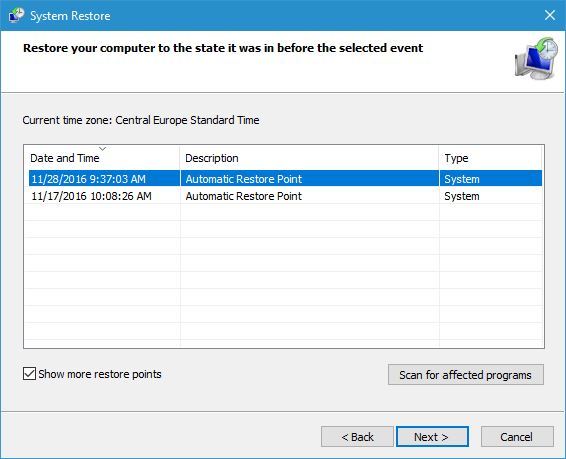
  4. Select the Show more restore points setting to fully expand the list of system restore points.
  5. Then select a restore point that might fix the unarc.dll error.
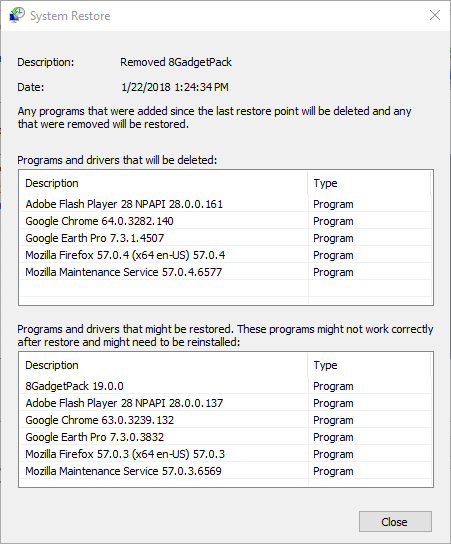
  6. Note that programs installed after a selected restore point will be removed. Press the Scan for affected programs button to see what software is deleted for a restore point.
  7. Click Next and Finish to roll Windows 10 back to the selected restore point.

Note: The System Restore utility is a potential resolution for unarc file errors that have come about as a consequence of recent system changes.

System Restore will probably fix a unarc file error if a user can select a restore point that will roll Windows back to a date when they could run the required software without any unarc.dll error message popping up. 

5. Scan the registry

  1. Download and install CCleaner.
  2. Run CCleaner and click Registry.
  3. Select Missing Shared DLL and all the other checkboxes for the most thorough scan.
  4. Click the Scan for Issues button.
  5. Thereafter, press the Fix Selected Issues button to open a dialog box window.
  6. Users can select Yes to back up the registry first if they prefer.
  7. Then press the Fix All Selected Issues button shown directly below.

Note: A unarc file error can be due to invalid registry entries. So some of the best registry cleaner software might fix unarc.dll error messages. Millions of users utilize CCleaner for registry scans and fixes.

6. Reset Windows 10

  1. Enter reset this PC in Cortana’s search box.
  2. Select Reset this PC to open the window shown directly below.reset pc
  3. Press the Get started button.
  4. Select the Keep my files option.
  5. Press the Next and Reset buttons to confirm.

Note: As a last resort, you can reset Windows 10. That will effectively reinstall the platform, which will probably restore the unarc file to its original version.

However, you need to reinstall most third-party software that was previously installed after resetting Windows 10. 

Those resolutions will probably fix most unarc.dll errors so that you can run or install the required software. Some of the above resolutions might also fix similar DLL error messages that reference other files.

Fix: SYSTEM PTE MISUSE BSOD error in Windows 10

SYSTEM_PTE_MISUSE and other Blue Screen of Death errors can cause a lot of issues on your PC, therefore it’s important to fix them as soon as possible.

The main problem is that a BSOD will force your computer to crash resulting in losing any unsaved work and data and making your PC unstable to use.

If the issue keeps appearing, it might cause permanent damage along the way, therefore you need to find a way to fix it.

We’ve put together a list consisting of solutions for all these problems below. Make sure you follow every step and you will solve the error in no time.

Why does the SYSTEM PTE MISUSE error appear?

In most cases, these types of errors appear if you have an issue with certain files, such as file corruption or incompatible drivers. Incorrect BIOS settings can also lead to this problem.

Hover, the issue can occur if your hardware is faulty, so you might have to replace it to fix it.

Is SYSTEM PTE MISUSE error dangerous?

This depends on the cause of the issue. If it is software-related, you’ll lose unsaved work whenever this error appears since you’ll be forced to restart your PC.

On the other hand, if the cause is related to your hardware, your computer will eventually stop working if you don’t find and replace the problematic component.

How can I fix the SYSTEM PTE MISUSE BSOD error?

  1. Run the Hardware Troubleshooter 
  2. Use a third-party BSOD fixer
  3. Run the SFC scan
  4. Update Windows 10 and all your drivers
  5. Run DISM
  6. Remove your antivirus software
  7. Use Safe Mode
  8. Overclock or underclock your RAM
  9. Check your hardware and clean your PC from dust
  10. Fix SYSTEM PTE MISUSE on Windows 11

1. Run the Hardware troubleshooter

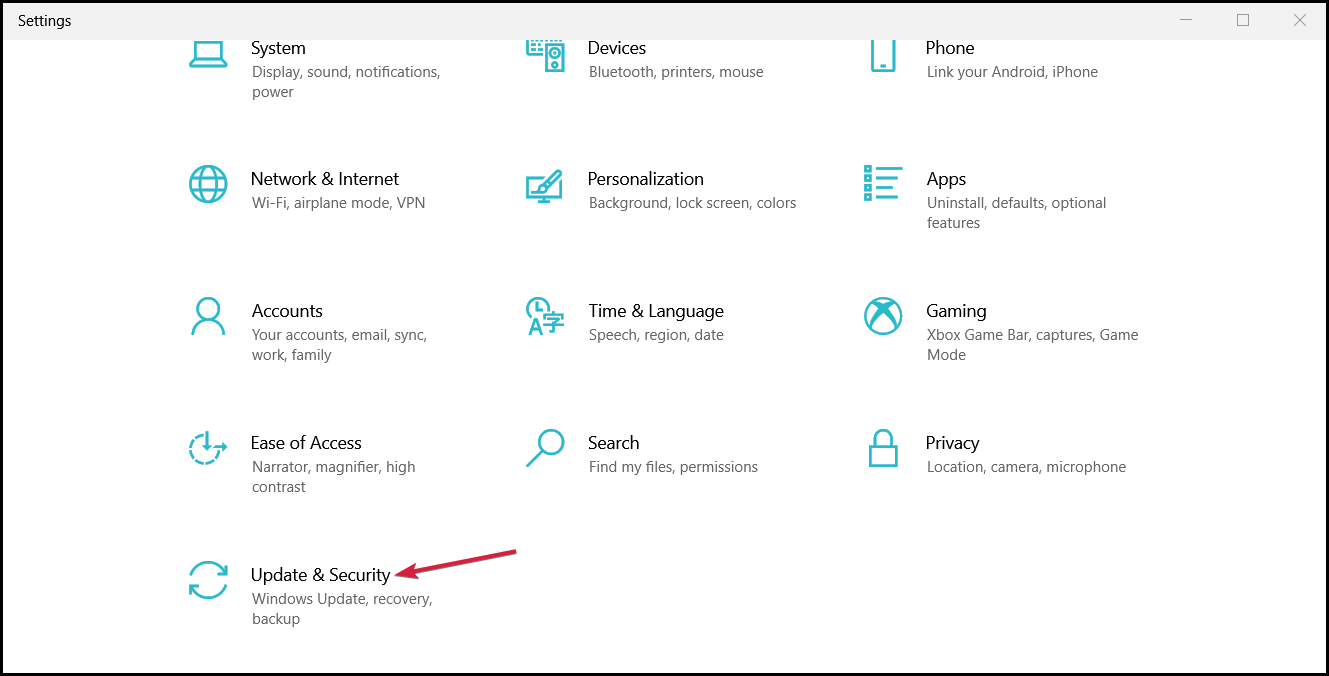
  1. Open the Settings app and go to Update & Security section.
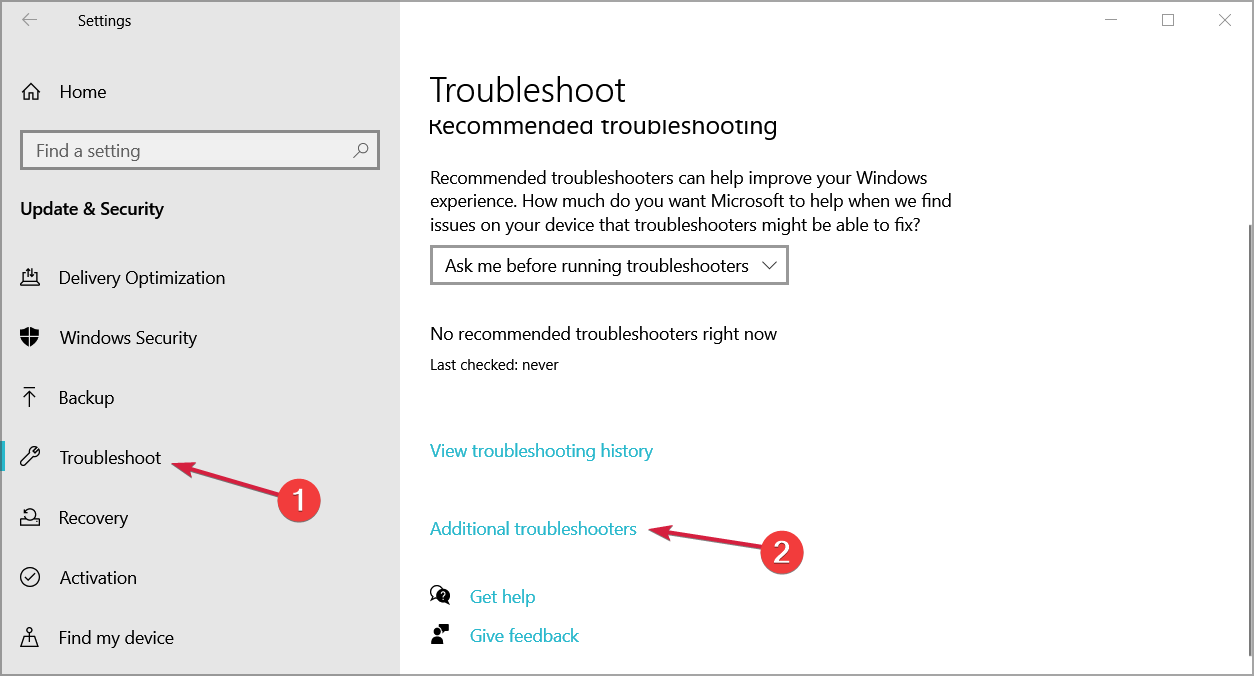
  2. Select Troubleshoot from the menu on the left. Now select Additional troubleshooters.
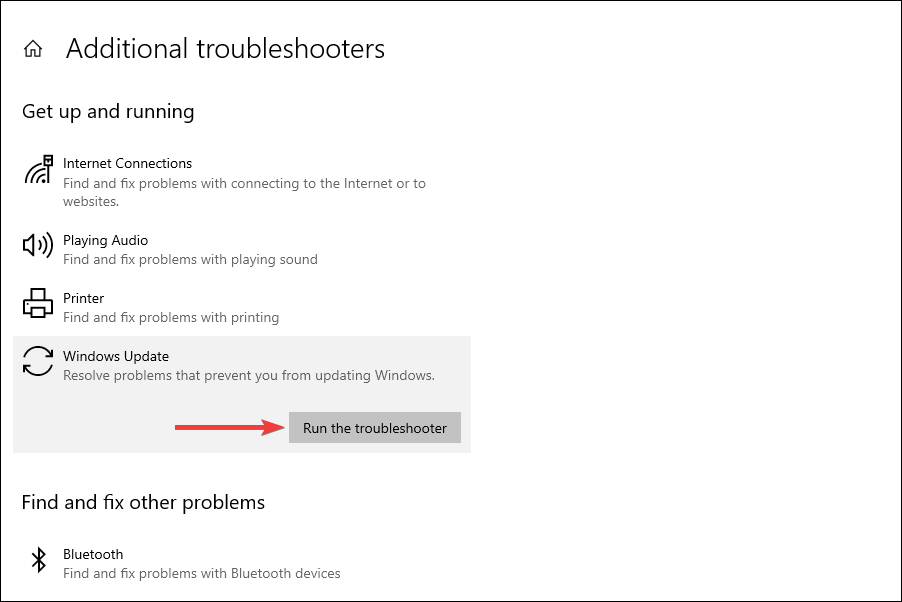
  3. Select the desired troubleshooter and click the Run thetroubleshooter.
    Run troubleshooter
  4. Follow the instructions on the screen to complete the troubleshooter.

2. Use a third-party BSOD fixer

The simplest way to solve these error messages is by installing software specialized in restoring crucial OS files. The program will ensure that your PC is running properly with no bugs.

3. Run the SFC scan

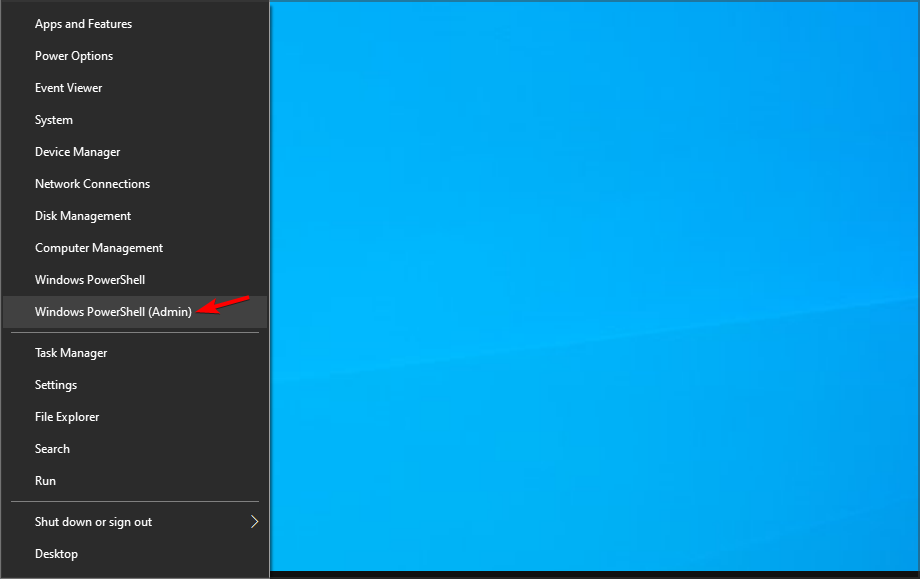
  1. Right-click on the Start Menu button, and select Windows PowerShell (Admin).
  2. Enter the following line and run it: sfc/scannow
  3. Wait until the process is done (it may take a while).
  4. If the solution is found, it will automatically be applied.
  5. Now, close the PowerShell and restart your computer.

Few users reported that SFC /scannow stops for some reason, but there are ways to fix that issue.

4. Update Windows 10 and all your drivers

➡ Update Windows

  1. Press Windows key + I to open the Settings app.
  2. Navigate to Update & Security section.
  3. Now check for available updates and download them.

➡ Update drivers

  1. Visit your hardware manufactuer’s website.
  2. Go to the Drivers section.
  3. Locate your model and download the latest driver for it.

  4. Repeat this for all devices whose drivers you want to update.

To make this process faster, you might want to consider using dedicated driver updater software.

5. Run DISM

➡ Standard way

  1. Right-click Start and open Windows PowerShell (Admin).
  2. Paste the following command and press Enter:
    • DISM /Online /Cleanup-Image /RestoreHealth
  3. Wait until the scan is finished.
  4. Restart your computer and try updating again.

➡ With the Windows installation media

  1. Insert your Windows installation media.
  2. Right-click the Start button and choose the Windows PowerShell (Admin).
  3. Now, type the following command and press Enter:
    • DISM/Online/Cleanup-Image/RestoreHealth/source:WIM:X:SourcesInstall.wim:1/LimitAccess
  4. Make sure to change an X value with the letter of the mounted drive with Windows 10 installation.
  5. After the procedure is finished, restart your computer.

6. Remove your antivirus software

  1. Press Windows key + I to open the Settings app.
  2. Navigate to the Apps section.
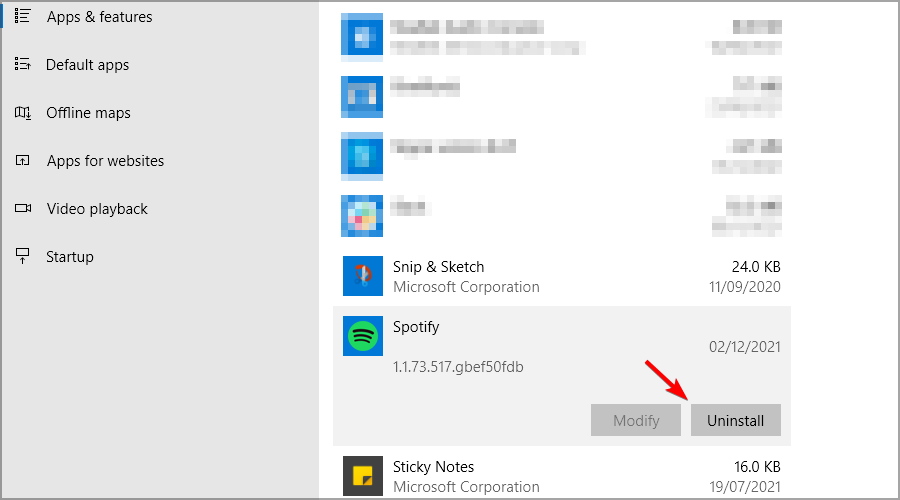
  3. Select your antivirus software and click on Uninstall.

If this solution fixes the problem, you might want to consider switching to different antivirus software to avoid future issues.

7. Use Safe Mode

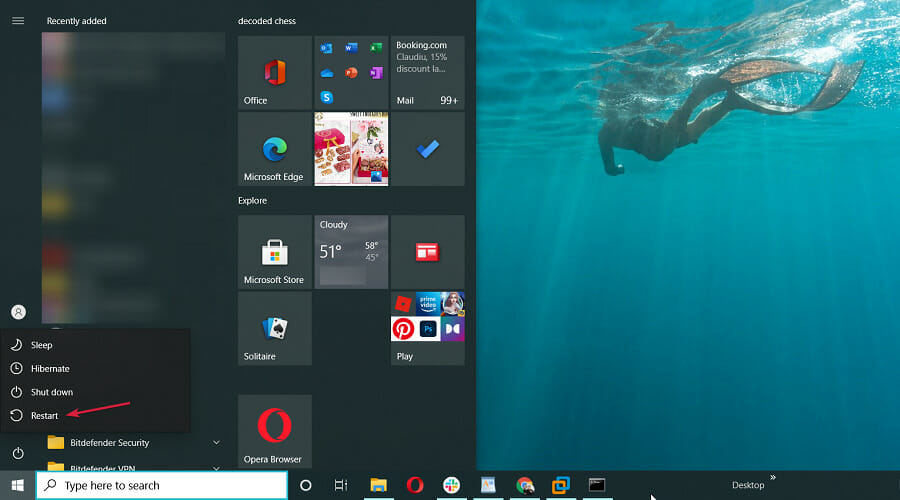
  1. Hold the Shift key on your keyboard and click the Restart button.
  2. Choose Troubleshoot.
    troublehsoot https://windowsreport.com/wp-content/uploads/2021/11/advanced-startup-restart-now.jpg
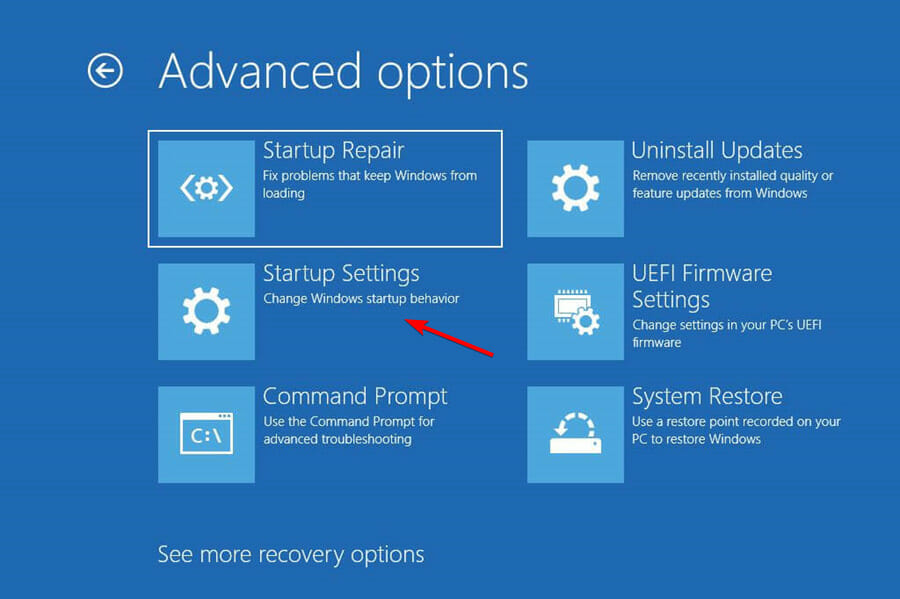
  3. Navigate to Advanced options.
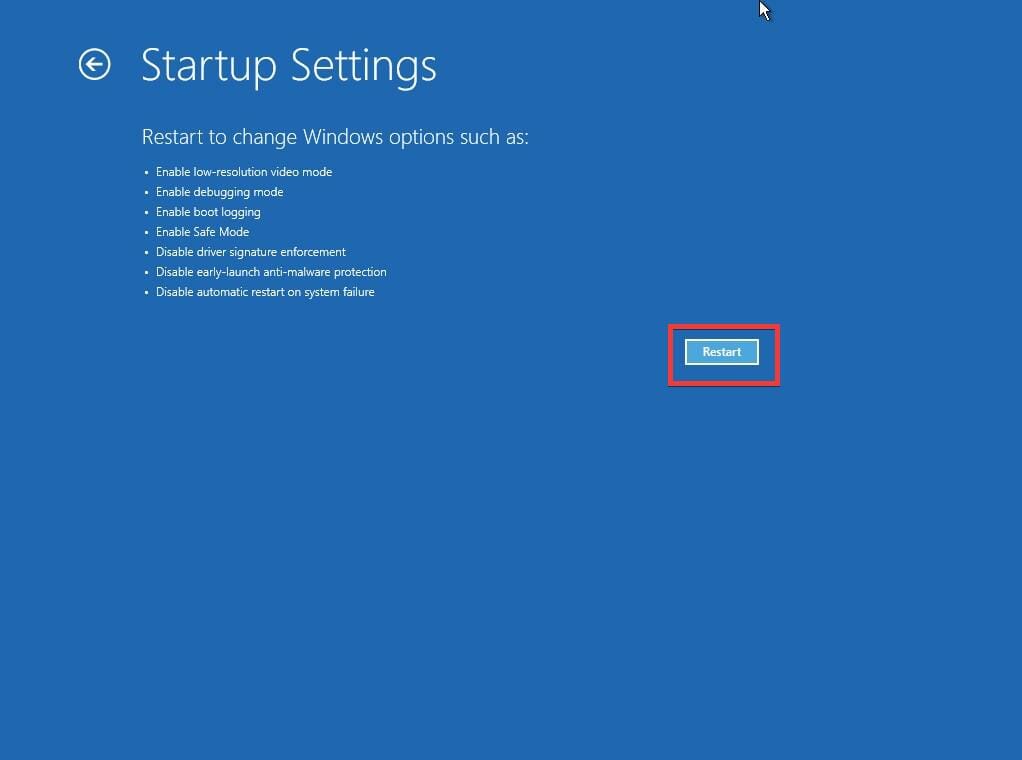
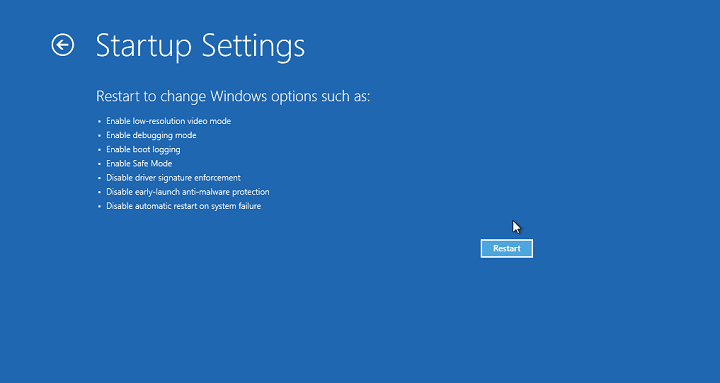
  4. Pick the Startup Settings.
  5. Click the Restart button.
  6. When your computer restarts you’ll see a list of options. Select Safe Mode with Networking by pressing 5 or F5.
  7. Your computer will now enter Safe Mode.

If the BSOD error doesn’t appear, it means that it was caused by a third-party application or a driver that you have installed, and you can use the Safe Mode to remove the problematic software.

8. Overclock or underclock your RAM

Note icon NOTE
Overclocking your memory can lead to system instability and permanent damage if you’re not careful, so use this solution at your own risk.
  1. While your PC boots, keep pressing F2 or Del to access BIOS.
  2. Navigate to Overclock section.
  3. If you’re using 1600MHz RAM, change the frequency of your to 1333MHz.
  4. Alternatively, change the voltage of your RAM from 1.5 to 1.6V.

9. Check your hardware and clean your PC from dust

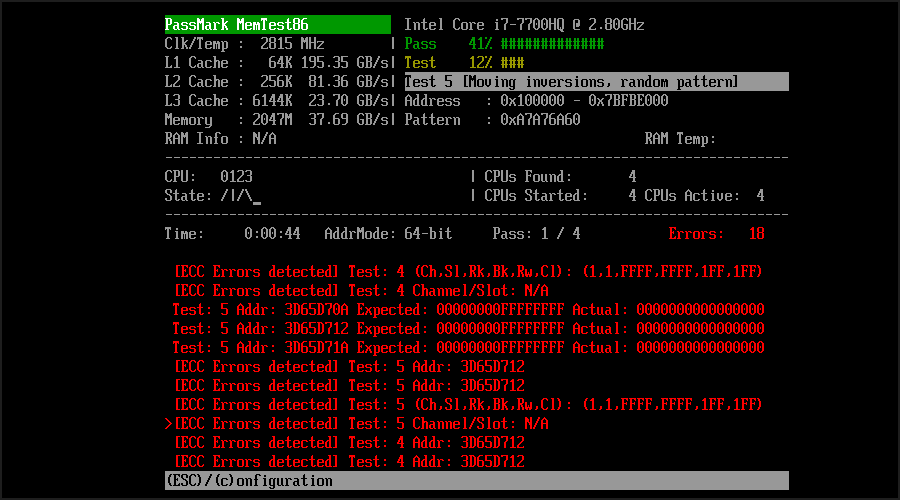
  1. Use Memtest86 to check your RAM.
  2. Reseat your RAM modules.
  3. Clean your PC from dust.

10. How can I fix the SYSTEM PTE MISUSE error in Windows 11?

10.1. Disable PTT/TPM in BIOS

  1. While your system boots, keep pressing F2 or Del to enter BIOS.
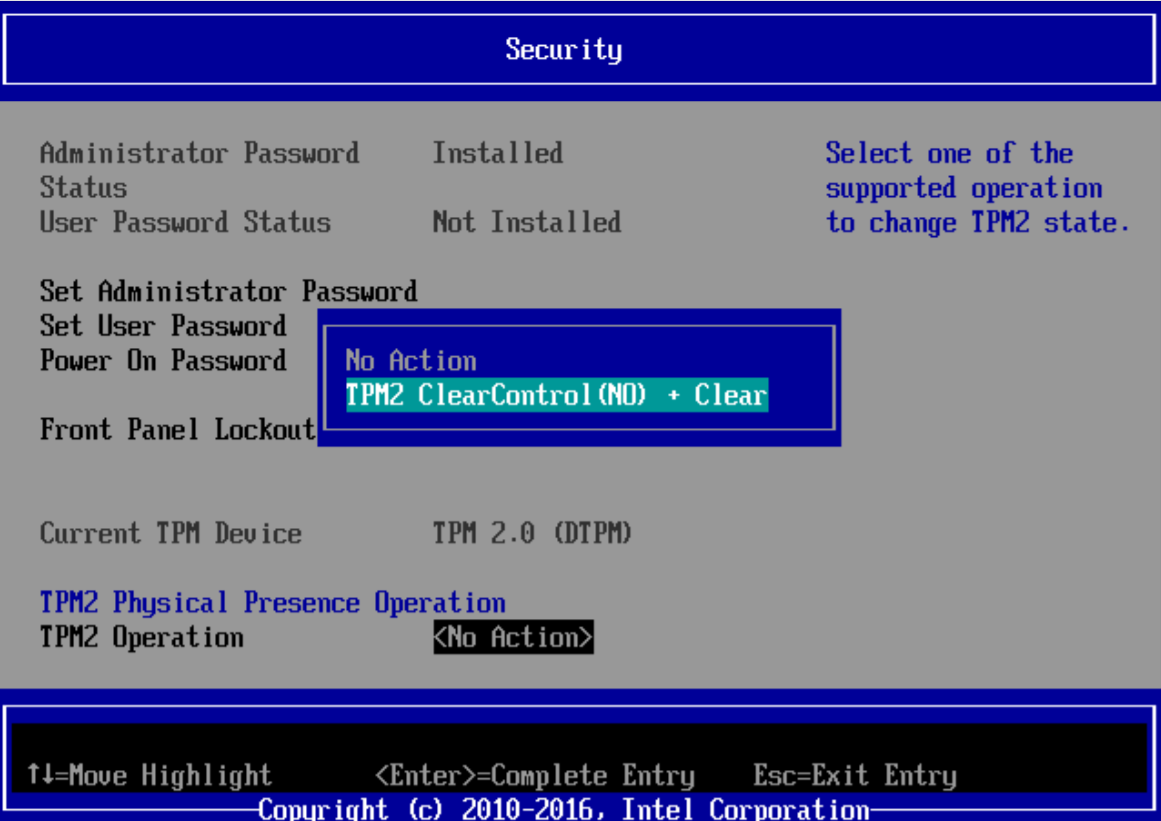
  2. Navigate to Security section.
  3. Select PTT and set it to Hidden.
  4. Look for TPM and set it to Disabled.
  5. Save changes.

10.2. Update BIOS

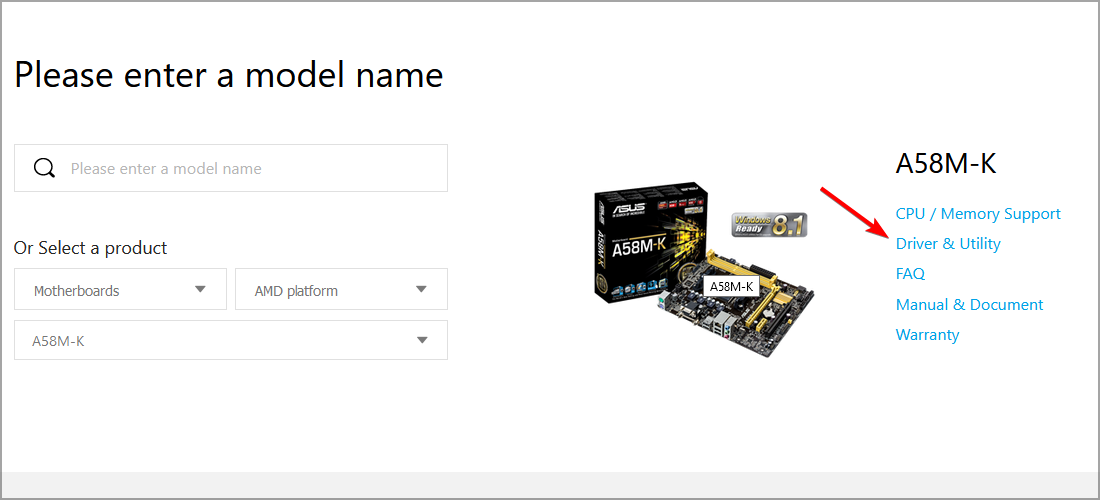
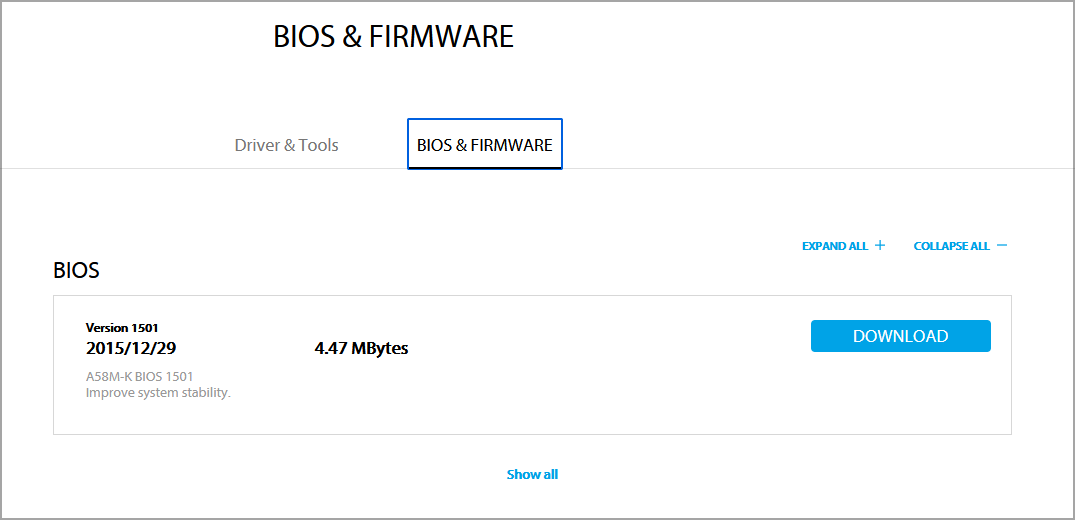
  1. Visit your motherboard manufactuer’s website.
  2. Locate your model and navigate to the Download section.
  3. Locate the latest BIOS for it and download it.
  4. Move the downloaded file to a flash drive.
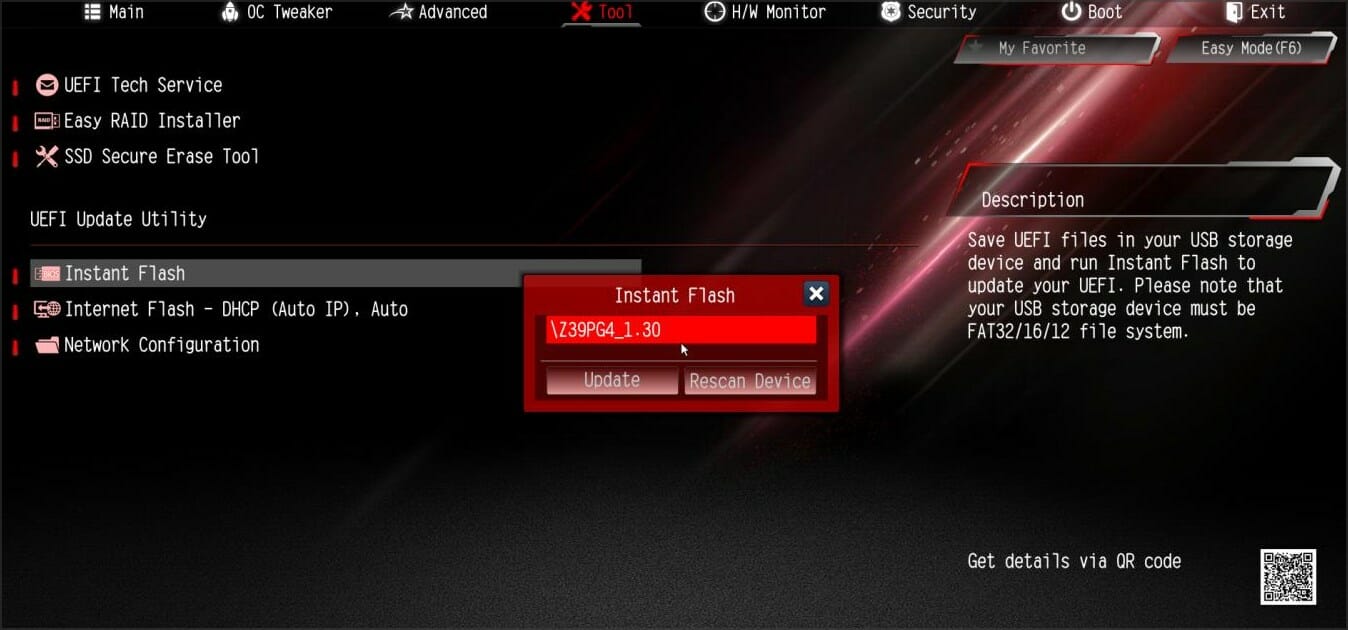
  5. Restart your PC and keep pressing F2 or Del to enter BIOS.
  6. Select the BIOS update option and choose the file that you downloaded from the flash drive.
  7. Wait for the process to finish.

For more solutions, check out this guide on how to fix the SYSTEM PTE MISUSE error in Windows 11. Rest assured that you will be able to resolve the problem in no time.

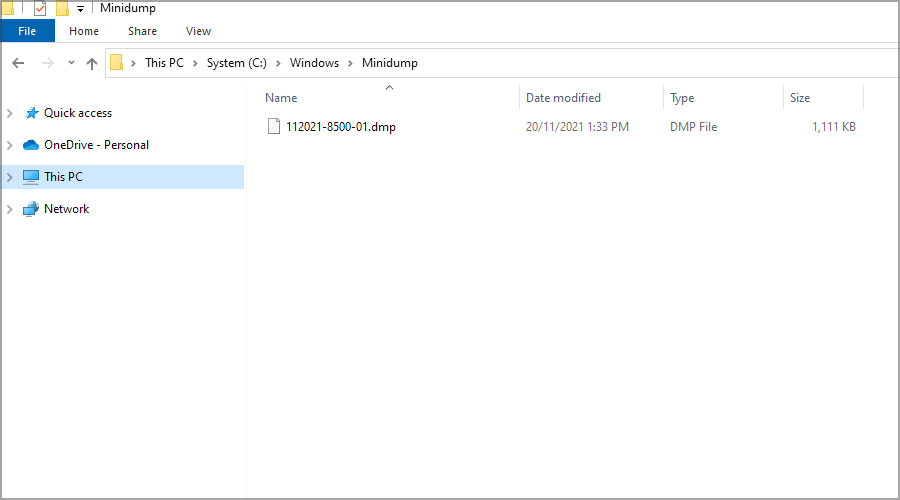
Where can I find BOSD crash files?

Whenever a BSOD error occurs, Windows save the crash information to a file that you can use to analyze the issue.

You can find these files in the following directory: C:\Windows\Minidump

How to open crash files?

By default, Windows doesn’t have the necessary components to open the crash files, so it needs to rely on third-party solutions.

Many applications can do that, but we recommend using WinDbg Preview.

SYSTEM_PTE_MISUSE Blue Screen of Death error can cause many problems, but it can be easily fixed by replacing the faulty RAM or by underclocking it.

To make the process simpler, you can always use Blue Screen of Death repair software to solve any non-hardware issues on your PC.

If that doesn’t work, feel free to try other solutions from this article and let us know what worked for you in the comments section below.

3 Quick Fixes for Microsoft IME high CPU usage

All the Windows 10 users who installed KB3194496 are affected by high CPU usage issues, but it appears that Surface Pro 4 users are particularly plagued by this bug.

Moreover, the users who installed the Chinese Simplified language pack can have this problem.

The high CPU usage incapacitates your system so it’s imperative to solve this problem as soon as possible. Let’s see how we can get rid of this issue by using the solutions below.


How can I fix Microsoft IME high CPU issues?

1. Restore the original owner of the process

  1. Right-click the process ChsIME.exe in Task Manager and Open file location.
  2. Right-click the file ChsIME.exe, select Properties, and go to the Security tab.
  3. Click on Advanced at the bottom right.
  4. Beside Owner: TrustedInstaller, click Change.
  5. Type in Administrators, click on Check Names and make sure that the keywords you just typed in are underlined.
  6. Click OK to close the advanced dialog.
  7. Click the Edit… button above the Advanced.
  8. Under Group or user names: click SYSTEM.
  9. Under Permissions for SYSTEM check Deny on the Read & execute row. Click OK.
  10. Click Advanced at the bottom right again and repeat steps 4, 5, 6, but type NT SERVICETrustedInstaller in step 5 to restore the owner to the original.
  11. Click OK to finish everything.
  12. Restart your computer.

2. Use a specialized software

This is a classic problem where the system goes haywire because of a simple problem or file. Sometimes some problems are not so easy to resolve using classic tweaking.

Dedicated repair software can scan for and replace any missing system files with fresh ones from their own databases.

3. Rollback your system in Safe Mode

  1. Shut down your PC and turn it back on.
  2. Navigate to the Run in Safe Mode option and press Enter.
  3. Go to Start, type system restore, and then hit Enter.
  4. Follow the prompts to revert back to a certain restore point.
  5. Wait for the process to complete, and then reboot.

Note: System restore does not affect any of your files, documents, and personal data.

Rolling back Windows to a point before experiencing the IME problem can also fix the issue. Use the comment section below to tell us if these solutions solved the problem for you.


Libvlc.dll not Found: 3 Easy Methods to Get it Back

The Libvlc.dll not found issue is often problematic with the music player. This article will explore all possible resolutions.

VLC Media Player is a top-rated piece of software for all multimedia fans. Its freeware open-source nature, intuitive design, and versatility are only some of its traits.

And to add to that, it hardly has any noticeable reoccurring issues. One common error concerns the missing DLL file called Libvlc.dll. It appears when VLC or similar software is run.

Why am I getting a libvlc.dll not found message?

For most users, the libvlc.dll not found error is triggered by various elements. At the top of this list are the following factors:

  • Corrupted or incomplete installation – The VLC Media Player installation may have been corrupted or incomplete, leading to missing or damaged files.
  • Malware or virus infection – Malware or virus infection can cause the DLL file to be deleted or corrupted, resulting in an error message.
  • Outdated or missing system drivers – VLC Media Player needs to be able to access the necessary files to run correctly.
  • Compatibility issues – Incompatibility with other software installed on the computer may cause the error message to appear.
  • Hardware failure or malfunction – A hardware failure or malfunction may prevent VLC Media Player from accessing the necessary files to run correctly.
  • User error – Accidental deletion or removal of the DLL file by the user may cause the error message to appear.

What is a LibVLC dll?

LibVLC.dll is a dynamic link library file part of the VLC Media Player software. It contains a set of functions and procedures that provide programmatic access to the VLC Media Player engine.

The library allows developers to embed VLC Media Player functionality into their applications or use VLC as a standalone player.

The library provides a range of features, including video and audio playback, media conversion, streaming, and support for various media formats.

It is used by many multimedia applications and tools that require a flexible and powerful media player engine. The library is open-source, distributed under the GNU Lesser General Public License (LGPL), and available for macOS, Windows, and Linux operating systems.

What can I do if libvlc.dll is not found?

1. Use a dedicated software

If you’re experiencing any errors with missing or corrupted files on your PC, you can use dedicated repair software. The software will replace and restore broken files from your software and operating system.

Moreover, the software will protect your PC from malware, protect you from dangerous sites, and improve your system’s performance after restoring and cleaning it.

2. Reinstall VLC

2.1 Uninstall the Player

  1. Close VLC.
  2. Press Ctrl + Shift + Esc to open Task Manager.
  3. Choose Startup, right-click on enabled apps, and select Disable to prevent all programs from starting with the system.
  4. Restart your PC.
  5. Press Windows + R, type msconfig, and hit Enter.
    libvlc.dll not found
  6. Under the Services tab, check the Hide all Microsoft services box and click Disable All.
    libvlc.dll not found
  7. Press Windows + R, type appwiz.cpl, and hit Enter.
    libvlc.dll not found
  8. Click on the VLC media player from the app list, then click the Change/Uninstall button.
    libvlc.dll not found
  9. Wait for the uninstallation to complete.
  10. Press Windows + E, and navigate to the path below:
    C:\Program Files
  11. Delete the VideoLAN folder.
  12. Navigate to the path below and delete the VLC file (replace afamo with your user name).
    C:\Users\afamo\AppData\Roaming
  13. And finally, do not restart the PC.

Reinstalling the VLC will fix this issue. But, the thing is, some users tried doing so, but the issue prevailed, and the error message kept appearing. That’s why a clean reinstallation is the only viable solution.

We’re referring to clearing all remaining associated files and installing a clean-slate version of the VLC media player.

Tip icon Editor’s tip
Do not download the DLL file from some online depository, as those can harm your system.

Also, some remaining processes might remain in the system threshold, so you must terminate them before starting a new installation. We explained the whole process below, so follow the steps closely.

You can also run one of the third-party cleaners or uninstallers to do this for you. That way, you’ll clean all remaining registry inputs.

2.2 Reinstall the app

  1. Download the latest version of the VLC Media Player here. Then, choose between the 32-bit and 64-bit versions based on your system architecture.
  2. Install everything else you usually need.
  3. Restart your PC.

That should be all. Try starting the program again and see if you still have any problems. The installation should install all the necessary files for the software to run correctly.

3. Use the Windows System Restore

  1. Press and hold the Windows + R key.
  2. In the run dialog box, write: rstrui and hit Enter.
    libvlc.dll not found
  3. Click on the System Restore button.
    libvlc.dll not found
  4. Choose a restore point and hit Next.
  5. Lastly, select Finish.

Restoring your system to a previous point before the error is also a great idea since it will replace the potentially corrupted files with good ones and remove any errors caused by them.

Multiple issues might cause the missing DLL file errors. Check this helpful article dedicated to scanning your system to fix your problem.

With that, the Libvlc.dll not found error should be gone for good. If that’s not the case, write us in the comments section.

Fix: Error 0x8007065E Data of This Type Is Not Supported

Updating the OS is critical for a stable and error-free Windows experience. But what if you encounter issues during the process? One such is the 0x8007065E Data of this type is not supported Windows Update error.

Remember, when you run an outdated version of Windows, the PC runs slower, incompatibility issues may arise, and apps may automatically crash. So, let’s find out all about the error.

What is Windows Update standalone installer error 0x8007052E?

The update error usually arises in Windows 7 when you are manually downloading and installing the updates, but users were affected by it on Windows 10 as well. And unless you follow the necessary troubleshooting steps, the error message will keep appearing.

Here are a few reasons you might be encountering the error:

  • Corrupt system files: When the system files are corrupt, you run into several issues with the OS, including errors while updating Windows.
  • Issues with the Windows Update components: The WU components are critical for the updates to install successfully, but these are often found to be corrupt.
  • Downloading the incorrect package: When manually updating Windows, it’s imperative that you download the right package. Otherwise, it might throw an error during installation.

How can I fix error 0x8007065e?

Before we head to the slightly complex solutions, here are a few quick ones you can try:

  • Restart the computer and then try installing the update.
  • Disable any installed antivirus or firewall and check if the 0x8007065e Data of this type is not supported error disappears. If yes, we recommend you switch to an error-free antivirus for better results.

If none of these work, move to the fixes listed next.

1. Download the correct update package

  1. Get the KB (Knowledge Base) number for the package throwing the error, head to Microsoft Update Catalog, and search for it.microsoft update catalog
  2. Now, click on the Download button for the package that suits your system architecture.download to fix 0x8007065e Data of this type not supported
  3. Click the link in the new window.link
  4. Once the download is completed, run the setup, and follow the on-screen instructions to install it.setup

When encountering the 0x8007065e Data of this type is not supported update error in Windows 7, the primary check should be to verify whether the downloaded package is right. Check if it’s 32-bit or 62-bit, and for the correct iteration.

2. Use third-party software

You can fix error 0x8007065E Data of this type is not supported by using a reliable third-party tool that optimizes your Windows OS and restores registry settings to their default values.

A dedicated tool specializes in Windows repair. It scans and diagnoses your damaged PC, then repairs it using technology that not only repairs your Windows Operating System but also reverses the harm done with a full database of replacement files.

It does a thorough system diagnosis, performs rigorous system optimization, removes malware and viruses, and fixes the Windows registry.

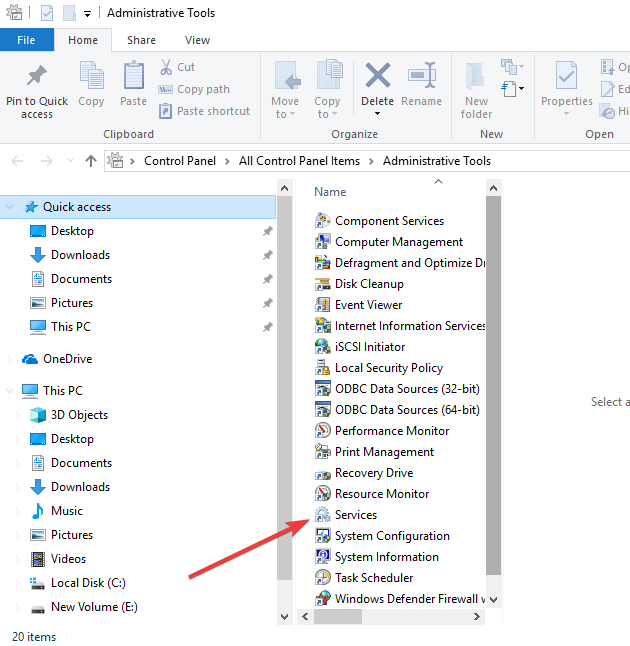
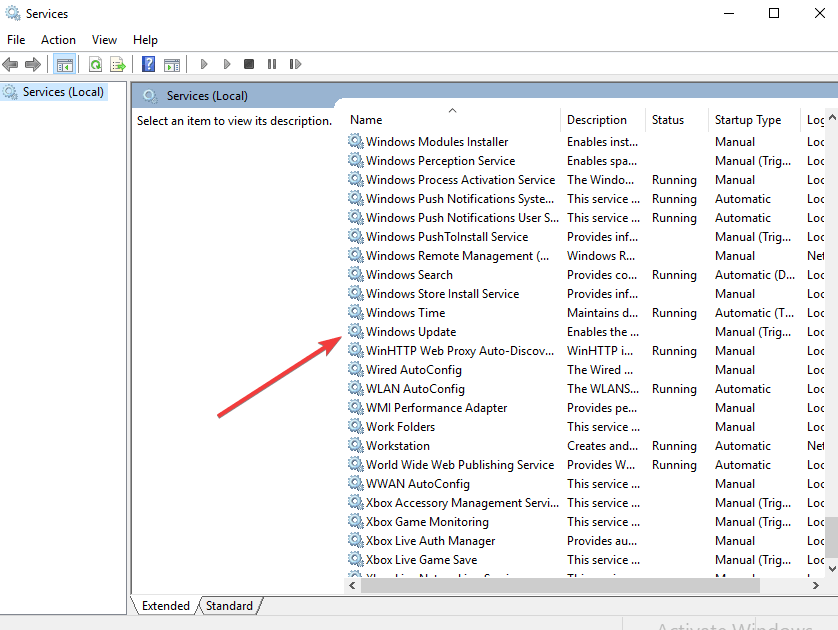
3. Rename the SoftwareDistribution folder

  1. Press Windows + R to open Run, type cmd, and hit Ctrl + Shift + Enter.command prompt
  2. Click Yes in the UAC prompt.
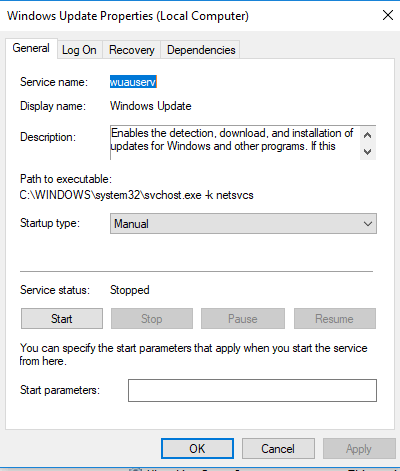
  3. Now, paste the following command and hit Enter to stop the Windows Update service:NET STOP WUAUSERVwindows update service
  4. Next, execute the following command to rename the SoftwareDistribution folder to SoftwareDistributionOld:REN C:\WINDOWS\SoftwareDistribution SofwareDistributionOldrename folder to fix 0x8007065e Data of this type not supported
  5. Finally, run this command to restart the service:NET START WUAUSERVstart service

4. Run the DISM and SFC scan

  1. Press Windows + S to open Search, type Command Prompt, and then click on Run as administrator.cmd
  2. Click Yes in the prompt.
  3. Now, paste the following three commands individually and hit Enter after each to run the DISM tool:DISM /Online /Cleanup-Image /CheckHealth DISM /Online /Cleanup-Image /ScanHealth DISM /Online /Cleanup-Image /RestoreHealth
  4. Once done, execute the following command to run the SFC scan: sfc /scannowsfc scan to fix 0x8007065e Data of this type not supported

Running the DISM tool and SFC scan proves quite useful when getting the 0x8007065e Data of this type is not supported error. Remember first to run DISM and then the SFC scan, as the former creates a suitable environment for the latter.

5. Reset Windows Update components

  1. Press Windows + R to open Run, type cmd, press Ctrl + Shift, and click on OK.cmd
  2. Now, execute the following commands individually to reset the Windows Update components:net stop bits net stop wuauserv net stop appidsvc net stop cryptsvc Del "%ALLUSERSPROFILE%\Application Data\Microsoft\Network\Downloader\qmgr*.dat" Ren %systemroot%\SoftwareDistribution SoftwareDistribution.bak Ren %systemroot%\system32\catroot2 catroot2.bak sc.exe sdset bits D:(A;;CCLCSWRPWPDTLOCRRC;;;SY)(A;;CCDCLCSWRPWPDTLOCRSDRCWDWO;;;BA)(A;;CCLCSWLOCRRC;;;AU)(A;;CCLCSWRPWPDTLOCRRC;;;PU) sc.exe sdset wuauserv D:(A;;CCLCSWRPWPDTLOCRRC;;;SY)(A;;CCDCLCSWRPWPDTLOCRSDRCWDWO;;;BA)(A;;CCLCSWLOCRRC;;;AU)(A;;CCLCSWRPWPDTLOCRRC;;;PU) cd /d %windir%\system32

regsvr32.exe atl.dll
regsvr32.exe urlmon.dll
regsvr32.exe mshtml.dll
regsvr32.exe shdocvw.dll
regsvr32.exe browseui.dll
regsvr32.exe jscript.dll
regsvr32.exe vbscript.dll
regsvr32.exe scrrun.dll
regsvr32.exe msxml.dll
regsvr32.exe msxml3.dll
regsvr32.exe msxml6.dll
regsvr32.exe actxprxy.dll
regsvr32.exe softpub.dll
regsvr32.exe wintrust.dll
regsvr32.exe dssenh.dll
regsvr32.exe rsaenh.dll
regsvr32.exe gpkcsp.dll
regsvr32.exe sccbase.dll
regsvr32.exe slbcsp.dll
regsvr32.exe cryptdlg.dll
regsvr32.exe oleaut32.dll
regsvr32.exe ole32.dll
regsvr32.exe shell32.dll
regsvr32.exe initpki.dll
regsvr32.exe wuapi.dll
regsvr32.exe wuaueng.dll
regsvr32.exe wuaueng1.dll
regsvr32.exe wucltui.dll
regsvr32.exe wups.dll
regsvr32.exe wups2.dll
regsvr32.exe wuweb.dll
regsvr32.exe qmgr.dll
regsvr32.exe qmgrprxy.dll
regsvr32.exe wucltux.dll
regsvr32.exe muweb.dll
regsvr32.exe wuwebv.dll
regsvr32.exe wudriver.dll

netsh winsock reset net start bits net start wuauserv net start appidsvc net start cryptsvc

That’s it! Once you are done resetting the WU components, the 0x8007065e Data of this type is not supported error should disappear for good. If it doesn’t, performing an in-place upgrade should do the trick.

And if you don’t want to take the manual route, we recommend using an effective PC repair tool that will automatically identify and eliminate issues with Windows.

Tell us which fix worked for you in the comments section below.

Dxgmms2.sys on Windows 11: What is it & How to fix it

Windows 11 is a fantastic operating system, but it is not without flaws, and you will encounter a bug or two sooner or later. Users have reported that the dxgmms2.sys file is causing a blue screen of death on their computers.

This might be a significant problem because your computer will restart every time you see this error, however, you can resolve this issue by using one of our solutions.

Similar to the dxgmms2.sys error, the dxgmms.sys error in Windows 11 might occur as a result of a hardware failure. In this case, your graphic driver is more responsible for the problem.

We’ve put up a list of steps you may take to resolve the problem, as well as an explanation of what’s going on.

What caused the dxgmms2.sys error?

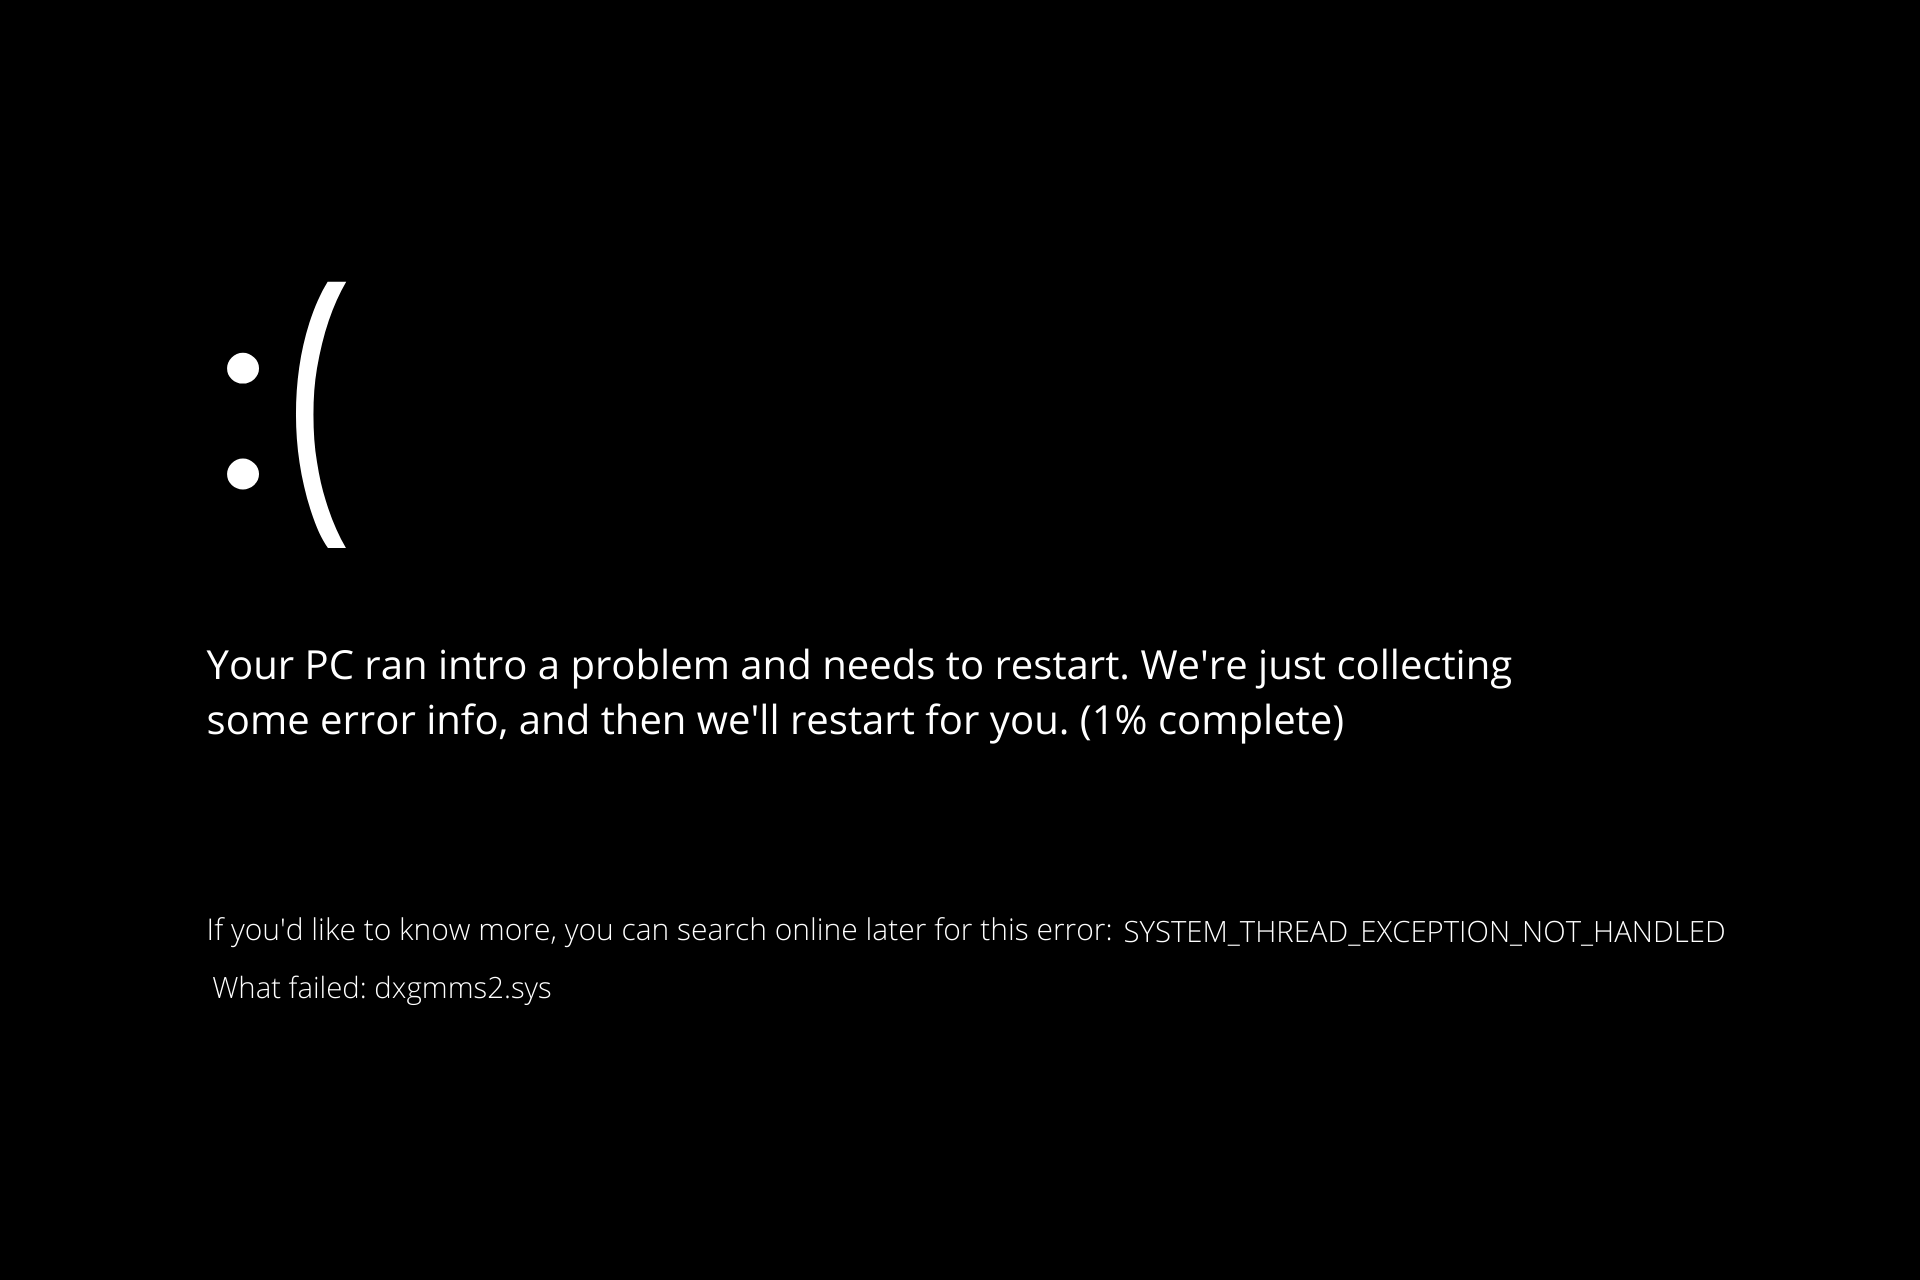
Your computer’s graphics rendering capabilities are dependent on the presence of the dxgmms2.sys file, which is a vital Windows file. If it is unable to manage the rendering process, an error screen with the message SYSTEM THREAD EXCEPTION NOT HANDLED will appear, along with the file name.
directx dxgmms2.sys windows 11

The dxgmms2.sys blue screen of death (BSoD) error occurs when the DirectX Graphics MMS system file in Windows 11 crashes as a result of outdated, buggy, or defective graphics card drivers.

However, generic file corruption and memory-related problems can also play a role in the occurrence on rare occasions.

Other possible causes could be:

➡ The driver software for your graphics card has been corrupted or out of date
➡ It could be caused by a corrupted BIOS or by erroneous settings
➡ RAM or hard disk that is not working properly
➡ An issue with hardware acceleration has been identified
➡ The TDR delay time has been decreased

How can I fix the dxgmms2.sys error in Windows 11?

1. Update your BIOS

To get started, go to the motherboard manufacturer’s website, such as Dell’s official page, and look for the Downloads or Support page for the board model you want.

Alternatively, for our users that reported getting the dxgmms2.sys error and use HP computers, you should visit HP’s official website.

Respectively, for our Lenovo users, check our Lenovo’s official page with drivers and updates.

You should see a list of the current BIOS versions, along with any improvements or bug fixes that have been made to each version, as well as the dates on which they were released.

Download the latest version of the software you wish to update. Unless you have a specific need for an older version, you should always use the most recent version available.

Almost certainly, your download will be in the form of an archive, such as a ZIP file. It is necessary to extract the contents of the file.

The BIOS-flashing tool you select will be determined by your motherboard’s features. These utilities come in a variety of shapes and sizes. The readme file included with the BIOS upgrade should assist you in deciding which option is appropriate for your hardware.

Copy the papers to a USB device and restart your computer after you’ve unzipped the file. After that, go to the BIOS menu and select the BIOS update option.

Finally, pick the file you saved to the USB drive, and the update will be applied automatically. See our article on how to simply upgrade your BIOS for further information and methods.

2. Change the HDMI/VGA port

You will receive the SYSTEM THREAD EXCEPTION NOT HANDLED blue screen problem whenever Windows 11 is launched.

Change the HDMI port on your computer to temporarily resolve this issue. The HDMI/VGA cable must be removed from the Graphics Card port and inserted into the HDMI/VGA port on the motherboard.

3. Use a stable version of Windows 11

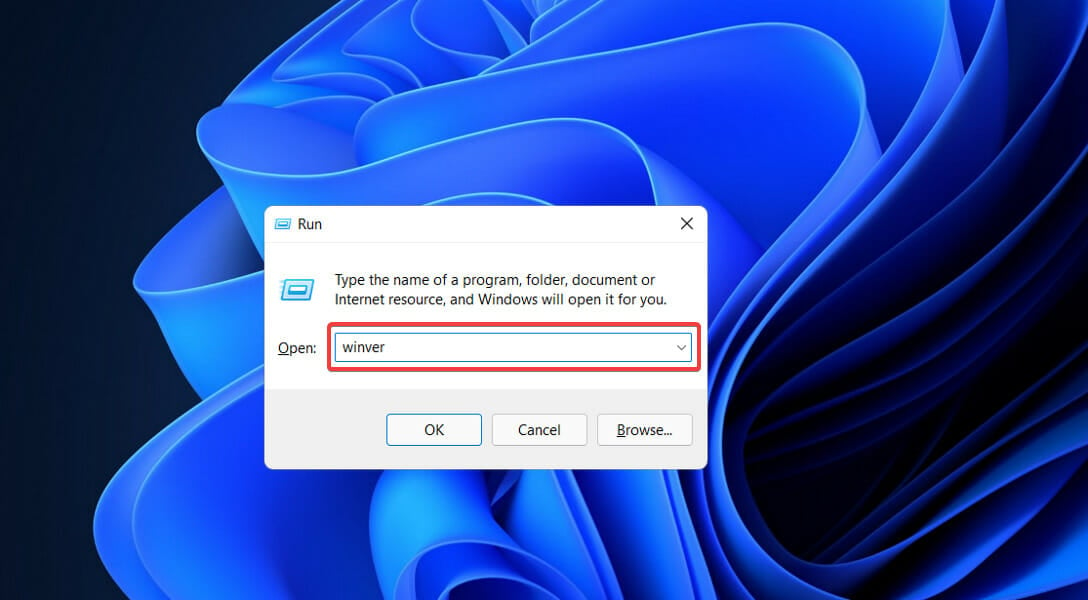
  1. Press the Windows key + R to open the run window and type or paste in winver then press Enter.
    winver-run dxgmms2.sys windows 11
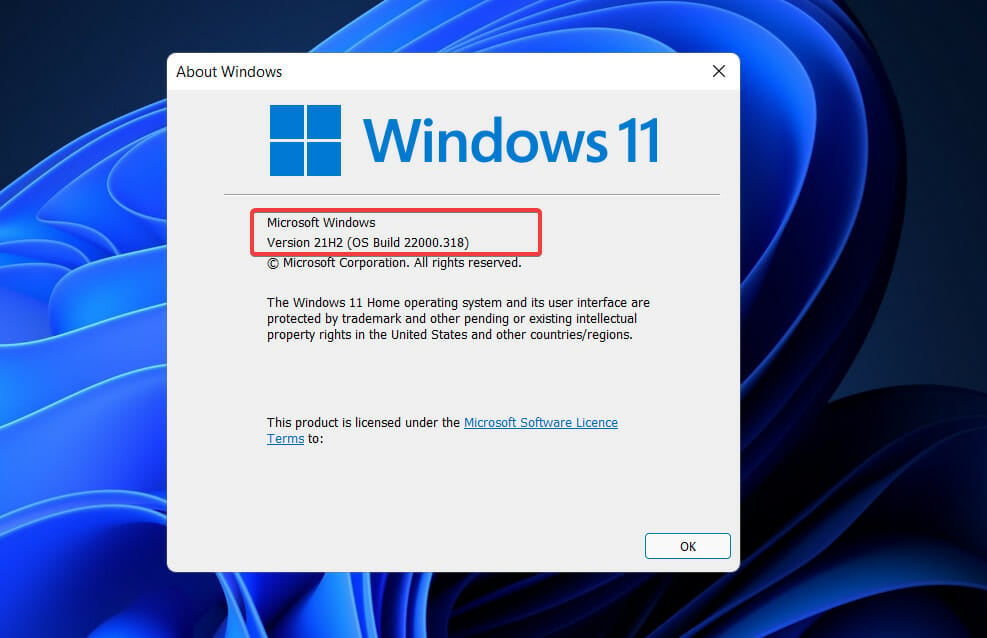
  2. Next, you will see an About Windows window inside which you can find the Windows version and OS build information.
    microsoft-version dxgmms2.sys windows 11
  3. Search on the internet the OS Build Number to find out whether you are using a beta, dev, or stable build.

If you’ve installed the Windows 11 Insider dev build on your PC, it’s possible that this is the root cause. When using Windows 11 developer builds, they are extremely unstable and can cause software incompatibility difficulties.

4. Use the DirectX diagnostic tool

  1. Press the Windows key + R to open the run window and type or paste in dxdiag then press Enter.
    dxdiag dxgmms2.sys windows 11
  2. Once the DirectX Diagnostic Tool gets open, click on the Display tab to see if there is anything written in the notes section. If it’s empty, it means everything’s clear.
    disaply-directx-no-pb dxgmms2.sys windows 11

5. Reinstall the graphics card driver

  1. Press the Windows key + X on your keyboard, then select Device Manager from the list of options.
    device-manager video_dxgkrnl_fatal_error windows 11
  2. Once the Device Manager window opens, locate the Display adapters option, click on it, then right-click on the graphics driver and choose Uninstall.
    uninstall nvidia video_dxgkrnl_fatal_error windows 11

After you have uninstalled the Intel graphics driver, make sure to reinstall it from the Intel website’s official download page. We strongly recommend using a dedicated tool to automatically update your drivers such as Outbyte Driver Updater.

6. Update Windows

  1. Press the Windows key + I to open the Settings app, then click on the Windows Update option.windows-update-settings kernel security check failure windows 11
  2. If you have any new updates to download, click on the Install now button, otherwise click on the Check for updates button.checl-for-updates kernel security check failure windows 11

If you are using an older version of Windows, this may be a cause of the error, which may be resolved by updating the operating system. Almost certainly, the error will be resolved in a subsequent software release.

What causes Memory Management BSoD errors?

In a word, memory management refers to the process of controlling the amount of memory available to your computer.
memory-management-bsod dxgmms2.sys windows 11

It maintains track of every byte of available memory in your computer, as well as if any of it is free or being used by other programs. It determines how much memory should be allocated to specific processes and when that memory should be allocated to them.

Furthermore, when you close an application, it marks the memory as being accessible to be used by another program, thereby freeing up space.

However, it is possible for it to crash at any point, just like any other process operating on your computer. And when it happens, you’ll very certainly get the MEMORY MANAGEMENT problem warning shortly afterward.

In accordance with Microsoft, the Memory Management blue screen of death error displays when there has been a significant memory management error.

Doesn’t that sound terrifying to you? But don’t be concerned – it is not life-threatening.

There are multiple tools out there that can assist you in determining what is triggering the dreaded blue screen of death on your computer. However, the likelihood is that it will be one of the following:

  • Conflicts between software and hardware
  • Virus infestation
  • Bad video drivers
  • Memory disk failures
  • Corrupted system files

For extra information, you can also refer to our page on how to resolve dxgmms2.sys errors in Windows 10. The tips may be used in Windows 11 too.

If you are having trouble with your graphics card, take a look at our article on Nvidia drivers not installing in Windows 11 as an alternative.

Even more, there are different reasons for blue screens. You can find out more about this by reading our guide which includes the most prevalent causes of BSoD.

Comment below and tell us which solution worked best for you as well as which graphics card you prefer to use the most.

You can now add folders in Windows 11’s pinned apps section

It’s the Beta Channel Insiders turn to sit on the sidelines and watch as the opposing team receives the new ball this week, after receiving an update only a few days ago.

Thus, after two weeks with no Dev channel releases whatsoever, the Redmond-based tech company has finally unveiled build 22557.

You might want to know that this Dev channel release is now moving to the NI_RELEASE or Nickel branch in preparation for the major feature update to Windows 11 later this year.

And there are loads of new stuff here, with features such as revamped Task Manager, Focus, and new Snap layouts, among others.

However, before we get into it and discover together what Microsoft changed via this latest software patch, we’re going to take a look at the TLDR section:

  • Windows Insiders will notice that the name of the branch we are releasing builds from has changed to NI_RELEASE. The branch in which we release builds from to Insiders in the Dev Channel is irrelevant to the features and improvements included within them. Going forward we will no longer be noting when these branch changes occur. For more on our approach to how we release things to the Dev Channel, please read this blog post here.
  • This build will not be offered to ARM64 PCs. We hope to be able to offer a new build for Insiders on ARM64 PCs soon.
  • This build includes a handful of new features for Insiders to try including folders in the pinned apps area of Start, live captions, a new Focus experience, Quick Access improvements in File Explorer, new touch gestures, and a lot more.
  • This build also includes a lot of general improvements and refinements to Windows 11 too.
  • We do have some new known issues for some of the new features and improvements being introduced with this build so be sure to read through the known issues below before submitting feedback.
  • We’re making it quicker to get to your recent Android apps on your phone from the Your Phone app. Details below.
  • Join us on Tuesday, February 22nd at 10am PST / 6pm UTC for our next Windows Insider webcast! We’ll discuss “Filing Feedback on the Difficult Bugs”, we’ll talk about logs that can be helpful, and sharing content links you can reference. Mark your calendar and tune in!

You can create and manage folders in the pinned apps section

The tech giant said it went based on user feedback for this feature, therefore it was added to the new Dev Channel build for Windows 11.

We’ve heard from many of you that you’d like to customize your pins in Start by organizing them into folders, so we’re introducing the first version of folders in this build.

All you have to do is drag an app on top of another to create a folder. You can add more apps to a folder, rearrange apps within a folder, and remove apps from a folder.

Microsoft also said it reimagined focus experiences on Windows, with DND and Focus. And while do not disturb makes it easy to silence notifications, Focus is a new experience that enables everyone to stay in the moment.

To help you stay on track, Focus integrates with the Clock app for other focus tools, such as a focus timer and calming music.

Also added with this build are Live captions, which will help everyone, including people who are deaf or hard of hearing, better understand audio by viewing captions of spoken content.

Captions are automatically generated on-device from any content with audio and can be displayed at the top or bottom of the screen, or in a floating window.

The tech giant is rolling out an update to File Explorer’s Quick Access view. First, Pin to Quick Access support has been extended from only supporting Folders to now also supporting Files.

What you might also want to keep in mind is that pinned files are shown in a new section above Recent files in Quick Access.

To help you have control over storage consumption and ensure your files are syncing, we’ve added OneDrive integration into File Explorer.

When browsing your OneDrive folders, you can now see your sync status and quota usage without having to leave File Explorer.

And, for those of you who use the new OS on tablets or phones, this build includes 5 new touch gestures to make it easier and quicker to navigate Windows 11 on a PC with touch.

Among the other additions are improved Snap Layouts, more sustainable power settings and recommendations, Task Manager Redesign & Efficiency Mode, and more improvements to browsing the web in Microsoft Edge with Narrator.

You can read more about all the changes and improvements introduced, as well as known issues, on the official Microsoft blog post.

Happy with the new changes coming to Windows 11 in the near future? Share your thoughts with us in the comments section below.

IMAP Backup Tool for Email Accounts: 6 Best to Use

IMAP stands for Internet Message Access Protocol, and they are a sub-type of email, alongside POP emails.

What makes IMAP emails stand out as far as utility goes is that the emails are stored on a  server, and that means that you can access your email messages wherever you are.

However, IMAP emails are still subject to loss and corruption, if something happens to the server that hosts them.

That being the case, we’ve compiled this list of the best backup tools that you can use in order to make sure that your emails are safe.

The entries are ranked based on a number of criteria, including price, how easy they are to use, and how efficient they are at recovering IMAP emails.

What is the best software to backup IMAP email servers?

Acronis Cyber Protect Home Office – Most complete cyberattacks

This solution is a resounding name in the backup software department. Acronis Cyber Protect Home Office, previously known as Acronis True Image, works in two different ways to help you with your IMAP emails:

  • You can use Acronis Cyber Protect Home Office to back up the IMAP emails per se
  • You can use Acronis Cyber Protect Home Office to back up the entire server that is hosting the IMAP emails

Whichever option you choose, rest assured that your emails will be stored safely and that you will be the only one to have access to them.

This tool has always boasted a simplistic UI, and it follows the principle that everyone should be able to easily use it without too much headache.

Here are some of the perks of using Acronis Cyber Protection Home Office:

  • Gets updated frequently
  • Extremely easy-to-use
  • Fast backup process
  • You can test it before you buy it

Acronis Cyber Protect Home Office

Back up all of your emails, including the IMAP ones, with the help of this A-class backup tool.
Check price Visit website

Mailbird – The most popular email alternative

When it comes to backing up emails in general, few tools are as good as Mailbird.

Whether we are talking about IMAP or POP emails, you should know that they are in very good hands.

Of course, this is just one of the many tools that you gain access to once you subscribe to Mailbird. Besides the backup feature, this tool is also one of the best email management tools in the world.

For example, you can manage all your emails and contacts from multiple accounts easily in one Inbox.

Additionally, this tool is highly customizable thanks to built-in apps like Facebook, Twitter, Whatsapp, Dropbox, Google Calendar, Asana, Todoist, etc.

Here are some of the perks of using Mailbird:

  • Great IMAP email recovery tool
  • Advanced email management
  • Now available at a discount price
  • You can test it before you buy it
  • Extremely easy to integrate into your daily activities

Mailbird

Secure your IMAP emails with the help of this dedicated backup tool, now available at a discount price for a limited time only
Free trial Visit Website

AOMEI Backupper Pro – Files and disk backup

AOMEI Backupper is a dedicated IMAP email backup application that can protect your essential email data from loss or cyber theft.

To back up your emails with AOMEI Backupper, you need to add your email account and password and select the IMAP server and port.

This software can automatically backup your IMAP emails from popular email clients such as Gmail, Yahoo, or Hotmail.

Plus, you can benefit from automatic technology to choose the backup location and migrate email backups to different locations on your PC.

Here are some of the perks of AOMEI:

  • Schedule sessions for backups
  • Local backup solutions
  • Server backup technology
  • Partition and system backup tools

AOMEI Backupper

Ensure your email data safety with IMAP backup technology instantly.
Check price Visit website

SysTools Email Backup Recovery Toolkit – Back up Office 365 data

systools gmail backup screenshot

As the name implies, SysTools Email Backup Recovery Toolkit is specially designed to handle all manner of email backup processes, including IMAP.

The catch is that this is not just one software tool, it is a bundle of multiple tools from SysTools that can work together to manage emails better.

Besides the aforementioned backup tool, you also get a recovery tool to deal with the emails that were damaged before a backup could be made in the first place.

Take advantage of this limited-time offer, since you can end up saving up to 40% on your purchase.

Here are some of the perks of using SysTools Email Backup Recovery Toolkit:

  • Now available at a massive discount
  • Can both backup and recover IMAP emails
  • Easy-to-use
  • Active customer support system

SysTools Email Backup Recovery Toolkit

Make sure your emails stay safe with the help of this complete email backup and recovery software kit.
Check price Visit website

Handy Backup – Import and migration

The next entry on our list is yet another reliable tool used for IMAP email backups since it mainly focuses on the backup of the IMAP server itself.

This means that not only is this service efficient at backing up your IMAP emails, but it will also back up pretty much anything else that is on that server as well.

Another neat feature about Handy Backup is the backup scheduling feature which will come in handy for those with limited time to spare.

In addition, this IMAP mail backup tool can deliver recovering features to guarantee email data safety with its retrieving technology.

Perks of using Handy Backup:

  • Makes perfect backups of your IMAP emails
  • Can schedule backups
  • Greate backup fidelity
  • Easy-to-use
  • Frequently updated

Handy Backup

Backup your IMAP email servers fast and efficiently with the help of this handy backup tool.
Check price Visit website

Stellar Mail Backup – Outlook files repairing

Stellar Mail Backup is not just your average backup software. It is a complete utility to take backups of all your emails, contacts, tasks, notes, calendar entries, journals, and more.

This particular software tool is also specialized in handling Outlook Express, MS Outlook, and Windows Mail but it works on other clients as well.

As far as a backup location is concerned, this tool supports Incremental as well as Differential backup on Logical, External, or Network drives

However, don’t let the tech talk scare you, the program is extremely easy-to-use.

Perks of using Stellar Mail Backup:

  • Supports MS Outlook 2013, 2010, 2007, and 2003
  • Easy-to-use
  • Quick backup speeds
  • Efficient email restoration features

Stellar Mail Backup

Make sure your IMAP emails never get corrupted or lost with the help of this great email backup and recovery kit.
Check price Visit Website

Is IMAP stored locally?

No, IMAP format is not saved locally on your PC. This email type is stored on the cloud to keep all your important emails secure on the server.

Therefore, if you need to keep your confidential information and have reliable backup storage, this format is the way to go.

That pretty much wraps up our list of the best tools that you can use for IMAP email backups. We hope that among these entries you will find one that will suit your tastes and needs.

If you want more information on the matter, do not hesitate to leave us a message in the comments section below.

How to fix msedgewebview2.exe high CPU usage

When the CPU consumption is high, it starts to affect the functioning of the system, and you will notice lagging and likely overheating of the Windows 11 PC. One such process that consumes a high CPU is msedgewebview2.exe.

The process is listed in the Details tab of the Task Manager along with various other ones running in the background. And since the details there are a little vague, users have a hard time identifying and eliminating the problem.

In the following sections, we will help you understand the role of the process and the most effective solutions to reduce the msedgewebview2.exe high CPU usage.

What does the msedgewebview2.exe process do?

The msedgewebview2.exe (Microsoft Edge WebView2) is an application that helps embed web-based technology in the native applications. There are various apps on your system that rely on it, such as Microsoft Teams, and Widgets.

As an example, the various real-time data and news available in the Widgets are due to this particular process. The Room Finder feature in Outlook also uses the msedgewebview2.exe process.

Widgets in Windows 11

But if you don’t use any of these native applications, the process would be consuming a large share of the CPU with no real benefit.

Thus, it becomes imperative that you fix the msedgewebview2.exe application error, terminate the relevant process, along with ensuring that the other applications don’t further trigger it.

How can I fix the msedgewebview2.exe high CPU usage?

1. Change display language to English

  1. Press Windows + I to launch the Settings app, and then select Time & language from the tabs listed in the navigation pane on the left.Time & language to fix msedgewebview2.exe high cpu
  2. Click on Language & region on the right.language & region
  3. Next, click on the Add a language button next to Preferred languages.Add language to fix msedgewebview2.exe high cpu
  4. Enter English in the text field at the top, select the relevant search result, and click on Next at the bottom.Search for English
  5. Tick the checkbox for Set as my Windows display langauge and the other options, and click on Install.Install to fix msedgewebview2.exe high cpu
  6. After it’s installed, click on Sign out option and then re-login to the Windows 11 system.Sign out

This method has worked for a lot of Windows 11 users. When you change the language, it reduces the msedgewebview2.exe high CPU usage, brings the temperature under control, and also fixes issues preventing Widgets from working.

After selecting English as the display language, the problem should most likely be eliminated. In case it persists, head to the next method.

2. Terminate relevant processes

  1. Press Ctrl + Shift + Esc to launch the Task Manager.Launch Task Manager
  2. Locate Microsoft Teams and Windows Widgets, choose each individually, right-click on the process and then select End task from the context menu.Terminate task to fix msedgewebview2.exe high cpu
  3. After you have terminated both the processes, the CPU usage should now reduce.

3. Disable startup apps

  1. Press Ctrl + Shift + Esc to launch the Task Manager and navigate to the Startup tab from the top.Startup tab
  2. Next, locate and select the Microsoft Teams entry, and then click on Disable at the bottom.Disable to fix msedgewebview2.exe high cpu

Microsoft Teams is, by default, set to load at startup, which may trigger the msedgewebview2.exe process to run. Now, even if you don’t use Teams, the msedgewebview2.exe running in background could still lead to a high CPU consumption.

So, it’s best that you disable Microsoft Teams from loading at startup to fix the problem.

4. Run DISM, SFC, and Check Disk scans

  1. Press Windows + S to launch the Search menu, enter Windows Terminal in the text field at the top, right-click on the relevant search result, and select Run as administrator from the context menu.Windows Terminal to fix msedgewebview2.exe high cpu
  2. Click Yes on the UAC (User Account Control) prompt that pops up.Click Yes
  3. Next, click on the downward-facing arrow at the top, and select Command Prompt from the list of options. Alternatively, you can hit Ctrl + Shift + 2 to launch Command Prompt in a new tab.Open Command Prompt
  4. Now, paste the following command and then hit Enter to run the DISM tool:DISM.exe /Online /Cleanup-image /RestorehealthRun DISM tool to fix msedgewebview2.exe high cpu
  5. Once the tool is done running, execute the following command to run the SFC scan:sfc /scannowRun SFC scan to fix msedgewebview2.exe high cpu
  6. After the SFC scan is complete, execute this command to run the Check Disk utility:chkdsk /f /r /bRun Check Disk utility to fix msedgewebview2.exe high cpu
  7. Press Y and hit Enter to schedule the scan the next time you restart the computer.Confirm run at startup
  8. Now, navigate to the desktop, hit Alt + F4 to launch the Shut Down Windows box, and select Restart from the dropdown menu.Restart the computer
  9. Finally, click on OK at the bottom to restart the computer.Confirm Restart

These three scans that we run earlier have the potential to solve a plethora of errors in Windows, and should work in case of msedgewebview2.exe unknown hard error as well.

The DISM (Deployment Image Servicing and Management) is a tool used to diagnose and eliminate problems with the OS that affect its functioning. Apart from that, the tool can repair the Windows image or modify the Windows installation media.

The SFC (System File Checker) scan identifies corrupt system files, and if any are found, replaces them with their cached copy stored on the computer.

Check Disk (CHKDSK) on the other hand, checks for problems with the hard drive and automatically repairs them. It will also mark the hard bad sector, so that no further data is stored on them, thus preventing data loss in the long run.

5. Disable widgets

  1. Press Windows + R to launch the Run command, type regedit in the text field, and either click on OK or hit Enter to launch the Registry Editor.Launch Registry Editor to fix msedgewebview2.exe high cpu
  2. Click Yes on the UAC (User Account Control) prompt that appears.Yes
  3. Now, paste the following path in the address bar at the top, and hit Enter:Computer\HKEY_CURRENT_USER\Software\Microsoft\Windows\CurrentVersion\Explorer\AdvancedNavigate address
  4. Locate and double-click on the TaskbarDa entry on the right.TaskbarDa to fix msedgewebview2.exe high cpu
  5. Now, enter 0 under Value data and then click on OK to save the changes.Change value data to 0

After making the changes, restart the computer for these to come into effect, and verify if the msedgewebview2.exe high CPU usage issue is fixed. If not, head to the last method. Also, check out the other ways to disable widgets in Windows 11.

6. Uninstall third-party antivirus

  1. Press Windows + I to launch Settings, and select Apps from the list of tabs in the navigation pane.Apps
  2. Next, click on Apps & features on the right.Apps & features
  3. Now, locate the third-party antivirus, click on the ellipsis next to it, and then select Uninstall from the menu.Uninstall app to fix msedgewebview2.exe high cpu
  4. Again, click on Uninstall in the confirmation prompt that pops up.Confirm uninstall

Certain third-party antiviruses are known to conflict with the functioning of Windows 11 and cause the msedgewebview2.exe high CPU consumption error.

Also, certain antiviruses come with their own uninstall tool, which would most likely pop up as soon as you click on uninstall in the last step. In case it doesn’t, check their official website for the exact steps to completely uninstall the antivirus.

Remember that your PC will not be at risk after uninstalling the third-party antivirus, since Microsoft already offers the built-in Windows Defender, which is more than capable of identifying and eliminating risks that could harm the system.

How can I reduce the high RAM and CPU usage?

Both, high RAM (Memory) and CPU usage can affect the performance of your PC, which makes it all the more important to keep these two under check. You can easily check the two parameters in the Task Manager.

In case you are wondering how to reduce the RAM usage in Windows 11, check this article. For those facing the high CPU usage problem, learn how to fix it.

In the case of CPU, there’s isn’t much you can do other than try the troubleshooting methods. But for RAM, you can go ahead and upgrade it. But remember to check the maximum RAM your PC can support.

That’s all there is to solving the msedgewebview2.exe high CPU usage error along with keeping the RAM and CPU consumption in check in Windows 11.

Besides, if you find out that Windows 11 is not using all available RAM, try the methods listed in this article.

To familiarize yourself with this component, we have a whole guide explaining what is Microsoft Edge WebView2 Runtime, so don’t miss it.

Tell us which fix worked for you in the comments section below.

This weekend’s Xbox Free Play days include NASCAR 21: Ignition, NBA 2K22

This weekend marks the Daytona 500, the start of the NASCAR season, and if you’re looking to celebrate, or just have some downtime while waiting for the big race, team Xbox wants to help out.

As part of the latest Free Play Days, you can play NASCAR 21: Ignition, or NBA 2K22 for free with your Xbox Live Gold and Xbox Game Pass Ultimate membership from Thursday, February 17 at 12:01 a.m. PST until Sunday, February 20 at 11:59 p.m. PST. If you like the games, you also can buy them at discounted prices, seen below.

For those who aren’t stock car fans, NASCAR 21: Ignition is the latest NASCAR video game. It sports all the official drivers, teams, and tracks from the 2021 season. And, it has enhanced graphics and broadcast-quality cutscenes. As for NBA 2K22, it’s a great game for basketball fans as it lets you jump in and play as your favorite teams, without even having to go outdoors.

To enjoy these games for free, all you need to do is find and install the games through Xbox.com with our links above. You’ll then be sent to the Microsoft Store, where you can sign in to install with your membership. On a console, you can click on the Subscriptions tab in the Xbox Store, and then enter the Gold member area and look for the Free Play Days collection.

Microsoft is testing ability to sync your PWAs in Microsoft Edge Canary

You already can sync your history, bookmarks, collections, and other items across different devices with Microsoft Edge, but Microsoft is now adding one more thing to the list (via Neowin.)

Spotted by a Redditor, now in testing with Canary Channel Edge Insiders is the ability to sync your favorite PWAs across different devices. This Edge Canary user installed three sites as PWAs on one of his devices and opened Edge Canary on another device, and then found the same apps as installable in the All Apps section of the browser. Of course, the apps are grayed out, with the option to Install manually.

At the moment, this seems to be a controlled feature, as we’re not seeing it on our end. However, for folks who own multiple PCs, Macs, or Linux devices, this is sure to be useful as it makes getting up to speed with the browser easier. Once rolled out to everyone, you’ll no longer have to go diving through menus and set each app as a PWA in each install of Edge. You’ll rather just have to depend on Edge syncing and doing all the heavy lifting for you.

How to Disable Antimalware Service Executable on Windows 10

Want to disable the Antimalware Service Executable? Understandable. The service uses a lot of CPU, often making your PC act up. Luckily, you can disable it and find alternative security tools that take way fewer resources. Keep reading, and we’ll show you how to disable MsMpeng.exe permanently.

How do I permanently disable Antimalware Service Executable?

1. Get AdvancedRun software

Note icon NOTE
This isn’t a solution, it is a prerequisite software needed to complete most solutions, so be sure to have it downloaded and started when the instructions tell you to run it.
  1. Visit the Advanced Run download page.
  2. Next, download the software.
  3. Once the software is downloaded, extract it to a directory for quick and easy access.

Whenever the solution requires you to use Advanced Run, always do the following:

  1. Start the Advanced Run software by double-clicking it.
  2. Crucial: Always set Run as a TrustedInstaller.
  3. Follow further instructions from the solution.

2. Add exclusions to Windows Defender

  1. Press Windows key + S and type defender. Choose Windows Defender from the list of results.
  2. Click on Virus & threat protection. Next, click on Manage settings.
  3. After that, click on Add or remove exclusions in the Exclusions section.
  4. Click on the Add an exclusion button and select File.
  5. Go to the following directory and select MsMpEnd.exe in the following directory: C:\Program Files\Windows Defender

3. Create a batch script

Note icon NOTE
This solution will make system changes to your PC. Back up your files and create a System Restore point. We’re not responsible for any damage that might occur after using this solution.
  1. Open Notepad.
  2. Now paste the following code:
    @echo off
    ::Windows Defender
    reg add "HKLM\SYSTEM\ControlSet001\Services\MsSecFlt" /v "Start" /t REG_DWORD /d "4" /f
    reg add "HKLM\SYSTEM\ControlSet001\Services\SecurityHealthService" /v "Start" /t REG_DWORD /d "4" /f
    reg add "HKLM\SYSTEM\ControlSet001\Services\Sense" /v "Start" /t REG_DWORD /d "4" /f
    reg add "HKLM\SYSTEM\ControlSet001\Services\WdBoot" /v "Start" /t REG_DWORD /d "4" /f
    reg add "HKLM\SYSTEM\ControlSet001\Services\WdFilter" /v "Start" /t REG_DWORD /d "4" /f
    reg add "HKLM\SYSTEM\ControlSet001\Services\WdNisDrv" /v "Start" /t REG_DWORD /d "4" /f
    reg add "HKLM\SYSTEM\ControlSet001\Services\WdNisSvc" /v "Start" /t REG_DWORD /d "4" /f
    reg add "HKLM\SYSTEM\ControlSet001\Services\WinDefend" /v "Start" /t REG_DWORD /d "4" /f
    ::WindowsSystemTray
    reg delete "HKLM\SOFTWARE\Microsoft\Windows\CurrentVersion\Run" /v "SecurityHealth" /f
    ::System Guard
    reg add "HKLM\SYSTEM\ControlSet001\Services\SgrmAgent" /v "Start" /t REG_DWORD /d "4" /f
    reg add "HKLM\SYSTEM\ControlSet001\Services\SgrmBroker" /v "Start" /t REG_DWORD /d "4" /f
    ::WebThreatDefSvc
    reg add "HKLM\SYSTEM\ControlSet001\Services\webthreatdefsvc" /v "Start" /t REG_DWORD /d "4" /f
    reg add "HKLM\SYSTEM\ControlSet001\Services\webthreatdefusersvc" /v "Start" /t REG_DWORD /d "4" /f
    for /f %%i in ('reg query "HKLM\SYSTEM\ControlSet001\Services" /s /k "webthreatdefusersvc" /f 2^>nul ^| find /i "webthreatdefusersvc" ') do (
    reg add "%%i" /v "Start" /t REG_DWORD /d "4" /f
    )
    ::
    reg add "HKLM\SOFTWARE\Microsoft\Windows NT\CurrentVersion\Image File Execution Options\smartscreen.exe" /v "Debugger" /t REG_SZ /d "%%windir%%\System32\taskkill.exe" /f
    reg add "HKCU\Software\Microsoft\Windows\CurrentVersion\Policies\Associations" /v "DefaultFileTypeRisk" /t REG_DWORD /d "1808" /f
    reg add "HKCU\Software\Microsoft\Windows\CurrentVersion\Policies\Attachments" /v "SaveZoneInformation" /t REG_DWORD /d "1" /f
    reg add "HKCU\Software\Microsoft\Windows\CurrentVersion\Policies\Associations" /v "LowRiskFileTypes" /t REG_SZ /d ".avi;.bat;.com;.cmd;.exe;.htm;.html;.lnk;.mpg;.mpeg;.mov;.mp3;.msi;.m3u;.rar;.reg;.txt;.vbs;.wav;.zip;" /f
    reg add "HKCU\Software\Microsoft\Windows\CurrentVersion\Policies\Associations" /v "ModRiskFileTypes" /t REG_SZ /d ".bat;.exe;.reg;.vbs;.chm;.msi;.js;.cmd" /f
    reg add "HKLM\Software\Policies\Microsoft\Windows Defender\SmartScreen" /v "ConfigureAppInstallControlEnabled" /t REG_DWORD /d "0" /f
    reg add "HKLM\Software\Policies\Microsoft\Windows Defender\SmartScreen" /v "ConfigureAppInstallControl" /t REG_DWORD /d "0" /f
    reg add "HKLM\Software\Policies\Microsoft\Windows Defender\SmartScreen" /v "EnableSmartScreen" /t REG_DWORD /d "0" /f
    reg add "HKCU\Software\Policies\Microsoft\MicrosoftEdge\PhishingFilter" /v "EnabledV9" /t REG_DWORD /d "0" /f
    reg add "HKLM\Software\Policies\Microsoft\MicrosoftEdge\PhishingFilter" /v "EnabledV9" /t REG_DWORD /d "0" /f
    goto :EOF
  3. Click on File and choose Save as.
  4. Choose a save location. Set Save as type as All Files. Enter the save name as disabledefender.bat and save it.
  5. Start Advanced Run and configure it to run the file as TrustedInstaller.
  6. Set Run mode to Run .EXE File. Click three dots next to the Program to Run field.

  7. Select All files and choose disabledefender.bat file that you just created.
  8. Click the Run button and wait for the process to finish.

You can restore Windows Defender by creating a new script like this:

  1. Start Notepad and paste the following code:
    @echo off
    ::Windows Defender
    reg add "HKLM\SYSTEM\ControlSet001\Services\MsSecFlt" /v "Start" /t REG_DWORD /d "0" /f
    reg add "HKLM\SYSTEM\ControlSet001\Services\SecurityHealthService" /v "Start" /t REG_DWORD /d "3" /f
    reg add "HKLM\SYSTEM\ControlSet001\Services\Sense" /v "Start" /t REG_DWORD /d "3" /f
    reg add "HKLM\SYSTEM\ControlSet001\Services\WdBoot" /v "Start" /t REG_DWORD /d "0" /f
    reg add "HKLM\SYSTEM\ControlSet001\Services\WdFilter" /v "Start" /t REG_DWORD /d "0" /f
    reg add "HKLM\SYSTEM\ControlSet001\Services\WdNisDrv" /v "Start" /t REG_DWORD /d "3" /f
    reg add "HKLM\SYSTEM\ControlSet001\Services\WdNisSvc" /v "Start" /t REG_DWORD /d "3" /f
    reg add "HKLM\SYSTEM\ControlSet001\Services\WinDefend" /v "Start" /t REG_DWORD /d "2" /f
    ::WindowsSystemTray
    reg add "HKLM\SOFTWARE\Microsoft\Windows\CurrentVersion\Run" /v "SecurityHealth" /t REG_EXPAND_SZ /d "%systemroot%\system32\SecurityHealthSystray.exe" /f
    ::SystemGuard
    reg add "HKLM\SYSTEM\ControlSet001\Services\SgrmAgent" /v "Start" /t REG_DWORD /d "0" /f
    reg add "HKLM\SYSTEM\ControlSet001\Services\SgrmBroker" /v "Start" /t REG_DWORD /d "2" /f
    ::WebThreatDefSvc
    reg add "HKLM\SYSTEM\ControlSet001\Services\webthreatdefsvc" /v "Start" /t REG_DWORD /d "3" /f
    reg add "HKLM\SYSTEM\ControlSet001\Services\webthreatdefusersvc" /v "Start" /t REG_DWORD /d "2" /f
    for /f %%i in ('reg query "HKLM\SYSTEM\ControlSet001\Services" /s /k "webthreatdefusersvc" /f 2^>nul ^| find /i "webthreatdefusersvc" ') do (
    reg add "%%i" /v "Start" /t REG_DWORD /d "2" /f
    )
    ::
    reg delete "HKLM\Software\Microsoft\Windows NT\CurrentVersion\Image File Execution Options\smartscreen.exe" /f
    reg delete "HKCU\Software\Microsoft\Windows\CurrentVersion\Policies\Associations" /f
    reg delete "HKLM\Software\Policies\Microsoft\Windows Defender\SmartScreen" /f
    reg delete "HKLM\Software\Policies\Microsoft\Windows Defender\Signature Updates" /f
    goto :EOF
  2. Click File and choose Save as.
  3. Set Save as type to All files. Name the file restoredefender.bat and save it.
  4. Start Advanced Run and run restoredefender.bat as TrustedInstaller.

4. Use the GitHub script

Note icon NOTE
Running any batch script comes with security risks, and we’re not responsible for any potential damages. You’re advised to create a backup before proceeding.
  1. Visit Tairiku’s GitHub page.
  2. Click on Code and select Download ZIP.
  3. Once the file is downloaded, extract it to a location that you can quickly access.
  4. Next, start Advanced Run and make sure you run it as TrustedInstaller.
  5. Set Run Mode to Run .EXE File and click three dots next to the Program to Run field.
     
  6. Select All files and choose the Microsoft Defender Disable.bat file that you downloaded.
  7. Lastly, click the Run button to run the script.

To revert the changes, repeat the steps but use the Microsoft Defender Enable.bat script instead.

5. Use Command Prompt

  1. Start Advanced Run and set it to run as TrustedInstaller.
  2. Set Run Mode to Command Prompt and click Run.
  3. Run the following command: "%ProgramFiles%\Windows Defender\MpCmdRun.exe" -DisableService & sc config "WinDefend" depend= RpcSs-DISABLED
  4. Restart your PC.
  5. Optional: To revert the changes, use this command: sc config "WinDefend" depend= RpcSs & "%ProgramFiles%\Windows Defender\MpCmdRun.exe" -EnableService

If the previous commands didn’t work, use these commands instead:

  • To disable Windows Defender: REG ADD "HKEY_LOCAL_MACHINE\SYSTEM\CurrentControlSet\Services\WinDefend" /v "DependOnService" /t REG_MULTI_SZ /d "RpcSs-DISABLED" /f
  • To enable Windows Defender: REG ADD "HKEY_LOCAL_MACHINE\SYSTEM\CurrentControlSet\Services\WinDefend" /v "DependOnService" /t REG_MULTI_SZ /d "RpcSs" /f

6. Install a third-party antivirus

Antimalware Service Executable is a process closely related to Microsoft Defender.

However, Microsoft Defender won’t run side by side with a third-party antivirus, so if you’re having problems with Antimalware Service Executable, you might want to install a third-party antivirus.

After fixing the issue with the Defender process, you can safely use TotalAV software to provide high-end protection against online cyberattacks. Not only that, this valuable tool comes with the best low-resource usage.

You can also secure your Windows PC against new emerging malware, ransomware attacks, or financial-related threats while performing sensitive activities such as banking operations.

After you install a third-party antivirus, Microsoft Defender will automatically turn itself off, and your problem should be resolved.

TotalAV

Forget about the issues caused by Microsoft Defender and install this top-notch light antivirus.
Free Trial Visit Website

Can I turn off Antimalware Service Executable? Is It Safe?

If you don’t install any additional antivirus software, Windows Defender is the only thing that will protect your computer from malicious software. So, you should disable the service if it is causing you trouble, but purchase or install additional antivirus protection.

Wrapping up

We hope our solutions helped you learn how to stop the Antimalware Service Executable and fix this problem for good.

Disabling this service is one of the necessary steps to fix the can’t turn off real-time protection on Windows 11 issue.

Even if you turn off Antimalware Service Executable, don’t leave your system unprotected. You can use any antivirus software option from the best antivirus with an unlimited license list.

Before you go, don’t miss our guide on Msmpeng.exe high memory usage since it covers a similar subject. Other related issues you might encounter with Windows security processes include Antimalware Service Executable using high CPU or needing to disable it entirely in Windows 11 to improve performance.

For more suggestions or questions, don’t hesitate to leave them in the comments section below, and we’ll be sure to check them out.

How to Combine Two Internet Connections on Windows 10

Some PC users are interested in finding out how to combine two Internet connections on Windows 10. Some want to combine two WiFi connections, whereas others want to combine Ethernet ones.

This can be a great solution if your connection disconnects randomly for a few seconds or if you’re having other issues.

This is possible, and to learn more about the benefits of combining two or more connections, be sure to keep reading.

Can you combine two Internet connections?

Yes, you can combine two Internet connections into one. This comes with several benefits:

  • Faster connection – Remember that download speeds won’t combine when using single stream connections. However, you will notice speed increase with multi-stream connections, such as with torrent clients.
  • More reliable connection – By combining two connections, you’ll get a more stable connection because if one is having issues, the other can continue working as a backup.

How do I combine two Internet connections on Windows 10?

1. Use built-in resources

1.1 Tweak TCP/IP Settings

  1. In the Windows search bar, type control, and open Control Panel from the results.
  2. Choose Network and Internet.
  3. Open Network and Sharing Center and select Change adapter settings.
    change adapter settings
  4. Right-click on your active internet connection and open Properties.
    network adapter properties
  5. Highlight Internet Protocol TCP/IP Version 4 and click Properties.
  6. Click Advanced.
  7. Uncheck the Automatic metric box and enter 15 in the Interface metric field.
    disable automatic metric
  8. Confirm the changes and repeat this for all connections.
  9. Disconnect both connections and reboot your PC.
  10. Connect both connections and look for improvements.

1.2 Bridge two Internet connections

  1. Navigate to Control Panel, and click on Network and Sharing Center.
  2. Select Change adapter settings.
  3. Press and hold CTRL and click both connections to highlight them.
  4. Right-click on one of the connections and choose Bridge Connections.
    bridge connections

You can also read this guide on how to create a network bridge in Windows to learn more about linking two network adapters for shared connectivity.

2. Use a dedicated program

Software such as Speedify allows you to combine several Internet connections to improve your online performance.

The software dynamically spreads packages among the connections for improved performance. With this software, you can get improvements on single connections as well.

This is achieved by making 8 simultaneous connections to Speedify servers. Priority levels are available, so you can fine-tune your connection for the best performance.

The software ensures 100% stability thanks to the fallover feature. The service is optimized for streaming, and you can test your connection anytime and view real-time statistics.

Of course, all your connections use AES 256 encryption, and the company keeps no logs, so your browsing sessions will remain completely private.

⇒ Get Speedify

3. Try a load-balancing router

Finally, if your workflow requires a reliable and stable connection, the most secure way to combine two (or even several) connections is with a Load Balancing Router.

These come in all shapes and forms, some even offered by various ISPs. The TP-link-ones are the most affordable, but you can go with Cisco or UTT. It depends on your needs and budget.

Once you’ve acquired a load-balancing router, the procedure is rather simple. Just use WAN/LAN to merge multiple connections.

There might be a few minor things to do, configuration-wise, but you should be good to go in a matter of minutes.

The important thing to remember is that IP addresses can’t be the same for the router and the Internet connections you’re merging.

With that said, we can conclude this article, and we hope that our solutions helped you use two internet connections simultaneously on Windows 10 without issues.

If you want to know how to use WiFi and Ethernet simultaneously, check out our dedicated article.

You might also be interested in the best load balancer solutions that will provide you with stable network traffic for your devices.

In case you have any questions or suggestions on how to combine two internet connections on Windows 10, feel free to tell us in the comments section below. We look forward to hearing from you.

Best Network Inspection Tools for 2026 [Top 8 Picks]

Network-monitoring software is primarily designed for the business domain and network admins. It provides network report details and enables users to fix any network faults, compliance issues, or bottlenecks that might emerge.

Network monitoring, otherwise, traffic analysis, is an important aspect of these software tools. There’s an extensive range of software solutions that enable you to inspect network traffic.

Aside from monitoring the network and its processes, some users might need reliable network simulation tools for imitating network models.

What are the best tools to inspect your network traffic with?

Site24x7

If you need to monitor traffic, you should go for a SNMP-based tool and Site24x7 is just what you’re looking for.

For instance, you will get really good friends with the Heath Dashboard because that’s where you’ll be able to monitor all the top devices based on response time and packet loss.

And that’s not all! You also get data for the top interfaces based on traffic, bandwidth utilization, errors, and discards.

This SNMP-based solution uses over 60 performance metrics to collect the data from all the devices within a specified IP range or with the help of CIDR technology.

How about monitoring the Microsoft applications’ performance? Site24x7 can also do that for a long list of software including IIS, SQL, Exchange, Office 365, and more.

The IT manager doesn’t have to be at his/her desk all the time because the could based command center can be accessed from anywhere, even from a mobile device.

Committing to this kind of solution takes time and analysis but you can test Site24x7 because it offers a free trial version just for that.

Site24x7 best features:

  • Easy SNMP traffic monitoring with over 60 performance metrics
  • Control everything from a single cloud-based dashboard
  • Professional support and free trial available
  • Secure management of customer accounts and endpoints
  • Easy implementation and intuitive interface

Site24x7

Keep track of all the traffic of your entire network with this advanced management tool.
Free trial Visit website

PRTG Network Monitor

This tool is developed by one of the biggest network security companies in the world. It will let you verify the traffic that comes into your network and check if it is safe or not.

Basically, it is your best friend when you want to see if some of the traffic on your Wi-Fi network is dangerous for your devices or not.

PRTG will monitor your firewalls and all that they let through. Its SNMP and NetFlow sensors will immediately let you know if your firewall has a breach.

All the unusual traffic is located through the program’s Packet Sniffing Sensor. Once something odd is sniffed, PRTG notifies you and proposes some actions to take as soon as possible.

In case there are security holes in the network because of the Windows Updates, PRTG lets the administrator know and helps him find solutions so none of the network’s data remains exposed.

PRTG is also a great Wi-Fi scanner and monitoring tool that you could use while overwatching your network’s traffic.

Try this program for 30 days and go on the free (but limited) version after that, or you can continue by upgrading to a Pro plan.

PRTG Network Monitor best features:

  • Network breach detection
  • Wi-Fi scanner and monitoring tool
  • Suitable for businesses of all sizes
  • Centrally monitor and manage all your cloud computing services
  • SNMP functionality
PRTG Network Monitor

PRTG Network Monitor

Manage the way your PC uses your bandwidth with one of the best network monitoring tools on the market today!
Free trial Visit website

Wireshark

Wireshark is an open-source IP traffic-monitoring tool for Windows platforms, Mac OS X, and Linux that has had rave reviews.

This is software primarily designed for a more advanced user base that provides detailed traffic info and statistics.

Note that you might also need WinPcap installed for Wireshark to work.

Wireshark is a network-monitoring tool that can inspect a multitude of protocols. It includes an interface list from which you can select which interface to inspect traffic.

The software captures traffic in real-time and enables you to set up filters to inspect more specific traffic and connections. Its display filters are among the best in the industry.

Another great thing about Wireshark is its color-coding that highlights different types of traffic. For example, green highlights TCP traffic and blue DNS traffic.

Users can also create their own custom color code sets for data packets. In addition, the program also generates a variety of reports for things such as protocol hierarchy.

Wireshark best features:

  • Color-based traffic differentiations
  • Works on Windows, Mac OS X, and Linux
  • Open source free software
  • Inspects a multitude of protocols
  • Captures traffic in real-time

⇒ Get Wireshark

Capsa

Capsa is a network analyzer for Windows that you can inspect Ethernet traffic with. It has freeware, Professional, and Enterprise editions.

The freeware version alone has plenty of handy options, and Enterprise boasts an even wider range of advanced features.

Capsa monitors more than 300 protocols and provides traffic and bandwidth statistics in both numerical and graph formats within an intuitive dashboard UI.

The software gives users detailed and customizable summary reports for each type of analysis that includes total traffic, DNS queries and responses, data link, packet size distribution details, and more besides.

The Enterprise edition has a variety of diagnostic tools to help fix networks and a matrix view that includes the top 100 node connections in a network.

In addition to this, you can also schedule tasks, set up alarm notifiers, configure decoder, and export packets with Capsa.

Capsa best features:

  • Monitors over 300 protocols
  • Schedule tasks, set up alarm notifiers, configure decoder, and export packets
  • Detailed and customizable summary reports
  • Reports include total traffic, DNS queries and responses, data link, packet size distribution details, and more
  • Very easy to use

⇒ Get Capsa

ManageEngine OpManager

ManageEngine OpManager is comprehensive monitoring software that provides network traffic analysis for Windows servers.

The software has Essential, OpManager Plus, and Enterprise edition for more than 500 network devices.

It has tools for network monitoring, bandwidth analysis, configuration management, IP address management, and firewall log management.

The software’s netflow monitoring module is ideal for inspecting network traffic. That provides real-time bandwidth monitoring and detailed traffic reports and graphs for end users.

With that, you can then discover the apps and protocols that are hogging the most network bandwidth.

OpManager also comes with a wide range of reporting profiles, and users can also set up their own custom reports. So, this is an invaluable tool for isolating and eliminating bandwidth hogs.

ManageEngine OpManager best features:

  • Network monitoring, bandwidth analysis, configuration management, IP address management, and firewall log management
  • Professional-level advanced features for network management
  • Customizable and comprehensive reports
  • Very well structured interface
  • Centralized console management

ManageEngine OpManager

Monitor your network with detailed real-time reports from this professional software.
Free Trial Visit Website

Spiceworks Network Monitor

Spiceworks Network Monitor is freeware for Windows servers that has no device limit. This program has a decent set of options to inspect network traffic with.

The software has a quick setup, and you don’t need to be a network engineer to implement it, although it offers some interesting, advanced features.

It has a dynamic and easy-to-use dashboard interface. With the software, users can inspect bandwidth usage at the port level.

This can help reduce network saturation and traffic congestion and check for packet loss. The software also gives you historical data to spot trends, to determine if a network needs more bandwidth or not.

Spiceworks Network Monitor is a handy networking-monitoring tool that offers terrific value, so we encourage you to test it.

Spiceworks Network Monitor best features:

  • Quick setup and implementation
  • Freeware version available
  • Inspects bandwidth usage at the port level
  • Easy-to-use dashboard interface

⇒ Get Spiceworks Network Monitor

Microsoft Network Monitor

Microsoft Network Monitor provides detailed traffic capture and analysis for networks and is fairly straightforward to use compared with other alternatives.

It captures data packets sent over a network and provides graphical displays of network stats.

The Microsoft Network Monitor utility supports an extensive number of data protocols. It includes numerous filtering options so that users can filter out more specific details from captured data packets.

Furthermore, you can also create your own customized filters either entirely from scratch or from an existing one. The software also presents the traffic data details clearly within its UI.

In addition, MNM includes a Wireless Monitor Mode and simultaneous capture sessions options. So even if it isn’t the most updated network monitor, it’s still a handy utility for network administration.

Microsoft Network Monitor best features:

  • Available for free
  • Designed especially for Windows
  • Customized filters creation
  • Reports with detailed traffic data

⇒ Get Microsoft Network Monitor

Nagios Network Analyzer

Nagios is another utility that provides detailed traffic analysis for both smaller and larger networks. With this software, it’s possible to monitor various network services such as HTTP, POP3, SMTP, and ICMP.

The Nagios Network Analyzer is available as an evaluation copy to try out for a 60-day evaluation. Note that Nagios Core is an open-source alternative with network monitoring options.

The app gives you a central view of network traffic for both smaller and larger networks with its comprehensive home dashboard.

It can provide details for specific IPs, disk usage, destination, or source ports; and the software also includes advanced visualizations that illustrate network traffic data in graphical format.

With the utility’s custom application monitoring you can inspect traffic for more specific applications.

The Nagios bandwidth utilization calculator is another handy tool that enables users to set up reports highlighting bandwidth usage for a source or IP.

With that, it’s easy to inspect which IPs are hogging the most bandwidth and fix the situation quickly.

Nagios Network Analyzer best features:

  • Monitors network services such as HTTP, POP3, SMTP, and ICMP
  • 60-days trial evaluation version
  • Centralized dashboard
  • Offers details for specific IPs, disk usage, destination, or source ports
  • Network traffic data reports in graphical format

⇒ Get Nagios Network Analyzer

So those are the best software tools for both business and home networks. They’ll give you a detailed overview of network traffic so that you can analyze and manage networks more efficiently.

And while we’re on the subject, take a look at our selection of the best network performance management tools because you might get more ideas.

FAQs

What is network monitoring software used for?

Network monitoring software tracks traffic across devices, detects bottlenecks, and provides reports to help admins resolve faults, compliance issues, or bandwidth problems.

What is the best free network traffic analyzer?

Wireshark and Microsoft Network Monitor are among the best free options. They capture packets in real time, support multiple protocols, and provide detailed analysis.

Can network monitoring tools detect security issues?

Yes. Tools like PRTG, OpManager, and Capsa include breach detection, firewall monitoring, and traffic analysis to identify unusual or malicious network activity.

Is network monitoring only for businesses?

No. While designed for admins, free tools like Spiceworks or Wireshark are also useful for home users who want to check bandwidth usage, packet loss, or Wi-Fi performance.

Have you tried any of the recommended solutions? If so, let us know more about your experience in the comments section below.

Microsoft’s Soundscape technology helps power Sony’s latest set of earbuds

Microsoft and Sony appear to be competing at the upper echelon of the wireless headphone category with the Surface Headphones 2 and the Sony WH-100XM4’s going head-to-head, but the two found time to partner at the lower end with the new Sony LinkBuds experience.

According to Microsoft Research, the new Sony LinkBuds integrate Microsoft Soundscape into its audio experience.

Microsoft Soundscape is a product from Microsoft Research that explores the use of innovative audio-based technology to enable people to build a richer awareness of their surroundings, thus becoming more confident and empowered to get around. Unlike step-by-step navigation apps, Soundscape uses 3D audio cues to enrich ambient awareness and provide a new way to relate to the environment. It allows you to build a mental map and make personal route choices while being more comfortable within unfamiliar spaces. Soundscape is designed to be used by everyone and live in the background; therefore, feel free to use it in conjunction with other apps such as podcasts, audio books, email and even GPS navigation!

As mentioned by Microsoft Research, Soundscape is best for ambient sound profiles but it can also be used to set a homing beacon that can leverage spatial sound to help guide users, or it can help with familiarizing Soundscape callouts among other things.

Specifically, Soundscape creates an audio profile using synthesized binaural audio and 3D sound. When paired, apps and services that utilize area and location based environmental mapping via the sensors in a smartphone or tablet, users can follow the ambient beacons for hands and sight free navigation.

Apple iPhone SE, 6S and later make use of Soundscape technology as well as most wired and Bluetooth enabled devices.

For anyone interested, Microsoft Research is offering a free download of Soundscape to test out from its blog.

The New Visual Studio 2023 17.1 Experience Is Now Available

As we’re sure most of us remember, the Visual Studio 2022 17.1 Preview became available for users that wanted to test the integrated development environment (IDE) before the release.

You might be pleased to find out that this version of the software was released to the general public earlier today and you can download and install it as you please.

Also noteworthy is the fact that most of the features that were available in the preview have made it over to the GA version and Microsoft has also incorporated feedback gathered from end-users.

Microsoft just released the new version of Visual Studio

One of the features that are now enabled by default is indexed Find in Files, which leads to a faster searching experience.

Of course, you can also disable this functionality if you choose so, by navigating to the options menu and unchecking the Enable indexing for faster find experience box.

The tech giant also gave users the ability to enable a new feature that attempts to save every document in the IDE such as project and solution each time your IDE window loses focus.

Not to mention that there are some Git enhancements also included, among which the ability to compare branches, check out a commit, review pull requests and many others.

Developers will also find some visualizations for available registers and their mapped memory locations when using RTOS Objects.

Solution Filters allow you to choose what projects to load so you can avoid loading massive solutions every time. You have the choice to load individual projects or a project with its entire dependency tree.

What’s also worth mentioning is that Visual Studio 2022 version 17.1 added an easier way to load the entire dependency tree for all the projects in the solution filter.

Needless to say, this will pull in any new dependencies that were added to ensure you have all the projects you need.

The Redmond company noted that with Visual Studio 2022 17.1 now available, professional and enterprise customers should start looking into how they can start leveraging from the new features.

Microsoft especially mentioned those users that are still on the 17.0 Long Term Servicing Channel (LTSC).

And, if you were already wondering about Visual Studio 2022 17.2, you might like to know that it is now available in preview.

It currently packs some more Git enhancements, bug fixes for MAUI development, support for new C# 11 refactorings, and improvements when dealing with data locally.

What other features do you feel should have been included in this version, or maybe a future one? Share your thoughts with us in the comments section below.

Microsoft makes moves to clean up AltspaceVR and make it a safer space

Ever since Microsoft acquired AltspaceVR, a social platform for mixed reality back in 2017, the world has changed a lot and it has become one of the big building blocks for the Metaverse at Microsoft. Accordingly, Microsoft announced several changes for the service, all designed to help make it a safer place for everyone.

Rolling out today, AltspaceVR’s hosted social hubs including the Campfire, News and Entertainment Commons will all be removed. In addition, a Safety bubble will also now be turned on by default, and new attendees joining events will automatically be muted. Perhaps the biggest change, though, is requiring all users to log in to AltspaceVR using a Microsoft Account in the coming weeks.

This move will help integrate with the Microsoft Family Safety service, for those using AltspaceVR who might be age 13 and who might download from the Microsoft Store.  “As platforms like AltspaceVR evolve, it is important that we look at existing experiences and evaluate whether they’re adequately serving the needs of customers today and in the future,” explained Alex Kipman.

Xbox teams up with NY Liberty, Brooklyn Nets to launch Jnr.Ballers

As Nintendo had famously done with its industry-changing NES back in the 80s, Microsoft launched its fledgling Xbox in The Big Apple with the notion that “if you can make it in New York City, you can make it anywhere.” Just over 20 years have passed since that exciting day at a Times Square Toys “R” Us. And now, Xbox is returning to New York, this time to give back in the place where it all started.

It will be teaming up with New York Liberty and The Brooklyn Nets to create a digital content series it is calling Jnr.Ballers. Pepper Persley, a 10 year old sports journalist from NYC, will be the host of the series, which follows 6 boys and girls participating in the NYPD Community Center who have been selected to work with Sabrina Ionescu of the WNBA’s New York Liberty and Cam Thomas of the NBA’s Brooklyn Nets as they plot out a road map toward finding and realizing their dreams.

The collaboration is not only an intersection of sports and video gaming, but also is a nice example of giving back to the community (not to mention a good PR endeavor for all parties involved). There is also a sweepstakes that fans can enter for a chance to win one of an array of prizes including VIP seats to a home Liberty or Nets game as well as a custom basketball-themed Series S console.

Rumor: could Microsoft be buying Capcom next?

This rumor comes from a tweet that was posted on Capcom’s official Twitter account on Valentine’s Day. The rather ominous post features a countdown clock against a stark black background, seems to allude to a major impending announcement.

While many seem to think that the announcement in question – which seems to be set to happen around February 20th – will actually pertain to a Resident Evil 4 remake and/or Street Fighter 6, after a few hours leaks (thus far unsubstantiated) began to circulate that Capcom would be coming under new ownership, specifically Microsoft’s. This “info” comes thanks to the efforts of hackers who got into the countdown sites‘ Javascript.

One twitter account in particular (@chinnerdomain) gave an example of the “evidence.”

Whether any of this can be taken seriously though, is another matter. All of this information could be fake, for all we know. And this doesn’t seem to be the first time rumors of Microsoft buying Capcom have surfaced, as a Destructoid post from around 15 years ago shows. It’s not even clear whether or not such an acquisition would be legally permitted under Japanese law. At any rate, we will have to wait until Sunday to see if there is anything to the rumor or it’s just fluff.


Microsoft is retiring Xbox Live services on Windows Phone on May 16, 2022

Microsoft is letting gamers know that Xbox Live services on Windows Phone will be shut down on May 16, 2022. The message was posted in the Xbox app on Android and iOS devices and means many online features of Windows Phone games that connect with Xbox Live will no longer work come that day (via Windows Central.)

According to Microsoft’s message, Xbox features like earning achievements will stop working after this date. Some games may still be playable, but progress will not be recorded to your Xbox profile. The full message can be seen below.

Starting May 16, 2022, Xbox features will no longer be supported on Windows Phone devices. As part of this change, earning achievements will be retired on Windows Phone devices. Some games may still be playable on your phone, but progress will not be recorded to your Xbox profile.

This move should not be surprising, as Microsoft ended support for Windows 10 Mobile back in 2020. Ending support for Xbox Live on Windows Phones also enables Microsoft to focus its server power on more modern services, like Xbox Game Streaming, and the Xbox Game Pass App.

Of course, if you do have a Windows Phone, and are currently enjoying Xbox Live Services for any remaining games, it’s best to try and 100% those achievements as soon as you can. Because come May 22, there’s no going back.

Microsoft Teams update loses call support

Microsoft Teams was updated recently and its most notable feature, for at least some users, is not being able to send or receive calls.

A user on the Microsoft Tech Community board wrote that they now get a message saying ‘this action has been blocked’ whenever they try making a call using the app. The user added that this had been a problem since the last update, with the ability to make calls being blocked for unknown reasons.

The issue was first reported in the answers forum but has popped up in other locations as well. The problem appears to be related to the calling functionality on the app and it affects both Windows 11 Mobile and Windows 11 PCs.

Unfortunately, there’s not much that can be done about the issue, though it’s only temporary as a fix is expected in the next update which should arrive soon according to Microsoft.

It’s unclear what exactly caused the bug, but given that this affects both outbound and inbound calls, it seems like users are completely unable to use Teams for telephony at all. It’s also unclear if this issue affects both Android and iOS devices or just one of them.

This is perhaps less than ideal given that Teams is intended as a collaboration and meetings tool. It may also be a concern for those who use Teams for personal reasons, such as staying in touch with friends and family.

Users reports

A number of users are reporting that they can no longer make calls on the Microsoft Teams desktop app. It appears that the latest update broke the ability of the app to access device speakers and microphones.

Several users of the Teams desktop app have reported that the app does not work after an update installation. The error it reports is vague, and Teams cannot access a device’s speakers or microphone.

The problem seems to be limited to a specific subset of Teams users, but it’s unclear how widespread the issue is.

The advice is to use Teams via a web browser because rolling back to a functioning version will be undone by a subsequent Auto Update. The issue has popped up in the Microsoft questions forum.

Microsoft didn’t immediately respond to a request to confirm that it was aware something was wrong. But complaints began appearing on its support site early today.

The fact that there is not more of an outcry about the bug suggests it affects only a small portion of Teams’ monthly users.

Teams growth

Teams is a workplace messaging app that lets professionals communicate, share files, collaborate on documents and spreadsheets, and hold video conferences.

 It is available for Windows, Mac, iOS, Android, and Linux as well as in the cloud; it’s also offered as part of Microsoft 365. On its recent earnings call, it was noted that many organizations use Teams to handle business workflow.

Like the rival apps Slack, Zoom, and Google Meet, Teams has grown significantly during the COVID pandemic.

In the last two years, usage of third-party applications and custom-built solutions has grown tenfold, with new and updated apps released this quarter by Atlassian, Monday.com, SAP, and Workday, said Nadella, Microsoft CEO.

Added update

After reports of problems sending and receiving calls, Microsoft sent a statement later acknowledging the problem.  

The statement said Microsoft Teams is running normally and the issue that may have prevented a very limited number of users from making or receiving calls in the desktop app had been resolved.

Was your Teams app also affected by the update to Microsoft Teams? Is the problem solved on your side? Please share your views in the comments section.

FIX: YouTube full screen not working in your browser

YouTube is maybe the most popular online video channel used by worldwide users on a portable, touch-based or desktop devices regardless of the operating system we might think of.

Thus, when having issues with Youtube it is important to address the problems as soon as possible or else you won’t be able to properly access and check your favorite movies, video clips, music and so on.


Similar with the Youtube green screen issue, another annoying problem reported by Windows 10, 8 and Windows 8.1 users is related to the fullscreen mode which isn’t working properly while using a certain web browser client.

So, if you noticed that you cannot watch Youtube clips in fullscreen mode on your Windows 10/8 based tablet, laptop or desktop, don’t hesitate and read the guidelines from below where we will try to address your issues in order to fix and improve your YouTube experience.

How to solve Youtube full-screen problem on Windows 10, 8

  1. Use a different browser
  2. Check content settings in Chrome
  3. Close background apps and programs
  4. Turn off hardware acceleration
  5. Reinstall your browser
  6. Disable browser extensions/ add-ons
  7. Update your browser

1. Use a different browser

First of all, it is important to notice when you are dealing with the mentioned problem. For example, you should test to see if the YouTube fullscreen problem is caused only by one web browser client or by any other similar platform.

The first thing to do will be to use Google Chrome, Internet Explorer, Mozilla Firefox or other web browser apps – probably Youtube will smoothly run when using a different program than the current one.

Several users reported problems with Youtube when using Google Chrome – it seems that the web browser app received a new update which is causing this issue. If you are using Google Chrome, the best will be to temporarily switch to another platform.

We recommend you try Opera One because it is very stable, secure, and has good speed rates. It is an up-to-standard browser that is very easy to use, it has a built-in VPN and AI, it is very customizable and you can integrate tons of add-ons.

⇒ Get Opera One

2. Check content settings in Chrome

First, let’s make sure you have the correct content settings, else you might experience YouTube fullscreen problem.
Here is what you need to do:

  • type: “chrome://settings/content” in your browser URL bar and press Enter;
  • then select Protected Content;
  • there are two options here and both of them have to be turned on.
How to fix YouTube fullscreen not working in Chrome

If you are using an older version of Google Chrome might have two flash players installed instead of one. You can perform a quick check by typing “chrome://plugins” in the URL bar and hit Enter.

In case you have two flash players you need to disable one. First, locate the entry of the player including “pepflashplayer.dll” and then click on Disable.

Finally, restart your Chrome and check if the issue is solved.

Also, it will be important to use Flash Player as the HTML 5 player is kind of buggy.

3. Close background apps and programs

Another thing you might try is to close all the processes that are related to your web browser activity and to Youtube each time you are experiencing the fullscreen problem – just access Windows Task Manager and close the mentioned processes.

4. Turn off hardware acceleration

Furthermore, within your web browser settings, disable hardware acceleration and set history to “Never remember”. Many users confirmed this quick solution worked for them, so it’s worth giving it a try.

Need more details on this solution? Check now how to disable hardware acceleration.

5. Reinstall your browser

You can also choose to reinstall your web browser client and to try again, as a clean install might easily resolve your issues.

6. Disable browser extensions/ add-ons

Sometimes, browser extensions may prevent you from watching YouTube videos in full-screen mode. As a workaround, temporarily disable all your extensions to identify the culprit of this YouTube fullscreen glitch.

Once identified, you’ll know which extension to turn off when you want to play YouTube videos on full screen.

7. Update your browser

Make sure that you’re running the latest browser version on your computer. All the major browsers available on the market regularly receive updates that improve the overall browsing experience and fix the bugs reported by users.

If the YouTube fullscreen problem is caused by a known issue, perhaps the issue has been fixed in the latest browser version, so do check for updates. The same is valid for Windows OS updates, so don’t forget to go to Windows Update and check for updates.

That’s how you can deal with your Youtube full-screen problems on Windows 10, 8, or Windows 8.1.

In case you know other troubleshooting solutions, don’t hesitate and share the same with us (use the comments field from below in that matter) and we will update this tutorial accordingly.

How to Recover Deleted Emails from Windows Live Mail

Emails from your Windows Live Account can disappear due to several reasons, including the user deleting the email intentionally/unintentionally or the latest Windows update messing up the files and folders again.

Fortunately, there are several ways to restore deleted emails from the Windows Live Mail account as long as the files are in a recoverable state. In this article, we show you how to recover deleted emails from a Windows Live Mail account.

How I can restore deleted emails in Windows Live Mail?

1. Restore the previous version

recover deleted emails from Windows Live Mail
  1. Open File Explorer and navigate to the following location:
    C:\Users\username\AppData\Local\Microsoft
  2. In the above command, replace username with the account name.
  3. Scroll down and locate the Windows Live Mail folder.
  4. Right-click on the Windows Live Mail folder and select Restore Previous Version. This will Windows Live Mail properties window.
  5. In the Previous Versions tab, click the Restore button.
  6. Windows will scan the system and start the recovery process.
  7. The recovery process may take several minutes to find and restore deleted emails from the Windows Live Mail account.
  8. Make sure you live the computer idle during the process.
  9. Once the recovery is complete, follow the on-screen instructions and restart the system when done.
  10. Launch Windows Live Mail and check if your deleted emails are restored.

2. Use specialized email recovery software

Email data recovery software are specialized utilities that will let you access deleted or lost emails without causing any harm to your system.

They are often a safer solution, especially for users who are not very experienced because attempting to manually recover data can result in more damage than good.

We recommend you to try Recoverit from Wondershare. It is a lightweight utility that can recover hundreds of file formats that got lost due to accidental deletion, formatting, device corruption, virus attacks, and more.

⇒ Get Wondershare Recoverit

3. Restore folders using Compact View

recover deleted emails from Windows Live Mail
  1. Start the Windows Live Mail client.
  2. Click on View in the taskbar.
  3. Select Compact View. This will collapse all the Windows Live Mail folders listed, and a green sign in the shape of a plus will appear under them.
  4. Click on the green plus icon. This will open a new window, and you should see all of the Windows Live Mail folders including the deleted ones.
  5. Check the folders you want to restore and click on OK.
  6. Once the folders have been imported, click on View.
  7. Select the Compact View option again.
  8. Now you should see all the recovered email folders.
  9. Check your email account to see if the emails are restored.

4. Use the Import feature

recover deleted emails from Windows Live Mail
  1. Press Windows Key + R to open Run.
  2. Type %appdata%  and click OK. This will open the Local Data folder.
  3. Once there, navigate to the following location:
    AppDataLocalMicrosoftWindows Live Mail
    AppDataRoamingMicrosoftWindows Live Mail
  4. Your Live Mail account folder should be in one of these directories.
  5. Copy everything and create a new folder on Desktop. Rename the new folder as Back-Up Live Mail.
  6. Open Windows Live Mail.
  7. Click File and select Import Messages.
  8. Select Windows Live Mail option and click Next.
  9. Click on Browse and navigate to the folder in which your backup is stored.
  10. Click the backup file and click Next.
  11. Click on Next again.
  12. Windows Live Mail will show a success message if the emails are successfully restored.
  13. Click on Finish and restart Windows Live Mail.
  14. Check if the deleted emails recovered.

Depending on what actions you have taken after deleting the emails, you can try to recover deleted emails from the Windows Live Mail client using the steps listed in this article.

The recovery process should be relatively simple if you lost the email after the Windows update. Check out the links below that can help you to keep your emails and email account safe.

If you have any other questions or suggestions, don’t hesitate to leave them in the comments section below and we’ll surely check them out.

Can’t put your laptop to sleep? Here are a few solutions

Sleep mode helps you turn off your computer’s system, or parts of it, at least until the time you don’t need them.

For laptops, it helps save the battery, but for both PC and laptop, you can prevent burn-in for the monitor screen.

With the Windows operating system, there are several options you can use to conserve power when you’re not using your laptop or computer, like Sleep, Hibernate, and/or Hybrid Sleep.

However, sometimes you can’t put the laptop to sleep, and this can be annoying because you may have other things you want to attend.

Another option would be to want to keep it off such that others won’t access your documents, yet you don’t really want to shut it down completely.

Sleep is usually controlled by your display driver, so if this happens, there could be something preventing your laptop from going to sleep, so try the troubleshooting fixes below to resolve the issue.

What to do if my laptop won’t go to sleep?

  1. Scan for malware
  2. Change Windows Update Services setting
  3. Install version 9 or 10 of the Intel Management Engine Interface (MEI) driver
  4. Run the Windows 10 Show or Hide Updates troubleshooter package
  5. Reset the Update Services setting
  6. Change the power settings in Windows
  7. Disable Hybrid sleep
  8. Generate Power Report
  9. Easily fix the System Required Request error

1. Scan for malware

Malware applications can cause sleep issues. That’s why you should scan your laptop for malware in order to resolve the issue. As always, you can use Windows Defender or your own antivirus program.

However, if you want better security, we recommend you use a third-party antivirus as well. Many good security utilities have very high detection rates and are equipped with a complete set of features that ensure real-time protection against all threats.

If you do not know where to start, you can try out a few options, because most worthy antivirus software have free trial versions.

2. Change Windows Update Services setting

  1. Click Start and select Control Panel.
  2. Select View by and set to Small icons.
  3. Click Administrative Tools.
  4. Open Services.
  5. Double-click Windows Update to open Properties.
  6. Click Stop to stop the service from running.
  7. Select Manual on the Startup Type drop-down menu
  8. Click OK.

3. Install version 9 or 10 of the Intel Management Engine Interface (MEI) driver

  1. Ensure you have the correct version of the MEI driver installed.
  2. Go to your laptop’s manufacturer website.
  3. Type the computer model number and select your model number from the list.
  4. On the Software and driver results page, select Microsoft Windows 8.1 on the Version drop-down menu, and then click Change.
  5. Download the MEI driver version 9 or 10 from the Driver-Chipset
  6. If an MEI driver version 9 or 10 is not listed, download and install the appropriate driver from  Version 9.5.24.1790 1.5M works for most models
  7. Install the MEI driver. If you receive a dialog warning about replacing a newer version of the software, accept it.

You do not need to uninstall version 11 before installing version 9 or 10. An existing version of the driver must be installed in order to install version 9 or 10.

4. Run the Windows 10 Show or Hide Updates troubleshooter package

Another option to consider is running the troubleshooter package. All you need to do is to hide updates to the MEI driver.

This will block your system from automatically reinstalling or showing updates for version 11 of the MEI driver.

5. Reset the Update Services setting

You can also try to change the Windows Update Services setting from Manual back to Automatic (Delayed Start).

After doing that, do not hesitate to restart your computer in order to complete the process.

6. Change the power settings in Windows

  1. Click Start and select Control panel.
  2. Click View by and set to Small icons.
  3. Click Power Options.
  4. Click Change plan settings next to the plan you want to change.
  5. On the Change settings for the plan window, choose the display, sleep, and brightness settings you want to use.
  6. To change more power settings, click Change advanced power settings.
  7. On the Advanced settings tab, select the power plan from the drop-down menu
  8. Expand the category you want to customize
  9. Expand each setting you want to change, and select the values you want to use.
  10. Click OK, and then click Save changes.
  11. Restart the computer.

7. Disable Hybrid sleep

  1. Click Start and open Control Panel.
  2. Click View by and set to Category.
  3. Click Hardware and Sound.
  4. Click Power Options.
  5. Click Change plan settings for the power plan that is selected.
  6. Click Change advanced power settings.
  7. Expand Sleep.
  8. Expand Allow hybrid sleep.
  9. Select Off from the On battery drop-down menu
  10. Select Off from the Plugged in drop-down menu.
  11. Click OK.

Hybrid sleep may cause your laptop not to go into sleep mode, but you can change the advanced power settings to disable this setting. use the above steps in that regard.

8. Generate Power Report

  1. Type CMD in the search box then right-click Command Prompt and select Run as Administrator.
  2. In the administrative command prompt, type in the following command: exe /energy.
  3. Look at the errors section.

  4. To view the report, go to C: Windows/System32 and open the energy-report.html file in your browser. Copy the report to your desktop then open from there.
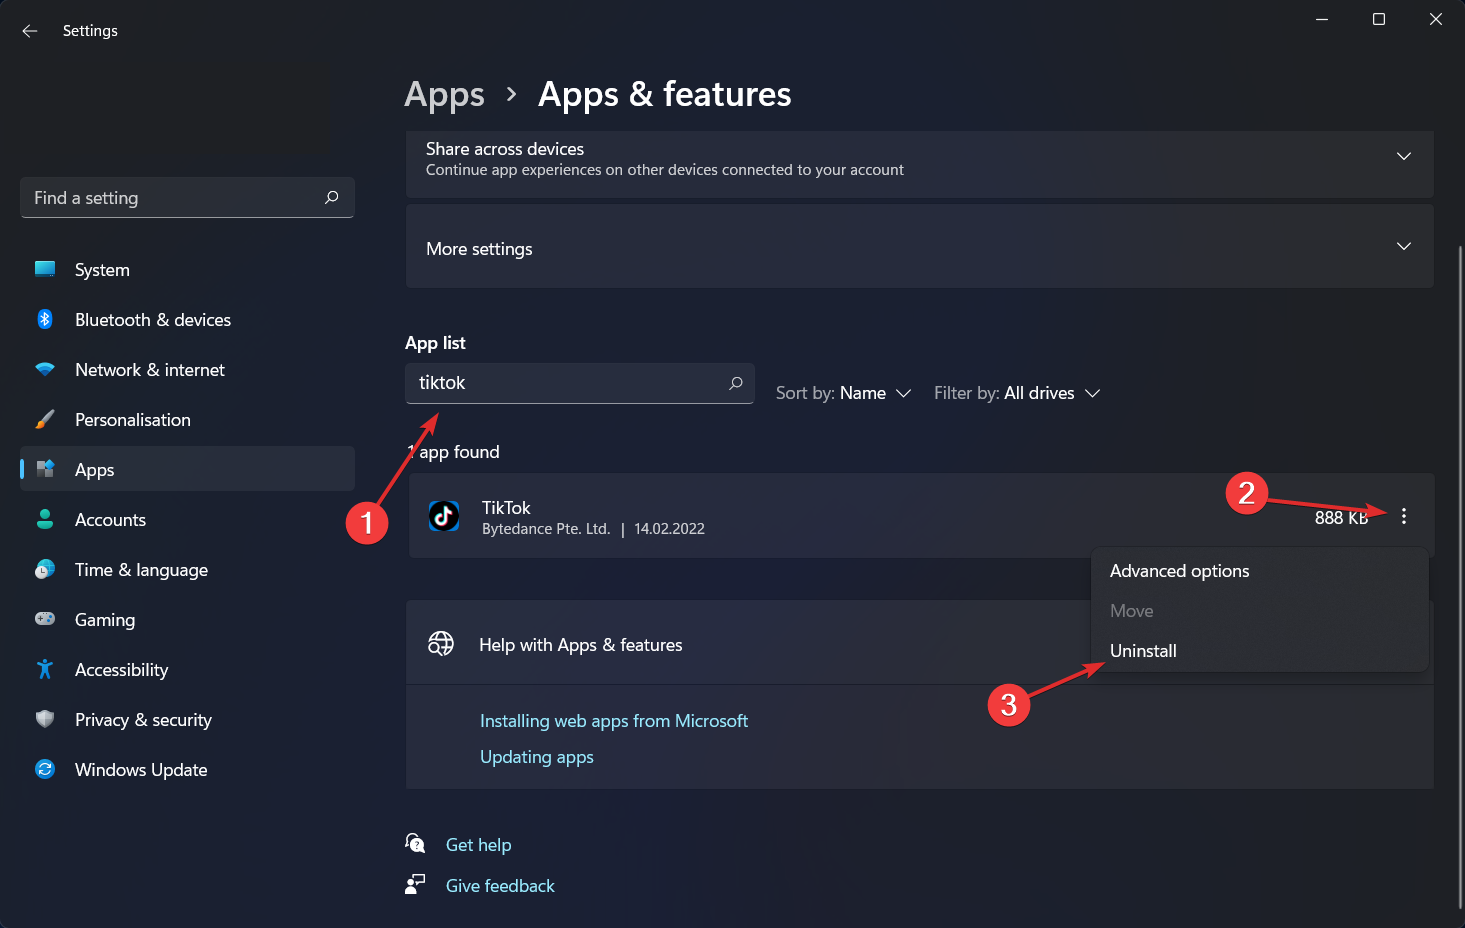
The power report can reveal why you can’t put your laptop to sleep. To run it, do as described above.

9. Easily fix the System Required Request error

  1. Remove yourself from the Windows HomeGroup if you are joined to one as it can get corrupted or misconfigured causing the laptop to think there’s an active remote request, thus it won’t sleep. Open Control Panel > HomeGroup > Leave the homegroup.
  2. Turn off media streaming. This feature turns your computer to a local media server for access to media files. To turn it off, go to Control Panel > Network & Sharing Center > Change Advanced Sharing Settings > Media streaming > Choose media streaming options > Block All > OK. Restart your computer once this is done.
  3. Check the SRVNET driver as it is related to your network. Update your network card driver, or download it from the manufacturer’s site.
  4. Override SRVNET in your operating system such that even remote connections will be overridden so that your laptop can sleep. To do this, click Start > type CMD in search box > right-click Command Prompt > select Run as Administrator and type powercfg /requestsoverride DRIVER srvnet System. Your laptop should go to sleep after this. You can undo this command by typing powercfg /requestsoverride DRIVER srvnet.

One of the errors that cause your laptop not to sleep is the System Required Request: The device or driver has made a request to prevent the system from automatically entering sleep. Driver Name FileSystemsrvnet

The SRVNET error is the most common culprit when you can’t put a laptop to sleep. To resolve it, consider applying the above tips.

Did any of these solutions help? Let us know in the comments section below.

Latest leak shows Surface 5 models will have Ryzen 6000 Rembrandt

We know that Surface users and fans weren’t too thrilled when Microsoft announced that the Surface 4 would come packaged with Ryzen 4000 instead of the latest Ryzen 5000 processors.

And it seems like the company learned a valuable lesson there, as that could be changing this time around. A recently leaked spec document of the next-gen Surface Laptop 5 sheds a bit more light on the matter.

Apparently, this upcoming device will not only feature the latest Intel 12th Gen Alder Lake chips, but also the newest AMD Ryzen 6000 Rembrandt mobile APUs.

Microsoft won’t repeat the same mistake again with Surface 5

So, while the above-mentioned users were recuperating from the previous launch of the Surface Laptop 4, the Redmond-based tech giant took it upon itself to surprise everyone.

As we can see from the document leaked by WindowsPrime, the tech specs of the upcoming Surface Laptop 5 and the users are definitely in for a treat.

Judging from the leaked specs, it actually looks like Microsoft will be using custom Ryzen Rembrandt variants in the form of the 8C/16T Ryzen 7 6980U and the 6C/12T Ryzen 5 6680U.

However, we’re sure that many of you will also be excited about the upgrade to the GPU, seeing how RDNA 2 will finally replace Vega integrated graphics.

Ryzen 6000 also packs AV1 decode support as well as LPDDR5 support though it seems like Surface Laptop 5 will only feature LPDDR4X, at least according to this leaked document.

And if we are talking about the Intel SKUs, Surface Laptop 5 is allegedly getting the 14C/20T Core i7-1280P and the 12C/16T i5-1240P.

We’re hoping users will be happy with Microsoft’s latest decisions and find a Surface device that will suit their every need.

Excited about the new Surface devices that are coming soon? Share your thoughts with us in the comments section below.