Many Windows 10 users have been saying that they are unable to display to a VGA projector in Windows 10. Here are a couple of basic fixes that you could try for this problem.
A few fresh Windows 10 users have been complaining about the fact that they have various problems with their VGA projector. Here’s what one affected user has been saying:
I have an Acer One S1002 laptop/tablet. I use the Micro HDMI output with a Micro HDMI to VGA adapter. This worked properly when I originally purchased the laptop, but, after upgrade to Windows 10, I have not been able to project to a VGA projector. The laptop recognized that the second display is there, but it does not extend or duplicate the screen.
This works fairly well with my Micro HDMI to HDMI adapter (although, occasionally, the signal will disappear for about 2 seconds before returning. I have also upgraded the Intel graphics drivers for the computer, but no change.
If your VGA projector doesn’t work in Windows 10, we’ve found the quickest solutions to fix the problem. Keep reading this article and get rid of this issue in no time!
What to do if the VGA projector won’t work in Windows 10?
Press the Windows key + R, type devmgmt.msc, and hit Enter.
Now click on Ports (COM & LPT) and expand it.
Right-click on the device driver and click on Update.
The problem only appeared after the Windows 10 upgrade. It goes without saying that you should update your drivers, and that’s what the user in question did, as well.
But what most users do is update the graphics drivers only. You need to updated the HDMI adapter driver as well, just in case it’s outdated.
Did you know that the majority of Windows 10 users have outdated drivers? Be a step ahead using our guide.
If Windows can’t automatically find and download new drivers, don’t worry, we’ve got the right solution for you. You can rely on a great third-party solution.
If updating your computer driver didn’t help, you can also try to install the latest OS updates on your PC.
As you already know, Microsoft regularly rolls out Windows 10 updates to fix the issues reported by users and improve the operating system’s overall performance.
In fact, the latest patches may target directly VGA projector issues. So, make sure that you’re running the latest updates on your machine.
Also, if you are having trouble updating your Windows 10, take a closer look at our guide to fix it in no time.
3. Run the Hardware and Devices Troubleshooter
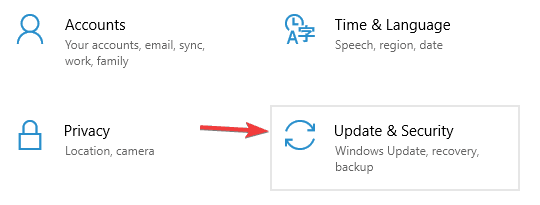
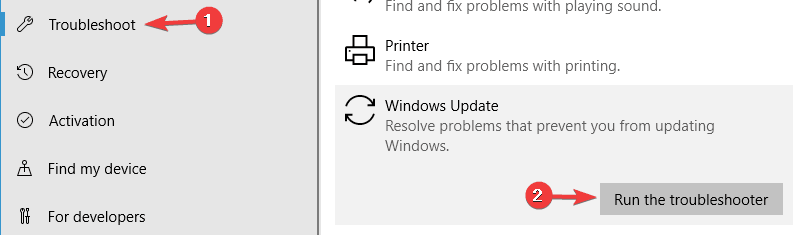
Go to Settings, click on Update & Security, and select Troubleshoot.
Under Find and fix other problems, select the Hardware and Devices Troubleshooter and run it.
Windows 10 features a useful built-in troubleshooter that allows users to fix hardware issues. Running this troubleshooter may help you solve this problem and connect your VGA projector to Windows 10.
If the Troubleshooter stops before completing the process, fix it with the help of our complete guide.
4. Roll back your drivers
Go to Start, typedevice manager, and double-click the first result.
Locate the Display Adapter and Monitor drivers, and right-click on them.
Go to the Driver tab, and select Rollback driver.
There are also cases where you’re no longer able to display Windows 10 on your VGA projector after installing the latest updates on your PC.
In this case, the best solution is to simply roll back your Display Adapter and Monitor drivers.
If the older driver works for you, then you’ll have to prevent Windows from automatically updating it. To do that, follow the simple steps in our dedicated guide.
These are the fixes that we can suggest at the moment. If you happen to know another solution, then do use the comments section below and help the community.
Windows Defender might not be the best antivirus software, but it’s the default antivirus tool that comes installed with your OS.
This tool has its flaws and users reported error 577 with Windows Defender in Windows 10, so let’s see how to fix it.
Windows Defender is a solid antivirus, but several users reported error 577 in Windows Defender. This error can be problematic, and speaking of this error, here are some similar issues that users reported:
Windows Defender this program is turned off – This message is closely related to error 577, and if you encounter it, be sure to enable Windows Defender using the Registry Editor.
Windows Defender turned off by group policy – Sometimes Windows Defender can be disabled from Group Policy. However, you can fix this problem simply by changing your group policy settings.
Windows Defender error 577 McAfee, Avast, Kaspersky – Third-party antivirus tools can often interfere with Windows Defender and lead to this error. Even if you don’t have a third-party antivirus installed, sometimes leftover files can interfere with Windows Defender and cause error 577.
Can’t start Windows Defender error 577 – Many users reported that they are unable to start Windows Defender due to this error. If that’s the case, try restarting Windows Defender services and check if that helps.
Windows Defender digital signature error 577 – This is another variation of this error, but if you encounter it, you should be able to fix it one of our solutions.
How can I fix the Windows Defender error 577?
1. Consider switching to a third-party antivirus software
Windows Defender is a solid antivirus tool, it offers great protection, comes built-in to Windows 10, and it’s completely free.
Despite all these great features, the software is riddled with issues, therefore you might want to consider switching to a third-party antivirus.
Although it offers basic protection, it lacks certain features that other antivirus tools have, so if you want to avoid this error and get improved security, you should consider a third-party antivirus.
There are many great tools, but the best right now is the one recommended below, so feel free to it out right now.
This tool offers a wide array of security features, and it’s fully compatible with Windows 10, so it won’t interfere with your applications or with your system in any way.
TotalAV
Forget about Windows Defender errors and enhance your security with this exceptional solution.
Press Windows Key + R and enter regedit. Press Enter or click OK.
When the Registry Editor opens, navigate to the following key in the left pane: HKEY_LOCAL_MACHINE\SOFTWARE\Policies\Microsoft\Windows Defender
In the right panel locate DisableAntiSpyware and DisableAntiVirus DWORD and change their values from 0 to 1. You can do that simply by double-clicking the entries and changing the Value data value.
If you can’t see the keys, right-click on an empty space from the right pane, select New, and click on DWORD (32-bit) Value. Name it DisableAntiSpyware, then double-click it and set the value to 1. Do the same for DiableAntiVirus.
Click OK to save the changes.
Close Registry Editor.
Open Windows File Manager by pressing Windows key + E.
Go to the following path: C:\Program Files\Windows Defender
Locate and run MSASCui.exe.
According to users, you can fix this problem by changing few values in your registry so follow the steps above to get this done but be careful as this is an advanced procedure.
Before you start you need to know that modifying your registry can cause certain issues, therefore we strongly suggest creating a backup of your registry in case anything goes wrong.
If you get an error message saying that you don’t have the necessary privileges, try performing Solution 4 fist and then try the entire process again.
As we already mentioned, modifying the registry is an advanced procedure, so be extra cautious and follow the instructions carefully.
If you can’t edit your Windows 10’s registry, read thishandy guide and find the quickest solutions to the issue.
3. Completely remove third-party antivirus tools
Windows Defender doesn’t work with third-party antivirus programs, therefore it’s impossible to have another antivirus tool installed and run Windows Defender at the same time.
So, if you’re really set on not installing a third-party antivirus like we suggested in the first step and stick with Windows Defender, you need to completely remove your antivirus tool.
Sometimes it’s not enough just to uninstall your antivirus, you have to remove all files and registry entries associated with your antivirus tool.
You can do that manually, but that’s not the safest or the simplest processes, therefore we recommend that you download the cleanup tool for your antivirus software.
For the Norton users, we’ve got a dedicated guide on how to completely remove it from your PC.
There’s a similar guide for McAfee users, as well, so try to make the best out of them and remove all their remains.
Almost all antivirus companies have these tools available for download, so be sure to download this tool for your antivirus program.
Users reported that Avast, Norton, and McAfee antivirus tools caused this problem, and after removing all files associated with your antivirus, the issue was completely resolved.
If you’re using any antivirus solution and you want to completely remove it from your PC, be sure to check out this amazing list with the best uninstaller software you can use right now.
In addition to your antivirus, tools such as SpyBot Search and Destroy, Comodo Antivirus, Constant Protection, and IObit Malware Fighter can also cause this error, therefore be sure to remove these tools from your PC.
And if you want to make absolutely sure that your PC got clean, follow this expert guide on how to remove any software leftovers in just a couple of simple steps.
4. Turn on Windows Defender from Notification Center
According to users, you can fix this problem simply by turning on Windows Defender from Notification Center.
To that, go to Notification Center at the bottom right corner of the screen and you’ll see an alert with a little flag next to it. Click it and Windows Defender should turn itself on.
5. Change the security permissions in your Registry
Open Registry Editor as shown in Solution 2.
Go to the following key in the right panel: HKEY_LOCAL_MACHINE/SOFTWARE/Microsoft/Windows Defender
Right-click this key and choose Permissions from the menu.
Click the Advanced button.
Click the Add button.
Now click Select a principal.
In the Enter the object name to select field enter your user name and click Check Names.
If your user name is correct, click OK to save the changes.
You’ll see your username in the Principal section. In Basic permissions section check Full Control and click OK to save changes.
Click Enable Inheritance button.
Click Apply and OK to save the changes.
Sometimes this problem can occur due to your security permissions in the registry. To fix error 577, you need to change the security permissions of certain keys in the registry.
Modifying the registry can cause problems with your system, therefore we advise you to create a registry backup before you start. To change the security permissions, follow the steps above.
Also, if you have any registry permission problems, solve them quickly with the help of this step-by-step guide.
6. Restart Security Center and Windows Defender service
Press the Windows Key + Rkeyboard shortcut and enter services.msc. Press Enter or click OK.
Locate Security Center service, right-click it and choose Restart.
Alternatively, you can restart this service simply by right-clicking the Security Center service and choosing Stop from the menu. After that, right-click the service again and choose Start from the menu.
According to users, you can fix Windows Defender error 577 simply by restarting the Security Center service.
This error can appear after you remove your antivirus tool, and users reported this issue after removing the McAfee LiveSafe tool.
To restart the Security Center service, follow the steps above so make sure you try this too and see if the problem persists.
7. Create a new user account
Press Windows Key + I to open the Settings app.
Now navigate to the Accounts section.
Select Family & other people and click on Add someone else to this PC.
Now click on I don’t have this person’s sign-in information.
You’ll be asked to enter your Microsoft credentials. Select Add a user without a Microsoft account.
Enter the desired name and click on Next to proceed.
Sometimes this error can appear because your user account is corrupted. If that’s the case, you need to create a new user account by following the above steps.
Once you create a new user account, switch to it and check if the issue is resolved. If the problem doesn’t reappear, you’ll need to move your personal files to the new account and start using it instead of your main account.
This isn’t the most practical solution, but several users reported that it worked for them, so feel free to try it out.
If Windows won’t let you add a new user account, follow the easy steps from our step-by-step guide and create as many accounts as you want.
Windows Defender service error 577 can be problematic, but you should be able to fix it by using one of our solutions. If you can’t fix this problem, you might want to consider using third-party antivirus software instead.
The official announcement from Qualcomm was pretty light on details regarding the Snapdragon Developer Kit, but the Mac Mini-like PC has been spotted under a different name on the website of the Elitegroup Computer Systems (ECS), a Taiwan-based manufacturer of motherboards and computer products (via Thurrott). ECS has since confirmed to us that its Qualcomm-powered QC710 PC is indeed identical to the Snapdragon Developer Kit, and the company will be working with Microsoft and Qualcomm to promote it with developers in the coming months.
The ECS website has listed comprehensive specs for the Snapdragon Developer Kit, which you can find below:
Ports: 1 USB 2.0 Type-C (PD-Charging), 1 USB 3.2 Gen1 Type-A, 1 USB 2.0 Type-A, 1 MicroSD, 1 Micro-SIM card slot type, 1 Ethernet (10/100), 1 HDMI
Connectivity: eSIM, optional 802.11ax WiFi
Weight: 0.23 kg
Dimensions: 119 mm (W) x 116.6 mm (D) x 35 mm (H)
These are pretty low specs overall, though keep in mind that the purpose of this Snapdragon Developer Kit is to offer an affordable alternative to other Windows 10 on ARM products such as Microsoft’s Surface Pro X, which starts at $999. There are no pricing details yet for the Snapdragon Developer Kit, though Qualcomm said that the mini PC will be available to purchase from the Microsoft Store later this summer.
While this small form factor PC is targeting developers, it will be interesting to see if consumers will also be able to get their hands on it later this year. Apple’s Mac Mini and Intel’s NUC devices have proven that there’s definitely a market for mini PCs, and maybe Windows 10 on ARM could really thrive on Qualcomm’s new Snapdragon 7c Compute platform.
Do you think Microsoft and other manufacturers could eventually release Qualcomm-powered mini PCs to compete with Apple’s M1-based Mac Mini? Sound off in the comments below.
Using Facebook Messenger on the desktop does make it easier to keep in touch with friends and family while working from your device.
As a third-party application, the Facebook Messenger app can be removed easily from your phone, with just a few clicks, and just as easily if you are using it on your desktop.
In this article, we will show you the exact steps you need to make in order to delete the Facebook Messenger app from your device, so make sure to keep on reading.
How can I uninstall Facebook Messenger on the desktop?
1. Use the Settings page
Go to theSearch barand type inSettings.
Click on the settings icon and selectSystem.
Next, click onApps & Features.
Locate the Facebook Messenger app in the list and click on it.
Select the application and click onUninstall.
Restartyour device for the process to complete.
2. Uninstall Facebook Messenger from Control Panel
Go to the Search box and type in Control Panel.
Select it from the resulted list and click on Programs.
Next, click on Programs and features.
Search for Facebook Messenger and right-click on it.
Tap on Uninstall and allow for the process to start.
Perhaps the easier way to uninstall Facebook Messenger is by using a dedicated tool that will automatically take care of the procedure.
Moreover, this will ensure that all components will be erased and you will not have to deal with them later, ensuring the uninstall process was a success.
Let us tell you more about the best tools for cleaning your PC, while also protecting your privacy and ensuring that it works faster and more securely.
It can happen that the conventional way of uninstalling the Facebook Messenger app for a device does not work, in which case using a dedicated third-party tool is recommended.
With specialized tools for removing unused applications or programs from your PC, you can successfully uninstall the Messenger app.
To proceed with uninstalling this app correctly, removing all its temporary files or residuals left behind, an efficient way is by using the best uninstaller software for Windows PCs
Most of us frequently use our laptop camera for chats on apps like Skype, Google Meet, or Zoom. Thus, it is important to keep it in regular conditions, and not worry about our day-to-day performance.
Users often reported that the Lenovocamera is not working on Windows 10. This can be an extremely annoying issue, but we are here to fix it.
This is what the users see whenever they try to use their camera:
This article will let you be aware of the best options to fix your Windows 10Lenovocamera not working issue. So, read it with interest!
What can I do if the Lenovo camera is not working?
1. Check if the camera is disabled
Open Device Manager.
Expand Cameras.
Right-click on Integrated Webcam, and select Enable device.
2. Turn off Lenovo Privacy Mode
Click on theStart button, and type Lenovo in the search bar.
Select Lenovo Settings.
To open the setting from your Lenovocamera, click on the Camera icon.
Scroll down, and turn off the Privacy Mode.
Restart your PC, and check if the camera is working.
Keeping your operating system constantly updated represents an essential part of our everyday work, that’s for sure.
Not only that it’ll provide much more efficiency, but it’ll make you not worry about your device troubles again.
When trying to access files you can suddenly receive a notification saying that if you want to open this file, you need the most recent Windows update.
That being said, we recommend you to keep an eye on this article. We will show you some of the best options you can try to get the most recent Windows update.
How can I get the most recent Windows update to open files?
1. Use the Update & Security options
Open Settings.
Go to Update & Security.
On the left side, select Windows Update, then click on Check for updates, from the right side.
2. Use the Windows update tool
Open an Internet browser, type on Google Windows media creation tool, and click on the first result.
In the shown window, click on the Update now blue button.
After the updating is completed, you’ll have to restart your PC.
3. Use a third-party software
Another efficient option you can try to get the most recent Windows update is using third-party dedicated software.
If you run this on your PC, not only that it’ll save you much more time, but it’ll also be your main support for a long time.
It can provide you some interesting features, that will surely suit you. With their help, you’ll not have to worry about updating your software again.
Among the most exciting abilities, we can mention a friendly and intuitive interface, which provides easy-to-use and highly functional qualities.
Moreover, it allows you be constantly aware of notifications and information on available software update.
Glarysoft
If you need a quality software client, which provides easy upgrades, you should try Glarysoft.
These were our suggested options you can try to get the latest Windows update, in order to open files.
Also, if you have troubles running folders, feel free to check a full guide regarding how to fix the Windows 10 apps won’t open issue.
Since your opinion is so important to us, don’t hesitate to let us know which of the recommended suggestions you prefer the most. Thus, you can comment in the section below.
Cortana represents a virtual assistant and we can admit that it is one of the biggest advantages that make Windows 10 so competent and popular.
However, Cortana is not the only way you can efficiently use the search bar. Thus, after the 2019 update, Windows 10 allows you to perform some new actions regarding your hunt box.
This option is extremely useful during work and being able to access it in different ways represents an advantage that will save your time.
This article will present you with a complete guide regarding a few options that will easily help you use Windows 10 search bar without Cortana, so make sure you read it with interest.
How can I use Windows 10 search bar without Cortana?
1. Use the Windows key
Open the Start menu by pressing the Windows button on your keyboard, but do not click on any other icon or title.
Start typing on your keyboard the file’s name you are searching for.
Windows 10 will show you a series of matches.
2. Use search by categories
Click on the search bar.
On the top of the search menu, you will notice several categories.
Type the keyword and click on a category tofilter the results.
Navigate to the folder you want to search your file.
In thetop right corner of the window, type a few characters matching your hunted item and press Enter.
In the recommended below list, click on your correct result.
If File Explorer fails to work properly – it cannot open, load or simply crashes frequently, you cannot complete the above procedure. This guide on how to fix File Explorer problems is just what you’re looking for.
4. Manage search bar visibility
Right-click on your taskbar.
Press on Search.
Choose your desired option, by clicking on it.
Your configuration will be modified on your left side taskbar, next to the Windows icon.
5. Fix search bar problems
Press Windows + Ikeys to open the Settings window.
Click on Update & Security section.
Select Troubleshoot and go to Additional Troubleshooters.
In the Additional troubleshooters window, under Find and fix other problems,select Search and Indexing.
Click on Run the troubleshooter and select your search box issue.
6. Reset Windows search
Press Windows + I keys in order to open Settings.
Click on Update & Security.
In the left side, click on Windows update and then on the Check for updates button.
Install any available updates.
Restart your computer if the updates require it.
As you can see, after the 2019 Cortana and Windows change, you are allowed to perform some new actions on managing your search bar.
This was our guide regarding how to use Windows 10 search bar without Cortana. We hope at least one of the mentioned solutions will fit your necessities.
However, if you consider yourself as a Cortana passionate, feel free to use it anytime you need. If you encounter any issues while running it, you can always take a look at this guide dedicated to solving Cortana not working.
Do not hesitate to let us know which of the above solutions worked for you. Feel free to use the comments area in that regard.
You are trying to play an online game with your friends, attend a video meeting or just record your newest podcast on your PC when you get this message: Microphone not plugged in.
It happened to the best of us so don’t worry, good news is coming. There are a number of options in Windows 10 sound settings that need to be configured in order for the computer to detect the microphone.
You’ll just have to go through the troubleshooting steps below to fix it and be sure that by the end of the article, your microphone will be working as it should be and the error will be gone for good.
How to fix the microphone not plugged in Windows 10 issue?
1. Set your microphone as default
Open Settings and click on System.
Click on Sound.
Under the Input section, use the drop-down menu and select the microphone that you want to use as the system default.
2. Check your microphone settings
Go to Control Paneland select View by: Small icons.
Click on Sound.
Go to the Recording tab.
Right-click in the empty space and select Show Disabled Devices.
Enable your microphone if it’s disabled.
3. Update your audio drivers
Right-click on the Startbutton then select Device Manager.
Find your microphone device, click right on it, and select Update Driver.
If there are any updates, the installation wizard will install them automatically.
Afterward, restartyour computer.
On the other hand, you could try updating your drivers automatically by using a third-party app. This will save you time and effort, not to mention you’ll avoid permanent damage to your system.
Installing mismatched drivers can potentially cause serious issues in your system, which is why we recommend you try a dedicated tool that will detect the type of hardware you run and find the best driver version available for it.
Outbyte Driver Updater can scan your whole PC and detect outdated drivers. Additionally, the software is also able to find whether you have any damaged or missing drivers and install new versions in just a few minutes.
You can set it up to regularly update your drivers. It has a very low resource usage rate, so you can let it run in the background with no worries.
If you keep receiving the same not plugged in error, it might be time to get another microphone. These great wireless microphones are worthy of your full attention.
Have any questions or suggestions? Feel free to use the comments section below and tell us what worked for you.
Graphics cards are the deciding factor in the gaming and design industry. Their performance dictates how many pixels we see on our screens and the resolution.
When it comes to gaming, we always want the most frames and the highest settings to get fully immersed in the awesome world of the games we play.
Now, when we talk about graphic design, a powerful GPU will render models and actions faster and smoother, which will result in a shorter time for testing and ultimately, less time spent working.
All in all, a high-end GPU will make wonders. But what GPU do we really need? Is it an AMD card, or an NVIDIA one?
The answer varies, but lately, NVIDIA gained so much ground over AMD it’s not even funny. At the moment, the NVIDIA RTX series is the most stable and the beefiest GPU on the market.
As a result, many AMD users decided to switch to NVIDIA due to more stable drivers, no compatibility issues, and overall a huge performance leap.
Should I uninstall NVIDIA drivers before installing AMD?
Changing graphics cards might seem complicated, but it is actually as simple as changing a lightbulb. You need to take out the older GPU from the motherboard and replace it with the newer one.
This seemed pretty simple, right? Well, there’s a small catch. Since the latest technologies utilize lots of software to optimize the processes, they have many specific programs running in the background.
So, if you’re asking yourself Do I need to uninstall NVIDIAdrivers before installing AMD, or vice versa, the answer is no. You can install them after, and this goes for all the other software from the previous GPU.
In this article, we’ll show you exactly what to do after installing a brand new GPU into your PC. It’s pretty simple, and if you follow our steps thoroughly there shouldn’t be any problem.
How do I switch from AMD to NVIDIA?
1. Uninstall the old GPU drivers
Uninstall drivers using the Device Manager
Press the Windows Key + S and type in Device Manager.
In the Device Manager, search for the Display Adapter section and expand it.
Right-click on your old GPU from there and select Uninstall device.
Let Windows finish uninstalling the driver.
If you keep asking yourself the following question: Should I uninstall AMD drivers before installing NVIDIA ones? The short answer is definitely yes.
Fortunately, Windows gives you a way to manually uninstall the drivers. All you have to do is go to the Device Manager and uninstall the older drivers.
However, this does not get rid of the other files tied to the older GPU that is still running in the background. They need to be removed because they can cause crashes and stability issues.
Select OK to agree to the window about the risks involved.
Choose what files you want to remove and Close the next window.
Select the Device Type, in this case, it’s GPU.
Select the GPU manufacturer that you want to uninstall then select Clean and restart.
Let the program uninstall the files and restart your PC.
Do not hesitate to use an uninstaller that gets rid of all those files we talked about earlier. This will make sure no previous program will interfere and mess things up.
The program we have in mind is pretty straightforward, and it works for all GPU manufacturers. Additionally, it can also uninstall audio drivers, which suffer from the same problem when you change brands.
Now that we’ve shown you how to uninstall the previous drivers and the files related to the old GPU, you need to learn how to install and update your newest drivers as well.
Press the Windows Key + S and search for the Device Manager.
Inside the Device Manager, open your Display Adapter and find your new card.
Right-click on it, and select Update Driver.
Wait for your OS to finish installing the drivers.
After you switch from AMD to NVIDIA, keep your GeForce driver up to date to avoid conflicts and get the latest game optimizations. Use this step-by-step guide to update NVIDIA drivers on Windows 11 via GeForce Experience, Windows Update, or a manual download.
The days of having to use CDs to install the GPU drivers are long gone. Nowadays, Windows 10 will make sure you can use your card right away, without haveing to install the driver yourself.
Once you install your newest GPU to your motherboard, your Windows will automatically install the default driver for it, so don’t worry about not having any video signal or not being able to use your PC, since it won’t be the case.
Even if you don’t have to install the drivers from scratch, You do need to update them to the latest version, since the default firmware driver is usually there to help the hard work so you can download the latest ones.
What you need to do next is simply use the Device Manager to update them to the latest version, thus making sure that your GPU uses its full potential.
Update your drivers with a specialized software
Device Manager is not the best way to keep everything up to date on your computer, so we suggest seeking other ways to do it.
One simpler and more secure method of updating your drivers is using specialized software to do it automatically for you.
The tool will periodically scan your hardware, including the GPU, for the newest available drivers, and it will install them accordingly. Its database gets updated constantly with the newest driver versions.
That’s about it for this article. We hope we managed to give an honest answer to you if you were wondering if it is necessary to uninstall AMD drivers before installing NVIDIA ones.
When working on your Windows computer, you may encounter the System error 109: The pipe has ended.
This issue is usually noticed when the user tries to stop a running service such as ScanEngine using the command prompt or Task Manager.
In most cases, you can ignore the error. However, if it is repeatedly occurring, perform some troubleshooting steps to see if a malware or outdated driver is triggering the problem.
In this article, we take a look at how to fix the system error in Windows 10. For the error the pipe is being closed, please check the linked article instead.
How do I fix the System error 109: The pipe has ended?
1. Update device drivers
Outdated device drivers from peripherals such as Bluetooth adapters can trigger this error. To resolve the issue, try updating your device driver from the Device Manager.
Hardware drivers are programs that allow Windows to communicate with the hardware on your computer. These drivers are created by device manufacturers, and you may get them directly from the manufacturer of your PC hardware.
If you are not sure how to do it, use a third-party software updater utility that scans for missing and outdated drives and installs them automatically.
You can manually update drivers if you have a thorough understanding of the drivers your PC requires. The driver updater utility is the best alternative for a fast and secured result.
A professional tool like Outbyte Driver Updater keeps your system running smoothly by upgrading its drivers. This utility examines your system and discovers outdated drivers that cause sluggishness.
You may rely on Outbyte Driver Updater to make such enhancements to ensure a proper upgrade with the most latest Bluetooth drivers.
Chrome will check for pending browser updates and install them automatically if found.
Click the Relaunch button to restart the browser.
Do this for all the Chromium-based browsers such as Edge, Brave, Opera, etc., installed on your PC.
This is a known bug in Chromium-based browsers and does not harm the computer. If you are noticing the error saved in a text document in your folder, updating the browser should fix any bug.
3. Run a full system scan
Click on Start and choose Settings.
Go to Update & Security.
Open the Windows Security tab from the left pane.
Click on Virus and Threat protection.
Scroll down and click Scan Options.,
Choose Microsoft Defender Offline Scan.
Click the Scan Now button.
Make sure you have saved your work and close all the open programs. Click the Scan button to restart your PC.
Windows will shut down and perform an offline scan. Once done, the PC will automatically restart. After the restart, check if the System error 109: The pipe has ended is resolved.
4. Check for third-party software conflict in Clean Boot mode
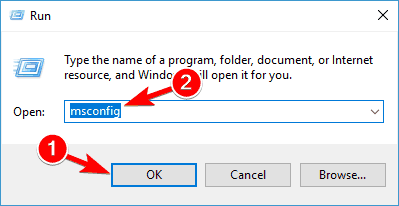
Press the Windows key + R to open Run.
Type msconfig.msc and click OK to open System Configuration.
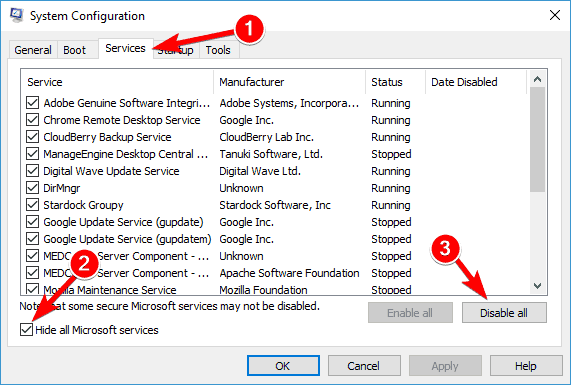
Open the Services tab in the System Configuration window.
Here you need to hide all the Microsoft services first. So, check the Hide all Microsoft Services box.
Next, click the Disable All button to stop all third-party services from when you restart next time.
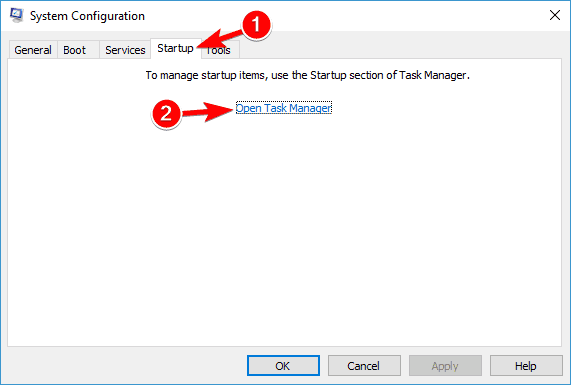
Open the Startup tab and click on the Open Task Manager link.
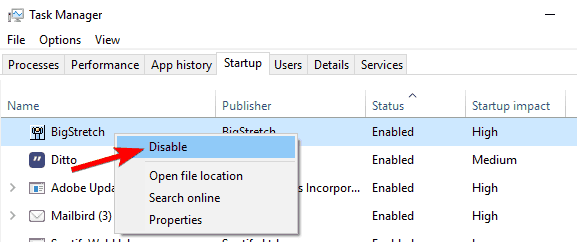
Disable all the startup apps that are enabled. Close Task Manager and go back to the System Configuration.
Click the Apply and OK to button. When the Restart prompt appears, click Restart Now.
In the Clean Boot state, Windows starts with only essential services required for Windows to run. Try performing the activity that resulted in this system error and see if it occurs in Clean Boot mode.
If not, you may have third-party software installed that is creating conflict resulting in the error.
Before restarting, open System Configuration and enable all the services that you had disabled previously. Reboot the computer and remove the most recently installed apps that you think may cause the issue.
The System error 109: The pipe has ended usually occurs due to a faulty device driver or malware infection. Perform a full system scan and then run a driver update utility to install new drivers for your system.
If not, restart your PC in clean boot mode to determine if third-party software is causing the error and remove conflicting software.
We covered a similar issue in our error PDF validation broken pipe guide, so don’t miss it. Our latest guide covers the Error_Pipe_Busy message, so you might want to visit it for more information.
We hope you were able to fix the problem by using any of the aforementioned solutions. Just let us know by commenting below.
In their ongoing quest to make our lives easier and simplify some processes, that involved a certain amount of hassle for users, Microsoft found another way to do so.
The company is preparing an update for Teams, that will allow users worldwide to access all the files they need, even if they are offline.
Users gain offline access to files shared in MS Teams
According to the Microsoft 365 roadmap, a future update will completely revolutionize the way we access our files within Teams.
After this software changes go online, users will be able access previously opened files even if they don’t have an internet connection at that moment.
This is amazing news for us all, considering how more and more companies encourage their employees to work from home, due to the COVID-19 pandemic.
And the best part about this whole new feature that Microsoft thought about is that we don’t even have to wait that much for it, as it is said to be released in June 2021.
More and more features are coming to Microsoft Teams
This new update comes shortly after the company developed a lot of new projects that involve its video conferencing platform.
Recently, new next-level encryption was added to Teams, and Customer Key support also became available, as the company seeks to bolster security further.
Not to mention that Teams also received a new UI sharing feature this month, that made it easier for users to find and share files during meetings.
It seems like Microsoft spares no expense or time when it comes to enhancing their flagship applications so we can probably expect even more tweaks in the near future.
You might also be interested in how to enable Offline files in Windows 11. It will help you access network files even without an internet connection.
What do you think about this new update that is coming to Teams? Share your thoughts with us, in the comments section below.
The current situation involving the next generation gaming consoles makes fans everywhere scramble in a continuous quest tp get their hands on an Xbox Series X/S, or a PS5.
Desired more than gold, at the moment, the general availability of these devices is next to none and, each time a store refills its stock, they disappear in an instant.
Some stores refilled their Xbox Series X/S stocks
Yesterday, shortly after GameStop refilled their shelves, Target also had an early-morning restock for the Xbox Series gaming consoles.
This was excellent news for fans who actually got a chance to purchase one, as the Xbox Series X and Series S consoles simply fly off digital shelves everywhere.
Best Buy also performed a restock earlier this week and, as probably already imagined, there are no more consoles available for the moment.
Most likely, as fans are hoping, the next web store that will provide the public with the much desired gaming equipment will by Microsoft itself, although there is information that can point in this direction, yet.
What makes these consoles so difficult to get?
Basically, Microsoft has a hard time procuring the materials it needs in order to build these awesome gaming machines.
Its the same story as with the Sony PS5, as well as most PC video cards. The chip required to power up the graphics for the Xbox is in really high demand right now and, again, in massive shortage.
The COVID-19 pandemic derailed the production for a lot of the chip manufacturers and analysts don’t expect the issue to be resolved until the end of the year.
This means that Microsoft makes as many gaming devices as it can at any give moment and distributes them to its retail partners.
As you can imagine, once any of the retail partners announce the availability of consoles, they instantly vanish, leaving many wondering how will they ever buy an Xbox.
Over the last few weeks, these retailers performed restocks:
Target, May 27
GameStop, May 26
Best Buy, May 24
Walmart, May 20
Microsoft, May 17
Some users got their Xbox through the Console Purchase Pilot program
Microsoft gave some people, who participate in the Xbox Insiders program, the opportunity to form a virtual queue that guaranteed that they would receive an Xbox console, at the regular price, once one was available.
The catch was that in order to participate in this limited program, the user has to own an Xbox already so that he could join the Xbox Insiders program and be invited to sign up for this Console Purchase Pilot.
Currently, the registration for the pilot is closed, but Microsoft stated that it will reopen the registration soon. While you wait, you can join Xbox Insiders.
In case you’re still waiting for Series S, why not read our Xbox Series S vs PS5 to find out which is the better console?
Have you had the chance to acquire an Xbox Series X/S? Let us know you managed to obtain it in the comments section below.
Microsoft has just brought a new addition to its already diverse collection of extensions for the Chrome Web Store.
And speaking of new additions, the Microsoft Compliance Extension for Chrome is more of an organizational extension, as it utilizes Microsoft’s Data Loss Prevention and Insider Risk Management solutions for sensitive workflows.
The Compliance Extension for Chrome is now available
What this extension basically does is enabling organizations to setup all granular policies for handling sensitive data on Chrome.
This includes actions such as blocking, as well as recording violations, going as far as allowing users to override it if they have a legitimate business need.
All of the the DLP events and logs can then be used through Insider Risk Management investigations, which can be utilized in order to deliver observations about threats.
In order to create awareness about these policy violations, and to also reduce training time, this extension quickly displays alert with guidance, as well as actions that a user can resort to if they perform such an activity.
Microsoft has paused development process for the moment
Even though this extension has been available for quite some time in preview, and it already has over 5,000 users, Microsoft hasn’t announced any new enhancements that come with general availability.
Furthermore, the only notable difference is the removal of the preview branding, which means that this extension has now entered a more permanent stage of its life.
What is your opinion on this new extension created by Microsoft? Let us know in the comments section below.
Xhunter1.sys is a third-party driver file for the XIGNCODE3 System Guard anti-cheat engine. Some players have said in support forums that xhunter1.sys blue screen errors occur when they try to play certain games.
These are two widely cited BSOD error messages that reference the xhunter1.sys file:
PAGE_FAULT_IN_NONPAGED_AREA
DRIVER_IRQL_NOT_LESS_OR_EQUAL
Quite a few players have reported that xhunter1.sys blue screen errors can arise when trying to play (or install) PUBG Lite (now discontinued) and PUBG Mobile with Android emulators, such as Tencent Gaming Buddy.
In today’s guide, we’re going to take a closer look and show you how to fix this problem.
How can I fix xhunter1.sys blue screen errors?
1. Fix BSOD errors with Windows repair software
The best Windows repair software can be invaluable tools for fixing blue screen errors. There are numerous third-party BSOD repair tools with which users can scan their PCs to detect issues.
Then all users usually need to do is click fix buttons for those utilities to weave their magic!
Using a specialized tool will provide efficient help to avoid serious screen errors on your Windows PC. Such a method is practically designed to repair malfunctioning system files and replace them.
All in all, restoring your PC from this kind of BSoD error using professional repair tools is the most reliable method of all.
2. Disable Automatically manage paging file size
First, click the magnifying glass taskbar button, which will open Windows 10’s search tool.
Type the keyword system in the search box.
Click System to open the window in the screenshot directly below.
Next, click Advanced system settings to open the System Properties window.
Click Settings on the Advanced tab to open a Performance Options window.
Then select the Advanced tab in Performance Options.
Press the Change button to open the Virtual Memory window.
Uncheck the checkbox for the Automatically manage paging file size for all drives option to deselect it.
Select the No paging file radio button.
Press the Set button, and select Yes to confirm.
Click the OK button to close the window.
Restart Windows after disabling Automatic manage paging.
Once you make this change, check if xhunter1.sys Blue Screen still appears.
3. Disable antivirus software
Click the Windows Security system tray icon.
Next, click the Virus & threat protection button on Windows Security’s sidebar.
Select Manage settings to open the options shown directly below.
Toggle off the Real-time protection option to disable the antivirus tool.
If you’ve installed a third-party antivirus utility, you’ll need to disable that. To do so, right-click the antivirus tool’s system tray icon and select a disable/shut down context menu option.
Select to disable it for a few hours, and then try playing the game the BSOD issue arises for.
4. Use a different Android emulator
Open the Settings app.
Select Apps.
Locate your current Android emulator, select it and click on Uninstall.
Follow the instructions on the screen to complete the process.
Once the emulator is removed, try switching to a different emulator. You can use any emulator that you want, but for the best performance, we suggest using LD Player.
Click the Settings button on the Start menu in Windows 10.
Select Update & Security to open the Windows Update tab.
If there’s a Windows feature update available, click the Download and Install option for it.
Click the Check for updates button to install available patch updates if you can’t update your Windows version.
Once your system is up to date, check if xhunter1.sys blue screen still appears.
6. Run the Windows Memory Diagnostic tool
Open the search text box in Windows 10.
Input Windows Memory Diagnostic in the search box to find that tool.
Click Windows Memory Diagnostic to open the window in the shot directly below.
Then select Restart now and check for problems within the WMD tool.
Thereafter, WMD will display results after the restart. If it detects RAM errors, you might need to replace one of your PC’s RAM modules.
NOTE
Some users might need to view WMD’s results within Event Viewer. Click \Windows Logs\ and \System\ within the Event Viewer window. Then click \Find\ and enter the search keyword \MemoryDiagnostic\ to view its results.
7. Scan system files
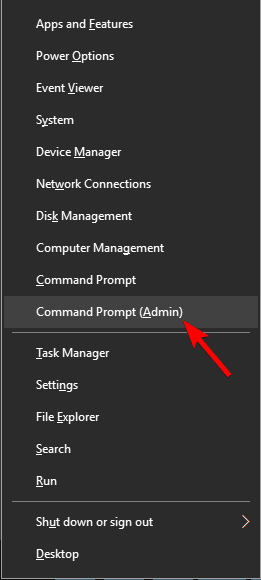
Type Command Prompt in Windows 10’s search box.
Right-click the Command Prompt search result to select a Run as administrator option for it.
Input this command in the Prompt’s window and press Enter: DISM.exe /Online /Cleanup-image /Restorehealth
When the Deployment Image scan is complete, type in this command and press Enter: sfc /scannow
Wait for the SFC scan to reach 100 percent verification.
If the scan’s outcome tells you Windows Resource Protection repaired files, restart your desktop or laptop.
8. Run a Chkdsk scan
Open the Command Prompt as an administrator as outlined in the first two steps of the previous resolution.
Type in this Chkdsk command: chkdsk /f /r
Press the Enter key to initiate the Chkdsk scan.
9. Restore Windows to a previous date
Press the Windows key and X at the same time, and select Run on the menu that opens.
To open System Restore, enter the following Run command in the Open box and click OK: rstrui
Select a Choose a different restore point option if System Restore presents that option to you, and click the Next button.
Then select the Show more restore points checkbox to view a full list of restoration dates.
Choose a restoration point that will restore Windows to a time when there wasn’t a xhunter1.sys blue screen issue on your PC.
Select the Next option to proceed to the confirmation step.
Finally, click Finish to roll Windows 10 back to your selected restoration point.
NOTE
Rolling Windows 10 back deletes software installed before a selected restore point. To get an overview of what programs a restore point deletes, click the \Scan for affected\ programs button in the System Restore tool.
The above potential resolutions can feasibly fix many xhunter1.sys blue screen errors, but aren’t necessarily guaranteed for all users.
In addition, try resetting Windows 10, as outlined within our factory reset guide, as a last resort. Also, check out Microsoft’s BSOD troubleshooter for further potential fixes.
Ceip.exe is the Citrix Customer Experience Improvement Program process, which collects data from a Citrix Workspace (or older Receiver) app.
Many reported an application error related to this process. If you encounter it, the Citrix software won’t work correctly, so fixing this issue as soon as possible is important.
You might get this error if the registry values aren’t correctly configured.
Third-party applications and services can lead to compatibility issues.
In some rare cases, a Windows update can cause this issue to appear.
How can I fix the Citrix ceip.exe Application error?
1. Modify the registry
Press the Windows key + R and enter regedit. Press Enter or click OK.
Navigate to the following key: HKEY_LOCAL_MACHINE\SOFTWARE\Microsoft\WindowsNT\CurrentVersion\Windows\LoadAppInit_DLLs
Double-click on LoadAppInit_DLL and change the value data to 0.
After making these changes, check if the ceip.exe Application Error is gone.
2. Uninstall or reinstall the CEIP Citrix app
To open Run, press the Windows key and R simultaneously.
Input this Run command and click OK: appwiz.cpl
Enter the keyword Citrix in the search box to find your Citrix app.
Select your Citrix app, and click the Uninstall option for it.
Click Yes if any confirmation dialog boxes pop up.
Restart your desktop or laptop after uninstalling the Citrix app.
If you don’t want the Citrix app, you can stop here. However, users who need the Citrix Workspace CEIP app can reinstall the latest version by clicking the Download for Windows button on the Citrix website.
Thereafter, reinstall Citrix Workspace with the downloaded installer.
3. Clean-boot Windows
Launch the Run accessory.
To open MSConfig, type in this Run command and select OK: msconfig
Click the Selective startup radio button on the General tab.
Uncheck the Load startup items checkbox.
Make sure you have the Load system services and Use original boot configuration settings selected.
Select the Services tab in the screenshot directly below.
Then select the Hide all Microsoft services option.
Press the Disable all button to disable the remaining services.
Make sure you click Apply to save settings.
Select the OK option to close the MSConfig window.
Click Restart on the dialog box window that opens after closing MSConfig.
4. Disable problematic services
Press Windows key + R and enter services.msc. Press Enter or click OK.
Locate EntryProtect Inject on the list and double-click it to open its settings.
Set the Startup type to Disabled and click on Apply and OK to save changes.
Once you make these changes, Ceip.exe application error should be gone.
Click the Settings cog icon on the Start menu in Windows 10.
Select Update & Security to open a Windows Update tab in Settings.
Next, click the View update history option.
Click Uninstall updates to open a list of Windows patch updates.
Select to uninstall a recent update that might have triggered the issue.
Then click theUninstall option.
Select the Yes option on confirmation prompts.
Those resolutions for fixing the Citrix CEIP.exe – Application Error are certainly worth a try. You can also get further advice for fixing that issue from Citrix technical support.
Microsoft has issued a serious warning concerning cybersecurity for everyone out there, as attack levels have begun to spike once again.
The Russian-backed group Nobelium is at it again and, this time, the tactics they employed could fool even the most vigilant of observers.
Nobelium is using a hacked USAID account for phishing
As we mentioned above, the Russian hackers have now gotten their hands on a Constant Contact email marketing platform formerly used by USAID, in order to conduct their shady business.
Estimations show that more than 3000 accounts that are linked to government agencies, consultants, think tanks, as well as other non-governmental organizations, were targeted by this phishing scheme.
And even though most of Nobelium’s efforts were concentrated mostly on the US, it seems that the malicious content reached more than 24 countries, according to Microsoft.
Tom Burt, the vice president of customer security and trust from Microsoft, explained how the Native Zone malware was inserted into victim’s computers.
Nobelium launched this week’s attacks by gaining access to the Constant Contact account of USAID. From there, the actor was able to distribute phishing emails that looked authentic but included a link that, when clicked, inserted a malicious file used to distribute a backdoor we call Native Zone. This backdoor could enable a wide range of activities from stealing data to infecting other computers on a network.
As an attempt to not incriminate Microsoft, by allowing people to think that flaws in the system may have facilitated these attacks, Burton said that many of the emails were blocked, thus vulnerability of any Microsoft products can be ruled out.
How does Nobelium attack its victims?
The email that the hackers send has a link included and, once this link is clicked, its pretty much like handing thieves the keys to your house.
After clicking the above-mentioned link, an ISO is delivered to the machine in question, that contains a decoy document, a shortcut, and a DLL executable with a Cobalt Strike Beacon loader (Native Zone).
When users actually run this shortcut, the DLL is executed and Nobelium has free access to all your data, thus extracting any information they want, and can even deliver additional malware.
This malware distributing campaign was first discovered back in February 2021, by Microsoft, as detailed in the post from the Microsoft Threat Intelligence Center.
Microsoft has kicked it into full gear in the battle against these malicious groups and has enlisted the help of other nations that are willing to stand up and act against cyber oppression, according to Tom Burt.
Microsoft will continue to work with willing governments and the private sector to advance the cause of digital peace.
Remember that the internet is not only cool wallpapers, great music and funny cat videos. Staying protected in this dangerous cyber environment should be everyone’s first concern while online.
We will keep our eyes on this developing story and inform you of any, if any, changes on this matter that may occur. As you may know by now, we cover subjects that involve serious ransomware threats.
Have you ever been a victim of cyber-attacks? Tell us all about it in the comments section below.
One of the main causes of various Windows 10 problems ever since the operating system was released are bad drivers.
Microsoft is aware of the fact that incompatibility between drivers and the system is a major problem and made things at least slightly better.
Many device manufacturers have a partnership with Microsoft, which allows them to release driver updates through Windows Update, as regular updates for Windows 10.
Having the latest drivers installed on your computer is actually a good thing in most cases and is always recommended.
However, manufacturers can still offer optional driver updates that you can easily install. In this article, we will talk about how to install them or how to prevent installing drivers with Windows updates.
How can I block driver installation in Windows 10 updates?
Navigate to the following key in the Local Group Policy Editor: Computer Configuration/Administrative Templates/Windows Components/Windows Update
Double click on the Do not include drivers with Windows Updates.
Select Enable, then click on Apply and OK to enable the policy and stop including the drivers in Windows updates.
Restart your computer.
Most of the times, getting the latest driver updates is a great thing but for some, installing a new driver can cause all sorts of problems.
System administrators especially want to install the drivers manually for their endpoints so the steps above will help you disable the automatic driver inclusion with Windows 10 updates.
NOTE
Note: This option is availableon Professional, Education, and Enterprise editions of Windows. Home users don’t have the Group Policy Editor. However, we have an excellent guide on how to install it.
2. Use the Registry Editor
Press Windows key + R to start Run.
Type regedit and press Enter or click OK.
Navigate to the following keys in the Registry Editor:
Edit the ExcludeWUDriversInQualityUpdate DWORD with any text editor like the Notepad and change its value from 0 to 1.
Navigate to the following key: HKEY_LOCAL_MACHINE\SOFTWARE\Microsoft\PolicyManager\default\Update\ExcludeWUDriversInQualityUpdate
Change the value DWORD from 0 to 1.
This is a slightly more complicated solution meant for more advanced users so proceed with caution.
Editing the registry will also block the inclusion and the installation of the drivers in the Windows 10 updates so go ahead and perform the steps above.
3. How to install optional drivers
Type updates in Windows search and click on Check for updates from the results.
Click on View optional updates.
Now click on Driver updates to expand the section.
Select the drivers you want to update and hit the Download and install button from underneath.
Wait for the drivers to get installed and restart your PC.
If you disabled the automatic update for the drivers within Windows 10 updates, you would still need to update them manually from time to time.
To install optional drivers issued by the manufacturers of your components, perform the easy steps above.
On the other hand, you can opt for an automatic tool that looks for the most suitable drivers for your PC and installs them with a single click.
That’s it, we hope that our guide helped you disable the automatic inclusion of the drivers in the OS updates.
Windows 10 build 14385 for both PC and Mobile is out, but it appears many Insiders couldn’t install the latest update due to various error codes. We have already reported about the 0x80246019 error code that prevented Insiders from downloading the latest Windows 10 build, but a new error reared its ugly head.
This time, it’s error 0x8020000f that doesn’t allow Insiders to install the current build. Actually, this is not the first time when this error has prevented Insiders from getting their hands on Microsoft’s builds. Last year, thousands of users couldn’t download build 10159 due to the same error code.
Can’t install the latest Insider builds due to error 0x8020000f
Error 0x8020000f can be problematic and prevent you from downloading the latest builds. Speaking of errors, here are some similar issues that users reported:
Problem in updating Windows 10 – If you can’t download the latest updates due to this error, we suggest that you temporarily switch to the Slow Ring and check if that helps.
Windows 10 update error – Sometimes you might encounter update errors due to your antivirus. If that’s the case, disable your antivirus and check if the problem is still there.
Windows 10 update failed loop – According to users, this issue can occur if you’re using a metered connection. To fix this problem, simply turn this feature off.
Windows 10 update always fails – This issue can occur for various reasons, but you should be able to fix it using one of our solutions.
Solution 1 – Switch to the Slow Ring temporarily
If you’re having problems with error 0x8020000f and you can’t install the latest build, you might want to consider switching to the Slow Ring temporarily. To do that, follow these steps:
Open the Settings app. The quickest way to do that is to press Windows Key + I shortcut.
Now go to the Update & Security section.
Go to Advanced options and change the Update Fast Ring option to Slow Ring
Close the window and open the Windows Update Center again
Go to Advanced options and change back to Fast Ring. Next time you open the Windows Update Center, the update procedure will start immediately.
After making these changes, the problem should be resolved and you’ll be able to install the latest updates.
Solution 2 – Check your antivirus
If you can’t install the latest Windows 10 build due to error 0x8020000f, the problem might be your antivirus. Your antivirus can sometimes interfere with certain Windows features and it can cause this and other errors to appear.
To fix the problem, it’s advised that you check your antivirus settings and disable certain features. In some cases, you might even have to completely disable your antivirus. In case this doesn’t work, your next step would be to uninstall your antivirus.
Even if you remove your third-party antivirus, you’ll still be protected by Windows Defender, so there’s no need to worry about your safety. After you remove the antivirus, check if the problem is still there.
If removing the antivirus solves your problem, perhaps this might be a good time to consider a new antivirus software.
There are many great antivirus tools on the market, and you will be pleased to know that many of the antiviruses with the highest detection rate don’t interfere with your system.
Solution 3 – Make sure that you’re not using a metered connection
According to users, they weren’t able to install the latest builds due to error 0x8020000f. Apparently, this was caused by the metered connection. In case you don’t know, Windows 10 won’t download any updates while using a metered connection in order to save your monthly data.
However, this can be an issue and prevent you from downloading the latest updates. To fix the issue, you just have to do the following:
Open the Settings app.
When the Settings app opens, navigate to the Network & Internet section.
From the left pane, select Ethernet or Wi-Fi depending on the type of connection you’re using. Now select your connection in the right pane.
Scroll down to the Metered connection section and turn Set as metered connection to Off.
After making this change, check if the problem is still there. Several users reported that after they disabled the metered connection feature, the issue was resolved, so be sure to try that.
Solution 4 – Disconnect all USB devices
Sometimes error 0x8020000f can appear due to your USB peripherals. We have all sorts of USB peripherals connected to our PCs, and sometimes these devices can interfere with the update process. To fix the problem, it’s advised to disconnect all unnecessary USB devices from your PC.
As a rule of thumb, you should just leave your mouse and keyboard connected and try to update again. Other devices such as Wi-Fi adapters can also cause this problem, so you might have to remove your Wi-Fi card and check if that helps. Here’s an article dedicated to fixing Windows Update error 0x8007139f if you are interested.
Solution 5 – Run Disk Cleanup
If you can’t install the latest build due to the 0x8020000f error, you might be able to fix the problem simply by running Disk Cleanup. Sometimes temporary files might be corrupted and they can interfere with the installation process, so it’s advised to remove them. To perform Disk Cleanup, do the following:
Press Windows Key + S and type disk. Select Disk Cleanup from the list.
Select your system drive, by default C. Now click OK.
Your PC will now scan the selected drive.
After the scanning process is finished, select all files on the list and click OK. If you want, you can click the Clean system files button in order to remove additional files.
After cleaning the old files, try to install the update again and check if the problem is still there.
Solution 6 – Run SFC and DISM scans
If your current Windows installation is corrupted, you might encounter 0x8020000f error while installing new builds. This can be a big problem, but you might be able to fix it simply by performing an SFC scan. To do that, follow these steps:
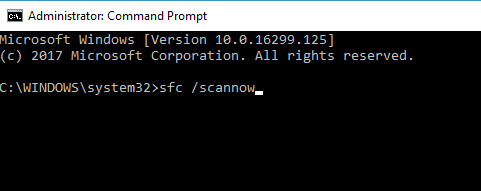
When Command Prompt starts, type sfc /scannow and press Enter to run it.
The SFC scan will now start. The scanning can take about 15 minutes, so don’t interfere with it.
After the scanning process is finished, check if the issue is still there. Sometimes the SFC scan can’t fix the problem, and if that happens, you need to run a DISM scan by doing the following:
Start Command Prompt as an administrator once again.
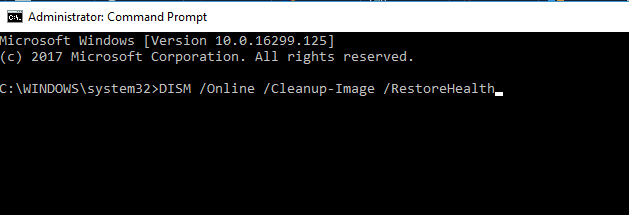
Enter the DISM /Online /Cleanup-Image /RestoreHealth command and press Enter to run it.
DISM scan will now start. This scan can take about 20 minutes or more, so be sure not to stop it or interfere with it.
After performing both scans, check if the problem is still there. If you were unable to run the SFC scan before, try running it once again after running the DISM scan.
Another option is to use automated repair software that will make the job a whole lot easier. We recommend these tools because they can repair multiple Windows-related errors, restore your OS, repair malware damage, and more.
Solution 7 – Disable proxy
If you want to protect your privacy online, using a proxy might be one of the simplest ways to do it. However, sometimes your proxy might interfere with certain Windows features, and that can cause error 0x8020000f while installingupdates.
To fix this issue, users are recommending that you disable your proxy and check if that helps. To do that, just follow these simple steps:
Open the Settings app. Now navigate to the Network & Internet section.
Choose Proxy from the left pane. Disable all options in the right pane.
After doing that, your proxy should be completely disabled and the problem will be resolved.
Not being able to download the latest builds due to error 0x8020000f can be quite annoying, but in most cases, you can fix this problem by disabling the metered connection or by switching temporarily to the Slow ring.
Microsoft Publisher is a desktop publishing application brought by Microsoft that puts emphasis on page layout and design.
There are plenty of differences but also similarities between Publisher and Word. As such, it goes without saying that you may also need to print your works after you are done editing them.
Unfortunately, some users have reported that they are experiencing difficulties when trying to print their Publisher works.
Some users reported that they cannot print their works in color, while others stated that they cannot print their works at all.
How do I print Microsoft Publisher works?
1. Test your printer
Type printers and scanners in Windows search and click on the app from the results.
Click the printer you are using and choose Manage.
Click the Print a test page option.
Before putting the blame on Microsoft Publisher, test and see if your printer is working properly. If a test page prints, the device is working properly, and if not, Troubleshoot the issue further.
2. Adjust your printer settings
Click Printer properties in the Settings page of your printer.
Select the Effects tab, if available.
Click Print document on in the Resize Options section.
Select the Scale to Fit check box.
Click OK to apply the changes.
Some printers have this Effects option and setting the right print dimensions can solve the problem with the Publisher app.
3. Print Microsoft Publisher works in color
Open Microsoft Publisher.
Click File and then select Print.
Then confirm that you have the settings to Composite RBG and not Composite Grayscale option.
Check your printer properties to confirm that you have not selected a grayscale option.
If your printer doesn’t print in color from Publisher, check the settings from the app and the printer as indicated in the steps above.
4. Update your printer drivers
4.1 Update the drivers manually
Press Windows Key + R.
Type devmgmt.msc and press Enter to open Device Manager.
Expand Print queues.
Look for the affected printer in the list, right-click it and choose Update driver.
Choose Search automatically for updated driver software.
Windows will look for any new update for the driver and download it.
4.2 Update the drivers automatically
Updating your drivers manually can take a lot of time depending on your device and it’s not always successful so you might also need to visit the manufacturer’s website to get them.
The alternative is to use dedicated software that will update all your drivers, not just the printer’s in just a few seconds automatically. Try the tool recommended below.
Type control and press enter to open Control Panel.
Go to Programs.
Select Programs and Features.
Locate Microsoft Office and click on Change
Select Quick Repair and click the Repair button.
This problem can also be triggered by some corrupted files inside Microsoft Office so repairing it can also fix this problem for good.
6. Hard reset the printer
Make sure your printer is on and unplug the power cord from the rear of the printer and from the outlet.
Unplug the USB cable from the printer if you have one.
Wait for a couple of minutes (2 or 3), then press and hold the power button of the printer for about 30 seconds.
Plug the power cable back into the printer and directly into an outlet, without any extensions.
Plug back the USB printer, and turn on the printer.
Wait until the printer ends its warm-up and try printing again.
Sometimes, hard resetting the printer can do a great deal in resolving any printing issues you might have so make sure you try that too.
We hope that your solutions helped you fix the Publisher not printing issue and now you can use it properly.
As this issue can also be produced by potentially incorrect settings of your printer, we recommend reading our best printer management software and picking up a preferred solution.
If you have any other solutions, share them in the dedicated comments section below. They might help other users as yourself.
Most peripherals are nowadays connected to the PC via USB. The USB controller or USB host controller is responsible for organizing the USB ports.
If you have problems with USB devices on your PC, but Windows does not specifically point out the lack of a driver, the USB controller displays error messages like The driver detected a controller error on \Device\Harddisk1\DR1.
If you’re running Windows 10 and have problems with the USB controller or its drivers, this guide provides helpful solutions to solve the problem.
How can I fix The driver detected a controller error?
1. Check the hardware cables
1.1 If only one device is affected
You might have a broken USB cable.
Connect the device with a different USB cable.
Try connecting the device to another computer/laptop or another USB port.
If it doesn’t work here either, then the external device you’re trying to connect is having the issue.
1.2 If several USB devices no longer work correctly
Shut down your PC and remove all the connected USB devices.
Pull off the power plug and leave the PC completely without power for 60 seconds.
Reconnect the power plug and then power up the PC.
While in the Windows interface, reconnect the USB devices one by one, and try them out.
If all the USB devices present the same problem, there may be a hardware defect in the device.
But if this does not work, there might be a driver problem, or the corresponding drivers are simply missing.
It might not be about the cables or the devices themselves. Check our guide on what to do if your USB ports are not working.
2. Reset controller driver to zero
Press the Windows + R key to open Run.
Enter devmgmt.msc and press Enter or click OK.
Once you are in the Device Manager, open the USB Controller category.
The faulty controller should appear here with a yellow warning symbol. Right-click on it and click on Uninstall.
If the uninstall option is not available, go to the Properties of the USB controller.
Go to the Drivers tab and click on the Uninstall button.
Restart your PC.
Windows should now search for a suitable USB driver and install it automatically.
However, various circumstances (damaged files, incorrect file structures or settings, etc.) can cause a problem with the driver.
3. Update your drivers
Press the Windows + R key to open Run.
Enter the following command: devmgmt.msc.
Once you are in the Device Manager, expand the Disk drives.
Locate the driver and right-click on it, then choose Update driver and click OK.
Restart your PC.
Sometimes, updating your drivers manually can become tedious and time consuming. And also, the default drivers might not be the best for your device.
Here are some other similar errors that can be fixed with our solutions above:
The driver detected a controller error on \Device\IDE\IDEport0
The driver detected a controller error on \Device\IDE\IDEport1
The driver detected a controller error on \Device\IDE\IDEport2
The driver detected a controller error on \Device\IDE\IDEport4
The driver detected a controller error on \Device\Harddisk2\DR2
The driver detected a controller error on \Device\Harddisk2\DR2 b
The driver detected a controller error on \Device\Harddisk3\DR3
The driver detected a controller error on \Device\Harddisk4\DR4
It’s essentially the same error that is followed by the name of the port or drive causing this issue.
If your drivers are outdated, you can update them through Device Manager as above mentioned. We also extensively covered this topic in our dedicated Update drivers guide.
If you have any more questions or suggestions, be sure to let us know by using the comments section below.
In a recent Microsoft blog post, Microsoft’s Raymond Chen explains for all the users out there, exactly how the ownership of the Windows clipboard is tracked in Win32.
This information may prove invaluable to some of the more enthusiastic and tech-savvy Windows users out there, as we are sure you can agree.
Tracking ownership of the Windows clipboard in Win32
As some of you may know, in Win32, there is the concept of a clipboard owner. The intended rule behind all this is that the clipboard owner is , actually, the window that created the data currently on the clipboard.
In this post, Chen also explains the specific usage pattern for putting data on the clipboard. He mentions that the clipboard owner receives a coded message when somebody requests data from the clipboard that had been set as delay-rendered.
These coded messages are also received as part of the window destruction sequence if it is still the owner of the clipboard at the time it is destroyed.
Thus, delay-rendering allows the user to defer the creation of complicated clipboard data up to the point it is requested.
Following the rules is of paramount importance
Raymond Chen mentions the fact that its very important to follow certain rules, when performing this process and points out that not everybody actually does it.
We can understand that, seeing how some programs open the clipboard with the intent of adding data, instead of replacing the content altogether.
Back in the days of 16-bit Windows, the system assumed that applications were honest and played by the rules for the common good.
He goes on by explaining that this bonus clipboard data scenario creates an issue, since there is only one clipboard owner, but there are now two windows who collaborated to put data onto the clipboard.
Ownership of the clipboard changes only under these circumstances, as explained by Chen:
When the empty clipboard command is deployed, the current clipboard opener becomes the clipboard owner.
When the clipboard owner is destroyed, the clipboard owner resets to null.
The only logical conclusion here would be that the clipboard owner can be summarized as the window that most recently called the empty keyboard command if it still exists.
All this useful information can be browsed by reading the complete article submitted on the Microsoft blog.
What is your take on the methods presented by the Microsoft employee? Let us know all about it in the comments section below.
As with every month, players that pay for the Xbox online subscription receive free access to a variety of games.
Xbox has now revealed a pretty unexpected lineup for Games with Gold for June, that we think fans will certainly enjoy and play not just because they didn’t have to buy them.
Injustice: Gods Among Us is the biggest title in this lineup
One of the best fighting games of its age, considering its release date was April 2013, it tells the story of Superman going rogue and becoming a villain himself.
This impressive game features heroes and villains from the DC universe, such as Batman, Superman, Aquaman, The Joker, Harley Quinn, Black Adam, and many others.
Also featured in this blockbuster game are guest character from the Mortal Kombat universe, such as Scorpion of Sub-Zero.
This title will be available to users from 16th or June 30th.
Three other titles are available via Games with Gold, in July 2021
Shadows: Awaken will also be available for free, through Games with Gold, allowing you to take control of a demon summoned from the Shadow Realm to consume souls.
This single-player RPG, with real-time tactical combat, invites players to embark on an epic adventure with challenging gameplay, a gripping storyline and enchanting graphics.
Enjoy this game for free, via Games with Gold, fromJune 16th to July 15th.
Another awesome game that Xbox users will get to enjoy via Games with Gold in July is The King’s Bird, in which you have to escape into a world kept secret by a tyrant, and discover the truth about your freedom.
The King’s Bird is actually an artistic and momentum-based game that combines precision-platforming with physics-based gliding.
Gamers can enjoy this title for a whole month, from June 1st to June 30th.
Finally, the last game that will be available through Games with Gold for June 2021, from June 1st to June 15th, is the NeoGeo Battle Coliseum.
This fun 2v2 tag-team fighter allows you to play as all your favorite NeoGeo characters and defeat all the opponent that the game throws in your path.
What do you think about the games that Xbox prepared for June 2021? Write your opinion in the comments section below.
Do you want to create royalty free music? Today, we will be showing some of the top royalty free music software available.
Royalty free music enables the purchaser pay for a music license only once and is able to use the music more than once.
For instance, if you buy a royalty free music license for a video on your blog or site, you pay only once, it does not matter if you have 100 or 10,000 visitors, or you make use of the music for 2 months or 12 years.
In addition, royalty free music does not mean you can get a music license for free. Royalty free Music is not also a stock music.
It is not a copyright free music, neither is it a particular genre or music quality. However, there are several software’s available for making royalty free music.
What are the top royalty free music software to use?
This software is also very good for making royalty free music. It has an enhanced interface which makes complex productions much easier.
FL Studio accepts several simultaneous inputs such as piano, guitar, drum, and several musical instruments. The mixer can be controlled directly with a touchscreen notebook or tablet. The interface can fit automatically to any screen size.
Furthermore, beginners can find FL Studio easy to use compared to other royalty free music software. It is fairly cheap and offers free upgrades to new editions.
FL Studio
Create royalty free music and control the mixer directly with the most reliable tool.
Music Maker software has various options which make music production much easier. Beginners find it very easy and intuitive to use right from the beginning.
This royalty free music software has eight tracks and free loops, software instruments, and sound packages.
In addition, this free software has a drag & drop workflow and comes with very good loops needed to make trap, hip-hop, and techno beats which gives an authentic and professional sound.
Melodies and chords can easily be composed with the MIDI editor even if you lack the knowledge to read music.
Music Maker software provides real creative freedom for creating any kind of music. You can produce songs in any genre trap, hip-hop, techno, and EDM quickly.
This software was developed by Steinberg, a German musical software company. It combines good sound quality and a range of advanced MIDI and audio tools for the composition, recording, mixing, and editing of music.
Cubase can create music projects, which enables the user to edit raw audio tracks, edit MIDI files, and lyrics, and present them in different formats such as musical scores, event lists, and editing consoles. Hence, royalty free music can easily be created.
Various tracks can also be mixed by the operator into a stereo.wav file readily in place to be burnt into a compact disc in mp3 or Red Book format as files on CD or DVD or to be published online.
Also, it is compatible with several Windows OS versions.
In conclusion, any of the royalty free music software we mentioned in this post is ideal even for novice computer users. Your knowledge, skill, and experience in music might come into play when making your choice of software.
However, it boils down to what you want and which software is preferable for you. Go for the royalty free music software which suits your interest the most and makes good music.
You might also be interested in the best music production software so that you can really start creating your excellent content.
Which product did you choose? If you have other suggestions, write them in a comment from the dedicated section below.
A good Internet connection is essential for everyone, so we don’t have to stress that anymore. On the other hand, not everyone is lucky enough to have excellent Internet traffic and stable connections.
This is where software that helps you avoid Internet disconnection comes in really handy. We picked five of the best tools that will help you avoid getting disconnected from the Internet.
Check out their sets of features and decide which one is the best for your connection needs.
What are the best tools to avoid Internet disconnections?
cFosSpeed is an Internet accelerator and Ping optimizer. This software is able to increase your throughput and reduce your Ping.
Also, their Internet connections were more stable when using this program, so it’s definitely worth trying.
You can check out more features of the program and find out more about its benefits on the official website of cFosSpeed.
Check out the best features that are included in this program below:
Using this program, you will be able to keep your Internet fast during download and upload.
You can also improve your Ping for online games and reduce the audio and audio streaming issues.
The program is able to optimize the Internet connection with Traffic Shaping and Prioritization.
Users who have been using cFosSpeed claimed that they got the maximum speed available for their Internet connection and their browsers used the full download speeds.
DeskSoft BWMeter is a powerful bandwidth meter, traffic controller, monitor which measures, control and displays all traffic to/from your computer or on your network.
This software is not like other similar tools, and it can analyze data packets showing you all the necessary details. This means that it will be possible to distinguish between local and Internet traffic for instance.
DeskSoft BWMeter provides lots of options for great customization and the program also supports Windows 10.
Check out the entire list of extended features that are included in DeskSoft BWMeter on the program’s official website.
Check out more impressive features that are packed in DeskSoft BWMeter:
The software also allows you to use it for traffic control by setting a speed limit for all kinds of connections and restricting access of applications to some Internet sites.
The program is also able to create statistics for all computers in your network and measure and display all LAN traffic and download/upload from the Internet.
You will also have the ability to define the filters which show your transfer with particular Internet addresses.
DeskSoft BWMeter is perfect for home users to control the traffic and to maintain the statistics of their data.
The software is straightforward to configure.
DeskSoft BWMeter provides a graphical and numerical display of bandwidth and filters for measuring it.
You will be able to monitor all network adapters and interfaces.
There is also a firewall mode, traffic control features, access control and speed limits implemented in the program.
You will be able to create monthly, weekly, daily and also yearly statistics.
The software provides Ping support for monitoring web servers, Internet connections and more.
NetLimiter provides you full control over your network connection. Using this software, you will be able to decide which apps will be allowed to connect to the Internet and how much of the total bandwidth they can handle.
This traffic control and monitoring program is designed for Windows. NetLimiter includes real-time traffic measurement and long-term per-application Internet traffic statistics.
Together with this particular feature, the software also provides a set of Internet statistics tools, and it includes real-time traffic measurement and even long-term per-app Internet traffic statistics.
You can check out more features of NetLimiter on the official website.
Check out the best features that are included in the program below:
You will be able to set the exact download and upload speed limits to any app, and you can also provide the apps higher priority to ensure that they will always get enough bandwidth.
Using NetLimiter 4 makes sure that you won’t miss a single app connection to the Internet.
You will also be able to monitor the amount of data that it transfers from and to the Internet.
The data will be displayed in customizable charts.
While using the NetLimiter 4, you will be allowed to specify which apps can connect to the Internet and under which conditions.
NetLimiter 4 is using an interactive system of rules.
The software also allows users to set data transfer quotas for selected apps and if the quota is reached, the limit, blocker rule or other rules are able to be enabled.
NetWorkX is another simple, powerful and versatile bandwidth and data usage reports for Windows.
You will be able to collect bandwidth usage information and also measure the speed of your Internet or any other network connections.
This program can help you identify potential sources for your Internet problems and to make sure that you will not exceed the bandwidth limits specified by your ISP.
You will also get the chance to use a dial-up session journal with detailed data about your each and every session.
Check out more exciting features that are included in this software on the official website of NetWorkX.
You can also track down suspicious network activity characteristic of Trojan horses and cyber-attacks. Check out more exciting features that are included in the program:
It provides clear graphics and numeric display.
NetWorkx offers usage reports that are exportable to a variety of file formats including HTML, Excel, MS Word.
You can closely supervise the uploads and downloads.
The software provides network information and testing tools with advanced netstat that shows application using the Internet connection.
You will also get options to be notified and to automatically disconnect from the Internet when the network activity exceeds a certain level.
The speed meter included in the program accurately times downloads and reports the average rates of transfer.
Connection Keeper is a great time-saving tool for dial-up users. This is a free software that is able to simulate Internet browsing in order to prevent your connection from appearing idle.
It prevents your ISP from dropping the connection due to inactivity.
The program is also able to automatically close lots of types of popup windows such as the ones that ask you if you want to remain connected.
Whenever your connection is lost, the program will automatically sign back in, and it will restore the connection as fast as possible.
Check out more features and great functionalities that are included in Gammadyne Connection Keeper on the official website.
Check out the best features of this program below:
This is a desktop app that runs on Windows XP and later versions.
You can set it to automatically redial when the connection is lost.
It can automatically close popup windows with a simulated button click, simulated keystrokes, by sending a message in a window and more.
This program can also be used to monitor websites and also DNS records.
The errors are reported by email and by popup windows.
The program will not be able to run when you are not connected to the Internet, and it will wait until the connection is made again.
Windows 10 build 21390 preview is available for Insiders
Microsoft delights users with another Windows 10 preview build for Insiders in the Dev Channel.
This recent 21390 build includes a new Fluent-inspired icon for the Task Manager and, also, MSI installers. There’s a new option that allows you to set Windows Terminal as the default terminal, as well.
As part of our ongoing iconography improvements, Task Manager and MSI installers now have new Fluent icons.
You can now set Windows Terminal Preview as your default terminal emulator on Windows – please see this blog post for details. This requires Windows Terminal Preview version 1.9 (or higher).
We fixed an issue causing the news and interests text on the taskbar to appear blurry on some resolutions and scaling factors.
We fixed an issue resulting in certain punctuation not being displayed correctly when the display language was Chinese.
We fixed a svchost.exe crash related to cdp.dll that some Insiders have been experiencing in recent builds.
We fixed an issue impacting Start reliability in recent flights.
We fixed an issue where when using dark mode, the text in the File Explorer search box would be black on a black background. Please note this only addresses this dark theme issue in File Explorer, we are continuing to investigate a second issue impacting dark theme when using Search in the taskbar.
We fixed an issue in recent flights where a folder might not retain keyboard focus after being renamed in File Explorer.
We fixed an issue resulting in Task Manager showing the incorrect icon for some processes.
We fixed a second issue causing some devices to fail when updating to this build with error code 0xc1900101. If you continue to receive this error code when attempting to update, please file a new feedback item.
Microsoft is also focusing on the already known issues
As with any new build, a major factor that needs to be taken into consideration is dealing with the already known issues that take away from the user experience.
Here are the known issues that Microsoft addresses with build 21390:
The Windows Camera App currently does not respect the default brightness setting set via the new Camera Settings page.
We’re investigating an issue where Search results are unexpectedly no longer following dark theme as of recent flights.
[News and interests] We’re investigating an issue where the flyout may occasionally flash in the top left corner of your screen after clicking the button on your taskbar.
What Windows 10 build are you currently using on your PC? Tell us in the comments section below.
Microsoft 365 users suddenly realized that they aren’t receiving emails anymore and their inbox folder showed no new notifications.
Much to their surprise, they later discovered that all their emails were being automatically forwarded to the junk folder, for no known reason.
Microsoft Office 365 error sends incoming emails to junk
The support team at Microsoft currently working on solving an Office 365 issue causing Outlook and Exchange Online emails to totally skip recipients’ inboxes and, instead, be forwarded to their junk folders instead.
In their first Twitter report, the tech team from Microsoft stated that they are aware of the issue and are about to perform a more in-depth investigation on the matter.
We’re investigating an issue in which email is being sent to the junk folder. We’ll be providing updates under EX258373 in the admin center.
About an hour later, Microsoft confirmed that the error was the result of some changes they performed and that the issue was being dealt with accordingly.
We’re reverting a change that has caused inbound email to be incorrectly routed to the junk folder. Additional information can be found in the admin center under EX258373
The Microsoft support team says the changes were reverted
In an update posted from the same Twitter account this morning, the Microsoft 365 support team confirmed that they had gotten to the bottom of the situation and all the changes were being reverted.
We've reverted the change and observed successful email delivery. We're now reprocessing any emails that were incorrectly delivered as junk. More info can be found in the admin center under EX258373.
— Microsoft 365 Status (@MSFT365Status) May 26, 2021
These issues that affected MS Office started twelve hours earlier when the tech company said it was investigating an ongoing problem where some users were unable to forward email messages using Exchange Online.
Apparently, while trying to come up with a solution to this problem, they accidentally caused a series of events that lead to all this conundrum.
We are keeping an eye on this developing story, in order to know exactly if this will still be a problem in the future and, also, what we can do to fix it.
Microsoft announced a big update to improve the shared calendar experience in Outlook for Windows back in July 2019. After being in preview for almost two years, these shared calendar improvements are now rolling out to all Outlook users on Windows.
Microsoft says that this update significantly improves the reliability and sync latency for both shared and delegated calendars in Outlook for Windows. Previously, the shared calendar recipient had to wait a couple of mins to see the new changes, and there was also a slight delay in the calendar’s loading time.
The company has now addressed these issues, as the calendar should instantly appear upon selection, and all the changes will now immediately sync for everyone in the shared calendar. The new shared calendar experience is now available on all major platforms, including the new Outlook for Mac, Outlook for Windows, Outlook on the web, as well as Outlook for iOS and Android.
Microsoft noted that it’s a major update to Outlook for Windows since 1997, and the company has incorporated user feedback to eliminates the issues. “Since summer 2019, we polished the experience and fixed bugs, thanks to many customer reports. With tens of thousands of daily users on the preview, we feel confident now that the experience is going to delight calendar delegates.” the Exchange team explained.
It is important to note that the new shared calendar experience has just started rolling out, and it is only available for select Outlook for Windows users in the Current Channel. The company plans to gradually expand it to everyone in the coming months. If you’re interested, we invite you to check out this support page to learn more about these calendar sync improvements.
The Sims 4 is one of the most popular games in recent years. Nonetheless, the game is, like its predecessor, plagued with lots of bugs and glitches.
Seemingly, the optimization of the game is on the short side with The Sims 4. One of the commonly reported problems concerns stuttering while in the game, especially when panning the camera.
We noted the viable solutions and compiled the list below to help you fix this problem and enjoy the game.
Let’s start with the obvious one. If you have a new PC or laptop, there’s a high probability you have a configuration which can run The Sims 4.
But we need to cover that ground in order to move to more delicate steps. In addition, there’s a possibility that you have an older configuration.
Nonetheless, here are the minimum system requirements for The Sims 4:
CPU: Intel Core 2 Duo E4300 or AMD Athlon 64 X2 4000+ (2.0 GHz Dual-Core required if using integrated graphics)
RAM:4 GB
GPU: NVIDIA GeForce 6600 or ATI Radeon X1300 or Intel GMA X4500
DIRECTX: DirectX 9.0, 10 and 11 compatible
HDD: 16 GB
Internet connection for product activation
2. Check the drivers
Drivers or in particular GPU driver are essential. And the most complex thing to deal with on Windows 10.
Namely, you may as well have the top-tier GPU, but without the fitting drivers, gaming becomes a glitchy ride. Windows 10 will provide the generic copy of display drivers, but they won’t suffice most of the time.
Not for gaming or legacy cards, at least. What you’ll need to do is to download the proper driver from the official site, provided by the OEM.
Follow one of these links and find yourself a suitable up-to-date driver:
In addition, make sure to install the driver cleanly by deleting the previous display driver from the device. After you’ve dealt with this step, try out the game. If the issue is persistent, continue through the list.
Update the drivers automatically
Of course, you can visit the manufacturer and get the correct drivers but it’s not that simple and it can take some time that you probably don’t have.
The easiest way is to use a dedicated updating tool that will scan your sistem in a couple of seconds, find all the right drivers for your system, not only the GPU’s and update them automatically.
3. Disable online features
Open Origin.
Click on Origin and start the game Offline mode.
In addition, you can click Origin and open Application Settings.
Under the Diagnostics tab, disable Share hardware info.
Under the More,go toOrigin In-Game, and toggle off the Enable Origin In-Game.
Even though The Sims franchise was always about the single-player experience, The Sims 4 was partly produced for the multiplayer.
Since this concept fell apart, the online features of the game are now more of a burden than an advantage. Except, if you’re part of the modding community and running the custom multiplayer mod.
Long story short, disable online features before you start playing the game. This resolved the problem for some users. Just open the game, access the Game settings, and disable Online content.
In addition, disable online features in Origin, too. Follow the steps above to get to the desired result.
4. Check the game’s integrity
Open theOrigin client.
Open My Game Library.
Right-click on The Sims 4 and chooseRepair from the contextual menu.
Wait until the tool verifies the integrity of the game files and close Origin.
Restart your PC and run the game.
Since The Sims 4 is a pretty customization-open game, there’s a chance that something went wrong with the installation files.
The issue here is that you can’t be sure whether that’s the case. However, instead of reinstallation as the first step, you can utilize the tool in the Origin desktop client.
This tool verifies the integrity of the game files. If something is wrong with any of those, it downloads and replaces the damaged files.
5. Switch to the windowed mode or 32-bit version
Open Origin and My Game Library.
Right-click on The Sims 4 and open Game Properties.
Choose theAdvanced Launch Optionstab.
Select The Sims 4 32 Bit from the drop-down menu.
Add-w to the command-line and confirm changes.
Start the game and look for improvements.
There are dozens of threads online about this problem. Where some users succeeded in resolving the stuttering, others failed.
One of the most common solutions includes tweaking advanced launch options. Some users reduced the stuttering by running the game in windowed mode.
Others were more successful with running the game in the 32-bit version. Both can be applied through the Origin desktop client.
Perform the steps above to run The Sims 4 in windowed mode and get rid of the stuttering of the image.
6. Enforce the dedicated graphics and disable Vsync
If you, by any chance, have a dual-GPU configuration, we suggest enforcing The Sims 4 on the dedicated graphics.
Even though the dedicated GPU should, by default, take over from the integrated graphics when the game starts, this transition causes glitches.
Obviously, the loading of the game is disrupted, and stuttering is a possibility.
You can enforce the dedicated Nvidia or ATI graphic in two ways. The first option is applicable through the GPU’s control panel. There you should also globally disable Vsync.
The second is right-clicking on the game’s shortcut and selecting the high-performance graphics from the contextual menu. Just select Run with graphics processor and choose the dedicated card out of the two.
Close the game and the Origins client and restart your PC.
Navigate to the following folder: C:\Users\Your Username\Documents\Electronic Arts\Sims4
Cut the Mods folderand paste it on the desktop.
Start the game and check whether the white screen occurs.
Mods are a vital part of The Sims 4 experience. However, some of them might cause issues with the game’s performance.
They also tend to get corrupt but unfortunately, they can’t be repaired with the Origin’s built-in tool.
And if you have lots of them installed, chances are you’ll have a hard time determining which individual mod is behind the reoccurring stutters.
Therefore, we suggest removing temporarily all mods to determine whether they’re inflicting stutters in the first place.
If that’s indeed the case, you can use the community-built Mode Conflict Detector to determine the culprit and use the steps above to disable the mods temporarily.
8. Reinstall the game and Origin
Finally, try reinstalling both the game and the Origin client and hope for the best. We can confirm, based on the vast presence of this subject online, that this is a big issue.
The game has its share of bugs, just like The Sims 3 was. However, since the majority still can play the game without stuttering, the small part of the problem might be on your side.
Make sure you follow the troubleshooting instructions we provided and, if the game is still suffering from constant stutters, contact the developer on the official forum.
Nowadays, technology is engulfing everything at a fast and steady rate. Everyone gets accommodated to it in some form or way.
Lots of old-fashioned designs and traditions are being replaced by digitalized versions of them, which is great in a way because most of the time the result is cost-efficient.
In the same manner, publishers around the world started to transition from normal magazines to digitalized versions of them, called Flipbooks.
They don’t need any paper or ink to be published. The only thing you need is specialized software and some time to make them.
Today, we’ll show you some of the best flipbook software for Windows 10, so brace yourself for some awesome products!
If you don’t want to get through the trouble of downloading software into your PC, there are other great options for you.
FlipbookPDF.net is the best online Flipbook converter you’ll find. Turn your PDF files into Flipbooks with only 1 click. All you have to do is drag and drop it, press the Convert Now! button and you’re done.
Don’t worry about compatibility with other devices. You can choose to download the converted file. It will be in HTML5 format, therefore it’s going to work on phones, tablets, laptops, PCs, and websites.
Besides converting existing files, the tool lets you create your own Flipbooks from scratch. You can choose from a wide variety of templates to make them unique.
FlipbookPDF.net offers limited services for free, and you can also choose to upgrade to a yearly subscription to benefit from the full deal.
Flipsnack has been in the business for 10 years. So, 10 whole years of making customers happy by creating, converting, and embedding Flipbooks.
This is another free online Flipbook maker and converter that can be used by anyone and is compatible with all browsers.
After creating/converting the file you want, you will be able to publish it, sent it to your email, or simply download it to your desired device.
Flipsnack utilizes the most out of the HTML format, creating realistic and cool page-flipping effects for magazines, presentations, comics, and many other things.
As we mentioned before, using the tool is completely free, but if you want to get the most out of it and to have access to cool features like adding YouTube or Vimeo videos to your device, you’ll have to pay.
FlippingBook lets you keep your audience engages from the first page of your magazine to the last by including embedded videos, images, and links.
With Flippingbook, each Flipbook becomes an extension of you, and therefore, an extension of your own company and brand. This is possible thanks to clickable logos and branded publication links.
If you’re all in for marketing and sales, you will be able to see statistics of the people and the way they interact with your magazines and the products included in them.
Overall, this great software has everything you need to boost your business past its limits by creating lifelike digital magazines and Flipbooks compatible with all devices.
Yet another online design platform for Flipbooks, Lucidpress gives you all the tools needed to create the best monetizable magazine for your company.
Create on-brand, personalized content that catches the eyes of your customers and keeps them engaged through awesome templates, embedded videos, links, and images.
The tool has something called Advanced Template Locking which allows team members to collaborate better and customize co-owned templates.
Through Lucidpress, you can build a stronger brand presence, share anything from anywhere, accomplish more as a team, all through creating fresh content such as Flipbooks.
MyFlipbook is an awesome software for Windows that converts PDF files into interesting and eye-catching Flipbooks. The initial file is converted, into the HTML5 format.
Additionally, you can share the file via email, add it to a website, or simply upload it to MyFlipbook.net. This type of file is compatible with any device.
You can create new Flipbooks, import your own, use existing templates and customize them to your liking, choosing from the plethora of fonts, colors, background, and much more.
Keep track of your sales by using Google analytics to check click rates and provide insightful statistics of your customer’s choices.
Moreover, you can also add links to the products you added in the Flipbook, and even insert entire youtube videos. Other links from the initial PDF version of the file will also be retained after the conversion!
MyFlipbook has a free version with limited features, and a PRO version that comes with all the software’s assets, and options, your own web hosting with unlimited storage, and 100MB of MyFlipbook online storage.
That’s about it for this article today. We included one awesome downloadable software and lots of other online tools for Flipbook conversion and creation.
The latest Windows 10 builds and the Windows 10 versions for the general public surely bring a lot of UI improvements. But if that’s not enough, you can try to customize your system even more.
If you’re a fan of the Mac interface but are working with the Windows 10 operating system, there are some apps that can help you out.
Have you ever wanted to turn your PC into a Mac? Well, with a special theme pack, you’ll be able to make your Windows PC look like a Mac.
How can I make my Windows 10 PC look like macOS?
Before you download your Mac theme for Windows, make sure you download the right pack for Windows 10.
Check the pack to be compatible with your Windows 10 system and for a 32-bit system or a 64-bit system.
The installation process allows you to customize it as you see fit.
After the installation, restart your Windows 10 PC.
This is a frequent question among Windows 10 users who recently switched from Apple’s OS to Microsoft’s.
Of course, there are also many Windows 10 users who simply prefer the neater, cleaner macOS user interface for aesthetic reasons.
The Yosemite Transformation Pack is just an OS theme for Windows 10, but it will also perform a couple of changes to your system files.
It will install a collection of various programs to automatically make Windows 10 look like macOS.
The regular Windows 10 taskbar will become a macOS taskbar for Windows 10 and will be moved to the top, while the Mac dock for Windows 10 (RocketDock) will be at the bottom.
A bunch of other interesting features will be added, as well, such as virtual desktops, Launchpad-styled application menus, and widgets menu.
Of course, this is not an exact copy of Yosemite, but if you want to try the completely new look of your traditional Windows, you definitely should try this macOS launcher for Windows 10.
It looks like users of Mac and Windows like to experiment with the rival’s operating system these days, as Parallels released a virtual machine for macOS which supports the installation of Windows 10.
No surprise there, considering that KB5003214 addresses more than one Windows 10 version, such as 21H1, 20H2, and 2004.
Important changes and fixes brought by KB5003214
One of the more notable changes brought forth by KB5003214 is the integration of the News and Interests feature to the Windows 10 taskbar,
Developers look at this new idea as the fastest way to stay up to date on your Windows 10 PC, according to the presentation of this feature, from the Windows blog.
As people spend more time on their Windows PCs, working, learning, connecting and creating, we’re making it easier to access personalized content that is available at a glance and updated throughout the day. News and interests on the Windows taskbar will begin rolling out to customers over the next several weeks.
Also, the Open on hover option (checked by default) has been added to the News and interests menu. To access it, just right-click a blank space on the Windows taskbar and open the News and interests menu.
KB5003214 also addresses an issue that might prevent users from opening phone apps that are pinned to the taskbar, as well as the one that might display items on the desktop after you have deleted them from the desktop.
Other highlights for this patch include:
News and interests on the taskbar is now available to anyone who installs this update!
Improves the hover experience by adding the Open on hover option (checked by default) on the News and interests submenu that appears when you right-click the Windows taskbar.
Updates an issue that might prevent users from opening phone apps that are pinned to the taskbar. This issue occurs after they update to Windows 10, version 2004 and then use the Your Phone app.
Updates an issue that prevents a touch device from working as a serial mouse in multiple monitor situations.
Updates an issue that might display items on the desktop after you have deleted them from the desktop.
Updates an error that might cause video playback to fail when you switch from an external high-dynamic-range (HDR) display to a built-in non-HDR display.
Updates an issue that fails to apply the spatial audio effect to sounds when you enable spatial audio.
Updates an issue with noise when you enable spatial audio and use Bluetooth USB headphones.
Updates an issue that prevents users from receiving geographic location information.
Windows 10 version 2004 receives the most fixes with KB5003214
The largest number of fixes that are implemented are, by farm to the 2004 version of the operating system. Good news, considering that some of these issues were long overdue for some tweaking.
The key changes that Microsoft brought forth include:
Addresses an issue with the just-in-time (JIT) behavior of jscript9.dll.
Addresses an issue that might prevent users from opening phone apps that are pinned to the taskbar. This issue occurs after they update to Windows 10, version 2004 and then use the Your Phone app.
Addresses an issue that prevents certain Win32 apps from opening when using the runas command.
Addresses an issue that prevents certain Win32 apps from opening when the “BlockNonAdminUserInstall” Group Policy is turned on.
Addresses an issue that displays progressive web application (PWA) icons as blank when you pin them to the taskbar.
Addresses an issue that fails to properly manage memory for touch input before a session ends.
Addresses a memory leak in ctfmon.exe that occurs when you refresh an application that has an editable box.
Addresses an issue that prevents a touch device from working as a serial mouse in multiple monitor situations.
Addresses an issue that unexpectedly displays the Settings page text “Let’s finish setting up your device” at startup.
Addresses an issue that might display items on the desktop after you have deleted them from the desktop.
Addresses an issue that prevents users from viewing the Mouse settings page after the Settings Page Visibility Group Policy is set to “showonly:easeofaccess-mousepointer”.
Addresses an issue in Safe Mode that prevents users from signing in if Web Sign-in is enabled.
Addresses an issue in Active Directory (AD) Admin Center that displays an error when it lists many organizational units (OU) or container objects and PowerShell Transcription is enabled. The error message is, “Collection was modified after the enumerator was instantiated”.
Addresses an issue that causes Screen Readers to report the wrong UI information. This issue occurs because UI Automation reports inaccurate property information for some controls, such as IsDialog and IsControl.
Addresses an issue that fails to apply BitLocker encryption automatically using a Group Policy. This issue occurs on external drives that have a master boot record (MBR) active boot partition.
Addresses a memory leak issue in PKU2U that causes cluster nodes to run out of memory.
Addresses an issue with the Autopilot Reset command taking too long to process after it has been sent.
Addresses an issue that might prevent the Windows Dynamic Host Configuration Protocol (DHCP) Server from offering a lease to a DHCPv6 client after the client moves to a different virtual LAN (VLAN).
Addresses an issue that prevents a task from working correctly when you set the condition “Start only if the following network connection is available” for the task.
Addresses an issue that might display the “Device Removed” error when Direct3D developers use the SetStablePowerState() API in Windows Developer Mode.
Addresses an error that might cause video playback to fail when you switch from an external high-dynamic-range (HDR) display to a built-in non-HDR display.
Addresses an issue that fails to apply the spatial audio effect to sounds when you enable spatial audio.
Addresses an issue with noise when you enable spatial audio and use Bluetooth USB headphones.
Addresses a metadata encoding issue that causes Free Lossless Audio Codec (FLAC) music files to become unplayable if you change their title, artist, or other metadata. For more information, see FLAC encoded music file is corrupted when metadata is edited in Windows Explorer.
Adds support for the .hif file extension for High Efficiency Image File (HEIF) images.
Addresses an issue that might cause a system to stop working when using Remote Desktop for USB redirection of an Xbox One controller.
Addresses an issue that might cause a RemoteApp window to flicker or move to another area of the screen when using touch or pen input.
Addresses an issue with the PerfMon API that might cause handle leaks, which slow performance.
Addresses an issue that might cause endless replication when you promote a new domain controller and the Active Directory Recycle Bin feature is enabled.
Addresses an issue that sporadically prevents the Resource Host Subsystem (RHS) from registering network name resources in the Domain Name System (DNS). As a result, Event ID 1196 appears.
Addresses an issue with devices that were configured using mobile device management (MDM) RestrictedGroups, LocalUsersAndGroups, or UserRights policies. These devices incorrectly continue to receive the policy after you use MDM to remove the configuration profile that has the policy. As a result, users of the affected devices might have incorrect group memberships and UserRights assignments or other symptoms. This issue occurs after installing Windows updates from October 29, 2020 and later.
Addresses an issue that prevents users from receiving geographic location information even when all the geolocation UI settings are enabled correctly, and the device contains a location sensor.
Addresses an issue that fails to register a DNS update to an A record and a PTR when Azure virtual machines update against corporate DNS zones.
Addresses a timing issue that might cause a RemoteApp to intermittently duplicate characters that were entered on the local keyboard or pasted from the Windows clipboard.
Addresses an issue with the Magnifier that causes the mouse pointer to jump around the screen when you move the mouse.
Remember that you can either download this update manually or you can do it through the Windows Update feature in the Settings menu, where it will show up as an optional update.
In order to get the standalone package for the latest SSU, you can search for it in the Microsoft Update Catalog.
As usual, this is an optional update, but all the changes here will be rolled into next month’s Patch Tuesday, which is mandatory.
What version of Windows 10 are you using? Let us know all about it in the comments section below.
Microsoft is constantly trying to supply users with a more stable and secure system by performing more frequent updates for Windows 10.
On the other hand, those users listed over 30 errors related to Windows 10’s system update. And some of those are a tough nut to crack.
One of those annoying errors is linked with the code 0x8024a10a. According to numerous users, this error occurs both on PCs and Windows-powered smartphones. It completely shuts down the update process.
On the other side, Microsoft is not addressing it as it should. So, we’ll try and clear things up with this article.
How to fix Windows 10 Update error 0x8024a10a
Windows update error 0x8024a10a can prevent you from installing the latest updates, and that can be a security concern. Speaking of this error, here are some similar issues users reported:
Windows 10 not updating, cannot update – The main problem with this error is that it will prevent you from updating your PC, but you should be able to fix it by using one of our solutions.
Update error 0x8024a10a laptop – This issue affects both laptop and desktop PC, and if you encounter it, you might be able to fix it by temporarily disabling your antivirus.
0x8024a10a Windows 10 update – According to users, this error occurs mostly while trying to download new updates. To fix the problem, reset Windows Update components and check if that helps.
Solution 1 – Disable Your Antivirus
Some users reported that, on some occasions, third-party antimalware software slowed down or even stops the Windows update process.
Using an antivirus tool is important if you want to protect your PC from online threats, but sometimes your antivirus can interfere with your system and cause this error to occur.
To fix the problem, it’s advised to disable certain antivirus features and check if that helps. If that doesn’t work, your next step would be to disable your antivirus altogether.
Even if you decide to do that, you’ll still be protected by Windows Defender, so you don’t have to worry about your safety.
If the error code still appears, you might have to remove your antivirus to solve this problem. If removing the antivirus fixes the issue, it might be a good time to consider switching to a different antivirus solution with maximum protection that won’t interfere with your system.
Additionally, it is a good idea to disable your VPN while updating.
Solution 2 – Perform the System File Checker
System File Checker (SFC) is the built-in tool that helps you scan and repair various system files. Mostly due to virus infections, your files may get corrupted or incomplete.
If the update worked well before, and then stopped for no apparent reason, SFC may be just the tool for the job. You can use System File Checker this way:
Press Windows key + X and run Command Prompt (Admin).
In the command line, type sfc/scannow
The process should last for approximately 5 minutes.
After it’s done, restart your PC and try updating again.
If the SFC scan was unsuccessful, you might want to try using a DISM scan instead. DISM is an acronym for Deployment Image Servicing and Management.
The main task of the DISM is to scan and fix corrupted files related to Windows Update. To use DISM, just follow these steps:
Press Windows key + X and start Command Prompt (Admin).
In the command line type following command: DISM.exe /Online /Cleanup-image /Restorehealth
In case the DISM can’t obtain files online, try using your installation USB or DVD. Insert media and type following command:
Be sure to replace ”C:RepairSourceWindows” path of your DVD or USB.
The operation should last no more than 5 minutes.
Once the DISM scan is finished, check if the problem is still there. If the issue persists, or if you were unable to run SFC scan before, repeat the SFC scan and check if that helps.
Solution 3 – Try starting PC in the Clean Boot mode
Sometimes third-party applications can interfere with your system and cause update error 0x8024a10a to appear.
Certain applications and services can start automatically with your PC and cause this issue to appear, and in order to fix the problem, you need to perform Clean boot.
This is rather simple, and you can do it by following these steps:
Press Windows Key + R and enter msconfig. Press Enter or click OK.
Go to Services tab and check Hide all Microsoft services box. Then click Disable All and press Apply.
Go to Startup tab and click Open Task Manager.
Disable all Startup programs individually and press OK.
Restart your PC and try updating.
If the problem is persistent, you can move to the final step. Additionally, If you are keen to retrieve past configuration, you can do it easily by returning to System Configuration and Task Manager respectively.
Just enable disabled processes and you are good to go.
Solution 4 – Reset Windows Update components
If you have issues with update error 0x8024a10a, the problem might be related to Windows Update services.
Sometimes issues with services can be resolved simply by restarting them, but there are multiple services related to Windows Update, so restarting them all by hand can be a time-consuming task.
This process is quite simple, and you’ll have your script ready in a matter of minutes. Once you create a script, just run it and the problem will be resolved.
Solution 5 – Run Windows Update troubleshooter
Windows comes with various tools called troubleshooters that can fix common PC problems. Several users reported that they fixed error 0x8024a10a simply by using Windows Update troubleshooter.
To use Windows Update troubleshooter, you just need to do the following:
In the left pane, select Troubleshoot. Select Windows Update from the right pane and click Run the troubleshooter button.
The troubleshooter will now start. Follow the instructions on the screen to complete it.
Once the troubleshooter is finished, check if the problem is still there.
Solution 6 – Download the desired update manually
According to users, if you can’t download Windows updates due to error 0x8024a10a, you might be able to circumvent the problem simply by downloading and installing the desired update manually.
To do that, you just need to follow these steps:
First, you need to find out the code of the update you’re trying to download. To do that, simply go to Windows Update and check the code of the update you’re trying to install. The code will consist of an array of numbers and KB letters at the beginning. Once you find the code, copy it or write it down.
Go to Microsoft’s Update Catalog website. Now enter the update code in the search bar. List of results will now appear. Select the update that matches your system architecture and click Download.
After downloading the update, run the setup file and you should be able to update your system.
Solution 7 – Perform an in-place upgrade
If you’re having problems with update error 0x8024a10a, you might be able to solve it by performing an in-place upgrade.
In case you’re not familiar, this process will install the latest version of Windows while keeping all your personal files and applications intact.
To perform an in-place upgrade, you need to do the following:
Wait while the application prepares your PC. Now choose Download and install updates and click Next.
Wait while the updates are downloaded and follow the instructions on the screen until you get to the Ready to install screen.
On Ready to install screen, click Change what to keep. Now select Keep personal files and apps and click Next.
Follow the instructions on the screen to complete the installation.
Once the installation is finished, you’ll have the latest version of Windows 10 installed and the issue should be resolved.
Solution 8 – Perform a clean install of Windows 10
In case all of the above steps proved futile, you may consider reinstallation is your easiest solution. We are aware that can take some time, but the installation process for Windows 10 is not lengthy nor hard to perform.
We hope you managed to fix your update issue with these workarounds. If you have any questions or doubts, be sure to address them in the comments section below.
With the 2021 Microsoft Build event well underway, we can all just sit back and take in all the important announcements that have already been made so far.
The future looks bright for Microsoft and the grand implementations that developers have revealed are just around the corner.
Windows receives its most important update of the decade
Right from the very start of the Microsoft Build 2021 conference, CEO Satya Nadella blew everyone’s minds by stating that Microsoft will soon release one of the most significant updates to Windows of the past decade.
He also mentioned that one of the important targets that they want to achieve is to unlock greater economic opportunities for developers and creators.
And soon we will share one of the most significant updates to Windows of the past decade to unlock greater economic opportunity for developers and creators. I’ve been self-hosting it over the past several months, and I’m incredibly excited about the next generation of Windows.
Nadella continued talking about this absolute change for Windows by saying that he has been also testing the next generation of Windows in the last couple of months.
Let’s all keep in mind the fact that the complete system makeover we all know as Sun Valley is already on its way, so this leads us to believe that something even greater is about to happen.
Also referenced in his keynote was the brand new Microsoft Store app that is in the works at the moment, a project that vows to unlock a better economy for developers and creators within the operating system itself.
This news will be welcomed with open arms by users everywhere, considering that it will allow them to submit any Windows application.
Previous rumors may have suggested that the tech giant may even give permission to third-party commerce platforms in apps, so that developers could actually avoid paying Microsoft’s commissions.
What’s next for Windows?
Judging from what Satya Nadella announced at the 2021 Microsoft build it is entirely possible that the operating system could be looking at a lot more changes than just the user interface.
He also implied that these significant changes are about to happen very soon, so we can expect major updates announcement, or maybe even an event, in the coming weeks.
It appears that Microsoft is undergoing many projects that will completely change the way we see and interact with Windows.
The future never seemed as close as it does now and we can all just rejoice with the new opportunities that will be created once the waters calm down a bit.
What’s your opinion on all the changes brought to your favorite operating system? Tell us all about it in the comments section below.
Recycle Bin is one of those features of Windows that we use every day without thinking twice about it, but several users reported Recycle Bin file association error on their PC. This is an unusual issue, and in today’s article we’ll show you how to fix it.
According to users, file association errors can cause problems with Recycle Bin, and speaking of issues, here are some common problems that users reported:
The Recycle Bin on C is corrupted Windows 10 – According to users, sometimes your Recycle Bin can become corrupted. To fix the problem, remove the Recycle Bin directory using Command Prompt.
Recycle Bin this file does not have a program associated – This issue can occur due to a malware infection on your PC. However, you can fix the problem by performing a full system scan.
Recycle Bin file association won’t delete, access denied – These are some issues that can appear on your PC, but you should be able to fix them using one of our solutions.
Recycle Bin file association error, how to fix it?
According to users, if you’re having Recycle Bin file association error, the problem might be related to the files in the Recycle Bin. To fix this issue, users are suggesting to access your Recycle Bin and manually remove all files from it.
To do that, simply open Recycle Bin and select all items in it. If you have many files in the Recycle Bin, you can use Ctrl + A shortcut to select them all. After selecting all files, delete them and the problem should be resolved.
2. Perform a Full system scan
If you’re getting Recycle Bin file association error, the problem might be a malware infection. Malware can interfere with your system, change your settings and prevent you from using certain features. If you’re concerned that you might be infected by malware, we strongly suggest that you perform a full system scan.
Keep in mind that this scan can take several hours depending on the size of your hard drive. If you want a reliable antivirus that will prevent almost all malware threats, we strongly suggest that you consider TotalAV.
Sometimes certain issues can appear if you’re not using an administrative account on your PC. According to users, they managed to fix Recycle Bin file association error simply by adding their account to the Administrators group and removing it from all other groups. To do this, just follow these steps:
Press Windows Key + R and enter lusrmgr.msc. Now just press Enter or click OK.
Now select Users from the left pane. In the right pane, double-click your account.
Navigate to Member Of tab and click the Add button.
In the Enter the object names to select field enter Administrators. Now click Check Names button. If everything is in order, click OK.
Optional: Some users are suggesting to remove your user account from other groups, so you might want to do that as well. To do that, select Users group and click the Remove button. Keep in mind that removing your account from the user group could potentially cause issues, so be cautious.
Save changes and restart your PC.
Once your PC restarts, check if the problem is still there. According to users, this solution worked for them, so feel free to try it out.
4. Use Command Prompt
According to users, sometimes you might be able to fix the problem with Recycle Bin file association simply by using the Command Prompt. In case you don’t know, Recycle Bin is actually a directory on your PC, and you can access it and delete the files manually from it if you want.
To do that, just follow these simple steps:
Press Windows Key + X to open Win + X menu. You can also open this menu by right-clicking the Start button. Now select Command Prompt (Admin) or PowerShell (Admin).
When Command Prompt opens, enter rd /s /q C:$Recycle.bin and press Enter.
You’ll be asked to confirm if you’re sure that you want to remove this directory. Type Y and press Enter.
After removing the directory, the problem should be completely resolved and Windows will automatically create a new Recycle Bin. Keep in mind that this method will delete all files that you have in your Recycle Bin, so be sure to back up any files that you might need.
5. Perform an SFC and DISM scans
If you’re getting Recycle Bin file association error on your PC, the problem might be caused by a corrupted Windows installation. This can occur for various reasons, but you might be able to fix the corrupted installation simply by doing the following:
Start Command Prompt as an administrator.
When Command Prompt opens, enter sfc /scannow and press Enter to run it.
The SFC scan will now start. The scanning process can take about 10 to 15 minutes, so don’t interfere with it in any way.
After the scanning process is finished, check if the issue is still there. Some users reported that the SFC scan didn’t fix the problem for them. If that’s the case, you need to perform a DISM scan by doing the following:
Start Command Prompt as an administrator.
Now enter the DISM /Online /Cleanup-Image /RestoreHealth command and press Enter to run it.
DISM scan will now start. Keep in mind that this scan can take about 20 minutes, so don’t interfere with it.
After completing both scans, check if the problem is still there. In addition, you might want to repeat the SFC after the DISM scan if you weren’t able to run it before.
6. Enter Safe Mode
If you keep having Recycle Bin association error on your PC, you might be able to fix the problem by accessing the Safe Mode. To do that, just follow these steps:
Open the Settings app and head over to the Update & Security section.
Select Recovery from the menu on the left. Now click the Restart now button in the right pane.
Select Troubleshoot > Advanced options > Startup Settings. Now click the Restart button.
After your PC restarts, you should see a list of options. Press the appropriate keyboard key to select the desired version of Safe Mode.
Once you enter Safe Mode, check if the problem is still there.
7. Perform a System Restore
System Restore is a useful feature that allows you to easily restore your PC and fix any problems that started occurring recently. If Recycle Bin file association error started appearing not that long ago, you might be able to fix it using System Restore. To do that, just follow these steps:
Press Windows Key + S and type system restore in the search field. Click on Create a restore point from the list of results.
System Properties window will appear. Now click the System Restore button.
When System Restore window appears, click Next to proceed.
Check Show more restore points option, if available. Now you just have to select the desired restore point and click Next.
Follow the instructions on the screen to complete the restoration process.
Once your system is restored, check if the problem is still there.
8. Install the missing updates
According to users, Recycle bin file association error can sometimes appear if you don’t have the latest updates installed. Glitches can sometimes appear on Windows 10, and the best way to keep your PC bug-free is to keep your system updated.
Windows updates itself for the most part, but sometimes you might miss an update or two. However, you can always check for updates manually by doing the following:
Open the Settings app and go to the Update & Security section.
Click the Check for updates button. If there are any updates available, Windows will download them automatically in the background.
Once updates are downloaded, simply restart your PC to install them. After installing the latest updates, check if the problem is still there.
Recycle Bin file association error isn’t serious, but it can be quite annoying. However, we hope that you managed to fix it by using one of our solutions.
Sometimes, you may get a grey screen while opening the Snipping tool in Windows 10. This can be a problem and prevent you from creating screenshots.
This isn’t a major issue, but if you tend to rely on this tool for your screenshot needs, it’s important to know how to fix it, and this guide will show you the best ways to do it.
Why does a grey screen appear in the Snipping Tool?
Corrupted system files can affect this software and cause this problem.
In some instances, third-party applications or processes can interfere with the Snipping Tool.
Outdated graphics card drivers can sometimes cause this and many other problems.
How can I fix the grey screen of Snipping Tool in Windows 10?
1. Update the display driver
Press the Windows key + R to open Run.
Type devmgmt.msc, and click OK to open the Device Manager.
In the Device Manager, expand the Display adapters section.
Right-click on the Display Adapter installed on your PC (Intel or AMD) and select Update driver.
In the next screen, select Search automatically for the updated driver software.
Wait for Windows to look for new driver update. If found, download and install the updates.
Restart the computer after the driver is updated. For more information about driver updates, check our guide on how to update outdated drivers. Launch the snipping tool, and check if the grey screen error still exists.
Sometimes Windows has difficulty installing the latest drivers available on the market, and downloading and updating them manually also can be quite an arduous task.
That’s why we recommend using a tool that automatically updates drivers for you every time a new version is released.
2. Perform System File Check
Type cmd in the search bar.
Right-click on the Command Prompt option, and select Run as administrator.
In the Command Prompt, type the following command and press Enter:Sfc /scannow
The System File Checker tool will scan the system for any issue with the system files and repair them.
Reboot the system and check for any improvements.
If after updating the drivers the issue persists, use the System File Checker utility to scan and fix corrupted system files.
Type msconfig, and click OK to open the MS Configuration.
Open the Boot tab.
Under Boot Options, check the Safe Boot box.
Click Apply and OK to save the changes.
Restart the system when prompted by Windows.
Open Snipping Tool, and if the app opens without the grey screen, it means one of the third-party software, hardware or driver is causing the issue with the app.
In this case, start by removing any newly installed external hardware and uninstall newly installed software. Check again until you find the conflicting software.
4. Other solutions to try
Press Ctrl + Shift + Esc, to open the Task Manager.
Close all the programs that are running on your system.
If the issue persists, try the following troubleshooting tips to fix the issue. You should reboot the system and check if the Snipping tool is now accessible.
Also, if you want an alternative to the built-in snipping tool, check out our comprehensive guide with the best snipping tools for Windows 10.
We hope our solutions helped you fix the Snipping tool grey screen issue in Windows 10. For more suggestions or questions, please access the comments section below.

![Unable to Display to a VGA Projector in Windows 10/11 [FIX]](https://windowsreport.com/wp-content/uploads/2018/02/Unable-to-display-to-a-VGA-projector-in-Windows-10-SOLVED.jpg)
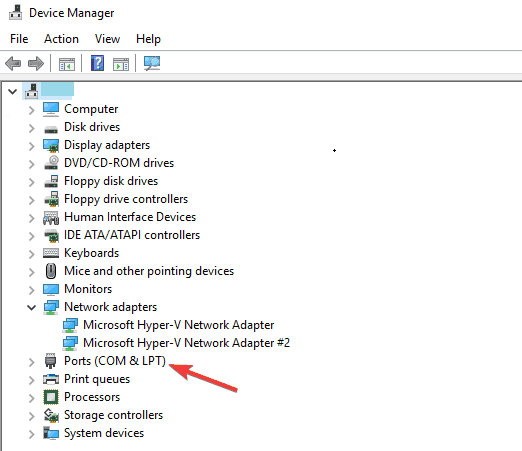
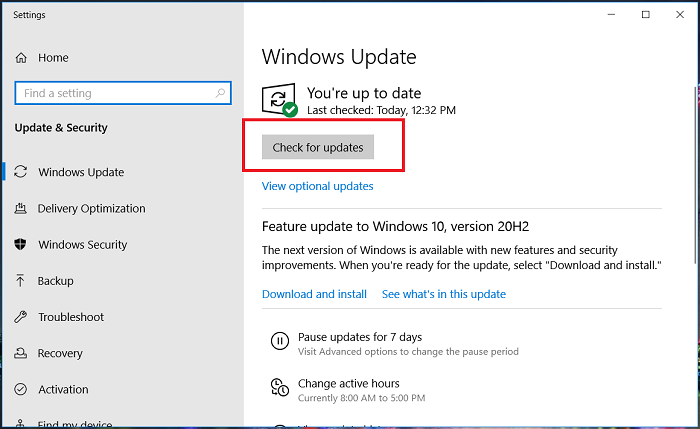
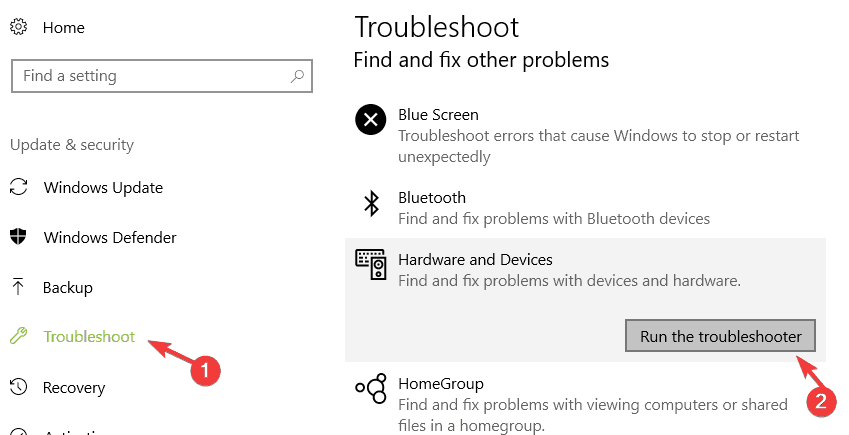
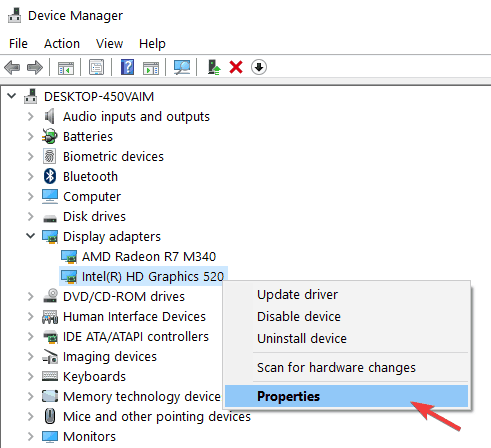
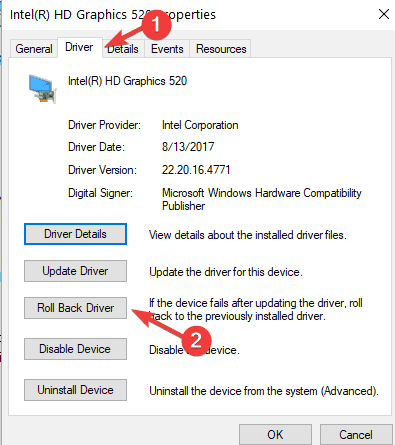
![Windows Defender error 577 on Windows 10/11 [Quick Solutions]](https://windowsreport.com/wp-content/uploads/2020/04/Windows-Defender-error-577.jpg)



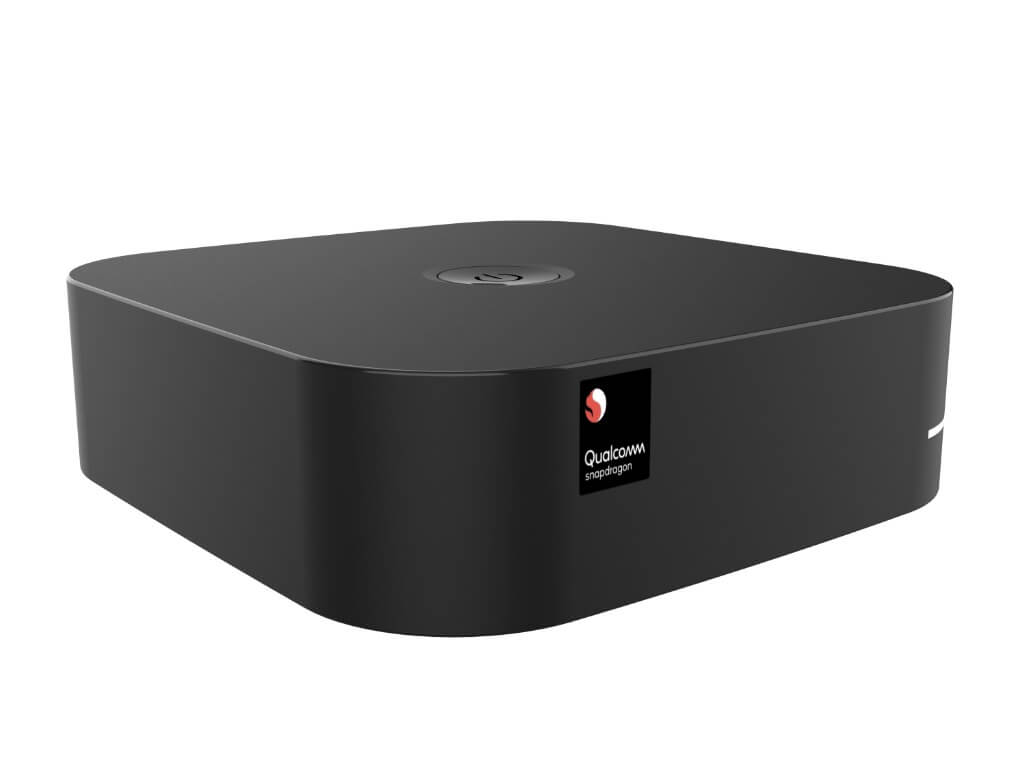
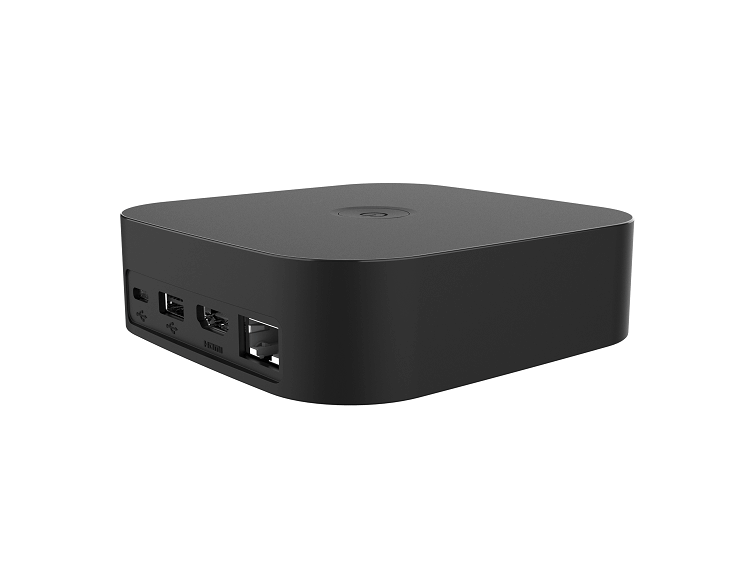
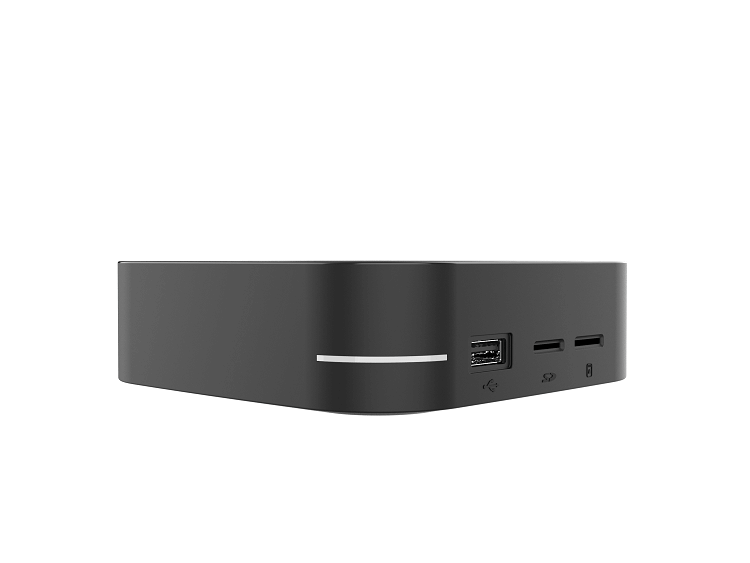


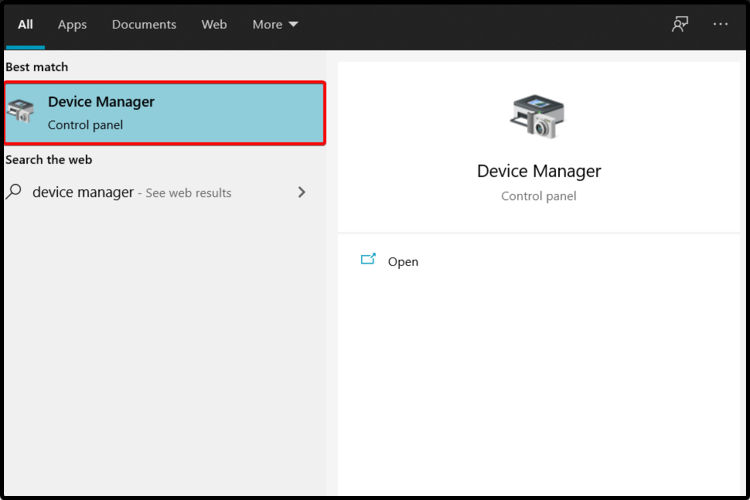



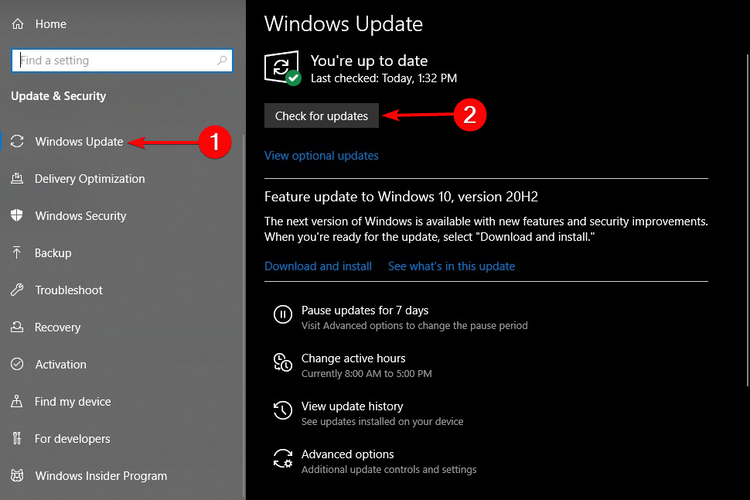



![Windows 10/11 search bar without Cortana [Complete Guide]](https://windowsreport.com/wp-content/uploads/2021/05/Windows-10-search-bar-without-Cortana.jpg)


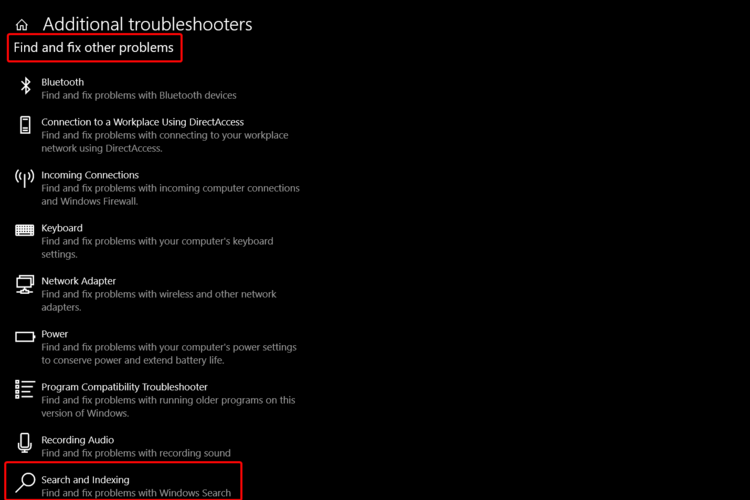








![System error 109: The pipe has ended [Quick Fix]](https://windowsreport.com/wp-content/uploads/2021/05/System-error-109-the-pipe-has-ended.jpg)
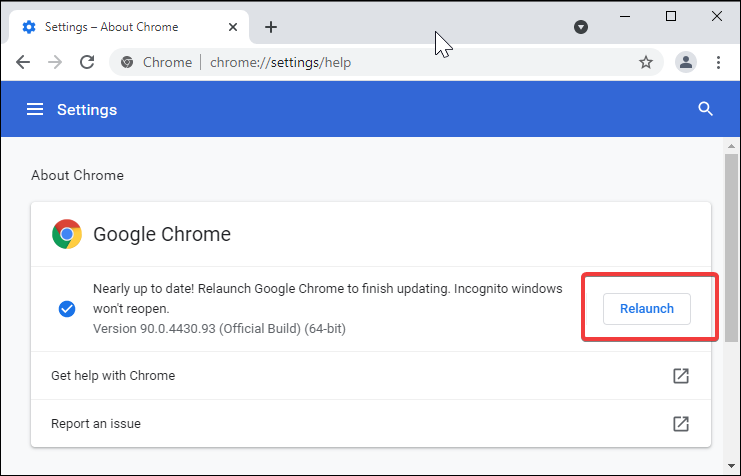
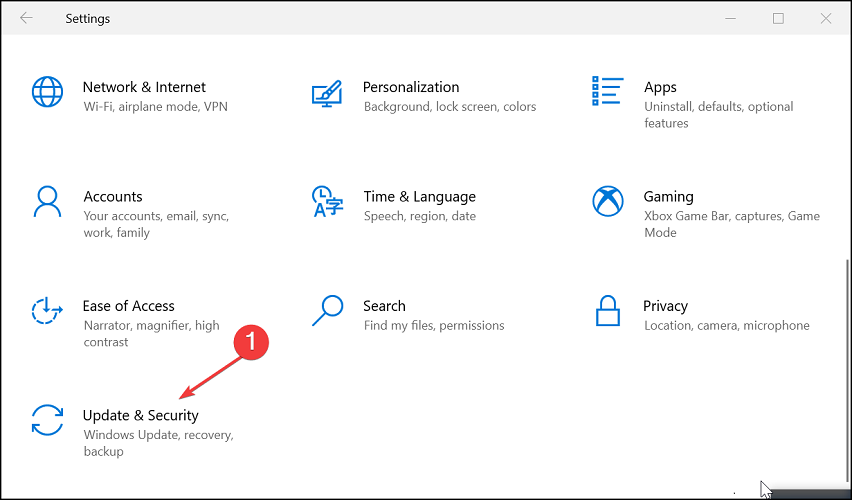
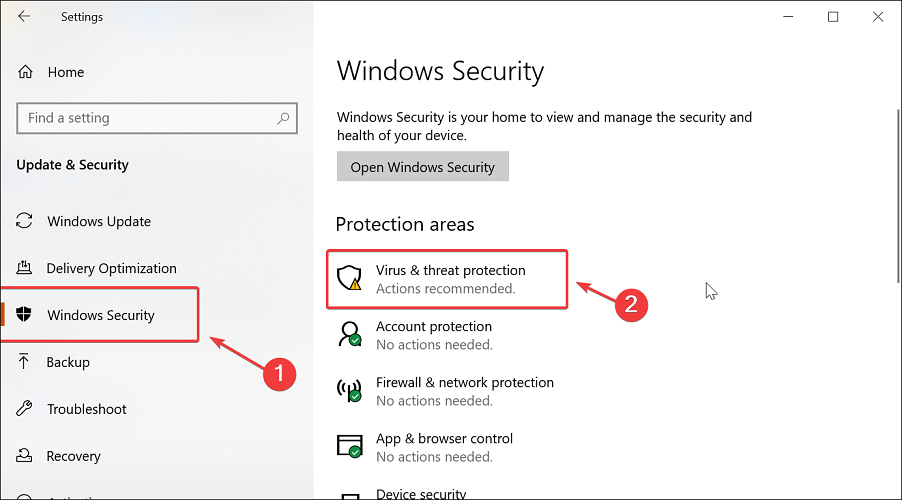
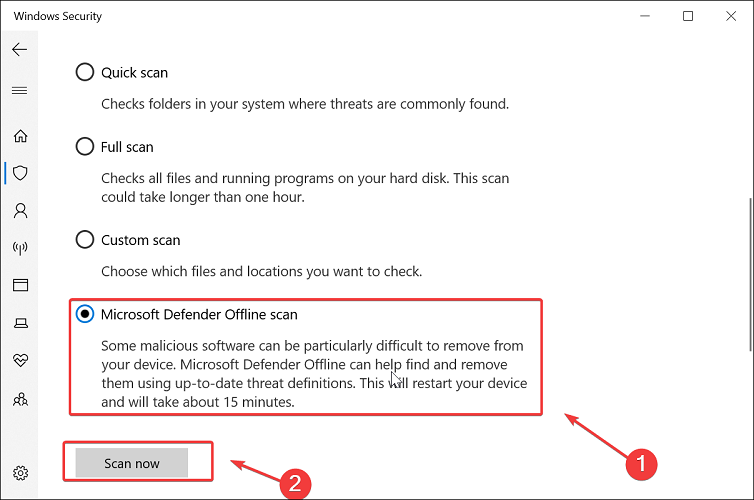




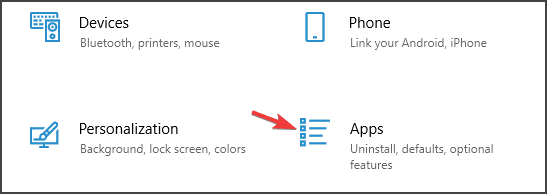
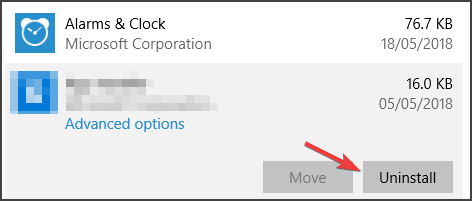


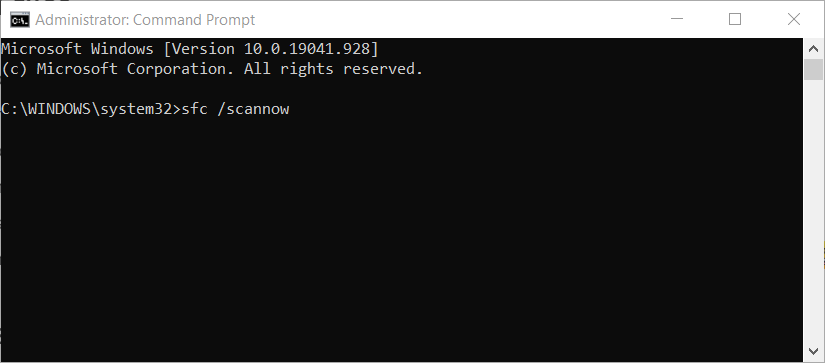


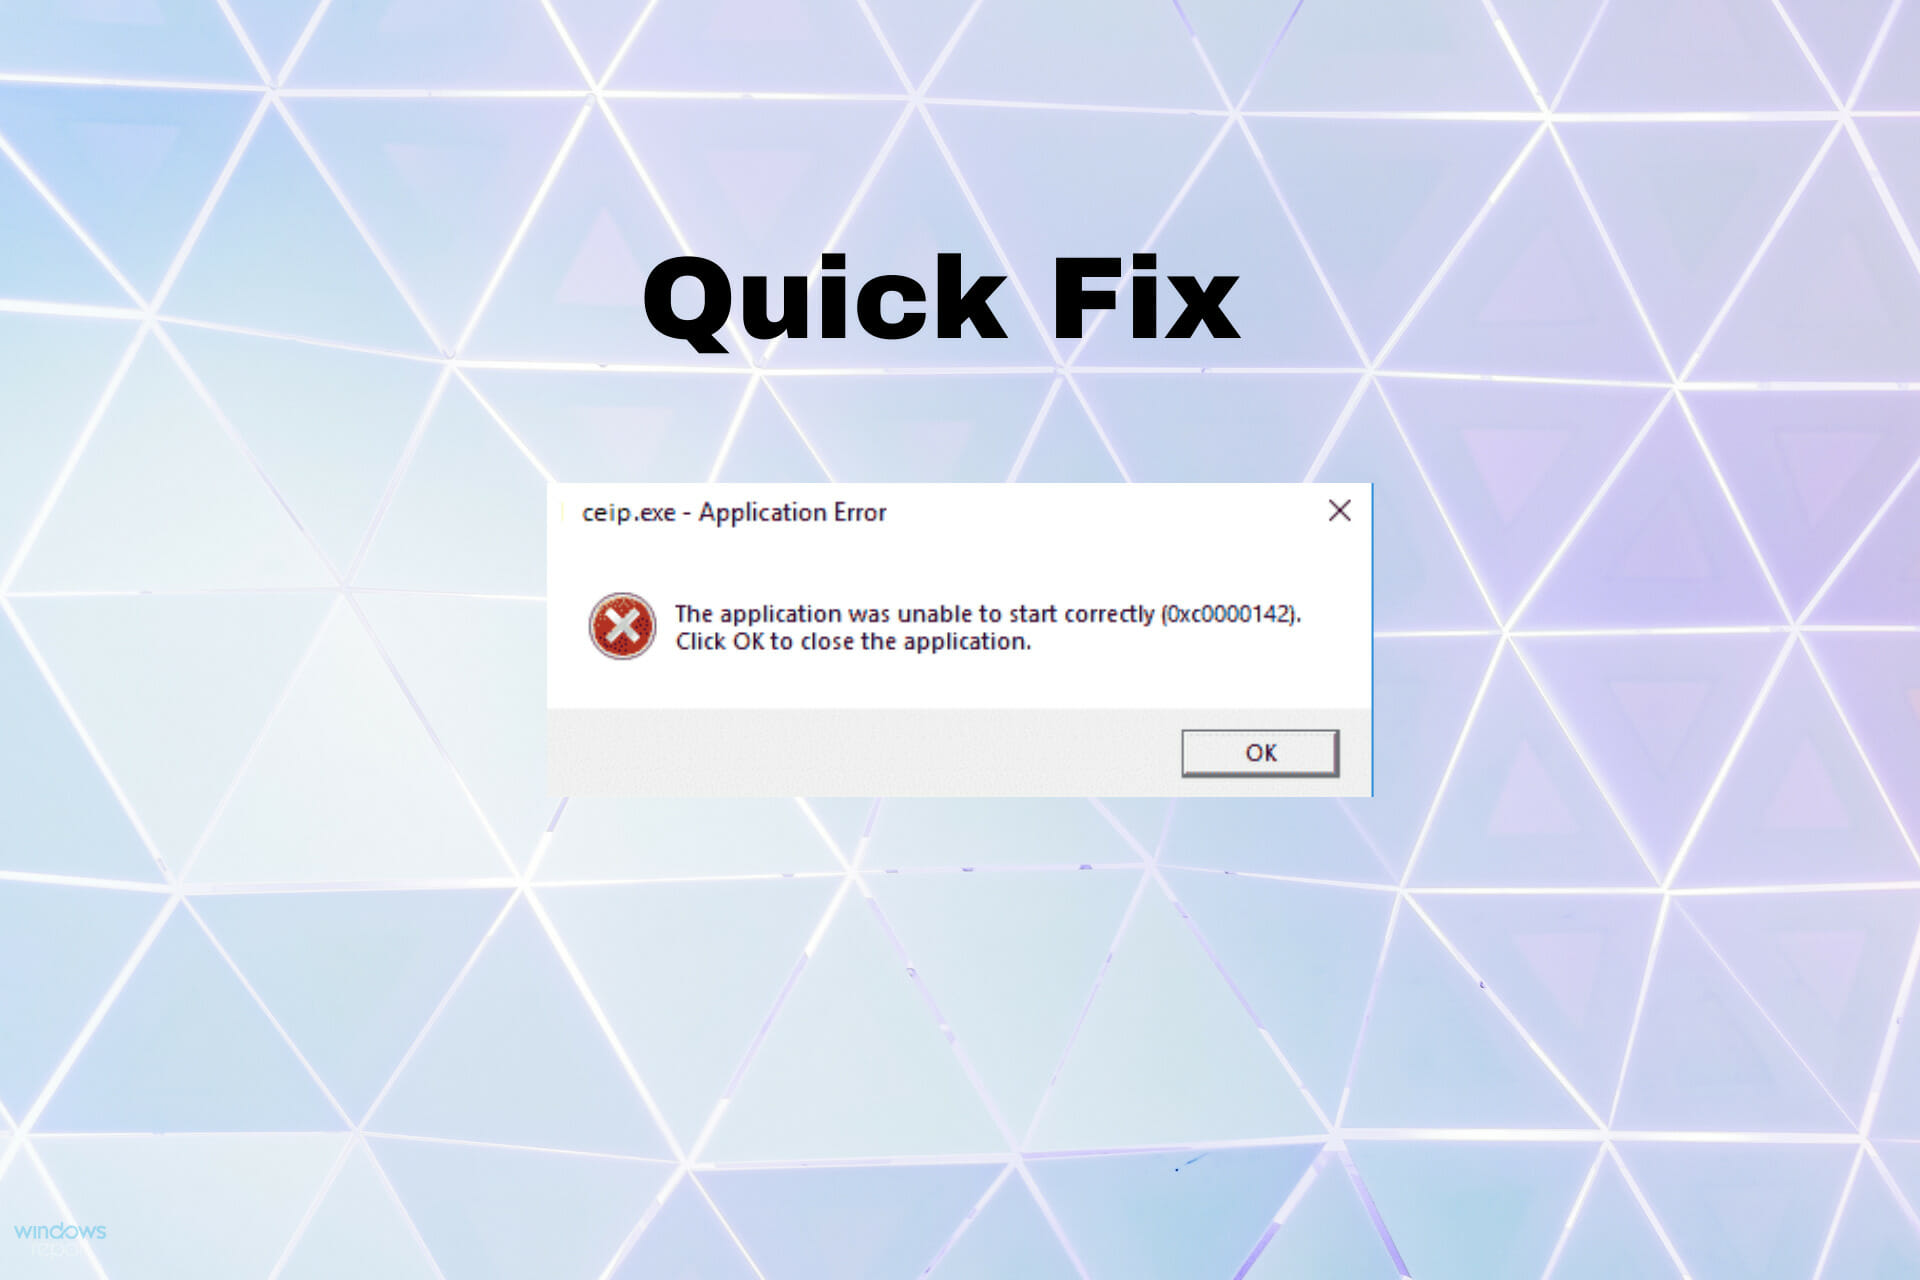
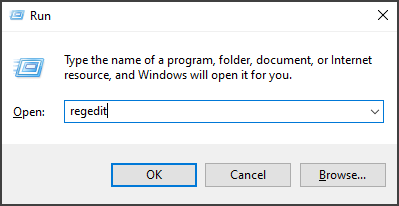








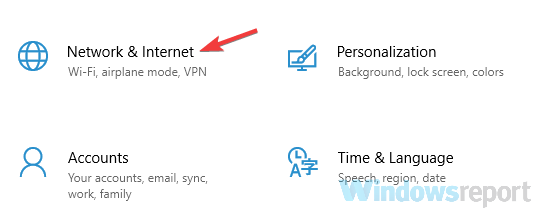
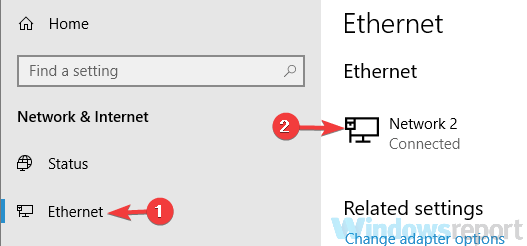
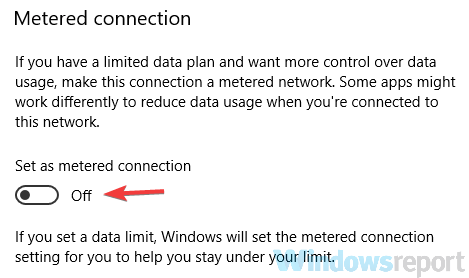
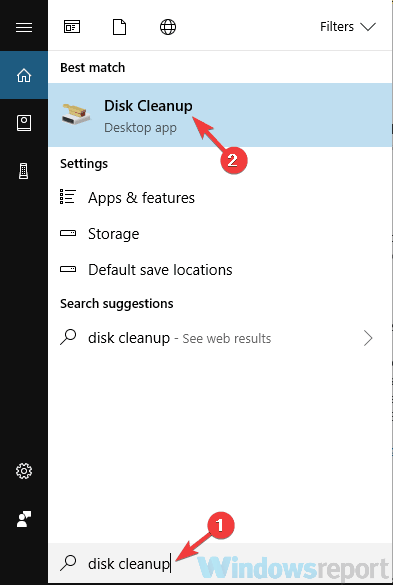
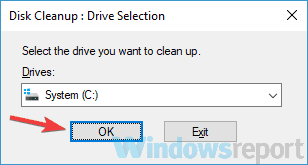
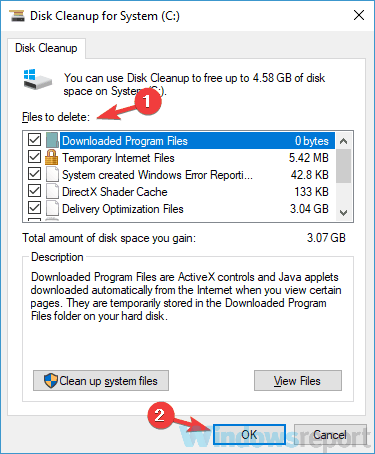
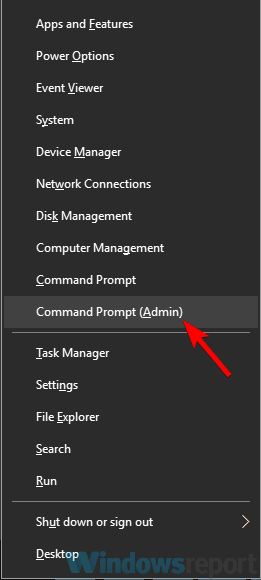
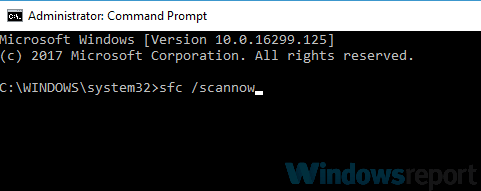
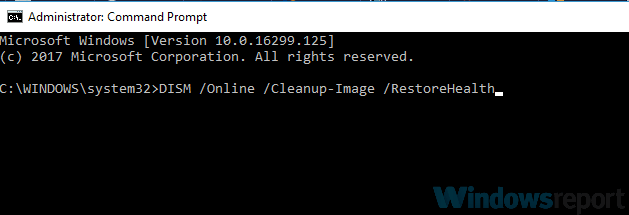
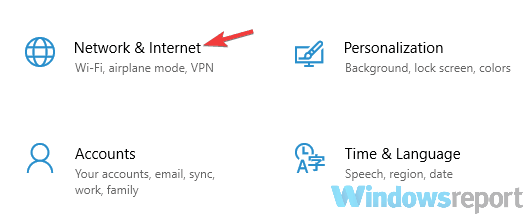
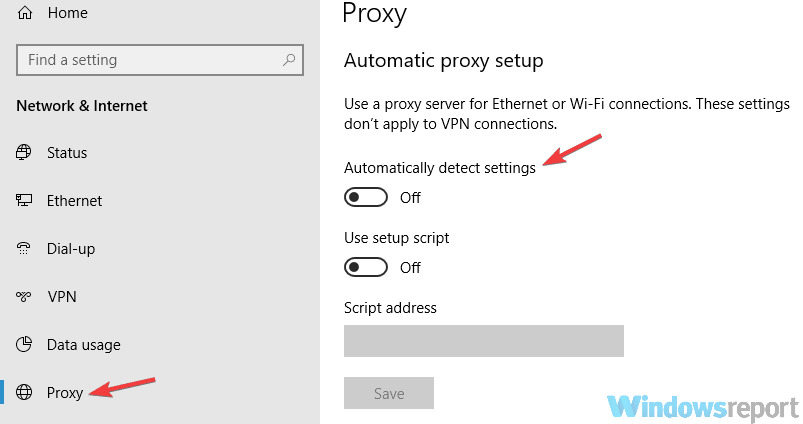


![The driver detected a controller error [Fixed]](https://windowsreport.com/wp-content/uploads/2020/07/The-driver-detected-a-controller-error-1.jpg)


























![How to turn your PC into a Mac [Best Methods]](https://windowsreport.com/wp-content/uploads/2021/05/How-to-turn-your-PC-into-a-Mac-Best-Methods.jpg)