Mortal Kombat 11: Aftermath (with RoboCop!) is now live on Microsoft’s Xbox One consoles

The first-ever major expansion for a Mortal Kombat video game, Aftermath, is now live for Mortal Kombat 11 owners on Xbox One.

This downloadable content (DLC) contains a new story, three skin packs, and three new characters including Sheeva, Fujin and the classic RoboCop voiced by the actor who played him in the original film, Peter Weller.

Those who already own the main game can buy the Aftermath content by itself while a new Mortal Kombat 11: Aftermath Kollection is also now available for those wanting to buy the main game, the Aftermath DLC, and the other previously released DLC all in one package.

Are you excited for this Aftermath content? Let us know what excites you the most in the comments below and then follow us on Pinterest and Twitter for more Xbox gaming content.


How to Retrieve Files From a Damaged Windows Laptop

Let’s assume that your laptop broke down, but you want to recover your personal files from it. In this tutorial we will show you how to recover your files from a broken laptop, assuming that your hard drive is still working.

You can use this guide to recover your files if your laptop won’t turn on, or if your display is damaged, but we have to mention that this guide won’t help you recover your files if your hard drive isn’t working. Before we start, you’ll need an external USB enclosure for 2.5″  hard drives.

retrieve files bricked computer

How to recover files from a broken laptop

  1. Install Stellar Data Recovery Professional
  2. Remove your hard drive
  3. Buy an external USB enclosure
  4. Install your HDD
  5. Connect your HDD to a functional PC
  6. FIX: Access is denied to external hard drive

STEP 1: Install Stellar Data Recovery Professional

Stellar Data Recovery software is a great tool that help you restore photos, videos and files that you accidentally deleted. It can even help you restore files from a lost Windows partition!

If your laptop can still be turned on and used, it’s the fastest way. Install the software, choose the location and then move all your recovered files on an external drive.

If that laptop is unusable, download and install this software on a different device, follow the next steps in this article to connect your old drive to your new device and run Stellar Data Recovery on the old drive to recover anything that you need.

It runs on Windows 10 as well as older versions of Windows and has very little system requirements (minim 2GB RAM, 250MB of disk space and a Pentium process are listed).

This means you can use almost any device, new or old, to recover data from the broken laptop.

Of course, you can use the software for even more things such as: recover emails from .PST files (Microsoft Outlook), recover files from other media such as SSD, USB sticks, CD/DVD or other optical media.

Download Stellar Data Recovery Professional here

STEP 2: Remove your hard drive

Firstly, you’ll need to remove the hard drive from the laptop. If the hard drive has mounting brackets or caddy you’ll have to separate them from the hard drive. As for the hard drive type, most laptops use 2.5” hard drives, and they can be IDE or SATA hard drives. We’ll show you the difference between the two in the following pictures.

2.5″ IDE HARD DRIVE

The IDE hard drive connector has two rows of pins.

ide hard disk drive wind8apps

2.5″ SATA HARD DRIVE

The SATA hard drive has two flat connectors. One of these connectors is used for data and one for power.

We also have to mention that same type of connectors are used in 3.5″ SATA desktop hard drives which means that you can connect a 2.5″ hard drive from your laptop directly to a desktop PC using same cables.

sata 2.5 inch wind8apps

STEP 3: Buy an external USB enclosure

If you don’t have external USB enclosure for 2.5″ hard drive, you’ll have to purchase one, just keep in mind that your purchase IDE or SATA enclosure depending on the type of your hard drive, since IDE enclosures aren’t compatible with SATA hard drives and vice versa.

We recommend NexStar brand but any other brand should work too. For IDE hard drives you can use NexStar 2.5″ IDE HDD enclosure. For SATA hard drives you can use NexStar 2.5″ SATA HDD enclosure.

STEP 4: Install your HDD

Install your IDE or SATA hard drive into the enclosure.

STEP 5: Connect your HDD to a functional PC

Now you can connect your hard drive enclosure with a working PC via USB. After connecting hard drive enclosure with your PC, it should be detected by the computer automatically and the external hard drive will appear in My Computer/This PC.

Now you can access it, and save any files you need from your laptop. We have to mention that Windows XP, Vista and Windows 7 keep user files in different locations, so here are few tips how to find them.

In Windows XP, you’ll find user files using the following path:

  • C:Documents and SettingsUser Account

In Windows Vista and Windows 7 you’ll find user files using the following path:

  • C:UsersUser Account

Remember, C: is the main system drive, but the external hard drive will have a different letter, but the path to user files will remain the same.

Sometimes, you may also need a file recovery program as you may not have access to all the files stored on the hard drive. If you’re in this situation, remember our recommendation in Step 1. You can also check out this list of the best file recovery software to use on your computer. Obviously, if you can immediately access all the files and folders once you’ve connected the HDD to a functional computer, then you don’t need to install any file recovery software.


Damaged USB flash drive? Our guide help you recover files from it.


FIX: Access is denied to external hard drive

While accessing user files you can get Access is Denied error message, this happens because your user account on the broken laptop was protected by a password, but there’s a way to fix that.

In order to get access to user files on the external hard drive you’ll have to take ownership over the user folder. In order to take ownership over Users folder (if you had Windows Vista or Windows 7 installed) or Documents and Settings folder (if you have Windows XP installed) you’ll need to follow these steps.

Solution: Replace the owner of the files

STEP 1

  1. Find the files located on the external hard drive and right click on the Users folder (if you have Windows Vista or Windows 7 installed) or right click on Documents and Settings folder (if you had Windows XP installed) and after that click on Properties.
  2. Head over to the Security tab in User Properties windows.
  3. Now click on Advanced button.

STEP 2

  1. Click on Owner tab in Advanced Security Settings for Users window.
  2. Now click on Edit button.

STEP 3

  1. Left click on Administrators group.
  2. Check the Replace owner on subcontainers and objects box.
  3. Click OK button.

STEP 4

When Windows Security pops up, click Yes. We have to warn you that the process of taking ownership might take a while. This depends on how many files you have in Users or Documents and Settings folder, so you might have to wait for a bit. After this process is done, you should be able access to all of your files.

0xc004f014 Windows Activation Error: 4 Fixes You Can Use

Upgrading from a regular Windows OS version to a Pro version can sometimes be tricky. Although the upgrade process is straightforward, various errors could occur when users want to switch to Windows 10 Pro. The 0xc004f014 Windows activation error is one such example.

If you have encountered this error, this article is for you. We explore causes as well as some of the best solutions.

What is 0xc004f014?

This error code shows a problem activating a licensed version of the operating system. Users have observed that a range of factors may trigger the error. Some of these causes include the following:

  • Bad product key – The product key you use for activation may be invalid, and it will trigger the error.
  • Hardware changes – If there are changes to specific hardware components, like the motherboard, you may experience an activation error.
  • Network issues – A bad connection is also a factor, as it can prevent the activation from completing.
  • Firewall software – These are essential tools since they keep your computer safe. However, they may block out legitimate and essential processes.
  • Date and time settings – These are connected to your computer’s ability to communicate with a network. When they are off, users may get an activation error.

Since we now have a grip on possible triggers, let us explore your best solutions.

How do I fix error code 0xc004f014?

Before going into the solutions, you should take the following actions:

  • Verify the product key – Since the wrong key can trigger this problem, double-check that you have inputted the correct one.
  • Check your connection – You may have to switch to a different network connection, which may save you any further troubleshooting.

1. Activate Windows with a phone call

  1. Press the Win key + R to open the Run window.
  2. Type in slui 4 and press Enter.
    0xc004f014
  3. The window will open, asking you to choose the region you’re residing in.
  4. Windows will now make an automated call.
  5. During the call, you’ll need to read your Installation ID. Once you read it, you’ll be provided with a Confirmation ID. 
  6. After that, you’ll have to read the Confirmation ID out loud to ensure you got everything right.
  7. Click the Activation button, and follow further instructions o finish the activation process.
  8. End the call and restart your computer.

Windows 10 users can activate the OS using a free call regardless of the location. This is a great way to solve this and similar Windows update errors.

2. Use the default product key

  1. Press Windows + R, type notepad, and hit Enter.
  2. Paste the generic registration key for Windows 10 Pro shown below and your new Windows 10 Pro registration key. Then save the file on your desktop.
    VK7JG-NPHTM-C97JM-9MPGT-3V66T
  3. Type network on Windows search, and click Network and Sharing Center.
    0xc004f014
  4. Click Change adapter settings.
  5. Disable all network devices on your computer by right-clicking them and selecting Disable.
  6. Reboot your computer.
  7. Press Windows + I to open the Settings app.
  8. Navigate to Updates & Security.
  9. Click Activation in the left pane, and select Change product key.0xc004f014
  10. Open the text file you saved on your desktop, and copy the generic registration key and paste it in the box, then click on the Next or Start Upgrade button, then Activate.
    0xc004f014
  11. Wait for the upgrade process to complete. Your computer will reboot several times during the process.
  12. Re-enable the network connections you disabled in step 5, by right-clicking them and selecting Enable.
  13. Return to your Setting’s Activation window from step 9.
  14. This time, your Windows Edition should be Windows 10 Pro. Open the text file with the product keys, and copy your new Windows 10 Pro registration Key.
  15. Click on the Change Product Key button.
    0xc004f014
  16. Paste your new Windows 10 Pro registration Key into the textbox and click Next.
    0xc004f014
  17. After a minute or two, a message will appear informing you that your copy of Windows 10 Pro is legitimate.

3. Use Windows Activation troubleshooter

  1. Press Windows + I to open the Settings app.
  2. Navigate to Updates & Security.
  3. Click Activation in the left pane, and if your copy of Windows is not activated correctly, you’ll see the Troubleshoot button. Click it.
    0xc004f014
  4. The troubleshooting wizard will now scan your computer for possible problems. If it finds the solution, follow further instructions to activate Windows.

One great thing about Windows 10 is its built-in troubleshooter for almost any problem. And the 0xc004f014 activation error is not an exception. So, if the previous solutions failed, try the troubleshooter.

4. Change the product key

4.1 Using the Settings app

  1. Press Windows + I to open the Settings app.
  2. Navigate to Updates & Security.
  3. Click Activation in the left pane, and select Change product key.
    0xc004f014
  4. Input a different product key.
  5. Restart your computer and retry the process.

You can also use the Command Prompt to activate Windows 10. Below are the steps.

4.2 Using the Command Prompt

  1. Press Windows + R, type cmd, and hit Ctrl + Shift + Enter to open an elevated Command Prompt.
  2. Change the product key by running the script below (replace new product key with the actual product key).
    slmgr.vbs /ipk <new product key>
  3. Enter the script below and hit Enter to activate the key.
    slmgr.vbs /ato

There you go. Regardless of the activation error causes, we hope at least one of these solutions helped you resolve the 0xc004f014 problem.

If you have any comments, questions, or suggestions, just let us know in the comments below.

Best AI Software for PC Available for Anyone in 2026

There is all sorts of AI software for PC, and finding the right tool might not be as simple as you think.

Luckily, this guide should help you find the right application for your needs, so keep on reading.

Top 5 free AI software to build smart applications

Braina – Best overall

Braina is an artificial intelligence software solution that can perform loads of tasks on Windows 10. It’s also an incredible virtual assistant that can help you accomplish various operations quickly and easier.

Braina, aka Brain Artificial, is a human language interface, automation, and voice recognition software that flawlessly works on computers running Windows.

This software lets you interact with your Windows 10 PC using voice commands. You can also convert speech to text in more than 100 languages.

Find out more about this free AI software solution by reading our Braina review.

Here are the key features of Braina:

  • Voice controlled.
  • Designed to help users with their tasks.
  • Can be accessed from anywhere on the same Wi-Fi network.
  • Outstanding speech recognition.
  • Can work with other apps, websites, and more.

Braina has a free version called Braina Lite.

⇒ Get Braina Lite

H2O.ai – Great for machine learning

H2O.ai was named a leader among the 16 vendors that are included in Gartner’s 2018 Magic Quadrant for Data Science and Machine Learning Platforms, and this is excellent.

H2O.ai is an amazing platform for enterprises that packs many extremely useful features and functionalities. It also offers a free AI software solution to test its functionality.

Here are the H2O.ai key features:

  • About to create and train machine-learning models.
  • Can design and deploy AI apps.
  • Executives can analyze data sets and extract insights.
  • Doesn’t require any extensive knowledge.

H2O.ai has a free trial.

⇒ Get H2O.ai

Inbenta – Offers powerful search

Inbenta is a conversational platform that is able to deliver incredible and real results. It offers a free AI software solution and has industry-leading self-service rates of more than 90%.

The AI and lateral language processing aims to boost customer happiness at all times. Every brand means a lot to its customers; the best AI software is aware of this and acts in consequence.

Here are the key features of Inbenta:

  • InbentaBot customer agent that is 24/7 available.
  • Supports more than 25 languages.
  • Powerful search technology that can read between the lines.
  • Highly conversational skills.
  • Seamless integration.

Inbenta has a free trial.

⇒ Get Inbenta

NVIVO – Offers better information organization

NVIVO is another excellent artificial intelligence software product. It targets qualitative data analysis but also offers a free AI software solution.

Whether you are working in a team or individually, you’re new to research or have lots of years of expertise behind you, you will definitely find an NVIVO option that will suit your needs and skills as well.

Here are the key features of NVIVO:

  • Storing information.
  • Fast and easy to use.
  • Smarter insights.

NVIVO has a free trial.

⇒ Get NVIVO

Apache PredictionIO – Completely open-source

Apache PredictionIO is a bit different compared to the other artificial intelligence software tools on this list. It’s a free AI software solution and an open-source Machine Learning Server.

It means you can download, modify, and implement the Apache PredictionIO code into your products and services at zero cost.

It’s built on top of a fantastic open-source stack for developers and data scientists to create the most predictive engines for machine learning tasks.

Here are the key features of Apache PredictionIO:

  • Quickly build and deploy an engine as a web service.
  • Respond to queries in real time.
  • Evaluate and tune more engine variants systematically.
  • Unify data from more platforms in real-time for predictive analytics.
  • Speed up the machine learning modeling with processes.

Apache PredictionIO is free and open-source.

⇒ Get Apache PredictionIO

These were our top 5 free AI software solutions you can use to build your own artificial intelligence applications. They come packed with sophisticated and unique features.

Before making your final decision, we recommend visiting these tools’ official websites to learn as much about them as possible.

This way, you will make a well-informed decision based on your AI-related needs and skills. And since AI software tools go hand in hand with other tools, we’d like to shift your attention toward SciSpace Copilot, which is also an AI-powered tool that helps simplify scientific content.

Before you leave, don’t miss our guide on the best open-source AI content generators and best AI websites for more information.

If you have any other suggestions or questions, please leave them in the comments section below.

Face Recognition Software for Windows 10: Best for 2026

Using facial recognition software tools, you can access your Windows 10 PC quickly and securely, without typing your username and password. All you need to do is look at your webcam and the tool will unlock your session.

Microsoft has an excellent built-in tool for this, but Windows Hello doesn’t always work. If you’re looking for an alternative, you’ve come to the right place.

In this article, we’re going to list the 5 best face recognition software for Windows 10 (free download), including their key features to help you decide which tool to install.

What’s the best face recognition software for Windows 10?

1. KeyLemon


KeyLemon is a desktop app that allows to unlock your Windows session using your camera. This software is highly accurate and secure. The spoofing detection feature prevents intruders from tricking the system by using a photo of the legitimate user.

The photo face recognition software for Windows 10 also lets users add strong additional challenge-responses with limited time to be performed. These include eye blink, head movement and a combination of eye blink and head movement challenges.

KeyLemon stores and encrypts your biometric model on the local system. The software keeps your personal data confidential and does not send it to a server.

Unfortunately, the face recognition photo software is no longer supported, but you can still download KeyLemon and use it with its limitations.


If you want to sing in to Windows 10 without a password, check out this guide.


2. TrueKey

True Key is a powerful and versatile tool that uses your face or fingerprint to sign you in without having to type any passwords.

Multi-factor authentication is a standard requirement with the True Key app. In other words, you’ll need to pass through at least two authentication levels before being signed in.

Of course, you can add more authentication factors to make your profile safer.


Fingerprint recognition doesn’t work on Windows 10? Don’t worry, we’ve got the right solution for you.


You can also opt to use only one authentication factor on the devices you trust. If you want to quickly access your PC, you can enable only face recognition.

You can also use this free face recognition software as a password manager. True Key auto-saves and enters your passwords, allowing you to quickly access the pages that you’re interested in.

Rest assured, your passwords are always safe with True Key thanks to the strongest encryption algorithms that it uses.

The True Key free version syncs across all your devices and lets you store 15 passwords for free. If you need more space, you can upgrade to the Premium version for $19.99/ year.


3. Rohos Face Logon

Rohos Face Logon uses any Windows-compatible camera to log you in. There is no need to press any keys or perform additional authentication steps. Once the software has recognized your face, it automatically unlocks the desktop.

This tool also allows you to combine both face recognition and a USB stick for login. The multi-user support feature lets you register the faces of several users for any user account.


If you want to block facial recognition on Windows 10, follow the steps from this simple guide.


Rohos Face Logon is eco-friendly and one of the best face recognition software solutions for Windows 10. It immediately stops the camera when there is no one in front of it.

Unlike the other face recognition tools listed above, Rohos Face Logon is compatible with all popular Windows versions, including Windows XP.

You can download Rohos Face Logon for free and test it for 15 days. After the trial period expires, you can purchase the tool for $10.00.


4. Blink!

Luxand’s Blink! allows you to log into your Microsoft account in the blink of an eye. The tool supports multiple computer users and automatically adjusts for varying lighting conditions.

If you recently changed your look, the smart identification algorithms can quickly adjust to the changes. Blink! will recognize you and let you login even with a grown beard, heavy makeup or glasses.

Blink! is compatible with Windows Vista and Windows 7 only. It does not support Windows 10.

You can download Blink! from Luxand’s official website.


5. AMD Face Login

AMD makes it easier for you to access your PC thanks to AMD Face Login. It’s among the best face recognition software for Windows 10.

You can also use this software on select AMD A-Series processor-based systems to log on to your favorite sites using facial recognition algorithms.

AMD Face Login features a series of options that allow you to enhance login security. For example, by setting the accuracy level to high, you have to blink to log in. Naturally, intruders won’t be aware of this detail and they won’t be able to login.

The face-out feature automatically puts your PC to sleep or lock the screen when you leave your computer. ​

You can download AMD Face Login right away. It’s compatible with Windows 10, 8 and 7.


Conclusion

This brings us to the end of our list. The facial recognition software solutions above are perfect for Windows. You can unlock your PC using your facial signature instead of a password, which automatically increases your computer security and privacy.

Some of them also support extra features such as password managers. Forget about typing long passwords and install the face recognition tool that best suits your needs.

And, if you can’t log in Windows 10, check out our quick fixes.

If you have any more questions, feel free to drop them in the comments section below.


How to create a scheduled or instant meeting in Microsoft Teams

Creating a meeting with Microsoft Teams is a good way to stay in contact with your coworkers on projects while you work from home, or whenever you’re working remotely. Assuming you or your organization is a Microsoft 365 customer, you are already taking advantage of all of the app integration Microsoft provides. Here’s how to create a meeting in Microsoft Teams.

Create a meeting

Here are three ways to create a meeting in Microsoft Teams.

  1. Choose the Calendar icon underneath the Teams chat box to create a meeting with your coworkers in Teams. If the Calendar icon is missing, check with your organization’s IT administrator.
  2. Choose Calendar on the left side of the Microsoft Teams desktop app and choose New meeting in the upper right corner.
  3. Choose a range of time in the Calendar.

Once you do any of the three above-mentioned options, a calendar form will pop open to edit the meeting information. Use the Scheduling Assistant to help schedule a meeting time that works for everyone, provided that their work schedules and existing meetings are already set up within the Microsoft Teams Calendar. Once you are finished filling out the time, optional attendees, locations (physical or virtual meeting rooms with locations already set up in Teams), and meeting details, click Save. Teams will send a Microsoft Teams meeting notification or email a link to all meeting attendees.

If you add a Teams channel to your meeting, you will need to send a link to the meeting if there are people invited to your meeting from outside your organization.  Choose Send when finished. Teams will automatically send an invite to all the invited attendees via a notification in Microsoft Teams or via email if they are outside your organization.

Invite people from outside your organization

Microsoft Teams also allows users to invite people to their Teams meetings from outside their organization. In order to invite someone from outside your organization, you will need to know their full email address and once you’ve created a Teams meeting link, you can share it with them.

Choose Add required attendees. If anyone is an optional attendee, choose Add Optional attendees instead.

Type the person’s full email address (i.e [email protected]). Select Invite (email address). The email address you provide will receive an email with an invite link to the Teams meeting.

Schedule a meeting from Outlook

Microsoft Teams Outlook add-in

When installed, Microsoft Teams can install an Outlook add-in with your permission. The Outlook add-in allows you to create new Teams meetings directly from Outlook. This way, you don’t need to switch between Outlook and Microsoft Teams, users can view, accept, reject, or join meetings, from within either app.

Create an instant meeting

If you want to set up a quick meeting at the last minute, you can create a quick meeting in Teams. This is for instances where you are in the Calendar or in a Teams channel and want to meet with a coworker for a quick 10-minute meeting to exchange ideas or give a quick update on your progress for a project.

Within the Calendar

When you are in the Teams Calendar, instead of choosing New meeting, choose Meet now.

Meet now
Join now
join now people
get join info link

From there, you will be able to add a meeting title, choose whether you want to use video or not, and pick your preferred audio source. Once you are ready to start the meeting, choose Join now.

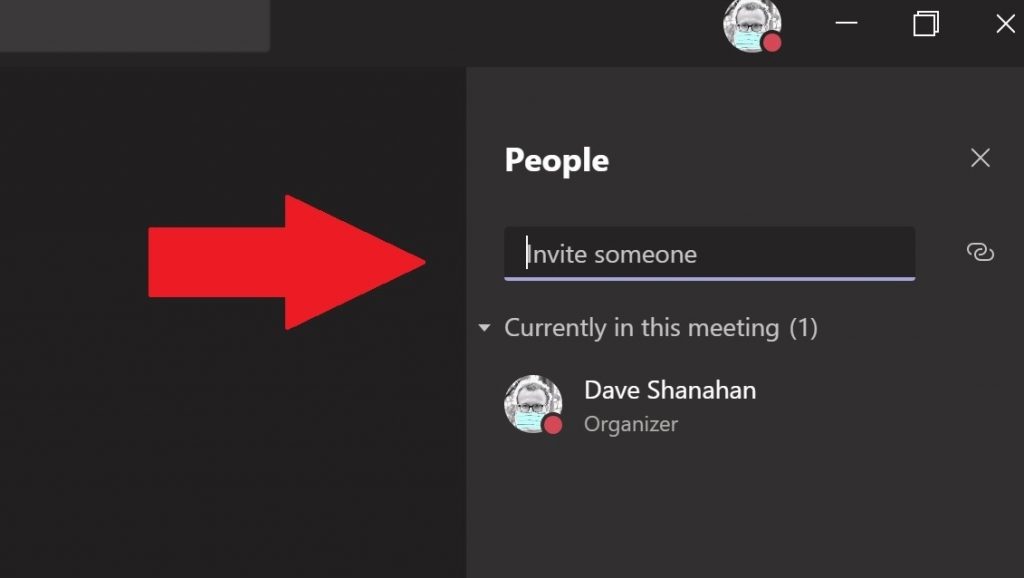
In the upper right corner a box marked People will open up to allow you to invite someone to your instant meeting. Just start typing the name of the person or people that you want to invite to your instant meeting. They will receive a call in Microsoft Teams to join your meeting.
If you choose, you can also copy the join info link to your clipboard and send the invite link in an email if the person or people are outside your organization. If your email recipients do not have Microsoft Teams, they can join the instant meeting just by using their internet browser.

This is a great option to use if you do not have meeting the scheduling capability in Outlook or Teams. Meet now works just like scheduled meetings in the Teams Calendar. Everyone in the Meet now meeting can access everything that is shared in the meeting, including the meeting chat, the recording, and any files or documents that are shared in the meeting.

In a Teams channel

If you are in a Teams channel and want to start an instant meeting, go to the Posts tab and go where you type new messages in the channel and choose the Meet now icon.

meet now

Once you choose the Meet now icon, an instant meeting will open right in the comment thread.

You can use the Meet now button to start an instant meeting to get clarification on an issue that cannot be resolved via messaging. Just reply to any comment thread in your Teams channel and choose Meet now to continue the conversation. Once you choose Meet now everyone in the comment thread will be invited to the instant meeting.

Do you have any issues creating a meeting in Microsoft Teams? Let us know in the comments.

Want step-by-step instructions on scheduling directly from Outlook? Check out this guide on how to schedule a Microsoft Teams meeting in Outlook. 

Microsoft to open new data center region in New Zealand

Microsoft today announced its plans to build its first data centre region in New Zealand which will accelerate digital transformation opportunities across the country. The construction of a new data centre will provide New Zealand customers local access to Microsoft 365, Power Platform, Dynamics 365, and Microsoft Azure. In addition, the Redmond giant also aims to launch educational skilling programs to train the people of New Zealand.

With this announcement, the company reiterated its commitment towards privacy, noting that customer data remains stored locally in New Zealand. The press release also mentions that Microsoft has been collaborating with The Collaborative Studio and Massey University to launch an educational program called i4 Accelerator. Notably, the program offers targeted workplace-based training to address the shortage of skills in primary industries including technology and manufacturing in the region.

“Technology is driving transformation in agrifood and fibre at an incredible speed, so it’s vital we move quickly to ensure the education system meets the requirements of what businesses need to be innovative. It’s especially important for the agrifood and fibre sector to remain competitive for years to come and capitalise on brighter thinking and bigger ideas,” said Anne Taylor, Microsoft education lead today.

It is noteworthy that, Microsoft seeks approval from the Overseas Investment Office to proceed with this plan. However, if the OIO gives the green light, it would be a notable addition to Microsoft’s existing 54 Azure regions across the globe. In case you missed, Microsoft has also announced a $1 billion digital transformation plan for Poland yesterday which includes the contribution of a new data centre in the country.

DayZ, Final Fantasy IX, and Fractured Minds are coming to Xbox Game Pass in May

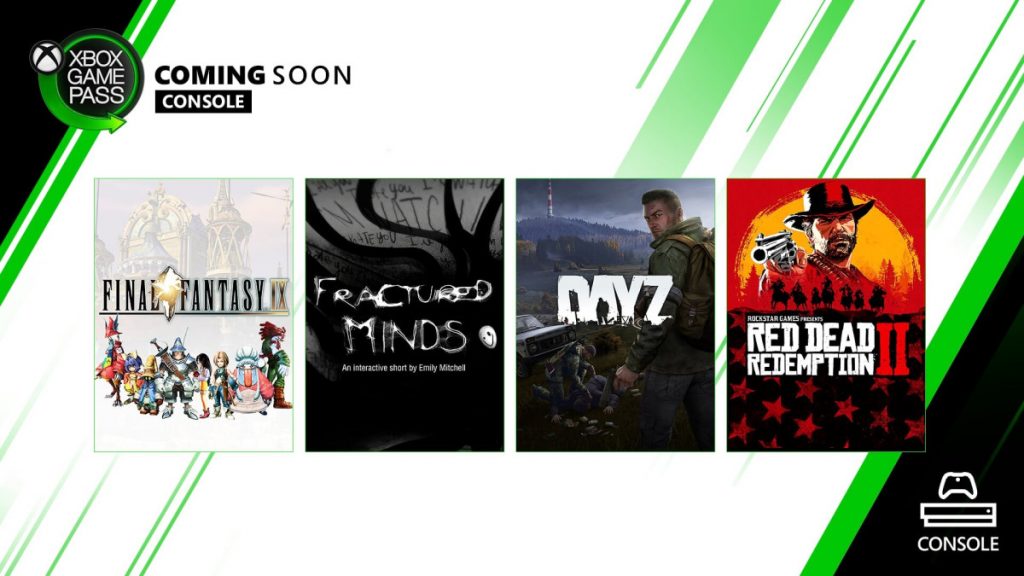
Microsoft already announced that Red Dead Redemption 2 will join Xbox Game Pass for Console tomorrow, May 7, but three new Xbox One games will also be added to the catalog in May. Good news for fans of survival adventures, the open-world multiplayer game DayZ, which was released on Xbox One a year ago, will be playable starting tomorrow along with Red Dead Redemption 2.

Two more games will be available on Xbox Game Pass next week, starting with Final Fantasy IX on May 14. This one is actually an Xbox Play Anywhere game, so you’ll be able to play it on both Xbox One and Windows 10. Fractured Minds, an immersive puzzle game with RPG elements will also follow on May 19.

Microsoft also announced some new bonus perks for Xbox Game Pass Ultimate members in May: Subscribers in the US and UK can get six months of Spotify Premium for free, while subscribers in France, Germany, Australia, Mexico and Brazil can get 3 free months of Spotify Premium. This offer is only available for new Spotify Premium members, the Xbox team said today.

Xbox Game Pass Ultimate Perks can be redeemed in the Xbox Game Pass mobile app or the Xbox beta app for Windows 10. As a reminder, those of you who never subscribed to Xbox Game Pass can still get their first month of Xbox Game Pass Ultimate for just $1.

Microsoft announces Surface Dock 2 and other new accessories

If a series of rumors of leaks have been suggesting the imminent launch of new Surface products this spring, and the company has finally delivered this morning. Indeed, the Surface Book 3 and Surface Go 2 are now official, along with the Surface Earbuds and a new version of the Surface Headphones. But there are also a couple of new accessories including a new version of the Surface Dock, which hasn’t been updated since 2015.

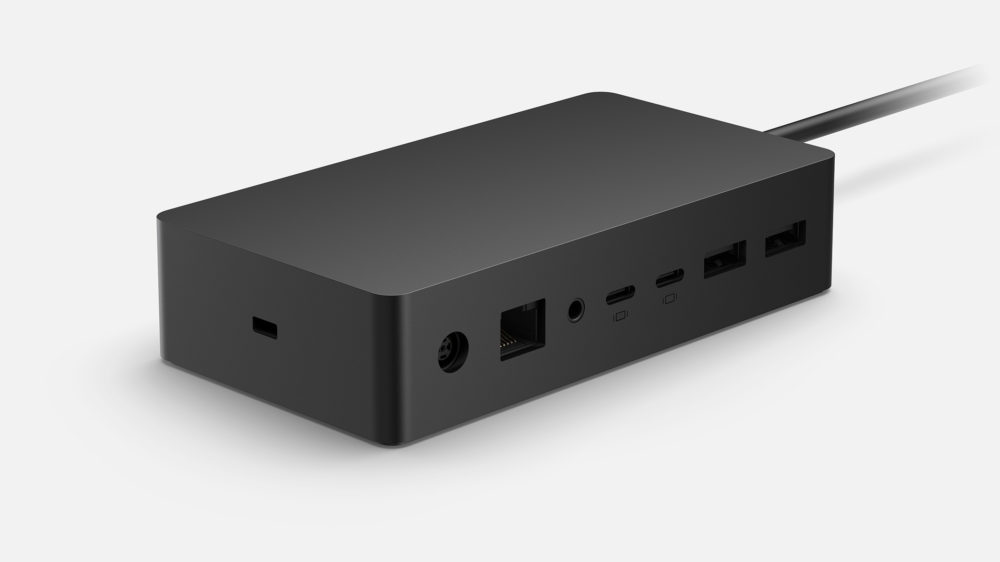
Details about the Surface Dock 2 actually leaked last month, but today’s press release pretty much confirms what we knew. The new Dock keeps the proprietary Surface Connect port to provide compatibility with existing Surface devices, though Microsoft says the new accessory provides faster charging and higher data transfer rates than its predecessor.

To make it more versatile, Microsoft included four USB-C ports on the Surface Dock 2, though the two USB Type-A ports, audio jack, and Ethernet port are still there. Moreover, the new peripheral has been designed to sit behind your device and seems like a more compact docking solution than the older dock.

The Surface Dock 2 will be available to pre-order in select markets today, and it will be priced at $259.99. Microsoft also other accessories today including a $99.99 USB-C Travel Hub, along with two new keyboard and mouse bundles: the $89.99 Microsoft Ergonomic Desktop and the $59.99 Microsoft Bluetooth Desktop. The USB-C Travel Hub can be seen below, and it includes various ports including one USB-C port, one USB-A port, 1 HDMI port, 1 VGA port, 1 Ethernet port, and a headphone jack.

“We hope these new products will not only help people be more productive from wherever they are currently working and learning, but also help people find moments of focus and relaxation,” Microsoft said today.

Windows And Office Genuine ISO Verifier: How to Use it

Windows and Office Genuine ISO Verifier is a lightweight tool that helps you determine whether you have genuine Microsoft Office and Windows ISO files.

This is especially important if you got these files from third-party sources and not directly from Microsoft. To avoid these types of problems, be sure to check our guide on how to download Windows ISO properly.

In case you want to verify your ISO file, keep on reading.

How do I know if my Windows ISO is genuine?

  1. When downloading the ISO, notice the MD5 hash on the download page.
  2. Once the download is finished, start PowerShell as admin by pressing Windows key + X and choosing PowerShell (Admin).
  3. Next, locate the download directory. You can do that with cd ~/Downloads
  4. Lastly, run: Get-FileHash Win10_2004_English_x64.iso | Format-List
  5. If the value matches the one from step 1, your ISO is genuine.

Alternatively, you can use the software mentioned in this guide.

How can I use Windows and Office Genuine ISO Verifier?

The installation and interface of the tool is as straightforward as it comes in a portable package. You can set up the program up quickly by decompressing the archive in the target location on your hard disk.

Its user-friendly interface won’t give you a hard time when navigating the application, either.

The tool’s UI consists of a single window with intuitive fields for quick access. Once you specify the input file, the program does the rest of the task without your intervention.

Windows and Office Genuine ISO Verifier also supports various versions and languages of Office and Windows.

The tool’s major selling factor is its ability to recognize various hashes associated with Windows and Office. It is able to compare file SHA-1 even to Office 95 and Windows XP.

The tool is most helpful if you want to reinstall Windows or Office on your PC with no legal complications. If you are unsure whether your file is genuine, then the Windows and Office Genuine ISO Verifier provides the answer.

Are you currently using the Windows and Office Genuine ISO Verifier to check whether your Microsoft files are legitimate? What is your experience so far? Let us know.

EventID 10016 error in Windows 10/11 [FULL FIX]

Many Windows 10 users complain that after each boot, the Event Log displays intriguing application-specific permission errors.

These errors started to appears soon after users upgraded to the Anniversary Update.

Since there is very little information available as to why Windows 10 displays this type of errors, many users quickly rolled back to their previous OS.

Those who haven’t, are still struggling to understand why this error appears and how to fix it.

Windows 10 users report that this error also appears when they install the latest OS updates. Fortunately, we’ve found a possible solution to remove this error once and for all.

Windows 10 EventID 10016 error

After the anniversary updates, I’m getting the same error as everyone else.  Microsoft, this is inexcusable given the new Windows 10 update strategy that you have implemented.

The application-specific permission settings do not grant Local Activation permission for the COM Server application with CLSID
{8D8F4F83-3594-4F07-8369-FC3C3CAE4919}
and APPID
{F72671A9-012C-4725-9D2F-2A4D32D65169}
to the user NT AUTHORITYSYSTEM SID (S-1-5-18) from address LocalHost (Using LRPC) running in the application container Unavailable SID (Unavailable). This security permission can be modified using the Component Services administrative tool.

How can I fix EventID 10016 error?

1. Go to Regedit > search for {F72671A9-012C-4725-9D2F-2A4D32D65169}
2. Right-click > Permissions and Advanced.
3. On the top line, click Change and add Users in the white box >  tick the little box underneath > click OK
4. Back in the permissions window, tick ‘Full Control‘ for Administrators and Users.
5. Go to Component services >the box shouldn’t be greyed out.
6. You’ll see 3 tables: Launch and Activation Permissions, Access Permissions, Configuration
7. Go to Launch and Activation Permissions > Click Customize > add System if it’s not there.
8. Tick all 4 boxes > click OK.
9. In regedit, restore CLSID permissions back to SYSTEM and APPID permissions back to TRUSTED INSTALLER, which should be NT SERVICEtrustedinstaller.
10. Reboot your computer and the EventID 10016 error should be gone.

Windows 10/11 privacy issues: What you need to know?

We live in the age when our privacy is more vulnerable than ever and we’re in constant fear if somebody is watching what we are doing on the internet.

Prior to that, we’re becoming more and more skeptical of the new products that big companies are offering to us, and we try to find ways in how to increase privacy on windows 10
windows 10 privacy wind8apps

Does Windows 10 attend to your personal privacy or it has privacy policy issues?

When Microsoft released Windows 10 Technical Preview this fall, they also presented the new Privacy Policy to go along with the operating system.

The new Privacy Policy states that Microsoft will use certain methods to collect information about software performance and bugs, in order to make the final release of Windows 10 as reliable as possible.

When you acquire, install and use the Program, Microsoft collects information about you, your devices, applications and networks, and your use of those devices, applications, and networks, the privacy policy stated.

Examples of data we collect include your name, email address, preferences and interests; browsing, search and file history; phone call and SMS data; device configuration and sensor data; and application usage.

Microsoft provided four examples, one of which clearly states that when entering text into any application, Microsoft may collect those typed characters. Why? So that the company can fine-tune the spell check and autocomplete features.

Again, the Technical Preview is not ideal on machines used for everyday purposes unless users don’t care about this character collection.

But this Privacy Statement and Microsoft’s method of collecting personal information have disturbed a lot of users. People just don’t want to share their personal information and what they do and where they go on the internet with Microsoft.

And reactions from them are mixed. Some of them accept Microsoft’s method of collecting data by saying that the purpose of the preview is to collect as much data as possible in order to make a good and stable operating system.

While others often don’t refrain from curses when reporting about their disagreement with Microsoft.

But at least, Microsoft was fair for saying all of that in the Privacy Statement, so you cannot say that you haven’t been warned and that Microsoft is spying on you against your will, because it is completely up to you whether you’ll use Technical Preview and expose your personal info to Microsoft, or not.

But Microsoft is aware that people don’t like its way, so they don’t recommend you to install Windows 10 Technical Preview on computers that you use every day.

What can you do for minimizing the impact of collecting your personal data?

In case you are one of the persons who are highly concerned about their personal data, you can always stay anonymous while surfing the internet. You can use a proxy server or a good VPN.

If you suppose that Microsoft already collected some of your personal data, you can avoid anyone uses it against your digital profile.

From all VPN services out there that can hide your computer’s IP, keep you safe from attacks and hackers and keep your data secured and encrypted, Cyberghost is the best in terms of quality-price.

Available at $2.75 per month, you have plenty of great features in it and keeps your digital traces anonymous.

[wl_navigator]

Download Skype for Desktop in Windows 10/11

If you have been let down or you are annoyed by the functionality of the touch version of Skype for Windows 10.

Or you just want to use it on a non-touch device, then feel free to download the desktop version of Skype for Windows 10.

Skype has become one of the most used  IM clients of all and its name is synonymous with video calls. M

any Windows 10 and Windows 8.1 users out there that used to use Skype to keep in touch with their friends want to know how to download and install Skype as a desktop app.

download skype desktop windows 10


While Microsoft was kind enough to provide us with a Skype app for Windows 10, Windows 8 that replaced Windows Live Manager, many users don’t seem to like it (yours truly included).

They prefer the desktop alternative, as it has a very simple user interface and we are all accustomed to it. So, for those who want to download Skype for Windows 10, Windows 8, or Windows 8.1, here’s how you do it.

How do I download and install Skype for Windows 10, 8, 8.1?

If you are using a Windows 8 or Windows 8.1, Windows 10 computer, you noticed that on the Skype website the download button will forward you to the Microsoft Store to download the app.

However, if you look closely, there is a link to the desktop version also. If you follow that link, you will see the Skype desktop installer page.

Once you’ve downloaded the SkypeSetup.exe file to your drive, you can proceed to the classic install of Skype.

After the wizard finishes, you will have the desktop version of Skype installed on your Windows 10 computer.

If you already upgraded to Windows 10, Skype is already installed on your computer. The app comes as a built-in app and you can use it without any problems.

install skype windows 10


And this is how to get the Skype desktop app on any Windows 8 and Windows 8.1, Windows 10 computer. The confusion surrounding this must have started with the forward from the Skype website to the Windows Store.

If so, check the link located below the Windows 8, Windows 10 download button on the website, and it will let you download the desktop app.

I personally find that Skype for desktop is easier to use than the specially designed app for Windows 8, Windows 10 touch screen devices.

Therefore, if you don’t have a touch screen machine, it’s better to use Skype for desktop in Windows 10, Windows 8.

If you’re planning to use Skype for business purposes, you can then download and install Skype for Business.

As its name suggests, this version of Skype brings a series of dedicated features and options that focus on collaboration. For example, you can quickly join meetings by using a simple meeting link.

skype for business

With one click, anyone can join your online meeting, from any device. You can choose to meet right away, or schedule from Outlook for later. The meeting URL is personalized just for you.

Should you encounter any bugs during the download process, let us know in the comments below and we’ll try to find a solution as quickly as possible.

How to set up a flowchart with the LibreOffice Draw

Flowcharts are diagrams that system designers and software developers design IT systems and programs with. There are numerous diagram software applications you can set up flowcharts with.

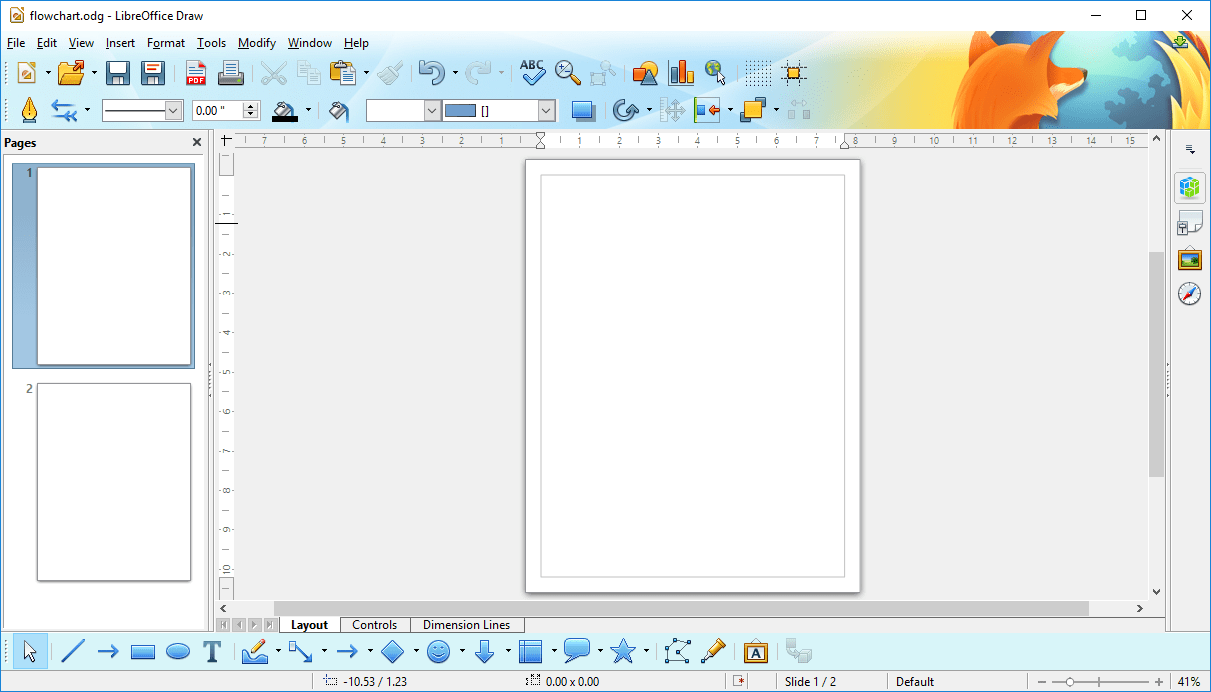
The open-source LibreOffice Draw is one diagramming application that you can utilize for flowcharts.

It includes all the basic, and some more advanced, options and tools you’ll need to set up diagrams for system design or software algorithms.

This is how you can set up a flowchart with Draw.

1. Download the LibreOffice Draw flowchart designer tool

If you don’t already have the LibreOffice suite installed, you can save its wizard from this webpage. Select either Windows X86 (32-bit platform) or Windows X86_64 (64-bit platform) from the drop-down menu.

Press the Download button to save LibreOffice’s installer. Open LibreOffice’s Installation Wizard window to add the suite to Windows. Then open Draw’s window.

Libre Office

2. Adding Shapes to Flowchart Diagrams

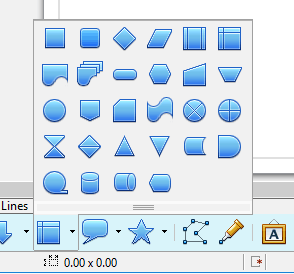
First, add some shapes to the flowchart. Draw’s toolbar includes a Flowcharts button you can press to select shapes more specifically for flowchart diagrams.

Press that button’s small arrow to expand its list of shapes as shown directly below.


Now select the first flowchart shape to add to the diagram from there. Hold the left mouse button and drag the cursor on the diagram sheet to expand the shape.

Then you can resize the shape by selecting it and dragging its border points.


To alter shapes’ colors, select Color from the Area/Styling drop-down menu. Then select a color from the adjacent drop-down menu.

Alternatively, you can add a gradient effect to the shape by selecting Gradient from the Area Style drop-down menu as shown in the snapshot directly below.


Shadow is another shape formatting option that adds flat shadows to the symbols. Select a shape to add the shadow to. Then press the Shadow button to add a shadow effect to the symbol as below.

3. Connecting Flowchart Symbols

When you’ve added and positioned more flowchart symbols on the diagram, you’ll need to connect them with arrows. Although you can add them with the Lines and Arrow option, it’s better to press the Connector button.

This will ensure that the arrows connect to the shapes. When you press Connector, you’ll see four connection points on the flowchart’s shapes as in the snapshot directly below.

Flowchart in Libre Office
Click the small arrow beside the Connector button, and select the Straight Connector ends with arrow option.

Then hover the cursor over a connector point on one shape, hold the left mouse button and drag the cursor to a connector point on the second shape.

That will connect your flowchart’s shapes with straight-line arrows as shown in the shot directly below. As you’ve added connector lines to the diagram, the arrows will move if you alter the shapes’ positions.


You can choose alternative arrow styles by selecting an arrow on the diagram and then clicking the small arrow on the Arrow Styles button.

That will open the drop-down menu below from which you can choose alternative arrowheads. Select an arrowhead listed there to alter the selected arrow.


To select an alternative color for an arrow, first, click an arrow on the diagram. Click the small arrow on the Line Color button to open the palette below.

Then you can choose another arrow color from the palette.

4. Adding Text to Flowchart Diagrams

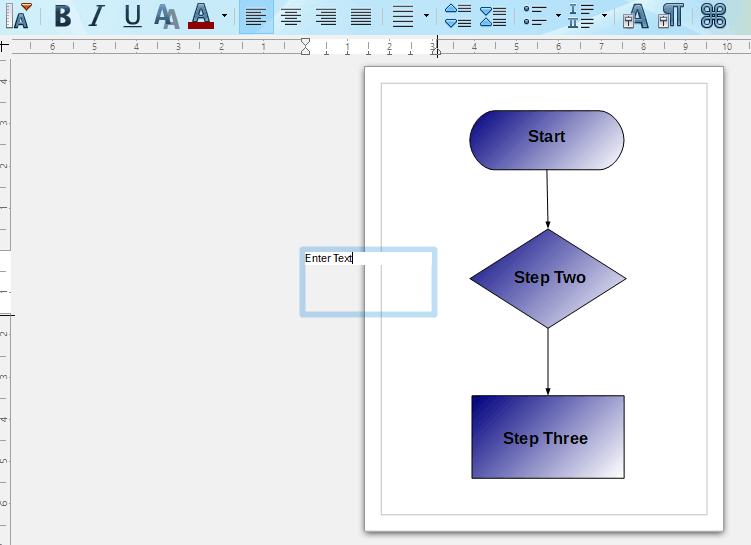
  • Finally, you’ll need to add some text to each shape within the diagram. Press the T (Text) button to open the text toolbar.
  • Then hold the left mouse button and drag the cursor to expand a text box.
  • Enter something in the text box, and then resize and drag the box onto a shape in your flowchart.

Enter text for flowchart

  • Then you can format the text entered by selecting the Bold, Italic, Shadow, Font Color or Underline options on the toolbar. Click the Font Size drop-down menu to adjust the font’s dimensions, and you can choose alternative fonts from the Font Name drop-down menu.

5. Add 3D to Flowchart Symbols

To give your flowchart a little more visual impact, you can convert the 2D symbols to 3D shapes. Then you can rotate the shapes and add extra 3D effects to them. This is how you can add 3D shapes to flowchart diagrams in Draw.

  • First, right-click a shape on the diagram and select Convert > To 3D from the context menu. That will convert the selected shape to 3D as below.

  • To rotate the symbol, position the cursor in the center of the shape and left-click. The cursor will then become a curved arrow.
  • Now hold the left mouse button with the cursor within the shape to rotate it.

  • To add further 3D effects, right-click the flowchart symbol and select 3-D Effects from the menu. That will open the window shown in the snapshot directly below.

  • There you can select to add shading, geometry, illumination , and material effects to the 3D symbol. For example, click the Shading button, select the 3-D Shadowing on/off option and press the Assign button to add a 3D shadow effect to the shape as in the shot below.

Moving 3D objects
So you can set up flowcharts with Draw’s Text Box, Flowcharts, and Connector tools and add some groovy effects to them with the application’s 3D options. The application probably has most of the tools and options you’ll need for flowcharts.

However, you can also set up flowcharts with the diagram software included in this software guide.

What’s up with that Deceptive site ahead! warning in Chrome?

Lately, the internet became a dangerous place, as the population of daily users grows and cyber-criminals are rather productive.

The majorities’ go-to tool for browsing through the interwebz is Google Chrome.

However, there are some bewildering things in Chrome. Like the sudden warning about the dangerous site ahead, or rather a deceptive one.

This requires some light-shedding and we made sure to do so today. If you ever bumped into a Deceptive site ahead warning screen while navigating to a site, make sure to check the explanation below.

What’s Deceptive site ahead security warning on Chrome?

Google pays a lot of attention to users’ online safety, and that’s the inclusive concept of the Chrome browser, as well. They might invade your privacy occasionally, but phishing and malware sites are immediately identified.

Thus, even without the third-party antivirus’ online protection, you’ll probably run into one or more security warnings along the way. Especially if you roam around the obscure parts of the internet or click on pop-ups or ads.

They are characterized by the red alert screen informing you that the link you’re trying to follow is:

  • Containing malware
  • Leading to a deceptive site
  • Trying to load scripts from the untrusted source.

Concerning the Deceptive site ahead warning, most of the time those are the treacherous sites trying to steal your personal data, especially passwords. Milder versions come with dozens of ad pop-ups.

When something like this happens, you can send a report, close the tab and avoid the site in the future, or just open it if you know you can trust it.

These protective measures are there to prevent phishing and malware infections. Also, Chrome will automatically prevent all downloads from unauthorized sources.

How to disable warnings about unsafe sites in Google Chrome

We found out some false reports saying that this is a browser hijacker or malware infection at hand. It’s not.

It’s an integral part of Chrome that can be disabled if you like to do so. Read more about Google’s official Transparency Report.

Here’s how to disable the Deceptive site ahead prompt in Chrome:

  1. Open Chrome.
  2. Click on the 3-dot menu in the far right corner and open Settings.Deceptive site ahead
  3. Scroll down and expand the Advanced section.
  4. Navigate to Privacy & security.
  5. Disable Protect you and your device from dangerous sites.Deceptive site ahead

We recommend using an AdBlocker to surmount pop-ups and antivirus for online protection.

Windows Defender will suffice most of the time, but if you want to make your browsing extra-safe, we recommend using a reliable third-party antivirus solution for complete protection. 

A powerful antivirus program keeps your data safe while you are online and protects your device against cyber attacks and malware.

⇒ Get TotalAV

With that, we can conclude this article. If you have some unanswered questions concerning the Deceptive side ahead prompt and similar subjects, make sure to tell us in the comments section below.

Google Chrome is the most used browser so we wrote a plethora of articles about it. Find them in our Google Chrome section. If you have a website, you should take a peek at our Site Owner Hub for lots of tips and guides on how to manage it better.

How to install BBM app (Blackberry Messenger) on Windows

BlackBerry Messenger or BBM app, is an Internet-based, instant messaging and videotelephony app that allows you to connect with your contacts, whether friends, family, or workmates.

This app works in a similar way to WhatsApp or WeChat and is available for download to users on Windows phone, iPhone, Android, and BlackBerry.

Some of the tasks you can fulfill with BBM app include:

  • Instant chatting with your contacts either individually, multiple people, or in groups. The app also allows you to broadcast messages at one go
  • Picture or photo sharing
  • Quickly share voice notes
  • Sharing contacts and location/maps
  • Update your status to let people know how you feel, or what you’re up to

Its functionalities are also similar to other popular instant messaging apps, such that you can see when your contacts are typing responses, have access to a variety of emoticons for every mood and emotion so you can express yourself.

You can also set timed messages, retract messages, choose how to share your information, and even control your privacy settings.

The app also has the BBM Channels feature, which lets you create your own channel where you can post messages, share pictures, initiate conversations, and communicate directly with brands and subscribers.

This article describes how you can download and install BBM on your Windows devices such as your Windows phone, or Windows PC.

How to install BBM app on Windows Phone

BBM app for Windows Phone

In order to install BBM on your Windows Phone, you can download it directly from the BlackBerry webstore.

Alternatively, you can download BBM for free from the Windows Store.

How do I install BBM on Windows PC?

There are three ways to install the BBM app on Windows PC:

  1. Install BBM directly to PC
  2. Install BBM using Bluestacks
  3. Install BBM using Genymotion

1. Install BBM app directly to Windows PC

If you’re using Windows 8, you’ll need an Android SDK bundle, and BBM apk so as to install BBM directly to Windows PC, then follow these steps to set BBM up on your PC.

  • Go to the extracted Android SDK bundle folder
  • Open SDK Manager.exe file
  • Select Tools>Manage AVDs
  • Create an Android Virtual Device (RAM of 512 MB or greater)create android virtual device for BBM app
  • Start the created Android Virtual Device
  • Copy the BBM.apk file you downloaded so that it reads sdk/platform-tools/BBM.apk
  • Go to the sdk/platform-tools folder using File Explorer
  • Choose File>Open command prompt within platform-tools folder

If you’re using Windows 7, follow these steps to install BBM on your Windows PC:

  • Press and hold down Shift key, then right-click on the platform-tools folder
  • Click Open Command Window Here
  • Enter the command adb install BBM.apk
  • After a few minutes, BBM will be installed on your virtual device
  • Open BBM app from App launcher, and use the app

2. Install BBM app using LDPlayer

LDPlayer is an Android emulator and is the recommended option if you want to download and install BBM on your Windows PC.

In order to do this, you’ll need to download the updated version of LDPlayer, and BBM apk from Google Play, then follow these steps to install:

  • Download and install LDPlayer
  • Open the BBM apk
  • Install BBM apk in LDPlayer
  • Open BBM from the emulator app launcher and start using it on your PC

3. Install BBM app using Genymotion

Genymotion is one of the top free Android emulators that is powerful, easy to use, and can emulate most Android phones.

It not only automatically detects your PC’s keyboard and mouse, but also allows geolocation enablement, and adjustment of the emulator window when you launch Android applications.

In order to install BBM using Genymotion, you’ll need to download the Genymotion Android Emulator for Windows, then follow these steps:

  • After downloading Genymotion Emulator, open and sign in to Genymotion cloud
  • Choose Galaxy S4 HTC One Xperia Z – 4.2.2 virtual device from the list (BBM works only with this)
  • Download the virtual device
  • Click Play to start the virtual device
  • Click on Google Play store to download BBM
  • Once download is complete, click on the BBM app
  • Sign in to your BBM account and use it on your PC

Advantages of BBM app

  • Can be installed on up to ten Windows 10 devices
  • Can be used in the same way as other instant messaging apps
  • Can be used on PC, and mobile devices
  • Takes up little storage space (size 15.88 MB)

There you go, follow the steps listed above to install BBM on Windows.

3 best Xbox One USB external storage devices to use

Xbox One‘s 500GB or 1TB of storage doesn’t seem like much, especially if you have newer AAA games.

If you stick to Xbox’s original hard drive, you’ll eventually have to delete some content in order to free the space for new games, which is pretty annoying especially if you regularly play all your games.

But don’t be discouraged by Xbox One‘s default capacity because there’s a solution. And in this case, the solution is getting an external hard drive that will provide enough space for your stuff.

Luckily, Xbox One supports basically any external hard drive with 256GB of space or more.

You just need to pick a good external drive, connect it to your Xbox One, and you’ll be able to install as many games as you want.

But even a simple decision like picking up an external drive for your Xbox One can turn out to be complicated.

To help you decide what’s best for you, we made the full guide for choosing and setting up the perfect external hard drive for you.

The best external hard drives for Xbox One

WesternDigital MyBook

WesternDigital MyBook is perhaps the best external drive for your Xbox One. This device is our number one pick mostly because of what it offers for the price.

You get 4TB of storage for just $120, which is $30 per Terabyte.

This hard drive also provides an exceptional performance boost compared to the internal hard drive. You’ll notice increased speeds of both game loading and downloading.

The drive needs an AC adapter, but that’s basically the case with all external drives from this range.

So if you want significantly more storage on your Xbox One along with enhanced performance, the WesternDigital MyBook is the best choice.

Toshiba 1TB Canvio

xbox one external storage toshiba digital

storage

Toshiba’s drive is for those who don’t need a huge drive and would like to avoid an AC adapter. The Toshiba Canvio brings 1TB of additional storage to your console for a great price.

You can get Toshiba Canvio for as low as $55. Yes, the WesternDigital My Book has a better price per terabyte, but this is basically the best 1TB hard drive you can get for the price.

You can use a USB cable to connect the Toshiba Canvio with your Xbox One, so installation can’t be simpler.

When it comes to improved performance, this device also provides installation and loading speed enhancements. Not as much as WesternDigital, but still quite satisfying.

⇒ Get Toshiba 1TB Canvio

HGST Touro S 1TB

xbox one external storage HGST Touro S 1TB

The HGST Touro S is for those who want increased performance but are not so obsessed with having multiple terabytes of storage space.

It is powered by USB and doesn’t contain an AC adapter, which can be a deal-breaker for some users.

Besides its limited capacity of just 1TB, the HGST Touro S provides a solid performance boost to Xbox One. You’ll notice faster loading and installation times.

So, if 1 TB is enough for you and you want some more speed, the HGST Touro S should be in the conversation.

⇒ Get HGST Touro S 1TB

How to set up an external hard drive on Xbox One

Connecting your new external drive to your Xbox is fairly easy. Just plug in the drive and wait for the initialization wizard to start.

The Xbox One doesn’t necessarily have to be turned off while connecting your drive but it won’t hurt if you power the console off.

Once your Xbox One recognizes the external drive, it will ask you if you want to set up the external drive. Choose Yes and carry on with the process.

Your drive will then be formatted for use on Xbox One.

Keep in mind that once you format the external drive for Xbox One, it can only be used on the console so you can’t connect it with, for example, your PC or PS4.

And finally, you’ll be asked to name the drive and choose whether you want new apps and games to be installed on it by default.

As we already pointed out, this is a good idea because the external hard drive provides better performance for installing and loading your content.

Move your existing games and apps to the external hard drive

You’ll probably want to move all your frequently used apps and games to the new hard drive. Moving content from drive to drive in Xbox One is quite easy, here’s exactly what you need to do:

  1. Go to the My games and apps menu
  2. You’ll notice the two sorting options. One sorts games and apps by size, alphabet, and recent use, while the other sorts them by the storage location. Click on the second storing option and choose Internal. This will put all games stored on Xbox One‘s internal drive before others.
  3. Select the game you want to move, press the Start button, and select Manage game
  4. Now, select Internal, and Move allxbox one external storage
  5. The console will start relocating the game to the new address immediately. You can repeat the process for each game you want to move, but since it’s annoying and time-consuming, you can simply select all games you want to move first, and then move them. Xbox One will automatically move game by game, without any interruptions.
  6. And when you’re finally done, get back to the menu, and switch the sorting option back to All or External, to make sure all your games are displayed.

You now know why using an external hard drive is important, What the best external hard drive to use on your Xbox One is, and how to set it up. If you have any comments, questions, or suggestions, don’t hesitate to let us know in the comments below.

  • How do I access my external hard drive on Xbox One?

You just need to open the guide go to the Storage menu. If Xbox didn’t detect your external drive, read our complete guide to solve this issue.

  • Will any external drive work with Xbox one?
No, not really. Any external drives must be at least 256GB and support USB 3.0 on Xbox One. Xbox One also has a top limit at 16TB but it’s unlikely you will get over that. We made a list of the best USB 3.0 Hard Drives.

CredentialsFileView: access decrypted Credentials files

In case you want to see what’s inside a Credentials file in Windows, you don’t need to be an expert programmer, just use a third-party program.

A new application from Nirsoft, called CredentialsFileView allows you to decrypt Windows credential files, and display what’s stored in it.

In case you’re not familiar with this type of file in Windows, the system uses credentials for storing data and sensitive info securely.

How can I use CredentialsFileView?

Credentials can store various types of data, including remote computer login passwords, mail accounts passwords, Windows Live session information, Windows Messenger passwords, or Internet Explorer/Microsoft Edge passwords.

To keep these data secure, credential files are encrypted.

The program is very simple to use. You just need to enter the Windows login password, and it will automatically detect all information.

Without the Windows login password, the program isn’t useful, because it only shows encrypted info.

When you open CredentialsFileView for the first time, it will automatically detect all credentials files, based on the path you enter. Once the setup is done, all files will be listed in the main screen of the program.

Here, you can click on each file individually, to show its decrypted content in the lower half of the interface.

Information is shown as a full hex dump by default, but you can switch the view mode to strings, for better understanding.

It also allows you to change any password in a credential file, so if you want an application to use a different password, you can use this program to change it.

How can I download CredentialsFileView?

CredentialsFileView is compatible with every version of Windows from Windows XP to Windows 10. So, whatever system you’re currently on, you can use this program to access decrypted credentials files on your computer.

This program will be of most use mainly to system administrators, but you may also use it to remind yourself of a certain app password.

CredentialsFileView is available, and you can download it for free.

Steam Cleaner clears temporary data and duplicate files

Steam is one of the popular distribution platforms for digital games along with Origin, uPlay, and Gog.

Players can access a large library of games containing a list of game manufacturers and prices using Steam.

As it is a huge repository of digital games, Steam has the tendency to leave behind a massive number of junk files.

This happens because installing games on Steam and other gaming platforms also brings with it redistributable packages as a system requirement. After the installation is complete, these temporary files are no longer of any use.

However, some gaming platforms retain the files for quite a while. Depending on the games you have downloaded and installed, these unnecessary files can consume hundreds of megabytes of storage space.

For gamers lucky to have terabytes of free storage, this by no means poses a problem. But for those who use a solid-state drive, freeing up space is necessary.

How can I use Steam Cleaner?

With Steam Cleaner, gamers can now delete huge volumes of unwanted files left behind by gaming platforms. The tool requires no installation or configuration after the download process.

Simply click the download file and Steam Cleaner runs.

The software will automatically scan all the installed games on your platform and display on its dashboard all the unnecessary files.

The list contains the program path, file name, and the total program size. Click the trash icon to initiate the cleanup process in just a few seconds.

Steam Cleaner not only removes unnecessary files from your gaming device but also deletes the junk from your hard drive. It also lets users set the program path if platform detection fails.

There’s also an option to store the files in another location, though users might ignore this feature.

Where can I download Steam Cleaner from?

The tool is available to download from GitHub. Before downloading the tool, make sure your computer has Microsoft .Net Framework 4 installed to run Steam Cleaner properly.

Acronis True Image for imaging Windows 10/11 SSD drives

Restore Windows 10 to different hardware with Acronis True Image

Acronis True Image is one of the best PC backup full disk image software to be used for your Windows 10 device and not only. It’s not exactly common knowledge that Acronis True Image can restore to dissimilar hardware. That means you can perform a backup copy on one device and restore it on an entirely new one. This perk can be greatly useful especially if you decide to upgrade your old computer.

Without further ado, here’s our step-by-step guide showing you how to restore Windows 10 to different hardware with Acronis True Image:

  1. Validate your backup (the one you want to restore from) by performing one of the following actions:
    1. While using Acronis True Image, click the angle button associated with the backup and click Validate
    2. If you’re using bootable media, right-click the backup and select Validate Archive
  2. Prepare the necessary drivers for your new hardware. Make sure you have the drivers for the chipset and your new HDD or SSD controller. Note that Acronis Universal Restore won’t deploy sound, video, or plug & play drivers
  3. Create bootable media by using the Acronis Universal Restore Tool (having this tool is crucial if you want your new hardware to boot your old system)
  4. Connect the bootable media you’ve just created to your computer
  5. Restart your PC
  6. Restore your system
  7. Once the recovery process is over, start your new PC
  8. Use the Universal Restore feat to make your old system bootable on your new PC

That’s it! Your old system should now be functional on your new system, and you can start working with it without any issues. Make sure that during the Universal Restore step you add a folder with the drivers you previously prepared. Otherwise, the new hardware might not be capable of booting your old system.

Download Acronis True Image

Acronis is one of the most reliable software solutions used by thousands worldwide when it comes to providing PC backup support and many other features.

⇒ Get Acronis True Image

For one Windows 10 computer, the license costs $59.99 and for three computers it will cost $89.99. There is also a trial version available that you can use for 30 days. You can find all of them on Acronis’ official website.

More than half a decade ago, Acronis Disk Director has received important compatibility updates for Windows 10. As an important piece of the Acronis suite, the Acronis Disk Director really needed this update and the users warmly received the news. Thus, you can use it without any fear that it could crash or not be getting the job done.

In case you are searching for a full guide on how to backup your data in Windows 10 with Acronis, you can find an excellent step-by-step guide right here. If for some reason, Acronis does not fit your needs, we have a list of other backup software that will replace Acronis and help you store your important data while restoring or making any kind of experiments with your OS or PC.

Install Windows 10/11 on Mac without Bootcamp [Full Guide]

If you’re using a Mac computer, but still want to see how Windows 10 looks like, we have some great news for you.

With Parallels Desktop 15 for Mac, you’ll be able to install Windows 10 on the virtual machine on your Mac.

Parallels announced that recently that its virtual machine software for Mac computers, Parallels Desktop 15 got a very important update in the form of experimental support for Microsoft’s Windows 10 operating system.

You can use Mac and Parallels to reinstall Windows or to do a Windows job.

This software offers the best privacy settings for Windows 10 through Parallels 11 on Mac and will allow users to test the latest version of Windows 10.

All that without overwriting their existing Boot Camp or creating the new partition just for the system, but to safely install it on Parallels’ virtual machine.

This update will give you the ability to try the new preview of Microsoft Office for Windows 10, which includes the improved versions of Word, Excel , and PowerPoint, and other new features of Windows 10.

Parallels Desktop 15 also gives Mac users the chance to try Microsoft’s personal assistant, Cortana, and compare it with Apple’s VA, Siri, which is great if you like to experiment with your system.

Installing operating systems on the virtual machines before installing them on actual computers has become a trend lately.

But it is indeed a more practical way to determine which operating system fits you.

Maybe using Microsoft Windows 10 Technical Preview on Parallels Desktop 15 will not change your choice of the operating system, but it will certainly give you the insight in other OS and all it’s good and bad sides.

But unfortunately, Parallels Desktop 15 is not free, it is available to purchase from the Parallels’ website for $79.99.

There is also a special pricing plan for students and users of previous versions of Parallels Desktop. But you can always try a free trial version, which can be downloaded from here.

Best Rugby Analysis Software for Your Team [Great Picks]

Rugby is played with an oval ball by two teams of 15 players (in Rugby Union play) or 13 players (in Rugby League play).

Both versions have their origins in the style of football player at Rugby School in England.

The basis of the game was well established by the early 1900’s, about the same time that the foundation was laid for baseball. Since then, the game has constantly evolved.

With the development of video cameras, the game has become an incredibly strategic sport thanks to video analysis software.

They say a picture is worth a thousand words, but when it comes to video, the information obtained by coaches and scouts is worth considerably more.

Video analysis uses motion recording in order to improve the techniques the players use, identify problems related to movement, and more.

Behind every successful athlete, there is whole team of professionals that make sure he/she always performs at top peak performance.

The data gathered through video analysis allow physiotherapists and rugby coaches to polish the skills of their athletes.

In this article, we will explore some of the Rugby analysis software for rugby matches analysis.

Which are the best 6 rugby analysis software?

NacSport Analysis Pro

NacSport Analysis Rugby

Another Rugby analysis software that offers a wide array of features no matter your level, budget, and sport.

NacSport Analysis offers a wide range of versions:

  • Basic suitable for ‘rookies’ in video analysis:
    • Basic customized analysis
    • Powerful video player
    • Add extra info to your clips
  • Basic + for in-depth analyses:
    • Advanced customized analysis
    • Easy access to detailed info
    • Dashboard and reports capabilities
  • Scout + for high-end features with the capability to use 5 different videos in your                                          presentation:
    • Customized limitless analysis
    • Big volumes of detailed data
    • Analyze without video source
    • Add extra info to your clips
    • Two video angles at a time
  • Pro + for high-end processes for professional analysts aimed at elite teams:
    • Panel Flows for templates (maximum 3)
    • Big volumes of detailed data – an unlimited number of videos
    • Dynamic matrix-based insights or submatrix with the capability to export to Excel
    • Analyzing without a video source
    • Adding extra info to your clips – text notes, ratings, draw, compare actions
    • Two video angles at a time
    • Dashboard and reports that can be shared with charts and labels in real-time
    • Powerful search tools
  • Elite offers all the features of Pro+ and some extras:
    • First-class video analysis
    • Unlimited video analysis options
    • Immediate feedback
    • Registration tools that allow you to compile a high amount of data
    • Richer perspective for your clips
    • Up to 4 angles at a time
    • Live stats and reports
    • Stream videos and data
    • Wirelessly share video and data

The software has multiple price plans but we have found a downloadable trial version for our readers and you can get it from the link below.

NacSport Analysis Pro

NacSport Analysis Pro

Nothing beats using a dedicated tool for any given job, and when it comes to sports analysis, NacSport Analysis Pro is the very best.
Check priceVisit website

Optapro Rugby SuperScout

OptaPro Rugby Super Scout

Opta is the global leader in rugby performance data and statistics, covering all major rugby competitions.

SuperScout allows you to search, view and create your own time-stamped video footage by collecting data about the ball event in each game, and assisting each action with a corresponding X, Y pitch co-ordinate.

The tool can import video and XML feeds to other analysis platforms with data from other sources like GPS. SuperScout has the ability to also recover 2D graphics data from the review video.

Opta has collated the most comprehensive database of player performance data across the major global rugby competitions for domestic and international level from : Aviva Premiership, Super 15, Top 14, Rabo Direct Pro 12, Heineken Cup, Amlin Challenge Cup, LV Cup, ITM Cup, RBS 6 Nations, IRB Rugby World Cup, Autumn Internationals, Summer Tours and selected age grade and Women’s International fixtures, Stobart Super League and NRL.

Multiple SuperScout licences are available that include some powerful features:

  • Summary match stats
  • Detailed home and away team reports
  • Season to date team
  • Player comparison reports
  • Tournament and referee reports
  • Video and SuperScout XML data
  • Player analysis and reports dating back to 2005
  • Performance data
  • Timestamp events
  • Plot kicking data on a 2D graphic
  • Video review

⇒ Get Opta

StatsPro

StatsPro Rugby

StatsPro offers a quality service regarding data gathering from any rugby match. You can also send the videos to them and have them analyzed or do it yourself by buying an annual licence to use this software.

You can use software for free if you want them to code the games for you.

StatsPro key features:

  • KPI Dashboard – one page overview of game data, ruckspeed, return to play time, etc.
  • Player match report and Player Matrix – feedback for your players with pass, kicks and tackles ratings
  • Line-out Analysis – feedback for lineout formations
  • Video Feedback – export selected clips, individual video clips of players

⇒ Download StatsPro

Rugby Assistant

Rugby Assistant

Rugby Assitant is a free software that allows you to redistribute/modify it under the terms of the GNU (General Public License).

Rugby Assistant  key features:

  • Future match analysis – discover recursive patterns in opponents
  • Matches made analysis – player stats and self-assessment
  • Medical stuff -take control of injuries and players availability
  • Ability to check the most involved playes with stats.

⇒ Download Rugby Assistant

Avenir Sports – Sportscode

Avenir Sportcode Rugby

Because video analysis is the first and most important step in improving your Rugby’s team performance, Avenir Sports offers a very powerful and easy to use software to fit any analysis situation, packed into a software called SportsCode.

With Sportscode, you can analyse rugby matches from 2 or more angles to give you a more informed insight into your team’s performance. You can analyze aspects of movement of players, running lines both on and off the ball, and more.

It is worth mentioning that 6000 Elite Sporting Organisations around the world currently use SportsCode.

Sportscode key features:

  • Easy to use coding/tagging templates
  • You can upload footage from anywhere – Digital video camera, TV, DVD, etc.
  • Multiple angle analysis using stacking feature
  • No limitations on how many code buttons can be included
  • HD footage support
  • Can generate a spreadsheet-style analysis report
  • Data link to video for qualitative analysis
  • Real time sharing for coded data and reports
  • Timeline feature that allows you to combine many games together in order to see patterns
  • Ability to play back video in slow motion, frame by frame, etc.
  • Drawing tools to highlight different aspects of play
  • Annotation feature with specific times chose by you
  • Capture video live
  • Review features without stopping the recording
  • Key-moments easy flagging
  • Offline analysis integration
  • HUDL  app – allows players access to the analysis information from any device.

⇒ Get Avenir Sports Sportscode

Coach Logic

CoachLogic Rugby

This coaching software improves the use of video in performance analysis. It brings the teams closer by offering engagement capabilities and combines the best coaching practice by making players central to the analysis process for optimum results.

Coach Logic key features:

  • Streamlined video analysis – easily accesible tools
  • Upload, view, analyse, discuss and share limitless match and training videos
  • User-friendly interface
  • Saves time by completing match analysis collaboratively
  • Upload, move and learn anywhere features by using cloud based phone and web apps
  • It allows players to access the information at any time and respond with comments
  • You can easily create playlists
  • Notifications that keep coaches and players up to date with any information needed
  • Video tagging, match review and video filters
  • Offline analysis integration

⇒ Download Coach Logic

We’ll end this list here. If you have any questions or suggestions related to this post, feel free to let us know in the comments below.

Steven Sinofsky is authoring a book about his time at Microsoft

The former head of Windows and Office, Steven Sinofsky, is working on an upcoming memoir titled Hardcore Software: Inside the Rise and Fall of the PC Revolution. Today, Fast Company released an excerpt from Sinofsky’s draft in a Q&A format on its site.

Reflecting on the 20th anniversary of the ILOVEYOU virus that ravaged the PC landscape, Fast Company published its inside account of how Sinofsky and the Office teams handled the crisis as well as other insights from his time at Microsoft.

Fast Company: The story of the Concept, Melissa, and ILOVEYOU viruses is sort of the end of the age of innocence when it came to security for businesses and consumers, and maybe a little bit for Microsoft, too. And yet it’s relevant today as companies wrestle with trade-offs between ease of use, power, and security, and get user pushback regardless of where they land. Given how much higher the stakes are now than they were in the 1990s, should the industry be better at anticipating threats and preventing them?

Steven Sinofsky: In many ways this was the earliest of the battle between “techie” computer people (a phrase popularized by The Wall Street Journal’s Walt Mossberg) and everyone else, whom we always just called “humans.” When we tried to make the PC safer, it inherently meant making it more difficult to do anything you wanted to the PC—such as run any code from anywhere or to script or customize every program. With each restriction we put in, techies would push back. The real tension for Office came about when these customizations were also used to do useful business functions—for example, most early CRM solutions were built as customizations on top of Outlook.

While the released excerpt was in the light of Sinofsky’s handling of the ILOVEYOU virus at Microsoft, there were some interesting reflections shared that include his new appreciation of trust earned. According to Sinofsky, the way Microsoft was able to navigate the ILOVEYOU virus was compounded by its waning trust with customers. Even seemingly transparent communication between Microsoft and customers was distorted by distrust, but that was only part of the issue. The other was the company’s inability to internalize its deteriorating position with its customers.

As reflected in the following years, Microsoft repositioned itself as mostly an enterprise company with a concentration on security, which incidentally, is the same view most people had already perceived it as. Since his departure following the company’s unfortunate Windows 8 debacle, Sinofsky has been among the staunchest critics of Microsoft’s consumer-facing decisions and perhaps justifiably so, as someone with insider experience into the former decision-making process as well as a new bird’s eye view of the computing market outside of the Microsoft garden.

Sinofsky hasn’t been afraid to point out where Microsoft’s recent computing efforts have fallen short with consumers, despite being head of the team that fumbled the company’s transition into modern computing interfaces. It’ll be interesting to see where Sinofsky delineates between the rise of the iPhone, his team’s mishandling of Windows 8, and the company’s Windows 10 predicament.

Monthly Xbox 20/20 series to start on Inside Xbox May 7 with Xbox Series X gameplay

If 2020 was already a very special year for the video games industry due to the launch of next-gen consoles, the ongoing coronavirus pandemic is making it even more special. If game delays and the cancellation of in-person such as E3 are forcing developers and publishers to adapt, the number of people playing video games at home has been on the rise.

As you can expect, the Xbox team is well aware that more and more gamers have been impatiently waiting for some next-gen console news. After announcing the May 7 Inside Xbox episode last week that will focus on third-party games shipping on Xbox Series X, the Xbox team announced today that this first Inside Xbox livestream will be the first of a series of “Xbox 20/20″ monthly digital events.

“Starting with the May 7 episode of Inside Xbox, we will be showcasing what happens next in the world of Xbox, every month, which is why we’re calling it “Xbox 20/20.” These monthly moments will take place throughout the rest of the year and will be a way for us to engage, connect and celebrate with you about what’s in store for the next generation of gaming, including what’s next for Xbox Series X, Xbox Game Studios, Xbox Game Pass and Project xCloud. Every month will bring something different,” explained Jerret West, CVP, Gaming Marketing.

As a teaser for tomorrow’s digital event, Microsoft published today the following video showing what appears to be the new boot up screen and sound for the company’s upcoming Xbox Series X console:

As expected, this new Inside Xbox episode on May 7, which the Xbox team has now rebranded the “Xbox 20/20 May Update”, will showcase gameplay videos of next-gen titles such as Ubisoft’s Assassin’s Creed Valhalla. West also added that “We’ll be confirming games that utilize our new Smart Delivery feature, which ensures that you always play the best version of the games you own for your console, across generations.” In case you missed it, Assassin’s Creed Valhalla and Cyberpunk 2077 are one of the first confirmed cross-gen titles to support Smart Delivery on Xbox Series X and Xbox One.

While this week’s livestream will focus on third-party games, the Xbox 20/20 July Update will finally provide some details about next-gen first-party games. “A number of our studio teams are looking forward to sharing first looks at new gameplay, insights from development teams being optimized for Xbox Series X, and brand-new game announcements,” West said, without naming specific titles such as Halo Infinite. We’ll have to wait and see, but the new Halo game has been announced as a launch title for Xbox Series X, so we definitely expect to see some gameplay footage during the Xbox 20/20 July Update.

In the meantime, we invite you to mark your calendars for the first Xbox 20/20 on May 7 at 8 a.m. PDT. As usual, the event will be live-streamed on several platforms including Mixer, Twitch, and YouTube, and we plan to cover it live on OnMSFT.

Facebook Gameroom not working in Windows 10/11 [FULL GUIDE]

Facebook Gameroom is a Windows-native application that lets you experienceand play a variety of both native games and web-based games.

In order to enjoy the gaming experience from the application on Windows, you first have to download it, then access the games on the platform.

Facebook Gameroom promises players an exclusive, and immersive gaming experience, while developers who would want to upload their games on the platform benefit from better app launch timings, memory consumption, and tailored solutions to issues like threading, debugging, and networking.

As always, with every invention, there are bound to be some troubleshooting issues.

Users have noted concerns specific to the application not opening, downloading or installing on their devices.

The app is available for download by Windows users. Once you’re on the site, click Install now, then follow the download and installation instructions. All the games will appear in the Gameroom with both levels and rewards.

There’s no need to get worried about the safety of download or installation as the app is whitelisted by most anti-virus programs.

Facebook Gameroom not working: How to fix it

  1. How to troubleshoot Facebook Gameroom install issues
  2. Facebook Gameroom won’t open or load games
  3. What to do if the game download process doesn’t complete

Troubleshoot Facebook Gameroom not installing

If Facebook Gameroom won’t install, here’s what you need to do:

  • If you use Windows 7, install Microsoft .NET Framework 4, then download the Facebook Gameroom application. To fix the installation error, right-click the Facebook Gameroom installer then click on Run as administrator.
  • Windows 10 users need not install Microsoft .NET Framework 4 in the event the app won’t install. You need to download the setup files again and run it as administrator.

Note: if you’re using an office PC, check with your network administrator first because some organizations have restrictions against software installs on their computers, so if such a policy exists, you won’t be able to install Facebook Gameroom.

Troubleshoot: Facebook Gameroom won’t open or load games

Sometimes the problem is not the download or installation, but the launching of the application. In the event games do not run on the app, try to download Facebook Gameroom again, then do the following:

  • Go to Downloaded Games section
  • Click on the X next to the game itself, which will stop the ongoing download or delete the game
  • Click on the game again to download it again
  • Right-click on Gameroom to close it completely
  • Open it again

There are errors you may get in the event the app doesn’t open or load games such as “the game crashed”, or “Failed to initialize Direct3D”. These errors can be resolved by checking your graphics card driver. Speaking of which, if you run Windows 10 Fall Creators Update, check out this article where we list a series of quick troubleshooting steps to fix common game issues.

Ensure you have installed your graphic cards driver because it enables you to play 3D games such as those on Facebook Gameroom.

Check that you have prerequisites such as DirectX 9.0c installed, and 3D acceleration is enabled under your display settings.

Troubleshoot: Game download doesn’t complete

If the issue isn’t downloading the app, but a game or games, here’s what you can do to resolve it:

  • Go to Facebook Gameroom home

Facebook Gameroom

  • Look for the game and try to access it again
  • If this doesn’t resume download, go to Downloaded Games list
  • Click the X next to the particular game
  • Remove the game
  • Try accessing it again

If none of these resolutions to each troubleshooter works for your PC, try updating your internet browser to the latest version.

Otherwise, you can head over to Facebook Gameroom and drop them a message, or use ‘Report a Problem’ link from your Facebook profile to reach the support team over your issue.

If you want to uninstall Facebook Gameroom altogether, including all its plug-ins, without losing the progress of all your games, do the following:

  • Right-click Start
  • Select Programs and Features

Facebook Gameroom

  • Locate Facebook Gameroom from the list
  • Right-click and select Uninstall

Once you select to uninstall Facebook Gameroom, you’ll get a feedback form that launches in your current browser after uninstall is complete, which will request for your feedback about the app.

We hope that the solutions listed above helped you to fix the FB Gameroom issues that you encountered. Use the comment section below to tell which solution worked for you.

[wl_navigator]

Fix: FFXIV unable to complete version check or update

Some Final Fantasy XIV players have discussed an unable to complete version check error on Steam’s forum. That error arises when players open the FFXIV launcher’s window.

Consequently, players can’t play FFXIV when that error arises. If you need to fix that same error, check out some of these resolutions for it.


How do I fix the FFXIV unable to complete version check error

1. Restart your router

First, restart your router after the error arises. To do that, turn off the router; and then unplug it. Wait for about five minutes before plugging your router back in. Then turn the router on again.

Router ffxiv unable to complete version check / update


2. Turn off Windows Defender Firewall

Some users have said they’ve fixed the FFXIV unable to complete version check error by turning Windows’ firewall off.

  1. Press the Windows key + S hotkey to open the search utility.
  2. Next, input firewall to search for Windows Defender Firewall.
  3. Click Windows Defender Firewall to open the Control Panel applet for it.
    The Windows Defender Firewall applet ffxiv unable to complete version check / update
  4. Click Turn Windows Defender Firewall on or off to open the settings shown directly below.
    The firewall settings ffxiv unable to complete version check / update
  5. Select the Turn off Windows Defender Firewall options, and click OK to exit.
  6. Then try opening the FFXIV launcher with WDF disabled.

3. Disable third-party antivirus software

Users with third-party antivirus software will need to disable those utilities instead of WDF. Right-click the system tray icon for your antivirus utility to select a disable option for it.

If your antivirus software includes an option for disabling the firewall, select that setting as well.

Norton Security's context menu ffxiv unable to complete version check / update


4. Run an adware scan

The FFXIV unable to complete version check error can be due to adware. So, scanning for adware with AdwCleaner might fix the issue for some players.

Click Free Download on the AdwCleaner page to save the setup wizard for that software, with which you can install it. Then open Malwarebytes AdwCleaner, and click Scan Now to initiate an adware scan.

Malwarebytes AdwCleaner ffxiv unable to complete version check / update


5. Verify the game’s file integrity

If you’ve installed FFXIV via Steam client, verify the integrity of the game’s files.

  1. Open the Steam window.
  2. Right-click Final Fantasy FFXIV in your Steam’s game library to select Properties.
  3. Select the Local Files tab on the properties window.
    Local Files tab ffxiv unable to complete version check / update
  4. Click the Verify Integrity of Game Files option.

6. Connect to VPN

Some users have resolved the FFXIV unable to complete version check error by connecting to VPN and then opening the game’s launcher. If you don’t have VPN software installed, check out our best VPN client guide.

Download and install one of those VPN clients. Then open the FFXIV launcher when connected to your VPN.

VPN software ffxiv unable to complete version check / update


7. Edit FFXIV’s boot file

Editing the game’s boot file might fix the FFXIV unable to complete version check error for some users.

  1. Open File Explorer with the Windows key + E hotkey for it.
  2. Open this folder path in File Explorer:
  3. %userprofile%/Documents/My Games/FINAL FANTASY XIV – A Realm Reborn.
  4. Right-click the FFXIV_BOOT file to select Open with > Choose another app.
    • Then select to open the file with Notepad.
      Open file program list ffxiv unable to complete version check / update
  5. Edit the BootVersionCheckMode value in the FFXIV_BOOT file from 0 to 1.
  6. Adjust the B4EulaAgreement value to 1 if it’s not already.
  7. Click File and the Save option.

Those are some of the resolutions players confirm can fix FFXIV’s version check error. Note that this issue can also arise due to server maintenance for the game. You can check if the FFXIV server is undergoing maintenance at the game’s forum.


[wl_navigator]

How to change default font in Windows 10 Registry Editor

The latest Preview build for Windows 10 brought improvements to the Registry Editor. More precisely, the Registry Editor in Windows 10 now has the address bar.

But that’s not all, you probably didn’t know that you’re also able to change the font type in the Registry Editor, and customize this tool even more.

Well, you are able to change the default font type of the Registry Editor, and the only thing you’ll need for that is the tool itself, as it requires creating a string that will change the font.

Before we begin, keep in mind that you need to run at least build 14942 of Windows 10 Preview, as this option is not available to the general public, yet.

We don’t know precisely when Microsoft will introduce it to all users, but we assume it will be with the next major update for Windows 10.

How can I change the Registry Editor font in Windows 10?

Here’s exactly what you need to do, to change the font type in Registry Editor:

  1. Go to Search, type regedit, and open Registry Editor
  2. Paste the following Registry path in the address bar (since you can now): HKEY_LOCAL_MACHINE\Software\Microsoft\Windows\CurrentVersion 
  3. Right-click CurrentVersion, and select New > Key.
  4. Name that key Regedit.
  5. Now, right-click Regedit, and select New > String.
  6. Name the String ‘FontFace’.
  7. Double-click on FontFace, and add the name of  a font that is installed on the system as the value. If you’re not sure which font type to add, return to Search, type fonts, and open Fonts. From here, you’ll be able to find info about any font installed on your computer
  8. Restart the Registry Editor.

There you go, next time you open the Registry Editor, the font type will be changed.

If you have any comments or questions, just let us know in the comments below.

Fix: Window 10 won’t play MOV files

Can’t playblack .mov files? Is your video application continuously crashing in the middle of a movie or perhaps just after you run it? This issue is due to the update to Windows 10 but you can read below some useful tips on how to fix the video application if it stopped playing after the update to Windows 10.
Can't play movie files ever since upgrade to windows 8.1, Windows 10 Fix
Now it also depends what video application you are using to play your .mov files in Windows 10 because either you have some errors within the video app and you will most likely need to update that as well to a version compatible with Windows 10 or perhaps you have issues with all your video apps in which case this is most likely a graphics driver issue and we will need to update that as well.

Note: Before we get started if Windows 10 won’t play MOV files, make sure that the .mov file you are trying to play isn’t the issue. Check if the .MOV file is corrupted and read the guide on how to repair mov files.

How do I see MOV files if Windows won’t play?

  1. Install the latest necessary drivers
  2. Update graphics drivers manually
  3. Check for problematic applications
  4. Change your media player

1. Install the latest necessary drivers

  1. On the start screen of your Windows 10, you need to move the mouse cursor over to the upper right side of the screen.
  2. You should have in front of you the Charms bar.
  3. Left-click or tap on the Settings feature.
  4. After you are in the Settings menu left-click or tap on Change PC settings.
  5. Left-click or tap on the Update and Recovery feature.
  6. Left-click or tap on the Windows updates feature.
  7. Now you will need to select the Choose how updates get installed option.
  8. You will have there a topic that says Important updates and under that topic left-click or tap on the Install updates automatically (recommended).
  9. After a reboot of the Windows 10 system, this change should take effect and install any necessary drivers that you might need.

2. Update graphics drivers manually

If the steps above did not work we are going to update the graphics driver manually.

  1. Move the mouse cursor over to the upper right side of the screen.
  2. Left-click or tap on the Search feature.
  3. In the search box, you will have to write the following: Device manager.
  4. After the search is finished left-click or tap on the Device Manager icon.
  5. On the left side in the Device Manager window you will need to double-click on the Display adapters category and expand it.
  6. Now you will need to double-click on the name of the graphics card you have installed in your Windows device.
  7. Left-click or tap on the Driver tab.
  8. Left-click or tap on the Update Driver button.
  9. From here you will have to follow the instructions posted on the screen.
    Note: If you cannot install the drivers from here you will have to go on the manufacturer’s website and download the latest graphic card driver compatible with Windows 10 and install it on your system.

3. Check for problematic applications

In this method, we will do a clean boot and see if any other application you are running on Windows 10 is preventing your video player from working properly.

  1. Move the mouse cursor over to the upper right side of the screen.
  2. Left-click or tap on the Search feature.
  3. In the search box write the following: msconfig .
  4. After the search is finished you will need to left click or tap on the msconfig icon.
  5. In the System Configuration window that you have in front of you, left-click or tap on the Services tab situated in the upper side of the window.
  6. In the Services tab you need to check the box next to Hide all Microsoft services
  7. Left-click or tap on the Disable All button.
  8. Left-click or tap the Startup tab situated on the upper side of the System Configuration window.
  9. Left-click or tap on the Open Task Manager feature.
  10. You will have to left click or tap on the Startup tab in the Task manager window.
  11. Left-click or tap on all the applications you have there and left-click again on the Disable button in order to stop them from running when the Windows 10 device starts.
  12. Close the Task Manager window.
  13. Left-click on the OK button in the System Configuration window.
  14. Reboot your Windows 10 device.
  15. Now after the reboot of the operating system you need to try and play a movie.
    Note: If you manage to open and successfully play a movie file then it means that one of your applications you had running before you did the clean boot was interfering with the video application.

4. Change your media player

These days, media playback is pretty well supported in the latest version of Windows. However, certain special file types require more than what Windows has to offer. Check out the list of best media players for Windows 10 and choose one from the list. They should be able to play the .mov file without issue. As a side benefit, the new media player comes with a lot of useful functionalities that can make your life easier.

So there you have it, you got above a couple of ways to make your Windows 10 play the .mov files you want. You can also write to us in the comments section of the page if you have any other questions on this subject.

[wl_navigator]

FIX: Razer Synapse not detecting mouse or keyboard

Razor makes some of the most premium computer gaming peripherals, including keyboards and mice. And to make the most of these premium devices, it also offers the Razer Synapse software to the users. However, at times the Razer Synapse software may fail to detect the mouse and keyboard connected to the computer.

Several users have reported the Razer Synapse not detecting mouse/keyboard issues in the Reddit forum.

So I have a razer black mamba mouse and it won’t appear in the razer synapse 3 application but I do see my Keyboard (Razer Blackwidow)

In this article, we have listed all the possible solutions to help you fix the Razer Synapse 3 not detecting mouse/keyboard issues in Windows.

What can I do if Razer Synapse does not detect mouse/keyboard?

1. Check for hardware issues 

  1. Let’s begin by diagnosing the mouse for hardware issues.
  2. Disconnect the mouse or keyboard from your computer.
  3. Connect the Razer mouse to a different computer that has Razer Synapse installed.
  4. Check if Razer Synapse detects the mouse.
  5. If the mouse is not detected, you may have to contact Razer support to get the device repaired or replaced.

Run keyboard troubleshooter

Razer Synapse not detecting mouse
  1. Press Windows + I to open Settings.
  2. Click on Update & Security.
  3. From the left pane, click on Troubleshoot.
  4. Scroll down and click on Keyboard.
  5. Click the Run the troubleshooter button.
  6. Follow on-screen instructions and apply any recommended fixes.

2. Reinstall device drivers

Razer Synapse not detecting mouse
  1. Press Windows Key + R.
  2. Type devmgmt.msc and click OK to open Device Manager.
  3. Expand the Mice and other pointing devices category.
  4. Right-click on your Razer mouse and Uninstall Device. Click Yes to confirm the action.
  5. Next, repeat the steps to uninstall your keyboard driver as well after expanding the Keyboard category.
  6. Restart the computer, and Windows will reinstall the device driver.

Reinstalling the device drivers will fix any issues the Razer Synapse app may be experiencing due to a temporary glitch or driver corruption.

3. Reinstall Razer Synapse

3.1 Check for updates

Razer Synapse not detecting keyboard
  1. Launch Razer Synapse if not already running.
  2. Expand the system tray and right-click on the Razer icon.
  3. Select Check for updates from the options menu.
  4. Razer will scan for any pending updates and install them.
  5. Relaunch Razer Synapse and check for any improvements.

3.2 Repair Razer Synapse 

Razer Synapse not detecting keyboard
  1. Press the Windows key, type control, and open Control Panel.
  2. Click on Uninstall a program.
  3. Select Razer Synapse and click on Change.
  4. Click the Repair button.
  5. Razer Synapse will scan the app for file corruption and fix them if required.
  6. Relaunch the app and check if it detects your keyboard and mouse.

3.3 Reinstall Razer Synapse

Razer Synapse not detecting keyboard
  1. Press Windows Key + R to open Run.
  2. Type appwiz.cpl and click OK.
  3. In Control Panel, go to Programs > Programs and Features.
  4. From the list of installed programs, select Razer Synapse.
  5. Click Uninstall and then click Yes to confirm the action.
  6. Once uninstalled, reboot the computer.
  7. Download the latest version of Razer Synapse from the Razer website.
  8. Run the installer and install the app.
  9. Connect your Razer mouse and keyboard to your computer and check the Razer Synapse detects the devices.

The Razer Synapse not detecting mouse/keyboard issues usually occurs if you are running an outdated version of Razer Synapse. In that case, updating to the latest version of Razer Synapse should help.

However, the issue can also occur due to other reasons, such as corrupt installation or hardware failure. Follow the steps in this article to fix mouse and keyboard detection issues in Razer Synapse.

FIX: Razer Synapse not detecting DeathAdder or Kraken

Razer makes some of the most premium gaming peripherals and offers the Synapse software to customize these devices. However, sometime you may experience the Razer Synapse not detecting Deathadder, Kraken issue after installing a new Razer device.

Just downloaded Synapse 2.21 for Windows 10 for the first time. I have a Kraken 7.1 V2 headset that Synapse detected no problem. Unfortunately, it doesn’t seem to recognize my mouse.

This issue is usually fixed by installing the latest version of Razer Synapse. If that does not work, we have other workarounds as well.

Follow the steps in this article below for the step by step guide to fix Razer Synapse not detecting DeathAdder Elite mouse and Kraken headset issue in Windows.


What to do if Razer Synapse does not detect mouse or headset?

1. Install Razer Synapse 3

Razer Synapse not detecting Deathadder

  1. If you are running Razer Synapse version 2, try updating to Razer Synapse version 3.
  2. The latest version of Synapse brings support for more devices and should be able to detect your gaming peripheral from Razer without any issues.
  3. Launch Razer Synapse.
  4. Click the Gear icon on the top right corner.
  5. Open the About tab.
  6. Click on Check for updates.
  7. Download and install any pending update in the My Apps section.
  8. Reconnect your Razer device and check if the device is detected.

2. Repair Razer Synapse

Razer Synapse not detecting Deathadder

  1. Press Windows Key + R.
  2. Type control and click OK to open Control Panel.
  3. Go to Programs > Programs and Features.
  4. Select Razer Synapse from the list of installed apps.
  5. Click on Change. It will open the Razer Synapse installation wizard.
  6. Under What would you like to do? section, Click the Repair button.
  7. The troubleshooter will repair the Razer Synapse files in case any files are found missing or corrupted.
  8. Once repaired, close the troubleshooter and reboot your computer.
  9. Launch Razer Synapse and check if it detects Deathadder Elite and Kraken headset.

Razer Chroma not working in Windows 10? Here’s how to fix the issues


3. Reinstall Razer Synapse

Razer Synapse not detecting Deathadder, Kraken

  1. Press Windows Key + R.
  2. Type control and click OK to open Control Panel.
  3. Click on Uninstall a program.
  4. Select Razer Synapse and click Uninstall.
  5. Click on Uninstall again.
  6. Once uninstalled, download the latest version of Razer Synapse from the Razer website.
  7. Disconnect all the Razer devices connected and reboot the computer.
  8. Launch the app and check for any improvements.

4. Uninstall and reinstall the Razer devices

Razer Synapse not detecting Razer device

  1. Press Windows Key + R to open Run.
  2. Type devmgmt.msc and click
  3. In Device Manager, expand the Mice and other Pointing Devices category.
  4. Right-click on your Razer device
  5. Click on Uninstall Device.
  6. Unplug your Razer Deathadder mouse and wait for a minute.
  7. Reconnect the device and restart your computer.
  8. Windows will scan for any hardware changes and reinstall the device.
  9. Upon restart, open Synapse and check for any improvements.

The Razer Synapse not detecting Deathadder, Kraken issue can occur due to a glitch in the software or due to other temporary issues. Follow the steps in this article, and you should be able to resolve the error in Windows.

Star Wars Jedi: Fallen Order video game updates on Xbox One consoles with new free content

A surprise update for the Star Wars Jedi: Fallen Order video game was announced yesterday on May the 4th (aka Star Wars Day) and is now live for owners of the game on Microsoft’s Xbox One consoles and other platforms.

This update adds several new skins for both Cal and BD-1 and a new Game Plus mode which includes two new challenge modes that can be accessed via the meditation mechanic and the ability for Cal to appear as the Inquisitor version of himself with a red lightsaber (see above image) as glimpsed in a vision within the main game.

“From the day we first announced the game to right now, it’s been an absolutely wild ride and a truly humbling experience to see how much so many of you have enjoyed this game,” the announcement on the official EA website reads. “We’ve thoroughly enjoyed seeing many of you react so positively to the game, from your screenshots, videos, fan art, cosplay, live stream reactions, and more!

“From the bottom of our hearts, thank you for being such a supportive community! It means the galaxy to us. Your passion has moved us so much that we felt we just had to do something extra as a thank you, and that’s where this update comes in.”

While most fans of Jedi: Fallen Order likely would have preferred new story content or another planet to explore, these extra play options should add quite a bit of replayability to the title, something it noticeably lacked until now.

Are you excited to play this new content? Let us know why or why not in the comments below and then follow us on Pinterest and Twitter for more Xbox gaming content.

Here’s how to hide your IP address in Windows XP

Windows XP support was discontinued a long time ago and this once beloved Windows system is out of the picture for the majority of users.

However, there are still some nostalgics that find it the best-suited for the job, due to low requirements and compatibility with antiquated components. And those folks need their privacy boxes checked, too.

One of the main reasons why even the most faithful followers are considering upgrade lies in the fact that Windows XP isn’t all that safe to use anymore.

Security-wise, you’ll have a hard time to protect your data and privacy while using Windows XP. However, there are ways to, at least, improve it. The first step is to hide your IP address.

For that purpose, we prepared a few instructions on how to hide your IP address in Windows XP. Make sure to check them out below.

But first, let’s not skip on the importance of this procedure and how much it means in the modern-day web surfing. By hiding your IP address, you prevent ISP or other trackers to take a hold of your personal data and location.

With some tools, like VPNs, you switch your ISP-provided IP address with any given servers’ IP.

What’s an IP address? It’s the randomly generated identification provided by your ISP. It’s different for every user. Your IP address leaves traces wherever you go while surfing.

Some sites will track your IP and use your geo-location and online behavior to create a profile or pattern if you will, of your online endeavors. And some folks (including us) don’t like to share personal data with corporate snoops.

In addition, some sites provide geo-restricted content. In case you’re not from the supported country or a region, you won’t be able to access that content.

Luckily, with VPN, proxy, or Tor, you should be able to hurdle over those restrictions and enjoy free internet like it’s supposed to be.

How can I hide my IP address in Windows XP?

  1. Use VPN service
  2. Hide your IP with the Command Prompt trick
  3. Give the Proxy server a go
  4. Try Tor browser

1. Use VPN service

Now, this here is a touchy subject. We’re all aware of the massive growth of the VPN services market. However, not many top-rated solutions support Windows XP. The industry is just giving up on Windows XP for obvious reasons.

Even Microsoft discontinued the support for Windows XP.hide ip address windows xp

For the apparent reasons, you can choose to upgrade to a later Windows version or check out the scarce number of VPNs that support Windows XP.

With the reliable VPN solution, you should be able to replace your IP address with various different dedicated servers based in various locations. When it comes to the dilemma of whether to use paid or free VPN solutions, make sure to check our insight on the matter here.

Install ExpressVPN

ExpressVPN deal

One highly-rated solution available for Windows XP is no other than ExpressVPN, a trusted leader in the VPN industry that guarantees to offer you supreme privacy without taking a toll on your PC’s performances.

Speaking about performances, we all know that XP is no longer the latest and greatest OS for a long time now. This is why speed is quintessential and ExpressVPN brings unlimited-bandwidth, and ultra-fast servers with global coverage.

ExpressVPN hides your IP address and encrypts your network data so that you can stay secure and anonymous every time you go online, plus it does so for every single device you own under a single subscription.

Packed with the best-in-class encryption and leak proofing tools, this VPN is your trusted partner in fighting hackers and spies. Additional security-oriented tools like DNS Leak Test, WebRTC Leak Test, Password Generator, and a 10-Step Security Check are included.

ExpressVPN

ExpressVPN

Still running on Windows XP? Team up with ExpressVPN to enjoy the retro vibe of your OS without compromising on privacy!
$8.32/mo. Buy it now

2. Change your IP with the Command Prompt trick

Back in the days, when Windows XP was at its peak, some knowledgeable users found the way to hide your IP address with a few simple steps in Command Prompt.

However, there’s a limitation to a number of times you can switch your IP address to an alternative. This probably won’t work on later iterations of Windows OS, but it seems that it did well for XP users in the not so distant past.

Follow the instructions below to change your default IP address with a new one that’s randomly generated in Windows XP:

  1. Navigate to What’s My IP site to find out your current IP.
  2. Open Start and then the Run elevated console.
  3. In the command line, type cmd and press Enter.
  4. In the input line, type the following command and press Enter:
    • ipconfig /release
  5. Close the Command Prompt and open Start > Connect to > Show all connections.
  6. Right-click on Local Area Connection and open Properties.
  7. Right-click on Internet Protocol (TCP/IP) and open Properties.
  8. Check the Use the following IP address and insert these values in the IP address and Subnet mask fields:
    • 111.111.111.111
    • 255.0.0.0
  9. Click OK and wait for approximately 30 seconds.
  10. Now, get back to Local Area Connection > Properties > Internet Protocol (TCP/IP) > Properties.
  11. Check the Obtain IP address automatically box and confirm changes.

That’s it. Your personal IP address should change after these steps.

3. Give the Proxy server a go

Besides VPNs, there’s also a proxy server that can come in handy. To get things straight, Proxy isn’t the same as a VPN.

Virtual Private Network covers the whole device connection, while proxies are mainly linked with browsers. Nonetheless, due to a lack of choice in the VPN department, you might want to reconsider using a proxy instead of VPN.hide ip address windows 7
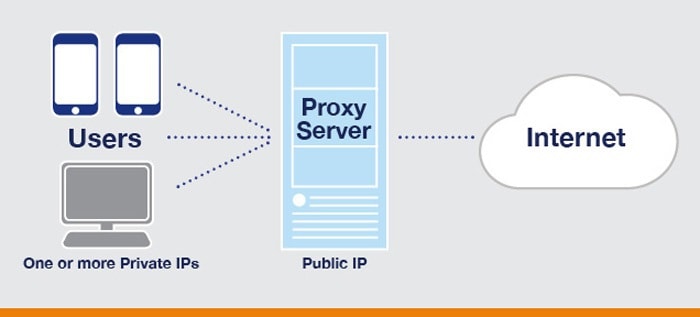
Proxy is the middleman between you and the site you want to access. It takes your IP address and replaces it with the public one which makes tracking almost impossible.

There are plenty of Proxy servers out there, both free and premium versions. In comparison to VPN solutions, you can most certainly use the majority of proxy solutions.

Here’s the list of the most popular ones:

Need a hand to set up a global proxy server in Windows 10? Check out this step-by-step guide.

4. Try Tor browser

Finally, we can’t overlook the most secure browser out there you’ve probably heard of whenever someone brings privacy into the conversation.

Yes, it’s the Tor browser. Tor (The Onion Router) is the open-source internet privacy project packed in one multi-functional browser.hide ip address windows 7
It does slow down your connection a bit but it provides users with almost complete anonymity. Furthermore, you can use it for accessing the Dark Web (or Deep Web) if you’re into that.

Nonetheless, this program is completely free and should work on the Windows XP platform without any issues. You can download the Tor browser here.


Check out this guide and learn how to download and use the Tor Browser on Windows 10.


That should do it. If you’re still a proud owner of Windows XP and want to keep up with the times and protect your privacy, these instructions should do you justice.

Also, don’t forget to share your thoughts and questions in the comments section below.

[wl_navigator]

How to repair broken PowerPoint files on Windows 10/11

PowerPoint is one of the most reliable tools that you can use to create, edit, and run presentations. However, sometimes unexpected things happen and you can’t run your presentation due to broken PowerPoint file issues.

In this quick guide, we’re going to show you how you can repair your broken PowerPoint files so that you may go on with your presentation.

How can I repair broken PowerPoint files?

1. Use the repair option in Office

PowerPoint is part of the Microsoft Office suite. There is a built-in Office option that allows you to automatically repair problematic PowerPoint files.

Here are the steps to follow:

  1. Go to Control Panel > Programs and Features.
  2. Select the Microsoft Office version installed on your PC.
  3. Click Change and then select Quick Repair.repair office 2016

Check if this quick solution solved your problem. If this is the case, go to the second solution.

2. Uninstall add-ons

You’d be surprised to learn how many technical issues and errors Office add-ons may cause. As a matter of fact, most users don’t even need add-ons.

PowerPoint already sports all the features and options that you need to create and run amazing presentations.

Moreover, certain problematic add-ons may even break your PowerPoint files. In this case, removing the respective add-ons may fix your problem.

Here are the steps to follow:

  1. Go to Start > type PowerPoint /safe > hit Enter.
  2. Go to the File menu, click Options > go to Add-Ins.
  3. Select COM Add-ins > hit Go.
  4. Clear all the checkboxes (Disable the Add-ins) > hit OK.
  5. Restart PowerPoint and check if your broken files are now fully functional.

If you disable absolutely all your add-ons and you notice that the issue no longer persists, you can enable your add-ons back on one by one.

In this manner, you’ll identify the culprit. You can then remove only the problematic add-on and use the other ones if you really need them.

3. Insert the broken PowerPoint file into a blank presentation

Another solution that worked for many users is to simply use a blank presentation and insert the problematic file there.

These are the steps to follow:

  1. Create a blank PowerPoint file.
  2. Go to Home > New slides > Reuse Slides.
  3. Go to Browse > select the broken PowerPoint presentation.
  4. Click Open.
  5. Select one of the slides in the Reuse Slides pane.
  6. Select Insert All > hit Save.

4. Move the PowerPoint file to a different location

Sometimes, the location where you saved your PowerPoint file may break your files due to incorrect settings or compatibility issues.

So, in order to cross this off your list of potential causes of the issue, save your PowerPoint file to a different location.

For example, move it to another drive. You can even save it on an external storage device and try to run it from there.

5. Use PowerPoint Online

If nothing worked and you are running out of time, you can use PowerPoint Online to open and run your presentation.

As a quick reminder, PowerPoint Online is a free tool that you can use to open any PowerPoint files — even corrupted, damaged, or broken ones.

Simply go to PowerPoint Online’s website and upload your broken PowerPoint file. The platform should display the presentation content in a few seconds.

There you have a few quick solutions that everyone can use to repair broken PowerPoint files.

If you’ve got any suggestions about other potential fixes, feel free to list the steps to follow in the comments below.

You should also rule out a virus infection, so check out some great antivirus picks.

  • How do I fix a corrupt PowerPoint file on a Mac?

To fix a corrupt PowerPoint file on a Mac, you may try importing the slides to a new PowerPoint or copying it to a different location.

[wl_navigator]

Panos Panay wants to accelerate Windows 10 innovation, confirms Windows 10X’s single-screen devices focus

Panos Panay, Microsoft’s Chief Product Office Officer and new head of both Windows client and hardware shared some important news about the future of Windows 10 today. In a blog post titled “Accelerating innovation in Windows 10 to meet customers where they are,” the exec mentioned the release of the Windows 10 May 2020 Update later this month (without sharing a firm release date), but he had more important things to say about what to expect in the second half of 2020.

While we still don’t know if we should expect another Service Pack-like update for Windows 10 20H2, Panay said today that “in this holiday and the next, we are going to accelerate innovation in Windows 10 to ensure that Windows devices are the best way to work, learn and play. We are going to make important improvements in every one of those areas.” This suggests that 20H2 could be a bigger update than the November 2019 Update (19H2) was, though Panay didn’t give more details today.

However, the exec was a bit less ambiguous about Windows 10X, Microsoft’s new lightweight version of Windows 10 initially designed for dual-screen devices, such as the company’s upcoming Surface Neo. Well, Panay pretty much said today that Microsoft now has other priorities than dual-screen devices. “The world is a very different place than it was last October when we shared our vision for a new category of dual-screen Windows devices,” wrote the Chief Design Officer.

Because Microsoft needs to “focus on meeting customers where they are now”, Panay pretty much suggested that Windows 10 is once again becoming a priority for the company. On the other hand, the exec confirmed today that Windows 10X will now ship first on single-screen devices, meaning laptops and probably Chromebook-like devices.

“With Windows 10X, we designed for flexibility, and that flexibility has enabled us to pivot our focus toward single-screen Windows 10X devices that leverage the power of the cloud to help our customers work, learn and play in new ways. These single-screen devices will be the first expression of Windows 10X that we deliver to our customers, and we will continue to look for the right moment, in conjunction with our OEM partners, to bring dual-screen devices to market,” Panay said.

The exec didn’t say anything today about Microsoft’s dual-screen Surface Neo, but it looks like it has been delayed to give room to the aforementioned single-screen Windows 10X devices. This confirms a previous report from ZDNet’s Mary Jo Foley Microsoft explaining that neither Surface Neo nor Windows 10X would ship this year.

Microsoft’s shipped a Windows 10X emulator earlier this year, but so far news about Windows 10X have been pretty scarce. However, the Android-powered Surface Duo, which Panay didn’t mention today, could be a different story. According to recent reports, the device could ship as soon as this summer.

Do you think it’s good news that Microsoft now wants to accelerate Windows 10 to meet its customers where they are, even though that means the company’s ambitious plans for Windows 10X are changing? Let us know in the comments below.

Google reportedly considered acquiring Zoom after Microsoft passed

With the coronavirus outbreak forcing many workers to communicate through digital means, the popularity of apps like Zoom and Microsoft Teams pretty much exploded over the past few months. However, Zoom isn’t the only company competing in the video conferencing space, as Google has already jumped in to announce that Google Meet is now free for everyone with a Google account.

If Google has already started opening its video conferencing app to all users starting this week, a new report from The Information reveals today that Google once considered acquiring Zoom before making a push to beat it. The report reveals that Google had cordial relations with Zoom to the extent that thousands of Google employees preferred Zoom over Google Meet. Notably, some Google Cloud engineers even started discussing Zoom’s acquisition plans back in 2018.

“They went so far as to evaluate what would be a reasonable price to pay and calculated the unit economics for the service if it ran on Google’s servers, according to a person who has worked at Google Cloud. Zoom was one of several companies the Google engineers evaluated in this way, said the former Google Cloud employee. The internal discussions didn’t get very far,” the report reads.

A Google Cloud spokesperson told The Information that Google has now stopped its employees from using Zoom since the desktop application doesn’t meet Google’s security standards. However, the security team recommended its employees should either use Zoom on a browser or mobile phones (if they need to).

It is noteworthy that Google isn’t the only company that was interested in an acquisition. Over the past couple of years, Microsoft made several attempts to acquire Zoom. However, Recode has previously reported that “the talks never grew serious”. In fact, the founder of Zoom, Eric Yuan has been repeatedly declining the offers, since he’s not interested in the idea of selling the company.

In response to these reports, a Google Cloud spokesperson stated “the company has never seriously evaluated acquiring Zoom” and there has never been a “large-scale agreement” for Google employees to use Zoom.” On the other hand, Zoom declined to comment on this matter.

Fix: Python Runtime Error

Programming is pretty fun, but at some point, when you try to run the program, unfortunately, and inevitably, errors will show up. So, causing, understanding, and fixing errors is integral to programming.

There are three significant types of errors that you can get in Python, but here we will talk about how to solve Python runtime errors.

A run-time error happens when Python understands what you are saying but runs into trouble when following your instructions.

How can I fix the Python runtime error?

So you’ve written everything correctly. In other words, your syntax is correct, but Python still doesn’t understand what you’re saying. Let’s have a simple example of a Python runtime error:

  • print(solution)

If you try to run this simple line, you will receive a runtime error simply because you didn’t define the solution variable. The line doesn’t make sense.

To understand better that conundrum, let’s make an association with English grammar. Let’s take this sentence, for instance.

  • Please eat the door.

Grammatically, there is absolutely no problem with this sentence. Everything is there; we have all the syntax elements correct.

But when you are trying to understand the sentence, when you piece up the words, it doesn’t make sense because you know you can open and close the door, even shut it or taking it out but eating it?

In programming, this will be called a run-time error because it shows up before you start the program. There are a few types of runtime errors. In this article, you will learn how to solve them.

1. Use an undefined variable or function

This can also occur if you use capital letters inconsistently in a variable name:

callMe = “Brad”
print(callme)

Traceback (most recent call last):
  In line 2 of the code you submitted:
    print(callme)
NameError: name 'callme' is not defined

In this case, the program returned the undefined variable error. You defined the variable callMe, but you tried to print another variable, callme. You must use the variables precisely as you define them, case sensitive.

2. Dividing by zero

Guess what? Python cares about math, and dividing by zero makes no sense in math. 

print(1/0)

Traceback (most recent call last):
  In line 1 of the code you submitted:
    print(1/0)
ZeroDivisionError: division by zero

So this line returns a runtime error as Python can read it properly, but when it comes to executing it, he refuses to do so as it has no mathematical sense.

3. Use operators on the wrong type of data

print(“you are trying to add text and numbers” + 20)
Traceback (most recent call last):
  In line 1 of the code you submitted:
    print("you are trying to add text and numbers" + 20)
TypeError: can only concatenate str (not "int") to str

This line returns the runtime error because you try adding text with numbers, crayons, oranges, chairs with pigeons, etc. It just doesn’t make sense to perform operations with different types of variables.

You also need to know that Python runs the program in two steps. It first checks the syntax and if the syntax is correct, it goes to the second step of executing the program. That’s where he stumbles on possible runtime errors.

To better handle errors such as these in the future, we have a great guide on how to use try-except-print in Python for error handling.

If you are facing another issue with Python, such as python setup.py bdist_wheel did not run successfully; we have a separate guide to how to use it.

In case you’re having problems with Python, we also have a guide on _xsrf argument missing from post error, so feel free to check it out. Our latest guide covers Cannot open shared object no such file or directory error, so don’t miss it.

Before you leave, why not check our latest guide and see how to fix python27.dll is missing error? If you encounter the Python error OXZEP7 software, follow our step-by-step fixes to resolve it quickly.

We hope this guide answers all your questions, but if you have any others or you run into other problems, please throw them down in the comments section below, and we will get back to you.