Top five ways Office 365/ Microsoft 365 can boost your productivity

If you’re a small, medium, or large business alike, productivity for yourself and your workers is essential. Even if you’re not, and you’re just a student or parent, or worker, you’ll also likely need to be constructive to get your assignments done and sort out your day.

With Office 365, soon to be known as Microsoft 365, you can do just that. The Microsoft subscription service offers a lot that can help you balance out your day, and get more work done. Here’s a look at the top five ways in which Microsoft 365 can boost your productivity.

Microsoft Teams to help you keep in touch with your coworkers

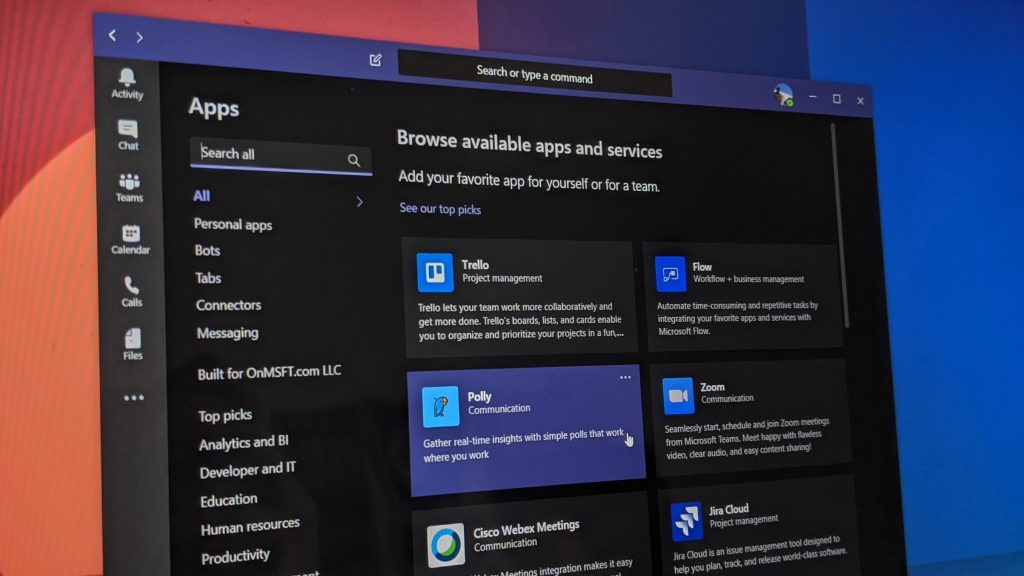
Our number one pick for how Microsoft 365 can boost your productivity relates to Microsoft Teams. Best known by many as Microsoft’s take on Slack, the popular cloud-based proprietary instant messaging platform lets you communicate with your coworkers remotely. It’s included for no added cost with most Microsoft 365 business and education subscriptions, and a consumer version is on the way, too.

Teams has become especially popular recently due to the Coronavirus, and there’s a good reason. When an office isn’t available, you can use Teams to chat and have fun with coworkers, host meetings, add apps to boost your productivity, and keep the workflow moving. Teams also plug in nicely with the rest of Microsoft’s products, which we discuss here and gives you one hub for all things productivity.  We’ve covered Teams extensively here at OnMSFT, so check out our dedicated hub for more ways in which Teams can help you be productive!

Collaboration features in Word, Excel

It’s one thing to work on your own on a particular document or assignment, but with Microsoft 365, there are collaboration features that can help you, too. Number two on the list are some features in Word and Excel.

With a Microsoft 365 subscription, you’ll be able to add comments to a document in Word to help simulate a meeting, and to get direct feedback from coworkers. You also can right-click cells in Excel to add comments to data sets. Outside of the dedicated apps, specific Word, Excel documents can also be “pinned” to a channel or a chat in Teams for quick access. Finally, If the document is uploaded to OneDrive, which we describe next, multiple people can even edit it at the same time.

OneDrive to share your files

Next up is OneDrive. Thanks to the power of OneDrive, you can store your files and share almost anything you work on with your coworkers instantly. When logged in with a Microsoft 365 account, you’ll be able to share a link to your file and allow your coworkers to download and share it, too. You also can get up to 1TB of space, with specific Microsoft 365 plans, which means anything is possible.  You can even back up your phone’s camera roll, save your email attachments to OneDrive, and back up your PC, too.

Outlook to organize your emails, calendars

Build a better schedule with our tips and tricks for Office 365 Calendar in the Outlook Web App

Fourth on the list is Outlook. With Outlook, you’re able to manage your emails and calendars to stay productive. Included with most Microsoft 365 subscriptions, there’s the dedicated Outlook app on Windows and Mac. It allows you to add multiple email accounts, create contact lists, customize your calendars, and more. You also can use Outlook calendar from within the app to email calendars, print calendars, and more. All of this can help you manage your time and stay on top of your work when you need to.

And, if you have a Samsung Galaxy Watch or an Android phone, a dedicated app lets you extend the experience to your wrists. Of course, Outlook is not limited to just the app. There’s a web app, too, which gives you access to your calendars and emails. We’ve previously looked at some tricks for the web app, and some of our other tips and tricks for Outlook, too.

OneNote to take notes, drawings, and more

OneNote UWP

Last, but not least on our list is OneNote. A digital notebook, OneNote can be used to take notes, organizer thoughts in a journal, and a lot more. The desktop (non-Microsoft Store version), known as OneNote 2016, can plugin with Outlook and let you send emails to a Notebook so you can mark them up. You also can use OneNote to create Outlook tasks to help you manage your daily workflow. The Microsoft Store version of the app also has some added features like changing the paper color, solving math problems, and more.

Microsoft 365 has a lot of value.

We’ve just given a top-five look at how Microsoft 365 can boost your productivity. There are many other ways that we haven’t discussed. Feel free to check out our Microsoft 365 News Hub for more, and drop us a comment below to let us know how you are using Office 365.

Mediatek Wireless LAN Driver For Windows 10: How to Download

Driver issues are somewhat common, so it’s important to keep drivers up to date. In today’s guide, we’re going to show you how to update Mediatek Wireless LAN driver on Windows 10.

The process is similar to the one described in our guide on how to update outdated drivers, but it has a few minor differences. So without further ado, let’s get started.

Do I need to download Wi-Fi driver?

  • In most cases, Windows will recognize your wireless adapter and install the drivers automatically.
  • However, when using a newer operating system, it’s possible that your hardware isn’t recognized.

What should I know about Mediatek Ralink 802.11n wireless driver?

In order to obtain this rare driver, you should forget about the HP Assistant tool or Windows 10 Update.

The problem is that the driver you’re using is recognized as the latest iteration by those two. They’ll avoid updating since the current driver is probably asserted as the latest one.

That’s, of course, valid for some users while others won’t be able to connect to Wi-Fi. You’ll need to download and install the driver manually. Once you’ve installed it, it should enable you to connect via Wi-Fi again.

The driver we provided below supports both 32-bit and 64-bit Windows 10 architecture. These are the supported adapters:

  • Ralink RT3090 802.11b/g/n WiFi Adapter
  • Ralink RT3290 802.11b/g/n Wi-Fi Adapter
  • 802.11n Wireless PCI Express Card LAN Adapter
  • Ralink RT3592 802.11a/b/g/n WiFi Adapter
  • Ralink RT5390 802.11b/g/n WiFi Adapter
  • Mediatec MT7630E 802.11bgn Wi-Fi Adapter
  • Ralink RT5390R 802.11b/g/n WiFi Adapter

How do I download Mediatek wireless LAN driver on Windows 10?

Use Device Manager

  1. Download and extract Ralink Mediatec WLAN driver, from HP’s official website.
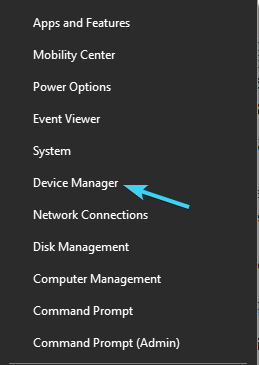
  2. Right-click on the Start button and open Device Manager.mediatek (ralink) wireless lan adapter driver windows 10
  3. Click on the View in the menu and check the Show hidden devices option.
  4. Expand Network adapters.
  5. Right-click on the WLAN driver and open Properties.mediatek (ralink) wireless lan adapter driver windows 10
  6. Under the Driver tab, click Update driver.
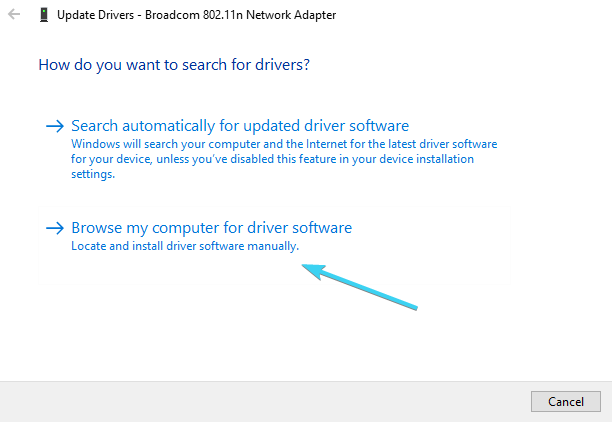
  7. Click on Browse my computer for driver software.mediatek (ralink) wireless lan adapter driver windows 10
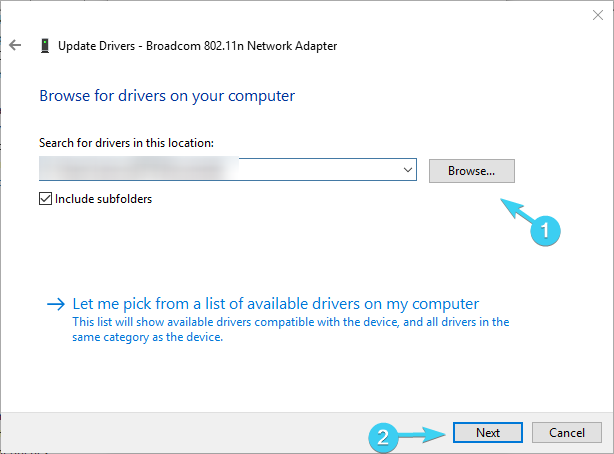
  8. Use Browse to navigate to the extracted Ralink Mediatek driver and select it.mediatek (ralink) wireless lan adapter driver windows 10
  9. Click Next and wait until the driver is installed.
  10. Restart your PC and look for changes.

That’s it. If you’re still unable to connect, we advise you to inspect the hardware and, if the Wi-Fi radio is faulty, replace it accordingly. You might need the help of a professional, so have that in mind.

Installing and updating your drivers manually can be a time-consuming task and confusing for a first-time try. We suggest you use a professional driver updater tool that can help you install drivers and update them in seconds.

Also, a viable alternative is an external Wi-Fi USB adapter. They’re affordable and should come cheaper than the replacement of outdated hardware. Check out the list of Wi-Fi adapters to make the wisest decision!

If you’re another HP user in trouble, don’t forget to share your experience or post questions in the comments section below.

Gears Tactics and several ID@Xbox games are coming to Xbox Game Pass this month

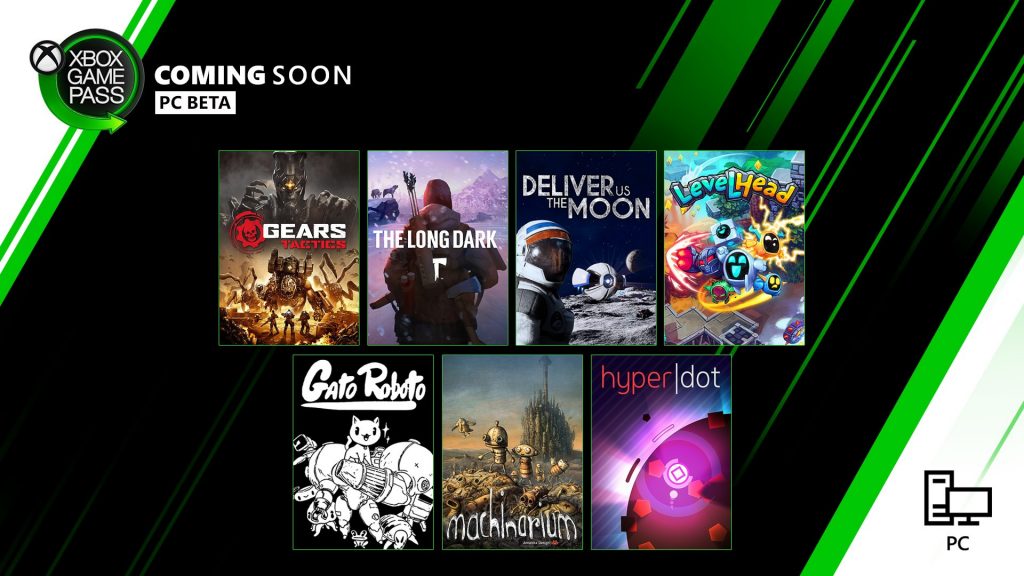
Microsoft has just announced the next wave of games coming to Xbox Game Pass for Console and PC this month. This was already known, but the Xbox Game Studios title Gears Tactics will be available on Windows 10 on launch day, April 28. You may already have seen the game’s launch trailer that published two days ago, but here it is in all its glory.

Before Gears Tactics hits Xbox Game Pass for PC next week, the ID@Xbox game The Long Dark will be available for both Console and PC subscribers, tomorrow, April 16. This first-person survival game supports Xbox Play Anywhere, meaning that you can start playing on Xbox One and pick up where you left off on a Windows 10 PC.

More ID@Xbox games will be available next week on console and PC, starting with the Metroid-like Gato Roboto on April 21 and the sci-fi thriller Deliver Us The Moon on April 23. Two more ID@Xbox games will be available on Xbox and PC on April 30 with HyperDot and Levelhead, and PC gamers will get one additional ID@XBOX title with the adventure game Machinarium.

Several games will also leave Xbox Game Pass on April 30: The Banner Saga 2, Bomber Crew, Full Metal Furies, Ruiner, Silence: The Whispered World 2, and Smoke and Sacrifice will disappear from both the Console and PC catalogs. Lastly, Fallout 4, Wolfenstein: The New Order, Braid, and Metal Slug 3 will also leave Xbox Game Pass for Console on this same date.

If you have yet to subscribe to Xbox Game Pass, we remind you that you can get your first month of Xbox Game Pass Ultimate for just $1. This bundle includes Xbox Game Pass for Console, Xbox Game Pass for PC, and Xbox Live Gold in a single package, and it’s really great value.

Fallout 76’s massive free Wastelanders update is now live on Microsoft’s Xbox One consoles

Fallout 76’s latest free update, Wastelanders, is now live on Xbox One and other platforms. This rather large update adds a new main story and quests, NPC factions and characters, new allies, events, and more.

Here’s the official list of highlights for the Fallout 76 Wastelanders update. You can read the full notes here:

  • People Are Back!: Whether in search of rumored fortune, or mere survival, people have returned to Appalachia in droves. Get to know them through the new dialogue system.
  • New Main Story: Experience the new story that Wastelanders brings to Fallout 76 by completing all-new main quests.
  • Meet the Factions: Who will you side with: The Raiders at Crater, or the Settlers at Foundation? Aid them in their endeavors to earn Reputation and unlock new items.
  • Recruit an Ally: Certain NPCs can come to live in your C.A.M.P., help defend it, and offer you daily quests. Some also bring story quests and romance opportunities.
  • More Events and Dailies: Take on challenging new events, like Riding Shotgun and Radiation Rumble. There are also four new daily quests to explore.
  • New Items and Enemies: Hunt down the monstrous Wendigo Colossus or a pack of Floaters, but don’t forget to pack your new Gauss Minigun!
  • New and Updated Locations: New arrivals in Appalachia are certainly making their mark on the world. Discover new and updated locations as you quest and explore.

To help reinvigorate the playerbase, a new version of the game, named the Fallout 76: Wastelanders Deluxe Edition, has been released in the Microsoft Store with the latest update already added and a host of additional in-game content.

Here’s the extra content that players can expect:

  • Mine Car Planter – A small planter for your crops when no dirt is available; buildable in your C.A.M.P.
  • Raider C.A.M.P. – Change the look of your Vault-Tec C.A.M.P. deployable to give it a Raider edge
  • Raider Stash Box – Raider-themed Stash box for the C.A.M.P
  • Raider Faction Flag – New flag for a player’s C.A.M.P. that show their allegiance with Crater
  • Raider Pathfinder Outfit – Look like another resident of Crater with this outfit; includes mask and bandanna
  • Raider Conquest Loot Bag – Raider-style Loot bag, complete with skull
  • Raider Pillager Backpack – A Raider-style backpack
  • Raider Marauder Power Armor Skin -Unique appearance based on the Crater Raiders
  • Garden Truckbed Trailer – A small planter for your crops when no dirt is available; buildable in your C.A.M.P.
  • Settler C.A.M.P. – Change the look of your Vault-Tec C.A.M.P. deployable to give it a Settler appearance
  • Settler Stash Box – Settler-themed Stash box for the C.A.M.P.
  • Settler Faction Flag – New flag for a player’s C.A.M.P. that show their allegiance with Foundation
  • Settler Mechanic Outfit – Look like another resident of Foundation with this outfit; included hat
  • Settler Traveler Loot Bag – Settler-style Loot Bag; looks like a travel case
  • Settler Relief Backpack – A Settler-style backpack
  • Settler Vigilante Power Armor Skin – Unique appearance based on the Foundation Settlers

Do you own Fallout 76 and has this latest update encouraged you to jump back in? Share your thoughts with the community in the comments below and then follow us on Pinterest for more gaming content.

One or more folders in your mailbox named incorrectly [FIX]

Microsoft Outlook is a reliable email platform, but sometimes users encounter annoying or even blocking errors when trying to access their mailbox.

One such error is the one that informs users their mailbox folders are named incorrectly:

The name of one or more of your folders includes the character / or more than 250 characters. Folders with names that include this character can’t be downloaded to your IMAP e-mail program. Please rename these folders [name of the folder].

It is worth mentioning that this error often invokes Calendar folders, therefore don’t forget to also check these folders when troubleshooting.

How can I fix incorrect mailbox name issues?

  1. Delete the folders mentioned by the error message (look for them in the Calendar tab and in the mailbox folders).
  2. Empty the Trash folder.
  3. If the issue hasn’t been fixed after performing the actions mentioned at steps 1 & 2, create a new Outlook profile.

As simplistic as this solution may first seem, users confirmed it worked.

This looks to have worked…  Thanks for your help.  The bit that worked was emptying the Trash folder

Speaking of Outlook issues, there is an interesting tool out there that promises to fix a series of Outlook and Office issues.

The Microsoft Support and Recovery Assistant tool can both fix issues or share information on how to manually perform a fix yourself.

Here’s a full list of the issue this tool can fix:

  • Outlook stops responding
  • Outlook keeps asking for my password
  • Outlook keeps saying Trying to connect… or Disconnected
  • Can’t receive emails
  • Shared mailboxes or shared calendars don’t work.
  • I can’t sync my email
  • Email app keeps asking for my password
  • I can’t activate Office
  • I need help setting up my Office 365 email in Outlook
  • I can’t sign in
  • I can’t find Outlook on the web
  • I can’t install, connect, or enable CRM for Outlook

You might also want to read our article on how to rename the email in Outlook for more information about this procedure.

Freel free to use the comments section below for any questions or suggestions you might have.

Outlook couldn’t complete your search? We got the solution!

Microsoft Outlook is a popular email client for Windows users, providing lots of features that help home users or companies manage projects and work.

Sometimes, while searching for emails or media, users may encounter Something went wrong, and your search couldn’t be completed Outlook error.

Several users have reported similar errors in the Reddit community.

On click-to-run installs in 2016, several users complaining they cannot search today with the error Something went wrong and your search couldn’t be completed.

The following error can be triggered due to a faulty update or issues with the Outlook client.

If you are also troubled by this error, here are a couple of troubleshooting tips to help you fix Something went wrong, and your search couldn’t be completed outlook error in Windows.

How can I fix Something went wrong, your Outlook search couldn’t be completed error?

1. Install pending updates

  1. The issue seems to be with one of the Windows KB updates. If you have not installed any updates recently, check if any update is pending that needs to be installed.
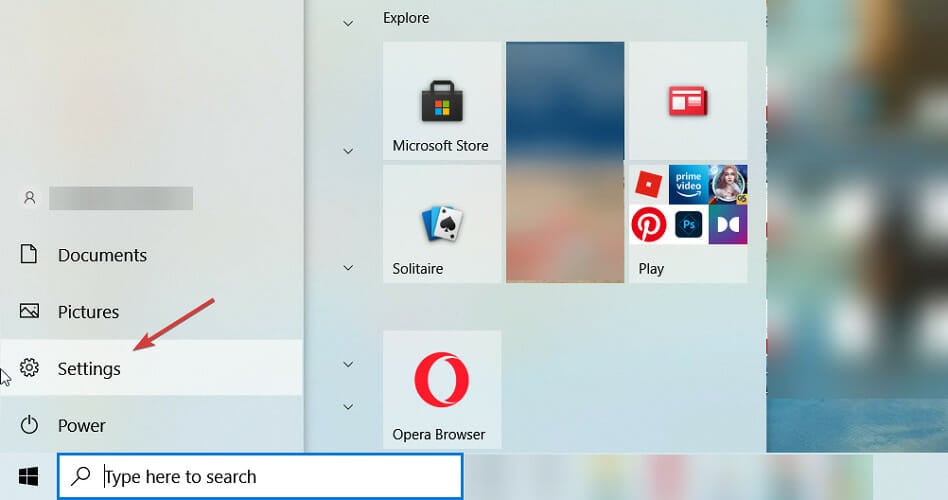
  2. Click on Start and select Settings.
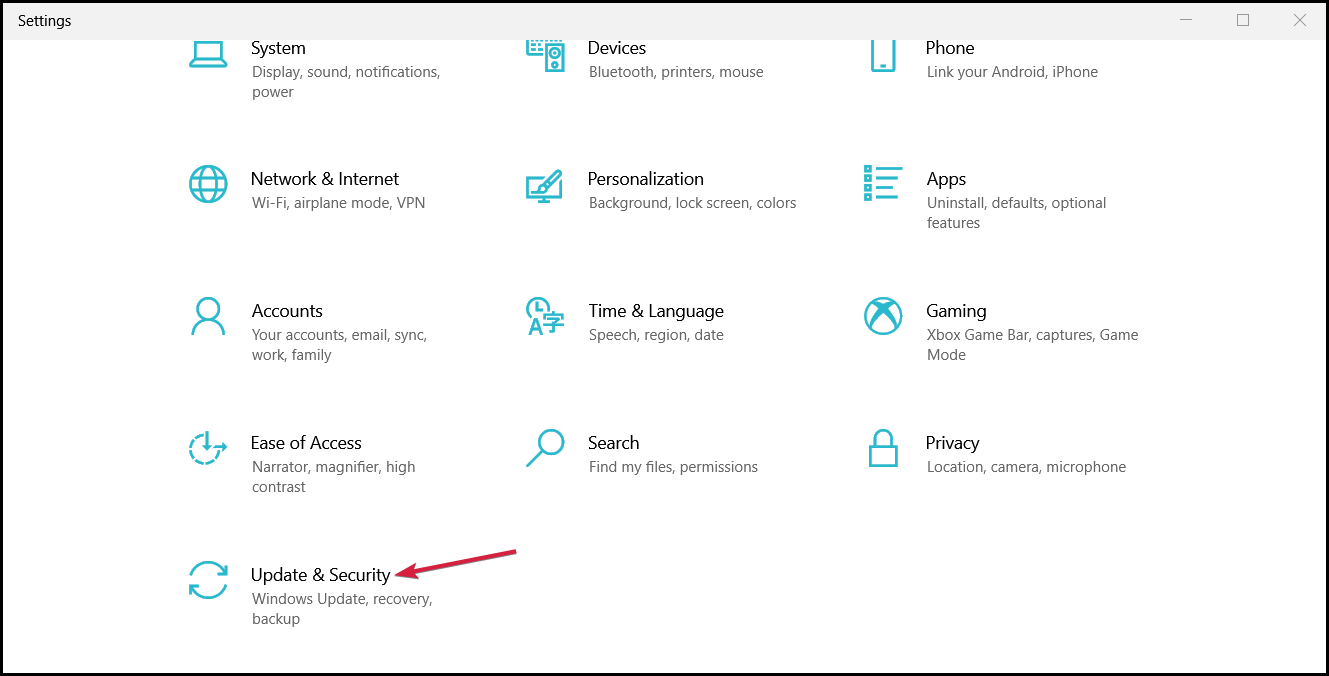
  3. Go to Updates and Security.
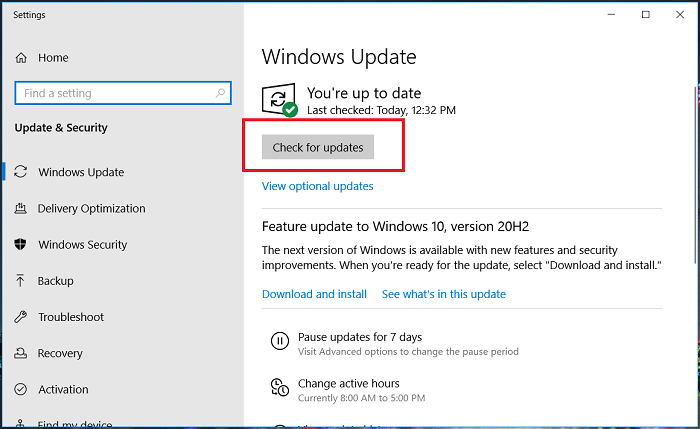
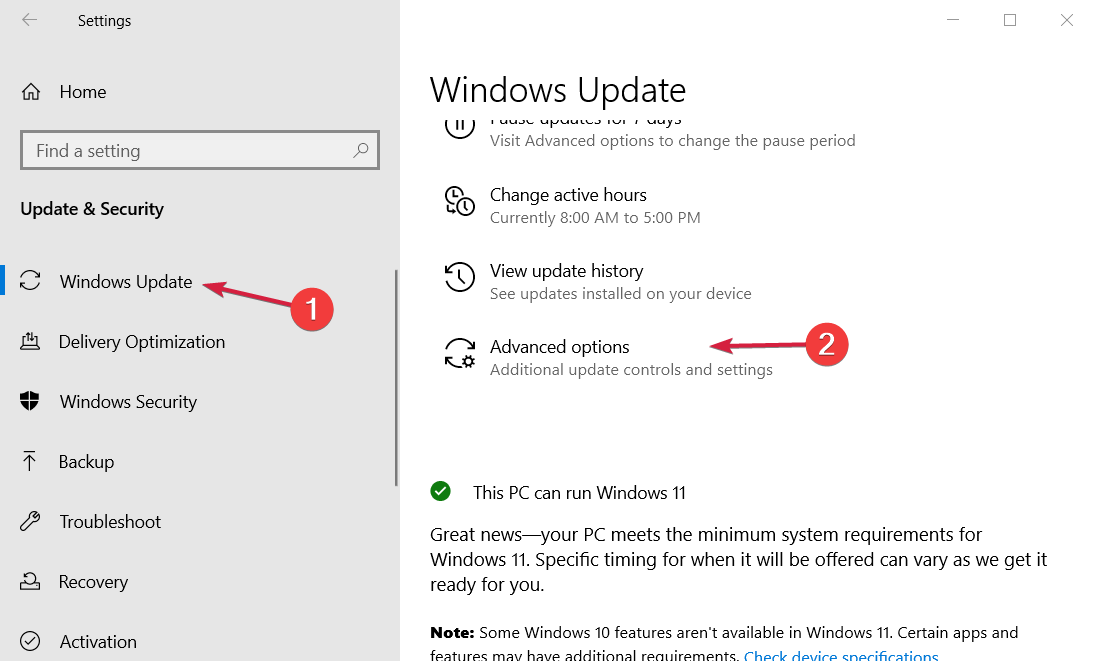
  4. Under Windows Update, select Check for updates to see if any are available.
  5. If you can, download and install the updates.
  6. Restart the computer and check if the Outlook search is working now.

Are you having problems with your Outlook login? Here’s a thorough article dedicated to fixing Outlook if it keeps asking for your password.

2. Uninstall Windows 10 KB updates

  1. If you have installed new KB updates, you may want to uninstall them to fix the issue.
  2. Click on Start and select Settings.
  3. Go to Updates and Security.
    Something went wrong search couldn’t be completed outlook
  4. Click on View Update History.
    Something went wrong search couldn’t be completed outlook
  5. Click on Uninstall updates.
    Windows updates
  6. Select the most recently installed Microsoft Windows update and click on Uninstall.
  7. Restart the computer and check for any improvements.

Wait for Microsoft to release new updates or a hotfix before installing the uninstalled updates.

3. Access your Outlook files via a third-party email program

1. Open Mailbird and click Settings.
2. Go to the Accounts tab and select Import.
3. Click Add a mail account.
4. Enter your full name and Outlook email address.
 5. Click Continue to complete the process.

Outlook offers IMAP/SMTP access to your account, enabling you to connect to your emails using a third-party program, like Mailbird.

This advanced tool can automatically detect your settings and lets you access your Outlook files from desktop software.

Mailbird

Mailbird

Access your email files in a fast and secure way with this modern, all-in-one tool!
Check priceVisit website

4. Remove third-party Outlook add-in

  1. Open Outlook and go to File and Options.
  2. From the left pane, click on the Add-ins tab.
  3. At the bottom, click the drop-down menu for Manage, select COM Add-ins, and click Go.
  4. Now select the recently installed Add-in and click on Remove.
  5. Relaunch Outlook and check if the error is resolved.
  6. If not, remove all the add-ins one by one till you find the problematic add-in.

Another reason for the Outlook search issue can occur due to third-party add-in creating conflict with indexing. Disable any third-party add-in installed for Outlook and try again.

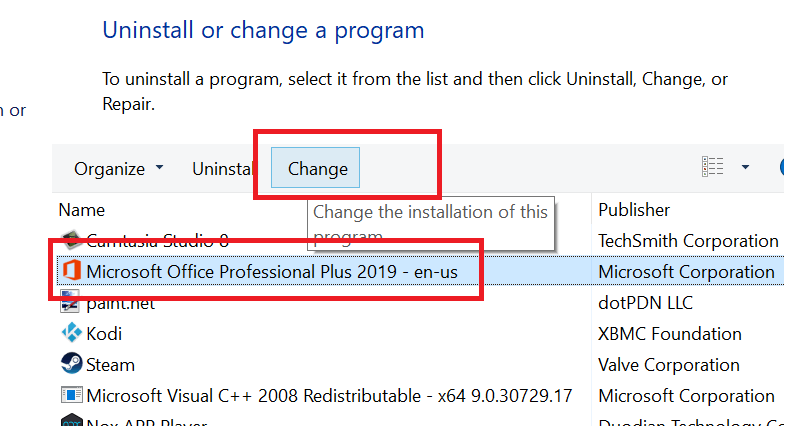
5. Repair Microsoft Office installation

  1. If the issue persists, run Microsoft Office troubleshooter from the Control panel.
  2. Press Windows Key + R key to open Run.
  3. Type control and click OK to open Control Panel.
  4. Go to Programs, then Programs and Features.
  5. Select Microsoft Office and click on Change.
  6. From the repair tool, select Quick Repair. This will quickly find and fix minor issues with the Outlook client.

  7. If the issue persists, use Online Repair.
    • This option requires a working internet connection.
  8. Close the troubleshooter and check for any improvements.

5. Rebuild indexing

  1. Press Windows Key + R to open Run.
  2. Type control and click OK.
  3. In the Control Panel, search for index.
  4. Click on Indexing Options.
    Something went wrong search couldn’t be completed outlook
  5. Click the Advanced button.
  6. Under Troubleshooting section click the Rebuild button.

That’s about it for this article. We hope that these solutions helped you solve the Something went wrong search couldn’t be completed error.

Outlook is not the best mail service out there. Thankfully, we’ve got a great list of the best Email clients on the market in case you want to switch to another one.

Feel free to give us any feedback regarding the subject in the comment section below, or any suggestions if you think they will help.

Slow ring Windows insiders can now download update KB4550936

As Windows 10 build 20H1 gets closer to the Release Preview ring, it has received yet another cumulative update (CU).

As such, testers in the Slow ring can now download CU KB4550936 or Windows 10 Insider Preview build 19041.207.

This update does not introduce new system or app features to build 20H1. Instead, it brings a couple of quality enhancements that streamline the user experience.

Build 20H1 quality improvements

The enhancements Microsoft announced today include:

  • Solution to the unexpected crashing of the Remote Procedure Call (RPC) service. Affected users had to restart their devices.
  • The Device Enrollment Status Page (ESP) on managed devices should now function well even if you have installed a policy that requires you to restart your device.
  • Your device’s rear camera flash should have no problems now that Microsoft has fixed a known issue with it.

Security update

Earlier today, Microsoft released the usual Patch Tuesday updates that fix known security issues with Windows 10. Likewise, CU KB4550936 fixes a couple of security flaws affecting several Windows 10 apps and features.

It also includes the latest security updates to the Microsoft Scripting Engine, Windows Kernel, Windows App Platform and Frameworks, Microsoft Graphics Component, Windows Media, Windows Shell, Windows Management, Windows Cloud Infrastructure, Windows Fundamentals, Windows Authentication, Windows Virtualization, Windows Core Networking, Windows Storage and Filesystems, Windows Update Stack, and the Microsoft JET Database Engine.

Microsoft released 20H1 Build 19041.173 to the Slow ring last week. While the beta Windows 10version fixed a couple of issues, it did not address the Narrator and NVDA flaws affecting users of the new Chromium-based Edge browser.

The bad news for the visually impaired is that the latest update to this build does not solve the problem either. As a result, these users may have to continue using the old version of Edge that works well with the affected screen readers.

Meanwhile, NVDA users can download a solution to the identified problem with Edge.

It is in the best interests of Microsoft to sort out any such issues by the time Windows 10 version 2004 hits general availability sometime in May.

Outlook Error: Your Account Settings are Out of Date

Many PC owners use Outlook as their email service, but sometimes issues with it can occur.

Windows 10 users are reporting the Your Outlook account settings are out of date message and today we’re going to show you how to fix that problem.

What does it mean when it says Your email account settings are out of date?

It’s possible that when you log in to your Windows computer, you’ll suddenly see this notification flash up on the right side of the screen at the bottom corner.

An incorrect date and time, an invalid or incorrect password, or an invalid security certificate are all potential reasons for this problem.

Try restarting your device and logging in with your Microsoft account to determine whether or not this resolves the issue of the notifications showing.

Otherwise, follow the solutions below in order to fix this issue and get access to your emails as soon as possible.

How do I fix Your Outlook account settings are out of date error with these solutions?

  1. Click the Fix button
  2. Log in using your Microsoft Account
  3. Check your password
  4. Turn off Internet Time
  5. Add a PIN to your PC
  6. Install the latest updates
  7. Change the time synchronization server
  8. Disable PIN
  9. Disable certain types of notifications
  10. Delete your Outlook account and add it again
  11. Delete your profile folder
  12. Click Change account settings
  13. Use the winsock reset command

1. Click the Fix button

According to users, you can easily fix the problem with a single click of a button. When the Your Outlook account settings are out of date message appears, click it.

That will open the Mail app. You should see the same message but this time, a Fix account button as well.

Click the button and Windows 10 will try to fix the problem. After doing that, the problem should be completely resolved.

Sometimes the quickest and simplest solutions are the best, and although this isn’t a guaranteed solution, several users reported that it worked for them, so you might want to try it out.

If this solution fails, feel free to try the next one.

2. Log in using your Microsoft Account

If you have a Microsoft account, be sure to use it to log into Windows 10. If you use your local password or a PIN, you might encounter this or some other similar problem.

To fix the Your Outlook account settings are out of date message, log out of Windows 10 and log in with your Microsoft account.

If you’re using a local account, you can convert it to Microsoft account by following these steps:

  1. Press Windows Key + I to open the Settings app.
  2. Go to the Accounts section and click on Sign in with a Microsoft account instead.
  3. Enter the password of your local account if required and click Next.
  4. If you have a Microsoft account, enter your login information and click Next.
  5. You might be asked to verify your account. Choose the verification method from the menu and click Next.
  6. You should receive a confirmation code. Enter the code and click Next.
  7. If everything is in order, click the Switch button.

After doing that, log out of your account and log back in with a Microsoft account and check if the problem is resolved.

Some users suggest that you can fix this problem by switching to a local account. This is rather simple and you can do it by following these steps:

  1. Open the Settings app and navigate to the Accounts section.
  2. Click on Sign in with a local account instead.
    sign in with a local account instead Outlook account settings
  3. Enter your account password and click Next.
    Outlook account settings switch to a local account
  4. Now enter the desired username for your local account. Click Next.
    new user Outlook account settings
  5. If everything is in order, click the Sign Out button and sign in again with your local account.

Several users report that you can fix this problem by using a local account to remove your Outlook account from Mail app.

After removing the Outlook account, be sure to add it again. We wrote a detailed guide on how to remove or add an account in Mail app in Solution 10, so be sure to check it out.

3. Check your password

The Your Outlook account settings are out of date message can appear if you changed your Outlook password recently.

If you changed your password online, the Mail app won’t use the new password and won’t be able to connect to Outlook.

To fix this problem, be sure to update your password in Mail app and check if that fixes the problem.

After updating your password in the Mail app, check if the problem is still there.

If you’re using a different email client, you’ll need to check your account settings in that application and add a new password to your account settings.

4. Turn off Internet Time

According to users, the Your Outlook account settings are out of date message can appear if your clock isn’t correct or if you’re using Internet Time synchronization.

To fix the problem, you need to turn off Internet Time synchronization by doing the following:

  1. Press Windows Key + X to open the Win + X menu and choose Control Panel from the list of options.
    control panel win + X menu outlook settings out of date
  2. Choose Date and Time from the list of options.
    date and time control panel outlook account settings
  3. Go to the Internet Time tab and click on Change settings button.
    internet time outlook account settings
  4. Uncheck Synchronize with an Internet time server option and click OK to save changes. The hotmail account settings out of date error will be fixed.
    syncchronize with an Internet time server outlook account settings out of date

Alternatively, you can stop time synchronization by using the Settings app. To do that, follow these steps:

  1. Right-click the clock in your Taskbar and choose Adjust time/date from the menu.
    adjust date/time Outlook account settings
  2. Turn off the Set time automatically option. If needed, adjust your date and time.
    set time automatically outlook settings problems

Both these methods will achieve the same results, so feel free to use any of them. After you disable time synchronization, the problem should be fixed.

If this solution fixes the problem, you can try enabling time synchronization again and check if the problem is resolved.

5. Add a PIN to your PC

Many users set PINs in order to protect their account from unauthorized access.

In fact, a few users reported that they managed to fix the problem by attempting to add a PIN to their account. To do that, follow these simple steps:

  1. Open the Settings app.
  2. Navigate to Accounts > Sign-in options.
    add PIN outlook account settings problem
  3. In the right pane, navigate to PIN section and click the Add button.
    password field outlook settings
  4. Enter your account password and click on Sign in button. The Outlook settings out of date issue will be resolved.

According to users, you can now stop the PIN creation process and close the window.

After entering your account password, the problem should be resolved so there’s no need to complete PIN creation process.

If the issue still persists, try repeating the process and adding a PIN to your account.

6. Install the latest updates

Microsoft frequently releases new updates and many of these updates address both hardware and software issues.

If you’re getting the Your Outlook account settings are out of date message, you might be able to solve it by installing the latest updates.

Windows 10 automatically downloads updates but if needed you can check for updates manually too. To do that, follow these steps:

  1. Open the Settings app.
  2. Go to Update & security section > Windows Update.
  3. Click the Check for updates button. Windows 10 will now check if updates are available. If so, it will download and install the updates automatically.
    check for updates button outlook settings

7. Change the time synchronization server

If you’re getting Your Outlook account settings are out of date message, you might be able to fix it simply by changing the time synchronization server.

This is rather simple, and you can do it by following these steps:

  1. Follow steps 1 to 3 from Solution 4.
  2. Once you open Internet Time Settings window, choose a different server from Server menu. Click Update now to update the time and then click OK to save changes.
    time server outlook account settings problem

After changing the server, the problem should be fixed completely.

8. Disable PIN

Even though a PIN-based login is useful, it can cause certain issues. One of these issues is the Your Outlook account settings are out of date message.

To fix the problem, you need to remove your PIN by doing the following:

  1. Open the Settings app.
  2. Navigate to Accounts > Sign-in options.
  3. In the PIN section click on Remove button.
  4. If you see a confirmation message, click the Remove button again.
  5. Now enter your Microsoft account password and click OK.

After doing that, your PIN will be removed. Now you just need to log out then back in using your Microsoft account. Once you log back in, check if the problem is resolved.

Users report that while the same message can appear once in a while, you should be able to remove it by following the steps from Solution 1.

9. Disable certain types of notifications

This is a simple workaround that might be helpful to some users.

Keep in mind that this solution won’t fix the problem, but it will prevent the Your Outlook account settings are out of date message from appearing.

To permanently remove this message, simply right-click one of these notifications and choose the option to not receive notifications from this app.

As we already mentioned, this solution won’t fix the core problem but it will prevent this message from appearing.

10. Delete your Outlook account and add it again

If you’re getting the Your Outlook account settings are out of date message, you might be able to fix it simply by deleting your Outlook account from the Mail app.

This is rather simple and you can do it by following these steps:

  1. Start the Mail app and go to Settings > Manage accounts.
  2. Select your Outlook account and choose Delete account option.
  3. After deleting your Outlook account, click on the Settings icon and choose Manage accounts.
    manage accounts outlook settings
  4. Now click on Add account option.
    add account outlook settings
  5. Scroll all the way down and select Advanced setup option.
    advanced setup settings out of date
  6. Now select Internet email option.
    internet email account settings out of date
  7. Enter the required information and select IMAP4 as the Account type. After you’re done, click Sign in button.
    internet email account settings

Several users suggest that you can fix this problem by adding an Exchange account instead. To do that, follow the same steps, but instead of Advanced setup, be sure to choose Exchange from the menu.

exchange account outlook account settings

After doing that, follow the instructions on the screen to add an Exchange account.

11. Delete your profile folder

According to a few users, they managed to solve the problem with the Your Outlook account settings are out of date message simply by removing a single folder.

To do that, you need to follow these steps:

  1. Press Windows Key + E to open File Explorer.
  2. Once File Explorer opens, paste %APPDATA%MicrosoftProtect and press Enter.
    protect directory account settings
  3. You should see your profile folder. Create a copy of your profile folder on your Desktop and delete the original folder from Protect folder.
  4. After doing that, restart your PC.

If everything is in order, you’ll be asked to enter your Microsoft account login information in the Mail app. After you do that, the problem should be fixed.

Several users also reported that deleting the %LOCALAPPDATA%Comms folder also fixes the problem, so you might want to try that as well.

Before proceeding, be sure to create a copy of Comms folder on your Desktop.

12. Click Change account settings

If you’re having problems with your Outlook.com account, you should be able to fix them simply by clicking on Change account settings.

This will open https://account.microsoft.com/ and ask you to log in. After logging in with your Outlook account, the issue will be resolved.

If you use a different Microsoft account to log into Windows 10, you should be automatically logged into that account. To fix the issue, log out and sign in using your Outlook email account.

According to users, this issue usually appears when you change your account password. If you changed your password recently, be sure to try this solution.


You might also be interested in our article about the top 6 Windows 10 Password Managers to use


13. Use the winsock reset command

According to users, you can easily fix the Your Outlook account settings are out of date message. To do that, you just need to run few commands in Command Prompt.

You can do that by following these steps:

  1. Press Windows Key + X and choose Command Prompt (Admin) from the menu.
    command prompt outlook settings
  2. When Command Prompt starts, enter the following commands:
    • netsh winsock reset
    • netsh int ip reset

After both commands are executed, the problem should be resolved.

Users reported that this is just a temporary workaround, so it’s possible that the message will appear again after some time. If that happens, you’ll need to apply the same solution again.

The Your Outlook account settings are out of date message can be rather irritating, but we hope that you managed to fix the problem by using one of our solutions listed above.

Let us know how it worked out for you!

Also, you can try the best Windows 10 Email Clients and Apps to Use from our comprehensive list.

Was this guide useful to you? Let us know by leaving a comment in the section below. Thanks for reading!

Dropbox full/almost full alerts [SOLVED]

For those of you experiencing syncing issues on your Dropbox, we recommend that you patiently go through this guide. We’ll show you what to do in order to fix Dropbox file sync issues in just a few minutes.

While Dropbox offers an amazing and convenient file-sharing service, the platform may sometimes fail to sync with your computer.

Here are a few solutions you can use to fix the Dropbox full alert. Let’s go through the basic checks first before going into the more complicated ones.

How can I fix Dropbox is full notification

Solution 1: Check your Dropbox process

Make sure that your Internet is working properly. Now, confirm that the Dropbox process is running on your system.

Go to the Taskbar, click on the up arrow and you will find the Dropbox icon.

If you can’t find the Dropbox process in the taskbar, do the following:

  1. Check the Task Manager in Windows to find the Dropbox process.
  2. Right-click on the Windows Taskbar and then select the Task Manager.Task Manager windows 10
  3. On the Task Manager menu, search for the Dropbox process in the list.
  4. If you find the Dropbox process, select it, then right-click and finally click on End task.
  5. After ending the task, restart it by making use of the desktop icon or menu item.

Note that the Dropbox process may get interrupted, so, restarting should take care of that.

Solution 2: Check the problematic files

Corrupted files may sometimes trigger sync issues even when  Dropbox itself doesn’t care what kind of file it handles.

  1. Move or hover your mouse over the Dropbox icon to confirm its sync status. It should display 100% sync or just an error.
  2. Confirm that the file you are uploading is not open on your system.
  3. Make sure that the file name does not have any special character such as “”, etc.
  4. Confirm that the file can be open in another application, after your confirmation, close the file.
  5. Delete the file from the Dropbox folder and try copying a new version of it.

Repair corrupted files automatically with these software solutions.


Solution 3: Disable Selective Sync

This is a feature on Dropbox that allows you to select the kind of files or folder that you want to back up. This feature can be easily overlooked or turned on without you knowing.

So, what you need to do is:

  1. In the Windows Taskbar, right-click on the Dropbox icon.
  2. Make a selection on the Preferences and then Advanced.
  3. Mark the Selective Sync.dropbox selective sync settings
  4. Make sure that the folder containing the file is not marked.

Solution 4: Empty Dropbox cache

At times, the Dropbox cache gets full or unreadable. This can cause files not to sync. The cache can be cleared in just a few seconds.

  1. Open the Dropbox folder.
  2. Look for .dropbox.cache in the folder.delete dropbox cache
  3. Select all the files in the cache folder and delete it.
  4. To confirm if it has been deleted you can repeat the process.

Still experiencing Dropbox syncing issues? Go through this quick checklist:

  • Are your files in a shared folder?

Maybe the files that are not syncing are in a shared folder. There are two major reasons for this: you are no longer a member of that shared folder or there is a different version of the file in the folder.

  • Confirm if you are signed in to the same Dropbox account on your devices

Note that sync can only work when you are signed in to the same Dropbox account on all your devices.

To confirm this:

  1. Click on the Dropbox icon on the menu bar, go to Preferences and finally click on Account to check the information.
  2. On the Dropbox website, click on your name at the top right corner.
  3. Check out if the addresses are the same, if not correct the addresses. Or log out and sign in with the correct account information.
  • Check if your computer has enough space in the hard drive to synchronize

Note that if a computer is low on hard drive space, files won’t sync on Dropbox. Check your hard drive space. If the computer has insufficient space on the hard drive, that means you need to free up storage space for Dropbox to sync.

There you go, your Dropbox files should sync now. In case you have any other methods of solving this issue, feel free to list them in the comments below.

[wl_navigator]

KB4550922 offers security updates for 13 software products

In the new April Patch Tuesday, Microsoft includes major security updates for a lot of software products.

The new KB4549951 includes security updates for the Microsoft Scripting Engine, Windows Kernel, Windows App Platform and Frameworks, Microsoft Graphics Component and Windows Media.

Other security updated software includes Windows Shell, Windows Management, Windows Cloud Infrastructure, Windows Fundamentals, Windows Core Networking, Windows Storage and Filesystems, Windows Update Stack, and the Microsoft JET Database Engine.

The new KB4550922 patch also presents a problem affecting 1507, 1703, 1709 and 1803, versions of Windows 10.

The devices on a domain might be unable to install apps published using a Group Policy Object (GPO). However, Microsoft specifies that this issue only affects app installations that use .msi files.

That means that this issue doesn’t affect any other installation methods, such as the ones from the Microsoft Store as they are not installed with .msi files. 

How to get the latest Patch Tuesday updates

The malware attacks and threats have increased in number and the scammers are trying to benefit from every single breach that they can exploit in our systems. It is, obviously, very important to understand how these security patches work. The next reasonable step is to read about the best way to apply the patches safely.

The best ways to download the latest Patch Tuesday updates, recommended by Microsoft are Windows Update and Microsoft Update, Microsoft Update Catalog  and Windows Server Update Services (WSUS).

If you want to get the standalone package for this update, go to the Microsoft Update Catalog website.

Note: It is very important to install the updates and patches, but before doing that, start by performing a back-up of your data.

KB4549951 improves security in Microsoft Office products

Microsoft just released the April Patch Tuesday updates and it seems that, in the light of the new developments, they decided to prioritize their efforts on security updates.

The company added that starting next month, they will pause all optional non-security releases for all the supported versions of Windows client and server products (Windows 10, version 1909 down to Windows Server 2008 SP2).

Therefore, the new update is dedicated exclusively to security. Precisely, the new KB4549951 patch is improving security in all Microsoft Office products. Additionally, it will improve security when Windows performs basic operations.

Microsoft also mentions that KB4549951 contains an update for storing and managing files. We have to mention that these updates are available to 1903 and 1906 versions of Windows 10.

How to get the latest Patch Tuesday updates

In these troubled times, security is the most prized possession of our systems. The malware attacks and threats have risen so more than ever, we need to focus our attention on how these security patches work. Once you’ve done that, you can read up on the best way to apply them.

The best ways to download the latest Patch Tuesday updates, recommended by Microsoft are:

  • Windows Update and Microsoft Update
  • Microsoft Update Catalog
  • Windows Server Update Services (WSUS)

If you don’t want to install the whole patch and you are interested only in certain cumulative updates, go for the Windows Update Catalog.

Note: Remember to always backup your data before installing updates like the ones from Patch Tuesday.

Dying Light Dockets: how to get the best weapons in the game

Dying Light is one of the best-known zombie-survival games of recent years and the developer, Techland, has managed to keep the game alive years after its initial release by constantly adding new content.

Now they keep players coming back and attracting new ones with Dying Light dockets.

Dockets are codes hidden within videos, images and press releases that you can redeem for in-game top-tier weapons which will fuel your brain-splattering addiction.

How do I get Dying Light dockets?

1. Follow Techland’s social media pages

First thing you want to do is follow Dying Light developer, Techland on their social media platforms. They are constantly releasing new dockets hidden away in community events and promotional materials. Here are the main pages you want to keep an eye on:

  1. Dying Light Facebook page
  2. Dying Light Twitter page
  3. Dying Light YouTube page
  4. Dying Light Instagram page
  5. Official Techland news page
  6. Techland Facebook page
  7. Techland Twitter page
  8. Techland YouTube page
  9. Techland Instagram page

2. Follow the Dying Light subreddit

dying light weapon dockets

The Dying Light Reddit community is active and always on the lookout for new dockets. Once they are discovered, you’ll be sure to see the dockets pop up on the subreddit within a few hours.

Keep in mind that dockets expire after a few days, so you will need to act quickly and visit the page every day to get the latest Dying Light dockets.


3. Keep an eye on the Steam community page

Just like the Dying Light subreddit, the Steam community also keeps a close eye on the latest Dying Light dockets. Here, you will find a complete list of all expired dockets as well as all the active ones you can still redeem.

In addition to live dockets, you can find news and guides on Steam, which makes it an invaluable resource.

To check the status of the latest active Dying Light dockets, head over to this Steam guide and you will see all the previous codes and which ones can still be redeemed.


Steam not responding on your PC? Try these simple solutions to quickly fix it


4. Take part in community events

community event dying light

Techland has maintained a lively community in Dying Light (pun intended) by keeping its fans engaged with content drops, DLC and community events far more than other development studios.

During these community events, you are rewarded with in-game items which can be redeemed for dockets. For example, the Easter Egg Hunt where players could search the Slums, Old Town and the Countryside for eggs.

These community events are regularly added to the game and it helps keep its player base engaged.

Keep in mind that there are other dockets available in Dying Light, such as the Bozak Dockets which you receive from playing the Bozak Horde DLC. Depending on how far you get in the trials, you will receive dockets for blue, purple, orange or gold-tier weapons.


5. How to redeem Dying Light dockets?

how to redeem dying light dockets

  1. Go to the dockets website
  2. Log in or create an account
  3. Link your account to either Steam, Xbox Live or PlayStation Network
  4. Copy the code and in the text box and click Redeem
  5. Start the game
  6. Go to the nearest quartermaster to redeem the in-game rewards:
    1. The Slums –  he is located in the Tower (first floor)
    2. Old Town – you will find him in the Library (north-west)
    3. Countryside –  there is only Bilal at the Gas Station (north-west)

[wl_navigator]

FIX: Outlook got stuck on loading profile

Outlook is one of the oldest email applications in the market with over 500 million active users. And, despite its multi-functionality and sheer plethora of various features, it still has its flaws.

One common issue that attracted a lot of attention is Outlook being suddenly stuck at the loading profile screen in Windows 10.

Various users claim they’re unable to go past the initial loading screen. We can agree this is a critical error that renders the application completely unusable. Because of the gravity of the error, we enlisted the possible solutions below.

If you’re having a hard time with the Outlook freeze, make sure to check the list below.

What to do if Outlook gets stuck loading profile

Solution 1 – Disable connection temporarily

Some cautious users noticed this unusual Outlook behavior is somehow related to their network. Namely, it seems that at the startup, Outlook was trying to connect to a certain online service but hasn’t succeeded. That, consequently, leads to a stall and the application is unable to move past the Loading Profile screen.

Where this is a bug of some kind or some file corruption issue within the Outlook files, no one knows. But, either way, the first troubleshooting step is to disable the connection and start Outlook.

So, just unplug the LAN cable or disconnect from Wi-Fi and try running Outlook again. Bear in mind that this is just a workaround and not a solution per se. In order to resolve the issue for good, you should check the steps below.

Solution 2 – Disable Hardware Acceleration

Hardware Acceleration is indeed useful and it improves the visual experience within Office applications, but only if you have the fitting configuration. On the contrary, it can downgrade performance or even inflict crashes and freezes on unsupported devices.

If you’re stuck with an old, integrated GPU, Hardware Acceleration can do more harm than good. And, in the worst-case scenario, it can render Outlook completely unusable and cause a halt on the profile loading screen.

So, you might want to disable it temporarily and look for changes. In order to do so, you’ll need to run Outlook in Safe mode.

The instructions below should lead you through the whole procedure:

  1. Press Windows key + R to summon the Run command box.
  2. In the command-line, type the following command and press Enter:
    • Outlook /safe
  3. Once the program starts, open File from the Menu bar.
  4. Choose Options.
  5. Open Advanced.
  6. Under Display, check the Disable hardware graphics acceleration box.Disable hardware graphics acceleration outlook
  7. Save changes and restart Outlook.

Solution 3 – Install Windows Updates

Windows 10 is all about frequent updates. They can occasionally pose as an annoyance, but in the long run, they provide users with the necessary security and performance improvements. Since Office belongs to Microsoft, it receives its updates via the Windows Update feature.

With that in mind, it’s likely that some of the available or upcoming updates will tend to Outlook issues. Including the profile loading issue that we’re addressing in this guide.

So, it’s advisable to check and install the latest Windows updates before we can move on to additional steps. As you’re probably aware, Windows 10 updates will install automatically after working hours.

But, it won’t cost you to check for updates on your own. In order to do so, follow the instructions below:

  1. Press Windows key + I to open the Settings app.
  2. Select Update & Security.
  3. Click Check for updates.Check for updates
  4. Install the available updates.windows 10 updates

Additionally, you can install updates manually. The steps below will inform you how:

  1. Navigate to Microsoft Update Catalog which can be found on this link.
  2. In the Search bar, type Outlook.
  3. Navigate through the list and locate the latest update. Make sure to choose the proper version with fitting system architecture (32-bit or 64-bit).
  4. Download the update and install it.
  5. Restart your PC.

That should relieve you of the trouble with the profile loading screen.

Solution 4 – Run as admin and change compatibility mode

Optimization is arguably the biggest problem for third-party apps in Windows 10. The Microsoft Office Suite is somewhat covered with upgrades provided via Windows Update, but occasionally, this won’t suffice.

In case you have an older iteration of Microsoft’s Outlook, there’s a chance it will underperform in Windows 10.

Luckily, you can force the system to adjust to Outlook with the compatibility mode. In addition, it’s recommended to run Outlook as an administrator and check for improvements. It should help you overcome the Profile Screen halt.

Follow the instructions below to tweak Outlook‘s Compatibility features:

  1. Right-click the Outlook shortcut and open Properties.
  2. Open the Compatibility tab.
  3. Check the Run this program in compatibility mode for box.Run outlook in compatibility mode
  4. Select Windows 7 from the drop-down list.
  5. Now, check the Run this program as an administrator box.
  6. Click OK and try running Outlook again.

That should be enough to get you going. On the other hand, if the problem is persistent, make sure to continue with the listed steps.

Solution 5 – Run Inbox Repair Tool

The Personal Storage Table or PST is a file format that stores personal files related to Outlook and similar Office applications. In case a PST file gets corrupted or incomplete, you won’t be able to start Outlook.

Unlike system file errors, you don’t need to use the System File Checker to scan for errors. Office comes with a specific repair tool, and its sole purpose is to check and repair PST (and OST) files.

You can’t scan all the files at the same time, so you’ll need to isolate one individual PST file and start from there. Follow the instructions below to run the Inbox Repair Tool:

  1. Close Outlook and kill its process in Task Manager.
  2. In the Windows Search box, type the following command and press Enter:
    • Scanpst.exe
  3. Choose to Browse under the Enter the name of the file you want to scan box.
  4. Select PST (.pst extension) file you want to scan and click Start.
  5. The tool should scan, locate, and repair possible corruption within the selected file.

If this solution falls short just like the others before, move to the next enlisted step.

Solution 6 – Repair Office

If repairing one file isn’t enough to get things started, maybe we should look-up up a more thorough approach. You can always completely reinstall the whole Office suite and start from scratch. However, you don’t need to do so if you can repair the installation in a few simple steps.

Additionally, you don’t need any installation media to retrieve the integrity of Office and its applications, respectively. Just follow closely the instructions below:

  1. In the Windows Search bar, type Control and open Control Panel.
  2. Select the Category view.
  3. Click on Uninstall a program.
  4. Click on Office and choose Change.repair microsoft office
  5. Follow the instructions to repair the Office installation.Repair Office

Solution 7 – Remove and create new Outlook profile

The Outlook Profile poses as much more than an account in an e-mail application. It also stores your preferences that affect how Outlook performs and looks.

In the abundance of applicable settings, one of them might invoke an error or multiple errors. So, what you’ll need to do is to create an alternative Outlook profile and switch all your accounts to it.

After that, you can delete the troubled Outlook profile and stick with the functional one. If you’re not sure how to do it, make sure to follow the steps below:

  1. Close Outlook and kill the remaining processes in Task Manager.
  2. In the Search bar, type Control and open Control Panel.
  3. Choose User Accounts.
  4. Open Mail.
  5. Click on Show Profiles.
  6. Select Add.
  7. Create a brand new Profile Name and click OK.
  8. In the Show Profiles dialog window, enable Prompt for a profile to be used.
  9. Start Outlook and switch to the newly created profile.

You can delete the old profile or keep it – it’s your choice.

In conclusion, we hope this was a helpful read. Don’t forget to share your experience with Outlook and related issues. We look forward to hearing from you in the comment section below.

  1. Open the Control Panel
  2. Type mail in the search box
  3. Click on the Mail option
  4. Select Show Profiles to see your Outlook profile.
  • How do I change my profile in Outlook?

To change your Outlook profile, click on File, go to Account Settings, and then select  Change Profile. In this manner, the next time you launch Outlook, the Choose Profile window will appear on the screen.

  • Where are Outlook profiles stored?

Outlook profiles are stored in the Windows registry. Any information related to your Outlook profile is directly retrieved from the Registry.

  • Why is my Outlook stuck on loading profile?

There are several explanations as to why Outlook gets stuck on loading the user profile: incompatible add-ins, incorrect email settings, incompatible software, running outdated OS versions, unstable Internet connections, firewall settings, and more.

  • How do I rebuild my Outlook 365 profile?

To rebuild your Outlook 365 profile, you need to repair Office from the Control Panel. To do that, launch the Control Panel, go to the Uninstall a program section, select your Office version, click on the Change button and then follow the on-screen instructions to repair your profile.

Also, you can try the best Windows 10 email clients and apps to use from our list.

FIX: Printer syntax error offending command in Windows

If you are using a Postscript printer, when printing documents you may encounter printer syntax error offending command error. The full error reads: ERROR: syntaxerror OFFENDING COMMAND: –nostringval– STACK: mark

This error can occur while printing from a photo viewer or editing software as well as word processors like Microsoft Wordpad.

If you are also troubled by this error, here are a couple of troubleshooting tips to help you resolve the Printer syntax error offending command in Windows 10.

How to fix syntax error offending command on printers

1. Convert the file to PDF

Printer syntax error offending command
  1. Open the document in MS Word.
  2. Click on File and select Save as.
  3. Click the drop-down menu for Save as and select PDF from the options.
  4. Enter a name and save the file.
  5. Open the PDF file in a PDF viewer and try to print the file. The printer should print the file successfully.

Several users have reported that converting the word document to a PDF file as helped them resolve the issue. While this is just a workaround, it should help you to take a printout when required.

2. Remove and re-add the printer

Printer syntax error offending command
  1. Click on Start and select Settings.
  2. Go to Devices.
  3. Select Printers and Scanners.
  4. Scroll down to your installed printer list.
  5. Select your printer and click on Remove device.
  6. Click Yes to confirm the action.

2.1 Uninstall the software

PSL6 print driver
  1. Press Windows Key + R to open Run.
  2. Type control and click OK.
  3. In the Control Panel window, go to Programs > Programs and Features.
  4. Select your printer app from the list of installer apps.
  5. Click on Uninstall. Click Yes if prompted by the UAC.
  6. Follow on-screen instructions to remove the software.

2.2. Add the printer

Printer syntax error offending command
  1. Download the latest version of your printer‘s software. You can download it from the manufacturer’s website.
  2. Install the printer software.
  3. Next, click on Start > Settings and select Device.
  4. Click on Printers and scanners.
  5. Click on Add a printer or scanner.
  6. Follow on-screen instructions to install the printer.
  7. Now try to print using the newly added printer and check for any improvements.

2.3. Use an automatic tool

To save time and ensure the process is performed correctly, we recommend using a third-party tool that downloads and installs printer drivers automatically.

In order to benefit from this valuable service, then you should get the latest printer drivers to resolve functionality errors for good.

Plus, it offers the warranty of installing and updating the right drivers, without causing system issues on your PC.

⇒ Get Fortect Driver Updater

3. Use HP universal print drivers

PSL6 print driver
  1. Press the Windows key and search for control.
  2. Click and open Control Panel.
  3. Go to Hardware and Sound > Devices and Printers.
    PSL6 print driver
  4. Select your printer from the list and click on Print server properties.
  5. In the Print Server Properties window, select the printer driver.
  6. Click the Remove button. Click Yes to confirm the action.
  7. Close the Properties window and the Control Panel.

3.1 Download HP Universal Print Drivers

PSL6 print driver
  1. Go to HP software and driver download page.
  2. Download and install the latest version of the HP Universal Print driver.
  3. Make sure you re-add the printer and check for any improvements.
    • Refer to Method 2

The printer syntax error offending command is a common error that can occur due to various reasons. In this article, we have listed a workaround as well as some quick fixes to help you resolve the issue.

If you’re aware of another fix or workaround for this printer error, let us know about it by leaving a message in the comments section below.

FIX: Origin in-game overlay not working

The Origin overlay adds additional options to games that you can select while playing them. However, an Origin in-Game-Overlay is not enabled error message pops up for some users. As a consequence, the Origin in-game overlay doesn’t work.

Check out some of these resolutions if you need to fix Origin’s in-game overlay not working.


This is how you can fix Origin’s in-game overlay

1. Check that Origin’s in-game overlay is enabled

  1. First, check that Origin’s in-game overlay is enabled. Open the Origin client software.
  2. Click the Origin menu at the top left of the software.
  3. Select Applications Settings on the menu.
  4. Click the Origin in-game tab.
    The Enable Origin In-Game option origin in game overlay not working
  5. Toggle the Enable Origin In-Game option on if it’s off.

2. Close background software (especially MSI Afterburner)

  1. If Origin’s overlay doesn’t work even when enabled, try closing background software.
  2. Right-click the taskbar in Windows to select Task Manager.
  3. Click the Processes tab if it’s not already selected.
    The Processes tab origin in game overlay not working
  4. Then close third-party apps listed under Apps and Background processes by selecting them and clicking End task.
  5. MSI Afterburner, Steam, and Razer Synapse are three programs users have confirmed can conflict with Origin’s overlay.
  6. So, make sure you close any background processes for those programs.

3. Add Origin to third-party antivirus utilities’ exception lists

Some users have said they’ve fixed Origin’s in-game overlay not working by adding Origin to their third-party antivirus utilities’ exclusion lists. Doing so will ensure the antivirus software doesn’t interfere with Origin.

How exactly you can do that will vary between antivirus software, but look for an Exclusions tab within the utility’s settings menu.

Alternatively, try turning off your third-party antivirus utility before playing an Origin game. Right-click your antivirus software’s system tray icon to open its context menu.

That context menu will probably include a disable option of some kind. So, select that disable option to turn off the antivirus software for a certain time period.

Avast disable options origin in game overlay not working


4. Clean boot Windows

  1. Clean-booting Windows will remove third-party software and services from the system startup to ensure there aren’t any programs conflicting with Origin’s in-game overlay.
  2. To clean boot Windows, right-click the Start menu button and select Run.
  3. Type msconfig in Run’s Open box and press Enter to open the window shown directly below.The General tab origin in game overlay not working
  4. Click the Selective startup radio button to select the Load system services and Use original boot configuration options.
  5. Deselect the Load startup items check box if that option is checked.
  6. On the Services tab, select the Hide all Microsoft services check box.
    The Services tab origin in game overlay not working
  7. Press the Disable all button to deselect all the remaining third-party services listed.
  8. Select the Apply option to save the new settings.
  9. Press the OK button to exit MSConfig.
  10. Click Restart on the System Configuration dialog box that pops up.
  11. Then try playing a game with Origin’s overlay after clean-booting Windows.

5. Reinstall Origin

  1. Some users have also confirmed that reinstalling Origin can fix the overlay.
  2. First, press the Windows key + R keys at the same time.
  3. Input appwiz.cpl in Run’s text box and click OK to open the Programs and Features applet.
    Programs and Features applet origin in game overlay not working
  4. Select Origin within the Uninstall or change a program list.
  5. Click the Uninstall option.
  6. If prompted for further confirmation, click the Yes button.
  7. Restart Windows before reinstalling Origin.
  8. Click the Download button for Windows on the Origin website.
  9. Then open the downloaded Origin setup wizard to install the very latest version.

The above resolutions have fixed Origin’s in-game overlay for numerous users. So, there’s a good chance they’ll fix the overlay.


[wl_navigator]

How to increase bandwidth on Windows 10/11 [Quick Guide]

All users have been victims of the slow Internet speed on Windows 10 and 11, and despite troubleshooting the router, the problem failed to be resolved.

Windows 10 used a bit of data across network computers since it used a peer-to-peer system, in order to deliver the updates in a much faster way.

This means that a part of the bandwidth is consummated by the P2P update system. Therefore, in order to increase the Internet speed on Windows 10 and 11, users need to make some changes in the settings.

The following methods will work on Windows 10 Home, Windows 10 Pro, and Windows 11.

How can I increase bandwidth on Windows 10 and 11?

1. Switch off Updates Delivery

  1. Click the Start button and select Settings.
  2. Go to Update & Security.
  3. Select Advanced Options.
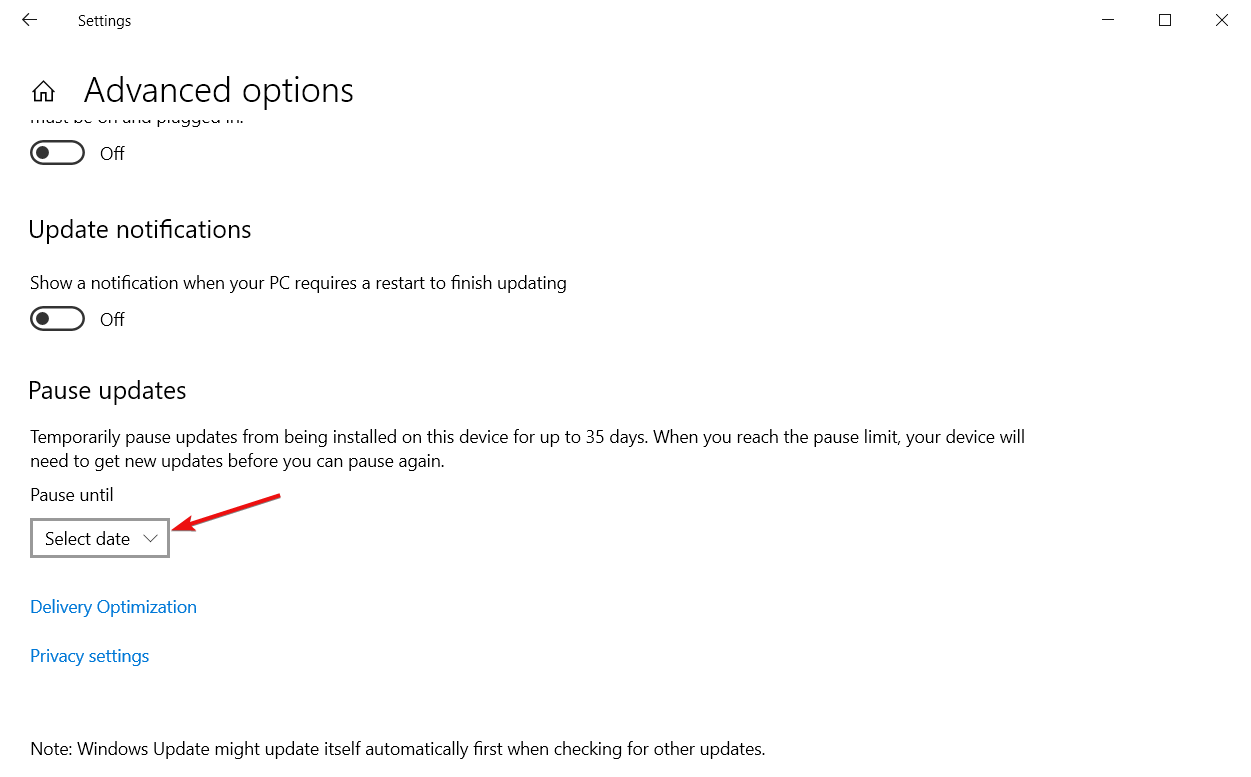
  4. Click on the Select date drop-down menu under the Pause updates section and select a further date of at least a week from the present.

Your laptop will use your bandwidth to deliver Windows 10 as well as Windows 11 updates to other users on the network.

The updates delivery option is switched on by default in all versions of Windows 10 and 11 and by pausing them, you will save some bandwidth.

2. Edit the setting called Limit reservable bandwidth settings

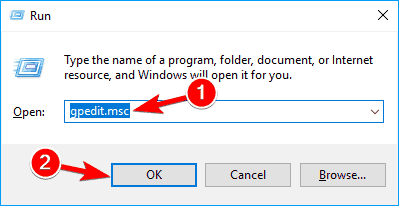
  1. Press the Windows key + R, type gpedit.msc, and hit Enter or click OK.
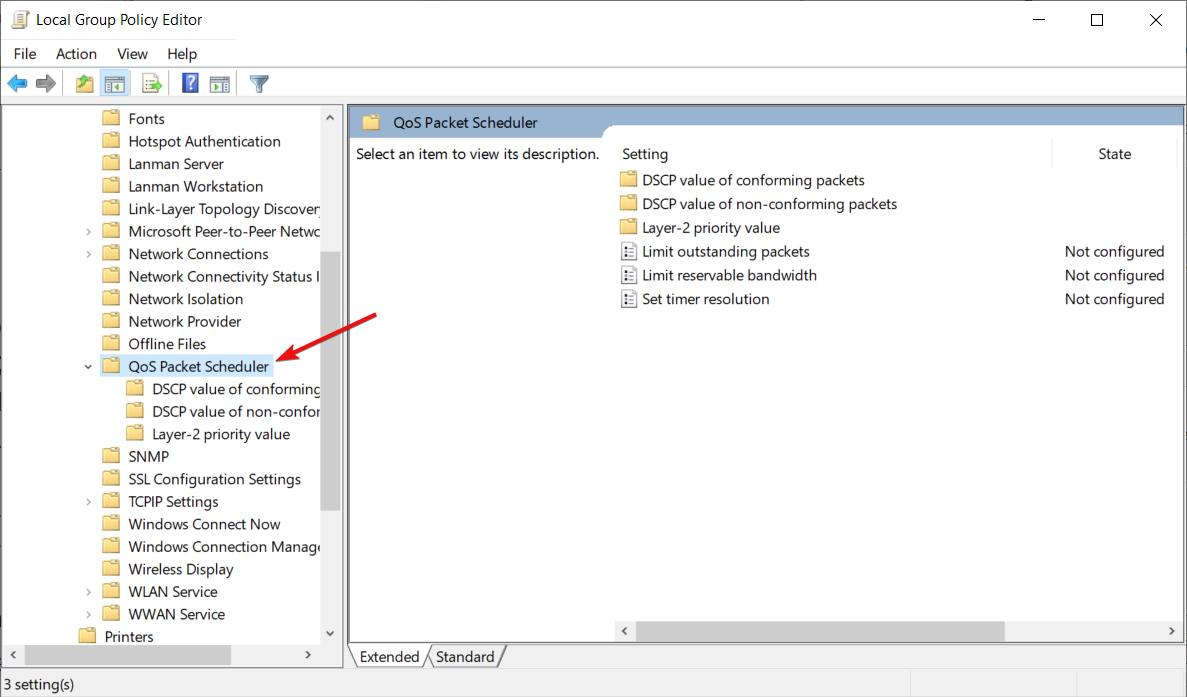
  2. Head over to the following path: Computer Configuration\Administrative Templates\Network\QoS Packet Scheduler
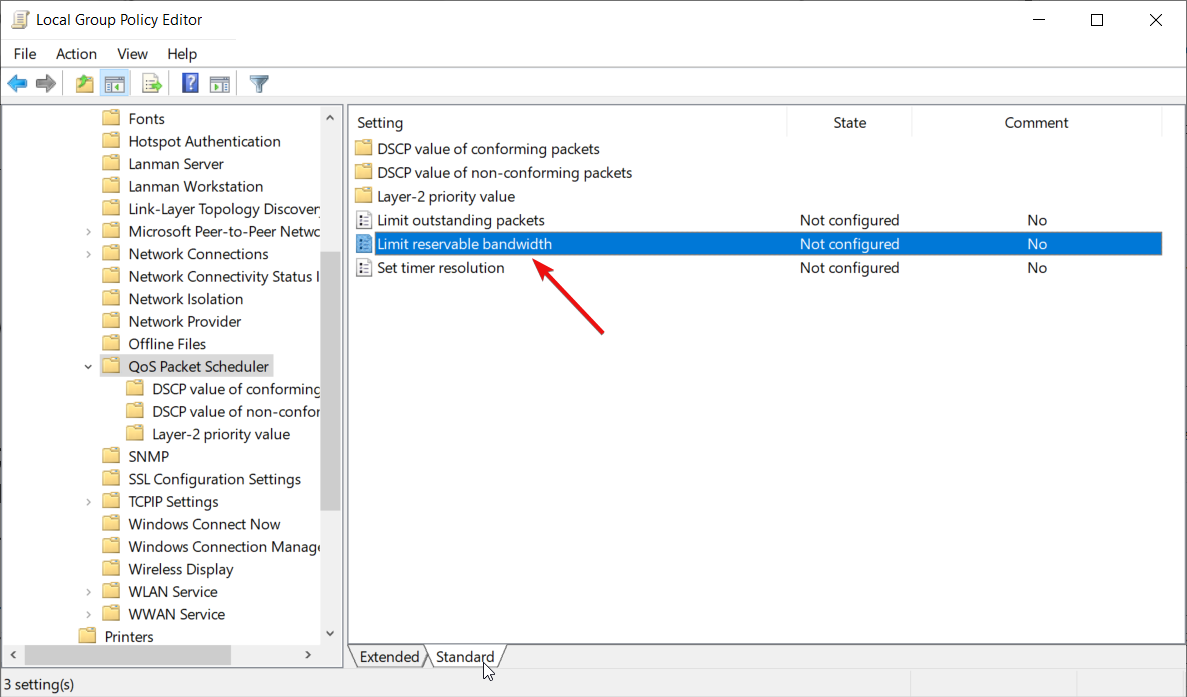
  3. Double-click on Limit reservable bandwidth to open the settings.
  4. Click on the Enabled button and set the bandwidth to a lower percentage.

Windows reserve a certain amount of bandwidth for its Quality of Service which includes Windows update and other programs that constantly send feedback.

However, be forewarned that allocating zero bandwidth to the QoS is expected to interfere with the update process and eventually compromise on the safety front.

3. Flush DNS and clear temporary files

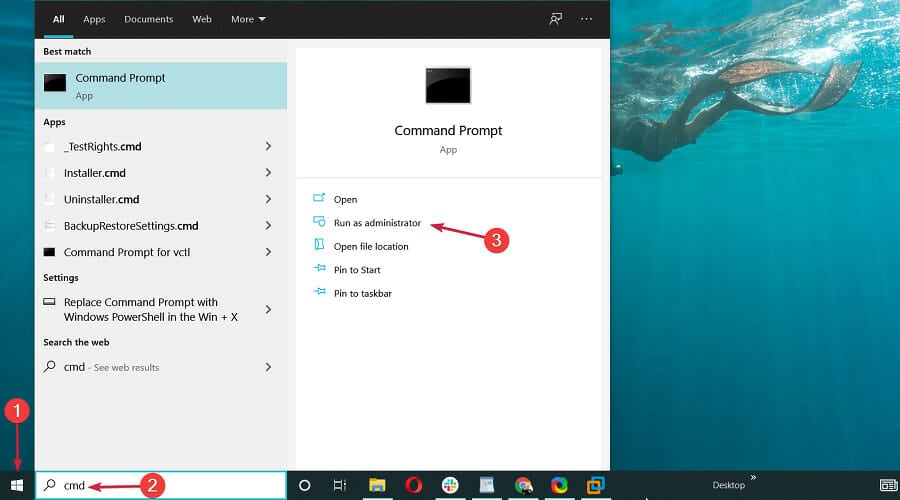
  1. Click the Start button, type cmd, and select Run as administrator from the results.
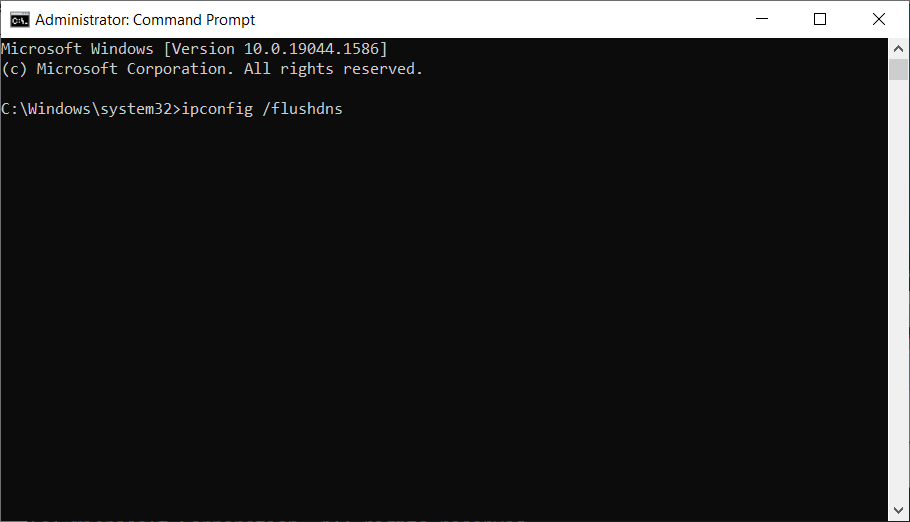
  2. Type ipconfig /flushdns and press Enter.
  3. Close Command Prompt and return to the desktop.
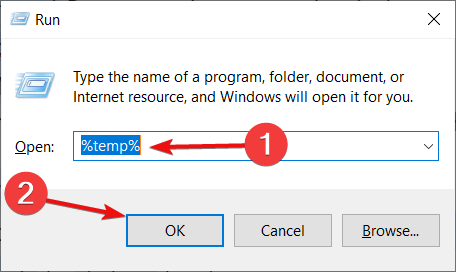
  4. Press Windows+R and open Run, type %temp%, and press Enter.
  5. Select all the content and use right-click to delete the temporary files.

Nowadays, the internet comes with a bandwidth cap that limits how much bandwidth you may use in a month. It’s unavoidable, and if you go over the limit, your internet provider may charge you a fee or reduce your speeds to dial-up levels.

If you do not want this to happen to you, you should keep track of your internet usage on your Windows 10 and Windows 11 computers.

A bandwidth monitor is a tool that measures the amount of available bandwidth on a local system.

You can use bandwidth monitors to receive a true view of what bandwidth is available due to the different aspects involved in providing high-speed Internet.

For any more questions or suggestions, don’t hesitate to reach out in the comments section below.

Windows 10 Router Software [Top Picks]

The router connects your desktop or laptop to web and other networks, and that also comes with its own built-in software, which is otherwise firmware. Router firmware is software that enables you to configure your router and network settings. This is software that you can usually open in your web browser and configure network settings from there.

Default Router Software

To get a better idea of what you can do with router firmware, first check out your router’s default software. To do that, you’ll need to enter your IP address in a browser’s URL bar. To get the IP address, press the Win key + R hotkey and type ‘cmd’ in Run to open the Command Prompt. Input ‘ipconfig’ in the Command Prompt and press the Return key. Your IP address is the second number listed under Default Gateway.

Now open your browser, input the IP address in the URL bar and press Enter. That will open your router firmware in the browser as shown in the shot below. From there, you might be able to configure your network channel, adjust the network title, reboot the router, revert to default settings and open other network diagnostic tools after logging in.


However, the default firmware isn’t the only software you can configure your router with. There are third-party firmware packages for Wi-Fi routers. Some of the third-party router firmware might have handy network settings not included in the default software. With alternative software, you might be able to boost the Wi-Fi signal and track bandwidth usage. This is some of the custom router firmware you might be able to install, but much depends on if the software supports your router. Also note that not all third-party router software comes with a warranty.

OpenWRT

DDNS OpenWrt
OpenWRT is open-source firmware with a writable filesystem that you can download from the software’s site. This firmware isn’t especially straightforward to set up or operate, but it provides tons of options and supports a broad range of routers listed on this page. OpenWRT users can configure IPv4 support, IPv6 native stack, port forwarding protocols, traffic shaping, the DNS, Dynamic DNS services and much more. In addition, it provides network monitoring stats with extra software such as Nagios Core. The software now has a more extensive web UI based on LuCI, and extensions such as X-WRT also provide alternative UIs for OpenWRT.

Gargoyle

Gargoyle is another open-source router management utility you can download from here. This page on the software’s website lists compatible routers, and the firmware works best in the Firefox, Opera and Safari browsers. There are also routers available with Gargoyle pre-installed. The software enables users to monitor bandwidth usage for network devices with customizable graphs. In addition, Gargoyle users can block websites, configure wireless bridge networks and allocate network resources with quotas and throttles.

DD-WRT

DD-WRT is third-party router firmware that supports more than 200 alternative devices, and you can find out if that includes your router by entering the model in the database text box on this page. If the router is supported, you can click its model to download the firmware. As the software is based on OpenWRT, it shares many of the same options and settings. For example, it provides users with real-time bandwidth monitoring, VPN support, IPv4 and IPv6 settings, QoS to prioritize traffic with and filtering systems. Those options and features are included within a more intuitive UI than OpenWRT, and it also includes other novelties such as as the Wake-On-LAN option.

Tomato

Tomato is a router software that has an appealing UI design and straightforward setup, but it only supports a relatively limited number of routers. You can save the software’s Zip to Windows from this home page. The best thing about Tomato is probably its real-time network monitoring and traffic stats, but it also has handy QoS traffic shaping and Wi-Fi signal-boosting options.

Those are some of the third-party firmware packages you can boost your Wi-Fi router with. At the very least, they’ll give you handy bandwidth-monitoring tools. Check out this Windows Report article for details on how you can update your router’s firmware.

Microsoft to provide AccountGuard malware detector free to healthcare and humanitarian organizations

To protect healthcare providers and front line workers in the fight against COVID-19, Microsoft announced today that they are making their AccountGuard threat notification service available to healthcare providers and humanitarian organizations worldwide at no cost.   Organizations can begin signing up today using the links below.

Health organizations can sign up here

Humanitarian organizations can sign up here

Today’s announcement was a direct result of recent news reports that showed criminal and nation-state actors targeting organizations such as Paris’ hospital system, medical clinics in Texas and even international entities like the World Health Organization.  In the past year, the Microsoft Threat Intelligence Center, or MSTIC, has also tracked five separate nation-state activity groups that have attempted nearly nine hundred times to target or compromise hundreds of accounts belonging to employees of nine prominent human rights organizations around the world.

AccountGuard works by monitoring nation-state threat actors who are targeting enterprise email boxes and personal email boxes of employees or volunteers being monitored.  When an activity is seen, Microsoft’s team will notify the users, so they can proactively work to protect themselves.  The AccountGuard team also helps organizations to harden their defenses against all forms of cyberattacks.  Today, organizations that include Freedom House, Human Rights Watch, Amnesty International and Physicians for Humans Rights are already using AccountGuard through an initial pilot program.

Microsoft AccountGuard has a proven track record having been used previously to protect high-profile political campaigns, members of the US Congress and just last year AccountGuard was used to prevent election meddling in Europe in 14 different countries.  Today supports close to 100,000 email accounts across 29 different countries.

AccountGuard will be available to all healthcare and humanitarian organizations until the COVID-19 pandemic ends.

Microsoft makes core GitHub features free for everyone, reduces paid Team plan prices

Microsoft is offering access to core GitHub features for free and reducing the prices of paid Team plan prices. The announcement is detailed in a post on the GitHub Blog.

“Until now, if your organization wanted to use GitHub for private development, you had to subscribe to one of our paid plans. But every developer on earth should have access to GitHub. Price shouldn’t be a barrier. This means teams can now manage their work together in one place: CI/CD, project management, code review, packages, and more. We want everyone to be able to ship great software on the platform developers love. Teams who need advanced features (like code owners), enterprise features (like SAML), or personalized support can upgrade to one of our paid plans.”

In addition, GitHub is reducing the price of their paid Team Plan to $4 per user/month, down from $9 per user/month. Existing Team plan subscribers will also see the discount attached to their monthly statements. If you prepaid for yearly GitHub plan, you will see a prorated refund in the next 30 days. The new monthly prices of the GitHub Team plans are reflected below.

More information about how these Team plan changes affect you and your company are available on GitHub’s FAQ page. Unlike some offers announced during the coronavirus crisis, this change is permanent. but this is a good reason to try GitHub now.

What are your thoughts on GitHub’s recent subscription price change? Let us know in the comments.

Nvidia is bringing ray tracing support to new Minecraft for Windows 10 beta this week

It’s been almost a year since Minecraft developer Mojang announced that the game would get ray-tracing support on Windows 10, but Nvidia is finally ready to deliver. With a new beta of Minecraft for Windows 10 that will be available on Thursday, April 16, players will Nvidia GeForce RTX GPUs will be able to experience Minecraft with fully path-traced rendering, thanks to Nvidia’s DLSS 2.0 real-time rendering technique.

Nvidia has teamed up with Minecraft creators to deliver 6 free RTX Creators worlds that will be available in the Minecraft Marketplace. “The results of Minecraft with ray tracing are astounding – realistic hard and soft shadows are seen everywhere; global illumination realistically lights the world, with that light filling interiors through windows and gaps in the terrain; illuminated blocks and other light sources cast pixel-perfect lighting; reflections are seen on all reflective surfaces and blocks, with a level of fidelity far surpassing that of screen space reflections; light reflects, refracts and scatters through water, ice, stained glass, and other transparencies; and atmospheric effects occur naturally, resulting in high-quality volumetric fog, and pixel-perfect god rays,” Nvidia explained today.

Minecraft’s clearly dated graphics didn’t prevent it to become one of the most popular video games ever released, but ray-tracing really turn the sandbox game into something different. You can see how this Minecraft with RTX beta looks in the video below:

If you have a GeForce GTX GPU, Nvidia says that players will have the best experience by installing new Minecraft with RTX Game Ready Driver that will be available tomorrow through the GeForce experience app. As for the beta, you’ll be able to install it through the Xbox Insider Hub app on Windows 10. Be aware that you’ll need to own Minecraft for Windows 10 to sign up.

Minecraft for Windows
Developer:
Microsoft Studios
Price:
Free

Bots, analytics, project management, and lots more: How to add apps to Microsoft Teams

Apps in Microsoft Teams can significantly boost your experience. They plug into the sidebar, chats, channels, and can help you do more in Teams. There’s even a catalog of nearly 200 applications you can choose from if your IT admin or Team owner has allowed it. So, if you have the valid permissions to add one, you might be wondering how apps work in Teams. In our latest guide, we’ll take a look at just that.

Adding apps from the left side of Teams

The most common way to add an app to Teams is from the left side of Teams. You’ll see an Apps button. Be sure to click it, and you’ll see a list of apps and services that plug into Teams. Once you click it you can use the search bar at the top of the screen to find a specific app that you are looking for.

Once you found your app, click it and then click the Add button. You’ll see a description telling you where the app works in Teams, be it in tabs, bots, or with messages. If the specific app supports it, you’ll then see an icon appear for the app at the side of Teams. If you no longer want to use the app from the sidebar, simply right-click it, and then select uninstall. 

Adding apps to a tab to a chat or channel

Not all apps support appearing on the left side of Teams, so sometimes apps will only appear as a tab in a chat or a channel. Tab apps allow you to share content and work collaboratively, right from inside your Teams experience.

To add apps to a tab in channel or chat, you’ll want to go to the channel, group chat, or one-on-one conversation where you want the app and then and click Add a tab. It appears as a “+” button. From there, you can select the app that you want. There are many you can choose from, such as YouTube, Planner, PowerPoint, and much more. Once you click the tab, you can choose the option to post to the channel about this tab if you want others to know you added the app.

Adding apps as connectors

Another type of app in Teams is known as a connector. This type of app inserts notifications into a channel in Microsoft Teams. You can add one by going to the channel where you want to add it, choosing … More Options, and then Connectors. From here, you’ll see a list of apps and the ability to configure notifications if one has already been added. You’ll also be able to add new ones by clicking Add. 

Adding apps to the messaging area

Finally, there are messaging area apps in Teams. These types of Teams apps are sometimes known as bots, and let you insert content directly into your Teams messages. You can add one by selecting “…” beneath the message box, and then choose an app. You also can add apps this way by typing out in the box and then choosing Get bots. 

Check out our picks for the best apps!

Now that you know how to add apps to Teams, you might be wondering which ones are best to use. We’ve previously covered that, and our picks include WIkipedia, Trello, Microsoft Flow, and much more. We’ve also given a comparison to Teams apps against Slacks apps, if you’re more familiar with Slack. Keep it tuned to OnMSFT for all the latest on Teams, and be sure to drop us a comment below.

Fix Origin client loading issues for good

Some users reported experiencing a peculiar issue with Origin. Upon opening the app, they get to a blank page, Origin not being able to load properly. Apparently, this issue could be caused by corrupted Origin files, app privilege, or internet connection issues.

One user provided his concerns with the Origin client on the dedicated subreddit.

Hi guys, I’m at my wit’s end here. I’ve been trying to install the origin launcher onto my computer in order to play apex legends, and I can’t get it to open no matter what I try. I’ve googled and done everything I could, and it seems like the solutions being provided only worked for some people.

Fortunately, we have a few solutions worth trying, meant to fix this annoying issue.

How do I make Origin client load UI?

1. Run Origin as administrator

  1. Right-click on the Origin desktop shortcut and open Properties.
  2. Select the Compatibility tab.
  3. Check the Run this program as an administrator and confirm changes.Run as admin origin client not loading

2. Verify your internet connection

  • Open your internet browser to see if web page loading performs fast, without interruptions.
  • If you notice abnormal internet activity, hard reset your router/modem.
  • If hard resetting your router/modem doesn’t make any difference, contact your internet provider and let them know about this issue.
  • Always have your PC connected to the internet through a wired connection. Wifi connections tend to be less reliable.

Can’t add friends on Origin client? We’ve got the right fix for you


3. Clear the Origin cache

  1. First, you need to close the Origin app, go to the Task Manager in order to make sure that the process isn’t running in the background.
  2. Press the Windows logo key + R on your keyboard > type %ProgramData%/Origin in the Run box and hit Enter.programdata run origin client not loading
  3. In the window that pops up, delete all the folders except for the folder named LocalContent.
  4. Press the Windows logo key + R on your keyboard > type %AppData% in the Run box and hit Enter.app data origin client not loading
  5. Roaming folder will open, there you need to delete the Origin folder.
  6. Click App Data in the address bar.
  7. Access the Local folder and delete the Origin folder located there
  8. Restart your PC and see if it fixed the issue

4. Reinstall Origin

  1. Navigate to Control Panel > Uninstall a program and uninstall Origin.
  2. Navigate to Program Files and AppData and clear all the remnants of Origin. Avoid deleting folders with games, or else you would need to redownload them.
  3. Reboot your PC.
  4. Navigate to the official EA Origin website, here, and download the latest iteration of the desktop client.download origin client origin client not loading
  5. Install Origin.

Hopefully, at least one of our solutions helped you fix the Origin loading issue.

Our readers also complained about Igoproxy.exe error when opening Origin, but the highlighted guide will help you with that issue.

If you found this article helpful, leave a comment in the comment section below.

Origin won’t start games on Windows 10/11

If you found yourself in a situation in which you wanted to play on your PC, and Origin games are not launching? Unfortunately, you are not the only one experiencing this issue.

A large number of users have complained that they can’t get access to their beloved games on the Origin platform. Seeing that none of your Origin games can be launched has caused (and is still causing) a lot of stress and worry to Origin users. Some other users complained the Origin is installed, but it won’t open.

It seems that the issue can be caused by a variety of reasons. In some cases, the games stopped launching after an update to the Origin platform. In other cases, it can be caused by incompatible software running at the same time in the background, or because of a DNS cache error. Lastly, the game client might still be open but has become unresponsive.

For these reasons, in today’s fix article we will explore some of the best troubleshooting steps for this issue. Please follow the methods closely to avoid any other issues.


What to do if none of my Origin games will launch?

1. Clear your PCs DNS cache

  1. Press Win+R keys on your keyboard to open the Run dialog box.
  2. Inside the Run window -> type the following command:  -> ipconfig /flushdns -> press Enter.run window with command - Origin won't start game;none of my origin games will launch
  3. A command box will appear on the screen for less than a second, and the DNS cache will be cleared.
  4. Try to see if this method allows you to run your Origin games.

Can’t add friends on the Origin client? Here’s how you can fix that


2. Reset the Hosts file on Windows 10

keyboard - Origin won't start game/none of my origin games will launch
Every Windows installation contains a Hosts file that helps redirect websites to specific IP addresses.

In the case that this file becomes corrupt, or contains incorrect information, it can cause your Internet not to work or can create problems with applications like Origin.

We already wrote a comprehensive guide on how to reset the Hosts file easily, so be sure to check it out.


3. Disable all Origin in-game overlays

Origin webpage - Origin won't start game/none of my origin games will launch
The in-game overlays that you use with Origin might be causing the issue with the Origin games not launching. Beyond this, using in-game overlays can dramatically affect your framerate.

Here’s how to disable them:

  1. Open Origin.
  2. Select the option Application Settings from the top menu.
  3. Click on Origin In-game.
  4. Disable all in-game overlays found in the list and restart your Origin app.

4. Clear the Origin cache

  1. Press Win+R keys -> type %ProgramData%/Origin -> click Ok.Run command - origin won't start game/none of my origin games will launch
  2. Delete all the files and folders in that location but do not delete the LocalContent folder.
  3. Press Win+R keys again -> type %AppData% -> hit Enter.
  4. Inside the Roaming folder -> delete the Origin folder.
  5. Click AppData in the address bar -> open Local folder -> delete the Origin folder in there.
  6. Restart your PC and log into Origin again.

Note: To complete this method, you will need to make sure that all instances of Origin are closed. To make sure that Origin will be able to open, it is recommended that you search for Origin.exe and OriginWebHelperService.exe inside Task Manager, and press End task for each of them.


5. Uninstall and re-install Origin

  1. Press Win+X keys -> select Apps and Features.win+x menu apps and features - origin won't start game/none of my origin games will launch
  2. Search for Origin -> select Uninstall.
  3. Download the latest Origin software and re-install it by following the on-screen instructions.

If Origin is not opening in Windows 10, your best bet is to reinstall the program by following the steps above.


Conclusion

Please feel free to let us know if this guide helped you solved your problem by using the comment section below.

[wl_navigator]

Microsoft’s Surface Go 2 may have been confirmed by FCC filing

If the ongoing coronavirus outbreak could well change the near-term plans of PC and phone manufacturers, Microsoft is apparently still committed to its planned products and releases. Indeed, it seems like the Redmond giant is ramping up to announce its upcoming products, one of them being Surface Go 2.

We reported about the leaked Surface Go 2 specifications a couple of weeks ago, and now a new FCC filing for a “portable computing device” spotted by Windows Latest seems to have confirmed the device’s upcoming launch.

For those curious to know the design changes, the report says that the Surface Go 2 should be similar to the first iteration, like all other second-gen Surface products. Microsoft is probably going to follow its tradition of bringing major changes in the third iteration, as we noticed in Surface Laptop 3, Surface 3, and Surface Pro 3.

As for the specifications, the base model is expected to pack an Intel Pentium Gold 4425Y, which is a minor improvement as compared to the original model with the Pentium Gold 4415Y processor. Besides the base model, Microsoft reportedly plans to deliver a higher-end version with a Core M processor, as well.

It likely won’t be long before Microsoft makes its Surface Go 2 official. The company is also expected to announce a new Surface Book 3 very soon, which should once again feature more powerful specs compared to what we’ve seen in the Surface Pro 7 and Surface Laptop 3 last year.

Cannot uninstall Join.me? Complete guide to remove the app

Join.me is a pretty good video conferencing app, but some users might still need to uninstall it. However, sometimes Windows 10 might not uninstall that software when users try to remove it. If you cannot uninstall Join.me the usual way via Programs and Features, check out some of these potential resolutions for removing it.


What can I do if Join.me will not uninstall?

1. Check that Join.me isn’t still running

  1. Even if Join.me’s window isn’t open, the program might still be running in the background.
    • To terminate all Join.me processes, right-click the taskbar and select Task Manager.
  2. Select the Processes tab in Task Manager.
  3. Then have a look for any Join.me processes under Background processes.
    Task Manager window cannot uninstall join.me
  4. Right-click any process that pertains to Join.me and select End task.
  5. When you’re sure Join.me is no longer running, try uninstalling the software again.

2. Uninstall Join.me in Safe Mode

  1. Alternatively, try uninstalling Join.me in Windows 10’s Safe Mode.
    • To do that, click the Power button on the Start menu.
  2. Click the Restart option while pressing the Shift key.
  3. Thereafter, Windows should restart at a Choose an option menu.
    • Select the Troubleshoot option there.Choose an option menu How do I start my HP laptop in recovery mode
  4. Select Advanced options and Startup Settings.
    • Some users might also need to select See more recovery options before Startup Settings.
  5. Select the Restart option.
  6. After the restart, press the 4 key to select Enable Safe Mode.
  7. Thereafter, uninstall Join.me from Safe Mode.

3. Check out the Program Install and Uninstall troubleshooter

  1. Microsoft has a Program Install and Uninstall troubleshooter for Windows that might fix Join.me not uninstalling.
  2. Open the folder the troubleshooter downloaded to.
  3. Then click MicrosoftProgram_Install_and_Uninstall.meta.diagcab to open the troubleshooter’s window.Program Install and Uninstall troubleshooter cannot uninstall join.me
  4. Click the Next button.
  5. Select the Uninstalling option to open a list of installed software.
    A software list within the Program Install troubleshooter cannot uninstall join.me
  6. Select Join.me on the software list.
  7. Then click Next to go through the troubleshooter.

4. Remove Join.me with third-party uninstaller

If you can’t find Join.me listed in Programs and Features, try uninstalling it with a third-party uninstaller utility. Those utilities more fully remove software than the Windows uninstaller.

Revo Uninstaller, Wise Program Uninstaller, and Ashampoo Uninstaller are three of the best software uninstallers for Windows. Try uninstalling Join.me with one of those freeware software uninstallers.

Revo Uninstaller Pro cannot uninstall join.me


5. Remove Join.me with System Restore

  1. If Join.me was installed relatively recently, you might be able to remove it by restoring Windows to a restore point.
    • Press the Windows key + R keyboard shortcut to launch Run.
  2. Input rstrui in the text box and click OK to open System Restore.
  3. Click the Next to open the restore points list.System Restore window cannot uninstall join.me
  4. Select a restore point that predates the date you installed Join.me.
  5. Click Scan for affected programs to check if the restore point will remove Join.me.
  6. Press the Next button, and click the Finish option.

6. Delete Join.me’s registry key

  1. You can also delete Join.me’s registry key when standard uninstall methods don’t remove the software.
  2. Enter regedit in Run’s Open box, and click the OK button.
  3. Then open this registry key path:
    • HKEY_LOCAL_MACHINE > SOFTWARE > Microsoft > Windows > CurrentVersion > Uninstall.
  4. You can identify all software registry keys there by looking at their DisplayName strings.
  5. Right-click the registry key for Join.me and select Delete.
    Registry Editor cannot uninstall join.me
  6. Restart Windows after deleting the Join.me registry key.

FIX: Microphone not working in Google Hangouts

Regardless of whether you are talking about work of personal reasons, being able to send messages to others and make calls can be extremely useful. However, most tool s of this kind usually involve a lengthy login process and a client that needs to be installed.

However, that is not the case with Google Hangouts, a communications tool created by Google which is accessible as a web service. Unfortunately, things don’t go too smoothly with this tool, since a handful of users have reported having issues with the audio during calls.

Since Google Hangouts is quite popular, we’ve decided to write an article on the matter, so that you can finally enjoy voice calls the proper way.


What can I do if my Google Hangouts audio is not working?

1. Troubleshoot your hardware

  • Make sure that your microphone and speakers are plugged into your PC and that they are turned on
    • This is also a good chance to check whether your mic is not actually muted
  • If your mic is connected via USB, check if you need to install software or drivers from the device manufacturer.
  • make sure that no other program is currently using your microphone
  • Look in the Google Hangoutsvideo call window and make sure you’ve turned on the microphone for use

3. Perform a PC reboot or simply restart the call

  1. Exit your current audio or video call
  2. Close and then relaunch your browser
  3. Go back to a Google Hangouts window and try to call the person again
  4. If that doesn’t work, simply restart your PC

Note: The only web browser that fully supports Google services is Google Chrome. Firefox, Opera, Internet Explorer, and Microsoft Edge also offer to support to google services, but they are limited.


2. Make sure that your Hangouts settings are set properly

  1. Open your browser and launch Google Hangouts in a new tab
  2. At the top of your video call window, choose Settings 
  3. Ensure that the correct device is selected for each settings
    • You can change it using by using the Down arrow
  4. Go to Microphone
  5. To test your microphone, speak out loud and ask if the other person can hear you

Tired of using Hangouts? Check out these great alternatives!


4. Make sure that the other person is not the one with video issues

If none of the steps mentioned above worked, then make sure that the person that you are trying to call doesn’t actually have speaker issues. Advise them to troubleshoot their speaker settings and adjust their volume.


By following these guides, you should be able to fix all audio issues with your mics on Google hangouts.

Lets us know which of the solutions mentioned above helped you by leaving us a message in the comments section below.


[wl_navigator]

How to configure Windows Live Mail for Outlook?

Desktop email clients are always useful if you want to quickly check your email. Speaking of which, one of the most used desktop clients was Outlook Express and Windows Live Mail.

The development of Outlook Express is permanently canceled, and there’s no way to install it on any modern Windows operating system.

Fortunately, you can still install Windows Live Mail on Windows 10, and today we’re going to show you how to configure Windows Live Mail for Outlook.

Outlook Express was a default email client on older versions of Windows, and as such, it has gained tremendous popularity.

As previously mentioned, Outlook Express was scrapped by Microsoft and it was replaced by Windows Live Mail.

Many users were pleased with Windows Live Mail and accepted it as an Outlook Express successor.

With Windows Live Mail being such a popular email client on the Windows platform, we decided to make a small guide on how to configure it to work with Outlook.

How can I configure Windows Live Mail to work with Outlook on Windows 10?

First thing you’ll notice when you open Windows Live Mail is the account creation screen.

Windows Live Mail works with many popular webmail services such as Gmail, Yahoo, and Outlook, and the account creation process is straightforward.

All that you need to do is to enter your email and password and Windows Live Mail should automatically configure it. If you wish, you can also manually configure your email account.

The account creation process is straightforward for certain webmail services such as Gmail, and it doesn’t require any additional configuration.

Unfortunately, account creation process got a bit more complex while trying to use Outlook account with Windows Live Mail, but we managed to fix that by following these steps:

  1. While connecting an Outlook account, enter your username and password, check Manually configure server settings option and click Next.
  2. Set Server type to IMAP, change the Server address to imap-mail.outlook.com, set port to 993 and check Requires a secure connection (SSL) option.
  3. Set Server address to smtp.live.com for Outgoing server information and check to Require a secure connection (SSL).
  4. Enter your Outlook email address as your login username and click Next.
    windows-live-outlook
  5. Your email should be successfully created and you’ll be able to send and receive new emails.

If the steps above seem familiar to you, it’s because the same configuration process is used for Outlook 2007 versions older than 12.0.6680.5000.

Of course, if you use Outlook 2007 version 12.0.6680.5000 or newer, there’s no need to manually enter this data.

As you can see, Windows Live Mail runs perfectly on Windows 10, although you might run into certain account creation issues, you can easily fix them by setting the server information manually.

It’s worth mentioning that Windows Live Mail isn’t being developed anymore, and the last update for it was released in 2012.

If you’re ready to move away from Windows Live Mail, follow this step-by-step guide to transfer your data to Outlook.

Although Windows Live Mail is a great email client, you might want to use a client that is being updated more frequently.

Even though Windows Live Mail worked great with Outlook in the past, reports were stating that Windows Live Mail won’t be able to synchronize with Outlook anymore.

So users considered an alternative email client.

Microsoft ended support for Windows Live Essentials, a suite of freeware applications, that includes Windows Live Mail. Therefore, it is no longer available to download from Microsoft.

OE Classic is an amazing Windows Live Mail alternative, so if you’re looking for a simple email client for Windows 10, you might want to try OE Classic.

Also, you can try the best Windows 10 email clients and apps to use from our list.

  • Is Windows Live Mail and Outlook the same?
Not at all! Live Mail is free, light, and a basic email client. Keep in mind that it’s also not developed anymore. Its last update was in 2012. Outlook is a more professional e-mail client with advanced features and it’s not free.
  • Is Windows Live Mail still available?
Yes, Windows Live Mail 2012 is still available although it is not updated anymore. You don’t have any support for it anymore so it’s also not very secure. Microsoft moved everything to the more advanced Outlook e-mail client.

[wl_navigator]

How to fix OneDrive error code 36 in 7 easy steps

OneDrive slowly but steadily becomes the best solution in the cloud business.

However, like everything concerning Microsoft, this cloud-based platform for both business and standard use, has a lot of downsides.

Frequent errors can completely spoil the impression of overall usability and cast a dark cloud on end-user experience. And one of those errors goes by code 36.

This error, seemingly, disturbs the deletion of the whole folders, asking users to delete the in-folder content file at the time.

Now, we all know that this can be an issue, especially if you have thousands of files in the folder.

Fortunately, we provided some solutions below.

In case you’re unable to delete the folder on your own and the error 36 appears frequently, make sure to check them out in order as they appear on the list.

How can I fix OneDrive error 36 in Windows 10?

  1. Update OneDrive
  2. Unlink account and link it again
  3. Run Troubleshooter
  4. Clear browser cache
  5. Delete 0-byte files
  6. Reinstall OneDrive
  7. Create a brand new account and transfer your files

1. Update OneDrive

Since there are multiple ways to access OneDrive on your PC, we’ll need to cover them all.

In case you’re using an OneDrive app for Windows 10, we recommend updating as the first steps towards the resolution.

Namely, the occurrence of the major issue is centered around Windows 10 updates.

Microsoft changes a lot of minor things with OneDrive and there’s a chance that the integration of their native cloud service with the system is falling short.

Luckily, after some time, they tend to provide the patch which resolves the issues at hand.

If you’re not sure how to update OneDrive Store app or built-in OneDrive desktop client, follow the steps we provided below:

UWP OneDrive for Windows 10

  1. Open Microsoft Store, click 3-dot menu and select Downloads and updates.onedrive error code 36
  2. Click on Get updates and wait until every app is updated.onedrive error code 36
  3. Restart your PC and try again.

Pre-installed OneDrive for Windows 10

  1. Enable Hidden folders.
  2. Navigate to CUsers:Your username: AppDataLocalMicrosoftOneDrive.
  3. Run OneDriveStandaloneUpdater.exe and wait until everything is updated.onedrive error code 36

2. Unlink account and link it again

The conundrums which are closely connected to OneDrive credentials never stop to amaze. Especially for Bussines users who have a hard time with various permissions.

Luckily, if the problem isn’t beyond the simple bug, you can simply address it by unlinking your account and linking it again on the troubled system.

This operation on its own is rather simple and it shouldn’t take you too much time to perform it.

On the other hand, the best results come when you completely switch your synchronizing physical drive’s location.

And that can profess as a problem, especially if you have a limited data plan, a lot of files and slow bandwidth to start with.

If you’re not sure how to unlink your account and link it again, follow these instructions:

  1. Right-click on the OneDrive icon in the notification area and open Settings.
  2. Select the Account tab.
  3. Click on the Unlink this PC button.onedrive error code 36
  4. Sign in with your credentials.onedrive error code 36
  5. Select the location of the OneDrive folder.

3. Run Troubleshooter

Now, we all approve the addition of unified troubleshooter to Windows 10, but it, seemingly, isn’t too much of a help.

Concerning OneDrive, Microsoft provides the downloadable troubleshooter which should address minor issues, restart the related services, and provide you with a better insight into the core of the problem.

As we already said, this troubleshooter comes from Microsoft and not from a third-party source, so you can run it safely on your Windows 10.

Here’s how to run Troubleshooter and try fixing the error ’36’ on OneDrive for Windows 10:

  1. Download the OneDrive Troubleshooting tool here.
  2. Run the tool and choose Next.onedrive error code 36
  3. Wait for the troubleshooter to finish and restart your PC.
  4. Try deleting the file again.

4. Clear browser cache

If you’re accessing and using OneDrive through the browser instead of OneDrive desktop client and OneDrive UWP app, we recommend cleaning the cache.

Users which run into this error were unable to delete certain folders and the issue can be invoked by the pre-stored data on your browser.

The cache which resides in your browser will, quite often, slow down page loading speeds and affect the OneDrive‘s web-based interface.

Because of that, we recommend clearing your browser’s cache as soon as possible and look for changes.

Since Google Chrome is the most-used browser on the Windows platform, and Edge is, well, a native browser recommended for OneDrive use, we’ll show you how to do it on both of them below.

Just don’t forget to backup your passwords.

Chrome

  1. Open Chrome and press Ctrl + Shift + Delete to access the Clear browsing data menu.
  2. Check everything.
  3. Click on the Clear Data buttononedrive error code 36

Edge

  1. Open Edge.
  2. Open 3-dots menu and then click on the Clear browsing data button.onedrive error code 36
  3. Clear everything and restart Edge.
  4. Try logging in OneDrive again.

5. Delete 0-byte files

The mere presence of 0-byte files will cause a lot of problems during the synchronization and, especially, when it comes to manipulating files and folders.

They tend to appear from time to time, as the pieces of the configuration files for certain applications or meta-data storages.

And they can, in an unwanted scenario, corrupt the OneDrive folder. They’ll render it either inaccessible or hard to delete.

For that reason, we recommend searching for these files and removing them accordingly. If you’re unable to locate them on your own, these steps should come in handy:

  1. Open your OneDrive folder on local PC storage.
  2. Press F3 to instantly access the Search bar.
  3. Type the following line in the search bar:
    size: 0onedrive error code 36
  4. Delete all 0-byte files and try removing the folder in OneDrive again.

6. Reinstall OneDrive

Besides the unlinking and updating, respectively, you can also try and reinstall OneDrive for Windows 10.

As we already mentioned before, there are two applications you can use on Windows 10 and regarding OneDrive.

The first one comes from Microsoft Store and it’s your standard UWP application. It’s fairly limited and it lacks the inclusivity a desktop client version offers.

The second is a desktop client version which comes pre-installed with Windows 10.

Nowadays, you can remove both of them without issues and install them again.

Below, you can find the reinstallation procedure for both of them, so make sure to follow the steps.

Hopefully, this should resolve any integration-related issues a.k.a error 36, and let you delete a whole folder without issues.

Desktop client OneDrive for Windows 10

  1. Navigate to Control Panel > Uninstall a program, and uninstall OneDrive.
  2. Go to official site and download OneDrive desktop client installation.
  3. Install OneDrive and log in with your credentials.

UWP OneDrive

  1. Search for white-cloud-icon OneDrive in the Start Menu, right-click on it and uninstall it.onedrive error code 36
  2. Open Store and search for OneDrive.onedrive error code 36
  3. Install the app again and sign in with your credentials.
  4. Try deleting the error-inflicting folder again.

7. Create a brand new account and transfer your files

Finally, this workaround isn’t exactly in the ‘solutions’ category. However, if you’re determined to continue using OneDrive in a seamless manner, this might be the only way.

The data migration from one to another account can be performed in various ways, but we recommend creation of a new account and transferring all the files to a different physical location.

This should invoke the synchronization sequence.

That should do it. Have in mind that this article mostly tackles the error 36 for standard users and not the Business ones.

If you’re a premium user of OneDrive for Bussines, we recommend addressing the problem to Microsoft support.

In case any alternative solution comes to your mind or you have any questions, make sure to tell us in the comments section below.

  • How do I fix OneDrive error 0x8004deb2?

First, try to modify Windows 10 Credential settings. If that doesn’t work, read this complete guide to fix the problem.

  • How do I clean up my OneDrive?

 Search for big files and old files that you already backed up and delete them. If that sounds complicated, our expert guide will make things easier.

[wl_navigator]

FIX: Dropbox there was an error downloading your file

Dropbox is one of the most popular tools when it comes to sharing and storing files.

However, this app is affected by many errors. You can check out our comprehensive guide to solve many issues with Dropbox reported by users.

Also, many users encountered this problem regardless of the computer, browser, or the type of Internet connection used.

Many people use Dropbox to share files with their peers. So, it is safe to say that you can’t use Dropbox without the download feature.

Luckily, there are solutions available to fix this issue.

Today we will show you what to do if you encounter there was an error downloading your file error message in Dropbox.

What to do if Dropbox won’t let you download files?

1. Try using a different web browser

The first thing you should try is using a different browser to download files from Dropbox. You can use any browser you want, but we recommend the Opera One browser.

This modern-looking browser is the right choice, in case you have a problem with file transferring services. You have multiple integrated tools like a VPN or messaging apps.

More importantly, you can share files easily with the Flow feature, the shared storage tool that permits you to transfer files between your devices at any time. Plus, it comes with built-in AI.

⇒ Get Opera One

2. Try incognito mode

Some users reported that going in private/incognito mode solved the problem for them.

For Google Chrome, go to the three vertical dots from the upper-right corner of the window. Then, select New incognito window.

new incognito window There was an error downloading your file in Dropbox

Alternatively, you can press CTRL + SHIFT + N on your keyboard and a new incognito page will open automatically.

3. Clear your cache

Clearing your temporary Internet files is always a great idea. Doing this, your browser will run better, and you will avoid errors such as this one.

  1. Click on the three vertical dots from the upper-right corner of your window.
  2. Select More tools.
  3. Click on Clear browsing data.clear browsing data There was an error downloading your file in Dropbox
  4. Choose a relevant time range or select All time to clear everything.
  5. Select the checkboxes next to Cached images and files and Cookies and other site data.
  6. Click on Clear data.chrome clear browsing data There was an error downloading your file in Dropbox

4. Check the name of the files or folders

If Dropbox won’t let you download, make sure there aren’t certain characters in your file name, such as punctuation signs.

Conclusion

So, this problem can be solved in no time with our solutions. Make sure your browser runs smoothly by clearing the cache.

You can also go in incognito or private mode. Moreover, check the file name to see if there are no special characters such as comas, hashtags etc.

Did our solutions work for you? Did you find other methods to fix this issue? Do let us know in the comments section below!

Game Benchmark Software: 5 Best Tools to Use in 2026

We all love playing games, and the industry has evolved to keep up with our demand. In the 70’s there were only 2D text-style games and the computers were often big and hard to use. The industry has changed a lot since then. In the 21st century, we play incredibly immersive games with photo realistic 3D graphics, that we couldn’t even imagine a decade ago.

The market produces constant upgrades to any piece of hardware your PC might contain. We are also exposed to variety of games with different hardware specifications so it can become frustrating to check which games you can run smoothly on your PC.

In this article, we will explore some of the best options of game benchmarking software on the market. You will find out what benchmarking software is right for your needs with the option to even avoid downloading any software.

Some of the options in this list can directly compare your hardware specifications to any game you would like to test, with just a few clicks.

What are the top 5 gaming benchmark tools in 2020?

PCMark 10

3D Mark is a complete tool that allows you to easily benchmark your PC and mobile devices in one app. PCMark 10 is the latest version of the 3D Mark series and features a comprehensive set of tests that cover a wide variety of tasks.

The tool comes designed for home use with the free Basic Edition and Advanced Edition and for business use with the Professional Edition.

Best features of PCMark 10 Basic Edition include:

  • Automatically scans your hardware & recommends the best benchmark for your system
  • Ability to invidually update benchmark tests
  • Custom settings – rendering resolution and quality
  • Fast and efficient
  • Multi-level reporting – low,mid and high-level test groups
  • PCMark 10 Express test

The features in the Advanced edition of PCMark 10 are the same as the features of the Basic edition but also include:

  • PCMark 10 Extended test
  • Hardware monitoring
  • Custom benchmark settings
  • Compare results side-by-side
  • Ability to save results offline

PCMark 10 Professional Edition has all the features included in the 2 previous versions presented, and adds other very useful features :

  • Private, offline results option
  • Command line automation
  • Export results as PDF and XML
  • Licensed for commercial use
  • Compatible with Testdriver
  • Priority support by email and phone

⇒ Download PCMark 10

— RELATED: 5 best PC benchmarking software for Windows 10

UNIGINE 2

UNIGINE can be effectively used to determine the stability of a GPU under extreme conditions and also has the ability to check the cooling system’s potential under maximum heat output.

“UNIGINE benchmarks provide completely unbiased results and can generate true in-game rendering workloads across all PC platforms. This program also offers you a walk-through mode for the users with little to no experience.”

This benchmark app is very powerful and can test for performance and stability data on video card, power supply and cooling system. All these options come with interactive experience in a beautiful, detailed virtual environment.

The UNIGINE benchmarks for testing your video gaming capabilities have different themes – Superposition, Valley, Heaven, Tropics, and Sanctuary.

Some of the best features of UNIGINE Benchmarks include:

  • 64-bit coordinates precision – real-world scale of virtual scenes
  • Connect to Oculus Rift/HTC Vive, monitor walls, etc.
  • Visual realism – nearly photorealistic
  • Professional input and output
  • Outstanding performance
  • Great technical support

⇒ Download UNIGINE 2

— RELATED: The best gaming mouse pads to enhance your gaming experience

UserBenchmark

User Benchmark

UserBenchmark is a lightweight option for benchmarking your PC because it works without installation.

After downloading the EXE file, run it, and simply click Run. The tools will analyze your computer’s configuration and the results will be displayed in a new window.

This benchmark software gives you scores for Gaming, Desktop and Workstation performance and also an overall percentile score and a component-specific percentile score. This percentile score comes from a comparison with only computer s with the same components as yours.

UserBenchmark tests CPU, GPU, SSD, HDD, RAM, and USB.

⇒ Try UserBenchmark

— RELATED: 6 best antivirus with gaming mode to stay protected while gaming

Catzilla

catzilla benchmarking

Catzilla is a powerful tool that allows you to test your computer’s performance in 4K resolution.
After you run the tests, Catzilla gives you specific results in forms of a score but also in a graphic form. This shows you how strong your computer is and if you can run a game.

Catzilla also allows you to test your computer by answering the question: ‘Will this game run on my PC?’

To test your computer for its performance in relation to a game, you can easily select the game from the list and run the test. Catzilla compares your hardware capabilities with the minimum and recommended specifications of any game you want to test and gives you the results in seconds.

If the results for the game you tested are not confirming you can play a game, then Catzilla searches in database for the best recommendation of hardware change, based on which it is easiest to replace.

This will allow you to know which hardware component it is recommended to change and it even gives you a preview of the score results after the upgrade would be applied.

⇒ Download Catzilla

— RELATED: 5 best emulators for PUBG Mobile on PC for a new gaming experience

CanYouRunIt

canyourunit -benchmarks

CanYouRunIt is actually an online data-base benchmarking software that you can use to easily find out if you can run a game on your PC.

CanYouRunIt works by just installing a plugin on your PC. After the initial installation, the plug-in runs automatically when you test a game on their site.

⇒ Try CanYouRunIt


Conclusion

In this article, we listed 5 of the best software options that allows you to easily benchmark your PC no matter its hardware configuration.

There are people who don’t want to download anything. Others prefer a powerful benchmarking tool installed on their PCs. The options presented in this article cover both categories and allow you to have an optimum gaming experience on any PC.

Let us know what tool you chose from this list in the comment section below.


[wl_navigator]

This Diablo 3 skill calculator helps to achieve higher GRs

Whilst seasoned Diablo players have a clear plan of their character progression, you might find yourself disheartened by the prospect. This is where a Diablo 3 skill calculator can help.

While eagerly awaiting the release of Diablo 4, new players wanting to take part in the adventures of Sanctuary look towards Diablo 3 to immerse themselves in the rich lore and fast-paced gameplay that Blizzard has created.

Before the release of Diablo 3, Blizzard put out a Diablo 3 skill calculator on the official website, but in the years since, several such build planners have cropped up, offering more information and a comprehensive database of items.

How can I use the Diablo 3 skills calculator?

1. Official Diablo 3 calculator

Diablo 3 skills overview

  1. Go to the Diablo 3 Game Guides page (EU Link | US Link)
  2. Select Skill Calculator from the Tools section
  3. Select your desired class
  4. Browse through the skills
  5. Save your build

Note: if you do not log in to your account, you can still save build but they will be kept as cookies and if you clear your browser’s cookies, you will lose the saved builds.

You can save up to 15 builds on this Diablo 3 skill calculator, and because it is linked to your battle.net account, you will be able to come back and revisit them.

Additionally, any in-game characters you’ve created will be available to view on your profile page.

This tool was created prior to the release of Diablo 3, but it has been updated to skill changes and new class introductions.

Whilst it does not calculate player stats or take items into account, it is a good resource for new players to familiarise themselves with Diablo 3 classes and their abilities.


2. D3Planner

diablo 3 skill calculator

  1. Go to the Diablo 3 Planner
  2. Select the Class you play as
  3. Click on each item and select the desired item from the dropdown list
  4. Add your Skills and Paragon points
  5. Check the stats on the right-hand side

D3Planner also allows players to import their in-game characters and go into the finest details of their builds by simulating what effect changing stats, items or sockets would have on their DPS.

This Diablo 3 skill calculator is one of the best tools you can use to build and test your character.

This is especially important when you find a much-needed item and you want to see what effect changing its stats would have.

As you know, once you have committed to changing a stat, this cannot be undone and by using a tool such as this, you can see the different effects without committing to the change.


Want to get more power out of your legendary item in Diablo 3? This is how you augment it for more damage


3. Diablo 3 Misc Calculators

diablo 3 skills and items

As you will progress through your Diablo 3 journey and your knowledge of the intricacies of your character, you will start to look at minute details to give you that extra edge when pushing the greater rifts.

There are many Diablo 3 calculators which can help you on this journey. Here are a few that we recommend to new players:

  1. Paragon Calculator
  2. XP time calculator
  3. Legendary Gem upgrade success rate
  4. Vitality vs % Life
  5.  Critical Hit Chance vs Damage

We highly recommend the D3 Resource repository where you can find information on all aspects of the game. This fan-made website can be an invaluable resource when starting out in the world of Diablo.

As a new player, Diablo 3 could be a daunting title, but with the help of these skill calculators and other tools, you will manage to find your way through the trials that the world presents.


[wl_navigator]

Best 3D Camera Tracking Software

We live in a time when everything from Hollywood blockbusters to common commercials makes use of 3D elements, so certain special effects have become quite common and mandatory to pull off.

One good example is 3D camera tracking, and if you want to use this special effect in your videos, then you need to know which software can pull it off the fastest, easiest, and in the best manner possible.

To that extent, we will be looking over several software tools that have proven their efficiency when it comes to 3D camera tracking.

The entries were selected base don their toolset, how easy they are to use, how much do they cost, and other important criteria.

What is the best software for 3D camera tracking?

Adobe After Effects

Topping out our list is a software tool that you may not have even known that it had 3D camera tracking included in the feature list: Adobe After Effects.

This program is part of the Adobe Suite, and it is one of the best that you can buy on the market today. It has tones of features that include titles, transitions, and multiple-layer 3D embedding and tracking.

More so, any of you that are familiar with any of the other Adobe products, such as Photoshop or Illustrator are will quickly get accustomed to the look and feel of After Effects.

You can get it as part of the general subscription of the Adobe services, or you can subscribe to it separately.

Here are some of Adobe After Effects’ main features:

  • Full compatibility with other Adobe products
  • The  Internet is full of useful guides for After Effects
  • Professional-level toolset
  • Can easily handle tasks such as 3D camera tracking
  • Features plug-in support

⇒ Download Adobe After Effects

Adobe Premiere Pro

Adobe Premiere Pro along with adobe After Effects can be considered a 2-package deal when it comes to editing videos.

While After effects mainly focuses on post-processing and the addition of special effects to already existing videos, Adobe Premiere Pro deals mainly with creating and edit videos from the bottom up.

As such, a complete video editor’s digital library would usually consist of both programs, used in a sequence.

However, despite the differences between the two, Adobe Premiere Pro is also perfectly capable of handly certain special effects, of which we can also mention 3D camera tracking.

The program does a solid job at it, albeit the steps you need to take are a bit more complicated since this wasn’t the focus and intended design of the program.

Here are some of Adobe Premiere Pro’s main features:

  • Full compatibility with other Adobe products
  • Works well with Adobe After Effects
  • 360 VR and 4K support
  • 3D camera tracking is possible
  • The price tag

⇒ Download Adobe Premiere Pro

SynthEyes

Unlike the previous two entries on our list that are well-rounded programs in themselves, SynthEyes was specially created with 3D special effects in mind.

One of the main features of this program is stabilizing 360-degree shots and adding any 3D animation that you may want in your live-action videos.

More so, you can also manage green screen effects using this tool, making it a great overall package when it comes to videos featuring special effects and fictitious settings.

Here are some of SynthEyes’s main features:

  • Has geometric hierarchy tracking
  • Features 360 VR stabilization
  • Comes in various license types
  • Compatible with Python
  • Supports stereo 360VR

⇒ Download SynthEyes

3DEqualizer

Adding 3D effects to a regular 2D video may seem like a daunting task, especially if you’re a beginner. However, that is no longer the case, since video editing software now also caters to non-professionals as well.

One great example is 3DEqualizer, a video editing tool that focuses on simplicity above all else.

Their 3D motion tracking is some of the best on the market, and it is mainly aimed at studios and those who want to be sure that they get top-end effects.

The program has been around for some time already, but it is continuously updated, allowing it to stay competitive even 2 decades after it first appeared.

Here are some of 3DEqualizer’s main features:

  • Deep Python Integration
  • High-speed optimization
  • Lens distortion
  • Unique solvers
  • One of the best 3D tracking algorithms on the market

⇒ Download 3DEqualizer

Boujou

Affordability is another aspect that you should consider when buying any type of software. As such, this last entry is here not necessarily because it is cheap, but because it offers an incredible number of tools given the low price.

Another highlight of this tool is that is is also perfectly equipped to put your computer effects directly into your high-speed, real-life footage.

It does it with incredible accuracy and seamless integration using frame-by-frame exploration and a fully functional graph editor.

The program is constantly updated to stay competitive, and if you’re looking for a budget-friendly alternative, go ahead and try Boujou. In fact, you can even take advantage of their free trial before making a purchase.

Here are some of Boujou’s main features:

  • Comes with a free trial
  • Extremely affordable
  • Can insert 3D effects into videos in real-time
  • Frequently updated
  • Offers seamless integration of VFX

⇒ Download Boujou

Movies nowadays can no longer survive with at least a few 3D special effects, and implementing them has become easier and easier.

However, the end goal is to make a movie that looks believable, so a good software tool that will handle this aspect is a must.

That being said, feel free to look over our top 5 picks, and make sure you find the one that suits you best.


[wl_navigator]

Fix Outlook Error Too Many Recipients on Windows 10/11

Are you getting an Outlook error that says there are too many recipients? Well, the first thing to know about this error is that it happens when a distribution list is too big, and people who regularly use distribution lists to manage and/or send emails are prone to receiving this error.

The error, which is displayed as Error 550 Too many invalid recipients occurs when you attempt to send a message to multiple users or email addresses, that are no longer valid, from Outlook, and eventually, the message doesn’t get to the intended recipients.

But what really is the maximum number of recipients you can send messages to at a go using Outlook? First of all, the Outlook error too many recipients message isn’t generated by Outlook itself, but comes from your internet service provider (ISP), or your corporate mail administrator in the form of a send/receive error.

This is because Outlook doesn’t have a limit on the number of addresses you can send to in one single message or email.

However, your ISP or corporate mail admin can set limits or a combination of limits on the number of emails you can send in an hour or day and the number of recipients for a single email in a bid to protect the mail server from abuse or excessive use.

But this is something you’d then have to check with your ISP or corporate mail admin to avoid getting the error in future messages.

One of the easiest ways of dealing with this error is by first creating a distribution list that has an optimum number of email addresses, though you can find out from your mail admin or ISP about the limits on the number of emails you can send. In this way, you can avoid receiving the Outlook error too many recipients next time you send multiple emails.

Otherwise, you can try some of the solutions listed below if the error persists.

Fix: Outlook error too many recipients

1. Make a new profile and account on Outlook

  • Open Control panel
  • Select Mail
  • Delete the Outlook profileshow outlook mail profile
  • Restart your computer and open Outlook again
  • Make a new profile and a new account
  • If the account is an Exchange, connect to the exchange server
  • If it isn’t Exchange, use the manual account setup to connect the PST file, otherwise back up the PST file first

Note: Making a new profile should not damage the PST file.

If creating a new Outlook profile or account doesn’t fix the Outlook error too many recipients, make a new test Windows User Profile (account) by logging into the new Windows account, set up Outlook and test it again.

2. Check with your ISP

If you get Outlook error too many recipients, there could be an email reputation issue and your ISP probably doesn’t want to admit it.

In this case, check your ISP’s domain reputation, block reputation, and your assigned address reputation from sites like spamhaus.org, spamcop.net, abuseat.org, or barracudacentral.org.

If this turns out to be the probable cause of the error, then it may be affecting many other customers of the same ISP. You can also get the manager’s outgoing mail routing through smtp2go.com.

3. Work with or around the email limitations

To do this, there are several methods that come in handy including:

  • Using a Mail Merge in Outlook
  • Use a Mail merge add-in to break mail merge into batches below the email limitation
  • Consider using a third party app or service for mass mailings or distribution lists
  • Get an upgrade on your subscription from your ISP and ask about possibilities that such an upgrade comes with, look out for email allowances or limitations
  • Check with your corporate mail administrator for a specific mail address you can use to send out large distribution lists or mailings, and/or remove the limits on your account temporarily. You can also schedule the list to go out or run later in the night
  • Verify your account through SMS to allow you to temporarily go beyond the set limit on sending emails or messages

Did any of these solutions help? Let us know in the comments section below.

How to fix printer error 1203 for good

If you’re using a Dell printer and you’ve come across error 1203, it more often than not signifies a cartridge error.

Now, some of these errors come when we really aren’t anticipating them, in any case, who reads printer manuals?  That’s what we’re here for – to simplify the stuff in the manuals and make it easier to use.

Anyways, error 1203 on your Dell printer simply means you need to replace your ink cartridge as soon as possible.

You also need to check whether the cartridges you’ve been using, or are using, are genuine Dell ink cartridges, or cut-rate ink cartridges.

Error 1203 also means that your Dell printer’s ink cartridges overflow, whether they’re brand new or not, either after you’ve done several prints, or just after you refilled the cartridges.

In both cases, you need to check and see whether the ink is smeared on the copper contacts of your printer’s holder.

You can easily do this by opening your printer while it’s off, then the holder with the contact panel slides across where you can see everything clearly.

Here are some solutions that can help you fix it.

Fix error 1203 on Dell printers and other printer models

1. Clean the copper contacts on the printer’s holder

Before you run a print job, do the following:

  • Take a lint free cloth, pour a few drops of water to dampen it,
  • Clean off the copper contacts on the printer’s holder.
  • Check if the printer works again.
  • Make sure you align the ink cartridges a few times, then run the cleaned up cartridges.
  • Print a test page to see how the print job looks

Note: make sure you don’t leave any debris of the lint-free cloth on the contact panel of your printer.


2. Replace your ink cartridge

If your ink cartridges are brand new, you can go back to where you purchased them then ask for a refund, or a replacement.

If the ink cartridges are old, try purchasing a new Dell Series 5-ink cartridge. These ink cartridges have a sensor in them that cannot be reset, therefore, even if you do a refill, the print job will not give the same output.

Usually, the error 1203 shows you which ink cartridge is causing the error.

The sensor in the cartridges reports the ink levels once they reach a certain level, so if you refill such a cartridge, you may get a print job done, but the cartridge’s sensor will still report low ink.

The only way around this is to replace it with a new, genuine Dell Series 5 ink cartridge.

Another reason not to refill ink cartridges is because it may lead to print quality issues, and eventually your printer experiences hardware problems.


3. Contact Dell Support

In case the error 1203 message persists, kindly get in touch with Dell’s Customer Support team with specifics on your issue and they’ll be glad to assist you.

We sure hope one of these solutions helped you. Let us know your experience in the comments section.

[wl_navigator]

Microsoft Edge 81 comes to the stable channel

If you’re sporting the new Microsoft Edge on your computer, it’s time for an update. Indeed, as spotted by Neowin, Microsoft has just pushed out the version 81 update to the Edge Stable channel, which is the regular non-insider version of the browser.

This release has already been tested for many weeks now in the Beta channel, and delivers the long awaited Collections Feature. It also comes with Dev Tools localization and some under the hood options for developers. As usual, you can find the update by heading to the Settings menu, clicking About Microsoft Edge, let the browser download the data, and then restart the browser.

If you’re looking for some newer features, you might want to check out the other versions of the browser via the Edge Insider program. Just keep in mind that there won’t be a version 82 update to Edge, due to the Coronavirus situation. Some new features that you can look forward to in the upcoming release include extension syncing, the ability to add all tabs to a collection, and much more.

Microsoft ups Teams meeting view from 4 to 9 participants, promises more to come

Microsoft took to Twitter this afternoon to announce a major change to its Microsoft Teams service. The company detailed that it is increasing the number of participants viewed simultaneously on the meeting stage to 9.

Over four years in the making now, this is a major change from before, where you would only see active video from the last four people that have spoken in the chat. According to Microsoft, the feature will be rolling out soon, though no exact time frame has been given. The company finally responded in the Teams UserVoice, indicating that they are “continuing work to increase this limit even further.”

Reaction to this change has been a bit mixed in the community. Considering Zoom lets you see up to 49 participants on a single screen, users seem to think that the change doesn’t go far enough to help teachers or organizations with larger team sizes. However, Microsoft did say they are continuing work to increase the limit, so there is hope on the road ahead.