If you wonder how to make periods bigger in Google Docs, then you came to the right place. As a number of users have reported that the size of the period on Google Docs is not as obvious as needed, our team did the required research to sort this issue.
This is a really annoying issue to encounter, and it affects you even more if you’re using Google Docs to write your project or essay for school or work. Not having an obvious period at the end of every sentence in the above-mentioned situations can cause difficulty to the reader.
For these reasons, in today’s article, we will explore the best ways to deal with this issue. After reading these methods, you will have all the tools you need to avoid this issue in the future. Read on to find out more.
How do I make periods bigger in Google Docs?
1. Manually change the font size for each of the periods
Note:In order to apply this method, you will have two options – edit every period as it is written, or to edit all periods after you’ve finished writing the content.
The first option will require you to change the font size to the text size after every period, so in my opinion, it is better to perform the entire range of Font size changes after finishing the text.
This method only applies if you don’t have a very big text to deal with. In order to do so, follow the next steps:
Inside your Google Docs page -> select each of the periods you want to modify.
After the selection is done -> click on Font size button -> choose a value that suits your text.
If your text is too big for this method, please follow the next one.
Note:Even though this method will make the periods of your text bigger, this method only applies in the case that you don’t have a set requirement regarding the font used in your text.
Select the text you want to change the font style to.
Click on the Font style button and choose an option from the list.
3. Use keyboard command to automatically select all periods
Inside your Google Docs text -> press Ctrl+F keys on your keyboard to open up the search box.
Type a period inside the search box.
Press the three dots options of the search box -> change the size of your Font to a bigger size -> type a period in the Replace with box -> click Replace all.
In this article, we explored some of the best methods to make periods bigger on Google Docs. Please feel free to let us know if this guide helped you, by using the comment section below.
The No Man’s Sky Beyond update is less than a week away, and the launch trailer for the game has already been released for those to see (via Eurogamer). Beyond is the 7th free update to the popular title, and the third update since No Man’s Sky Next that coincided with the game’s release on Xbox One.
No Man’s Sky Beyond will include many new features, with one of the major ones expanding upon the online multiplayer that comes with the game. Additionally, Windows and PS4 users will soon be able to take advantage of a VR experience on compatible headsets.
Details about the game continue to be scarce aside from what we’ve seen in the trailer. Luckily its August 14th release is right around the corner, so it won’t be long before we get all of the details.
If you don’t yet have the game, it’s on sale for just $34.99, or 30% off, on the Microsoft Store right now. Xbox One X owners will also be able to take advantage of 4K Ultra HD and HDR 10 support on supported TVs.
As more companies opt to store their data in the cloud, Microsoft and other service providers are blazing forward with broad and custom solutions to accommodate not only the transition but quantify their aggregate information.
We understand that the idea of migrating these systems to the cloud can seem risky and daunting. This is why we are partnering with Informatica to help customers begin their cloud analytics journey today with an industry-leading offer.
More specifically, customers can now make use of:
The Azure team does not detail how long the offer is being extended for, but that parts of the services have a value “up to 30 days.” Interested customers can visit and register for Azure and Informatica webinars here or sign up for a free Informatica: Cloud Data Warehouse Modernization on Azure workshop here.
Since popular video game streamer Ninja made the switch from market leader Twitch to Microsoft’s Mixer service, the video games industry is starting to look at the underdog quite differently. Mixer can certainly attract new users with its industry-leading Faster than Light (FTL) streaming protocol, interactive “Mixplay” features, and deep integrations on Windows 10 and Xbox One, but Microsoft is now being increasingly pressured to offer Twitch Prime-like benefits to people who subscribe to Xbox Live Gold or Xbox Game Pass.
As a matter of fact, offering a free Mixer subscription every month to Xbox Live Gold and Xbox Game Pass members has been one of the top requested features on the Mixer Feedback portal since last year. Amazon is currently offering a similar benefit to Amazon Prime subscribers, who can also get four free games every month and free “Twitch Prime” loot for popular games such as League of Legends or GTA V.
Answering a question on Twitter about providing Mixer benefits to Xbox Live Gold or Xbox Game Pass members, Xbox head Phil Spencer said yesterday that these kind of synergies made “a ton of sense.”
We are always listening and learning. Lot's of people have suggested we find some connection between XGPU and Mixer subs which makes a ton of sense, good ideas.
Even though the exec provided a non-committal answer, Xbox Live Gold and Xbox Game Pass could play a big role in Mixer’s monetization plans. As of today, Mixer offers a $7.99/month “Pro” subscription that provides an ad-free experience, early access to new features, as well as some bonus experts for chat and Mixer’s progression system. However, this Pro tier doesn’t include a free subscription to a Mixer channel, or exclusive in-game loot.
Amazon’s “Twitch Prime” benefits for Amazon Prime subscribers are a great way to make the service more sticky, though it’s worth reminding that Amazon removed ad-free viewing from the Twitch Prime benefits last year. Microsoft could certainly give Xbox Live Gold and Xbox Game Pass more incentives to spend time on Mixer, similar to the free one month subscription to Ninja’s Mixer channel. This limited-time promotion helped Ninja reach 1 million subscribers and one million followers in just a couple of days, something that’s really unprecedented for Mixer.
Do you think Microsoft should look to replicate what Amazon has done with Twitch Prime, or do you think leveraging Xbox Live Gold and Xbox Game Pass to give Mixer a boost could have the unfortunate effect of making Mixer too Xbox dependent? Let us know what you think in the comments below.
Right-click on External Hard drive and select Format partition.
A pop-up window will appear. Now select NTFS and click OK.
Go back to the main interface and authorize your setup. Click Apply and click OK.
Now your external hard drive will be formatted, and you can gain complete access. Moreover, you could transfer previously recovered files and folders in it.
These solutions are the most effective methods to help you change external hard drive permissions on Windows 10.
These methods should help you change external hard drive permissions on Windows 10. If you’re still having issues, check out these guides: if your WD external hard drive isn’t showing up, refer to our article on fixing WD drives not recognized.
Power BI Desktop is Windows software with which users can set up interactive reports and visualizations for data. However, sometimes users can’t sign in to the Power BI Desktop software.
When users can’t log in, the We don’t recognize this user ID (or Unable to sign in) error message might pop up.
Why can’t I log into Power BI?
1. Double-check the Login Details
First, double-check that you’re entering the right login details. Then carefully enter the login text.
In addition, make sure that Caps Lock isn’t on when entering the text.
2. Reset Power BI Login
The most obvious way to fix most log-in errors is to reset the login details. Users can request a password reset for Power BI at BI’s account recovery page.
There enter a Power BI user ID and click Next to reset the login.
3. Try Logging in to the Power BI Service
Alternatively, users can try logging in to the Power BI service in the browser. Open the login page for the Power BI service to log in from there. If users can still log in to the BI service, they can then change the password from there.
Thereafter, sign out and sign back in again to BI service and desktop software with the new login details.
If you’re having issues logging in to Power Bi, we advise trying Opera One Browser for this purpose.
Opera One is quite similar to Chrome, due to its engine, but it has several other very unique features. Opera One has the best user interface: it’s elegant, simple, and yet powerful.
You may now obtain a little more privacy with the free VPN available in Opera One. It’s a much lighter package than Chrome. When using add-ons like the VPN and built-in ad-blocker, you’ll have a faster and more responsive internet experience, as well as battery savings for laptops.
When it comes to speed, Opera One features a unique Turbo option that you may activate when you’re using a slow connection, such as airport Wi-Fi. When enabled, it can load pages significantly faster on a slower connection by employing an algorithm that removes the heavy material, leaving only the essence of the page visible.
Opera One also saves data using compression technologies that are not found in other browsers. Plus, it features a built-in AI
Some users have confirmed that they’ve fixed Power BI login issues by installing the latest version of the software. To do that, uninstall the current version first by pressing the Windows key + R, entering ‘appwiz.cpl’ in Run, and clicking the OK button.
Select the Power BI Desktop software.
Click the Uninstall button.
Then click Yes to confirm the selected option.
Restart Windows before reinstalling the latest Power BI version.
Next, open the Power BI website and click Advanced download options to open the page shown directly below.
Thereafter, click Download on that page.
Then select either PBIDesktop.msi (32-bit installer) or PBIDesktop_x64.msi (64-bit installer). The correct installer is the one that matches your 32 or 64-bit system architecture.
Press the Next button.
Thereafter, open the Power BI installer to add the software to Windows.
5. Whitelist Domains
If a “Sign in failed because your network required proxy authentication” error message pops up, a proxy authentication network server is probably blocking Power BI Desktop’s web requests. In such circumstances, users will need to contact network administrators to fix the login error. Ask the administrator to whitelist the following domains:
api.powerbi.com
pi.powerbi.com
domains in the *.analysis.windows.net namespace
Those are a few resolutions that might fix Power BI Desktop user log-in errors. For further fixes, users can file support tickets by clicking the Create Support Ticket button on Power BI’s Support page.
Which of these solutions solved your issue? Share your thoughts in the comments section below.
The Power BI Desktop software enables users to set up charts and visualizations for their data. However, some Power BI users have stated in forum posts that they can’t open their Power BI PBIX files with the software. The FILE is incompatible with your current version of Microsoft Power BI Desktop (or Unable to open document) error messages pop up when Power BI users can’t open their PBIX files.
Why can’t I open Power BI file?
1. Reinstall Power BI
Fix the FILE is incompatible error by reinstalling Power BI. To do that, press the Windows key + X hotkey.
Select Run to open that accessory’s window.
Input ‘appwiz.cpl’ in Run, and press the OK button.
Next, select Microsoft Power BI Desktop within the Programs and Features applet.
Click the Install (or Get) button to reinstall BI.
Note that Power BI on the MS Store is for 64-bit architecture. Users with 32-bit systems might need to download 32-bit Power BI Desktop by clicking Advanced Download Options on the software’s website.
2. Edit the File Title
Power BI users also posted about an “Unable to open the document; we weren’t able to restore the saved database to the model” error message during 2018. Some users fixed that error by removing “, <, >, &, and ‘ characters from the PBIX file titles that didn’t open.
Users can edit a PBIX file in File Explorer by pressing the Windows key + E hotkey, right-clicking the PBIX file, and selecting Rename. Then enter a new title for the title that doesn’t include “, &, <, >, or ‘.
If the “Unable to open document” error arises after a recent Power BI update, try reinstalling the previous version of the software. Users can do that so long as they have kept the install file for the previous version in their download folders.
Uninstall Power BI Desktop, and then reinstall the software with the install file for the older version. Users might find that they can still open the PBIX files ok in the previous BI version.
4. Copy the file to a USB stick
Also, try copying the PBIX File to a USB drive and opening it from there. To do that, open File Explorer with the Windows key + E hotkey.
Insert a USB Drive to copy the PBIX into the laptop’s or desktop’s USB slot.
Open the folder path that includes the PBIX file.
Drag and drop the PBIX file on the USB drive on the left of Explorer to copy it there.
Thereafter, open the PBIX file from the USB drive instead.
Microsoft Jigsaw puzzle collection is one of the most popular and best-rated games in the Microsoft Store. However, users are experiencing sign-in issues after the previous major Windows 10 update. It seems that there’s a halt in the sign-in procedure and users are either met with the dark screen or brown screen and end up getting stuck there. If Microsoft Jigsaw won’t sign in for you, check these steps.
Why can’t I login into Microsoft Jigsaw on Windows 10?
1. Run the dedicated app troubleshooter
Right-click Start and open Settings.
Choose Update & Security.
Select Troubleshoot from the left pane.
Click on the Windows Store Apps troubleshooter to expand it.
Click Run this troubleshooter and follow further instructions.
2. Reset the app
Press Windows key + I to open Settings.
Choose Apps.
Under the Apps & Features, focus on the right pane.
In the Search bar below, search for Jigsaw.
Expand Microsoft Jigsaw and open Advanced options.
Click Reset and reboot your PC afterward.
3. Reinstall the Microsoft Jigsaw
Navigate to Settings > Apps > Microsoft Jigsaw and uninstall it.
Make sure you are signed with the Microsoft Account you used to play the game. Also, navigate to Settings > System > Storage > Change where new content is saved and ensure that Apps are installed on the system partition.
In addition, you should ensure that both your Windows 10 and Xbox Companion App share the same Microsoft Account.
Navigate to Settings > Accounts and sign in with the Microsoft account you used to log into Microsoft Jigsaw earlier.
In the Windows Search bar, type Xbox Console, and open Xbox Console Companion.
Sign in with your account and scroll to the bottom.
Open Settings (cog-like icon).
Disable Auto Sign-in option.
Open Microsoft Jigsaw and look for improvements.
With that, you should be able to sing in successfully into Microsoft Jigsaw. On the other hand, if you are still bothered by the error, you can roll back the update to the previous Windows 10 version. Learn how to do that, here.
The decision was made in an attempt to align codenames for Azure and Windows. Microsoft has now decided to introduce the new naming convention for future Windows 10 updates.
Microsoft Leakster Tero Alhonen sneaked into the recent Windows 10 SDK build 18950 and revealed that Microsoft plans to name the upcoming 19H2 update as Vanadium.
Moreover, the 20H1 update that is expected to roll out in the Spring of 2020 would be called Vibranium.
I think it would be really nice marketing move if the next Windows version (20H1 2020 1st half/2003 2020 March/…) would be called Windows 10 Vibranium https://t.co/g8UvOXlZdk
It seems that Microsoft took inspiration from Chemistry to add a bit of excitement for the upcoming builds. Interestingly, both the names Vanadium and Vibranium seem to be inspired by the elements of the periodic table.
For those who don’t know, the change in the naming convention is a result of the reorganization in the company that took place last year.
Heads up Windows Insiders, Microsoft has just released the Windows 10 build 18956 for those of you in the Fast Ring. This new build introduces a redesigned Network Status page in Settings, making it possible to see at glance your Network status. This build also brings improvements to the Traditional Chinese IME, and it will also provide all Fast Ring Insiders access to the more granular notifications improvements introduced in the build 18932.
If you have yet to get access to the new Cortana Beta app with the new conversational UI, the Windows Insider team says that it should now be available for 50% of Insiders using English (US) with this build. Last but not least, the Always on Top mode for the Windows 10 Calculator app will also make its debut with the build 18956, though Microsoft notes that this will be a gradual rollout that will start over the next few days.
You can learn more about all the new features included in the build 18956 below:
A redesigned Network Status page in Settings
Based on your feedback, we’re revamping the Network & Internet landing page in Settings to provide more information at a glance about your device’s connectivity, combining several pages to give you one clear view of how you are connected to the internet.
New view of active connections: We now show all available connection interfaces on the Status page, so you can quickly see what is connected and view and change properties as needed. If you have multiple connections, only one will be used for internet connectivity at a time, and that one is still shown in the Status diagram at the top of the page.
Integrated Data Usage: As you may have noticed in the picture above, you can now see how much data is being used by a network right from the Status page! If it looks like you’re using a lot of data, you can drill into the Data Usage page to create a limit for that network, which will warn you if you get close or go over your limit. You can also see how much data each app is using on that network.
We hope you like the changes! If you have any feedback about these, you can share it via the Feedback Hub under Network and Internet > Networking Experience – Look and Feel.
Bopomofo, ChangJie, and Quick IMEs: We improved the speed of toggling conversion mode ([中] mode and [英] mode). Now it you can switch between the two faster.
Bopomofo IME:
We heard feedback that some of you’ve been accidentally hitting the Shift + Space keyboard shortcut, resulting in the character width changing unexpectedly between Half-width and Full-width, so we’ve added a new setting for this if you’d prefer to disable the keyboard shortcut (Note: The default is enabled). To access this setting, right click the [中/英] icon in the taskbar, click Settings > General > “Use Shift + Space to switch character width”.
As you may have noticed in the screenshot above, we’re now adding the ability to change the candidate font size, separate from the rest of the system if you find that you need it to be a bit bigger. (You can still change the system font size under [Ease of Access]>[Display]>[Make text bigger].)
We also fixed issues where:
The candidate numbers sometimes disappeared from the candidate window.
Shift+Number wasn’t working for selecting an associated phrase.
Thanks again! If you have any further feedback about these experiences, let us know.
Notification settings improvements now rolling out to all of Fast
Thanks everyone who’s tried out our improvements so far. We’re now starting to roll these out to all Insiders. To recap what you’ll see when you have the change:
If you hover your mouse over an incoming notification, you’ll now see a settings icon to make it easy to adjust that app’s notification settings.
We’ve updated the design of the per-app notification settings for visual clarity.
There’s now a direct link to notification settings at the top of the Action Center.
Notifications & Action Settings now has a checkbox for muting the sound of all notifications.
By default, the senders in Notifications & Action Settings are now sorted by “most recently sent a notification.”
Cortana rollout increasing to more Insiders using English (United States)
We’re increasing the rollout of the new Cortana experience to now be available for 50% of the Insiders using English (United States). You may need to reboot before you see the change on your PC. Looking for something to try once it appears for you? Try “What’s the weather?” or “Tell me a joke” to get started.
Other Updates for Insiders
Calculator app updates
Over the next few days we’ll be starting to roll out a Calculator app update to Insiders in the Fast ring. This app is most notable because it adds the ability to put Calculator in an Always on Top mode! Thanks everyone who shared feedback requesting this – we look forward to you trying it out. Once you have the updated version, you’ll be able to switch into the Always on Top mode by clicking the icon next to the calculator mode name.
As usual, this new build also brings some general fixes and improvements, and Microsoft has addressed an issue causing File Explorer to crash when searching for files or starting in a OneDrive folder if OneDrive was not running. You can learn more about other fixes and known issues in our separate post.
Windows PCs with Intel and AMD chips might be vulnerable again, as Spectre returns after almost a year.
New SWAPGS vulnerability bypasses previous mitigations
This time, the designated CVE-2019-1125 issue similar to Spectre and Meltdown is more powerful and bypasses previous security barriers. The SWAPGS vulnerability mainly affects Intel CPUs produced after 2012.
The vulnerability reads sensitive kernel memory and a malware attack could use it to get passwords and encryption keys out of RAM.
As such, Microsoft released a silent patch to address the problem. The update to the Linux kernel was part of last month’s Patch Tuesday, but it wasn’t revealed until recently, at the BlackHat security conference.
Updating the kernel seems to solve the problem
Here’s what RedHat had to say about CVE-2019-1125:
Red Hat has been made aware of an additional spectre-V1 like attack vector, requiring updates to the Linux kernel. This additional attack vector builds on existing software fixes shipped in previous kernel updates. This vulnerability only applies to x86-64 systems using either Intel or AMD processors.
This issue has been assignedCVE-2019-1125and is ratedModerate.
An unprivileged local attacker can use these flaws to bypass conventional memory security restrictions to gain read access to privileged memory that would otherwise be inaccessible.
Because the kernel patch builds on existing spectre mitigations from previous updates, the only solution is updating the kernel and rebooting the system.
Neither AMD nor Intel are extremely concerned with the issue, and don’t have plans to release microcode updates because the vulnerability can be addressed in software.
Bitdefender, who originally found Spectre, created a page that will give you more info on how to protect your system against critical SWAPGS attacks.
Dashboards can be used in many ways in Power BI, from adding images and text to adding a report. However, quite a few people may sometimes encounter issues when trying to add a report to their Power BI dashboard.
One user described such a situation on the official forum:
I have a report having 4 pages, how can I pin the entire report not individual page. I can pin 4 pages of the report individually but I am looking for a way where I can just pin a report to dashboard and once that report is clicked, it shows the entire report. Any suggestion?
So, the OP wants to pin an entire report to a dashboard, not just individual pages of the report.
The problem has a rather simple solution. Today, we will show you how you can add an entire report to your dashboard in Power BI.
Steps to add a report to a dashboard in Power BI
Select the Spend Overview tab from the report editor. This will open the second page of the report.
Select Pin Live Page from the upper-right corner of the menubar.
Select Existing dashboard on the Pin to dashboard window. Then click on Pin live.
After the Success message appears, select Go to dashboard.
Here you’ll see the tiles you pinned from the report.
Pinning the whole report in this way means that the tiles are live, so you can interact with your data right on the dashboard.
Moreover, any changes you’ll make in the report editor will also reflect on the dashboard tile.
Conclusion
So, adding an entire report to a dashboard is pretty easy. Also, this is a useful feature if you want to see all your data in one place.
As you well know, visualizing your various sets of data in an interactive manner is one of the main characteristics of Power BI.
So, there you have it! With these easy steps, you can see all your charts and diagrams in a single dashboard.
The remastered version of the classic DuckTales game is being removed from the Microsoft Store for Xbox 360 consoles as well as Xbox One thanks to backward compatibility, in addition to all of the games other storefronts including PS3, Wii U, and PC via Steam. If you’d like to purchase the game before this time, you’ll have until tomorrow to get it on Xbox, or August 9 on PS3 or Wii U.
To give those a chance to purchase the game given it’s extremely short deadline, Capcom is allowing those to order it for just $3.74, which is about 75% off its previous list price of $14.99. The good news is that once you buy the game, you’ll get to keep it even after the game has been removed from the store. Additionally, if you’ve already have the game—physically or digitally—you can reinstall it at any time just as you would prior to its removal from the online stores.
If you’re interested, you can purchase the game using our link below. As a reminder, the game is an Xbox 360 title, but has been made backward compatible with Xbox One.
Do you remember playing this game when you were young? How about the TV show the game is based off of? Let us know in the comments area below.
If the number of Windows 10 active devices is slowly inching closer to 1 billion, we now know that Microsoft has been doing significant work in the past couple of years to make Windows 10 more modular. That’s the main purpose of Windows Core OS, which will power new devices and form factors such as HoloLens 2, the Surface Hub 2X, the next-gen Xbox console codenamed “Project Scarlett,” as well as a new lightweight PC OS that the tech press is currently reffering to as “Windows Lite.”
We don’t have many details about Windows Lite yet, but this new platform is expected to debut on Chromebook-like devices and dual-screen form factors. Google has seen major success with Chromebooks in the US education market, mostly because these devices are simple to use and easy to manage for IT admins. Steve Ballmer’s Microsoft used to mock Chromebooks with an unforgettable “Scroogled” ad campaign, but the new Microsoft is definitely taking Chromebooks very seriously.
It’s not clear yet if Windows Lite will be compatible with all Windows 10 UWP apps and legacy Win32 apps, but Google recently brought support for Android and Linux apps on ChromeOS. Chromebooks are no longer the underpowered cheap PCs that become useless without an Internet connection, they’re actually a pretty good alternative to cheap Windows laptops for people who don’t need the full power of Windows.
I had never used a Chromebook until I saw a great deal on a 14” Chromebook from HP. For just €200, the model I bought (which doesn’t seem to be available in the US) comes with a FullHD IPS screen, a dual-core AMD CPU, 4 gigs of DDR4 RAM, and 64GB of eMMC storage (expandable with a microSD card). The build quality is pretty good, and this machine also has two USB 3.1 Type C ports and 2 standard USB 2.0 ports, a pretty solid trackpad and an excellent chiclet keyboard.
It’s been fun discovering how Chrome OS works on this machine, and as a regular Windows 10 and macOS user there’s actually a lot to like about Chromebooks in general. There are also a couple things that I didn’t like, but I hope that Microsoft’s Windows Lite will take the best from Chrome OS and mix it up with some unique Windows things, providing users the best of both worlds.
What will follow will be a short review of Chrome OS from a Windows 10/macOS fan, and I should add that I didn’t really become a Chrome OS power user in the two weeks since I purchased this Chromebook. There are probably some things that I have yet to discover on Chrome OS, but I’m already convinced that Chromebooks can already satisfy the needs of most casual PC users. This entire article has also been written on Chrome OS, and I’m pretty sure I could do most of my work-related tasks on a Chromebook without any issues.
The good
The great thing with Chromebooks is that they’re very easy to setup. I had to install a software update after unboxing mine, which didn’t take longer than 30 min, but after that I just logged in with my Gmail account and the machine was up an running. Google Chrome had also already synced all my bookmarks and extensions, and the web browser works flawlessy on this Chromebook. Chrome is a key part of Chrome OS, and everyone knowing how to use it should have no real trouble using a Chromebook.
ChromeOS has an equivalent to the Windows task bar where you can pin all the web apps you have, as well as Android and Linux apps (more on that later). Just like on Windows, this “Shelf” can also be moved to the left or right sides of your screen if you prefer. There’s a launcher button on the left corner of the Shelf, and an equivalent to the Windows 10 Action Center on the right corner. This section includes various quick settings, recent notifications, as well a buttons for signing out of your session or shutting down your Chromebook.
Chrome OS also ships with a native Files app for managing all your Files, and it puts Google’s Drive cloud storage service front and center. This Files app can also integrate with other cloud storage services such as Microsoft’s OneDrive, and my OneDrive folders automatically showed up once I installed the OneDrive Android app. It’s also possible to access network share files from the Files app, but I didn’t get the chance to test it on this machine.
It’s worth noting that Chromebooks should be compatible with most accessories: I’ve been able to use various USB peripherals without any issues, and I also had no trouble connecting to my external monitor on my desk. Just like on Windows, Chrome OS displays notifications every time you connect a new peripheral, and you really shouldn’t be lost coming from a Windows PC.
Compared to Windows 10, I found that Chrome OS provides a distraction-free experience. You won’t see “ads” about Microsoft products or annoying feedback notifications here and there, and you also won’t find Candy Crush, Paint 3D or other apps you don’t need being preinstalled. OS updates follow Chrome updates and happen every six weeks or so, which is better than the two or three patches that Microsoft can release for a single version of Windows 10 every month.
Using Chrome also feels great on Chrome OS. I’ve noticed that some websites will ask you if you want to pin them on your task bar, something you can also do with Chrome or the Chromium-based Edge on Windows. The result is a web app that open in a separate window without the browser UI, looking just like a regular desktop app. Here’s an example with the Spotify web app below.
Using Android apps or Linux is entirely optional, but I have found that some Android apps can be really useful. Gmail is a pretty good email client that can sync with Outlook.com and Office 365 accounts, and the two columns layout works pretty good on a laptop screen. As said above, installing the OneDrive Android app will make your OneDrive folder appear in the native Files app, just as it works in the Windows 10 File Explorer.
Google Play Music is also a great media player on Chrome OS, especially if you’ve uploaded your own music collection into the service for free. The app also integrates with the notification center where you can control music playback without opening the app. There’s actually a separate Settings apps for Android apps on Chrome OS, which looks the same as the Settings app for Android. There, you can control app permissions, notifications, and more, and again Android users should be very familiar with it.
Android apps are definitely nice to have on Chrome OS, especially since the Google Play Store has much more apps than the Windows 10 Microsoft. However, not all Android apps are compatible with Chrome OS, and some big names such as OneNote or Microsoft Edge are still missing as of this writing.
The bad
It took years for Google to bring Android apps to Chrome OS, and only recent Chromebook models actually support the Google Play Store. Android apps work generally well on the Chromebook I’m using, but I’ve encountered some crashes from times to times. It’s also worth mentioning that many apps are also not optimized for Chromebooks, and I’ve also noticed some performance issues when dragging Android apps windows over my screen.
Android apps also have some annoying limitations on Chrome OS: One of the first ones I’ve noticed is that sound coming from Android apps will automatically stop once you open a web page with background audio, or any another Android app using sound. That’s likely an Android limitation, but it’s really weird on a non-mobile platform like Chrome OS.
Most Android apps also don’t work well while offline, but you can actually use some web apps in offline mode on Chrome OS. Gmail, Google Drive, and Google Docs can all work offline on Chrome OS, though I’ve had a lot of trouble enabling this on my Chromebook. Offline mode is currently opt-in and requires the installation of a dedicated extension for Google Docs, and I wished this is something Google had made much easier to set up.
You can use Google Docs while offline.
Anyway, when it works, being able to access Gmail or write documents in Google Docs without an Internet connection is quite amazing. It really demonstrates the power of the web, and I wish Microsoft did something similar with its OneDrive and Office web apps.
The ugly
I’ve mentioned the Chrome OS Files app earlier, which is pretty good, but files management on Chrome OS can be quite confusing coming from Windows and macOS. First of all, there’s no trash bin on Chrome OS, and files you delete will be gone forever. That’s a really weird limitation, and that’s also why Google invites users to put all their important files in Google Drive (which has an online trash bin). Moreover, Google indicates that any file in the Downloads could get deleted if your Chromebook runs out of space, so the risk of losing important files shouldn’t be underestimated on a Chromebook.
On Chrome OS, it’s also impossible to put or save any files right on your desktop. If you like to have a mix of folders, files, and app shortcuts on your desktop, Chrome OS is probably not for you. Chromebooks are also not for you if you’re a diehard fan of the dark themes on Windows 10 and macOS, as the option is currently missing on Chrome OS.
Last but not least, Chromebooks users should know that Google won’t support their devices with software updates indefinitely. According to this support page, “Google provides each new hardware platform with 6.5 years of Auto Update support.” That seems to be roughly in line with what Apple currently provides for its new iPhone and iPads, but people running the latest Windows 10 update on PCs from the past decade should still find that very curious, especially since Chrome OS is a very light OS compared to Windows 10.
There’s probably many more things to say about Chrome OS, but in the end I would still recommend Chromebooks to people who don’t really need a Windows PC, and who rather not learn how to use a mobile-centric OS like the one on the iPad. Chromebooks definitely offer a lot of value at a low price point, they’re easier to use and support compared to a Windows 10 PC, and they have all the apps you need thanks to Chrome, the Google Play Store, and Linux apps if you’re into that. It took years for Google to get Chromebooks to be taken seriously, and it’s not clear if Microsoft will be able to achieve the same level of success with its new Windows Lite platform.
The strength of Windows remains the huge ecosystem of apps that developers have built over the years, and Windows Lite will likely be DOA if doesn’t support all these legacy apps. Additionally, Windows 8, Windows RT, and Windows 10 to a lesser extent have all shown that Windows users generally hate change, and even the rumored deprecation of Live Tiles on Windows 10 and Windows Lite already seems to be troubling news for people who liked them.
Overall, this is a complicated equation to solve for Microsoft as the company need to better compete with Chromebooks and bring Windows to more diverse form factors, but at the same time the company can’t really give up on what makes Windows the most popular desktop OS of all time. We hope Microsoft will finally light our lanterns when it’s ready to unveil Windows Lite, but just like Windows Phone, it may already be too late to compete with Google.
If you’ve ever wondered how to set up and use the PS4 Remote Play service to control and play your PS4 games from your computer, you came to the right place.
Having access to your PS4 platform while using a Windows 10PC is an extremely useful feature to have. You can use the PS4 platform even when it is not physically close to your PC. This means that if you own a laptop, you will never be too far away from your favorite games and social hubs.
In today’s article, we will have a look at what Remote Play is, how you can set it up efficiently, and how you can use it on Windows 10 as well. Read on to find out more.
How can I play my PS4 on my computer?
Key features of the PS4 Remote Play
As you already know, the PS4 Remote Play service is a software application offered by PlayStation to allow you to control your PS4 from your PC.
This software enables you to play your favorite games even when the PS4 console is not close by, which makes a lot of people’s dreams come true.
Here are some of the best features offered by the Remote Play service for PS4:
Great streaming capability using 5GHz connection.
Allows you to play your favorite games on ean xternal device, thus freeing up the TV for other activities.
Full connection to PlayStation Network.
Full HD streaming capabilities (if the speed of your Internet connection allows it).
Here is how to download and set up the PS4 Remote Play application
Click here to download the Windows PC PS4 Remote Play application. (download starts automatically).
Navigate to the download location and run the setup file to start the installation process.
Follow the on-screen instructions to complete the setup.
Settings you need to apply to your PS4 system for a smooth Remote Play experience
To enable Remote Play -> select Settings -> Remote Play Connection settings -> check the box next to Enable Remote Play.
Inside the Settings window -> select Account Management -> Activate as your primary PS4.
To make sure that you can start Remote Play when the PS4 is in rest mode -> choose Power Saving Settings -> in Features available in Rest Mode -> check the boxes next to Stay Connected to the Internet -> enable the Turning On of PS4 from Network option.
In this article, we discussed about what the PS4 Remote Play service is, how to set it up, and also how to use it on Windows 10.
Please feel free to let us know if this guide helped you in any way by using the comment section found below.
Geoff Keighley has confirmed in a tweet (via WC) that at least some Xbox Game Studio titles will be revealed during the Gamescom 2019 Opening Night Live presentation which is set to begin at 8PM CEST on Monday, August 19th.
Epic Games, Ubisoft, Square Enix, and others will also be making announcements during Opening Night Live. 16 game companies are mentioned in the tweet below but several more unannounced studios will also be showcasing their games as well.
More than 15 game publishers will premiere new content and make announcements during @gamescom Opening Night Live. An exciting show is coming together for Monday, August 19! Hope you get to tune in and watch the stream! pic.twitter.com/THAv4bvZlm
Gamescom is a major video game event, not too dissimilar from E3. Gamers get to attend and try out new titles or video game content while gaming companies often make major announcements for their properties. Like E3, most major presentations are streamed online via services such as Twitch and Microsoft’s Mixer.
The new console and controller aren’t the only Gears 5 merchandise on the way, though. Also announced today were a new Gears 5 headset, keyboard, and mouse made by Razer, all due for release in September.
The headset, whose full title is the Razer Thresher for Xbox One: Gears 5 Edition wireless headset, features Windows Sonic for virtual surround sound, lag-free audio, and a digital microphone. It also comes with an in-game Lancer weapon skin.
The keyboard and mouse are officially named the Razer Turret for Xbox One: Gears 5 Edition and Razer Thresher for Xbox One: Gears 5 Edition. The mouse mat is built-in to the keyboard while the mouse itself sports the Razer 5G Advanced Optical Sensor with 2.4 GHz Wireless Connection with Adaptive Frequency Technology for stable wireless communication with an Xbox One console. The keyboard and mouse will sell together for $299.99.
Also announced today was the Seagate Game Drive for Xbox Gears 5 Special Edition, a 2TB hard drive with USB 3.0 Plug & Play functionality. Each Game Drive will unlock an in-game Lancer weapon skin, supply drops for use in Gears 5, and a one-month Xbox Game Pass Ultimate membership to play Gears 5 in early access four days early.
Gears 5 is the latest video game in the popular Gears franchise. It’s due for release on Xbox One and Windows 10 on September 10th.
Are you hyped for Gears 5? Are you going to pick up any of this cool new gaming gear? Let us know why or why not in the comments below and then follow us on Pinterest for more geek content.
With the recent updates to Microsoft Teams, including the new features on Android, the tech giant is trying to expand its platform and to make it available and more user friendly for more customers.
It seems like their efforts don’t stop here, as Linux could get a Microsoft Teams app in the future.
Microsoft Teams could land on Linux in the future
It’s not the first time when this is speculated, but now a Twitter user called unixterminal has shared an update to a Microsoft Teams UserVoice page:
A Linux apt repo has also been created, but for now it’s empty.
Microsoft Teams is now available on Windows, Mac, iOS, and Android. The “Stay tuned for more information soon” message from a Microsoft Teams engineer suggest that we will see it in Linux, as well.
We’ll just have to wait and see if Microsoft is seriously considering a Teams app for Linux.
It’s worth mentioning that Slack, Team’s main competitor, already has a Linux app and this might be just enough to determine Microsoft to create its own app for Linux.
Microsoft Power BI is a business application that enables users to set up graphs, reports, and other visualizations for their data. BI users can then share and annotate their data with the software.
It might sound similar to spreadsheet applications, but it’s not entirely the same as users don’t need to set up spreadsheets. Windows Power BI is freely available for download, but users will need to subscribe to Power BI Pro at $9.99 a month to fully utilize the service.
Is Power BI available for Mac?
There isn’t a Power BI Mac version that users can utilize on Apple desktops and laptops. So, users cannot download BI for Mac platforms. Users have requested on the Power BI forum that Microsoft release a BI application install for Mac. A Power BI program manager responded as follows:
We are not considering bringing Power BI Desktop to Mac anytime soon; however, we do plan to bring more and more authoring capabilities from Power BI Desktop into the web experience. In the meantime, consider running Power BI Desktop in an application like Parallels or Turbo.net.
Thus, some users utilize Parallels virtualization software to run Power BI on Mac. Alternatively, users can install Windows platforms on MacBooks and iMacs released more recently than 2012 with the Boot Camp Assistant. To do that, users will need to download a 64-bit Windows 10 ISO to Apple Mac.
Then users can set up a Windows 10 boot disk on a 16 GB USB storage drive with Boot Camp. For further details on how to install Windows 10 on Mac, check out the article below.
However, Power BI is available for Apple’s mobile devices. Apple iPhone and iPad users can utilize the Power BI app on their mobiles and tablets. Users can download that app from its App Store page.
Power BI can be an invaluable utility for displaying and sharing data. So, it’s a little surprising that Microsoft is seemingly not considering releasing BI for Apple Macs. Nevertheless, Apple users who really need BI can still add Windows to their MacBooks or utilize the software.
A wide number of users have reported encountering the error Something went wrong when trying to set up the fingerprint login method for a Windows 10 PC.
This error is specific for HP computers, and it seems to have been caused by a conflict between the software and the updates applied to the fingerprint scanner.
This issue can become annoying in time, as the main purpose (besides security), of using a fingerprint is to log in into Windows as fast as possible. Seeing this error will mean that you will have to sign in in another way. You can do so either by using a PIN or a password.
Because this issue can cause a large amount of stress after a repeated occurrence, in today’s article we will explore the best way to troubleshoot this issue. Read on to find out more details about this.
How to fix Something went wrong fingerprint error?
1. Check for any Windows Updates
Click on the Cortana search button inside your taskbar -> type Updates.
Select the first option from the top from the results.
Inside the Windows Update window -> click the Check for updates button.
Wait for the process to be completed, and install any available updates.
Follow the on-screen instructions and restart your PC to apply the updates if needed.
Check to see if the issue persists.
2. Download the latest HP drivers for the fingerprint scanner
Open the downloaded file and follow the on-screen instructions to complete the setup of the drivers.
Restart your PC after you’re done, and check to see if the issue persists.
If this method didn’t solve your issue, you can follow the next method.
Another simple method to download the latest HP drivers completely safe and in just a few seconds is to use a driver updater tool, such as Fortect Driver Updater. This type of software prevents you from downloading the wrong driver, keeps you safe from severe PC problems, and saves you time if you haven’t done so before.
3. Use Device Manager
Press Win+X keys on your keyboard -> select Device Manager from the list.
Under the Biometrics devices -> right-click the driver -> select Properties.
Under the Power Management tab -> untick Allow the computer to turn off this device to save power.
Re-try to set the fingerprint authentication method again. This method should solve your problem.
In today’s fix article we explored the best methods to deal with the issues caused by the error Something went wrong while trying to set up your log-in method.
Even though this issue has only been reported on HP laptops, an official fix or update from the company has yet to be released. We hope that our fix will help you manage your log-in process until an official fix is released by the developers at HP.
Please feel free to let us know if this guide helped you solve your issue by using the comment section below.
Microsoft recently released some new driver updates for their Surface line-up to improve Bluetooth and Wi-Fi connectivity.
Microsoft’s driver updates for Surface devices are faulty
The update rolled out on the Surface Pro, Surface Book, and the first-generation Surface Laptop. But it seems like the drivers that came with the latest firmware update have some big problems.
A lot of Windows 10 users are reporting that Marvell Semiconductor, Inc. – Net – 15.68.17013.110 driver, intended to improve Wi-Fi connectivity, is affecting their Surface devices.
Marvell Semiconductor, Inc. – Net – 15.68.17013.110 WiFi driver breaks 5GHz connection I’ve been wondering why my surface book was the only device I had that couldn’t get wifi Had the same issue. It also made my bluetooth mouse very jittery
Surface users who updated can’t connect to 5Ghz Wi-Fi bands
According to user reports, after installing the Marvell driver, they were unable to connect to 5Ghz Wi-Fi bands. This is a particularly odd problem, as the 2.4Ghz band works just fine for them.
Surface owners confirm that when they try to connect to a 5Ghz band, they get the “Unable to connect to this network” error message.
It’s worth noting that the update changelog didn’t confirm any known issues, so Microsoft isn’t aware of the problem.
If you’re in the same boat, the only solution for now is to rollback to the previous network adapter driver version using Device Manager.
Requests for a solution have been sent to Microsoft through the Feedback Hub, but there isn’t an ETA for an official resolution.
Power BI is an incredibly useful tool when it comes to making calculations. However, quite a few users are encountering issues with adding a calculated column in Power BI.
One user described the problem on the official forum:
I’m quite new with Power Bi and i am using a matrix to group my data like this (image below). Now I want to add a new column which allow me to make a new calculation = ([q’ty per unit of 3rd month] – [q’ty per unit of 2nd month]) * [Price per Unit of 3rd month]
Is there any simple way help me to do so since I’m not an expect with DAX. Thanks for your help.
So, the OP wants to add a new column that will allow a new calculation. Today we will show you how to do that in a few easy steps.
Steps to add a calculated column in Power BI
1. Create a measure using DAX
DAX stands for Data Analysis Expression and it is the formula language in Power BI. Here you can add functions and formulas for your columns like in the image below.
In the upper case (second arrow), add the following:
Result =
VAR qty_per_unit_of_3rd_month =
CALCULATE ( MAX ( Table[q’ty per unit] ), FILTER ( Table, Table[Month] = 3 ) )
VAR qty_per_unit_of_2rd_month =
CALCULATE ( MAX ( Table[q’ty per unit] ), FILTER ( Table, Table[Month] = 2 ) )
VAR Price_per_Unit_of_3rd_month =
CALCULATE ( MAX ( Table[Price per Unit] ), FILTER ( Table, Table[Month] = 3 ) )
RETURN
qty_per_unit_of_3rd_month – qty_per_unit_of_2rd_month * Price_per_Unit_of_3rd_month
Adapt the values to make the formulas work for your case.
Result =
VAR qty_per_unit_of_first_month_in_slicer =
CALCULATE ( MIN ( Table[q’ty per unit] ), ALLSELECTED ( Table ) )
VAR qty_per_unit_of_last_month_in_slicer =
CALCULATE ( MAX ( Table[q’ty per unit] ), ALLSELECTED ( Table ) )
VAR Price_per_Unit_of_last_month =
CALCULATE (
MAX ( Table[Price per Unit] ),
FILTER ( Table, Table[Month] = qty_per_unit_of_last_month_in_slicer )
)
RETURN
qty_per_unit_of_last_month_in_slicer – qty_per_unit_of_first_month_in_slicer * Price_per_Unit_of_last_month
The second measure applies directly to the slicer, so you can compare different months, such as the first and the last.
Conclusion
With calculated columns, you can organize and visualize your data in various ways. But first, you need to know a few basic principles and measures for these columns. They are pretty easy to work with once you get to understand them.
How do you add calculated columns in Power BI? Do let us know in the comments section below!
3. Change the location of Program Files folder to default
Hold the Shift key on your keyboard and click the Restart button.
Go to Troubleshoot and select Advanced options. Next, select Startup settings and click on Restart button.
When your computer restarts, a list of options will appear. Select any version of Safe Mode by pressing the appropriate key.
Open theRegistry Editor. Press Windows key + R and enter regedit.
Go to the HKEY_LOCAL_MACHINE\SOFTWARE\Microsoft\Windows\CurrentVersion
Click on ProgramFilesDir and change its Value data to C:\Program Files If you have the ProgramFilesDir (x86) entry available, change its Value data to C:\Program Files (x86)
Close Registry Editor and restart your PC.
If The environment is incorrect error is still preventing you from opening .exe files, you may also want to check our dedicated article on how to fix executable files not opening.
We hope the solutions listed above helped you fix The environment is incorrect error code. If you’ve encountered other workarounds to fix this problem, you can help the Windows community by listing the troubleshooting steps in the comments below.
Microsoft Rewards has always been interactive and fun, but it would now appear as though the program recently picked up a new limited-time “refer a friend” feature. It is not clear when this was first added, but we first noticed it today, August 8th, as an activity on the main Microsoft Rewards dashboard.
According to Microsoft, users can earn up to 1,250 Microsoft Rewards points for referring a friend to the program. Users can get 250 points for the first five friends that join and complete a punch card in four steps. The steps include taking the Microsoft Rewards Tour, completing 40 Bing searches, finishing a daily set, and reaching Level 2 status.
Currently, this feature is a limited time offer and is set to expire on August 31, 2019. It also appears to be valid for Microsoft Rewards users in the United States, and our writer in Europe is not seeing it on his dashboard. You can learn more about the refer a friend feature by checking Microsoft’s link here.
Adding an image to dashboards in Power BI is one of the most basic features of this app. So, it should be easy to use that. But this is not always the case for quite a few people.
One user reported the following on the official forum:
Hi there, been trying to insert a local image onto my PowerBI Desktop report but could not get the “image” function on PowerBI desktop to work. Seeking help over here. tks in advance for reading my post!
The OP encountered problems while trying to insert an image in a report and received this message:
Also, the user added that the image he tried to add is 380 kb and in .jpg format. The picture was meant as a tile and not as a background, like in the image below.
Fortunately, there is a solution available for this issue and today we will show you how to add an image if you encounter this problem.
Steps to add an image in Power BI
Resize the image in Paint or in any other photo editing tool. In this case, the image was resized from 380 kB to 449 kB.
Add it to Power BI Desktop.
So, you can try to get your image to a proper size to fit in the dashboard. This should solve your problem.
Learn more about Power BI by reading this guide.
Is adding images in Power BI a walk in the park? Not really
Even for the not so advanced users, it is a known fact that you can only add images in Power BI if they are categorized as URLs. The URL must come from a file system or another website page.
So, the times when you just needed to upload an image from your computer are gone, at least for Power BI.
This can have some major drawbacks. For example, you can’t add an image when you’re offline. Also, if the file is moved, renamed or deleted, the image will not show in your dashboard.
Conclusion
If all the conditions are met, it should be easy to add an image to Power BI. Resize the images to proper dimensions and use them from reliable sources.
Did you find our solution helpful? How do you add images in Power BI? Do let us know in the comments section below.
Many users have reported Player unknown battlegrounds matchmaking failed issue on the official PUBG and Reddit, and this error is usually due to connection issues, or missing or corrupted game files. However, you should first check the PUBG latency to see if you have a strong connection to the server.
How to fix the Matchmaking failed error on PUBG
1. Refresh or Restart PUBG
In case you are consistently getting the matchmaking failed error, try to refresh the lobby. If failed, try again multiple times until you are connected.
If that fails, try to restart the game. In case you are stuck at your last queue and the game was already started, you should be able to connect after restarting the game.
2. Verify the Game Files in Steam
If the error is appearing on your Steam Client, try to verify the integrity of game files to fix the error.
Launch Steam client on your PC.
Click on the Library tab and select Games.
Now right-click on PUBG and select Properties
Click on Locate Files tab.
Click the “Verify Integrity of Game Files” button.
Steam will scan and try to fix any issues with the game files.
Exit Steam and relaunch it. Check if you are able to connect and join other players.
If the issue persists, try to change the region in the game to North America. Users have reported that changing the region helped resolve the matchmaking issue.
Launch PlayerUnknown’s Battleground and choose a game mode. Open Menu and select Region.
Click the drop-down menu and select it to NA (North America).
Save the changes and check if matchmaking goes through.
Although it is a temporary workaround, it should help you keep busy until the issues are resolved if from the developers end.
If the issue persists, try to disconnect and reconnect to your WiFi network. If that does not work, connect to your phone’s WiFi hotspot and try again.
4. Reinstall the Game
If nothing seems working, as a last resort, try uninstalling and reinstalling the game.
If you are on Steam, click the Library tab and select Games.
Now right-click on the game and select Uninstall.
Relaunch Steam and reinstall PUBG.
After the installation is over, check for any improvements.
A full reinstallation of the game should fix the PUBG Matchmaking failed error, but hopefully, you have managed to fix the problem from the first solution.
Microsoft employees have been raving on Twitter for some time about the company’s Office of Legal Compliance video series, Standards of Business Conduct. Most large companies have such videos, used to highlight the various do’s and don’ts of company policy, but apparently Microsoft has taken the usually dry and boring training videos to a whole new level.
Here’s the preview for the “Season 3 Series Finale” of the training videos, found by our favorite Microsoft super sleuth, WalkingCat:
Microsoft employee Scott Hanselman compared the video series to a “telenovella”:
THIS. IS. EVERYTHING!!! Honestly, our Standards of Business Conduct Video (which is "supposed to be" boring, mandatory, legal compliance video for all @Microsoft employees), is FIRE!!! ???????????? Great job, Microsoft ???? https://t.co/yVKvvdM5xk
Gears 5 is Microsoft’s next big exclusive game launching on Xbox One and Windows 10 on September 10, and a Xbox One X Gears 5 limited edition console has just been spotted on Amazon Italy (via Reddit). The console is quite a looker, featuring a concrete wall graphic design hiding the series’ iconic “Crimson Omen” logo, and there’s also the Locust emblem at the bottom.
Th €500 bundle also includes the Gears 5 limited edition controller that leaked a couple of days ago, as well as Gears 5 Ultimate Edition, the first four Gears of War games (excluding the spinoff Gears of War: Judgment), one month of Xbox Live Gold and one month of Xbox Game Pass. Judging from the pictures, the console will also come with a vertical stand, something that Microsoft previously offered with the Xbox One X Project Scorpio Edition.
Microsoft has yet to officially announced this Xbox One X Gears 5 Limited Edition bundle and its matching controller, but it definitely looks to be excellent fan service for Gears of Wars fans. Microsoft previously released a custom-designed Xbox One S Gears of War 4 Limited Edition three years ago, and what the company has done with that Xbox One X console is just as good or better depending if you prefer this more subtle grey color.
Update 9AM PDT: It’s official, the Xbox One X Gears 5 Limited Edition console is available for preorder today at participating retailers worldwide, including the Microsoft Store where you can get it for $499. Microsoft didn’t announce a release date today, but the company had this to say about the console’s unique design: “The Xbox One X Gears 5 Limited Edition console features a never-before-seen dark translucent casing and laser-etched cracks across the console’s icy top surface, with snow drifting across a golden Locust symbol on the back.” The Xbox Wireless Controller – Gears 5 Kait Diaz Limited Edition ($74.99) is also available for pre-order today and will start shipping on August 20.
Introducing the Xbox One X Gears 5 Limited Edition bundle, including the Gears 5 Kait Diaz Limited Edition Xbox Wireless Controller.
If Halo Infinite is expected to be a launch title for the next gen “Project Scarlett” Xbox console next year, the latest installment in the popular Halo franchise will also be released on the Xbox One family of consoles. The OG Xbox One and Xbox One S are definitely starting to show their age at the end of this console generation, but developer 343 Industries is committed to make Halo: Infinite run great on all Xbox One consoles.
Frank O’Connor, Halo franchise development director at 343 Industries recently said so in an interview with YouTuber Blackmist523 (via IGN). “Obviously the special citizen [for Halo Infinite] will be Scarlett, and we’ve worked with that hardware team to make sure the game shows up amazingly on it… but it will [also] be for Xbox One and it will look incredible,” O’Connor said.
“The Xbox One is not going to be a second-class citizen,” he added. “We’re building it so it plays and looks fantastic on Xbox One, and then everything else is plus-plus-plus, but we’ve got a few tricks up our sleeves that we’re thinking about.” As you may know, Halo 5: Guardians used a dynamic resolution to achieve 60 FPS on Xbox One, and Halo: Infinite will likely use a similar technique to provide a smooth gameplay experience on Xbox One.
Halo: Infinite probably won’t be the last big blockbuster game to launch on Xbox One next year, but it should be one the few titles that pushes the Xbox One hardware to its limits, especially since 343 Industries and other game developers are now very familiar with the hardware. Anyway, the family of Xbox One consoles should continue to be supported in the years to come, especially since all Xbox One games and accessories will be compatible with Project Scarlett.
Microsoft has announced that it is now providing data residency for customers in South Korea. The tech giant noted on its blog post that all Teams members that have signed up after July 9 will be served though their local data center.
Microsoft will store files uploaded to a channel from within Teams via SharePoint Online, however files uploaded via direct message will be stored in their OneDrive for Business account linked to their local data center. For older users, the company will continue to store files in the one of the Asia Pacific data centers either in Singapore or in Hong Kong.
Microsoft opened the new South Korean data centers in Seoul and Busan back in February, giving Azure users in the region the option for storing their sensitive data right within their home county. However, Teams can now store data in SharePoint Online, Exchange Online, or in the local OneDrive for Business all in those two local data centers.
Microsoft now stores data from most of its Office 365 applications in the local South Korean datacenters for users in the country.
The company says that it plans to offer a data migration tool in the future for those who wish to move their data over to the new data centers. However, it was not able to provide a date as to when that might happen.
In this article, I will show you how to reset temporary Internet files location to default. This fix is useful if you have been getting some errors or warnings on Internet Explorer perhaps from programs or games that need to use the default saving location.
Errors may also come when trying to edit some settings via the Windows 10 Registry.
Why Internet Explorer (IE) Saves Files in a Temporary Location
IE saves certain data inside the aforementioned temporary files folder to enhance our browsing experience.
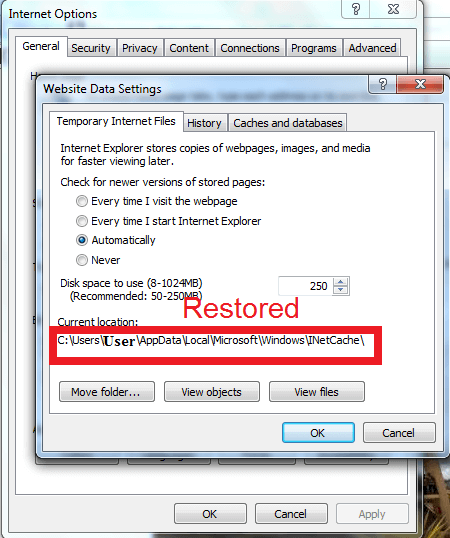
Ordinarily, the address of this location is C:\Users\user name\AppData\Local\Microsoft\Windows\INetCache
Here you will find cached internet pages, downloaded images, and multimedia as saved by IE. Primarily, whatever cached therein enables web pages to load at lightning-fast speeds.
Anyway, the thing with InternetExplorer’s temporary files location is that if by any chance you had changed it to a new folder/location, even uninstalling explorer won’t work. Here is what works.
How can I reset Temporary Internet files location to default?
Modify your registry
You will have to edit some two registry keys and reboot your PC. Remember we want to move back to:
Again, go to the Cache key and check it if it was automatically moved to the right location.
You will repeat the previous steps if it wasn’t so double click the cache, type the default location (%USERPROFILE%\AppData\Local\Microsoft\Windows\INetCache) then confirm by pressing OK.
Now restart your PC and login. You will then open your Internet Explorer browser window to confirm that you have reset temporary internet files location to default.
This is what you should see if all went well in your quest to reset temporary internet files location to default.
There you go, we hope that this guide helped you reset temporary Internet files location to its default directory. If you found this guide helpful, feel free to let us know by using the comment section below.
Do you own an emerging enterprise? Are you looking for a reliable and affordable means of reviewing your business prospects? Then, you’re in the right place.
Business diagnostic software is a tool, specially designed for business owners, advisers, consultants, freelancers, and so on.
The tool uses a set of algorithms to identify and analyze the growth, trends/changes, patterns, and performance of a business, with the aim of identifying the strong and weak points of such a business.
However, like most utility tools, standard small business diagnostic software is hard to come by, as there are numerous substandard diagnostic tools out there. Hence, to avoid falling victim to such tools, we have curated this piece for you.
What are diagnostic tools in business?
Shortly, diagnostic tools for businesses can entail software or automatic instruments that analyze the performance of the entire organization.
Essentially, a standard business diagnostic software seeks to drive up the productivity level of your company. And it’s especially important for small business owners, who are looking to improve their sales or brand image.
Herein, we’ll be outlining the best small business diagnostic software in the market. So read on!
What’s the best small business diagnostic software?
The BIR – Business Improvement Review software from RapidBI is one of the leading diagnostic tools for small, medium, and large businesses across the globe.
It is designed to run full checks on your business structure, with a view to identifying the key productive areas and the less productive ones.
The tool is applicable to virtually all businesses; hence, it can be employed by most professionals, including Human Resource managers, Accountants, Plant Managers, and Entrepreneurs among others.
The software uses a set of analytical tools to analyze all the key indices of a business, and then present the result in an easy-to-understand graphical illustration, showing the business’ KPI (Key Performance Indicators), staff performance, management style, customer satisfaction, employees confidence and so on.
BIR’s functions revolve around three basic concepts: Knowledge – Understanding – Action. This means that BIR gathers relevant information about your business, and then ensures you have an adequate understanding of every piece of information gathered, before executing your work functions.
BIR is offered in four variants: Coaching Review (BIR-C), Strategic Review (BIR-S), BIR-Solo, and BIR-HR. Its pricing, though affordable, is available only by quote (custom pricing).
Tooliers is an all-inclusive small business diagnostic software, which is equipped to perform various forms and degrees of functions, with the primary aim of driving up productivity, towards attaining sustainable business growth.
The tool uses a three-pronged technique, which entails diagnosis, action plans, and growth programs.
The tri-faceted tactical formation seeks to drive up the productivity scale of a small business, by first analyzing the key areas of the business (diagnosis), then drawing up executable plans (action plans) based on the analyzed result, before implementing the plans to generate visible growth patterns (growth programs).
Some of the key diagnostic features of Tooliers include Strategy Evaluation, True Nature, Leader Identity, Staff Motivation Level, Client Perception, Time Use, Borrowing Perspective, Equity Financing, and many more.
All these features are summarized under 5 basic categories. These include management, financial, leadership, business growth, and sustainability categories.
Tooliers, like most standard small business diagnostic software, is fairly affordable. However, its pricing is feature-specific i.e. each feature has its own specific pricing rate and is purchased separately.
CEO Business Diagnostics is another top-rated small business diagnostic software, designed to run comprehensive checks and analyses on SMEs, to generate credible reports on business health, performance, and flaws.
This software is a suite of tools, as it offers a host of unique tools, designed to work in unison to provide you with accurate diagnosis (evaluation) of your business. These tools make up the core features of the software.
Some of these features include BD Online Assessment, Value Chain Assessment, Ansoff Matrix, SWOT Summary, TOWS Strategy Analysis, CAPE Model, Online & Email Support, Generic Business Strategy, and Competitor Assessment among others.
Of the above-mentioned tools, BD Online Assessment stands out. It is a diagnostic function that analyzes all the KPIs of your business, including your company’s financial integrity, operational efficiency, customer satisfaction, client-pull effect, technological innovation and more. All these indicators are aptly analyzed and presented in comprehensive reports.
CEO Business Diagnostics’ pricing information is not made public; it is offered strictly by quote. To get the software, you’ll have to place an order in advance.
Diagnostic Tool from Better Business Express is one of the top diagnostic engines for analyzing the performance and growth of emerging businesses. Hence, it makes our list of the best small business diagnostic software.
This diagnostic tool basically checks five critical areas of a business. These areas include people (employees), strategy, finance, processes, and partnerships. Each of these areas is further broken down into four sub-sections, to facilitate analysis.
After the analysis, comprehensive reports are presented, indicating the weak links that need strengthening, as well as the strong (productive) areas that need utmost attention.
Diagnostic Tool from BBE is fairly easy to use, as it hosts an intuitive interface. There is also a video guide (YouTube video) on their website, designed to help you navigate the interface with ease.
To use the software, all you need to do is input all the relevant information (about your business) and the tool will generate feedback based on the information provided.
Business Diagnostic Plus is one of the products of RAN ONE Management Consulting, a leading online consultancy firm. It is a versatile diagnostic software, designed to run comprehensive checks on all levels of businesses, and proffer solutions to identified problems.
The software, upon analysis, provides credible recommendations on how you can improve your business, towards achieving sustainable growth.
Diagnostic Plus is built for flexibility, and it can be applied to various forms of businesses. It analyzes the strategic and operational pattern of your business and presents you with qualitative & quantitative reports on the performance of every key aspect.
Typically, Business Diagnostic Plus analyzes business areas like production techniques, employee performance, financial structure, sales, and marketing among others. Also, it employs a set of unique techniques to analyze external factors that can influence/affect business performance.
Notable features of Diagnostic Plus include SWOT Analysis, Diagnostic questionnaire, Email distribution, PIVOT Table analysis, Flexible diagnostic sessions, Online guide (via Wizard library), Internal and external review, Viability analysis, and many more.
Small and medium-scale businesses spend most of their money on what and how to produce, with little or no effort dedicated to how they can grow their respective businesses.
And for any business to grow, the owner needs to know the status of all the KPIs of his/her business. By understanding this, you can proceed to draw out plans for growing your business.
In the end, small business diagnostic software is specially designed for this purpose; to offer business diagnostic services to emerging businesses at an affordable cost.
While Microsoft may not be getting into wholesale online retail to likes of Amazon, the company has just made a strategic purchase that could help integrate some of its software toolsets into the sector.
According to Microsoft’s Advertising blog, the company just announced its acquisition of PromoteIQ, the company happens to be among on the leading firms of marketing technology to online retailers and brands. Today’s announcement puts PromoteIQ in Microsoft’s back pocket of integrated solutions to help its clients not only execute technically but find new monetization avenues via modern digital marketing strategies.
Enable your trusted brand partners to promote products, drive awareness, and increase sales on-site.
Digital vendor marketing is a critical source of high-margin revenue for global e-commerce retailers. The PromoteIQ platform makes it easy for brands to promote products in a native and unobtrusive way – facilitated by the retailers with full control over the end-user experience.
Microsoft has been in the process of overhauling its advertising platform by first establishing a new brand direction that shifts the focus away from Bing and leverages the higher valued association of Microsoft’s brand while also expanding its feature set by incorporating a new LinkedIn targeting dashboard.
PromoteIQ boasts about its ability to be the connective tissued between brands and vendors while at the same time cutting out the middlemen platforms such as AdWords and Microsoft Advertising, but it’ll be interesting to see if the company software-as-a-service (Saas) becomes yet another integrated marketing tool for Microsoft.
ZDNet is reporting, that for now, Microsoft doesn’t seem inclined to make any major waves in the day to day operations of PromoteIQ, opting instead to allow the company to retain its own brand as well as its headquarter offices in New York City for the time being.
Obviously, the two companies will work in the near future on integrating technologies and services, be it bringing PromoteIQ to the Microsoft Advertising platform or getting the company to hawk Microsoft wares alongside its custom digital marketing services.
Whatever the outcome, we can presume PromoteIQ’s client portfolio of large North American retailers such as Kohl’s, Kroger and Overstock.com will at some point be inundated with Microsoft technologies soon.
Creating slicers in Power BI is one of the most used functions of this tool, but sometimes, people are encountering an issue with this feature, as one user described:
I wanted to make the slicers look as a button that can be pressed. I tried following previous advice on here but I couldn’t find a Settings>General>Orientation option.
So, the OP didn’t find the Orientation option, which definitely makes work harder. Fortunately, there are quite a few solutions available.
Move the column that you have the names to filter.
Edit the properties of the slicer in General and change Orientation from vertical to horizontal.
Go to Items and change the font and background of the bottoms.
Modify the size of the slicer visual.
Conclusion
So, there are many ways to create slicers in Power BI, and each method is designed for the needs of each user. Also, these are easy steps that any beginner can understand.
Did you find these methods useful? How do you create slicers in Power BI? Let us know in the comments section below!
Depending on the print job, the printer can print multiple or single copies of the document. However, some users have reported that their printer prints only one copy despite the print job including multiple copies.
This is a common issue, and the users have explained the problem in various tech forums, including Microsoft Community Forums.
Every thing has been working smoothly but today I tried to print a multi-page document and the printer only prints the last page of the document. I’ve rebooted and turned off the printer and turned it back on but same result. Thanks for anyone’s help
Follow the steps given in this article to fix printer printing one page at a time problem.
Why does my printer only print one copy?
1. Check Document Compatibility
If you are trying to print documents from the MS Word app, check the compatibility of the document.
If the document was saved in MS Word 2003 format and if you are trying to print it from the MS Word 2016 version, you may face the difficulty mentioned in this article.
To fix this, open the document in your current MS Word app and then save it using the current app.
Now try to print the same document and check if the printer accepts and prints multiple copies.
2. Print as PDF File
One workaround that seems to be working for all the affected users is printing the document after converting it to a PDF file.
You can easily save the picture or text document in PDF format from the paint or MS Word app.
After converting the file to PDF format, open the document in a PDF viewer and proceed with printing.
Now your printer should print multiple pages without any issues.
Luckily, there is a way to fix this issue, and in today’s guide, we’re going to show you how to do it.
Why is my Microsoft Exchange server unavailable?
Outlook isn’t configured correctly in the registry, causing the issue.
Data encryption for Outlook and Exchange isn’t enabled.
Your Outlook profile might be corrupted, and that’s causing the problem.
Exchange services aren’t running on your PC.
How do I fix Outlook the connection to Microsoft Exchange is unavailable?
1. Edit your registry
On the working computer press Windows Key + R and enter regedit. Click OK.
When Registry Editor opens, go to the HKEY_CURRENT_USER\Software\Microsoft\Windows\CurrentVersion\Explorer\User Shell Folders
Right-click User Shell Folders key and choose Export from the menu.
Select the export location for this key, enter a name, for example, export.reg and click Save.
Locate export.reg file and copy it to the problematic PC.
After doing that, just run the export.reg file on the problematic PC, and it will be added to your registry.
After adding this key to your registry, the problem with Microsoft Exchange should be fixed completely.
2. Update your Outlook profile
Press Windows Key + X to open the Win + X menu and choose Control Panel from the list.
When Control Panel opens, locate and select Mail item.
When Mail window opens, click on Show Profiles.
Select your profile and click on Properties.
Click E-mail Accounts.
Select Microsoft Exchange (send from this account by default) account and click Change.
Click on More Settings.
Microsoft Exchange window will now open. Go to the Security tab.
In the Encryption section, check the Encrypt data between Microsoft Office Outlook and Microsoft Exchange and click Apply and OK to save changes.
Click Next and Finish to complete the change.
After making these changes, the issue with Microsoft Exchange should be fixed.
3. Create a new Outlook profile
Go to Control Panel and select Mail.
Click on Show Profiles and then click on Add.
In the Profile Name box enter the name for the new profile and click OK.
After creating a new profile, set it as default and check if the error is resolved.
4. Delete your Outlook profile
Go to Control Panel and select Mail.
Delete your default profile.
After deleting the default profile, start Outlook and you’ll be asked to create a new profile.
After creating a new profile everything should work without any problems.
5. Use flushdns command
Press Windows Key + X and select Command Prompt (Admin) from the menu.
When Command Prompt opens, enter the following command: ipconfig /flushdns
After the command is executed, close Command Prompt and check if the problem is resolved.
6. Restart Microsoft Exchange services
Press Windows Key + R and enter services.msc. Press Enter or click OK.
When Services window opens, locate Microsoft Exchange service, right-click it and choose Restart from the menu. If you have more than one Microsoft Exchange service available, be sure to restart them all.
After Microsoft Exchange service restarts, check if the problem is resolved.
7. Disable your antivirus
Locate your antivirus software in the system tray.
Right-click it and choose the option to quit or to pause protection.
Check if that solves the problem.
Users reported that Malwarebytes was causing this error to appear, but keep in mind that almost any third-party antivirus software can interfere with Outlook and cause this issue.
8. Set the WINS IP addresses on your PC
If you’re using a VPN while connecting to the server, you need to set your IP addresses to static.
The process differs depending on the VPN client you’re using.
Once the static PC address is set, check if the problem is still there.
Changing the WINS IP addresses fixes the problem with Microsoft Exchange; therefore, try it if you’re using a VPN.
How to fix The connection to Microsoft Exchange is unavailable in Outlook 2007?
1. Enable RPC encryption in the Group Policy Editor
Start Group Policy Editor by pressing Windows Key + R, entering gpedit.msc and clicking OK.
In the left pane navigate to User Configuration > Administrative Templates > Classic Administrative Templates (ADM) > Microsoft Office Outlook 2007 > Tools | Account Settings > Exchange.
In the right pane, locate Enable RPC encryption option and double click it.
In the Settings window select Enabled and click OK to save changes.
2. Export registry keys from a different PC
Open Registry Editor and go to the HKEY_CURRENT_USER\Software\Microsoft\Windows NT\CurrentVersion\Windows Messaging Subsystem
Right-click Windows Messaging Subsystem key and choose Export. Enter the name for the export file and save it.
Transfer the exported registry file to the problematic PC and double click it to add it to your registry.
After adding this file to your registry, the problem with Outlook 2007 and Microsoft Exchange should be fixed completely.
3. Remove ZeroConfigExchange DWORD from the registry
Open Registry Editor.
Go to HKEY_CURRENT_USER\Software\Policies\Microsoft\Office\12.0\Outlook\AutoDiscover
In the right pane, locate ZeroConfigExchange DWORD, right-click it and choose Delete from the menu.
Close Registry Editor and check if the problem is resolved.
4. Create a new DWORD
Open Registry Editor and navigate to the HKEY_CURRENT_USER\Software\Microsoft\Office\12.0\Outlook\RPC
In the right pane, right-click the empty space and choose New > DWORD Value.
Enter DefConnectOpts as the name of the new DWORD and double click it to open its properties.
In the Value data field enter 0 and click OK to save changes.
After that, close Registry Editor and check if the problem is resolved.
How can I fix The connection to Microsoft Exchange is unavailable in Outlook 2010?
1. Enable RPC encryption
Open Group Policy Editor and go to the User Configuration > Administrative Templates (ADM) > Microsoft Outlook 2010 > Account Settings > Exchange.
In the right pane, locate Enable RPC encryption option and double click it.
Make sure that this option is set to Enabled. Click OK to save changes.
2. Add proxy exceptions
Press Windows Key + S and enter internet options. Select Internet Options from the menu.
When the Internet Options window opens, go to Connections tab and click on LAN settings.
In the Proxy server section click on Advanced button.
In the Exceptions section, be sure to add your mail server address. Click OK to save changes.
After adding the mail server to the exceptions list, the problem with Microsoft Exchange and Outlook 2010 should be completely fixed.
3. Add DefConnectOpts DWORD to the registry
To fix this problem, start Registry Editor and go to the HKEY_CURRENT_USER\Software\Microsoft\Office\14.0\Outlook\RPC
In RPC key create a new DWORD and name it DefConnectOpts.
Open its properties and set the Value data to 0. Click OK to save changes and check if the problem is resolved.
How can I fix The connection to Microsoft Exchange is unavailable in Outlook 2013?
1. Enable RPC encryption
Start Group Policy Editor.
In the left pane navigate to the User Configuration > Administrative Templates (ADM) > Microsoft Outlook 2013 > Account Settings > Exchange.
In the right pane double click Enable RPC encryption.
Set RPC encryption to Enabled and click OK to save changes.
2. Edit your registry
Open Registry Editor.
When Registry Editor opens, in the left pane navigate to the HKEY_CURRENT_USER\Software\Microsoft\Exchange\Exchange Provider
In the right pane, you need to create a new string value by right-clicking the empty space and choosing New > String Value. Enter DS Server as the name of the string.
Double click DS Server to open its properties. In the Value data field enter the address of your global catalog services domain controller.
Close Registry Editor and create a new profile in Outlook.
After changing your registry and creating a new profile in Outlook, the issue with Microsoft Exchange should be fixed.
3. Download and run Microsoft Office 365 Support & Recovery Assistant
If you’re getting The connection to Microsoft Exchange is unavailable error while using Outlook 2013, you might be able to fix this problem by downloading Microsoft Office 356 Support & Recovery Assistant tool. After downloading this tool, run it and let it fix any potential problems.
A few users reported that this tool fixed the Microsoft Exchange error message on their PC, so you might want to give it a try.
If you want to learn more, we have a great guide on Exchange Mailbox Migration that might help you with further issues.
The connection to Microsoft Exchange is unavailable error will prevent you from sending or receiving any emails. Still, you should be able to fix this problem using one of our solutions.