FIX: Copy this file without its properties warning

Have you ever received Are you sure you want to copy this file without its properties message from Windows when you were trying to move or to copy a file? If the answer is Yes, but you don’t know why you received this message and how to stop it from appearing, keep reading this article to find out.

Usually, this pop-up message shows up when you are trying to copy or to move a file from an NTFS drive to another drive that has FAT (FAT16. FAT32 and any other type of FAT). Basically, the NTFS file system is capable of storing some properties, that the ones formatted with the FAT file system cannot, thus causing the message to appear.

This pop-up message is actually a good thing because is a warning, and not a problem to be solved. However, if you don’t want to receive this pop-up message anymore in the future, we have a few solutions for you.

How can I fix the error: Copy file without properties?

1. Convert the destination drive to NTFS

  1. The first thing that you will need to do it will be to connect the FAT drive to your computer.
  2. Open This PC.
  3. Back up all files from the FAT drive.
  4. Now right-click the drive and choose Format from the menu.
    format are you sure you want to copy this file without its properties
  5. Now set the File System to NTFS or exFAT and click Format.
    format settings are you sure you want to copy this file without its properties
  6. After the process is finished, check if the warning message is gone. If the problem is still there, try using different File system setting file formatting.

Need to convert MBR to GPT disk? Here’s how to do it without file loss!


2. You can use a third-party file manager

frigate3 are you sure you want to copy this file without its properties

  1. Some file managers don’t support this warning message, and if you want to avoid it, just switch to an alternative file manager such as Frigate3.
  2. Bear in mind that you don’t have to completely switch to a new file manager, you can use it only if this warning message appears.

There you go, two quick workarounds that might help you deal with Are you sure you want to copy this file without its properties message. If you found our solutions helpful, let us know in the comments section below.

READ ALSO:

Office 365 offers 3 months of Adobe Photography CC in first “thanks for subscribing” deal

Office 365 continues to get better across the board, and recently Microsoft emailed subscribers to sweeten the pot even more. In “just one way to say ‘thanks’ for being an Office 365 subscriber,” the email offers 3 months of Adobe Creative Cloud Photography (a $29.97 value, as Photography CC is normally $9.99/mo) for free:

I received the emailed offer to my personal account, where I an Office 365 Personal account (we also use Office 365 for our @onmsft.com accounts – I didn’t receive the offer there, and am assuming the offer is going out to consumer accounts only), and in a bit of a surprise, I was able to redeem the offer even though I already have an Adobe Photography CC plan. I just logged in with my Adobe account, redeemed the offer, and now my account is paid through October.

What’s perhaps most interesting about the email is the note at the end:

And this is just the beginning
More ways to say “thanks for subscribing” are in the works—watch your inbox for other special offers.

While offers like this aren’t “free as in beer,” if you sign up for Photography CC the hope is that you’ll continue to use the service after the three month grace period, it’s still an interesting perk, and effectively cuts the price of Office 365 Personal by 1/3, which isn’t a bad thing. Check your inboxes if you have Office 365 Home or Personal, and let us know if you received this offer or a similar one in the comments below.

You Don’t Have The Privilege to Create New Virtual Machine [FIXED]

The error You do not have the necessary privilege to create new virtual machines appears in the cases in which the user doesn’t have enough privileges set up in order to make different changes in the VMware software.

This issue can become very frustrating over time, as you won’t get the power to create new virtual machines, or edit the existing VMs. Depending on the way your permissions are set up, it might be the case that only administrator users can make important changes.

In this article, we will explore the best way to deal with this situation. We will first see how to assign permissions to different users, read on to find out more.


What to do if I don’t have the privilege to create a new virtual machine?

Assign permission with VMware vCenter Server

assign permissions you do not have the privilege create new virtual machine

  1. Login to VMware vCenter Server and select which resource from the list you want to assign extended permissions to.
  2. Click on the Permissions tab.
  3. In the Permissions window, click on Add.
  4. Select the correct Domain name and then click on the domain user you want to give extra permissions to.
  5. Click on Add, then Ok
  6. Once the Domain User is added, select which of the roles you want to assign (read below), and check the ‘Propagate to child objects’ option (in case you want for the permissions to apply to child objects as well.

Want to run different OS inside of Windows 10? Try one of these virtual machine applications!


Note: In order for this method to work, you will need to assign administrator rights, and add these CustomRole permissions to your domain user.

Make sure that you select these privileges for the new administrator role. These will give you the power to modify all aspects of privileges and data control for your Server:

Datastore 

  • Allocate space
  • Browse datastore

Host

  • Local operations
  • Create a virtual machine
  • Delete virtual machine
  • Manage user groups
  • Reconfigure virtual machine

Network

  • Assign Network

Resource

  • Assign virtual machine to resource pool

Virtual Machine

  • Select the only virtual machine that is allowed to allocate privileges to others

In this article we explored a quick fix for the error You do not have the necessary privilege to create new virtual machines error in VMware.

Following these steps closely will guide you through the process of assigning different access rules for all the users of the VM. Creating and managing an administrator account will allow you access to all settings and thus open up the entire range of capabilities VMware has to offer.

We hope these steps solved your issue. Please feel free to let us know if this method helped you by using the comment section found below this article.

READ ALSO:

Posted in Fix

Xbox One’s new surreal gravity-puzzle video game, Etherborn, is now available to play

Etherborn, a new puzzle title from Altered Matter, is now available to download and play on Microsoft’s Xbox One family of consoles.

This new game is a gravity-puzzle game which requires the player to navigate surreal environment using physic-based movements and strategies.

Here’s the official game description and trailer:

Etherborn is an elegant leap in the gravity-puzzle genre; an environmental puzzle platformer built on exploring and understanding gravity-shifting structures. You are a voiceless being that has just been born into a world where a bodiless voice awaits your arrival. As your first thoughts emerge, you realise your journey has just begun. You must reach this ethereal voice to fully understand your own existence.

In this world, the laws of physics behave in a way that will bend your imagination. You experience gravity perpendicular to the surface you are standing on, allowing for creative exploration possibilities in environments carefully crafted as navigation-based puzzles. Travel through beautiful and exotic sceneries where each level is an organic puzzle that you need to explore, manipulate and shift your gravity on in order to decipher the way forward.

Etherborn is a relatively cheap video game, currently selling for just $16.99 in the Microsoft Store so it may be worth a look for those after some variety in their gaming this weekend.

Have you played Etherborn yet? Share your thoughts on it with the community in the comments below and then follow us on Pinterest for more Xbox gaming content.

Etherborn
Etherborn
Developer:
Akupara Games
Price:
$16.99

Microsoft’s Q4 earnings and 2020 expectations are through the roof

Microsoft released their Q4 earnings for 2019 an it’s all good news. The giant registered amazing growth on all departments, increasing its share price by one third.

Here’s what Ryan Duguid, Chief Evangelist at Nintex(largest global partner of SharePoint and a Microsoft partner of the year) declared for Windows Report:

Microsoft has repeatedly beaten Wall Street’s expectations this year – its share price is up by one-third – and its latest results only reinforce this trend.

As he confirms, it seems like Azure had a big part to play in all of this:

Azure is a powerful differentiator, and it continues to gain market share. One key to Microsoft’s success with the cloud platform has been its embrace of openness and customer choice in tech stacks, and creating a common data model underneath everything.

microsoft commercial cloud revenue q4 2019

It was a record fiscal year for Microsoft, and the numbers exceeded all expectations:

  • Revenue was $33.7 billion and increased 12%
  • Operating income was $12.4 billion and increased 20%
  • Net income was $13.2 billion GAAP and $10.6 billion non-GAAP, and increased 49% and 21%, respectively
  • Diluted earnings per share was $1.71 GAAP and $1.37 non-GAAP, and increased 50% and 21%, respectively
  • GAAP results include a $2.6 billion net income tax benefit explained in the Non-GAAP Definition section below

Of course, Microsoft’s partnership with many industry leading companies also played a role in the constant development and improvement of their products.

Despite Azure leading the way, Office 365, Windows, and Microsoft Teams also contributed to the growth:

Microsoft is also seeing strong contributions from Office 365, and of course continuing strength in its original cash cow, Windows. It also has had a great year with Teams and has shown real momentum. Teams now claims 13 million users, 30% more than Slack

Ryan Duguid also stated that Microsoft is already planning some big things for next year, with AI and productivity software leading the way:

In 2020, we expect to see Microsoft double down in three key areas to further differentiate from the leading tech giants: AI and ML (across the entire platform), data (infinitely expandable, cost-effective, and supportive of ODI), and modern workplace (productivity software)

Microsoft spent $16.87 billion on research and development in 2019, significantly more than the $14.73 billion spent in 2018.

Snipping Tool not Printing? Fix it with These Solutions

The Snipping Tool in Windows 10 is a handy utility and allows the users to take screenshots in different modes as well as offers the built-in print function. That said, several users have reported the snipping tool is not printing directly.

If you can’t print from the snipping tool, too, follow the steps below to fix the issue effectively.

How do I fix the snipping tool if it’s not printing?

1. Change Print Preferences

  1. Launch the Snipping Tool.
  2. Now snip the area that you want to print.
  3. Once the screenshot is captured, click on File and select Print.
  4. In the General Tab, click on the Preferences button.
  5. Open the Effects tab.
  6. Now click on Print document on and select the paper size that you are using to print the document.
  7. Also, check the Scale to fit option.
  8. Click on Print, and you should be able to print the document without any issues.

2. Change the Printer Graphics Setting

  1. Open your Printer software and then open the Printer Properties. 
  2. In the Printer Properties window, open the Printer Quality tab.
  3. In the Print Quality tab, look for the Graphics section.
  4. Click on Vector drop-down menu and select the Raster option.
  5. Click OK and Apply to save the changes.
  6. Close the Printer Properties window. Now try to print the Snipping Tool screenshot and check if the issue is resolved.

3. Save and Print

  1. One of the reasons why the printer is finding it difficult to print screenshots from the snipping tool can be because of display size. If you have your display scaled up 150% or more, then you need to save the file first and then try to print it.
  2. So, after taking a screenshot, press the Windows key + S to save the file.
  3. Now open the saved file in the Photos app and try to print it from there.

4. Print from Paint

  1. If you don’t want to save the file before being able to print it, you can use an image editing app to skip the step.
  2. After taking a screenshot, launch the paint app and paste the snippet.
  3. Click on File and select Print.
  4. Change the preferences and click on Print. This should allow you to print the snippet without having to save it first.

With this solution, we can now conclude this guide on how to fix the snipping tool if it is not printing. All you need to do now is to follow the instruction therein carefully, and things should be back to normal.

Similarly, if the snipping tool is blocked by your policy, check our detailed guide to fix it.

Feel free to let us know the solution that helped you fix this issue in the comments below.

Windows 10 build 18941 available for insiders in the Fast ring

Microsoft released Windows 10 Insider Preview Build 18941 (20H1) to Windows Insiders in the Fast ring, but the update comes with some fair warnings.

If you’re a Fast ring insider,  check out this important message from the company:

IMPORTANT: As is normal with builds early in the development cycle, these builds may contain bugs that might be painful for some. If you take this flight, you won’t be able to switch Slow or Release Preview rings without doing a clean-install on your PC. If you wish to remain on 19H1, please change your ring settings via Settings > Update & Security > Windows Insider Program *before* taking this flight.

Remember, if you’re in the Fast ring and want to get your hands on the new build right away, keep in mind that there may be potential bugs and issues.

Let’s not forget the plethora of problems surrounding Windows 10 May update.

What’s new in Windows 10 Insider Preview Build 18941?

There are no notable new features, but Microsoft included a series of fixes as it follows:

  • We fixed an issue resulting in some users experiencing a large amount of lag when using the previous flight.
  • We fixed an issue where explorer.exe would crash if you started a File Explorer search while in a OneDrive folder.
  • We fixed an issue where if you searched for advanced Windows Update options, the search result would open to the main Windows Update Settings page, rather than the advanced one.
  • We fixed an issue where Settings would crash if you clicked on the microphone section under Privacy Settings while audio recording was in progress by a Win32 application.

What issue can I expect if I update to Windows 10 build 18941?

The most important know issue is the error code c1900101. If you’ve tried to install Build 18936 or Build 18941 and failed, than this error may seem familiar.

Error code c1900101 is related to a compatibility bug with a storage driver on their device and can create boot loops and other issues, but the good news is that you can roll back to the previous build.

Other know issues include: crashes related to older versions of anti-cheat software, Realtek SD card readers not functioning properly, and Tamper Protection may be turned off in Windows Security after the update.

If you get the Windows 10 build 18941, please share your experience and the potential bugs you may encounter in the comments section below.

Dolby Atmos Error 0x80bd0009 on Xbox One [Fixed]

A lot of Xbox users have claimed that they have encountered Dolby Atmos error code 0x80bd0009 while trying to set up Dolby Atmos via Xbox One S or while trying to enable Dolby Atmos for headphones.

This issue can be rather annoying, and in today’s article, we’ll show you how to quickly solve it once and for all.

What to do if Dolby Atmos isn’t working on Xbox One?

1. Check your TV and HDMI connections

check hdmi Dolby Atmos error code 0x80bd0009
  1. The first thing that you will have to do is to press the Xbox button in order to open the guide.
  2. After this, you will have to select System -> Settings -> Display & Sound -> Video output.
  3. Now, you will have to select Video, fidelity & overscan.
  4. And the last, select HDMI, located under Display.

2. Troubleshooting sound issues with an audio-video receiver

  1. First, you will have to make sure that you will turn on your devices in the following order. Also also, take into consideration that you will have to wait for each one to fully power up before you will start with the next one: Television -> Audio-video receiver -> Xbox One console.
  2. Now you will have to press the “Input” button, located on your television’s remote control to change the input source of your receiver away from the Xbox One console and then to switch it back (HDMI1 to HDMI2, then back to HDMI1).
  3. After, you will have to restart the audio-video receiver.
  4. And then, just to set your TV connection to HDMI by following the steps from the previous solution.

3. Troubleshoot issues during voice chat

  1. Press the Xbox button in order to open the guide.
  2. After this, choose System -> Select Settings -> Select Display & sound.
  3. Now go to Volume -> Then Chat mixer and now you will have to select one of the available options.

4. Dolby Atmos for Headphones

dolby atmos settings Dolby Atmos error code 0x80bd0009
  1. First, you will need to go to Settings;
  2. After this, select Display & Sound -> Audio output on the Xbox One and switch Headset Format to Dolby Atmos for Headphones.
  3. Then you will be asked to get the Dolby Access application.
  4. After the installation process is complete, please note that it is very important to select from the menu the option With my Headphones.
  5. Now, everything it will be done if you own an LS20, but if you own an LS30/40 you will have to proceed to the next step.
  6. After this, select Using HDMI or optical audio headset.
  7. If you are using LS40, you will have to press the EQ button until you will hear “Stereo”.

We hope that these solutions helped you fix Dolby Atmos error code 0x80bd0009 on your console. If they did, feel free to let us know in the comment section below.

Printer Not Printing All Pages: 5 Ways to Fix it

Printing is a necessary process, but sometimes when printing multiple pages, your printer might not be printing all pages.

This can be a problem and interfere with your workflow, so it’s crucial to fix this problem. To learn how to do that, be sure to keep on reading.

Why is my printer not printing all my pages?

  • Your drivers may be out of date. If this happens, update printer drivers.
  • You don’t have enough paper in the paper tray to complete the task.
  • Your ink levels are too low for this process.

What can I do if the printer is not printing all pages?

1. Check to see if the printer has enough paper

  1. Check that the amount of paper that your printer has available is enough for the document you’re trying to print.
  2. You can do so by checking the printer paper tray, and add more paper if needed.
  3. After adding more paper, check if the problem is resolved.

2. Check to see if your printer has enough ink in the cartridges

  1. Depending on the documents you’re trying to print, you might need to use more of the black color than any other.
  2. This usually tends to finish faster than the other color options, so it is always good to check the levels of ink inside your printer before attempting to print a document.
  3. In case your ink is low, you might need to replace the cartridges.

3. Update the driver software for your printer

  1. Press Win + X on your keyboard and select Device Manager.Device manager - why won't my printer print all pages
  2. Right-click on the printer hardware from the list and select Update Driver.
  3. Now, follow the instructions on the screen to complete the process.

Alternatively, you can use a third-party tool to update all your drivers with just a few clicks automatically.

4. Upgrade the RAM either on your PC, or printer

  1. Inkjet printers rely on your RAM while printing, so ensure you have enough RAM to finish the printing process.
  2. You might have to upgrade your RAM to fix this problem in some rare occurrences.

This is not a likely scenario, but it’s something to keep in mind.

5. Take into account the size of the document you’re trying to print

  1. Relating to the RAM issue mentioned above, you will need to give your printer time to process the information if you’re trying to print an extremely large file with hundreds of pages.
  2. The printer might stop indexing the information needed to print your document successfully.

In this article, we explored some of the troubleshooting methods to solve the issue of your printer not printing all pages. In case the problem is still there, our printer only prints one page at a time should be able to help you.

Please let us know if this guide helped you by using the comment section below.

Microsoft reports fourth quarter earnings for fiscal year 2019, as expected, the trillion dollar company continues to rake it in

Microsoft, who passed the $1 trillion market cap milestone a few weeks ago, continues to fire on all cylinders with the latest earnings results. Nearly every category is up, some significantly. Revenue is up 12% to $33.7 billion for the quarter, commercial cloud is up a whopping 39% to $11 billion, and $11 billion seems to be the theme of the day:

About the only thing down in this blockbuster earnings release was gaming revenue, which declined 10% (down 8% in constant currency) with Xbox software and services revenue down 3% (down 1% in constant currency). This isn’t as alarming as it could be, however, with a typically soft 4th quarter (no holidays or back to school to boost revenues), and a looming Xbox Scarlett and the new game streaming service xCloud looming on the horizon, perhaps giving gamers pause to wait for the next big thing.

The rest of “More Personal Computing” was up:

Revenue in More Personal Computing was $11.3 billion and increased 4% (up 6% in constant currency), with the following business highlights:

  • Windows OEM revenue increased 9% (up 9% in constant currency)
  • Windows Commercial products and cloud services revenue increased 13% (up 16% in constant currency)
  • Surface revenue increased 14% (up 17% in constant currency)
  • Search advertising revenue excluding traffic acquisition costs increased 9% (up 10% in constant currency)
  • >Gaming revenue declined 10% (down 8% in constant currency) with Xbox software and services revenue down 3% (down 1% in constant currency)

Office 365 Commercial revenue growth was up 31%, there are now 34.8 million consumer Office 365 subscribers, and LinkedIn really seems to be catching on:

LinkedIn revenue increased 25% (up 28% in constant currency) with record levels of engagement highlighted by LinkedIn sessions growth of 22%

There really just isn’t anything to complain about, and even though Microsoft has already gained from its trillion dollar position, expect it to continue on the upswing.

There Was a Problem We Couldn’t Continue 0x80a4001a [Solved]

Did you ever face error There was a problem and we couldn’t continue 0x80a4001a while you were trying to log in into your Xbox One account? Actually, a lot of Xbox One users have complained about having this issue and nothing seemed to work.

Microsoft said that there is a current general issue with the logins to Xbox One and obviously that they are working on solving this problem. So far, we have found two solutions that might help you solve this issue and hopefully, they will also work for you.

How to fix There was a problem we couldn’t continue 0x80a4001a error?

1. Remove and then re-add your user account

remove your user account there was a problem we couldn't continue 0x80a4001a
  1. The first thing that you will need to do is to delete your account from your console. In order to do that, please go to System -> Then Settings -> Then go to Account -> And then to Remove accounts.
  2. Now you will have to choose the account that you want to remove and then select Remove.
  3. After the process is complete and your account is removed, please go back and select Sign-In and then you will have to add your account again and enter your password.
  4. The last thing that you will have to do is to select either No barriers or Ask for my passkey. (Please keep in mind that if you will select the option Lock it down, it’s possible that you will encounter this problem again.)

2. Restart or power cycle your Xbox One console

reset xbox one there was a problem we couldn't continue 0x80a4001a

 Restart your Xbox One console from the guide:

  1. First, you will have to press the Xbox button in order to open the guide.
  2. Then please go to System -> Then Settings.
  3. After this, select Restart console.
  4. And then select Restart.

Physically power cycle the console:

  1. First, you will have to turn off your console. You can do this by simply holding the Xbox button located on the front of the console for about 10 seconds and then your console will turn off.
  2. Now, you will have to turn your Xbox One console back on. You can do this by pressing the Xbox button located on the console or the Xbox button located on your controller.

Disconnect and reconnect your Xbox One console’s power cable:

  1. First, you will have to turn off the Xbox One console following the methods we described in the previous section.
  2. Then, you will have to unplug the console’s power cable and wait for about 10 seconds.
  3. After this, please plug the console power cable back in.
  4. And now, just press the Xbox button located on your console to turn it on.

We hope that these two solutions provided were helpful to you and that you have managed to solve There was a problem and we couldn’t continue 0x80a4001a error.

Our favorite tips and tricks for Office 365: Outlook

Whether you’re a student at an educational institution, an employee at a company, or just the average person with a Gmail account, email is likely to be a big part of your day. So, to avoid being caught up in a mess of messages, it is always best to use some sort of software to help manage your inbox.

Microsoft Outlook just so happens to be one of the most popular desktop solutions for just that, and it is included for free with Office 365 subscriptions. In this guide, we’ll take a closer look at some of the tips and tricks in Outlook that you can leverage to manage and send emails with the utmost efficiency and productivity.

Use Outlook hotkeys

During your busy day, you might not always have the time to drag your mouse over icons to accomplish common tasks like composing, replying, or forwarding messages. Luckily, just like in Microsoft Teams, there are several Outlook hotkeys that you can use. These hotkeys can save you time by skipping menus. We’ve gathered a few of our favorites below.

  • CTRL + Shift + M: Creates a new message
  • CTRL + R: Opens the reply window
  • CTRL + F Opens the Forward window
  • CTRL+ Shift+ R: Opens the reply window, to reply to an entire group
  • CTRL+K: Can be used to insert hyperlinks into emails
  • CTRL+ Shift+ G: Flag a message
  • F4: Search for text in an email
  • CTRL+ 3: Opens the contacts list
  • CTRL+ 2: Opens Outlook calendar

Our list is just the start of the shortcuts. Microsoft has a deep dive into more Outlook hotkeys right here, so feel free to check it out.

Use the Outlook resizing tool to send large picture files

One of the pains of emails (and Outlook) is that there is a 20MB limit for when you want to send pictures or files in your messages. No need to worry though, as there is a workaround to this. Outlook has an automatic resizing feature that can be used to cut down on image sizes before sending your emails out.

After you’ve composed your new message and attached all your photos, you can find the option by heading to the “File” tab on the top left side of the window. You can then click the yellow box that says “Image Attachments” Finally, you can choose “Resize large images when I send this message.” Typically, this will reduce files from MB to smaller sizes in KB. Keep in mind though, that this feature will only work if you’ve attached the photos by using the Insert files button. Images embedded directly in the email won’t be resized with his method.

If all else fails, you could always send your attachments as a ZIP file.

Combine the power of OneNote with Outlook, or save emails as PDF

Outlook is great on its own for managing emails, but it also can be paired with the power of the notetaking app OneNote. For instance, when you take note and plan items in OneNote 2016, you can transfer it over as an Outlook task. To do this in OneNote, highlight the words that you want as a task, and then in the menu that shows up, click the arrow next to the “Outlook Tasks” button to choose a reminder.

You also can transfer any email from Outlook right into OneNote to help you mark up the email, and even schedule tasks. To get started with this feature, select the “Home” Tab on your Outlook inbox, and then click on the email you’d like to send to OneNote. Then, click the “Send To OneNote” icon. If you’re signed into OneNote with the same account, this will open up a version of the email OneNote Microsoft Store desktop app, allowing you to edit it as you please.

As an alternate method, another great way to markup emails would be to save it as a PDF file, You can do this by going to the “Print” menu, choosing Microsoft Print to PDF, picking a folder, and then pressing “Save.” You can then navigate to find the PDF file, and open it in Microsoft Edge and write all the notes as you please.

Backup your emails to avoid accidents

When you’re managing your email accounts across various devices, things can sometimes go wrong. You might accidentally delete an important message, or a message can be misplaced. Well, you can easily back up your emails in Outlook to avoid such embarrassing situations.

One of the easiest ways to back up important emails in Outlook on Windows 10 is to simply highlight the message and then drag it into a File Explorer window. This will cause it to show up as an Outlook Item, and if you double click it, the message will still open in Outlook, regardless if it was deleted from the server or inbox.

You also can export your entire mailbox as a .PST file manually on a regular basis. You can do this by heading to your inbox, clicking “File,” and then “Open and Export.” Next, you can click on the “Import/Export” button and choose the “Export to file” button. Complete the wizard by choosing .PST, and then clicking the folder you’d like to export (in this case, the Inbox.) You can then choose where you want to save and then click finish. If you want, you could password protect it, but this is optional.

Opening and importing back the .PST file into Outlook is easy, simply head back to the “File” menu, click “Open and Export,” and choose “Open Outlook Data File.” Once you open the PST file, this will create a new area on the left panel known as Outlook Data. That’s the new home to your backed up messages.

Use the Clean up tool to purge messages

Nothing is more annoying than a full inbox, but Outlook has a built-in tool to help you purge all the unwanted messages. To use this tool, right-click on an email conversation you’d like to clean up. Outlook will then give you a warning prompt and will send all redundant messages over to the Deleted Items folder. Outlook considers an item redundant if it appears more than once within a message thread. This is especially useful for cleaning up long email conversations.

You also can use the same tool to clean up folders, simply visit the folder you want to clean up, and click on the “Home” tab, and then click on the icon of an envelope with an “X” over it under the “Delete” group.

…And that’s just the beginning!

We’ve only highlighted five tips and tricks in Outlook, but there’s plenty more that you can do. You can secure your Outlook data with a password, set up professional-looking email signatures, set up rules for your inbox, schedule messages, and plenty more. Will you be checking any of these out? Let us know in the comments below if you have any other Outlook tips and tricks.

 

How to disable the login screen’s Fluent Design “Acrylic” blur in the Windows 10 May 2019 update

With the Windows 10 May 2019 update, Microsoft made a simple but highly noticeable change to the login screen. It now features the “Acrylic” translucent blur effect from Fluent Design, which makes the background image almost unrecognisable in an attempt to focus you on the login form.

If you’d rather keep your background photo visible, without the extra blur, there are a couple of ways to disable the new effect. They’ll both restore your login screen to the same style used by the Windows 10 October 2018 update and prior.

Disabling transparency in Windows 10

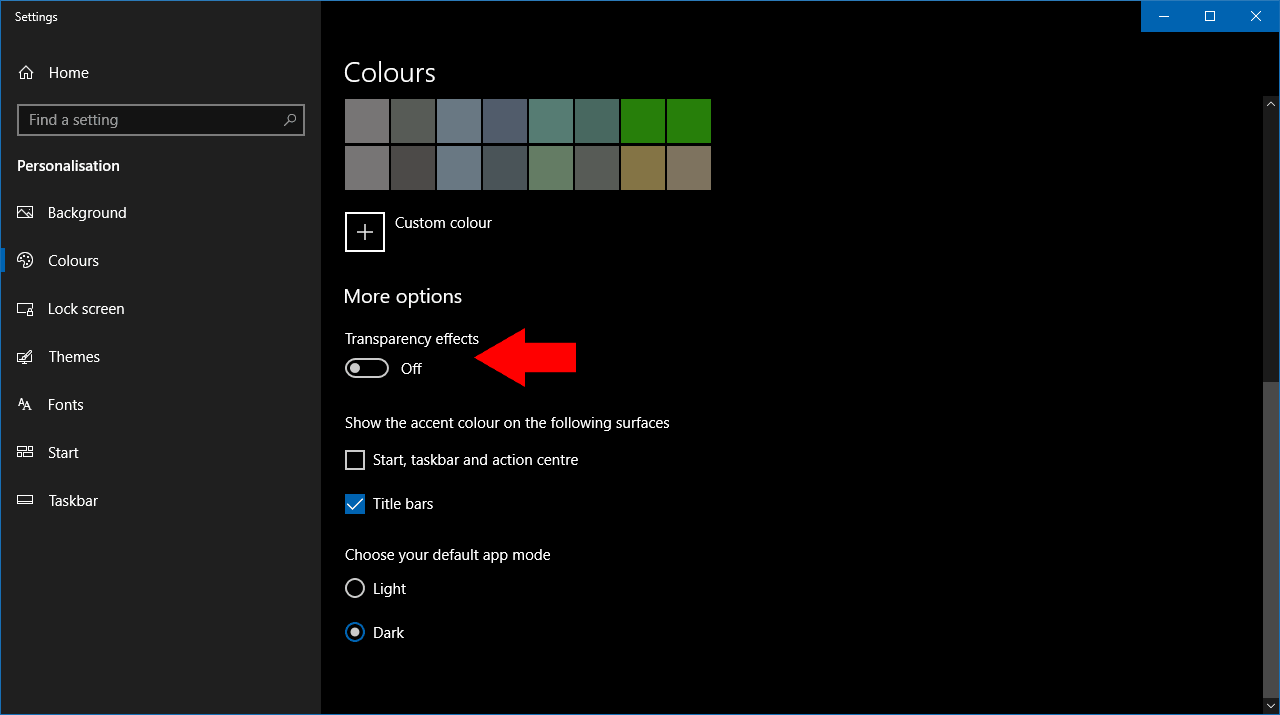
The quickest way to achieve this is to disable transparency altogether. Launch the Settings app and click the “Personalisation” category, followed by the “Colours” page from the left menu. Turn the “Transparency effects” toggle button to the off position.

This method disables transparency completely, which might not be what you want. If you’d like to retain Fluent Design transparency but remove the login screen blur, you’ll need to manually edit a registry key. Our usual warning applies – take care when editing the registry, since mistakes could lead to an inoperable system.

Search for and launch the registry editor from the Start menu. Paste the following key into the address bar at the top of the screen and press enter:

HKEY_LOCAL_MACHINESOFTWAREPoliciesMicrosoftWindows

From the left sidebar, right-click the “System” key in the expanded node. From the context menu, choose New > DWORD (32-bit value). Per HowToGeek, you’ll need to name this value “DisableAcrylicBackgroundOnLogon”. Next, double-click the value to open the value editor and change the data field to “1”.

Disabling Fluent Design on login screen via registry in Windows 10

You’re now done. Try pressing Win+L to lock your PC and display the login screen. You should find the Acrylic effect is gone, so you’re back to having Fluent Design with a standard login screen – how it was before the May 2019 update.

FIX: Windows 10/11 Calendar not syncing with Gmail/Outlook

A wide number of users have complained about an issue caused by Windows 10 Calendar not syncing with Gmail/Outlook.

This issue can cause a lot of complications, as you might check the Windows 10 Calendar app for any appointments to come, just to find out later that you missed some of them.

In this article, we will explore the best troubleshooting methods. Please follow the steps closely to avoid any other issues.

What to do if Windows 10 Calendar isn’t syncing with Google Calendar?

1. Check that your antivirus software doesn’t interfere with a Calendar app

Depending on the third-party antivirus software you’re using on your PC, these steps will vary. Here are the steps to follow if you’re using Bitdefender:

  1. Open BitDefender by double-clicking the icon inside your taskbar.
  2. In the Firewall section -> select Settings.BitDefender firewall settings - Windows 10 calendar not syncing with gmail and outlook
  3. Type Calendar inside the search box -> make sure the button next to the option is toggled On.Toggle access for Calendar app -windows 10 calendar not syncing with gmail/outlook
  4. Close BitDefender -> check to see if the issue persists.

2. Allow Calendar application through Windows Firewall service

  1. Click on Cortana search box -> type Windows Firewall -> Allow an app through Windows Firewall.Allow an app through Windows Firewall - windows 10 calendar not syncing with gmail/outlook
  2. Inside the Windows Firewall settings -> click on Change Settings.
  3. Scroll through the list and tick the boxes for the option Mail and Calendar -> both Private and Public.Allow an app through Windows Firewall private and public -windows 10 calendar not syncing with gmail/outlook
  4. Click OK to close the Windows Firewall window.

3. Change sync settings for each of your email accounts

  1. Click on Cortana search box -> type Calendar -> open the app.
  2. Inside the Calendar app -> select cogwheel settings button -> click Manage Accounts.
  3. Click on each of the accounts that you’re having issues with -> select Change settings.
  4. Click on Change mailbox sync settings.Change mailbox sync settings - windows 10 calendar not syncing with gmail/outlook
  5. Make sure to toggle on all the options available, and also choose the time-frame in which you want your data to sync.
  6. Click on Save, and check to see if the issue is resolved.

4. Remove problem email accounts from Calendar and re-add them

  1. Click on Cortana search box -> type Calendar -> open the app.
  2. Inside the Calendar app -> select cogwheel settings button -> click Manage Accounts.Calendar manage accounts - windows 10 calendar not syncing with gmail/outlook
  3. Click on the accounts that you’re having issues with -> select Change settings.
  4. Select Delete account from this device.
  5. Click Save.
  6. Add the removed account again.
  7. Try to see if the issue persists.

5. Turn on the Privacy Settings to let the app access your Calendar information

  1. Press Win+X -> select Settings from the menu.
  2. Select the Privacy button.Privacy settings - windows 10 calendar not syncing with gmail/outlook
  3. Click on Calendar -> turn on Let apps access my calendar.Allow apps to access your calendar - windows 10 calendar not syncing with gmail/outlook
  4. Check to see if this solved your issue.

In this article, we explored the best methods to deal with issues caused by your Windows 10 Calendar app not syncing with your Gmail, and Outlook accounts.

Please let us know if this guide helped you by using the comment section below.

Sorry this channel is temporarily unavailable Hulu error [FIXED]

Hulu can be a great entertainment platform, but many users reported Sorry this channel is temporarily unavailable message while watching live sports feed. While that can be outright frustrating, getting shut out while in the midst of something interesting, here are a few ways you can mitigate the issue with.

This issue occurs more often on Xbox console than PC, therefore, you’ll find 3 solutions for Xbox One and one for PC users in this guide.

How to fix Sorry this channel is temporarily unavailable Hulu error?

1. Restart the Hulu App

Restart the Hulu app if you are getting the sorry this channel is temporarily unavailable Hulu message

  1. Exit the app and make sure that it has completely been stopped.
  2. For this, refer to the guidelines for the device you are running the app on.
  3. For the Xbox One, that involves pressing the Xbox button to launch Guide.
  4. Select Hulu.
  5. Press Menu on your controller and select Quit.
  6. On a Windows 10 device, launch Task Manager by pressing the key combinations of Ctrl + Shift + Esc.
  7. Under the Applications tab, select Hulu (if present).
  8. Click End Task button.
  9. Close Task Manager.
  10. Re-launch the Hulu app again and check if it’s working fine.

2. Shut down and restart the device

Restart device to deal with 'sorry this channel is temporarily unavailable Hulu' error

  1. Power off the device you are watching Hulu on.
  2. Similarly, power off the modem and router as well. Not applicable if you are using a mobile or tablet having a cellular connection.
  3. Unplug all the devices and wait for a minute or two.
  4. Plug back in and restart the device.
  5. This often helps in dealing with most issues related to Hulu.

Hulu won’t work on your Xbox One? Try this quick fix!


3. Clear cache and data

clear cache files to deal with 'sorry this channel is temporarily unavailable Hulu' error

  1. Temporary files stored in cache often get corrupted leading to unpredictable performance.
  2. To delete temp files in Xbox One, press the Home menu > My Games and Apps > Apps.
  3. Highlight Hulu.
  4. Press the Menu button on the controller and launch More options > Manage Apps.
  5. Select clear the saved data.

4. Uninstall and re-install the Hulu app

Go for fresh install of Hulu app to solve 'sorry this channel is temporarily unavailable Hulu' error

  1. On Xbox One, press the main menu and highlight the Hulu app.
  2. Press Menu from the controller and select Manage App > Internal > Uninstall.
  3. Turn off and unplug your device.
  4. Wait for at least a minute.
  5. Restart Xbox One and launch Microsoft Store.
  6. Search for Hulu app and click on the Get button to install the same.

4. Update Hulu app

Update Hulu app for solving 'sorry this channel is temporarily unavailable Hulu'


  1. On the Xbox One, open the Guide and select Settings.
  2. Under Settings, select All settings > System > Updates > Update console.
  3. Similarly, update the Hulu app when prompted to keep things up-to-date.

This should be all you can do if you find any channel temporarily unavailable on Hulu. Also, you should have a stable Internet connection as well to ensure smooth streaming of the shows.

READ ALSO:

Posted in Fix

Windows 10 19H2 Build 18362.10006 isn’t available for all Windows insiders

Today Microsoft released a new Windows 10 19H2 build for a subset of lucky Windows insiders in the Slow ring.

It’s not really new, because the company released build 18362.10005 two days ago, but none of its features were turned on. 

That’s because Microsoft is testing a new CFR (controlled feature rollout) system. This way, new features will be available for some from the beginning, and only later for everybody.

What do I get in the Windows 10 19H2 Build 18362.10006?

Here’s what’s new in the 18362.10006 build:

  • Windows containers require matched host and container version. This restricts customers and limits Windows containers from supporting mixed-version container pod scenarios This update includes 5 fixes to address this and allow the host to run down-level containers on up-level for process (Argon) isolation.
  • A fix to allow OEMs to reduce the inking latency based on the hardware capabilities of their devices rather than being stuck with latency selected on typical hardware configuration by the OS.
  • Key-rolling or Key-rotation feature enables secure rolling of Recovery passwords on MDM managed AAD devices upon on demand request from in-tune/MDM tools or upon every time recovery password is used to unlock the BitLocker protected drive. This feature will help prevent accidental recovery password disclosure as part of manual BitLocker drive unlock by users.
  • A change to enable third-party digital assistants to voice activate above the Lock screen.

Keep in mind that these changes will be turned on just for a subset of insiders from the Slow ring, not for all of them. So if you’re an insider and you don’t get the build right away, don’t worry.

Let’s see how this new system will work and how it will improve the build delivery.

If you get the new features, share it with us in the comments section below.

Windows 10 May update can slow down your PC significantly

performance or security related.

It’s already a known fact that the update came with a lot of issues, but Microsoft tries to solve them with each update patch they release.

Although Windows 10 v1903 update was meant to improve performance and make things run smoother, in some cases it made PCs almost unusable, as one user describes the problem:

I installed update 1903 and now my PC is not only running slower but on startup it takes forever getting the wait circle.

And he’s not the only one:

I have the same problem after 1903.  UI interaction is lagging and slow. Everything from mouse movement to typing will often lag. The notifications centre on the left just topped working (sure a reboot will bring it back).  It’s been like this for weeks now. 

It seems like this is a recurring problem, and many Windows 10 users rolled back to previous versions of Windows just to get rid of it.

What can I do if my PC is slow after updating to Windows 10 v1903?

This is particularly weird, as it was reported on systems with SSDs.

If you have the same issue, you can try a clean boot or a disk defragmentation and see if the issue persists. If that doesn’t work, you can always roll back to the previous version of Windows 10.


Disk Defragmenter doesn’t work? Check out this useful guide to solve the problem quickly.


Also, you can try a clean install, as it might solve the slowdown.

To completely avoid the problem, you can block the Windows 10 v1903 update for now, and wait for a couple more update patches.

Is your Windows 10 PC running slower after the latest updates? Leave your answer in the comments section below along with any other questions you may have.

Take a look at the upcoming Windows 7/8.1 cumulative updates

Microsoft recently released Monthly Rollup Preview KB4507437 for Windows 7 and Windows Server 2008 R2 SP1.

Windows 8.1 users weren’t left behind as they can now download Monthly Rollup Preview KB4507463 on their Windows 8.1, Windows RT 8.1 and Windows Server 2012 R2 devices.

These updates are optional and available through Windows Update. You can also download the standalone package for these updates from the Microsoft Update Catalog. website.

Keep in mind that you need to install the latest Service Stack Update before downloading these preview updates.

KB4507437 changelog

This is a non-security update. The KB support page mentions that KB4507437 fixes the problems introduced by KB4507449 on July 9. The changelog for Windows 7 Monthly Rollup KB4507437 only lists some Brazilian time zone information updates.

Microsoft listed two known issues in this update. The patch breaks systems running McAfee security products. According to Microsoft, your system might become unresponsive or experience slow startup issues.


Experiencing computer slowdown issues? Here’s why this happens and how to fix it.


Hopefully, Microsoft will fix this issue by the next Patch Tuesday edition.

KB4507463 changelog

Microsoft released KB4507463 to Windows 8.1 and Windows Server 2012 R2 as a Preview of the upcoming Monthly Rollup.

This is a non-security update that brings a few quality improvements. The changelog lists that this update resolves the following issues apart from the Brazilian Zone information Updates.

Workflow definition cache

Microsoft confirms the update fixed the Workflow definition cache issues for Windows 8.1 systems.

Window-Eyes screen reader application

The Preview of Monthly Rollup for Windows 8.1 addresses a problem with Window-Eyes screen reader application. The problem prevented the application from working properly.

Microsoft confirmed three known issues in KB4507463. Some operations that you perform on CSV files or folders can fail on your systems.

You should perform those operations from a process with administrator privileges.

If you experienced other issues after installing these updates, do let us know in the comments below.

RELATED POSTS:

Windows Calendar is Not Showing Events: 5 Ways to Fix it

Many users have reported that their Windows Calendar is now showing events. This issue can be extremely frustrating, especially if you have a busy schedule.

This isn’t the only issue, and many reported that Calendar isn’t working on their PC, but we covered that problem in a separate guide.

For these reasons, we will explore some of the best troubleshooting methods available in today’s article. Read on to find out how to do it.

Why are my calendar events not showing up?

  • Missing updates can sometimes cause issues with certain Windows components.
  • Problems with the Store cache can sometimes affect the Calendar.
  • Glitches with the Calendar app are the most common cause of this issue.
  • Issues with syncing or your profile can lead to this error.

What can I do if Windows Calendar is not showing events?

1. Check for any Windows updates

  1. Click on Cortana search box and type Updates.  Next, select the first option from the top.
  2. Next, click on Check for updates and wait for the process to complete.
  3. Restart your computer if needed.

2. Clear Windows Store cache

  1. Press the Windows key + R keys on your keyboard to launch Run window.
  2. Inside the Run window, type WSReset.exe and press Enter.

  3. A command prompt window will open and the process of cleaning the cache will start.
  4. Wait for the process to complete and check if the issue persists.

After doing that, check if the problem is fixed.

3. Reset Calendar application

  1. Click on Cortana search box and type Calendar.
  2. Right-click the Calendar app and select App settings.
  3. Inside the App settings window scroll down and select Reset.Reset Calendar app - Windows 10 calendar not showing events
  4. Wait for the process to complete.

4. De-active and re-active the sync option in the Calendar app

  1. Click Cortana search, type Calendar and open it.
  2. Inside the Calendar app select the cogwheel Settings button.Calendar app settings - Windows 10 calendar not showing events
  3. Select the account you’re having issues with and choose Change mailbox sync settings.
  4. Toggle the button to Off, and then toggle it to On again.
  5. Select Done and click Save.

5. Remove the account with the issue and reconnect it

  1. Open the Calendar app.
  2. Select the settings cogwheel.Cog wheel calendar app - Windows 10 calendar app not showing events
  3. Select the account that you want to reconnect.
  4. Select Change settings.
  5. Select Delete account from this device.
  6. Close the Calendar app and add the same account again

In this article, we explored some of the best troubleshooting methods to deal with your Windows 10 Calendar app not showing you events.

It is worth mentioning that the steps presented here are not a definitive solution to this problem, but these steps helped some users. The developers at Microsoft have not released an official solution for this issue.

In case you’re having further issues, we have a great guide on how to fix Windows Calendar if it’s not opening.

Please let us know if these steps helped you by using the comment section below.

Sorry another game in progress Roblox error [SOLVED]

Roblox is a popular online game that offers a virtual universe to basically live in with your friends and family. While the game itself is relatively easy to install, at times you may encounter some errors while playing the game. The  Sorry another game in progress Roblox error appears while trying to open the game as reported by the Microsoft Community users.

I have this problem with the xbox one version of roblox.
Whenever I try to go in a game I get error 116. I already changed the privacy settings but it didn’t help.
It still says I have to change the settings. Do you know how to solve this?

It is a general error and can be fixed with a few tweaks. Follow these steps to fix Roblox game error on your PC.

How do I save Snipping Tool screenshots in clipboard?

1. Reset Internet Options

  1. Type Internet in the windows search bar and click on Internet Options.
  2. In the Internet Properties window, open the Advanced tab.
  3. Under ” Reset Internet Explorer Settings” click the Reset button.
  4. Again click on the Reset button.
    Reset Internet Properties
  5. Click OK and Apply to save the changes.
  6. Close Internet Properties window and try to open Roblox and check for any improvements.

2. Delete Temporary Internet Files

For Google Chrome:

  1. Click on the Menu (three dots) and select Settings.

  2. Scroll down and click on Advanced.
  3. Under “Privacy and Security”, click on Clear Browsing Data.
    Clear Chrome history
  4. Go to the Basics tab, select Time Range as Last 24 Hours.
  5. Select all the options and click on Clear Data.
  6. Close and launch Google Chrome again and check if you are able to access Roblox without any error.
  7. If not, open Clear Browsing Data page again from the Settings and change the Time Range to Last 7 Days.

For Microsoft Edge Chromium:

  1. Click the “Settings and More” icon or press Alt + F and select Settings.
  2. From the left pane, click on “Privacy and services” tab.
  3. Click on Choose What to clear under Clear Browsing Data.
  4. Select a Time Range and then select all the types of data you want to delete.
  5. Click on Clear now and close the settings page.
  6. Try to access Roblox again and check for any improvements. If the issue persists, select different Time Range and try again.

3. Check your Firewall

  1. Click on Start and select Settings.
  2. Go to Update and Security.
  3. Choose Windows Security.
  4. Click on Firewall and Network protection.
  5. Click on the currently active network.
  6. Under “Windows Defender Firewall“, click the toggle switch to turn it off.
  7. Close the settings window and launch Roblox. Check for any improvements. Make sure you enable the Firewall again once the game is up and running.

If the issue persists, try to uninstall and re-install Roblox and also update your internet browsers.

RELATED STORIES YOU MAY LIKE:

Microsoft mass deletes inactive Xbox accounts starting August

Recent news has surfaced that Microsoft’s new Terms of Service (TOS) state that inactive Xbox accounts will be permanently shut down.

Naturally, the Xbox community has been in an uproar regarding the safety of their content ever since. 

The problem is that as with any Terms of Service, be it that of a game or any other piece of software, many failed to actually read the conditions that may lead to your account being permanently deleted.

Users speculated that bad language or the occasional ban might make your account an ideal target for deletion.

Some have even stated that you need to be Silver ranked or higher to make sure your account is safe, or to at least have a minimum account balance.

Because of this, Microsoft clearly stated that the purpose of this process is to simply eliminate any dead or duplicate accounts.

As such, they wanted to make it clear that the only thing you need to do in order to keep your account is to log into it.

Microsoft will soon remove inactive Xbox accounts

The mass deletion will take place on August 30, 2019, and the main targets are accounts that have been inactive for the past two years. 

This means that if you haven’t logged in since August 30, 2017, then you might want to pay your Xbox account a visit.


Just in case you can’t log into your Xbox account, check out this troubleshooting guide to learn how to fix the problem.


You don’t even have to do anything with it, just log in and that should be enough.

More so, you have an unspent balance or an unpaid credit, your account is safe as these will not be targeted for deletion either.

Family accounts will also be spared if at least one of the sub-accounts is active as well.

Finally, users who published content on the Microsoft Store are the last people who should worry, since their accounts are protected indefinitely.

As you may know, Microsoft is promising an interesting 2024 lineup of games across Activision, Bethesda, Blizzard, King, and Xbox Studios, so we’ll keep an eye on this. And if you’d like to know more about Xbox executive reshuffle: Microsoft’s latest moves, our article is waiting for you.

SteamVR Settings Not Working [2 FIXES THAT REALLY WORK]

Some users trying to use Steam VR with the WMR (Windows Mixed Reality) headsets have reported that they can’t access the Steam VR settings.

Here is what a user had to say about this topic on Reddit:

I have been troubleshooting this issue for a while and I have not found a fix yet. When selecting the “Advanced Settings” menu in SteamVR dashboard (in VR), an empty screen shows up. I can still run OpenVR Advanced Settings from the desktop, but not solving this issue is driving me nuts. Uninstall/reinstall did not help.

This issue seems to be present when users tried the WMR headset inside Steam VR on computers using an integrated graphics card and also a dedicated graphics card.

Even though this issue is not very common, it can be extremely annoying not to be able to access the advanced settings inside their Steam VR application.

For these reasons, in this article, we will explore some of the best solutions to deal with this issue, and get back to playing your favorite VR games using Windows Mixed Reality headsets inside Steam VR.

What to do if SteamVR isn’t working?

1. Try using the Beta versions of Steam VR

  1. Open up the Steam application on your PC.
  2. Click Library -> right-click Steam VR -> select Properties.Steam VR Properties - Steam VR settings not working
  3. Select the Betas tab.
  4. Under Select the beta you would like to opt into list -> select beta – SteamVR Beta Update.Steam VR beta update - Steam VR settings not working
  5. Close the window and wait for the update process of SteamVR to finish.

SteamVR Home has stopped working? Fix it now with this guide!


2. Change settings in Nvidia/AMD control panel

Note: You will need to force Steam, Steam VR, VR.exe, and also WMR applications to run on the dedicated graphics card.

Nvidia graphics cardnvidia logo - Steam VR settings not working

  1.  Right-click on an empty area on your desktop -> select NVIDIA Control Panel option.
  2. Select the Desktop menu -> enable Run with graphics processor.
  3. Go back to your desktop -> right-click the app you want to force to use the dedicated GPU.
  4. Hover your mouse over the option Run with graphics processor -> select High-performance NVIDIA processor.

AMD graphics cardAMD LOGO - Steam VR settings not working

  1. Right-click on an empty area on your desktop -> select Catalyst Control Center.
  2. Select Power -> select Switchable application graphics settings.
  3. Here you will be able to see a list of apps AMD apps that can be modified.
  4. Click on Add application button -> select the EXE of the app you want to modify.
  5. After selecting the specific app -> click the drop-down menu next to it -> select High Performance.

In this article, we explored the best solution to deal with Steam VR settings not allowing you to access the menu. Please follow these steps carefully in order to avoid any issues.

Let us know if this guide helped you solve your issue by using the comment section below.

READ ALSO:

Older Windows 10 versions got three new cumulative updates

Microsoft released the July Patch Tuesday updates last week. However, these updates introduced some issues of their own. Now the Big M is back with another round of cumulative updates.

Microsoft  just released Windows 10 Cumulative updates KB4507465, KB4507466, and KB4507467. These updates are available for Windows 10 version 1709, 1803 and 1703, respectively.

This time, the company addressed different issues that previously existed in the OS. Notably, Microsoft plans to release new updates for Windows 10 October 2018 Update and May 2019 Update by the end of July as well.

What’s new in KB4507465, KB4507466, and KB4507467?

Website performance issues

Previously, users experienced performance issues on websites that use WebAssembly. These issues have been resolved in the latest batch of cumulative updates.

IE authentication bug

There were some reports that a bug prevented the personal identification number prompt from popping up in Internet Explorer. Microsoft released these updates to address this issue.

Windows Event Log service issues

KB4507466 fixed a bug that prevented Windows Event Log service from processing notifications.

Account recognition issues

Some systems had problems with recognizing Azure Active Directory or Microsoft accounts. At times Windows 10 users had to sign in again to resolve this issue. All three Windows 10 cumulative updates address the same problem.

Windows Hello bugs

Microsoft addressed two different issues related to Windows Hello in KB4507466. The first one is related to the PIN policy and the second one deals with authentication issues.

SMB performance issues

KB4507466 resolves performance issues for some SMB clients with directories containing more than 500,000 files.

Window-Eyes screen reader app issues

There were some reports that users experienced issues when they launched and used the Window-Eyes screen reader app. The application either failed to launch completely or some features didn’t work properly due to this issue. Thankfully, these issues have been fixed now.

NTFS bug

Microsoft released KB4507465 to address a bug that existed in the New Technology File System (NTFS).

Known issues

Microsoft acknowledged many known issues in the recent updates. You can check out the respective changelogs to find out the details. The company plans to release a fix very soon.

RELATED ARTICLES YOU NEED TO CHECK OUT:

Microsoft kicks off controlled 19H2 feature rollout with preview build 18362.10006, now available for a subset of Slow Ring insiders,

Microsoft today is announcing Windows 10 19H2 build 18362.10006 to a subset of Windows Insiders in the slow ring. This release will appear as a cumulative update, and not as a full build update in Windows Update. Given Microsoft’s progressive ways of testing features in builds, it also turns on some of the new features that were previously turned off by default with the previous build 18362.10005.

If you’re one of the lucky few that are seeing build 18362.10006, this now means you’ll be able to enjoy some new features. One of those includes the ability to voice activate Alexa above the Windows 10 Lock screen. Another feature is Key-rolling or Key-rotation features which enables secure rolling of recovery passwords on MDM manages AAS devices. You can see the list of other changes and known issues right here.

As of July 17th, this is now the third Windows 10 19H2 build to be released by Microsoft. This follows both build 18362.1 released on July 1, and build 18362.10005 from July 15th. Today’s release will also include all the fixes from KB4507453 for the May 2019 Update.

Skype to lose SMS Connect feature at the end of August

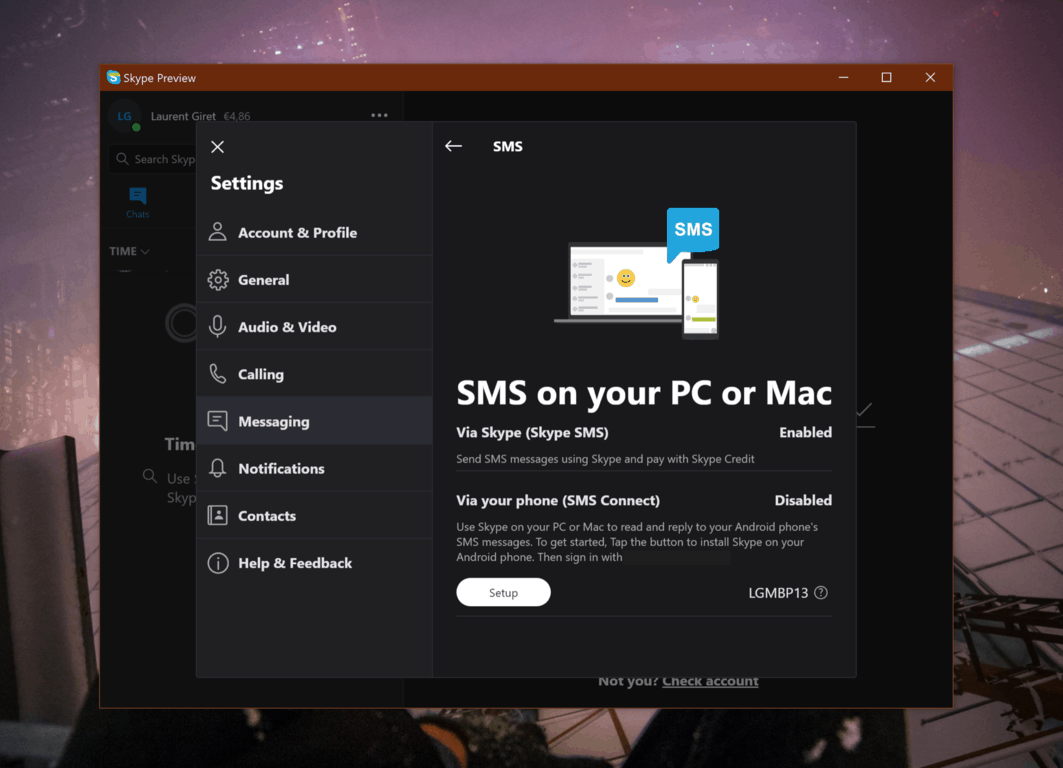
Microsoft’s Skype app will soon lose the SMS functionality that allowed users to send and receive SMS from an Android phone. The feature will stop working after August 30 , and Microsoft is inviting users to switch to the Your Phone app after that date. If you’re using the Skype app, you may be notified about the upcoming retirement of SMS Connect right within the app.

Here’s what Microsoft said about the retirement of SMS Connect on a support page:

After limited availability, we decided to remove SMS Connect functionality from Skype. SMS Connect will no longer be available after August 30th, 2019 but don’t worry, you can still find all your individual SMS conversations with full history on your phone.

If you want to continue reading and replying to SMS messages from your computer and you’re using Windows 10, we recommend you install and start using the Your Phone app from Microsoft. With this app, you can send and receive SMS or MMS messages, share photos between your phone and computer and more. The Your Phone app is continuing to evolve so stay tuned for more feature updates.

SMS Connect in the new Skype app was a replacement for the SMS Relay feature that was previously available on the Skype UWP app for Windows 10 And Windows 10 Mobile. As Your Phone on Windows 10 now provides a more complete feature set for Android users, it didn’t make sense for Microsoft to keep SMS Connect in Skype. It’s worth noting that it will still be possible to use your paid Skype credit to send SMS from Skype after August 30, as this feature isn’t being discontinued.

How to send feedback about Windows 10

With Windows 10, Microsoft introduced a new community-driven development model where feedback from users is not only valued, but expected. Although the operating system’s feedback request notifications are often maligned, it might be you actively want to report a bug, request a feature or provide your commentary on the most recent changes.

You can do any of these through Windows 10’s built-in Feedback Hub app. This acts as a direct link through to Microsoft engineers working on Windows 10. Although you can’t expect an individual response to each piece of feedback, your comments will be used to help improve the software.

Screenshot of Feedback Hub in Windows 10

To submit your feedback, launch Feedback Hub from the Start menu. Before creating new feedback, you should check whether a similar item already exists.

Search for your problem or feature request in the “Give us feedback to make Windows better” search bar on the Feedback Hub homepage. If anything relevant shows up, you should upvote it to show your support, instead of opening new feedback. Duplicate reports make it harder to identify the scale of issues and can hide other feedback.

Feedback Hub duplicate feedback in 18922

Microsoft’s currently working to improve this process. Future Windows 10 versions will be able to automatically identify possible duplicates, so you might not need to make so many manual searches. The feature’s currently only available to Insider testers.

Once you’ve determined your report is an original piece of feedback, you can proceed with adding it to the database. Click the “Feedback” button in the left navigation menu and then the blue “Add new feedback” button on the screen which appears.

Screenshot of Feedback Hub in Windows 10

Fill out the form to file your comments. Start by adding a title to your feedback, which should succinctly describe your issue or request. Avoid being too technical, but don’t be ambiguous either – you want Microsoft engineers and other Feedback Hub users to understand what the problem is.

Screenshot of Feedback Hub in Windows 10

Next, you can write your detailed explanation in the long-form textarea. If filing a bug report, you should include as much description of the issue as possible. Try to provide a step-by-step guide to reproduce the problem, or explain what you were doing when the bug occurred. If you’re submitting a feature request, try to clearly articulate what you’d like to see included – if you’re too vague, you might find readers don’t fully understand the idea.

Screenshot of Feedback Hub in Windows 10

Once you’ve written your feedback, you’ll need to tag it with a category. Select whether it’s a Suggestion or a Problem and then use the dropdown menus to find the most appropriate category. The Feedback Hub app will also suggest some common categories in case you’re unsure.

Screenshot of Feedback Hub in Windows 10

Finally, click “Next” to access the last section of the form. Here, you can add a screenshot or a file, which might be useful if you need to illustrate an issue. It’s also possible to launch a screen recording session – if you’re encountering a bug which you can reliably reproduce, consider using this option to show Microsoft exactly what’s happening.

You can now click “Submit” to send your feedback. It will appear back on the Feedback page of the Feedback Hub, under the “My feedback” section. If you’re fortunate, you might get a reply from a Microsoft engineer or other community members, who may express support for your idea. The Feedback Hub uses an upvoting system to highlight popular suggestions; remember to upvote other users’ feedback before filing your own to avoid any unintentional duplicates!

Microsoft plans big gamescom 2019 presence with demos for Project xCloud, Age of Empires II Definitive Edition, more

Following a very busy E3 in June, the Xbox team will come back to Cologne, Germany for gamescom 2019 next month. The annual trade fair for video games will open its door on Wednesday, August 21, but Microsoft will have a special Inside Xbox episode live from Cologne on Monday, August 19 at 5:00 p.m. CEST (8:00 a.m. PDT).

Starting Wednesday, August 21 to Friday, August 23, Microsoft open both its Xbox booth in Hall 8 of the Koelnmesse, but there will also be an “Xbox Open Doors” multiday experience at the Gloria Theatre in Cologne. “Entry to Xbox Open Doors is free and fans will be able to participate in community events, game tournaments, panel sessions and other exciting experiences,” the team said today, and more details about Xbox Open Doors will be shared very soon.

Back to the Xbox booth at gamescom, Microsoft plans to have close to 200 gaming stations this year where attendees will be able to play upcoming Xbox Game Studios titles such as Age of Empires II Definitive Edition, Battletoads, Bleeding Edge, Gears 5, Halo: The Master Chief Collection on PC, and Minecraft Dungeons. As for third-party titles, Borderlands 3, which will be released three days after Gears 5 will also be playable at the Xbox booth, along with Doom Eternal, NBA 2K20, and Tom Clancy’s Ghost Recon: Breakpoint.

Microsoft’s Project xCloud game streaming service will also be available for testing at gamescom. Microsoft allowed select journalists to try the service at E3 last month, and Project xCloud was also available for testing at opening of the first Microsoft Store in London last week. Public trials for Project xCloud are expected to kick off in October, just a month ahead of the launch of Google’s competing Stadia service.

If you’d like to attend the biggest gaming event in Europe next month, you can get your tickets on the official gamescom website. We’ll be making the trip to Cologne this year, so you can expect lots of news about Project xCloud and upcoming Xbox Game Studios titles on OnMSFT next month.

Microsoft and AT&T announce “extensive” strategic alliance on cloud, 5G, and AI

Microsoft on Wednesday, July 17, announced what it is calling an “extensive multiyear alliance” with AT&T on cloud, A.I. and 5G technologies. With the goal of “improving how people live and work today and in the future,” Microsoft will also become AT&T’s preferred cloud provider for non-network applications and will support AT&T’s consolidation of its data centers.

Under this new extensive alliance, AT&T will come onboard with the power of Microsoft 365, and will also move its non-network infrastructure to Microsoft Azure. Microsoft, however, will also be able to leverage AT&T’s 5G networks to design, test, and build edge-computing capabilities. There is an additional vision with this alliance to use 5G to bring instantaneous communications for first responders using AI-live powered voice translations to communicate and break down language barriers. In the words of Microsoft CEO Satya Nadella:

“AT&T is at the forefront of defining how advances in technology, including 5G and edge computing, will transform every aspect of work and life. The world’s leading companies run on our cloud, and we are delighted that AT&T chose Microsoft to accelerate its innovation. Together, we will apply the power of Azure and Microsoft 365 to transform the way AT&T’s workforce collaborates and to shape the future of media and communications for people everywhere.”

Other plans under the alliance will see both companies bring voice, collaboration, conferencing, intelligent edge, networking, IoT, public safety, and cybersecurity solutions. In addition, there are separate goals for the two companies to work on technology solutions for social good — relating to sustainability, accessibility, and community challenges such as homelessness. This ties in with both Microsoft’s affordable housing initiative and AT&T Believes.

Both Microsoft and AT&T already have worked on enterprise networking, IoT, and blockchain solutions, and more services will be announced later in 2019.

There Was a Problem Updating your Controller [Fixed]

Have you ever had There was a problem updating your controller error while you were trying to update your Xbox One controller? If the answer is Yes, you don’t have to worry because a lot of other users have complained about this issue.

However, there’s a way to fix this problem, and in this article, we’ll show you how to do it.

How to fix There was a problem updating your controller error?

1. Update your controller using the USB connection

usb cable there was a problem updating your controller
  1. First, you will have to download and install the Xbox Accessories app from Microsoft.
  2. After this, launch the Xbox Accessories app that you have installed before.
  3. Then, use a USB cable to connect your Xbox One to your computer.
  4. When the controller is connected, it will show a message Update Required, only if an update is mandatory.
  5. If the message doesn’t appear, just click the three dots to go to more options.
  6. Now, please click on the box Firmware version, then click continue and wait until the process is complete.
  7. Click on Close and now enjoy. Your Xbox One controller is updated.

Note: Few users reported that their cable was the problem, so you might want to try updating the controller using a different micro-USB cable.

2. Remove the controller batteries

remove controller batteries there was a problem updating your controller
  1. Remove the controller batteries.
  2. Now connect the controller to your PC via a micro-USB cable.
  3. Wait for a few minutes. During this step, noting will be shown on the screen since the process performs in the background.
  4. After waiting for a couple of minutes, try to update the controller again.

Note: The option to update the controller might be grayed out, but it will still work.

We hope that these solutions helped you resolve the problem and now your Xbox One controller is updated.

Printer will not accept new cartridge [SOLVED]

One of the most common printer issues is that the printer will not accept a new ink cartridge. This issue appears on all printer brands, and with all ink cartridges brands, so the issue is rather well-known.

In this article, we will discuss how to avoid and fix this error once and for all.

What to do if printer won’t accept new cartridge?

1. Check your cartridge

printer cut - printer won't accept new cartridge

  1. Make sure you removed the protective plastic strip off of your cartridge before attempting to install it.
  2. Your printer software might not be updated.
  3. The connectors for the cartridges might be dirty.
  4. You bought the wrong type of toner for your machine.

2. Remove the old cartridge and wait

print-head - printer won't accept new cartridges

  1. Remove your old cartridge from the printer.
  2. Wait for 10 minutes or more removing the old cartridge.
  3. Insert the new cartridge and check if the issue is still there.

Need to align printer cartridges? Check this guide to learn how to do it!


3. Restart your printer

printer epsom - printer won't accept new cartridge

  1. Turn off the power and unplug your printer from the wall socket.
  2. Wait for 10 minutes.
  3. Plug everything back in, and try re-inserting the new cartridge.
  4. Turn the power back on and check to see if your printer recognizes the cartridge now.
  5. If this doesn’t work, please follow the next method.

4. Clean the toner cartridge

toner - printer won't accept new cartridge

  1. Turn off and unplug your printer.
  2. Remove the cartridge, and gently wipe the metal connector with a soft cloth.
  3. Check and clean the connector inside your printer.
  4. Try inserting the cartridge again.

5. Update the firmware or printer software

printer samsung - printer won't accept new cartridge

  1. As per the manual received with the printer, you should try updating the software and firmware of your device.
  2. Once the firmware is up to date, check if the problem is still there.

If your printer won’t accept new cartridge, be sure to try all of our solutions. If our solutions worked for you, feel free to let us know in the comments section.

READ ALSO:

Computer starts up with Devices Diagnostic Level set to Basic [FIX]

A wide range of users have reported that their computer starts-up with Devices Diagnostic Level set to Basic. More than this, it seems like the files that were stored both in the local accounts and apps installed were removed as well.

This is an extremely annoying problem, as you can’t get access to your main account, and all files seem lost a never-ending loop of moving from one profile to another.

The issue seems to arise when computer experience a power cut and shuts down instantly without any chance of saving the session. This can cause Windows 10 to enter a never-ending loop of creating a new temporary backup profile, without access to the original files.

What to do if your Devices Diagnostic Data level has been set to Basic?

1. Restart your computer

restart windows - Computer Starts-up with Devices Diagnostic Level set to Basic

  1. Click the Start button.
  2. Select the Power button and choose Restart from the menu.
  3. Once your PC restarts, check if the problem is still there.
  4. If the issue is still present, try restarting your PC a few more times.

2. Create another public profile in order to try and access the files on your hard-drive

  1. Press Win+X keys -> select Settings.settings - Computer Starts-up with Devices Diagnostic Level set to Basic
  2. Click on Accounts -> select Family & other users.accounts settings - Computer Starts-up with Devices Diagnostic Level set to Basic
  3. Select Add someone else to this PC.
  4. Choose I don’t have this person’s sign-in information.
  5. Select Add a user without a Microsoft account.
  6. Enter the credentials required (username and account password).
  7. Log into that new account.
  8. Search your computer (usually the: C drive), for a folder called Windows.old, or named after the user account that you encountered the issue in.
  9. Select all the files stored there and move them to an external hard-drive.
  10. Log into your administrator account, and follow the next method.

Want to remove Windows.old folder and free up space? Check out our in-depth guide!


3. Change Diagnostic and Usage Data Settings

  1. Press Win+X keys -> choose Settings -> Privacy.Privacy settings - Computer Starts-up with Devices Diagnostic Level set to Basic
  2. Select Diagnostics & Feedback.diagnostics and feedback - Computer Starts-up with Devices Diagnostic Level set to Basic
  3. Change the Diagnostic and Usage Data Settings to Full.
  4. Restart Windows and log into your administrator account.
  5. Delete all other profiles from your PC.

In this article we explored some of the best troubleshooting methods available for this issue. We would love to know if this guide helped you solve your problem.

Please feel free to let us know by using the comment section below.

READ ALSO:

Microsoft Forms now detects and blocks phishing attacks automatically

Microsoft Forms is a popular service that is used by millions of people around the world to create polls and surveys, as well as quizzes.

The tech giant has recently introduced Microsoft Forms Pro to enhance the capabilities of this service.

We can not deny the fact that phishing attacks are on the rise these days. The attackers are constantly looking for new ways to steal your sensitive information.

Thankfully, Microsoft decided to come up with a better strategy to restrict the scammers from using their service. The company recently implemented an automatic phishing detection technique in Microsoft Forms. Scammers can no longer create forms to steal your private information.

You must be wondering how the automatic phishing detection technique works. Attackers often used convincing titles for the forms. They did their best to design these forms as a legit source of feedback collection.

Microsoft has now limited the use of these practices by implementing an intelligent system that can detect when something is wrong.

This is done by detecting redirections to suspicious links, passwords collection in surveys and more. You can now report a suspicious phishing form by using the “Report abuse” option available under the Submit button.


Use these anti-hacking software for Windows 10 to prevent hackers from collecting private information.


Office 365 users are under attack

Microsoft took this decision due to the increased number of phishing attacks last year. Office 365 users sent and received around 470 billion malicious emails in 2018.

These emails were mainly malware or phishing attacks. Microsoft was unable to prevent such activities despite having dedicated Spam Analysis and Phishing Analysis teams.

However, it is worth noting that this problem is not just confined to Microsoft Forms. The entire Office 365 community is under attack. Microsoft is currently working on additional protection mechanisms to deal with these issues.
Microsoft recommends its users not to submit sensitive information to online forms and surveys. Furthermore, the company  published a complete guide to help users report phishing scam messages much quicker.

Comment down below if you have ever encountered a phishing attack via online surveys and forms. How did you deal with it?

RELATED ARTICLES YOU NEED TO CHECK OUT:

There Was a Problem With the Printhead [Fix]

Many users reported There was a problem with the printhead error while trying to print certain documents. This error will prevent you from printing, given that the printhead is a vital component.

While there are many printhead errors, this one, in particular, is tricky to troubleshoot, given the lack of available information. But we have listed some verified solutions that helped others! Keep reading to find out!

How do I fix There is a problem with the printhead?

1. Clean the printhead

  1. First, you will have to press the Power button to turn off the printer.
  2. Disconnect the printer from the power outlet.
  3. Then, open the cartridge access door.
  4. After this, remove all the cartridges and put them somewhere with the ink opening up. Do not leave the cartridge outside of the printer for longer than 30 minutes.
  5. Now carefully, lift the latch handle on the print carriage until it stops.
  6. Then carefully remove the printhead, also by lifting it up.
  7. And finally, clean the printhead.

While cleaning the printhead, three areas need particular attention since these are the ones that often trigger issues, especially the There is a problem with the printhead error:

  • The plastic ramps on both sides of the ink nozzles.
  • The edge between the nozzles.
  • The electrical contacts.
Tip icon Tip
Be very careful when cleaning the nozzles and the electrical contact areas. Do not touch the nozzles and the electrical contact areas with your fingers. Clean them only with cleaning materials.

2. Restart the printer

  1. First, turn on the printer and wait until the printer is idle and silent.
  2. After this, disconnect the power cord from the rear of the printer and unplug it from the wall outlet.
  3. Now, wait 1 minute and plug the power cord back into the wall outlet.
  4. Reconnect the power cord to the rear of the printer, then turn on the printer and wait until it is again idle and silent.

Once done, check whether There is a problem with the printhead error disappears.

3. Replace the printhead

If the previous methods didn’t work, try replacing the printhead. You can purchase one from the manufacturer’s official website, any e-commerce portal, or a reliable shop nearby. With the latter two, purchase a printhead compatible with the printer.

If the new printhead doesn’t work, you might want to take your printer to the repair center and ask the professional to take a look.

By now, There is a problem with the printhead error should be fixed, and the printer up and running just fine! And if you’d like to discover more tips and tricks, resolve printhead issues on your HP 6830 printer with these techniques in no time.

Before you leave, do check the best printer management software to print documents and be notified in case of issues effortlessly.

Tell us which fix worked for you in the comments section below.

Google Calendar won’t delete recurring events [FIXED BY EXPERTS]

A large number of users have complained that Google Calendar won’t delete recurring events. This issue seems to be extremely common.

Having to deal with this Google Calendar issue while also making sure you’re keeping up to date with your latest meeting arrangements can be extremely annoying.

Here is what one user had to say about this issue on Google Support forums:

I cannot delete one event on Google Calendar reoccurring events. It disappears and shows back up.

In this article, we will explore some of the best troubleshooting methods to help you regain control over your calendar. Read on to find out more.

What to do if Google Calendar event won’t delete?

1. Update your browser to the latest version

  1. Click the three dots button found at the top-right side of your screen.Chrome settings button - Google calendar won't delete recurring events
  2. Hover your mouse over the Help button -> select About Google Chrome.Check Chrome version - Google calendar won't delete recurring events
  3. Another tab will open that will check for the latest version released.
  4. Restart Chrome and check to see if the issue persists.

2. Open up your browser in Incognito Mode

  1. Right-click the executable file for Google Chrome -> select New Incognito Window.Incognito window Chrome - Google calendar won't delete recurring events
  2. Access Google Calendar and try to delete the recurring event again.
  3. If this method didn’t solve your issue, please follow the next method.

3. Check when the event/events end, and try to delete them from there

calendar app - google calendar won't delete recurring events
  1. Some users have managed to delete the problematic entry in their calendar by tracing the end date of the event to a few years in the future.
  2. You will need to find the end date setting of the event you’re trying to delete and delete it from that location in the calendar.

4. Remove all the people that shared the calendar

agenda calendar - Google calendar won't delete recurring events
  1. Try removing all the people that had access to the event from the calendar.
  2. After doing that, try to remove the event again.

5. Check other non-Google calendars

day-planner - Google calendar won't delete recurring events
  1. Not being able to remove a recurring event in Google Calendar might also be caused by the calendar being connected to other calendar services like Microsoft Outlook.
  2. Open the other Calendar app, and make sure that the event is removed from there first, then try to remove the recurring event from Google Calendar as well.

In this article, we explored some of the best troubleshooting methods to fix the issue caused by not being able to remove a recurring event from your Google Calendar.

We would love to know if this guide helped you solve your issue. Please feel free to let us know by using the comment section found below this article.

Users switch to OneDrive after Dropbox limits free accounts to 3 devices

Many people have been using free Dropbox accounts for years. However, Dropbox made some changes to its policy in March this year.

The company limited free Basic account users to only three devices. The support article reveals that Professional, Plus and Business users can still continue using their Dropbox accounts with an unlimited number of devices.

Notably, this decision does not affect those who have already connected three devices to the Basic account. But they won’t be able to add more devices inthe  future.

Dropbox users are annoyed by the fact that the company didn’t inform them about the change. Only a few users received emails from Dropbox while others claim that they were not informed.

The conversation on this Reddit thread shows that many users already decided to switch to OneDrive.

Dropbox vs OneDrive: Which is better?

Some people are concerned about the lack of encryption in OneDrive. They don’t want their data to be accessible for Microsoft.

However, you might not be aware of the fact that encryption issues have been fixed. The files stored on OneDrive are now encrypted.

Moreover, many people are willing to pay the increased price to enjoy smart sync features.

Well, I still use it. Dropbox just works and I have had many troubles with Microsoft OneDrive not syncing or taking hours to sync the smallest Excel doc. No thanks! I don’t mind paying for a service and don’t fault them for altering their free service. I do fault Microsoft for their crapy syncing, and have seen the low level of quality on pretty much all Microsoft software for going on years now.

Many people already shifted to OneDrive months ago. They are managing two separate accounts for their personal and professional needs.

One of the major reasons behind the switch is that Dropbox started sending emails to its clients about their data being deleted soon.

As you can see, both of these cloud storage platforms have their own features. Now it’s up to you if you want to continue using Dropbox at an increased price or switch to OneDrive.

RELATED ARTICLES YOU NEED TO CHECK OUT:

PC Automatically Starts When Plugged in [FIXED BY EXPERTS]

Many users reported that their PC automatically starts when plugged in. This can be a problem for some, and in this article, we’ll show you two simple methods you can use to fix this problem.

What to do if the computer turns on without pressing the power button?

1. Remove motherboard battery

motherboard battery pc automatically starts when plugged in
  1. Note: This solution requires you to open your computer case. If your PC is under warranty, perhaps it would be best to contact the official repair center.
  2. Open your computer case and locate the motherboard battery.
  3. Carefully remove it from the motherboard. Note: Be extra cautious not to damage any other hardware while removing the battery.
  4. Once the battery is removed, wait for 10 minutes or more, and insert the battery again.
  5. Start your PC and check if the problem is still there.
  6. Note: If you’re not comfortable with removing the battery on your own, contact a professional or try our next solution.

2. Reset BIOS settings

access bios pc automatically starts when plugged in
  1. Enter BIOS. If you don’t know how to do that, be sure to check out a guide on how to access BIOS.
  2. Now, wait for your BIOS settings to load. This should take only a few seconds. After the loading is complete, the BIOS settings menu will appear on the screen.
  3. Look for the Setup Defaults option. If this option isn’t available, look for Factory Default, Setup Defaults, Reset to Default or something similar.
  4. After this, you will have to select the Load Setup Defaults.
  5. Now you will just have to save the changes. After this, the process of exiting BIOS settings will start and your computer will automatically restart.

We hope that this article helped you solve the issue. After using these two solutions, your PC shouldn’t start automatically when plugged in anymore. If you found our solutions helpful, feel free to let us know in the comments section below.