What to do if pop-up window won’t go away on Windows 10/11


8 solutions to remove stubborn pop-up windows

  1. Force-close the pop up window
  2. End background process
  3. Reboot your computer
  4. Use Windows’ built-in maintenance function
  5. Restore your system to an earlier time
  6. Use Malwarebytes or Adwcleaner
  7. Install Windows Updates
  8. Uninstall & reinstall programs

Pop ups are relatively common features of Windows computers today. More often than not, a pop up serves as a notification or short cut on a computer’s screen, and this would normally go away on its own or simply by clicking exit. However, at times, due to a host of individual or combined factors, a pop up window won’t go away.

If you are having this problem, you are in the right place. This article is developed to proffer solution(s) to the pop window won’t go away problem.

Basically, pop ups are some kind of unsolicited messages or notifications from computer programs (system and installed programs). This is inclusive of web browsers like Chrome, Firefox and others programs that use the Internet. Most times, these pop ups request your approval or decline, and at times, it could constitute a lot of nuisance.

This becomes worse when a pop up window won’t go away, and no matter how hard you try, it just stares right back at you on your computer screen.

While there are many factors that could make a pop up window not to go away, the most significant of these factors is malware or virus attack, which disrupts computer system’s performance.

Other factors, which could be responsible for the pop up window error include incomplete installation of  program(s), high CPU (frozen system), apps running in background, corrupt .exe files and more.

Nevertheless, this article has provided some of the best, proven, solutions to resolve this issue.

What you can do if pop up window won’t close

Solution 1: Force-close the pop up window

This is the basic method for shutting down a program, and it can also be employed to close a pop up window. To force-close a pop up window on your computer, simply press the Alt + F4 keys.

If a pop up window won’t go away as a result of a minor technical issue, then force-closing it should ensure it doesn’t show up again. However, if the error is caused by more severe factors like file corruption, system malfunction or malware attack, this method might be ineffective. In this case, you can try the next solution.

Solution 2: End background process

A program running in the background might become infected, thereby resulting in a pop up window that won’t go away.

To end such infected process, follow the steps outlined below.

  • Press Ctrl + Alt + Delete
  • Click the “Task Manager” icon.
  • Select “Processes”.pop up windows wont go away
  • Right-click on an infected process and select “End process”.

If the pop up window won’t go away, try the next solution.

Solution 3: Reboot your computer

At times, a pop up window won’t go away from your home screen simply because of a minor system malfunction, which could range from clogged up files to a technical glitch. In this case, a simple reboot is usually the ultimate solution. System reboot automatically clears off temporary files from your computer, and this, most times, fixes the pop up window won’t go away error.

To reboot your computer system, simply restart it or outrightly power it down and power it up again. If this action fails to remove the pop up window, you can try the next solution.

Solution 4: Use Windows’ built-in maintenance function

This solution is specific to Windows users, who are having the issue of pop up notifications that won’t go away. Windows maintenance function should clear the notification pop ups from your screen.

Follow the steps below to execute this function:

  • Click on the “Start” button.
  • In the search box, input the keyword – Control Panel and press “Enter”
  • Navigate to the top right of your computer screen and locate “View by”.
  • Change the default “View by” option from “Category” to either “Large Icons” or “Small Icons”.
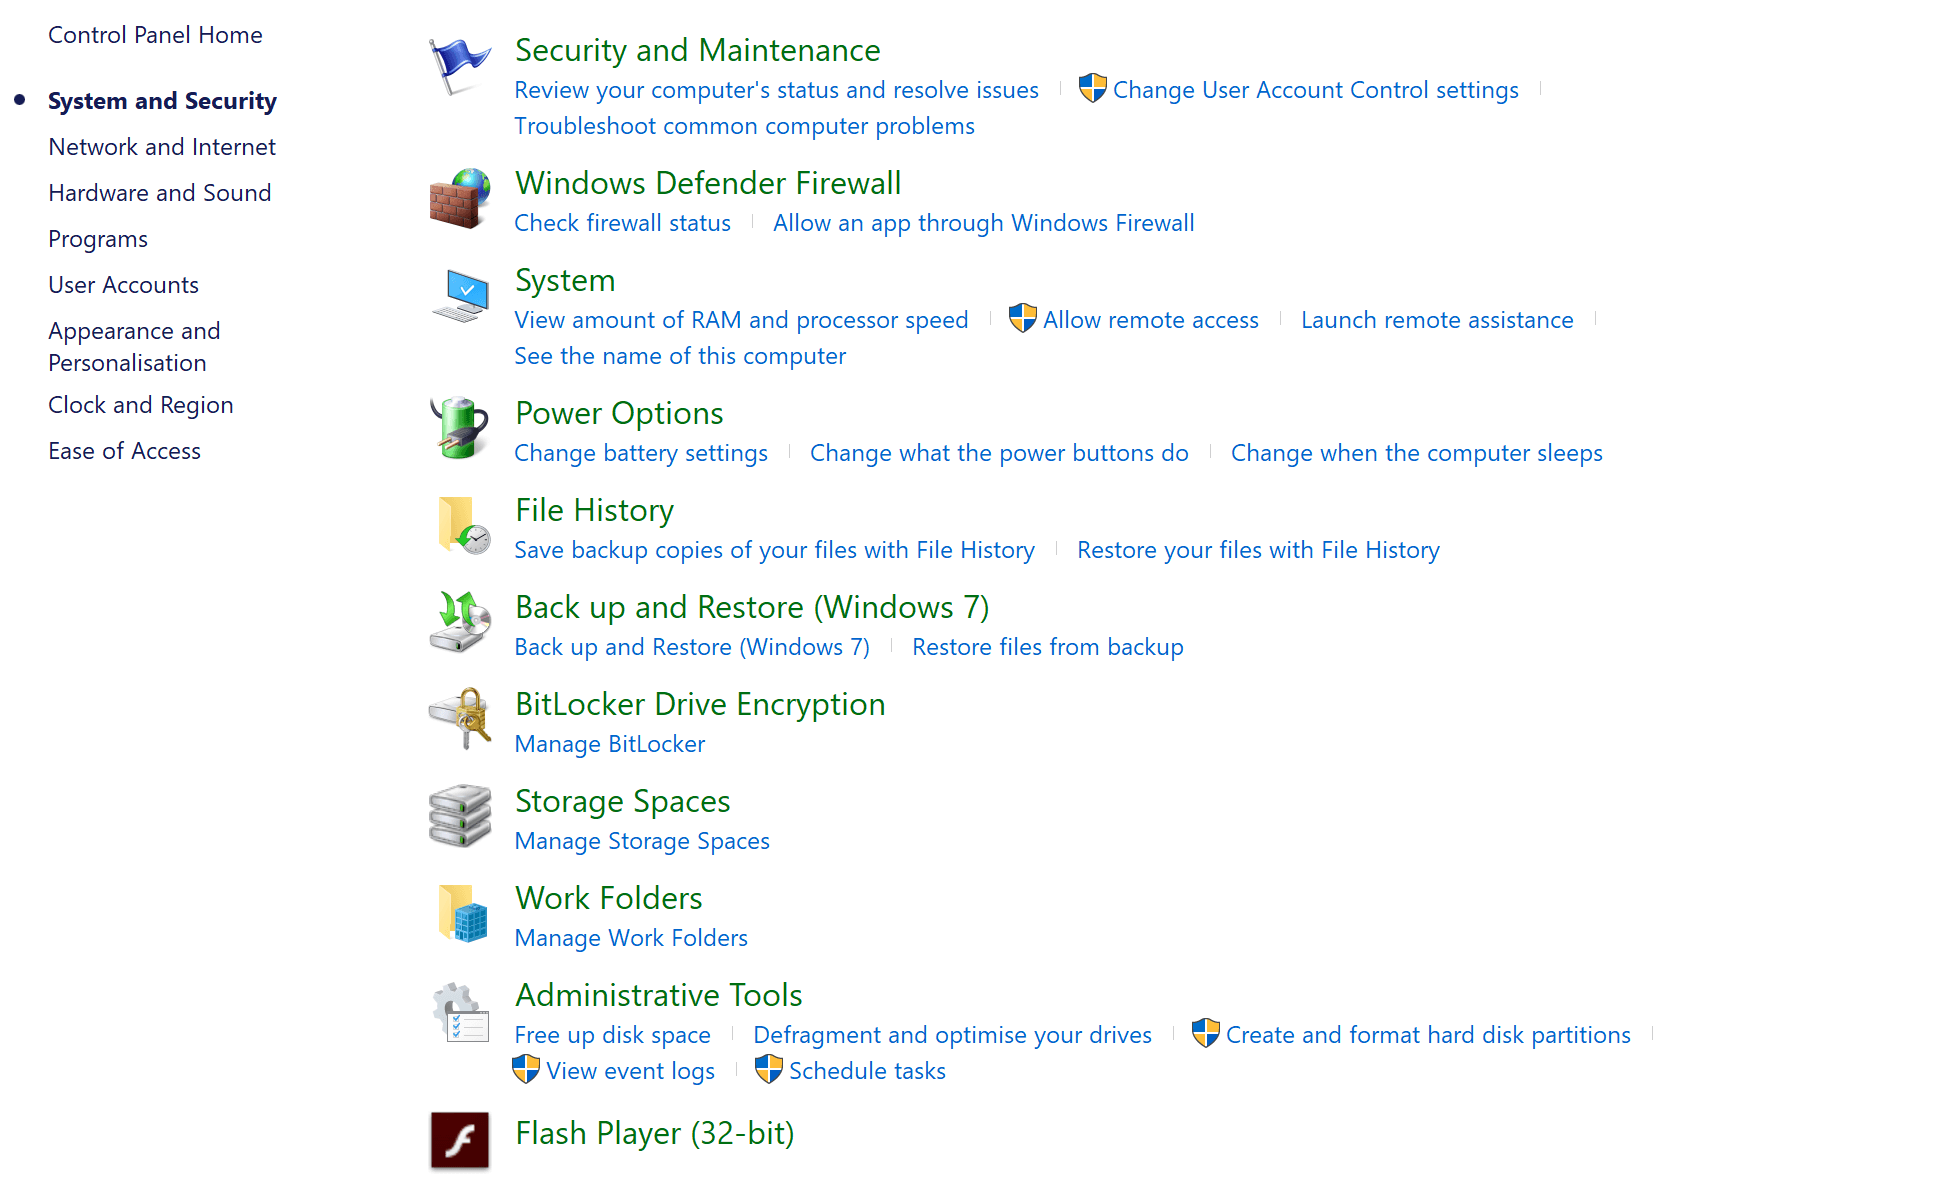
  • Click on “Security and Maintenance”.
  • Select “Change Security and Maintenance Settings”.pop up windows wont go away
  • Navigate to “Maintenance Messages” and locate the “Windows Backup” checkbox.
  • Uncheck the box.
  • Save your changes by selecting “OK”.
  • Reboot your computer system.
  • After your computer has restarted, repeat the steps up to the sixth step.
  • At the seventh step, under “Windows Backup” checkbox, check the box.
  • Select “OK” and restart your computer.

Note: This process is specifically recommended on Windows 10. If, after trying this method, your pop up window still won’t go away, you can try the next solution.

Solution 5: Restore your system to an earlier time

System restore could be the ultimate solution to the pop up window won’t go away error. This is because; it restores your system to an earlier time, before the error.

To run a system restore, follow the steps outlined below.

  • Click the “Start” button.
  • Input the keyword “restore or system restore” in the space provided.
  • On the pop up options, select “System Restore“.system restore breakpoint has been reached
  • Click on “Next”
  • Select “Next” again.
  • On the displayed window, click “Finish”.

This action will automatically restart your system, and your computer will be restored to an earlier time; a day, two days or more. If the system restore process fails to permanently remove the pop up window, proceed to the next solution.

Solution 6: Use Malwarebytes or Adwcleaner

If a pop up window won’t go away, the most likely problem is virus or malware attack. Hence, the way to go is to run a scan and clear off malware, and viruses from your system. Two recommended tools in this regard are Malwarebytes and Adwcleaner. These tools will free up your system and remove the malignant pop up window from your screen.

You can try the next solution, in case the problem is not related to malware or virus attack.

Solution 7: Install Windows Updates

Installation of latest Windows update will improve the operability of your computer. As such, it will repair some corruptions on your computer system (even the pop up window won’t go away error).

Basically, Microsoft occasionally notifies users of new updates. However, you can check for updates and install them directly. To do this, follow the steps outlined below.

  • Click “Start”.
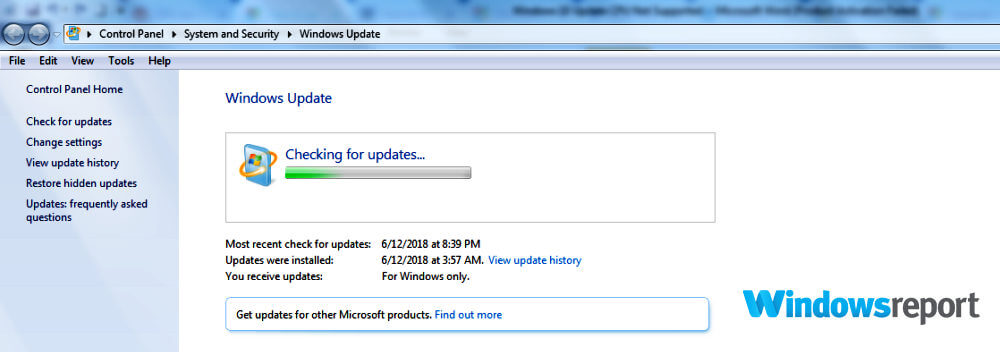
  • Type “Windows Update” in the searchbox and click Enter.
  • Install all available updates (if any), by clicking on Select “Install Updates”.pop up windows wont go away
  • Wait for a couple of minutes for all the updates to install.
  • After successful installation, Windows will automatically restart.

Installing all available updates on your Windows computer should remove the pop up window from your screen. If this process is ineffective against the pop up window error, you can try the next method.

Solution 8: Uninstall & reinstall programs

If a pop up window is associated with a corrupt or damaged app, the ultimate solution might be to uninstall the app (and reinstall it), provided all other options have been exhausted.

You can uninstall any program on your computer by following the steps below.

  • Click the “Start” button.
  • Tap on “Control Panel”.
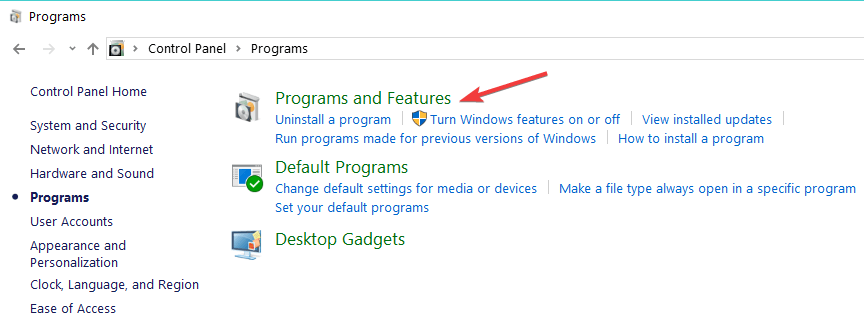
  • Select “Programs”.
  • Under “Programs, click “Programs and Features“.Programs and Features
  • Locate the affected app and click on it.
  • Select “Uninstall” and let the process run.
  • After uninstalling the program, you can download it again and reinstall it.

To uninstall a program on Windows 10, you can also follow the simple steps outlined below:

  • Click on “Settings” and select “Apps”.
  • Under “Apps”, click “Apps & Features“.apps&features windows 10
  • Click on the affected/desired app or program.
  • Click the “Uninstall” button
  • Confirm the uninstall by clicking on the pop up “Uninstall” key.
  • Follow the prompt command to complete installation
  • Download & reinstall the program.

Conclusion

Pop ups are common occurrences on computer systems today, and they are especially common on systems with web browsers and internet connections. At times, a pop up window won’t go away no matter how hard you try to close it. This is caused by many factors.

In this article, we have compiled some of the best solutions to fix the pop up window won’t go away error on your computer system. Essentially, at least one of the above outlined solutions should permanently remove a stubborn pop up window from your computer screen.

RELATED STORIES YOU NEED TO CHECK OUT:

Fix a Corrupted Save File: 5 Ways to do it

Imagine all your in-game progress lost in a matter of seconds. Hours of playthrough lost due to a game save corruption! Though not that common, corrupted game save files is still a possibility, and you will need to fix them.

And if that’s not a good enough reason to act with caution, we don’t know what it is. Either way, if that happens and you can’t play games, you can still (sometimes) fix a corrupted game save file in Windows.

What causes a save file to corrupt?

Here are a few reasons the saved files corrupt:

  • Abrupt shutdown: Abrupt shutdown is the primary reason behind the problem because it affects the process, and some vital piece of data goes missing.
  • Malware infection: Malware or virus can also affect the game saves, and render them unreadable. You could use a reliable third-party antivirus to scan for these.
  • Missing or corrupt app files: When vital app files are missing, it would affect the app’s functioning and process of saving the progress.

How do I fix corrupted game saves?

1. Scan for malware

  1. Press Windows + S to open Search, type Windows Security, and click on the relevant search result.
  2. Click on Virus & threat protection.virus & threat protection
  3. Click on Scan options.
  4. Choose the Full scan option and then click on Scan now.full scan to fix how to fix a corrupted save file

Often malware or virus affects the game files and leads to a corrupted state. To fix things, your primary approach should be eliminating or quarantining the threat. Remember, this will not fix the file but will prevent further issues.

To perform this, you most probably need an effective antivirus with strong detection tools. Hence, it’s advised to use professional antivirus technology like the one below.

⇒ Get TotalAV

2. Verify the integrity of game files (Steam)

  1. Launch Steam, navigate to the game Library, right-click on the affected game, and select Properties.library
  2. Go to the Installed files tab, then click on Verify integrity of game files, and wait for the process to complete.

When facing corrupted game save files on Steam, a quick solution is to verify their integrity. It will help restore any critical files triggering the issue and should get things running.

3. Re-establishing mods

The other reason falls to mods. Many games have an active community that puts out tons of mods. This makes it harder for the game to configure a save file. Much harder than the vanilla version.

So, removing and re-establishing mods might help. This also helps fix a broken save file in Sims 4.

4. Run the SFC scan

  1. Press Windows + R to open Run, type cmd, and hit Ctrl + Shift + Enter.cmd
  2. Click Yes in the UAC prompt.
  3. Now, paste the following commands individually and hit Enter after each for the DISM tool:DISM /Online /Cleanup-Image /CheckHealth DISM /Online /Cleanup-Image /ScanHealth DISM /Online /Cleanup-Image /RestoreHealth
  4. Next, execute the following command for the SFC scan:sfc /scannowsfc scan to fix a corrupted save file
  5. Once done, restart the computer.

Corrupt system files may also lead to issues with game saves by either conflicting with the process or preventing it altogether. A quick solution here is to run the DISM tool and the SFC (System File Checker) scan.

5. Save game data locally

A slow Internet connection or intermittent loss of network connectivity can affect the game saves done on the cloud. When you lose connectivity, some files may not be uploaded, corrupting the entire game save.

So, if you don’t have a reliable Internet connection, we recommend saving the game data locally on the PC. This will also help load things quickly, though it takes up significant disk space.

To avoid this problem in the future, make sure not to pile up saves for a single game (20 should be the top limit). Furthermore, backup saves regularly and avoid relying on the autosave feature. Creating game saves manually is the way to go!

Before you leave, do check some quick tricks to boost gaming performance in Windows.

Don’t forget to tell us about the exact game that is bothering you with the corrupted save, and we’ll do our best to help you. The comments section is just below.

How to fix Microsoft Message Analyzer errors

The most used Network troubleshooting tool for IT professionals is provided by a first-party. Yeah, Microsoft Message Analyzer is commonly used to monitor and resolve network errors. If you fall into that group, you must have run into occasional errors.

In this guide, we listed some common solutions, but for the thorough and in-depth explanation, check Technet and elaborate on your problem. They usually help users in need.

Steps to fix Microsoft Message Analyzer errors

Solution 1 – Load Windows Parser

Let’s start by loading Windows Parser from the News menu in the Message Analyzer. For some reason, the automatic update of the Windows Parser isn’t enabled by default.

Here’s what you need to do:

  1. Open Microsoft Message Analyzer.
  2. Choose the News.
  3. Select Asset Manager under Tools.
  4. Click Sync all displayed items.

Solution 2 – Increase the number of filter drivers

Some users managed to resolve certain errors by increasing the value of filter drivers you can load. By default, this value stands at 8 and we recommend increasing it to 14.

Here’s how to increase the number of filter drivers via Registry Editor:

  1. Open Registry Editor.
  2. Navigate to HKEY_LOCAL_MACHINE\SYSTEM\CurrentControlSet\Control\Network
  3. Change the MaxNumFilter value from 8 to 14. If there’s no dword MaxNumFilter, create it manually.

Solution 3 – Reinstall Message Analyzer

Finally, the usual troubleshooting step is to reinstall and re-configure the Message Analyzer. Don’t forget to clear all locally-stored configuration files and start from scratch. Some users had better luck with an older Windows iteration and downgraded from Windows 10/8 to Windows 7.

With that said, we can conclude this article. The best way to resolve any Microsoft Message Analyzer errors is to ask good folks at Technet as there’s a lot of IT professionals there, always willing to offer a helping hand in need. Don’t forget to share your experience with Message Analyzer errors in the comments section below.

RELATED STORIES YOU SHOULD CHECK OUT:

What to do if Windows 10/11 dialog box has no text


How to troubleshoot empty dialog boxes on PC

  1. Use a third-party system optimizer
  2. Restart your PC
  3. Use Windows 10 built-in repair tool
  4. Uninstall & reinstall affected program
  5. Run a system restore
  6. Clean install Windows 10

If you are getting blank dialog boxes on your Windows 10 computer, this article will provide you with methods to fix it. Normally, a dialog box is designed to facilitate decision making on your computer system. It comes up like a pop up window, either to request your approval/decline on a task or to simply present you with options on the execution of a task (or tasks).

At times, a dialog box comes up empty, with no option or information whatsoever; just blank.

Various reasons could be responsible for this error. However, the most notorious ones are those associated with Windows updates. Some of these include:

  • Incompatible graphics driver after Windows update
  • Outdated driver(s)
  • Incompatible Antivirus or other security programs
  • Bug attack after a system update
  • Corrupted system file after an update

Typically, a dialog box might come up empty as a result of one or a combination of some of the above outlined technical and security errors. In this post, Windows Report team has compiled various levels of solutions to help you resolve the Windows 10 empty dialog boxes error.

5+ solutions to fix Windows 10 empty dialog boxes

Solution 1: Use a third-party system optimizer

This type of program has built-in functions designed to fix Windows errors and improve the performance of your device.  Moreover, it frees up space on your disk, removes malware, and restores the registry values to their default settings.

Corrupted system files are often the cause of Windows errors such as empty dialog boxes. With the help of professional repair software, you can simply replace broken files with healthy ones within just a few minutes.

Solution 2: Restart your PC

Restarting a computer system is a basic troubleshooting method (probably the most basic) used to fix various forms of system errors. This method can be used to fix the Windows 10 empty dialog boxes error.

Rebooting (or restarting) a system clears off temporary files from such computer. It also closes running tasks, which could be the reason for the empty dialog boxes error. However, simply restarting a computer system to fix this error is usually ineffective; therefore, it is a necessity to use a repair tool.

Solution 3: Use Windows 10 built-in repair tool

This tool serves as the first line of defence, to combat all forms of corruptions, damages and errors on your system. The error of empty dialog boxes is no different. If, while operating your computer system or using a program, a dialog box comes up blank, then you should try the system Repair option.

Provided the error is only a minor technical issue and not caused by any serious corruption or incompatible driver, the repair tool should effectively fix the error.

To execute the Windows Repair function, follow the steps outlined below:

Note: The guideline below entails steps for repairing an error or corruption associated with MS Office.

  • Close the empty dialog box by clicking Alt + F4.
  • Navigate to the “Start” button and click on it.
  • Select “Control Panel”.
  • On the displayed window, select “Programs”
  • Under “Programs”, click on “Programs and Features”.Programs and Features
  • On the displayed window, locate “Microsoft Office” and click on it.
  • Select “Change” > “Repair”.repair microsoft office
  • Complete repair by following the command prompt on your screen.
  • Close the window and navigate to MS Office’s location.
  • Open it and execute a command to bring up the dialog box.
  • Check if the problem is resolved.

This process can be applied to all programs (system and installed) on your Windows 10 computer. To run the repair function on any program, follow the steps outlined below:

  • Under “Programs and Features”, locate the program you want to repair and right-click on it.
  • Click “Change” > “Repair”.
  • Complete repair by following the on-screen command.
  • Close the window.
  • Navigate to the repaired program’s location and click on it.
  • Execute a command to bring up the dialog box and check if it is no longer empty.

If there is no form of severe corruption, outdated system driver or acute bug attack, this simple repair should resolve the empty dialog boxes error. In case the problem persists, try the more advanced process in the next method.

Solution 4: Uninstall & reinstall affected program

As far-fetched as this method may sound, it might be the ultimate solution to the empty dialog boxes issue. This method is, however, only applicable if the error is specific to a particular program.

To uninstall a program on your Windows 10 computer, follow the steps below:

  • Close the empty dialog box by clicking Alt + F4.
  • Click on “Start” and type “settings” in the searchbox.
  • Select “Settings” from the displayed options.
  • On the displayed window, select “Apps“
  • Under “Apps“, click on “Apps & Features”.windows 10 empty dialog boxes
  • Locate the program you want to uninstall and click on it.
  • Click the “Uninstall” button
  • On the pop up window, select “Uninstall” to confirm uninstallation.
  • Follow the on-screen command to complete the process.

After the process, you can then navigate to Microsoft Store (or the program’s official download site) to download and install a new app afresh. If this doesn’t fix the issue, you can try the next solution.

— RELATED: Empty Task Manager? Fix it using these 5 solutions

Solution 5: Run a system restore

Restoring your system to an earlier time will remove recently installed updates, apps, drivers and others. This makes a system restore more effective than ordinary reinstallation, in fixing errors on computers.

To run a system restore process, follow the steps below.

  • Click on “Start” > “Control Panel”.
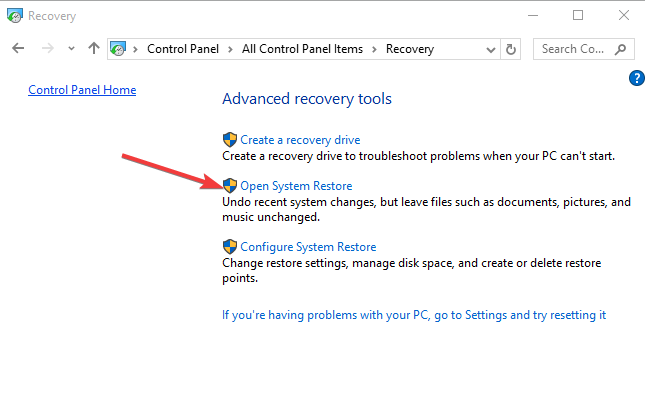
  • Locate “Recovery” and click on it.
  • Select “Configure System Restore” and click on “Configure”.
  • Select “Turn on system protection” (if not already on) to display restore points.can’t factory reset Windows 10
  • Navigate back to “Recovery” under “Control Panel”.
  • Select “Open System Restore” and click “Next”.open system restore
  • Select the recent apps, drivers, files and updates on the displayed list.
  • Click on “Scan for affected programs” and modify the date/restore point (back or forth), if needed.
  • Click “Next” and select “Finish”. This action should auto-restart your system.

After your system has restarted, reinstall any affected app. The dialog boxes should now come up just fine. However, in case your dialog boxes are still coming up empty, you can go for the last straw; the ultimate solution.

Solution 6: Clean install Windows 10

This process is the last resort and it should only be executed after all available options have been exhausted. Clean installation of Windows 10 might look too advanced for an issue as trivial as empty dialog boxes.

However, this the ultimate solution for resolving the background cause(s) of such error, as well as other inherent errors on your system.

To run a clean installation of Windows 10 using Media Creation, follow the steps outlined below:

Note: This action will clear off every app, driver, setting and all other installed programs, with the exception of system apps and personal files. Hence, it is strongly recommended that you back up every essential program and setting on an external storage medium.

Ensure you have a stable internet connection; preferably to a Wi-Fi network. This is to facilitate the downloading of the Media Creation tool.

  • Download the tool from Microsoft Website.
  • Open the tool and “Accept” the licence terms (upon review).
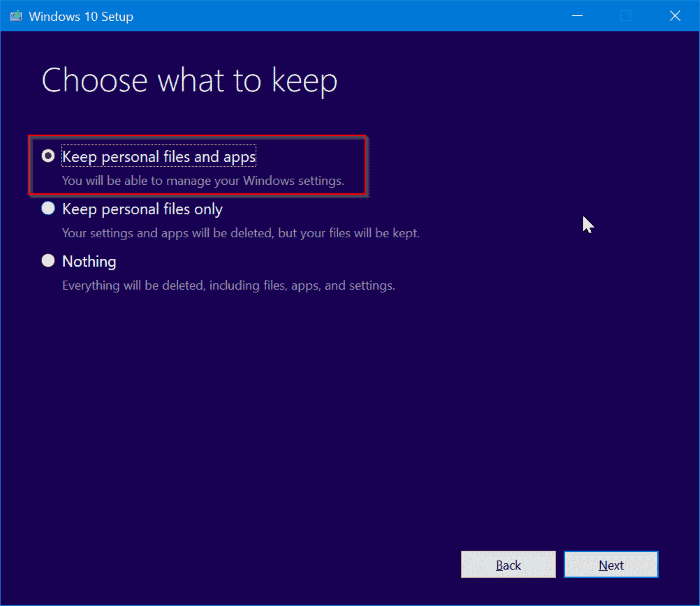
  • On the displayed window, select “Keep personal files”.Reset Windows 10 - Keep personal files and apps
  • Select “OK” to commence the clean installation.
  • After clicking “OK”, the rest of the process is automated.
  • After the new Windows 10 installation, install missing drivers manually under “Settings”.
  • Reinstall apps from Microsoft Store or other official download sites (for utility and social apps).

With the successful implementation of the clean installation, you can rest assured that your “Windows 10 empty dialog boxes” error (and other errors) would be resolved and your system will come up clean.

We recommend using a reliable program that installs Windows drivers automatically and prepares driver backups. Blank dialog boxes can be caused by outdated drivers too. The chances to experience these errors again with driver updater software will be minimal.

⇒ Get Fortect Driver Updater

Conclusion

Windows 10 empty dialog boxes could be the aftereffects of an isolated error (corruption or incompatibility of a driver), which affects only a specific program. Conversely, it could be a general issue that affects the whole system. Either way, it has the propensity for causing further damage if left unfixed.

This post has provided several solutions, ranging from the basic troubleshooting method (rebooting) to the most advanced method (clean installation of Windows 10). One of these solutions should be ideal for you, in fixing the Windows 10 empty dialog boxes error.

RELATED STORIES YOU NEED TO CHECK OUT:

How to fix Windows 10/11 Update CPU not supported errors


4 solutions to fix Windows 10 Update CPU not supported

  1. Check Windows 10 Minimum Hardware requirements
  2. Update the Compatibility Appraiser
  3. Turn On the NX (No-eXecute) Bit
  4. Disable CPU Overclocking

If you have been receiving the error “Windows 10 update CPU not supported” when attempting to upgrade to Windows 10, don’t fret because you are not alone.

Well, the problem has been a bother since the earliest days of Windows 10 but now there are multiple solutions. And there is a good chance that one of them will work for you.

In this guide, we will take you through the foolproof solutions that work for the Windows 10 Update CPU not supported issue when updating from Windows 8/8.1. Let’s delve right into this.

Steps to fix Windows 10 Update CPU not supported

Fix 1: Check Windows 10 hardware requirements

Like every other Windows, Windows 10 may not install on machines which doesn’t meet its least hardware requirements (or may install but run inefficiently) so you may have to reconfirm your machine’s hardware specifications before anything else.

Specifically, your CPU should have a minimum speed of 1 GHz. You should thus start by going to your windows properties windows to verify this.

Steps to follow:

Windows 7

  1. Click Start then type “system” in the provided search box from the menu.
  2. Click System (near the top of the results)
  3. The system specifications are displayed.

Windows 8

  1. Press the WIN key and the pause break key simultaneously on the keyboard.
  2. The system specifications are displayed.

You will, of course, need to upgrade the CPU before restarting the update. Otherwise, skip to the rest of the suggested fixes if your CPU turns out okay.

Fix 2: Update the Compatibility Appraiser

One of the causes of this error is a bug in the compatibility appraiser that comes with Windows 10 update files. Microsoft has since released the relevant updates to upgrade the tool and the error should disappear as soon as you run the updates.

Here are the required updates depending on the Windows you are currently running:

Steps To Install The Update:

Windows 7

  1. Click Start then type “update” in the provided search box from the menu.
  2. Click Windows Update (near the top of the results)
  3. In the subsequent pane click on the Check for updates. Windows will look for the recent applicable updates for your PC. Wait as it may take some moments.

cpu not supported windows 7

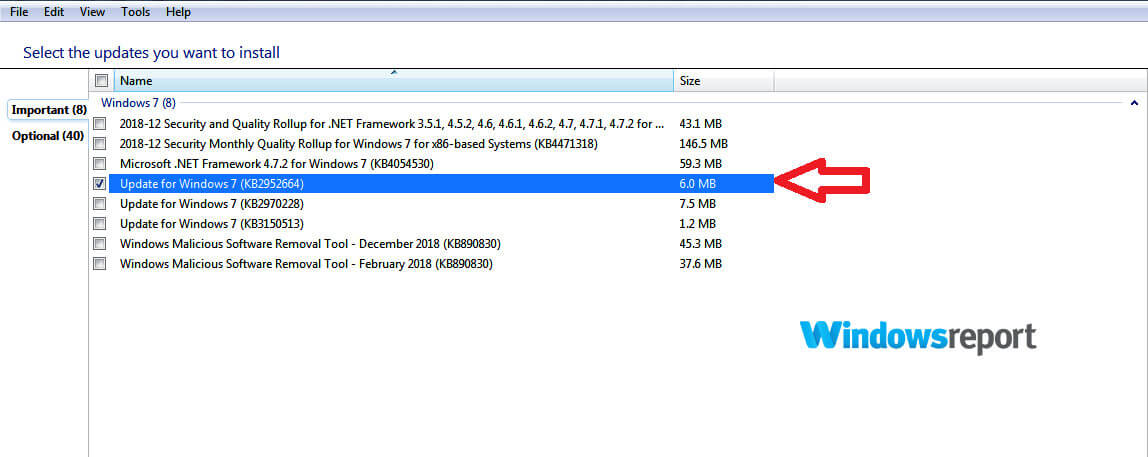
  1. To progress, click the message that pops up alerting you that some optional/ important updates are available, or requiring you to review optional/ important updates.
  2. In the displayed list (important updates), select the check box next to KB/2952664 then click OK (important updates).windows 10 upgrade says cpu not supported
  3. Lastly, click Install updates.

Windows 8/8.1

  1. Point to the bottom-right corner of your screen with your mouse then click Search. You can also swipe into Windows from the right end of your screen then tap Search.
  2. Click/ tap Settings.
  3. Type Windows Update in the search dialog box area.
  4. Click/ tap install optional updates.
  5. Click Check for updates and wait.
  6. The various updates will again be shown. Click/tap the message to access all the updates.
  7. In the displayed list (important updates), select the check box next to KB/2976978 then click/tap OK. Finally, click Install updates 

Wait for the update to run then reboot your computer. You can now turn on the PC and make a fresh attempt to update to Windows 10.

If all went well, the system should no longer report this error.

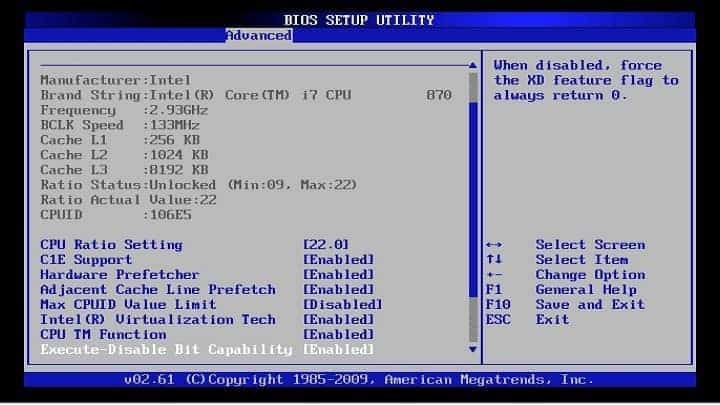
Fix 3: Turn On the NX (No-eXecute) Bit

The NX technology allows the processor to segregate areas in the memory where program code including Windows can or cannot run and can cause the annoying Windows 10 update CPU not supported error.

The solution is to disable the technology either via the settings or the BIOS.

Your computer needs to be repaired blue screen

Turn Off The NX Bits from the Windows settings

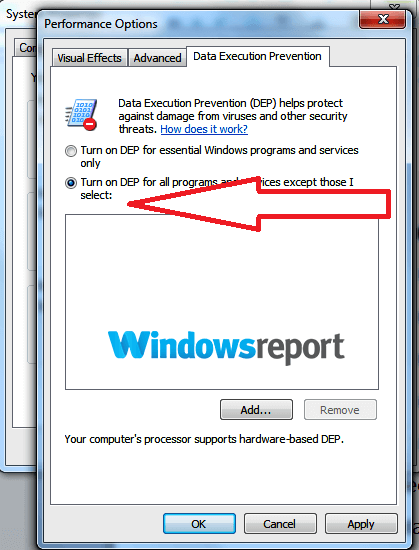
On Windows 7:

  1. Click start then type “control panel” in the provided search box from the menu.
  2. Click control panel (near the top of the results).
  3. Click system and security.
  4. Click system in the next window.
  5. Click advanced system settings.
  6. Click the advanced tab.
  7. Now select performance.
  8. Click data execution prevention option.
  9. Choose turn on DEP for all programs and services except those I select.CPU not supported - Windows 10
  1. Click ok now to close.
  2. Retry the Windows 10 installer.

On Windows 8 or 8.1:

  1. Pressthe WIN key and the pause break key simultaneously on the keyboard.
  2. Click the advanced system settings tab on the left-hand side.
  3. Click the advanced
  4. Now select performance.
  5. Click data execution prevention
  6. Choose turn on DEP for all programs and services except those i select.

Turn Off The NX Bits From BIOS

For most machines, changing the setting from the BIOS works like a charm. Here are the steps to boot to the BIOS:

  1. Turn off your computer.
  2. Press the power button to bring the computer on. Start pressing the correct key immediately the manufacturer logo has appeared and until the BIOS screen appears. For example, for HP/Compaq computers, pressing F10 takes you to BIOS. For others, it’s the F2/Esc keys.
  3. Locate for the NX settings under the BIOS advanced configuration
    Enable this setting by pressing the indicated key to change.
  4. Save the changes as you exit BIOS.
  5. Proceed to boot the computer and try to update.

TIP: NX can also be labeled EDB (execute disabled bit), Execute Disabled Memory Protection, EVP (enhanced virus protection), or even No Execute Memory Protect so enable whatever option your system provides.
Some laptops/desktops don’t provide the enable NX settings BIOS option so you may have to retry the earlier method or raise a ticket with the manufacturer.

Hopefully, the Windows 10 update program will be happy with your CPU so restart the upgrade. 

Fix 4: Disable CPU Overclocking

Sometimes the windows update program will refuse to work because of an overclocked CPU.

To maneuver this problem, you will need to reverse the overclocking.

Here are the steps:

  1. Turn off your computer.
  2. Press the power button to bring the computer on and then repeatedly press the correct key immediately the manufacturer logo has appeared (Until the BIOS screen comes up). The right keys are still as aforementioned.
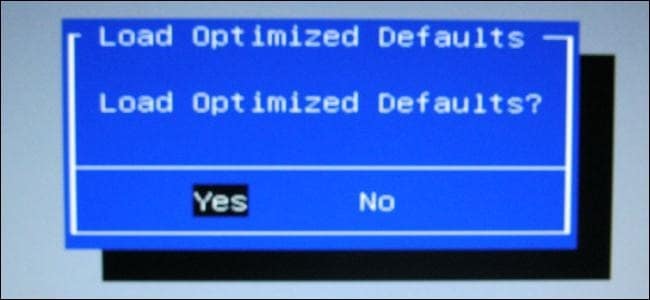
  3. Look for the option to reset the BIOS back to the factory settings.
  4. Save the changes as you exit.
  5. Restart the Windows 10 upgrade process.


Wrapping It Up 

The Windows 10 update CPU not supported error can be caused by an unsatisfactory CPU (below 1.0GHz) so start there. Other causes include an outdated Windows 7/8.0/8.1 so try to install the highlighted updates.

Other triggers include overclocking your CPU or disabled NX bits so also try the specified solutions if the first ideas fail.

MORE RESOURCES:

How to fix corrupted SD card on Raspberry Pi

Raspberry Pi community was often struck by the lack of proper troubleshooting steps for certain issues. Of course, there’s a good probability the OEM puts all users in the same experienced journeyman category. One issue which isn’t quite common but it happens from time to time is the SD card failure. Corrupted SD card on Raspberry Pi can be quite infuriating, especially if you haven’t backed up your work. Even though they’re scarce, there are a few ways to deal with this.

How to fix corrupted SD card on Raspberry Pi

The only thing making this worse is the absence of backups for the affected SD card. If you don’t have backups, you have low chances of retrieving the content of the corrupted SD card.

There are various reasons why an SD card will get corrupted on your Raspberry Pi, but the most common one is powering off without the ”halt” command. In addition, if you’ve meddled with the CPU clocks, power problems might break SD cards, as well.

So what you can do when this happens? You can format the SD and use backups to restore Raspbian on your SD card. However, if you’ve made a mistake to work without timely backups, there are only two things you can try. There’s the “fsck” command, which will unlikely fix your corrupted SD card.

On the other hand, the second and a more reliable way is to use an alternative SD card and build a fresh copy of Raspbian. After that, use the USB adapter and attach the affected card. Once it’s there, you might be able to fix it within the new system.

At the end of the day, you should be able to scavenge at least some of the data. Once you’ve got what you can, and fancy using the SD card again, use any third-party formatting tool (or digital camera) to format it.

With that said, we can conclude this article. If you have any questions or suggestions, feel free to tell us in the comments section below.

RELATED STORIES YOU SHOULD CHECK OUT:

How to disable Activity history and protect your privacy

Activity history is a new feature introduced in the April update, and although this feature can be helpful, many users have privacy concerns. This feature can send your information, such as applications you use, as well as documents and websites you view to Microsoft, and many users don’t want that. If you’re one of the users concerned about their privacy, today we’ll show you how to disable Activity history feature on Windows 10.

What is Activity history and how to disable it?

As previously mentioned, Activity history feature was introduced in April update along with Timeline. By using Timeline and Activity history, you can easily see all the documents or web pages that you visited on a certain date and switch back to them with just a single click.

This feature stores all this data locally, but if you want, you can enable synchronization and sync your data with Microsoft’s servers. By doing so, you can sync your activity with other devices and continue working on documents or visit the websites on other devices. Although this sounds quite useful, many users have privacy concerns, so today we’ll show you how to disable activity history on your PC.

Here are some methods that you can use to disable Activity history on your PC:


  1. Change your settings
  2. Change your Group policy
  3. Edit your registry
  4. Clear your activity history
  5. Clear your history from your Microsoft account

Solution 1 – Change your settings

According to users, the best and easiest way to disable Activity history is to disable it from the Settings app. This is quite simple, and you can do it by following these steps:

  1. Open the Settings app. You can do that quickly by using Windows Key + I
  2. One the Settings app opens, navigate to the Privacy section.
    privacy activity history
  3. From the left pane select Activity history. In the right pane uncheck Let Windows collect my activities from this PC and Let Windows sync my activities from this PC to the cloud options.
    disable activity history

After disabling these options, Windows won’t collect any activity history on your PC. If you still want to use the Timeline feature but you don’t want to share your history with Microsoft, you can use Let Windows collect my activities from this PC option.


Solution 2 – Change your Group policy

According to users, you can also disable Activity history feature right from Group policy settings. This is quite useful if you’re managing multiple PCs or you simply want to enforce this rule on the entire PC. To disable Activity history, you just need to do the following:

  1. Press Windows Key + R and enter msc. Now press Enter or click OK.
    group policy run activity history
  2. When Group Policy Editor opens, in the left pane navigate to the Computer Configuration\Administrative Templates\System\OS Policies In the right pane, double-click the Allow publishing of User Activities policy.
    group policy activity history disable
  3. Now select the Disabled option and click Apply and OK to save changes.
    disable policy activity history
  4. Optional: You can also set Enable Activity Feed and Allow upload of User Activities policies to disabled. This isn’t mandatory, but it might help you out.

After making these changes, your PC won’t gather activity history and your data won’t be uploaded to Microsoft’s servers.


Solution 3 – Edit your registry

Using a Group Policy Editor to disable Activity history on your PC is a great method, but some versions of Windows don’t have Group Policy Editor available. If you don’t have Group Policy Editor, you can disable this feature from Registry Editor. To do that, just follow these steps:

  1. Press Windows Key + R and enter regedit. Press Enter or click OK.
    regedit activity history disable
  2. When Registry Editor opens, navigate to the HKEY_LOCAL_MACHINE\SOFTWARE\Policies\Microsoft\Windows\System key in the left pane.
  3. Right-click anywhere in the right pane and choose New > DWORD (32-bit) Value.
    new dword activity history
  4. Enter PublishUserActivities as the name of the new DWORD. Double-click the new DWORD and set its Value data to 0.

After doing that, restart your PC or simply log out of your account and log back in again. After doing that, the activity history feature will be disabled.


Solution 4 – Clear your activity history

If you’ve already disabled Activity history on your PC, you should know that your data is still stored online on Microsoft’s servers. However, you can fix that easily simply by clearing your history from the Settings app. To do that, follow these steps:

  1. Open the Settings app and navigate to the Privacy > Activity history.
  2. In the right pane navigate to the Clear activity history section and click the Clear button.
    clear button activity history
  3. A confirmation dialog will now appear. Click OK.
  4. Windows will start clearing your activity history. This can take a minute or two, so be patient.

After doing that, your history will be cleared and all your data removed from Microsoft’s servers.


Solution 5 – Clear your history from your Microsoft account

If you’re worried that your information is still available on Microsoft’s servers, you can remove it right from your Microsoft account. This is useful if you don’t have the access to your PC but you want to ensure that your activity history isn’t available online.

To clear your activity history, do the following:

  1. Open your browser, and go to Microsoft’s activity history page.
  2. Now sign in with your Microsoft account.
  3. Select from the menu on the left Apps and services. Now click Clear activity in the right pane.
    activity history apps and services
  4. A confirmation dialog will now appear. Click the Clear

After a couple of moments, your activity history will be removed from Microsoft’s servers.

Activity history can be a useful feature, especially if you want to quickly hop back to a certain project that you were working on earlier. However, if you’re concerned about your privacy, feel free to try some of our solutions and use them to disable activity history on your PC.

READ ALSO:

Windows Sandbox allows you to run apps safely in isolation

News from Microsoft tech department. Soon we will be able to run applications that we are not sure about in an “isolated, temporary desktop environment” called Windows Sandbox.

What is Windows Sandbox?

The idea is that when a user installs any software in Windows Sandbox, it will stay in the sandbox, keeping whatever is outside sandbox safe.

When you have finished testing the software, you can either install it on your machine in the normal way if you like it and if you don’t, you just close down Windows Sandbox and the software, with all its files, will be permanently deleted.

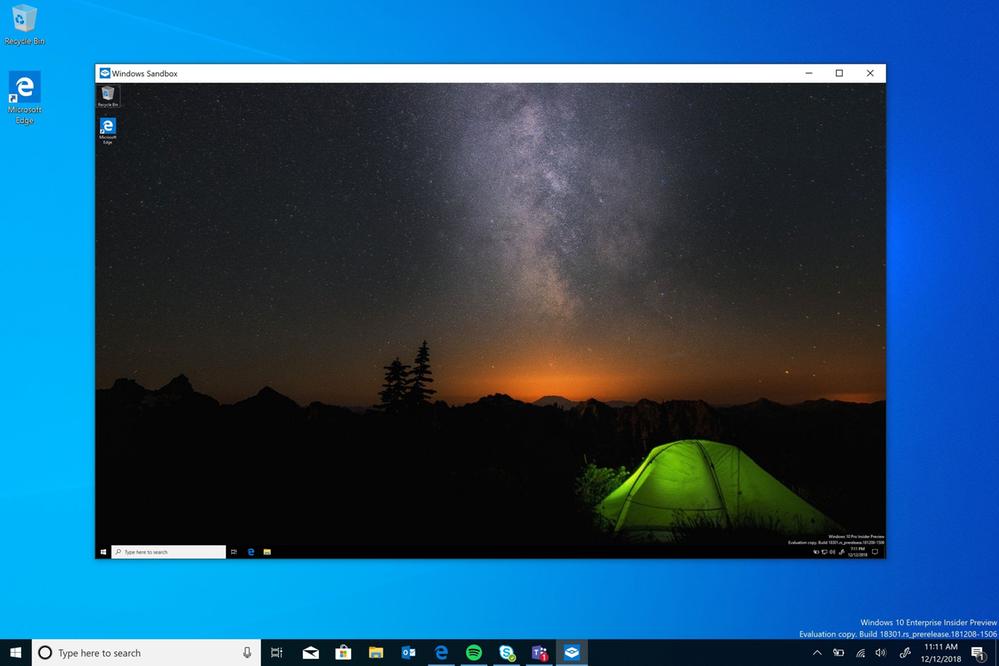
We have a nifty looking screenshot that I got from the Microsoft blog. This shows how Windows Sandbox will look on your desktop. Basically, it will look just like your desktop.

Windows Sandbox

Here is a quick rundown of the properties of Windows Sandbox:

  • Part of Windows – everything required for this feature ships with Windows 10 Pro and Enterprise. No need to download a VHD!
  • Pristine – every time Windows Sandbox runs, it’s as clean as a brand-new installation of Windows
  • Disposable – nothing persists on the device; everything is discarded after you close the application
  • Secure – uses hardware-based virtualization for kernel isolation, which relies on the Microsoft’s hypervisor to run a separate kernel which isolates Windows Sandbox from the host
  • Efficient – uses integrated kernel scheduler, smart memory management, and virtual GPU

What you will need to run Windows Sandbox

And here are the prerequisites you will need if you want to use Windows Sandbox:

  • Windows 10 Pro or Enterprise Insider build 18305 or later
  • AMD64 architecture
  • Virtualization capabilities enabled in BIOS

And you will need at least:

  • 4GB of RAM (8GB recommended)
  • 1 GB of free disk space (SSD recommended)
  • 2 CPU cores (4 cores with hyperthreading recommended)

I’m not going to include all the instructions that you can find on the Windows blog itself. Just head over here if you are interested.

The wrap-up

Gotta say. It’s a shame we can’t use Windows Sandbox for Windows Updates. Yes, I know that doesn’t make sense, I was only joking.

Sadly, I can’t ask any of you about your experiences as Windows Sandbox will not be available until Windows 10 Pro or Enterprise, build 18305 or newer next spring, so please feel free to talk amongst yourselves.

RELATED ARTICLES YOU SHOULD CHECK OUT:

Fix Corrupt FIT File: Do it With a Repair Tool

There is no doubt that data corruption of any file can be a hardship. FIT files, which are important for sports enthusiasts who fancy tracking their running or cycling routes with the faithful Garmin navigation, are often corrupt, and you will need to fix them.

Once they get corrupted (usually due to GPS readings), users can’t access them with Garmin Connect or similar services for tracking the routes, which provide map display. Luckily, this is far from being unrepairable, and we have two ways to fix corrupt FIT files on your PC.

How do I fix a corrupted FIT file?

1. Use Garmin Online Fit Repair Tool

  1. Navigate to the Garmin Online Fit Repair Tool’s website.
  2. Sign in or sign up, as the case may be.
  3. Upload your FIT file and let the auto-fix tool work its magic.online fit repair tool
  4. Additionally, you can choose to convert it to the CSV format.

If you’re trying to access the file with the FIT extension to no avail, don’t worry. A few tools might come in handy when it comes to repairing corrupted FIT files.

One of those is the free Garmin online FIT repair tool that allows you to upload a corrupted FIT file to download the uncorrupted version afterward.

2. Try the FIT File Repair Tool

  1. Download Fit File Repair Tool. You might need Microsoft Access installed in order to run it.
  2. Extract the tool and run it.
  3. Click on the Import and repair file button and add your corrupted FIT file (or batch of files).import and repair to fix fix corrupt fit file
  4. Run the tool, and the FIT file should be fixed and accessible again.

For users who are dealing with numerous FIT files daily, a premium tool is probably the best solution.

Fit File Repair Tool is a utility that allows you to access and restore corrupted FIT files with small or no effort. However, it’s a paid solution, so you’ll need to purchase the license after a free trial period ends.

There are some other options, like FIT SDK, which allows you to deconstruct and convert FIT files to CSV format. That way, you can edit them or restore their integrity. On the other hand, the two tools mentioned above should be enough for an inexperienced user.

If you are looking for alternatives, check out the most reliable handheld GPS for hiking and cycling.

With that said, we can conclude this article. If you have any questions or suggestions, feel free to tell us in the comments section below.

Chromebook will soon support Windows 10 dual-boot

Many people use Windows on a daily basis for their computing needs. They use it because of their work, because they write about it, I have even heard that some people use Windows because they like it. What I don’t understand is why you would want to use Windows on a Chromebook.

Advantages of Chrome OS

Correct me if I am wrong (in the comments below, please), but I thought that the entire point of people owning a Chromebook was because they were fed up of spending their money on over-priced, bloated software that is pretty much guaranteed to screw up your machine at some future point due to a dodgy update that wasn’t checked before release.

Before I continue, I should point out that in the interests of openness, I am not a Chromebook user, but I have been toying with the idea of making the move for more than a year now. However, since I have not used one, forgive any mistakes I make.

Chromebooks will lose security

Google promotes Chromebooks and the OS that goes with it as being highly secure. Of course, when Google says ‘highly secure’ it means from hacking. Giving any information to Google means you are pretty much agreed that your life is compromised from that moment on, but that’s for another post.

By Google letting Windows onto its machines, even if it is ‘just’ as a alternative OS, means that your Chromebook is now more likely to be compromised. It doesn’t even need to mean that Windows is less secure. If you are running two OS’s on one machine, there are more ways it can be compromised.

Chromebook

Chromebooks are inexpensive

Additionally, Chromebooks have dinky little hard drives, don’t they. There is no way you are going to get Windows OS onto a 32 GB hard drive. So presumably, Chromebooks are going to come with bigger drives making them more expensive. Of course, I am assuming that whatever Windows OS is being used will come pre-installed, since why would anyone download it voluntarily.

How many will really use Dual-Boot?

I am a bit confused about the whole ‘Dual-Boot‘ thing as well. I used to run a laptop with dual operating systems, Windows 7 (I think it was) and Ubuntu. One thing I remember was that changing between OS‘s was a pain in the neck. So much so that if I booted up in Windows, I stayed in Windows for the rest of the day. If I booted up in Ubuntu, I’d stay in Ubuntu.

Why would Google want to give people an OS that if they booted up using it, would probably just stick with it? Google might as well just take out a full-page ad saying they are giving up, and all Chromebooks will be Windowsbooks in the future.

Everything will end up the same

Why would you want to allow Microsoft any access at all to anything that has an OS on it that isn’t Windows? Perhaps Google feels that it is big enough and strong enough that if Microsoft starts putting in demands, Google will be able to stand up to Microsoft. Well, that may be true but I wouldn’t bet my Chromebook on it.

Wrapping it all up

I am not an over-cynical person, I don’t think, but I really don’t see how this has any advantages for Google and any disadvantages for Microsoft. I think this is a bad move for Google, and will end up making it a junior partner in something that it started in the first place.

RELATED STORIES TO CHECK OUT:

Microsoft details Windows 10’s upcoming Windows Sandbox feature

Earlier this year, we learned that Microsoft was working on an “InPrivate Desktop” feature for Windows. In the Windows 10 Feedback Hub, Microsoft described InPrivate Desktop as “a throaway sandbox for secure, one-time execution of untrusted software.

This handy VM solution has apparently been rechristened as “Windows Sandbox,” and Microsoft has provided more details about this feature on the Windows Kernel blog yesterday. Just like the previous “InPrivate Desktop” feature, Windows Sandbox will provide Windows admins a temporary desktop environment where they can safely test untrusted software. “Any software installed in Windows Sandbox stays only in the sandbox and cannot affect your host. Once Windows Sandbox is closed, all the software with all its files and state are permanently deleted,” Microsoft explained in the blog post.

Compared to traditional VM solutions, the company highlighted the following advantages for Windows Sandbox:

  • Part of Windows – everything required for this feature ships with Windows 10 Pro and Enterprise. No need to download a VHD!
  • Pristine – every time Windows Sandbox runs, it’s as clean as a brand-new installation of Windows
  • Disposable – nothing persists on the device; everything is discarded after you close the application
  • Secure – uses hardware-based virtualization for kernel isolation, which relies on the Microsoft’s hypervisor to run a separate kernel which isolates Windows Sandbox from the host
  • Efficient – uses integrated kernel scheduler, smart memory management, and virtual GPU

The timing for the announcement is quite interesting as this same blog post mentions that Windows Sandbox requires Windows 10 Pro or Enterprise build 18305 or later. Microsoft released the 19H1 build 18298 last week for Fast Ring Insiders, and we hope the build 18305 will be released this week, right before the holidays. FYI, Microsoft mentioned that Windows Sandbox will require at least 4GB of RAM, 1 GB of free disk space and at least 2 CPU cores. We’re looking forward to test this new feature, sound off in the comments if you think this could become a new killer feature for Windows 10 Pro.

Windows 10 Twitter app secretly adds new list and emoji improvements

The official Twitter app for Windows 10 devices updated last week with a host of improvements but two other changes appear to have been made to it since then.

Over the last few days, the Twitter app gained a new emoji picker within the compose box (see above image). When clicked on, this emoji picker opens and users can now scroll through and select an emoji to use.

In addition to the emoji picker, the Windows 10 Twitter app now displays whether a user has already been added to a list by displaying a blue checkmark next to list names during the “Add to list” process. Previously, there was no way to tell if a user had already been added to a list without manually scrolling through all list members one-by-one-beforehand. Other Twitter apps have had this basic feature for a while now so it’s good to see it finally come to Windows 10 users.

Have you noticed any other changes with the Windows 10 Twitter app recently? Let us know in the comments below and then follow us on Twitter for more Windows 10 news.

Twitter
Twitter
Developer:
Twitter Inc.
Price:
Free

Warning! Nasty new Office 365 phishing attack doing the rounds

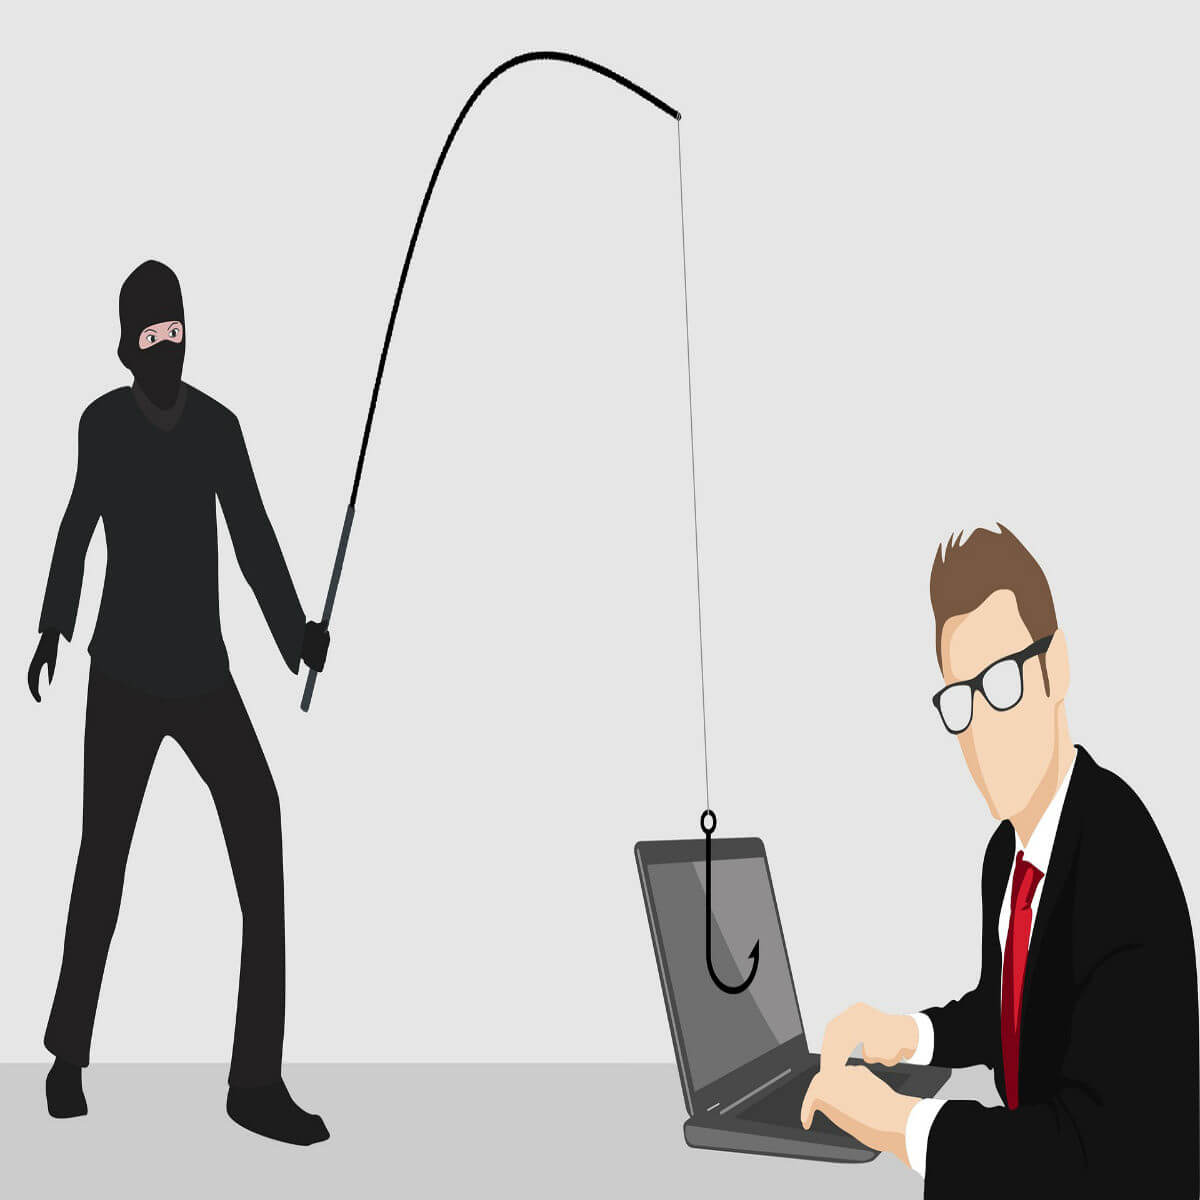
A new and very nasty phishing attack has been doing the rounds, and it is extremely difficult to spot. Here is what you need to look out for.

First of all, we should thank Xavier Mertens for being the first to spot it. If you want to see the code that the phishing attack uses, pop over to this website.

How does this attack work?

A recipient gets a Non Delivery Receipt (NDR) from what looks like a trusted account. It tells the recipient that “Microsoft found several undelivered messages”.

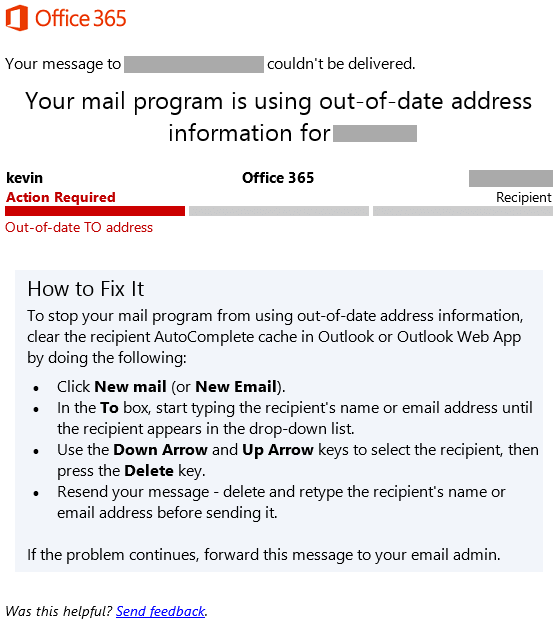
Non Delivery Receipt

The next step that the phisherman wants you to do is click the ‘Send Again’ button. This will take you to a page that looks very much like the Office 365 page.

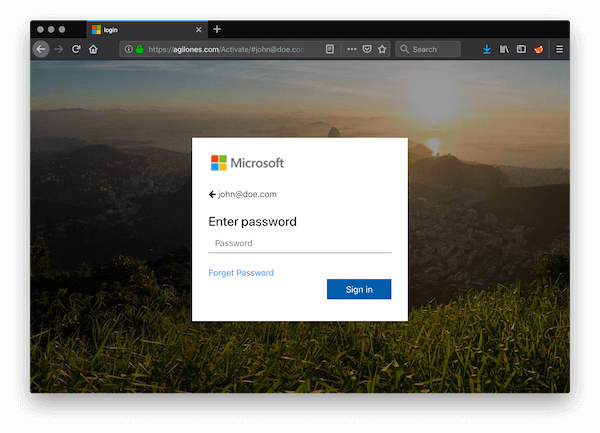
Fake phishing attack login page

Not the Office 365 Login
Check out the website address in the image above. It is obviously not the address of Office 365, Microsoft, Windows, or anything remotely linked to Microsoft, and yet I am sure many people entered their login information.

When you do enter your login info, you get sent to Outlook, so it looks very much like you have not been phished. Unfortunately, your Office 365 login details have just been sent to the bad guys, and they now have access to your Office Account and everything that goes with it.

Genuine Non Delivery Receipt

Genuine NDR Notice

Now, you all know how much I love to rant against Microsoft (in a constructive way, of course), but I really don’t think we can blame Microsoft for this. While the email address for the original phishing attack looks like it is ‘sort of’ official, there is no way that anyone should fall for the login address.


In case you want to be secure while surfing the internet, you will need to get a full-dedicated tool to secure your network.  Install now Cyberghost VPN and secure yourself. It protects your PC from attacks while browsing, masks your IP address and blocks all unwanted access.


Guys, always check the web addresses and if you are in any doubt, do NOT login from a link. Go into your browser and type in the address you want in the normal way, and then login. It ain’t rocket surgery, guys, just basic online safety rules.

Have you received this phishing attack. Did you spot it as phishing immediately, or did you have to double check? Or did you fall for it? Don’t worry if you did; I fell for a PayPal phishing scam once. The address was PayPel. In my defence, it was about 10 years ago. Let us know in the comments below.

RELATED ARTICLES YOU SHOULD CHECK OUT:

Want to learn more about containers? Check out the latest in the Windows Insider Internals series

For some of us, “computing” means reading Twitter, checking email, and playing games. On the other end of the spectrum are the IT professionals who spend their work life building websites, business apps, and even Internet of Things solutions and next generation Artificial Intelligence and Machine Learning applications. Still, there are some who are somewhere in the middle, interested in what’s going on in a computing world beyond Twitter, but not quite sure what all the fuss about IoT, AI, Machine Learning, and containers really means.

One of the members of the Windows Insider team, Brandon LeBlanc, has started an occasional series called “Windows Internals,” where he highlights Microsoft posts on subjects that aren’t quite mainstream, but still could be interesting to Windows Insiders looking to learn more about the computing world around them. In the latest in his series, LeBlanc focuses on containers, which he defines as “virtualized “boxes” that allow app developers to easily port their apps to different platforms.” These containers, well, contain everything an app needs to run, including dependencies, libraries, binaries, etc., making it easier to develop and maintain apps. LeBlanc then links to a couple of Microsoft posts on how to learn more.

The internet is great at throwing phrases around, kind of just assuming that everyone knows what they mean, and it’s difficult sometimes to “crack the code.” We applaud the Windows Insider team for giving computer novices a place to go to begin to learn more. Check out Windows Internals, and keep up the good work, Brandon!

How to view your Windows 10 Sticky Notes on the web

Microsoft has been expanding its popular Windows 10 app Sticky Notes, adding a slew of useful new features. In recent months, the app has gained cross-device syncing and some initial integrations into Microsoft’s other products.

As a consequence of these changes, you can now view your Sticky Notes on the web when you’re away from your PC. Likewise, you can create notes online and see them appear within Windows 10’s Sticky Notes app when you get back to your desk.

First, create a new test note on your PC by opening the Sticky Notes app and writing some content. You will see your new note show up in the app’s notes list. It will immediately sync to the cloud using your Microsoft account.

Sticky Notes screenshot

Now, you’re ready to view your note online. To do so, just visit onenote.com/stickynotes. You’ll see a simple interface that displays all your notes in a list on the left. You can click each note to show its full content on the right. Editing tools and note background colour options are available in the same manner as Sticky Notes for Windows 10.

Sticky Notes screenshot

To create a new note, click the “+” button next to the search bar. Type your content and then wait a moment to see the note show up in the notes list in your Windows 10 Sticky Notes app.

Needless to say, this is a simple but extremely useful experience. With Sticky Notes now syncing across devices and to the web, you’ve got a much better chance of keeping track of your thoughts. If you’ve got a Surface, or another device with an active stylus, you can scribble down thoughts on sticky notes using Windows Ink and then consume them wherever you happen to be.

Sticky Notes screenshot

It’s worth noting it’s still quite early days for Sticky Notes on the web. The current experience is exceedingly basic and may well be expanded over time. Microsoft has chosen to put Sticky Notes under the OneNote umbrella but, so far, the two seem to be completely separate except for the domain. Unless you already know the URL, you won’t find Sticky Notes easily either – there’s no links to it from any of the other Office 365 apps.

Still, the core functionality is there and is ready for you to use today. Microsoft’s also testing Sticky Notes integration in the OneNote apps for Android and iOS, giving you even more options when you need to note something down.

Crossplay could be in the future for Xbox and Steam gamers

Microsoft has repeatedly expressed its interest in smudging the line between traditional console and PC gaming audiences. As the rumors continue to surface about Microsoft’s next batch of console and game streaming hardware and services, it seems that Steam may be quietly preparing for a future where Xbox One and PC players coexist more natively.

Buried in the most recent Steam beta release is a line of code that could be pointing to cross-platform integration from the PC gaming storefront. While originally spotted on ResetEra (via Windows Central), the specific source code can be found at Steam Beta GitHub’s repository.

For a bit of context, Steam and Xbox Live have been cross-play buddies for a few years now on titles such as PC-first Rise of Nations and console first Killer Instinct. yet, this new line of code looks like it’s intended for use by more developers seeking deeper integration with features such as Xbox networking using more standardization with Valve’s Steamworks toolset.
Open sourcing this level of integration could spur and streamline more cross-platform development from all types of game developers and not just the console blessed AAA approved ones.

Microsoft has a long road ahead of itself in bridging the gap between console and PC audiences as well as navigating its ‘future-of-gaming’ story, but, taken this code find with a grain of salt, if Steam is prepping for more cross-platform development, Microsoft might be headed into 2019 in decent gaming shape.

Razer unveils its first keyboard and mouse designed for Xbox One consoles

The Xbox One will soon be receiving its first official wireless keyboard and mouse combo from the gaming-centric Razer hardware department.

You’d be forgiven if you thought that five years into the Xbox One’s lifecycle, the console would have had an official first-party wireless keyboard and mouse combo to tout, but Microsoft left it to the experts in gaming to produce a truly game focused experience.

News about Razer’s first wireless Xbox One-supported mouse and keyboard has sort been all over the place with the company first announcing its intent to create the combo almost half a year ago.
Since the announcement, fans have only been treated to teaser images along the way with a full image reveal happening in late Novemeber, 2018.

Adding to the convoluted timeline is Razer’s most recent promotions of formal announcement of the mouse and keyboard happening January 8th, around the time of the Consumer Electronics Showcase.

Without details on specs, pricing or availability, all fans have to go on is the below video that highlights the development journey of Razer’s wireless keyboard and mouse.

There are a few details that can be parsed from the video that shines a light on the specific features that are coming with the mouse and keyboard that are Xbox oriented such as a dedicated Xbox button on the keyboard and slide-out mouse mat for lap gaming. Other spotted features include a color changing Chroma backlit powered keyboard that Xbox One developers were rumored to have access to in order to enhance gaming experiences.

While the wireless keyboard and mouse are welcomed additions to the Xbox One family of peripherals, the combo raises the question of how they’ll change the landscape of competitive gaming on the console as well as how Microsoft will position its next set of consoles alongside its Windows 10 gaming ambitions.

Windows 10 October 2018 Update now available to download for “seekers,” some upgrade blocks still remain

It’s now been a little more than a month since Microsoft re-released the Windows 10 October 2018 Update, and the Redmond giant quietly announced yesterday that the major release is now available for all “seekers.” In an update posted on the Windows 10 update history page (via Windows Latest), the company explains that “Windows 10, version 1809, is now fully available for advanced users who manually select “Check for updates” via Windows Update.”

The release of the October 2018 update has been a PR nightmare for Microsoft, as the company had to quickly pause the rollout after a file deletion bug surfaced. John Cable, Director of Program Management, Windows Servicing and Delivery explained last month that the October 2018 update would have a slower rollout to “more carefully study device health data”, and the new bits now being available for all Windows 10 users checking for updates doesn’t change this. If you’re not in a hurry to get it, it’s probably better to wait for Microsoft to push this update to your PC.

It’s worth noting that there are still several upgrade blocks in place: if you’re PC has incompatible Intel display drivers, AMD Radeon HD2000 and HD4000 series graphic processor units (GPUs), F5 VPN clients or rend Micro’s OfficeScan and Worry-Free Business Security software installed, you won’t receive the October 2018 for now. Microsoft is still working with partners to fix these issues, and you can learn more details on the Windows 10 Update history page.

For Honor Complete Edition launches on Microsoft’s Xbox One consoles

The For Honor Complete Edition is now live on Xbox One. This new repackaging of the game comes with the base game and all of the additional content that’s been released since its initial launch.

Here’s the official list of content for For Honor Complete Edition:

Get the entire ultimate For Honor experience with the base game, Marching Fire Expansion, the Year 1: Heroes Bundle, and the Year 3 Pass.

  • The base game includes: 12 Heroes, 7 Multiplayer Modes, and Story Campaign.
  • The Marching Fire Expansion includes: 4 new Heroes (Shaolin, Nuxia, Jiang Jun, and the Tiandi) and Unlimited solo or co-op PVE Arcade Mode.
  • The Year 3 Pass includes: 4 new Heroes coming in 2019 (1 week early access), 4 Elite outfits, one per new Hero, 30 days of Champion Status, 5 Scavenger Crates, and An effect for all Heroes.
  • The Year 1: Heroes Bundle includes: 6 additional Heroes (Centurion, Shinobi, Gladiator, Highlander, Aramusha and Shaman),  6 Elite Outfits (one per Hero), 30 days of Champion Status, 3 Scavenger Crates, 1 Exclusive Sunbeam effect for all Heroes, and 3 Exclusive Emblem Outlines.

For Honor is an action and adventure video game set within a chaotic world where Vikings samurai, and knights collide. The game features a single-player story campaign but the main focus is on its online battles which allows players to strategize and fight against each other.

Are you a fan of For Honor or will this be your first time playing? Let us know in the comments below and then follow us on Pinterest for more Xbox content.

FOR HONOR - Complete Edition WW

Hit video game Hellblade: Senua’s Sacrifice joins Xbox Game Pass

Hellblade: Senua’s Sacrifice, one of the most-popular video games of the past year or so, is now available to play for free for Xbox Game Pass subscribers on Xbox One.

Hellblade: Senua’s Sacrifice originally came out on Sony’s PlayStation 4 console and PC in August 2017, but eventually made the jump to Microsoft’s Xbox One consoles in April 2018. The game is a blend of action, puzzle-solving, and horror and is set during the 8th century. It was praised by many for its exploration of mental illness and won numerous awards for its visuals, gameplay, audio, game design, and narrative.

Xbox Game Pass is a Netflix-like video game subscription service on Microsoft’s Xbox One consoles. Traditionally, new games would be added to the Game Pass library at the beginning of the month but, recently, several titles have been added a few weeks in.

Have you played Hellblade: Senua’s Sacrifice yet and will you give it a go with Xbox Game Pass? Let us know in the comments below and then follow us on Pinterest for more Xbox gaming content.

The Printer Couldn’t Print: 5 Easy Methods You Can Use

Printers are a vital part of most modern-day computers, especially in office setups where users require documenting stuff. But, the device is known to throw errors more often than others. And one such is The printer couldn’t print error on Epson, HP, and other manufacturers.

When you can’t find the printer, it at least makes sense as to why the print jobs are stuck. But, when everything looks in order, the printer is visible, set as default, and has no warning sign, troubleshooting is slightly trickier. So, let’s find out how you can fix things!

Why does my HP printer say it can’t print?

Here are a few reasons The printer couldn’t print test page in Windows 10:

  • Improper connection: Some older ones can only print when connected via a cable, and if that’s not the connection type, the error message will appear.
  • Issues with the driver: If the printer drivers are outdated, incompatible, or corrupt, it will have trouble printing and will throw a range of errors, including The printer couldn’t print in Microsoft Word.
  • Critical services not running: A few services need to be running for the printing jobs to go through effectively.

How can I fix The printer couldn’t print error?

Before we start making changes to the two devices, here are a few quick things you can try:

  • Restart both the computer and the printer.
  • Verify that the connection between the two is in order. To be sure, unplug the cable from both ends and reconnect it.
  • If the problem is limited to limited, download the HP Print and Scan Doctor tool to automatically identify and eliminate problems. Once done, check whether The printer couldn’t print a full page photo problem is fixed.
  • Assign a static IP to the printer. This could be done from the embedded web server accessible via the printer’s IP address. The interface for each manufacturer would be different, so we recommend you check the official website for the exact steps.

If these didn’t work, move to the changes listed next.

1. Run the Print Spooler service

  1. Press Windows + R to open Run, type services.msc in the text field, and hit Enter.services
  2. Locate the Print Spooler service, right-click on it, and choose Properties.properties
  3. Select Automatic from the Startup type, and click the Start button if the service is not running.automatic to fix the printer couldn't print
  4. Once done, click Apply and OK to save the changes.save changes

In most cases, it turns out to be the Print Spooler service to blame when The printer couldn’t print message shows up. So, make sure it’s active. Also, restarting the service should do the trick if it is already running.

2. Clear the print queue

  1. Stop the Print Spooler service as described earlier.
  2. Press Windows + E to open File Explorer, paste the following path, and hit Enter:C:\Windows\System32\Spool\PRINTERSclear queue to fix the printer couldn't print
  3. Press Ctrl + A to select all the files here and hit Delete to clear them.
  4. Once done, restart the Print Spooler service.
  5. You can now try printing and check whether the error message disappears.

3. Reinstall the printer driver

  1. Press Windows + X to open the Power User menu, and select Device Manager.device manager
  2. Expand the Printers entry, right-click the problematic printer, and choose Uninstall device from the context menu.uninstall device to fix the printer couldn't print
  3. Now, tick the checkbox for Attempt to remove the driver for this device and click Uninstall.uninstall
  4. Once done, restart the computer, and Windows will automatically install a fresh copy of the best available driver.

Another quick solution when you get The printer couldn’t print message is reinstalling the driver as shown in the guide above.

If this doesn’t work out, you can certainly rely on a smart driver app that can help you solve any PC driver matters in a short time.

4. Turn off the offline mode

  1. Press Windows + S to open Search, type Control Panel, and click the relevant search result.control panel
  2. Click on View devices and printers.view devices and printers
  3. Right-click on the affected printer and select See what’s printing.see what's printing
  4. Now, click on the Printer menu, and uncheck the Use Printer Offline option.disable to fix the printer couldn't print

5. Soft reset the printer

  1. Turn off the printer and disconnect the power cord from its rear end and also that of the router.
  2. Now, power off the computer and wait for 30 seconds.
  3. Next, turn on the router by connecting the power cable and wait for it to get ready. It usually takes 30 seconds to 1 minute.
  4. Turn the computer back on, and once Windows fully loads, connect the power cord to the printer and turn it on.

That’s it! This is how you soft reset a printer. While the steps are for an HP device, the process is similar for other manufacturers. In case you face issues, check the official website.

One of the solutions here should have helped get rid of The printer couldn’t print message, and you should be able to use the device again. If the problem persists, we recommend you replace the cable used for the connection.

If you use the PC a lot, check some quick tips to manage your device and printer settings and how to improve the performance of Windows to make it faster than ever.

For any queries or to share another solution with us, use the comments section below.

More Surface Pro 4 devices to be replaced due to faulty hardware

Around the middle of this year, a firmware update for Microsoft Surface Pro 4 devices was released. Quickly afterwards, reports started coming in of display and pen issues among many other things, and another update fiasco began to unfold.

What was the original problem

What happened was that Microsoft issued a firmware update in July 2018 that was meant to give the Surface Pro 4 lots of new improvements. Unfortunately for Microsoft, what the update allegedly did was screw up many a display with no possibility of a workaround.

Back to the issue in hand

Apparently, Microsoft started to replace some units fairly quickly (for a tech company anyway). Now, according to new reports, Microsoft has decided to speed up the process.

Of course, you will have to reach out to support to get the ball rolling but we’ll assume that if you were affected by this update, you have already done that. So, reach out to support (again) and get the ball rolling on a new surface.

But you may need to be quick. As I was researching this article, I came across one website that pointed out something I hadn’t cottoned on to. Since Microsoft no longer makes the Surface Pro 4, all the replacements must be coming from existing stock. How many Surface Pro 4s have they got, I wonder?

Surface Pro 4

What’s being said by whom?

One place I recommend you check out is the Microsoft Answers page that has the original complaint and then all the usual stuff afterwards. It’s very entertaining. Especially the bits where the people who work for Microsoft chime in with ‘help’. Well, entertaining if you don’t have a Microsoft Surface Pro 4. Annoying as heck for people who do.

Apart from throwing their moderators to the wolves, Microsoft is as talkative as ever (when things go wrong). For major screw-ups, Microsoft’s usual tactic is to tell all and sundry that it is ‘investigating’ the issue, which is exactly what it has done here.

What caused the problem?

Who knows? It appears that Microsoft still has no idea what caused the problem in the first place. This is not only highly embarrassing but also begs the question about the use of the insider program again. If I remember rightly, both the fast and slow rings were skipped for the Windows 10 1809 update, and that ended pretty badly, although no machines have needed to be replaced as far as I am aware.

It’s only fair to assume that the firmware update for the Microsoft Surface Pro 4 must have skipped the insider program altogether as well, otherwise how did this major (and extremely costly) error not get picked up?

Wrapping it all up

What Microsoft has not addressed yet is the fact that for around five months, its customers have been led the old merry runaround. I would hate to suggest that it was presumably to give Microsoft’s legal department a chance to see if they could get out of replacing devices that were no longer under warranty, or better yet, get out of doing anything at all. That would be a terrible thing to suggest. Anyway, it would appear the big bosses just got the bad news and it is time to cough up.

Was your Microsoft Surface Pro 4 affected by this latest debacle? If so, let us know how you get on with fixing the problem or getting a replacement. We’d love to here from you.

RECENT NEWS ARTICLES YOU SHOULD CHECK OUT:

Microsoft open sources Trill, an internal tool for processing “a trillion events per day”

Update: We mentioned that Trill will be available in the coming months, but it appears that it is already available on GitHub and developers can grab it here. 

Another day, another open source project gets a blessing from Microsoft. Today, December 17, 2018, Microsoft is open sourcing an internal project it’s dubbed Trill, so that more developers have access to a new temporal query language as well as “a trillion events per day” worth of aggregated data.

For those unfamiliar with Trill, it started as a Microsoft Research project back in 2012 and has since been featured in published research papers. Moving from the research phase to actual implementation, Microsoft has used Trill internally for Azure Data products and other mission-critical streaming initiatives throughout the company including Bing Ads and Halo.

Microsoft details Trill as,

Trill was the first streaming engine to incorporate techniques and algorithms that process events in small batches of data based on the latency tolerated by the user. It was also the first engine to organize those batches in columnar format, enabling queries to execute much more efficiently than before. To users, working with Trill is the same as working with any .NET library, so there is no need to leave the .NET environment. Users can embed Trill within a variety of distributed processing infrastructures such as Orleans and a streaming version of Microsoft’s SCOPE data processing infrastructure.

As of today, open source developers get access to the following Trill enabled data and toolsets:

  • As a single-node engine library, any .NET application, service, or platform can easily use Trill and start processing queries.
  • A temporal query language allows users to express complex queries over real-time and/or offline data sets.
  • Trill’s high performance across its intended usage scenarios means users get results with incredible speed and low latency. For example, filters operate at memory bandwidth speeds up to several billions of events per second, while grouped aggregates operate at 10 to 100 million events per second.

As far as the benefit to Microsoft from open sourcing Trill, the company seems to want Trill as the foundation layer for temporal processing for all businesses and developers. Microsoft also sees community involvement as the future of IStreamable abstraction for customers as well as IEnumerable and IObservable being made available to more people.

All Xbox One X / S bundles are now $100 off for a limited time

Microsoft previously offered a $100 discount on select Xbox One bundles for Black Friday, and the company will be doing the same during the holidays. The limited-time offer starts today in the US and will last through December 25, while supplies last.

The list of discounted bundles is available on Xbox.com, but we’ve highlighted some of the most interesting below. If you’re not a fan of the standard black colour for the Xbox One X, and you can snag the Robot White Special Edition or the Gold Rush Special Edition for just $399:

  • Xbox One X Gold Rush Special Edition Battlefield V Bundle (also includes Battlefield 1 and Battlefield 1943) – $399
  • Xbox One X Robot White Special Edition Fallout 76 Bundle – $399
  • Xbox One X Forza Horizon 4 Bundle (also includes Forza Motorsport 7 – $399
  • Xbox One S Minecraft Creators Bundle (1TB) – $199
  • Xbox One S Forza Horizon 4 Bundle (1TB) – $199
  • Xbox One S Battlefield V Bundle (1TB) – $199

Any Xbox console would definitely make a great holiday gift, and we hope these lowered prices will go standard in 2019. In case you missed it, Microsoft is planning to launch two new Xbox One consoles next year, a disc-less model that could start shipping in 2019, as well as an updated Xbox One S later in the year to cut manufacturing costs. Even though Microsoft is planning two next-gen “Scarlett” consoles in 2020, the Xbox One family will be supported for many years to come, and all Xbox One games you buy today are expected to be backward compatible on the next generation.

Windows 10 news recap: Surface Pro 4’s affected by firmware issue are being replaced, testing of splitting Search and Cortana now taking place, and more

Welcome back to our Windows 10 news recap, where we go over the top stories of the past week in the world of Microsoft’s flagship operating system.

Microsoft addresses faulty Surface Pro 4 firmware issue with device replacements

Surface Pro 4 devices that have suffered the fate of a firmware issue are being replaced by Microsoft. Specifically, the issue is caused by a firmware update that took place in July.

My Surface Pro 4

Windows 10’s People Bar set for the chopping block

The People Bar in Windows 10 is reportedly being deprecated soon. It’s a relatively new feature that aimed to surface those you communicate with most to make it easier to get in touch with them, but it appears Microsoft no longer has the same feeling for the People Bar as it did when it first touted the feature.

Microsoft starts testing splitting Search and Cortana in two

It looks like Microsoft may be in the Christmas-giving spirit, as it begins testing the break-up of Windows 10 Search and Cortana.

Mozilla Firefox gains native Windows 10 sharing in latest update

Firefox has released a new update that adds direct integration with Windows 10’s sharing functionality, making it easier to share across apps and with those you communicate with regularly.

Firefox on Windows 10

That’s it for this week – we’ll be back next week with more Windows 10 news!

Surface Diagnostic Toolkit Download: Quick and Easy Repair

Computer problems are usually not that complicated to fix. The real problem is that most people are not keen to try and fix them, preferring to call IT or take the problematic machine to the local shop.

With the recent release of the Surface Diagnostic Toolkit (SDT), there is now a third option if you have a Surface device. Let’s have a look at how it works.

What is the Surface diagnostic toolkit?

The Surface Diagnostic Toolkit is a free Microsoft tool designed to help diagnose and resolve common issues with Microsoft Surface devices. It is compatible with Surface devices running Windows 10 and later versions.

The Surface Diagnostic Toolkit can identify and troubleshoot many issues, including battery and power problems, audio and video, network connectivity, and software and hardware issues.

In addition, the toolkit runs a series of tests to diagnose problems and provides recommended solutions or repair options.

The Surface Diagnostic Toolkit is easy to use and can be downloaded and installed directly from the Microsoft website. It is a valuable tool for Surface users experiencing issues and wanting to troubleshoot and fix problems without technical support.

How do I download Surface Diagnostic Toolkit?

  1. Go to the Microsoft website.
  2. Click the Download button.
    surface diagnostic toolkit download
  3. Select the tool version that matches your device’s operating system, then click the Next button.
     Fortect Top articles for Editing - 4510 articles Fortect Top articles for Editing - 4510 articles 100% 10 B1954  surface diagnostic toolkit download      	 surface diagnostic toolkit download Turn on screen reader support To enable screen reader support, press Ctrl+Alt+Z To learn about keyboard shortcuts, press Ctrl+slashBolaji Ola-Hassan has joined the document.
  4. Once the download is complete, double-click the downloaded file to launch the installer.
  5. Follow the on-screen instructions to install the Surface Diagnostic Toolkit on your device.

Once the tool is installed, launch it from your Start menu or search for “Surface Diagnostic Toolkit” in the Windows search bar.

How do I run repair on my Surface Pro?

  1. Download and install the Surface Diagnostic Toolkit as described in my previous section.
  2. Launch the Surface Diagnostic Toolkit from your Start menu or search for Surface Diagnostic Toolkit in the Windows search bar.
  3. On the main menu, select Run All, or any specific repair.
  4. Follow the prompts and instructions to run the diagnostic tests on your device.
  5. Once the diagnostic tests are complete, the tool will summarize any issues detected.
  6. If the tool detects an issue that can be repaired, click on Repair and Continue to begin the repair process.
  7. Follow the on-screen instructions to complete the repair process.
  8. After the repair, click on Restart your computer.

The Surface Diagnostic Toolkit is a powerful tool that can help diagnose and resolve many common issues with Surface devices. 

However, it may not be able to resolve all issues, and in some cases, you may need to contact MS support for further assistance.

SDT has been around a while and is one of those rare good and practical ideas. Please tell us your experience using this tool and what you find most interesting.

Windows 10 ARM emulator: What it is and what it does

Since the Fall Creators Update, users who have ARM64 (or ARM32) machines are able to run Windows 10 without any issues. Two supported editions are Windows 10 Pro and Windows 10 S. This brings a lot of advantages and diversifies a bit stalled development of the platform.

How does Windows 10 ARM emulator work?

Now, do not mistake this for the Windows 10 Mobile, as the Qualcomm-powered CPUs are finding their place on more and more non-smartphone devices. This breakthrough allows users to utilize low power consumption and mobile data features on the ARM architecture.

Since all UWP applications for standard x86 and x64 processors flawlessly emulate on ARM, you get the full Windows 10 experience with all the goodies an ARM CPU brings to the table.

But how does Windows 10 ARM emulates x86 and x64 applications? Or can it do it in the first place? It can do it and in a seamless manner, for that matter.

The only exception being x64 Win32 applications which are not supported. The applications don’t need to be recompiled or modified thanks to emulation of WOW64 layer.

x86 win32 emulation

It works by compiling blocks of x86 instructions into ARM64 instructions with optimizations to improve performance. Accordingly, these instructions are translated and cached, so the application modules are optimized to work in a seamless manner.

Primarily, if the app you want to use has an ARM version, that’s the version you’ll get. On the other hand, if that’s not the case, the system will provide you with the version for x86 architecture.

What are your thoughts on Windows 10 on ARM-powered devices? Tell us in the comments section below.

RELATED STORIES YOU SHOULD CHECK OUT:
Microsoft launches Surface Go in India; available exclusively on Flipkart for now

Microsoft has finally launched its smallest, most portable and affordable Surface device yet – Surface Go – India.

While the company skipped the first two generations of Surface in India, Surface Pro 3 and Surface Pro 4 were launched together in India in January 2016. The latest generation Surface Pro (2017) – at the time – which went on sale in the US in June last year was launched in India earlier this year.

In August, Microsoft announced the launch of the extended Surface family of devices in India – the Surface Book 2 and the Surface Laptop. Looks like Microsoft is now considering India as a definite market for Surface devices.

Surface Go Specifications

  • Operating System: Windows 10 Home in S mode
  • Display: 10-inch 1800 x 1200 | 217ppi | 3:2 aspect ratio | 10-point multi-touch | Corning Gorilla Glass 3
  • Processor: Intel Pentium Gold 4415Y
  • Graphics: Intel HD Graphics 615
  • RAM: 4GB/8GB
  • Storage: 64GB eMMC or 128GB SSD
  • Ports: 1 x USB-C, 3.5 mm headphone jack, Surface Connect port, Surface Type Cover Port, MicroSDXC Card Reader
  • Cameras: 5MP front camera | 8MP auto-focus rear camera
  • Connectivity: Qualcomm Atheros (QCA61x4A) Wi-Fi 802.11 a/b/g/n/ac | Bluetooth 4.1
  • Dimensions: 9.6″ x 6.9″ x .33″ (245mm x 175mm x 8.3mm)
  • Weight: 1.15 lbs (0.52 kg) without keyboard/1.7lbs (0.77 kg) with keyboard

Surface Go is now available for pre-order in India exclusively with Flipkart starting from 12:01pm on December 15, 2018.

While the 4GB + 64GB variant is priced at ₹38,599, the 8GB + 128 GB variant is priced at ₹50,999. The black Surface Go Type Cover will retail at ₹8,699 and the colored Surface Go Signature Type Cover at ₹11,799.

Commercial customers can opt for Windows 10 Pro which brings essential business security features to protect devices and infrastructure from modern threats. Users can benefit from Windows Autopilot, whereby the Surface Go can be unboxed and configured from the cloud.

What are your thoughts on the Surface Go, and would you like to pick one up?

How to Fix Windows Bootloader Device Unknown Boot Error

When boot errors occur, inexperienced users will usually panic. And, even though they’re quite troublesome, they can be resolved without necessarily resorting to a clean reinstallation from the get-go. Corrupt Bootloader has a variety of errors, and one of them is Bootloader Device Unknown, where the usual system drive can’t be recognized.

We made sure to cover this and provide you with some solutions for quite a pressing issue at hand.

How can I fix Bootloader Device Unknown errors?

1. Repair the installation

To repair the installation, we’ll need a bootable Windows installation drive. You can use a USB flash drive or DVD with the system installation.

If the problem occurs on a Windows 10 PC, you can easily create a bootable drive with the Media Creation Tool tool. Once you get your hands on the Windows installation media, the reparation procedure is rather simple.

Here’s what you need to do in order to repair system errors:

  1. Unplug everything from your PC apart from the mouse and keyboard.
  2. Insert the bootable media drive (USB or DVD) and boot with it.
  3. Once the drive boots, choose “Repair your computer“.
  4. Choose Troubleshoot.
  5. Select Advanced options.
  6. Choose Startup repair.

2. Repair BCD / MBR

The BCD (Boot Configuration Data) or MBR (Master Boot Record) can get corrupted and thus your volume will switch from a system drive to an unrecognized device.

These also require reparations, and bootable media will come in handy again. We need to access the Command Prompt in the pre-setup screen and repair BCD (or MBR) that way.

Here are all the steps you need to follow through:

  1. Insert the Windows 10 bootable media (USB stick or DVD) and restart your PC.
  2. Set the bootable media with the Windows 10 installation as the primary boot device. Change the boot order by either entering the Boot menu or within BIOS settings.
  3. Press any key to boot.
  4. The loading process of the installation file should commence.
  5. Select the preferred language, time/format, and keyboard input. Hit the ”Next” button.
  6. In the following dialog box, select ”Repair your computer” from the bottom left corner.
  7. Open Troubleshoot from the selection menu.
  8. Choose Advanced Options.
  9. Open Command Prompt. If prompted, select your account and enter the password.
  10. In the command line, type the following commands and press Enter after each:
    • bootrec /FixMbr
    • bootrec /FixBoot
    • bootrec /ScanOs
    • bootrec /RebuildBcd
  11. Exit, remove the installation drive and try starting the system in a usual manner.

3. Backup your data and reinstall Windows

Finally, if there’s a possibility to backup your data, the final step is reinstallation. Starting from scratch might be an issue for many affected users, but sometimes, that’s just what you need to do.

There’s a variety of backup tools that should allow you to get all your files out so you can safely format the partition and install a fresh system.

Once you’ve got everything backed up, use the said media installation drive and perform a clean reinstallation.

With that said, we can conclude this article. If you have any questions or suggestions, feel free to tell us in the comments section below.

A quick guide to stop Microsoft from collecting your data

Yesterday’s news about Microsoft collecting data, even when unauthorised to do so, has left many Windows 10 users unsure about how to stop Microsoft from collecting their data.

Never fear. Windows Report is here to help you navigate the minefield that is Microsoft Privacy Settings.

Steps to block Microsoft Activity history

How to check Activity history settings

First thing you need to do is go to Settings > Privacy > Activity history, and see what your settings are. The “Let Windows collect my activities from this PC” was checked, even though I am pretty sure I didn’t check it, because I don’t like sharing anything.

Anyway, you need to decide what data you want to give Microsoft, and check the boxes you are happy to check. Or you can leave them both unchecked as I have.

Active History Settings

Now you should go into all the App permissions and turn the ones off that you want. This should mean that the only data your PC is sending to Microsoft is the data you want. If only it were that simple.

However, you may be surprised to hear that this is not enough to keep Microsoft from snooping on you. Read on to find out what else you need to do.

App Permissions


In case you want to be secure while surfing the internet, you will need to get a full-dedicated tool to secure your network.  Install now Cyberghost VPN and secure yourself. It protects your PC from attacks while browsing, masks your IP address and blocks all unwanted access.


Check your account settings online

If you head over to your activity history in your Microsoft Account page, you will see all the data that Microsoft has been collecting on you. The first thing you’ll want to do is clear it. You will probably get some sort of warning like this:

Clearing History Warning

If you think about the two warnings above, they don’t really make sense. I ignored them and cleared everything. If you some how feel that your fixing you issues may be hindered or your experiences less relevant, then you can choose not to clear your data; the option is yours.

By the way, when the warning notice popped up, it was shaking like it was having some sort of fit. Anyone else have the same experience? I wonder if it’s a glitch, or it’s there to try and scare people into pressing the ‘Don’t clear’ button.

What had Microsoft Activity history been collected?

There was quite a lot of data that had been collected. However, I have to say that it did seem a bit random. When I used Skype, there was a record, which makes some sense as Microsoft owns Skype.

My browsing history was sparse (as I had not given permission to track my internet use), but Microsoft appeared to be very interested in my Netflix viewing, as there was a record of that.

Make sure to check your ads settings

Anyway, you’ll need to go through everything, turning off anything you are uncomfortable with. As you can see below, you will also need to turn off the ads settings even if you had disabled that on your PC.

Now, I know that I had turned those settings off on my PC because I did an article a couple of weeks ago showing you exactly how to do it. So, Microsoft knew I didn’t want personalised ads showing up and didn’t want Microsoft tracking my internet use. Yet on my account settings in the website, it showed that I did want Microsoft to track my internet use show me personalised ads.

Browser Ads

As you can see above and below, I have now unselected the two options.

Wrapping it all up

You should finally be set up the way you want things to be set up. And I know a lot of people are asking what all the fuss is about. The usual comment is, “I don’t do anything wrong so I don’t care if they track me”, but that’s not the point.

The point is that Microsoft et al. do not have the right to collect your data without your permission. Your data has value. If it didn’t, companies like Facebook and Google would have little value, instead of being two of the most valuable companies on the planet. Why shouldn’t we hold Microsoft to the same standards as Facebook and Google?

Tell us what you think. Do you care that Microsoft is collecting your data? Or are you one of the people who are more relaxed about these things? Let us know your thoughts below.

RECENT NEWS ARTICLES YOU SHOULD CHECK OUT:

The file chosen is not recognized by E-Run [WE FIXED IT]

E-Prime is a premium psychology software tool. It’s used for creating and conducting experiments in this scientific branch. There are rare errors occurring during the creation process. However,  you’ll run into a one eventually.

Moreover, one common error is “The file chosen is not recognized by E-Run” which prevents the automatized E-Run from accessing media files you’ve assigned. Solve it by checking the explanation below.

What to do if E-Run won’t recognize files on E-Prime

There are multiple reasons why a multimedia file can’t load into the E-Prime over its automatized feature called E-Run. The most common reasons are:

  • The file is corrupted or unsupported.
  • The file is already opened.
  • Or, the disk has a write protection and thus the application can’t load the file.

With that in mind, we advise you to restart the application and give it another try. You can also try to change the format of the file at hand, as the current format might be unsupported.

The list of supported files contains the following formats:

  • .AVI Audio Video Interleave File.
  • .BMP Bitmap Image File.
  • .EMF Enhanced Windows Metafile.
  • .JPEG JPEG Image.
  • .JPG JPEG Image.
  • .MP3 MP3 Audio File.
  • .MPEG MPEG Movie.
  • .PNG Portable Network Graphic.
  • .TIF Tagged Image File.
  • .TIFF Tagged Image File Format.
  • .WMA Windows Media Audio File.
  • .WMF Windows Metafile.
  • .WMV Windows Media Video File.

In addition, it might help running the E-Prime with the administrative permission. Just right-click on its desktop shortcut and open Properties. In the Compatibility tab, check the “Run this program as an administrator” and confirm changes.

After that, the E-Run feature of the renowned psychology software should have access to all files you want to load. If not, reinstall the application and give it another try.

With that said, we can conclude this article. If you have any questions or suggestions, give us a shout in the comments section below.

RELATED STORIES YOU SHOULD CHECK OUT:

Windows 10’s People Bar set for the chopping block

Perhaps, the fumbled release and subsequent PR nightmare of Windows 10 October 2018 Update has made the Windows team a bit gun shy about rolling out or amending seemingly frivolous features.

Regardless of the reasoning, the company appears set to scale back its People Bar feature in the next public Windows 10 update.

A relatively new Twitter reporter (@thebookisclosed) with an eye for code has been on a tear recently, unveiling recent Microsoft moves with a fair degree of accuracy, is now reporting that the company will be removing the feature over the next few Insider builds and ultimately drop support of it before the next public Windows 10 update.

At this moment, Microsoft has yet to comment on the Twitter post and most well-known reporters and observers have also remained relatively mum on the reporting.

However, the possible removal of the People Hub probably comes with little surprise to Windows 10 users as the Microsoft itself mentioned it zero times during its 2018 developer conference keynotes.

The removal of the People Bar may come as huge loss to those who used Skype or compartmentalized emailing to a large degree but it seems Microsoft’s telemetry might be showing that group was small enough to do away with the feature with minimum blowback.

As a personal observation, the People Bar not only lacked the developer support for new features but it also lacked the foresight from Microsoft.

Perhaps, Microsoft’s move to Chromium will help breathe some life into the concept of the People Bar by providing, out-of-the-box support for Android’s Messages PWA, giving Windows 10 users a native cross-platform messaging experience.

Microsoft’s sleeper hit, Kaizala, powers over 1000 organizations in India already

Microsoft has announced that Kaizala is now powering over 1000 organizations in India across government and business institutions.

Business organizations using this product represent a cross-section of industry sectors, from BFSI to manufacturing to retail, and include YES Bank, UPL, Alembic, Shopper’s Stop, and Eureka Forbes.

A ‘made for India’ product, Kaizala aims to enhance workplace productivity by bringing mobile-only workers, mainly first-line workers, into a digitally integrated modern workplace. It is, of course, backed by Microsoft Azure platform ensuring compliance with an organization’s data-use policies as well as GDPR.

Kaizala, a Microsoft Garage project introduced in 2016, was formally launched as a beta in February 2017 by Satya Nadella at the Future Decoded event in Mumbai. Later in the year, the company officially debuted the new product – Microsoft Kaizala.

At the launch, Anant Maheshwari, President, Microsoft India said that the company is delighted with the rapid adoption in just over an year. “Microsoft Kaizala, with cloud scale & enterprise security, is enabling organizations to achieve more by empowering employees, engaging customers, and enhancing workplace productivity,” he said.

Microsoft Kaizala is now available in 18 languages including Indian languages like Hindi, Marathi, Tamil, Gujarati, and Telugu.

Microsoft also announced new, unique features like Me Chat and Persistent Chat for Kaizala. With Persistent Chat, messages are saved over time, hence, even when a user joins a group at a later stage he/she will be able to read messages that were exchanged prior to his/her joining the group. Me Chat is a user’s personal space where the user can save notes, messages, photos, and more. Users can find their saved items quickly with Search, and can forward them to whoever they want.

The company also announced Microsoft Kaizala Web in preview giving users the ability to use Microsoft Kaizala on their web browser. Also, users can now make audio and video calls to their Microsoft Kaizala contacts.

Microsoft Kaizala is a chat-based communication and data management tool. It is an enterprise ready, compliant and secure chat app. It offers organizations easy and simple way to share data for insightful decision making and gives employees an easy-to-use solution for efficient collaboration and improved productivity. Microsoft Kaizala provides controlled user access and data security in accordance with an organization’s policies and is compliant with data protection legislations such as GDPR, ISO 27001, SOC2 and HIPAA.

– Rajiv Kumar, Corporate Vice President, Microsoft

Microsoft Kaizala is an open platform and has developers integrating their solutions to address diverse business needs. Microsoft Partners like WittyParrot, Bitscape, PC Solutions, et al offer custom solutions for businesses.

Microsoft Kaizala is now commercially available across 28 markets in Asia, Middle East, Africa, and South America. Microsoft also announced that it will be expanding the reach of Kaizala to Office 365 commercial plans worldwide.

Telegram updates on Windows with custom languages and more new features

The popular Telegram messaging app updated to Version 1.5 today on Windows computers and added a lot of new functionality.

In addition to new emoji, improved scaling for larger screens, 2x speed for video and audio, and Twitter and Instagram link previews, this update also added support for custom languages which means that anyone can now create and add their own languages for use on the platform.

Here’s the full release notes:
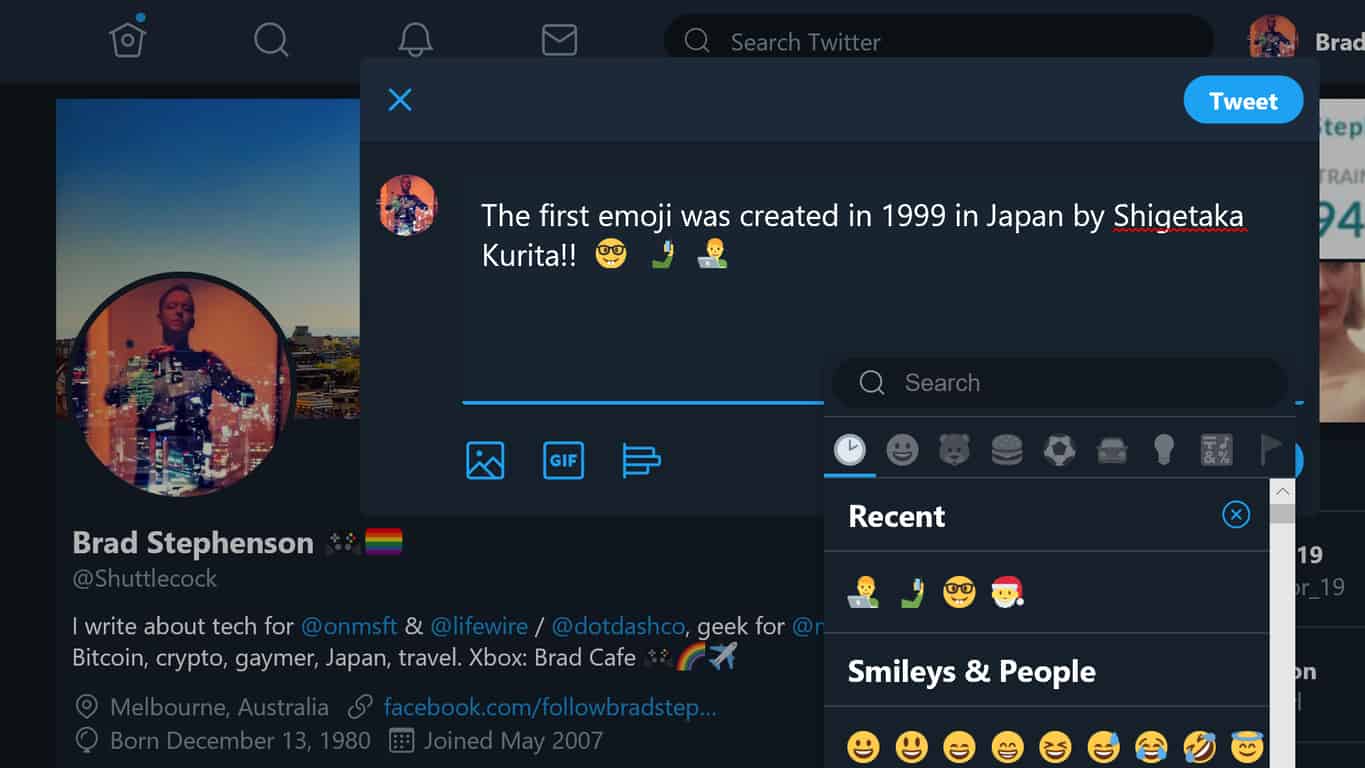
  • Support for custom languages. Crowdsource a cloud-based language pack for Telegram in any language using our Translations platform – then apply it in real time.
  • Interface scaling for large screens, up to 300% (up to 150% for macOS retina screens).
  • ‘Count unread messages’ setting for the Badge counter in Settings > Notifications. Disable to show number of unread chats.
  • Video messages displayed in shared media (under voice messages).
  • Updated emoji. Farewell to question marks ?

Also in this update:

  • Listen to voice and video messages in 2X mode if you’re in a hurry.
  • Add a comment when sharing posts from channels.
  • View all photos and videos in Twitter and Instagram link previews.
  • Add emoji to media captions.

Telegram is a messaging app that’s popular in tech circles due to its enhanced encryption and future plans for its own cryptocurrency. Do you use Telegram? Let us know why or why not in the comments below and then follow us on Pinterest for more Windows app content.

BELOW is now available on Xbox One for sale and for free play in Xbox Game Pass

The atmospheric action and adventure title, BELOW, is now available to purchase outright on Microsoft’s Xbox One consoles or play for free as part of the Xbox Game Pass subscription service.

BELOW is designed to be challenging gaming experience with randomly-generated locations, little hand-holding, and permadeath (no respawning after a character dies). The game has been highly anticipated by gamers and gaming media alike since its initial reveal in 2013 but had been delayed for several years due to the developers wanting to perfect their creation before its release.

Here’s the official game description, trailer, and store link:

Test your adventurer mettle against The Isle’s procedural subterranean labyrinths. Explore a large, interconnected underworld crawling with cunning wildlife, deadly traps and stalked by a shadowy presence. Survive the perils of The Depths and unearth what lies below… or die trying.. BELOW is a procedural terrarium filled with life, mystery and death.

Explore the vast subterranean underworld of The Isle: a dangerous, unfathomable deep. Choose your path through the randomly generated labyrinth crawling with deadly monstrosities, traps and hazardous environments. Perma-death awaits at every false step, and there are no hints to guide you… Spelunking through The Depths of BELOW is a treacherous endeavour, with death around every corner. The world is alive with flora & fauna, and there are many ways to scavenge materials and harvest ingredients to create life-saving remedies or useful survival tools…

What lies below? Only the bravest wanderers will find out. The Depths are filled with secrets and danger. BELOW embraces the idea that players enjoy discovering secret areas, finding hidden passageways and unravelling the deepest mysteries hidden in the darkness…

Having you been waiting to play BELOW and will you buy it or play it with Xbox Game Pass? Let us know in the comments below and then follow us on Pinterest for more gaming content.

BELOW
BELOW
Developer:
Capy
Price:
$24.99

What to do if You are Unable to Restart DNS Client

The DNS server, short for Domain Name Server, is where the management, maintenance, and processing of Internet domain names occur. Or in simple terms, a DNS server assigns an IP address to your PC so that you are easily recognizable on the world wide web. And it does so by translating the domain names to IP addresses.

However, often the server might stop running altogether or have other issues like web pages not getting loaded correctly.

That could be due to some error cropping up, though, in such a scenario, one easy and sure-shot method of getting things back on track is to restart the DNS Server, which is exactly what we discuss in this article.

How can I fix DNS client restart issues?

1. Via command line interface

how to start/stop dns client from cmd prompt

Start command prompt: You can do this either by clicking on Start followed by selecting Run or by simply pressing the Windows and R button simultaneously. When the Run dialog box appears, type cmd and press Enter to start the Windows command prompt.

Alternatively, you can simply type cmd in the Cortana search box, right click on the Command prompt app that shows and select Run as administrator.

Type the command net stop dnscache and press enter. This will stop the service. However, it might take a few seconds for the command to take effect.

You will be shown the following messages:

  • The DNS Server service is stopping.
  • The DNS Server service was stopped successfully.

Next, type the command net start dnscache and press Enter. This will restart the DNS server though again there might be a few seconds’ delay for that to happen. DNS Server runs as a service in your PC and the above command restarts the service.

The following message should confirm the above.

  • The DNS Server service is starting.
  • The DNS Server service was started successfully.

2. Via graphical user interface

Changing DNS setting via admin tools

Launch Control Panel: You can do this by clicking on Start > Windows Systems > Control Panel. Alternately, you can also type Control Panel in the Cortana search box and selecting accordingly from the search results shown. You can also right click on the Start menu and select Control Menu.

Under Control Panel, click on System and Security > Administrative Tools and open DNS snap-in.

From the list of options on the left, locate server, right-click on it and select All Tasks. Here, there are Start and Stop options for starting and stopping the service, respectively.

3. Restart DNS Server on a remote server

This is done with the help of the utility named sc, which gets installed together with the OS so far as Windows Server 2003 is concerned. To perform the start and stop DNS operations, here is what needs to be done.

To Stop DNS.

C:> sc \matrix stop dns

SERVICE_NAME: dns

TYPE               : 10  WIN32_OWN_PROCESS

STATE              : 3  STOP_PENDING

(STOPPABLE, PAUSABLE, ACCEPTS_SHUTDOWN)

WIN32_EXIT_CODE    : 0  (0x0)

SERVICE_EXIT_CODE  : 0  (0x0)

CHECKPOINT         : 0x1

WAIT_HINT          : 0x7530

To Start DNS.

C:> sc \matrix start dns

SERVICE_NAME: dns

TYPE               : 10  WIN32_OWN_PROCESS

STATE              : 2  START_PENDING

(NOT_STOPPABLE, NOT_PAUSABLE, IGNORES_SHUTDOWN))

WIN32_EXIT_CODE    : 0  (0x0)

SERVICE_EXIT_CODE  : 0  (0x0)

CHECKPOINT         : 0x0

WAIT_HINT          : 0x7d0

PID                : 504

FLAGS              :

This is all you need to do.

You can check if things have been resolved by launching any internet browser and entering a domain name in the address bar. If the page launches successfully, you know you have your issue resolved.

Meanwhile, here are some additional resources worth having a look at.