Windows 11 Beta Channel Insiders to get Snipping Tool, Notepad improvements

Some Windows Insiders in the Beta Channel release recently received an update that brought some tweaks and performance improvements to in-box apps such as Snipping Tool and Notepad and it looks like those features are starting to roll out to all Beta Insiders.

Insiders using Snipping Tool version 11.2307.44.0 and Notepad version 11.2307.22.0 can start playing with a new combined capture bar in Snipping Tool that offers an extended list of capture features such as additional cropping options, and improved screen capturing settings that allow users to select their preferred recording device and audio input before recordings.

Paint Overlayrecording

As for Notepad, users will now benefit from automatic saving states that function similar to the auto save features in Office 365 apps. For Notepad sessions that are interrupted or closed prematurely, the app will restore from previous saved points as well as open previous tabs and the content within.

Notepad Ghostfiles

There is one noted bug coming with the new features in this roll out that includes a pop-up dialog when taking screenshots that reads “Select an app to open this ‘ms-screenclip’ link.”

The Windows team suggested selecting “Snipping Tool” when encountering this new dialog bug to continue with using the app without crashing it. The dialog pop isn’t a permanent fixture and may not affect every Insider equally but is being noted with a workaround for now.

How to restore Microsoft Teams meeting recordings after they are expired and deleted in 2 easy steps

Restoring Microsoft Teams meeting recordings is a straightforward process that can be completed in just a few minutes. Here’s a quick guide to help you with the process:

How to restore Microsoft Teams meeting recordings

Understand the Storage Locations

When you record a Microsoft Teams meeting, the recording is automatically saved in two places:

  • In the user’s OneDrive account (who initiated the recording).
  • On the SharePoint site (if the meeting was conducted in a channel).

To restore Microsoft Teams meeting recordings, if the recording is deleted, it initially goes to the Recycle Bin, which will be retained for 90 days. Microsoft has implemented this policy to optimize storage space over time.

To learn more, about this subject, we have an entire guide dedicated to finding and changing the Microsoft Teams recording location, so don’t miss it for more information.

Step 1: Receive Notification and Take Action

If a meeting recording is deleted or has expired, you will receive an email notification prompting you to take action. Here’s what you need to do:

  • Open your email and click the Go to recycle bin button.
    Go To Recycle Bin. restore Microsoft Teams meeting recordings

    Image Credits: www.marquette.edu


Step 2: Locate and Restore the Recording Inside the Recycle Bin

Locate the deleted recording and follow these steps:

  • Select the recording you want to restore.
  • Click on the “Restore” option.
    Restore

Successful Restoration

Your selected recording will now be restored to its original location, making it accessible once again. 

Additional Information

Here are some important points to keep in mind regarding Teams meeting recordings:

  • You have a 90-day window to restore a recording after receiving the email notification indicating its expiration.
  • By default, meeting recordings are set to automatically expire after 120 days, but an administrator can adjust this value.
  • Once a recording is recovered, it will no longer be subject to automatic expiration dates.

Remember the expiration periods to ensure you don’t lose valuable meeting recordings.

How Chinese operatives use AI photos to sow discord among US voters, reveals Microsoft

In an alarming revelation, Microsoft, the American multinational technology company, identified a surge in sophisticated, state-aligned influence and disinformation campaigns from China permeating multiple social media platforms.

The findings, published in a threat analysis report on Thursday, revealed that Chinese Communist Party (CCP)-affiliated covert operations have targeted US political candidates and adopted insidious personas of American voters, escalating the divide in the already polarized nation.

We have observed China-affiliated actors leveraging AI-generated visual media in a broad campaign that largely focuses on politically divisive topics, such as gun violence, and denigrating U.S. political figures and symbols. This technology produces more eye-catching content than the awkward digital drawings and stock photo collages used in previous campaigns. We can expect China to continue to hone this technology over time, though it remains to be seen how and when it will deploy it at scale.

Since March, China has significantly upgraded its disinformation arsenal, utilizing generative Artificial Intelligence (AI) to create headline content designed to go viral and widen divides among US voters, according to Microsoft analysts.

The Microsoft report, titled Digital threats from East Asia, brings to light the growing infiltration of Asian digital threats on American soil, particularly emphasizing Chinese influence campaigns. The report stated, “Covert influence operations have now begun to successfully engage with target audiences on social media to a greater extent than previously observed.”

An alarming observation highlighted in the report was China’s exploitation of generative AI to create visually engaging content that draws significant interaction from genuine users. This disconcerting pattern, as detailed in the report, began to surface around March.

While historically, Chinese influence campaigns have had limited success in penetrating their target audiences, predominantly US voters and residents, the trend noticeably began to turn in their favor since the 2022 midterm elections, Microsoft warned.

Notably, the findings have shed light on the increasing threat of foreign influence campaigns seeping into social media platforms, specifically X, formerly Twitter.

The infiltration has been widespread, with the disinformation content infiltrating multiple platforms, including Facebook and Instagram, Microsoft-owned LinkedIn, and X.

Microsoft, while commenting on the spread of this disinformation, presented screenshots of two different X posts from April, identified as perpetuating CCP-affiliated disinformation.

Both posts, centering on the Black Lives Matter movement, utilized the same graphic. One originated from an automated CCP-affiliated account, while the other was posted by an account impersonating a conservative US voter seven hours later.

In a separate report, Microsoft asserts that Russia exploits the internet to incite worldwide political instability.

The revelations prompted an alarming reminder of the concerning growth of disinformation campaigns. Let us know your thoughts on this.

Microsoft introduces one-click solution for removing background from images via Paint

Microsoft has released details about a new update for the Paint app in Windows. The latest version of the Paint app, 11.2306.30.0, includes a new feature that enables users to easily remove the background of an image with just a single click. This feature has been designed to create a smooth cutout of the subject in the image, making it easier for users to edit and manipulate their images.

Users can automatically remove the background from the entire image or make a manual selection using the selection tool to specify the area from which they want the background removed.

To use this feature, simply paste or import your content onto the canvas within the Paint app. Then, look for the new “remove background” button in the toolbar. Clicking on this button will initiate the background removal process.

This new feature is expected to be a popular addition for users who need to create images with subject matter that does not have a background, making it useful for both creative and practical purposes. The update is available only for Windows Insiders in the Canary and Dev Channels. Last month, Microsoft announced Paint getting centered canvas.

We believe this tool will be particularly helpful for removing backgrounds from images of people and objects and creating collages and other image editing projects.


How to Remove the Background in Windows 11’s Paint App

Insiders in the Canary and Dev Channels (version 11.2306.30.0) are able to remove the background in the Paint app, meaning that background removal in this app is coming to Windows 11 after all.

Microsoft has been improving the Paint app over 2023, and the app now has a Dark Mode, so it’s good to know that users will be able to experience this feature as well.

According to Microsoft, you’ll be able to remove the background in Paint with just a click.

With background removal, you can now remove the background of any image automatically in just one click leaving a smooth cutout of the subject. Background removal can detect the subject from the entire canvas or from a selection using the selection tool.

Microsoft

The new feature uses AI to easily cut and crop elements from the images you want to edit. This way, you’ll be able to use Paint to extensively edit your images professionally.

The Photoshop-like feature will allow you to easily move the background, or entirely remove it, allowing you to keep the selected element and repurpose it.

How to remove the background in Windows 11’s Paint app?

  1. Paste or import content onto the canvas. remove background in paint
  2. Click on the new remove background button in the toolbar to remove the background on your entire image. You can also use the rectangle select to specify an area on which you want to remove the background.

For now, the feature is only available to Insiders, but it will soon come to the live Windows 11 servers, most probably with the release of 23H2 which will happen later month.

The update will improve the Paint experience, and you’ll be able to use it for more than just saving screenshots or designing simple templates.

We also have a guide on how to hide or remove Learn about this picture on Windows 11, so don’t miss it.

Are you excited about this new feature? Do you use Paint in your projects?

Chrome’s new design will let you personalize your homepage now

The Chrome browser is turning 15, and to celebrate it, Google is adding a lot of new options and features that you can use to customize the Chrome homepage. According to their latest blog post, Chrome will be using the Material You language to offer you a personalized design of your Google homepage.

Based on our Material You design language, we’ve refreshed Chrome’s icons with a focus on legibility and created new color palettes that better complement your tabs and toolbar.

The new customization will help you design your work profile and your personal profile so you can distinguish them better. Chrome will allow you to do it effortlessly, with just a few clicks. All the changes will happen on-to-go, meaning you won’t have to restart your Chrome to implement them.

These improvements will come to Chrome over the following weeks. They will first be implemented on the desktop platforms, and it’s uncertain if the changes will be available to mobile devices. For now, there are no official announcements when it comes to it, but Google might consider a similar revamp for Android and iOS too.

While the new customization will be added automatically through updates, you’ll still need to know your way around them. Don’t worry, though. It’s not complicated. Here’s how you’re going to customize your Chrome homepage.

How to customize your new Chrome homepage

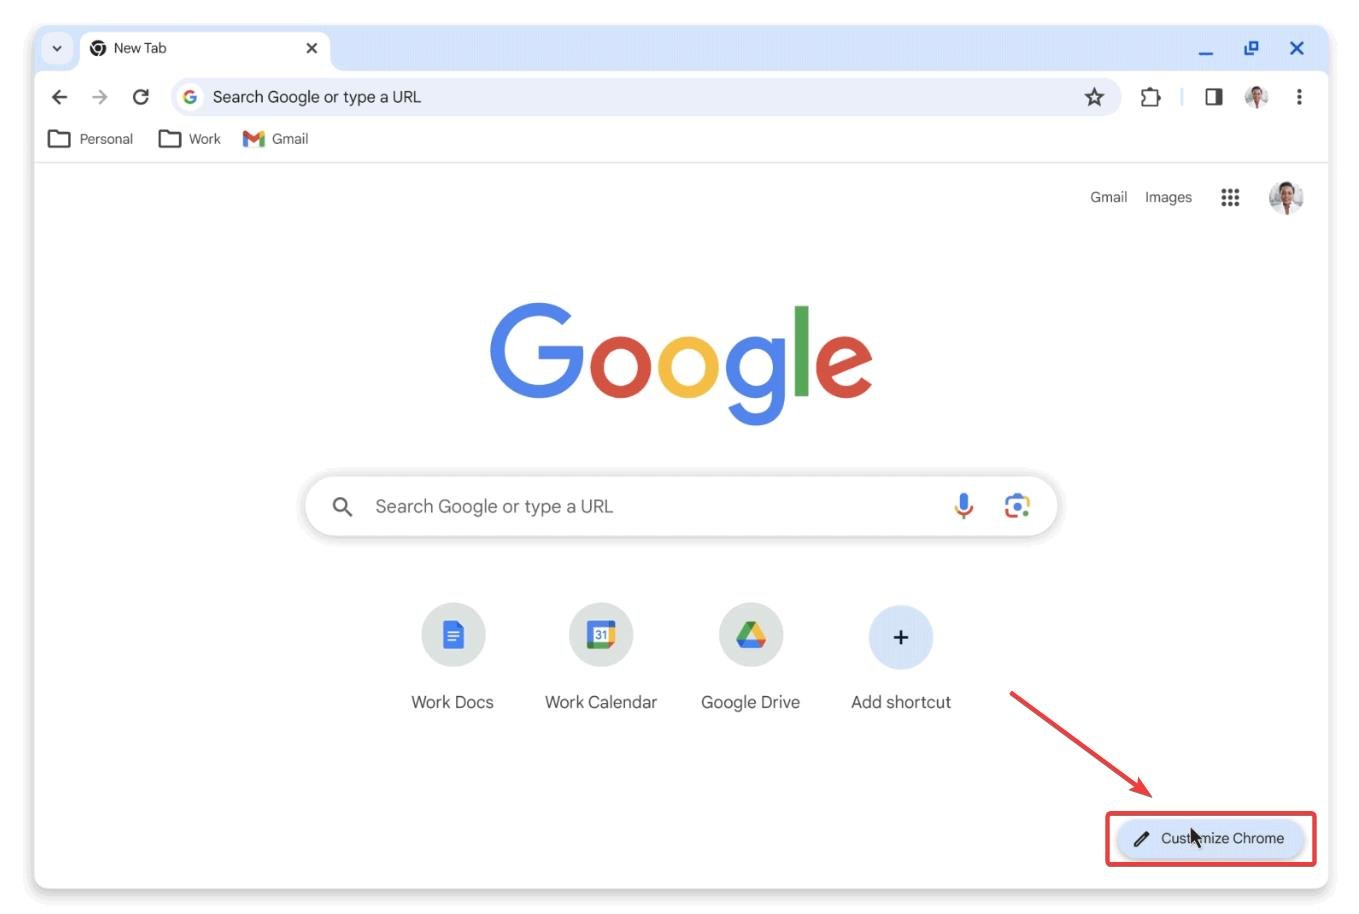
  1. Click on the Customize Chrome button at the bottom-right of your screen. customize chrome homepage
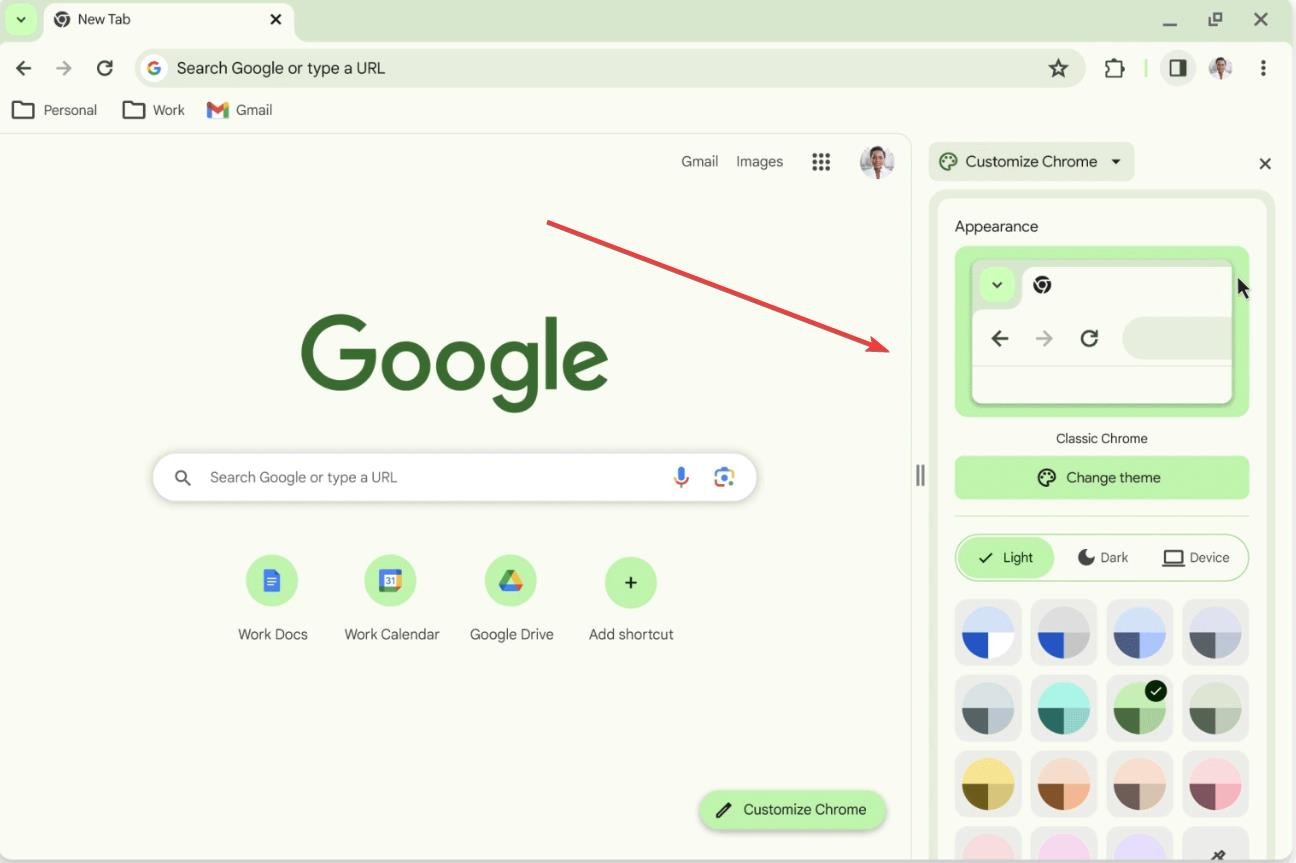
  2. This will open a new sidebar to the right of your screen, allowing you to choose from many color templates that suit your style. As you choose, the template will be implemented in real time.
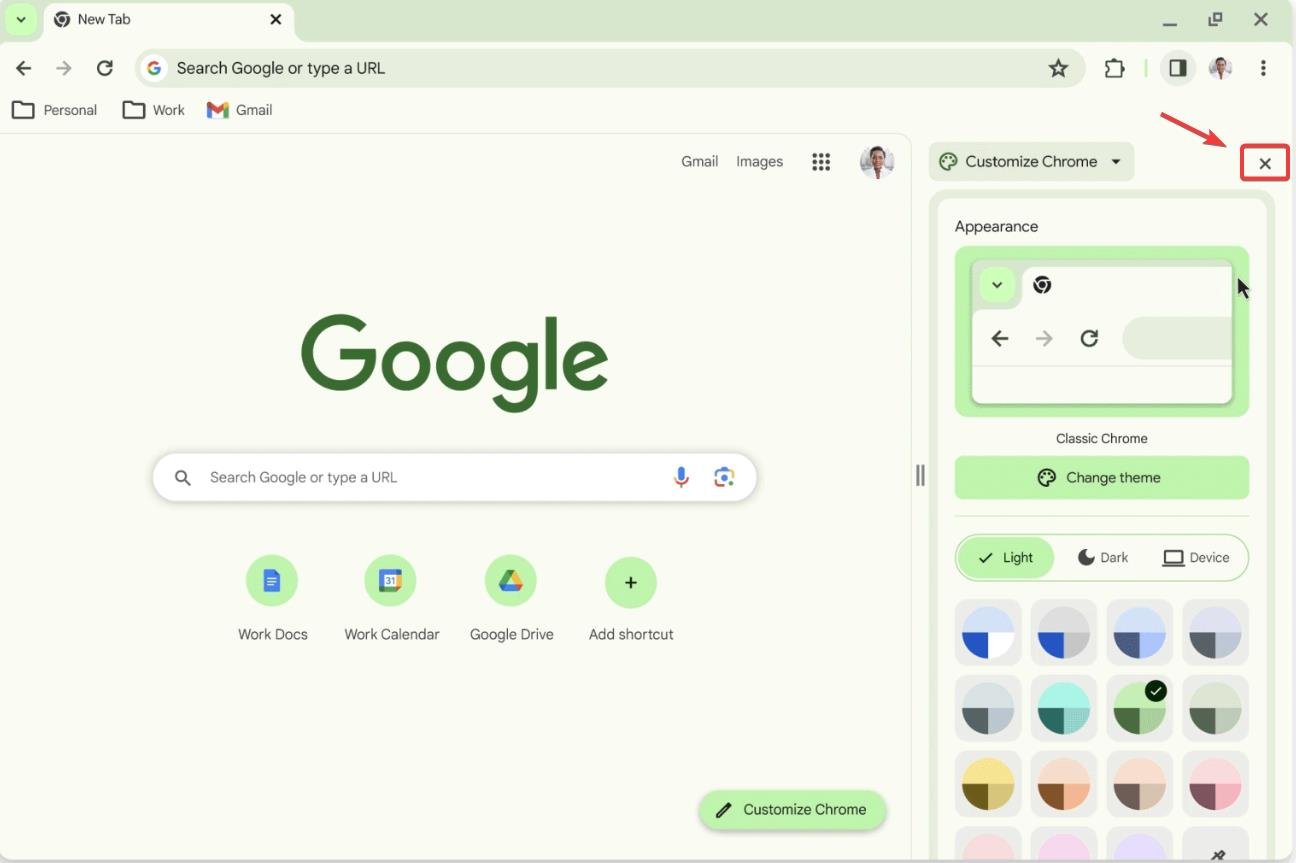
  3. To close the sidebar, click on the X button, and the top-right of it. customize chrome homepage

As you can see, the sidebar allows for a better customization of your Google homepage. You have the option to choose many templates, including switching from the classic Google look to the modern Google look.

The appearance panel will also allow you to customize the layout of your Chrome homepage, allowing you to give it that modern look.

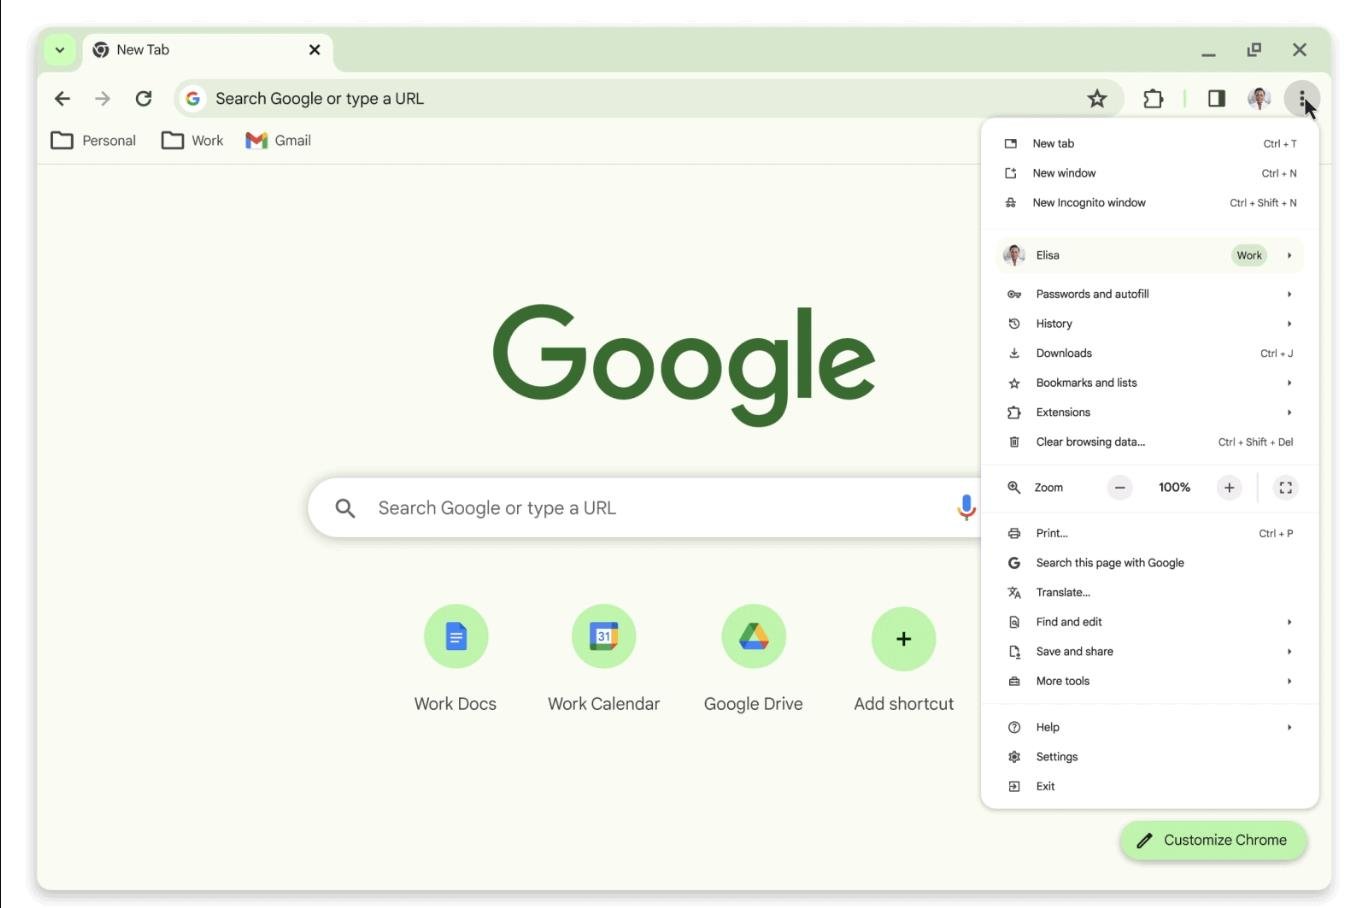
Plus, if you click on the 3 dots, on the top-right of your Google homepage, you will open up a new and modernized option panel. If you notice, you can easily switch between your professional homepage and your personal homepage. customize chrome homepage

What other improvements are coming to Chrome?

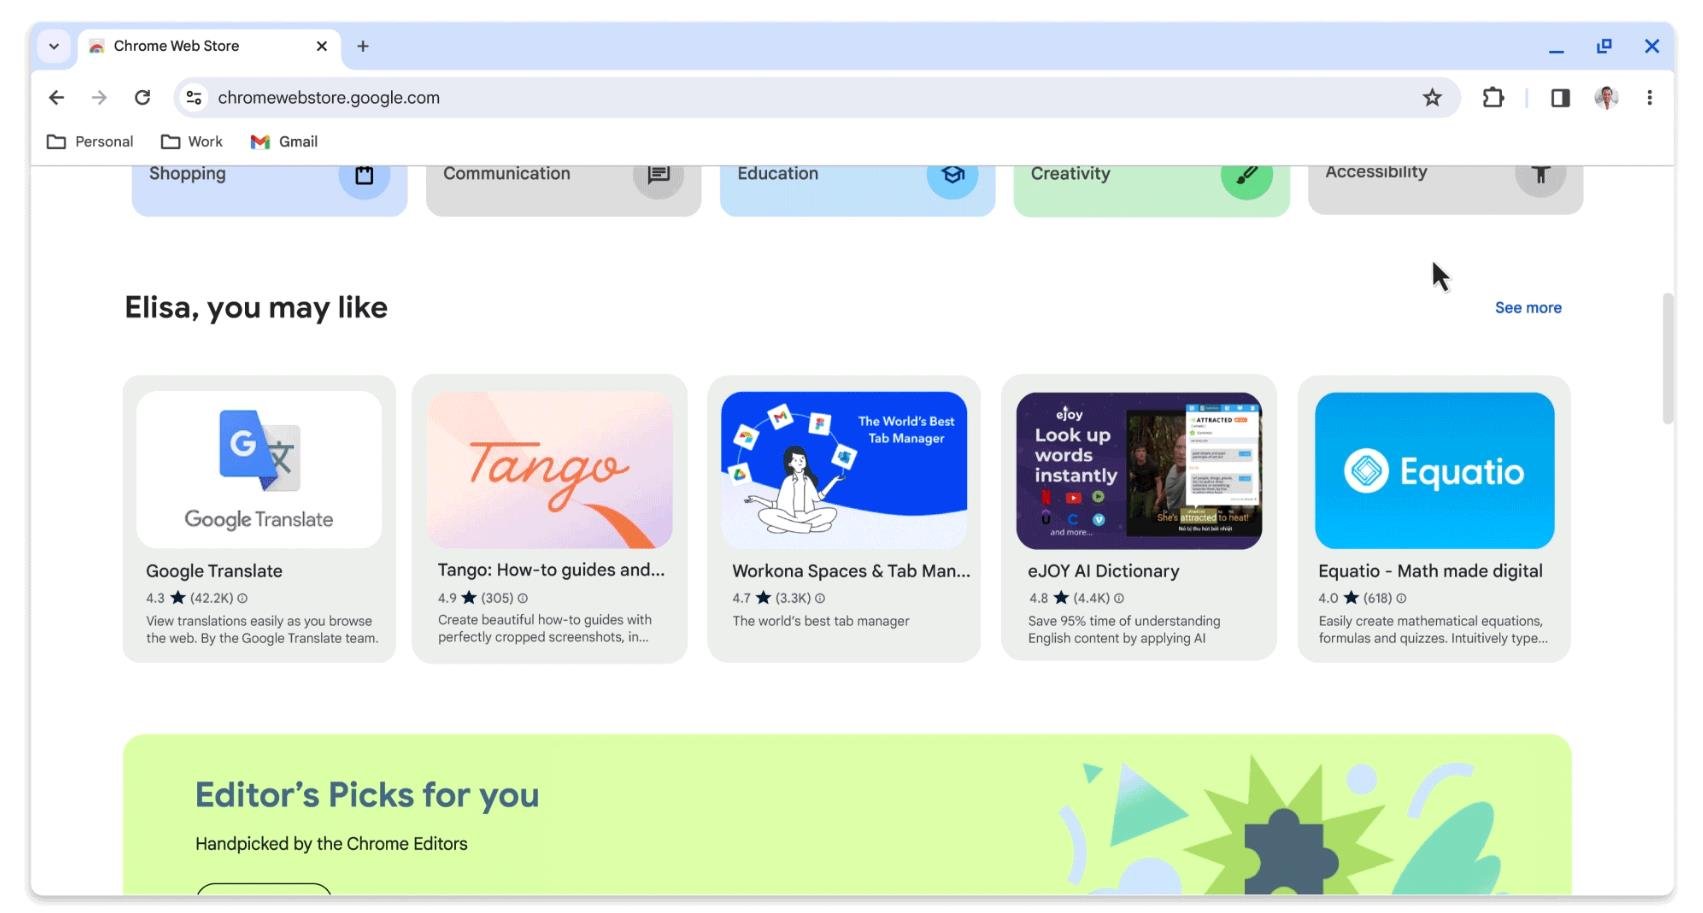
Google will also update several other features from Chrome: the new Chrome Web Store will allow you to easily look up your favorite extensions. You’ll get recommendations based on your profile and your work on Chrome.

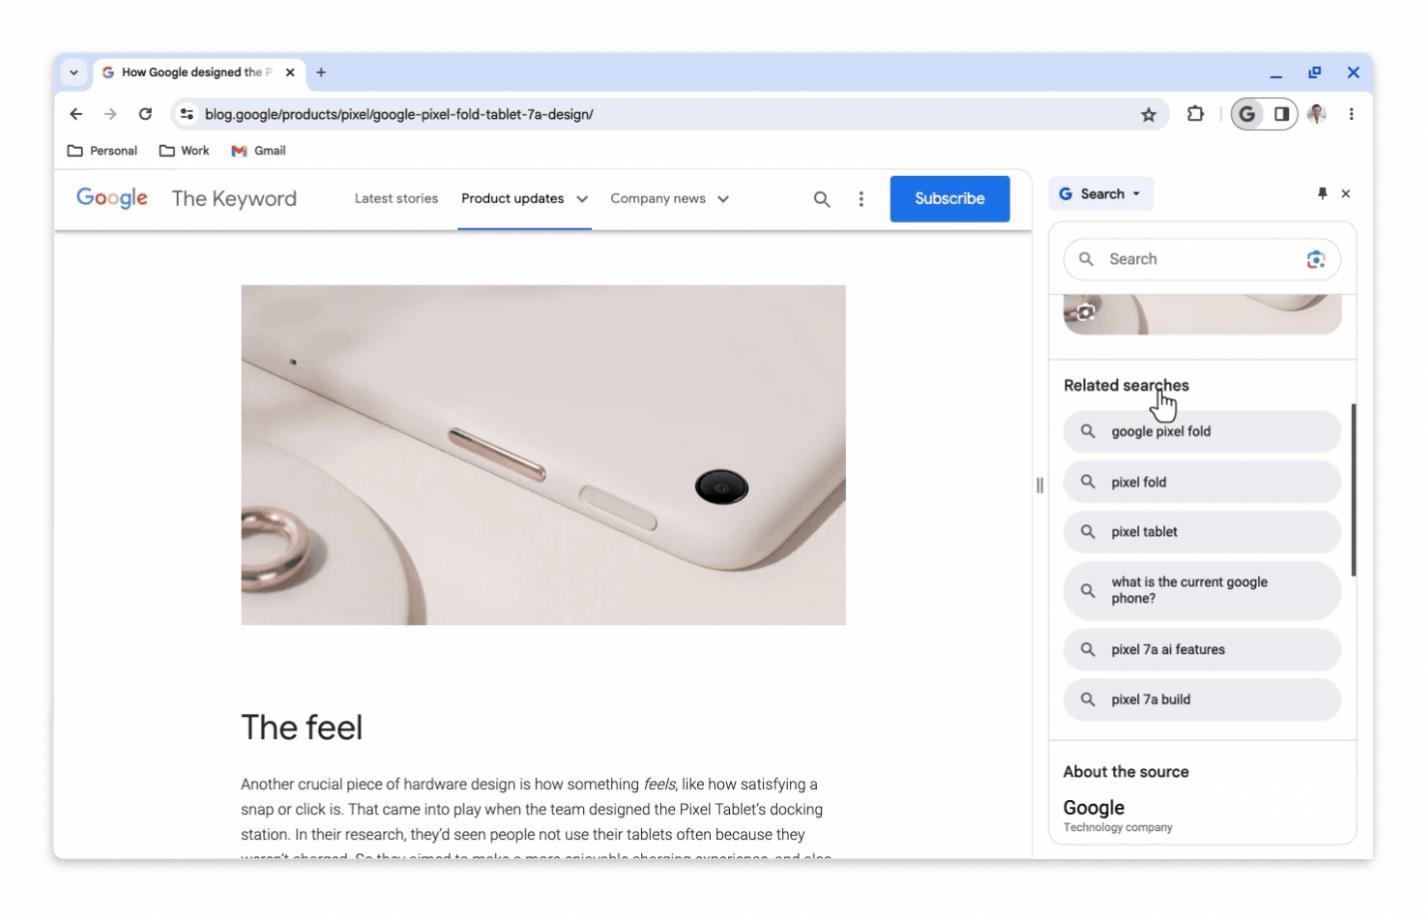
Then, the new and improved Google Search side panel will act similarly to Bing Chat, and its generative AI capabilities will help you find the right information in no time, Google says.

Plus, Google will also roll out its new Safe Browsing feature that will protect you from phishing attacks and other malware in real-time, as you’re browsing. Google says the rollout should happen over the following weeks.

Are you excited about the new Google? We most definitely are. Even if we use Edge sometimes.

How to Check Network Connection Details & Status on Windows 11

To ensure that your network connection is working properly, or to troubleshoot problems, sometimes you need to check network connection details on Windows 11.

By doing so, you can view various information including your IP address, MAC address, link speed, driver version, and more, and in this guide, we’ll show you how to do that.  

How do I find network connection details on Windows 11?

1. Use the Settings app

  1. Press the Windows key + I to open the Windows Settings.
  2. Next, navigate to Network & Internet in the left pane and select your network type. In our case, that’s Ethernet. If you’re using a wireless network, select Wi-Fi network instead.
     
  3. At the bottom of the screen, you should see Windows 11 network adapter settings.

2. Use Control Panel

  1. Press the Windows key + R and type control. Press Enter.
     
  2. Navigate to the Network and Sharing Center.
  3. In the right pane, choose Change adapter settings.
  4. Now you should be able to view network connections on your PC. Double-click your network connection to open connection properties.
  5. Click on Details to view more network adapter options.
  6. The network information will now appear.

Windows 10 users can access similar options through the Network and Internet settings for managing connections and troubleshooting issues.

3. Use Command Prompt

  1. Press the Windows key + S and type cmd. Select Run as administrator.
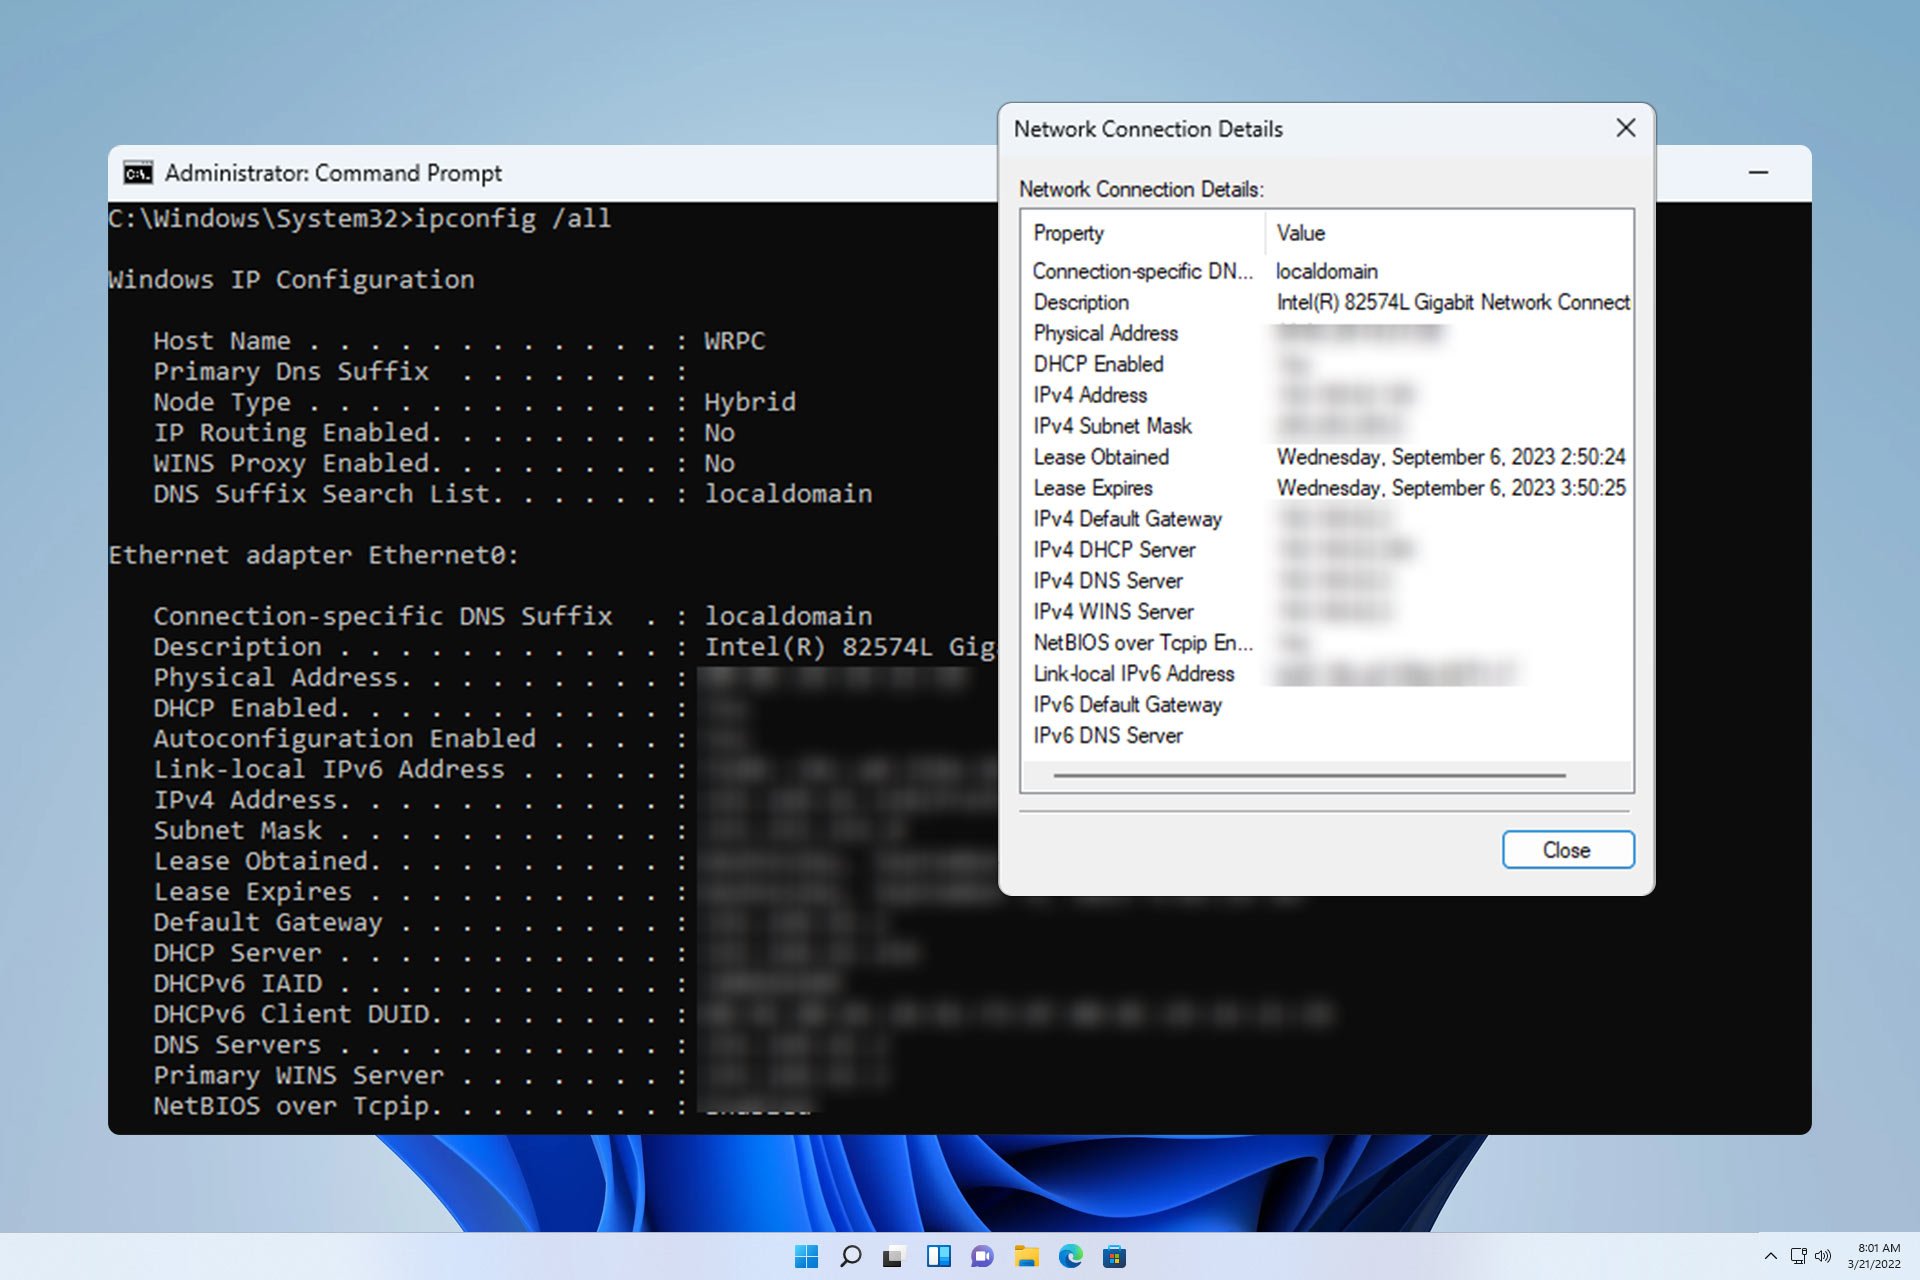
  2. Run the following command: ipconfig /all
  3. A list of connection details for all network adapters will now appear.

4. Use PowerShell

  1. In the Search box, type powershell and choose Run as administrator.
  2. Run the following command: Get-NetIPConfiguration
  3. Now you should see all the necessary network information.

Why is my network connections folder empty in Windows 11?

  • There are no network connections available, probably because your PC has never connected to one before.
  • Issues with your network adapter configuration or drivers.
  • The network adapter is faulty and not working.

Checking connection details is simple, and the fastest way to do it is by using the ipconfig command, however, for less advanced users it might be more convenient to use the Settings app.

Now that you know how to check network details, you can easily change the network type or change the network band of your wireless network. Besides, it will help troubleshoot problems when the cellular option is missing in Windows 11.

If needed, you can also turn on network discovery or add a secondary IP address to your connection right from the network details window.

Did we miss your favorite method of checking connection details on Windows 11? If so, share it with us in the comments section.

Fix: Record Video is not Working in the Snipping Tool

While the concept behind the Snipping Tool in Windows 11 is great, one of its main functions, which is to record videos, has been really disappointing.

The screen recording feature is still relatively new, so it may get a hard pass for the malfunction. Nonetheless, let’s take a look at this problem and try to find a solution for it.

So why is the Snipping Tool record video feature not working?

  • You probably don’t have the latest version of Windows 11 installed.
  • The Snipping Tool may be broken or corrupted.
  • A third-party software like your antivirus may be blocking it from recording your screen.
  • Your computer doesn’t have enough RAM or hard disk space to store the screen record.
  • A virus or malware on your PC is interfering with how programs work.

How can I get the Snipping Tool to record my screen in Windows 11?

Before you attempt the somewhat complex solutions, start with the following basic workarounds:

If any of the above resolves the problem, no need for the next steps, but if no luck, try the following:

1. Disable firewall/antivirus temporarily

  1. Hit the Start Menu icon, type Windows Security in the search bar, and click Open.
  2. Click on Firewall & network protection, then select Public network.league of legends black screen after champion select
  3. Locate Microsoft Defender Firewall and toggle the off button.turning off Microsoft Defender Firewall Windows

Remember to turn on the Firewall, as running a PC with no protection is not a good idea. If the feature works when the firewall is disabled, try allowing the program through the firewall.

2. Scan your PC for malware

  1. Click on the Start Menu icon, search Windows Security, and click Open.
  2. Select Virus & threat protection.
  3. Next, press Quick scan under Current threats.
  4. If you don’t find any threats, proceed to perform a full scan by clicking on Scan options just below Quick scan.Scan options
  5. Click on Full scan, then Scan now to perform a deep scan of your PC.Full Scan Scan Now
  6. Wait for the process to finish and restart your system.

As Windows Defender might not be able to detect the latest threats from your PC, you can use a powerful antivirus to protect your system from all types of digital threats and prevent them from damaging it in the future.

⇒ Get TotalAV

3. Repair/Reset the Snipping Tool

  1. Hit the Windows key and click on Settings.settings windows 11
  2. Select Apps, then click on Apps & features.
  3. Search for Snipping Tool, click on the three ellipses, and select Advanced options.
  4. Scroll down and hit the Repair button.
  5. Try recording again, and if it doesn’t work, go back and hit Reset.

If none of the above work, your last resort would be to reinstall the Snipping Tool. Don’t forget to remove any software remnant files that may have corrupted the app causing it to malfunction.

What are some Snipping Tool alternatives for Windows 11?

  • Snagit – Has a wider variety of capture options and supports multiple OSes.
  • Screenpresso – Lightweight program that supports integration with third-party apps such as Google Drive.
  • ShareX – User-friendly app with customizable edit options.
  • Greenshot – This is an open-source app that makes it a top choice for developers.
  • PicPick – This portable, lightweight, full-featured application with a wide range of features makes it the ultimate all-in-one Snipping Tool alternative.

Unfortunately, you may try out all the above steps, and you still won’t be able to record video using the Snipping Tool. And while the tool may be highly useful, the video recording feature is the most coveted.

In such cases, an alternative should suffice, so if the above options don’t make the cut, we have an extensive list of more Snipping Tool alternatives.

Hopefully, this article will offer a solution to anyone having trouble with the video feature. If you have any solution(s) you think are worth mentioning, please feel free to leave them in the box below.

How to Enable or Disable Bitlocker Auto Unlock on Windows 11

Enabling BitLocker on a computer is relatively easy. Once enabled, the computer will require you to enter a password or insert an encryption key when you restart the computer. But is this something that we always want?

If it happens occasionally, it’s okay, but if you frequently have to input your password, it can get tiresome. Luckily, you can use Microsoft’s Bitlocker Auto Unlock feature to automatically unlock your PC during startup without entering your password, and here’s how to go about it.

So why enable or disable Bitlocker Auto Unlock? If it’s a personal computer, you do not need to key in your password anytime you boot your PC because it slows down the login process. It also comes in handy if you easily forget your passwords.

On the downside, you introduce security risks because it gives access to unauthorized persons. They don’t have to authenticate their information first and will be able to access anything on your PC.

How do I turn on or off Bitlocker auto unlock on Windows 11?

1. By using the Control Panel

  1. Hit the Windows key, type Control Panel in the search bar, and click Open.control-panel-search fallout new vegas runtime error
  2. Select System and Security, then click on Bitlocker Drive Encryption.
  3. Find the drive you wish to enable/disable auto-unlock and click on Turn on auto-unlock/Turn off auto-unlock.

Note: This feature requires administrator privileges on each encrypted drive to be set up before using auto-unlock.

2. By using the Command prompt

  1. Hit the Windows key, type cmd in the search bar, and click Run as administrator.cmd-run-admin-w11 unexpected kernel mode trap windows 11
  2. Type the following command and hit Enter. Remember to replace F with the actual drive letter you wish to auto-unlock: manage-bde -autounlock -enable <F>:
  3. To disable, type in this command and hit Enter: manage-bde -autounlock -disable <F>:

3. By using the PowerShell command

  1. Hit the Windows key, type PowerShell in the search bar, and click Run as administrator.
  2. Type in the following command and hit Enter. Remember to replace F with the actual drive letter you wish to auto-unlock: Enable-BitLockerAutoUnlock -MountPoint "<F>:"
  3. To disable, type in this command and hit Enter: Disable-BitLockerAutoUnlock -MountPoint "<F>:"

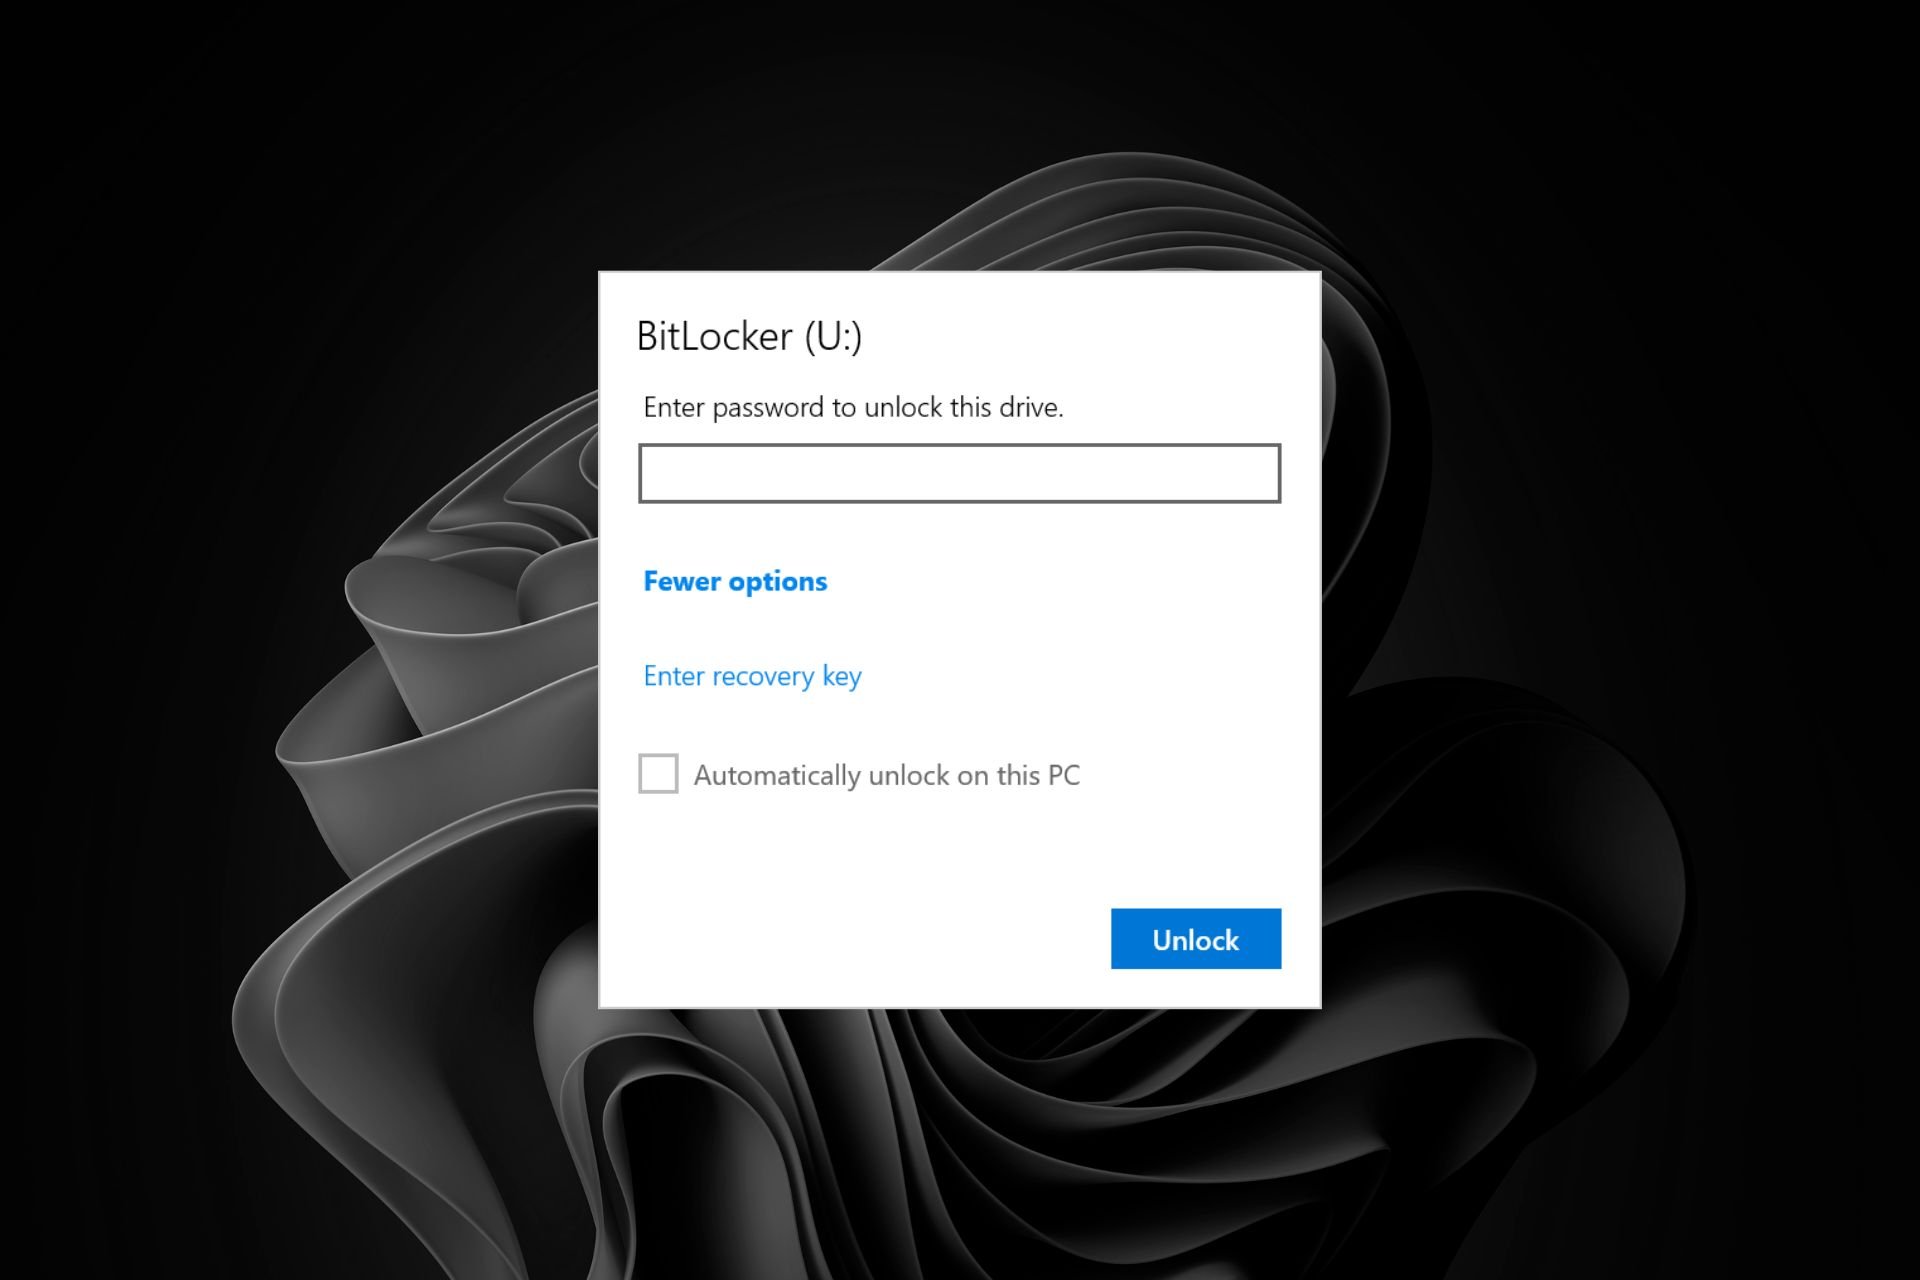
If it’s a removable data drive, once you insert it and are entering in your login credentials, ensure to also check the Automatically unlock on this PC box and repeat the same when you want to disable it.

How does Bitlocker auto-unlock work? 

The BitLocker auto-unlock feature allows users to automatically unlock their encrypted drive on a computer where they have logged on at least once before by using the same Microsoft account on the same device.

This allows users to bypass having to enter their PIN or password whenever they want to access their encrypted drive if they use only one device. This feature only works on systems with a Trusted Platform Module (TPM) version 2.0 and above.

As a precaution, we recommend enabling this feature for non-operating system drives and others that do not contain sensitive information.

Hopefully, this article has taught you how to enable or disable Bitlocker Auto Unlock on a Windows 11 device. If the steps seem too cumbersome, perhaps unlocking your BitLocker without a password or recovery key may be of interest to you.

Better yet, you can disable BitLocker altogether if you’ve ascertained there are no risks of unauthorized access to your PC or your hard drive being stolen. And if you have trouble turning off your BitLocker, don’t hesitate to check out our helpful guide.

Be sure to check out our Device Encryption vs BitLocker review to explore the differences.

Have you enabled or disabled the auto-unlock feature on BitLocker? What are your reasons for your stand? We’d love your input on this topic, so share your response in the comment section.

Fix: HP Spectre Goes to Sleep in Full Table Mode on Windows 11

2-in-1 convertible laptops are a popular choice, and they should automatically switch to tablet mode when the screen is flipped. But that’s not always the case, and we often see instances where the HP Spectre’s tablet mode is not working.

Remember, the Tablet Mode settings have changed in Windows. While Windows 10 allows users to configure Tablet Mode, Windows 11 automatically adjusts the settings when you flip the screen or detach the keyboard. And this is when problems start to appear. 

Why is my laptop entering sleep when in tablet mode on Windows 11?

  • The tablet mode settings or the related Registry entries are misconfigured.
  • You are running outdated or buggy drivers.
  • The sensors (HID Sensor Collection V2) are disabled.
  • The hardware is malfunctioning.
  • A glitch in the OS or corrupt system files.

Keep reading to find out how to fix things when your HP Spectre laptop goes to sleep in tablet mode.

What can I do if my HP Spectre goes to sleep when in tablet mode?

Before we head to the slightly complex solutions, try these quick ones first:

  • Make sure to check the documents on compatibility and verify your laptop supports tablet mode.
  • Completely discharge the battery, plug in the power adapter, and turn on the computer.
  • Turn off the HP Spectre laptop, hold the power button for 30 seconds, and then turn it back on. 
  • Check the installed version and update the BIOS. A BIOS update worked in many cases.

If none work, move to the fixes listed next.

1. Change the orientation

  1. Press Windows + I to open Settings, and click on Display in the System tab.display
  2. Now, select Portrait from the Display orientation dropdown menu.portrait to fix hp spectre tablet mode not working

2. Enable the sensors

  1. Press Windows + R to open Run, type devmgmt.msc in the text field, and hit Enter.
  2. Expand the Sensors entry, right-click on the HID Sensor Collection V2 device listed here, and select Enable device.enable device
  3. Similarly, enable all the other devices listed here, then restart the computer and check if the problem is resolved.

3. Update the drivers

  1. Press Windows + S to open Search, type Device Manager in the text field, and click on the relevant search result.
  2. Expand the System devices entry, right-click on Intel(R) Integrated Sensor Solution, and select Update driver.update driver
  3. Click on Search automatically for drivers and let Windows locate and install the best driver available locally.search automatically
  4. Finally, reboot the PC.

A driver update can do wonders when the HP Spectre is stuck in laptop mode and doesn’t switch to tablet mode when flipped. If Windows can’t find the relevant drivers, you can always head to HP’s official website, choose your laptop, locate the latest version, and manually install the driver.

4. Roll back the drivers

  1. Press Windows + X to open the Power User menu, and select Device Manager from the list of options.
  2. Double-click the System devices entry, right-click on Intel(R) Integrated Sensor Solution, and select Properties.properties
  3. Go to the Driver tab, and click the Roll Back Driver button.roll back driver to fix hp spectre tablet mode not working
  4. Finally, select a reason for rolling back the driver version or enter one in the text field, and click Yes to proceed.roll back reason
  5. Once done, restart the computer for the changes to apply.

Users often report that the HP Spectre laptop turns off tablet mode automatically, and this could be due to a buggy driver. In this case, rolling back the driver will get you to the previous stable version.

5. Modify the Registry

  1. Press Windows + R to open Run, type regedit in the text field, and click OK.regedit
  2. Click Yes in the UAC prompt.
  3. Now, paste the following path in the address bar and hit Enter: HKEY_LOCAL_MACHINE\SOFTWARE\Microsoft\Windows\CurrentVersion\AutoRotationpath
  4. Double-click the Enable DWORD on the right, enter 1 under Value data, and click OK.mdoify to fix hp spectre tablet mode not working
  5. Change the Value data for the LastOrientation DWORD to 0, and save the changes.
  6. If the SensorPresent DWORD is available, set its Value data as 1.modify
  7. Finally, restart the computer and verify whether the tablet mode issue is fixed.

6. Perform an in-place upgrade 

  1. Go to Microsoft’s official website, select the OS edition, and proceed to download the Windows 11 ISO.
  2. Double-click the ISO file and click Open in the confirmation box. 
  3. Run the setup.exe file.setup.exe
  4. Click Yes in the UAC prompt.
  5. Click Next in the setup window to proceed.next
  6. Now, click Accept to acknowledge Microsoft’s license terms.
  7. Finally, check whether the Windows 11 Setup reads, Keep personal files and apps, and click Install.in-place upgrade to fix hp spectre tablet mode not working
  8. Wait for the process to complete. It may take a few hours.

An in-place upgrade will fix any software-based inconsistencies or misconfigured settings that led to the HP Spectre’s tablet mode not working. It’s as good as reverting to factory settings, and the best part is that you don’t lose the installed apps or stored files. 

7. Roll back to Windows 10

When nothing else works, and the problem first appeared after you upgraded to Windows 11, a quick solution would be to roll back to Windows 10. 

While Windows 11 supports tablet mode, there’s a likelihood that your laptop is not able to effectively run the OS. And switching to an iteration where it worked is the best course.

Tip icon Tip
If the problem remains unresolved, it’s likely a hardware issue to blame. We recommend you get the automatic detector sensors and other components inspected. Contact HP if the laptop is under warranty.

How do I force Windows 11 tablet mode?

There’s no way you can force the Windows 11 tablet mode. The functionality has changed in the latest iteration, and flipping the screen or detaching the keyboard will turn on tablet mode.

Similarly, you can’t force disable it when stuck in tablet mode. Just do the reverse: move the screen to the normal/original position or reattach the keyboard.

This completes our list of solutions when tablet mode is not working on an HP Spectre laptop. Remember, when we looked at forums, users highlighted that the problem usually appeared after the laptop was sent for repair.

So, you can’t rule out any angle. Check every aspect and let us know what worked for you in the comments section.

Microsoft reports on Outlook email hacking investigation – here’s what went wrong

Microsoft released a blog post explaining the behind-the-scenes acquisitions from the incident on July 11, 2023, in which a China-based threat actor named Storm-0558 compromised the security of Microsoft accounts.

The attack was massive; even the U.S. lawmaker’s accounts got hacked, as well as the email accounts of approximately 25 organizations, including U.S. government agencies.

But in April 2021, there was a computer crash, and something important called a “consumer signing key” got mixed up in the crash report. This key was not supposed to be in the crash dump but was due to a race condition. This key material was moved to the corporate network’s debugging environment without detection.

Compromise of an Engineer’s Account

After this key was moved, the group Storm-0558 could hack into an engineer’s Microsoft account. This engineer had access to the part of Microsoft’s computers with the key. The text suggests that no specific logs prove this exfiltration, but it is the most likely way the threat actor acquired the key.

Why a Consumer Key Accessed Enterprise Mail

Microsoft explains that they introduced a common key metadata publishing endpoint in September 2018 to support applications for both consumer and enterprise accounts. However, a mistake was made in updating libraries and documentation related to key scope validation. This meant the hackers could use a regular key to get into business email.

Microsoft outlines the actions taken to address the incident. These include identifying and correcting the race condition issue, enhancing prevention, detection, and response mechanisms for handling key material in crash dumps, improving credential scanning, and releasing enhanced libraries to automate key scope validation in authentication libraries.

Microsoft pledges legal protection for AI customers against copyright infringements lawsuits

In a recent announcement, Microsoft stated it would back its AI product users in the face of copyright infringement litigation. The announcement comes after the tech giant launched its advanced AI tool, the Copilot, designed to generate content drawn from pre-existing work.

The move aims to alleviate worries about using its AI services that could inadvertently infringe copyright laws. Hossein Nowbar, General Counsel, Corporate Legal Affairs, and Corporate Secretary at Microsoft, released a statement Thursday detailing the Copilot Copyright Commitment.

According to Nowbar, this guarantee will safeguard users who utilize the protective measures Microsoft implemented, such as specially designed filters integrated within its AI products.

Additionally, Microsoft shared that it would assume responsibility for any related fines or settlements and has taken substantial measures to warrant its Copilots obey copyright rules. The software giant disclosed that it has embedded filters in its AI tools to minimize potential infringement.

 If a third party sues a commercial customer for copyright infringement for using Microsoft’s Copilots or the output they generate, we will defend the customer and pay the amount of any adverse judgments or settlements that result from the lawsuit, as long as the customer used the guardrails and content filters we have built into our products.

The Microsoft 365 Copilot, a user-friendly application that integrates generative AI into core Microsoft products like Word, Excel, and PowerPoint, promises to streamline day-to-day processes. By automating tasks like data analysis or document conversion, the application increases overall productivity.

Similarly, GitHub Copilot aims to relieve developers of monotonous coding, allowing them to devote their time and energy to creating innovative and unique outputs.

The rise of generative AI applications has stirred up an array of copyright issues, calling into question the legality of using pre-existing content without explicit permission. Used extensively in various industries, these AI tools can convert available content like art, articles, and programming code into fresh, unique creations, making manual processes obsolete.

Microsoft, in collaboration with OpenAI Inc., is incorporating this technology in some of its key products like Office and Windows. Although this potentially opens up customers to legal risk, the latest commitment is a clear signal of reassurance to its users.

Nevertheless, the promise of legal protection doesn’t eliminate all the turmoil surrounding this issue. Several artists, writers, and software developers have been vocal about their dissent, filing lawsuits and objections about their work being used unauthorized.

Now, it’s time to see how effectively the new Copilot Copyright Commitment fulfills its purpose in this contentious landscape.

Reedpop and L.A. Convention Center will no longer be a part of future E3 events

The Entertainment Software Association (ESA) has announced that it will no longer be working with ReedPop on future E3 events. The two had entered into a partnership to relaunch the Electronic Entertainment Expo after it had gone on hiatus. Those efforts ended in failure however, as several major game publishers dropped out of the event.

The ESA also announced that E3 2024 will not be held at the Los Angeles Convention Center—the event’s traditional home. Note that the 2024 edition of the event itself  has not been officially canceled at this point. As reported by GamesIndustry.biz, the ESA is planning “a complete reinvention of the E3 show for 2025.”

E3 2024 and 2025 aren't canceled (yet) | Engadget

ESA president and CEO Stanley Pierre-Louis said in a statement,

We appreciate ReedPop’s partnership over the past 14 months and support their ongoing efforts to bring industry and fans together through their various events.

While the reach of E3 remains unmatched in our industry, we are continuing to explore how we can evolve it to best serve the video game industry and are evaluating every aspect of the event, from format to location. We are committed to our role as a convenor for the industry and look forward to sharing news about E3 in the coming months.”

It will be interesting to see what new form the convention might take in the years to come.

Xbox Free Play Days: Madden 24, Control and Crime Boss: Rockay City

Xbox Free Play Days brings another weekend packed with exciting games for subscribers of Xbox Live Gold and Xbox Game Pass Ultimate to try out. These three games will be available with Free Play Days from Thursday through Sunday, September 10.

Madden NFL 24: NFL+ Edition Xbox Series X|S & Xbox One

Play Madden NFL 24 for free during Xbox Free Play Days from September 7-10. Then maximize your football experience with the Madden NFL 24: NFL+ Edition that includes 3 months of NFL+ Premium and 3 monthly MUT packs (1 per month from September-November).—Xbox Wire.

Control

Take on the role of Jesse Faden as you investigate a corruptive presence that has invaded the Federal Bureau of Control. Do you have what it takes to regain control? Time to find out in this award winning third-person action adventure from the team at Remedy Entertainment and 505 Games. What’s more, enjoy 75% off for a limited time.—Xbox Wire.

Crime Boss: Rockay City

Hey buddy, grab your weapon, put on your cowboy boots, and walk into Rockay City like a boss! Take on the role of Travis Baker (Michael Madsen) who has his sights set on becoming the new King of Rockay City. Choose your crew based on their skills and expertise and execute daring missions with the hopes of walking away with the cash, the turf and, ultimately, the crown. For a limited time, Crime Boss: Rockay City is 30% off!—Xbox Wire.

Learn more about Xbox Free Play Days

Xbox Free Play Days brings a lineup of games almost every week for members to try out at no additional charge. It’s a great way to try something new a maybe even find a new favorite. Find out more about the program over on the Xbox Free Play Days FAQ page.

Featured image via Xbox Wire. 

Starfield has already hit one million concurrent players a day after launch

Starfield has already reached one million concurrent players across all platforms. The game has achieved this impressive feat only one day after its full release.

But given the sheer magnitude of the hype and anticipation that surrounded Bethesda’s AAA space RPG, it’s popularity is really no surprise.

Microsoft Gaming CEO Phil Spencer took to X (Twitter) to thank all those who have played Starfield so far, while congratulating Bethesda Game Studios on the landmark release.

As seen in our Starfield review roundup, the game was met with a decidedly positive critical reception. Starfield will no doubt be a stout game of the year contender, and some are even calling it the “game of the generation.”

Whether the open world(s) action-RPG will live up to that designation only time will tell. But given the sheer scope of Starfield, it is safe to say that people will be playing it for years to come like other Bethesda RPGs of the past (case in point: Skyrim).

Starfield is now available for Windows and Xbox Series X|S, and can be accessed with Xbox Game Pass.

Starfield
Starfield
Developer:
Bethesda Softworks
Price:
Free

Microsoft explores AI and fashion at Milan headquarters meetup

The OTB fashion group held its first Artificial Intelligence Day with Microsoft Italia, Bain & Company, and Adobe Italia to promote awareness and encourage discussion. The event involved over 50 managers from OTB’s holding company and various brands. It took place at the Microsoft Italia headquarters in Milan.

The event delved into artificial intelligence’s opportunities for the fashion and luxury sector. AI is recognized as a fundamental element in luxury companies’ value chains and processes. It plays a role in product development, merchandising, marketing, supply chain management, sales, distribution, and customer relations.

Here is how AI can play a pivotal role in these sectors:

  • Product development: AI can analyze customer data to identify trends and preferences. This information can then be used to develop new products that are more likely to succeed.
  • Marketing: AI can personalize marketing campaigns, boosting engagement and conversion.
  • Supply chain management: AI can optimize supply chains by forecasting demand, managing inventory, and tracking shipments. This can help reduce costs and improve efficiency.
  • Sustainability: AI can be used to reduce the fashion industry’s environmental impact. For example, AI can be used to design more sustainable materials and to optimize production processes.

Renzo Rosso, founder of OTB, believes that while technology and AI are important for fashion and luxury, they should not replace craftsmanship, creativity, and essential skills.

Microsoft Italia’s CEO, Vincenzo Esposito, emphasized the significance of AI in business, particularly in the fashion and luxury industry. Microsoft works with companies to help them with digital transformation, discover AI use cases, and leverage new technologies to drive growth and innovation.

The event showcased the increasing importance of artificial intelligence in the fashion and luxury industry. OTB demonstrated its dedication to staying at the forefront of technological advancements in this sector by collaborating with leading technology partners and academic institutions.

We believe that AI has the potential to make a significant positive impact on the fashion industry. It can help to make the industry more efficient, sustainable, and customer-centric.

via TheSpinOff

Microsoft brings native web capture to Edge: Sharing Bing Chat responses made easy

Microsoft is set to introduce a feature to their Edge browser for Android that has been in high demand amongst users – a native web capture tool.

The update, brought to light by tech enthusiast @Leopeva64, will allow users to share chat responses directly from Bing.

In Edge for Android Bing Chat lets you share a “Web capture”, you can share the current view or the full page, there is also an option to crop the screenshot:

When it comes to Android browsers, Microsoft Edge has steadily been growing its reputation and user base. Streamlined, fast, and user-friendly, it offers an alternative to the stronghold of Google Chrome.

A significant part of Edge’s appeal lies in the tech giant’s responsiveness to user feedback rather than a pre-determined development plan. And it seems once again, Microsoft has listened to users’ demands.

One of the most frequently requested features was the ability to capture and share web content without resorting to screenshotting. And now, that feature is making its debut on the Edge Canary version, an experimental channel where new functionality is tested before being rolled out more widely.

So, how does this new feature work?

When having a conversation with Bing Chat, users can click the three dots on the right side of the chat bubble and select Share. This prompts several options, including Capture current view and Capture full page, and allows to crop or save the image before sharing it further.

The move might seem like a minor one, given the prevalence of smartphone screenshotting. However, the subtlety of the feature deserves recognition.

With this update, sharing a quick snippet of an online conversation can be done without filling the phone’s gallery with unnecessary screenshots. While the feature is undergoing testing on the Edge Canary channel on Android devices, its cascade to other platforms is just a matter of time.

Stay tuned for more updates as Microsoft continues to enhance the browsing experience through Edge.

Nintendo reportedly showed off the Switch 2 at Gamescom 2023

Speculation has been rampant lately regarding the as-yet unannounced successor to Nintendo’s absurdly popular Switch console. With that hardware now well into its sixth year on the market, many are expecting the “Switch 2” to release sometime in 2024.

Apparently the new console was demoed at last month’s Gamescom event, where Nintendo held presentations for developers showing off what the new system was capable of. Specifically, a tech demo featuring an enhanced version of the Switch smash hit The Legend of Zelda: Breath of the Wild was showcased.

Reportedly, some developers already have access to Switch 2 development kits. Among the rumored features coming to the new console are backward compatibility with Switch games and a camera. Whether this latter could have some kind of gameplay integration remains unknown. Of course, this is all just speculation and is to be taken with the customary grain of salt. However it is safe to say that the Switch 2 will boast a performance boost with upgraded hardware.

Super Mario Bros. Wonder hands-on -- 2D Mario is exciting again | VentureBeat
Super Mario Bros. Wonder

Meanwhile, the Switch is still going strong, with an exciting lineup for the remainder of 2023 headed up by Super Mario Bros. Wonder. The hybrid console has sold in excess of 125 million units worldwide.

Microsoft to provide drivers to all the Mopria-compliant printers, to end support for 3rd-party printer drivers

Microsoft has provided information regarding the end-of-servicing plan for third-party printer drivers on Windows. This is an important development in the Windows print platform, which aims to enhance reliability and performance while reducing the need for third-party printer driver installations.

Printer manufacturers can still submit printer drivers through the Partner Center hardware tool for validation and signing. Even after the end of servicing, existing printer drivers can still be installed on Windows PCs. In addition, Windows will continue to allow vendor-supplied printer drivers to be installed via separate packages. This change applies to all versions of Windows.

Windows 10 21H2 now supports Mopria-compliant printers through Microsoft IPP Class Driver, eliminating the need for manufacturers to provide installers, drivers, and utilities.

Print Support Apps are now used for device experience customization, improving reliability and performance. This solution is supported on all Windows versions and editions, reducing the need for software rebuilds.

Microsoft has provided a timeline for guidance on the end of the servicing roadmap:

  • In September of 2023, it was announced that the servicing plan for legacy v3 and v4 Windows printer drivers would end.
  • By 2025, no new printer drivers will be available on Windows Update, although existing ones can still be updated.
  • In 2026, the printer driver ranking order will favor the Windows IPP inbox class driver.
  • By 2027, third-party printer driver updates will not be allowed except for security-related fixes. However, existing drivers can still be installed from Windows Update or manufacturer installer programs.

Microsoft will continue to provide security updates for the legacy printer driver platform throughout the Microsoft Support Lifecycle. Print features related to the legacy driver platform will not be disabled.

The move to Microsoft IPP Class Driver and Print Support Apps simplifies the user experience, boosts reliability, and enhances security on Windows. It guarantees consistency, eases manufacturer maintenance, and supports Mopria certification while also contributing to eco-friendliness.

Microsoft introduces live translated transcripts in Teams meetings for premium users

Microsoft recently announced the roll-out of a new feature for its Teams Public Preview and Microsoft 365 Targeted Release users possessing a Teams Premium license.

We’re very pleased to announce that Microsoft Teams Public Preview and Microsoft 365 Targeted Release users with a Teams Premium license can now use live translated transcript in Teams meetings.

Live Translated Transcripts

The new feature permits users to translate meeting transcripts into languages different from the ones spoken in the meeting. Now, participants in a Teams meeting can select from over 30 currently supported languages.

The translated transcript materializes on the meeting’s side panel—a feature that boosts productivity and inclusivity by overcoming lingual barriers.

So how does it function?

Simple Steps to Utilize the Feature

  1. During the Teams meeting, click on Meeting.
  2. Select More (…)
  3. Choose Record and Transcribe, and then press Start Transcription.
  4. When the transcription appears at the right-hand side of the meeting pane, press Settings > Transcript > Transcript language, and select the language you want the transcripts to appear in. By default, the transcriptions will be in the chosen Spoken language.

Enhancing the Experience

You can toggle the Show both original and translation button to view the original language and the translated version simultaneously. However, it is noteworthy that admins have the authority to control the Transcription setting. You can enable or disable it in your meeting policy under Meetings > Meeting policies. The default setting, however, is OFF.

To avail themselves of this feature, users must be part of the Teams Public Preview or Microsoft 365 Targeted Release, have a Teams Premium license, and use the Windows, macOS, or web (Edge, Chrome) Teams client. However, other meeting participants are not required to be members of the Teams Public Preview.

3 Quick Steps to Cancel a Microsoft 365 Subscription

Whether you want to avoid auto-renewal or switch to another productivity suite, you need to cancel a Microsoft 365 subscription.

In this guide, we will discuss some of the easy steps to ensure hassle-free cancellation for annual subscriptions for Personal and Business editions.

Can you cancel your Microsoft subscription at any time?

You can cancel the free trial or your annual or monthly subscription anytime to prevent the auto-renewal charges on your account.

However, if you cancel the plan after you have been charged, you will get a prorated refund in 3-5 business days. Also, make sure you turn off the recurring billing within 7 days after the renewal.

How do I cancel my Microsoft 365 subscription?

1. Use Microsoft 365 admin center (Microsoft 365 Business)

  1. Sign in to your Microsoft 365 admin account.
  2. On the Microsoft 365 admin center, click Billing from the left pane.
  3. Click Your Products.Billing
  4. On the right pane, go to Microsoft 365 and click it.
  5. Under subscription status, click Cancel subscription.Cancel plan
  6. Select the reason to cancel and click Cancel.Cancel a Microsoft 365 Subscription Business
  7. If you cancel an active subscription, it skips the Expired stage and goes to the Disabled stage directly. Instead, Turn off the recurring billing option and use the services until the current subscription term expires.

Remember that after canceling Microsoft 365 for business service, your account will lose the subscription benefits.

Normal users can only access the data for 30 days, whereas administrators can access the Admin page and back up the company’s data within 90 days after cancellation. So, ensure you back up the data before discontinuing the service.

2. Use the Microsoft Account (Personal or Family)

  1. Sign in to your Microsoft Account.
  2. On the Microsoft account page, go to Services & subscriptions from the top menu bar.
  3. Locate the Microsoft 365 subscription and click Manage.Services & subscriptions from the top menu bar Cancel a Microsoft 365 Subscription
  4. Click Cancel the subscription.Cancel the subscription.
  5. Select I don’t want my subscription.I don't want the subscriptionon.
  6. You will receive a confirmation message displaying that the plan has been canceled, and you can use the service until it expires.Plan cancelled

You can use the same steps to cancel your trial subscription as well.

3. Use the Settings app (Personal or Family)

  1. Press Windows + I to open Settings.
  2. Go to Accounts and locate Microsoft 365 Family or Personal.
  3. Click Manage.Manage plan via Settings Cancel a Microsoft 365 Subscription
  4. You will be directed to the Microsoft account page and might have to sign in. Click Cancel subscription.Cancel the subscription.
  5. Select I don’t want my subscription.I don't want the subscriptionon.
  6. You will receive a confirmation message displaying that the subscription has been canceled.Plan cancelled

If you have second thoughts about canceling and need help deciding whether to get Microsoft 365 Personal or Family, check this guide and make an informed decision.

Why can’t I cancel Microsoft 365?

  • The Microsoft account you are using is not linked to the purchase.
  • Technical glitch.
  • Purchase made via a third-party provider.
  • The payment method needs to be updated.
  • For a business subscription, the reason could also be a contractual agreement or the absence of necessary permissions.

To ensure the cancellation process goes through, you must contact Microsoft customer service.

To conclude, we leave you with a few takeaways: always use Microsoft’s official website to confirm the plan status to avoid being a victim of phishing emails asking to renew your Microsoft 365 subscription.

Also, use the correct method for your plan to cancel the service and keep the recurring billing option disabled to avoid any unexpected charges.

Trial period ending soon? We’ve found the best deals to continue the plan and keep using your favorite apps.

If you have any questions or suggestions about the subject, feel free to mention them in the comments section below.

Spacebar, Enter, and Backspace are Not Working on Windows 11 [Fix]

If your Spacebar, Enter, or Backspace keys are not working on your Windows 11 computer, this guide can help! The issue is mostly reported by Lenovo desktop and laptop users.

We will provide you with troubleshooting steps to fix the issues and get your keyboard working in no time.

Why is my Backspace, Enter, and Spacebar not working?

  • Physical damage – spills, dirt, or wear & tear could cause the device to malfunction
  • Outdated or conflicting keyboard driver.
  • Pending Windows updates
  • Misconfigured keyboard settings like enabled Sticky keys.
  • Loose connection between the CPU and keyboard.

How can I fix the Spacebar, Enter, and Backspace keys not working on Windows 11?

Before proceeding with any detailed steps to fix the problem, go through the following preliminary checks:

  • Replug all the cables connected to your computer and clean the dirt & debris from your keyboard.
  • Restart your computer and press the Backspace, Enter, and Spacebar at once for 5 seconds.
  • Go to Settings>Accessibility>Keyboard>Turn on On-screen keyboard.
  • Scan your computer for malware.
  • Replace the batteries if you have a wireless keyboard, or use a different external keyboard to rule out the hardware issue.
  • Reset BIOS, install all Windows updates, and uninstall unwanted apps.

1. Run a troubleshooter

  1. Press Windows +I to open Settings.
  2. Go to System, then Troubleshoot.System troubleshoot Fix Spacebar, Enter, and Backspace Not Working on Windows 11
  3. Click Other troubleshooters.Other Troubleshooters
  4. Locate the Keyboard option and select Run.Keyboard Troubleshooter RUN

Follow the onscreen prompts and wait for the process to complete. However, if you can’t find the Keyboard troubleshooter in Settings, follow these steps instead:

  1. Press the Windows key, type cmd, and click Run as administrator.CMD elevated Fix Spacebar, Enter, and Backspace Not Working on Windows 11
  2. Copy & paste the following command to invoke hardware troubleshooter and hit Enter: msdt.exe -id DeviceDiagnosticmsdt.exe -id DeviceDiagnostic
  3. On the Hardware and Devices window, click Advanced.Advanced option
  4. Select Apply repairs automatically and click Next.Apply the repairs
  5. The tool will scan to find the issues; click Apply this fix. Now, wait for the process to complete.Apply this fix

Your PC may restart to complete the process, so make sure you save all the work and close other applications before applying the fix.

2. Disable Sticky keys & Filter keys

  1. Press Windows + I to open Settings.
  2. Go to Accessibility, then Keyboard.Accessibility _keyboards
  3. Locate the Sticky key option and disable it.
  4. Now find the Filter key option and turn it off.Turn off Sticky and Filter key  Fix Spacebar, Enter, and Backspace Not Working on Windows 11?

3. Update/reinstall the keyboard driver

  1. Press Windows +R to open the Run dialog box.Device Manager Run command  Fix Spacebar, Enter, and Backspace Not Working on Windows 11?
  2. Type devmgmt.msc and click OK to open Device Manager.
  3. Locate and click Keyboards to expand it.
  4. Right-click the keyboard from the list and choose Update driver.
  5. Click Search automatically for drivers, and follow the onscreen instructions.Update driver 2 Action scan for hardware changes Spacebar, Enter, and Backspace Not Working on Windows 11

If this doesn’t help, you need to reinstall the keyboard driver; for that, follow these steps:

  1. On the Device Manager, locate and click Keyboards, right-click the keyboard from the list, and choose Uninstall device.
  2. Once it is done, go to Action, then click Scan for hardware changes. The device driver will be reinstalled.Action scan for hardware changes Spacebar, Enter, and Backspace Not Working on Windows 11

Restart your computer and check if the issue persists. Reinstalling the driver can resolve similar issues, like the Ctrl key not working.

4. Run your PC in a clean boot environment

  1. Press Windows + R to open the Run window. cleanboot1 Spacebar, Enter, and Backspace Not Working on Windows 11
  2. Type msconfig and click OK to open System Configuration.
  3. Go to the Services tab, place a checkmark next to Hide all Microsoft services, and click Disable all.Disable all Services except Microsoft
  4. Switch to the Startup tab, and click the Open Task Manager link.Open Task manager Spacebar, Enter, and Backspace Not Working on Windows 11
  5. For each unwanted Enabled item, select it and click Disable, then close the Task Manager.Task Manager Disable Startup items
  6. On the System Configuration window, select Apply, then OK.
  7. Click Restart.Restart your computer in clean boot

Your Windows will restart with minimal functionality; now check if the Spacebar, Enter, and Backspace keys not working issue persists. If not, then the issue could be due to a third-party software conflict.

To restart your computer normally, reverse engineer the process mentioned above.

5. Perform a system restore

  1. Press Windows + R to open the Run dialog box.Restore point window - Spacebar, Enter, and Backspace Not Working on Windows 11
  2. Type rstrui.exe and click OK to open the System Restore window.
  3. Select Choose a different restore point and click Next.Select the restore point
  4. Choose the desired one from the list and click Next.Select the restore point
  5. Click Finish, and your computer will revert the settings to a previous version.Confirm the restore point

Use this method only if you know when the problem started, and select the restore point before that time to fix it.

If these troubleshooting steps didn’t work for you and you were not able to determine physical damage on the keyboard, the problem could be system configuration; therefore, you might have to reinstall the operating system.

What is the alternative key for Spacebar, Enter, or Backspace?

As an alternative to the Spacebar, turn on the Num lock, press and hold the Alt key, and type 32 or 255, then release the Alt key, and you will get space.

For the Backspace key, select the characters you want to remove and use the Delete key to remove them. In place of the Enter key, press and hold the Alt key, type 013, then release the Alt key to go to the next line.

If some other keys are not working on your Windows 11 computer, read this article to find the solutions. We also have a guide on the Windows key not working on Windows 11, so don’t miss it.

Do you know other methods that worked for you? Don’t hesitate to mention them in the comments section below, and we will happily add them to the list.

4 Ways to Quickly Rename Your Printer on Windows 11

If you have a lot of printers in your office, the printer list can get quite long and make it tedious to get work done. What’s more, multiple printers usually mean similarity in names which can be a bit confusing.

The last thing you want is to scroll through an endless list and still end up sending a print job to the wrong printer. Luckily, you can solve all this with a simple renaming trick we’ll show you below.

How do I rename my printer in Windows 11?

1. By using the Settings app

  1. Hit the Windows key and click on Settings.settings windows 11
  2. Click on Bluetooth & devices, then select Printers & scanners.
  3. Select the printer you wish to rename.
  4. Click on Printer properties.
  5. Navigate to the General tab, type in the new name, then hit Apply and OK to save the changes.

2. By using the Control Panel

  1. Hit the Windows key, type Control Panel in the search bar, and click Open.control-panel-search fallout new vegas runtime error
  2. Click on Hardware and Sound >select Devices and Printers.
  3. Right-click on the printer you wish to rename and select Printer properties.
  4. Navigate to the General tab, type in the new name, then hit Apply and OK to save the changes.

3. By using the Command Prompt

  1. Hit the Windows key, type cmd in the search bar, and click Run as administrator.cmd-run-admin-w11 unexpected kernel mode trap windows 11
  2. Type the following command and hit Enter. Remember to replace CURRENT-PRINTER-NAME with the printer name you wish to change: cscript %WINDIR%\System32\Printing_Admin_Scripts\en-US\prncnfg.vbs -x -p "CURRENT-PRINTER-NAME" -z "NEW-PRINTER-NAME"

4. By using the PowerShell command

  1. Hit the Windows key, type PowerShell in the search bar, and click Run as administrator.
  2. Type in the following command to get a list of printers and hit Enter: Get-Printer | Format-Table Name
  3. Next, type in the following command and hit Enter. Remember to replace CURRENT-PRINTER-NAME with the printer name you took note of in 3 above: Rename-Printer -Name "CURRENT-PRINTER-NAME" -NewName "NEW-PRINTER-NAME"

What are common problems when renaming a printer in Windows 11?

1. Unresponsive device drivers requiring administrator access

This is usually caused by outdated device drivers. You can update them using Windows Update or manually download them from the manufacturer’s website and install them manually.

Better yet, you can enlist the assistance of a third-party driver updater. Outbyte Driver Updater has the ability to scan and detect outdated, missing, or damaged drivers and replace them with the correct ones.

2. Print jobs refusing to send to newly-renamed printers

This can happen if the driver for the old name has been removed from memory. If this happens, try restarting your computer and if it doesn’t work, you will have to re-install the driver.

3. The printer name is not visible after changing it

This problem usually occurs when you have changed the name of your printer, but it hasn’t been updated on all devices yet.

You may have changed the name of an offline printer. Try restarting your devices and make sure it is online or add your printer by IP before renaming it.

So, if, for whatever reason, you need to rename your printer, the steps are actually quite simple. Speaking of changing names, you can also rename your PC on Windows 11 or change your Bluetooth name if you’d like to customize your PC.

Have you tried to rename your printer before? Was it easy, or did you face any challenges? let us know in the comment section below.

Antivirus Market Share: Complete Statistics & Trends in 2026

The antivirus market is bolstered by a number of vendors and a variety of service offerings. But what is the exact value of this growing industry and how large is it?

In this report, we’ll focus on getting complete insights into the antivirus industry, including its growth, trends, statistics, and future forecasts.

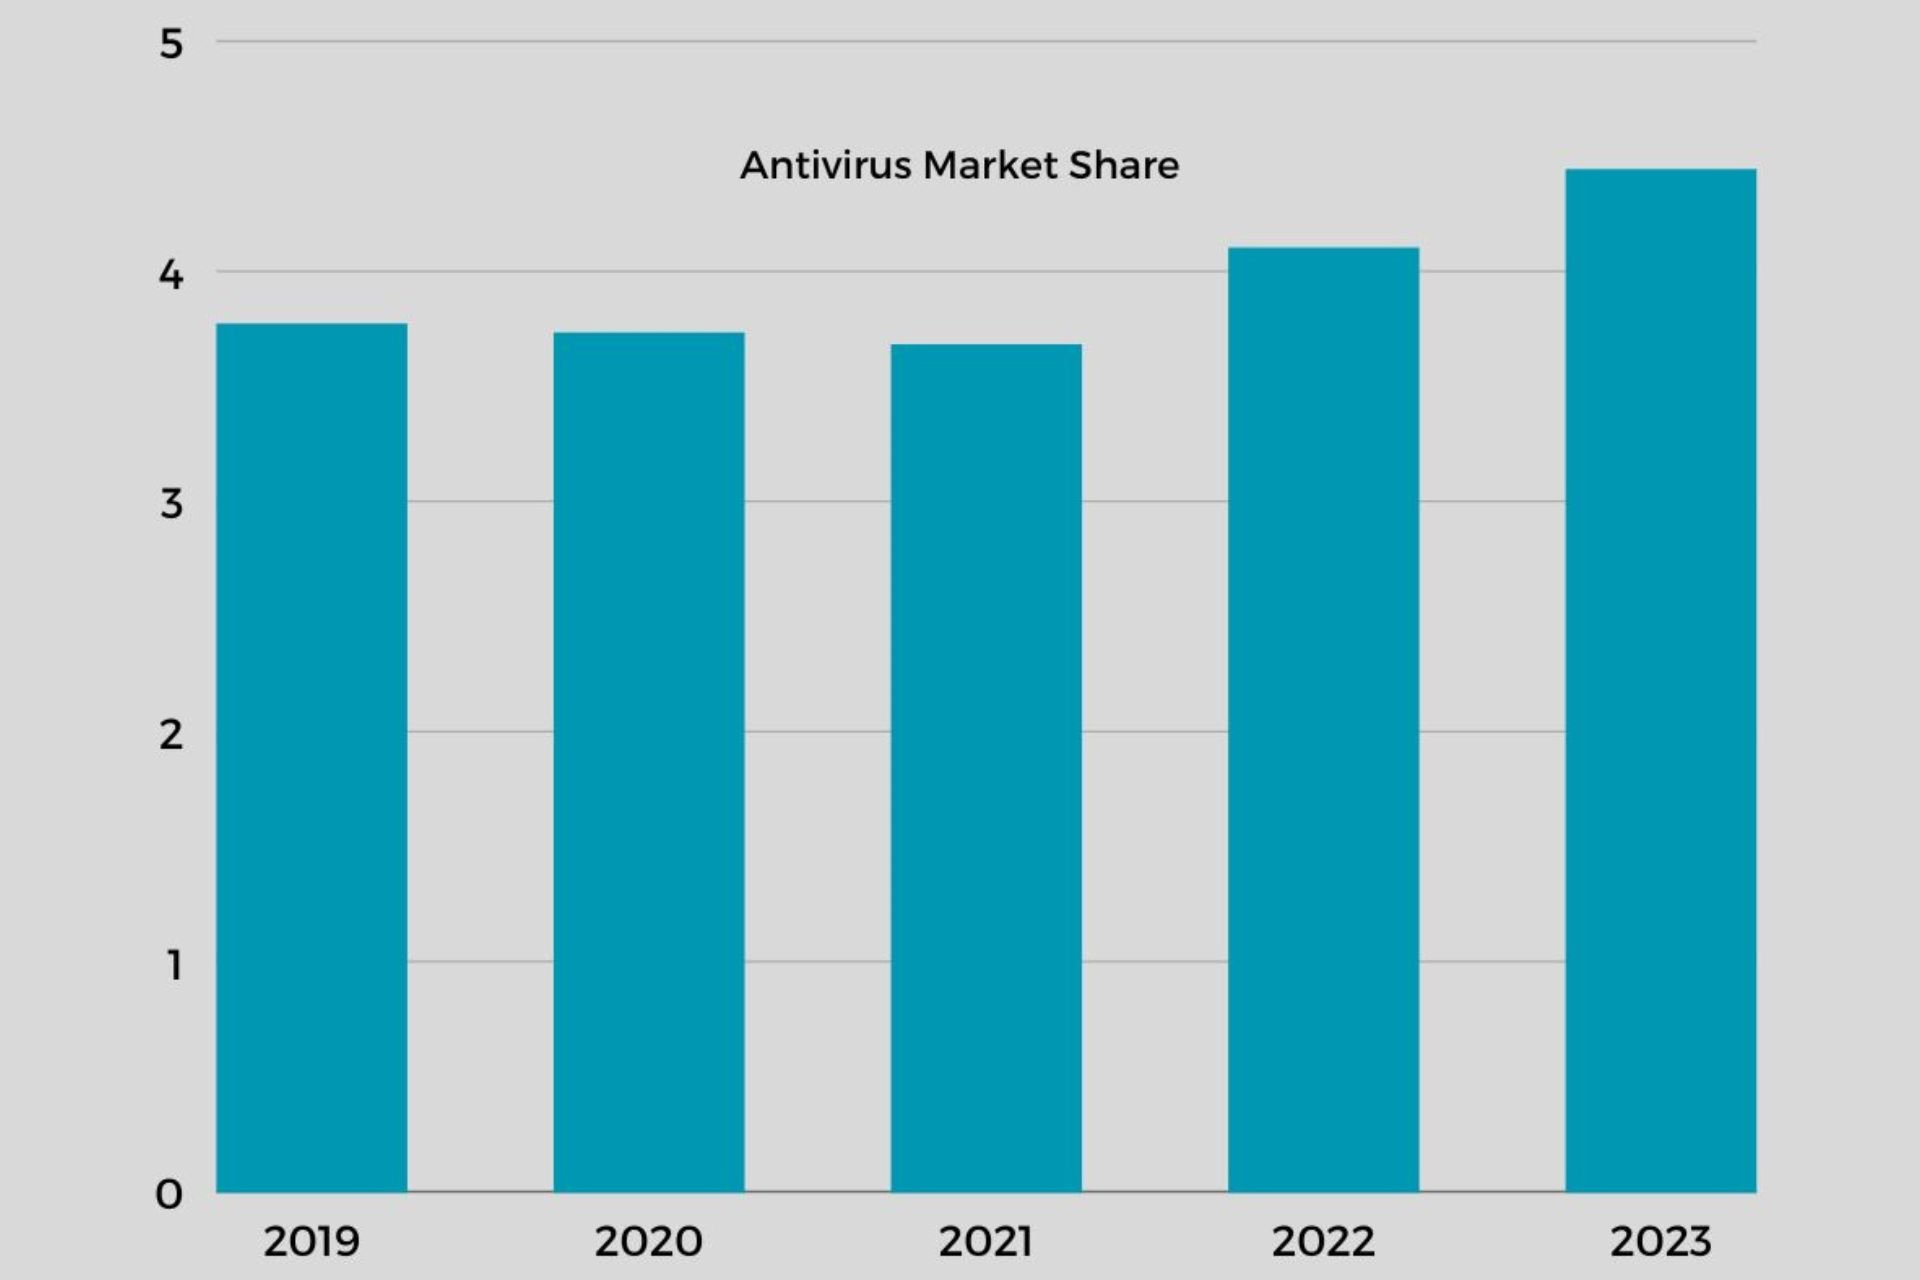
As of 2023, the antivirus market is valued at $4.444 billion. In recent years, the need for various types of protection has increased considerably, and different companies have presented their products so as to supply this demand.

The COVID-19 period most notably catapulted this growth, given the number of people working from home and staying online for other activities. According to research from Statista, a 3.6% growth was registered between 2021 and 2022.

What is the current Antivirus software market share?

1. North America Antivirus Market Share

The North American region is the largest market share holder in the antivirus software industry. And while it is not the region with the largest population, it has a good number of active computers.

More computers mean more viruses and malware, which translates to more people using security software. Another reason is that North America also hosts the top first-world countries, meaning the demographic has a lot of disposable income.

Most companies that sell software will target their products in countries with high demand for their products, and their users are more than willing to pay for extra security features and services.

2. South America Antivirus Market Share

The antivirus market in South America has been witnessing substantial growth over the last few years due to the increasing adoption of mobile devices and growing focus on the Internet of Things (IoT).

Other factors, such as rising awareness about cyber security and increasing internet penetration rate in the region, have also played a role.

A compound annual growth rate of 12.83% is expected by 2027 which makes it a region to watch out for.

3. Global Antivirus Market Share

The antivirus market is highly competitive, and there are many products available. Even as various regions boast of controlling the market share on a global scale, these numbers are highly dependent on the digital population.

The more people active on the internet, the more likely they are to install an antivirus program.

The number of internet users is not the only driving force. For one, there are more devices than ever connected to the internet. This leaves them more vulnerable to cyberattacks than ever before.

If we’re looking at the screen time statistics, the average internet user spends at least two hours online every day and uses multiple devices: computers, smartphones, tablets, and smartwatches. This means that you will need an antivirus installed on all your devices.

So, how many people use an antivirus?

people use antivirus - Latest Antivirus Statistics with 8 Most Grossing Facts

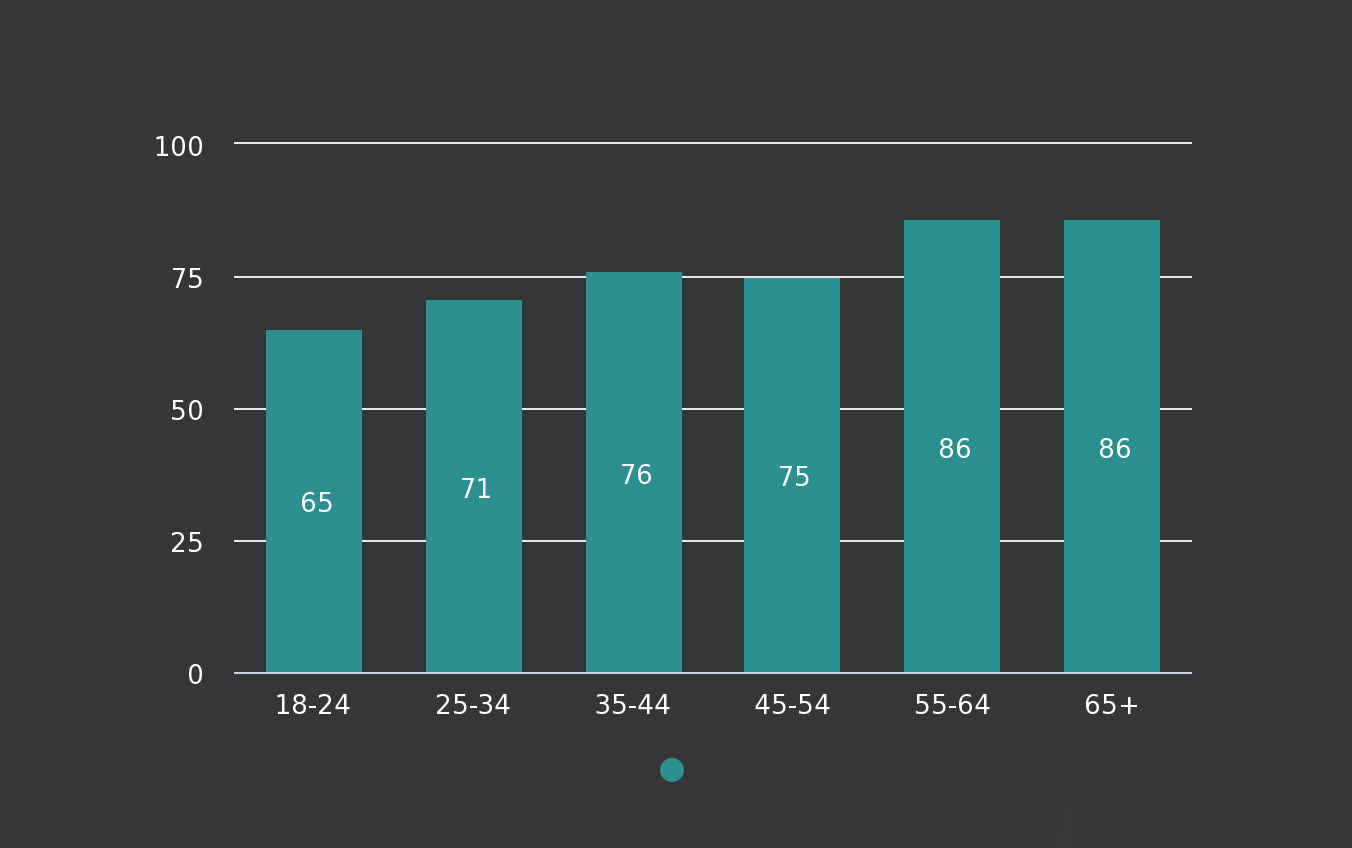
Desktop users seem to be the largest demographic using antiviruses, as a whopping 89% were registered to have installed an antivirus on their PCs. The number declines when it comes to mobile phones and drops to 49%.

This means that mobile users need to be sensitized to the importance of an antivirus. Still, all is not lost because if the projected growth is anything to go by, these numbers will shift towards an upward trend sooner rather than later.

Who are the key antivirus market players?

1. Norton 360

The antivirus market is dominated by Symantec Corp., a U.S. antivirus software company. Its technology and services are designed to protect against sophisticated threats across endpoints, networks, and cloud.

This versatility makes it control a huge chunk of the market. Its credibility and customer satisfaction are well embedded in its achievements. Norton 360 has consecutively scooped the best protection and security award in the last six years.

⇒ Get Norton 360

2. McAfee

McAfee is the second largest security software company in the world, after Symantec. The company’s flagship antivirus product is called McAfee Antivirus Plus, and it is available for Windows, macOS, and Android devices.

In addition to its core antivirus products, McAfee offers several other security suites that include additional features like backup and device control. Its extensive catalog puts it ahead of its competitors, and its subscriber base is continuously growing.

For instance, at the end of 2022, the total revenue was $2.9 billion which is a 10% increase from the previous year.

⇒ Get McAfee

3. ESET HOME Security Essential

ESET is a market leader in the cybersecurity industry with a global reputation for innovation, reliability, and trustworthiness. One of the factors that make a product successful is consistent profits, and ESET has a proven track record in this area.

For instance, in 2020, it registered a 13% profit increase. This not only implies a satisfied consumer base but also an increase in market share.

⇒ Get ESET HOME Security Essential

While these are the top contenders overall, Some products perform better as standalone that are worth mentioning. According to a Help Net Security report, some companies with a wide subscription base include:

AntivirusMarket Share
Norton 36097.5
McAfee96.3
Eset Internet Security96.3
Microsoft Security Essentials96.0
COMODO92.0

What does the forecast period for the global Antivirus Software Market look like?

The market for antivirus software is always changing. The introduction of cloud-based antiviruses is a huge step in offloading the PC. However, in equal measure, data privacy concerns and security threats still hamper this market’s growth over the forecast period.

The threats are becoming more sophisticated. For instance, between 2021 and 2022, the number of malware attacks increased from 5.4 to 5.5 billion.

And as the number of developed countries continues to soar, the number of users is also growing. Tech companies are also not left behind as they strive to meet the growing demand for devices. This means the number of computers in the world will continue increasing.

However, only the active and connected to the Internet devices will be affected. As of 2023, there are at least 15.4 billion active devices.

And since the number of active devices is projected to hit the 29 million mark by 2030, the antivirus market is also expected to experience exponential growth. In turn, this increases the number of potential entry points for malware.

Since reports from the cyber attack statistics indicate that businesses are at a higher risk of ransomware attacks, they are investing more money into securing their systems by employing better security measures.

Individual users are also not left behind as they are no longer asking whether your Windows 11 needs an antivirus. They have become aware of the risks involved in using a computer without an antivirus installed and securing their devices.

Ultimately, the consumer segment will continue to grow, but businesses will overtake personal users since they are more concerned about data protection.

What are the key drivers for the Global Antivirus Software Market Shares?

  • The growing popularity of mobile devices and the increasing usage of smartphones and tablets.
  • Increased use of the internet and the popularity of social networking sites have birthed numerous hacking techniques.
  • Dynamic and rising malware, viruses, spyware, and adware threats.
  • Growing popularity of cloud computing necessitates the development of better data protection technologies.

As antivirus companies strive to provide the most powerful and effective program, achieving this in today’s market can be difficult. The sheer variety of available products complicates the purchasing decision, even for tech-savvy consumers.

You only need to install an antivirus that meets your needs. For instance, if it is based on operating systems, you can choose the best antivirus for Windows 10 or the best antivirus for Windows 11. Ultimately, it boils down to user needs and preferences.

What’s more, antiviruses can be hacked, so it’s important to be vigilant about security. You can employ a multi-layered approach, such as firewalls and a proxy, to get all-rounded protection.

There you have it. What do you think of the growth in the antivirus industry? Is there something that needs to be done to get everyone on board to secure their devices? Share your thoughts with us in the comment section below.

Is OneLaunch Malware? Everything You Need to Know

Many reported that their interface is changed due to OneLaunch software. Of course, many users were converted and are left wondering if OneLaunch is malware.

In today’s guide, we’re going to take a closer look at this tool and tell you everything you need to know about it.

What is OneLaunch?

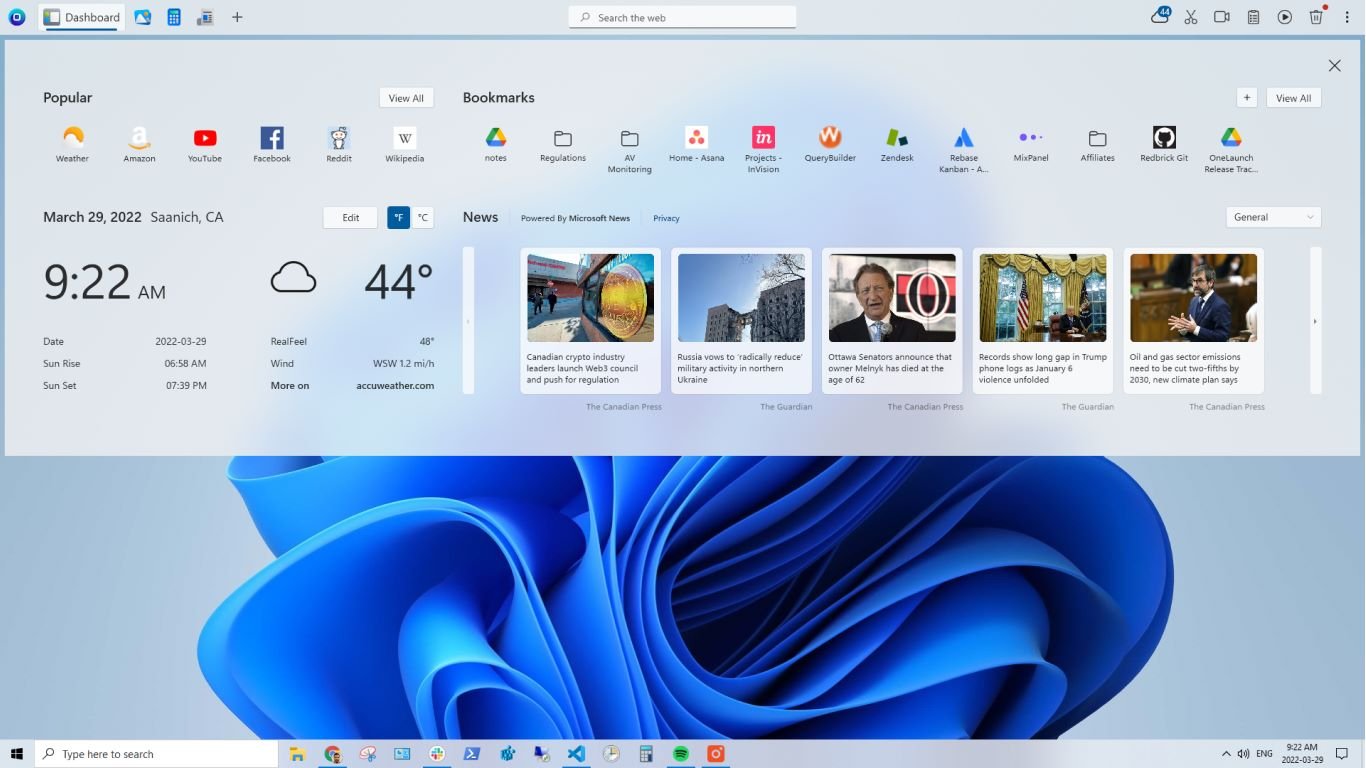
OneLaunch is a productivity software meant to improve the Windows experience. It has a dedicated dashboard, a search bar, a custom browser, lists recent items, displays clipboard history, and more. 

OneLaunch’s interface (Image source: Microsoft Store)

Is OneLaunch a malware?

As per experts, OneLaunch can’t be categorized as malware, but it’s an unwanted program and falls in the same set as Windows bloatware.

But anyone concerned about security, privacy, and discreetness should know the ins and outs of OneLaunch and the effects it has on the PC.

What is OneLaunch used for?

OneLaunch works as a customization software that allows users to personalize the desktop and ensure a seamless experience. Be it accessing recent files or searching the web directly from any screen!

But its after-effects are concerning. The application has numerous permissions, it has it’s own startup task in Task Scheduler, and it can slow down your PC.

Besides, as per OneLaunch’s Terms of Use, it stores user data and uses it to serve pop-up ads or promote third-party services.

Searching with OneLaunch (Image source: Microsoft Store)

Types of malware related to OneLaunch

  • Adware software: The software presents many ads, some of which are intrusive and may redirect users to suspicious sites.
  • Browser hijackers: OneLaunch may change your PC’s default browser or search engine and set its own.
  • Rogue software: OneLaunch, though developed by a reputable company, is an unwanted software, given its functioning.
  • Search engines with unwanted extensions: The custom OneLaunch browser is not as safe as the other popular browser options, though its integration is user-oriented.

Potential dangers of having OneLaunch installed

  • Data security risks: When any program stores data, there’s always the risk of a breach, no matter how secure their system is.
  • Reduced computer performance: Based on user feedback, the primary disadvantage of OneLaunch is reduced PC performance.
  • Increased risk of infection from malicious software: Third-party programs can always result in suspicious files, malware attacks, and a wide array of security threats.

How do I get rid of OneLaunch on my computer?

  1. Press Windows + I to open Settings, go to Apps from the navigation pane, and click Installed apps on the right.installed apps
  2. Locate OneLaunch from the list, then click on the ellipsis next to it, and select Uninstall.uninstall OneLaunch malware
  3. Again, click Uninstall in the confirmation prompt.

While this will remove the app, we recommend using an effective uninstaller tool to get rid of any leftover files and registry entries. And if Windows keeps installing apps without permissions, fix that too. It’s a major security threat!

By now, you should understand whether the software is a virus or the OneLaunch browser a malware. Our take, it poses no immediate threat or critically affects the PC directly.

The security aspect can be further solidified, given that OneLaunch is available on the Microsoft Store. The apps listed here undergo several security checks, as detailed in this official guide. So, if you want to install OneLaunch, get it from the Microsoft Store instead.

You can also use PUP remover tools to ensure that this and other applications never appear on your PC again. We also have a guide on how to block potentially unwanted apps on your PC, so don’t miss it.

For any queries or to share your thoughts on OneLaunch, drop a comment below.

Demystifying Windows on Arm: A comprehensive 2023 guide

If you’re currently in the market for a new laptop or tablet, you might have encountered various options falling within the Windows on Arm ecosystem. But what exactly does ‘Arm’ refer to? In simple terms, it’s a computer processor architecture that powers numerous portable electronics, including your smartphone. However, it hasn’t yet made a significant impact in the desktop PC arena.

Demystifying Windows on Arm

windows on arm

Windows on Arm refers to Microsoft’s Windows operating system running on computers powered by Arm processors, in contrast to the dominant x86 chips provided by Intel and AMD. This platform initially brought Windows 10 to Arm-powered laptops and tablets back in 2017, and it has since been updated to support Windows 11 as well.

Compared to traditional Windows laptops, Windows on Arm promises superior battery life, lasting more than a day, and constant internet connectivity through 4G or 5G. It also boasts lightning-fast boot times and offers chipset-level support for security features like Windows Hello. However, it’s essential to consider some platform limitations, including limited gaming support, occasional driver issues, and software emulation that may not cover all your needs.

Essentially, Windows on Arm means Microsoft Windows running on Qualcomm’s 4G and 5G laptop-tier processors. Currently, Qualcomm is the exclusive system-on-a-chip (SoC) vendor offering Windows on Arm chipsets. These belong to their Snapdragon 7c, 8c, and 8cx families, which have been adopted by various manufacturers. Even Microsoft’s processors in the Surface Pro X are essentially modified versions of Qualcomm’s Snapdragon 8cx lineup.

Windows on Arm vs. Traditional Windows x86

windows on arm

In terms of the Windows user experience, Windows on Arm is functionally equivalent to traditional Windows 10 and Windows 11. This isn’t a return to the days of Windows RT, which had a limited app ecosystem.

With Windows on Arm, you can run virtually all your favorite apps. While an increasing number of apps are built specifically for this platform, you can also emulate x86 applications. We’ll explore the implications of software emulation in the following sections.

The move to Arm isn’t just about CPU power; it’s also linked to the growing divide between traditional CPUs and SoCs (System-on-Chip) that offer a more comprehensive platform. Arm-based SoCs integrate graphics, modems, machine learning capabilities, image processing, sensor hubs, and security technologies into a single package. In contrast, Intel and AMD processors still require additional external components for broader use cases, such as 5G networking.

In other words, Arm-based SoCs provide integrated solutions with benefits beyond performance and energy efficiency.

Emulating older apps with Windows on Arm

windows on arm

The core Windows experiences, including the Start menu and File Explorer, are all designed to run natively on Arm chips, ensuring maximum performance. They operate directly on the processor without translation or emulation, similar to how they function on an x86 PC.

Windows also supports native applications optimized for Arm hardware. The list of native apps continues to grow and includes popular names like Microsoft Edge, Firefox, Adobe Photoshop, Netflix, VLC, and Zoom.

However, for apps that don’t have native Arm support, emulation becomes crucial. Emulation takes software compiled for one architecture (e.g., x86) and converts it into machine code compatible with a different processor architecture, in this case, Arm. While this enables compatibility with a wide range of older applications, there is a slight performance penalty associated with emulation.

Windows 10 on Arm initially provided emulation for 32-bit (x86) apps but couldn’t run non-native 64-bit applications. Windows 11 introduced 64-bit (x86-x64) emulation, expanding the range of compatible applications significantly.

Should you make the switch to Windows on Arm?

windows on arm

Is Windows on Arm the right choice for you? Windows on Arm offers several advantages, but it may not be suitable for every use case, at least not yet. It struggles with playing demanding games and resource-intensive software like CAD applications. However, it excels in portability, delivering ample performance for tasks like document editing and web browsing while offering all-day battery life. If you need a device for on-the-go work, Windows on Arm is a compelling choice.

Devices running Windows on Arm

The Windows on Arm ecosystem is relatively small, with a few notable options, including:

  1. Microsoft Surface Pro X (discontinued/merged into Surface Pro line)
  2. Microsoft Surface Pro 9 (SQ3 5G variant only)
  3. Lenovo ThinkPad x13s

You can also check the Snapdragon website for more hardware options on Windows 11. Please note that some older models, like the HUAWEI Matebook E 2019, Lenovo Flex 5G, Lenovo Miix 630, and Lenovo Yoga C630, have been discontinued.

The future of Windows on Arm

windows on arm

Windows on Arm represents a promising shift in the world of computing, offering a host of advantages over traditional x86 architecture. With enhanced power efficiency, longer battery life, and sleek, portable designs, Arm-based devices are well-suited for on-the-go professionals seeking productivity and connectivity. While there are some limitations, such as gaming support and occasional software emulation challenges, the future of Windows on Arm appears bright.

As the ecosystem continues to grow, with notable devices like the Microsoft Surface Pro X laying the groundwork, users have more choices today than ever before. Ultimately, the decision to switch to Windows on Arm depends on your specific needs and priorities. If portability and everyday productivity are high on your list, Windows on Arm could be the perfect fit, ushering in a new era of computing convenience and efficiency.

How to stop Outlook from opening email links in Edge

Back in February, Microsoft announced a pretty major change for Microsoft 365 Outlook and Teams. The Redmond company said that Outlook, and in the future Teams, would open browser links by default on Microsoft Edge.

Microsoft later explained in detail why it was making such a change in a support article, so there was no confusion.

  • To improve your experience between email and browsing—letting you see them both at the same time, in the same place. No more switching back and forth between apps.
  • To provide a unique experience—at Microsoft, we strive to create the best customer experience across our products.
  • To reduce task switching and improve workflow and focus—by opening browser links in Microsoft Edge, the original message in Outlook can be viewed alongside web content to easily access, read, and respond to the message, using the matching authenticated profile.

So, the emails will open in the Outlook app in the Edge sidebar. Links will open in Microsoft Edge even if it is not the system’s default browser in Windows. But there is a way to stop it. With just a few clicks, you can set up your Outlook to open links with your system’s default browser.

Here’s how to stop Outlook from opening email links in Edge

Before we start, you should know that only links set to open via a web browser are affected. Links that are set to open in a client app or within Outlook itself will continue to do so.

  1. On your Outlook app, click on the View panel, and then select View Settings. outlook edge link
  2. On the Setting page, head over to Advanced, then Link Handling, and select the Open hyperlinks from Outlook option.
  3. Select your preferred or default browser.

That’s it. From now on, your default browser will open up any hyperlinks that come in your emails. While it is frustrating that Microsoft would only want you to use Edge when handling emails on Outlook, at least the Redmond-based tech giant is giving you the option to actually choose your default browser.

In many ways, Edge is a very performant browser, especially due to all the features that Microsoft has been pouring into it. However, Edge is not yet popular, and many people prefer to use alternatives such as Chrome, Opera, or Firefox.

So this sort of feature is can frustrating, considering you’ll have to look up a guide, such as this one, on how to change Edge for your default browser.

A simple search on Reddit, for example, would show you a lot of users who are mad and upset about it, and rightfully so.

But even so, Microsoft has not listened to the community, and the Redmond-based tech giant keeps on pushing its products and apps on every corner of their software.

What do you think about this feature in particular? Do you mind if Edge is the one browser opening up your Outlook hyperlinks, or not? Let us know your opinion.

MW 2 isn’t working in Windows 11 Insider, but here’s a trick

Update: Modern Warfare 2 should work now in Windows 11 Insider

Call of Duty: Modern Warfare 2 is one of the most popular Activision games on PCs, and gamers everywhere predominately play it on Windows devices. Sure, the game has its fair share of issues when running it on Windows: from being stuck on the loading screen, to not working on Steam Deck, or causing GPU issues, they can all be fixed.

However, it seems that some Modern Warfare 2 has not working in the Windows 11 Insider Program, ever since the last update patch to the channel. Many users reported this issue, and it seems that the problem is a general one. Activision is looking into fixing it, as we speak.

When trying to open Modern Warfare on Windows 11, while being enlisted in the Windows Insider Program, you’ll get hit with a pop-up saying that your Windows 11 is not supported by Modern Warfare 2.

Your operating system Windows 11 is not supported by Call of Duty: Modern Warfare II. We recommend upgrading to Windows 10, version 1909 or newer. Would you like to visit Activision Support for more information?

If you run into this problem, apparently there is a quick fix, until there is an official solution that will handle it.

Uninstalling the May Beta updates fixed the problem for some of our readers so you should try that before anything else.

Modern Warfare 2 not working in Windows 11 Insider? Here’s what you can do

If you’re enlisted in the Windows Insider Program, and you have installed the Windows 11 Insider Preview 10.0.22623.1180 (ni_release) build, then a Reddit user who faced the same issue, solved by uninstalling the latest updates.modern warfare 2 not working in windows 11

I found a fix and it works for me. I’m on Windows 11 Insider Preview 10.0.22623.1180 (ni_release). Settings > Windows update > Update History > Uninstall Updates. I uninstalled all updates, and restarted the PC and the game is working for me

Others have tried this method, and it seems it’s working.

Yup, just turn off Windows Insider (Next Update Option), go where Hot_Relief9611 said and just uninstall any that say Beta Build in their name. There are different levels of preview builds, so they may be named differently for Dev Builds and the other levels Microsoft Offers. I had to uninstall 4 different Beta KBs and reboot and it worked. It isn’t either company’s fault, btw. These are Beta Builds. Can’t expect everyone to adopt Beta Builds, since they are subject to change anyway. That would just be a lot of extra work.

You can also opt out of the Windows Insider Program, which can solve the issue altogether, as builds released there tend to be quite experimental and may not always work properly.

If you try these solutions, let us know if they worked for you.

10 Best PowerToys Utilities to Use on Windows 11

Microsoft is adding various features to Windows via the PowerToys app, and if you aren’t familiar with this software, today we’ll show you the best PowerToys utilities to use.

Many of these features will make your workflow faster and allow you to multitask better, so be sure to keep on reading to learn more about the best PowerToys features.

What are the best PowerToys utilities I should use?

Always On Top – Keep any window on top

Using this feature you can easily keep any window at the top. To activate it, simply select the desired window and press Ctrl + Windows key + T. You can use the same shortcut to disable it.

The feature has several customization options:

  • The ability to change the size, opacity, and color of the border.
  • Exclusion list for apps.
  • Sound notification whenever this feature is enabled/disabled.

Awake – Ignore your power plan and keep your PC awake

With Awake, you can prevent your PC or monitor from going to sleep and ignore PC sleep settings. This feature has its icon in the system tray, so you can easily configure it.

As for configuration, the following options are available:

  • Ability to turn the monitor off or keep it on.
  • Keep the monitor or PC awake until the specified date, time, or interval.
  • You can quickly turn the selected power mode on or off.

Peek – Preview files without opening them

With Peek, you can preview any file simply by using Ctrl + Space shortcut. The file will be opened in a new window so you can easily see its contents.

This feature can do the following:

  • It supports a wide array of file formats.
  • Instantly closes as soon as you click away.
  • Can be configured to stay open even if you click away.
  • Has a button to open the file using the default software

PowerToys Run – Launch any application instantly

PowerToys Run works as a quick launcher for files and applications, and you can start it instantly by using the Alt + Ctrl shortcut. The search is fast and in our opinion more handy than Windows search.

Regarding other features, this feature can do the following:

  • Ability to perform web searches.
  • Can be used to run system commands.
  • Supports registry searching.
  • Can search and start services.
  • Supports various plugins.

PowerRename – Rename multiple files from File Explorer

With this feature, you can rename multiple files easily. Simply select the files, right-click them, and choose the PowerRename option from the menu.

The feature offers the following:

  • Support for regular expressions.
  • Ability to perform text formatting.
  • Preview of original and renamed file names.
  • Placeholders for date, time, and counters.

Image Resizer – Resize and optimize images quickly

Using the image resizer, you can quickly and easily resize images without using image editors. To resize pictures, simply select them and choose Resize Pictures from the context menu. It’s that simple.

These are the available features:

  • Ability to configure custom resizing presets.
  • Support for multiple encoding types.
  • Image compression.
  • Creates resized images as copies.

Fancy Zones – Create custom window layouts

Fancy Zones works as a window manager and it allows you to create and customize layouts. This works better than the default snapping feature since you can make an unlimited number of presets, columns, and rows. To activate this feature, simply drag the window while using the Shift key.

Other features that we need to mention:

  • Ability to override Windows Snap shortcuts.
  • Zone color and opacity can be easily adjusted.
  • Support for layout switching with shortcuts.

Color Picker – Get color codes from your screen

If you’re a designer, you’ll find this feature incredibly helpful. Simply press Ctrl + Windows key + C and pick the color from the screen. The color editor will now open and you’ll be able to customize it or copy it in one of many available formats.

Other features of Color Picker:

  • Ability to see the color name when picking a color.
  • You can instantly copy the color code without using the editor.
  • Support for 14 color formats.

Screen Ruler – Measure distance between elements easily

Another useful tool for designers is the Screen Ruler. You can start this tool with the Windows key + Shift + R. After that, just select what you want to measure, move the mouse cursor to the desired location and you’ll get the distance between the elements.

Screen Ruler comes with the following features:

  • Ability to measure bounds.
  • The feature can measure both horizontal and vertical spacing.
  • You can adjust the pixel detection tolerance and ruler color.

File Locksmith – Unlock files with a single click

If you can’t end a certain process because another file is using it, File Locksmith is here to help. Right-click the file in the File Explorer and select What’s using this file from the context menu to see all the information.

Other features of File Locksmith:

  • Ability to see the process ID and the user that uses it.
  • The process can be easily ended with a click of a button.
  • If necessary, you can restart the process with administrative privileges right from there.

Top 5 reasons to use PowerToys utilities on Windows 11

  • It bundles individual tools from several developers into a single software.
  • The software lets you improve your productivity by adding additional functionality to Windows.
  • You can access most features with keyboard shortcuts instantly.
  • Some functions are added to the context menu and can be accessed natively.
  • The software is free and published by Microsoft.

What are the alternatives to PowerToys utilities?

While there’s no alternative for PowerToys software as a whole, there are alternatives for the following utilities:

Microsoft is frequently updating this tool, and speaking of updates, you might want to check PowerToys 0.61.0 update changes.

Now that you know about the best utilities this tool offers, go and install PowerToys for Windows 11 and try them yourself!

What are your favorite features of this software? Let us know in the comments section below.

Fix: Screen Goes Off When Plugging in the Charger on Windows 11

Displays are the second most affected aspect of the PC, only next to performance. Speaking of which, many users found that their Windows 11 screen goes black for a second when the AC adapter is plugged in or unplugged.

It appears as if the laptop turned off, but the display brights up within a few seconds. And for users who don’t always have the power cord plugged in, this is a major problem.

Why does my laptop screen go off when I plug in the charger?

  • A damaged cord can affect the power supply 
  • The laptop screen goes black when plugged in due to a bug, as reported in Windows 10.
  • Outdated, corrupt, or incompatible graphics driver
  • Windows 11 HDR settings are set to optimize for battery life

What can I do if my laptop screen turns off when charging?

Before we head to the slightly complex solutions, try these quick ones first:

  • Make sure the power cable is not damaged and the power source is not faulty. If possible, use another cord or plug the adapter into another socket.
  • In case an external monitor goes black for a few seconds when plugged into charging, reconnect it or revert to the default monitor configuration.
  • Check for any pending Windows updates and install them. Also, increase the brightness level on the laptop.
  • Discharge the battery, press the power button to turn off the PC, unplug the battery, then put it back in, and turn on the PC.

If none work, move to the fixes listed next.

1. Switch to another power plan

  1. Press Windows + I to open Settings, and click on Power & battery on the right in the System tab.power & battery
  2. Select Best performance or Best power efficiency from the Power mode dropdown menu.change power plan to fix screen turns off when charger plugged in windows 11
  3. Restart the computer when done.

When you plug in the charger and the laptop screen turns off on Windows 11, switching the power plan may help. Also, use the Ultimate Performance power plan for best results and to get rid of the issue.

2. Reset power plan settings to default

  1. Press Windows + R to open Run, type cmd, and hit Ctrl + Shift + Enter.cmd
  2. Click Yes in the UAC prompt.
  3. Paste the following command and hit Enter to reset the power plan configuration:powercfg -restoredefaultschemesrestore defaults to fix screen turns off when charger plugged in windows 11

3. Set a uniform refresh rate

Certain apps, especially those that come pre-installed on the Windows 11 device, change the refresh rate when the laptop is plugged in, and the display, subsequently, blacks out momentarily. This includes the MSI Action Center and Intel Graphics Command Center.

You will have to reconfigure the display and advanced power settings in these two. Here’s how:

  • MSI Action Center: Open Settings > go to Features > turn off Display Power Saver.display power saver
  • Intel Graphics Command Center: Disable Auto-refresh or the equivalent setting. 

If that doesn’t work, uninstall the app, whichever is installed on the PC, and check for improvements. 

4. Change Windows HDR settings

  1. Press Windows + I to open Settings, and click Display on the right.display
  2. Click on HDR.
  3. Now, under Battery options, choose Optimize for image quality.optimize for image quality to fix screen turns off when charger plugged in windows 11

When you have Optimize for battery life selected under Battery options, it will disable HDR when running on battery power, and this sudden change in refresh rate might cause the Windows 11 laptop screen to turn off when the charger is plugged in.

5. Reinstall the graphics driver

  1. Press Windows + X to open the Power User menu, and select Device Manager from the list of options.
  2. Expand the Display adapters entry, right-click on the active graphics adapter, and select Uninstall device.uninstall device
  3. Tick the checkbox for Attempt to remove the driver for this device, and click on Uninstall.reinstall driver
  4. Once done, restart the computer and let Windows install a fresh copy of the driver.

6. Update the graphics driver

  1. Press Windows + R to open Run, type devmgmt.msc in the text field, and hit Enter.
  2. Locate the active graphics adapter under the Display adapters entry, right-click on it, and select Update driver.update driver to fix screen turns off when charger plugged in windows 11
  3. Now, choose Search automatically for drivers and let Windows search the computer for the best available version and install it.search automatically
  4. After the new driver is installed, reinstall the computer for the changes to apply.

If the screen is turning black when you plug or unplug the charger, updating the graphics driver will help. When the OS can’t find a newer version, check Windows Updates or head to the manufacturer’s website, locate the latest version, and manually install the driver.

7. Perform an in-place upgrade

  1. Go to Microsoft’s official website, choose the product language and edition, and then download the Windows 11 ISO.windows 11 ISO
  2. Double-click the ISO file and click Open in the prompt.
  3. Run the setup.exe file.setup.exe
  4. Click Yes in the UAC prompt.
  5. Click on Next in Windows 11 Setup to proceed.in-place upgrade to fix screen turns off when charger plugged in windows 11
  6. Now, click on Accept to agree to Microsoft’s license terms.
  7. Verify the setup reads, Keep personal files and apps, and click Install to start the in-place upgrade.install

An in-place upgrade takes a few hours to complete, so let the process run unhindered. Remember, it’s like a Windows reinstall, but you don’t lose any installed apps or stored files. And it should fix things when the monitor turns off and goes black for good!

Tip icon Tip
If none of the fixes work, the problem, in all likelihood, arises due to a hardware issue. In this case, we recommend you contact the manufacturer or get the PC inspected by a professional.

Why is my laptop underperforming when charging?

If the laptop underperforms when plugged into charging, it could be the high temperature to blame. Batteries tend to warm up when charged, which might increase the CPU temperature. To fix the problem, put your laptop into sleep mode while charging.

Besides, you could be using an adapter that delivers higher power compared to your laptop’s specifications. Check that as well!

If the screen turns off when the charger is plugged in on Windows 11, be it a laptop or a desktop, it’s usually a driver issue or a problem with the power options. But things are a lot different when the laptop screen goes black on connecting an external monitor.

Remember, similar misconfigurations can also trigger the PC screen to turn off with the fan running, but that, too, is easily fixable.

For any queries or to share what worked for you, drop a comment below.

KJM K3 Certified JBL & Netflix Projector Review: A crazy amazing entertainment deal

Starting at: $275 (early bird special)

Since the pandemic, I’ve reevaluated the convenience of a traditional glass flat screen tv viewing experience versus the flexibility projector systems offer, and until recently the single prohibitive obstacle to making the modern leap has boiled down to price.

Between the absorbent price of a projector hardware itself, auxiliary sound equipment, projector screens and stands, and dedicated streaming sticks or services, switching to projector viewing experience it typically a costly investment, which was until I reviewed the KJM K3 Certified JBL & Netflix Projector.

Specs

KJM K3
HDR Type HDR10
IR Receiver Support, 1 in the front and 1 in the back
Controller Bluetooth Controller
Noise 35db@1m
Picture Type JPEG
BMP
GIF
PNG
Audio Type mp3/wav/asf/wmv/divx/mkv/3gp/mp4/mov/m4a/trp/mpeg/mpg

/vob/dat/mka/eac3/web,/ac4/mts/m2ts

Video Type IPS 2.4″ Smart Easy Read Display with color screen
Power Input: 100-240V, 50/60Hz,3A Max:
Output: 35V, 6.85A 240W
Working Temperature 0° – 40°
Storage Humidity 30% – 70% RH
Working Humidity 30% – 70% RH
Size PU foaming black
Seatpost 28.2*28* 16.9cm
Weight 4.08KG
8.99LBS

Design and features

Unlike most home theater projectors in the market currently, the KJM K3 ops for a more natural and inviting design that emphasizes a rounded-corner aesthetic and part fabric material back versus the angular fiber glass and metal construction of most.

The KJM K3 can tend to resemble an oversize Nest Max speaker with a single glowing circular light facing out depending on where it’s positioned in the home. The discreet design allows the mini subwoofer-sized projector to blend into a modern home aesthetic with its two-tone dark grey coloring and minimal lines with relative ease.

As with many other projectors, the KJM K3 tucks its ports in the upper back of the device which houses 2 HDMI, 2 USB-A, USB-C, DC-IN, ethernet jack, 3.3mm audio, and IR receiver.

Kjm K3 Parts Accessories

The KJM K3 doesn’t host very many tactile or manual controls on the device itself, so much of the tweaking and navigation of the projector comes from the included control. However, the first thing the KJM K3 does when plugged in and the lens cap is taken off is auto focus based on distance, projector screen size and suggested clarity.

The autofocus process can take as long as 20 seconds or as few as 3 depending on your own personal set up.

Once focused, the next thing users are greeted with is the overly simplistic Linux-powered menu system that walks viewers through a three-selection prompt journey to setting up their system which the projector stores options in memory.

Kjm K3 Front

Once the settings are in place, it’s off to the races with content features that include Netflix, Prime Video and YouTube support out of the box. There are other streaming apps that are included in the content menu but are much smaller in scale and notoriety than the big three such as TikiLive, and TC for kids.

For those who haven’t invested in a streaming stick or just want to use their preferred apps over the ones included with the KJM K3, there is the screen casting feature that connects the projector to a smartphone with a three-button selection. Android, iPhones, Windows and MacOS platforms are all supported and appear instantaneously and present an almost lag free viewing experience.

The smart controller included with the KJM K3 looks like a standard app-enabled handheld with dedicated buttons for quick access to Netflix, YouTube, Prime Video, and casting alongside a four-area navigation wheel as well as buttons for power, Home, and volume.

KJM K3 Port Selection

Another distinguishing feature of the KJM K3 is its actual weight. While the projector is not as light as a pillow, it is surprisingly light for its appearance, enough so that my five-year-old could effortlessly move the device around the house at will. The roughly eight-pound projector evenly distributes its weight between the speaker arrangement and lens design which makes positioning or transitioning the projector around the house, backyard, or park environments pretty easy.

Image and Soud quality

The out-of-the-box set up process for the KJM K3 was about as streamlined as any traditional flat panel TV, which consisted mostly of connecting a power source, attaching a streaming box or stick (if desired) and selecting some settings info from the three prompts that appear in sequential order on the screen.

A lot of projectors opt for Dolby Vision support rather than HDR10 but when using the KJM K3, the slightly upscaled DV support wasn’t missed as the projectors HD10 images were vibrant and as close to DV support one can get without having to tweak and tune their settings out of the box.

Coupled with expansive color gamut and contrast ratio, the KJM K3 also boasts one of the brightest pictures available at 1500 ANSI Lumens for an LCD projector at this price. Watching content in both dark and lit rooms was easy and convenient and didn’t require a secondary light filter or adjustment moment for the KJM K3 as some other projectors may need when transitioning between lighting scenarios.

Kjm K3 Apps Platform

Admittedly, this is still a projector so daylight viewing is still obscured a bit by outside light and dark scenes can still tend to be washed out when viewing, despite its high Lumens count, but the HDR contrast helps salvage some of that viewing experience.

Some other convenient features of the KJM K3 include its Keystone correction, which is done electronically and, on the fly, to clear up some of the fuzzy edges that can appear when readjusting the distance between the projector and the screen.

In addition to lens correction, another key feature I found very useful was the speed at with the KJM K3 auto focused out of the box are anytime the positioning of the image was affected. Again, with an antsy five-year-old in the house, a projector can get bumped or displaced accidentally, but the KJM K3 was able to auto focus in under 3 seconds to maintain its clear picture throughout viewings.

Kjm K3 Auto Focus

There are viewing modes in the settings that offer a bit more tweaking that include a Gaming Mode, Sports, and Cinema, but they’re mostly a gradient of shading. The picture quality between the options doesn’t fluctuate much, which would be an issue if the out-of-the-box clarity needed more adjustments.

The KJM K3 is a forward-facing light projector with a large 3.4-inch lens that provides one of the clearest HDR10 supported images out of the box. The image from the KJM K3 can scale from 50 to 200-inch surfaces with a native 1080p resolution.

The biggest selling point of the KJM K3 is its JBL certified audio that delivers, especially when considering the cost of a home audio setup.

In addition to the JBL tuned speaker arrangement, the KJM K3 also supports Dolby Digital sound technology that ramps up the clarity of sounds and offers a facsimile of a three-point surround sound setup. Depending on where the KJM K3 is positioned in a room, viewers can experience a pretty immersive soundscape just from the speakers onboard the projector, however, there is support for 3rd party wired and wireless audio.

Kjm K3 Screen Casting

The sound from the KJM K3’s Speaker Mode is full and robust. The KJM K3 may lack a bit of the bass as dedicated subs, but it’s more than suitable for a single-family living room viewing experience as well as eliminating any lag that comes from directing video and audio through multiple sources.

Netflix shows like the Witcher, Bodyguard, and Luther: The Fallen Sun were all particularly good test beds for KJM K3 as they fluctuate between light and dark scenes as well as annoyingly soft whispers and loud action arrangements and the KJM K3 handily all with ease.

The biggest downside is the fan noise coming from the KJM K3. It’s loud and noticable when sitting next to the projector. If you happen to be privilaged enough to have the space to position it a few feet away, the fan noise becomes less of an issue.

The air filter in the KJM K3 is relatively thick and may be contributing to the loud fan noise as the projector tries to suck in and vent air through the device’s body.

Summary

When most home projector units’ range between $500 and $3,000, the KJM K3 is a steal with an early bird special price of $279. Even at a normal price of $558, the KJM K3 checks all the basic features list items as well as including some extras such as JBL tuned speakers, auto focus, Dolby Sound support and HDR 10 out of the box.

If you’re looking to replace an aging projector or if this is your first projector, I’d recommend giving this Indiegogo project a look. I’ve managed to use the KJM K3 at a park for my daughters Girl Scouts movie night and at home in various rooms for both gaming and movies.

If you’re considering a living room renovation and replacing your 50 to 60-inch flat screen with something a bit more flexible, the KJM K3 at $279 is a great testing device in my opinion.

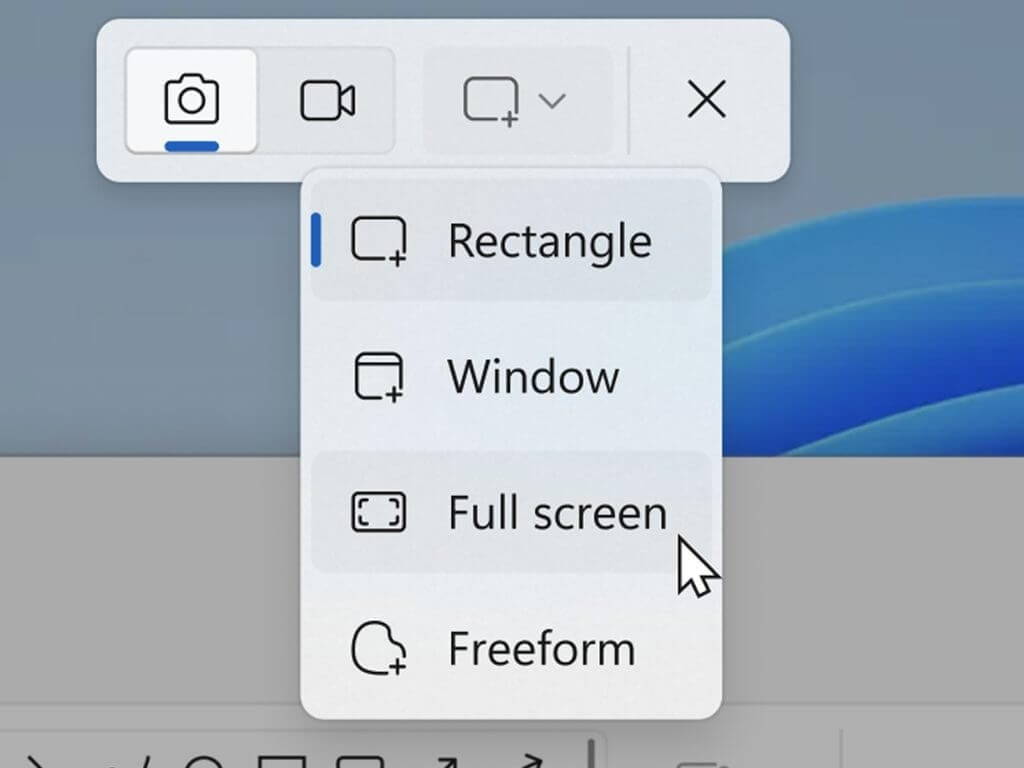
MSI resolves Windows 11 ‘UNSUPPORTED_PROCESSOR’ BSoD issue with BIOS updates

MSI has identified and resolved the “unsupported processor” Blue Screen of Death (BSOD) issue with their Intel 700 and 600 Series motherboards. This issue seemed to be related to firmware settings associated with Intel Hybrid Architecture, and it only affected Intel’s 13th Gen Core i9 processors with specific versions of Windows 11 and Windows 10 updates.

2023 09 06 21 17 10

According to a report from last month, after updating to Windows 11 KB5029351, certain MSI motherboard users have experienced a “Blue Screen of Death” error. Upon installing the update, some Windows 11 users have been confronted with this error message: “UNSUPPORTED_PROCESSOR.”

The Blue Screen of Death (BSoD) is a screen of error that appears unexpectedly on a Windows computer. It is caused by a fatal error in Windows that prevents the computer from continuing to run.

MSI has taken action to resolve a problem by releasing BIOS updates for affected motherboards. These updates contain an update to the Intel CPU uCode, which will prevent any further “UNSUPPORTED_PROCESSOR” error messages. If you’re experiencing this issue, you can expect the updates to be available on MSI’s official website. All affected motherboard models will receive updates by the end of September.

via The Verge

Russia uses internet to stir global political instability, Microsoft claims

The digital world is not just about social connectivity or endless repositories of information, it’s a versatile battlefield where countries wage silent wars.

Microsoft Threat Analysis Center (MTAC) has shared an alarming example by publishing a report that underscores how Russia uses the internet to fuel political instability worldwide.

Today we are sharing a report from the Microsoft Threat Analysis Center (MTAC) on Russian influence operations in Africa, principally focused on the Niger coup. We believe it is vital there is a wider understanding of the ways in which the Internet is being used to stoke political instability around the world.

MTAC’s recent focus has been Africa, a continent stained by a rash of military coups in nations like Mali, Guinea, Burkina Faso, Niger, and Gabon.

One of the pointed-out events was the palace coup in Niger. The leaders cherry-picked oppressive measures to consolidate power – suppressing protests in Niamey, instating a curfew, and sealing the borders.

However, counter-protests emerged, proliferating pro-Russian sentiments and blaming France for the unrest. Behind the screens of these demonstrations, two distinctly pro-Russian organizations drew attention — PARADE Niger and the Union of Pan-African Patriots.

PARADE Niger, appearing to be a construct of the Russian Ministry of Foreign Affairs, masquerades as a local group, and the Union of Pan-African Patriots serves as a political vessel for one individual.

These entities have vociferously defended the coup, promoting a stronger allegiance with Russia while orchestrating and amplifying offline protests.

In the grand scheme of things, MTAC identified six primary ingredients in Russia’s “African coup cookbook.”

  1. Long-term Influence Campaigns: Russia and its African allies consistently churn out content that maligns France and glorifies Russia, focusing on polarising colonial-era issues.
  2. Alliance with the Putschists: Upon a coup’s occurrence, Russian entities rapidly announce support for the coup leaders, often through intermediaries.
  3. Narrative Control: Post-coup, Russian communicators monopolize the plot, exploiting the information vacuum by eulogizing the military and coup heads while derogating France.
  4. Amplifying Affiliates: With Africa being a longstanding playing field for Russian influencers, it’s easy to mobilize an array of figures to amplify their narrative and drown out competing discourse.
  5. Supporter Mobilization: Pro-coup demonstrations waving Russian flags to project an illusion of a widespread alliance between the masses, the coup, and Russian interests.
  6. Media Blackout: The immediate silencing of Western French-language news outlets like Radio France International and France 24 guarantees the repression of opposing narratives.

The report paints a grim picture of cyberspace hijacked for geopolitical maneuvering. With this revelation uncovered by MTAC, one can only hope that this insight could strengthen global cybersecurity measures and counter similar influence operations effectively in the future.

Upcoming Game Pass releases Payday 3, Party Animals will each have open betas this weekend

Two upcoming Xbox Game Pass games will have free open betas this weekend. Each open beta will be live between September 8-11—that is, between Friday and Monday.

The Payday 3 open beta begins 7am PT/10am ET/3pm BST. Besides being a great promotional tool, the beta will server as a server stress test. You can learn more, including where to sign up, over on the game’s official website. Payday 3 releases on September 21 for Windows, PlayStation 5 and Xbox Series X|S.

PAYDAY 3
PAYDAY 3
Developer:
Deep Silver
Price:
Free

As for the Party Animals open beta, this will be on a limited basis, so you’ll need to act quick if you want to take part. The beta opens at 5am PT/ 8am ET/1pm BST on Friday. The game launches on September 20. To learn more, including preorder info, check out this press release.

Party Animals
Party Animals
Developer:
Source Technology
Price:
Free

So will you be checking out either of these open betas this weekend? Let us know down in the comments section below.

Featured image via Charlie Intel. 

EU’s Digital Markets Act (DMA) targets Microsoft, Apple, four more

The European Union has announced new digital rules, the Digital Markets Act (DMA), to regulate online companies’ market power. These rules target six major tech companies, which have been classified as “online gatekeepers.” The six companies include Apple, Amazon, Microsoft, Google’s parent company Alphabet, Facebook’s owner Meta, and TikTok’s parent company ByteDance.

Gatekeepers? The DMA focuses on the most prominent digital platforms within the EU, commonly called “gatekeepers.” These encompass online search engines, app distribution platforms, and social media networks.

Things have barely begun, and Microsoft and Apple are already claiming that Bing and iMessage shouldn’t be considered “gatekeepers” as they are not big enough. Bing has a market share of 3% in the EU. In contrast, iMessage potentially has around 1 billion global users, though Apple has not disclosed recent figures.

Under the DMA, these gatekeeper companies will face the highest scrutiny within the EU. The DMA outlines regulations to prevent tech giants from dominating digital markets. It includes the possibility of imposing substantial fines and even requiring Big Tech companies to divest parts of their businesses to continue operating in Europe.

The Digital Markets Act (DMA) is a set of rules that will force these companies to make changes to the way they operate, such as:

  • Not stopping consumers from connecting with businesses outside their platforms.
  • Requiring messaging services to work with each other.
  • Banning platforms from ranking their products or services higher than their rivals’ in search results.
  • Not combining a user’s data to build a profile for targeted advertising.
  • Not installing essential software or apps, such as web browsers and the operating system, by default.

Companies that violate these rules may be fined up to 10% of their annual global revenue. Repeat offenders could face fines of up to 20% or divestiture.

via The Washington Post

Revolutionizing AI: Microsoft introduces a ‘Heavy Metal Quartet’ of Compilers

In a world where technology continues to lead every aspect of our lives, Microsoft takes another leap forward. The tech giant has recently upped the ante by unveiling a trailblazing suite of four new artificial intelligence compilers.

Clad in the appellation of the Heavy Metal Quartet: Rammer, Roller, Welder, and Grinder, these tools are certain to elicit a headbanging response in technology.

The fresh batch of compilers has been forged in the foundry of Microsoft Research in synchrony with various esteemed academic institutions. These new tools are formulated to optimize AI models’ performance by redefining the compilation process.

The compilation, fundamentally, is the transformation from source code—the human-readable—into machine code—the computer-executable, or a series of ones and zeros.

Microsoft Research blog post gleams with the breakthrough achievements of these AI compilers. Jilong Xue, Principal Researcher at MSR Asia, elucidates their functions.

The AI compilers we developed have demonstrated a substantial improvement in AI compilation efficiency, thereby facilitating the training and deployment of AI models.

In the future, these large-scale models themselves may inherently assist in achieving optimization and compilation.

The Heavy Metal Quartet: Optimizing AI Workloads

Each member of Microsoft’s “Heavy Metal Quartet” tackles distinct conundrums in the sphere of AI workload optimization.

  1. Rammer: This system maximizes hardware parallelism, a pivotal component in performance. Consider it like many hands working simultaneously to lighten the load and enhance efficiency.

  2. Roller: Roller focuses on fast-tracking the compilation process using a rapid construction algorithm. It is designed to create the AI program you need in seconds, not hours.
  3. Welder: It is the band’s memory conserver. Welder aims to mitigate memory-related overheads by connecting operators in a concentrated pipeline.
  4. Grinder: Grinder syncs control-flow execution with data flow, resulting in optimization across control flow boundaries—a maestro of sorts.

Testing of these compilers shows an impressive advantage over existing solutions. Rammer and Roller outperformed their competition by 20x and reduced time frames by orders of magnitude, respectively. Welder left its peers, including PyTorch, trailing with up to 21x efficiency on GPUs. Grinder, not left behind, accelerator models with control flow by an outstanding 8x.

Microsoft’s ‘heavy-metal quartet’ represents the company’s pioneer advancements in the AI industry. With the ongoing growth of the AI sector, these four tools could potentially solidify the company’s standing as a significant contender in the tech world.