LBRY’s desktop client updates for Windows with improvements and fixes

The official LBRY desktop app updated today for Windows devices. This latest update brings the app up to Version 0.52.6 and makes improvements to disk space management and media sorting in addition to fixing a number of app crash bugs.

Here’s the release notes for the LBRY desktop Version 0.52.6 update:

Added

  • Discover page medium duration filter (#7506)
  • Keep last used collection for Add To (#7491)
  • Disk space functionality on mac / windows (#7500)
  • Enable renaming private collections (#7519)

Changed

  • Some upgrade modal improvements (#7488)
  • Updated lbry-sdk to 0.107.1
  • New YRBL!; facelift for first run (#7527)

Fixed

  • Failed comment count increment (#7510)
  • App crash playing media on older windows versions by updating electron (#7509)
  • Local build failures on mac (#7497)
  • Language change now rerenders whole app (#7504)
  • Mac notarization (#7518)
  • Prevent crash when deleting last comment reply (#7526)

LBRY, pronounced “Library,” is a blockchain project that’s aiming to build a decentralized web hosting solution for video, audio, and other media. All users who download the desktop client essentially help host parts of the LBRY network while anyone can also upload almost anything to the service by using the same app.

Once files have been uploaded to the LBRY blockchain, they can be accessed within the LBRY app or by using an alternative interface such as Odysee which is basically a YouTube rival that focuses primarily on LBRY-hosted videos.

Need more tech news? Give us a follow on Twitter and Facebook.

Fix: VMX file is corrupted error while opening the virtual machine

Although VMware Workstation is a commonly used piece of software, it is not without flaws, one of which is VMX file is corrupted error while opening the virtual machine.

VMware Workstation was initially launched in 2001 and has since developed to become the go-to option until this day.

With excellent hardware compatibility support, you should find your experience with VMware Workstation to be silky smooth and very productive.

The software is used by web developers, software engineers, IT administrators, or simply any technology-loving geek!

However, nothing is perfect, and VMware Workstation is no exception. Right now, we are going to solve one of the common errors, which is known as the VMX file being corrupted.

What are the differences between the Pro and Player version of VMware Workstation?

  • VMware Workstation Player is available for free; however, VMware Workstation Pro requires a license. Both operate on top of the host operating system, either Windows or Linux.
  • Workstation Player is a simpler, non-commercial virtualization application, whereas Workstation Pro is a more powerful, professional virtualization solution for creating and managing Virtual Machines.
  • Workstation Player is a non-advanced virtualization program that is free to use. Also, it can operate VMware Workstation Pro and Fusion Pro Virtual Machines using the licensed version.
  • A non-licensed Workstation Player cannot operate several virtual machines at the same time.
  • VMware Workstation Pro is a considerably more powerful Hypervisor Application that allows users to build Virtual Machines, Virtual Networks, Snapshots, Clone Virtual Machines, and share VMs.
  • VMware Workstation Pro has far more advanced Virtual Machine settings and is intended for technical specialists like systems engineers and IT administrators, among others.
  • Above all, the Pro version of VMware Workstation has VMware-vdiskmanager.exe within its installation package that can help you fix VMX file is corrupted error way easier than you can in the player version.

Why I am getting the VMX file corrupted error?

It is very simple. You get the error when VMware can’t find the VMX file, or it is corrupted. The error may be caused when you accidentally delete or alter this file.

The good news is that VMX file corruption won’t affect VMDK (the existing disk in which all your progress is saved), and you can revive everything.

So, now you know the error is not unsolvable, and if you follow the step-by-step guide carefully, you won’t lose anything. Why wait then? Let’s get into our solutions!

How can I fix the VMX file corrupted error while opening the virtual machine in VMware Workstation?

1. VMware Workstation Player fix

  1. Launch VMware Workstation and click on Create a New Virtual Machine.Create a new virtual machine
  2. Click the third option, which says I will select my OS later.choose I will select my OS
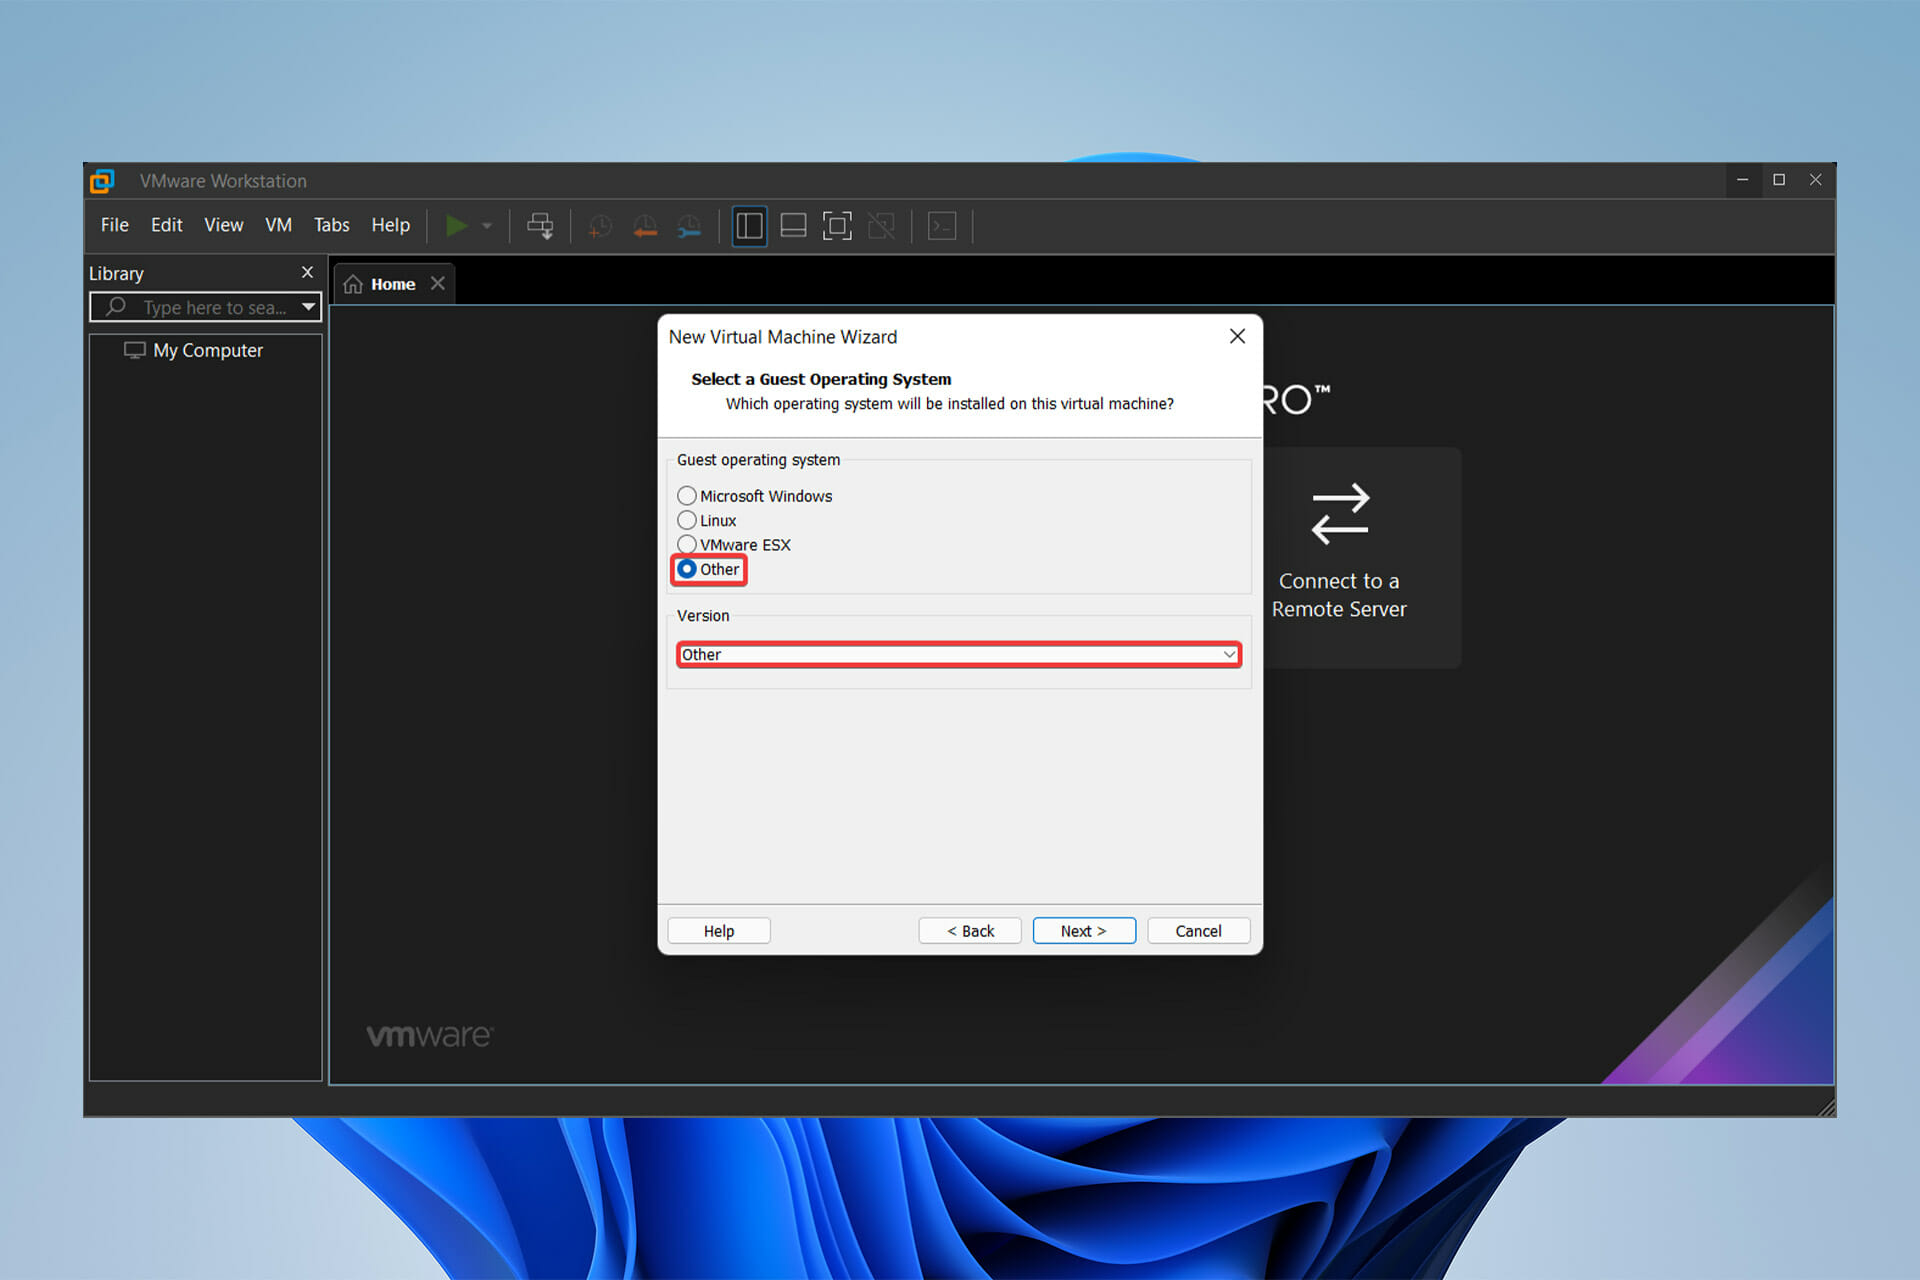
  3. Select OS and version as Other. Select OS as and version as others
  4. Copy the name of the VDMK file you downloaded to run in the VMware Workstation in the first place and paste it as the name of the new VM you are creating.Copy the name of the VDMK file you to downloaded and paste it as name
  5. Select the location where you want the newly created VMX file to save.Select the location where you want
  6. For Disk space and RAM, choose whatever amount you desire. Disk space and Ram amount
  7. Click finish.Finish
  8. Now you have successfully created the VMX file for the downloaded VM that you received VMX file is a corrupted error while running it.
  9. Go to the directory where you created the new virtual machine; now, just copy your downloaded VM and click on replace in the destination—once done, close all windows.
  10. Head to the newly created Virtual machine and click Play virtual machine. Voila! The error is fixed.

By following the above steps, you can fix the VMX file is corrupted error in a blink.

If the mentioned solution didn’t work for you, check all the steps again, and if everything was fine, try using another VM file to test.

2. VMware Workstation Pro fix

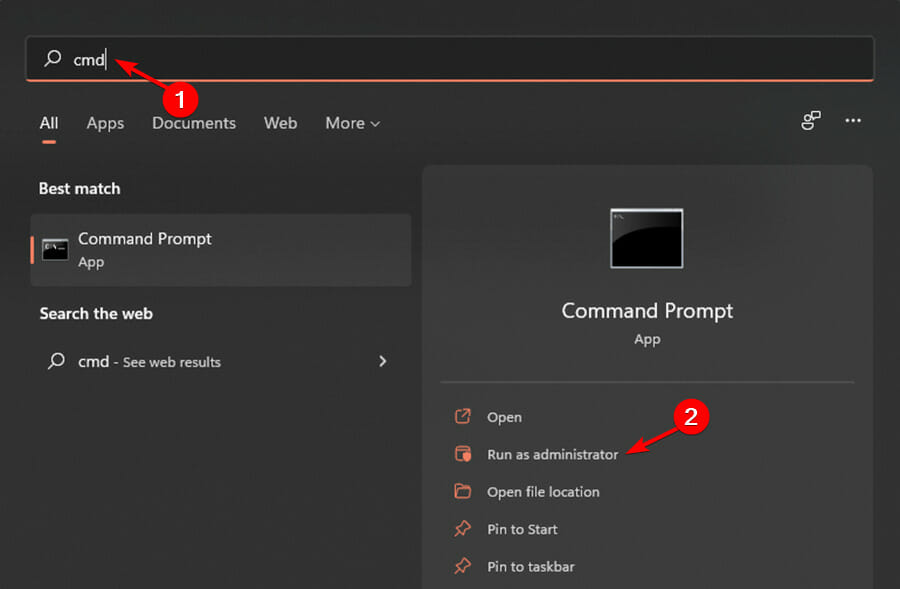
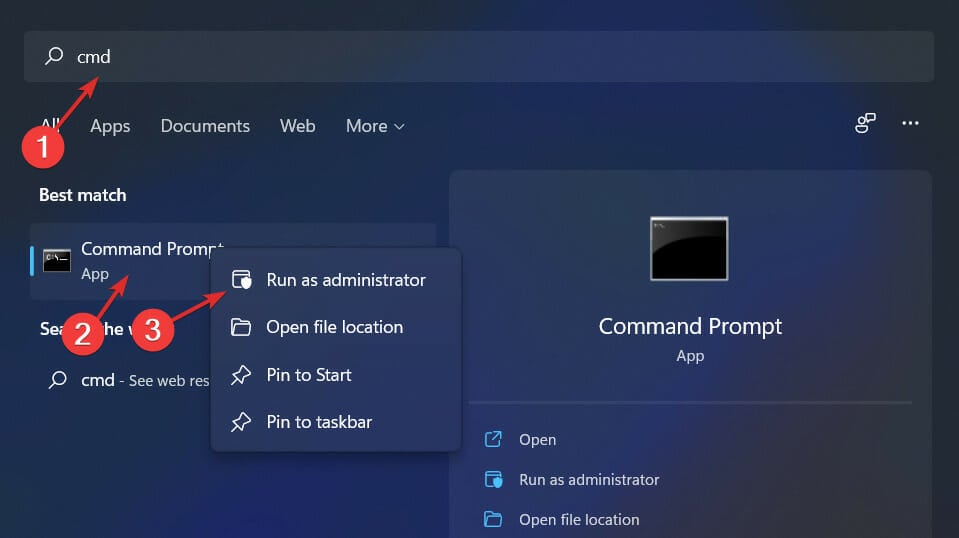
  1. Click on the Start menu, type CMD, then right-click on Command Prompt and select Run as administrator.Run CMD as Administrator
  2. Type the following command and hit Enter. Make sure that you replace your corrupt VMDK’s full path in the command.
    VMware-vdiskmanager.exe –R C:\Users\PC Name\Downloads\Bluemoon\Bluemoon.vmdkEnter-the-command
  3. Run VMware Workstation, navigate to File, and click on New Virtual Machine.choose-new-virtual-machine-from-file-window
  4. Then, select the Custom option.Select custom option
  5. Choose the appropriate hardware compatibility for your VM and click on Next.choose your preferred setup
  6. After that, select the third option, which says I will select my OS later, and click on Next.Choose I will select my OS later option
  7. Select OS and version as Other.Choose other for both OS and version
  8. Chose the locations and enter the same virtual machine name as the corrupted VMX file.Choose name and location of your VM
  9. Now, in selecting a disk window, choose the Use an existing virtual disk option and click on Next.choose to use an existing virtual disk
  10. Then, locate an existing corrupted disk, and in the next step, click on Next and then on Finish. Now we can run our virtual machine.Select an existing corrupted disk

As we mentioned before, the Pro version benefits from having VMware-vdiskmanager.exe within its installation package, which makes fixing the VMX file is corrupted error way easier in this version.

Why do users prefer VMware Workstation over other options?

VMware Workstation benefits from having VMware Tools, a package including drivers and other software for the many guests operating systems supported by VMware products which install in guest operating systems to provide functionality.

Tools are updated regularly, with v11.2.5 released in January 2021. It is made up of various parts, including the following:

  • Drivers for emulated hardware
  • Support of shared folders and drag-and-drop file transfer between host and guest.
  • Clipboard sharing between host and guest
  • Time-synchronization capabilities
  • Support for Unity

Aside from the VMware tools, the software has a user-friendly graphical user interface (GUI) as well as the VMrun command-line program for controlling virtual machines, including guest operating systems.

You may also use the VMware command with proper arguments to start Workstation, launch a VM, switch to full-screen mode, etc.

Because of these characteristics, VMware Workstation has become one of the best, if not the best, virtual machine software available.

However, if you’re looking for another Virtual Machine for Windows 10 or 11 PC, take a look at this article.

Errors can occur due to hardware and software incompatibility, which in our case for the VMX file, is a corrupted error while opening the virtual machine, are usually fixable.

As for hardware compatibility, VMware Workstation can work on most the pc and laptops. However, for a seamless experience with the software, your system should run windows 10 and benefit from 4GB or more RAM.

Check out this article if you’re experiencing a different type of error with your VMware Workstation.

That’s how you can fix the Macrium MFT corrupt error

Macrium MFT corrupt error is a problem that many people encounter, but they’re not aware that it can be fixed in a number of different ways.

There are a plethora of backup programs available, but Macrium Reflect is the most user-friendly.

This tool has many useful features and provides free backup, disk imaging, and cloning services. However, customers have reported issues with this application, such as Macrium MFT corrupt error code 6.

This error is a system file level error and has nothing to do with the hardware, and is usually related to a bad data structure. Users have also reported that this error occurs after upgrading to Windows 11.

Therefore we’ve gathered various methods that have supposedly resolved the problem on some devices.

How does Macrium Reflect work?

Macrium Reflect is a backup program for Microsoft Windows released in 2006. To assure point in time data accuracy, it uses Microsoft Volume Shadow Copy Service to produce disk images and file backup archives.

As the best cloning and backup tool, Macrium Reflect can backup entire partitions or individual files and folders to a single compressed, mountable archive file.

Then, it can be used to restore precise images of partitions on the same hard drive for disaster recovery or a new hard disk for data migration.

Let’s move on to the next step, which will most likely solve your problem.

How can I fix Macrium MFT corrupt error?

1. Run chkdsk

From This PC

  1. Double click on This PC on your desktop.
  2. Right-click on the hard disk you’d like to run the utility on and select Properties.Drive C properties
  3. Then, click Tools.Tools in Properties
  4. At the Error-checking section, select Check. tools check
  5. To run the utility, simply click Scan Now.

If your system was able to find errors during the scan, you would see this message: Restart your computer to repair the file system. You can restart right away or schedule the error fixing on the next restart.

You should also repeat the same process on the destination drive (the disk on which you are attempting to copy the files).

Using Command Prompt

  1. Click on the Start menu, type in cmd in the search box, then right-click on Command Prompt and select Run as administrator.Run CMD as Administrator
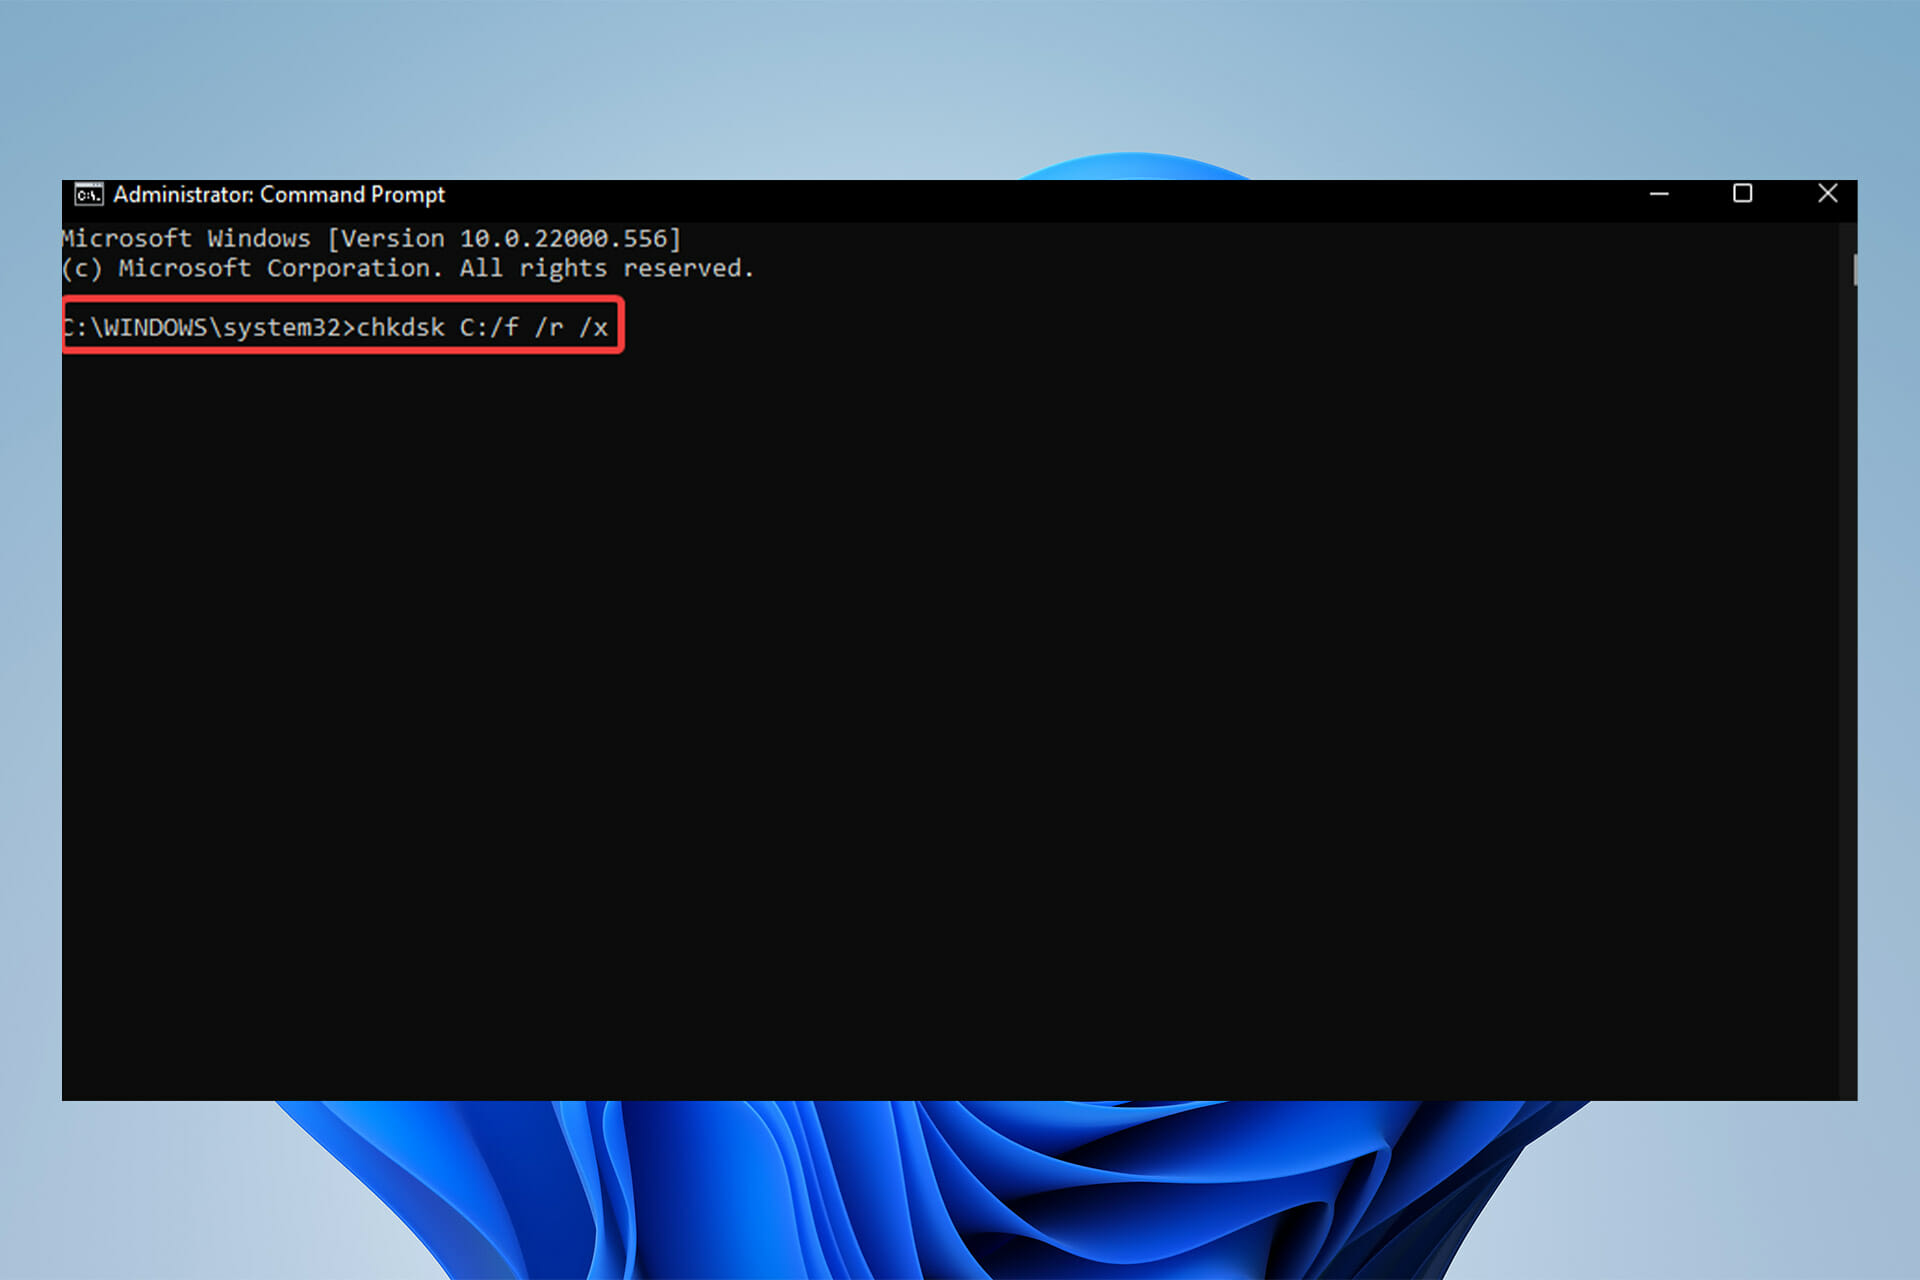
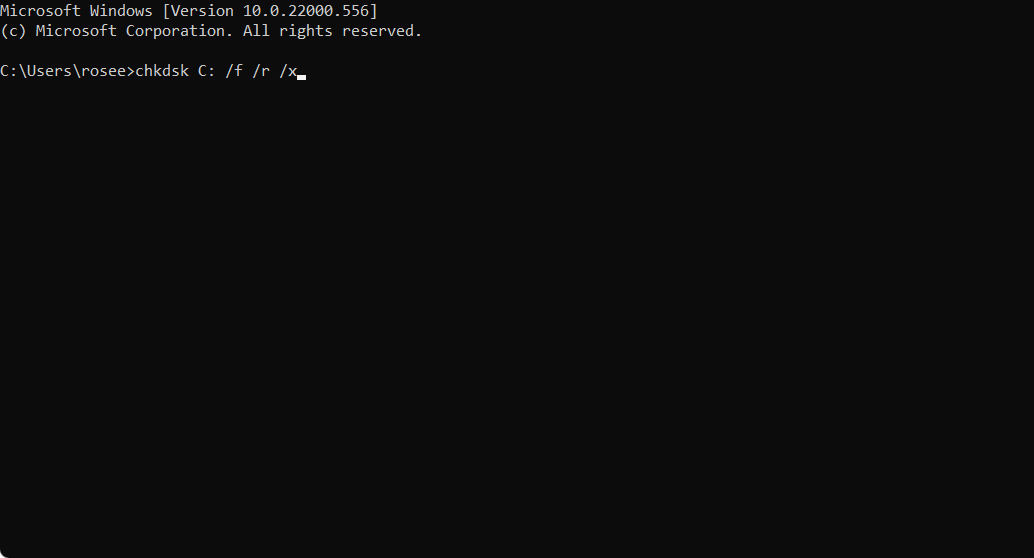
  2. When Command Prompt launches, type the following command and hit Enter:
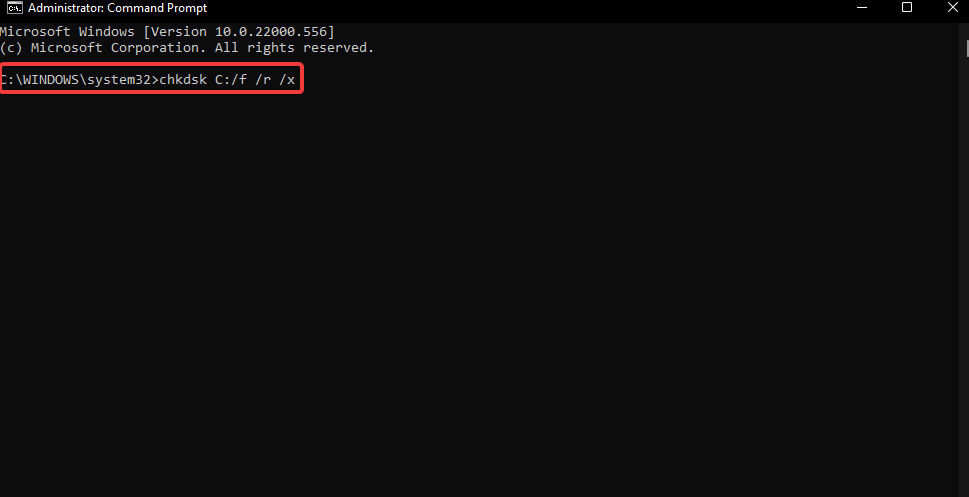
    chkdsk C: /f /r /xCommand chkdsk

If you’re wondering what this command does, the /f option will attempt to correct any errors that are discovered.

The /r option searches for faulty sectors and recovers any readable data. Before the tool begins a scan, the /x option will require the volume you’re going to inspect to be unmounted.

If your PC’s C: drive is in use, type Y to run a scan when it restarts. If this is the case, close Command Prompt and restart your computer.

The main purpose of chkdsk is to scan a disk’s file system and check its integrity, including file system information, as well as to fix any logical faults it detects. Chkdsk may check for faulty sectors as well.

Note icon NOTE
It is worth noting that there are two types of bad sectors: soft bad sectors, which occur when data is written incorrectly, and hard bad sectors, which occur when the disk is physically damaged.

Chkdsk tries to resolve these issues by fixing soft bad sectors and labeling hard bad sectors as unusable.

Corrupt entries in a volume’s master file table (MFT), which is the main reason for the issue that we are dealing with, or any kind of disk damage that can cause the MFT corruption error to pop up, can also be fixed by this utility.

Now check to see if the Macrium MFT corrupt error has been fixed. If not, proceed to the next solution.

2. Use a diagnostic tool

The easiest way of fixing the problem is to scan your hard drive with the utility tool or hard drive manufacturer diagnostics tool.

This may also improve the load speed of your PC and solve some other minor problems like slowdowns.

Windows Utility tools and official manufacturer diagnostic tools, of course, are fully risk-free.

Running a PC repair tool is another option, as it is probable that the problem lies in your computer’s Registry or operating system.

3. Turn off file system checking

  1. First, double click and launch the Macrium software.
  2. Click on the Other Tasks tab located on the upper part of the application.Other Tasks in Macrium
  3. Click on Edit Defaults and Settings. edit defaults in Macrium
  4. Find Verify File System option on the left side of the newly opened tab.verify file system
  5. Uncheck the Verify the integrity of the file systems being backed up option. verify integrity

This is rather a workaround than a solution, which will skip the verification process of the files and will jump right to the backup process.

You can later verify the files from the option available within the application.

4. Reinstall Windows

  1. Download the Windows 11 installation Media.
  2. After double-clicking to run the tool, it prompts Preparation is in progress, click Next
  3. Click Accept User License Terms.
  4. Select Create installation media for another computer after the Windows preparation work is completed.create installation
  5. Depending on your demands, choose a language, system version, and bit size (the default is to automatically match according to the current system, if you re-select, uncheck Use the recommended options for this computer).select language
  6. Select the ISO file and click Next.
  7. Wait for the file download and media creation to complete, click Finish.
  8. Start the installation of Windows 11 now. However, don’t forget to copy your important files from drive C, your desktop, and your document folders to a different drive.

As a last resort, reinstalling the operating system seems to be the final solution to this problem.

Keep in mind that you need to backup your important files manually before attempting to reinstall the operating system of your PC.

While there can be various reasons for this error, system image backup failure can be fixed using third-party apps.

However, we do not recommend this method due to the high risk of disk damage, or even simply by doing what the Macrium suggests you do, running chkdsk command.

Having said that, sometimes the system is unable to fix this issue, and damage to this system partition may go undetected.

Is there an alternative to Macrium Reflect that is as good?

While Macrium may be the greatest backup and cloning software, Acronis can provide similar services with perfect and error-free procedures.

Additionally, this tool provides additional security features to keep your data safe and secure from hackers and scammers.

Acronis Cyber Protect combines backup and sophisticated anti-ransomware technology to overcome the growing complexity of IT systems and sophisticated cyberattacks.

As a software application which has been released in 2006, Macrium Reflect is regularly updated to eliminate bugs and undesired software crashes and flaws.

While the reason for this problem is less likely to be application-related, this application performs complex tasks, thus errors are to be expected.

Although many users who are expecting the Macrium MFT corrupt error believe it is not related to the application and may be resolved by following the procedures listed above.

Cloning Software for Windows 11: 7 Best Tools for 2026

Windows 11 has been released, and many users are looking for the best Windows 11 cloning software, either free or paid.

Some prefer copying files over cloning hard drives when moving files between computers, and as such they might be looking for the best copying software. However, it’s more efficient to clone.

We’ve compiled a list of the seven best cloning software for Windows 11 in case you’d like to do the same and transfer your important data to your new hard drive.

What is the difference between Disk Imaging and Disk Cloning?

Disk cloning is copying all the information and content from one hard drive to another. In Disk cloning, even the information for booting the operating system copies. 

Disk imaging is making a backup or copy of all the information and content from a hard drive. It is actually a storage file with all the data stored on the hard drive you made a copy of it. 

What are the best Windows 11 cloning software tools?

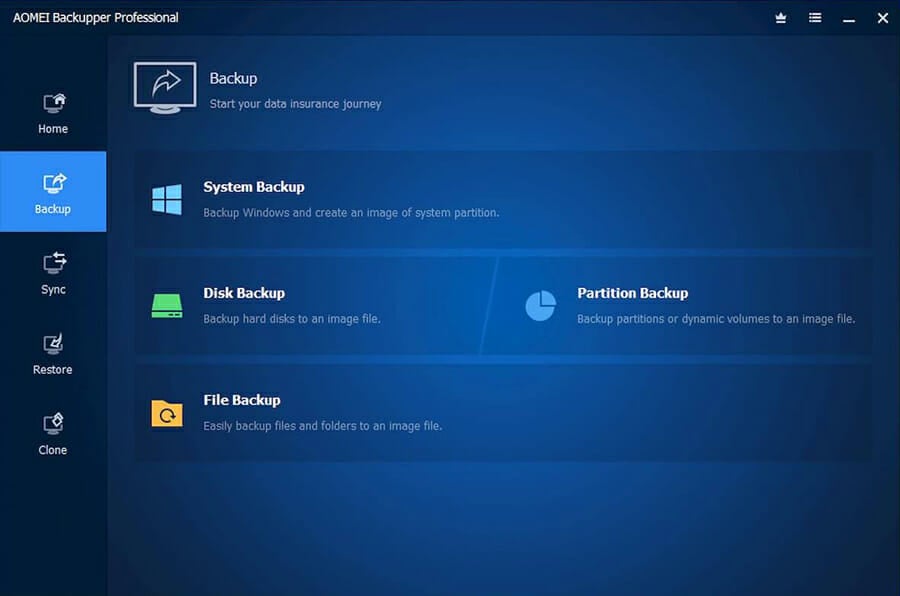
AOMEI Backupper – Compatible with all Windows OS

AOMEI Backupper

AOMEI Backupper is another reliable Windows backup software that backup, restores, and clones your system’s data and information so that you can protect your system, data, and applications.

This software is compatible with all operating systems (Windows XP and later) and Servers (Windows Server 2003 and later).

AOMEI protects your data with system backup, disk cloning, partition backup, file backup, and syncing.

This software has a user-friendly interface and uses professional technologies to make system migration and data transformation simple and efficient. 

AOMEI Backupper’s key features include:

  • Supports email notifications
  • System backup, disk cloning, partition backup, file backup, and syncing
  • Can set to back up the used sectors of a disk or a partition
  • Mount a backup image as a virtual partition
  • Compatible with all Windows OS, including Server 

AOMEI Backupper

It is compatible with most operating systems and has numerous advanced capabilities for safely importing and exporting data. Purchase and activate today!
Check price Visit website

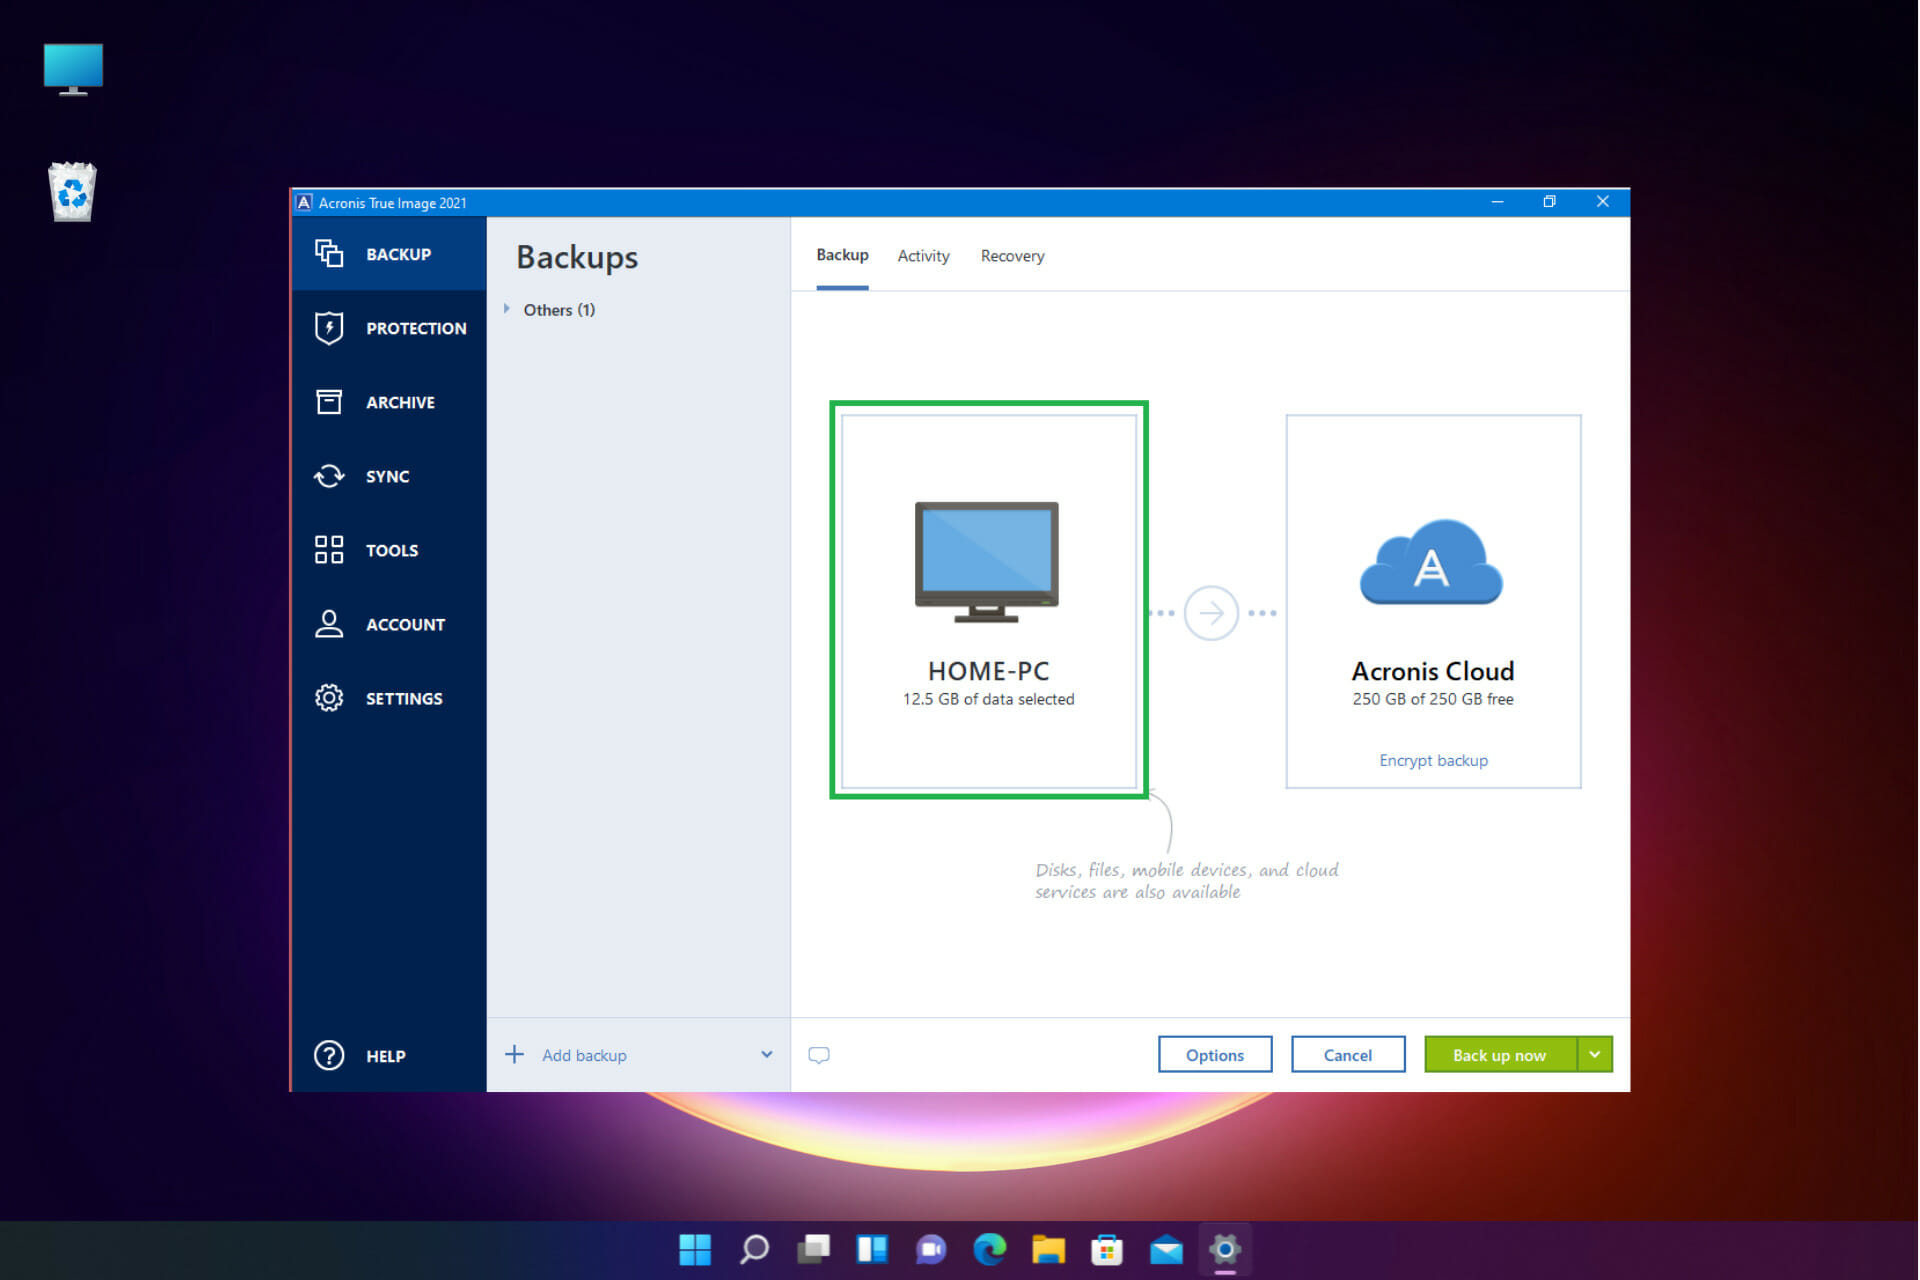
Acronis Cyber Protect Home Office – Real-time Protection

Because of its modern and easy-to-use user interface, this Acronis Cyber Protect Home Office is an excellent choice for beginners.

Additionally, this cloning software comes with an online backup service that ensures your files are accessible from anywhere, anytime. 

Importantly, Acronis Cyber Protect Home Office includes features such as disk partitioning and system cleanup, which are both helpful.

One of the main advantages of this software is enhanced security using dual protection that safeguards the data and the system.

Also, it provides secure mobile features. However, one of the downsides of Acronis True Image is that it increases boot time. 

Take a look at its best features below:

  • Real-time protection against attacks
  • Finds any infections that may be hidden.
  • File synchronization and sharing
  • Disk partitioning and system cleanup
  • Dual protection for data and system

Acronis Cyber Protect Home Office

This software has a lot of useful features and has been dubbed the best cloning software, so don’t hesitate to test it out!
Check price Visit website

Paragon Hard Disk Manager – Advanced partitioning

Paragon Hard Disk Manager

This software can clone hard drives and partitions conveniently using Master of Cloning which provides easy data migration.

Paragon is widely considered the best cloning software available, with advanced features such as a partitioning tool for creating, deleting, hiding, or formatting partitions, as well as making them active or inactive and more.

You can copy the entire hard disk or single partitions to a USB flash drive using the cloning function.

Regardless of the source or the target, this software can function in every migration, eliminating the time-consuming re-installation process.

Another convenient option the software provides is that you can exclude the data you do not require to migrate.

One of the main downsides could be that it does not offer a free trial, however, it is a tried and tested software, and many users reported complete satisfaction with this powerful cloning software.

Paragon Hard Disk Manager’s other features include:

  • Advanced partitioning, such as split/merge, changing cluster size
  • Back up an entire system
  • Backup automation
  • Copy the entire hard disk or single partitions to a USB flash drive
  • Data exclusion included within the process

Paragon Hard Disk Manager

This software features a partitioning tool for creating, deleting, hiding, or formatting partition. Purchase today!
Check price Visit website

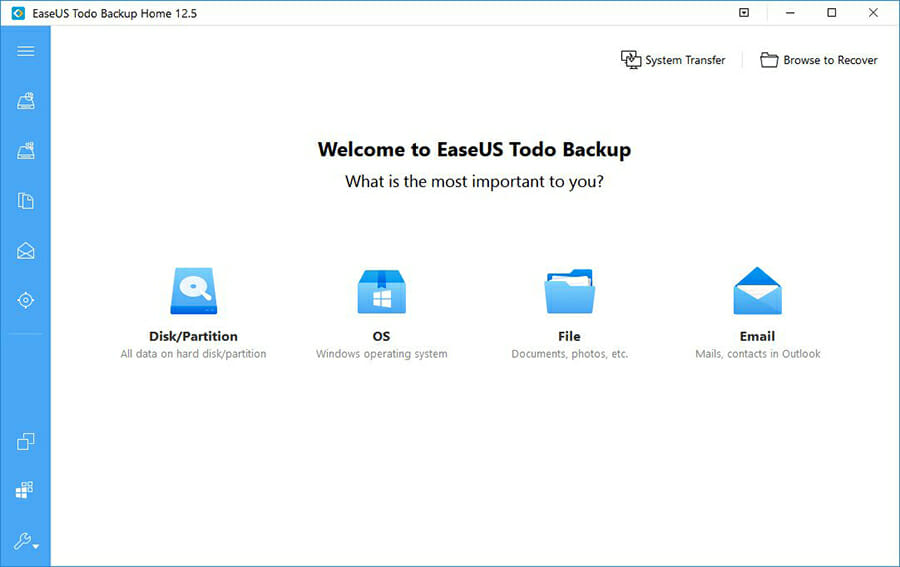
EaseUS Todo Backup – Smart Backup

EaseUS Todo Backup

This software is swift and intuitive for the users and allows you to perform all tasks through the Guide Wizard.

One of the most important features of this software is that you can enable Pre-OS to ensure that you recover and restore your system image to clone or partition a hard drive to retrieve data.

Even if you forget to enable this option, it’s still possible to create a bootable backup emergency disk.

This software is also compatible with all storage devices, including the internal HDD, SSD, M.2 SSD, NVMe SSD, and hybrid drive as well.

If you need the basic data backup, a free version is available. If you need to check out the paid option features, a 30-day free trial is available.

After all, this software is highly accessible and easy to use; if you decide to go for a paid version, it’s excellent value for money, as it is entirely reliable and efficient.

Last but not least, you can get your money back after 30 days if you are unsatisfied.

Let’s review its best features below:

  • Outlook email backup & recovery
  • Smart Backup
  • Compatible with all storage devices
  • Protect important files with the Cloud backup service
  • Very easy to use without additional training

EaseUS Todo Backup

In just a few simple steps, protect your data with EaseUS Todo Backup. Purchase now!
Check price Visit website

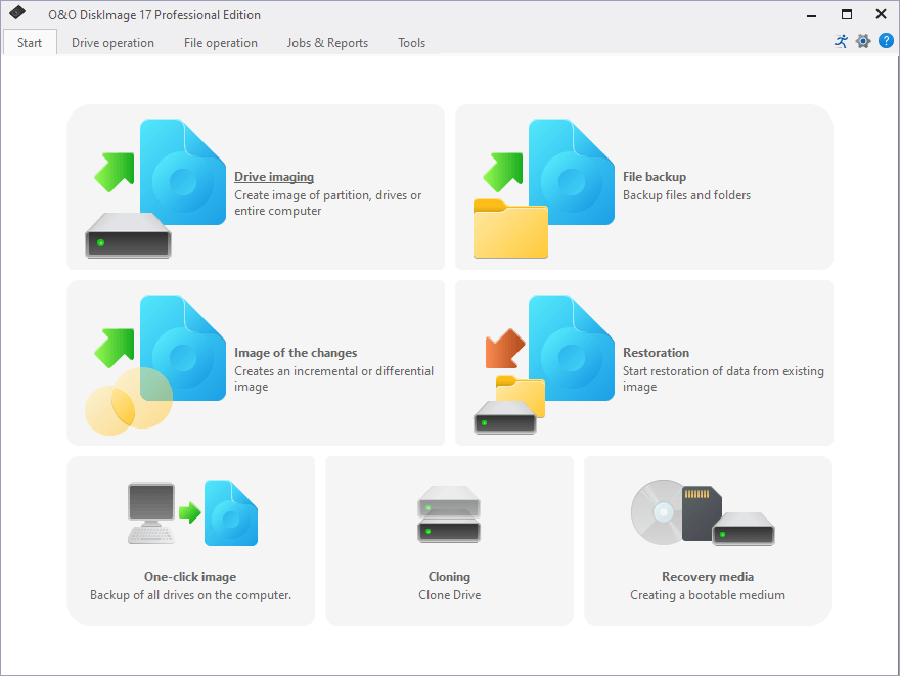
O&O DiskImage 17 – Plug-and-play function

O & O DiskImage 17

O&O DiskImage 17 is ranked 5th on the list of best Windows 11 cloning software, and it can back up all the data on your computer or desired files (single files).

One of the most interesting features of this software is the ability to back up your system even when it is used.

If your computer encounters a problem and you no longer have access to your Windows, O & O DiskImage 17 can restore your data with just a few clicks.

You can clone an entire computer or hard drive and restore or duplicate data. It also supports SSD drives and the latest UEFI System.

O&O DiskImage 17 can restore the backup onto a computer with different hardware than the source system or machine. 

This software’s key features include:

  • Plug-and-play function
  • Create a boot medium directly from within the program
  • Direct creation of VHD/VHDX
  • Restore your data with just a few clicks
  • Supports SSD drives and the latest UEFI System

O&O DiskImage 17

If you want to backup and restore your data with one click, this tool is the best choice for you.
Check price Visit website

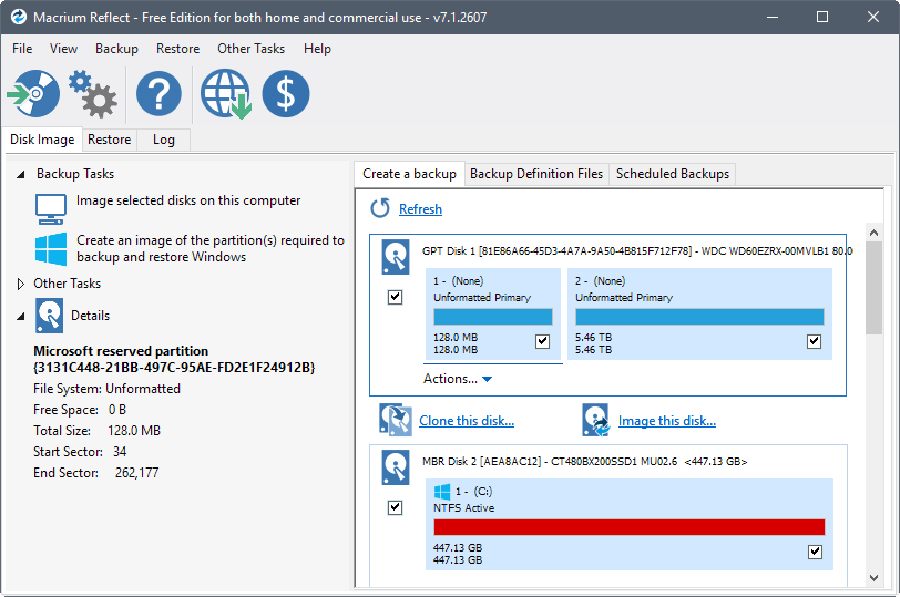
Macrium Reflect – Instantly boot backups

Macrium Reflect

Another cloning software in this list enables backing up data and creating hard drive images easily for beginners with a user-friendly interface.

The free version of this software is completely functional and has all the basic features that you may need to clone your hard disk safely.

One of the most unique and useful features of this software is that it allows a data backup to be scheduled by the built-in data planner.

This feature initiates backup at the set time automatically without needing your supervision.

Another important feature of Macrium Reflect software is the ability to create an image file while the operating system is running, eliminating the need to reboot Windows to finish the process.

It has the option to record data on optical drives (DVD). All of the tasks are completed with a fast operation speed. Additionally, you have options to choose where to store the image.

There is a paid version of this software in which the price is relatively higher compared to other products, but the unique features compensate for the price.

Macrium Reflect’s most important features include:

  • Scalable and navigable log view interface
  • Instantly boot backups in Hyper-V / Oracle VirtualBox VM
  • WinPE 11 rescue media creation
  • Record data on optical drives (DVD)
  • Schedule backups conveniently in the data planner

⇒ Get Macrium Reflect

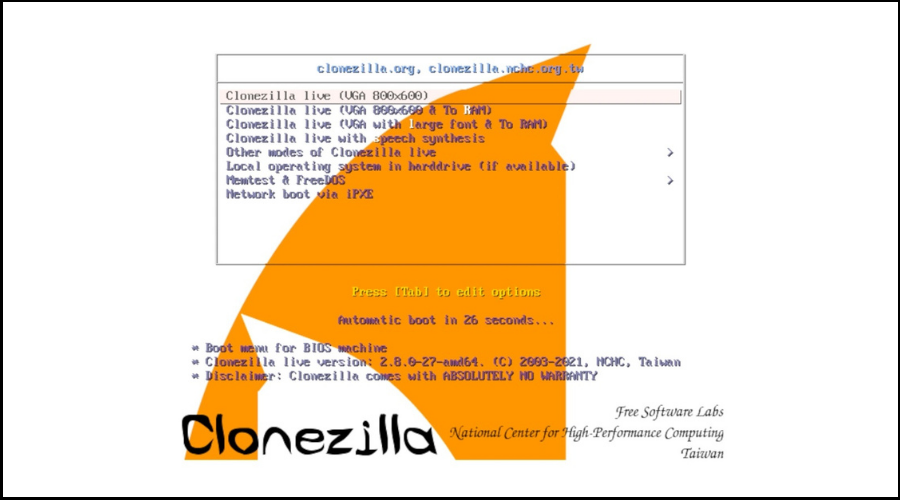
Clonezilla – Unattended Mode

This is a great free and open-source cloning as well as imaging software, which provides fast backup and cloning operations.

However, many users complain that the interface is not user-friendly and easy to navigate.

It is available for home and business users in two versions: Live and SE. The SE edition allows you to clone up to forty machines simultaneously, a fantastic feature for offices and small businesses.

This software supports various file systems, such as GPT/MBR partition formats, and can clone various OSs, including Minix, NetBSD, and Chromium. It can also run from a DVD or USB drive.

Overall, the restoration time is short. Users have claimed speeds of up to 8GB per minute, which is excellent for a free program.

This free and open-source software has all the features to meet your cloning and imaging requirements; however, the software has a few limitations, according to their website.

These limitations include the destination partition must be equal to or larger than the source one, online imaging/cloning has not been implemented yet, and it is difficult to choose the destination drive.

Take a look at some of its best features:

  • BIOS or UEFI Machine Bootable
  • AES-256 Encryption
  • Unattended Mode
  • Supports various file systems such as GPT/MBR
  • Can clone various OSs, including Minix, NetBSD, and Chromium

⇒ Get Clonezilla

Should you backup or clone your data?

If you want to recover your information and files quickly, disk cloning is best. However, if you need extra choices for backup, a disk image is preferred.

Note that if you want to choose disk cloning, you must pick software capable of cloning a drive even with bad sectors. 

If you are looking for free cloning software, we recommend you try Clonezilla.

The most functional software is O & O DiskImage 17, and if you need user-friendly software, you may try AOMEI Backupper.

It’s worth noting that the best cloning software is compatible with HDD and SSD hard drives and servers. If you don’t want to worry about compatibility, you can create a mirror volume in Windows using the built-in tools.

Does Windows 11 have a cloning tool?

No, Windows 11 does not have its own cloning tool, and such we must use a third-party software for this procedure.

If you are looking for the best hard drives for Windows 11, take a look at this article and pick the right one for your needs.

All these tools are incredibly useful if you need to transfer data from one hard drive to another, so be sure to use them.

For any other suggestions or products that worked for you, we are waiting for your input in the comments section below. 

How to Download Logitech Unifying Software on Windows 11

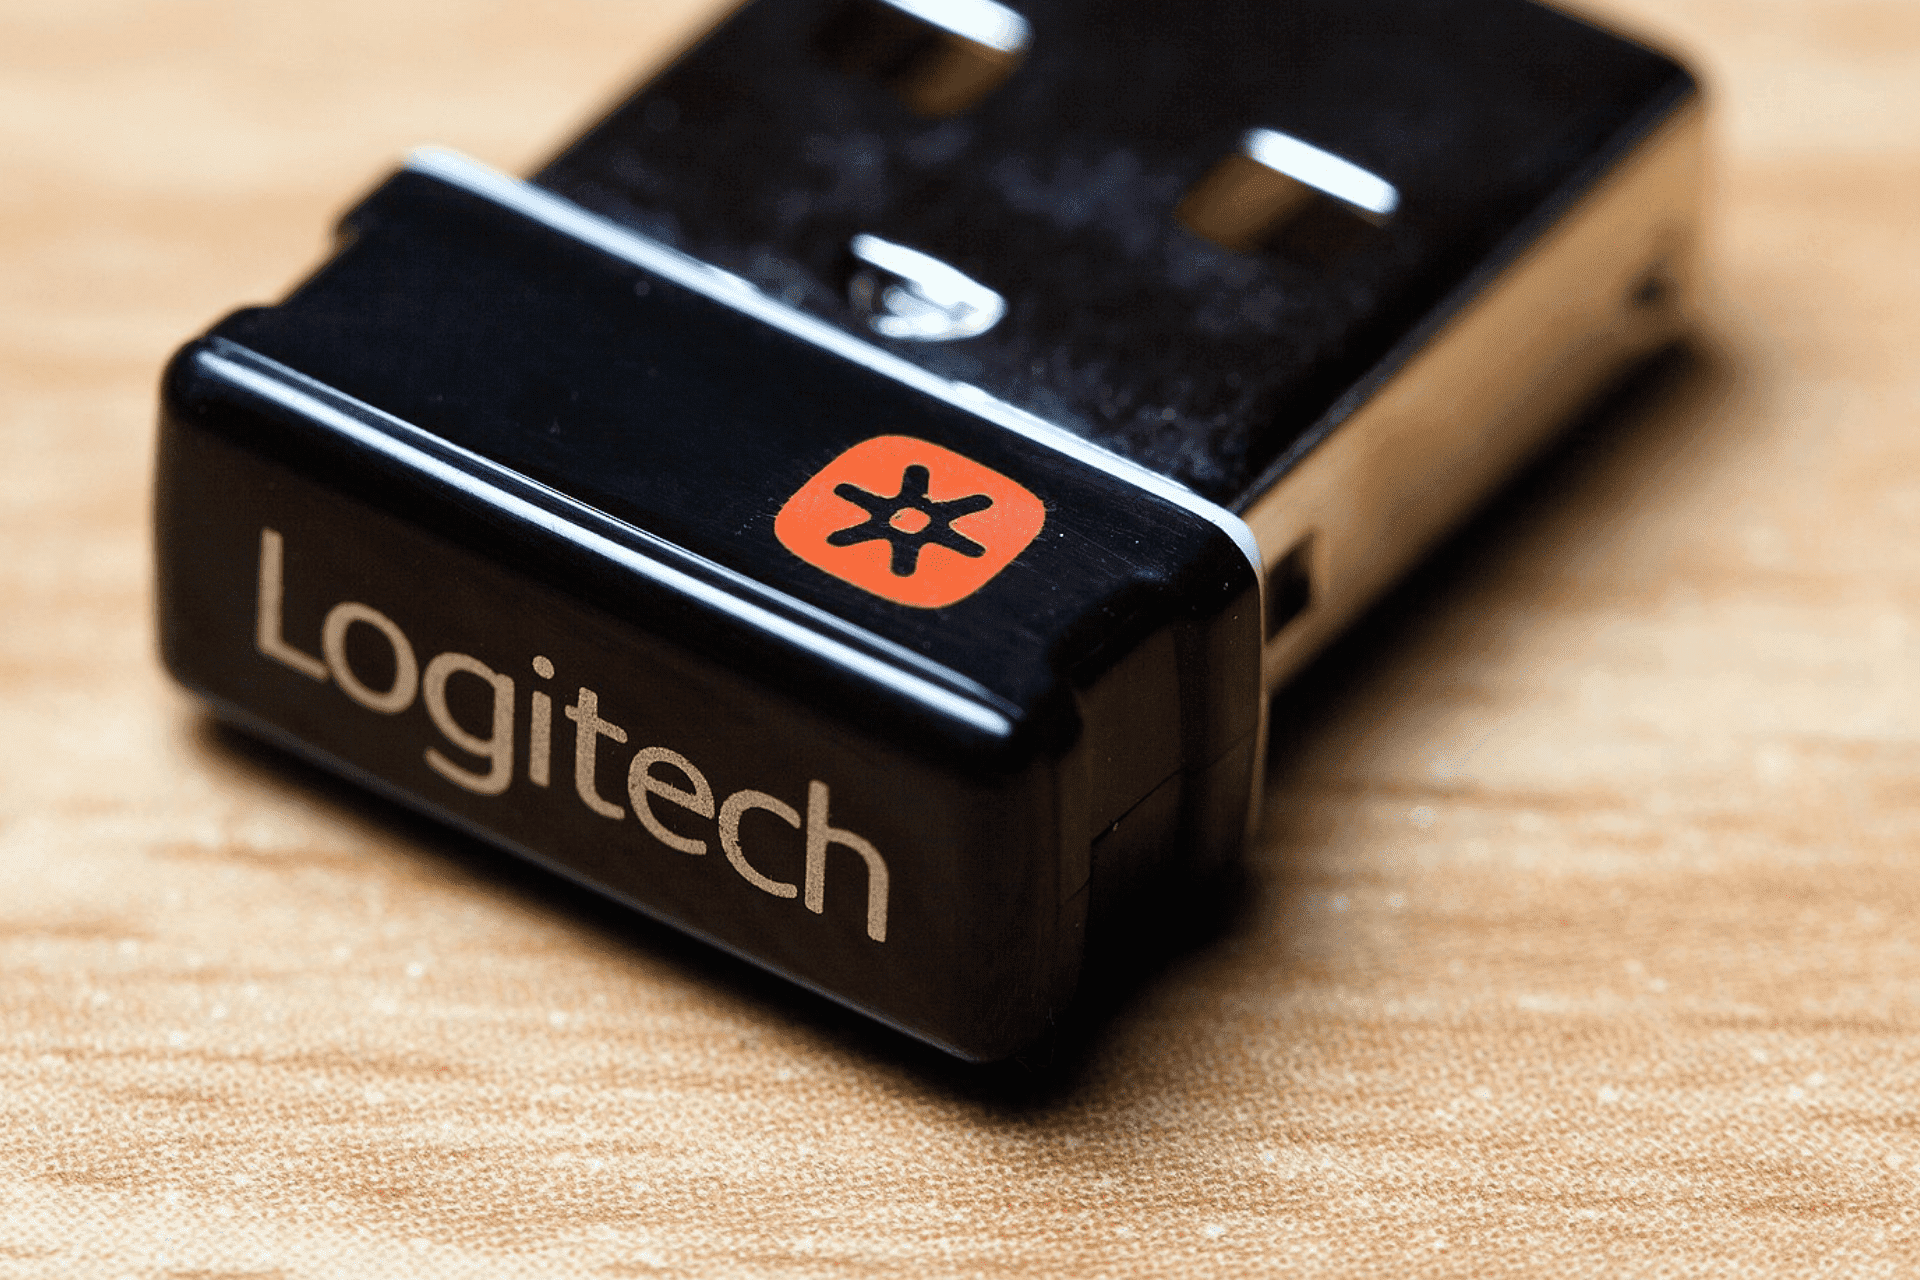
Logitech has a crazy feature that helps us reduce the clutter by eliminating the need to carry multiple USB dongles for every Logitech device (keyboard, mouse, touchpad, trackpad, and more). 

With one receiver, you can register up to 6 Logitech devices. To do this, Logitech uses a program called Logitech Unifying Software.

The application allows you to connect multiple Logitech Unifying Certified products to one Logitech Unifying Receiver, and you can use up to 6 products simultaneously using this receiver.

This software is free to download and use, but the issue here is that it has not been updated in a while and can be a little complicated to set up and pair.

Keep reading to learn how to download and install the Logitech Unifying Software for Windows 11.

How can I download the Logitech Unifying software installer and use it?

1. Download the software

  1. Go to Logitech’s official download page.
  2. There is no official installer for Windows 11 by Logitech yet. So select the Windows 10 version. This supports and works with Windows 11, too.Selecting the Windows version to download
  3. Click on Download.Downloading the Logitech Unifying software

Once done, follow these steps to install and pair up your devices.

2. Install the app

  1. Once you have downloaded the software from Logitech’s website, open the application to install the program.
  2. Once the program has been opened, select I accept the terms of the license agreement and click on Install. Accepting terms and conditions to install
  3. Wait for the installation process to be completed.
  4. After the installation is complete, click on Finish to pair up your Logitech devices.Finishing the installation process

3. Pair the Logitech devices

  1. Plug the unifying receiver into your computer’s USB port.
  2. Click on the start menu and click on the Logitech Unifying icon.Opening Logitech Unifying from Windows 11 start menu
  3. Click on Next on the welcome screen.Clicking the next button to connect devices
  4. Now restart your Logitech devices by turning them off and on.
  5. Wait for the program to detect your device. Once detected, to confirm that the Logitech device is working properly, select Yes and then click Next.
  6. Your device is now ready to be used.

Repeat the steps with each device to connect them to the application, and you can connect up to 6 devices.

Does Logitech Gsuite support Logitech Unifying?

Logitech G Suite devices, such as G Hub, are exclusively made for gamers. It allows them to customize their gaming experience extensively. Logitech G products do not support Logitech Unifying. With the Logitech G suite (G Hub and G devices), gamers can integrate G devices with G Hub, significantly improving the gaming experience.

If you have a Logitech G device, you can install Ghub, and it comes with more lightning effects compared with its previous gaming software, Logitech’s gaming software. The G Hub now includes the Screen Sampler and Audio Visualizer effects.

You can also create your macro and assign it to a keyboard key, mouse button, or other input devices. You can download other gamers’ profiles, and you can also share yours.

However, the G Hub software sometimes stops working on your Windows 11 and 10 systems, possibly due to multiple reasons. If your G Hub isn’t working, try uninstalling and reinstalling the software (G Hub).

Logitech Unifying is an outstanding idea executed by the Logitech team for ordinary and office users. As more people buy Bluetooth devices to free themselves from the wires, the wireless devices come with their issues, such as the fact that each device comes with its own receiver. 

Now that you know how the software works, you can pair Logitech keyboard with your PC in a matter of seconds. Always keep the software up to date since that can help you with the Logitech keyboard not lighting up, and many other issues.

Logitech solved this problem in their way with the Logitech Unifying. Moreover, you can easily buy a replacement receiver if you lose it.

Fix: Weird West’s most common bugs [Gamer Guide]

Weird West is an action role-playing video game, that allows you to discover a dark fantasy reimagining of the Wild West where lawmen and gunslingers share the frontier with fantastical creatures.

It is a newly released and versatile masterpiece, as it can be played on both Windows PCs and consoles like PlayStation and Xbox editions.

Unfortunately, it seems like some users already reported some annoying bugs while trying to run it and if you’re here, it means you also face this kind of trouble.

In today’s guide, you’re going to discover how to easily solve the most common ones.

How can I fix the Weird West’s most common bugs?

1. Weird West crashes/low FPS/friezes/hangs

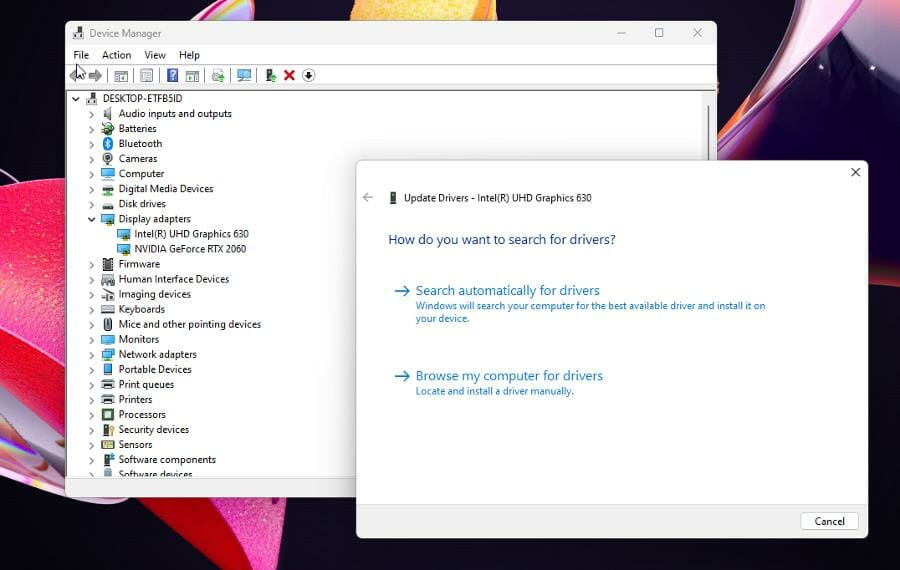
1.1 Update your graphics drivers on your PC

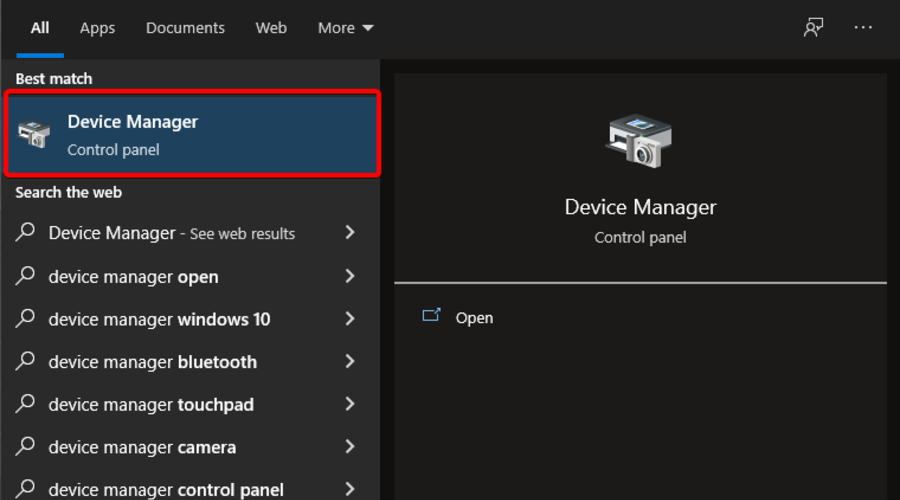
  1. Press on the Windows key, type Device Manager, and open the first result.
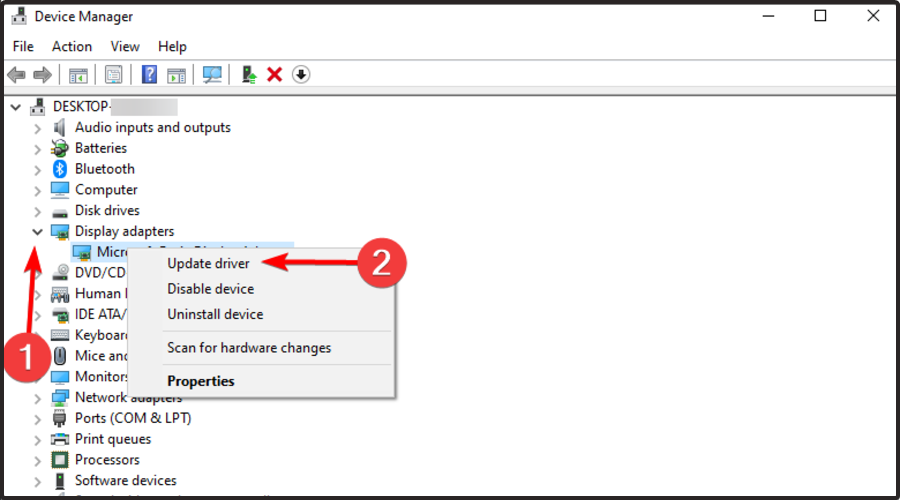
  2. Search for the Display adapters section, expand it, right-click on the needed driver, then choose to Update driver.
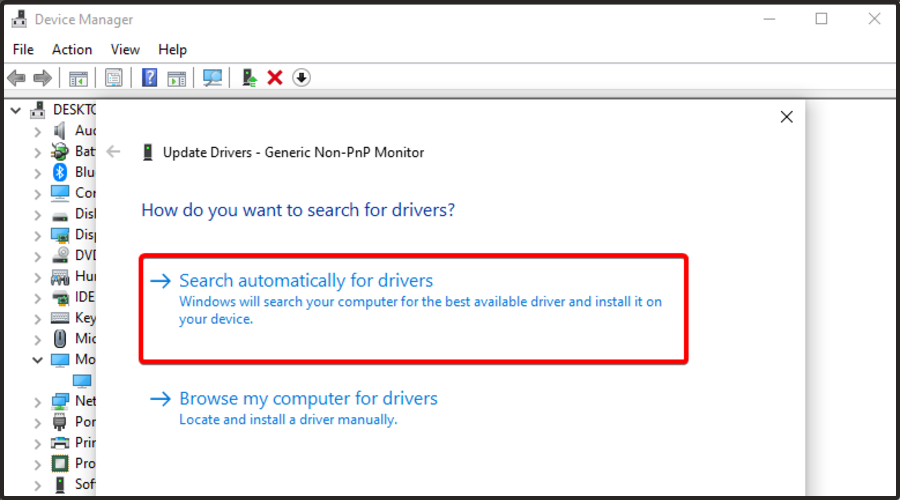
  3. Select to Search automatically for drivers.
  4. Your system will now scan and recommend any available and reliable options.

Keep in mind that updating your graphics drivers will help you to drastically rise Weird West’s FPS and you can use the above steps without any hesitation.

If you’re that kind of person who doesn’t want to consume his/her time, we have an additional solution, that will help you update all of your drivers in no time.

You can try to use a dedicated tool, that will automatically scan for reliable components through its huge database. Then, it will fix or update anything you need.

Plus, A convenient feature to fix corrupt installations or if you otherwise wish to roll back to a previous driver is the Outbyte Driver Updater Backup.

You can find this tool at the top of the scan results page, then select the individual or complete set of drivers to back up.

⇒ Get Outbyte Driver Updater

1.2 Check the CPU and memory utilization

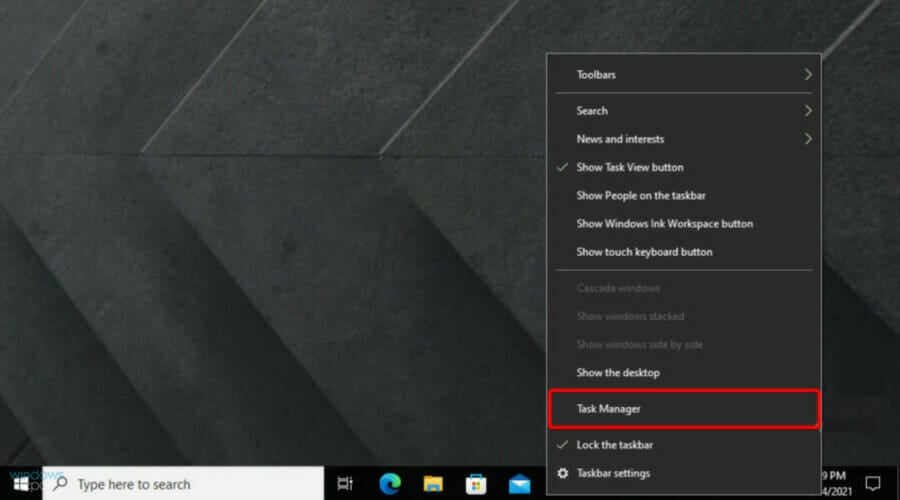
  1. Right-click on your Windows Taskbar, then choose Task Manager.
  2. Click on the Performance tab.
  3. Now, you’ll be able to see the CPU and memory utilization on your computer.

If before starting the game you can see that some process consumes too many resources – turn off the program or simply remove this process from Task Manager.

1.3 Customize the game’s settings

  1. Open Weird West.
  2. Go to the Settings menu.
  3. Choose the graphics settings.
  4. Turn off anti-aliasing and try to lower the setting, responsible for post-processing. Many of them consume a lot of resources and switching them off will greatly enhance the performance.

2. Installation bugs

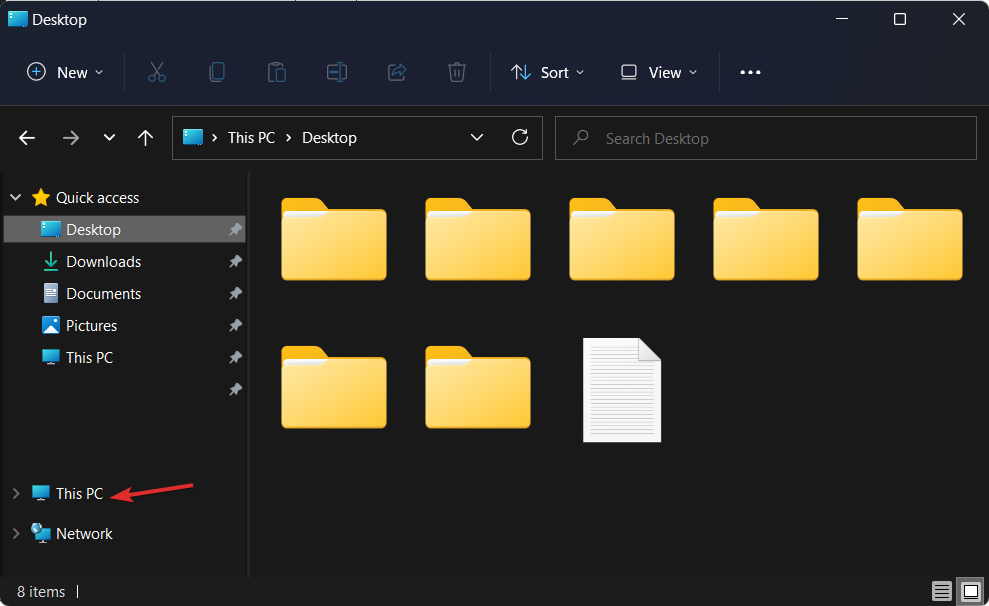
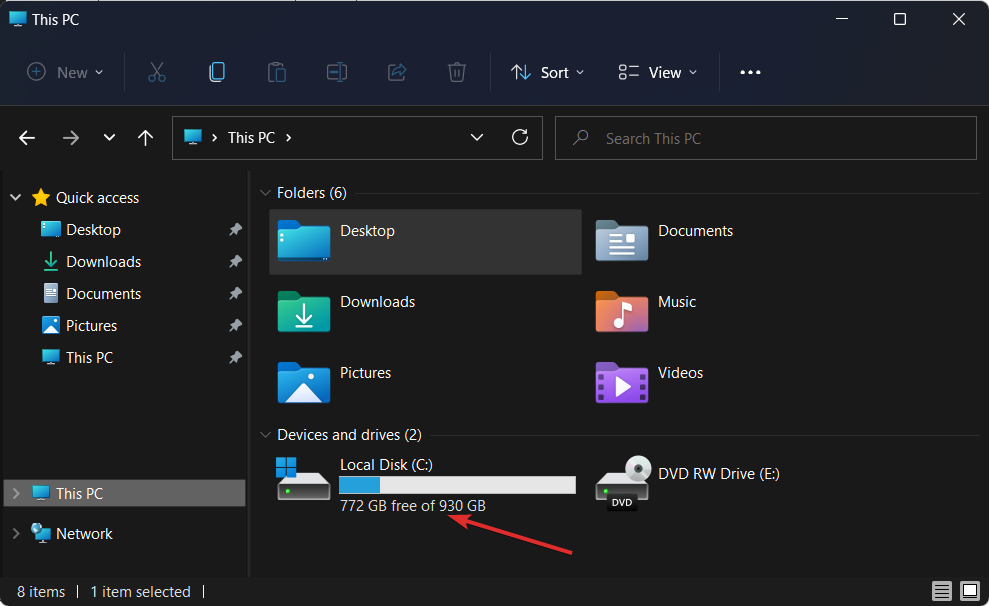
2.1 Check if you have enough space on the HDD

2.1.1 PC
  1. Use the following keyboard shortcut to open Windows Settings: Windows + I.
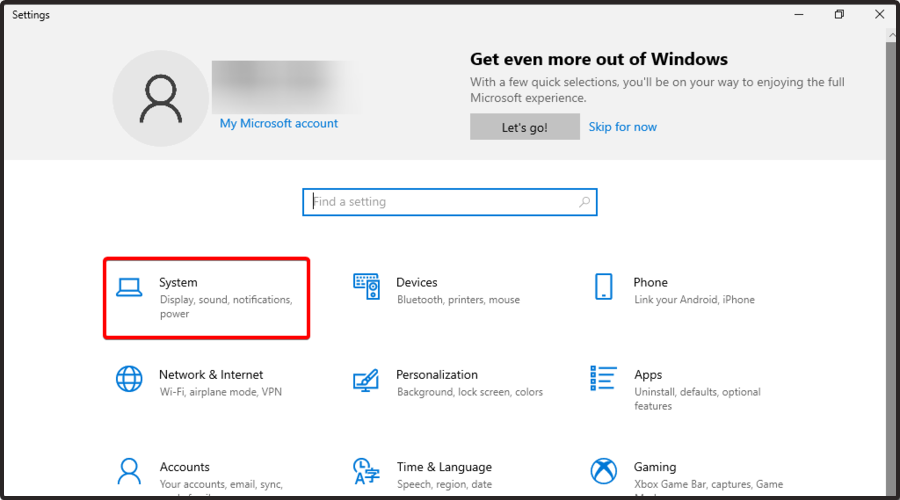
  2. Navigate to System.
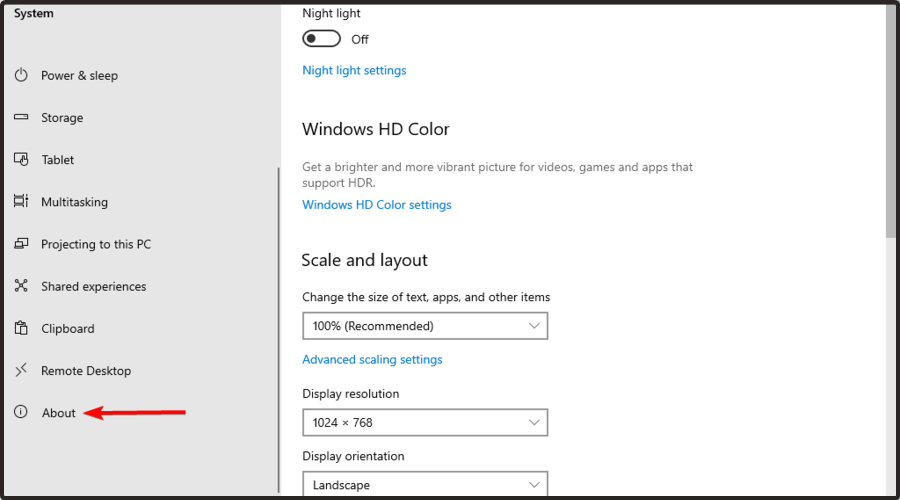
  3. From the left window pane, click on About.
  4. Now, on the right side of the window, you’ll be able to see your device and OS specifications.

The first thing to do is to check if your device meets the minimum installation requirements. Keep in mind that to work in proper terms, you’ll need the declared volume of space, plus 1-2 GB of additional free space on your system drive.

To get the best out of the Weird West experience, you should make sure that you have at least 16 GB of available space.

2.1.2 Consoles

If you’re using a console to play Weird West, you’ll probably need to also check the disk space here. Keep in mind that the process is pretty similar, regardless of the device you’re using (PS or Xbox).

You should open your console’s settings, then go to the Storage section. There, you’ll be able to see how the disk space is distributed and how much free space you have.

3. The game is not starting

Some users reported that the game is not starting and if it’s happening to face the same issue, keep in mind that many launching issues are related to an improper installation.

In this matter, we recommend if there was any error during installation. If not, try to delete the game, then run the installer again.

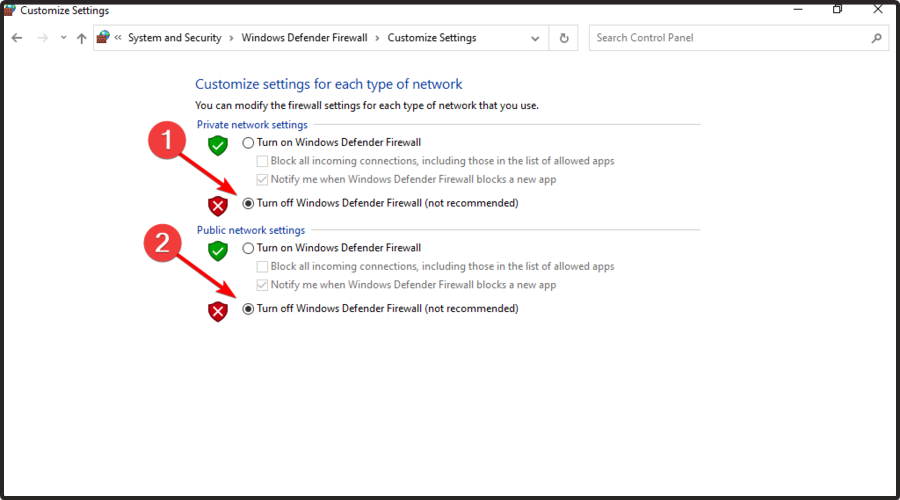
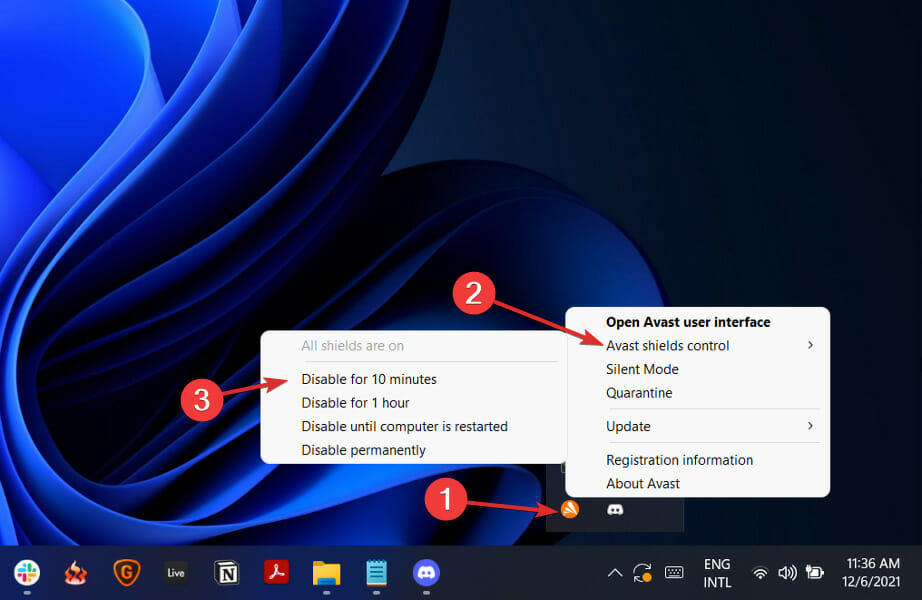
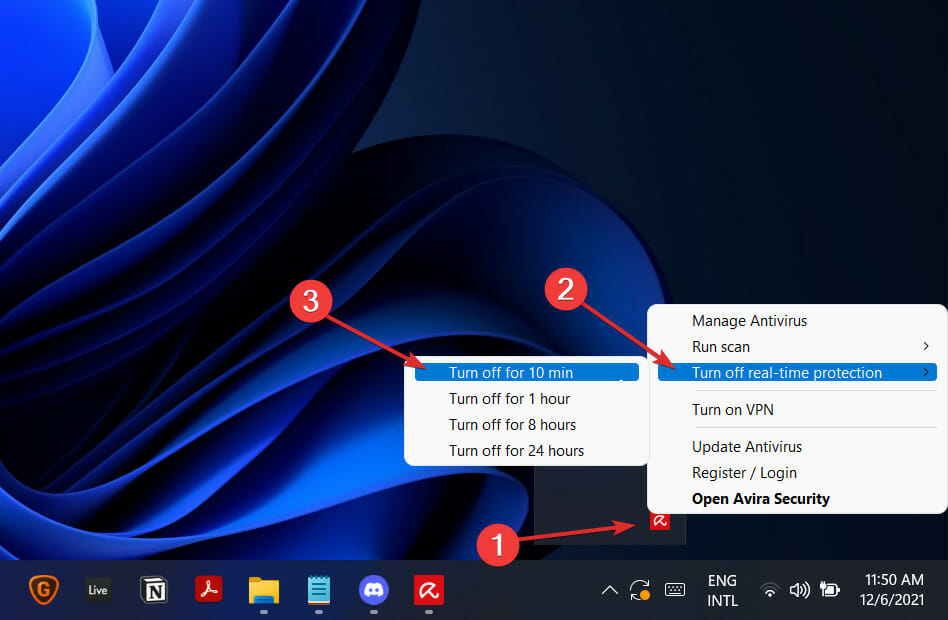
Before starting the installation process we suggest temporarily disabling your antivirus software on your Windows PC. If you don’t know how to perform the needed steps, make sure you verify the ones listed below:

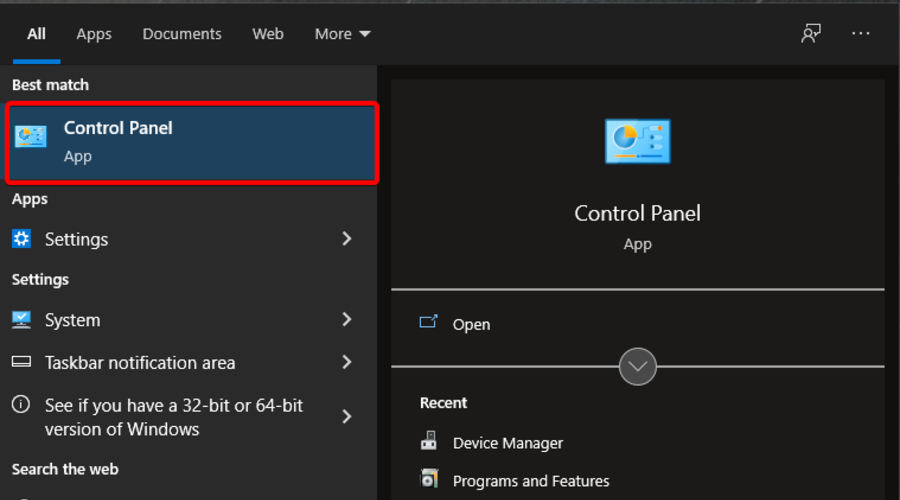
  1. Hit the Windows key, type Control Panel, then click on the first result.
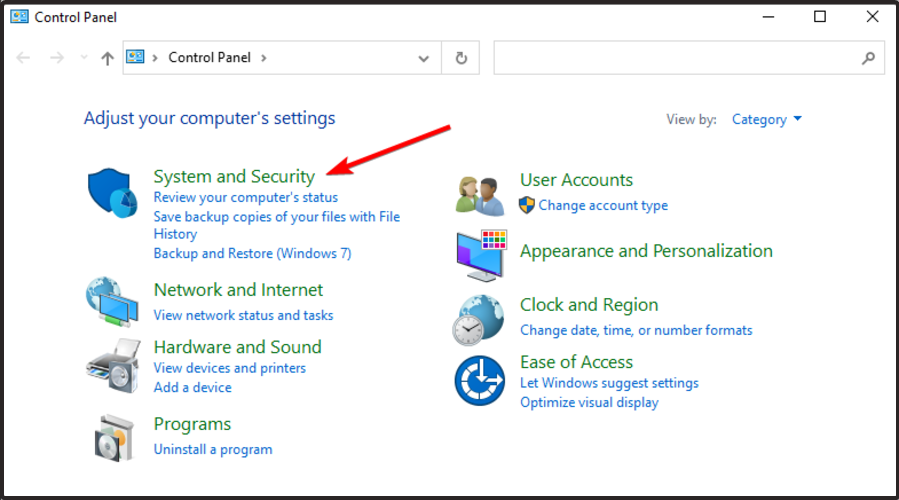
  2. In the opened window, go to System and security.
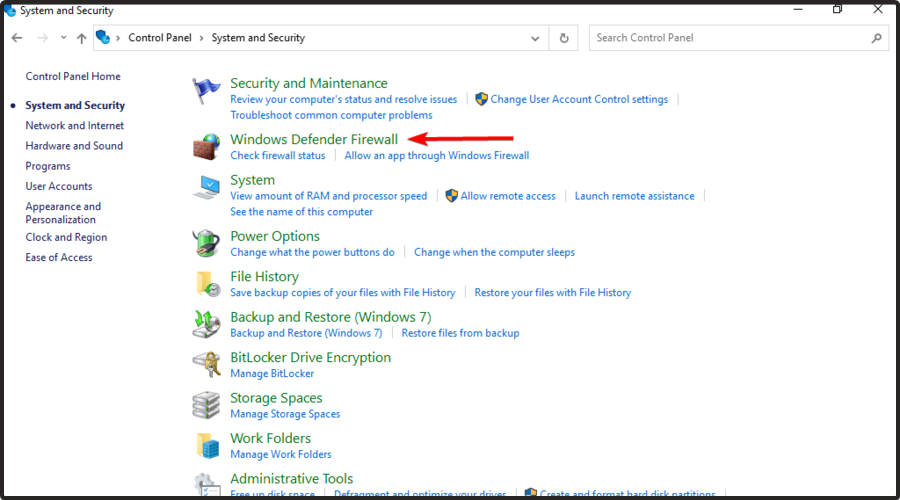
  3. Now, navigate to Windows Defender Firewall.
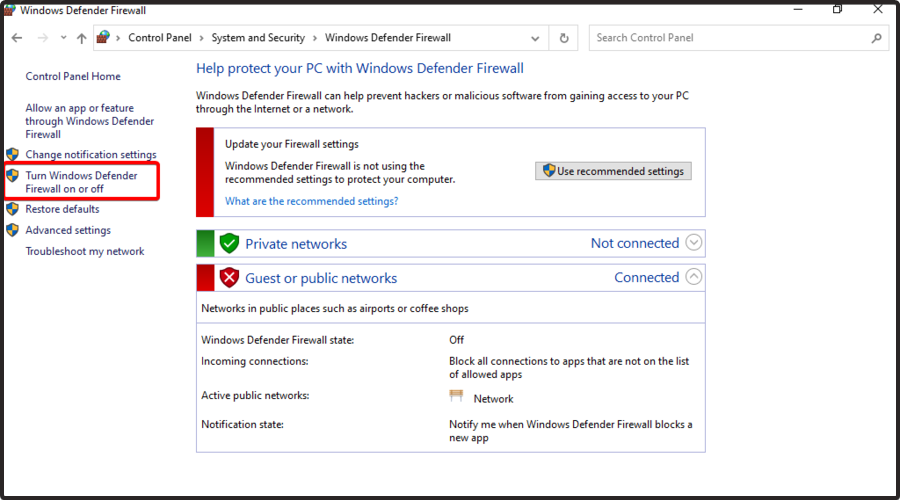
  4. From the left window pane, choose to Turn Windows Defender Firewall on or off.
  5. Make sure you checkmark the two boxes shown directly below.

Because Weird West might not start because of the wrong access privileges, do not forget to run the game with the admin ones.

Last, but not least, if none of the above recommendations worked for you, you’ll probably need to check whether there is enough space on the HDD for installation.

To easily perform this process, make sure you follow the steps listed on the second solution.

4. Saves not working in-game

This one seems to be one of the most annoying Weird West bugs, as users claimed that they were losing all the progress.

By analogy with the installation bugs, in this case, you’ll need to check for free space on HDD, as you might not be able to save in-game experience due to poor disk space.

To check these aspects, make sure you follow the steps listed in our second recommendation.

5. Black of black screen in the Weird West

The most common reason why this issue appears is related to your GPU.

In this case, you should check to see if your video card meets the minimum requirements. To easily do it, just go back to our second solution and follow the dedicated process.

Plus, it would be extremely practical to update your graphics drivers, just like we show you in the first listed solution.

However, if everything seems to be fine with your device/OS specifications and GPU, trying to switch to another window (Alt + Tab), then returning to the game screen might be a useful workaround.

6. Controls are not working in Weird West

Sometimes the in-game controls don’t work due to the simultaneous connection of multiple input devices.

In this manner, you should try disabling the gamepad, or, if for some reason, you have two connected keyboards or mouses, leave only one pair of devices.

In case your gamepad does not work, keep in mind that the games usually officially support only native Xbox controllers.

If your controller is defined in the system differently try to use software that emulates the Xbox gamepad. 

7. No sound in Weird West

  1. Hit the Windows key, type Device Manager, and open the first result.
  2.  Expand the Sound, video, and game controllers section.
  3. Right-click on the driver that you’re using, then choose to Update driver.
  4. Select to Search automatically for drivers.
  5. Your OS will scan and recommend any reliable driver.

Of course, it is easier to use Outbyte Driver Updater, the automatic tool that will support you in updating and fixing and driver you need.

As you can see, many of the Weird West bugs can be easily solved by updating your drivers, as these components are the backbone of a smooth and complete gaming experience.

Some gamers forget to think about it, but you might want to try checking if the sound option is turned On. On your PC, you can easily do it through the Windows settings.

So, this is how you can easily manage the most common Weird West bugs. As you can see, they can be pretty various, but there are also simple fixes to use.

For any additional questions, make sure you leave a comment in the comment section below.

Xbox Game Pass Quests not Showing Up? Fix it now

You’ve prepared to earn redeemable points, but your Xbox Game Pass quest not showing up? Before we explain why let us give those new to Xbox gaming a basic introduction to the service.

These points can be used for gift cards, such as Xbox and Microsoft money, contest entry, and charitable donations.

It’s essentially the same as completing Achievements, only for real money. There are three types of quests: daily, weekly, and monthly.

The most recent quests can be found in the Game Pass menu of your Xbox console or in the Xbox Game Pass mobile app. Every day, new quests are offered.

However, in some cases, the Xbox Game Pass quest not showing up, and this article will help you with that. So, without further ado, let’s get started.

Different types of Xbox Game Pass quests

  • Daily quests: Every day, you will be given two tasks in which you must log in to the Game Pass mobile app on your phone and play a Game Pass game.
    It’s simple, takes a few seconds, and if you’re wondering if using Game Pass on PC via the Xbox (beta) app to start a game works or not… well, it does!
    You should also know that only Xbox Game Pass Ultimate and Game Pass PC subscribers have access to PC Game Pass games
  • Weekly quests: These change and vanish with each week’s reset. The majority of the time, you’ll be asked to complete a number of daily missions, play a certain number of Game Pass games, or launch a specific number of games from the program
  • Monthly quests: There are two types of quests available here; cumulative quests, which will fill up over the weeks as you accomplish daily and weekly tasks, and in-game challenge quests, which are related to specific games in the program

What can I do if Game Pass Quests is not displaying on PC?

1. Sign out and sign back in

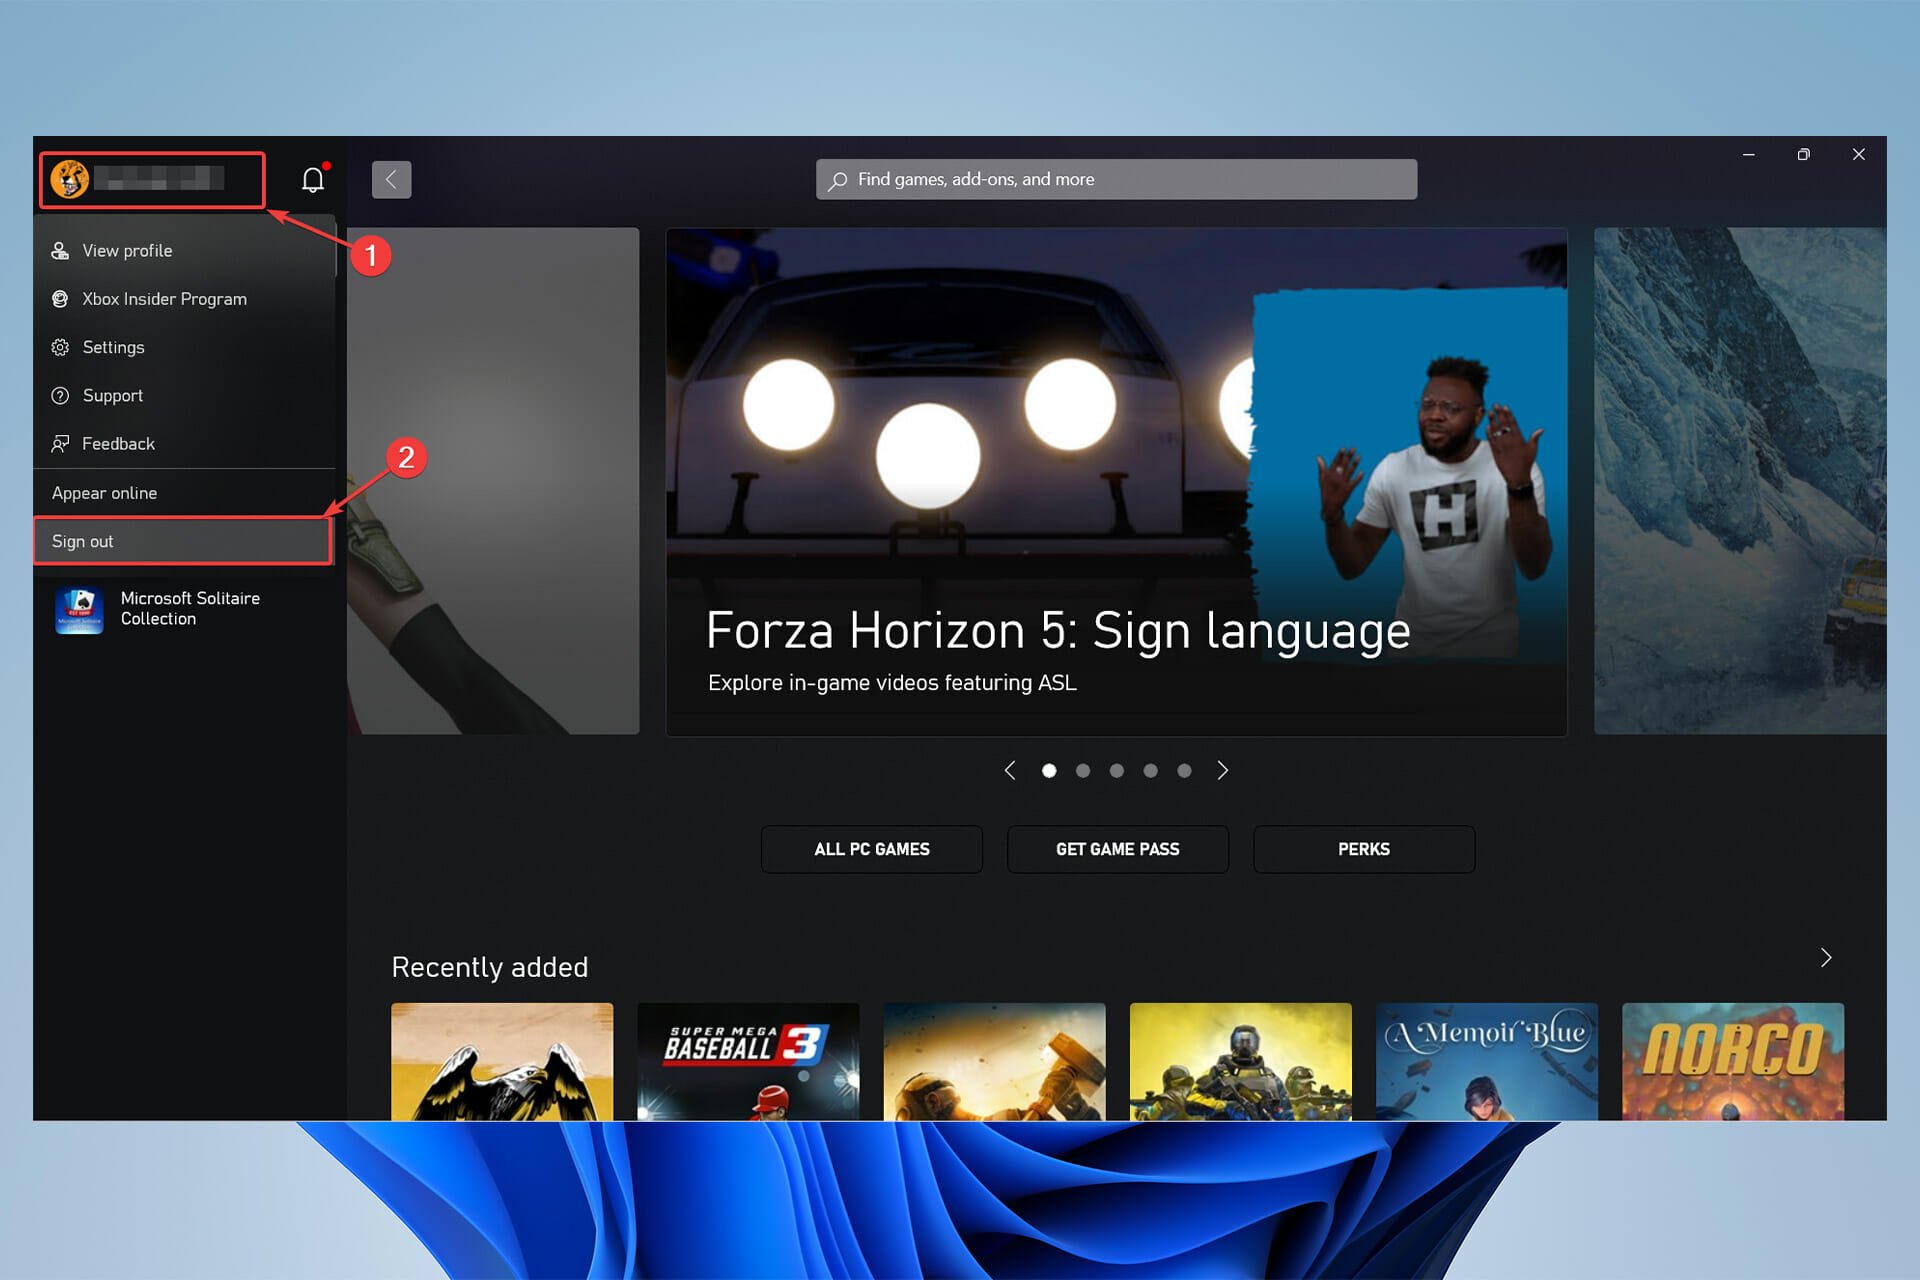
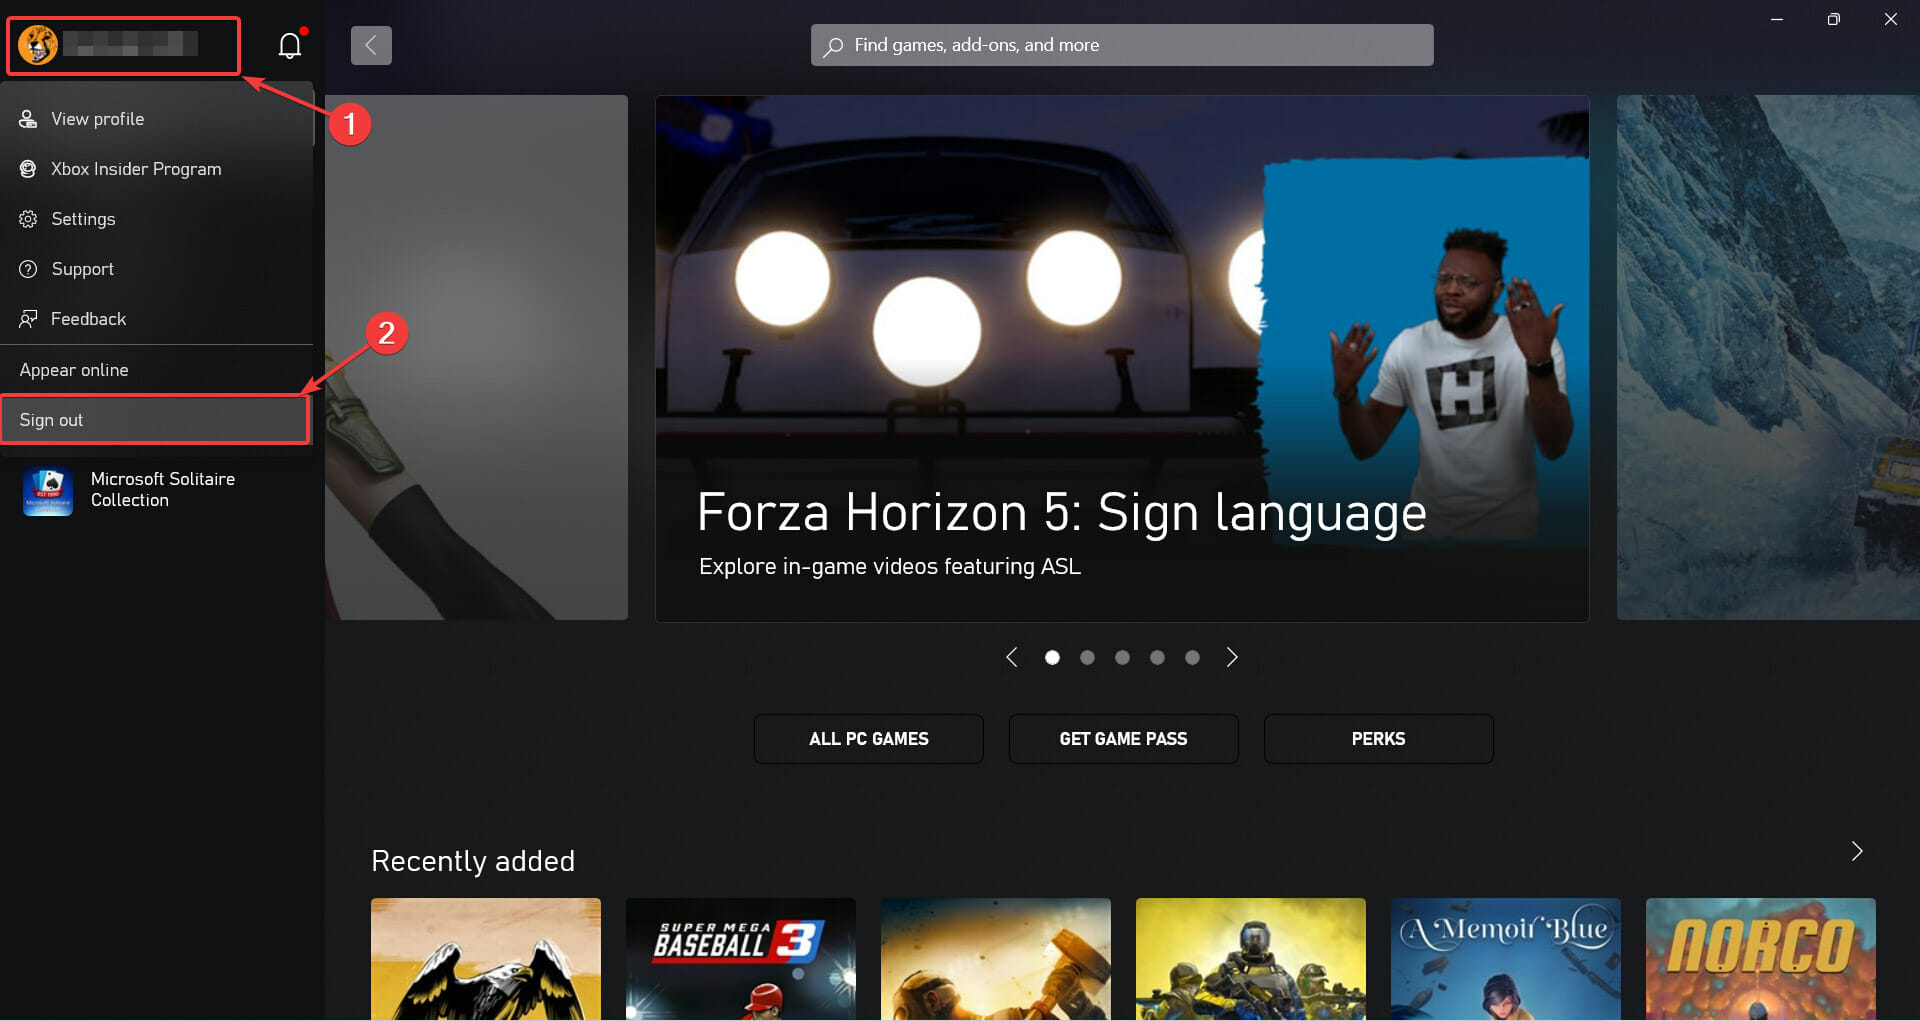
  1. Click on your profile then select the Sign out option.Sign-out
  2. Close your Xbox app on your PC.
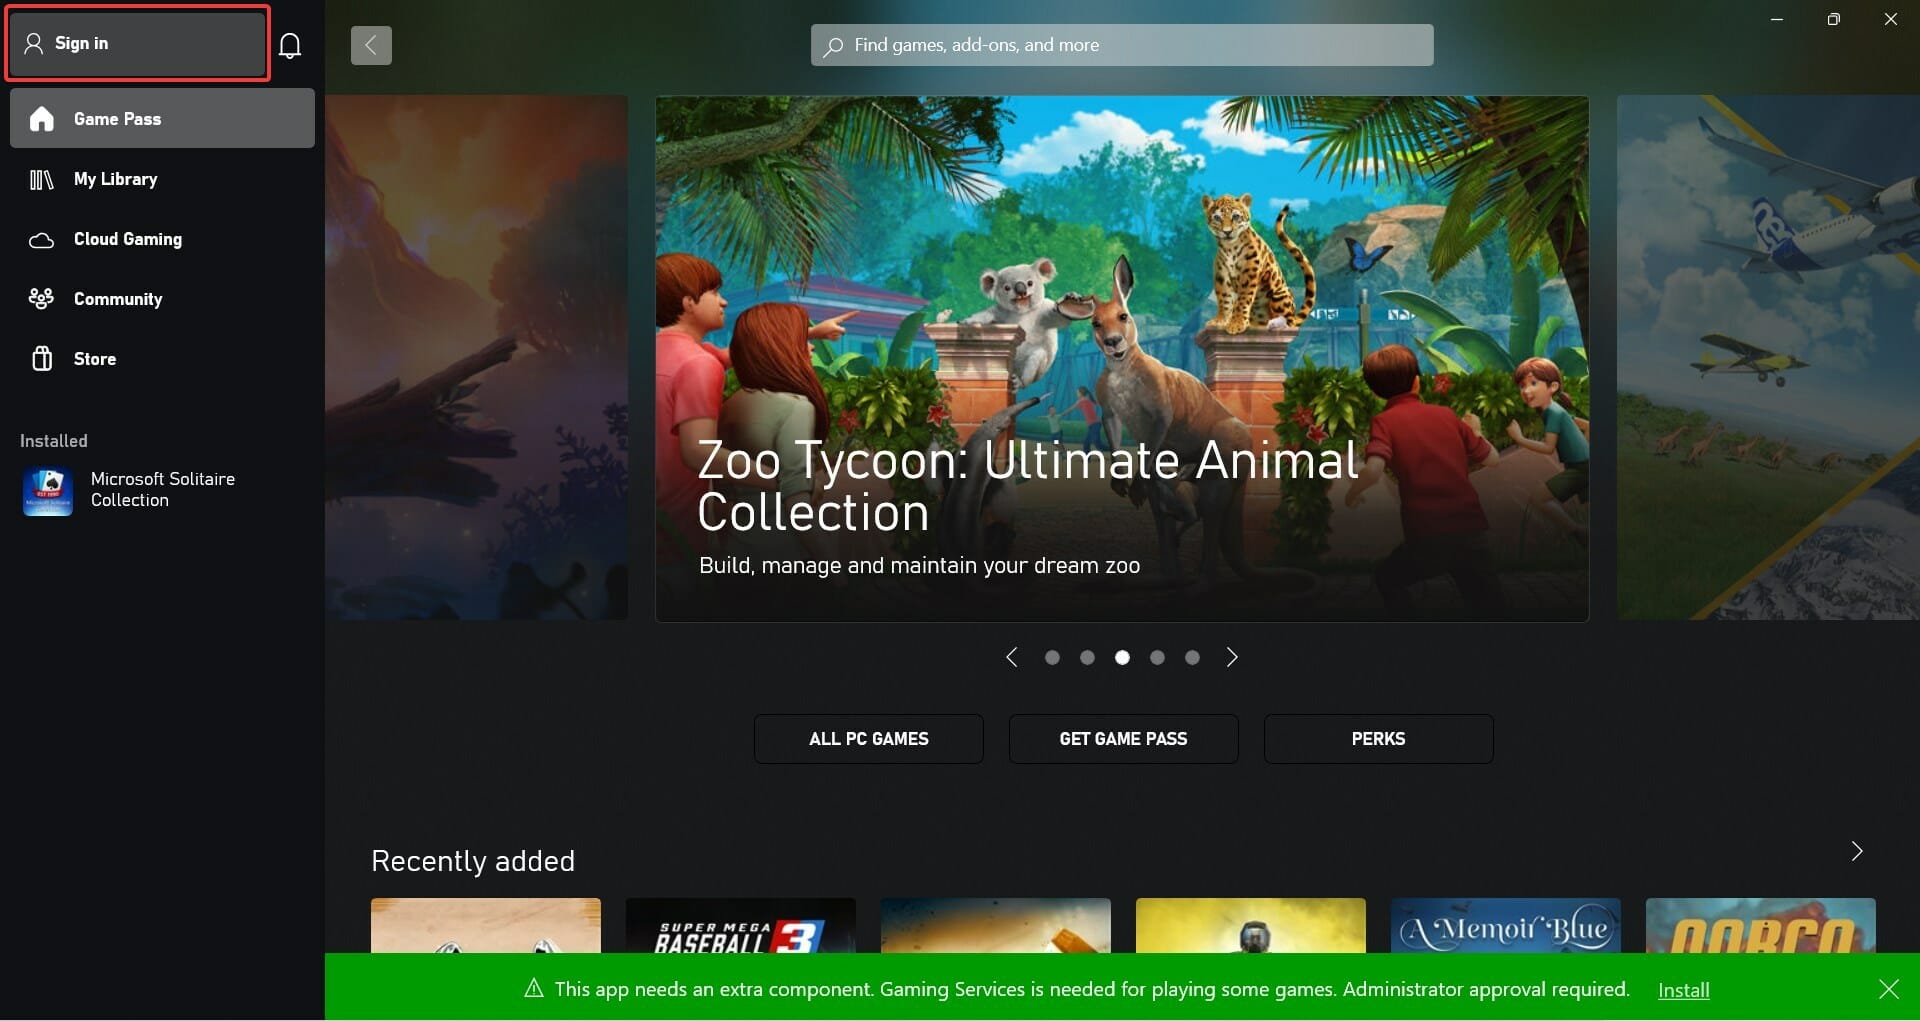
  3. Open the app again and select the Sign in option to sign back in. Sign in

Now check to see if Xbox Game Pass quest not showing up issue has been fixed. If not, proceed to the next method.

2. Try repairing and resetting

  1. Hit the Windows key, type Apps and Features, and open it.
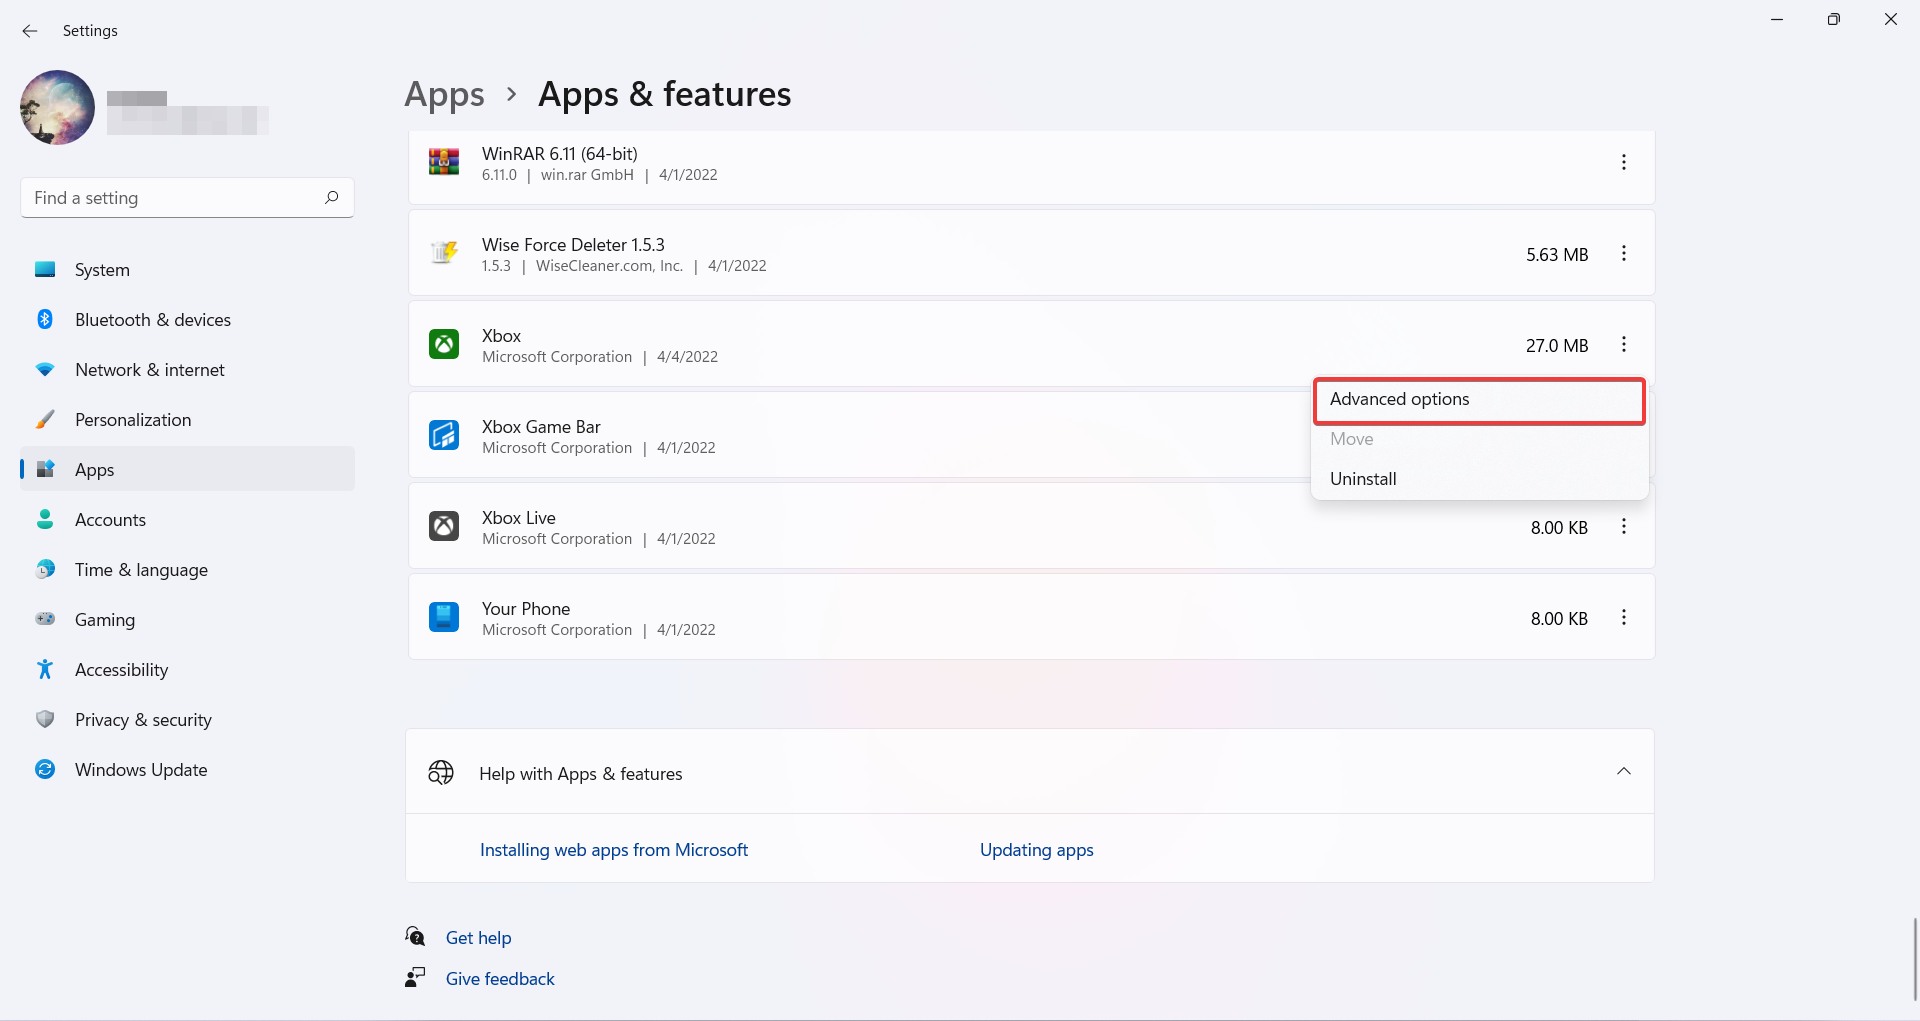
  2. find the Xbox app, click on the 3 dots next to it and choose Advanced options.Xbox advanced options
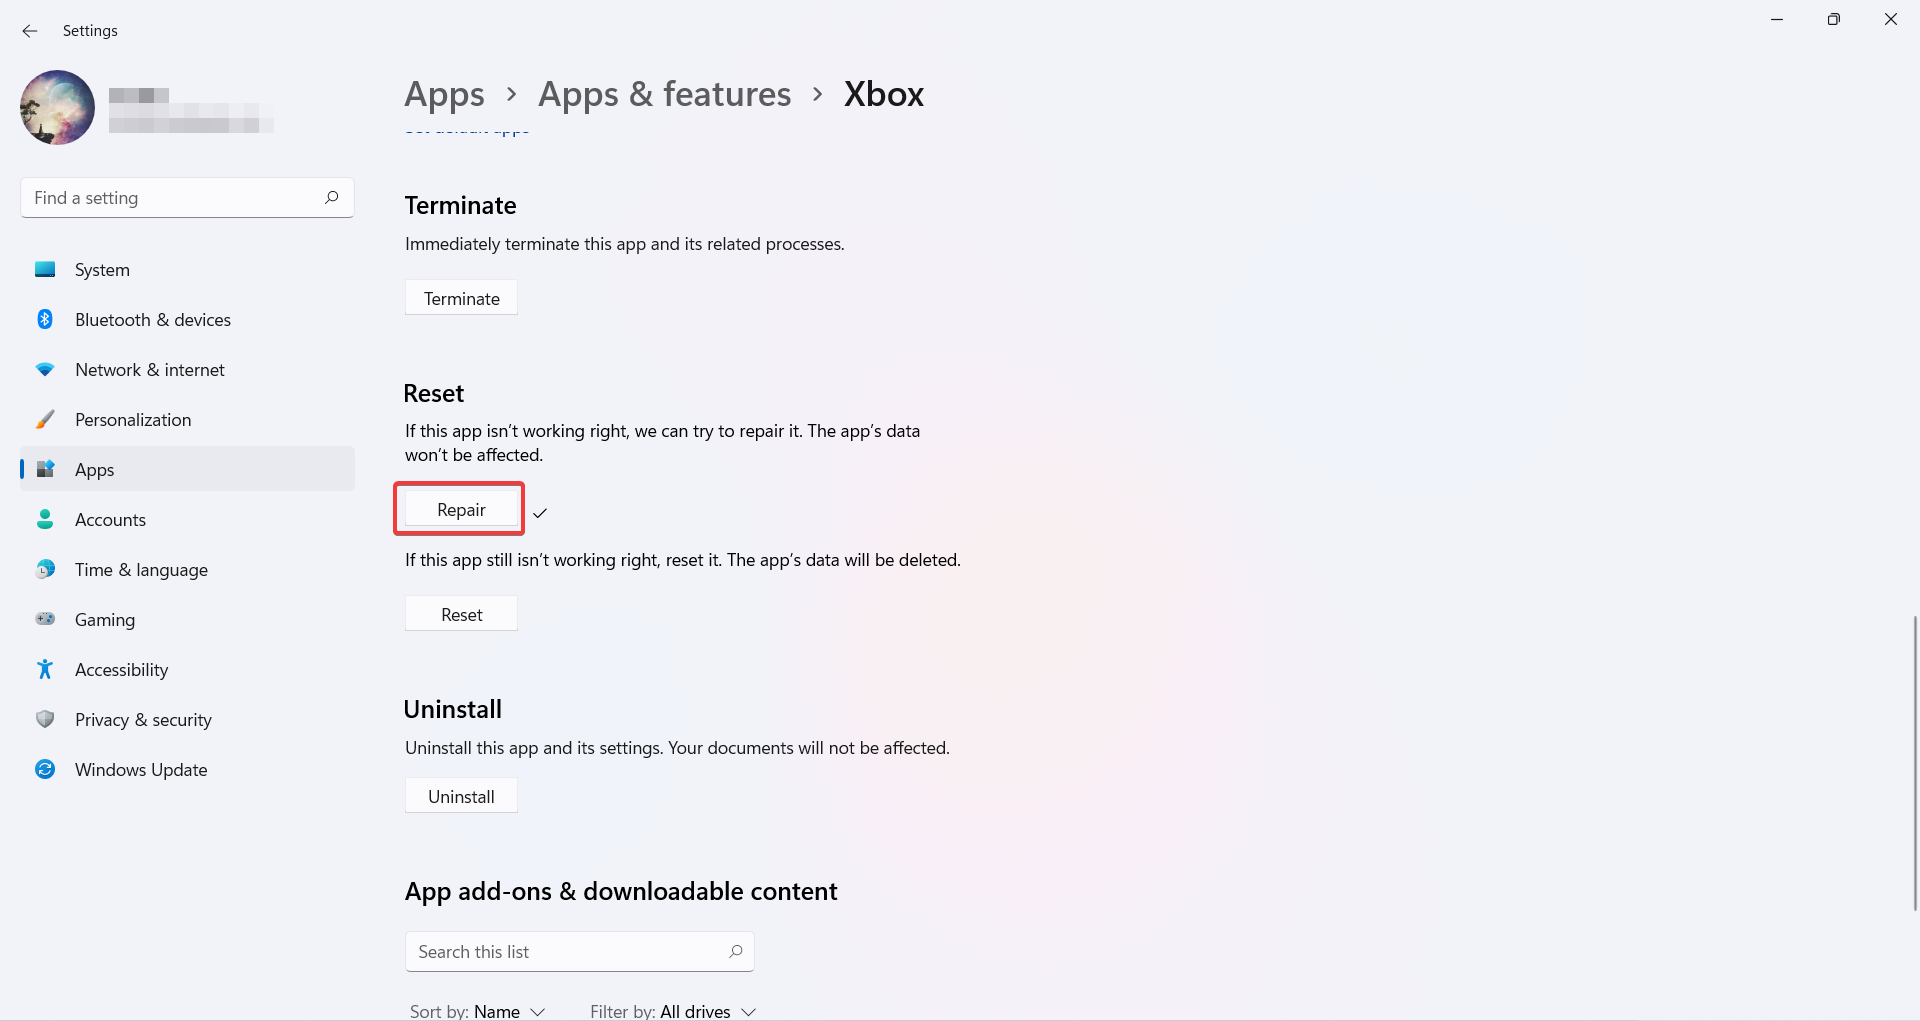
  3. Scroll down and find the button that says Repair, click on it and wait for it to finish. A check icon will appear when the repair is done.Repair Xbox app
  1. If that doesn’t fix it, in the same location right below the Repair option, you can see the Rest button. Click on it and wait for the check to appear. Then launch the app and see if the issue is solved or not.

If Game Pass is still not showing up on your computer, we recommend using a PC repair tool.

Fortect is one of the most effective software in this field that scans your PC and replaces faulty files, repairing errors and improving performance.

⇒ Get Fortect

3. Reinstall the Xbox app

  1. As the 3rd solution, type Apps and Features in the Start menu, and hit Enter.
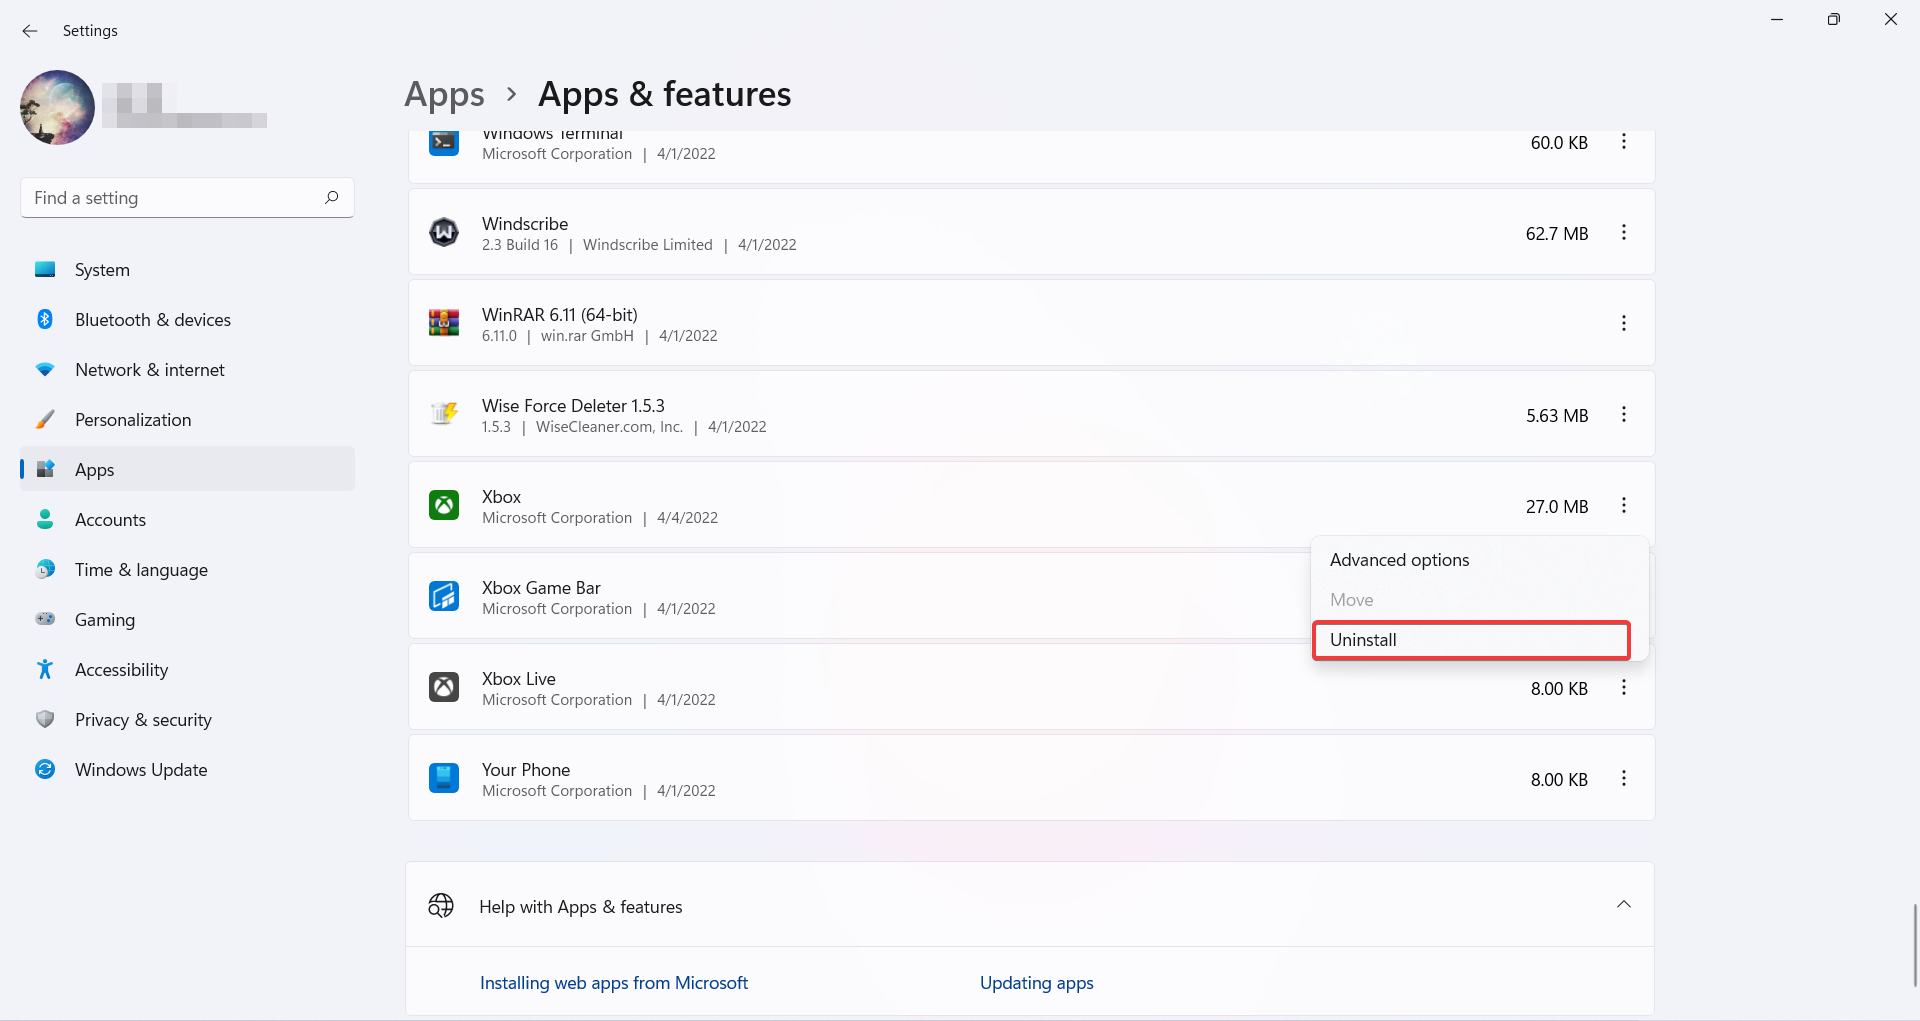
  2. Find the Xbox app, click on the 3 dots, and Uninstall the app. Uninstall Xbox
  3. Then download and install it again from Microsoft Store, Sign in, and see if the quests show up.

4. Have patience

Probably the most simple way to solve the issue is to wait. Many players have reported that after a few days since they subscribed to Game Pass on PC, the quests started to show up.

So in case none of the solutions mentioned above worked, after you subscribe, all you can do is wait for 3 to 5 days and that just may do the trick.

A lot of players have been struggling with Game Pass quests, in particular on the Xbox console, they have this issue where they can not see or find the quests so that they can try to complete them.

Here in this part, you will find all the possible solutions to quickly get rid of this problem.

What can I do if Xbox Game Pass quests isn’t displaying on the Xbox console?

1. Follow this path

  1. First things first, you need to make sure you know where the quests are supposed to be. Sign in to your Xbox account and press the Xbox button in the middle of your controller.
  2. In the dashboard which is the first screen you see when you sign in, you must be able to see the XBOX GAME PASS option. Select it.
  1. At the top of the screen, find the Gaming tab, and in that section, you will be able to see the Game Pass quests on the left-hand side.

If you couldn’t find the options we showed you in the pictures above, continue following the rest of the solutions.

2. Try restarting

  1. Press the Xbox button on your controller. Navigate to the profile section on the top left corner of the dashboard, and press A to select it. 
  2. If you don’t see the Sign-out option, navigate left using your controller and find the profile section.
    There you should be able to see the Sign out option. Select it and turn off your Xbox console.
  3. Turn your console back on, Sign in, go to the Game Pass menu and see if the quests are showing up in the Gaming tab.

Now check to see if Xbox Game Pass quest not showing up issue has been fixed. If not, proceed to the next solution.

3. Install Microsoft Rewards

Make sure you have the Microsoft Rewards app installed on your Xbox console. If you don’t, download and install it from Microsoft Store in your dashboard.

This isn’t necessarily going to fix the issue, but it might and you do have to have it in order to redeem your points and etc anyways.

4. Xbox Game Pass mobile

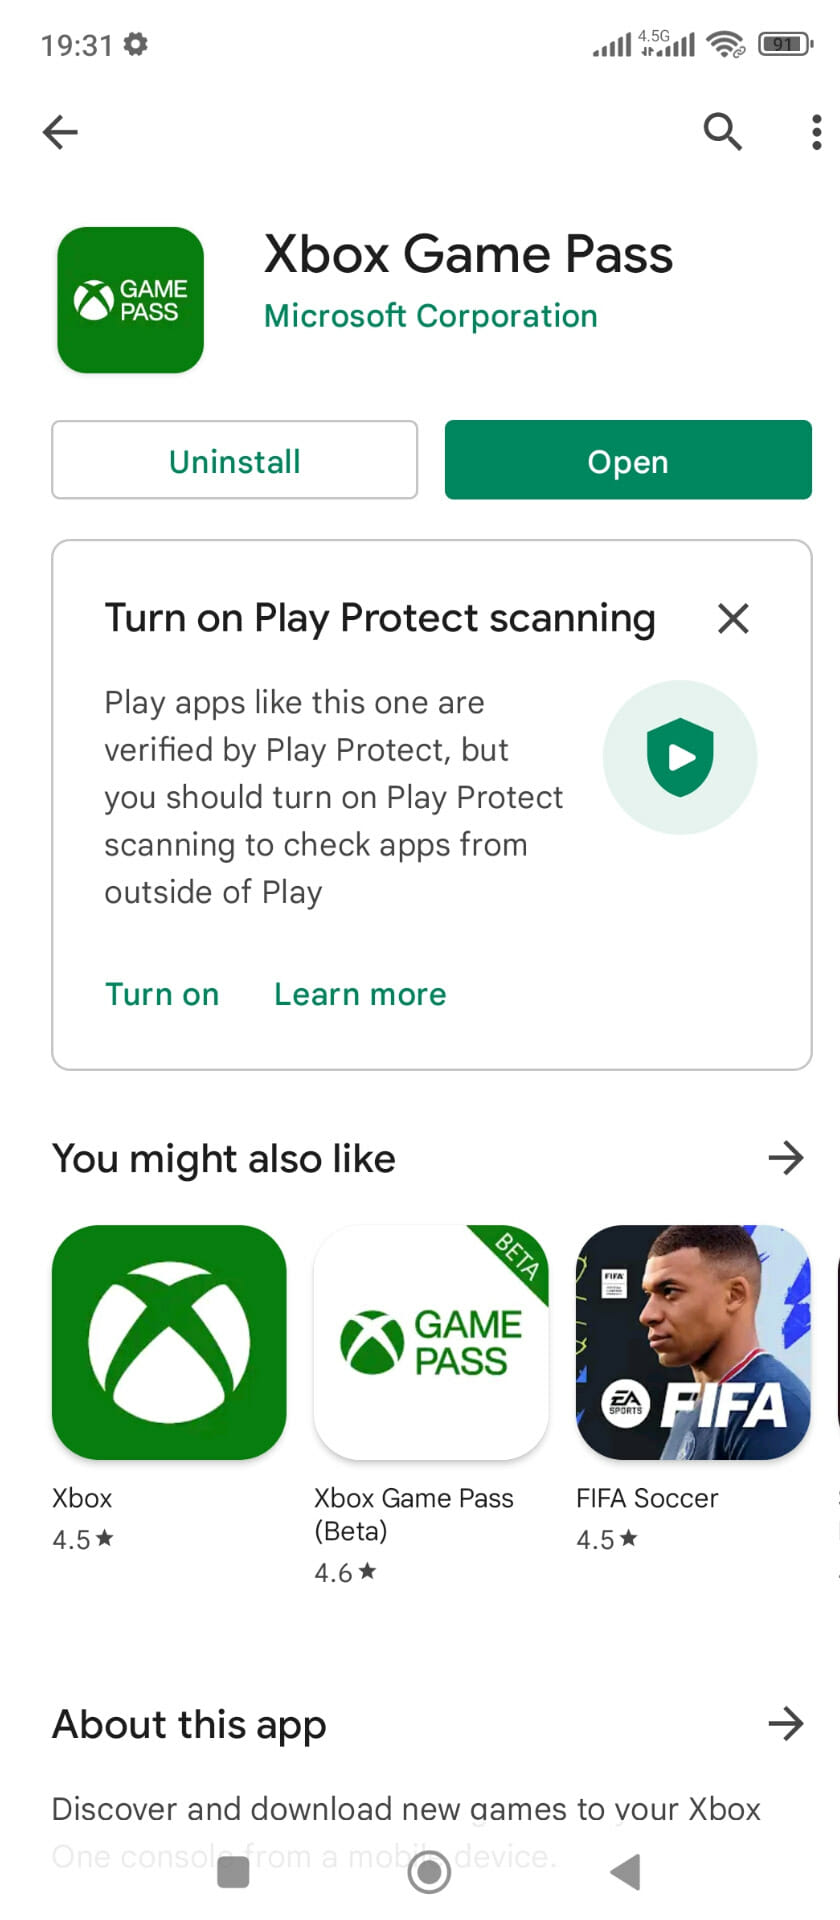
  1. Download and install the Xbox Game Pass app from Google Play or App Store and open it. xbox game pass on phone
  2. Sign in to your Google account and you will be able to see and track the quests there.
  1. If you already have the app and sign in, clear the cache and try again.

5. Wait a few days

According to many users and players, the Game Pass quests will show up in your Xbox Game Pass menu a few days after you subscribe.

Apparently, if you haven’t been able to see the quests by now, the last solution is to wait between 2 to 5 days.

However, some players have also claimed that you can track the quests in the mobile app the moment you subscribe to the Game Pass, so if you’re in a hurry, make sure to follow the solution mentioned before this one.

What is the difference between Xbox Game Pass and PS Now?

Currently, Xbox Game Pass is the better service in 2022, although PS Now could catch up with certain upgrades.

The quality of its library, the speed of its first-party games appear, and Microsoft’s commitment to making Game Pass a huge success through cloud gaming, collaborations, and sales are all factors that favor Microsoft.

PS Now, on the other hand, has been improving, albeit more slowly and quietly. Sony has added new movies to its collection, reduced the price, and added downloads to complement its streaming services.

It will do even better if it can balance out its inventory of older titles with some of the most recent first- and third-party offers.

With Google and even Amazon seeking a piece of the video gaming pie, the winner of the subscription war may well determine the next-generation console battle.

The Xbox Game Pass is the best gaming offer available. You’ve definitely heard that statement a million times before, but it’s worth repeating.

No other subscription comes close to matching Microsoft’s gaming fiesta in terms of sheer value, which is why Sony is rumored to be working on its own version of Game Pass.

Xbox Game Pass has been a godsend to indie developers in particular. A quick glance at the Game Pass library reveals a slew of independently made titles, and it’s credited with launching plenty of recent hits. 

By following each of the steps we have provided in our guide concerning the Xbox Game Pass quests, you will be able to solve any issues you encounter on both Xbox and PC.

If you’re experiencing issues while trying to sign in to your Xbox account in Windows 11, take a look at our article.

Which solution worked for you? Let us know in the comments area below.

Could not find this item error when deleting a file [FIX]

Are you getting a Could not find this item error when trying to delete a folder or file? This Windows error has an Item Not Found window that states: Could not find this item: This is no longer located in (path). Verify the item’s location and try again.

This can happen as a consequence of an invalid file, invalid folder title, or high RAM usage. These are a few ways you can fix the error in Windows and delete the required folder or file.

How to delete a file that says could not find this item

  1. Use a dedicated tool
  2. Close Taskbar Programs to Free up RAM
  3. Move the file or folder into a new, temporary directory
  4. Edit the folder/file title
  5. Delete the folder or file with Command Prompt

1. Use a dedicated tool

Sometimes, Windows has conflicting information about the same file. One says that a file was deleted and the location is empty, while another is showing an icon and the name of the file and asking for it to be deleted.

This is the exact moment when the operating system is thinking How could I delete something that isn’t there“?

And here we are, facing strange errors such as this. A quick solution would be to perform a registry scan and fix any issues found. We also recommend performing a custom scan as well and ticking as many items from Windows Explorer as possible.

For a quick and safe process, we recommend you use CCleaner. It is a lightweight PC cleaner utility that detects errors within your system and deletes all unnecessary files.

The software can scan your whole PC and also clean your browser. Let it run the scans and perform the fixes. Reboot your computer and see if the issue is fixed. 

Either the file will be gone from the system already, or there won’t be an error when trying to delete it again.

CCleaner can also help you clean your browser, remove junk files, uninstall bloatware, and do many other optimization-oriented actions that will increase PC performance.

CCleaner

Use this comprehensive utility to clean and optimize your PC for greater speed and no errors.
Free trial Visit website

2. Close Taskbar Programs to Free up RAM

First, you should free up RAM before deleting the folder or file. Close all software open on your taskbar.

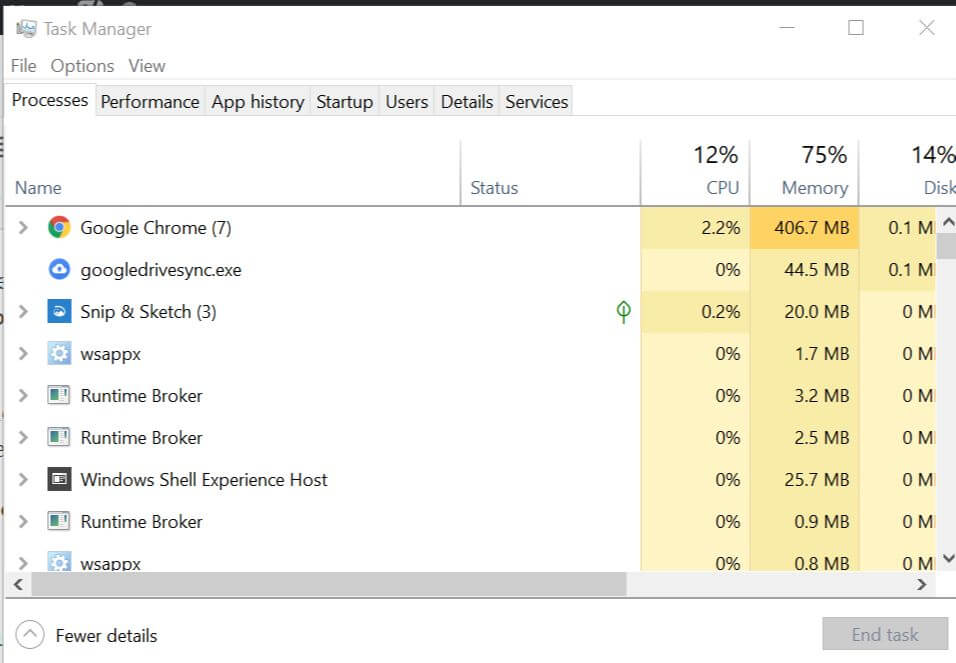
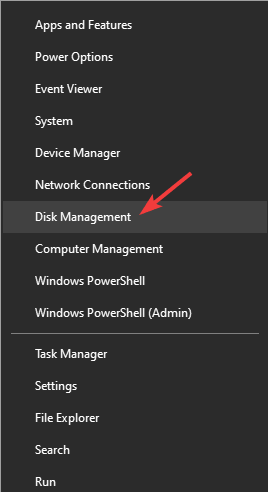
In addition, close background programs with the Task Manager by pressing the Win key + X hotkey and selecting Task Manager from the menu.

Task manager Process tab

Select software listed under Background processes and press their End task buttons. This Windows Report article includes more tips for how you can free up RAM.

3. Move the file or folder into a new, temporary directory

Moving the subfolder or file to a new directory might also do the trick. Set up a new folder outside the directory the subfolder or file is in by pressing the New folder button in File Explorer.

Then, drag and drop the subfolder or file into the new, temporary folder and try deleting it again.

4. Edit the folder/file title

Long folder or file titles with spaces and symbols can cause this error. so try changing the title to something shorter with no spaces or symbols.

You can rename folders and files with the Command Prompt as follows:

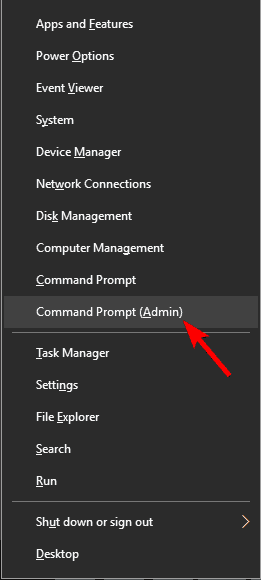
  • Press the Win key + X hotkey and select Command Prompt (Admin) from the menu.
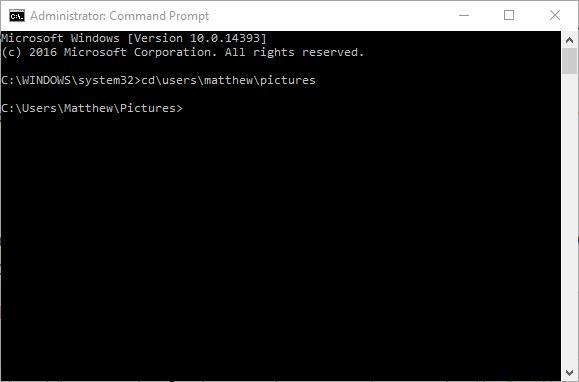
  • Open the folder you need to delete or one that contains the file to erase in Command Prompt. You can do that by entering ‘cd’ followed by the full folder path as shown in the snapshot below.
cd command
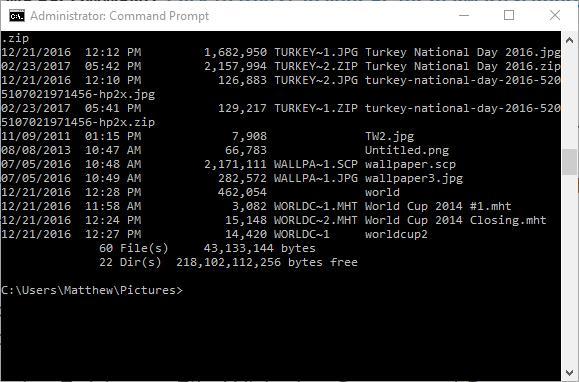
  • Next, type ‘dir /x’ in the Command Prompt and press Enter. That will show you all the directory content with the 8.3 formats as below.
  • Rename the file or folder title by entering ‘ren <8.3 file or folder title> <new file or folder title>’ in the Command Prompt as below with no spaces. The 8.3 file or folder title would be something like WORLDC~1.BMP.
  • Close Command Prompt, open File Explorer and erase the folder or file from there.

5. Delete the folder or file with Command Prompt

  • If you still can’t delete the file or folder in File Explorer, erase it with the Command Prompt by pressing the Win key + X keyboard shortcut and selecting Command Prompt (Admin) to open the CP.
  • Open the directory path with cd as before.
  • Input ‘dir /x’ to open the directory with DOC 8.3 folder and file titles.
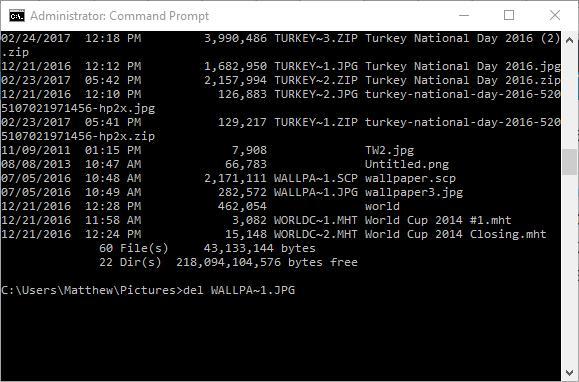
  • Now input ‘del’ and the 8.3 file title as shown in the shot below. Press the Enter key to delete the file or folder.
  • Alternatively, input ‘rmdir’ and the 8.3 directory title to delete a folder.

That’s how you can fix the Could not find this item error and delete the blocked file or folder.

Editing or deleting the folder or file with the Command Prompt will usually do the trick. Check out our article on how you can fix Windows file delete issues for more information.

This issue is most of the time caused by minor problems within your system that are certainly not irreversible.

Registry issues for example may happen to any Windows user due to the fact that we frequently install and uninstall different applications.

Tell us which of the above-mentioned solutions you decided to apply and how your experience went. If you have any questions or recommendations, feel free to use the comment section below.

If you need to solve other problems with explorer, check out our guides from the File Explorer section on the site.

A lot of problems have been solved and collected in various articles found in the fixing Windows 10 section.

How to fix the FPS drops when moving mouse error

Users have been reporting their FPS drops when moving their mouse, and they can’t seem to find the reason why it happens so.

The causes can vary from outdated drivers to a bug inside the mouse software or lag caused by Xbox Game Bar.

Follow along as we have put together a comprehensive list of solutions you can apply to fix the FPS drops when moving mouse error, right after we see in more detail what FPS means.

What does FPS mean?

Frames Per Second, also known as FPS, is the rate at which back-to-back images known as frames appear in a display and combine to create moving imagery. Note that they are fully customizable in Windows 11.

The video information that we watch on a regular basis isn’t truly moving at all. In reality, these are still photos that are played one after the other one after the other.

If a video is shot at 24 frames per second (the standard frame rate for video transmission on the internet), this indicates that 24 separate frames are played back in a second throughout the duration of it.

Regarding the frame rate at which you should shoot videos, it is dependent on the type of which you are attempting to produce. For your normal social media posts, the most popular frame rates accessible on smartphones are 30 and 60 frames per second.

Higher frame rates will result in smoother film, as well as the ability to slow down footage while editing it in a video editor without experiencing any jitters or shaking. This is most commonly utilized in the event of a slow-motion video.

Any frame rate greater than 60 frames per second (fps) can be utilized for a slo-mo; certain smartphones include a built-in slo-mo mode that shoots at 240 frames per second, which allows you to slow the video down ten times later using a video editor.

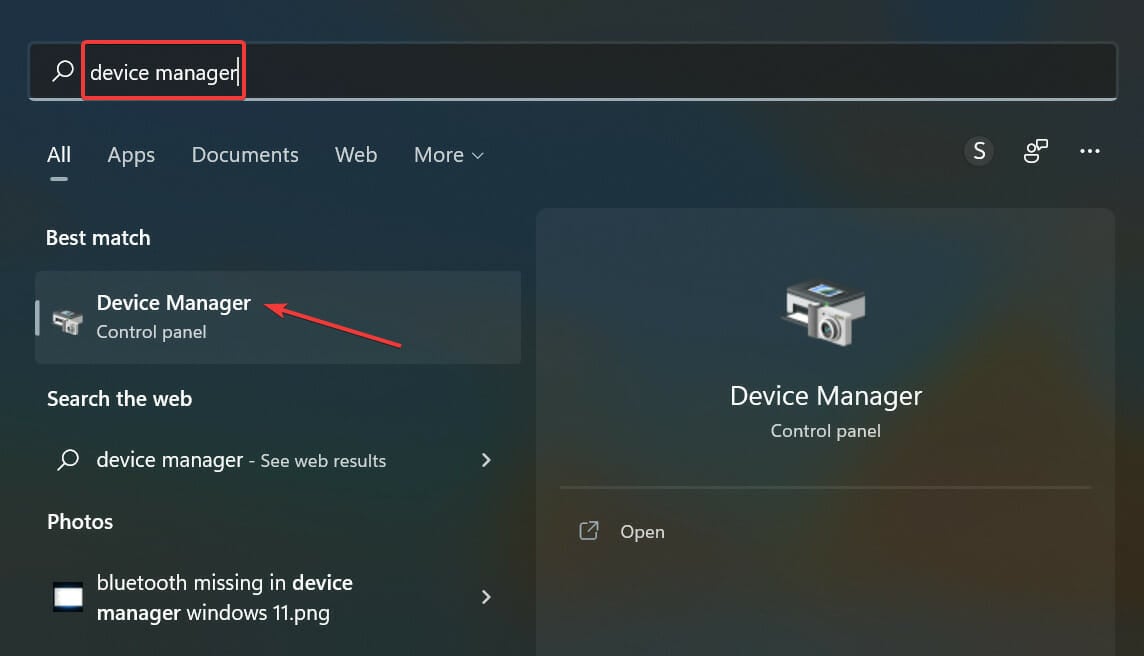
What can I do if FPS drops when moving the mouse?

1. Update your mouse driver

  1. Open Device Manager by right-clicking on the Start button and clicking the option with its name.device-man fps drops when moving mouse
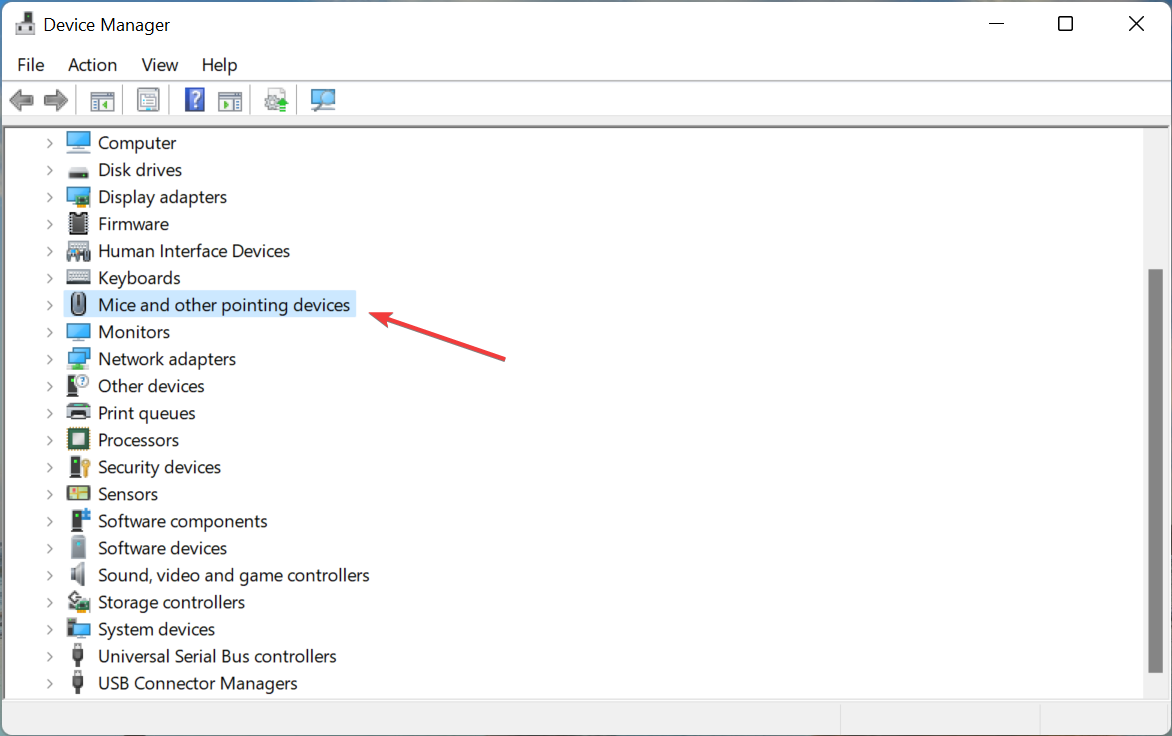
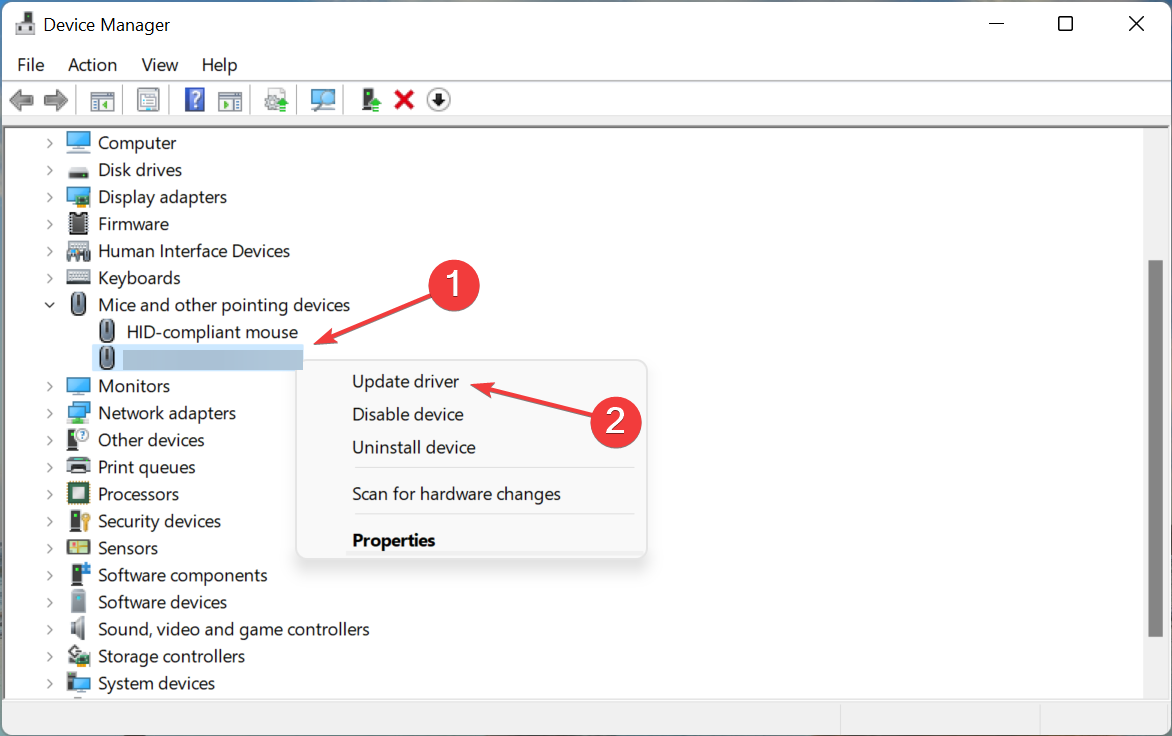
  2. Expand the Mice and other pointing devices section and right-click on the mouse driver to choose Update driver.update-mouse fps drops when moving mouse

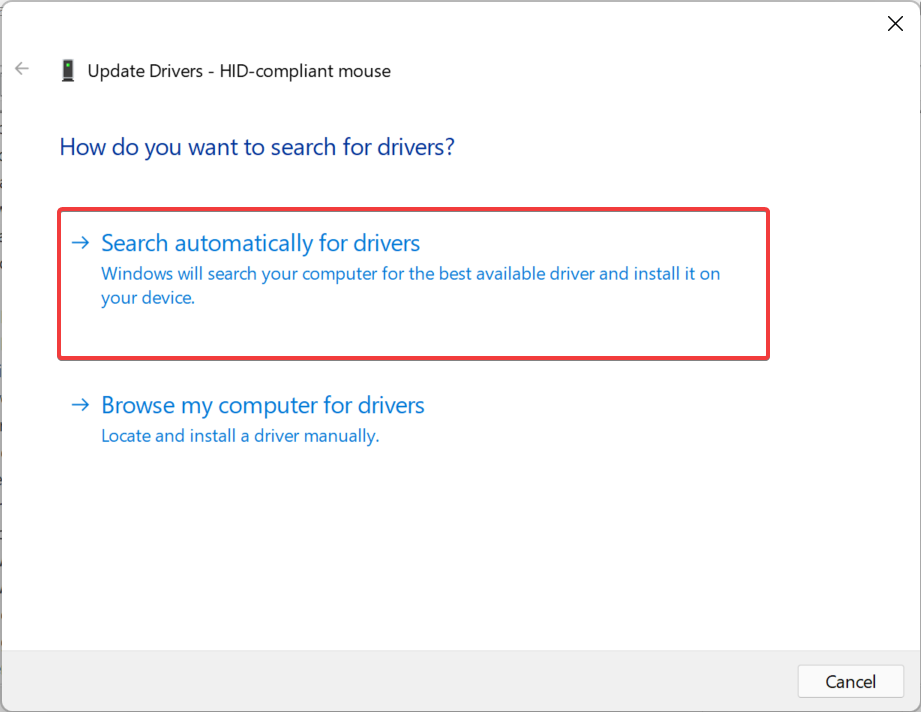
Alternatively, you can opt for a third-party driver management tool that automatically updates, replaces, and fixes any driver from your computer.

Thus allowing you to avoid future driver-related errors such as the FPS drops when moving the mouse issue we are discussing today. By using Fortect Driver Updater, you will minimize the number of problems you will encounter.

⇒ Get Fortect Driver Updater

2. Reinstall your mouse software and driver

  1. Access Device Manager from the Start menu.device-man fps drops when moving mouse
  2. Expand the Mice and other pointing devices section then right-click on the mouse driver. Here choose Uninstall device. Make sure to also reinstall your mouse software then restart your computer to apply the changes made. The FPS drops when moving mouse error should be gone.uninstall-mouse fps drops when moving mouse

3. Disable Game DVR

  1. Open Settings and go to the Gaming section from the left panel, followed by Xbox Game Bar from the right side.game-bar fps drops when moving mouse
  2. Here, turn off the Open Xbox Game Bar using this button on a controller option. To completely fix the FPS drops when moving mouse error, we need to do one more thing.off-gamebar fps drops when moving mouse
  3. Next, go to Apps followed by Apps and features.apps-apps&features fps drops when moving mouse
  4. Enter Xbox in the search bar and select Advanced options from the three-dot menu.game-bar-advanced fps drops when moving mouse
  5. Select the Never option under the Background apps permissions section and click the Terminate button under the Terminate section located below the former part.never-bg fps drops when moving mouse

For more information and more solutions to the FPS drops when moving mouse error, take a look at how to efficiently fix a lagging mouse in Windows 10 and 11.


Alternatively, check out how to solve erratic mouse movements in Windows 10 and see if the methods in there can help you as well.

Leave us a comment in the selection below and tell us what you think about our posts. Thanks for reading!

Fix Windows 10/11 Error 0x800F0955 to Proceed With Updates

Are you looking for applicable workarounds to resolve Windows 10 error 0x800F0955? Look no further with Windows Report as we’ve got you covered.

Recently, Microsoft released Windows 10 v1809. However, users are unable to install the update on their Windows PC. For some users, the update rolls back during installation, and for some, the updates do not appear in the Windows updates history. “

Nevertheless, the failed Windows installation error results in the error prompt “Error on installation – Code 0x800f0955.

On the other hand, Windows 10 error 0x800F0955 is caused by several reasons such as bloated Windows registry keys, system file corruption, incomplete Windows OS installation, outdated system drivers, and more.

How can I fix Windows 10 error 0x800F0955?

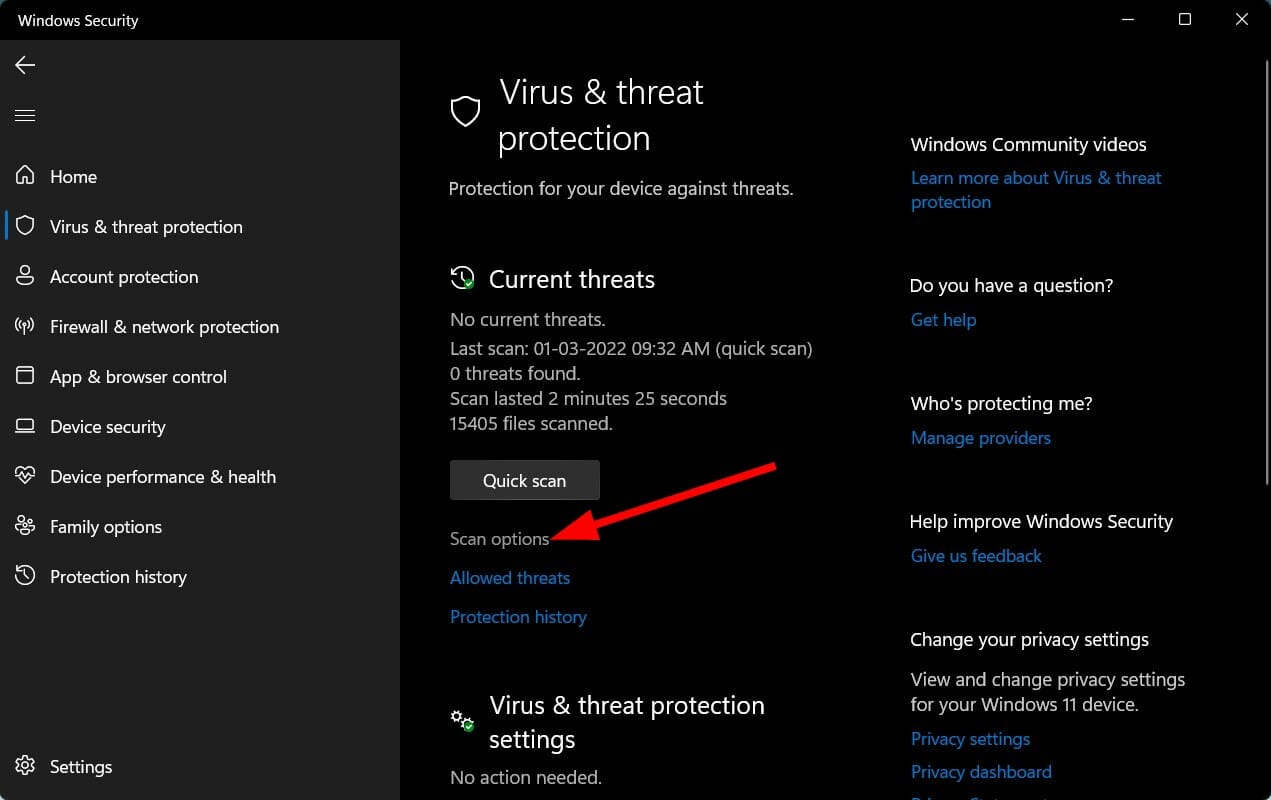
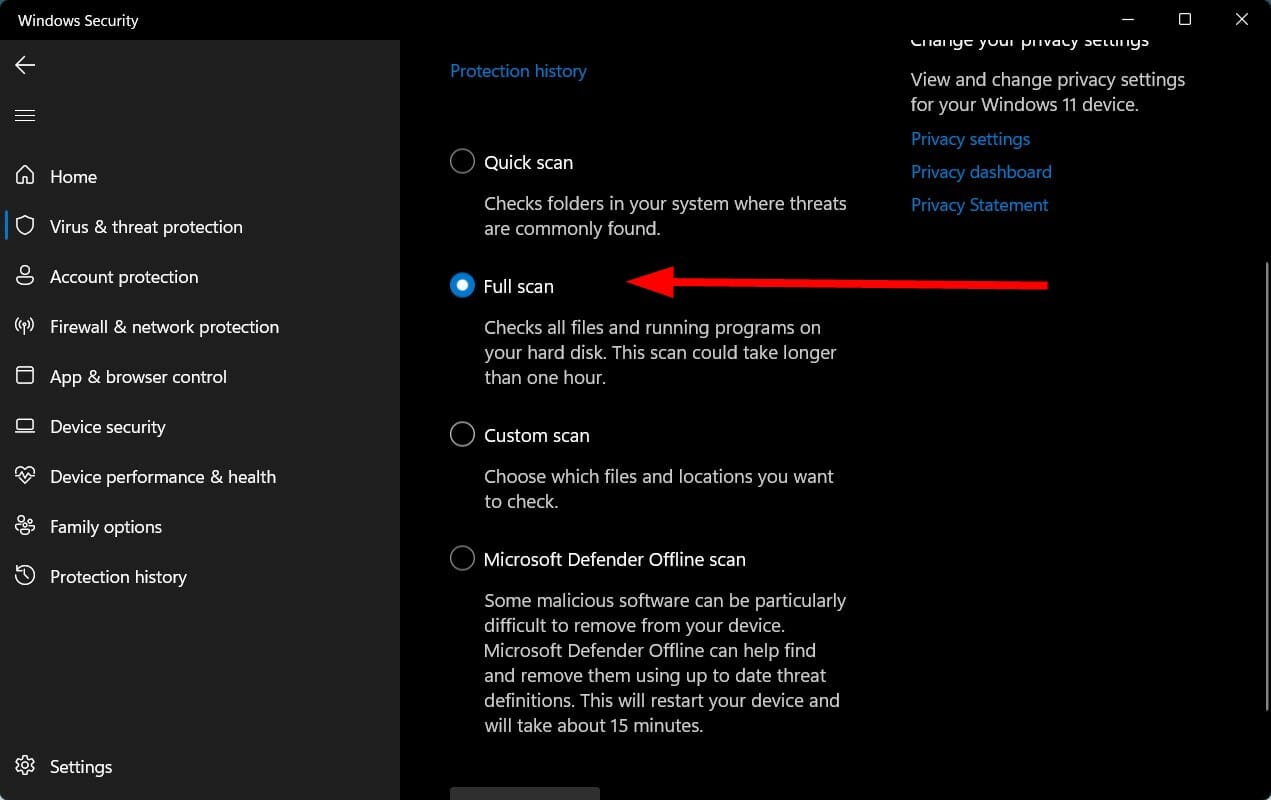
1. Run a full system scan

If you experienced Windows 10 error 0x800F0955 during an update, it is very likely that the error is caused by system file corruption.

While there are several ways viruses and malware can infiltrate your PC, it is highly recommended that you perform a full system scan in order to remove the malware and viruses responsible for the system file corruption.

With the MalwarebytesAdwCleaner solution, you can remove all malware from your Windows 10 PC.

Follow these steps to use MalwarebytesAdwCleaner:

  • Download MalwarebytesAdwCleaner.
  • Double-click on the downloaded executable file and follow the prompts to complete the installation.
  • After installation, right-click on the MalwarebytesAdwCleaner icon and then select “Run as administrator” to launch the program.
  • In the MalwarebytesAdwCleaner program, click on the “Scan” button to commence the scanning operation.
  • After the completed scan, click on the “Clean” button.
  • Now, click “OK” when prompted to restart your PC to complete the cleaning process.
  • Afterward, initiate the Windows Updates process.

On the other hand, we highly recommend other software package such as Bullguard, Bitdefender, and ZemanaAntiMalware to remove malware from your PC.

2. Run System File Checker

It is well noted that Windows 10 error 0x800F0955 is caused by system file violations thereby resulting in interruption while updating Windows 10 PC to the version 1809 update.

Nevertheless, the System File Checker Utility tool is a built-in Windows 10 tool that automatically resolves any form of system file corruption on the system.

Here’s how to run an SFC scan:

  • Press Windows+Q and type cmd.
  • From the search results, right-click Command Prompt and choose “Run as Administrator”.
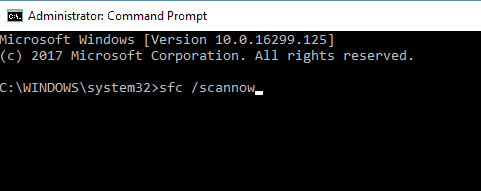
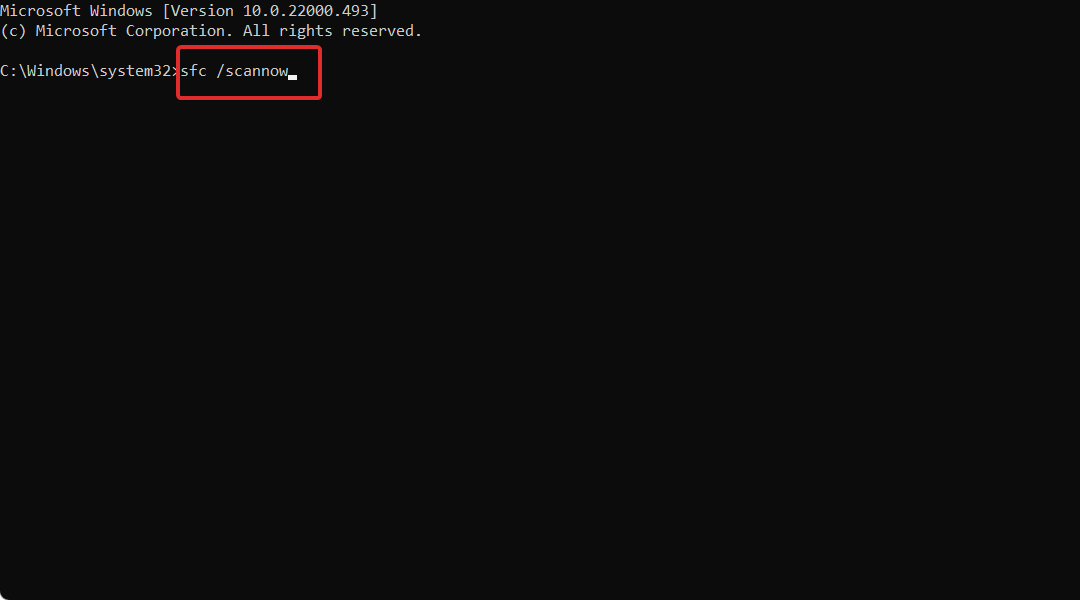
  • A new cmd window appears. Type SFC /scannow and hit the ‘Enter’ key.
  • Wait until the scan and repair process is finished.

Alternatively, you can also run CHKDSK on your hard drive; besides, this tool cleans up any disk-related errors on your Windows 10 PC.

Here’s how to run CHKDSK:

  • Go to Start > Type “command prompt” >Right-click on it, and select “Run as administrator”.
  • Now, type “CHKDSK C: /F”.
  • Hence, type CHKDSK C: /R without quotes in the Command Prompt and hit the “Enter” key.
  • After the CHKDSK process, restart your PC afterward.

3. Use a third-party cleaning tool

When installing, updating, and removing applications, the Registry can become cluttered with missing or damaged entries over time.

Specialized third-party software is excellent for this task dues to its multi-functional features and optimizing Windows PCs. You can easily and quickly scan your whole system, identify broken or corrupted files, and repair or replace them with clean ones.

4. Run DISM

Another Windows 10 built-in tool you can use to resolve the Windows 10 error 0x800F0955 is the Deployment Image Servicing and Management tool. DISM is also applicable in fixing corrupt system files as well.

Here’s how to run DISM in Windows 10:

  • Press Windows key + X and run Command Prompt (Admin).
  • Copy and paste the following command on the command line:
  • exe /Online /Cleanup-image /Restorehealth
  • In case the DISM can’t obtain files online, try using your installation USB or DVD. Insert media and type the following command:
  • exe /Online /Cleanup-Image /RestoreHealth /Source:C:RepairSourceWindows /LimitAccess
  • Be sure to replace “C:RepairSourceWindows” path of your DVD or USB.
Note icon NOTE
Ensure that you replaced the repair source path with your own.

5. Use Windows Update troubleshooter

Windows 10 Creators Update is incorporated with the Windows Update troubleshooting tool. Windows 10 error 0x800F0955 on the other hand is a Windows 10 issue; therefore, you can run the troubleshooter in order to fix the error problem.

Here’s how to do this:

  • Go to Start > Type “Settings” and then hit the Enter key.
  • Head over to Update & Security > Troubleshoot
  • Find Windows Update, and click Run the troubleshooter
  • Follow further on-screen instructions
  • Restart your computer

6. Run Automatic Repair

An automatic repair can be used to fix myriads of errors on the Windows 10 system most especially Windows 10 error 0x800F0955.

However, you need a Windows bootable installation DVD ready for automatic repair.

Here’s how to run automatic repair:

  • Insert Windows bootable installation DVD and restart your PC afterward.
  • Press any key to boot from CD or DVD when prompted to continue.
  • Select your language preferences, and click “Next”.
  • Click Repair your computer in the bottom-left.
  • In the “choose an option” screen, Click Troubleshoot > Click Advanced option > Automatic Repair. Then, wait for the Windows Automatic Repair to be completed.
  • Restart your PC and boot to Windows.

7. Clean install Windows 10

Due to the hours, it will take to install your current software as well as to restore your backed up files, clean installing your Windows 10 PC might not be the ultimate solution. However, it is an effective solution to fix the Windows 10 error 0x800F0955.

Before you proceed, you should create an ISO file with the ‘media creation tool’, and create a bootable USB drive with it or burn it on DVD. Also, you should back up your files and also note your currently installed programs.

Here’s how to clean install Windows 10:

  • Download the Media Creation Tool.
  • Plug-in the USB flash drive(preferably 2.0) with at least 4 GB.
  • Run Media Creation Tool and accept the License Terms.
  • Select the “Create installation media (USB flash drive, DVD, or ISO file) for another PC” option.
  • Pick the preferred language, architecture, and edition and click Next.
  • Choose a USB flash drive and then click Next.
  • Media Creation Tool will download the setup and copy the installation files onto the USB flash drive.
  • Finally, restart your PC.
  • Plug-in USB and start the Setup.

8. Reset Windows Updates components

Disclaimer: Follow the outlined steps carefully as serious problems may occur if you do this incorrectly. This solution involves modifying your system registry.

Here’s how to manually reset the Windows Updates Components:

  • Right-click Start
  • Select Command Prompt (Admin)
  • Click Yes when asked for permissions
  • Stop the Windows Update, Cryptographic, BITS, and MSI Installer services by typing the following commands at a command prompt:

net stop wuauserv

net stop cryptSvc

net stop bits

net stop msiserver

(Press the Enter key after each command you type)

  • Rename the SoftwareDistribution and Catroot2 folder by typing the commands below in the Command Prompt then press Enter after each command you type:

Ren C:WindowssoftwareDistribution SoftwareDistribution.old

Ren C:WindowsSystem32catroot2 Catroot2.old

  • Restart the Windows Update, Cryptographic, BITS, and MSI Installer services by typing the following commands in the Command prompt:

net start wuauserv

net start cryptSvc

net start bits

net start msiserver

  • Type Exit in the Command Prompt to close it

Afterward, initiate Windows Updates and install the latest updates.

On the other hand, some Windows 10 users reported getting “Access Denied” prompts when trying the processes above. Here’s what to do if your access is denied:

  • Log in first as an administrator or use an administrator user account
  • Stop the Windows Update service and try to rename the SoftwareDistribution folder
  • Right-click Start
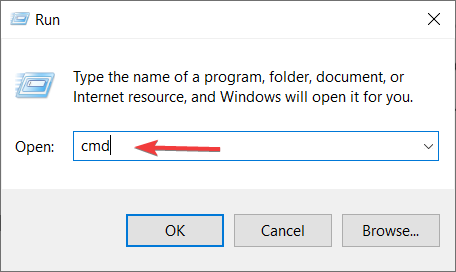
  • Select Run
  • Type services.msc and press OK or enter
  • Scroll down and locate Windows Update service
  • Right-click and select Properties
  • Stop the service

Follow the steps above so as to manually reset Windows Update Components

Afterward, go to the Services window again, now start the Windows Update service, and then restart your PC.

Conclusively, any of the above-mentioned solutions are adept at resolving Windows 10 error 0x800F0955. Should you have any questions, let us know by dropping a comment below.

FIX: 0x800703f9 Windows 10/11 Update Error

Many Windows users often complain the 0x800703f9 error prevents them from updating their systems.

Users encounter this error when they are trying to upgrade to Windows 10, as well as when they are trying to install the latest updates on their Windows 10 OS.

How to fix the 0x800703f9 error

0x800703f9 error can prevent you from downloading new updates, which can be a big security risk for many users. Speaking of update issues, users reported the following problems:

  • Windows Update failed – Sometimes Windows Update won’t be able to complete on your PC. If this happens, you might want to try running Windows Update troubleshooter and check if that helps.
  • Windows 10 not updating – Several users reported that their Windows 10 isn’t updating at all. To fix this issue, be sure to reset Windows Update components.
  • Windows Update problems – There are many problems that can occur with Windows Update, but if you encounter them, perform the SFC and DISM scans and check if that solves your issue.
  • Windows fails to update – Many users reported that Windows fails to update on their PC. This can be a problem, but you should be able to fix it by using one of our solutions.

1. Check your antivirus

Sometimes 0x800703f9 Windows Update error can be caused by your antivirus or firewall. Your antivirus can sometimes block Windows Update by accident, and that can lead to this problem.

However, you can fix this issue simply by disabling certain antivirus settings.

If disabling the settings doesn’t solve the problem, you might want to consider disabling your antivirus entirely.

Even if you disable your antivirus, Windows Defender will still protect your system, so there’s no need to worry.

In a worst-case scenario, you might have to uninstall your antivirus in order to fix this problem. If removing the antivirus solves the issue, you might want to consider switching to a different antivirus solution.

It is perfectly acceptable to use a third-party security tool that does not interfere with Windows updates. Most typical anti-virus products operate wonderfully, however, some have flaws.

Some of them may fail to detect malware on occasion, which is why we recommend doing scheduled scans with it, for a complete security check.

All these tools are fully compatible with Windows 10, and they won’t cause you any problems in the future.

2. Run the Windows Update Troubleshooter

If you’re having issues while trying to download updates, you might be able to solve the problem by using Windows Update troubleshooter.

Microsoft is aware of Windows Update issues, and it has already developed a tool that can help you with common Windows Update errors.

If you’re not familiar, Microsoft’s troubleshooters are designed to scan your PC and fix common problems.

If you’re having a 0x800703f9 Windows Update error, you might be able to fix it by following these steps:

  1. Download the Windows Update Troubleshooter from Microsoft.
  2. Launch the tool > follow the on-screen instructions.
  3. Try to install the update again.

3. Clean your Registry

Several users reported that they fixed the 0x800703f9 Windows Update error simply by cleaning their registry.

According to users, sometimes your registry can interfere with the Windows Update process and cause this problem to appear.

To fix the problem, it’s advised to use registry cleaner software.

There are various cleanup tools available that claim to improve your PC’s efficiency by removing unneeded registry keys. They’re unlikely to cause any damage, but they’re also unlikely to have any effect on overall PC speed, like optimizing it.

If you need professional cleaning software to help you clear the registry, the software below is the right answer.

4. Manually reset the Windows Updates Components

Sometimes problems with Windows Update can occur due to corrupted files. For example, if your Windows Update components are corrupted, you might encounter a 0x800703f9 Windows Update error on your PC.

However, you can fix the problem simply by stopping Windows Update services and removing the corrupted files. This is relatively simple, and you can do it by following these steps:

  1. Press Windows Key + X, and choose Command Prompt (Admin) or PowerShell (Admin).
    Windows Update failed
  2. Stop the BITS, Cryptographic, MSI Installer, and the Windows Update Services by typing the following commands, pressing Enter after each one:
  • net stop wuauserv
  • net stop cryptSvc
  • net stop bits
  • net stop msiserver
  1. Rename the SoftwareDistribution and Catroot2 folder by typing the commands listed below. Hit Enter after each command.
  • ren C:WindowsSoftwareDistribution SoftwareDistribution.old
  • ren C:WindowsSystem32catroot2 Catroot2.old
  1. Restart the BITS, Cryptographic, MSI Installer, and the Windows Update Services. As usual, type the following commands and press ENTER after each command.
  • net start wuauserv
  • net start cryptSvc
  • net start bits
  • net start msiserver
  1. Type Exit in the Command Prompt windows > try to install the updates.

5. Delete the C:$WINDOWS.~BT folder

According to users, sometimes certain files can prevent you from installing the updates. To fix the issue, it’s advised to find and remove those files.

This is relatively simple, and you can do it by following these steps:

  1. Go to the View tab and check Hidden items.
    Windows fails to update
  2. Delete the C:$WINDOWS.~BT folder.

6. Run the SFC and DISM scans

If you’re having this problem on your PC, the issue might be corrupted system files. However, you can fix this problem by running an SFC scan. To do that, just follow these steps:

  1. Open Command Prompt as administrator.
  2. Now enter sfc /scannow and press Enter to run this command. This scan can take about 15 minutes, so be sure not to interrupt it.
    Windows Update problems

Once the SFC scan is completed, check if the problem still persists. If you were unable to run SFC scan or if the scan didn’t find any problems, you might want to try using the DISM scan instead.

To do that, just do the following:

  1. Start Command Prompt as administrator.
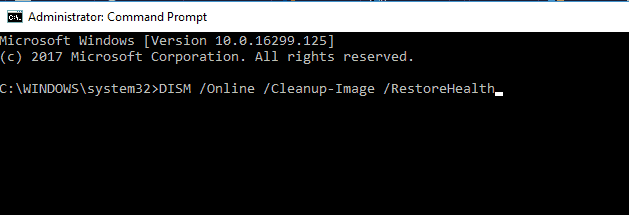
  2. Enter DISM /Online /Cleanup-Image /RestoreHealth and run this command.
    Windows 10 not updating
  3. The DISM scan will now start. The scan can take up to 20 minutes or more, so don’t interrupt it.

Once the DISM scan is finished, check if the problem still persists. If it does, or if you were unable to run the SFC scan before, be sure to repeat the SFC scan once again and check if that solves the issue.

7. Change Windows Update settings

According to users, sometimes a 0x800703f9 Windows Update error can appear due to your Windows Update settings.

However, you might be able to fix this issue simply by turning one set off. To do that, just follow these steps:

  1. Press Windows Key + I to open the Settings app.
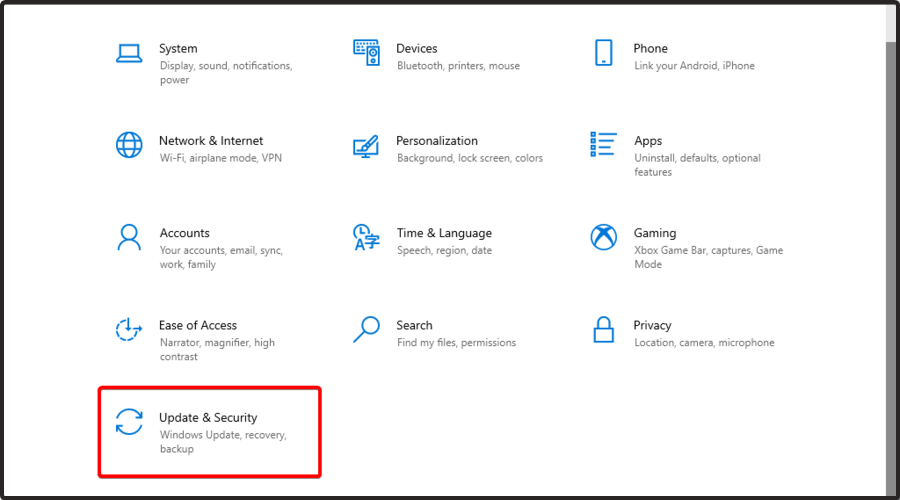
  2. Now go to the Update & Security section.
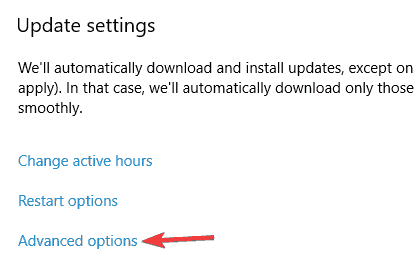
  3. In the left pane, click on Advanced options under the Update settings category.
    Windows Update failed
  4. Uncheck Give me updates for other Microsoft products when I update Windows option.
    Windows 10 not updating

After doing that, the problem with Windows Update should be resolved and your PC should be resolved.

8. Perform an in-place upgrade

If you’re having problems with the 0x800703f9 Windows Update error, you might be able to solve them simply by performing an in-place upgrade.

In case you’re not familiar, an in-place upgrade will force your Windows to upgrade while keeping all your files intact. To do that, just follow these steps:

  1. Download Media Creation Tool and run it.
  2. Select Upgrade this PC now and click Next.
  3. Select the Download and install updates option.
  4. Windows will now download the updates. This process can take a while, so don’t interrupt it.
  5. Once you get to the Ready to install screen, click the Change what to keep.
  6. Now select Keep personal files and apps and click Next.
  7. Follow the instructions on the screen to complete the process.

Once you’re done, check if the problem is resolved.

As always, if you’ve found other workarounds, you can help the community by listing them in the comment section below.

Dying Light 2 Patch 1.2 is out now [Patch Notes]

Dying Light 2 was recently released and lots of users seem to be pretty exciting about what it got.

Even if some of you might already encounter specific bugs, keep in mind that Dying Light 2 update patch notes are now officially live on all platforms.

Alongside the 1.2 updates, there’s a tonne of co-op and quest-related fixes, as well as remedies for various problems, but there are also plenty of improvements in very specific areas, including UI/UX, the final boss fight, and night combat.

If you’re interested in discovering more about this subject, make sure you read this article completely.

What’s changed in Dying Light 2?

1. Fixes

1.1 Story progression fixes

If you’re a Dying Light 2 fan, you’re probably aware of the story progression-related bugs. Fortunately, engineers ensured to fix the most common ones.

Alongside the Dying Light 2 Patch 1.2, keep in mind the following:

  • All known cases with Deathloops were eliminated
  • Developers have fixed blocks in multiple quests – Into The Dark, Assassination, Sophie in The Raid Quest, Hubert in The Only Way Out, Veronika, Nightrunners, The Lost Light, and Double Time
  • Safe zones related problems were solved (in-game clock stops, can’t sleep)

1.2 Nightrunner Tool fixes

As a lot of worldwide gamers reported night runner tool related problems, engineers didn’t wait to fix the most important ones, as follows:

  • Occasional screen flickering on PS5
  • Infinite loadings
  • Custom quest music for peers in co-op sessions

1.3 Co-op fixes

In case you don’t already know, co-op games (cooperative games) allow players to work with one another to achieve a common objective. Co-op is a subcategory or game mode of Multiplayer. 

It seems like many users were complaining about co-op issues and this is what developers managed to fix through the Dying Light 2 Patch notes 1.2:

  • Stability issues like crashes or black screens in certain situations
  • Numerous story progress blocks
  • Accepting invites related problems
  • Challenges issues like no weapon when inventory full, difficulty balance improved, tools requirements properly handled
  • Co-op parties spawning in distant places
  • Improved/fixed replication of city open-world activities: windmills, hanging cages, loot chests, NPC rescue issues
  • Enemies and players falling through the ground in certain situations
  • Several performance drops

2. Improvements

2.1 UI/UX improvements

Of course, the Dying Light 2 Patch 1.2 updates are not only about fixes, but also the game’s improvements.

When it comes to the UI/UX related ones, these are the aspects described by developers:

  • Survivor Sense – It now works correctly and can be triggered without any cooldowns after getting hit or performing specific parkour actions
  • Improvements to the Options Menu information architecture incl. – It was introduced a dedicated Accessibility Tab
  • New features – Added feature to show, hide or dynamically display Player Health Bar, Item Selector, and Time of Day Indicator
  • The dynamic setting for Player Health Bar – It is the new default and hides the bar when the player is at 100% health
  • The dynamic setting for Item Selector – Is the new default. The Item Selector becomes visible when in combat and when performing combat actions or using D-Pad
  • The dynamic setting for the Time of Day Indicator – It is the new default setting. The Time of Day Indicator becomes visible during day-night transitional periods
  • Widget settings – All of the widgets that are set Hidden or Dynamic become visible in Extended HUD
  • Visual Improvements to Player HP and Stamina bars – These elements are lighter and their colors are more neutral
  • Visual Improvements to the enemies’ stance meter – These were improved to indicate its connection to blunt weapons

2.2 Important Combat improvements

Besides the UI/UX improvements, Dying Light 2 Patch 1.2 also comes up with important combat improvements and these are the ones reported by engineers:

  • Biter behavior during the day – In this case, the enemy latches onto the players more frequently which diversifies enemy encounters
  • Performance of blunt weapons – These were improved to reflect the sense of weight
  • Enemy reaction depending on the type of weapon – The updates were applied to better reflect the weight of the weapon
  • Human opponents – Now, they can now block players’ attacks during light hit reaction time
  • The light hit reactions for human enemies – These have been shortened

2.3 Night improvements and balance

When it comes to night improvements and balance, it seems like these are the news that you might have interest in:

  • Howler’s sense range increased
  • Increased the Howler resistance to range weapons
  • The chase is triggered when a Howler is hit by a ranged weapon and is still alive
  • Volatiles come out of hiding spots faster during the chase
  • Level 4 of the chase is now more difficult

2.4 Final Boss Fights improvements

As worldwide gamers reported, it seems like the final boss fights are some of the most exciting in Dying Light 2. That’s why manufacturers decided to improve this feature, as follows:

  • They fixed the issue where the opponent does not react correctly to other players and does not change behavior that might lead to several glitches during CO-OP play
  • Opponent behaviors were alternated in Phase 2 during CO-OP play
  • Opponent performs area attacks now more frequently during CO-OP sessions
  • They shortened the narrative scenes between the phases in a boss fight
  • They improved the boss fight pacing

2.5 Technical improvements

Because having a game that is always technically improved will allow you to enjoy the best experience you can, we also need to consider the Dying Light 2 technical improvements:

  • High-performance preset that optimizes the displayed graphics which allows you to play Dying Light 2 on older computers and laptops
  • PC DX12 cache-related improvements. The game now works smoother upon the first launch
  • AVX technology is no longer used in the game, improving issues related to a game crashing on the launch
  • Improvements in outdoor lighting, sun and spotlight shadows, to Motion Blur – added intensity and distance blur customization

In conclusion, this is all you have to know about the Dying Light 2 patch notes that came at the same time as Patch 1.2.

Unfortunately, some users reported that Dying Light 2 is still not launching on Steam. In order to prevent/solve this issue, do not hesitate to check our dedicated guide.

Tip icon Tip
Because it is always important to boost your gaming experience and get the best out of Dying Light 2, we strongly recommend trying the Game Fire from Smart PC Utilities.

For those of you who are facing any additional questions, make sure you share them by leaving a comment in the section below.

Windows 11 Driver Scanner Not Working? Here’s How to Fix it

Windows 11 driver scanner is a tool that scans your computer for outdated drivers and updates them for you. This way, you can be sure that your PC is always performing at its best.

If it is not working, your PC would not be able to send and receive data correctly, making it impossible to use.

One of the most important features of Windows 11 is its compatibility with the majority of programs and peripherals. However, you have to update your drivers regularly in order to enjoy a stable performance and take full advantage of your computer’s capabilities.

Your PC’s drivers do a lot of work. They tell every part of your machine how to interact with every other part. Keeping your drivers up-to-date is essential for every computer user. 

Unfortunately, finding the right driver for your hardware can be time-consuming and error-prone. Windows 11 driver scanner is designed to automate this process and do the heavy lifting for you, automatically installing and updating nearly any Windows 11 device in minutes.

While this process is smooth most of the time, there are some instances where it may fail and stop working.

Why is the Windows 11 driver scanner not working?

  • Corrupted system files – Sometimes when you run a scan on your computer and it shows that Windows 11 driver scanner is not working, there may be a problem with your computer’s system files.
  • Bad installation – Another common issue is due to a bad installation of the driver scanner program itself. When you install programs onto your computer, they will usually install themselves into a directory on your hard drive called Program Files or Programs. This can be a problem if the program is not written properly, or if it was written for an older version of Windows that is no longer supported by Microsoft. If the program was meant for an older version of Windows, it may not be compatible with Windows 11.
  • Outdated drivers – The outdated drivers can also cause the Windows 11 driver scanner not working problem. In some cases, the drivers you’ve downloaded may be out of date or they might be corrupted. To prevent this from happening, make sure that you have the latest version of the drivers installed on your computer. 

If you encounter any of the above issues, proceed to our recommended solutions and attempt to fix the situation.

What can I do if my Windows 11 driver scanner is not working?

1. Reinstall scanner drivers

  1. Hit the Windows key, type Device Manager, and click Open.
  2. Locate Imaging Devices and right-click on your specific driver to Uninstall.
  3. Restart your PC and your drivers will be automatically restored.

Another easy solution is to use a driver updater tool. Outbyte Driver Updater automatically updates your drivers, so you don’t have to go searching for the right downloads and installation instructions.

The program works by scanning your computer and identifying any hardware or software that may be out of date.

It then searches the Internet for updated drivers and installs them on your computer automatically, making it a great way to save time while also giving your computer a boost in performance.

⇒ Get Outbyte Driver Updater

2. Run the SFC and DISM commands

  1. Press the Windows key, type cmd in the search bar, and click Run as administrator.
  2. Type in the following command and press Enter: sfc /scannowsfc-scannow win + x not working windows 11
  3. Once the command has been executed, type and Enter the next one: DISM /Online /Cleanup-Image /Restorehealthdism windows 10 apps close when minimized
  4. Wait for the command to be executed and restart your PC.

3. Uninstall the latest Windows Update

  1. Press the Windows + I keys simultaneously to open Settings.open settings
  2. Navigate to Windows Updates and go to Update history.
  3. Click on Uninstall updates.
  4. Select the most recent update then click Uninstall.

Can I skip driver updates?

It is completely fine to not update device drivers. If your hardware is working as expected, then you should generally not need to update your drivers unless you have a specific reason such as fixing a bug or adding support for new technology.

Hardware manufacturers will often release driver updates to fix bugs, improve the stability of a device, or add support for new features.

It’s usually best to get these from the manufacturer directly so you don’t have to worry about any additional bundled software that may be included with software downloaded from other sites. Alternatively, you can use driver updater software if you don’t want to do it manually.

When drivers are updated, sometimes the new version of the driver can cause problems for a particular configuration of the computer and device.

Sometimes these problems will cause a device (such as a printer) to stop working altogether; sometimes they’ll just detract from performance.

If you’re not experiencing any problems with your current setup, there’s no compelling reason to update the drivers for your devices.

However, in the case of outdated drivers, it is always recommended that you update your drivers to secure your system from malicious software and hackers.

In case you face any additional problems such as Windows not downloading drivers, feel free to refer to our expert guide for quick solutions.

We hope you were able to get some help from our guide if you were facing this particular problem. If you have any additional queries, let us know in the comments section below.

Got The Dropbox Gmail Cookie Error? Fix it in 4 Easy Steps

Being one of the most popular cloud storage solutions, Dropbox offers integration with Gmail accounts. Users can use the Gmail Chrome extension or Gmail-Add-on for firefox.

However, several users have reported a Dropbox Gmail error while trying to access Dropbox from their desktop.

The full error reads Could not communicate with https://mail.google.com. It occurs when trying to open Dropbox on your web browser or desktop client on your Windows PC.

Follow the steps in this article to troubleshoot the Dropbox Gmail error on a Windows computer.

How do I fix the Dropbox Gmail could not communicate errors?

1. Clear browser cache and allow cookies

1.1 Block third-party cookies

  1. If the third-party cookies are blocked on Chrome, you may encounter issues with the Gmail and Dropbox integration.
  2. Open Google Chrome.
  3. Click the “Menu” icon and select Settings.
  4. Scroll down and click on Advanced.
  5. Under “Privacy and security” click on Site Settings.
  6. Click on “Cookies and site data” under “Permissions”.
  7. Make sure the “Block third-party cookies” option is disabled.
  8. Check the “Block” section for the blocked Dropbox cookies. Unblock the Dropbox cookies if it is in the Block section.
  9. Relaunch Chrome and check if the Gmail Dropbox integration is working.

1.2 Clear cache and old cookies

  1. The bad cache and cookies can create issues with websites. Try clearing the old cache and cookies to fix the issue.
  2. Open Chrome and click on Menu.
  3. Select Settings > Advanced.
  4. Scroll down to Privacy and security.
  5. Click on “Clear browsing data”.
  6. Select the “Time range” and select the “Cookies and other site data” option.
  7. Click on the Clear data button.
  8. Click Yes if asked to confirm the action.
  9. Relaunch and try to access the Dropbox account and check if the error is resolved.

In order to clear browser cookies and cache efficiently, there is a more effective method you can use, namely cleaning software.

As a tip, CCleaner has dedicated functionality that clears out browsing data and cookies from any browser application. This way, you can resolve Gmail cookie errors and use the Dropbox service again.

2. Troubleshoot internet connection

  1. Try troubleshooting your internet connection to fix the issue with the Dropbox desktop client.
  2. On the taskbar, right-click on Internet Access.
  3. Select Troubleshoot Problems.
  4. The troubleshooter will scan the system for any network-related issues and recommend fixes.
  5. Apply the fixes to see if that helps resolve the error.

3. Disable and enable integration

Note icon NOTE
Note: The following steps are for the Chrome browser. However, most of it also applies to Microsoft Edge (Chromium).
  1. If the issue persists, try disabling and re-enabling the Dropbox integration in Chrome.
  2. Open Chrome and click on the Menu icon.
  3. Go to More Tools and select Extensions.
  4. Find the Dropbox extension and disable it.
  5. Click Delete (trash icon) besides the Dropbox extension to remove it.
  6. Relaunch Google chrome.
  7. Install the Dropbox extension from the Chrome store and check for any improvements.

4. Update Dropbox for Windows

  1. If you are using the Dropbox client for Windows, try checking for any updates available for the client.
  2. Launch the Dropbox app and check for updates.
  3. Download and install the update if available.

4.1 Reinstall Dropbox for Windows

  1. If the issue persists, you can try to uninstall and reinstall the app.
  2. Click on Start and select Settings.
  3. Click on Apps.
  4. Search for Dropbox and click on it.
  5. Select Uninstall and click Yes to confirm.
  6. Reinstall the app from the official website and check if the Dropbox Gmail error is resolved.

Dropbox integration for Gmail is a handy feature and by following the troubleshooting tips in this article, you can iron out any glitches with the service.

Fixed: Windows 11 Android Emulator Not Responding

It is no news that Windows 11 is now the go-to OS since its release. Near the front of this queue are developers looking to take advantage of its new and revamped features. But this is coming at a painful trade-off.

Since the upgrade, most developers have complained that Windows 11 Android Emulator is not responding.

And with the emulator an integral part of app development these days, most have had to downgrade their PC to Windows 10 to be able to solve the issue.

This guide will take you through three effective ways of fixing this issue without downgrading your PC.

Requirements to run Android Apps on Windows 11

Not all Windows 11 compatible PCs can run Android apps. Below are the minimum requirements as listed by Microsoft:

  • RAM: 8GB (minimum), 16GB (recommended).
  • Storage type: Solid State Drive (SSD).
  • Processor:
    • Intel Core i3 8th Gen minimum or above.
    • AMD Ryzen 3000 minimum or above.
    • Qualcomm Snapdragon 8c minimum or above.
  • Processor architecture: x64 or ARM64.
  • Virtual Machine Platform: Feature must be enabled.

Now that we cleared up the details about what your system will need to optimally run this app, let’s dive into the actual fixes for this issue.

How can I fix the Android Emulator not responding on Windows 11?

1. Use the Turn feature on and off option

  1. Press the Start button and type Turn Windows.
  2. Select the Turn Windows features on or off option.disable hyper-v
  3. Locate the Hyper-V option and uncheck the checkbox.disable windows hypervisor platform
  4. Uncheck the Windows Hypervisor platform.

After disabling these features, you can now install Android Emulator Hypervisor Driver from SDK tools in Android Studio and SDK Manager.

Note that when you disable Hyper-V, WSL2 and other Virtual Machines will not work. To use them, you have to enable the feature again.

2. Comment out a line from the Android Emulator source code

remove line of comment

The Windows 11 Android Emulator not responding issue has been associated with the XSAVE disable code in the WHPX API integration.

A quick fix is by commenting out the line of code and compiling it yourself. So many users have confirmed this works for them without disabling Hyper-V. It would be best if you gave it a try too.

3. Try an alternative Emulator

If the fixes above do not work for you, we will recommend trying an alternative Emulator in LD Player.

The LD Player is a surprisingly lightweight Emulator that allows you to test, install, and uninstall your Android apps games on Windows 11 without any issue.

More an Emulator for gamers, it is adept at running other apps. What’s more, it is backed by the LD Store where you can download millions of games and apps. It also allows you to download apps APK and install them on the platform.

It might just be everything you need to run an Android Emulator on your PC without disabling Hyper-V and subsequently WSL2.

⇒ Get LD Player

How to run an Android app with a physical device?

If Windows 11 Android Emulator is still not responding or you want to try a new method, you can run your Android apps on a real Android device.

To do this, you need to go through two stages:

1. Enable developer mode on your Android device

  1. Connect your phone to a Windows development machine via a USB cable. Install a USB driver if you are prompted.
  2. Go to the Settings app on your Android phone.about phone
  3. Tap the About phone option.build number
  4. Tap the Build number seven times. Wait till it shows Developer mode now enabled or an equivalent prompt.developer mode
  5. Go back to the Settings app window and select the Developer options after the About phone option.usb debugging
  6. Now, enable USB debugging in the Developer options window.

2. Run the app on your device

  1. Go to the Android Studio toolbar and select the app to run from the run configuration drop-down menu.run on device
  2. Finally, select your device name from the Available devices drop-down menu.device available

Note that your device must be running Android 9.0 or higher to use this option.

The Windows 11 Android Emulator not responding issue can be frustrating. But not a problem that is impossible to solve, as shown above.

We hope these fixes help you get back to doing what you love without having to dish Windows 11.

Let us know the fix that worked for you in the comments section below. You can also share any proven solution that you have used to successfully solve this problem.

SD Card Not Showing up on Windows 11: How to Fix it

SD card doesn’t show up and you cannot transfer files from it on Windows 11? We’ll explain why it happens and show you how to fix it.

If you are experiencing this problem, then, for better or worse, you are not alone. There are multiple user reports on official Microsoft forums indicating that many users are facing similar issues on their Windows 11 PCs.

Just follow the guidelines below to get rid of it and check out potential causes so you can avoid having to deal with this in the future.

How to make SD card show up on Windows

1. Clean SD card and re-insert

If your SD card isn’t clean due to dust or debris, it may not be recognized by your PC. This issue arises because the pins on both the SD card and the card reader can’t establish a proper connection.

To fix this:

  • Clean the SD Card: Wipe the metal pins on the SD card with a soft cloth.
  • Clean the Card Reader: Also clean the pins inside the card reader.

Usually, a quick wipe works, but for a thorough clean, try using contact cleaner sprays, isopropyl alcohol with microfiber cloths to get your electronic contacts squeaky clean.

Some laptop screen cleaners work on SD card sloths too.

2. Try on another PC

Windows 11 not reading SD card could be because of the interface or support problems. If your SD card is not recognized by your PC, chances are that your PC doesn’t support the interface of the SD card.

We would suggest you try inserting or using it with another PC, and if it detects your card, then you can carry on with your tasks. Unfortunately, if this doesn’t help then you can check out the next solution.

3. Download the latest drivers

  1. Open the Start menu and search for Device Manager.run device manager
  2. Expand the Disk Drives section.disk drive
  3. Right-click on your SD card. If it is not recognized by your PC, then it will have a yellow exclamation mark.
  4. Choose Update drivers.
  5. Select Search automatically for drivers.
  6. Restart your PC.

4. Change the drive letter of the SD Card

  1. Right-click on the Start menu icon and select Disk Management.
  2. Right-click on your SD card and choose Change Drive Letter and Path.
  3. In the Add Driver or Path window, click on Add.
  4. Select a drive letter and click OK.
  5. Close the Disk Management tool.

5. Run CHKDSK to fix corrupt files

  1. Press the Win + R keys to open the Run dialogue.
  2. Type the below command and press Enter. cmd
  3. Execute the below command.chkdsk C: /f /r /xchkdsk-command windows 11 disk error
    Make sure to replace /x with the drive letter of your SD card.
  4. Close command prompt.
  5. Restart your PC.

CHKDSK utility scans for any errors in the file system and automatically fixes any logical system file errors if found.

There are chances that due to a corrupt system file, the SD card isn’t recognized by your Windows 11 PC. So, to fix this, simply run the CHKDSK command and see if this fixes the issue or not.

6. Ensure your card reader supports the SD card

One of the main causes that Windows 11 is not reading SD card issues pops up is because users insert an SD card that is not supported by the card reader.

High-capacity SD cards, such as SDHC or SDXC cards, require modern SD card readers that support them. Make sure that you have an SD card reader that supports the card format that you are inserting into.

7. Format SD card

  1. Right-click on the Start menu icon and select Disk Management.
  2. Right-click on your SD card and choose Format.SD card not recognized after format
  3. Click Yes on the warning message that appears.D card not detected in any device
  4. Choose the file system and click OK.Kingston SD card not recognized
    • Do note that to store files larger than 4GB, then you need to select NTFS file format instead of FAT32.
  5. Close the window.

Once you format your SD card, it should be recognized by your Windows 11 PC. Formatting heals the corrupt sector of your SD card, which could have been causing issues.

8. Disable Write Protection

  1. Press the Win + R keys to open the Run command.
  2. Type the below command and hit Enter.devmgmt.msc
  3. Located your SD card under the Disk Drive section.
  4. Right-click on it and select Properties.
  5. Under the Policies tab, make sure to check the box next to Enable write caching on the device.

9. Scan your PC for viruses or malware

  1. Click on the upward arrow button on the bottom-right taskbar.see all apps
  2. Select Windows Security.windows security
  3. Click on Virus & threat protection.virus and threat protection steam error e502 l3
  4. HIt the Quick Scan button and let Windows Security scan your PC for viruses and malware.quick scan
  5. You can also select the Scan options button.Performing Scan to address WSL error on Windows 11
  6. Under Scan Options, choose Full scan to deeply scan your PC for viruses or malware.

Why Windows doesn’t read cards

  • Your external SD card reader is not properly connected to your PC.
  • The external SD card is damaged.
  • The in-built SD card reader has damaged pins.
  • The SD card you are using is corrupt.
  • The SD card is infected by a virus or malware.
  • You are not using an updated device driver.
  • Proper drivers are missing on your PC.
  • The drive letter is missing from the SD card.
  • The Write Protection switch is not disabled.
  • Presence of bad sectors on your PC.
  • The SD card that you are using is physically damaged.

The good thing about this is that there are a bunch of solutions that we have listed in this guide that will help you possibly fix the problem at hand.

We recommend a routine SD card health check to catch such issues in their infant stage. Let us know in the comments below which one of the above solutions helped you fix the Windows 11 not reading SD card issue.

If you followed a different solution and it worked for you, then you can share that solution with us in the comments section below as well.

FIX: AVG won’t install on Windows 10

Does the AVG installation freeze every time you try to run it? This article lists the most common elements which could cause this installation fails, as well as the actions you can perform to fix this issue.

Speaking of issues, users reported the following errors:

  • Error 0x6001f916, 0xe001f90b, 0x6001f90b, or 0xe001f916 – The system needs a reboot before continuing the installation. Restart the PC and the error should disappear.
  • Error 0xe001d026 or 0xc00700652 – Another installation is running and blocks you from installing the antivirus. Wait until the installation finishes, restart your PC and the AVG installation.
  • Error 0xe001d028 – It occurs when on your PC, different software with the same features as AVG are located. Uninstall those programs, restart the PC, and run an AVG installation.
  • Error 0xe0060006 – It indicates that there is a problem with the installation of the AVG file. This can be solved by reinstalling the antivirus.
  • Error 0xC0070643 – If it occurs after re-installing the antivirus, you should contact the Support department because the AVG experts must analyze your situation in detail.

We prepared a list of possible solutions that should come in handy. Make sure to check them out below.

How can I fix the AVG installation if it gets stuck?

1. Delete antivirus files with a dedicated tool

Make sure you do not have another antivirus installed on your computer. If you missed this, delete the current one, and try to install AVG again.

Whenever you install a piece of software, it also installs several files and probably Registry entries in order to work efficiently.

Even if you remove your previous antivirus, entries for it may still remain in the Registry and cause various issues with your new software solution.

We recommend relying on a specialized tool to remove any leftovers. By using professional cleaner software you will tidy up software that removes temporary files.

This solution includes multiple functionalities for optimizing your PC by cleaning your hard disk, repairing broken files in the registry, removing junk files or leftovers, and much more.

2. Check the system requirements

Check that your system complies with the minimum AVG requirements. Otherwise, the installation cannot be completed.

AVG can run on any version of Windows, from the XP Service Pack 3 version to Windows 10.

For more information on the minimum system requirements to install AVG, check out AVG’s support page.

3. Check for updates

  1. Press the Windows Key + I to open the Settings app.
  2. Go to the Update & Security section.
  3. Click on the Check for updates button.
  4. Windows will check for available updates and download them automatically in the background.
  5. Restart your PC.

Check if your operating system is up to date. It may be missing some updates that can affect the configuration of AVG. Windows 10 usually installs the updates automatically, but you can always check for updates on your own.

4. Restart your PC

Restart your PC before installation. If it works for some time, there is a chance it may be running some applications that block the installation of the antivirus software.

By rebooting, you make sure that when you try to install AVG, only the applications necessary for the operation will run.

5. Run as an Administrator

  1. Locate the application shortcut, right-click it and choose Properties.
  2. Go to the Compatibility tab, and check Run this program as an administrator.
  3. Click Apply, and OK to save changes.
  4. Run the install.

Make sure you run the installation as an Administrator. This way, you are allowed to execute any kind of install/uninstall operation at the system level.

6. Install the latest version

Make sure you install the latest version of AVG.

If you bought this antivirus software from the store some time ago and are now trying to install it from the original CD, problems may occur because that version may not be compatible with your system anymore.

It is recommended to install the latest version published on the official website.

7. Completely uninstall the software before reinstalling it

  1. Download the AVG Remover software.poze1
  2. Open the uninstaller, and click on the Continue button to start the process.poze2
  3. Make sure you tick all the boxes, and then click on the Remove button.poze3
  4. Click on the Restart button to reboot your system, and finish the process.

Make sure you clear all the files from the previous installation before trying to configure the antivirus again. There is a chance that some files became corrupt during installation, so a restart may solve the problem.

By following the steps in this article you can fix the AVG installation in Windows 10 if it gets stuck, and keep your PC safe.

If you have any more questions or suggestions, leave them in the comments section below, and we’ll be sure to check them out.

How To Delete App Backup Files in Windows 10 [Cache Files]

Many applications store their configuration data on your PC, and while you can use this data to back up your settings, some users choose to remove it.

Deleting backup files is quite simple, and in this guide, we’re going to show you how to easily delete app backup files on Windows 10, so let’s get started.

How to remove app backup files & cache files in Windows 10?

1. Use Disk Cleanup

  1. Press Windows Key + S and enter disk cleanup. Select Disk Cleanup from the list of results.
     disk cleanup how to delete app backup files windows 10
  2. Select the C drive and click OK. Wait while the application scans your PC.
  3. Make sure to check Temporary files and then click on OK. If you want, you can select other file types.
    temporary files how to delete app backup files windows 10

2. Remove them manually

  1. Press Windows Key + R and enter
    %localappdata%
    run window localappdata how to delete app backup files windows 10
  2. Navigate to the Temp folder.
  3. Now select all files and delete them.

These files are completely safe to remove since they are only cache files and they don’t usually contain any crucial information.

Many applications hold their data in the following directory:

AppData\Local

For Universal apps, the directory is the following:

AppData\Local\Packages

These are usually configuration files; if you want to delete app backup files, you should delete the files from this directory. Almost every app has its own directory, so finding the desired files is easy.

Note icon NOTE
Remember that by removing these files, some applications might reset to default settings while others might not work correctly, so use this method at your own risk.

After the cleanup process is finished, the cache and temporary files should be removed completely.

3. Use a memory cleaner software

In order to remove the backup files and cache files that can take storage on your PC, an efficient method is to use memory cleaners that help you clean the system.

Using such practical methods, you will optimize the computer performance by removing duplicated content or defective files in a few minutes.

Memory cleaner software will benefit your system by freeing up the storage and deleting unimportant files that occupy significant memory.

Plus, these tools can improve startup speed and great operations running. The bloatware will be removed from your system by defragmenting the hard drive and removing useless files, as well as repairing the registry.

That being said, profit from the most reliable memory cleaner software to erase the cache files and other files that take valuable storage.

Looking for more guides like this one? The Removal Guides Hub might have all the information you need.

To learn more about cache, we have a great guide on how to clear cache and cookies on Windows 10, so be sure to check it out.

Did you manage to delete backup files on your Windows 10 PC with this guide? You can share your experience in the comments section below.

Msdownld.tmp: What is This Folder and How Can I Remove It?

Are you wondering why you see msdownld.tmp in one of your drive or multiple drives? Don’t worry, this hidden folder is not harmful to your PC.

The msdownld.tmp folder is a temporary folder used by the Internet Explorer installer. The setup process does not remove it after Internet Explorer has been installed due to Microsoft glitches.

However, the content of the msdownld.tmp is empty meaning that it is harmless.

We have compiled 5 methods that can be used to remove msdownld.tmp from your Windows 10 PC.

How can I delete the msdownld.tmp folder?

  1. Update Internet Explorer
  2. Delete msdownld.tmp folder
  3. Run Disk Cleanup
  4. Run SFC Scan
  5. Use professional third-party software

1. Update Internet Explorer

The msdownld.tmp problem occurs because of the installation of Internet Explorer 6; however, this is an older IE version.

Consider updating your Internet Explorer web browser using Microsoft update which you can download here.

Also, you may completely uninstall Internet Explorer 6 using IObit Uninstaller here and then install a fresh copy of the Internet Explorer web browser.

2. Delete the msdownld.tmp folder

The msdownld.tmp folder cannot be easily viewed on your Windows PC because it belongs to the category of hidden files.

In order to delete the folder, you need to enable hidden files to be viewable and delete msdownld.tmp folder afterward. Here’s how to do this:

  1. Go to Start > Computer
  2. For Windows 10, click View and then check Hidden items (for previous versions, click Organize in the upper-left region and select Folders and Search Options).
msdownld tmp remove
  1. Click on the View tab, select Show hidden files, folders and drives, and then uncheck Hide file extensions for known file types.
  1. Click Apply and then select OK.msdownld.tmp
  2. Now, type msdownld.tmp in the search bar (located on the top right corner)
  3. Right-click on the tmp folder and select Delete. Follow the prompts to delete the msdownld.tmp folders.

3. Run Disk Cleanup

In addition, you can also run disk cleanup on your Windows PC to fix the temporary folder problem. Disk Cleanup is a Windows utility program that reduces the number of unnecessary files on your hard disk to free up disk space.

It also removes temporary files, empties the Recycle Bin, and removes unwanted system files. Here’s how to run Disk Cleanup:

  1. Go to Start > Type Disk Cleanup and hit Enter.msdownld.tmp
  2. Wait for Disk cleanup to scan your drive(s).msdownld.tmp
  3. After the scanning, check the Temporary files box, and then click on OK to delete.msdownld.tmp
  4. Select delete files to proceed.msdownld.tmp

Third-party system cleaners include a feature for file selection that lets you pick which temporary files to erase.

Using a trustworthy and efficient file cleanup is a great method to keep your PC working smoothly. It frees up important hard disk space while also improving performance, security, and privacy.

Additionally, you may improve your digital privacy by eliminating browsing history and other sensitive data from unnecessary temporary application folders like msdownld.tmp.

4. Run System File Check Scan

Another way to remove the msdownld.tmp temporary folder is by running a system file check. SFC can be used to scan, check, and remove temporary files.

To run an SFC scan on your Windows PC, follow these steps:

  1. Go to the Start menu and type cmd. Right-click on the Command Prompt icon and click on Run as Administrator. Click yes to accept the UAC prompt.msdownld tmp remove
  2. Also, in the cmd prompt, type SFC and hit the Enter key.
  3. Now, type /scannow and hit the Enter key.msdownld.tmp
  4. Finally, restart your Windows PC and try launching the application again.

5. Use professional third-party software

Since the IE installer does not remove the msdownld.tmp empty folder once it’s done its job, it will be your job to do it.

If you want a professional-level tool to help you with this task, consider Ashampoo Winoptimizer.

WinOptimizer can remove junk data, corrupt temp files, and fix broken shortcuts and broken registry entries. It can also disable unnecessary services, allowing you to use your resources for the task at hand.

This tool will free up drive space which will speed up your system. The user experience will most likely improve as you will be able to run your apps quickly and with fewer errors

Let’s quickly look at its key features:

  • Comprehensive dashboard with valuable details on status updates on your Temp Files, Registry, services, or privacy, all neatly arranged
  • New SSD-ready Defrag tool to automate drive analysis and defragmentation
  • Reclaim precious disk space by eliminating redundant temp and log files and superfluous Registry entries
  • Instant notifications on resource hogs and up-to-date data
  • Rids your system of junk data and reduces clutter
  • Live Tuner to provide a smart launch boost to all applications

Speaking about IE, we’re got you covered no matter what. Check out our Internet Explorer Hub.

Explore our Removal Guides as well to find the right way to eliminate obstinate items from your PC.

There you go, these are the fixes that can be used to delete the msdownld.tmp folder on your Windows PC. Do share your troubleshooting experience with us via the comments section below.

How to Clean your Windows 10 & 11 with CCleaner [Review]

Keeping your Windows 10 or 11 computer clean is mandatory if you want it to run smoothly for a long time. This healthy habit should be implemented by every computer user in the world, not only by those with the latest Windows.

Even though they only use their devices occasionally, and even further, regardless of the device itself, be it a mobile phone, a workstation, or a personal computer; they all need to be cleaned.

Of course, I’m talking here about cleaning your computer at a software level (although keeping the hardware clean is also mandatory), and what this means is cleaning registry entries, uninstalling unused programs, or deleting temp files to free space.

There are several apps that allow you to do this, but when it comes to Windows 10 or 11 computers, few of them are better than CCleaner, which, unfortunately, works only as a desktop application.

Is CCleaner recommended for Windows 10 and 11?

Yes, CCleaner is a great tool for any version of Windows because it allows you to quickly and easily manage your system settings and clean unwanted files.

Although most of its options are available in Windows, the software consolidates them in a simple-to-use interface, allowing less experienced users to optimize their PC.

How do I clean my PC using CCleaner?

CCleaner is a solid application, but sometimes certain issues can occur. In this article, we’re going to cover the following topics:

  • CCleaner won’t boot in Windows 10
    • In some cases, CCleaner might cause certain problems with your Windows 10 PC. Speaking of problems, several users reported that Windows 10 won’t boot after running CCleaner.
  • CCleaner won’t start, install, open in Windows 10
    • Several users reported that CCleaner won’t start or open on their Windows 10 PC. In some instances users weren’t able to install CCleaner at all.
  • CCleaner (Windows 10) not working
    • Users reported that CCleaner isn’t working on their PC properly. This is a minor problem that can be fixed by reinstalling the application.
  • CCleaner not running, hangs Windows 10
    • In several instances, users reported that CCleaner hangs on their PC. In some serious cases, users weren’t able to run CCleaner at all.
  • CCleaner slow in Windows 10
    • According to users, CCleaner can become slow on Windows 10. This is a minor problem but you can fix it simply by reinstalling the app.
  • CCleaner uninstall Windows 10 apps
    • CCleaner comes with an interesting feature that allows you to uninstall Universal apps. This can be rather useful since you’ll be able to uninstall apps with just a single click.

CCleaner is a Windows 10 desktop application used by thousands of users to keep their computers in shape and get rid of useless junk files left all over the place.

If you’re looking for more tools similar to CCleaner, we advise you to check some of the best tools to delete junk files that we covered recently.

As for CCleaner, it makes your computer run faster, as it deletes multiple files that would have otherwise slowed search results and occupied a lot of RAM, and it also gives users more space on their hard drives.

Keeping your hard drive clean is important, but you shouldn’t neglect the health of your hard drive. We wrote about the best HDD health software in one of our previous articles, so be sure to check it out.

At first, you might think that it can’t free up that much space; after all, the temp files and other small documents and registry entries don’t occupy that much, but keep in mind that they pile up after some time, and they might end up occupying a space of a few GB, which is not at all negligible.

The program itself is pretty simple, having a simple interface that anyone with no effort can follow. As a Windows 10 or 11 cleaner, it cannot miss from your computer, and by running it on a tight schedule, you ensure that your computer is always at its best.

The first part of the program is the actual cleaner which scans all your Temp folders and applications.

If you wish to run CCleaner, all you have to do is click the Analyze button and it will start searching for the files that are no longer needed.

After the analysis is complete, you can run CCleaner, and it will delete them. The next part of the app is the Registry Cleaner which scans every registry entry and filters the ones that are no longer in use.

Keep in mind that every program you install on your computer creates many registry entries and once you’ve uninstalled the program, these remain on your computer, and over time, it impacts the performance of your Windows device.

Running CCleaner to clean your registry is a great way to make your computer run faster.

CCleaner offers solid performance in terms of registry cleaning, but if you want a dedicated tool to clean your registry, be sure to check out the best registry cleaners for Windows 10 that we covered recently.

In the Tools, section users have at their disposal many useful features, such as a software uninstaller, which is similar to the default Windows uninstaller, startup manager which allows users to select what services start with Windows 10 or 11.

Additional features include file search, which is basically a search box like the default system search, a system restore function that allows users to restore to a previous point if something no longer works properly, and a drive wiper that allows users to scan and clean free space or completely wipe a drive.

CCleaner is a solid tool for hard drive cleaning, but if you want a dedicated tool to wipe your hard drive, you might be interested in these hard drive eraser tools.

If you don’t see the reason why empty space should be cleaned, then you should know that it is not, in fact, clean. There are bytes of the information left over from the previous files, and even if your computer sees it as empty, it is not.

If you haven’t already, we suggest you try CCleaner and make your PC fast and stable again.

CCleaner

Boost your PC performance and remove junk files easily with CCleaner.
Free trial Visit website

How can I use CCleaner on Windows 11?

  1. Visit CCleaner’s downlod page and download the version you want to use.
  2. Once the download is finished, run the setup file.
  3. Follow the instructions on the screen to complete the setup.
  4. Once the process is finished, start the application.

CCleaner is fully compatible with Windows 11, so it works exactly the same, and all of its features are readily available to you.

Is CCleaner free?

There are two versions of CCleaner, Free, and Professional, and you can use the Free version on your home PC without any restrictions.

Both versions will optimize your PC, but the Free version is missing the following features:

  • Driver updater
  • Software updater
  • Deep cleaning
  • Junk files real-time monitor
  • Ability to automatically clean the browser history

As you can see, there are some differences between the two, and you can use the Free version without restrictions, but if you want the best optimization for your PC, then the Professional version is what you need.

Cleaning can result in more free space or a performance boost for your Windows 10 or 11 PC.

As you can see, CCleaner offers users a host of features that allows them to keep their computers clean and running smoothly.

However, it’s recommended that you do 2 or even 3 passes when you clean your computer, as some files might not be picked up the first time around.

For more information, we suggest reading out how to download CCleaner to see how to install the software and learn how it works properly.

All this being said, we highly recommend that you use CCleaner on your Windows 10 or 11 computers. It is an awesome program, and it is also free. For more advanced utilities, upgrade to professional.

Firefox not loading pages after an update? Here’s a fix

Firefox is a great privacy-oriented browser, and it’s the browser of choice for many users. However, it seems that some users are having problems with it.

According to users, Firefox is not loading pages after an update. This can be a big issue since you won’t be able to visit websites on your PC.

If you’re having this problem, you’re in luck because today we’re going to show you a couple of methods that you can use to fix this and get back to browsing.

Why can’t Firefox load websites but other browsers can?

Many reported that they’re having trouble finding that site message in Firefox, and this is usually caused by your settings, so you might have to find and disable certain options.

Your firewall is another potential cause, so it’s advised to check its settings and make sure that Firefox is allowed to access the Internet.

If you encounter a Server not Found error in Firefox, the issue is most likely your proxy or DNS settings, so you’ll have to adjust them to fix this issue.

Luckily, there are ways to fix these issues, and today’s guide will show you how to do that.

What can I do if Firefox is not loading pages after an update?

1. Disable HTTP3

  1. Open Firefox.
  2. In the address bar, enter about:config.
  3. Enter network.http.http3.enabled and click the plus icon.
  4. Now set the network.http.http3.enabled value to False.
  5. Restart Firefox.

2. Use a different browser

Sometimes your browser installation might be damaged, thus causing issues such as this one. If that’s the case, you might want to consider using a different web browser.

Opera is a great alternative to Firefox, and it’s based on Chromium, so it works with Chrome’s extensions. Regarding privacy, the browser has a built-in ad blocker and VPN, so you can rest assured that your browsing sessions are private.

⇒ Get Opera

3. Disable extensions

  1. In Firefox, press Ctrl + Shift + A.
  2. This will open the Add-ons page.
  3. Click the switch icon next to the add-on that you want to disable.
  4. Repeat these steps for all addons.
  5. Once all addons are disabled, restart Firefox.

If the issue is gone, enable extensions one by one until you manage to recreate the problem. Once you find the problematic extension, disable or remove it.

4. Disable Enhanced protection

  1. Click the More icon and select Settings from the menu.
  2. Navigate to Privacy & Security and select Standard.
  3. Restart Firefox and check if the problem is resolved.

5. Make sure that Firefox is allowed through your firewall

  1. Press Windows key + S and type allow. Select Allow an app through Windows firewall.

  2. Click the Change settings button.
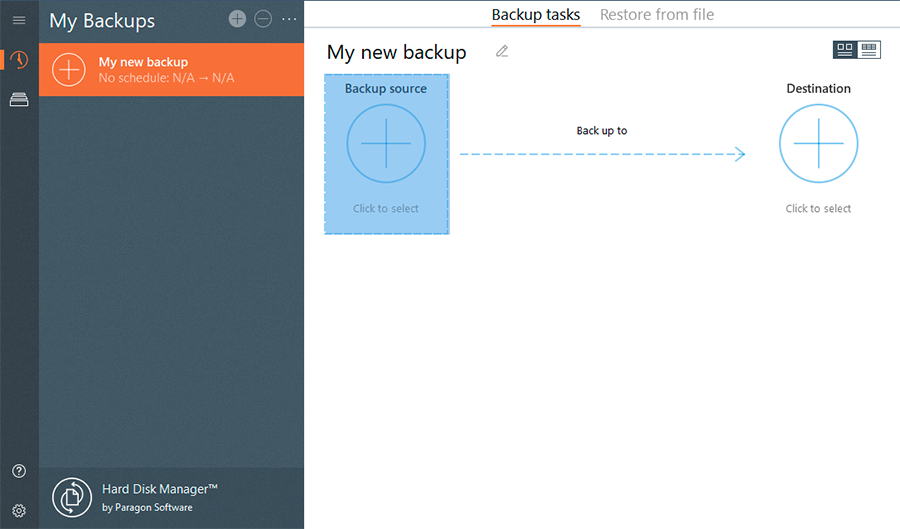
  3. Select Firefox and click on Remove.
  4. Now click Allow another app.
  5. Click on Browse.

  6. Select Firefox from its installation directory and click on Add.
  7. Click OK to save changes.

Keep in mind that this solution only works if you’re not using a third-party firewall. In case you’re using one, change its settings and make sure that Firefox is allowed through it.
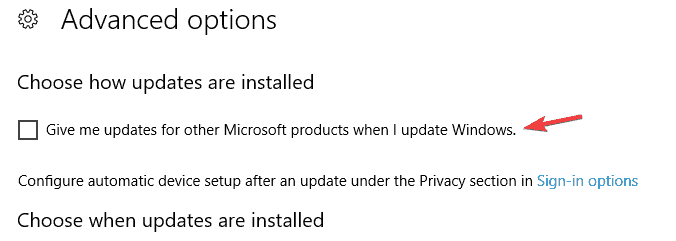
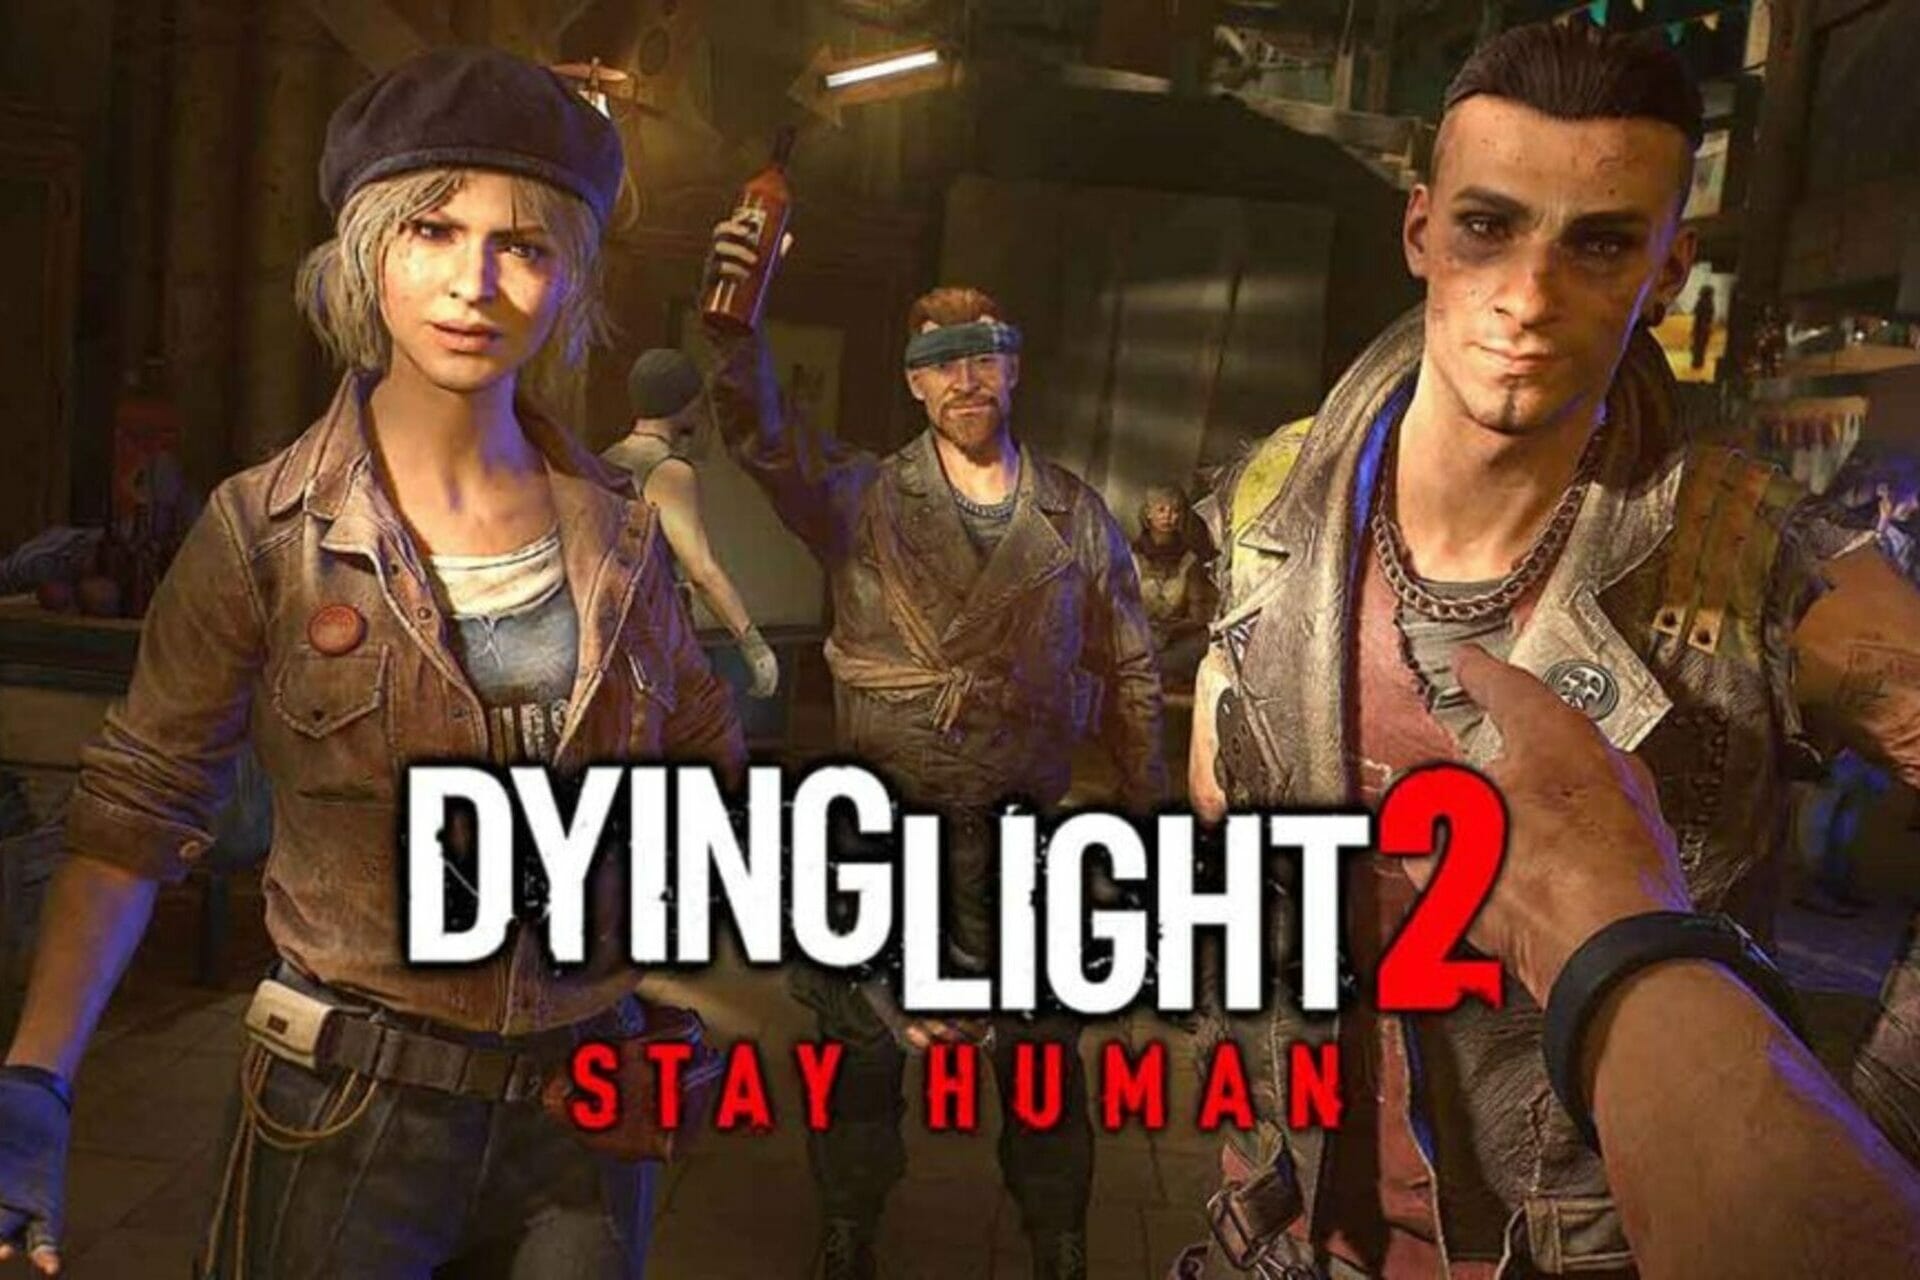
6. Try cleaning the cache

  1. Click the Menu icon and pick Settings.
  2. Navigate to Privacy & Security. Now click on Clear data.
  3. Click on Clear to confirm.
  4. Once the cache files are cleared, restart Firefox.

7. Check proxy settings in Firefox

  1. Navigate to the Firefox menu and pick Settings.
  2. Scroll down to the Network Settings and click on Settings.
  3. Select No proxy or Use system proxy settings and save changes.

8. Disable DNS Prefetching

  1. In the address bar enter about:config.
  2. Enter network.dns.disablePrefetch in the search.
  3. Locate network.dns.disablePrefetch on the list and set it to True.
  4. Restart Firefox.

Why is my Firefox page blank?

There are a few reasons for this issue, and the first one might be a bad extension. If your extensions are interfering with Firefox, you might get this problem on your PC.

A corrupted cache can also lead to this issue, so be sure to remove your cache and try again. In case your Firefox installation is damaged, you can also experience this problem, so a quick reinstall might be the best option.

These are just some of the solutions that you might want to try if Firefox is not loading pages after an update. If these solutions don’t work for you, then you might want to consider reinstalling your browser.

In case you’re having additional problems, you should read our guide on Firefox issues in Windows, since it covers most issues, so it’s a great start if you want to troubleshoot your browser.

Did you find a solution to this problem on your own? If you have, feel free to share it with us in the comments section below.

Microsoft celebrates Earth Day by showcasing some very eco-friendly laptops

Earth Day, a day that many people show their support for protecting the environment is coming up on April 22, and Microsoft is already celebrating. The company is highlighting some eco-friendly laptops and devices that you can purchase from its partners today, alongside mentioning how some laptop makers are being smarter with packaging and processes.

Leading the list of eco-friendly devices is the Acer Aspire Vero. The laptop comes with 30% recycled plastic in the chassis, and 50% recycled plastic in the keyboard caps. There’s also no paint on the chassis service, and the laptop is fully repairable and upgradable. Another laptop on the list is the ASUS ExpertBook B9, which has a long-lasting battery, so you use less electricity. There’s also the Dell Latitude 5000, which is made with 20% reclaimed carbon fiber, and has bio-based rubber feet. It even has  71% recycled and rentable materials in the lid.

Some other laptops and companies Microsoft choose to highlight can be seen below.

  • Dynabook Satellite Pro C40-J: Dynabook uses their on solar power generation system to cast this device. Packaging is also recyclable.
  • HP Elite Dragonfly G3: Uses recycled magnesium in the cover, ocean-bound plastic in the speaker enclosure, 50% recycled plastics in key caps. Box packaging is 100% sourced sustainably.
  • Lenovo Yoga 6:  Made with recycled materials, cover has recycled aluminum that’s fabric rapped with 50% recycled plastics. Free of mercury and arsenic, and is BPR free. Battery cells use post-consumer plastic.
  • Samsung Galaxy Book 2: Feature Samsung’s eco-conscious materials that remorse’s ocean-bound plastics. AMOLED display is GREENGUARD gold certified.

The Logitech Meetup, Panasonic Toughbook 55 also make this list. Remember to celebrate Earth Day on April 22, as this year’s theme is “Invest in Our Planet.” Learn more about Earth Day and how other companies and people are celebrating by going to the dedicated website.

Saving and sharing Excel scripts with your coworkers is getting much easier

Scripts are pretty useful as it can help automate parts of working in Excel, so sometimes you might want to share one with a coworker within your organization. Well, spotted by Neowin, it looks as though Microsoft has heard feedback and is working on the ability to save scripts to SharePoint sites.

The feature has officially been added to the Microsoft 365 Roadmap, and is set for release in July of this year. With it, you can run team-owned and shared scripts in Excel for the web. Microsoft offers the following description.

“With this new feature, users will be able to save their scripts to a SharePoint site so that their team members can more easily collaborate, view, and run team-owned scripts on their Excel workbooks.”

This feature was first mentioned by Microsoft back on March 31, and will hit all users worldwide when released. Do note, though, that this is just an estimate and the actual release can always change. It’s just the latest ability for Excel on the Web, which is also getting a Argument Assistance card UI, to help minimize errors in your workflows.

Microsoft PowerToys could add a macOS-like “peek” feature to preview items in File Explorer

Microsoft PowerToys already adds many useful additions to the File Explorer, but a big one that’s based on something from MacOS could be coming soon. That’s according to a new prototype video shared by a Microsoft employee on Reddit, suggesting a “peek” feature for the popular Windows app (via Neowin.)

Apparently created during a hack week at Microsoft, u/MSFT-SAM notes that this new Powertoys Peek feature was created as a “lighting fast file preview feature.” Four engineers worked on the project, according to Sam. That’s why, for now, it’s just a prototype and the team is looking for feedback from the community based on the video. Yet unlike how file preview works in macOS (spacebar key to preview) Microsoft’s take for PowerToys looks to add the ability to preview photos in the File Explorer with the Spacebar and the Shift key combo. This then opens the photo in a small temporary preview window, without opening the actual app. It doesn’t look like it works with other file types at the moment, and the multi-key combo is necessary because PowerToys does not allow for single key shortcuts.

PowerToys Peek

So far Feedback has been pretty good based on reactions in the Reddit thread. The performance looks to be on point, and many people have mentioned that Microsoft should add some tweaks. This includes support for Office Files, a way to open the app from the associated app from the preview window, navigating between previews for multiple files with arrow keys, and even basic edit controls.

To be clear, you already can “add” this feature to Windows with a third-party app called QuickLook. But it would be nice for this to be added to PowerToys, too which is much more popular. We’d love to hear what you think of this feature so be sure to drop us a comment below.

What is UEFI (and how it differs from BIOS)

UEFI, short for Unified Extensible Firmware Interface, is a specific interface that helps you power up your operating system. Basically, it’s the thing that breathes fire into your startup process. It does this by acting as an interface between the hardware firmware and your operating system.

Interestingly, people frequently confuse UEFI and BIOS for each other. They are, however, quite different. Let’s learn how.

What is UEFI?

UEFI is a special standard that sets up an interface between your computer’s operating system and firmware. In brief, it lays out a way your PC’s firmware (the software necessary to run your device hardware) and operating system can communicate with each other.

You can understand the role of firmware in this process by checking this clear guide that explains what firmware is.

Moreover, it also supports a wide variety of hardware platforms, including everything from Intel Itanium, x86-32 and x86-64 processors to Das U-Boot.

How do UEFI and BIOS differ from each other?

The BIOS, short for Basic Input and Output, is also a specification responsible for starting up your PC. You can think of it as an earlier, less developed version of UEFI.

From what you must’ve guessed by now, both UEFI and BIOS perform a similar function: they help you power up your CPU. The UEFI, a modern version of BIOS, differs from the BIOS due to its superior functionalities. It gives you faster boot time, while also supporting a larger hard drive.

But how does that happen?

If you’re using a system that uses BIOS, then when you boot it up, the first thing that BIOS does is load up the first sector of your PC’s hard drive, which, in turn, contains the address to other sectors. It also only supports 16-bit mode—which severely limits larger server platforms.

Related: How to Enter into BIOS in Windows 10 or Windows 11

The UEFI, on the other hand, stores up the all information required for startup and initialization in an .efl file. Moreover, it also supports a 64-bit system, therefore having a higher addressable memory. In short, this makes UEFI much faster than its predecessor. It can also provide GUI navigation, as opposed to BIOS, where you can only move through the keyboard.

UEFI also offers the feature of Secure Boot, a security standard designed to make sure your computer start-ups secure. Suffice it to say, this makes UEFI a preferable choice among almost all modern computer systems.

BIOS and UEFI, Explained

We hope this brief introduction helped you get sound on BIOS and UEFI. To wrap it all up, both BIOS and UEFI are interfaces between your operating system and your hardware’s firmware. While the UEFI is the more modern and faster version of the two, the former laid down the groundwork for the whole technology.

Peloton Guide is a gut punch to fans of Microsoft’s Xbox Fitness

Peloton this week finally released the Peloton Guide, the company’s first motion-tracking fitness camera designed to add an advanced level of feedback and guidance to Peloton’s various fitness videos.

The Peloton Guide, which was announced in late-2021 for a 2022 release, can be purchased from the official Peloton website for a one-off payment of $295 or paid off monthly for $13 per month. A $545 ($23 per month) Guide Strength Starter bundle is also available which includes the Peloton Guide camera, three sets of dumbbells, and a workout mat.

Peloton enthusiasts looking to get really serious with their home workouts can invest in the pricey $935 ($39 per month) Guide Power bundle which includes the Guide, a workout mat, six dumbbells, and a separate heart rate monitor device.

Currently, the Peloton Guide’s tracking features only support Peloton’s on-demand Strength classes though support for other workout styles and live classes is planned in a future update. A separate $24 monthly Peloton All-Access Membership subscription is required to access all of these workouts.

The Peloton Guide will seem remarkably familiar to those who owned one of Microsoft’s Xbox One video game consoles as it seems to work almost exactly the same as the Xbox One’s Kinect sensor and the Xbox Fitness service that launched with the Xbox One in late-2013, almost a decade ago.

Xbox Fitness boasted a large selection of on-demand workout videos that could be accessed by all Xbox Live Gold subscribers and the Xbox One’s Kinect, a marked improvement on the Xbox 360 console’s Kinect sensor, could track body movements, the level of stress being applied to specific muscle groups, and even a user’s heartrate, something the brand new Peloton Guide can’t actually do and needs a separate device for.

Xbox Fitness had an incredibly passionate userbase during its time though it was eventually shut down by Microsoft in mid-2017 as part of the rather frustrating shift away from motion gaming and Kinect functionality on Xbox consoles.

Microsoft’s Xbox One Kinect and console where very much ahead of their time when it came to features such as voice and gesture controls and now it seems that fitness tracking can be added to this list. Not only is Peloton this week picking up where Xbox Fitness left off but Sky TV is also exploring motion gaming with their new TVs (ironically with the help of Microsoft) and there are several smartphone fitness apps which now also offer limited body tracking via smartphone and tablet cameras.

The sudden renewed interest in motion-tracking in the health and wellness space is likely pretty infuriating for Xbox Fitness fans and those who worked on the initiative who knew just how much potential it had and wished Microsoft would have continued supporting it.

It’ll be interesting to see if Microsoft ever decides to resurrect the Kinect and motion gaming given how mainstream such concepts are nowadays. The tech giant is apparently working on some kind of new Xbox-related project which could see a release sometime soon. Could it be a new Kinect? Fingers crossed.

Do you miss Xbox Fitness and would you like to see it make a comeback? Are you interested in the Peloton Guide? Let us know in the comments below and then follow us on Twitter and Facebook for more tech news.

Fix: Kernel Mode Heap Corruption on Windows 11

If you’ve used any Windows computer for an extended period, you’ve no doubt run into the infamous blue screen of death or green screen of death as it is for Windows 11.

There are many causes of the death screen, but one of them is the KERNAL_MODE_HEAP_CORRUPTION error. You can see this error pop up on the death screen, but the question is what causes this error? And what are the ways to fix this?

What is Kernel Mode and why does it cause the screen of death?

Kernal Mode, also known as the system mode, is one of the CPU’s main operating modes. If you run your computer on Kernal Mode, you’ll pretty much have unrestricted access to every aspect of the hardware.

There are many causes of the error with the most common being problems with the drivers, issues with the hardware, or corrupted files causing havoc. You have to try multiple solutions before you find out what is the cause.

This guide will show you how to diagnose and subsequently fix the Kernal Mode issue plaguing your computer. Fixing this issue is a little complicated but follow these steps and you won’t go wrong.

How can I fix Kernel Mode Heap Corruption on Windows 11?

1. Use the built-in Verifier

  1. Bring up the search bar by clicking on the magnifying glass icon in the taskbar.
  2. Type in verifier in the search bar and click on the ‘verifier’ entry that appears.
  3. Clicking it will bring up the Device Verifier Manager.
  4. In this window, select Create Standard settings then click Next.
  5. Next, click on Automatically select unsigned drivers then click Next. Doing so will narrow down the problem caused by an unsigned driver.
  6. The Driver Verifier Manager will search for any unsigned drivers. If everything’s okay, a small window will appear telling you nothing has been found.
  7. If there’s an issue, the Verifier Manager will tell you the source where you will then have to fix your drivers.

2. Update graphical drivers

  1. One solution is to update your drivers by first opening the Settings menu.
  2. Click on the Windows Update tab.
  3. Check if there are any updates available. If there are, they will download automatically.
  4. Click Restart now to finish the installation.
  5. You can also manually update by first opening the search bar and searching for the Device Manager.
  6. Click on Display adapters.
  7. Right-click on your video card and select Properties from the drop-down menu.
  8. Go to the Driver tab and select Update Driver.
  9. Select Search automatically for drivers. Windows 11 will automatically download and install the driver.

If you’re looking for a more time-efficient way to automatically update your drivers, then you should download and install Outbyte Driver Updater.

3. Rollback on driver update

  1. At times, the cause of the kernel-mode corruption may because of a malfunctioning or poorly designed driver update. So you will have to roll back the update.
  2. Return to the Device Manager and open the Properties menu of the video card.
  3. Select the Driver tab and locate Roll Back Driver.
  4. Click Roll Back Driver.
  5. Windows 11 will automatically install the previous version of the driver.

4. Fix corrupt files on the system using Command Prompt

  1. In the search bar, type in Command Prompt to bring up the Command Prompt app.
  2. Click Run as administrator.
  3. Start by typing in sfc /scannow
  4. Give your Windows 11 computer time to scan and verify the system.
  5. Windows Resource Protection should not find any sort of integrity violations.
  6. If it does, you’ll need to fix this.
  7. In the Command Prompt, type in Dism /Online /Cleanup-image /Scanhealth
  8. Press Enter on your keyboard. Wait for Windows 11 to finish its process.
  9. If everything is fine, the Command Prompt will state that no corruption has been detected.
  10. If something wrong was indeed detected, type in Dism /Online /Cleanup-image /Restorehealth
  11. Press Enter on your keyboard.
  12. Wait for your Windows 11 computer to finish its process

5. Run troubleshooter for hardware

  1. Search for the Command Prompt again and click Run as administrator.
  2. Type in msdt.exe -id DeviceDiagnostic
  3. Hardware and Devices window appears.
  4. Click Advanced.
  5. Unclick Apply repairs automatically. Do this so you can know what the problem is before it gets automatically patched.
  6. Then click Next.
  7. The software will run a diagnostic scan of your computer and see if there are any problems.
  8. If there’s an issue with the drivers, the troubleshooter will list them out.
  9. You can select which ones you want to implement and which ones you don’t.
  10. After making your selection, click Next.
  11. You may have to enable the changes Windows 11 is asking for.
  12. A window will appear asking you to attempt the fixes that are being suggested. Perform them and close the window.

6. Run Windows Memory Diagnostics Tool

  1. Right-click the Start icon to bring up a popup menu.
  2. Click Run.
  3. In the Run command menu, type in mdsched.exe.
  4. Click OK which will open up Windows Memory Diagnostic.
  5. Click on Restart now and check for problems.
  6. Check for problems the next time I start my computer is better for checking your computer’s memory later.
  7. The Windows Memory Diagnostic Tool will do multiple runs as it runs its tests. If no errors appear, then your computer’s memory is totally fine.
  8. If there are errors, you may need to replace some hardware components. Contact your hardware manufacturer for help on this end.

What are other methods to fix my Windows computer?

If you have a Windows 10 computer, the same problem arises there and it’s recommended that you learn how to fix that issue if it ever comes up. You still have to update your drivers manually and check your GPU for hardware issues.

Another error you may encounter is the Windows Subsystem for Linux register error that gets in the way of a Linux installation. Although this solution is mainly for developers and other people who dabble in Linux.

More common are when Windows 11 drivers become unavailable. In this instance, you may have to reinstall the driver again or outright manually do it yourself. Fortunately, it’s easy to do; much easier than fixing the kernel-mode error.

We recently covered the Invalid_Kernel_Stack_Address error, so don’t miss it for more information.

Feel free to leave a comment below if you have any questions on other Windows 11 apps. Also, leave comments about reviews that you’d like to see or information on other Windows 11 features.

Dying Light 2 is not launching on Steam? Fix it now

With its initial release date at the end of 2021, Dying Light 2 is one of the most exciting masterpieces this year, as it places you into an adventurous environment built on numerous narrative branches.

The whole scenario relates middle of the civilization where viruses won and people have fallen back to the Dark Ages.

As it can be played on Microsoft Windows, PlayStation 4, PlayStation 5, Xbox One, and Xbox Series X/S. A Nintendo Switch there is no wonder that this game is also extremely versatile.

According to worldwide users, Dying Light 2 usually works great on any device and platform, but it sometimes seems like not launching on Steam.

It can be a pretty annoying issue, especially if you just discovered this game’s amazing capabilities.

Fortunately, there are always useful solutions that will help you get rid of this problem, and today we’re going to show you the best you can find.

What can I do if Dying Light 2 is not launching?

1. Update your graphics drivers

  1. Press on the Windows key, type Device Manager, then click on the first result.
  2. Search for the Display adapters section, expand it, then right-click on the needed driver and click on Update driver.
  3. Choose to Search automatically for drivers.
  4. Now, your OS will scan for the newest available options and will notify you accordingly.

If you choose to perform the above steps, you’ll surely update your drivers effortlessly, but there is another solution that will guarantee that you won’t consume time.

Outbyte Driver Updater is software that monitors your PC for missing/outdated drivers and easily lets you fix and update them.

Not to mention that it lets you back up and save your PC drivers into a compressed zip file. This tool is extremely useful because a driver update can sometimes cause malfunctions. 

Plus, it is incredibly fast and easy to use, so you don’t have to worry if you’re a beginner. It would be a piece of cake to use any of its features.

⇒ Get Outbyte Driver Updater

2. Update the gaming platform

  1. Hit the Windows key, type Steam, then open the first result.
  2. Now, from the top-left corner of the window, click on Steam, then choose to Check for Steam Client Updates.
  3. Wait until the process is finished, then check if the issue persists.

3. Update the game on Steam

  1. Press on the Windows key, type Steam, and open the app.
  2. From the main menu, navigate to Library.
  3. Search for Dying Light 2, then right-click on its Properties (Just like we show you with CS directly below).
  4. Choose Updates, then, from the right window pane, under Automatic Updates, choose to Always keep the game up to date.

4. Verify the game’s integrity files

  1. In your Steam app, click on Library.
  2. From the left side of the window, right-click on Dying Light 2, then choose Properties (Just like we show you with CS directly below).
  3. Now, click on Local Files, located in the left window pane.
  4. Choose to Verify the integrity of the game files.

5. Perform a clean boot and run the game

  1. Use the following keyboard shortcut to open the Windows run dialog box: Windows + R.
  2. There, type msconfig, then click on OK.
  3. Go to the Services tab, then check the Hide all Microsoft services box.
  4. Now, click on Disable all.
  5. Go to the Startup tab and click on Open Task Manager.
  6. Disable one task at a time and restart the system.

6. Reinstall the game

  1. In your Steam client, click on Library.
  2. Search for Dying Light 2, from the left window pane.
  3. Right-click on it, then choose to Uninstall it (Just like we show you with the CS example directly below).
  4. Steam will confirm with you whether you want to completely uninstall the game. When you are ready, click the Uninstall button.
  5. To reinstall it, double-click the game’s name or right-click and choose Install from the pop-up menu.
  6. Follow the on-screen instructions to complete the process.

So, if you ever notice that Dying Light 2 is not launching on Steam, this guide will surely help you fix this issue in no time.

Plus, if none of our today’s recommendations worked for you, you might also want to try updating/reinstalling DirectX and Visual C++.

The best thing is that the above solutions will work for any launching-related game problem. Thus, do not hesitate to try them anytime you need, not only when running the Steam gaming platform.

In case it’s happening to face any additional related questions, make sure you leave a comment in the dedicated section below.

Kindle Driver for Windows 11: Download & Fix Compatibility

Kindle is an e-reader manufactured by Amazon, that lets users purchase, download, and read from thousands of books. It’s a great device for those who love to read and offers amazing support, but many users found that Windows 11 is not recognizing Kindle.

And this poses a major problem to those who regularly transfer data between their PC and the Kindle. But the problem isn’t as intricate as it appears, and if you follow the right approach, it should be resolved within a few minutes.

So, without further ado, let’s delve into the topic at hand and understand why Windows 11 is not recognizing Kindle.

Why is my Windows 11 PC not recognizing Kindle?

There’s no single issue that leads to this problem which makes troubleshooting a tad more difficult. So here, you will have to identify the underlying cause in your case and execute the relevant fix for it, to get things up and running.

Many users faced the issue due to something as trivial as an improper connection or a malfunctioning USB port. Also, misconfigured power settings are known to cause issues with the connected devices.

Power plan settings in Windows 11

A problematic driver is another common reason behind Windows 11 not recognizing Kindle. Besides, oftentimes, the OS is unable to read Kindle, so modifying the device type here might help.

Let’s now walk you through the most effective fixes here. Try them in the listed sequence for quick troubleshooting, unless you have identified the underlying cause. In which case, go ahead and directly execute the relevant fix.

What do I do if Windows 11 is not recognizing Kindle?

1. Check the connection and restart Kindle

Your primary approach when Windows 11 is not recognizing Kindle should be to verify that the connections are in order. Make sure that the cable is properly plugged in at both ends and that it’s not damaged.

Then, press and hold the power button for 30-40 seconds to restart the Kindle. In case it restarts earlier, release the power button immediately, and now check if Kindle now appears on the Windows 11 PC.

In case the issue persists, try connecting the Kindle to another computer and check if it works there. If it does, the problem most likely lies with your PC and the methods listed here should fix the Windows 11 not recognizing Kindle issue.

But, if the Kindle is not recognized on the other PC as well, try resetting it and that should resolve the problem.

2. Install Kindle as an MTP device

  1. Press Windows + S to launch the Search menu, enter Device Manager in the text field at the top, and click on the relevant search result that appears.Device Manager
  2. Double-click on the Portable Devices entry here to expand and view Kindle.Portable devices to fix windows 11 not recognizing kindle
  3. Now, right-click on the Kindle (could be here with another name) device, and select Update driver from the context menu.Update driver to fix windows 11 not recognizing kindle
  4. Next, click on Browse my computer for drivers in the Update Drivers window.Browse my computer for drivers
  5. Select Let me pick from a list of available drivers on my computer here.Let me pick from a list of available drivers
  6. Untick the Show compatible hardware checkbox to view all available drivers.Uncheck show compatible hardware to fix windows 11 not recognizing kindle
  7. Select the relevant category from the left, the MTP driver from the right, and then click on Next at the bottom.Select MTP driver to fix windows 11 not recognizing kindle
  8. Click Yes in the confirmation prompt that pops up.Click Yes

Having the right driver installed for every device is critical for its effective functioning. There are various drivers that could work for a given device but all these wouldn’t have the same outcome. So, select the MTP driver for Kindle and check if Windows 11 is now recognizing it.

Also, you can use a reliable third-party app that will get you the best available drivers for every device and minimize the chance of encountering such errors.

We recommend using Fortect Driver Updater, a dedicated tool that will automatically install the latest version and keep all the drivers on the system up to date.

⇒ Get Fortect Driver Updater

3. Assign a drive letter to Kindle

  1. Press Windows + X or right-click on the Start icon to launch the Quick Access/Power User menu, and select Disk Management from the list of options.Dism Management to fix windows 11 not recognizing kindle
  2. Now, right-click on the Kindle entry near the bottom, and select Change Drive Letter and Paths from the context menu.Change drive letter and paths
  3. Click on the Add button.Add to fix windows 11 not recognizing kindle
  4. Select a drive letter from the dropdown menu or go with the default selection, and click on OK to assign the drive letter.Assign drive letter to fix windows 11 not recognizing kindle

For a storage device to appear in File Explorer, it should have a drive letter assigned. The same applies to USB drives and hard disks. So, assign a drive letter to Kindle, if one is not given by default, and check if Windows 11 is now recognizing it.

4. Turn off the USB selective suspend setting

  1. Press Windows + R to launch the Run command, type control panel in the text field, and either hit Enter or click on OK to launch the Control Panel app.Control panel to fix windows 11 not recognizing kindle
  2. Now, click on System and Security from the options here.System and Security
  3. Click on Power Options.Power options to fix windows 11 not recognizing kindle
  4. Click on Change plan settings next to the plan that’s currently selected.Change plan settings to fix windows 11 not recognizing kindle
  5. Now, click on the Change advanced power settings option.Change advanced power options
  6. Double-click on the USB settings entry and then on the USB selective suspend setting option under it. Click on the On battery dropdown menu, and select Disabled.Disable USB selective suspend setting to fix windows 11 not recognizing kindle
  7. Similarly, select Disabled for Plugged in as well, and click on OK at the bottom to save the changes.Disable for both

Once done, restart the computer for the changes to come into effect and check if the Windows 11 not recognizing Kindle issue is resolved.

5. Reinstall USB controller drivers

  1. Press Windows + R to launch the Run command, enter devmgmt.msc in the text field, and either click on OK or hit Enter to launch the Device Manager window.Device Manager
  2. Double-click on the Universal Serial Bus controller entry to expand and view the devices under it.Universal Serial Bus controllers
  3. Now, right on the Universal Serial Bus controller device here, and select Uninstall device from the context menu.Uninstall device to fix windows 11 not recognizing kindle
  4. Click Uninstall in the confirmation prompt that pops up.click Uninstall
  5. Similarly, uninstall all such devices and then restart the computer for the drivers to be automatically reinstalled.

If the USB drivers are not functioning effectively, it’s likely that they are corrupt. In this case, reinstalling them is the simplest way to eliminate the problem.

One of the five methods listed above must have fixed the Windows 11 not recognizing Kindle issue for you. In case these haven’t, you are left with no option but to either update its software or reset Kindle since the problem most likely lies with it.

Also, find out what to do if a Kindle book won’t download, since this error negates the whole purpose of purchasing a Kindle.

Tell us which fix worked and your experience of Kindle with Windows 11, in the comments section below.

Fix: Tiny Tina’s Wonderlands is not loading on PC

Developed by Gearbox Software and published by 2K Games, Tiny Tina’s Wonderlands is an action role-playing first-person shooter video game.

Since its release (on 25 March 2022), positive feedback didn’t wait to come to our attention, but there are also some specific issues reported by worldwide users.

In this matter, it seems like Tiny Tina’s Wonderlands is sometimes not loading as needed. Plus, according to players, this problem will occur most of the time on PCs.

Fortunately, there are always solutions you can try to solve this kind of trouble, and this article is going to list the best of them.

Even if this issue seems to usually appear on computers, we consider properly delivering some useful fixes that will help you if Tiny Tina’s Wonderlands is not loading on your console.

Where can I play Tiny Tina’s Wonderlands?

If you’re facing loading troubles with Tiny Tina’s Wonderlands on your computer, keep in mind that this game is extremely versatile, as you can also try running it on various consoles if you have one.

In this matter, developers allow you to play on both PS (PlayStation 4 and 5) and Xbox editions (Xbox One, Xbox Series X, and Xbox Series S).

According to engineers’ declarations, Tiny Tina’s Wonderlands will soon be available on one of the most gaming platforms, Steam, so make sure you keep an eye on the biggest news.

What can I do if Tiny Tina’s Wonderlands is not loading on PC?

1. Check the game’s minimum requirements

  1. Use the following keyboard shortcut to open Windows Settings: Windows + I.
  2. Go to System.
  3. From the left window pane, scroll to About, and click on it.
  4. Now, in the right window pane, you’ll be able to find your OS and hardware specs.

If your game is not loading on your computer, you should first check if your system meets the Tiny Tina’s Wonderlands’ minimum requirements. In case you don’t already know what are those, make sure you verify the list below:

  • CPU: Intel Core i5-3570 or AMD FX-8350
  • RAM: 6GB
  • Graphics: Nvidia GTX 960 4GB, or AMD Radeon RX 470
  • Storage: 75GB
  • Operating System: Windows 10

Meeting the game’s minimum requirements is good, but having better specifications is better. That’s why you should follow the following recommendations:

  • CPU: Intel Core i7-4770 or AMD Ryzen 2600
  • RAM: 16 GB
  • Graphics: Nvidia GTX 1060 6GB, or AMD Radeon RX 590 8GB
  • Storage: 75 GB
  • Operating System: Windows 10

2. Update your OS

  1. Press simultaneously on the Windows and I keys, to open Windows Settings.
  2. Navigate to Update & Security.
  3. Now, from the right window pane, choose to Check for updates.
  4. Wait until your system scans for new updates. After that, you’ll be notified if there are any available options to download.

3. Set High Priority in Task Manager

  1. Press simultaneously on the Ctrl, Shift, and Esc keys to start Task Manager.
  2. Go to the Details tab, right-click the desired process, and choose to Set priority. Then, select any value that you want.
  3. When the confirmation dialog appears, select Change priority.

4. Update your graphics drivers

  1. Hit the Windows key, type Device Manager, then click on the first shown result.
  2. Look for the Display adapters section and expand it. Then, right-click on the needed element and choose to Update driver.
  3. Now, click on Search automatically for drivers.
  4. Your OS will scan for any available and reliable option and you’ll be notified accordingly.
  5. Repeat the same process with all the listed drivers from the Display adapters section.

The above steps are simple but they can consume your precious time. That’s why we truly believe that trying an automatic solution to update your drivers is a better workaround.

Its name is Outbyte Driver Updater and it is a tool that will effortlessly take care of your updated or corrupted drivers. It will automatically scan for reliable options through its huge database.

Plus, it will provide a detailed report of all of your out-of-date device drivers, in order to know where the issues may come from.

⇒ Get Outbyte Driver Updater

What can I do if Tiny Tina’s Wonderlands is not loading on my console?

2.1 Check for game updates

2.1.1 Xbox editions
  1. Press the Xbox button on your controller.
  2. Next, choose My games & apps, then to See all.
  3. Select Manage and then Updates.
  4. If there is an update available, your console will automatically start downloading & installing the new patch.
2.1.1 PS editions
  1. Go to Library and highlight the game you want to update.
  2. Press the Options button and select Check for Update.
  3. If an update is available, follow the instructions to install the update.

2.2 Check for system updates

2.2.1 Xbox editions
  1. Press the Home button on the Xbox console to open the Dashboard menu.
  2. Now, select Settings from the bottom of the menu.
  3. Choose All Settings.
  4. Go to System.
  5. Select Updates.
  6. Choose to Update Console (if available).
  7. Follow the on-screen prompts to complete the update process.
  8. Once done, make sure to restart the console to apply changes.
2.2.2 PS editions

For PS4:

  1. Go to Notifications and delete any existing update files by pressing the (options) button, then choose to Delete them. 
  2. Select Settings.
  3. Choose System Software Update.

For PS5:

  1. Go to Settings.
  2. Navigate to System.
  3. From the left window pane, choose System Software.
  4. Select System Software Updates and Settings.

2.3 Reset your console

2.3.1 Xbox editions
  1. Press the Xbox button to open the guide.
  2. Select Profile & system.
  3. Go to Settings.
  4. Choose System.
  5. Navigate to Console info.
  6. Select Reset console.
2.3.2 PS editions

For PS4:

  1. Power off your console completely, then unplug any cables (Keep in mind not to set it to Rest Mode).
  2. Press the power button on your PS4, then hold it down until you hear two beeps (It usually takes like 10 seconds).
  3. You’ll see a black screen when the system boots up in Safe Mode.
  4. There, you can either choose to Restore Default Settings, Initialize PS4, or Initialize PS4 (Reinstall System Software).

For PS5:

  1. Press and hold the power button for approximately 10 seconds, and release it after you hear two beeps.
  2. Connect a DualSense wireless controller via a USB cable.
  3. Then, press the [PS] button on the controller.
  4. Your system should now be in Safe Mode.
  5.  Now, you can choose to Restore Default Settings or Reset PS5.

So, here you are! With a complete guide to using if Tiny Tina’s Wonderlands is not loading as expected on your computer or console.

Of course, in case you encounter additional questions or curiosities, do not hesitate to leave a comment in the dedicated section below.

Windows 11 Not Updating After Restart? How to Fix it

Windows updates are released on a regular basis by Microsoft, and they are vital for keeping your computer secure. Thus, we will show you how to fix the Windows 11 not updating after restart error.

It is highly advised that you create a backup of your personal data before proceeding with the solutions to make sure you won’t lose anything by mistake.

A variety of factors may contribute to the not updating after restart problem, ranging from a sluggish internet connection, and third-party antivirus software to a lack of available disc space, corrupted update files, or driver problems.

Follow along as we will first see why it is important to update your operating system on a regular basis then jump into the list of solutions to the Windows 11 not updating after restart error. Keep up with us!

Why should I update my OS?

You’re probably used to seeing those small pop-up windows that tell you to update your OS by now. This notice indicates that software updates for your computer, laptop, tablet, or smartphone are available.

Updating your software and OS has numerous advantages. It all boils down to making adjustments. Identifying and removing computer bugs, as well as repairing security issues that have been detected, are examples of such duties.

Security flaws, also known as software vulnerabilities, are appealing to hackers because they allow them to gain access to a system. Hackers can exploit the weakness by writing code that particularly targets the flaw at hand.

When you visit a malicious website, read a compromised email, or play infected media, an exploit may infect your machine without your knowledge or agreement.

What happens after that? Malware can be used to steal data from your device or allow an attacker to take control of your computer and encrypt the data in your files. On your devices, you most likely have a big number of papers and personal information.

Your personally identifiable information, which might range from emails to bank account numbers, is of interest to cybercriminals.

This means they can either use it to commit crimes in your name or sell it on the dark web to allow others to do so in your identity.

It’s conceivable that you’ll have to pay a ransom to have your encryption key back. You might also pay a ransom and then not get your money back.

Cyber security is largely about you, but there are some other individuals to think about as well. You incur the danger of distributing a virus to your friends, family, and business contacts if your device becomes infected with one. As a result, it’s critical that you keep your software and OS up to date.

How can I fix Windows 11 not updating after restart?

1. Run the Windows Update troubleshooter

  1. Hold the Windows key + I and navigate to System from the left panel followed by Troubleshoot.system-troubleshoot windows 11 not updating after restart
  2. After you are inside the Troubleshoot menu, click on the Other trouble-shooters option in order to find more troubleshooters.othertroubleshoot windows 11 not updating after restart
  3. Scroll down until you find the Windows Update troubleshooter and click Run next to it.windows-update-troubleshooter windows 11 not updating after restart

2. Free up drive space

  1. Open File Explorer and click on This PC.this-pc windows 11 not updating after restart
  2. Now check whether the drive you have set to install Windows updates on is full. If it is, try to go through it and delete redundant data.local-c-free windows 11 not updating after restart

3. Update your drivers

Outbyte Driver Updater is a lightweight software that updates, fixes, and replaces all your device drivers that need to be addressed. It is suitable for those who don’t want to spend time going through their drivers or troubleshooting driver-related errors.

4. Disable your antivirus

  1. Expand the icons from your taskbar on the right side and right-click on the antivirus one. Choose Avast shields control followed by Disable for 10 minutes.disable-antivirus-icon xbox controller not recognized windows 11
  2. In case you use another antivirus software, the steps are similar in disabling it temporarily.avira-disable-icon xbox controller not recognized windows 11

If the problem has gone away, it’s likely that your antivirus software was the source of the issue. To secure your machine and avoid future antivirus-related errors, you should try using another appropriate antivirus tool for Windows 11.

5. Run the SFC scan

  1. Open Command Prompt as an administrator by typing cmd inside the Windows Search function and right-clicking on it.cmd-search windows 11 error system thread exception not handled
  2. Now type or paste the following command and press Enter: sfc /scannowsfc-scannow windows 11 error system thread exception not handled

These are the five solutions you can apply in order to fix the Windows 11 not updating after restart issue. However, in case you need further aid, check out our post on what to do if Windows Update is not working.

Was this guide useful for you? In order to improve our future posts leave us a comment in the section below and tell us what you think. Thanks for reading!

Best Minecraft Mods for Windows 11 (& Other Popular Games)

Windows 11 has a lot of customization options available from changing your wallpaper to choosing your accent colors and customizing the taskbar.

These customizations should be more than enough for most people who want to personalize their operating system.

Windows 11 is a great-looking OS on its own, but if you’ve been staring at the same old graphics for a while, you might be getting a little bored. Luckily, there are plenty of mods out there to spice things up.

In addition, Microsoft is also open to third-party developers, and this means that the operating system has a thriving modding community.

If you want to customize your desktop even further, then these mods are the best place to start.

Are mods legal?

Windows 11 has been out for a little while now, and we’re starting to see some amazing mods being made for it.

Rather than just adding new features like a lot of the mods out there, these mods are all about bringing something new to the OS.

The best thing about most of these mods is that they don’t require any additional software or hardware. You can download them directly from the website and immediately start using them.

On the legality of mods, it is a grey area. It’s not illegal to mod games, but it is illegal to distribute copyrighted material, such as game codes and certain assets.

As such, you cannot sell mods. It’s also important to note that the software developers you’re modifying can opt out of supporting modding, which means they can shut down mods anytime.

What are some of the best Windows 11 mods?

1. Minecraft

Minecraft’s mod scene has always played a huge part in the game’s longevity and popularity. Whether it’s a visual upgrade or a few mechanical tweaks, there are hundreds of ways to improve your experience to make the game feel new.

However, as you install mods, remember to keep them at a minimum as too many can cause loading issues.

1.0 RLCraft

When you’re looking for an extreme survival adventure, this is the Minecraft mod pack to choose. RLCraft is a modded add-on to Minecraft created by Shivaxi. This means the player must already have Minecraft and download the pack online.

The mod pack introduces a skill tree that can be unlocked throughout the game, providing different benefits that can be learned.

Additional features include:

  • A new tool has been added which allows players to break down specific blocks faster and more efficiently.
  • Weapons, and most tools, are now crafted from the new resource and have enhanced qualities.
  • An enhanced compass is part of the pack and you can find your way around your Minecraft world, and it’s pretty useful for finding where you’re going in dungeons too.

⇒ Get RLCraft

1.1 The Lost Cities Mod

The Lost Cities mod for Minecraft is one of the more popular and stable adventure mods out there.

This mod adds a wide variety of structures to Minecraft. These structures include houses and forts for the people who lived in the cities during their period. 

Some structures also include things you might find in everyday life in these civilizations, such as markets or arenas where gladiators fought.

Additional features include:

  • This mod adds various dungeons, towers, and other structures to explore as well as a variety of ways to earn money early on in the game.
  • The thirst and hunger mechanics have been exacerbated to give players the ultimate adventure.

⇒ Get The Lost Cities Mod

2. Star Wars Battlefront 2

The game is a sequel to 2015’s Star Wars Battlefront includes content from all three trilogies, and has three times as much content as the original had at launch. 

Critics received mixed reviews, praising its gameplay, visuals, and high production values. Critics, on the other hand, did not like its narrative. They claimed the hero characters were being too expensive in credits to unlock, the short campaign mode, and the progression system.

To make the game more interesting, you can download some mods.

2.0 Splitscreen

The Battlefront 2 Splitscreen mod will enable two players to play offline on the same console. 

Additional features include:

  • The split-screen mode supports up to two players in horizontal or vertical layout on PC.
  • You can play by yourself or with friends, as well as join up with other players from around the world in an attempt to defeat your opponents.

⇒ Get Splitscreen mod

2.1 AI Arcade Overhaul

Thanks to krazivan777, users can customize players and AI characters. The AI characters are smarter and more reactive to their environment than ever before. This makes for more gameplay customization as well as smarter opponents on all sides of the battle.

Additional features include:

  • Improved running speed on ground-level combat maps.
  • Enemies take longer to get into battle, they have more health, and they’re much better at using cover when they can.

⇒ Get AI Arcade Overhaul mod

3. The Witcher 3

The gameplay is tight and responsive, giving you a deep sense of control and ownership over your actions. It’s full of exciting moments, breathtaking visual splendor, and deeply satisfying role-playing systems.

3.0 The Witcher 3 HD Reworked Project

The Witcher 3 HD Reworked Project is a mod that completely revamps the game’s graphics. It’s free, and it’s a boon for players who want to keep playing The Witcher 3 on modern systems.

Additional features include:

  • The mod does an incredible job of improving character models, environments, weapons, armor, and more. 
  • It features some additional improvements such as sharpening, 4K support, or adding missing details not in the original game.

⇒ Get The Witcher 3 HD Reworked Project

3.1 Better Combat Evolved 2.0 

In every game, there is always a set of players who feel that the difficulty levels are just not difficult enough. If you fall under this group and are a fan of The Witcher 3, this is the mod for you.

Additional features include:

  • Heightens the difficulty levels of the game to quench the challenge-hungry players.
  • It adds a slew of different changes, from increasing the damage that Geralt can dish out to lowering the damage that enemies can withstand.

⇒ Get Better Combat Evolved 2.0 

Is Windows 11 great for gaming?

Windows 11 has been getting a lot of attention from gamers who are looking to upgrade their PCs because of what Microsoft claims about it being great for gaming. But does it live up to all that hype?

Compared to previous Windows versions, Windows 11 brings a smoother gaming experience.

Windows 11’s DirectStorage feature is big news for PC gamers, especially those who play games without any form of hard drive optimization. 

That’s because DirectStorage is a new API built to take advantage of the SSDs and NVMe drives that are becoming standard in today’s PCs.

DirectStorage promises to improve load times, reduce in-game stutters, and ultimately benefit game performance.

AutoHDR, currently exclusive to Windows 11 is another feature that makes gaming worth it. The feature automatically lets games run with HDR graphics, even if they don’t have native support for high dynamic range (HDR) visuals.

Aside from these features, you also need to enable Windows 11 gaming settings to get the most out of your game.

In addition, also check out our guide on how to optimize your PC for better gaming performance to get the most fun out of your game.

This is in no way an exhaustive list, as there are hundreds of games available and mods associated with each game. To elevate your Minecraft gameplay visuals, explore our guide featuring a list of shaders you can download and install.

Steam users can also make use of DLCs, but if they do not meet expectations, you can request a DLC refund.

For the sake of other game fanatics, we’d love to hear from you about your favorite games and the accompanying mods that you just can’t live without. Start us off in the comment section below.

Switch Pro Controller Not Detected on Windows 11 [Fix]

While the Switch Pro controller is popular for its long battery life and large buttons, some users have reported that Windows 11 doesn’t recognize it, either in Device Manager or Steam.

This issue may stem from outdated drivers, faulty USB ports, or other technical glitches. Here’s how to fix it.

How can I fix Windows 11 not recognizing the Switch Pro controller?

1. Check your USB port

add device windows 11 not recognizing switch pro controller

While USB ports are generally durable, they can accumulate dust and debris over time, leading to recognition problems with your Switch Pro controller.

To check if the issue is with the USB port, try connecting to another device, like your phone. If your computer recognizes the other device, the port is fine. You can also try holding down the sync button on the controller while plugging it into your computer.

2. Update your drivers

  1. Open Settings with the Windows + I shortcut and navigate to the Windows Update section from the left side, followed by Advanced options from the right side.advanced-options windows 11 not recognizing switch pro controller
  2. Now click on the Optional updates option and select all the driver updates that you have available followed by the Download and install button.optional-updates-button windows 11 not recognizing switch pro controller

If you don’t want to manually update your drivers, we recommend that you give Fortect Driver Updater a try. It is a lightweight software that automatically updates, fixes, and replaces all of your drivers without interfering with your day-to-day activities.

⇒ Get Fortect Driver Updater

3. Disconnect other controllers from Switch

  1.  In order to disconnect all your controllers from your Switch, you will have to go to System Settings followed by Controllers and Sensors.controllers-switch windows 11 not recognizing switch pro controller
  2. Scroll down to the button then select the Disconnect controllers option. In order to ensure your controller doesn’t connect to your Switch wirelessly and cause Windows 11 not to recognize the Switch Pro controller error again, turn your Switch off.

4. Update your OS

  1. Open the Settings app and go to the Windows Update section.windows-update windows 11 dynamic refresh rate not working
  2. Here, press the blue button that either says Install now or Check for new updates, depending on your case.check-for-updates windows 11 dynamic refresh rate not working

What are the advantages of using the Switch Pro controller?

Here are the main benefits of Switch Pro controller:

  • Ergonomic Design: The Switch Pro controller features a smarter button layout and size, offering maximum comfort for hands and fingers during gameplay.
  • High-Quality Build: Made from matte plastic, it resists fingerprints and is assembled with precision for durability.
  • Comfortable Thumb Positioning: Unlike Joy-Cons, the design allows users to keep their thumbs straight when switching between buttons and sticks.
  • Optimized Buttons: The A, B, X, and Y buttons are larger and arranged in a traditional diamond pattern, suitable for all hand sizes.
  • Smooth Sticks: The sticks on the Pro controller provide a very smooth gaming experience.
switch windows 11 not recognizing switch pro controller
Switch Pro controller (Source: Nintendo)

Wrapping up

If you’re having this problem, it’s very likely that you’re using an older version of Windows, and that’s what’s causing it. Upgrading to the most recent Windows update may resolve the problem.

These are the ways in which you can fix the Windows 11 not recognizing Switch Pro controller error. If you need further assistance, you might have to call the Nintendo support team to check whether your controller has any problems.

Was this guide useful? Let us know in the comments section below as well as whether you have more solutions in mind. Thanks for reading!

Best Collage Maker Software For PC: 7 Free & Paid Options

With the best photo collage software for PC you can transform your favorite photos into stunning visuals effortlessly. Today we’ll explore the best options for creating eye-catching pieces easily.

Whether you’re a photography enthusiast, graphic designer, or social media user, these top tools offer everything you need (from interfaces to customization options)to bring your creative ideas to life.

What is the best collage maker for PC?

If you’re short on time, take a quick look at the video below. If you want more details, keep reading:

Let’s check out each tool at a time:

inPixio Photo Studio Pro 12 – Perfect for Detailed Collages and Restorations

Main features:

  • Object erase
  • Fix old photos
  • Easy-to-use and master
  • Create great photo montages
  • Great amazing photo collages
  • Switch the sky for vibrant photos

With InPixio, removing or adding new objects to photos is done seamlessly thanks to a built-in AI, and the final photo will look natural and unaltered.

Bring together the best moments of your life and your favorite people all in a single frame, retouch any imperfections, or even add elements from older photos, since those can be restored as well.

Whatever you need, inPixio Photo Studio delivers, and for a free app, it definitely comes with a lot of excellent features. Furthermore, you can share your project on Facebook and Twitter.

Photo Studio Pro 12

Photo Studio Pro 12

Transform your photos into beautiful, cohesive collages with inPixio!
Check price Visit Website

Adobe Creative Cloud Express –  Ideal for Quick and Easy Collage Design

Main features

  • Delivers different layouts, backgrounds, colors, fonts, and much more
  • Pick images from a vast library on Adobe Creative Cloud
  • Layout hint feature (to give you directions while editing so you don’t have to rely on guessing)
  • Create, edit, and publish your project from anywhere using the mobile app
  • Friendly and intuitive interface

Adobe Creative Cloud Express is one great product from the Adobe Creative Suite and it’s extremely versatile. 

Besides having a large usage in the creation of logos, banners, and letterheads, it is perfect for designing photo collages both for beginners and professionals.

It was built with an easy-to-use dashboard and navigation panel in mind so that you can find immediately what you’re looking for.

Adobe Creative Cloud Express

Start designing with ease today and impress your audience with Adobe Creative Cloud Express!
Check price Visit Website

Adobe Photoshop CC – Professional Tools for Custom Collages

Main features:

  • Smart Objects import option for safe resizing and editing of images
  • Integrated Selection tool for accurate and precise selections
  • Ability to work on the images in real-time and make adjustments accordingly
  • Advanced image editing tools for a high-quality montage
  • Complex set of tools and features

The amount of work involved in collage creation will be greater because in Adobe Photoshop CC you will need to design from scratch.

To create a good-looking collage we recommend sticking only to a few images (5-10) and picking different sizes. You can also use Adobe Lightroom which can organize your image library and fasten the process.

The great advantage of Photoshop is that you’ve also got an unparalleled photo editor at your disposal to enhance your images before including them in the montages.

Adobe Photoshop CC

Unleash your creativity and create stunning photo collages with the world’s best graphic design software.
Free trial Visit Website

Fotor –  Freestyle Collage Creation with Versatility

Main features:

  • Set up collages with up to 80 templates that support up to nine photographs
  • Freestyle mode to arrange the photos with a more unique layout (adjust border shadows, corners, width, and add patterns to borders)
  • Rotate photos and adjust their transparency
  • Includes 22 unique backgrounds for collages
  • Export options for social media and photo sites such as Twitter and Flickr

If you’re looking for free photo collage software, look no further! Fotor is an app you can add to Windows desktop and mobile platforms, Android, iOS, and Mac devices.

Furthermore, you can set up photo collages with Fotor’s online collage tool. The web tool has a Fotor Pro pack with a competitive monthly subscription plan that gives you more than 80 collage templates and other exclusive content.

As Fotor is multi-purpose photography software, it also has plenty of image-editing options and more than 60 filter effects to enhance your collage pictures.

Fotor

Create, adjust, and resize any images into a gorgeous photo collage with just a few clicks!

CorelDRAW – Professional Vector-Based Collage Design

Main features:

  • Professional vector illustration, layout, photo editing, and typography tools
  • Productivity and collaboration-focused options to accelerate and streamline your workflow
  • Pre-made collage templates where you can simply add your own photos
  • Cross-platform compatibility to work from anywhere you like
  • Extensive learning materials, tutorials, and guidelines

When it comes to vector-based graphic design, CorelDRAW delivers all the tools you want to craft sleek design projects.

This app covers all your needs from photo editing to layout and typography tools, using bitmap-to-trace vector-based technology for crisp-looking results that you can scale as up or as down as you like without compromising on image quality.

Creating a photo collage with CorelDraw is as easy as it gets. Feel free to make use of its complex toolkit and even rely on pre-built templates to achieve stunning results.

CorelDRAW

Elevate your collage-making with CorelDRAW’s professional design tools.
Free trial Visit Website

Photo Collage Maker – Fun and Easy for Creative Freedom

Main features:

  • More than 370 professional templates are available
  • Lots of elements like photo frames, clipart, and masks to add
  • Easy-to-use interface
  • Save your work in any popular image format
  • Separate any object from its background 

If you have a soft spot for digital scrapbooking and collage creation, Photo Collage Maker might be the right program for you.

There are 370+ professional templates under the hood – you are going to find a template just for your liking and occasion.

You may decorate your photos with a variety of other elements, from photo frames and masks to captions and cliparts – these things will surely draw a smile on anyone’s face.

Photo Collage Maker

Explore endless possibilities and express your creativity today!
Check price Visit Website

Canva – Inspiration and Creativity for Stunning Collages

Main features:

  • Beautiful imagery collection
  • Professional templates and layout options
  • Ideas, inspirational content, guides, and tutorials
  • Extensive image editing toolkit
  • Countless filters and effects
  • Beautiful fonts and typography tools
  • Native support for popular formats such as JPEG, PNG, PDF and many more

Canva is another great photo editing tool that allows you to create stunning photo collages effortlessly.

Boasting an impressive library of fully customizable templates with more than a hundred photo collage layouts, Canva will take your photo montage to unprecedented peeks.

⇒ Get Canva

Wrapping up

These are the best Windows programs and apps to help you set up photo collages. With these tools, you can create visually stunning collages that include stickers, clip art, unique layouts, text, shapes, and additional multimedia.

And while we’re on this subject, feel free to look at our list including the best slideshow creation software, and add music and effects to your photos.

What’s your favorite photo collage software? Feel free to share your choice by reaching for the comments section below.

Microsoft Money for Windows 11: Download all Versions

Even though Microsoft Money was discontinued, the Microsoft Money Plus Sunset version still lets you access and edit Money files, though without online features or support.

Today, we’ll show you where to download it and how to set it up.

How can I download and install Microsoft Money Plus Sunset Home & Business on Windows 11?

  1. Download the 2010 version of Microsoft Money. 
  2. Double click on the downloaded file for the installation to begin. 
  3. On the next page, read through the whole license terms and when you do that, click on I Accept for the installation to begin.MS Money Sunset install begin
  4. Wait until the installation is over. Here click on Finish, and you should be good to go.MS Money Sunset install complete
  1. The Microsoft Money icon will appear when you click the Start button and type money in the search box. To continue, simply click on Microsoft Money.search MS Money
  1. If the page below shows up, select Create a New File and click on Next. Then choose a location for the money file and click OK.Launching MS Money step 1
  1. Microsoft Money will now give you guarantees concerning keeping track of your finances over the internet, but none of them are valid any longer. Continue by pressing the Next button. Launching Microsoft Money step 2
  1. Money promises to make your financial records more secure by adding a password to the data file. Feel free to add one or check the box that says I don’t want to use a password then click Next.Launching MS Money step 3
  1. Next, they ask you to enter your personal information for better customization of your money file. You better just click on Skip and move on.Launching MS Money step 4
  1. Money used to be able to connect straight to bank accounts and work its wonders by taking in transactional data.
    Banking security has advanced, and we are pretty sure that no financial organization allows this anymore.
    However, if your bank still does allow you to export.qif or .ofx files, you can import them into Microsoft Money Sunset. Otherwise, just click on Skip Account Setup.Launching Microsoft Money step 5
  1. Finally, you can see the message You have successfully created your money file. your money file is ready and you can click Finish.Launching Microsoft Money step 6
  1. Here it is. Microsoft Money is on your Windows 11 and you’re good to go. Launching ms money completed

What to do if Microsoft Money Sunset doesn’t launch on Windows 11?

  1. Click on the search button in your Windows 11 taskbar and type Registry Editor and hit Enter.
  1. Follow this path to find the Internet Explorer file: HKEY_LOCAL_MACHINE\SOFTWARE\Wow6432Node\Microsoft\Internet Explorer
  2. When you find the folder, on the right side, click on Version and change the value to 9.11.10240.0 and click OK.Locate internet explorer folder and change version value
  3. Then exit the registry and restart your computer. Now you should be good to go.

MS Money’s version releases

  • Microsoft Money 2007, version 16.0 of the program, was the first version to require product activation for copies installed from downloaded installation files.
  • Microsoft Money Plus, version 17.0.150.1415 of the program was the final retail release. The first and only version to require product activation on those copies installed from a CD.
  • Microsoft later released Money Plus Sunset, version 17.0.150.3817 of the program, an edition of Money Plus that did not require activation.
  • Then came the Windows 8 edition released back in 2012, which is version 18.0 of the program, and it was at this time when they decided to introduce the MSN: Money as the replacement for the main software.
  • And last but not least is the Windows 10 edition, which is basically the aforementioned MSN: Money, only optimized for Windows 10.

What should I know about different versions of Microsoft Money?

Microsoft Money has localized editions for the UK, France, Japan, and Canada, as well as an International English edition for additional English-speaking nations.

Other countries, such as Russia, Brazil, Germany, and Italy, have their own editions. However, these editions were phased out.

Later, Microsoft provided a free, time-limited trial version of Microsoft Money Plus that could be downloaded.

Data files from the Canadian edition of Money could be imported into this trial version but not from other non-US editions.

Users upgrading from non-US editions must manually export and reimport their accounts, and some information may need to be re-entered.

And now, for the main part, you’re here for the solutions. Below you can see a couple of different ways to install Microsoft Money on your Windows 11 and fix any possible issues and errors.

Summary

Microsoft Money is an outdated software that works with other old software, most notably the now-retired Internet Explorer.

Many Money users have noticed that the software occasionally fails to open, necessitating a short registry adjustment. To fix the issues you should follow the steps above.

However, Microsoft Money continues to maintain a large user base, despite the fact that it is over a decade old.

So, in case you don’t mind doing some manual data entry or import, it’s still an excellent way to keep track of your personal finances. 

How to fix the Logitech G305 mouse cursor stuttering

Problems with the mouse can happen from time to time, but a simple restart should suffice in most cases. However, several users encountered the stuttering issue with Logitech G305 and were unable to eliminate it.

Though Logitech manufactures some of the best mouse models available, there is always a chance of one running into an error. And after going through several forums where users shared the issues, we found out that it’s not always the mouse to be blamed.

Sometimes, it was an issue with the system that caused the mouse to stutter. In such cases, even replacing the mouse wouldn’t help. So, let’s now go through the underlying causes and most effective fixes for Logitech G305 stuttering issues.

Why is the Logitech G305 mouse cursor stuttering?

The primary reason behind the issue is problems with the connections. Say, the mouse is kept too far from the receiver or there’s another object between the two that is affecting the signal strength.

Apart from that, issues with the system itself can cause the Logitech G305 stuttering problem. If you have overclocked the system, it could cause the mouse to stutter. Or, even an improper power supply can lead to the issue.

Besides, an outdated driver or misconfigured system settings are just as likely to cause problems with the Logitech G305 mouse. Also, running an older version of the OS is known to cause the Logitech G305 stuttering issue.

Now that you have a basic understanding of the underlying causes, let’s walk you through the most effective fixes for them.

How do I fix Logitech G305 stuttering issue?

1. Some basic checks

In most cases, the issue lies with the USB port. So, if you have the USB receiver connected to a USB 3.0 port, remove and reconnect it to a USB 2.0 port. Besides, plug the receiver directly into the USB port on the computer and not an extender or hub.

Also, make sure that the surface you are using it on is mouse-friendly and that the mouse is fully charged. Low battery levels can also cause stuttering in some cases.

If these don’t get the Logitech G305 stuttering issue fixed, try the next method. Before changing ports or settings, review this quick guide to connect a Logitech mouse to a laptop to confirm pairing, receiver placement, and power are set up correctly.

2. Restart the computer

  1. Go to the desktop, press Alt + F4 to launch the Shut Down Windows box, and select Restart from the dropdown menu.
    Restart to fix Logitech G305 stuttering
  2. Click on OK at the bottom to restart the computer.
    Ok

Most minor issues with the system can be fixed by a simple restart. When you restart the computer, the OS is rebooted, and any bug that might be causing the error will be eliminated right away. After restarting the computer, verify if the Logitech G305 stuttering issue is fixed.

3. Remove non-critical external devices

Various external pieces of hardware can often conflict with Logitech G305 and lead to the stuttering issue. In this case, it’s best that you remove all non-critical external peripherals and then identify the one behind the problem.

To do that, first, turn off the computer, and remove all the non-critical hardware with just the mouse and keyboard connected. Now, connect the devices that you removed one at a time, restart the computer after each, and check if the stuttering issue is there.

The moment stuttering with the Logitech G305 mouse cursor starts, the device that you connected last is to be blamed. Just keep it removed until you find a solution. You can contact the device manufacturer for help, or go through the FAQ section on their website.

4. Update the mouse driver

  1. Press Windows + S to launch the Search menu, enter Device Manager in the text field at the top, and click on the relevant search result that appears.
    Device manager to fix logitech g305 stuttering
  2. Now, double-click on the Mice and other pointing devices entry.
    Mice and other pointing devices
  3. Right-click on the malfunctioning mouse, and select Update driver from the context menu.
    Update driver to fix logitech g305 stuttering
  4. Next, select Search automatically for drivers in the Update Drivers window.
    Search automatically for drivers

Wait for the update process to go through and check if the Logitech G305 stuttering issue is fixed.

A driver is a critical piece of software that relays commands between the OS and the device. And an outdated or corrupt driver is likely to throw errors. So, you must always have the latest driver version installed.

If the Device Manager was unable to find a newer version, try the other ways to update the driver in Windows 11.

Or, you can use a reliable third-party app that will update all the drivers in one go. We recommend Outbyte Driver Updater, a dedicated tool that automatically locates the latest version and installs it for the drivers installed on the PC, thus keeping them all up-to-date.

⇒ Get Outbyte Driver Updater

5. Run Hardware and Devices troubleshooter

  1. Press Windows + S to launch the Search menu, enter Windows Terminal in the text field at the top, and click on the relevant search result.
    Windows Terminal
  2. Click on the arrow at the top, and select Command Prompt from the menu. Alternatively, you can press Ctrl + Shift + 2 to launch Command Prompt in a new tab.
    Cmd to fix logitech g305 stuttering
  3. Now, paste the following command and hit Enter to run the Hardware and Devices troubleshooter.msdt.exe -id DeviceDiagnostic
    Hardware and Devices troubleshooter to fix logitech g305 stuttering
  4. Follow the on-screen instructions to complete the troubleshooting process.
    Run

One of the best ways to fix issues with the mouse is to run the Hardware and Devices troubleshooter. It will take care of the misconfigured settings, check the connections, and make the required changes to fix the Logitech G305 stuttering issue.

6. Modify mouse settings

  1. Press Windows + R to launch the Run command, enter control panel in the text field, and either click on OK or hit Enter to launch the Control Panel window.
    Control Panel
  2. Click on Hardware and Sound here.
    Hardware and Sound
  3. Click on the Mouse option under Devices and Printers.
    Mouse to fix logitech g305 stuttering
  4. Navigate to the Pointer Options tab from the top.
    Pointer Options
  5. Next, untick the checkbox for Enhance pointer precision and click on OK at the bottom to save the changes.
    Disable enhance pointer precision to fix logitech g305 stuttering

7. Update Windows

  1. Press Windows + I to launch the Settings app, and select Windows Update from the tabs listed in the navigation pane on the left.
    Windows Update
  2. Click on the Check for updates button on the right to scan for any available newer versions of the OS.
    Check for updates to fix logitech g305 stuttering
  3. Now, if an update is listed after the scan, click Download & install.
    Download & install

Oftentimes, running an outdated version of the OS can lead to a bunch of issues including the Logitech G305 stuttering problem. If there is a bug in the OS or it is simply too outdated, updating Windows could help fix the problem.

What are the best mouse options for my Windows PC?

A mouse is a critical piece of hardware, since it ensures quick and easy navigation across the system and allows the user to perform quick functions. But, due to a plethora of options available in the market, buyers often get confused between them.

So, if you are planning to buy a mouse for a Windows 11 PC, check our curated list. Also, here are some of the best mice available at discounted prices. Just, pick the one that meets your requirements and fits into your budget.

These are all the ways you can fix the Logitech G305 mouse cursor stuttering problem. In case it persists, remove overclocking if there’s any, and reset Windows to its factory settings. Overlocking is often found to affect effective functioning, and removing it should help.

Also, find out how to download the Logitech G HUB in Windows 11, since it would help you establish stable and secure connections, and troubleshoot issues as well.

Tell us which fix worked and your experience with Logitech G305, in the comments section below.