Solved: Windows 10 ISO File Won’t Work

Installing Windows 10 is a much simpler task than one would expect. You have all the resources provided by Microsoft, and all you need to do is get bootable media (USB or DVD) and deal with the tweaks later on.

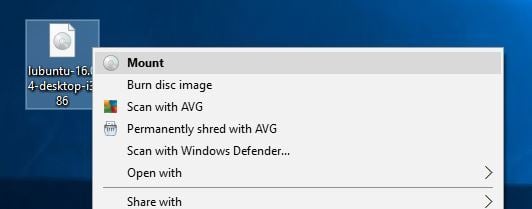
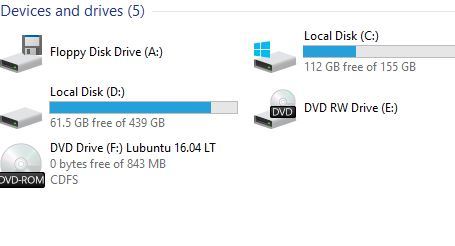
Everything in the middle is as intuitive as you can hope for. However, some users who prefer DVD over USB have had a lot of difficulty with that alternate way. Windows 10 ISO file wouldn’t work.

That’s why we provided more than needed steps to resolve this problem. If the Windows 10 ISO file doesn’t work, the steps below should help you address this.

What do I do if ISO files don’t work on my PC?

1. Redownload the Media Creation tool and try again

  1. Download the Media Creation Tool, here.
  2. Run the tool and accept the Terms.
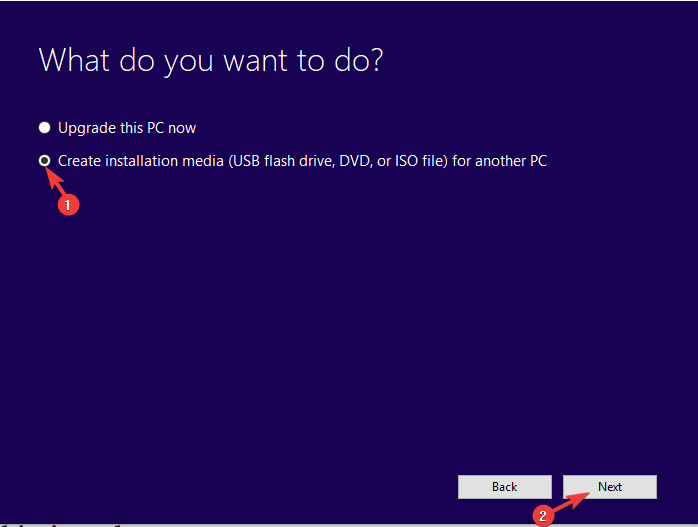
  3. Toggle the “Create installation media (USB flash drive, DVD, or ISO file) for another PC” option and click Next.windows 10 iso file not working
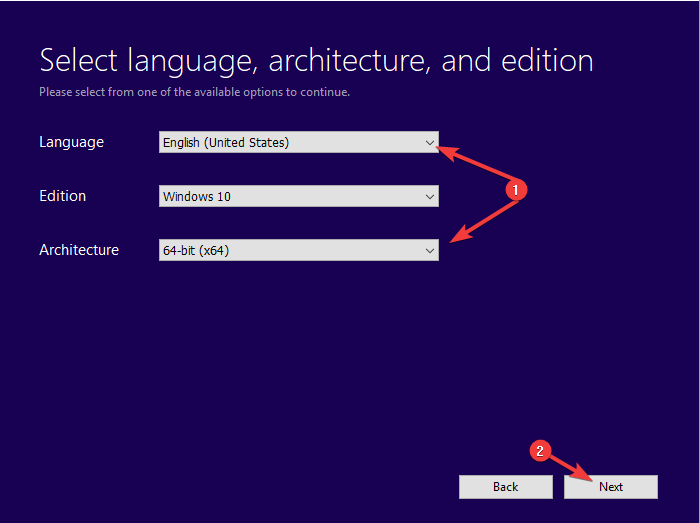
  4. Select the Language and Architecture. Click Next.windows 10 iso file not working
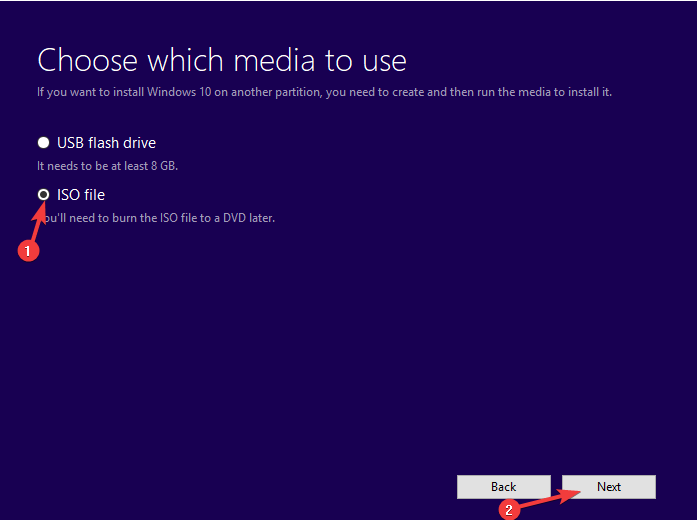
  5. Select the ISO file option and click Next.windows 10 iso file not working
  6. Wait for the tool to download the Windows 10 ISO file. It can take some time, depending on your bandwidth speed.
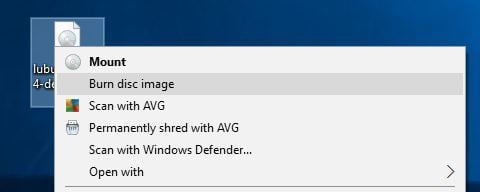
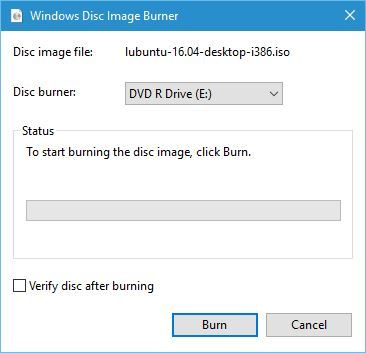
  7. After that, use any third-party tool to burn the ISO file to DVD. Here’s the list of the best ones around.
  8. Stick with the x8 speed to avoid any issues.

Let’s get to the point right away. There are 3 things you need to check. Firstly, make sure that you’ve finalized the downloading procedure. The second thing is to confirm that your DVD-ROM is fully functional.

And last but not least, double-check the system DVD you’re using to burn the installation ISO file.

After you’re over that, but the ISO file still won’t work, we suggest re-downloading the Media Creation tool from the official Microsoft site and moving to do everything from scratch.

The pirated versions of the system are not what we are referring to, and dealing with those is not our current concern.

Besides, a simple re-download is often faced with the We are unable to complete your request at this time error.

2. Extract the ISO file using WinZip

If, for some reason, your PC persists in not accepting ISO files, then maybe extracting it will yield better results.

To that extent, you should use WinZip since it is the world’s best commercial-grade file archiver and extractor, and it supports all major file formats, including ISO files.

That being said, install WinZip on your PC, right-click the ISO file, and select Extract here. Once the content is extracted, you can easily access whatever is on the ISO file.

WinZip

Extract any ISO files and avoid any issues with the mounting phase by using a reliable tool like WinZip!
Free trial Visit Website

3. Create a USB bootable drive instead

  1. Plug in the USB stick in the fastest port. It needs to be at least 6 GB (8 GB options are more common).
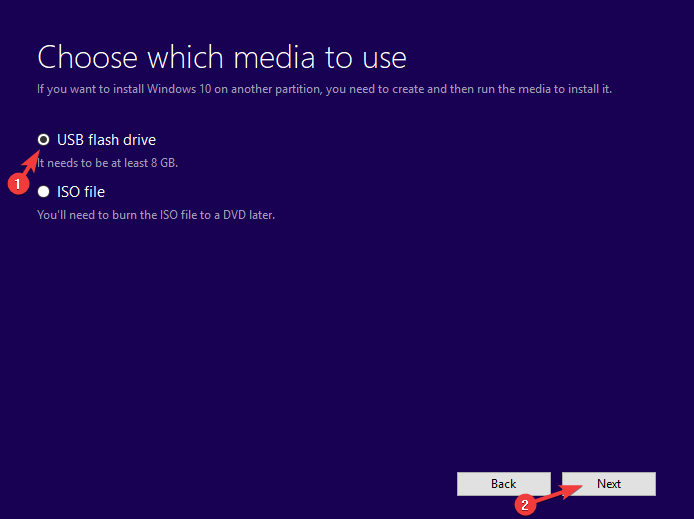
  2. Open the Media Creation Tool and, instead of selecting ISO, choose the USB flash drive option.windows 10 iso file not working
  3. Wait until the bootable USB is ready.

If you’re not able to create a bootable DVD with the ISO above file, we suggest going for the USB option. It’s a preferred option for various reasons.

Of course, if you don’t have any urges, go for the DVD instead of the flash stick drive. The creation procedure is similar, but you don’t have to burn it, as the Media Creation Tool creates a bootable USB drive automatically.

With that, we can conclude this article. In case you have anything to add or take, make sure to point it out in the comments section below.

We have many more articles like this one in our dedicated Fix section.

Do you like learning about Windows 10? Then, go and visit our dedicated Windows 10 section.

How to fix Windows 10/11 errors when mounting ISO files

With Windows 8 and later 10, Microsoft (beyond many other things) tried to cover as much field as it can, creating an ecosystem. This reduced the need for third-party tools, like virtual drive tools.

In theory, you can use Windows Explorer to mount ISO/IMG files to the virtual drive. However, this doesn’t work out perfectly in practice. A crowd of users experienced an error when mounting ISO files in Windows 10, as they bumped into an error.

In order to address this, we prepared a list of possible solutions. Of course, you need to be certain that the ISO file at hand isn’t corrupted or incomplete.

If you’re positive about ISO‘s health and still unable to mount it in Windows 10, make sure to try out these solutions.


How do I fix Windows 10 couldn’t mount file in Windows 10?

  1. Extract the ISO file
  2. Try to open ISO file with Windows Explorer
  3. Unmount all drives
  4. Reinstall third-party ISO tool
  5. Use a PowerShell tweak
  6. Move the ISO file to other partition
  7. Update Windows 10 or uninstall the latest security update

1. Extract the ISO file using Winzip

One surefire way of fixing any ISO-related issue if time is not something that you can spare is to simply extract the content of an ISO, like you would an archive.

That being said, one software tool that can help you out with the task is WinZip, the world’s best archiver.

Simply install WinZip so that it can become integrated into your OS’ context menu. Then right-click the ISO file and select to extract it using WinZip.

Once you’ve done that, go into the folder where you extracted the ISO file’s contents, and carry on from there.

”WinZip”

”WinZip”

”Extract
”Free
&aff_sub2=Native” current_url=”true” button_text=”Get it now” image=”https://windowsreport.com/wp-content/uploads/2017/11/WinZip-button-210×160.png”]

2. Try to open ISO file with Windows Explorer

  1. Navigate to your ISO file.
  2. Right-click on it and expend ”Open with” in the contextual menu.
  3. Select Windows Explorer.windows 10 error mounting iso / windows 10 couldn't mount file
  4. You should see the files ISO file contains and it should Auto-mount on your drive.

This error can merely be a small system misconception. Namely, Windows 10 lets you access ISO or Image (IMG) files through the explorer, without any need for a third-party ISO tool.

However, there seems to be a bug (depending on the system version i.e. major update you have) in Windows 10 concerning file association.

It seems that Windows 10 can’t always recognize ISO file and thus there’s no default application for accessing or mounting it.


3. Unmount all drives

  1. Open This PC and expand the Drives section.
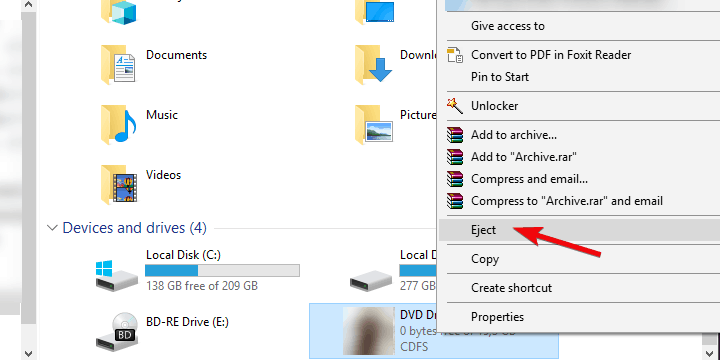
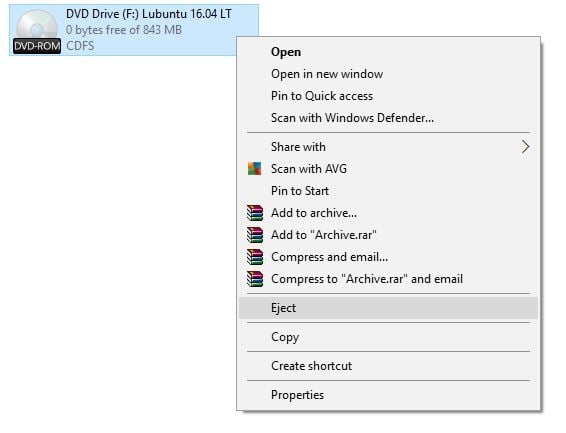
  2. Right-click on individual virtual drives and click Eject.
  3. Restart your PC and try to mount the preferred ISO file on any available slot.

Some users managed to tackle the issue by simply unmounting all virtual drives. Namely, as it looks like, if you already have mounted ISO file on any of the available Virtual Drives, the new ISO file won’t mount over it.

This auto-replace function can be the core of the problem. By simply unmounting all drives, the issue should be addressed.

However, this worked for some users while the others needed a more adept approach in order to address the ISO won’t mount in Windows 10.


4. Uninstall third-party ISO tool

  1. In the Windows Search bar, type regedit and open regedit as an administrator.windows 10 error mounting iso / windows 10 couldn't mount file
  2. Navigate to the following location:
    • ComputerHKEY_CLASSES_ROOT.iso
  3. Back up your registry.
  4. If you’re seeing a third-party program you uninstalled is still associated with ISO extension, make sure to right-click on Default entry and replace it with Windows.IsoFile value and confirm changes.windows 10 error mounting iso / windows 10 couldn't mount file
  5. Restart your PC and try mounting ISO file again.

If you ever used a third-party tool for ISO mounting, like Alcohol 120% or Deamon Tools, and you’re experiencing the same error, we advise you to uninstall it.

As we already said in the first recommended solution, the file association is most likely the cause of the problem. Now, there’s a chance you already part your ways with the third-party Virtual Drive tool, but the registry entries might still be there.

And that’s what’s probably causing the problem. In order to address this, you should clean registry entries related to ISO file association. This can be done manually, by roaming through Registry Editor or, in a simple manner, by using IObit Uninstaller Pro.

We highly recommend this tool for the clean removal of all applications. On the other hand, you can use any tool of your choice.


5. Use a PowerShell tweak

Via PowerShell

  1. Right-click on Start and open PowerShell (Admin).
  2. In the command line, copy-paste the following commands and press Enter. Don’t forget to change the ”C:FilePathFileName.iso” with the path of your ISO file, though.
    • fsutil sparse setflag "C:FilePathFileName.iso" 0windows 10 error mounting iso / windows 10 couldn't mount file
  3. Close PowerShell and try mounting ISO file again.

With Batch file

  1. Right-click on the Desktop and select New > Text Document.
  2. Open the blank text document with Notepad and copy-paste these entries:
    • fsutil sparse queryflag %1
      pause
      fsutil sparse setflag %1 0
      fsutil sparse queryflag %1
      pausewindows 10 error mounting iso / windows 10 couldn't mount file
  3. Click on File in the Menu Bar and choose the ‘Save as…‘ option.
  4. Name it as you wish, just delete .txt extension and replace it with the .bat extension.
  5. Now, drag your ISO file and place it over this newly-created batch file as you would wish to open it with the batch file.
  6. After that, restart your PC and try to mount your ISO file with Windows Explorer again.

There’s a thing called sparse flag which is imposed on NTFS partitions with large sections of binary zeros. The file containers, in this case, an ISO file, are flagged and might not be accessed through Windows Explorer.

In order to address this, you’ll need to use PowerShell (or Command Prompt, for that matter) and remove the flag from the ISO file in order to open it without issues.


6. Move the ISO file to other partition

For some peculiar reason, the localization can cause the issue with opening ISO files on Windows 10, as well. Nonetheless, this can be easily addressed by simply moving your ISO from one partition to another.

Also, if you’re using USB flash drive or DVD, make sure to copy the ISO file on your PC storage, and then try to access it or, in this case, mount it with Windows Explorer.

It’s hard to say why this is the problem, but we are already accustomed to various issues on Windows 10 and this hardly comes as a surprise.

If you’re still unable to mount ISO/IMG file on your PC, even after you moved the ISO file to an alternative location, make sure to continue with the provided steps.


7. Update Windows 10 or uninstall the latest security update

  1. Press Windows key + I to open Settings.
  2. Choose Update & Security.
  3. Under Windows Update, click Check for updates.windows 10 error mounting iso / windows 10 couldn't mount file

Alas, if you’ve updated Windows 10 and the resolution is nowhere to be seen, you can uninstall the latest security update and move from there. These steps should show you how:

  1. Press Windows key + I to open Settings.
  2. Choose Update & Security.windows 10 error mounting iso / windows 10 couldn't mount file
  3. Under the Windows Update section, click ”View installed update history”.windows 10 error mounting iso / windows 10 couldn't mount file
  4. Click Uninstall updates.
  5. Right-click on the latest, presumably, security update and uninstall it.windows 10 error mounting iso / windows 10 couldn't mount file
  6. Restart your PC and try mounting ISO file again.

Some reports also include a certain Windows security update that broke the ISO mounting feature. However, since that was back in 2016, we can’t say with certainty that this is the case nowadays.

On the other hand, just for the sake of eliminating this from the list, we highly recommend checking for updates. That way, in the perfect scenario, the next security patch should fix the problem.


[wl_navigator]

Fix Gmail error: Too many messages to download

Do you get the Gmail error Too many messages to download. Mail cannot be retrieved from this account at this time?

We compiled a list of the best workarounds for this error to help you fix it as soon as possible.

Gmail is one of the most popular webmail platforms in the world with millions of accounts. However, some Gmail users experienced an error while using Gmail to fetch Outlook mails.

This is because they have too many messages to download. For instance, importing 50,000 Outlook mails into Gmail might be hit with technology restraints.

However, not all emails are useless, therefore there is a need to salvage the situation and solve this Gmail error problem.

The Windows Report team has compiled the best solutions to fix the Gmail error ‘Too many messages to download’.

How can I fix the Too many messages Gmail error?

  1. Clean up your email
  2. Enable Labs
  3. Disable Labs
  4. Use an alternative webmail

1. Clean up your email

  1. Login to your Gmail account
  2. Open Gmail in standard view
  3. Use the following search commands (before:, after:, older:, newer:. ). For instance: after:2015/12/31 before:2017/01/01gmail error too many messages to download
  4. Hit the Enter key
  5. Tick all (the checkbox in the upper left region)gmail error too many messages to download
  6. Also, click on the hyperlink in the text that pops up in the Select all conversations that match this searchgmail error too many messages to download
  7. Click the delete button on the top  displayed as a trash icongmail error too many messages to download

You can repeat this procedure to continue deleting unwanted/old emails clogging on your mailbox. Afterward, you can import Outlook emails into your Gmail account.

However, if the problem persists after trying out this method, you can proceed to the next method.

2. Enable Labs

  1. Open your Gmail account.
  2. Click the Gear icon on the upper right side.
  3. Select Settings.
  4. Click the Labs tab.gmail error too many messages to download
  5. Enable an Available Labs.
  6. Click save changes to confirm

3. Disable Labs

  1. Open Gmail.
  2. In the top right, click the gear icon.
  3. Click on Settings.
  4. Click the Labs tab.gmail error too many messages to download
  5. Next to any labs, select Disable.
  6. At the bottom of the page, click Save Changes.

Conclusively, if you try out any of the aforementioned fixes and it doesn’t fix the Too many messages Gmail error, contact Gmail Help support for advanced troubleshooting.

4. Use an alternative webmail

A workaround to bypass the Gmail error is to use a third-party client and we strongly recommend Mailbird for that.

This awesome tool allows you to sync all your emails easily in a unified Inbox and has plenty of options to customize its layout with many color themes including the dark one.

Mailbird is a modern email client that comes with built-in apps like Facebook, Twitter, Whatsapp, and many more, that will keep you updated on your social media at all times.

If you have many emails, you will love the built-in attachment search feature. As you probably guessed, this helps you find attachments as fast as typing their names.

Therefore, if you need a reliable and error-free email client to increase your email tasks productivity, such a tool is guaranteed to meet your needs.

⇒ Get Mailbird

Were you able to resolve the Gmail error too many messages to download problem using any of these solutions? Let us know in the comments section below.

WiFi Booster PC Software: 5 Best to use in 2026

Even if the strength of Wi-Fi connections has significantly increased lately, there are still times when the signal cannot be detected. It’s pointless to stress the frustration that arises when such a thing happens.

In our times the internet connection can be vital because it involves a significant part of our lives, so if the Wi-fi signal is not strong enough it can become a real nuisance.

For instance, you would need powerful Wi-fi internet software to stay updated with the new streaming platforms, or with the gaming requirements regarding your connection speed.

Why bother enduring such frustrating connections and slow download times when you can use signal booster software?

We picked five of the best tool for boosting signals compatible with Windows 10 just to make your choice much easier. More so, you can improve your internet connection using Wi-fi extenders on Windows 10 computers.

Take a look at their sets of features and decide which one is the best for your OS.

What are the top 5 Wi-Fi signal boosters for Windows 10 PC?

Connectify Hotspot (recommended)

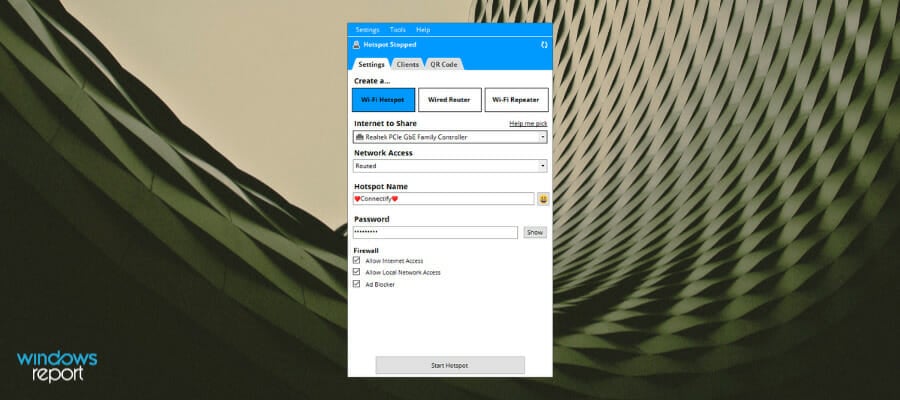
Connectify Hotspot is the perfect software for you to boost your Wi-Fi signal so it could reach some spots in your house where you do not catch the Wi-Fi connection. If you choose a dedicated device for boosting your Wi-Fi signal, you will have to configure it each time you change your SSID and it will stay in a fixed location.

Let’s see what makes Connectify Hotspot special:

  • Share any Internet connections with your devices: Wi-Fi, LAN, DSL, 3G/4G, and even VPN connections
  • Save money when traveling: connect all your devices to a single hotspot
  • Save up to 60% of your Internet bandwidth with Connectify’s universal adblocker
  • Eliminate networking issues by bridging other devices
  • Perform all of these actions and many more from your Windows 10 laptop

Connectify Hotspot is way better than any average signal booster and it does not interfere with your system functionality. You can check it on the official webpage from the link below.

Connectify Hotspot

Turn your PC into a wireless hotspot and boost your already existent signal with the help of this amazing software tool.
Check price Visit website

Ashampoo Internet Accelerator

internet connection software

Ashampoo Internet Accelerator can do exactly what the name says, giving a boost for your connection by changing the relevant settings with just a click.

This intuitive platform allows the user to optimize PC settings without having specific knowledge about technical aspects or internet connection settings.

Let’s see the key feature of Ashampoo Internet Accelerator:

  • Removing internet traces left behind
  • File checker features helps to stop spyware redirecting you
  • Interactive auto-check for key setting of internet access
  • Boosts and configure Firefox browser
  • Check advanced parameters for your live connection to configure best settings

An important aspect of this software is that it does all the work for you in no time, performing really complex operations in order to give a fast and stable connection.

in addition, you will benefit from browser settings configuration to boost the internet speed even more. If you’re using Mozilla Firefox it’s your lucky day because you have tools to optimize these browser settings and boost connectivity today.

Another worth mentioning fact involves the spyware attacks on exposed computers. That’s why this software blocks any malicious redirecting websites with the Hosts File Checker option.

Thus using this solution means a blazing-fast connection, plus strong security regarding your presence online.

Ashampoo Internet Accelerator

Go beyond internet speed limits and configure your settings with this effective software today.
Check price Visit website

Acrylic Wi-Fi Professional

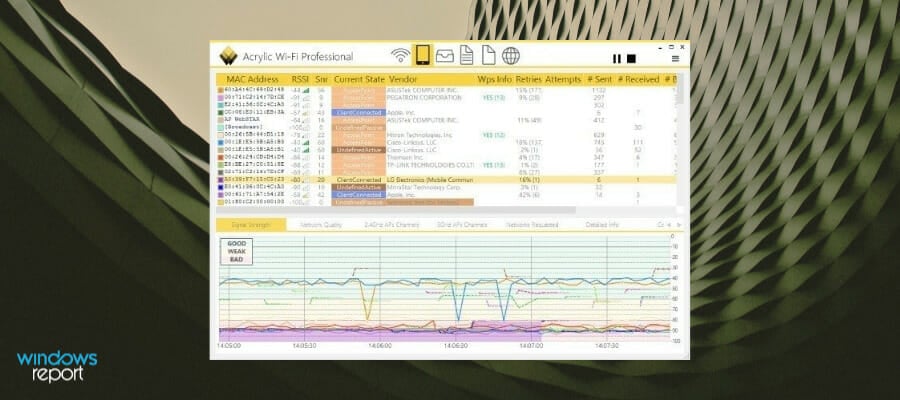
Acrylic Wi-Fi Professional is one of the best Wi-Fi analyzers that is able to identify access points and Wi-Fi channels. It can also analyze and resolve various issues on wireless networks in real-time.

Here are the key features of this great Wi-Fi signal booster software:

  • This is the ideal tool for advanced users and professional Wi-Fi network analysts and administrators
  • Users will be able to control their office wireless network performance and who is connected to it
  • You will be able to access point data transmission speeds and optimize the Wi-Fi network channels
  • You can also access Wi-Fi network detailed information including hidden wireless networks
  • Using this tool, you will be able to make the most out of unique features such as monitor mode that captures and analyzes device traffic, equipment inventory, Wi-Fi speed and more

⇒ Get Acrylic Wi-Fi Professional

Internet Accelerator

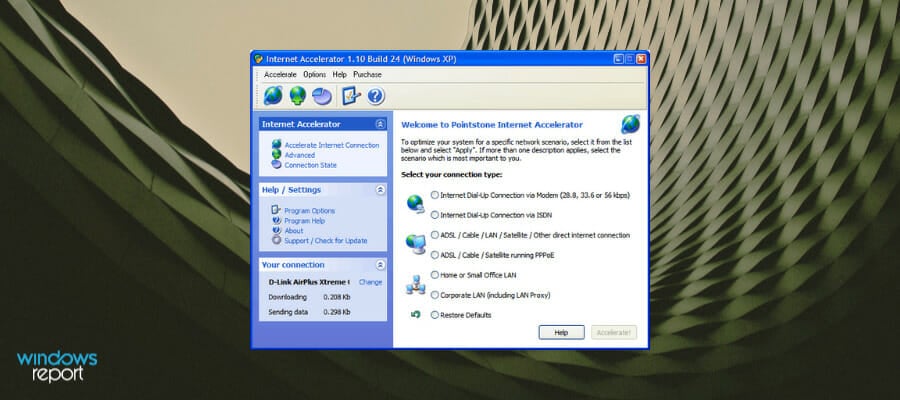
Internet Accelerator works in a way to decrease your page loading times, and it also optimizes your Internet connection. Using this tool, you will be able to transfer the maximum amount of data quicker than ever before. As such, you can use it as Wi-Fi signal booster software.

Check out more great features packed in this tool:

  • Using this software, you won’t have to wait on pages to take tons of time to load
  • You can stop wasting time downloading Music, Email, Pictures and more
  • You will be able to work more efficiently and faster on your system running Windows 10
  • You can now get the most out of your computer without having to buy all sorts of expensive hardware
  • Your games will play better, and your app will work faster.

⇒ Get Internet Accelerator

NetSpot

NetSpot for Windows PC can be used as a Wi-Fi signal booster. This software solution is the first free Wi-Fi survey app, and it features two major troubleshooting modes: Survey and Discover.

Check out the best features and functionalities of this tool:

  • This is an excellent professional software for office and home Wi-Fi management, analysis and visualization for systems running Windows
  • You need just a few clicks to start your wireless network site survey
  • All you have to do is to point where you are on the map, and this program will boost your connection

NetSpot is an indispensable tool for locating signal leakage and for visualizing your Wi-Fi coverage. With the help of this tool, your Wi-Fi can become better and more reliable.

⇒ Get NetSpot

Here’s where our list of top picks for software that boosts Internet connection for your system running Windows comes to an end.

No matter which one of these tools you decide to use, you will experience a significantly more powerful signal on your system.

If you have any other suggestions or questions, don’t hesitate to leave them in the comments section below.

Ralink WiFi Adapter not Working: 3 Solutions to Fix it

Multiple users have been complaining on various forums the Ralink WiFi adapter is not working. This problem can get even more severe, sometimes leading to the dreaded BSOD.

Fortunately, it is an issue that can be easily fixed with the correct information, such as the one in this comprehensive guide.

Below are some of the factors that can cause the Ralink WiFi adapter not to work:

  • Faulty driver: In some cases, the Ralink RT3290 not detecting WiFi issues can be due to an outdated or broken driver. The solution to this is to reinstall or update your network driver.
  • Wrong power setting: Sometimes, you might face this issue because your adapter has been set to turn off when your PC needs to save power. You need to change the power setting in Device Manager.

1. Re-enable the adapter in BIOS

1.1. Access the BIOS

  1. Access your PC BIOS.
  2. Now, go to Memory > System Configuration > Inbuilt devices to disable the embedded WiFi.
  3. Log back into your PC, press the Windows key + I, and select Update & Security.
    update and ralink wifi adapter not working
  4. Next, click the Check for updates button and install all available updates.
    check for
  5. Go to the official website to download the latest Ralink driver.
  6. Go back into BIOS and re-enable the embedded WiFi.

After doing this, proceed to the next 1.2 below.

1.2. Disable the WiFi adapter in Safe Mode

  1. Boot into your PC and press the Windows key + I, and select Update & Security.
    update and ralink wifi adapter not working
  2. Select Recovery in the left pane and click the Restart now button under Advanced startup.
    restart now
  3. Now, navigate to Troubleshoot > Advanced options > Startup Settings.
    startup settings ralink wifi adapter not working
  4. Click the Restart button.
    restart
  5. When your PC restarts, select Enable Safe Mode.
    enable start
  6. From here, press the Windows key + X and select Device Manager.
    device manager ralink wifi adapter not working
  7. Next, double-click the Network adapters option and right-click your WiFi adapter.
  8. Choose the Disable device option.
    disable device
  9. Now, click the Yes button to confirm the action.
    yes
  10. Finally, reboot your PC normally.

After booting into your PC, move to the last step to complete your WiFi adapter’s revival.

1.3. Update driver

  1. Go to Device Manager and expand the Network adapters option.
  2. Right-click your disabled WiFi adapter and select Update driver.
    update driver ralink wifi adapter not working
  3. Now, select Browse my computer for drivers.
    browse my
  4. Click the Browse button.
    browse ralink wifi adapter not working
  5. Now, choose the driver you downloaded and click OK.
  6. Wait for the process to complete.
  7. Finally, enable the device again and restart your PC.

If the Ralink RT5390r 802.11bgn or RT3290 WiFi adapter is not working, disable the WiFi adapter in BIOS and complete the update process in Safe Mode.

You can download Ralink’s latest WiFi drivers from here and make sure you save them to a proper location.

Dedicated software is also a safe option to update your drivers because it has a technology that scans your computer for all outdated drivers and instantly finds the latest and correct updates from its considerable vault.

⇒ Get Fortect Driver Updater

2. Change power settings

  1. Open Device Manager and expand the Network adapters option.
  2. Right-click your adapter and select Properties.
    properties
  3. Now, click the Power Management tab at the top.
  4. Finally, uncheck the Allow the computer to turn off this device to save power and click the OK button.
    power management

Sometimes, the Ralink WiFi adapter not working issue can be due to the power saving feature of your PC. You need to disable this feature to solve the problem.

3. Reinstall the adapter

  1. Launch the Device Manager and expand the Network adapters.
  2. Right-click your WiFi adapter and select Uninstall device.
    uninstall device Ralink WiFi adapter not working
  3. Now, check the Delete the driver software for this device box and click Uninstall.
    uninstall button
  4. Next, click the Scan for hardware changes icon at the top.
    scan for Ralink WiFi adapter not working
  5. Finally, if you have the latest Ralink driver on your PC, update it following the steps in solution 1.3.

Sometimes, the Ralink WiFi adapter not working can be down to issues with your network adapter driver. Reinstalling the adapter should solve the problem.

We have reached the end of the guide on fixing the Ralink WiFi adapter not working issue. All you need is to follow the steps carefully; the case should be history.

If the USB WiFi is not detected on your PC, check our detailed guide to solve the problem.

Feel free to let us know the solution that helped you solve this problem in the comments below.

Battletoads review: A cute but challenging beat ’em up game

This month is quite a busy one for Microsoft’s Xbox Game Studios Division. No less than four new Microsoft games are coming this month, and the company kicked things off pretty nicely yesterday with Microsoft Flight Simulator, which went to become the highest-rated Microsoft game in years. Battletoads, which will be released tomorrow, August 20, plays in a whole different category, and you have to wonder if Microsoft gave it the best chances to make an impact after shipping it so close to a juggernaut.

Battletoads is one of Rare’s oldest franchises, with the first game being released on the Nintendo NES back in 1991. The beat ‘em up series really shined on Nintendo consoles in the nineties, with Rare releasing a couple of other Battletoads games for the Game Boy and the SNES. There hasn’t been a new Battletoads game since the release of Battletoads Arcade in 1994, though the franchise managed to reach cult classic status over the years.

Side-Scrolling beat ‘em up games really saw their golden age in the nineties, where Rare’s notoriously difficult Battletoads games had to compete with other popular franchises such as Double Dragon, Final Fight, Streets of Rage, Teenage Mutant Ninja Turtles, and more. Fast forward to 2020, this genre is apparently still popular as we’ve seen with the recent release of Street of Rage 4, which is currently available on Xbox Game Pass for Console and PC. It seems like a good time to bring the Battletoads series back to life, though this new game is being developed by Dlala Studios, with the assistance of Rare.

Battletoads was first announced at E3 2018 as a reboot of one of Rare’s oldest franchises, and the game was initially expected to ship in 2019. After Microsoft showed the game again at gamescom 2019 and X019 last year, the August 20, 2020 release date was officially announced last month. Battletoads is clearly not a big budget game like Microsoft Flight Simulator, but Dlala Studios has apparently made good use of the additional development time to improve the game’s hand-drawn cartoon art style and create lots of cutscenes with professional voice acting.

To be honest, this focus on story-telling often feels a bit odd for a beat ‘em up game. There are indeed a lot of cutscenes in Battletoads, and you can clearly see Dlala Studios’ ambition to create an entertaining, family-friendly cartoon game with some funny moments. The game’s sense of humour may probably not resonate with all adult players, but fortunately, you can skip all the cutscenes if you prefer to focus on the button-mashing action.

This new Battletoads game once again features Rash, Zitz, and Pimple, the three toad warriors from outer space who can morph parts of their bodies to smash enemies. The Dark Queen, the antagonist of the previous Battletoads game is also still there, and the game continues to mix different gameplay styles with platforming levels, obstacle courses, space shooting, and more. The action is also punctuated by boss fights, puzzle sequences, and various hacking mini-games that require some real dexterity.

Battletoads

Each toad has unique morph attacks and characteristics. Rash, the toad with the cool sunglasses is the most-balanced character, while Zitz is fast but weak and Pimple compensates his slowness with powerful punches. If you play solo, you can switch between the three toads on the fly using the d-pad, and having three characters available at all times makes the game less difficult than previous episodes. When one of your toads has been knocked out, you just have to wait for their health bar to recharge in the background before you can use them again in battle.

The game is even easier in local co-op, which supports up to three players (unfortunately, Xbox Live multiplayer is unsupported). You can revive your buddies when they have been knocked out, and you and your friends should have much less trouble fighting off the waves of enemies that the game will throw at you. Battletoads also offers frequent autosaves and different difficulty levels, and you can also count on a series of tutorials to explain you the control scheme that will often change depending on the genre you will be playing level-to-level.

The combat gameplay is pretty simple: You have one key for basic attacks, another one for powerful Morph and Charge attacks, as well as another button for the Launcher attack to throw enemies in the air. The amphibian heroes can also use their tongues for various purposes including grabbing enemies, spitting gum at them, and eating flies to restore health. The right trigger also allows you to dash to avoid enemy attacks, and this will be very useful when you’ll need to fight off five or more enemies at once.

Battletoads

The random button mashing won’t work on some enemies that won’t be vulnerable after being knocked out by a charge attack. The game can also become really challenging when you’re facing multiple enemies using ranged attacks, or other foes using the environment to create zone damage. In these cases, the dash move and the toads’ various tongue abilities become really essential, especially when you’re playing solo.

Overall, Battletoads is a competent brawler, though the classic beat ‘em up levels can quickly become repetitive. You’ll basically be moving from one area to the next with different waves of spawning enemies, and the action is only slowed down by various puzzles and mini-games that can be more annoying than anything else. But again, Battletoads is a game that mixes different genres and challenges, and the vehicle and space combat sections should cater to the different skills of everyone.

This Battletoads reboot doesn’t do anything special to reinvent an old genre, but it doesn’t really need to. It’s not that easy to bring old franchises back to life, and Dlala Studios deserve credit for making an accessible game that’s fun to play in co-op. The hand-drawn art style is also a labor of love and something that we rarely see in video games these days.

Battletoads

Battletoads may not be game of the year material like Microsoft Flight Simulator is, but it’s great filler content for Microsoft’s Xbox Game Pass subscription service. It’s just bit unfortunate that it may go unnoticed in the sea of new Xbox Game Pass games coming in the next couple of weeks.

Battletoads will be available tomorrow on Xbox One, Windows 10, Steam, and Xbox Game Pass. The Microsoft Store version supports Xbox Play Anywhere, which means that you can buy it once and it play it for free on both your console and PC. If you have yet to subscribe to Xbox Game Pass Ultimate, we remind you that you can get your first month for just $1 and enjoy other upcoming Xbox Game Studios titles such as Tell Me Why and Wasteland 3 on day one.

For nostalgics, the Rare Replay anthology, also available on Xbox Game Pass, includes the original Battletoads game released on the NES in 1991, as well as the Battletoads Arcade game from 1994. The latter, also known as Super Battletoads, was notorious for its gory effects and weaponry, and it’s fun to see how the 2020 reboot went in a completely different direction.

Battletoads
Battletoads
Price:
Free


Xbox Game Pass Ultimate

What ports need to be open for VPN connection Windows 10/11?

If you’re serious about setting up a VPN on Windows 10 using the OS built-in feature, you must understand that the setup involves a certain amount of technical knowledge.

Consumer VPN clients usually require a minimum amount of configuration. You just install them on the target computer, log into your account, and connect to the server of your choice.

Unfortunately, Windows 10-configured VPNs don’t come as easily and require a bit of elbow grease to get them working. Furthermore, you can’t select a VPN server from a different location.

One of the most important pieces of knowledge you need to acquire when it comes to Windows 10 VPN configuration is the port you need to forward to accept incoming connections.

We could just give you the answer here and you’d be on your way. The answer’s 1723; that’s the default port you need to open to accept an incoming connection.

But, for the sake of making sure nothing goes wrong, we’ll give you the full rundown.

How to configure a VPN on Windows 10?

  1. Make sure incoming connections are accepted on your PC
  2. Create a new incoming connection on your PC
  3. Configure the user accounts that can access your PC remotely
  4. Activate the Through the Internet option
  5. Enable port forwarding on your router
  6. Make sure you select the PPTP protocol for the VPN server
  7. Use ipconfig to detect and use the correct IP address
  8. Forward port 1723 to accept incoming and outgoing connections
  9. Enable PPTP passthrough
  10. Allow TCP traffic on port 1723 using firewall rules

If you need more detailed steps on setting up a VPN on your Windows 10 home PC, check out our full guide.

Make sure to forward the right port

All things considered, configuring a VPN efficiently on your Windows 10 computer requires a bit of technical know-how. Setting up a Windows 10 VPN server/client connection is not exactly difficult, but it’s no walk in the park, either.

Even something as little as not knowing which port you need to forward can mess up your whole configuration. However, as long as you follow our instructions carefully, everything should be a-ok.

[wl_navigator]

Microsoft lets you choose your secured DNS choice in Edge

Not long ago, Microsoft announced that they are making it easier to change the encrypted DNS options in Windows 10.

Basically, they moved the DNS over HTTPS or DoH options in the Settings app to make them easier to access.

Now, a Reddit user posted a screen capture showing a similar feature in Microsoft Edge.

What is Encrypted DNS and why is it a good thing?

The main thing about encrypted DNS is that it offers privacy protection. It hides DNS address lookups in normal https traffic.

Before this technology, your ISP could create a profile of the pages you visited a lot easier.

Of course, that’s a double-bladed sword as now, ISPs won’t be able to block certain websites that were a hazard to regular people.

Microsoft Edge Canary beginning with Build 86.0.612.0 offers a Secure DNS option with a couple of encrypted DNS providers.

How can I change the Encrypted DNS option in Edge?

The option is available from the Privacy, search, and services option in Settings.

Scroll down to the secure DNS feature, click on the Choose a service provider and select one of the providers available in the drop-down menu like it’s shown in the image below.

Edge encrypted DNS

Let’s all hope that this DoH in Edge is not going to conflict in any way with the Windows 10 setting and will not lead to any unfortunate events.

But for now, the feature seems pretty straight forward, easy to use, and safe so let’s stay positive.

If you have any comments or suggestions please drop us a line in the Comments section below.

[wl_navigator]

Windows 10/11 VPN using a different port: is it possible?

If you’re using Windows 10’s built-in VPN, you probably know that it involves certain limitations. While it is a great feature, Windows 10’s VPN follows a set of predefined rules and allows little to no customization.

As opposed to a consumer-grade VPN such as Private Internet Access, there’s also no advanced feature in sight. You can’t enable a kill switch, there’s no way to split traffic without getting your hands dirty. You know, the usual.

However, one of the most annoying limitations that Windows 10’s VPN entails is the inability to use a different port. Although this might not sound like more than a nuisance, it can actually trigger some difficult situations.

Can you use a different port in Windows 10 VPN?

Unfortunately, no matter how hard you try, there’s no way to switch Windows 10 VPN‘s port. By default, this VPN uses port 1723 for PPTP connections.

If you’re trying to connect to a server that runs on a different port, you’re definitely going to have a hard time. You can check this out by trying to connect to a VPN server using Windows 10’s built-in feature.

How does Windows 10’s VPN work?

In the VPN connection window, you’ll get the following fields:

  • VPN provider: by default, you can only choose the Windows built-in provider
  • Connection name: doesn’t affect your connection, it’s mainly used for telling VPNs apart
  • Server name or address: self-explanatory, you either type in the server name or its IP address
  • VPN type: you can choose from PPTP, L2TP/IPsec, SSTP, and IKEv2
  • Type of sign-in info: what type of authentication does the server support
  • Sign-in info: username, and password, if neededEdit VPN connection in Windows 10

As you can see, there’s little to no elbow room regarding customization possibilities. Ideally, it should be possible to append the port number to the server‘s address by using a colon (:).

However, it appears that doing that has no effect whatsoever. If you try adding a port number to the address (so that it looks like this 127.0.0.1:4000), Windows will try to resolve the port, thinking it’s a Domain Name.

If your server runs on another port and you only input the server‘s address, Windows 10’s VPN will attempt to use the default port (1723), which will lead to a failed connection.

How can I fix Windows 10 VPN’s default port issue?

1. Make the server run on the default port

Not ideal, but doing so could save you from a lot of headaches. Just make sure the VPN server you configure runs on the default 1723 port. That way, you won’t have to deal with compatibility issues between clients and the server regarding the port number.

Note that doing so will most definitely affect your VPN‘s ability to avoid firewall blocks. If you’re in an environment where VPNs are not exactly tolerated, it will be tenfold easier for the network administrator to detect and block VPN traffic.

2. Use third-party software

This is a more acceptable solution since it doesn’t involve compromising your VPN server by making it use the default port number. Third-party software such as OpenVPN provides you with the same level of security and more flexibility.

On the downside, you’ll need to use OpenVPN for both the server and the clients you wish to connect to said server. While Windows 10’s VPN does support several VPN protocols, OpenVPN is still not one of them.

Unfortunately, Windows 10’s VPN can’t use different ports

To wrap it up, if you’ve planned on using Windows 10’s VPN with a different port than its default one, we have some bad news. Currently, there’s absolutely no way you can change the default port when creating a VPN connection in Windows 10.

However, if you’re 100% determined to keep using Windows 10 as your VPN provider, there are a few things you can do about it.

It’s not exactly great, but you can try using the default port on the VPN server. If that doesn’t work for you, there’s also the possibility of using third-party software solutions such as OpenVPN.

[wl_navigator]

Add VPN connection using Group Policy on Windows 10/11

If you’re a casual VPN consumer, then setting up a VPN on your computer should be as easy as pie. However, if you’re a network administrator and need a quick way to deploy a VPN connection on several devices, things could get hairy fast.

One might believe that it would be easier to just ask whoever’s using a certain station to deploy a VPN by themselves. But that goes beyond the point of having a quick, reliable way to deploy software or configuration settings in bulk.

That’s why operating systems such as Windows Server provide you with the tools to perform these tasks in no time. For instance, you can deploy VPNs in bulk using Windows’ Group Policy.

Note that currently, deploying a VPN connection on multiple devices only works on various editions on Windows Server, including 2016, 2012, and 2008. The best part is that you can deploy the connections on multiple systems, including Windows 10, 8, and 7.

How to deploy VPN on Windows 10 with Group Policy

1. Make sure you backup your Group Policy

  1. Open your Start menu
  2. Go to Administrative Tools
  3. Access Group Policy Management
  4. Head to the folder you want to back up in the GPMC
  5. Expand the folder that contains the GPO you wish to back up
  6. Right-click the object and select Back Up from the context menu
  7. If you want to back up the whole folder, right-click the folder instead
  8. Select Back Up All
  9. Define the destination path where you want to save the content
  10. Click OK

2. Open the Group Policy Editor

  1. Click the Win key on your keyboard
  2. Type gpedit.msc
  3. Select the Group Policy Editor

3. Locate the VPN connection section

  1. In the GP editor, select User Configuration
  2. Head to the Control Panel Settings section
  3. Right-click Network Options
  4. Hover your mouse cursor over the New button
  5. Select VPN Connection in the New menu

4. Configure the VPN connection

  1. Select the VPN connection tab
  2. In the Action combo menu, make sure Update is selected
  3. Click the User connection radio button
  4. Type the connection name in the designated field
  5. Input the address correctly in the DNS Name field
  6. Make sure the Use DNS Name option is enabled
  7. Enable the notification area icon, if you want
  8. Select the Network tab
  9. Choose PPTP VPN in the Type of VPN menu
  10. Click OK

5. Restore the GPO if anything goes bad

  1. Open your Start Menu and launch the Run tool
  2. Type gpmc.msc in the Run field and hit Enter on your keyboard
  3. Right-click the Group Policy Objects folder in the GPMC
  4. Select Manage Backups from the context menu
  5. Define the path where you backed up the GPOs before
  6. Select the GPO you want to restore from the list
  7. Click Restore and confirm by hitting the OK button
  8. Tap the OK button once more

That’s it, if you’ve followed all the steps, all the clients should be able to see the connection and use it without a hiccup.

Windows Server lets you deploy VPNs with Group Policy

All things considered, if you’re a network administrator running Windows Server and need a quick way to deploy VPN connections, don’t fret. You can easily do so using the handy Group Policy management tool that Windows Server comes with.

A VPN connection can be deployed this way to various operating systems, including but not limited to Windows 7, Windows 8, and Windows 10.

Note that it’s always a wise decision to back up anything you’ll wish to tamper with. You can easily back up and restore Group Policy Objects by following our instructions above.

[wl_navigator]

Does Windows 10 have built-in Shadowsocks VPN? How to use it

Microsoft’s latest operating system has native support for VPN and proxy, but there are a few users wondering if Windows 10 has built-in Shadowsocks VPN. We’re here to clarify.

What is Shadowsocks and VPN?

There’s a misconception that Shadowsocks is a VPN service. It’s false. Shadowsocks is a secure SOCKS5 proxy server, making it different from a VPN.

Although the two share some traits, they use different technologies to hide your IP address, encrypt your traffic, and make you anonymous online.

Does Windows 10 have built-in Shadowsocks VPN?

No, Windows 10 doesn’t have support for Shadowsocks, although it comes with proxy and VPN native support.

If you want to use Shadowsocks on your Windows 10 PC, you can download and install the application directly to your PC. It’s free.

Otherwise, you can get a premium VPN service that allows you to use VPN and proxy together, including Shadowsocks.

How to use Shadowsocks on Windows 10

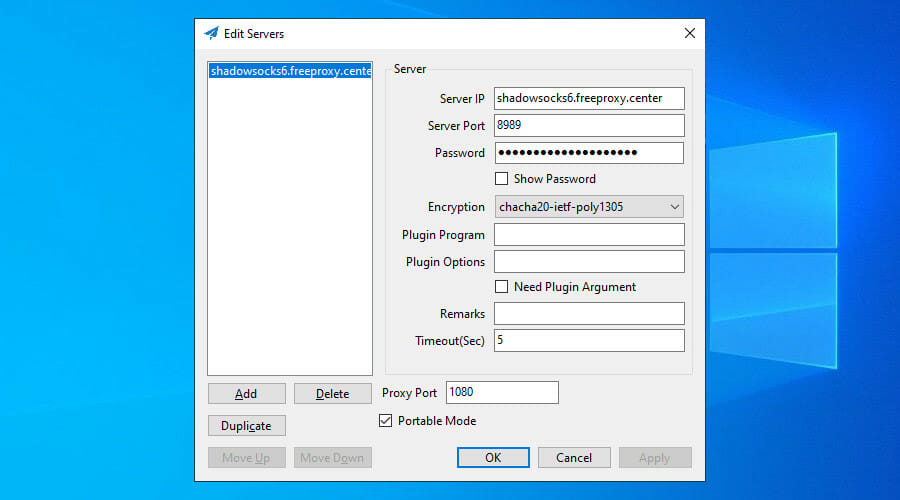
use Shadowsocks on Windows 10

  • Visit the Shadowsocks downloads page.
  • Get the newest version for Windows 10.
  • Unpack the downloaded file and launch the EXE.
  • Specify the IP address, port, and password of the SOCKS5 proxy.
  • Click OK.
  • Right-click the Shadowsocks systray icon.
  • Select System Proxy > Global.

If you want to use the Shadowsocks client, you need to separately get hold of IP addresses, port numbers, and authentication modes compatible with SOCKS5.

The tool comes with a few security methods to encrypt your data, including 256-bit AES military-grade encryption. The best part of it is that it’s free, open-source, and compatible with multiple platforms: Windows, Mac OS X, Linux, Android, iOS, and OpenWRT (router firmware).

How to use Shadowsocks and VPN on Windows 10

Private Internet Access proxy settings

  • Get a PIA subscription plan.
  • Download and set up PIA for Windows 10.
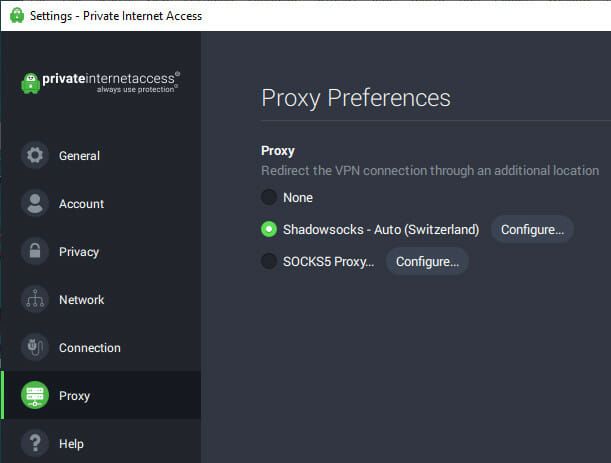
  • Right-click the app’s systray icon and select Settings.
  • Go to the Proxy tab.
  • Select Shadowsocks, click Configure, and choose a location.
  • Exit the settings panel and left-click PIA’s systray icon.
  • Click the power button to connect to a VPN server.

If you want to use Shadowsocks and VPN at the same time, there’s no better way than turning to Private Internet Access. Made by Kape Technologies, it’s the best VPN for Windows 10.

The VPN changes your IP address and geolocation, encrypts your network traffic to block hackers, defends your router from cyber-criminals, unblocks streaming services like Netflix US, and helps you defeat government censorship.

Plus, PIA is one of the few VPNs with integrated Shadowsocks proxy, which you can use to redirect your VPN server to a second location. It’s similar to using double VPN or multi-hop VPN to stay connected to two VPN servers at once.

What else you should know about PIA:

  • +3,300 VPN servers in 48 countries
  • 10 simultaneous connections
  • No logs or leaks
  • 24/7 live chat support
  • 30-day money-back guarantee (no free trial)

Private Internet Access

Private Internet Access

Set up this app on your Windows 10 PC to use VPN and Shadowsocks at the same time.
$2.85/mo. Buy it now

To conclude, Windows 10 has an integrated VPN provider and proxy server, but it doesn’t have built-in Shadowsocks.

If you want to use the secure SOCKS5 proxy server, you can directly download and install the client on your Windows 10 PC at no cost.

But we suggest resorting to Private Internet Access because it lets you use a VPN and Shadowsocks at the same time.

[wl_navigator]

FIX: This PDF document might not be displayed correctly

When trying to open a PDF in a web browser, mostly in Firefox, some users reported receiving the warning This PDF document might not be displayed correctly in all the documents they were trying to view.

Without downloading the document, their option was to open the document with a different viewer, as suggested.

The problem is caused by the Firefox built-in PDF viewer which needs to be tweaked.

Quick Tip

Before you go along with the steps to fix PDF documents that might not be displayed correctly, check that you have Adobe Reader installed on your computer.

If it’s there, you should update it. If not, download and install right away. Then you can continue making the necessary changes.

Having Adobe Reader installed will solve this problem instantly. It works offline just as well. Instead of directly opening files, you can first save them on your local computer and open them with Adobe.

Adobe Acrobat Reader

Get rid of all PDF-related issues with the world’s most well-known PDF editor and reader.

How do I correctly display PDF documents in Firefox?

  1. Open a new Firefox window and type about:config in the address bar.
  2. A window will open with a warning > accept the warning and open the configuration window.
  3. Type js in the search bar at the top.
  4. Look for pdfjs.disabled with a value of true.pdf reader firefox
  5. Change the value to false using the toggle on the right side.
  6. Then, open Firefox menu> Options.
  7. Go to the Applications tab >locate Portable Document Format (PDF) or Adobe Acrobat Document(PDF).change pdf reader firefox
  8. Click the drop-down menu on the right > Use other.. > select Adobe Reader as the app to preview in Firefox.

This will disable Firefox‘s built-in PDF viewer and enable Adobe reader‘s plugin for viewing PDFs.

Note: If you want to save a Firefox webpage as PDF, follow these recommendations.


We hope you found this article helpful. You can send us your suggestions using the comments sections below.


Also, any other document type can be converted to PDF for an easier reading preview.


Posted in Fix

Windows 10 WiFi Connected but No Internet Access [Full Fix]

One of the most annoying problems regarding Wi-Fi is your device showing full Wi-Fi bars, yet your Internet connection is still not working.

Do not worry, as this is a relatively common situation that many users are complaining about.

Below, you can find some practical solutions to walkthrough if you face this situation.

How can I fix my device connected to Wi-Fi but not to the Internet?

1. Restart your computer

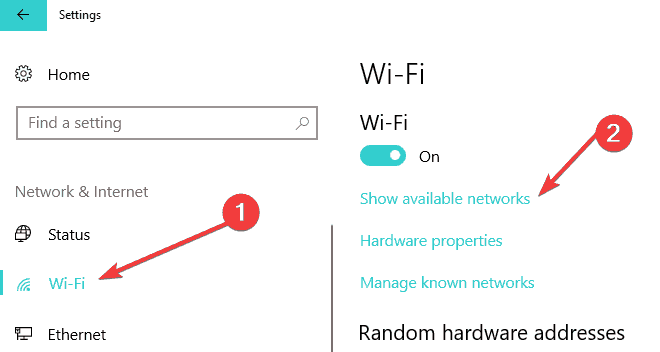
  1. Click the Start button and go to Settings.
  2. Navigate to Network & Internet.
  3. Next, choose Wi-Fi.show available WiFi networks
  4. Select your network connection and click Connect.

2. Restart your Internet modem and router

Another easy step that could fix your problem is unplugging your modem and router from their power sources, waiting for a few seconds, and plugging them back in.

Restarting the router and modem flushes the memory contents and helps reset any background or lingering problems.

3. Update the network adapter driver

Wi-Fi not working can probably be caused by a missing or outdated network driver, and the way to solve this is to check and see if an updated driver is available.

Using a third-party driver update is the quickest way to fix this issue, and we recommend using Fortect Driver Updater.

This tool will scan your computer and inform you about outdated, damaged, or missing device drivers. Next, you can choose how to update your drivers manually or automatically.

Once you install the software, it will scan your device and let you know your driver’s status. The scan will not take long, and the better news about it is that it won’t use much CPU or RAM.

Next, you can update the drivers individually or in bulk. Then, you can let the automated process do the job for you and update the old drivers.

⇒ Get Fortect Driver Updater

4. Make sure you connect to the correct network

Ensure your Wi-Fi device is not trying to reach a network next door because even if Wi-Fi is on and connected, you might still not have working internet.

To verify this, open the Wi-Fi settings and check the network name you are trying to connect to. It is probably not your network if you do not recognize it.

Also, if your device is connected to a VPN service, you might see a full Wi-Fi connection but no internet connectivity.

In this case, try a different VPN server or disconnect from the VPN completely to see if that fixes the problem.

5. Re-enter the wireless password

Some operating systems will not warn you if you put in the wrong wireless password.

Your computer might show that you have a strong Wi-Fi signal but if the password is incorrect, the router will refuse to properly communicate with your device.

If you are using a laptop on a public Wi-Fi hotspot, make sure the password is correct. You might be using an old password that used to work but has changed meanwhile.

6. Run commands in Command Prompt

  1. In the search box on the taskbar, type Command prompt.cmd
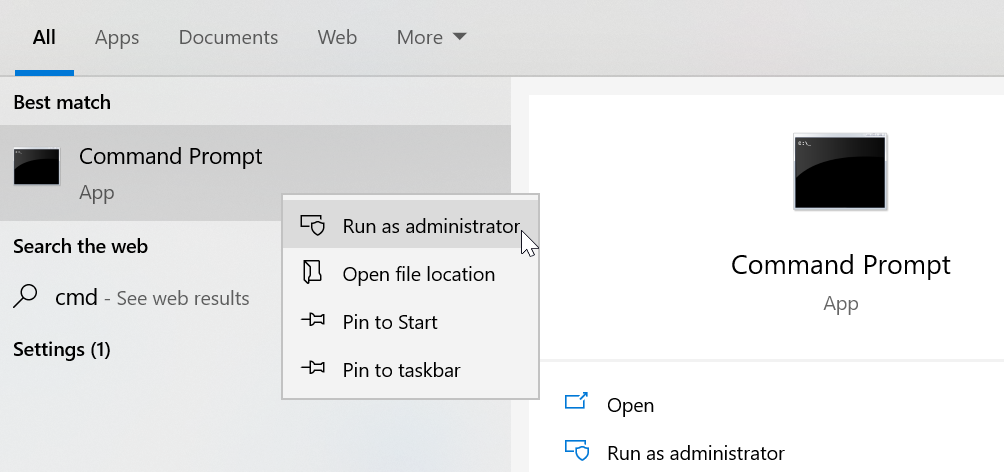
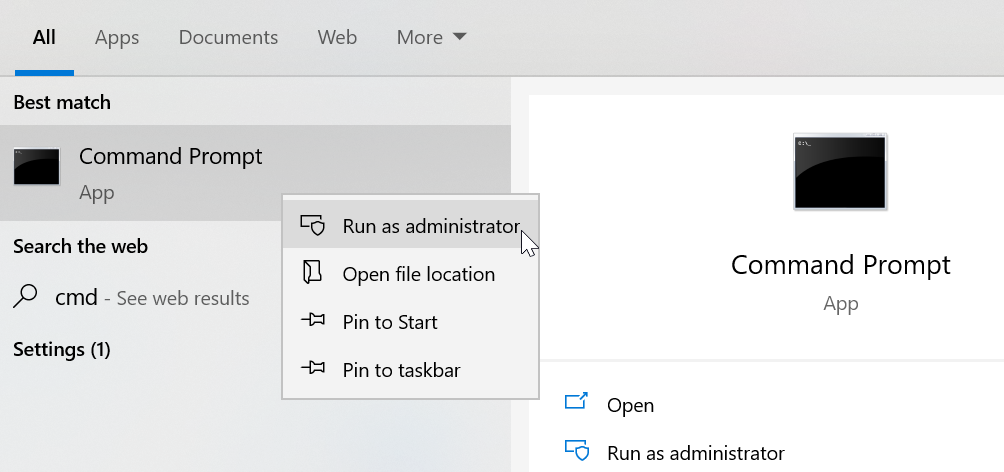
  2. Right-click Command prompt, and then select Run as administrator.
  3. In the Command prompt, run the following commands.
  • netsh winsock reset
  • netsh int ip reset
  • ipconfig /release
  • ipconfig /renew
  • ipconfig /flushdns

7. Use Windows Network Troubleshooter

  1. Type Network Troubleshooter in the search box.
  2. Click on Identify and Repair Network Connections.
  3. The Windows Network Troubleshooter will start.Identify Repair Network Connections

8. Reset DNS

  1. Right-click the network connection icon at the bottom right corner.
  2. Click Open Network and Sharing Center.
  3. Click Change adapter settings.
  4. Right-click your Wi-Fi adapter and click Properties.
  5. Select Internet Protocol Version 4 (TCP/IPv4).
  6. Next, click Properties.
  7. Click Obtain an IP address automatically.
  8. If you still cannot connect to the internet, select Use the following DNS server addresses and fill in the addresses:
    • Preferred DNS server: 8.8.8.8
    • Alternate DNS server: 8.8.4.4
Slow LAN speed Windows 7

9. Temporarily turn off your security software

Your problem can also be caused by interference with your security software. To see if that is the case, temporarily turn off your security software and check if the problem is solved.

Consult your software documentation for instructions to disable it. If this solves the problem, contact your security software vendor and ask them for advice, or install a different security program.

Note: While your security software is disabled, be extra careful what sites you visit, what emails you open, and what files you download, as your computer is very vulnerable.

Make sure you turn your antivirus software back on as soon as possible to ensure your computer is better protected.

10. Temporarily turn off your Firewall

  1. Open the Start menu and type Command Prompt.
  2. Right-click on the top link and select Run as administrator.
  3. Type netsh advfirewall set allprofiles state off.
  4. Next, press Enter.

Similarly, to turn your firewalls back on, return to Command Prompt and type netsh advfirewall set allprofiles state on.

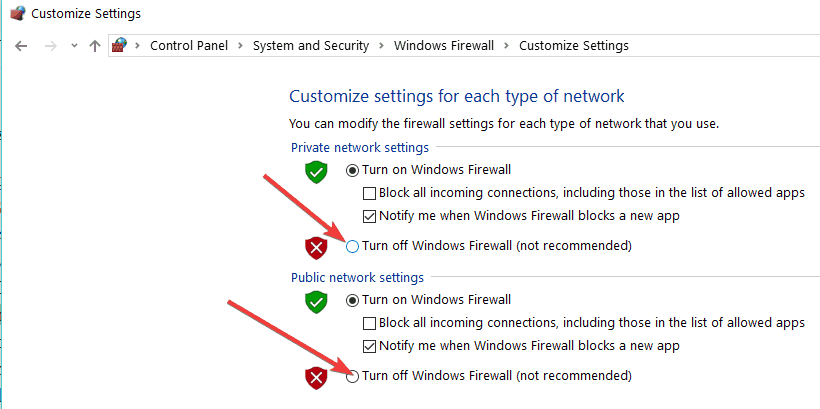
If you’re using Windows 10’s built-in firewall, you can disable it directly from the Control Panel, as shown in the screenshot below.

Turn off Windows firewall

These are some workarounds you can use if your Wi-Fi appears connected, but the Internet is not working. For users who have multiple access points, it can be worth checking out whether your access point is temporarily full because this means your bandwidth is up to capacity.

In case no WiFi networks are found, we have a dedicated guide that addresses this issue, so don’t miss it.

Let us know which of these methods helped you fix your problem.

Video Encryption Software for Windows [Free]

Audiovisuals are viewed by many as the most credible means of transmitting information.

This is especially important in the line of marketing and advertisement. As a result, sensitive information is constantly being stored and transmitted in audiovisual format (videos).

Hence, there is a growing awareness of the importance of protecting sensitive video files. To secure your video files, video encryption becomes a necessity.

Today, video encryption has been made very easy.

Unlike in the past when you needed a different set of sophisticated tools to encrypt files, there are now several video encryption software options, which are equipped to execute this function in a matter of minutes.

In this post, we have compiled five of the best video encryption software available.

Encryption your videos with these tools

WinZip (recommended)

WinZip has gained a lot of popularity and it’s used by millions of people all over the world. Part of this has to do with the fact that the tool is extremely easy to use.

The software allows you to share, manage, and protect your files. This all-in-one file manager is the perfect tool if you need your file to be protected via password and it’s compatible with all major file formats.

”WinZip”

”WinZip”

”All-in-one
”Free
&aff_sub2=Native” current_url=”true” button_text=”Visit website” image=”https://windowsreport.com/wp-content/uploads/2016/08/winzip-windows-10-compression-tool-210×160.jpg”]

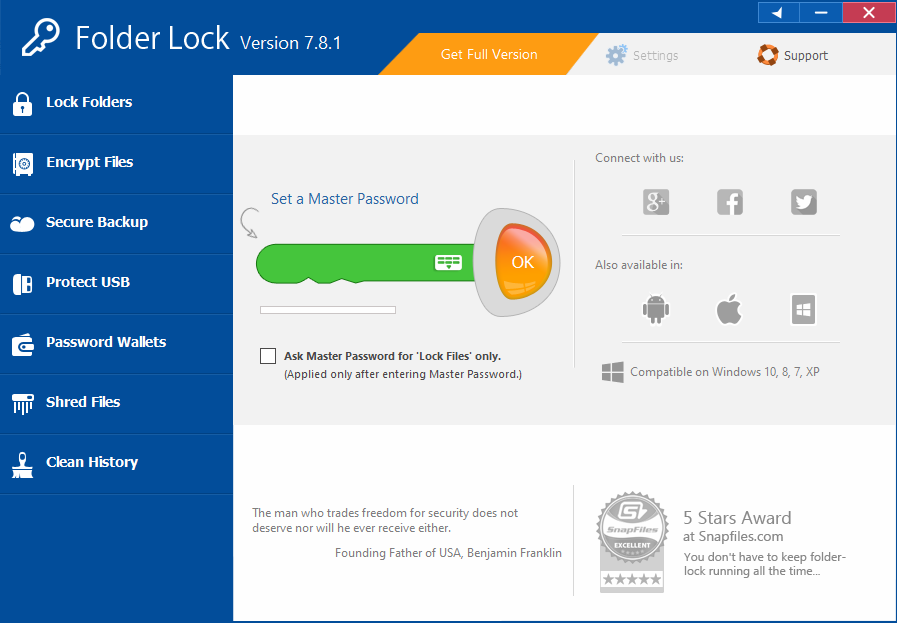
Folder Lock

video encryption softwareFolder Lock is a software that provides encryption options for video files (and other files) on your computer. The software is developed by NewSoftware, which is famous for its durable digital security solutions.

Typically, Folder Lock allows users to encrypt personal files like photographs, videos, contacts, and so on.

This software, like most encryption tools, adopts the AES 256-bit encryption system.

You are also given the opportunity of creating storage lockers for highly sensitive (classified) files (including videos).

In addition, Folder Lock has the capability to connect with any cloud server. This allows you to upload encrypted videos directly from your storage lockers to any connected cloud server.

Furthermore, Folder Lock is compatible with mobile devices, most especially Windows Mobile. With this, you can easily encrypt your files, irrespective of your location.

Nevertheless, Folder Lock is free to download. However, you are required to subscribe to a premium plan, before you can access its myriad of features.

Folder Lock

Folder Lock

Password-protect all of your files and folders, create storage lockers for your most sensitive files with this amazing software. Get the best deal now!
Free trial Visit website

AxCrypt

video encryption softwareAxCrypt is arguably one of the best video encryption software on the market. It hosts a set of versatile encryption features, which makes it suitable for both personal and business use.

AxCrypt enjoys global prominence, as evident in its diverse client-base.

Besides that, this video encryption software is designed to protect video files against hacks.

To do this, it uses different encryption protocols, which range from the simple 128-bit protocol to the more advanced 256-bit encryption, which is widely used by top-grade firms.

AxCrypt hosts a set of tools, which enables it to integrate perfectly with any cloud storage service, be it OneDrive, Google Drive, or Dropbox.

Upon integration, it encrypts the files and folders, backed up on the cloud service(s).

In addition, the software is fairly easy to use, requiring only simple steps to effectively encrypt video files.

You are also afforded the opportunity of sharing encrypted videos directly from AxCrypt to your email or other media hubs.

Furthermore, AxCrypt comes with mobile applications that allow you to encrypt and view encrypted video files on your mobile phones and tablets, wherever you are (even on the go).

Nevertheless, AxCrypt offers a free version, albeit with restricted access.

⇒ Get AxCrypt

Idoo File Encryption

video encryption softwareThe Idoo File Encryption software is one of the topmost encryption tools on the market, which reinforces the security of video files against unauthorized access.

The software is equipped with best-in-class encryption protocols, which can lock, hide, or encrypt videos on your computer, as you see fit.

In addition, Idoo File Encryption can encrypt private DVDs, and it can also execute batch encryption of videos.

This video encryption software also allows you to monitor access to every video file on your computer.

With this, you are easily able to identify when and how your videos were accessed.

Furthermore, this software hosts an advanced encryption protocol (AES 256-bit), which formidably protects all encrypted video files from unauthorized access.

Also, the software is equipped with a setup wizard that guides you through the encryption process, from start to finish.

Idoo File Encryption software offers a free trial version, with limited features, for a period of one month.

⇒ Get Idoo File Encryption

AES Crypt

AES Crypt features a set of advanced security protocols, which make it one of the most durable video encryption tools available.

It hosts the 256-bit encryption algorithm, which formidably protects your video files against forced entry or hacks.

In addition, the software hosts a user-friendly interface, which makes it fairly easy to navigate.

Its encryption process is automated and all you are required to do is to input your password, and the software takes over from there.

This video encryption software is compatible with virtually all computer OS, most especially Windows.

Besides that, AES Crypt is flexibly built, with respect to its open-source nature. This means that you are able to incorporate additional features into its default setup.

The software features a storage bank, which serves as retention storage for encrypted videos, before syncing them to the cloud storage. With this, every encrypted video is securely backed up on the cloud.

In essence, AES Crypt is an effective video encryption software, which is best suited for basic encryption purposes.

Its open-source functionality, however, ensures that you can extend the platform, to further enhance the performance of the software.

⇒ Get AES Crypt

Password Protect Video Master

Password Protect Video master ranks among the best video encryption software. The software basically converts a video file to EXE file format, which is durably protected by a playback password.

This ensures that encrypted files are not, in any way, compressed or tampered with during encryption.

Typically, Password Protect Video Master hosts a unique feature, which enables encrypted video files to be played on only authorized computer systems.

With this, you don’t have to worry about unauthorized access, as your video files are practically useless on unauthorized computers. There is also a feature, which protects your video files from unauthorized screen capture or recording.

This video encryption software protects video files with the best-in-class encryption system, and you are afforded the opportunity of selecting from a pool of dynamic password formats.

Certain automated functions can be set. For instance, you can instruct the system to encrypt a particular video file after a specific number of playbacks.

Lastly, Password Protect Video Master offers a free trial version to new users, which is only available for a brief period.

⇒ Get Password Protect Video Master

Have you made use of any of the aforementioned video encryption software? Or do you know of any tools which did not make our list? Feel free to let us know by commenting below.

[wl_navigator]

Microsoft wants to better separate new conversations from thread replies in Teams channels

Microsoft is working on a new feature that should prevent users from starting a new conversation when they intend to reply to an in-line thread in Teams channels. A member of the Microsoft engineering team noted on the UserVoice forum that the company is internally testing this feature.

A Teams channel can contain multiple conversations happening at the same time. When users need to discuss a topic or idea with their colleagues, they can either start a new conversation or reply to a conversation. While messaging functionality isn’t something new, some people usually reply in the primary message box for the channel instead of in the reply message box for the thread. It’s probably because these two boxes are pretty much closer to each other which could be confusing especially for new users. Probably, Microsoft aims to address this common problem by introducing this new capability in Microsoft Teams.

Microsoft Teams Resply Thread

At the moment, there is no ETA on when to expect the new functionality in Microsoft Teams. The initial user request appeared in May 2017, and hundreds of people have commented on this post since then. The idea has been upvoted by more than 9,000 people until now, and you can also vote on this feature on the Microsoft Teams Uservoice website if this is important for you.

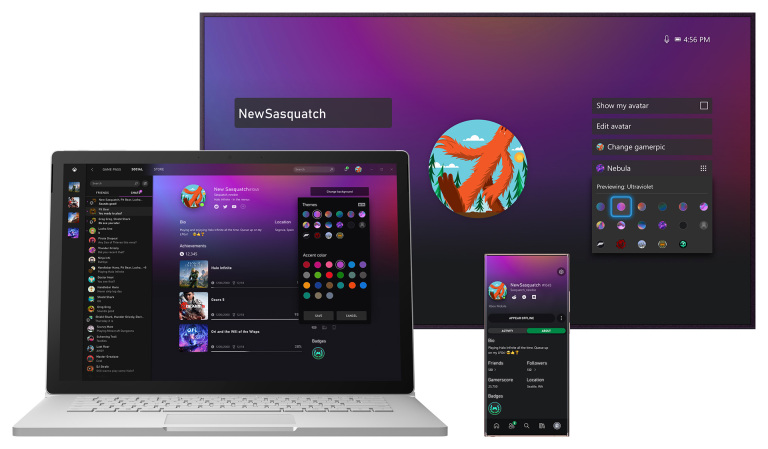
A new Xbox experience is coming to Xbox consoles, Windows 10, and mobile devices later this year

As Microsoft is now gearing up for the launch of the Xbox Series X in November, the Xbox team has just unveiled a new Xbox experience that will be coming soon to Xbox consoles, Windows 10 PCs, and mobile devices. We’ve already seen glimpses of a new Xbox design language in the Xbox app for Windows 10, the Xbox Game Pass app for mobile, and the redesigned Microsoft Store on Xbox One, but what Microsoft has in the pipeline is much more than a fresh coat of paint.

“The new Xbox look and feel is designed to be faster to use, more approachable and visually appealing. This holiday it will be shared across all Xbox mobile apps, Xbox Game Pass on PC, and of course Xbox One and Xbox Series X consoles. Text is more readable, elements on screen are easier to understand at a glance, and accomplishing your tasks is faster than ever. This includes tile shape, fonts, an updated illustration style, and more,” explained Chris Novak, Head of Xbox Research & Design.

On Xbox consoles, the overall layout of most of the pages will remain similar, but the team has been working to make it all “faster and more focused.” The speed improvements will benefit both Xbox One consoles and the upcoming Xbox Series X, with the Xbox team promising more than 50% faster load times for the Home screen, and close to 30% faster load times when you’re returning to Home from a game. “Furthermore, these improvements use 40 percent less memory than what was previously required,” Novak said today.

In addition to the design revamp for the Xbox OS, new Xbox mobile apps are also in the work with useful new features. Mobile notifications will now reflect your gaming activity across Console, PC, and mobile, and that includes notifications when games are now done installing on your PC or console. The Xbox team believes that the Xbox mobile app is more convenient to use than the virtual keyboard on Xbox consoles, and you’ll also be able to use it for sharing clips that you’ve just recorded on your console.

Digitalexperience Inline1

Novak says that this new Xbox experience will start rolling out “in the coming weeks, and come November we’ll celebrate a milestone in our user experience journey alongside the launch of Xbox Series X.” There are some exciting times ahead for Xbox gamers, and it’s good to see that Microsoft won’t let the Xbox One behind on the eve of a new console generation. “We’ll continue to listen to your feedback and build together with you,” Novak said, if you’re an Xbox Insider on the Alpha or Skip Ahead rings you may get the chance to test all these changes very soon.

Microsoft Flight Simulator X Available on Steam for Windows

Update: If you liked FSX, you will probably love the new Microsoft Flight Simulator 2020 launched on August 18th 2020. However, read our article about the game’s potential installation errors and how to avoid them.


Microsoft Flight Simulator X is available on Steam

It’s finally here! Microsoft Flight Simulator X was launched on Steam on December 18. Now you can test your pilot skills on this flight simulator and see for yourself what’s new in this game version.
microsoft-flight-simulator-x-only-$12-49-holiday-sale
This summer, Dovetail, and Microsoft agreed on a partnership to develop new flight software and now we can see the end result.

This time, the game features Windows 8.1 support and updated multi-player functionality among many others.

You can choose from over 20 aircraft, ranging from commercial and private planes to helicopters: 747 jumbo jet, F/A-18 Hornet, P-51D Mustang, or EH-101 helicopters. No, UFOs are not on the list yet.

You can fly the aircrafts to any one of 24,000 destinations. You can select your starting location, set the time, the season, and even the weather.

You can be whatever you want to be: from air-traffic controller to pilot or co-pilot.

There are over 80 missions available, from rescue operations to races. Talking about races, the list to choose from will never get you bored.

You can select a Red Bull Air Race course, the unlimited Reno National Championship course, cross country, competition sailplane courses, and also fictional courses such as the Hoop and Jet Canyon.

However, there isn’t much improvement as far as visuals are concerned. Microsoft has kind of limited Steam from upgrading the graphics part through their license agreement.

Microsoft Flight Simulator X comes with a price tag of $12.49 till January 2. This holiday offer lets you buy the game 50% off the usual price.

And one more piece of information: so far 86% of those who have tested the game gave it a thumbs up, so you’ll definitely make the right choice by buying it.

What are the available aircraft in Flight Simulator X?

And now let’s see what beauties these games have in store in terms of aircraft:

  • Augusta Westland EH101 (Helicopter)
  • Airbus A321
  • AirCreation 582L Trike Ultralight
  • Beechcraft Baron 58
  • Beechcraft King Air 350
  • Bell 206B JetRanger (Helicopter)
  • Boeing 737-800
  • Boeing 747-400
  • Boeing F/A-18
  • Bombardier CRJ700
  • Bombardier LearJet 45
  • Cessna C172SP Skyhawk
  • Cessna C208B Grand Caravan
  • De Havilland DHC-2 Beaver
  • DG Flugzeugbau DG-808S
  • Douglas DC3
  • Extra 300S
  • Gunman G21A Goose
  • Maule M7 Orion
  • Maule M7 Orion (on skis)
  • Mooney Bravo
  • North American P-51D Mustang
  • Piper J-3 Cub
  • Robinson R22 Beta II (Helicopter)

Here are the system requirements:

  • OS: Windows XP Service Pack 2 or later
  • Processor: 2.0 GHz or higher (single-core)
  • Memory: 2 GB RAM
  • Graphics: DirectX9 compliant video card or greater, 256 MB video RAM or higher, Shader Model 1.1 or higher
  • DirectX: Version 9.0c
  • Network: Broadband Internet connection
  • Hard Drive: 30 GB available space

[wl_navigator]

FIX: Microsoft Flight Simulator X fatal error in Windows 10/11

Microsoft Flight Simulator X is still among Windows’ most beloved flight games. Yet, some users have stated that a fatal error occurred error message pops up when they try to launch FSX.

Consequently, those users can’t get the game running.

That same error message can pop up for users with the Flight Simulator X: Steam Edition or DVD version.

Update: Microsoft released the sequel title, Flight Simulator 2020 and many users reported problems with installing and running the game.

Six potential resolutions for Flight Simulator X fatal error

1. Get a new uiautomationcore.dll file for Flight Simulator X

  1. First, open DLL-Files.Com in a browser.
  2. Enter uiautomationcore.dll in that website’s search box, press the Search DLL file button, and click uiautomationcore.dll to open the page shown directly below.
  3. Then click Download to download a 32 or 64-bit uiautomationcore.dll. If you’re running Flight Simulator X on a 32-bit Windows platform, you’ll need a 32-bit DLL.
  4. The file saves as a compressed ZIP. So, extract the uiautomationcore.dll ZIP by opening it in File Explorer and clicking Extract all.
  5. Then click the Browse button to choose a folder to extract the ZIP to.
  6. Click the Extract all button.
  7. Next, open the folder that you extracted the ZIP to in File Explorer.
  8. Thereafter, move the uiautomationcore.dll file into the Microsoft Flight Simulator X folder that includes FSX.EXE. The path for that folder might be Program Files/Microsoft Games/Microsoft Flight Simulator X

2. Run Flight Simulator X in Compatibility Mode and as Administrator

  1. First, click the File Explorer button on the taskbar.
  2. Then open the Flight Simulator X folder.
  3. Right-click FSX.EXE and select Properties to open its properties window.
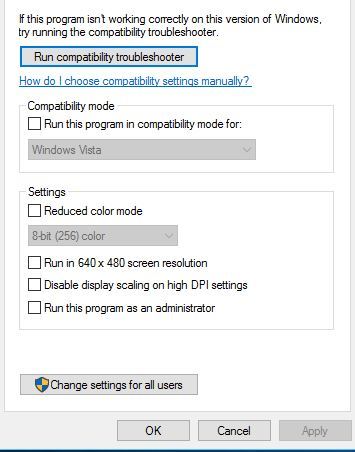
  4. Select the Compatibility tab shown in the snapshot directly below.
  5. Select the Run this program in compatibility mode for option.
  6. Then select Windows XP Service Pack 2 on the drop-down menu.
  7. In addition, select the Run this program as an administrator option.
  8. Select the Apply option.
  9. Click OK to close the window.

3. Reinstall Flight Simulator X

Uninstall Flight Simulator X using Advanced Uninstaller PRO 12

  1. Click Download Now on Advanced Uninstaller PRO 12’s webpage to download the software’s setup wizard. Open the utility’s setup wizard to install Advanced Uninstaller.
  2. Launch the Advanced Uninstaller software.
  3. Click General Tools and Uninstall Programs to open the software’s uninstaller window.
  4. Select Flight Simulator X and click Uninstall.
  5. Click the Use the leftover scanner option on the dialog box window that opens.
  6. Select Yes to provide further confirmation.
  7. Thereafter, a window will open that shows users leftover registry entries and files. Click the Next button to erase all the selected leftovers.
  8. Select the Done option to finish.
  9. Restart Windows after uninstalling FSX.
  10. Then reinstall Flight Simulator X with the DVD.

Uninstall Flight Simulator X using Steam

  1. Steam users can uninstall FSX within Steam. Open Steam and click Library.
  2. Then right-click Flight Simulator X and selectUninstall.uninstall game via steam
  3. Click Delete to confirm.
  4. Open this directory in File Explorer: C://Program Files (x86)/Steam/SteamApps/commonFSX.
  5. Then open the FSX folder, and press Ctrl + A to select all its content. Click the Delete button.
  6. Users might also find further leftover files at this path: C://Users<user name>/Documents/Flight Simulator X Files.
  7. Select all the files in the Flight Simulator X Files folder, and press the Delete button. Then delete the folder itself.
  8. Click Restart to reboot Windows 10.
  9. Open Steam and click Library. Right-click Flight Simulator X and select Install.

4. Free up some RAM

  1. Right-click the Start button and select Task Manager to open the system utility shown below.
  2. Select third-party software listed under Apps and Background processes, and click End Task to close them.
  3. Select the Start-up tab.
  4. Select the software to remove from the system startup, and press the Disable button.
  5. Restart Windows.

5. Verify the Game’s Cache

  1. Launch the Steam game client.
  2. Click Library to open the game list.
  3. Right-click Flight Simulator X and select Properties.
  4. Select the Local Files tab.
  5. Then select the Verify Integrity of Game Cache option.

6. Erase Flight Simulator X’s Log File

Some players have also stated that erasing FSX’s log file can fix the fatal error occurred error. Note, however, that the log file stores all the game’s pilot records.

To erase the log, open this path in File Explorer and delete the Logbook.BIN: C:Users<user name>DocumentsFlight Simulator X Files.

Those resolutions might fix Flight Simulator X’s fatal error for some players. However, they aren’t guaranteed to fix the issue for everyone.

This game post also includes further resolutions that could fix FSX: Steam Edition when it doesn’t run in Windows 10.

[wl_navigator]

EA Access is now EA Play on Xbox One consoles, Windows, and other platforms

Beginning this week, EA’s membership plans, EA Access and Origin Access, have both been renamed as EA Play while Origin Access Premier has been rebranded as EA Play Pro.

This new naming should sound familiar to most gamers as EA Play is also the name of the annual video game experience where EA shows off all of their latest titles and announces new, upcoming ones. This rebranding of the various membership plans under the EA Play brand should make it much easier to understand for those new to EA and who may have possible been confusing EA Access with early access or beta gameplay experiences.

The pricing and features for the newly-named EA Play and EA Play Pro will remain the same and further improvements are promised in the near future such as the addition of exclusive in-game challenges and monthly reward drops. The later sounds similar to what Prime Gaming (previously Twitch/Amazon Prime) offers its subscribers.

Here’s the official list of features for each plan.

EA Play makes your games more rewarding with:

  • Access to exclusive player benefits and a library of top titles including fan-favorite series and premium games.
  • The chance to try out selected new-release games before launch for up to 10 hours of playtime. If you decide to buy the game, all of your saved progress carries over, so you can pick up right where you left off.
  • Savings on EA digital purchases with a 10% member discount – letting you save on full games, Season Passes, points packs, and DLC.

EA Play Pro members get everything above plus:

  • Unlimited access to all our latest titles as soon as they drop.
  • Pro-level rewards like Season Passes and exclusive player content.
  • A library of deluxe edition games.

EA Play is available on Windows devices and Microsoft’s family of Xbox One consoles. It will also expand to Steam gamers later this month on August 31st.

Are you a current subscriber to EA Play or EA Play Pro? Let us know if you like these changes in the comments below and then follow us on Pinterest and Facebook for more gaming news.

EA Play
EA Play
Developer:
Electronic Arts
Price:
$5.99

Leaked Microsoft keyboard shows a new physical key for Windows 10 emoji

A new upcoming keyboard for Windows devices has leaked online (via the reliable Microsoft leaker, WalkingCat). While most of the keyboard isn’t too ground-breaking, what is noteworthy is the inclusion of a key for bringing up the emoji window in the Windows operating system.

This isn’t the first time that Microsoft’s experimented with a dedicated emoji button on their keyboards (two were revealed late last year with the feature) but this is the first time that we’ve seen a physical keyboard use the new emoji key design seen in the Windows 10X software keyboard that was previewed just over a week ago.

Leaked Windows keyboard.

The new design, that of a heart icon over a square, is rather ambiguous and seems to have confused most who noticed it on Twitter. It does make one wonder why Microsoft isn’t simply sticking with the basic smiley face which is recognisable by almost everyone. My initial impression was that this key was for liking, bookmarking, or saving content.

What do you think? Do you like this new emoji key design or do you prefer the smiley face? Share your thoughts in the comments below and then follow us on Pinterest and Twitter for more Windows news.

FIX: Windows 10 has WiFi but I can’t access the Internet

If you have issues with your Internet connections in Windows 10 while connected to the WiFi, read this guide to find out why your Internet access isn’t working and what you can do to fix it.

Even though your WiFi icon shows up in your taskbar of the Windows 10 system, you can still have some issues with Internet access.

What can I do if I have WiFi connection but no Internet access?

  1. Try a different browser
  2. Restart your Wi-Fi device
  3. Restart the Internet router
  4. Unplug/plug the cable
  5. Disconnect/reconnect to the Wi-Fi router
  6. Other Wi-Fi/Internet connection issues in Windows 10

1. Try a different browser

As this might be a problem with your browser, the first and easiest way of solving the issue would be to simply change your browser to a reliable one like Opera.

This awesome browser is less prone to such problems and errors and has a built-in ad blocker that will speed up the page loading.

And if you want to feel completely safe, use the built-in VPN service that will hide your identity even from your ISP while browsing.

Nowadays, the pandemic is forcing us to stay inside but you can still socialize with ease because you will find Instagram, WhatsApp, and Facebook Messenger right on your sidebar.

Don’t take our word for it, and try out Opera to optimize your browsing services and connectivity with clever functionalities.

2. Restart your Wi-Fi device

  1. Click the WiFi icon found next to the clock in the taskbar. 
  2. Seeing an exclamation mark next to the WiFi icon means that you’re not connected to the internet.
  3. Turn off WiFi from your Windows 10 device.
  4. Reboot your PC.
  5. Enable the wifi adaptor and check your Internet connectivity.

3. Restart the router

  1. Power off the router.
  2. Wait for approximately one minute.
  3. Power up the router.
  4. Wait for the router to properly start.
  5. Try connecting your device to the WiFi connections and check your Internet access.

4. Unplug/plug the cable

  1. Unplug the Ethernet cable (the internet cable) from the router and plug it directly into your device.
  2. If the Internet is not working with a direct cable connection then you will need to contact your Internet Service Provider to troubleshoot the problem.
  3. If your Internet access is working after you plugged in the cable directly then it is most likely an issue with your router.

Note: If it is an issue with your router install it again by following the instructions on the CD that came with it when you bought it.

5. Disconnect/reconnect to the Wi-Fi router

  1. Disconnect from the router.
  2. Connect again to the wifi router by entering your password and account.
  3. Check to see if your Internet access is working properly

Other Wi-Fi/Internet connection issues in Windows 10

This is not the only problem that may occur while trying to connect to the Internet via Wi-Fi.

If you have other connection problems, we recommend you check the list we have prepared for you. Here are the most common issues:

If you have any more similar problems or suggestions, don’t hesitate to share your thoughts in the Comments section below.

5 best VPNs for Safari to protect your online privacy

If you’re using a Mac and looking for the best VPNs for Safari to protect your online privacy, it might be challenging to find a browser extension that actually works since Apple no longer supports Safari addons.

But it’s not all bad news. Instead, you can check out the best VPNs for Mac that protect not only Safari but all Internet-enabled apps.

With a virtual private network service for Mac, you can defend not only your browsing sessions from phishing and other malware but also all programs with Internet access.

Here’s what you can do with a VPN for Safari:

  • Hide your browsing activity from your ISP and protect your online privacy
  • Watch unlimited streaming by unlocking streaming services like Netflix US, Hulu, or BBC iPlayer
  • Find cheaper flights with a VPN and get major discounts by changing your geolocation

What are the best VPNs for Safari?

Private Internet Access

PIA is the best VPN for Mac

Created by Kape Technologies, Private Internet Access (PIA) is a top VPN for Mac and Safari, thanks to an extensive network of servers, superior security features, and speedy Internet connections.

The service has an ad and malware blocker called PIA MACE that puts a shield on Safari and any other installed browsers. Plus, it uses OpenVPN with up to 256-bit military-grade encryption to protect your data.

PIA also comes with static and dynamic IP addresses, a kill switch, port forwarding, split-tunneling mode, as well as exclusive DNS servers. It allows 10 simultaneous connections.

More about PIA:

  • +3,300 VPN servers in 48 countries
  • No logs or leaks
  • 24/7 live chat support
  • 30-day money-back guarantee (no free trial)
Private Internet Access

Private Internet Access

Use PIA to defend your Mac from hackers and unblock Netflix US.
$2.85/mo. Buy it now

NordVPN

use NordVPN for Macbook

Developed by Tefincom & Co., NordVPN is a great VPN for Safari if you’re looking for advanced security features. It supports OpenVPN with 256-bit military-grade encryption.

What’s more, NordVPN can use obfuscation mode to hide the fact that you’re using VPN, in order to access websites that reject VPN connections. Or you can use Onion-over-VPN or Double VPN connections.

The app allows up to 6 connections at the same time. It has an ad and malware blocker called CyberSec, along with private and custom DNS servers.

More about NordVPN:

  • +5,100 VPN servers in 59 countries
  • No logs or leaks
  • 24/7 live chat support
  • 30-day money-back guarantee (no free trial)
NordVPN

NordVPN

Keep your privacy and security in check by turning to this awesome VPN for Safari.
$3.49/mo. Buy it now

Surfshark

use Surfshark for Macbook

Made by Surfshark LTD, Surfshark works best for users interested in a cheap VPN for Safari. It’s the most affordable VPN on this list.

The service doesn’t have an impressive network of servers as the other VPNs here. But it makes up for it in other ways, such as excellent security features.

Surfshark supports OpenVPN and WireGuard, split-tunneling mode, obfuscated servers, multi-hop VPN connections, and a kill switch. You can use it to protect your entire household devices with a single subscription.

More about Surfshark:

  • +1,700 VPN servers in +63 countries
  • 24/7 live chat and email support
  • 30-day money-back guarantee
  • 7-day free trial for Android and iOS
Surfshark

Surfshark

Use this reliable VPN for Safari to secure the devices of your entire family.
$1.99/mo. Buy it now

CyberGhost VPN

use CyberGhost VPN for Macbook

Also operated by Kape Technologies, CyberGhost VPN is the best free VPN for Safari because it’s a premium service that offers free trials for Windows and Mac, without requiring your credit card.

The app has an intuitive user interface and options for users less experienced with VPNs. It supports OpenVPN and an ad and malware blocker for Safari and other browsers.

Moreover, CyberGhost VPN comes with a kill switch, split-tunneling mode, along with private DNS and DNS leak protection. It permits up to 7 connections at the same time.

More about CyberGhost VPN:

  • +6,500 VPN servers in 89 countries
  • No logs or leaks
  • 24/7 live chat support
  • Up to 45-day money-back guarantee
  • 1-day free trial for Windows and macOS
  • 7-day free trial for Android and iOS
CyberGhost VPN

CyberGhost VPN

Get this free VPN for Safari to encrypt your Mac's entire network traffic.
$2.75/mo. Buy it now

ExpressVPN

use ExpressVPN for work

Created by Express VPN International LTD, ExpressVPN is the priciest VPN on this list for Safari. However, it’s an excellent choice for maximum security and speedy Internet connections.

If you often play multiplayer games, you can use ExpressVPN to reduce your ping and improve your gameplay. It supports OpenVPN with up to 256-bit encryption.

Furthermore, ExpressVPN allows up to 5 devices at the same time. It has a kill switch, split-tunneling mode, and works in China, making it ideal for overcoming Internet censorship.

More about ExpressVPN:

  • +3,000 VPN servers in 94 countries
  • No logs or leaks
  • 24/7 live chat and email support
  • 30-day money-back guarantee
  • 7-day free trial for Android and iOS
ExpressVPN

ExpressVPN

Improve the security of the Safari browser using this dependable VPN for Mac.
$8.32/mo. Buy it now

In conclusion, you can use a VPN for Safari to improve your entire Internet experience. It’s ideal for circumventing Internet blocks, defeating government censorship, and hiding your browsing history from your ISP.

Plus, you can use a VPN to watch Netflix and unblock other streaming services on Safari, which aren’t normally available to your country. You just have to get equipped with the right VPN for the job.

[wl_navigator]

Windows 10/11 VPN connecting forever: How to fix it?

One of the most common issues with using a VPN on Windows 10 is the service being stuck in a loop so that it seems that the VPN is connecting forever.

As a result, your connection is never established, and a long time may pass before you even see an error prompt on your screen. The VPN dialog displays an everlasting Connecting to … message and at some point, it might display an ambiguous error.

Although it can be quite annoying when this happens, things are not so bad. You can rest assured knowing that among other issues that are way more serious, this one is a piece of cake.

Windows VPN says connecting forever

There’s no simpler way to describe this issue. If you’re using the Windows 10 built-in VPN feature, you might experience the VPN connecting forever issue.

The VPN dialog refuses to connect, but also won’t let go of the connection. Instead, it holds the VPN connection attempt in a loop and keeps you waiting for it to be established successfully. Only it never happens.

We’ve noticed that most of the time, this issue occurs whenever you try to establish two consecutive connections in a row without giving the adapter enough time to cool down.

More often than not, if you just wait a couple of minutes before attempting to connect to another (or even the same) VPN connection in Windows 10, you’ll bypass this inconvenience without even noticing it was there.

How to fix VPN stuck on Connecting?

1. Wait it out

As we said above, most of the time you need to allow some timeout between consecutive connections.

Once a connection is disrupted, the virtual adapter needs to reassign values such as IP addresses and gateways to your system, and this might take a while.

Not waiting might lead to conflicts between the old, default, and new values.

2. Try the alternative route

If you’re trying to connect to your VPN by using the network button in the notification area, try connecting to the VPN this way, instead:

  1. Hit the Win key on your keyboard
  2. Click the gear-shaped button on your Start Menu
  3. Select Network & Internet from the Settings appChoose Network & Internet
  4. Click the VPN button in the left-hand menu
  5. Select the VPN connection you want to establish
  6. Click the Connect button and waitVPN Windows 10 button

Granted, this is a Windows-type of deal and we have no idea why it works better than connecting a VPN from the notification area, but most of the time it does.

We’re guessing that it takes you more time to reach the VPN menu in the Settings app, which gives the connection more time to reset, which we’ve explained in the suggested fix above.

3. Try using a consumer-grade VPN

  1. Purchase a Private Internet Access subscription
  2. Download the VPN client installer
  3. Install it on your computer
  4. Launch the VPN client
  5. Log into your PIA account
  6. Select a server of your liking (choose a nearby one for faster speed)
  7. Enjoy not having to deal with connection issues

Sure enough, choosing a consumer-grade VPN instead of relying on your own connection is not a solution all the time. Many users prefer creating their own VPN so that they can connect to remote computers and share resources more easily.

However, if you’re using a VPN for the sake of keeping things private and don’t need resource management features, you could easily skip Windows’ built-in VPN issues by choosing such a product.

PIA is an excellent VPN service offered by Kape Technologies that can keep your connection private and secure. It has a lot of fast servers you can connect to and provides you with 24/7 customer support, should you ever need it.

4. Reset your network adapter

  1. Tap the Win key on your keyboard
  2. Once again, click the gear-shaped button on the Start Menu
  3. Choose Network & Internet from the Settings app windowChoose Network & Internet
  4. Go to the VPN section
  5. Click the Change adapter options buttonChange adapter options in Windows 10
  6. Right-click your active network adapter
  7. Choose Disable
  8. Right-click it again
  9. Select Enable
  10. Check to see if the problem still persists

Sometimes, a faulty or slow network adapter can spell trouble for other components that are depending on it. In this case, the VPN connection, which uses your network adapter to enable you with Internet access, all the while keeping things on the hush.

Therefore, you might find that simply resetting your default network adapter, whether it’s wired or wireless, can easily fix the issue of your VPN connecting forever.

Note that some laptops have a dedicated hardware button for swiftly disabling and enabling WiFi functionality. It does exactly the same thing and it takes a whole lot less time.

5. Restart your modem, router, or PC

This doesn’t, or better yet shouldn’t need any additional step-by-step instruction list. It’s as self-explanatory as it gets, and doesn’t require a rocket engineering degree to accomplish.

Just unplug your router and/or modem for a few (~10) seconds and plug it back in to reset it. If you haven’t tried this yet, consider restarting your PC, as well.

There’s a good reason any tech support agent asks you to do that before trying other solutions. If it works, your VPN should bypass the connecting forever issue and everything should be a-ok.

6. Flush your DNS

  1. Hit the Win key on your keyboard
  2. Type CMD when the Start menu spawns
  3. Right-click the Command Prompt icon
  4. Select Run as administrator
  5. Type the following commands in this exact order:
    1. ipconfig /flushdns
    2. ipconfig /registerdns
    3. ipconfig /release
    4. ipconfig /renewflush DNS servers in Windows 10
  6. Check if the problem still persists

This is an easy fix that could save you from a lot of headaches. It simply involves releasing any bad or dated information and updating any wrong connection data on your system.

VPN connecting forever on Windows 10 can be fixed

All things considered, if your Windows 10 VPN connection seems to be stuck inside a loop, there’s no need to despair. There are a lot of fixes that can assure things are back to smooth sailing, and none of them require extensive PC knowledge.

If you decide to give any suggested fix a try for yourself, make sure you follow our instructions as closely as possible. Although there’s little to no chance to mess anything up, you should always double-check before you perform any system configuration.

[wl_navigator]

How to configure KeepSolid VPN Unlimited on Windows 10 PC

If you’re looking for instructions on how to configure VPN Unlimited, the VPN service provided by KeepSolid Inc., you’ve come to the right place. You can easily set it up on a Windows 10 PC.

Generally speaking, each VPN service has its own configuration process. Even installing the VPN, to begin with, can be different from one VPN to another.

And since VPNs are the last frontier between you and an insecure connection, it’s best that you do it right from the start, to avoid any issues.

A VPN that’s improperly configured on your PC can cause you more harm than good.

For that reason, we’ve prepared the ultimate guide on how you can configure KeepSolid’s VPN Unlimited on your Windows 10 PC, just so you can avoid unpleasant situations.

Is KeepSolid VPN Unlimited free?

If you want to install KeepSolid VPN Unlimited on your Windows 10 PC, you must consider the licensing plan of this product.

In case you’re wondering whether this VPN is free or not, we’ll have to give you some bad news.

KeepSolid VPN Unlimited is absolutely not free. However, there’s also some good news, in the sense that you can download the product and try it for 7 days entirely free.

There’s a 7-day trial you can test before even considering purchasing a license.

Note that KeepSolid VPN Unlimited offers you a free, unlimited trial (from a feature standpoint), but you can only use it for 7 days.

Meaning that you get to explore the full version features of this service, but you only get to do that for 7 days.

How to purchase and download KeepSolid VPN Unlimited?

  1. Purchase a VPN Unlimited license
  2. Visit the Download section of the KeepSolid websiteHow to download VPN Unlimited
  3. Download the client to your PC

If your trial version has expired, there’s no way that you can keep using this product. Therefore, you’ll need to purchase a license.

On the bright side, the process isn’t exactly complicated. Thus, you can both purchase a VPN Unlimited license and download the client to your PC without being tech-savvy.

You only need to provide accurate payment details and you should all be set.

Once you have a valid license, whether trial or paid-for, you can download the client by selecting the Downloads menu on the VPN Unlimited website, selecting Windows, and clicking the appropriate version you want to retrieve.

Note that currently, you can get a Windows 10 app, a standalone version for Windows Vista and higher, and a version for Microsoft Windows XP SP3.

How to install VPN Unlimited?

Installing VPN Unlimited on your PC is not exactly rocket science.

If you opt for the Windows 10 store version of the app, things are even easier.

VPN Unlimited Windows 10 app

You’ll need to provide the installer with a valid Hotmail/Outlook account, and then create a free VPN Unlimited trial account once you’re in the app.

The Windows 10 version is not very different than the standalone version you can also install on Windows Vista.

If you opted for the 7-day trial, make sure to select the appropriate option once you’re in the Windows 10 app. Also, you may need to verify your PIN.

How to configure VPN Unlimited on Windows 10?

If you’re using the standalone version

  1. Launch the VPN Unlimited app
  2. Log into your accountLog in to your VPN Unlimited account
  3. Access the configuration menu
  4. Click the Settings buttonConfiguring VPN Unlimited

In the Settings menu, you can choose the default protocol that VPN Unlimited will use to keep your connection secure. You can choose from the following protocols:

  • Optimal – let the VPN Unlimited client make the best protocol choice for your current connection conditions
  • IKEv2 – this protocol ensures high security, data protection and top-notch performance
  • OpenVPN – not as fast as IKEv2, but more stable
  • KeepSolid Wise UDP – proprietary protocol that advertises for ultimate security and high performance
  • KeepSolid Wise TCP – same as the UDP protocol, but generally deemed as being more reliable
  • Wireguard – promises to deliver the best data protection and performance, but Wireguard is still quite experimental
Protocols of VPN Unlimited
Trusted networks menu VPN Unlimited

Aside from selecting the default protocol, you can also activate a DNS leak protection feature, configure a DNS firewall, enable a kill switch, define trusted networks, see debugging information, and enable the VPN to run on startup.

Note that you can set the VPN to be always disabled on trusted networks. All you have to do is toggle the option and configure a bunch of trusted networks.

How to use the DNS Firewall in VPN Unlimited

We’ve briefly mentioned above that VPN Unlimited has a DNS firewall, but how can you use this feature? It’s quite simple actually. From the configuration menu, click the DNS Firewall OFF button.

DNS firewall VPN Unlimited

Once you do that, a browser tab should be launched, and you should be able to see a bunch of rules. There’s a block list and a custom list you can easily configure to decide which content can your device access and which content is forbidden.

For instance, the block list offers you categories such as:

  • Adult content
  • Drugs and alcohol
  • Fake news
  • Gambling
  • Games
  • Social
  • Malware, ADS

And the best part is that you get to decide which one of them you want to restrict. If you find the categories a bit too restrictive, you can easily define your own rules.

Just scroll a bit lower to the Custom List menu and manually type the hosts you don’t want your device to be able to access.

If you use the Windows 10 version

  1. Launch the Windows 10 app of VPN Unlimited (buy here)
  2. Activate the trial or purchase a premium license
  3. Click the Network Settings button on the left-hand menu
  4. Choose the protocol as instructed aboveWindows 10 app VPN Unlimited protocols
  5. Configure the DNS Firewall, if needed
  6. Click the Settings button in the bottom-left corner of the screenVPN Unlimited Windows 10 app personalization
  7. Choose a theme for the application
  8. Toggle the application to run on startup or not
  9. Enable or disable notifications
  10. Toggle connection feedbacks

In a sense, VPN Unlimited’s Windows 10 app is a bit more streamlined than the standalone version you can install on Windows Vista and later versions of Windows.

Last, but not least, you can access the Notification section, but it won’t let you configure notification-related options. Instead, it will prompt you with sponsored messages and promotions from VPN Unlimited.

  1. Launch the Windows 10 app of VPN Unlimited (buy here)
  2. Activate the trial or purchase a premium license
  3. Click the Network Settings button on the left-hand menu
  4. Choose the protocol as instructed aboveWindows 10 app VPN Unlimited protocols
  5. Configure the DNS Firewall, if needed
  6. Click the Settings button in the bottom-left corner of the screenVPN Unlimited Windows 10 app personalization
  7. Choose a theme for the application
  8. Toggle the application to run on startup or not
  9. Enable or disable notifications
  10. Toggle connection feedbacks

In a sense, VPN Unlimited’s Windows 10 app is a bit more streamlined than the standalone version you can install on Windows Vista and later versions of Windows.

Last, but not least, you can access the Notification section, but it won’t let you configure notification-related options. Instead, it will prompt you with sponsored messages and promotions from VPN Unlimited.

You can easily find all the customizable settings and configuring the app requires almost no technical knowledge. Just make sure to remember the default settings, since VPN Unlimited doesn’t have a Restore to default option in any apps.

Conclusion

All things considered, you can configure VPN Unlimited on your Windows 10 PC without significant efforts. The standalone app and its Windows 10 counterpart are somewhat similar, but they have certain subtle differences that you will notice if you use both.

On the bright side, configuring each version of the VPN Unlimited client can be easily handled even by users who are not exactly tech-savvy. Maybe the most complicated part is choosing the right VPN protocol.

However, even this section enables you to select a recommended value, so that you won’t get overburdened with seemingly unnecessary information. Just choose the Optimal protocol and everything should be just fine.

New Super Lucky’s Tale, Resident Evil 7, and more are coming soon to Xbox Game Pass

The Xbox team has just announced a big list of new games coming to Xbox Game Pass for Console and PC this month. Microsoft Flight Simulator was the first new Xbox Game Studio title to land on the catalog today, but it’s actually joined by Spiritfarer, a brand new management game about death which is available now on both PC and console.

Four other games will follow on Thursday, August 20 with the beat ‘em up game Battletoads, Don’t Starve: Giant Edition, and the PC games Darksiders: Genesis and Crossing Souls. New Super Lucky’s Tale, the re-imagining of the original Super Lucky’s Tale game that debuted on the Nintendo Switch will also be available on console and PC on Friday, August 21.

That’s not all, as four more games will join Xbox Game Pass for Console and PC next week: Hypnospace Outlaw and Tell Me Why: Chapter 1 will be available on August 27, and Double Kick Heroes and Wasteland 3 will follow on August 28. The latter is developed by Inxile Entertainment, one of the latest game studios that Microsoft acquired over the past two years.

Last but not least, the Xbox team has already announced the first two games coming to Xbox Game Pass next month: The PC game Crusader Kings III will be available on September 1, while Resident Evil 7 Biohazard will be available on September 3. The latter was one of the first big third-party AAA games to support Xbox Play Anywhere back in 2017, and it’s great to see it coming to Xbox Game Pass.

Unfortunately, Microsoft also announced that seven games will soon leave Xbox Game Pass, including Red Dead Redemption 2 on September 7. Creature in the Well, Giana Sisters: Twisted Dreams, Metal Gear Solid 2 & 3 HD, Metro: Last Light Redux, and The Jackbox Party Pack 3 will also leave on August 31, while NBA 2K20 will be removed on September 1.

That’s it for this latest Xbox Game Pass Update, and we remind you that Cloud gaming (Project xCloud) is also coming to Xbox Game Pass Ultimate on September 15. If you have yet to subscribe, we remind you that you can still get your first month for just $1 instead of $14.99.

Xbox Game Pass Ultimate

Windows 10 user interface concepts look awesome

Microsoft Surface Duo created an expected hype around it because of the dual-screen design.

Syncing with the Your Phone app is just the tip of the iceberg for the new device but the main attraction is its multiple screen modes.

So it’s obvious that the whole concept of having a multiple screen device is to harness its full potential from these displays.

How could Windows 10 benefit from multiple screens?

A famous designer for Windows UI elements reimagined a new feature for Windows 10 that could benefit from the double screens of Microsoft Surface Duo.

windows 10 redesigned ui for multiple screens Vastglad designed a new conceptual menu button with 5 functionalities for a program window.

The first would pin the window on top, the second would maximize the window on both screens while the next 2 would move the window on the left or right screen.

The last option imagines switching only that window to Dark Mode. The new functionality was immediately praised in comments but it didn’t receive any reaction from Microsoft.

How could the new Windows 10 Start Menu look in the future?

Another concept, this time directly from Microsoft, comes from a YouTube video presenting a concept for new Windows 10 icons.

The concept from Microsoft is presenting some awesome new icons based on the fluent design:

Our mission was to create a beautiful, moving, coherent icon system, and each discipline added its expertise to the process. The resulting One Microsoft icon design language is unique to Microsoft and reflects our brand personality.


The even more attractive thing comes from a 2 seconds part showing a conceptual new Start Menu. The live tiles have 3D features and are highlighted by a colorful and luminous edge around them.

In a few words, this new Start Menu looks dreamy but there is very little chance that we will see these new graphic features any time soon.

What do you think about the new Windows 10 design concepts? Let’s discuss this in the Comments section below.

[wl_navigator]

Microsoft Flight Simulator 2020 won’t install/ won’t launch

The new Microsoft Flight Simulator 2020 looks like one of the best simulator games and for the ones that succeeding in installing it didn’t disappoint.

However, after Microsoft launched the new game, a lot of people complained on Twitter and Reddit (1, 2, 3, 4, 5) either because they are unable to install it or run it.

To eliminate one of the possible issues, first, check if you meet the minimum requirements for your computer to run the game:

  • CPU: Intel Core i5-4460 or AMD Ryzen 3 1200 or better
  • RAM: 8 GB
  • OS: Windows 10 64-bit
  • Video card: Radeon RX 570 or GeForce GTX 770 or better
  • Pixel Shader: 5.0
  • Vertex Shader: 5.0
  • Free disk space: 150 GB
  • Dedicated video memory: 2048 MB

What can I do if I can’t install Microsoft Flight Simulator 2020?

First, double-check if you have at least 150 GB of free space because that is the main problem for not being to install the game.

Because Microsoft just released the game, there might be issues with properly downloading it.

If you are stuck installing Microsoft Flight Simulator 2020, the solution is to uninstall it and reinstall it fresh. To make sure you uninstall it properly, use a professional uninstalling software.

With those having a problem with downloading it, run the following line in Command Prompt: netsh int tcp set global autotuninglevel=normal

Did you try to install the game from the official source? Hit the button below to get the game from Microsoft.

Microsoft Flight Simulator 2020

Microsoft Flight Simulator 2020

Soar the skies in fashion with the latest edition of Microsoft's long line of aerial simulators, Flight Simulator 2020!
$59.99 Get it now

What can I do if Microsoft Flight Simulator 2020 won’t start or freezes?

For some users, closing and restarting the game whether they were running it in Windows 10 or Xbox worked so you should try this first.

Another solution is to run Microsoft Flight Simulator 2020 as Administrator.

Another user pointed out that he solved this problem by changing the resolution from 3440×1440 to 1920×1080.

We hope that these solutions helped you. If you have any other problems or solutions leave us a line in the Comments section below.

Microsoft Flight Simulator 2020 was released yesterday.

A lot of people reported problems with installing and running the new game.
Microsoft didn’t solve the problem yet. Windowsreport.com wrote first about this issue and we presented a few workarounds and solutions.

Hands on with PowerPoint Live: A great way to make presentations less boring

Presentations are something that happens every day across business, but they can be quite boring. Depending on your presentation, your audience might lose their focus quickly, or have a hard time following along with you. Well, since everyone spends time on their mobile phones already, Microsoft has a solution to help you out.

Known as PowerPoint Live, during presentations, your audience members can scan a QR code to see your presentation on their devices and read live subtitles as you speak. They also can use features like pinch to zoom to see the slides more closely, send live reactions, or go back to previous slides. Here’s a hands-on look at the experience, and how it can make presentations less boring.

Using PowerPoint Live

Powerpoint Live Setting It Up

To get started with PowerPoint Live, you’ll have to make sure you’ve uploaded your presentation to OneDrive. Keep in mind that PowerPoint Live is only available on the web, so you’ll have to make sure that you open the presentation from OneDrive, and then PowerPoint on the web. Once open, you can go to the Slide Show tab.

From there, click the drop arrow next to Present Live to select who should be able to connect to this presentation. You can choose “only people in your organization” or “anyone.” If you choose “only people in your organization,” this will be the option for limiting access to people who only share the same organizational email as you. With “anyone,” people outside the organization can view it.

It doesn’t get any easier than that. Once you select an option, your screen will show a QR code for your audience to scan with their phone. They’ll also be a link next to the code, too, so folks who can’t scan can manually go to the presentation online. Keep in mind, though, that they won’t need to have a Microsoft 365 subscription to view it. You, however, will need one to share a PowerPoint Live.

The PowerPoint Live experience

Powepoint Live Ios

Once your audience scans the QR code or goes to the website, they’ll be able to do a couple of cool things. As you speak during your presentation, they’ll see your words appear on their phone as captions. This is great for when your audience can’t hear you clearly. Your audience can also choose their own language, other than English, to see the captions in. They’re over 60 languages that can be chosen from.

Other than captions. The audience member can also go back to an earlier slide in your presentation, without interrupting you. They can go as far back as they want, and continue to see the captions for your current place in your presentation. Again, this is useful for speeding up presentations and not wasting time going back and forth between slides during your busy day.

Finally, audience members also have the ability to give you live feedback. They can choose from a variety of feedback such as “love,” “puzzled” or “surprised.” Their selection will show up at the bottom of your screen as you present. It’s a nice way to keep people engaged.

Presentation evaluations with PowerPoint Live

Feedback Powerpoint Live

One of the final options for your audience during your presentation will be a presentation evaluation. They each will receive a short survey (as we showed above) to rate your design, skill, content, and interaction. There’s also a point for feedback, too. A couple of minutes after you end your presentation, you’ll get this feedback emailed to you.

In that email, you’ll see how many people responded, and what they thought about your presentation. You’ll also see stats about audience reactions, and a list of comments. For longer presentations, you’ll be able to click the link at the bottom of the email and open Microsoft Forms to see detailed insights, and even download the data to Excel.

Just one tool in the PowerPoint bucket

PowerPoint Live is just one tool in the PowerPoint bucket. If you’re looking for other ways to improve presentations, Microsoft still has you covered. You can also try rehearsing your slide shows with Presentation Coach. Also available on the web, this evaluates your pacing, pitch, your use of filler words, informal speech, euphemisms, and culturally sensitive terms. It detects when you’re being overly wordy or are simply reading the text on a slide.

Do you have tips for delivering PowerPoint presentations? Let us know in the comments below.

How to Use a Floppy Disk on Windows 10

Floppy disks are things of the past, but if for some reason you need to use a floppy disk, today we’re going to show you how to create a virtual floppy disk on Windows 10.

Before USB flash drives and DVDs, the only way to transfer files was a floppy disk. Floppy disks were used for data transfer in 80’s and early 90’s, but they got replaced by CDs and USB flash drives.

It’s safe to say that floppy disks are old technology, and most modern computers don’t have a floppy drive available. Since modern computers don’t have a floppy drive, the only way to access floppy disk is to use a floppy disk image also known as a virtual floppy disk.

What is a virtual floppy disk and how can I use it?

Virtual floppy disk works in a similar way as CD or DVD image file. You create a virtual copy of a floppy disk on your computer or download one, mount the virtual floppy disk, and you can use it without any problems.

There are tools such as Power ISO that will allow you to create a floppy disk image from files on your computer, but at the same time, this tool can make bootable images from floppy disks.

In order to make a disk image from an actual floppy disk, you’ll need a computer that has a floppy drive or an external floppy drive that connects to your computer via USB port.

Another tool that can help you create virtual floppy disks is Magic ISO Maker, and it works in a similar way as Power ISO. We also have to mention ImDisk Virtual Disk Driver that allows you to create virtual hard disks or virtual floppy disks. This tool allows you to store virtual drives into your RAM, which has its advantages, such as quick access, and you can use this tool for recovery as well.

It’s safe to say that ImDisk Virtual Disk Driver isn’t intended for basic users, but it’s one of the most powerful applications if you need to create floppy disk images.

As for floppy disk images, they are stored as .img files on your computer, and you can mount them just like any .iso file, simply by right-clicking it and choosing Mount from the menu.

As you can see, creating virtual floppy disks isn’t that simple, because floppy disks aren’t being used anymore, so you might want to consider switching from floppy disks to CDs or USB flash drives.

If you want to read more about floppy disks, we have covered floppy disk support on Windows 10, so you might want to read that as well.


[wl_navigator]

We answer: What is disk image and how to use it?

You’ve probably heard the term disk image or ISO image file before. These types of files gained a lot of popularity due to their simplicity, so today we’re going to explain to you what are image files and how to use them on Windows 10.

Need a solution to open ISO files?

ISO files can be opened with a wide variety of programs, but the most accessible ones are usually archivers since ISO is one of their supported formats.

However, if you’re going to get a file compression tool, might as well get one that supports archiving and extraction to and from all known supported formats.

Compressing and archiving files together can drastically reduce their size, conserve disk space, speed up transmission, and simplify file management. If you’re looking for a certain file compression utility, there’s a good chance you’ll find it in the list above.

More so, some of the benefits you get from an archiver are several encryption tools, cloud sync features, data migration tools, and distribution means via social media platforms.

What is disk image file and how does it work?

A disk image is a type of file that is an exact copy of a certain disk. For example, a disk image is usually a copy of a certain optical media, but you can also create a disk image from your hard drive or from a USB flash drive.

We have to mention that the disk image is a perfect copy of a certain optical media, therefore it will have all of its properties.

Disk images have a long history, and they were used way back in the 1960s for backup and disk cloning. Back then users used them to clone mainframe disk media to magnetic tape.

Over the years disk images became more popular, and they gained massive popularity during the era of floppy disks.

As previously mentioned, the image file is a perfect copy of any optical media, and you can store that image file on your computer’s hard drive. Many people tend to use disk images simply because they are easy to use and because they provide extra convenience.

One of the main reasons why people use disk images is to prevent their optical discs from wearing out. For example, if you’re frequently watching a certain movie or listening to your favorite album on a CD, it’s possible that your disc might become worn out after some time.

This means that eventually, you won’t be able to read any files that are stored on that optical media.

Some users prefer using disk images because it’s simpler and faster to use than regular optical media. If you want to use certain optical media you have to find it, open its case, open your disk drive, and insert your media.

With disk images, there are no such problems, and all that you have to do is to find an image file, click it, and it will become available to access, just as if you inserted a real disc in the optical drive.

Besides convenience, we have to mention that you can read an image file faster than an optical disc since hard drives have a fast reading speed. In addition to speed, you won’t have to worry about any physical damage, such as scratches, that can happen to your optical discs.

Disk image files are available in many different formats, and while some formats are universal, some are related to the software that is used to create the disk image. The most common format is .iso, but there are also several others.

For example .bin and .cue files are disk image files, and one of these files contains the exact copy of the disk, while the other file contains the information regarding the data structure of the original disk.

There are also .mdf and .mds files, and they work similarly to .bin and .cue files. The .mdf file stores the disk image while the track information is stored in the .mds file. Lastly, there are .nrg files, and this file format is related to disk image files created with Nero software.

If you have an optical disk that you want to copy to your hard drive, you can easily do it by using one of the many third-party applications.

Windows doesn’t have the native support for creating disk images, so if you want to create a disk image you need to use one of the many third-party applications. Bear in mind that you can only copy unprotected discs.

After you create a disk image, you can keep it on your hard drive, or you can burn it to a different optical media.

While certain image file is on your hard drive, you can easily use them just like if it was a regular CD or DVD. We have to mention that Windows 8.1 and Windows 10 have native support for .iso files, and you can easily use them without any third-party application.

If you have any other type of disk image files on your PC, you’ll need to download the appropriate third-party software that can work with those types of files. To mount an .iso file on Windows 10, you just need to do the following:

  1. Locate the .iso file that you want to use.
    disk-image-iso-file
  2. Double click the file. Alternatively, you can right-click the file and choose Mount from the menu.
    disk-image-mount
  3. After the disk image is mounted you should see a new disk available in This PC.
    disk-image-this-pc
  4. You can now access the disk, view available files, and use the disk image as if it was a real CD or DVD.
    disk-image-disk-open

Mounting the .iso image file is simple and easy, and after you’re done with it, you just need to unmount it. To do that follow these steps:

  1. Open This PC.
  2. Locate the drive where the image file is mounted.
  3. Right-click the drive and choose Eject from the menu.
    disk-image-eject
  4. The DVD drive will now disappear from This PC meaning that you’ve successfully unmounted a disk image.

Mounting and unmounting a disk image is quite straightforward in Windows 10, but you can also burn a disk image by following these steps:

  1. Find the image file that you want to burn.
  2. Right-click the image file and choose Burn disc image.
    disk-image-burn-disk-image
  3. Windows Disc Image Burner will now open. Now you just need to select the drive that you wish to use, insert a blank DVD or CD into it and click the Burn button.
    disk-image-disc-image-burner

As you can see, disk image files are quite useful and even major software companies are using them for the distribution of their software. Linux community has been using disk image files for distribution for years, and even Microsoft allows you to download Windows 10 ISO files by using Media Creation Tool.

By using disk image files companies can directly distribute their software to the users without the need for shipping, packing, or burning the software first.

As we already mentioned, by using disk image files you can also preserve your optical discs because you won’t be using your optical drive to read them. In addition, you can easily store an entire DVD collection on your hard drive and quickly access any DVD that you want.

In fact, you can even store the collection on a portable hard drive or USB flash drive and carry it with you at all times.

Disk image files are simple to use and quite practical, so it’s no wonder that millions of users and several major companies use them. One thing is for certain, disk image files are here to stay, so now it might be the perfect time for you to start using them.

Laptop Encryption Software: Best Picks for 2026

One of the most vital areas for modern businesses is cybersecurity. Without the right protection and in place, organizations or businesses face the risk of hackers entering illegally into their systems and collecting valuable business data which may likely result into much damage in the future.

A very crucial area of cyber security is encryption. Encryption tools usually encode data, unlocking it with a certain key, making it difficult for third-parties to gain access.

Full disk encryption software guards the contents of computers by requiring a multi-factor authentication or password before the system can boot.

To make use of this software in a business context, you will require a solution which can manage devices that are encrypted, and offer key recovery and other enterprise-friendly features.

With this encryption software, you can protect data such as customer transactions and passwords, email addresses and other important information. Many organizations are also making use of encryption software’s to ensure the privacy of internal online conversations and emails.

What are the best encryption software for laptops?

WinZip (recommended)

Topping off our list is a software tool that may have not have found a place here if you were to ask us a few years ago.

Starting off as a mere archiving tool, WinZip has evolved way past that point, incorporating a wide variety of features and tools that make it a must-have for any PC owner, and not just an optional utility.

For example, besides the archiving tools, it is also an excellent encryption and locking tool. More so, it allows better sharing of data between PCs via networks, clouds like Dropbox, Google Drive, OneDrive, and social platforms.

The software boasts an incredibly simplistic UI, and once installed it integrates with your PC’s context menu, allowing you to archive, encrypt, and more just by right-clicking a file.

Here are some of the perks of using WinZip:

  • Banking-level encryption
  • Enhanced archiving capabilities
  • Improved data sharing between PCs on the same network
  • Integrated cloud support that works with Dropbox, Google Drive, OneDrive, and more.
  • Can be tested for free without limitations for a limited time

”WinZip”

”WinZip”

”Encrypt
”Free
&aff_sub2=Native” current_url=”true” button_text=”Get it now” image=”https://windowsreport.com/wp-content/uploads/2017/11/WinZip-button-210×160.png”]

Folder Lock

Aside from protecting assets on company computers, it is also very important to add protection to any device that stores vital data. For instance, smartphones of employees need to be protected because they store vital company data such as emails and other company documents.

Folder Lock is good for adding encryption to mobile devices.

Features/Pros:

  • The app can protect photos, videos, personal files, contacts, notes, wallet cards, and audio recordings stored in your handset.
  • It has some hidden security features.
  • Aside from encrypting devices, you can also enable a decoy password, log unauthorized login attempts, hacker deterrents, back up all your passwords and get notifications whenever there is a potential brute-force attack.
  • The app is free to download.

Cons:

  • A different subscription is required for a secure backup.
Folder Lock

Folder Lock

Password-protect all of your laptop's files and folders and keep them away from prying eyes fast and efficiently.
Free trial Visit website

NordLocker

nordlocker bannerIf what you are interested in is file sharing in a safe and secure manner, then you cannot go wrong with NordLocker. It offers coverage for pretty much any type of data, including photos, videos, banking details, and accounts, text documents, music, you name it.

Besides the versatility in terms of what it can support, it is also extremely versatile in terms of the encryption it uses to keep all of the above safe, featuring Argon2, AES256, ECC (with XChaCha20, EdDSA, and Poly1305), and other creations of modern cryptography to guarantee ultimate security of your files.

Pros:

  • Comes with a 5 GB free trial
  • Advanced encryption methods
  • Supports a wide variety of files for protection
  • Easy-to-use
  • Includes cloud data syncing for protection of your online files as well
  • Allows safe data transfers
  • Long-term plans are extremely affordable

Cons:

  • Somewhat limited platform support

⇒ Download NordLocker 

Symantec Endpoint Encryption

Symantec Endpoint Encryption

From a single console, Symantec Endpoint Encryption software can be managed centrally providing full disk encryption for Windows OS devices.

Features/Pros:

  • The console can also be used to manage its own endpoint encryption and also systems encrypted with Microsoft BitLocker and Opal-compliant self-encrypting drives.
  • The solution offers employees that forget their passwords a choice of self-recovery and help-desk support.
  • For ease of use, authentication can be integrated with Microsoft’s Active Directory. The full disk encryption solution also offers automated policy controls and compliance-based reporting. It can be integrated with Symantec Data Loss Prevention for additional security and consistency.

Cons:

  • Management requires a better console.
  • Lots of new releases.
  • Interface is a bit difficult to understand.
  • Symantec processes are slow.
  • Symantec encryption is a bit expensive.

Supported client operating systems:

  • Microsoft Windows 7, 8, 8.1, and 10

⇒ Download Symantec Endpoint Encryption 

Sophos SafeGuard Encryption

Sophos SafeGuard Encryption

Sophos SafeGuard Encryption is a powerful encryption software for laptops.

Features/Pros:

  • Without an end user involvement, Sophos SafeGuard Encryption can be deployed onto endpoints and with the Intel’s AES-NI instruction set, encryption can be accelerated.
  • The management for all enterprise devices is provided by a single console, including the encryption of hard disks with Microsoft’s BitLocker, Apple’s FileVault 2 and Opal self-encrypting drives.
  • This consists of encryption status, auditing and editing to ensure compliance with internal and external regulations.
  • The authentication system of the software supports cryptographic and biometric token, and multiple users can share encrypted computers without sharing passwords.
  • If a user forgets a password, it can be recovered quickly using a challenge/response system accessed over the phone or via a web portal.

Cons:

  • New users find it difficult to use.

Supported client operating systems:

  • Windows XP SP3 Professional
  • Windows Vista SP2 Business, Enterprise, Ultimate Edition
  • Windows 7 SP1 Home Premium, Enterprise, Professional, Ultimate Edition
  • Windows 8, 8.1 Pro, Enterprise Edition
  • Windows 10 Pro, Enterprise Edition

⇒ Download Sophos SafeGuard Encryption

Dell Data Protection Encryption Enterprise Edition

This encryption software offers full disk encryption software for both Dell and non-Dell endpoints.  The built-in “Hardware Crypto Accelerators” can be used by selected Dell hardware.

Features:

  • The Enterprise Edition Server regulates the Dell solution for big deployments or the Virtual Edition Server for simpler deployments.
  • Existing authentication processes including Windows password, fingerprint, RSA and smartcard are used for its integration.
  • A centralized console enables encryption management which consists of encryption based on end user groups and profiles, and also the provision for the management of Microsoft BitLocker encryption software and self-encrypting drives (SEDs).
  • It comes with pre-set policy templates to address compliance regulations such as Sarbanes Oxley, PCI DSS, EU Data Protection Directive 95/46/EC and HIPAA.
  • Supported Windows OS includes Windows XP, 7, 8, and 10.

⇒  Download Dell Data Protection Encryption

Check Point Full Disk Encryption Software Blade

Check Point Full Disk Encryption Software Blade

The software offers centrally managed full disk encryption software for endpoints as a security “blade,” which is a part of its entire security suite.

Features:

  • Users can only access encrypted laptop or other endpoint after authentication.
  • Multi-factor authentication options consist of dynamic tokens and certificate-based smartcards.
  • The full disk encryption solution supports multiple pre-boot authentication languages for global deployments.
  • Check Point’s Endpoint Policy Management Software Blade manages the Full Disk Encryption Software Blade enabling central policy enforcement, administration and logging from a particular console.
  • Centralized management provides control of security policies and offers various deployment options.
  • One-Time Login remote help options and Remote Password Change are available for users who may have lost access tokens or forgotten their passwords.
  • Web-based remote help options are available.

Cons:

  • It has too much overhead and configuration.
  • Supports only Windows XP, 7 and 8

⇒ Download Check Point Full Disk Encryption Software

Microsoft’s BitLocker full disk encryption

BitLockerBitLocker

This is the native encryption system that comes with the Enterprise, Ultimate and Pro versions of Microsoft’s Windows Vista.

It can be used for either personal use or business purposes. Microsoft BitLocker Administration and Monitoring provides the enterprise deployment centralized management.

Third-party full disk encryption systems such as Sophos SafeGuard Enterprise and Symantec Endpoint Encryption manage the Bitlocker encryption software.

Features/Pros:

  • Microsoft BitLocker Administration and Monitoring (MBAM) enable security officers to quickly determine the individual computers compliance state and also allow administrators to convert the process of encrypting volumes on client computers.
  • The BitLocker encryption policy options are enforced by MBAM. The compliance of client computers with those reports and policies on the encryption status of individuals’ computers and enterprise are also monitored by MBAM.
  • The recovery of encrypted devices by end-users independently is enabled by MBAM through the use of the self-service portal or a help desk.

Cons:

  • Difficulty in accessing encrypted drives from non MS Operating System including Windows XP.
  • If a user loses the recovery key, he or she also loses data.
  • For encryption, a special TPM chip is required; however, it is available on branded Desktops or notes such as Lenovo, HP and Dell.
  • When a computer is functioning normally, data from local attacks or network might not be protected.
  • During Encryption or Decryption, the performance of a slight Disk may degrade.

⇒ Download the tool from Microsoft

SecureDoc Enterprise Server (SES)

SecureDoc Enterprise Server (SES)

SecureDoc Enterprise Server (SES) keeps all security-related management under a centralized enterprise server.

Features:

  • This consists of policies, password rules, key management, recovery and the management of encryption.
  • Encrypted systems can also be managed by administrators from a web console.
  • Supported encryption ranges from SecureDoc’s full disk encryption for laptop to native OS encryption for Windows (BitLocker) to managing hardware-based encryption with SEDs.
  • It provides pre-boot authentication using readers, smartcards, tokens or LDAP/Active Directory integration.

Cons:

  • It boots slowly.
  • Password should never be forgotten.

Supported client operating systems:

  • Windows XP

⇒ Download SecureDoc Enterprise Server

VeraCrypt

veracrypt

VeraCrypt is one of the most famous security tools, offering you enterprise-grade encryption for vital data.

Features:

  • It is easy to use.
  • Automatically adds encrypted passwords to partitions and data. However, it requires details such as location, volume size and unique hashing algorithms.
  • It is immune to brute-force attacks, which prevents hackers from decrypting your passwords and other important data.
  • Support for various encryption cyphers.

Cons:

  • Technical skills are required in case something goes wrong

⇒ Download VeraCrypt

McAfee Complete Data Protection Advanced

McAfee Complete Data Protection Advanced

McAfee Complete Data Protection Advanced provides a full disk encryption solution using McAfee-implemented encryption, Apple’s FileVault native encryption systems or through Microsoft’s BitLocker with pre-boot two factor authentication.

Features/Pros:

  • It makes use of the instruction set of Intel’s AES-NI for faster encryption operations.
  • McAfee’s ePolicy Orchestrator (ePO) management suite and other products of McAfee endpoint manage encryption.
  • ePO regulates policy and patch management, recover lost passwords and demonstrate regulatory compliance.
  • It synchronizes security policies with Novell NDS, Microsoft Active Directory, PKI, and other systems.

Cons:

  • It is not compatible with some operating systems.
  • It lacks backup protection.
  • The documentations are not too good and need improvement.
  • It does not offer any options to view how employees transfer, make use, or access information that are sensitive through a common schedule.

Supported client operating systems:

  • Microsoft Windows 7, 8 and 10 (32/64-bit versions)
  • Microsoft Vista (32/64-bit versions)
  • Microsoft Windows XP (32-bit version only)
  • Microsoft Windows Server 2008

⇒ Download McAfee Complete Data Protection Advanced

AxCrypt

axcrypt

The software is specifically designed for individuals and small groups within businesses.

Features/Pros:

  • This software offers strong security, with files encrypted by either 128-bit or 256-bit AES, which can block any intruders.
  • It has cloud storage capabilities. It offers automatic protection to files saved on services such as Dropbox and Google Drive.
  • It is fully multilingual, and works with languages such as French, Dutch, German, Korean, Italian, Spanish, Russian, Swedish, and Portuguese.
  • It has passport management.
  • Your encrypted files can be accessed through a smartphone app.
  • The Premium package is $27 per year.
  • It has a free version with fewer options.

Cons:

  • The open candy system is used by the install program for bundled third party software.

⇒ Download AxCrypt

CryptoExpert

cryptoexpert

CryptoExpert provides secure data vaults for all your data to protect it from potential breaches.

Features/Pros:

  • It provides a better encryption than most of the software’s listed in this article.
  • Backup support for files such as certificates, Excel and PowerPoint, Word, multimedia files and email databases.
  • It can protect vaults of unlimited size.
  • It uses Cast, Blowfish, 3DES and AES-256 encryption algorithms.

Cons:

  • It lacks secure deletion.
  • Testing displays odd error messages during testing.

Supported client operating systems:

  • 32-bit and 64-bit versions of Windows 7, 8, and 10.

⇒ Download CryptoExpert

This concludes our list of the best laptop encryption tools that you can get for your laptop.

Do you know of any other entries that deserve a spot on our list? If so, let us know by leaving us your feedback in the comments section below.


[wl_navigator]

How to join Microsoft’s Flight Simulator Insider Program

Update: Microsoft Flight Simulator 2020 was released on August 18th 2020 and can be downloaded from the Microsoft Store.

Unfortunately, people already have problems downloading, installing, and running the game so far.

Microsoft Flight Simulator 2020 first unveiled at E3 2019

Microsoft unveiled a new Flight Simulator game for Windows and Xbox One. It’s the first new addition to the FS series since 2006.

Flight Simulator fans have rejoiced the announcement of a new FS game.

Although Microsoft has not confirmed a release date for it, players can play a few test flights of the game from August 2019 if they sign up for the Microsoft Flight Simulator Insider Program.

Thus, Microsoft has confirmed that it will release the first batch of game content for the Microsoft Flight Simulator Program in August 2019.

That means Microsoft will be unveiling the first Flight Simulator preview builds shortly.

Then selected Insiders can provide some feedback for the early FS preview builds. Microsoft will also give Insiders surveys and newsletters and provide exclusive forums for them to post on.

Not every Insider can take part in all the preview builds. Microsoft strives to ensure that all its Insiders participate in the program, but the big M also selects Insiders for preview builds.

The Insider program FAQ states:

Our goal is ensure that everyone participates in the Preview Program. But that doesn’t mean everyone will participate in every build of the Preview Build Program.


These are the best flight simulator games you can play on your Windows 10 PC.


How to enroll in Microsoft’s Flight Simulator Insider Program

  1. To register on the Microsoft Flight Simulator Insider Program, players must be 18 years or over.
  2. A Microsoft account is required to join the program.
  3. Players also need to be a part of the Xbox Insider Program and have the Xbox Insider Hub Installed on Windows.
  4. So, some users might first need to set up a Microsoft account and then register on the Xbox Insider Program. Thereafter, players can register themselves on the Microsoft Flight Simulator Insider Program at its signup page.
  5. Enter the required details in the text boxes on that page, select the I agree to the terms and conditions check box (and check those conditions), and then click the Sign Up button.

Then some selected Insiders can take to the skies in Flight Simulator preview builds!

With the exception of a Flight Simulator trailer (above) that shows off some impressive visuals, Microsoft has provided scant details for the game as of yet.

The game’s first preview builds will likely reveal a lot more about Flight Simulator’s gameplay.

[wl_navigator]

No cursor in Google Chrome? 6 fixes to get back mouse cursor

Google Chrome is a useful browsing application that caters to no less than 68 percent of the world’s internet browsing needs. Given the disparity, it is obvious that Google Chrome has little margin of error in competing for market share.

However, that doesn’t mean issues are nonexistent. A common error in Chrome is that the cursor vanishes intermittently.

Here are our tips and techniques to unveil your cursor and allow for a more smooth browsing experience with Google Chrome.

What do I do if Google Chrome cursor disappears?

1. Switch your browser

If you notice that this browser issue still persists, then instead of going through the troubleshooting steps trying to fix it, you might as well switch to a different browser.

On that note, we recommend you give Opera One a shot. It is built using the same engine as Google Chrome and Microsoft Edge, so their extensions are cross-compatible.

More so, this build allows the browser to be fast and powerful, but certain particularities make it far less resource-intensive than its other Chromium counterparts.

As for cursor issues, Opera One is highly customizable, and there is plenty of extensions that you can try to greatly enhance its functionality. Also, this browser comes with it’s own AI.

Opera One

If you need a web browser that is incredibly stable and has a low chance of error occurrences, try Opera One now!
Free Download Visit website

2. Update Mouse Drivers

2.1. Update via built-in features

  1. Navigate to Control Panel.
  2. Double-click on Device Manager.control panel device manager
  3. Expand the menu under Mice and Other Pointing Devices.mouse driver update return cursor
  4. Locate your mouse and right-click.
  5. Choose Update Driver.
  6. A command prompt will now ask you how you want to update your driver.
  7. Unless you have drivers already downloaded, choose the Search Automatically option.
mouse driver update

2.2. Use a third-party driver updater

It is much simpler to use a driver updater, such as Fortect Driver Updater. In just a few simple steps, your drivers will be repaired and updated.

  1. Download Fortect Driver Updater
  2. You don’t need to install it, it is portable
  3. Let it run the initial scan to see which drivers are broken, outdated, or missing
  4. Choose which drivers to fix
  5. Wait for the process to finish, and restart your PC.

This lightweight tool can save you lots of time and hassle. Any driver will eventually become outdated, and you have to constantly check them if you want optimal functionality for your device.

In this regard, Fortect Driver Updater comes in handy because you can set it up to regularly scan and update all drivers on your PC without requiring any effort on your part.

⇒ Get Fortect Driver Updater

3. Restart manually

reboot pc return chrome cursor

An important thing to remember is that your cursor hasn’t exactly gone. It is just at the position it was last, and can only become visible once Google Chrome is closed.

This method is only a permanent solution if some background process interferes directly with Chrome and rebooting fixes the interference.

4. Restart your Chrome browser

Restart with Chrome

restart chrome no cursor

Chrome recognizes a few inbuilt commands. One of those commands allows for a direct restart of the browser. All you have to do is type Chrome://restart and press enter to successfully relaunch your browser. Then, check your cursor to gauge its visibility and the lifespan of your newly spawned cursor.

Restart with Task Manager

  1. Press Ctrl + Alt + Delete to launch Task Manager
  2. Navigate to Processes and end all Google Chrome tasks by using right-click and then End task.end task return chrome cursor
  3. Find the Google Chrome shortcut and launch. To shut down all threads in one command, end the main task.

If your cursor has still not returned to Chrome permanently, then we suggest you keep reading on.


5. Update Google Chrome

  1. Navigate to Options > Help
  2. Select About Google Chrome.about google chrome
  3. You will now see an option to get the latest version of Chrome,if your version isn’t up to date.
chrome update no cursor

6. Disable hardware acceleration on Chrome

  1. Open settings by clicking on Options and selecting Settings in the toolbar.google chrome settings cursor
  2. Scroll to the bottom and select Advanced at the bottom of the page.google chrome advanced settings
  3. Scroll a bit further and find the System menu. Make sure hardware acceleration is disabled.
disable hardware acceleration return cursor

If you have no cursor in Chrome, then this guide is for you. Depending on what causes your cursor issue, any one of these fixes can help you regain cursor visibility.

If you’d like to know more about Google Chrome, we recommend visiting our Chrome Hub.

To stay updated with more problems and fixes relating to browsing software, bookmark our Browsers section.

It is important to keep wary of the details surrounding your cursor issues in Chrome so that looking for the solution is easier. If you found this guide useful, or other alternatives to this problem, we invite you to share in the comments below!

How to Encrypt USB Flash Drive in Windows 10 [Easy Guide]

If you want to encrypt your USB flash drive, you don’t need to install any third-party tools. Windows already has everything you need to perform the encryption of your USB drive.

This built-in Windows tool is called BitLocker, and is definitely the best choice because it’s probably the safest and the most reliable tool for encrypting.

How do I encrypt a USB flash drive on Windows 10?

1. Use a flash drive encryption software

Encrypting your data, removable or not, is always easier if you use a third-party tool specialized just for that. With that in mind, Folder Lock is your best choice when you want to encrypt any USB drive.

It is lightweight, fast, and you don’t need prior experience using similar tools to figure out how it is done.

Just set a master password, then select whatever type of data needs protecting, such as folder locking, file encryption, secure backups, and more.

Folder Lock

Folder Lock

Password-protect all of your files and folders and keep them away from prying eyes with the help of this amazing software utility.
Free trial Visit website

2. Use Windows 10’s built-in tools

To encrypt your USB flash drive, follow these instructions listed below:

  1. Logon to your Windows computer and go to Desktop
  2. Make sure that your USB flash drive is properly inserted in the USB port of your computer
  3. Open the This PC icon on the desktop
  4. Under the Devices and drivers section of This PC folder, locate and right-click the icon of your USB flash drive
  5. From the context menu, click Turn on BitLocker
  6. Wait until BitLocker initializes your USB drive
  7. Once the initialization process is done, click to check Use a password to unlock your drive, enter and re-enter your password, and  click the Next button to continue
  8. Now, pick the destination where you want to save your recovery key
    • Save to your Microsoft account, Save to a file, or print the recovery keyusb drive encryption wind8apps
  9. From the Save BitLocker recovery key as box, browse for the location to save your recovery key, and click Save.
  10. Click Next to continue
  11. On the Choose how much of your drive to encrypt window, make sure that Encrypt used disk space only (faster and best for new PCs and drives) radio button is checked and click Next
  12. Now click on Start Encrypting from the next window
  13. When the BitLocker Drive Encryption interface comes up, wait till the process completes

If you’re using a newer Windows 10 version, the steps to follow are a bit different. This is because Microsoft added a few changes to Windows 1o’s UI.

How to enable Bitlocker on USB drive on newer Windows 10 versions?

Here’s what you should do to encrypt a USB flash drive with BitLocker in Windows 10:

  1. Connect the drive to your computer.
  2. Windows 10 should recognise the drive, so go to the Start Menu, type “bitlocker”, and click on “Manage BitLocker” .Disable BitLocker Windows 8.1 Group Policy
  3. The BitLocker control panel will be launched and all the drivers on your system eligible for BitLocker encryption will be listed.
  4. Locate the flash drive you wish to encrypt, and then click on the Turn on BitLocker link.
  5. BitLocker will then initialize your flash drive, but don`t remove the flash drive during this process, as it may cause damage to the drive.
  6. BitLocker will ask what kind of security you want to use with your drive. Enter a password and then press Next.
  7. BitLocker will also produce a recovery key for the drive, to help you recover data in case you forget your password.
    • Be sure you save the recovery key to a secure location and press Next.
  8. Specify if you need BitLocker to encrypt the entire device, or used space only. So, select your option and then click Next.
  9. Press Start Encrypting and BitLocker will start to encrypt your drive.

Now your USB flash drive is encrypted, and only you or users with the password could access its content.

For additional protection, check our guide on how to create a USB security key on Windows 11 and keep your PC safe from all third parties.

How to enable BitLocker without TPM on Windows 10

Windows Bitlocker is a fantastic tool – allowing you to fully encrypt your data directly on the hard disk level, giving you an extra layer of privacy that you demand.

However, Bitlocker has its limitations – more like security features that prove to be a limitation for some. There is a security chip called Trusted Platform Module – or in short TPM – that is supposed to store the encryption key for your encrypted hard disk.

When you encrypt something, on the basic level, it is comparable to putting something in a locker – so the name BitLocker actually does make sense. Any encrypted data has a key known as its encryption key – whoever has this key is able to decrypt the data.

Now, obviously, this means the key needs to be stored somewhere safe – that is what the TPM chip is for.

Now the problem comes here – some older hard disks or even some newer ones don’t have this TPM chip, either because the hard disks were too old to consider it or the manufacturer was trying to keep the manufacturing costs low and thus skipped on an optional feature.

There is however a way to get around this requirement of a TPM and chip and encrypt your drive anyway.

How do you allow BitLocker without a compatible TPM?

  • Open your Start Menu and type gpedit.msc, then click the top result.
  • This will open the Group Policy Editor.
  • Under Local Computer Policy, follow this path:
    • Computer Configuration > Administrative Templates > Windows Components > BitLocker Drive Encryption > Operating System Drives.
  • Now locate Require additional authentication at startup and right-click it, then click Edit.
  • On this window, click Enabled and under Options check the box that says Allow BitLocker without a compatible TPM.
  • Now click OK, and close the Local Policy Editor.
  • Now open the BitLocker setup once again on the drive you want to encrypt, it should ask you to go through a restart to prepare the disk.
  • Once you have restarted, it will ask you to set up a Startup key for every time you start your PC
    • This is the key that was supposed to be saved on the TPM chip but since we have bypassed that, you will need to save this on a USB flash drive.
    • That’s your key now.

Now you can encrypt your hard disk even though it doesn’t have a TPM chip – and store the key for encryption in a handy USB flash drive that you can unplug from your PC to deny access to the drive. It exactly works like a physical key at this point.

This is the beauty of Windows – the reason Windows is so complex is because of how many options it features.

It’s easy to make a feature – it’s harder to make a feature that can be tweaked in every way possible.

In case you are stuck on the Preparing BitLocker recovery screen; read this guide to learn about the solutions.

If you’re on Windows 11, don’t miss our guide on how to turn off BitLocker on Windows 11.

By following our suggestions, you can now use your Bitlocker without any further issues. Let us know which solution you used by leaving your feedback in the comments section below.

Can VPN reduce data usage? How to minimize VPN data usage

VPNs are incredibly popular on the Internet, thanks to the numerous advantages they bring. But a lot of users are wondering if a VPN can reduce data usage. We’re here to clarify.

Can VPN reduce data usage?

No, a VPN can’t reduce data usage.

In fact, a VPN uses more data than normal. Because a VPN encrypts your network traffic, it results in higher overhead.

In turn, the secure tunnel requires more processing power to successfully transmit data packets. The higher the encryption level, the more data it will use.

What about obfuscated VPN servers?

obfuscation mode

No, you can’t use obfuscated VPN servers to reduce data usage either.

Although obfuscation mode hides your VPN traffic and makes it look like HTTPS traffic, it can’t hide the amount of user data.

Your ISP can still see the information quantity you use, making it impossible to reduce data usage with a VPN.

Can VPN bypass throttling and capping?

Yes, you can use a VPN to bypass throttling if your ISP limits your bandwidth speed based on specific activities like streaming or torrenting.

However, you can’t use a VPN to bypass data capping because that would mean using the VPN to hide or reduce your data usage. As we previously established, it isn’t possible.

How to reduce VPN data usage

Don’t keep your VPN on at all times

If your Internet subscription plan is limited, turn off your VPN when you’re not using it. Certain processes like web browsers continue using the Internet in the background.

Slowly but surely, you will run out of network traffic even if you don’t use your computer, smartphone, or tablet online.

On Windows, a lot of VPN desktop clients are configured to automatically run at system startup by default. To reduce data usage caused by VPN, make sure to find and disable the autorun setting.

Enable VPN split tunneling

split tunneling in Private Internet Access

Split tunneling is a special VPN feature that isolates VPN traffic from the public Internet. If you use a VPN for a specific task only, like watching Netflix in a web browser, then split-tunneling mode can help you reduce VPN data usage.

Many VPN clients have an integrated split-tunneling setting, including Private Internet Access, CyberGhost VPN, and Surfshark.

Connect to the nearest VPN server

connect to the auto server in Private Internet Access

When you connect to a VPN server, your data passes through several checkpoints before it reaches its destination. The further the VPN server, the more data it uses.

Most premium VPNs show a recommended VPN server based on your current location. Or, if you must connect to a VPN server from another country, make sure to pick the closest city to you.

For example, Private Internet Access shows the latency of each VPN server relative to your current position. You just have to connect to the server with the lowest latency, which is always shown in the first position.

Use the private DNS servers of the VPN provider

DNS is responsible for translating domain names into IP addresses. However, each DNS provider has a unique mode of operation. And your DNS servers are assigned by your ISP.

If the DNS servers are slow, this can lead to a higher amount of data usage, especially when connected to the VPN.

But you can fix this problem by switching to the exclusive DNS servers supported by the VPN provider. If they don’t exist, then you should change your DNS servers to Cloudflare, Google Public DNS or OpenDNS.

Select a VPN protocol with lower security

The VPN protocol determines how your data travels on the Internet, what encryption and authentication mode it uses, and so on.

If you opt for a super-secure VPN protocol like SSTP, you will notice a connection slowdown. Also, your Internet data will be quickly used up.
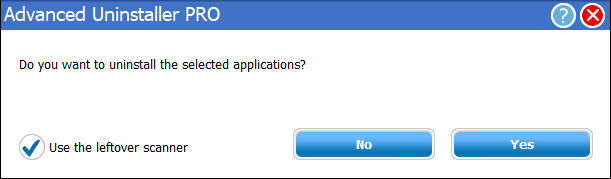
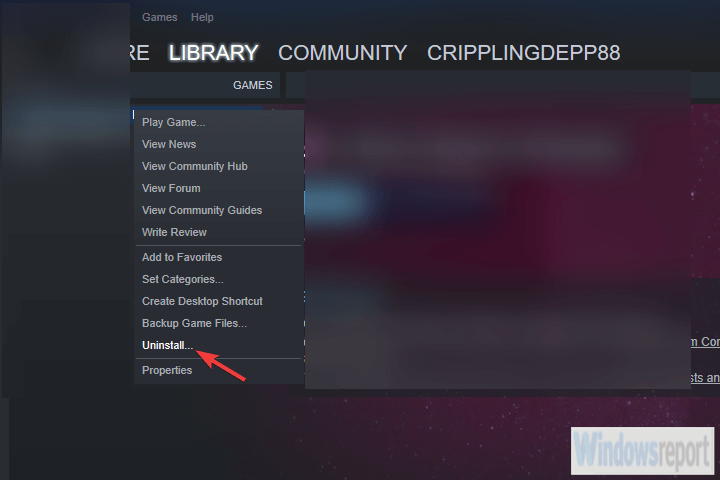
But you can switch to a less secure VPN protocol like PPTP or L2TP. We strongly discourage this, however, since a VPN’s top priority should be security and privacy. You should always use OpenVPN.

Optimize more VPN settings

configure PIA connection settings

Each VPN client has its own particularities, so it’s impossible to give you an exact recipe of what VPN settings you should enable or disable in order to optimize data usage over VPN.

For instance, Private Internet Access gives you the possibility to disable data encryption when using the OpenVPN protocol.

On the other hand, ExpressVPN has a special feature that optimizes the Windows network settings to improve VPN speed.

Don’t hesitate to fire up the options panel of your VPN client and look under its hood for settings that would help improve the Internet connection speed and reduce data usage over VPN.

Avoid using free VPNs

Free VPNs can’t be compared to premium products when it comes to online privacy, security, and even Internet speed. Besides, you can’t trust a free VPN with your data.

However, you can trust a premium VPN with a zero-logging policy, such as Private Internet Access. We used it in our examples above precisely because it’s the best VPN overall.

Owned by Kape Technologies, PIA can connect you to the nearest VPN server to grant you the best possible Internet speed. You can even temporarily disable VPN encryption if you want to minimize data usage.

The app is compatible with all major devices, including Windows, macOS, Linux, Android, iOS, and routers. It supports split tunneling and allows 10 simultaneous device connections.

More about PIA:

  • +3,300 VPN servers in 48 countries
  • Exclusive DNS and DNS leak protection
  • No logs or leaks
  • 24/7 live chat support
  • 30-day money-back guarantee (no free trial)
Private Internet Access

Private Internet Access

Reduce VPN data usage by connecting to the fast and secure VPN servers of PIA.
$2.85/mo. Buy it now

To recap, you can’t use a VPN to reduce data usage because a VPN can’t hide the amount of network traffic from your ISP. Instead, a VPN can help you bypass throttling.

Furthermore, you can use the solutions we provided above to reduce data usage over VPN. Just keep in mind that you need a reliable VPN like PIA to get the best possible results.