How to fix 0x80780166 error when backing up Windows 10/11

Several users reported their worries about the 0x80780166 error when backing up Windows 10. They used the Windows snap-in backup tool hundreds of times before and they never experienced this issue.

This error has been known to occur as a result of one of the following causes: the incorrect status setting of Volume Shadow Copy service, corrupted data inside the WindowsImageBackup folder, or corrupted system files.

If you come across the same 0x80780166 error message, we have a few working tips for you. To be more precise, down below, you’ll find a collection of potential repair strategies that other users in a similar situation have successfully used to solve the issue.

What can I do if getting the 0x80780166 error?

1. Check Volume Shadow Copy Service

Volume Shadow Copy Service

  1. Press Windows + R keyboard hotkey to open Run command.
  2. Once you’re inside the text box, type Services.msc and press Enter.
  3. Search for Volume Shadow Copy Service, right-click on it and start the service.
  4. While here, set the Startup type to Automatic.
  5. Log-out from the current user account, then restart.
  6. Re-log-in and check if the issue persists.

Firstly, you should verify if the Volume Shadow Copy Service (VSS) is running properly. Apply the above steps to perform the procedure.


2. Delete the WindowsImageBackup folder

delete WindowsImageBackup folder

  1. Open File Explorer and navigate to the drive you want to save the backups.
  2. Look for the WindowsImageBackup folder and double-click it to access it.
  3. In case of not finding it, go to the View tab and check the option Hidden items to continue.
  4. Once the WindowsImageBackup becomes visible, select every file.
  5. Don’t hesitate to delete everything until the folder is empty.
  6. Finally, run the backup procedure once again to check whether the error 0x80780166 is fixed or not.

There are times when the drive where you want to store the backup contains the leftover files of the previous backups. This error code often occurs if the previous backup procedure was interrupted or didn’t have enough space to complete, yet cleaning the WindowsImageBackup folder solves it.


3. Use the System Restore utility

use System Restore utility

  1. Press Windows key + R to open up a Run dialog box.
  2. Type rstrui and press Enter to open up the System Restore wizard.
  3. Click Next at the initial prompt to advance to the next menu.
  4. Select a restore point before you first tried to create the backup.
  5. Click Next.
  6. Verify your restore point and simply click Finish.
  7. Then, click Yes at the confirmation prompt to start the restoring process.
  8. After that, your PC will restart and the new state will be enforced at the next system startup.
  9. Once the old state is enforced, try to back up your OS once again and see if the same error is gone.

Several concerned users reported that the error continues to occur after executing the above instructions. If you’re one of them too, don’t hesitate to restore your computer state back to a previous point when the issue wasn’t occurring.


Worried about restoring Windows? Check this guide and creating a system restore point will be like a walk in the park.


If there are corrupted system files on your computer, you may also encounter the Windows 10 backup 0x80780166 error when running a backup. So, other potential fixes are running DISM to fix the corrupted system files or eventually performing a repair/clean install.

Do you know any other fixes? Share them with the other readers via the comments section below.

[wl_navigator]

FIX: Microsoft Teams error code caa7000a

When it comes to talking with colleagues and coordinating your workforce, nothing beats a collaborative tool in this day and age. One good example is Microsoft Teams, a well-rounded collaborative tool that has all the features you may ever need in order to get in touch and manage your projects.

However, one core aspect of Microsoft Teams is the fact that you need to log into it using your credentials, and that doesn’t always go too smoothly.

For example, users have reported getting an error code caa7000a when trying to sign in:


There exact reason why this error code may appear is not yet known. However, there are a few things you could try in order to bypass it.

How do I fix Microsoft Teams Error Code: caa7000a?

1. Reinstall Microsoft Teams

One solution that helped even the original poster of the issue was a complete reinstall of Microsoft Teams:

Did a clean uninstall of Teams including the app data and credentials. did the trick 🙂

If you encounter issues attempting a complete and clean reinstall of Microsoft Teams, check out this in-depth article on the matter.


2. Check for connectivity issues

2.1 Network-related issues

Sometimes Microsoft Teams might Error Code: caa7000a simply because the overall network has issues. If that is the case, just do the following:

  • Check network issues
    • If you have any issues, then change network connection
    • Additionally, you could switch to a cellular network

2.2. Client-related issues

There are plenty of variables that you need to consider if you are experiencing Error Code: caa7000a. Check the lsit below for some of the most common causes:

  • If you cannot sign in using the downloaded client, you could always just use the web client.
  • If the web client doesn’t work either, check the smartphone app
  • Try updating Microsoft Teams
  • Try repairing your Microsoft Office Suite
    • This will also repair Microsoft Teams
  • Make sure your client is not blocked by any VPN
  • Make sure your Firewall settings and antivirus settings don’t block Microsoft Teams

By following any of these steps, you should no longer encounter Microsoft Teams Error Code: caa7000a any more, or any other similar issues for that matter.

If you know of any other fix for this issue that we may have missed out on, share it in the comments section below so that other users can try it, as well.

[wl_navigator]

SOLVED: Xbox sign in error code 0x87dd0019

Errors on Xbox are pretty common. They indeed come in numerous alphanumeric codes, which might be a little confusing.

However, most of them are simple to resolve and, if you’re paying your Xbox Live subscription regularly, sign in errors will rarely appear.

On the other hand, if you run into an error, like the 0x87dd0019 error code. We have a few steps which should help you to address it.

  1. Power cycle the console
  2. Check the status of Xbox Live services
  3. Make sure your connection isn’t an issue
  4. Remove and re-establish your account

How can I fix sign in error 0x87dd0019 on Xbox

1: Power cycle the console

Let’s start with the simple solution which tends to solve all kinds of Xbox issues.

That’s a hard reset or power cycle, and it usually resolves all kinds of minor bugs in the Xbox system, including the sign in errors which are rather common.

The halt is more times than not a temporary thing and it resolves on its own. However, if there’s more to it, the power cycle is a go-to move to resolve it.

Here’s how to power cycle an Xbox console:

  1. Press and hold the Power button for 10 seconds.
  2. Wait until the console shuts down.
  3. After a minute, turn on the console again and look for changes.

2: Check the status of Xbox Live services

As we already pointed out, the cause of sign in errors is rarely on the users side. Xbox Live services and dedicated servers might be down temporarily due to an error or maintenance.

Therefore, before you move onward with the troubleshooting step below, we suggest checking the status of Xbox Live services.

You can find the status on the official site, here.

3: Make sure your connection isn’t an issue

sign in error 0x87dd0019 Xbox
A bad connection is probably the only thing on your side which might cause sign-in errors.

With that in mind, we suggest you do some basic troubleshooting steps regarding the network connectivity.

Some of them should tackle the error, while others might give you a better insight into the cause.

Here’s what you can try to fix connectivity issues on an Xbox:

  • Make sure you use a wired connection instead of wireless.
  • Run diagnostics
  1. Press the Xbox button to open the guide.
  2. Choose Settings.
  3. Tap All Settings.
  4. Choose Network.
  5. Select Network settings.
  6. Select Test network connection.
  • Set a static IP address
  1. Open Settings and then All Settings.
  2. Choose Network.
  3. Open Network settings > Advanced settings.
  4. Write down your IP and DNS values (IP, Subnet mask, and Gateway).
  5. Under the Advanced settings, open IP settings.
  6. Select Manual.
  7. Once here, open DNS and write down DNS input.
  8. Enter the values you wrote and confirm changes in the Advanced settings.
  9. Restart Xbox

4: Remove and re-establish your account

Finally, we can only suggest removing and re-enabling your account. After that, some users were able to resolve the sign-in error with the code 0x87dd0019.

As we already have said, this is a temporary problem, but if you’re in a hurry, this might help.

Moreover, we suggest signing out of all devices using the same Xbox Live account and sign-in again.

With that said, we can wrap it up. In case you have some additional solutions or questions, the comments section is below. Feel free to share them with us.

  • How can I fix error code 0x87dd0019?
The first step would be to do a full reboot of your system or a power cycle. If that doesn’t fix the problem, read our expert guide to solve error code 0x87dd0019.

[wl_navigator]

FIX: Microsoft Teams error code caa20004

When it comes to multi-national companies, getting a license key for hundreds or maybe even thousands of PCs can be quite expensive. This is something that applies to collaborative tool licenses as well.

That is why a program that is free of charge, such as Microsoft Teams, can be a great choice. This neat collaborative tool comes bundled up with the Microsoft Office Suite, but you can also get it as a separate download free of charge.

However, this program is still prone to occasional issues. For example, some users have reported getting an error code caa20004 during the first time login processcaa20004

Depending on the settings of your company-wide GPOs, this issue can be quite frequent. That being the case, we’ve created this step-by-step guide that will show you exactly what to do to bypass this issue.


What causes MS Teams error code caa20004?

Any Azure Active Directory-dependent apps like Microsoft Teams use an optimized path for the first time login process to log in. It does this with WS-Trust Kerberos authentication endpoints of ADFS.

If your first login attempt is not successful, as with the case above, then the client will try to perform an interactive login session which is presented as a web browser dialog.

However, the new office and ADAL clients will first try only the WS-Trust 1.3 version of the endpoint for Windows Integrated Authentication. The only problem with this is that the feature is not enabled by default.


Tired of Microsoft Teams? Check out this article for a list of great alternatives


How do I fix MS Teams error code caa20004?

caa20004

Enable WS-Trust 1.3 for Desktop Client SSO on the onprem ADFS server which has a federated setup with Azure AD tenant by running the below command.

  • Enable-AdfsEndpoint -TargetAddressPath “/adfs/services/trust/13/windowstransport”

You also need to enable both Forms and Windows Authentication (WIA) in your global authentication policies.

By following these steps, you should no longer receive an error code caa20004 when trying to log into Microsoft Teams.

Note: As you can imagine, these steps are something only the IT administrator can follow. As such, if you and your colleagues encounter this error, as your IT Administrator to follow the steps written above.

If you’re aware of another way to solve this problem, share it in the comments section below so that other users can try it, as well.

  • Internet connection issues
  • The date and time are not set up correctly
    Your organization is not complying with the Azure Active Directory (AAD) configuration policies
  • Your Windows credentials are not the same as your Office 365 credentials.

Keep in mind that the Windows credentials you use to sign in should not be different than your Office 365 credentials.

  • What is modern authentication in Microsoft Teams?

Modern authentication is an authentication method that includes SSO (single sign-on) whereby Microsoft Teams detects you’ve already entered your credentials in another app and doesn’t require your to enter them again. In this manner, you no longer need to enter your email and password when you start a new Microsoft Teams session.

  • What does the status code of my login error mean?

The status code of Microsoft Teams login errors provide additional information for IT admins to diagnose the problem. Based on the status code, they’ll know what troubleshoot procedures to use first.

[wl_navigator]

SMTP gateway is not responding? Try these methods to fix it

Modern printers come with Scan to Email feature that allows the users to scan and send the document to an email. However, some users have reported SMTP gateway not responding printer error while setting up scan to email.

This error usually occurs due to incorrect configuration of your web server page and can be fixed by editing the same.

If you are also troubled by this error, here are a couple of troubleshooting tips to help you resolve it and get the scan to email feature working again.

How do I fix SMTP gateway not responding error?

1. Change printer web server configuration

SMTP gateway not responding

  1. Access the embedded web server page using the web browser and your printer‘s IP address.
  2. Make sure your configuration looks like this:
    • Default From: [email protected]Default Display Name: xxxx
    • SMTP Server: smtp-mail.outlook.com
    • SMTP Port: 587
    • Always Use secure connection SSL/TLS (checked)
    • Validate Server Certificate (Unchecked)
    • Maximum Size of Email: Unlimited
    • Server Requires Authentification (checked)
    • User name [email protected]
    • Password: email account password
  3. Save the changes and close the setup wizard.
    • Note: The above configuration is for a Hotmail account. If you are using other email service providers, change the details accordingly.
  4. Now try to scan the document using Scan to Email feature and check if the error is resolved.
  5. Make sure that your DNS settings and gateway setting are correct before proceeding with other troubleshooting tips.
    • If required, try using public DNS server address like 8.8.8.8, 8.8.4.4 instead.
    • If you are using an IP address for the SMTP server, contact the provider to check if the address is changed.

You’re unable to change your DNS server or IP Address in Windows 10? Follow this guide to fix the issue in not time.


2. Disable connection from a less secure source

SMTP gateway not responding

  1. If you are a Gmail user, visit the Gmail configuration page.
    • Note that this link won’t work if you have enabled 2 step authentication for your account.
  2. Once in, sign in with your Google account if asked to verify the account.
  3. Next, you have to disable connections from less secure sources in your email address.
  4. Once disabled, try to use the Scan to Email feature and check for any improvements.

Google can block devices from logging in to Gmail account if it considers them to be less secure. In that case, disabling the connection from less secure sources can help you fix the problem.


3. Downgrade to older firmware

SMTP gateway not responding

Note: Before proceeding with the firmware downgrading process, make sure to create a system restore point.

  1. Download the older version of firmware you want to downgrade from the HP website.
  2. Download Ncat to your PC.
  3. Move the downloaded firmware in the same directory that has ncat.exe file.
  4. Press Windows Key + R to open Run.
  5. Type cmd and click OK.
  6. In the Command Prompt, enter the following command and hit enter:
    • ncat.exe -w 100 [your printer’s IP address] < ojpro_8710_1834A_08212018.rfu
  7. In the above command, make sure you enter your IP address before executing the command.
  8. Wait for the command prompt to return.
  9. Once done, restart the printer and check if the firmware downgrade is successful.

If you’re having trouble accessing Command Prompt as an admin, then you better take a closer look at this guide.

Downgrading the printer firmware can help you resolve the error if the issue started to occur after upgrading to a newer version of the firmware.

The SMTP gateway error while accessing Scan to Email occurs due to incorrect server configuration. Follow all the steps in this article one by one to resolve the issue.

Which one of these solutions helped you fix your problem? Let us know by leaving a message in the comments section below.

[wl_navigator]

FIX: Xbox error wrong region code

If you moved recently or got any new games from another country or region for your Xbox, you might experience the wrong region code error on your console.

This error can prevent you from playing any games from a different region, but you might be able to fix this problem by using one of our solutions.

Regional locking is a digital restriction management that prevents users of one region from accessing content designed for a different region.

Regional locking is used to delay the release of certain content in some regions or to prevent the grey market import of foreign products.

Lastly, region locking is used to prevent users from accessing content that is banned in their country or region.

And this is because of censorship laws or because the distributor doesn’t have the rights to certain intellectual property outside of a certain region.

Original Xbox and Xbox 360 were region-locked, and it was left to the publisher to decide if the game is going to have a region lock or not.

Many Xbox and Xbox 360 games were region-free, but digital content from Xbox Live such as DLCs, movies, and apps was region locked.

Just like its predecessors, Xbox One was supposed to be region-locked, but Microsoft changed its policy and the final version of Xbox One came out without region restrictions.

Although regional locking is useful, gamers can sometimes experience certain issues with it, and today we’re going to show you how to fix these issues.

Table of contents:

  1. Change the region code on your console
  2. Check the region of your console and the game region
  3. Delete and redownload your profile
  4. Clear the system cache
  5. Power cycle your console

Wrong region code Xbox error, how to fix it?

Fix – Xbox error wrong region code

Solution 1 – Change the region code on your console

If you’re moving to a different country you’ll have to make changes to your region settings in order to make purchases in your new location.

If you decide to change your region, you should know that all your profile information such as your gamertag, achievements and rest of Xbox profile information will be moved with you.

On the other hand, all funds that you have on your Microsoft account won’t be moved, therefore be sure to spend them before moving.

Although your Xbox Live Gold subscription will be moved, it can only work in regions that support Xbox Live Gold, so keep that in mind.

Other subscriptions such as XNA Creator’s Club or Call of Duty Elite will remain active, but they will not work unless they are available in the new region.

As for Groove Music Pass, your subscription will be canceled after you move, but your collection will remain unchanged.

If you subscribe to Groove Music Pass in the new region, keep in mind that not all items in your collection will be available.

Now that you know what happens when you change your region, let’s see how to actually do it. On Xbox One, do the following:

  1. Make sure that you’re signed in to your Xbox.
  2. Scroll left on the Home screen to open the guide.
  3. Select Settings > All Settings > System.
  4. Select Language & location.
  5. Choose your new location from the list and select Restart now.

If you’re using Xbox 360 you can change your region by doing the following:

  1. Sign in to your Microsoft account.
  2. Add a credit card and enter the billing address for the new region.
  3. On your console go to Settings > System.
  4. Choose Console Settings > Language and Locale > Locale.
  5. Select the locale that you want to use.

Keep in mind that sometimes there might be issues while changing your country or region. For example, you won’t be able to change it if you already did it in the last three months.

You also won’t be able to change your region if your account is suspended or if you have balance due on your Xbox subscription.

Solution 2 – Check the region of your console and the game region

Your console and your game both have region numbers assigned to them, therefore be sure to check them.

You can find this number on the back of your console and on the case for the game.

If those numbers don’t match, you won’t be able to run that specific game on your console. This rule is enforced by game publisher and you won’t be able to change it.

The only solution, in this case, it to purchase a copy that matches your region.

Solution 3 – Delete and redownload your profile

If tweaking the region settings didn’t get the job done, we’re going to try with re-downloading your profile. Here’s how to do that:

  1. Press the Guide button on your controller.
  2. Go to Settings and select System Settings.
  3. Go to Storage > All Devices > Gamer Profiles.
  4. Select your gamertag that you want to delete.
  5. Select Delete.
  6. Select Delete Profile Only. (This deletes the profile but leaves saved games and achievements.)

Solution 4 – Clear the system cache

Clearing the system cache is a universal solution for all sorts of issues, so it might be helpful here, as well. Here’s how to

  1. Press the Guide button on your controller.
  2. Go to Settings and select System Settings.
  3. Select Storage or Memory.
  4. Highlight any storage device, and then press Y  on your controller (you can select any storage device, because the system will clear the cache for all of them).
  5. Select Clear System Cache.
  6. Confirm the action.
  7. Restart your console

Solution 5 – Power cycle your console

If other solutions don’t work, you might want to perform a factory reset. This option will usually delete all files from your console and reset it to the original state.

This means that you’ll delete all your accounts, saved games, settings, and files.

If you want to keep your files, we strongly suggest that you back them up to a USB flash drive before starting the reset process. To reset your Xbox to factory settings, do the following:

  1. Open the guide by scrolling left on the Home screen.
  2. Select Settings and go to All Settings.
  3. Choose System > Console info & updates.
  4. Select Reset console.
  5. You should see two options available: Reset and keep my games & apps and Reset and remove everything. We suggest that you use the first option since this option will only reset your console and delete potentially corrupted data without deleting games and other large files.
  6. If that option doesn’t work and the problem still persists, be sure to use Reset and remove everything option. This option will delete all downloaded games, saved games, accounts, and applications, therefore if you want to preserve some of your files, we suggest that you back them up before using this option.

Few users reported that factory reset fixed

Region locking has its benefits and flaws, and if you encounter wrong region code errors on your Xbox, be sure to check if the region code of your console matches the region code of your game.

If not, you might want to try to change your region from Xbox Settings. If that doesn’t work, consider purchasing a game that matches your current region.


FIX: Microsoft Teams failed to connect to settings endpoint

Microsoft Teams allows remote access for organizations that have employees around the world, making it possible to work from anywhere. That said, some users have reported Failed to connect to settings endpoint error while launching the desktop client.

The timeout error is usually caused by third-party programs blocking the connection to Microsoft Teams server. If you are also troubled by this issue, this is the article you need.

We have listed a couple of fixes to help you resolve this Microsoft Teams problem.

How can I fix Microsoft Teams timeout error?

1. Check for third-party programs

Microsoft Teams failed to connect to settings endpoint

Disable Windows Firewall 

  1. Click on Start and select Settings.
  2. Click on Update and Security.
  3. From the left pane click on “Windows Security”.
  4. Open the “Firewall and Network Protection” option.
  5. Click on your currently active network.
  6. Toggle the switch to turn off the Firewall.

If you’re having trouble opening the Setting app, take a look at this article to solve the issue.


Disable third-party firewall

  1. If you are using a third-party antivirus, it may also have an active firewall.
  2. Launch the antivirus program and look for the firewall option.
  3. Disable the firewall.

Once the firewall is disabled, try launching Microsoft Teams again and check for any improvements. If you are able to connect successfully, you may have to add Microsoft Teams to your firewall whitelist.

Alternatively, also disable any VPN client in use. Microsoft Teams may not function properly with a VPN client running.


2. Check for service issues

Microsoft Teams failed to connect to settings endpoint

  1. You may encounter an issue while signing in to Microsoft Teams if the services are down.
  2. Launch a web browser and try accessing the Microsoft Teams web client.
  3. If the Microsoft Teams web client works, the issue is not with Microsoft Team service.
  4. In case, the web client has similar issues, check the Office Admin centre for service-related updates.
  5. You can also check the Microsoft Teams official social media account for service-related updates.

3. Check for updates

Microsoft Teams failed to connect to settings endpoint

  1. Microsoft tends to release new updates to fix bugs with its software. While Microsoft Teams automatically updates when a new update is available, you may want to check for the updates manually.
  2. Launch Microsoft Teams desktop client.
  3. Click on the Profile picture on top of the app.
  4. Select Check for updates. 
  5. Download and install any pending updates.
  6. Restart after the updates are installed and check for any improvements.

4. Other solutions to consider

Microsoft Teams failed to connect to settings endpoint

  1. Make sure that you are connected to the Internet. You may also want to work with your IT admin to ensure the connection is not blocked by the firewall configuration.
  2. Make sure you are using the same Windows credentials that used to sign with Office 365.
  3. Contact your IT admin so they can confirm that your organization is complying with Azure Active Directory configuration policies.

Conclusion 

Microsoft Teams request timeout failed to connect to settings endpoint is usually caused by antivirus program or other software that may block the connection. Go through all the solutions in this article to resolve this issue with Microsoft Teams.

If you have any more questions or suggestions, feel free to leave them in the comments section below.

[wl_navigator]

FIX: Xbox One X won’t turn on after shutting down

Microsoft proudly says that the Xbox One X is the most powerful gaming console in the world.

However, many players have already encountered a series of annoying bugs with the console, such as black screen issues and a console that shuts down and doesn’t turn back on.

Unfortunately, for the time being, there is no clear solution to some of these problems.

According to a Redditor:

I got the Project Scorpio Edition at midnight. Hooked it up the next morning and installed all my games and what not. Next day I started playing and after a couple hours, POOF it spontaneously shut down and wouldn’t turn back on. I was pretty distraught […]

What to do when your Xbox One X doesn’t turn on?

Luckily, the post confirmed that replacing the power cable fixed the problem, making it seem like the power cord is too fragile to handle the amperage required by the console.

xbox one x adapter

It was said that the default cable included with the console is rated at 7 amps and 125 volts, while the replacement cable is rated 10 amps and 125 volts.

In other words, any cable rated 7 amps or more and at least 125 volts should fix the problem.

So I decided to at least try to fix it before sending it away. […] picked up a used universal power cable, the Nyko one that’s branded for Sony consoles […]  Sure enough, swap the cable out and it powers right up. Tried the original cable one more time just to be sure and it seems to be a fried power cable being the issue as the original still did not work but the replacement one does.
So, if you don’t want to sacrifice your Scorpio Edition or wait weeks possibly to return it / repair it, go buy a new power cable and give that a shot.

Many Xbox One X owners who encountered the same issue confirmed that swapping the power cable fixed the problem. Keep in mind that by using a third-party power cable, you risk voiding your warranty, so proceed at your own risk.

If you’re experiencing this problem, you can buy the Nyko universal power cord from Amazon.

Do you know any other methods to solve the Xbox One X not turning on issue?

Feel free to share your solution with all members of the Windows community through the comments section below.

[wl_navigator]

FIX: Xbox One error code 0x807a1007

Communication is a key part if you’re playing a multiplayer game with your friends on Xbox.

If you’re in a team with your friends, you’re probably using party chat, but few users reported Xbox One error code 0x807a1007 that prevents them from using the party chat.

Table of contents:

  1. Change your region
  2. Turn on Energy Saving mode
  3. Change the NAT settings
  4. Delete and redownload your profile
  5. Clear the system cache
  6. Power cycle your console
  7. Restore factory defaults

Xbox One error code 0x807a1007

Fix – Xbox One error code 0x807a1007

Solution 1 – Change your region

According to users, you can fix this issue simply by changing your region.

Changing your region on Xbox One is simple, but keep in mind that you need to spend all the money that you have on your Microsoft account before you can change your region.

Also, keep in mind that certain services might not be available in specific regions, so be sure to choose your region carefully.

We have to mention that you can only change your region once in three months.

As for limitations, you won’t be able to change your region if you have a balance due on your Xbox subscription or if your account is currently suspended.

To change the region, follow these steps:

  1. Make sure that you’re signed in to your console.
  2. On the Home screen scroll left to open the Guide.
  3. Choose Settings > All Settings.
  4. Select System and choose Language & location.
  5. Select the new location and choose Restart now.

After your console restarts, check if the error is resolved.

Solution 2 – Turn on Energy Saving mode

Few users reported that you might be able to fix error code 0x807a1007 simply by turning on Energy Saving mode. This is a simple procedure and you can do it by following these steps:

  1. Go to Settings.
  2. Select Power & Startup.
  3. Select Power Mode and enable Energy-saving option.

After turning this mode on, your Xbox will start a bit slower than before, but the error should be completely resolved.

Solution 3 – Change the NAT settings

One way to fix this problem is to change your NAT settings. To do that, follow these steps:

  1. Scroll left on the Home screen to open the Guide.
  2. Select Settings > All Settings.
  3. Now choose Network.

You should be able to see your NAT Type. There are three different NAT types and all of them have certain advantages and limitations.

If your NAT Type is set to anything else except Open, you might encounter this error.

To fix this problem be sure to set the NAT type to Open and check if that solves the issue.

Solution 4 – Delete and redownload your profile

The next thing we’re going to try is redownloading your Xbox profile. Here’s how to do that:

  1. Press the Guide button on your controller.
  2. Go to Settings and select System Settings.
  3. Go to Storage > All Devices > Gamer Profiles.
  4. Select your gamertag that you want to delete.
  5. Select Delete.
  6. Select Delete Profile Only. (This deletes the profile but leaves saved games and achievements.)

Solution 5 – Clear the system cache

Clearing the system cache can resolve all sorts of issues, so it can be helpful in this case, as well. Go on and clear the system cache:

  1. Press the Guide button on your controller.
  2. Go to Settings and select System Settings.
  3. Select Storage or Memory.
  4. Highlight any storage device, and then press Y  on your controller (you can select any storage device because the system will clear the cache for all of them).
  5. Select Clear System Cache.
  6. Confirm the action.
  7. Restart your console

Solution 6 – Power cycle your console

And finally, if none of the previous solutions resolved the issue, we’re going to restart the console. First, let’s power cycle your Xbox. Here’s how to do that:

To perform a power cycle reset, follow these steps:

  1. Unplug the power cable from the back of the router, modem, or gateway, and wait for five minutes. If you have both a router and a modem, unplug the power cable from both devices.
  2. Restart your Xbox One console:
    • Press the Xbox button to open the guide.
    • Select Settings.
    • Select Restart console.
    • Select Yes to confirm.
  3. After five minutes, plug the modem or gateway in first and wait for all the lights to return to their normal state.
  4. If you are using a router, plug in the router and wait for all the lights to return to their normal state.

Now that your console is reset, you should test your Xbox Live connection. Here’s how to do that:

  1. Press the Xbox button to open the guide.
  2. Select Settings > All Settings > Network.
  3. Now, select Network settings. If there’s an outage, it will appear on the screen.
  4. On the right side of the Network settings screen, select Test network connection.

Solution 7 – Restore factory defaults

If this issue still appears on your Xbox One, you might be able to fix it by performing a factory reset.

This procedure will reset your console to factory defaults and remove all your files and games, therefore we strongly suggest that you back up all important files.

Keep in mind that you can download synced files from Xbox Live since they won’t be affected by a factory reset. To reset your console, do the following:

  1. Scroll left on the Home screen to open the Guide.
  2. Select Settings > All Settings.
  3. Choose System > Console info & updates.
  4. Now select Reset console option.
  5. You should see two options available, Reset and remove everything and Reset and keep my games & apps. We suggest that you use the latter option to reset your console while keeping your games intact.

  6. If this option doesn’t work, you’ll have to use Reset and remove everything option. This option will delete all files from your console, including your games, so be careful while using it.
  7. After the reset process is completed, check if the problem is resolved.

Xbox One error code 0x807a1007 can prevent you from joining the party chat, and if that happens, you just need to try to join it again.

If that doesn’t help, feel free to try all the solutions from this article.

FIX: Error Code X80080008 Apps not Installing on PC

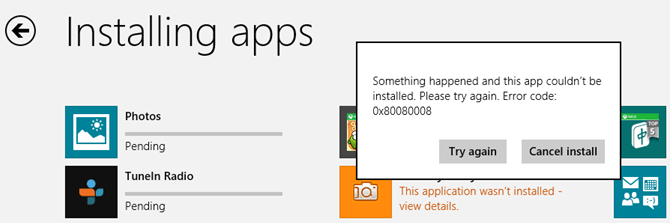
If you upgraded your operating system to Windows 10 OS or perhaps you just bought a new computer with this operating system installed, you might have stumbled upon the app error code x80080008 when you try to install one or more apps. Seeing that there is a very easy fix to apps not installing due to error code x80080008, I decided to write this guide. You only need to follow the instructions listed below.
Fix Apps not installing error code x80080008 in Windows 8.1 and Windows 10
Another symptom of this issue is that you might not even get the error message shown above. Instead the application you are trying to install just hangs and you have to close the process. This issue is usually caused by registry errors in your  Windows 10 but downloading the application below and also doing some additional troubleshooting steps on the system will fix this.

Apps not installing error code x80080008

  1. Delete the Windows Store cache
  2. Run this Notepad script
  3. Run the app troubleshooter
  4. Turn off your antivirus software
  5. Disable Windows Firewall
  6. Check app compatibility
  7. Contact the app developer is this is a specific issue
  8. Additional solutions

1. Delete the Windows Store cache

    • Press and hold the Windows button and the R button.
    • Now the Run window should pop up.
    • Write in the run box the following: WSReset.exe without the quotes.
    • Press the Enter button on the keyboard.
    • After the process finishes reboot your Windows 10 device.
    • Try downloading and installing the apps after the Windows PC is powered up.

2. Run this Notepad script

  1. Press and hold the Windows button and the R button.
  2. Now type in the run box the following: notepad.
  3. Now you should have a notepad document opened.
  4. Write in the notepad document the following lines or just copy paste it from below:
    REGSVR32 WUPS2.DLL /S
    REGSVR32 WUPS.DLL /S
    REGSVR32 WUAUENG.DLL /S
    REGSVR32 WUAPI.DLL /S
    REGSVR32 WUCLTUX.DLL /S
    REGSVR32 WUWEBV.DLL /S
    REGSVR32 JSCRIPT.DLL /S
    REGSVR32 MSXML3.DLL /S
  5. Left click on the File button on the upper left side of the notepad document.
  6. Left click on the Save as feature.
  7. In the File name box you need to write app.bat.
  8. In the Save as type box you need to select All files
  9. The location where the file is saved should be on your desktop.
  10. Go to the desktop and right click or hold the tap on the app.bat file you made.
  11. Left click or tap on Run as administrator feature from the menu that appears.
  12. Reboot the Windows 10 system after the operation completes.
  13. Try and see if the app you are trying to download and install works for you now.

3. Run the app troubleshooter

  1. Left click or tap on the link below
  2. Left click or tap on the Save file feature.
  3. Left click or tap on the OK button.
  4. Go to the directory where the troubleshooter was downloaded and run the application.
  5. Let the process finish and close the troubleshooter.
  6. Reboot the Windows device.
  7. Try again to see if it fixed your issue.

4. Turn off your antivirus software

  1. If you have an antivirus installed, try disabling it for the duration of this step.
  2. After you disabled it, please try again to download and install the app you are having issues with.

Perhaps this would be a good time to think about switching your antivirus. Here’s our guide


5. Disable Windows Firewall

  1. Move the mouse cursor over to the upper right side of the screen.
  2. Left click on the Search feature present in the menu that shows.
  3. Write in the search box the following: firewall without the quotes.
  4. Left click or tap on the Windows Firewall icon that shows after the search.
  5. Left click or tap on the Allow an app or feature through Windows Firewall feature.
  6. Left click or tap on the Change Settings feature.
  7. Now, from there, you can check the box next to the application you are having issues with.
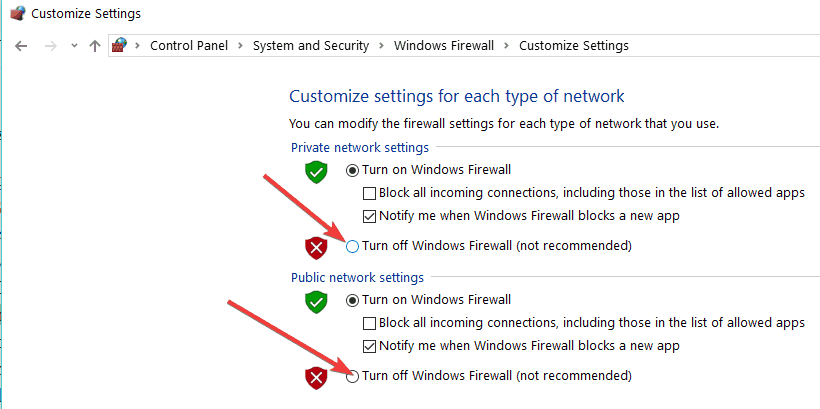
  8. If you cannot see the application there, go back to Windows Firewall screen and this time left click on the Turn Windows Firewall on or off.Turn off Windows firewall
  9. Left click on the Turn off Windows Firewall (not recommended) feature.
  10. Try to see if the app you have issues with downloads correctly and can be installed, if it is then your Windows Firewall was blocking the access to the app.

6. Check app compatibility

If you are having this issue on a specific application, I would suggest you check if the app is compatible with the Windows 8.1, 10 operating system. If it isn’t, then you will have to wait until a new version is available on the market because it will probably give you this error every time you try to download and install it.

7. Contact the app developer is this is a specific issue

  1. If this only happens on specific apps and the apps are compatible with Windows 8.1 or Windows 10, then you need to send an email to the app publisher by left clicking or tapping the Store icon in the Start screen of Windows.
  2. Search for the application you have issues with.
  3. Left click or tap on the app.
  4. In the app description page you will need to find the Details topic.
  5. Go to the Learn more option.
  6. Left click or tap on the support link in this page.
  7. From here you will find all the details you need to contact the app publisher to help you with the support needed.

8. Additional solutions

If the issue persists, here are a few additional troubleshooting solutions that you can use:

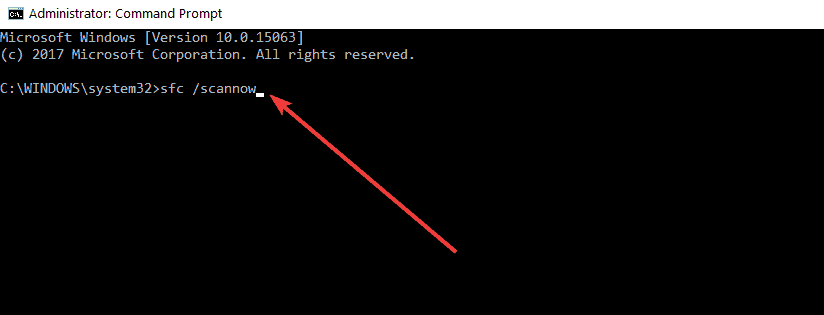
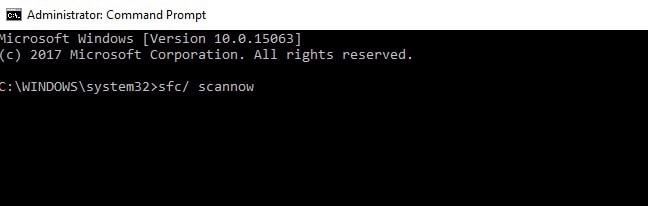
  • Run SFC scan: Launch Command Prompt as admin, enter sfc /scannow and hit Enter.
  • Disable your VPN: If you’re using a VPN tool, turn it off and try to download the problematic app again.
  • Update the Windows Store App and install the latest OS updates as well.

The steps listed above will most likely fix your app download and installation issue. If you have further questions related to this subject, please don’t hesitate to contact us by using the comments below.

[wl_navigator]

FIX: Xbox error UI-122

Your Xbox is a multimedia center that allows you to enjoy in latest games and online content.

Unfortunately, certain errors can appear on your Xbox once in a while, and today we’re going to show you how to fix Xbox error UI-122.

Table of contents:

  1. Check if your public connection supports streaming
  2. Switch to a non-cellular data network
  3. Restart your Xbox
  4. Delete Netflix saved data
  5. Check your Xbox’s DNS settings
  6. Restart your modem
  7. Improve the wireless signal
  8. Connect Xbox directly to your modem
  9. Delete and redownload your profile
  10. Clear the system cache
  11. Power cycle your console

Xbox error UI-122, how to fix it?

Solution 1 – Check if your public connection supports streaming

If you’re using a public Wi-Fi network, you might not be able to access Netflix on your console depending on network configuration. Administrators sometimes block streaming services on their network, thus causing this error to appear.

If that’s the case, try accessing Netflix from any other device that has Internet access. If Netflix is blocked by network administrator, you won’t be able to access it from any device and you should contact the network administrator in order to fix the problem.

Keep in mind that many public networks have limited bandwidth, therefore many streaming services are blocked.

Solution 2 – Switch to a non-cellular data network

If you’re using cellular or satellite Internet to access Netflix on your Xbox, you might encounter this error. These types of connections have slower speeds, and that can sometimes cause this error to appear.

If you can, be sure to switch to cable or DSL connection and check if the error persists.

Solution 3 – Restart your Xbox

If you’re having Xbox error UI-122, you might be able to fix it by turning off your Xbox. To do that, do the following:

  1. Press and hold the Guide button on your Xbox controller for three seconds. Select the option to turn off the console. Alternatively, you can press and hold the power button on the console itself.
  2. After the console turns off, unplug the power cable from the console and keep in disconnected for at least a minute.
  3. Plug the power cable again.
  4. Turn on the console by pressing the Guide button on the controller or by pressing the power button on the console.
  5. After your console turns on, start the Netflix app and check if the error is resolved.

Solution 4 – Delete Netflix saved data

Netflix stores its data on your console, but sometimes that data can become corrupted and cause this and many other errors to appear. To fix this issue, it’s advised to remove Netflix Saved Data by following these steps:

  1. Select Settings from the Xbox Dashboard.
  2. Choose System > Storage.
  3. Select All Devices. If this option isn’t available, select the first available device such as Memory Unit, USB storage or Hard Drive.
  4. Select Games and Apps.
  5. Now choose Netflix > Netflix Saved Data.
  6. Select Delete and then Yes to confirm.
  7. Start Netflix again and check if the problem is resolved.

Solution 5 – Check your Xbox’s DNS settings

Sometimes your DNS settings can cause Xbox error UI-122 to appear. To fix this problem, you need to set DNS settings to Automatic on Xbox 360 by doing the following:

  1. Press the Guide button on your controller.
  2. Navigate to Settings and choose System Settings.
  3. Now select Network Settings.
  4. Select your network and choose Configure Network option.
  5. Locate DNS Settings and set them to Automatic.
  6. Turn the console off and turn it back on again.
  7. Start the Netflix app and check if the problem is resolved.

If you have Xbox One, you can change DNS settings by following these steps:

  1. Press the Menu button on your controller and choose Settings. Alternatively, you can just select Settings from the Home screen.
  2. Select Network > Advanced settings.
  3. Choose DNS settings and set them to Automatic.
  4. Press the B button to save changes.
  5. Start Netflix and check if the error appears again.

Solution 6 – Restart your modem

According to users, sometimes you can fix this error simply by restarting your modem. Configuration errors can occur once in awhile, and in order to fix them, you need to restart your modem.

To do that, follow these steps:

  1. Turn off your console completely.
  2. On your modem press the Power button to turn it off. Some users are suggesting to unplug the power cable, so you can do that as an alternative.
  3. After your modem is turned off, wait for 30 seconds or more and press the Power button again to turn it on.
  4. After your modem turns on, start your console and check if the error is resolved.
  5. Optional: If you have a router, be sure to restart it as well before turning on your console.

Solution 7 – Improve the wireless signal

Sometimes this error appears due to the strength of your wireless signal and in order to fix it, you need to improve your wireless connectivity.

If possible, you might have to move your router to a new location in order to improve your wireless signal.

In addition, you need to keep a close eye on wireless interference. Other devices can interfere with the wireless signal therefore be sure to keep all wireless devices away from your router.

Lastly, try to elevate your router by placing it high off the ground. By doing so you’ll ensure that there are no obstacles and that you’re getting the best reception.

Solution 8 – Connect Xbox directly to your modem

Error UI-122 can appear on your Xbox due to problems with your wireless connection. To fix this problem you need to connect your Xbox directly to your modem by using an Ethernet cable.

After doing that, restart your modem as we showed you in Solution 6.

In addition, you might want to try restarting your console as well. If this method solves the issue, it means that there’s a problem with your network connection or router.

If the problem still persists, you’ll have to check if your Internet connection is available on other network devices.

If there’s an issue with your modem, you’ll have to contact your Internet Service Provider.

Solution 9 – Delete and redownload your profile

The next thing we’re going to try is re-downloading your Xbox One profile. Here’s what you need to do:

  1. Press the Guide button on your controller.
  2. Go to Settings and select System Settings.
  3. Go to Storage > All Devices > Gamer Profiles.
  4. Select your gamertag that you want to delete.
  5. Select Delete.
  6. Select Delete Profile Only. (This deletes the profile but leaves saved games and achievements.)

Solution 10 – Clear the system cache

Clearing the system cache is a universal solution that can resolve all sorts of issues, so we’re going to test our luck with this one, as well. Here’s how to clear the cache on your Xbox One:

  1. Press the Guide button on your controller.
  2. Go to Settings and select System Settings.
  3. Select Storage or Memory.
  4. Highlight any storage device, and then press Y  on your controller (you can select any storage device, because the system will clear the cache for all of them).
  5. Select Clear System Cache.
  6. Confirm the action.
  7. Restart your console

Solution 11 – Power cycle your console

If other solutions don’t work, you might want to perform a factory reset. This option will usually delete all files from your console and reset it to the original state.

This means that you’ll delete all your accounts, saved games, settings, and files.

If you want to keep your files, we strongly suggest that you back them up to a USB flash drive before starting the reset process. To reset your Xbox to factory settings, do the following:

  1. Open the guide by scrolling left on the Home screen.
  2. Select Settings and go to All Settings.
  3. Choose System > Console info & updates.
  4. Select Reset console.
  5. You should see two options available: Reset and keep my games & apps and Reset and remove everything. We suggest that you use the first option since this option will only reset your console and delete potentially corrupted data without deleting games and other large files.
  6. If that option doesn’t work and the problem still persists, be sure to use Reset and remove everything option. This option will delete all downloaded games, saved games, accounts, and applications, therefore if you want to preserve some of your files, we suggest that you back them up before using this option.

Xbox error UI-122 affects the Netflix app on Xbox One and Xbox 360, but we hope that you managed to solve this issue by using one of our solutions.

FIX: Antivirus blocking Roblox in Windows 10/11

Roblox is the largest user-generated online gaming platform that hosts more than 15 million games, created by users on a daily basis in an immersive 3D experience.

This platform is easily accessible on different operating systems and devices including the Xbox One, so multiple players can enjoy the adventure regardless of their location.

But with any innovation, comes troubleshooting challenges, which is why this article covers the solutions to use when you encounter your antivirus blocking Roblox platform.

How to fix antivirus blocking Roblox

1. Turn off your internet firewall software

turn off windows 10 firewall

There are many antivirus or internet security software programs, most of which try to control the programs that can access the internet.

Oftentimes, these programs err in terms of caution, and by default, many of these are not allowed access.

One of the simplest things to try is turning off your internet firewall software, and check whether it lets you join games. If it does allow you, you can turn it back on, then safely allow Roblox to access the internet.

Here are the steps you can take to safely allow Roblox to access the internet:

  1. Go to your firewall program’s Control Panel. This is usually found in the taskbar on the lower right-hand side of your desktop, or check in your Windows Control Panel
  2. Go to the program permissions section
  3. Find Roblox
  4. Allow unrestricted access to the internet for the Roblox program

Note: if you need help with a particular software type, check with your program’s help manual or website if any.

2. Update your antivirus

Most of us have antivirus or antimalware programs installed on our computers because we need the safety and protection they provide whether we’re on the internet or simply using our computers.

If you have an antivirus or antimalware program running in the background, they could probably be acting as an overly cautious firewall that may prevent some important communication between Roblox or Roblox Studio and the relevant servers.

In this case, you may need to update your antivirus or antimalware program, or alternatively add Roblox to its whitelist.

If Roblox has been flagged by your antivirus or antimalware program as a concern, worry not, because Roblox is completely virus free and it doesn’t have any malware in it.

Occasionally, antivirus programs may incorrectly flag programs, an occurrence known as a false positive.

Therefore, you need to ensure that you have the most recent or latest version of your antivirus or antimalware program. It is likely that the manufacturer brand for your security software has patched the problem, but if this doesn’t work, try the next solution.

3. Add Roblox to your antivirus program’s whitelist

whitelist an app windows 10 firewall

If you updated your antivirus or antimalware program to the latest version but it still didn’t fix antivirus blocking Roblox, then you can flag the warning as a false positive.

In order to ensure that Roblox runs correctly, you need to add it to your security software’s whitelist as a permitted program.

This varies from one antivirus to another, so check with your security software’s program for instructions on exclusion, or whitelisting.

Note: When searching for exclusions if using a Windows machine, Roblox files are usually stored in the following folder: C: > Users > (Your Windows Username) > AppData > Local > Roblox

Did any of these solutions fix the antivirus blocking Roblox problem? Let us know your experience in the comments section below.

Fix: HP My Display Has Stopped Working Error Message

Keep receiving the same error every time you boot up the computer? It happens to a lot of users. They describe an error message, saying HP My Display has stopped working. Windows is checking for a solution to this problem.

Then, it turns into A problem caused the program to stop working correctly. Windows will close the program and notify you if a solution is available, but no such thing ever happens.

When encountering this issue, some of the guilty culprits may be a recent Windows update, corrupted app files, or your graphics driver. With this in mind, be sure that there are a few options for quickly fixing the HP My Display has stopped working error message.

What can I do if getting HP My Display has stopped working?

1. Reinstall HP My Display

HP My Display options
  1. Start by pressing the Windows key and letter R at the same time to open the Run box.
  2. Type control and press Enter.
  3. Select Programs and Features next.
  4. Right-click HP My Display to select Uninstall.
  5. Click Yes when prompted by User Account Control.
  6. Then, go to the official HP website.
  7. Click Download Now.
  8. Double-click the downloaded file and follow the on-screen instructions to reinstall HP My Display on your computer.

Reinstalling HP My Display is a reasonably straightforward process, and it usually fixes the issue you’re getting. That’s why it’s a top recommendation, so apply the above steps without hesitation.

2. Update your Graphics Card and Display Driver

NVIDIA drivers
  1. On your keyboard, hold down the keyboard shortcut Windows key + R to bring up the Run window.
  2. Type devmgmt.msc to initiate the Device Manager.
  3. Access your Device Manager settings.
  4. Find your graphics card from the list and update the drivers.
  5. Do the same with your monitor driver.

If reinstalling HP My Display doesn’t help you get rid of the error message, then take into consideration updating your graphics card driver and the HP monitor driver. For that, you may manually download the latest drivers from the manufacturer’s website.

Updating the graphics driver is also recommended when looking for methods to easily fix Display driver amdwddmg stopped responding and has successfully recovered errors.

However, you may not be able to integrate some types of graphics hardware into laptops straight from the graphics adapter manufacturer. Thus, use Device Manager to let Windows detect and install updates automatically.

You can also employ a specialized driver tool like Fortect Driver Updater. This performant tool, developed to manage all your PC drivers, will actually improve system performance and fix issues with your components by installing the latest driver versions from its extensive database.

3. Create a System Restore point

create a restore point
  1. Open Start.
  2. Open your system restore menu next by typing System Restore Point in the search bar.
  3. Under the Protection Settings section, you need to click Create.
  4. Type a descriptive name for the restore point.
  5. Then, click the Create button.
  6. Have patience, as this is a crucial step, and it must not be interrupted in any way.
  7. Click the Close button.
  8. Lastly, click the OK button.

If you didn’t notice the error before the latest updates, it could be worth performing a System Restore to fix the HP My Display has stopped working error message as soon as possible.

In case you’re not familiar with restoring Windows, you should read about creating a system restore point before proceeding with the steps above.

This is basically an image of the system configuration and settings in the Windows Registry that helps restore the system to an earlier date, so keep your fingers crossed for a successful result.

Was this article helpful? Here are a couple of fixes that you could try to solve the error message you’re getting, but don’t be shy if you know of any other solutions. Share them with us in the comments section below.

FIX: Microsoft Teams error code 6

When it comes to work environments, no modern company can hope to achieve great cooperation between their coworkers without a collaborative tool of some kind.

For example, companies that use the Microsoft Office Suite are most likely familiar with Microsoft Teams, a great collaborative tool that includes everything that a team would need to better work together.

For example, it includes instant chat capabilities, file transfer, project management and even groups.

Speaking of groups, Microsoft Teams is still software that can be prone to bugs, and users have reported issues when trying to log in for the first time:

One of our user have an issue when he try to connect to the Teams applications, here is the error messages:error code 6

Upon further research, a solution to Microsoft Teams error code 6 was discovered. That is why we’ve listed it along with some explanations in the article below.


Not a fan of Microsoft Teams? Check out this article for some worthy alternatives.


How can I fix Microsoft Teams Error code 6?

It seems that the problem that caused Error code 6 was a group misconfiguration on the user’s part. As for the solution, all you need to do is changes the Power Web App Settings on the SharePoint site.

While no exact specifications are given, suffice it to say you need to make sure that everyone that belongs to a Microsoft Teams group has the exact same PWA settings.

Similarly to other collaborative tools such as Slack, users cannot be created without first being part of a larger organization. In the case of Microsoft Teams, a group called a Team.

That being the case, simply make sure that all present and future users have the exact same PWA settings applied to them. If you do that, there will be no more error code 6 messages whenever they try logging in.

The only downside to this apparently simple solution is that those that have this problem cannot solve it themselves. This is because their PWA settings need to be changed by an administrator.

If you have any other questions or suggestions, don’t hesitate to reach for the comments section below.

  1. Restart Teams
  2. Log out and then log back in
  3. Check for available updates
  4. Disable non-essential programs running in the background
  5. Check Microsoft Teams permission settings
  • Is Microsoft Teams down?

From time to time, Microsoft Teams is unavailable for users worldwide, mostly due to issues related to servers and the increase in the number of users. To check if Microsoft Teams is down, go to the Office 365 Service Health Status center and the official Microsoft Teams Twitter page. These are the first platforms where Microsoft share official information about Microsoft outages.

  • Is Microsoft Teams going away?

Microsoft Teams is not going away. As a matter of fact, Teams is slowly replacing Skype of Business and all users are asked to switch to Teams by July 2021. New Office 365 customers are all direct to Microsoft Teams.

So, no, the Redmond giant is not ending support for Microsoft Teams. You can cross that reason off your list of possible causes triggering Teams issues.

[wl_navigator]

FIX: Microsoft Teams Security Zone setting error

When it comes to working together with your colleagues at the office, modern times ask that you appeal to collaborative tools to help you. These tools usually include instant messaging features, file transfers, project management, and control features, and more.

One service that provides all that, and more is Microsoft Teams, and it is extremely popular among companies that use the Microsoft Office Suite, and not only.

However, Microsoft Teams has its own fair share of glitches. For example, some users have reported receiving error messages related to Microsoft Team’s Security Zone settings:

I can’t use the new Teams and Skype Admin Center from either IE or Edge. Had to use Chrome. I keep getting a Security Zone error. I’ve added the domains in IE (don’t know where to do it in Edge) but still got the same error. Ditching both Microsoft browsers and using Chrome instead.

Security zone setting error
Please make sure these two domains are added to the trusted sites in IE or Microsoft Edge: https://admin.teams.microsoft.com and https://login.microsoftonline.com.
If you are using other browsers, please close all browser windows and try again.


microsoft teams securityzone

This is an error message that can appear quite often. That is why we’ve compiled this step-by-step guide that will show you exactly what you need to do to get rid of it.

How do I fix the Microsoft Teams Security Zone setting error?

1. If you use Microsoft Edge

  1. Click Start
  2. Type inetcpl.cpl and press Enter
    • Internet Properties window will open.
  3. Select the Security tab
  4. Under Trusted Sites, click on Sites
  5. In the Add this website to the zone box, type in the website that you wanted to add
    • In our case, these would be:
      • https://admin.teams.microsoft.com
      • https://login.microsoftonline.comtrusted sites
  6. Click on Close
  7. Open Microsoft Edge
  8. On the top-right corner of the window, click on the 3 dots icon.
  9. Select Settings
  10. Go to Import or exportimport export
  11. Select Internet Explorer, and then click on Import
  12. Click on Back 
  13. Under Account, click on Accounts settings
  14. Under Accounts used by other apps, click on Add a Microsoft account link
  15. Sign in your Microsoft account
  16. Go back to Microsoft Edge window
  17. Click on Device sync settings link.
  18. Toggle Sync your settings to On

This error you will receive if an actual Security Setting in Edge Browser is missing and can be solved by adding the https://admin.teams.microsoft.com and the https://login.microsoftonline.com page to the trusted site.

Unfortunately, the feature of adding trusted websites on Microsoft Edge is not yet available yet, so your only option is to import all of your settings from Internet Explorer.

Note: If you use Mozilla Firefox or Google Chrome you can fix this issue by logging into the website through a private (incognito) window. No explanation as to why this works currently exists, and admittedly this is more of a workaround, but it will at least fix this issue.

Know of a fix that isn’t a workaround but a permanent solution? Share it in the comments section below so that other users can try it, as well.

[wl_navigator]

How to Fix Common HyperTerminal Issues [Step-by-Step Guide]

HyperTerminal is a popular Windows terminal emulation program. It allows the users to connect through TCP/IP Networks, Dial-Up Modems, and COM ports.

That said, when using HyperTerminal, you may encounter some issues. Some of the most common HyperTerminal issues are:

  • HyperTerminal not opening
  • HyperTerminal does not show text
  • HyperTerminal does not show com port
  • HyperTerminal not sending commands
  • HyperTerminal not receiving data
  • HyperTerminal not responding
  • HyperTerminal not taking keyboard input

In this article, we take a look at a couple of troubleshooting tips to help you resolve the common HyperTerminal issues in Windows.

How do I fix the common HyperTerminal issues?

1. HyperTerminal is not opening

  1. Right-click on the Antivirus icon on your Taskbar and select Disable protection temporarily.
  2. Once disabled, try launching HyperTerminal.
  3. If the issue is resolved, open your Antivirus and make sure you add the program to the whitelist.

If you are running an Enterprise version of Windows, you may need to contact your IT administrator to disable the antivirus or add an exception.

2. HyperTerminal does not show text

  1. Open HyperTerminal.
  2. Click on File and select Properties.
    file properties
  3. Open the Settings tab.
  4. Click ASCII Setup.
  5. Select the Echo Typed Character Locally option and click OK twice.
    echo typed character hyperterminal issues

3. HyperTerminal not sending commands

  1. Create a new text file anywhere on your desktop.
  2. Open the newly created text file and write the ASCII command of your choice and save it.
  3. Next, open HyperTerminal.
  4. Name the HyperTerminal session and set the following:
    • BAUD rate 9600
    • Parity to ODD 
    • 8 data-bits
    • 1 stop-bit
    • No Flow Control (when the COM Port setup pops up).
  5. Next, go to File and select Properties ASCII Setup.
  6. In ASCII Setup, check the Echo Typed Characters Locally option.
  7. Go back to the main HyperTerminal window.
  8. In the HyperTerminal window, go to Transfer and select Send Text File.
  9. Select the text file you saved on desktop.
  10. You should see the command and the response in the interactive portion of HyperTerminal.

4. HyperTerminal not receiving data

  1. Make sure you have configured the flow control in HyperTerminal correctly.
  2. If the issue persists, run the tool in debug mode and check if the print functions are working correctly.

5. HyperTerminal not taking keyboard input

  1. HyperTerminal, by default, has disabled the Echo Typed Characters Locally feature.
  2. If HyperTerminal is not taking keyboard input, check if the feature is disabled.
  3. Click on File and select Properties.
    file properties
  4. Open the Settings tab.
  5. Click ASCII Setup.
  6. Check the Echo Typed Character Locally option and click OK.
    echo typed character hyperterminal issues

In this article, we have covered some of the common HyperTerminal issues and troubleshooting tips to fix the issues. Closely following each of the above-mentioned steps will surely help you solve your issue.

If you want to know how to install HyperTerminal on Windows 7, check our detailed

If you have any other issues related to HyperTerminal that are not listed here, let us know in the comments, and we’ll make sure to include them.

Microsoft Teams DND when presenting not working? Here’s why

Sometimes, when you are using Microsoft Teams presentation, a notification pops-up which may even include some personal message. This can be annoying if you are sharing your screen with your colleagues or clients.

By default, Microsoft Teams supports Do not disturb (DND) feature that allows the users to block notifications from appearing on their desktop and prevent any distraction. However, this feature has its shortcomings.

In this article, we show you how you can use the Do not disturb feature in Microsoft Teams and why should Microsoft Teams support the automatic DND feature provided by Skye and other software.

How do I enable do not disturb for Microsoft Teams?

1. Enable do not disturb in Microsoft Teams

Microsoft Teams DND

  1. Launch Microsoft Teams.
  2. Click on the user profile icon.
  3. Under the user name, go to Available.
  4. Select Do not disturb from the option.
  5. This will disable all the notifications from appearing on your Microsoft Teams or desktop screen.

Manage priority access

Microsoft Teams DND

  1. If you want to receive some notifications even when do not disturb option is enabled, you can add the user to priority access settings.
  2. Start Microsoft Teams.
  3. Click on the user profile icon and select Settings.
  4. In the Settings window, open the Privacy tab.
  5. Click on the Manage priority access button.
  6. Under the Add people section, search for the contact name using the phone number of the email address.
  7. You can add as many users you want to priority access.
  8. This will allow Microsoft Teams to show notifications from the selected people on the screen, even when in DND mode.

However, the feature requires the users to set Microsoft Teams status to Do Not Disturb manually each time the users want to work with presentations.


If your Microsoft Teams status is stuck on Out of Office, follow the steps from this handy guide to fix it easily.


2. Use Focus assist

Microsoft Teams DND

  1. Click on the Action Center icon in the taskbar.
  2. If it is collapsed, click on Expand.
  3. Click the Focus Assist option to enable it.
  4. When the Focus Assist option is enabled, Windows will stop any notifications from appearing on your screen. You can access all the blocked notifications from the action center.

Similar to the Do not disturb option in the Microsoft Teams, the Focus Assist option also requires you to enable and disable the option manually.

Why should Microsoft Teams support the automatic DND feature?

While some people may prefer manually enabling and disabling the DND feature in Microsoft Teams, some may only want to activate the DND feature during Teams presentation.

This makes sense because the user can miss out on important notifications if they forget to reset the DND status to available in Microsoft Teams.

This issue can be resolved if Microsoft offers Teams users an option to enable DND automatically during Teams presentation. The status will change to available once the presentation is closed.

Microsoft is reportedly working on the feature for Teams; however, there is no ETA on when it will be made available. That said, you can help to expedite the implementation by upvoting this uservoice in the user feedback forum.

The Do not disturb is a handy feature in Microsoft Teams. However, having the ability to enable and disable DND based on the actions automatically can make Teams more user-friendly.

If you have any other questions or suggestions, don’t hesitate to use the comments section below.

  1. Navigate to Call Options > go to Share Desktop
  2. Select which parts of your screen you want to share (which programs or windows)
  3. Click on the window or program you want to share to confirm your choice
  • Can you share multiple screens on Microsoft Teams?

Microsoft Teams allows users to utilize multiple screen configuration during conference video calls. However, the participants can only see the content on the active screen.

[wl_navigator]

How to Find the AppData Folder on Windows 10 and 11: Step-by-Step Guide

Here’s how to find the AppData folder on your Windows 11 and Windows 10 PC. Locating the AppData folder can be tricky because it’s hidden by default.

We’ll walk you through the exact steps to access it and recover it if it’s missing. Follow the steps below to identify and restore the AppData folder on your system quickly.

How to Find and Restore the Missing AppData Folder in Windows 10/11

1. Locate the Appdata/LocalLow folder

Another point to keep in mind is that this folder is hidden. So, if you are trying to access it normally, you will probably not see it in the system. Just to make sure the folders are indeed missing, follow the instructions below, and let’s see if you can find them:

  1. Go to Start > type %appdata% without the quotes, of course
    Appdata folder
  2. Select the folder that appears as the first result (it should take you to the Roaming folder).
    AppData folder location
  3. If it takes you to the following path: “C:Users[The user that you are logged in with]AppDataRoaming” then it means that your folders are still there but they are hidden.
  4. Click on the AppData in the Explorer path on the upper side of the screen and check if you have a LocalLow folder there as well.
  5. If it doesn’t take you to the path specified above, follow the instructions below.

If you want a clearer understanding of how this directory works, check out this detailed guide on what the AppData folder in Windows is and why it’s essential for your apps.

If storage is also a concern, see our guide on AppData folder too big for ways to safely reduce its size.

2. Recover the Appdata/LocalLow folder by using a restore point

  1. Go to Start > type Control Panel without the quotes.
  2. After the search is finished, click on the Control Panel icon.
  3. From the upper side in the Control Panel window, select the Search box > write Recovery.
    control panel
  4. Press the Enter button on the keyboard.
  5. Select the Open system restore feature.
  6. Now you need to follow the on-screen instructions and get your operating system back to a point in time when the folders were not missing, and you will have disappeared folders available.

3. Hide extensions in File Explorer

If you still can’t locate the Appdata/LocalLow folders, try changing your File Explorer Settings.
Disabling the options Hide extensions for known file type and Hide protected Operating System files may help you fix the problem.

Here are the steps to follow:

  1. Click on Start button > type File Explorer Options > double-click on the first result
  2. Select the View tab > scroll down and locate these two options:
    • Hide extensions for known file type
    • Hide protected Operating System files
  3. Remove the checkmark for both options > hit Apply > OK.
file explorer options

4. Create a new user account

  1. Go to Start > select Settings > Accounts > Family & other people > Add someone else to this PC.
    create new windows user account
  2. Enter a user name, password as well as password hint >  select Next.
  3. Follow the on-screen instructions to complete the process.
new windows 10 user account

5. Run SFC scan

  1. Go to Start > type cmd > right-click on Command Prompt > select Run as administrator
  2. Run the sfc /scannow command > hit Enter
    SFC scan
  3. Wait until the scanning process completes and then restart your computer.

Make sure that this problem is not caused by corrupted or missing system files. This is why we’ve run a System File Checker scan to quickly detect and fix such problems.

FAQ

Why is the AppData folder missing after a Windows 11 upgrade?

The AppData folder is hidden by default, so it may seem missing after an upgrade. Windows updates can reset folder visibility settings, making hidden folders like AppData invisible until you enable viewing hidden files.

Is it safe to delete files inside the AppData folder?

Generally, no. Deleting files inside AppData can cause applications to malfunction or lose settings. Only delete files if you know what you’re doing or if instructed by official support.

Can I move the AppData folder to another drive or location?

It’s not recommended to move the AppData folder because many applications rely on its default location. Moving it can cause apps to stop working correctly.

How do I backup the AppData folder before reinstalling Windows?

You can copy the entire AppData folder from C:\Users\[Your Username]\AppData to an external drive. After reinstalling, you can restore it to keep your application settings.

How can I clean up the AppData folder safely on Windows 11?

Cleaning the AppData folder can help free up disk space, but you need to avoid deleting important files that apps rely on. For a comprehensive guide on safely removing unnecessary files from the AppData folder on Windows 11, follow this detailed tutorial on cleaning the AppData folder in Windows 11.

Can I make a program available to all users on Windows 11, and how does AppData affect this?

Programs installed in user-specific AppData folders may only be available to that user. To ensure a program is accessible to all users on the PC, it needs to be installed in a system-wide location. Learn the proper steps to make a program available to all users in Windows 11 and understand how AppData impacts program availability.

So there you have it, 5 ways to bring back your Appdata/LocalLow folder in  Windows 10 in just a few minutes of your time. Also, if you encounter any particular trouble along the way, drop us a line in the comments below, and we will help you further.

Next, select the View tab and, in Advanced settings, select Show hidden files, folders, and drives and click OK.

Fix 0x80070043 error on Windows with these simple solutions

Windows users report spending quite a few hours from their precious time trying to fix the 0x80070043 error with no result. Typically, this is caused by corrupted Windows system files and slows down the computer or opens the gate for other security issues.

Are you experiencing the 0x80070043 error too? The lines below contain some advanced troubleshooting solutions you can use to correct this behavior you’re encountering.

What can I do when getting the 0x80070043 error on Windows?

1. Use third-party software for registry errors

The most effective and timely solution would be to use a specialized third-party tool that addresses Windows Registry errors and focuses on repairing corrupted files.

This type of program has advanced cleaning features that can also boost your PC’s speed and performance.

2. Enable the Network Startup Local policy

click Enabled
  1. Firstly, hold down the Windows Key and R keyboard shortcut.
  2. Once you’re inside the Run dialog box, type gpedit.msc and press Enter to start the Group Policy Object Editor.
  3. If you’re prompted by the UAC window, click Yes to grant administrative privileges.
  4. Up next, expand Local Computer Policy > Computer Configuration > Administrative Templates from the right-hand side.
  5. Click on System.
  6. Then, click on Logon from the list of available options.
  7. While inside the Logon folder, you need to right-click Always wait for the network at computer startup and logon.
  8. Click Properties after that.
  9. On the Settings tab, click Enabled, then confirm.
  10. Finally, restart your computer and wait for the next startup to complete.

Before any other procedure, we advise you to select the option that says Always wait for the network to start when you start your computer and connect to the local policy option. To do this, proceed as described above.

3. Fire up an SFC scan

fire up an SFC scan
  1. Press Windows key + R. The Run dialog box will open.
  2. Next, type cmd and press Ctrl + Shift + Enter to open up an elevated Command Prompt.
  3. Then, select the Run as administrator option.
  4. After you’re inside the elevated Command prompt, type the following command, and then press Enter:
    sfc /scannow
  5. When you complete the steps, close the elevated Command Prompt and restart your computer. Check if the issue is resolved at the next system startup.

Note: Even if this is generally a harmless command, create a temporary full backup before proceeding since you’ll be making some important system changes. You may use one of the best local data backup software tools of the moment in that regard.

The sfc /scannow command can scan all protected system files, and replace corrupted files with a cached copy. However, if getting the message Windows Resource Protection did not find any integrity violations, this means that you do not have any missing or corrupted system files.

Continue to the next step to keep on troubleshooting the 0x80070043 error.

4. Use the DISM command tool

DISM scan
  1. Open Start.
  2. Search for Command Prompt and right-click the top result.
  3. When you see the User Account Prompt, you need to click Yes to grant admin privileges to the CMD window.
  4. At the next startup sequence, follow the first steps again to open up another elevated Command Prompt.
  5. Then, type the following command to initiate a DISM scan:
    DISM /Online /Cleanup-Image /RestoreHealth
  6. While the command is running, you might see the process stuck at 20 percent or higher. After a few minutes, the process will complete successfully.
  7. You may then restart your PC.

If it detects any problems, the Deployment Image Servicing and Management tool will connect to the Windows Update servers to download and replace the damaged files in the local image for Windows 10.

5. Clear the temp folder while in Safe Mode

temporary files
  1. Power-cycle your computer.
  2. While getting to the initial login screen, click on the Power icon next.
  3. Then, press and hold the Shift key while clicking on Restart.
  4. During the next startup sequence, your computer will automatically restart inside the Troubleshoot menu. That’s your chance to click on Troubleshoot.
  5. Once you’re inside the Advanced Options menu, click on Startup Settings.
  6. Then, hit F5 to boot up in Safe Mode with Networking.
  7. Once the next startup sequence is finalized, you will be prompted by a slightly different login screen. Enter your Windows password to complete the startup procedure.
  8. Then, enter the Win + R keyboard shortcut.
  9. Type %temp% and press Enter to open up the Temp folder.
  10. You may now select everything. Right-click on an item and choose Delete from the newly appeared context menu to delete every temporary file.
  11. Finally, restart your computer and see if the issue is resolved at the next computer startup.

If you’re still bothered by the 0x80070043 error, clearing the temp folder while in Safe Mode can be a great troubleshooting step too. Files whose extension is .tmp or .temp are created as a temporary work area by an application.

Typically, these files won’t cause any issues, but they can grow rapidly and you can never know when things get messy.

If you need help applying the above steps, don’t hesitate to leave a comment in the comments area below. That’s what we are here for.

Microsoft Teams cannot add guest? Try these solutions

Microsoft Teams allows the admins to add guests to a team in the Teams client or from the admin center. However, some users have reported “Microsoft Teams cannot add guest” issue. This is also discussed in the Microsoft Community forum:

I am, already busy on this issue for about few days and tried nearly anything to fix this, but no luck.
In Teams still that msg appears “we didn’t find any matches” if I enter an ‘outside organisation’ email address.

If you are also troubled by this problem, here are a couple of troubleshooting steps to resolve it.

What I can do if I am unable to add guest users to Microsoft Teams?

1. Checklist to add a guest to Microsoft Teams

Microsoft Teams cannot add guest

  1. Before trying any troubleshooting steps, make sure you have followed all the steps in the checklist below.
  2. Make sure the guest access option at the Team org-wide level is turned on.
  3. Make sure you have Configured Azure AD business-to-business settings.
  4. Then go to Office 365 groups and configure it for guest access.
  5. Also, configure Office 365 sharing.
  6. Make sure you have verified sharing settings in SharePoint.
  7. Make sure you enter the full email address of the guest user while granting access.

2. Grant access using PowerShell command

Microsoft Teams cannot add guest

  1. If the issue exists, you can add guest users to Microsoft Teams using PowerShell command. Here is how to do it.
  2. Open PowerShell as admin.
  3. Login/Connect to Office 365 using PowerShell.
  4. Once you are connected to Office 365 admin, enter the following command:
    Set-MsolCompanySettings -UsersPermissionToReadOtherUsersEnabled $True
  5. Now try to add the guest user and check if the issue is resolved.

Windows PowerShell has stopped working? Follow the steps from this handy guide to solve the problem with ease.


3. Check for latency issues

Microsoft Teams cannot add guest

  1. At times, Microsoft Teams may face temporary latency for the guest changes.
  2. Wait for a few minutes and then try to add the guest user again.

4. Update Microsoft Teams

Microsoft Teams cannot add guest

  1. If the issue persists, try updating Microsoft Teams client.
  2. Launch the Microsoft Teams app and click the profile picture.
  3. Click on Check for updates.

Microsoft Teams will download and install any pending updates. The desktop client automatically checks for updates each time your login. However, you can manually check for any pending updates as well.

If you have any syncing problems in Microsoft Teams, take a look at this dedicated article and solve them easily.

Conclusion

Microsoft Teams cannot add guest issues occurs due to temporary latency problem, and most of the time can be solved by entering a PowerShell command. Do let us know which step helped you fix the problem in the comments.

Also, leave there any other questions or suggestions that you may have and we’ll be sure to check them out.

  1. Go to your Microsoft Teams admin center
  2. Navigate to your organization’s settings > go to Guest access
  3. Turn on the option Allow guest access in Microsoft Teams
  4. Tweak guest access capabilities in terms of calls, meetings and messaging.
  • What can Microsoft Teams guest users do?

Microsoft Teams guests can access existing team channels and chats and view files. Teams administrators can control what features guests can access as well as the areas where they don’t have access.

  • What limitations exist for Microsoft Teams guests?

By default, Microsoft Teams guests don’t have access to the following areas and information: the list of persons outside of Teams, information on the calendar and meetings, the organization chart, PSTN and OneDrive for Business. Guest cannot create teams, browser for a team or upload files in private chats.

[wl_navigator]

HyperTerminal for Windows 7: How to Download and Install it

The original HyperTerminal was a popular terminal emulation software for Windows. It helps to connect one computer to another remote system. To use the HyperTerminal, the user requires a modem, Ethernet connection, or a null-modem cable.

Microsoft HyperTerminal is no longer available for Windows 7/8/10. However, you can still install it using a workaround. That said, there are many excellent and modern alternatives to the software that you can use.

If you are new to HyperTerminal, this is the article you need. In this article, we show you how to install HyperTerminal on a Windows 7 PC. This article also covers a popular HyperTerminal alternative and the setup process.

How do I install HyperTerminal on Windows 7?

1. Move HyperTerminal from XP

  1. On your XP computer, navigate to the following location: C:/Program Files/Windows NT
  2. Copy the hypertrm.exe file to a flash drive.
  3. Next, navigate to the following location: C:/Windows/System32
  4. Copy the hypertrm.dll file to your flash drive.
  5. Move both files to any directory on your PC, and you should be able to run HyperTerminal.

2. Install HyperTerminal Private Edition

 2.1 Download and install HyperTerminal

  1. Download the HyperTerminal Private Edition installer from the official website.
  2. Double-click on the installer to initialize the installation.
  3. If you are using Windows 7 or Vista, click Yes when the User Account Control prompts you to take action.
  4. Click Next to proceed.
  5. You may have to agree to the terms of the license agreement.
  6. Click Next to proceed.
    next accept
  7. Next, if you want to change the default installation folder, you can specify the location.
  8. Click Next to proceed with the installation.
  9. When successfully installed, click on Finish.

2.2 Register HyperTerminal Private Edition copy

  1. Launch HyperTerminal client.
    launch
  2. Click Yes when the trial box dialog appears.
  3. If you haven’t purchased the license yet, you can do it now.
  4. You will receive the serial number in the email. Enter the license in the registration box and click OK.

If you get an Unable to write to file error during the registration, make sure you run the program with administrator rights. To do this, right-click on the HyperTerminal program and select Run as Administrator.

The HyperTerminal client comes with a free trial that you can use. However, for prolonged use, you must purchase the license.

2.3 Setup a modem connection

  1. Once registered, select your country and enter your area code.
  2. Enter a unique name for your connection and click OK.
    connection name
  3. Next, enter the area code and phone of the system you are connecting to, and click OK.
    • If you want to manually configure the setup, click on Modify and then click on Configure for connection configuration or settings for the emulator setting.
  4. Click the Dial button to connect.
  5. To save the connection profile, click on File and select Save.

2.4 Troubleshoot modem connection

After setting up the connection, you may encounter some issues. Here are the most common connection issues and how to resolve them:

  • No answer
    • Check the dialing properties and make sure the phone number is correct. If not, try lowering port speeds and dialing other settings.
  • No dial tone
    • Make sure the modem is plugged in and receiving power.
  • Asking for Host Address instead of phone number
    • This error occurs if the computer fails to recognize the modem or dial-up connection. Try restarting the computer and checking if that resolves the issue.
  • Data appearing in the wrong section
    • Make sure you are using the correct terminal emulator for the system you are connecting.
    • You can check the setting by going to File >Properties > Settings.

Installing HyperTerminal in Windows 7 is a straightforward process. By following the steps in this article, you can learn how to install the software as well as set it up for the first time.

Similarly, if you are facing issues on HyperTerminal, we have a guide to help you fix the common problems users encounter.

If you know of another simple way of installing HyperTerminal on Windows 7, leave us a message in the comments section below.

Microsoft ask developers to not break the Internet with Xbox game updates

The ongoing coronavirus outbreak is starting to take its toll on the Internet, with Netflix, YouTube, Amazon, and many other tech giants being forced to reduce their bandwidth usage. Microsoft is being affected too, with the company announcing recently that it was adding some Office 365 service restrictions as usage soars.

Microsoft’s Xbox division is also willing to help during these challenging times. On March 15, Xbox head Phil Spencer tweeted that usage is up on almost everything, but Microsoft is well aware that huge game downloads could quickly break the Internet. According to an internal email seen by the New York Times, the software giant has recently asked game companies to not release big game updates during peak hours, when everyone else could use more bandwidth for critical activities.

Microsoft’s Xbox gaming business recently asked large gaming companies to release online updates of their games during off-peak hours while it helped focus on the critical internet needs of people involved in the coronavirus crisis, according to an Xbox email reviewed by The New York Times. Video game updates can require great amounts of bandwidth to download.

Xbox asked the companies to release updates in a four-hour overnight window in North America, and only from Monday through Thursday.

“Microsoft is actively monitoring performance and usage trends to ensure we’re optimizing service for our customers worldwide, and accommodating new growth and demand,” the company said. “At the same time, these are unprecedented times, and we’re also taking proactive steps to plan for these high-usage periods.”

During this console generation, we’ve seen AAA games like Gears of War 4 of Red Dead Redemption 2 reach a massive 100GB size, while service games like Fortnite or Call of Duty get new patches every two weeks or so. Whether you’re a gamer and remote worker, we’re probably all starting to realize that the Internet is just as essential as water at electricity, and any disruption of service could have devastating consequences. If you have any pending updates on your console, it may be a good thing to space them out a little bit, Internet users across the world will thank you.

Microsoft releases Power Platform solution for healthcare emergency response

With Covid-19 still impacting businesses globally, Microsoft has taken another step to help hospitals and healthcare providers to better manage communications across their organizations.  Today, Microsoft released a new Emergency Response Solution built using their Power Platform that allows any healthcare provider to download and track their scarce resources during an emergency, including an extended free 6-month trial for any healthcare, government, non-profit or education customer responding to Covid-19.

The new Emergency Response Solution was driven by Microsoft’s experiences working with Seattle-based healthcare organizations who needed the ability for their front-line works to track and gain visibility over their resources including beds, and supplies including ventilators and masks with nothing more than a mobile phone.  With these new solutions, organizations and hospitals have immediate access to a Decision Support Dashboard that displays aggregate information across their entire network and helps decisions on where and how their supplies should be distributed.

Microsoft indicates that this is just version one, and they are already working with hospitals to implement new improvements.


Xbox One error 0x87e107d1: Here’s how to fix it

Worried about the error 0x87e107d1 on your Xbox One? Some affected users are seeing this error message when they try to download content to their Xbox One console, especially with one game only.

The inability to enjoy a particular game doesn’t sound so frightening. However, things could turn into something a lot more serious as other users are reporting that the issue is spreading and affects every game that they purchased digitally.

That’s why it’s important to resolve it. Assuming that’s also your goal, let’s take a closer look at some effective solutions that may help you get back to a flawless Xbox One experience.

How can I fix Xbox One error 0x87e107d1?

1. Try again to download the content

Xbox One content

  1. From Home, enter into My games & apps > See all > Queue.
  2. Up next, highlight the game or app you’re trying to download.
  3. If the status shown is Queued or Paused, select the game or app.
  4. Then, press the Menu button.
  5. Finally, select Resume installation.

2. Physically power cycle your Xbox One

power cycle console

  1. Turn off your console by holding the Xbox button on the front for 10 seconds. The console will turn off.
  2. Remove any headsets, wired controllers, or other accessories from the console.
  3. Turn it back on by pressing the Xbox button.

It’s that simple to power cycle your console. This helps to smooth out the performance by clearing out the cache from the Xbox and removing error codes such as 0x87e107d1.

Note that you may also restart the console from the guide. You just need to press the Xbox button to open it. Select System > Settings > General > Power mode & startup, then hit Restart now. A confirmation message will appear.

Confirm your intention to restart by selecting Yes. Your Xbox One will turn off and then turn back on.


3. Reset your console

how to reset console

  1. Sign in. Press the Xbox button on your controller to open up the guide menu.
  2. Navigate to the System Menu and select Settings.
  3. Select System, followed by Console info.
  4. While here, access the Reset console button.
  5. You may choose to either Reset and remove everything or Reset and keep my games & apps.
  6. Select one of these options and wait patiently until the operation is finished.
  7. Once it is, your console will restart automatically.

Performing a soft reset could be the best solution when all other procedures already failed. However, do note that even if you keep your games and apps, all of your personal data will still be wiped from the system.

That’s why you need to sync up with Xbox Live or export your settings manually prior to the procedure if you want to keep them all safe. If you’re still seeing the error 0x87e107d1 on your Xbox One, move down to the final method below.


Can’t open Xbox One guide? Just check out this guide and solve the issue quickly.


4. Change Network settings to Offline Mode

it's time to Go Offline

  1. Sign in. Press the Xbox button to get to the guide overlay.
  2. Enter into Settings > System > Settings > Network.
  3. Access the go Offline section next.
  4. After you’ve managed to switch your console’s network mode to Offline, go back to the sign-in screen.
  5. It’s time to log in with your account.
  6. Launch the same game that was previously triggering the 0x87e107d1 error.
  7. To go back online, return to the Network Settings menu, into the Go online section.
  8. You may now re-launch the game and see if the issue has been resolved.

As a last resort, remember that you may use your Xbox One without being prompted to connect to Xbox Live. Thus, go offline and note that you’re free to play games, provided you’ve set this as your home Xbox in the past.

Other users also reported success while deleting their profile from the Xbox and re-downloading it again. What about you; have the above solutions proved to be helpful? If so, let us know in the comments section below.

[wl_navigator]

Windows 10 November 2019 Update reaches 28.2% usage share in latest AdDuplex survey

AdDuplex released its monthly report for March 2020, and the company’s latest data shows that the Windows 10 November update (or version 1909) is now close to the 30% percent mark. To no surprise, nothing has changed much since AdDuplex’s last report. Interestingly, the November 2029 update is now running on 28.2 % PCs. Moreover, the usage share of the May 2019 Update (version 1903) has dropped from 52.6% to 50.7% in a month.

AdDuplex Report March 2020


As usual, we remind you that the survey is based on approximately 100,000 Windows PCs running AdDuplex ads, so it’s possible that the actual statistics could be slightly different. Microsoft recently announced that 1 billion devices were running Windows 10, but unfortunately, the company doesn’t go into details about Windows 10 versions.

Microsoft is all set to release the next feature update (Windows 10 version 2004), probably in April or May this year. The update is currently accessible to Slow Ring insiders, and it’s likely hitting the Release Preview Ring soon.

What’s your take on the rapid increase in the Windows 10 version 1909 market share? Let us know in the comments section below.

Here’s how to get alerts when someone changes your files in SharePoint Online

When you’re sharing files with coworkers as part of your daily routine, you might want to stay on top of who is making changes to your files. This can be especially important in businesses where remote collaboration is key to day-to-day operations.

Luckily, if your company is subscribed to Office 365 and uses SharePoint to store files, there is an easy way to do this. To stay updated when your SharePoint documents or items on your site change, you can create alerts. In this guide, we’ll take a look at how you can do that.

Some notes

Before getting started, there are some important notes we want to mention. First off, you might see different options whenever you set up an alert. If you’re a more advanced user, you can also skip out on the manual work and automate your alerts with Power Automate with the SharePoint connector. There are also ways to see your file activity in a document library without creating alerts. With this method, you can see the changes that were made by just right-clicking on the file or folder,  select the details pane, and scanning the activity section.

How to get started

To get started with alerts in SharePoint Online, you’ll want to visit the file, link, or folder first. You can then tap the ellipses menu next to it, and choose Alert Me on the bottom. You’ll then get a new menu on your screen.

If you’re setting up an alert for a folder or library, they’ll be various options. For instance, you can set a custom Alert Title on the top, or change your delivery method from email to SMS. You also can change your alert type. You’ll be able to get alerts for the following: only when new items are added when existing items are modified, or when items are deleted.

You also can get a specific alert sent to you about if anything in the folder changes based on specific criteria. These include: if someone else changes a document, if someone else changes a document created by you, or if someone else changes a document last modified by you. There are even options to send out alerts, either immediately, or a daily or weekly summary.

How to cancel your alerts

If you end up changing your mind about alerts, you easily can cancel them. To view your alerts, you can go to any folder or library in SharePoint. Then, you can click the ellipsis menu in the top right corner of the screen and choose Manage my alerts. You can then select the alert you want to delete and select Delete Selected Alerts. You can then click OK to delete it.

Just one way you can collaborate with Office 365

SharePoint is just one way you can stay on top of your files and collaborate with coworkers. You also can collaborate in Word and Excel, use the new Office app on iOS and Android, as well as try out OneNote 2016 with Outlook. Do you have ant tips for collaboration? Let us know in the comments below, and check our Office 365 news hub for more features and stories.


Tom Clancy’s Ghost Recon Breakpoint, Tekken 7, and Risk of Rain 2 are free to play with Xbox Live Gold this weekend

Ahead of this week’s official Xbox Free Play Days announcement by Microsoft, Xbox Live Gold and Xbox Game Pass subscribers can play another trio of Xbox One games for free this weekend. As noted in a post on TrueAchievements, Tom Clancy’s Ghost Recon Breakpoint, Tekken 7, and Risk of Rain 2 will be the latest installment of Xbox’s Free Play Days.

For the uninitiated, Xbox’s Free Play Days are offered every weekend to allow gamers to get a chance to play three Xbox One games for free for the weekend. If you decide that you like the game and want to keep playing it past the free weekend period, you can buy any of the three Xbox One games at a reduced price through the Microsoft Store, Xbox.com, or through your Xbox One console. One thing you need to remember is that every weekend, Free Play Days is only offered to Xbox Live Gold and Xbox Game Pass subscribers.

Here’s a look at this week’s Free Play Days game discounts for Xbox One:

Another thing to remember about Free Play Days is that if you are an Xbox Game Pass subscriber, the Xbox One games that are offered for “free” that weekend may already be available as part of your Xbox Game Pass subscription. For example, this weekend, Tekken 7 is already available for free as part of an Xbox Game Pass subscription, so subscribers do not need to buy the game.

If you are not already an Xbox Live Gold or Xbox Game Pass subscriber, today is the best time to sign up!

Xbox Game Pass Core
Xbox Game Pass Core
Price:
$9.99


Xbox Game Pass Ultimate

What are you going to play this weekend? Let us know in the comments.

Hacker leaks source code for Xbox Series X’s AMD GPU

A hacker who claims to have stolen the source code for a couple of high-profile AMD GPUs is currently causing some trouble for the chipmaker. According to a report from TorrentFreak (via Engadget), the hacker claims to have test files for AMD’s Navi 10 and upcoming Navi 21 GPUs, as well as the “Arden” GPU that will power Microsoft’s upcoming Xbox Series X console.

AMD has already taken down some of the leaked data on GitHub, but the hacker is now asking for $100 million for not leaking the rest of the files online. In a statement published yesterday, AMD confirmed to have been contacted by the hacker back in December 2019, and after taking care of the previous leaks, the company apparently isn’t too worried about the rest of its stolen data that’s still in the hands of the hacker.

“While we are aware the perpetrator has additional files that have not been made public, we believe the stolen graphics IP is not core to the competitiveness or security of our graphics products. We are not aware of the perpetrator possessing any other AMD IP. We are working closely with law enforcement officials and other experts as a part of an ongoing criminal investigation,” the company said yesterday.

How to Fix a Corrupted Recycle Bin in Windows 10/11

Do you have problems in using your Windows 10 Recycle Bin? If you used to have a smooth Windows 10 platform that worked without problems, but now, when trying to access Recycle Bin, you receive only the “corrupted” error, apply the guidelines available below to troubleshoot your Windows system.

So, if you want to fix the Windows 10 corrupted Recycle Bin error The Recycle Bin is corrupted. Do you want to empty the Recycle Bin for this drive? this step-by-step guide will be more than useful for you.

Now, this problem might happen due to various reasons, such as unexpected force close errors, DLL issues (learn how to fix any Windows 10 DLL error by using a dedicated tutorial), incompatibility problems, and more.

Anyway, the result is that you can’t access the Recycle Bin to remove your files or restore the same in case you have accidentally erased some files from your device.

As you might know, each of your Windows drive has a dedicated system folder dubbed $Recycle.bin. Of course, this folder is hidden, so you can’t see or access the same unless you check the “unhide” option under Folder Options.

Now, when the Recycle Bin gets corrupted the $Recycle.bin also gets corrupted, and in order to resolve your problem, you must fix $Recycle.bin. Doing the same is easy, as you only have to run a command in cmd window.

Anyway, check the steps below for the proper troubleshooting solution.

How to fix Windows 10 Corrupted Recycle Bin?

1. Clean Recycle Bin in Command Prompt

  1. Go to the Start Screen right click on your Start button and select “run cmd as administrator” like in the image from below.cmd
  2. Then in the cmd window type “rd /s /q C:$Recycle.bin” and press enter.
  3. Up next reboot your computer and enjoy your new and reset Recycle Bin.

2. Use the System File Checker tool

In addition, if that isn’t working for you, open the cmd window once more type sfc / scannow, and press Enter.

sfc scannow

The System File Checker feature will be launched on your device so just wait while your Windows 10 or Windows 8.1 system is being fixed – on that matter, learn how to fix chkdsk stuck on Windows. Moreover, there are methods of scanning and repairing automatically corrupt files, such as third-party repair tools.

3. Delete Recycle Bin in Safe Mode

  1. Hold down the shift key and click the on-screen power button
  2. Select the restart option while holding the shift key
  3. Select Troubleshoot > Advanced options > Startup Settings > hit Restartsafe-mode-windows-10
  4. Wait until Windows 10 reboots, and select Safe Mode.
  5. Now, try to repair your corrupted Recycle Bin again using the steps available above.

Sometimes, you may encounter an Access denied error when you want to perform the abovementioned actions on Windows 10. So, if your Recycle Bin corrupted Windows 10 and access is denied, try enabling Safe Mode.

4. Scan your computer for malware

Malware may cause various issues on your computer, including Recycle Bin corruption issues. Perform a full system scan in order to detect any malware running on your computer.

You can use Windows’ built-in antivirus, Windows Defender, or third-party antivirus solutions.

5. Update Windows

Quite a few Windows 10 users confirmed that installing the latest system and driver updates solved the problem. So, go to Settings > Update & Security > click on the ‘Check for updates’ button and install all the available updates.

update windows 10

Good job! You have successfully fixed the corrupted Recycle Bin on your Windows 10 device. That was all for today, but stay close as we will update with similar and useful Windows tips and tricks.

Fixing the corrupted Recycle Bin can also prevent issues like the restored files missing issue; read this guide.

Also, if you’ve got additional tips and suggestions on how to fix corrupted Recycle Bin issues, you can list them in the comments below.

FIX: Slack doesn’t have enough storage

If you’re using the free version of Slack, you might run into a common problem: the storage used for your messages will run out.

Basically, there won’t be enough storage at a certain point to load everything in the app. For instance, you’ll have space for only 5 GB of files.

Here’s something you should know: If you’re looking for ways to expand your storage by changing settings or other characteristics of the app, you won’t be able to do that.

How can I get more storage on Slack?

1. Upgrade your account

slack-not-enough-storage

The first and easiest method to get more storage space for your Slack account is to upgrade to the premium version of the service. Here are the steps to do it:

  1. Go to Slack’s website
  2. Log into your account
  3. Click Upgrade Now
  4. Select a plan that fits your needs
  5. Enter the required information in the form
  6. Click Review Order
  7. Click Purchase to confirm your order

2. Sign up for a premium account

The second way to have a bigger storage space is to choose a premium plan from the very start.

This is almost the same as upgrading, the difference being that you choose a paid package when you sign up for Slack.

  1. Go to Slack’s website
  2. Log into your account
  3. Click on Get Started on one of the premium options
  4. Select a plan that fits your needs
  5. Enter the required information in the form
  6. Click Review Order
  7. Click Purchase to confirm your order

In terms of the extra space you receive, there is no difference between how much you get from subscribing to a premium program from the start or somewhere along the way.

However, if you plan on saving money and you know you won’t need too much space, you might as well go for the free version, and use the next method.


Not a big fan of Slack? Check out our list with some amazing alternatives.


3. Free up some of the space you already used

The great thing is that if you really don’t need the data saved on Slack, you can always delete the excess to save up some more space. Keep in mind that every document, video or picture sent over Slack counts towards this limit.

To delete items that you have uploaded, simply follow these steps:

  1. Click the  More Items icon in the top right
  2. Select Your Files
  3. Locate and choose the file you’d like to delete
  4. Click the three dots icon and select Delete File from Slack
  5. Click Yes, delete this file

If you plan on deleting someone else’s files, simply choose All files instead of Your Files in step 2.

By following any of the steps mentioned above, you should be able to gain more storage space over Slack.

If you have any more questions or suggestions, leave them in the comments section below and we’ll be sure to check them out.

[wl_navigator]

Microsoft acknowledges issues Windows insider build 19592 didn’t fix   

Windows Insider Preview Build 19592 introduced a bunch of features that will delight insiders in the Fast ring. A key highlight of the upgrade is the tablet posture tweaks that Microsoft is currently testing.

But the company acknowledged a broad array of issues that build 19592 did not resolve. These range from BattlEye/Windows 10 update incompatibility to hardware driver complications.

Persistent incompatibility issues

Insiders who use BattlEye repot this problem from time to time. Microsoft is admitting that some of them are unable to update to certain insider builds due to the incompatibility issue.

What complicates matters is the fact that a third-party software maker is involved. As such, the flaw is not entirely Microsoft’s to resolve.

The company said it put a compatibility hold on these machines, though. So, if you are using the anti-cheating app, you are current unable to update your PC with affected Windows 10 insider builds.

To safeguard Insiders who might have these versions installed on their PC, we have applied a compatibility hold on these devices from being offered affected builds of Windows Insider Preview.

Alternatively, you can upgrade if you uninstall BattlEye while counting on Microsoft and its partner to offer a lasting solution soon.

Driver incompatibility

According to reports, insiders using certain virtual machines receive compatibility warnings when trying to upgrade to a newer preview build.

Microsoft said it already started investigating the matter. Affected users can only hope that the company gets to the bottom of the issue before a compatibility block becomes the only option.

Screen reader problems

Some Narrator and NVDA users have reported difficulty reading specific web content on the new Microsoft Edge browser. Developers of these apps are liaising with the Windows 10 maker to solve the glitch.

It is in the best interests of Microsoft to fix that problem to expand the accessibility and usability of its Chromium-based browser.

Users of these screen-reading apps who are still on the old version of Edge are not experiencing the web navigation issues, though.

Bugcheck

Some insiders get the Green Screen of Death (GSoD) error when they reboot their system to install this update.

Stalling Windows 10 updates

Other insiders complain about the inability of their PCs to complete an upgrade.

Documents section icon

The Documents icon under Privacy does not display well for some users.

Screenshot shortcut

You cannot take a screenshot by pressing Win + PrtScn. The command does not save the shot in the right directory. WIN + Shift + S works, though.

Sticky Notes

There are reports of Sticky Notes windows failing to move.


Windows 10 Telegram Desktop app updates with new picture-in-picture feature and more

The Telegram Desktop app for Windows devices updated to Version 1.9.21 this week. This updated added several notable features including picture-in-picture mode for multitasking, video playback speed controls, media rotation options, and a new way to mark images as read.

This update also improves the in-app spellchecking for those Telegram users on Linux or still using Windows 7.

Here’s the full release notes:

  • Switch to Picture-in-Picture mode to watch your video in a small window while doing something else.
  • Change playback speed in the ‘…’ menu when watching videos.
  • Rotate photos and videos in the media viewer using the rotate button in the bottom right corner.
  • Mark new messages as read while scrolling down through them.
  • Improved spellchecking on Windows 7 and Linux.

Telegram is a free messaging app with a strong focus on privacy and security. It’s incredibly popular with cryptocurrency and tech enthusiasts but is quickly growing in popularity in other circles as well.

Do you use Telegram? Let us know why or why not in the comments below and then follow us on Pinterest for more Windows app content.

Telegram Desktop
Telegram Desktop
Price:
Free

Fix: Failed to Unlock with This Recovery Key BitLocker Error

BitLocker happens to be one of the best security features of Windows 10. It encrypts the data on your disk, thereby preventing others from eavesdropping on it.

That said, all the positives can quickly turn against you if you happen to lose the BitLocker key, or if something of the sort goes wrong.

But fret not, for here are some ways an order can be enforced in the chaos in the face of the usual Failed to unlock with this recovery key error message, the one most common message to have with BitLocker-related issues. And it is easy too.

How can I fix the Failed to unlock with this recovery key error?

  1. Under Active Directory Users and Computers, search for the container where your computer is located.
  2. Click on the container.
  3. Right-click on the computer, and in the menu that appears, click on ‘Properties’ to launch the Properties dialog box.
  4. Here, click on the BitLocker Recovery tab. This will let you see the BitLocker recovery passwords applicable to the specific computer.

The next step for you to do will be to copy the recovery passwords for the computer:

  1. Repeat steps 1 – 4 as described above to reach the section where the BitLocker recovery passwords are stored, that is the BitLocker Recovery tab within the Properties dialog box.
  2. In the BitLocker Recovery tab right-click on the BitLocker recovery password that you want to copy. From the menu that appears, click on Copy Details.
  3. Paste the copied text to a destination location (using either the key combo CTRL+V or right-click -> Paste. The destination again can be any text file, spreadsheet, and such.

So there you have it, the all-important recovery key to unlock your PC.

Access the computer as an administrator

However, just in case the above does not help sort your issue, like when the key fails to unlock the PC, here is another way to crack the situation. You need to have access to the computer as an administrator to perform the following. Here are the steps:

  1. Launch Control Panel. (You can simply ask Cortana to do that for you if you are not sure how to.)
  2. Click on System and Security.
  3. Click on BitLocker Drive Encryption. This will launch the BitLocker configuration panel.
  4. Select the drive that you want the BitLocker Drive Encryption to be turned off for and click on the Turn Off BitLocker tab.
  5. There is going to be a message flashed on the display informing you that the drive will be decrypted, and that it is going to take some time. Click on Decrypt the drive to start the decryption process. BitLocker will be turned off for the particular drive.

If you have lost the admin privileges

Things get messy once you have lost admin access to the PC. That said, there is still a way out. This would require access to another instance of Windows though.

  1. Start the PC but be prepared to press on Shift + F10 when the setup screen appears. A command line shows up.
  2. Here find out how the system drive has been set up, or which drive letter is assigned to a specific drive. You can do so using the following command: DISKPART> list volume
  3. Once you are sure which drive you have been locked out of (or wish to decrypt), use the following manage-bde command to decrypt the drive:
manage-bde -unlock C: -RecoveryPassword BITLOCKER-RECOVERY-KEY

Here ‘C’ refers to the system drive letter.

In case you want to keep your BitLocker key handy, the easiest way is to learn all about getting back the BitLocker Recovery Key through CMD; read this guide to learn more.

However, in the unfortunate scenario of the above steps not working as well, you will be left with no option but to reset your PC or do a backup.

Windows 10 Fast ring insiders to test new tablet experiences

Now that Windows 10 Preview Build 19592 is out, Fast ring insiders have an opportunity to test the new tablet experiences it introduces.

The build comes with numerous enhancements and fixes. There are multiple issues it does not resolve, however.

New tablet experiences

Select Windows insiders in the Fast ring can now test tablet/laptop postures for PCs that offer the best of the two form factors.

Microsoft has tried to explore the idea of tablet experiences for 2-in-1 convertible computers before. The first time, it released that feature for insider testing in 20H1 Build 18970.

The concept is back to beta now, the Windows Insider team announced earlier today. However, the feature has a couple of improvements that insiders have not tested before.

This feature was previously rolled out as an experiment to Windows Insiders in 20H1 Build 18970 and ended in Build 19013. After some refinement, we’re reintroducing it to Windows Insiders in this build and plan to deliver this experience to customers in a future Windows 10 update.

Just in case you have got used to the existing Windows 10 Tablet Mode, do not worry. Microsoft is not taking away your experience with this update.

Instead, it is introducing a new way to seamlessly transition to the tablet posture within the regular desktop experience.

New tablet UI tweaks

You will notice a couple of minor changes to the user interface while exploring the new tablet mode. For starters, the update increases the spacing between Taskbar icons.

It also collapses the search feature on the left bottom corner of the screen into icon-only mode. This modification creates more space on the Taskbar, letting you add more app shortcuts.

Tapping the collapsed Search box should open it up for use, though. Additionally, you can now quickly access the touch keyboard by tapping a text field.

There is also some extra padding coming to File Explorer elements to enhance your touch experience with the UI.

Microsoft wants you to explore much more than the new tablet experiences that are available by default. That is why it is giving you the ability to customize the redesigned Tablet UI. You can do that by going to Settings>System.

Not all insiders in the Fast ring get to test the improved tablet posture in the meantime. The updates first go to beta testers that have never removed their keyboard before.

You can also participate in the experiment if you have applied the Don’t ask me and don’t switch tablet mode setting.

How to utilize emoji reactions in Slack

The Slack instant-messaging app has a plethora of emoji for you to add to your own messages. You can also add emoji reactions to other user messages. For example, you could add a laughing emoji reaction to a hilarious joke within a channel.

Emoji reactions provide a quick and simple alternative to entering text all the time, and it’s easy to utilize them in Slack.

How can I use emoji reactions in Slack?

1. Add an emoji reaction

  1. To add an emoji reaction to somebody’s message, hover the cursor over it. Then the bar shown below will appear in Slack.
    Add reaction button slack how to see who read, reacted and liked your messages
  2. Click the Add reaction button on the menu bar to open the emoji panel below.Slack's emoji panel slack how to see who read, reacted and liked your messages
  3. Select an emoji there to add it to the message. The emoji reaction is included within a blue circle.
    An emoji reaction slack how to see who read, reacted and liked your messages
  4. Note that you can also add multiple emoji reactions to alternative paragraphs within the same message. Hover the cursor over another paragraph to add an emoji reaction to it.

2. Remove an emoji reaction

To remove an emoji reaction, click the emoji. That’s all you need to do to erase it. You can’t delete emoji reactions added by other members.


3. Check who attached an emoji reaction

  1. You can check who attached an emoji reaction to your own message by hovering the cursor over it. A black label will then tell you who added the emoji reaction to the message as shown directly below.An emoji reaction label slack how to see who read, reacted and liked your messages
  2. To open a full list of recent emoji reactions attached to your messages, click the Show Activity button in the shot directly below.The Show Activity button slack how to see who read, reacted and liked your messages
  3. To jump to the channel that includes the emoji reaction within the Activity sidebar, move the cursor to the top right of the activity box for it and click the Jump button.The Jump button slack how to see who read, reacted and liked your messagesf

Overall, emoji reactions are both a fun and handy Slack feature. They can sometimes provide an alternative to entering text into Slack. You can also decorate your own messages with emoji reactions.

[wl_navigator]

Fix Error Code 0xc00000e9 in Windows 10/11 in a few easy steps

Have you gotten the error code 0xc00000e9 in Windows 10? This error usually appears from a hardware malfunction and most of the time is because of a communication error between the hard drive and the system.

You will see by reading the lines below how you could fix this and also how you managed to get this error in the first place.

Because there could be a software issue as well as a hard drive failure in Windows 10 we will see below what we could do for bought of them and fix our Windows operating system.

Also as a reminder follow the tutorial posted below in the order presented to lower your troubleshooting time and get back to your daily activity.

How can I fix Error Code 0xc00000e9 in Windows 10?

1. Check peripheral connections

USB ports
  1. Shut down your Windows 10 PC.
  2. After the shutdown process is completed take a look at the USB ports into your device and disconnect all USB cables except the one for your keyboard and the one for the mouse.
  3. Start your device as you normally do.
  4. Check and see if you still get the error code 0xc00000e9.
  5. If the error code does not appear anymore then you will need to plug in one device at a time respecting the same procedure above.
  6. If you notice that after you plugged in the Printer, for example, you get this error code then you will have to change the USB cable to the printer in this case and also update the driver for the printer to support the Windows 10 operating system.
  7. You can also try to update your drivers automatically in order to avoid permanent damage to your system. We strongly recommend using a dedicated tool to automatically download all the outdated drivers on your PC.

2. Repair your PC from Advanced Startup feature

  1. Move the mouse over to the lower right side of the screen.
  2. You will have the charms bar open.
  3. Left-click on the Settings feature in the Charms bar.
  4. Left-click on Change PC settings feature in the Settings menu.
  5. On the left side of the window, you will have to left-click on the Update and Recovery feature.
  6. Left-click on the Recovery feature.
  7. On the right side in the window, you will have Advanced startup.
  8. In the Advanced startup feature, you need to left-click on the Restart now button.
  9. Now you will have to wait for the Windows 10 device to reboot.
  10. After the reboot, it will take you directly to the Advanced startup feature.
  11. Now in the Advanced startup feature, you will have to select the Automatic repair feature and follow the instructions on the screen.
  12. After the Automatic repair feature is finished then you will need to reboot your Windows 10 device and see if you still have this issue.

Note: Another way you can access the Automatic repair feature is to place in your DVD device the Windows Media disk and access it directly from the CD.


3. Check your hard drive

You will have to take into account that the hard drive in your device may be damaged. You might find yourself wondering: How do I know if my hard drive is damaged?

Disk errors, frequent error messages while running software, or strange noises such as humming from the drive are all signs to take into consideration.

In this case, if you have another hard drive, then you can try to plug it in and see if that is the error code 0xc00000e9 is appearing because of the old hard drive.

Can a hard drive be repaired? Yes, it can. We’d suggest taking it to a specialized repair shop and telling them exactly what the issue with your device is and what error code you get when you try to boot into the system.


4. Fix the MBR with Windows PE

  1. Connect a hard drive or external hard drive with Windows PE on it to your PC.
  2. Launch Windows PE and set your Disk C as Master Boot Record.
  3. Reboot your computer, reinstall Windows and see if the problem gets fixed.

Another fix try is fixing this issue using Windows Preinstallation Environment (PE). Sometimes when Windows OS is installed the Master Boot Record (MBR) is not set correctly (C drive).

Be careful as the procedure shown above requires a certain skill level.

Please let us know in the comments section if this tutorial was helpful for you and also write us any questions regarding this issue and we will see how we can help you further.