The essence of many games lies in the multiplayer mode, where players can join their friends and share the gaming experience. However, there seems to be a widespread issue with Diablo 3 on all supported devices. Namely, users are getting the There was a problem joining the game error.
This completely prevents them from joining certain games while the others work without issues. Blizzard responded to the problem since the first reports and allegedly solved it, but the error is still bothering users nonetheless.
To fix this, follow the steps below.
How can I fix Diablo 3 error: There was a problem joining the game?
1: Update the game
Primarily, reboot your PC or console and try again.
If the problem occurred on the PC, navigate to the Battle.net client.
The client should automatically update the game.
Alternatively, if you are stuck with the problem on consoles, navigate to the game and update it from the menu.
After that, check for the console firmware updates, too, and reboot your console.
Since the problem is mostly related to connection issues, try resetting your router and modem.
Stick to wired connection instead of wireless.
Open Ports on your router that are required for the game to work seamlessly online. For Diablo 3, you’ll need to ensure that these ports are open: TCP PORTS 80, 1119UDP PORTS 1119, 6120
Change region settings to ALL.
Restore your router or modem to factory settings.
Disable IPv6 and stick to IPv4 solely in network settings.
Navigate to Battle.net client and select the game from the Main menu.
Uninstall the game.
Navigate to the installation folder and delete all remaining files.
Get back to Battle.net client and install the game again.
This is just one of many issues that you can encounter, and many have also encountered Diablo 3 Code 1 during their gaming sessions. Speaking of issues, if you’re playing the latest game, you should know that many are dealing with Diablo 4 error code 395002, but we have a guide that will show you how to fix it.
Diablo 3 is already here and a new episode “Reaper of Souls” has been unveiled.
However, there’s nothing you can do to beat nostalgia and there are many out there who like to play Diablo 2, despite the fact that they have made the jump to a new Windows OS like Windows 10.
A good friend of mine is still playing Diablo 2 on his new Windows 10 laptop and knowing that I run a website on Windows, asked whether I could share some tips on how to make lags and crushes stop in the game.
And my friend isn’t the only one – there are millions of gamers worldwide who still play the good old Diablo 2 Lord of Destruction either in single mode or even by logging into Battle.net.
First of all, if you have an official game, acquired digitally or on a physical disk, then make sure you have the latest version installed and working.
If you have a pirated copy, then maybe you know where most of your problems are coming from…
How can I fix Diablo 2/ Diablo 3 lags on Windows 10:
You have probably tried this, but let me say it again – make sure that you have the latest video drivers downloaded and installed. Indeed, such an old game doesn’t require too much, but just have this thing ticked on the to do list.
Now, like any other old app or game, in Windows 10 you will need to try and run it in the Compatibility mode to see whether it will work without lags, and will provide a smooth gaming experience. So here’s what you need to do:
Right-click the Diablo II icon and click Properties
Click the Compatibility tab and check Run
Select Windows XP (Service Pack 2 or 3) from the dropdown and then click ok
After that, you need to run the Video Test option under the Diablo II program listing, select Direct3D and after it loads, then click Battle.net to patch to the latest version of Diablo 2.
After running the game in Compatibility mode, also make sure that you tick the following – “Reduced Color Mode” and “16-bit (65536) Color”.
Also, you will need to disable display scaling on high DPI settings, just in case this has been missing with your game. And don’t forget to be logged in with an administrator account while performing all these changes.
3. Use 3DFX Glide Wrapper
If the issue still persists, you can try to remove the lags with 3DFX Glide Wrapper, which is a small application that could do wonders.
4. Update your computer/ game client
Your game client and all the games that you run on your computer depend on your device to run properly. Running outdated Windows versions may cause various issues, including lag issues.
Make sure that you’ve installed the latest Windows 10 updates on your device. Go to Settings > Update & Security > click on the ‘Check for updates’ button and install the available updates.
The same is valid for your game client. For example, if you use Steam’s gaming platform or perhaps Battle.net, check for specific updates available for the respective clients.
If you can’t open the Setting app in Windows 10, take a look atthis article to solve the issue.
One common reason why you may experience game lags is represented by CPU-hungry apps and programs. If other third-party apps are using too much CPU and GPU resources, your computer struggles to run your favourite games.
As a result, turn off all programs that use too many resources so that your PC may direct them to your game.
Go to Start > type ‘task manager‘ > double-click on the first result
Click on CPU to filter the results > right-click on the programs that are using too much CPU power > select End Task
Game lags can also be caused by bandwidth-chugging programs. Turn off all torrents, audio and video streaming apps if possible, close the browsers that you don’t need, etc.
Game boosting software automatically enhance and optimize your computer’s performance while gaming. We compiled a selection of the best game boosters that you can use on Windows 10.
Download and install one of those tools and watch your PC’s gameperformance improve.
We strongly recommend you one of the best game boosters: Game Fire. This is a tool that will get rid of freezes, lags, low FPS and other issues while playing. Download it now (free) for a better gaming experience.
Let me know if this has solved your problems. If you happen to know a solution, do share it with us and we’ll make sure to update the article.
For any more questions, reach for the comments section below.
Most users print documents frequently, but sometimes the error message Resolution is not Supported can appear and prevent them from doing so.
They often see this message in the print queue while trying to print Excel files. It further extends to printing documents from Access, while other documents, including graphics, work fine.
This can be an annoying issue, but be sure of the fact that there are various potential fixes that might get it printing again. Let’s check them out closely.
What can I do if getting printer error: Resolution not supported?
1. Reset the printer
In solving most wireless printing problems, a simple resetting procedure might just do the trick. First, remove the power cable without turning the printer off. Then you should wait for about 30 seconds before plugging the power cable back in the printer.
If the printer doesn’t automatically switch on, press the Power button. After performing these steps on your misbehaving printer, do the same on your PC itself if necessary.
2. Change the DPI setting
Click the worksheet that you want to print.
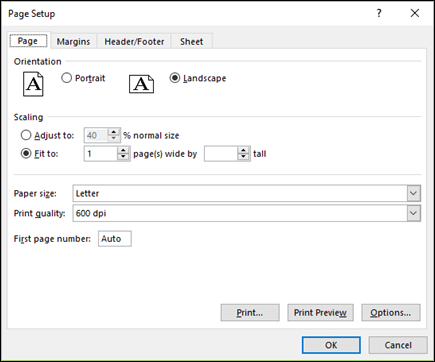
On the Page Layout tab, in the Page Setup group, click the Launcher.
On the Page tab, you’ll find the Print quality box. While there, click the resolution that you want to use.
The DPI settings that are available depend on the type of printer that you are using. If you don’t know the precise value, simply set it to a lower number.
If the Resolution not supportederror comes up when trying to print a document that you’re received from someone else, it may have a slightly higher resolution than your printer can handle. That’s why you should change the DPI setting in Excel.
Aside from that, you should take into consideration that Excel documents apparently contain the resolution which they are supposed to be printed.
3. Reinstall the printer’s driver
With the latest driver stored on your Windows PC, navigate to the Start menu.
Then, search for Control Panel and open it.
Follow this path Hardware and Sound > Printers.
Right-click the printer whose driver you need to install, and then select Run as administrator.
Click Properties.
Then, click Advanced.
Finally, click the New Driver tab, and then follow the onscreen instructions to install the driver.
If you keep getting the Resolution not supported message while trying to print, the problem could be related to your drivers. If the driver develops a problem, you may not be able to print documents any longer or some of your printer’s features may not work as they used to.
To fix this, it’s time to reinstall the printer’s driver. This is quite simple to do, so just follow the above steps if the most recent driver is already stored on your Windows PC.
You may also visit the printer manufacturer’s website, locate the latest driver, and then download it. Further, install it by following the instructions provided there.
4. Delete your printer and add it back
In case the issue persists, you’d better revisit System Preferences > Printers & Scanners and delete the printer. To further use it, you must add it back to your list of printers using Printers & Scanners preferences once again.
If the network printer you want to use doesn’t show up in the list of available printers, do not hesitate to add it as an IP printer. Keep in mind that the printer must support one of the following printing protocols: AirPrint, Line Printer Daemon (LPD), HP Jetdirect (Socket), or Internet Printing Protocol (IPP).
Once you complete these steps, the Resolution not supported error should no longer be an annoyance for you.
When all solutions fail, you should take into consideration to service the printer if it’s still within the warranty period. To have it repaired, contact the manufacturer.
Storage space is usually not a problem on Windows 10, but sometimes storing a large file heavily depends on your storage device.
Users report getting the File too large for destination file system message, and today we’re going to address this very issue.
What does it mean when a file is too large for the destination file system? If you’re also troubled by this error, it means that you’re trying to transfer a file that is larger than 4GB to your USB flash drive or any other storage device.
This isn’t a Windows error. It’s just a limitation of the FAT32 file system instead. FAT32 could only support single files that are less than 4GB, so a new file system called NTFS was invented.
NTFS file system almost completely replaced the FAT32 file system, but even today certain devices rely on FAT32.
Regarding computers, if you’re trying to transfer a file that is larger than 4GB to a FAT32 USB flash drive or a hard drive partition, you’ll get the message you know by heart already.
Don’t worry, as there are a few ways to fix this problem. You’ll find them listed below, so don’t waste any more time.
How can I fix File is too large for the destination file system?
1. Split large files
This might not sound like the ideal solution, but it will allow you to store your file on a FAT32 file system device. One way to circumvent this 4GB file limitation is to split your file. To split large files, you can use tools such as WinRAR.
This method is useful if you want to store a large file on a USB flash drive and transfer it to a different PC. You won’t be able to join files on your flash drive, but you should be able to join them on a different PC without any problems.
2. Format your drive
Go to My Computer, locate your drive, right-click it and choose Format from the menu.
When the Format window opens, select NTFS as the File system or exFAT and click Start.
Wait for the format process to complete.
Formatting your drive allows you to change the file system from FAT32 to NTFS or exFAT. Both exFAT and NTFS allow you to store files larger than 4GB.
So, you should always use NTFS for hard drive partitions and NTFS or exFAT for USB flash drivers. To format your drive, follow the above steps.
3. Change the file system without formatting
Press Windows Key + X to open Win + X menu.
Select Command Prompt (Admin).
Optional: When Command Prompt opens, enter chkdsk F: /f. We used F: in our example because that’s the letter assigned to our USB flash drive, but you need to use the letter that matches your USB flash drive.
After the scan is completed and no errors are found, move on to the next step.
Enter convert F: /FS:ntfs and press Enter to run it. Once again, be sure to use the correct drive letter.
After the conversion process is completed, check if the storage device is converted and if all your files are still present.
If everything is in order, try to transfer the large file again.
If you want to keep all your files on the storage device, you can also change the file system without formatting. This method should preserve all your data, but a backup is strongly recommended.
The error message you are getting can be a problem, but you can easily solve it by applying the above steps. For any questions, feel free to let us know by using the comments area below. We will reply to you as soon as possible.
NTFS comes packed with modern features such as encryption, user-level disk space, larger file and volume sizes, shadow copies for backups, and more.
Which is better exFAT or NTFS?
NTFS provides top advantages not available to exFAT. However, exFAT is an upgrade over FAT32 and flash drives you purchase will often come formatted with exFAT.
This assures maximum compatibility across modern computers, game consoles, and not only.
Can I convert exFAT to NTFS without losing data?
No, there’s no procedure or utility that you may currently use to make the de desired conversion and avoid data loss. However, you can back up the partition first by using the best data backup software.
Microsoft has released today a new update for its Microsoft Emulator on the Microsoft Store, along with a new Windows 10X emulator image for developers looking to test their apps on the new OS. You don’t need to be a Windows Insider to download both packages, and the latest version of the Microsoft Emulator will now check for new images on first run.
The new Windows 10X Emulator image now allows legacy Win32 apps running in the container to participate in the windowing model. “System-defined window placement ensures that users have a consistent and simplified windowing experience that is tailored and appropriate to a smaller, dual-screen, and touch-friendly device. Some gaps remain and will be addressed in future updates,” Microsoft explained today.
This new Windows 10X image also includes what Microsoft calls an “early version” of a File Manager app, which can display OneDrive files when a Microsoft account is linked to the OS. You can learn more about new features and known issues in this build on this page.
Windows 10X, which will make its debut on the Surface Neo later this year, is a new OS designed for the ground up for dual-screen devices. App developers can use the Windows 10X to optimize their apps for dual-screen use, and that includes Win32 apps. The OS will run all types of apps in containers, which according to Microsoft should improve security and battery life. By including support for Win32 apps, Windows 10X will hopefully avoid the app issues that have plagued the now-deprecated Windows RT, and in a more minor way, Windows 10 on ARM.
Have you been wondering why you keep getting the GWXUX.exe has stopped workingerror message on your Windows 10 PC? There is no cause for any worries; we have got the solutions to this problem.
The error is associated with an application component of Windows 10 updates known as GWXUX.exe which is referenced as KB3035583. This is installed automatically via Windows Updates.
According to Windows users, this Microsoft update is meant to install pop-ups and invite users to download Windows 10.
However, some of them have complained about the unwanted pop-ups interfering with basic PC operations. Meanwhile, the GWXUX.exe application checks for compatibility issues and gets your PC ready for the upgrade.
There is no cause for alarm as we have come up with solutions to solve the GWXUX.exe has stopped workingerror message.
What can I do when getting GWXUX.exe has stopped working?
1. Disable the GWXUX application in Task Scheduler
First of all, you can use Task Scheduler to disable the GWXUX application on your Windows PC. Here’s how you can do it.
2. Uninstall the KB3035583 update from Control Panel
Press Windows key > type Control Panel in the search bar and hit Enter.
In the Control Panel window, type Windows Updates on the search bar at the top-right and hit Enter.
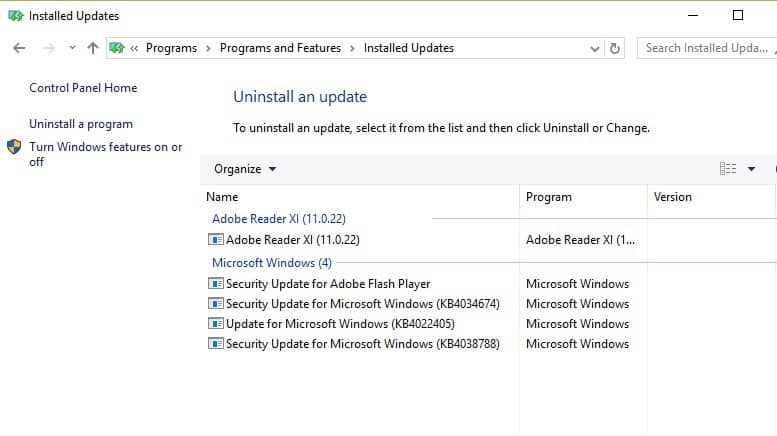
Under Programs and Features, click on View Installed Updates.
From the list of installed updates, locate KB3035583 and double-click on it to uninstall.
After uninstall, your PC will restart.
Another way of fixing the GWXUX error problem is by uninstalling the KB3035583 update. Performing this procedure should help you get rid of these intrusive pop-ups on your Windows PC.
Click Next to proceed with system restore, and then select a restore point (a date before the error message display started).
Follow the prompts to complete the System Restore.
Note: If there is no specified restore point before the GWXUX has stopped workingerror message displayed, consider using the solution above.
Windows 10 users can permanently fix the error by running a system restore. System Restore will uninstall programs on your Windows PC, most especially GWXUX.exe back to a time before the error message started appearing.
4. Use Windows Troubleshooter
Click the Start button and type troubleshooting in the search bar.
Hence, click on the first result that says Troubleshooting.
In the Troubleshooter window, choose Fix Problems with Windows Updates.
Click Next and follow the prompts to fix the error problem.
You can also fix this error problem by using the Microsoft in-built troubleshooting tool known as Troubleshooter. Follow this procedure to use it on your Windows PC and let us know if it makes any difference.
Despite your best efforts of using safe printing practices, you may find yourself facing the following <span id="urn:enhancement-a89224fe” class=”textannotation disambiguated wl-thing” itemid=”/entity/printer”>printer error: Unsupported Protocol.
When dealing with this issue you can try out one of the following troubleshooting tips to get rid of it as soon as possible.
How can I fix printer error: Unsupported Protocol?
1. Set Send True Type as Bitmap as Enabled
To change your printer’s settings, head to Control Panel > Hardware and Sound.
Open Devices and Printers.
Right-click on your printer’s icon, then select Printing Preferences.
Open the Advanced tab.
Under the Printer Features section, you need to set Send True Type as Bitmap as Enabled.
Confirm by clicking OK and try printing again.
2. Change the Print Optimizations value
In the Control Panel, right-click your printer to find various options.
In the Printing Preferences dialog box that appears, select the Advanced tab.
Under the Document Options section try changing the Print Optimizations value.
Confirm and try printing again.
If the first procedure didn’t work, it’s a good idea to change the Print Optimizations value. Follow the above steps to do so.
3. Update your printer’s USB drivers
Press the Windows logo key + Rkeyboard hotkey to open the Run dialog box.
Then, just type devmgmt.msc in the Run dialog box.
Press Enter.
If prompted for an administrator password or for a confirmation, type the password, or click Allow.
Expand Universal Serial Bus Controllers in Device Manager.
Find your USB port driver.
Right-click on your USB controller driver and click on Update driver software.
On the next window, choose the Search automatically for updated drivers (connect to the Internet for the latest version of the drivers).
Let the process complete.
Finally, click OK.
Let’s continue with the basics. Follow the above procedure to update your printer’s USB drivers or find them online.
4. Remove your printer and add it again
Locate the printer in Devices and Printers from the Control Panel.
Then, right-click it.
Select the Remove device option from the list.
Click Yes from the Remove Device dialog box.
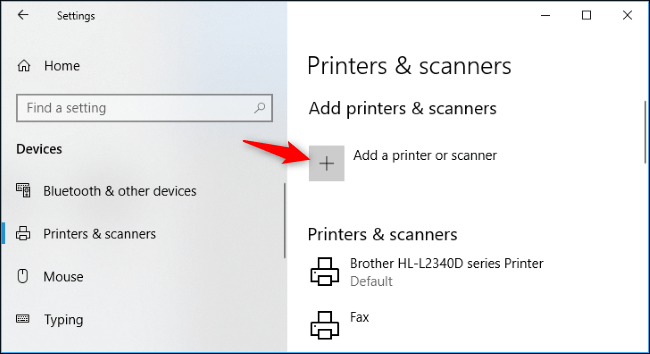
To add the printer back, head to Settings > Devices > Printers & Scanners.
Click the Add a Printer or Scanner button to search for nearby printers, whether they’re hooked up to your PC or connected to the network.
You should see your printer’s name appear here, so click it right away.
If you don’t see it, click the link that says The printer that I want isn’t listed. This opens the old Add Printer dialog, which gives you the option to scan for older types of printers, connect to network printers, or add printers with custom settings.
Then, click the Next button.
Follow the instructions available on the screen to complete the installation process.
Your printer should finally show up again in the Printers section.
If these steps didn’t help, you could also try to remove the printer from the system where it has been installed. Then, add it again and check if the issue persists.
Other users also try to directly plug in the printer with a USB, then right-click its icon and select Printer Properties. Open the Ports tab and select the USB port before trying to print again.
Don’t hesitate to try any one of these tips and comment below the one that worked for you. You could also check your printer’s manual for more information on its diagnostic features.
In case of having other questions, let us know in the comments below.
Despite the constant updates that Microsoft brings to Windows 10, new bugs and issues are constantly appearing. These can be more or less important, but some of them can even cripple functionality.
A memory integrity setting prevents driver functionality
One good example is a memory integrity setting that causes an error that states:
A driver can’t load on this device
Users have been reporting that a setting within Windows 10 is blocking drivers from loading and causing issues with the associated hardware. Microsoft is well aware of the issue and has created a dedicated help page speaking about the issue at hand.
The bug is present in all current versions of Windows 10. However, it can be taken care of if you turn off the setting in Windows Security app.
Although fixable, Microsoft warns users that:
If you choose to continue using your device without addressing the driver problem, you might discover that the functionality the driver supports does not work any longer, which could have consequences ranging from negligible to severe.
According to them, the issue is easily fixable, as long as you take 3 factors into account:
You can also open the Core isolation page by selecting Start > Settings > Update & Security > Windows Security > Device Security and then under Core isolation, selecting Core isolation details
Though the driver has a minor vulnerability that’s preventing it from loading, it’s most likely not malicious in any way.
If an updated driver is unavailable from the driver manufacturer, it might be a good idea to contact them and inquire whether a fix is coming soon.
In other news, KB4535996 seems to be acting up again. Not only does it causes stuttering in games, but now it seems that it causes issues with Windows 10‘s sleep function and general performance issues.
Several reports have come in of issues with sleep, BSoD errors, and a reduction in system performance following the installation of KB4535996.
Microsoft itself has nothing to add regarding the issue. Unfortunately, their help forums are filled with people complaining about problems with KB4535996.
One general consensus is that uninstalling the update will indeed fix all issues associated with it, which is apparently the only bright side of the entire ordeal.
As for the sleep issues, one user reported on Twitter the following issue:
@MicrosoftHelps Since the latest Windows 10 updates, KB4537572 and KB4535996, my computer is waking itself from sleep every couple of hours. Didn’t do this prior to updates. Ideas?
Unfortunately, this is just one of the many complaints that users have regarding the sleep issue caused by the optional KB.
Since Microsoft did not provide any solution to the problem or at least release a statement on the matter, the only solution users are left with is to simply uninstall the update until a fix arrives.
What’s your take on Windows 10‘s latest issue? Share your thoughts in the comments section below and we’ll continue the talk.
Microsoft Teams has grown into a mature corporate chat system which helps you to communicate and stay connected with colleagues. Making Teams your central communications hub gives the tool unique visibility into your daily interactions. This data is exposed as team-level analytics within the app’s interface.
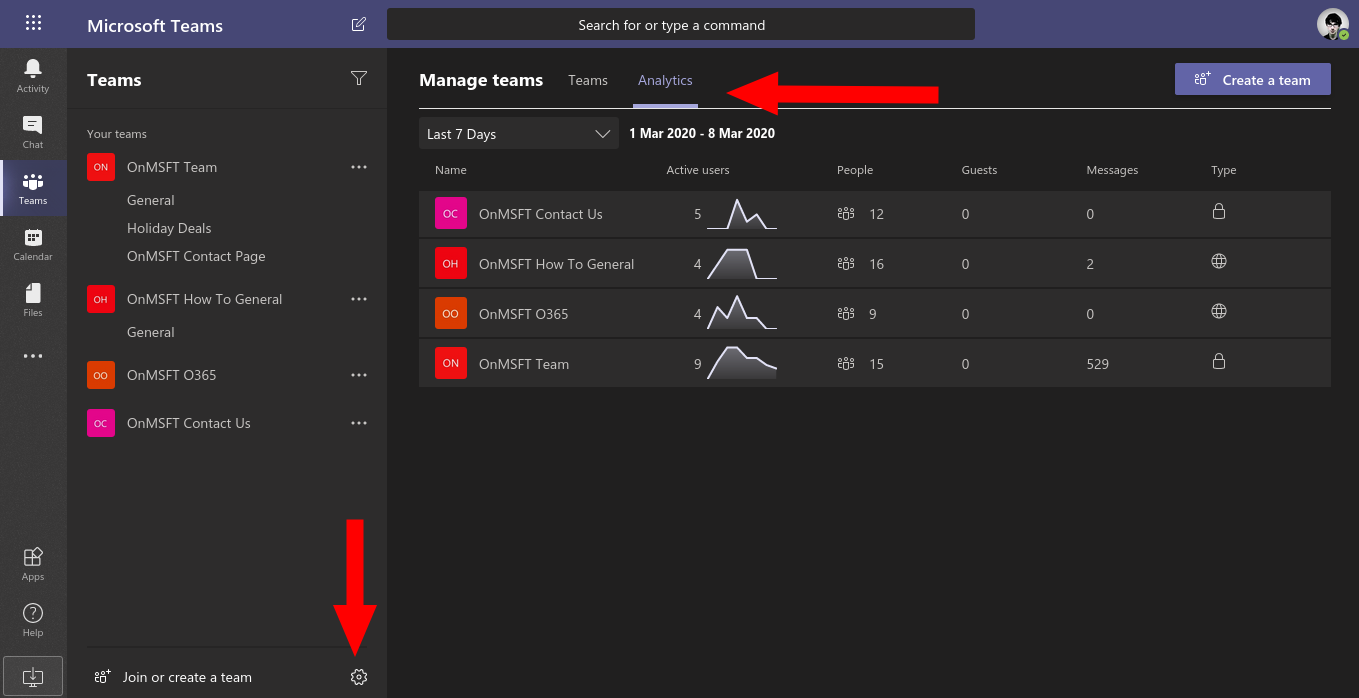
Anyone can view the analytics associated with teams which they’re a member of. A high-level overview of all teams is available by clicking the Settings icon next to the “Join or create a team” button. Next, switch to the Analytics tab of the “Manage teams” screen.
Here, you’ll see a list of all of your teams. Use the dropdown box in the top-left to select the date range for the analytics. There’s currently only two options – last 7 days, or last 28 days.
The analytics displays a count of the messages sent to the team within the selected timeframe. You also get a histogram indicating how the number of active users varied during the period. An “active user” is any team member who posted a message into the thread or performed an intentional action within a Teams client.
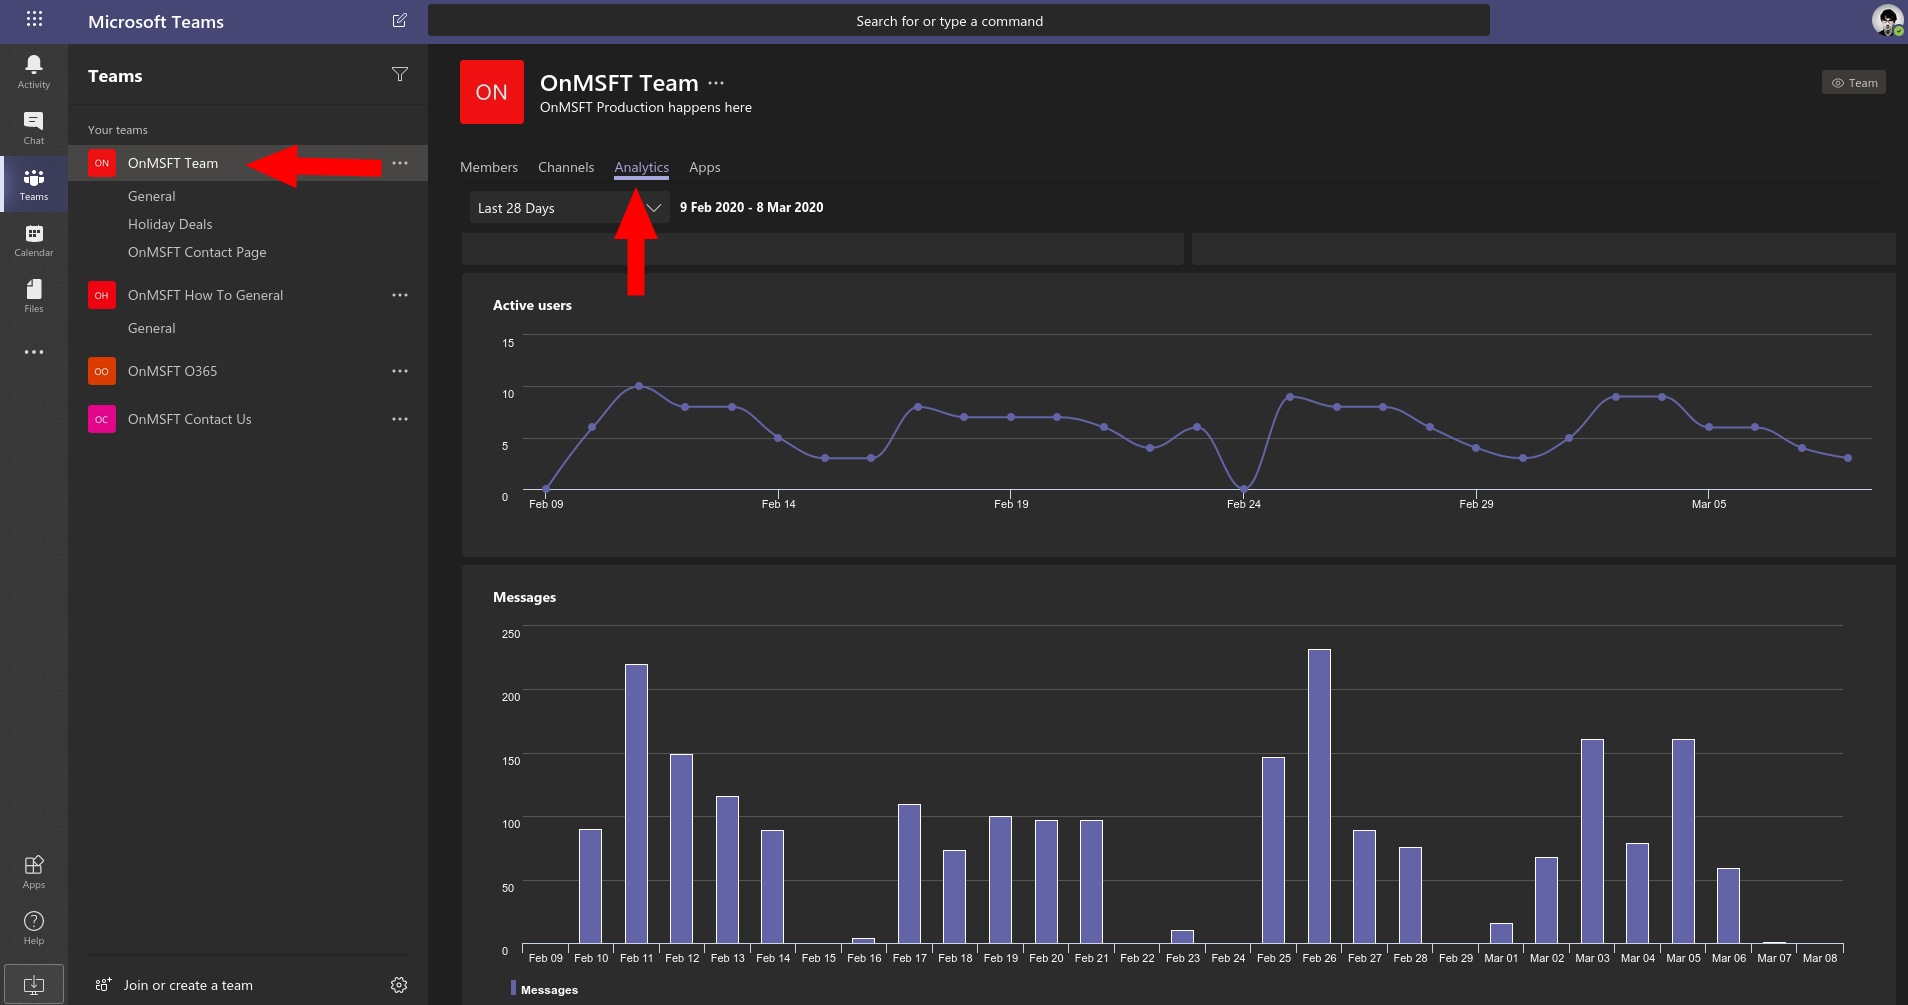
You can get more detailed information about a team’s activity by clicking its name. This will take you straight to the team-level analytics page. This can also be accessed by clicking the “…” button next to a team in the sidebar. Select “Manage team” from the dropdown menu, then the Analytics tab at the top of the page.
The team-level analytics give you a much more detailed view into messaging patterns. The active users and sent messages metrics are graphed day-by-day, so you can easily see when your team’s communications reached a peak. Hovering over a point on the graph reveals the count for that day.
The data is supposed to give you a starting point when assessing the usage patterns and work habits of your team. Using the insights you obtain, you may be able to identify working trends which help you to improve the performance of your team.
As an example, a very busy team with lots of messages between members might indicate an imbalance in the distribution of information. A more more focused team may be quieter, if people are having to spend less time exchanging knowledge in chat threads. By providing these metrics, Teams gives you more options when planning for productivity and optimising knowledge distribution.
Working from home has its benefits as you’re often in a quiet and less hectic environment when compared to the office (not to mention safer from epidemics). However, it also can be distracting if you’re not too careful, as you can get sidetracked real fast. When using Microsoft Teams, though, there’s a number of tips and tricks you can leverage to your advantage to make sure that you can boost your overall productivity and keep yourself in your workflow. In this guide, we’ll take a look at some of those.
Tip 1: Take notes in meetings, record meetings, and switch views during meetings
When you’re in the office and attending a physical meeting, you’ll be able to take physical notes, record the meeting on your phone for future reference, and even watch your coworker’s body language. In our first tip, we’ll touch on all of that, but how you can do it virtually through Teams.
With Microsoft Teams, you’ll be able to take notes during your virtual meeting. In the lead up to your meeting, you can select your meeting from your Calendar in Teams and then Chat with participants, and select the Meeting Notes tab to take notes. And, during your meeting, you can select More Options at the bottom of the screen and choosing Show meeting notes in the meeting controls.
Secondly, with Teams, you can record the entire virtual meeting — if your organization allows it. This will let you go back to it for future reference if you might have missed something important during the call. You can record a meeting by going to the meeting controls, selecting more options and choosing start recording. Everyone will then be notified that recording has started and a notification about the recording will be posted to chat history
Finally, there is the ability to switch views during a meeting. Teams automatically puts the person who is speaking into focus, but you can switch views to see someone else on-screen if you want. This is useful for reading body language of your coworkers. You can focus on a particular video by right-clicking it and selecting Pin. The video will remain pinned to your view regardless of who is talking. We talk about this more in our dedicated post about meetings in Teams, so feel free to give it a read.
Tip 2: Pin chats, search chats, and configure read receipts
Nothing beats face-to-face conversations, but when you’re working from home, chatting via text is sometimes the only option. That might seem boring, but with Teams, there’s a couple of ways you can boost your productivity with just the chat alone. Here’s how.
First off, if you’re frequently chatting with someone, you’ll want to pin the conversation so it can appear at the top of your chat list. You can do this by selecting the Chat, and open the chat list. You can then right-click the conversation, and choose Pin. This will make sure that you’ll be able to get to the chat with this person right away, no trip to their office required!
Next, as chat is the core experience of Teams, you might want to go back and look through your messages, without scrolling endlessly through the conversation. You can skip out on this by heading to the search/command box at the top of the screen and entering the word or message that you’re looking for, followed by the enter key. You’ll get a list of results that include that word or phrase you were looking for.
Finally, you might also want to turn on read receipts in Microsoft Teams. If you’re a slacker, this will for sure get you on your toes, as your coworkers will know when you’ve seen their important messages. You can do this by clicking your profile icon in the top right of the screen, clicking settings, choosing privacy, and toggling the switch for read receipts. Again, we touch in these tips and tricks in our dedicated post about chatting in Teams, so feel free to check it out for more.
Tip 3: Use Apps and the Wiki Tab in Teams
Typically, you might think of apps as a distraction, but in Teams, apps can be used for your productivity advantage, as there are well over 300 you can choose from. There’s also The Wiki Tab, which can be used as a way to communicate effectively with your coworkers. Here’s a bit of an explanation about both.
Starting first with Apps in Teams, if your administrator has enabled it, you can add apps to your own space in Teams by clicking the “+” sign at the top of any Teams channel or chat. There are many apps that you can add here to help productivity. The first of them is Trello, as when added to Teams, you’ll be able to see all boards directly from Teams, without opening a new tab. You can also add Wikipedia as a way to get information at a quick glance, though it might need to be configured by your administrator first.
For even more information at a glance, there’s Microsoft Flow, which can help automate certain tasks and give you alerts in Teams for Tweets, emails, and more. And, if your company has a custom app designed with PowerApps, Microsoft’s updated and rebranded version of Flow, you can add these too. We’ll be planning more coverage on that front soon, but our guide to the best Teams apps has you covered in the meantime.
To end, we’ll touch on the Wiki Tab in Teams. While chats and channels are a great way to chat and collaborate, as well as working on documents through OneDrive, the WikiTab can also help. You can add the Wiki Tab by clicking the “Add a Tab” button at the top of a channel. Once added, you can choose Wiki, and give it a name. You’ll then be able to treat it similar to a Word Document and add sections and pages, or even “@” coworkers to get their attention. It’s a great hub to help you take down notes, and focus, as we explained in our post here.
There’s much more you can do with Teams
As usual, we’ve just touched on some of the top ways you can boost your productivity with Microsoft Teams when working from home. There’s a lot more that you can do. We’ve covered Teams extensively these past few months. Other topics that you might find interesting include making transcripts of calls, sharing your screen, praising your coworkers, and more. Do you have tricks and tips for Teams? Let us know in the comments below!
PUBG’s latest update on consoles is introducing a much-anticipated crossplay feature between Xbox One and PlayStation 4 consoles. The game is following Fortnite’s lead which has been supporting crossplay for quite some time now, though unlike Fortnite, the console versions of PUBG won’t support crossplay with PC gamers.
Cross Platform Party Play on Console is live! Invite your friends on Xbox One or PlayStation 4 to a single party with the new Cross-Party Play feature! pic.twitter.com/Nqy8OQ6LjK
Because of a one-year timed exclusivity deal with Microsoft, PUBG launched on PlayStation 4 a year after its Xbox One release in December 2017, but the battle royale game hasn’t really managed to steal the spotlight from free-to-play alternatives like Fortnite and EA’s Apex Legends. The latter still doesn’t support crossplay, though developer Respawn Entertainment hinted earlier that it was coming.
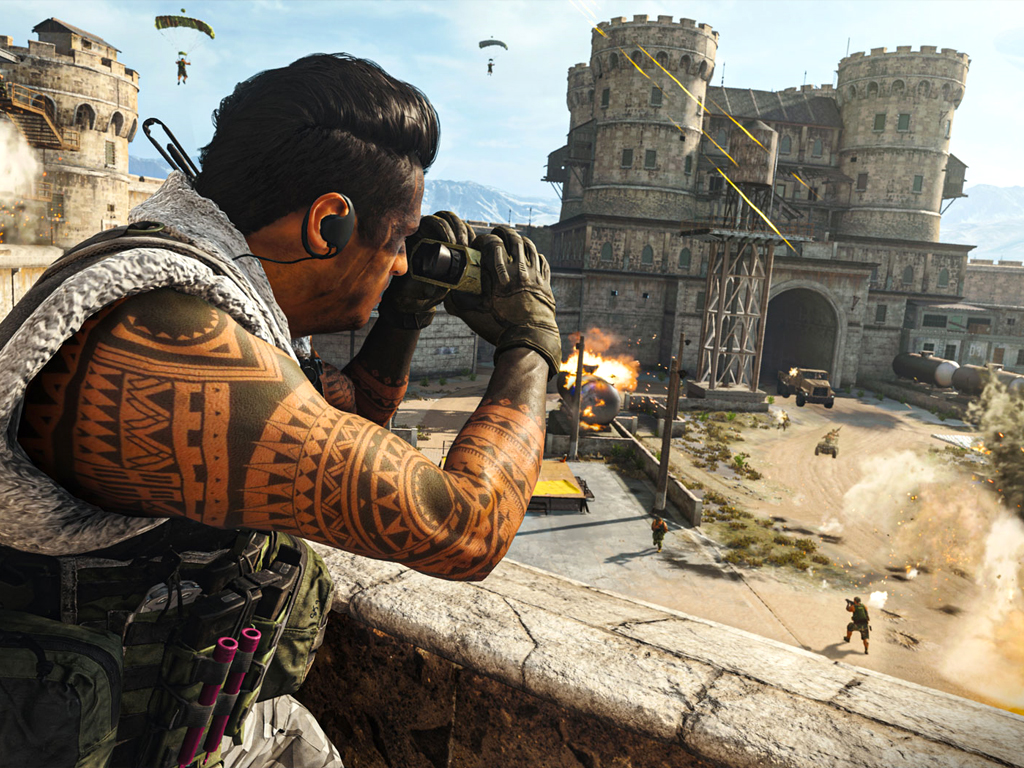
If PUBG was probably the game that made the battle royale genre go mainstream a couple of years ago, the genre has since been perfected by AAA developers. We mentioned Apex Legends earlier, but Call of Duty: Warzone, the new free-to-play battle royale mode of Call of Duty: Modern Warfare launching today on Xbox One, PlayStation 4 and PC will likely make a huge smash. Not only did developer Infinity Ward build a state of the art engine that pushes current-gen consoles to their limits, but the developers also made sure that the game will also support crossplay and cross-progression on day one.
A Call of Duty battle royale mode has been rumored for a while but it’s now been officially confirmed and is launching today on Microsoft’s Xbox One consoles, Sony’s PlayStation 4, and on PC.
Named Call of Duty: Warzone, this new battle royale mode will actually be a stand-alone video game that’s completely free for anyone to play regardless of what Call of Duty titles they may or may not have purchased.
Warzone will support crossplay between all three platforms straight out of the gate and players, much like with Fortnite, will be able to continue their progress when switching.
Impressively, Call of Duty: Warzone will support matches with up to 150 players with two separate modes on offer; Battle Royale and Plunder. Battle Royale is exactly what it sounds like while Plunder is kind of a battle royale mode but with the aim to collect the most cash instead of kills.
The map is set in a city named Verdansk but it will be split up into several different zones with a variety of environmental and manmade obstacles to navigate and explore. Vehicles, including helicopters, will be made available to make traversal faster while the rather unique one-versus-one Gulag game mechanic should help differentiate Warzone form its battle royale rivals.
Owners of Call of Duty: Modern Warfare will be able to download Warzone ahead of everyone else at 8AM PDT today while everyone else can grab it from the Microsoft Store on their Xbox One consoles (or other platforms) at 6AM in Sydney, 7PM in London, 3PM in New York, and 12PM in Los Angeles.
The onesies are likely following on from the success of the Xbox Onesies from over two years ago which become extremely wanted by gamers after their limited debut in Australia. Unfortunately, these Ori onesies don’t appear to be for sale to the general public and are more of a promotional gift to give to video game streamers on platforms such as Mixer.
Here’s one of them being worn by Mixer streamer, Greenskull.
The hoodies are for sale, however, for anyone in the United States and Canada from the Microsoft Store for $69.99. They’re available in sizes from S to 3XL and are limited to 300 units.
Using the Wi-Fi radio switch (or a combination of keyboard keys) to turn Wi-Fi on or off was quite useful back in the day. However, since there’s a way to disable Wi-Fi with the software, they somewhat lost their purpose in laptops.
In addition, the presence of dedicated keys or side switches can cause a lot of issues with Windows users. Some users are prompted with Wi-Fi radio switch is off and thus, they’re unable to connect to a Wi-Fi network.
Even though it sounds obvious, the problem might not be related to the physical switch. For that purpose, we prepared a list of possible solutions that should help you resolve this issue. If you’ve had a hard time with it, make sure to check the list below.
How do I turn on a hardware radio switch?
1. Check the hardware first
Most of the time, users that bump into this problem neglect the fact that there’s always a combination of buttons or a switch that disables/enables the Wi-Fi radio.
On the majority of laptops, a Wi-Fi radio can be turned off with the combination of Fn (FuNction dual-purpose key) and one of the F-keys (Function keys). In this example, the Wi-Fi radio is enabled/disabled by pressing Fn + F5. This may vary, depending on the manufacturer.
Furthermore, some older laptops have a side switch for the same purpose. This is analogous to modern Airplane mode, which uses software to disable Wi-Fi and Bluetooth radios.
So, take a good look at the peripherals on the side of your laptop and make sure that, if present, the Wi-Fi radio switch is On.
2. Check the BIOS
Press Windows key + I to open Settings.
Open Update & security.
Choose Recovery from the left pane.
Click on Restart now, under Advanced Startup.
Choose Troubleshoot.
Select Advanced Options.
Choose UEFI Firmware Settings and then Restart.
Your PC should boot into BIOS and, from there, you should be able to work it out.
Another reason for this occurrence lies in some Wi-Fi-related BIOS settings that can disable the Wi-Fi radio. The main suspect is the Power Management section in BIOS settings where you can regulate the activity of various hardware features, including the Wi-Fi radio (Wireless Radio Management).
There’s frequently an option to disable the Wi-Fi radio while the LAN cable is attached. So, make sure to boot into BIOS and disable it. Also, make sure that you’re running the latest BIOS version. Some users report motherboard incompatibility with the network adapter.
You can resolve that by updating your BIOS, but we strongly advise you to take great caution while doing so. For further insights on BIOS flashing, make sure to check this article.
However, if you’re still stuck with the same error and unable to connect to Wi-Fi due to a radio switch, make sure to check the final step.
3. Reinstall drivers
Right-click on the Start button and open Device Manager.
Navigate to Network adapters.
Right-click on the Wireless LAN driver and Uninstall device.
Connect the LAN cable to a router or modem.
Install the driver again and look for changes.
We can’t afford to exclude the wireless LAN driver from a shortlist of possible culprits. On some rare occasions, the conflict between multiple drivers can cause the error we’re addressing today. Moreover, making sure that Wi-Fi drivers are properly installed is also important.
On the other hand, if you’re still stuck with the same problem, we’ll need to change our approach. Namely, the Windows Update forces a driver that’s maybe the latest version, but not always the functional version.
Thus, making you look for a legacy driver on the official site. Luckily, since this is a laptop/netbook-related problem, there’s support for accompanying software on the manufacturer’s official site.
Once you’ve located the proper Wireless LAN driver, install it and look for changes. Also, some manufacturers offer utilities (ancillary applications) for replacing the hardware when it comes to enabling or disabling the various system features, including the Wi-Fi radio.
For example, a lot of users with Intel-based chips resolved this issue by installing Switch On Wi-Fi Radio Using Intel PROSet.
However, there is another option for saving time and ensuring that you are running the most recent versions of your drivers. Using a specialized third-party driver updating tool that can accomplish this for you automatically.
That should do it. In case you have some questions or suggestions regarding the Wi-Fi radio issue, make sure to post them in the comments section below.
Windows Defender is much better than Windows Security Essentials was, but it still has some issues, and not in regards to protection. Namely, it seems that sometimes is overeager to prevent certain applications and it literally bombards users with Potentially harmful software detected messages.
You might say that it’s just doing its job. Well, that would be the case if the users haven’t created an exception for certain executable files and the containing folder. Windows Defender is sometimes just over-determined, and below, we provided ways to resolve this for good.
How can I remove the Potentially harmful software detected alert?
1. Scan the system with Windows Defender or a third-party antivirus
Open Windows Defender from the notification area.
Select Virus & threat protection.
Choose Advanced scan.
Select Windows Defender Offline scan and click Scan now.
Your PC will restart and the scanning process will begin.
Even though you are sure that the suspicious application is clean, let’s indulge Windows Defender and scan for viruses. And then maybe it’ll leave you alone and that annoying popping sound will stop repeating over and over again.
Now, the best way to scan and remove malicious software with Windows Defender in Windows 10 is the Offline scan. If you’re not sure how to run it, we’ve got your back. Follow the instructions above.
Even though one can say that Windows Defender provides reliable protection, we’re still more inclined towards third-party solutions.
Therefore, you should benefit from valuable security capabilities that will entirely scan the system and eliminate risky software that can cause serious damage.
2. Disable Windows Defender and stick with the third-party antivirus
Press Windows key + I to open Settings.
Choose Update & security.
Select Windows Defender from the left pane.
Click on Open Windows Defender Security Center.
Open Virus & threat protection section.
Choose Virus & threat protection settings.
Toggle off Real-time protection.
As some users have stated, despite explicitly ordering Windows Defender to avoid that one application, it just refuses to do so. They decided to ditch Windows Defender, and if you’re inclined to do so too, make sure to follow the steps above.
Need a good antivirus for your Windows 10 computer? Look no further, here is a list of the top software available.
3. Disable Windows Defender in the Group Policy Editor
In the Windows Search bar, type group policy, and open Edit group policy.
Follow this path:
Computer Configuration > Administrative Templates > Windows Components > Windows Defender Antivirus
In the right pane, right-click on the Turn Off Windows Defender and click Edit.
Set the policy to Enabled and confirm changes.
Restart your PC for them to take effect.
If Windows Defender is still bothering you, there’s a simple way to disable it completely. Since it’s the core part of Windows 10 shell, you won’t be able to uninstall it.
At least, not with the usual approach. However, you can completely subdue it with a little tweak in Group Policy Editor as shown above. Don’t forget that you’ll need administrative permission to do so.
In addition, the Local Group Policy Editor is only available in the Windows 10 Pro, Enterprise, and Education editions.
4. Use Registry Editor instead
In the Windows Search, type regedit, right-click on Registry Editor and run it as an administrator.
In the right pane, right-click on the DisableAntiSpyware DWORD and open Properties.
Change its value from 0 (zero) to 1.
If you can’t see the DWORD, right-click on the empty space and create DWORD (32-bit) Value. Name it DisableAntiSpyware and, set its value to 1.
If you’re not able to access Group Policy Editor, don’t worry. You can block Windows Defender through Registry Editor, as well. However, we advise you to avoid rushed moves since this is a danger zone.
The misuse of Registry can lead to critical system errors, ones that are hard to correct. So, follow the above steps closely to avoid any further issues.
With that, we can conclude this article. We hope Windows Defender’s alert won’t bother you anymore after you took the aforementioned steps.
If you have any more questions or suggestions, don’t hesitate to leave them in the comments section below.
Since the collectible cards genre gained a great popularity bust over the years, all the world needed is a massive online game. So, Blizzard took the opportunity and created Hearthstone: Heroes of Warcraft. Based on the well-established Warcraft universe, the game became an instant hit worldwide.
Hearthstone is not a demanding game. So, system requirements usually aren’t the problem, but there are some other issues that can bother players. Nevertheless, some users recently reported an annoying flaw. The game simply won’t start. For that matter, we’ve prepared some solutions for you.
How do I fix ”Game won’t start” issue in Hearthstone
Solution 1 – Disable or uninstall known conflicting programs
Some programs and their background processes are known for interfering with Hearthstone. Therefore, they can create a whole variety of issues. We are listing some of them here:
Norton, Kaspersky and Panda Antivirus solutions.
Torrent clients and download managers.
GPU tuning applications.
VoIP services.
Peer 2 Peer software.
The easiest way to resolve this issue is by uninstalling these programs. On the other hand, you can just disable them while playing Hearthstone.
Solution 2 – Update Hearthstone
You should always have the latest patch/update installed. The client will automatically update Hearthstone to the latest version, so that shouldn’t be a problem. Sadly, on some occasions, you’ll have to patch the game manually. You can do that by following these instructions:
If you want to update your drivers from the Device Manager, check out this article.
Solution 4 – Log into a different region
Changing your region can be very helpful for various issues. Don’t worry, it’s not a permanent change. After a few games in another region, you can comfortably get back home. You can easily change your region it the Battle.net app in Hearthstone tab. There might be a temporary problem with your regional server.
Hearthstone has 4 regions: America, Europe, Asia, and China. Try switching to one of them you’re not playing regularly on and later you can come back without losing any progress.
Solution 5 – Change compatibility mode
Some users reported that changing compatibility mode helped them resolve similar issues. So you should give it a try. This process isn’t hard at all, and we’ll lead you through it:
Go to Battle.net installation folder. The default location is C:\Program Files\Hearthstone.
Right-click Hearthstone application and open Properties.
In Compatibility tab check Run this program in compatibility mode for.
If you are running Windows 10, you should select Windows 8. So, basically, downgrade for earlier system version.
Check Run as administrator box, too.
Save the configuration and start the game.
Solution 6 – Scan and repair the game installation
Sometimes the game files get corrupted or incomplete. Is it because of bugs, malware, or other malicious software. Now, imagine that you have to reinstall the game every time that happens. Thanks to an implemented tool, Battle.net lets you scan and repair those files. To do so, follow these instructions:
Open your Battle.net desktop client.
Click on the Hearthstone tab.
Open Options and choose Scan and Repair.
The process will last for a couple of minutes.
Once it finishes, you can try starting the game.
Solution 7 – Reinstall the game
If none of the previous 6 steps helped you, try reinstalling the Hearthstone and look for changes. Even though this and all kind of other issues are resolved by the repair tool, sometimes the clean reinstall is the way to go. We encourage you to delete all associated files and registry entries after the game is uninstalled. That way, you can start from scratch. If you’re not sure how to reinstall the Hearthstone, follow these steps:
Open the Battle.net client, right-click on Hearthstone and uninstall it.
Navigate to Program Files and AppData and delete associated files.
Get back to the client and reinstall Hearthstone.
That’s about it. We hope you’ll find these solutions helpful and finally resolve problems related to failed startup.
Do you have any additional solutions? If you do, please share them with us in the comments section.
Whenever you request a web page and receive the Error 404 – the requested resource is not available at the top of your browser, or you get messages such as the page cannot be found, or the page you are looking for might have been removed, had its name changed, or is temporarily unavailable, it can be due to several causes.
Some of the most known and common causes, when the webserver returns the HTTP Error 404 – the requested resource is not available message, include:
The file you requested has been renamed
The file has been moved elsewhere and/or deleted
The file is temporarily unavailable due to maintenance, upgrades or other causes that are unknown
The file doesn’t exist
IIS 6.0 – the appropriate web service extension or MIME type has not been enabled
A virtual directory has been mapped to the root of a drive on a different server
While this Error 404 may sound technical at face value, there are some quick fixes you can try and see whether it helps solve the issue on your PC.
How do I fix HTTP Error 404 – the requested resource is not found?
1. Check your URL
Check if you typed the correct URL. A wrong URL will bring up the error 404, whether it’s a single letter or number, it makes a difference.
2. Boot in Safe Mode with Networking
Restart your PC.
When the sign-in screen is displayed, hold down the SHIFT key while you select Power then Restart.
After the computer restarts to Choose an option screen, select Troubleshoot.
4. Click Advanced options.
5. Click Startup Settings.
6. Click Restart.
7. Once it restarts, you will see a list of options. select 5 or F5 for Safe Mode with Networking.
Safe Mode with Networking starts Windows in safe mode, including the network drivers and services you need to access the internet or other computers on the same network.
Once you’re in safe mode, try to perform a clean boot as described in the next solution.
Performing a clean boot for your computer reduces conflicts related to software that can bring up the root causes of error 404. These conflicts can be caused by applications and services that start up and run in the background whenever you start Windows normally.
You will have a clean boot environment after all these steps are carefully followed, after which you can try and check if the problem is gone.
How to exit Safe Mode with Networking:
Right-click Start button.
Select Run.
3. Type msconfig.
4. A pop up will open.
5. Go to the Boot tab.
6. Deselect or uncheck Safe Boot option box.
7. Restart your computer.
Missing the Safe mode feature in Windows 10? Check out this guide and learn how to get it back in no time.
A System File Checker scan checks or scans all protected system files, and then replaces the incorrect versions, with the genuine, correct Microsoft versions.
If you’re having trouble accessing Command Prompt as an admin, then you better take a closer look atthis guide.
As you open web pages on your computer, you can use Internet Explorer (with No Add-Ons mode) as a failsafe mode, or an alternative browser with its own safe mode, and check Error 404 – the requested resource is not available issue persists. This means you temporarily disable all add-ons and see if they’re causing the issue.
If it works fine in the No Add-ons mode, then an add-on could be causing the error, so you need to re-enable each one by elimination to determine which one is causing the issue.
If you’re having Internet Explorer black screen issues you can also check this resource which provides the best fixes.
6. Reset Internet Explorer
Close all windows.
Select Tools.
3. Select Internet Options.
4. Select Advanced tab.
5. Go to Reset Internet Explorer Settings.
error 404 – the requested resource is not available
6. Select Reset.
7. Select Close once default settings have been applied.
8. Click OK.
9. Restart your computer to apply changes.
Resetting Internet Explorer is irreversible and may remove security or privacy preferences added to the list of Trusted Sites. This includes parental control settings so note the sites before you do the reset.
7. Troubleshoot error 404 on a server running IIS
If you’re on a server running IIS, you can resolve error 404 by verifying that the file requested exists on the IIS computer and it is in the correct location.
Use the IIS Microsoft Management Console (MMC) snap-in to determine where the file exists in the IIS computer’s file system.
This is important if the website uses a virtual directory – one that isn’t contained in the home directory of the website, but appears to the client browser as if it does. The virtual directory must be mapped to a subfolder on a drive or reference files by name.
Did any of these solutions helped you fix the Error 404 – the requested resource is not available problem? Let us know in the comments section below.
The Battle.net desktop app helps gamers install and patch their favorite games much easier. Also, it allows them to log in faster thanks to its single sign-on feature. Gamers can also use the app’s game pages to check out the latest Blizzard news, too.
As it happens with any software, the Battle.net app stops working from time to time due to various issues. In this article, we’re going to focus on the update issue where Battle.net gets stuck at 0%.
“Logged into battle.net today and I can’t play any games because it says “Waiting on another installation or update.” It’s at 0% in “Updating Battle.net” menu so I don’t know what game is updating.”
It is good to know that even if Battle.net remains stuck at 0%, the app is still updating itself. Depending on your computer’s configuration, this process may take up to 45 minutes: “Thanks, after sitting at 0% for 45 minutes, […] later battle.net started updating.”
However, if you want to speed up the process and make sure the latest update files are installed without any problems, follow the troubleshooting steps listed below.
Fix Battle.net update issues
Open Task manager > select End task for both Battle.Net Launcher and Agent.exe
Launch Battle.net again> it should immediately install the update.
This solution will fix your update issues, but it’s only a temporary workaround. This means it won’t completely eliminate the Battle.net update bugs. Many Battle.net users wish they had other options at their disposal, such as manually installing the latest patches. Unfortunately, it appears that this update issue is here to stay.
You can also go for the client reinstall, but considering that the issue is connected to the latest version of the Battle.net app, it might not be of any use whatsoever.
A number of users have reported a similar situation: when printing PDF image files or PDF searchable image files to certain kinds of PostScript printers, they will print correctly, but an extra page is printed too. Sadly, this contains the following error message:
Undefined – OFFENDING COMMAND: showpage – STACK
Others say that only a part of the file prints, the design part, while the text doesn’t show up at all.
If you too are having problems with this printer issue, then you should check out the step-by-step guide we’ve written below precisely for cases like yours.
What can I fix the OFFENDING COMMAND printer error?
1. Check the printer’s drivers
Virtually, every printer function that you might want to enjoy can be controlled through the driver. What you’re experiencing this time sounds like a driver issue as well.
That’s why your first troubleshooting step is to make sure you have the most current drivers installed. In general, you could open the printer’s Properties dialog box, hit the Setup tab, click About and check the version.
Contact the printer manufacturer to obtain the latest version of your printer’s driver. If you are already using it and the Undefined – OFFENDING COMMAND error keeps reappearing, remove the driver, then try to reinstall it from the original installation disks or CD-ROM.
If this is too complicated or takes you a lot of time, there is an alternative that can provide helpful drivers support directly. With the press of a button, you can install or update any driver within a few minutes.
With specialized software, your PC will be scanned entirely for outdated drivers, broken or corrupted ones, and missing drivers too. Thus you can resolve the printer’s driver with zero effort and high efficiency.
To access your printer driver’s interface, click in the search box at the bottom left of your screen and type Control Panel.
Press Enter.
Then, click on Devices and Printers.
You should now see a series of icons identifying all printers for which you have installed drivers. The default printer is the one with a green checkmark.
Right-click on the icon for the printer you want to access.
This will bring up a menu with two choices: Printing Preferences and Printer Properties.
Enter into Printer properties > Advanced tab.
While here, just untick the option that says Advanced printing features.
This should further allow prints to come out with no issues.
The setting Enable Advanced Print Features is often considered a residual of the ancient days of Windows NT. The option was previously known as Always spool in RAW in Windows versions prior to Windows 2000.
When it is disabled, documents will spool in RAW format, which could be Postscript, PCL, or the printer’s native language. This allows the printer to easily read the files and helps you stay away from these errors.
3. Delete the existing print queue and add the printer
In the Printers list, click your printer.
Then, just click the Minus button to delete it.
Click the Add button next.
Find and select the name of your printer from the Printer list, then click Add to add your printer.
Click Print Using or Use.
Select the name of your printer.
Your new printer queue displays in the Printers list in an idle status.
Try printing again.
4. Disable Optimize printing for PS printer option
Navigate to the printer‘s printing options.
Unmark the Optimize printing for PS printer checkbox.
Also simple and easy is to disable the Optimize printing for PS printer. This could also help you get rid of the issue, so give it a try.
If after performing these troubleshooting steps you still encounter the Undefined – OFFENDING COMMAND error from time to time, remember this. Other users also report that printing a few files at a time works just fine. This might do the trick, but it’s just impractical when you’re supposed to print large amounts of files.
Also, make sure that your printer and the computer are connected to the same network. Double-checking that your computer’s software is updated cannot hurt either.
If you have any other questions or suggestions regarding this particular issue, don’t hesitate to reach in the comments section below.
Hearthstone’s popularity is well deserved. Blizzard made the right move with this game, even though it was primarily just an experiment. Nowadays, this collectible card game gathers more than 60 million players. And the numbers are growing on a daily basis.
The game’s simplistic graphics and low requirements are the valid reasons for its popularity. Nevertheless, even the best-optimized games can have an issue or two. One of those rare but critical issues is API loading error. In this article, we’ll try to address this problem.
On some occasions, your native server can be the reason for this issue. Therefore, you should try and switch the realm in order to troubleshoot it. If you are still prompted with an error, move on to the next solution.
Solution 2 – Update GPU drivers and redistributables
You should at any time have the latest drivers. Additionally, it seems that DirectX and Visual C can inflict a lot of errors. Therefore, updating them will make the problem easier to troubleshoot.
Windows will usually provide you with the latest iteration of GPU drivers, but they won’t work all the time. What you need to do is get the latest drivers from the OEM’s official website and install them. Also, another option is to try and roll back drivers to an older version. Windows Update tends to fix what’s not broken frequently, so a previous version of GPU drivers might work better.
Here’s where you can find Nvidia and ATI/AMD drivers.
Otherwise, you should update your GPU drivers with specialized help from a dedicated tool. You can thus manage all your drivers automatically using Fortect Driver Updater.
Solution 3 – Run the game in the compatibility mode
Compatibility mode will let your system adapt the game to an older version. Moreover, many users had a problem after upgrading to Windows 10. Rather than downgrading your system, try this out:
Right-click Hearthstone and open Properties.
Move on to the Compatibility tab.
Check the ‘Run this program in compatibility mode for’ box.
Choose Windows 7.
Save your settings and start the game.
Solution 4 – Repair the game using Battle.net client
Battle.net desktop app has a built-in repair tool for incomplete or corrupted game files. It is worth trying out in this on similar occasions. You can use Scan & Repair tool this way:
Open your Battle.net client.
Highlight Hearthstone.
Click Options menu above the game title.
Choose Scan and Repair.
Close the app and restart your PC.
Start the game.
If the problem proves is not related to game installation, clearing cache is the next obvious step.
Solution 5 – Delete Battle.net cache folder in Program Data
Cache files can get corrupted, too. While this doesn’t happen too often, it mostly happens after an update. As a result, your game can have numerous issues. You can delete the game cache this way:
Close the game and Battle.net app.
Make sure you ‘kill’ all game-related processes in Task manager.
Go to the system partition.
Enable view of Hidden Folders.
Open Program Data.
Select Blizzard Entertainment.
Open Battle.net folder.
Delete Cache folder.
Solution 6 – Perform a clean reinstall of Hearthstone
If the previous solution proved insufficient, reinstallation is the next viable solution. Furthermore, there is a possibility that the game system integration is the main reason for loading failure. You can reinstall the game in a few easy steps. In addition, we want the clean install, so you’ll have to use any registry cleaner and delete the installation folder manually.
Open Battle.net desktop app.
Select Hearthstone.
Open Options placed above game title.
Choose Uninstall Game.
After the process is finished, delete existing remainings of the game install folder.
Use registry cleaner (CCleaner is a viable choice) and clear registry.
Restart your PC and reopen Battle.net client.
Highlight Hearthstone and install the game.
Solution 7 – Use Windows File Checker tool
All of the previous steps are basically oriented on game issues. But, on some occasions due to corrupted system files, the game can suffer various problems. Therefore, you should download the Windows File Checker and look out for faulty files. You can run the mentioned tool this way:
Open Start and in the Run type CMD.
You should see the Command Prompt feature.
Right-click and choose Run as administrator.
In the command window type sfc /scannow.
Wait until the process is completed.
Close the window and restart your PC.
Solution 8 – Tweak Kernel32
The good folks of the Blizzard community suggested an additional workaround. We find it a bit risky since it involves tweaking Windows Kernel files. And we all know that can, in the worst scenario, result in a complete system crash. However, we will walk you through the process, step by step, and show you how to do it.
Go to your system partition.
Open WindowsSystem32.
Find Kernel32.dll and copy-paste it to Hearthstone_DataPlugins
Move or rename MemModule32.dll from Plugins.
Rename Kernel32.dll in Plugins folder to MemModule32.dll.
Start the game.
Please note that you may need administrative permission in order to do these steps.
We hope that the suggested workarounds will let you play Hearthstone again. If you have related issues or any suggestions or concerns, please tell us in the comments.
The Game Developers Conference, which was set to kick off on March 16 in San Francisco, is one of the many tech events to be cancelled amid growing concerns over the coronavirus outbreak. As we previously reported, Microsoft’s Game Stack team didn’t wait for GDC to be officially postponed to later this year to announce that it was pulling out in favour of an online event to be held during GDC.
— Microsoft Game Stack (@MSFTGameStack) March 9, 2020
Today, the schedule for the Game Stack Live digital-only event on March 17-18 has been made official, with multiple sessions featuring Microsoft’s internal studios such as The Coalition (Gears 5), Rare (Sea of Thieves), Turn 10 (Forza Motorsport 7), and inXile (Wasteland 3). For those unfamiliar, Microsoft’s Game Stack team is responsible for building the cloud and game development technologies that developers can leverage to create games for Xbox and other platforms, but some of the Game Stack Live sessions will actually focus on what’s coming next.
On March 18, there will be one session titled “Xbox Series X + Project xCloud = New Chapter in Gaming,” followed by another interesting session titled “What’s new in DirectX: Raytracing, mesh shading, and more.” Overall, it seems that this Game Stack Live event could be the next milestone in Microsoft’s communication strategy for the next-gen Xbox.
We still don’t know how Xbox Series X will integrate Project xCloud, Microsoft’s cloud gaming service that’s currently available in preview on iOS and Android, but we may finally get more details during this Game Stack Live event. All sessions will be live-streamed on Mixer, another Microsoft service that will hopefully get a boost from Project xCloud and Xbox Series X.
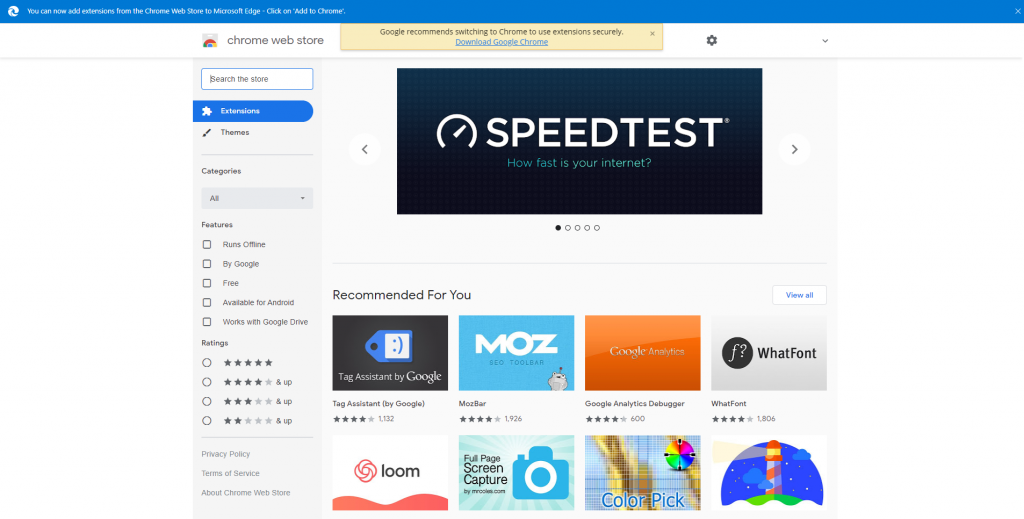
A little over half a month ago, users of Microsoft’s new Chromium-based Edge browser noticed that Google would issue a pop-up “warning” under the favorites bar about installing extensions to the browser from the Chrome Web Apps store. This caused quite the stir on the web, and especially in the Microsoft community. Perhaps in the face of such criticism, it looks as though Google has backtracked a bit as the banner has now been replaced (via Techdows.)
As a reminder, Google’s original “warning” message said that switching to Chrome is the best way to use extensions securely. This was proven as somewhat misleading, though. It was later explained a bit more in-depth by Eric Lawrence of the Edge development team that Microsoft implemented a protocol in the browser that pings the extension store roughly every 2 to 4 hours while querying for threat updates — making using extensions with the browser safer.
Now, fast forward to today, and Google’s “warning” message is gone entirely and has been removed in favor of Microsoft’s own message. Visiting the Chrome Web App Store now only shows Microsoft’s note about installing extensions. It reads, “You can now add extensions from the Chrome Web Store to Microsoft Edge – Click on Add to Chrome.”
Microsoft has made a lot of effort to ensure that Edge is indeed safer than before. There’s even a feature that can protect you from installing unwanted applications.
If you follow Microsoft, are a self starter, have experience producing timely, well-written content, and are looking for a part-time commitment of around 15+ hours per week, we are looking for you! OnMSFT has openings for writers conversant in all things Microsoft.
Pay is based on traffic, and while it isn’t a full time job, we can provide a respectable secondary income if you’re willing to put in the time and the effort. Knowledge and interests can vary, we post on a wide array of Microsoft-centric topics, from Azure to Xbox, and from breaking news to how-to and feature stories. Video expertise is not required, but it’s a plus, and we share YouTube revenue.
We have writers working from both US coasts, Australia, France, and India, so we can work out any time difference issues, but we generally work on “Redmond time” (US Pacific Time Zone, GMT -8), as that’s when the news happens.
If you’re experience, talented, and interested, apply to [email protected].
The Command Prompt has a handy little autocomplete feature allowing users to change directory paths using the Tab key. However, several users have reported Tab autocomplete is not working in CMD on Windows.
This issue can occur if the Completion Function is disabled in the registry. This can happen after installing new Windows updates, which may have disabled the feature. Keep reading to find out how to enable Tab autocomplete in Command Prompt and Terminal.
How do I turn on Tab autocomplete in CMD?
1. Enable autocomplete through Registry Editor
Press Windows + R to open Run, type regedit and click OK.
In the Registry Editor, navigate to the following locations and locate the CompletionChar entry: HKEY_CURRENT_USER\Software\Microsoft\Command ProcessorComputer\HKEY_LOCAL_MACHINE\SOFTWARE\Microsoft\Command Processor
Depending on the Windows release, you will find the Command Processor in one of the above directories.
From the right pane, double-click on the CompletionChar DWORD.
In the Value data field, enter 9 and click OK.
Next, double-click on PathCompletionChar and set the Value data to 9 as well.
Restart the computer for the changes to come into effect.
When CMD Tab autocomplete is not working, modifying the Registry, i.e., the CompletionChar and PathCompletionChar DWORDs, should get things up and running.
2. Enable tab autocomplete using Command Prompt
Press the Windows key, type cmd, and click on Run as administrator.
In the Command Prompt, enter the following commands individually and hit Enter after each: reg add "hkcusoftwaremicrosoftcommand processor" /v CompletionChar /d 9 /t REG_DWORD /freg add "hkcusoftwaremicrosoftcommand processor" /v PathCompletionChar /d 9 /t REG_DWORD /f
The above commands will add the required registry values to the registry.
Having to type the complete folder path manually is a time-consuming task, which becomes annoying if the pathname has long numbers in it. This is where the autocomplete feature comes in handy.
And with these two methods, you should be able to fix things when the CMD tab autocomplete is not working.
When you try to install Windows 10 on a dynamic disk, you may encounter the Windows cannot be installed to this hard disk space error. This error occurs because, to install Windows, you must convert the dynamic disk space to a basic disk.
The full error reads:
Windows cannot be installed to this hard disk space. The partition contains one or more dynamic volumes that are not supported for installation
As discussed earlier, to resolve this error, you must convert the dynamic disk to basic, which can be done in multiple ways.
If you are also troubled by this error, here are the three ways to resolve Windows that cannot be installed to this hard disk space error while installing Windows.
How do I fix the Windows installation hard disk error?
1. Convert dynamic disk to basic using the Disk Management tool
Press the WindowsKey + R to open Run.
Type diskmgmt.msc and click OK to open Disk Management.
The dynamic disk that needs converting will be shown in Disk Management.
Right-click on every volume on the dynamic disk and select Delete Volume.
Once all the volumes on the dynamic disk are deleted, you will see the dynamic disk presented as unallocated disk space.
Right-click on the disk and select Convert to basic.
Once the disk is converted to basic, try to install Windows and check for any improvements.
The built-in disk management tool makes it easy to convert dynamic disk to basic disk. However, the process deletes all the data on the disk during conversion.
In the main interface, find the dynamic disk that you want to convert.
Right-click on the dynamic disk and select Convert to Basic Disk.
Click OK to confirm the action.
Return to the main interface again.
Click on Commit and then click on Proceed to complete the process.
The AOMEI Partition Assistant tool may take a few minutes to complete the task. Once done, the disk is ready to install Windows without losing any data.
While the Windows OS has a built-in disk management tool, it cannot convert the disk to basic from dynamic without deleting the data.
Type diskpart and click OK to open the Diskpart tool.
This Command Prompt-based utility requires you to execute a few commands to convert the disk.
In the command prompt, enter the following command to list disks.
list disk
Enter the following command to select the disk you want to convert. In the below command N refer to the disk number of the dynamic disk that you want to convert.
select disk n
Next, enter the following commands one by one:
list volume
select volume m
m is the number of the volume on the dynamic disk
delete volume
Repeat the two commands select volume m and delete volume to delete all volumes
select disk n
convert basic
While executing the command, make sure you have selected the right disk before deleting the volume and converting it.
Windows cannot be installed on this hard disk space since the partition contains one or more dynamic volumes not supported for installation. If you’re struggling with this solution, you can find a complete guide on how to convert your dynamic disk to a basic disk on Windows.
While installing a third-party PDF reading software like PhantomPDF, you may encounter the Windows cannot install the kernel-mode print driver error.
In this article, we look closely at a few troubleshooting tips to help you resolve the Windows cannot install kernel-mode print driver error in Windows 10.
What can I do if Windows cannot install the Kernel Mode print driver?
1. Disable the blocking policy for installation of drivers
Press the Windows key + R, type gpedit.msc and click OK to open the Group Policy Editor.
In the Group Policy Editor window, expand the Local computer Policy option.
Next, navigate to the following path: Computer Configuration\Administrative Templates\Printers
On the right pane, locate and double-click on Disallow installation of printers using kernel-mode drivers policy.
In the properties window, select Disabled and click OK.
Click Apply and OK to save the changes and close Group Policy Editor.
Press the Windows key and type cmd. Right-click on Command Prompt and select Run as administrator.
In the Command Prompt, enter the following command and hit Enter: gpupdate
If that did not work, use gpupdate/force
Close the Command Prompt and try to install the program.
Depending on the version of Windows installed, the Group Policy Editor may or may not be available on your computer.
Open the Device Manager by pressing Windows key + X and choosing Device Manager from the list.
Right-click on Printers and select Properties.
Click on Settings and select Devices and Printers Folder.
Right-click on the printer you want to update.
Outdated or damaged printer drivers might cause the Windows kernel-mode print driver error. You can manually update them by following the above steps. We also have a great guide with detailed steps on how to download printer drivers, so don’t miss it.
You can also use an automatic tool that scans your PC and installs the most suitable drivers, optimizing your Windows OS and the overall system performance.
3. Configure point and printer restriction
3.1 Rename W32x86 / X64 folders
Open the File Explorer and navigate to the following location: C:\windows\system32\spool\drivers
In the Drivers folder, rename the following folders to anything you want:
W32x86
X64
Renaming these folders will remove incomplete or corrupt printer driver installation.
It will also remove your printer settings. So if you have a working printer, you may have to reinstall the printer drivers again to make your printer work.
Following this article’s steps, you can remove the limitations and resolve the error. Let us know which method helped you resolve the error in the comments.
Microsoft’s Surface Laptop 3 gets new Core i5 variant with 16GB RAM and 256GB SSD
A new variant of the Surface Laptop 3 has been made available, it runs a Core i5 CPU sporting 16GB RAM whilst coming with a 256GB SSD for storage. It gives more flexibility in having a more powerful Surface device without exponentially increasing cost due to the CPU.
New PowerToys for Windows 10 updates brings over 100 fixes and new auto-update tool
PowerToys on Windows 10 has received a new update that brings more than 100 bug fixes, as well as the ability to auto-update the tool.
That’s it for this week. We will be back next week with more Windows 10 news.
This error can occur if you are trying to print a page that is too large for the imagesetter or CtP device.
If your printer does not support explicit paper tray selection, it may generate rangecheck error if a wrong cassette is selected.
Check if the path is too long
Long path names of embedded images can also cause the rangecheck errors.
If your images have long names, try shortening the names for folders.
The Error rangecheck offending command image can occur due to bad Postscript code or if the Postscript drivers are not compatible with the print job.
This isn’t the only issue you can encounter, and many reported Printer error has occurred message, but we already covered that issue in a separate guide.
If any of our methods helped you, or if you know of another one we may have skipped, let us know by leaving us a message in the comments section below.
If the printer has multiple print jobs in the queue, it may show a pending deletion printer error, documents waiting error in the print box on the status line.
Several users have reported similar errors in the Microsoft community forum.
Have just one HP 4L printer, but is appearing on my printer list twice,4Land4L Copy 1. The 4L Copy 1, has 5 documents in its queue, but its status is : Offline – Pending deletion. (What does pending deletion mean?)
If you are also troubled by this error, here are a couple of troubleshooting tips to help you resolve the pending deletion printer error in Windows.
How to resolve pending deletion printer error?
1. Remove the print queue
Press Windows Key + R to open Run.
Type services.msc and click OK to open Services.
The UAC may ask you to provide admin access. Click Yes to proceed.
In the Services window, look for Print Spooler service.
Right-click on Print Spooler and select Properties.
In the properties window, click the Stop button under Service status.
Next, open the File Explorer and navigate to the following location:
C:\Windows\System32\Spool\printers
You may require admin access to access the Printers folder.
Delete all the jobs inside the Printers folder.
In the Printer Spooler Properties window, click the Start button and close the Service window.
Restart the computer.
Give a print job and check if the error is resolved.
2. Run printer troubleshooter
Click Start and select Settings.
Go to Update and Security.
From the left pane, click on the Troubleshoot tab.
Scroll down and click on Printer.
Click the Run the troubleshooter button.
Follow on-screen instructions to troubleshoot issues with the printer.
Apply any fixes recommended by the troubleshooter and check for any improvements.
3. Reinstall printer drivers
Press Windows Key + R to open Run.
Type control and click OK.
In the Control Panel window, open Hardware and Sound.
Click on Devices and Printers.
Right-click on your Printer and select Properties.
Open the Hardware tab and click the Properties button.
Open the Driver tab and click the Uninstall button.
Close the Properties window and restart the computer.
Upon restart, Windows will reinstall the driver, and that should resolve any issues with the printer.
A computer cannot manage video cards, computer programs, sound cards, or other hardware; they must be managed by a driver. If you are completely familiar with the drivers your PC requires, you can update them manually.
If you don’t have time to search for the best driver, an alternative is to use a driver updater tool, which can detect obsolete, missing, or corrupted drivers.
This type of tool, such as Fortect Driver Updater, not only downloads and installs drivers, but also manages them by troubleshooting, backing up, and restoring them. Try it out for yourself and see how easily it flows.
Scroll down and select your printer from the list.
Click the Remove device button.
Click Yes to confirm the action.
4.1 Add the printer
Click Start and select Settings.
Go to Devices > Printers and Scanners.
Under Add printers and scanners, click on Add a printer or scanner button.
Follow on-screen instructions to add the printer.
If the printer is added successfully, try giving a print job and check if the error is resolved.
If the issue persists, go to Start > Settings > Update and Security. Download and install pending Windows updates to download additional drivers for the printer.
The pending deletion printer error is a common problem that can be resolved by restarting the Print Spooler service. However, if the issue persists, follow other steps in this article to get your printer working again in no time.
If you found our article useful, let us know which method worked best for you by leaving your feedback in the comments section below.
The battle for streaming dominance has gotten bigger as Disney Plus stepped in. Considering the impressive library, it was surprising to see it without a Continue watching feature for tracking progress.
Disney Plus had a bumpy start, with many users reporting difficulty logging into their accounts, completing payment or watching The Mandalorian. One of the company’s first moves to address these issues was to remove certain features, the Continue watching list being one of them.
Subscribers were disappointed by this major shortcoming and started a flood of support inquiries to customer service. Disney Plus is not continuing shows and movies where you left off either?
If you left a series, you would have to either watch it again from the very beginning or manually figure out the moment you stopped watching. Worry no longer about this inconvenience since Disney corrected that.
It eventually added back the ability to track your viewing progress into its platform. You just need to know where to look for in order to easily pick up a movie or show for watching it later.
Where is my Continue Watching on Disney Plus?
Continue Watching on Disney Plus
Quickly jumping back into a movie or show without digging through menus is possible thanks to the Continue Watching feature.
In the Disney Plus interface, Continue Watching finally shows up as a row on the main screen. This displays all your most recently viewed selections. Even more, there’s also a Resume button on individual show and movie pages.
You may use it to easily restart the film or episode at the point where you last stopped watching. If you still can’t see the Continue Watching feature on your end, it’s just a matter of waiting. Don’t panic, it’ll probably appear shortly.
Moreover, Disney still needs to iron out these bugs. It’s a recently launched service, so it’s bound to glitches and features working with a certain inconsistency. Despite these few hiccups, the feature is meant to work across platforms.
If you play pause on your favorite show on a mobile phone, you will able to resume playback on your connected TV device or PC with ease. Just give it a try and confirm that it works or take a closer at some effective ways to address playback issues in the browser.
With these being said, the addition of a Continue Watching feature should finally allow you to easily keep track of what show you were interested in and where exactly you left off in a rewatch of one of those amazing TV episodes from your childhood.
Back in 2017, Microsoft launched an initiative to bring broadband connectivity to the more rural parts of the world, starting first in select US regions with the eventual goal of deploying its efforts to three million people in underserved areas within the United States by 2022. Roughly two years into the project, Microsoft is reporting that the company has reached 50% viability of its goal but notes that “one thing we have learned is that the problem is even bigger than we imagined.”
Far from throwing up its hands and calling it a day, Microsoft acknowledges that the broadband gap between more rural parts of the United States versus the more metropolitan areas presents a unique challenge but ultimately a solvable one.
According to the Federal Communications Commission’s (FCC)2019 broadband report, more than 21 million people in America, nearly 17 million of who live in rural communities, don’t have access to broadband.
Part of the issue facing Microsoft in its efforts to expand broadband access are the numbers being reported. According to a recent study published by BroadbandNow, the number of unserved people may look to be almost double the currently reported states. The lack of access to broadband connectivity exceeds 42 million Americans with a majority living in the more rural parts of the country, furthermore, Microsoft’s own internal research finds that over 157.3 million people in the US aren’t utilizing internet access at broadband speeds.
As we’ve said from the start of the initiative, without accurate data we cannot fully understand the broadband gap. You cannot solve a problem youdon’t understand.More accurate data will help deploy broadband in the places its needed.
While waiting to get a handle on the exact number of people who do not have access to or are not utilizing broadband speeds, Microsoft continues its project and is now reporting that its white noise utilization is up and running in “25 states and one territory, and staging pilot programs in two additional states.” On top of their spreading presence in the United States, Microsoft’s broadband efforts have touched 633,000 people who previously were underserved by their previous internet access. According to Microsoft’s numbers, the 633,000 best the company’s expansion in 2018 where it managed to only serve 24,000 people. Microsoft plans an accelerated reach of its broadband project by leveraging its partner’s network deployments such as Wisper Internet to its 1 million customers across six states, Watch Communications to 860,000 users, and Sacred Wind Communications 47,000 people off the Navajo lands.
Aside from leveraging a growing list of telecommunications partners, another factor to Microsoft’s enthusiasm about expanding its efforts and potentially exceeding its goals comes by way of lowered connectivity costs through TV white spaces devices in general. TVWS connectivity technology prices have dropped YoY by 50% while simultaneously increasing broadband speeds by 10 times as much as before. While not a cure-all for the many issues ravaging ecosystems in rural America, Microsoft is hoping that connectivity will assist its other endeavors such as its TechSpark program, digital skills, and telehealth initiatives to boost job creation and employment in the areas.
Microsoft listed this particular update as an “Annual Updated” so we can presume we’ll get another update this time in 2021 where the company’s numbers have once again risen across the board, meaning the access to information is further democratized in the U.S.
Named Fuser, this new game tasks the player with mixing over 100 songs together by blending blend vocals, bass lines, beats and riffs from different tracks. It actually sounds very similar to the Dropmix card game that Harmonix also made recently.
Fuser will support both solo and online multiplayer modes and gamers will be able to share their creations on social media.
Here’s the official announcement trailer:
No release date for Fuser has been announced yet, however, it has been stated that it’s expected to launch in Fall this year.
To help promote the upcoming release of the Ori and the Will of the Wisps video game, Microsoft has created 10 official bonsai (see above image) based on the title and is giving each of them away to gamers.
Those interested in obtaining this limited, and pretty cool, piece of video game memorabilia can enter the giveaway by simply replying to this Facebook post with an emoji or GIF that represents their own spirit.
The competition will close on March 9th and is limited to gamers who are residents of Australia. You can read the full terms and conditions here.
Crossplay is now live for Black Desert players on Xbox One and PlayStation 4 consoles. This means that gamers on each platform can now play with each other in games which should significantly boost the number of players online in the MMORPG.
Black Desert players will still be able to select console-specific servers if they want but special Conquest and Node Wars events are currently planned for cross-console servers which should entice many to try the feature out.
Black Desert is the latest of many video games being given cross-console support following the likes of Minecraft, Dauntless, Fortnite, and Next Up Hero.
Download PCL5 / HP Universal Print Driver for Windows.
Install the drivers and check for any improvements.
If your printer is using a PCL6 driver, you may want to use PostScript or PCL5 drivers. Several users have reported that changing the printer driver has resolved the issue.
Select the Printers andScanners tab from the left pane.
Select your printer from the list of devices and click the Remove Device button.
4.2 Uninstall printer software
Click on Start and select Settings.
Go to Apps.
Search for your printer name or app.
Select the printer software and click on Uninstall. You may have to confirm the action by clicking on Yes.
This method works best when you perform a complete uninstall. That being said, a good third-party uninstaler will help you get rid of any residual data left over from uninstalls.
4.3. Remove drivers from Printer Server Properties
Click on Start and select Settings.
Go to Devices.
Scroll down to the Related settings section.
Click on Printer server properties.
In the new window, select the Drivers tab.
Select the printer you want to remove from the list and click the Remove button.
In the Remove Driver And Package box, select Remove driver and driver package option.
Click OK to proceed.
Click Delete to confirm the action.
4.4. Install the printer and driver
Download the latest version of drivers for your printer from the manufacturer’s website.
Install the driver and check for any improvements.
The Insufficient memory to load selected printer error can be resolved by resetting the printer to factory default. However, if the issue persists, try using universal printer drivers or reinstalling the printer.
If you are using Adobe Acrobat Reader, try resetting the preference settings.
Next, check if the application has any updates pending.
Adobe Acrobat Reader comes with a built-in repair tool.
Click on Help and select Repair Installation.
Follow on-screen instructions to fix any installation-related issues.
3.1 Isolate the file-specific problem
Open the PDF file in Microsoft Word.
Click Enable Editing button on top.
Click File and select Save as.
Select a folder to save the file.
Click the drop-down menu for Save as type and select PDF.
Click the Save button.
Open the file in Acrobat Reader and check for any improvements.
The Printer error ioerror offending command image usually occurs due to printer disk problems or application-related issues. Follow the steps in this article to fix this error and get your printer working.
If you are aware of another method that lets you fix the Printer error ioerror offending command image, tell us about it in the comments section below so that other users can use it as well.