The Xbox Forums have now completely migrated to the Microsoft Community forums

Over the past few months, we’ve documented the slow move of the Xbox Forums over to the Microsoft Community forums. Today, on August 29, things have finally become official, and the move is now complete.

Microsoft acknowledges the official forums move over in a blog post, mentioning that it is a result of Xbox continuing to grow and evolve. The company also reminds users that the Microsoft Community forums feature the same ability to ask Xbox questions, chat about games, and get help. Additionally, there is the bonus of checking out the other communities about Windows, Office, Skype, and more.

For those new to the Microsoft Community Forums, you can still earn XP while using the Xbox area. Upvotes will give you 10 XP, a verified forums post 75 XP, replies 10 to 25 XP, and a gaming guide 75XP.  Microsoft also provides the following tricks and tips:

  • Make sure to sign in using your Microsoft account to the Microsoft Community forums to create new threads and replies, and you’ll even show up as an “Ambassador” when you do.
  • To get to Xbox Forums, navigate to “Categories” at the top left and scroll down to select “Xbox.”
  • Now, Microsoft Community forums has a lot of threads, so to browse different thread options, make sure to use the filter boxes to hone down your search options. There is even advanced filters to narrow down your search even more.
  • The first threads you see under “Featured” are sticky threads that apply to the hierarchy level you choose in the category, topic, and/or topic filter options.
  • Want to start a discussion or ask a question? No problem. Make sure to navigate to “Ask a question” at the top right-hand corner of the webpage and ask away.
  • When you start a new thread, you decide where it appears in the hierarchy and whether it’s a discussion tread or a question. Plus, you have the option to be notified when someone responds to your post.

You should also be reminded that the Xbox Forums for Ambassadors has also migrated over. You can find it by navigating to the “Private Categories drop-down and selecting “Ambassadors.” Once there, you will see a “Topic” drop down. Feel free to head to the Microsoft Community Forums now and check it out.

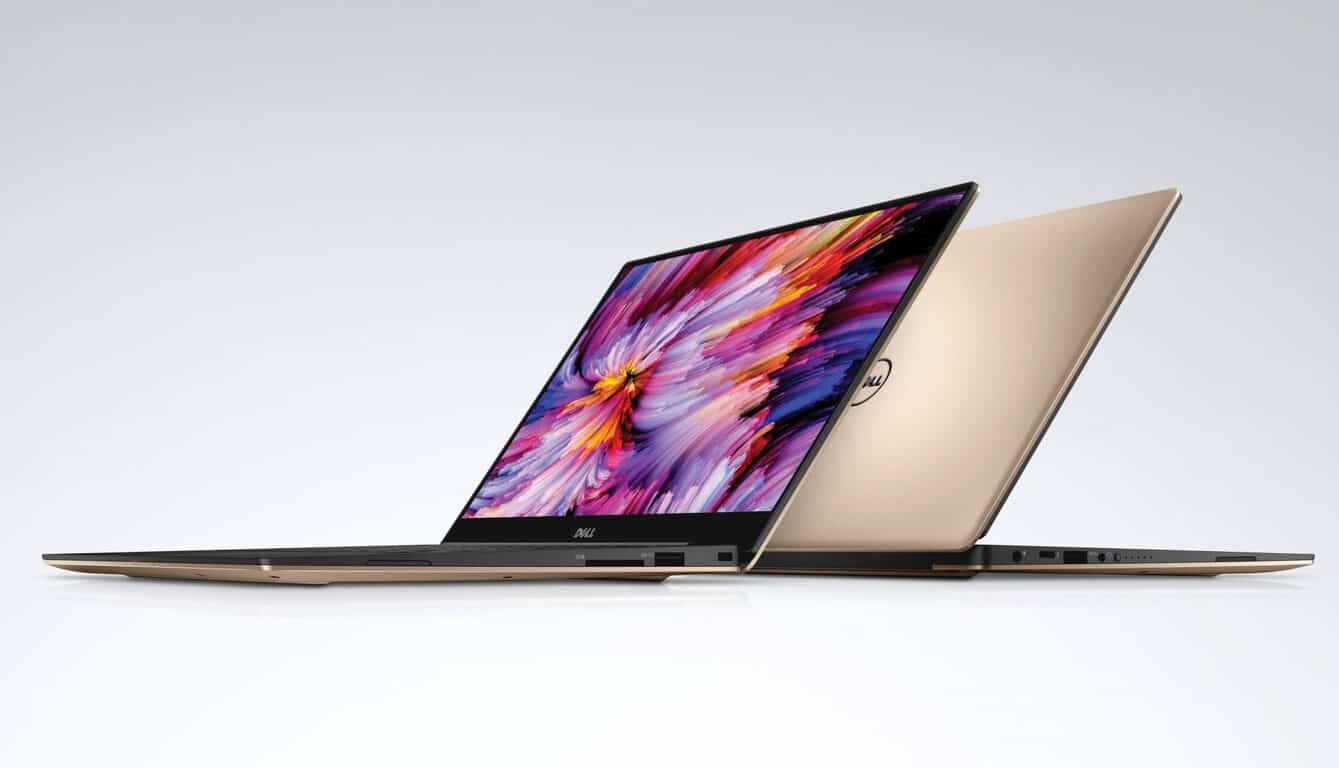
Dell updates their XPS 13 line of computers with new processors

When it comes to the laptop upgrades, it’s not always about thinning the chassis or widening the viewable screen ration. Sometimes, updating a laptop can be as simple and useful as just upgrading the processor powering an already well made device, and that’s just what Dell has done.

Dell’s widely popular XPS 13 2-in-1 device has just been updated with Intel’s latest 8th Gen Core i5 and i7 processors. Dell’s super portable laptop has just been juiced with processor that improves responsiveness at lower power consumption. The new 8th Gen processors also do well in performance bursts by making use of Dynamic Power Mode in Windows 10.

Fortunately, leaving the body relatively unchanged allows Dell to provide the updated XPS 13 2-in-1’s at an affordable price for consumers.

Dell has announced an entire line up of upgraded devices and for more information keep it locked here.

Bid now on this custom Shadow of the Tomb Raider Xbox One X to benefit charity

We’ve seen Microsoft come up with some cool custom Xbox One systems before, and now another one has just entered the picture. Indeed, you can now bid on a custom Shadow of the Tomb Raider Xbox One X to benefit charity.

Bids for the custom console are now open on eBay, with the leading price currently at $1,125. The console is decorated with custom Tomb Raider inspired designs and includes a matching Xbox Wireless Controller and also a digital download of Shadow of the Tomb Raider.

Proceeds will benefit Best Friends Animal Society, which is a nationwide animal rescue and advocacy organization, with spay neuter, TNR (trap neuter return), pet adoption and no-kill programs. There are also several other items which you can bid on, including three Xbox One X 1TB Shadow of the Tomb Raider bundles which are autographed by Camilla Luddington, the actress who plays Lara Croft.

The price might be out of reach for the average gamer, but it is still nice to see Microsoft and Square Enix teaming up to help benefit charity. Everyone else with emptier pockets might just have to wait until September 14, when the Shadow of the Tomb Raider game and the Shadow of the Tomb Raider Xbox One X bundles hits store shelves.

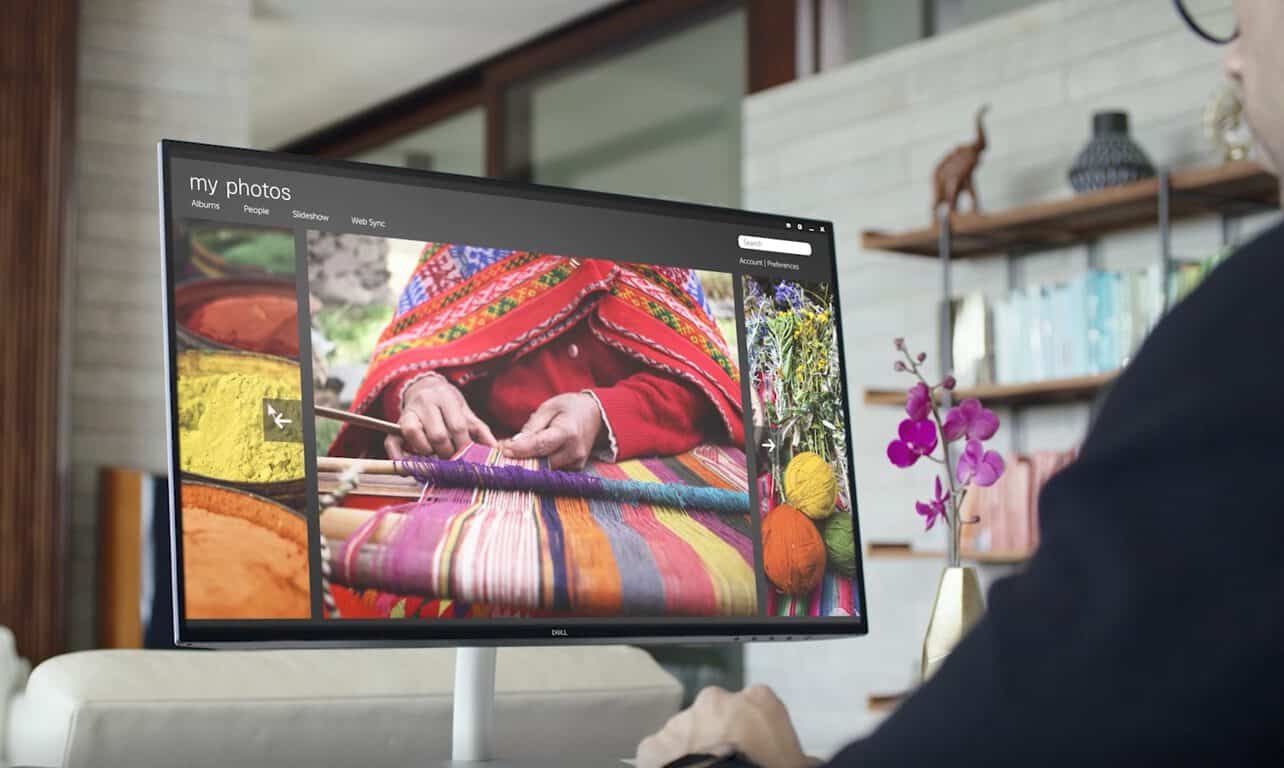
Dell 27 USB-C Ultrathin monitor announced, looks very cool

The Dell 27 USB-C Ultrathin monitor is the world’s brightest 27-inch USB-C ultrathin monitor. With 600 nits in peak brightness, the Dell 27 USB-C Ultrathin (S2719DC) is a premium HDR monitor with VESA-certified DisplayHDR 600 and integrated with Corning Iris™ Glass Light-Guide Plate (LGP) technology. Take a look at the monitor in action in this video.

As noted in a post on the Windows Blog, the monitor has a USB-C connection that can transfer video, data, and power, all from a single port. Dell’s cutting edge design is amazingly thin, just 5.5mm at its thinnest point. The Dell 27 USB-C Ultrathin monitor allows you to enjoy crisp images with Quad HD resolution (2560×1440) and Dell’s InfinityEdge display allows a wide viewing angle enabled by In-Plane Switching technology.

Microsoft, Windows 10, USB-C
The Dell 27 USB-C Ultrathin monitor back

The Dell 27 USB-C Ultrathin monitor shows you more than 99 percent sRGB and 90 percent DCI-P3 color coverage too. Other bonuses of the Dell 27 USB-C Ultrathin monitor include:

    • Connect your laptop to the monitor and charge up to 45W from a single source.
    • Quickly power up your devices with one of the USB downstream ports. And plug in to all your accessories on the other.
    • This TUV Certified monitor has a flicker-free screen with ComfortView, a feature that filters out harmful blue light emissions.

The Dell 27 USB-C Ultrathin monitor is the latest of new announcements made by Dell, Acer, and Intel, on new mixed-reality headsets, laptops, and more unveiled at IFA in Berlin this week.

Windows 10/11 system time jumps backwards [FIX]

Many Windows 10 users have encountered a weird system time issue recently where it set itself to the past at random intervals. Users report there is no particular warning prior to the system time change. Fortunately, one resourceful user managed to pinpoint the culprit to this issue and came up with a quick fix.

System time jumps back on Windows 10 PCs, how to fix it?

If system time jumps back on your PC, that can be an annoying problem. Speaking of this issue, here are some similar problems that users reported:

  • Computer clock going backwards – This is a relatively common problem that can occur, and if you encounter it, be sure to reregister Windows Time services.
  • Computer clock keeps jumping ahead – This issue can occur if your clock isn’t properly synchronized. Simply adjust your date and time and check if that solves the problem.
  • Computer clock always ahead – If your clock is ahead, it’s possible that your time zone isn’t correct. Check your settings and make sure that you’re using the correct time zone.
  • My computer date and time keeps resetting – This problem can occur due to third-party applications. If you have any application that affects your clock, be sure to remove it.
  • System time wrong – Sometimes your system time can be wrong due to your registry. However, you can fix that issue simply by making a couple of changes in the registry.
  • System time keeps changing, resetting – In some cases, your motherboard battery can cause this issue to appear, and in order to fix it, you might need to replace it.

Solution 1 – Restart your PC

Sometimes the simplest issue is the best, and if your system time jumps back, you might be able to fix the problem simply by restarting your PC.

Several users reported that restarting their PC temporarily fixed the problem for them, so you should definitely try that out. Keep in mind that this is just a temporary solution, and it might not permanently fix your problem.


Solution 2 – Reregister Windows Time services

According to users, this problem can occur due to issues with Windows Time service. Sometimes this service might have some problems, and in order to fix them, it’s advised to reregister the service. This is relatively simple to do, and you can do it by following these steps:

  1. Press Windows Key + X to open Win + X menu. Now choose Command Prompt (Admin) or PowerShell (Admin) from the list of results.
    Computer clock going backwards
  2. Now run the following commands:
  • Net stop w32time
  • W32tm /unregister
  • W32tm /register
  • W32tm /start
  • W32tm /resync /force

Solution 3 – Modify your registry

According to users, sometimes this problem can be caused by values in your registry. If your system time jumps back, you might be able to fix this problem simply by making a couple of changes in your registry. To do that, follow these steps:

  1. Press Windows Key + R and enter regedit. Press Enter and click OK.
    Computer clock going backwards
  2. Go to HKEY_LOCAL_MACHINESYSTEMCurrentControlSetServicesw32timeConfig and set UtilizeSslTimeData to 0 (zero).

After making these changes to the registry, your issue should be completely resolved.


Solution 4 – Remove problematic applications

According to users, sometimes third-party applications can interfere with your system and cause certain issues. If your system time jumps back, the issue could be a third-party application.

Several users reported that PC Auto Shutdown software caused this issue, so if you’re using this application, be sure to remove it. In fact, any other third-party application that has features related to time adjustment can cause this problem to appear.

To fix the issue, you should remove the problematic application completely. There are several ways to do that, but the most effective one is to use an uninstaller software. In case you’re not familiar, uninstaller software will remove the desired application and all its files and registry entries.

By using the uninstaller software, you’ll ensure that the application is completely removed from your PC. There are many great uninstaller applications, but one of the simplest to use is IOBit Uninstaller, so be sure to try it out.


Solution 5 – Make sure that Windows Time service is properly running

If your system time jumps back, the problem might one of your services. Windows Time service is in charge of your clock, and if there’s an issue with this service, your time might not be correct. However, you can fix the problem simply by making a few changes to this service.

To do that, follow these steps:

  1. Press Windows Key + R and enter services.msc. Now press Enter or click OK.
    Computer clock keeps jumping ahead
  2. Now locate Windows Time service and double-click it to open its properties.
    Computer clock always ahead
  3. Set Startup type to Automatic and then click Apply and OK to save changes.
    My computer date and time keeps resetting

After doing that, restart your PC and the issue with the system time should be resolved.


Solution 6 – Adjust your clock and time zone

If your system time jumps back, you might be able to temporarily fix this problem simply by readjusting your time and date. To do that, follow these steps:

  1. Right-click the clock in the bottom right corner and select Adjust date/time from the context menu.
    System time wrong
  2. Disable Set time automatically option. Now wait for a few seconds and enable this option again.
    System time keeps changing

This should automatically update your time and date. Alternatively, you can click the Change button and change the time and date on your own. In addition, make sure that your time zone is correct as well.

In most cases this is just a temporary solution, but it should somewhat help with this problem.


Solution 7 – Change the time synchronization server

Sometimes system time jumps back on your PC because the time synchronization server might not be working properly. If you’re having this issue, we strongly advise you to switch to a different time server.

This is pretty simple to do, and you can do it by following these steps:

  1. Press Windows Key + S and enter control panel. Select Control Panel from the list of results.
    Computer clock keeps jumping ahead
  2. When the Control Panel opens, go to Date and Time section.
    Computer clock always ahead
  3. Date and Time window will now appear. Go to the Internet Time tab and click Change settings button.
    My computer date and time keeps resetting
  4. Select a different server from the list and click Update now button. Now click OK to save changes.
    System time wrong

After selecting a different server, check if the problem is resolved.


Solution 8 – Check your battery

According to users, some of the most common causes for incorrect time on your PC is your motherboard battery. If you don’t know, your PC has a built-in battery that allows BIOS to save settings and keep the clock running while your PC is turned off.

However, your battery can get drained or damaged after a while, and if that’s the case, your PC won’t be able to keep track of time anymore, and you’ll end up with this kind of problem. However, you can check if your battery is the problem with ease.

To do that, simply enter BIOS and adjust your time and date from there. Now save changes and boot to Windows. If your date and time are still correct, turn off your PC and disconnect it from the power outlet.

Leave your PC like that for an hour or two. Better yet, leave it disconnected from the power outlet over the night. After leaving the PC unplugged for a couple of hours, turn it back on again. If the issue reappears, it’s rather likely that your battery is faulty.

To fix the problem, you’ll need to purchase a new motherboard battery and replace the faulty one. If you don’t know how to do that, or if your PC is under warranty, it might be best to contact the official repair center.

Incorrect system time can be a big problem, but we hope that you managed to fix this issue on your PC by using one of our solutions.


RELATED STORIES YOU NEED TO CHECK OUT:

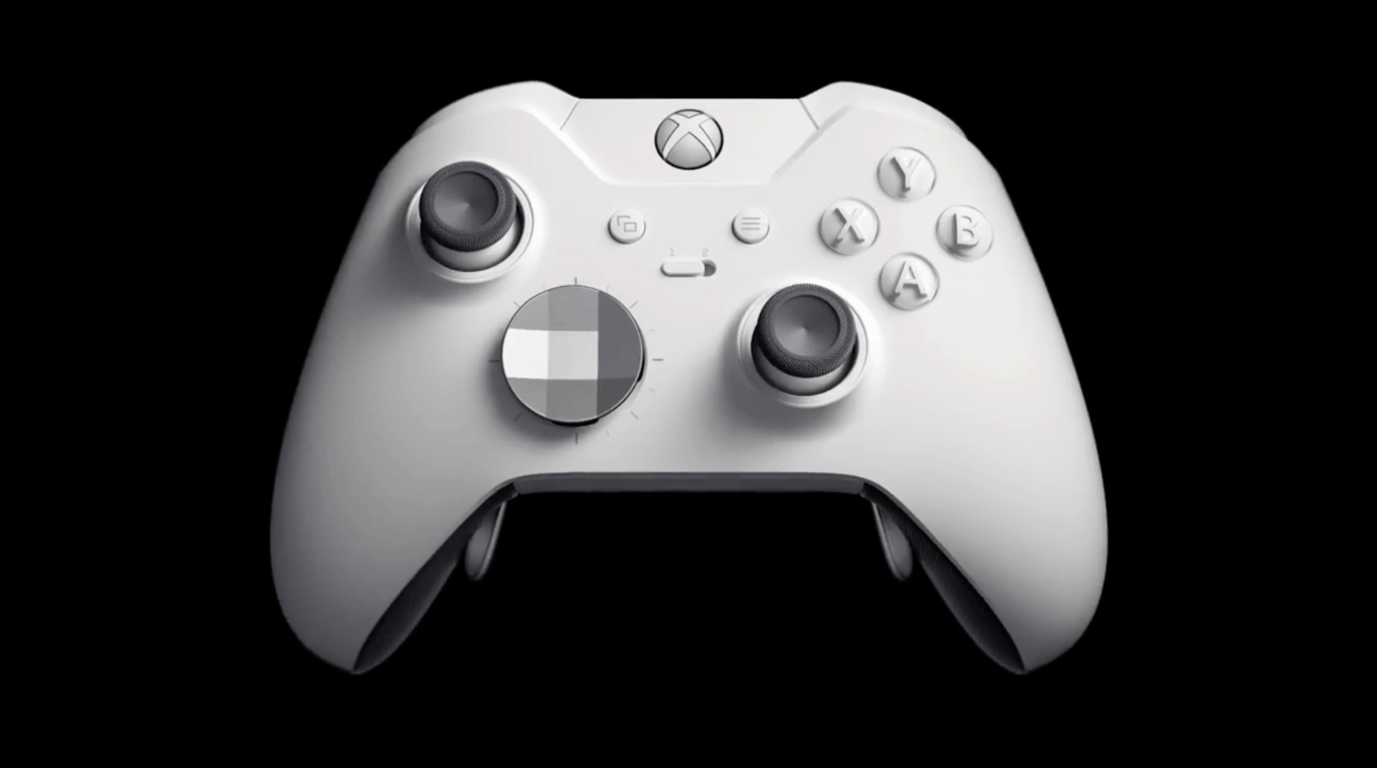
Microsoft rolls out a white Xbox Elite Controller

Even though Xbox fans can now create customized versions of the basic Xbox One controller with Microsoft’s Xbox Design Lab, the company has yet to offer custom design options for its premium Xbox Elite Controller. Until now, the $149 controller was only available in black, but Microsoft is launching today a White Special Edition that should go along well with a white Xbox One S.

There is really nothing special about this new white Xbox Elite controller, except its color. Microsoft has kept the same swappable components (thumbsticks, D-pads, and paddles), Hair Trigger Locks, Rubberized diamond grip and button mapping options through the Xbox Accessory app. And to be clear, this white Xbox Elite Controller uses the same Xbox wireless technology as the original model, and there’s no Bluetooth support like on the new standard Xbox controllers.

You can pre-order the $149.99 white Xbox Elite controller at the Microsoft Store today, and it will start shipping worldwide on October 16. If you always wanted to have a white Xbox One X, the company also announced an Xbox One X Robot White Special Edition Fallout 76 bundle today, which will be available worldwide starting November 14.

Xbox introduces three new “idea drives,” wants to hear from you

It was just four months ago that Microsoft opted to close the Xbox Feedback website in favor of a new Xbox Ideas website. The company then later launched “idea drives” as a new three-step process for consumers to submit specific Xbox themed ideas and features. Today team Xbox is following up by introducing three new “idea drives,” noting that they want to hear from you.

They’re themed towards three key Xbox features— Gamer Profile, Xbox Game Pass, and Family Settings and Child Accounts. Team Xbox wants to know how you can improve these three areas, be it highlighting achievements, finding new Xbox Game Pass titles, or managing family permissions. You can learn more and submit your own thoughts by checking out the Xbox Ideas Website.

As a reminder, once feedback is collected, it enters a voting phase, followed by the completion phase where Microsoft reviews requests for new features. This shows that the Xbox team is always listening to your wants and needs, so be sure to head to Xbox Ideas today if you’ve got a burning Xbox-themed suggestion or idea.

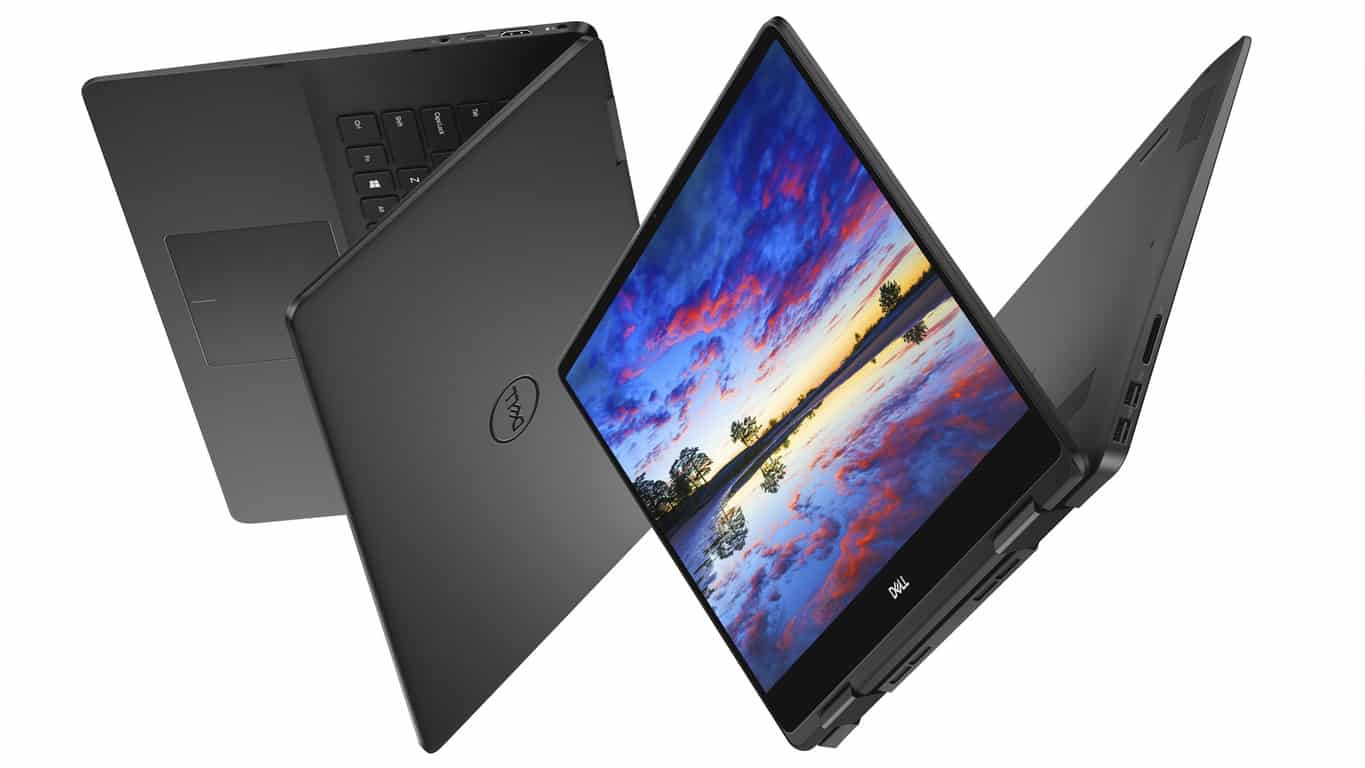
Dell announces new Inspiron 2-in-1 PCs with new Intel chips and Alexa support

Dell has announced a several new devices today which will ship with Intel’s new 8th Gen Intel Core processors.

The Inspiron 7000 2-in-1 devices (see above image) will come in 13, 15, and 17-inch sizes, will use the new U Series processor, and will come with option 4K UHD screens. The 13 and 15-inch models will feature a webcam with Temporal Noise Reduction which, according to Dell’s press release, will make it the “first PC-integrated USB camera to use this technology.” The 15 and 17-inch 7000 models will also make available optional NVIDIA GeForce MX150 and Intel OptaneTM Memory to boost graphics and memory respectively.

The Dell’s Inspiron 7000 2-in-1s will ship on October 2nd being “Alexa-ready” however Amazon’s virtual assistant isn’t expected to launch until a later date. The 13-inch model will start at $879.99, while the 15-inch will begin at $849.99, and the 17-inch at $1,099.99.

Inspiron 14 5000 2-in-1

The Inspiron 14 5000 2-in-1, which will be available in 5481 and 5482 models, will use the new U Series processor as well. The 5482 model will feature a USB Type-C port with a NVIDIA GeForce MX130 discrete graphics card being an optional extra. The 5481 Inspiron 14 5000 model will include a “full-size HDMI port, a full-size SD card reader, two USB 3.1 Generation 1 ports, one USB 2.0 port.”

Dell’s Inspiron 14 5000 2-in-1s are expected to launch on October 2nd this year with the 5482 model starting at $599.99 while the 5481 will be slightly cheaper at $459.99.

Do any of these new computers interest you? Let us know which ones in the comments below and then follow us on Twitter for more tech news.

Intel reveals 8th Gen Intel Core processors with Gigabit Wi-Fi speeds

Earlier today, Intel formally revealed their new 8th Gen Intel Core U-series and Y-series processors. Both chips are designed for 2-in-1 devices and light laptops and enable Gigabit Wi-Fi internet speeds which are described by Intel as being up to “12-times faster” than normal. The U-series chip also provides faster LTE speeds while both are said to offer processing speeds twice that of the average five year old computer.

“The new 8th Gen Intel Core processors extend once again our leadership in delivering exceptional performance,” Intel’s Christ Walker said in a press release. “Now with Gigabit Wi-Fi, we’ve enabled faster PC connectivity, added more intuitive voice experiences and enabled longer battery life needed for the next wave of mobile computing.”

The new U-series chip is designed to support “multiple voice services” with both Amazon’s Alexa and Microsoft’s Cortana being mentioned by name. It will also enable Dolby Vision HDR and Dolby Atmos functionality on compatible devices. The Y-series on the other hand is geared more towards improved touch and stylus functionality.

Devices featuring both processors will be available this fall according to Intel.

How to fix IntcOED errors in Windows 10/11

Intel Smart Sound Technology OSD driver is one of the most prominent reasons for system sound issues on so many Windows 10 laptops. It’s easily recognizable since it often causes sound issues and, eventually, even BSODs. Users who experienced these have found that the error is identified as “IntcOED”. Which, of course, points in the Intel Smart Sound Technology driver’s direction.

We provided a few solutions, hoping they’ll help you address the issue at hand. Start from the beginning and move onwards through the list.

How to fix “IntcOED” critical system error in Windows 10

  1. Run Sound Troubleshooter
  2. Update drivers
  3. Run SFC
  4. Try with DISM
  5. Disable onboard graphics and Intel Smart Sound
  6. Update BIOS
  7. Start the system in a clean boot
  8. Update Windows
  9. Reset your PC to factory settings
  10. Reinstall Windows 10

1. Run Sound Troubleshooter

Even though the possible instigator is uncertain, this is most certainly the Intel Smart Sound issue. The error appears mostly due to the failed integration of the Intel Smart Sound driver in Windows 10. And, since we already know how Windows 10 has issues with drivers, especially with some older hardware.

The first step you can take is to allow Windows 10 to fix the problem through the built-in troubleshooting tool. If you’re missing the sound, the obvious step is to run the Audio Troubleshooter. This might be a long stretch, taking into consideration how serious is the error at hand. But, it won’t cost you anything to give it a try.

Here’s how to run Play Audio Troubleshooter in Windows 10:

  1. Right-click on the Start and open Settings.
  2. Choose Update & Security.intcoed error
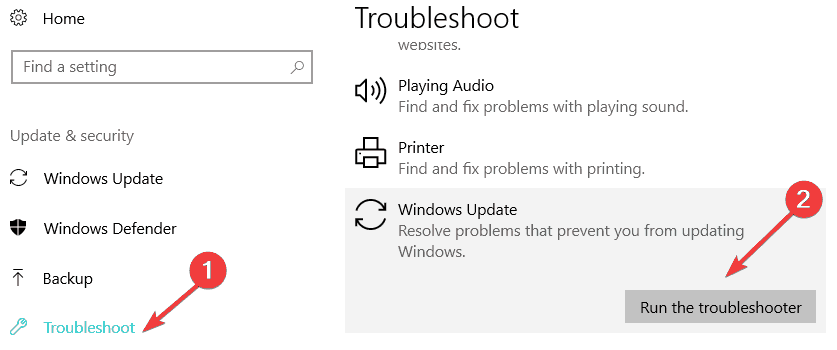
  3. Select Troubleshoot from the left pane.
  4. Expand the “Playing Audio” Troubleshooter.
  5. Click on the “Run the troubleshooter” button.intcoed error

2. Update drivers

In regular circumstances, this step should resolve the “IntcOED” error. Drivers are, as we already said, are the main reason for this more than unwelcome occurrence. Especially if you’ve upgraded to Windows 10 over Windows 7.

The official support for some devices is discontinued. But, this doesn’t mean that you won’t be able to get a fully functional driver. The trick is in avoiding Windows Update-provided drivers.

Follow these steps to install Intel Sound driver from the official source:

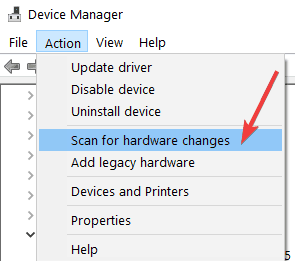
  1. Right-click on the Start button and open Device Manager.
  2. Expand the “Sound, video and game controllers” section.
  3. Right-click on Intel Smart Sound device and choose Uninstall device from the contextual menu.intcoed error
  4. Check the “Delete the driver software for this device” box.
  5. Download Inter Driver Update Assistant, here, and install it.
  6. Run the client and update all drivers.
  7. Restart your PC and look for changes.

Alternatively, you can use dedicated software. It will remove the risk of permanent damage caused by faulty driver installs.

A dedicated driver updater will scan find the perfect match for your specific hardware and install it to your PC.

The tool can also detect if you have any damaged or missing drivers and fix them as well. You can set it up to keep your drivers in check on a regular basis.

⇒ Get Fortect Driver Updater

3. Run SFC

Now, if the problem is still present even after you’ve set the driver straight, a possible system corruption might be at hand. When this happens, we suggest running the built-in utility via Command Prompt. This tool checks for potential corruption of system files and fixes them accordingly.

Follow these steps to run SFC in Windows 10:

  1. In the Windows Search bar, type cmd. Right-click click on Command Prompt and run it as admin.
  2. In the command-line, type sfc/scannow and press Enter.intcoed error
  3. If the SFC tool hasn’t found anything suspicious, don’t close the command-line.

4. Try with DISM

If SFC fails to find system errors, the Deployment Image Servicing and Management tool should help. This tool uses all available means to fix system errors. And its, like System File Checker, the built-in utility you can run through the elevated command line. It uses Windows Update to replace all files, so it takes fixing system errors one step further.

Here’s how to run DISM in Windows 10:

  1. In the command line, type the following commands and press Enter after each:
    • DISM /Online /Cleanup-Image /CheckHealthintcoed error
    • DISM/Online/Cleanup-Image/RestoreHealth
  2. Wait until the tool locates and resolves system errors. It might take some time.

5. Disable onboard graphics and Intel Smart Sound

Now, this problem appears almost exclusively on dual-GPU configurations where Intel is providing the onboard integrated graphics and sound control. However, the collision of drivers might create lots of issues.

For that reason, we suggest sticking to dedicated graphics (ATI or Nvidia) and Realtek HD Audio for the time being.

If you’re not sure how to disable the dedicated GPU on your dual-GPU laptop or PC, follow the steps we provided below:

  1. Open Device Manager.
  2. Expand the Display adapters section.
  3. Disable integrated onboard Intel graphics.
  4. Restart your PC and look for changes.

6. Update BIOS

Some users who have reappearing issues with IntcOED on Windows 10, resolved the issue by flashing the BIOS. Now, with the transition to a newer OS, you should always update your BIOS.

Just, a common user will rarely deal with the BIOS flashing, especially if there’s (and there is) a chance to brick your computer. We still suggest looking up your device and updating BIOS.

The procedure might differ for different manufacturers, as some offer updates in the BIOS/UEFI settings menu while others require special third-party tools to apply updates.

On the other hand, if the error possibly started after flashing BIOS, you should navigate to BIOS/UEFI settings and restore them to default values. This seemingly addressed the problem for more than a few users.

7. Start the system in a clean boot

Besides the obvious driver issues, there might be a third-party application that conflicts with Intel Smart Sound. This list is long, and we can’t say with certainty what exact program won’t work when combined with the aforementioned device. That’s why you can try a Clean Boot, and look for changes.

Here’s how to start Windows 10 in a Clean Boot:

  1. In the Windows Search bar, type msconfig and open System Configuration.
  2. Under the Services tab, check the “Hide all Microsoft services” box.
  3. Click “Disable all” to disable all active third-party services.intcoed error
  4. Now, select the Startup tab and go to Task Manager.
  5. Prevent all programs from starting with the system and confirm changes.
  6. Restart your PC.

8. Update Windows

Windows Updates and the way they’re administered in Windows 10 received a huge backlash from the user community.

However, this doesn’t mean that they’re not useful. Some users noticed that all initial system issues which appeared upon system installation were resolved with updates later on.

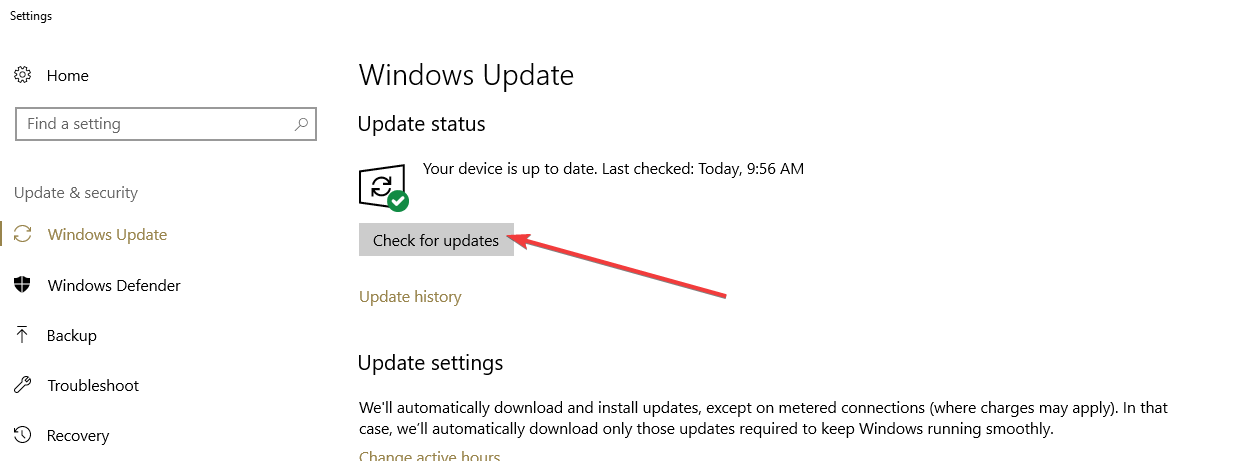
That’s a good reason to update your system. Even though they come in automatically, you should check for updates manually from time to time. Here’s how to do it:

  1. In the Windows Search bar, type Update and click “Check for updates“.intcoed error
  2. Click Check for updates in Settings.
  3. Wait until updates are installed and restart your PC.

9. Reset your PC to factory settings

If the error still appears, we can only suggest more radical measures. Before you move to a clean reinstallation of Windows 10, it’s worth trying some of the recovery options.

We suggest going for the “Reset this PC” option which allows you to start from scratch without losing your data. You can, of course, clear everything and start from a blank slate, but we keep that for the complete reinstallation.

Follow these steps to reset your system to factory values:

  1. In the Search bar, type Reset and open Reset this PC.
  2. Under the ‘Reset this PC‘ option, click Get started.intcoed error
  3. Choose to keep your files and apps and continue with the resetting process.

10. Reinstall Windows 10

Finally, if none of the previous steps worked out, clean reinstallation is the last resort. Of course, in this scenario, we suggest formatting your drive and starting from scratch.

In addition, restore your BIOS settings to default values. Before you start the procedure, make sure to back up all your data on external media.

Follow the steps from this article to install Windows 10 clean. After that, make sure to navigate to the official OEM site and install exclusively official drivers. In addition, as we’ve mentioned in step 2, use Intel Driver Update Assistant to get the latest Intel drivers for Windows 10.

With that said, we can conclude this article. In case you have some additional solutions to offer or something to ask, feel free to post those in the comments section below.

Windows Insider ISOs for build 17738, Windows Server 2019 17744 released

If you’re a developer or business-based Windows Insider, you’re up for some big treats all across the board. Microsoft has just pushed out new releases for various branches of the Insider program, and even a new SDK. Heading to Windows Insiders running Windows Server 2019 is build 17744, to developers SDK Preview build 17744, and to consumers, the ISO files for build 17738.


First off, there is the matter of the new ISO for build 17738. Microsoft originally promised these ISO files last week, and the company has now delivered. You can find the ISO files from the Advanced Preview section of the Windows Insider website. Keep in mind that build 17738 dropped on August 14, and doesn’t really come with any new features to note of. There are some bug fixes and known issues though, and you can read up on those here.

Next up, is Windows Server 2019 Insider Preview build 17744. Microsoft documents all the new technical features right here but takes note of several known issues and with transitioning systems running Server Code, and the incorrect format with the Italian language in the EULA. You can download this build from the Windows Server Insider Preview download page, or sign up here to get started.

Finally, there is Windows 10 SDK Preview Build 17744. As usual, this release doesn’t bring many new features and rather contains bug fixes. You can dive deeper into the changes over on the Windows Blog, but as usual, the SDK will only install on Windows 10 Insider Preview builds and with Visual Studio 2017 and greater. You can download from the developer section on Windows Insider website.

We have yet to hear teases about a new Fast Ring or Skip Ahead build this week, but we will be keeping our hopes up. September is right around the corner and development of Redstone 5 is likely almost over now, so a bug fixing build will likely be coming later this week.

Fix: Error 0x80070005-0x90002 in Windows 10

Since free upgrade period ended on July 29, only way to get Windows 10 is to perform the clean install. Many users reported error 0x80070005-0x90002 while using Media Creation Tool, so let’s see how to fix this error.

Error 0x80070005-0x90002, how to fix it?

  1. Try using Media Creation Tool on a different PC
  2. Update your drivers
  3. Run the SFC scan
  4. Run DISM
  5. Run the Update Troubleshooter
  6. Uninstall previous updates
  7. Remove your antivirus software
  8. Delete $WINDOWS.~BT folder

Fix: Windows 10 upgrade error 0x80070005-0x90002

Media Creation Tool is a popular tool that downloads Windows 10 ISO file and creates a bootable media in just a few steps. This is an official tool from Microsoft, and users worldwide use it to create Windows 10 installation media. Since this is the only tool that allows you to download Windows 10 ISO files and create bootable media, it’s easy to see how error 0x80070005-0x90002 can cause so many problems. Even though problems with Media Creation Tool can be troublesome, there are few ways to fix these problems.

1. Try using Media Creation Tool on a different PC

If your computer is giving you error 0x80070005-0x90002 while using Media Creation Tool, you might want to try using it on a different PC. Users reported that they are unable to create a bootable media with Media Creation Tool on their PC, but the issue was easily fixed after using the Media Creation Tool on a different PC.

According to users, you just need to choose an option to create a media for another computer, insert a blank DVD or USB flash drive and wait for Media Creation Tool to complete the process. After doing that you can use the bootable media on your PC to install Windows 10.

2. Update your drivers

  1. Right-click the Start button and select Device Manager from the list.device manager
  2. Go to the desired section and expand it.
  3. Right-click the component and select Update driver from the list of options.
  4. Select Search automatically for drivers.
  5. Do that for all the drivers you want to update.

It’s always a good idea to keep your drivers up to date. But this time, it may actually solve the problem you’re having. So, go and make sure all your drivers are updated.

In order to prevent PC damage by installing the wrong driver versions, we strongly suggest doing it automatically by using a driver updater tool.

An automatized solution will reduce your time spent and with just a few clicks the program will start scanning your PC for outdated drivers automatically.

3. Run the SFC scan

If none of the previous solutions managed to resolve the problem, we’ll seek help from troubleshooters. The first troublesooting tool we’re going to try is the SFC scan. This is a command-line tool that basically scans your computer for potential issues, and resolves them if possible.

Here’s how to run the SFC scan:

  1. Right-click on the Start Menu button, and open Command Prompt (Admin).
  2. Enter the following line and press Enter: sfc/scannow
  3. Wait until the process is done (it may take a while).
  4. If the solution is found, it will automatically be applied.
  5. Now, close the Command Prompt and restart your computer.

4. Run DISM

The next tool we’re going to try is DISM. Here’s how to run DISM in Windows 10:

  1. Open the Command Prompt as shown above.
  2. Enter the following command and press Enter:
    • DISM.exe /Online /Cleanup-image /Restorehealth
  3. Wait for the process to finish.
  4. Restart your computer.
  5. In case the DISM can’t obtain files online, try using your installation USB or DVD. Insert media and type following command:
    • DISM.exe /Online /Cleanup-Image /RestoreHealth /Source:C:RepairSourceWindows /LimitAccess
  6. Make sure to replace ”C:RepairSourceWindows” path of your DVD or USB.
  7. Follow further on-screen instructions.

5. Run the Update Troubleshooter

And finally, if the command line tools faild to resolve the issue, let’s try Windows 10‘s built-in troubleshooting tool. You can use this tool to fix various issues, including update problems.

Here’s how to run Windows 10‘s troubleshooter:

  1. Go to Settings.
  2. Head over to Updates & Security > Troubleshoot. 
  3. Select Windows Update, and go to Run the Troubleshooter. 
  4. Follow further on-screen instructions and let the process finish.
  5. Restart your computer.

6. Uninstall previous updates

There’s also a chance some previous update you installed prevents your system from receiving new ones. In that case, the best solution is to simply delete that update. Here’s how to do that:

  1. Go to Settings > Updates & Security > Windows Update.
  2. Go to Update history > Uninstall updates.
  3. Now, find the troublesome update (you can sort updates by date), right-click it, and go to Uninstall.
  4. Restart your computer.

7. Remove your antivirus software

Users reported that error 0x80070005-0x90002 can be caused by your antivirus software, therefore it’s advised that you disable it or remove it while using Media Creation Tool. Almost any antivirus tool or firewall can cause this error to appear, therefore be sure to remove all antivirus programs from your PC in order to fix this error.

Sometimes the easiest way to fix problems on your PC is to update all your drivers. Updating drivers manually can be a long and tedious process, but with this Driver Update software, you can quickly download all the necessary drivers thus fixing many problems.

8. Delete $WINDOWS.~BT folder

And finally, some users also reported that deleting the $WINDOWS.~BT folder resolves this problem, so we can try that, as well. Here’s what you need to do:

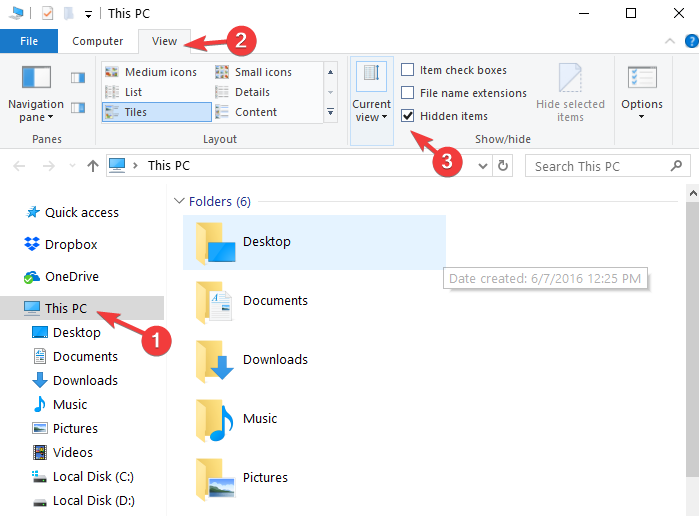
  1. Open File Explorer, and go to This PC > Local Disk (C:) (or whichever your system hard drive is).
  2. Now, click View and check the box that says Hidden Files.
  3. Find the folder named $WINDOWS. ~ BT.
  4. Rename it or delete it.

Error 0x80070005-0x90002 can cause big problems if you’re trying to create a Windows 10 bootable media, but we hope that you fixed this issue after using one of our solutions.

Call of Duty: Modern Warfare 2 is now backward compatible on Xbox One

Microsoft’s Major Nelson today announced that Call of Duty: Modern Warfare 2 is now backward compatible on Xbox One. This now completes the Modern Warfare saga, with all the original titles from the main series now being backward compatible on Xbox One devices.

Interestingly, the addition of Call of Duty: Modern Warfare 2 comes several months after it was revealed that the game was being remastered for next-gen systems. Anyway, backward compatibility means that you can dive back into the original game as it played on the Xbox 360. If you own a physical copy, all you need to do is insert the disc into your Xbox One and have it download to your hard drive. If you own the digital copy, you will see it appear in the ready to install section of the Games and Apps section of the Xbox One dashboard.

In the event that you don’t already own this game, you can get it at a discount right now for $14.99 instead of $19.99 with your Xbox Live Gold membership. It’s a solid experience and was marked by many as one of the best first-person shooters of all time.

Microsoft is fighting spam calls with blockchain and Azure

Microsoft is hopping aboard the blockchain train as the company plans to use the technology to curb spam calls in India.

According to a report from Hindustan, Microsoft is partnering with Tech Mahindra to address a growing concern with mobile users that involves using blockchain technology to curb spam calls in India.

As with many blockchain technologies, Microsoft will leverage its investment in cloud services to house its spam constraining efforts.

While the roadmap or detailed description of Microsoft’s efforts of spam curbing blockchain usage has yet to officially materialize, with a limited knowledge of how blockchain technologies work, we can roughly surmise how the company plans to lay the foundation for its processes.

Combining blockchain technologies with its Azure cloud services, Microsoft is looking to become the ecosystem platform for service providers as well as telemarketers to store their databases of client information regarding consent acquisition and preference registration.

By providing services to both the service providers and telemarketers, Microsoft’s middle man approach should help both keep up to date records of contact which eventually should lead to less multi-encounter contact instances, and thus, less spam.

“The solution will be a shared, secured ledger of UCCs [unsolicited commercial communication] distributed across a network of computers,” Tech Mahindra said in a press statement. “[This] will ensure a transparent and verifiable system to help companies mitigate UCC on their networks.”

Recently, telecom operators in India were told by the TRAI (Telecom Regulatory Authority of India) to use blockchain technologies as a way to mitigate an epidemic of spam calls.

 If an operator fails to follow the norms, they risk facing a penalty of up to Indian Rupees 500,000 ($7,136 approximately) per month.

We’re in the wait and see phase of Microsoft’s ambitious blockchain effort, but thanks to the enforcement nature of the TRAI, it shouldn’t be too long before we show Microsoft plans to integrate the new technology with its growing list of cloud based services for Azure.

Disgruntled user exposes unpatched Windows zero-day exploit via Twitter

It’s always best to keep your Windows 10 system up to date with the latest updates from Microsoft, but sometimes, there are still some unpatched vulnerabilities which hackers can take advantage of. That is exactly what one disgruntled Windows user recently discovered, and decided to out Microsoft for on Twitter for (via ZDNet.)

The user who goes by the name of “Sandbox Escaper” disclosed the vulnerability which permits any software running on your PC to gain system privileges. It is actually a local exploit and involves a security flaw in the Microsoft Windows task scheduler and Advanced Local Procedure Call. Sandbox Escaper noted the local exploit on GitHub, including a proof-of-concept. It has since been verified by US-CERT, which notes that the exploit code works on 64-bit Windows 10 and Windows Server 2016 systems.

There’s currently no known solution for the exploit, but Microsoft has acknowledged the issue. In a statement to The Register, the company explained that they will “proactively update impacted devices as soon as possible.” This could likely mean that we can see a fix in time for the next September Patch Tuesday updates, so best keep tuned for more.

Microsoft starts testing simplified UI for “My Games & Apps” screen on Xbox One

Microsoft is working to simplify the “My Games & Apps” section on the Xbox dashboard to make it easier to see what games and apps are installed or ready to be installed on your console. In the latest Xbox One preview build that shipped to Skip Ahead and Preview Alpha Xbox insiders yesterday, Microsoft has removed the “Ready to Install” tab from My Games & Apps to replace it with a new “Installed”/“Ready to Install” toggle in the separate Games and Apps sections.

Before that change, the “Ready to Install” tab mixed games and apps like Netflix by default, though you could use filters to only display games or apps. With the new system, all filter options have also been placed under one button for quickly surfacing games and apps by size, last update and more.

In addition to the new UX for My Games and Apps, this latest Xbox One preview build also brings fixes various issues related to Xbox Live Clubs, the new Avatar subsystem and the Mixer chat window. Microsoft started rolling out the latest Xbox One system update to Preview Beta Insiders last week, and if you’re currently on that ring you should receive this latest preview build over the coming days.

myTube! app updates on Windows 10 & Xbox One with full black/white theme, new playback rates, and more

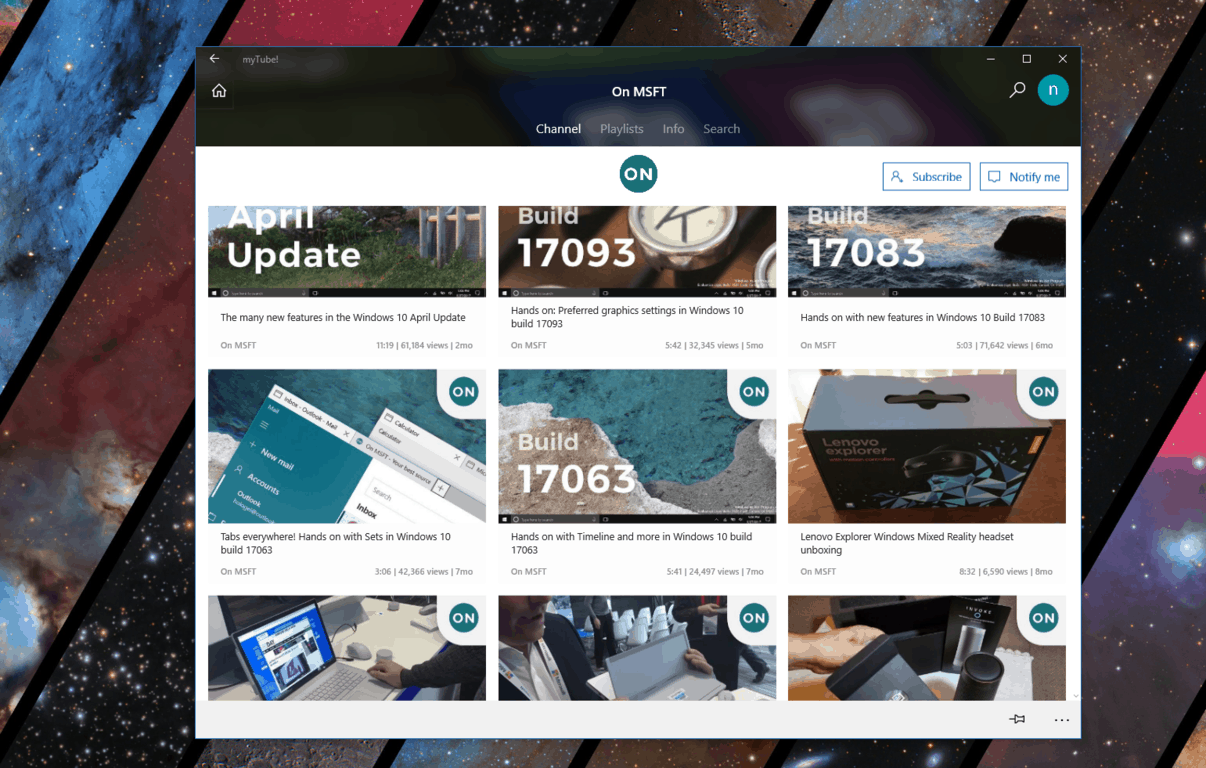
Ryken Studio is back at it again and recently released a version 3.37 update for the myTube! Youtube client on Xbox, Windows 10, and Mobile. This update is not as significant as prior releases but it still comes with several fixes and new features for the app across Microsoft’s platforms.

First of all, the update adds in a full black and white theme, and a 0.75x playback rate. Additionally, a selected playback rate will now persist between videos, and you’ll notice variable playback rates in the web player.

This version also adds in a tweak where videos submitted by the Room owner will automatically be accepted, and a fix for the issue where the player controls constantly reappeared while the pointer was over them. Some of the other fixes in this release can be seen below.

  • Video lists are no longer refreshed every 45 minutes during the app’s routine account access-token refreshes
  • Fixed crash when trying to save a video without an internet connection
  • (PC & Mobile) Fixed issue where using fullscreen comments resulted in a black layer over the video
  • (PC & Mobile) Added ‘Copy link’ and ‘Pin’ context menu item to playlist and channel thumbnails
  • (PC) Added setting for what gets added to Timeline
  • (November 2015 Update) Fixed crash when background audio finished while on the video page
  •  (November 2015 Update and Xbox) Fixed issue where private playlists didn’t work in the background
  •  (Xbox) Video details now aligned to the top of the frame rather than the center when too small to fill the space

About three weeks ago, myTube! received a big update that delivered Windows Timeline support to the app. The developer is always listening to Feedback, so feel free to try out myTube via the link below.

myTube!
myTube!
Developer:
Ryken Studio
Price:
Free

Halo: MCC gets major update with Xbox One X enhancements, team is looking at Halo: Reach port

Halo: The Master Chief Collection has just received a major update ahead of its inclusion on Xbox Games Pass on September 1. Following months of testing with Insiders, developer 343 Industries has completely reworked the matchmaking process with dedicated servers and delivered some cool visual enhancements (up to 4K graphics and HDR) for Xbox One X owners.

The update is a 73GB download, but thanks to the new Intelligent Delivery system you can choose what parts of the game you actually want to install, as well as your preferred languages. The game is now completely modular, which is something we’d really like to see being implemented in other massive games like Halo 5: Guardians or Gears of War 4.

Other highlights in this update include updated Menus and UI elements as well as Offline LAN support, in case you want to organize old school LAN parties with 16 players on four Xbox One consoles. This is definitely an old school feature that we don’t see on a lot of modern console games these days, but this once again a labor of love from 343 Industries.

Last but not least, the developer said yesterday that it’s open to the idea of adding more content to Halo: The Master Chief Collection. As of today, Halo: Reach is the only Halo game that has yet to be ported to the Xbox One (the Xbox 360 version is already backward compatible on the new console). Adding the last Halo game from Bungie would finally make the Xbox One anthology a must-have game for Halo fans:

When it comes to future features, the team is definitely aware that many, many players are very eager to see Halo: Reach added – we don’t have anything to announce or commit to right now, but it’s on the long list of things the team is constantly evaluating and thinking about for possible future updates.

This major update for Halo: MCC is just the first in a series of future updates that 343 has in the pipeline for Halo: MCC. The team is already working on a custom Game Browser as well as other quality improvements for the Xbox One title. Considering that Halo: MCC was released four years ago, it’s really nice to see Microsoft continuing to support the collection after all these years.

Microsoft’s Bing Spotlight breaks down news stories for lazy readers

In a time where fake news it taking over the feeds of Facebook and other social media websites across, it is even more important to stay informed on top of what is true news and not. That’s why Bing is now making it easier to understand the most current news topics when you search for a specific news event or story on the search engine.

The name of this feature is Spotlight, and it shows users the latest headlines, a peek at how the story has developed over time, and also social media posts from around the web. Spotlight also gives users a diverse look at any given topic, so you can choose your own sources to learn more about the story.  There’s a specific algorithm that determines which articles make it to the Spotlight page, as the team explains:

Bing monitors millions of queries and news articles every day and identifies impactful stories that evolve over a period of weeks or months. We look at various user signals such as queries and browser logs, and document signals from publishers such as how many publishers cover a story, their angles, and how prominently they feature the story on their site. For controversial topics, in the Perspectives module, we show different viewpoints from high-quality sources.

A look at Bing Spotlight

This Spotlight feature is currently available on Bing and mobile here in the US. You can get started with it right now by clicking on the homepage carousel on Bing.com, and or search for major topics like self-driving cars.

Plex for Xbox One app updates with menu changes and bug fixes

An update for the Plex for Xbox One app has now gone live on all Xbox One consoles. This update adds a couple of new options for sorting media and fixes loads of bugs and glitches that were frustrating users.

Here’s the official release notes for the update:

NEW:

  • Automatically sort dashboard buttons based on which types the user has access to
  • Added menu in settings to reorder and show/hide media types
  • Added AdChoices link to Privacy settings

FIXED:

  • Removed errant app settings section
  • Fixed an issue that could cause dashboard pages to fail to load while the app is offline
  • Fixed an issue that could cause the UI to become unresponsive when browsing News settings
  • Fixed album preplay sometimes wrapping titles off screen
  • Fixed video direct play setting incorrectly affecting music playback
  • Fixed Cloud Sync server library names not showing up in source modal
  • Fixed lost focus when opening User Menu while offline
  • Fixed inconsistency with Mark as Played string naming

Plex for Xbox One is popular media streaming app that’s packed with features. It allows users to stream their own media to their Xbox One console, view news broadcasts from over 190 news providers, and even use their Xbox One as a DVR device.

Let us know if you use Plex in the comments below and then like us on Facebook for more Xbox app news.

Plex
Plex
Developer:
Plex
Price:
Free

Telegram updates on Windows 10 with night theme and more Telegram Passport options

Telegram Desktop updated to Version 1.3.13 on Windows 10 devices earlier today. This latest update to the popular messaging app introduces a new method for exporting data, a night/dark theme, and a variety of refinements to the recently launched Telegram Passport feature.

Here’s the full release notes:

  • Export data from individual chats using the ‘…’ menu.
  • Added a new night theme.
  • You can now assign custom themes as night and day themes to quickly switch between them.
  • Telegram Passport now supports more types of data including translated versions of documents.
  • Improved password hashing algorithm to better protect Telegram Passport data.

Telegram is a messaging app that’s popular amongst tech and crypto circles due to its emphasis on privacy and security and support for numerous device including Windows phones. It’s hardly a little kept secret though and, earlier this year, surpassed 200 million users worldwide.

Do you use Telegram? Let us know which device you use it on in the comments below and then follow us on Twitter for more Windows 10 app news.

Telegram Desktop
Telegram Desktop
Price:
Free

Fix: Laptop Freezes While Running Automatic Maintenance

There are plenty of Windows 10-related errors, and today, we’re going to talk about the issue where your Windows laptop is freezing when running automatic maintenance procedures. Here’s what the deal is all about.

Recently, the owner of a new Sony Vaio laptop complained that a few weeks after installing Windows 8 on it,  it has started freezing when Automatic Maintenance started.

I remember I read a while ago about the same issue that happened to some HP EliteBook owners running Windows 10, and there was apparently an official fix for that.

Automatic Maintenance bricks laptops

Here’s what the user has been saying:

My sony vaio SVE15137CGW (Windows 8) has started freezing when Automatic Maintenance starts (after it has been idle for a few minutes). A black clock appears on the taskbar so I know the Maintenance is running. I have to power off and on to stop the freeze which is a real nuisance.

What might be causing this problem and how can I fix it? How can I disable the Automatic Maintenance until I’ve fixed the problem? I followed the instructions on the webpage below but the Maintenance turned itself back on again after a reboot:

Sadly, I don’t have a working fix to provide you, but I’ve subscribed to follow the updates on this problem and will change the article and amend it with the needed information once I know more myself. If you somehow know a solution, let us know by commenting.

How can I fix computer freezes caused by Automatic Maintenance?

1. UPDATE 1

There has recently been a reply from a Microsoft support representative, so I’m going to paste the answer here, just in case it might be helpful for some of you out there.

Automatic Maintenance facilitates idle efficiency and permits all activity to run in a timely and prioritized fashion. So, the event that is set to run will start at pre-described time (default set to 2:00 a.m. everyday). the default configuration of leaving the Automatic Maintenance enabled should do no harm at all.

On the other hand, the home PCs are not always powered on, and neither are they heavily loaded by the processes or data. Therefore it is recommended that you should disable the Automatic Maintenance in home PCs in order to avoid processing overhead.

After the Automatic Maintenance is disabled, you can manually optimize your PC by manually initializing the disk defragmentation, CHKDSK command, etc. You can refer to the link to know how to disable the Automatic Maintenance tasks using Task Scheduler: Refer to the suggestion that is marked as answer: https://answers.microsoft.com/en-us/windows/forum/windows8_1-performance/windows-81-freezes-when-automatic-maintenance/fece2a5a-855c-4430-9521-a7ec666d61ff

If you don’t find the same performance after disabling the Automatic Maintenance, enable the tasks again. Refer to the link for more details: https://msdn.microsoft.com/en-us/library/windows/desktop/jj835985(v=vs.85).aspx

So, my suggestion is to check out the fixes provided in the links mentioned above, as I wouldn’t want to rehash the same solutions provided already elsewhere. Sound off below and let us know if this has fixed your Windows 10 laptop freezing issues while running automatic updates.

UPDATE 2

Meanwhile, we searched for additional solutions, and here’s what we found.

1. Check your drivers

Outdated or incompatible drivers commonly trigger computer freezes. So, ensure you’re running the latest driver versions for your hardware components. Go to Device Manager and update all the drivers for which there’s an exclamation mark. Alternatively, you can download the latest drivers straight from your hardware manufacturer’s website.

2. Update your OS

Ensure you’ve installed the latest OS version on your computer by hitting the ‘Check for updates’ button.

check for updates

3. Check your disk

Disk problems may also trigger unexpected computer freezes. Here’s how to check your disk for errors:

  1. Go to Start > Type command prompt > launch it as an administrator
  2. Type CHKDSK C: /F (Replace C with your drive letter)
  3. Type CHKDSK C: /R  and hit Enter
  4. After the CHKDSK process completed, reboot your PC and check if the computer freezes still occur.

4. Run Disk Cleanup

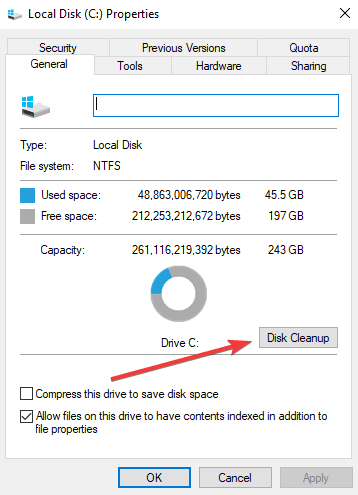
Another method to fix this issue is to run Disk Cleanup. Go to My Computer or This PC (depending on your OS version) and right-click on your main drive. Go to Properties and click on Disk Cleanup.

Follow the on-screen instructions to clean your disk and remove unnecessary folders and junk files. Repeat the process for all your drives.

disk cleanup

Another closely linked problem is Your VAIO failed to start Windows, and one of the solutions for it could also help in this case!

Let us know if these workarounds solved your problem.

How to fix errors 0xC004C003, 0x80070002 in Windows 10

There are frequent updates issued by Microsoft through the Windows Update features, but still, there are plenty of error codes that Windows 10 and Windows 8.1 users are getting. Here’s one of them:
windows 8 error codes

My win8 just keep asking me to activate my window,Error code: 0xC004C003 I just bought a new latop and its come with Window 8, but recently it just stated the product keys doesnt work and requested me to activate my window, i really have no idea what to do. It also stated that my product key should be on box but the window dvd doesnt came along with my laptop, please help me to solve the problem.

And here’s another complaint from one user who has some problems with the app tiles, unlike the one from above, who says he gets errors with the activation of his Windows 8 device, despite the fact that he is running a legit version. The same issue can affect Windows 10 users as well.

a while ago the windows tiles stopped working along side with the windows store and after hours of searching i managed to make the windows store open, but still the tiles didn’t work so i tried to update some apps maybe they will work then, but every time i try to update it fails and gives me this error 0x80070002. then i ignored the problem and lived without using any apps. The the update to windows 8.1 came out so i thought maybe this will solve the problems that i’m having so i started the update and everything was going fine then it hits me again with the 0x80070002 error.

Solutions to fix errors 0xC004C003, 0x80070002

So, we see that even after such a long while, there are plenty of error codes that Windows 10 and Windows 8.1 user are receiving and this doesn’t make this Windows version any more different than Windows 7 and all the other versions before. The plethora of bugs and glitches is still here, unfortunately…

We want to help you get rid of these two errors as soon as possible and we compiled this quick list of solutions to help you do that. So, here’s what you can do to get rid of errors 0xC004C003 and 0x80070002 on your Windows computer.

  • Check your product key and make sure you’re using a valid key. If your product key is not valid, you need to buy a new one.
  • Run the Media Creation Tool. Many users confirmed they managed to fix these errors by installing the Media Creation Tool. Here are the steps to follow:
    • Revert to the previous version of Windows and then download and run Media Creation Tool.
    • Select Upgrade this PC now > Next.
    • Select Download and install updates so that Windows 10 downloads all the necessary updates. The whole process may take a few minutes, so please be patient.
    • Select which files you want to keep and hit Install. Once the process has completed, check if the new OS version is activated.
  • Check for updates again. These error codes may also occur when Microsoft’s update servers are very busy. This happens when a large number of users are trying to download the latest updates. So, another workaround is to simply wait for an hour or two and then check for updates once more.
  • Restart the Windows Update Service. If the problem persists, you can also uninstall all the updates that you previously installed and then restart the Windows Update Service from the Services menu.
    • Launch a new Run window > enter services.msc and hit Enter.
    • Locate Windows Update > right-click on the service > select Restart.restart windows update service
    • Try to install the updates again.

For additional solutions on how to fix error code 0xc004c003, you can also check out this guide.

RELATED STORIES TO CHECK OUT:


How to Fix corrupt QuickTime Movie Files on Windows PCs


Solutions to fix corrupt QuickTime files

  1. Preliminary fixes
  2. Repair the unplayable MOV video file
  3. Repair with QuickTime 7 player
  4. Repair a corrupt QuickTime movie file using VLC
  5. Change file extension

Struggling with a corrupt QuickTime movie file? Have you experienced a fault in the QuickTime media player, which suddenly halts and closes down, and you started it again and tried playing the movie file but it has no sound or breaks?

Or you probably tried playing it on a different media player but the result is still the same? You probably have a corrupt QuickTime movie file if this is your situation.

QuickTime media player is an innovation introduced in 1988 by Apple Inc. and is compatible with all versions of OS X. It can handle different formats from digital video, sound, panoramic images, pictures, and interactivity but is commonly used to open QTL files.

However good the player is, its users tend to get issues when playing a movie file in QuickTime.

MOV is a commonly used video container file format with a proprietary compression algorithm and MPEG codec to compress the files.

Why do I get QuickTime errors on my PC?

There are several common reasons why you may get a corrupt QuickTime movie file, including:

  • The file can be empty if the import and/or conversion was terminated prematurely before the data was copied to a new target file
  • A bad video compression
  • Missing EOF
  • A video with a broken header
  • Video data rate may be lower than the minimum required for creating keyframes
  • Corrupt playback in/out points
  • Power interruption while recording videos makes the video corrupt and unplayable
  • If MOV files are encoded with QuickTime incompatible video or audio codec
  • Using unreliable software for recovering lost and/or deleted videos
  • Frequent conversions of video file formats
  • Trying to play MOV files with unsupported media players
  • Interruptions when transferring video files from one system to another device or vice versa
  • Audio video synchronization issues and codec issues

So what do you do now that there’s a corrupt QuickTime movie file? Below are some solutions to try to fix a corrupt QuickTime file.

— RELATED: How to fix video_tdr_failure (nvlddmkm.sys) on Windows 10

How to solve Corrupt QuickTime movie file

1. Preliminary fixes

2. Repair the unplayable MOV video file

You can use a MOV video repair software for Windows that rebuilds and fixes corrupt videos supported by QuickTime. Whatever tool you use should resolve issues of frame, header, sound, duration, and movement. It should also be able to repair corrupt videos that have been damaged due to compression, or changes made in file formats, errors of read/write, and virus attacks among other reasons.

3. Repair with QuickTime 7 player

QuickTime 7 player has new features such as trimming, editing, looping, saving, and reverting video files. It can automatically repair any slightly damaged videos, but severely damaged files get a Black Screen error message. It has a feature that checks properties of the damaged movie file.

To do this:

  • Run QuickTime player
  • Select Show Movie Inspector from Windows. This will give back details such as video format, pixel information, data rate, movie FPS, Playing FPS, and others. If a movie file is damaged, the player will show a black screen error message, and the inspector will display details within the metadata of the movie file.

4. Repair a corrupt QuickTime movie file using VLC

VLC may be for playing videos or movies. But it also has features for fixing a corrupt QuickTime movie file. If your VLC player prompts you to repair corrupt or videos that cannot be played, select Yes, then do the following:

  • Run VLC player
  • Go to Media
  • Click Convert/Save
  • Click Add and select the movie file you want to repair
  • If you want to edit or check profile settings, go to Show more options box and check it
  • Click convert/save button
  • The convert window will open. Go to Settings and select the preferred codec from the drop-down menu
  • Name the destination file and browse a location to save it
  • Click Start

Note: You may get options to Add a new profile or Delete an existing one.

5. Change file extension

  • Create a copy of the original movie file
  • Change the extension to AVI
  • Run VLC player
  • Go to Tools tab
  • Click Preferences
  • In the preferences window, select Input/Codecs
  • Go to Files
  • Select Always Fix
  • Click Save and follow the steps to repair with QuickTime Player 7

Were you able to resolve the corrupt QuickTime movie file using the abovementioned solutions? Let us know your experience in the comments section below.

Error 0x80200001 in Windows 10 Update Assistant [Fix]

Updating your Windows 10 computer should be a smooth task. However, this is not always the case, and sometimes you might get a Windows Update error 0x80200001.

While sometimes you can fix issues with Windows Update Troubleshooter, sometimes you need to use other methods. Fixing these issues is crucial since your system will remain vulnerable and miss out on new features.

So, in today’s guide, let’s take a closer look and see how we can fix this error message.

What does error 0x80200001 mean?

  • This Windows Update error occurs if your system files are damaged.
  • Issues with Windows Update components can also cause this problem to appear.
  • If necessary services aren’t running, you can encounter this and other errors.

How do I fix error 0x80200001?

1. Disable third-party antivirus software

  1. Open your antivirus settings.
  2. Navigate to the Protection page.
  3. Disable all features.

Keep in mind that this should only be used as a temporary solution, so make sure to turn your antivirus back on as soon as you’re finished.

2. Run the Update Troubleshooter

  1. Go to Settings.
  2. Head over to Updates & Security and choose Troubleshoot. 
  3. Select Windows Update, and go to Run the Troubleshooter. 
  4. Follow further on-screen instructions and let the process finish.
  5. Restart your computer.

3. Run the SFC scan

  1. Right-click on the Start Menu button, and open Command Prompt (Admin).
  2. Enter the following line and press Enter: sfc/scannow
  3. Wait until the process is done (it may take a while).
  4. If the solution is found, it will automatically be applied.
  5. Now, close the Command Prompt and restart your computer.

Sometimes you might experience problems with this method, and if SFC scannow is not working, we have a special guide that can help you fix it.

4. Run DISM

  1. Open the Command Prompt as shown above.
  2. Enter the following command and press Enter:
    DISM.exe /Online /Cleanup-image /Restorehealth
  3. Wait for the process to finish.
  4. Restart your computer.
  5. In case the DISM can’t obtain files online, try using your installation USB or DVD. Insert media and type the following command:
    DISM.exe /Online /Cleanup-Image /RestoreHealth /Source:C:\RepairSourceWindows /LimitAccess
  6. Make sure to replace RepairSourceWindows path of your DVD or USB.
  7. Follow further on-screen instructions.

5. Reset Windows Update components

  1. Start Command Prompt as administrator.
  2. When Command Prompt starts, run the following commands:
    net stop wuauservnet stop cryptSvc
    net stop bits
    net stop msiserver
    ren C:\Windows\SoftwareDistribution SoftwareDistribution.old
    ren C:\Windows\System32\catroot2 Catroot2.old
    net start wuauserv
    net start cryptSvc
    net start bits
    net start msiserver

If you don’t want to run all of these commands manually, you can always use a Windows Update reset script.

6. Make sure Windows Update service is running

  1. Go to Search, type services.msc, and open Services.
  2. Find the Windows Update service. Right-click and open Properties.
  3. On the General tab, find Startup type and choose Automatic.
  4. If the service is not running, right-click and choose Start.
  5. Confirm selection and close the window.

7. Change the DNS settings

  1. Go to Windows Search, type control panel, and open Control Panel.
  2. Go to Network and Sharing Center, and click on Change adapter settings from the left pane.
  3. Choose the network you’re currently using, right-click it, and choose Properties.
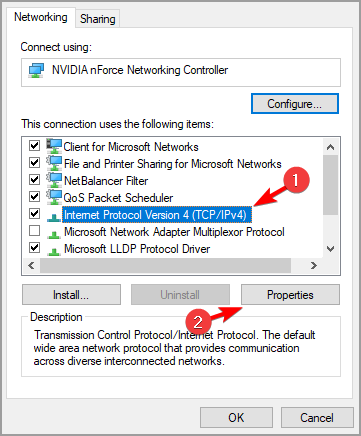
  4. Scroll down to Internet protocol version 4 (TCP/IPv4), and choose Properties.

  5. Now, choose Use the following DNS Server addresses
  6. Enter the following values:  DNS Server – 8.8.8.8 and Alternate DNS Server – 8.8.4.4

  7. Save changes, and restart your computer

We hope the above solutions helped you fix the update error 80200001. This can be a serious error, and it can cause Windows Update to not work properly, but luckily, you managed to fix it.

If you’ve come across other solutions to fix this update problem, list the troubleshooting steps in the comment section below.

Microsoft is counting fish near its undersea datacenter using AI

Microsoft’s Project Natick made headlines in recent months with the company deploying a full-fledged data center in the North Sea. The ambitious project leverages AI to monitor Project Natick’s various equipment, but Microsoft is revealing today that the same AI is also being used to study the datacenter’s underwater environment.

Two cameras connected to the undersea datacenter are able currently being used to monitor aquatic life in real time, and you can even check the live feed on the Project Natick home page. Microsoft has created an object detection model to count all the fish passing in front of the cameras.

From the video stream, we observed that there are only a few types of aquatic life that come within view—fish, arrow worms, and rays,” the company explained on the Azure blog. “The limited number of animal categories allows us to choose a relatively light-weight object detection model which can be run on CPUs.”

Microsoft’s object detection model can count the number of marine creatures in each frame.

For Microsoft, Project Natick is all about understanding the possibilities of deploying undersea datacenters worldwide, and with all the current talk about global/ocean warming, it’s still not clear if such a project actually makes sense. “Monitoring the environmental impact is an important topic, and AI can help make this process more scalable and automated,” the company said, without further detailing if the heat output of its undersea datacenter actually has an impact on its submarine environment.

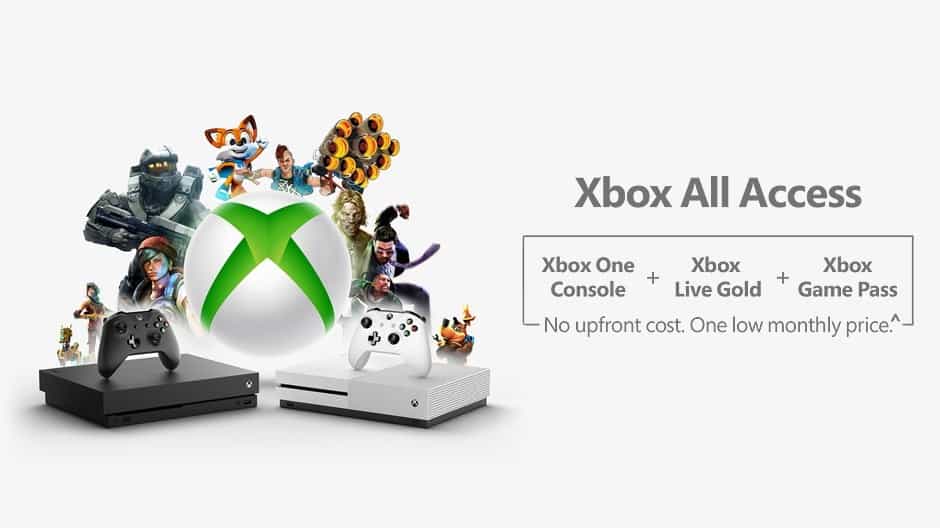
[Update: It’s official] Xbox Wire confirms All Access subscription plan, then removes the post

The incoming holiday season is usually a very important period for the video games industry, and this year Microsoft will be experimenting with something new to drive more consumers to get an Xbox One console. Xbox All Access, the company’s new subscription plan that bundle an Xbox One X or S console, two years of Xbox Game Pass, and a two year Xbox Live Gold subscription was made official today by a blog post that briefly appeared on Xbox Wire before being taken down (via Venture Beat)

“For no upfront cost and one low monthly price for 24 months, Xbox All Access gets you a new Xbox One S or Xbox One X, access to more than 100 great games through Xbox Game Pass, and online multiplayer with Xbox Live Gold,” wrote Xbox product marketing boss Bogdan Bilan in the Xbox Wire blog post. “That’s more than 100 all-you-can-play games — including highly-anticipated new Xbox One exclusives the day they’re released, plus more games added all the time on  the fastest, most reliable gaming network and an Xbox One console.”

According to the since removed post, Xbox All Access will cost $22 a month for two years with an Xbox One S console, or $35/month for consumers choosing the more powerful Xbox One X. Once the two-year subscription ends, consumer will own the consoles and will have the choice to keep subscribing to Xbox Games Pass and Xbox Live Gold. Microsoft also said that consumers can save $130 if they choose an Xbox One S with Xbox All Access, and paying just $22/month for two years for the complete package is definitely a great deal. Choosing an Xbox One X adds $13 to the monthly bill, but you’ll still pay less ($20) than what you would have if you had to buy everything outright.

The console business already functions with razor-thin margins, but Xbox All Access seems to be a good strategy to get gamers on board with Xbox Games Pass and Xbox Live Gold, which both provide a regular stream of revenue to the company. Moreover, the Xbox team recently said that it saw Game Pass subscribers spend 20% more time playing games and play 40% more titles compared to non-subscribers. “We are seeing both purchase and subscription increases as a result of Game Pass,” said Ben Decker, general manager of services at Microsoft in an interview with Variety last week.

Xbox All Access looks like a great way for Microsoft to grow its Xbox business, but the blog post on Xbox Wire said that the subscription would be a “limited-time offer” and only available for “qualified customers.” It’s still not clear when the Xbox All Access will launch in the US, or why the post was removed, but we’ll update this post as soon as we get more information.

Update: A dedicated Xbox All Access page is now live on Microsoft’s website, revealing that US customers will be able to subscribe starting today by visiting their local Microsoft Store. Xbox All Access financing will be done through Dell Preferred Account, in partnership with WebBank and Member FDIC. Last but not least, Xbox All Access bundles will be available through December 31, 2018, while supplies last.

Windows 10/11 Ubuntu Dual Boot Not Working [Quick Solutions]

Depending on their requirements and needs, many people use a dual boot setup on their PCs. Some use Ubuntu and Windows 10 because both have pros and cons.

Ubuntu, like many other non-Windows operating systems, does support dual booting. Windows 10, on the other hand, usually ships with settings that are not optimal for dual boot setups.

GRUB (the acronym for GRand Unified Bootloader) is the bootloader that Ubuntu uses to manage the operating systems installed on your computer.

The software looks at the operating systems installed on your PC and allows you to choose which one to start after switching on the machine.

Most of the problems are related to GRUB, so if you cannot boot into Grub and the system boots directly to Windows repeatedly, you will find some solutions below.

You can use this guide to fix the following Windows 10-Ubuntu issues:

  • Dual boot option is not showing in Windows 10
  • GRUB menu not showing in Ubuntu
  • Ubuntu won’t dual boot with Windows 10

What can I do if there is no GRUB on Windows 10 Ubuntu dual boot?

1. Repair from Windows – Command Prompt

The simplest way to solve this issue is using the Command Prompt from Windows. In order to do this, please use the steps described below:

  1. In Windows, go to menu and search for Command prompt
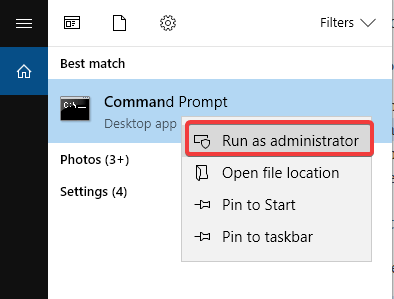
  2. Right click on Command Prompt and choose the option Run as administratorcommand prompt run as administrator
  3. Copy and paste the command bcdedit /set {bootmgr} path EFIubuntugrubx64.eficommand prompt efi ubuntu
  4. Restart your computer

If you’re having trouble accessing Command Prompt as an admin, then you better take a closer look at this guide.

2. Disable Fast Boot

You can also try deactivating fast boot function of Windows 10 to access the GRUB menu. To do so, please follow the steps below:

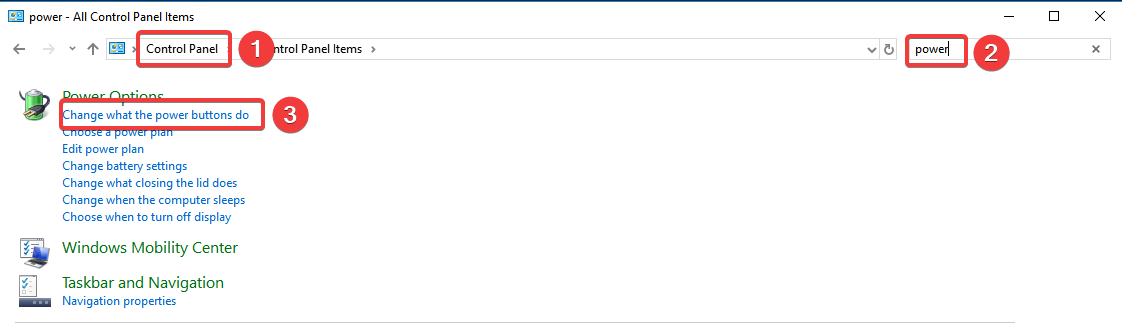
  1. Access Control Panel
  2. Search for the term power in the search bar at the top right
  3. Click on Change what the power buttons dochange what the power buttons do
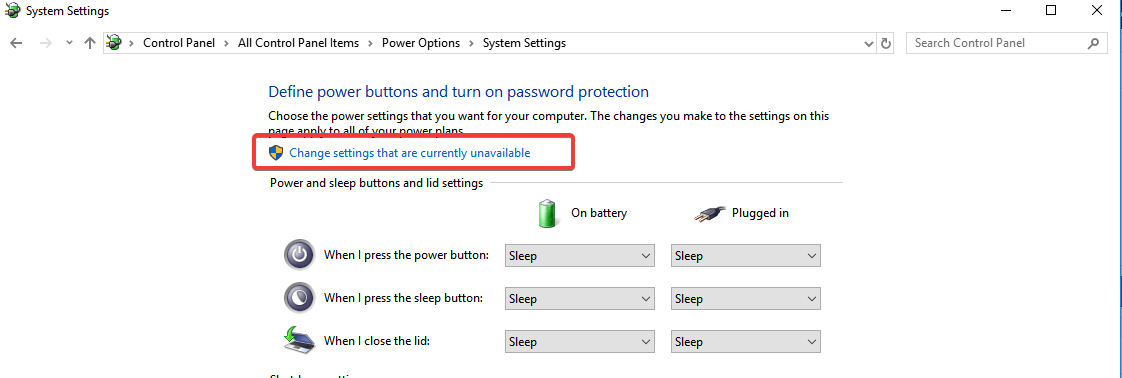
  4. Click on the Change settings currently unavailablecontrol panel power options
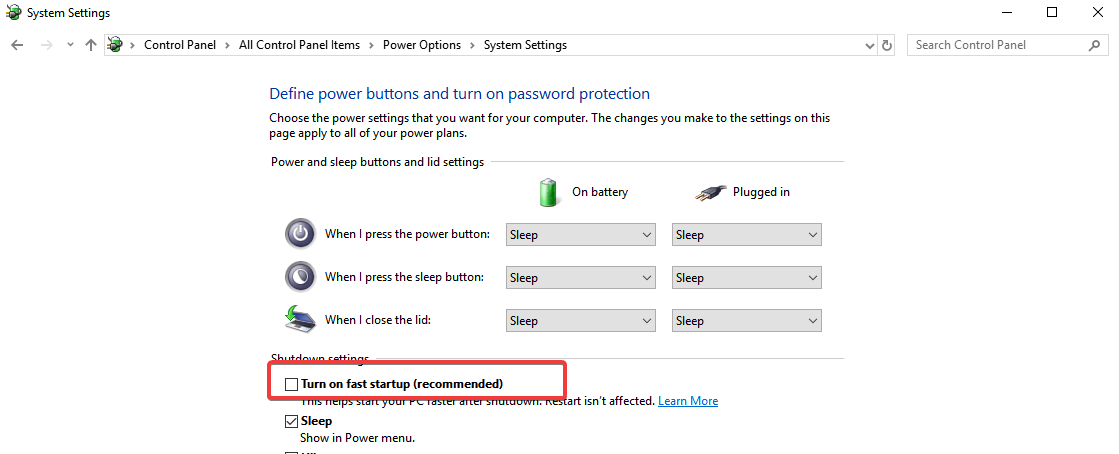
  5. Uncheck the item Turn on fast start up (recommended)turn on fast start up
  6. Press Save Changes to save the settings

You can’t open Control Panel? Take a look at this step-by-step guide to find a solution.

3. Use the Boot Repair Tool

The Boot Repair Tool is a small software that can solve most of the boot-related problems. In order to install it and use it:

  1. Boot into your operating system
  2. Enter the following commands:
    sudo add-apt-repository -y ppa:yannubuntu/boot-repair
    sudo apt-get update
    sudo apt-get install -y boot-repair && boot-repair
  3. After the installation is complete, you can launch Boot Repair tool from the apps menu
  4. It will do some scanning so let it finish its job
  5. Then a screen will appear which will be saying recommended repair based on the scan
  6. After choosing recommended updates, it will start the repair
  7. Open the terminal and copy and paste the highlighted command in terminal one by one.
  8. Select yes by using arrow keys or tab buttons and hit enter to select
  9. in Boot Repair Tool screen hit forward
  10. Copy the command mentioned there and paste it into terminal and hit enter and let it do the job
  11. If prompted some options to configure where to install GRUB Choose yes and then hit enter
  12. Use spacebar to select an option and TAB to navigate through options
  13. After you finish installing GRUB, you can close Terminal
  14. Select the forward option in Boot Repair Tool screen
  15. Select Yes for every option regarding confirmation
  16. A successful confirmation message will appear on the screen
  17. Restart your computer

4. Windows and Ubuntu are installed in different modes

It is impossible to dual boot two operating systems if installed in different modes – one in UEFI mode and the other in BIOS Legacy mode.

Therefore, to solve the problem and restore the dual boot, you have to convert the installation of Ubuntu to the same mode in which Windows is installed.

In order to solve this, you can use the Boot Repair Utility and you will need a live bootable DVD of your installed operating system. Afterwards, you can follow one of the steps below, depending on your situation.

  1. To convert Ubuntu to UEFI mode you need to start Boot Repair and activate the panel with the Advanced options, then select the GRUB Position tab, put the check on separate Partition/boot/efi and click Apply.
  2. To convert Ubuntu to BIOS Legacy mode, start Boot Repair and activate the panel with Advanced Options, then select the GRUB Position tab, uncheck the separate Partition/boot/efi item, and click Apply.

Afterwards, enter into the UEFI firmware configuration panel and choose whether to start the computer in UEFI or Legacy mode.

Most users don’t know how to enable Legacy Boot on Windows. Check out this guide and be a step ahead. If you’re having UEFI boot problems on Windows, this article should help you solve them quickly.

We hope one of the solutions described above helped you solve the dual booting problems, and now you are welcomed by the familiar Grub screen.

Now with Windows 11 Insider Preview Build 26052, you can use Sudo command in Windows 11, check out this guide to learn how to do that.

This issue can be associated with Grub rescue message on Windows 10, so don’t miss it.

If you have any more questions, feel free to post them in the comments section below.

FIX: Internet Explorer 11 has Proxy Problems After Update

More trouble’s ahead for Windows 10, Windows 8.1 users who’re trying to use proxy servers with their Internet Explorer 11 browsers. Here’s what one of them has been saying about the problem: internet explorer 11 proxy windows 8.1

Today morning I “successfully” installed a dozen updates to windows (detailed below) and now the browsers (FFox 29/IE 11) and my email client (Thunderbird 24.5) do not work. Other programs seems to be fine. I narrowed down the problem to proxy settings. I did not used a proxy before. But now those programs that do not attempt to use a proxy, like Skype, Remote Desktop client, an FTP/WebDAV client — do work. What is more, when I start Fiddler, IE and FFox begins to work — as long as Fiddler is capturing the network traffic. (This is how I can write here now.) But I still cannot read email!!

Read Also: Users Complain OneDrive Upload is Very Slow

How to fix Internet Explorer 11 proxy issues

The user who has submitted this problem on the Microsoft Community forums is quite experienced, so this seems to be a problem from Microsoft’s back-end. Here’s what else he tried to fix the problem:

Of course I checked Internet Options/Connections/LAN settings. First time all checkboxes were cleared. I turned “Automatically detect settings” on, but it changed nothing. Not even after reboot. I also tried “netsh winhttp reset proxy” from admin prompt. It said: Current WinHTTP proxy settings: Direct access (no proxy server). but nothing changed.

I have Hyper-V turned on. I have 2 virtual switches, one external and another internal. Now I disabled the internal switch’s network interface (because it has a different IP address), for the case if it confused something, reboot, but no help. Please help me to recover from this situation. Reinstalling everything would be a nightmare, becuase of so many custom software configuration. Here is the list of Windows updates that claimed to be “successful”:

The same users says that the issue disappeared only after a good number of reboots, only to return and become even more annoying. Despite several workarounds, the problem is still there and not a single Microsoft representatives has reached out to offer a fix. Here’s how the latest reply looks like:

I found it to be non-deterministic: the browsers/email client are working after one reboot and doesn’t work after another (I use ffox but also try with IE with settings reset. Both of them cannot download anything on http/https but apparently have no problem with accessing the name server. The proxy settings are empty in every location I’m aware of),
despite that I change nothing between reboots, and this happens in safe mode, too (safe mode with networking), and the problem is present more often than not.

Since it occurs in safe mode and non-deterministically, I did not bothered with “clean boot” (disabling all non-M$ services and start-up programs), because if the problem disappears I cannot tell whether it was the result of my action or it simply wasn’t occurring at that time. When the problem doesn’t occur, I can use the system as intended, and this state remains after hibernation. Thus my work-around currently is to avoid reboots for several days. But it is terrible for a developer who always have to know what his machine is doing exactly to know that with every reboot I risk the ability of accessing emails for an unpredictable period.

Also, make sure that you’re using the correct proxy settings for Internet Explorer. For more information on the correct proxy configuration to use, go to Microsoft’s Support Page and follow the instructions available in their guide.

Other potential fixes may include:

  • Turn off hardware acceleration
    • Go to Control Panel > Internet Options > Internet Properties to configure your internet display and connection settingsinternet explorer black screen issue fixes
    • Go to the Advanced tab > Settings
    • Go to Accelerated Graphics > enable tthe feature Use software rendering instead of GPU rendering
  • Uninstall all the add-ons and extensions you installed on your browser.
  • Reset Internet Explorer by following these steps:
    • Go to the Tools menu > Internet Options
    • Click on the Advanced tab > hit Reset
  • Reinstall IE 11 if nothing worked
  • If you still can’t use your IE 11 browser, you can install a different browser.

So, if you happen to know a working fix, we’ll be more than happy to hear it. Until then, we’ll be keeping a keen eye on the topic and update it once and if a working solution will be provided.

RELATED STORIES TO CHECK OUT:


Windows 10 Display Goes Blank and Flipped Upside Down

Here we go again – more troubles for Windows 10 and Windows 8.1 users. This time, according to a frustrated user, his Windows computer’s display goes blank from time to time and gets flipped upside down. Here’s what he said:
windows 8 display upside down blank

My computer screen sometimes goes blank when I click on a link or fill in a form online. Then when I move the cursor around the screen the information on the screen will pop back up slowly based on when the cursor is. If I click on spots on the screen more information will appear. Sometimes when I am reading email and clicking on an email to delete or clicking on the next email, the screen will show information upside down. I click on anything on the screen again and it will return to right side up.This problem happens when looking at any website on line or reading emails. The problem only happens when I am clicking on a link or new item.

We’ve come across this problem in the past, as well, but we’ve decided to talk about it now, after one of our own readers has sent in this annoying issue. But in this situation, it seems to be affecting those who are browsing online and we’ll refer exactly to that.

SOLVED: PC display is blank, got flipped upside down

  1. Run Internet Explorer Performance Troubleshooter
  2. Disable add-ons and tweak the display
  3. Change display resolution
  4. Disconnect all peripherals

1. Run Internet Explorer Performance Troubleshooter

This is an automated tool which will check for any performance issues, but if you are using another browser and getting the same problem, then you will need to try out a different solution.

  1. Press “Windows Logo” + “W” keys from the keyboard and then type “Troubleshooting”
  2. Now choose “View All” on the left pane and then click on “Internet Explorer Performance” or Internet Connections (depending on your OS version).
  3. Choose “Advanced” and then click on “Run as Administrator”
  4. Now click “Next” and follow the on-screen instructions

2. Disable add-ons and tweak the display

Also, the problem could be caused by a certain add-on, so go ahead and press the “Win Logo Key” + “R” and then type: iexplore.exe –extoff. This will disable the addons, so go ahead and see whether it doesn’t give errors with this setting enabled. If your display is upside down, go ahead and right click on the desktop > Personalization > Display Settings > Advanced Settings and look for rotation settings there, since it varies from machine to machine. Also, you could try one of the following hotkeys:

  • Ctrl + Alt + Right Arrow: To flip the screen to the right.
  • Ctrl + Alt + Left Arrow: To flip the screen to the left.
  • Ctrl + Alt + Up Arrow: To set the screen to its normal display settings.
  • Ctrl + Alt + Down Arrow: To flip the screen upside down.

3. Change display resolution

Blank screen issues may also occur due to incorrect or incompatible resolution settings. Restart your computer several times until the blank screen no longer appears – hopefully. Go to Settings > System > select Display and change the display settings to recommended.

4. Disconnect all peripherals

Some users confirmed that disconnecting all peripherals may fix this problem. Go ahead and unplug absolutely all peripherals (keyboard, mouse, USB flash drive, etc) and turn off your computer. Then boot up your device without plugging in the peripherals. You can then connect your peripherals one by one in order to detect the culprit.

As for the blank issue, go ahead and try the fixes proposed by Microsoft in this article or follow HP’s highly detailed guide which can be applied to other devices, as well. If you happen to have knowledge of a working fix for the above mentioned issues, do let us know by leaving your comment below.

RELATED STORIES TO CHECK OUT:


Remove the Extra Windows Installation: How to do it Safely

Many users like experimenting with different operating systems, but how can you remove extra Windows installation from your PC?

This issue can appear due to various errors or if you’re dual-booting Windows 10 and 11 or any operating system. Luckily, there are ways to fix that.

How do I uninstall a second OS without formatting?

  • The only way to remove the second operating system is to format the partition in which it’s installed.
  • You can always back up files from that partition with local backup software or manually before you start the process.
  • Remember that you have to format the partition on which Windows is installed and not the whole drive.

How do I delete a second Windows installation?

1. Set the default operating system

  1. Press Windows + X, and after that, click System.
  2. Now, go ahead and click on Advanced System Settings.advanced system settings windows 10
  3. Under Advanced tab, and then select Start up and Recovery, and after that click on Settings.startup recovery settings
  4. Under the System Startup, you will now click in the Default Operating System, and from there, select your version of Windows.
  5. Now go ahead and uncheck the Time to display list of operating systems.
Time to display list of operating systems

This won’t remove the extra Windows installation, but you won’t have to choose an operating system at startup anymore.

2. Delete the partition with the second operating system

  1. Press the Windows key + X, and then click Disk Management.

  2. Now, expand Disk Management and after that, select the Recovery Partition.
  3. Now, right-click it, and then select Format after which you will receive a Warning dialog.
  4. Now, select your file system option, and the default which is NTFS.
  5. You now need to right-click the Logical Drive in Disk Management, and then choose Delete Volume select Yes when the warning dialog appears.
  6. The Volume you deleted will now appear as Free space.
  7. Right-click the Free space partition, and click Delete, click Yes on the Disk Management warning that appears.

These are just some solutions to remove extra Windows installation from your PC. In case you have further problems, we have a great guide on how to fix dual boot issues due to Fast Boot.

To learn more, we have a great guide on how to remove Windows from a drive but keep your data, so don’t miss it.

What method did you use to fix this problem? Let us know in the comments section below.

FIX: Start Button not Working After Windows 10/11 Update

The latest Windows 10 and Windows 8.1 update has brought along many annoying issues for users, besides the new features and options. Many have been complaining about the fact that the start button isn’t working properly. Read below for more.
windows 8.1 update start button

I have windows 8.1 enterprise evaluation and i upgraded to the new update and i have the option to go the desktop instead of start on. Im not sure if this is what causing the problem but when i click on the start button it doesn’t do anything or right click either, and when u put the mouse to the bottom right the bar doesn’t show either. switching between desktop and start don’t work ,Sometimes a restart fix the problem but sometimes not. im using a pc by the way not a tablet

  • READ ALSO: How to change the Start button color in Windows 10, 8.1

SOLVED: Start button isn’t working after update

So, you saw in the above excerpt what one of the affected users has been saying about this. As it turns out, the start button isn’t responding neither to the left or the right click, which is obviously darn annoying. And here’s what another user has been complaining about:

Well, you’re not alone. I have the exact same annoying behavior. Switching from Metro-app back to desktop is only possible using the start-button on my keyboard. Charms bar is also gone, so upper-left en upper-right corner are useless as well. And a restart does solve the problem for a few hours, and then it suddenly disappears again.

Solutions to fix Start Button not working after update

Delete the Windows update files

What I could suggest is to go ahead and delete the Windows 10, 8.1 Update install files, and this might fix the annoying problem. It did fix the problem for some; after that, you can use Windows Update and get it once more, as there might have been a glitch with one of the KB install files which was subsequently fixed.

Run the Update Troubleshooter

Another quick solution is to run the built-in update troubleshooter since this issue occurred shortly after you updated your system. If you’re running Windows 10, go to Settings > Update & Security > Troubleshooter > select and run the Windows Update Troubleshooter.

windows 10 update troubleshooter

If you’re running Windows 8.1 or Windows 7, you can run the Update Troubleshooter from Control Panel.

windows update troubleshooter control panel

Additional solutions

For additional solutions, you can also check out our guide on how to fix general Start Button issues. In case you know of another working fix, do let us know by leaving your comment below.

RELATED STORIES TO CHECK OUT:


How to install Classic Skype on Windows 10 [Download link]

Many Windows 10 users prefer to install Classic Skype on their machines rather than using the latest Skype versions. In this guide, we’ll show you what are the steps to follow to download and install Classic Skype on your Windows 10 computer.

Well, it seems that Microsoft is not very persuasive when it comes to convincing users to install the latest software versions of its products. As a quick reminder, Windows 7 still has a strong user base despite Microsoft’s constant efforts to convince users to upgrade to Windows 10.

The same is valid for Skype Classic. Although Microsoft added tens of news features and improvements to its latest Skype version release, users are not rushing to install it. Instead many are looking for ways to keep using old Skype versions or install Skype Classic on their devices.

Download Skype Classic on Windows 10

If you want to install Skype Classic on Windows 10, go to Skype’s download page and select the option get Skype for Windows. The launch the downloaded .exe file to complete the install process.

Additionally, you can also use this Skype Classic download link in case the first one won’t work for you.

Back in February 2018, Microsoft removed Skype Classic from its download page. Then, the company changed its mind and made this Skype version available again — only to remove it again a few weeks after. Now, when you first visit the download page, Windows 10 will inform you that Skype is already installed on your machine.

The drop-down menu allows you to download the current Skype Version, Skype for Windows 10 and two Skype versions for Linux.

download classic Skype Windows 10


The good news is that Microsoft recently decided to extend Skype 7 support although it had previously announced that it would end support for this version in September 2018.

Many Skype users criticized Microsoft’s decision to remove Skype Classic from the download page, suggesting this was another strategy to force them to use newer software versions. On the other hand, the Redmond giant said the decision has been taken due to security issues.

Have your say

Have you managed to install Skype Classic on your Windows 10 computer? Tell us why you prefer using old Skype versions over newer versions.

RELATED STORIES TO CHECK OUT:

Can I Use the Same Windows Product Key on Multiple PCs?

While Windows is great software, you’ll need a license to use it. However, many users asked: can I use the same Windows product key on multiple computers?

Before starting, why not check our guide on how to find the Windows product key using the Command Prompt? To learn more about the product keys and Windows, keep on reading.

Can I use one Windows 10 key on two computers?

The short answer is no. You can’t use the same account on multiple devices. It’s clearly stated in the Terms of Service when installing Windows:

a. One Copy per Computer. You may install one copy of the software on one computer. That computer is the “licensed computer.”
b. Licensed Computer. You may use the software on up to two processors on the licensed computer at one time. Unless otherwise provided in these license terms, you may not use the software on any other computer.
c. Number of Users. Unless otherwise provided in these license terms, only one user may use the software at a time.
d. Alternative Versions. The software may include more than one version, such as 32-bit and 64-bit. You may install and use only one version at one time.

So, there you have it – you will need a license key for every computer.

Can I reuse my Windows 10 key on a new SSD?

  • Yes, you can reuse the key on a new SSD drive as long as it’s on the same computer.
  • This means you can move Windows to another drive, which will be activated.
  • For this to work, your license key is stored in BIOS, so Windows will remain activated unless you change your motherboard.
  • This means that you can freely replace any components such as storage device, memory, or GPU without any issues.

What happens if I use my Windows 10 key twice?

  • It’s not possible to use Windows 10 key twice.
  • The activation process will fail and detect that the key is already activated.
  • However, if you deactivate the first device, you can reuse the key on a different one.

How many times a Windows product key can be used?

  • The key can be used only on one device at a time.
  • There is no limit on how often the product key can be used.
  • The only limitation is that it can be active only on a single device at a time.

So you can see, there are no limitations as long as you keep just a single device activated at the time.

Is Windows 10 activation permanent?

  • Yes, the activation is permanent, for the most part.
  • In case you change your motherboard, you might have to reactivate Windows.
  • However, this can be done without purchasing a new license.

We hope this guide answered all your questions about using the same Windows product key on multiple computers.

The only problematic situation is the case where you replaced your computer motherboard. We have a dedicated guide on how to activate Windows 10 if you replaced your motherboard.

What are your thoughts on Windows activation and license keys? Let us know in the comments section below.

FIX: Windows 10/11 File Explorer won’t refresh

There is an annoying issue that is affecting especially Windows 8.1, Windows 10 users and even yours truly – the thumbnails for pictures and pdf files on the Fle Explorer interface don’t seem to refresh. We explore the issue and try to fix it.

A number of Windows 8.1 and Windows 10 users have reportedly been affected by some annoying issues regarding the fact that the thumbnails of pictures and pdf files, but also some other files, isn’t getting refreshed. This isn’t necessarily a big problem, but one that is rather annoying and it ruins your Windows experience, after all. Here’s what one of the affected users has been saying:

I have minor problem…. that is my explorer won’t refresh the pictures thumbnail (and .pdf which won’t show the reader apps icon inside the .pdf file icons) even though other media like music and movies went well…..for the pictures….

SOLVED: Windows 10 File Explorer does not refresh

  1. Create a new user profile
  2. Rebuild the Icon cache
  3. Clean File Explorer history
  4. Disable Quick Access

The solutions from below have been given by a moderator on the Microsoft community forums, so I trust he knows his business. But if you happen to know some working fixes, as well, do let us know by leaving your comment below, please.

1. Create a new user profile

  1. Hold down “Windows Logo” + “X” keys on the keyboard to open the quick menu and the select “File Explorer” from there
  2. After that, click on the “View” tab and then click on “Options” at the top right corner
  3. Now, click the “View” tab, and then select “Show hidden files, folders, and drives”
  4. Right now, you need to uncheck the box which states “Hide protected operating system files”
  5. You will have to click “Yes” to confirm, and then click or tap on “OK”
  6. Find your “C:UsersOld_Username” folder, and “Old_Username” is the name of the old user profile you will have to copy the files from
  7. Now, go ahead and select all of the files and folders in this folder and copy them, except the following:  Ntuser.dat, Ntuser.dat.log and Ntuser.ini
  8. Find the “C:UsersNew_Username” folder and “New_Username” is the name of the new user profile you have created.
  9. Now paste the files there that you have copied
  10. Restart your PC and log in with your default profile

2. Rebuild the Icon cache

If the above steps didn’t do it, try the following then:

  1. Open File Explorer and the click on the ‘View’ tab.
  2. Click on the ‘Options’ button to the far right.
  3. After that, click on ‘view’ tab in folder options
  4. Check the box that says ‘Show hidden files, folders and drives’ and click apply and ok.
  5. Go to C:UsersUsernameAppDataLocal folderapp data local file explorer windows 10
  6. Delete the hidden IconCache.db file.
  7. Restart and that’s it.

3. Clean File Explorer history

Clearing your File Explorer history can help you to fix many issues affecting this Windows component. As a quick reminder, File Explorer keeps a list of recently modified files and folders and this may sometimes block various commands. Follow these steps to delete your File Explorer history:

  1. Open File Explorer > click on the File menu > select Change Folder and Search optionsfile explorer Change Folder and Search options
  2. Go to Privacy > hit the Clear buttonclear file explorer history
  3. Check if you can now refresh your files and folders.

4. Disable Quick Access

You can access recently opened and modified files and folders using the Quick Access feature. However, sometimes Quick access can cause various File Explorer issues. It may even prevent you from refreshing your File Explorer pictures, PDF thumbnails, files and folders.

To disable Quick Access, you need to open File Explorer Options, go to Privacy and then simply uncheck the options Show recently used files in Quick access and Show frequently used folders in Quick access. Hit Apply and OK.

disable quick access file explorer

For additional fixes, you can check out the troubleshooting guides listed below:


FIX: Can’t Eject USB Drive in Windows 10/11


SOLVED: Problem ejecting USB mass storage device

  1. Check your USB ports
  2. Update USB drivers
  3. Check Bluetooth Support Service settings
  4. Make sure no USB file is in use
  5. Scan your computer
  6. Run the Hardware and Devices Troubleshooter

Even if the Windows 10, Windows 8.1 update fixes a lot of bugs and glitches that were present in previous Windows versions, there are still plenty remaining. We try to solve a problem with USB drives which can’t be ejected in Windows 10 and Windows 8.1.
can't eject usb windows 8.1 A few Windows 10, Windows 8.1 users have been complaining that they can’t eject USB drives from the ‘Safely Remove Hardware and Eject Media icon’ which usually pops out on the low right corner when you plug in a USB drive, just as in the above image. This is quite a problem, since if you have important data on your device, you want to make sure that it doesn’t get lost. Here is the complaint of one of those suffering from this:

Hi, my partner’s laptop was just upgraded to Win 8.1. Most things seem okay after the upgrade (thank you for the Start/Windows button…), but where before clicking on the ‘Safely Remove Hardware and Eject Media’ icon in the Taskbar showed any USB drives attached to be ejected, the name of the drive is there but is now greyed out and can’t be clicked on. I’ve tried this with several USB stick drives and it’s the same for each of them. I can open My Computer/This PC and eject the drive there, although the some of the icons there are strangely flickering which makes it difficult to right-click and eject the device.

Solutions for USB ejecting problems in Windows 10

1. Check your USB ports

This might seem as a silly, if not stupid advice, but in my case, this was exactly the problem – make sure that your USB port is clean and that there’s no dust inside it, or even worse, that it is not damaged. There might be some faulty circuitry which won’t get fixed if you solve this via software.

— RELATED: How to Improve your USB Data Transfer in Windows 10

2. Update USB drivers

Go to Device Manager and from there pick Universal Serial Bus controllers. The first thing that you can do is scan for hardware changes right after you plug in your USB drive, so that you could force it to “recognize” it better.

device manager scan for hardware changes

If you see an exclamation market, then reinstall the drivers. Even if there isn’t one, then uninstall and install again the drivers for the affected device, as shown in the screenshot below.

uninstall USB controller

3. Check Bluetooth Support Service settings

Type Services.msc into the run command, look for Bluetooth Support Service, double-click to open its Properties window and then make sure Startup type is NOT set to Disabled. You should set it to Automatic (Delayed Start); and click Apply after that.

bluetooth support service automatic startup

4. Make sure no USB file is in use

Your computer won’t eject USB drives if there is any file, folder or app in use. Make sure there is no file or program running from the USB flash drive. Also, make sure that your antivirus is not currently scanning your USB device for malware and virus infections as this may also prevent you from removing the USB device.

— RELATED: How to eject USB devices from Windows 10, 8.1 without any worries

5. Scan your computer

Particular malware or virus infections may affect your computer’s capability of ejecting USB devices. As a result, run a full system antivirus scan and then try to eject the problematic device again.

6. Run the Hardware and Devices Troubleshooter

If nothing works, maybe the Hardware and Device troubleshooter can help you fix this problem. Go to Settings > Update & Security > Troubleshoot > select and launch the troubleshooter as shown in the screenshot below.

troubleshoot hardware and devices


On Windows 8.1, you can launch the troubleshooter from Control Panel.

hardware and devices troubleshooter control panel

We will be gathering more solutions that we know have a direct effect on this, and you if you also happen to know any working fixes, let us know by leaving your comment in the field from below.
RELATED STORIES TO CHECK OUT: