Xbox One’s EA Sports NHL 18 Young Stars Edition is now live and ready to play

EA Sports NHL 18 launched today on Microsoft’s Xbox One game console. This latest video game in the EA Sports franchise brings several new features to help it stand apart from its predecessors. Among the new features are new creative attack controls, a new expansion draft, several new multiplayer modes, and three-on-three matches.

EA SPORTS™ NHL 18 delivers the speed, creativity and action of today’s young NHL superstars with new Creative Attack controls and an all-new Defensive Skill Stick. Play the fast-paced, arcade-inspired 3-on-3 NHL THREES mode, or create your own custom 32nd NHL team with the new Expansion Draft. Do it all with the most co-op and competitive multiplayer options ever in an EA SPORTS NHL game.

No other sports game allows you to team up with friends and hit the ice like NHL 18. Whether you’re playing cooperatively or competitively, offline on the couch or online with up to 12 players, NHL 18 delivers more than 64 combinations to team up with – or against – friends locally and online. It no longer matters if your friends are on the couch, online, or both. However you want to play, NHL 18 offers more ways to play multiplayer with your friends or against your rivals than any other sports videogame.

Buy EA Sports NHL 18 on Xbox One

There are two special editions of EA Sports NHL 18 available for digital purchase right now; the Young Stars Edition and the Young Stars Deluxe Edition. The former features the main game and one Gold Plus Pack per week for 20 weeks after purchase, one Rookie HUT item, one Adidas Custom HUT Jersey, and an EASHL McDavid celebration while the latter features the same but comes with two Gold Plus Packs instead of one.

Did you buy EA Sports NHL 18? Let us know which version you grabbed in the comments below.

Ringtone making apps you can download on Windows 10/11

Looking for a unique ringtone for your computer or phone just got easier thanks to ringtone making apps.

A ringtone making app is an audio editor that comes with fewer editing features so that you can easily create a ringtone for your phone from your favorite track, with a few clicks.

Some of the benefits of using a ringtone making app include:

  • Creating custom ringtones
  • Modify, edit and cut tracks to size
  • Easy to use as it has no complicated features

If you’re using a Windows 10 phone, here are five ringtone making apps you can use to create your desired tune.

Ringtone making apps for PC

Ringtone Maker by Microsoft

Ringtone Maker by Microsoft

The Ringtone Maker was designed to be a universal app. However, this free app works only on Windows 10 smartphones at the moment, and can be downloaded from the app store to your phone.

It is 3.52 MB in size so it won’t take up much of your storage space. What’s more, you can install it on multiple devices when signed in to your Microsoft account.

With this app, you can create a unique ringtone tailored to your tastes and preferences, by selecting a song from your playlist, and creating a ringtone out of it.

How to create a ringtone using Ringtone Maker

  1. Open the Ringtone Maker app from the app store
  2. Choose your favorite track or song from your music folder
  3. Save the song as a ringtone
  4. Use the editing controls to choose the start, end and length of your ringtone

You can also create notification alerts for messages, emails, alarms, and calendar reminders.

Pros

  • Takes up little space on your phone
  • Supports more than 20 different languages
  • Uses your device network services
  • Uses your saved playlists
  • Can be installed on up to 10 devices

Cons

  • Users have reported a few glitches and bugs

Ringtone Maker by Fried Cookie

Ringtone Maker by Fried Cookie

This free app converts your MP3 tracks into ringtones within a short time.

The downside though, is that the app has limited editing control, such as no fade in/out options, and no options to zoom to a specific part of the MP3 file. This can be frustrating for the user as the ringtone starts abruptly if not carefully selected.

How to create a ringtone using Ringtone Maker by Fried Cookie

  1. Drag and drop an MP3 file onto the window
  2. The app will show your track and time indicators. Adjust by dragging to where you want the track to start and end
  3. Preview the edited track
  4. Select where you want to save and you’re good to go

Note: the app exports your new ringtone to your mobile device whether it is Windows, iPhone, or Android.

Pros

  • Creates a ringtone within seconds
  • Minimal and snappy
  • Easy drag and drop
  • Uses little storage space (about 390 kb)
  • Supports commonly used phone platforms

Cons

  • You can only make a ringtone of 30 seconds (maximum)
  • Has limited track editing control options
  • Doesn’t support other file formats except MP3
  • Doesn’t transfer ringtone to device

READ ALSO: Ringtone creation tool for Windows 10 mobile is on the way


Metro Ringtones by Ashtech

Just like the Ringtone Maker app by Microsoft, this free app lets you create personalized ringtones by downloading your favorite song, then selecting the section you want to set as your ringtone. The app is used on the phone, so you need not clip the song on your Windows PC then transfer it to your phone.

Pros

  • Uses little storage space (about 1.69 MB)
  • Supports Windows devices
  • Uses your device network services
  • Uses your media library
  • Can be installed on up to 10 devices

Cons

  • Supports only one language (English – US)
  • Doesn’t transfer ringtone to device

Relax Melodies by Ipnos

Relax Melodies ringtone making app

Most ringtone making apps are usually for fun and personal enjoyment, but this app is for people who value quality relaxation, and sleep time. With this free app you can mix your favorite sounds and create your own personal melody. It comes with 41 high quality sounds, and a timer system that stops the melodies once you sleep. The app derives its unique advantage from its ability to help people relax, meditate, and sleep. It’s like having your own personal harp player at your bedside.

Pros

  • Wide range of melodies for better sleep and relaxation
  • Uses your device network services
  • Uses your media library
  • Can be installed on up to 10 devices

Cons

  • Takes up storage space (about 66 MB)
  • Supports two languages only (English and French)

Fun Sounds by Ozan

Fun Sounds ringtone making app by Ozan

This is one of the free ringtone making apps that boasts of having four times more sounds than any other app in the Windows Store. With this app, you can create your own personal sounds then adjust the tempo and pitch according to your tastes.

If you’re a lover of silly, animated, or weird, this app comes with a variety of sounds in 13 categories ranging from fun, animals, instruments, cartoons, robots, and silly sounds among others. To use it, simply click on the buttons to play the sounds then share with your contacts.

Pros

  • Variety of 182 sounds available
  • Ringtones you create can be shared with others via SMS or email

Cons

  • Supports only one language (English – US)
  • Takes up storage space (7.59 MB)
  • Some users have noted that it has poor sound quality

Have you tried any of these ringtone making apps? Share with us your experience in the comments section.

RELATED STORIES YOU NEED TO CHECK OUT:

Skype for Business is out; Microsoft Teams is in

In what may have first came out as an accidental leak, Microsoft is now letting users know that it will be letting go of the Skype for Business name and combining this business communications solution with its Microsoft Teams offering.

The two had once been separate and used for different reasons, but it seems the giant is working to bring the two functionalities together to offer business users features like messaging, video conferencing with multiple attendees, and more.

Microsoft Teams is a chat-based workspace app used to increase collaboration across organizations and competes directly with other services like Slack.

There hasn’t been an official announcement or details on how combining both will work, but business users are already getting antsy thinking about how this move may help or hinder their communications needs.

Business communications are critical today thanks to the internet. Remote communications have limited boundaries and made it possible to communicate easily across borders without having to be in the same physical location. Microsoft took a giant piece of this communications pie when it purchased Skype back and changed it the service’s name from Lync.

Since Skype for Business has become a huge force in the business communications space for its UC capabilities and security, it was only a matter of time before we’d see a new name come around and new capabilities from Microsoft. This latest move will change the name to a more fitting description that highlights the technologies ability to foster collaboration and teamwork and communications across business users.

Only time will tell how long this name sticks around and how well the added capabilities are received. Which feature are you most excited about? Tell us in the comments below.

See also:

The previous ownership of this semaphore has ended

If you’re getting the ‘ERROR_SEM_OWNER_DIED 105 (0x69)’ error code with ‘The previous ownership of this semaphore has ended‘, follow the troubleshooting steps below to fix it.

Just as same as with all related semaphore system errors, this error refers to owned Windows processes. This exact error can cause crashes while using a system-related programs or services. It can occur mostly due to failed code, but there are some other things that can affect your system and inflict this or similar errors. These are alternative factors that can cause this error:

  • Faulty or outdated drivers and BIOS
  • Missing EXE, DLL or SYS files.
  • Corrupted registry.
  • The presence of malware.
  • Failed installation of the system-related program.

The ‘105 error’ appears on most Windows platforms, including Windows 10. Because of that, your approach might differ, but, in general, you should be able to resolve the issue at hand with a few simple workarounds. Another thing that’s worth mentioning is that the occurrence timing is essential for the further troubleshooting.

So, if you’ve experienced this error, we advise you to pay a close attention and follow the instructions below. Hopefully, together, we’ll resolve the problem at hand.

Fix ‘The previous ownership of this semaphore has ended’ error

also known as ERROR_SEM_OWNER_DIED 105 (0x69)

Solution 1 — Check the drivers

Drivers are the essential link that connects the software and hardware on your PC. You can be sure that, without the proper drivers, your system won’t function as intended, and that includes the occasional appearance of various system errors. Including the system error 105. So, it’s paramount to download and install proper drivers before we move to more delicate steps.

In addition, with the introduction of Windows 7, drivers are automatically installed via the Windows Update feature. Things even get more extreme with Windows 10 mandatory updates. Now, don’t get us wrong, that can be a nice feature, but it’s occasionally erratic and might change already working drivers to a faulty alternative. For that purpose, we advise you to follow the steps below and confirm that everything is working as it should:

  1.  Right-click the Start menu and, from the contextual menu, open Device Manager.
  2. If you locate any driver with the yellow exclamation sign, right-click and click Update Driver Software.
  3. In addition, you can navigate to the OEM’s site and download the drivers for various devices.

For major devices that are essential for system seamless performance, we advise you to download drivers exclusively from the official site or trusted sources. If you’re not sure what’s the exact name of the device at hand, follow the instructions below:

  1. Right-click Start and choose Device Manager.
  2. Right-click the device and open Properties.
  3. Under the Details tab, from the drop-down menu choose HardwareId.
  4. Copy the values from the box and paste them into the preferred browser.
  5. You should see the exact name of your device and act accordingly.

That should do it when it comes to drivers. Now we can move on to system errors.


Solution 2 — Scan system with SFC

System errors are often inflicted by the corruption of system files. There are multiple reasons for that, and most common is a virus infection. As you’re probably aware, viruses tend to infiltrate the system and corrupt files that are of utmost importance for the system overall performance.

Besides the timely deep scan with the antimalware software, you can use various command line tools to resolve this problem. One of the best-known tools must be the SFC tool. System File Checker will, once you run it, check for the corruption of system files and repair them.

If you’re uncertain how to utilize this nifty command and get rid of the error code 105, follow the instruction below:

  1. Right-click the Start button and open Command Prompt (Admin) in the contextual menu.
  2. In the command line, type or copy-paste the following command and press Enter:
    • sfc/scannow
  3. After the procedure is finished, restart your PC.

The tool should check for the files integrity and repair them accordingly.


Solution 3 — Use DISM

If the issue is still persistent, and you’re encountering the error again in various occasions, you can take the troubleshooting to a next level and turn to DISM. The Deployment Image Servicing and Management tool is an advanced command-line tool that is a step further in front of the SFC when it comes to resolving the corruption of system files.

This tool can be run in a standard manner, trough the system resources, but you can use an external installation media as a source, as well. Follow the instructions below to resolve the problem with the DISM tool:

  1. Right-click Start and, from the contextual menu, run Command Prompt (Admin).
  2. In the command line, type the following command and press Enter:
      • DISM /Online /Cleanup-Image /RestoreHealth
  3. Wait until the scan is performed It can take about five to ten minutes.
  4. After DISM has finished scanning, restart your computer.

After the procedure is finished, any system error should be resolved. However, if the error keeps occurring frequently, you should turn to alternative steps.


Solution 4 — Reinstall the troubled program

After multiple retries, you should take into consideration a complete reinstallation of the troubled program. It’s imperative to use a CCleaner or similar 3rd-party cleaning tool and erase a registry inputs. Moreover, don’t forget to backup your registry before you move on to cleaning procedure.

Finally, some programs offer a repair option, which is a plain better than a reinstallation. If you have a chance to repair an installation, do so. On the other hand, if you’re forced to reinstall the program, so be it. Follow the instructions below and you should be good to go in just a few minutes, depending on the program size:

  1. Right-click Start menu and, from administrative options, open Control Panel.
  2. While in the Category view, choose to Uninstall a program in the bottom left corner.
  3. Navigate to troubled, Windows-related program that inflicted the error dialog box.
  4. Right-click and Uninstall it.
  5. Delete remaining folders and clean the registry (make sure to back it up before you run the cleanup tool).
  6. Restart your PC.
  7. Install the program and look for changes.

That should prevent future occurrence of the system error with the code 105. However, if you’re still prompted with the ”ERROR_SEM_OWNER_DIED 105 (0x69)” warning message, there’s still something you might do.


Solution 5 — Restore system

This workaround goes for all system versions produced by the Redmond giant, except Windows 10. While using Windows 10, there’s  always a chance that something will go terminally wrong. Is it due to a faulty driver, system corruption, malware infection or just a simple misuse. Luckily, you can always use a specific time-travel function and restore your system to a previously saved restore point.

Of course, if you’ve previously disabled the system protection for the system partition, there’s a chance that you won’t be able to restore to a preferred restore point. Follow the instructions below to restore your system to a previous, errorless restore point:

  1. In Windows Search, type system properties and open System Properties.
  2. In the System Properties, open the System Protection tab.
  3. Click on the System Restore button.
  4. Click Next and, from the next dialog box, choose the preferred restore point.
  5. You can inform of applicable changes that will occur after the restore by clicking on Scan for affected programs.
  6. Once you’re certain to which date you want to restore your PC, highlight the restore point and click Next.
  7. Finally, click Finish.
  8. Your PC will restart and the restoring procedure will start.

Solution 6 — Use alternative recovery options

On the other hand, with the introduction of the Windows 10 OS, users are able to perform a more thorough troubleshooting steps with the addition of the advanced recovery options. One of those is the ”Reset this PC” recovery option that lets you preserve your data while restoring the system to default values.

If you’re unsure how to run the ”Reset this PC” recovery mode in Windows 10, follow closely the steps below:

  1. Press Window key + I to open the Settings app.
  2. Open Update & Security section from the menu.
  3. Click on Recovery under the left pane.
  4. Click on Get Started under Reset this PC.
  5. Choose to Keep your files.
  6. Follow the instructions until the reset is completed

After that, your PC will restart and you can move with the seamless use. However, if the problem is persistent and the core system error 105 appears again, we advise you to take a clean reinstallation into consideration.


Solution 7 — Reinstall the system

Finally, we get ourselves to the proper solution for even the most resilient system errors. With the clean reinstall, you should be safe that every previous, awkwardly inflicted error, will succumb. However, we’re aware that this isn’t a likable solution for many reasons. Firstly, you’ll lose all installed programs and customized settings. Secondly, the procedure can be time-consuming and, occasionally, too complex.

If you’re not sure how to do it, we advise you to take a look at this article. There you can find a thorough explanation of the reinstallation procedure.

With the clean reinstallation, we conclude this article. We hope you’ll find it informative and helpful. And don’t forget to share your experience with this errors, including questions or suggestions. Thank you for reading.

RELATED STORIES YOU NEED TO CHECK OUT:

Set Webcam as Desktop Background: How to do it

With Windows, the possibilities are endless. If, for some peculiar reason, you want to, let’s say, mirror yourself on the desktop background and follow the constant motion with a webcam, you can do it. In simple terms, you can set webcam output as the desktop background.

That’s the next-level live background we’re talking about, and below, we’ll instruct you on how to make it work.

How do I set the webcam as a desktop background in Windows?

Use VLC Media Player

  1. Download VLC and install the media player.
  2. Once done, launch VLC Media Player.
  3. Press Ctrl+ C to launch the Open Media window.
  4. Under the Capture Device tab, set the following options like this:
    • Capture mode -> Direct Show
    • Video Device Name -> Your camera name
    • Audio Device Name -> Nonechange settings to set webcam as desktop background
  5. After that, open Advanced Options and change Aspect Ratio to counter the display’s aspect ratio.aspect ratio
  6. Click OK to confirm, and finally, click Play.
  7. Now, in the menu bar, open Video and click Set as Wallpaper.set as wallpaper

And that’s all! You should be able to see yourself on the desktop background, with the webcam’s output being projected to it. Just make sure to let VLC work in the background.

Also, remember that you won’t be able to see icons, but you can always create a multi-display. That way, you’ll always have the webcam’s output on one desktop background, and the main display can maintain the same look.

If you have questions or alternative ways to use a webcam as the desktop background, tell us in the comments section below.

Fix Your PC did not start correctly error in Windows 10

Booting problems are pretty common for Windows 10 users. These distinctive errors are hard to resolve and can affect your PC in multiple ways. Some users will get sudden performance drops, others won’t even be able to access the system.

Moreover, the exact cause of these problems can differ. Sometimes it can be a sudden shutdown, which can be resolved with a simple restart.

On the other hand, sometimes your boot sectors and configurations can be damaged, and that’s the worst-case scenario. Either way, it’s not a refreshing feeling to see this error screen.

For that purpose, we’ll provide you with multiple solutions for the various scenarios. All you need to do is locate the culprit and perform the workarounds we presented in the article below.

So, if you have any issues with the Your PC did not start correctly error, these should help you resolve them.

How do I fix Windows 10 booting errors?

1. Boot in Safe mode

  1. Press Windows key + R to open the elevated Run command line.
  2. In the command line, type the msconfig.exe and press Enter.
  3. Under the Boot tab > Boot Options, check the Safe Boot box.
  4. Press OK and restart your PC when prompted.
  5. Your PC should boot in Safe mode.
  • If the system won’t start, within Advanced options.
  1. Open Advanced Options on the error screen.
  2. Click Startup Settings.
  3. Click Restart.
  4. After your PC restarts, you should see the boot menu.
  5. Press F4 to start in standard Safe Mode, or F5 / F6 for Safe Mode with Networking or Command Prompt, respectively.
  6. Your PC should boot in the Safe Mode.

If you’re unsure about the cause of the problem, the safe mode should help you determine it. Namely, if you’re prompted with the Your PC did not start correctly error on the standard startup, but everything works fine when the system starts in the safe mode, we’re on a good track.

In that scenario, you can be almost certain that the drivers or hardware changes invoke startup errors.

Once you’ve managed to boot into Safe Mode, you can easily locate faulty drivers and uninstall them. Moreover, we advise you to restore previous hardware configurations and unplug recently acquired hardware in order to resolve your issues. As simple as that.

You’re unable to boot into Safe Mode on Windows 10? Follow the steps from this article to do it with ease.

2. Use sfc/scannow to repair system files

  1. Open Advanced Options on the error screen.
  2. Click Startup Settings.
  3. Click Restart.
  4. After your PC restarts, you should see the boot menu.
  5. Press F6 to start in Safe Mode with the Command Prompt.
  6. Once the Windows 10 starts, right-click Start and open Command Prompt (Admin).
  7. In the command line, type the following command and press Enter:
    sfc/scannowsfc scan command prompt
  8. SFC should locate system errors and resolve them within minutes.
  9. After the procedure is finished, restart your PC and look for changes.

In addition, you can run Safe Mode with Command Prompt and use various repairing tools like SFC or DISM.

Another effective method to repair system files is with specialized support for Windows errors occurring. Hence, replace corrupted files easily using a dedicated tool, Fortect.

3. Restore registry

  1. In the Windows Search bar, type regedit, right-click regedit and run as administrator.
  2. Click on File and choose Import.
  3. Navigate to a working registry backup file, select it and click OK.
  4. After the procedure is finished, restart your PC and look for changes.

Registry is a risky place for those who aren’t aware of their surroundings. Please note that configuration files for important system resources are stored there. One small change and might create additional issues.

This is why before applying the steps above, make sure to back up your registry accordingly, as you can always restore previous settings and resolve the emerged problems.

So, if you’ve already exported registry values, you can restore them in a simple way and, hopefully, resolve your problems.

Have in mind that some registry values can’t be exported/imported. So, if you tweaked in the forbidden area, there’s a chance that you can’t undo changes. Luckily, there are more than several ways to fix a startup error.

If you’re looking for the best registry cleaners for Windows 10, check out this awesome list.

4. Restore system

  1. Right-click the Start menu and open Control Panel.
  2. In the Category view, open System and Security.
  3. Click File History.
  4. Open Recovery from the bottom left.
  5. Click on Open System Restore.
  6. Click Next until you can see the list of the available Restore Points.
  7. Confirm the selection and start with the restoring procedure.
  • If the system won’t start, try within Advanced Options
  1. Open Advanced Options on the error screen.
  2. Click System Restore.
  3. Choose the Restore Point and continue with the procedure.
  4. After the system restores, Windows 10 should boot just like before.

If you need to rewind your system to a previous working version, system restore is the most logical solution. If you have a proper restore point it won’t take too much time to perform a time-traveling procedure in Windows 10.

System Restore is not working on your Windows 10 PC? Follow the simple steps from this guide.

5. Rebuild Boot Configuration Data

  1. Open Advanced Options on the error screen.
  2. Choose Command Prompt.
  3. In the command line, type the following command and press Enter:
    • bootrec /rebuildbcd
  4. Now there are two scenarios you can encounter:
    1. Total identified Windows installations: 0. Continue to Step 5.
    2. Total identified Windows installations: 1. Type Y, press enter and restart your PC.
  5. In the command line, type the following commands and press Enter after each:
    • bcdedit /export c:bcdbackup
    • attrib c:bootbcd -h -r -s
    • ren c:bootbcd bcd.old
    • bootrec /rebuildbcd
  6. Insert Y or Yes and press Enter.
  7. Reset the PC and you should be good to go.

If you’re unable to boot even though you’ve performed previous steps, there’s a chance that the Boot Configuration Data is corrupted.

Also, some essential files may get deleted or the system update can cause issues on its own. One way or another, you’ll need to rebuild the Boot Configuration Data in order to resolve this problem.

6.  Fix corrupted Master Boot Record

  1. Open Advanced Options on the error screen.
  2. Open Command Prompt.
  3. In the command line, type chkdsk /r and wait for the repairs to finish.
  4. If the problem is still there, you may need to insert additional commands to make it work.
  5. In the command line, type the following commands and press Enter after each:
    • bootrec /RebuildBcd
    • bootrec /fixMbr
    • bootrec /fixboot
  6. Reset your PC and look for changes.

Master Boot Record (MBR) is a special boot sector that saves the boot configuration and information on your HDD. If it’s corrupted or incomplete, you won’t be able to boot.

There’s a large variety of errors that can occur because of the faulty Master Boot record, and it’s not exactly easy to resolve it, especially without the installation or recovery media.

7. Restore system to the previous build

  1. Press Windows key + I to open the Settings app.
  2. Open Update & Security.
  3. Choose Windows Update.
  4. Open Advanced Options.
  5. Choose to View your update history.
  6. Uninstall the latest updates and restart your PC.
  • Steps for cumulative updates
  1. Press Windows key + I to open the Settings app.
  2. Open Update & Security.
  3. Open Recovery from the left pane.
  4. Under the Go back to an earlier build option, click Get Started.
  5. Follow the instructions and you should roll back to a previous build.
  • Steps for Builds and major updates within the system:
  1. Open Advanced Options.
  2. Click on Go back to the previous build.
  3. Follow the instructions and wait for the procedure to finish.

8. Perform a clean reinstallation

And finally, if none of the above solutions managed to resolve the problem, clean reinstallation is the only remaining option. In order to perform it, you’ll need installation media, either USB or DVD.

If you’re able to access the system, make sure to backup your data. If not, you’ll lose all data from the system partition.

You can find the instructions on how to create bootable media and perform a clean reinstallation in this handy article.

That should do it. We hope that, with these workarounds, you’ll be able to resolve the matter at hand. In addition, don’t forget to post questions or suggestions in the comments. The comments section is just below.

Fix: ”An update is required. To continue using OneDrive you need to update it”

OneDrive is an omnipresent part of Windows 10. Like it or not, it can compete with the opposition in many regards and it’s one of the best cloud applications you can use. At least, until it starts misbehaving. There are bugs and then there are errors like ”An update is required. To continue using OneDrive you need to update it” in Windows 10.

If we already know that OneDrive gets updates via Windows Update, this pop-up looks like something suspicious at the very least. Add an unofficial link to this equation and things get even stranger. Luckily, we’re there to help you in distress.

In case you’ve experienced this issue with OneDrive, make sure to check the solutions below with a thorough explanation.

How to deal with the ”An update is required. To continue using OneDrive you need to update it.” prompt in Windows 10

Solution 1 – Download and install Windows Updates

First, let’s get this out of the table: you can update OneDrive solely via Windows Update. Any OneDrive pop-up that appears and asks for an update is an error. Not a virus, not a legit update – just an error, and omission Microsoft is responsible for.

A lot of users reported that, after they click on Update OneDrive button, they’re led to a strange link and redirected to OneDrive main page. Microsoft leased this suspicious domain so you don’t need to worry about malware intrusion or similar wrongdoings. However, we can agree it’s unexpected that Microsoft is using third-party sources (in this case, Akamai servers) for official updates.

This misconception created quite a stir in Windows community and it’s still there because, before Windows 10, OneDrive wasn’t the built-in part of the system and updates were deployed in a different manner. Somehow that remained to be the case for certain Windows 10 users. Take this with a pinch of salt, since Microsoft support never provided the relevant answer and we can only guess.

In conclusion, make sure to install Windows Updates timely and your OneDrive should be up to date.


Solution 2 – Reinstall OneDrive

Creators Update brought positive changes to OneDrive and users are now able to uninstall it just like any other third-party application. If we take into consideration how annoying it was with all those pop-ups and prompts, these are good news. Moreover, with that change, the troubleshooting is now easier, since you can reinstall OneDrive and start from a scratch.

Therefore, if you’re still seeing this odd update prompt, make sure to follow the instructions below and reinstall OneDrive:

  1.  In the Search bar, type Control and open Control Panel.
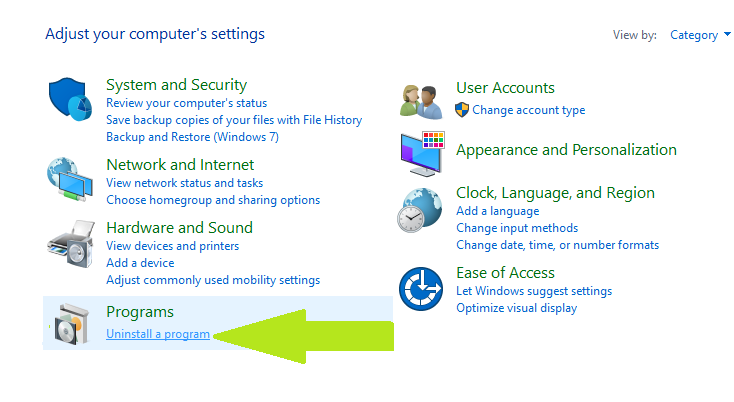
  2. In Category view, open Uninstall a program.
  3. Uninstall OneDrive and restart your PC.
  4. Navigate to this location:
    • C:  Users  :Your Username:  AppData  Local > MicrosoftOneDrive  Update  OneDriveSetup.exe
  5. Run the OneDriveSetup.exe to install OneDrive. In case the setup won’t start, right-click on the EXE file and run it as an administrator.
  6. After the installation, you can insert your email and start the synchronization.

In case there’s no installation file in the mentioned path, you can always download it here.

Either one of these steps should help you to overcome this error.

How do you rate OneDrive in comparison to other cloud applications? Don’t forget to tell us in the comments section below.

RELATED STORIES YOU NEED TO CHECK OUT:

The program stopped because an alternate diskette was not inserted

If you’re getting the ‘ERROR_DISK_CHANGE 107 (0x6B)’ error code with ‘The program stopped because an alternate diskette was not inserted‘, follow the troubleshooting steps below to resolve the issue.

This error might refer to various problems, so it’s not exactly easy to address it. However, once you’ve learned about the exact way it occurs, and it mostly occurs once the troubled program is run, we can easily apply some of the available workarounds.

Most of the time, this error occurs due to:

  • Missing EXE, DLL or SYS files.
  • Malware.
  • Registry corruption.
  • Corrupted installation of the program.
  • Outdated or even faulty drivers.
  • Outdated BIOS version.

ERROR_DISK_CHANGE 107 (0x6B) might appear on every known Windows PC platform, and, consequently, the troubleshooting steps may differ. However, we provided you with a list of valuable workarounds that should help you overcome the issue at hand. For that purpose, we advise you to check the solutions below, and hopefully, get rid of this critical system error.

Fix ‘The program stopped because an alternate diskette was not inserted’ error

also known as ERROR_DISK_CHANGE 107 (0x6B)

Scan for malware presence

The first thing you should do is to perform a thorough cleanup regarding the viruses. Various users reported critical system errors inflicted by the virus. Once they are safe to roam trough your computer, they tend to navigate to system folders and corrupt or delete essential system files. Moreover, they can damage the installation of a certain program which will, eventually, cause crashes led by errors.

For that purpose, we strongly advise you to install a 3rd-party antimalware software or use Windows Defender to scan and get rid of the possible virus infections on your system partition. Additionally, it’s recommended to use a deep scan for better locating and identification of malicious software. The procedure varies on various 3rd-party tools, but we’re sure that you’ll find your way around it.

When it comes to Windows Defender, this is how to perform a deep scan:

  1. Click on the Windows Defender icon from the Notification area.
  2. Open Settings.
  3. Save everything before you start, to prevent the data loss since the PC will restart.
  4. Locate Windows Defender Offline and click Scan Offline.
  5. Your PC will restart and the scanning procedure will last for approximately 15-20 minutes.

This should be enough to get the malware out of the equation. Now, if the problem is still there, we should turn to additional steps.


Update/reinstall drivers

For the seamless and coherent system performance, you’ll need to create an optimal state in which the software and hardware can function without issues. That link, or bond if you wish, depends on drivers. There’s more than one case where the system freezes or works with flaws, just because a certain driver isn’t properly installed. The same goes for the critical system errors, like the one with the error code 107 which we’re addressing today.

For that purpose, we advise you to check the driver status and install latest, functioning drivers. If you’re unsure how to do so, these instructions should help you substantially:

  1. Right-click on the Start button and, from the Administrative Tools menu, open Device Manager.
  2. If you locate any driver with the yellow exclamation sign, right-click and click Update Driver Software.
  3. In addition, you can navigate to the OEM’s site and download the drivers for various devices.

Moreover, if you’re unable to locate and install a proper driver trough the Windows Update feature, you can always turn to an official manufacturer’s site and find the appropriate driver. Some users have problems with the identification of the device, but there’s a simple way to find out the exact name and traits of the device at hand.

  1. Right-click the Start button and, from the Administrative tools list, choose Device Manager.
  2. Right-click the device and open Properties.
  3. Open the Details tab
  4. From the drop-down menu choose HardwareId.
  5. Copy the values from the box and paste them into the preferred browser.
  6. You should see the exact name of your device and act accordingly.

Reinstall troubled program

If the problem is related just to a single program, you can always turn to a reinstallation. Some users resolved the problem and got rid of the system error 107, simply by reinstalling the troubled program. On some occasions, the problem can be resolved by repairing, but there’s just so many programs that offer that procedure.

One thing that’s of utmost importance is a registry. So make sure to, after the program is uninstalled, use a 3rd-party tool and clean the remaining registry values. Moreover, you should navigate to the installation folder and delete the remaining files from there. Follow these steps to reinstall the troubled program and resolve the issue at hand:

  1. Right-click Start menu and, from the contextual menu, open Control Panel.
  2. While in the Category view, choose to Uninstall a program in the bottom left corner.
  3. Locate the program that inflicted the error dialog box in the list.
  4. Right-click and Uninstall it.
  5. Delete remaining folders and clean the registry (make sure to back it up before you run the cleanup tool).
  6. Restart your PC.
  7. Install the program and look for changes.

However, if the error occurrence isn’t program-related, you should move to the additional steps.


Scan system with SFC and DISM

The bare name of the critical system error says enough. The corruption of system files can cause all kinds of errors. system instability or large performance drops. For that purpose, it’s advised to use one or even both elevated command-line tools. System File Checker or SFC is the repair tool that checks the integrity of the system files. If they’re incomplete or corrupted, SFC will restore them to original values.

Follow the instructions below to use the SFC tool and restore the possibly corrupted files:

  1. Right-click the Start button and open Command Prompt (Admin).
  2. In the command line, copy-paste the following command and press Enter:
    • sfc/scannow
  3. After the procedure is finished, restart your PC.

However, if the SFC wasn’t able to find and fix problems, you should turn to Deployment Image Servicing and Management tool or DISM. This is a bit more advanced tool and it can be utilized in various ways.

Follow the instructions below to resolve the problem with DISM:

  1. Right-click Start and, from the Administrative menu, run Command Prompt (Admin).
  2. In the command line, type the following command and press Enter:
      • DISM /Online /Cleanup-Image /RestoreHealth
  3. Wait until the scan is performed It can take about five to ten minutes.
  4. After DISM has finished scanning, restart your computer.

With DISM, you’ll safely resolve the problems and, possibly, relieve yourself of errors.


Use recovery options

If all of the previous steps fell short and you’re still experiencing the same error in various scenarios, we have to inform you that your options are kind of limited. For the pre-Windows 10 systems, you can turn to System Restore. This procedure will restore your system to a latest properly functioning point so you can move on with a smooth PC use. Follow the steps below to restore your system to earlier restore point:

  1. In Windows Search, under the Start Menu, type system properties and open System Properties.
  2. In the System Properties dialog box, open System Protection.
  3. Click on System Restore.
  4. Click Next and, from the next window, choose the preferred restore point.
  5. You can inform of applicable changes that will occur after the restore by clicking on Scan for affected programs.
  6. Once you’re certain to which date you want to restore your PC, highlight the restore point and click Next.
  7. Click Finish.
  8. Your PC will restart and the restoring procedure will start.

However, you have some other Recovery options that were introduced with Windows 10. One of those is ”Reset this PC” wich restores your PC to default values while keeping your files. Follow the steps below to use a Reset this PC and, after the procedure is done, you should be in a clear when it comes to system errors:

  1. Press Window key + I to open Settings.
  2. Open Update & Security.
  3. Click on Recovery under the left pane.
  4. Click on Get Started under Reset this PC.
  5. Choose to Keep your files.
  6. Follow the instructions until everything is done.

With that, we’re concluding this article. We certainly hope that you’ll find it helpful. If you have any questions or suggestions regarding the system error we addressed today, post them in the comments section below.

RELATED STORIES YOU NEED TO CHECK OUT:

Microsoft Network Realtime Inspection Service: How to validate and disable the module

Microsoft Network Realtime Inspection Service (NisSrv.exe) is a module of Microsoft security software. If you open the Task Manager on a device running a recent version of Windows, you will notice the module as one of the tasks running on the PC. This module is a legit process if it is located in the right directory of Windows.

How to validate the NisSrv.exe module

The easiest way to find out if the module is legit is to right-click on it and select Open file location from the context menu.

The location that will open should read C:Program FilesWindows Defender and the file’s name should be NisSrv.exe on systems running Windows 10.

On earlier versions of the operating system, the location is different. For instance, on Windows 7 it will be C:Program FilesMicrosoft Security ClientAntimalwareNisSrv.exe.

Additional methods to validate the NisSrv.exe module

In case you’re not sure if the module is legit or not, you can run additional verification checks.

  1. You can upload it to Virustotal.com to have it scanned for malicious content.
  2. You can use the data offered by the Windows Services Manager to check the legitimacy of the process and the file.
    1. Tap on the Windows key, type services.msc, and press Enter.
    2. Find Windows Defender Antivirus Network Inspection Service and double-click on it.
    3. Open Properties.
    4. The info listed here should include the following:

Service Name: WdNisSvc
Display Name: Windows Defender Antivirus Network Inspection Service
Path to executable: C:Program FilesWindows DefenderNisSrv.exe
Description: “Helps guard against intrusion attempts targeting known and newly discovered vulnerabilities in network protocols.”

How to disable the Microsoft Network Realtime Inspection Service

The module is linked to Windows Defender’s real-time protection, and you may turn off the module by turning off the real-time protection. This will only be a temporary solution because it will turn back on automatically.

There is no direct method to disable the Microsoft Network Realtime Inspection Service using Windows Defender’s settings.

You cannot, therefore, disable the service and it is recommended to keep it activated.

RELATED STORIES TO CHECK OUT:

How to use net user command in Windows 10,8,7

Many advanced users and administrators use Command Prompt to perform various actions. Speaking of which, today we’re going to explain how net user command works and what you can do with it on Windows 10.

What is net user command and how does it work?

Net user command was first introduced in Windows Vista, and it has been a part of Windows ever since. The command allows you to create and modify user accounts on your PC. To use this command, you need to start Command Prompt as an administrator. The fastest way to do that is to press Windows Key + X to open Win + X menu and then choose Command Prompt (Admin) from the menu.

When you enter net user in Command Prompt, you’ll see a list of available accounts on your PC.

Of course, you can view detailed information regarding available user accounts on your PC. To do that, simply enter net user desired_username and press Enter. By using this command you can see the full name of the user account as well as additional information. You can see if the account is protected by a password and even the time when the password was set. In addition, you can see to which groups the selected user account belongs to.

Using this command you can also set passwords for accounts on your PC. To do that, you just have to enter net user desired_username *. Now you’ll be prompted to enter the desired password and retype it to confirm the change.

If you want to set an account password more quickly, you just need to enter net user desired_username yournewpassword

In addition to changing passwords, you can also easily add new accounts to your PC using the net user command. To do that, you just have to enter net user name_of_the_new_account /add.

If needed, you can add password to your account while creating it using the net user name_of_the_new_account mypassword /add command. Of course, you can also use the net user new_user_name * /add command to create a new user account with a password.

Using this command you can also set your account to active or inactive. Basically, if you set your account to inactive other users won’t be able to see it or access it without using net user command. To hide an account, you just have to enter net user account_name /active:no. After doing that, the selected account will become hidden and you won’t be able to access it.

Of course, you can always make account accessible by entering net user account_name /active:yes command. Net user also allows you to assign comments to user accounts. Thanks to this feature, you can add a 48-character comment to any account in order to differentiate it from others. If you’re a system administrator and you’re managing several accounts, this can be incredibly useful. To add a comment, just enter net user account_name /comment:”Comment message”.

Using this command you can also set a country code for any account on your PC. This means you can change the language for Help and error messages on any user account. All users have 000 country code as default, but you can easily change it with this command. To change the country code of a specific user, enter net user user_name /countrycode:123 and press Enter. Of course, be sure to replace 123 with an actual country code.

It’s also worth mentioning that you can set any account to expire by using this command. The base structure for this command is net user user_name /expires:MM/DD/YYYY, but you can also use DD/MM/YYYY format as well. It’s worth mentioning that you can use three types of values for months. You can use the full name of the month, a three letter abbreviation or just a number. As for year, you can use two-digit or four-digit values.

Of course, you can also set your account to never expire by using the /expire:never parameter.

You can also set a full name for any user on your PC. If you’re managing several users, this command will allow you to differentiate them using their real name. To assign a full name to a user, you just have to enter net user user_name /fullname:”User’s full name”.

Since many users tend to use passwords to protect their accounts, as a system administrator you can allow or prevent users from changing their account password. Thanks to this feature you’ll prevent users from changing their password without your knowledge. To prevent a specific user from changing its password you need to use net user user_name /passwordchg:no command.

If you want to allow users to change their password, you need to use net user user_name /passwordchg:yes command instead.

As we already mentioned, using a password is important if you want to protect your account, and with net user command you can force individual users to use a password. By doing that you’ll minimize the chance for unauthorized access. To force a user to use a password on his account, you need to use net user user_name /passwordreq:yes command. Of course, you can use net user user_name /passwordreq:no command to remove this requirement.

Net user command also allows you to specify the time period in which the user can use its account. This feature is especially useful if you want to set time restrictions for specific users. To restrict access for a specific user, you need to specify time frame for each day.

You can enter the full name of the day or use the abbreviation. As for the time, you can use 12-hour or 24-hour format. To set a time restriction for a user, you need to use net user user_name /time:M-F,08:00-17:00. Of course, you can use a different format so your command will look like net user user_name /time:M-F,8AM-5PM.

If needed, you can also set different time frame for different days by using net user user_name /time:M,4AM-5PM;T,1PM-3PM;W-F,8:00-17:00.

You can prevent users from permanently logging to their account on specific days simply by leaving the value blank. If you want to remove all time restrictions for a specific account, simply enter net user user_name /time:all. As you can see, this is a rather powerful command, but it only works with one hour increments and that’s its biggest flaw. Nevertheless, this command is extremely useful if you want to restrict computer usage.

Using this command you can also add a user comment for the account in order to differentiate it from others. To do that, use net user user_name /usercomment:”Your comment” command.

Net user command also allows you to set a home directory for your account by using /homedir parameter. You can also set a logon script for a user using the /scriptpath option. If needed, you can also specify profile path using /profilepath parameter.

Net user command is rather powerful and it allows you to manage user accounts on your PC. The command is relatively simple to use and we hope that our article helped you understand it a bit better.

READ ALSO:

Destiny 2 Xbox One issues roundup: Connection issues, freezes, and more

Destiny 2was released a few days ago for PlayStation 4 and Xbox One. Since this is one of the most anticipated games of the year, the excitement from players around the world was expected.

However, ever since the game was released, players from various regions of the world have reported problems. In fact, some players faced problems minutes after the game was released when they weren’t able to download it at all.

But that’s not where the list of issues ends. Keep reading this article to find out the rest:

Destiny 2 reported issues on Xbox One

Lost connection to servers

Losing connection to Bungie servers is a problem that a couple of users reported recently. Apparently, they’re prompted with the following error message:

“You have lost connection to the destiny 2 servers. Your permissions to access online multiplayer gameplay may have changed or your profile may be signed in elsewhere.”

According to some other users on the forums, this is a longstanding issue that can affect just about any game, not just Destiny 2. So, the solution would be to simply disconnect your network cable, and put it back in after a few minutes. But we don’t know if this will surely solve the problem, though.

Connection issues

There are even more internet connection issues that occurred. One user reported on the forums that he’s not able to finish the first mission as the game constantly disconnects:

“Ive been trying to complete the first mission for about 3 hours as of now. It started out with me not being able to get out of the first room in the very first mission without being kicked to the choose character screen. Finally after deleting the game and reinstalling it I finally got out of the room and to the part where you have to defend from 3 attacks. Now I can’t connect to the destiny servers and I keep on getting an error every time I take 10 steps into the room. I am starting to get really frustrated with this game as I have taken off work to play this game that I spent $100 on, just to be disappointed. I know that the connection issue isn’t on my end as I my internet is working perfectly, I even reinstalled al l 35gb of the game in just over an hour.”

Game freezes during matchmaking

Another player reported the game freezing during matchmaking:

“Entire game freezes when I get to 4 out of 8 guardians in matchmaking for crucible quickplay on xbone. At this rate I’ll never get into crucible! I have open NAT and all connection is good. I’ve been trying for over an hour!!!”

But apparently, that’s not the only case one player said that the game tends to freeze even during the regular gameplay. However, he also confirmed that reinstalling the game solved the problem, so if you experience freezes, maybe reinstalling will get the job done.

Emblems not unlocking

And finally, one player reported a strange bug that stopped emblems from unlocking in the vault:

“I qualified for all veteran awards but two of them didn’t unlock, They’re Young Wolf and Saladin’s Pride both of them have to do with the age of triumph book, and I completed the book months before August 1, I even have the shirt to prove it. found out recently a few of my friends and at least 10 people with the same problem posted on the form. I Just want to know if this is going to get fixed and if Anyone else have this problem?”

We expect even more issues to be reported in the coming days since the game is just a few days old, so be aware.

Have you experienced any issues while playing Destiny 2 on your Xbox One? Let us know in the comments below.

RELATED STORIES YOU NEED TO CHECK OUT:
How to Add a USB-C Port to your Laptop

Most laptop owners almost always have two or more devices, such as a tablet or smartphone, and these gadgets also rely on USB  ports to perform common tasks such as data transfer or charging.

For such users, a laptop may not offer much in terms of connectivity owing to the limited number of ports it comes with.  There is a need for something extra that ensures everything is in one place without the hassle of carrying extra cables, adapters, and finding extra power sources.

Unlike the usual USB-A and USB-B ports found on most PCs and laptops, the USB-C port is gaining more popularity because it enables faster data transmission and quick charging for different devices.

How can I add a USB-C port to my laptop?

If you’re looking to add a USB-C port to your laptop, don’t fret. Computer networking hubs, or simply USB hubs, are designed with users like you in mind.

A USB hub is a gadget with multiple USB ports on it, which you can plug into your laptop’s USB port, then use with up to eight devices connected to the hub.

These hubs come with anywhere between three to eight ports, so you have the freedom and convenience of moving around with your laptop and other devices as you so wish.

When it comes to a USB hub, you need to look for the following:

  • Ports that work whenever anything is plugged into them (and an indicator that shows they’re working)
  • Well-arranged ports that keep the desk organized and do not suck up much space
  • Minimum of three data ports
  • Speeds that do not drop off
  • A good price

What you need if you have multiple devices is the powered hub, which must be plugged into the computer to get power, then supply power to your other USB devices.

It is important to note that not all devices can run from USB hubs, so you’ll have to plug it directly into your laptop’s ports. However, your laptop will give you a warning message prompt in such a case and recommend what to do when this happens.

If you have a small laptop case or bag, don’t worry. There are many small USB hubs available in the market that can comfortably meet your needs.

Like a Swiss Army knife, a multi-port hub has several extended ports that offer a variety of functions.

Some of the tasks you can fulfill while using this hub include:

  • Charging your phone
  • Fast data transfer
  • Charging your laptop (if you have a type-C connector)
  • Connect your keyboard, mouse, flash drive, or hard disk
  • Stream HDTV, as the hub also has an HDMI port
  • SD and Micro SD memory card readers

The compact design of multi-port USB hubs effectively takes up little desk space and supports high-power devices when connected to an external power source.

If you’re looking for a USB-C port hub that matches your connectivity needs, remember to check out our list of the best USB hubs for your laptop.

Tell us if you managed to add the USB-C port to your laptop in the comments section below.

There are no more files’ Windows 10/11 error fix

If you’re getting the ‘ERROR_NO_MORE_FILES’ error code with the ‘There are no more files‘ description, follow the troubleshooting steps listed in this article to fix it.

There are no more files: Error background

The ‘ERROR_NO_MORE_FILES’ error code, also known as error 18 (0x12), usually occurs when users try to save or copy files. There are various elements triggering this issue:

  • Damaged or corrupted files and folders.
  • Folder lock and other such programs.
  • Missing EXE, DLL or SYS files.
  • Malware infection.
  • Outdated software versions.
  • Incompatible software, etc.

How to fix the error code ‘ERROR_NO_MORE_FILES 18 (0x12)’

Solution 1 — Remove folder lock

Folder lock and other such programs are known to cause this error code. Uninstall any such programs running on your computer, and see if that fixes the issue.

If you don’t want to uninstall your folder lock program, try updating it. Many users reported that the error disappeared after they updated the folder lock program.

Solution 2 – Repair your registry

You can use Microsoft’s System File Checker to check for system file corruption. However, this utility is only available on Windows 10. Here’s how to run an SFC scan:

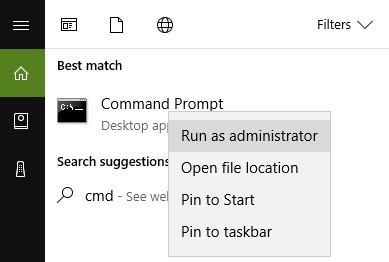
1. Go to Start > type cmd > right-click Command Prompt > select Run as Administrator

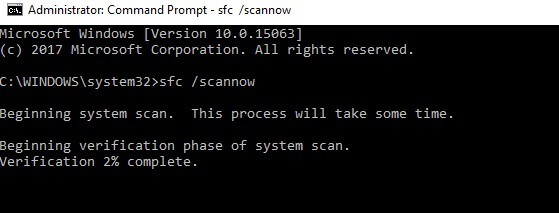
2. Now type the sfc /scannow command

3. Wait for the scanning process to complete and then restart your computer. All corrupted files will be replaced on reboot.

The simplest way to repair your registry is to use a dedicated tool. Don’t forget to first backup your registry in case anything goes wrong. If you haven’t installed any registry cleaner on your computer, check out our article on the best registry cleaners to use on PC.

As mentioned before, we recommend using third-party software that performs this action automatically.

So the most reliable way to fix registry cleaner troubles is by using robust specialized software that is capable of restoring corrupted files and repairing Windows errors.

Firstly, these tools will entirely scan the system for damaged files and thus repair the broken files from your registry. Then they can replace them with new functional Windows files in no time.

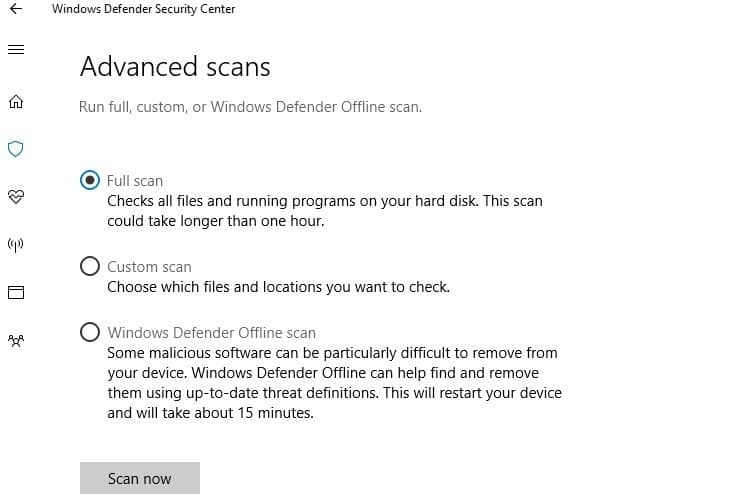
Solution 3 — Run a full system scan

Malware may cause various issues on your computer, including errors. Perform a full system scan in order to detect any malware running on your computer. You can use Windows’ built-in antivirus, Windows Defender, or third-party antivirus solutions.

Solution 4 — Update your OS

Make sure that you’re running the latest Windows OS updates on your machine. As a quick reminder, Microsoft constantly rolls out Windows updates in order to improve the system’s stability and fix various issues.

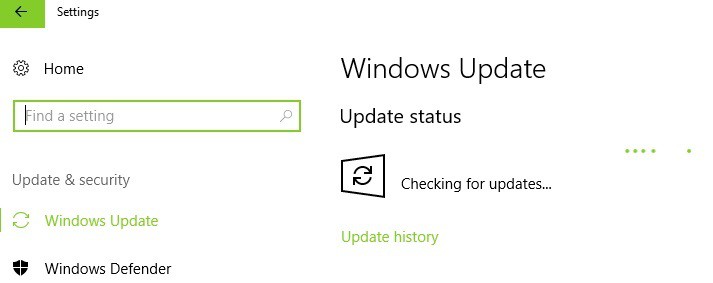
Go to Windows Update, check for updates and install the available updates. To access the Windows Update section, you can simply type “update” in the search box. This method works on all Windows versions.

If you’re looking for a particular update, go to Microsoft’s Update Catalog website. Simply type the KB number of the respective update, hit Enter, and then click on the download button.

Solution 5 — Remove recently installed software

If you recently installed new software on your computer, try uninstalling it. Go to Start > type Control Panel > select the program(s) recently added > click Uninstall.

Then restart your computer, and try to save or copy the problematic files again.

Solution 6 — Uninstall Comodo Cleaner/ ASUS security data manager

Many users confirm that the Comodo Cleaner/ ASUS security data manager may sometimes cause this error code. If you installed these programs on your computer, try uninstalling them and see if that solves the problem.

Solution 7 — Boot into Safe Mode

You can also try to save or copy the problematic files while in Safe Mode.

1. Hold down the shift key and click the on-screen power button

2. Select the restart option while holding the shift key

3. Select Troubleshoot > Advanced options > Startup Settings > hit Restart

4. Wait until Windows 10 reboots, and select Safe Mode.

5. Save/ copy the files > restart your computer > check if the problem still persists.

If you are able to save or copy the files in safe mode, this means that there is a conflict between various programs or applications. Try troubleshooting this issue using Clean Boot in order to identify the program or driver that could be causing this issue.

Here’s how to clean boot your Windows 10 computer:

  1. Type System Configuration in the search box > hit Enter
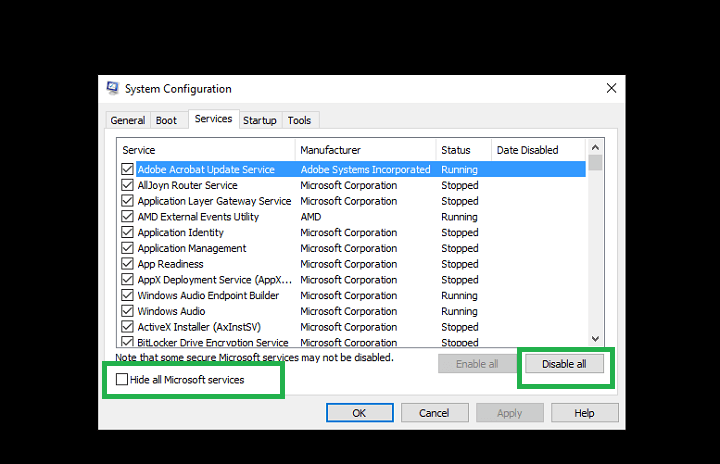
  2. On the Services tab >  select the Hide all Microsoft services check box > click Disable all.
hide all microsoft services windows 10

3. On the Startup tab > click on Open Task Manager.

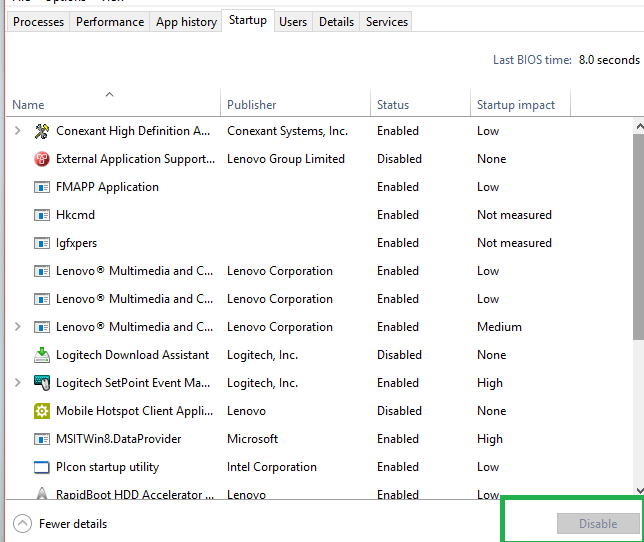
4. On the Startup tab in Task Manager > select all items > click Disable.

disable start up items windows 10

5. Close the Task Manager.

6. On the Startup tab of the System Configuration dialog box >click OK > restart your computer.

Here’s how to clean boot your Windows 7 PC:

  1. Go to Start > type msconfig > hit ENTER.
  2. Go to the General tab > click Selective Startup.
  3. Clear the Load Startup items check box.
  4. Go to the Services tab > select the Hide All Microsoft Services check box > click Disable all > hit OK.
  5. Restart the computer when prompted > check if the issue still persists.

 Solution 7 — Deactivate iSCSI Initiator

If you own a computer running Windows 7, and you can’t save or copy files, try deactivating the iSCSI Initiator.
Go to Control Panel >Administrative Tools > deactivate iSCSI Initiator. Many users reported that this simple solution solves the problem.

Solution 8 — Check your disk for errors

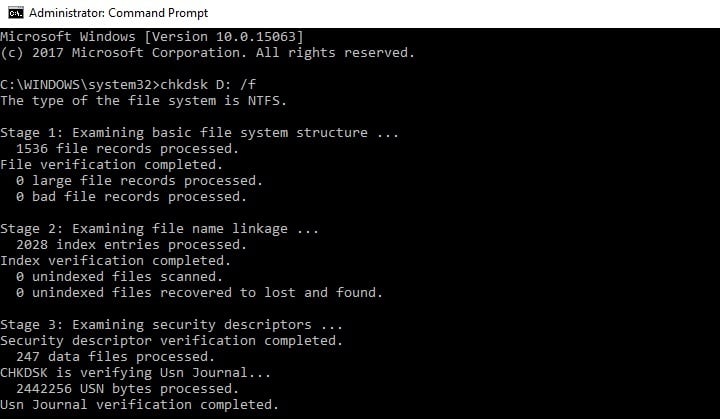
On Windows 10, you can run a disk check using Command Prompt. Start Command Prompt as administrator and type the chkdsk C: /f command followed by Enter. Replace C with the letter of your hard drive partition.

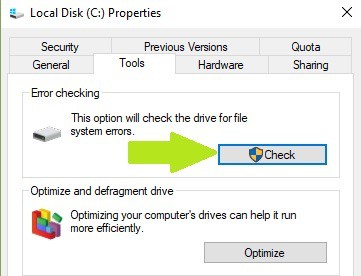
On Windows 7, go to hard drives > right-click the drive that you want to check  > select Properties > Tool. Under the ‘Error checking’ section, click Check.


Solution 9 — Use system recovery options

The System Restore option allows you to restore the previous well-performing system configuration without losing any files, except for a few customizable features and settings.

If System Restore is enabled, follow the instructions listed below:

  1. Go to Search > type system properties > open System Properties.
  2. Go to System Protection > click on System Restore.
  3. Click Next > choose the preferred restore point in the new window.
  4. Once you’ve select your preferred restore point, click Next > click Finish.
  5. Your PC will restart and the restoring process will start.

After the restore process completes, try to copy or save some files to see if the problem still persists.

Windows 10 offers a series of advanced recovery option that allows users to clean install the OS. If you’re a Windows 10 user, you can also use ‘Reset this PC’ recovery option.

  1. Go to Settings > Update & Security > click on Recovery under the left pane.
  2. Click on Get Started under Reset this PC > choose to Keep your files.
  3. Follow the on-screen instructions to complete the reset.

We hope that the solutions listed above helped you fix this annoying ‘There are no more files‘ error message. If you’ve come across other workarounds to fix this problem, you can help the Windows community by listing the troubleshooting steps in the comments below.

Fix: USB Drive is Detected but Doesn’t Show any Data

We now rely so much on USB drives as a computing tool that their failure naturally drives us into a panic. One of the most common USB errors is when a USB storage device is detected on your machine but does not show data.

This issue, along with USB drives not being recognized in Windows 10, is actually quite common. And unless the data has been accidentally erased, you can still recover it.

Why do my USB devices stop working properly?

In most cases where a USB drive fails to show any data despite the computer detecting it, the culprit can be traced to a virus infection. And in the majority of these cases, the data is not lost.

Rather, the virus hides it by creating a shortcut that does not lead anywhere. So when you encounter this problem after you recently used the USB drive on another computer or lent it to a friend, know that a virus is likely the reason.

So maybe before you even try to recover your missing data, you will want to first clean the USB storage device by scanning it using anti-malware or anti-virus software.

After that, you should go on and instruct your Windows computer to show the hidden files. To do that, follow the navigation path below: Windows Explorer > Tools > Folder Options > View Tab 

Once in the View tab, check the Show hidden files, folders, and drives option.

How can I restore my hidden USB files?

  1. Click the Windows icon, type cmd in the search bar, and click Run as administrator under Command Prompt.
  2. Now, copy and paste the command (replace e with your drive letter) below and hit Enter: attrib -h -r -s /s /d e:*.*
  3. Finally, wait for the command to finish running.

You can now go and open your USB storage device. Your data should now be showing. In case there are any files you can’t recognize, rename and open them to recover your data.

To avoid exposing your computer to viruses and malware, avoid lending out any USB storage devices with important data. It is also not a good practice to use your USB drives on computers with no antivirus software installed.

If you need a list of the best USB drive to avoid issues, check our excellent picks.

Feel free to let us know if you were able to fix the USB problem with the solution in this guide in the comments below.

Final Fantasy XV Windows Edition is now listed in the Windows Store

Square Enix’s Final Fantasy XV Windows Edition will become generally available only in 2018, but it was formally revealed a week ago. The game can be spotted listed in the Windows Store.

Final Fantasy XV Windows Edition powered by NVIDIA GameWorks

The game is not a Pocket Edition, and it will come loaded with NVIDIA GameWorks tech and more advanced PC features including some cutting-edge graphics and physics simulation technologies supporting NVIDIA’s capture and share tools as well.

According to Hajime Tabata, the Director of Final Fantasy XV, NVIDIA helps developers to create the most stunning visual experience in the game for Windows PCs. He stated that NVIDIA would push the pace of innovation in the industry and this will highly benefit both developers and gamers at the same time.

Final Fantasy XV Windows Edition features

Once you get the game, you will penetrate the center of the ultimate fantasy adventure, and you can finally enjoy all of this on your Windows PC. In the game, you will be joined by your closest friends on the adventure of your lifetime, and you’ll walk around the most breathtaking world where you’ll immerse yourself in amazing landscapes. You will also encounter humongous beasts throughout your journey, and you’ll have to get back your homeland from the most horrific foe.

The game will feature an action-packed battle system, and it will channel the power of your ancestors in the most thrilling combat. With the help of your friends, you’ll learn to master the skills of magic, weaponry and also team-based attacks.

The Windows edition of the game was developed with the incredible power of the cutting-edge technology including support for hi-res displays and HDR10.

You will get to explore the fantastic experience on Final Fantasy XV like you never have before. We can’t wait to get our hands on this exciting version of the game!

RELATED STORIES TO CHECK OUT:

Classic Rockstar Games thriller L.A. Noire coming to Xbox with One X enhancements

L.A. Noire, the critically-acclaimed detective thriller game from Rockstar Games, will be re-released on the Xbox One on November 14. The remastered game will include all previous DLC and come with various visual enhancements: it will run in native Full HD resolution on the Xbox One and in 4K on the Xbox One X, and you can also expect “updated weather, smog and lighting effects for a more realistic Los Angeles,” explained the Xbox team.

The game was originally released on 7th gen consoles and Windows back in 2011, and it tells the story of a newly minted detective investigating a series of murders in L.A. during the 1940s. The game did not receive the same amount of success as Grand Theft Auto IV or Red Dead Redemption, but it was praised for its storytelling and rich neo-noir universe.

With the exception of GTA V, Rockstar Games usually doesn’t do remaster of old titles (both GTA IV and Red Dead Redemption are backward compatible on the Xbox One, as an example), but L.A. Noire will also be released on the Playstation 4 and Nintendo Switch in November. In addition, a special version of the game called L.A. Noire: The VR Case Files is coming for the HTC Vive. No word on pricing yet, but you can learn more about the different remastered editions on Rockstar Games’ website.

How to delete locked files or folders

Computers are designed to be smarter than the people who use them. And for the majority of times, they indeed are, helping us to execute wildly complex tasks faster and with remarkable efficiency. But sometimes they confound us by failing to complete tasks that seem straight forward even to us.

An example is when your Windows computer refuses to delete a file or folder. Other times it will also refuse to move or rename a file. The computer will give you different reasons for refusing to delete your selected file. It will tell you:

  • The file, its source, destination or directory may be in use by another program
  • Access is denied
  • There is a sharing violation somewhere
  • That the file is unreadable or is corrupted, etc.

Of course, if the computer tells you the file is open in another program, usually one you have opened yourself, closing that program first should unlock the file or folder for deletion. That should be straight forward. But there are cases, as with some background processes, where you can’t immediately tell which program currently has the file open.

How to delete locked files

Just to be sure, Windows system files are locked for a reason. In case you end up in the Registry while trying to fix something, avoid deleting any files or folders there. If unsure what to do, consult a professional. But for locally stored files that you know are safe to delete, but for some reason won’t oblige, there are a few tricks you can try;

Solution 1 — Restart your computer

Sometimes exiting the programs you are in and restarting your computer maybe all you need to delete a stubborn file. Restarting the computer reboots your system and clears it of any temporary bugs that may have locked your file.

But when it is the Windows startup program itself that is locking your file, simply restarting the computer may not unlock it. If you notice restarting the computer isn’t doing the trick, try restarting it in safe mode and deleting the file, before considering other fixes. You can switch back to normal mode after you have deleted the file.

Solution 2 — Use Windows’ Command Prompt

A quick way to force file deletion is to go the CMD route. Open the Run dialog box, type in cmd, and hit the enter key. Once you are in command prompt, type del /f file name and press enter key.

Remember to replace file name with your own file’s name. This should delete the file. However, please note you won’t be able to retrieve the file once you have deleted it this way.

Solution 3 — Use third party file deleting software

Another way to delete a locked file is by using third party software that’s specially written for the purpose. There are several options available, but Unlocker is a popular one. Some of these will also make it painless to rename and move locked files.

Most third party software for deleting locked will require you to download and install them on your computer. However, there are others, like the Process Explorer task manager, are portable and won’t require you to install them on your machine.

Process Explorer is particularly useful as it also shows you which processes are currently running at a given time, as well as the processes’ owning accounts.

The Process Explorer software gives you greater insight into the Windows OS. Among other functions, the tool can tell which process is running any open window, suspend or kill a running process, and, importantly, figure out which process has locked the file you are trying to delete.

Any one of the solutions we have discussed here should help you delete any file you may have been struggling with and, hopefully, put you back in command of your machine again. If you find this problem cropping up repeatedly, you should consider cleaning your computer. There is always a possibility a stubborn bug or virus attack could be messing with your files.

RELATED ARTICLES YOU NEED TO CHECK OUT:

Windows loses the market share growth battle against Linux

Windows suffered its largest market share collapse in August, and its rival Linux experienced the most substantial market share increase in the last year.

Windows market share statistics

In August, Windows dropped to a 90.70% market share from 91.45% from July, despite Microsoft’s effort. This drop of 0.75% is the biggest one that the operating system had recorded since April 2016. Back then, the OS’s market share collapsed from 90.45% to 88.77%.

The whole drop in performance is strange because Microsoft completed the rollout of its Windows 10 Creators Update and besides that, the company is also finishing the development of the latest version of the operating system ready for launch on October 17.

Other operating systems in numbers

Linux has been considered Windows’ rival for a very long time. In August, the operating system managed to experience the highest growth in the last year. It has improved its share from 2.53% in July to 3.37%. More and more users who are ditching Windows are choosing Linux. The growth experienced by Linux is quite impressive because in only four months the OS jumped from less than 2% to 3.37%. In May, the open-source platform was only running on just 1.99% of desktop systems throughout the world.

Windows still powers 9 out of 10 PCs

There’s still good news regarding Windows. At least, the operating system’s  market share didn’t drop below 90%. This means that Windows is still in charge powering 9 out of 10 PCs all over the world. Back in July 2016 Windows experienced a collapse below 90%  and it was running only on 89.79% of all the PCs out there. The next month it grew to 90.52%, so things started to go better again.

RELATED STORIES TO CHECK OUT:

Google uses Chromebooks to lure Microsoft Partners to its cloud business

As Google attempts to grow its cloud services, it’s doing so at the expense of Microsoft’s presence in the same market.

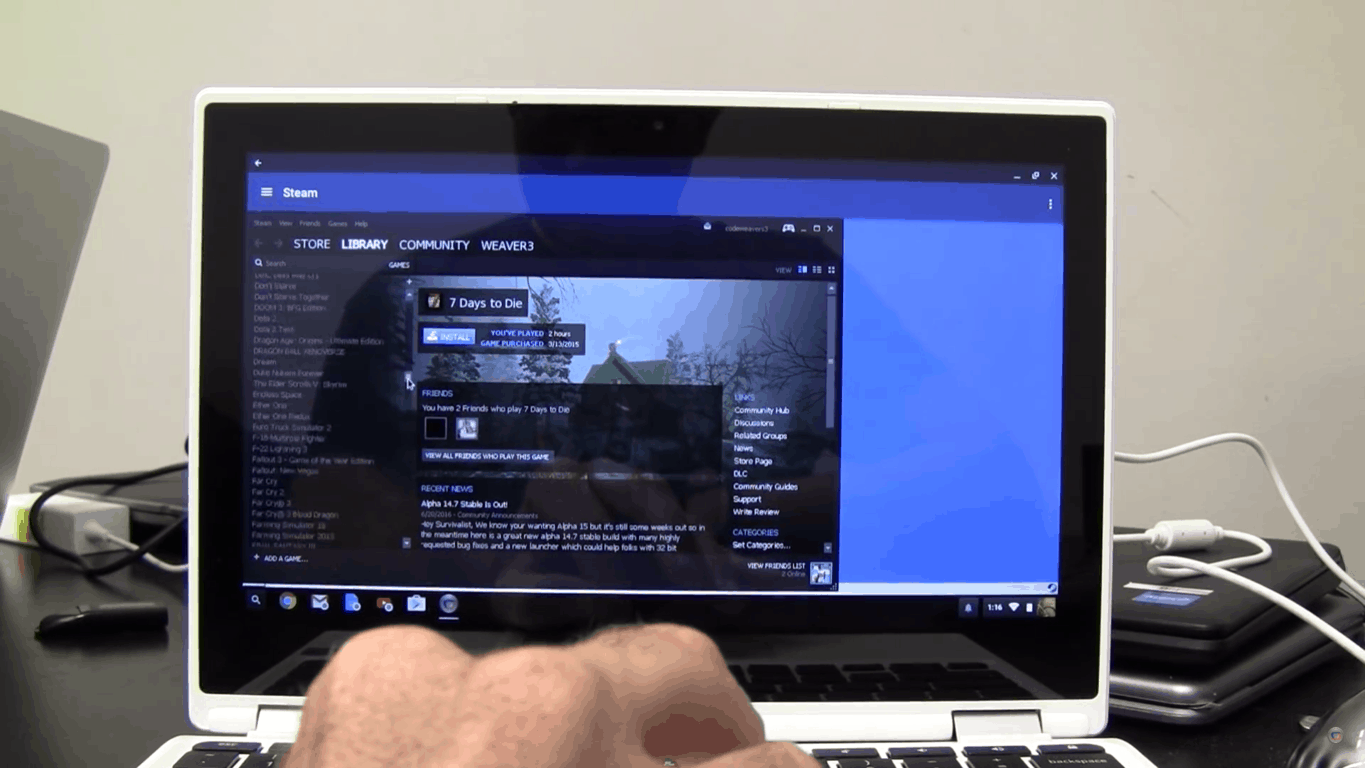
According to a report from Petri.com, select Microsoft Partners have been receiving little Google-laden packages to lure them away from Redmond’s Azure service offering and over to Mountain View’s Google Cloud.

Over the past few weeks, Google has been ramping up its efforts by sending out packages that offer information and testimonials favoring Google’s Cloud as well as a Chromebook to conduct a Hangout meeting to further discuss the benefits of its technologies.

Something to keep in mind, is that Microsoft Partners are comprised of mostly companies who have already gone into an agreement (often at great financial expense) with the company to re-sell its cloud services, making this move all the most bold and aggressive.

As Google brings up the rear in a seemingly three-horse race, it would appear the company is looking to capitalize on any points of leverage or missed opportunities unprotected from either Amazon or Microsoft.

Story Remix is now available to all Windows 10 users

Microsoft Photos app changed its name a few time recently, but that didn’t surprise anyone anymore. The new app was pushed out to Insiders in August bearing the name Microsoft Photos. However the company said that was not the final name and it was only gathering feedback.

Story Remix reaches the general public

The update is now being pushed out to regular users aka Non-Insiders. The app is not called Photos anymore, it comes by the name of Story Remix. This might be a surprising change, but who knows what Microsoft is thinking. It may be just a mistake even though we doubt it and we believe that it’s something intentional done by the company.

What regular users who get the app will see is the following situation: “Photos is now Story Remix”. Here are some things that you’ll be able to do:

  • Tell stories – you can transform photos into videos.
  • Remix a video – you will be able to personalize it in the new editor.

Make your photos pop with Story Remix

…or Microsoft Photos, or whatever you may call it. What’s really important is that Microsoft has already confirmed that 3D objects will be in the latest version of Story Remix and this is really great news. No more dull slideshows of vacation pics! One of the best features that this app will include is adding 3D objects to an existing image or video.

The app allows users to stitch together photos into stories with inking, music, transitions, and also make-believe 3D objects to liven them up. Story Remix might even do this for you automatically. Custom music that is supplied by Microsoft’s Groove Music service will sync to the transitions and users will get to have control over filters, transitions and much more.

RELATED STORIES TO CHECK OUT:

Battlefield 1 “In the name of the tsar” bugs: low FPS, server lag, and more

As its name suggests, Battlefield 1’s latest update “In the name of the tsar” is set in the cold winter Russian landscape. This DLC brings a series of new maps, a new mode, new weapons, vehicles, and a bevy of fixes.

At the same time, the update also brings issues of its own, as users report. In this article, we’re going to list the most common Battlefield 1 “In the name of the tsar” bugs reported by gamers to give you an idea of what to expect in terms of issues.

Battlefield 1 “In the name of the tsar” issues

Finding a match is a difficult task

Players report that they often can’t find any matches or end up in games that they didn’t select.

The new patch has some serious issues,the first thing that happend to me that it didnt find any match,the other was that i ended in a game i didnt pick and few players in that server.

Battlefield 1 lag issues

Gamers also confirm that this update fails to fix the lag issues triggered by the previous update. If you experienced slow motion action, rest assured your PC is not to blame.

Just tried today and i and a few of others were randomly dying by knife and bayonett kills, kills were delayed for a good 30 seconds or so before they registered, enemies randomly appearing beside me, still “Quickmatching” into empty servers which is nothing new. I’m sure theres plenty more we’ll all experience

Low FPS issues

Battlefield 1 is still affected by FPS issues even after this update. However, this time it seems that there is indeed something that you can do to fix this problem: use DirectX12. Players reported that DX12 mode seems to be working much smoother now for those with FPS problems.

So, if you’re experiencing FPS bugs in Battlefield 1, give DirecX12 another try.

Battlefield 1 looks grainy

If the overall Battlefield 1 graphics quality is not what you had expected, rest assured, you’re not the only one experiencing such issues. It appears that this update introduced severe chromatic aberration causing the game to look grainy.

I updated for the DLC this morning, played the game fine, came back to it after a break and then I notice this (Image attached below)
All the objectives, horse and tank spawns, medal trackers etc. look really grainy and have lines around them. I know it’s a game issue. Has anyone else got this problem? It’s really bugging me

Other issues affecting Battlefield 1’s “In the name of the tsar” update include:

  • Sound gets muted without any reason
  • There is no HUD
  • Spotting fails
  • Friendly icons are gone
  • Delayed notifications, etc.

These are the most common Battlefield 1 “In the name of the tsar” bugs affecting gamers. If you encountered other issues, tell us more about your experience in the comments below.

RELATED STORIES YOU NEED TO CHECK OUT:
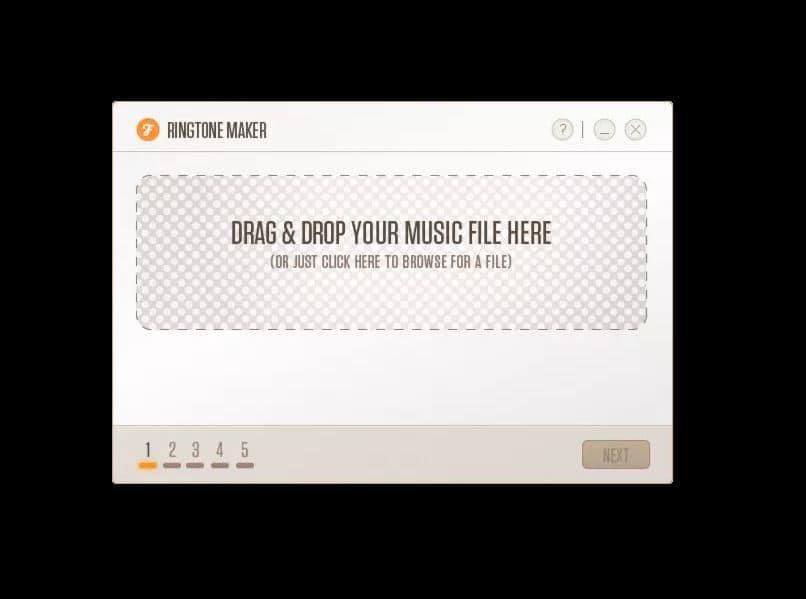
Latest Xbox One Preview Alpha build brings new light theme option

Last month, Xbox exec Mike Ybarra teased a new Light theme for the redesigned Xbox One dashboard that will ship on all consoles later this Fall. This new option is finally coming with the latest Xbox One Preview build for Preview Alpha Insiders, which the Xbox team released yesterday. If you already installed the new build, be aware that the option will go live today at 9AM PDT, and you’ll have to reboot your console to see it in the Settings app.

This latest build also brings notifications improvements, with Game invites moving from Action Center to the Multiplayer tab of the Xbox Guide, while Recent Achievements will now be found in the Achievements tab. You can read the full release notes below.

DETAILS

OS version released: rs3_release_xbox_dev_1710.170831-1900
Available: 6:00PM PDT 9/5 (1:00AM GMT 6/9)

NEW FEATURES:

Light and Dark Themes

  • We are adding new themes to the dashboard. In addition to the current theme, you’ll be able to select a new light theme. Please note that this setting will not be enabled till 9.00am PDT 9/6/17 as we need all Alpha users to be on this new build. After 9.00am on 9/6 simply reboot your console to see the setting. 1. Navigate to Settings > Personalization > System personalization > System theme. 2. Select Light.

Notifications enhancements

  • Game invites are moving from Action Center to the Multiplayer tab of Guide and Recent Achievements will now be in the Achievements tab. This makes it easy to see at a glance if you have new invites or Achievements when opening the Guide, and makes accessing those notifications faster, now that other system notifications aren’t in the way

FIXES:

  • Movies & TV and Misc Media Apps: Black screens during movie playback have been fixed as has Fast Forward.

KNOWN ISSUES:

  • Light Theme: There are some known visual contrast issues in messaging, the entertainment twist and the Mixer twist – you may see white one white. Fixes will be coming soon.
  • Sign-in When using Arabic or Hebrew language and signing in with a profile using the “Lock it down” security preference, the sign-in screen which requests Microsoft account e-mail address and password is distorted. This does not affect the profile if it is set to use the “Ask for my passkey” or “No barriers” security preferences. Workaround: Set the console to use another language, sign-in, and set the profile’s security preference to “Ask for my passkey” or “No barriers”. Alternatively, you can still type in your password as normal using the virtual keyboard though the screen is distorted.
  • Netflix: When using Hebrew language, Netflix fails to launch.
  • Minecraft Better Together Beta: Other games fail to launch after launching the Minecraft Beta. Workaround: This occurs if the Minecraft Beta is the first game launched after powering on the console; launch another game before Minecraft to avoid this issue. If you are stuck in this state, hard reset your console.
  • Blu-Ray Player: 3D Blu-Ray content plays in 2D.
  • Game Hub: Game Hub isn’t accurately tracking Gamerscore and achievement unlocks for certain games.

The redesigned Xbox Dashboard and the new Light Theme are just the first steps in Microsoft’s Fluent Design update for the Xbox One, and we expect much more in the near future. If you’re on the Preview Beta Ring, Xbox Preview Program manager Brad Rossetti also tweeted yesterday that you should get your first 1710 build in the next few days.

Fix: iTunes causes high CPU usage in Windows

When it comes to multimedia platforms and music management, not many applications are better or more popular than iTunes. Nonetheless, even Apple’s simplicity and intuitive design won’t prevail if iTunes devours your resources with abnormally high CPU usage in Windows 10. Even when in an idle state.

Various users reported that iTunes is consuming up to 40% of CPU which is more than strange if we take into consideration that this is, more or less, a multimedia player. For that purpose, we prepared a list of possible solutions that should help you restrain iTunes CPU hogging.

In case you’ve experienced this or a similar issue with iTunes, make sure to check the list below.

Fix: iTunes hogs on CPU in Windows 10

Solution 1 – Update iTunes

Users who reported issues stated that the problem emerged after the upgrade to Windows 10 Creators Update. Before that, iTunes worked as expected. After the Creators Update, the resource consumption hit the ceiling, which, consequently, affected the overall system performance. So, an update might just be enough to address this.

Occasionally, third-party software needs some time to adjust to system changes. In order to optimize their application for different surroundings, developers (at least, the capable ones) have to provide timely changes. That’s just the case with Apple’s iTunes for Windows, which has been lately updated to version 12.6.2. This version, allegedly, resolved the CPU hogging in Windows 10.

So, the task for you is to check for possible updates. You can do that by following these steps:

  1. Open iTunes.
  2. In the Menu bar, open Help.
  3. Choose Check for updates.
  4. Install available updates and restart iTunes.

In case you’re still experiencing critical levels of CPU activity, make sure to continue with further workarounds we presented below.

Solution 2 -Run iTunes as Administrator

In addition, there are restrictions the system creates for third-party programs. The initial thought is to prevent a program from doing something unwanted. Sadly, this occasionally does just the opposite: it slowdowns the application execution and thus downgrades its effectiveness and usability. And, occasionally (read: often), the affected program goes wild, just like iTunes in this scenario.

In order to avoid that, you can choose to run iTunes as administrator and, as some users stated, resolve the issue that way. Follow the instructions below to grant the administrative permission to iTunes in Windows 10:

  1. Close iTunes and kill its process in the Task Manager.
  2. Right-click the iTunes desktop shortcut and open Properties.
  3. Open the Compatibility tab.
  4. Check the ”Run this program as Administrator” box.
  5. Click OK to confirm the selection.
  6. Start iTunes again.

Solution 3 – Disable third-party Plug-ins

As you may know, iTunes is used to support third-party plug-ins. Yes, it seems a bit irregular if we take into account Apple’s approach to its software and hardware. With Apple, all is about exclusivity and this sounds odd, even though plug-ins vastly improve and enrich iTunes. But, there’s also the other side of the coin and the reasoning behind their decision to ditch third-party add-ons. At least the majority of them.

Some users reported that certain plug-ins affect the performance in Windows 10, and not in a positive way. After some time of extensive use, a few specific plug-ins started to misbehave and cause performance drops. Additionally, some of those add-ons may cause CPU hogging. This occurs mostly due to the incompatibility of a plugin and the current iTunes version.

So, if you run an older version of iTunes, make sure to update it and, additionally, delete the remaining plug-ins and scripts from the installation folder.

  1. Exit iTunes.
  2. Navigate to:
    • C:UsersusernameApp DataRoamingApple ComputeriTunesiTunes Plug-ins
    • C:Program FilesiTunesPlug-ins
  3. Delete Plug-ins folders and restart your iTunes Windows client.

Solution 4 – Reinstall iTunes

Starting from scratch can be painful and time-consuming, but nonetheless, reinstallation is always a valid solution for most of the issues regarding any third-party app. Especially after the system upgrade. Due to compatibility, system changes can initiate issues with iTunes. So, your safest bet to subdue the abnormal resource-hogging lies in the reinstallation.

Follow the instructions below to reinstall the iTunes Windows client:

  1. In the Windows Search bar, type Control and open Control Panel.
  2. Choose Category view.
  3. Click Uninstall a program.
  4. Find iTunes on the program list and highlight it with a single click.
  5. Choose Uninstall and follow the prompts.
  6. Restart your computer.
  7. After the procedure is finished, download the iTunes installer here.
  8. Run the installer and follow the instructions to finalize the installation.

Alternatively, we recommend using a professional uninstalling tool for this process, because it can thoroughly remove all the stray files left behind by the app, something that can hardly be achieved manually.

Some apps and programs are infamous for being difficult to completely remove. Those pesky leftovers occupying disk space and the registry can be rather troublesome, so it is strongly advised to use professional removal software.

It’s a safe and convenient way to keep your system clean and highly functional. Furthermore, deleting iTunes with all of its folders might be a risky act if you are not tech-savvy and do not fully grasp how an uninstallation works.

So why not save yourself the trouble and go with an automatic option that applies clean code to clear the way for a new installation?

Solution 5 – Disable .xml in Windows Search Indexer

Finally, if none of the previous solutions normalized iTunes resource consumption, maybe Windows is causing the problem in the first place. A few tech-savvy users found out the culprit for the issue at hand. And it’s Windows Search Indexer. This Windows native service records all files and extensions you have on your storage, with the main purpose to speed up the search protocol.

Now, in theory, this is great. Just not that great for iTunes. Windows Search Indexer is indexing a .xml extension that iTunes uses to share the library data with other integrated applications. The fact that there’s an abundance of .xml files induces over-consumption of system resources. So, in order to address this, you should simply disable the indexing for this individual extension.

Follow the instructions below to disable the indexing for .xml files:

  1. In the Windows Search Bar, type ”Indexing” and open Indexing Options.
  2. Click on Advanced Options.
  3. In the Advanced Options tab, open File Types.
  4. Scroll down until you reach the .xml extension.
  5. Uncheck the box beside .xml and click OK.
  6. Restart your PC and give iTunes another try.

That should wrap it up. If you have any questions, suggestions, or remarks, we’ll be glad to hear from you. You can post your thoughts and opinions in the comments section below.

Microsoft’s new Windows Insider Lab for Enterprise will help businesses test Windows 10 Enterprise features

Noted by ZDNet, Microsoft is piloting a new “Windows Insider Lab for Enterprise” program to help businesses test out upcoming Windows 10 Enterprise features. The program is designed for select Windows Insiders for Business customers already running test versions of Windows 10 Enterprise, who can now try new Windows Enterprise preview features.

Currently, entry into the program is on an email invite only basis. Interested parties, though, can also enroll in the pilot by checking out this survey. According to this survey page, those who enroll will get access to Microsoft’s virtual corporation, Olympia Corp, and get access to enterprise-specific Windows 10 features such as Windows Information Protection (WIP), Windows Defender Application Guard (WDAG) and Host Intrusion Prevention Systems.

As you may recall, Microsoft initially opened up the Windows Insider Program for Business back in April of this year. At the time, Microsoft said the program brings “better support the IT Professionals and business users in our Insider community.” With the new Windows Insider Lab for Enterprise, Microsoft will no doubt live up to this promise, and help build a better version of Windows for all businesses across the world.

Huawei to bring Microsoft enterprise apps to their cloud in new partnership

Microsoft and Huawei have signed a memorandum of understanding which will bring Microsoft’s enterprise apps over to the HUAWEI CLOUD. Although Huawei is already providing Windows Server and Microsoft RDS for SQL Server, Microsoft at the moment is not detailing which specific enterprise apps will be coming to the HUAWEI CLOUD in the months ahead.

According to reports, under the memorandum of understanding, Microsoft and Huawei will “initiate in-depth cooperation on the public cloud,” build an “open and win-win ecosystem” while also planning joint market expansion and market sharing activities. Huawei is also hoping that the two companies will be able to drive innovation in the market, while also helping provide “optimal experience of cloud services for enterprises.”

In the words of Microsoft China CEO Alain Crozier:

“As a global leader in enterprise IT, Huawei is a strategic partner for Microsoft in the mission to empower organisations as they transform… Our increased collaboration will drive innovation as we build a seamless platform to benefit customers through industry-leading technology. Together, we are confident that we will lead, and win, in the era of digital transformation.”

The cloud is where the money is at for Microsoft, as Intelligent Cloud services netted the company a $7.4 billion profit, up 11% from last year. With Microsoft’s enterprise apps becoming more and more popular, the company will no doubt see the benefits from this latest collaboration.

Event ID 5973 in Apps: 3 Ways to Easily Fix it

If any of your programs are crashing, or having other issues, that could be due to event id 5973.

This is usually an error message in Event Log, but if it’s causing problems, it’s important to fix it as soon as possible. And that’s exactly what we will do in this guide, so keep reading.

What is event ID 5973?

Event 5973 is an event that appears in Event Log. The message appears in the following cases:

  • When the Microsoft Store app can’t be opened.
  • If there’s an issue with your current user account.

How can I fix event id 5973?

1. Create a new user account and copy your files

Create a new user account

  1. Press the Cortana button, and then enter user accounts in the search box.
  2. Select Add, edit or remove other people to open the window shown directly below.
  3. Press the Add someone else to this PC option to open the window below.
  4. First, select the I don’t have this person’s sign-in information option; and then click the Add a user without a Microsoft account option.
  5. Enter the login details for the new account, and click the Next button.
  6. Now log in to the new account just set up, and run the same apps that weren’t opening. If they now open, the new account has effectively resolved the 5973 error.

Back up your files

  1. If you want to back up your profile data from your old user account, log back in to the original account.
  2. Enter files and folders in the Cortana search box. Select Show hidden files and folders to open the Explorer Options window directly below.
  3. Click the View tab, and select the Show hidden files, folders and drives option.
  4. Deselect the Hide extensions for known file types and Hide protected operating system files (Recommended) options if they’re currently selected.
  5. Press Apply and OK to close the window.
  6. Open the following folder: C:\ Users
  7. Then open your old user account subfolder from there.
  8. Select and copy almost every file and subfolder in the user account folder. However, do not copy the NtUser.dat, NtUser.ini and NtUser.log files in that folder.
  9. Paste the copied files and subfolders to a backup folder from which you can retrieve the former user account profile data.
  10. Log out of the old user account.
  11. Delete the old user account by selecting it in the Settings app and pressing the Remove button.

2. Reset the affected app

  1. To reset an app, first enter apps in Cortana’s search box.
  2. Select Apps & features.
  3. Select a Windows Store app listed there. Click Advanced options to open the window below.
  4. Press the Reset button to reregister the app. Click Reset again on the small dialog box that opens to confirm.

This is a quick and easy way to fix event ID 5973, so try it out.

3. Use the app troubleshooter

  1. Enter troubleshoot in the Cortana search box and select Troubleshoot.
  2. Scroll down to Windows Store Apps as shown in the shot below.
  3. Press the Run the troubleshooter button to open the app troubleshooter’s window.

Overall, event id 5973 is a somewhat mysterious app issue. There aren’t many specific fixes for resolving it, but we hope that our fixes managed to help.

If you’re having additional problems, check our Event ID 7036 guide for more similar solutions.

What method did you use to fix this issue? Let us know in the comments below.

Final Fantasy XV Windows Edition might arrive with a few issues

Square Enix hit the gaming world by storm when it announced that Final Fantasy XV would be coming to PC. As a result, gamers around the world are ecstatic because they’ll be able to play one of the most well-received games in the world on Windows 10.

The game is announced for sometime in “early 2018,” which some players consider too late given the game’s late-2016 console release. But after the first demo of the game and initial tests, it’s clear why the game won’t arrive before 2018. The guys from ArsTechnica had a privilege of trying Final Fantasy XV Windows Edition and after trying the demo, they let the world know about the various issues that occurred during gameplay. Given the number of issues, it’s clear that Square Enix’s development has a lot of work to do before releasing the game, making the early 2018 release a reasonable date.

Final Fantasy XV Windows Edition issues

Here are the issues the ArsTechnica team noticed while playing the first Final Fantasy XV Windows Edition demo:

  • A lack of full 4K resolution
  • No video menu of any kind
  • Performance shy of 30 frames a second
  • Assets that aren’t up to 4K snuff

Of course, this is only the first demo and it’s not even a public one, so we have no right to claim any of these issues will ‘make its way’ to the official release. We’re just saying that the development team has a lot of work ahead of it as the official release is about 6 months away. So, some of these issues might, in fact, happen to early adopters of the game.

What do you think about Final Fantasy XV coming to Windows 10? Do you expect any of these issues to occur in the public release? Let us know in the comments below.

RELATED STORIES YOU NEED TO CHECK OUT:
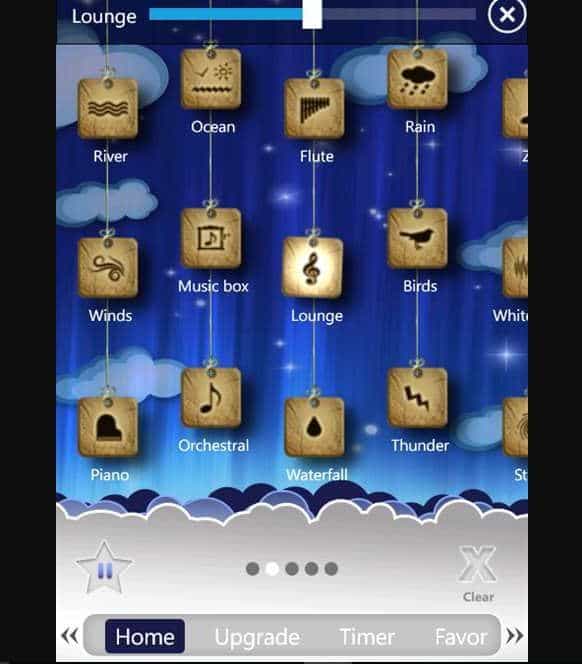
Windows 10 on ARM only gets a brief mention at IFA 2017

Last week at IFA 2017, Microsoft announced that the Windows 10 Fall Creators Update would be released on October 17, along with the first Windows Mixed Reality headsets from partners. Interestingly, the upcoming Windows 10 on ARM got no stage time during the annual trade show, even though Microsoft and Qualcomm previously said that the first devices using Qualcomm’s Snapdragon 835 SoC would be released later this year.

Last week, Qualcomm published a blog post to highlight its Always Connected PC leadership, inviting readers to “stay tuned to learn more on how Windows PCs powered by the Qualcomm Snapdragon 835 Mobile PC Platform are delivering breakthrough user experiences.” As for Microsoft, a company’s spokesperson released the following statement to MSPoweruser:

We are on track to see Windows 10 on Snapdragon devices become available this year as previously shared. Microsoft and Qualcomm continue to work closely with our OEM partners ASUS, HP and Lenovo in bringing Always Connected devices featuring always-on LTE connectivity and great battery life to market.

So yes, despite the industry’s silence about Windows 10 on ARM, the first devices are confirmed to be coming later this year. As Microsoft and its partners showcased Windows Mixed Reality headsets months before they were ready, it’s quite surprising that we have yet to see any of these Windows 10 on ARM PCs. Microsoft first demoed the OS last December at WinHEC, and this 2’30 video is pretty much all we have for now.

Windows 10 on ARM PCs should hopefully sell much better than Windows Mixed Reality headsets, as VR still remains a niche market. The new OS will allow OEMs to create cheaper, always-connected Windows 10 PCs with great battery life, something that could really help PC sales during the holiday season. It’s not clear when Microsoft will be ready to talk about it, but the company’s traditional hardware event in October could be the perfect opportunity to do it.

Last but not least, we can’t wait to see if Microsoft will let its OEM partners test the market this year, or choose to compete with them with its own Windows 10 on ARM device. That’s what the company did five years ago with the Surface RT (with poor results), so the company may well change its strategy this time around.

Windows 10 news recap: Logitech’s Craft keyboard has a built-in mini ‘Surface Dial’, Fall Creators Update coming this October and more

Welcome back to our Windows 10 news recap. We are continuing the trend of our weekly “Windows 10 news recap” series where we go over the top stories of the past week in the world of Microsoft’s flagship operating system.

The Windows 10 Fall Creators Update will be released on October 17, along with first Windows Mixed Reality headsets from partners

The next major upgrade for Windows 10, the Fall Creators Update, is coming on October 17th. As an added bonus, Microsoft’s partners will release their first set of Windows Mixed Reality headsets at the same time.

The Logitech Craft keyboard comes with a built-in “mini Surface Dial”

Logitech, well-known for its PC accessories that includes mice, keyboards and speakers, has unveiled its latest keyboard, the Logitech Craft keyboard, that has what somewhat resembles a mini Surface Dial-like wheel, which is actually being dubbed the Creative Input Dial.

Windows 10 PC & Mobile Ethereum wallet app updates, locks out users

Users of the EtherWallet app are likely to be disgruntled with the latest app update, as it locks users out of the app, preventing them from accessing their Ethereum.

Ethereum

Select Windows Insiders can now download and test Office 365 from the Windows Store

Some Windows Insiders are now able to download and test Office 365 using the Windows Store, marking the first official glimpse of Office 365 being distributed and managed via the Windows Store.

Office 365 Windows Store

That’s it for this week. We’ll be back next week with more Windows 10 news!

Xbox news recap: Bug causes consoles to factory reset, new update brings 1080p streaming, Arabic, and more

Welcome to our weekly Xbox news recap series, where we go over the top stories of the past week in the world of Xbox. Let’s get started.

New bug causes Xbox Ones to randomly factory reset

Time for some Spring cleaning, whether you want it or not. Xbox Ones with the latest update spent some time this week being hit with a bug that makes them “factory reset”, seemingly losing everything on their hard drive, and generally just becoming a clean slate. Microsoft has since stepped in and fixed the issue, revealing a little bit about it. As it turns out, this was more of a minor bug than it looked like – causing people to go through the “out of box experience,” but still keep their data.

Huge update brings 1080p streaming, Arabic, and more

Xbox Insiders have gotten a new update to their consoles, providing them with some quality of life improvements, as well as right-to-left language support for Arabic. Insiders will also be able to stream natively to Mixer at 1080p, giving the service a huge bump in quality across the board, assuming users frequently use the option. You can check out the full change log for the update right here.

Sequel to Game of Thrones Telltale game on hold

The Game of Thrones Telltale game was pretty good, as are the majority of the company’s projects. With the latest season of the HBO phenomenon coming to a close, many fans have been hungry to get another addition to the adventure game’s take on George R. R. Martin’s universe. Unfortunately, Telltale says that the next Game of Thrones game will be on hold for a while as they work on other projects.

ReCore: Definitive Edition ends up being free for a while

Sort of a classic issue for the Xbox store at this point – a game has shown up as totally free, for a short while. ReCore: Definitive Edition launched recently to the Xbox One audience, but ended up costing $0 instead of its advertised $19.99. The problem has since been fixed up and, of course, the versions of the game that were taken for free are no longer functional. You’ll have to get the game legitimately if you want to try it out. If you’re curious, we reviewed this one when it first launched.

ReCore: Definitive Edition on Xbox One and Windows 10

Marlon Wayans will be playing Destiny 2 on Mixer for “Xbox Live Sessions”

Heads up, Guardians. Marlon Wayans, lead actor in NBC’s new show “Marlon,” will be the guest for the second ever showing of the “Xbox Live Sessions” show – this time around, with Destiny 2. He’ll be fulfilling the same role as DJ Khaled did last week, talking about his new work while he plays the game, answering some fan questions, and generally just having a good time. It should be fun if you’re a Destiny fan, or a fan of Wayans’ work.

Thanks for joining us. To keep up to date with all the latest Xbox news, keep a close eye on our Xbox One tag.

More games with keyboard and mouse support are coming to Xbox, but it’s “developer choice” says Mike Ybarra

At PAX West 2017 in Seattle, Microsoft’s Mike Ybarra, an Xbox exec, was asked if keyboard and mouse support is still coming to Xbox, and whether games other than Minecraft will be able to make use of it.

In response, Ybarra said that “keyboard and mouse support is definitely coming” but admitted that it will be “developer choice” on whether to implement it into specific games, as some games are better suited to supporting both controller, keyboard and mouse support, whereas others, particularly competitive games, are better suited to one or the other.

Additionally, while it is known that the new cross-play Minecraft will support keyboard and mouse input on the Xbox One, Ybarra also confirmed that other games, that they can’t talk about just yet, will also support keyboard and mouse support.

Focused Inbox is now available on Windows 10 Mobile

Microsoft launched Focused Inbox for the  Outlook Mail app on nearly every platform except for Windows 10 Mobile. As a result, many of Microsoft’s mobile users expressed their disappointment asking the tech giant to include them in the Focused Inbox club as well.

Focused Inbox rolls out to Insiders

Now, the feature that shows you the most important emails that are waiting in your inbox at only one glance is available for Windows 10 Mobile users in the Release Preview ring.

The feature is especially useful if you receive lots of spam on a daily basis and you want to filter things down to only high-priority items. Things will change for the better for Windows 10 Mobile thanks to Focused Inbox on Outlook.

Focused Inbox helps you focus on the emails that matter most to you. It separates your inbox into two tabs—Focused and Other. Your most important emails are on the Focused tab while the rest remain easily accessible—but out of the way—on the Other tab. You’ll be informed about email flowing to Other, and you can switch between tabs at any time to take a quick look.

focused inbox phone

Focused Inbox doesn’t appear to be available also for all the Fast ring Insiders, as WindowsUnited notes, but it will probably roll out to testers in gradual waves.

It is not yet clear when other rings can expect the Focused Inbox to reach them as well, but it looks like it might not be that long  since the app is currently in testing. This feature will be a great addition to the robust Outlook Mobile app on Windows 10 Mobile devices.

Focused Inbox has already reached the desktop version of Windows 10. You can turn the app on by heading to Settings and Reading.

RELATED STORIES TO CHECK OUT:

Microsoft, Satya Nadella lash out at Trump administration for reported end to DACA

The Deferred Action for Childhood Act, otherwise known as DACA, is an Obama-era United States government program known for protecting hundreds of thousands of young undocumented immigrants and helping them remain in the country. Reports posted on Fox News and elsewhere have indicated that the new Trump Administration may end up dismantling the program, ending the protection for the individuals who are in the program and are known as DREAMers. In reaction, Microsoft President Brad Smith and CEO Satya Nadella are lashing back, with Smith calling the possible change a “step backwards for our entire nation.”

Smith addresses his concerns about the possible end to DACA in a lengthy post to the On the Issues Blog. The Microsoft President writes that an end to DACA will lead to economic consequences, job loss, put individuals at risk of deportation, and “disrupt the lives of these individuals who willingly came forward to register with the federal government.” According to Smith, DACA is experienced in a “very real way at Microsoft” since 27 employees are beneficiaries of the program.

They are software engineers with top technical skills; finance professionals driving our business ambitions forward; and retail and sales associates connecting customers to our technologies. Each of them is actively participating in our collective mission to empower every person and every organization on the planet to achieve more. They are not only our colleagues, but our friends, our neighbors and valued members of the Microsoft community.

Instead of ending DACA, Smith calls on legislators to enact the DREAM Act, and or another more permanent solution to help protect DREAMers. “These employees, along with other DREAMers, should continue to have the opportunity to make meaningful contributions to our country’s strength and prosperity,” explained Smith.

In a separate post published on LinkedIn, Satya Nadella expanded on Smith’s comments by issuing a much more personal statement. The Microsoft CEO remarked that he is a “product of two uniquely American attributes.”

As I shared at the White House in June, I am a product of two uniquely American attributes: the ingenuity of American technology reaching me where I was growing up, fueling my dreams, and the enlightened immigration policy that allowed me to pursue my dreams.

There is no question in my mind that a priority must be to create more jobs and opportunity for every American citizen. On top of this, smart immigration can help our economic growth and global competitiveness.

Nadella remarked that Microsoft fully supports the DREAMers who work at the company, and mentions that Microsoft always stands for diversity and opportunity for everyone.

It is still not clear if or when the Trump administration will make an official public announcement of the end to DACA, but it no doubt will be faced with more criticism. As you may recall, Microsoft and many major tech giants spoke out against presidentTrump’s executive order on immigration and the travel ban.

Samsung and its QLED 4K HDR TVs to be official Xbox One X partner

As we’re getting closer to the release of the Xbox One X, we guess that many enthusiasts are planning to upgrade their TV to enjoy true 4K HDR gaming on the new console. The Xbox team obviously knows it as it just announced a new partnership with Samsung, which will make the company’s QLED 4K HDR TVs the official Xbox One X partner in the US.

“For gamers, the QLED TV provides an unparalleled 4K HDR gaming experience,” explained the Xbox team. “It leverages quantum dot technology to bring even the smallest graphical details to life in perfect color.” Samsung’s top-of-the-line QLED TVs also provide a very low input lag of less than 20 milliseconds, rich picture quality with 100 percent color volume, and Samsung also includes a lifetime guarantee against burn-in.

In addition, the company’s QLED TV sets will also deliver a great set up experience to Xbox One X owners thanks to Samsung’s Smart Hub:

By simply connecting the Xbox One X, the TV automatically recognizes the console and sets up the Samsung One Remote that now supports more devices and offers voice control capabilities across more Smart TV features. Just by saying “Game Mode” into the One Remote, users will have immediately optimized their audio and video settings for gaming. Paired with the latest Smart View app, available on Android or iOS mobile devices, users will enjoy their very own personalized Smart Hub.

The Xbox team added that gamers in the US can now experience the Xbox One X on Samsung’s QLED 4K TVs at various Xbox and Samsung marketing and retail locations in the US through the rest of the year. Samsung’s 2017 QLED TV lineup starts at $2.799.99, and you can learn more about the different models on the company’s website.

The Windows 10 Fall Creators Update will be released on October 17, along with first Windows Mixed Reality headsets from partners

Terry Myerson, Microsoft’s EVP of Windows and Devices Group announced today at IFA 2017 that the Windows 10 Fall Creators Update will be released worldwide on October 17. The upcoming release will be the fourth major update to Windows 10, and it will still be focused on creating “a platform that inspires your creativity,” explained Myerson.

The Fall Creators Update will introduce many new features such as OneDrive Files On-Demand and Story Remix, but users can also expect many improvements for Windows Inking, Gaming, Security and Accessibility. Additionally, the major release will open the gates for the Windows Mixed Reality platform, with the first head-mounted displays from partners to be released on October 17, alongside the Fall Creators Update.

“Our mission at Microsoft is to empower every person and every organization on the planet to achieve more, one of the ways we’re supporting that mission is by taking this next step in our Windows journey and empowering the creator in all of us with the Windows 10 Fall Creators Update,” explained Myerson. Microsoft’s IFA 2017 keynote is still ongoing, so keep it locked to OnMSFT if you want to learn more about the company’s other announcements.

Watch Microsoft’s IFA 2017 Keynote right here

Microsoft is holding their IFA 2017 keynote this morning and you can watch it live right here! The keynote is taking place in Berlin, Germany at 5:05 am PDT (8 am EDT) and Microsoft is expected to discuss how they are bringing new Windows devices and experiences to excite and delight customers.

Scheduled speakers for the keynote include Executive Vice President of Windows and Devices Group Engineering, Terry Myerson, Vice President, Partner Devices and Solutions, Peter Han, and Corporate Vice President Consumer Device Sales, Nick Parker.

If you happen to miss the live keynote, Microsoft will be posting it online at a later point to watch on-demand. We will be keeping an eye on the keynote and will update you with the biggest news throughout the day. So, be sure to keep it locked into OnMSFT all day long for all your Windows news and information!