In October 2012, Microsoft launched its first Surface tablet running Windows RT. The company is celebrating its 10th anniversary in a matter of months.
The Surface Go 3
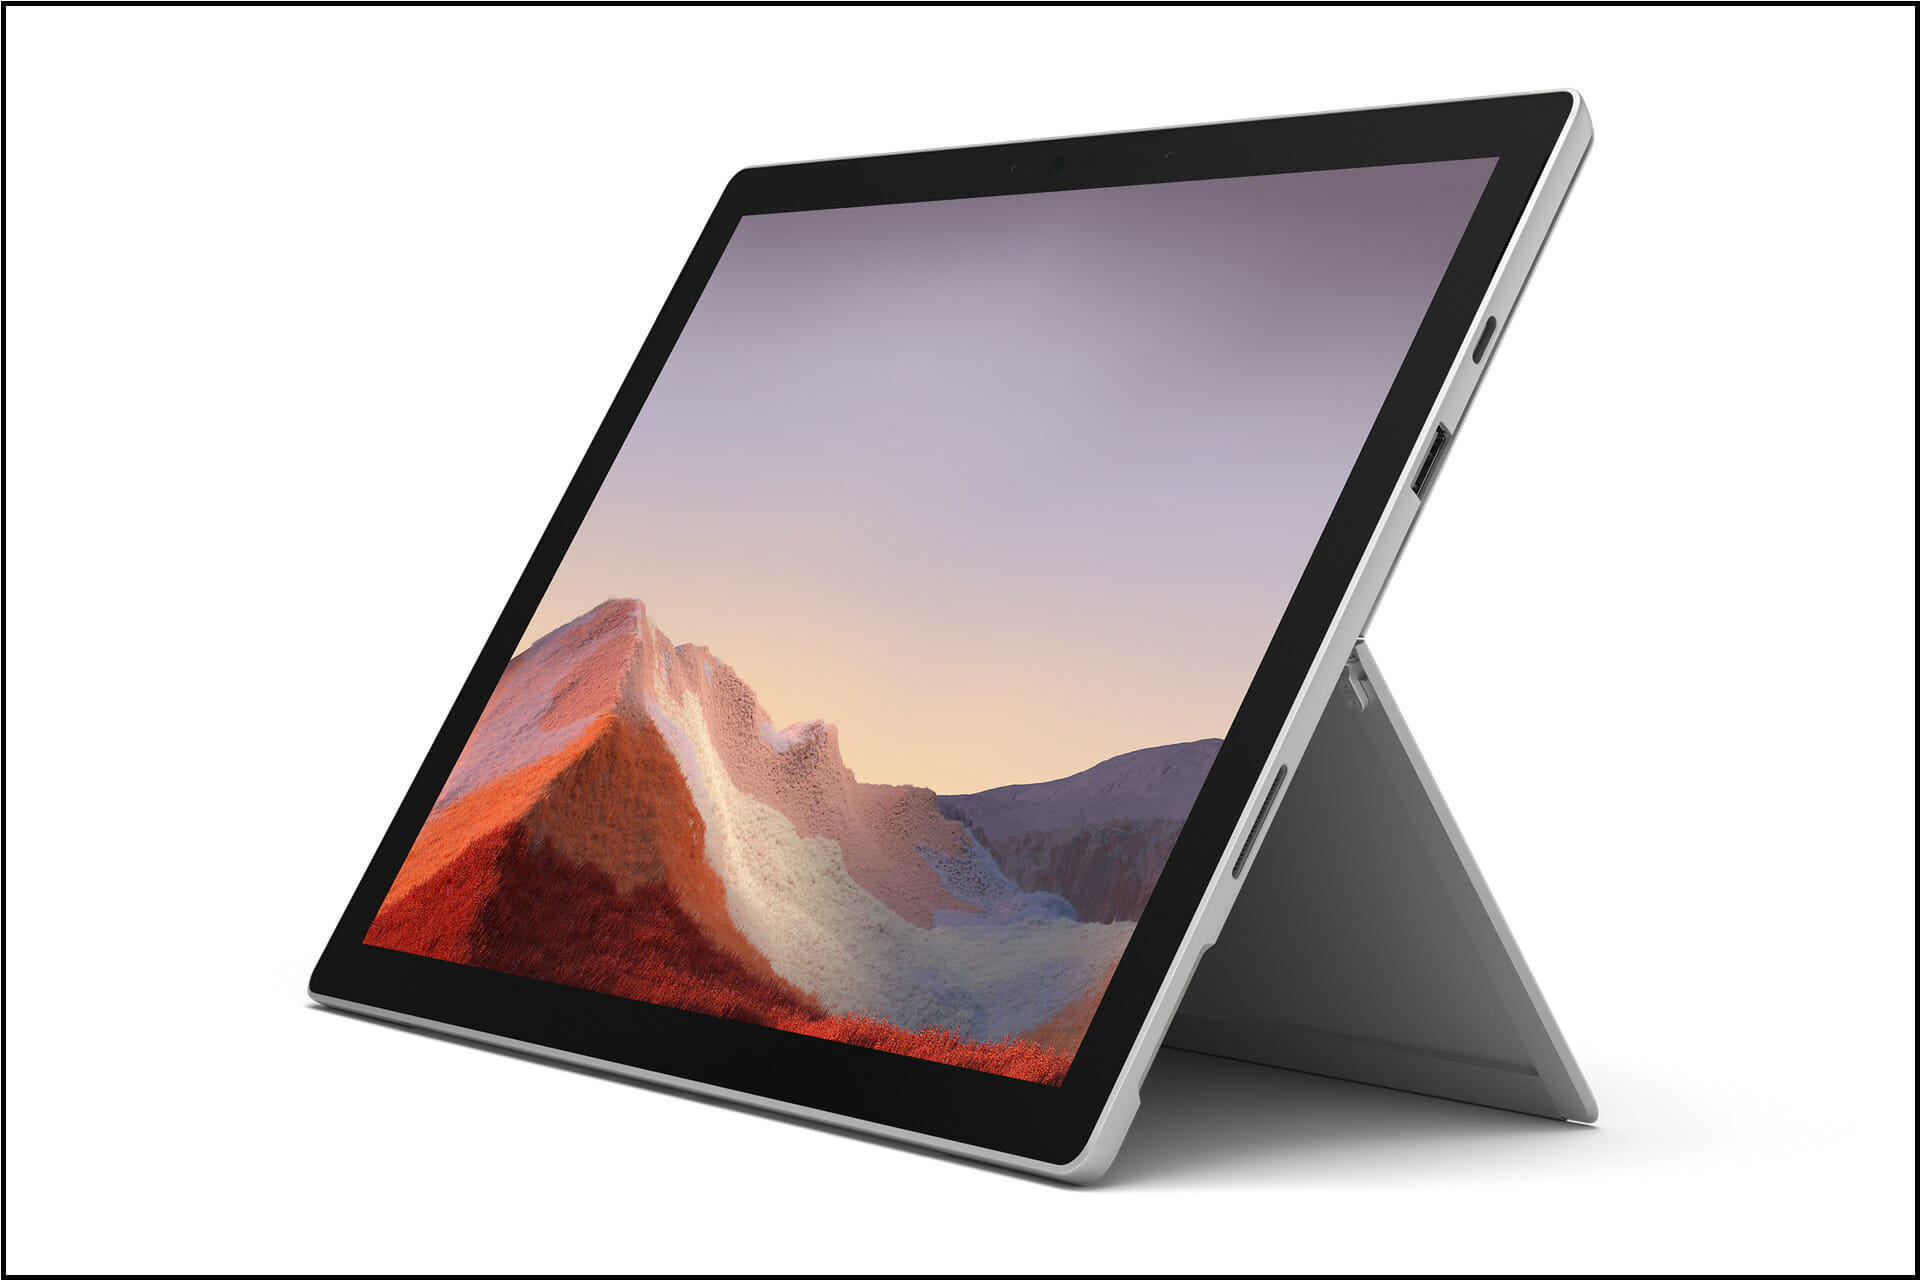
It appears that the company is getting ready to launch a new product line. The Surface Go 3, as seen in leaked images, appears to have the same hardware as the existing model, except for its color.
Although a Microsoft listing is yet to be availed, and Amazon Germany listing has surfaced, and it indicates that the new Surface device will be available in stores on January 11.
LTE version
Microsoft is working on an LTE version of its Surface Go, so it’s likely that the black model of that device will be announced alongside it.
However, Microsoft has not yet officially confirmed the existence of the black hardware. We’ve heard from sources familiar with the matter that Microsoft is gearing up to celebrate the 10-year anniversary of its Surface lineup.
The Microsoft Surface Go 3 could be the first step in this direction if Microsoft refreshes the device this year.
What thrills you most about the release of the Surface Go 3? Share your thoughts with us in the comment section below.
We’re talking about the old 5.25-inch Floppy Disk Drives and their media and some of the commenters from the aforementioned post say that they still got some data on the soft disks.
In fact, we have a great guide on how to Use a Floppy Disk on Windows 10. You will find it useful on Windows 11 too because the indications are very similar.
Quick info about the Floppy Disk Drive
The first floppy disks, invented and made by IBM, had a disk diameter of 8 inches. In 1976, Shugart Associates introduced the 5.25-inch FDD.
After IBM introduced the 3.5-inch FDD, it became the most popular data storage and transfer in the first years of the 21st century.
It’s no surprise that 3.5-inch floppy disks can still be used with a Floppy Disk Drive but we wouldn’t expect that the 5.25-inch one would still be supported.
That’s because the old disks are obviously not manufactured anymore and those who are still catching dust in some collector’s stashes are probably demagnetized by now.
Still, as this finding clearly suggests, some users continue to use older equipment to read or transfer data from floppy disks.
The 5.25″ Floppy Disk drive still works in Windows 11
In the YouTube clip posted by the Reddit user, he clearly shows how he inserts the disk onto the Floppy drive and can access a photo stored on it.
Not only that File Explorer from Windows 11 is able to recognize the drive, but it also accesses the data pretty quickly.
However, it’s only an image with a few Kb of data so there is no real surprise there. A real challenge would be to see an early Windows kit installed with the help of those soft disks.
The world is digitizing at a head-spinning pace and a couple of dusty drawers or shelves no longer qualify as reliable storage alternatives.
Instead, modern storage systems such as NAS devices and Cloud solutions accommodate our most sensitive files and data. Thus, deploying an antivirus for NAS storage makes perfect sense to security-mindful and privacy-conscious users.
Needless to say that NAS devices are far more secure than a paper file and they boast all kinds of defensive mechanisms from encryption services to backup solutions, firewalls, DDoS protection, and so on.
But the very nature of the information they house makes them a particularly enticing prize for profit-hungry hackers prowling for new targets to exploit.
And let’s not forget they are physical devices after all, prone to hardware malfunction and failure, manual tampering, and many other risks.
Now, we are not trying to diminish NAS devices’ security enhancements, but merely to emphasize that there is no such thing as too much protection when it comes to cyber threats.
So, just how secure is a NAS? Is NAS safe from hackers? Let’s find out together.
Can NAS be hacked?
Unpatched IoT gadgets are high-profile targets in regard to the valuable information they hold and NAS devices make no exception, regardless of the brand.
Take, for instance, the QNAP NAS. It has a long record of ransomware-based attacks exploiting vulnerabilities in outdated firmware, unsecured ports, and so on. Needless to say, it is essential to secure these devices using a reliable antivirus tool specifically designed for QNAP.
While we’re at it, you can also have a look at these best QNAP NAS backup software programs just to be on the safe side. After all, not putting all eggs in the same basket has proved effective so far in the most diverse of scenarios.
Sinology, for instance, another immensely popular NAS provider has known its fair share of large-scale attacks based on weak credentials combinations. And the list could go on and on.
Since there are threats that do not aim to leverage specific vulnerabilities, your device would benefit from a network-wide security solution, capable to repel diverse attacks, from phishing to ransomware, malware infections, and so on.
The best way to add another layer of security is by deploying a good antivirus for Network Attached Storage.
Does NAS need antivirus?
Most hackers cannot be bothered with such sophisticated methods. The truth is, the most common way to compromise a NAS is by a brute-force attack.
Sticking to sensitive security policies such as strengthening your passwords, using encryption tools, multi-factor authentification, or not opening too many ports or connections is always a good idea.
But is it enough to keep your data safe? As you can see, the dangers lurking on the Web are far greater than a few random hackers targeting individual gadgets.
Thus, we suggest you use antivirus tools to prevent and remove malicious threats and maintain your data safe all the time.
Can you install antivirus on NAS?
You can and by all means, you should. There are a handful of security programs specifically designed with storage protection in mind.
Now that that’s out of the way, let’s see how he chose the best antivirus for NAS storage in the first place. Our experienced testers thoroughly scanned the market and compiled this selection of top antivirus solutions for storage devices.
They highlighted that cross-platform compatibility and high scalability are key factors when choosing a security software to safeguard the digital assets stored on a NAS.
As you probably know, not all NAS devices run on the same OS. Some popular alternatives such as QNAP gadgets run on different Linux-based distributions, while others rely on the good old Windows.
If you’re a home user, scalability will not be essential for you since a NAS already delivers plenty of storage space for your files, photos, videos, and so on.
However, things are entirely different when entering the enterprise segment and our guess is, you’d want a solution that is able to grow along with your workforce and secure your thriving corporate data.
As always, personal expectations and habits will shift the balance in one direction or another, but we can all agree that airtight security and good performance are not areas on which you’d want to compromise. So, here goes.
Tip
Here are the criteria on which we focused in order to pick the best antivirus for NAS storage:
➡ High scalability and wide compatibility (support for multiple NAS vendors) ➡ Encryption and credentials’ protection modules ➡ Network security tools (exploit-blocking capabilities, Wi-Fi weaknesses identification, firewalls) ➡ Powerful sanitization modules and device protection ➡ Performance optimization features and low CPU consumption rates ➡ Effective threats identification with proactive measures as well as instant reaction capacity ➡ Multi-layered defense to stop diverse, polymorphic, or hidden nuisance of all kinds ➡ Sensitive data protection, anti-hacking, and backup utilities ➡ Automatic updates of virus signatures to keep emergent threats contained
What is the best antivirus for Network Attached Storage?
Since scalability and compatibility ranked so highly on our criteria list, why not start there?
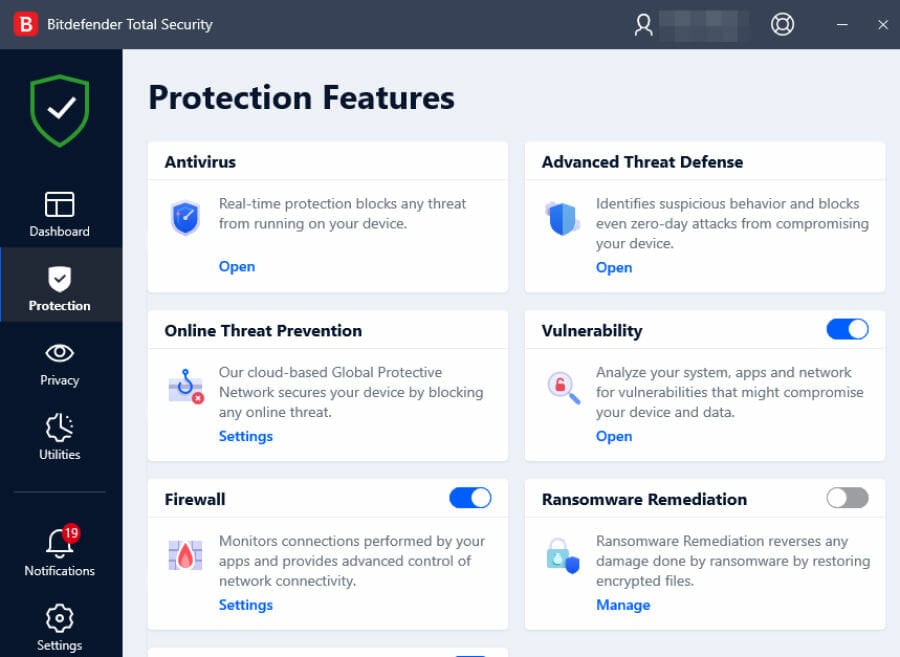
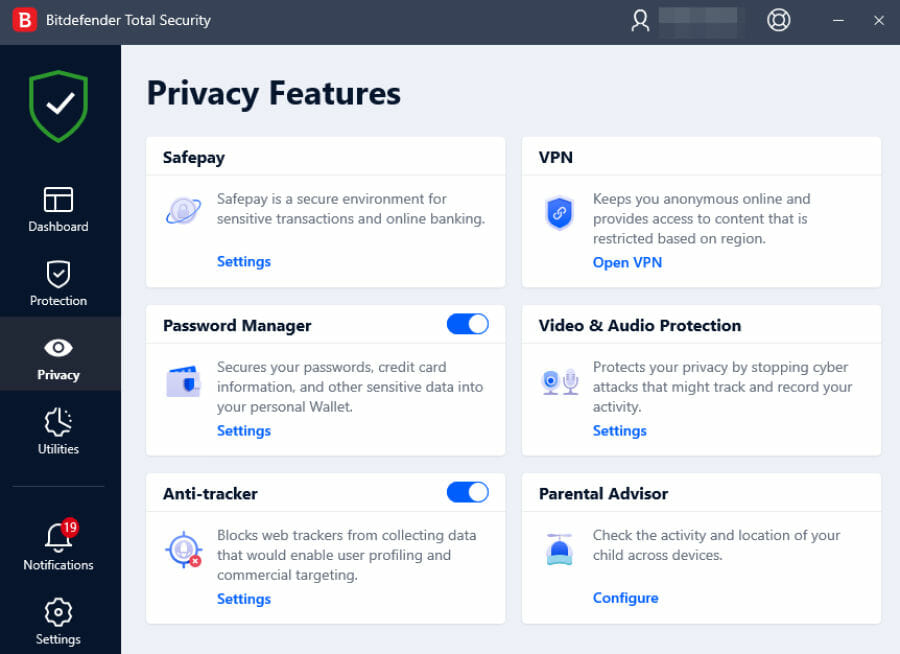
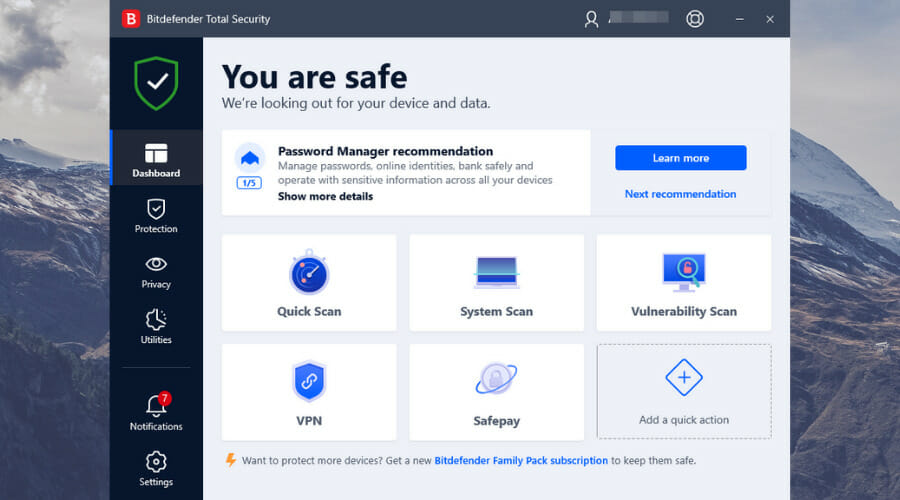
Bitdefender’s Security boasts unlimited scalability, allowing you to expand the number of scans as you add more servers and NAS devices into the mix.
The advantage is self-explanatory. You get to enjoy complete peace of mind thanks to an evolutive security solution that will grow along with your data.
Through continuous protection and the highest degree of availability, you can rest assured that no single point at the system or client level will ever be exposed.
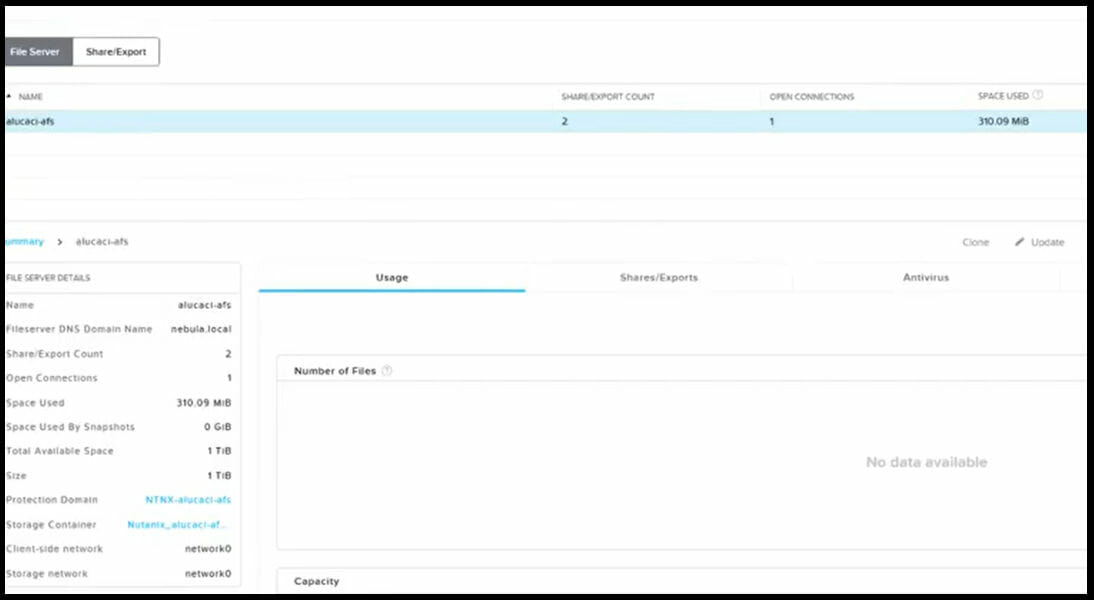
Compatibility is at the heart of this best antivirus for NAS storage. Thus, it delivers impeccable defense for ICAP protocols, Citrix ShareFile, and Nutanix Files and it supports a plethora of NAS models from just as many vendors.
Heavy names such as Oracle, HPE, Dell, EMC, Hitachi, or IBM only account for a handful of examples.
Bitdefender’s modular architecture makes it easy to adapt to complex and heterogeneous multi-vendor NAS infrastructures from the same deployment while still keeping protection management as easy as a breeze.
This antivirus for Network Attached Storage relies on the central GravityZone console that allows for a unified management system, as easy to deploy as it is highly customizable.
You get access to the right amount of tools that enable you to tailor security as per your needs and it isn’t much you cannot do.
From defining global policies to setting up exclusions, and default actions, and creating real-time alerts along with comprehensive reports, you get to control security from endpoint to endpoint with granular precision.
When it comes to protection mechanisms, we were pleased to observe that this antivirus for NAS storage combines the most advanced techniques in the industry.
This includes virus signatures, cloud-based lookup, behavioral analysis as well as machine learning in order to deliver multiple layers of in-depth defense for all your shared storage systems and files.
From widespread infections to infamous zero-day attacks and other prolific cyber threats, Bitdefender can eradicate everything thanks to its unmatched, award-winning security that does not hurt your NAS device’s performance in any way.
Kaspersky is one resourceful vendor that does not fail to reinvent itself in order to stay fresh and deliver crisp security solutions that perfectly adapt to the shifting digital environment.
Flexibility is quintessential for their business and they manage to stay flexible through modular architecture defense solutions that can easily accommodate a bevy of infrastructures and platforms.
Kaspersky’s Network Attached Storage Security supports all major protocols such as ICAP and RPC-based storage systems as well as most major NAS manufacturers including Hitachi, Dell, Oracle, EMC, and more.
Its versatility goes beyond wide compatibility and it reflects all the way down to scanning and reporting levels.
Thus, you can specify with granular precision the type of files you want to include in your scans, those that need to be removed from this process, as well as the depth of anti-virus and anti-malware defense.
Reporting is just as versatile and you can search through large-volume logs, include visual elements into your reports such as graphs and diagrams to make information more digestible, and use filters to customize your data as per your needs.
A complex notification system is available no further than a click away and you can set differentiated privilege levels for each server admin individually for better management.
Speaking of management, you can rely on a dedicated console that allows for a simplified overview of all your operations, notifications, and updates.
Remotely or directly, you name it, Kaspersky delivers it, thus allowing you to keep an eye on each NAS equipment from a centralized location.
All this flexibility wouldn’t make a lot of difference if it weren’t for the integrated performance optimization-focused tools that aim to secure your network without overcharging your servers.
This antivirus for NAS storage boasts a minimal impact on performance.
Through small-sized update files, modular scanning options, and performance-boosting settings, Kaspersky will keep your infrastructure safe without slowing you down.
Similar to Bitdefender’s security solution for storage systems, this program is highly scalable and it will adapt to your increasing data and workload with no hassle and no special requirements or additional deployments.
This antivirus for NAS storage may not be the simplest tool to deploy, but it does simplify security once you have it in place.
Thanks to the McAfee ePolicy Orchestrator, you will be able to supervise all security-related actions and decisions from a centralized console with complete management tools including policies and reporting setup.
Thus, you not only streamline administration but also simplify your environment by protecting your entire infrastructure with a single, comprehensive security program that covers NAS devices from multiple vendors, running on multiple operating systems and platforms.
This antivirus for Network Attached Storage will keep a close eye on all your storage environments and instantly alert you in case of virus detection by email, SMS, or SNMP.
Speaking about virus detection rates, McAfee has another trick up its sleeve.
It’s the powerful combination of generic virus identification and state-of-the-art heuristics analysis that allows for instant reaction and blocking of viruses, malware, and other deceitful threats that can hide in ZIP archives stored on your NAS devices.
Its real-time defense can even detect PUPs and you can tweak its multi-scanner configuration in the most convenient way to perfectly suit your infrastructure and needs.
How do I protect my NAS?
How do I protect my NAS?
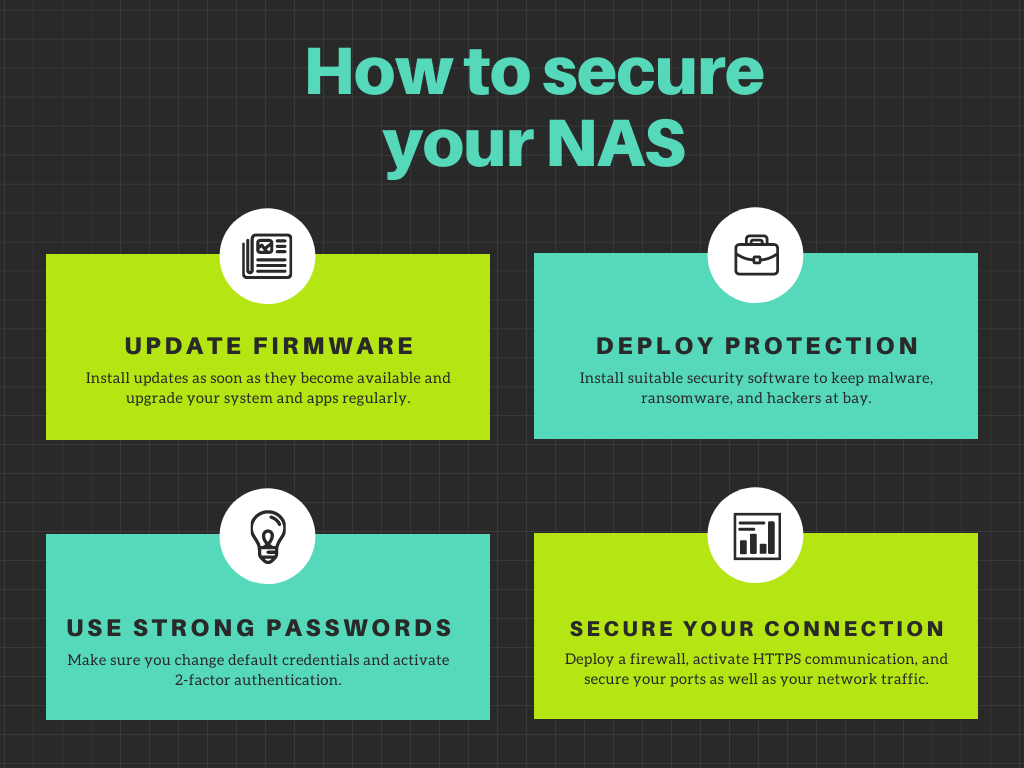
A sain routine implies sticking to some basic cybersecurity guidelines and this includes credentials and overall network protection. Start by changing the default passwords and go for strong credentials that won’t be easily compromised by brute-force attacks.
Speaking about password policy, it’s best to use multiple factors authentification in order to make sure your data is beyond hackers’ grasp.
Since staying off the grid defeats the purpose of owning a NAS – as in Network Attached Storage – you should secure your connection and network the best you can.
This implies using a traffic encryption tool, deploying a firewall, activating SSL certificates on your NAS to enable HTTPS connection, and securing ports.
Security often calls for tough choices. Thus, some settings may need to be activated, while others (generally the ones you do not use) simply have to go in order to leave as few exploitable loops as possible.
As always, outdated firmware is a recipe for disaster, so make sure your download and install all updates as soon as they become available in order to pump those security patches into your NAS.
Finally, it’s smart to combine NAS storage with performant antivirus software to keep out malware in the first place and you have a solid selection to help you out right here.
Don’t forget to use strong encryption as well as backup services to secure your valuable data against ransomware.
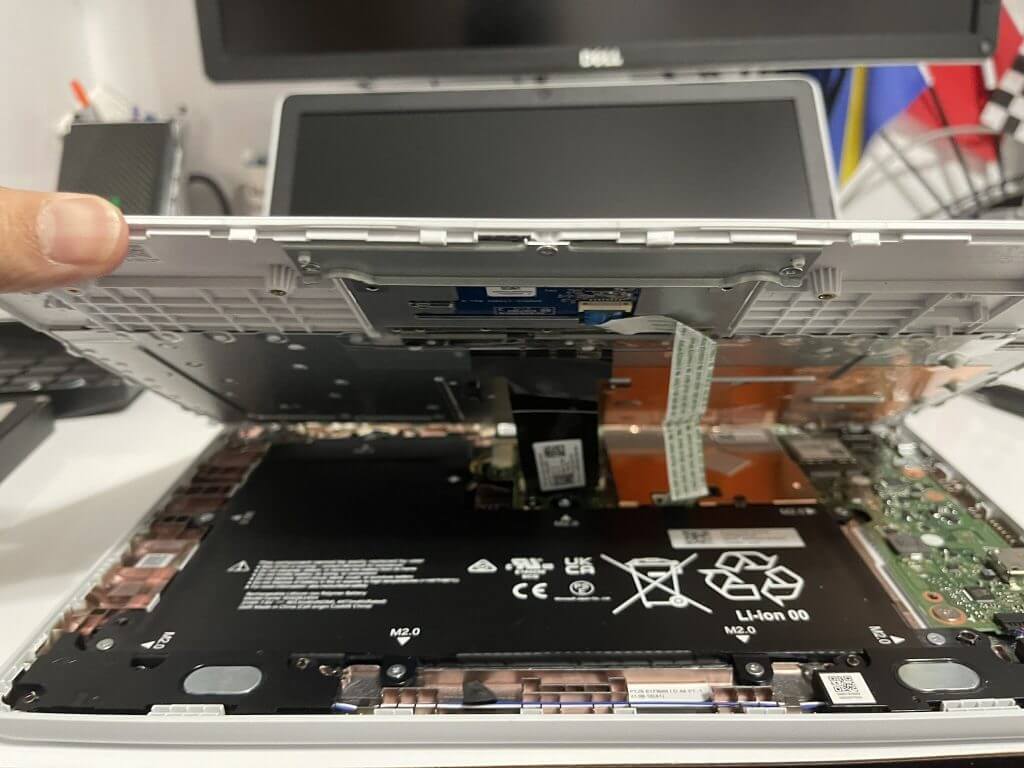
Microsoft is highlighting how easy it is to repair the new Surface Laptop SE. The company published an iFixit style teardown video, showing how the entire education-focused device can come apart with minimum tools.
The roughly 8-minute long video begins with the simple step of unscrewing the Torx screws at the bottom of the device. After that, the disassembly continues by prying up the keyboard deck with a spudger tool. This gives access to removing the keyboard deck entirely by detaching just two cables. Other points in the video include steps to remove the display itself, as well as the motherboard, the battery, and the speakers. Microsoft highlights the modularity of the device, and how there’s no adhesive.
Despite the Microsoft video, it is important to note that the Laptop SE isn’t fully modular. The CPU, RAM, and storage are soldered to the motherboard and are non-upgradable. It’s also not a consumer device, but rather one designed for education users. It’s for these users where repairs can be lengthy, but with the Laptop SE being more self-repairable, it reduces the time needed to be spent out of service. We’re hoping the lessons learned from Laptop SE can also come over to the main Surface lineup one day.
Microsoft SQL Server is a database management system whose main purpose is to store and retrieve data that are requested by other apps, whether it’s on the same computer or one across the network. Microsoft has created multiple editions of SQL Server, each of which is aimed at different audiences and workloads.
The different versions of SQL Server can range from single-computer applications to large internet-centric ones with tons of concurrent users. SQL Servers are important for people running businesses and organizations that undoubtedly have an internet presence
You may be happy to know that there is a free version of SQL Server: the Express version. It’s the most scaled-down version but does include no limitations on the number of databases or users supported, plus a core database engine. However, Express only allows one processor to be used, a single GB of memory, and 10 GB for database storage.
Other versions include the Web Edition for low-TCO web hosting, the Standard edition which has some stand-alone services not available on Express, and the Enterprise which can manage databases as large as 524 petabytes.
Is Microsoft SQL Server a must-have service?
Honestly, unless you’re a developer of some kind that writes applications that work with databases, you don’t need SQL Server. It has a very specific certain of circumstances that it will be used in. It’s not something that you typically install on a workstation.
Instead, SQL Server is installed on a server or computer that is shared by dozens, maybe even hundreds of users on a large-scale application. You may typically find Reddit threads or forum posts asking about the service and when it’ll be available. Well, as it turns out, SQL Server recently became available on Windows 11.
Right now, the latest version supported is SQL Server 2019 and this guide will show you how to download and install SQL Server.
It’s helpful to know how to do it correctly if you ever decide to try out the software and you’re a fledgling developer.
And if any of your .MDF files gets corrupted, we have a guide on how to repair an SQL database and retrieve your data quickly.
How do I install SQL Server 2019?
1. Installing SQL Server Express
In a web browser, search for the official Microsoft SQL Server page.
In this page scroll down until you find the free specialized editions.
Under Express, click Download now.
A small window may appear. Select Save File.
After downloading, locate the SQL Server Express installation file and double click it.
If the computer asks if you want to make changes, select Yes.
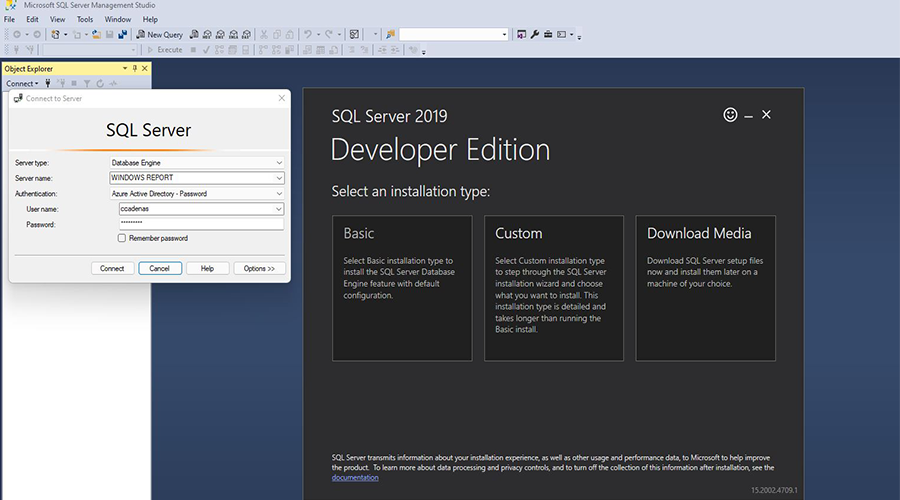
The Setup wizard for Express appears. For this installation, the guide will choose Basic, but you have the opportunity to create a customized rendition or download the media to install later.
Click Accept at the License Terms.
Click Browse to choose where you want the software to go. Otherwise, click Install.
Give the installation some time to finish.
After installing, click Connect Now.
The Command Prompt will appear stating that you have successfully connected your SQL Server app.
After installing the Express edition, click Install SSMS.
2. Installing SQL Server 2021 Developer Edition
In the Microsoft SQL Server page, select Download now under Developer.
A small window may appear. Select Save File.
After downloading, locate the SQL Server Developer file and double click it.
If the computer asks if you want to make changes, select Yes.
The Setup wizard for Developer appears. For this installation, the guide will choose Basic, but you have the opportunity to create a customized rendition or simple download media to install later.
Click Accept at the License Terms.
Click Browse to choose where you want the software to go. Otherwise, click Install.
Give the installation some time.
After installing, click Connect Now.
The Command Prompt will appear stating that you have successfully connected your SQL Server app.
After installing the Developer edition, click Install SSMS.
3. Installing SQL Server Management Studio (SSMS)
Clicking Install SSMS will take you to the SQL Server Management Studio download page.
Click on the SSMS download hyperlink to start installation.
A small window may appear. Click Save File.
Locate the SSMS installation file and double-click it.
If the computer asks you to make changes, click Yes.
The SSMS installation wizard appears. You can change the file’s location by clicking Change.
Then, click Install.
Give the installation process some time.
Once SSMS has finished installing, click Close.
Now you will have to connect to your server.
Start by opening the search bar.
In the search bar, type in SSMS to bring up the SQL Server Management Studio App.
Click the first entry you see to open the app.
When the SSMS app open, you will be given the opportunity to authenticate your connection to the server.
In the Server type drop-down menu, you can select what type of server you’re trying to connect to.
Then add the Server name.
Next select how you to authenticate your credentials. In this case, Basic Authentication will be chosen.
Add your user name and password.
Then click Connect to establish a connection between you and the server.
Once you’ve been successfully authenticated, the Object Explorer on the left will be filled with database entries and other SQL objects.
If you want to connect to another server, click on File in the top left corner.
In this new drop-down menu, click Connect Object Explorer. The previously seen authentication window will appear.
In some cases, you may also need to install additional connectivity components. One of the most widely used is the ODBC Driver 17 for SQL Server, which allows applications to connect to SQL Server through the ODBC interface. This is especially useful if you plan to integrate SQL Server with external apps or reporting tools.
Are there other helpful apps or software that developers should download?
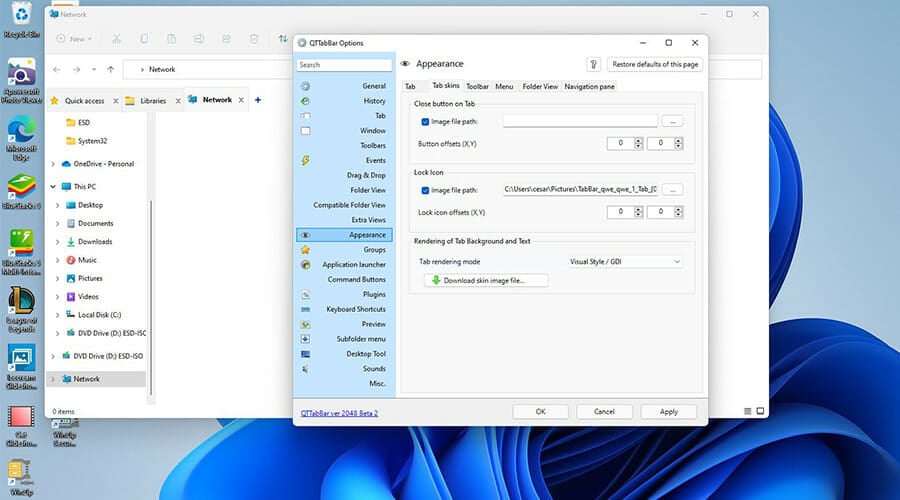
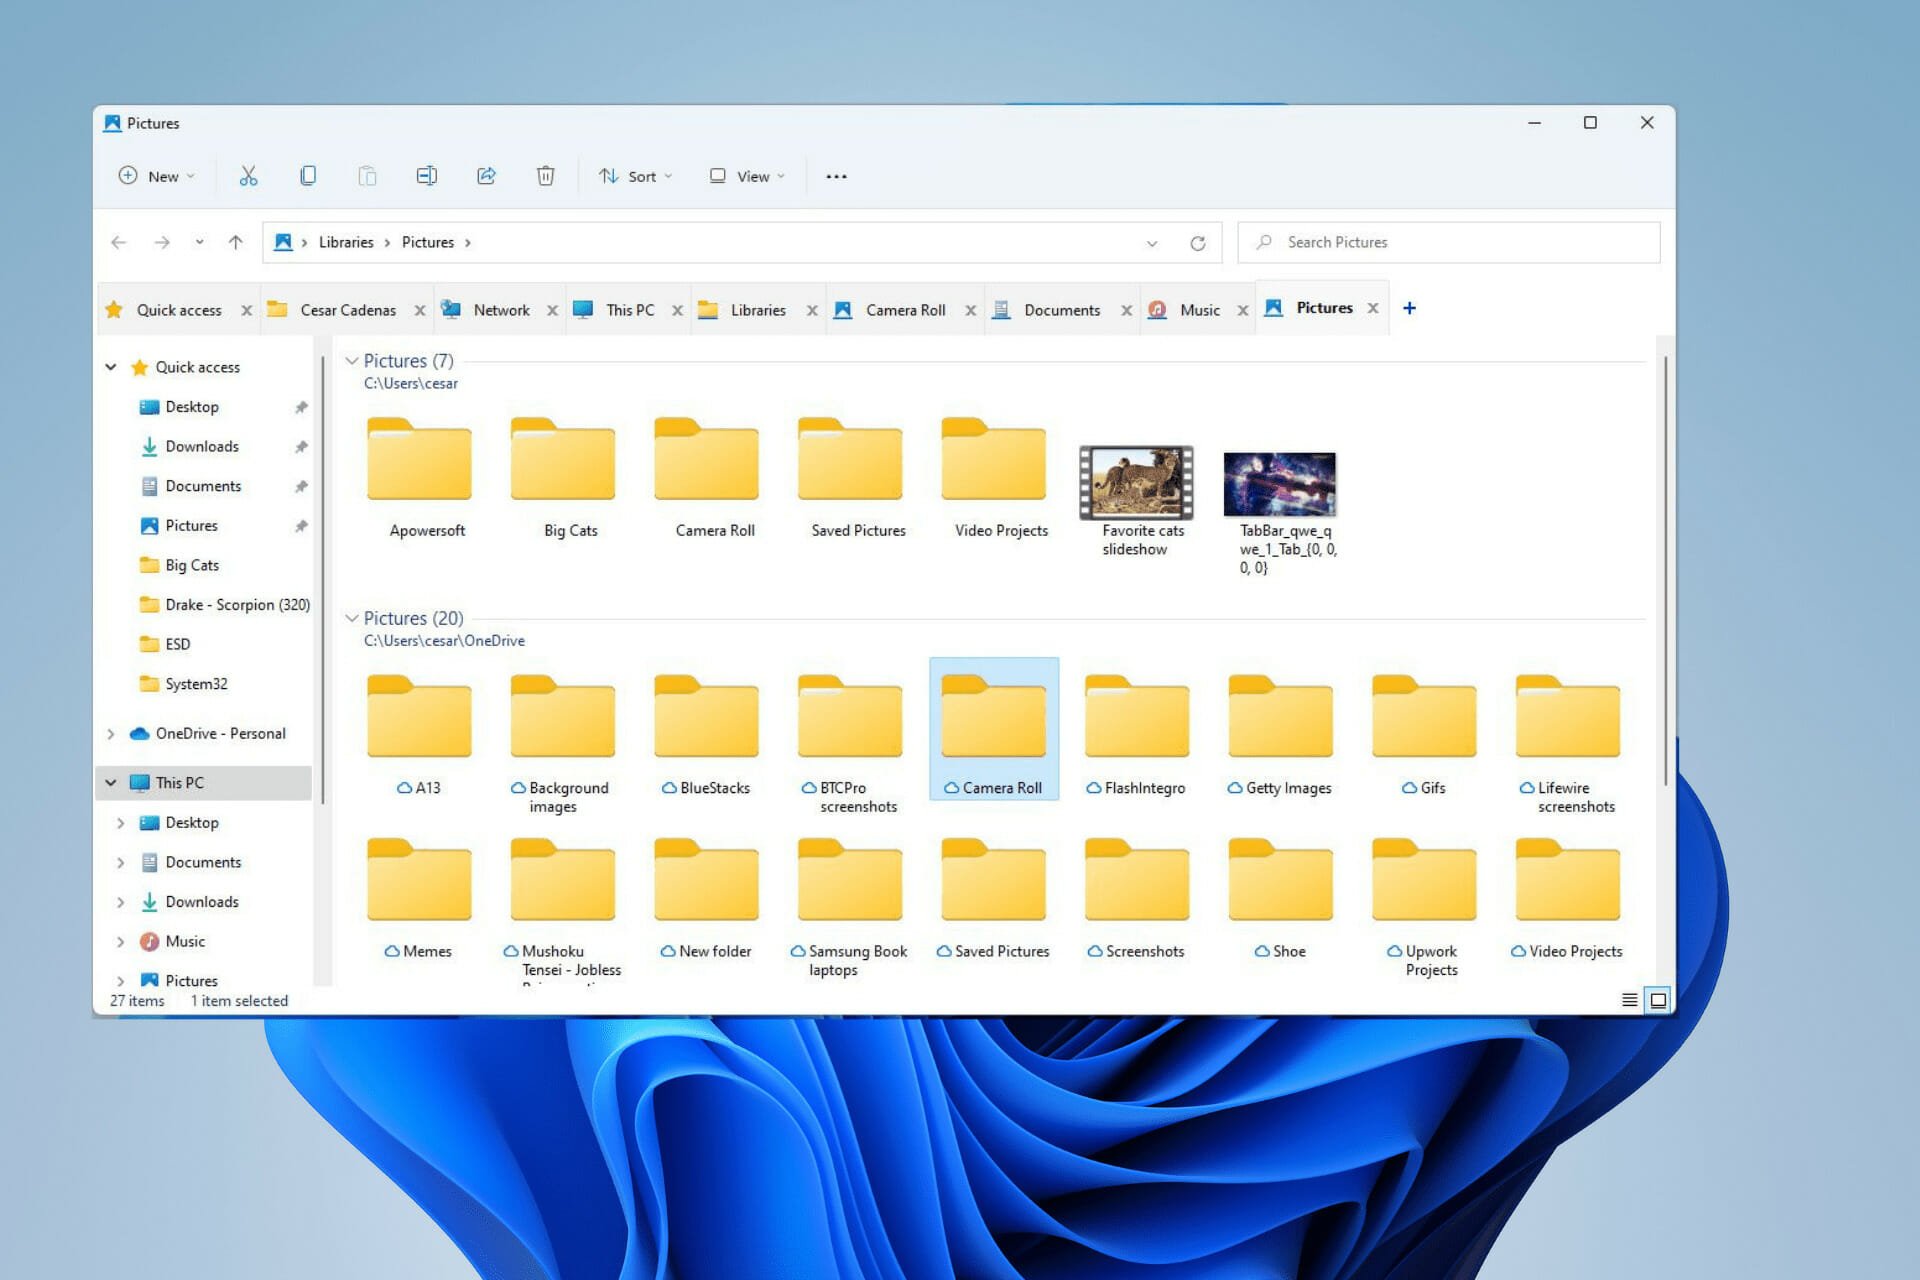
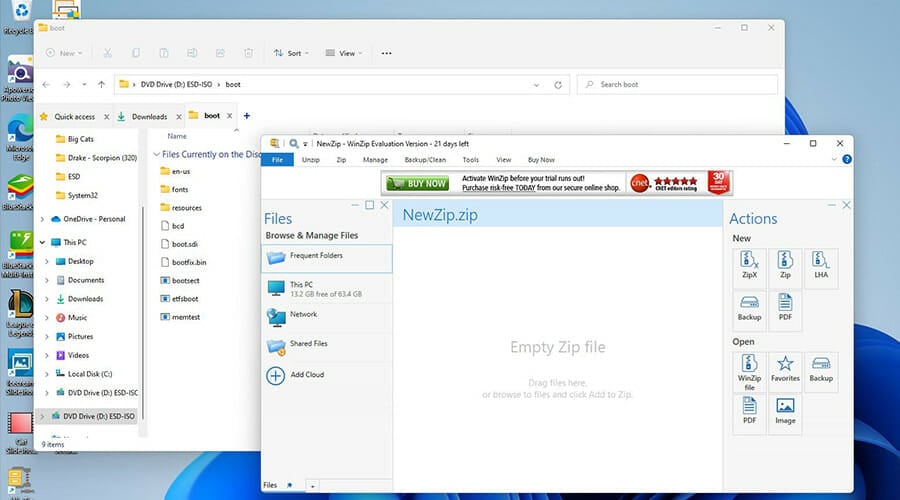
A useful software addition that comes highly recommended is QT TabBar. It changes the way File Explorer looks on Windows 11 and enables multiple tabs to open for a single window. It’s useful for giving the ability to jump between different windows without needing to have multiple instances open.
The main problem with having multiple windows open is that it soon becomes taxing on the computer’s CPU, which in turn causes performance issues and severe slowdown.
Plus, it can be annoying having to jump from window to window. Save yourself a lot of problems and download QT TabBar.
It may also interest you to know that Windows 11 may soon receive support for more widgets, although details are a little vague right now.
It is known that the OS’ third-party widget features will require a new version of the Windows Web Experience Pack.
There’s also a new software tool coming from GitHub called WSA PacMan that allows you to sideload Android apps in Windows 11. It’s easy to download and easy to use without needing to contend with ADB commands.
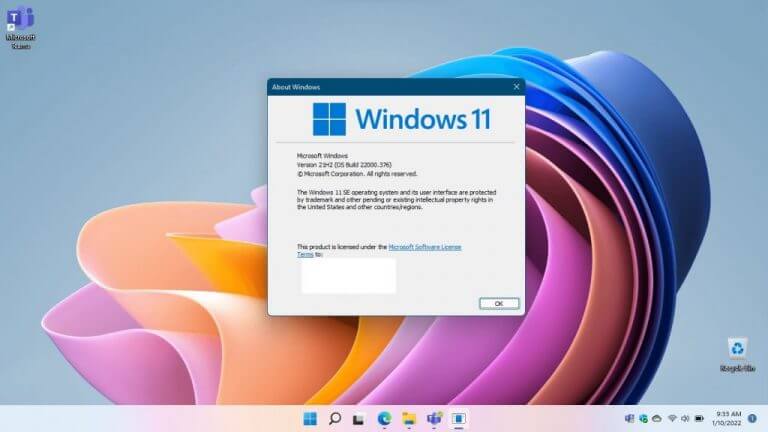
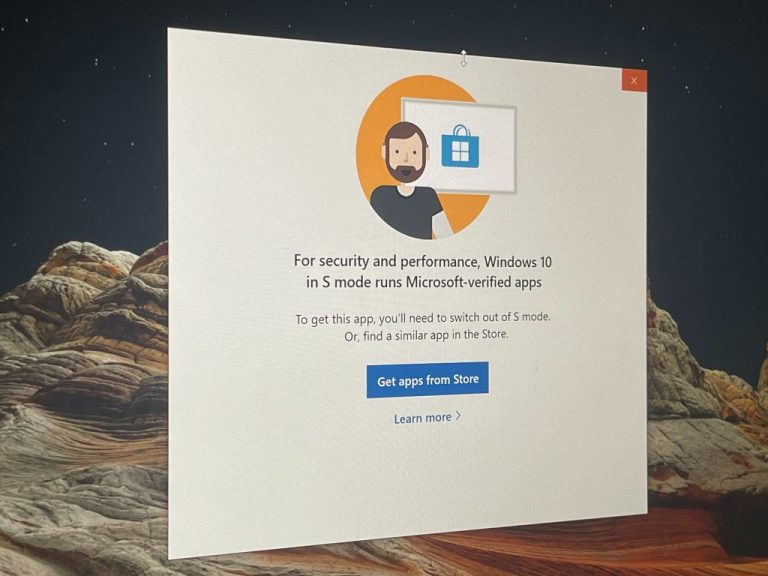
Microsoft is known for “special” editions of Windows. There’s Windows 10 in S mode and Windows 11 in S-mode, and recently, the company announced Windows 11 SE. This cloud-first Windows edition is uniquely designed for education customers, and only comes pre-installed on low-cost devices like the Surface Laptop SE.
It’s not a version of Windows that you can “buy” and install on your own, but it does offer the power and reliability of Windows 11, with a couple of key changes. Also, it’s intended to help make IT administrators’ lives easier so that they can provision Windows 11 SE devices for schools in a few simple steps with Microsoft Intune for Education.
I recently purchased a Surface Laptop SE which comes with the new OS, and here are my thoughts on why I think it’s a version of Windows that feels like “Microsoft EdgeOS.”
A few notes
Though education is the intended audience, Microsoft isn’t limiting who can buy devices with Windows 11 SE. You can’t find these devices through Microsoft’s own consumer store, but you can buy Windows 11 SE devices through Microsoft’s partners, which is how I got my Surface Laptop SE.
Going this route as a consumer means that Windows 11 SE will behave differently. The OS is designed for education customers and not the average consumer or for personal use. These customers use cloud-based tools like Microsoft Intune to provision Windows 11 SE devices for students. It’s through that provisioning that admins can load select Microsoft approved Win32 and Microsoft Store apps for students to use.
Without Intune, though, the experience on Windows 11 SE is limited to the pre-installed apps like Edge, Office, Flipgrid, and Minecraft for Education. There are also select system apps like Groove, Photos, Paint, Calculator, News, and To Do.
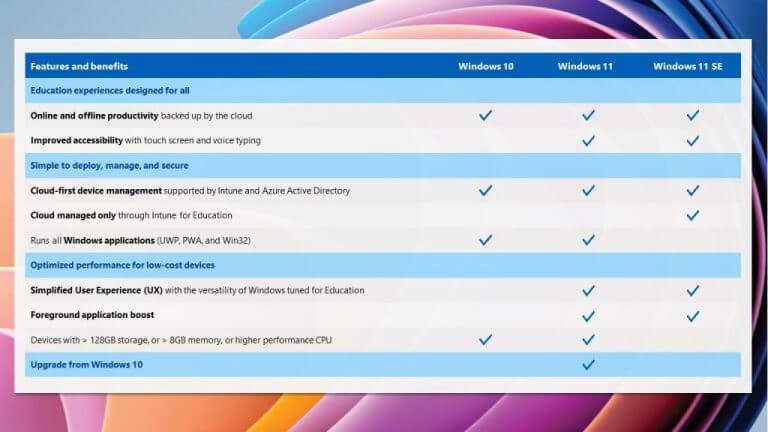
Though Windows 11 SE supports Microsoft-approved Win32 Microsoft Store apps, you can’t install these apps on your own through Windows 11 SE itself. There’s no Microsoft Store app, either. Intune is how everything is done. You can see how it compares to other Windows editions above.
Yet signing into a Windows 11 SE device without Intune and with just a Microsoft Account will work just fine, but the experience will be limited. With no Intune, you’ll face app and management issues. Microsoft even warns that if you use a Windows 11 SE device for personal use, it might be “too restrictive.” Yet, it’s those restrictions that make Windows 11 SE unique from the Microsoft fan’s and consumer’s point of view.
No Widgets
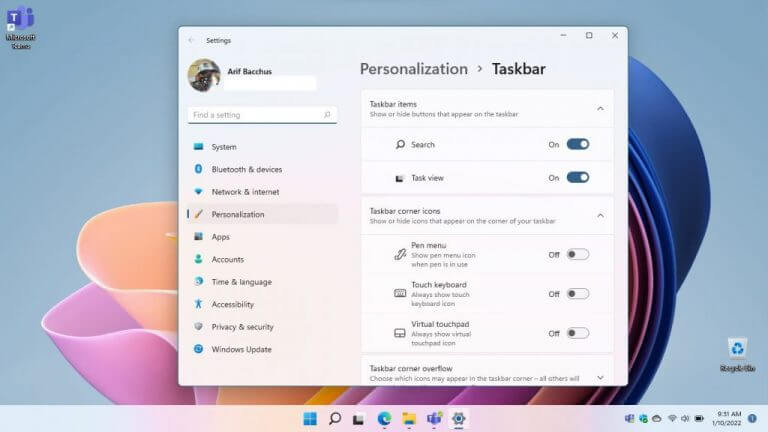
First off, one of the big changes in Windows 11 SE that applies to all users (using Intune or not) is the omission of Widgets. This is one of the signature features in Windows 11, and it gives quick access to news, weather, and other content. Yet in Windows 11 SE, Microsoft removed it for education users for a more distraction-free environment. Pressing Windows Key + W does nothing and the Taskbar doesn’t have the icon either. Even the Taskbar settings lack the Widgets setting.
File Explorer behavior
When you open File Explorer in Windows 11 SE it takes it full screen. That's the default behavior. Makes sense for students who need to look for files, right? pic.twitter.com/x4zFIkKra1
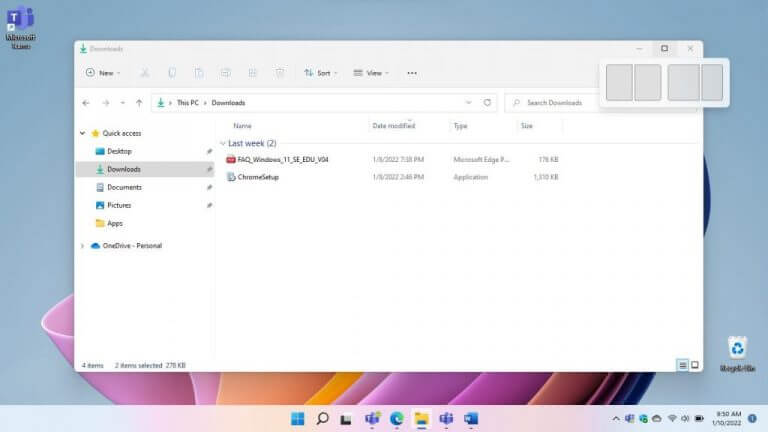
File Explorer in Windows 11 SE behaves very differently from Windows 11’s. Instead of opening in a windowed mode, it opens full screen by default. This lets you see more on your screen, with minimum distraction. All apps respect the behavior, too, and will load full screen by default. It makes sense for students, as it can help with focus.
Changes to Snap layouts
Windows 11’s other signature feature is Snap layouts. With the feature, you can stack your windows in six different ways for better productivity. In Windows 11 SE, though, Snap Layouts are limited to just two side-by-side options. This reduces the complexity for students, to again help with focus. Note that even on larger monitors, Snap Layouts are limited to just two layouts. Resolution size does not impact the Snap layout limit, and it looks to be baked into Windows 11 SE itself.
Other system limits
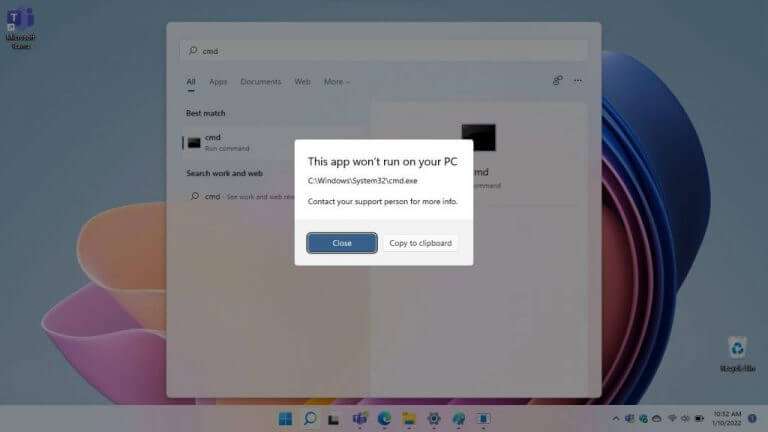
Focused on education, Windows 11 SE locks the end-user out of some features in Windows 11. We already mentioned the lack of the Microsoft Store, and installing Win32 apps, but there’s more. As an example, you can’t get into Command Prompt (though the app is installed.) There’s also no Windows PowerShell installed. In addition, you can’t even get into the classic Control Panel. It’s listed, but clicking it will lead to an error message.
Unlike Windows 10 and Windows 11 in S-mode, Windows 11 SE systems also can’t “upgrade” to standard Windows 11 Pro or Home. In one FAQ, Microsoft says there is no way to switch to a different version of Windows from Windows 11 SE.
Yet, it also indicates that should you like to use a Windows 11 SE device for personal use, you can purchase a license of the Windows version you like, erase all data, with the caveat of there being no way back to Windows 11 SE.
And about those app limits. While IT admins can load Win32, UWP, and Microsoft Store apps to Windows 11 SE devices with Intune, there are some limits. There are only 6 approved types of apps for Windows 11 SE.
Content Filtering apps
Test Taking solutions
Assistive technologies
Classroom communication apps
Essential diagnostics, management, and
supportability apps
Any apps that fall outside of those parameters can not be installed on Windows 11 SE. Microsoft says that Windows 11 SE supports a curated set of apps that are chosen based on feedback from educators and IT admins, and is open to supporting new apps by request.
Versus Windows 10 in S mode and Windows in S mode
So how does Windows 11 SE stack up against S-mode Windows versions? Well, as we said so far, Windows 11 SE has a more simplified user interface, there’s no Microsoft Store, and there’s no way to switch to regular Windows 11. Microsoft also indicates that Windows 11 SE has built-in enhancements to optimize performance on low-end hardware. It says that Windows 11 SE is cloud-first, so it requires less memory and uses a smaller footprint than traditional Windows Pro, so it can perform faster, Another key fact? Windows 11 SE is optimized for institutional use, but Windows 10 in S mode was also available to consumers.
Cloud-first and Edge-first
This thing is powered by an Intel Celeron N4120 CPU and 8 GB RAM. CPU clocked at 2.48 GHz. This is the higher-end version. Twitter, YouTube, Asana, WordPress, https://t.co/Rg7ccN0rxP, all open and it's chugging along nicely. Surprising. I guess Windows 11 SE is optimized. pic.twitter.com/fOgxOtI73M
All that explained, Windows 11 SE (in the way I used it) feels like a Microsoft take on the original version of Chrome OS (which was essentially just a web browser.) So far, in my time with my Surface Laptop SE, it’s been a cloud-first device. Files saved locally (when offline) sync up to OneDrive once connected.
In addition, Edge is the way to go on the Laptop SE as without any way to access to installing Chrome via Intune, it’s the key to the web. Oh, and speaking of the web, Edge even lets me create PWAs, too. Instagram, Twitter, are just a few examples of what I’ve created and used.
I definitely won’t be editing videos on the Laptop SE, but it feels like a no-nonsense laptop where you can just get work done, with little distraction. Performance has been great on my higher-end model, especially for web browsing. I’ll be planning a hands-on video in a few days, and also will be talking about the Laptop SE on the next OnPodcast, so be sure to stay tuned for more!
So you’re looking to leave a Teams meeting? A handy tool for remote collaboration, Microsoft Teams has become a lifesaver for online professional communications, especially since the Covid-19 pandemic first hit the world.
Of the many features that Teams comes packed with, the most important—and one which acts as a fulcrum for all others— is the one of creating specific teams. In some cases, however, leaving a team is often something you’ve might have to do. Maybe you were added to the wrong Team. Or perhaps you’re now done with the project and, therefore, don’t need to be the part of the team anymore. Whatever your specific reason, in this article, we’ve covered the exact steps you need to follow for leaving a specific Team. Let’s get started.
How to Leave a Team in Microsoft Teams
Be it the desktop app or the Teams version on android, leaving a team in your Teams app is a simple affair. Simply follow the steps below, and you too can leave a team easily.
Leaving a team in the Teams desktop app
Here’s how you can leave a team in the Teams desktop app:
Click on the Teams option from the left panel.
From the list of Teams, choose the one you’d like to leave now.
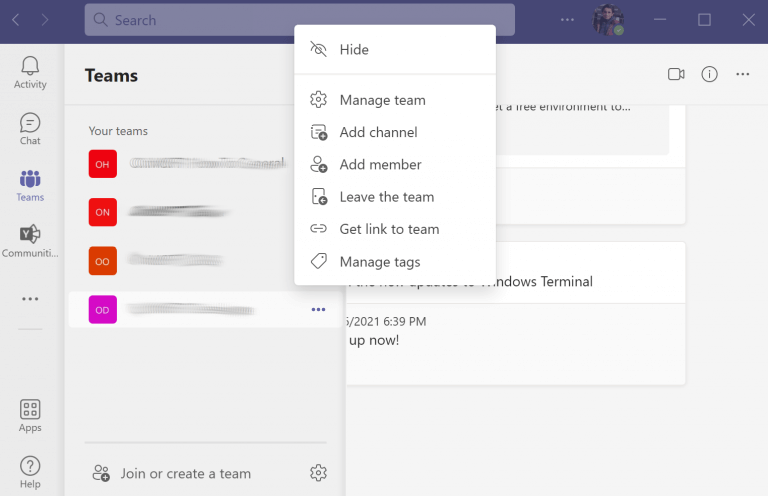
Click on the three dots for a specific team and select Leave the team.
You’ll then get a confirmation dialog box. Click on Leave the team, and you’ll be successfully exit that specific team.
How to leave a team in the Teams mobile app
To leave a team in the Teams Android app, first you’ve to navigate to the Teams navigation tab.
From the available list of teams, click on the options menu (three dots) of the specific team you’d like to leave and select Leaveteam.
You’ll then be asked for a confirmation again. Click on OK to leave the team.
Wrapping it up
And that’s all about leaving a team in Microsoft Teams app, folks. Whatever your reason for leaving a team, if you follow the above listed methods you’ll be able to do so successfully.
Windows 11, the latest iteration in the series from Microsoft, is said to be the most advanced and user-oriented. However, encountering errors remains as common, if not more than the previous version. In this article, we will be taking up the Windows Filtering Platform has blocked a connection problem.
The error arises when certain packets or connections are blocked by the Base Filtering Engine. Though the problem may seem intricate to most users, its solutions are rather simple and have been listed out in the following sections.
For those encountering the error in Windows 11, it’s likely that the upgrade didn’t go through successfully and there’s some kind of misrecognition in Windows Firewall.
But, before we head to the fixes, it’s imperative that you understand the role of the Windows Filtering Platform and its main features.
How does the Windows Filtering Platform help developers?
Windows Filtering Platform, a set of system services and API (Application Programming Interface) allows developers to create network filtering applications. It was first introduced in Windows Vista and has been a part of the Windows ecosystem ever since.
It can also be used to build independent firewalls, antivirus, amongst other network-related applications. With this, an application can access and modify packets while these are being processed.
The three main features of the Windows Filtering Platform are as follows:
Base Filter Engine
Generic Filter Engine
Callout Modules
Now that you are fairly acquainted with the concept, let’s head to the most effective fixes for the Windows Filtering Platform has blocked a connection problem in Windows 11.
How can I fix the Windows Filtering Platform has blocked a connection error in Windows 11?
1. Disable the Firewall
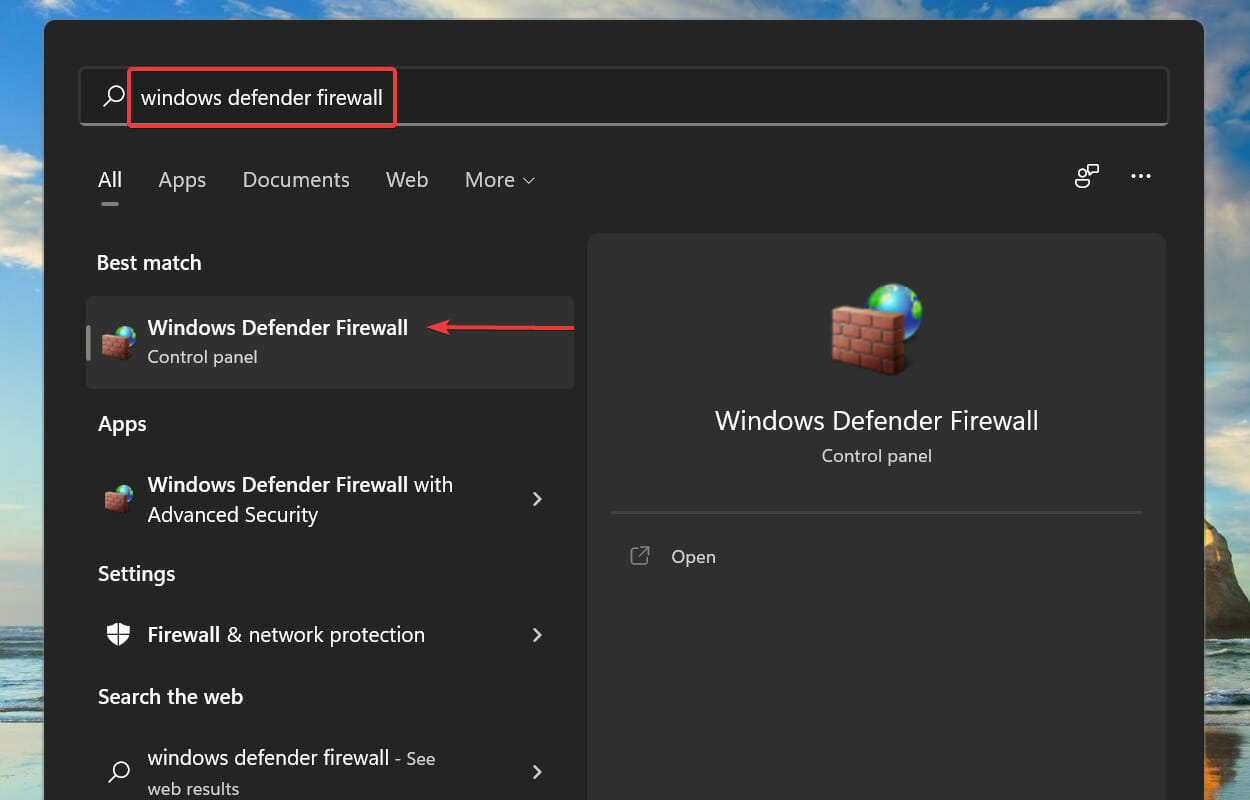
Press Windows + S to launch the Search menu. Enter Windows Defender Firewall in the text field at top and click on the relevant search result that appears.
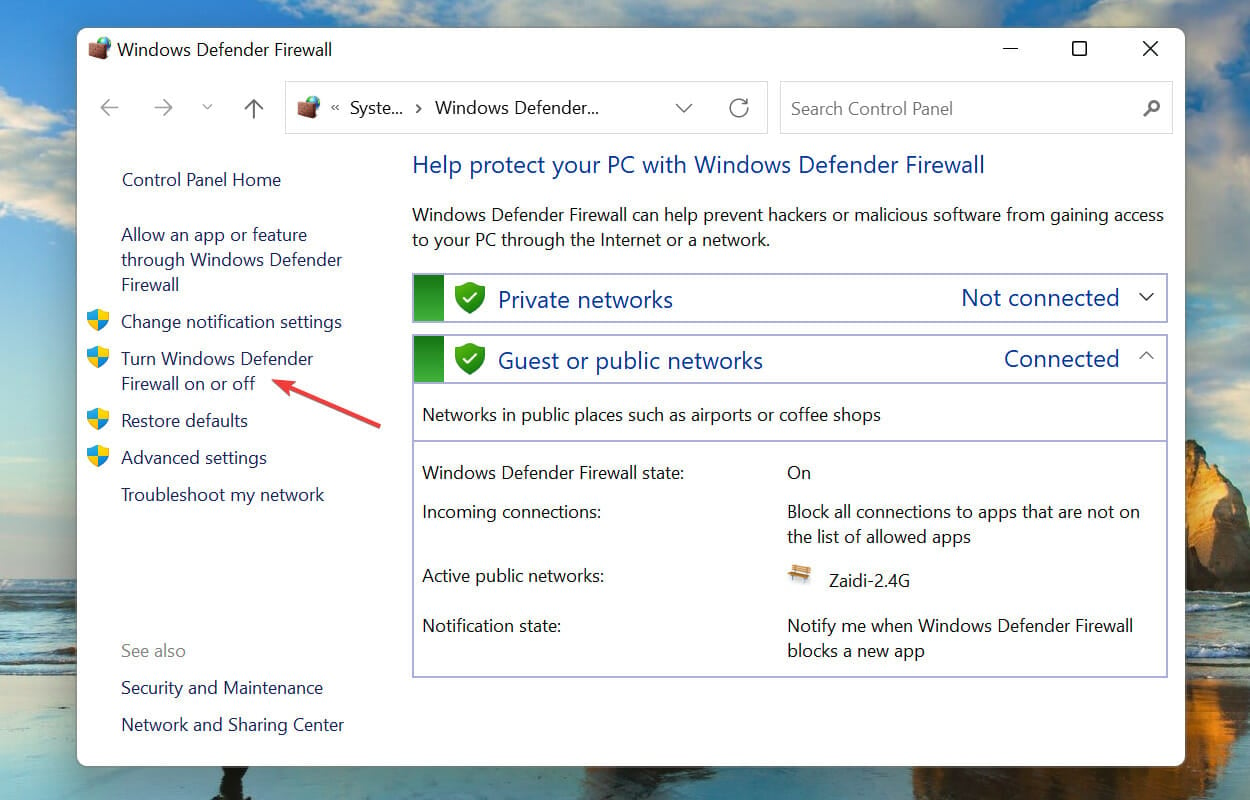
Next, click on Turn Windows Defender Firewall on or off from the list of options on the left.
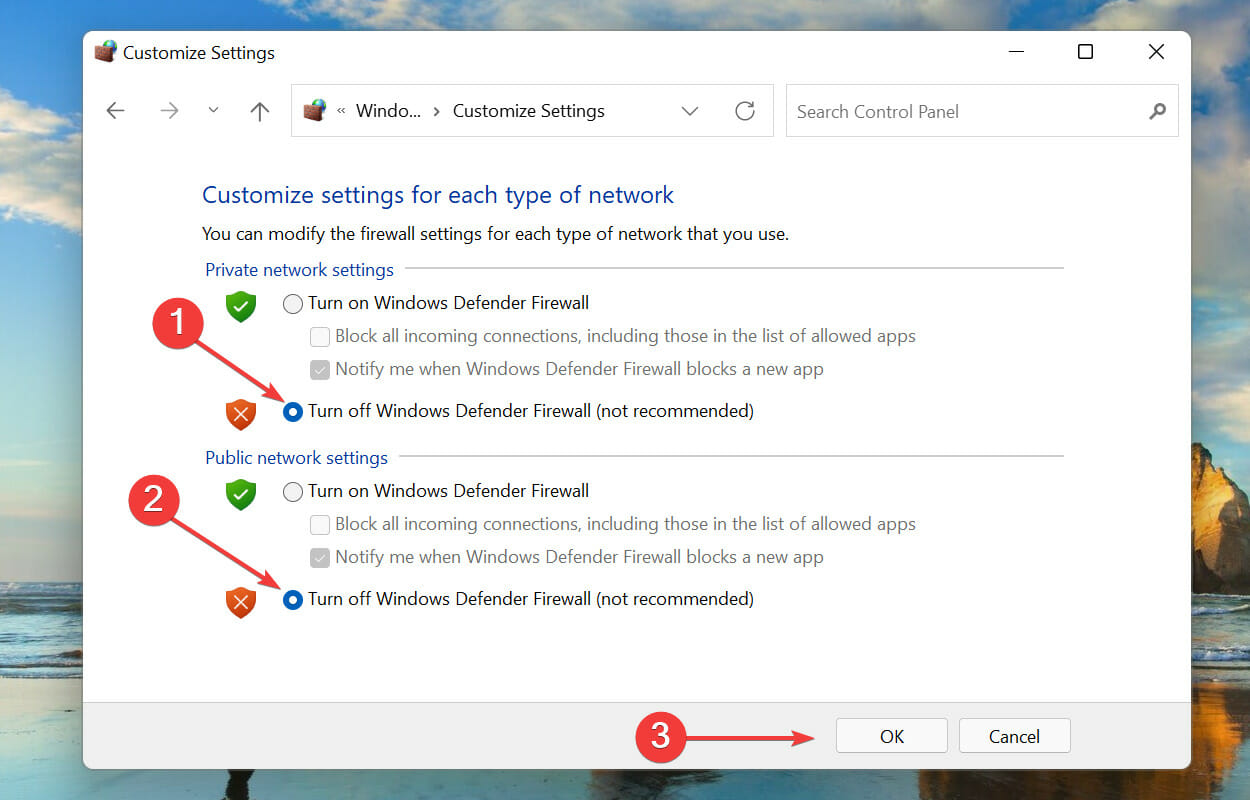
Tick the checkboxes for Turn off Windows Defender Firewall (not recommended) under both Private network settings and Public network settings, and click on OK at the bottom to save the changes.
After making the changes, restart the system and check if the Windows Filtering Platform has blocked a connection problem is eliminated in Windows 11. If not, head to the fix listed next.
2. Run DISM tool
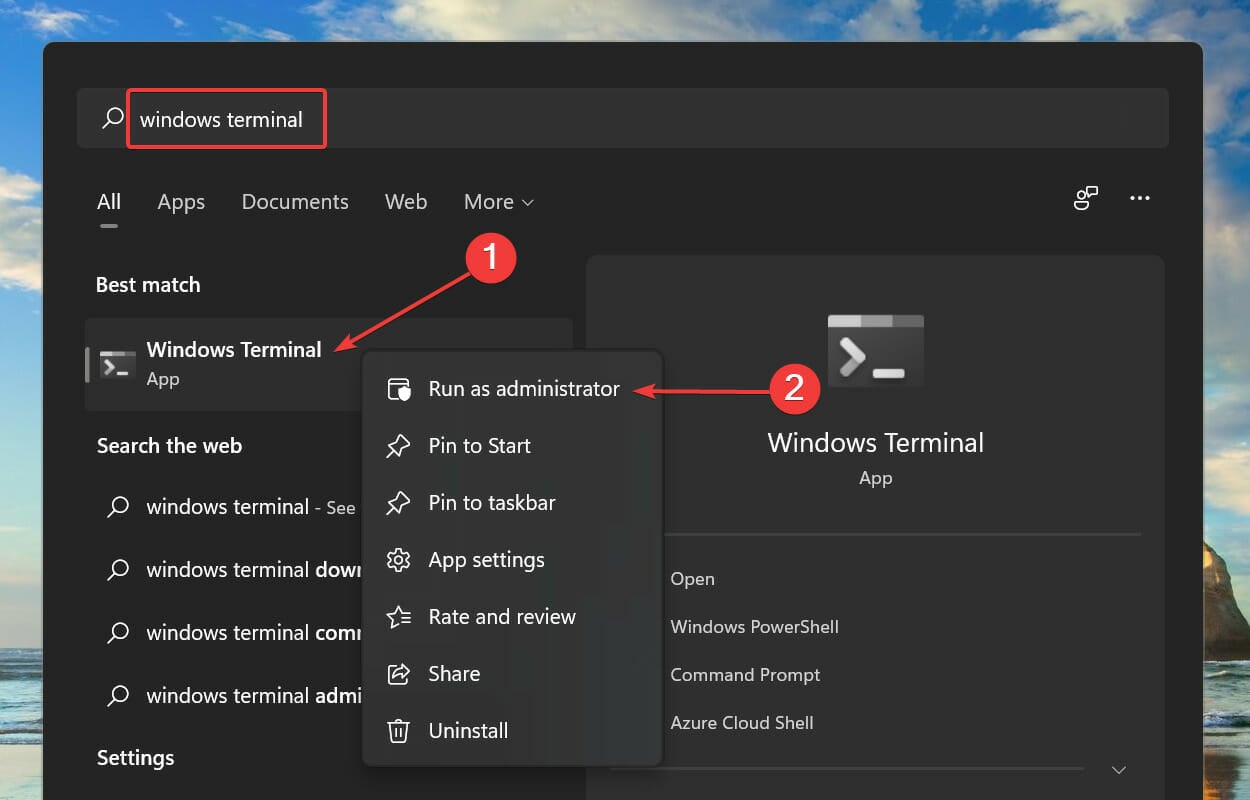
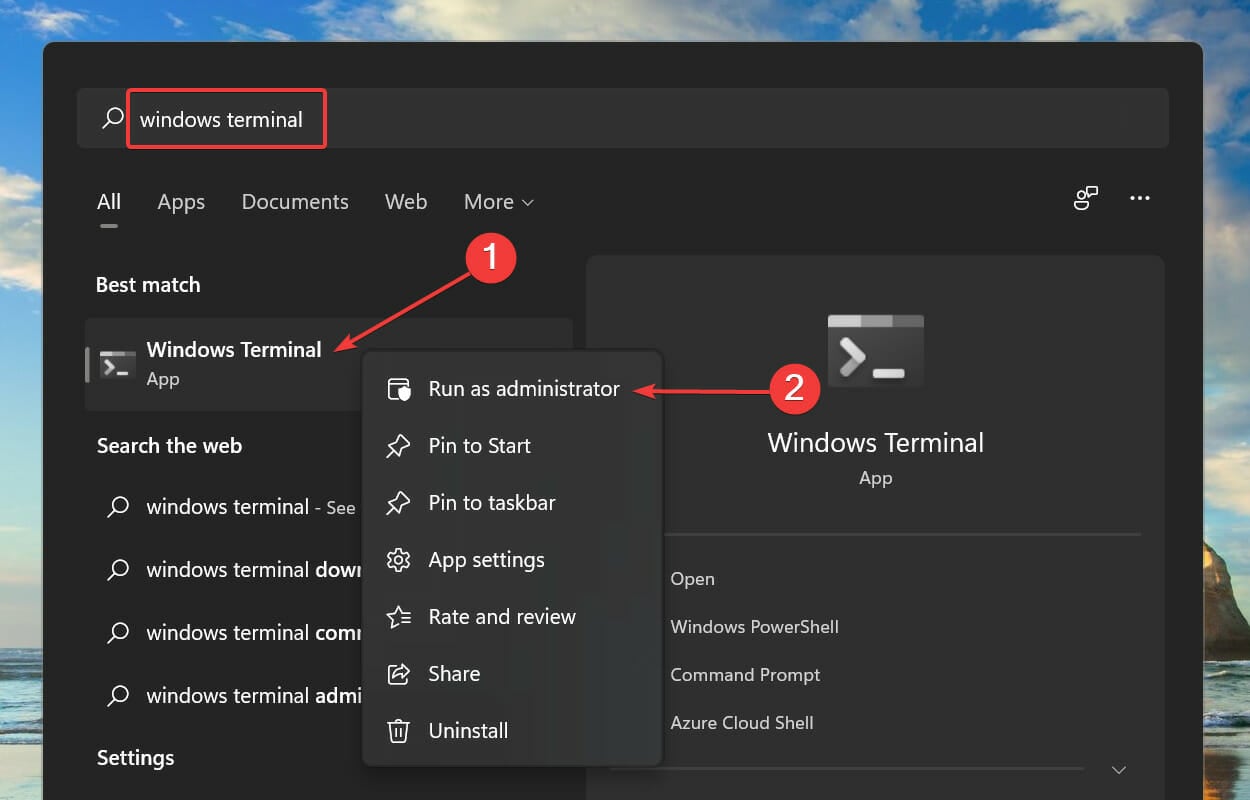
Press Windows + S to launch the Search menu. Enter Windows Terminal in the text field at the top, right-click on the relevant search result and select Run as administrator from the context menu.
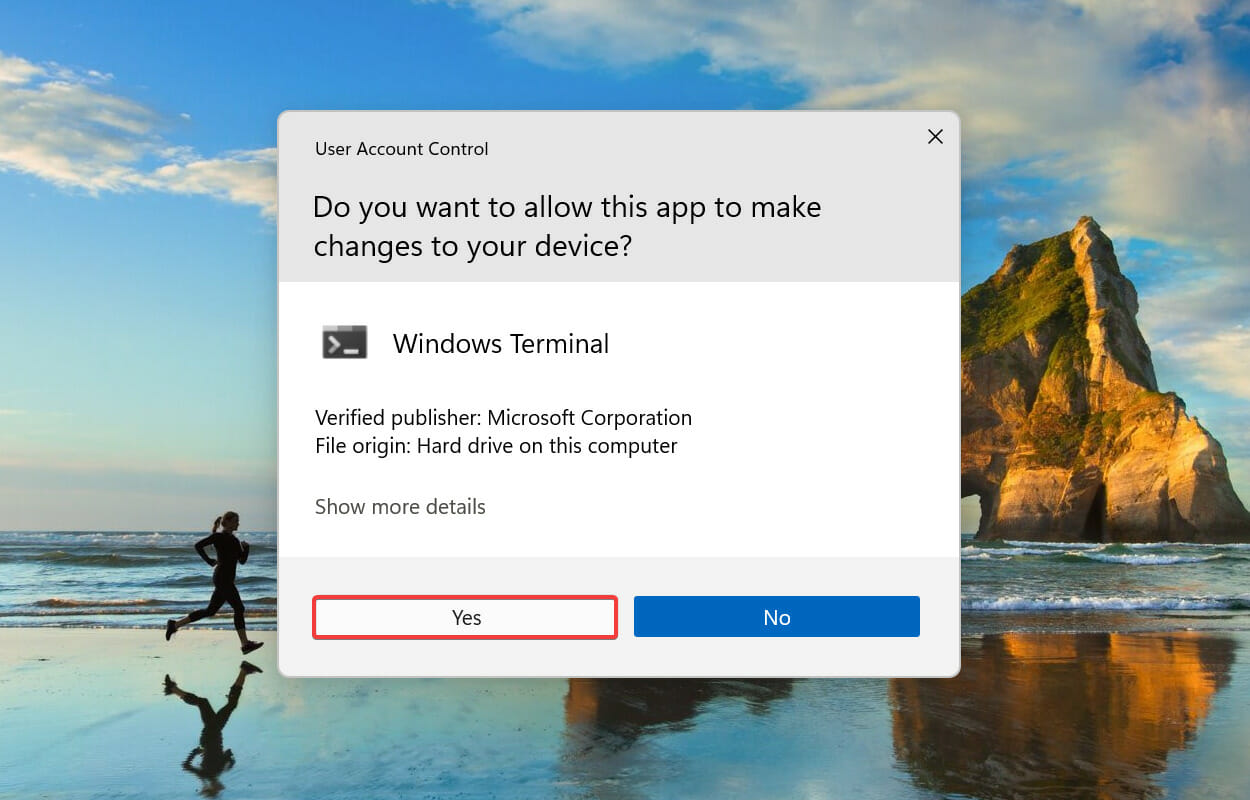
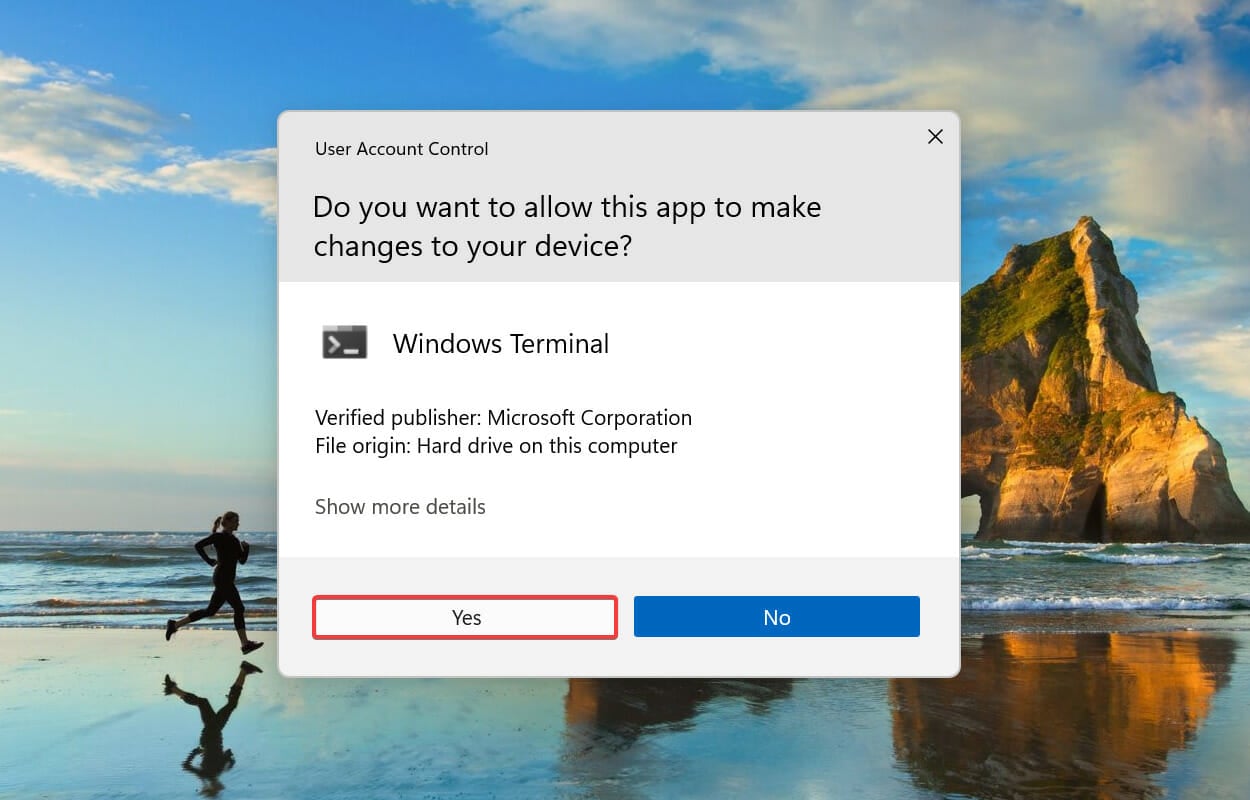
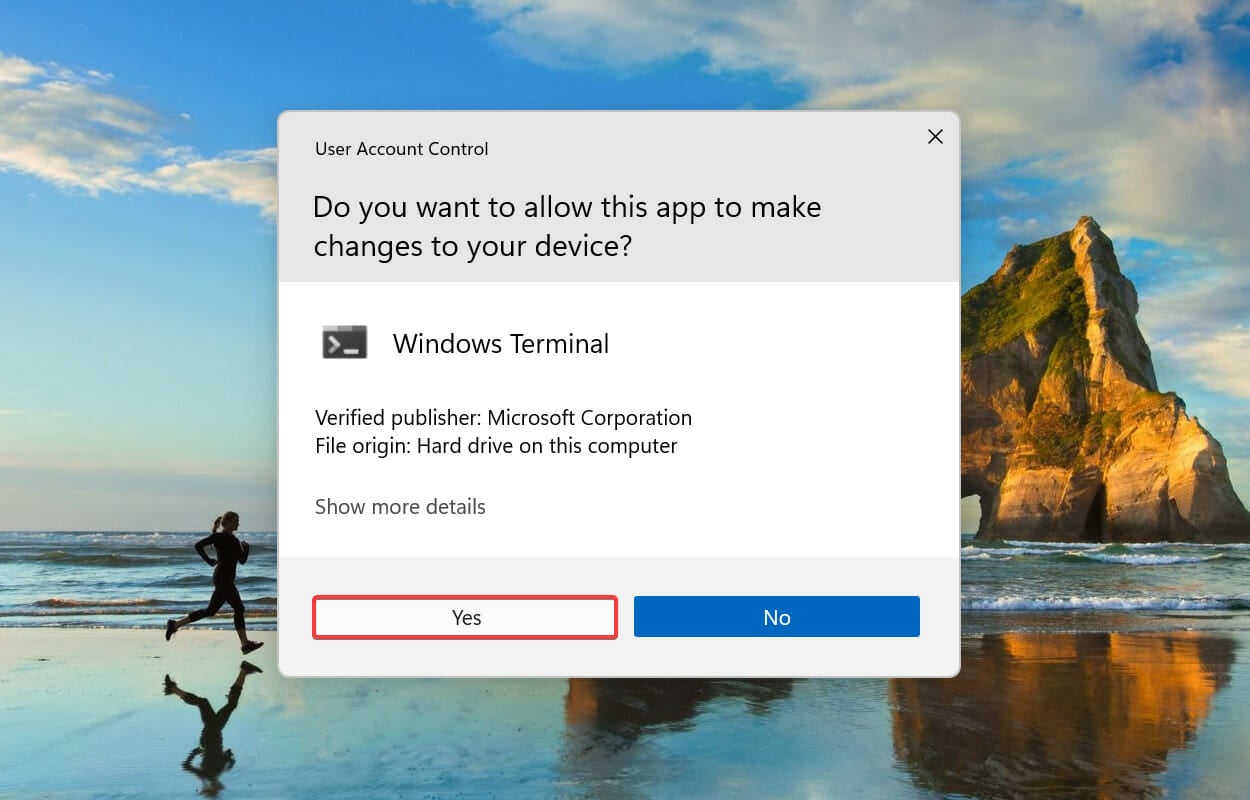
Click Yes on the UAC (User Account Control) prompt that pops up.
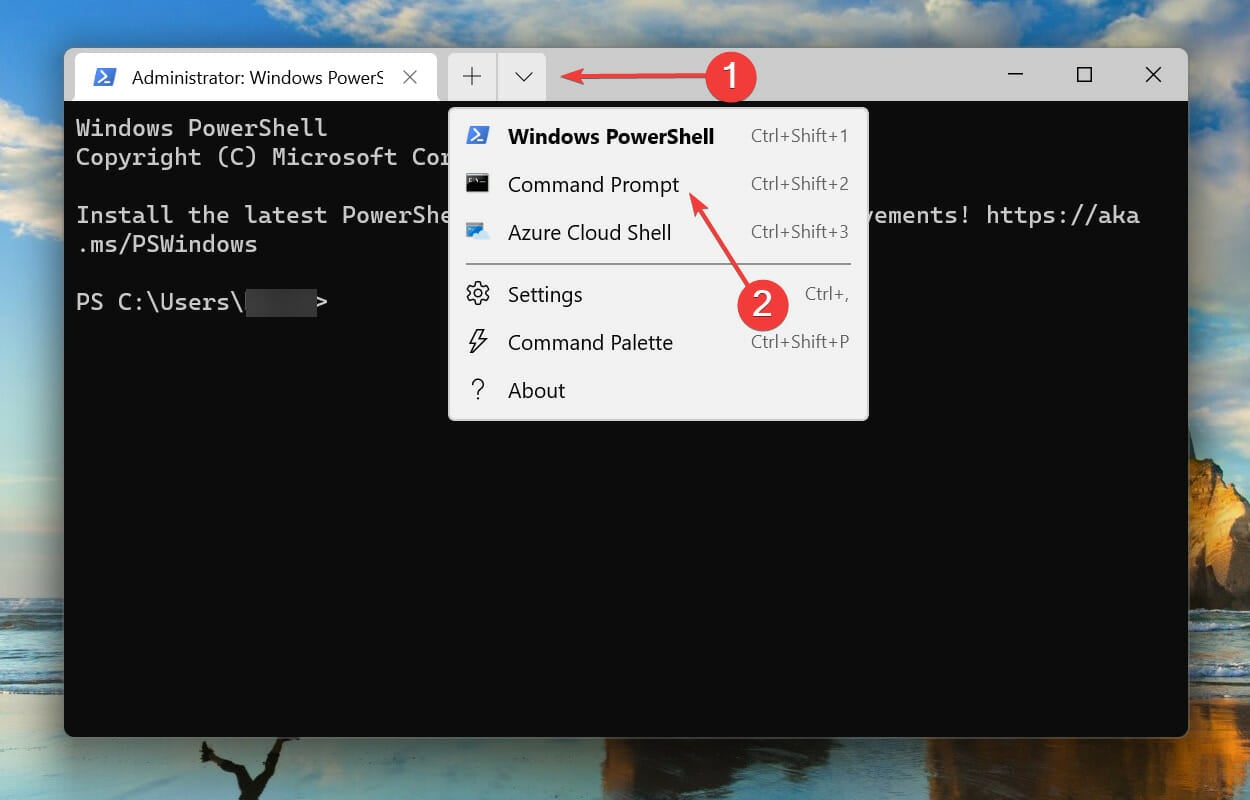
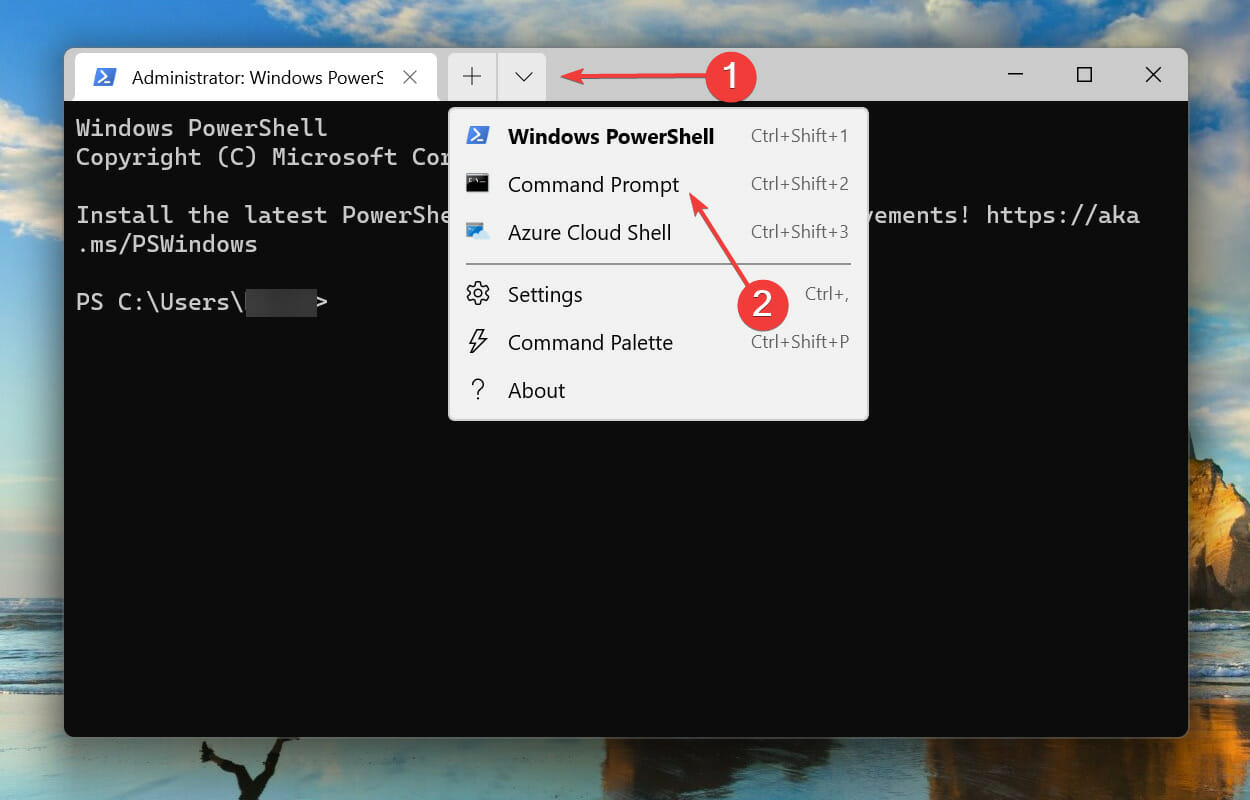
Click on the downward-facing arrow at the top and select Command Prompt from the list of options. Alternatively, you can hit the Ctrl + Shift + 2 to launch Command Prompt in a new tab in Windows Terminal.
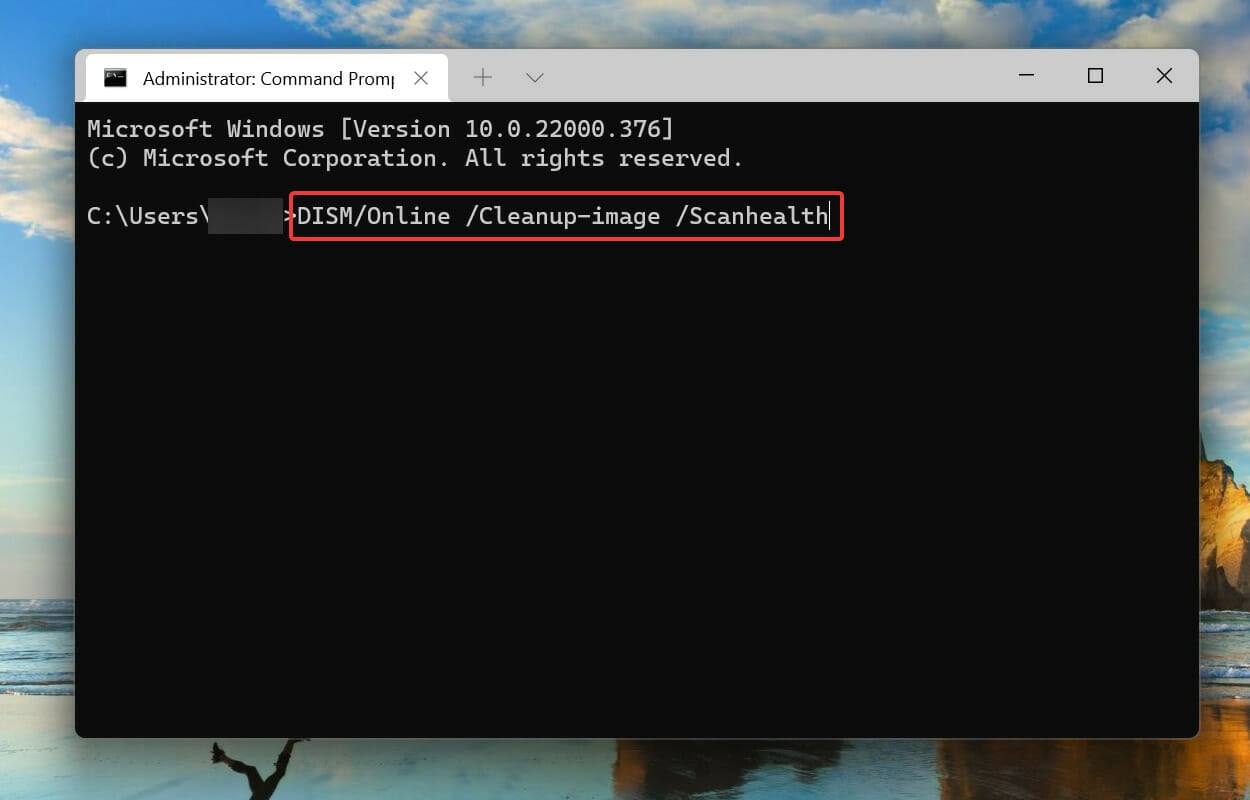
Next, paste the following command and hit Enter to execute it:DISM/Online /Cleanup-image /Scanhealth
Finally, execute the following command:DISM/Online /Cleanup-image /Restorehealth
3. Perform a quick SFC scan
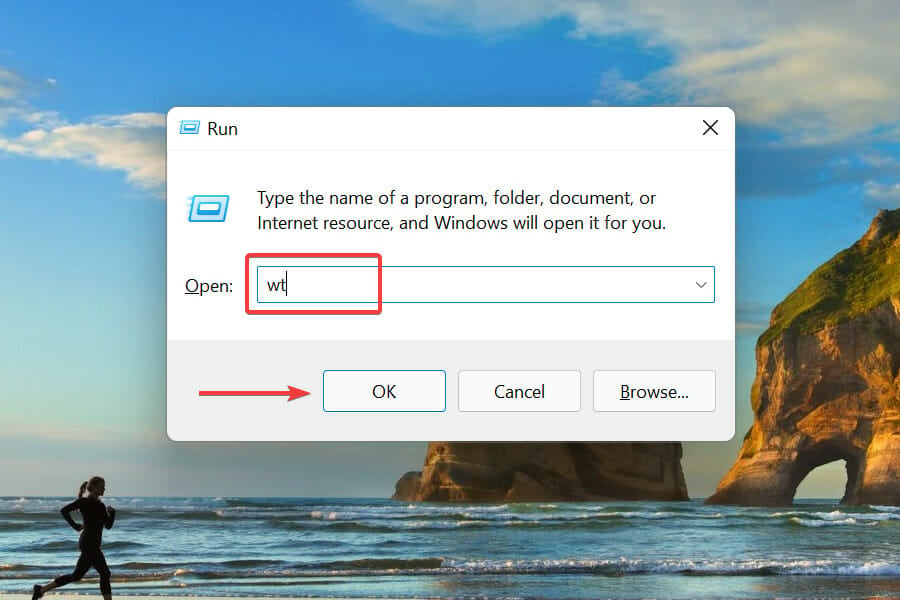
Press Windows + R to launch the Run command. Enter wt in the text field, press and hold the Ctrl + Shift keys, and then either click on OK or hit Enter to launch an elevated Windows Terminal.
Click Yes on the UAC (User Account Control) prompt.
Click on the downward arrow and select Command Prompt from the menu that appears.
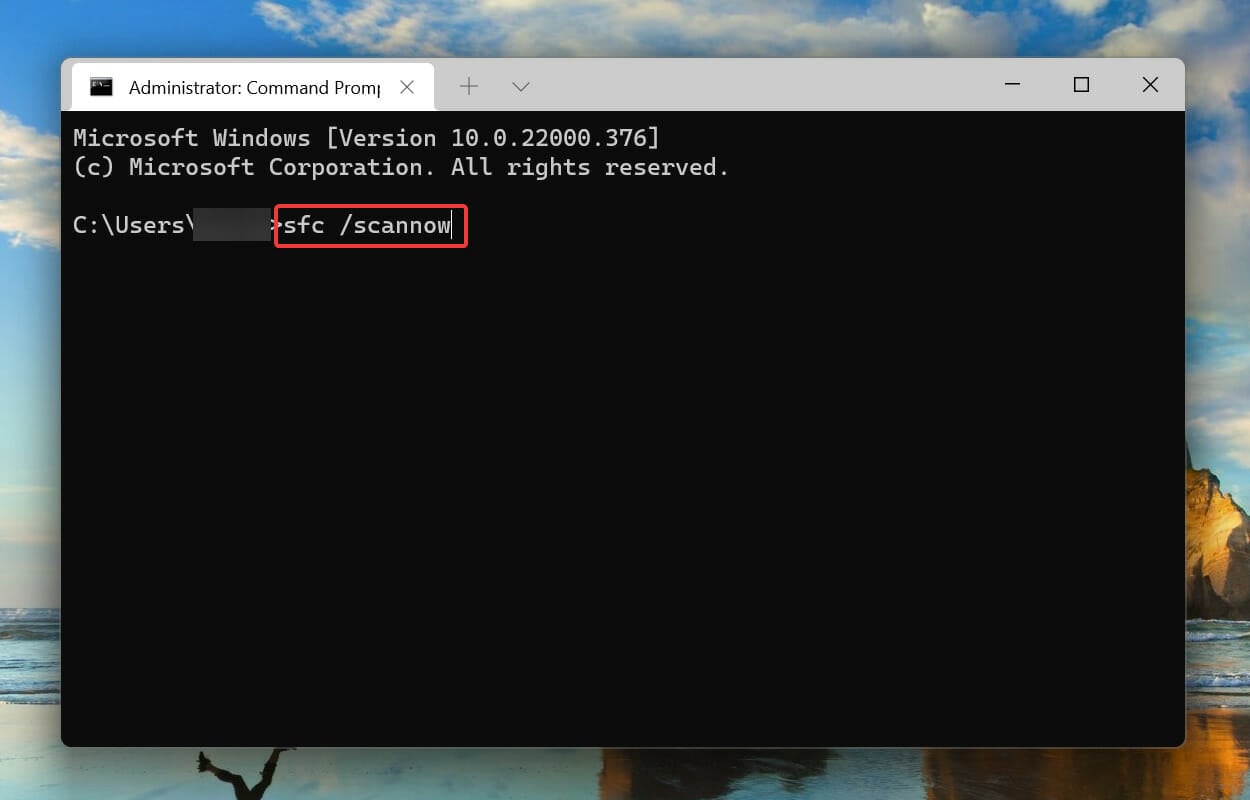
Next, type/paste the following command and hit Enter to run the SFC scan:sfc /scannow
The SFC (System File Checker) scan is used to identify corrupt system files, and if any are found, replace them with their cached copy stored on the system. So, if it’s the corrupt system files that are causing the Windows Filtering Platform has blocked a connection problem in Windows 11, running the SFC scan should fix it.
After executing the command, wait for the scan to complete, then restart the computer and check if the problem is eliminated. If the issue still persists, you can try using a third-party repair app that has more advanced features.
4. Restart Windows Security Center
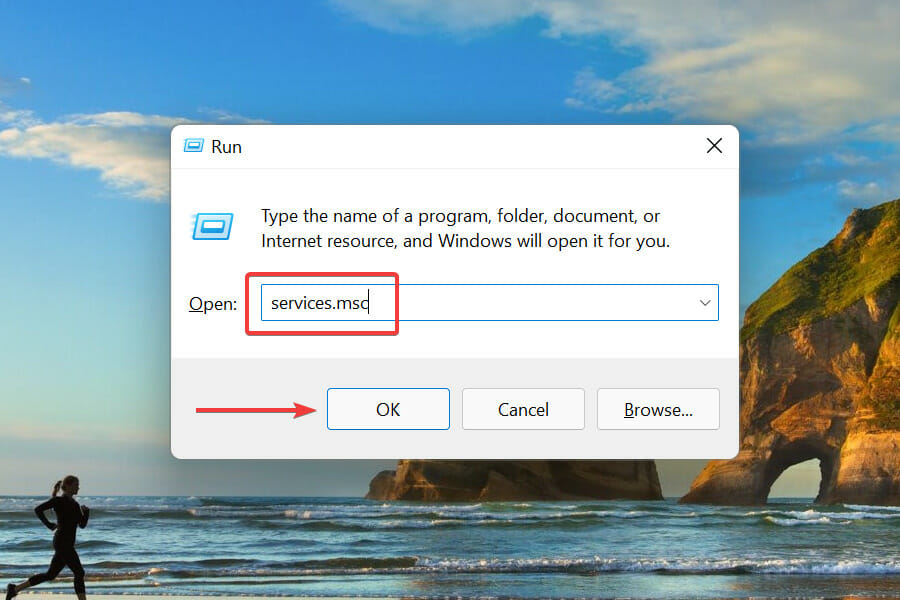
Press Windows + R to launch the Run command. Enter services.msc in the text field, and either click on OK or hit Enter to launch the Services app.
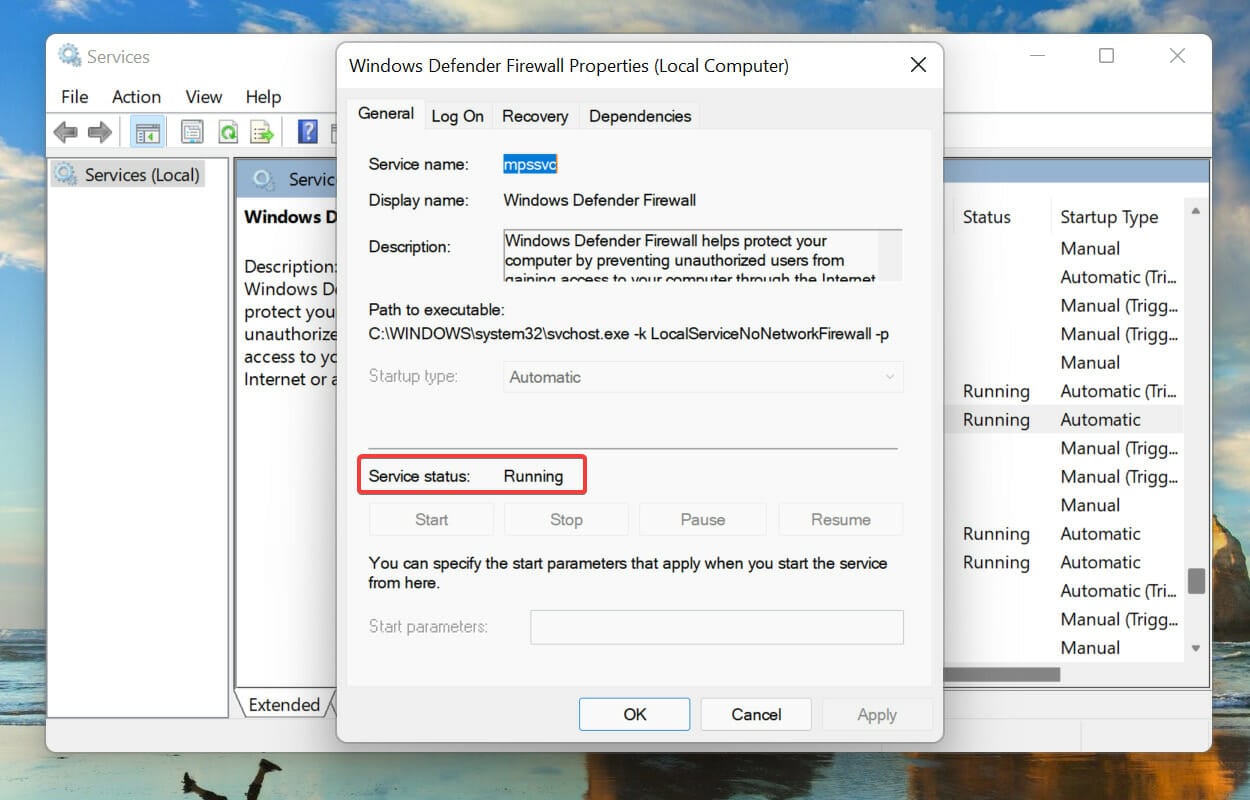
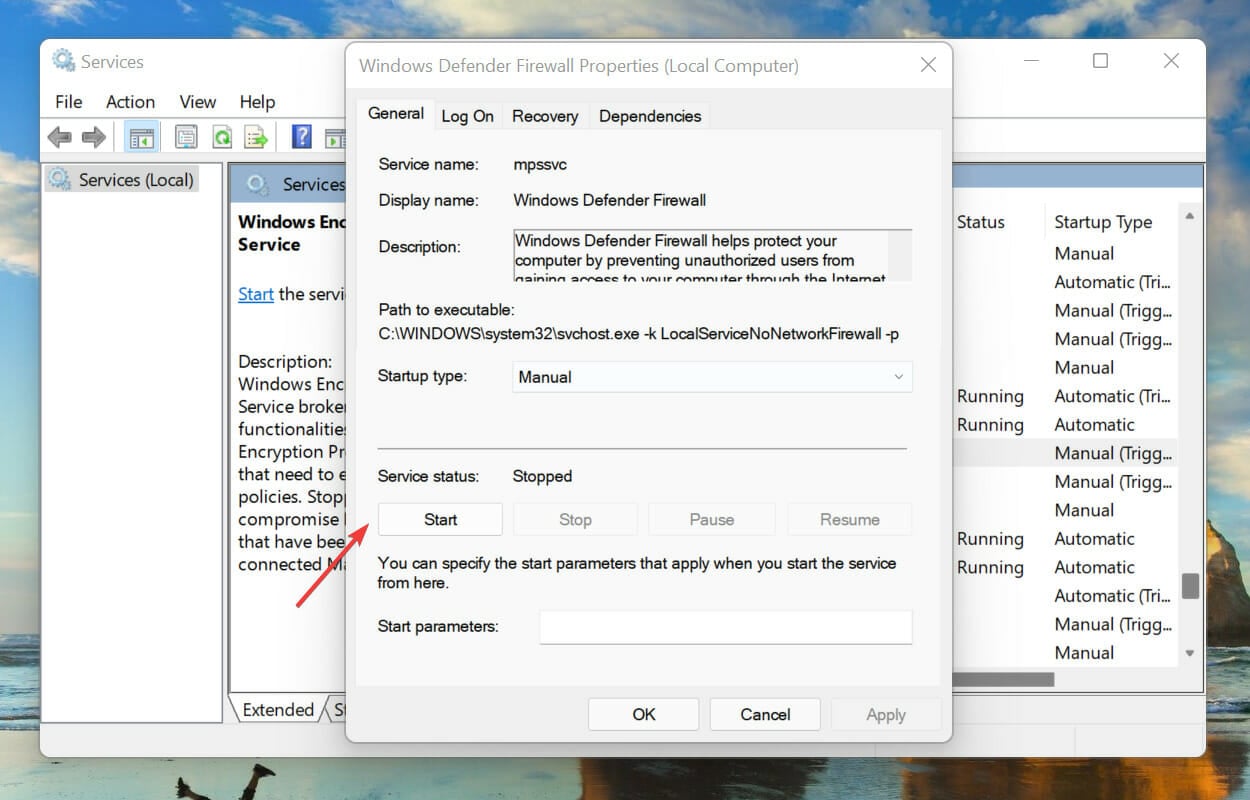
Locate and double-click on the Windows DefenderFirewall service.
Check if the Service status reads Running.
If not, click on the Start button under Service status to run the service.
Next, press Windows + S to launch the Search menu. Enter Windows Terminal in the text field, right-click on the relevant search result that appears, and select Run as administrator from the context menu.
Click Yes on the UAC (User Account Control) prompt that appears.
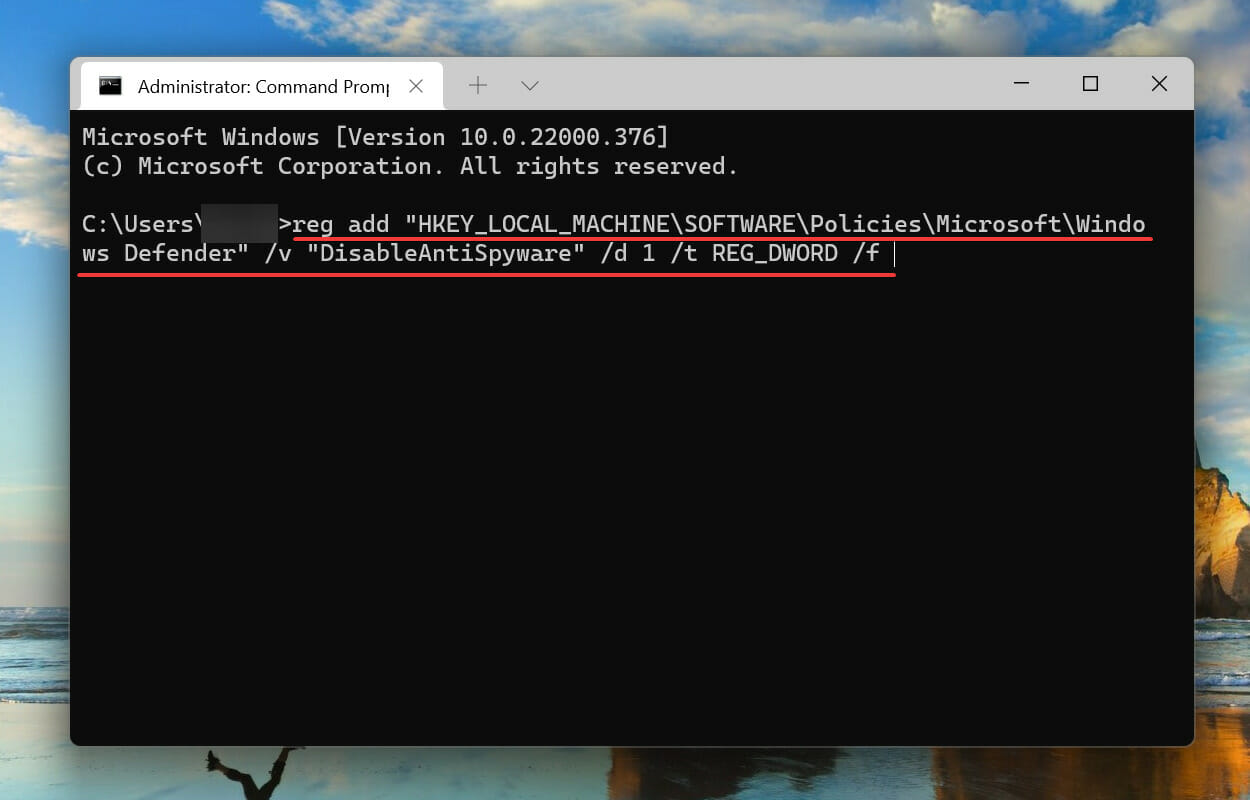
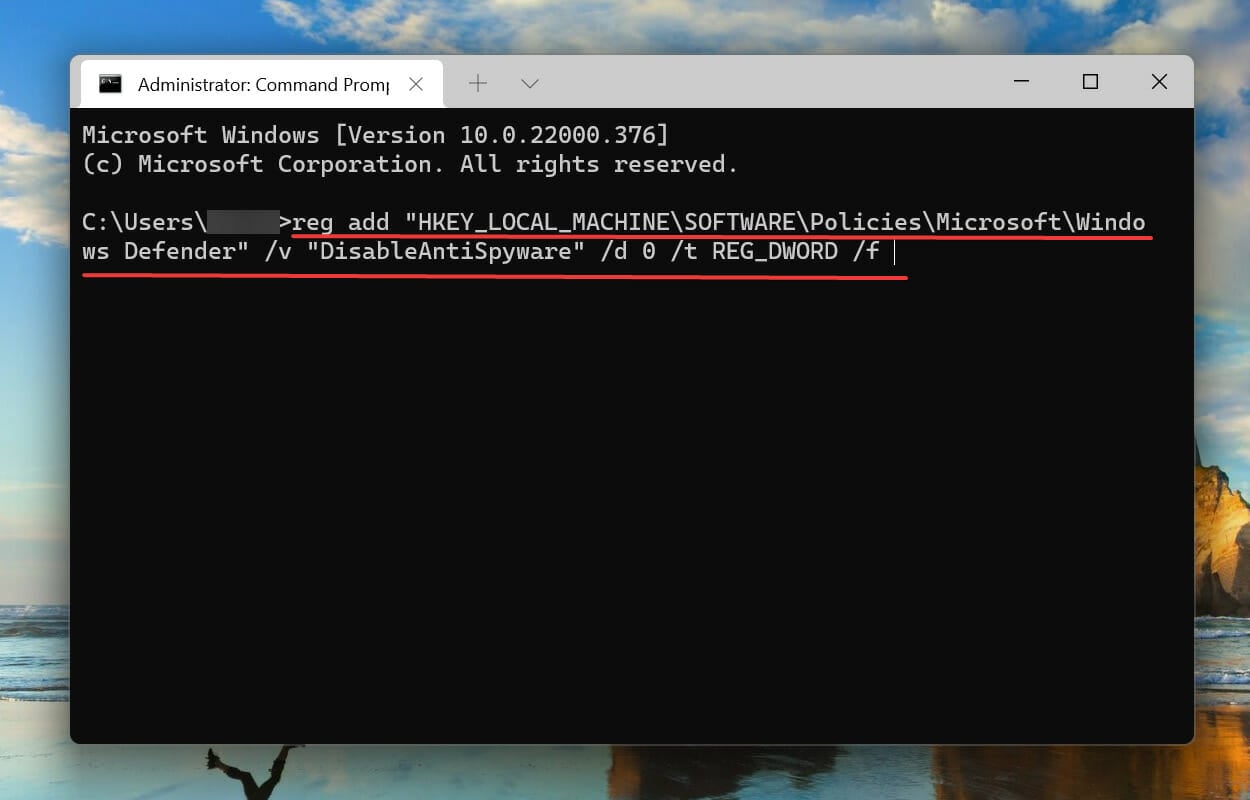
Next, execute the following command and then restart the PC:reg add "HKEY_LOCAL_MACHINE\SOFTWARE\Policies\Microsoft\Windows Defender" /v "DisableAntiSpyware" /d 1 /t REG_DWORD /f
After the computer restarts, paste the following command and hit Enter:reg add "HKEY_LOCAL_MACHINE\SOFTWARE\Policies\Microsoft\Windows Defender" /v "DisableAntiSpyware" /d 0 /t REG_DWORD /f
Once done, again restart the computer and check if the Windows Filtering Platform has blocked a connection problem is fixed in Windows 11.
5. Disable your antivirus
NOTE
We have listed the steps to disable the built-in Windows Security app. In case you are using a third-party antivirus, check its settings or head to the FAQ section on the manufacturer’s website for the steps to disable it.
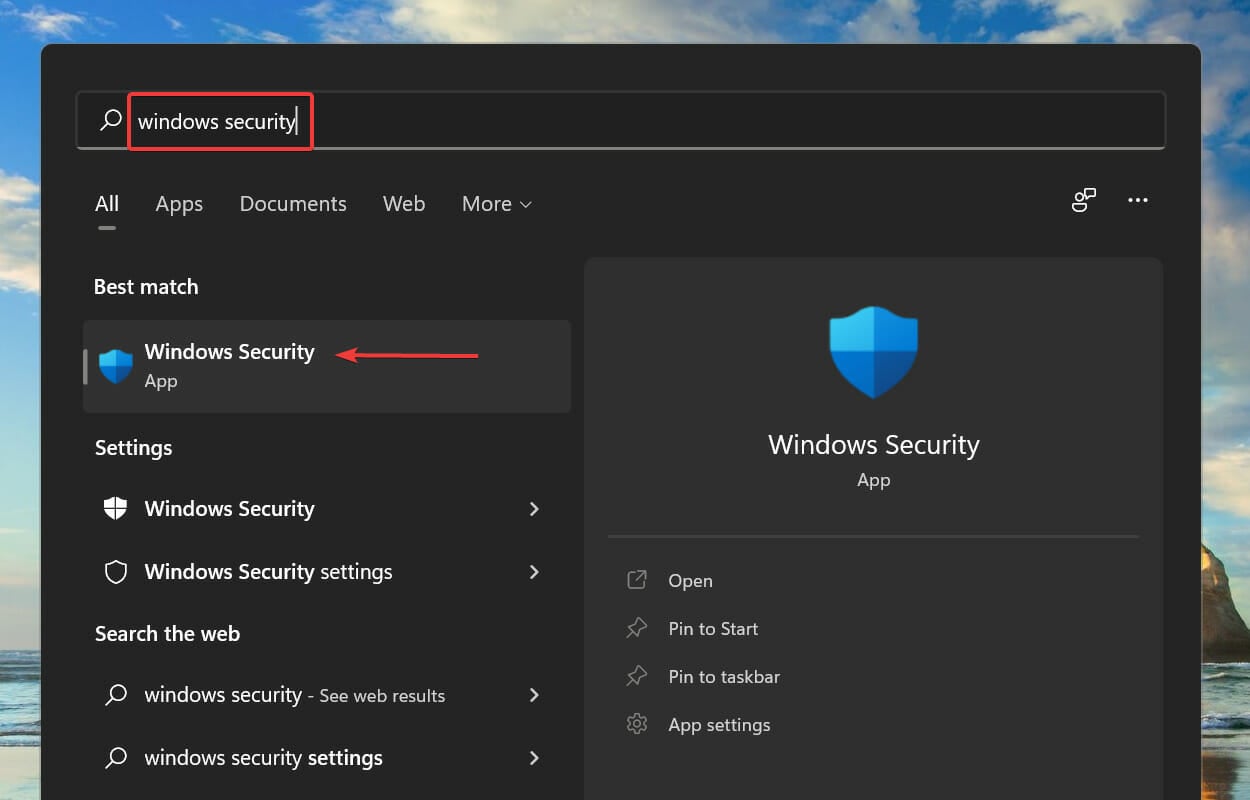
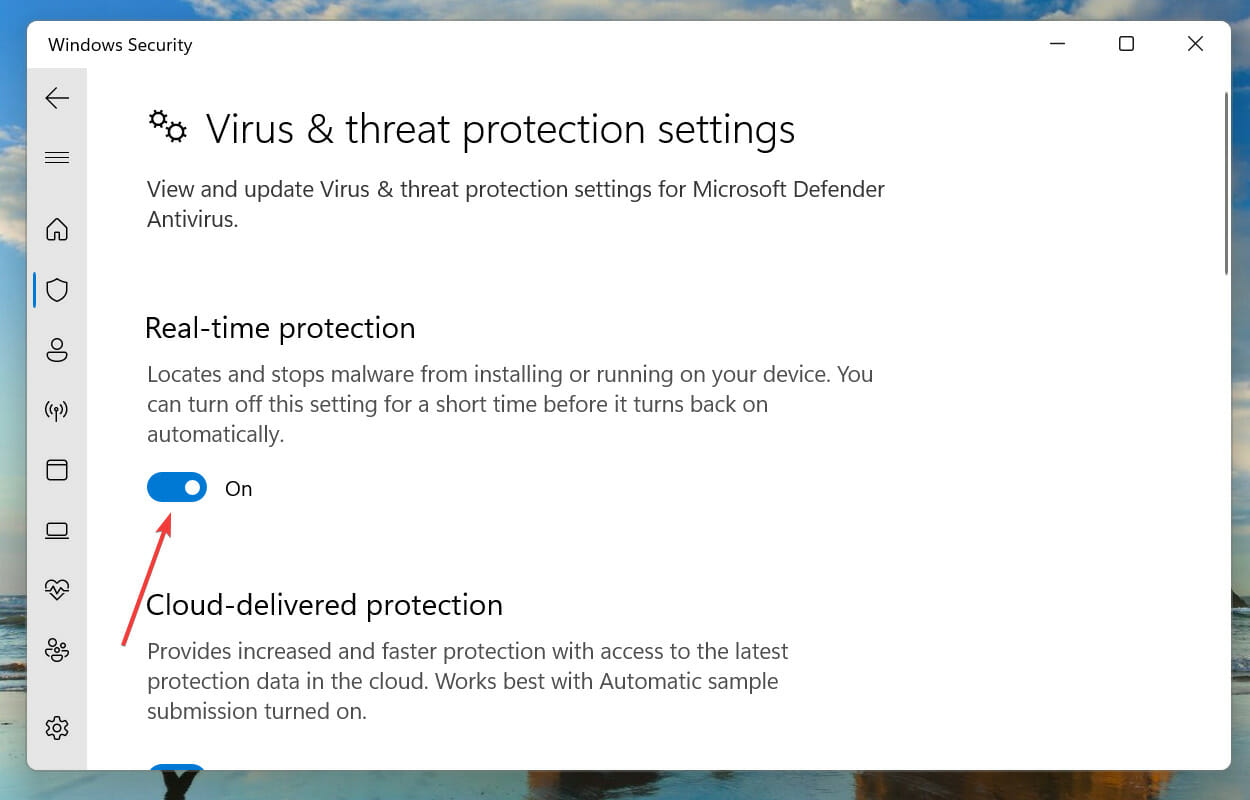
Press Windows + S to launch the Search menu. Enter Windows Security in the text field at the top, and then click on the relevant search result that appears.
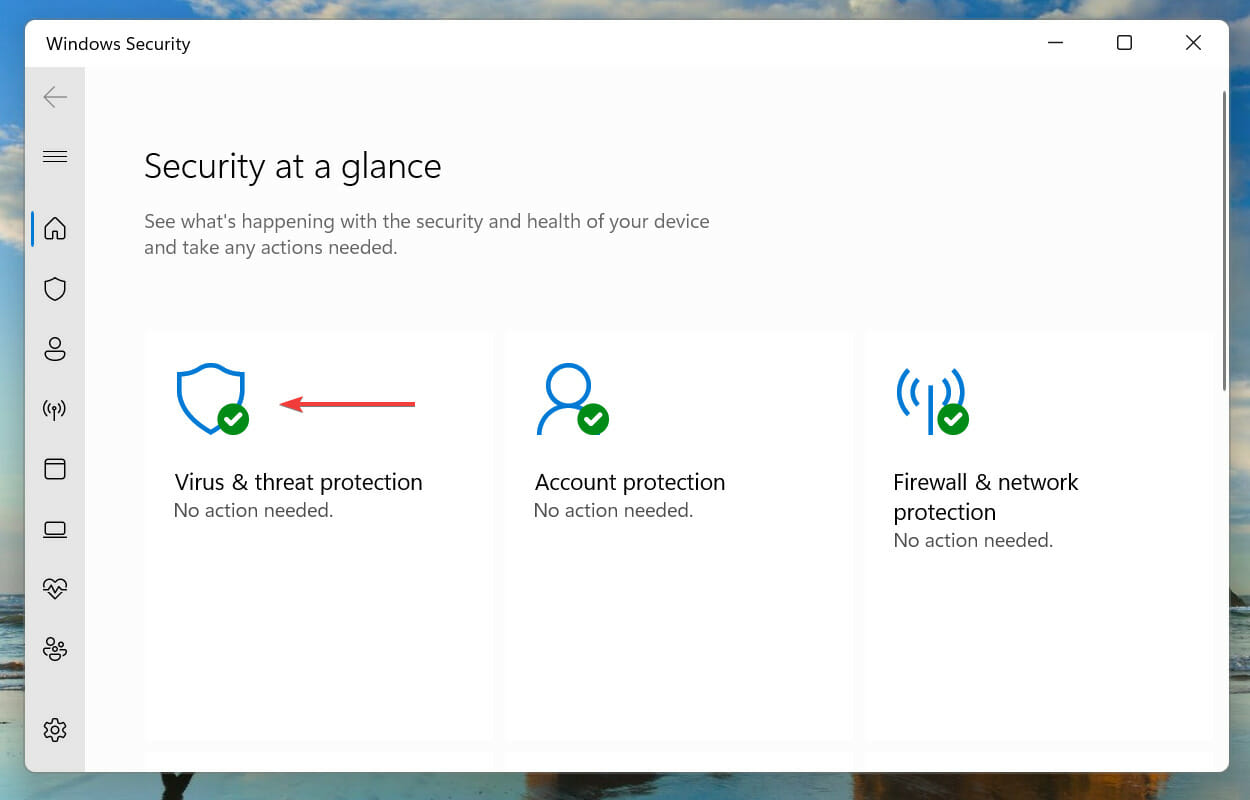
Click on Virus & threat protection.
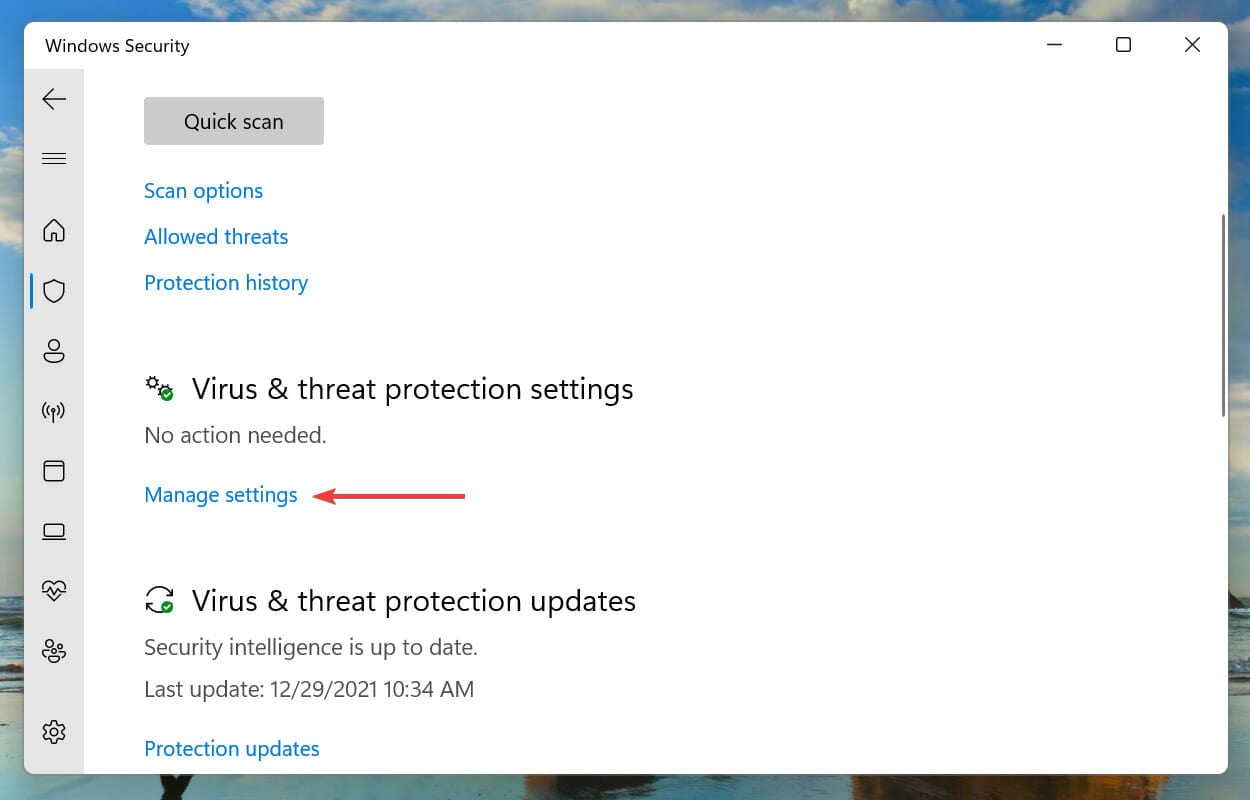
Click on Manage settings under Virus & threat protection settings.
Next, click on the toggle under Real-time protection to disable the antivirus.
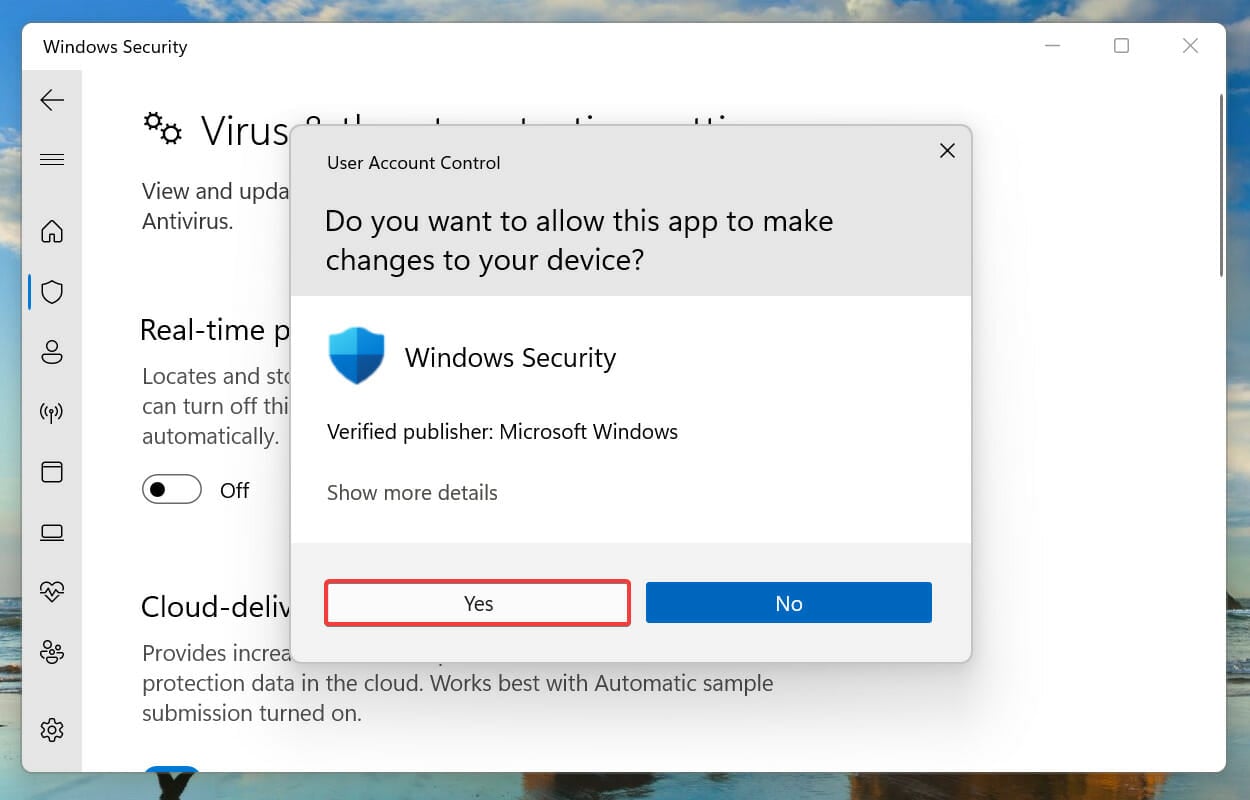
Lastly, click Yes on the UAC (User Account Control) prompt that pops up.
Oftentimes, the antivirus is known to conflict with the network settings and lead to a bunch of errors. This the generally the case with third-party antiviruses but the built-in Windows Security is also sometimes found to be the culprit.
Hence if the above fixes haven’t worked, you can try disabling the antivirus and check if the Windows Filtering Platform has blocked a connection problem is eliminated in Windows 11.
In many cases, it was a corruption in the user account that led to the Windows Filtering Platform has blocked a connection problem. If that’s the case, and the above methods have fixed it, you can create a new local account on your Windows 11 PC.
While there is a lot of debate around whether you should go for a Microsoft account or a Local one, the latter should be a better choice here since it’s not linked to any servers and can be used independently on the device.
Once you have created a new local account, the error should not be present in the Event Viewer anymore.
Which is better, Windows 11 or Windows 10?
With Windows 11 finally launched, most have been nothing but excited to get their hands on the latest iteration. But, a lot of users have been skeptical of the upgrade owing to various factors.
The primary reason is that they are accustomed to Windows 10 and it will take some time to get familiar with the new OS. But, that’s not a good enough reason since Windows 11 offers both a slightly better user interface along with a bunch of other features and security enhancements, meant to improve your experience.
Follow the steps below to quickly enable Dolby Atmos and fix common issues on Windows 11. This guide will help you restore immersive sound and get the most out of your audio experience.
What do I do if Dolby Atmos is not working in Windows 11?
1. Run the built-in audio troubleshooter
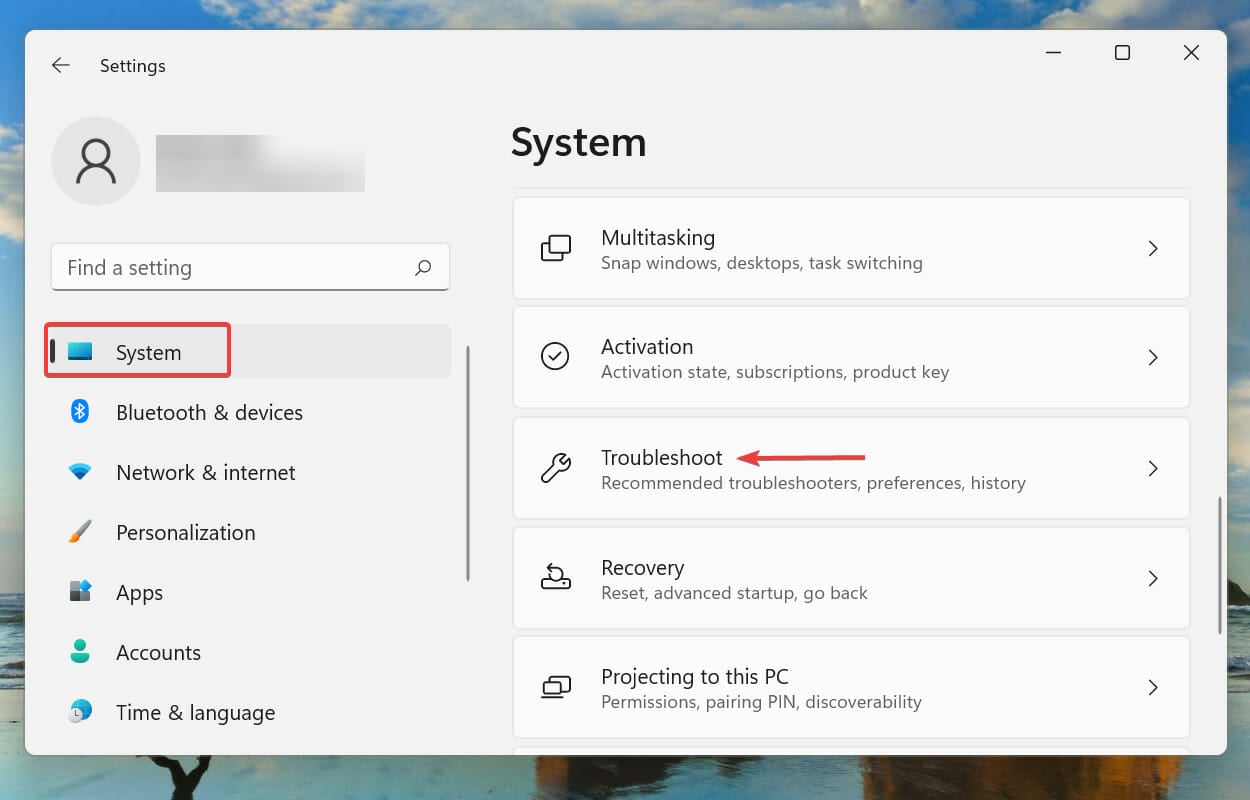
Press Windows + I to launch the Settings app and then click on Troubleshoot on the right in the System tab.
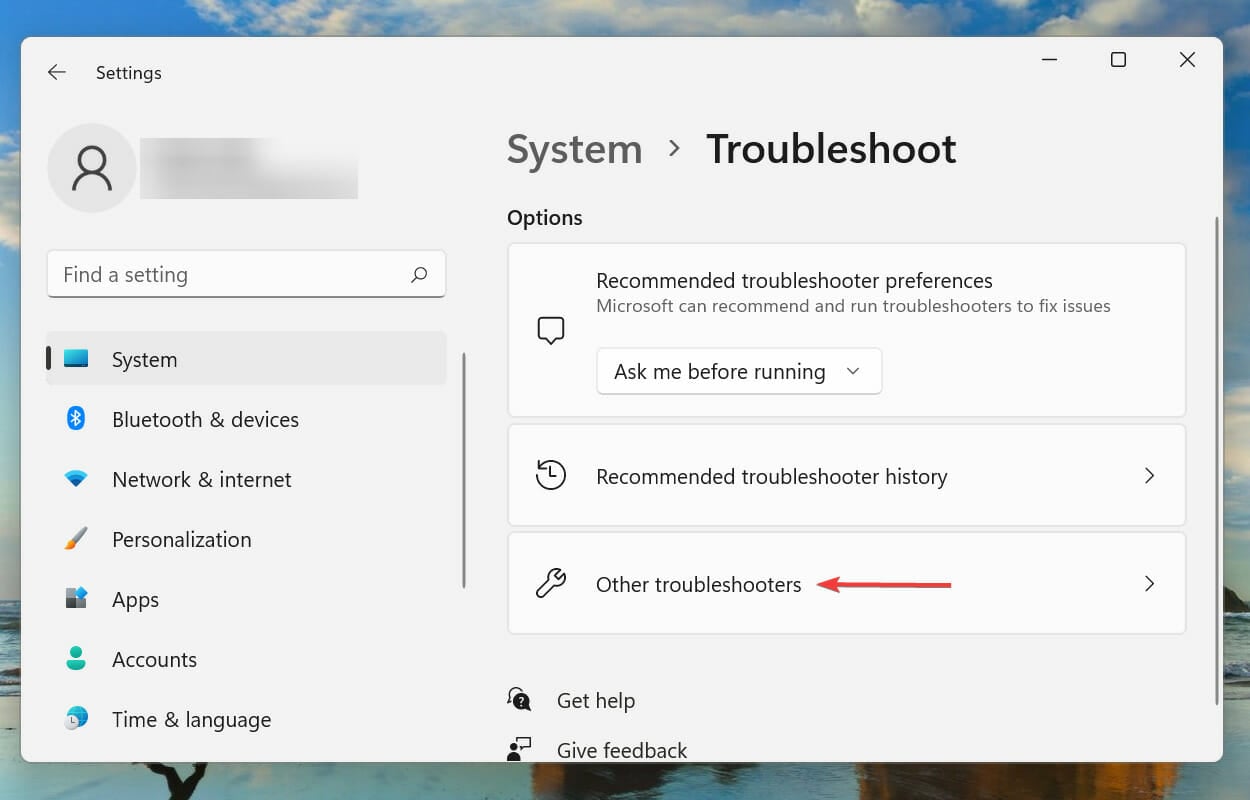
Next, click on Other troubleshooters.
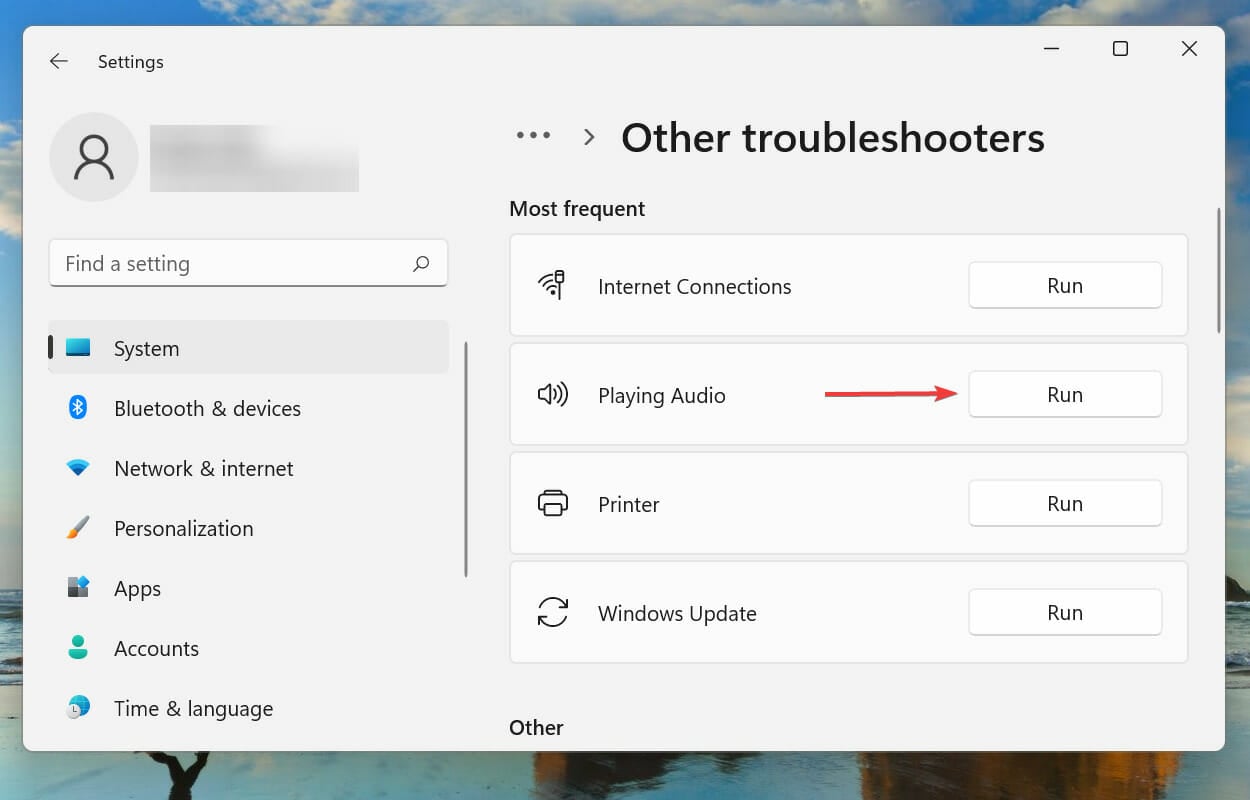
Locate and click on the Run button next to the Playing Audio troubleshooter.
Wait for the troubleshooter to detect the problem and follow the on-screen instructions to fix the error.
Whenever dealing with an error in Windows, it’s recommended that you first run the relevant built-in troubleshooter for it, if one exists. These are known to fix a plethora of problems with minimal effort from your end.
2. Update Windows 11
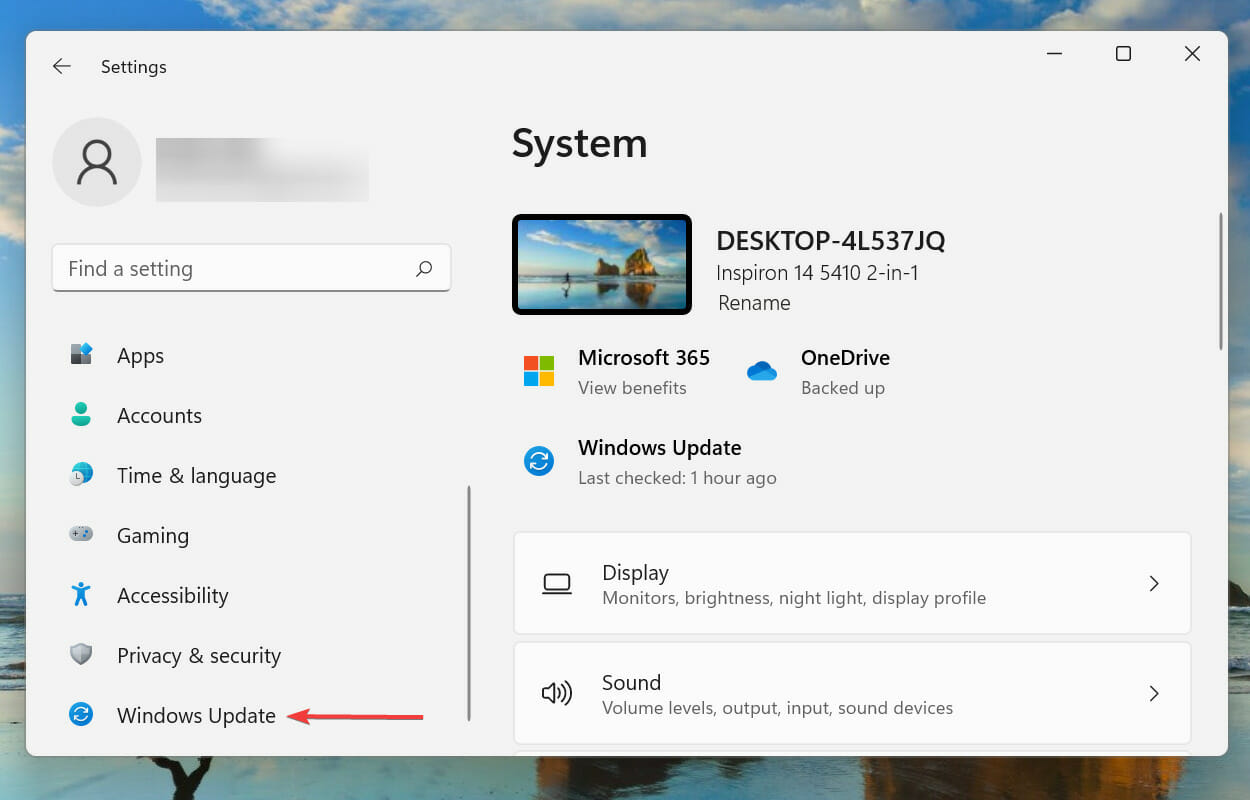
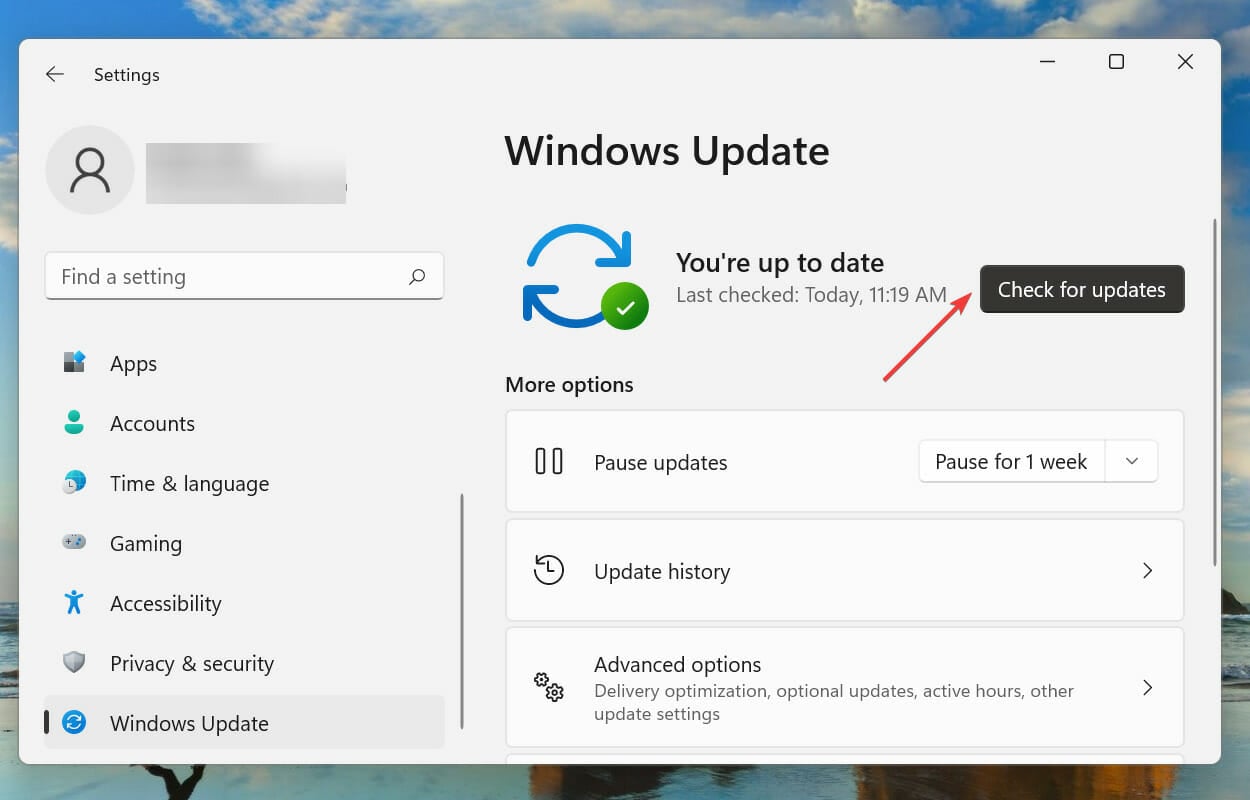
Press Windows + I to launch the Settings app, and then select Windows Update tab from the navigation pane on the left.
Click on Check for updates to scan for any available newer versions of the OS.
If any are available, download and install them to your system, since running an older version of the OS is known to cause problems with the functioning.
3. Update the sound driver
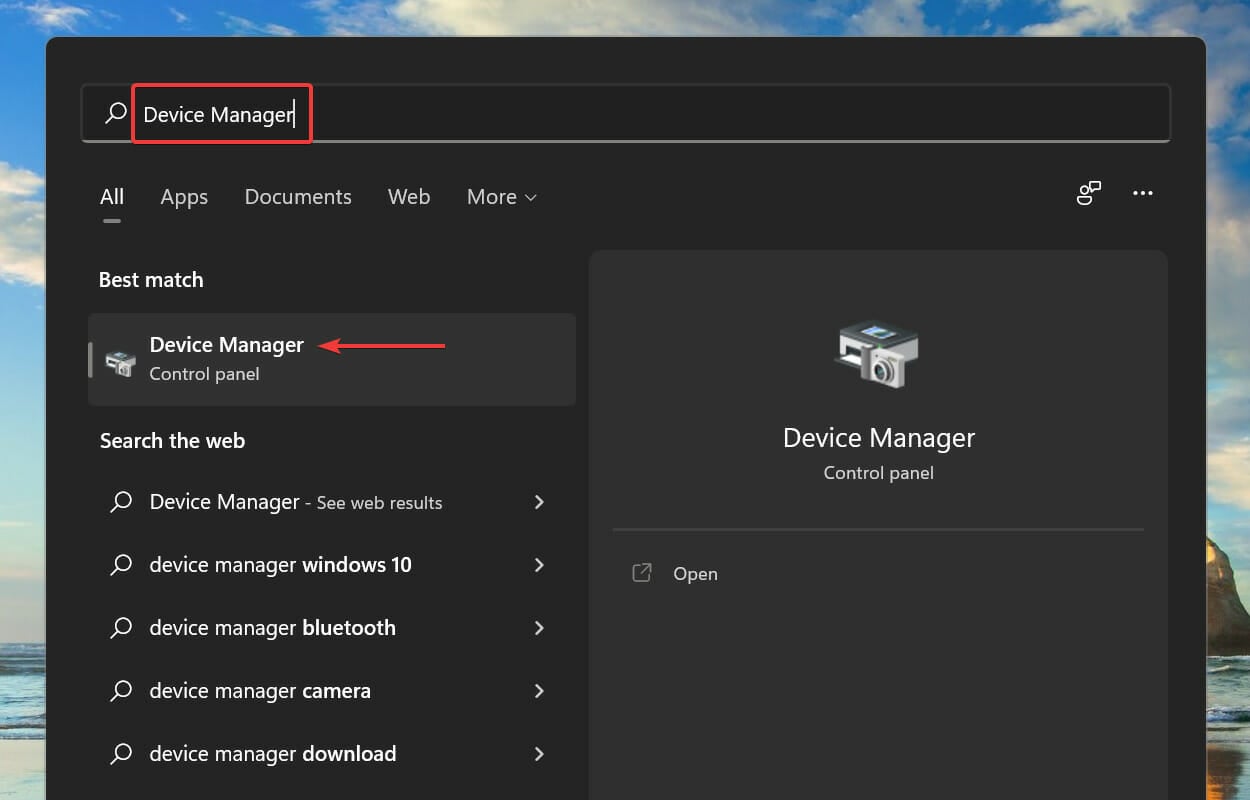
Press Windows + S to launch the Search menu, enter Device Manager in the text field at the top, and then click on the relevant search result that appears.
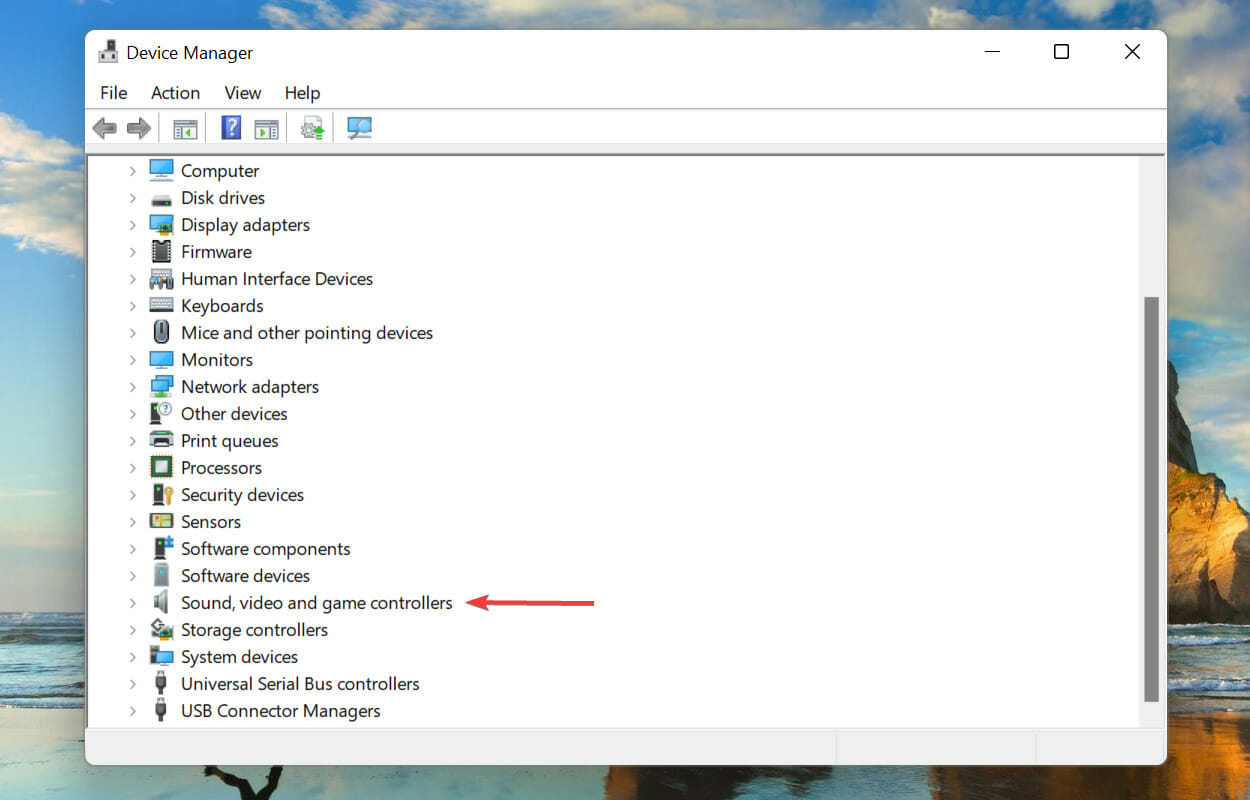
Locate and double-click on the Sound, video, and game controllers entry.
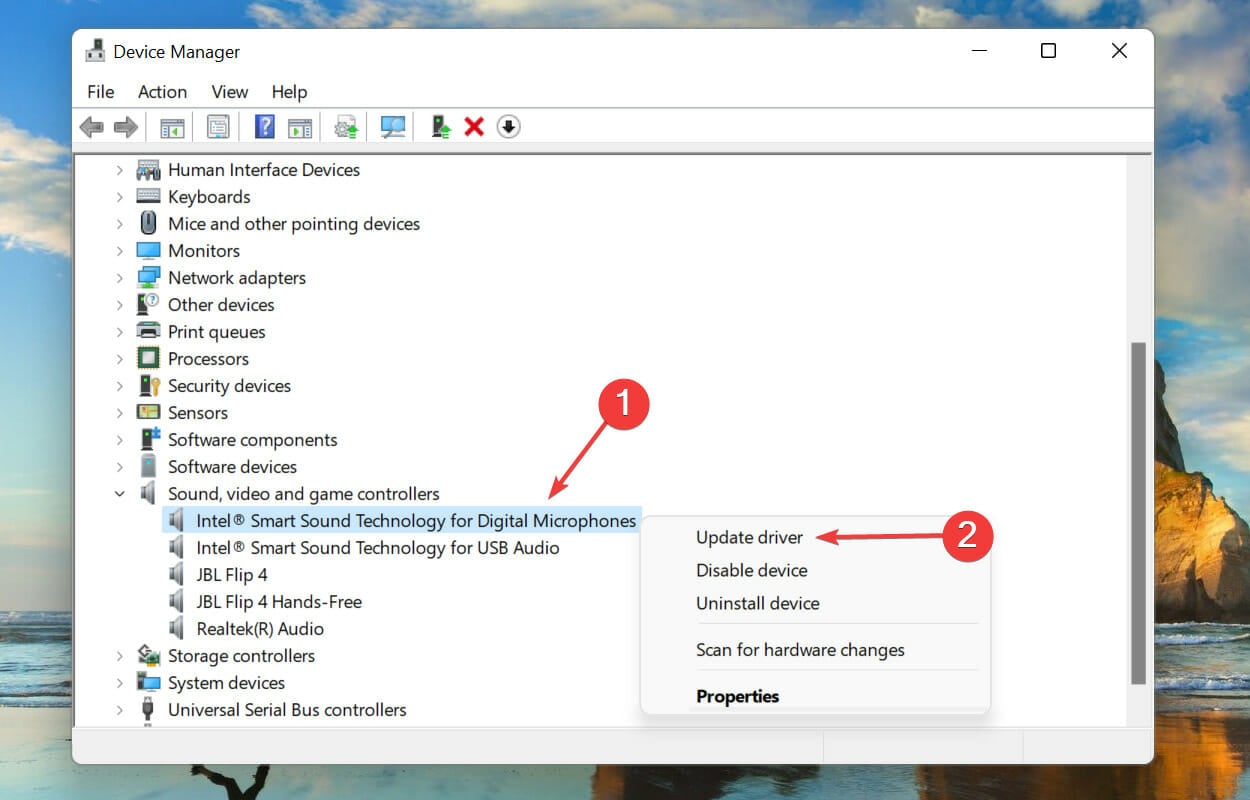
Now, right-click on the devices listed under it one at a time, and then select Update Driver from the context menu.
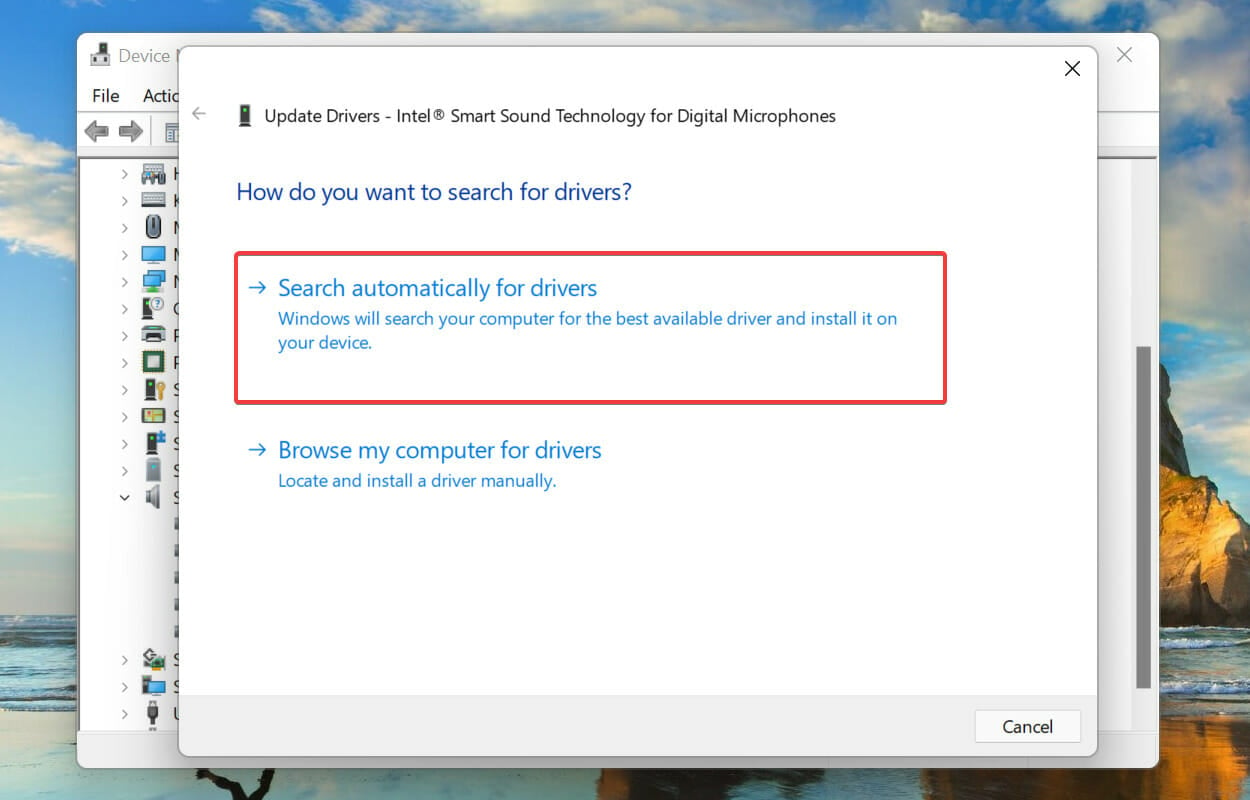
Select Search automatically for driver from the two options in the Update Drivers window.
Windows will now automatically look for the best available driver on the system and install it for the device. The major drawback here is that only the hard drive is scanned for updates and not the web servers or Windows Update.
After updating the driver, check if Dolby Atmos starts working in Windows 11.
If that sounds like too much trouble, you can always go with a reliable third-party app for the job. There are a bunch of these out there, but we recommend using Outbyte Driver Updater, a dedicated tool that scans all available sources for updates and keeps the installed drivers up-to-date.
4. Reinstall the sound driver
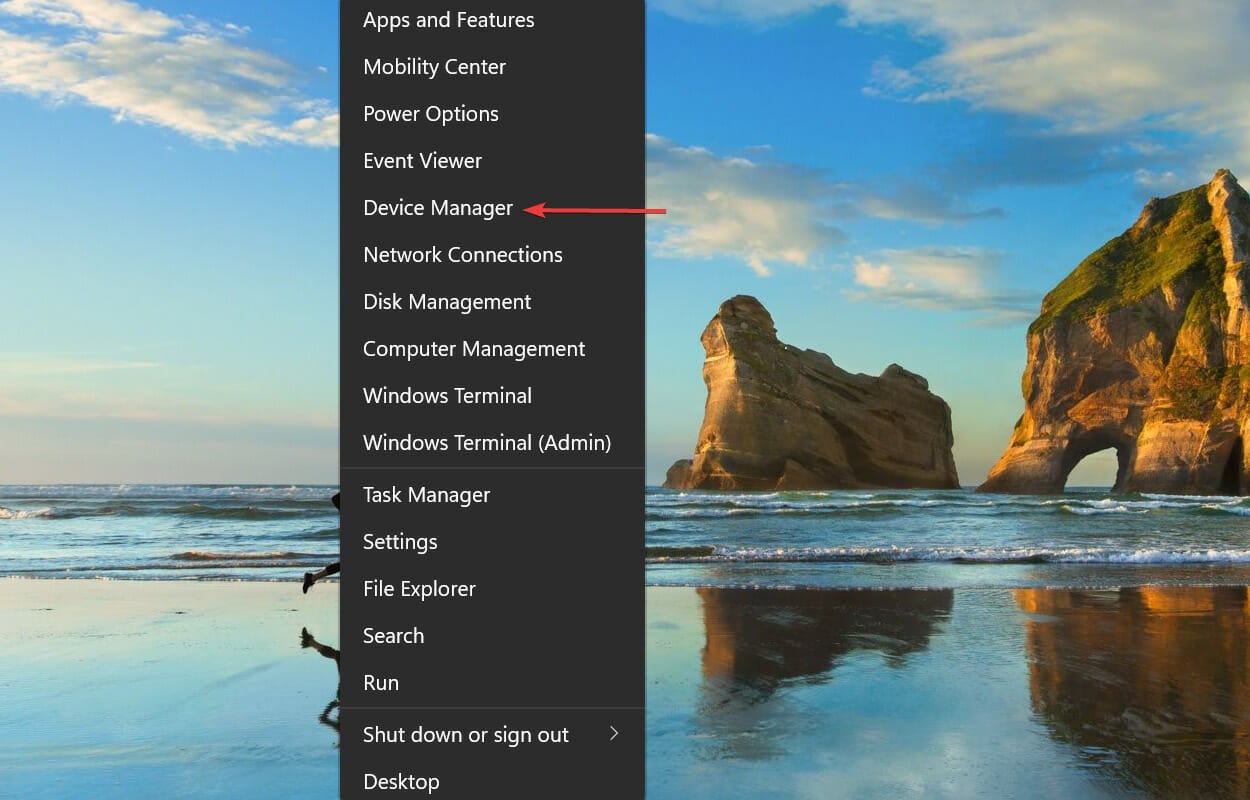
Right-click on the Start icon or press Windows + X to launch the Quick Access/Power User menu, and then select Device Manager from the list of options.
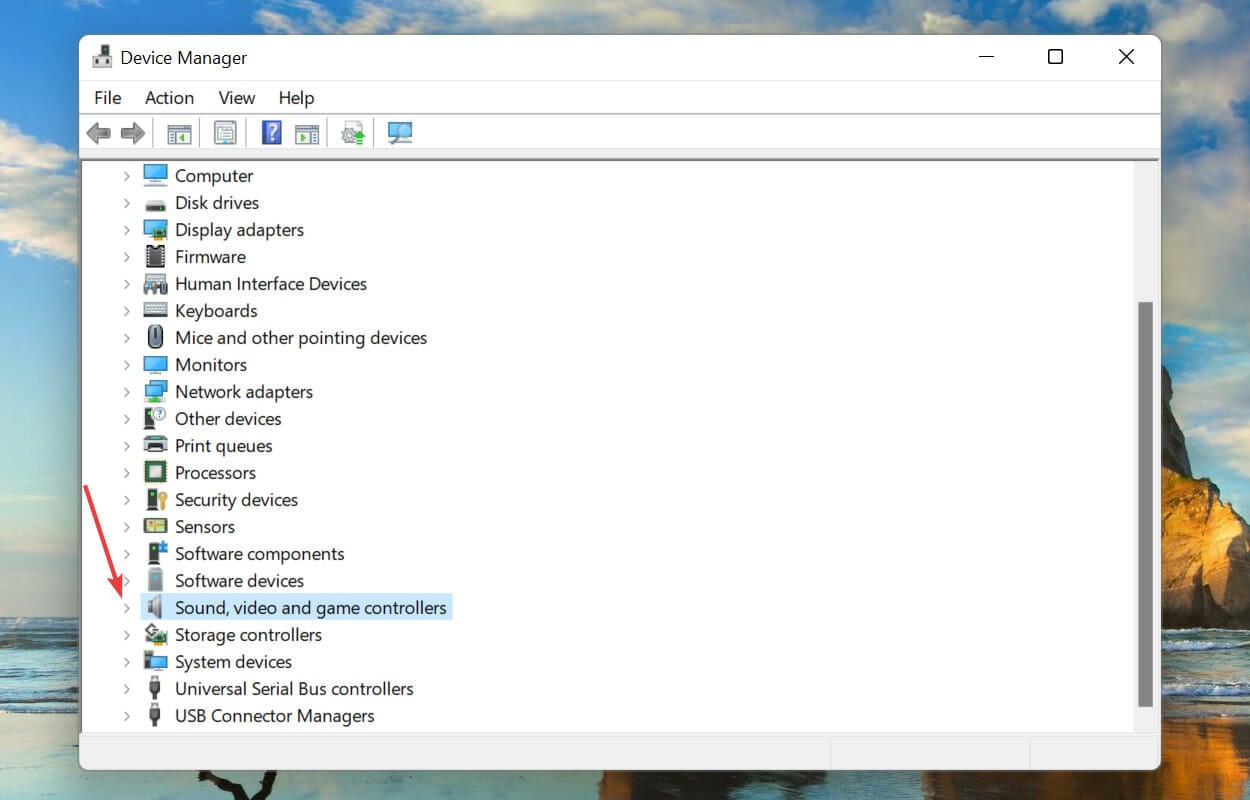
Next, click on the carat icon before the Sound, video and game controllers entry to expand and view the devices under it.
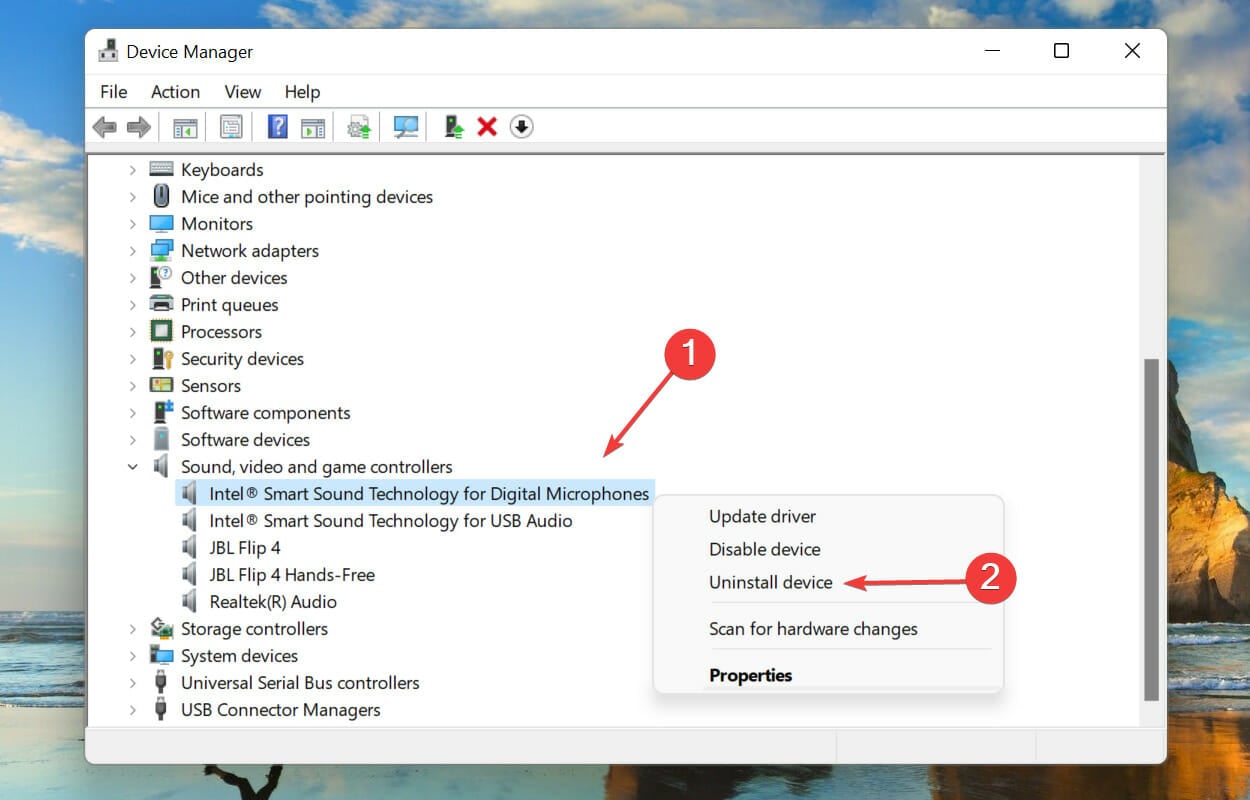
Now, look for a warning icon (exclaimation mark in a yellow triangle) next to any of the devices, right-click on it, and then select Uninstall device from the context menu.
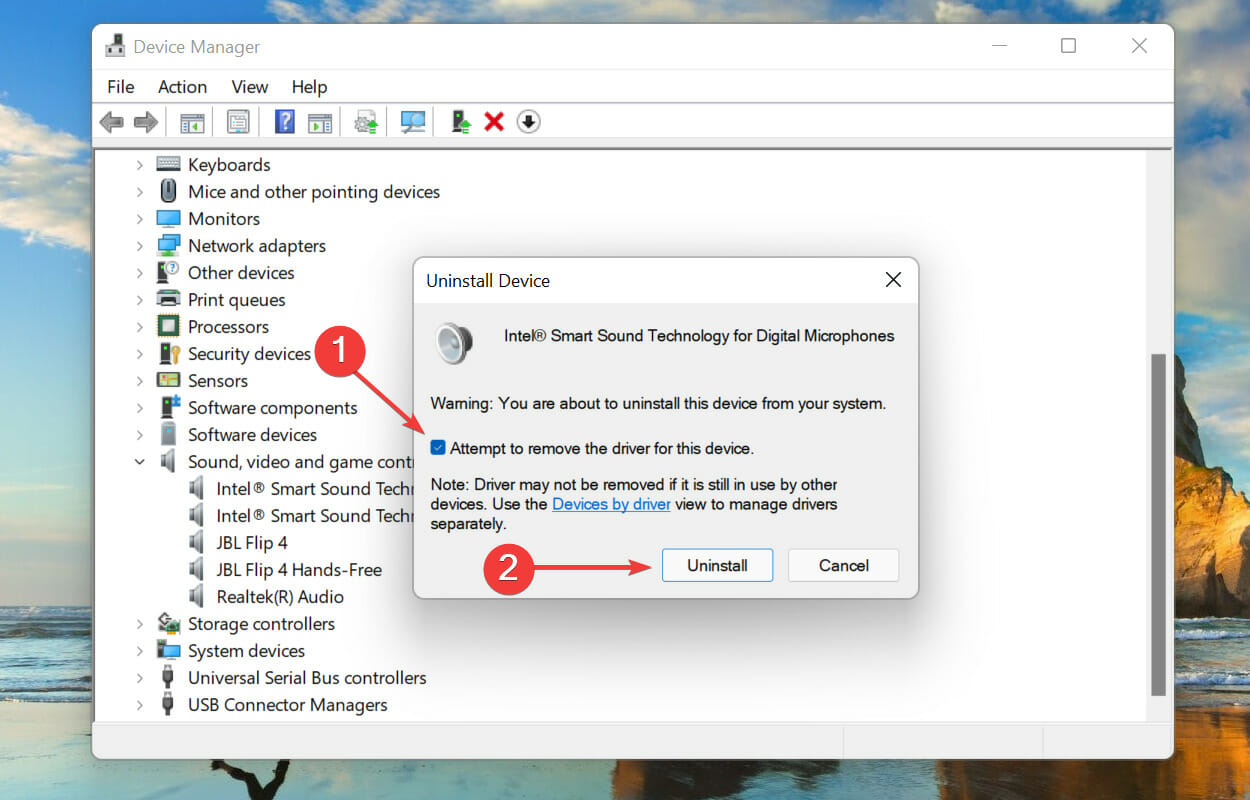
Tick the checkbox for Attempt to remove the driver for this device and then click on Uninstall.
After uninstalling the malfunctioning device, restart the computer.
When you restart the computer, Windows will automatically install a fresh driver to replace the corrupt one that was previously installed. Once done, check if the Dolby Atmos not working issue in Windows 11 is eliminated.
5. Roll back driver update
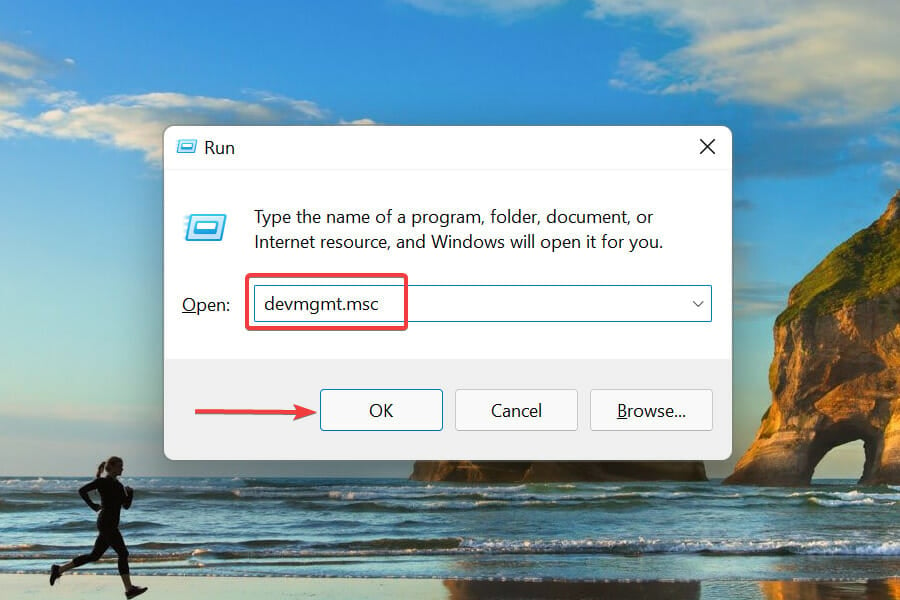
Press Windows + R to launch the Run command, type devmgmt.msc in the text field, and then either click on OK or hit Enter to launch the Device Manager.
Double-click on the Sound, video and game controller entry.
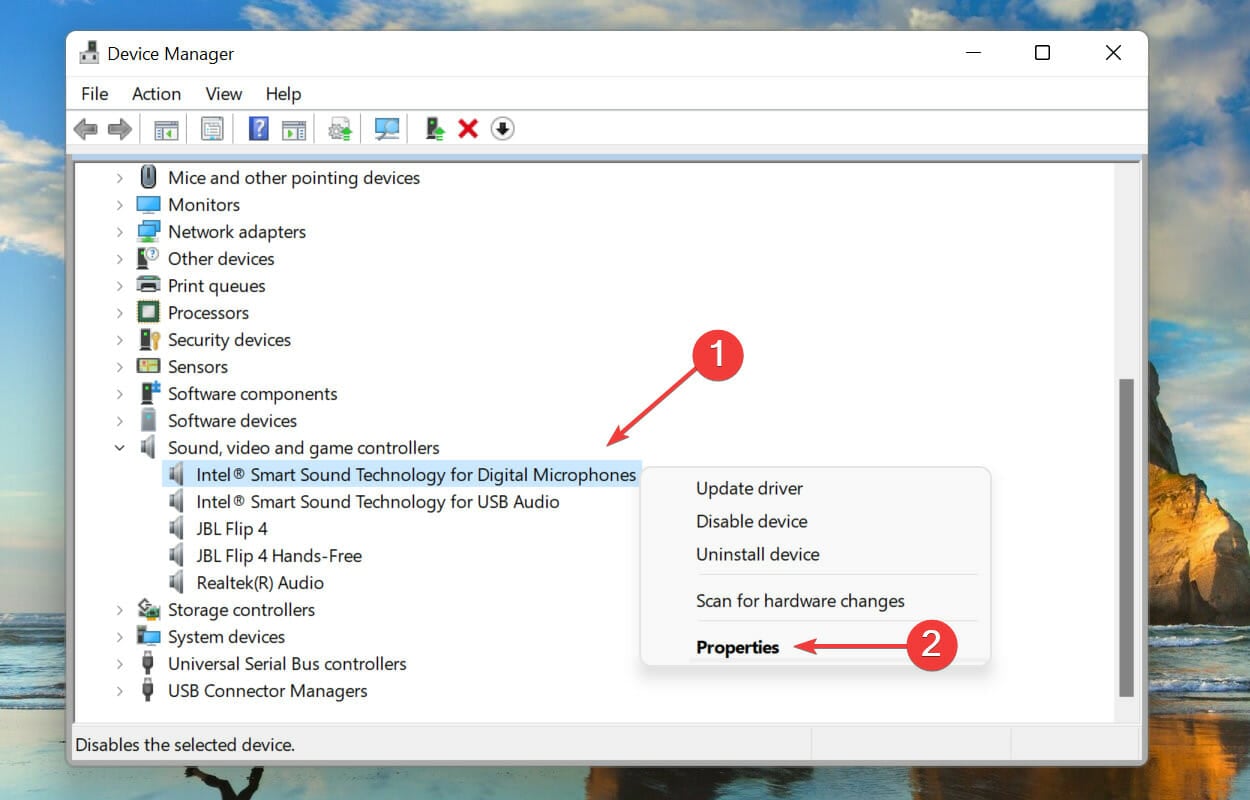
Right-click on each of the devices listed here one at a time, and then select Properties from the context menu.
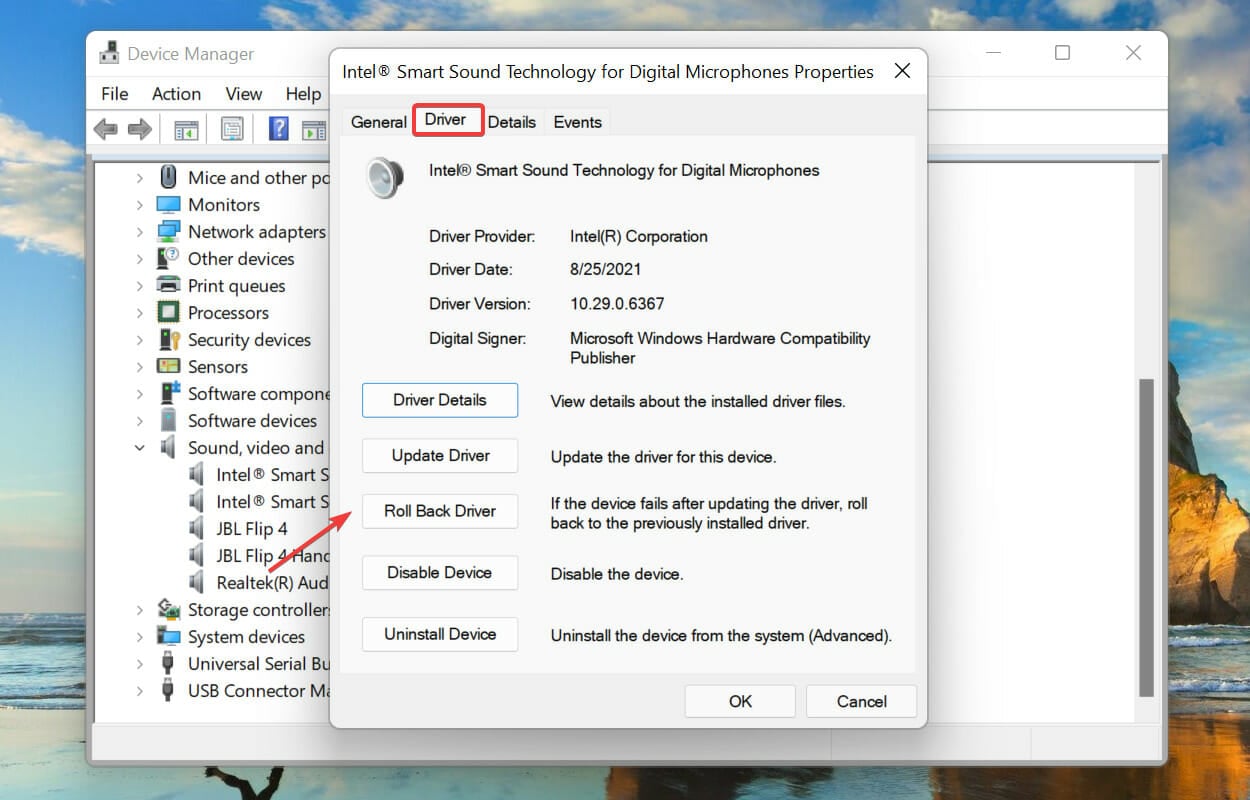
Navigate to the Driver tab, and then click on the Roll Back Driver button.
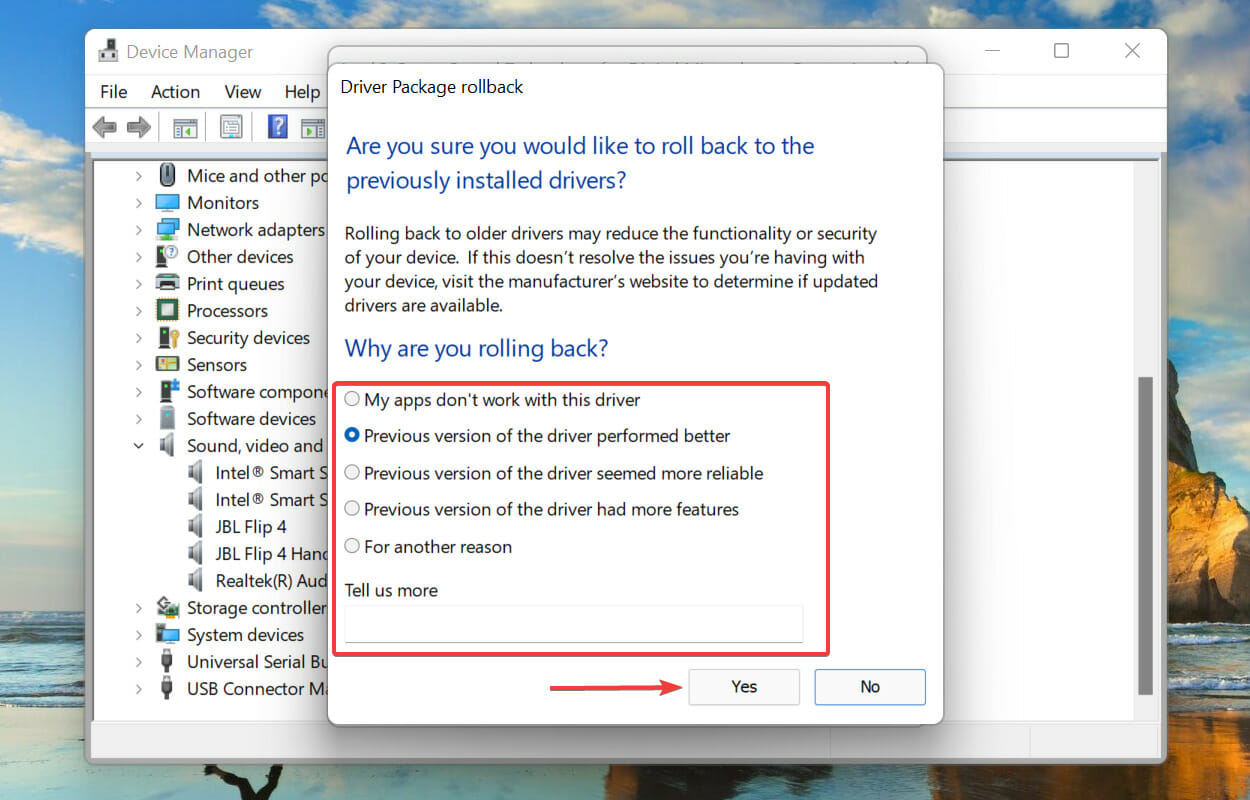
Next, select a reason for uninstalling the update and then click on Yes to proceed.
If Dolby Atmos stopped working after updating the sounds drivers in Windows 11, it’s time you roll back the driver update. Doing this will reinstall the previous driver, and in all likelihood fix the issue.
6. Enable exclusive mode
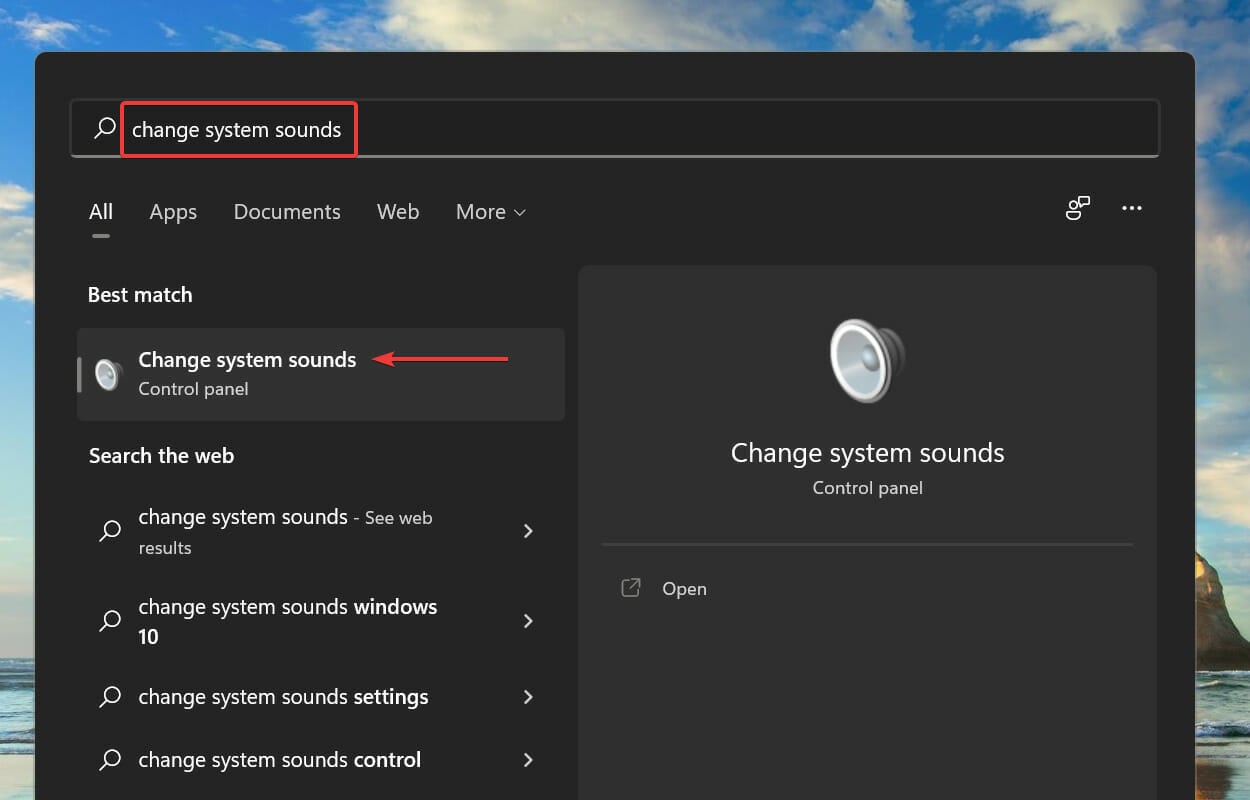
Press Windows + S to launch the Search menu, enter Change System Sounds in the text field at the top, and then click on the relevant search result that appears.
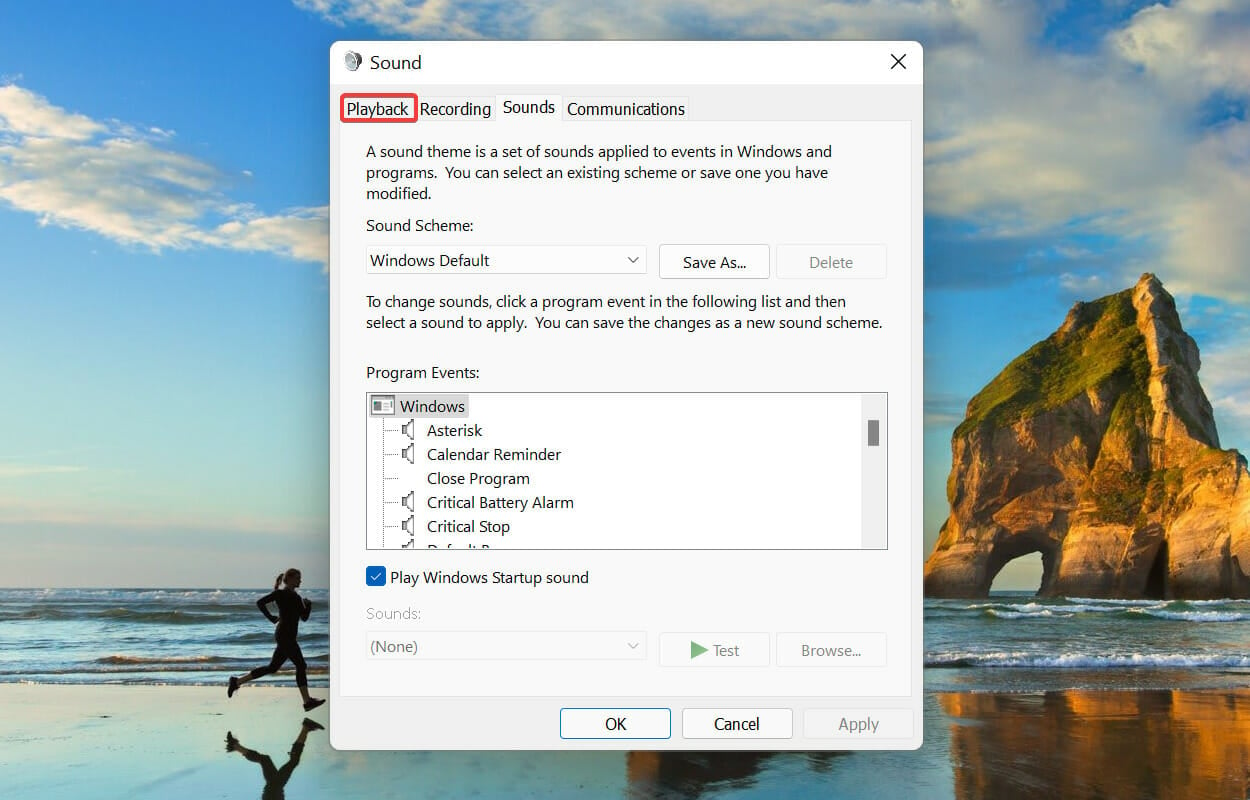
Next, navigate to the Playback tab from the top.
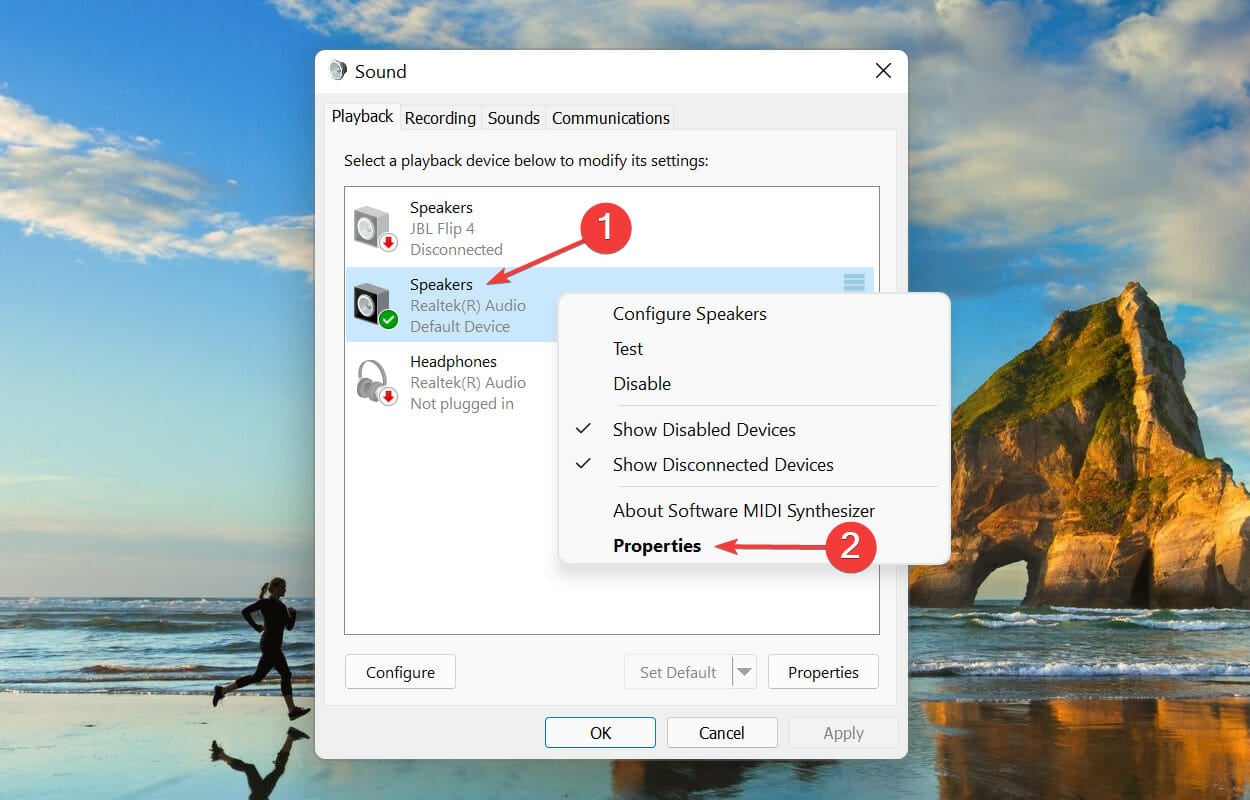
Right-click on the default playback device and select Properties from the context menu.
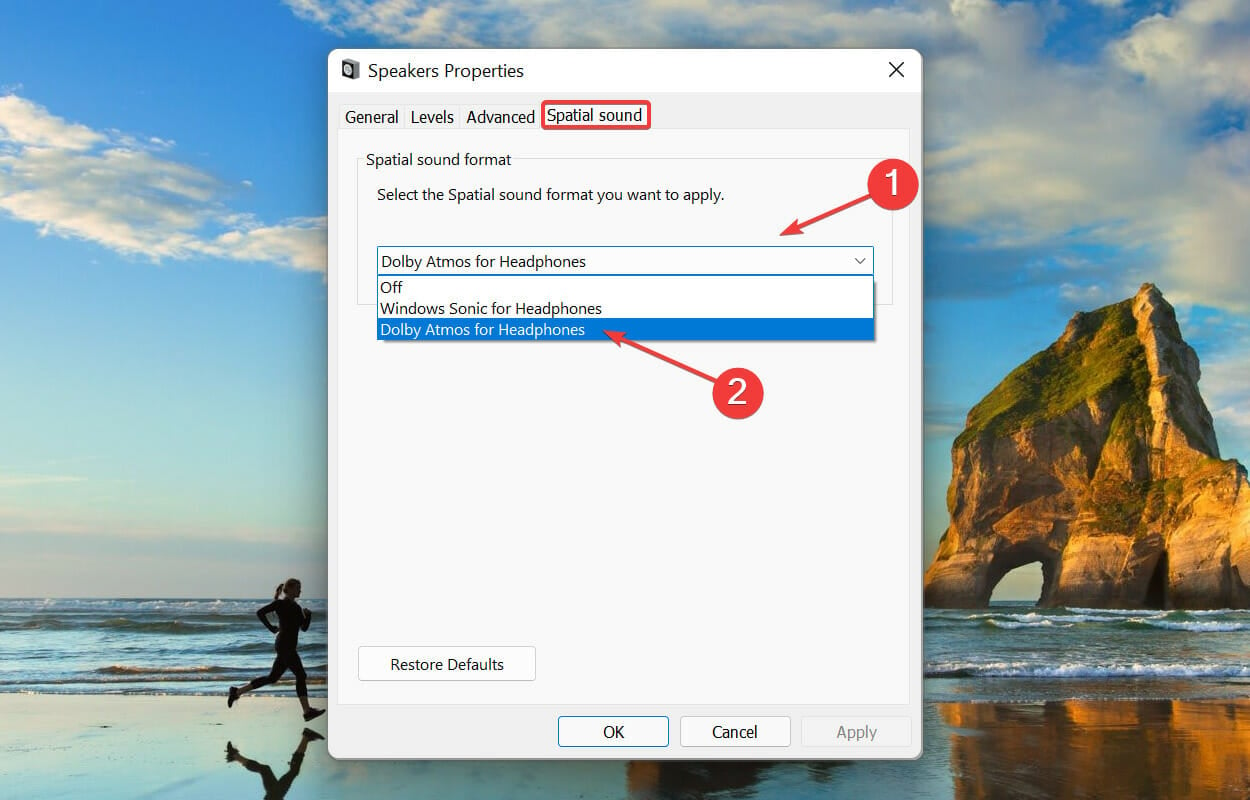
Go to the Spatial sound tab, click on the Spatial sound format dropdown menu and then select Dolby Atmos for headphones from the list of options.
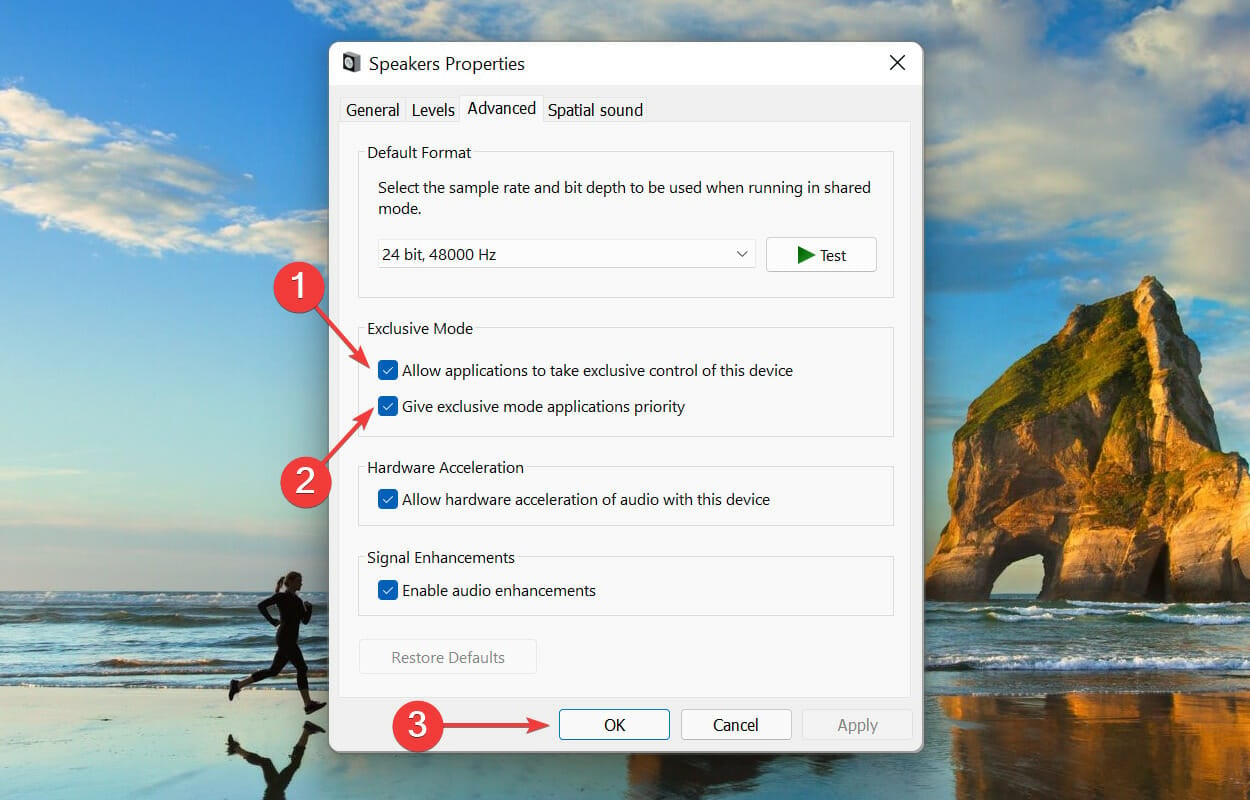
Next, navigate to the Advanced tab, tick both the checkboxes under Exclusive Mode, and then click on OK at the bottom to save the changes.
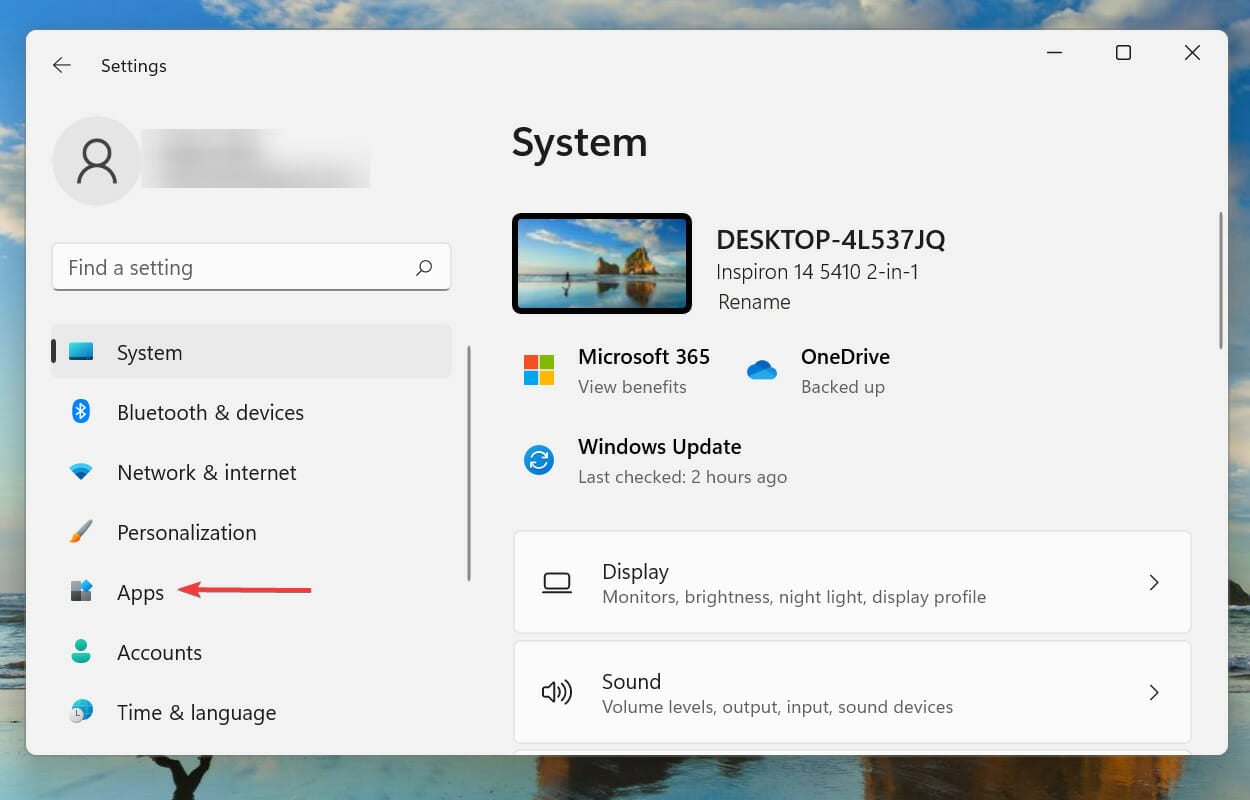
Press Windows + I to launch the Settings app and then select Apps from the list of tabs in the navigation pane on the left.
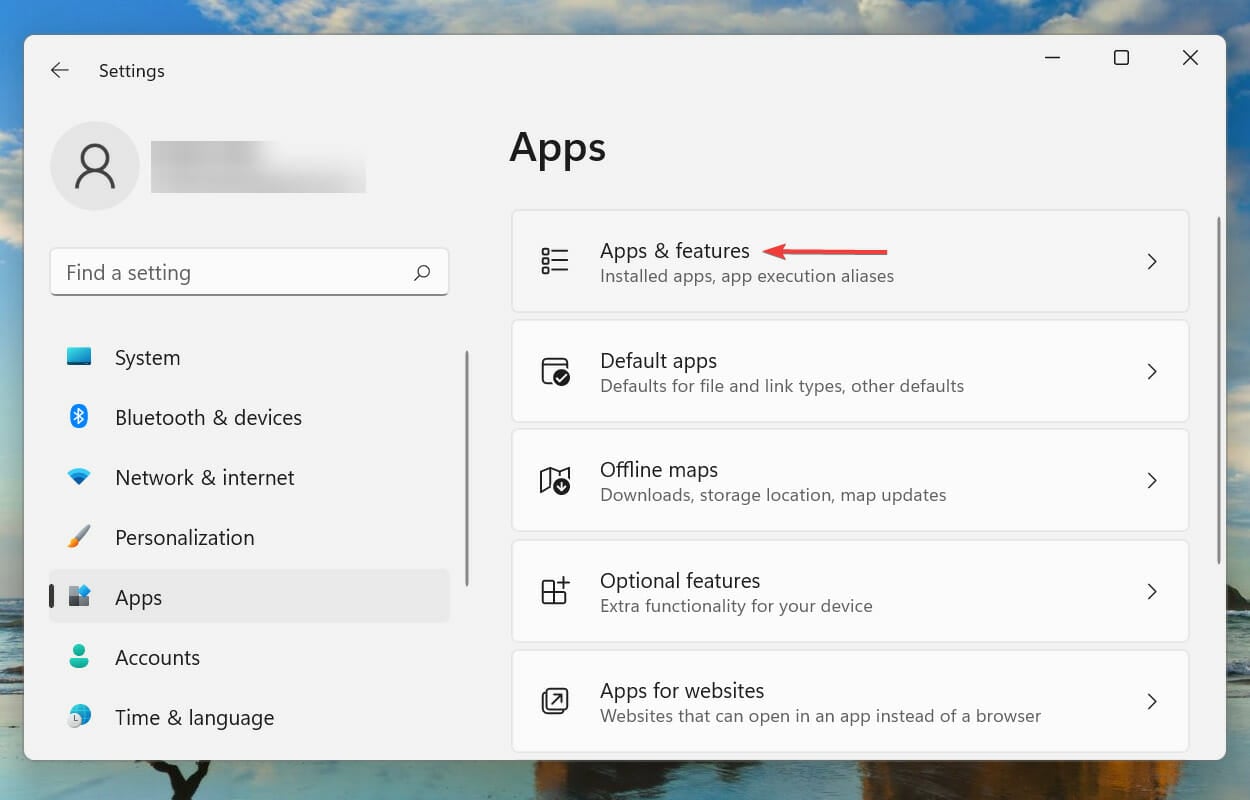
Click on Apps & features on the right.
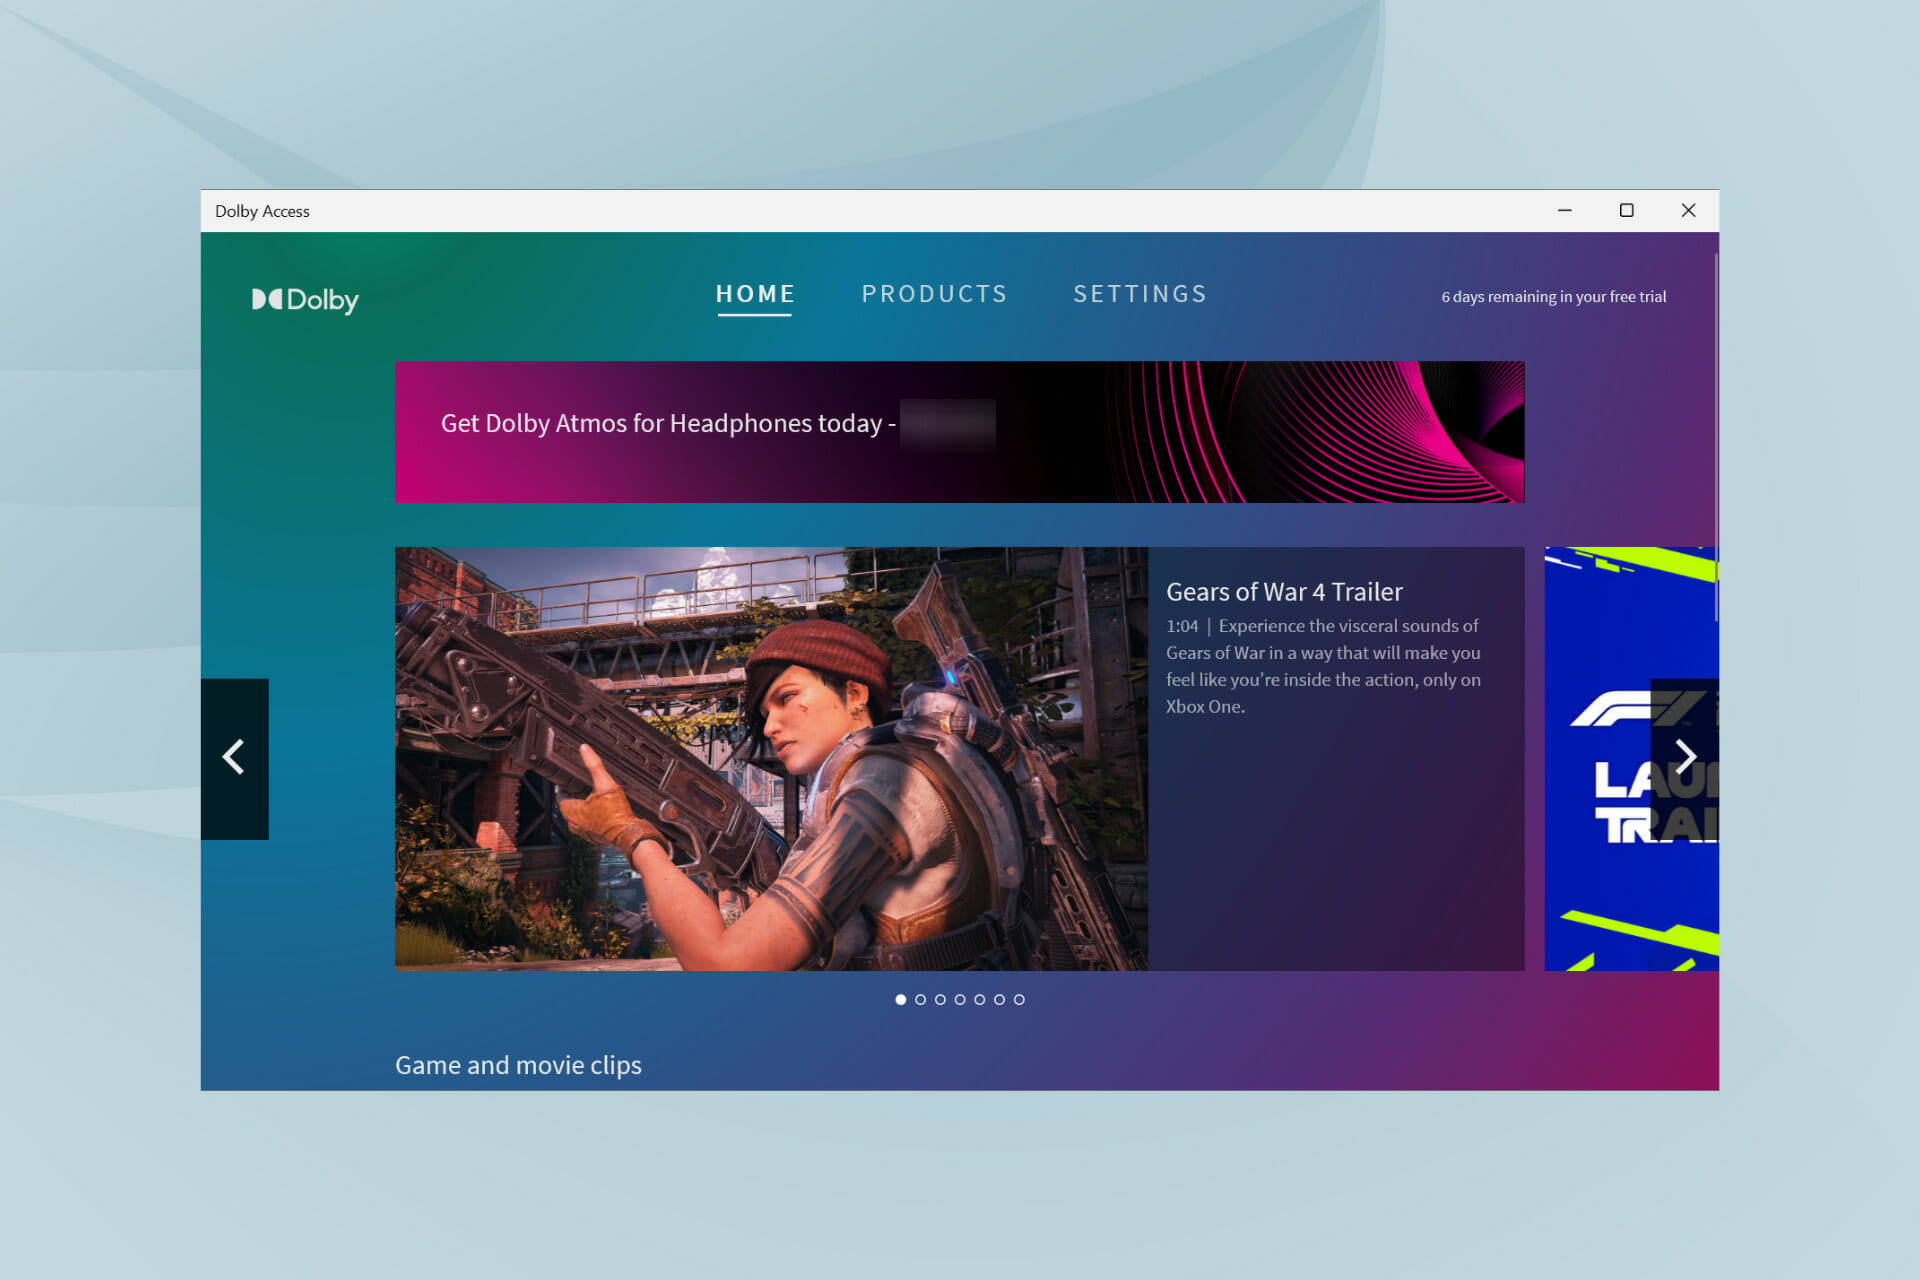
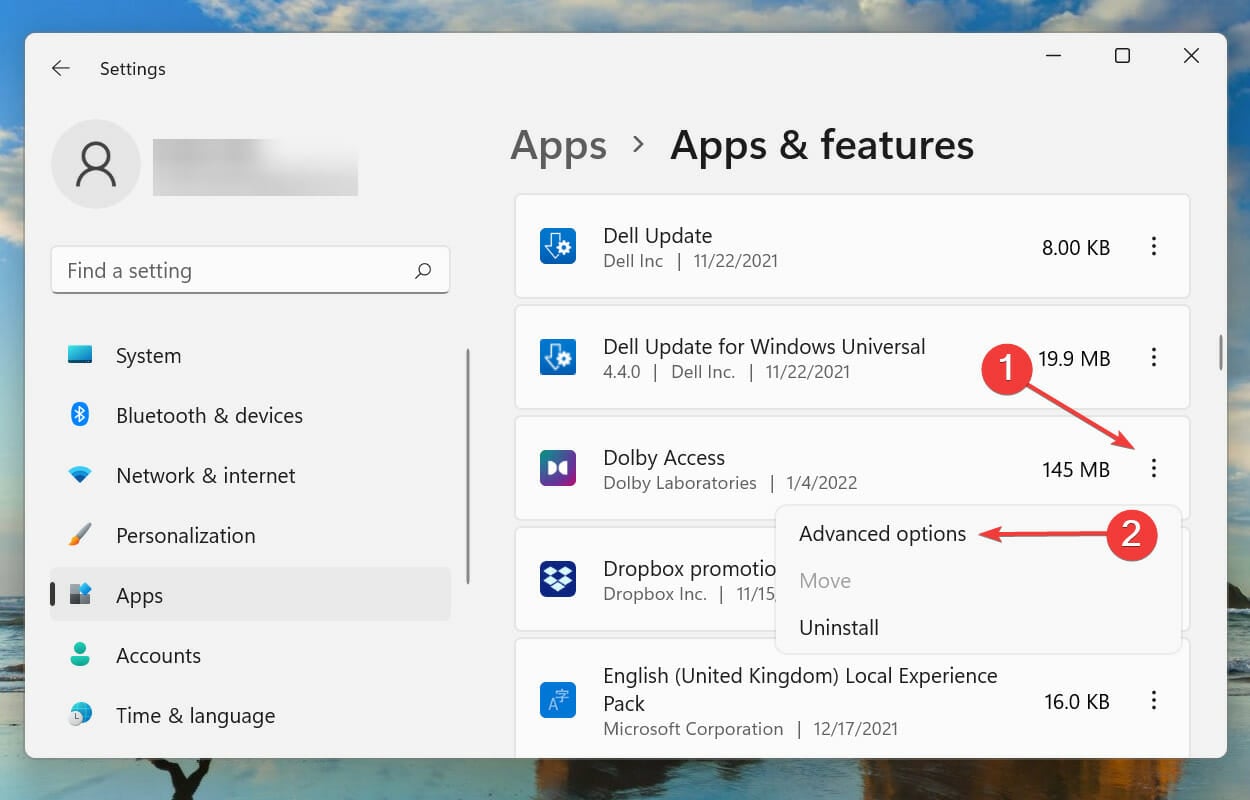
Locate the Dolby Access app, click on the ellipsis next to it, and then select Advanced options from the menu.
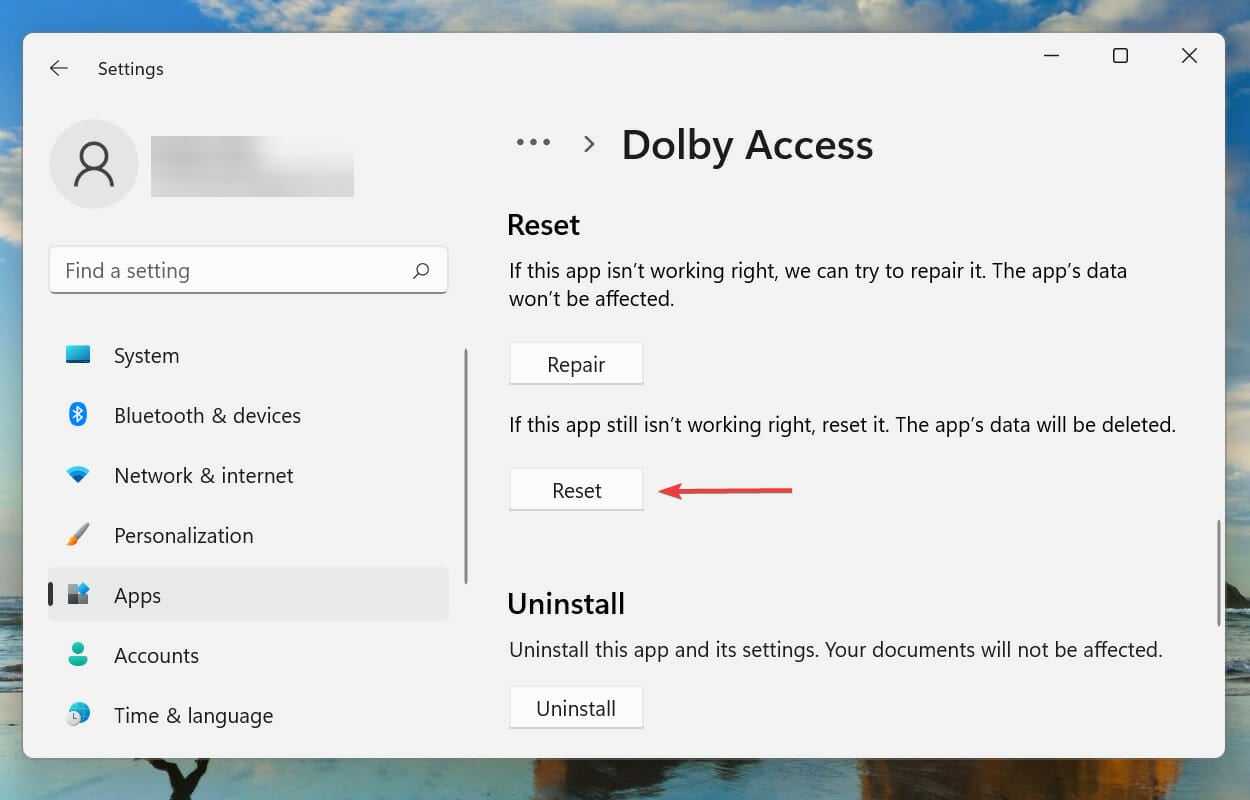
Click on the Reset button.
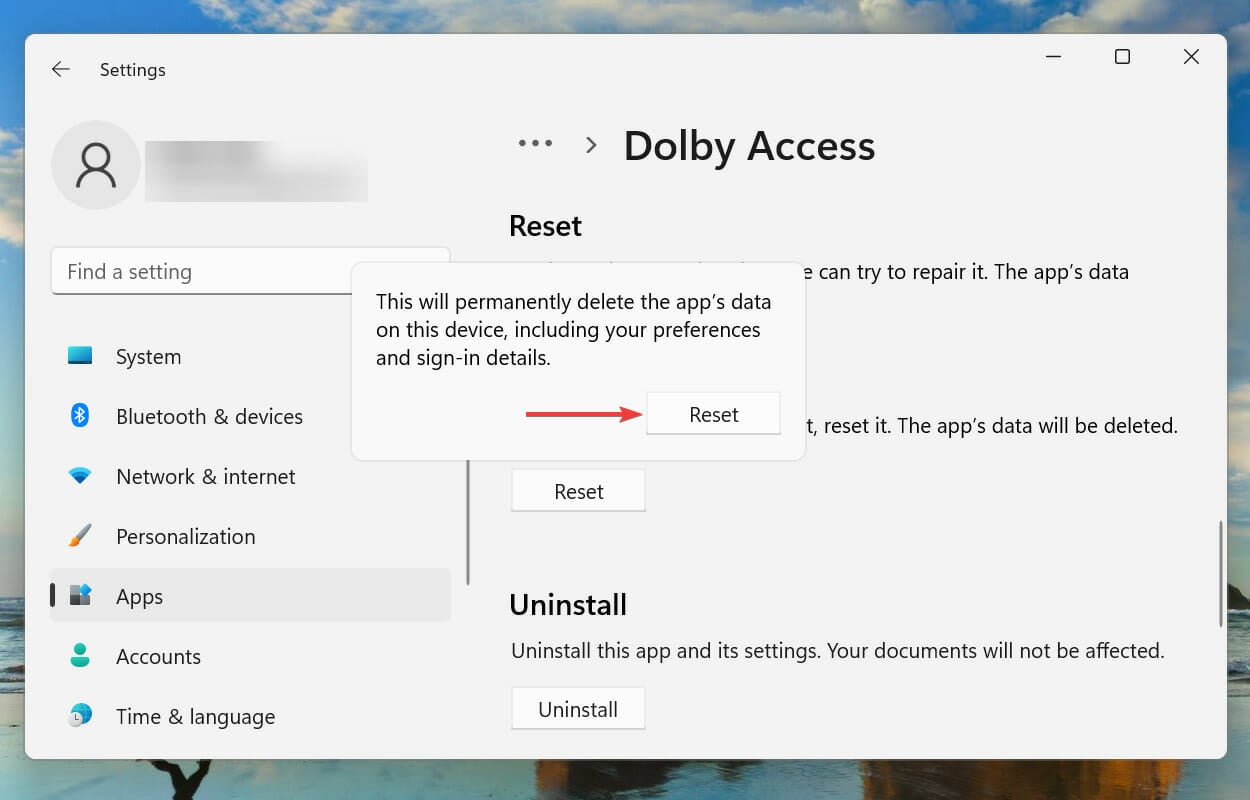
Again, click on Reset in the prompt that pops up.
Wait for the reset process to complete and then check if the Dolby Atmos not working issue in Windows 11 is eliminated.
Why is Dolby Atmos not working in Windows 11?
There could be a bunch of reasons behind Dolby Atmos not working on your Windows 11 system, but more often than not, it’s the drivers that are the culprit. It could both be a case of outdated or corrupt drivers, along with issues in the current version.
Apart from that, it could be a problem with the OS, misconfigured settings, or the Dolby Access app itself. Whatever be the case, we have listed the relevant fixes for each to get things back up and running in no time.
If you are able to identify the problem, say a corrupt driver, directly head to the relevant method and execute it. Otherwise, you can follow the steps in the listed sequence for quick and effective troubleshooting.
How can I install Dolby Atmos in Windows 11?
You can easily install the Dolby Atmos app from the Microsoft Store, spend a few minutes setting it up and enjoy the surround system technology as it’s meant to be. Though, make sure your system is compatible with it or you have external hardware that is.
In case you have none, there’s always the option to use the built-in feature for surround sound on your headphones with the Dolby Atmos app. This doesn’t require specialized hardware and will work with any set of headphones or earbuds.
These are all the ways you can eliminate issues that are preventing Dolby Atmos from working in Windows 11 and experience total sound immersion just the ways it is in movie theaters.
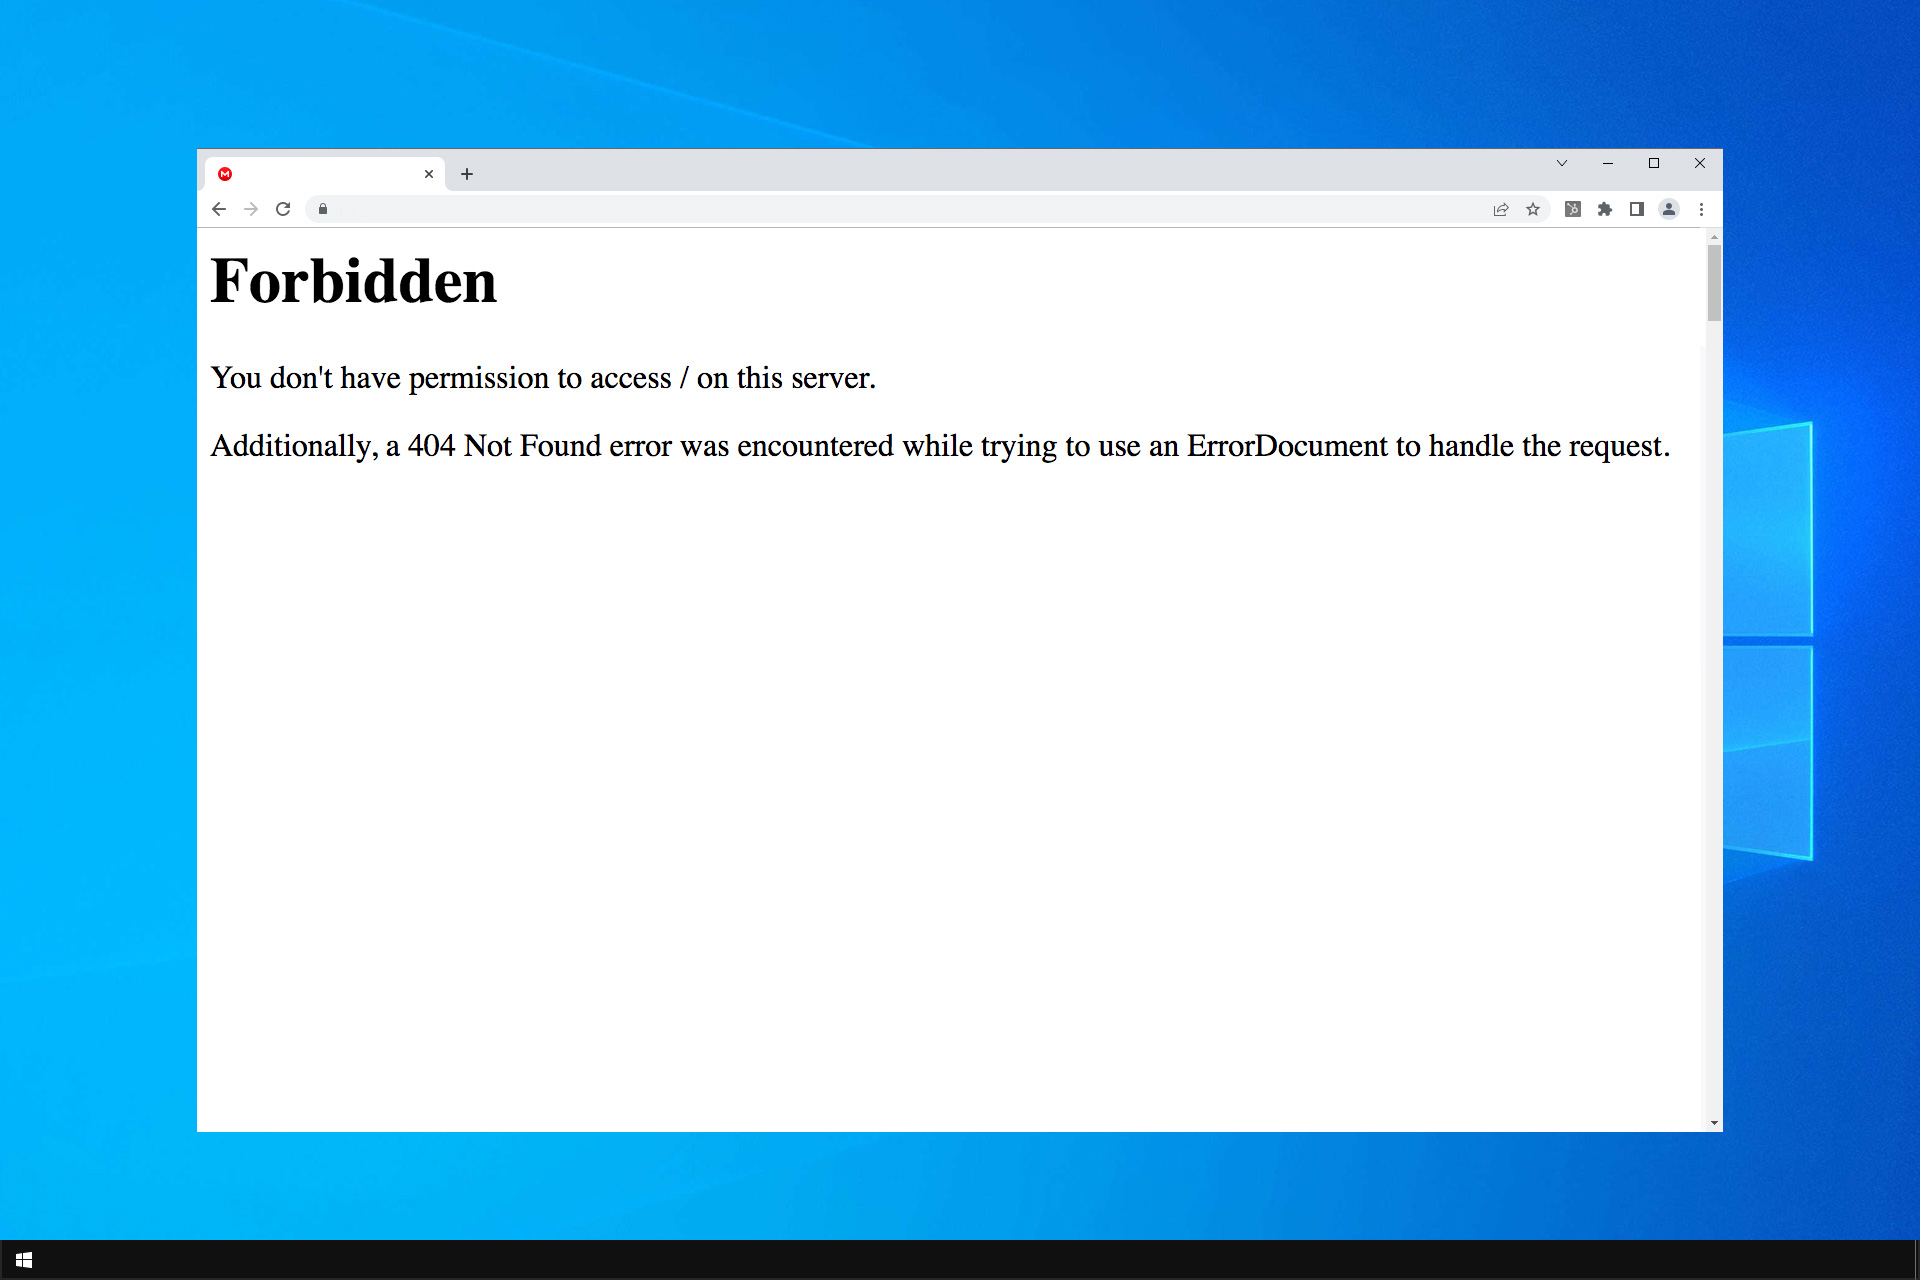
The You don’t have permission to access on this server error is a relatively common one that can arise in alternative browsers. Browsers occasionally display that error message in tabs when users try to open specific websites. When that error arises, users can’t open a website in the browser.
One error that was often reported was Server execution failure in Chrome, but we covered that one in a separate guide. You’d think that Chrome is probably the most likely place to encounter this error. But users reported various contexts, so let’s check it out.
What does it mean I don’t have permission on this server?
The issue usually appears if you’re having problems with your firewall. Often the problem can appear due to your VPN configuration or your proxy.
Sometimes, even your browser cache can cause this issue to appear. The error is somewhat universal, and here are its most common variations:
You don’t have permission to access this server Safari, Chrome, andFirefox: All browsers are affected by this issue. The cause can be your extensions or something else.
You don’t have permission to access this server Roblox, Minecraft: Many games are affected but this issue. But it’s not just the games, many reported Gamestop Access Denied Website Error.
You don’t have permission to access the requested URL on this server: The issue can occur due to a lack of certain privileges or your settings.
Sparknotes access denied: The error can affect various web apps, including Sparknotes.
You don’t have permission to access on this server Mac, iOS, or Android: Speaking of the error, there is a high possibility of also encountering the related error You don’t have permission to access this Airbnb resource.
ASOS access denied: This issue occurs due to a corrupted cache in your browser.
You don’t have permission to access this server IRS: This happens when you try to access the IRS website, however, our solutions can help you fix that.
You don’t have permission to access / this server. Apache: This is a server-side issue on Apache servers. To fix it you need to change your configuration.
You don’t have permission to access this server reference: This is just a specific error, which can be fixed by any of the solutions mentioned here.
How do I fix you don’t have permission to access on this server error?
1. Disable VPN software
Press Win + R keys to open the Run dialogue.
Type ncpa.cpl and click OK to open the Control Panel.
Select Network and Sharing Center.
Click on Change adapter settings.
Right-click your VPN to select the Disable option for it.
Check if the problem is gone.
After disabling your VPN check if the problem persists. Your VPN software can assign you an IP address forbidden on that particular server or website.
2. Turn off VPN extensions
Launch Google Chrome.
Click the 3-dot button at the top right of the browser.
Select the More Tools submenu.
Click Extensions to open that tab.
Toggle off the VPN extension.
Restart the browser.
VPN extensions for browsers can do the same thing as dedicated VPN software, so if you’re getting Access denied on this server message, be sure to disable them.
Apart from disabling just the VPN service, you can try toggling off each extension, one by one and see if this helps resolve the problem at your end.
3. Use a premium VPN service
Unfortunately, free VPNs often fail at bypassing firewalls, so you might still get the Access Denied: You don’t have permission to access this server error in your web browser.
Disabling your free VPN could fix it. But you won’t be able to take advantage of its security and privacy features anymore.
A better long-term solution is to turn to a paid VPN service like ExpressVPN. Websites will have a harder time identifying and blocking the VPN IP addresses because they aren’t public. Besides, this VPN has servers in 163 locations in 106 countries for you to explore if you get blocked on a specific IP.
Press the Windows key and S simultaneously to open the search box.
Type internet options and open it.
Select the Connections tab on that window.
Click the LAN settings button to open the Local Area Network (LAN) Settings window.
Deselect the Use a proxy server for your LAN option if it’s selected.
Click OK to close the LAN window.
Some users might be able to fix the Access Denied error by deselecting the Use a proxy server option. This option is usually used by companies when all the network traffic has to be filtered by a proxy.
Chrome users can do that by pressing the Ctrl + Shift + Delete.
Select All time on the Time range drop-down menu.
Select the Browsing history, Cookies and other site data, and Cached images and files checkboxes.
Click the Clear data button.
Clearing browsing data might also resolve the You don’t have permission to access the requested url on this server, because it makes the browser think you have never visited the website before.
6. Clear all data for a specific website in Firefox
Press the Ctrl+ Hhotkey on Firefox.
Right-click the website that doesn’t open in the History sidebar to open a context menu.
Select the Forget about this site option.
Firefox’s users can fix the Access Denied error by clearing all data for the specific website the error arises for. This was suggested by one of our readers. Deleting history and cache data for a specific website that you are facing trouble with will help you resolve the problem.
7. Reset your browser
7.1 For Google Chrome
Launch your browser.
Type the following in the address bar: chrome://settings/
Click on Reset and cleanup.
Click the Reset settings to their original defaults.
7.1 For Firefox
Enter the following in the address bar. about:support
Press the Refresh Firefox button.
Click on Refresh Firefox to confirm.
Resetting your web browser will clear all data and disable VPN extensions.
8. Run the Troubleshoot mode
Launch Firefox.
Click on the 3-line icon on the top-right.
Select Help.
Select the Troubleshoot mode.
In the Restart Firefox in Troubleshoot Mode prompt that appears, select Restart.
Click Open.
When you run Firefox in troubleshooting mode, it helps you to jot down the problem that is causing the error. Troubleshoot mode disables all extensions, switches to the default theme, turn off hardware acceleration, and disables JIT, and all other customizations and modifications.
So, the Access Denied error is usually a network issue. Disabling VPNs or clearing browser data are the most probable fixes for it. If the problem is still there, visit our 1005 Access Denied article for more potential solutions.
Please let us know which solution worked best for you. Also, write us a comment if you have any other suggestions for solutions that we should include here.
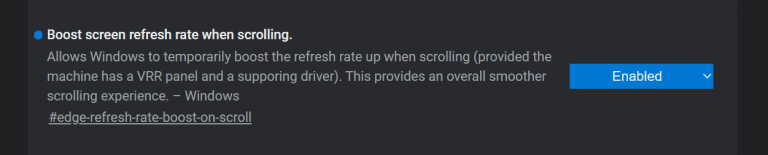
Microsoft is testing a smooth scrolling feature in the Canary version of Microsoft Edge. Currently hidden behind a flag, the feature works as the name suggests, boosting the web browsing experience on displays that support variable refresh rates (via Neowin/Reddit.)
According to the flag listing in Edge Canary, toggling this feature on will allow Windows to temporarily boost the refresh rates of a display when scrolling. That is, of course, if the display supports a variable refresh rate, and has the driver. Usually, only displays that are AMD Freesync or Nvidia G-Sync support the technology. On these displays, scrolling up and down in Edge should feel a lot more fluent thanks to smooth scrolling.
If you want to try this out for yourself, visit Edge://Flags and search for refresh-rate-boost-on-scroll. You can then toggle it to “enabled.” Reaction to the feature has been positive, and it seems as though the community thinks it’s a welcomed change. We’ll have to wait and see if Microsoft makes an official announcement when it rolls out to Edge Dev, and eventually the regular version of Microsoft Edge.
Microsoft has announced plans to introduce an auto-deletion feature for Microsoft Teams recordings. According to a recent blog post on the Microsoft website, this new feature will be implemented due to overwhelming customer requests.
Default lifetime
The default lifetime of a recording will be 60 days or 30 days for A1 users. However, admins will be able to disable the feature if they don’t want recordings disappearing into the ether.
Microsoft’s blog post, which announced the new auto-deletion feature for your local files, explained how the company decided on a default time frame and also explains how the user can change it:
The 60-day default was chosen because, on average across all tenants, 99%+ of meeting recordings are never watched again after 60 days. (…) However, this setting can be modified if a different expiration timeline is desired.
Archiving chats
You’ll need to create a Teams group, assign this group the right to auto-archive channels and apply the relevant retention policy. Then, you’ll need to assign the right to auto-archive channels to users who want their old chat messages preserved.
These are the steps required for archiving chats. You can find more about these steps in Microsoft’s official blog post. The ability to delete files physically begins in the third week of January 2022.
In the upcoming months, if you happen to notice OneDrive freeing itself up without any actions prompted by you, this might be the main reason for the sudden change.
What do you think of Microsoft Teams’ new auto-deletion feature? Share your thoughts with us in the comment section below.
Microsoft Edge has received some new features, which are now available for everyone on Stable Channels of Windows, macOS, and Linux.
Due to the holidays, they took a bit more time than usual with Edge this month, but they are happy to announce that their February release includes Citations in preview.
Citations are a way for you to tell students about the sources you used and where you found your information on the web.
Citations
By integrating a new feature known as Citations into Microsoft Edge, the company is giving students an easier way to manage and generate citations from academic online sources in the correct format.
Citations are Edge’s answer to the tabbed browsing experience favorites and collections, but with links that can be used in the text. There’s even a Citations button for easy access.
Microsoft Edge 97 brings new and exciting security features to both Windows 10 and macOS. With support for Microsoft Endpoint Data Loss Prevention (DLP), your assets remain safe and secure. A new platform security feature, Control Flow Guard (CFG), combats memory corruption vulnerabilities in the browser.
Automatic HTTPS
A new feature called Automatic HTTPS will automatically upgrade navigations from HTTP to HTTPS on domains that support the more secure protocol.
The new design feature will be available for Edge users over time, beginning with version 97.
Finally, this Edge update improves the preferences you set for websites. You can now tell Edge to use your current profile when signing into sites that have multiple accounts, such as work and school accounts, on your device. You can turn this feature on or off by entering into Settings, then Profile preferences.
Microsoft Edge 97 should update to the newest version automatically, but you can force the update by opening the About page in the browser.
Which feature excites you most about Microsoft Edge 97? Share your thoughts with us in the comments section.
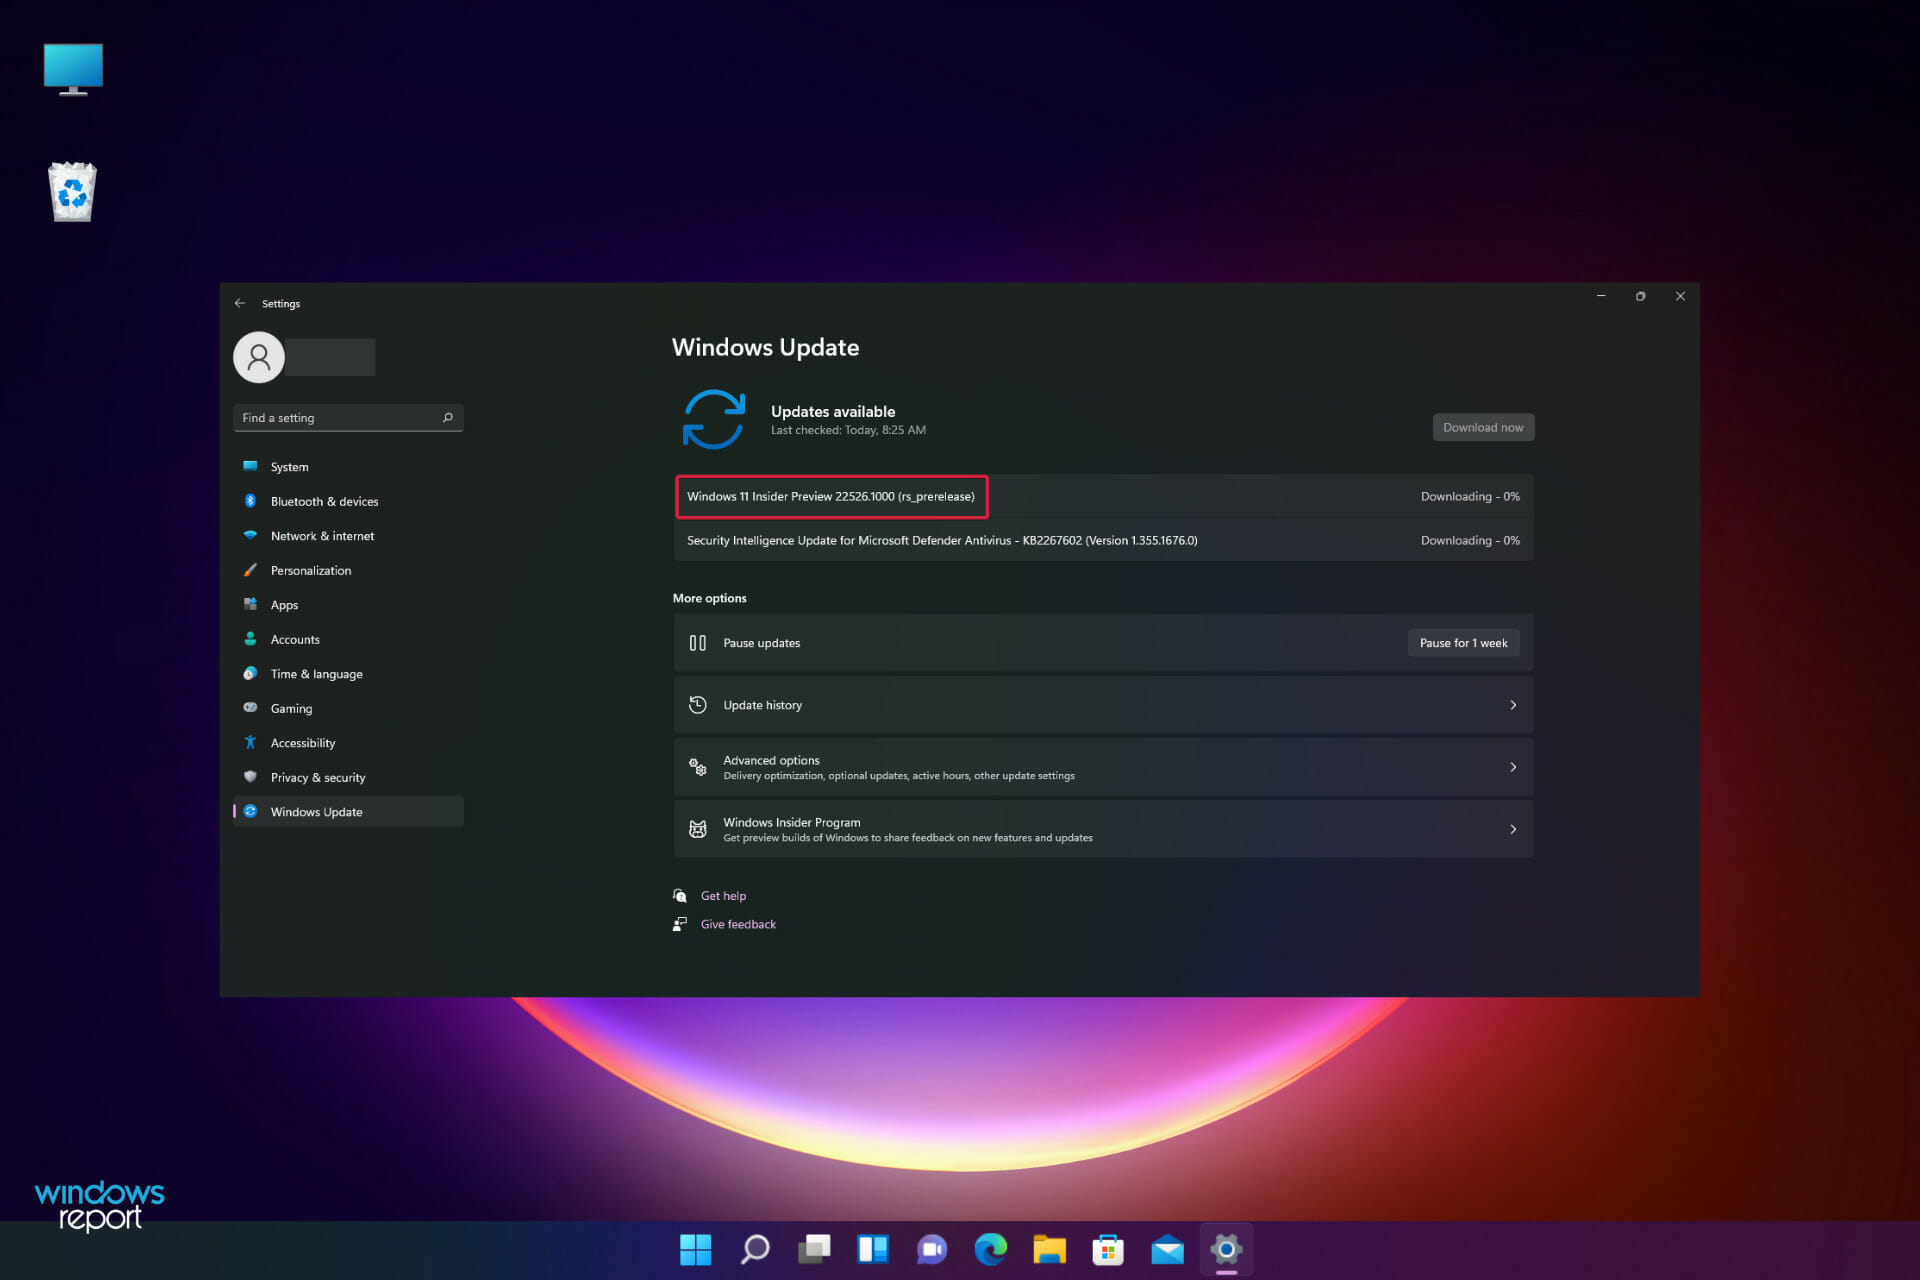
Microsoft is preparing an update for Windows 11 that could make the operating system more attractive to people with older or less powerful computers.
The latest Insider build, Windows 11 Build 22526, is currently available to members of the Insider early access program. It includes a number of fixes and enhancements.
Microsoft is using the latest build of Windows 10 to try a new approach to indexing file locations. The company hopes that this change will make it easier for users to find files they need in File Explorer.
Enhanced Windows 11 performance
Although Windows 11 brought with it a number of performance improvements, File Explorer continues to frustrate users with its slow response times and tendency to crash.
When searching for files, the search feature can be frustrating because it takes so long to return relevant results, especially when the user has a large number of files on their computer.
The latest update should make sifting through large quantities of files more efficient, which will be beneficial from a productivity perspective.
File indexing
Windows 11 users with older computers will especially benefit from the new system because their machines might not be as powerful or fast as newer systems. But better file indexing is just one of many new features in the latest Windows 11 build.
The release notes state that the newest version of the operating system offers support for wideband speech when using Apple AirPods which should improve audio quality for voice calls and a new windowed approach to familiar Alt + Tab functionality.
But for enterprise customers, Microsoft has enabled its Credential Guard service by default and is protected with a layer of virtualization-based security.
Available on the Dev channel
The Windows 11 developer build is available only to members of the Dev Channel, who are willing to receive the newest features in their software.
It is unclear when these new features will be ready for public use. But if you have problems with File Explorer, the chances are high that they will soon have solutions.
Are you excited to see Windows 11 get more coverage on computers with weaker processors? Share your thoughts with us in the comments section below.
It’s 2022 and Microsoft has just released the first Windows 11 Dev Channel build for this new year, one that is packing a handful of notable new changes and enhancements.
This brings the new OS to build 22526, which also brings an updated Alt+Tab interface, support for wideband speech using AirPods, and the indexing of more file locations by default.
Let’s dive right into it and uncover more of what the Redmond tech company prepared for its first 2022 release.
Improved Alt+Tab UI and better Airpods support with this build
By far, the most notable change this week is the introduction of a new Alt+Tab interface, even though this is just another A/B test, meaning some testers may not get this new UI just yet.
This new and apparently improved UI is a windowed version of the Alt+Tab experience, which is currently full-screen.
Microsoft officials stated that the new UI is nothing more than an experiment, meaning it may not get released to the general public, and that feedback from Insiders will be key to whether or not it will.
Another worth-mentioning improvement is the added support for wideband speech when using Apple AirPods products (AirPods, AirPods Pro, or AirPods Max), meant for improving audio quality for voice calls.
Also with build 22526, Credential Guard will now be enabled by default on Windows 11 Enterprise (E3 and E5) licensed PCs that are enterprise-joined.
And let’s not forget to mention that the tech giant is experimenting with indexing more file locations so that using search to find important files in Files Explorer is quicker.
Fixes
[File Explorer]
Did some work to help address an issue where if you’d used search in File Explorer, and then explorer.exe crashed, the next time you tried to search in File Explorer it wouldn’t work.
[Search]
We’ve made another fix to help address the recent searches flyout getting stuck on the screen (appearing transparent except the border).
Improved the resolution of app icons displayed in search results when the display scaling was set to greater than 100%.
[Spotlight collection]
If you’re using spotlight collection, the current image should migrate on upgrade now (if the build you’re upgrading from is Build 22523 or higher).
[Widgets]
Fixed an issue result in the Widgets board potentially not having the correct resolution when hovering over the entry point on a secondary monitor.
Addressed an issue where the Widgets board would temporarily be blank, showing only an Add Widgets button (which also opened to a blank dialog).
[Other]
Fixed a bugcheck with KMODE_EXCEPTION_NOT_HANDLED remote desktop users were encountering when attempting to shutdown or restart.
Microsoft Store should no longer show a message that trying to install the latest Web Media Extension update is returning error code 0x80073CFB.
Addressed a DWM crash impacting some Insiders on the previous flight.
NOTE
Some fixes noted here in Insider Preview builds from the active development branch may make their way into the servicing updates for the released version of Windows 11 that became generally available on October 5th, 2021.
Known issues
[General]
You may be unable to sign-in to certain apps such as Feedback Hub. Restarting your PC should correct the issue.
We’re investigating reports that some Insiders are seeing driver and firmware update failures in recent builds with the error 0x8007012a.
[Start]
In some cases, you might be unable to enter text when using Search from Start or the taskbar. If you experience the issue, press WIN + R on the keyboard to launch the Run dialog box, then close it.
[Taskbar]
The taskbar will sometimes flicker when switching input methods.
The network icon sometimes goes missing in the taskbar when it’s supposed to be there. If you encounter this, please try using Task Manager to restart explorer.exe.
If you have multiple monitors connected to your PC and right-click on the date and time on the taskbar on your primary monitor, it will crash explorer.exe
[Search]
After clicking the Search icon on the Taskbar, the Search panel may not open. If this occurs, restart the “Windows Explorer” process, and open the search panel again.
[Settings]
When viewing the list of available Wi-Fi networks, the signal strength indicators do not reflect the correct signal strength.
Settings may crash when going to System > Display > HDR.
There is a blank entry under Bluetooth & Devices.
We’re working on a fix for an issue impacting some Insiders, resulting in Settings crashing when trying to access the Installed Apps, Startup Apps, and Default Apps pages. If you are one of those impacted and need to uninstall an app, using winget should work.
[Widgets]
Changing the taskbar alignment can cause the Widgets button to disappear from taskbar.
When having multiple monitors, Widgets content on taskbar may get out of sync between monitors.
With the taskbar left-aligned, information such as temperature is not shown. This will be fixed in a future update.
[Voice access]
Some text authoring commands, e.g., “select that” or “delete that”, may not work as expected across Windows applications.
Recognition of some punctuation marks and symbols such as @ sign is not accurate
Microsoft just hit a new milestone. According to the company’s own internal data, and Comscore, a platform that evaluates media across platforms, Microsoft advertisements now reach 1 billion people (via Mediapost/ MSPU.)
Per Mediapost, Microsoft ads hit those 1 billion people across Bing, Outlook, AOL, Yahoo, MSN, and other publisher partners and Microsoft properties as of March 2021. This is apparently known as overlapping audiences, which is a phenomenon you might be familiar with. Basically, using multiple Microsoft products or services. The overlapping audiences allow Microsoft to expand its reach.
It’s so much good for Microsoft that the research from GWI, another audience insight tool, shows that 64% of people in the U.S. who use Windows devices also visit Microsoft advertising properties, per Mediapost. In turn, these people are more likely to make a purchase. Microsoft’s own numbers last showed that its own search advertising revenue went up to $788 million, or 10% in its last quarter so there’s extra truth to the numbers. Whether or not MSN or Microsoft News powered things like News & Interests in Windows 10, or Widgets in Windows factor into that growth is unknown, but it would not be surprising.
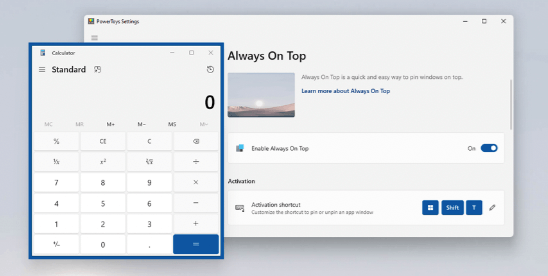
Microsoft PowerToys, the company’s set of Windows tools for power users has been updated this week with a new Always on Top feature. This top-requested feature can pin an application window so that it will remain always on top on your desktop, even when focus changes to another app window.
Always on Top can be activated with the Win + Ctrl + T shortcut, and users can also customize the visual outline of the pinned window in PowerToys settings. There are also options for turning off Always on top when the system-level Game Mode feature on Windows is on, and users can also manually exclude some apps from Always on Top.
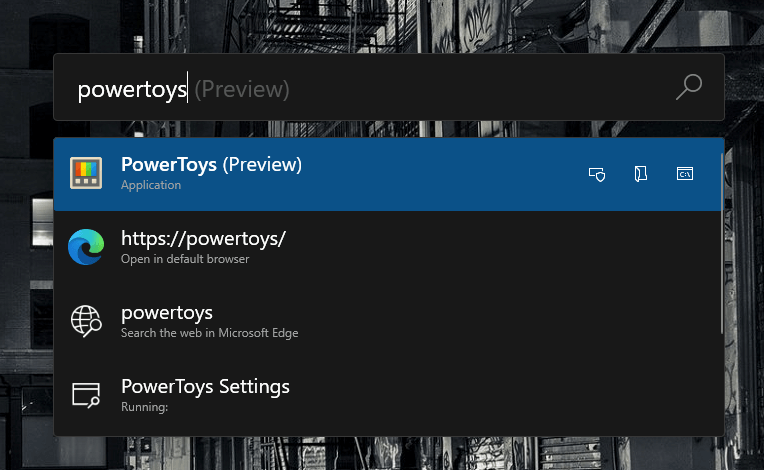
Another top-requested addition in this new PowerToys update is the addition of web search to PowerToys Run, the quick launcher that looks similar to Spotlight on macOS. You can open PowerToys Run by pressing Alt + Space and start typing in the search bar, and web searches will open in your default web browser.
If you only want to search the web with PowerToys Run, you’ll need to use the “??” command then add what you’re looking for in the search field. Compared to Windows Search, PowerToys has more options for power users without sacrificing performance, and the tool is quite elegant overall.
This latest Microsoft PowerToys update also includes plenty of bug fixes, and it’s available to download from GitHub and the Microsoft Store. There are over 10 different tools to help Windows users be more productive, and the open-source project also welcomes contributions from everyone.
The Entertainment Software Association announced yesterday that its E3 annual trade show won’t be held in person for the third year in a row. In a statement provided to VentureBeat, the organization cited “the ongoing health risks surrounding COVID-19 and its potential impact on the safety of exhibitors and attendees.”
The ESA has also confirmed that E3 2022 will once again be a virtual event this year and that the annual show wasn’t going away. “We remain incredibly excited about the future of E3 and look forward to announcing more details soon,” the trade group said.
E3 used to be the biggest event of the video game industry in June of each year, but its influence actually started to wane even before the pandemic hit when big publishers such as Sony or EA decided to stop participating. In the past two years, we’ve seen major video games announcements being spread out across multiple events throughout the summer, and E3 should once again compete with Geoff Keighley’s Summer Game Fest.
The ongoing COVID-19 pandemic has definitely hit the trade show industry pretty hard in the past couple of years, and the recent Omicron surge suggests that things aren’t coming back to normal anytime soon. However, CES 2022 did go as planned in Las Vegas this week despite Microsoft and other big tech companies canceling their physical presence. As of this writing, Mobile World Congress 2022 is also set to come back to Barcelona next month, and the Game Developers Conference is still scheduled as an in-person event in March.
One of the most exciting developments to come from Microsoft’s annual conference is Fast Pair, a Bluetooth feature that makes pairing Android devices with Windows-based laptops quick and easy.
This includes Android features such as syncing text messages and sharing files using Nearby Share, which behaves similarly to Apple’s AirDrop.
In addition to Android and Windows integration, Bluetooth connection between devices will be easier with the new Fast Pair feature. This will arrive in Windows PCs later in 2022.
Among other announcements made at the annual consumer tech conference, Google unveiled Fast Pair, a feature that is expected to work with more than just Windows.
Windows and Android integration
Windows integration is aimed at helping Android users be more productive, but it is hoped that it will also make the Android experience nicer and easier.
By pairing Bluetooth devices like headphones to other smart products, such as TVs and Chromebooks, Google said users will be able to listen to audio from those devices on their headphones.
The growth in connectivity between devices will be enhanced by Matter, a new standard soon to launch that will improve connectivity between the internet and smart devices.
If you work in an office and you’re responsible for taking notes on a smartphone that you later have to bring into the office to share with co-workers, Windows Phone’s easy file sharing feature will likely appeal to you.
Beyond Fast Pair, Google revealed a dozen other software-related announcements at the Consumer Electronics Show this year, all of which are useful to consumers – although one feature that may appeal to businesses is faster unlocking of devices.
Wearable devices
For years, Android phones have worked with Chromebooks. Now, Google is extending that functionality to smartwatches running Wear OS.
Android Wear devices will be able to unlock Android phones, tablets, and Chromebooks faster using the new Smart Lock system.
BMW will also use the same technology in its cars to unlock the doors when an Android phone is detected.
BMW users who own phones equipped with Ultra-Wideband technology will be able to unlock their vehicles without even taking their cell phones out of their pockets.
Which features are most exciting to see from the integration between Windows and Android? Let us know in the comment section below.
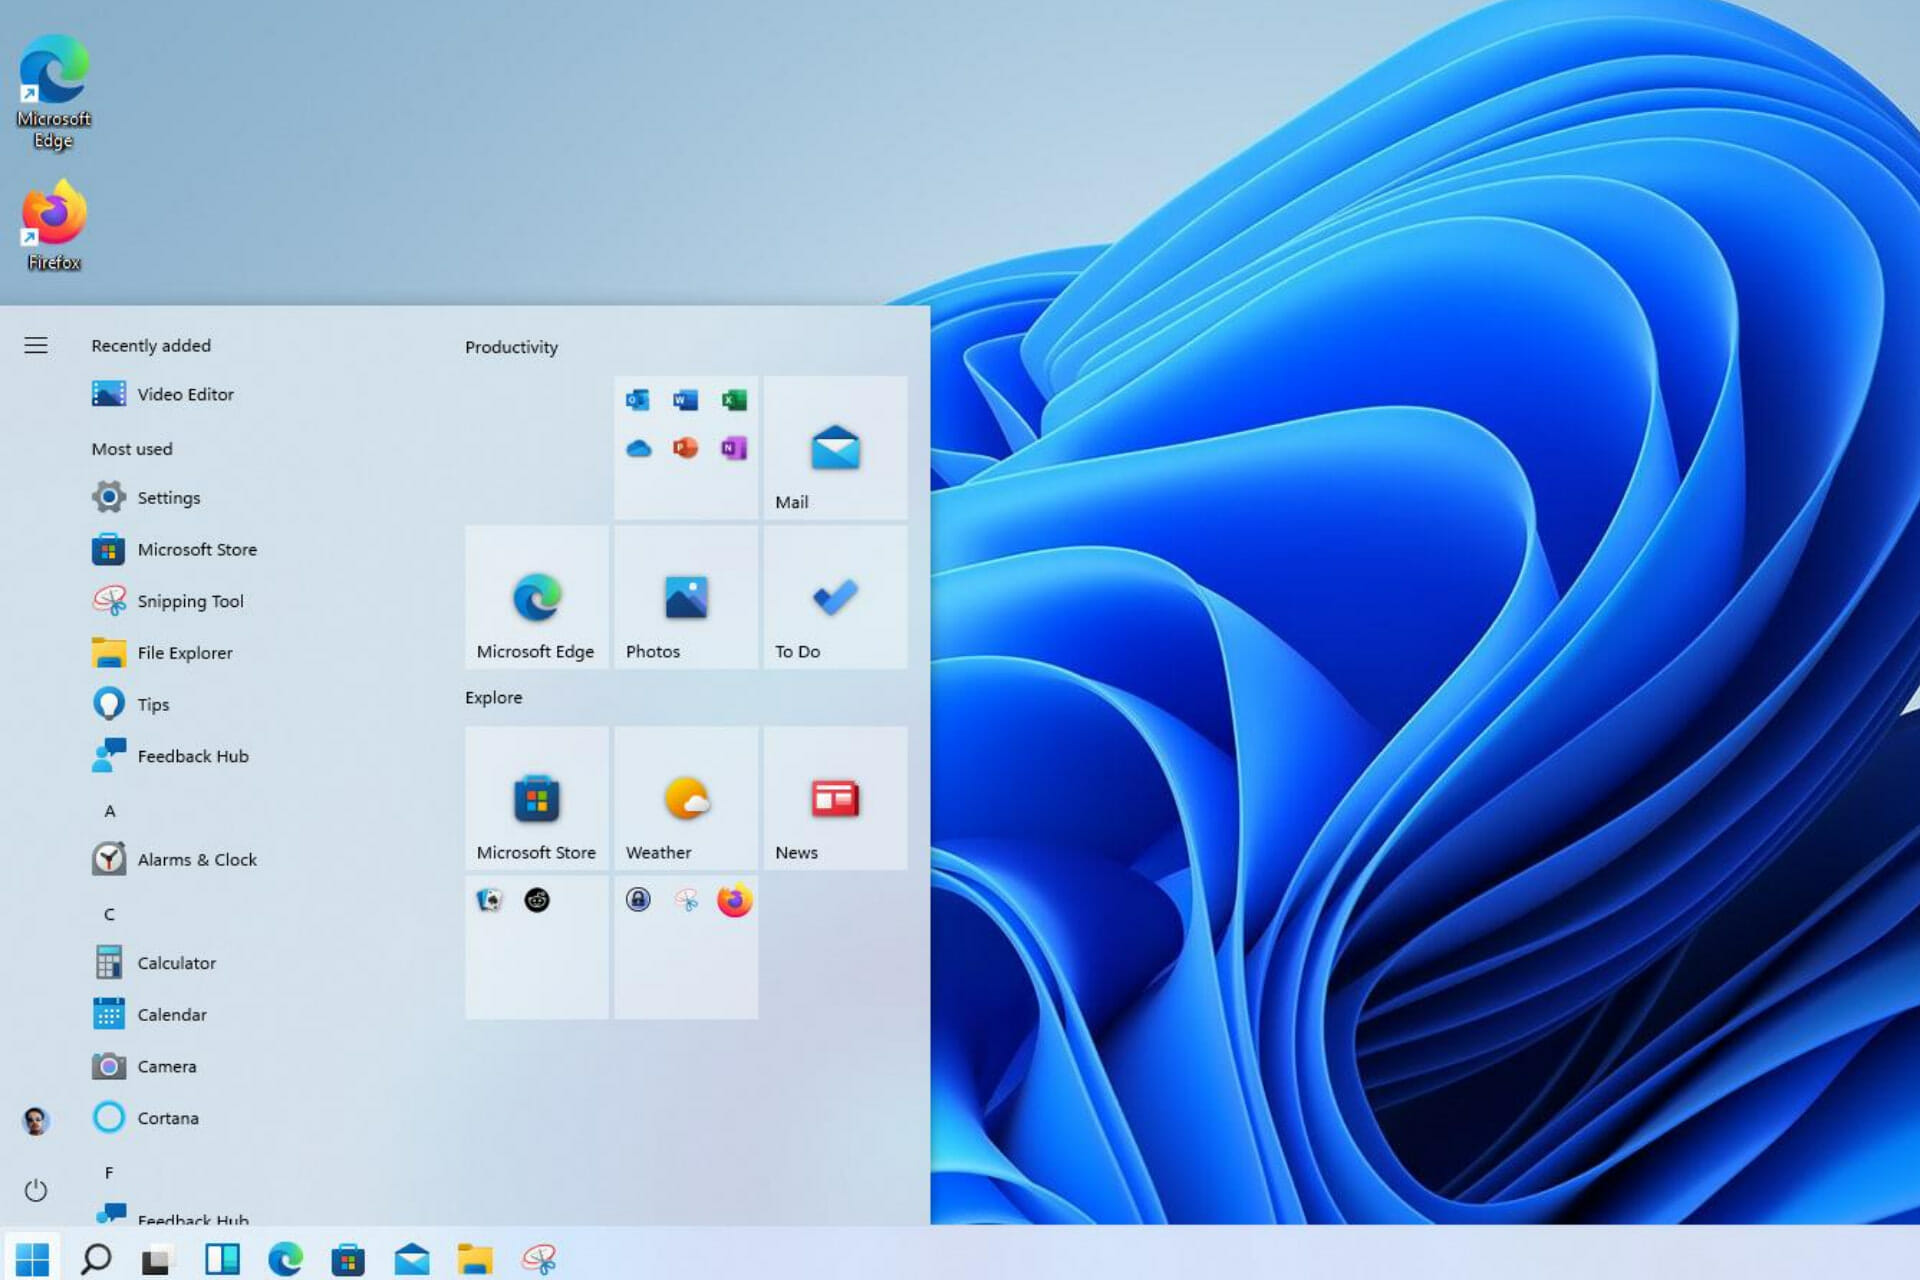
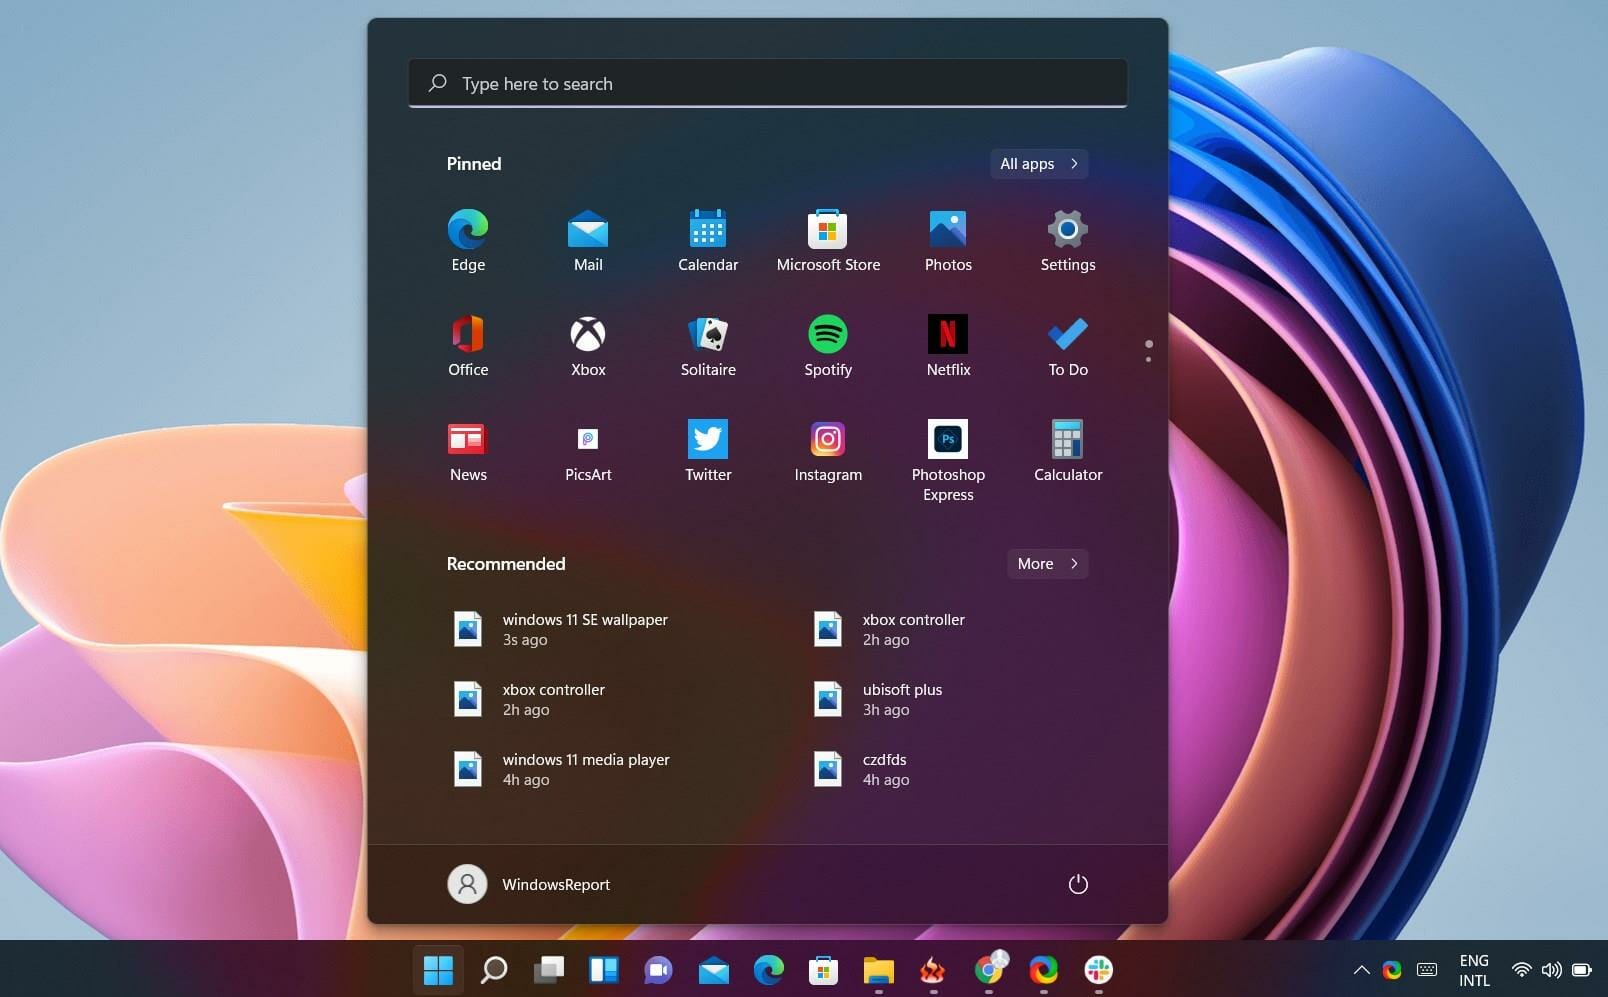
The Windows 11 Start menu saga continues, with users constantly expressing discontent and disappointment when it comes to this important OS element.
We remind you that these mixed emotions started ever since the new operating system was simply a toddler learning how to take its first steps.
Many months later, and several updates that sort of tweaked the Start menu, and users are still not at all happy with what Microsoft considered improvements for it.
And, with the community constantly asking for core features to be brought back, and the tech giant refusing to give in, it looks like this will drag on for quite a while, until one of the sides simply has enough.
The Windows 11 Start menu is simply not enough for most
What can the average user do when faced with this situation? Some of the more tech-savvy ones will surely find ways to bypass Microsoft-imposed standards.
But what about the people that are not that that comfortable using registry hacks? Or what about when the mother company disables such methods from being used?
Sure, there are all sorts of third-party software solutions out there, designed to modify how the Start menu looks, but what if users don’t want all these apps installed on their devices?
Well, the last thing they could actually do is talk about and hope to cause enough ruckus that Redmond developers would again follow community advice and actually change something.
This is pretty much what is happening nowadays, and social media platforms, as well as forums, are overflowing with posts that have the words start and menu in their description.
Indeed, at some point, there was a registry hack that would allow anyone to revert the menu back to the appearance it had on Windows 10.
However, Microsoft made sure that didn’t work anymore and they patched that so-called system gap with an update, recently.
Many have gone a different route, as we mentioned above, and downloaded third-party apps that brought back the old style of the menu, the one we got so familiar with on Windows 10.
Oh, we almost forgot about the fact that you can change its alignment as well, from the center, as it is by default, to the left, like the old one was positioned.
So, because of this lack of options and functionalities, many are already considering downgrading back to Windows 10, hoping that sometime in the future something will change.
It’s also true that the Start menu, as well as the taskbar, have been sort of the main focus point for Windows 11 naysayers, especially because of the limited way in which they are allowed to interact with them.
It will be interesting to see what will happen in the future and if the Redmon-based tech company will decide to fulfill these wishes and restore a little bit of Windows 10, in the form of these elements.
The major irony here is that most crave a new, futuristic and enhanced experience, but as soon as it is given, it’s picked apart, chewed, spat back out, and left for dead.
Right now, there aren’t any major bugs that affect the Windows 11 Start menu, so we can consider it pretty stable. However, if it doesn’t work properly for you, we can help you with fixing it.
We remind you that only four months have passed since the release of this brand new operating system, so a lot of changes can still occur.
All that’s left to do is wait and see when Microsoft decides the future for this important OS element, and what direction it’s going to lean towards.
What are your feelings about the Windows 11 Start menu? Share your thoughts with us in the comments section below.
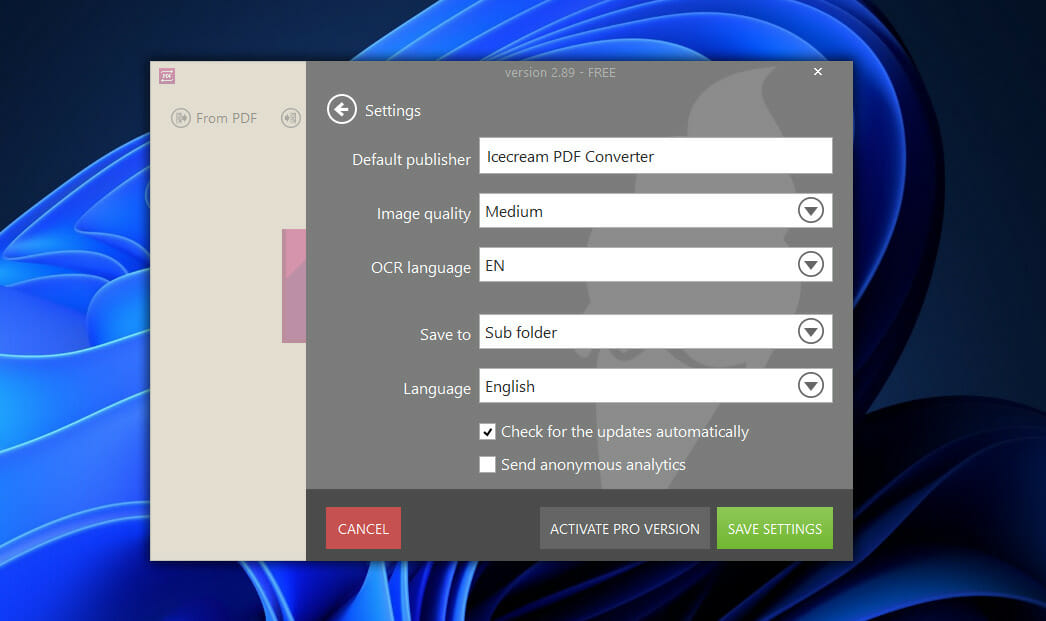
Users have been asking how they can convert batch files from HTML to PDF in a simple way. We have found the answer for you through the aid of IceCream PDF Converter software.
To install the app, follow the software’s official download page then proceed with the installation steps displayed on the screen.
HTML (HyperText Markup Language) is a web language that is used to build documents (or websites) that are displayed in a web browser.
Icecream PDF Converter converts PDF files of any size, and it can even handle numerous files at the same time, including bulk converting HTML to PDF, which is really convenient. You will be able to queue up PDFs in bunches and convert them all with a single click once the feature is implemented.
When converting to PDF (Word to PDF, JPG to PDF, ePub to PDF, and so on), you have the option of merging all of the files into a single PDF and using a variety of output file options.
The PDF file can be converted to DOC, JPG, and other formats. The app also comes with a built-in PDF reader and is capable of handling password-protected documents.
Beyond converting PDFs, it may also assist you in merging many documents or images into a single PDF file allowing you to customize your personal folders.
All of IceCream’s programs are completely free to use and include a plethora of features and customization choices to enhance the overall user experience. The utility does not spy on you and does not contain any other kind of malicious software.
How do I save multiple webpages as PDF?
Make sure you read our dedicated guide on how to save a webpage as PDF if you want to find out how to do it in any browser of your choice.
How do I save a Chrome HTML document as a PDF?
In general, it is an easy task, as all you have to do is right-click anywhere on the webpage then choose Print, and select Save as PDF.
Is there a way to Print an entire website?
You can print an entire webpage by pressing Ctrl + A then right-clicking anywhere on the page and selecting Print.
But without further ado, let’s see how you can batch convert HTML files to PDF in both Windows 10 and 11. Follow along!
How can I batch convert HTML files to PDF in Windows 11 & 10?
Proceed with the installation steps, select the language you want to be displayed then wait for the process to complete before you can batch convert HTML to PDF for free.
Click on the To PDF option from the main menu to convert files into PDF.
Now click on the Add file button and select the desired documents.
If you wish to also merge the documents click on the Merge all into one PDF option, followed by Convert. Otherwise just click on Convert.
Once the files are converted, you will be prompted with a button that opens the newly created folder. Click on it to see the PDF files.
And that’s it! The user interface is straightforward and easy to use and you can use the app to batch convert HTML to PDF on Mac devices as well. The free version of this software allows you to convert a maximum of three files at once, each with a maximum of 5 pages.
However, the PRO version will allow you to bulk convert HTML files to PDF with an unlimited number of pages, as well as convert all HTML files in folder to PDF.
To upgrade the app, you can simply click the Upgrade to PRO button from the bottom side of the main menu.
Icecream PDF Converter
Try this excellent HTML to PDF batch converter tool to manage your files better.
How can I batch convert HTML files to PDF in Windows 10?
Although Windows 11 has some important improvements and an elevated design, it’s not much different from Windows 10.
And in fact, when trying to convert a batch of HTML files to PDF, our solution of using the Icecream PDF Converter will work perfectly on Windows 10 as well.
You won’t notice any difference because the app works seamlessly on most Windows operating systems.
Which file type is most likely to contain malicious code?
The most common types of malware are viruses, which can delete files or directory information, spyware, which can gather data from a computer system without your knowledge, and worms, which can replicate and tunnel through your computer’s memory and hard drive.
Malware can infect your computer in a variety of ways, but one of the most prevalent is through opening an email attachment that contains malware.
For example, you can receive an email from an unknown sender that instructs you to open a file that you are unfamiliar with.
EXE files are one of the most often used file formats in the Windows operating system. It contains an executable program, which may be launched by simply double-clicking on the file in question.
BAT files are text files that contain a series of line commands that will run whenever the file is opened, making them a popular choice among malevolent programmers.
The CMD file format is a common file type for malware writers to use. In some cases, it can be used to erase files from a directory, or it can replicate itself and open a program repeatedly to deplete a computer’s resources, causing the computer to slow down and eventually fail (fork bomb).
The COM file is a type of executable file that is widely used to execute a set of instructions. If you open a file that includes malware and the instructions are followed, your computer will be harmed as a result of the actions.
Because we live in the digital age, malware is a constant concern. You may be a target, whether or not you are aware of it. As a result, it is critical to be aware of file types that may be potentially dangerous.
Also, keep in mind that you should never open email attachments from unknown senders. The use of suited antivirus software for your OS, which can identify and eradicate malware before it has a chance to spread, is also recommended.
Please note that, If you’ve been having issues where the Xbox Guide button lately, and it appears to be slow and unresponsive, you’re not alone.
Many users have been affected by this issue and Xbox Engineering Lead Eden Marie has officially confirmed the team is trying to figure out what is causing it.
Multiple Xbox users have reported such problems recently, saying that the guide button has a laggy response, which triggered developers to get this sorted out as soon as possible.
Xbox Insiders, if you witness a slow response to the Guide button, please immediately file a bug using the Guide -> Guide Performance category. We've added more logging to try and nail down what's going on.
The Xbox team is trying to solve the controller problem
it was also confirmed that the issue is widespread and affects everybody, but the team is hoping to get enough logs from Insiders to diagnose the issue thoroughly.
Furthermore, users report this issue to be even worse with certain types of games, so it’s best you pause gaming for a little bit until this is fixed, if it really stops you from actually enjoying it.
Xbox One and Xbox Series X/S users have been experiencing issues with the Guide button for a number of weeks.
Since it was confirmed that this nasty issue has spread to a large number of users both inside and out of the Xbox Insider Program, it’s clearly a priority for the company.
Because of this problem, there is an estimated 5-10 second delay between pressing the Xbox Wireless Controller’s Guide button and the menu popping up on the screen.
And although this doesn’t necessarily affect the gameplay experience, it does hinder the quality of life use of the console.
The silver lining here is that the Xbox team is already aware of the issue and is actively trying to diagnose and solve the problem.
However, it won’t be easy, considering they require a bit of crowdsourcing to find the cause. Filing a bug report immediately after experiencing an issue may help expedite the process and help a fix to rollout.
Have you also been experiencing this problem with your Xbox controller? Let us know in the comments section below.
Along with titans Lenovo and HP, Dell dominates the PC market. With remote work on the rise, Dell laptops sales were resurrected and the courageous VMWare and EMC acquisitions allowed this vendor to further consolidate its leading position.
Thus, it’s only natural to want to enhance your digital security with antivirus for Dell laptops. But rumor has it that Dell laptops are by default secure and equipped to face the Web and all the dangers that come with it. So, are Dell laptops secure?
What virus protection comes with Dell?
If we’re talking Windows and we surely are, the Microsoft Defender Antivirus is by default on duty. While it does a fine job keeping common viruses at bay, the Internet is famous for housing ill-intended links, websites, and people relentlessly trying to exploit whatever vulnerabilities they can find in exchange for a good profit.
It’s not a question of brands, but a universally valid fact with which we must all deal. Take, for example, HP laptops. Similar to Dell, they are considered safe to a certain extent due to integrated antivirus solutions.
Now, most Dell systems have preinstalled antivirus software and it can be the Defender or something else. Which antivirus comes with Dell?
It’s usually McAfee, either in the form of a free 30-day trial or up to 36 months’ worth of subscriptions. You might be wondering: Why does Dell use McAfee? Before anything else, we have to clarify that they do not own McAfee.
Instead, the 2 companies have developed a fruitful commercial relationship as we often encounter between hardware and software providers, and McAfee’s top-rated reputation and long expertise recommend it for the job.
Does my Dell need antivirus?
Since Dell laptops come with preinstalled antivirus programs, you can rely on the tools at hand to harden your device against online threats or deploy a third-party antivirus software for Dell laptops.
Our guess is you value your digital assets, be it confidential information, valuable data, or online privacy, and you’d want a solution that won’t comprise your security.
Just like any other brand, Dell laptops are only as secure as you make them. Thus, deploying the best antivirus for Dell laptops becomes quintessential for sensible security practices.
If you’re looking for that one program to meet all your expectations, you’re about to hit de jackpot. The cybersecurity jackpot, that is.
Tip
Keep in mind that most Dell computers have preinstalled antivirus protection.
Since running multiple security programs simultaneously can cause your system to lock up or generate all kinds of incompatibility errors, software clashes, interferences, and so on, you should uninstall the built-in solution before deploying a third-party antivirus for Dell laptop.
Antiviruses don’t really see PC brands, so the magic is in the specs. And that’s where our quest for the best antivirus for Dell laptops started. We made sure all the entries in this top are fully compatible with the Dell infrastructure.
Of course, your personal habits will heavily influence the decision, along with budget considerations, preferred operating system, and so on.
Nevertheless, there are a couple of criteria with broad applicability that are bound to set you on the right track.
A multi-layered defense that combines different techniques and technologies in order to cover a wide spectrum of web nastiness is a must.
Efficiency when it comes to performance is just as important. Thus, you need to make sure you pick an antivirus solution that not only secures your device but allows for a smooth and fast digital experience.
Our seasoned testers here at Windows Report had a blast deploying each of the antiviruses in this selection on one of our machines. We used a Dell XPS 15, a true pioneer in many ways, with an i7 processor, 8 GB of RAM, and 500 GB worth of storage.
From stress-testing, speed and performance measurements during quick and in-depth scans, functionalities comparison, and more – everything went under the radar with satisfactory results.
That’s how we were able to determine if each antivirus had what it took to make the cut. And they sure did.
Tip
Here are the main criteria on which we focused in order to pick the best antivirus for Dell laptops:
➡ Prevention, proactive or early threat detection (high scores in independent testing laboratories and low false-positive rates) ➡ Instant identification and reaction to suspicious files (real-time protection is a must along with on-the-spot isolation/quarantine capabilities) ➡ Strong removal capacities (to completely flush away and neutralize all malicious apps and signs of infection previously detected) ➡ Backup and recovery functions (to safely retrieve data and/or programs post-sanitization) ➡ Impact on performance (low CPU consumption, performance optimization, lightweight infrastructure, small-sized update files) ➡ Customizable scans and options, exemption settings, plus comprehensive reporting ➡ Multi-layered defense and multi-tech blends (IA, machine learning, heuristics, Cloud, virus signatures databases, etc.) ➡ Good price/value ratio (multi-device coverage, license transfers, cross-platform compatibility) ➡ Online privacy-oriented tools (audio and/or video protection, traffic and/or data encryption, anti-hacking and anti-ransomware defense) ➡ Network surveillance and web filtering modules ➡ Automatic virus definition updates to keep emergent threats contained
We love ESET and we’re not afraid to shout it out loud. However, if it were possible to have two contenders in the 1st position, Bitdefender Total Security would have been the obvious choice.
Similar to our previous recommendation, this best antivirus for Dell laptops takes great pride in its dual nature. It’s as ruthless with viruses as it’s delicate on your system and we are completely smitten with this adaptive approach.
This best antivirus for Dell laptops relies on revolutionary AI-based technologies to detect, block, and even predict threats with the best scores in the industry.
Its improved real-time data protection looks beyond viruses and is able to detect the newest threats thanks to a unique combination of advanced behavior-based threat defense, web filtering technology, and a top-rated virus engine.
In fact, its multiple protection layers will neutralize all existing and emerging threats. Thus, you can rely on built-in anti-phishing and anti-fraud protection, a Safe online banking module with a dedicated browser, Bitdefender VPN to encrypt your Internet traffic plus anti-tracker, anti-ransomware shield, and more.
Since virus removal itself can cause a fair share of havoc, remediation capabilities are not to be ignored. Fully anticipative, Bitdefender boasts a Rescue Environment in order to deal with rootkits, clean up and restore your data before Windows even starts.
Now, we mentioned Bitdefender’s lightweight infrastructure earlier on. But is it really possible to get impeccable protection without sacrificing speed or computing power?
With this best antivirus for Dell laptops, you can get the best of both worlds: airtight security and uncompromised performance that never skips a beat. Trust us, we tested it long and hard while constantly monitoring the Task Manager and the CPU gauge barely flinched.
Bitdefender Total Security does not settle for having a minimal impact on your system’s resources. It raises the bar with patented technologies that enhance overall performance and speed up boot time such as the OneClick Optimizer.
The Battery Mode takes it to the next level by tweaking system settings and updates in order to allocate resources where it matters the most.
Dedicated Game, Movie & Work Modes further pause background activities and halt notifications to allow you to get the most out of your Dell rig.
Finally, the exclusive Bitdefender Photon technology perfectly adapts to your configuration and specs in order to save up on computing resources while the Global Protective Network feature takes heavy scanning to the cloud in order to guarantee uncompromised system performance and speed.
TotalAV is a simple, lightweight antivirus with real-time protection, WebShield browsing protection and built-in clean-up tools. One licence covers Windows, Mac, Android and iOS.
Our quest for the best antivirus for Dell laptops would not be complete without McAfee, the official recommendation to secure Dell systems, as indicated by the manufacturer itself.
You might be wondering: Why does Dell recommend McAfee? Well, it’s the perfect balance between award-winning antivirus, performance optimization, and comprehensive privacy and online identity protection tools that make it an ideal choice for securing Dell laptops.
McAfee Total Protection delivers a comprehensive Internet security suite that can repel ransomware, spyware, and other malicious attacks on a multitude of platforms and devices without slowing you down.
In fact, Performance Optimization is a big deal for this best antivirus for Dell laptops and it spares no effort in order to provide uncompromised speed along with multi-faceted security.
Thus, McAfee will automatically detect resource-intensive apps in order to free up bandwidth when you need it the most.
Privacy is also privileged and you get a plethora of options to encrypt data, erase your digital footprints in order to avoid tracking, anonymize your browsing and secure your Wifi connection to its core.
From spam filtering capabilities to 256-bit AES storage encryption and McAfee shredder for your sensitive files, password management, Secure Browsing module, everything is included and available right at your fingertips.
The Identity Protection Service with Dark Web monitoring and a secure, bank-grade encryption VPN will keep you, your data, and your traffic safe from exploits of all kinds.
Speaking about network traffic, you also get firewall protection that will prevent hackers from accessing your home network.
We know that antiviruses are steadily shifting towards more complete security suites with all kinds of improvements, enhancements, and add-ons.
Since threats evolve, cybersecurity guardians have to step up their game in order to retaliate and Avast Premium Security is one tuned-up antivirus with many bonuses up its sleeve.
As they like to put it, Premium Security is more than just antivirus, it’s an end-to-end security suite designed to cover all your needs in terms of protection.
Thus, it can keep you safe from ransomware attacks, remote access hacking attacks, malware, viruses, scams, spyware, and more.
This best antivirus for Dell laptops will make sure you never land on a spoofed site thanks to its unique combination of web filters that block suspicious pages and downloads and real site module that checks sites’ authenticity in order to prevent data or money theft.
Your sensitive data – including your webcam and browser-stored passwords – are not only shielded against ransomware and spyware, but also against remote access attacks.
AVG is yet another strong contender that simply cannot be omitted when searching for the best antivirus software for Dell laptops.
Just as our previous recommendations, it boasts comprehensive tools tailored to neutralize a plethora of threats and keep you safe while browsing, working, or having fun online.
Its aim is to successfully protect every part of your digital life and we must admit it does a spectacular job securing your passwords, payments, browser, webcam, emails, network, system, privacy, and personal files against ransomware, viruses, malware, hackers, and more.
This best antivirus for Dell laptops relies on a complex infrastructure combining top-rated antivirus engines, AI-powered malware detection, behavioral analysis, and cyber capture to deliver impeccable defense.
Propelled by real-time updates, AVG Internet Security will even scan for PUA that is harder to detect by traditional means and the toolbar remover will eliminate potentially dangerous browser extensions.
Speaking about scanning, you won’t have to worry about painstakingly long scans that drain your Dell laptop’s resources.
We tested its Turbo Scan feature and we are thrilled with the results. Customization is key for this security software, thus you can even scan links in order to pinpoint suspicious websites.
Moreover, the Web Shield checks for hidden malware before downloading items, while the Fake Website Shield will automatically guide you away from spoofed pages.
Finally, an enhanced, fully customizable firewall will make sure your files are safe from hacking and exploits while the Wi-Fi Guard will automatically alert you when trying to connect to an unsecured wireless network.
Bottom runners
Besides the products that made the list after our rigorous testing process, there have been other antiviruses that proved their capabilities.
Even though they will most likely not with an award for the best antivirus for Dell laptops anytime soon, they could still make good options to consider.
With real-time award-winning protection, this antivirus for Dell laptops safeguards your device, your online identity, and even your transactions.
Its high compatibility makes it a great protection option for laptops, smartphones, desktops, and tablets. Thus, you won’t have to worry about specs matching up or not.
Avira does not hold back when it comes to securing your digital life. Its extensive security suite includes multiple layers of protection against the most diverse threats.
It will protect you against ransomware, scams, malware, and viruses and it even throws a free VPN into the mix to anonymize your web browsing.
And did we mention that this best antivirus for Dell laptops does not cost a single dime?
F-Secure’s flagship edition is tailored to protect all your devices, including your Dell laptop. Its state-of-the-art tools and techniques include advanced parental controls, banking, and browsing protection.
It also boasts a convenient gaming mode with enough optimizations to keep your digital experience smooth and snappy, just as you like it.
How can I tell if my Dell laptop has a virus?
How can I tell if my Dell laptop has a virus?
Viruses have an infamous reputation and we all know they’re bad for us. But bugs take many forms and not all of them flutter a big, flashy blue screen marked with a Virus tag to announce their presence.
In fact, malware grows more sophisticated with each day that passes by. Emergent threats are now polymorphic and there is even hidden malware that can bypass average protection systems and only act out when it’s too late.
Not all of them are designed to take over your PC, some are coded to exfiltrate data without ever getting in your way. Others monopolize resources or hijack your browser, so infection is not always easy to spot.
But the signs will definitely be there, you just need to know where to look. After all, the devil is in the details.
How do I know if I have a virus on my Dell laptop?
How can I protect my Dell laptop from viruses? Start by installing a good antivirus for Dell laptops, back up your files regularly, and don’t forget to update your OS to keep things running smoothly.
We know that you really appreciate the Dark Mode feature, regardless of what app we are actually talking about.
Not only does it make the software look a lot better, some say, but it also acts as a major eye strain reliever, which is extremely useful especially if you spend a lot of hours in front of your PC.
We are happy to announce that the Redmond tech giant has already rolled out this feature for Notepad, but only Insiders get to enjoy it for the time being.
Insiders are already testing the new and improved Notepad
Notepad, one of the applications that have been part of Windows for as long as the OS existed, finally receives its very own Dark Mode feature.
Microsoft just released the first preview of a new Notepad app built specifically for Windows 11, featuring a new Fluent design interface that matches the rest of the Windows 11 UI, and the above-mentioned feature.
Although, until now, this feature was only available for Dev Channel Insiders, we’re pleased to inform you that it has now found its way to the Beta Channel as well.
But while the visual updates such as the addition of Dark Mode, updated right-click menu, and Windows’ new design language are nice, the new Notepad also brings some interesting new functionalities.
In the current version of the app that ships with Windows 11, the text search tool and the find and replace tool are two different pop-up windows, accessed by two different keyboard shortcuts.
This redesign combines them into one floating bar instead of the old way of doing things, which takes us back to the much older versions of the operating system.
Redmond officials also stated that multi-step undo will also be included, which replaces the old version’s undo system that only lets you go back one step.
You’d like to know that Word Wrap is still off by default, even though it has been moved to the View menu.
We’re not exactly sure how long it’s going to be until this will be rolled out to the general public, but it will most likely be really soon, considering the app seems to be pretty stable.
Ubisoft fans this one is for you, and boy do we have some great news to share with everyone today. Your favorite gaming creators are preparing a lot of goodies for you in 2022.
Besides the big reveal of the upcoming arrival of Rainbow Six Extraction to all Xbox Game Pass subscriptions ever since its launch, they also announced that Ubisoft+ is incoming to Xbox consoles.
Ubisoft Plus was originally launched for PC and includes access to more than 100 Ubisoft games, including new titles such as Far Cry 6, at the price of $14.99 per month.
Ubisoft+ will grant free access to DLCs and expansions
Just like any other gaming subscription, Ubisoft+ offers its members access to a curated games library for a monthly cost, as we mentioned above.
When it first came out, back in 2019, it was called Uplay+, becoming Ubisoft+ last year, and also expanding its reach from just PC to Google Stadia and Amazon Luna.
Besides granting you early access to all the new Ubisoft games, this subscription service also boasts access to most games’ DLC and expansions at no extra cost.
Now this is something that a lot of fans were surely waiting on their favorite company to do, and the fact that the service is also coming to Xbox is an unexpected bonus for them.
We’re bringing Ubisoft+ to Xbox!! Expect more news in the future ?
We know that, once the announcement has been made, a lot of people have started growing impatient and are wondering when this will start becoming available.
Unfortunately, no specific dates were given as to when Xbox console owners can expect to get their hands on the subscription.
However surprising this would be for some people, this is actually not the first time a major publisher has brought over their subscription service to a console platform.
Other examples include EA bringing EA Play to Xbox, as well as PlayStation some years ago. And who knows, maybe we’ll even see other studios do the same and come up with their own subscription services.
The question on everyone’s lips right now is if this service will be an Xbox exclusive, or if it will at some point also become available for PlayStation users as well.
Would you be willing to purchase Ubisoft’s new subscription for your Xbox console? Share your opinion with us in the comments section below.
If you’re often using the Windows 11 photos app for sharing or viewing images, then it just got a bit better for you. Spotted by XDA Developers, the latest public non-Windows Insider version of the app has several improved image editing tools.
Available in version 2021.21120.8011.0, the enhancements we noticed right away include four key things. You’ll find a relocated cropping tool, new aspect ratio options for images, an easy-to-spot/understand adjustment tab, and new image mark-up options.
A lot of the improvements are self-explanatory and have moved directly under the edit button on an image, instead of a sidebar as in Windows 10. As an example, the cropping tool now opens under an image, with an additional option to flip an image horizontally, and alongside aspect ratio options.
The adjustments section, meanwhile, has moved to the right side of the app. That’s also where you’ll find new filters, which are a bit more clearly labeled. Finally, there’s the new mark-up option, which no longer opens in a separate mode. We’ve included a gallery of these options for you below, should you not yet have this latest version.
Image adjustments
Filters
Mark-up
Aspect Ratio
Cropping
Microsoft has been on top of its game recently with these app updates. Over in the Windows Insider Program, Beta Channel testers got a newly updated Notepad. Select Windows 11 users are also getting a new Media player, too.
While modern smartphones and desktops can handle all kinds of high-quality audio formats, MP3 is still one of the most popular audio formats average users enjoy.
If you prefer to listen to their music, you can use an MP4 to MP3 converter app to change your favorite video tracks into MP3 format.
Using such a tool, you will actually convert a video file into an audio file. There are several MP4 to MP3 converters online and offline that can help you to do that instantly.
What should you look for in an MP4 to MP3 converter?
There are a lot of tools out there that can help you with the conversion, but not all of them work as seamlessly as they should.
That’s why even if it’s a simple process, you will save a lot of time by considering some of our recommendations when looking for the right one.
➡ Compression and quality
MP3 is a compressed file type but even these audio files can have different quality settings, depending on the input.
If you want the best quality audio, start with an MP4 that has high-quality sound.
Sample rate selection in Adobe
Then, look for a converter that doesn’t downgrade the sound sampling rate for the sake of high-speed conversion. And if you have output choices, that’s a good sign.
➡ Features vs. quality
If you’re just going to make a quick playlist for the road out of your music videos, you can also do that quickly online, never minding the quality, you can do that with an online converter quickly.
Besides the fact that you will extract the best possible audio track, you will be able to edit it and even enhance the sound by using an equalizer or special effects.
In this article, we have put together a list of MP4 to MP3 converter software and online audio tools so that you can convert your favorite video tracks into sound format instantly.
What are the best tools to convert from MP4 to MP3?
Adobe has a long history of creating top-of-the-line products when it comes to handling multimedia files and formats.
As such, Adobe Audition is Adobe’s response to the market’s need for an audio editor. Simply think about everything a typical audio editor can do, and Audition will do even more, and better.
Professionals will appreciate how it features both a multitrack, non-destructive mix/edit environment and a destructive-approach waveform editing view.
Of course, for tasks as simple as extracting the audio from MP4 files and converting them into MP3, Adobe Audition is more than enough.
But we need to remind you that this is a tool dedicated to professionals so it will be a little more difficult to master all its features.
Here are some of its best features:
Playback and recording improvements
Multitrack Clip improvements
Third-party effect migration
Multitrack UI improvements
Add or delete empty tracks
Zoom to time
Adobe Audition
If you need a tool that will extract the audio from MP4s and convert it into MP3s, then Adobe Audition is the professional tool that you need!
Of course, getting Adobe Premiere Pro just for this would simply be a waste of its capabilities, since it is one of the most used video editors in the world, both a professional and casual level.
It doesn’t matter if you just want to turn a movie into black and white or edit and create your own mini-Hollywood blockbuster, Adobe Premiere Pro has everything that you need.
And if you add Adobe After Effects in the process, you can really spice up your videos in a Michael Bay style.
Just like Audition, Adobe Premiere Pro can be tested for free for 7 days, so don’t hesitate to give it a try, because it will be well worth the effort!
Here are some of the best features of Adobe Premiere Pro:
Timeline-based video editing
Video cropping and merging
image effects and filers.
Soundtrack addition
Basic special effects
Adobe Premiere Pro
Get the best video editor in the world so that converting MP4 files into MP3 will come as easy as it can get.
WinX HD Video Converter Deluxe, as the name suggests is a video converter that also comes with MP4 to MP3 file conversion feature.
WinX HD Video Converter Deluxe offers similar features as Uniconverter. It also comes in a basic free and advanced premium version.
It offers advanced features such as full 4K support allowing the user to convert 4K UHD videos, the ability to customize the output profiles with a built-in setting, and lossless transcoding for converting without quality loss.
The batch convert features allow you to convert multiple MP4 files to MP3 format simultaneously. The built-in lightweight video editor allows you to create and edit your personalized video with ease. It offers all the basic video editing features including trim, rotate, crop, effect, enhance, and watermark.
With an intuitive user interface and a free basic version, the WinX HD Video Converter Deluxe is an excellent MP4 to MP3 converter to get you started.
Beyond this, it is worth mentioning that WinX HD Video Converter Deluxe can convert MP4 to other formats besides MP3. E.g. AAC, AC3, WMA, OGG, FLAC, ALAC, so make sure to check it out today!
Take a look at its most notable features:
Can convert MP4 files to a lot of other formats besides MP3
4K UHD video support
Batch conversion
Easy to use and reliable
Ultra-fast conversion
WinX HD Video Converter Deluxe
If you have an MP4 video file and you just need the audio to be extracted from it, then you can rely on WinX HD Video Converter Deluxe!
The next entry on our list is yet another tool that is made with the average user in mind, as it boasts a simplistic interface and controls, and a pretty straightforward purpose: the ability to convert to and from the MP3 format.
As an example, this program can easily convert WMA, WAV, CDS, AIFF, MPEG, AVI, and more to MP3 files or convert MP3 files to another audio format.
More so, it allows you to batch convert thousands of MP3s at once, but it comes with a CPU optimizer so that such massive conversions don’t mean your PC will be sluggish at all.
Therefore, with such a potent program you will convert audio files easily and get your music fast, while also normalizing audio levels while converting MP3 files.
Here are some of the best features of Switch MP3 Converter Software:
Can extract MP3 files from imported videos or DVDs, including MP4s
It can access an online database to add song information to MP3s
Lets you play audio tracks prior to MP3 conversion
Automatically normalize audio levels in MP3s
Batch-convert thousands of MP3s at once
Switch MP3 Converter Software
Easily convert MP4 files to MP3 ones and access an online database with this great program.
With support for over 150 video formats and the ability to download videos from 1000+ online video-sharing websites, Uniconverter is a popular MP4 to MP3 converter you can use for high-quality conversion.
Uniconverter offers a highly optimized timeline to convert audio from various formats to MP3. It is a multipurpose file converter with integrated video editing and downloading features.
To convert any MP4 files, you need to drag and drop the files into the timeline. Unfold the profile list to get all profiles.
Under the General Audio section, set MP3 as the desired output format. Set a start and end time to trim the MP4 file and click Clip to confirm.
You can also customize the output by changing the export settings. Finally, click on Convert to start converting the file.
While Uniconverter offers more features with the premium license, basic audio conversion can be done using the free version of the tool.
Take a look at some of its best features:
Drag-and-drop functionality
Support for over 150 video formats
Download videos from more than 1000 video-sharing websites
High optimization timeline
Integrated video editor
Uniconverter
Drag and drop your favorite MP4 file and convert it with ease into an MP3 one by using Uniconverter.
VideoProc Converter is another top-level software that allows you to easily and efficiently transform files from one format to another, and most importantly, MP4 to MP3s.
This software runs perfectly on both Windows 11 and macOS 12, ensuring that even when using the latest OS releases you won’t encounter any annoying problems, and the quality of the results will be optimal.
This software is the only fully-accelerated video processing software that uses the GPU to process files effectively, even when dealing with 4K or 8K quality levels.
When it comes to the actual processing speeds, it can reach levels of up to 47x, making it one of the fastest on the market.
Some other useful features:
Video, audio, and DVD converter
Works with any format, including devices like smartphones, action cams, drones, camcorders, etc.
Amazing quality results
Cut, crop, and merge capabilities
Advanced editing features – video stabilization, GIF creation, video enhancement
Screen Recorder
VideoProc Converter
VideoProc Converter will ensure that all your MP4 files will be converted to MP3 quickly and with amazing quality.
Vidmore Video Converter, as the name suggests is a video converter that also comes with MP4 to MP3 file conversion feature.
Vidmore Video Converter offers similar features as Uniconverter. It also comes in a basic free and advanced premium version.
Vidmore comes with advanced features such as full 4k support allowing the user to convert 4K UHD videos, the ability to customize the output profiles with the built-in settings, and lossless transcoding for converting without quality loss.
The batch convert features allow you to convert multiple MP4 files to MP3 format simultaneously.
The built-in lightweight video editor allows you to create and edit your personalized video with ease. It offers all the basic video editing features including trim, rotate, crop, effect, enhance, and watermark.
With an intuitive user interface and a free basic version, the Vidmore Video Converter is an excellent MP4 to MP3 converter to get you started.
Online Audio Converter is yet another basic yet free online audio converter that probably has the most user-friendly interface among all the online audio converters.
It can also fetch MP4 files from cloud storage services, including Google Drive, Dropbox, and even URLs.
Using the app is easy. Open Online Audio Converter and click on Open Files. If you want to import from your Google Drive or Dropbox, click the respective icon.
Select the format you want to convert the imported file to (MP3, WAV, M4A, etc.). Drag the slider to set the output quality. Click the Advanced setting button to change bitrate, sample rate, channels, fade-out, and in options.
Click the Convert button to start converting the file. Once done, download the converted file to your computer.
Take a look at some of its most important features:
No need to install software on your PC
User-friendly interface
Cloud storage integration
Advanced features like bitrate, sample rate tunning
VLC Media Player is one of the most popular free and open-source media players available on all the major computer platforms. One not-so-known feature of VLC is its ability to convert MP4 files to MP3 format.
As you might already have it installed on your machine, we will explain how to do that with just a few clicks.
Open the appon your computer. Click on Media and select the Convert/Save option. Click on Add, select Browse and choose the MP4 file that you want to convert to MP3.
Click on Convert/Save again. Under Settings, in Profile, choose Audio as MP3. Click on Browse and select the file destination. Hit Start to convert the file.
VLC Media Player may not be the most feature-rich MP4 to MP3 converter available; however, the fact that most of the users have it installed on their system makes it the best converter for basic conversion tasks.
Here are some of the best features of VLC Media Player:
The oobesetings error in Windows 11 is a blue screen error that occurs because of a damaged Registry. A problem with the Registry can lead to errors that prevent your computer from booting correctly or even starting at all. If you get this error when trying to open a new file for the first time, you’re probably experiencing a normal memory shortage. Increasing your virtual memory may help correct the problem.
Your computer might not have enough installed memory to handle all of your programs at one time. Alternatively, one can install more RAM or reduce the size of your programs so they run faster.
What can I do to fix the oobesttings error in Windows 11?
1. Restart your device
The easiest way to fix this issue is by restarting your computer. This will solve the challenge if it occurs due to temporary causes like a pending service pack or an installed application that might conflict with your current settings.
2. Use the SFC utility
Click on the Search icon on your taskbar and type cmd.
Select the Run as Administartor option.
Then, key in the following command: sfc/scannow
Wait for the scan to complete, then restart your device to check whether the issue has been resolved.
For more advanced features, we recommend using specialized repair software. They will scan your system for corrupted files and repair them automatically with healthy components from its extensive database.
3. Repair the registry
Press Windows key + R key on your keyboard to open the Run dialog box.
Then, key the following code in the Run window and press Enter key on your keyboard to open the Windows Registry Editor: regedit
Navigate through the following path: HKEY_LOCAL_MACHINE/SYSTEM/CurrentControlSet/Control/Session Manager/ Memory Management.
Right click on CommitLimit value in right pane and choose the Delete option. Click Yes button when you get a confirmation message.
Close the Windows Registry Editor and restart your computer.
Navigate to the System section and select Recovery.
Now click the Reset PC button.
Select the desired option. In most cases, it’s better to use Remove everything, but if you choose it, be sure to back up your files beforehand.
Select the type of reinstall that you want. We used the Local reinstall.
Confirm your reinstall settings.
Click Reset to start the process.
Follow the instructions on the screen to finish it.
If you still have problems after trying all the other solutions, reinstall Windows. This will delete all your files, and you’ll start over with a fresh system.
Why does the oobekeyboard error occur in Windows 11?
If you are getting this error variation instead, let us tell you that the oobekeyboard error will prevent you from using your computer. It is a serious challenge that occurs due to corruption in your Windows 11 system files.
Moreover, the error can appear because of a damaged OS registry. A faulty hard drive often leads to this issue as well.
You may have received the error message because your system files are corrupt or a critical system file has been deleted or misplaced.
Furthermore, the problem also occurs if your Windows 11 registry is missing or damaged. If you do not repair the errors on your own, the oobekeyboard error will continue indefinitely and prevent you from using your PC.
The best way to fix the error is to run a complete diagnostic scan with an advanced cleaner program. This software will automatically scan and repair any problems that are found within seconds, ensuring that your computer will run more efficiently and without errors.
We also have a guide that will help you understand the OOBEEULA error on Windows 11 and show you how to overcome it effortlessly.
Why is the Surface Go Oobesettings Something went wrong error occuring?
The Surface Go Oobesettings Something went wrong error appears in Windows 11 when your device is infected by malicious third-party software.
Therefore, it is important to note that the error can show up in different ways, depending on the particular infection. The error message itself is not dangerous, but it indicates that you need to take immediate action to fix the problem by using a great antivirus.
Microsoft has acknowledged this issue and will most likely solve it in a future release. It only affects PCs that connect to the Internet during OOBE when a new computer is setting up for the first time, for example, or when you’re installing Windows 11 after using Refresh or Reset.
The oobesettings is a Windows utility that is used to reset the user settings and preferences in Windows 11. It displays a wizard that helps you configure your computer after a network or hardware change, such as adding or removing an add-in card, changing the power settings, or installing new software.
It performs an automatic configuration of the operating system by detecting basic hardware components, configuring Microsoft Office, and updating the system settings. The utility is part of Windows and does not require any installation to run.
Why does the oobesettings error appear in Windows 11?
It is a very common issue for Windows 11 users. Usually, the error will appear when you open or use a certain application, especially some applications of games. When you start to use the application, you will get an error message like:
Cannot start [some name]. This app has failed to start because oobesettings.dll was not found.
The cause of the oobesettings error message is a corrupt registry. This is one of many error messages that can occur when you are unable to open a file or access the data that you need. It can be frustrating to look for a solution but the good news is that it’s possible to fix these error messages.
Tip
To avoid this kind of error in the future, it is recommended that you create regular backups and store them in different disks or locations (if possible).
Does the oobemsangcenroll error affect Windows 11?
Oobemsangcenroll is another error message that you get when an update isn’t successful. This can happen for several reasons, but it’s always important to talk to your IT administrator about any updates that aren’t correctly installed.
In some cases, there’s a conflict between new and old components that need to be resolved before you upgrade everything. If this happens, make sure you have a backup just in case you need to revert to the previous version of the software.
If none of these methods works for you, it’s possible that there’s some other issue at play here. For example, if you’re using a VPN or proxy server.
It could also very well be interfering with Windows’ ability to connect properly with its own settings. If that’s the case, try disabling these programs and see if things improve.
Therefore, if this error occurs during an upgrade, revert to your previous version of Windows and then run Windows Update again. This should resolve any outstanding issues and allow you to continue upgrading without problems.
Which of the above methods helped you resolve the problem? Share your thoughts with us in the comments section below.
Cryptocurrencies and especially Bitcoins have triggered a massive frenzy among users. Many installed crypto-mining software on their computers hoping to strike digital gold.
Recent reports from many cybersecurity companies revealed that many entities (including torrent developers) have installed crypto-miners on users’ computers without telling them.
Taking into account this severe threat, you should really consider installing a crypto-jacking blocker on your computer.
For the time being, the offer is not as diverse as the one for, let’s say antivirus software, but we’re sure that many software developers will make building crypto-jacking blockers their priority in the future.
Without further ado, here are the best anti-cryptocurrency mining tools that you can install on your Windows 10 computer.
Most cryptojacking arrives through a web page running a mining script or a bundled download, and TotalAV covers both routes. WebShield blocks known malicious sites, including those hosting miners, and real-time protection stops miners bundled with software from installing.
Scheduled scans catch anything already running, the ad blocker in the higher plans cuts down the scripts that load in the first place, and one subscription covers Windows, Mac, Android and iOS.
WebShield blocks malicious and mining sites
Real-time protection against bundled miners and malware
Scheduled scans to catch anything already running
Ad blocker in the higher plans
Windows, Mac, Android and iOS
TotalAV
This well-known effective antivirus will keep you safe from crypto miners.
The reason we block CoinHive is because there are site owners who do not ask for their users’ permission to start running CPU-gorging applications on their systems. […] However, for those that do not know about this kind of technology, its purpose, or what it could do to their system, we are not comfortable allowing greedy website owners to abuse these users and so, we block it.
Of course, you can always change your mind and allow the crypto miner to run on your computer by adding it to the exceptions list.
Let’s take a look at some more of its core features:
Malwarebytes Premium
Keep your device protected from harmful ransomware and spyware attacks. Get the best deal now!
When it comes to free antiviruses, most of the choices on the market run pop-up ads for ad revenue. Avira Free Security, however, is completely free and doesn’t run any type of ads.
In addition, it comes with an in-built fast VPN and other privacy-related tools, as well as a PC cleanup tool. The software is popular and has been used by millions of people worldwide.
Let’s have a look at Avira Free Security’s main features:
Because some platforms are difficult to access due to geolocalization concerns, a VPN can assist you in hiding your IP address.
When you are in a location where you are unable to access it due to geoblocks, a VPN can save the day and allow you to advance. Nonetheless, it is important to recognize that not all VPNs are totally compatible with bypassing restrictions, such as a bitcoin platform.
This is where Avira Free Security shines with sites like Binance and eToro. If you want to go deeper and learn more on this topic this comprehensive guide will help you.
Avira Free Security
Avira Free Security is a completely free strong antivirus software used by millions of people.
Avast Free Antivirus offers a strong defense against online threats. Even if this is the free version of the software, it utilizes advanced AI and machine learning systems.
In other words, the software is more than capable of dealing with viruses that were never seen before. The advanced AI surpasses the standard industry antivirus by miles.
Avast Free Antivirus is capable of finding Trojan viruses easily, it also quarantines suspicious files and gives detailed reports of its scans.
Let’s take a look at some more of its core features:
Do not disturb mode
App behavior shield
Lightweight
Low energy consumption
Advanced scanner for malware, ransomware, etc
Avast Free Antivirus
One of the best anti-malware tools in the world, now completely free!
How do you know if your PC is being used for mining?
To know for sure if somebody else uses your PC to mine cryptocurrencies is when you’re having slower performance, CPU overheating, or laggy task execution.
At the same time, you should look for excessive power consumption and draining computer resources.
There you go, these are eight of the best crypto-jacking blockers that you can install on your Windows 10 device.
If you have other suggestions or recommendations, let us know in the comments section below.
Windows 11 made a lot of big changes when it first came out and simplified a lot of the menus to make the system as a whole more approachable and user-friendly. But certain aspects of the OS remain in the past and that is the case for the File Explorer.
The File Explorer is the system’s default file manager that, in the past, has been pretty confusing to use. That is until the release of Windows 11, which made the app much more simple and easier to use.
However, it still forces you to open two separate windows instead of a tab if you want to browse through and this can be a little annoying.
We live in a world where our favorite web browsers like Firefox, Chrome, and Edge, allow you to surf through the internet with multiple tabs open with no need to switch between two separate windows.
Multiple tabs are so ubiquitous that it’s difficult to imagine a browsing app without that capability.
Fortunately, there’s a way to add multiple tab functionality onto File Explorer, and that is through downloading QT TabBar. It’s the best way to get multiple tabs working on Windows 11.
What is QT TabBar?
It’s third-party software that integrates itself into File Explorer and enables multiple tabs to be open at the same time.
This may not sound like a big deal since it’s so ubiquitous on a web browser, but when it’s missing, it’s highly noticeable and makes using the app not as intuitive.
It’s unknown if Microsoft plans on including this feature in a future version of Windows 11. It’s certainly possible since Windows 10’s File Explorer had multiple tab functionality.
It’s entirely within Microsoft’s power to add this, but nothing official has been said.
Installing and configuring QT TabBar can be a little tricky. This guide will show you how to download and configure QT TabBar so you can customize the app however you want to suit your needs. Zip file apps like WinRar or 7Zip are needed for QT TabBar.
How do I enable QT TabBar in Windows 11?
1. Downloading QT TabBar
In a search bar, search for QT TabBar.
Locate and click the QuizoApps entry.
Click on the QT TabBar for Windows 11 hyperlink. This will begin the download.
A small may appear asking you what you want to do with the file. Click on Open with and select your Zip file opener app.
Conversely, you can save the file and hold it for later until you have an app to open it.
Once you’ve made your selection, click Ok.
After downloading, the Zip file app will open.
Click on the folder and select Extract To on the top bar.
Select where you want to extract the file to. As an example, this will choose Downloads.
Click OK.
Go to the destination where the files were extract to.
Locate and double-click the installation file.
A small window will appear asking if you want to make changes. Select Yes.
The QT TabBar Setup Wizard will appear. Select Next.
In the next window, select Next to start the installation.
After installation, the QT TabBar will automatically be installed onto File Explorer.
To add tabs, click on the Plus sign in the top bar.
A small window will appear where you can select what you want to open from a folder to a section of the computer.
Once you’ve made your selection, click OK.
2. Configuring QT TabBar
To change and configure the settings of QT TabBar, first open the File Explorer.
Hover over the Plus sign next to the tab and right-click it.
Scroll down and click QTTabBar Options….
The QTTabBar Options window will open allow you to configure the tabs as you see fit.
The General tab allows you to change the language file for File Explorer if you have one and you can even select if you want to be notified of any updates.
If you want to change how the tabs look, click on the Appearance tab on the left.
To change the appearance of the Tab size, adjust the number of the tab’s Height.
To change the width, click on the drop down menu for Width and select an option.
Auto adjusts the width in accordance with the height, Fixed allows you set the size manuall, and Limit tab width adds a limit to how big the tabs can be.
You can change the tab’s font by pressing the Choose font button and making a selection.
Change the font and select OK.
Change the color by selecting Active in the Text color section.
Pick a color and then click OK.
Clicking on Text Shadow will add a backdrop to the text to make it stand out.
Here, click on Active again. and then choose a color to serve as the shadow.
Choose a color to serve as the shadow. Click OK.
Change the font style by choosing the options on the left hand side.
The drop down menu next to Text alignment changes where the text is placed in a tab.
Once you’ve done the changes you want to make, click Apply on the bottom.
Click OK to close the window and see the changes.
You can also change the tabs’ skin by going to the Tab skins tab at the top.
Click the Download skin image file… in the Rendering of Tab Background and Text section.
In the QT TabBar Image Browser, scroll and find an image you want to be the tab’s background.
Double click it to save the file.
This will open the file explorer. Select a location where to save the image.
Going back to the Tab skins window, select Image file path underneath Close button on Tab.
Click on the button with the three dots and search for the previously saved image.
Find the image, click it, and then press Open.
Click Apply then OK.
You can now see the tab now has the image you downloaded and selected from the library.
3. Changing Tool Bar Design
You can further change the Toolbar’s design by first going to the Toolbar tab in the QT TabBar Options.
Click Toolbar background color to change its color.
Click Choose color…
Select a color, then click OK.
Click Apply to change the color.
You can change the background image by first clicking Toolbar background image.
Click on the drop-down menu next to Image placement to change how the image will look on the tool bar.
Click on the three dots above image placement.
Click on the image you want to place in the tool bar, then click Open.
Click Apply then OK to close the window to see the changes.
It’s worth pointing out how to change the Menu’s apperance by going to the Menu tab.
You can change the style of the File Explorer by clicking on the Menu style down drop list to change how it long.
You can select the Windows 10 style or the Windows XP style, for example.
The menu’s opacity can be changed by clicking the drop down menu and changing the amount.
Click Apply then OK.
As seen in this image, the Menu has taken on the Windows 10 style with its rigid box design.
Are there ways to enhance my Windows 11 experience?
There are lots of things you can do to streamline your Windows 11 experience. There’s a lot of neat tips and tricks that you can do like resizing the taskbar and learning new keyboard shortcuts. My favorite is pressing the Windows Key + A to bring up Quick Settings.
You should also learn how to fix your Windows 11 computer if it keeps freezing randomly. Limited system memory is a major factor behind many computer freeze as well as incompatibility with the GPU. Upgrading to Windows 11 may cause this issue if your old driver doesn’t mesh well with the new system.
For the most part, DirectX is updated automatically so there should never be any issues, but there’s always that odd instance where something just doesn’t work.
Modern computing has brought forth many valuable features and created a new standard where we expect things to always work without fail. Because of this universal standard, it can be incredibly frustrating when something as basic as a shared folder on a network suddenly stops working.
The inability to access shared folders is a problem that plagued Windows 10 users years ago. Back then, some of the solutions to the problem were enabling network discovery and ensuring network services were working.
Fortunately, fixing the inability to access a shared folder is relatively simple. Even Windows 11 will help you out by showing a Network Error where the OS will tell you to check the spelling of the shared folder’s name.
Most of the time, getting the name right is all it takes to gain access to a shared, but other times, it requires a finer touch.
Why can’t I access the shared folder?
There can be a multitude of reasons as to why a shared folder won’t work. There could be a wrongly configured network, incorrect drive settings, and a misspelling above the folder’s name.
And in some cases, the user account behind the folder has inappropriate permission settings.
Before going through the fixes in this guide, it’s recommended that you first talk to whoever is in control of the shared folder. Perhaps some oversight prevents people from having access to the shared folder, like they forgot to enable permissions.
However, if you are the person who is in control of the shared folder, you’ll have to reconfigure and grant network-sharing permissions to facilitate that access. This may also help when NAS is not showing under the Network tab.
This guide will go through different processes that you can try out to fix this shared folder issue.
How do I fix the Cannot Access Shared Folder error?
1. Reconfigure network Sharing permissions
Open the File Explorer and select either the drive or folder on your computer that you want to share. This guide will select a folder, but the methods are the same.
Right click on the folder and select Properties.
In the new Properties window, select the Sharing tab.
Click on the Advanced Sharing button in the middle of the window. This will open the Advanced Sharing window.
Click the checkbox at the top of the window to enable Share this folder.
Enter a Share name underneath Settings for the drive or folder you want to share.
You can limit the amount of users who can have access to the shared folder by changing the number on the right.
Then click the Permissions button under Comments to open another small window.
You can choose Everyone to allow everyone on the network to have access or choose a select few by click on their user names.
Enable Permissions for Everyone by checking all boxes under Allow.
Click on Apply to save the changes.
Click Ok to close the Permissions for Saved Pictures window.
In Advanced Sharing again, click Apply then OKto apply the settings.
If you decided to share a drive, you will see a Shared icon on the bottom part of the screen.
2. Grant security permissions
Select the drive or folder on your computer that you want to share.
Right-click on the drive or folder and select Properties.
Select the Security tab on the Properties window.
Click on Edit in the middle to change permissions.
Click on the Add button.
In the new Select Users or Groups pop-up window, select Advanced at the bottom.
A new window will appear. Click on Find Now to the right.
A series of search results will appear at the bottom of window. Scroll down until you locate Everyone.
Select Everyone in the list and then click Ok.
You’ll go back to the Select Users or Groups window. Select Ok.
You will see Everyone listed in the Security window under Group or user names.
Select Everyone and then check all the Allow boxes in the Permissions for Everyone box.
Click Apply at the bottom of the window to save the changes.
Click Ok to close the Permissions window.
3. Disable the Password Protected Sharing option
Click the magnifying glass icon on the taskbar.
In the Search bar, type Advanced sharing settings and select the first entry you see.
Click on All Networks to expand the options.
Selectthe Turn on sharing… option under Public folder sharing.
Scroll down to Password protected sharing and select Turn off password protected sharing.
Hit Save Changes at the bottom.
Close Advanced sharing settings and restart your computer.
NOTE
Be aware this method can be risky on unsafe networks. If you enable sharing in public, anyone can have access.
4. Enable File and Printer Settings
Open your search bar by clicking on the magnifying glass icon and search for Advanced sharing settings.
If on a private network, click Private to bring down the menu.
Select Turn on file and printer sharing underneath Filer and printer sharing, if not already selected.
Click Save changes on the bottom.
If you’re on a public network, click Guest or Public.
Then select Turn on file and printer sharing if already not chosen.
Hit Save Changes.
Close Advanced sharing settings, then restart your computer.
NOTE
Be aware that turning on file and printer sharing is risky on public networks as everyone can have access.
What are some other basic functionalities on Windows 11 that may fail?
Case in point: sleep mode on Windows 11. Sleep mode allows you to put the computer in a low-power state to conserve electricity while running some of its functions.
It could be as simple as turning sleep mode on manually, but other times it requires you to change some settings.
And in case you didn’t know, Windows 11 has a built-in VPN functionality that some have reported not working. Fixing the OS’s VPN is as simple as updating the computer, but tougher situations require reinstalling WAN network adapters.
Most of the time, a simple restart solves everyone, but other times, there is needs to be a proper solution.
Feel free to comment below if you have any questions about other Windows 11 problems or bugs. And leave comments about guides that you’d like to see or information on Windows 11 features.
It’s not uncommon for search indexing to be turned off via error or some features like web search not bringing results. Whenever you look for something on Windows 11, the OS will show you local results and search results from Bing.
Bing is an alright search engine, but most people use and prefer Google, so getting Bing results is not something many would even want.
How do I disable the search function on Windows 11?
1. Use the command prompt
Open the search bar by clicking the magnifying glass icon and type in Command Prompt.
When Command Prompt appears, click Run as administrator.
Type in this command: REG UPDATE HKLM\SYSTEM\CurrentControlSet\Services\WSearch\Start=3
Press Enter on your keyboard when done.
Then type in net.exe stop "Windows Search"
Hit Enter.
Windows Search is now temporarily disabled. The functionality will reactivate after restarting your computer as soon as you use it.
2. Via the Services app
Open the search bar and type in Services.
Click on the first result you see.
In the Services window, locate the Windows Search entry.
Right-click on the entry and select Properties.
Click on Stop in this new window.
Click on the drop-down menu next to Startup type and select Manual.
Click Ok to save your changes.
To re-enable Windows Services, right-click on the entry again and select Properties.
Click on the drop-down menu and select Automatic (Delayed Start).
Click Start to activate it.
Then Ok to save your changes.
3. Disable the searching feature permanently
Open the search bar and type in Services.
Click the first entry that appears.
Locate the Windows Search entry and right-click it.
Right-click on Windows Search and select Properties.
Click on Stop.
Click on the drop-down menu and select Disabled.
Click on Ok to save your changes.
Now you will have to rename the folder for Windows Search in order to prevent Windows 11 from accessing it.
Open the file explorer.
In the top bar, enter in C:\Windows\SystemApps\.
Locate the folder titled Microsoft.Windows.Search_cw5n1h2txyewy.
Right-click on the folder, then slect Show more options.
Click on Rename and rename the folder.
You will be asked to grant admin permissions. Select Yes.
After renaming the folder, double click and open the folder.
Locate the SearchApp.exe file.
Right-click the file and select Show more options.
Select Rename to rename the file.
Grant the admin permissions when asked.
Close the file explorer and restart the computer.
4. Disable Bing web results from appearing in Windows search
Open the search bar and type in Registry Editor.
Click on the first entry you see.
Click on HKEY_CURRENT_USER to extend the drop-down menu.
Next, click SOFTWARE to extend another drop-down menu.
Select POLICIES.
Click Microsoft.
Then click Windows.
Right-click on Windows, then select New.
Select Key in this new menu.
Name this new key Explorer, then press Enter to save.
Right-click Explorer to open up a menu.
Select New, then DWORD (32-bit) Value.
Name this new entry DisableSearchBoxSuggestions, then hit Enter.
Double-click the entry to open a new window. Set the Value data as 1 and click Ok.
5. Optimize power efficiency by configuring Windows Search (laptop only)
In the Start menu, click on the Settings icon to open the menu.
Select Privacy & security on the sidebar.
Scroll down and click on Searching Windows.
Toggle the swtich for Respect power settings when indexing.
Believe it or not, there are some benefits to disabling the search functionality on Windows 11 besides getting rid of pesky Bing results. These benefits include reclaiming computer resources and space on your hard drive and reducing the amount of power consumed and background tasks.
Plus, disabling functionality helps lower-end PCs that struggle with Windows 11. The system requirements for Windows 11 are pretty high, and by reducing the workload your computer has to deal with makes the machine run smoother and faster.
It’s not recommended that you disable any search functionality. Properly using Windows Search makes it the most efficient search tool on Windows 11, one of the few native apps that outperform third-party ones.
This guide will take you through how to disable the search functionality on Windows 11. It will also explain how to make Windows Search more power-efficient on laptops. Doing so will minimize indexing when your laptop is running low on power.
Are there any other search bar issues I should know about?
Rarely you will run into problems with the Windows 11 search bar, but sometimes you will run into that random glitch. If the search bar suddenly decides to start giving you problems one day, you should restart your computer and search for Windows updates.
If that doesn’t work, you may have to go and run the indexing troubleshooter to find out what is wrong with the search bar. While in the file explorer, it may be good to learn how to add tabs on it while you search so you can keep track of where your files are.
It’s also good to know how to disable File Explorer search history. It’s a great way to keep your information private, especially on shared PCs. Having that search history readily available is annoying.
Feel free to comment below if you have any questions about other Windows 11 problems or bugs. And leave comments about guides that you’d like to see or information on Windows 11 features.
When you need to share sensitive files securely with your clients or coworkers, things get a little bit complicated.
The small ones will fit in your corporate email which hopefully is protected but what do you do with the bigger ones that you can’t attach?
Using a cloud storage platform like OneDrive, Google Drive, or Dropbox will help but those are not quite great for enterprise usage and are riddled with issues.
That’s why here we’re going to show you how to use Sync, a cloud-sharing solution that is fast, secure, and delivers great features for corporate usage.
How can Sync help you avoid common cloud storage issues?
Sync is used by over 1.7 million businesses and that proves its popularity among users all over the world.
But the more important aspect is that this solution is a lot more stable and reliable and that’s why it’s preferred by businesses.
Using Sync can help you avoid the following issues and errors:
OneDrive 0x8004ded7 and 0x8004de40 errors – There are sign-in issues that can be caused by many possible cloud storage problems
Google Drive can’t connect – This cloud storage solution is pretty sensitive for connection issues
You can’t view or download this file at this time – The Google Drive error effectively blocks users from downloading the shared file
There was an error loading the file – It’s a Dropbox error that prevents users from downloading a shared file.
By installing Sync, you won’t have to deal with any of these disruptive issues when you share your sensitive data.
You will get an installer file and running it will start the process. Check the terms of service box and click Next.
If you don’t have an account, you need to create one so make sute the Create a new Sync account is checked and hit Next.
Complete the account information boxes and select Next again.
New indicate the folder that Sync is going to use for sharing and hit Next.
Now start Sync from the Start menu in Windows. You should find it in the Recently added section if you do this right after the installation.
The action will trigger the start of a File Manager window with the contents of the Sync folder you indicated in the installation process. Feel free to add here the files or folders you want to share.
Complete the form with the credentials you set up during the installation and click the Sign in button.
You will discover that the same files and folders you have copied in the Sync folder from your PC magically appeared in your cloud account.
If the user doesn’t have a Sync account, you can click the three points corresponding the file or folder and select Share as link from the drop-down menu.
The link was generated automatically. Now, all you need to do is to enter the email address where you want to send it and hit the Send email button.
If you already have a team set up with your coworkers, you can click the three dots and select Manage team share.
Also, you don’t need to be in your account to make any modifications. You will notice that when you are in your Sync folder on your PC, right-clicking on any file will give you access to the Sync options right there.
That’s it! This is how to share a file or a folder with Sync. The number of steps doesn’t make it justice because after you set up the folder and users you frequently send files to, all is going to be a lot faster.
Other Sync important features
1. Office integration
Sync Pro includes document previews, which makes viewing your documents directly from your web browser easy, without downloading.
And for Microsoft Office 365 subscribers, Sync includes full integration with Office for the desktop, mobile, and web-based Microsoft document editor.
This makes secure collaboration easy because all edits will save automatically back to Sync!
2. Change rights and permissions
With Sync, it’s also possible to manage the users and permissions right from your PC, without the need for file servers or email.
You will also access the activity logs for all users and file actions on shares, to keep track of any modifications.
And if someone deletes one of the documents, there’s absolutely no problem because you benefit from centralized, real-time backups that help you recover and restore them quickly.
3. Unlimited storage and administrative controls
If you create a free account, you get 5 GB of storage that can handle personal usage. Sync Pro plans for business include up to unlimited cloud storage.
Also, you can have multiple administrative accounts that can handle all the activity, reset passwords, add users, and more.
And if you were wondering, there’s a centralized billing system with invoicing when you add new users to the account.
We also need to mention that you will also benefit from Slack integration and phone support with a great customer assistance team.
You won’t need to worry about security either. The end-to-end encryption permanently protects your data in the cloud from unauthorized access.
We hope that our guide helped you find a better way to share your data safely with this great solution. If you are already using Sync, tell us about your experience in the comments section below.
We’ve started a brand new year, with endless possibilities and a vast array of new technology coming at us from all the companies that you can possibly think of.
And seeing how more and more people are prepared to take the leap to Windows 11 and try out a new experience, hardware manufacturers have to keep up.
Intel, for example, has announced its third-generation update for its Intel Evo certification program at CES 2022.
The company added some new requirements for better video calls for future devices, expanding the certification to include larger and more powerful laptops and even some new foldable designs.
So, if you were still looking for a Windows 11 compatible machine, and decided to leave Windows 10 behind, or you just want to update your setup, here’s what Intel will bring to the table.
Intel promises better quality video calls and foldable laptops
As some of you may know, Intel has been trying to bring foldable laptops to the market since 2019, but the company has been somewhat disappointed by poor OS support from Microsoft.
Howeverm, Intel seems ready to go ahead and try again, and has decided to include foldable laptops in their new Evo specification for 2022.
This couldn’t have come at a better time for all the people out there that are still searching for their Windows 11 compatible device.
Even though there are enough new-generation choices on the market, some users have decided to wait for 2022 and try out the new range of laptops, PCs and tablets.
This Intel Evo branding was introduced back in 2020, as most of us recall, alongside Intel’s 11th Gen Tiger Lake chips.
This was intended as a simple and easy way for users to know that they’d be getting a laptop that checked certain basic performance and experiential metrics.
And, with the introduction of the upcoming 12th Gen Alder Lake chips, Intel is also updating the requirements for Evo approval.
To be more specific, new Evo laptops will have to feature Intel’s new 12th Gen chips, and also fulfill the requirement to mandate high-quality videoconferencing experiences.
As part of that, the new Intel Evo standard will mandate at least a 1080p webcam or better, along with Wi-Fi 6E and AI-based audio enhancement to cut down on background noise.
The most interesting addition to the Intel family, by far, is the introduction of a third category of Evo certification for foldable laptops.
Manufacturers will have to adhere to the usual Evo spec list, with the obvious addition of a large, foldable display, as the first Evo-approved foldables are set to hit the market in 2022.
Furthermore, Intel announced that it’ll be expanding its Project Athena program to desktops, starting with its new wave of 12th Gen Alder Lake chips that the company announced at CES 2022.
Unlike the Intel Evo program for laptops, though, Project Athena for desktops will focus on different experiential requirements, prioritizing things like privacy and sustainability.
So, after reading this article, would you consider tranzitioning to the new Microsoft operating system on one of these upcoming Intel devices?
Share your opinions with us in the comments section below.
Sony officially unveiled its PlayStation VR2 virtual reality system for PlayStation 5 consoles yesterday. Sony brought virtual reality to consoles for the first time with the first PSVR system for the PlayStation 4, and the Japanese company aims to make a giant leap forward with the upcoming PS VR2.
There are no pictures yet of the PlayStation VR2, but the official specs are quite impressive: PS VR2 will support 4K HDR gameplay thanks to two 2000×2040 OLED displays with a 90/120Hz refresh rate providing a 110-degree field of view. PS VR2 will also improve immersion with 3D audio, vibration motors, and an eye-tracking technology giving players an additional input in games.
Sony’s PS VR2 will require a wired connection to a PlayStation 5 console, and the headset will support inside-out tracking to track player movements without the need for external cameras. The new PS VR2 controllers will also feature the same haptic feedback and adaptive triggers previously seen in the PlayStation 5 DualSense controllers.
The first PS VR2 game that Sony announced yesterday is Horizon Call of the Mountain, which will be set in the same universe as the much anticipated PlayStation exclusive Horizon Forbidden West. You can watch a short teaser trailer for the upcoming PS VR2 game below:
Sony sold over 5 million units of its first PlayStation VR headset since its launch in October 2016, and the first PSVR is still compatible with PlayStation 5 consoles. VR is becoming an increasingly competitive market with Facebook receiving praise for its Oculus Quest 2 headset last year, but Microsoft doesn’t seem really interested these days.
Xbox exec Phil Spencer reiterated many times that bringing VR to Xbox consoles wasn’t a priority for the team, and Microsoft’s own Windows Mixed Reality initiative quickly lost traction despite early enthusiasm from partners. However, the Redmond giant is still investing in its HoloLens 2 augmented reality headset for the business world, and the company also has an ambitious vision for the “Metaverse” with its Microsoft Mesh platform.
When compared to previous iterations, Windows 11 has more stringent security standards. The use of a TPM 2.0 chip (TPM 2.0 can be enabled in your BIOS if you have current hardware) and Secure Boot are the two primary requirements for it to run in QEMU.
If you wish to take advantage of Windows 11, you can do so by installing it in a virtual machine using virtualization tools such as QEMU on a Linux or Mac computer. This article assumes you’ve already installed QEMU and are familiar with the process of configuring a virtual machine using it.
However, if you haven’t installed it yet, you can head to QEMU’s download page and install the version you desire after selecting your OP.
Follow along as we will first see what the QEMU requirements are then proceed with the Windows 11 installation process.
What are QEMU’s requirements?
Qemu is a hypervisor that conducts hardware virtualization and is available for free and open-source use. QEMU v2.6.0 added the virtual NVDIMM (vNVDIMM) capability, which allows users to emulate a virtual NVDIMM.
The memory type (pmem) is the only one that has been implemented. In terms of feature enhancements, the block window type (blk) is one that should be deployed in the near future. If there are any changes, please refer to the QEMU release notes.
To get TPM 2.0 emulation, you’ll need to have QEMU 4.0 or higher installed on your computer. Other hardware requirements for Windows 11 include 4GB of RAM and a hard drive with a capacity of 64GB.
Unless you match the basic requirements, which include TPM and Secure boot, you will see an error message stating that your PC is unable to run Windows 11.
After the installation of Qtemu run it from the Windows Startmenu.
In the first column QEMU binaries path copy-paste the following command or enter the path where you have installed the QEMU: C:\Program Files\qemu\
For the second column enter the path of the Qemu-img file that is: C:\Program Files\qemu\qemu-img.exe
Now create a folder anywhere on your computer where you want to save the virtual machines created by QEMU. Click on the folder icon given in the front of the third column to select that particular folder.
Now, from Qemu GUI manager Qtemu, simply click on Machine and select New Machine.
Configure the Virtual Machine hardware, then select the CPU.
By Default, the HAXM- Hardware Accelerated Execution will be selected in the Qtemu but in case the HAXM is not supported by your system or not available, thus uncheck it and check TCG- Tiny Code Generator.
Set the amount of RAM you want to assign to your VM.
Right-click on the created VM on the QTEMU interface and select Machine Settings.
There select the Boot options from the right-side panel and after that check the Enable boot menu and then the CD ROM option following the Save button.
Under the Machine settings, go to the Media menu and click on the CD icon. This will open the Windows file explorer, navigate to the ISO file of the OS with which you want to boot in QEMU, and click on the Save button.
Now, on the main interface of the Qtemu GUI, select the created VM and click on the Start button. This will open the boot screen.
As we know, the QEMU uses the command line to create virtual machines by default. But it would be not feasible for standard computer users using CLI to manage virtual machines, thus we install another open-source application to provide a Graphical user interface (GUI) to QEMU.
How can I make QEMU run faster?
If you are unfamiliar with the terms virtualization and emulation, you might think that they are interchangeable. However, this is as far from the truth as you could possibly go.
Virtualization is the process of emulating the operation of computer hardware, such as the CPU, CD-ROM, graphics controller, and other components.In contrast, in an emulator, the virtual machine duplicates the entire hardware environment in software. In this way, an operating system designed for one computer architecture can be used to run on another computer architecture for which the emulator has been written.
In the case that you are running qemu-system-x64 on an x64-compatible processor, you can take advantage of the hardware virtualization capabilities provided by KVM (hardware virtualization). To make use of KVM, send the command enable-kvm to QEMU.
If you find that QEMU is slower than usual, examine your BIOS settings first, and make certain that VT-x (or Virtualization Technology, depending on your BIOS) is turned on.
Assuming there is also an option for the Execute Disable Bit, make certain that it is also enabled. In the vast majority of circumstances, both options are enabled by default.
Alternatively, if your system is protected against BIOS changes, for example, if you have enabled BitLocker Drive Encryption or any other tamper-resistant method, you may need to take preventive actions to avoid getting locked out after making the aforementioned BIOS settings changes.
Let us know in the comments section below whether the installation process was easy enough and if you have decided to switch to Windows 11 yet. Thanks for reading!