Your Linksys router is not resetting? Fix it with these steps

As you may have noticed with most router fixing guides, the ultimate solution is usually to reset it and then re-do the settings. However, some routers have issues with this operation.

For example some, Linksys routers don’t seem to reset, even when you push the button in the back.

This is a rather common problem, so we’ve decided to create a step-by-step guide to show you how to reset your Linksys router with ease.

What can I do if my Linksys router will not reset to factory defaults?

1. Perform a 30/30/30 reset

unplug Linksys from power source

  1. While the router is plugged in and powered on, press and hold the Reset button for 30 seconds.
  2. Unplug the router from its power source, while still holding down the button for 30 seconds once more.
  3. Then, turn the power back on.
  4. Continue holding Reset for another 30 seconds.
  5. Release the Reset button and leave the router for about 10 seconds.
  6. Disconnect the power cord for another 10 seconds, then reconnect.

This option is pretty straightforward as all you have to do is to press and hold this button for about 10 seconds until the Power LED will start flashing.

When this doesn’t work, reset the device to the factory default settings using the 30-30-30 method. Your router should respond to the 10 seconds reset method, but this approach won’t do any harm either.

Note: once you have successfully reset your router, you will need to reconfigure its settings.


Don’t know how to configure your Linksys router? Check this useful guide for help.


2. Apply an alternative resetting procedure

apply alternative resetting procedure

  1. Disconnect the modem.
  2. Connect your Linksys router to the PC and port 1 on the router.
  3. On the computer, set IP Address to use specific IP. Set it to 192.168.1.101 (gateway needs to be set to 192.168.1.1).
  4. Press the Reset button on the router for a few seconds. The Ethernet light should go off, then back on.
  5. Unplug the router.
  6. Plug it back in, then immediately press and hold the Reset button.
    • The power light should start blinking. Keep holding it until it stops doing so.
  7. The settings should now be reverted to factory defaults.
  8. Launch a web browser on your computer.
  9. Type in the router default IP 192.168.1.1.
  10. The management screen should appear without any login or password needed.
  11. Go to Setup > Mac Address Clone, and enable it.
  12. Press the Clone button.
  13. Next, hit Save settings.
  14. Go to Administration to set a new password.
    • It will kick you out, so log back in with the username and your new password to make sure everything is correct.
  15. Close the browser.
  16. On the PC, set the IP back to Automatic, then repair the connection.
  17. Check the status to make sure you have an IP Address in the 192.168.1.xxx network.

After performing all the above steps thoroughly, open your browser for a quick Internet test. If you can’t connect, unplug both the modem and the router. Wait 30 seconds, then plug the modem in first.

Make sure the modem is ready to go before plugging the router back in too. Once the router is operating, repair your connection on the PC again. You should be able to access your Internet connection now.

If you have any other questions or suggestions, reach for the comments section below.

RELATED ARTICLES YOU SHOULD CHECK OUT:

This is how you can fix Mixer broadcast delays

One of the inherent positives of the Mixer Platform and a prime reason contributing to its popularity is the feature that allows you to broadcast your channel so that your friends and followers have an inkling of what you are up to. Similarly, you also get to see what your friends are up to though unfortunately, there are times when the broadcast feature might start acting bonkers.

However, as with most issues, it’s easy settings things right when Mixer won’t broadcast properly. For the record, this issue might occur irrespective of whether the app is being used on a Windows 10 or on an Xbox device.

How to fix Mixer broadcast delay

1. Clear MAC address

Clear Xbox One MAC address if mixer won't broadcast

  1. Delete your profile on the Xbox One.
  2. Launch Settings > Network > Network settings > Advanced settings > Alternate MAC address.
  3. Select the Clear
  4. Click on Restart.
  5. Once the console restarts, download your profile again.
  6. Check if you are able to broadcast.

2. Restart the game stream

Mixer won't broadcast? Try restarting the game stream

  1. Stop the stream.
  2. Also, quit the game that you wanted to stream.
  3. Start the game back up and attempt to stream afresh.
  4. You should have no issue broadcasting your stream now.

3. Power cycle the Xbox One

Power cycle the Xbox One if mixer won't broadcast on your device

  1. Power off the Xbox One console by pressing and holding on to the Xbox button on the console for about 10 secs, or until the console shuts down completely.
  2. Unplug the power cable from the console. Leave it in this state – unplugged – for at least 10 secs.
  3. Plug the power cable back in.
  4. Start the console by pressing the Xbox button.
  5. This should help if you are unable to broadcast on Mixer.

4. Set broadcasting option to On

Toggle on the broadcast option in the Windows 10 Game Bar to broadcast via Mixer

  1. Click on Start > Settings on your Windows 10 device.
  2. Click on the Gaming
  3. Under Game bar, make sure the option Record game clips, screenshots and broadcast using Game bar option is set to On.
  4. Close Settings.
  5. You should now be able to stream unhindered.
  6. If needed, relaunch the Mixer app and attempt streaming from scratch.

5. Contact Mixer


Sometimes, the issue might be with the Mixer platform itself. In the case, get in touch with Mixel via Zendesk.

This will apprise them of the issue and hopefully, a solution is made available quickly enough.


This should be all you need to do if faced with the situation when Mixer won’t broadcast.

Meanwhile, here are some related topics to browse.

Linksys router is not working? Check out these solutions

Has your Linksys router ceased working after a power outage? Cases like yours are inevitable. Once you experience power outages, everything that runs on an electric current shuts down and your router is no exception to that.

A brief power interruption isn’t the only thing making your router unable to work. Sometimes, a reset has the very same outcome.

Since these problems are very common, we’ve decided to create a step-by-step guide that will tell you what to do in case your Linksys router is no longer working.

What can I do if my Linksys router is not working?

How can I fix a Linksys router that’s not working after a power outage?

1. Reboot your router

unplug Linksys from the power
  1. Unplug your router from the power and check the power supply.
  2. Remove all cables from the router.
  3. Then, plug them back and make sure the wires are connected properly.

2. Release and renew the IP addresses

If you still cannot maintain an Internet connection for longer than a couple of minutes after rebooting your router, it’s time to move on to the next step. Start from here: your router gets its IP Address from the ISP modem.

Therefore, try connecting to your router’s admin page, then release and renew its connection to your modem. You may do the same on your computers.

Afterward, turn off the computers, the router, and the modem. Wait a minute to turn on the ISP modem. When the status lights indicate it’s ready, also turn on the router. After a 60 seconds break, finally turn on your computers.

3. Clone the computer MAC

computer MAC
  1. On your computer, follow this path Setup > MAC Address Clone.
  2. Log into the browser-based utility.
  3. Click the Setup tab.
  4. Click the MAC Address Clone page.
  5. Then, click Enabled.
  6. Click either Clone My PC’s MAC or enter the 12-digit MAC address of your old router.
  7. Click Save Settings.

In any Ethernet network, a list is maintained to identify which MAC corresponds to what IP. The power outage might have caused your ISPs to refuse the home network.

That’s why you should now clone the MAC address that was originally set up. Afterward,, reboot everything and confirm that things are back to normal.

4. Reset Linksys to its factory default settings

factory default settings

You can also try to reset the Linksys router to its factory default settings. With the Power LED of the router blinking, press the Reset button. Hold it down for 30 seconds to complete the reset process.

What can I do if my Linksys router is not working after reset?

1. Apply additional power cycling

apply power cycling

After performing the reset, the Power LED of the router will keep on blinking for a few seconds. However, if it isn’t stabilized after a minute, power cycle the router. Just unplug the power cord from the power outlet, wait for 30 seconds, then plug it back in.

Make sure the power adapter is properly plugged into your Linksys router and to the available power outlet. Let’s see if it’s working now.

2. Check static/dynamic IP – DHCP server relation

IP - DHCP server relation

If it’s not, you might have set a static IP to your device and your DHCP server is still enabled. Try logging in to your router by accessing its classic web-based setup page. Open any web browser at your choice and enter 192.168.1.1 in the Address bar.

Press Enter and you will be asked for your login details. Up next, check if this feature is enabled. In case it is, disable it and check if your IP address is static. If it is static indeed, then it should work just fine.

If it is dynamic, try enabling the DHCP feature back. In this case, the DHCP server should remain enabled. Disabling it will simply make your router work as a switch, allowing just one computer to have Internet access.

3. Use default gateway to establish Internet connection

default gateway to establish Internet connection
  1. Press the Windows key and the R key at the same time to open the Run command box.
  2. Type cmd.
  3. Then, type ipconfig.
  4. Press Enter.
  5. Here you will find the default gateway. Enter it in the URL of your browser.
  6. It will ask you for your username and password.
  7. Once you enter this info, the computer should accept Internet connection.

If you can only connect to the Internet through your modem and not through the router, these steps could help. Connect the cable from the modem to the router, then the router to the computer by using a LAN cable. On your Windows computer, just find the default gateway.

If you have any other questions or suggestions, don’t hesitate to leave them in the comments section below.

Windows 7 Family Safety will no longer send you alerts

The Microsoft Windows OS comes with a variety of tools that make it a very family-oriented tool.

For example, users of Windows 7, 8 and 8.1 can create family Microsoft Accounts with child sub-accounts. They can then limit and monitor their activity via the parental controls attached to them.

However, this will change in the future.

No more Windows 7 Family Safety  alerts

In an official statement of Microsoft forums, it was announced that Windows 7 devices with Windows Live Family Safety installed, or Windows 8.1 with Family Safety will have the optional online services discontinued.

Your device will continue to enforce the limits you set, but soon, you will no longer receive emails of your kids’ device and internet usage from Windows 7 or Windows 8.1, or be able to see usage and set limits at account.microsoft.com for these older devices.  Setting limits and viewing usage will still be available in the User Accounts & Family Safety control panel on your device.

No explanation as to why this change will be implemented was given. However, those that use parental restrictions to their children’s sub-accounts are most likely not happy.

If you never used the feature or checked that you have no parental restrictions applied to your account, it means that this change will not affect you at all.

However, Windows 7 users should uninstall the Windows Live Family Safety app. This is simply because soon it will be just taking up space.

Do you have any other questions or suggestions regarding the Windows 7 Family Safety feature? Don’t hesitate to reach for the comments section below.

Windows Live Mail Login Password Problems: 5 Fixes to Use

In some rare and frustrating situations, you might encounter some Windows Live Mail login password problems. In some cases, users complain that the email client is not accepting their password.

This happens even if you are sure that you are typing the correct user ID and password combination. In this guide, we will show you how to solve the problem and regain access to Windows Live Mail.

Why won’t Windows Live Mail accept password?

Below are some of the potential causes of the Windows Live Mail login password problems:

  • Wrong internet options: Some users have reported this problem to be due to problems with some of their internet options. You need to make the necessary changes to your internet options.
  • Corrupt system files: If your system files are faulty or missing, you can encounter this password problem. The solution to this is to repair these corrupt files.

What can I do if Windows Live Mail is not logging in?

1. Have a quick look at Internet Options

  1. Press the Windows key + R, type control, and click OK.
    control windows live mail password problems
  2. Select the Network and Internet option.
    network
  3. Now, choose Internet Options.
    internet options
  4. Click the Advanced tab at the top.
  5. Next, ensure that Use TLS 1.0, TLS 1.1 and 1.2 are selected, while SSL 2.0 and 3.0 remain unselected.
    advanced tls  windows live mail password problems
  6. Finally, click the OK button and restart your PC.

2. Turn off the two-step verification

  1. Visit the Microsoft account login page and log in to your account.
  2. Click the Security tab at the top.
    security windows live mail password problems
  3. Now, select Advanced security options.
    advanced security
  4. Finally, select the Two-step verification option and follow the onscreen instructions to disable it.
    two-step verification

If you started facing Windows Live Mail login password problems after enabling two-factor verification for your Microsoft account, you need to disable it to fix this issue.

For a complete walkthrough on accessing your Hotmail account, check our Windows Live Mail sign in Hotmail guide.

3. Run the System File Checker

  1. Press the Windows key, type cmd, and click Run as administrator under Command Prompt.
    cmd admin
  2. Type the command below and hit Enter: sfc /scannowsfc scan
  3. Finally, wait for the command to finish running and restart your PC.

In some cases, the Windows Live Mail login password problems can be due to issues with your system files. You can fix this by running an SFC scan and restarting your PC.

Alternatively, you can employ a top-notch third-party tool to fix this issue and replace the missing files with the original version generated from your PC cache.

4. Reset your password to fix Windows Live Mail error 0x800CCC92

  1. From the official login page, enter your email ID and click Next.
    next windows Live Mail login password problems
  2. Click the Forgot password? link below the Sign in button.
    forgot
  3. Finally, click the Reset your Password option and follow the onscreen instructions to complete the process.

5. Use third-party email client software

Another quick and secure solution would be to use a reliable third-party email client service that enables you to access your Live Mail account with minimal effort.

Desktop email client programs like Mailbird support IMAP and POP3 technology that connect you to other email providers automatically. All you need to do is enter your Live Mail address, and the advanced software will detect the server settings instantly.

Here’s how you can access your Live Mail account:

  1. Download and install Mailbird.
  2. Go to the Main Menu and select Settings.
  3. Click on the Accounts tab.
  4. Add your Live Mail email address.

We can conclude this guide on the Windows Live Mail login password problems with this. You should now be able to fix the issue for good.

If you need a list of top-notch email client apps, check our detailed guide for the top-notch available options.

If you have any other questions or suggestions, don’t hesitate to reach out in the comments below.

New acronym answers feature in Microsoft Search will help you navigate your company’s alphabet soup

Microsoft Search, the enterprise search platform designed to bring personalized searches across Office 365, Windows, and Bing is about to get a bit more useful. Indeed, Microsoft has announced that Microsoft Search now has an acronym answer feature (via MSPU).

According to Microsoft, with this new feature, users will be able to navigate their company’s confusing lingo. This is especially important, as Microsoft claims that 2-3% of search queries entered by employees are related to acronyms.

The new feature lets Office 365 Admins create custom definitions for any acronyms used within a business. Once acronyms are created by an administrator, Microsoft Search will be able to pick out the acronyms on company internal websites, documents, and Teams, Yammer, and other areas of Office 365. Users will also only see Acronyms mined from data that they already have access to.

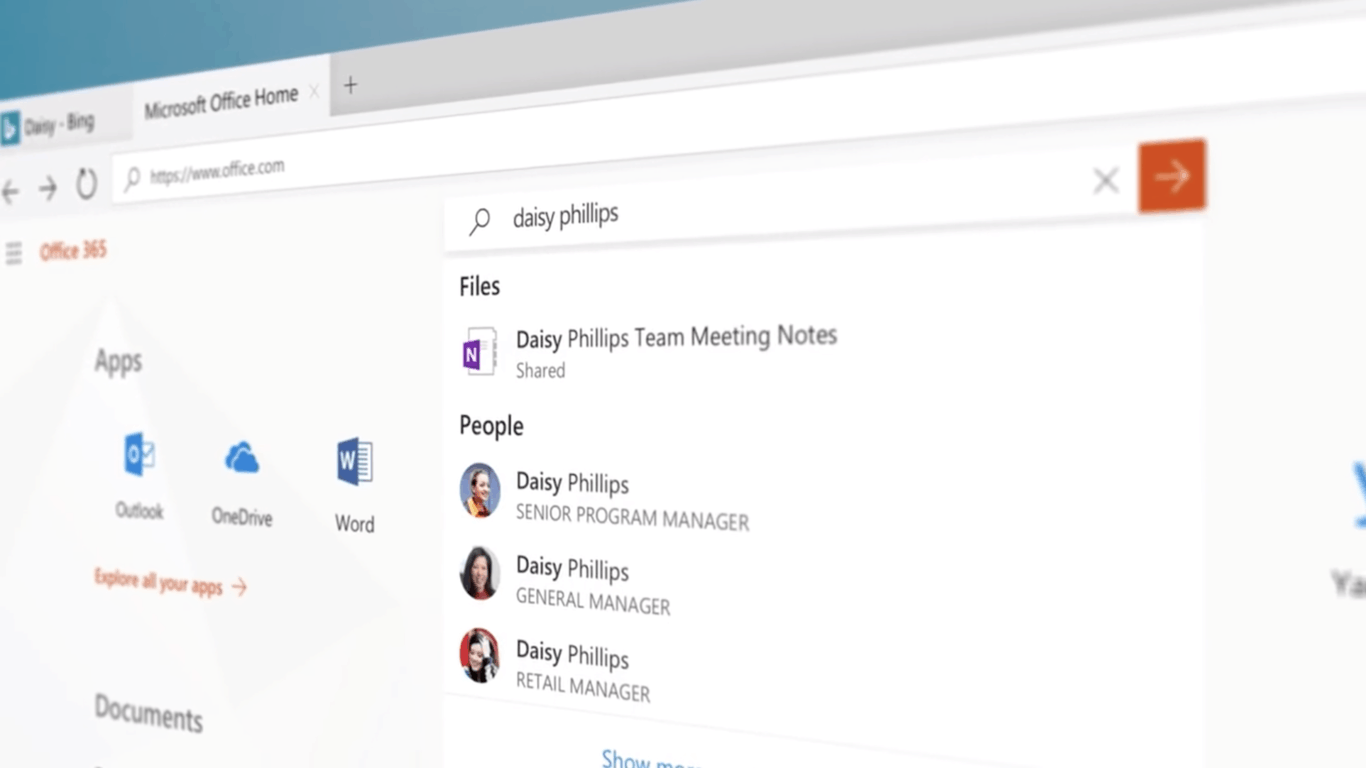
Results and definitions will appear in a list in Bing as it does in the image above, with an ability to see more results if needed. The original location of the acronym will also be listed, for added convenience. And, if there are no internal definitions available, Microsoft Search will show results from Bing instead.

With the news that Microsoft will be making Bing as the default search engine for Chrome users with Office 365 ProPlus, it’s becoming more important to understand the purpose of Microsoft Search. The search platform was first announced at Ignite 2018 and hit general availability after Build 2019. We’re planning a new Office 365 series with tips, tricks, and explanations around Microsoft Search, so be sure to keep tuned for more in the days ahead.

No Teams? No Problem! Here’s How to join meetings as a guest in Teams

Microsoft Teams is used by many organizations across the world, so there might be a day when you get an invite to a Teams Meeting for a job interview or another occasion. However, you might not have a Microsoft Teams or organizational Office 365 account just yet. There’s no need to worry, though, as you can easily join a Teams meeting without an Office 365 account. Here’s how.

Check your email for the Teams Meeting invite


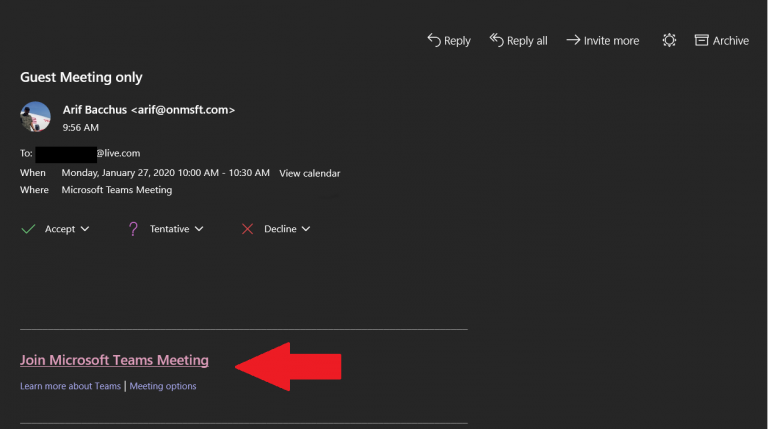
The first step in joining a Microsoft Teams meeting without an Office 365 account is simple. You’ll first want to check your email for the invite. You’ll then want to click the link on the bottom of the email that says Join Microsoft Teams Meeting. Once you click that, you also can Accept the invite to add it to your calendar in your email.

Open Teams on the web or download the program


Next, you’ll see that after clicking the link, you’ll have the choice to Download the Windows app, or join on the web instead. If you choose to join the meeting on the web, you’ll have a web-based version of Microsoft Teams. Your browser will then ask you to use your webcam and microphone, so be sure to accept both. This ensures you’ll be seen and heard during the meeting.

Get ready for the meeting

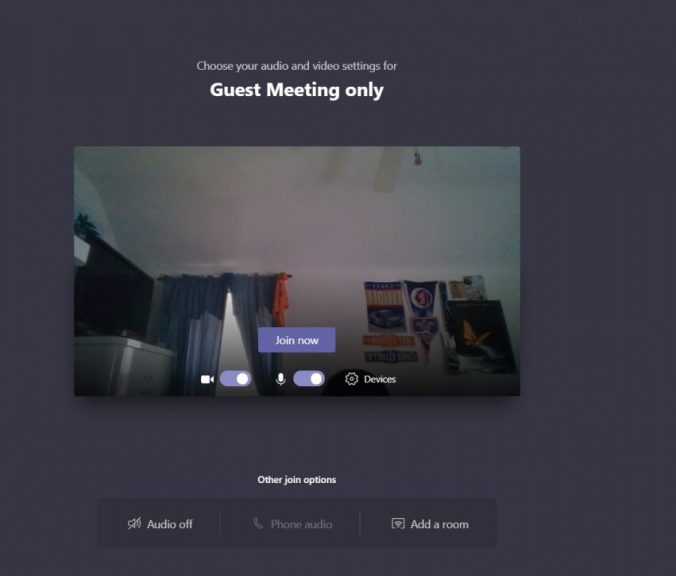
Once you’ve launched Microsoft Teams, you’ll have to enter your name and choose your audio and video settings. You can toggle off your microphone or webcam. You also can choose a different device for audio, if needed. Once you’re ready, you can click the purple Join now button.

Enter the meeting lobby

Finally, you’ll be put into the meeting lobby. Once you’re in the lobby, the meeting organizer will be notified that you’re there, and you’ll be admitted in. If no one has admitted you to the meeting within 15 minutes of joining, you’ll be kicked out from the lobby, and you’ll need to join again. It’s also worth noting that you won’t have full access to some of the features in the Teams meeting.

That might include Microsoft Whiteboard, Meeting Notes, and some of the other collaboration features we’ve previously talked about. Feel free to check out or other coverage of Microsoft Teams here via our dedicated news hub, and be sure to keep it tuned to OnMSFT for all your Teams news and information.

Microsoft to fix wallpaper bug on Windows 7 caused by end of support update

Microsoft officially ended support for Windows 7 two weeks ago, but the company has since acknowledged that the latest “Patch Tuesday” update for the 10 years-old OS has introduced an unexpected wallpaper issue (via The Verge). This is a minor bug that may cause your wallpaper to appear black when set to “Stretch,” but the company said that this will be fixed in an upcoming update.

In the known issues for the latest Windows 7 patch (KB4534310), the company explained that users affected by this wallpaper bug can mitigate the issue by either choosing other alternatives to Stretch including Fill, Fit, Tile, or Center, or by simply switching to wallpaper that matches the resolution of their desktop. “We are working on a resolution and will provide an update in an upcoming release, which will be released to all customers running Windows 7 and Windows Server 2008 R2 SP1,” the company said.

It’s quite embarrassing for Microsoft to introduce a bug in the last public patch for Windows 7, but it’s good to see that the company will act on it as soon as possible. It won’t be the first time that Microsoft releases a patch for an unsupported version of Windows. As an example, the software giant did release an emergency patch for Windows XP following the discovery of the “WannaCry” ransomware exploit.

However, the company invites Windows 7 users to upgrade to Windows 10 as soon as possible, while organizations that are not ready to upgrade will be able to pay Microsoft for Extended Security Updates for three more years.

Fix: Linksys router is not connecting to printer

Setting up a connection between your Linksys router and a printer should be easy. Linksys provides quick and easy setup, but sometimes it may have issues connecting to some printers.

If you too are among those that have encountered this problem, check out the article below for several fixes regarding the matter.

What can I do if my Linksys router won’t connect to the printer?

1. Install Linksys Connect software on your computer

install Linksys Connect software version 1.4 or up
  1. Insert the Setup CD on your computer’s CD drive.
  2. Click Run.
    • On Mac computers, the Linksys Connect Software should run automatically as soon as the setup CD is inserted into the CD drive.
  3. Read the Software End User License Agreement, then click Next.
  4. Click Next after following all detailed instructions on how to connect both the power cable and the modem to your router.
  5. Select Yes, install Linksys Connect on the new prompt.
  6. Click Next.
  7. Enter your router’s password screen in the blank field.
  8. After that, click Next.
    • You should be prompted that you are already connected to the Internet.
  9. Click OK.
  10. Eventually, click Done on the Linksys Connect main menu.

Install Linksys Connect software version 1.4 or higher on all computers within the network where you want to print from. This can be easily accomplished by following the above steps.

Keep though in mind that you need to temporarily disable any firewall software on your PC if you want to complete the procedure.

2. Update your Linksys router firmware

newest version supported by router

Your Linksys router should be working properly when you want to connect pretty much any machine to the router, not just the printer.

If you’re inclined to forget all about installing the latest firmware to your router, your best bet now is to check out the newest version supported.

3. Double-check your router’s wireless settings

check Linksys wireless settings

To connect a wireless printer, you need to know your router’s wireless settings. They are supposed to be used to synchronize the printer’s network settings with that of your router.

Any mistake prevents creating a wireless connection between them, so double-checking cannot hurt.

4. Ensure your printer software and drivers are installed

Connecting a wireless printer to your Linksys router is impossible without the proper printer software and drivers installed on the computer that you intend to work on.

You may refer to your printer’s documentation or the manufacturer’s online support for further instructions on the topic.

Alternatively, you have the option to automatically install missing drivers or update existing ones using a specialized tool designed to manage all your drivers correctly, without causing any system problems.

⇒ Get Fortect Driver Updater

5. Allow Windows Firewall access or temporarily switch it

allow Windows Firewall access

Even though the router and the printer are doing most of the work, they need help from other components to complete the connection job.

In most cases, the Windows install of the printer through the router requires allowing Windows Firewall access. There are also times when temporarily switching the 3rd party firewall tools is needed.

6. Check out your wireless printer

connect wireless printer to Linksys

Is your wireless printer about 3-10 feet away from the router when setting up the wireless connection? If not, bring it closer since longer distances affect connectivity.

Even more, for things to function properly, the printer needs to support the WPA™/WPA2™ wireless encryption standard.

If you are aware of any other solutions that can quickly solve the issue, share them in the comments section below so that other users can try them as well.

Linksys router server is not found? Check these solutions

Let’s cut to the chase: the server not found error in your Linksys router shouldn’t be there to stay. You might have more desktops and laptops connected by wire to the router. Everything used to work fine for a while.

Anyway, when you try to disconnect the laptop and connect wirelessly, you eventually get this DNS error most of the time. Things get back to normal when reconnecting the laptop by wire.

The story is no different when wireless shows connected, but you get the same Server can’t be found message when you try to open your browser. What are you missing?

We’ll give our very best to resolve your issue in an uncomplicated manner.

What can I do if my Linksys router’s server is not found?

1. Reboot your router via a power cycle

reboot your Linksys router

Start by rebooting your router. Disconnecting it from its power source, and then plugging it back in is all it takes to perform this procedure.

Following this, the default administrative username is either blank or “admin”, while the default administrative password is usually “admin”.

Sounds easy enough, right? And it isn’t just simple, but also efficient most of the time.


2. Configure Linksys router to connect to the Internet

configure Linksys router

If the problem persists after performing a power cycle, you may need to proceed with other workarounds. This includes reminding you that there are two connections involved when setting up any router: broadband and LAN. These connections are mutually exclusive.

In other words, your Linksys needs to be connected to the Internet through the broadband connection as well. If the cable broadband does not usually require a login, DSL/ADSL/VDSL use PPPoE which requires login data.

Call your ISP and ask details about what type of broadband connection you have. Once having the answer, configure your router to connect to the Internet. Then, share this connection with any computer connected to it through the LAN.


3. Update the firmware to the latest version

update router firmware

Free up yourself from having to experience these server errors by making sure you constantly update your router firmware. The closest interaction you probably have with your Linksys router is the occasional reboot described above.

Keep in mind that the manufacturer rolls out a few software updates throughout the year to address all bugs and vulnerabilities, so don’t postpone the update.


Need more info on how to update your Linksys router? Follow these steps to find out how it’s done.


Other users also tried to open the Command Prompt and run IPCONFIG /ALL to see info on their wireless connection. They’ve noticed a sudden change in the IP Address. That’s why they can connect wirelessly on occasions, and receive this DNS error most of the time.

We hope you will go past this issue with the solutions mentioned above. Do you know any other tips that may help? Use the comments area to let us know.

READ NEXT:

FIX: The projector fan won’t turn on

Projector fan not working to the optimum, or not turning on at all is a common problem to be faced with projectors. This also is a pretty much serious issue as a non-functional fan is almost as good as the projector on the whole ending up being a dud.

That’s because a dead fan will not be able to eliminate the heat from the inside, leading to the projector getting too overheated to remain operational. However, there are ways to overcome the issue effectively. Read on!

Here are the things to do if the projector fan won’t turn on

1. Check if any debris is hampering the fan’s operation

  1. Make a visual inspection to see if there is anything that has got lodged between the fan blades and the housing.
  2. Sometimes, just removing the debris and cleaning the area is all that might be needed for the fan to work normally again.

2. Fan/ projector motherboard might have become faulty

  1. There is every chance the fan itself might have developed a snag if not the projector‘s motherboard itself.
  2. The best way to diagnose such an issue is to install another fan in the projector or install the fan in another projector.
  3. If things are fine in the first instance, then the issue is with the fan.
  4. In that case, replacing the fan is all you need to do.
  5. However, if it’s the second instance where things proved to be right, that is the fan is working fine, then the issue could be with the electric circuitry that supported the fan.
  6. In the worst-case scenario, there could be something wrong with the project’s motherboard itself.
  7. Get in touch with the company support staff in either case.

3. Vents might have become blocked

  1. Vents becoming blocked could also lead to the fan not working.
  2. The obvious solution here is to clean the vents using an air pump or anything of that sort.
  3. Ensure the projector has a proper airflow which is necessary to ensure the smooth operation of the fan.

projector fan troubleshooting


4. Check lamp life

  1. Turn the projector off and wait for some time.
  2. Restart the projector.
  3. If the projector has been working with the lamp life having exceeded its normal span, then the best and safest option for you will be to replace the same.
  4. You will then be required to reset the lamp timer. (Get help from support staff if needed.)
  5. Replacing the lamp is indispensable — if the lamp life is exceeded, the lamp timer sets automatically to zero.
  6. In that state, the fan becomes inoperative.
  7. Replacing the lamp will make the fan function normally again.

5. Check if filter door is properly latched

  1. Check if the filter has not become clogged.
  2. If that be the case, cleaning the filter will enable the fan to work normally again.
  3. Also, ensure the filter door is not left open as this too makes the fan stop functioning.

This should be enough to deal with the situation when the projector fan does not turn on. For company specific issues, get in touch with the respective support department. In any case, it is recommended to seek help from experts in the field in any of the steps mentioned above if you aren’t comfortable handling things on your own.

Further readings:

Posted in Fix

Linksys router will not connect to Xbox? Try these fixes

If you own a gaming console, you are supposed to easily connect it to your router. That’s not always the case and sometimes, your Linksys router cannot connect to a Xbox.

If you’re passionate about gaming, chances are you own one of those router models claiming to eliminate lag and offer the advantages of that innovative prioritization engine networking technology. So, what went wrong?

Some users claim their Xbox can see the network, but will not connect. Others describe performing an entire ritual for one-time connections. This includes removing the password, factory resetting the Xbox, and then connecting to it. Once they turn the Xbox off, it cannot reconnect.

Are you experiencing a similar problem and troubleshooting it gave you a headache? These solutions may help you out.

How can I fix a Linksys router that’s not connecting to a Xbox?

1. Reboot your router

reboot Linksys router

The most basic way to attempt to fix this connection problem is to reboot your router. It’s a relatively simple process that requires unplugging the power cord, waiting for 30 seconds, and then plugging the power connector back in.

Doing this can also increase your network security, as well as upload and download speeds.


2. Update the firmware of your Linksys router

update the firmware

Yes, that’s definitely a chore, but don’t postpone the inevitable. You’re already facing difficulties such as the impossibility to connect to Xbox.

Once you update the firmware, you will rest assured in terms of security, speed, and potential bug fixes that you obviously need.


Need more info on how to update your router’s firmware? Check out this detailed guide.


3. Change your Linksys router channel

Linksys router channel changed to 1

  1. Launch a web browser and enter 192.168.1.1 in the address bar.
  2. The network password window will appear. This is where you need to enter the network password. As always, the default password is admin.
  3. Click the Wireless tab.
  4. Select Manual.
  5. For the 2.4 GHz network, the available Channel Width is 20 MHz.
  6. Click the drop-down arrow for Channel.
  7. You may now select your preferred channel. The recommended channels are 1 or 11.

Note: on some models, you just need to click on Wireless > Basic Wireless Settings, find the Wireless Channel then make your changes through the drop-down menu.

The cause of your issue could be wireless interference from other networks. Try to change your router’s channel to one of the two non-overlapping channels mentioned above.


4. Reset the router to its factory default settings

back to factory default settings

  1. Locate the Reset button on the back of your router.
  2. With the router powered on, use the pointed end of a paperclip or another similar object to press and hold the Reset button for 10 seconds.
  3. Make sure that the Power LED of the router is blinking when you do that.
  4. Then, unplug and re-plug the router’s power adapter.
  5. Wait for the router to fully reset and power back on.
  6. The Power LED of your router will keep on blinking for a few seconds after resetting it. If the Power light isn’t solid after 60 seconds, power cycle the router again.

If the previous steps made no difference, you may perform a router reset to restore factory defaults. This will wipe out all of your customized settings. Router username and password will also be reset to factory default values.

So, you’ll have to reconfigure your router and update your Wi-Fi devices to use the same customized Wi-Fi settings. Your Wi-Fi network will become accessible only after performing these actions.


5. Unblock the Wi-Fi access

troubleshoot Wi-Fi access

If the Xbox is not even able to get an IP address from the router, that’s a sign that you are not connecting to the local network. One frequent scenario is discovering that your antivirus is blocking the Internet, so start troubleshooting this from here.


Don’t know how to unblock the Wi-Fi access blocked by an antivirus? This handy guide will help you out.


Checking that you have the proper ports forwarded to the IP address of the Xbox or trying to manually set up static IPs on both ends could also help. Moreover, take into consideration that one of your 3rd party accessories could be behind this issue.

If you’re aware of another potential solution, share it in the comments area below with the rest of our readers.

RELATED STORIES YOU MAY LIKE:

Windows Server is not activated? Use this safe fix

Windows Server is widely used by many users across the world as it ensures safe and fast networking and sharing of services, data, and applications among multiple users. Its well-equipped interface is the reason for its widespread usage. If your version of Windows Server asks for activation, this is what you need to do to properly and permanently activate it.

How To Activate Windows Server

1. Activating Windows Server with KMS Client Key

To activate your Windows Server easily, you can manually install KMS Client Key for your version of Windows Server.

  1. First, you need to look for the KMS Client Key that is available on Microsoft’s website for your version of Windows Server. Go to Microsoft’s website to find the specific KMS key for the version you wish to activate.
  2. After finding out the appropriate key for your WS, write it somewhere in Notepad.
  3. Open Command Prompt (Admin) by Right-Clicking on the Windows Icon located in the left corner of the taskbar.
    Windows Server Is Not Activated
  4. Command Prompt will show you a black screen; type slmgr /ipk Client Key in the command windo. Hit Enter.Windows Server Is Not Activated
  5. Type slmgr /skms kms8.ms.com in the window and press Enter.
  6. In the end, type /ato in the window and press Enter.

2. Resetting The Activation Timer

Even though KMS Client Keys are available for almost all the latest versions of Windows Server, there are some exceptions. If you don’t find KMS Client Key for your version of Windows Server, you should not worry about it. Resetting the activation timer is another way to fix the activation issue. Follow these steps to reset your Windows activation timer and start using Windows Server as if you have just installed it.

  1. Firstly, launch Command Prompt (Admin) by Right-Clicking on the Windows Icon located in the left corner of the taskbar.Windows Server Is Not Activated
  1. In the command window, type vbs –rearm.Windows Server Is Not Activated
  1. Check whether you have spelled the command correctly or not.
  2. Press Enter.
  3. You will be asked to perform a restart; do it right away.
  4. Your Windows activation timer is reset.

3. Activating Windows Server with MAK

MAK or Multiple Activation Key is another method to activate your Windows Server. You can also use the MAK key and activate your WS. Follow these steps to learn how to get MAK key and its usage.

  1. MAK keys can be found on Microsoft’s website.
  2. Launch Command Prompt (Admin) by Right-Clicking on the Windows Icon located in the left corner of the taskbar.Windows Server Is Not Activated
  3. Type vbs /ipk MAKProductKey; press Enter.Windows Server Is Not Activated
  4. Now, type vbs /ato; press Enter.
  5. Windows Server will activate.

There you have three quick methods to permanently activate Windows Server.

READ NEXT:

AirPods not connecting to Macbook? Here’s how to fix that

AirPods are one of the best headphones on the market, but many users reported that AirPods aren’t connecting to their MacBook. This can be a big problem for some, but in today’s article, we’ll show you how to fix that.

What to do if AirPods won’t connect to MacBook

1. Make sure that your Mac OS is up to date

If AirPods won’t connect to MacBook, you need to make sure that your OS meets the AirPods requirements. These are the requirements:

  • For 1st generation of AirPods, you need to have macOS Sierra or later installed.
  • For 2nd generation or AirPods, you need to have macOS 10.14.4 or newer.

2. Remove AirPods from the list of devices

One way to fix this problem is to remove AirPods from the list of devices and then add them again. You can do that by following these steps:

  1. Open the Apple menu and go to System Preferences > Bluetooth.
  2. Select AirPods from the list of devices and click X right next to it.
  3. Put your AirPods in the charging case.
  4. Move the charging case close to your MacBook and open the case lid.
  5. From the device list, choose AirPods and click on Connect.

3. Forget AirPods as a Bluetooth device

If AirPods are not connecting to MacBook, try using the Forget Device option like this:

  1. Go to System Preferences > Bluetooth.
  2. Select your AirPods and click on X.
  3. Now click on Forget Device.
  4. Wait for a few minutes and try to connect your AirPods again.

4. Make sure AirPods are set as the output device

If AirPods aren’t selected as the output device, then you might encounter this issue. To fix it, do the following:

  1. Turn on Bluetooth on your MacBook.
  2. Place your AirPods in range and open the case.
  3. Go to System Preferences > Sounds > Output.
  4. Now select your AirPods.

5. Reset the AirPods

If nothing else works, try resetting your AirPods:

  1. Press and hold the setup button on your charging case.
  2. Release the setup button when the status light flashes amber a few times and then flashes white.
  3. Connect the AirPods to your MacBook.

There you go, several solutions that should help you if AirPods aren’t connecting to your MacBook.

Linksys router won’t stop blinking? Fix it with these steps

If the Power or Diag LED on your router is blinking, you know for sure the firmware is malfunctioning. When this happens, you can’t assign IP Addresses to any computers connected to your router or access the router’s web-based setup page.

With the increase in the number of people stating that their Linksys routers will not stop blinking, we wanted to discuss how to address the issue.

Are you wondering how the Blinking Power on your router can be stopped? To find out how to do that, check the fixes below.

What can I do if the Linksys router doesn’t stop blinking?

1. Try a quick reboot

how to reboot router

  1. Shut down all your networking devices.
  2. Unplug the power cord of your router from the power outlet.
  3. Allow it to sit for 30 seconds unplugged.
  4. Plug back in and turn on the router.
  5. Wait for it to completely boot up.

Note: You may also unplug the power cord, Internet, and Ethernet cables from their ports. Then, plug them back.

Make sure you first try to reboot your router. This procedure allows it to re-establish a connection to your ISP, therefore potentially putting an end to the blinking.


2. Update the Linksys router firmware

update router firmware

You will have to update its firmware if the lights continue to blink. Make sure that you download the correct firmware for the specific router you own to prevent further technical problems.


Updating your Linksys router firmware seems scary? Check out this guide for more help.


3. Assign a static IP Address to your PC

static IP Address

  1. Right-click the Network User-added icon located at the bottom-right corner of your Desktop screen.
  2. Click Open Network and Sharing Center.
  3. Then, click Change adapter settings.
  4. Right-click the Local Area Connection icon, and choose Properties.
  5. Select Internet Protocol Version 4 (TCP/IPv4) on the Local Area Connection Properties window.
  6. Up next, click Properties.
  7. Click the radio button beside Use the following IP address.
  8. You may now enter the IP address, Subnet Mask, and Default gateway in the fields provided.
  9. The default values for the IP address and Subnet Mask are 192.168.1.1 and 255.255.255.0 respectively.
  10. Select Use the following DNS server Addresses.
  11. Enter a Preferred DNS server. This is obtained from your internet service provider.
  12. Click OK.
  13. Finally, click Close.

Note: Steps here detailed are for Windows 10 computers.

Your router can no longer assign IP Addresses to the computer connected to it, so you need to manually assign the static IP Address. After doing that, check the computer’s connectivity to the router by conducting a ping test

Press the Windows key on your keyboard to access the Start screen. Type cmd in the search field, then select Command Prompt once getting the search result.


4. Reset your Linksys router

reset your Linksys router

  1. With something small and pointed, like a paperclip, press and hold the Reset button of your router for 30 seconds.
  2. Unplug the power cord of the router for 10 seconds.
  3. Plug it back in and wait 30 seconds for the router to fully reset.

Rebooting your router means you cycle the power to it. Power cycles do not erase your saved passwords, security keys, or other settings.

However, resetting your router involves changing it back to its default settings. When troubleshooting a Linksys router refusing to stop blinking, this can help.


Looking to configure your Linksys router now? Find out how it’s done right here.


By following these steps, you should be able to make your Linksys router’s LED lights stop blinking.

If you have any other questions or suggestions, don’t hesitate to leave them in the comments section below.

RELATED STORIES YOU MAY LIKE:

Linksys Router Won’t Connect to Modem: How to Fix it

Every router device goes dysfunctional at times and so are the Linksys routers. In fact, many reported that Linksys router won’t connect to modem.

This can be a major problem since you won’t be able to connect to the Internet at all, so it’s important to tackle this issue as soon as possible.

Fixing this problem is somewhat simple, and today we’re going to show you the best ways to do it.

Why is my modem not connecting to WiFi?

  • Issues with the modem or router can cause this problem.
  • Router’s default IP isn’t correctly set.
  • You don’t meet the ISP MTU requirements.

What can I do if Linksys router is not connecting to modem?

Linksys not working with Spectrum modem

1. Reboot the modem, then the router

  1. Rebooting your router means cycling the power to it.
  2. You should first try to unplug the power connector from the back of the router and plug it back in.
  3. Rebooting the modem, then the router, and finally the PC restores connectivity most of the time.

2. Clone the Mac address of your computer

  1. Open any web browser.
  2. Enter the default 192.168.1.1 in the address bar, then press Enter.
  3. Enter your login details. The default username is admin and the password is blank.
  4. Click OK.
  5. In the Setup tab, click the sub-heading called MAC Address Clone.
  6. Click the Enable option.
  7. Next, click the Clone Your PC’s MAC button.
    clone Mac address
  8. Click Save Settings.

Clone the MAC address of your laptop to the route. This should work, and you ought to be all set and ready to surf the Internet.

You could also power off the Spectrum modem, unplug the coax, and wait a few minutes so that the modem loses the associated MAC address. Then, plug it back in and see if the connection works.

Linksys router does not connect to Arris modem

1. Power cycle your router and the modem

  1. Unplug both the modem and the router.
  2. Wait for 30 seconds. This allows the short-term memory of the devices to clear completely.
  3. Plug the Arris modem back in first.
  4. Wait a few more seconds for the modem to connect before turning on the router.

There is a difference between resetting a router and rebooting a router. The first fix you should try is to reboot (power cycle) it. This procedure will hardly take a few minutes of your time, so power cycle both your router and the modem.

2. Change the router’s default IP

  1. Access your Linksys cloud account.
  2. Click Connectivity.
  3. Then, click the Local Network tab.
  4. Click Edit next to Router Details.
  5. Enter the IP address you want for your router.
    change the router default IP
  6. The IP address you may use for the Linksys router can be:
    10.0.0.0 to 10.255.255.255
    172.16.0.0 to 172.31.255.255
    192.168.0.0 to 192.168.255.255

Most Arris modems use the default setting for their IP and that will conflict with your router’s DHCP. Try changing your router IP, then reconnect.

3. Reset the router

  1. Reset your Linksys router.
  2. Then connect your modem to the router.
  3. From the router, connect a cable to your computer.

If this doesn’t work, do the following:

  1. Type cmd on your RUN menu (Windows).
  2. A black screen window will come up next.
  3. Type the following: ipconfig/release  ipconfig/renew

If you’re having trouble accessing Command Prompt as an admin, then you better take a closer look at our can’t run Command Prompt as administrator guide.

Linksys router can’t connect to Comcast modem

1. Power cycle the devices

  1. Turn off your router and modem.
  2. Keep them off for 30 seconds.
  3. Next, power on your modem and wait for it to boot.
  4. Do the same for the router.

2. Check ISP MTU requirements

  1. On Windows 10, right-click on the Start button.
  2. Select Command Prompt to open the application.
  3. Perform a ping test and take note of the results.
    determine MTU requirements
  4. You’ll receive a reply regarding the correct MTU size.

Determining the correct MTU size to resolve intermittent wired connections is imperative. After knowing it, don’t hesitate to change the MTU Size.

3. Reset the Linksys router

  1. First of all, ensure the port on your computer is enabled.
  2. If you turn on Wi-Fi, it disables the Ethernet port.
  3. Turn off the modem and do a factory reset on the router by taking a sharp object and pressing down on the Reset button for about 30 seconds.
  4. After that, unplug and re-plug the router’s power adapter.
  5. While it’s booting, plug in a straight cable from the PC to a LAN port on the router. Also, plug in a cat5e or cat6 from the router’s WAN port to the modem.
  6. Wait until the router finishes booting. If it doesn’t open a browser, then open one by yourself and enter 192.168.1.1 in the address bar. That should get you to log in and solve the issue.

Remember, a reset like this one erases all settings you have ever changed in the past.

If this doesn’t work, we would recommend calling your cable ISP and telling them to send a tech who is able to set up the Internet through the router.

To learn more, we suggest reading our guide on how to configure Linksys router since it might come in handy when dealing with this issue.

If you have any other questions or suggestions, leave them in the comments section below and we’ll be sure to check them out.

Internet Explorer is not keeping history? Try these fixes

Internet Explorer usually keeps a page history for a certain time period. However, some Internet Explorer users have posted on the Microsoft support forum about IE not keeping a page history. One user stated:

After having to do a thorough cleaning to get rid of malware, the History pane only shows the search in history option, and no history.

Thus, IE’s History tab doesn’t include any pages for those users.

What can I do if Internet Explorer doesn’t keep history?

1. Check the Delete browsing history on exit option

  1. First, check if the Delete browsing history on exit option is selected. Click the Tools gear button at the top right of Internet Explorer’s window.
  2. Click Internet options to open the window in the snapshot directly below.Internet Options window internet explorer not keeping history
  3. If the Delete browsing history on exit option is selected, that’s probably why your IE browser doesn’t display a page history. Deselect the Delete browsing history on exit option.

If you’re also curious about how to change Edge’s internet options, check out this dedicated guide.


2. Increase the number of days Explorer keeps page history for

  1. Your Internet Explorer browser might be configured to keep pages in history for zero days. To check if that’s the case, open the Internet Options window as outlined above.
  2. Click the Settings button on the General tab to open the Website Data Settings window.
  3. Click the History tab shown directly below.Days to keep pages in history box internet explorer not keeping history
  4. Enter a higher value in the Days to keep pages in history box.
  5. Click the OK button.

3. Increase disk storage space allocated to page history

In addition, check how much storage space is allocated to IE’s page history. To do so, select the Temporary Internet Files tab on the Website Data Settings window. There should be at least 50 megabytes allocated to page history. Increase the value in the Disk space to use box to 250 MB if it’s not already.

Disk space to use box internet explorer not keeping history


If you want to reset Temporary Internet Files location to default, follow the simple steps from this handy guide.


4. Reset Internet Explorer

  1. Resetting Internet Explorer will restore the browser to its default configuration, which might fix IE‘s page history. Open the Internet Options window again by clicking Tools > Internet options in IE.
  2. Select the Advanced tab shown directly below.Advanced tab internet explorer not keeping history
  3. Click the Reset button.
  4. A Reset Internet Explorer settings dialog box window will open. Don’t select the Delete personal settings option there as that will erase your page history.Reset Internet Explorer Settings window internet explorer not keeping history
  5. Click Reset on that dialog box to confirm.
  6. Restart Windows after resetting Internet Explorer.

5. Reset the system attributes for IE’s page history folder

  1. Users have also confirmed they’ve fixed blank IE page history panes by resetting the system attributes for the browser’s history folder. To do so, press the Windows key + S hotkey.
  2. Enter the keyword ‘cmd’ to search for Command Prompt.
  3. Right-click Command Prompt and select Run as administrator.
  4. Enter the following into the window: attrib +h +s +r %localappdata%MicrosoftWindowsHistory. Press the Return key after entering that command.The attrib command internet explorer not keeping history

If you’re having trouble accessing Command Prompt as an admin, then you better take a closer look at this guide.

There’s a good chance the above resolutions will fix Internet Explorer’s empty History pane. Then IE’s History pane will show you pages that you’ve opened within the browser in recent weeks once again.

Don’t forget to leave any other questions or suggestions that you may have in the comments section below.

RELATED ARTICLES TO CHECK OUT:

Linksys Router not Broadcasting WiFi: How to Enable it

Disappointed that your Linksys router is not broadcasting WiFi, especially when so many dual-band routers support both 2.4 GHz and 5 GHz networks? Fortunately, we’ve got the right solutions for you.

This can be a big problem since you won’t be able to access Wi-Fi at all, or you won’t be able to use the high-speed connection.

However, there are a few fixes that you can try, so let’s see how we can fix this issue.

Why is my router not broadcasting a wireless signal?

  • Your PC or Wi-Fi router isn’t supporting 5GHz wireless.
  • Temporary glitches with the router can cause this problem to occur.
  • Outdated firmware can cause issues such as these in some rare cases.
  • Your router software might not support the latest features.

What can I do if the Linksys router is not broadcasting WiFi?

Before we start, make sure to check the following:

1. Linksys 5GHz not showing up

1.1 Check that you own a Linksys dual-band router

  1. Visit the official support list of Linksys routers.
  2. Locate your model on the list.
    Linksys dual-band router
  3. Check if it has 5GHz capability.

1.2 Confirm your computer has 5 GHz network band capability

  1. Press the Windows key on your keyboard to access the Start screen.
  2. Type cmd until the search result appears under the Apps list.
  3. Select Command Prompt to open the application.
  4. On touch-enabled computers, you might also swipe from the right side of the screen to reveal the Charms bar with the system commands.
  5. Enter netsh wlan show drivers
    Radio types supported in Command Prompt
  6. Now, look for the Radio types supported section. If it says that the network adapter supports 802.11a or 802.11n network modes, this means that your computer has 5 GHz network capability indeed.

If you’re having trouble accessing Command Prompt, check our can’t run Command Prompt as admin guide.

1.3 Perform a quick reset

  1. A reset often solves the issue here described, so press and hold the Reset button.reset Linksys router
  2. Wait for 30 seconds, then release it.
  3. Just wait for about 30 seconds until it boosts.

2. Linksys 2.4GHz not working

2.1 Make sure that firmware is up-to-date

Note icon NOTE
This is an advanced process, and it can cause irreversible damage if not careful, so use extra caution.
  1. Visit the Linksys download page.
  2. Locate your model.
  3. Now locate the firmware for it and download it.
  4. Once the firmware is downloaded, install it on your router.

To learn more about this process, we have great guide on how to update Linksys router firmware.

2.2 Reboot your router

  1. Press the Power button on your router.
  2. Keep it turned off for about 30 seconds.
  3. Now press it again and wait for it to boot.

2.3 Change the software to DD-WRT

  1. Visit the DD-WRT FTP to get the latest BS build.
  2. Pick the year and the current build.
    DD-WRT FTP
  3. Find your router in the list and select it.
  4. Download the factory-to-ddwrt.img.
  5. Login to the router stock firmware and click Connectivity.
  6. Select Manual.
  7. Then, choose the img file you downloaded and click Start.
  8. The router will finally reboot. You can already set up your user/password and configure it.

If rebooting the router works temporarily, changing the software to DD-WRT corrects the issue. Flashing it voids the warranty, so proceed with caution.

Other Linksys router owners also claim the issue has been resolved after setting the bandwidth to 20mHz instead of Auto or manually re-entering the network information (SSID/password) on their phone.

We hope that our guide helped you fix the problem with your router. This isn’t the only issue you can encounter, and many reported that their Linksys router is not working.

In the comment section below, let us know which solutions worked best for you. Also, leave there any other questions or suggestions that you may have.

FIX: Office 365 not responding due to a long-running script

Office 365 is a line of subscription services offered by Microsoft as part of the Microsoft Office product line and can be considered as an alternative form of the Microsoft Office Suite.

Office 365 is constantly updated to bring users the best experience with all the services that it offers, but it goes without saying that some bugs do slip through the cracks along the way.

Such would be the case with an Office 365 issue that users have been reporting on the Microsoft forums:

When using IE11 to view my outlook 365 online, I receive the following error. “Office.com is not responding due to a long-running script.” User’s that are experiencing this issue have stated their email is running very slow.

Microsoft staff was soon to answer, and based upon their response we’ve made this guide that will tell you how you can fix the program.

What to do if Office 365 becomes unresponsive

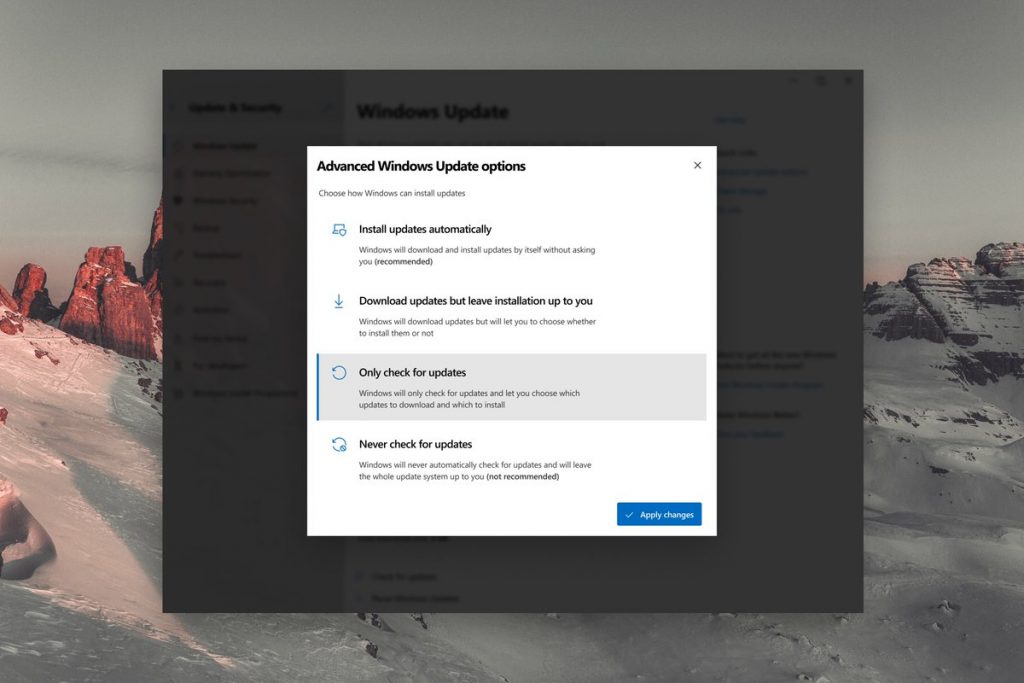
1. Update your PC to the latest Windows 10 version

  1. Select Start
  2. Click on Settings (the gear-shaped icon in the Start Menu)
  3. Click Updates & Security
  4. Select the Windows Update tab in the sidebar
  5. Select Check for Updates
    • If an update has already been downloaded, select Update now
  6. Restart your PC
ffice 365 is not responding due to a long-running script update windows

Additionally, you can also update your Windows 10 PC using a third-party Windows Update Manager.

2. Update your Internet browser

According to official Office support, Edge, Internet Explorer 11, Firefox and Chrome offer the best experience for Office 365 web services on Windows 10:

While some of these browsers automatically update when you open them, some need to be manually started. Check out each respective browser‘s documentation to see how to properly update them.

3. Clear your Internet browser’s cache and cookies

Office 365 may have problems running when the browser‘s cache is already full of data. As such, it is a good idea to perform a cache cleanup once in a while and see if that solves the issue.

Check out these links for official guides on how to clear your cache and browsing history on all of the supported browsers:

4. Try another browser

If you notice that you keep experiencing this sort of error, we advise you to switch to a browser with better loading and speed rates.

Opera is a modern browser that is frequently updated to provide the best possible user experience. The browser is light and easy to use, plus it is very customizable and it integrates a free VPN and adblocker.

⇒ Get Opera One

If you tried all of the solutions above and the issue still persists, you should consider contacting Office 365 support.

Did the listed solutions help you make your Office 365 responsive again? Provide us with your feedback in the comments section below.

FIX: An update to your launcher is available in Minecraft

Although the Minecraft Launcher is programmed to be self-updating, there are occasions when it fails and instead displays the following error message: An update to your launcher is available. In most cases, the game won’t even launch after this message appears on the screen.

Fortunately, there are a few fixes that can help you to fix this problem. We will take you through them so that you may quickly fix this problem and resume playing.

What to do if Minecraft Launcher needs updating

1. Restart Minecraft

In most cases, restarting the game helps solve this issue. You simply close the game and you launch it again. Minecraft will attempt to connect to the server and download the required launcher updates before fully launching.

If all goes well, the game should successfully load and since you will be effectively running a new launcher.

This is typically the solution for users running an older Java-based launcher.

2. Force update Minecraft

If your launcher won’t yet open, try to force-update Minecraft.

  1. Start your Minecraft Launcher.
  2. Click on Options right next to the Username
  3. Select the box next to Force update under the Launch Options
  4. Click Done then login with your usual Minecraft credentials. Minecraft should soon start updating itself.

During the process, Minecraft fetches the newest launcher updates online to help overcome the bug.

3. Uninstall your launcher then reinstall

If restarting the launcher and forcing the update doesn’t get rid of the irritating warning, try to download the Minecraft Launcher afresh.

Steps:

  1. Hold the Windows and X keys simultaneously.
  2. On the menu that pops up, click on Programs and Features.Programs and Features windows 10
  3. Locate the Minecraft Launcher from the Programs and Apps list then click on it.
  4. Next, click Uninstall. This initiates the uninstallation and it should be done in a short while.

Let’s now look at how you reinstall the Minecraft Launcher.

  1. Head over to the official Minecraft website and Click Download. Note that you might be asked to log in using your Mojang account to access the Minecraft Launcher file.An update to your launcher is available minecraft
  2. Open the msi file from the taskbar to run the installer. From there, just follow the easy instructions as displayed by the installer.
  3. Once completed, close Minecraft then launch the game again. Your launcher should now work.

The latest launcher often comes with a number of new and very useful features and you’re enjoy Minecraft even more after this.

4. Update your Java to the latest edition

If you’re still receiving this error, it could be that your current Java installation is causing the launcher troubles. Subsequently, to play the game, you need to download the latest Java version.

Just follow these steps to download Java on your Windows computer (The steps are similar even for Java 11 etc.) then retry.

READ NEXT:

FIX: HDMI connection not working on MacBook

Many MacBook users reported that the HDMI connection is not working for them. This can be an issue, especially if you want to connect your MacBook to an external display. However, there’s a way to fix that.

What to do if HDMI connect isn’t working on MacBook?

1. Check if everything is connected properly

If your HDMI connection isn’t working, make sure that your MacBook is properly connected to an HDMI device. In addition, you can try the following:

  1. Turn off the HDMI device while keeping the MacBook connected.
  2. Disconnect the HDMI cable from your MacBook.
  3. Wait for few seconds and connect the HDMI cable back to your MacBook.
  4. Now turn the HDMI device back on.

This is a simple workaround, but it might come in handy, so be sure to try it out.

2. Check the HDMI cable

If HDMI never worked on your MacBook, it’s possible that there’s an issue with your HDMI cable. Apple products work best with Apple Certified cables, and if your cable isn’t certified, you might have to replace it.

Alternatively, you can consider purchasing an Apple HDMI cable.

3. Use Detect Displays option

If HDMI connection won’t work, try using Detect Displays option like this:

  1. Open the Apple menu and choose System Preferences.
  2. Select Displays.
  3. Now hold the Alt (Option) key and click on Detect Displays

Check if the issue is resolved.

4. Restart your MacBook

Sometimes there might a glitch on your system that prevents the MacBook from working properly. The simplest way to fix that is to restart your MacBook and check if that helps.

5. Relabel or factory reset your TV

This issue appears usually with Samsung TVs, but you can fix it sometimes simply by relabeling the input that is used by your PC.

Alternatively, you can try resetting your TV to the factory settings.

There you go, several quick and simple solutions that can help you if HDMI isn’t working on your MacBook.

In case the HDMI connection is not working on your MacBook, you can fix it simply by checking your cables or by using the Detect Displays option.

Linksys Router is Not Turning on? Try These Methods

It looks like you are having a problem with your Linksys router. It is not turning on at all. You had it for a long time, and it used to work like a charm.

That’s why you’re inclined to think it died without warning, and there’s no chance to change that. We wouldn’t go that far into calling it defective, at least not yet.

Here is a short list of things you can try to fix this problem.

What can I do if my Linksys router is not powering on?

1. Basic troubleshooting procedures

try to fix Linksys router

Let’s first apply some basic troubleshooting steps for your problem:

  • Resort to the good old power cycle trick. Unplug your router from the power. Let it sit for 30 seconds, then plug it back in. You may unplug all the Ethernet cables and the power cord from their ports and plug them back in. Connect the power cord to the power outlet.
  • Ensure that your modem is connected from the Internet port of the Linksys router.
  • Test the power supply to verify it’s putting out the proper voltage.
  • Try different outlets and power strips.

2. Try the 30/30/30 reset

30/30/30 reset

Assuming you tried all previous steps to no avail, this procedure will clear out the NVRAM memory modules and set your Linksys router back to default values.

Start by pressing and holding the Reset button from the back of the unit for 30 seconds. Unplug the power cable from the router while still keeping Reset pressed for another 30 seconds.

Plug the unit back in, holding the button for 30 seconds. We hope you’re not one of those who lack the patience to wait the full 30 seconds time.

Even if the Reset button can be relatively easily clicked, it usually doesn’t do anything unless pressed for the correct amount of time.

Worried about having to configure your Linksys router next? Take a look at our guide for further instructions.

3. Update the firmware

update the firmware

An old firmware can be why your Linksys router is not powering on any longer too. So, you should keep the firmware up to date.

Take a peek and see if you have the latest firmware. If not, correct that right away and update your Linksys router firmware. You can never know; it might just be your lucky day.

In case the router doesn’t work after applying the previously mentioned steps (not even with a wired connection), chances are internal hardware damage is involved.

If any damage is visible on the plastic casing of your router, you need to replace it. However, if there’s any damaged component on the motherboard, you must also replace the functional component.

The worst-case scenario here is that the motherboard itself has been damaged. The bottom line, the router will most likely need to be replaced.

If you have any other questions or suggestions, don’t hesitate to leave them in the comments below.

What is Akamai NetSession and how do I uninstall it?

With the ever-increasing size of the software applications, many developers bundle the installer with some download manager that allows the users to download large files over the Internet, even if the Internet is slow. This is what the Akamai NetSession Interface also does.

It may happen that one of the software installed on your computer came bundled with Akamai NetSessions and installed without your knowledge. Now, if you are wondering what is Akamai NetSession, if it’s safe, and how to install it, this is the article you need.

Why do I have Akamai NetSession?

What is Akamai NetSession?

Akamai NetSession

The Akamai NetSession Interface is a secure application that may be installed by a third-party installer on your computer to improve the speed, reliability, and efficiency of applications and media download.

Some video streaming applications also make use of the tool to improve streaming quality.

When enabled by the software publisher, NetSession may use a small amount of your upload bandwidth, enabling other NetSession interfaces to download pieces of the publisher’s content from your computer. This is similar to how the torrent client works but less aggressive.


Want to check your internet speed? Take a look at the best internet speed testing tools for Windows 10.


Is Akamai NetSession safe?

Akamai NetSession

Yes, the NetSession Interface is safe and does not contain any spyware, adware, or viruses. According to the developers, the software does not collect or send personal information either.

NetSession Interface runs in the background and is designed to help improve the speed, reliability, and efficiency of media downloads and streams. You can check the Akamai process activity by doing the following:

Windows

  • On your Windows computer, press Windows Key + R to open Run.
  • Type control and click OK to open the Control Panel.
  • Click on the Akamai NetSession Interface Control Panel to check the activities.

You can’t open Control Panel? Take a look at this step-by-step guide to find a solution.

Mac

  • You can find the Akamai extension on the System Preference pane. Go to Other > Akamai Preference.

How to uninstall Akamai NetSession?

Akamai NetSession

  1. Press Windows Key + R to open Run.
  2. Type control and click OK to open Control Panel.
  3. Go to Programs > Programs and Features.
  4. Select Akamai Netsession Interface from the list of installed apps.
  5. Click on Uninstall, then click Yes to confirm the action.

Uninstall using command prompt

Akamai NetSession

  1. Press Windows Key + R to open Run.
  2. Type cmd and click OK to open the Command Prompt.
  3. In the Command prompt, type the following command and hit enter to execute.
    cd Users<user name>AppDataLocalAkamai
  4. Next, enter the following command to force remove Akamai NetSession and hit enter:
    admintool.exe uninstall -force
  5. You should see a successful uninstallation message.

If you’re having trouble accessing Command Prompt as an admin, then you better take a closer look at this guide.


If you want to remove Akamai NetSession believing it to be malware or adware, then you don’t need to uninstall it as the tool is entirely safe to use. However, if you want to remove the tool from your system altogether, our step by step uninstallation guide can help you achieve the same.

If you have any other questions or suggestions, don’t hesitate to reach for the comments section below.

RELATED STORIES YOU MAY LIME:

FIX: MacBook won’t connect to Chromecast

Chromecast is one of the best ways to stream multimedia to your TV, but many users reported that MacBook is not connecting to Chromecast. This can be an issue, but there’s a way to fix that.

What to do if MacBook isn’t connecting to Chromecast?

1. Use the Google Home app

If Chromecast isn’t working with your MacBook, try downloading the Google Home app. To do that, follow these steps:

  1. Download the Google Home app on your phone.
  2. Use the app to set up your TV.
  3. After doing that, check if Chromecast works with your MacBook.

2. Restart Media Router component

Sometimes your MacBook isn’t connecting to Chromecast because the Media Router component is having problems. To fix that, simply restart Media Router component like this:

  1. Open a new tab in Chrome and enter chrome://flags//#load-media-router-component-extension in the address bar.
  2. Check if the component is enabled. If it is, disable it and restart Chrome.
  3. Repeat the steps from above, but this time enable the component.
  4. Restart Chrome once again and check if the problem is still there.

Want to cast your laptop screen using Chromecast? Here’s how to do that!


3. Make sure that your Chromecast and MacBook are on the same channel

macbook not connecting to chromecast network channel

If your router has two Wi-Fi channels, that can lead to certain issues. To avoid any protentional issues with Chromecast and MacBook, make sure that both are connected to the same Wi-Fi channel.


4. Try connecting the Chromecast to another port

According to users, if your MacBook can’t connect to Chromecast, the issue can be your HDMI and USB port. Simply unplug the Chromecast from HDMI and USB ports and connect it to different ones.

After doing that, check if the problem is still there.


5. Factory reset your Chromecast

If you still can’t connect to Chromecast with your MacBook, you might want to try performing a factory reset. To do that, follow these steps:

  1. Make sure that your Chromecast is connected to the TV.
  2. Now press and hold the button on the side of the Chromecast.
  3. The LED will blink orange. Keep holding it until the LED turns white.

After doing that, your Chromecast will reset to default.

There you go, several quick and easy solutions you can use if your MacBook won’t connect to Chromecast.

READ ALSO:

Linksys router is not broadcasting SSID? Here’s what to do

Linksys routers should automatically transmit their hotspot service set identifier into the open air in beacons. This makes it easy for nearby computers and other devices to see and connect to the network, so a Linksys router that is not broadcasting its SSID can turn into a serious problem.

In other words, the SSID is the name you see when your PC or mobile device detects the wireless network. Without it, you have to know the name and set up a manual connection instead.

Chances are you don’t want to keep on connecting to the Linksys router by using its IP address all the time. For this reason, in this article, we have listed a couple of ways to correct the issue.

What can I do if my Linksys router is not broadcasting the SSID?

1. Check that SSID Broadcast is Enabled

SSID Broadcast is Enabled

  1. Open a web browser on any Linksys router-connected computer or mobile device and typing 192.168.1.1 into the address bar.
  2. Log in with your administrator credentials to the setup page.
  3. Click Wireless.
  4. Make sure you tick Enabled box for SSID Broadcast.
  5. If the Configuration View is set to Wi-Fi Protected Setup, select Manual.
  6. Then, tick Enabled for SSID Broadcast.
  7. If it’s already this way, set it to Disabled then back to Enabled again.
  8. Click Save Changes and see if that helps.

Make sure that Broadcast SSID is visible. To unhide the SSID and allow other devices to view your wireless network, follow the steps above.

2. Ensure that Linksys router firmware is updated

Linksys router firmware is updated

If you’re particularly security-conscious, you already know that installing the latest available updates is essential to keep your network both safe and efficient. Just ensure that the router is running on the latest firmware by going to the web-based setup page.


Want to know more about how to update your router’s firmware? Check out this hady guide.


3 Make sure Network is enabled

Network is enabled on Linksys router

Before concluding that the router is not working properly, you might consider checking if the Network option is enabled on the user interface as well. If not, change that immediately and see if the issue persists.

Let us know which of the methods above did the trick for you in the comment section below. Also, leave there any other questions or suggestions that you may have and we’ll be sure to check them out.

RELATED ARTICLES TO CHECK OUT:

Netflix marketing exec Jerret West comes back to Microsoft as Chief Marketing Officer for Xbox

Jerret West, the former Vice President/Head of Marketing at Netflix APAC (Asia Pacific region) is coming back at Microsoft as Chief Marketing Officer for Xbox. The news was shared on Twitter earlier today by Xbox watcher Klobrille, and it’s interesting for several reasons.

First of all, Xbox is very familiar territory for West who worked there for 8 years between 2003 and 2011, including three years as Director of marketing. At this time, West was in charge of the worldwide marketing for the Xbox LIVE subscriptions business. In this interview from 2010, you can hear him discuss new social media applications (including Netflix) coming to the Xbox 360.

Now more than ever, Microsoft has become a huge services company, with Xbox Game Pass now clearly overshadowing the still valuable Xbox Live Gold subscription. Xbox Game Pass has often been described in the press as the “Netflix of video games,” so it’s quite significant to see a Netflix marketing exec being tasked of marketing Xbox Game Pass and the overall Xbox business. According to West’s LinkedIn profile, he’s currently responsible for “a 200 person global team and over half a billion dollars in marketing spend.”

West started his new marketing role at Xbox in December, but the news had gone pretty much unnoticed. Until now, Aaron Greenberg, General Manager, Xbox Games Marketing was one of the main public faces of Xbox, along with Director of Xbox Programming Larry Hryb aka “Major Nelson,” as well as Xbox head Phil Spencer. West comes back at a very interesting time for Xbox with the upcoming launch of Xbox Series X, and we hope the team has learned all the lessons from the disastrous Xbox One launch seven years ago.

Microsoft wants Title Bar customization options for PWAs

The new version of Microsoft Edge that the company released last week brings full support for Progressive Web Apps (PWAs), just like Google Chrome and other Chromium-based browsers. This means that Edge should now be able to identify PWAs when you’re browsing the web, and display an “Install” button to make PWAs open in a separate window without the browser UI.

Last month, Microsoft introduced coloured title bars for PWAs in the Edge Canary channel, making these web apps look even more native. The Edge team now wants to go even further and implement title bar customisations for PWAs, as it was explained on GitHub earlier this week (via NextImpact).

As the Edge team pointed out, the PWA Title bar area is currently system reserved, and can’t be customized like it is in many popular apps. However, the team proposed a solution to circumvent this limitation, including a standards-based way for developers to define which areas of their content within title bar should be treated as draggable.

The team provided a image of what a PWA with a customizable title bar would look like, and this example includes a Search Bar.


The Edge team explained that its proposal “do not pose considerable privacy concerns other than feature detection,” but the team would like to work the community to better understand how to implement title tar customization options for PWAs in Chromium. For Microsoft, one the main purposes of the switch to Chromium for Edge was to be able to suggest new features that could benefit all Chromium-based browsers, and we’re glad to see the Edge team coming up with good ideas for improving PWA support.

Surface Duo to support multiple screen modes

Microsoft Surface Duo, which will likely hit the market before the end of 2020, will sport multiple screen modes. It’s a futuristic mobile device that’s attracted both skepticism and excitement in equal measure considering the failure of similar gadgets in the past.

While announcing the release of dual-screen preview SDKs, Microsoft’s Kevin Gallo said the device would let users span apps across screens. Meanwhile, developers won’t be able to do this programmatically.

Your app, by default, will occupy a single screen, but users can span the app to cover both screens when the device is in a double-portrait or double-landscape layout.

Prioritizing the dual-screen user experience

Microsoft believes that the Surface Duo will be a success if developers can take into account dual-screen user preferences when creating apps for the device. Failure to optimize the user experience is part of the reason why such gadgets are failing in the market or not catching on fast enough.

The company is advising developers not to offer spanned layouts for the sake of it, especially where they don’t add value or if they can compromise the UX. That advice makes sense when it comes to mobile applications that don’t have to display on multiple screens, such as calculators.

Also, users are more like to receive dual-screen patterns well when available as an option depending on how they want to view or access apps or content on the Surface Duo.

Will Android performance be an issue?

Surface Duo is an Android device. Perhaps, after failing in the smartphone market, Microsoft hopes to succeed by deploying the popular mobile OS on its upcoming dual-screen gadget.

But it remains to be seen whether Android can seamlessly manage multiple screens on the Surface Duo. The Samsung Galaxy Fold, also a dual-screen device that runs on Android, had a difficult entry into the market. However, most of its early technical problems had a lot to do with hardware design and not the Android OS.


FIX: The snip could not be sent on Windows 10/11

The Sniping Tool is a great way to take a quick screenshot of what is there on your screen, crop out the irrelevant portions and save the image. You can then share it with others or keep it in your own record.

Unfortunately, things aren’t free-flowing with the Send Snip Tool and a common error you are likely to get is that the snip could not be sent. This usually happens if your computer does not have MAPI-compliant mail client installed. In other words, you should have an email client software like Microsoft Office Outlook, Mailbird, or Mozilla Thunderbird installed on your device.

That apart, setting things right here is quite easy and can be accomplished in no time.

Fixing the snip could not be sent error

1. Repair Outlook Express

  1. Open the Run dialog box. You can do this simply by typing Run in the Cortana search box and selecting from the search result.
  2. In the Run dialog box, type regedit and press Enter.
  3. In the Registry Editor window, locate the subkeyHKEY_LOCAL_MACHINESoftwareClientsMailMicrosoft Outlook
  4. Select the subkey and press Delete.
  5. Click on Yes on any confirmatory box that appears.
  6. Close Registry Editor.
  7. Next launch Control Panel. Again, simply typing Control Panel in the Cortana search box will do.
  8. In Control Panel, click on Programs > Programs and Features.
  9. Click on the Microsoft Office program and hit the Repair button that appears at the top.repair microsoft office
  10. The subkey will be recreated.
  11. This should help deal with the snip could not be sent error.

Note: It is strongly recommended to create a backup of your registry before making any changes in it. In the Registry editor window, click on File > Export to create a back up.


2. Set default mail client in Registry

  1. Launch Registry Editor as before.
  2. Go to the following subkey: HKEY_LOCAL_MACHINESOFTWAREClientsMail
  3. In the panel on the right, check if the data for Default is set as Microsoft Outlook (or the email client installed on your device)
  4. If it’s something else, double click on Default and set the field accordingly.
  5. Also, expand the Mail key and check if Microsoft Outlook (or the mail client you have) is installed.Setting the default mail client in registry can help fix the snip could not be sent error
  6. If that isn’t the case, close Registry Editor and proceed to either repair or reinstall Outlook Express or whatever mail client you wish to have.
  7. However, if the Outlook Express key is present under Mail, select the same and check the MSIComponentID value on the right panel.
  8. The right GUID should be {6DB1921F-8B40-4406-A18B-E906DBEEF0C9}. (This applies to Outlook 2013 and Outlook 2016.)
  9. Double click on MSIComponentID and set the right value if that isn’t already the case.

3. Check MSI Components Registry Permissions


  1. In the Registry Editor window, go to the following branchHKEY_CLASSES_ROOTInstallerComponentsF1291BD604B860441AB89E60BDEE0F9C
  2. Right click on the key and select Properties.
  3. In the Properties window, select the Security
  4. Check if Users group is present.
  5. If it is, ensure the Users group has Read permission for the key.
  6. However, if Users group is not present, click on Add, type Users and press Enter.
  7. Close Registry Editor.

4. Repair Msmapi32.dll file

Repair Msmapi32.dll file to fix the snip could not be sent error


  1. Close Outlook Express if it’s open.
  2. Launch File Explorer and click on This PC from the options on the left.
  3. Open the C: folder and navigate to Program Files (x86) > Common Files > System > MSMAPI > 1033.
  4. Delete the file dll.
  5. Re-launch Outlook Express. This will recreate the DLL file and hopefully, should also fix the error as well.
  6. You are also recommended to update Windows to the latest build available.

This should be all you need to do to get rid of the snip could not be sent error.

Further, here are some related topics to browse.

Posted in Fix

Windows 10 Update Settings reimagined; include new customization options and progress UI

Up until recently, Microsoft’s Windows development team has been rather cagey about the details on the upcoming evolution of the company’s flagship operating system, so creative graphic and UI designers have rushed to fill the void of anticipation with their own takes on how the company can advance the platform visually and functionally.

Thanks to a few high-level mentions that include @Daniel_Rubino and @tomwarren, we’ve seen a recent Twitter thread posted by @zeealeid who is a self-proclaimed “tech geek who knows a bit about design” surfaced and offered, yet another visual perspective of where the Windows development and UX team could put some design focus on subsequent updates to the platform.

@zeealeid focuses on transforming the current Windows Update settings and prompts with a much more robust display of information to presumably walk users through the update process while also giving them finer controls over when and what gets updated in Windows.

Diving further, @zeealeid also pins a few more shots detailing a proposed update process in his vision of a new Windows 10 update setting that includes, the ability to customize which bits are actually installed, set up of Windows update scans, detailed updates page, updated progress, and ETA visuals, as well as taskbar and new Start Menu prompts.

As with all design concepts, there is a bit of fantasy that runs askew of actual engineering but @zeealeid’s concepts seem thoroughly thought through and considerate of relatively realistic design goals that can be taken up by the Windows UI and UX team.

A little over 24 hours ago, an update to Windows 10 SDK was released with support for dual screens and hints at what might be coming down the pipe with Windows 10X and since then videos have surfaced showcasing what users might come to expect from the updated platform.

So far, the videos only tease a handful of application functionality, but the Windows Start experience displayed in the teases looks very similar to that from several fan-made concepts, so there is some hope that the Windows team may be aligning their updated UI with that of some more outstanding concept designs from its fan community.

How to disable USB selective suspend in Windows 10

One thing many users don’t know about USB devices is what happens to them when you keep them connected, but don’t actually use them.

For example, in the case of a portable PC, such as a laptop or a tablet, USB devices that aren’t actively in use are put in a selective suspend. This feature was implemented in Windows 10 to help prolong battery life as much as possible.

Unfortunately, this low-power mode can cause performance issues with certain peripherals and result in the devices not working at all.

If you too encounter a similar issue, you can always choose to disable Windows 10‘s USB selective suspend feature. This will make the USB devices constantly draw out the same amount of power, but you will at least get rid of any connectivity issues.

This feature isn’t very easy to come across within Windows 10‘s interface, and that is why we’ve created this step-by-step guide that will give you more information on the matter.

How can I disable USB selective suspend in Windows 10?

  1. Press Start
  2. Type in control and launch the Control Panel
  3. Go to Hardware and Sound
  4. Go to Power Options
  5. Look under Selected plan and select Change plan settings 
  6. Select Change advanced power settings
  7. Expand the USB Settings menu
  8. Expand the USB selective suspend setting menu
  9. Select Disabled usb selective suspend
  10. Click Apply
  11. Click OK

Note: If you’re doing these changes on a laptop or tablet, you’ll see two options: 

  • On Battery
  • Plugged in

As such, make sure to change those settings accordingly.

If you’re interested in more tips that can extend a Laptop’s battery life, check out this detailed guide.

By following these steps, Windows 10 will no longer power-off USB devices connected to your computer. This can fix any problem you may have as a result of this feature.

USB selective suspend has been around for quite a while, and similar guides can apply to Windows 7, 8, and 8.1.

If you want to read about more tips and tricks that can help extend the battery life of your portable device, leave us a message in the comment section below.

RELATED ARTICLES YOU SHOULD CHECK OUT:

Windows 7 lost its HIPAA compliance: Migrate now!

Now that Microsoft has finally ceased support for Windows 7, any organizations and institutions that work with a client’s sensitive data will now need to decide on whether to migrate to Windows 10 or risk being a liability.

This also applies to institutions that are in the healthcare business, as they now are struggling to maintain their HIPAA (Health Insurance Portability and Accountability Act) compliance.

Since Microsoft is no longer offering support to Windows 7, this means that there will be no more security updates.

Healthcare institutions are a prime spot for hackers to try and retrieve personal client information from. This is especially since they are known to be among the institution to upgrade last.

Is Windows 7 still HIPAA compliant?

Given how Windows 7 is no longer receiving any security updates, the short answer would be no.

However, the only workaround for institutions to maintain their HIPAA compliance and still run Windows 7 would be to get the Windows 7 Extended Support for Business.

Unfortunately, this too is nothing more than a temporary solution. This is because the Extended Support would only buy them an extra 3 years. Additionally, the costs ramp up pretty fast as years progress, and in the end, they would have to upgrade to Windows 10 anyway.

If you want HIPAA compliance, you’ll need Windows 10

From a mere security standpoint, Windows 10 is indeed HIPAA compliant, as long as certain guidelines are met.

This involves signing agreements with Microsoft where you discuss the availability of your clients’ data, limiting what Microsoft can access, and what it can do with what it accesses.

Thus, if you want to maintain your HIPAA compliance, you are forced to do one of two things:

  • Migrate to Windows 10 and follow certain guidelines
  • Get the Windows Extended USpport for Business, and pay a lot of money in the process

The obvious choice in terms of costs and long-term efficiency is pretty obvious. As such, you might as well start reading about the steps need to migrate right now.

If you work for a healthcare organization and want information on how to maintain your HIPAA compliance post-migration, leave us a message in the comment section below.

RELATED ARTICLES YOU SHOULD CHECK OUT:

All Lights Flashing on Linksys Router: 4 Ways to Fix

Are all lights flashing on your Linksys router? This can be concerning since this is unusual behavior that can impact your ability to access the Internet.

This problem can prevent you from accessing the Web altogether, so it’s crucial to fix it as soon as possible.

Trying to second-guess the outcome of these methods is exhausting, so check them out yourself.

Why are the lights blinking on my Linksys wireless router?

  • Hardware failures such as damaged power supply or cable can cause this issue.
  • Firmware compatibility issues can cause problems with router booting.
  • Your router might not be properly configured, thus causing the issue.
  • Glitches with your router can cause this issue to appear as well.

What can I do if all lights are flashing on the Linksys router?

1. Rule out hardware failure

  1. Make sure the wall power supply is not malfunctioning.
  2. Replace the power supply with another one, possibly from a second unit, and confirm if it works.
  3. Also, try to replace the power adapter of your router.

Replace the power supply with another one, possibly from a second unit, and confirm if it works. Also, try to replace the power adapter of your router.

2. Make sure the firmware is working on the latest version

  1. Log in to the router’s settings page.
  2. Next, locate the firmware version.update firmware version
  3. Check the web and make sure that there aren’t any issues with the firmware version.

It might be necessary to update your router’s firmware to fix this issue, but luckily we have a ready guide to help you.

3. Check MAC Address Clone settings

  1. Login into your Linksys router.
  2. Go to Setup.
  3. Check the MAC Address Clone settings.
    check MAC Address Clone

After doing that, check if all lights are flashing on the Linksys router.

4. Change the router’s IP Address

  1. Login into Linksys router.
  2. Go to the Router IP Address window.change router IP
  3. Then change it with a different IP Address class like 10.0.0.1.

5. Reset your Linksys router

  1. To proceed, locate the Reset button on the router. The location may vary for every model, yet it is usually hidden in a tiny hole to prevent accidental resets.
    factory reset your router
  2. To press it, you use a paper clip or another small sharp-pointed object.
  3. Hold the button for about 30 seconds.
  4. Then, remove the router’s power adapter.
  5. Wait for another 30 seconds before plugging it back in.

After carefully following all the above steps, your Linksys router should work without any other issues.

In case the problem is still there, check our guide on how to configure Linksys router properly and try to fix the issue.

If you have further questions or suggestions, don’t hesitate to leave them in the comments section below.

Linksys Router Keeps Disconnecting: 4 Ways to Fix it

Some Linksys router owners have posted on numerous software forums that their Linksys router keeps disconnecting.

This can be an issue since it will stop you from accessing the Internet and disrupt important online tasks on your computer.

However, this can be fixed, and today we’re going to show you the best ways to do it.

Why does my Linksys router keep disconnecting?

  • The wireless channel you’re using is too has too many wireless devices on it.
  • Your router firmware is out of date and it needs to be updated.
  • The SSID assigned to your network isn’t unique.
  • Interference from other devices and physical obstacles.

What can I do when Linksys router is not staying connected?

1. Change your router’s channel

  1. Access the router’s web-based setup page by launching a web browser and entering 192.168.1.1 in the Address bar.
  2. Click the Wireless tab.
  3. On the Basic Wireless Settings sub-tab, select Manual.
  4. Click the drop-down arrow for Channel.
  5. You may now select your preferred channel.
  6. Change your router’s channel from 6 to 1 or 11.
    change router channel
  7. Don’t forget to click Save Settings.
  8. Finally, restart the wireless computer.

This issue could be the result of your router operating on the same frequency as your cordless telephone system or other nearby devices.

That’s why we strongly advise you to change the router’s channel to 1 or 11. These are both considered non-overlapping channels.

2. Make sure that your router is running on the latest firmware

  1. Download the latest firmware for your router.
  2. Check the instruction manual.
  3. Closely follow the instructions to complete the process.
    latest firmware for router

For more instructions, check our guide on how to update router firmware.

3. Give your router’s Wi-Fi a unique SSID

  1. Access the router’s web-based setup page.
  2. When the router’s web-based setup page opens, click Wireless.
  3. Follow this path Wireless  and select Basic Wireless Settings page.
  4. Select Manual.
  5. Look for Network Name (SSID) and change it to your desired name.
    router WiFi with a unique SSID
  6. Click Save Settings.

Every Linksys wireless router has a network name assigned to it. The technical term for it is Service Set Identifier (SSID). It’s time to give your network a unique SSID and forget about using the classic “Linksys”.

Leave it this way and don’t act surprised when trying to connect to your neighbor’s router instead of yours. You could also set SSID Broadcast to Enabled. This will further help your computer find and lock on to your router‘s signal.

4. Reduce wireless interference

  1. Adjust the 2.4GHz wireless channel to 1 or 11.
  2. Customize the Wireless Settings of the router.
  3. If the problem persists, then we suggest reducing the wireless interference immediately.

Do note that your router may be losing connectivity because of physical obstacles such as walls and floors. Try to move it to a different location, preferably in the central part of your house.

These are a few of the potential fixes for the Linksys router keeps disconnecting issue. In case you’re having additional problems, we have a great guide on Linksys router not resetting that you might want to check.

If you know of any other methods that can fix a Linksys router from dropping signal, let us know in the comment section below.

Fix Error 524: A timeout occurred in a couple of easy steps

Millions of users use the CDN service offered by Cloudflare to keep their website secure and make it load faster. However, sometimes, while accessing a website you may encounter Error 524: A timeout occurred Cloudflare server error.

This error can occur if your server failed to respond to a TCP connection established by Cloudflare or if the server is overloaded and limited by resources.

In this article, we discuss a couple of troubleshooting tips to help you resolve the error 524 a timeout occurred Cloudflare server error so that you can get your website back online.

How do I fix Error 524: A timeout occurred?

1. Check server load

524 a timeout occurred Cloudflare server error

  1. One of the reasons for this error can be the high usage of your server resources.
  2. Begin with checking if your server‘s resource is at its peak or above normal use.
  3. If the issue is occurring due to an increase in traffic, you may need to upgrade your server and increase the resources.
  4. If there aren’t noticeable differences in the traffic, then check if the resources are being utilized by some other processes.
  5. Also, try to limit the processes running on the server to keep the server usage in check.

Why is Cloudflare checking my browser? Find out the answer in this handy guide.


2. Check for brute force attack

524 a timeout occurred Cloudflare server error

  1. Run your SSH client and login with root access.
  2. Enter the following command to check if multiple hits are coming from any particular IP address.
    netstat -an | grep 80
  3. The above command will provide the list of IPs from which the website is receiving multiple hits.
  4. To resolve the issue, we can block any suspicious IP addresses to protect your server.
  5. To block any suspicious IP address, enter the following command, and hit enter. Make sure you replace the IP address with xxx below.
    iptables -A INPUT -s xxx.xx.xx.x -j DROP
  6. Repeat the steps to block all the suspicious IP addresses.
  7. Once done, use the following command to restart the server.
    systemctl httpd restart
  8. Now try to access your website again and check if the error 524 is resolved.

By following these steps, you can lower the website hits, which will reduce server usage. This also helps you to ensure that only valid traffic is accessing your server.


3. Other solutions to try

524 a timeout occurred Cloudflare server error

  1. Investigate the issue at your origin server and check if the server is taking longer than 100 seconds to respond. If so, ask your admin or hosting provider to look into the issue.
  2. If you are running a Database server, diagnose the server to find if there are long-running queries. Review your origin server log file to find more information about the issue.
  3. If you have scripts that run for longer than 100 seconds, you can run it via a grey-clouded subdomain. This way, it can end a long-running background process and return a status that the browser can show until the background process is completed.
  4. If you are running a VPS, like Windows VPS,  make sure the firewall at the origin is properly configured and Cloudflare’s connecting IPs are not limited in any way.

The Error 524: A timeout occurred Cloudflare server error indicates that the issue is at the origin server and not at Cloudflare’s end. By following the steps in this article, you can troubleshoot the issues causing the error and get your website back online successfully.

This isn’t the only Cloudflare error you can encounter, and in our latest guide we covered Argo tunnel error, so don’t miss it for more information.

If you have any other questions or suggestions, don’t hesitate to leave them in the comments section below.

Bluetooth devices not connecting to MacBook? Use this fix

We use Bluetooth every day, but many MacBook users reported that devices are not connecting via Bluetooth to their MacBook. This can be a problem, but there’s a way to fix it once and for all.

What to do if Bluetooth is not connecting on the MacBook?

1. Restart Bluetooth and your MacBook

One way to fix Bluetooth issues is to restart Bluetooth. To do that follow these steps:

  1. Click the Bluetooth icon in the menu bar.
  2. Choose Turn Bluetooth Off.
  3. Click the icon again and this time choose Turn Bluetooth On.

If that doesn’t work, try restarting your MacBook and see if that helps.


2. Reconnect your Bluetooth devices

If Bluetooth is not connecting on your MacBook, you might be able to fix it by reconnecting the paired devices. You can do that by following these steps:

  1. Go to System Preferences > Bluetooth.
  2. Click on the X next to a Bluetooth device.
  3. Wait for a few moments and reconnect your Bluetooth device.

Some users are suggesting to restart your Mac before connecting Bluetooth devices, so you can try that as well.


3. Delete Bluetooth .plist file

delete bluetooth file macbook not connecting bluetooth

Sometimes you can fix Bluetooth issues simply by deleting the Bluetooth .plist file. To do that, follow these steps:

  1. Select Go from the Finder menu and choose Go to Folder.
  2. Enter /Library/Preferences and choose Go.
  3. Locate the apple.Bluetooth.plist file and delete it.
  4. Choose Go to Folder again in Finder.
  5. Enter ~/Library/Preferences/ByHost and choose Go.
  6. Find the apple.Bluetooth.xxx.plist and delete it.
  7. Turn off your MacBook and leave it off for a minute or two.

Once you turn the device back on, the issue should be resolved.


4. Reset the Bluetooth module

If the previous solutions didn’t work, you might want to try resetting the Bluetooth module. To do that, follow these steps:

  1. Press and hold Shift + Option and click on the Bluetooth icon in the menu bar.
  2. Select Debug and choose Remove all devices.
  3. Click Debug and this time choose Reset the Bluetooth module.
  4. After doing that, restart your MacBook and connect the Bluetooth devices again.

There you go, several quick and easy solutions that can help you if Bluetooth devices aren’t connecting to your MacBook.

READ ALSO: