Fix the unexpected error occurs in PSWS call error

If you have administrator privileges, you can view, quarantine, or delete quarantined messages and files in Office 365.

It is worth mentioning that Office 365 has the default option to send directly to quarantine phishing and malware messages.

You can view and manage these files in the Security & Compliance Center.

However, many users encountered issues with this operation. They received the “Unexpected error occurs in PSWS call” error message.

What to do if the quarantine management page is broken?

1. Clear the cache of your browser

This issue might appear if the internet temporary files are corrupted. To fix the problem quickly, delete them from your browser.

To do this in Google Chrome, follow the steps below.

  1. Click on the three vertical dots from the upper-right corner of the windows.
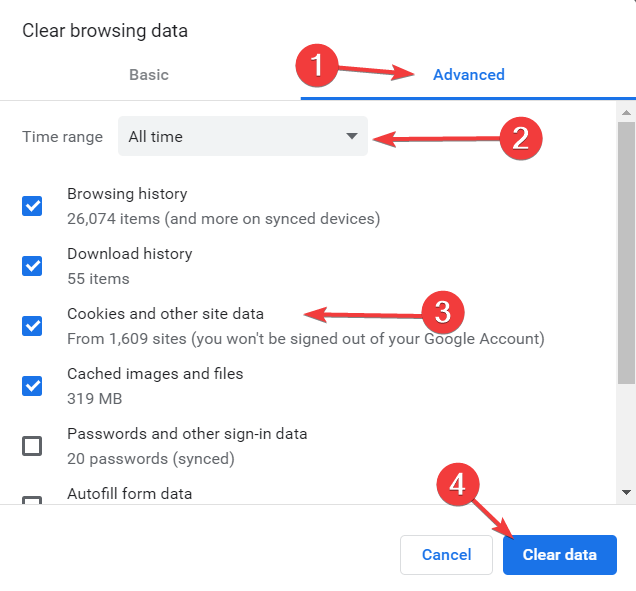
  2. Go to More tools and select Clear browsing data.chrome clear data
  3. On the Advanced tab, select All time from Time range, check the first four, and click on Clear data.chrome clear browsing data

2. Start browser in private mode

Going in private mode is an interesting option for many browsers. Also, many users reported that going incognito solves the “Unexpected error occurs in PSWS call” error.

  1. In Google Chrome, go to the three vertical dots from the upper-right side of the window.
  2. Select New incognito window.https://windowsreport.com/wp-content/uploads/2019/09/new-incognito-window.png
  3. Once you opened Chrome in incognito mode, try the operation here.

3. Switch to another browser

Quite a few people reported that switching to another browser solved this problem.

We recommend Opera One browser. This particular alternative will offer valuable services, such as third-party integrations in the homepage, free VPN security, and a modern user-friendly interface.

Moreover, this tool is privacy-oriented, so you don’t have to go incognito – you already are in privacy mode by default.

So, you are always protected from online threats regarding identity or data, using a reliable adblocker and VPN service in the browser. Plus, it also comes with a built-in AI.

⇒ Get Opera One

Conclusion

The quarantine management is a very important function used by many people. Unfortunately, errors are common, and solving them might not be as easy as users want.

Luckily, the methods described above are simple. You can clear your cache, which is always a good idea even if your browser is running properly.

Also, you can choose another browser. We recommend UR for enhanced privacy protection and reliability.

Did our solutions help you fix the issue? Do let us know in the comments section below!

US Department of Interior moves 84K employees from Google apps back to Office 365

The US Department of Interior has decided to move back 84,500 employees from Google apps to Office 365, according to a report from Federal News Network (via Windows Central). The new $94 million contract follows a previous battle between Google and Microsoft seven years ago, when the Interior ultimately chose Google to move its email to the cloud.

With this new contract, the US Department of Interior plans to leverage Microsoft tools to improve collaboration between DOI employees, as explained in this statement:

“The cloud based solution will support DOI employees by improving work collaboration methods, documentation flows, communication capabilities, streamlined email usage and management and overall increased business performance of DOI’s mission, cost and support objectives,” the statement of work states. “DOI goals include developing an integrated partnership to build a project that transitions accounts, data, technical controls, authentication or access capabilities and applications that make up the current cloud email and collaboration system into a modernized, secure, service enriched, email and collaboration system.”

The timing for this new contract is quite interesting, as Microsoft is still waiting on a decision regarding Pentagon’s $10 billion, multi-year JEDI contract. Last month, we also reported that the United States Defense Department agreed to use Microsoft’s 365 productivity software and solutions in a $7.6 billion deal.

Microsoft makes its ElectionGuard software for voting systems open source

Part of Microsoft’s Defending Democracy Program just became officially an open-sourced development kit (SDK) that, ideally, will enable more election campaigns to secure their communications in the future as well as put up additional safeguards around voting methods.

In May, Microsoft CEO Satya Nadella announced that it would be rolling out ElectionGuard as free open-source solution, but earlier this week the project finally became publically available across the company’s GitHub repositories.

Here is what’s being gifted to developers:

  • ElectionGuard specification. The ElectionGuard specification includes both “informal” and “formal” road maps for how ElectionGuard works. The informal spec is authored by Dr. Josh Benaloh of Microsoft Research and provides the conceptual and mathematical basis for end-to-end verifiable elections with ElectionGuard. The formal spec contains detailed guidance manufacturers will need to incorporate ElectionGuard into their systems, including a full description of the API – which is the way voting systems communicate with the ElectionGuard software – and the stages of an end-to-end verifiable election.
  • Software code. This repository contains the actual source code vendors will use to build their ElectionGuard implementations. It is written in C, a standard language commonly used by open-source software developers and includes a buildable version of the API. This documentation is also viewable here. This code was built together with our development partner Galois.
  • Reference verifier and specification. As we announced in May, ElectionGuard enables government entities, news organizations, human rights organizations, or anyone else to build additional verifiers that independently can certify election results have been accurately counted and have not been altered. The resources available on GitHub today include a working verifier as well as the specifications necessary to build your own independent verifier.
  • Ballot marking device reference implementation. Voting system manufacturers will be free to build ElectionGuard into their systems in a variety of ways. At the Aspen Security Forum in July, we demonstrated a sample voting system, built with the help of industrial designer Tucker Viemeister, that we believe showcased a great way the features enabled by ElectionGuard can be used in voting systems. The ballot marking device we demonstrated included accessibility features built under the guidance of the Center for Civic Design, authors of the original “Anywhere Ballot,” and incorporated the Xbox Adaptive Controller as an optional device to mark ballots. The ballot marking device open-source repository released today includes a variety of tools and visuals necessary to build or augment real-world election systems using the best of ElectionGuard.

While Defending Democracy is a program that is being offered both nationally and internationally, it appears that ElectionGuard is being pitched to US-based developers and “manufacturers of voting systems in the United States.”

Pre-orders open for 2 new Star Wars Jedi: Fallen Order Xbox One console bundles

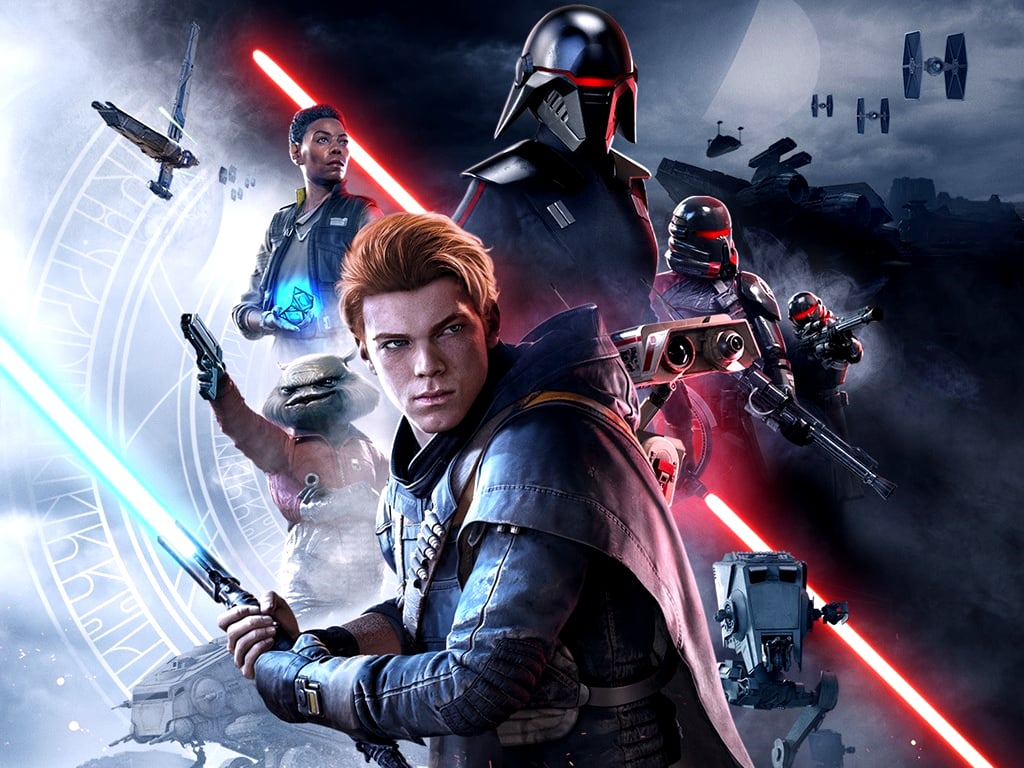
Star Wars Jedi: Fallen Order is set to launch in mid-November and hype is definitely beginning to build around the video game.

In addition to the release of a new story-focused trailer (which you can watch below), two new Xbox One console bundles were announced today as part of Lucasfilm’s Force Friday merchandise marketing promotion.

Each Xbox One bundle comes with a console (Xbox One S or Xbox One X), a digital code for the Star Wars Jedi: Fallen Order video game, the in-game digital pre-order bonuses (Orange lightsaber blade color, BEE D-1 skin, mygeeto campaign hilt, and umbaran campaign hilt), and digital codes for the OG Xbox Knights of the Old Republic and Knights of the Old Republic 2 video games which are now playable on Xbox One due to added backwards compatibility. A one-month trial of Xbox Game Pass, Xbox Live Gold, and EA Access is also included.

The Xbox One S Star Wars Jedi: Fallen Order bundle is currently up for pre-order for $299 while the Xbox One X bundle will set gamers back $499. Both have a release date of November 15th, the same day as the launch of Star Wars Jedi: Fallen Order.

For those who already have an Xbox One S or X console and are just needing to pre-order Jedi: Fallen Order, a special discount is being offered to all owners of Star Wars Battlefront II.

Are you excited for Star Wars Jedi: Fallen Order and are you thinking of grabbing either of these bundles? Share your thoughts with the community in the comments below and then follow us on Pinterest for more Xbox gaming content.


Why is Elara app preventing shutdown in Windows 10? [Solved]

The Elaraapp is basically an application that comes pre-installed with most of the systems. This app basically improves the functionality of your pointing device.

However, there are many reports that this app prevented a good number of users from shutting down their Windows 10 systems. This can be rather annoying, so today we’re going to show you how to fix it.

What to if Elara app is preventing shutdown in Windows 10?

1. Check for Windows 10 & touchpad driver updates

  1. Search for the Settings app from the Start menu and open it.
  2.  Navigate to the Update and Security section and select Check for Updates.check for updates elara app preventing shutdown windows 10
  3. Your system will start to download all the latest updates. Wait until your system completes the installation process.
  4. Press Windows key + X and click Device Manager from the list of options.
  5. Go to Mice and other pointing devices section, right-click on a driver and click Update driver. Now select Search automatically for updated driver software. update driver elara app preventing shutdown windows 10
  6. Repeat the same process to update all the drivers listed under this section.
  7. Alternatively, you can manually download the latest updates from your hardware manufacturer’s website.
  8. Reboot your system to apply the changes.

For a quicker and safer experience that will remove any risk of installing a faulty driver, use dedicated updater software such as Fortect Driver Updater.

2. Create a new Registry Key

  1. Press Windows + R keys to open the Run dialog box on your screen. Type regedit and press the Enter button to open Registry Editor.
  2. Once the Registry Editor window is open, navigate to HKEY_CURRENT_USERControl PanelDesktop key in the left pane.create registry key elara app preventing shutdown windows 10
  3. Navigate to the right side of the window and right-click on an empty space. Click New >> DWORD (32-bit) Value. 
  4. Write the name of the new key AutoEndTasks, set its value to 1.
  5. Click the OK button to save the changes and close Registry Editor.

3. Remove Elara app from system

  1. Search for Control Panel from the Start menu and open it.
  2. Click Uninstall a Program from the Programs section.select uninstall a program elara app preventing shutdown windows 10
  3. Search for Elara app or other suspicious programs that you might see in the list of installed programs.
  4. Uninstall all of them one by one and finally click the OK button.

4. Remove Elara app from Google Chrome

  1. Launch the Google Chrome browser to remove extensions related to Elara App from it.
  2.  Navigate to the three dots menu and click More tools >> Extensions. Now remove all the suspicious extensions one by one by using the trash icon.remove extension elara app preventing shutdown windows 10
  3. Close the browser.

5. Restore your system

  1. Go to the Start menu and search for System Restore. Open the first result from the list. You might need to provide your administrator’s password.
    remove Elara app system properties window
  2. Follow the on-screen instructions to restore your system to a stable point.

FAQs

What is the Elara app on Windows?

The Elara app is a preinstalled touchpad control utility used on many laptops. It helps manage trackpad functions, gestures, and device-specific features. It’s usually part of your laptop manufacturer’s drivers.

Why does the Elara app prevent my laptop from shutting down?

This happens when the touchpad driver or a background process blocks shutdown to prevent data loss or driver corruption. It’s often caused by outdated drivers, stuck background tasks, or conflicts with other software.

Is it safe to end the Elara app task in Task Manager?

Yes. Ending the task won’t harm your system, but it may temporarily disable some touchpad features until you restart. Your laptop will still function normally.

How do I fix the Elara app preventing shutdown?

Update your touchpad driver, uninstall and reinstall the OEM touchpad software, disable startup apps that may conflict, or perform a clean boot. If the issue persists, running Windows Update or reinstalling device drivers often resolves it.

Elara app preventing your system from shutting down can be annoying. However, we hope that you managed to resolve it using one of these solutions.

Other programs can also block shutdown on Windows 10, so be sure to check our guide on apps preventing shutdown to quickly identify and stop stubborn processes.

Failed to connect to Ingest in Mixer [FIX]

Mixer is one of the best platforms for streaming videos online. The service owned by Microsoft helps people stream video content such as online games.

So, the platform must work properly for everyone. Unfortunately, this is not always the case. Many users reported a major issue while using Mixer to stream videos. They failed to connect to the ingest server on Mixer.

The ingest servers are important for taking in video traffic and distributing to edge servers.

Also, several users encountered the “Failed to connect to Ingest” error message while trying to stream the games they play on Xbox.

Fortunately, there are some easy solutions available and today we will show you what to do if you encounter this problem.

Fix connection issues with Mixer

1. Unlink and relink your Microsoft account

The solution is as easy as it gets. You just need to unlink and relink your account from Microsoft.

2. Reset your modem or router

Sometimes, your modem or router could cause this issue. So, you might have an internet connection issue.

To fix that, reset your modem/router. Every device should have a reset button. Search this button on your model and press it.


Fix network problems with the help of our comprehensive guide!


3. Reboot your console

If your network connection is not the culprit and the problem persists, try rebooting your Xbox console.

Hold the power button for at least 10 seconds while the system is on.

Press the button again to start the console. The cache is cleared, your data is preserved, and some settings are reverted to default.

Conclusion

The “Failed to connect to Ingest” error is one of the most frequently met problems in video streaming. Luckily, the solutions to solve this error are not complicated or technical.

All the solutions above signify a syncing issue, whether on servers, your Microsoft account, or your console. So, unlink and relink your Microsoft account, reset your modem, or reboot your console.

If these methods don’t work, your problem might be more complicated and you’ll need technician support. Contact the Mixer team and describe your problem to start streaming videos again.

Did our solutions help you Did you find another method to fix the problem? Do let us know in the comments section below!

RELATED ARTICLES YOU NEED TO CHECK OUT:

Forgot Your Windows 10/11 Admin Password? Here’s What to Do

To log into a computer running on Windows 10, you’ll need an administrator account, secured by an administrator password. Not knowing your Windows administrator password can be quite troublesome.

Depending on the privileges of the administrator account, forgetting the password can prevent you from installing any software, or even logging into the PC altogether.

While password recovery isn’t all that simple due to security reasons, there are a few things you could do.

How to recover your Windows 10 Admin password?

1. Use a Password Reset Disk

This is the official method used by Microsoft when losing your password.

The only problem with the method is that the disk needs to be created beforehand.

If you have a password reset disk nearby, all you need is to log into your Windows 10 and simply ask for a password reset.

2. Log in using alternative sign-in options

You can use an elevated Command Prompt to reset your password.

The only problem is that you first need to log in using either through PIN, Picture Password, or another administrator account logged on that PC.

Once logged in, do the following:

  1. Press Windows + X
  2. Select Command Prompt (Admin)
  3. Type in the following command line:
net user account_name new_password

Replace account_name with your username, and new_password with the new password you’d like

Forgot windows 10 admin password Login with Other Sign-in Option

Alternatively, you could use a third-party password recovery tool that will be able to perform live memory analysis and provide you with the desired data within minutes.

⇒ Get Passware

3. Reset your Microsoft Admin Account password online

Forgot windows 10 admin password Reset Microsoft Account Password Online

Visit the Windows Live password reset page and simply request a password change from there.

The only thing you should know is that you need to have provided an alternate E-mail address and phone number.

4. Reset your Windows 10 Admin password with PCUnlocker

With PCUnlocker you can simply create a bootable image on a CD or a USB stick.

Afterward, you just need to boot from the image, and you’ll see all the accounts logged into that PC.

Once there, select one of your local accounts and click on Reset Password button.

Forgot windows 10 admin password PCUnlocker

5. Reset your Windows 10 Admin password with MSDaRT

DaRT, also known as Microsoft Diagnostics and Recovery Toolset is a professional tool created by Microsoft.

All you need to do is boot your PC with A DaRT Recovery Disk.

Then you just launch the built-in Locksmith Wizard tool, which allows you to reset the Windows 10 password of any local account.

The only downside to this is that DaRT is not free.

Forgot windows 10 admin password MSDaRT

6. Restore your PC to a previous state

If you don’t know how to use a reset disk, or if your PC is encrypted with a BitLocker, your only choice is a system restore.

The only drawback is that you need to remember the password you used to have at that exact time.

More so, keep note that this method is also the only one with the potential to delete programs.

If you’re on an older version of Windows, don’t miss our guide on how to reset your Windows 7 passwords without logging in. And if your Windows 11 password changes on its own, we know what to do.

Ever wondered what is default password on Windows 11? We have a guide that will answer all your questions, so don’t miss it.

4K TV Not Upscaling? Try These Solutions

4K TVs are becoming the new norm, with the Chinese OEMs launching affordable 4K Televisions every few months. From being a cutting-edge technology a few years ago, 4K TVs are now mainstream. However, with 4K TVs, we have 4K TVs not upscaling issues as well.

Just because you have a 4K TV doesn’t mean everything you watch on TV is 4K. To experience true 4K, you must also have 4K content. 4K content is still a rarity because most of the videos are still in Full HD resolution due to the size and cost of making 4K content.

To overcome this situation, TV manufacturers use 4K upscaling. Upscaling makes standard definition and Full HD videos look better on a 4K TV. However, if you notice the videos coming to your TV take only a quarter of the screen, it means your TV is not upscaling successfully.

If you are also troubled by this issue, here are a couple of troubleshooting tips to fix the 4K TV not upscaling, problem.

What can I do if 4K TV not upscaling (Sony, Samsung, LG)?

1. Check the signal quality

4K TV not upscaling
  1. While the 4K TV should have no problem with upscaling HD and Full HD content, if the content is in an SD or lower version, try to bump up the quality from the streaming service settings.
  2. If the signal coming to the TV is not high quality, the TV will scale to match the TV’s size. However, this can lead to blurry and fuzzy images.
  3. Check if the 4K TV not upscaling issue is fixed.

2. Check the connection source

4K TV not upscaling
  1. Another thing that can affect the picture quality and upscaling issue is the connection method you are using.
  2. The quality of the connection method is important. The best connection method for the highest quality is to use the HDMI connection. If HDMI is not available, check for the DVI method. Other connection methods like VGA, Component A/V, S-Video, Composite A/V, and Analog RF offer low-quality output, respectively.

3. More troubleshooting options

  1. Press the info button available on the TV remote to check the input resolution on top of the TV screen. If the resolution does not match the output device, change it to the optimum resolution of your TV.
  2. Perform the picture test. Move the video to your USB device and then check the quality of the TV. If the quality is better while playing from the USB Drive, the issue is with your external device.

Almost all the 4K TVs offer some upscaling. However, not all the upscaling is equal. Premium brands like Sony, Samsung, and LG have better-upscaling technology on their high-end TVs.

The TV should upscale successfully, even from HD+ or Full HD resolutions, and we hope the image looks fine on your screen now.

Follow the steps in this article to fix the 4K TV not upscaling issue, and let us know which method worked for you in the comments.

File & Print Sharing Resource is Online But Not Responding

While trying to access one or multiple shared connections or folder across the local network, Windows users may run into File and print sharing resource is online but isn’t responding to connection attempts message.

This can be a problem, and it can cause network sharing to not work properly, so it’s important to fix it. The process is rather simple, so be sure to keep on reading.

Why does file and print sharing resource is online but isn’t responding to connection attempts appear?

  • Issues with your Wi-Fi or wired connection can cause this and many other issues.
  • Missing Windows updates can sometimes cause this problem.
  • Firewall settings can prevent sharing services from working properly.

How can I fix File and Print Sharing resource is online but isn’t responding to connection attempts?

1. Check if the computers are discoverable

Connecting via Wi-Fi adapter

  1. Click on Start and select Settings.
  2. Select Network and Internet.
  3. From the left pane, click on the Wi-Fi tab.
    File & print sharing resource online isn't responding
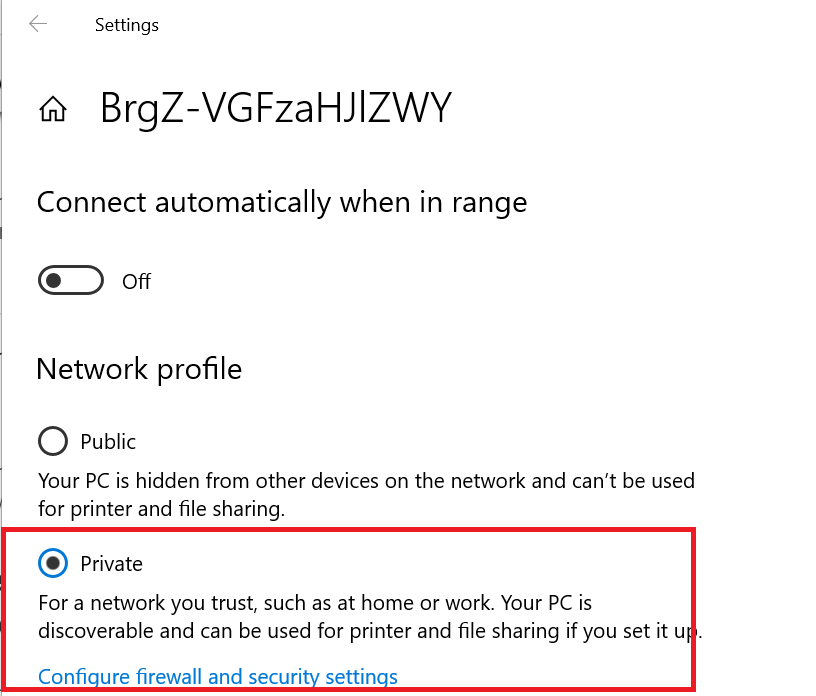
  4. From the right-pane click on your Wi-Fi network.

  5. Under Network Profile select Public option.
  6. Do the same with all the computer on the network that uses the Wi-Fi connection.

Connecting via Ethernet adapter

  1. Click on Start and select Settings.
  2. Click on Network and Internet.
  3. Select the Ethernet tab from the left pane.
  4. From the right pane, click on the Network adapter.
  5. Under Network Profile,  select Private option.
  6. Now you need to repeat these steps with all the computers that are available on the network.

Now that you have configured all the computers to be discoverable try to access the shared folder and check if the error is resolved.

2. Install pending Windows updates

  1. Click on Start and select Settings.
  2. Go to Updates and Security.
    File & print sharing resource online isn't responding
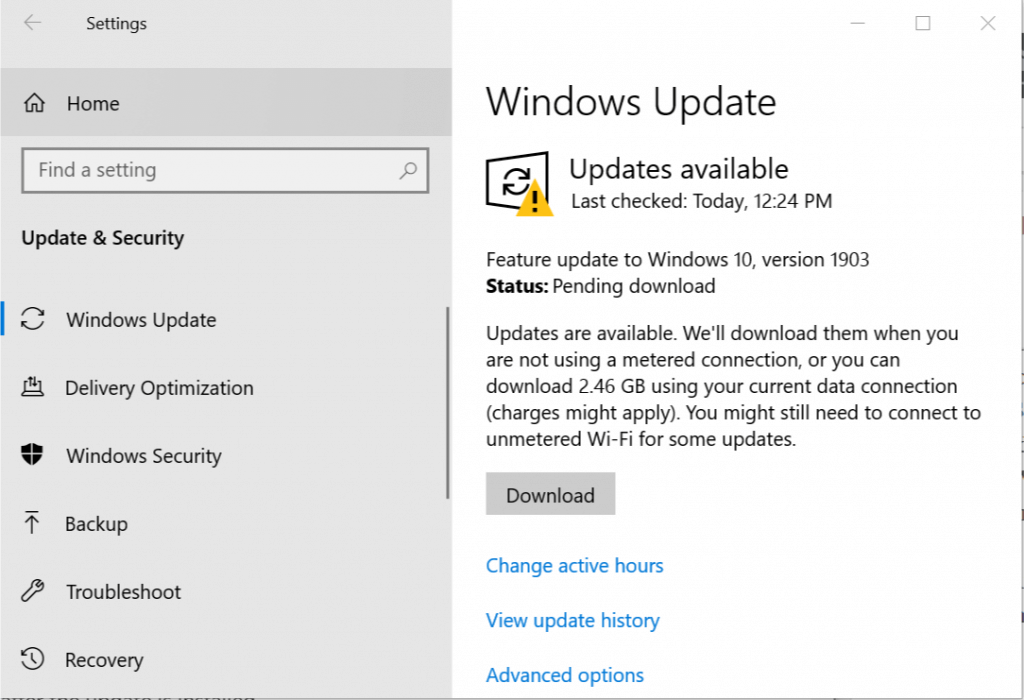
  3. Click on Windows Update.
  4. Check if any update is available. Click on Download now to download and install the update.
  5. Once the update is installed, restart the computer and check for any improvements.

After doing that, check if File and print sharing resource is online but isn’t responding message is gone.

3.  Disable Windows Firewall

  1. The Windows Defender Firewall may sometime block the connection that it may tag as unsafe. Try disabling Windows Defender Firewall temporarily and check for any improvements.
  2. Click on Start and select Settings.
  3. Go to Update and Security.
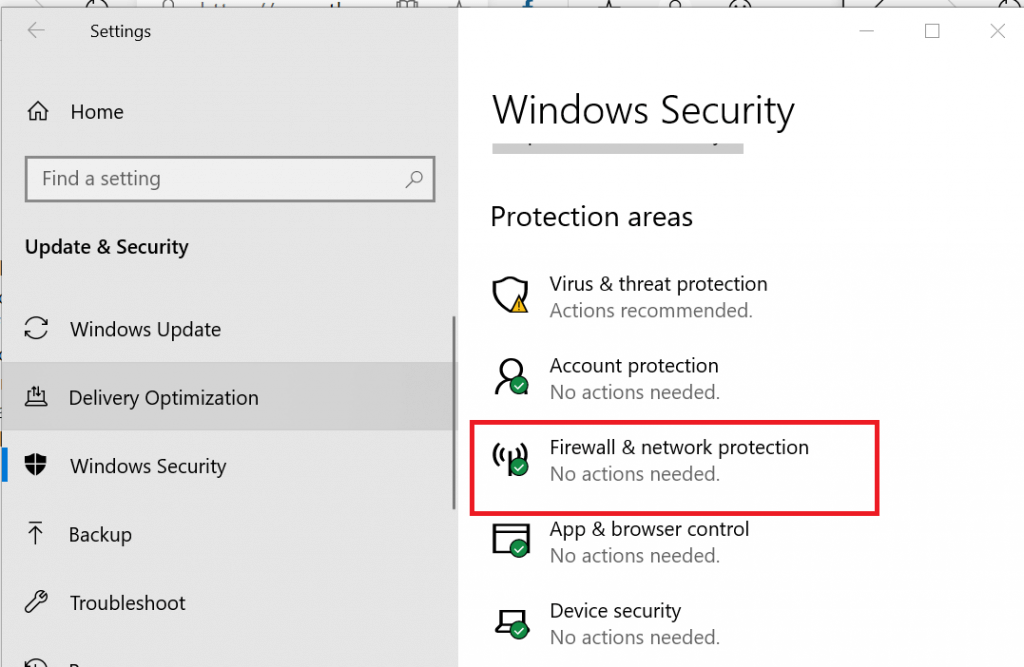
  4. Click on Windows Security.
    File & print sharing resource online isn't responding
  5. From the right pane, click on Firewall and Network Protection.
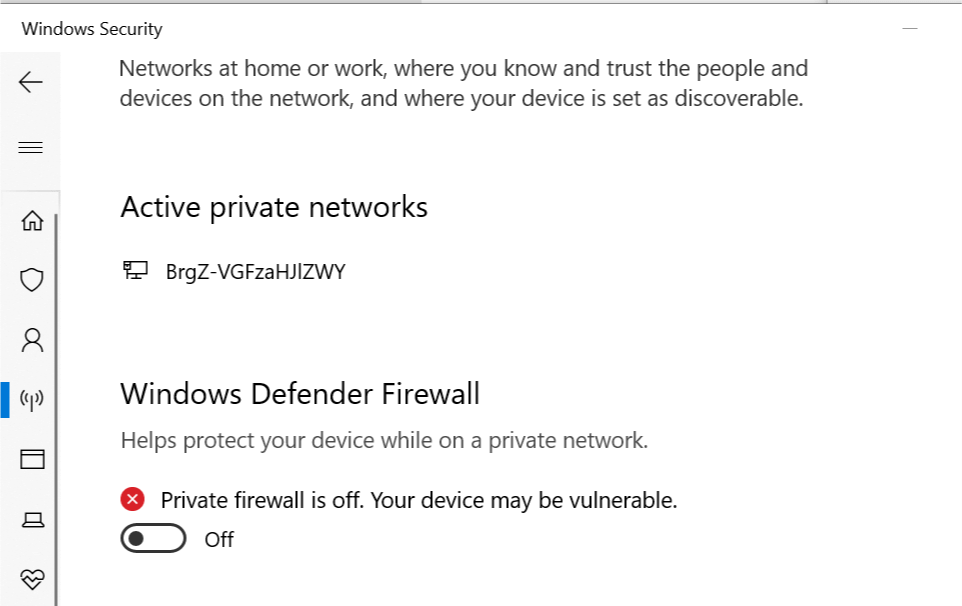
  6. Click on the currently active network.
    File & print sharing resource online isn't responding
  7. Click the toggle switch under Windows Defender Firewall to turn off Windows Defender Firewall.
  8. Now try to access the shared folder and check if the File and print sharing resource is online but isn’t responding to connection attempts error is resolved.
  9. Make sure you turn on the firewall once the error is resolved.

As you can see, File and print sharing resource is online but isn’t responding to connection attempts can be easily fixed.

This isn’t the only sharing issue, and in the past, we wrote about how to fix a shared folder if it’s not accessible, so you might want to check that guide as well.

Did you find a different solution? If so, share it with us in the comments section below.

How to fix Asana not working in Chrome

Asana is a web-based project management app that users can utilize in Google Chrome, Firefox, Safari, and Internet Explorer. Some users have said on Asana’s forum that they can’t connect to Asana in Chrome even though their net connections are ok. Asana might get stuck on its loading screen for some users. Thus, Asana doesn’t always work in Chrome and other browsers.

How Can Users Fix Asana in Chrome?

1. Is Asana Down?

Asana might be generally down for all users. Users can check if Asana is down at Downdetector. Open the Downdectector page. Then enter ‘Asana’ in the search box and press Return to open the page shown directly below. That page tells users if Asana is generally down or not.

Downdetector asana not working in chrome


2. Clear Chrome’s Data

  1. If Asana isn’t down, try clearing Google Chrome’s data. Click the Customize and control Google Chrome button at top right of the browser’s window.
  2. Select the More tools submenu, and then click the Clear browsing data option.

    The Clear browsing data window asana not working in chrome

  3. Select the Browsing history, Cookies and other site data, and Cached images and files options on the Clear browsing data window.
  4. Select the All time option on the Time range drop-down menu.
  5. Then click the Clear data button.

3. Turn Off all Browser Extensions

  1. Asana might not work due to certain browser extensions. To turn all Chrome’s extensions off, click the Customize Google Chrome menu button.
  2. Select More tools and Extensions to open the tab shown directly below.

    Extensions tab asana not working in chrome

  3. Click the buttons at the bottom right corner of each extension box to turn the extensions off.

    An extension button asana not working in chrome


4. Reset Google Chrome

  1. Resetting Chrome will both clear its data and turn off all extensions. To do that, select Settings on Chrome’s menu.
  2. Click the Advanced button to expand the Settings tab.
  3. Scroll to the bottom of the tab where there’s a Restore settings to their original defaults option. Click the Restore settings option.

    The Restore settings option asana not working in chrome

  4. Click the Reset settings button again to confirm.

5. Open Asana Within an Incognito Window

Alternatively, users can effectively disable all Chrome’s extension by opening the browser’s Incognito window. To do that, click the Customize and control Google Chrome button. Then select New Incognito window to open a Chrome window as shown below. Try utilizing Asana within the Incognito window instead.

The Incognito window asana not working in chrome


6. Update Google Chrome to Latest Version

Asana doesn’t support all Google Chrome versions. So, users browsing with older Chrome versions might need to update the browser. To do that, select Help and About Google Chrome on the browser’s menu. That will open the tab shown below which will update the browser if it’s not the latest version.
About Chrome tab asana not working in chrome


7. Turn Off Firewalls

  1. Asana might not work because of firewall blocks. To fix that, press the Windows key + S hotkey.
  2. Input ‘firewall’ in the search box and click Windows Defender Firewall to open the window shown directly below.

    The Windows Defender Firewall applet asana not working in chrome

  3. Click Turn Windows Defender Firewall on or off, which opens the options shown in the snapshot directly below.

    Turn off WDF options asana not working in chrome

  4. Select both Turn off Windows Defender Firewall settings there, and press the OK button.

Users might also need to uninstall, or at least disable, third-party antivirus software that could be blocking Asana. To temporarily disable an antivirus utility, users can usually right-click its system try icon and select a disable or turn off setting of some kind. Alternatively, open the settings tab for the antivirus software to select a disable or turn off option from there.

The resolutions above might fix Asana for some Google Chrome users. Aside from those fixes, try utilizing Asana in the other supported browsers.

RELATED ARTICLES TO CHECK OUT: 

How to Fix Common Madden NFL 20 Issues

While not as popular as its Football counterpart, FIFA 20, Madden NFL 20 is another sports title from EA with an impressive number of fans.

This American football-themed game series has been in the gaming industry for some time and is still going strong.

However, just like FIFA 20, Madden NFL 20 has its fair share of bugs and issues. Thankfully, the most common among them have known solutions.

Which are the most common Madden NFL 20 issues?

1. Players are experiencing extremely slow downloads

Try checking your Internet connection for problems.

Try restarting your console or PC and resume downloading.

Pause the download for a few seconds, and resume it:

  1. On Xbox One, go to Games & Apps
  2. Choose the Queue and then on Madden 20
  3. Press the three lines button on your controller and choose pause installation.
Madden 20 common issues pause xbox game download

2. Players are having installation problems

Try restarting your console or PC and resume the installation.

Make sure you have enough storage space for Madden NFL 20.

  • For PC:
  1. Press Windows
  2. Type in This PC
  3. Right-click on the partition where you want to install Madden NFL 20
  4. Check how much free disk space you have
Madden 20 common issues cehck PC disk space
  • For Xbox:
  1. Press the Xbox button to open the guide.
  2. Select System
  3. Go to Settings
  4. Select System
  5. View Storage.
Madden 20 common issues check Xbox disk space

Try clearing your system cache  (beware that this will delete any game saves unless synced with the cloud).

  • For Xbox:
  1. Press the Xbox button to open the guide.
  2. Select System
  3. Go to Settings
  4. Select System
  5. View Storage.
  6. Press Clear local saved games
Madden 20 common issues clear save game data
  • Once that is finished, proceed as follows:
  1. Once finished, select Settings
  2. Choose All Settings
  3. Go to Network
  4. Choose Network Settings
  5. Select Go offline
  6. Restart the Xbox
Madden 20 common issue go offline

3. Players have issues with MUT 20

Some players see an error message that looks something like this when finishing MUT challenges:

Madden 20 common issues MUT error

If you see it, try to exit the challenges and enter the main Ultimate Team menu.

If that doesn’t fix it and you consistently see the error message, check your Internet connection.

4. Players are reporting missing Madden bonus items

Make sure you redeemed the code associated with the bonus item.

Ensure you don’t share the game since only the first player gets the bonus.

One method worked when similar issues happened in Madden 19:

  1. Turn the Xbox entirely off.
  2. Unplug the power cable for 2-3 minutes.
  3. Plug the cable in, turn the Xbox on, and open Madden 20.
  4. Go to MUT, to Store and Claim Packs even if it says 0.

5. PC users are having general audio and video problems

Disable the Origin overlay during the game while running Madden 20.

Disable full-screen optimizations:

  1. Right-click the Madden 20 icon on your Desktop or Start Menu
  2. Select Properties
  3. Click Compatibilities
  4. Check Disable Fullscreen optimizations
Madden 20 common issues full-screen compatibility

A common consensus for solving most video issues is to run the Madden 20 process in real-time in Task Manager and using DirectX 11.

Besides that, you can as well try to reinstall or update video and audio drivers using specialized software, such as Fortect Driver Updater.

6. Fix common lag and connection issues

Try restarting your console, router, and modem, as this can solve most of the issues.

If that doesn’t help, consider opening ports on your network.

For a more in-depth guide on opening ports for MaddenNFL 20, visit this helpful guide.

7. Fix common controller mapping issues

Plenty of users are running into controller mapping issues.One solution would be to open origin and perform a game repair.

In case you encountered the Play Trial Error while playing Madden 24, we have a detailed guide to fix the issue.

If that doesn’t work either, all you can do is wait for a new patch to fix the problem.

Keep note that in the case of FIFA 20, EA stated that they only support Xbox controllers on PC.

FIX: Overwolf’s overlay doesn’t stay on top

Overwolf is neat gaming software that enables users to open an in-game dock overlay in games from which they launch apps. However, that dock might not always appear in games for some players when they press its hotkey.

Here are a few troubleshooting tips for users who need to fix Overwolf docks that don’t overlay in games.

What to do when the Overwolf dock is not showing in games?

1. Is the game supported?

The Overwolf dock won’t open in any games that aren’t supported. So, check that Overwolf supports the game its dock doesn’t open in. Open the Overwolf Supported Games page to check if the software supports the game.

Overwolf's supported games page overwolf won't stay on top


2. Check Overwolf’s Keyboard Settings

  1. Check that the default Ctrl + Tab hotkey for Overwolf’s dock has not been changed in any anyway. Users can do that by clicking the arrow button at the top left of the Overwolf appstore window.
  2. Select Settings to open the Settings window shown directly below.The Settings window overwolf won't stay on top
  3. Click Hotkeys on the left of the window.
  4. Thereafter, users can adjust the Change/Dismiss Overwolf in-game hotkey if required.

Want to become Windows 10 pro? Here are few useful shortcuts you should know!


3. Disable Razer Synapse Data Tracking

Razer Synapse’s data tracking stops the Overwolf overlay showing in games. Razer Synapse users can fix that by clicking the Stats tab and the settings (cog) button in Synapse. Then turn off the Data Tracking option.

Razer Synapse's Data Tracking option overwolf won't stay on top


4. Remove Conflicting Startup Software

  1. Software such as the Asus AI suite, MSI apps, and antivirus utilities can also conflict with Overwolf. To ensure there are no potential software conflicts, open Run with the Windows key + R hotkey.
  2. Then enter ‘msconfig’ in the Open box, and select the OK option.The System Configuration window overwolf won't stay on top
  3. Click the Selective startup radio button.
  4. Deselect the Load startup items check box, which will remove third-party programs from the system startup.
  5. Select the Use original boot configuration setting.
  6. Then click the Apply button, and select the OK option.
  7. Click the Restart button.

5. Change the Game’s DirectX Settings

Changing a game’s DirectX settings to DirectX 9, 10, or 11 might fix the Overwolf dock for some users. Users can do that if their graphics cards supports DirectX 10/11.

To change the DirectX settings, open a game’s graphics options. Then select a DirectX 10 or 11 mode under graphics hardware options.

DirectX logo overwolf won't stay on top


DirectX isn’t compatible with this version of Windows? Here’s how to fix it!


6. Uninstall Graphics-Enhancing Software

Uninstalling graphics-enhancing software, such as SweetFX, is another potential resolution. If users can’t uninstall the graphics-enhancing software via Programs and Features, open the graphics enhancer’s folder in File Explorer.

Right-click the folder and select Delete. Then open the Recycle Bin, and click the Empty Recycle Bin option.
The Recycle Bin overwolf won't stay on top


7. Edit the Registry

  1. Try this registry fix for Overwolf in Windows 10. Open the registry, via Run, by pressing the Windows key + R hotkey.
  2. Input ‘regedit’ in Run’s Open box and click OK to launch the Registry Editor.The Registry Editor overwolf won't stay on top
  3. Then open this registry path within the Registry Editor:
    • HKEY_LOCAL_MACHINE\SOFTWARE\Microsoft\Windows NT\CurrentVersion\Image File Execution Options
  4. Delete the overwolf.exe key on the left of the window by right-clicking it and selecting Delete.
  5. If there’s an overwolflauncher.exe key, right-click the overwolflauncher.exe key and select Delete.

Those are few resolutions that might fix the Overwolf dock when it doesn’t open in games. They aren’t necessarily guaranteed fixes, but they might fix the Overwolf dock for some users. For further resolutions, users can get in touch with Overwolf support via its contact us page.

RELATED ARTICLES TO CHECK OUT: 

Windows 10 version 1903 gets a new optional update with build 18362.387

After Windows 10 versions 1809 and older received new optional updates earlier this week, it’s now the latest version of the OS that is getting some love today. The build 18362.387 (KB4517211) for Windows 10 Version 1903 is now available with a long list of fixes, including one for the issue that was causing audio in certain games to be quieter or different than expected.

You can read the full list of quality fixes below:

  • Addresses an issue that causes vertical fonts to be larger when printing to a PostScript printer.
  • Addresses an issue that causes printing from 32-bit applications to fail with an “Access is denied” error when you select Run as different user for the application.
  • Addresses an issue that may give write access to a removable USB disk when a user switches from a privileged user to an unprivileged user.
  • Addresses an issue that causes the lsass.exe service to stop working, which causes the system to shut down. This occurs when migrating Data Protection API (DPAPI) credentials using dpapimig.exe with the –domain option.
  • Addresses an issue that gives a Windows Hello for Business user two certificates for authentication during certificate renewal instead of one certificate.
  • Addresses an issue that prevents a web browser from connecting securely to Windows Server. This occurs when using a client authentication certificate, such as a SHA512-based certificate, and the web browser does not support a signature algorithm that matches the certificate.
  • Addresses an issue that may cause authentication to fail for certificate-based authentication when the certificate authentication includes a cname as part of the pre-authentication request.
  • Addresses an issue that prevents a Microsoft App-V application from opening and displays a network failure error. This issue occurs under certain circumstances, such as when a system’s battery is low or there is an unexpected power failure.
  • Addresses an issue that causes a query request of the Win32_LogonSession class for the StartTime to display the value of the epoch (for example, 1-1-1601 1:00:00) instead of the actual logon time. This occurs when a user who isn’t an administrator creates the query request.
  • Addresses an issue that causes File Explorer to show a regular file icon for files marked with FILE_ATTRIBUTE_OFFLINE instead of the expected placeholder icon.
  • Addresses an issue with intermittent virtual private network (VPN) disconnections on cellular networks.
  • Addresses an issue that may cause audio playback and recording to fail when connecting to a remote virtual machine.
  • Addresses an issue with MSCTF.dll that causes an application to stop working.
  • Addresses an issue with the input and display of special characters that occurs when an app uses imm32.dll.
  • Addresses an issue with resizing Windows Presentation Foundation (WPF) applications; they may not respond to being resized using the mouse until you release the mouse button.
  • Addresses an issue that may prevent older systems from upgrading to the latest operating systems because of an error in the display driver of older versions.
  • Addresses an issue that may cause the screen color to turn white on laptops that have built-in, high-dynamic-range (HDR) screens.
  • Addresses an issue with converting an application from 32-bit to 64-bit architecture.
  • Addresses an issue that prevents you from running the Active Directory Diagnostics Data Collector Set from the Performance Monitor for Domain Controllers. This causes the Data Collector Set name to appear empty. Running the Active Directory Diagnostics Data Collector Set returns the error, “The system cannot find the file specified.” Event ID 1023 is logged with the source as Perflib and the following messages:
  • “Windows cannot load the extensible counter DLL “C:\Windows\system32\ntdsperf.dll.”
  • “The specified module could not be found.”
  • Addresses an issue that causes audio in certain games to be quieter or different than expected.
  • Addresses an issue that prevents Microsoft App-V from handling a parameter of the CreateProcess API properly, which prevents the virtual process from opening.
  • Addresses an issue in which the maximum central processing unit (CPU) performance is not enabled when you select the High Performance power plan.
  • Provides a way to configure the read buffer size. This allows you to address an issue with slow upload times when uploading a file to a Universal Naming Convention (UNC) share using the Internet Information Services (IIS) Web Distributed Authoring and Versioning (WebDAV) feature.
  • Addresses an issue that causes a device to stop working when opening files from a network drive that has client-side caching enabled. This issue may occur when the device has certain third-party antivirus products installed and the drive is backed by a server that is not a Microsoft Server Message Block (SMB) server. The error code is, “0x27 RDR_FILE_SYSTEM.”
  • Facilitates the configuration of devices that are managed by mobile device management (MDM) settings, which are created by ADMX ingestion. You can update a previously ingested ADMX file with a newer version, and you are not required to delete the previous ADMX file. This solution applies to all applications that use ADMX ingestion.

As of this writing, this new build has only known issue with some Input Method Editors (IME) potentially causing high CPU usage, though this bug was already present in this month’s Patch Tuesday. If you prefer not to install this optional update on your PC, keep in mind that you’ll still get all these qualify fixes in next month’s Patch Tuesday update.

FIX: Windows Push Notification User Service stopped working

For those who are not familiar, Windows Push Notification User Service offers support for push and local notifications on Windows 10 OS.

Sometimes the notification service might stop working and there are numerous reports that it keeps crashing on their systems. Windows 10 users can’t receive any notification on their PCs in that case.

This issue is reported on the official Microsoft forum in the following manner:

The problem is when the computer starts it shows an error called windows push notification user service has stopped working. Besides different windows store apps are not working. I reinstalled a few and they worked then but most apps didn’t. Hope to get a solution from you soon.

Here below we have listed some common solutions that helped many Windows 10 users to get rid of this error.


What to do if Windows Push Notification User Service doesn’t work

1. Scan for Memory Leaks

  1. Head towards the Start menu and search for Command Prompt.
  2. Righ-click on the first result and select Run as administrator. run cmd windows push notification user service has stopped working
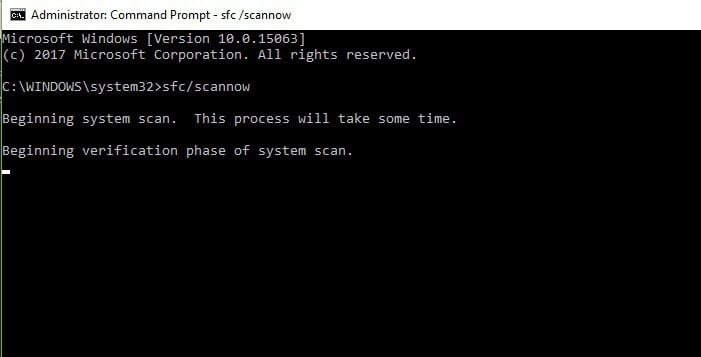
  3. Type the following command press the Enter key:                                                                                                          run sfc/scannow windows push notification user service has stopped working
  4. Wait for the process to complete and reboot your system.
  5. Check if the problem is resolved.

2. Restart WpnUserService Manually

  1. To manually restart the service, open Command Prompt from the Start menu.
  2. Type the following commands and hit the Enter key:
  • sc config WpnUserService start= auto
  • sc start WpnUserService

 run sc config windows push notification user service has stopped working

Restart your system to apply the changes.


3. Rename or Delete the Notifications Folder in Safe Mode

  1. The latest Windows 10 update might have corrupted the notifications database and you need to delete or rename its folder.
  2. Press the Windows + R keys to open Run dialog on your system.
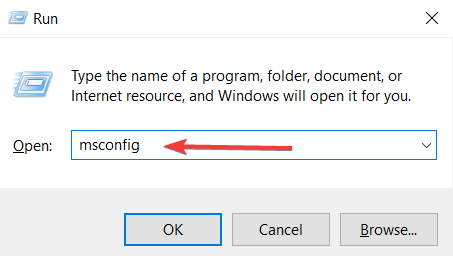
  3. Type msconfig and click the OK button.open msconfig windows push notification user service has stopped working
  4. Once the System Configuration window opens on your screen, go to the Boot tab and click the checkbox beside the Safe Boot option.
  5. Click OK and reboot your system. Your system will now boot into the Safe Mode.
  6. Open This PC and navigate to the following location:
    • C:\Users\YOURUSERNAME\AppData\Local\Microsoft\Windows
  7. If you can’t see the AppData folder, navigate to the FileExplorer menu and click the View tab.
  8. From the Show/hide section, click the Hidden items checkbox to show the hidden files in the File Explorer.
  9. Once you are insider the Windows folder, find the Notifications folder and right-click on it.
  10. Click Rename, type a random name and restart your system.

4. Install the latest updates

  1. Open the Settings app from the Start menu and click Update & security. 
  2. Click the Check for updates button from the Windows Update tab.check for updates windows push notification user service has stopped working
  3. Finally, reboot your system once Windows finishes the update process.

Were you able to fix Windows Push Notification User Service has Stopped Working error using any of these solutions? Comment down below.

RELATED ARTICLES YOU NEED TO CHECK OUT:

Microsoft is fighting to “curb the overuse” of government requests for enterprise data stored in the cloud

Microsoft wants everyone to know how serious the company takes the privacy and security of its customers. As noted in a Microsoft on the Issues blog post, the Redmond, Washington company outlined its guidelines for handling government and law enforcement requests for customer information. Microsoft details that in the matter of full transparency, Microsoft will notify its customers when such a request is made.

“We believe customers have a right to know when law enforcement requests their email or documents, and we have a right to tell them. The reason is simple – we believe our customers own their data and have the right to control it. Absent extraordinary circumstances, government agents should seek data directly from our enterprise customers, and if they seek our customers’ data from us, they should allow us to tell our customers when demands are made. We believe strongly that these fundamental protections should not disappear just because customers store their data in the cloud rather than in file cabinets or desk drawers.

When a law enforcement agency presents Microsoft with a legally valid warrant, court order or subpoena requesting data that belongs to one of our enterprise customers, we seek to redirect that request to the customer. And in the vast majority of cases, that is exactly what happens. There are times, however, when the government comes to us for data and prevents us from telling our enterprise customers that it is seeking their data. We agree that there are some limited circumstances in which law enforcement must be able to operate in secret to prevent crime and terrorism and keep people safe. And while we agree that secrecy orders that prevent us from notifying our customers may be appropriate in those limited circumstances, we also believe there are times when those orders go too far.”

The simple reasoning behind this is that Microsoft knows that its customers own their own data and should be notified whenever an unauthorized person or entity is trying to access that information. As a cloud services provider, Microsoft deems it necessary to notify its customers how it handles customer data and privacy in the United States and around the globe.

How to use desktop shortcuts in Windows 10

Desktop shortcuts are a staple of the Windows interface. Despite the move to Start menu live tiles with Windows 8 and Windows 10, desktop icons remain as a less distracting and simpler alternative. In this guide, we’ll show you a different approaches to creating and organising your shortcuts.

Adding desktop shortcuts in Windows 10

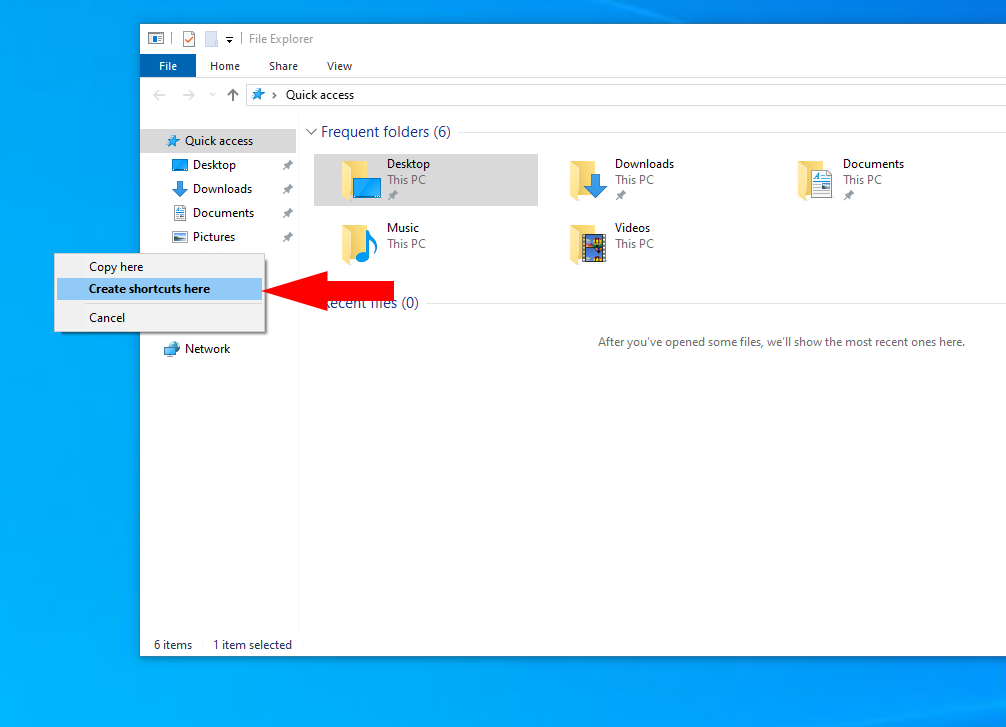
In general, the quickest way to create a new shortcut is by right-clicking a file, folder or program and dragging it over your desktop. Click “Create shortcut” in the context menu to add a link to the desktop.

Adding desktop shortcuts in Windows 10

You may also right-click your desktop and choose New > Shortcut. You’ll need to choose an item to link to from your PC. This could be a file, folder or program. An alternative method is to right-click an item in File Explorer and choose Send to > Desktop (create shortcut).

You can create shortcuts to apps from the Microsoft Store too. To do this, open your Start menu and find the app to link to. Drag it from the menu onto your desktop to create the shortcut.

Adding desktop shortcuts in Windows 10

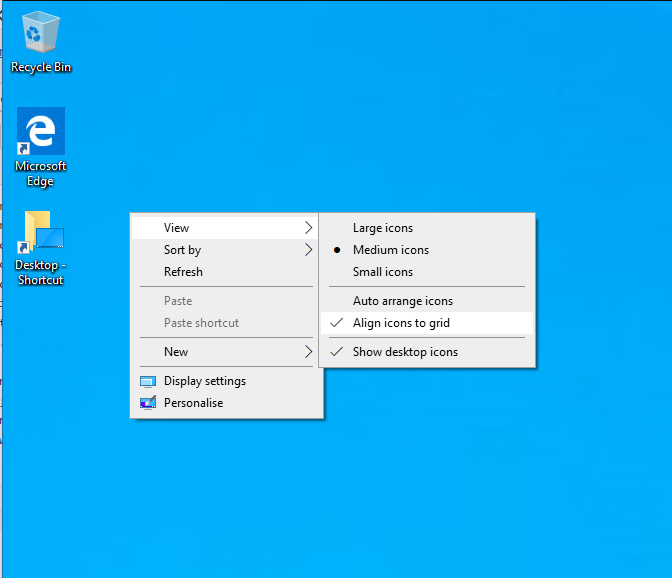
With your shortcuts created, you can now customise how they display. If you like, you can manually rearrange them into a unique layout. However, Windows does have built-in sorting options which can automate the process. Right-click your desktop and click “Sort by” to rearrange your icons.

The “View” sub-menu houses some useful options too. You can change the size of your desktop icons or opt to hide them altogether, decluttering your desktop. Further settings let you remove the hidden icon grid, enabling true freeform positioning, or automatically arrange icons into a tidy layout. Experiment to build a desktop that works for you.

13 new ID@Xbox games are coming soon to Xbox Game Pass for PC and console

Microsoft announced today during its ID@Xbox Game Pass Fall 2019 showcase that more ID@Xbox games are coming to Xbox Game Pass for PC and console in the next couple of months. There are already several indie games included in Microsoft’s game subscription service, but 13 new ID@Xbox titles will soon join Game Pass Across Console and PC, and you can find all details below.

  • Xbox Game Pass for Console and PC titles: Munchkin, Lonely Mountains: Downhill, Demon’s Tilt, Genesis Noir, Minit, The Talos Principle, Vambrace: Cold Soul:
  • Xbox Game Pass for Console titles: Yooka Laylee, The Escapists 2
  • Xbox Game Pass for PC titles: Cities: Skyline (Windows 10 Edition), Dead by Daylight, The Red Strings Club, State of Mind

You can watch the video of the ID@Xbox Game Pass Fall 2019 showcase below, which features video trailers for all these new games as well as interviews of some of the developers behind them.

If you have yet to try Xbox Game Pass, we remind you that can still get 2 months of Xbox Game Pass Ultimate for just $2. This premium tier includes Xbox Game Pass for console, Xbox Game Pass for PC, as well as Xbox Live Gold.

Xbox Game Pass Ultimate

Sony Smart TV Won’t Turn on? 3 Ways to Fix it

Your Sony smart TV won’t turn on? Well, this sounds like pretty bad news, as you can’t use the smart features or even watch TV.

Usually, a TV has no power after a storm, a drop in voltage in electrical power, or after a blackout. This isn’t the only issue, and we already covered no signal from the antenna on Sony TV.

If the whole situation seems pretty scary and you don’t know what to do, keep reading this article to find out how to get your Sony Smart TV back in working condition.

Why is my Sony TV not turning on?

  • The batteries on your remote might be empty.
  • Power and HDMI cables might not be properly connected.
  • Glitches with the TV.
  • The right input source isn’t selected.

What do I do if my Sony smart TV won’t turn on?

1. Perform a few simple checks

  1. If your Sony Smart TV won’t turn on, check the remote control batteries. Consider changing the batteries and then check again if the TV will turn on.
  2. Make sure that nothing is interfering with the infrared signal from your remote.
  3. Check if the power cable is correctly plugged into the TV and outlet.
  4. Plug your TV’s power cable into another power outlet or plug another device into the same outlet to confirm that it works.
  5. If your TV is plugged into a smart plug or anything of sorts, plug it in directly into the wall outlet.
  6. Check your power cable for any damage.

2. Perform a Power reset

  1. Disconnect any external devices connected to your Sony Smart TV. Remove any external drives, USB drives, Chromecast/Amazon Fire stick, or any other device.
  2. Now remove the power cord and wait for a couple of minutes to drain residual power. You can wait longer (about 30 minutes) if you want to make sure that any additional power is drained.
  3. After that, plug in your TV back again. Make sure to connect it directly to a wall outlet. Sometimes, bad extension cords or smart plugs can cause power issues with your TV, so bypass them.
  4. Start your Sony TV and check if it works properly.

Newer Sony Smart TVs have self-resetting fuses. Unplugging the power cord and leaving it this way for a period of time allows a tripped fuse to reset, solving the problem.

3. Change the input

  1. Make sure that your TV is turned on.
  2. Press the Input button on the remote.
  3. Select the proper input source.

This also applies to bad HDMI cables or other types of connection cables. To ensure this is not a cable problem, try to use a different cable or input.

Similarly, a bad input device can trigger the same problem. Check the connections to your input devices and ensure they are turned on and working properly.

If the problem is persistent, contact Sony service. Remember that this isn’t the only issue, and many reported that Sony TV won’t connect to Internet, but we covered that in a separate guide. And if you have a different TV model, check out what to do when your Technika TV won’t turn on.

If you have any other suggestions or questions, please leave them in the comments section below.

The DNS name does not exist in Windows 10 [SOLVED]

Many people from around the world access the internet. We can have access to this global system from almost anywhere on the planet and even beyond. We can even contact the astronauts from the International Space Station through the internet.

Also, many daily activities are depending on the internet. So, the connection should run smoothly.

However, this is not always the case, and users from all over the world are encountering connection issues.

Many people encountered the “The DNS name does not exist. Error Code: INET_E_RESOURCE_NOT_FOUND” error message in Windows 10.

It is worth mentioning that this error appeared on Microsoft Edge and not on other browsers.

This is a major issue that blocks access to the internet and today we will show you what to do to fix the problem.

The DNS name does not exist? Here are the solutions!

1. Change to HTTPS

Several users reported that changing “HTTP” to “HTTPS” solves the issue.

2. Use Google’s DNS server

Your ISP’s DNS server might cause this problem. Therefore, you might want to use Google’s public DNS instead. To do that follow the steps below.

  1. Open Network Connections, locate your connection, right-click on it and select Properties.
  2. Here, select Internet Protocol Version 4 (TCP/IPv4), and then open Properties.Internet Protocol Version 4 TCP-IPv4 - Properties
  3. Select Use the following DNS server addresses and set 8.8.8.8 as Preferred DNS server and 8.8.4.4 as Alternate DNS server.
    Once you’re done, click on OK.
  4. Alternatively, some users are suggesting to use 208.67.222.222 as Preferred DNS server and 208.67.222.220 as Alternate DNS server.

3. Use another browser

As we said at the beginning of this article, this error appears only on Microsoft Edge. So, to make this issue a thing of the past, surf the internet through another browser.

You can choose Google Chrome, Firefox, or another browser. We recommend Opera One Browser for enhanced privacy protection and top-notch reliability.

Opera One is a modern browser with a straightforward user interface and great security and privacy. It has a built-in VPN that allows you to access geo-restricted content.

On top of that, Opera One has good speed rates and many built-ins. You can easily access your social media accounts in just a few clicks or take advantage of the built in AI.

⇒ Get Opera One

Conclusion

As you can see, you can fix this problem in no time. Change to HTTPS, use Google’s DNS server or choose another browser to surf the internet. For that, we recommend UR Browser.

If you don’t want to lose your bookmarks from Microsoft Edge, choose one of these tools from our fresh list to import your favorite pages.

Did our solutions help you! Do let us know in the comments section below!

How to view detailed system information in Windows 10

Windows 10 provides several mechanisms to learn about the hardware and software within your system. To get the most detailed information, you’ll need to use the aptly-named “System Information” app. Search for its name in the Start menu to find and open the program.

System Information provides a wealth of details about your devices, components and software environment. It’s often your best starting point if you need to get advanced information about a particular aspect of your system.

System Information in Windows 10

After launching System Information, you’ll see the default “System Summary” page. This displays fundamental details about your PC, including stats like Windows version, system manufacturer and BIOS version. Basic hardware resources are displayed too, such as installed RAM and available virtual memory.

To dive deeper, you’ll need to expand one of the sections in the tree view. This is attached to the left of the window. It’s divided into three core groups: Hardware Resources, Components and Software Environment.

System Information in Windows 10

The first of these provides some fairly low-level details on how hardware resources are being used, such as memory addresses and I/O details. Chances are, you won’t be using this information on a regular basis.

The second section, Components, has more general applications. The devices on your PC are separated into logical categories. You can explore this group, such as “Display” and “USB,” to acquire detailed information on the physical components of your device.

System Information in Windows 10

The final section, Software Environment, pertains to Windows settings and your user configuration. Here, you can monitor details of drivers, environment variables, running services and registered startup programs, among other items. It’s worth noting you can’t edit anything directly – System Information purely surfaces details for you to review in other tools.

System Information has a “Find” bar accessible with Ctrl+F. This helps if you’ve already got an idea of what you’re looking for. For example, searching for “adapter” will help you quickly find display adapter details if you’re troubleshooting a graphical fault.

System Information in Windows 10

Finally, reports can be exported and imported using the options in the “File” menu. Another option, under View, lets you connect to a remote computer to view its system information. This utilises Windows’ Remote Desktop functionality but means you don’t need to start a full remote desktop session. Instead, you can load the data into your local System Information instance.

System Information gives you a comprehensive view into everything happening on your Windows PC. You’ll then need to jump into other tools to action your discoveries. Typically, you’ll use other facilities from the “Windows Administrative Tools” Start menu folder to continue your search.

Microsoft launches public beta of Xbox Action for the Google Assistant

Microsoft’s Xbox One consoles are getting support for one more digital assistant today. Following the launch of the Xbox skill for Alexa and Cortana last Fall, the Redmond giant has just announced the availability of the Xbox Action for the Google Assistant.

This new capability is currently available in beta to all customers using the Assistant in English. The new Xbox Action for the Google Assistant will work on all Home-enabled devices from Google, but the Google Assistant apps for iOS and Android will work just as well. You’ll also need the Google Home app for iOS and Android to get started with the beta:

Here are the steps you’ll have to follow to get started:

  • Join our Google Group with the Google Account you intend to use
  • Sign into your Xbox
  • In the Google Home app for iOS or Android:
  • Tap “+ Add”
  • Tap “Set up device”
  • Tap “Have something already set up?”
  • Search for and select “[beta] Xbox”
  • Sign in with the Microsoft account you use on Xbox
  • Follow the instructions to link your Xbox and give it a device name

When you have connected to Google Assistant to your Xbox One, you’ll be able to use voice commands to turn your console on and off, launch games, apps, and videos, control music or video playback, and much more. You can find below a couple of voice commands you can try today:

Action Command
Turn on Hey Google, turn on Xbox.
Turn off Hey Google, turn off Xbox.
Launch game Hey Google, play Gears 5 on Xbox.
Volume up Hey Google, volume up on Xbox.
Volume down Hey Google, volume down on Xbox.
Mute Hey Google, mute Xbox.
Un-mute Hey Google, un-mute Xbox.
Pause* Hey Google, pause.
Play* Hey Google, play.
Next* Hey Google, next.
Previous* Hey Google, previous
Take a screenshot Hey Google, take a screenshot on Xbox.
Record a game clip Hey Google, record that on Xbox.
Reboot Hey Google, reboot Xbox.
Stop Hey Google, stop on Xbox.
Watch a TV channel (if live TV is configured) Hey Google, switch to PBS on Xbox.

Google Assistant is one of the most popular digital assistants out there along with Alexa, thanks to its native integration on Android. Google has also started rolling out its Assistant on select Chromebooks, and the company is also investing heavily in smart appliances. It’s great news for Xbox One users to have alternatives to Kinect or Cortana voice commands on the console, and we hope this openess regarding digital assistants will continue with the next-gen “Project Scarlett” Xbox console.

What to expect from Microsoft’s Oct 2 media event in NYC

On October 2 (next Wednesday), Microsoft will be holding a media event in New York City. For the first time since 2017, the event will be live-streamed. We’ll also be in attendance, bringing you all the latest news direct from the floor of the venue in the West Side of Manhattan.

However, in the lead up to the event, there has been plenty of talk on what Microsoft could have in store for Surface fans. There’s a lot to think about, but we’ve gathered up all the rumors for you in a single post. From Surface Pro 7, Surface Centaurus, Windows Core OS, and more, here’s a look at what we expect, and don’t expect to be revealed at Microsoft’ October 2 event.

Most likely to be announced

Surface Pro 7

Last year, Microsoft took the wraps off the Surface Pro 6 at a similar media event in New York City, but it was not live-streamed for all to see. The Surface Pro 6 was more of a minor upgrade, without any major design changes, but this year, we’re expecting something different — the Surface Pro 7.

Rumors have indicated that Microsoft could be releasing three different models of the Surface Pro 7. It’s been said that the entry-level model could feature an Intel Core i3 processor and 4GB RAM. Other leaks have indicated that the Surface Pro 7 could be powered by Intel Ice Lake CPUs, which were just announced a few months ago.

Elsewhere, the Surface Pro 7 could come with a new Surface Pen that supports wireless charging. Other talks include USB-C replacing Surface Connect, and perhaps a Surface Pro 7 featuring a custom-designed ARM processor. Codenamed as Excalibur, that ARM-based Surface could be a first for Microsoft.

More details about Windows 10 19H2 and 20H1

Surface events are not always about hardware, as the last live-streamed Surface event in May 2017 saw many mentions of Windows 10, Office 365, and more.

Well, since the launch of the Windows 10 May 2019 Update, Microsoft has changed the way major featured updates are rolled out. It appears as though major Windows 10 updates are only released once a year, with a big release in the Spring, followed by a minor release with bug fixes in the Fall.

That said, we expect that Microsoft could explain this a bit more during its October 2 event. We could get a recap of all the features introduced in the May 2019 Update, and a look at what’s to come in the 19H2 and 20H1 updates.

Of course, Microsoft could also give the 19H2 update an official launch date and name. We also could hear the company discuss its Chromium-based Edge browser, and perhaps give it an official release date alongside.

Additionally, since Windows Insiders have been testing the 20H1 update for months now, Microsoft could perhaps mention it one way or another during the October 2 event. We might hear them recap the features, and surprise with an announcement of anything new to come in the release — but that’s just speculation.

Windows 10 Logo Featured Image Generic Hero

Surface Laptop 3

Right with the Surface Pro 7, it is very likely that Microsoft could talk about its other Surface products. One of those happens to the Surface Laptop 3, the follow up to last year’s Surface Laptop 2. Based on rumors, and the fact that Microsoft’s stock of last year’s Surface Laptop 2 is now sold out, we expect that there could perhaps be two different versions of the Surface Laptop 3.

A 13-inch Intel version and a 15-inch AMD version could both be released. It has been said that the AMD version could come in up to six variants. One of those could feature an Octa-core CPU, and maybe a dedicated graphics card, which could bring the Surface Laptop closer to the MacBook Pro.

Surface Laptop 2 on sale at Microsoft Store for up to $300 off

Surface Go 2

The $400 Surface Go was Microsoft’s little surprise to take on Apple’s iPad and the education market. It hasn’t seen an update since it was announced in July 2018, so it’s likely that we could hear a bit more about it during the October 2 event.  Current models sport an underpowered Intel Pentium Gold CPU, but rumors show that a refreshed version of the device might sport an Intel Core m3 inside.

Surface Go

Could be announced

Surface Book 3

The final member of the Surface family is the Surface Book 3. Although it went under the radar, the Surface Book lineup last received a refresh with new quad-core Intel Core i5 processors in April. That was an exception, as all these other Surface devices have been stuck on a refreshed version of of the 8th Gen Intel Kaby Lake CPUs.

Still, there hasn’t been much talk about the Surface Book when compared to the Surface Laptop or Surface Pro. We’re assuming it could be getting a minor upgrade. The CPUs inside could see the bump to 10th gen Ice Lake, and perhaps Microsoft could stuff a newer Nvidia GTX 1650 or RTX 2060 GPU inside the 15-inch versions of the Surface Book.

Dual-Screen Surface Centarus?

Microsoft’s dual-screen PC, codenamed Surface Centaurus. has been one of the company’s best, but also worst kept-secrets. There have been plenty of rumors around it. Patents and LinkedIn job listings have revealed the work around the device. However, Microsoft has remained quiet and has never officially acknowledged the device at all.

So, judging that we know employees at the company have seen Centauraus, we’re assuming it could make an appearance during the October 2 event. Additionally, this is the first *major* Surface event since 2017. With the company teasing “experiences” in the event invite, that makes it a major chance for Microsoft to tease or reveal Centaurus in front of the world to see.

It might not be an official reveal or the highlight of the event, but we’re assuming that Microsoft will mention Centaurus one way or another.

Surface Note / Surface Phone concept

Windows Core OS?

If Microsoft were to reveal Surface Centaurus, it would need an operating system for it. Windows 10 isn’t optimized for dual-screen PCs, so the answer would have to be Windows Core OS.

Given that rumors show variants of Core OS powers both HoloLens 2 and the Surface Hub 2X, Microsoft could talk more about it during this October 2 event. We know HoloLens 2 is coming in September, and Surface Hub 2X next year, but we could perhaps get a demo of Core OS on a dual-screen device. That could finally give us a peek at the modularity of the operating system. It could likely include the new start menu and taskbar, for which a recent Windows Insider build leaked.

What we expect from Microsoft's Oct 2 media event in NYC

Teams for Life, Microsoft 365 for consumers, and new Surface accessories?

Surface Laptop, Pro, Book 3, Windows, and Surface Centaurus are not the only things we think might be discussed during the October 2 event. Based on patents and FCC filings, we might also see a new smart speaker from Microsoft, as well as a new Surface Keyboard and Mouse. Of course, there could also be updates to the Surface Headphones, which just launched last year — perhaps a version similar to Apple earpods.

Given that it’s been indicated that the line between Microsoft subscriptions is blurring, we also think that Microsoft could introduce a version of its Microsoft 365 subscription for consumers. This could tie in with “Teams for Life,” a version of Microsoft Teams that was shown off internally at the company. It could extend the chat functionality beyond enterprise and business, allowing general consumers to keep in touch with family and friends, as they would with a standard chat app.

We’ll be on the ground in New York City and will be covering the event live. So, be sure to keep it locked right here to OnMSFT for all the latest news and information.

Tile Database is corrupted error: Here’s a quick fix

If you’re getting Tile Database is corrupted error message, you might not be able to use your Start Menu properly.

This can be a big problem, and in today’s article, we’ll show you how to fix this issue once and for all.

What to do if Title Database is corrupted on my PC?

1. Reinstall Start Menu/Cortana

  1. Press Windows Key + S, and enter powershell. Choose Run as administrator.
    powoershell search results Tile Database is corrupted
  2. Run the following commands:
    1. Get-AppXPackage -Name Microsoft.Windows.ShellExperienceHost | Foreach {Add-AppxPackage -DisableDevelopmentMode -Register "$($_.InstallLocation)\AppXManifest.xml"}
    2. Get-AppXPackage -Name Microsoft.Windows.Cortana | Foreach {Add-AppxPackage -DisableDevelopmentMode -Register "$($_.InstallLocation)\AppXManifest.xml"}
  3. After the commands are executed, restart your PC.

2. Perform SFC and DISM scan

Tile Database is corrupted can appear due to file corruption, but you can fix that by performing SFC and DISM scans.

To do that, follow these steps:

  1. Start Command Prompt or PowerShell as administrator.
  2. Now enter sfc /scannow and press Enter to run it.
    sfc scannow command prompt Tile Database is corrupted
  3. Wait for the scan to complete.

If the issue is still there or if you can’t start SFC scan, do the following:

  1. Open Command Prompt as administrator.
  2. Enter DISM /Online /Cleanup-Image /RestoreHealth and press Enter.
    dism scan command prompt Tile Database is corrupted
  3. Once the scan is finished, check if the issue is still there. Alternatively, you can try running SFC scan again, if you weren’t able to do that before.

3. Create a new user account

  1. Open the Settings app and navigate to the Accounts
  2. Select Family & other people in the left pane. In the right pane, click on Add someone else to this PC.
  3. Now select I don’t have this person’s sign-in information > Add a user without a Microsoft account.
  4. Enter the username and password for the new account.
    create an account for this PC Tile Database is corrupted
  5. After creating a new user account, switch to it and check if the problem is still there.

4. Perform an in-place upgrade

media creation tool download Tile Database is corrupted
  1. Download Media Creation Tool and start it.
  2. Once you start the tool, accept terms of service and select Upgrade this PC now.
  3. Wait while the setup prepares the necessary files.
  4. Click on Change how Windows Setup downloads updates and select Not right now.
  5. Follow the instructions on the screen until you reach Ready to install Select Change what to keep.
  6. Make sure to select Keep personal files and apps and click Next.
  7. Wait for the installation to finish.

Once the process is completed, you’ll have a fresh installation of Windows 10, with all your files intact, and the issue should be gone.

There you go, these are our solutions for Tile Database is corrupted error. If you found our solutions helpful, let us know by using the comment section below.

Nikon camera not charging? Try these fixes

Keeping your camera’s battery charged is essential. Professional photographers keep multiple batteries just in case. However, sometimes users may encounter Nikon camera not charging issue with their camera.

Camera not charging is a common issue and can occur due to many reasons, including faulty battery or charger and other issues.  So, what you should do if your camera’s battery is not charging?

Troubleshooting a camera battery problem is easy. In this article, we have listed a couple of troubleshooting tips to fix Nikon camera battery not charging issue.

How to fix Nikon camera not charging issue

1. Check for the faulty charger

Nikon camera not charging

  1. If your charger fell, it is possible that the charger may have received some damage.
  2. Look in the charge port and blow out any dust that may be causing issues with the connection.
  3. Look in the port and check for any bent pins. You can straighten the bent pins, but make sure to be careful while doing so. Use a toothpick to do the same.
  4. If the charger cord is faulty, try another compatible charger cord and check if that charges the battery
  5. If the charging port is defective or damaged, you probably need to take it to the Nikon service center. The charging port is soldered to the motherboard of the camera, so don’t try to repair it yourself if you don’t know what you are doing.

7 best vectorize images software for designers and artists


2. Replace the camera battery

Nikon battery not charging

  1. Even if you think the camera battery is fully charged, the battery may be completely dead.
  2. If you have a spare battery compatible with your camera model, replace it with the original battery.
  3. Turn on the camera and check if it is working or charging.
  4. Before placing a replacement request for a new battery,  insert the battery in another Nikon camera. This way you can be sure that your battery is dead and the issue is not with your camera.

3. Battery exhausted issue

Nikon battery not charging

  1. If you are getting battery exhausted error when turning on the camera, do the following.
  2. Check the battery type. If you are using incorrect battery type in your camera’s menu.
  3. On your camera, go to Menu > Setup Menu.
  4. Select Battery Type.
  5. Check if you are using the right battery type that matches the types selected in your camera.

4. Other Solutions to try 

Nikon battery not charging

  1. While plugging in the battery to charge, make sure to plug in the USB cable first into the charging adapter. Next, plug the adapter into a wall outlet. Now connect the charger to your camera.
  2. While charging the battery, make sure the camera is turned off.

By following the troubleshooting tips in this article, you should be able to fix Nikon camera not charging issue. Usually, the camera not charging issue occurs due to a faulty charger or dead battery.

RELATED STORIES YOU MAY LIKE:

Sony Smart TV Remote Doesn’t Work: 4 Easy Ways to Fix it

Sony’s Smart TVs come with a smart remote control that can be used to control your Setup box etc. Sometimes, the remote control may stop working. Several users have reported Sony smart TV remote doesn’t work issue in the tech forums.

Troubleshooting this issue is easier than it may appear. Follow the steps in this article to know how to get your remote working now.

Why is my Sony Smart TV not responding to my remote?

Below are some of the factors that might cause your Sony TV remote to stop working:

  • Issues with the remote: In some cases. this problem might be due to problems with your remote. This might be due to battery problems or other factors.
  • Boot issues: If it is just a few of the buttons on your Sony Smart remote are not working, it might be a boot issue. You need to reboot your TV to fix this.

How can I fix my Sony Smart TV remote if it doesn’t work?

1. Reboot and wait

Sony smart TV remote doesn't work

If only a few buttons of the Sony remote don’t work, it is due to the boot process. Sony recommends that users wait for a few minutes for all the remote control functions to start working.

Before proceeding with other troubleshooting tips, please check the batteries. Dead batteries are a common cause of partially functioning or dead remote control. Place the batteries according to the polarity and try again.

2. Check TV operations / reset Android TV

  1. Make sure that your TV is functioning properly using the buttons on the TV. Press any of the buttons and check if you are able to control the volume and menu etc.
  2. If the TV is functioning properly, jump to the third fix.
  3. If the TV button is not working, make sure the lights on the TV are on.
  4. Perform a power cycle by pressing the Power button for 5 seconds until the message Power off appears.
  5. Wait for the TV to restart. That should complete the power cycle. Use your remote again and check for any improvements.

3. Troubleshoot remote control

  1. If the issue persists, troubleshoot the remote control using these steps.
  2. Clean the remote control terminal. The remote control battery terminals can accumulate dirt over time. Remove the battery lid and roll the batteries with your thumb.
  3. Remove external devices connected to the computer. External devices like hard drives, gaming consoles, and even streaming devices can create issues.
  4. Remove all the connected devices one by one. Then start connecting them again and check if the remote control starts functioning.
  5. If the remote control starts working, then you may have an external device to troubleshoot.

4. Verify the remote control IR blaster

  1. Remote controls use an Infra-Red blaster to transmit signals. You can easily verify if the remote control is sending an IR signal.
  2. Take a smartphone with a camera. Open the camera app.
  3. Point the end of the remote control with the IR emitter at the camera.
    blaster sony
  4. Press the power on button on the remote control if you see a light on the phone screen if the remote control is sending IR signals.

With this, we can conclude this guide on how to fix your Sony Smart Tv remote if it doesn’t work. You should be able to solve the problem with the solutions therein.

If your Sony TV is not responding at all, check our detailed guide to fix it.

Feel free to let us know the solution that helped you fix this issue in the comments below.

Nikon Camera Not Taking Pictures? 3 Ways to Fix it

Unlike smartphones, a camera is made for only one purpose and that is taking pictures. Sometimes, your Nikon camera may stop doing that one job it is made for. Several users reported that their Nikon camera is not taking pictures.

The problem arises due to several reasons, some related to the camera while others are external factors. Keep reading to find out the underlying cause and the solutions that actually work when your Nikon camera won’t take pictures!

Why is my Nikon camera not taking pictures?

Here are a few reasons your camera is not taking clear pictures or not capturing at all:

  • Misconfigured settings: Camera settings are vital for taking crisp and clear pictures, and any issues here won’t just affect the quality but may altogether disable the functionality.
  • Improper focus: When the Nikon camera can’t focus, it affects the ability to capture pictures.
  • Running low on storage: If the connected SD card doesn’t have enough free storage, you won’t be able to capture more pictures.

What can I do if the Nikon camera is not taking pictures?

Before we move to the slightly complex solutions, here are a few quick things to try:

  • Perform a power cycle. To do that, turn off the camera, remove the lens and the batter, then move the AF switch on the left from A to AM, repeat this a few times, and finally set the AF switch back to A. Reinsert the battery and the lens.
  • Make sure the SD card has enough free space to store photos when the Nikon camera is not taking pictures.

If none work, head to the fixes listed next.

1. Reset camera options

  1. Make sure your camera is turned on.
  2. Go into Menu and select Settings (gear icon).
  3. Select Reset setup options.
    Nikon camera not taking pictures
  4. Select Yes to confirm the action.
  5. Now try to focus and click a picture. Check for any improvements.

If you don’t mind adjusting some settings and options from scratch, the best fix is to reset the settings when your Nikon camera won’t take pictures.

2. Check focus and light conditions

Most of the issues related to the Nikon camera not taking pictures has to do with the camera being not able to focus. To achieve optimal focus, make sure there is sufficient light in the direction of the object. This is also true for contrast in the direction of the object.

If necessary, turn on the flashlight and try clicking the picture. Check your lens’ minimum focus distance before shooting any object. If the object is closer than the minimum focus distance of the lens, then you need a new lens to take micro shots.

Nikon camera not taking pictures

Check the camera’s drive mode for the self-timer option. If self-time is on, turn it off and then try clicking a picture.

3.  Check AE/AF Lock

  1. On your camera, press the Menu button.
  2. Go to the Setup menu.
  3. Select the AE-LAF-L option.
  4. If the option moves to AE/AF Lock which is the last option, then move it to the first option AE/AF Lock, and press OK.
  5. Try to click a picture and check for any improvements.

This issue can occur if you have changed the AutoFocus lock setting in the camera accidentally.

By now, you should have fixed things when the Nikon camera is not taking pictures, and it should be up and running just fine! If the issue persists, you may need to take assistance from Nikon support.

Before you leave, find out how to create blurred background photos with Nikon.

For any queries or to share what worked for you, drop a comment below.

Uplay can’t recognize your password? Try this

Uplay is a neat game distribution platform where you can buy and download Ubisoft games an their respective DLCs.

More so, it acts like a hub where you can view achievements, chat with friends and read news from the Internet.

As you probably already know, accessing Uplay is only possible via account and password.

Plenty of users are complaining on the official Ubisoft forums that sometimes Uplay doesn’t recognize their password anymore.

On website I can log in normally, but on Uplay, as soon as I click login, it immediately dismisses that it doesn’t recognize my password and yes I’m sure what i type is right.
Should I reinstall? But doing so, maybe will make my go offline mode disappear? Not ready to risk it yet.

What makes the issue all the more confusing is that it happens completely randomly.

What’s more, passwords become valid again after some time, even without any sort of user intervention.

What to do if Uplay rejects your password?

The first solution to come to mind is probably a password reset.

However, it was reported that this problem can normally arise when you change your password from the account management page but still keep signing into Uplay in offline mode.


Having trouble forgetting your passwords? Why not try one of this great password managers instead?


1. Prevent Uplay from always starting in offline mode

  1. When you launch Uplay before you sign in, click on the Settings menu at the bottom of the window.
  2. Deselect Always start Uplay in Offline Mode
  3. Click on Save 
  4. Press Ctrl + Shift + Esc
  5. When the Task manager opens, select the Uplay entry
  6. Press End Task
  7. Relaunch Uplay

Always start Uplay in Offline Mode Uplay can't recognize your password


2. Re-install Uplay

While there is no explanation as to why exactly this solutions works, it seems that sometimes re-installing the app can do the trick.

  1. Press Windows + R
  2. Type in appwiz.cpl
  3. Right-click the Uplay entry
  4. Select Uninstall / Change
  5. Head over to Uplay’s official page and download a fresh new client
  6. Install it

Uninstall Uplay Uplay won't accept password


3. Check to see the status of Ubisoft servers

Sometimes, because the servers are down,  the application tells you you entered the wrong credentials.

While this error message may be misleading, simply check whether Ubisoft is having its routine server maintenance, or if it is experiencing any issues.

Ubisoft usually posts ahead of time whenever they are ready to perform a routine server maintenance, so be sure to visit their page from time to time.

READ ALSO:

GOG Can’t Install the Game: 5 Ways to Fix it

GOG Galaxy is game-client software for players to acquire and install games. However, some users complained that GOG can’t install a game.

If you’re not familiar with this software, we have a great guide on how to run GOG games on Windows, so we encourage you to check it out.

As for installation problems, keep reading to find out how to fix them.

Why is GOG not installing games?

  • Lack of storage space can prevent you from installing games from GOG.
  • Damaged or corrupted game files can cause this problem as well.
  • Corrupted GOG files can interfere with the installation process.
  • In some cases, your antivirus can interfere with installation.
  • Lack of permission will also cause problems with some games.

What can I do if GOG can’t install a game?

1. Free up some space

  1. Open the Settings app with the Windows key + I shortcut.
  2. Navigate to System and select Storage.
  3. Now select the category that you want to clean.
  4. Follow the instructions on the screen.

2. Select the Verify/Repair option

  1. Some users have fixed the Installation Failed error with the Verify/Repair option in GOG Galaxy. First, open the GOG client software.
  2. Then find and select the game installation that needs fixing within the GOG Galaxy library.
  3. Click the More button, and select the Manage installation submenu.GOG More button gog games not installing
  4. Click the Verify/Repair option.

3. Delete the Galaxy.db file

  1. Users have confirmed that deleting the galaxy.db file can resolve the Installation Failed error for GOG games. First, make sure the GOG gaming client isn’t running.
  2. Open File Explorer with the Windows key + E keyboard shortcut.File Explorer gog games not installing
  3. Open the GOG Storage subfolder, which will usually be at this default path: C:\ProgramData\GOG.com\Galaxy\Storage
  4. Select the galaxy.db file in that folder.
  5. Click the Delete button to erase the file, which will reset the database.

After doing that, check if GOG still can’t install the game.

4. Disable third-party antivirus software

  1. Open the Task Manager by right-clicking the taskbar and selecting Task Manager.
  2. Click the Start-up tab.
  3. Select the antivirus utility, and press the Disable button.The Task Manager window gog games not installing
  4. Close the Task Manager utility, and then restart Windows.
  5. Alternatively, users can usually temporarily turn off antivirus utilities by right-clicking their system tray icons and selecting a turn off or disable option.
  6. Or users can uninstall antivirus utilities by opening the Programs and Features Control Panel applet, selecting the antivirus software listed there, and clicking Uninstall.

5 Adjust the GOG Galaxy folder’s security settings

  1. Users have also fixed Installed Failed errors by unchecking the Read Only option for the GOG Galaxy and game folders. Open File Explorer in Windows.
  2. Right-click the GOG Galaxy folder in File Explorer and select Properties.The Read-only option gog games not installing
  3. Deselect the Read-only option, if it’s selected, on the General tab.
  4. Click the Apply and OK buttons.
  5. Then deselect the Read-only options for the folders that include the games the Installation Failed error arises for.

Can I play GOG games without a GOG launcher?

Yes, the games from GOG don’t require any launchers, unlike other distribution platforms.

Games are distributed as exe files, so you can install the game and run the executable without relying on any launchers.

The above resolutions should be able to help you if GOG can’t install the game on your PC.

Now that you have that issue sorted, why not check our guide on how to download games without GOG Galaxy software?

Did you find a different solution that worked for you? If so, feel free to share it with us in the comments section below.

No Signal From Antenna on Sony Bravia TV: 4 Ways to Fix

If you own a Sony Smart TV you might’ve encountered a Sony Bravia TV with no signal from an antenna issue.

We wrote about Sony TVs in the past, and we suggest reading our guide on how to add or delete apps on Sony TV.

This is a completely different issue, and in today’s guide, we will show you the best ways to fix it, so let’s get started.

Why is my Sony Bravia TV not picking up signal?

  • Issues with the connection between the antenna and TV.
  • The source device might not be working properly.
  • Outdated firmware can sometimes cause this problem.
  • Issues with channel settings can cause this issue as well.
  • An incorrect input source will give you this message.
  • Issues with your TV settings.

How can I fix No signal message on Sony Bravia TV when using antenna?

1. General troubleshooting steps

  1. Check if all the connections are working properly. If your antenna, cable, or other source device is not properly connected to your Sony Smart TV, this will trigger the NO SIGNAL message.
  2. Make sure that all the cables are plugged in to the right ports.
  3. Change the channel and try a different source or device.
  4. Confirm that the source device is on and working properly.
  5. Make sure that there are no issues with your cable provider.
  6. Check if the TV has the latest firmware update installed. If not, update your Sony Smart TV.
  7. Perform a Power reset. If you don’t know how to do that, check out the steps from this article.

2. Use the Auto Program feature

  1. Power on your Sony Smart TV.
  2. Press the Home button on your remote control.
  3. Select Settings.
  4. Now choose Channels and choose Channel setup.
  5. After that, you’ll see two options: Cable and Antenna. Select the appropriate signal type for your connection.
  6. Select Auto Program and wait for the process to finish.

It’s worth mentioning that the channels you receive depend on your region. Also, the Auto Program feature can take several minutes, depending on the number of channels received.

3. Change the Input on your TV

  1. If your TV worked fine and suddenly is showing the NO SIGNAL message, it is possible that you changed the input by mistake.
  2. Press the Input button on your remote control. Usually, it is located at the top of the remote, but if it isn’t there, check your remote for the Input button.
  3. After pressing the Input button, a list with all the available inputs should appear. The active ones should be highlighted with a color while the inactive ones should be grayed out.
  4. Depending on your source, choose the appropriate input for that source (HDMI, cable, antenna). Keep in mind that if your TV has multiple HDMI’s, they will be named differently (HDMI 1, HDMI 2, HDMI Side). Be sure to select the correct one.

After doing that, check if Sony TV antenna input is still not working.

4. Perform a Factory reset

  1. To start, press the Home button on your remote control.
  2. Now go to Settings.
  3. Under Storage & Reset select Factory data reset.
  4. Choose Erase everything.
  5. Confirm by selecting Yes.

Keep in mind that this will delete all your information, downloaded apps, saved info, and settings. Use it as a last option.

Sometimes, if you’re using a signal splitter, the signal can be weak.

In this case, try a direct connection to see if it works. If the direct connection works, then the signal splitter is at fault, and you should always keep your Sony Smart TV on a direct connection.

As you can see, it’s easy to fix no signal from the antenna on Sony Bravia TV, but that’s not the only issue you can encounter.

Unfortunately, this isn’t the only issue, and many reported that Sony Smart TV isn’t responding, but we tackled that issue in a separate guide.

If you have any other questions, drop them in the comments section below, and we’ll be sure to check them out.

FIFA 20: How to use real manager faces

FIFA is known for a lot of things, but customizability isn’t exactly one of them.

Users that have played FIFA 19 were used to using a hex editor use in-game real managers faces in career mode.

With the launch of FIFA 20, users are wondering if this trick is still usable.

The go-to hex editor for these types of modifications is RDBM.

RDBM is a modding tool, but only affects the visual aspects of the game, and in no way will give you an unfair advantage during online matches.

This tool is very similar in functions with the old Internal Master and allows you do edit the database tables present in the FIFA 20 career and tournament files.

How to use RDBM to get real manager faces

In essence, all you needed to do is edit a certain line in FIFA.exe from RAM with this hex editor.

The problem is that EA has changed the game’s coding by adding a few extra lines of text.

Because of the possibility to edit your manager appearance in FIFA 20, EA has added new fields to the manager table in the database.

As such, editing headassetid is no longer enough to make a perfect copy

This makes it so that it is no longer possible to edit the manager table with RDBM, or at least not with RDBM 19 the way you used to.

If you too are trying to use RDBM 19 to modify FIFA 20, but are unsuccessful, just extract this FIFA 20 folder inside RDBM/Templates.

Afterward, proceed using the steps listed below:

  1. Download the latest version of RDBM
    • Please be advised that this is an unofficial download. This means that we are NOT responsible for any damage it may cause due to improper usage.
  2. Install it
  3. Always run the tool as admin, or edit RDBM19.exe property to always run as admin
  4. Open your Career* file
  5. Click DB2
  6. Select manager table, then edit everything you want.
  7. Click Save to confirm all changes made

Remember that this is a Beta version and some functions may have issues!

RDBM can also be used to apply starheads on a manager’s headid, allowing you to go crazy with your customization.

More so, it can be used to make slight adjustments to faces, such as changing the hue or tint of eyes.

For a more in-depth guide on how to use RDBM 19, check out this thread.

Your account doesn’t have a FUT club associated with it [FIX]

Many people are thrilled with the release of the FIFA 20. However, not everything is perfect for all gamers.

Quite a few users encountered the “Your account doesn’t have a fut club associated with it” message in the FUT 20 web app. 

This problem appeared even though users have FUT 19 that works properly. So, what’s the problem here? Well, nobody knows exactly. However, we have a few suggestions that might solve the problem.

Encountering FUT 20 error? Try this!

Make sure you’re logged in with the right account

Sometimes, this error message appears if you logged in with another account. Check to see if you use the correct EA account. If you use the correct account, try the method below.


Can’t remove FUT players from FIFA 20? Find out why!


Load FIFA Ultimate Team 19

Many users reported that they fixed the problem by loading FUT 19. The app came up with a pop-up that redirected to FUT 20. The new web application opened without any issues.

Conclusion

As you can see, this article shows two easy solutions for this problem. Check if you logged in with the correct EA Account. If this method didn’t work, load FUT 19. From there, it should redirect you to FIFA Ultimate Team 20.

Also, the users who didn’t get FUT 19 didn’t have access to FUT 20 either. So, this is a major issue from the developers’ part.

Did our solutions help you? Do let us know in the comments section below!

RELATED ARTICLES YOU NEED TO CHECK OUT:

Posted in Fix

FIX: FIFA 20 Ultimate Team starts on the wrong account

FIFA 20 players have been reporting on FIFA forums that they are having issues logging into the game with their persona:

i played on my main throughout the ea access and now it wants me to make a new club and stuff.. I were in contact with support last year about this same problem but it seems to happen

With the official launch of FIFA 20, thousands of users across both PS4 and Xbox consoles will not be able to play online or use the game‘s most popular features.

These persona issues manifest themselves in several ways, including:

  • The game keeps mistakenly fetches the wrong persona data tied to your EA account.
  • Plenty of users are now seeing the wrong Ultimate Team, which has resulted in FIFA points being redeemed on one account but ending up in another’s Ultimate Team.
  • Some users are seeing the wrong Virtual Pro.
  • Users can’t play online at all
  • Users can’t play Volta story, which gets stuck on the generating match report message after first game of story.

Curiously enough, this issues seems to be linked more to the way FIFA 20 is handled on consoles.

This is because the issue does not exist on the FUT Web App where the correct corresponding data is shown for each account.

More troubling is that users confirmed that the issue carries over to the full game.

What to do if your FIFA 20 has persona issues on your console

While no permanent fix is available yet, one workaround can be used to view your correct FUT club.

It doesn’t seem to allow you to play online FUT games, though.

  1. Go into Online Seasons on your primary account.
  2. Search for a game and get the error message instantly.
  3. Repeatedly press X on the message 20-25 times.
  4. Exit, and go to your desired game mode.

Your correct persona should now be detected, and you should have your correct FUT club.

This workaround will sometimes allow you to play online games in Seasons, but usually not FUT.

Keep note that this fix is only a temporary solution, as only a patch can permanently fix it.

It seems that EA has taken note of this serious issue.

They also promised players that this issue will definitely be fixed, as it is a priority issue ahead of launch.

Additionally, they promised that players will not lose any content as a result of this bug.

Bluetooth Not Working on Sony TV: 4 Ways to Reconnect

Sony Smart TVs, among other things, are also Bluetooth enabled devices. However, many reported that Bluetooth is not working on their Sony TV.

Usually, things like smartphones, gamepads, mice and keyboards, speakers, and others, can be connected to your TV if both devices have Bluetooth enabled.

This is a fairly common problem, and we wrote about the couldn’t connect your device to Samsung TV issue in the past.

If you bumped in to Bluetooth connectivity issues with your Smart TV, then take a look at the steps below to learn how to fix them.

Why my TV is not connecting to Bluetooth?

  • Bluetooth might not be enabled on the TV or the device.
  • The Bluetooth device is low on battery power.
  • Interference with 2.4GHz signal.
  • Glitches with Bluetooth settings.

How can I fix Sony TV Bluetooth if it’s not working?

1. General troubleshooting steps

  1. Make sure that your Sony Smart TV has Bluetooth and is enabled. This applies for the device that you’re trying to connect as well.
  2. Make sure that the device that you’re trying to connect has enough battery life.
  3. Try to connect your device to another TV or PC/console to check if it works.
  4. Make sure that there are no wireless communication interference. Bluetooth devices use 2.4Ghz band and the connection may degrade due to wireless interference.
  5. Update your Sony Smart TV to the latest firmware version.

Note: some devices can’t be connected to Sony Smart TVs through Bluetooth. Audio devices can’t be connected through Bluetooth to TVs older than 2016. Also, smartphones, tablets, and some headphones won’t connect to your TV via Bluetooth.

Be sure to try these steps if Sony Bravia is not finding Bluetooth headphones.

2. Re-do your Bluetooth settings

  1. Press the Home button on your remote control.
  2. Navigate to Settings and go to NETWORK & ACCESSORIES. Lastly, choose Bluetooth settings.
  3. Select Bluetooth.
  4. Change the Bluetooth from ON to OFF.
  5. Now change it back to ON.

After re-making your Bluetooth settings, check if the connection can now be established properly.

3. Touchpad Remote Control won’t connect

  1. Remove the batteries from your remote and reinsert them.
  2. Re-do your Bluetooth settings as shown in the previous solution.
  3. If your remote and TV are paired, un-pair them and then re-pair them back. To re-pair your remote, follow the next steps.
  4. Turn on your TV and press the Home button on the remote.
  5. Go to Settings and go to Network & Accessories. Select Touchpad Remote Control settings.
    touchpad and remote control settings
  6. Select Pair Touchpad Remote Control and then choose Yes.
  7. Follow the on-screen instructions.
  8. If you want to pair your remote without using it, turn on the TV, on the back panel of your Sony Smart TV press and hold the INPUT button for 7 seconds, and then follow the on-screen instructions.

After doing that, check if Sony TV is not pairing with Bluetooth.

4. Keyboards, mice, and gamepads

Sony Smart TVs can recognize most USB keyboard and mice. This also applies to Bluetooth enabled peripherals.

Keep in mind that some functions, for example, the right-click on a mouse, are not supported. Also, some peripherals and accessories won’t connect if not supported.

As for gamepads, there is official Bluetooth support only for DS4 controllers. Other controllers might work as well, but you’ll experience input lag.

After following these steps, your Sony Smart TV’s Bluetooth should work as intended, and you should be able to connect to any supported devices.

If you still experience connection problems, you can try to perform a Power reset or a Factory reset. For more info on how to do that, check out the steps in this guide.

Now that you’ve sorted this issue, why not check our guide on how to connect Sony smart TV to Wi-Fi.

If you have any other suggestions or questions, feel free to drop them in the comments section below.

Microsoft makes Azure Sentinel security management service generally available

Seemingly in homage to former CEO Steve Ballmer’s infamous “Developers! Developers! Developers!” keynote chant, Microsoft seems to be repeatedly beating the drum of cloud protections through a “Security! Security! Security!” typed of mindset as of late.

To that end, Microsoft announced earlier this week that Azure Sentinel, the company’s cloud-native SIEM is now generally available.  Azure Sentinel represents Microsoft’s intelligent security analytics platform designed for scale at a cloud-level and specifically targetting various sized enterprises and workloads.

Recent research tells us that 70 percent of organizations continue to anchor their security analytics and operations with SIEM systems, and 82 percent are committed to moving large volumes of applications and workloads to the public cloud. Security analytics and operations technologies must lean in and help security analysts deal with the complexity, pace, and scale of their responsibilities. To accomplish this, 65 percent of organizations are leveraging new technologies for process automation/orchestration, while 51 percent are adopting security analytics tools featuring machine learning algorithms. This is exactly why we developed Azure Sentinel—an SIEM re-invented in the cloud to address the modern challenges of security analytics.

In cultivating Azure Sentinel, Microsoft worked with partners to gain feedback from over 12,000 customers and two petabytes of data analysis to create a solution that empowers customers to defend their infrastructures with more efficiently.

In a new blog added to Microsoft Security, the company shares details about how successful some of its partners have already become successful with their own anecdotes of Azure Sentinel usage.

With these design partners, we’ve continued our innovation in Azure Sentinel. It starts from the ability to connect to any data source, whether in Azure or on-premises or even other clouds. We continue to add new connectors to different sources and more machine learning-based detections. Azure Sentinel will also integrate with Azure Lighthouse service, which will enable service providers and enterprise customers with the ability to view Azure Sentinel instances across different tenants in Azure.

For now, Azure Sentinel is in public preview and in general availability for anyone in charge of their company’s more traditional SIEM’s while also looking for a more cost-effective solution. For anyone still up in the air about Azure Sentinel, Microsoft will be hosting an Azure Security Expert Series tomorrow September 26, 2019, from 10-11 AM Pacific Time and signs are here.

FIFA 20 users can’t use the D-Pad anymore

FIFA 20 is the latest installment in the critically-acclaimed football-themed game series.

As you may already know, it is available on PC, Xbox and PS4, so pretty much everyone gets to enjoy it.

Those of you that play FIFA 20 on PC know that you can choose to play either using a mouse and keyboard or using a controller attached to your PC.

The problem with those using console controllers is that users have been reporting issues when trying to control their in-game players using the d-pad.

Seems there are problems for certain skill moves, especially for the fake shot… this worked well for years and years. Hopefully it is a demo-thing and will be fixed with ea access and full launch. I know d-pad users are a minority, but we most let EA know that we want a fix.

Why use the D-Pad and not joystick instead?

The first reactions regarding the issue were why was it even treated as an issue.

Users argued that a far better control alternative already existed in the form of the joystick.

As you all know, FIFA started out with their first game back in 1995.

Back then, the d-pad was your go-to solution when it came to omnidirectional character control.

Many of the players from that era continue playing today.

Subsequently, many of them prefer the good old-fashioned d-pad over the joystick.

 I am 37y i grew up with the d-pad…. but the point is…. don’t mess with what is good…

Apparently the issue is most visible when trying to perform special moves, such as penalties and free kicks.

More so, the issue seems to extend to keyboard users as well.

Apparently, they seem to be having the exact same issues with the arrow keys.

Curiously enough, what seems to bug users, even more, is not the severity of the issue itself.

It is the fact that it was reported during the beta, during the demo, and during the EA access.

This leaves players rather pessimistic whether the issue will be solved any time soon, or will they just have to learn how to play using the joystick.

Speaking of which, you must remember that if you have FIFA 20 on PC, and don’t want to play it using a mouse and keyboard, you need to have an official Xbox 360 or Xbox One controller if you wish to play it.

This is because FIFA 20 no longer supports any other type of controllers.

FIFA 20: Changes in the defending mechanics

FIFA 20 players have reported that the game’s AI is broken when it comes to defensive maneuvers.

Players on the official forums have summarized that:

DEFENDING, it’s broke to the point it is embarrassing .

More so, they go into further detail explaining the issue:

[…]team mates will proceed to break shape and leave gaps they just go opposite directions from what your wanting them to do they take up spaces so there not going to be involved in defending[…]

Apparently, the main problems seem to stem from the game’s faulty AI.

The FIFA 20 goalkeepers are apparently facing the worst issues

I would seem that the goalkeeper is also suffering from a faulty AI:

goalkeepers don’t have good games anymore because they don’t make saves anymore lol 4 shots on target 4 goals , shot hit straight at goal keeper parried into net or underneath him etc

Of course, this entire problem is most likely caused by the fact that EA itself announced heavy changes regarding the game’s defending system.

They especially mentioned the way keepers will behave and move, and how computer-controlled defending behaves in general.

For example, the goalkeeper will move far slower that what players were used to in FIFA 20.

This was in order to reflect the realistic movements of an actual keeper.

This also forces players commit to a direction when defending manually.

Back in FIFA 19, it was considered that goalkeepers had “superhuman” reactions.

As such, changes were implemented to ensure that more shots were made in easy situations, and less shots were made in harder ones.

Why FIFA 20 abandoned AI-controlled defending

The reason for this overhaul in the defending system is because computer-controlled was extremely open in certain situations.

For example, chaining multiple step overs in quick succession or doing repeated flick-ups.

These two scenarios were almost impossible to defend against, which resulted in unrealistic and ridiculous plays.

EA stated that:

Now the goal of this update to the AI is to make defending far more engaging for the player, and feel all the more rewarding as well.

As such, the entire issue of a broken defending system in FIFA 20s stems from one of two things:

  • These changes to the defending system in FIFA 20 were poorly implemented
  • The players didn’t know about the new mechanics and treated them as bugs rather than features