Microsoft unveils new Phantom Black and Grey/Blue Xbox controllers

There’s no shortage of Xbox One controller options these days, and today more new color schemes have entered the fray. Indeed, Microsoft has just announced new Phantom Black and Grey/Blue Xbox One controllers, giving you more ways to customize your gaming setup.

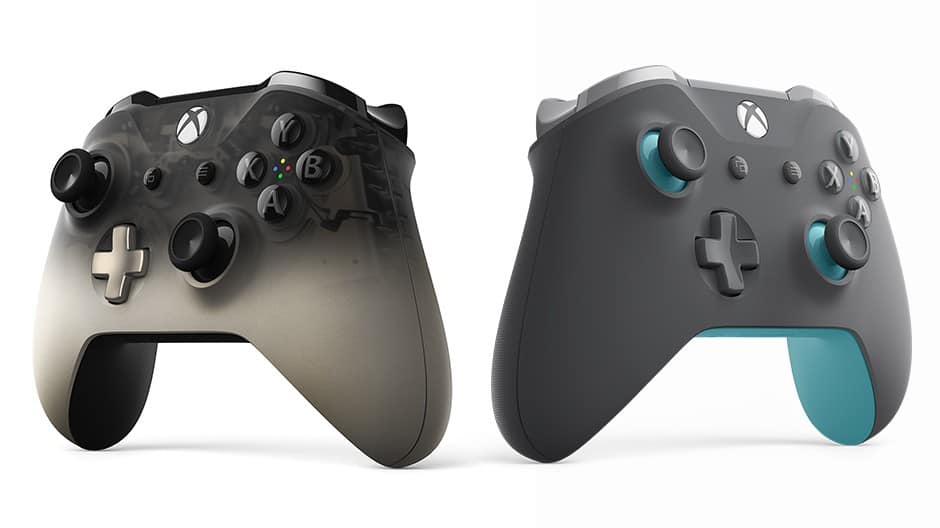
The Xbox Wireless Controller in Grey/Blue comes with a sleek, dark gray design, blue accents on the thumbsticks and base, and a monochrome ABXY, menu, and navigation buttons. The special edition Phantom Black controller, meanwhile, fades from a translucent matte black to a stunning metallic champagne gold. That controller also has textured grips, Black buttons, triggers, thumbsticks, and bumpers accented with a champagne gold D-pad.

Special edition Phantom Black controller

The Phantom Black Special Editon controllers will become available on September 11 in the USA for $69.99, and the Grey/Blue controller will follow on September 25 for $64.99. You can pre-order both controllers today at the Microsoft Store, and also at select retailers worldwide.

Grey/Blue Xbox One controller

For those not in the USA, the Grey/Blue controller will ship on October 9. The controllers come with 14-day trials for Xbox Live Gold and Xbox Game Pass.

If you’re after some nostalgia, you might also want to check out the Green Xbox One ‘Duke’ controller. Though not designed by Microsoft or as flashy as these new controllers, it is a replica of the original Xbox Controller, but designed to work with a wired connection with Xbox One.

Microsoft brings Azure Stack to Azure Government

Microsoft yesterday announced the availability of Azure stack for Azure Government customers. Azure stack for Azure Government should help address the challenges and regulations Microsoft’s federal government customers face and more.

According to Microsoft Azure Stack is an “extension of Azure to consistently run hybrid applications on-premises.” Per yesterday’s posting, Azure stack for Azure Government also comes with the necessary infrastructure and services for governments to “meet directives faster, and make strategic choices about where to run their workloads and applications.” Microsoft highlights the following other benefits:

  • Consistency means government customers get the same infrastructure and services with Azure Stack as they do with Azure — the same APIs, DevOps tools, portal, and more.
  • Government customers can develop and deploy applications in Azure Government and then deploy on-premises using Azure Stack to meet data compliance, regulatory, or policy requirements.
  • With Azure Stack for Azure Government, agencies can bring core and advanced cloud services to the edge —right to where they’re needed, making it possible to process data in the field without worrying about latency or internet connectivity
  • agencies can also efficiently modernize their on-premises legacy applications that are not ready or a fit for the public cloud due to cyber defense concerns or other requirements

Interested parties can get started with Azure government by checking out this webpage here. They also can download an Azure Stack development Kit. 

Inside Xbox will be live from gamescom next Tuesday

With E3 2018 behind them, it is now time for the Xbox crew to turn their attention to gamescom. It was promised that there would be new “new Xbox One bundles and accessories,” at the annual trades fair in Germany, and now Microsoft is now reminding you to tune into all the action in the next Inside Xbox webcast on August 21st.

As always, Inside Xbox will be streaming live on Mixer, Twitch, YouTube, Facebook, and Twitter on Tuesday, August 21 at 7:30 a.m. PDT/10:30 a.m. EDT. The Xbox team promises that you’ll be hearing more about Forza Horizon 4, Sea of Thieves, and State of Decay 2 during the webcast. They even hint at new breaking news stories, exclusive interviews and never-before-seen content for many other games.

For those who are attending gamescom, you can expect multiple events at the venue. There will be the Xbox Fanfest on Thursday, August 23 on the Rhein River, an Xbox booth in Hall 8 of the Koelnmesse, and a Mixer Booth and Xbox Gear Shop. You can keep an eye out on Xbox social media for more on this, or check out this Microsoft website for the full schedule.


Full Fix: Error x80070002 on Windows 10, 7

When you are thrilled about upgrading your Windows version for an all-new OS experiences and promising features offered by the latest versions, you might come across some bugs and glitches that will stop you in the process. In this post, though, we will specifically talk about the error code x80070002 that sometimes stops people from moving forward with their updates on Windows.

Let’s talk about this error code first and see why it happens. The cause of the error – the error x80070002 or x80070003 occurs due to corrupt or missing files on Windows after an update.

How to fix error x80070002 on Windows 10?

Error x80070002 can be problematic and prevent you from installing the latest updates. Speaking of this error, here are some similar issues reported by users:

  • Error 0x80070002 Windows 10, Windows 7 – This error can appear on almost any version of Windows, and if you encounter it, you should be able to fix the problem using one of our solutions.
  • Windows Update service not running – This message is frequently related to this error, but you can fix this problem simply by enabling the Windows Update service on your own.
  • Installation failed with error 0x80070002 – Sometimes you might get this error message on your screen. If that happens, reset Windows Update components and check if that helps.

1. Reset Windows Update components

According to users, error x80070002 can appear while trying to install updates. This issue can occur due to problems with Windows Update, and in order to fix the issue, it’s advised to reset Windows Update components.

You can do this manually, but this can be a tedious task, therefore it’s better to use the command line for such a task. To do that, follow these steps:

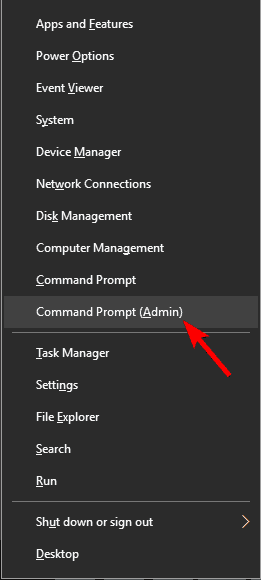
  1. Press Windows Key + X to open Win + X menu. Choose Command Prompt (Admin) or Powershell (Admin) from the list.
    Error 0x80070002 Windows 7
  2. When Command Prompt starts, run the following commands:
  • net stop wuauserv
  • net stop cryptSvc
  • net stop bits
  • net stop msiserver
  • Ren C:WindowsSoftwareDistribution SoftwareDistribution.old
  • Ren C:WindowsSystem32catroot2 Catroot2.old
  • net start wuauserv
  • net start cryptSvc
  • net start bits
  • net start msiserver

After running these commands, check if the problem is resolved.


2. Rename CBS.Log file

Sometimes error x80070002 can appear due to CBS.Log file on your PC. The file can get corrupted, and the best way to deal with it is to rename it. This is quite simple to do, and you can do it by following these steps:

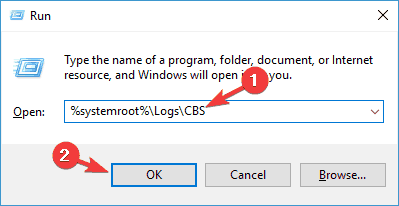
  1. Press Windows Key + R and enter %systemroot%LogsCBS. Now press Enter or click OK.
    Windows Update service not running
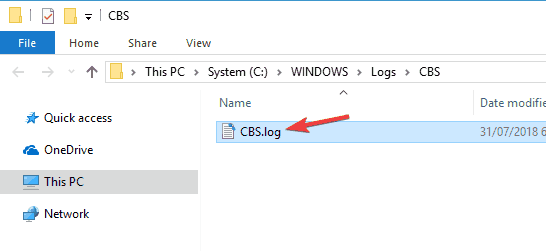
  2. Locate CBS.Log file and rename it to anything else.
    Installation failed with error 0x80070002

After renaming the file, check if the problem is resolved.

Several users reported that they are unable to rename this file. If that’s the case, first you’ll need to stop a couple of services manually. To do that, just follow these steps:

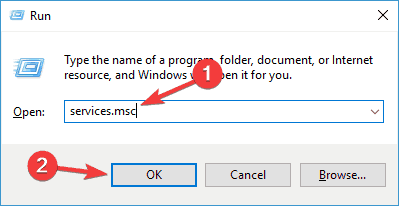
  1. Press Windows Key + R and enter services.msc. Press Enter or click OK.
    Installation failed with error 0x80070002
  2. When Services window opens, locate Windows Modules Installer service and double-click it.
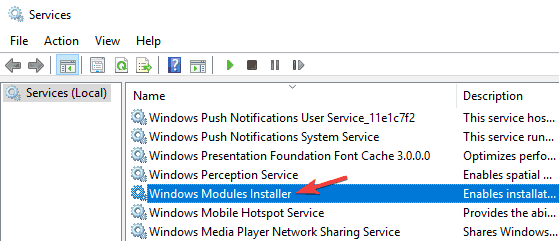
    Error 0x80070002 Windows 7
  3. Set the Startup type to Manual and click Apply and OK to save changes.
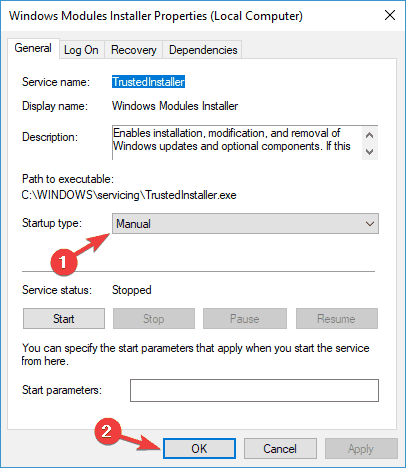
    Error 0x80070002 Windows 10
  4. After your PC restarts, you should be able to rename CBS.Log file.
  5. Go back to Services window and set the Startup Type of Windows Modules Installer to Automatic and restart your PC.

3. Download the update manually

Error x80070002 usually occurs while trying to download Windows 10 updates. This can happen due to various issues, and if you can’t fix the problem, you can always download the update manually.

Before you do that, you need to find the number of your update. You can do that from the Windows Update section. The update code will have KB at the beginning followed by the array of numbers.

Once you find the update number, you need to do the following:

  1. Go to the Microsoft Update Catalog website.
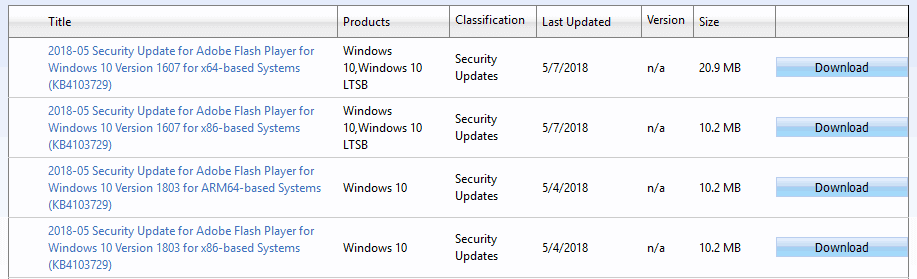
    Error 0x80070002 Windows 10
  2. In the search box enter the code of your update.
  3. List of matching updates will appear. Select the update that matches your architecture and click the Download button next to it.
  4. After you download the update, run the setup file to install it on your PC.

Keep in mind that this solution will install the missing update, but it might not fix the core problem, so you’ll have to do that manually.


4. Check your antivirus

Installation failed with error 0x80070002

Another common cause for error x80070002 can be your antivirus software. Sometimes the antivirus can interfere with your system, and that can cause this and other errors to appear.

To fix the issue, it’s advised that you disable certain antivirus features and check if that helps. If that doesn’t work, you might have to disable your antivirus completely.

In case that doesn’t work, your next step would be to remove your antivirus. If removing the antivirus solves the problem, you should consider switching to a different antivirus solution. There are many great antivirus applications on the market, and if you want an antivirus that won’t interfere with your system while providing maximum protection, you should consider Bitdefender.


5. Make sure that Windows Update service is running

If you keep getting x80070002 error, you should check if Windows Update service is running properly on your PC. To fix this problem, you need to make a couple of changes in the Services window. To do that, follow these steps:

  1. Open the Services window.
  2. Locate Windows Update service on the list, right-click it and choose Start from the menu.
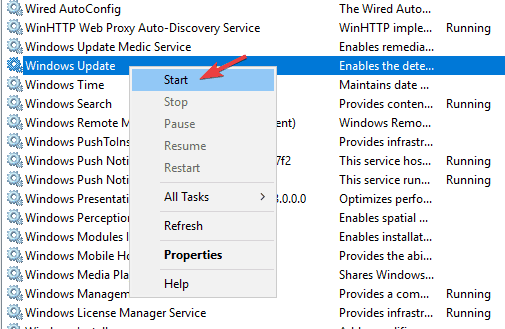
    Windows Update service not running

After starting this service, check if the problem is resolved.


6. Make sure that your time and date are correct

According to users, error x80070002 can occur due to problems with your date and time. If your date or time isn’t correct, you can encounter this error. However, there’s a way to fix this problem:

  1. Right-click the clock in the bottom right corner and select Adjust date/time from the menu.
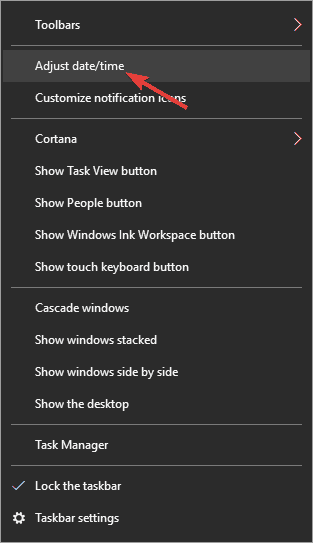
    Installation failed with error 0x80070002
  2. When Settings app opens, turn off Set time automatically option. After a couple of moments, turn this feature back on again.
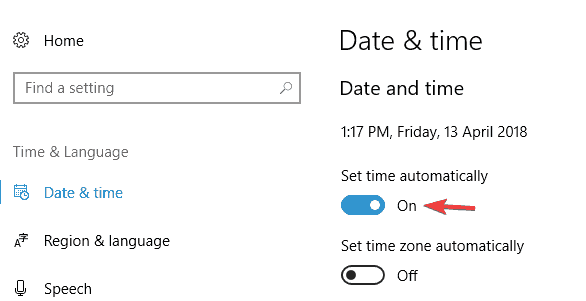
    Error 0x80070002 Windows 7

Alternatively, you can also click the Change button to adjust date and time manually. Once your date and time are correctly configured, the issue should be resolved.


7. Run Windows Update troubleshooter

Error x80070002 usually occurs while trying to download Windows Updates, and in order to fix it, you need to run Windows Update troubleshooter. Sometimes your system might not be properly configured, and that can cause this issue to occur. However, you can easily fix that by running the troubleshooter:

  1. Press Windows Key + I to open the Settings app.
  2. Navigate to the Update & Security section.
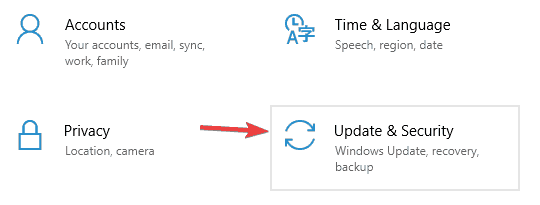
    Windows Update service not running
  3. In the left pane select Troubleshoot. Choose Windows Update from the right pane and click Run the troubleshooter button.
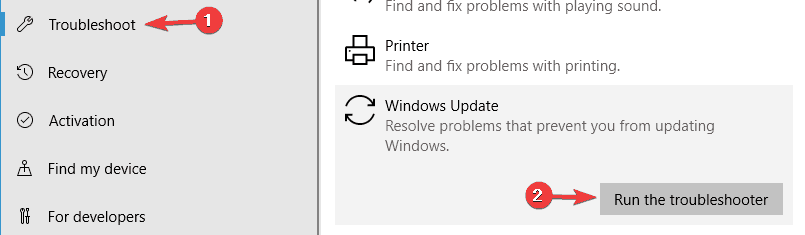
    Windows Update service not running
  4. Follow the instructions on the screen to complete the troubleshooter.

Once the troubleshooter is finished, check if the problem is still there.


8. Modify your registry

Sometimes error x80070002 can occur due to issues in your registry, but you can fix that by following these steps:

  1. Press Windows Key + R and enter regedit. Press Enter or click OK.
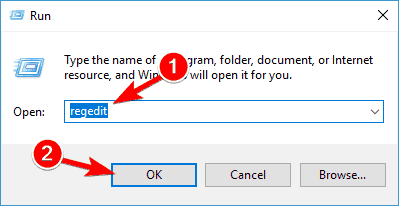
    Installation failed with error 0x80070002
  2. When Registry Editor opens, navigate to the HKEY_LOCAL_MACHINESOFTWAREMicrosoftWindowsCurrentVersionWindowsUpdateOSUpgrade in the left pane.
  3. In the right pane, right-click the empty space and choose New > DWORD (32-bit) Value.
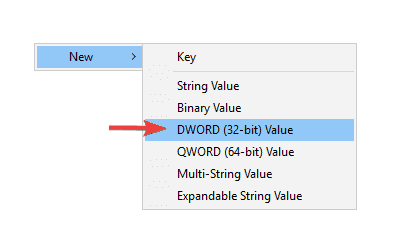
    Error 0x80070002 Windows 10
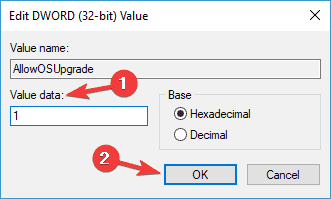
  4. Enter AllowOSUpgrade as the name of the new DWORD and double-click it to open its properties.
    Windows Update service not running
  5. Set Value data to 1 and click OK to save changes.

After making these changes, check if the problem is resolved.


9. Perform an in-place upgrade

According to users, error x80070002 can occur because your Windows installation is damaged. This can be a big problem, however, you don’t have to reinstall windows in order to fix it. To fix this problem, you just have to perform an in-place upgrade.

In case you’re not familiar, an in-place upgrade will reinstall Windows 10 and force it to upgrade to the latest version while keeping all your files and applications intact. To perform an in-place upgrade, you just need to do the following:

  1. Download and run Media Creation Tool.
  2. When Media Creation Tool opens, select Upgrade this PC now option.
  3. Wait while the setup prepares the necessary files.
  4. Select Download and install updates (recommended) and click Next.
  5. Wait for setup to download the necessary files.
  6. Follow the instructions on the screen. On Ready to install screen click Change what to keep.
  7. Be sure to select Keep personal files and apps and click Next.
  8. Follow the instructions on the screen to complete the setup.

Once the setup is finished, you’ll have the latest version of Windows installed and all your files and applications will be preserved. This is a bit drastic solution, so use it only if other solutions can’t fix your problem.

These are some solutions that can help you with this error, so be sure to try them all. If you still have any queries then shoot them in the comments below.


READ ALSO:

Fix: Your Account Wasn’t Changed to This Microsoft Account

Do you want to learn how to fix your Windows 10 if you get the Your account wasn’t changed to this Microsoft account error message? By following step by step the instructions posted in the tutorial below you will quickly fix this issue and get back to your work.

You can very easily stumble upon this message after you upgrade your Windows 10 PC and it is usually followed by the 0x80070426 error code. You get the Your account wasn’t changed to this Microsoft account message in Windows 10 because you most likely updated your Windows operating system logged in with your Microsoft account and for that matter, some registry keys need to be adjusted.

Your account wasn't changed to this Microsoft account in Windows 8.1 or Windows 10 Fix

What can I do when getting Your account wasn’t changed to this Microsoft account message in Windows 10?

As a good safety step you are advised to make a copy of your operating system before doing these steps or perhaps create a system restore point before you try applying these changes.

  1. Press and hold the “Windows” button and the “R” button.
  2. Write in the run box the following: “regedit”.
  3. Press the “Enter” button on the keyboard.
  4. Now you have the “Registry Editor” window in front of you.
  5. Press and hold the “Ctrl” button and the “F” button in order to open the “Find” box.
  6. In the “Find” window you need to place a check mark next to “Keys”, “Values” and “Data” features.
  7. In the box next to “Find what” you will need to write in there your Microsoft account.
    Example: [email protected]
  8. Left click or tap on the “Find” button.
  9. Your “Find” feature should get you two results that include your Microsoft account name.
  10. On the right side you will need to left click or tap on the registry key that includes your Microsoft account and then left click or tap on the “File” menu in the upper left side of the window.
  11. Choose the “Export” feature from the “File” menu and save it to the desktop or some other place but be sure to know where it is.
    Note: Export the other registry key that the “Find” feature showed you exactly how you did above.
  12. Now you will need to delete these two registry keys from this “Registry Editor” menu by right clicking on them and choosing the “Delete” option.
  13. After you deleted them you will need to close the “Registry Editor” window and reboot your Windows 10 device.
  14. After the device is powered up you should have no issues with the above error message anymore.

Account-related problems in Windows 10 can be a real headache. You might also have other annoying issues such as This alias cannot be added to your account that you might want to fix.

We propose you to check first of all the guide unable to login with my Microsoft account. This is a common issue that appears often on different Windows 10 PCs. Also here’s a great guide that fixes You need to fix your Microsoft account.

Was that hard? I think anybody can do it in just five or ten minutes of their time and fix the Your account wasn’t changed to this Microsoft account message in Windows 10. Also you can write us below if you have any other questions regarding this subject and we will help you as soon as possible.

How to Check Clock Accuracy in Windows 10

We all want to have our clock in Windows 10 or Windows 8.1 to be very accurate but what if you want to find out how to check the clock accuracy in Windows 10 or Windows 8.1? This check is done very easily and then you will rest assured that your clock is working at the most precise time.
How to check Windows 8.1, Windows 10 clock accuracy
Windows 8.1 or Windows 10 has a feature called Windows Time Service and it is specifically made to check the time and also synchronize the time and date once every seven days. We will check the clock accuracy by comparing it with the atomic clock and see if it is as precise as it should be.

Check in Windows 10 the clock accuracy: how to do it?

  1. Open your clock in Windows 8.1 or Windows 10 device by clicking or tapping on it in the Windows taskbar and let it run.
  2. Now go over to the link below in order to display the application that has time accuracy between 0.02 and 0.08 seconds.
    Access application for time accuracy (Time.is)
  3. Check and see your clock accuracy by comparing it to the atomic clock displayed in the link above.

You can also adjust your clock by modifying the Internet Time Server by doing the short steps below:

  1. Double click or tap on the time displayed in your Windows 8.1 or Windows 10 taskbar.
  2. Left click or tap on the “Change date and time settings”.
  3. Left click or tap on the “Internet Time” tab situated in the upper side of the window.
  4. Left click or tap on “Change Settings”.
  5. You have there, next to “Server” a drop-down menu where you can choose the time server as you see fit.
  6. After you chose the server you can left click or tap on the “OK” button and close the windows you have opened.
  7. Check and see how your clock accuracy works with a different time server by comparing it with the clock posted in the link you accessed above(Time.is).

If you checked your clock and it does not display the right time, you might want to fix it. You can try out to fix it by yourself and set the time at a certain period of time, or you can choose one of our guides in order to fix your clock. Lately, WIndows have received some fixing updates from Microsoft, but, you never know.

That is it, a very quick method on how to check your Windows 8.1 or Windows 10 clock accuracy. Please write us below in the comments section of the page if you have any other questions regarding the check on the clock accuracy in Windows 8.1, Windows 10.

READ ALSO: Why your computer clock falls behind, and how to fix it

Star Wars Battlefront II video game is just $9 this week on Xbox One

Star Wars Battlefront II has had its price reduced to just $9 on Microsoft’s Xbox One consoles as part of this week’s Deals With Gold discounts for Xbox Live Gold subscribers. That’s an 85% discount from its usual price.

Star Wars Battlefront II received a lot of controversy when it first launched in late-2017 due to its crates which many claimed made the title a pay-to-win game. The game has since replaced the crates with a more traditional levelling system and, in general, Star Wars Battlefront II has now become a pretty impressive major video game with stunning graphics, solid gameplay, and a praiseworthy eye for detail when it comes to Star Wars locales, characters, and weapons. The game will also be getting a large number of content updates over the coming months as well which will be completely free for all players.

Other Xbox One games discounted this week as part of Deals With Gold include Blood Bowl 2 (75% off), Locks Quest (80%), Mordheim: City of the Damned (75%), and WWE 2K18 Digital Deluxe Edition (70%).

Are you going to take advantage of this Games With Gold promotion or do you already own Star Wars Battlefront II? Share your thoughts with the community in the comments below and then follow us on Pinterest for more Xbox One content.

Windows 10’s Twitter Progressive Web App gains image descriptions

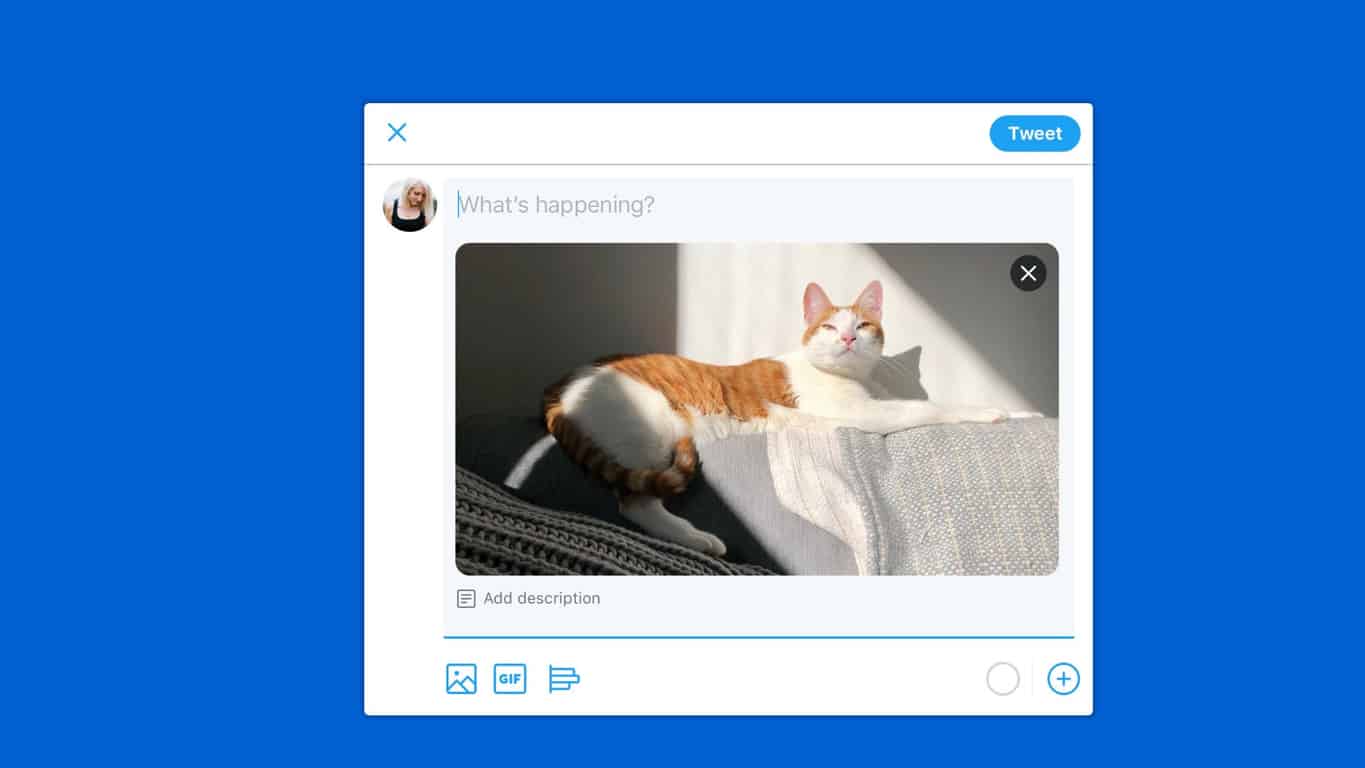
Twitter’s Patrick Traughber announced today on, well, Twitter that the Lite, mobile, and Windows 10 Progressive Web App (PWA) versions of the social network have now gained support for image descriptions.

This new feature essentially allows users to type in a text description for their tweet’s image attachments which can be used in Twitter searches and for those unable to see the images properly due to a disability.

Despite Traughber saying the feature is now live, it doesn’t appear to be showing for all Windows 10 users just yet which suggests that a rollout is in effect.

Are you seeing image descriptions in your Twitter PWA app yet? Let us know in the comments below and then follow us on Twitter for more Windows 10 app news.

Twitter
Twitter
Developer:
Twitter Inc.
Price:
Free

Check Disk Command

CHKDSK (or Check Disk command) is a system tool in DOS, OS/2, and Windows Command Prompt that can check the integrity of your hard disk and can fix various file system errors.

Sure, you can use a software that checks your hard disk health. To choose the best one, check out our list of HDD health check software for PC users.

In this post, you will find out how to run and use the CHKDSK utility tool for related issues in Windows 10.

How to run CHDSK

Follow these steps to run CHDSK from Command Prompt:

  • Press the Windows key+X to open the Start Menu
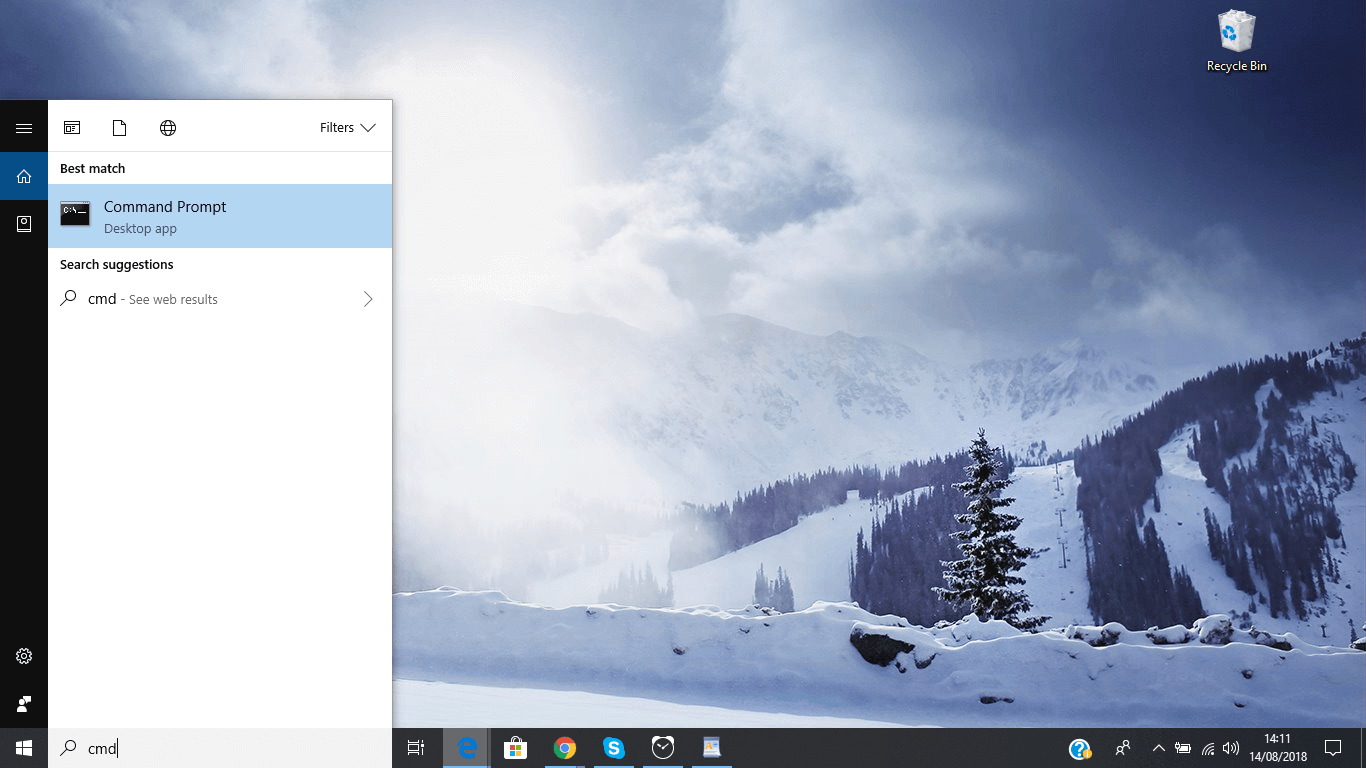
  • Select Search (or press S) and type: cmd to open the Command Prompt
    Open Command Prompt
  • Right-click on Command Prompt from the search results list
  • Click Run as administrator
  • Log in as an Administrator
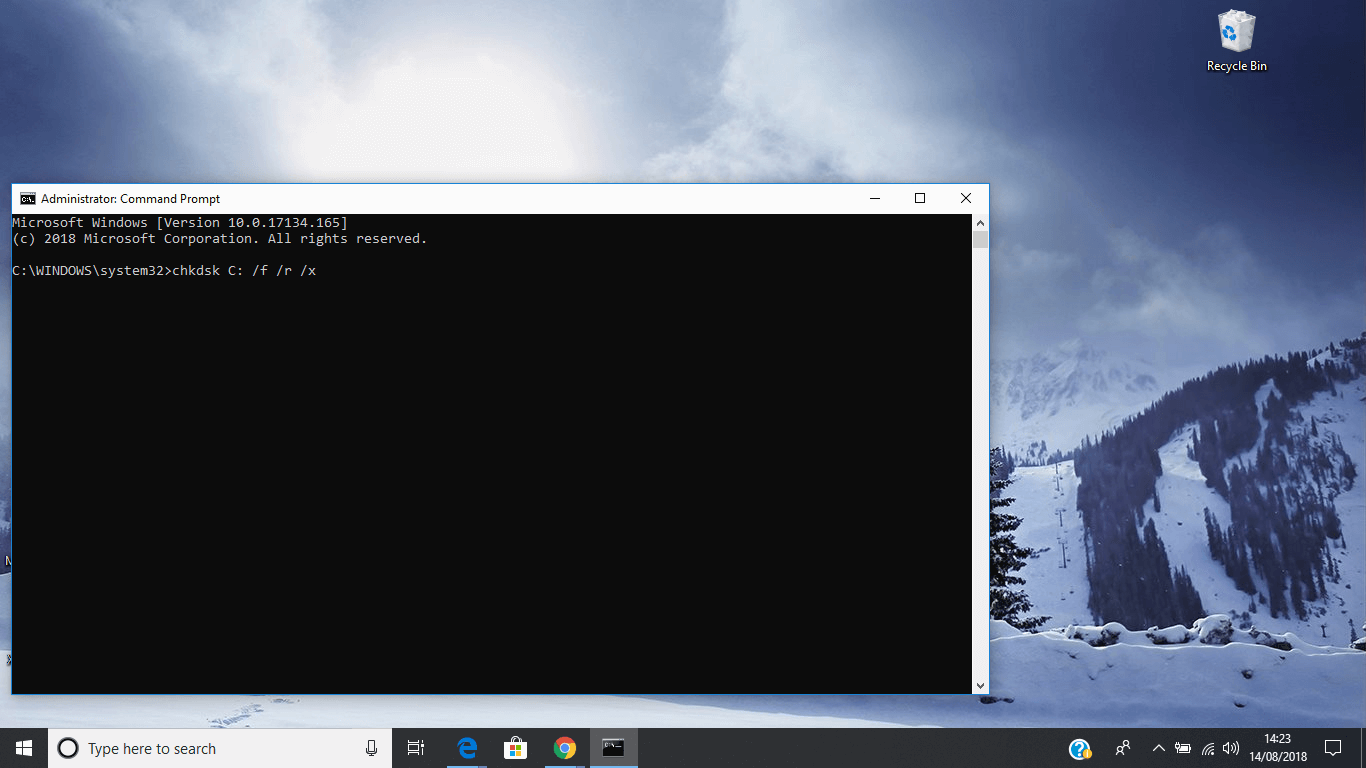
  • When Command Prompt launches, type the command:
    chkdsk C: /f /r /x
    Check Disk command in Command Prompt

chkdsk /f C: When you use this command, Check Disk performs an analysis of the disk and then repairs any errors it finds, provided that the disk isn’t in use. If the disk is in use, Check Disk displays a prompt that asks whether you want to schedule the disk to be checked the next time you restart the system.

chkdsk /r C: When you use this option, Check Disk will locate bad sectors and proceed to recovery any readable information.

chkdsk /x C: When using this command parameter, Check Disk will force the dismount of the volume you’re about to work on before the utility begins the scan.

Fix CHKDSK issues in Windows 10

The Check Disk Utility or Chkdsk.exe is used for detecting and fixing errors in your hard disk and the file system. But it also can cause some problems. As users reported, here are some of the errors that occurred and the solutions to help you fix them:

Fix error 0x802A0002: Shutdown was already called on this object


What to do if you get error 0x802A0002 in Windows 10?

  1. Use SFC scan
  2. Use Hardware and Devices troubleshooter
  3. Update device driver
  4. Reinstall driver
  5. Run System Restore
  6. Run Windows Updates
  7. Replace the affected Device

Did you get the error 0x802A0002: Shutdown was already called on this object or the object that owns it? Do not worry, we will show you how to fix this problem.

Many Windows users encounter this prompt when a hardware devices such as mice, keyboard, USB, thumb drives, mobile devices, etc are connected to the system.

The error prompt is followed by a foreclosure from ‘Device Manager’ which indicates that the hardware has issue. However, the problem can be traced to either the hardware or the hardware driver.

If you are looking for the best solutions for solving the ‘shutdown was already called on this object or the object that owns it’ crisis; we’ve listed the best workarounds available for you:

SOLVED: Shutdown was already called on this object

Solution 1: Use SFC Scan

Malware or virus infection may overwrite the hardware driver thereby resulting in the error problem. Meanwhile, SFC checks for and repair corrupt system file violations; this is also applicable in solving the ‘shutdown was already called on this object or the object that owns it’ issue.

Here’s how to run SFC scan in lower Windows 10 OS:

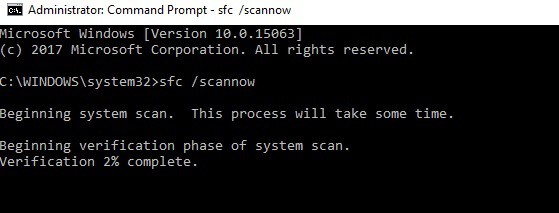
  • Go to Start > Type ‘command prompt’ > Click on ‘Command Prompt run as adminstrator’
  • In the command line type sfc /scannow.skype error 0xc00007b
  • Wait for the process to be completed.
  • Afterwards, close the Command Prompt

Alternatively, you can use proactive tools such as CCleaner or other PC cleaning tools to repair corrupt system files in Windows registry.

If after trying this method, you’re still experiencing the ‘shutdown was already called on this object or the object that owns it’ prompt, you might want to proceed to the next method.

Solution 2: Use the Hardware and Devices troubleshooter

Another simple way of resolving this error is to run Hardware and Devices troubleshooter. This troubleshooter checks for potential issues and fixes them. Also, it enables new hardware devices installation with ease.

Here’s how to run the troubleshooter:

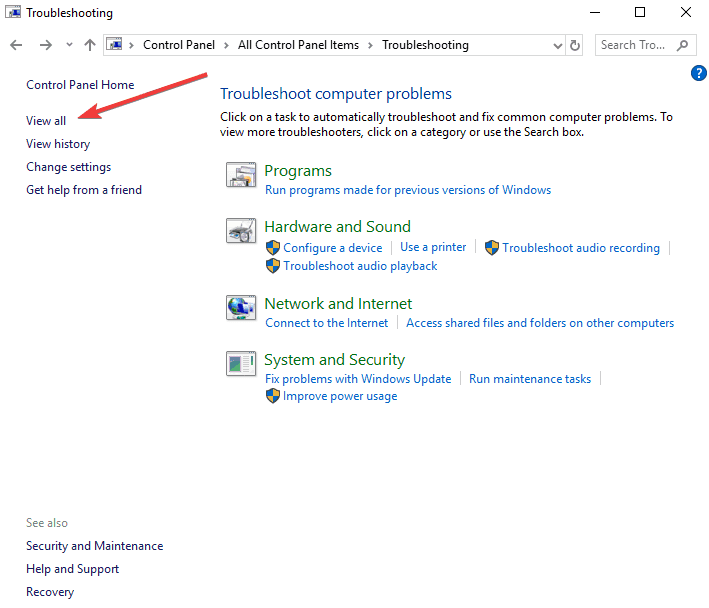
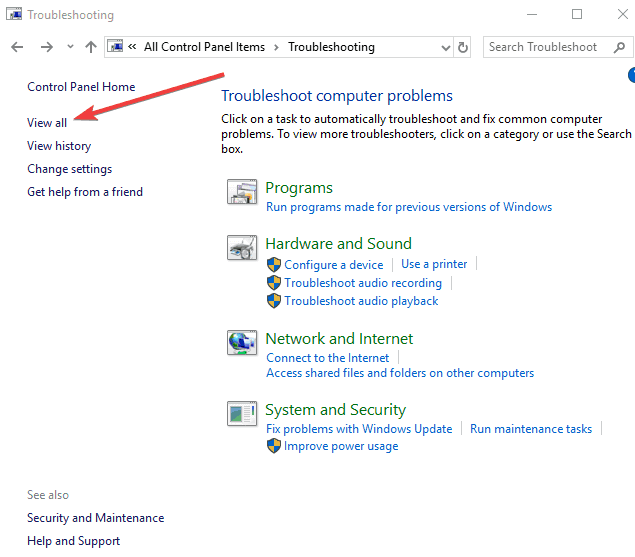
  • Go to Start > Select Control Panel.
  • Now, go to “View by” option at the top right corner, click the drop-down arrows, and then select “Large icons”.
  • Click Troubleshooting > Click on the View all option at the left pane.view all - troubleshooting
  • Click on “Hardware and Devices”.hardware devices troubleshooter windows 10
  • Follow the prompts to run the troubleshooter.

If the ‘shutdown was already called on this object or the object that owns it’ hardware problem still persists, proceed to the next method.

Solution 3: Update the device driver

Obsolete or old device drivers may cause error 0x802A0002. Therefore, you should update the device driver.

Follow the steps below to update the driver:

  • Go to Start > Type “Device Manager” and hit “Enter” key.
  • Click on the category of the affected device (such as USB, mice, keyboards, etc) to expand it.
  • Right-click on the affected driver and click on “Update Driver Software”.
  • Follow the prompts to update the device driver.

Alternatively, you can use a third-party tool (approved and tested by our team) to automatically update the outdated hardware drivers (and any other drivers) on your PC.

⇒ Get Fortect Driver Updater

Solution 4: Reinstall the driver

Reinstalling the hardware can also fix the ‘error 0x802A0002: ‘shutdown was already called on this object or the object that owns it’ problem.

Here’s how to do this:

  • Right-Click on Start > Select “Control Panel”
  • Double-click System > Click on the Hardware tab, and then select Device Manager.
  • Click on the category of the affected device (such as mice, keyboards, USB, etc) to expand it.
  • Right-click on the affected driver > Click “Uninstall”, and then follow the prompts.
  • Restart your PC. Windows automatically detects the change in your hardware.
  • Download and install the hardware’s driver from the official manufacturer’s website or Microsoft’s driver download center.

— READ ALSO: FIX: Windows cannot connect to all network drivers

Solution 5: Run System Restore

Sometimes, this problem takes place as a result of recent program installation. System restore is a feature that reverts your system back to a certain restore point, probably before the recent program installation.

Here’s how to run system restore on your Windows 10 PC:

  1. Press down the power button until the Automatic Repair message appears.
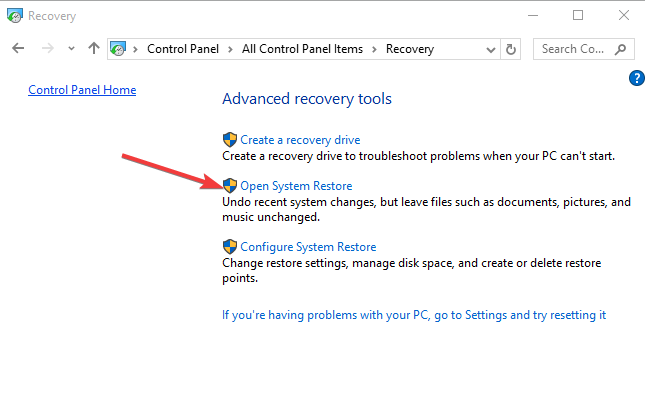
  2. Go to Troubleshoot > Advanced options > System Restore.
  3. Now, select your username and enter your password.
  4. Click on Next, select the desired restore point and follow the instructions on the screen to restore your PC.
  5. After your PC is restored, check if the problem still appears.

If you are have not created a restore point earlier or maybe ‘system restore’ did not resolve the issue, then you might need to proceed to the next solution.

Solution 6: Run Windows Updates

Windows Updates reportedly fixed error 0x802A0002: Shutdown was already called. This is because the missing or outdated hardware drivers are automatically installed. Therefore, you can try running Windows update to resolve the issue.

Here’s how to run Windows update:

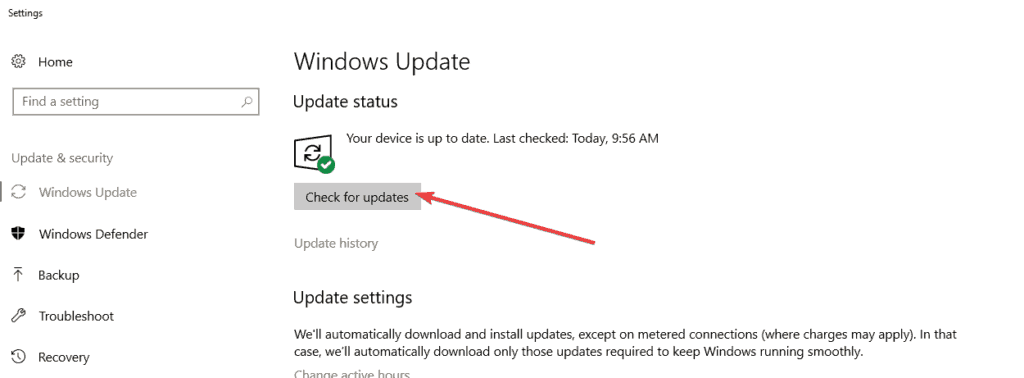
  • Go to Start>type “update” in the search box and then click on “Windows Update” to proceed.
  • In the Windows Update window, check for updates and install the available updates.skype error 0xc00007b
  • After the update is complete, restart your Windows PC.

Solution 7: Replace the affected Device

Some external hardware devices cannot be easily fixed due to technical deficiency and their micro state. For instance, a faulty USB drive cannot be easily repaired by some computer technicians.

Replacing the affected device is an ultimate solution; this is because the new hardware is installed afresh after connection. Also, the affected device may have micro-issues which may not be easily fixed.

If the hardware device in question does not have a warranty for replacement, you can purchase a new one from Amazon, or from your local computer store.

These solutions should fix ‘Error 0x802A0002: shutdown was already called on this object or the object that owns it’.

Do you have in mind any workarounds which we did not mention in this post? In case you have any questions or suggestions, the comments section is below.

RELATED STORIES TO CHECK OUT:

How to Get Touch Internet Explorer in Windows 10

Unfortunately, in Windows 10 technical preview builds, the touch Internet Explorer is not installed. But you don’t have to worry because there are a couple of methods that you can use to fix this. In this guide, we’ll show you exactly what you need to do in order to get back your touch Internet Explorer in Windows 10 operating system.
Bring back touch internet explorer in Windows 10
So if you want to use your Windows 10 operating system with a touch screen device, you only need to use the methods posted below. If you follow the instructions in the order they are lists, you should be able to install the touch Internet Explorer for Windows 10 in no time.

How to enable touch Internet Explorer in Windows 10

Solution 1 – Run this script

  1. Go to your desktop in the Windows 10 operating system.
  2. Right click or hold tap on an open space on your desktop.
  3. Left click or tap on the “New” feature in the menu that appears.
  4. Left click or tap on the “Text Document” option from the “New” menu.
    Note: you can also open a notepad document by going on the “Start” menu and typing “notepad”. Left click or tap on the “Notepad” icon that shows up.
  5. Now name this document “touch internet explorer” .
  6. Press the “Enter” button on the keyboard.
  7. Open this notepad document and copy paste the following lines posted below.

    “$code = @"
    using System;
    using System.Runtime.CompilerServices;
    using System.Runtime.InteropServices;
    namespace Win8 {
    [ComImport, Guid("2e941141-7f97-4756-ba1d-9decde894a3d"), InterfaceType(ComInterfaceType.InterfaceIsIUnknown)]
    interface IApplicationActivationManager
    {
    IntPtr ActivateApplication([In] String appUserModelId, [In] String arguments, [In] UInt32 options, [Out] out UInt32 processId);
    }
    [ComImport, Guid("45BA127D-10A8-46EA-8AB7-56EA9078943C")]//Application Activation Manager
    public class ApplicationActivationManager : IApplicationActivationManager
    {
    [MethodImpl(MethodImplOptions.InternalCall, MethodCodeType = MethodCodeType.Runtime)/*, PreserveSig*/]
    public extern IntPtr ActivateApplication([In] String appUserModelId, [In] String arguments, [In] UInt32 options, [Out] out UInt32 processId);
    }
    }
    "@
    add-type -TypeDefinition $code
    $appman = new-object Win8.ApplicationActivationManager
    $appman.ActivateApplication("DefaultBrowser_NOPUBLISHERID!Microsoft.InternetExplorer.Default",$null,0,[ref]0)]
  8. Left click or tap on the “File” menu situated in the upper left side of the notepad window.
  9. Left click or tap on the “Save menu item” or “Save As..” feature.
  10. Save this file as “modern ie.ps1” with the quotes included in the name.
  11. Now you will need to close this notepad file.
  12. Go on your Windows 10 desktop and right click on it or hold tap.
  13. Left click or tap on the “Run with Powershell” feature.
  14. This will immediately open your touch internet explorer.
    Note: You must have the internet explorer set as your default browser.
    Note2: If this does not start your touch internet explorer reboot your Windows 10 operating system and run again the modern ie.ps1 file you made on your desktop.

Solution 2 – Download ModernIE

  1. Left click or tap on the link posted below.
  2. After the file is saved to your Windows 10 operating system, double click on it to open.
  3. Extract the contents of the archive on your desktop.
  4. Double click or tap on the ModernIE.exe file in order to open the application.

Fix touch screen issues in Internet Explorer

If you followed the instructions listed above yet touch screen is not working in Internet Explorerdownload the troubleshooter, you can run the Modern UI App troubleshooter. You can from Microsoft’s official webpage. Once downloaded, double-click on the .exe file to install and run the tool.

Another quick solution is to run IE in no add-ons mode. Open the browser > go to Tools > Internet Options > Programs >Manage add-ons > disable the add-ons > restart the browser.

This is all you need to do in order to bring back your touch Internet Explorer on your Windows 10 operating system. If you did not manage to start the touch Internet Explorer, let us know in the comments below and we will help you further to solve this issue.

RELATED STORIES TO CHECK OUT:


Delete Files From Guest Account on Windows 10 [How to]

Do you want to delete files from the guest account in Windows 10? You will be pleased to know that there is a very simple solution to this situation.

We already wrote about how to enable a guest account on Windows 10, but once you’re done with it, you might want to delete its files. This guide will surely help you accomplish that.

Can a guest account access my files?

  • A guest account is severely limited, and it can’t access the files of other user accounts.
  • It can only create files on the Desktop and on its user folder.

How do I delete Guest account files on Windows 10?

Delete them from the Users folder

  1. Make sure you’re logged in as an administrator.
  2. Open File Explorer and go to your C drive.
  3. Next, go to the Users folder to open it.
  4. Navigate to the user account whose data you wish to remove.
  5. Select all files and folders, except App Data. Right-click them and choose Delete.
  6. Confirm that you want to remove the file.

If you mistakenly deleted certain files and want to restore them, you can go to Recycle Bin and check if they’re still there. For more information, you can check out our guide on how to recover deleted files from Recycle Bin.

Simple, isn’t it? Now you have a quick method on how to delete all these files for good on your PC.

We also have a great guide on how to recover the Guest account in case you encounter any issues, so you might want to check it out.

If you run into any issues along the way while following this tutorial let us know in the comments below and we will help you further as soon as possible.

How to Enable the New Tray Clock UI on Windows 10

Well after Microsoft has released the Windows 10 Technical Preview build 9926 it also implemented some nice to have features in the system and one of those features is the new tray clock user interface but by default this feature is not enabled so you will have to follow the tutorial below and bring your new tray clock user interface to the surface in your Windows 10 Technical Preview.
How to enable the new tray clock UI on Windows 10 build 9926
Also if you follow the lines below you will have to make some changes to the registry keys available in Windows 10 so be very careful and follow the instructions to the letter because if you change something else in the Registry Editor by mistake it could damage your Windows 10 Technical Preview operating system to a point where you might have to reinstall it.

Enable the new tray clock user interface in Windows 10 build 9926: how to do it?

  1. Move the mouse cursor over to the lower left side of the screen where the start button is situated.
  2. Right-click or hold tap on the start button.
  3. From the menu that pops up, you will have to left click or tap on the “Run” feature.
    Note: Another way to bring up the “Run” window is by pressing and holding the “Windows” button and the “R” button.
  4. In the run dialog box, you will have to write the following: “regedit” without the quotes.
  5. Press the “OK” button on the run window or just hit the “Enter” button on the keyboard.
  6. Now you should have in front of you the “Registry Editor” window.
  7. On the left side in the “Registry Editor” window you will have to look for a folder called “HKEY_LOCAL_MACHINE”.
  8. Left click or tap on “HKEY_LOCAL_MACHINE” to expand it.
  9. In the “HKEY_LOCAL_MACHINE” folder find and left click on the “Software” folder to expand it.
  10. In the “Software” folder left-click or tap on the “Microsoft” folder.
  11. In the “Microsoft” folder left-click or tap on the “Windows” folder.
  12. In the “Windows” folder left-click or tap on the “CurrentVersion” folder.
  13. In the “CurrentVersion” folder left-click or tap on the “ImmersiveShell” folder.
  14. On the left side, you will have to create a DWORD.
  15. Right click on an open space on the right side window in the Registry Editor screen.
  16. Left click or tap on the “New” button.
  17. Left click or tap on the “DWORD (32-bit) value”
  18. Now name the DWORD that you created “UseWin32TrayClockExperience” or just copy paste it from here.
  19. After you created the DWORD close the Registry Editor Window.
  20. Reboot your Windows 10 Technical Preview system.
  21. After your device starts, check to see if you got the new tray clock user interface available for you in Windows 10 Technical Preview.

Windows 10 clock useful tips

The Clock feature in Windows 10 has received many updates and has been improved through the years. These updates occurred after the Clock feature started having problems. One of the most common issues was Clock displaying the wrong time. After this issue received a fix, the clock was updated with vibrate and custom alert functions. Finally, for those who schedule their agenda from their Windows 10 PC, the Clock now integrates with Calendar.

That’s it folks, a quick and easy way on how to enable the new tray clock UI in Windows 10 Technical Preview but if you have any other questions related to this article please write us in the comments section of the page below and we will get back to you in the shortest time possible.

READ ALSO: This Smartphone Runs on Both Windows 10 and Android 5.0 Lollipop

FIX: Dual Boot issues due to Fast Boot on Windows PCs

Do you have issues with the Fast boot feature in Windows 10, Windows 8.1? Some Windows 10, 8.1 users who also use another operating system, like Linux for example, can’t mount all the files or folders in the “C:” drive and neither on the other drives they may have when they shutdown Windows 10, Windows 8.1 using the Fast boot feature and they log in to Linux. Seeing that this issue started to be a bit frustrating, we have decided to explain to you in the lines below what you can do to fix your Fast boot feature in Windows 10, 8.1 and use your Linux operating system normally.
Fix Fast boot leaves drives in unsafe state, unable to dual boot normally (Windows 8.1)
In order for you to access the drives you have on your device normally from the Linux operating system, you’ll use a certain command in the system to fully shutdown the Windows 10, 8.1 OS. You’ll also check your system for errors in the Windows Registry to make sure there are no issues affecting it.

Fix dual boot problems on Windows 10

  1. Shutdown Windows 10 using Command Prompt
  2. Check drive for errors
  3. Use dual-boot repair tools
  4. Disable Fast Startup

Solution 1 – Shutdown Windows 10 using Command Prompt

  1. First, we’ll try to shutdown the operating system by moving the mouse cursor over to the upper right side of the screen.
  2. From the menu that appears, left click or tap on the “Search” feature.
  3. In the search dialog box, write the following: “Command Prompt” without the quotes.
  4. After the search has finished, you will need to right click or hold tap on the “Command Prompt” icon.
  5. From the sub-menu that appears left click or tap on the “Run as Administrator” feature.
  6. If you are prompt by a user account control window, you will need to write your administrator account and password in the specified boxes.
  7. You should now have the black screen window in front of you (Command Prompt).
  8. In the command prompt window write the following command : “shutdown.exe /s /t 0” without the quotes.
  9. Now press the Enter button on the keyboard.
  10. The Windows 8.1 , Windows 10 device should power off now.
  11. When the device starts, you will need to log in to your Linux or other operating system you are using and see if you still have the same issues.

Solution 2 – Check drive for errors

  1. Move the mouse cursor over to the upper right side of the screen.
  2. From the menu that pops up, you will need to left click or tap on the Search feature.
  3. In the search dialog box, write the following: “File Explorer” without the quotes.
  4. After the search has finished, left click or tap on the “File Explorer” icon.
  5. Now, for your partitions that you have issues with, you will need to right click or hold tap on them.
  6. From the menu that appears, left click or tap on the “Properties” option.
  7. In the upper side of the Properties window, search for and left click on the “Tools” tab.
  8. Search for the topic that says “Error Checking”check computer drive for errors
  9. Under the topic above, left click or tap on the “Check now” button.
  10. Follow the instructions on the screen to finish the error checking process.
  11. After the process has finished, reboot your operating system.
  12. Check again if your dual boot feature works correctly.

Solution 3 – Use dual-boot repair tools

If the problem persists, you can run a dedicated dual-boot repair software. For example, you can use Ubuntu’s Boot Repair tool.  This boot troubleshooter fixes frequent boot problems with a simple click. Basically, it reinstalls GRUB restoring access to the problematic OS. The tool also features additional repair features that allow you to fix and back up boot sectors, repair broken file systems, and more.

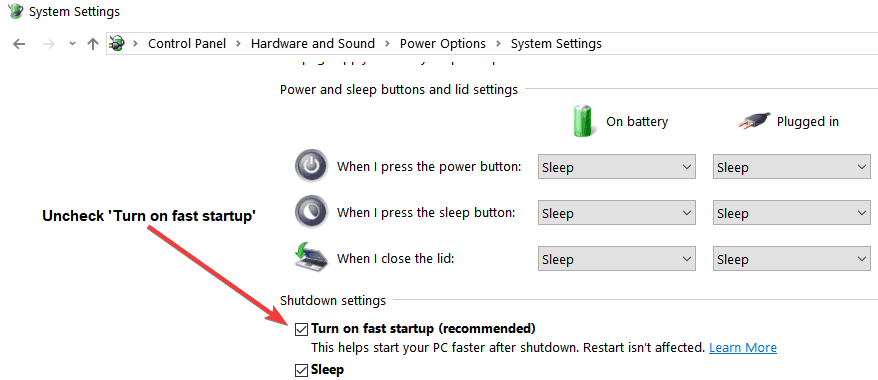
Solution 4 – Disable Fast Startup

To avoid similar issues in the future, you can simply disable Fast Boot. Go to Control Panel > Power Options > Choose what the power buttons do. Now, scroll down to Shutdown settings > uncheck the ‘Turn on fast startup’ option.

turn off fast startup windows 10

Note: Sometimes, when you shutdown your device and power it up again using other operating systems like Linux, it will not boot correctly. In this case, you need to use the Reboot option instead of the Shutdown option.
Now that you have followed the steps listed below, you can see how easy it is to dual boot your Linux operating system using the Windows 8.1, Windows 10 Fast boot feature.

If you do run into issues along the way while following this tutorial, let us know in the comments section below. We will help you further as soon as possible.

RELATED GUIDES TO CHECK OUT:


MS-People App Download: How to Install it

You might be wondering why you cannot use the People app in Windows 10. The answer is simple: Microsoft has disabled this application. But if you still want to download the MS-People app in Windows 10, there’s a way!

Keep in mind that the Microsoft People app is by far a stable application. But you might be required to tweak some settings or appropriately configure the PC. Keep reading to find out how to download the People app on Windows.

How do I install Microsoft People?

1. Manually enable the People App

Tip icon Tip
A few users reported that the contacts.txt file was not found. If that’s the case, head directly to the next solution to download Microsoft People.
  1. Press Windows + E to open File Explorer, and tick the checkbox for Hidden items in the View tab.show hidden items file explorer
  2. Now, double-click the C: partition, and open the Users folder.
  3. Open the folder dedicated to your profile, and select the AppData folder.
  4. Double-click the Local folder.appdata local folder
  5. Search the Packages folder, and then open the Microsoft.People_8wekyb3d8bbwe folder.
  6. Head to the LocalState folder and double-click the contacts.txt file.
  7. In this folder, remove everything except the first line and the last line. It should look something like this:
    "False|24,5,5|24,8,8|24,9,9
    END_OF_FILE"
  8. Press Ctrl + S to save the file, and restart the computer.
  9. After the device starts, open the People app and see how it goes.

You can enable the MS-People app by making a few quick modifications to the contact.txt file. If this sounds too complex, head to the next method.

2. Download the People App

If you want to get the app running quickly, simply download MS: People app from the Microsoft Store. 

download microsoft people app

Click on the Get the app button and follow the on-screen instructions to complete the installation process.

There you go! By following the instructions above, you can download and enable the MS-People app on Windows 10.

Before you leave, find out the best Windows apps to download today!

If you are stuck or encounter any issues while following any of the steps listed in this tutorial, please let us know in the comments section below. We will help you further as soon as possible.

Microsoft Teams expands data residency to Canada, Australia and Japan coming soon

Microsoft announced last week that it now provides data residency for Microsoft Teams in Canada, using two of its data centers in Quebec City and Toronto. Since August 10, 2018, all new users of Microsoft Teams in Canada will now automatically have data stored in the country. For existing users, the company will provide a migration feature next year.

“Teams data residency in Canada, as well as our other Office 365 data residency commitments in the datacenter geo in Canada, help regulated organizations, like in education, banking, public sector, government, and healthcare, onboard to Teams and Office 365 while complying with their data residency requirements,” wrote Varun Sagar, Product Manager, Microsoft Teams.

Microsoft already provides data residency for Teams in six Office 365 geos: Asia Pacific, EMEA (Europe, Middle East and Asia), North and South Americas, the UK, India and now Canada. The company is planning to expand data residency to more Office 365 geos, including two before the end of the month (Australia and Japan) and more next year including South Korea and France. You can check where your Office 365 customer data is located in the Office 365 Admin Portal under Home\Organizational Profile.

Google’s rumored “Campfire” alt-OS mode could bring Windows 10 to Chromebooks

Google might be making fun of Windows in its latest Chromebook ads, but the company also could be playing nice with Microsoft’s OS sometime in the future. Noted by XDA-Developers, Google is working on a rumored “Campfire” alt-OS mode which could end up letting users dual boot Windows 10 on Chromebooks (via The Verge)

An alt-OS mode for Chromebook is not necessarily really new, as Google was already apparently using Microsoft’s coding tools to try and get Windows 10 certification for Pixelbooks. Anyway, XDA now notes that Google’s “Campfire” is the code name for a feature equal to Apple’s Boot Camp on macOS. It would let users run Windows 10 on Chromebooks, and there are even multiple variants under development for the various Chromebook devices on the market.

XDA-Developers also mentions that dual-booting with Windows 10 on Chromebooks will be seamless, not requiring a user to enable developer mode. Unfortunately, some source code suggests that the minimum space for Windows on Chromebooks will be 40GB, so some older Chromebooks might not be able to run Windows 10.

This is not much more than a rumor for now, but it sheds some new light on the divide between ChromeOS and Windows 10. It is unclear when Google will take the wraps off this feature, or which Chromebooks will support it, but the actually has a hardware event in a few weeks. More might develop then, but for now, it’s best to keep tuned for more.

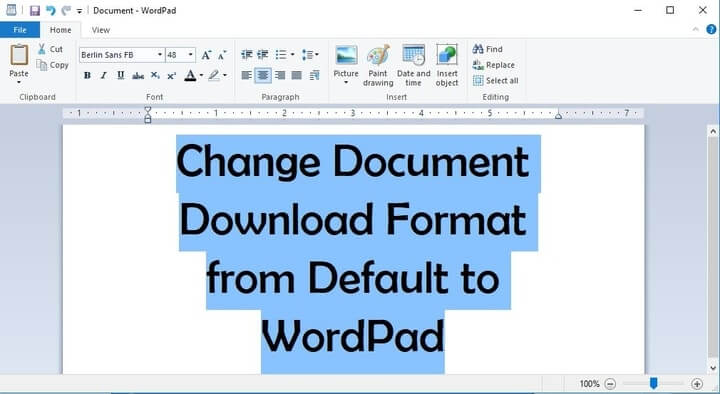
Change document default format to WordPad in Windows 10/11


Choose WordPad as the default program to open downloaded documents with

  1. From PC settings
  2. From the file’s right-click menu

When you download a specific file type usually Windows 10,  8.1, as well as other versions of Windows operating systems, will open them with the default application you have set in the system but you can find out how to change the downloaded document format from a default state to any application you want including WordPad just in a few minutes by following the lines below.
Find out how to change document download from defaulting to WordPad format in Windows 8.1
You will learn in this article not only how to change a default app in Windows to open a document in WordPad but for other types of files as well like: songs, movies or photos. As a heads up on this tutorial is the fact that the changes you make to your default documents opening after you download them will only remain in the account of Windows 8.1 you are using. So if you log in with another user account these settings will not apply to it.

How to choose WordPad to open your downloaded documents in Windows 10?

1. From PC settings

  1. Move the mouse cursor over to the upper right side of the screen.
  2. You should now have a menu in front of you.
  3. Left click or tap on the “Settings” feature you have in that menu.
  4. Left click or tap on the “Change PC settings” feature.
  5. In the “Change PC settings” feature left-click or tap on the “Search and apps” feature.
  6. Left click or tap on the “Defaults” button.
  7. Left click or tap on the “Choose default apps by file type”.
  8. Left click or tap on the application you currently use as default.
    Note: If you do not have an application by default you have to left-click or tap on the “Choose a default” feature.
  9. Now you only have to select another default application you wish to open your text, photos, movies or music extensions with. In this case, you can select the “WordPad” app for all your text documents therefore when you download and open a document it will automatically go to your WordPad.
    Note: You need to have the apps installed on your Windows 8.1 computer in order to set them as defaults.

2. From the file’s right-click menu

This is anothner great old solution that you can try. It does not work for sophisticated file types, but for the most usual (audio, video, text, etc..) – works fine for me since I started using Windows. Here’s how you do:

  1. Open the folder where your file is located
  2. Right-click on the file
  3. From the menu appeared, select ‘Open with’ option (if it does not have this option – retry the solution above)
  4. Click on ‘Choose another app’
  5. from the list, choose WordPad
  6. Do not forget to check ‘always using WordPad to open .XYZ files ‘

This is all you have to do in order to set your WordPad application as default in your Windows 8.1 operating system. If you have any issues along the way in this article you can write us a couple of rows below in the comments section of the page and we will help you further with this subject.

READ ALSO: Family Guy: The Quest for Stuff Game for Windows Lets You Rebuild the City of Quahog

How to Reinstall Windows 10


How do I reinstall Windows 10 on my laptop or PC?

  1. Uninstall the previous OS version
  2. Install Windows 10
  3. Possible Windows 10 installation issues and their fixes

If you want to find out how to reinstall Windows 10 Technical Preview on your operating system then you only need to follow the instructions posted below and you will be done in just a few minutes of your time.

The reason as to why you would want to reinstall can be several but most users usually encounter registry errors in the usage of the operating system and the only way to completely fix it is by completely reinstalling the operating system.
How to reinstall Windows 10
Doing the steps below are as easy as they can get but you will have to follow them to the letter and be sure not to skip any one of them as it may take you a bit more time redoing them all over again.

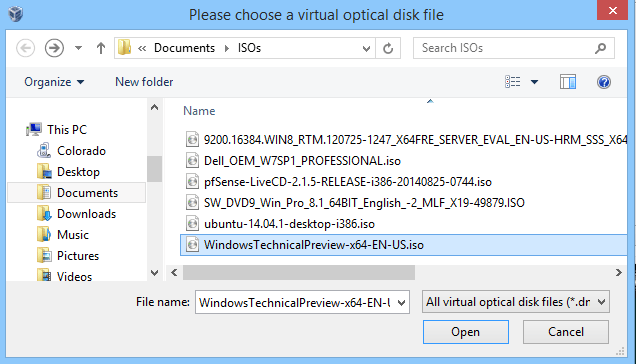
In order to do this tutorial, you only need the Windows 10 Technical Preview ISO file and an 8GB USB stick but I am sure you have it if you installed it before on your operating system.


Encountering Windows 10 cannot be installed to the disk error? Check this detailed guide to solve the issue in no time!


How to reinstall Windows 10 ton a PC or laptop?

First of all, we will be uninstalling the operating system:

  1. Start the device in the latest Windows 10 Technical Preview build.
  2. You will get to a “Choose an operating system” window.
  3. Left click or tap on the “Windows Rollback” feature you get in the window mentioned above.
  4. Now after you selected the Windows Rollback feature it will take you to a black window that says “Restoring your previous version of Windows”.
    Note: This process will only take a few minutes and after it is done you will get back the previous version of Windows you used.
    Note2: If you are using a virtual application to run your Windows 10 Technical Preview it should not affect your other version of Windows you are using but the steps are the same if you want to uninstall it from there.

Now we will install the Windows 10 Technical Preview:

  1. Left click or tap on the link posted below to get you started with the Windows Insider program.
  2. Left click here to download Windows 10 Technical Preview ISO
  3. Now in the website, you accessed above you will need to left click or tap on the “Get Started” button and follow the instructions in order to download the Windows 10 Technical Preview ISO.
  4. Now after you have finished downloading the ISO version of Windows you will need to make a bootable USB with it.
  5. Place the USB stick inside the Windows device.
    Note: The USB stick should have at least 8 GB of memory.
  6. Go to the location where the USB stick is and right click or hold tap on it.
  7. From the menu that appears we will need to left click or tap on the “Format…” feature.
  8. Under the “File System” topic select from the drop-down menu the “NTFS” feature.
  9. Check the box next to “Quick Format”.
  10. Left click or tap on the “Start” button to proceed with the formatting.
  11. Now you will be prompt with a message saying that it will format the USB stick and you will need to left click or tap on the “OK” button.
  12. Go on the Windows store and download the application: “Windows 7 USB/DVD DOWNLOAD TOOL” and don’t worry because this is a free application.
  13. After you downloaded and installed the “Windows 7 USB/DVD DOWNLOAD TOOL” application you will need to open it by running the executable file.
  14. Now in the first screen of the application above you need to left click or tap on the “Browse” button.
  15. Now browse to the location where you downloaded the Windows 10 Technical Preview ISO file and select it.
  16. After you selected the ISO file you need to left click or tap on the “Next” button to proceed.
  17. Next, you will get to a “Choose media type” screen and you will need to left click or tap on the “USB device” button.
  18. The next screen will tell you to select the USB device that you formatted earlier from the drop-down menu.
  19. After you selected it left click or tap on the “Begin copying” button.
  20. Wait for a couple of minutes for the process to finish.
  21. After the process has finished you will have a good to go bootable USB stick ready.
  22. Now with the USB stick plugged in you will need to reboot your operating system.
  23. After the device starts it will automatically get you to a “Windows Setup” window.
  24. Left click or tap on the “Next” button to proceed.
  25. In the next screen left-click or tap on the “Install Now” button situated in the middle of the screen.
  26. In the “Which type of installation you want?” screen left-click or tap on the “Custom: Install Windows only (Advanced)”
  27. Now in the “Where do you want to install Windows?” screen, you can choose the same directory as you used before or create a separate partition for this Windows only.
  28. Left click or tap on the “Next” button to proceed with the installation.
    Note: The process will take up to half an hour depending on the device you have.
  29. Your device will reboot after the installation process has finished.
  30. You should now have the “Settings” screen in front of you.
  31. Left click or tap on the “Use Express Settings” button situated in the lower side of the window.
  32. After the process above you will get to a “Sign in to your Microsoft account” screen in which you will need to write your Microsoft information.
  33. Left click or tap on the “Next” button after you are done in this window.
  34. Next, you will get to a “How should we set up your PC?” window.
  35. Left click or tap to select the “Set this up as a new PC instead” option.
  36. Next screen will be “OneDrive is our cloud storage” in which you need to left click or tap on the “Next” button.
  37. Wait a couple of minutes more for your apps to get installed properly.
  38. And voila, you are in your Windows 10 Technical Preview once more.

Which is the latest version of Windows 10? Find out from our constantly updated article!


Possible Windows 10 installation issues

Even if Windows 10 is a well-designed OS, there might be some problems with its installation. Several problems may occur, from the disk you are trying to install Windows to your laptop model.

We have decided to gather the most useful articles for this purpose so you can have a solid backup in case something goes wrong. Here they are:

  1. What to do if you can’t install Windows 10 on SSD
  2. Windows 10 simply won’t install (Fix)
  3. Windows 10 can’t be installed on GPT partition
  4. Fix: Windows 10 cannot be installed to this disk
  5. Windows 10 won’t install on Alienware laptops

So if you have a USB stick and an ISO file I don’t think you will have any issues following the steps above and get your Windows 10 Technical Preview reinstalled on your device.

Also if you have any questions regarding this subject please write us in the comments section of the page below and I will help you as soon as possible.

READ ALSO: Cyberlink Updates PowerDirector App for Windows Devices, [Free Download]

How to Make ISO Installs for Windows 10 Builds

You will find out in this article how exactly you can make an ISO install files for your new Windows 10 Technical Preview version and it will only take you a few minutes of your time. So go right ahead and read the tutorial below for a detailed explanation.
How to make free ISO install files for Windows 10 builds
You will also need to have a removable USB stick or a CD/DVD in order to properly copy the downloaded ISO file to it thus making it ready for the Windows 10 Technical Preview build you want to install. Also, you will need to carefully download the correct ISO file for Windows 10 Technical Preview depending on the country you are from because it comes in different languages as well as for a version for Windows (x64) and a Windows (x86).

How to create ISO install in Windows 10 Technical Preview?

  1. Left click or tap on the link posted below.
  2. Click here to sign up for the Windows insider program
  3. Go to the bottom of the page and left click or tap on the “Get Started” button or “Sign In” if you are already registered.
  4. Left click or tap on the link posted below to download the latest Windows 10 Technical Preview ISO file.
  5. Click here to download Windows 10 ISO
  6. Scroll down on the page above and look for the language and type of Windows operating system you need.
  7. Left click or tap on the Language you want the operating system to be.
  8. Left click or tap on the “Download” button afterward.
  9. Left click or tap on the “Save File” feature you get on the pop-up message.
  10. Save it to your Windows operating system.
  11. Insert a boot USB stick or a CD/DVD in the device.
    Note: It needs to be a boot CD, DVD or USB stick so basically be sure not to have any important data on it.
  12. Now we will need to right click or hold tap on the USB partition in Windows.
  13. Left click or tap on the “Format” button you get from the menu that appears and follow the instructions on the screen to do a quick format on the USB stick.
  14. Now copy the Windows 10 Technical Preview ISO file on to the USB stick.
  15. Double click to open the “Setup.exe” file within the ISO extension.
  16. Follow the instructions on the screen to finish the process and get your USB stick up and running with the new build of Windows 10 Technical Preview.
  17. Now that you made a free ISO install for Windows 10 Technical Preview latest build you can go ahead and install it on any operating system you wish.

Windows 10 ISO installs useful tips

If you have a specific Windows 10 build, and you are not sure how to make it ISO, we have a great guide which will help you to create an ISO file out of any Windows 10 build. IN case you already started installing Windows 10 from an ISO file but you encounter issues, here’s an article that will help you install any Windows 10 build from an ISO file.

If you want to download and install Windows 10 from official sources, you can find out how to do it here.

Was it hard? I am confident that you can finish the ISO install in just a few minutes if you carefully followed the instructions above in the correct order but if you need further help with this subject write us below in the comments section of the page and I will be more than happy to help you.

READ ALSO: How to install Windows 10 April Update from an ISO file

Lenovo announces powerful and stylish ThinkPad P1 and ThinkPad P72 workstation laptops

Lenovo today announced two new ThinkPad workstation models— the ThinkPad P1 and the ThinkPad P72. These latest additions to the family are built for the ultra-creative type and come with features like 4K IPS panels, powerful Intel Xeon processors, and more. The P1 starts at $1,949 and the P72 at $1799, with availability coming up in August. Here’s what you need to know about these newest models.

First off, with the ThinkPad P1, Lenovo is aiming to bring big style and increased performance to its customers. The device is 35% smaller than in the past and packs a signature, black finish, glass touchpad and seamless keyboard, and premium packaging. On the inside, the ThinkPad P1 is powered by 8th Gen Intel Xeon and Core processors (including support for the Core i9 CPU) and ECC memory support with clock speed up to 4.6GHz.  In addition to a 15-inch, 4K UHD touchscreen display it also packs powerful  NVIDIA Quadro P1000 and P2000 professional graphics cards. Specs are listed below.

  • Processor: 8th Generation Intel Xeon and Core
  • Operating System: Windows 10 Pro for Workstations 1 Windows 10 Pro
  • Graphics: Up to NVIDIA Quadro P2000
  • Camera: IR Camera 2 HD Camera
  • Total Memory Up to 64GB DDR4
  • Memory DIMM Capacity: 2 SoDIMM, 32GB per DIMM
  • Total Storage Up to 4TB NVMe SSD
  • RAID 0,1
  • Battery: 80WHr
  • Power Supply: 135W
  • Security: dTPM 2.0 Kensington Lock Slot Touch Fingerprint Reader
  • Ports: (2) Intel Thunderbolt 3 (Type-C) (2) USB 3.1 Gen 1 (Type A) (1) HDMI 2.0 (1) Mini Gigabit Ethernet (1) Mic/Headphone Combo Jack (1) Smart Card Reader 2
  • WLAN: Intel 9560 802.11 a/c + Bluetooth 5.0
  • Media Card Reader 4-in-1 SD Card Reader
  • Dimensions: (WxDxH) (mm): 361.8 x 245.7 x 18.4 (inches): 14.2” x 9.7” x 0.7”
  • Display: 15.6” Display FHD (1920 x 1080) IPS, 300nits, 72% NTSC color gamut
    4K UHD Touch (3840 x 2160) IPS, 400nits, 100% Adobe color gamut, 10-bit color depth
  • Weight Starting at 3.76lbs (1.7kg)
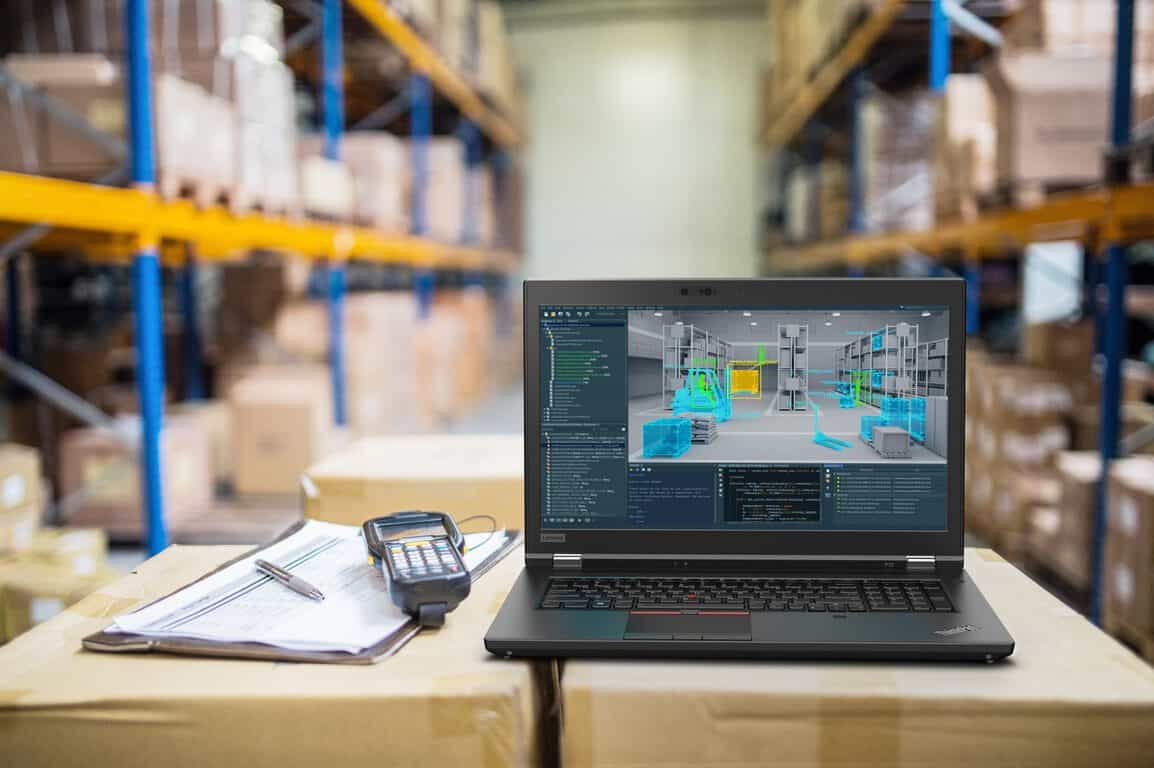
The front of the ThinkPad P1

Additionally, with the ThinkPad P72, Lenovo built a device for those in important industries. The device packs a 17-inch chassis, 8th Gen Intel Xeon, and Core processors, and up to P5200 NVIDIA Quadro graphics. Users will also find support for up to 6TB of storage, 128GB of memory and 16GB of Intel Optane memory. Other specs are listed below.

  • Processor: 8th Generation Intel Xeon and Core
  • Operating System: Windows 10 Pro for Workstations 1 Windows 10 Pro
  • Graphics: Up to NVIDIA Quadro P5200
  • Camera: IR Camera
  • Total Memory Up to 128GB DDR4
  • Memory DIMM Capacity: 4 SoDIMM Slots, 32GB per DIMM
  • Total Storage Up to 6TB
  • RAID 0,1
  • Optane Support Intel Optane 16GB Memory
  • Battery: 99WHr
  • Power Supply: 230W
  • Security: dTPM 2.0 Kensington Lock Slot Touch Fingerprint Reader
  • Ports: (2) Intel Thunderbolt 3 (Type C) (3) USB 3.1 Gen 1 (Type A) (1) HDMI 2.0 (1) Gigabit Ethernet (1) Mini Display Port 1.4 (1) Smart Card Reader 2 (1)
  • Mic/Headphone Combo Jack
  • WLAN: Intel 9560 2×2 802.11 a/c + Bluetooth 5.0
  • Media Card Reader 4-in-1 SD Card Reader
  • Dimensions: (WxDxH) (mm): 416 x 281 x 25.9 (inches): 16.4” x 11.1” x 1” Display 17.3”
  • Display: FHD (1920 x 1080) IPS, 300nits, 72% NTSC color gamut
    4K UHD (3840 x 2160) IPS, 400nits, 100% Adobe color gamut, 10-bit color depth
  • Weight Starting at 7.5lbs (3.4kg)
The ThinkPad P72

All of the models announced today are Mil-Spec tested for 12 methods and 21 procedures. They also come with multiple ISV and Green Certifications and can work with optional accessories like the ThinkVision P32u Monitor, and the ThinkPad Thunderbolt Workstation Dock. Keep an eye out on this Lenovo webpage for more on availability.

PaperPort Unable to Communicate With Scanning Device [Fix]

PaperPort 14 is one of the most popular document imaging and/or management products made by Nuance Communications (formerly ScanSoft). But for some users, PaperPort is unable to communicate with the scanning device.

It is used widely both by individuals and businesses and users of Windows computers who apply it daily for most of their document and photo scanning or imaging tasks.

However, issues with it can be fixed, and below are some solutions you can try to resolve it.

What can I do if PaperPort can’t communicate with the scanning device?

1. Use the PaperPort 14 Scanner connection tool

  1. Download the PaperPort Scanner Connection Tool.
  2. Exit PaperPort 14.
  3. Run the downloaded executable file.
  4. The User Account Control dialog box will be displayed if UAC is on.
  5. Click Yes on UAC.
  6. Click Enable button in the new dialog box.
  7. A successful installation dialog will display.
  8. Click Yes and accept to put a shortcut on the desktop to run easily if you need to use it again.

When you run it now, PaperPort should not anymore be unable to communicate with the scanning device.

2. Confirm that you selected the scanner in PP14

  1. Open PaperPort 14
  2. If using 6.x or 7.x, click File, select Scanner, and select the scanner’s TWAIN driver. If using 8.x or 9.0, click Scan and select your scanner from the drop-down menu
  3. In case you see multiple drivers, select the appropriate one for your scanner
  4. Check if your scanner is recognizable by PaperPort 14 now

3. Check if you can scan into a different app

  1. Visit the manufacturer’s website for your scanner
  2. Download and install the latest drivers for your specific scanner and for your version of Windows OS
  3. Click Start
  4. Select Programs (or Apps)
  5. Select Accessories
  6. Click Imaging
  7. Click File and select Scan New or Acquire Image to launch the scanner’s user interface
  8. Perform a scan. If you can’t scan into Imaging, check with the manufacturer of your scanner for further support to ensure it runs well on Windows

4. Install a newer version of PaperPort 14 on top of your scanner’s version

  1. Open the Control Panel.
  2. Select Uninstall a program to remove the previous PaperPort 14 version from your system.uninstall a program
  3. Uninstall the PaperPort version that came with your scanner.
  4. Reinstall the newer version on top of the previous one.
  5. Try and see if your scanner is recognizable and works.

Your scanner came with a specific version of PaperPort 14, so if you’re upgrading from a previous version, install it, then install the newer version of PaperPort on top of the previous version.

5. Run initwain

  1. Click Start.
  2. Select Find.
  3. Click Files or Folders.
  4. Search for initwain.exe on the drive that PaperPort 14 is installed to.
  5. Double-click on the file you find.
  6. A dialog box will display showing PaperPort 14 has been reinitialized for TWAIN access.
  7. Click OK.
  8. Open PaperPort 14 again.
  9. If using 6.x or 7.x, click File and select Scanner.
  10. Select the scanner’s TWAIN driver.
  11. If using 8.x or 9.0, click Scan and select your scanner from the drop-down menu.
  12. Check if the scanner is now recognizable.

6. Uninstall and Reinstall PP14

  1. Open Control Panel, and select Uninstall a program.
  2. Uninstall all PaperPort versions and the print driver for PaperPort that is listed.uninstall
  3. Reboot your computer.
  4. If you upgraded from a previous PaperPort version, install the version your scanner came with and reboot your computer.
  5. Install the current PP14 version to your system and check if it recognizes the scanner

7. Create registry keys and let the scan button function normally

  1. Close PP14.
  2. Download and install the Scanner Connection Tool as in solution one
  3. Once downloaded, double-click the PPScnConnTool.exe file.
  4. When the tool appears, click Enable.
  5. You’ll be prompted to create a desktop shortcut to run the tool again.
  6. Launch PaperPort 14 and confirm that the Scan button is available and that your scanner is recognizable.

The problem could be caused by specific registry keys not being created properly on Windows. Thus, PaperPort 14 doesn’t recognize your scanner. To resolve it, install the PaperPort 14 scanner connection tool. This creates the appropriate registry keys and allows the scan button to work properly and normally.

Before you leave, check the most reliable printer management software and get one today!

Did any of the solutions help? Let us know in the comments section below.

Skype now has a UserVoice – asks for feature requests only

Microsoft has launched a UserVoice site for its communications service, Skype. The aim is to allow users to submit their ideas for the platform and vote on them.

One specific rule of the new UserVoice is that posts should be feature requests and that if they’re not, they may be removed. Nonetheless, it acts as another avenue of sharing your thoughts on Skype, alongside the Skype Community forums, Skype Insider feedback tools, and more.

You can access Skype’s UserVoice here.

Microsoft launches all-black Precision Mouse for $99.99

Last year, Microsoft unveiled the Surface Precision Mouse to coexist alongside the Surface Book 2. Originally, it was only available in grey to match the colour of the Surface Book 2. A year later, however, it appears Microsoft has had a change of heart.

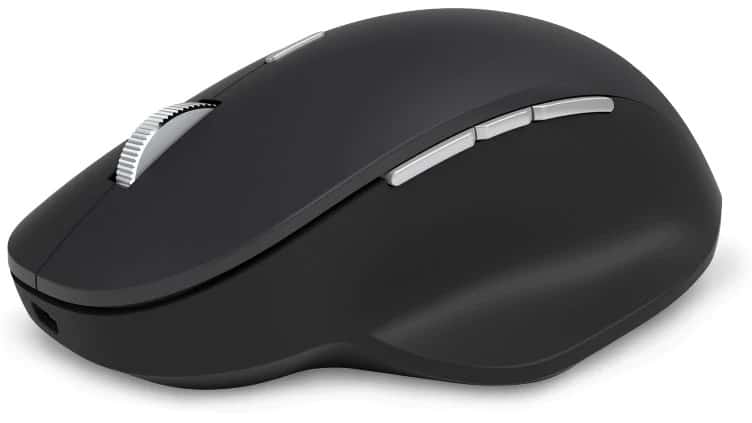
The company has now launched the Precision Mouse (dropping the “Surface” tag) and it now comes in an all-black version, with the added effect of some silver accents.

This new edition comes with all the same features as the Surface Precision Mouse, including Bluetooth, 6 buttons, right and left click, scroll wheel, and more. It’s just the colour that’s different – perfect for those who have been working towards an all-black setup.

The Precision Mouse in all-black is available to purchase at the Microsoft Store here for $99.99 ($89.99 for students, parents, teachers, and military personnel).

Windows 10 news recap: send multiple tweets in one click with Twitter, File Explorer’s dark theme gets better, and more

Welcome back to our Windows 10 news recap, where we go over the top stories of the past week in the world of Microsoft’s flagship operating system.

Windows Timeline extension for Google Chrome now available again, renamed to “Timeline Support”

After having a shaky start with a trademark dispute, the extension for Google Chrome that adds support for Windows Timeline is now available again, but with a new name of “Timeline Support”.

Windows 10 Timeline extension for Google Chrome

Twitter PWA on Windows 10 picks up the ability to send multiple tweets with one click

Users of Twitter’s app on Windows 10 can now send multiple tweets at the same time with just one click, known as threaded tweets.

Dark Theme for File Explorer looks better in latest Insider build, but it’s still not perfect

Microsoft has been busy working on File Explorer’s new dark theme with Windows Insiders. The latest update has seen some tweaks made to the theme to make it better, but it’s still not quite up to scratch.

Windows 10 could get a “InPrivate Desktop” feature to help users run untrusted software

To help protect users who want to run untrusted software, Microsoft could be working on adding a new feature called “InPrivate Desktop”. The feature would essentially create a temporary, sandboxed desktop environment, dubbed a “speedy VM”.

That’s it for this week. We’ll be back next week with more Windows 10 news!

Microsoft news recap: threatens to take down social network hosted on Azure over anti-Semitic posts, Skype getting Spotify add-in, and more

Microsoft news recap is a weekly feature highlighting the top Microsoft news stories of the past week. Sit back, grab some coffee, and enjoy the read!

Microsoft enters hate speech fray, threatens to take down social network site Gab over anti-Semitic posts

Microsoft has threatened to take down a social network site hosted on its Azure platform. The social network, Gab, has been accused by Microsoft for refusing to remove anti-Semitic posts. Microsoft’s threat follows complaints to the tech giant from users.

https://twitter.com/getongab/status/1027550072932851713

Microsoft Edge on Android scores 4.4 rating on the Google Play Store, beating even Chrome

Microsoft’s web browser, Edge, has overtaken Chrome’s rating on the Google Play Store, with Edge coming in at a rating of 4.4.

Skype version 8 is getting a new Spotify add-in

Skype is currently testing a new add-in that adds Spotify integration to the communication tool. Currently available for Skype Insiders in the US, the feature will be released worldwide soon. It adds the ability to share and preview songs.

Microsoft To-Do Beta on Android picks up dark mode option

Beta testers of Microsoft’s To-Do app on Android have received a new update that adds a dark mode, great for those who are making use of dark mode being added to many other apps.

That’s it for this week. We’ll be back next week with more Microsoft news.

How to Fix Sleep Mode Problems in Windows 8.1, Windows 10

So, basically if you are at work, holiday or at home using the sleep mode feature in Windows 10, Windows 8.1 can be very useful. Using this feature will allow you to save a significant percentage of battery power. Therefore you can leave it on when you take a break from working on your Windows 10 orWindows 8.1 PC or laptop. You can simply disable the sleep mode feature when you come back in order to resume work. You will see that all the apps you had opened are still there and you did not lose anything.
Windows 8.1 sleep mode issues
You will get this issue with sleep mode not working in most of the cases after you upgrade from Windows 7 or Windows 8 to Windows 8.1 or Windows 10. Before you go and reinstall your Windows 8.1 or Windows 10 operating system, follow the steps listed in this tutorial and you’ll how easy it is to fix PC sleep mode issues.

SOLVED: Sleep mode not working on PC

  1. Now after you opened your Windows 10, Windows 8.1 PC or laptop, you need to press and hold the buttons “Windows” and the button “W”. A window should pop up, you need to enter “troubleshooting” in the search box.
  2. Click (left click) on the icon “Troubleshooting” that appeared after the search.
  3. In the “Troubleshooting” window you opened look on the left side of the window for “View all” and after that click (left click) on it.view all control panel
  4. After you clicked (left click) on “View all” a list should be presented to you, you need to look in that list for “Power” icon and click (left click) on it.
  5. After clicking on “Power” it will automatically launch the troubleshooting feature for power issues in Windows 10, Windows 8.1.
  6. In the “Power” troubleshooting window you need to click (left click) on “Next”.
  7. After you click on Next, the Windows 10,Windows 8.1 system will start the automatic fixing of any errors that might occur with you power options.
  8. When the troubleshooting loading screen is completed you only need to click (left click) on “Close”.
  9. Restart your Windows 10, Windows 8.1 PC or Laptop and try you sleep feature now to see if it works.

If you’re running Windows 10, you can quickly find and run the power troubleshooter from the Settings page. Go to Settings > Update & Security > Troubleshoot and launch the troubleshooter.

windows 10 power troubleshooter


— RELATED: How to block Windows 10, 8, 8.1 from going to Sleep Mode

Additional solutions to solve computer sleep issues

If the Power troubleshooter didn’t solve the problem and you still can’t use Power Mode on your computer, here are some additional workarounds that you can use:

  • Disable Fast Startup: Launch Control Panel > go to Power options > Choose what the power buttons do > Change settings that are currently unavailable > uncheck ‘Turn on fast startup (recommended)‘ box. Restart your computer and check if the problem persists.turn off fast startup windows 10
  • Change your power settings: Go to Power options > Change plan settings > Change advanced power settings > select Restore plan defaults.

For detailed information, you can check out the troubleshooting guides below:

This is how you can easily fix your sleep issues in Windows 10, Windows 8.1. If you have any questions or suggestions, let us know in the comments below and we’ll see what we can do to improve this article.

RELATED STORIES TO CHECK OUT:


FIX: Media Center Live TV not Working on Windows 10/11

When I’m coming home from work I usually turn on the TV to relax a bit. Have you ever tried to watch the live TV app in Media Center on Windows 8 or Windows 10? Well, if you are watching TV on the Media Center live TV app on Windows 8 or Windows 10, then you might have encountered some errors along the way. Follow this tutorial to find out what to do if you have issues with the Live TV on your Windows 8, Windows 10 PC, laptop or other devices.
live tv on Windows media center in Windows 8
In this guide, we’ll list a detailed explanation of the errors and issues you might get on your Media Center live TV on Windows 8, Windows 10 and how to fix them in the shortest time possible. As a side note, you should know that the tutorial for Windows 8, Windows 10 Media Center won’t solve any possible hardware issues you might have with your PC, laptop or tablet.

How to fix Media Center Live TV in Windows 10

Your Computer or laptops tuner might not be installed

Note: This makes reference to the external USB tuner.

  1. Be sure your drivers are updated to support your Windows 8, Windows 8.1, Windows 10 device.
    Note: You can check this by going to the manufacturer’s website.
  2. Another possible reason as why you get this error is because your external TV tuner is not plugged into your PC.
  3. Also you will need to configure the tuner if you just installed your Windows 8, Windows 8.1 or Windows 10 operating system by using the Set up TV signal feature (in the “Start” window you will have to look for “tasks” and left click on it, left click on “Settings” in the “tasks” rubric, left click on the “TV” icon you have there and after you clicked on the TV icon you should have access to the “Set up TV signal” feature.)

Windows 10 cannot find the tuner – Tuner not found (internal tuner card)

  1. The first step in this process is to make sure the tuner card is installed on your Windows 10, 8 device.
  2. Check on the manufacturer’s website for an update on the driver for the tuner card compatible with Windows 8, Windows 10.
  3. Do follow the last step listed in the first tutorial.

— RELATED: Trick: how to bring Windows Media Center back in your Windows 10

Tuner in use issue in Media Center

  1. This usually means that your tuner is used by another program in your Windows 8, Windows 8.1, Windows 10 system.
    You will have to reboot the Windows 8, Windows 10 device.
  2. After the device is up and running, close any programs that might use your tuner.
  3. Open Media Center again and see if it works.

Invalid TV format issue in Media Center

  1. Change the channel and see if this helps.
  2. Reboot your Windows 10, Windows 8 device.

Video decoder is used by another program in Windows 10, 8.1

You will have to close all the other programs using your video decoder.

— RELATED: How to Install Windows Media Center on Windows 10, But we Advise not to

The video decoder is malfunctioning in Windows 10, 8.1

  1. In this particular case you might have some hardware malfunctions.
  2. You can try to reboot the Windows 10, Windows 8 Media Center and see if you still get this error.
  3. Try to reboot the Windows 10, Windows 8 device and see if it works.

Audio device errors on Windows Media center for live TV

  1. Double check you have the updated drivers on your audio card necessary for Windows 10, Windows 8.
  2. You can check if your audio is enabled from the “Device Manager” in Windows 10, Windows 8.

Windows Media Center will not change the channels

Check to see if the infrared remote cable (IR blaster) is connected properly.

Windows Media Center will change the channels incorrectly

  1. If you have this issue it means that your IR controls have an incorrect setup.
    On the start screen go to “Tasks” and left click on it .
  2. Left click on “Settings”
  3. Left click or tap “TV”.
  4. Left click on “Set up TV signal”
  5. Reboot your Windows 10, Windows 8 device after the procedure is finished.

If you don’t have a strong signal for a TV channel in Media Center

  1. You might not have access to that specific channel. If you are subscribed to the cable company and you know you should have access to that program then try calling them to fix this issue.
  2. Also if you have a cable card then check if it is inserted correctly and do a set up of the cable card again after a reboot of the Windows 10, Windows 8 device.

Use a third-party media center software

If the issue persists and you still can’t use the built-in Media Center, you can install a third-party alternative. For more information,   you can check out our guide on the best media center software for Windows computers.

If you have any questions regarding this article or if you encountered a different type of issue with the Windows Media Center Live TV then the ones we listed above, let us know in the comments below.

RELATED STORIES TO CHECK OUT:


FIX: Windows 10/11 Uninstall Doesn’t Work


What can I do if Windows 10 won’t uninstall apps and programs?

  1. Uninstall programs using Control Panel
  2. Uninstall programs in Safe Mode
  3. Run System Restore
  4. Run the Program Install and Uninstall Troubleshooter
  5. Use a third-party uninstaller

uninstall feature issues in Windows 8

In the Windows 10, 8.1 operating systems, the uninstall feature is as simple as it can get. However, you might experience some issues when you try to uninstall an app. Your computer may freeze during the process or it finishes the uninstall process but the respective app still appears in the programs list. For this reason, we have decided to explain to you how you can fix the uninstall feature and carry on with your use of your Windows 10 or Windows 8.1 device.

Uninstalling an app is usually done from the Uninstall/Change a program menu that you can access very easily in Windows 8 and Windows 10. Keep in mind that if, for example you want to uninstall a built-in feature of Windows 10 or Windows 8 (like Internet Explorer) it will not work. Although the built-in apps for Windows 10, 8 cannot be removed, you can install similar apps and set them as default for your operating system. For any issues regarding the uninstall feature in Windows 10, 8, you can follow the tutorial below and fix your problem in a few minutes.

SOLVED: Windows 10 won’t uninstall a program

1. Uninstall programs using Control Panel

When you try to uninstall a program you can do it very easily from the Uninstall/Change feature in your Windows 10, 8. If you left clicked on the program you wish to uninstall and then left clicked on the uninstall button, then this will normally completely remove it from your system.

If you left clicked the uninstall feature on an app and it freezes during the process, then try to completely reboot your Windows 8, Windows 10 operating system and try again to uninstall the problematic program.

Note: Some of your programs that you have running might interfere with the uninstall feature.

2. Uninstall programs in Safe Mode

If the uninstall feature doesn’t work after the reboot the Windows 8, Windows 10 device, then follow the steps below:

  1. Reboot the Windows 8, 10 device.
  2. During the reboot when the Windows 8, Windows 10 device starts hold the “Shift” button and keep pressing the F8 to get you into the recovery mode.
  3. You should be now in the “Recovery Mode” feature. Left click or tap on the “See advanced repair options” feature.
  4. Left click on “Troubleshoot” feature in the new window.
  5. Left click on “Advanced options” in the next window.
  6. Left click on “Windows startup settings” feature .
  7. Left click or tap the “restart” button in the lower right side of the window for the computer to boot.
  8. After the reboot of the Windows 8, Windows 10 device you will have the option to boot into “Safe Mode”.
  9. After the Windows 8 PC boots into Safe mode, you can go ahead and uninstall the desired program you had trouble with.

3. Run System Restore

If you still have troubles after doing the option above you can always restore your Windows 8 or Windows 10 computer to a previous version thus removing any programs you might have installed recently.

To run a system restore, you can just go into the Control Panel and left click on “Recovery”. From the “Recovery” window just left click the “Open system restore” feature and follow the on-screen instructions.

open system restore

4. Run the Program Install and Uninstall Troubleshooter

Microsoft’s Program Install and Uninstall troubleshooter can fix errors that prevent users from uninstalling software. Here are the steps to follow:

  • First, open this Microsoft Support webpage
  • Press the Download button to download the Program Install and Uninstall troubleshooter
  • Open the troubleshooter
  • Go to Advanced > Apply repairs automatically > hit Next > select the Uninstalling option.
  • Select the program that you can’t uninstall > hit Next. The troubleshooter will look for and apply potential fixes.

5. Use a third-party uninstaller

If the problem persists, you can download and install a third-party uninstaller. For more information about the best uninstalling software to use on your Windows computer, you can check out the guides below:

You now know how you can uninstall a program in Windows 8 or Windows 10 if the normal easy way doesn’t work for you. If you have any questions on this article, let us know in the comments below and we will see what we can do to help you further.

Can’t Create Installation Media for Windows 10/11 [FIX]

If you have got to the point where you cannot use your Windows operating system anymore due to blue screen errors, then having or creating an installation media for Windows 10, 8.1 might come in handy. There are some tips on how to create your installation media on Windows 10, 8.1 work. Seeing that some Windows 10, 8.1 users are having issues with their OS, we’ve come up with this tutorial to help you create a proper installation media.
installation media issues on Windows 8.1
To create an installation media, you need to have the Windows 7, Windows 8, Windows 8.1 or Windows 10 operating systems installed on your machine. If you have any other version of Windows, it will not work correctly. Also, if you are creating an installation media, the PC you are creating it from and the PC you are installing the media on have to have the same 32 or 64 bit system. So, basically, if you have created an installation media from a 32 bit system and you try to install it on a 64 bit system, it will not work.

How to fix installation media on Windows

For creating the installation media you will need:

  • An Windows Product key that you can find on the CD or DVD or you can just get it from the official Windows website where you bought it from.
  • Depending on where you want to copy the installation media, you will need either a USB drive, external hard drive or a CD or DVD.
    Note: The storage device where you are copying the installation media should be empty. Make you have nothing on it before starting the process.

— RELATED: Users complain Windows 10 installs King games after every update

Now follow the steps below to create installation media on Windows 10, 8.1:

  1. Left click on the link below to copy the Windows 8.1 Setup package
    Download Windows 10, 8.1 setup package here
  2. Left click on the button “Save file” after you clicked on the link above and save it to your desktop.
  3. Go to your desktop where you saved the file and double click (left click) on it.
  4. Choose to run it from the options presented.
  5. After you run the file, you will get another window where you will have to type in the product key of your Windows 10, 8.1 OS.
  6. A window will pop up after you typed the product key and you need to left click on the option “Install by creating media”.
  7. Left click on “Next” after you chose the feature above.
  8. You can plug in the USB, external hard drive or DVD and start the installation.
    After you clicked on “Next” you will have to choose the storage device where you want to copy the installation media for Windows 10, 8.1
    Note: Anything you have on the storage device will be deleted so be sure it is blank when you insert it and select the installation media.

Fix media creation errors on Windows 10, 8.1

First, navigate to your $Windows folder. Now, locate the following folder $Windows.~BTSources. Locate Setupprep and double click on it to launch the update repair process.

Another quick method to fix media creation error is to run the bootrec /rebuildbcd command. To do this, open Command Prompt as administrator, type bootrec /rebuildbcd and hit Enter. For more information on how to use this command to fix boot issues, go to Microsoft’s Support page.

So, these are the steps to follow in order to properly use the installation media and prevent any issues you might have during the install process on Windows 10, 8.1. If you have any questions, let us know in the comments section below and we will help you further.

RELATED STORIES TO CHECK OUT:


How to Change Windows 10 Product Key


How can I change Windows product key?

  1. Change Windows 10 key using Command Prompt
  2. Activate Windows key using SLUI3
  3. Change Windows product key using Settings

You will get to a point in your Windows 8.1 or Windows 10 usage when you might have to change your product key. If you skipped the product key section when you first installed Windows 8.1 or Windows 10 on your PC, laptop or other devices, you might be asked for it again after a while. There are some consequences if you do not activate your Windows 10, 8.1 OS with a product key. One of them is the lack of customization settings access of the start screen in Windows 8.1 or Windows 10.
Windows 8.1 change product keyWe will list a few options below that you can follow in order to change the Windows 10, 8.1 product key for your device. As a side note, you should be very careful and type in the correct product key when you are asked for it. Typing the wrong key may lead to some severe system issues. Also, you don’t need to worry anymore about this issue because you will see below a very easy fix and you can go on with your everyday activities on your Windows 8.1, Windows 10 device.

Steps for changing Windows 10 Product key

1. Change Windows 10 key using Command Prompt

  1. In the Start screen of your Windows 8.1, Windows 10 device you will need to start typing “cmd admin”.
  2. After you have the “cmd admin” icon in the search result left click on it.
    Note: If only the cmd icon appeared, you can right click on it and select the option “Run as administrator”.
  3. Now that you have the command prompt with administrative privileges in front of you, type in there the command “slmgr.vbs -ipk ACTIVATION KEY”.
    Note: In the command above instead of “ACTIVATION KEY”, you need to type you activation code.
  4. After you’ve written the command above, hit “Enter” button on the keyboard.
  5. A “Windows Script host” window will pop up and you will need to left click on the “OK” button in the lower side of that window.
  6. Now in the command prompt window, you need to type “slmgr.vbs -ipk ACTIVATION KEY”.
    Note: In the command above instead of “ACTIVATION KEY” you need to type you activation code/key.
  7. After you’ve written the command above, hit again “Enter” on the keyboard.
  8. Now another “Windows script host” window will appear saying that your product activated successfully.
  9. Reboot the Windows 8.1, Windows 10 operating system.
  10. After the reboot, your product should be activated and the Microsoft watermark will no longer be on your desktop.

2. Activate Windows key using SLUI3

  1. Again, like in the first step, type in the start screen of Windows 8.1, Windows 10 “cmd admin”.
  2. Left click on the icon that shows in the search box.
  3. Type in the command prompt window the following line “slui 3”.
  4. A window will pop up where you will need to type in the product key of the Windows 8.1, Windows 10 operating system.
  5. You will need to left click on the “Activate” button you have in that window or just hit the “Enter” key after you typed the key in.
    Note: For this option to work you will have be have an internet connection.
  6. Reboot the Windows 8.1, Windows 10 device.
  7. See if your Windows 8.1, Windows 10 OS activated correctly and the watermark disappeared from your desktop.

3. Change Windows product key using Settings

If the methods listed above seem a bit too complicated, you can modify your Windows product key from the Settings page. Go to Settings > Update & Security > Activation > Change product key.

change windows product key

How to fix Windows 10 activation key issues

If you can’t change your Windows product key due to various issues, we may have the right solution for you. For example, you can try to use a different product key. In this quick post on how to purchase a cheap Windows 10 product key, we offered you more information about users’ experience when buying cheap $15 Windows keys on the Internet. As a quick reminder, buying products from sellers on other marketplaces is very risky.  Your new product key may expire after a period of time and you’ll be forced to buy a new one again.

If you still can’t change your product key, you can check out our guide on how to fix frequent product key issues.

So there you have a few options that you can try to change your Windows 8.1 or Windows 10 product key and activate your Windows 8.1, Windows 10 operating system. Use the comment section below for any questions you might have on this article.

RELATED STORIES TO CHECK OUT:


How to Move Windows 10, 8.1 to a New Computer

Migrating Windows 8.1 or Windows 10 to a new computer can be easily done. But before you start the process, you should think a bit if you have the necessary hardware specs to run the Windows 8.1 or Windows 10 OS on the new computer. You need to also check if you have the necessary free space on your new computer to support everything you had on the Windows 8.1, Windows 10 device.
migrate windows 10
Another important thing to take into account is the Microsoft account. If you are using a Microsoft account on the old computer, then it should be pretty easy to migrate the OS to a new PC. You’ll be able to transfer the Windows 8.1 or Windows 10 operating system you had before and the specific customizations you made to the system. For a more detailed explanation, please follow the tutorial below to get your new computer up and running Windows 10 or Windows 8.1.

How to migrate Windows 10 to a new PC

1. Clone your OS

If the new computer has the same hardware or similar hardware as the old computer, you can create a backup of the system using the Ghost program or Acronis program and install it directly to the new computer.

If the two programs are not compatible with your computer or the cloning process fails to complete, you can try a different Windows 10 cloning tool. For more information, you can check out this guide on the best OS cloning software to install on your Windows computer.

If the new computer has a different setup then the old one, follow the second method listed below.

2. Use File History

For this method you need to have:

  1. A Microsoft account from the previous computer.
  2. A File History backup of the previous computer.
  3. A backup of your files on the OneDrive feature.
    Note: If you don’t have any of these and your old computer is not damaged, you can make them before starting the migration process.

Steps for migrating:

  1. Place in the Windows 8.1 CD in the new computer and start the computer.
  2. During the startup process, you will be asked for a Microsoft account. The Microsoft account you need to enter there should be the same one you had on your previous Windows 8.1, Windows 10 computer.
  3. You will get to a point in the setup process where you will be prompt to choose how to set up the computer, here you will have to write the same name as your previous computer.
  4. Now after the Windows 8.1, Windows 10 system boots up, you will have to use the File History feature for restoring all the files you had on the new PC.
  5. By restoring the file history, you only need to plug in the external drive you used to make the backup from the old computer and run the File History feature.
    Note: Everything you had when you last created the File History version will be back in the new computer running Windows 8.1, Windows 10.
  6. The File history process will take around one or two hours depending on how many backups you had on the external drive and how much space they take.

You can see how easy it is to migrate Windows 10 or Windows 8.1 to a new computer. You just have to be sure to create the proper backups before you start the migration process and everything should work as it did on your previous computer. If you have any questions or ideas on how to transfer Windows 10 to a new computer and you’d like to share them with us, you can use the comment section below.

RELATED STORIES TO CHECK OUT:


How to Install Windows 10 on a Mac computer

Do you own a Mac PC and you want to change your operating system to Windows 8, Windows 10? Well, whatever the reasons are for changing the operating system, you will be glad to find out that you can easily do it by following the steps listed below. You’ll be able to change the operating system to a brand new Windows 10 or Windows 8.1 version in only two hours.
install Windows 8 on a mac PC
Installing Windows 8.1 or Windows 10 on a Mac computer requires you to also have a minimum of 20 GB free space on a new partition, as well as a Windows 8.1, Windows 10 OEM copy which you can buy from a specialized PC store. Also, you will need to keep in mind the minimum hardware requirements necessary to run Windows 8.1, Windows 10. So, before you start this process, have a look at the Windows 8, Windows 10 hardware specs and compare them with your Mac PC.

Install Windows 10 on Macbook PCs

  1. You will need an external optical drive in order to make the installation easier on the Mac PC.
  2. If you don’t have an external optical drive, you can use an USB drive with at least 4 GB of free space on it
    Note: Ne sure the USB drive is completely empty.
  3. Download the program from the link below on the computer you have an optical drive with a Windows 8, Windows 10 disk on.
    Download here ImgBurn app for Windows 8, Windows 10
  4. After you insert the Windows 8, Windows 10 disk, do not run the installer.
  5. Run the ImgBurn program and select the feature to “Create Image from disk”.
  6. After you chose the “Create Image from disk” feature, you will need to select the optical drive you have your Windows 8,Windows 10 disk in.
  7. Select a destination in the PC where you want to install the .ISO image file.
  8. Left click on the button presented in the lower side of the window to proceed with the imaging process.
  9. After the .ISO file is finished you will need to copy it to the USB drive with a minimum free space of 4 GB.
    Note: you can copy the image file with the help of the “Windows 7 USB/DVD tool” by downloading it from Microsoft’s website.
  10. Now that you have the bootable USB drive with the copy of Windows on it we can proceed with the steps posted below.
  11. Open Launchpad and then go to “Other” folder in order to open “Boot Camp” feature on the mac PC.
  12. You will have a “Boot Camp assistant” window that pops up and you will need to select the “Continue” button to proceed.
  13. From the next window that appears, you need to uncheck the box next to “Create a Windows 7 or later version install disk”.
  14. Select the “Continue” button again.
  15. Next you will have to choose where to place the support software files. You can place them on a USB drive but make sure it is not the one containing the .ISO file.
  16. Be sure to have a network connection on the mac PC.
  17. Select the “Continue” button again.
  18. After the support drivers are installed (this can take up to half an hour) you will get from “Boot Camp assistant” window to create a partition for Windows 8, Windows 10. The Boot camp assistant will create a default partition of 20 GB which you can use.
  19. After the Mac PC has created the partition, insert the USB bootable device with Windows 8, Windows 10 and reboot the PC.
  20. After the PC starts up, it will automatically boot from your Windows 8, Windows 10 USB device .
  21. In the Windows 8, Windows 10 installation process, you will get to a window where you will need to select the partition on which to install the operating system.
  22. You will need to select the “BOOTCAMP” partition and also be sure to format that partition to be a NTFS drive.
  23. Now after the Windows 8, Windows 10 installation finishes, you will need to reboot the system once more and place t he USB drive with the Windows support drivers you have saved a couple of steps above.
  24. To install the Windows support drivers, open the “setup.exe” file present in the “WindowsSupport” folder.
  25. Follow the instructions on the screen to finish the support drivers installation.
  26. Reboot again the Mac PC and while it boots up you will need to hold down the “Option” button to enter the “boot manager” feature.
  27. From there you will need to select the Windows 8, Windows 10 operating system.
    Note: You might have some issues with the features present in Windows 8, Windows 10 because some Mac PCs don’t support the Windows 8, Windows 10 operating systems. Nevertheless you can still install these OS versions and check the features for yourself.

As you can see, this method involves 27 steps. We’ll list the quicker version below:

  1. Install the Windows 10 April Update OS using the Boot Camp Assistant. You can download the latest Windows 10 version from Microsoft.
  2. Open the Boot Camp Assistant from the Utilities folder of your Applications folder.
  3. Follow the on-screen instructions to install the April Update.
  4. While running the April Update, go to the Microsoft download site and click Update Now. Follow the onscreen instructions to install the OS.

With all these being said, you should be able to run your Windows 8, Windows 10 operating system on your Mac PC without any issues if you followed the steps above carefully. If you have further questions on how to install Windows 8, Windows 10 write us below in the comments section below and we will respond as soon as possible.

RELATED STORIES TO CHECK OUT:


Shutdown Button Missing on Windows 10? Restore it in 2 Ways

Did you upgrade to Windows 10, and your shutdown button has gone missing? Well, there is a feature on your PC that you can try in order to bring back your shutdown button.

Although it is easy to bring back your shutdown button in Windows 10, you should be very careful not to damage other system files while following the steps listed below.

How do I restore the shutdown button in Windows 10?

1. Tweak your Registry

  1. Press the Windows key + R, type regedit, and click OK.
    regedit  shutdown button missing windows 10
  2. Navigate to the path below in the left pane: HKEY_CURRENT_USER\Software\Microsoft\Windows\CurrentVersion\ImmersiveShell immersive shell windows 10
  3. Now, right-click the ImmersiveShell folder, select New, and click Key.
  4. Name the new folder Launcher and click it.
  5. Next, right-click the space in the right pane, choose New, and select DWORD (32 bit) Value.
  6. Name the new DWORD Launcher_ShowPowerButtonOnStartScreen.
  7. From here, double-click the Launcher_ShowPowerButtonOnStartScreen DWORD, set its Value data to 1, and click OK.
  8. Finally, restart your PC in order for the changes to take effect.

2. Check Group Policy settings

  1. Press the Windows key + R, type gpedit.msc, and hit Enter.
  2. Go to the following path:User Configuration/Administrative Templates/Start Menu and Taskbar
    start menu taskbar windows 10 group policy settings
  3. Double-click Remove and Prevent Access to the Shut Down commandRemove Prevent Access Shut Down
  4. Select Not configured or Disabled to allow all users to access the shutdown button.prevent access windows 10 shutdown button
  5. Click the Apply button, followed by OK.
  6. Close Group Policy and restart your computer.

If the Shutdown button is not available in the Start Menu or it’s greyed out, this may be due to incorrect Group Policy settings. As a result, you can quickly fix this issue by applying the correct settings.

So, there you have two methods to use if you want to add the shutdown button to your Windows 10 device.

Although, in some cases, you really don’t need the shutdown button, it is still a good idea to know how you can add it just in case you might want to use it in the future.

Finally, if your shutdown button is not working despite being present, check our detailed guide to fix it.

Google rolls out Windows 10 Action Center support for Chrome

Google started testing Windows 10 Action Center support for Chrome in March 2018. The search engine giant first gave Action Center support a try in the experimental Chrome Canary browser. Now Google has confirmed that it’s rolling out native Win 10 notification support for Chrome 68.

The Googler Mr. Beverloo, of the Chrome division, announced on his Twitter page that Google is rolling out native Windows 10 notification support for Chrome. There he stated:

We’re now rolling out support for native notifications in Chrome 68 using the Windows 10 Action Center—super exciting! Would love to hear your feedback!” Mr. Beverloo added, “Also a shout out to the Microsoft Edge and Action Center teams, who were instrumental in making this happen.

It has taken a while for Google to establish native Windows 10 notification support in its flagship browser. Users have requested that Google add native Action Center notifier support to Chrome for a few years. The search engine giant was initially lukewarm about user feedback suggesting that it enable native notification support in Chrome. A Chrome support moderator stated, “Maybe we can revisit it in a few years when most users are on Win 10.”

However, Mr. Beverloo has now confirmed that Google has rolled native notification support out to about 50% of Chrome 68 users at the moment; and it won’t be long before all users get the new browser notifications. You can manually enable native notifications in Chrome 68 via the chrome://flags page by entering ‘chrome://flags/#enable-native-notifications’ in Chrome‘s URL bar. Select Enabled from the Enable native notifications drop-down menu, and then restart the browser.

Google Chrome used to have its own notifications. Now, however, Chrome‘s website and web app notifications will appear in the Action Center. The native integration will also enable users to configure Chrome notifiers with Windows 10’s notification options and Focus Assist.

So now Google Chrome is a part of the Windows 10 Action Center! If you need to update your Chrome browser to 68, click Customize Google Chrome > Help > About Google Chrome. Alternatively, click Download Now on this webpage.

Uninstall Windows 10 and go Back to Windows 8: 3 Quick Ways

Have you installed Windows 10 on your Windows 8 or Windows 8.1 operating system? Well, if you see that you don’t need Windows 10 and want to uninstall it from your Windows 8 or Windows 8.1 system, you can go back to the previous iteration.

You might be facing performance issues in Windows 10, or the interface appears confusing. Be it either of the two or for any other reason, you can always uninstall Windows 10 and revert to Windows 8 or 8.1. Keep reading to find out how!

How do I uninstall Windows 10 and go back to Windows 8?

1. Uninstall Windows 10 preview

  1. Open the Start menu, press the Shift key, and click on Restart.
  2. Once Windows enter the Recovery Mode, click on Troubleshoot.
  3. Now, click on Advanced options.
  4. Click on Uninstall Preview updates.
  5. Wait for the PC to restart.
  6. Select the user account, enter the password, and click on Continue.uninstall windows 10 preview build
  7. Click the Uninstall option to remove your Windows 10 operating system.
  8. Follow the instructions on the screen to finish the uninstall process.
  9. After the uninstall is completed, you will need to reboot Windows 8 device to completely finish the uninstall process of Windows 10.

That’s it! You can easily uninstall Windows 10 and return to Windows 8 or 8.1 from the Recovery Mode.

2. Uninstall Windows from virtual software

Suppose you installed your new Windows 10 operating system on a virtual software inside Windows 8, 8.1. In that case, you won’t need to follow the steps above because they will not affect your Windows operating system.

The only step you need to do is to take it out from the virtual software you are using by uninstalling it directly from inside the software.

3. Use a restore point

Perhaps the quickest and safest method to return to a previous OS version is to use System Restore. This solution allows you to restore the full OS version that was installed on your PC previously.

The only condition here is that you should have created a restore point when only Windows 8 was installed. Even if you didn’t do so manually, the OS automatically creates one before a major change is made. So do check the list of restore points.

The methods listed above are the easiest methods you can use to uninstall your Windows 10 operating system and continue running Windows 8 or Windows 8.1 on your device.

Before you leave, find out how to activate Windows 10 with a key for Windows 7.

If you have any additional questions regarding this article, let us know in the comments below, and we will help you as soon as possible.