Windows 10 May 2020 Update has new compatibility issues with certain LTE modems

Microsoft has discovered a new compatibility issue for some PCs with LTE modems running the Windows 10 May 2020 Update (via Bleeping Computer). On the Windows 10 Health Dashboard, the company explained yesterday that some PCs with certain WWAN LTE modems running the May 2020 Update might not be able to connect to the Internet after waking from sleep.

The company expects to fix the issue in a patch coming in late September, but in the meantime, the company has applied a compatibility hold on devices with affected WWAN LTE modems. For users who have already installed the May 2020 Update and are now encountering the issue, Microsoft recommends to enable and then disable Airplane mode to connect to the Internet after waking from sleep.

The Windows 10 May 2020 Update launched with several compatibility issues in the last week of May, and many owners of recent Surface devices have also been unable to install it until recently. However, Microsoft and its partners have now managed to resolve most problems, though there’s still a compatibility issue with Conexant audio drivers.

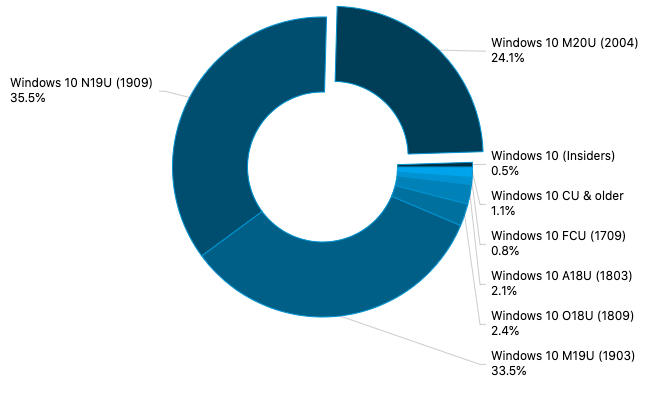
In the latest AdDuplex Windows Devices Statistics report for the month of August, the May 2020 Update was running on 24.1% of all surveyed PCs, still lagging behind the November 2019 Update at 35.5%. As the latest Windows 10 version is continuing its slow progression, Microsoft is now getting ready to roll out Windows 10 version 20H2, which will be a minor release just like the November 2019 Update was last year.

Hands-on with Surface Duo at Best Buy: An impressive phone unlike any other

The first Surface Duo review units are out, but Microsoft has a review embargo, and tech reviewers are under NDA and can not discuss the software or camera experiences until September 10th. Being the Surface fan that I am (and since OnMSFT was not on the initial review unit list and not under embargo) I was still eager to try one out, gather my own thoughts, and share them here.

Ahead of the arrival of my own Surface Duo pre-order next week, I headed to my local Best Buy where a display unit was available to try one out (without any limits on looking at the software or cameras.) It was tricky finding a location that had one available, but after spending two hours with the Duo in my hands, I must say, it is a phone like any other, and a phone that’ll make you a dual-screen believer.

Editor’s note: We are not under any NDAs and are using a display unit, and the final Android/software experience of the Surface Duo is subject to change. There’s also a red “tint” in our photos and videos, due to the lighting in the room at Best Buy. This is only noticeable on camera, and not in person.

The premium-feeling hardware

The minute I walked up to the Surface Duo display unit, I was amazed. As I picked it up with my hands, I was really surprised at how thin the Duo felt. Coming from the world of Windows Phone, Blackberry, iPhone, and Google Pixel, I never quite felt a phone that thin. As many tech reviewers have pointed out, one screen on the Duo is almost as thin as a single USB-C port. And, when folded together, the Duo is just as thin as a Pixel 3XL. It really is quite amazing.

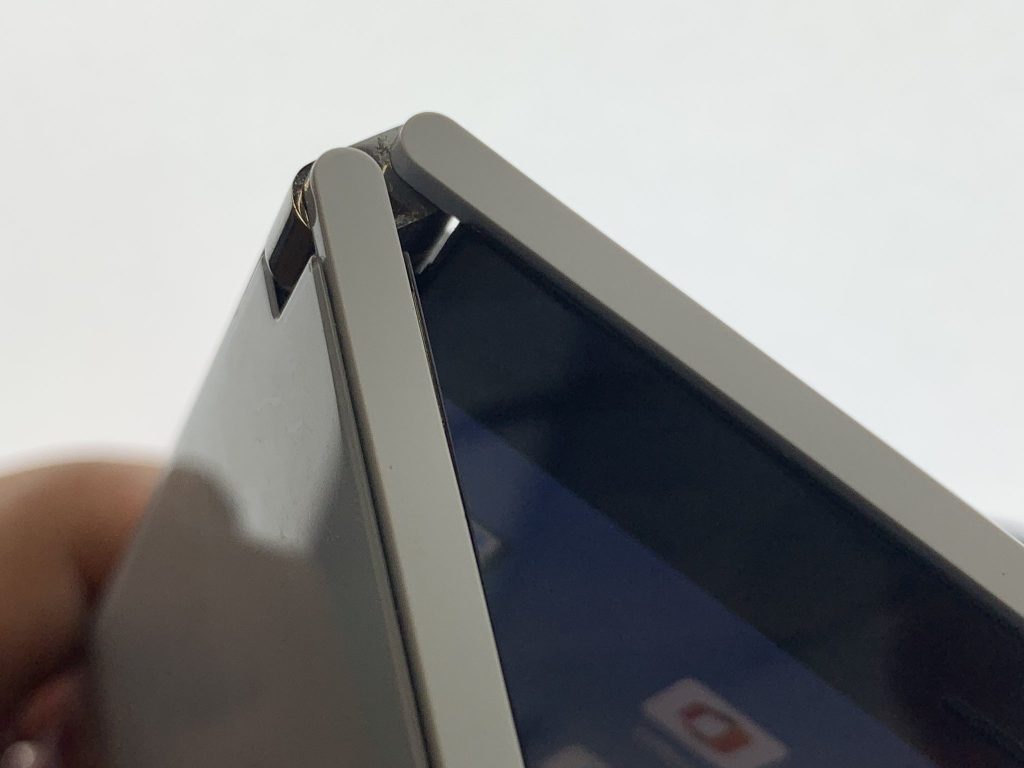
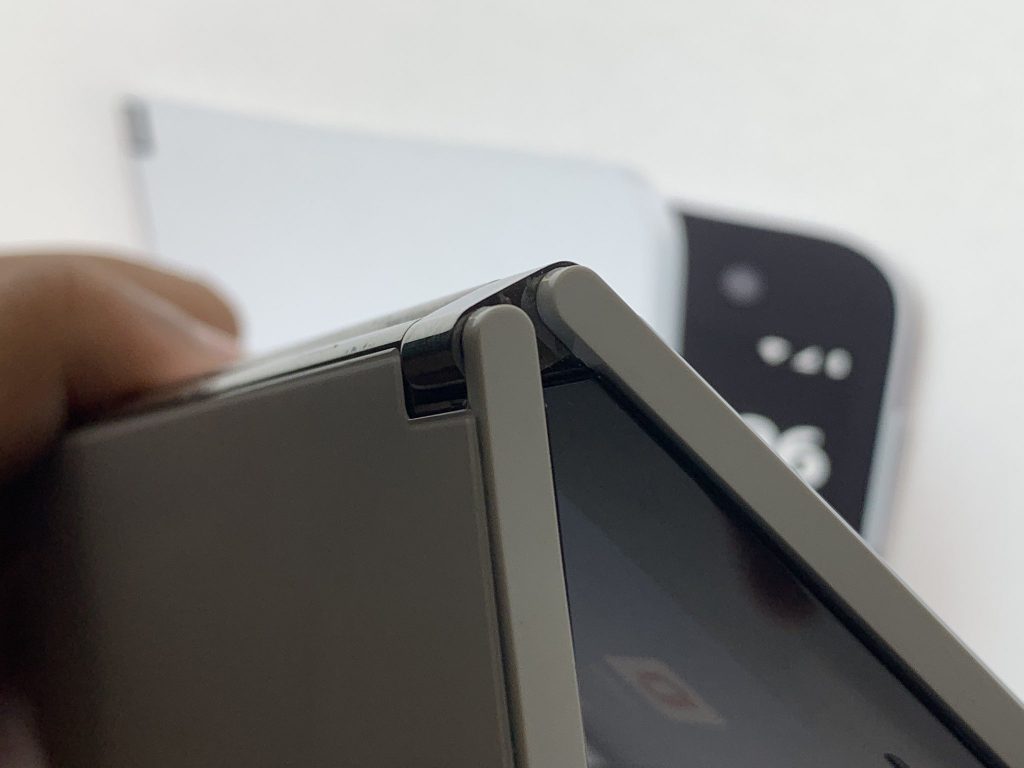
But the thinness wasn’t all that amazed me. As I folded and unfolded the screen, the hinges really caught my attention. They are super solid and really can hold the phone up well. No matter which angle I opened the Duo too, the phone was able to support itself thanks and stay in place thanks to the hinges. The feel is a bit reminiscent of the watchband hinges that Lenovo has on its Yoga laptops, but the difference is that Microsoft tucked the hinges inside the screen.
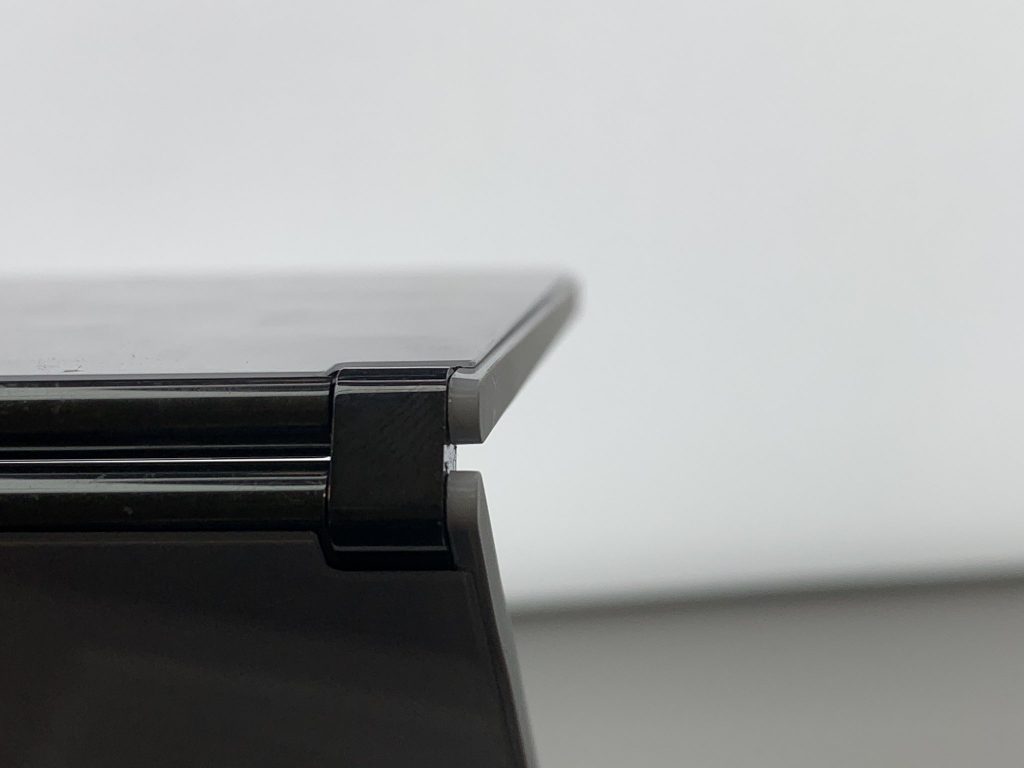
Surface Duo Hinge 2

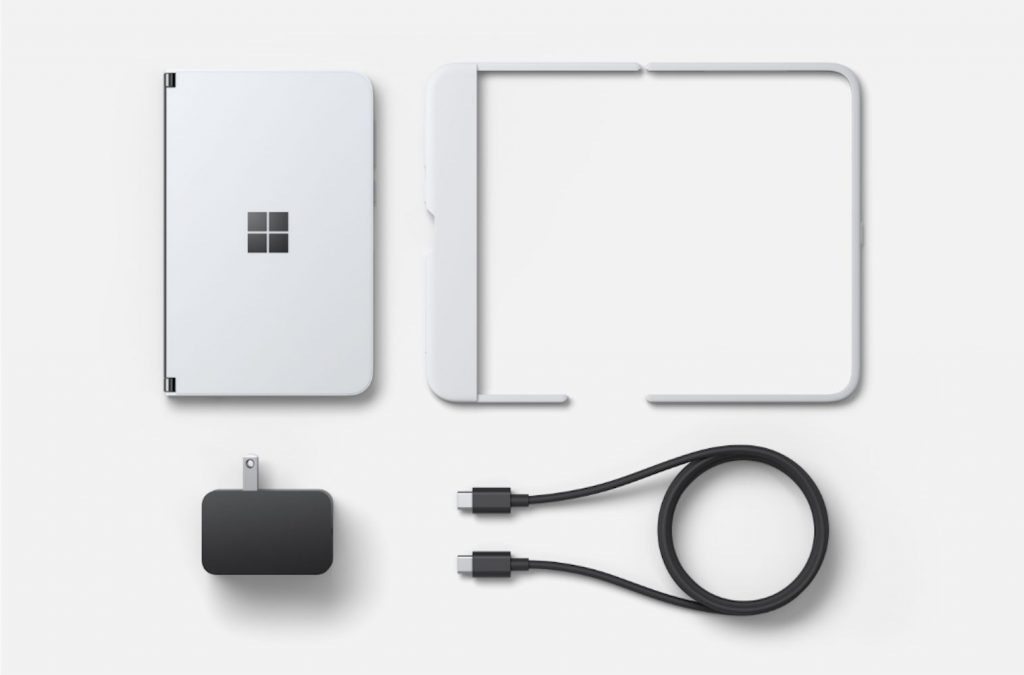
Then, there’s the overall material. The Duo is unlike your average Surface and is made of glass and not magnesium. It did feel a bit too smooth and slippery in my hands for my liking, but I think the included bumper case or a Drand skin can fix that. That’s also where I really appreciated the thick bezels, as it gave my fingers something to grab onto when handling the phone and rotating it around.

Comparing the dimensions of the Duo to my Pixel 3XL, meanwhile, offered another interesting experience. The Pixel is a lot taller than Duo, whereas the Duo is shorter, and a bit wider. I wasn’t able to move the Duo to see if it could fit in my pocket, but with those dimensions, I don’t see why it can’t fit.

The Dual-Screen Android experience
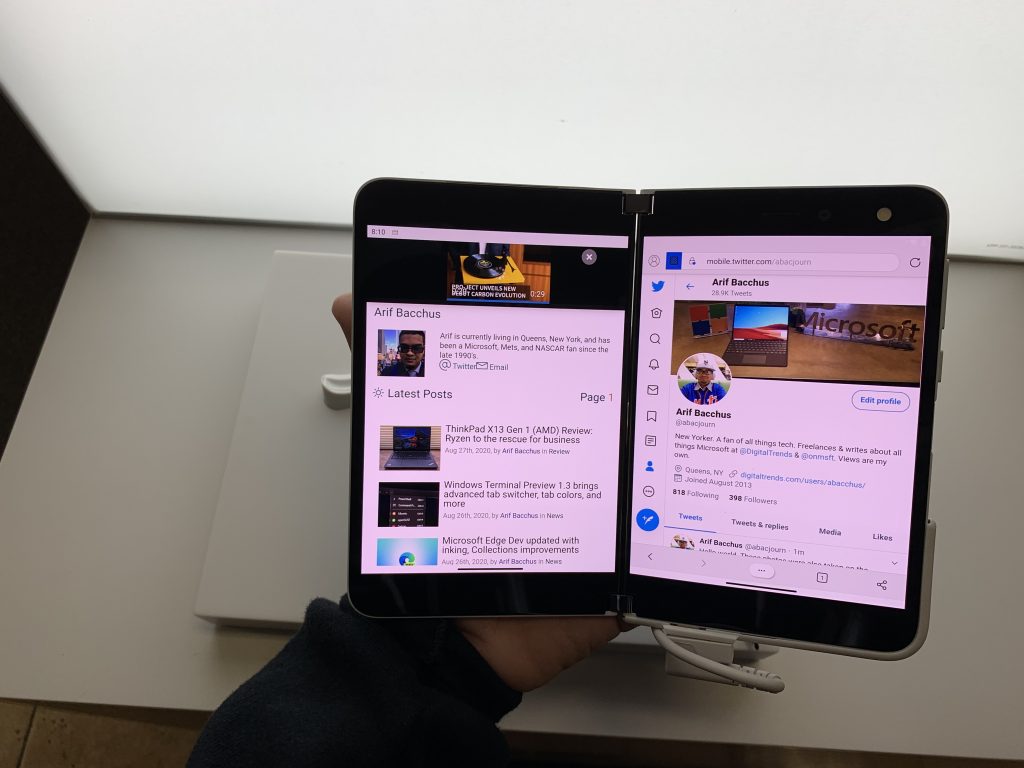
Surface Duo Dual Screen Apps

Next up in my hands-on experience was touring the dual-screen experience. This is where the Duo again feels different from other phones, and it’s all thanks to the underlying work Microsoft has done with Android. In fact, I think the Duo marks the perfect combination of Microsoft hardware and Google Android software.

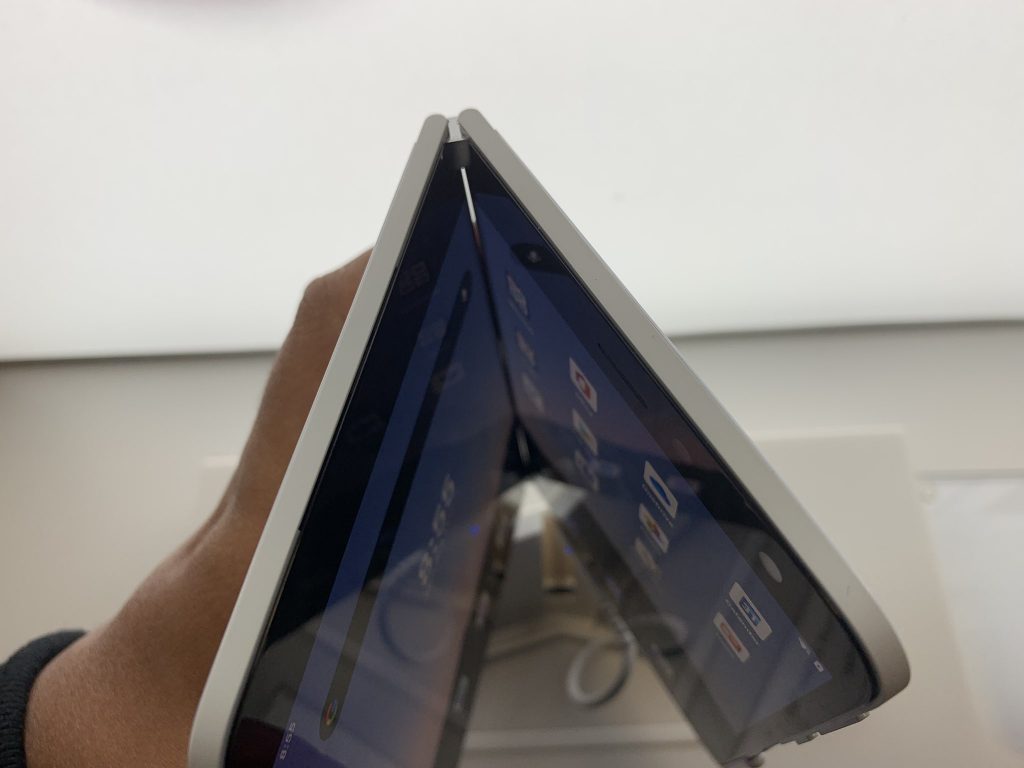
In my experience of testing out the dual-screens on the Duo, I tried a couple of things. I stacked and scrolled two apps on the two screens at the same time, slid apps around from one screen to the next, spanned an app across the two screens. I also ended up rotating the Duo so both screens are in the vertical orientation, and turned it back over and shifted apps around. Then, I ended up using the Duo in its various modes, such as “tent” or “laptop.” Keep in mind, all of these gestures and experiences are powered by Microsoft Launcher and Android.
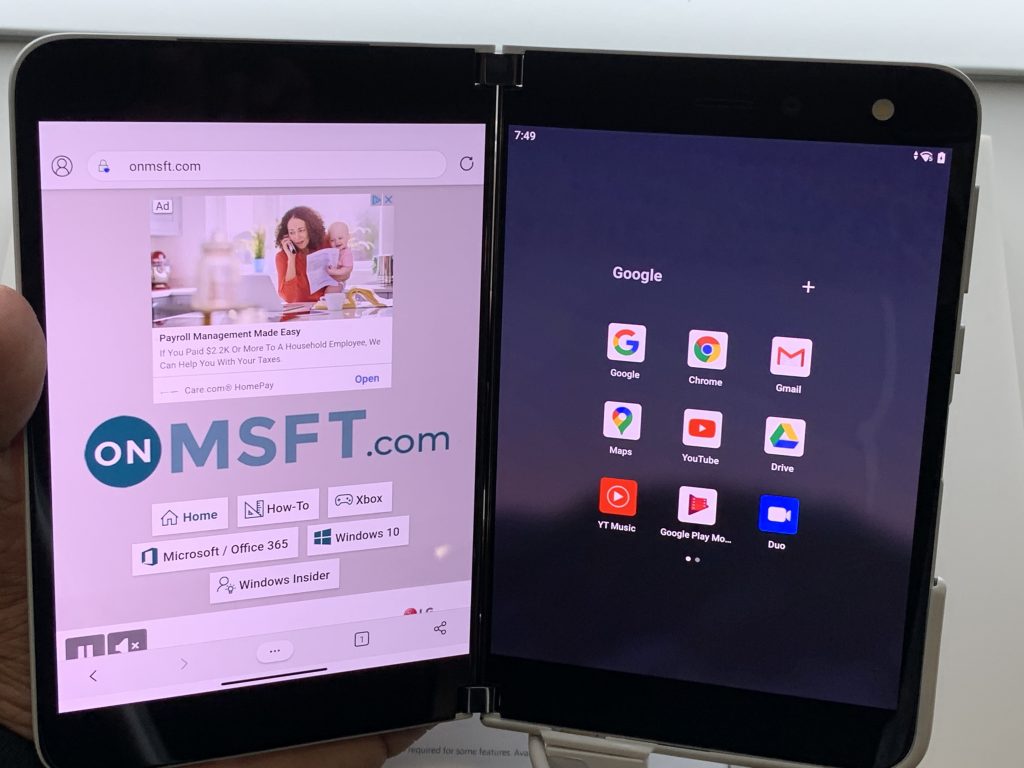
Surface Duo Side By Side Apps And Home

Again, thanks to Microsoft’s work on the hardware, leveraging those dual-screens for all my tests was an amazing experience. My fingers easily moved in between the two screens hinges as I pushed one screen to the next. It felt like the hinges and the gap in the screen were not even there. Even for pre-release, the software also felt quite polished too. As I moved things around, the Duo didn’t freeze and on-screen animations were always fluent and fast.

However, the hinge did feel a little annoying when spanning apps “full screen” in the horizontal mode. It cut out things I was scrolling or watching, especially when it comes to videos.
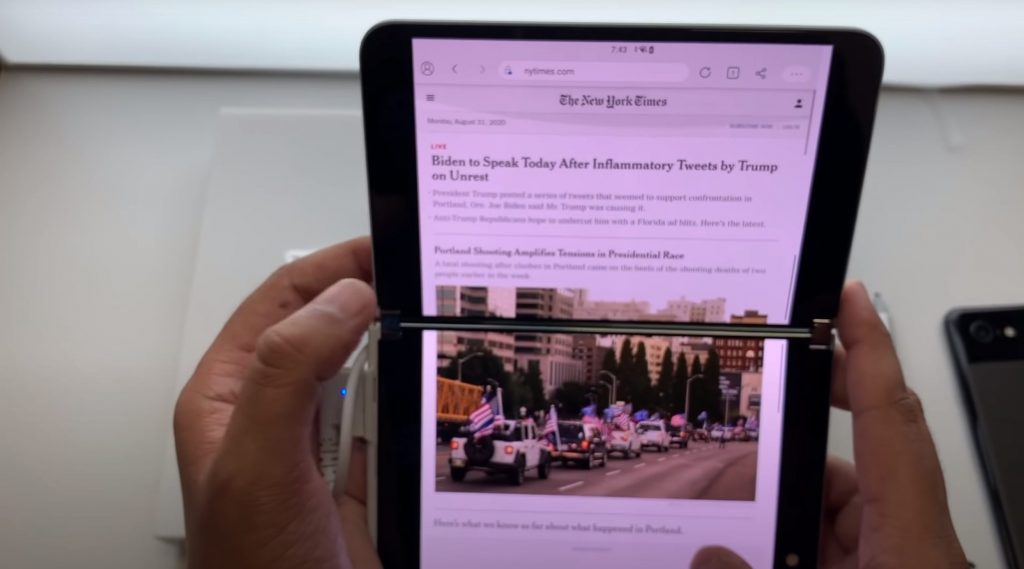
Surface Duo Apps Spanned Vertical Mode

But I do want to mention an interesting point. Although Microsoft hyped-up opening apps side by side, the real strength of the Duo is using it in the vertical mode, with a single app. Thanks to its aspect ratio and orientation, scrolling webpages, and other apps felt really natural and smooth. When reading the New York Times website, It felt like I was holding a piece of paper in front of me, and the content on the screen was really natural-looking. This will be a point for the Duo that I’ll keep an eye on moving forward.

I’ll end this section by pointing out another thing that makes the Duo unique. Since it has hinges, you can fold the Duo over into a tent mode. I did this to watch a video on YouTube, and it was really cool, to say the least. Although the video had a weird letterbox mode (I assume YouTube isn’t optimized for the Duo) it was a little heartwarming to be able to “fold” a phone over and use it to watch videos, in the same way that I would on a Windows 2-in-1.

The inking and using the Surface Pen
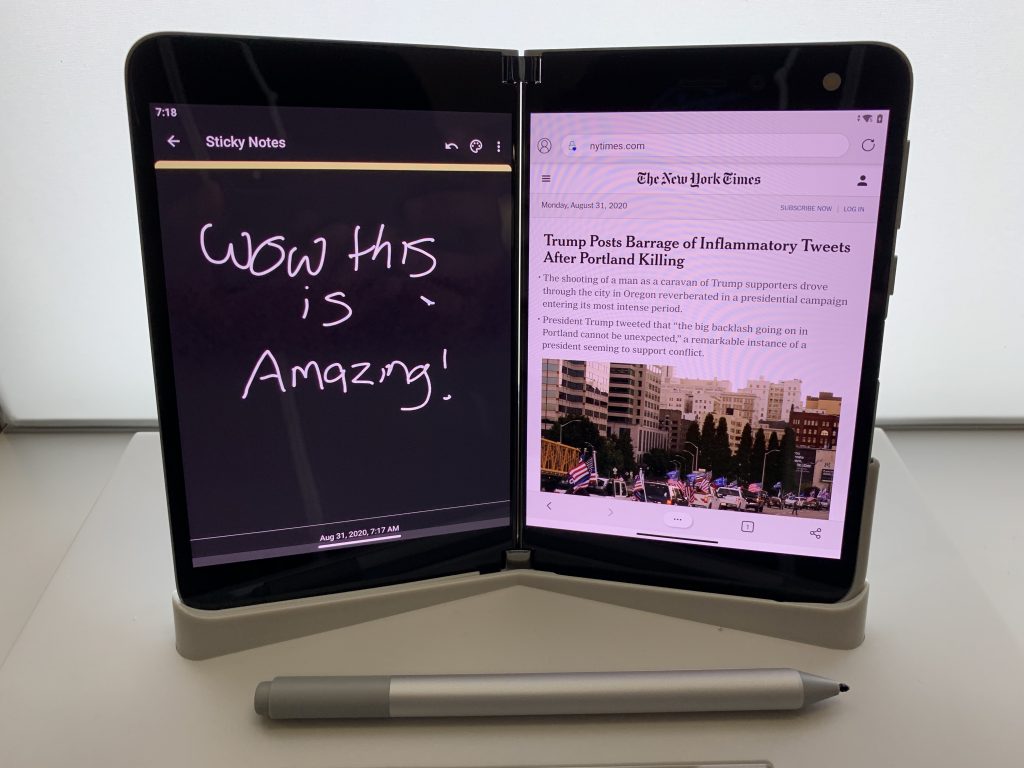
Surface Duo Inking On Phone

As I moved along in my demo, I found that the display unit I played with asked me to sign into a Microsoft Account to use core apps like OneNote, and Outlook, so my inking experience was a bit limited. However, that didn’t stop me.

I pulled up a New York Times article on one screen, and the sticky notes widget in the Microsoft Launcher on the other. I simulated jotting down notes, and I felt right at home. The movements of the pen on the screen is fluent, as is the latency. It’s really like using a Windows 10 PC or a Surface Pro.

Just be aware, there’s nowhere for the Surface Pen to attach to the Surface Duo. It’ll stick to the back screen, but it also will slide off. You’ll have to keep attaching it as it moves. From what I know, this isn’t officially supported, and you’d have to keep the pen stored in your pocket. Apparently this gets a bit better with the bumper, but still, it’s no Note 20.

The camera
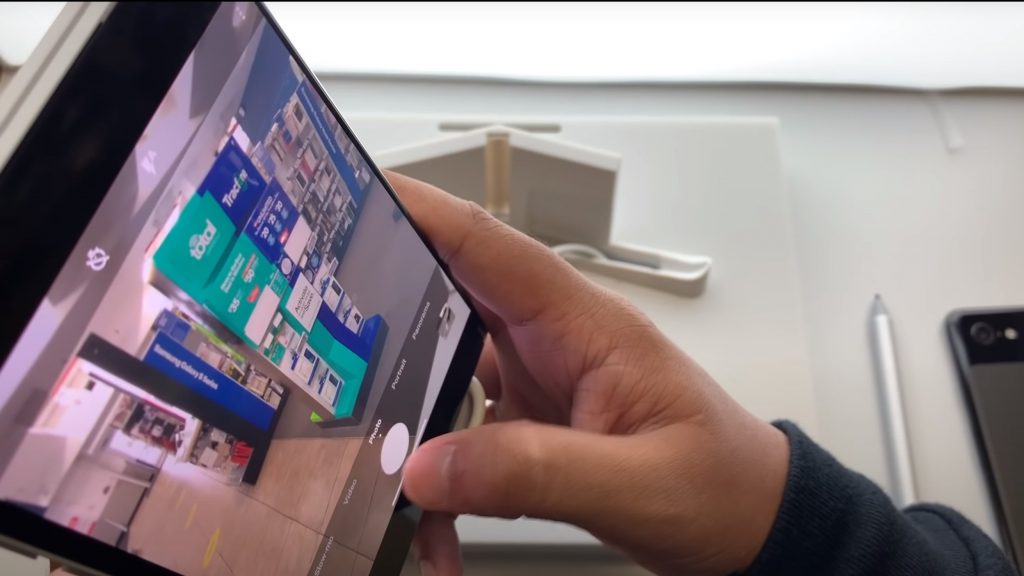
Surface Duo Camera

The final point I want to mention is the camera. This has been an area of controversy with the Duo, and a reason I was quite hesitant to purchase one for my personal use. However, after trying the Duo out, I’m not as worried. Here’s why.

Microsoft has done a lot of optimization with the Surface Duo camera. To my surprise, the overall user interface is quite fluent. While it is true that there’s no rear camera, if you want to take pictures of something in your world, the Duo has your back.

Thanks to the software, just fold the screens over, and flip them around to switch from selfie mode to rear-camera mode. The switch happens almost instantly as clicking the “switch camera” button on a typical Android phone.

But, then there’s the quality. With a single 11MP sensor, can the Duo make the cuts? Have a look below for the quality, and let us know what you think in the comments.

Overall, I am not too worried about the Surface Duo camera. For situations with a lot of light, it looks like the camera can punch out some really great photos. However, in situations with low-light, the Duo might struggle a bit. It’s hard to come to a conclusion right now, but I do look forward to finding out more when I get my own Duo and take it out into the wild.

I can’t wait to get my own Duo!

As my initial hands-on occurred on a demo unit in the limited setting of Best Buy, there’s still a lot of things I am curious to see about the Duo. Once I get my own Duo, I can’t wait to set up my daily apps (Snapchat, Instagram, etc) and see how the phone tackles my everyday needs. I’ll be doing a full review of the Duo come mid-September, so be sure to keep tuned to OnMSFT. And, if you have any questions for me, drop me a comment in the section below. I’ll do my best to answer them!

Crusader Kings III, Resident Evil VII, and more are coming to Xbox Game Pass in September

The month of August was a pretty good one for Xbox Game Pass, which received no less than 4 new Microsoft games including the critically-acclaimed Flight Simulator and Wasteland 3, the Battletoads reboot, as well as the first episode of Tell Me Why. Well, Microsoft has just announced the next wave of new games coming to Xbox Game Pass in September, starting with the freshly-released strategy game Crusader Kings III on PC.

More games will follow on Thursday, September 3, with Resident Evil 7, Touhou Luna Nights, and the episode 2 of Tell Me Why on Console and PC. Console gamers will also get The Jackbox Party Pack 4 on the same day, while World War Z, which is already available on Xbox Game Pass for Console, will also join the PC catalog. It’s worth noting that the latter was previously exclusive to the Epic Games Store on PC, and the Left 4 Dead-inspired game also recently introduced support crossplay between PC and Xbox One.

Next week, two new games will join the catalog on September 10 with Disgaea 4 Complete+ on PC and Hotshot Racing on Console. Additionally, the third and final chapter of Tell Me Why will also be available on Console and PC on September 10. The Xbox team also listed Destiny 2: Shadowkeep & Forsaken as “coming soon” on Console, and we’ll let you know once we have the release date.

In case you missed it, four games will also leave Xbox Game Pass in September, starting with NBA 2K20 on console today. Red Dead Redemption 2 will follow on September 7, and then Jumpforce and Gonner: Blueberry Edition will also be removed on September 15. On that day, Microsoft will also launch Cloud Gaming (Project xCloud) on Android as part of Xbox Game Pass Ultimate, and Microsoft promised that over 100 Xbox games would be playable on mobile devices at launch.

Xbox Series S mention appears once again in official Microsoft product docs

If Microsoft recently confirmed that its next-gen Xbox Series X console will launch in November, the company has yet to announce its cheaper alternative, the Xbox Series S, also codenamed “Lockhart”. This second next-gen Xbox console previously appeared in official documentation for developers as well as on the packaging for the next-gen Xbox controller to be released alongside the Xbox Series X and presumably, the Xbox Series S.

Earlier today, Twitter user BravaryBrendan tweeted a picture of an Xbox Game Pass Ultimate trial code sheet mentioning the “Xbox Series X/S consoles.”

According to previous reports, the Xbox Series S will share many of the Xbox Series X’s components, including a custom AMD Zen 2-based CPU and custom NVMe SSD. However, the Xbox Series S GPU is expected to deliver just 4 teraflops of computing power compared to 12 on the Xbox Series X. As a result, Microsoft is expected to position the Xbox Series S as an affordable next-gen option for 1080p gaming, delivering a better experience than the now-deprecated Xbox One X thanks to a faster SSD and a more modern GPU and CPU.

With the Xbox Series X set to launch in November, Microsoft probably won’t wait too long before officially announcing the Xbox Series S, as well as pricing details for the new console. A lot of details about the Xbox Series S have leaked in the past couple of months, but it’s quite impressive that the full hardware, which is presumably already in production, hasn’t leaked yet.

According to a previous report, the Xbox Series S could look more like the Xbox One S/X than the Xbox Series X. As the Xbox One X has now been discontinued, it could make sense for the company to re-purpose its existing Xbox One X manufacturing capabilities for Xbox Series S consoles going forward.

4 Tips on How to View Your WiFi Password in Windows 10/11

We use Wi-Fi almost every day on our devices, and we have dozens of saved networks on our devices. But what if we need to see saved WiFi passwords for certain networks?

These operating systems keep track of previously saved passwords. This includes all the networks you connected your device to.

There are multiple different ways to see your WiFI password in Windows and Mac, and you can even use your browser to do so.

This is pretty easy to do, and in today’s article, we’ll show you how to do this on both Windows 10/11 and Mac computers.

How do you find your Wi-Fi password on PC?

There are multiple ways to see WiFi password on your Windows 10/11 PC. You need an account with administrative rights. The simplest method is to check your connection settings. You can also use the Command Prompt or Powershell.

You can use the Command Prompt to learn more about your network connections and check your activity, devices, and more.

How do I list Wi-Fi networks using CMD?
There are several commands that you can use to get network-related information. Most PC requires the administrator’s rights to use these commands.

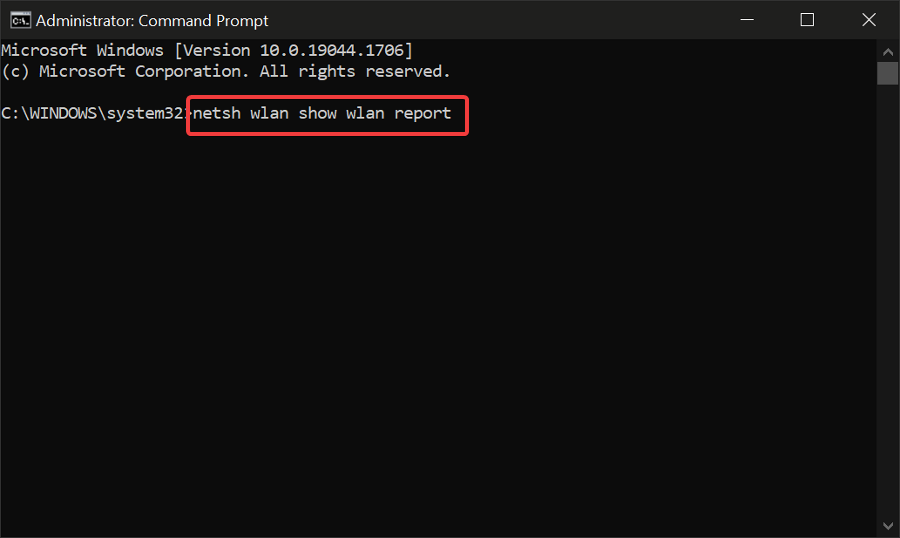
  1. Make sure to select Run as administrator when you open CMD.how to see wifi password windows 10
  2. Type the following command: netsh wlan show wlanreport Press enter.how to see wifi password windows 10
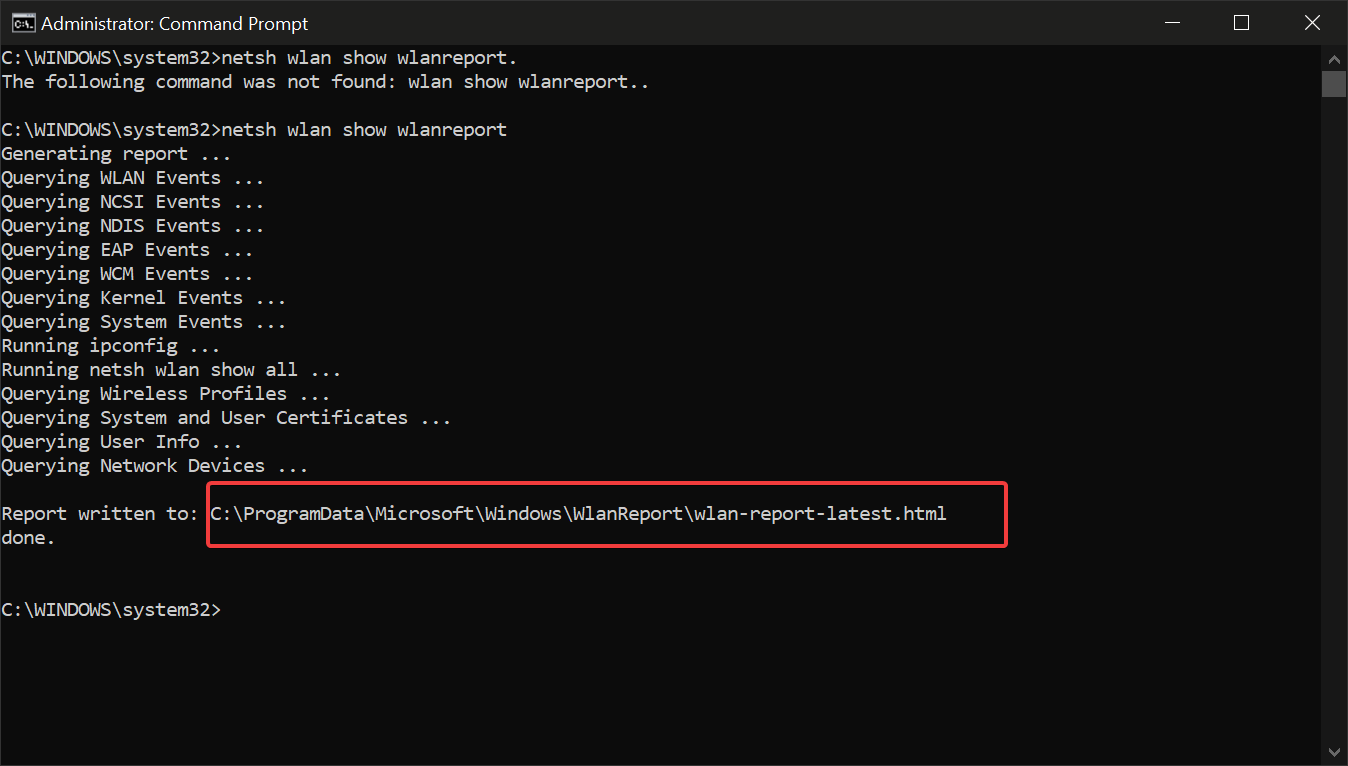
  3. The Command Prompt will generate the report and display its location. To access it, open the Windows File Explorer and paste the location in the location bar. Press Enter.how to see wifi password windows 10
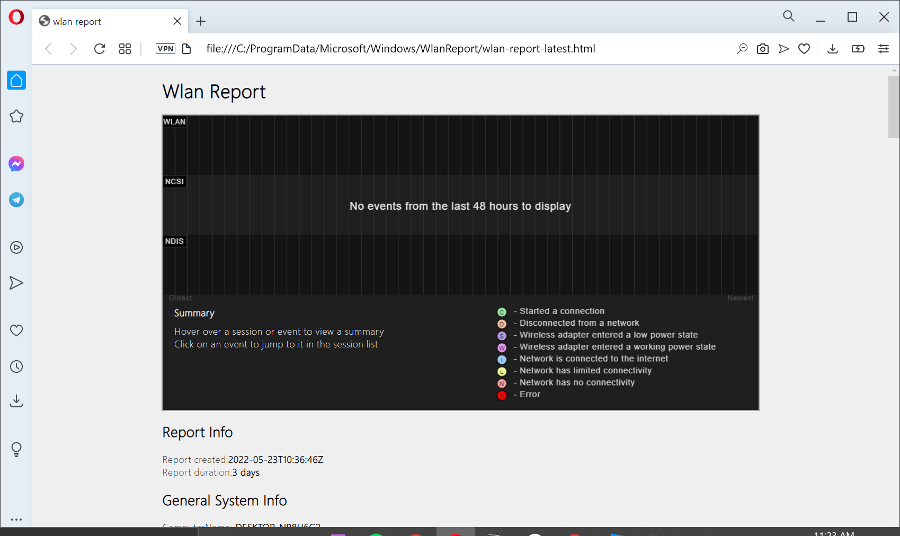
  4. This will open the report in a new window or tab on your default browser.how to see wifi password windows 10

The report shows info about the computer you execute the command from including name, manufacturer, BIOS version, operating system, and more.

You also get a list of all Network Adapters that are connected to your network. You can see the name, type of connection, connectivity percentage, and other useful information.

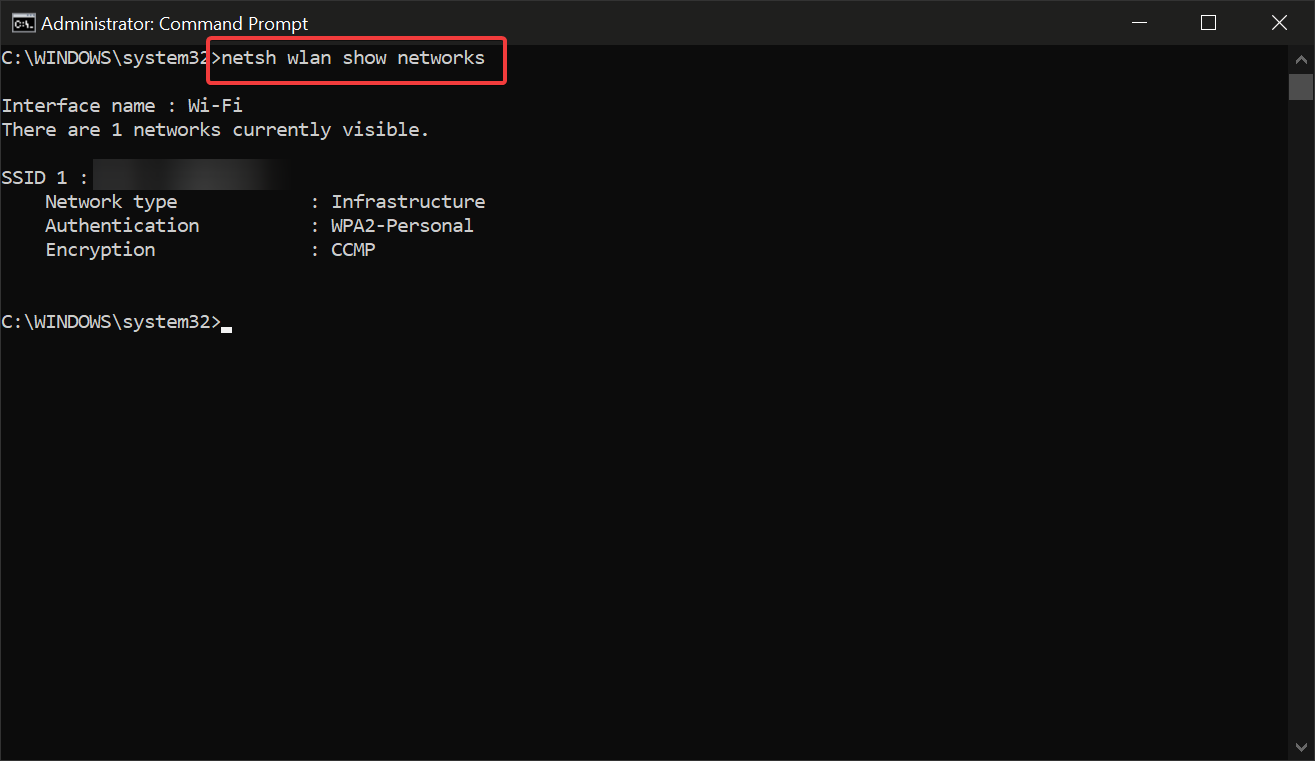
Another useful command that will give you a list of the WiFi networks in your area is netsh wlan show networks

Operating systems keep logs of the passwords of your saved networks. So if you have trouble connecting to a network you have logged into before on your Windows on Mac computer, check the following instructions.

How can I view saved WiFi passwords on Windows 10 and Mac?

1. Check your connection properties

  1. Press Windows Key + I to open the Settings app.
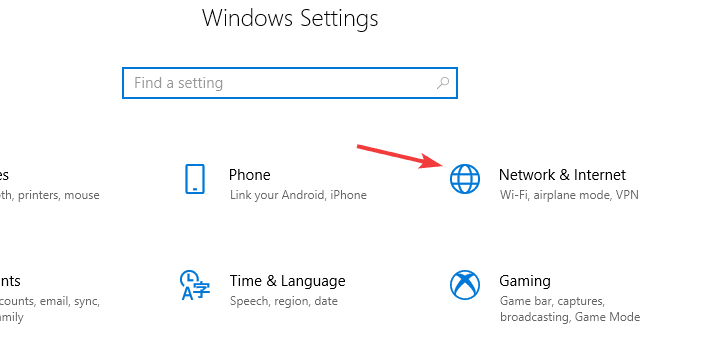
  2. Go to the Network & Internet section.
    network & internet view saved wifi passwords windows 10 , mac
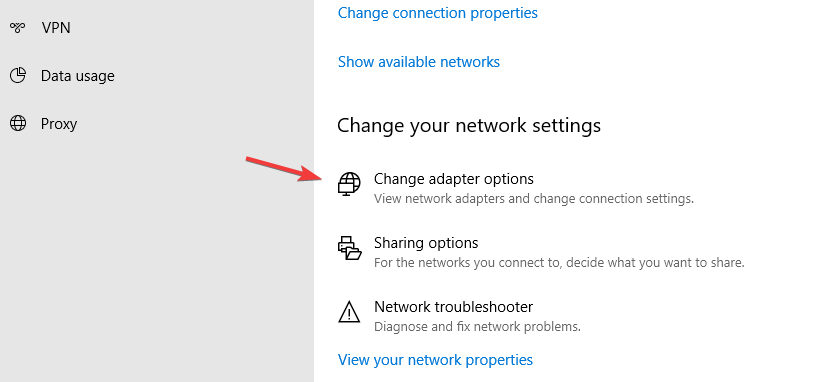
  3. Click on Change adapter options.
    change adapter options view saved wifi passwords windows 10 , mac
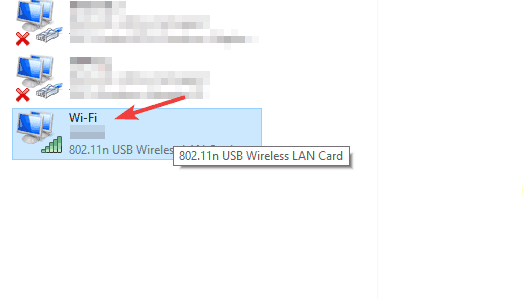
  4. Double-click your Wi-Fi connection.
    wi-fi connection view saved wifi passwords windows 10 , mac
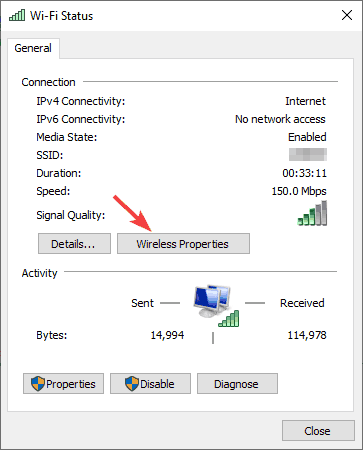
  5. Click the Wireless Properties button.
    wireless properties view saved wifi passwords windows 10 , mac
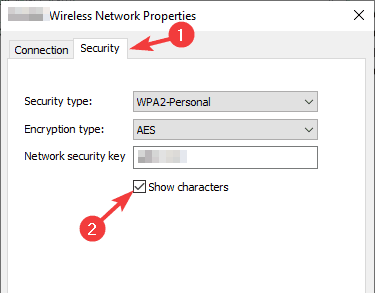
  6. Go to the Security tab and check Show characters checkbox.
    security tab view saved wifi passwords windows 10 , mac
  7. You should now see the password for this Wi-Fi connection in the Network security key field.

2. Use PowerShell or Command Prompt

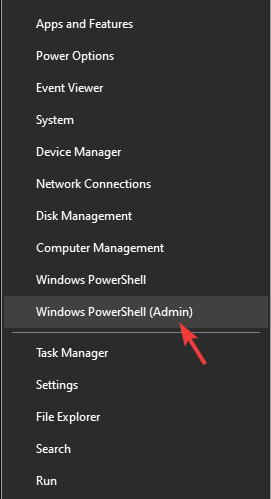
  1. Press Windows Key + X and choose PowerShell (Admin).
    powershell view saved wifi passwords windows 10 , mac
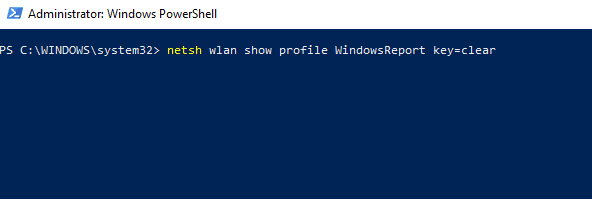
  2. When the PowerShell starts, enter the following command: netsh wlan show profile WI-FI_NAME key=clear
    netsh wlan powershell view saved wifi passwords windows 10 , mac
  3. Be sure to replace WI-FI_NAME with the name of your Wi-Fi network.
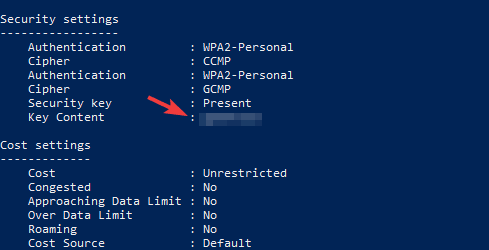
  4. Scroll down to the Security settings and in the Key content field you should find the password for this Wi-Fi network.
    key content view saved wifi passwords windows 10 , mac

3. Use Keychain Access

  1. On your Mac go to Applications > Utilities section.
  2. Start Keychain Access from there.
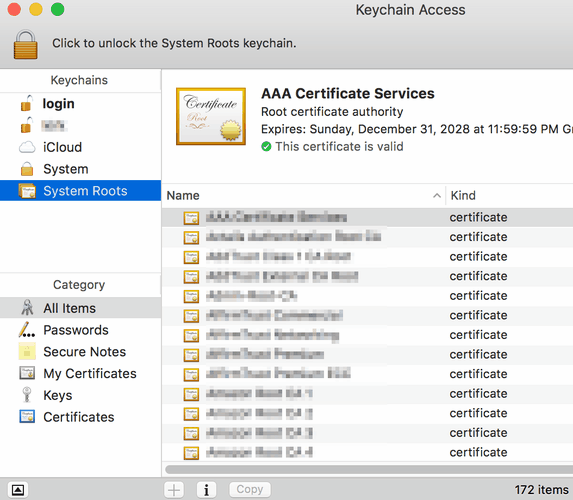
  3. In the Keychains field select System. In the Category section select Passwords.
    keychain access view saved wifi passwords windows 10 , mac
  4. Locate the network in the right pane and double-click it.
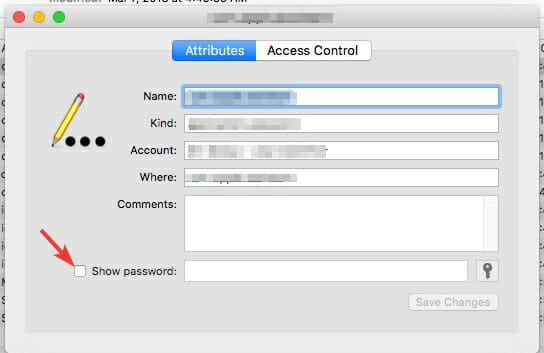
  5. Now check the Show password checkbox.
    keychain access show password view saved wifi passwords windows 10 , mac
  6. Enter your administrative password and the Wi-Fi password will appear.

4. Use the Terminal

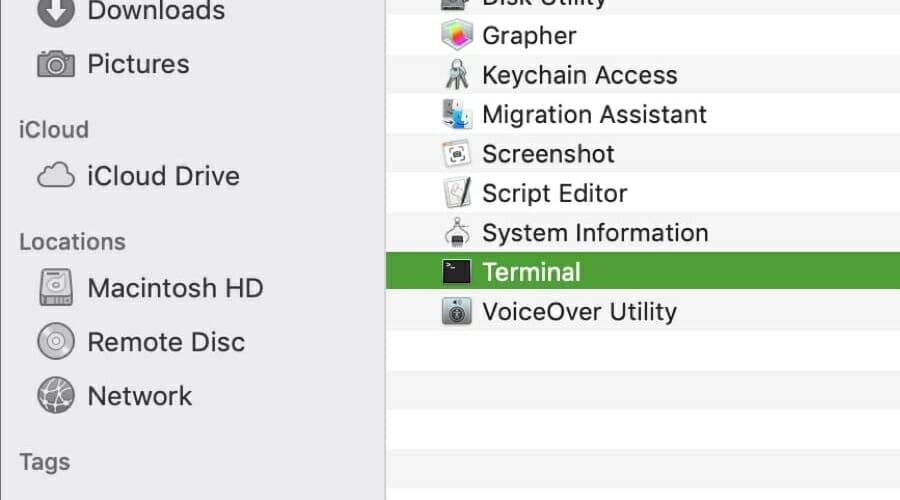
  1. Go to Applications > Utilities and start the Terminal.
    terminal open view saved wifi passwords windows 10 , mac
  2. Run the following command: security find-generic-password -ga WIFI_NAME | grep “password:”
  3. Replace the WIFI_NAME with the name of your network.
  4. Now enter your administrative credentials.
  5. The Wi-Fi password should now appear.

How to find WiFi password on Google Chrome?

  1. Open Google Chrome.
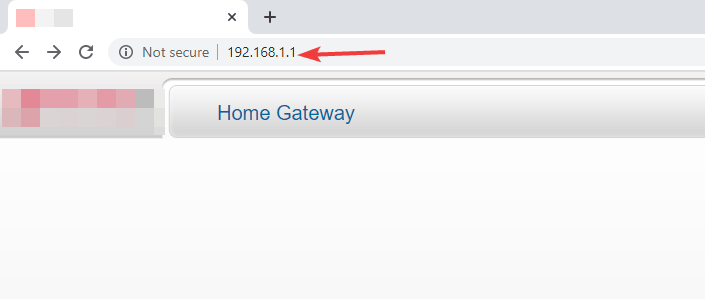
  2. In the address bar type 192.168.1.1 and press Enter.
    chrome address bar view saved wifi passwords windows 10 , mac
  3. Enter your router’s username and password.
  4. Go to the Wireless section.
  5. In there you should see your Wi-Fi settings.
  6. If available, check the Show password option to reveal your Wi-Fi password.
Note icon NOTE
Google Chrome doesn’t store saved Wi-Fi passwords, but you can use it to view your home network password.

Keep in mind that you need to know both your router’s IP address and login credentials to do so. Also, some routers won’t reveal your password, so this workaround might not work for you.

Viewing the saved password on Windows 10 and Mac is quite simple, and you can easily do it using the graphical interface.

If you’re more tech-savvy, you can easily reveal the saved password by using the command line. Did these methods work for you? Let us know in the comments below.

Want to learn more about network connections? For more info, go to our Network & Internet section.

We have a wide array of similar guides, and you can find them all in our How to Hub. Learn how to remove errors, optimize your settings, and more

FIX: Windows Firewall has blocked some features of this app

Some users have stated on forums that the Windows Firewall has blocked some features of this app alert keeps popping up on regular basis.

That notification window pops up every time they open specific software (which usually requires a net connection), such as Chrome, iTunes, Spotify, Kodi, Edge, etc.

It is not an error message, but some users need to get rid of the firewall alert that pops up with regularity. These are a few resolutions that might fix the Windows Firewall has blocked some features error.

How do I stop Windows Firewall from blocking app features?

  1. Scan for Malware
  2. Open the Windows Firewall Troubleshooter
  3. Turn Off the Windows Firewall
  4. Allow the Software Through the Firewall
  5. Disable Network Adapters
  6. VPN Software and Extensions
  7. Restore the Firewall to its Default Settings

1. Scan for Malware

The Windows Firewall has blocked some features error might be due to malware that resets firewall settings. As such, it might be worth running a malware scan.

You can find many effective antivirus programs that provide strong guarding on your PC, keeping malware and other cyber threats away round-the-clock.

Using proper software, you can benefit from powerful anti-malware tools that offer comprehensive scan and high detection rates of intrusive malware.

In addition, it’s worth mentioning that antivirus software will protect your system completely, covering browsing security or gaming modes. Thus, we recommend you choose the best antivirus software today.

2. Open the Windows Firewall Troubleshooter

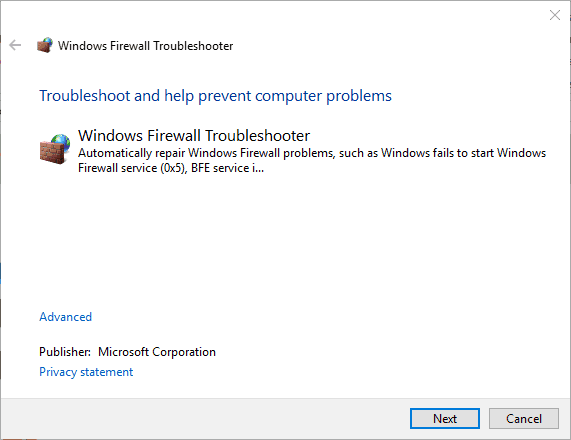
First, check out the Windows Firewall Troubleshooter for Windows 10, 8.1, 8 and 7. That’s a troubleshooter which can fix numerous WF errors.

The troubleshooter is not included in Win 10, but you can download it from this webpage. Open the troubleshooter from the folder you saved it to, and click Advanced to select the Apply repairs automatically option.

Then you can click Next to go through the troubleshooter.

3. Turn Off the Windows Firewall

  • Open Run with the Windows key + R.
  • Enter Control Panel in Run’s text box, and click the OK button.
  • Then enter firewall in the Control Panel’s search box, and click Windows Defender Firewall to open further options.
Windows 10 Store can't buy
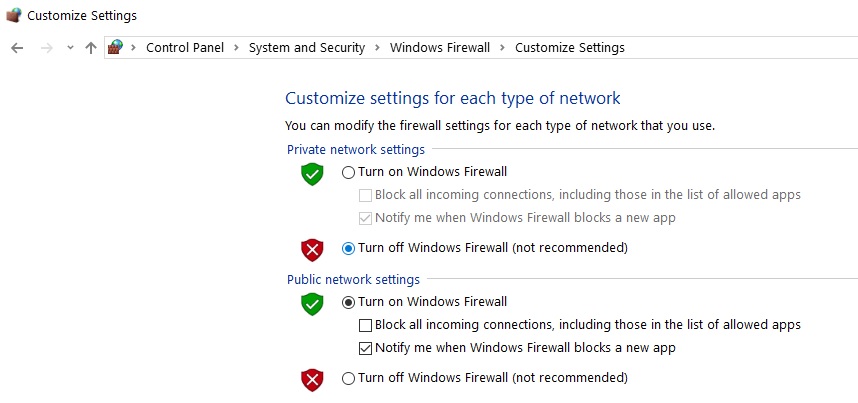
  • Click Turn Windows Defender Firewall on or off to open the options shown directly below.
disable windows firewall
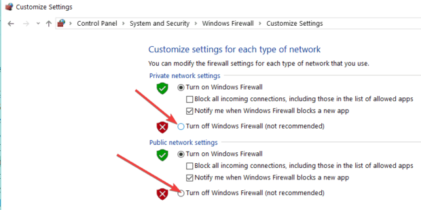
  • Select both the Turn off Windows Defender Firewall options, and press the OK button.
  • Add one of the third-party firewall alternatives included in this article to Windows.

Turning the firewall off might be among the more straightforward resolutions for ensuring the WF alert doesn’t pop up.

You don’t necessarily need the Windows Defender Firewall on as you can replace it with a third-party alternative. This is how you can switch off the Windows Defender Firewall.

4. Allow the Software Through the Firewall

  • Press Cortana’s Type here to search taskbar button.
  • Enter the keyword ‘firewall’ in the search box.
  • Then select to open Allow an app through Windows Firewall.
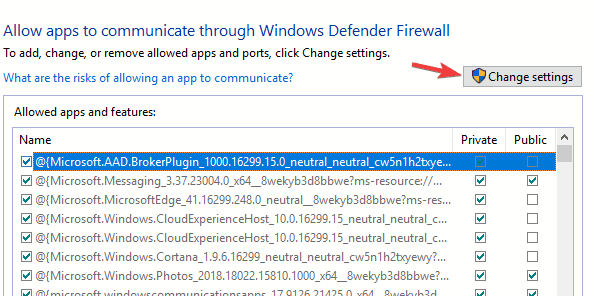
  • Press the Change settings button to adjust the options.
Windows 10 Start Menu and Cortana not working
  • Select both the check boxes for the software on the Allowed apps list that the “Windows Firewall has blocked some features” alert keeps popping up for.
  • Click the OK button.

The Windows Firewall has blocked some features of this app alert window requests that you permit an app through the firewall.

However, you might still need to let an app through the firewall via the Windows Defender Firewall settings to ensure the alert doesn’t pop up for particular software.

5. Disable Network Adapters

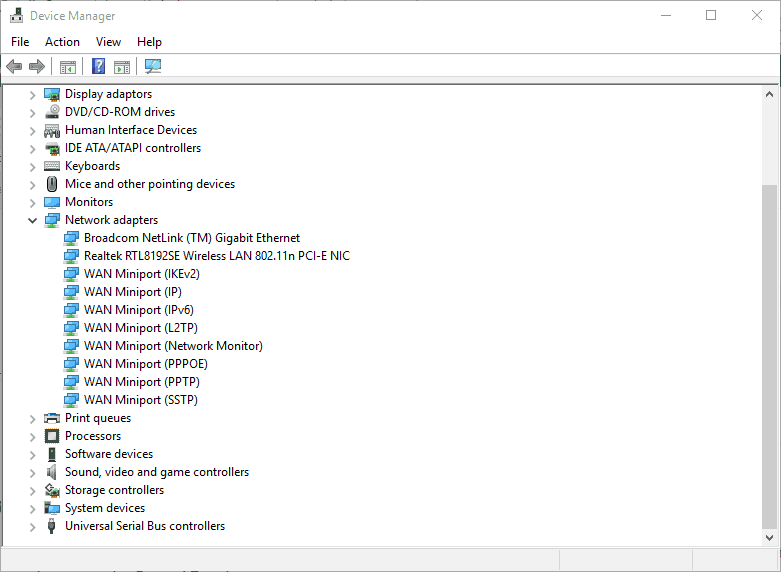
  • Enter ‘devmgmt.msc’ in Run and press the Return key to open the window below.
device manager
  • Select Network adapters to expand that device category as below.
  • Right-click your VPN network adapter and select Disable device.
  • If you’re not sure which one is the VPN adapter, just disable each network adapter one at a time to see if that fixes the Windows Firewall alert.

If you prefer to keep the VPN software, try disabling the VPN’s network adapter via Device Manager. Some users have confirmed they’ve fixed the issue by disabling a network adapter.

6. Uninstall VPN software and extensions

The Windows Firewall has blocked some features error can also be due to VPN client software and extensions.

So uninstalling VPN software, might fix the issue if you’ve installed a VPN client. In addition, check if there are any VPN extensions enabled for your browser.

One way to easily get around this issue is to simply have a dedicated uninstaller that will remove any program from your PC, extensions included.

So, in order to find highly efficient uninstallers that will erase your VPN fully with all its associated files, you can select one from the best uninstaller software on Windows 10.

7. Restore the Firewall to its Default Settings

  • Open the Control Panel.
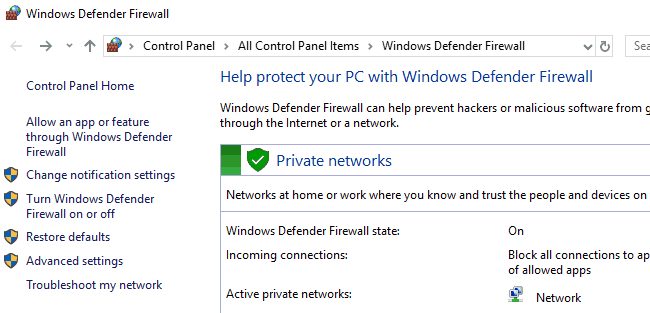
  • Type ‘firewall’ in the Control Panel’s search box, and click Windows Defender Firewall.
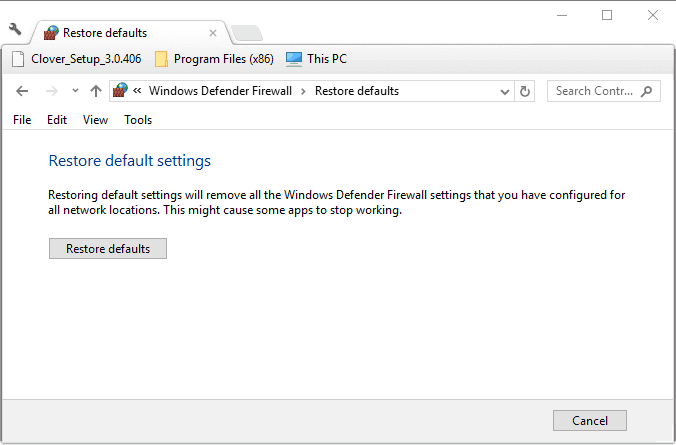
  • Click Restore defaults to open the options shown below.
  • Then you can press the Restore defaults button.
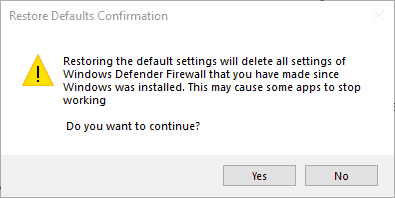
  • A Restore Defaults Confirmation window will open. Click Yes on that dialog box to restore the default settings.

One, or more, of the above resolutions, will probably fix the “Windows Firewall has blocked some features” alert so that it doesn’t pop up. If you have another fix for the Windows Firewall alert, feel free to share it below.

Marvel’s Avengers video game is now playable on Xbox One consoles for Deluxe Edition owners

Xbox One owners who pre-ordered the Deluxe Edition version of Marvel’s Avengers can now begin playing the full game three days before everyone else.

Marvel’s Avengers is the first major Avengers-focused video game to be released on any gaming platform in a very long time. Well, if you don’t count the various (legitimately fun) LEGO Marvel video games that is.

The game features a rather realistic visual style and follows a completely original storyline set outside of the comic books and the Marvel Cinematic Universe. On Day One, players will be able to play as Captain America, Black Widow, Thor, Hulk, Iron Man, and Ms Marvel though a number of additional characters are set to arrive post-launch such as Hawkeye. A data leak made mention of a large roster of potential upcoming characters from Quake and Mockingbird to Scarlet Witch and Black Panther though it’s unknown if these Marvel creations are completely locked in.

Spider-Man has also been confirmed but will frustratingly be only available to players on Sony’s PS4 and PS5 consoles.

The Xbox One version of Marvel’s Avengers supports forward compatibility with Microsoft’s Xbox Series X console which means that owners of the current gen version will be able to play the next gen version for free.

Are you going to play Marvel’s Avengers or are you satisfied with getting your Marvel fix in the current season of Fortnite? Share your thoughts with the community in the comments below and then follow us on Pinterest and Twitter for more Xbox gaming news.


Marvel's Avengers
Marvel's Avengers
Developer:
Crystal Dynamics
Price:
Free

Microsoft and Slack’s long-standing duel is becoming a three-way showdown amid Zoom’s explosive earnings

While Microsoft and Slack duke it out for enterprise market share, the relatively new contestant Zoom is not so quietly eating up both general mindshare and market share while also making a nice little profit in the process.

On Monday, Zoom reported to investors that the company’s revenue earnings were $663.5 million for the quarter versus the market expectations of $500.5 million. Signaling a 335% revenue growth for Zoom year over year. The result for investors was a 92 cents per share increase beating out the estimated 45 cents the market once again predicted.

Perhaps, more importantly, Zoom’s monthly active users continue to grow and were at 148.4 million for the company’s fiscal second-quarter highlighting a 4,700% YoY increase.

On the heels of a stellar fiscal quarter report, Zoom is raising its guidance for the full 2021 fiscal year, expecting its fortunes to continue amid continued pandemic circumstances.

Perhaps, in preparation for Zoom’s earnings results, Microsoft unloaded a sack of new features all seemingly targeted at Zoom’s user base. This week’s update includes improvements to the app on iOS and Android, search in chat, uploading images to galleries, generating links for free meeting invites, and a Safe Key setting as well sidebar navigation customizations.

What may have started off as a duel between Teams and Slacks is now becoming a three-way showdown for video and enterprise chat communication supremacy for Microsoft going into 2021.

Boot Configuration Data is Missing: How to Rebuild it

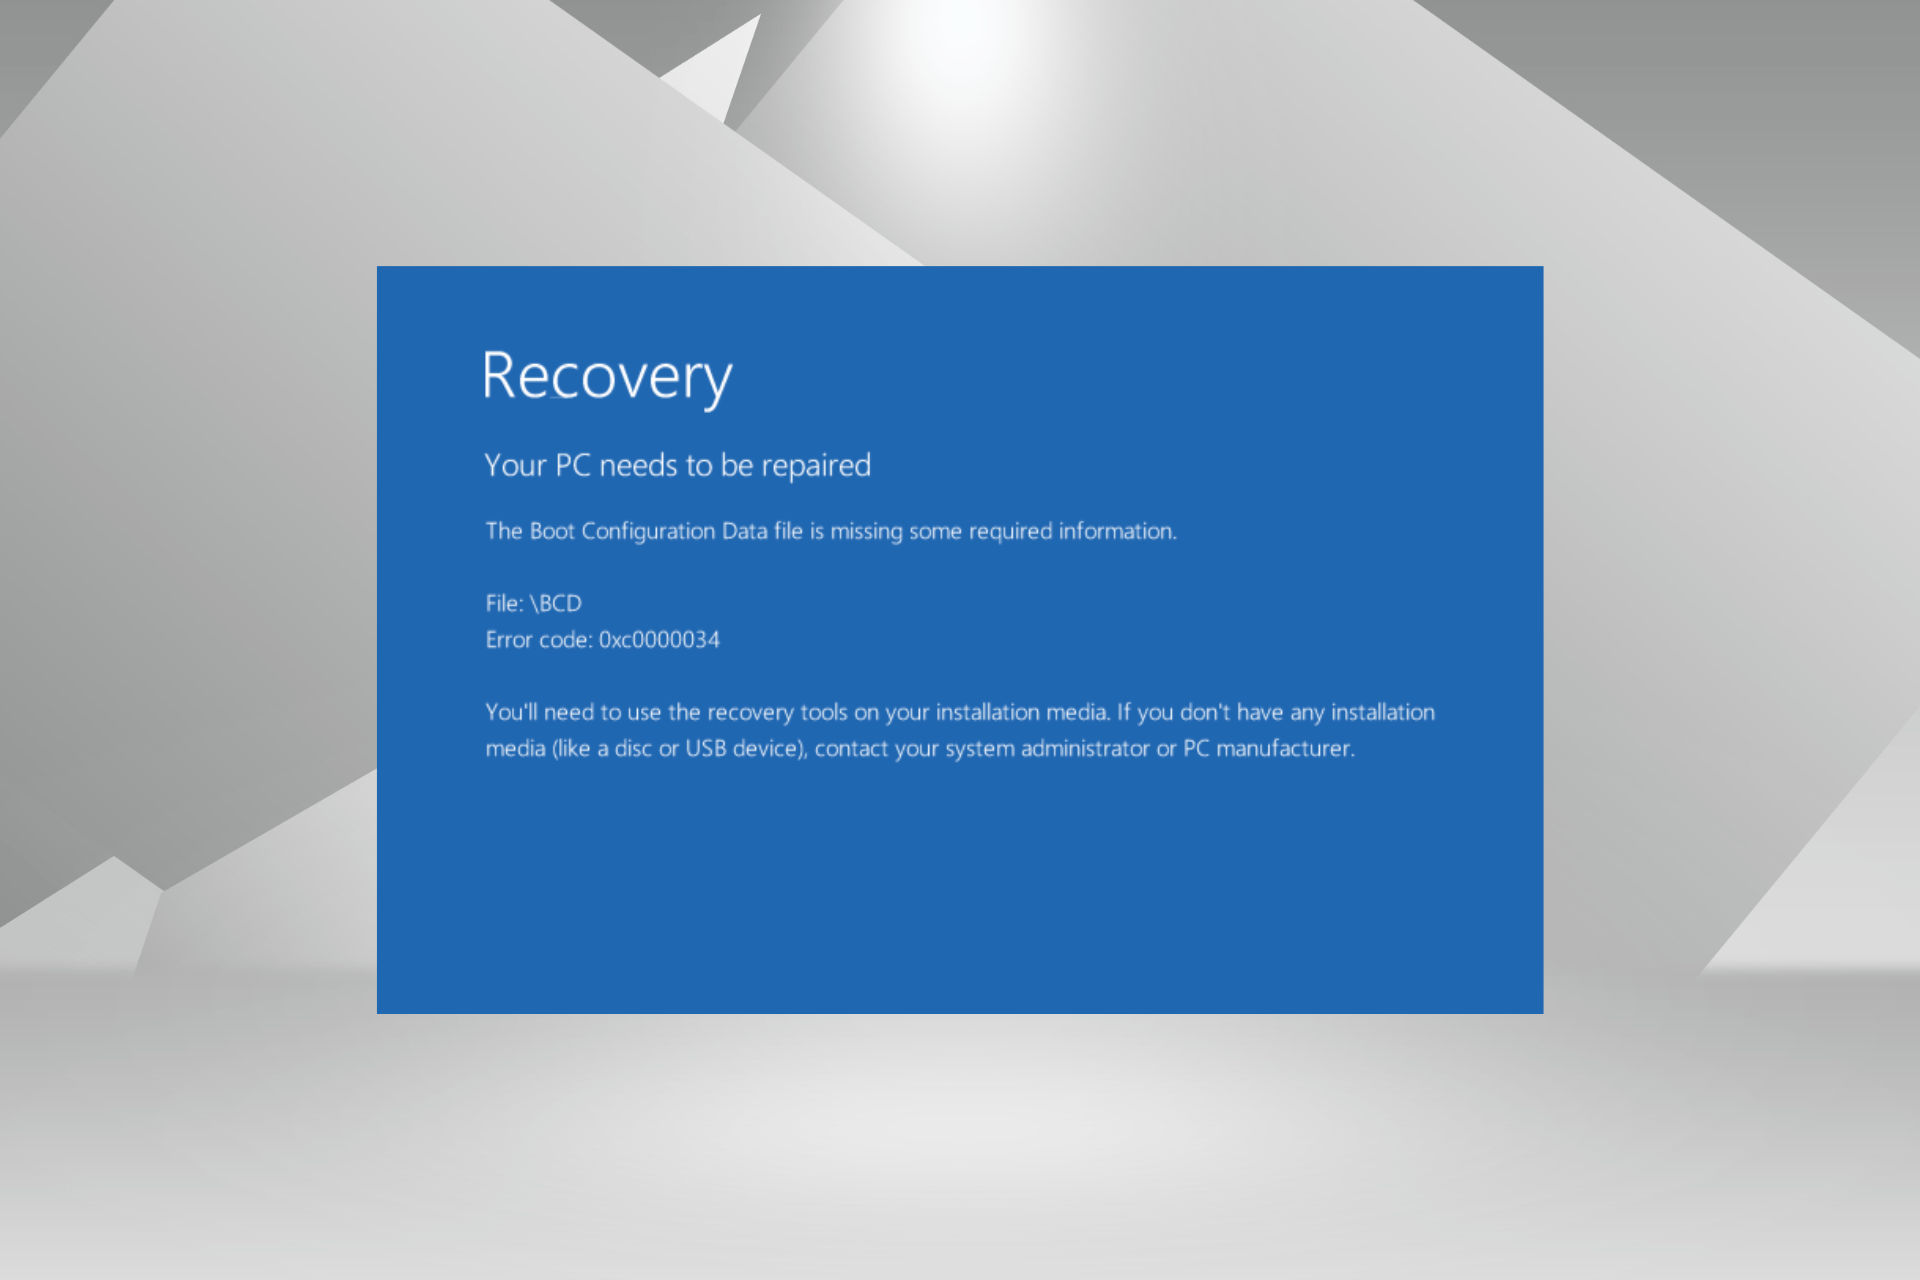
The error message, Recovery: The Boot Configuration Data file is missing some required information, is caused by missing system files in the operating system. So either you deleted them accidentally, or the PC is infected with a virus that deleted critical system information.

When you find the boot configuration data missing in Windows 10, a blue screen appears, listing the message and asking you to use an installation media to fix things. It’s not that simple, though. Fret not! We will walk you through the solutions.

How do I fix boot configuration data is missing?

1. Recover missing files with dedicated software

One way of recovering boot missing files is using a dedicated tool such as Tenorshare Windows Boot Genius.

In case of boot failure or system crash after deleting/losing vital system files, this program can help you recover not only all the necessary data but also registry keys or program passwords needed to access your system.

The tool also works if your files were lost due to partition damage or in case of virus infection.

With Tenorshare Windows Boot Genius, you can easily restore your Windows 10/8.1/8/7/XP/Vista OS and get it back on track.

Tenorshare Windows Boot Genius

Tenorshare Windows Boot Genius

An amazing tool to recover all your important boot configuration data files after a crash or accidental deletion.
Free trial Visit website

2. Use installation CD/DVD

  1. Place the DVD/CD on the device, and reboot your PC.
  2. Press any key to boot from the CD or DVD when the message prompts you.
  3. Select the time and the type of keyboard you wish to use. Just follow the instructions on the screen to get to the next window.
  4. Now, go to Repair your computer on the lower left side of the screen.
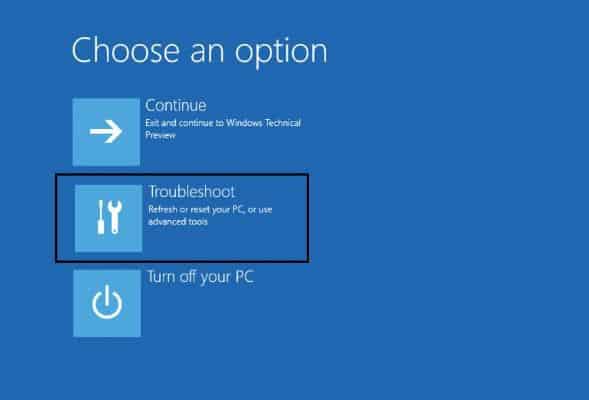
  5. A Choose an option screen should follow, then click on Troubleshoot.
  6. Select Advanced options, then open Command Prompt.
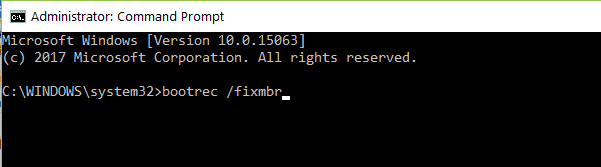
  7. Type the following command and press Enter: Bootrec /fixmbrbootrec fixmbr command
  8. Similarly, paste the following commands, and after each one, press Enter: Bootrec /fixboot Bootrec /scanos Bootrec /rebuildbcd

When faced with the boot configuration data missing in Windows 10, a quick solution would be to repair and rebuild the data using the dedicated Bootrec commands.

3. Run Startup/Automatic Repair

  1. Insert the Windows installation disk (it has to be bootable).
  2. When you get the image below, press any key to continue.cmd press any key to continue screenshot
  3. Select the preferred language and press Enter.
  4. Click on Repair your computer on the bottom left of the Windows Setup window.
  5. From the options proposed, press Troubleshoot.recovery boot configuration data file error troubleshoot
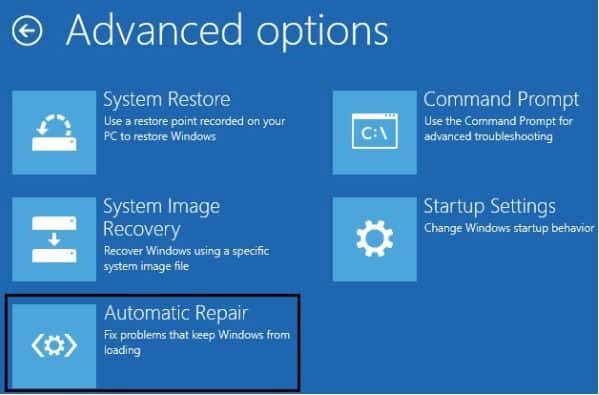
  6. When the Advanced Options screen opens, choose Automatic Repair, wait for the process to be finished, and restart your PC.recovery boot configuration data file missing automatic repair option

That’s it! Also, if you are wondering how to fix things when the boot configuration data is missing in Windows 10 without CD, a bootable USB drive would work just as well. Create one, connect it to the PC instead of the installation CD, and boot the PC through USB.
Before you leave, find out how to make Windows boot faster with some easy changes.

If you had any complications during this tutorial, please write to us in the comments section, and we will see what we can do to help you further with this issue.

FIX: The destination already contains a folder/file named..

Windows sometimes has the strangest issues one could imagine. Even the simplest UI commands, like copy-paste, can sometimes fail you. Luckily, those errors are not common and are simple to address.

For example, the The destination already contains a folder/file named… error pop-ups from time to time. Affected users are unable to copy or even merge the folder and files on the chosen destination.

In order to help you address this, we prepared a list of the most applicable solutions. If you’re having a hard time resolving the issue at hand, make sure to check them out below.

How do I fix The destination already contains a folder named..?

1. Restart Windows Explorer

the destination already contains a folder named
  1. Right-click on the Taskbar and open Task Manager.
  2. Under the Processes tab, navigate to Windows Explorer and End the task.
  3. Don’t close Task Manager yet.
  4. Click File on the Main menu and choose Run new task.
  5. Type explorer.exe in the command line and check the Create this task whit administrative privileges box.
  6. Press OK and close the Task Manager.

This and similar errors can have various causes, starting with the smallest ones and reaching to critical HDD or system issues.

The simplest cause for the error lies in the Windows Explorer inability to execute an ordinary task due to clipboard issues.

As it’s the essential built-in part of the Windows shell, you certainly can’t reinstall it. What you can do is restart it.By doing so, you’ll clear the cache and, hopefully, fix the copying error.

2. Check for hidden files

the destination already contains a folder named
  1. Open Windows Explorer.
  2. In the Main Menu (File, Computer, View) choose the View tab.
  3. Check the Hidden items box.
  4. Now you should be able to see whether there’s any conflicting folder in the preferred destination.

What if The destination already contains a folder/file named.. error is not an error at all? Some folders or files might be hidden, especially if you’re merging or copying to system folders.

And one single file can create the problem and prevent copying/merging. In order to address this, we recommend enabling hidden files.

That way you’ll know whether there’s or there isn’t the file or folder with the same name at the destination.

A file search tool can be used also to open hidden files in Windows 10.

This type of software allows you to search for text, pictures, music and video files. You can also search e-mails and contact addresses from Outlook and browse favorites and history in Internet Explorer.

The program searches MS Office, HTML, PDF, text and OpenOffice files. Using categories it can distinguish between file categories such as music, photos, videos or e-mails from Outlook or Mozilla programs.

3. Run SFCthe destination already contains a folder named

  1. Type cmd in the Windows Search bar.
  2. Right-click on the Command Prompt and run it as an admin.
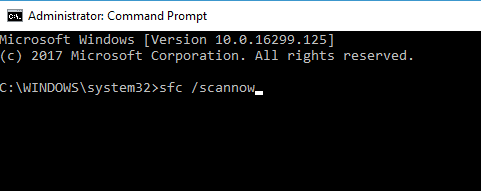
  3. In the command line, type sfc/ scannow and press Enter.
  4. Wait until the scan is finished and restart your PC.
  5. Try copying the troublesome file or folder again.

Even the slightest corruption of system files can lead to inconsistencies in the performance. Since this problem’s core is somewhere with the system, we recommend running the System File Checker utility.

The SFC is the system utility tool run through elevated Command Prompt. Its main purpose is to check the integrity of the system files.

Once run, it should identify and fix the majority of the problems concerning the system files.

4. Use Command Prompt to transfer files

the destination already contains a folder named
  1. Open Command Prompt as an administrator.
  2. In the command line, type the following command and press Enter: robocopy C:Folder1 D:DataFolder2 /e
  3. Don’t forget to replace the C:Folder1 D:DataFolder2 part with your own destinations.

If Windows Explorer won’t work and you are in a dire need to copy something from the destination A to destination B, you can use the robocopy command in Command Prompt.

This command is a great way to copy large chunks of data while retaining the access permissions and copying all subdirectories in the process.

5. Check storage for errors

the destination already contains a folder named
  1. Open This PC.
  2. Right-click on your HDD or the USB flash drive and open Properties.
  3. Choose the Tools tab.
  4. Under the Error Checking section, click Check.

This error would be the last thing on your mind if it turns out there’s a storage error on your HDD. On the other hand, if you’re copying files to USB flash drive, these errors are quite common.

These get corrupted all the time and it’s rather simple to fix them. Of course, this only works if the hardware part is still performing.

6. Scan for malware

the destination already contains a folder named
  1. Open Windows Security Center from the Notification area.
  2. Choose Virus & threat protection.
  3. Choose Advanced scan.
  4. Select Offline Scan and click on the Scan now button.
  5. Your PC will restart and the scanning procedure will commence.

Possible malware interference is also a viable reason for Explorer’s mischief. Making sure that your PC is protected from the effects of the malware presence is of utmost importance. In this case, we recommend a deep scan.

You can do so with the built-in protective software Windows Defender, or with a third-party antimalware solution. If you want to get a third-party anti-virus, your best options are the ones we identified in this comprehensive article with the best antivirus for Windows 10.

They all perform well, have been tried in real-world settings, and have received positive feedback. To be clear, each of them is unique and can discover different difficulties depending on your PC and regular usage habits.

7. Reset the system to factory settings

the destination already contains a folder named
  1. In the Windows Search bar, type recovery.
  2. Open Recovery options from the list of results.
  3. Click on the Get started button under the Reset this PC recovery option.
  4. Choose whether you want to preserve files stored on system partition or not.
  5. Follow the instructions until the system is refreshed.

In the end, if the error is persistent, the only viable solution is turning to recovery options. System Restore should work just fine, but it’s not enabled by the default.

Which mean that there’s a good chance you don’t have available restore points. On the other hand, factory reset works like a charm.

It refreshes your system similarly to clean reinstall but you get to keep your files and installed applications.

In case you are aware of any alternative solution for the The destination already contains a folder/file named… error in Windows 10, please do share it with us. You can do so in the comments section below.

[wl_navigator]

The Connect app is now an optional feature in Windows 10

With each new version, Microsoft is adding new features, but it also removes some that become obsolete, redundant, or useless.

Now, the software giant added the Connect app to the list of removed features from Windows 10 version 2004.

The Connect app was helping you to connect to a wireless display using Miracast so it is pretty important but don’t worry because it will still be available as an optional feature.

How can I install the Connect app?

If you updated your system to the Windows 10 version 2004 and you can’t find the Connect app, you can still install it from Settings > Apps > Optional features > Add a feature. 

Then, you just need to type Wireless Display and install the app. After the installation, you will find the Connect app by typing connect to a wireless display in Windows search. 

However, there’s another, easier way to connect to a wireless display by using the Windows key + K combination. Not only you will find any compatible display but also all other audio wireless devices.

If you can’t connect your Windows 10 device to a wireless display, we have an excellent guide to fix that problem.

Please let us know if you have any suggestions in the Comments section below.

[wl_navigator]

How to fix Windows 10/11 MBR without CD [FULL GUIDE]

The Windows 10 MBR (Master Boot Record) might get corrupted or you might experience MBR-related issues if your device was infected with malware, or if an improper shutdown has occurred.

So, as you might know, it’s more than recommended to protect your device by using dedicated antivirus and antimalware tools and you should always be careful when shutting down your Windows computer.

Fixing Windows 10 MBR can be quite easy especially if you can use the Windows 10 installation DVD. You just need to follow the troubleshooting process and to run some commands in Command Prompt.

But what can you do if you can’t use the Windows 10 CD?

In that case, the process is a little bit tricky as you need to be fast when completing the troubleshooting steps. You will see what I am talking about at the right time in the steps below.

How do I fix Windows 10 MBR without an installation disk?

  1. Use a third-party dedicated software
  2. Use Windows Troubleshoot
  3. Run Bootrec
  4. Disconnect USB portable drive

1. Use a third-party dedicated software

boot pc without cd
When you can’t find the Windows 10 CD, you still have a chance of booting your PC, as well as recovering the OS if it’s unbootable using a dedicated tool such as Tenorshare Windows Boot Genius.

This tool can help you with booting up a PC that won’t start properly, burning a bootable ISO image of Windows 10 on a CD/DVD/USB, recover all passwords, product keys, and data in case of boot failure.

So not only you will be able to restore your system and files, but also to repair the crashed MBR or a corrupted registry caused by BSOD, various system crashes, virus infection, or partition damage.

Tenorshare Windows Boot Genius supports Windows 10/8.1/8/7/XP/Vista.

Tenorshare Windows Boot Genius

Tenorshare Windows Boot Genius

Get all-in-one efficient help with booting and restoring a crashed Windows 10 MBR with just a few clicks.
Free trial Visit website

2. Use Windows Troubleshoot

  1. Restart your device.
  2. Immediately start pressing Ctrl + Alt + Del (you might need some practice before being able to do this properly).windows-8
  3. Your device will restart automatically.
  4. Repeat pressing the three buttons mentioned above.
  5. Let the machine restart without doing anything else.
  6. You should see the following messages displayed: Preparing automatic repair, Diagnose, Attempting Repairs.
  7. Select Advanced options.
  8. Next, go towards Troubleshoot.
  9. Once more, select Advanced options.
  10. And finally, pick Windows startup settings and choose Restart.
  11. That’s it, now your computer should restart normally.

3. Run Bootrec

  1. Follow the steps listed above until step number 9
  2. When the Advanced options screen appears, select Command Prompt.
  3. Enter the following commands and hit Enter after each one:

bootrec.exe /rebuildbcd

run bootrec to fix mbrbootrec.exe /fixmbr
bootrec.exe /fixboot


4.  Disconnect USB portable drive

Disconnect USB portable drive to fix windows 10 mbr
If there is an external USB portable drive connected to your Windows PC, this may explain why you can’t boot your device. Many users who encountered this issue confirmed that unplugging the drive solved the problem.

So, that’s how you can fix Windows 10 MBR without using your installation disk or DVD. If you’re running on an older OS, the tool recommended in the first step, Tenorshare, will surely do the job for you.

If you have questions or if you can’t apply the steps above, share your thoughts with us by using the comments field from below and we will help you as soon as possible.

Also, if you’ve got additional tips and suggestions on how to fix Windows 10 MBR without an installation disk, you can list them in the comments below.

[wl_navigator]

How to fix the Your input can’t be opened VLC error

Your input can’t be opened error is one that occurs for some VLC users when they try to play a video stream or YouTube video.

When they enter a URL for the YouTube video, an error message pops up stating: Your input can’t be opened. VLC is unable to open the MRL.

Consequently, users can’t play videos that aren’t saved on their HDDs. If that same error message pops up for you in VLC, check out some of the potential fixes for it below.

What can I do if VLC is unable to open the MRL streaming?

  1. Save the Youtube.lau file in VLC’s Playlist folder
  2. Turn off the Windows Firewall
  3. Turn off your third-party antivirus software
  4. Check for VLC updates
  5. Try a VLC alternative

1. Save the Youtube.lau file in VLC’s Playlist folder

  1. One resolution for the Input can’t be opened VLC error is save the Youtube.lau file to the VLC Playlist folder. To do that, open this VLC webpage in your browser.
  2. Click the Download button there to save the Youtube.lau file.
  3. Then, press the File Explorer button on the Windows 10 taskbar.
  4. Open the folder you saved Youtube.lau to.
  5. Right-click the Youtube.lau file and select Copy.
  6. Open this folder path in File Explorer: C:ProgramFiles(x86)/VideoLAN/VLC/lauplaylist
  7. Then right-click within the Playlist folder and select Paste to add the Youtube.lau file to that folder.

2. Turn off the Windows Firewall

  1. First, press the Type here to search button on the Windows 10 taskbar to open Cortana’s search box.
  2. Enter Windows Firewall in the search box.
  3. Then select Windows Defender Firewall to open the window shown in the shot directly below.
  4. Click Turn Windows Defender Firewall on or off to open the options.
  5. Select both the Turn off Windows Defender Firewall options.Turn off Windows firewall
  6. Click the OK button.
  7. If that does fix the Your input can’t be opened error, the Windows Firewall is probably blocking VLC. To add VLC to an exception list, enter Windows Firewall in Cortana and select Allow an app through Windows Firewall.
  8. Press the Change settings button.
  9. Scroll to VLC on the apps list and select all its checkboxes if they’re not selected.
  10. Press the OK button to close the window.

The Input can’t be opened error messages can often be due to firewalls blocking the VLC media player.

Thus, temporarily turning off the Windows Defender Firewall for VLC might fix the issue. You can turn off the Windows Defender Firewall as described above.

3. Turn off your third-party antivirus software

Third-party antivirus software can also include firewalls. As such, you might also need to turn off a third-party antivirus utility before you open VLC.

You can usually do that by right-clicking an antivirus utility’s system tray icon and selecting a disable option on the context menu.

Alternatively, open the antivirus software’s primary window to check if VLC is among the blocked applications on the firewall’s application list.

Adjust the software’s settings so that it allows VLC for all networks.

4. Check for VLC updates

Updating VLC might fix the Your input can’t be opened error if you’re currently utilizing an antiquated version of the media player.

To check for updates, click Help > Check for updates in VLC. The VLC media player updates window will tell you if there’s an available update.

If so, click Yes > Install to update the software.

5. Try a VLC alternative

If you keep getting the same error message that states Your input can’t be opened, you’ll need to think of a VLC alternative.

Cyberlink PowerDVD is an all-in-one multimedia app that can be easily used to play and pin your Youtube videos. Yes, you read it right. You wouldn’t have to worry about similar errors ever again.

Aside from that, it also allows you to enjoy Seamless Playback and return to watching your videos from the exact point where you left off and TrueTheater features, for the best video and audio quality.

⇒ Get Cyberlink PowerDVD

Those are some of the resolutions that might fix the error that prevents you from playing videos with the network stream in VLC.

Now, you know what to do when getting the Your input can’t be opened. VLC is unable to open the MRL message.

The above steps should be useful. Don’t hesitate to share your experience with us by using the comments section below.

How to play HEVC videos on PC [Best Tools]

Want to play HEVC files on your Windows 10 or Windows 11 PC but not sure how? You’re not alone. HEVC (also called H.265) is a powerful video format that delivers high-quality videos in smaller file sizes -but it doesn’t always work out of the box on Windows.

In this guide, we’ll explain what HEVC is, why it matters, and how you can easily play HEVC files on your PC, whether you’re using Windows 10 or Windows 11. We’ll also cover what codecs you might need, which devices support it natively, and the best players you can install to get smooth playback without any hassle.

Let’s break it down step by step so you can start watching your HEVC videos in no time.

What are the best HEVC players for Windows 10?

Cyberlink PowerDVD (recommended)

install Cyberlink PowerDVD

Cyberlink PowerDVD is a premium multimedia app that lets you play HEVC videos on your PC.

Aside from that, what really makes it stand out is the fact that it allows you to organize all your videos, photos, and music files in a single place.

No less important, if you’re constantly on the go, you’ll know the importance of the new Watch On-The-Go features.

You can easily take your HEVC videos and movies anywhere with the CyberLink cloud. And if you download them to your mobile device, watching offline is possible as well.

Main Cyberlink PowerDVD key features you’re about to enjoy:

  • Ultra HD Blu-ray and 8K video support
  • Seamless Playback to keep on watching from the exact point where you left off
  • TrueTheater features for an ultimate video experience
  • Ease of data share via a simple link
  • CyberLink generous cloud space
Cyberlink PowerDVD

Cyberlink PowerDVD

Do you want to play HEVC videos on PC? Cyberlink PowerDVD is the best multimedia app for the task!
Check priceVisit website

5K Player

install 5K Player

5K Player might be the newest kid on this block but is already considered among the best to play back HEVC videos. It is compatible with the UHD format, which makes it HEVC ready as well.

It is simple and efficient too, with the ability to playback HEVC videos really fast. It is lightweight as well, meaning its impact on the hardware is minimum.

Further, there is no need to download any codec or plug-in as the player comes with all the resources needed for it to read HEVC video files.

It supports 4K, 5K, and 8K formats as well, besides H.265, MP4, MKV, AVI video files. Saving the best for the last, 5K Player comes completely free.

⇒ Download 5K Player now

VLC Media Player

install VLC Media Player

VLC has already been among the most widely used media players and has built a reputation of being able to handle almost any media files you throw at it.

So it should be least surprising our old favorite VLC is able to handle HEVC video files with élan.

However, you might have to download the requisite codec before that, unless you are using the latest version of the VLC player.

The software otherwise is as simple and user friendly as it has always been.

⇒ Download VLC Media Player now

UFUSoft Blu-ray Player

install UFUSoft Blu-ray Player

Besides being an excellent Blu-ray disk player, its ability to playback HEVC videos is among the other extremely likable qualities of the free software.

It can also serve equally well as a 4K media player while other media formats it can handle include H.264, H.265, MPEG-4, and so on.

With these being said, could UFUSoft Blu-ray Player be your choice as well?

⇒ Download UFUSoft Blu-ray Player now

So there you have it, a brief introduction of the HEVC format followed by a compilation of the best players for reading HEVC video files.

Adopting any of these might require ditching one you have been hanging on for a long time, but rest assured that it will be worth it.

Which one is your choice? Let us know in the comments area below.

[wl_navigator]

Asus laptop won’t play DVD [Solved]

Many of us enjoy watching DVD movies on our computers, but it seems that DVDs won’t play on Asus laptops for some users.

This seems like a big problem, but fortunately for you, there are a few quick solutions available.

In previous versions of Windows, you were able to insert a DVD movie and watch it on Windows without any third-party software.

Now Microsoft decided to change that. Windows 10 doesn’t allow you to play DVD movies without using third-party software.

If you want to use the official software, you can download and buy the DVD application from Microsoft Store, but without that application, you can’t play DVD on your Asus laptop.

So, what can you do? Let’s take a look at some useful tips.

How can I play DVD on my Asus laptop?

  1. Use Windows 10’s built-in troubleshooter
  2. Update your computer
  3. Run an SFC scan
  4. Use a third-party media player that supports DVD playback

1. Use Windows 10’s built-in troubleshooter

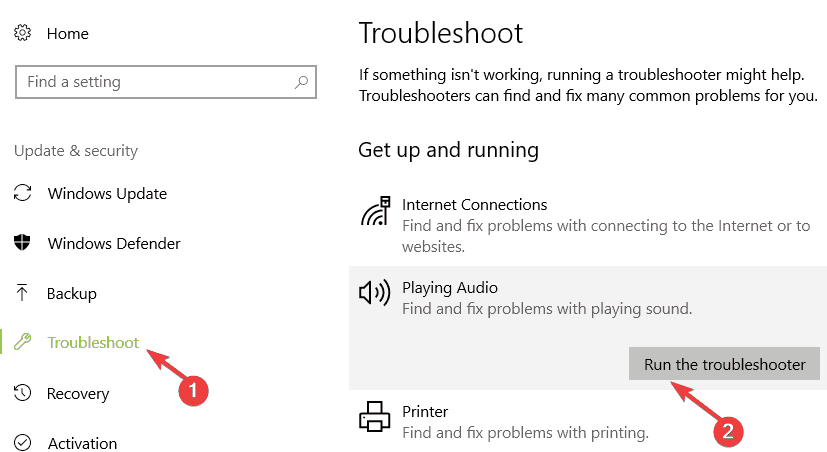
  1. Go to Settings > Update > Troubleshoot.
  2. Run the Playing audio and Video Playback troubleshooter.
fix DVD asus computer

If you installed a third-party media player that supports DVD, yet the problem persists, try running the built-in audio and video troubleshooter.

2. Update your computer

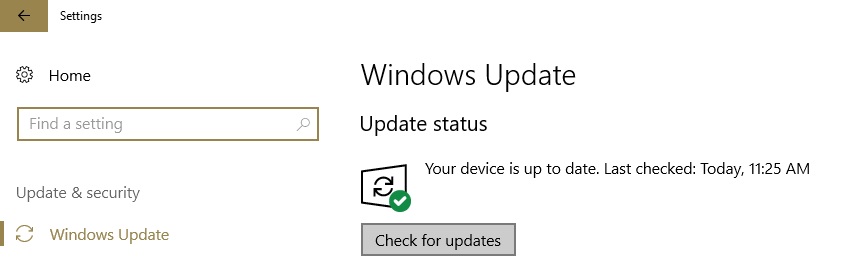
  1. Go to Settings > Update & Security.
  2. Click on the Check for updates button.
  3. Now, you just need to install the available updates.
check for updates windows 10

If your ASUS computer still fails to recognize or play your DVD movie, try installing the latest OS updates on your machine.

Microsoft regularly releases updates to Windows 10 computers in order to improve the OS stability and fix various issues, including DVD rendering bugs.

Also, if you installed any DVD recording programs, try uninstalling them. Quite a few users confirmed that this quick workaround helped them fix the problem.

3. Run an SFC scan

  1. Open Command Prompt as administrator.
  2. Then, enter the command sfc /scannow > hit Enter.sfc scannow
  3. Wait until the scanning process completes and restart your computer.

System file corruption issues are extremely annoying as they can affect the overall functioning of the OS. The quickest way to fix system file issues is to run an SFC scan.

Have problems using the SFC tool? Don’t worry, we’ve got a quick guide precisely for this issue.

4. Use a third-party media player that supports DVD playback

As we said earlier, Microsoft has decided to change its policy, and now you need to buy Microsoft’s official DVD application in order to play a DVD movie on your laptop.

This came as a shock to many Windows users mostly because this feature has been free in all versions of Windows for years.

However, this only affects the default Windows applications. You can still play a DVD movie using a third-party media player such as Cyberlink PowerDVD, for example.

Fortunately, if you’re having this issue, all that you have to do is to download and install Cyberlink PowerDVD and you’ll be able to watch any DVD movie on your Asus laptop.

⇒ Get CyberLink PowerDVD

These quick workarounds should help you fix the issue where your ASUS computer fails to play DVDs.

If you come across other workarounds that our readers could use to fix this problem, let us know in the comments below.

Windows Insider Program “Get Started” is Greyed Out

The Windows 10 Insider Program is still active, even after the release of the full version of Windows 10.

But some users who left the Insider Program for the full version, report that they’re unable to get back to the program because of the ‘Get Started‘ button is grayed out. Luckily, this is a common problem, and there’s an easy solution for it.

Microsoft attracted a lot of users with the Insider Program for Windows 10 Technical Preview. More than 5 million people were using and testing Windows 10, before its actual release.

But when the full release finally came, most of the users decided to leave the Insider Program and use the full version only.

But when some of them decided to get back to the Windows Insider Program, they simply couldn’t, because the Get Started, button, which brings you back to the program was greyed out.

How can I fix greyed out Get Started button in Windows 10?

  1. Delete the Software Distribution Folder
  2. Check your privacy settings
  3. Enable Telemetry in the Registry
  4. Disable VPN software

1. Delete the SoftwareDistribution folder

Some people said that besides fixing the broken updates, deleting the content of the SoftwareDistribution folder helped them to get back the Get Started button, as well. Here’s how to delete everything from the SoftwareDistribution folder:

  1. Go to This PC and open the partition you have your Windows installed on (it’s usually C:)
  2. Go to Windows folder
  3. In Windows folder, find a folder named SoftwareDistribution and open it
  4. Delete everything from that folder get started button greyed out
  5. Restart your computer

Since the SoftwareDistribution problem is a possible solution, the problem lays in Windows Updates. So, if deleting the SoftwareDistribution folder doesn’t have any effects, you can try running Windows Update Troubleshooter, from Control Panel, maybe this Microsoft tool will be helpful.

If you need to make sure everything is deleted and that nothing is left behind, you should consider the aid of a third-party program.

There are multiple effective tools that can help you to permanently erase specific files you need to keep away from your PC.

In order to be sure the files are really erased, it’s not enough to delete them with file explorer and empty the Recycle Bin.

Regardless of your privacy, using effective file deletion software will help you thoroughly erase files and folders from your system.

2. Check your privacy settings

If you’re worried about your privacy in Windows 10, and a lot of people are, because it is well known that Microsoft collects your personal data through Windows 10, you probably changed some privacy settings, in order to keep your computer as private as possible.

One of these privacy settings is the ability to send data to Microsoft, as feedback of using Windows 10, and if you chose not to send any data, you won’t be able to get back to Windows Insider Program.

So, when you try to ‘get started,’ you won’t be able to, and you’ll see the message which says Some Settings Are Managed By Your Organization.

We talked about removing this message in our article about Some Settings Are Managed By Your Organization in Windows 10, so just follow the instructions from that article, and you’ll be able to remove this message, and Get Started button won’t be greyed out anymore, so you can receive future Preview builds normally.

get started button greyed out windows 10

If your ‘Get Started’ button is still greyed out, even after changing settings like shown in the article, then something’s actually wrong with your system, so you can try some of the following solutions.

3. Enable Telemetry in the Registry

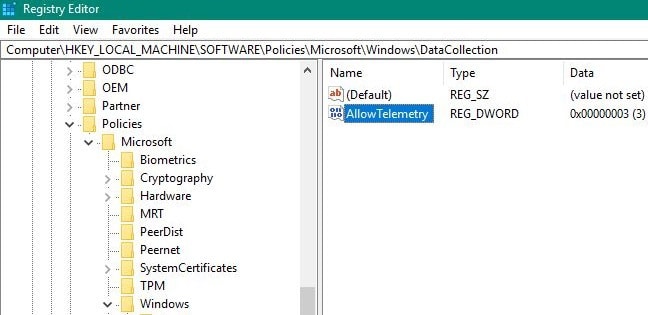
As stated at the beginning of this article, in order to be able to select Insider builds, you need to first enable Telemetry settings. You can also do this by tweaking your Registry:

  1. Go to Start > type regedit > double click on the first result to launch the Registry Editor
  2. Navigate to this key:
    • HKEY_LOCAL_MACHINESOFTWAREPoliciesMicrosoftWindowsDataCollection
  3. Change the AllowTelemetry dword value to 3
  4. If there is noAllowTelemetry dword available, create it
  5. Restart your computer and check if you can download the latest Windows 10 Insider build

4. Disable VPN software

If you currently use a VPN tool, try disabling it. Then navigate to Settings > Windows Update > go to the Windows Insider Program and check if the Get Started button is still grey.

If you want to participate in developing further versions of Windows 10, getting involved in Insider Program is probably the best thing for that. And if you had some problems re-joining the program, I hope this article solved everything.

Surface Pro 3 won’t turn on: Here’s how to fix this problem

Lucky testers of Windows 10 Insider Build 16288 might have noticed that it left Surface Pro 3 laptops in an unbootable state and stuck on the spinning dots screen, and it seems like more Surface Pro 3 laptops feature the same issue.

After Microsoft investigated the problem, it found that some required boot files for Surface Pro 3 devices ended up in a buggy state after an abnormal shutdown.

In case you installed build 16291 or 16288 and have not been affected yet, you should still follow the steps recommended by Microsoft because even if you seem safe for now, the issue may occur later on.

The article also covers the following topics:

  • Surface Pro won’t boot
  • Surface Pro 3 won’t boot
  • Surface Pro 3 won’t boot
  • Surface Pro 3 startup repair
  • Surface Pro 3 won’t boot past surface screen

How do I fix Surface Pro 3 boot issues?

Use a third-party repair tool that deals with boot issues

Follow these steps for getting your Surface Pro 3 to reboot.

  • First, prepare a bootable USB image from a working system.
  • While the device is powered off, boot your Surface Pro 3 from the USB drive.
  • After the Windows setup box pops up,  press Shift + F10.
  • Type wpeutil reboot in the Command Prompt window that appears and the device will reboot and load Windows normally.

All of the above can also be easily achieved through the help of third-party utilities that can help with the creation of bootable media, tools like Tenorshare Windows Boot Genius.

Thanks to its built-in tools, it can boot up any computers that won’t start properly, including models like the Surface Pro 3. This includes resolving issues like black screen, blue screen, loading circles, freezes, and more.

Tenorshare Windows Boot Genius

Tenorshare Windows Boot Genius

Fix all boot-related issues on your PC or laptop without wasting time and money by using this amazing utility.
$54.95/mo. Get it now

If you want the problem gone for good, follow these steps:

  • Open a web browser and go to aka.ms/fixsp3ec
  • Download the file: fixsp3.zip
  • Open File Explorer on your PC and go to the Downloads folder
  • Right-click on the file fixp3.zip and select Extract all
  • After the extraction process, a window will open, and you will have to right-click the file fixsp3.cmd and choose Run as Administrator
  • The process will execute, and implement the necessary patch to prevent the bug’s comeback
  • Reboot your device and it will be fully patched

Microsoft is still working on a permanent fix which will have a build number of 16294 or above that.


[wl_navigator]

FIX: CompareExchange128 / CMPXCHG16b problem in Windows 10

As you probably know, Windows 10 is free for most Windows 7 and Windows 8.1 users, but that doesn’t mean that upgrade to Windows 10 is always smooth.

Users report having a CMPXCHG16b / CompareExchange128 issue when upgrading to Windows 10, so let’s see how can we fix that.

The article also covers the following topics, in case you were researching them:

  • cmpxchg16b
  • compareexchange128
  • compare exchange 128
  • compareexchange128 solved
  • compareexchange128 Windows 10
  • compareexchange128 Windows 10 fix
  • compare exchange 128 error Windows 10

How do I solve the CMPXCHG16b / CompareExchange128 error?

CMPXCHG16b is a special CPU instruction this is required in order to upgrade to Windows 10, and some processors lack this instruction so you won’t be able to upgrade to Windows 10.

Changing your processor is usually expensive, especially if you have an older CPU that doesn’t support CMPXCHG16b instructions, so let’s see how we can fix this issue.

In the following video tutorial, we offer some helpful solutions and advice to work around this issue. Make sure to check it out and then continue with the upgrade process described just below.

1. Use third-party Windows repair tools

Whenever you have difficulties with the booting aspect of using a PC, then it’s most likely to fix it using dedicated programs that will improve system issues.

You can use built-in services on your Windows to resolve this, like booting in Safe Mode or Startup Repair options. With these options, you can manage to fix booting troubles manually.

Otherwise, if this is not working, you should opt-in for specialized programs that are capable to fix booting issues, system crashes or recovering essential lost data.

Thereby, it’s advised to choose the most efficient Windows 10 boot repair tools to revise your system immediately.

You will no longer have to go for more drastic solutions, such as performing a total PC reset, especially since they can result in data loss if done incorrectly.

2. Upgrade to a 64bit version of Windows 10

If you’re planning to upgrade to a 64bit version of Windows 10, you will need a processor that supports CMPXCHG16b instruction, but you can upgrade to a 32bit version of Windows 10 without any major issues. This is a workaround and not the best solution, but it’s worth giving it a try.

  1. Download 32-bit version of Windows you’re currently using and install it instead of your current version.
    • Make sure that you create a backup for your important files.
  2. Download all the updates and when you get asked to upgrade to Windows 10, do so.
  3. You’ll upgrade to a 32bit version of Windows 10, and it will be activated on Microsoft’s servers.
    • The great thing about this is that activation is limited only to your hardware, not to the version of Windows 10 you’re using.
  4. Download 64bit version of Windows 10.
  5. Use Creation Media program and choose to Create installation media for another PC.
  6. Perform a clean install of Windows 10 but remember to skip the step when asked to enter the serial number.
  7. Once the installation is complete, you’ll have activated and working 64bit version of Windows 10.

That’s about it, if you have any questions, comments or suggestions, just write them down in the comments, below.

PC won’t restart after update [Dell, HP, Asus]

My computer won’t boot after update

  1. Software solutions
  2. Make sure your laptop is compatible with Windows 10
  3. Disconnect external devices
  4. Update your drivers
  5. Remove your battery

What to do if Windows 10 won’t start after update

1. Software solutions

If your laptop is compatible with Windows 10, and all your external devices are compatible with Windows 10, then you don’t have any hardware issue that prevents your laptop from restarting.

We recommend you use third-party Windows boot repair tools. There are even good free options that will remediate issues that are not very critical or complicated.

Windows boot repair tools help you access your system. They can fix you registry, restore BCD files, help you create bootable recovery media, remove bloatware, and more.

2. Make sure your laptop is compatible with Windows 10

If you’re using an older laptop, there’s a chance that it isn’t compatible with Windows 10. In that case, some of the features of your system won’t be able to function normally, or you won’t even be able to turn on your laptop at all.

So, before upgrading your laptop’s system to Windows 10, make sure  it is compatible with Windows 10. Here are the specifications your laptop must meet in order to be able to run Windows 10 normally:

  • 1 gigahertz (GHz) or faster processor
  • 1 gigabyte (GB) for 32-bit or 2 GB for 64-bit version of the system
  • 16 GB of hard disk space for 32-bit OS, or 20 GB for 64-bit OS

3. Disconnect external devices

If you’re sure that your laptop is compatible, you also have to make sure that all your external components are compatible with the system, as well.

If your external components, like external HDD, or mouse, are not compatible with Windows 10, they might cause various problems, and this restart problem is only one of them.

4. Update your drivers

Another thing related to external components that could cause you problems are their drivers. If drivers for your external devices aren’t updated, you might face some issues, too.

So, make sure that all components are compatible with the system, and that all drivers are updated, and you shouldn’t face the restart problem. You can use this guide to learn how you can fix outdated driver issues. Of course, you can use this solution only if you’re able to boot your computer for a few minutes.

5. Remove your laptop battery

If this issue is affecting your laptop, you can try to remove its battery completely. Then plug in your device and try to boot it up again. As surprising as this method may seem, many users confirmed that it worked. So, do give it a try and let us know if it worked for you as well.

That would be all, if you have any comments, suggestions, or even some more solutions for the restarting problem in Windows 10, reach for our comment section, we would love to hear your thoughts.

Having other boot-related issues? Check out our Boot Errors Hub for help.

Follow more articles like this one in our dedicated Fix Hub.

Also, if you have any other Windows 10-related issues you can check for the solution in our Windows 10 Fix section.

The above article also covers the following issues:

  • Laptop won’t restart after update
  • Laptop won’t start after Windows update
  • Laptop won’t turn on after Windows 10 update

How to dual boot Windows 10 and Windows Server

There are a lot of situations where you would need a dual boot setup. Maybe you need to work on an app that isn’t compatible with your day-to-day operating system, maybe you need an isolated environment to test stuff or maybe you just want to play around with a different OS.

In today’s article, I’m going to show you how you can dual boot Windows 10 alongside Windows Server on the same computer.

In this example, I’ll be installing Windows Server 2012 R2 as the second OS on my machine but these steps also apply to the upcoming Windows Server 2016 or the older 2008 R2 which was based on the same kernel as Windows 7.

There are a few things you’ll need in order to achieve this setup. The first one is enough disk space.

You can use two partitions on the same hard drive but we would recommend using separate drives which will make the process of future reinstallation a lot easier and will also guarantee a working OS if one of the drives fails.

TIP: Another thing to check is that your main OS is running in BIOS/Legacy mode and not UEFI. You can use UEFI if you prefer it but I have had problems in the past booting multiple OS’s in this mode.

You’ll need some ISO images or installation media for your chosen operating systems. If you already have one of the operating systems installed on your machine and would like to keep it then you’ll only need an ISO image for the second OS.

For the sake of this tutorial, we’ll be installing both operating systems from scratch to cover all the necessary steps.

If you’re starting with an empty drive, you’ll have to choose the main operating system. In this example, we will install Windows 10 as the main OS and Windows Server 2012 R2 as the second one.

The guide below will also cover the following topics:

  • Windows server dual boot
  • Dual boot Windows server
  • Dual boot Windows 10 and Server 2019
  • Dual boot Windows 10 and Windows Server
  • Dual boot Windows 10 and Windows Server 2019
  • How to dual boot Windows 10 and Windows Server 2012

How do I dual boot Windows 10 and Windows Server?

1. Install the main Operating System

This step is for the users who don’t have an operating system installed on their machines or who want to install a fresh multi-boot setup.

Connect or insert the installation media (USB drive, DVD) for your main operating system, in my case Windows 10, and choose it as your boot device when starting up the computer. You’ll have to press the F11, F12, or Escape key in order to access the boot menu. Each manufacturer uses its own key so please consult your machine’s manual.

Once you get to the setup screen just go through the installation process as you would normally do until you reach the disk selection screen.

If you’re using the same hard drive for both OS’s then this is the place to make this possible.

First, create a partition for your main OS leaving enough free space for the second one. Now use the left free space to create a second partition for the dual boot operating system.

Your end result should look similar to the one in the image below.

How to dual boot Windows 10 and Windows Server

After you finished creating the partitions select the first one and install your main Windows as normal.

Tip: If you choose Windows Server 2016 for this dual-boot, review its support timeline so you can plan upgrades. See our guide on Windows Server 2016 end of life. You may also want to check the full details about Windows Server 2019 EOL so you are prepared for future migrations.

Additionally, you could also consider the use of a boot-repair tool like Tenorshare Windows Boot Genius.

This tool can be easily used to burn bootable ISO images so that you can boot up any computers that won’t start properly, regardless of what the underlying issue was.

Besides, that you can also use it to reset the Windows local and domain password, and even recover data from unbootable hard disks, basically making this a recovery tool as well.

2. Shrink main OS partition

This step is only for those who have a single partition with the main OS and would like to keep it.

If you don’t have a second drive or partition for the second operating system then you’ll need to shrink your current OS partition to free up space and create a new one.

Remember to leave enough disk space for your main OS and also have enough for the second one.

After you shrunk your main OS partition right-click on the new Unallocated space, select New simple volume and go through the wizard to create a new partition.

Format it as NTFS and label it properly so you can recognize it easily when installing the second operating system.

How to dual boot Windows 10 and Windows Server

3. Install second operating system

Connect the installation drive or insert the installation media for the second OS and boot your computer from it.

How to dual boot Windows 10 and Windows Server

Go through the setup menu and select the second partition, labeled as Windows Server in my case, as the destination for the second OS. Finish installing Windows as you would normally do.

How to dual boot Windows 10 and Windows Server

Windows usually reboot your machine several times during installation. When the first reboot comes you’ll be prompted with a bootloader menu similar to the one below.

At this point choose your second OS each time until the installation has finished.

How to dual boot Windows 10 and Windows Server

You’re done! You now have a dual boot setup with Windows 10 and Windows Server, 2012 R2 in my case. You can select between the two from the bootloader menu each time your computer starts.

You’ll probably notice that the second OS is now the default boot one. If that’s how you like it then you don’t need to do anything else. But if want to change it to the other Windows installation boot into your main OS, Windows 10 for me.

Once you’re at the desktop press the Windows + R keys to open the Run window, type msconfig, and press Enter or click on OK.

How to dual boot Windows 10 and Windows Server

This will open the System Configuration menu. Now open the Boot tab, select the operating system you would like to set as default by clicking on it, and then click the Set as default button. Now click Apply and then OK.

How to dual boot Windows 10 and Windows Server

Now when you start your computer it will automatically boot to the new default operating system if no user input is detected. If you have any problems setting this up please let us know in the comment section below.

Windows 10 news recap: Microsoft Teams bringing native notifications, May 2020 update on 24.1% of surveyed devices, and more

Welcome back to our Windows 10 news recap, where we go over the top stories of the past week in the world of Microsoft’s flagship operating system.

This week was fairly quiet in the Windows 10 world, though Windows 10 Insiders received new builds as normal. But outside of the Insider Program, things were on the quiet side.

AdDuplex: Windows 10 May 2020 Update now running on 24.1% of all surveyed PCs in August

In AdDuplex’s latest survey of the Windows 10 May 2020 Update, its numbers show that the update is now running on just over 24% of devices surveyed during August.

Adduplex Survey August 2020

Microsoft Teams starts rolling out native Windows 10 and macOS notifications for some users

Rolling out to both Windows 10 and macOS users, Microsoft Teams has added support for using the native notification systems of each respective platform, helping create a more consistent and unified experience.

That’s it for this week. We’ll be back next week with more Windows 10 news.

EVE Online packet loss: What is it and how to fix it?

EVE Online has been around for quite a while and it’s still in the heavyweight category when it comes to the fanbase. A lot of players eagerly join EVE Online on a daily basis and team up to explore its vast simulated universe.

What this game offers is a huge variety of content, ranging from starships, to ship customization items and star systems you can drift through.

You can choose from many paths that extend towards your goal, whether it’s mining, manufacturing items, trading spoils, stealing from others, or pure old-fashioned combat.

Scratch the old-fashioned part, our ancestors probably didn’t pilot starships.

Honestly, there’s not too much time for us to babble about how awesome EVE Online is. Just jump into action and give it a try. The best part is that nowadays you can play it for free (to some degree).

Back in the day you only had a 14-day trial, after which you had to pay up or exchange in-game resources to keep playing. However, not everything is as awesome as it sounds.

Like many other online games, EVE Online faces a bunch of technical challenges, mainly connectivity-related. For instance, packet loss is one of the most annoying problems any online game, including EVE Online, could face.

What is packet loss in EVE Online?

Packet loss is awful, no matter where you may encounter it. Unfortunately, EVE Online makes no exception to this rule.

To put it shortly, packet loss happens whenever data packets transmitted on your connection can’t make it to their destination.

Data packets are the very core of the content you experience. EVE Online has huge maps, that can’t be streamed all at once to your PC, so they get broken down in packets and then sent to you.

The same goes for almost everything else you can find in the game, including other players’ activities. Small packet loss is somewhat normal, but when the percentage of leaked packets increases, that’s when it gets noticeable and annoying.

Your game will start getting sluggish, your menus might become unresponsive, and you or other players might start rubberbanding. The last one is especially annoying when you engage in combat.

What causes EVE Online packet loss?

Truth be told, there’s no special cause for packet loss, but that doesn’t mean there are a few reasons for it to occur. On the contrary, it seems that packet loss is so moody that it can be triggered by a lot of things.

For instance, if you still use Cat 5 Ethernet cables instead of Cat 6, you might increase your odds of winning a free packet loss session. The same goes for choosing WiFi over wired connections whenever you go online.

However, there’s one reason that shines brighter than others: network congestion. And with EVE Online’s massive fanbase, it’s not hard to see why this could become a bit troublesome.

As its name clearly indicates, network congestion appears whenever the network you’re on becomes overloaded and servers can’t properly balance resource allocation.

As a result, some users might not feel a thing, while others might even get dropped because of packet loss. It’s worth mentioning that network congestion can occur anywhere between you and the game server, including the endpoints.

How to detect packet loss in EVE Online?

If you’ve been reading some of our previous guides on detecting packet loss in various games, we’ve often recommended using Windows’ built-in pathping tool.

On the downside, some game servers can’t be traced, and, as a result, you can’t perform accurate packet loss tests with pathping, since you have no precise game server to test against.

Finally, here comes some great news. EVE Online comes with its own network diagnostics tool that can even detect packet loss. Here’s how to use it:

  1. Run the game launcher
  2. Click the three-line button (next to minimize)
  3. Select Network diagnostics from the menuEVE Online Network diagnostics tool
  4. Click the Basic buttonBasic test EVE Online Network diagnostics packet loss
  5. Wait for the test to come to an end
  6. Scroll down to the bottom
  7. Check the packet loss value under the Ping statistics section

As you can see, it’s quite easy to detect packet loss in EVE Online, even without having the game running in the background or searching for the game server’s IP address.

EVE Online network diagnostics traceroute test

You just launch the Network diagnostics tool and click the Basic button. This utility can also perform a Traceroute test, a Download test, and an SSL encryption assessment.

How to fix packet loss in EVE Online?

1. Use a VPN service

  1. Get a Private Internet Access subscription plan
  2. Download the PIA VPN installer on your PC
  3. Deploy the VPN client
  4. Launch Private Internet Access
  5. Log into your account
  6. Connect to a suitable server (the closer it is to you, the faster it will be)
  7. Launch EVE Online
  8. Check if the problem still persists

Alternatively, instead of running EVE Online, you could just use the Network diagnostics tool once more to check packet loss percentage.

Private Internet Access is an awesome all-around VPN service brought to you by Kape Technologies. Currently, it’s one of the few VPNs that offer 24/7 customer support to its users.

Private Internet Access

Having bad packet loss in EVE Online? PIA could help you fix it in no time.
Free Trial Visit Website

As this method not-so-subtly implies, you can use PIA to reduce packet loss. However, it has many other uses, including but not limited to reducing in-game ping, circumventing geoblocking, and eliminating ISP throttling.

Not to mention the security and privacy boost your default, the insecure Internet connection will receive from using a VPN service.

However, note that using a VPN has been proven to work only if your ISP limits your connection somehow, by either throttling your bandwidth or using bad routing.

2. Troubleshoot your connection manually

  • Restart the game, your PC, your router, and your modem
  • Close any background-running apps that consume a lot of bandwidth
  • Flush your DNS
  • Check for any malfunctioning components on your network such as cables, adapters, or drivers
  • Replace or repair any faulty part on your end (for instance, upgrade your Cat 5 cables to Cat 6)
  • Update any old drivers to their latest version to avoid compatibility issues
  • Try to avoid peak hours if you suspect network congestion is the culprit (or use a VPN)
  • Reach out to your ISP and ask them if they can look into the issue and maybe even fix it
  • Contact EVE Online customer support if you notice anything wrong on their side
  • Upgrade your Internet connection if you have the funds
  • Use wired connections instead of WiFi whenever possible (WiFi packet loss happens more often)
  • Try lowering the quality settings in-game and check if there’s any improvement

We’ve said it before and we’ll say it once more. Packet loss has no exact cause, so it’s quite difficult to fix something if you don’t know why it broke. Trying all these fixes one-by-one might do nothing for your packet loss issue.

On the other hand, simply switching from WiFi to wired could instantly reduce packet loss. Unfortunately, at this point, it’s simply a matter of trial and error, as there’s no way of isolating the cause and finding a foolproof fix all the time.

EVE Online packet loss can be fixed

All things considered, if you encounter packet loss while playing EVE Online, don’t panic just yet. There are several operations you could perform in an attempt to reduce the packet loss percentage.

Most of the time, the issue solves by itself with no additional assistance. However, if you notice a pattern, you might want to take things in your own hands and try some (or preferably all) of our suggested fixes.

While a VPN seems to yield the best results at keeping packet loss percentages low, this solution will only work if your ISP artificially limits your connection by means of bandwidth throttling or using improper routing.

13 Best USB Drive Password Protection Software

Protecting your files from unauthorized access is important and rather simple. There are many specialized tools that can help you protect your files from unauthorized access.

In this guide, we’re going to show you what is the best password protection software for your USB stick. These software solutions allow you to hide the files and folders stored on your USB flash drive, encrypt them, add a password to protect your files, and so on.

We carefully selected these tools so as to be compatible with all the USB flash drive models available on the market.

What is the best USB password protection software?

Folder Lock

If you want to quickly and easily protect your files, you might want to consider Folder Lock. This is a simple tool and it can easily hide your files and protect them from unauthorized access.

In addition, you can also encrypt your files by creating a locker. Simply click the Encrypt files button and add a label and a password for your locker. Folder Lock supports AES 256-bit end-to-end encryption.

Regarding the locker, you’ll have to set its size and password manually. After creating it, you just need to add files to encrypt them.

With the Secure Backup feature, you can upload your encrypted files to a cloud server. This process is automatic, so you can upload your locked files with ease.

Using Folder Lock,  you can copy encrypted lockers to the USB drive, CDs, DVDs, and even email attachments.

The digital wallet feature is used to add and protect your credit card information. It is customizable with custom icons, backgrounds, and templates for better organization.

Another useful tool is Shred Files. Use it to permanently delete files from your hard drive or clean an entire drive making all your files unrecoverable.

Cleaning your history so you can remove clipboard data, temporary files, recent documents and other traces from your PC is also possible with Folder Lock.

Folder Lock

Folder Lock

Lock files and folders, encrypt data, and sync encrypted files with this versatile tool.
Check priceVisit website

GiliSoft USB Encryption

Protecting your USB flash drive from unauthorized access is rather simple, and you can do so by using this tool. 

GiliSoft USB Encryption will create a virtual drive on your USB, and you won’t be able to access it unless you enter the correct password.

The drive will remain hidden at all times, and the only way to reveal it is to run the GiliSoft USB Encryption tool from the USB flash drive. After starting the application and entering the password you can easily access the protected drive.

This application is fully compatible with various removable storage. The software uses multiple layers of protection, therefore your files will remain protected at all times.

The user-friendly interface will be appealing even for the basic users.

GiliSoft USB Encryption comes with a free trial, but if you want to continue using it, you’ll need to purchase a license.

GiliSoft USB Encryption

GiliSoft USB Encryption

Password-protected files with Gilisoft give total peace of mind against security breaches and invasions of privacy, on all Windows PCs.
Check priceVisit website

USB Secure

best tools to password protect usb secure

USB Secure is another tool that can protect your USB flash drive or any other removable media.

This is a portable application, so you don’t have to install it in order to run it. The application is PC-independent, so it will run on any computer without any problems.

USB Secure protects your drive and files with a single click. This application works as a virtual drive, which means that you can securely modify your protected files. Speaking of which, you can view your files in read-only mode or you can access them directly.

Adding and protecting files can be done without unlocking your drive thus further increasing the security.

The tool is simple to use, and it comes with a user-friendly interface. It’s also worth mentioning that USB Secure has multiple layers of security that will protect your files at all times.

Unfortunately USB Secure isn’t free, but it’s available as a free trial so you can download it and try it out.

 USB Secure

USB Secure

A minimalistic approach for encrypting your confidential data in a virtual drive, with limitless capacity and compatibility with all sorts of USB drives.
Check priceVisit website

Rohos Mini Drive

best tools to password protect usb

Rohos Mini Drive allows you to protect your files by creating an encrypted partition on a USB flash drive. It will be protected by a password and encrypted using the AES 256-bit encryption.

The encryption process is automatic, it’s performed on the fly, and follows NIST standards.

The tool allows you to use the encrypted partition on any other PC without installing Rohos Mini Drive. With the free version, you can create partitions up to 8GB in size

Rohos uses a secure virtual keyboard so your password will remain hidden from keyloggers and malicious users.

⇒ Get Rohos Mini Drive

USB Safeguard

best tools to password protect usb

Another simple tool that you can use to password-protect your USB flash drive is USB Safeguard.

This is a portable application, so it can work on any PC without installation. The application works with a wide range of devices including USB flash drives, SSDs, or any other removable storage.

The tool supports automatic locking so your USB flash drive will lock itself automatically if you don’t use it.

In addition, the drive will become locked as soon as you disconnect it from the PC, thus protecting your files from unauthorized access.

This is a simple and portable application, and in order to use it, you just need to copy it to your USB stick and run it. After that, the application will create a password-protected drive that will appear whenever you connect your USB flash drive.

The free version works with USB flash drives up to 4GB, but if you want to protect a larger USB flash drive, you’ll need to purchase the full version.

⇒ Get USB Safeguard

Cryptainer LE

Cryptainer LE is a portable application that can run it on any PC right from your flash drive.
The software uses virtual drives to protect your files, and you can have an unlimited number of virtual drives on your USB flash drive. You can access the drives directly and easily copy and encrypt any file.

All your files and folders are password protected and safe from any unauthorized access on a virtual drive. The application has a tabbed interface so you can easily work with multiple encrypted drives.

Each volume is represented by a new tab so you can easily navigate through multiple volumes.

Cryptainer LE can create drives up to 10TB in size, so it’s perfect if you need to encrypt large files. The tool is simple to use, and even basic users should be able to work with this application.

You can send encrypted self-extracting files which can be quite useful if you want to send sensitive data to someone else. In order to unlock the files, the recipient needs to enter the password, and it doesn’t even have to have Cryptainer LE installed.

Cryptainer LE is a great tool, and you can download and try it for free. The free version allows you to protect only 100MB of data, but if you want to protect more files, you’ll need to purchase a license.

⇒ Get Cryptainer LE

SanDisk SecureAccess 3.02

tools to password protect usb sandisk
SanDisk SecureAccess is designed to work with SanDisk flash drives, so it’s recommended to use it only with SanDisk drives. The tool allows you to protect your files with a password and it will also encrypt your files with AES 128 encryption.

After setting a password you just need to add the files that you want to protect, and they will be secured with a password.

The application is simple to use, and it supports multi-thread processing so you can easily encrypt your files. SanDisk SecureAccess 3.02 allows you to edit the documents in your vault, and it also supports file streaming.

The application also has automatic logout time-out so your files will be safe even if you leave your USB flash drive connected. It’s also worth mentioning that the application supports a file-shredding option, so you can permanently delete your files with ease.

⇒ Get SanDisk SecureAccess

DiskCryptor

DiskCryptor is a freeware solution that can help you protect your USB flash drive. The tool supports AES, Twofish, and Serpent encryption algorithms, which should be enough for most users.

There’s also support for transparent encryption, dynamic disks, and disks with large sector size. We have to mention that the tool offers high performance that is similar to non-encrypted systems.

The tool offers extensive configuration and it can work with third-party boot loaders such as LILO, GRUB, etc.

DiskCryptor can encrypt system and bootable partitions as well and allows you to place the boot loader on an external media and to authenticate by using that media.

Regarding the supported devices, the tool fully supports external USB storage devices as well as CDs and DVDs.

⇒ Get DiskCryptor

USB Security

USB Security is another simple application that can protect your USB flash drive with a password. This application installs on your USB flash drive, and it will protect it from unauthorized access on any PC.

Just like many other tools on our list, this application will create a virtual drive that you can easily access only if you enter your password.

This means that the virtual drive won’t appear automatically when you connect your flash drive to the PC.

USB Security is a simple tool, so it will be perfect for basic users. Unfortunately, this tool isn’t free, but you can download and check out the free trial.

⇒ Get USB Security

USBCrypt

Another tool that can help you protect your files is USBCrypt. According to the developer, the tool uses AES encryption that provides the strongest protection.
This tool installs your flash drive and creates a virtual encrypted disk in which your files are stored. Since this virtual disk can only be accessed with a correct password, all your files will remain protected.

Regarding compatibility, this application can work with any removable storage such as portable hard drives, USB flash drives, or internal hard drives, both in NTFS and FAT32 format.

The maximum limit for the used drive is 128TB.

⇒ Get USBCrypt

USB Locker

If you’re looking for a simple tool that will protect your USB stick with a password, you might want to consider USB Locker.

The application installs on your USB drive and it will protect your files even if you connect the drive to a PC that doesn’t have this tool installed.

Regarding the compatible devices, this drive works with almost every kind of removable storage.

We have to mention that this application uses multiple layers of encryption. Your files will remain protected regardless of the platform that you use.

The application has a Master Key feature, so you can unlock your device by using the master key. This is extremely useful if you manage to forget your password and you need to reset it.

⇒ Get USB Locker

Kruptos 2 Go

Protecting your files is relatively simple, and you can do that by using this tool. Kruptos 2 Go is a simple application that installs on your USB flash drive, and it will run on any PC right from your flash drive.

After you install the application, you need to create a file vault that you use to store and encrypt your files.

The file vault is protected by a password and 256-bit encryption so all your files will remain safely locked. The application is simple to use, and you can encrypt files simply by dragging and dropping them to the vault.

Kruptos 2 Go is rather simple to use, so it will be perfect for basic users. Unfortunately, this application requires a license, but you can download and try the free trial version.

⇒ Get Kruptos 2 Go

LaCie Private-Public

Another tool that allows you to easily protect your files is LaCie Private-Public. It offers AES 256-bit protection and it works on both Mac and PC.

It is a portable tool, so you just need to extract it to your USB flash drive and run it from there.

Before you start using LaCie, you need to set the size of the virtual volume. After that, set the desired password and you’re good to go. In order to reveal the hidden files, you need to run LaCie Private-Public from your USB flash drive.

After entering the password, the hidden volume will appear, and you’ll be able to access your files securely.

This application is simple to use, so it’s perfect for first-time users. We also have to mention that LaCie Private-Public is completely free, so there’s no reason not to try it.

⇒ Get LaCie Private-Public

As you can see, there are many great USB stick password-protection tools available, and most of them are simple to use.

If you want to protect your USB flash drive from unauthorized access, we highly recommend that you download and try any of the tools from this article.

If you already used some of the tools listed in this guide, feel free to use the comments below to tell us more about your experience.

How to watch BBC One live stream outside UK [Easy Guide]

BBC One is the United Kingdom’s most popular TV channel, where you can watch British TV like drama, comedy, science and nature, food, documentaries, current affairs, lifestyle, and more.

You can view BBC One on TV and directly in your web browser, thanks to the fact that it supports live streaming. Unfortunately, you can’t watch BBC One live stream outside the UK.

That’s because it requires an IP address from Great Britain. If you’re living or traveling outside the UK, you need to resort to special software to view BBC One.

Fortunately, you don’t have to waste too much time looking for solutions since we got you covered. Discover the best ways to watch BBC One live streaming from anywhere in the world. You can even view Channel 4 in the US this way.

How can I watch BBC One live streaming outside the UK?

Use a VPN

use Private Internet Access to watch BBC One
  • Get a VPN subscription plan (we recommend PIA).
  • Download and install the VPN.
  • Launch the app and connect to a UK VPN server.
  • Go to BBC and sign in with your account.
  • Watch BBC One live in your web browser.

This solution applies only to UK residents who are traveling abroad. That’s because you need a British TV license to sign up for a free account to BBC. You can also use a VPN to watch Paramount Network live streaming.

A VPN masks your IP address and location. By connecting to a VPN server from the United Kingdom, you are essentially fooling BBC One into thinking that you never left the country. As a result, you can watch BBC One live by bypassing geo-restrictions.

Made by Kape Technologies, Private Internet Access (PIA) is the best VPN for BBC iPlayer. It supports OpenVPN, WireGuard, Shadowsocks, SOCKS5, private DNS, kill switch, along with an ad and malware blocker for browsing.

More about PIA:

  • +3,300 VPN servers in 48 countries
  • 10 simultaneous devices
  • Works with Windows, Mac, Linux, iOS, Android, routers
  • No logs or leaks
  • 24/7 live chat support
  • 30-day money-back guarantee
Private Internet Access

Private Internet Access

Watch BBC One live streaming outside the UK with the help of this trustworthy VPN app.
$2.85/mo. Buy it now

Use Mobdro

use Mobdro to watch BBC One
  • Download and install Mobdro.
  • Fire up the Mobdro app and search for BBC One.
  • Select the TV channel from the list.
  • Watch BBC One live without a web browser.

Mobdro is completely free to use. It’s an app exclusively designed for Android, but you can also get it up and running on a Windows PC using an Android emulator like BlueStacks.

This super-intuitive app is ideal for watching TV on a Windows PC, without having to change your IP address or look for BBC One live streaming links that actually work. You just set it and leave it.

The best part about Mobdro is that you don’t need to use a web browser. Subsequently, you don’t have to sign in with a BBC account. Therefore, you can watch BBC One live stream outside the UK even if you don’t live in the United Kingdom and don’t have a TV license.

Take note, however, that Mobdro is not a website unblocker, Internet circumvention tool, or proxy server. You can’t count on it to protect your online privacy and security like a VPN, so you should use it for TV live streaming only.

Use an Internet circumvent tool or proxy

use Psiphon
  • Download Psiphon.
  • Open the program and go to Settings > Psiphon Server Region.
  • Pick United Kingdom and click Apply Changes.
  • Go to BBC and sign in with your account.
  • Watch BBC One live in your web browser.

Psiphon is one of the best proxy tools and Internet circumvention apps. You can trust it to unblock websites, online apps, and live streaming tools like BBC One so that you can view British television from any part of the world.

You can set up Psiphon on Windows, Android, and iOS, connect to a server region, and then watch BBC One live stream outside the UK. But you still need a British TV license to sign in to the BBC website.


Is your proxy not connecting on Windows 10? Find out how to easily fix this issue.


To summarize, you can watch BBC One live streaming anywhere in the world by using a VPN, Mobdro, or an Internet circumvention tool like Psiphon. It’s even possible to watch ITV live streaming in the USA this way.

However, out of these options, we suggest using a reliable VPN like PIA. In addition to unblocking websites and watching live streaming, you can use a VPN to encrypt your network traffic and protect your home router from hackers.

FIX: Resource Monitor not working in Windows 10/11

No matter which Windows version we’re talking about, if there’s one little tool that always made an impact, that must be Resource Monitor.

Many users have relied on this nifty native monitoring tool to provide them with valuable system-related reports, and that seems to be the case in Windows 10, as well.

However, that’s hard to do with various issues that affected Resource Monitor in Windows 10 lately.

Some users reported that there’s nothing visible on Monitor’s report dialog window, others were unable to access the reports page, while some of them weren’t able to start the Resource Monitor in the first place.

For that purpose, we prepared a list of possible solutions that should come in handy. Make sure to check them out below.

What can I do if Resource Monitor doesn’t work?

1. Enable Transparency effectsresource monitor not opening transparency effects

  1. Right-click on Desktop and choose Personalize.
  2. Under the left pane, select Colors.
  3. Under More Options, enable Transparency effects.

After doing that, check if the problem is still there.

2. Run Resource Monitor in Command Promptcommand prompt resource monitor not working windows 10

  1. In the Windows Search bar, type cmd.
  2. Right-click Command Prompt and run it as administrator.
  3. In the command line, type the following command and press Enter:
    • perfmon/report
  4. If the screen is still stuck after a minute or so, don’t worry. Move to additional steps.
  5. Get back to Command Prompt, type the following command and press Enter:
    • perfmon
  6. In the main Resource and Performance Monitor window, choose Reports.
  7. Open System and go to System Diagnostics.
  8. There you should be able to see all of your previous reports.

If after using this method the Resource Monitor still isn’t working, make sure to check the alternative ones below.


Can’t access Command Prompt as an admin? Take a closer look at this helpful guide.


3. Uninstall the latest updateremove update resource monitor not working windows 10

  1. Press the Windows key + I to open the Settings app.
  2. Open Update & security.
  3. Choose Windows Update from the left pane.
  4. Now, on the right side, choose Update History.
  5. Click on Uninstall updates.
  6. Uninstall the troubling update.
  7. Restart your PC and give Resource Monitor another try.

Although removing the problematic update can help you with this issue, you should know that Windows 10 tends to install updates automatically, so you might have to block the update from installing.

Check out our handy guide for some tips and tricks on how you can disable the Windows 10 automatic updates.

4. Run Resource Monitor manuallyRun Resource Monitor not working in Windows 10

  1.  Press Windows key + R.
  2. Type resmon.exe to start Resource Monitor.
  3. Alternatively you can navigate to Local Disk C.
  4. Go to Windows folder.
  5. Locate and double-click on System32 folder.
  6. Find an executable file called resmon.exe.
  7. Click on it to open.

If you have determined that you still cannot access Resource Monitor on your computer, you can try to solve this problem by running the application manually.

Hopefully, all these solutions managed to help you with your Resource Monitor troubles.

In case you have subject-related questions or suggestions, we’ll be glad to be hearing from you. You can post them in the comments section below.

[wl_navigator]

Microsoft released Edge 85: What’s changed?

Microsoft released an updated version of their Edge browser, Microsoft Edge 85, and more precisely version 85.0.564.41.

For those using the browser, the updates are available via the automatic update functionality and as a download from the official website.

The last update of Microsoft’s official browser for Windows 10 was rolled out in July 2020.

What’s new in Edge 85?

According to the release notes, the developers have been working on a few new features, along with fixing a long list of known bugs and behavior patterns.

Most of the novelties focus on the built-in PDF reader. Edge 85 comes with an adjustable page layout, to make reading more accessible, plus a highlighter, to markup favorite or interesting paragraphs.

edge 85 pdf reader improvements

The Read Aloud function in the reader has been fixed. In the previous version it wouldn’t highlight the correct words.

Additionally, Windows devices running the Canary channel of Microsoft Edge now have a new Link format available. Upon discussing with their community, the developers made available both a readable format and the plain-text version of an URL, when copy-pasting it.

Those using the Collections feature now have the possibility to sort their collections by name, get collection suggestions from Pinterest, plus a paste option inside the collection’s menu.

edge 85 collections

Last but not least, Microsoft improved the Developer Tools to support emulation of the Surface Duo device to check websites and content in the new dual-screen device. Additionally, users can now match keyboard shortcuts to VS code.

Some notable sore points fixed

One of the errors that have been bothering users for a long time is that the Edge tabs turn black. After several fixes, the developers say that this affects users with certain hardware and is easily triggered by resizing an Edge window. Killing the GPU process should fix the issue.

For Discord users, the platform should now be loading smoothly.

Users running on macOS 11 preview (Big Sur) can now confidently use Edge 85. The developers announced that they’ve identified the issue preventing the browser to load and are working to get it resolved before Big Sur is officially released. 

Have you downloaded the new Edge 85 yet? Tell us your take on it in the comments below.

[wl_navigator]

How to download and run the Start Menu troubleshooter

Downloading the Start Menu troubleshooter is a quick way to fix system issues.

The Windows 10 Start Menu and Cortana are vital for easy system navigation. Therefore, it could be so frustrating when the Start Menu is not working immediately when prompted.

And in some cases, users might need to download the Start Menu troubleshooter to detect and fix Windows 10 Start Menu issues.

Start Menu issues are commonly experienced problems even from the launch of Windows 10. Cortana can wait but the Start Menu must be fixed now.

Let’s look at some frequent issues, and where to download the Start Menu troubleshooter from.

Where can I download the Windows 10 Start Menu troubleshooter?How to download and run the Start Menu Troubleshooter

Note: Unfortunately, official Start Menu troubleshooter is no longer available and supported.

  1. You can now follow the on-screen instructions to install the Start Menu troubleshooter.
  2. Before selecting the next button, if you want to check  the whole process before fixing system issues, click Advanced to uncheck Apply Repairs automatically.
  3. But if wish to proceed without step two, then select the Next button.
  4. It will automatically start scanning your PC for any likely Start Menu issues.
  5. If any Start Menu issue is discovered, the report would be displayed for you to choose whether to fix it manually.
  6. If there are no troubleshooting issues, the system will prompt a message stating: Troubleshooting couldn’t identify the problem.
  7. Exit the troubleshooter or select view detailed information to see the details of the scan.

Finding the right download link for the Start Menu troubleshooter is not an easy task. There are plenty of link variations on the web, including on Microsoft’s forum, but most of them are dead links.

The Start Menu troubleshooter has been shut down by Microsoft so that explains why it’s so hard to find it nowadays.

Quick troubleshooting steps to fix  Start Menu issues manually

  1. Open CMD Command Prompt to conduct System File Checker.
  2. Type sfc /scannow and hit Enter.
  3. Restart the system once the scan is completed and confirm if there is an improvement.

In case you’re experiencing other Start Menu issues,  do let us know in the comments section below and we’ll make sure to take a look.

Port Forwarding Software for PC: 5 Best to use

Port forwarding software has become essential for many Internet users because most opt to use routers instead of modems for safety and security concerns.

One of the common issues with routers that you may encounter is that some applications or games may stop working.

Since your computer on a home or business network is hidden behind the router, it will lead to connection issues.

In this article, we look at the best port forwarding software for both Windows and Mac that will help you get past this barrier.


What is port forwarding software?

Port forwarding software allows you to redirect communication requests from one address and port number combination to another while the packets traverse a network gateway, like your router or firewall.

With this software, your remote servers and devices on the internet can access other devices that are connected to your private LAN.

What are the best port forwarding tools for PC?

  1. Simple Port Forwarding – Easy to use
  2. UPnP PortMapper – Automatic IP address retrieval
  3. PortMapper – TCP and UDP support
  4. Port Forward Network Utilities – Fast and accurate
  5. Port Forwarding Wizard for Mac – Simple software

Simple Port Forwarding

port forwarding software
  • Price – Free
  • Support – Windows

UPnP PortMapper is an easy-to-use program that manages the port forwarding (port mapping) of a UPnP-enabled Internet gateway device like your router in the local network.

UPnP PortMapper allows you to view, add, and remove port mappings easily. Using this tool, you can access servers (SSH, Web, Game server, and more) running in a private network from the Internet.

You can configure port forwarding by accessing the web administration interface of your router.

However, UPnP PortMapper removes the hassle of the traditional forwarding technique and makes the process much more convenient.

UPnP PortMapper allows you to create a new or select an existing preset and then add a port mapping for your computer in one click.

The IP address is retrieved automatically, so you don’t have to add it manually.

 ⇒ Get Simple Port Forwarding

UPnP PortMapper

port forwarding software
  • Price – Free
  • Support – Linux/Windows/macOS

UPnP PortMapper is an easy-to-use program that manages the port forwarding (port mapping) of a UPnP-enabled Internet gateway device like your router in the local network.

UPnP PortMapper allows you to view, add, and remove port mappings easily. Using the tool, you can access servers (SSH, Web, Game server, and more) running in a private network from the Internet.

You can configure port forwarding by accessing the web administration interface of your router.

However, UPnP PortMapper removes the hassle of the traditional forwarding technique and makes the process much more convenient.

UPnP PortMapper allows you to create a new or select an existing preset and then add a port mapping for your computer in one click.

The IP address is retrieved automatically, so you don’t have to add it manually.

⇒ Get UPnP PortMapper

PortMapper

port forwarding software
  • Price – Free
  • Support – Windows

PortMapper is yet another free port mapping software that allows you to forward any port to any IP address.

It supports both TCP and UDP connections making it effortless to monitor any port that you want.

To use the tool, select the port that you want to map and enter the destination, that is, the IP address or full URL to your FTP server or web server.

The tool allows blocking access from a specific IP address if you have a public FTP server. This is useful if you block some users from accessing the webserver.

PortMapper works on all versions of Windows, from 95 to Windows 10.

 ⇒ Get PortMapper

Port Forward Network Utilities

Port Forward Network Utilities
  • Price – Free trial
  • Support – Windows

Setting up a port forward is quick and easy with Port Forward Network Utilities. Thanks to the large database, you don’t have to work on the router yourself – the tool carries out all the changes independently.

The so-called port forwarding, i.e., the forwarding of a connection to a specific PC port, is often required when a PC acts as a server and has to be reached from the Internet.

This is often the case with online games, for example.

Setting up such forwarding can be complicated. Port Forward Network Utilities aims to simplify the process and forward ports to both Xbox and PlayStation consoles.

The software finds your router on your network, and it also optimizes it. It can recover lost router passwords too.

⇒ Port Forward Network Utilities

Port Forwarding Wizard for Mac

Port-Forwarding-Wizard-for-Mac
  • Price – Free trial
  • Support – macOS

If you’re a Mac user, we’ve also got you covered. As the name suggests, Port Forwarding Wizard for Mac is a port forwarding tool for macOS. It is a simple software that supports Snow Leopard, Lion, and the above version of macOS.

Port Forwarding Wizard communicates with your router by using the UPnP standard after enabling the UPnP option in your router.

To configure your router, launch Port Forwarding Wizard and wait till it detects the router. Once detected, the tool will fetch current port forwarding entries from your router and display them for you.

To add ports, click the add button and fill in the required details, including the port you want to forward and the internal IP address.

⇒ Port Forwarding Wizard for Mac

All the port forwarding software listed in this article can help get your ports forwarded.

These tools include everything you need to diagnose, troubleshoot, and fix port forwarding issues, including forwarding ports to both Xbox and PlayStation consoles, testing ports on your network, and optimizing your router.

If your router still does not forward ports, try these steps instead.

FIX: No sound with MKV files in Windows 10

Windows 10 brought many improvements ranging from security to multimedia enhancement.

Regarding the multimedia improvements, it is worth mentioning that Windows 10 now offers support for .mkv file format, but some users are reporting that there’s no sound with .mkv files on their computers.

Few months before the release of Windows 10, it was announced that Windows 10 will natively support .mkv and .flac files, and this was great news for all multimedia fans.

Few months before the release of Windows 10, it was announced that Windows 10 will natively support .mkv and .flac files, and this was great news for all multimedia fans.

So, here’s what you need to know about this file format and how you can fix sound issues.

  1. Convert .mkv files to MP4
  2. Switch to a third-party media player
  3. Run Windows 10 troubleshooter

How can I solve sound problems with MKV files in Windows 10?

1. Convert .mkv files to MP4

If the issue persists even when using a third-party media player, this could indicate that there’s something wrong with the  .mkv file itself. Converting it into an MP4 file could help you fix this problem.

You can use VLC to complete this task. This versatile media player can also convert Matroska files into MP4 files.

Simply launch VLC and click on the Media menu. Select Convert/ Save and upload the problematic file to VLC.

Now, you need to select the video format to use, specify the destination folder, and launch the process.

2. Switch to a third-party media player

As we mentioned, movies and TV apps don’t have support for DTS audio, so the only solution is to wait for an official update from Microsoft.

Because this might take a while, depending on how high this issue is on their list of priorities, you can always switch to a third-party media player.

MKV files are generally supported by universal media players. The benefit of switching to third-party software is also that they have more features than the built-in player.

Some players let you save media files to the cloud so you can access them regardless of device or location. On top of that, they have advanced subtitle libraries and audio settings and support 4K and ultra HD playback.

3. Run Windows 10 Troubleshooter

Windows 10 also features a dedicated audio troubleshooter that could help you get back sound on .mkv files.

  1. Go to Settings select Update & Security.
  2. Next, click on Troubleshooter.
  3. Go to Get up and running and select Playing audio.
  4. Lastly, press on Run the troubleshooter.

Check if the problem persists.

That’s all if you have any other Windows 10-related issues you can check for the solution in our Windows 10 Fix section.

5+ best cross-platform media players

Are you looking for a cross-platform media player? Then you’ve come to the right place.

In this article, you’ll find a list of the best cross-platform media players currently available on the market.

What are the best cross-platform media players?

Cyberlink Power DVD

CyberLink Power DVD is an all-in-one multimedia player that allows you to enjoy movies, TV shows, or photos and organize them all in one place.

And if at any moment you need to pause your movie, don’t worry, you can take it from the exact same spot where you left off.

The Watch On-The-Go feature allows you to watch your favorite shows or movies, directly from the cloud, in case that you may not have access to the Internet.

Once you have downloaded your favorite media file in the Cloud you can easily take the link, copy it, and share it with your friends and family.

Cyberlink Power DVD

Cyberlink Power DVD

The best movie and media player, with 100 GB of storage in the cloud to share and stream with family. Get the best deal now!

Gom Player

Gom Player is a great tool when it comes to playing media files. Not only it supports various formats such as AVI, MP4, MKV, FLV, WMV, MOV, DVD, and Audio CD but you can also use it to play damaged files.

If you are used to watching movies with subtitles then you’ll love the GOM Player Subtitle Library. It has a big library and once you start the movie it automatically searches for subtitles and plays it.

The amazing Gom Player has a friendly interface, it’s extremely easy to use and in just a few clicks you can relax and enjoy your favorite movie or TV show.

GOM Player

GOM Player

An amazing media player that supports various formats with its own subtitles library. Get the best deal now!

VLC

VLC doesn’t need any introduction. This free, open-source cross-platform multimedia player is perhaps the most popular media player in the world.

This tool can play absolutely everything: media files, discs, streams, you name it. It plays most codecs with no codec packs needed and is completely free. It doesn’t feature any spyware, ads, or user tracking.

Moreover, you can fully customize it: you can add skins, create skins with the VLC skin editor, and install various extensions.

⇒ Get VLC

MPlayer


MPlayer is a powerful open-source media player that you can use across many systems. The tool supports a wide variety of input formats, video and audio codecs, and output devices.

Another great feature of MPlayer is the wide range of supported output drivers: X11, Xv, DGA, OpenGL, SVGAlib, fbdev, AAlib, DirectFB, GGI, SDL, VESA, as well as some low-level card-specific drivers.

The tools support onscreen display, fullscreen, anti-aliased shaded subtitles, and visual feedback for keyboard controls, as well as 12 subtitle formats.

It is worth mentioning that there is also a fork of MPlayer, called MPV.

This tool shares some features with the former projects, and also introduces new capabilities, such as:

  • Streamlined CLI options: MPlayer’s options parser was improved to behave more like other CLI programs.
  • On-Screen Controller triggered by mouse movement.
  • High-quality video output: MPV has an OpenGL based video output that supports video scaling, color management, frame timing, interpolation, and more.
  • You can now embed MPV in other apps and use it as a library.

⇒ Get MPlayer

VideoJS

VideoJS is a free, open source HTML5 media player that offers basic playback functionalities, such as autoplay and preload, fullscreen display and subtitles.

Since it’s an open source tool, you can easily alter the code and upgrade the tool. VideoJS is not browser-dependent, meaning that you can download a copy of the player to use it offline.

The latest version of the tool is VideoJS 6.0, which brings accessibility improvements of the controls and components, as well as some new features for developers.

⇒ Get VideoJS

Clementine Music Player


Clementine is a multi-platform music player with an easy-to-use UI. Unlike the media players listed above, this tool is a bit more limited, rendering only audio files.

Here are Clementine’s main features:

  • Search and play your local music library
  • Listen to internet radio
  • Search and play songs you’ve uploaded to Box, Dropbox, Google Drive, and OneDrive
  • Create smart playlists and dynamic playlists.
  • Play audio CDs.
  • Transcode music into MP3, Ogg Vorbis, Ogg Speex, FLAC or AAC.
  • Discover and download Podcasts.
  • Remote control using an Android device, a Wii Remote, MPRIS or the command-line.

If you’re looking for a cross-platform music player, Clementine is a very good choice.

⇒ Get Clementine

There you go, these are the best cross-platform players currently available. If you’ve used other similar tools, you can tell us more about your experience in the comments below.

5 best tools to watch Sling TV outside US

Sling TV is one of the most popular streaming services, giving you access to more than 30 channels of top news, live sports, cartoons, movies, TV shows, and more. However, you can’t watch Sling TV outside of the US.

If you have a Sling TV account and want to stay in touch with your favorite TV channels when traveling abroad, you need to change your IP address and geo-position to a US location. The easiest and surest way to do this is by turning to a premium VPN.

Unfortunately, not all VPNs are optimized for streaming, so make sure to evaluate all your options before accidentally purchasing a subscription plan for a VPN that won’t work with Sling TV outside the United States.

How can I watch Sling TV from anywhere?

PIA is connected to a US VPN server

  • Get a VPN subscription plan (we recommend PIA).
  • Download and set up the VPN app on your device.
  • Fire up the tool and connect to a US VPN server.
  • Sign in to your Sling TV account.
  • Enjoy unlimited streaming on Sling TV!

If you don’t already have a Sling TV account, keep in mind that you need to register with an American credit card. Otherwise, the online streaming service won’t work because it rejects international credit cards.

What are the best VPNs to watch Sling TV outside US?

Private Internet Access

Private Internet Access is the best VPN for Sling TV

Made by Kape Technologies, Private Internet Access (PIA) is the best VPN for video streaming, and that’s why we suggested it in our instructions above. It comes with more than +3,300 VPN servers in 48 countries, including US locations.

Plus, you can use PIA to unblock not only Sling TV but also other media streaming services such as Netflix US or Hulu. It has exclusive DNS servers, together with OpenVPN and WireGuard protocols to ensure your privacy without hampering your Internet connection speed.

Private Internet Access has VPN servers dedicated to streaming and torrenting, so you shouldn’t encounter functionality or buffering issues. But you should also take into account that Sling TV frequently crashes.

More on PIA:

  • 10 simultaneous connections
  • No logs or leaks
  • 24/7 live chat support
  • 30-day money-back guarantee (no free trial)
Private Internet Access

Private Internet Access

Watch Sling TV outside the US by connecting to the high-speed servers of this VPN app.
$2.85/mo. Buy it now

NordVPN

use NordVPN to watch Sling TV

If you’re a privacy-concerned user who wants to use a VPN for more than just unblocking Sling TV, pick NordVPN. Created by Tefincom & Co., this is one of the most secure virtual private network solutions on the market. It offers over 5,100 VPN servers in 59 countries.

NordVPN has a Smart DNS feature that you can install on devices that can’t use VPN. This way, you can watch Sling TV anywhere, not just your smartphone or tablet. It can also unblock Netflix US, Japan, and other libraries.

The VPN service has OpenVPN, dedicated IP addresses, a malware and ad blocker for browsers called CyberSec, Onion-over-VPN, Double VPN, and obfuscation mode. It’s wrapped in a user-friendly interface and has intuitive options.

More on NordVPN:

  • 6 simultaneous connections
  • No logs or leaks
  • 24/7 live chat support
  • 30-day money-back guarantee (no free trial)
NordVPN

NordVPN

Start watching Sling TV anywhere outside the US by turning to this super-secure VPN.
$3.49/mo. Buy it now

Surfshark

use Surfshark to watch Sling TV

Developed by Surfshark LTD, Surfshark is the most affordable virtual private network service on this list. That and the fact that it’s incredibly powerful are the reasons why it has an excellent reputation in the VPN user community.

With more than 1,700 VPN servers in over 63 countries, Surfshark can’t equal other VPN apps on this list. But it makes up for it by throwing some great security features in the mix, including OpenVPN, multi-hop connections, and obfuscated servers.

Surfshark does a great job of unblocking streaming services like Netflix. You can use it to watch Sling TV outside the US without any trouble. Besides, you can set it up on all popular operating systems.

More on Surfshark:

  • Unlimited simultaneous connections
  • 24/7 live chat and email support
  • 30-day money-back guarantee
  • 7-day free trial for Android and iOS
Surfshark

Surfshark

Use this budget-friendly VPN solution to access your Sling TV account from any part of the world.
$1.99/mo. Buy it now

CyberGhost VPN

use CyberGhost to watch Sling TV

Also a product of Kape Technologies, CyberGhost VPN is the best free VPN for watching Sling TV outside the US. That’s because it offers a free trial without requesting your credit card. It has over 6,500 VPN servers in 89 countries.

You can quickly access CyberGhost VPN’s streaming servers to unblock Sling TV in your country and start watching your favorite shows online. It even has a Smart DNS feature that can be used to set up the tool on a device without native VPN support, like Apple TV, so that you can watch Sling TV there.

CyberGhost VPN supports OpenVPN, private DNS servers, split tunneling, a kill switch, and trusted Wi-Fi networks. It can also be used to unblock all popular Netflix libraries, including Netflix US, UK, and Canada.

More on CyberGhost VPN:

  • 7 simultaneous connections
  • No logs or leaks
  • 24/7 live chat support
  • Up to 45-day money-back guarantee
  • 1-day free trial for Windows and macOS
  • 7-day free trial for Android and iOS
CyberGhost VPN

CyberGhost VPN

Get the best free VPN app to watch watch Sling TV anywhere outside the United States.
$2.75/mo. Buy it now

ExpressVPN

use ExpressVPN to watch Sling TV

ExpressVPN is one of the fastest VPNs for streaming, ideal for improving your entertainment experience by watching Netflix, BBC iPlayer, Hulu, Sling TV, and other similar services. It’s made by Express VPN International LTD.

The tool runs zero-knowledge DNS servers to ensure your online anonymity. It supports OpenVPN, split-tunneling mode, and a Network Lock that cuts off your Internet access in case of emergency.

Furthermore, ExpressVPN comes with MediaStreamer, an awesome feature that uses Smart DNS technology to unblock websites and streaming services on devices without VPN support. You can use it to watch Sling TV outside the US on any supported platform.

More on ExpressVPN:

  • 5 simultaneous connections
  • No logs or leaks
  • 24/7 live chat and email support
  • 30-day money-back guarantee
  • 7-day free trial for Android and iOS
ExpressVPN

ExpressVPN

Use one of the fastest VPNs to watch Sling TV outside the US with zero buffering.
$8.32/mo. Buy it now

In conclusion, if you’re traveling outside the United States, make sure to equip your computer with a premium VPN that can give you unrestricted access to your Sling TV account.

This way, you can continue watching your favorite shows anywhere in the world, without having to worry about geo-restrictions and licensing issues.

[wl_navigator]

Red Dead Online packet loss: How to fix it?

Red Dead Online is the online version of the popular Red Dead Redemption 2 hit release from Rockstar. Just like GTA 5 has its own multiplayer version called GTA Online, so does RDR2.

If you played Red Dead Redemption 2 before, you’re not missing out on much. In fact, aside from events and having to farm a lot of gold to unlock professions, Red Dead Online doesn’t bring a lot to the table.

However, the game still leaves us in awe with its breathtaking graphics, amazing attention to small details, and its nostalgia-inducing soundtrack. Plus, you get to posse up and play it with your friends, if you’re into that.

On the downside, things aren’t exactly rosy, so to say. Aside from the online release’s obvious bugs, you might also get to experience connectivity issues, such as jitter, high ping, and, why not, even packet loss.

What is packet loss in Red Dead Online?

Packet loss doesn’t see color and is generally a ruthless individual. It happens whenever packets of data that you pass through your connection never make it to their destination, whether it’s you or the remote server.

In Red Dead Online, things are no different and packet loss can still get you there. Usually, packet leaks have a short life and might pass without you even noticing it.

On the other hand, if your connection is really messed up, you’ll start noticing things. Red Dead Online menus might become unresponsive, your character might be appearing to run/ride on the spot or rubberband, and you might even get disconnected.

These things happen and they’re more often than not triggered by packet loss.

The reason this phenomenon is dreaded is that it appears there’s no immediate fix for it. More so, it can be caused by a huge variety of things. Just like the common cold, there’s no known foolproof cure for packet loss.

However, there are ways to alleviate it.

What can cause packet loss in Red Dead Online?

As we’ve previously mentioned, packet loss can be caused by an outstanding number of reasons. Even having subpar Ethernet cables could trigger a leaking packets episode, or using WiFi instead of Ethernet.

The truth is that there’s probably a long way between you and the Red Dead Online server. The longer the connection is, the more potential causes for packet loss are involved.

One of the most frequent causes of packet loss is network congestion. This happens whenever servers become overcrowded and can’t possibly manage all the connections properly.

As a result, the server might allocate more resources to some users, while depriving others, which can cause the latter to experience connectivity issues. Yes, including Red Dead Online packet loss.

That’s also the reason why many advocates for waiting for the packet loss to pass by itself. Network congestion usually spawns during peak hours, and avoiding this timeframe can do wonders if you can afford it.

How to detect packet loss in Red Dead Online?

Well, usually we can shine some knowledge when it comes to detecting packet loss in various games. But this time, it seems that Red Dead Online has bested us and there’s no way to test packet loss between you and the game servers.

The reason why performing this seemingly harmless operation is that the game servers can’t be pinged. No traceroute, no pathping, no Wireshark.

We’ve tried it several ways, but apparently, the only way to detect packet loss is to just assume the worst in case you notice slowdowns.

Although it’s not 100% accurate, there’s a red flag you should look for if you go packet loss hunting. Now high ping has a more permanent nature and doesn’t stop after a few moments.

Packet loss, however, has some in-between time intervals when the game seems to be back to normal. Of course, this could be also caused by jitter, but it’s the best we have right now, in lieu of better methods.

You can check the game servers’ status on the official page. However, you’ll only get to see the overall well-being of the service and not any specifics.

How to fix packet loss in Red Dead Online?

1. Use a VPN

  1. Get a Private Internet Access subscription plan
  2. Download the installer on your PC
  3. Deploy PIA on your computer
  4. Launch the VPN client
  5. Log into your PIA account
  6. Connect to a nearby server (closer = faster)
  7. Launch Red Dead Online
  8. Check if you’re still experiencing packet loss

Private Internet Access is an excellent VPN service offered to you by Kape Technologies. It’s one of the few VPNs that provide you with 24/7 customer support.

This VPN can help you solve various issues such as improving in-game ping, decreasing packet loss, and even circumventing geo-blocking. Not to mention the privacy and security boost your connection will receive.

Private Internet Access

Getting packet loss in Red Dead Online? Use PIA to bypass this issue.
Free Trial Visit Website

However, note that using a VPN to decrease packet loss only works if your ISP limits your connection by throttling bandwidth or using improper traffic routing.

If you’re playing Red Dead Online on PS4 or Xbox, just install and configure PIA on your router. That way, all your devices will benefit from its capabilities without having to configure the service individually, on each of them.

2. Connect to another server

It’s no secret that Red Dead Online uses peer-to-peer technology to allow multiplayer. GTA Online does it, too, by the way. Although this might seem like a nuisance most of the time, it does have its ups, too.

For instance, if you notice that a certain game is kind of slow, you can just open the Online menu and select a game mode. If that doesn’t seem to work, briefly switch between the Story and Online game modes.

3. Perform some manual troubleshooting

  • Restart Red Dead Online, your PC, your router, and your modem
  • Try to avoid peak hours to dodge network congestion (or use a VPN)
  • Check your end of the connection for any faulty or old components
  • Replace or repair any troublesome component (cables, adapters, router, modem)
  • Always use wired connections instead of WiFi if possible (WiFi packet loss is more frequent)
  • Make sure you have the latest drivers installed on your PC
  • Check if your router’s firmware is up-to-date and update it if it isn’t
  • Contact your ISP and ask them if they can take a look at your issue and maybe even fix it
  • Flush your DNS
  • Try connecting to another Red Dead Online server
  • Create a solo lobby in Red Dead Online (it may be frowned upon since it’s not an official feature)

You probably noticed that most of the suggested fixes we’ve listed above are not exactly packet-loss specific. Instead, they can help increase the quality of your connection to some degree, which could improve packet loss in turn.

However, that’s the whole point of the article and the reason why packet loss is so infamous. It doesn’t have any immediate fix, so you’ll have to use the old trial and error method to solve this one if using a VPN is out of the question.

You can fix Red Dead Online packet loss

To wrap it up, if the stars are aligned, you might be able to fix packet loss in Red Dead Online without significant effort. However, the truth is that this issue is kind of a clinger and doesn’t go away that easily.

If you’re in luck, a VPN might be able to improve your packet loss situation dramatically. However, note that it will only work if your ISP limits your connection through bandwidth throttling or bad routing.

How to watch ITV in USA online [Live Streaming]

ITV is a free-to-air TV channel available in the United Kingdom. You can watch it not only on TV but also online, thanks to the fact that it supports live streaming.

The online live streaming version only requires an ITV account associated with a UK postal code, which you can create on the spot at no cost.

Sadly, you can’t view ITV if you travel outside of the UK. That’s because it allows only users with an IP address within Great Britain.

Can you watch ITV in the USA?

Yes, you can watch ITV in the USA or from any other part of the world.

Since ITV must identify an IP address within the United Kingdom, you can avoid this technicality by resorting to online services capable of changing your IP and unblocking ITV live streaming.

How can I watch ITV online in the USA or anywhere else?

Use a VPN

use Private Internet Access to watch ITV live streaming
  • Purchase a VPN subscription (we suggest PIA).
  • Set up the VPN client on your device.
  • Open the VPN app and connect to a UK server.
  • Visit the ITV Hub and register for a free account.
  • Search Google for a UK postal code and use it at signup.
  • Verify your email address.
  • Disable any active ad blockers in your browser.
  • Watch ITV live in your web browser.

Once you do this, you should be able to watch ITV live streaming in the USA and wherever you decide to go next. A dependable virtual private network solution like Private Internet Access (PIA) protects your online privacy and bypasses geoblocks.

It’s a service owned by Kape Technologies, which offers more than 3,300 VPN servers spread across 48 countries, including the United Kingdom. It has private DNS, VPN servers optimized for streaming and torrenting, along with an ad and malware blocker.

PIA is one of the best VPNs for watching British TV. It uses OpenVPN and WireGuard to encrypt your network traffic, Shadowsocks to redirect your VPN servers to a second location, and a kill switch to maintain your anonymity in case of unexpected Internet drops.

More about PIA:

  • 10 simultaneous devices
  • Made for Windows, Mac, Linux, iOS, Android, routers
  • No logs or leaks
  • 24/7 live chat support
  • 30-day money-back guarantee
Private Internet Access

Private Internet Access

Watch ITV live streaming in the USA or any other part of the world by turning to this excellent VPN service.
$2.85/mo. Buy it now

Use Mobdro

use Mobdro to watch ITV

  • Download and set up Mobdro.
  • Open the Mobdro app and search for ITV.
  • Select one of the ITV channels.
  • Watch ITV live without a web browser.

Mobdro is an excellent app that can help you access all popular TV channels in the world. It’s totally free to use and doesn’t need you to change your IP address.

Although it’s available for Android devices only, you can use BlueStacks or another Android emulator to watch TV on Windows PC. Just keep in mind that Mobdro can’t encrypt your traffic or keep you safe online like a VPN.

Use a proxy or Internet circumvention tool

use Psiphon to watch ITV live streaming

  • Download Psiphon on your device.
  • Open the tool and select Settings > Psiphon Server Region.
  • Choose United Kingdom and click Apply Changes.
  • Go to the ITV Hub and sign up for a free account.
  • Look for a UK postal code on Google and use it at signup.
  • Check your email address to confirm the account creation.
  • Deactivate any ad blockers in your browser.
  • Watch ITV live in your web browser.

There are few free proxy services that can actually unblock websites and online services without errors, and Psiphon is one of them. The tool is specifically designed to bypass firewalls and access restricted content on the web.

Being one of the best proxy tools, Psiphon hides your IP address to keep you anonymous on the web. You can install it on Windows, Android, and iOS. however, unlike a VPN, you can’t count on Psiphon to encrypt your data traffic and keep you safe from hackers.


Having proxy connection issues on Windows 10? Here’s how to solve them right away.


To sum up, you can watch ITV online live streaming in the USA or any other part of the world. Just use a premium VPN app like PIA, the Mobdro free app, or Psiphon’s UK servers.

If you want to take our advice, go with Private Internet Access. Although it’s not free to use, it can do more than just unblock ITV. You can also use it to watch Netflix US or Hulu, protect your home router from cyber-criminals, and find cheaper flights with a VPN.

[wl_navigator]

Microsoft is extending support for Windows 10, version 1803

Not long ago, Microsoft announced that Windows 10, version 1803 has reached the end of mainstream support.

Consequently, this version of Windows was not to benefit from any non-security update releases. You can forget about that. If you’re still running on 1803, here’s a quick reason to rejoice:

Microsoft is extending the end of service date for version 1803

To be more specific, Education, Enterprise, and Enterprise IoT editions are spared for the time being and will continue to benefit from regular updates up until May 2021.

The reason for this sudden change of heart seems to based on public opinion and feedback that the giant from Redmond received from Windows users worldwide.

Given the rather precarious global health context, Microsoft officially announced that the scheduled end-of-service date for the forementioned editions will be delayed until May 2021 in an attempt to facilitate business continuity.

The latest Patch Tuesday from August, 11 brought quite a number of improvements and fixes for this version of Windows 10.

As a reminder, the cumulative update KB4571709 delivered:

  • Security updates to Internet Explorer and Microsoft Edge Legacy
  • Updates to improve security when Windows performs basic operations.
  • Security updates to input devices and peripherals such as a mouse, or keyboard
  • New file storage and management capacities
  • Security updates to the Microsoft Scripting Engine, Windows Graphics, Windows Input and Composition
  • Updates to Windows Media, Windows Shell, the Windows Wallet Service, and Windows Cloud Infrastructure
  • Security updates to Windows Fundamentals, Windows Kernel, and Windows Update Stack Services
  • Updates to Microsoft JET Database Engine, the Windows AI Platform, and Windows Hybrid Storage

Needless to say that support for devices running on old Windows 10, version 1803 editions will be completely shut down from May onward.

As far as we see it, it’s just one more reason to jump on the v2004 boat. After all, this is the latest, most advanced, and most feature-rich Windows 10 version currently available.

But don’t just take our word for it. Feel free to take your time and carefully weigh in your options before making a decision.

As always, we have your back with all the information you need to know about Windows 10 v2004:

Do let us know how are you getting prepared for this change by reaching for the comments section below.

[wl_navigator]

How to watch Paramount Network live stream [Old Spike TV]

It’s been a few years now since Spike TV has been rebranded as Paramount Network and moved headquarters to Paramount Pictures, in Hollywood. However, this doesn’t mean that you won’t be able to stream it any longer.

Granted, you won’t be able to find it by its old name, but you can still locate and enjoy it under its new brand.

Unfortunately, like many other similar streaming services, you can’t stream Paramount Network (Spike TV) outside of the US. But we discovered some workarounds that might just do the trick for you.

Spike TV is now Paramount Network

As we’ve briefly mentioned above, Spike TV is no longer called that way. You may still find some references online to its old branding, but everyone now knows it as Paramount Network.

Much like Spike TV, Paramount Network is still owned by ViacomCBS. Spike TV was previously called TNN before it got rebranded and shifted focus to a young male audience.

In 2015, the content was re-balanced to accommodate a more varied audience.

In 2018, Spike TV was rebranded as Paramount Network, in an attempt to align it (name-wise) with Paramount Studios. Reportedly, Paramount Network can be received in more than 80 million households in the United States.

However, the content it encompasses is appealing even for non-US residents. For those reasons, many have started looking for ways to circumvent this apparently unfair location-based restriction.

How to watch Paramount Network online without cable

1. Use a streaming service

If you’re a US resident, Paramount Network is available on several streaming services, including but not limited to:

  • Philo
  • Sling TV
  • fuboTV
  • YouTubeTV
  • AT&T TV NOW

However, if you’re not a US resident, much like Paramount Network, some of these services won’t be available to you.

Furthermore, even if you can access the streaming service, you might not be able to find Paramount Network in the list of channels.

2. Use a VPN

  1. Purchase a Private Internet Access subscription planPrivate Internet Access is the best VPN service
  2. Download the PIA installer executable
  3. Install Private Internet Access on your PC
  4. Launch the PIA VPN client
  5. Log into your account
  6. Connect to a US server (make sure you choose the fastest one for best results)

Private Internet Access is an outstanding VPN service brought to you by Kape Technologies. It’s one of the few VPN services that provide you with 24/7 customer support.

After you download, install and launch it, make sure to connect to a US server if you want to unblock US content. Once the connection has been established, you can access geo-restricted content such as US streaming services.

Private Internet Access

Private Internet Access

Can't watch Paramount Network outside of US? Give PIA a try.
$2.85/mo. Buy it now

More so, PIA has an impressive network of more than 3,300 secure servers. Thus, even though one server might not yield the expected results, you can just try the next one.

You’ll be able to stream Paramount Network (Spike TV) in no time.

3. Use Psiphon

  1. Go to the Psiphon website
  2. Locate the download page
  3. Download Psiphon on the device of your choice
  4. Install the tool on your device (PC)
  5. Launch Psiphon
  6. Open the Settings menu
  7. Head over to the Psiphon Server Region section
  8. Select United StatesUsing Psiphon with United States region
  9. Hit the Apply Changes button

That’s it, now you should be able to access US-only streaming services even if you’re outside of this region. Just head to your favorite streaming service and you should be able to stream Paramount Network from it.

4. Use a Smart DNS service

A Smart DNS service won’t change your IP address to fool streaming services. Instead, it will strip your ISP-assigned DNS from your connection and give you a new, private one.

By spoofing your DNS, the Smart DNS service hides your real location as well. It also monitors your traffic and removes any location-revealing data from the data you send.

It’s also a lot faster than a VPN since there’s no encryption involved.

Once you’ve successfully spoofed your DNS and location, you can try using the aforementioned streaming services to watch Paramount Network.

5. Use Mobdro

  1. Enable installation from unknown sources on your Android device
  2. Download the Mobdro APK and install it on your device
  3. Launch the app
  4. Tap the search button in Mobdro
  5. Type Paramount Network in the text fieldWatch Paramount Network on Mobdro
  6. Select Paramount Network from the search results entries
  7. Wait for the stream to load

Note that there’s also a way to install Mobdro on your Windows computer using an Android emulator. However, it requires third-party software solutions such as BlueStacks, NoxPlayer, or Remix OS Player.

Using Mobdro alone should work fine, but sometimes the stream might not be available or very slow. In this case, you can safely turn to trustworthy VPN services such as PIA for a little pick-me-up.

Streaming Paramount Network couldn’t be easier

All things considered, if you’re looking for a way to stream Spike TV (now known as Paramount Network) without cable, you’re in luck.

Currently, there are several ways to enjoy Paramount Network on your computer, even if you’re not a cable user, or you’re outside of the US.

You may even get lucky with an IPTV service such as ProgDVB, but keep in mind that streaming free content that’s not supposed to be free is not legal. We don’t endorse piracy or unlawful behavior.

Microsoft Teams will soon get native support for ARM devices

ARM64 devices such as Surface Pro X have become ever more popular among Microsoft‘s userbase, and to that extent, Better compatibility for current apps needed to be implemented.

One good example would be that of Microsoft Teams, Microsoft‘s dedicated collaborative tool.

Microsoft Teams will get dedicate ARM device support

While users could use Microsoft Teams on their ARM devices until now, it was generally plagued with various performance issues, not to mention that you were forced to connect via a Win32 emulation or by using the web app.

However, a recent post from Microsoft revealed that this will soon be a thing of the past.

 A Microsoft representative revealed via a post from the UserVoice forum that a version of Microsoft Teams for ARM64 is currently in active development:

We are excited to announce that we are currently working on making a native ARM64 version of Teams. We will share an update as soon as one is available.

Unfortunately, that’s pretty much all they had to say about the matter, as they didn’t provide users with a schedule or at least a roadmap.

This leaves the date of launch for the new Microsoft Teams up to speculation, to the user’s dismay:

Can you tease us with any timescales?

However, ever since the ARM64 framework has been recompiled for Windows, this is the first piece of solid news regarding any updates that would come to Microsoft Teams.

Users have been quick to respond to the post, and the feedback was indeed quite positive:

I tried the emulated version and could see the lag when scrolling. The web version working on Edge Chromium has no problems. Please release the Native build of MS Teams for ARM64.

That being said, even if we have no exact idea when will we be finally able to run Teams on ARM64 devices natively, at least we now know that it’s just a matter of time.

What’s your take on this latest turn in development? Let us know what other apps do you expect to be optimized for ARM64 devices by leaving us your opinion in the comments section below.

[wl_navigator]