Kill all Processes on Windows: 4 Ways to Stop All Processes

Do you need to kill all processes on Windows? Come along with us. If multiple windows are running on your PC, your system might become slow, and you may face some errors. To solve this, you need to kill all those tasks.

In this tutorial, we’ll show you how to kill all the running tasks simultaneously with just one click.

The first thing that comes to mind when you’re in a situation like this is forceful restarting. But it would be best if you didn’t do that because forcefully restarting your PC could damage your computer and its system files.

So, forget about forceful restarting and perform some of the following actions in this article.

How do I kill a process on Windows?

Killing a process will increase the number of resources available to other processes. For example, you can kill your Windows processes via any of the following:

  • Using Task Manager – This is the most common method for killing a process on Windows. You make use of the utility’s End task feature. 
  • Employing Command Prompt – You can also use the Command Prompt to kill a process using specific scripts.
  • Using PowerShell – Like the Command Prompt, this utility also provides specific scripts that will end running processes on your computer.  
  • Using a third-party tool – Several third-party tools can help you kill processes on Windows, such as Process Explorer, Process Hacker, and KillProcess.

Before we head to killing processes, you must find the process ID for each application to avoid trivial issues.

How do I kill all processes on Windows?

1. Kill processes in Command Prompt

  1. Open Command Prompt by pressing the Windows key + R, typing cmd, and then hitting Ctrl + Shift + Enter.
    kill all processes windows
  2. Type the command below and hit Enter. This command will forcefully terminate all processes with the image name (process name) matching any name. The * symbol means any process name.
    taskkill /f /im *
    kill all processes windows
  3. Wait a few seconds while the command executes and terminates all the processes.
  4. Once the command has finished executing, all processes should be terminated.

This command should kill all processes recognized as unresponding, and you’ll be good to go. Command Prompt is very useful and is one of the most powerful features of Windows, so killing a couple of unresponding processes is a piece of cake for such a tool.

2. Use CloseAll

If you prefer to use third-party software to solve problems, CloseAll is probably the best task-killing tool. It automatically closes all running processes, leaving you on your Desktop. All you have to do is to open it and press OK, and that’s the whole philosophy.

Some users recommend you pin it to Taskbar to have easy, instant access to it every time you need it. You can download CloseAll from its official website for free.

3. How to end all processes in Task Manager

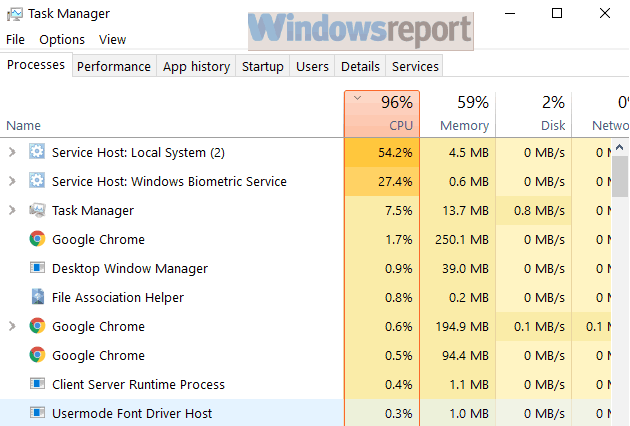
  1. Open the Task manager by pressing Crtl + Shift + Esc.
  2. Right-click on a process or process group and select End Task.
    kill all processes windows

In newer Windows 10 versions, related processes are grouped under one common cluster. As a result, you can end all the processes gathered under the same cluster.

4. Clean boot your computer

  1. Press Windows + R, type msconfig, and hit Enter.
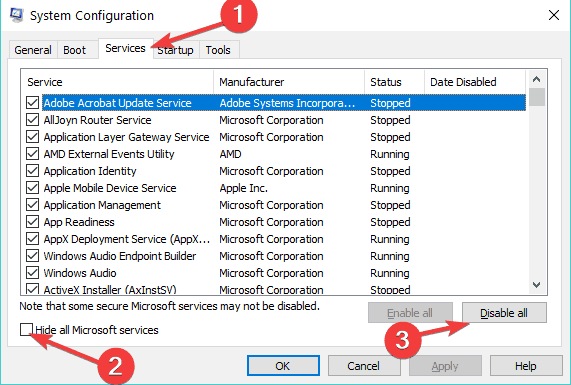
  2. Click on the Services tab, check the Hide all Microsoft services check box, and click Disable all.kill all processes windows
  3. Go to the Startup tab and click Open Task Manager.
  4. Select each startup item and click Disable
  5. Close the Task Manager and restart the computer.

Another method to kill unnecessary processes is to clean and boot your computer. This method allows you to start Windows using only a minimal set of drivers and programs. Of course, you’ll need to restart your computer for this solution to take effect.

5. End all processes using Powershell

  1. Open PowerShell by pressing the Windows key + X and select Windows PowerShell.
    kill all processes windows
  2. Type the command below and hit Enter. This command will get a list of all processes and then force them to stop.
    Get-Process | Stop-Process -Force
  3. Wait a few seconds while the command executes and terminates all the processes.

How do I kill all processes by name on Windows?

  1. Open PowerShell by pressing the Windows key + X and select Windows PowerShell.kill all processes windows
  2. Type the command below and hit Enter. This command will get a list of all processes and then force them to stop.
    Get-Process -Name | Stop-Process -Force
  3. Make sure to replace process name with the name of the process you want to terminate.

This command will get a list of all processes with the specified name and then force them to stop.

So, this is how you can end all the processes on Windows 10 or only a specific category of processes.

Using the command prompt or Powershell, you have a lot of flexibility and may tweak the script’s parameters to modify how it operates.

Regardless of your chosen solution, you should still achieve the same result. You may also be interested in terminating all app windows in Windows 11 at once, so check out how to proceed by visiting our expert guide.

Lastly, we like to hear from you in the comments below. So, please tell us what your favorite approach is.

Enable Caps Lock Notification in Windows 10 [How to]

We use Caps lock and other Lock buttons frequently, but sometimes we forget that we have them enabled. This is why many are wondering how to enable Caps Lock notification on Windows 10.

This is incredibly useful if Caps Lock is stuck, so be sure to keep on reading and learn how to properly enable this feature.

Why is my Caps Lock notification not showing?

  • Caps Lock doesn’t have visual notifications by default in Windows.
  • You can enable audio notifications from the accessibility settings.
  • Third-party software will allow you to get visual notifications as well.

How do I enable Caps Lock notification on Windows 10?

1. Change the Ease of Access settings

  1. Go to Search and type control panel.
  2. Open Control Panel and click on Ease of Access Center.ease of access control panel
  3. Go to Make the keyboard easier to use.make keyboard easier use
  4. Check Turn on Toggle Keys, under Make it easier to type and click OK.
turn on toggle keys

Now you have Scroll, Num and Caps lock warning enabled, and you don’t have to worry if you accidentally press one of these buttons, because you’ll hear a sound every time you do.

While this is a native solution, many aren’t looking for audio cues, and instead they would prefer a visual notifications.

Speaking of which, there is a Caps Lock software that will give you a notification in the system try, so you can use it instead.

As you can see, it’s incredibly easy to enable Caps Lock notification on Windows 10 from the accessibility settings. However, you can also use third-party software if you want more customization options.

We hope that you found these solutions useful and be sure to use them if your Caps Lock indicator isn’t working properly.

If you have some comments or additional questions, please write them down in the comments below, we would love to hear them.

Windows 10 build 17763.17 heads to the Slow and Release Preview rings with fix for deleted files issue

Microsoft has just announced that it has fixed a rare issue that caused some personal files to be erased when installing the Windows 10 October 2018 update. The company is testing the fix with Windows Insiders on the Slow and Release Preview rings today, whom can both download the Windows 10 October 2018 Update Build 17763.17.

John Cable, Director of Program Management, Windows Servicing and Delivery penned a long blog post to explain what went wrong during testing. “While the reports of actual data loss are few (one one-hundredth of one percent of version 1809 installs), any data loss is serious,” the exec wrote.

According to Cable, the root of the issue was new code that Microsoft implemented to remove duplicated known folders when Known Folder Redirection (KFR) is enabled. You can find Cable’s detailed explanation below:

Prior to re-releasing the October 2018 Update our engineering investigation determined that a very small number of users lost files during the October 2018 Update.  This occurred if Known Folder Redirection (KFR) had been previously enabled, but files remain in the original “old” folder location vs being moved to the new, redirected location.  KFR is the process of redirecting the known folders of Windows including Desktop, Documents, Pictures, Screenshots, Videos, Camera Roll, etc. from the default folder location, c:\users\username\, to a new folder location. In previous feedback from the Windows 10 April 2018 Update, users with KFR reported an extra, empty copy of Known Folders on their device.  Based on feedback from users, we introduced code in the October 2018 Update to remove these empty, duplicate known folders.  That change, combined with another change to the update construction sequence, resulted in the deletion of the original “old” folder locations and their content, leaving only the new “active” folder intact.

The good news is that Microsoft has seemingly fixed the issue in Windows 10 Build 17763.17, and now the original old folder location and all the personal documents it contained should remain intact when you install the October 2018 update. “We will carefully study the results, feedback, and diagnostic data from our Insiders before taking additional steps towards re-releasing more broadly,” Cable said.

As the October 2018 update was only made available for customers who actively checked for updates in Windows Update, the company says that “the number of customers taking the October 2018 update was limited.” Still, if you lost any personal data after proceeding, be aware that Microsoft will offer free customer support online and at its retail stores.

“We are committed to learning from this experience and improving our processes and notification systems to help ensure our customers have a positive experience with our update process,” Cable said today. The company will also revamp its Feedback Hub to let users indicate the severity of a bug when filing user feedback, which should hopefully help to avoid serious bug being ignored in the future.

FIX: Screen problems after Windows 10/11, 8.1 fresh install

Reinstalling your system could easily solve many problems you had, but it also could cause some new ones. Probably the first problem you’re going to face after you install the new operating system is a poor graphical experience, which appears due the corrupted drivers and wrong settings.
Windows Resource Protection Found a Corrupt File, But It's Unable To Remove It
More precisely, one user at Microsoft forum complained that after he did a fresh installation of Windows 8, Windows 10 his screen was constantly ‘jumping’ and he wasn’t able to do anything.

How to do I fix screen issues after Windows 10, 8.1 fresh install?

  1. Reinstall graphics drivers
  2. Use Safe Mode
  3. Check peripherals
  4. Roll back graphics drivers
  5. Disable overclocking software

Solution 1: Reinstall graphics drivers

This problem occurs because of the corrupted graphic card drivers (if there are any, if there aren’t any drivers, all you have to do is to install them), and could be solved by reinstalling them or replacing them with the right ones.

— RELATED: Full Fix: Windows 10 Blue Screen Loop

Solution 2: Use Safe Mode

It is a good idea to start your computer in Safe Mode and see if the problem still exits. If there are no screen problems in Safe Mode, you just have to update your drivers or download them from manufacturer’s website. Here’s how to check the compatibility of your drivers through the Safe Mode:

  1. Restart your computer
  2. Press Shift key and F8 at the same time
  3. Recovery screen will show up, but it probably won’t allow you to enter Safe Mode directly, so you’ll have to go to See advanced repair options
  4. Choose Troubleshoot
  5. Go to Advanced Options
  6. Now choose the Windows Startup Settings option
  7. Click on Restart
  8. Now in Advanced Boot Options select Safe Mode with Networking and press Enter

When you boot your computer in Safe Mode, update your graphics card drivers from Device Manager or download them from manufacturer’s website, install them and restart the machine.

Solution 3: Check peripherals

If your computer completed the fresh install process with a bunch of peripherals connected to it, unplug all the external devices and reboot your machine. The screen issues should be fixed now. You can now plug your peripherals back in.

— RELATED: FIX: Windows 10 Laptop Won’t Calibrate the Screen

Solution 4: Roll back graphics drivers

If nothing worked, using old driver versions may be the answer to your problem.

  1. Open Device Manager and go to Display Adapters
  2. Right-click on the Display Adapter driver > go to  Properties
    Windows black screen with cursor after login
  3. Go to the Driver tab > Roll Back Driver.
    Black screen windows 10 with cursor

Solution 5: Disable overclocking software

If you’re a gamer and you installed an overclocking tool on your machine, temporarily disable it and check if this solved the problem for you. This type of software puts an unusual strain on your computer’s hardware and may trigger many problems, including screen issues.

Your problem with screen should now be fixed, and your graphics should be smooth as it was before. If you have any additional comments, suggestions or maybe solutions please write it down in the comments section below.

RELATED STORIES TO CHECK OUT:

Microsoft reportedly finalizing deal to acquire RPG gaming maker Obsidian Entertainment

After announcing the acquisition of four game studios including Forza Horizon 4 developer Playground Games this year, Microsoft could add a fifth one to its belt, according to Kotaku. Obsidian Entertainment, the American company behind Fallout: New Vegas or Pillars of Eternity II: Deadfire is apparently Microsoft’s latest target, with one of Kotaku’s sources saying that the deal was “90%” done.

The indie developer has released several critically-acclaimed RPGs over the years, but it also went through some financial problems this decade which were caused in part by cancelled projects. The company is currently working on a new RPG that still has no release date.

“Unfortunately, we don’t comment on rumors or speculation other than to say that the Rumors album by Fleetwood Mac still holds up,” said an Obsidian spokesperson. A much more serious statement came from a Microsoft spokesperson, saying that “We do not comment on rumors or speculation.”

Microsoft having an “exclusive problem” has probably been one of the most common things we’ve heard during this console generation, and bringing another talented developer on board seems to be a good opportunity to fix that. The acquisition could also give Obsidian Entertainment much more resources for its future games. We’ll see what happens, but Microsoft’s upcoming XO event in November may well be much more interesting than expected.

Windows 10 October 2018 Update no longer includes basic external printer drivers

Microsoft will no longer bundle printer drivers with Windows 10 by default starting with the October Update 2018. The company stated that its reason is due to the OS’s ever-growing size, and that users who wish to get them can download them from Windows Update.

While new installations won’t include the drivers by default, users who upgraded to Windows 10 October Update 2018 from an older version will still be able to use the drivers that are still installed. For users who started with the new update, Windows 10 will install the appropriate printer drivers automatically upon hitting print on a document or web page, or fall back to the Mopria printer service if the printer is Mopria-compatible.

For those unfamiliar, Mopria is a wireless printing service that that allows computers and mobile devices to communicate with printers using a single universally-compatible service. Microsoft says that the majority of modern Wi-Fi printers are compatible with the Mopria standard.

Microsoft’s recent October 2018 Update has been pulled from Windows Update amid a number of consumers saying that the update deleted files from their systems. Later, Microsoft said that it was working on a fix.

Politico Europe builds its new EU Election Hub with Power BI

Hotly contested elections across the globe are creating headlines for both local and national candidates, and to offer voters the most comprehensive data collection going into the 2019 electoral season, POLITICO Europe has partnered with Microsoft for a new Election Hub.

POLITICO Europe and Microsoft have come together to create the Election Hub. which will cover the 2019 European Parliamentary Elections in a pretty impressive and heavily visualized interactive data map.

“Visualizing the election will make it a more meaningful event for our readers, showing them during nine months where the election is headed, and how they compare to their neighbors,” said Ryan Heath, Political Editor at POLITICO, leading this project for the newsroom. “We’re encouraging readers to adopt a new way of thinking about the European Union, one where we all see beyond our borders, and want to match this new way of thinking with new ways of discovering and exploring the latest news and facts at a personal level.”

In what looks like the best piece of marketing material for Power BI, Microsoft and POLITICO Europe have come up with something that should make the most apathetic voter at least curious about nominations and election trends in the country.

The Election Hub contains a “detailed, graphical, interactive view of the projected makeup of the 9th European Parliament,” as well as giving viewers the opportunity to see the makeup of the Parliament in-real time as votes are tallied and confirmations are assigned. Election Hub viewers will also be able to see MEP sears by region or country, for any interested in electorates outside of their area.

Much more than just a data collection the Election Hub will serve as news repository as it incorporates newer discussion formats alongside Power BI reports that include trends, polling results, women MEP’s and voter turnout.

The full extent of POLITICO Europe’s Election Hub will be rolled out in phases prior to the 2019 Parliament elections, but at launch, viewers will have a whole host of data to immerse and educate themselves with.

Microsoft to collaborate with Grab for big data & mobility solutions

Microsoft is adding another partner in its ambitious cloud growth trajectory with leading Southeast Asian on-demand transportation, mobile payment, and hybrid services platform, Grab.

According to a post on the Microsoft Stories blog, Microsoft and Grab have agreed to a five-year partnership to use Azure as the services platform cloud solution along with Microsoft’s other productivity options.

Through this partnership, Grab will adopt Microsoft Azure as its preferred cloud platform, tapping into Microsoft’s intelligent cloud and AI capabilities to scale Grab’s platform efficiently and increase its capacity and capabilities. Through this collaboration, the companies will explore a number of innovative deep technology projects that will enhance and transform the Grab experience for Grab’s users, driver-partners, merchants and agents.

The partnership will also provide specific innovations for Grab that include new ways of processing big data, AI and machine learning.

  • To help improve passenger and driver safety and security, Grab will work with Microsoft to explore new authentication mechanisms such as mobile facial recognition with built-in AI for drivers and customers who opt in, as a replacement for checking IDs, that help match both driver and passenger identities to the reservation.
  • Grab will explore utilizing Microsoft Azure’s data analytics and fraud detection services to better predict and prevent fraudulent transactions on Grab’s platform.
  • The companies plan to leverage Microsoft’s natural language processing capabilities to provide customers with contextualized real-time translations and create an AI chatbot so Grab users can engage in interactive experiences.
  • Microsoft’s machine learning and AI capabilities will be used to power Grab’s advanced “recommendation engine” that analyzes user data and behavior to provide personalized services and content recommendations through the Grab application.
  • Grab also plans to work with Microsoft to explore image recognition and computer vision technologies that will improve the user and driver pickup experience. For example, passengers will be able to take a photo of their current location and have it translated into an actual address for the driver.

To improve map creation and quality, Grab plans to tap into the power of Microsoft’s machine learning capabilities.

In addition to new cloud processes, Grab will also be taking advantage of Microsoft’s wide breadth of productivity software suites. The collaborative Microsoft and Grab partnership will see the use of Outlook integration to book rides directly in the email software, Kaizala that will enable group communication and work management with Grab, and Microsoft Rewards Gift Cards for loyalty programs.

Microsoft expands Azure features aimed at $10 billion Pentagon contract decision as Google drops out

Several big tech companies are currently in a race to win the Pentagon’s $10 billion JEDI cloud contract, and after Google pulled out from the fight yesterday, Microsoft is now touting an upcoming expansion of its Azure Government Secret cloud service (via Reuters). Microsoft first announced Azure Government Secret back in October, and today Julia White, Corporate Vice President, Microsoft Azure said that new Azure Regions dedicated to secret US classified data will be available in Q1 2019.

“We are making major progress in delivering this cloud designed to meet the regulatory and compliance requirements of the Department of Defense and the Intelligence Community,” the exec wrote in a blog post today. “In addition, to meet the growing demand and requirements of the U.S. Government, we are confirming our intent to deliver Azure Government services to meet the highest classification requirements, with capabilities for handling Top Secret U.S. classified data.“

With JEDI (Joint Enterprise Defense Infrastructure), the Pentagon is planning a major revamp of its IT infrastructure. Microsoft may not be able to win this multi-billion-dollar contract over Amazon, but Microsoft’s Julia White emphasized today that the company’s expanded Azure Government Secret Cloud service would make it “a strong option for the JEDI contract.”

Microsoft Project, one of the company’s oldest products, is revamped adds three new services

Microsoft has announced that Microsoft Projects will be getting an overhaul to the service with a new Home screen starting today, as well adding new features available soon. The Redmond tech giant says that the new Home screen will allow quick and easy creation of new projects, and that such projects are synchronized over the cloud to allow data to be accessed from anywhere and on any device the software currently supports.

For those unfamiliar, Microsoft Project is a project management service that allows project managers to create plans, assign tasks, and manage budgets and expenses. As one of the first Office products, it’s older than both Excel and PowerPoint, although it’s only available as part of a standalone subscription instead of part of Office 365.

The company is also adding a new project management service, which will support all project types as well as employee roles and skill levels. The new service will sport many capabilities, resource and financial management and expense tracking. Microsoft says the new service will be released early next year, and that all of Project’s desktop features will soon be supported in the new service.

Microsoft is also enabling an overview screen off all work performed by various team members with the new Roadmap service. From there, project managers will be able to create chronological views of multiple projects, each with dates and milestones. This new service will also be supported on Azure DevOps, and a future update of Project will include support for Microsoft Planner and other third-party applications. This new service is slated for closer to the middle of next year.

All three new services will be part of the Project Online Professional and Premium subscriptions, which start out at $30 per month per user.

Burnout Paradise Remastered and FIFA 18 are now available with EA Access on Xbox One

The EA Access Vault on Xbox One has is going to pick up four new games in October. Susbcribers can now play FIFA 18, Burnout Paradise Remastered and Fight Night Champion for free on Xbox One, and Army of Two will also join the Vault next week on October 17.

FIFA 18 was added much later in the year compared to its predecessor FIFA 17, and EA likely wanted to maximise game sales during this year’s FIFA World cup competition. FIFA 18 came to the Vault after FIFA 19 was released on Xbox One on September 28, but EA Access members can already try the latest entry for free for up to 10 hours. “Play First” trials are also available for EA Sports titles such as NHL 19, NBA LIVE 19 and Madden NFL 19

Battlefield V, which has been delayed to November 20, will also have its Play First Trial starting November 9. The WW2-themed shooter will come to the market after the release of blockbusters Call of Duty: Black Ops 4 and Red Dead Redemption 2, and this was probably a smart choice from EA. If you have yet to try EA Access, the subscription service is just $4.99 a month or $29.99 a year, and for that price you get unlimited access to a catalog of over 60 Xbox One and Xbox 360 games.

How to Install Third-Party Themes on Windows 10

We’re all excited about the Windows 10 operating system, and so far, Microsoft has done a great job with its Technical Previews. We saw all sorts of changes, ranging from visual to performance updates, and speaking of visual changes, if you want to change the look of your Windows 10 with custom themes, today we’re going to teach you how to easily install third-party themes on Windows 10.

Windows 10 is similar to Windows 8.1 since it doesn’t allow you to install third-party themes by default, but luckily for you, there are a few solutions that allow you to bypass this limitation.

How to apply third-party visual themes to your Windows 10 PC/laptop?

You’ll have to patch system files before you install third-party themes on your Windows 10 PC. Patching system files isn’t a simple process, but fortunately for you, several apps will patch system files for you, and allow you to install third party themes.

We have to warn you that patching system files using the third party software might create unexpected issues, so please perform the patching task at your own risk. That being said, here are best three applications for patching system files.

UxStyle is an application that removes Windows theme signature requirements in order to enable third-party customization of your Windows. This application supports a wide array of Windows systems including Windows XP, Windows Vista, Windows 7, Windows 8, Windows 8.1, Windows Server 2003, Windows Server 2008, Windows Server 2008 R2, Windows Server 2012 and Windows Server 2012 R2. As you can see, you’re not limited to Windows 10; you can also use this software on almost any Windows system.

Next on our list is UXTheme Multi-Patcher. This applications lets you use non-certified visual styles by bypassing Microsoft’s certification verification in uxtheme.dll.

Like the previous application, UXTheme Multi-Patcher supports almost all Windows versions, including Windows 10 32-bit and 64-bit versions.

Last on our list is UltraUXThemePatcher, a well-known application for patching system files. This software can be used for patching files on Windows XP, Windows Server 2003, Windows Vista, Windows Server 2008, Windows 7, Windows 8, and Windows 8.1, both 32-bit and 64-bit versions. Before using this application you should know that UltraUXThemePatcher application will make a few changes to your system files, so keep that in mind.

After you have successfully patched the system files, copy the selected theme folder (available with a .theme file) to “%windir%ResourcesThemes” folder. In addition, you can also open this folder by pressing Win + R keys to open the run command and typing the folder path.

After that, you need to double-click the click .theme file of your third-party theme, and your new theme will be applied to your Windows 10 computer. If you don’t like it, you can always delete a theme in Windows.

Various themes on your Windows PC

For all of you who like to customize your PC, it is essential to know how to apply third-party themes correctly. But where to take some themes that could fit your taste? We have many lists of the best themes that you could get for your Windows 10 PC or laptop, and we will list the best of them below. Here they are:

Installing third-party themes on Windows 10 isn’t impossible, although it’s disabled by default, but if you don’t feel comfortable patching systems files and potential risks, you shouldn’t try to do it.

Microsoft announces new Xbox One S Minecraft Creators Bundle

Microsoft has just announced a new Xbox One S console bundle aimed at Minecraft gamers or those who may be interested in playing the hit video game for the first time.

Named the Xbox One S Minecraft Creators Bundle, this pack comes with an Xbox One S console, an Xbox controller, a digital copy of the Minecraft video game, 1,000 Minecoins (the Minecraft in-game currency), the Starter Pack DLC (which contains the Greek Mythology Mash-up, Plastic Texture Pack, Skin Pack 1, and Villains Skin Pack), and the Creators Pack (Adventurer’s Dream Mash-up and Winter Mini-Games Festival by Noxcrew, Relics of the Privateers by Imagiverse, PureBDcraft Texture Pack by BDcraft, Pastel Skin Pack by Eneija, and Wildlife Savanna by PixelHeads).

Xbox One S Minecraft Creators Bundle

In addition to the above, the Xbox One S Minecraft Creators Bundle will also come with a 1-month membership for Xbox Game Pass, the Xbox One’s Netflix-style video game subscription service, and two weeks of Xbox Live Gold for online play.

The Xbox One S Minecraft Creators Bundle doesn’t appear to be available for pre-order yet however it will be priced at $299. The bundle is said to be due for release “soon.”

Are you interested in the Xbox One S Minecraft Creators Bundle or do you have your eye on another bundle or maybe the Xbox One X console? Share your thoughts with us in the comments below and then follow us on Pinterest for more Minecraft content.

Microsoft To-Do app’s new Planned feature rolls out to all users on Windows 10

The Windows 10 version of the Microsoft To-Do app updated today on Windows 10 Mobile smartphones and Windows 10 PCs. This latest update adds the new Planned feature, which had been tested with Insiders recently, and also improves the appearance of content when displayed on a LiveTile with better font size and spacing.

The new Planned feature displays all upcoming tasks from all lists and displays them chronologically based on their due date. This is a particularly useful for power users who create multiple lists for different projects.

Here’s the full release notes for the Microsoft To-Do app update:

  • The Planned smart list is now available on Windows! Just open Planned for an overview of your scheduled tasks for today, tomorrow, the next 5 days and beyond.
  • We’ve made our tiles a bit tidier with better formatting when the small size is selected.

Microsoft To-Do is a free task management app available on the web, Windows 10 Mobile and PC, iOS, and Android. Do you use To-Do on your device? Let us know in the comments below and then follow us on Pinterest for more app content.

Warface free-to-play video game now available on Xbox One consoles

The free-to-play first-person shooter, Warface, is now available to play on Microsoft’s Xbox One consoles.

The game is fairly popular already on PC with millions of players partaking in online matches every day. The Xbox One version of Warface supports online games with up to 16 players and Xbox Achievements.

Here’s the full game description and store link:

Warface is a contemporary first person shooter with millions of fans around the world. Four unique classes with special skills, teamwork, exciting PVE missions and raids, various PVP modes, hundreds of realistic weapons, modules, equipment and camo items. Play for free!

  • PVP. A range of modes with dozens of maps – from time proven classics to fresh experiments as well as the elaborated system of ranked matches await its heroes!
  • PVE. Play with your friends in short exciting PVE missions or try yourselves in full-scale raids with several difficulty levels.
  • Teamwork. Four classes with unique skills. Assault the defenses of your enemies with a heavy machinegun, revive your teammates, mine the corridors or take down the foes with precise shots – here you decide how to act!
  • Plenty of rewards and trophies. Hundreds of achievements with interesting and unusual obtain conditions. Can you collect them all?

Are you a Warface fan and will you play it on Xbox One? Let us know in the comments below and then follow us on Pinterest for more Xbox One gaming content.

Warface: Clutch
Warface: Clutch
Developer:
MY.GAMES
Price:
Free

How to fix email error 0x80048802 on Windows 10/11


Steps to fix email error 0x80048802

  1. Run the Windows built in troubleshooter
  2. Run SFC
  3. Perform a clean boot
  4. Update the Mail & Calendar app in Windows Store
  5. Reinstall the Mail & Calendar app
  6. Check if the proxy connection is enabled
  7. Install Windows updates
  8. Perform a system restore

There are thousands of different error codes that may occur in hundreds of places throughout your computer. This article is about the 0x80048802 email error. If you encounter this error and want to find a solution to your problem, here are a few ways that can help you fix this problem.

How can I fix error 0x80048802?

Solution 1: Run the App Troubleshooter

Because Windows 10 comes with a series of built-in troubleshooters that allow you to quickly fix some problems related to your operating system or the apps you are using, this is the first thing you can try. In order to verify if this solution works for you:

  1. Go to Settings and click on Update & Security
  2. Click on Troubleshoot
  3. Launch the Windows Apps troubleshooter

windows apps troubleshooter

In case the Windows app troubleshooter stopped working, you can use this guide to fix it.

Solution 2: Run SFC

Error 0x80048802 may be caused by Windows system file issues. That is why you can also use Microsoft’s System File Checker to check for system file corruption. This utility verifies the integrity of all system files and repairs the problematic ones:

  1. Go to Start and type cmd
  2. Right click on Command Prompt and select Run as Administrator
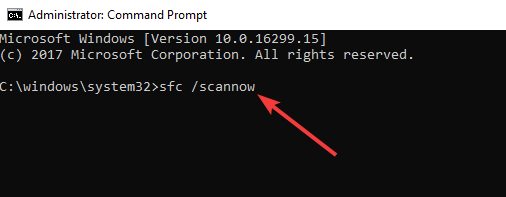
  3. Type sfc /scannow and wait for the scanning process to completesfc scannow
  4. Restart your computer

— RELATED: Full Fix: eM Client not receiving emails

Solution 3: Perform a clean boot

Performing a clean boot can be useful in identifying the cause behind error code. Disabling all start up processes and then re-enabling them one at a time can help you find the source of the error:

  1. Click on Start and type msconfig in the search bar
  2. Select System Configuration and open the Services tab
  3. Check the Hide all Microsoft services check box and click on Disable allhide all microsoft services
  4. Open the Startup tab and click on Open Task Manager button
  5. Right-click on all start-up items and click on Disable to disable themdisable startup programs
  6. Close Task Manager and save the changes
  7. Restart your computer

Note: If the error does not persist, you will have to start each application/ services at a time to see what is causing the error.

Solution 4: Update the Mail & Calendar app in Windows Store

Another suggestion is to check an update for Mail & Calendar app in Windows Store as many users reported that updating the app to the latest version can fix this issue:

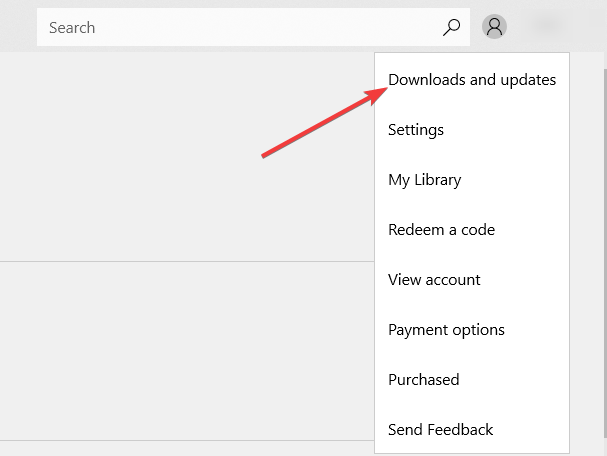
  1. Launch Windows Store and click on your Profile on top right of Windows Store
  2. Select Download and Updates
  3. Click Check for updates to see if any update available for Mail & Calendar app.

update windows store apps

Note: If the problem still persists, you can uninstall and reinstall the Mail & Calendar app. You can find more datiled information in the next solution.

— RELATED: Antivirus blocking email: How to fix it in less than 5 minutes

Solution 5: Reinstall the Mail & Calendar app

If the above solution did not work for you, the next thing you can try is uninstalling and reinstalling the Mail & Calendar app to see if this fixes your issue:

  1. Press Windows + X keys and select Command prompt (Admin)
  2. Copy and paste the below command lines one by one and press Enter
  • Powershell
  • Get-AppxPackage *windowscommunicationsapps* | Remove-AppxPackage
  1. Go back to Store and try to install the app again

Note: When you open the store to install the Mail & Calendar app, if it says the product is already installed, then press Windows key + R, type WSReset.exe and hit Enter. Now check if it allows you install again. If the problem persists, try to restart your PC, post complete shutdown and then check the issue.

Solution 6: Check if the proxy connection is enabled

There could be various reasons behind this error. We suggest you to check if the proxy connection is enabled. In order to do this:

  1. Go to Settings and click on Network and Internet
  2. Click on Proxy and ensure that Automatically detect connection is turned ON and the rest are OFF

automatically detect proxy

Along with this, follow the steps below:

  1. Press Windows + R keys
  2. Type inetcpl.cpl and click on OK
  3. From the Internet Options dialog box, go to the Connections tab and click on LAN Setting
  4. Uncheck the Use a proxy server for your LAN (These settings will not apply to dial-up or VPN connections) checkbox
  5. check Automatically detect settings and apply changes

— RELATED: FIX:There is no internet connection, there is something wrong with the proxy server

Solution 7: Install Windows updates

Some users reported that they succeeded to fix this problem simply by installing the latest Windows updates. Normally, Windows 10 installs automatically the updates in the background, but sometimes it can happen that you skip an important update. In order to check the updates, please follow the below steps:

  1. Press Windows + I keys in order to open Settings app
  2. Navigate to Update and security
  3. click on Check for updates button

check for updates

Solution 8: Perform a system restore

You can always try to revert your computer to its previous settings if you face a stubborn error that will not go away even though you tried all of the methods described above. In order to do this:

  1. Go to Start and type system restore
  2. In the System Properties window, click on System Restore button
  3. Click Next and you will see a list of all available restore pointsSystem restore Windows 10
  4. Check Show more restore points option and select the desired restore point
  5. Follow the instructions to complete the process

We hope that at least one of the described solutions helped you fix the 0x80048802 email error. If you found other solutions to this problem, we would be more than glad if you shared them with us.

RELATED GUIDES:

Sorry, You Don’t Have Access to This Page [Fix]

The Sorry, you don’t have access to this page message can appear in OneDrive, Office 365, and SharePoint and cause many issues.

Usually encountered due to a mismatch between the signed-in account and the one for the OneDrive Business service, the error affects a large number of users. However, you should be able to fix this issue using one of our solutions.

How do I fix Sorry, you don’t have access to this page OneDrive error?

1. Check the user’s settings

  1. Go to the SharePoint Admin Center.
  2. Select User profiles, choose Manage User Profiles, and click on Find profiles.
  3. Enter the user account name in the search field and click Find.
  4. Choose the Manage site collection owners option.
  5. Now enter the user’s account name into Site Collection Administrators field and click OK.

According to a few, sometimes your user’s settings aren’t correct, and that can cause the Sorry, you don’t have access to this page message to appear. So, it’s advised that you check user settings and make sure that the user can access OneDrive for Business.

2. Obtain design permission level

Many users reported Sorry you don’t have access to this page message in SharePoint while trying to Save List as a template. To fix this issue, you need to have at least the Design permission level in the List Template Gallery.

To access these settings, just navigate to Site Settings, select List templates and you should have the necessary permissions.

3. Reset the default site owner group

  1. Open your web browser, paste the following path in the address bar, and hit Enter:/_layouts/15/permsetup.aspx
  2. Now, you’ll be asked to select an existing group or create a new group.
  3. Select the current site owner group and click OK.
  4. After doing that, restart your browser, and the issue should be resolved.

Sorry you don’t have access to this page message can appear in SharePoint if you’re having issues with the default site owner group. However, you can always fix this issue by resetting the default owner group.

4. Give owwners group the required permissions

Sorry you don’t have access to this page message can sometimes appear if the Owners group doesn’t have the necessary permissions. However, you can fix this issue simply by giving the Owners group permissions to the Access Requests list.

After making these changes, the issue should be completely resolved, and everything will start working again.

5. Create a new project and share it

  1. Login to the PWA site with admin access.
  2. Now create a new project in PWA.
  3. Select Projects from the Home page.
  4. Click the dots icon next to the project name and choose Share.
  5. Enter the name of the user with whom you want to share the project, and then click Share.

According to users, the Sorry, you don’t have access to this page message can appear if the project isn’t properly shared. To fix this issue, you need to create a new project and share it.

6. Make sure that Custom Script option is enabled

  1. Go to the SharePoint Admin Center.
  2. Now go to Settings, and enable Custom Script.

According to users, Sorry you don’t have access to this page message can appear if Custom Scripts aren’t enabled in SharePoint.

Now check if the prevent option is enabled. If so, you’ll need to disable it by following these steps:

  1. Download SharePoint Online Management Shell.download
  2. Once you start the management shell, run this command:set-sposite https://your_website.sharepoint.com -denyaddandcustomizepages 0

This solution is a bit advanced, and it’s intended for advanced users that are familiar with the command line. If you don’t know how to work with the command line, perhaps you should skip this solution.

Several users reported that you can change the Custom Script options from the SharePoint Admin Center. Alternatively, you can just visit the following URL: https://sitename-admin.sharepoint.com/_layouts/15/online/TenantSettings.aspx

Now select Allow users to run custom script on personal sites and Allow users to run custom script on self-service created sites options. After doing that, save the changes. Keep in mind that it might take up to 24 hours for the changes to take effect.

7. Change your SharePoint settings

When the Sorry, you don’t have access to this page message appears in SharePoint, you just need to change a couple of settings. These are suggested workarounds from Microsoft, so you might want to try them out.

  • The first workaround is to Grant access to the whole Document Library instead of the folder. Alternatively, you can use a different Document Library instead of a folder.
  • You can also fix this issue by setting Content Approval to No.
  • Lastly, you can set Document Version History to any other setting except Create major and minor (draft) versions.

After making one of these changes, the problem with SharePoint should be resolved.

8. Run the commands from the command line

Sometimes the best way to fix the Sorry you don’t have access to this page message is to run a couple of commands from the command line.

This solution is intended for advanced users that are familiar with the command line. If you never used the command line along with SharePoint before, you might want to skip this solution.

As for the commands, you just need to run these three to fix the issue:Connect-SPOService https://sitename-admin.sharepoint.com Get-SPOSite -Identity "https://sitename.sharepoint.com" | fl * Set-SPOSite -Identity "https://sitename.sharepoint.com" -DenyAddAndCustomizePages $false

After the commands are executed, the issue should be resolved, and everything should start working again.

9. Enable anonymous access

  1. Go to Central Administration, select Application Management, and click on Manage Web Applications.
  2. Now select the web application that is giving you this message.
  3. Go to the Web Applications tab and click on Authentication providers in the Security section.
  4. In the Anonymous Access section, check the Enable anonymous access checkbox.

If you keep getting Sorry you don’t have access to this page message in SharePoint, you might be able to fix the issue by enabling anonymous access.

In case the problem persists, get one of the best personal cloud storage services for an error-free experience.

We hope that you managed to solve this problem using our solutions. Do share which method worked for you in the comments section below.

FIX: Via HD Audio Driver Doesn’t Work on Windows 10/11

Steps to fix Via HD Audio Driver bugs

  1. Restart to the previous version
  2. Enable Playback devices
  3. Install the latest Via HD Audio driver
  4. Scan your PC for malware
  5. Run SFC scan
  6. Change to High Definition Audio Device

Windows 10 passed the testing phase a long time ago and it supports more software than previous operating systems did. However, many users users are complaining about Via HD Audio driver issues. In most cases, users complain about the VIA high definition audio driver microphone not working, but this is not the only problem they experienced.

In this guide, we’ll tell you exactly what are the steps to follow in order to solve the problem with this software.

Solutions to fix Via HD Audio Driver issues

Solution 1: Restart to the previous version

Windows 10 still doesn’t support (well, at least not yet) some drivers and other additional software for older devices. Until your audio card driver is supported by Windows 10, you can install an older version of the driver software and your problem with sound in Windows 10 could be solved.

Some users who reported that they had problems with Via HD said that they managed to solve it by installing an older version of the driver. But you also should check if your playback devices are enabled, just in case.

Solution 2: Enable Playback devices

Maybe your driver is actually supported, but just isn’t enabled. When the driver is updated, it generally resets the audio settings, and your playback devices might get disabled. All you have to do is to enable it and set it as a default playback device. If your Via HD Audio device is not set as default playback device, you should follow these steps to check if the device has been set as default playback device:

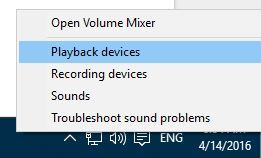
  1. Right-click on the speaker icon in the task bar (right bottom corner of the Desktop)
  2. Click on Playback devices to see a list of devices connected to the system
  3. If your Via HD Audio device is not listed, it is possible that the device has been disabled by accident. Right click and select Show disabled devices
  4. If your device is listed after this, right click on it and select enable
  5. After this, right click on the speaker and click Set as default option from the same window

If something doesn’t work for you, or you have some other solution, don’t hesitate to leave your comment below.

Solution 3: Install the latest Via HD Audio driver

via driver update windows 10

If the first solution didn’t work and rolling back to a previous driver didn’t solve the problem, then maybe installing the newest Via HD driver version will. Go to ViaTech’s official website, fill in all the information required and download the appropriate driver updates for your system.

Alternatively, you could use an all-in-one tool that scans your device and installs the most suitable drivers for your PC. We recommend this type of program because it is a safe and fast way to ensure you’ll install the right version of the HD Audio driver.

A computer cannot manage video cards, computer programs, sound cards, or other hardware; they must be managed by a driver. You can manually update drivers if you have a thorough understanding of the drivers your PC requires. The driver updater utility is the best alternative.

⇒ Get Fortect Driver Updater

Solution 4: Scan your PC for malware

Virus and malware infections may trigger various driver issues. To make sure your computer is malware-free, run an in-depth antivirus scan using Windows Defender or a third-party antivirus tool. Then restart your machine and check if the problem persists.

Solution 5: Run SFC scan

sfc scannow

The System File Checker Tool is a very useful troubleshooting solution that can fix a bunch of Windows 10 issues. Basically, it works by scanning your system files for missing or corrupted files and then replacing or fixing them automatically.

To run an SFC scan, simply launch Command Prompt as administrator and then enter sfc /scannow. Hit Enter and wait until the process completes. Then restart your computer and check if this solved the issue.

Solution 6: Change to High Definition Audio Device

If nothing worked, maybe this solution will:

  1. Open Device Manager > Go to Sound, Video, and Game Controllers
  2. Navigate to the VIA HD Audio entry > right click on it >click on ‘Update Driver Software’
  3. Select the option ‘Browse my computer for driver software’
  4. Click on ‘Let me pick from a list of device drivers on my computer’
  5. Now, select High Definition Audio Device
  6. Restart your computer and check if this solved the problem.

There you have six solutions to fix Via HD Audio Driver issues on Windows 10. Let us know which method worked for you.

FIX: Error 80188301 When Installing Windows 10 Mobile

Windows 10 for phones is finally here (but only for some Windows Phone devices)! Even though the OS is no longer in its  early, testing phase, users are still reporting problems. This time we have a problem of getting an error 80188301 when trying to install Windows Phone 10.
install windows 10 for phones on non-supported devices

Solution to fix Windows 10 Mobile error 80188301

The problem occurs because of the missing base package on the phone, but there’s a solution for it. You just need to rollback your system to a clean and working version of Windows Phone 8.1 and then install Windows 10 once again. You can do this in two ways, by performing a hard reset of the phone and by using Microsoft’s official Windows Phone Recovery Tool. It is completely up to you, because both ways proved to be effective.

In order to perform a hard reset on your Windows Phone device, follow these steps:

  1. Press and hold the Volume down and Power  buttons at the same time until your phone starts vibrating
  2. When you feel the vibration of your phone, immediately press and hold the Volume down button until a large exclamation mark appears
  3. Once you see the exclamation mark, press the following four buttons in this order: Volume up, Volume down, Power Power button, Volume down
  4. Your phone should now reset and restart itself, and you’ll have a fresh, new copy of your operating system

The other way to get your old Windows Phone 8.1 back is with Microsoft Windows Phone Recovery Tool:

  1. Connect your phone to your computer with a USB cable
  2. Wait for your computer to detect the connected phone and follow the on-screen instructions
  3. Press Install software to and Windows Phone Recovery Tool will do all the work for you

After you rolled your OS back to Windows Phone 8.1, you just need to re-install the Windows Insider App and install Windows 10 Technical Preview again.

You can download the Windows Insider App from this link.

Additionally, some users also suggested that setting time and date information manually helped them fix this issue. Give it a try as this simple method may be the solution you’ve been waiting for.

Microsoft abandoned Windows 10 Mobile

Windows 10 Mobile is no longer a priority for Microsoft. The company prefers to focus on the Windows 10 desktop version and other essential projects such as the HoloLens project.

There are fewer and fewer Windows 10 Mobile users in the world. It’s safe to say that in just a few years’ time, Windows 10 Mobile will be history. Switching to another mobile platform is a must.

RELATED STORIES TO CHECK OUT:

Microsoft Store stopped working after Windows 10/11 update

Some users have reported on Microsoft’s forum that they’re facing an issue with the App Store after they switched to a new version of Windows 10. Apparently, the App Store won’t load, or even shows an error message. But luckily, we have a couple of solutions here.
windows store doesn't work wind8apps

What to do if Microsoft Store won’t load after update

Solution 1: Solve the problem with PowerShell

The one way to solve the ‘not working App Store‘ problem is through PowerShell, but this method is only checked on Windows 8.1, so we’re not sure if it works properly on Windows 10 Technical Preview or the full version of Windows 10, as well. Anyway, here’s what you should do in order to fix the Store problem through PowerShell:

  • Open PowerShell as Administrator: type powershell on the Start screen. The PowerShell icon will appear in the search results on the right. Right click it and choose “Run as Administrator”
  • Add the following command into the PowerShell console:
    Add-AppxPackage -DisableDevelopmentMode -Register $Env:SystemRootWinStoreAppxManifest.XML
  • Press Enter and wait until the command is finished (It should last a couple seconds)
  • Reboot your PC

— RELATED: How to Show or Hide Windows Store Apps on the Taskbar

Solution 2: Fix the problem with Command Prompt

If somehow the PowerShell solution didn’t help, you will need to enter a few command lines in the Command Prompt, and your problems with App Store will probably be solved. Just follow these steps:

  1. Go to Search and type cmd
  2. Right click on Command Prompt and open it as Administrator
  3. In the Command Prompt, copy the following line: powershell -ExecutionPolicy Unrestricted Add-AppxPackage -DisableDevelopmentMode -Register $Env:SystemRootWinStoreAppxManifest.xml
  4. Hit Enter.
  5. Now in the same Administrator Command Prompt add: start “” “ms-windows-store:”
  6. Press Enter again

Solution 3: Additional solutions

We already covered Windows Store App issues extensively on this website. We published quite a few troubleshooting guides to help you get the app up and running after installing the latest Windows 10 updates.

So, if these two quick solutions failed to fix the problem, you need to use some more advanced troubleshooting methods. We already compiled exhaustive solution lists for this issue and you can find them in the guides below:

You should be able to run your App Store without any problems after applying one of these solutions. But if you have some comments, suggestions, or something just doesn’t work for you, feel free to express yourself in the comments section below.

FIX: Surface Pro 3 Pen Won’t Open OneNote in Windows 10/11


What to do if Surface Pen fails to open OneNote

  1. Check Surface Pen drivers
  2. Pair the Surface Pen manually
  3. Change the coin cell batteries
  4. Contact Enterprise Support
  5. Wait For New Updates/ The Next Build
  6. Run the Surface Software Repair Tool
  7. Install the Surface app

Windows 10 has a lot of bugs, and one of these bugs is bothering Surface Pro 3 users. Reportedly, they’re unable to run OneOne when the they press the top button of the pen. This problem occurs in technical preview builds, as well as in the full version of the OS. If you’re experiencing this problem, here are some methods that you can use to fix it.
surface 3 pro onenote wind8apps

Surface Pen top button is not opening OneNote

Solution 1: Check Surface Pen drivers

First thing you’ll need to check is if your Surface Pro 3 drivers and firmware are compatible with the current version of Windows 10 Technical Preview or the latest Windows 10 version for the general public that you’re using. If there are some drivers issues, just update your drivers to the latest version, and your problem should be solved. If this didn’t help, try some of the following solutions.

Solution 2: Pair the Surface Pen manually

  • Go to Start Menu and click on Settings.
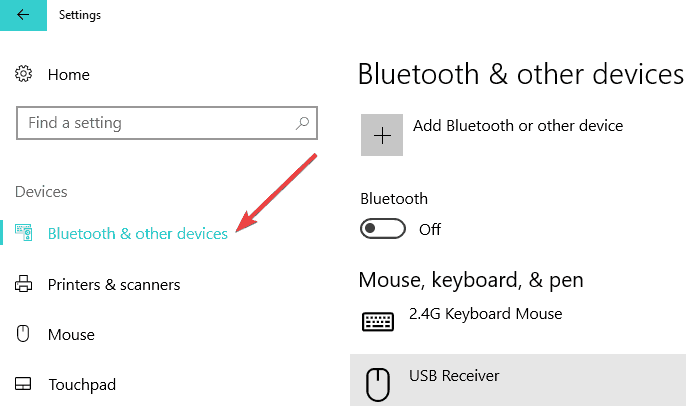
  • Click on Change PC settings, tap or click on Devices, and then tap or click Bluetooth. Make sure that Bluetooth is turned on.bluetooth other devices
  • If Surface Pen appears in the list of discovered devices, tap or click it and then tap or click Remove device.
  • Hold down the top button for seven seconds, until the light in the middle of the pen clip starts to flash.
  • When the pen appears in the list of Bluetooth devices, tap or click it, and then tap or click Pair.

If manual connection between the Surface Pen and Surface 3 Pro didn’t help, you might try to change the batteries.

Solution 3: Change the coin cell batteries

To change the coin cell batteries, you’ll need two size 319 coin cell batteries and a jewelers’ Phillips screwdriver. Here’s how to change the coin cell batteries:

  • Unscrew the top of the pen from the bottom leaving the paper label in the top in place.
  • Insert a jeweler’s Phillips screwdriver into the battery case, through the middle of the spring, and unscrew battery case.
  • Remove the battery case, and replace the old batteries with new ones. Insert the batteries into the battery case with the negative (—) side facing the pen tip.
  • Slide the top of the pen down over the battery case. Tighten the case just until you feel resistance. Do not over-tighten
  • Screw the bottom and top of the pen back together

You may need to pair the pen to your Surface again after you change the batteries

Solution 4 : Contact Enterprise Support

If manual connection and changing batteries didn’t help, you may try to contact Microsoft Enterprise support. Contacting the Enterprise Support could be useful not just for solving this problem, but for solving any Windows-related problem you can’t find online. You can ask Microsoft Enterprise support for help on this link.

Solution 5: Wait For New Updates/ The Next Build

As you know Windows 10 is work in progress with various, improving builds coming out once in a while. Every new build of Windows 10 improves some aspect of the system, so if your pen doesn’t launch OneNote when the top button is pressed, there’s a possibility that this problem will be solved in the next OS version. Windows 8 and 8.1 users had similar problem, which was solved in one of the system updates. You can of course report this bug with Windows Feedback Tool, but you should know that the tool doesn’t work as expected. You can read more about it in our Windows Feedback Tool article.

Solution 6: Run the software repair tool

If the problem persists after following the solutions listed above, you can also try to use Microsoft’s software repair tool. The Surface Disgnostic Toolkit allows you to fix a wide array of Surface issues provided that your device runs Windows 10, Windows 10 Pro, or Windows 10 in S mode.

Once you’ve downloaded it, install the tool and run it. Follow the on-screen instruction to run a quick diagnosis and repair of your Surface device. The whole process should take about 15 to 20 minutes.

Solution 7: Install the Surface app

If yo want to get the most of your Surface device, you can install the Surface app from the Microsoft Store – if you haven’t already. This app helps you to better optimize your Surface Pen experience and set up particular settings for your device.

Some users said they fixed their Surface Pro 3 Pen and OneNote issues after installing this app. You can download it from the Store.

We hope that the solutions listed in this guide helped you to fix your Surface Pen OneNote issues. Let us know which method worked for you.

RELATED GUIDES TO CHECK OUT:

Fix: Netflix.com is Not Responding in Browser

Netflix.com is a great video-streaming service for watching movies. However, Netflix doesn’t always stream movies entirely smoothly. Some Netflix users have stated that movies freeze and get stuck loading when they try to play them in their browsers.

One Chrome user stated, “I get no error message, all I get is a constant loading screen any time I try to watch a movie or show on Netflix.” Thus, Netflix.com stops responding in their browsers. These are some of the potential resolutions that might fix Netflix.com when its playback freezes and stops responding in browsers.

What to do if Netflix stopped responding?

1. Update Your Browser

Netflix.com’s supported browsers need to be reasonably updated versions to stream its movies. For example, Google Chrome must be version 37 or higher for HTML 5 playback in Windows 10. As such, make sure that the browser you’re utilizing is the most updated version to ensure it’s optimized for Netflix’s web player.

You can download the latest version from the browser’s website or check for updates. This is how you can check for Google Chrome updates.

  • Click the Customize Google Chrome button to open the browser’s menu.
  • Select Help > About Google Chrome to open the tab in the snapshot directly below.
  • Chrome will then update the browser.
  • Press the Relaunch button to close and reopen Chrome.

— RELATED: Free* VPNs that work with Netflix [2018 Guide]

2. Clear Browser Data

  • Clearing corrupted and outdated cookie files can fix Netflix playback. To clear browser data in Chrome, enter ‘chrome://settings/clearBrowserData’ in the URL bar and press Return.
  • Select the Cookies and other site data check box.
  • Select the Cached images and files option.
  • Then press the Clear data button.

3. Switch to an Alternative Browser

This isn’t exactly a fix, but you might find that Netflix.com streams movies ok in an alternative browser. Safari, Chrome, Firefox, Edge, Internet Explorer, and Opera are the six supported browsers you can utilize with Netflix.

If you’re browsing Chrome, try playing Netflix.com movies in Edge (which can stream movies at higher resolutions) or Opera.

⇒ Get Opera

4. Reset the Browser

Resetting your browser will also clear browser data, restoring the software to its default settings and disabling (or removing) extensions. That will ensure there aren’t any extensions undermining Netflix playback. You can reset Google Chrome as follows.

  • Enter ‘chrome://settings/’ in the URL bar and press the Return button to open the Settings tab.
  • Click Advanced to further extend the Settings tab.
  • Scroll down to the Restore settings to their original defaults option.
  • Click Restore settings to their original defaults to open the Reset settings option in the snapshot directly below.
  • Press Reset settings button to restore Chrome to its default configuration.

5. Set Up a new Browser Profile

  • Some Chrome users have confirmed that setting up a new browser profile to stream movies in fixes Netflix freezing. To set up a new profile in Google Chrome, enter ‘chrome://settings/’ in the browser’s URL bar and press the Return key.
  • Click Manage other people to open the window shown in the snapshot directly below.
  • Press the Add person button.
  • Then enter a user profile name in the text box, and click the Add button.
  • Click the user profile button at the top right of Chrome’s window to open the menu shown directly below.
  • Select the new profile you set up.
  • Then log in to Netflix to play a movie in the new user profile.

6. Adjust Netflix Playback Settings

Netflix includes three video-quality playback settings. Video streams might freeze if the Netflix playback setting is too high for your internet speed. You can adjust the playback setting by logging in to Netflix, clicking Your Account and selecting Playback settings in Your Profile.

Then, you can select Low, Medium, or High video quality options for playback. Select the Low or Medium option for your playback.

7. Turn Off Third-Party Antivirus Software

Antivirus utilities can also have an impact on Netflix playback. They might even block videos playing. So turning third-party antivirus software off might fix Netflix.com freezes. Right-click your antivirus utility’s system tray icon to select a disable option that will temporarily turn off the software.

If you can’t find a disable option on the context menu, open the utility’s primary window to select a disable or turn off option on its settings menu or tab.

— RELATED: 9 ways to fix Netflix black screen on your computer

8. Update the Silverlight Plug-in

Netflix’s video streams depend on the Silverlight plug-in and HTML 5. Silverlight is more essential in older browser versions. Netflix freezing can often be due to an outdated or corrupted Silverlight plug-in. So updating Silverlight might ensure more responsive movie playback in your browser.

  • Press Run’s Windows key + R hotkey.
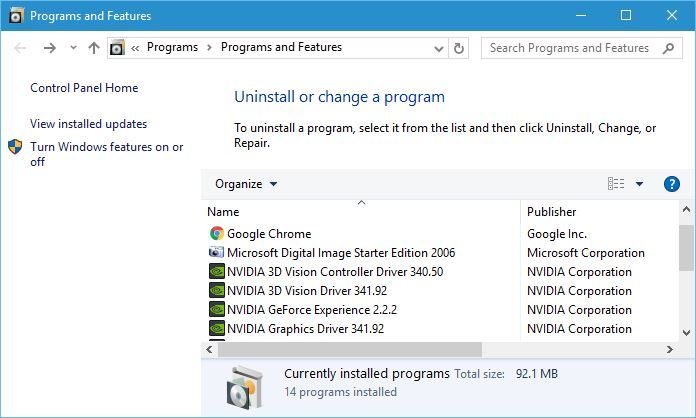
  • Input ‘appwiz.cpl’ in Run and click OK to open the Programs and Features applet.
  • Then select your current Microsoft Silverlight version, and click the Uninstall button.
  • To update Silverlight, open this page in your browser.
  • Click Install for Windows to download the Silverlight installer.
  • Open the folder you downloaded Silverlight.exe to in File Explorer.
  • Click the Silverlight.exe to open the installer’s window.
  • Deselect the Make Bing my search engine and MSN my homepage options.
  • Press the Install now button.

9. Close Background Software and Tabs

Netflix.com video streams might also freeze when you’re overextending your system’s resources. Don’t play Netflix movies with other third-party software open on your taskbar and within the system tray. Browser tabs and extensions also hog RAM. So make sure that there’s only one tab open in your browser when you play Netflix movies and turn off all browser extensions. That will maximize system resources for Netflix.com. You can close background third-party software with Task Manager as follows.

  • Press the Windows key + X hotkey.
  • Select Task Manager on the menu to open the Processes tab shown directly below.
  • Select each program under Apps and press the End Task button to close them.
  • Background processes lists third-party software services. You can also terminate third-party software services to free up RAM by selecting them and pressing the End Task button.

If it’s still not working, consider switching to another provider such as Disney+, one of the biggest streaming services in the US, offering its users a wide range of original movies and exclusive content for one monthly subscription fee.

⇒ Get Disney+

Those are a few of the resolutions that might fix movie playback freezing within Netflix.com. Remember, however, that a browser isn’t essential for Net’s movies, and you may encounter another variation of the same error in code m7362 1269. You can also play movies within the Netflix app for Windows 10 and 11, which you can download from this webpage.

The EU is set to approve Microsoft’s GitHub deal, Reuters says

While it may seem as though Microsoft’s GitHub acquisition is old news, the formality of the deal was still under legislative scrutiny in the EU.

A report from Reuters confirms the EU is set to bless the union of Microsoft and GitHub as soon as this week.

Not only is Microsoft about to receive the EU’s stamp of approval on the deal but the $7.5 billion acquisition is planned to happen with “unconditional” EU antitrust approval.

The EU’s decision should become official by October 19, 2018, but the commission and Microsoft have yet to respond to comments or questions publicly.

The unconditional nature of the EU’s decisions comes after Microsoft CEO Satya Nadella addressed concerns about the path of integration the largely open-sourced community of GitHub would undergo if Microsoft were to be its owner. Nadella, to his credit, proclaimed GitHub to remain an open platform that will continue to work with its current public clouds and its 28 million developers.

However, as one of the largest contributors to the open source community, Microsoft does have plans to eventually use GitHub to push its Intelligent Cloud efforts forward.

Microsoft Support is working to recover deleted Windows 10 October Update documents, says users should stop using affected PCs

Just a couple days after announcing the general availability of the Windows 10 October 2018 update, Microsoft had to stop the public rollout over the weekend after acknowledging that installing the update could erase personal files. It’s still not clear how widespread the issue is, but Head of the Windows Insider Program Dona Sarkar has since explained that Microsoft “has the tools” to recover lost personal data.

https://twitter.com/donasarkar/status/1048612272287834112

Windows 10 users who have encountered the issue are invited to contact Microsoft Support asap, but as spotted by Bleeping Computer, the company is also inviting consumers to stop using affected PCs. This recommendation was quietly added to the Windows 10 update history support page, with a new statement asking users to “please minimize your use of the affected device and contact us directly.”

Image credit: Bleeping Computer.

Presumably, this recommendation has been made to avoid making deleted files unrecoverable. According to a Reddit user who contacted Microsoft Support, the technicians may invite affected customers to run System Restore to go back to Windows 10 version 1803, but that may not be possible if System Restore has been disabled in Settings. In that case, tech support will be able to take control of the PC remotely and try other ways to recover lost data.

Xbox’s 1810 update nears as all RS5 Insider Preview rings are now on the same build

Xbox Insiders on Xbox One Preview Alpha, Beta, Delta and Omega Rings are all getting the same 1810 Xbox One system update (181005-1705), pointing to a final release coming soon. As noted on Xbox Wire, here’s what’s coming in the 1810 system update:

Fixes

Audio
We have fixed an issue when users experienced audio to stop playback or hang entirely when a headset was attached or detached during media playback with such apps as YouTube, Hulu, Twitch Beta, Spotify.

Known Issues:

Avatars
It can take up to 10 seconds to view an Avatar on the profile screen after creating a new Avatar.
My Games & Apps
We are aware that some users are experiencing crashing of a game or the Youtube app when you are either launching or resuming the Youtube app.
If you are in the Youtube app and then Resume to a Game the app/game and console may hang or crash.
We are aware that some users are experiencing challenges navigating the Ready to Install Filter options in My Games and Apps. Some users are unable to select the filter options at all and we are investigating.
Power
We are tracking an issue in which the console is fully powering off when it is placed into Instant On mode.
Profile Color
Sometimes users may encounter the incorrect Profile color when powering on the console.

It should be noted that Skip Ahead Insiders are already on 19H1.

Microsoft formally announces Project xCloud, bringing Xbox gaming to tablets and phones

The video games streaming service that Xbox head Phil Spencer announced back at E3 2018 now has an official name, Project xCloud. Kareem Choudhry, Corporate Vice President, Gaming Cloud at Microsoft shared today the first details about the company’s “state-of-the-art global game-streaming technology,” which will go in public preview next year.

First of all, Project xCloud will be a “multi-year journey” for the company, and Microsoft aims to leverage its 54 Azure regions across the world to deliver a great experience to all gamers, regardless of location. The cloud service will be powered by custom blades that will combine the components of multiple Xbox One consoles, as seen in the video below:

Microsoft is well aware that a lot of consumers don’t have a fast Internet connection today, and that’s why the Redmond giant is currently experimenting with some unique things to improve latency on average connections. The good new is that you apparently won’t need to have fiber optics Internet to enjoy Project xCloud:

Developers and researchers at Microsoft Research are creating ways to combat latency through advances in networking topology, and video encoding and decoding. Project xCloud will have the capability to make game streaming possible on 4G networks and will dynamically scale to push against the outer limits of what’s possible on 5G networks as they roll out globally. Currently, the test experience is running at 10 megabits per second. Our goal is to deliver high-quality experiences at the lowest possible bitrate that work across the widest possible networks, taking into consideration the uniqueness of every device and network.

As Phil Spencer previously said during E3, Project xCloud will also work on mobile devices including phones and tablets, and Kareem Choundry revealed today that an Xbox wireless controller won’t be mandatory on those devices. “We are developing a new, game-specific touch input overlay that provides maximum response in a minimal footprint for players who choose to play without a controller,” he explained.

As for the content that will be available on Protect xCloud, Choundry said that Microsoft has “enabled compatibility with existing and future Xbox games,” and that the company is already inviting game developers to get on board. “Developers of the more than 3,000 games available on Xbox One today, and those building the thousands that are coming in the future, will be able to deploy and dramatically scale access to their games across all devices on Project xCloud with no additional work,” the exec explained.

Microsoft isn’t the first company to launch a video games streaming service, but Project xCloud being available on phones and tablets is quite unprecentended. “Project xCloud is about providing gamers — whether they prefer console or PC — new  choices in when and where they play, while giving mobile-only players access to worlds, characters and  immersive stories they haven’t been able to experience before,” said Choundry. This is a pretty ambitious project, to say the least, and it’s still not clear yet if there will be minimum specs to access the service on mobile. Anyway, the public preview won’t launch until next year and we should learn details more about Project xCloud in the coming months.

Windows 10 hangs on initial startup but here’s how to fix that

What to do if Windows 10 hangs on startup screen on my PC/laptop?

  1. Disable Fast Startup
  2. Check your Hardware
  3. Disconnect your USB devices
  4. Use third-party software for Windows 10

Today we’re going to solve another Windows 10 Technical Preview issue. This time, one user complained on Microsoft Forum about how he wasn’t able to start his PC because Windows 10 was hanging on startup.

Reportedly, when he tried to turn on his machine, the system just showed the blue Windows pane and circling dots weren’t shown. When he rebooted the machine, everything was back to normal, but this problem appeared again after some time.

Fortunately, this is not a serious issue, and the solution for this problem is very simple. It is caused by the Windows 10 feature called Fast Startup, and disabling this feature will solve everything.

How to fix Windows 10 if it hangs on startup?

Fast Startup is the feature introduced in Windows 8 and is still present in Windows 10 Technical Preview.

Fast Startup allows your computer to start faster than normal by logging the user session and saving system-related files and drivers to a special hibernation file.

Although this feature helps your computer to boot faster, it can also cause some problems with booting, like it did in this case.

Fast Startup only works when the computer is shut down, as it doesn’t affect restart, which explains why things were back to normal after restarting a computer.

1. Disable Fast Startup

To disable the Fast Startup feature in Windows 10, follow these instructions:

  • Go to Search
  • Type po bu (short for power buttons) in the search box. It will bring you directly to the ‘Change what the power buttons do’ applet in search results. Click it.
  • System Settings window will appear
  • Click on the ‘Change settings that are currently unavailable’ link to see the available Shutdown options
  • Untick the Turn on fast startup (enabled) option

Disabling Fast Startup should solve your problem with Windows 10 hanging out on the initial startup, but in case you have some questions or maybe this solution does not fix your issue, please check the solutions below.

2. Check your hardware

Many users reported that this may be caused by faulty hardware. Some of them said that the internal SD card reader was faulty and caused this issue. They fixed it by disconnecting the device.

We also suggest you check your HDD and its connections. In case you cannot check it on your PC, try to check it on somebody’s PC that works.

3. Disconnect your USB devices

According to some users, devices that connect via USB to your PC may cause Windows 10 to hang. Disconnecting your mouse, keyboard, or any other USB device before starting your system might help you.

4. Use third-party software for Windows errors

Windows freezes are quite common, but having a stable OS and healthy registry files will minimize the risk of experiencing them.

We recommend using trustworthy third-party software that has powerful built-in tools designed to address these issues and optimize your OS.

If this does not work, try to check our article which explains to you how to fix Windows 10 stuck on the start screen.

Font Rendering Problems in Windows 10: How to Fix Them

Many users reported various font rendering issues on Windows 10. These types of problems can make reading information harder.

In some cases, you won’t be able to use some of these applications at all, so you must fix this issue, and this guide will show you how to do that.

Why do font rendering problems appear on Windows 10?

  • Sometimes, missing updates can cause glitches with fonts to appear.
  • Problems with your GPU driver can cause this and many other issues.

How do I fix font rendering issues on my Windows 10 PC?

1. Install the latest update

  1. Ensure your PC is plugged in and connected to the Internet using a non-metered connection. Don’t disconnect, unplug, or turn off your PC while the update is installed.
  2. Go to Start Menu, click Settings.
  3. Go to Update and Security.
  4. Click on Check for updates.
  5. System will now download the updates in the background.
  6. After the download is complete, restart your PC and sign in.

2. Reinstall display drivers

  1. Press Windows key and X key together.
  2.  Select Device Manager.
     
  3.  Locate and expand Display adapter.
  4.  Right-click on the Display adapter that is listed and click Uninstall device.
  5.  Restart the computer and download, install the latest drivers from the manufacturer website.

For more information, check our guide on how to update outdated drivers.

We also recommend a driver updater tool to automatically download all the outdated drivers on your PC.

You can also try reinstalling the font you’re having problems with or disabling scaling on high DPI settings. Another action you can take is to modify your registry.

You will find detailed information on how to perform these actions in our step-by-step guide on how to fix font bugs in Windows 10.

If this solution didn’t help, or you have some comments and suggestions, please leave your opinion in the comments section below.

Firefox to add support for Windows 10’s Action Centre for notifications

Windows 10’s Action Centre is a great way of having all your notifications in one place on your computer, but unfortunately, not everything makes use of it. This means that you’ll often find yourself actioning some notifications from the Action Centre, while still relying on other notification methods in other apps and software – such as e-mails, in-software notifications, and more.

While Windows 10 has been around for some time now, developers are taking their time to implement Windows 10’s Action Centre. Google’s Chrome recently added support for the Action Centre. Now, Firefox is working on implementing support, with the feature set to arrive in Firefox 64, as confirmed by a comment on Mozilla’s Bugzilla (via Windows Latest).

As a result of this feature enhancement, Firefox will stop delivering notifications from within the browser itself, instead feeding all notifications to the Action Centre, providing a consistent notification experience.

Microsoft stops public rollout of Windows 10 October 2018 update to investigate deleted files issue

Earlier this week, we learned that some early adopters for the Windows 10 October 2018 have been reporting lost data after updating, and the issue is apparently serious enough for Microsoft to stop the public rollout via Windows Update (via Windows Central).

On its Windows 10 update history page, the company now explains that “We have paused the rollout of the Windows 10 October 2018 Update (version 1809) for all users as we investigate isolated reports of users missing some files after updating.” Microsoft also recommends users who have manually downloaded the installation media to wait until new media is available.

It’s still not clear how widespread this deleted files issue is, but Microsoft can’t afford to put personal files of Windows 10 users in danger any longer. Not everyone makes sure to back up their data in the cloud or external hard drives, and the October 2018 update being responsible for erasing users’ personal documents folder is definitely something serious enough that could lead to class-action lawsuits.

This week, Microsoft used its October 2 Surface event in New York to announce the public availability of the October 2018 update, and the announcement came a bit earlier than usual. Indeed, the company usually takes the time to test new major Windows 10 updates with all Windows Insiders before announcing the public rollout, and this time Insiders on the Release Preview ring didn’t receive the update before the general public.

We hope Microsoft won’t do the same mistake in the future, but in the meantime the company says that it will provide an update when it’s ready to resume the rollout of the October 2018 Update to customers. If you have encountered any issues after installing the update, you can contact the company’s global customer service on this page.

How to Install Windows Media Center on Windows 10

Windows 10 Technical Preview comes with a lot of new features, but besides that, some features from the previous versions of Windows have been removed, and Windows Media Center is one of them. Eventually, you can install this feature in Windows 10, but it is not recommendable.

[DISCONTINUED] Microsoft confirmed in 2015 that Media Center, with its TV receiver and PVR functionality, would not be updated for or included with Windows 10, thus the product would be discontinued.

As a replacement, the paid Windows DVD Player app was received for free to all those upgradings to Windows 10 from a version of Windows that included the Media Center application.

You can find the best media software alternative to Windows Media Center in these articles:

“We do not recommend adding Media Center to Windows 10 Technical Preview as using a purchased product key will also prevent you from getting updates and future builds for Windows 10 Technical Preview,” says Winston M, a Microsoft Support Engineer.

On the other hand, if you just can’t use your system without Windows Media Center, you can add it to the system, but think about the facts you’ve read above. Here’s how to add Windows Media Center to Windows 10 Technical Preview using Windows 8 Media Center key:

  • Go to Search box, type add features and go to Add Features to Windows Technical Preview
  • After that, you will be asked whether you have a product key or you want to purchase one. Since you can’t purchase the product key, for now, you should use the Windows 8 Media Center key. Click on I already have a product key and enter your product key
  • To add Windows Media Center just go to Add Features and you’re good to go

Now you have Windows Media Center in your Windows 10 Technical Preview. But I personally don’t see the point in doing this, because the main purpose of Windows 10 Technical Preview is testing, and you won’t be able to do that anymore after you install Windows Media Center. So I think that it is a much better idea to use regular Windows 8/8.1 if you want this feature.

RELATED ARTICLES TO CHECK OUT NOW:

FIX: Windows 10 Technical Preview Key is Not Working

The Microsoft Insider Program has been available for quite some time and a lot of people are interested in it. It is a great way to determine what users would like to see in the final version of Windows 10. But even the Technical Preview of the new system has issues, and one of them is not working CD key.

Some participants of Windows Insider Programs have reported that after they downloaded Windows 10 Technical Preview, the system requires a CD key. After they type the key, an error occurs. The cause of this issue is a bug that is present in some copies of Windows 10 Enterprise Technical Preview.

Solutions to fix Windows 10 Technical Preview Key issues

  1. Use the SLUI 3 command
  2. Disable VPN software
  3. Reset your license

Solution 1: Use the SLUI 3 command

To solve this issue, you just need to do a couple of simple steps in the Command Prompt. Here’s what you should do:

  1. Go to Search and type cmd
  2. Right-click on Command Prompt and go to Run As Administrator
  3. Type SLUI 3 and hit Enter
  4. And type Microsoft’s recovery key: PBHCJ-Q2NYD-2PX34-T2TD6-233PK

Now you should be able to install your copy of Windows 10 Technical Preview without any problems and participate in Microsoft’s Insider Program in order to help Microsoft to create as good a system as possible. But remember, you should use Windows 10 Technical Preview just for testing purposes, and not as your everyday system because Microsoft is following every your step, and risking your privacy is probably something you wouldn’t like to do.

If the problem persists, here are some additional methods that you can use.

Solution 2: Disable VPN software

We noticed that many Windows 10 key issues occur on computers running VPN software. In many cases, simply disabling the VPN tool fixed the problem. So, if you rely on a VPN to keep your online activity anonymous, temporarily turn off the tool and check if the problem persists.

Solution 3: Reset your license

Another quick solution to fix Windows 10 key issues is to reset the license status.

  1. Go to Start > open Choose Command Prompt (Admin) or PowerShell (Admin).
    Windows 10 not activated after upgrade
  2. Enter the slmgr.vbs -rearm command > hit Enter
    Windows 10 product key doesn't work

Restart your PC and test if the key issue is still there.

Just as a reminder, Microsoft further improved Cortana and many other Windows components in the latest Windows 10 Technical Preview. The new build also features different interface than the previous build, which convinced us once more that Windows 10 is not just Windows 8.2, but if you want to know the full story about this discussion, you should read our “Debate: Should Windows 10 be Called Windows 8.2?” article.

RELATED STORIES TO CHECK OUT:

Loud Fan Noise in New Laptop [Fix]

You just got a new laptop, but something doesn’t feel right. Even though it’s new, your laptop’s fan makes noise and is louder than it should be, which is very annoying.

But don’t worry, a noisy fan isn’t as big a problem as you would imagine! We have a few solutions if your brand-new laptop fan is too loud.

Is it normal for a new laptop fan to make noise?

Though it shouldn’t be the case, a loud fan noise on a new laptop could be due to running it beyond its capacity. Say, running far, too many processes and programs on it.

When this happens, the fan runs at full throttle to keep the interiors clean. As a result, you get that loud noise. But, simply because it’s new, you can’t ignore the possibility of malfunctioning hardware or dust accumulation when the laptop is not kept in a well-ventilated environment.

How do I stop my laptop fan from making noise?

1. Use a fan speed software

Sometimes the solution is to keep your fan speed under control with software. And SpeedFan is probably the best program for that.

SpeedFan allows you to set the speed limits of your fan because default hardware drivers often tend to use it more than necessary, which can cause additional noise. So with this software, you’ll be able to keep your laptop quieter under safe temperatures.

But remember, it is a bad idea to overheat your computer to make it quieter. It is recommended to keep your fan speed to acceptable levels, but extremely forcing your fan to work faster can affect the lifespan of your system.

So, the best thing you can do is to let SpeedFan keep your fan at its default speed.

2. Clean your hardware regularly

Your laptop can and definitely will pick up some dust over time. The presence of dust and other particles will affect the performance of your fan, even if it’s new.

So take your time to clean your hardware completely. This will be good for your fan and the whole computer.

But be careful! Any lapses while cleaning the hardware could be dangerous sometimes because you may damage the fragile components. So here’s a video that will show you how to properly clean your laptop, without any damaging actions.

3. Kill Unnecessary Tasks

  1. Press Windows + R to open Run, type msconfig in the text field, and hit Enter.
  2. Go to Services tab, tick the checkbox for Hide all Microsoft services, and uncheck the ones that don’t seem critical, particularly services run by third-party apps.disable services
  3. Click OK.

It is also possible that your laptop‘s fan is too loud because you’re forcing it to work more than it can. So try to slow it down and kill some unnecessary processes.

If you’re running more tasks than you should, your CPU will get hotter and hotter, and this will definitely will affect the work of your fan. If you kill unnecessary tasks, you will do a huge favor to your system fan and your ears, as well.

Besides disabling the non-critical services, the next thing you can do is disable unnecessary programs at startup. This will eliminate all programs that you may not even notice running and overloading the CPU.

4. Buy a laptop cooler

It seems that laptops are getting hotter and hotter. While older models of laptops needed more than a year to start heating, it looks like the new ones require a laptop cooler from the first day.

This solution might require some extra money, but if there’s no other choice, you should consider it.

Coolers will control your laptop’s temperature, providing you with a nice, working, stable computer for everyday use. Coolers are not a good idea if you use your laptop on the go. But if you use it for doing long-lasting work at home, these will be a great choice.

5. Update your computer

  1. Press Windows + I to open Settings, and click on Update & Security.
  2. Click on Check for updates on the right.check for updates
  3. If an update is available, download it.

Sometimes, loud fan noise issues may be triggered by software-related problems. For example, Microsoft may release an update that’s not so well optimized, which may strain your computer resources.

As a result, your machine will try to keep the temperature under control by increasing the fan speed.

The tech giant usually fixes this kind of technical issue quite quickly with the help of hotfixes. So, maybe the pending updates focus on this exact issue. Installing the latest patches may help you fix abnormal fan noise issues.

By now, you should have gotten rid of the loud fan noise on a new laptop. And before you leave, do check how to manually control the CPU fan speed to keep the temperatures under check.

If you have any other solutions for a noisy fan problem, we would love to hear them, so please share them with us in the comment section.

How to install Windows 10 October Update from an ISO file

Microsoft has announced the launch of the Windows 10 October 2018 Update which is now available for download for all. The update is also crucial in that it comes with a whole host of bug fixes and enhancements. It also does away with several features which have either been replaced with new improved versions or are being worked upon for a future release sometime soon.

However, irrespective of whether there are new exciting features accompanying any new update being launched, installing the latest updates is always recommended as it contains all the fixes and protections against all of the newest and emerging threats. Mentioned below are the steps to install the update on your PC using an ISO file.

Install the Windows 10 October 2018 Update using ISO

  • Head over to the official Microsoft page that is offering the Windows 10 download. With the update now officially launched, the link Windows 10 October 2018 Update now available is there right at the top. However, we would prefer downloading the same via an ISO file as this would allow for a clean installation of Windows 10 with the October update instead of upgrading the current system.
  • So, scroll over to the Create Windows 10 installation media section right below it and click on the Download tool now
  • This will download the .exe file on your device. Click on it to open the file. Also, allow it to make changes to your PC when prompted for the same.
  • The Windows 10 Setup window will show up which will perform a few necessary verifications before the Microsoft Software License Of course you have to Accept the terms to proceed.
  • You will next be asked What do you want to do? Among the options provided include Upgrade this PC now and Create installation media (USB flash drive, DVD, or ISO file) for another PC.Create installation media for another PC
  • Select the second option and click on Next.
  • You will be led to a window where you will be asked to select the Language, Edition and Architecture The recommended values relevant for your PC should already be filled in though you can always enter your own choices. To do that, uncheck the Use the recommended options for this PC and enter your preferred values. Make sure you enter the right values so as not to end up downloading the wrong version.
  • You will next be asked, Choose which media to use. Opt for the ISO file option and not USB flash drive. Click on Next.
  • Next, you will be asked where you want to save the ISO file. The default here is My Documents though you sure can enter your choice here. Once you have done that, click on the Save
  • Here, you will have some waiting to do until the ISO file gets downloaded. The waiting time varies depending on your system and internet speed.
  • Once the ISO file has been downloaded you can transfer it to a USB flash drive, or for that matter, any storage medium.
  • Open the ISO file. You will be shown the Get important updates Select the Download and install updates (recommended) option and click on Next.
  • Follow on-screen instructions to complete the installation process. Once that is done, your PC should be upgraded to include the latest Windows 10 October 2018 update.

That’s it. Let us know if you managed to install Windows 10 v1809 on your PC. How has your upgrade experience been so far?

RELATED STORIES TO CHECK OUT:

FIX: AMD Driver Update Display Issues in Windows 10/11

What you’ll find in this guide:

  1. Increase the GPU processing time
  2. Check if the driver is updated
  3. Check visual effects or background programs
  4. Disable background programs
  5. Additional solutions

Some users have reported that they are facing some display issues after they updated their AMD display driver in Windows 8.1 or Windows 10. Various factors could cause this problem. We found a few solutions and as we hope that they will help you with your display issues so that you can use your computer normally again.

How to fix AMD driver update display issues?

There are three main problems that may occur after you update your AMD-powered computer:

  • AMD driver update black screen
  • AMD driver update Blue Screen of Death errors
  • AMD driver update blank screen issues

Follow the instructions listed below to fix these problems.

1. Increase GPU processing time

Timeout Detection and Recovery is a Windows feature that detects if video adapter hardware or driver software on your PC needs more time to complete the operation than it should. When it happens, Windows tries to recover and reset the graphics card in order to solve the problem.

If somehow Windows doesn’t manage to recover the graphics hardware, your system may become unresponsive, and the “Display driver stopped responding and has recovered” error message may show up.

Giving the Timeout Detection and Recovery more time to detect the problem may solve the issue. But this is a registry-related operation, and you should not perform it if you’re not sure what you’re doing. Here’s the fix:

  1. Exit all Windows based programs.
  2. Click Start, type regedit in the Search box, and then double-click regedit.exe from the results above. If you are prompted for an administrator password or confirmation, type the password or provide confirmation.
  3. Browse to and then click the following registry subkey:
    • HKEY_LOCAL_MACHINESYSTEMCurrentControlSetControlGraphicsDrivers
  4. On the Edit menu, click New, and then select the following registry value from the drop-down menu specific to your version of Windows (32 bit, or 64 bit):

For 32 bit Windows

  • Select DWORD (32-bit) value.
  • Type TdrDelay as the Name and click Enter.
  • Double-click TdrDelay and add 8 for the Value data and click OK.

For 64 bit Windows

  • Select QWORD (64-bit) value.
  • Type TdrDelay as the Name and click Enter.
  • Double-click TdrDelay and add 8 for the Value data and clickOK.
  • Close the registry editor and then restart your computer for the changes to take affect.

2. Check if the driver is updated

This is always one of the solutions for any video card problem, and everyone is going to tell you to check if your AMD drivers are up to date. But this method works sometimes, and that’s why we mentioned it. Sometimes, although everything may indicate that your AMD driver got updates, actually the update process may have stopped or failed.

You probably know how to update your AMD graphic driver, but just in case, here’s a step-by-step solution:

  1. Right click on This PC and go to Properties
  2. On the left side of the window, click on Device Manager
  3. Find your AMD graphics device under Display Adapters, right click on it and go to Update Driver Software

We also recommend a third-party tool (100% safe and tested by us) to automatically download all the outdated drivers on your PC.

So, you just made sure that your AMD driver updates were installed successfully but this didn’t solve your problem. In this case, you’ll have used a method a little bit more difficult.

You should always use the most recent versions of your drivers. There are third-party tools like Fortect Driver Updater that can perform this for you automatically.

With a few clicks, the program will scan your PC’s hardware and peripherals for potential driver upgrades. The driver updater program is handy for automatically upgrading Windows drivers.

Otherwise, doing it manually takes time and needs vast knowledge of the drivers you’re looking for.

3. Check visual effects

If these two steps didn’t help you, you can try to disable Windows visual effects for better performance. This might sacrifice the aesthetics of your system, but it could solve the problem. Here’s how to disable Windows visual effects:

  1. Go to Search and type appearance and performance in the search box
  2. Go to Adjust the appearance and performance of Windows
  3. Go to Visual Effects tab
  4. Under the Visual Effects tab, click Adjust for best performance, and then click OK.

On newer Windows 10 versions, the path to follow is a bit different. Here it is:

  1. Go to Start > type ‘sysdm.cpl’ to open System Properties
  2. Now, click on the Advanced tab and go to Performance Settings
    performance settings windows
  3. In the new windows, go to the Visual Effects tab > select Adjust for better performance and hit Apply.adjust for best performance visual effects

4. Disable background programs

task manager

In rare cases, certain apps and programs may be incompatible with the latest GPU driver update. To avoid this issue, try to disable any background programs that you don’t need. You can quickly do this by going to Task Manager. Select the programs that you don’t need right now and end the task.

Additional solutions

As we stated at the beginning of this post, most AMD driver issues translate into black, blue or blank screen issues. We already compiled extensive troubleshooting guides for these problems. You can check them out below, maybe some of the solutions listed in these guides hold the answer for you:

That would be all, we hope that at least one of these steps helped you solve your display issues. Hopefully, your display runs normally now. If you have any questions, suggestions, or remarks, let us know in the comment section below.

Xbox Insiders can start testing 10 new FastStart-enabled Xbox One and Xbox 360 games

Three months ago, the July update for the Xbox One brought a new AI-powered feature to the OS called FastStart. This new technology uses machine-learning to identify which game files need to be downloaded first to allow to gamers to launch their games up to 50% faster.

For now, FastStart only works with select Xbox One and Xbox 360 games such as ScreamRide, The Flame in the Flood, Borderlands 2, or Left 4 Dead, but Xbox Insiders can start testing 10 new FastStart-enabled games included in the Xbox Games Pass catalog. The list includes five Xbox 360 games (BattleBlock Theater, Fallout 3, The Elder Scrolls: Oblivion, and Star Wars: The Force Unleashed 1 and 2) and five Xbox One games (Costume Quest 2, Guacamelee!, Kingdom New Lands, Mega Man Legacy Collection 2 and State of Decay: Year One).

As of today, FastStart only works with English language versions of titles on consoles running in English, but Microsoft is working to support more languages in the future. Be aware that you also need to have a at least a 20Mbps download speed to take advantage of FastStart on your console.