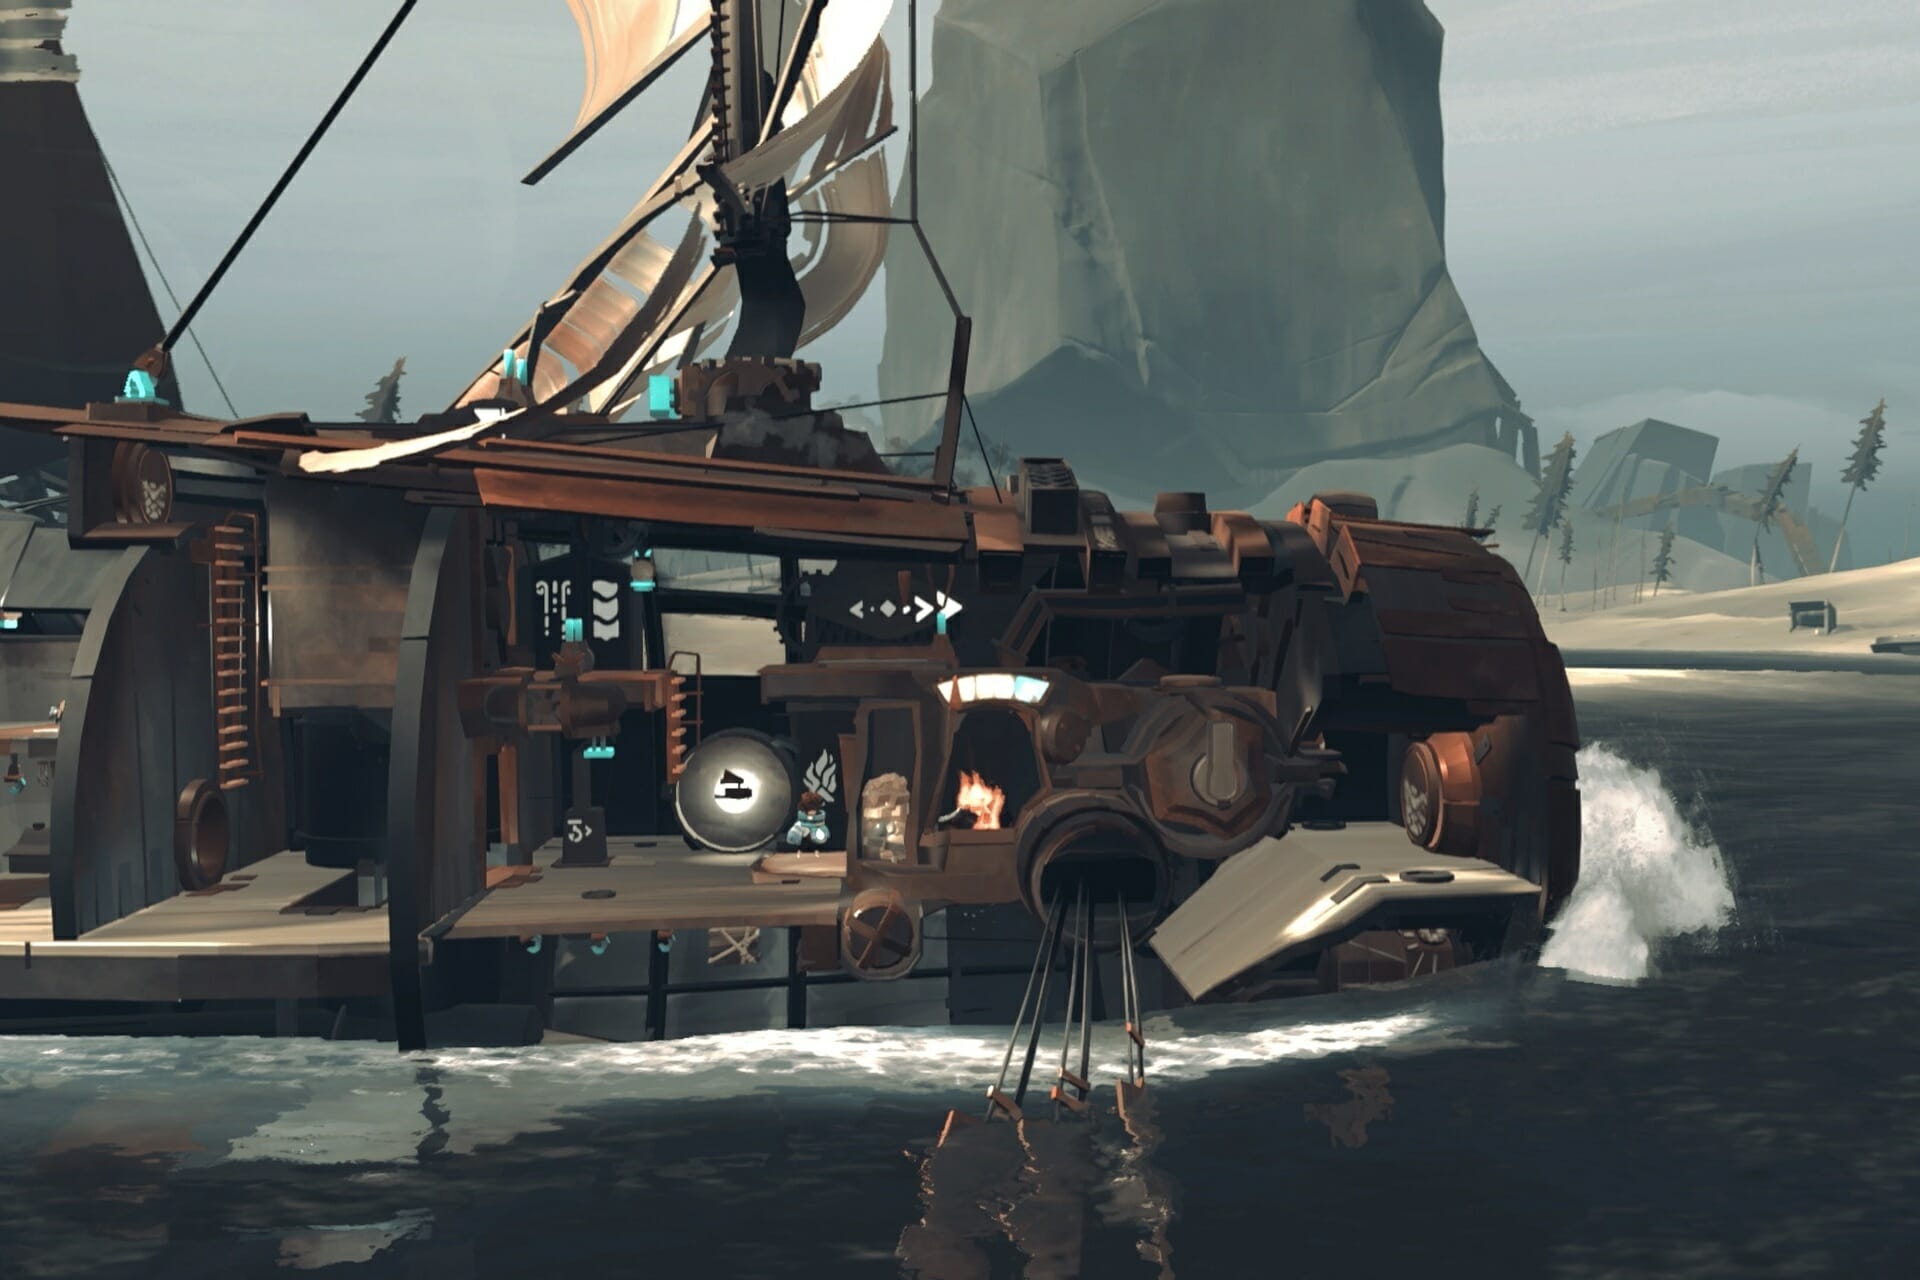
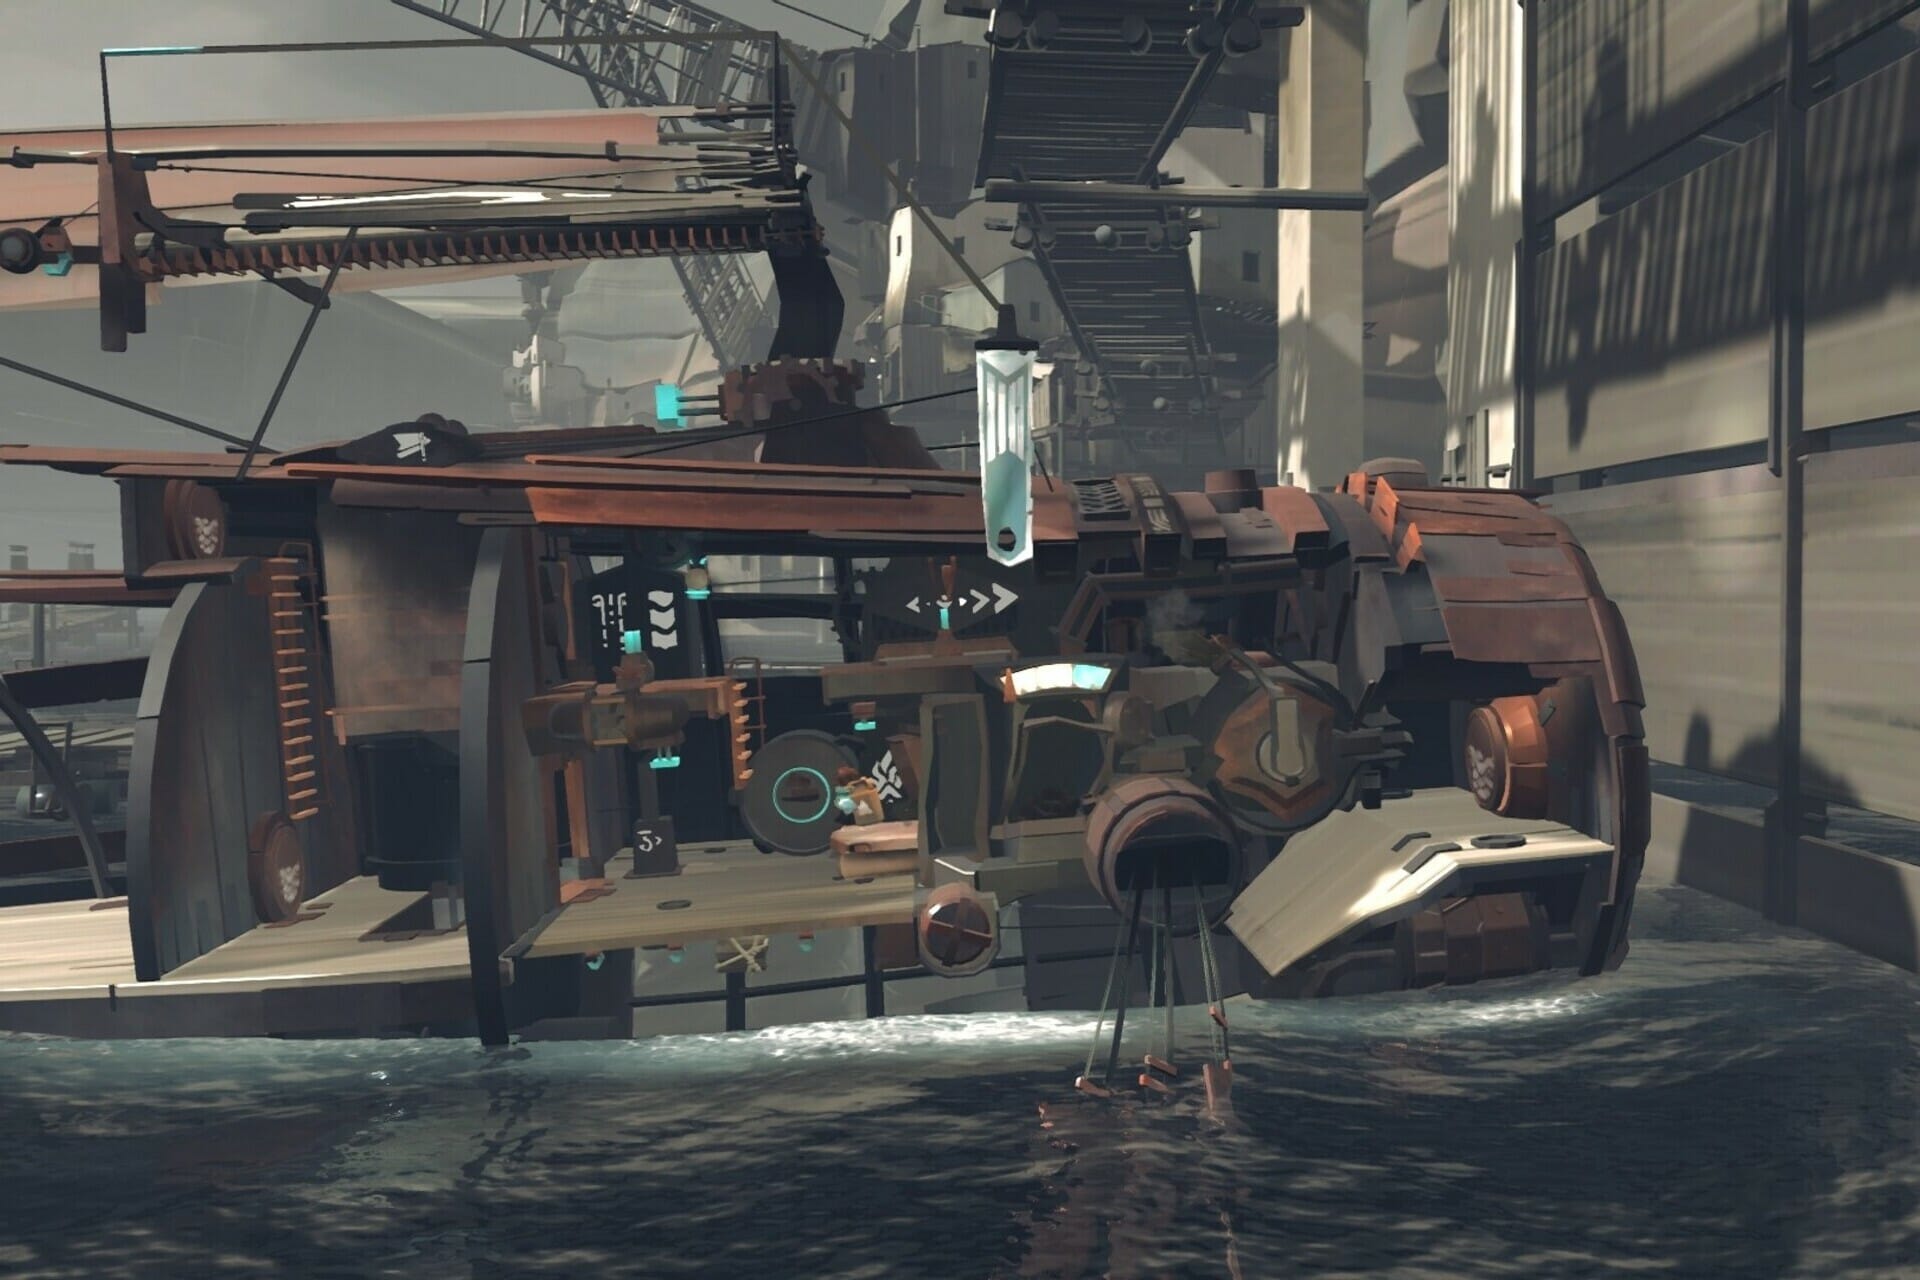
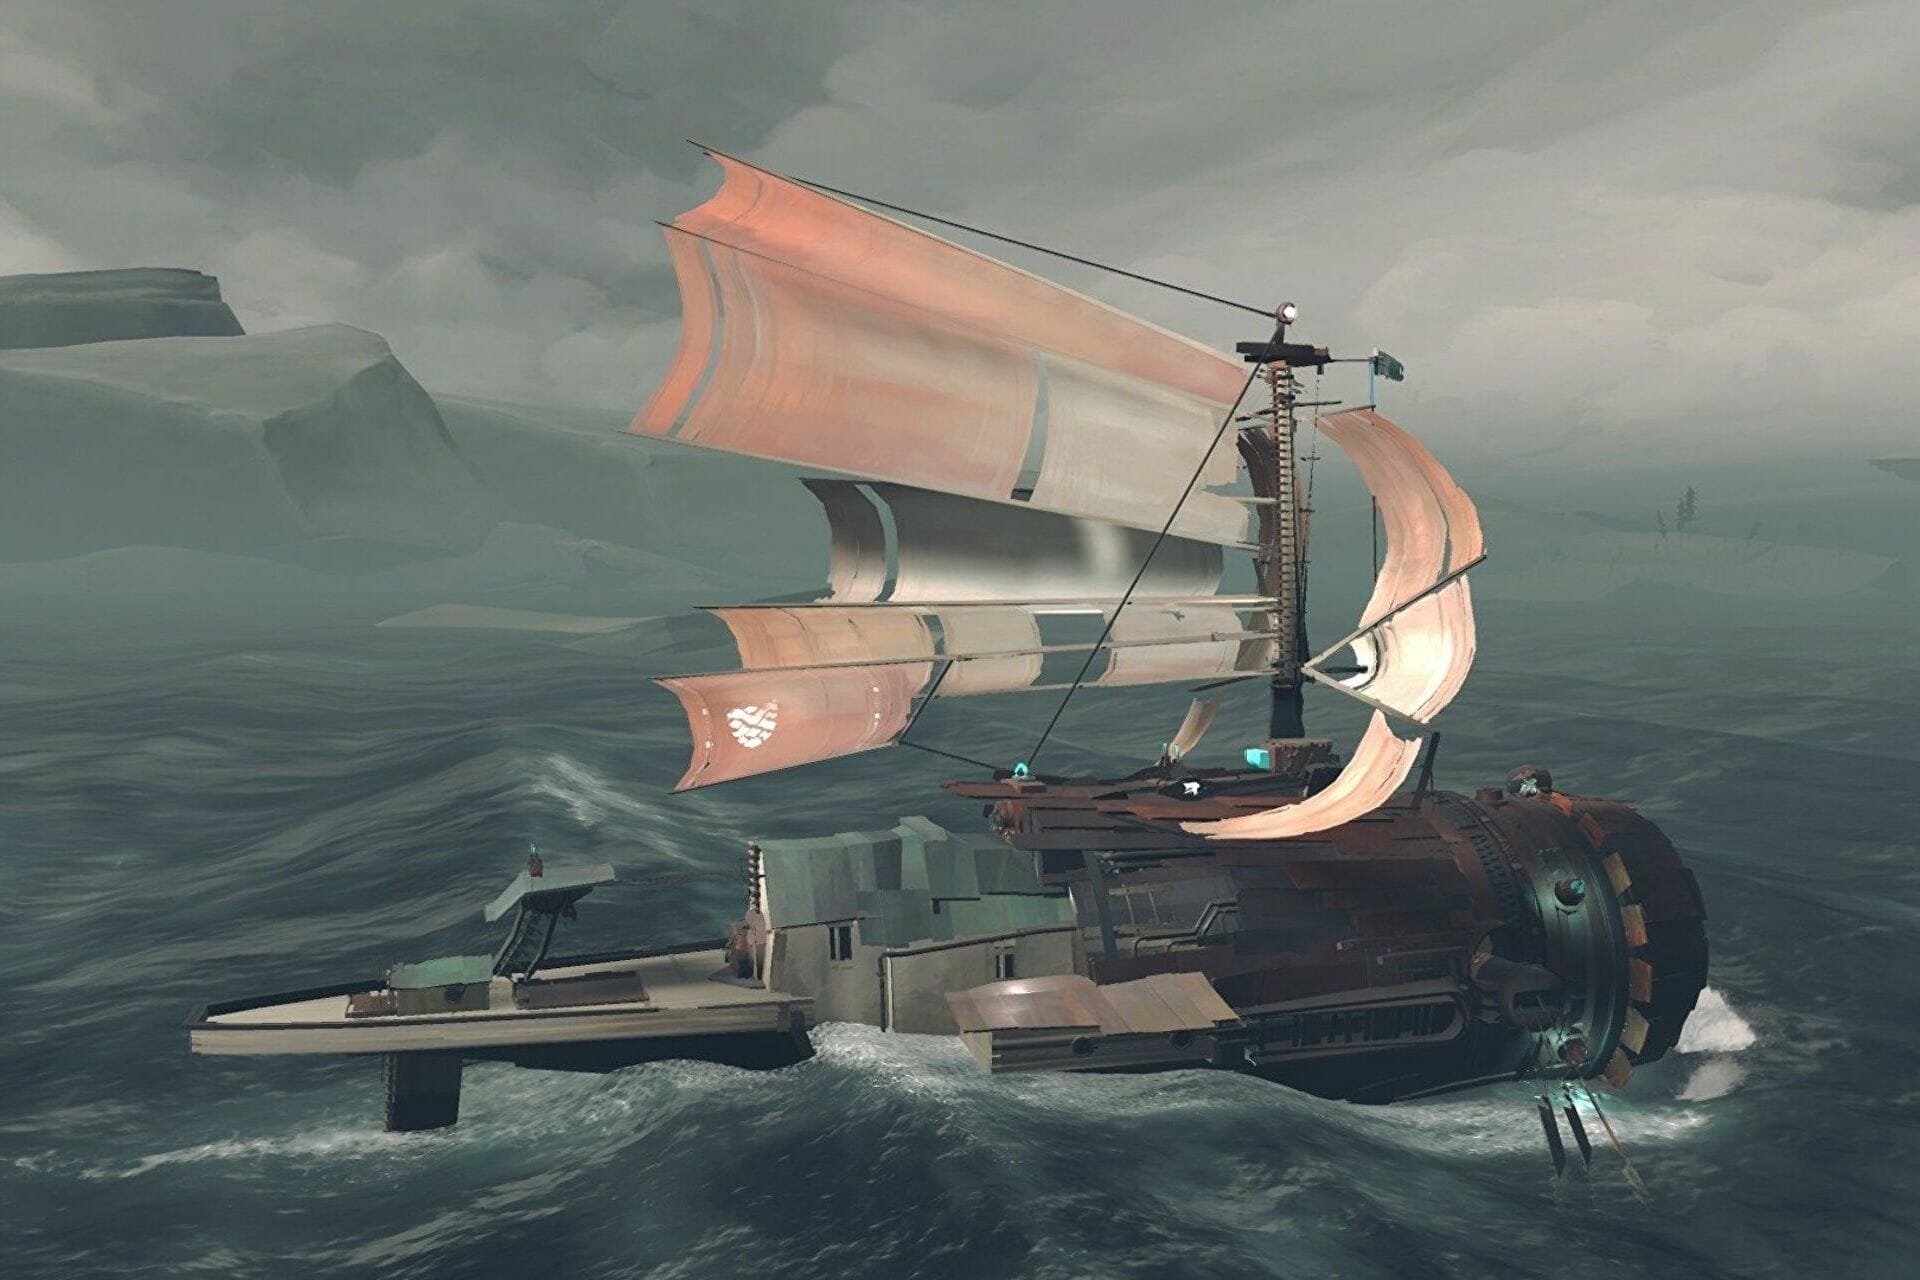
FAR: Changing Tides was recently released by Frontier Foundry in 2022 and many worldwide users are excited to download it on their PC.
This game follows an emotional journey of a boy, his ship, and the desire of discovering himself and seeking out a replacement home through an exceptional voyage.
If you’re one of those players that need to find how you can download and run FAR: Changing Tides, keep in mind that it is extremely versatile, and you can get it from multiple gaming platforms.
In this matter, we’ve prepared some of the most useful information, so make sure you read this guide completely.
How can I download FAR: Changing Tides on PC?
If you want to enjoy a complete and smooth sail experience, we recommend downloading FAR: Changing Tides from trusted sources, as follows:
1. Popular gaming platforms
Keep in mind that you can get this game directly from the most popular supported gaming platforms (like Steam or Epic Games Launcher).
Before purchasing it, you’ll need to log into your Steam/Epic account, with valid credentials (username and password). However, do not forget that FAR: Changing Tides doesn’t allow crossplay.
There, you’ll also be able to find the game’s story, features, and tons of additional related information you should definitely be aware of if you want to get the best out of the FAR sail experience.
What are the requirements my PC should meet to download FAR: Changing Tides?
In order to be able to properly download FAR: Changing Tides on your PC and to get the smoothest experience, you’ll need to check if your OS meets the game’s minimum requirements.
If you’re not sure what are those, make sure you verify the list below:
However, note that the minimum requirements might not always be enough in order to download the game without any problem. Thus, we strongly suggest following the recommendations below:
OS: Windows 10 64-bit
Processor: Intel Core i3-8350K or AMD Ryzen 3 1300X
In short terms, this is all you have to know about downloading FAR: Changing Tides on your PC. Make sure you compare the offers and get the one that suits you the best.
If you encounter any other questions, feel free to leave a comment in the dedicated section below.
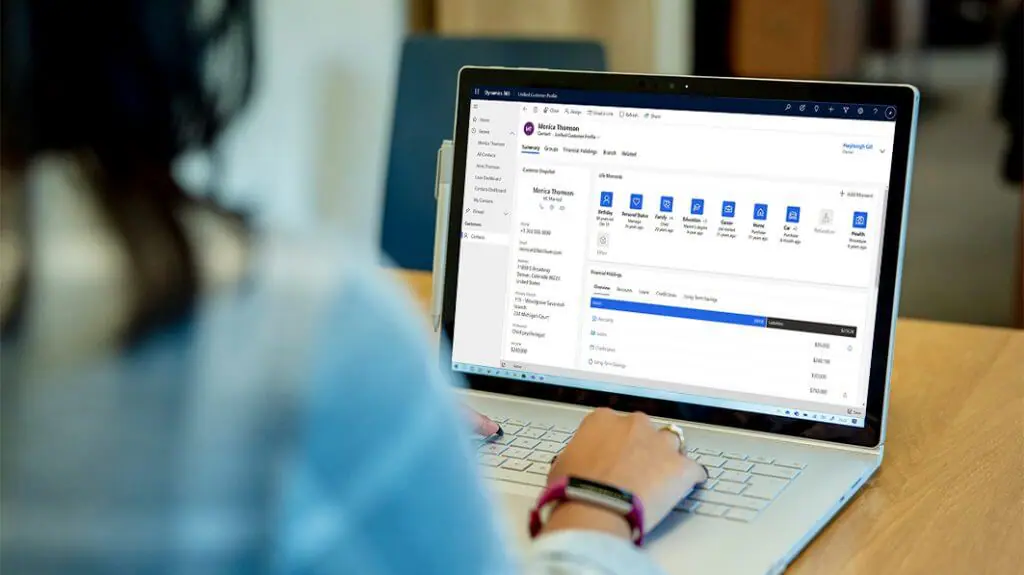
According to a report from ZDNet, there is a shakeup inside of Microsoft’s enterprise operations, with the head of Microsoft’s Digital Transformation Group leaving the company. The shakeup involves James Phillips, who has been at Microsoft for ten years.
Apparently announced in an email sent out by Microsoft Executive Vice President Scott Guthrie, Phillips will be leaving his spot at Microsoft for an “external opportunity.” He was in the spot since March of 2021 when the group was first created. Products under the group included Dynamics 365, Power Platform, Azure AI Platform, and others.
Per ZDNet, there’s no indication that Phillips will be replaced, and the groups that he oversaw are instead being divided and “moved around.” The big one is that the Azure IoT and Edge engineering teams have been consolidated, but here’s what Mary Jo Foley is hearing.
Charles Lamanna will continue to lead the Business Applications & Platform (BAP) organization and join his C+AI leadership team, reporting directly to Guthrie. Eric Boyd will continue to lead the AI platform organization and join the C+AI leadership team, reporting directly to Guthrie. Rohan Kumar will continue to lead the Azure Data organization, join the C+AI leadership team and report directly to Guthrie.
In addition to the news about Phillips, since Microsoft’s deal with Nuance closed, there also is some news around this area. Microsoft is moving more of its own people to Nuance, and vice versa, rather than keeping it seperate. The Microsoft Health & Life Sciences engineering team will be moved to the Nuance R&D organization, under Nuance CEO Mark Benjamin. In addition, Nuance Enterprise’s business and product management moves under the control of Charles Lamanna, who heads the Business Applications & Platform (BAP) organization at Microsoft.
Logitech customers can manage mouse settings with one of two programs: G Hub (Logitech Advanced Gaming Software) or Logitech Gaming Software.
To perform activities like personalizing your hotkeys, altering RGB, and changing your DPI, you’ll need one of these programs loaded. It will most likely identify your mouse and allow you to access it and change its settings.
Almost all Logitech mice released in the last ten years are compatible with Logitech Gaming Software. However, a mouse may require a specific version to function correctly.
This article shows solutions to fix any problems associated with g pro wireless not showing up in Logitech gaming software.
How do I know the software that will work for my mouse?
Please read the instructions that come with the mouse to verify what software is compatible with it.
All the newer Logitech mice are not supported by the Logitech Gaming Software. They are designed for use with the Logitech Advanced Gaming Software (G Hub).
The G Hub has a unique user interface, but it is very similar to Logitech Gaming Software. Both control the same functions for linked devices in a similar way.
The G Hub from Logitech does not support the older Logitech devices, and this will be an issue if you have an older mouse.
What are the best fixes for the Logitech g pro wireless not detected on my gaming software?
1. Restart your computer
Click the Start icon, click the input/output button, and select restart.
This initial step is the most straightforward. Restarting the computer frees up RAM and eliminates any background apps interfering with the Logitech G HUB.
It can help your computer work more smoothly in some circumstances by eradicating some flaws. This is an excellent solution to try before moving on to something more complicated.
If you’ve rebooted multiple times, skip to the next step below.
2. Update the device drivers
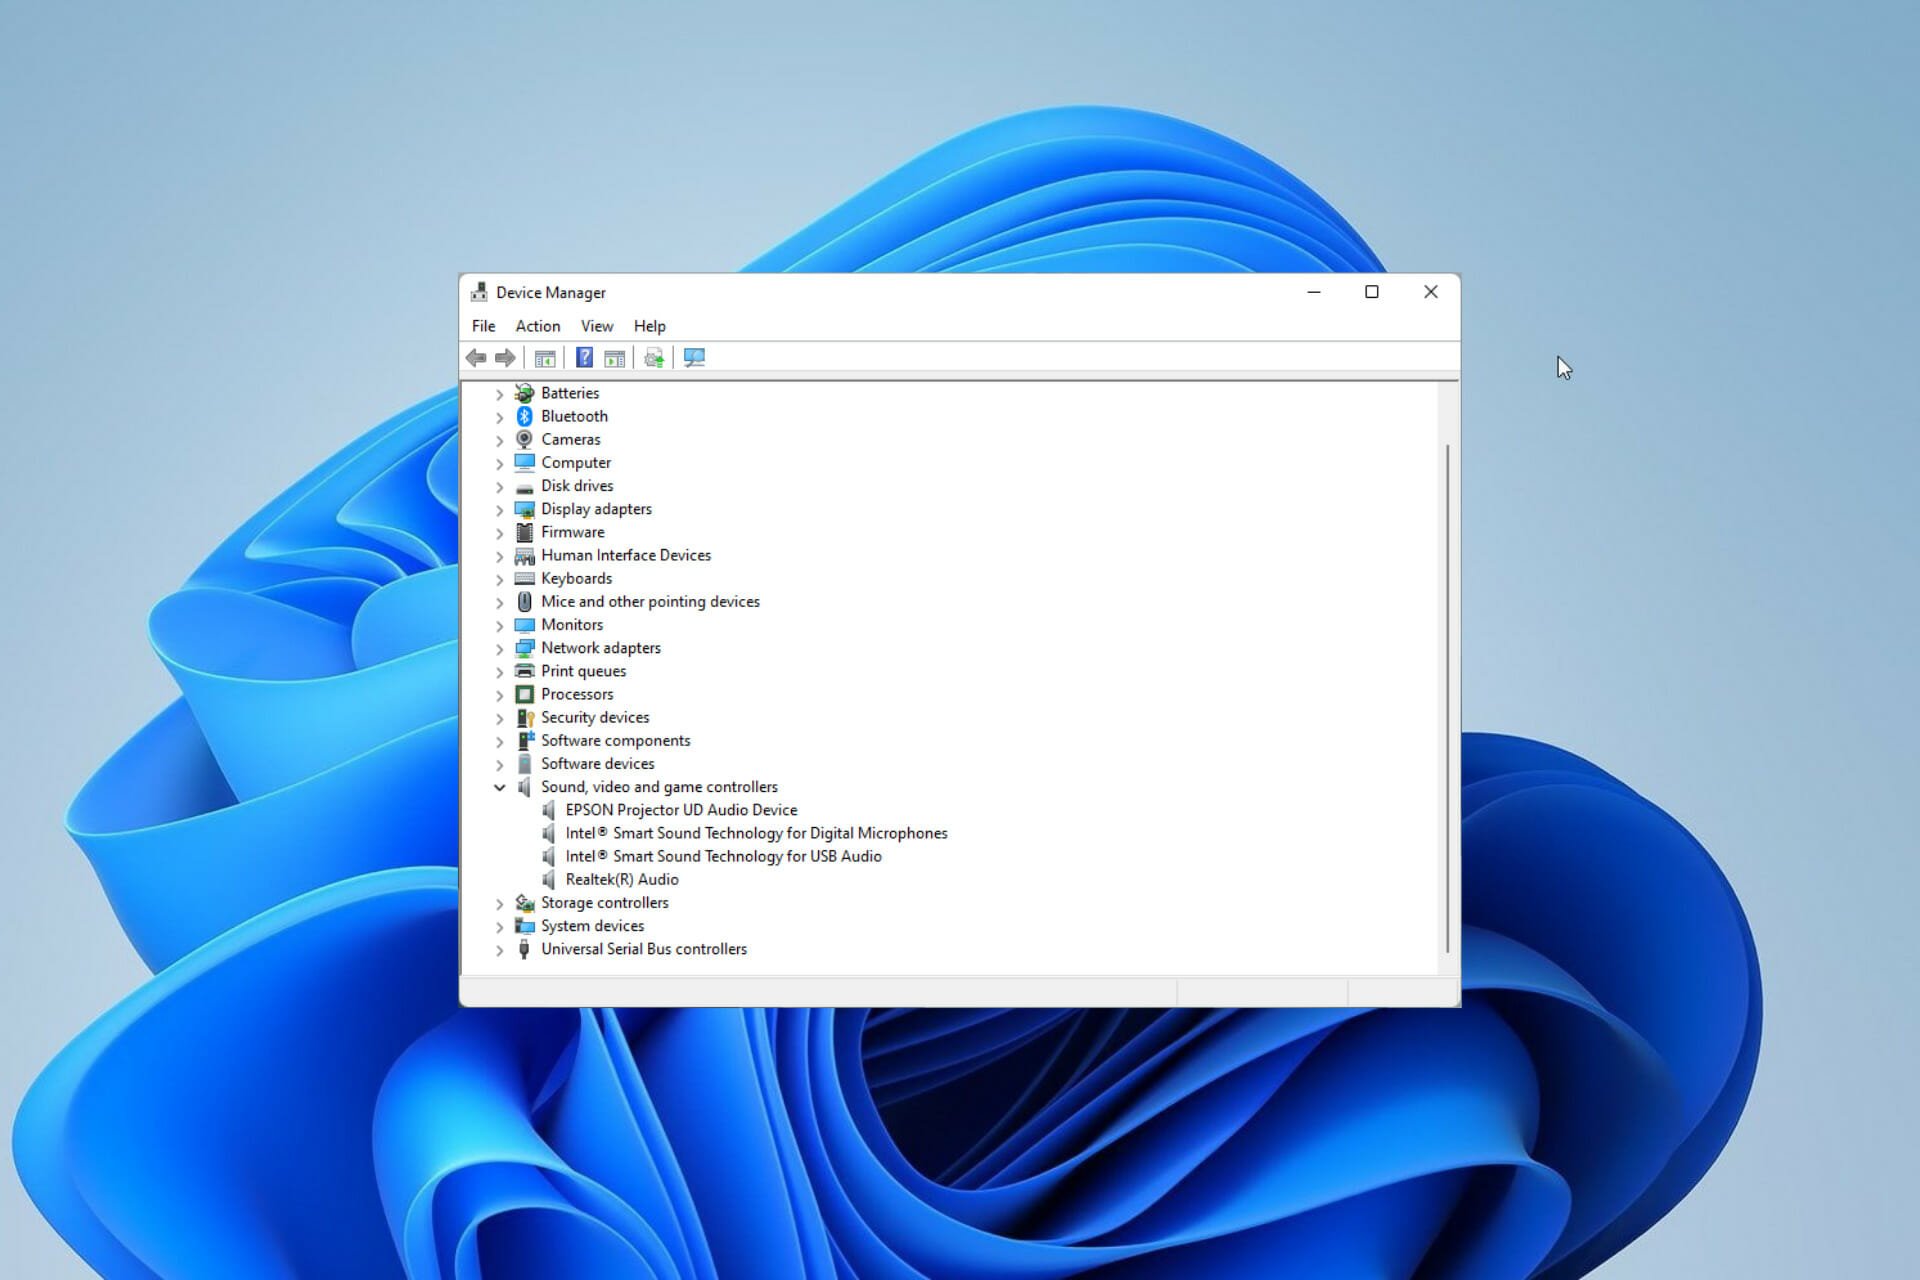
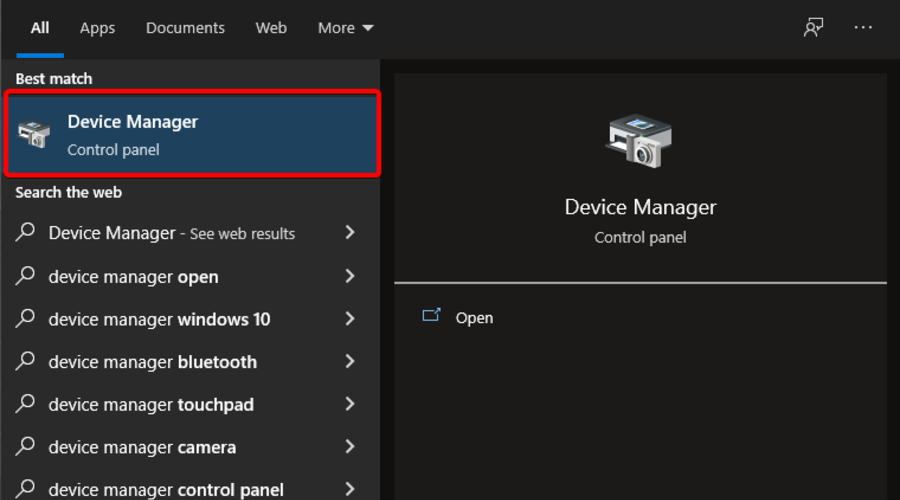
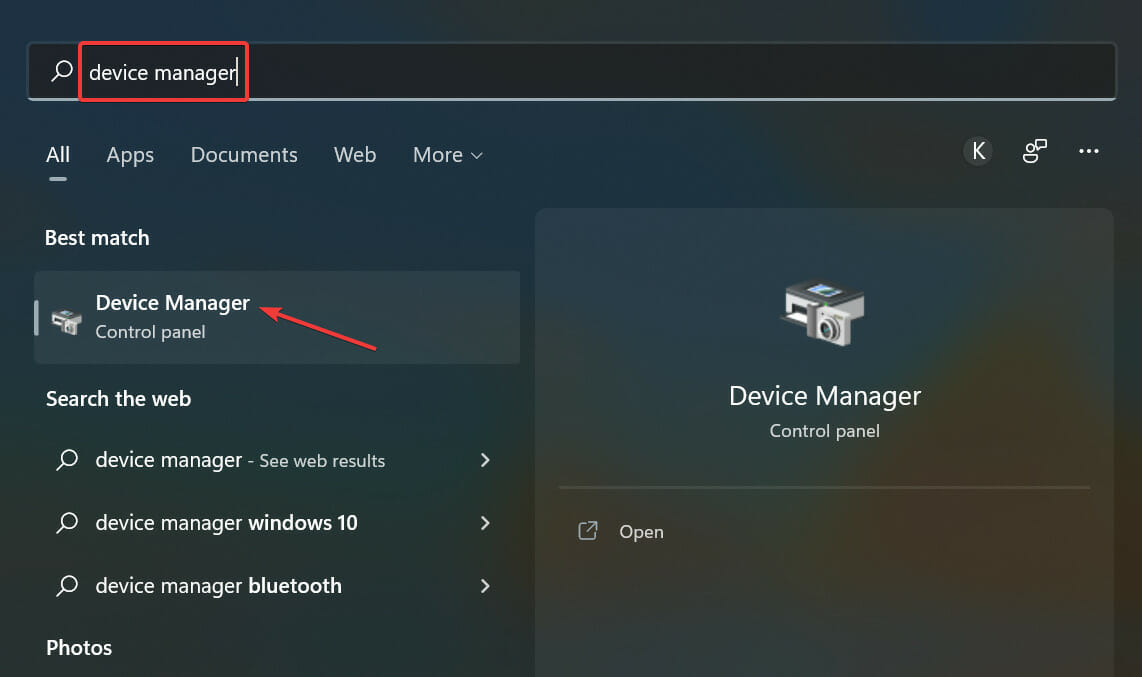
Click on the Start menu, type in device manager, and select the option for the Device Manager app.
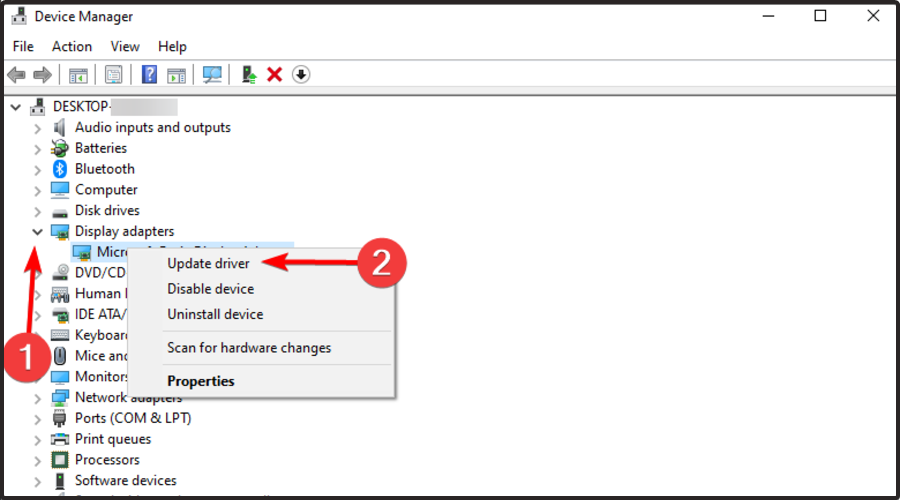
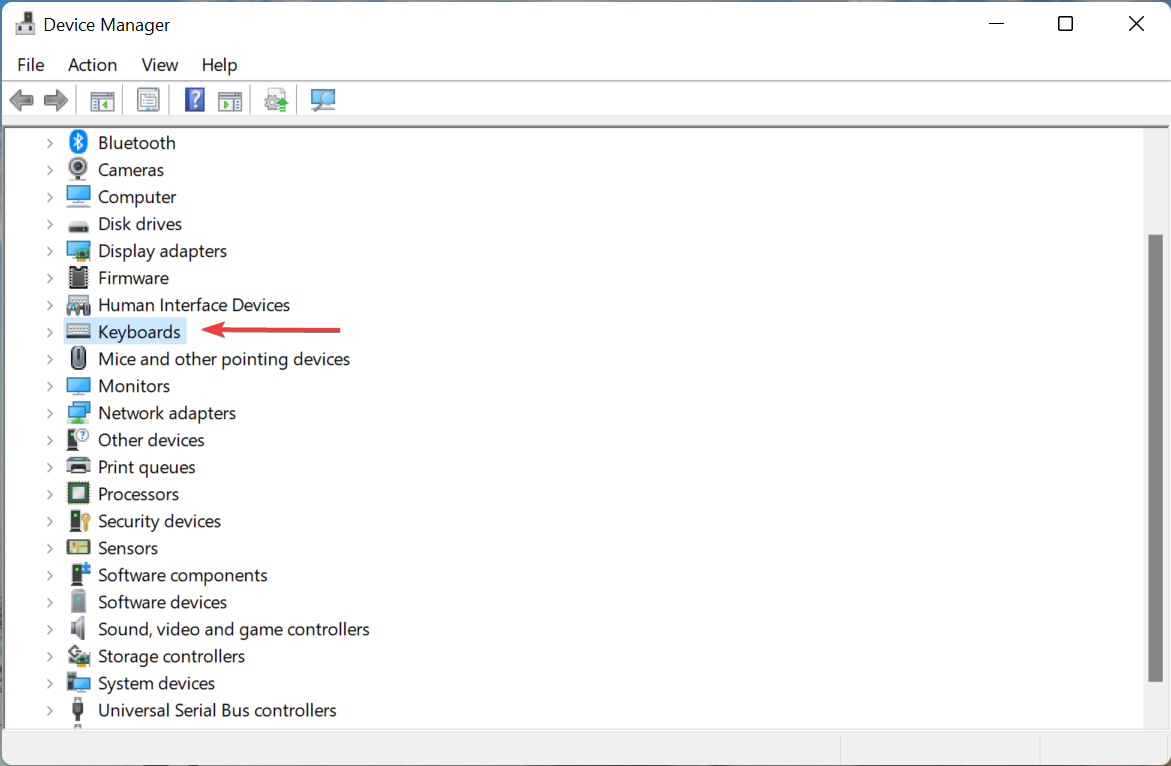
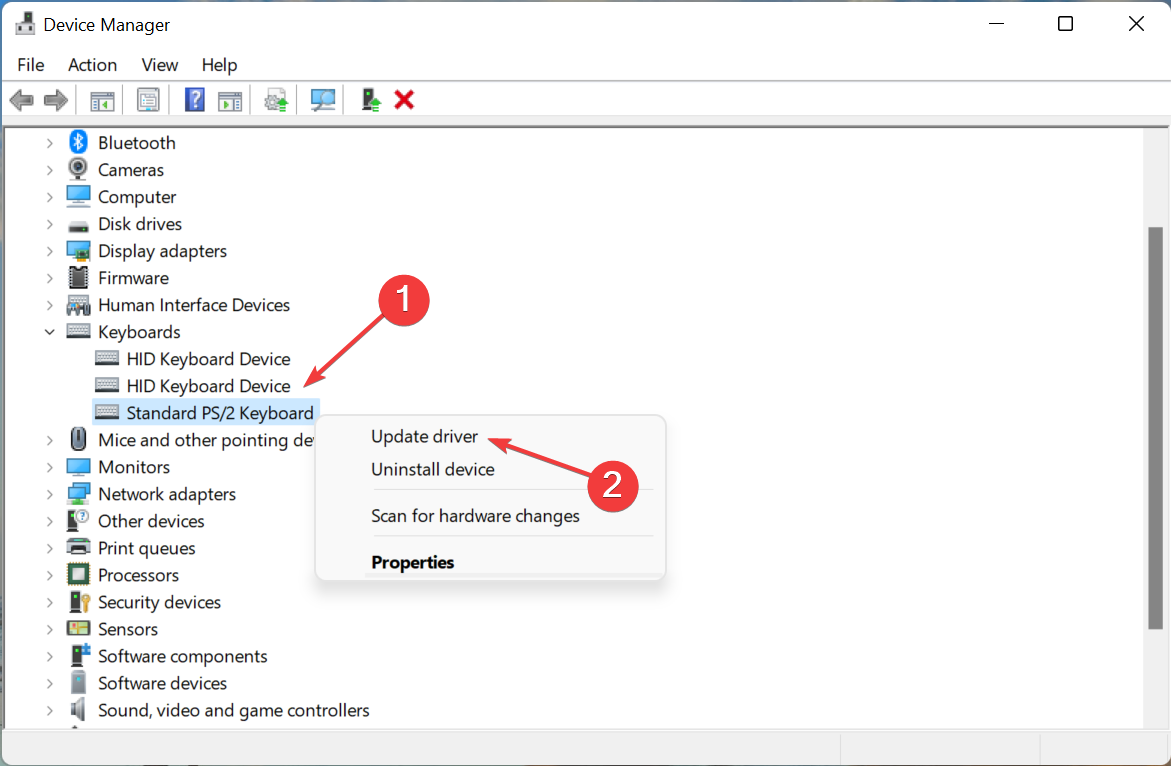
Expand the Mice and other pointing devices section, then right-click on your mouse and select the option to update.
Alternatively, you can use third-party tools to update device drivers. Our recommendation is Outbyte Driver Updater, which ensures the update process is safe and keeps the PC away from wrong driver versions.
4. Uninstall and reinstall the Logitech gaming software
4.1 Uninstalling the software
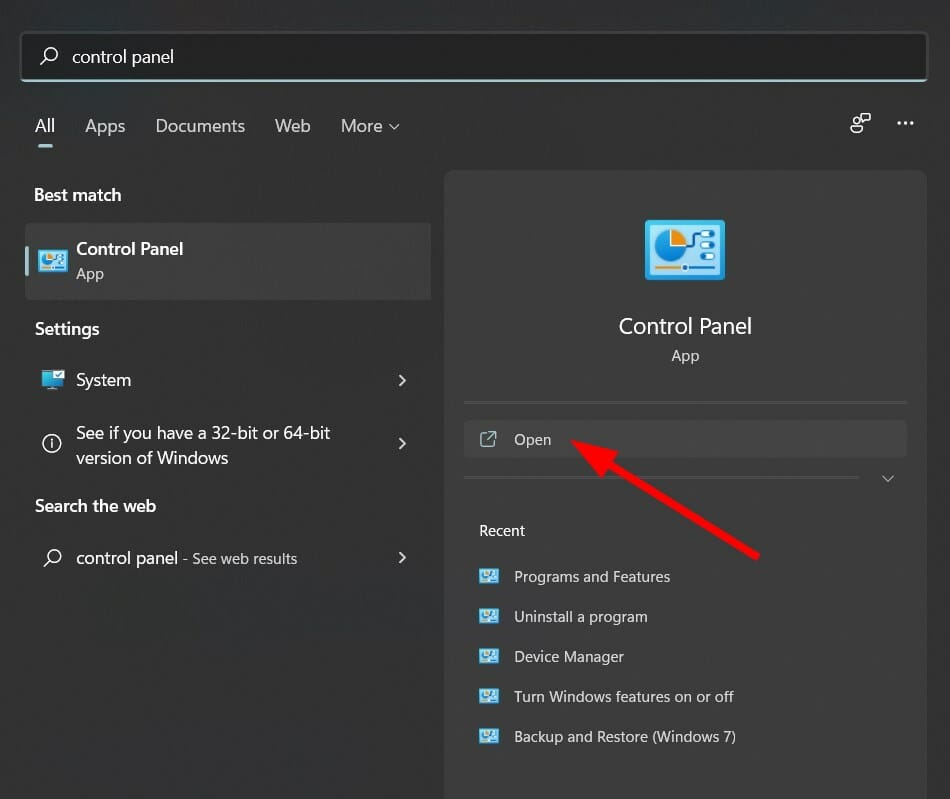
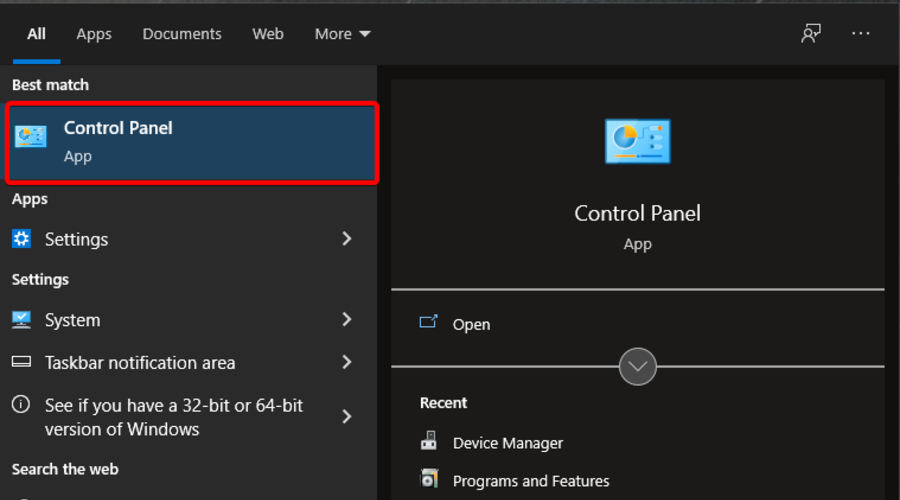
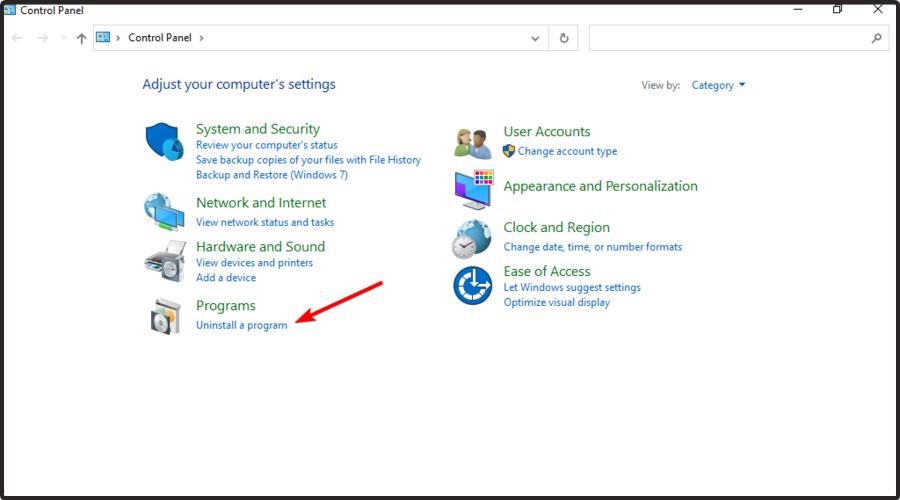
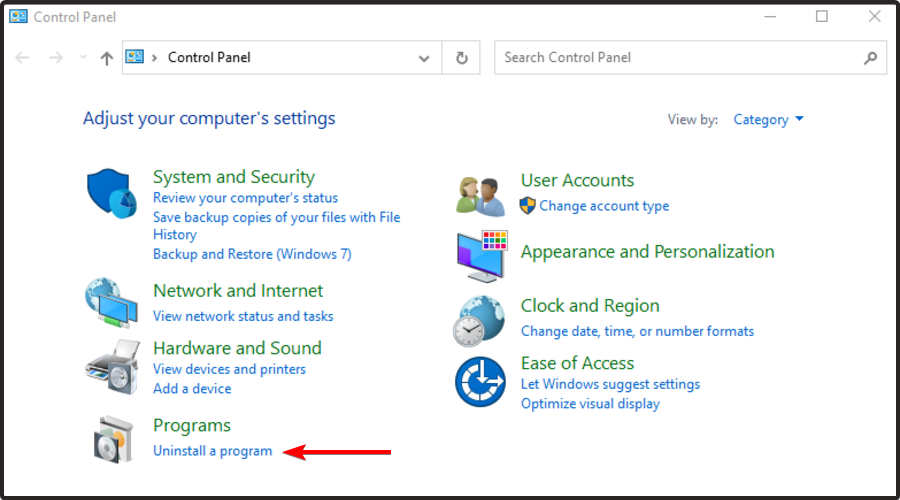
Click on the Start menu, type the control panel, and select the option to Uninstall a Program.
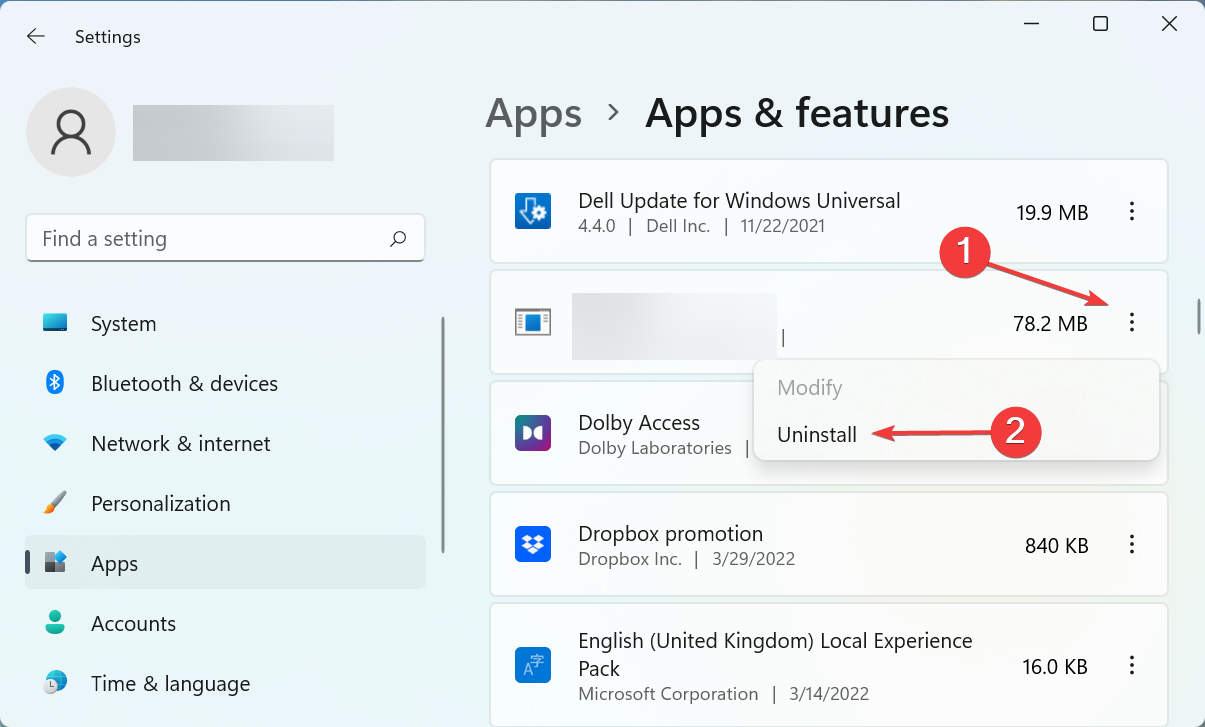
Under the list of programs, select the Logitech software and click on the uninstall tab.
Open the Run dialog using Windows + R, type in %AppData%, and hit ok.
Delete any folder related to the Logitech app.
It’s also imperative that you’re not using both versions of the program on your PC. Installing both on your computer may cause issues with your mouse’s functionality.
Click on the .exe and follow the installation process.
It is advisable to download a fresh copy rather than reinstall the old copy. There are situations where the old copy gets corrupted, and some functionality issues will arise.
5. Update Bluetooth drivers
Click on the Start menu, type device manager, and select the Device Manager app.
Expand the Bluetooth option, right-click on your Bluetooth device and click the update option.
There are various things to consider while utilizing a Wireless Bluetooth mouse. It is necessary to verify if Bluetooth is updated. Furthermore, the gadget must be close to the PC and should not interfere with other Bluetooth devices nearby.
6. Replace the G pro battery
You should use new batteries and double-check that the wireless connection is being detected by the computer. The Logitech Gaming Software can’t identify your mouse when the PC doesn’t recognize it at all.
Note that mouse feet must be removed to change the battery on a G PRO Wireless mouse. If you want to reuse the mouse feet, heat will weaken the glue, allowing you to remove them with minimum bending. Mouse feet that are bent or damaged may need to be replaced.
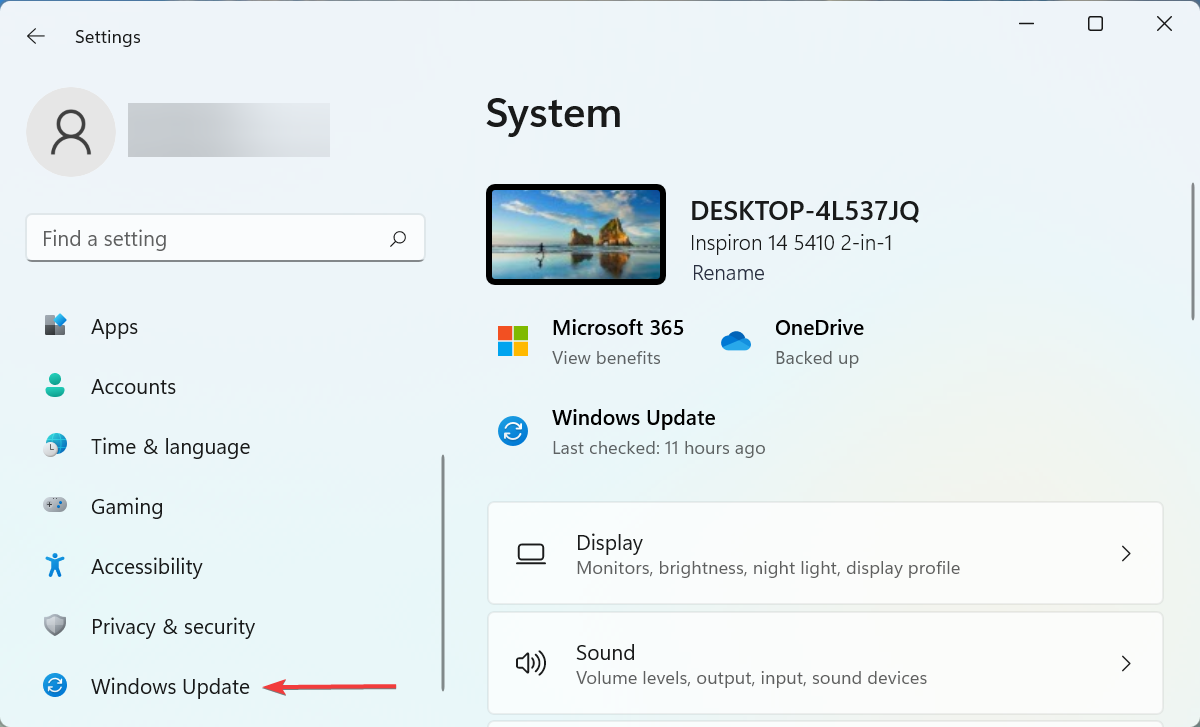
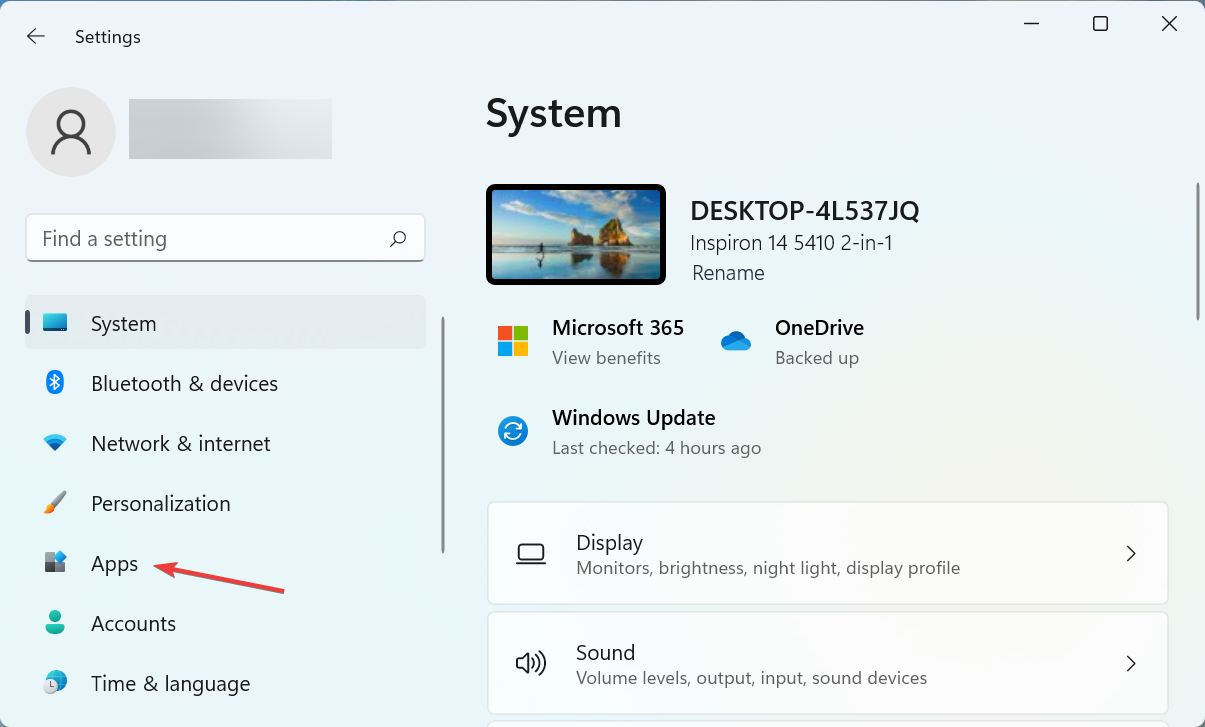
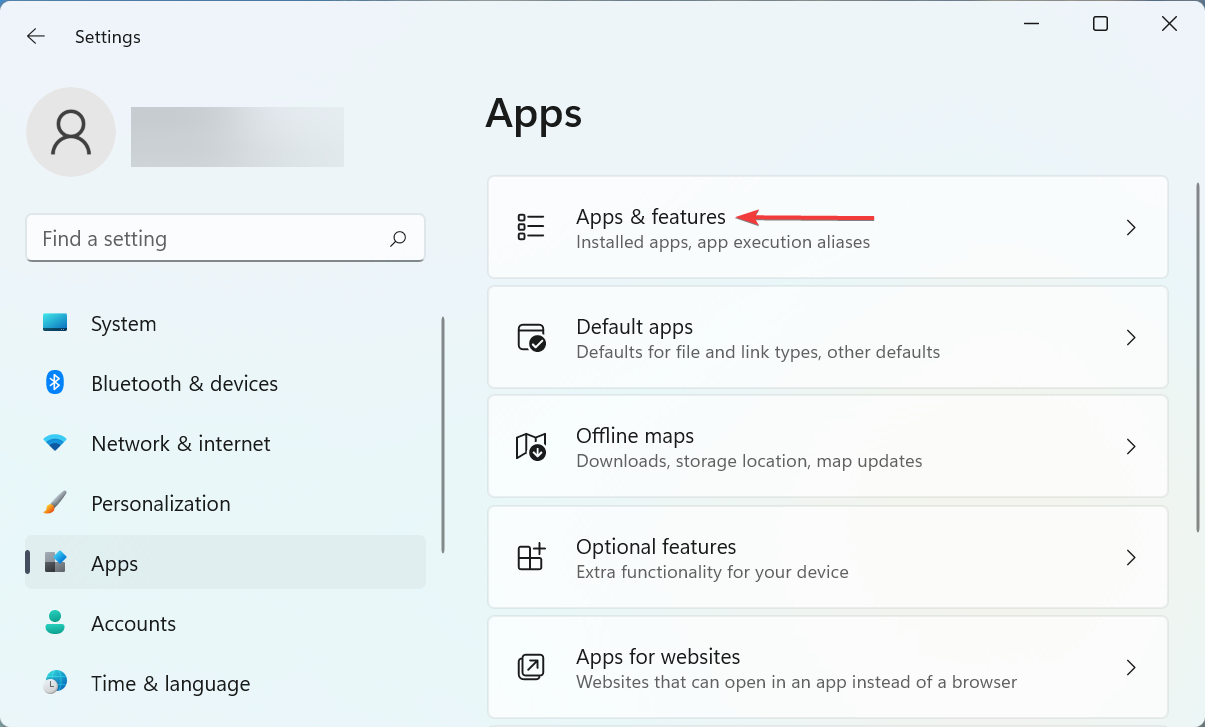
Click on the Start menu and open the Settings app.
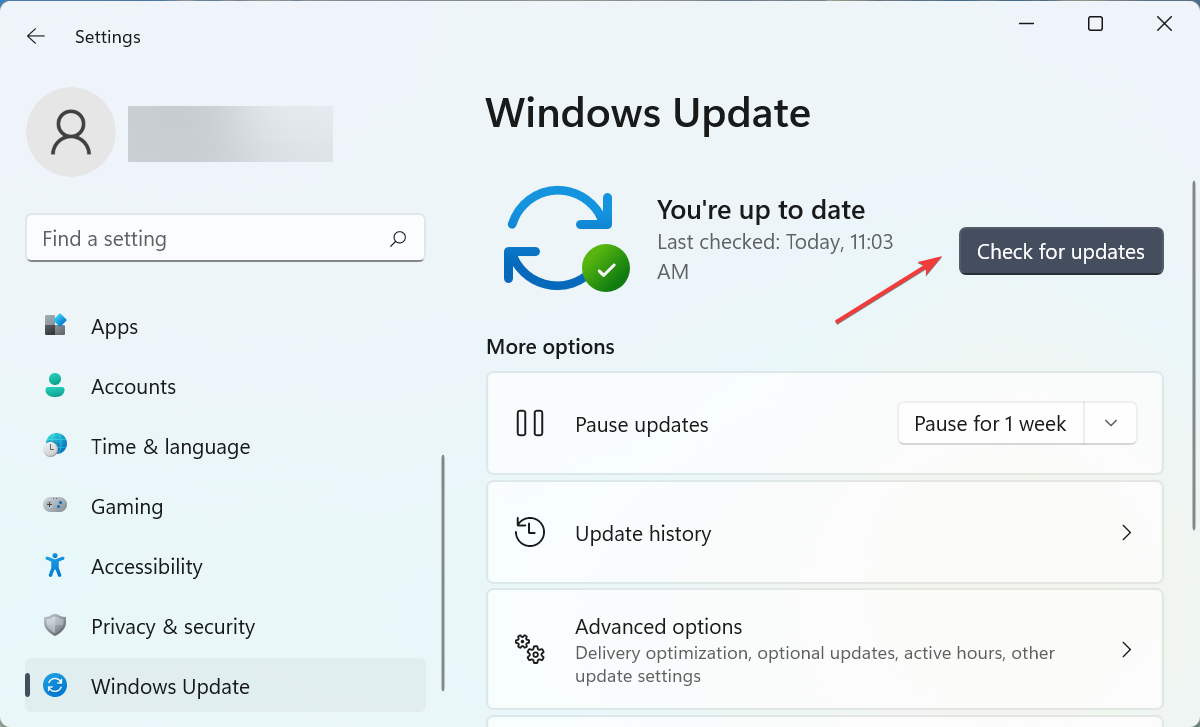
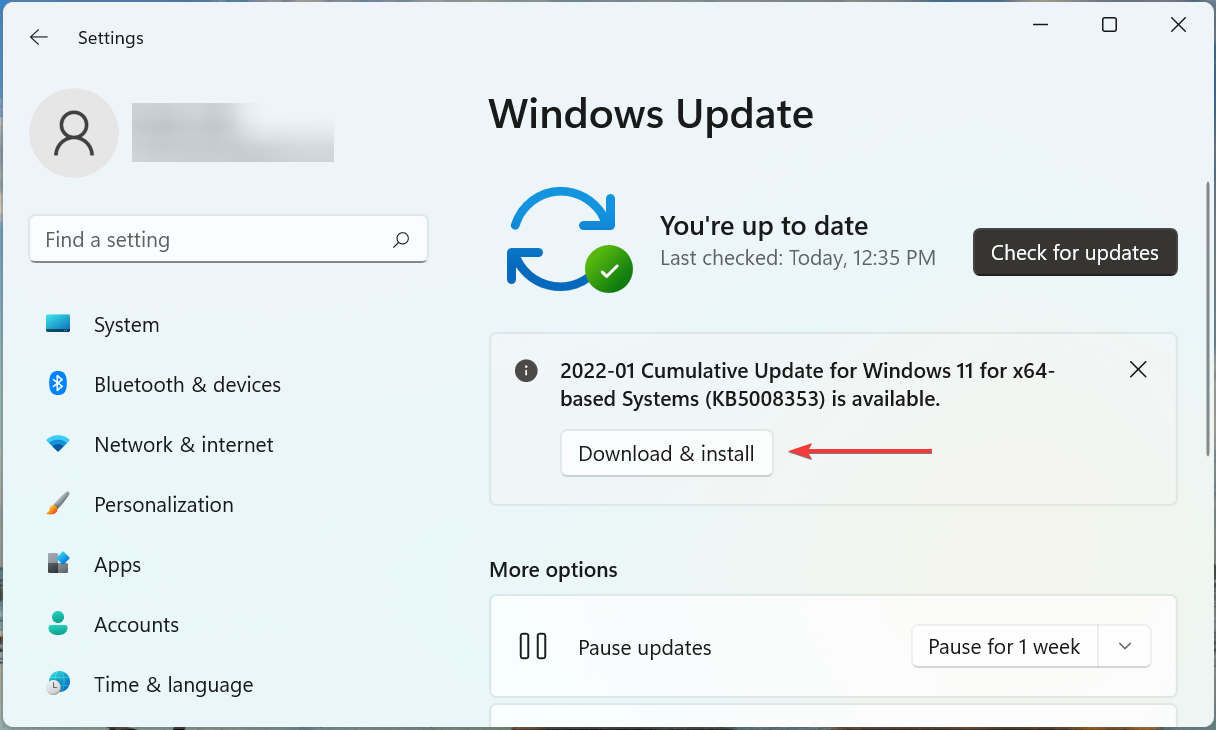
On the right pane scroll to the bottom and select the Windows Update option. Then on the right pane, you should download and install any pending updates.
Most of the solutions in this article are straightforward, and with just a few mouse clicks, you should be well on your way. While these solutions are in no particular order, we suggest contacting customer care after no other fix has worked.
Let’s know which of these fixes worked for you in the comments below.
It looks like April will be getting off to a pretty good start for Xbox releases, with a total of nine games coming to Xbox this week. A wide range of genres are represented in this week’s releases too, so there should be something new here to suit most tastes.
A game about organizing police documents. This text based title will have players sifting through a labyrinth of evidence to find justice and deliver a verdict in eight separate cases ranging from petty theft to the ultimate crime: murder.
This new LEGO Star Wars game allows players to relive all nine of the films, but with a light tone and whimsical humor. A playable Obi-Wan Kenobi is exclusive to the digital edition.
The boys of summer are back in a new game for 2022, and this time its coming to Xbox Game Pass when it releases on the 5th. The game features a bevy of gameplay modes, cross platform play and a tweaked Stadium Creator with a more streamlined interface.
In this mobile phone hacking simulator, which seems to be set in some kind of dystopian surveillance state, players will have to investigate the contents of a stranger’s phone to find any evidence of terrorist activity, all under the supervision of the state’s national security agency.
An homage to classic survival-horror games like Silent Hill and the early Resident Evil series, Outbreak: Contagious Memories embraces the survival elements of the genre by limiting what the player can carry, and rewarding keen observation of environmental clues.
Z-warp is a vertical shmup with a retro-inspired pixel art visual style and intense bullet hell action. In it, players will have to navigate a hellish, alien-infested spacescape to find an experimental, time-warping spaceship that disappeared on its maiden voyage.
The highly anticipated remaster of the classic PlayStation 1 jrpg Chrono Cross, the Radical Dreamers Edition also includes the text-based adventure game Radical Dreamers – a sort of prologue to Chrono Cross which has never been previously released in the U.S.
Chrono Cross: The Radical Dreamers Edition video game on Xbox consoles
A racing game with an 80s synthwave aesthetic and cars from the same period. A unique little racer with a drift-tacular driving style reminiscent of classic games like Outrun.
Just as the title implies, players will have to shoot and scavenge their way through the deep south in order to find safety in a world overrun by zombies. The only thing that can kill the zombie virus? Moonshine Whiskey, and players will have to chug large quantities of the stuff in order to survive.
So that’s it for the week in Xbox. It looks like a pretty solid lineup overall, even if there are no AAA titles releasing this week. All these games are playable on both Xbox One and Series X/S.
FAR: Changing Tides is one of the most interesting sail video games that allow players to enjoy an emotional and exceptional journey.
This game has hand-painted graphics that are kept in the style known from the previous masterpiece from Okomotive studio.
Some users reported encountering problems with the FAR: Changing Tides ultrawide mode and if it’s happening to be in the same boat, make sure you read this guide completely because we’re going to show you how to fix it.
Ultrawide monitors are those that utilize a 21:9 aspect ratio rather than the traditional monitor screen ratio of 16:9.
For those of you who are not familiar with the 21:9 aspect ratio, keep in mind that it is similar to the ratio of traditional movie theater screens.
How can I fix the FAR: Changing Tides ultrawide?
Well, if you were thinking about fixing the FAR: Changing Tides ultrawide, you should know that it is not actually an issue.
Our experiments indicated that the ultrawide mode is not selectable in-game. Thus, FAR: Changing Tides is locked to 16:9 resolutions.
The best thing you can do is set the game to windowed mode and the maximum resolution in-game. Then, you’ll need to use the Special K to set it to full-screen borderless windowed.
NOTE
In case you don’t already know, Special K is an extensive game modifying framework, allowing for various forms of in-depth tweaking of a game. Its focus is primarily on the graphics pipeline, but it also includes other features (input device blocking/configuring, window and volume management, enhancements for some of the in-game functionality of Steam, and more).
This is how you can set the maximum resolution in FAR: Changing Tides:
In conclusion, if you were thinking about fixing the FAR: Changing Tides ultrawide problems, we hope that this guide helped you build a better perspective on this particular subject.
This game can generate several annoying problems, so, that’s why we’ve compiled a list of the most popular ones. In these terms, we recommend checking how to fix FAR: Changing Tides bugs.
If you encounter any other related questions, make sure you share them with us by leaving a comment in the section below.
Python is not something you would traditionally associate with Microsoft or Visual Studio, however the Python team at Microsoft has been hard at work making sure the Python developer experience on Visual Studio Code is top notch. Today let’s have a look at some of the latest features available on the platform.
Smart Selection
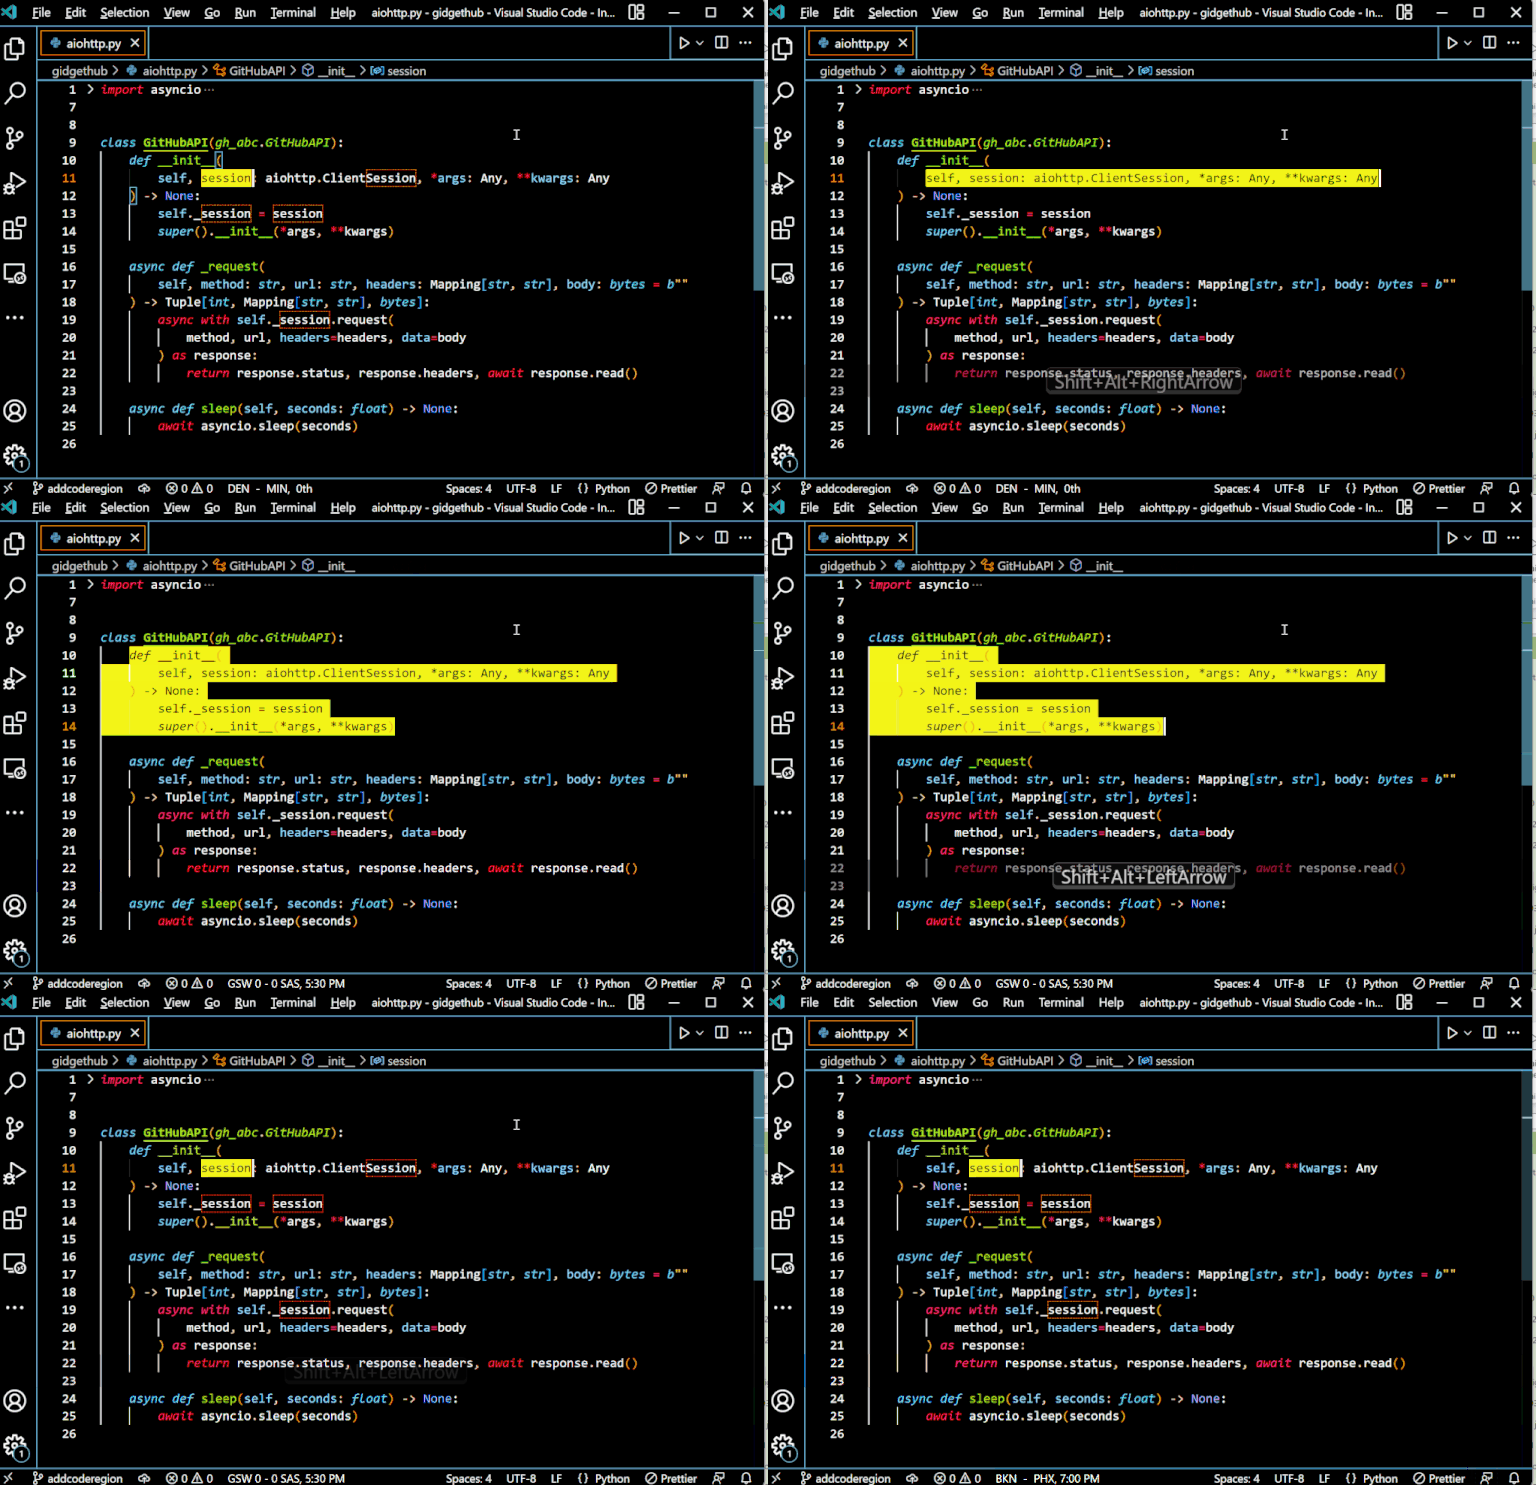
The team worked on improvements to keyboard code selection via Pylance. Now users can expand their code with “Shift + Alt + Right Arrow” or collapse it with “Shift + Alt + Left Arrow”
Folding Support
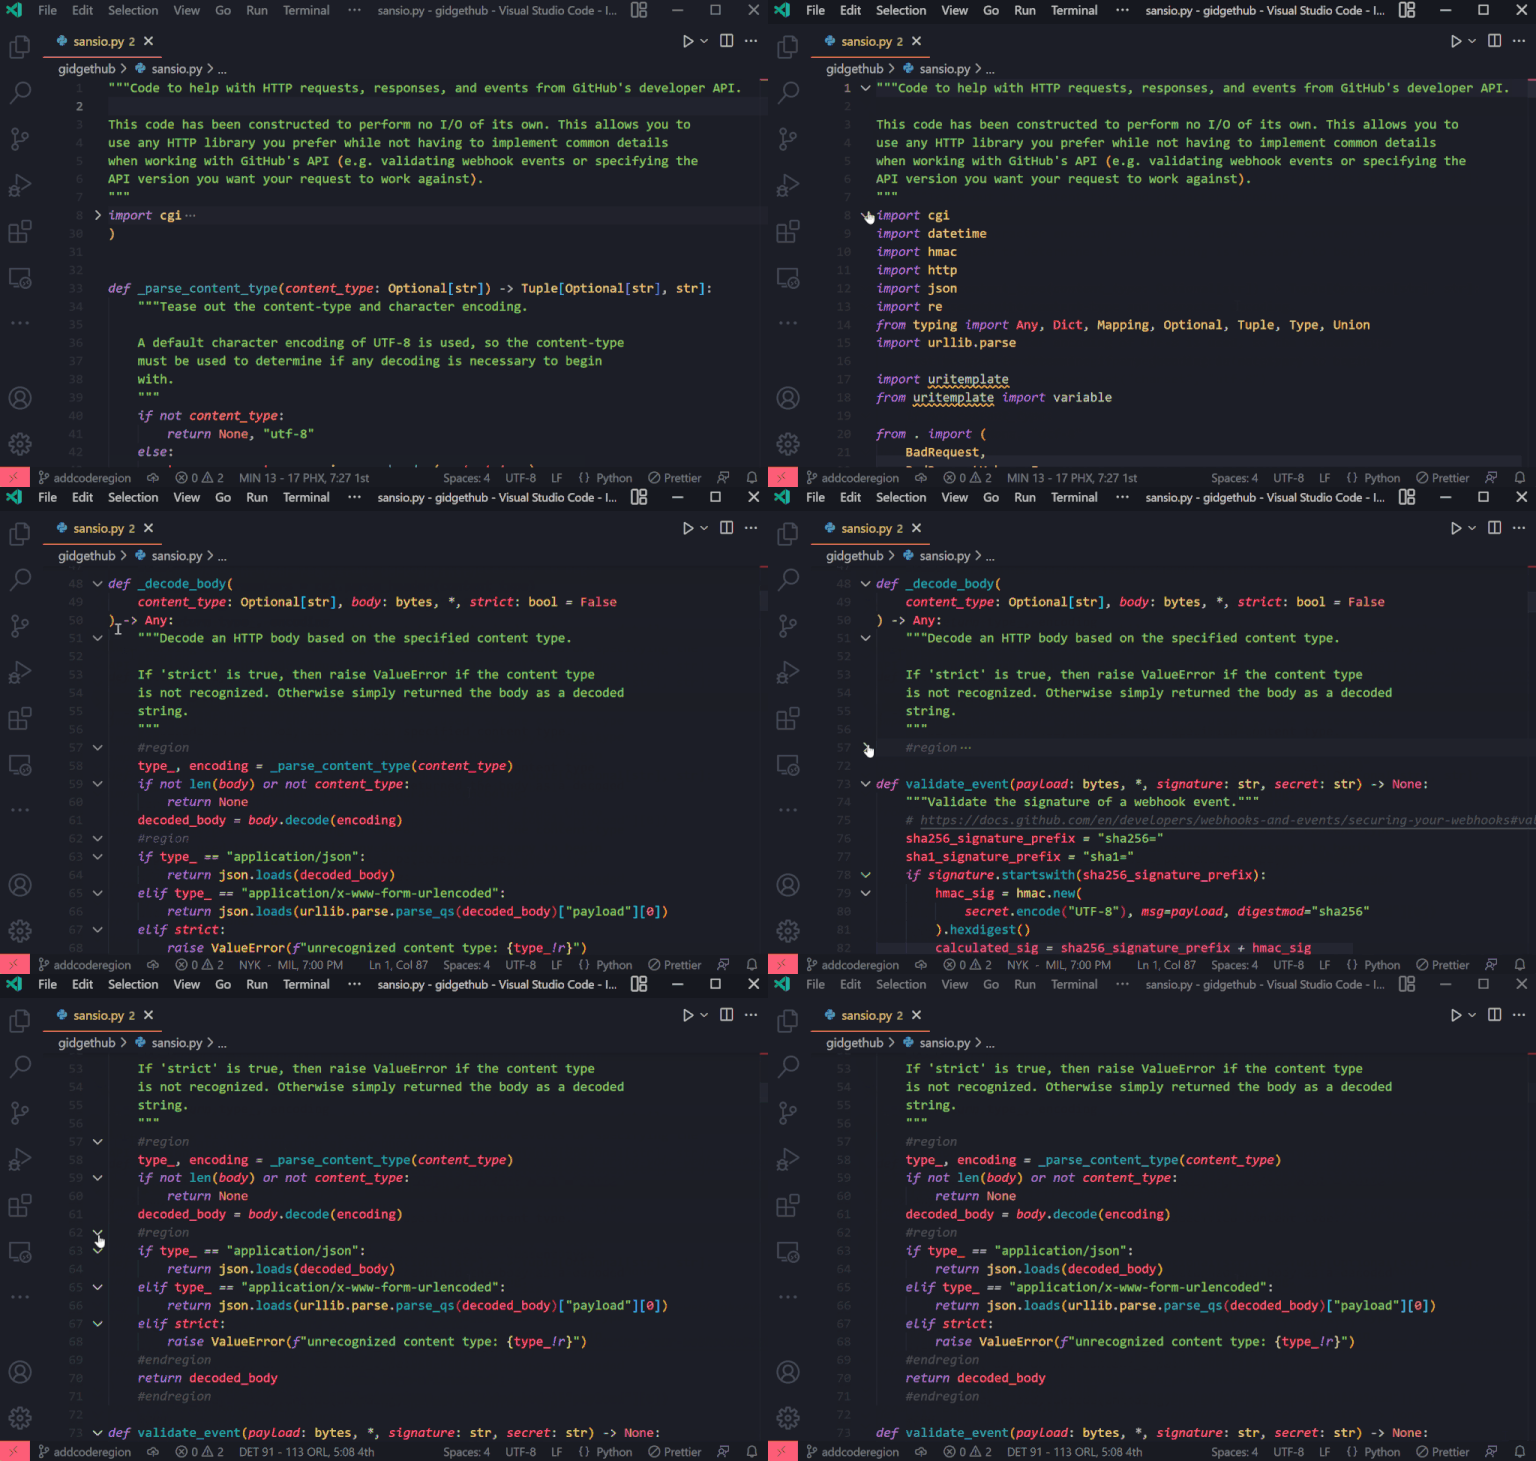
Also in Pylance, folding support has been greatly improved. Before folding regions was strictly performed based on indentation; this was very rudimentary and error prone. Folding now correctly takes semantic information into account when folding regions of code.
Environment Manager Extension
Now its possible to inspect Python environments and their packages with the Python Environment Manager extension. This extension can be used to check which packages are installed as well as their versions.
Pylint extension
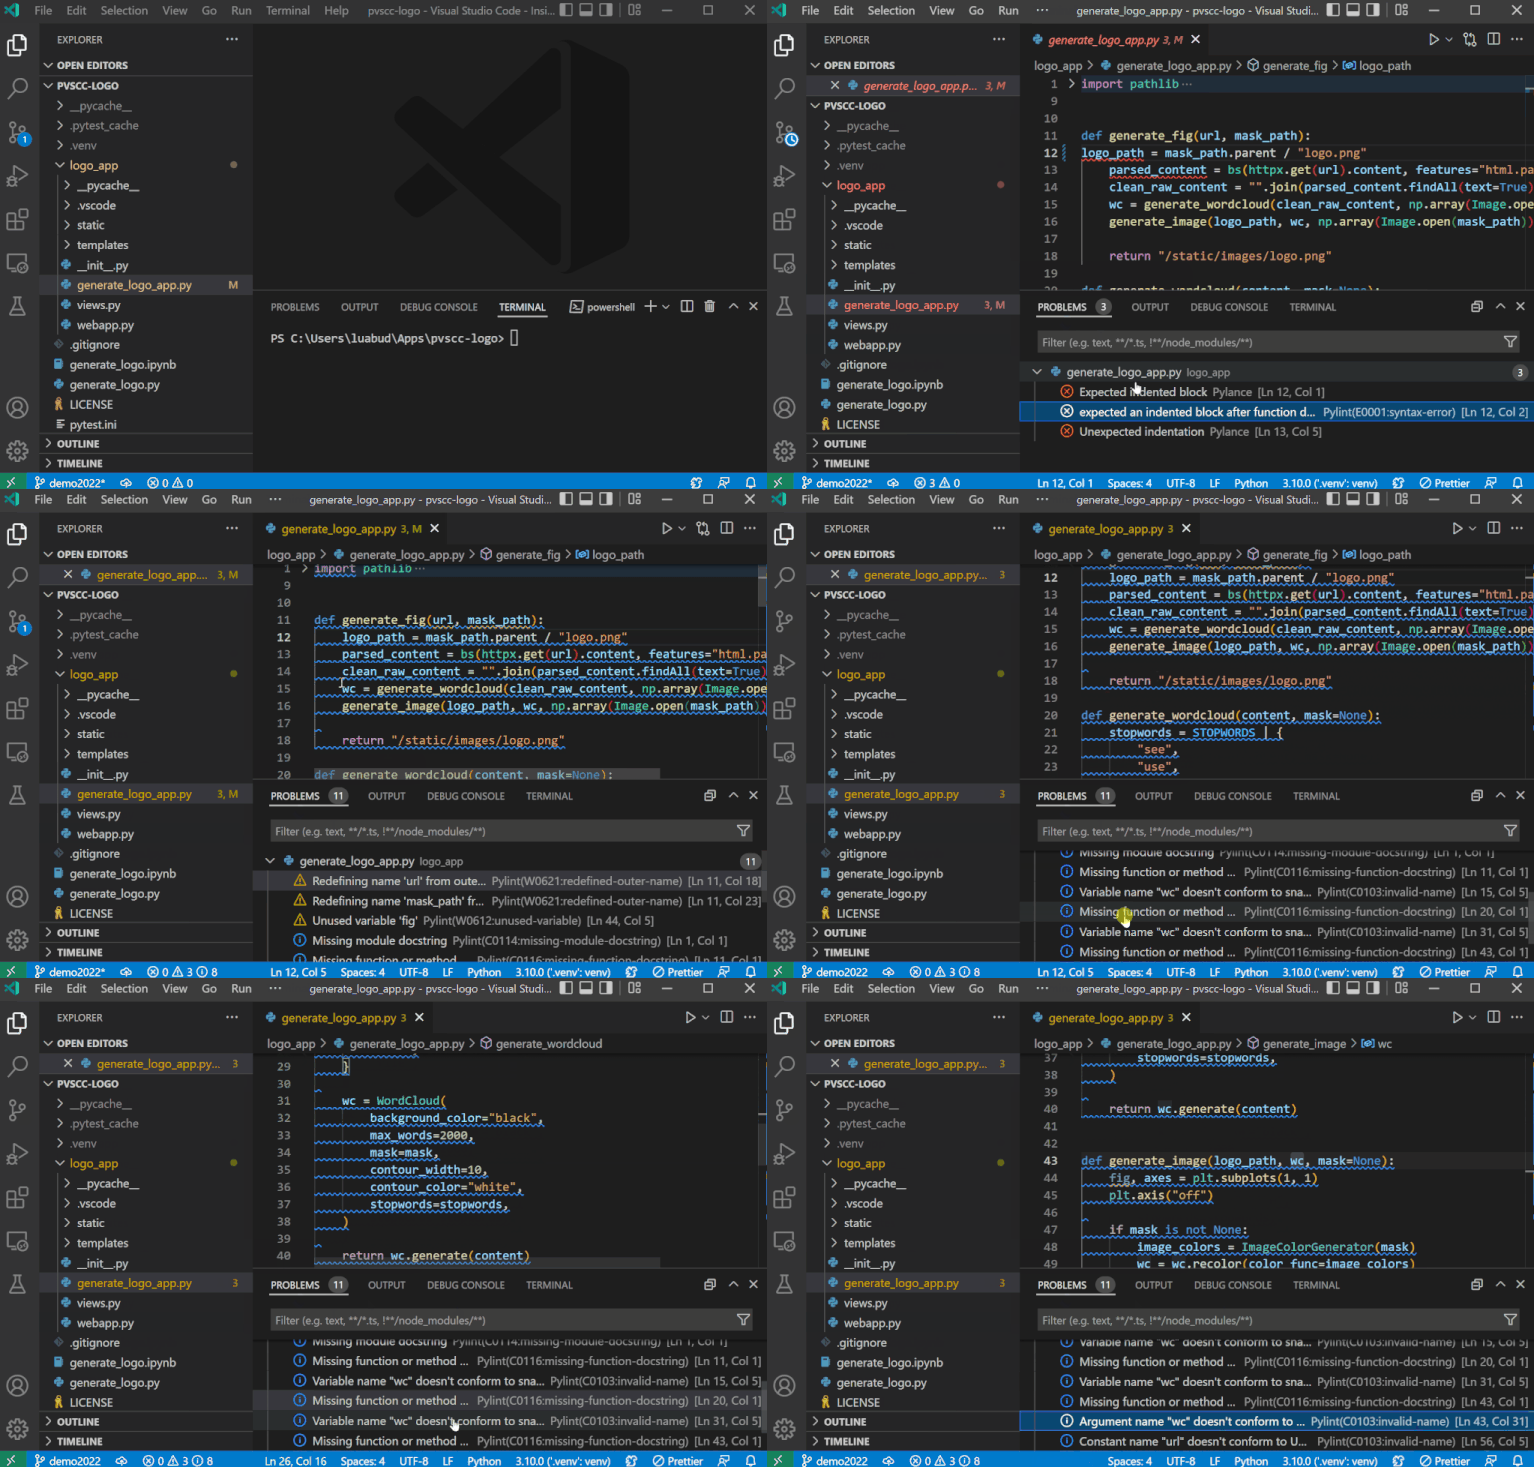
Linting support is being broken out from the Python extension into its own. The idea is to facilitate quicker improvements to performance and reliability. This new extension uses the Language Server Protocol to provide linting support. The new extension is available in the marketplace, to avoid seeing duplicates in the Problems panel make sure you disable the built-in linting support.
We covered some of what I think are the most noteworthy recently released features for Python developers using Visual Studio Code. To learn more check out these awesome resources from Microsoft. You can also give @luumelo14 a follow for awesome Python + Microsoft developments.
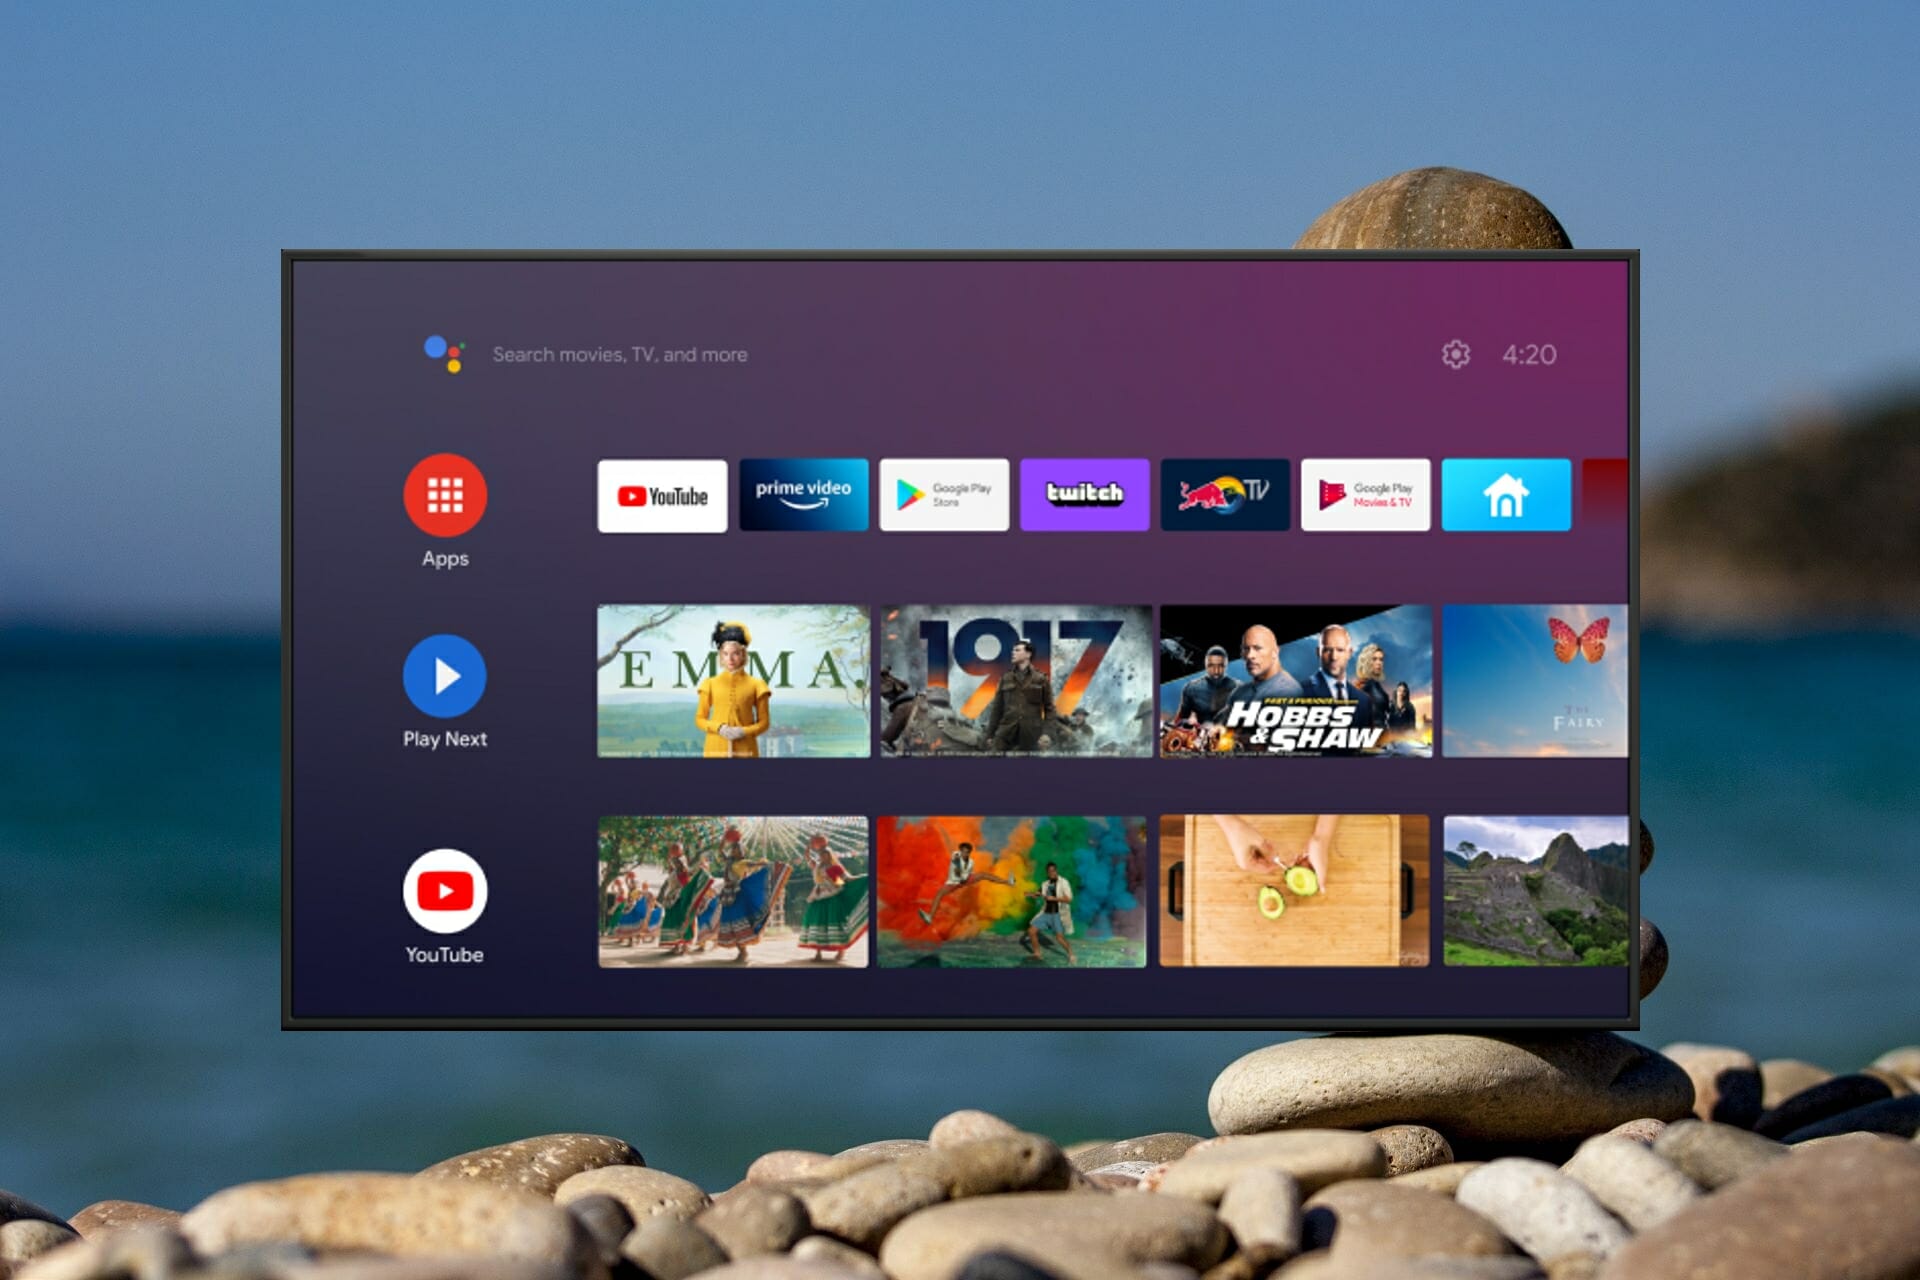
While most people prefer to use the browser on their smartphone or PC, it can be convenient to have it on their smart TV. Keep reading to find out why you should get Opera browser for Android TV.
How do I install Opera browser for Android TV?
In your Android TV, go to the Google Play Store and open it.
Either use the keyboard to search for Opera in the search bar, or use the voice control feature.
Select Opera browser and install.
Opera browser is now installed on your Android TV and ready to be explored. You can also find Opera in the Aptoide TV app store.
We hope this article helped answer any questions you might have about Opera browser for Android TV. It’s the perfect browser for quick web surfing on your smart TV.
2. Turn on Network Discovery in Windows 11 using Control Panel
If your Network Discovery is not turned on, you can easily enable it through the built-in Control Panel settings.
The advanced sharing settings for your network allow you to turn Network Discovery on and off in just a click.
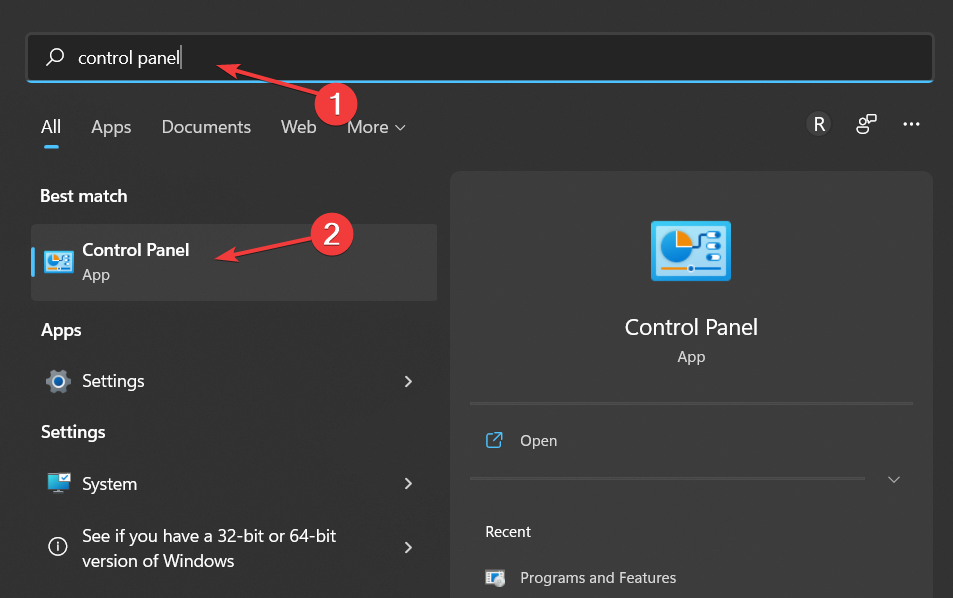
1. Press the Windows key to open the Windows Search function and enter Control Panel.
2. Click on the topmost result to open Control Panel.
3. Now click on Network and Internet.
4. Next, select the Network and Sharing Centre option.
5. From the left panel choose the Change advanced sharing settings option.
6. Here all you have to do is check the radio button next to the Turn on network discovery option. If you want to turn off the feature, you can simply follow the same steps as above but check the radio button next to the Turn off network discovery option.
Is Network Discovery safe?
Network Discovery is essential and safe for all MSPs and IT teams, regardless of organization size. It ensures network visibility, allowing IT teams to understand connected devices and their interactions.
In cybersecurity, Network Discovery helps identify malicious or rogue devices by detecting incorrect IP addresses. By mapping assigned IP addresses, IT teams can distinguish genuine devices from threats.
Tools in Network Discovery allow MSPs to perform frequent scans, ensuring no hidden threats on the network. It also helps improve security by identifying unnecessary open ports that could pose risks.
FAQs
How do I know if Network Discovery is turned on in Windows 11?
Open the Control Panel → Network and Sharing Center → Advanced sharing settings. If “Turn on network discovery” is selected, the feature is active.
Why can’t I see other devices even after enabling Network Discovery?
Make sure the network is set to Private, not Public, and that File and Printer Sharing is also turned on. Some firewalls or antivirus tools can block discovery.
Is it safe to enable Network Discovery on a public network?
No. It’s recommended to enable it only on private or work networks. Public networks expose your device to potential security risks.
Does Network Discovery automatically enable File Sharing?
Not necessarily. While setting the network to Private can turn on discovery, you still need to manually enable File Sharing under Advanced sharing settings if you want to share files or printers.
Summary
To wrap this up, remember that Network Discovery is essential for enhancing IT operations, ensuring network security, and simplifying device management across different environments.
You can check related troubleshooting details by visiting the Network and Sharing Center not opening guide, which helps you resolve access issues before adjusting Network Discovery settings.
Whether for troubleshooting, security scans, or device management, its role in modern networking remains crucial.
The wmic tool can be used for a wide range of purposes and, luckily, also executing commands on remote devices is also among its many powers.
Although it might look like it for some, this is far from being rocket science, and it all comes down to knowing and inputting the right commands.
You will see, as we are about to show you in this article, that running commands on a remote computer using the wmic tool is a piece of cake.
We’re going to guide you through the entire process and share the necessary commands with you, so that you will have it for future reference.
How can I run a command on a remote computer with wmic?
Before we start, it is important to know that, to use this feature, you must have administrative permissions.
Furthermore, if you are also talking about sharing between the remote machines, the file/folder that you want to share must already exist on the target computer.
We are going to use an example of a GPU update command on the target remote computer, to make sure you get the gist of the idea.
Thus, here’s what you need to do in order to successfully complete such a task:
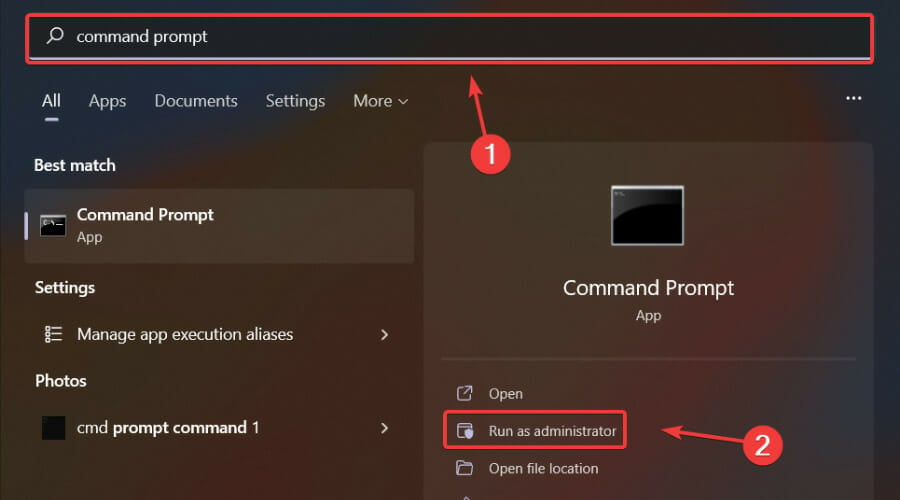
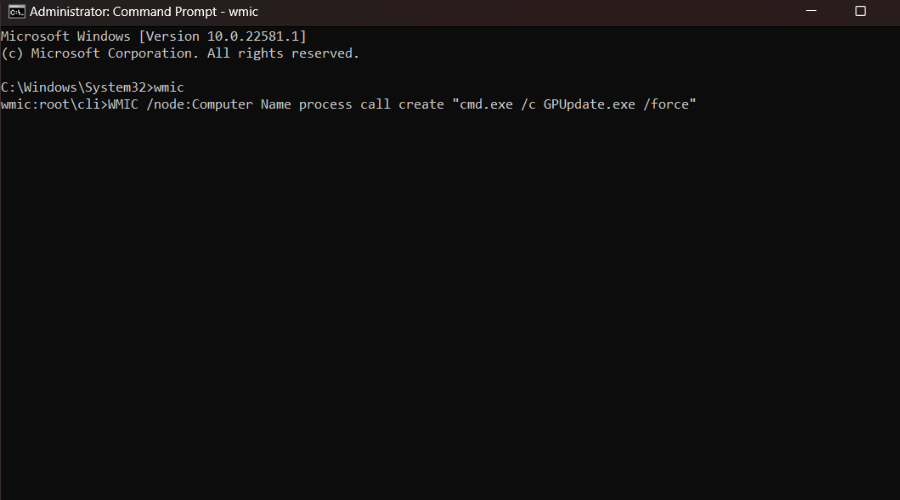
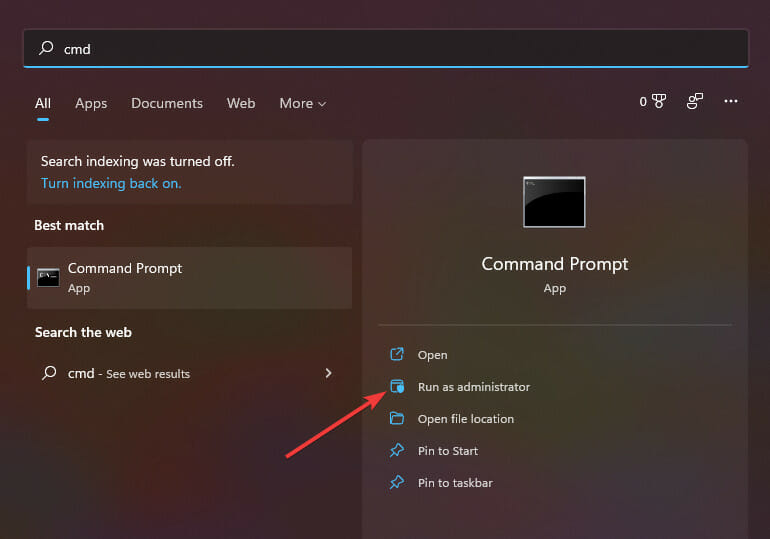
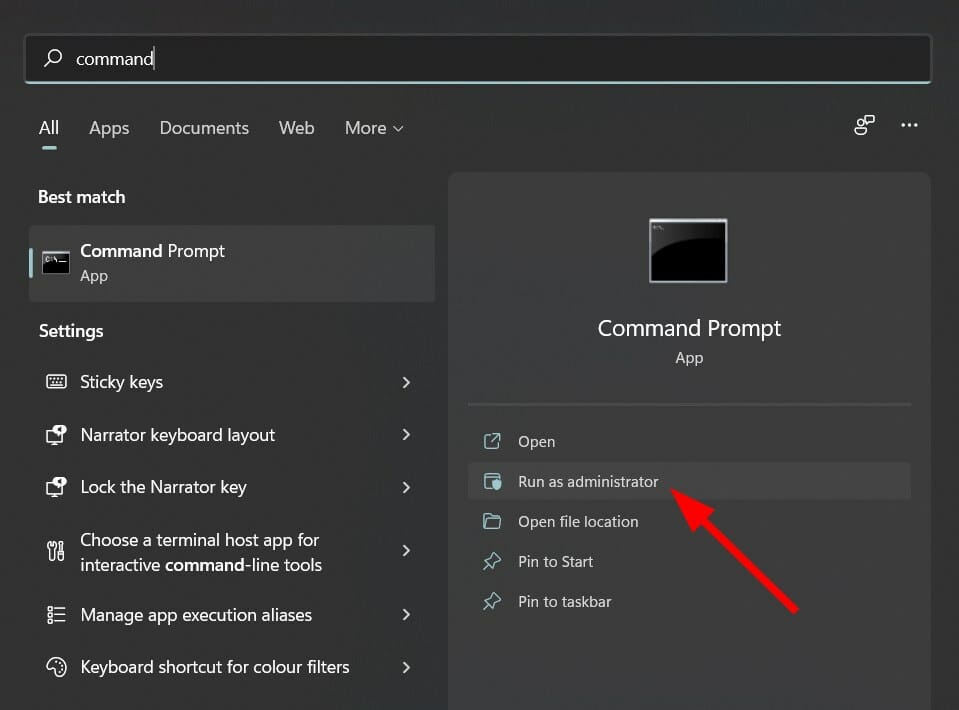
Press the Windows key, search for Command Prompt, and select Run as administrator.
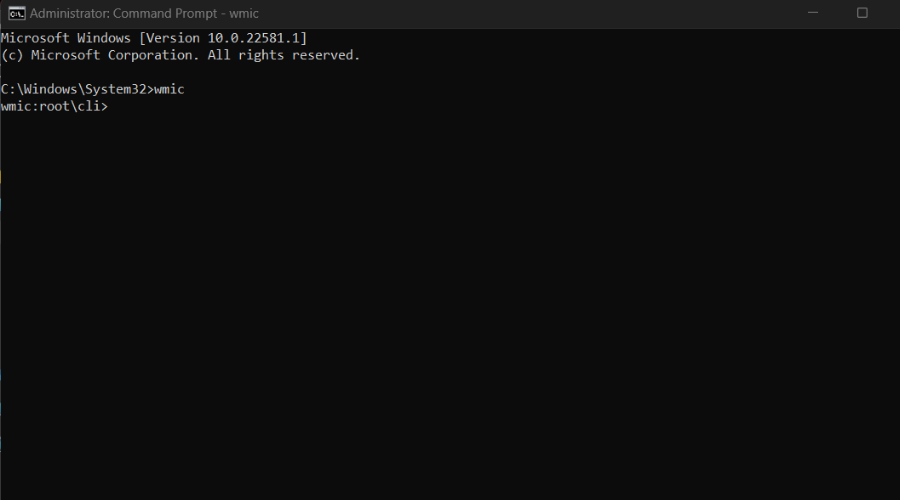
On the Command Prompt, type wmic, and then press Enter.
Input the following command: WMIC /node:ComputerName process call create “cmd.exe /c GPUpdate.exe”
NOTE
As we said, this is only an example, and you can run whatever command you want. Just replace the computer name with the name of the remote device you are trying to access, and the update GPU command with the desired command instead.
And, to be safe keep the " around the computer’s name, as without the quotes, some characters seem to cause issues with this command.
It goes without saying that there is, however, a downside to using this method, because you can’t see the command execute or the results of the process if there was an error or unexpected result.
Don’t let that discourage you though, as many Windows users have been running such commands remotely for years and the problems were few and far apart.
Since we’re talking about wmic, other Windows users have reported dealing with access is denied, and alias not found errors, so we prepared some fixes for you.
There are many options if you need a Bluetooth adapter for your Windows 11 PC. Bluetooth adapters have become very convenient and affordable, and we often need to purchase a more capable one than what’s included with most Windows 11 PCs.
Purchasing a 3rd-party Bluetooth adapter is the way to go if your needs include extra bandwidth or connecting to devices more than 30 feet away.
This article will explore the top options for Bluetooth adapters compatible with the new Windows 11 OS.
What should I look for when buying a Bluetooth adapter?
Bluetooth adapters are not quite as complicated as they appear, but you must look for a few factors and features while purchasing one. If you require higher performance, it’s not only a matter of price.
Here are some things to consider:
Maximum range – This is the distance the Bluetooth adapters stop being effective.
Intended use – This refers to the Bluetooth peripheral it is meant to work with.
Bluetooth version – Although most devices support Bluetooth 4.0, if you don’t require a lot of bandwidth or battery life, a Bluetooth 3.0 adapter will do.
Its other added features – A few more features set some adapters apart from the rest of the pack. NFC for connecting PCs and smartphones, automatic pairing mode for quick Bluetooth access, etc.
Asus BT500 Bluetooth 5.0 adapter reaches speeds of 3MBps using EDR. This is two times as fast as Bluetooth 4.0. In open space across a distance of up to 40 meters, this adapter will pair with as many as seven devices at once.
This adapter costs around $20 and works across all Bluetooth-enabled devices, including speakers, headsets, or game peripherals.
In the Bluetooth market, finding a recognized name is more complicated than you may imagine, so the fact that this adapter is Asus-branded and comes with a two-year guarantee should assuage any doubts regarding its quality.
If you use Windows 11, the Asus BT500 is a solid choice for every wireless need. It’s quick, has a great range, and can handle a lot of devices.
This Bluetooth 4.0 LE adapter for Windows 11 has a range of 65 feet (20 meters). It also has A2DP and EDR compatibility for as much as 3Mbps data speeds and consistent stereo audio output.
TP-Link UB400 pairs as many as seven devices, including headsets, gaming controllers, speakers, and phones. It comes with support for Plug & Play for Windows 10 and 11.
The TP-Link UB400 model is available for about $16 on Amazon. With a range of up to 65 feet, you may play music on your headset without having to be near your computer.
If you have a Windows 11 PC and need a dependable Bluetooth adapter for your wireless devices, this TP-Link is a fantastic alternative at a reasonable price.
The Avantree DG80 Bluetooth adapter works great on Windows 11, and with significant consoles and Mac PCs. It uses Bluetooth 5.0 and is really fast.
Nite that the Avantree DG80 is a superb wireless option for your audio demands, with a range of up to 100 feet (30 meters) outside with no obstructions and 65 feet (20 meters) indoors.
This adapter is audio-only, so its use with your Windows 11 is limited to soundbars, headsets, and speakers.
The DG80’s specialized support for FastStream and AptX Low Latency works excellently to maintain your music beyond CD quality and lag-free, positioning it as a fantastic wireless audio solution for the house.
The Avantree DG80 is available for roughly $30. If you’re looking for anything other than audio, you might want to check out other options.
The ZEXMTE Bluetooth 5.0 adapter is yet another good Windows 11 solution. It is a Class 1 Bluetooth 5.0 adapter and allows for use within distances of up to 328 feet (100 meters) at 3Mbps.
It’s equipped with an anti-interference feature that ensures problems of wireless signals interference don’t occur. This is great and provides a reliable connection.
It supports EDR and AptX Low Latency and is an excellent option for lag-free music streaming to your devices.
The ZEXMTE adaptor is reasonably priced at $20. Note that getting the best out of this long-distance adapter requires Class 1 Bluetooth devices meant for such distances, especially since most Bluetooth devices are Class 2.
The UGREEN USB Bluetooth Adapter is a wireless adapter that works with Windows 11 and peripherals such as keyboards, headphones, and speakers.
This 4.0 adapter communicates with other devices using BLE technology, which takes very little energy. CSR Harmony drivers are included in this Bluetooth receiver for seamless audio transmission.
The UGREEN USB Bluetooth adapter comes with a 24-month guarantee. You may enjoy wireless activities over a transmission range of up to 20 meters. It is small enough and very easy to carry around.
For ease of use, this adapter incorporates an LED indicator that indicates the connection status of devices.
You will enjoy great communication on devices thanks to its ISM band of 2.4GHz.
Kinivo BTD-400 is a great Bluetooth adapter for systems running on Windows (Vista and later), Linux (Mint, Ubuntu, and Fedora), macOS (10.3.9 or later), and any Raspberry Pi running Raspbian.
It uses Bluetooth 4.0 LE and supports connection speeds of 1MBps, and is excellent for ranges, not more than 33 feet (10m).
While it is a great option for Windows 11, you may not be satisfied by its lack of support for Xbox, PlayStation, or Switch.
This Kinivo BTD-400 is available for $14, which is a wonderful deal if you need an adapter that works with so many different OSs.
According to output power ratings, Bluetooth offers three distinct ranges:
The most advanced gadgets are classified as Class 1. With a standard antenna, these will produce up to 100 mW and range around 40 – 100 m (130 – 330 feet).
Class 2 devices have a reduced power output reaching 2.5 mW. They’ll have a range of roughly 15 – 30 m (50 – 100 feet) with a standard antenna.
Class 3 devices consume far less power, as little as one mW. They’ll have a range of roughly 5 – 10 m (16 – 33 feet) with a conventional antenna.
This list of the best Windows 11 Bluetooth adapters is in no particular order. However, we have only provided you with the best options in the market.
Your choice will likely be driven by the features you find most valuable and, of course, the price. For more options to pick from, also check out these great USB Bluetooth adapters.
Let us know in the comment sections which Bluetooth adapters are your favorite.
Even though many people think that gathering system information is only possible on Linux. However, this can also be done for the Windows OS, using Command Prompt.
There are some commands that need to be used to achieve your purpose and, to execute all these commands, you need to run the Command Prompt as Administrator to get access to the system information.
We’re going to be using wmic commands, in case you were wondering, so stay tuned and see exactly what you have to do.
The Windows Management Instrumentation Command-line (WMIC) is a command-line and scripting interface that simplifies the use of Windows Management Instrumentation (WMI) and systems managed through WMI.
How can I get system information using wmic?
Before we list the commands you need to use in order to have access to that information, you must first open a Command Prompt with Administrator privileges.
Only that way will your system display the requested information, so keep that in mind when trying this.
Press the Windows key, search for Command Prompt, and select Run as administrator.
Type the desired command and press the Enter key.
After you opened the app with Administrator privileges, it’s time to get the information you need by using one of the following commands, depending on the purpose:
Gather all information about a CPU, such as name, device ID, number of cores, max clock speed, and status.
wmic cpu
Send attributes to get the particular details of a CPU in a better view.
wmic cpu get caption, name, deviceid, numberofcores, maxclockspeed, status
Get the serial number of our BIOS.
wmic bios get serialnumber
Gather information about the available memory (RAM).
wmic computersystem get totalphysicalmemory
Get information about all the available partitions on the system.
wmic partition get name,size,type
Get the list of all processes running on our computer.
wmic process list
You can terminate these tasks by using the following command.
wmic process where name="name_of_file" call terminate
This command offers the list of all products/software installed on a computer.
wmic product
wmic product get name,version
Command that gives details of a particular volume of the disc and the serial number of the volume of that disc.
vol volume_letter:
NOTE
You have to replace volume_letter with the letter of the volume you wish to use.
Get the exact version of your Windows OS.
winver
Get a list of all large files and also files that are harmful.
chkdsk
Use this command to get elaborate system info.
systeminfo
NOTE
This will bring back information about Host Name, OS Name, OS Version, OS Manufacturer, OS Configuration, Os Build Type, Registered Owner, Product ID, Original Install Date, Bios Version, Processor, Input Locale, Time Zone & many more.
Get details of your hard disk.
diskpart
Get Mac Address.
wmic nic get macaddress
getmac
Get information about user accounts.
wmic USERACCOUNT get Caption,Name,PasswordRequired,Status
Get information About NICs.
wmic NIC get Description,MACAddress,NetEnabled,Speed
Get Memory Device DIMM Numbers
wmic MEMORYCHIP get Capacity,DeviceLocator,PartNumber,Tag
These are the commands you can use in Command Prompt in order to access your system information and get the necessary details.
Remember to run the software with Administrator privileges, otherwise, some information will be inaccessible to you.
For more advanced system management, check out the Vssadmin Commands guide that helps you control Volume Shadow Copies from Command Prompt.
Was this article helpful to you? Let us know in the dedicated comments section below.
Printers are one of the most important components of an organization. An organization has to handle a lot of paperwork, and printers are their best companion.
Big organizations have these network printers installed so that anyone within the organization could easily send a command to the printer and take out a copy of their document.
However, many users have reported that they are facing network printer issues on their Windows 11 PCs.
Since most computers across the globe have already upgraded to Windows 11, this issue is quite widespread.
Reportedly, because of this Windows 11 network printer issue, users aren’t able to send commands to the network printers and ultimately not able to take printouts of documents.
If you are also facing network printer issues too and are looking for solutions then you are at the right place.
Because in this guide, we will give you some effective solutions that you can apply and possibly solve these Windows 11 network printer problems for good. Let us get right into it.
What are the benefits of using a network printer?
While there is no harm in having multiple printers in your organization, that is feasible only if you have the space and money for it.
A good alternative, which could be good for organizations, especially those that are small is to use network printers.
Notably, a network printer is a printer that is connected to a network, via Wi-Fi or ethernet. Wi-Fi is the most convenient option and most modern printers come equipped with it.
Here are some of the benefits of using a network printer:
A network printer is connected to Wi-Fi or Ethernet, allowing it to be used by multiple devices connected to the network.
It negates the need to invest money in multiple printers, beneficial especially for smaller organizations.
Using a network printer also brings down the total IT setup cost, as all computers connected to the same network as the printer can print seamlessly.
Staff can print from anywhere using the network printer.
A network printer, being connected to Wi-Fi lets you use any device to print from, i.e., smartphone, PC, or tablet.
Now, these benefits can be availed only if your network printer is working properly and you are not experiencing Windows 11 network printer issues.
If you are on the other side of the land, and actually facing the issues, then check out the below-listed solutions that can possibly help you fix the problem at hand.
How can I fix network printer issues in Windows 11?
1. Restart your PC
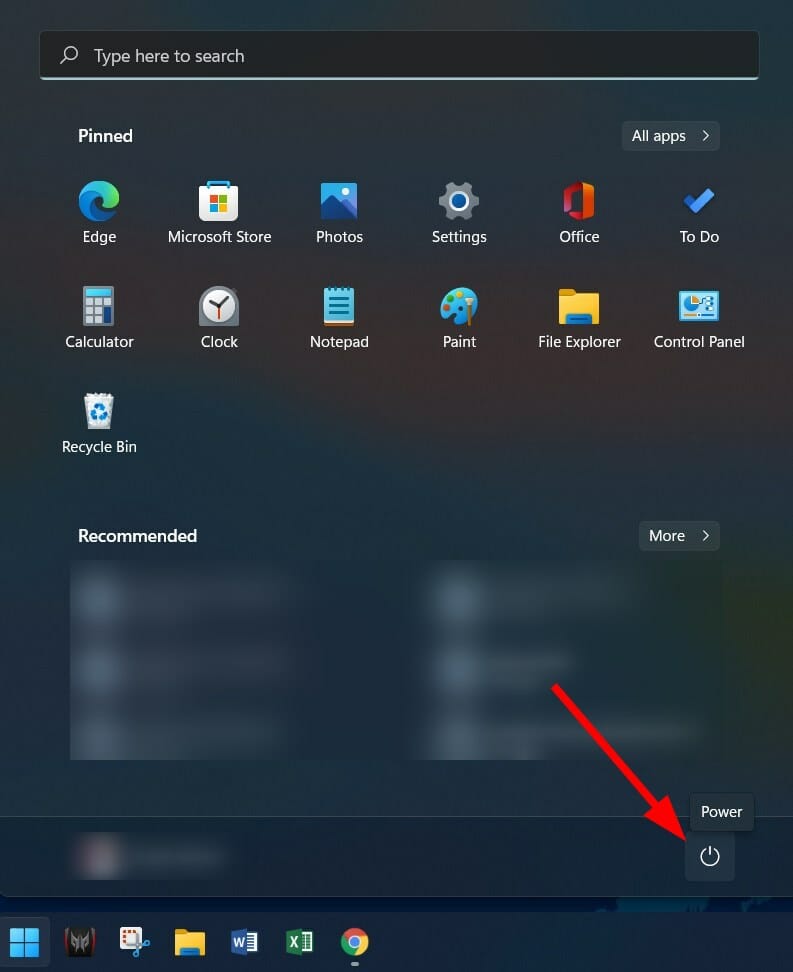
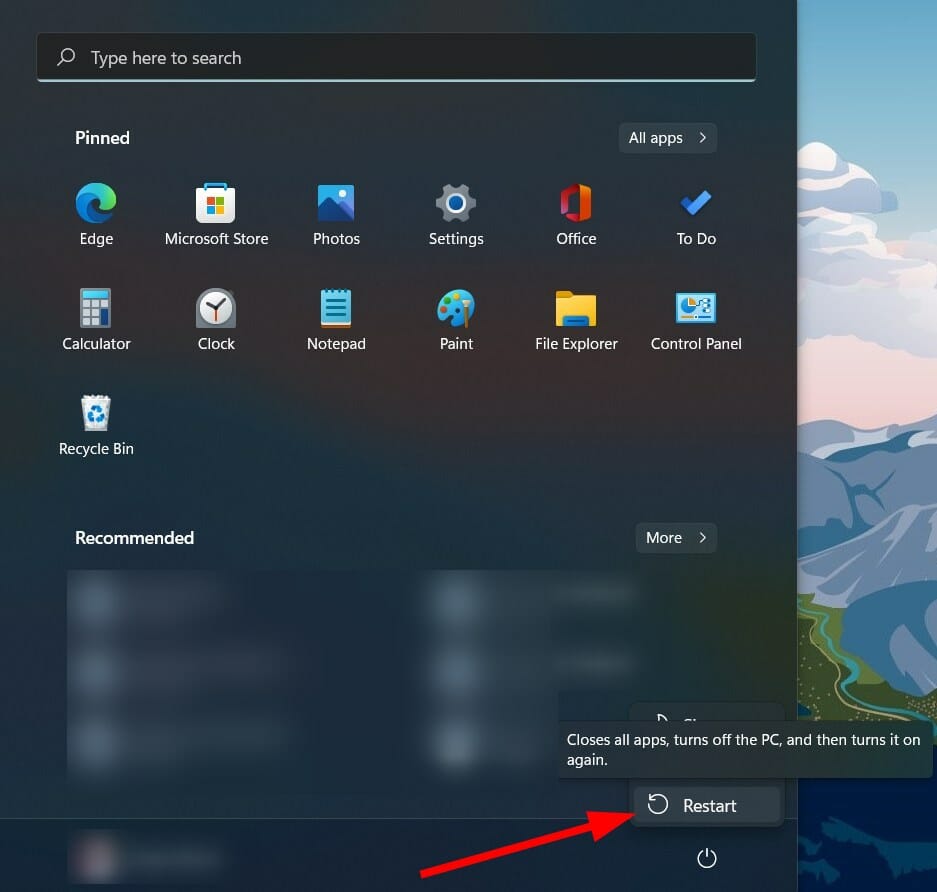
Open the Start menu.
Click on the Power button.
Select Restart.
Restarting your PC puts all the unnecessary files or processes are to sleep, and after the system boots up, all the important system files are re-loaded.
There are chances that some important network printer-related files did not load during the previous session. To cure this, you can try restarting your PC and checking if this fixes the issue or not.
2. Update printer drivers
Right-click on the Start menu icon.
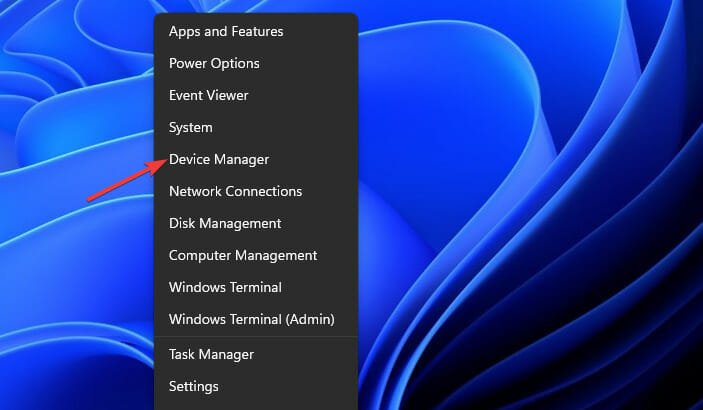
Select Device Manager.
Expand the Imaging devices section.
Right-click on the problematic driver and select Update Driver.
Your system will look for the appropriate printer driver.
Install it and see if this fixes the issue or not.
Manually updating the drivers on your PC could be very annoying. In order to nullify the frustration, we recommend you use a dedicated tool to do it automatically.
Outbyte Driver Updater keeps your system up-to-date by upgrading all the drivers. A simple click will scan for all outdated drivers, show you the result, and prompt you to install all the updates, all from within the software itself.
Minimize the Services window and head to the following folder: C:\Windows\System32\spool\Printers
You will need administrator privileges in order to access this folder. Also, the folder can be hidden sometimes. In such a case, make sure you have the option to view hidden files turned on.
Open the Printer folder, and delete all files within.
Restart your PC.
Often Print Spooler service can keep stopping due to corrupt Print Spooler files. This could be one of the reasons you are experiencing issues with your network printer. So, one way to fix this problem is to remove those files.
4. Run the troubleshooter
Press the Win + I buttons to open Windows Settings.
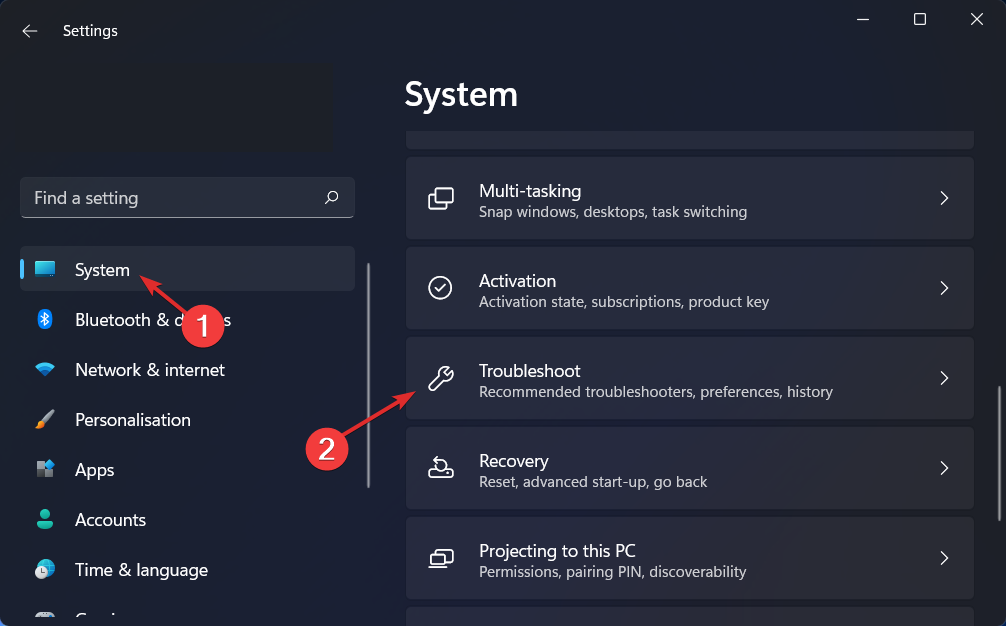
Scroll down and select Troubleshoot.
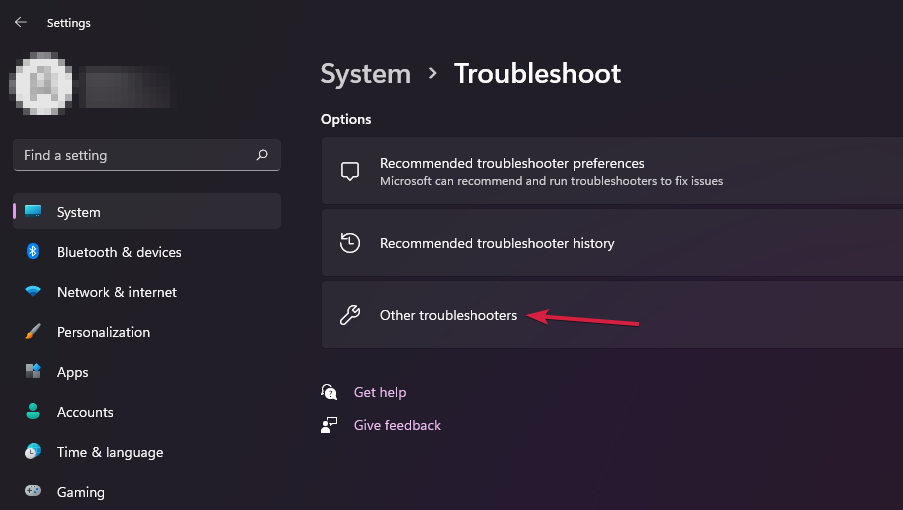
Click on Other troubleshooters.
Select Run next to Printer.
The troubleshooter for the printer will start and will also give you a report on what is wrong with the connected printer.
Apply the fixes the troubleshooter prompts you to do so, and check if this fixes the Windows 11 network printer issues or not.
Under the Printers section, right-click on your network printer and select Set as default printer.
If you have recently connected another printer to your Windows 11 PC, then chances are that your system has changed the default printer.
So, following the above steps will help you check and also set the network printer as the default printer.
6. Run a quick SFC Scan
Open the Start menu.
Search for Command Prompt.
Click on Run as administrator.
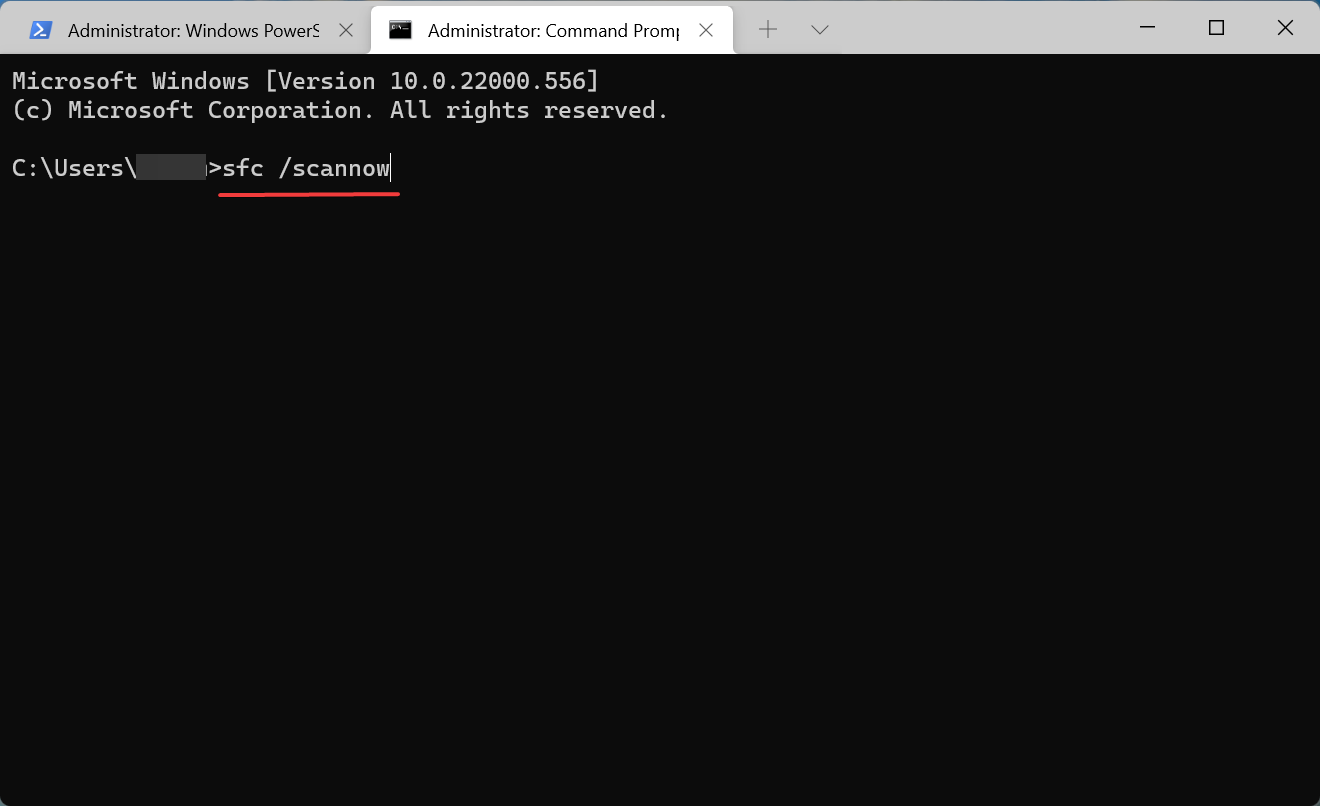
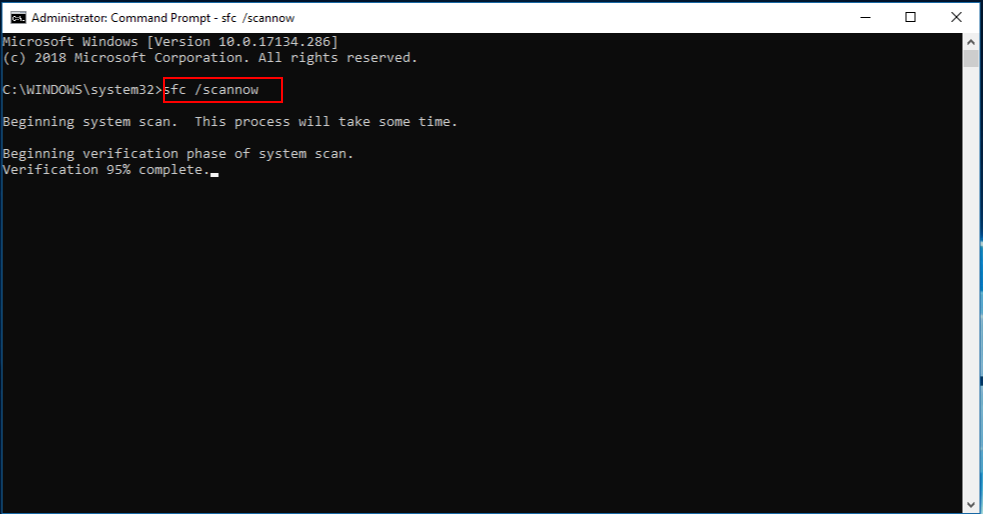
Type the below command and press Enter: sfc /scanow
Your system will start scanning and possibly fix the issue as well.
Rebootyour PC.
The SFC Scan is a very powerful in-built Windows troubleshooting tool. It scans all the system files and replaces the corrupt ones, automatically.
Simply execute a command in the CMD, and everything else will be taken care of by your PC. You can try using the SFC Scan tool and see if this fixes the Windows 11 network printer issue.
Alternatively, you can also make use of a trusted third-party repair software. Running this tool will help you resolve the issues caused by corrupt system files.
System-related files if corrupt can hamper the smooth functioning of the PC. So, it is pretty important to repair them.
7. Check for viruses
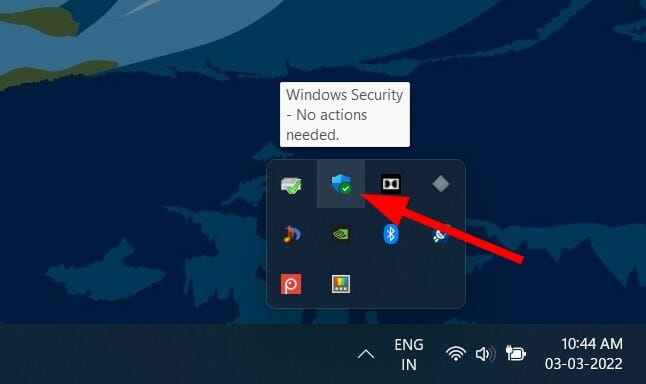
Click on the upward arrow on the bottom-right of the taskbar.
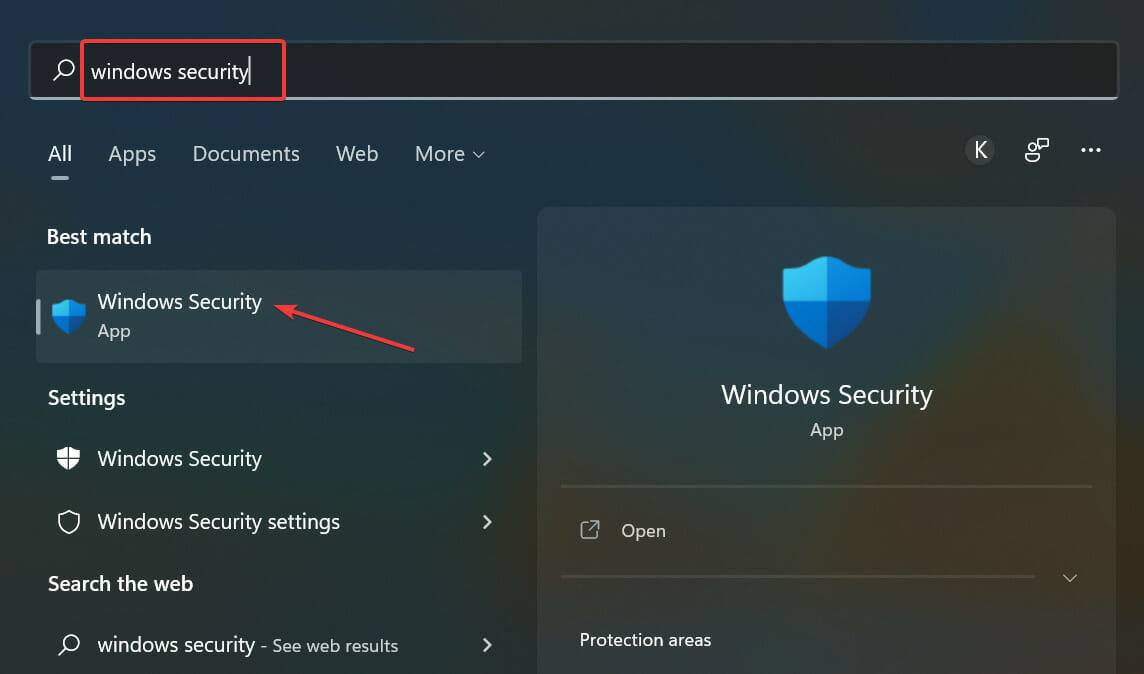
Choose Windows Security.
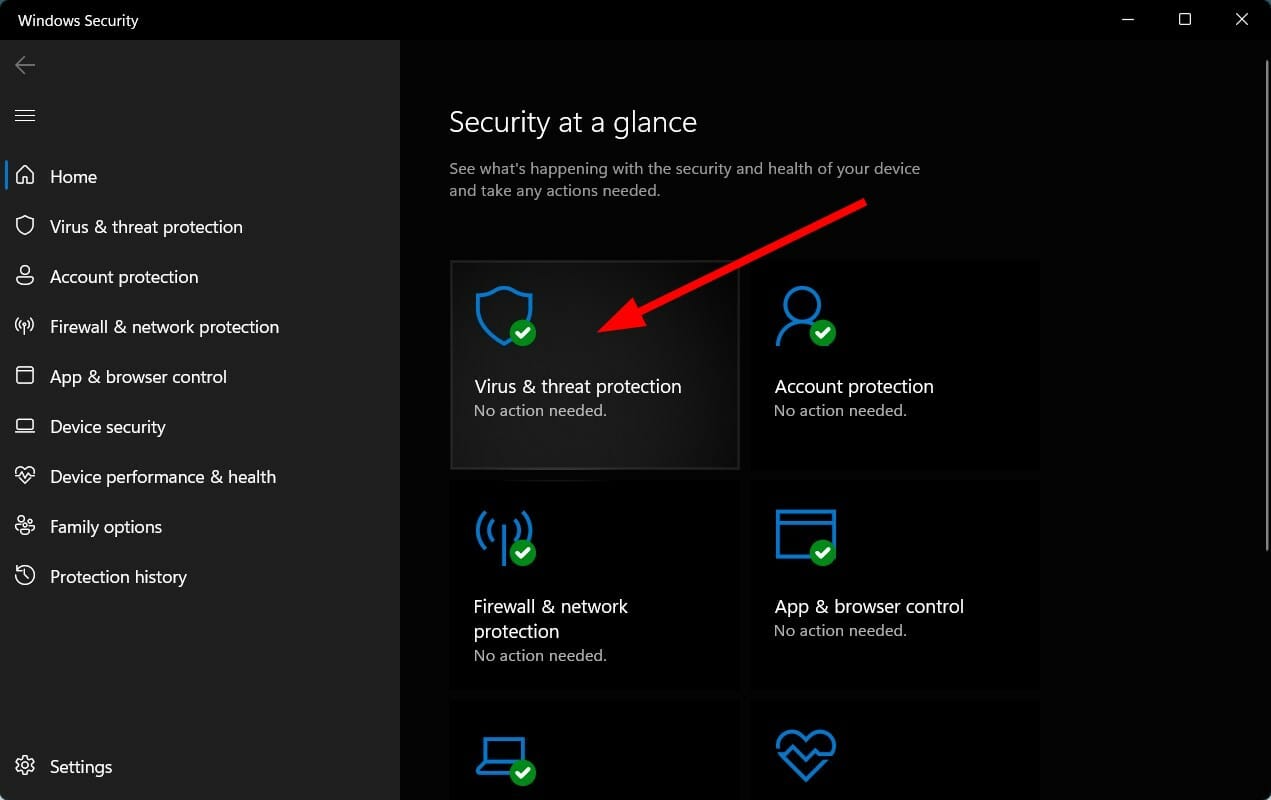
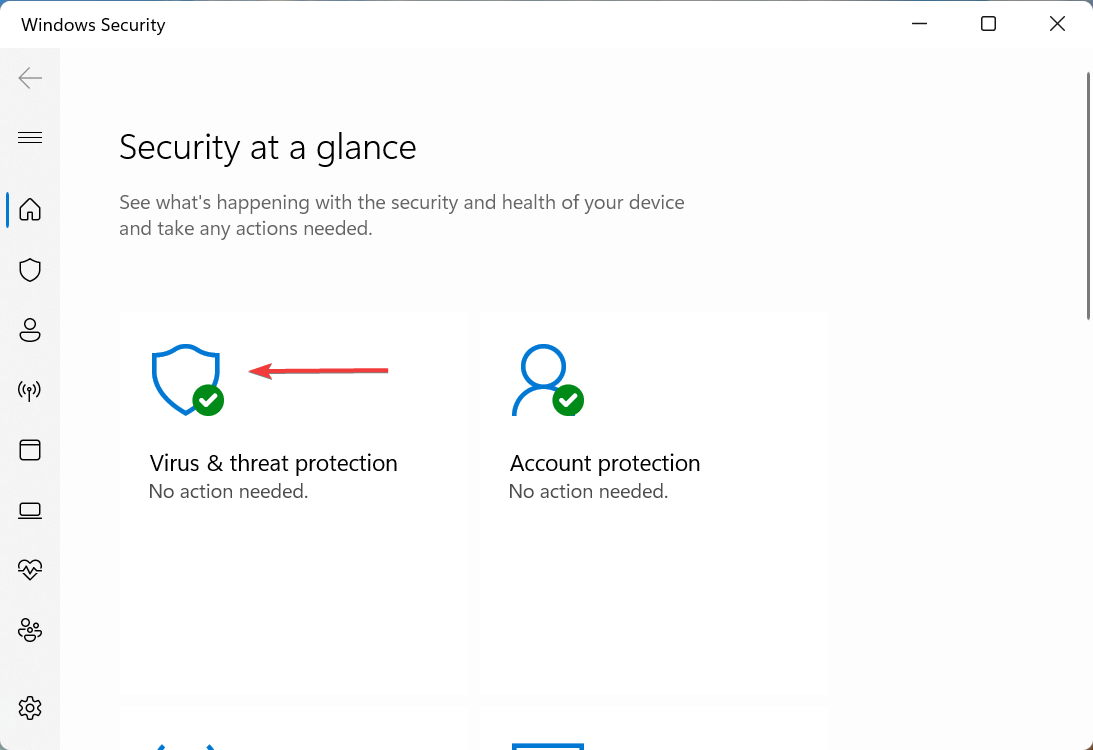
Select Virus & threat protection.
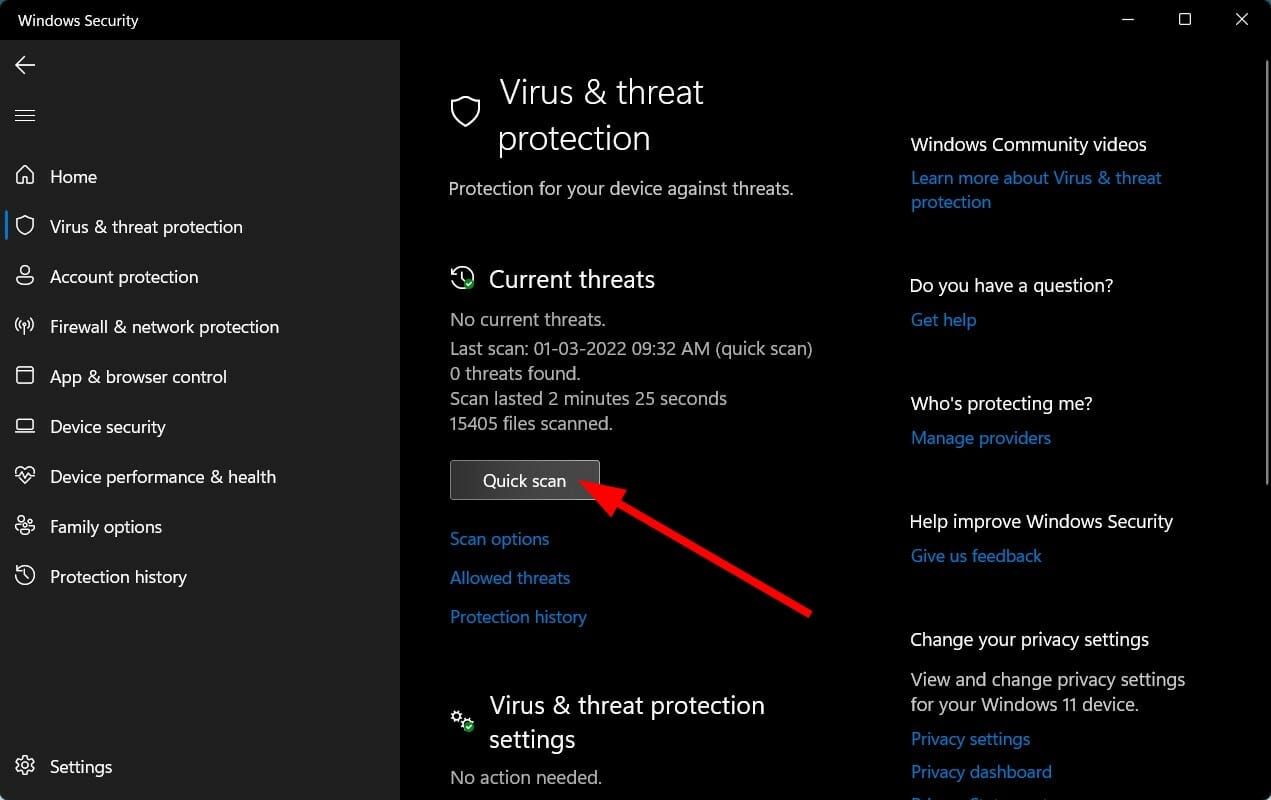
Click on Quick Scan and let Windows Security scan your PC for viruses and malware.
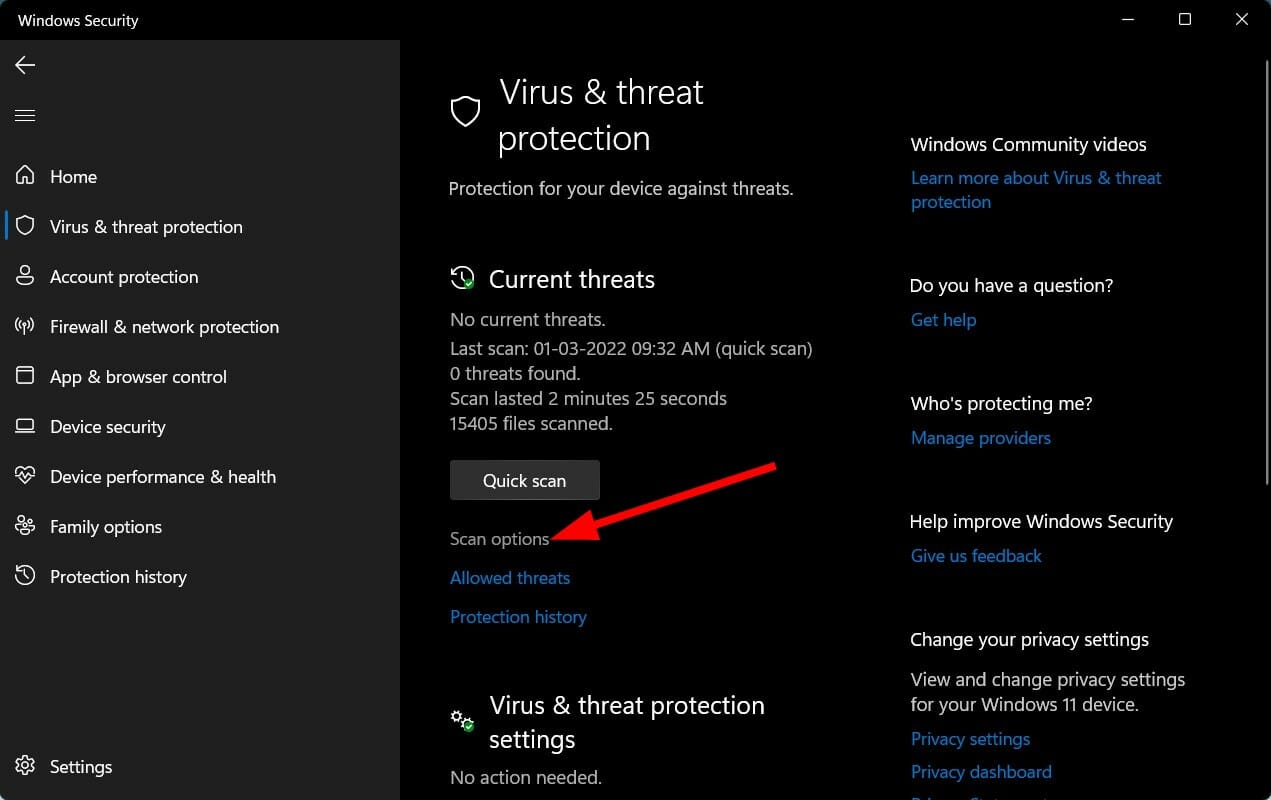
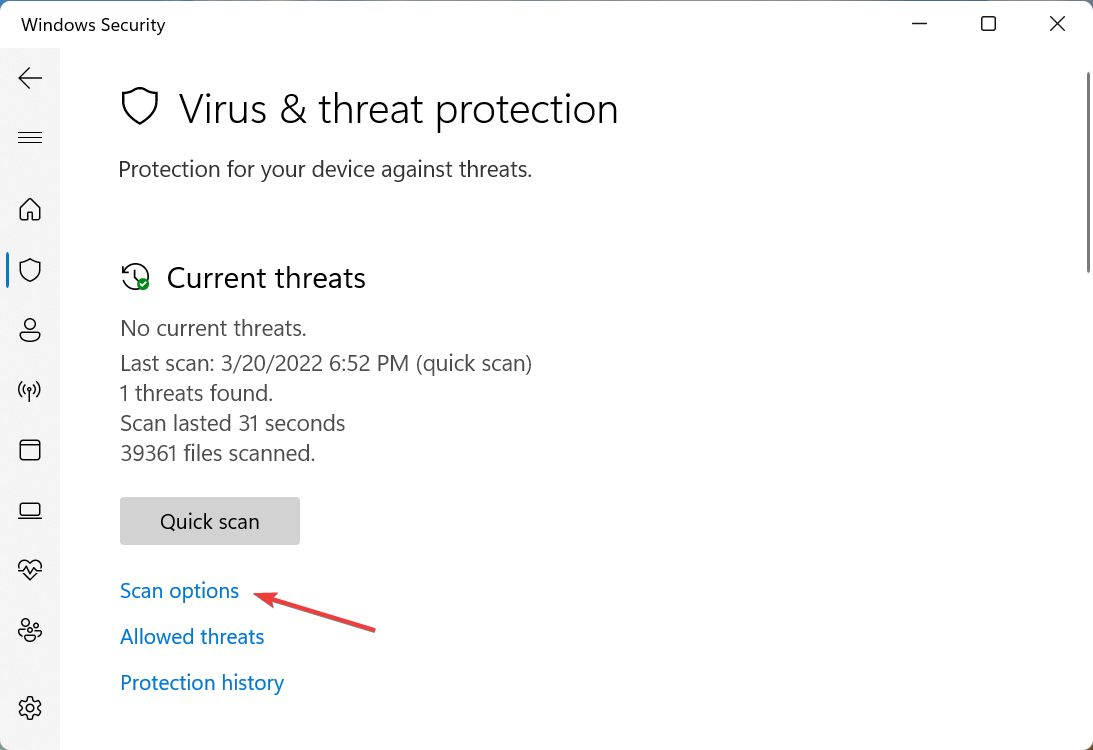
You can also choose the Scan options option.
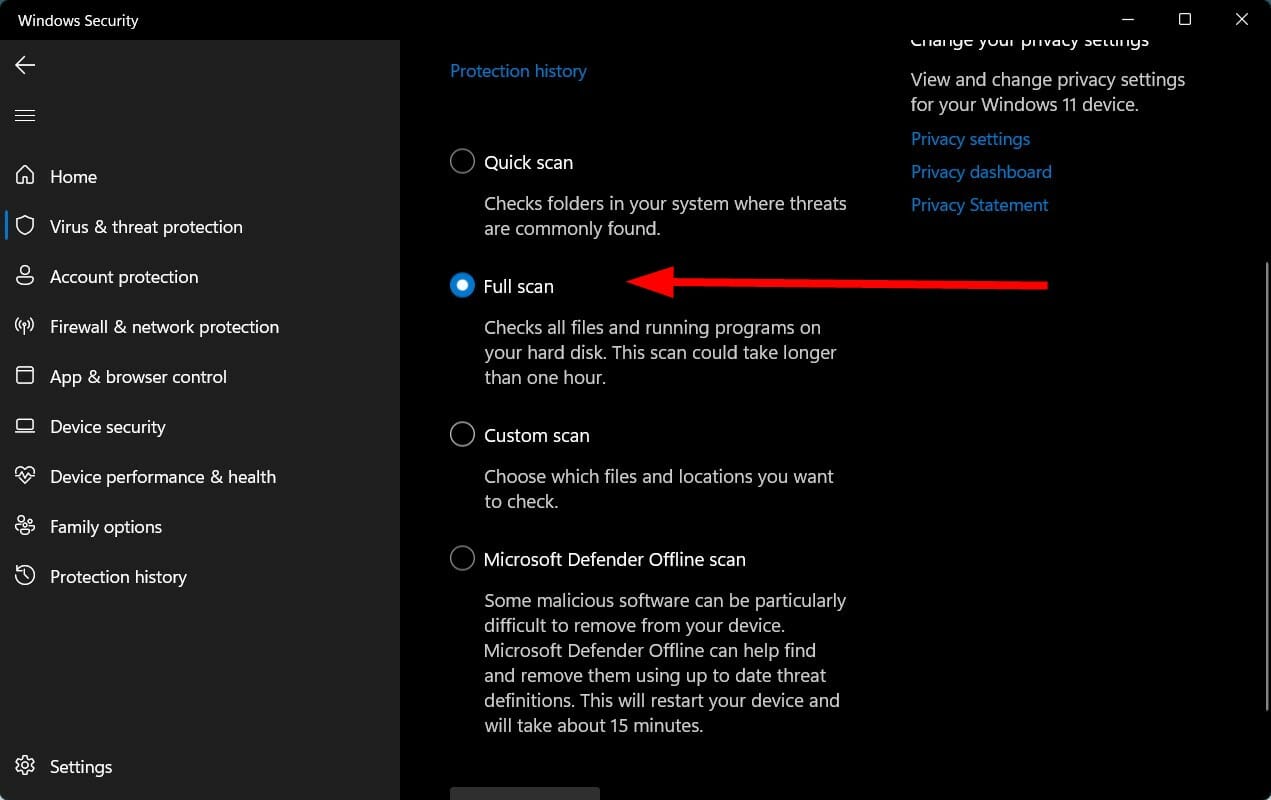
Under Scan Options, here you can go for a Full scan to deeply scan your PC for viruses or malware.
Here, we have shown the steps by making use of the Windows Security Defender to scan your PC for viruses, as we didn’t have any third-party antivirus applications installed on our Windows 11 PC.
But the above steps will give you an idea that you need to perform a scan to check for any viruses or malware present on your PC.
The presence of a virus or malware not only causes several issues but is also responsible for problems such as the Windows 11 network printer issues. Overall, they affect the smooth functioning of your PC.
Since viruses and malware are of different types, they can trigger different problems. So, it would be a safe bet to check your PC for viruses.
8. Reset printers network settings
Press and hold the Cancel or X button on your printer to print the network page.
Up next, press and hold the Power button on your printer.
Press the Network button two times.
Then, press the Cancel button three times. This will print a network configuration page.
Release the Power button.
Here you need to ensure that the default network name on the network configuration page reads hpsetup. Besides, the default communication mode should read ad hoc.
The above settings and steps apply only if you have an HP printer set up on your network. If you have a different branded network printer, then you can check their support pages.
9. Check for Windows updates
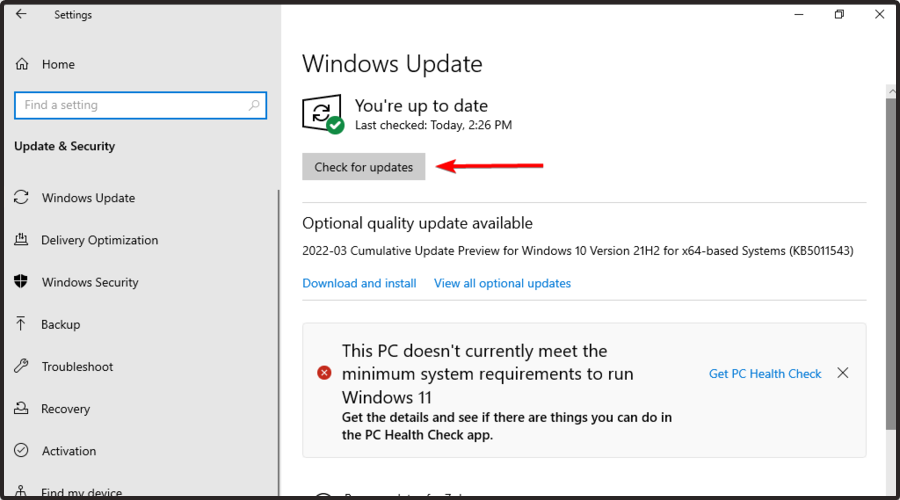
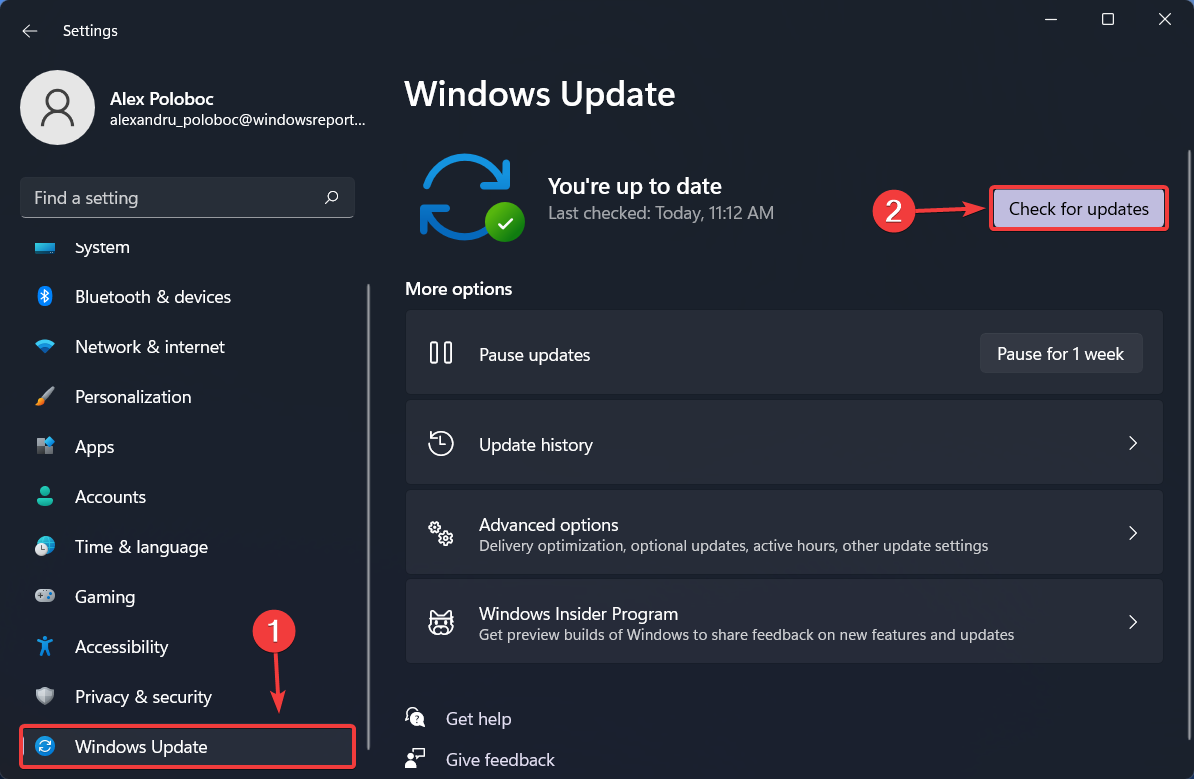
Press the Win + I buttons to open Settings.
Select Windows Update from the left pane.
Click on Check for updates button.
There are chances that due to a bug present in the version of the Windows update installed on your PC, the network printer isn’t properly functioning.
It is recommended that you keep your PC up-to-date as Microsoft rolls out new updates that not only bring new features but bug fixes for such errors as well.
What else can I do to fix the Windows 11 network printer issue?
If the network printer issue did not fix even after going through all the methods mentioned above, then there are a few other solutions that you can apply and hopefully fix the problem:
➡ Perform a system restore
There are users that have reported that for them, the network printer issue started showing up only after they recently upgraded their Windows 11 PC.
If that is the case with you as well, then we would suggest you perform a system restore. Using this method, Windows will take your PC back to the same state as the selected date, when everything was working perfectly normally.
➡ Check if you are connected to the same Wi-Fias your printer
The network printer is connected to the network using Wi-Fi or ethernet. There are more chances of your network printer using Wi-Fi.
So, here we would advise you to check if your PC and the printer are connected to the same Wi-Fi network or not.
If the printer or your PC is not connected to the same network then the commands that you are sending via your PC won’t go to your network printer.
➡ Disable the Firewall
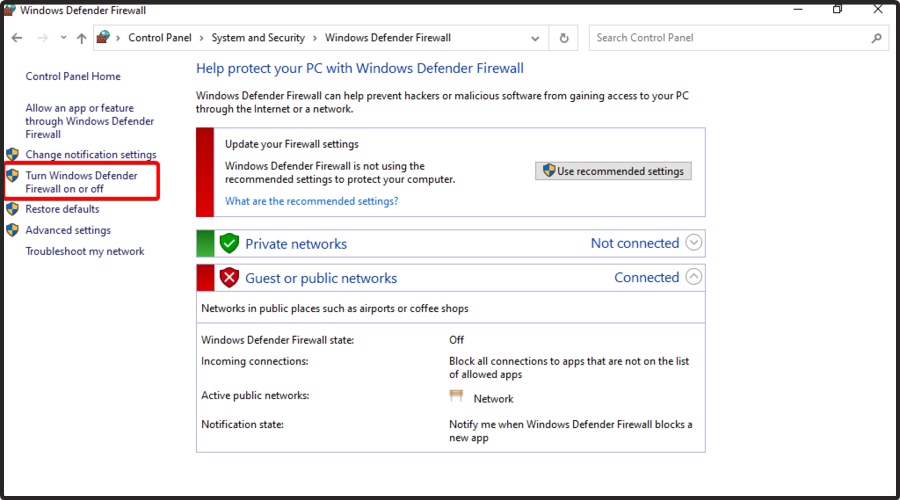
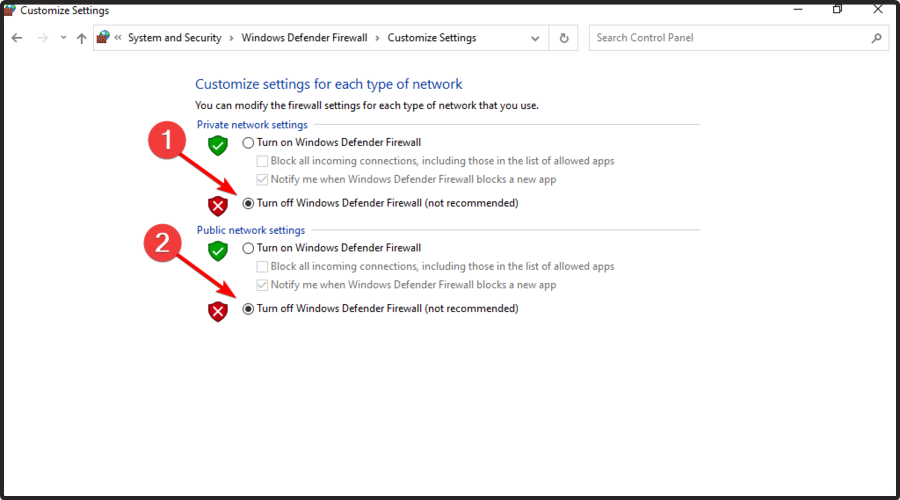
Windows Defender Firewall is the culprit for many network-related issues. If you have set up the Firewall very strictly, then it will cause such issues.
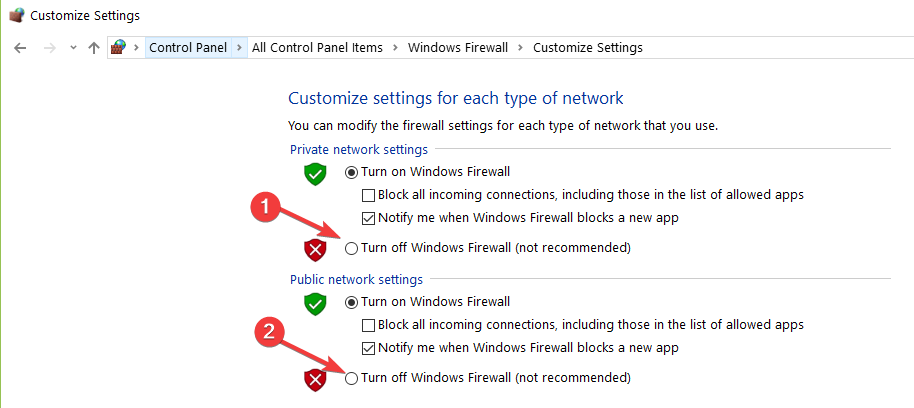
In such a case, we recommend you disable the Firewall by opening the Windows Security and toggling off the Windows Defender Firewall.
Well, the above solutions are probably sufficient enough for you to solve the Windows 11 network printer issues. But for a command error, The credentials supplied are not sufficient to access this printer, the fixes are slightly more complex, though they work in other cases as well.
Let us know in the comments section below which one of the solutions helped you eliminate the problem. You can also share any other tips that helped you fix the solution down in the comments section below.
Microsoft news recap is a weekly feature highlighting the top Microsoft news stories of the past week. Sit back, grab some coffee, and enjoy the read!
Microsoft expands cybersecurity skills training to 23 new countries
Based on what Microsoft deems an “elevated cyberthreat risk”, the company is expanding its cybersecurity skills training to an additional 23 countries, which include Australia, Belgium, Brazil, Canada, Colombia, Denmark, France, Germany, India, Ireland, Israel, Italy, Japan, Korea, Mexico, New Zealand, Norway, Poland, Romania, South Africa, Sweden, Switzerland, and the United Kingdom.
Microsoft could be working on an Xbox Game Pass Family Plan
According to a new report, Microsoft is working on a Family Plan for its Xbox Game Pass subscription service. This could prove useful for people who require multiple Game Pass subscriptions for people in the same household. The company could release a Family Plan as soon as later this year.
Microsoft to hold virtual Build 2022 conference on May 24-26
For those of you who don’t already know, Guild Wars 2: End of Dragons is the third expansion pack for Guild Wars 2, that was announced on March 12, 2020.
The great news is that developers are talking about some new changes to the map features and this is how they describe them:
One of the things we’re taking a close look at is map population in Cantha.
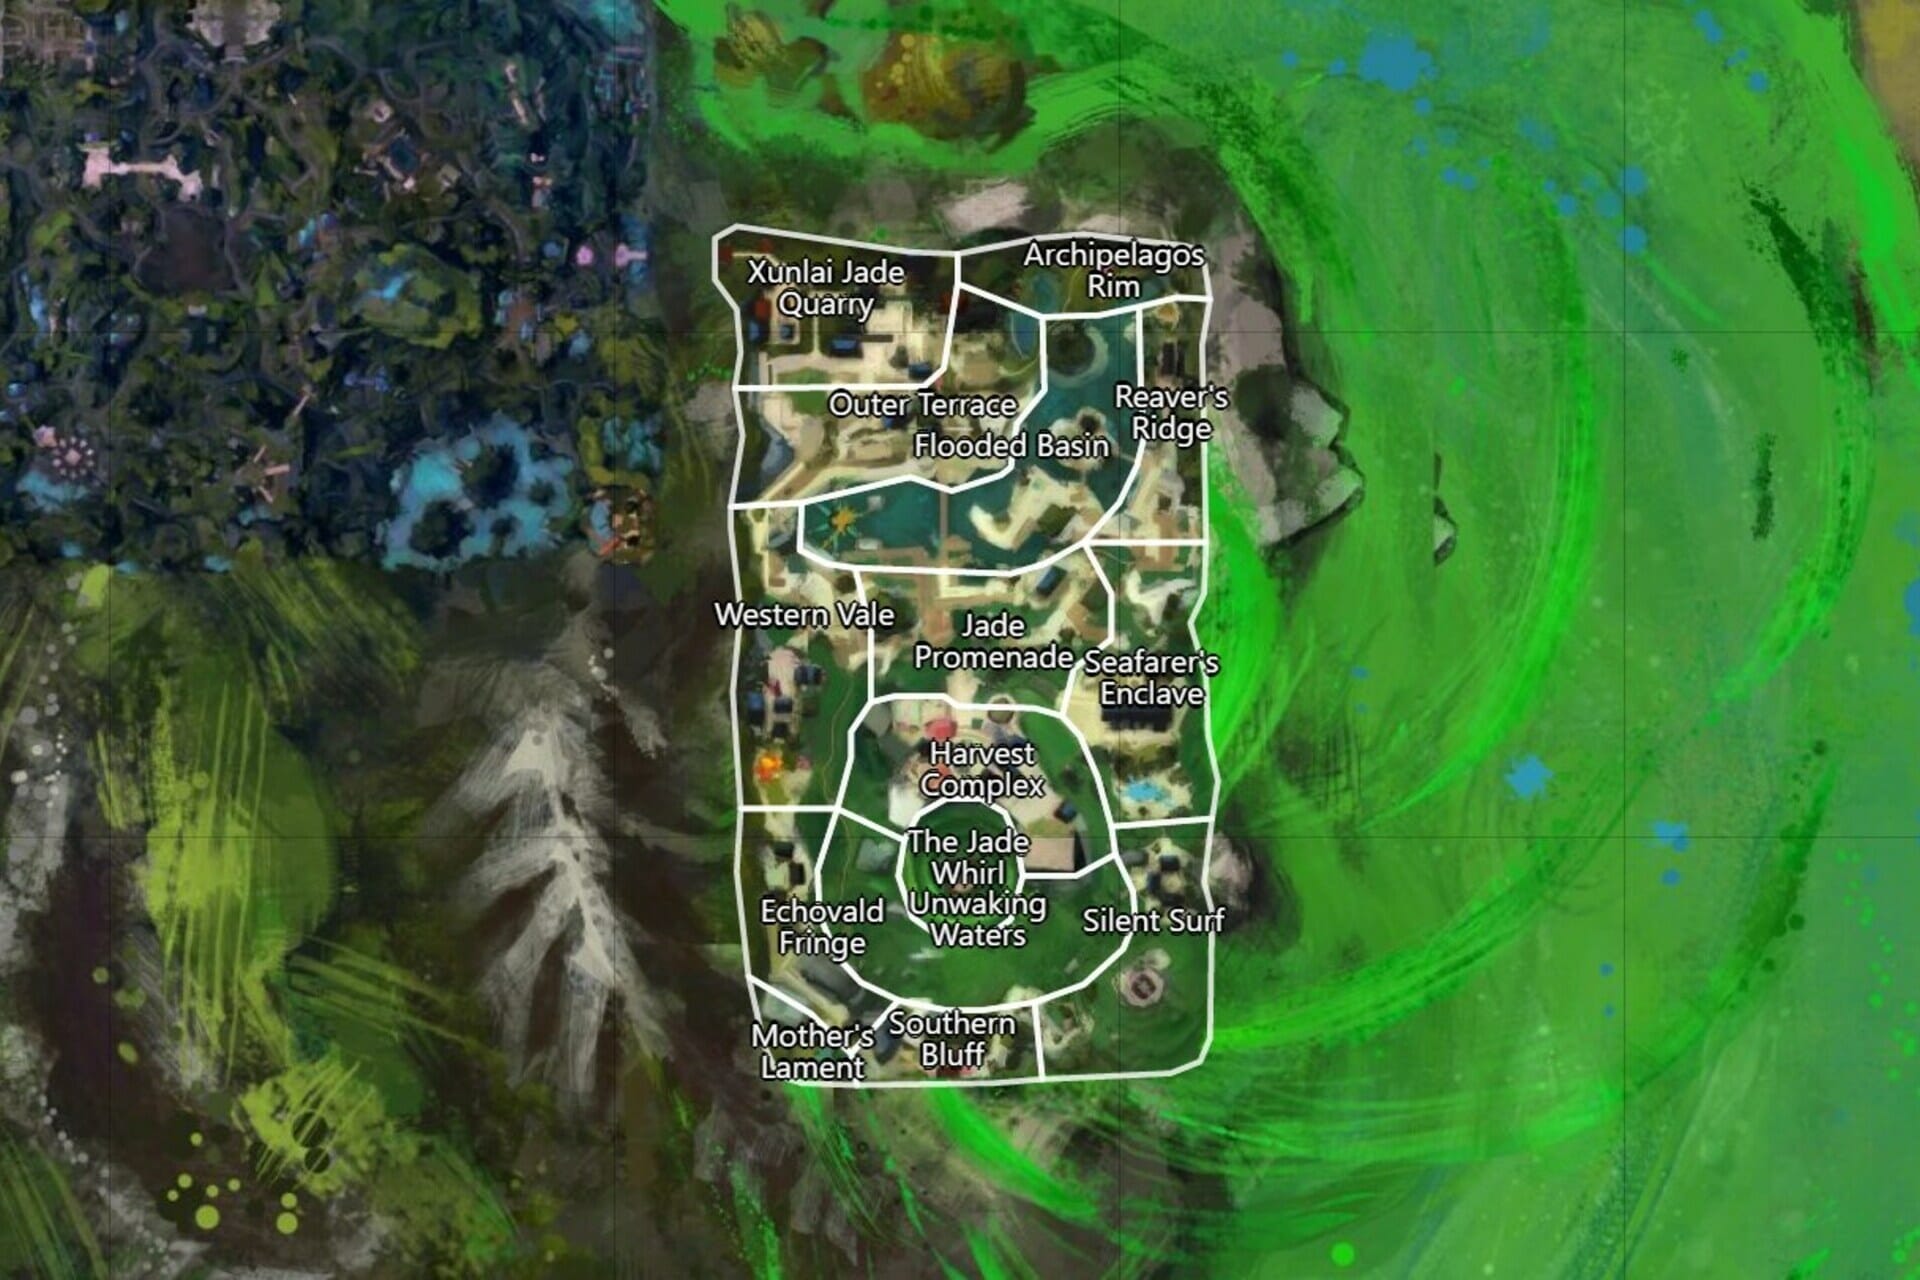
We made an adjustment to improve player distribution across map instances, and today we made a change to increase the maximum player capacity in Seitung Province, New Kaineng City, and the Echovald Wilds by about 30%. We’re not making changes to player capacity in the Jade Sea map at this time.
The map is one of the most important visuals of a game, so it seems like a wide range number of worldwide players are interested in discovering more about the Guild Wars 2: End of Dragons map size.
If you’re in the same boat, this guide will surely help you, so make sure you read it completely.
What to know about the Guild Wars 2: End of Dragons map size?
The picture above shows a user’s representation of the Guild Wars 2: End of Dragons map size.
According to his description, he calculated the area in pixels for each release as shown on Woodenpotatoes’ map and represented the data in terms of how many Queensdales would fit inside each area.
Even if the above representation is great and can help most of Guild Wars 2: End of Dragons, keep in mind that maps can have different verticality.
For those of you who don’t already know, the map is the full-screen user interface feature that helps players orient and enables travel waypoints.
You can easily open it by pressing the M key on your keyboard. Also, do not forget that you, guys, are able to communicate with party members by drawing on the map or the compass. To do that, you’ll need to hold the Shift key and right-click.
You can communicate with other members also by displaying the red alert marker (Shift + Left-click). If you want to add your own personal markers press on Alt and left-click.
In conclusion, we hope that this guide managed to help you understand better what is this all about with the Guild Wars 2: End of Dragons map size.
Because your opinion really matters to us, do not hesitate to share it by leaving a comment in the section below.
We’re pretty much all familiar with Wmic, the command-line and scripting interface that simplifies the use of Windows Management Instrumentation (WMI) and systems managed through WMI.
However, remember that Microsoft manufacturers recently reported that they will no longer develop the WMIC command-line feature.
Thus, the functionality will be removed from Windows 10, Windows 11, and Windows Server builds from now on, in case you were wondering.
That being said, you can add the functionality back to your PC as an optional feature or access it through PowerShell.
Many users reported receiving the login to remote object error, which usually pops up when we run the WMI Configuration Wizard.
UNKNOWN – The WMI query had problems. The error text from wmic is: [wmi/wmic.c:196:main()]
ERROR: Login to remote object.
NTSTATUS: NT code 0x800706ba – NT code 0x800706ba
We are going to show you what actions to take when you are faced with this situation so that there won’t be any problems.
How can I fix wmic login to remote object error?
Before we get into how we can solve this problem, we also have to understand its roots. It is possible that the Windows Firewall is not allowing any traffic through, thus the error.
We have to, first of all, make sure that within the Windows Firewall, under Allowed Programs, WMI is actually enabled.
How can I fix the error on Windows Server 2008, 2012, and 2016?
Press the Windows key, search for Command Prompt and click on Open.
Type wf.msc to opem Windows Firewall with Advanced Security.
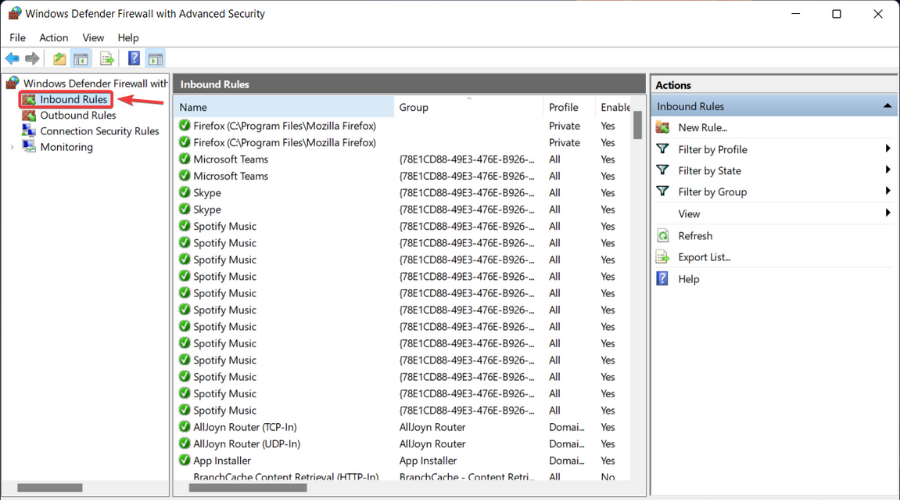
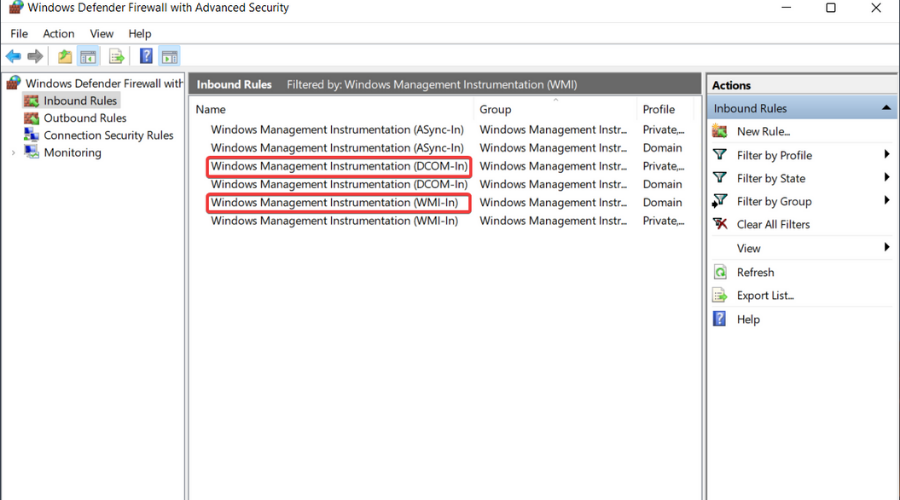
Click on Inbound rules on the left side panel.
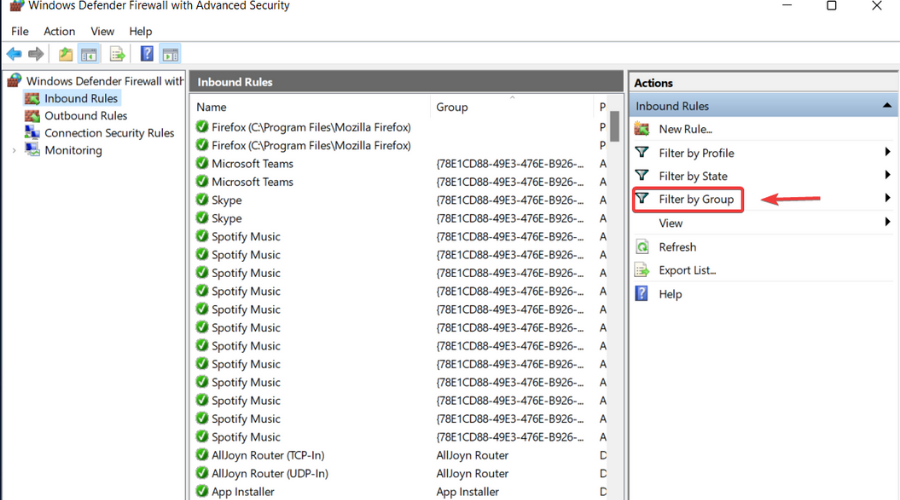
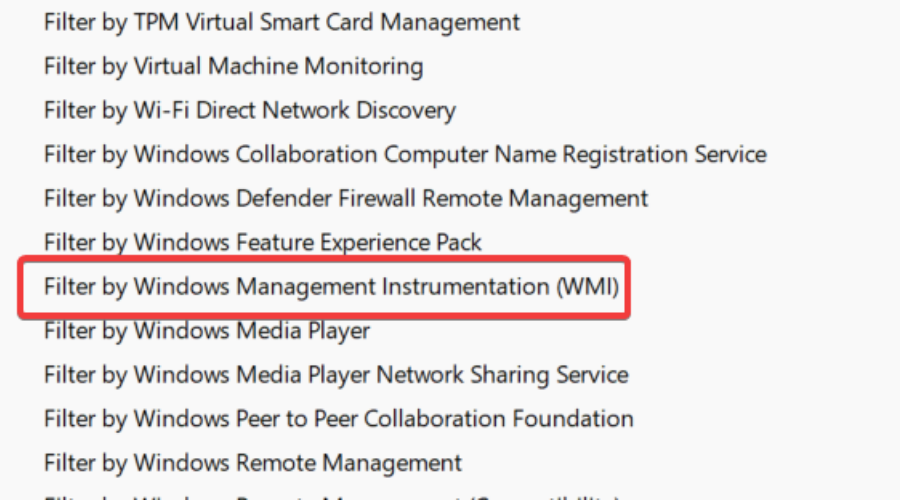
Click on Filter by Group on the right side panel.
Look for WMI and click on it.
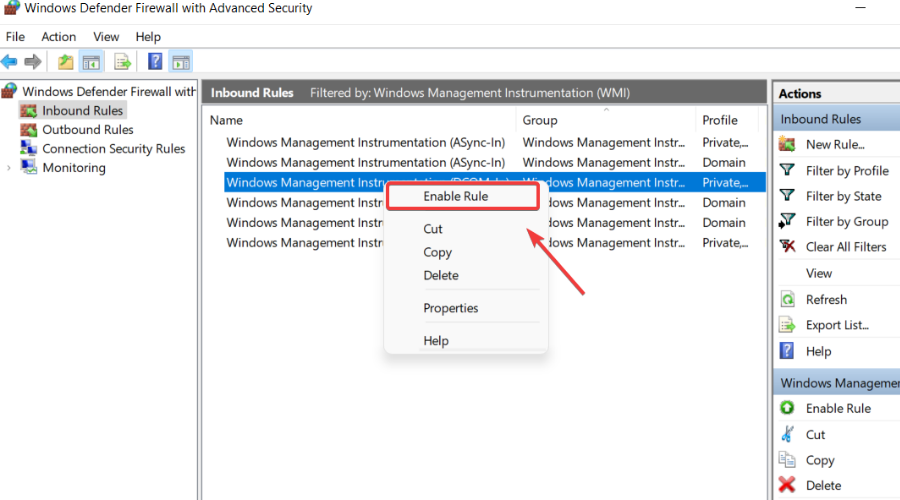
Find DCOM-In and WMI-In rules.
Right clicking on both of them and select Enable Rule.
However, on the off chance the WMI rule group doesn’t even exist, Microsoft suggests a method that we are about to describe for you right now.
Open a Command Prompt and enter the following command:
How can I solve this problem for Windows Server 2003?
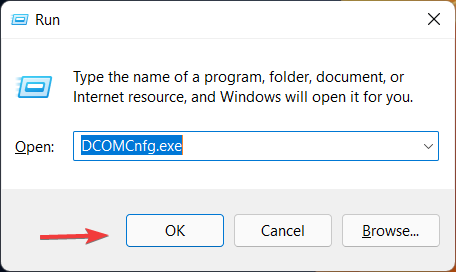
Press the Windows key + R and typeDCOMCnfg.exe, then clickOK.
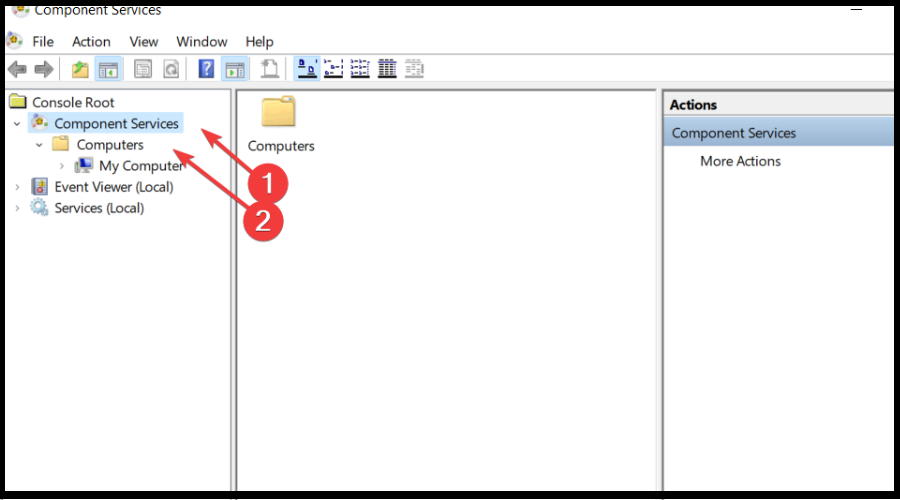
Click to expand Component Services, then Computers.
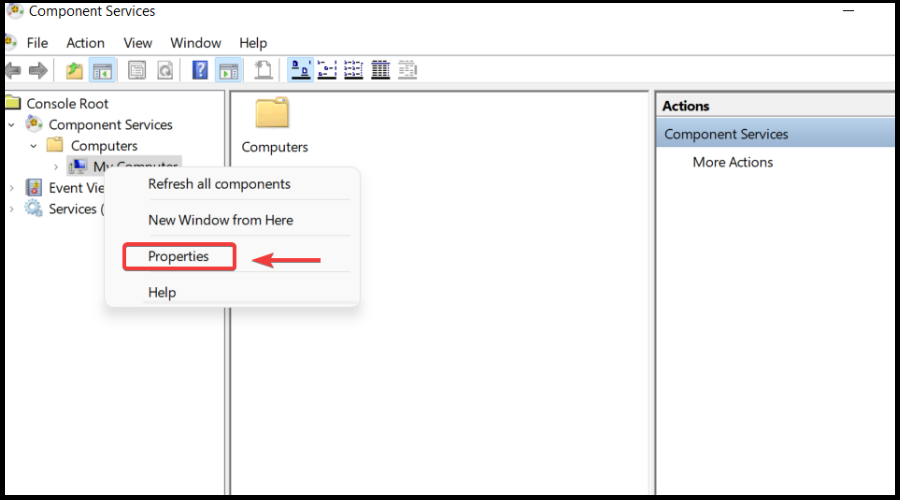
Right-clickMy Computer and select Properties.
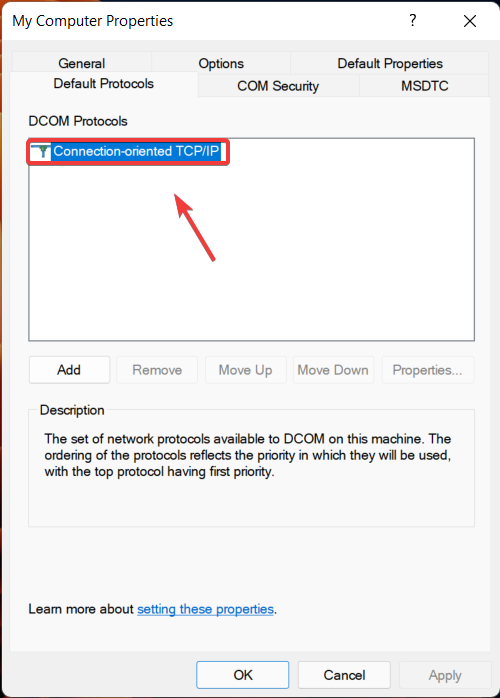
In the Default Protocols tab, double click on Connection-oriented TCP/IP.
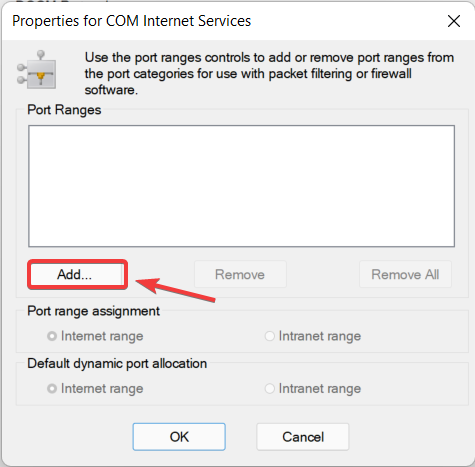
Press the Add button.
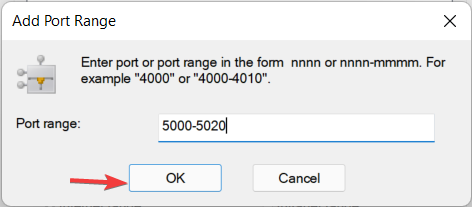
Enter a 5000-5020 port range for COM services and press OK.
Now, please allow the port range through the Windows Firewall with the following command, which will open ports from 5000-5020 to match the COM Internet Services Range.
FOR /L %I IN (5000,1,5020) DO netsh firewall add portopening TCP %I “COM”%I
And, finally, open DCOM port 135 and type the following command into Command Prompt:
netsh firewall add portopening TCP 135 “DCOM”
That’s pretty much all you have to do in order to solve your problem. However, this isn’t the only wmic error that’s been giving users sleepless nights.
People have also been reporting wmic access denied, as well as wmic alias not found errors. We can help you with either scenario if you are in need of assistance.
Was this guide helpful to you? let us know in the comments section below.
With Windows 11, Microsoft’s main point of focus was security instead of many other things that your day-to-day user finds essential.
Sure, things are starting to turn around for the new operating system, but there are still many areas where it lacks common functionalities specific to its predecessor.
For example, the new right-click context menu in the Windows 11 File Explorer is a notably different user experience than in Windows 10.
That may be exactly what some users want, but for other users, it is only one of the many reasons why they chose not to upgrade to the latest OS.
However, the full right-click context menu can also be restored for Windows 11 with a few Windows 11 Registry File hacks.
Provided you are ready to begin and have a clear goal, which is restoring the Windows 10 context menu for File Explorer, we can show you how to do it.
How can I restore the classic context menu in File Explorer?
As most of you know by now, right-clicking a file in File Explorer under Windows 11’s new user interface will trigger an abbreviated version of the context menu.
Many users won’t have this and would like to explore other possibilities, such as restoring the Windows 10 version of the File Explorer context menu.
For even more control over how File Explorer behaves in Windows 11, you can follow a dedicated guide to enable access to File Explorer Options and fine tune additional folder and view settings.
Let’s get right into it and reveal the entire process without any further ado. It might take a few minutes of your time, so make sure you aren’t in a hurry.
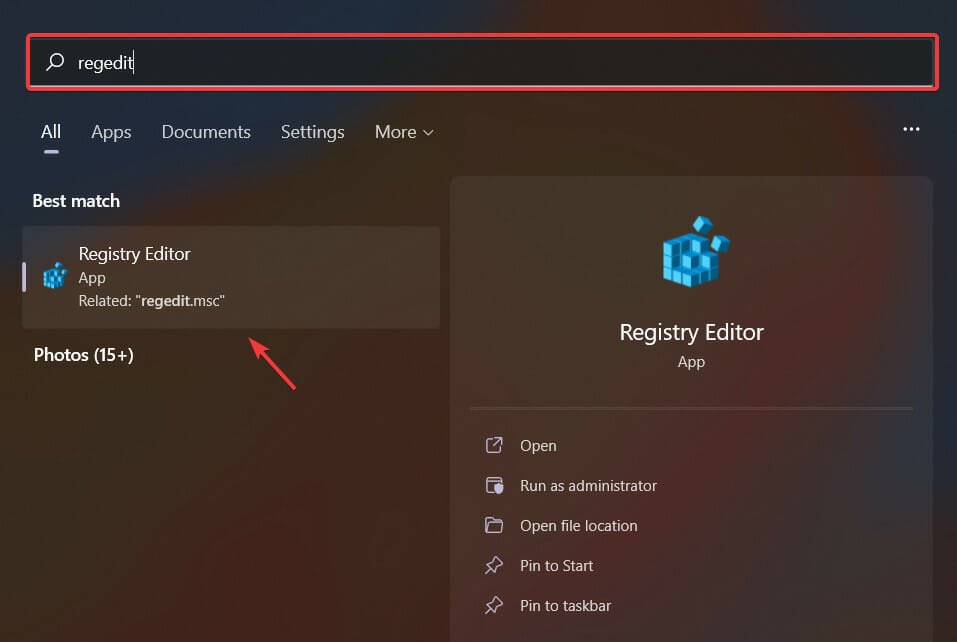
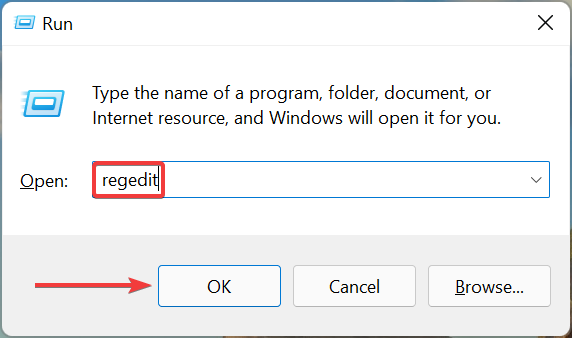
Open the Start menu, search for regedit and open the app.
Select HKEY_CURRENT_USER, then click on Software, then Classes.
Right-click the CLSID folder and select New, then Key.
Name this new key: 86ca1aa0-34aa-4e8b-a509-50c905bae2a2.
Right-click the new key you created and select New, then Key.
Name this new key: InprocServer32.
Double-click the Default settings item in the right-hand window under the new InprocServer32.
Press the OK button without typing anything into the Value Data box.
Of course, you can also revert these changes if you grow bored of them or want to switch back to the Windows 11 style. All you have to do is navigate to the correct folder and delete the new keys you created from the registry file.
We are all excited about the great features packed into Microsoft windows 11. While the OS has been mindblowing, you may seek ways to make it even more fun.
After long hours of work, you realize that a beautiful cursor could be the difference between giving up, falling asleep, and going the extra mile.
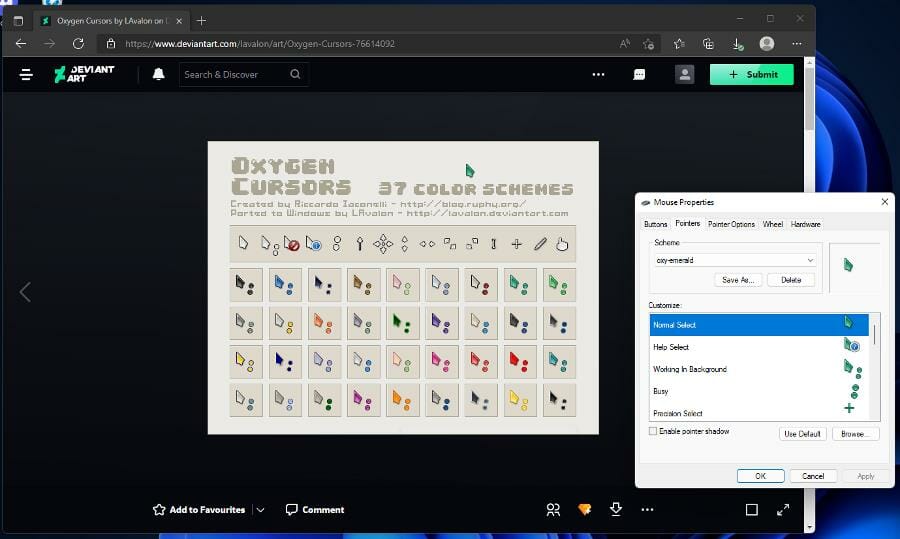
This article will introduce you to some of our favorite windows 11 cursors that are free for download. These cursors will represent a range of themes, including Android, macOS, and popular game themes.
What is the best free cursor to use on Windows 11?
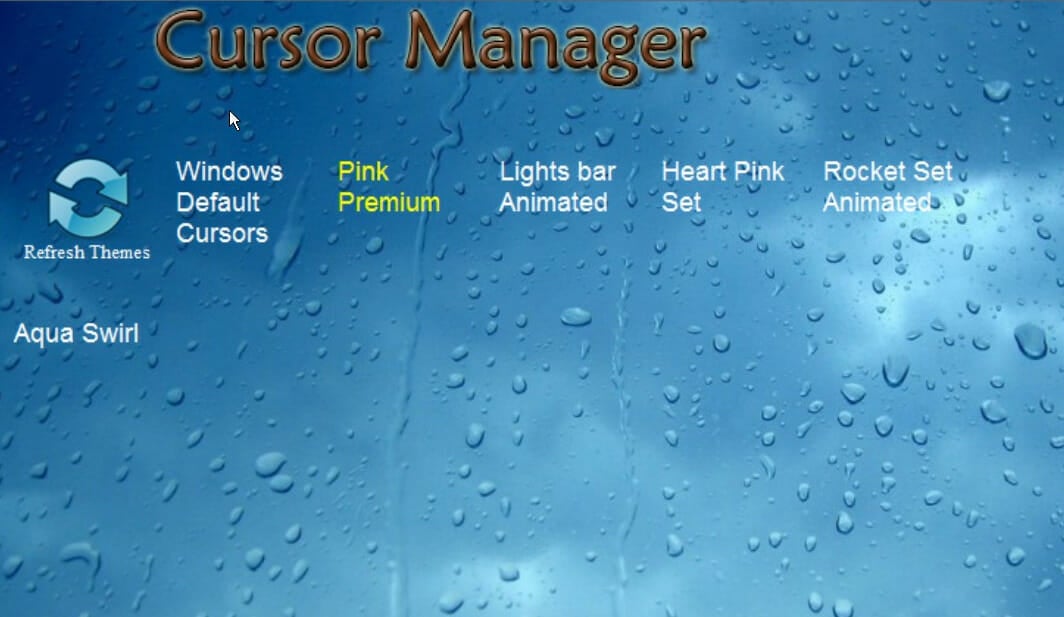
Cursor Manager is a dedicated Windows 11 free cursor manager that allows you to control mouse cursors fast. It’s a graphical user interface (GUI) tool that lets you choose from various cursor themes.
Pink Premium, Bindweed Cursors, Icy Blue, Aqua Swirls, and Heart Pink Set are some cursor themes available.
This software can be downloaded and then installed on your Windows 11 computer. After installation, launch the program, and you’ll see a variety of cursor themes.
You may see the cursor set and how they appear by hovering the mouse over the themes.
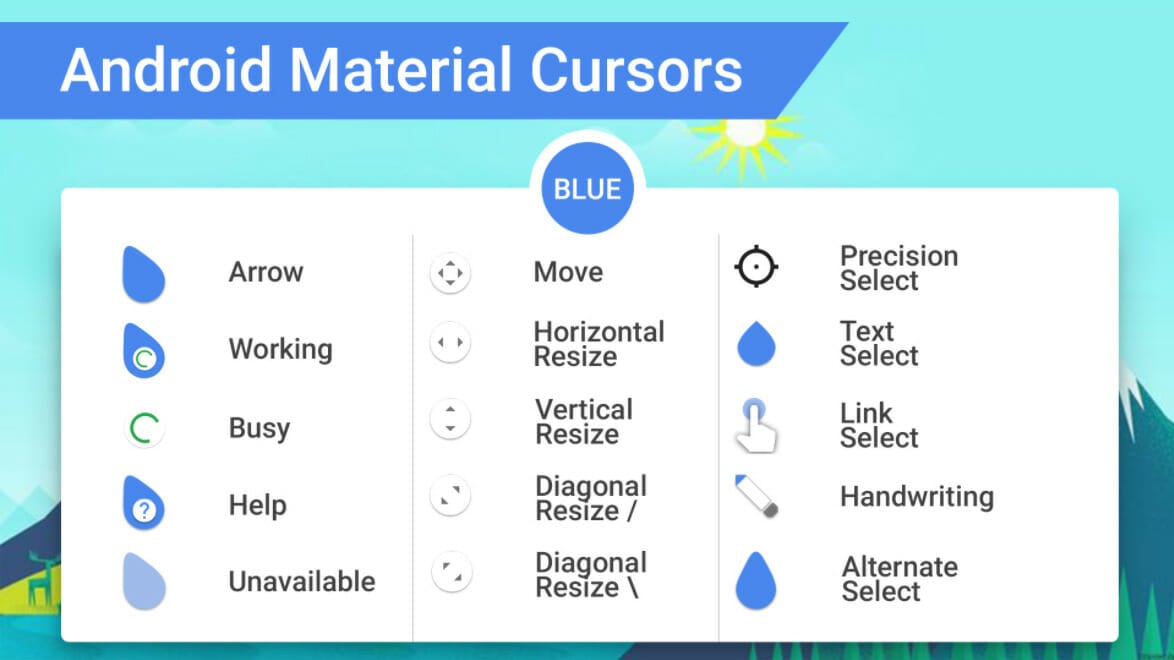
You should try Android Material Cursors if you want an Android-like experience on Windows. It’s free and compatible with Windows 11.
This set of mouse cursors is designed based on the Android theme, and you can utilize move, arrows, help, resize, select, unavailable, and many other mouse cursors.
With this pack, you’ll be able to choose from 15 different mouse cursors.
Another free mouse cursor set for Windows 11 is Chrome Glass. It’s a set of animated cursors. This cursor set includes arrows in several hues to signify different tasks, including white, yellow, blue, red, and green.
You will need to download its executable file and run it before the cursors become available. Once it is installed, all cursors in this set are added to Windows’ Mouse Properties menu.
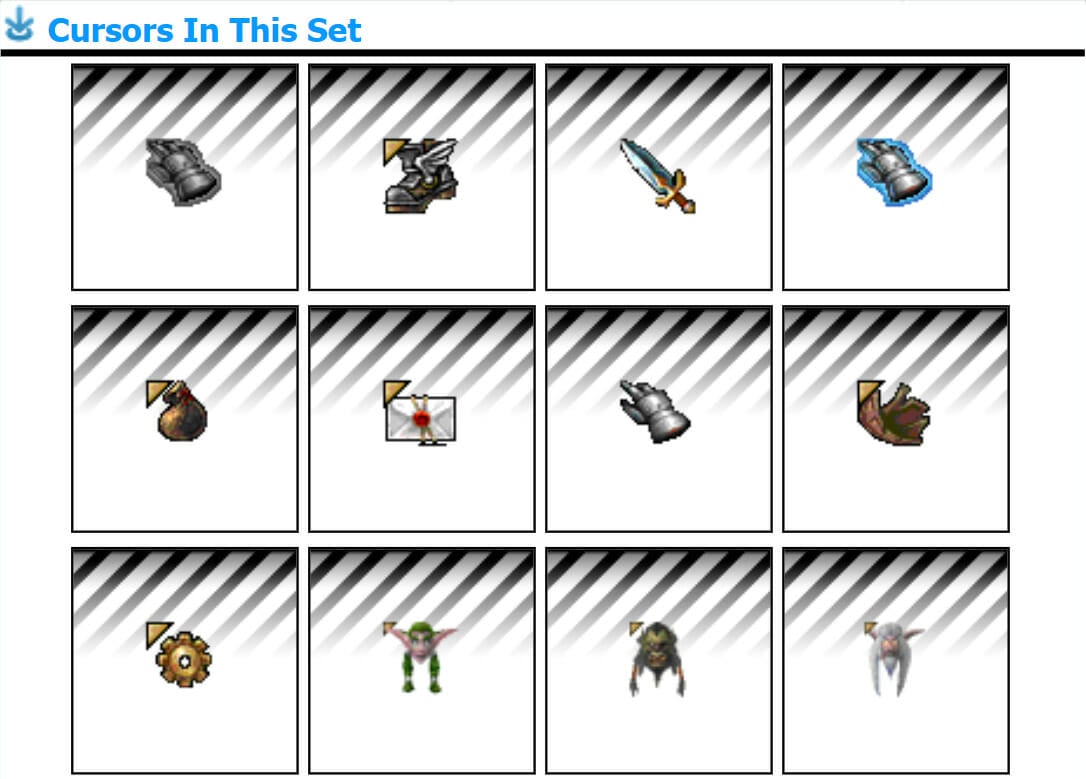
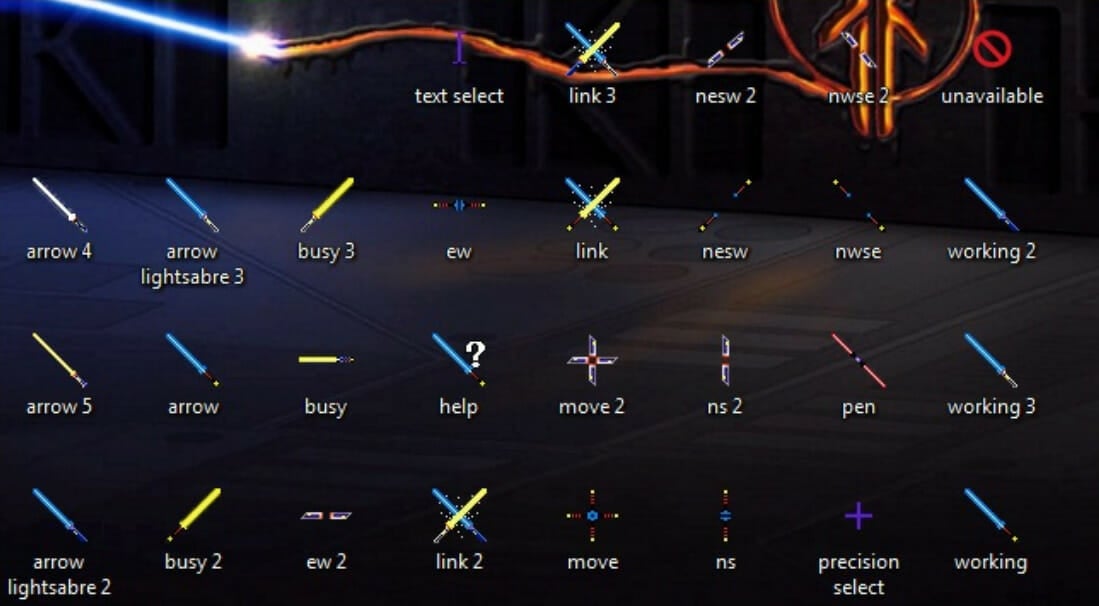
If you are a fan of Star Wars, this might be the cursor set for you. This set is a collection of animated mouse cursors that feature a glowing lightsabre.
It includes a variety of helpful mouse cursors in various color schemes to suit the Star Wars theme.
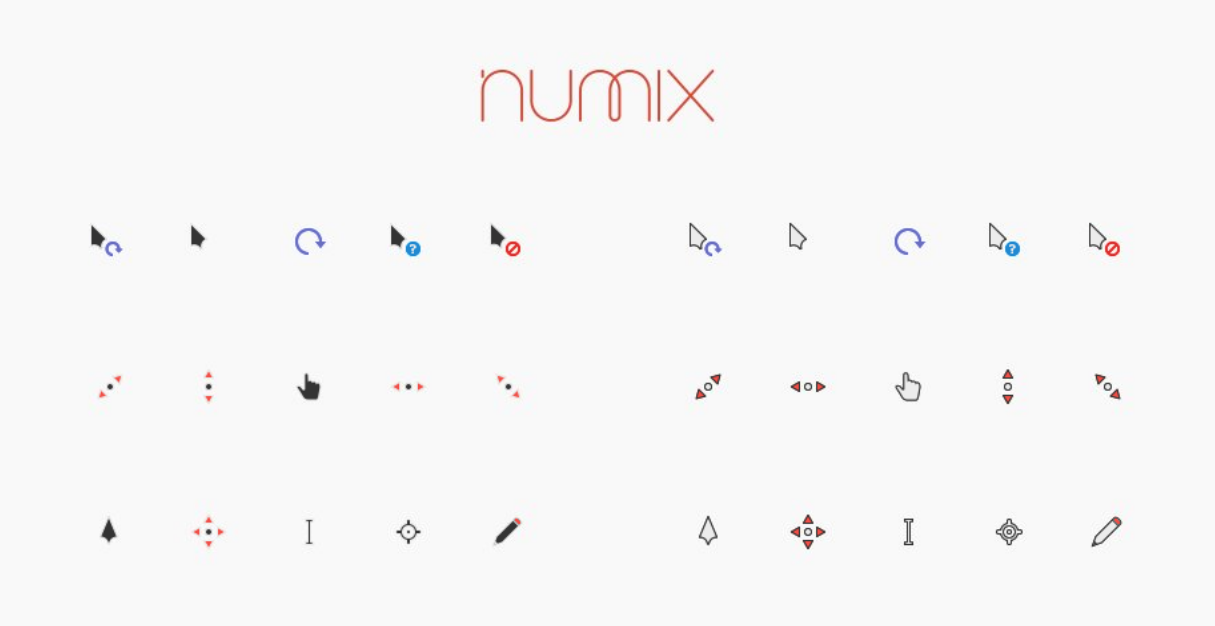
Numix is a set of animated mouse cursors that is beautiful, fresh, and clean. This one comes with roughly 30 mouse cursors. You may keep swapping between the mouse cursors to offer your Windows 11 desktop a new feel.
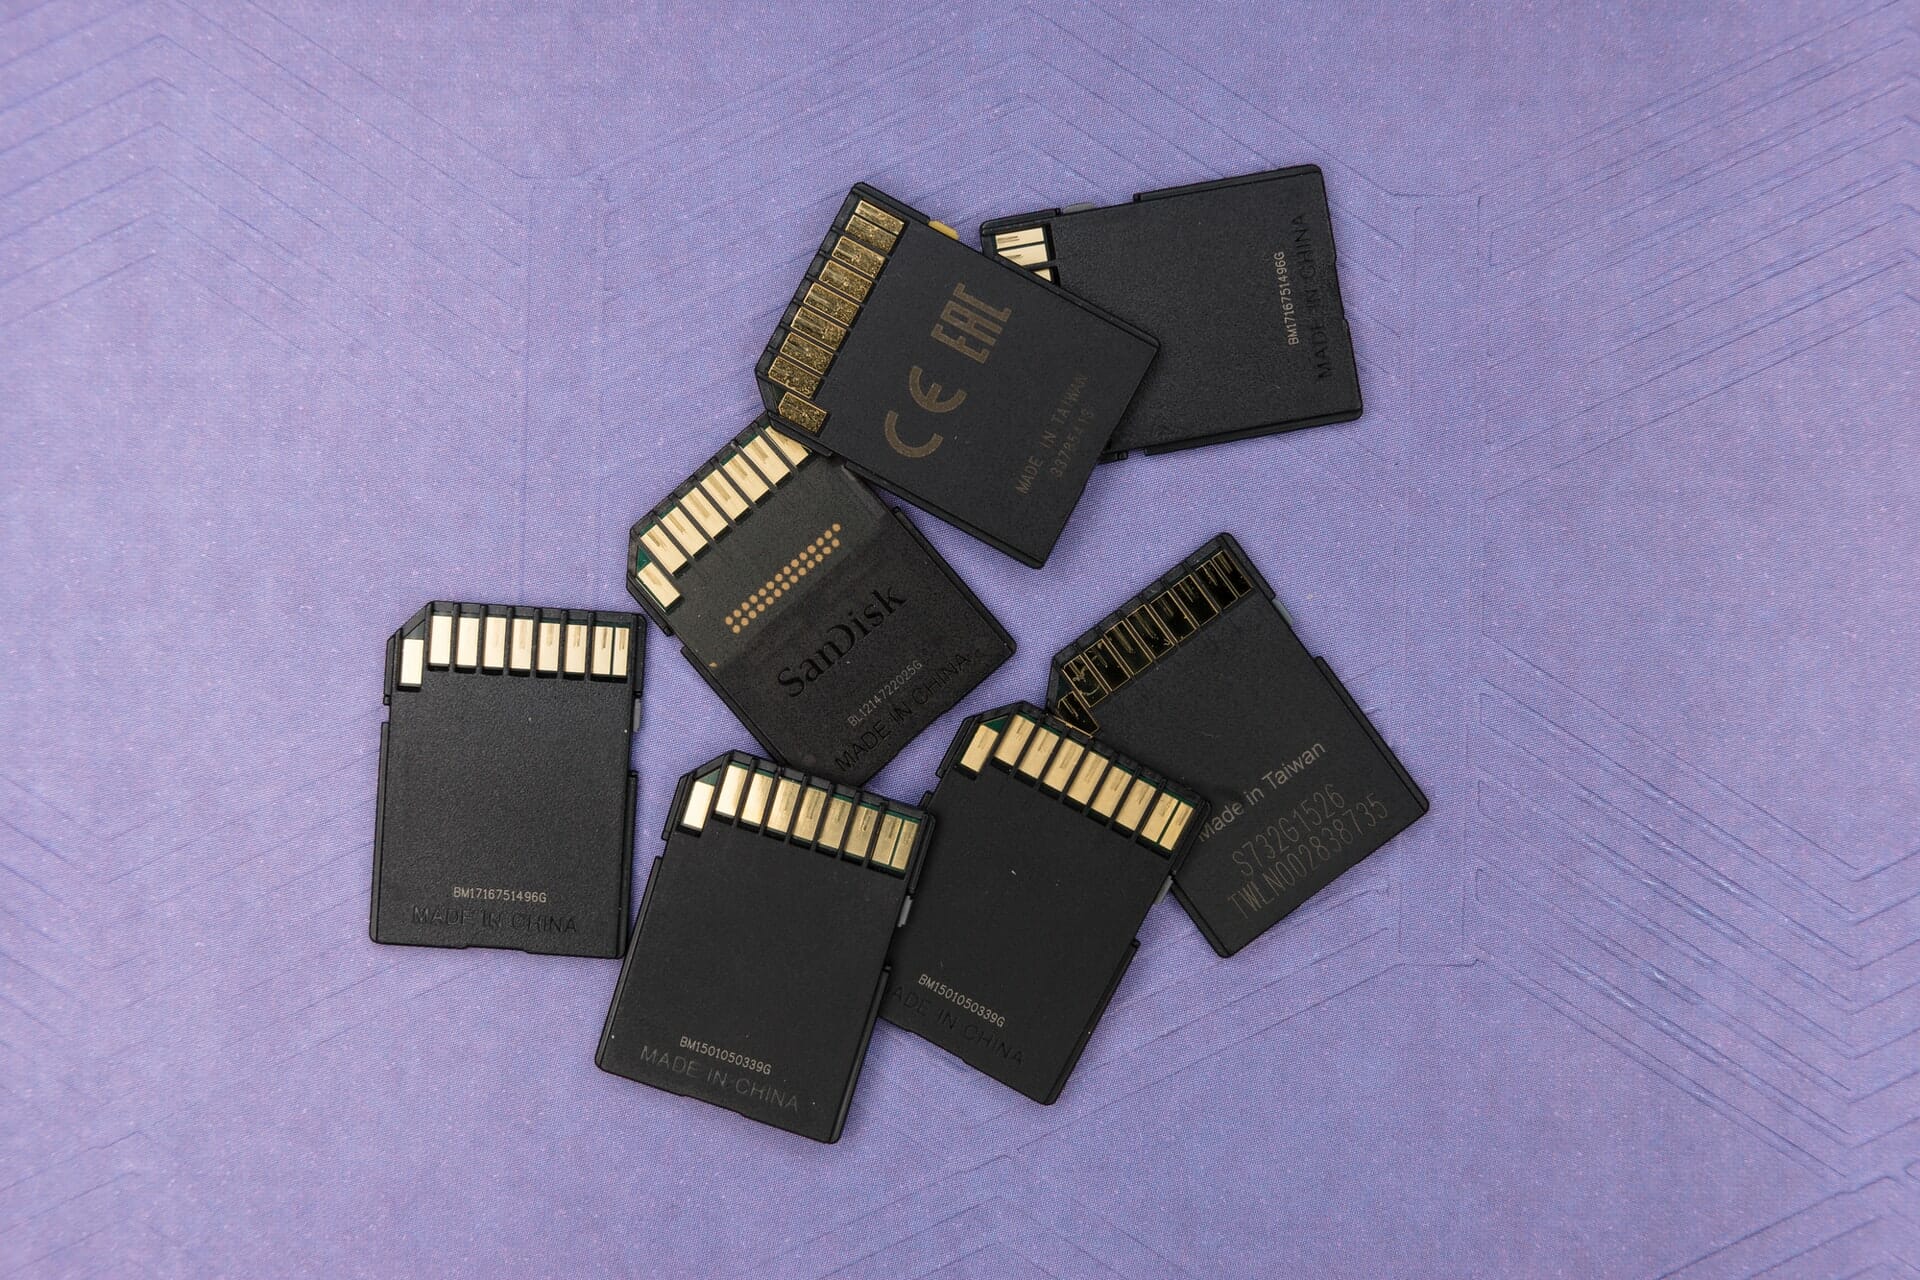
Though slightly less common now, many users still use SD cards to store images and other forms of data. To access this, there’s generally a dedicated slot, or you could use an external card reader. However several users have reported that their SD card is not recognized in Windows 11.
When this happens, users are left in a lurch since they are unable to access or retrieve data from the SD card. And the blame is generally put on the SD card itself, though that’s not always the case.
So, it becomes imperative that you understand what’s leading to your SD card not being recognized in Windows 11, and the best ways to fix the problem. Read the following sections to find the answer to both these questions.
Why is my SD card not recognized in Windows 11?
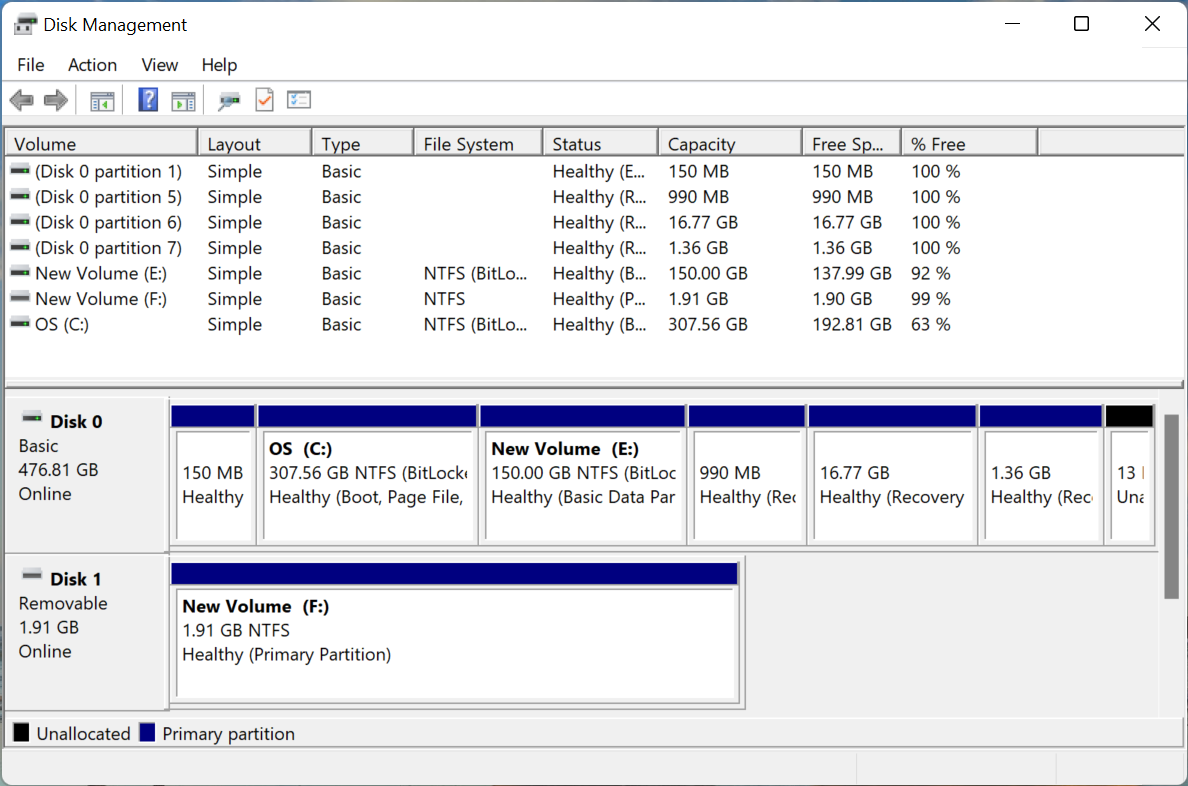
When troubleshooting an error, you should follow a systematic and balanced approach. First, check if the SD card is listed in the File Explorer. If it’s not, head to Disk Management and verify if you can find it there.
In case, the SD is not there in the File Explorer but is listed in the Disk Management, it’s most likely that a drive letter has not been assigned to it. But, if it cannot be found in both locations, the driver (both the card and the card reader) is to be blamed.
Disk Management in Windows 11
Apart from that, the SD card may have write protection enabled, which could be preventing you from accessing it. Also, malware or viruses on the SD card or the computer may lead to this issue.
If you can identify the issue, just head to the relevant method, and execute it to fix the SD card not recognized issue in Windows 11. Otherwise, follow them in the listed sequence for quick troubleshooting.
What do I do if the SD card is not recognized in Windows 11?
1. Some basic checks
Before we head to the complex solutions, there are a few basic checks that could help. First, remove the SD card and wipe it with a clean piece of cloth. Also, blow light air into the port on your computer to remove any dust accumulation or debris.
In case you are using an external SD card reader, unplug it, and then connect it to another USB port. If there was a problem with the previously connected USB port, this should fix it.
You can also try connecting the SD card to another computer and check if it works there. If it does, the problem lies with your computer and the methods listed below should fix it.
And even if it doesn’t, we do recommend trying the methods here to fix the SD card not recognized in Windows 11 issue, just to be sure, since it could have to do with write protection.
2. Disable Write Protection
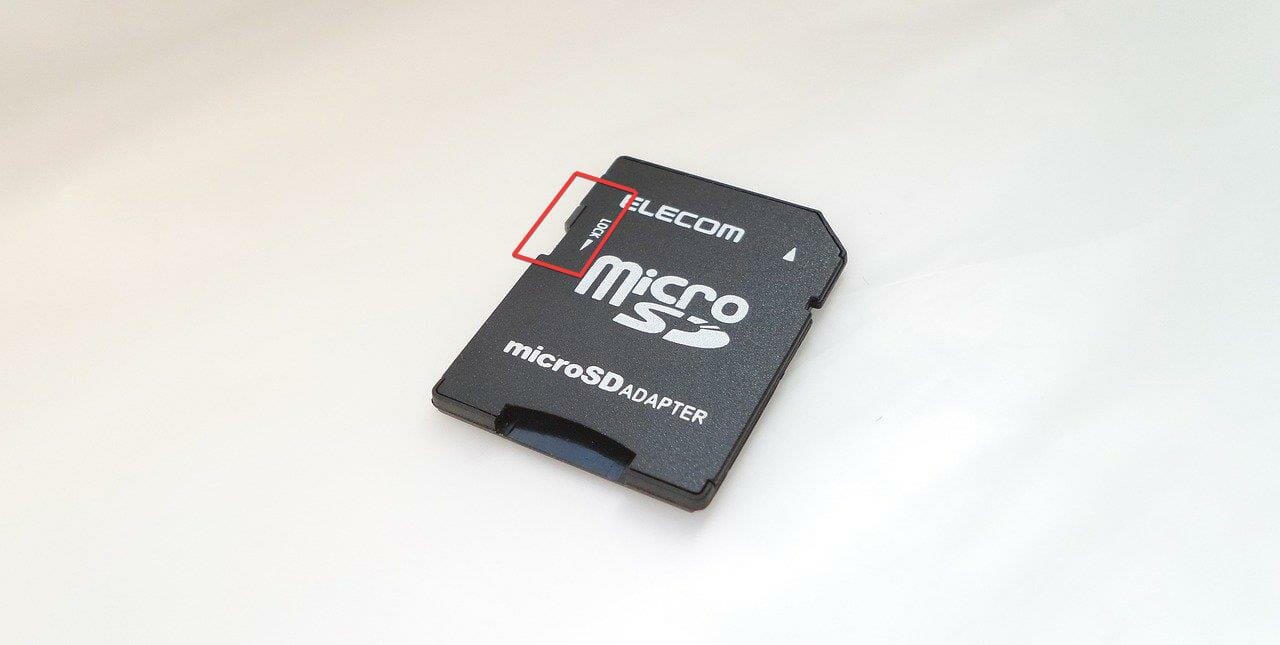
Many SD cards have a Write Protection feature, that only allows the data on them to be read and you cannot make any changes to it. But, if things go a little wrong here, it could also lead to your SD card not being recognized in Windows 11.
In this case, it’s best to disable Write Protection. To do that, look for a switch near the corner and move it to the off or unlock position, as the case may be with the SD card.
Write Protection switch on SD card
Once done, reconnect the SD card and check if it now works. In case the error persists, head to the next method.
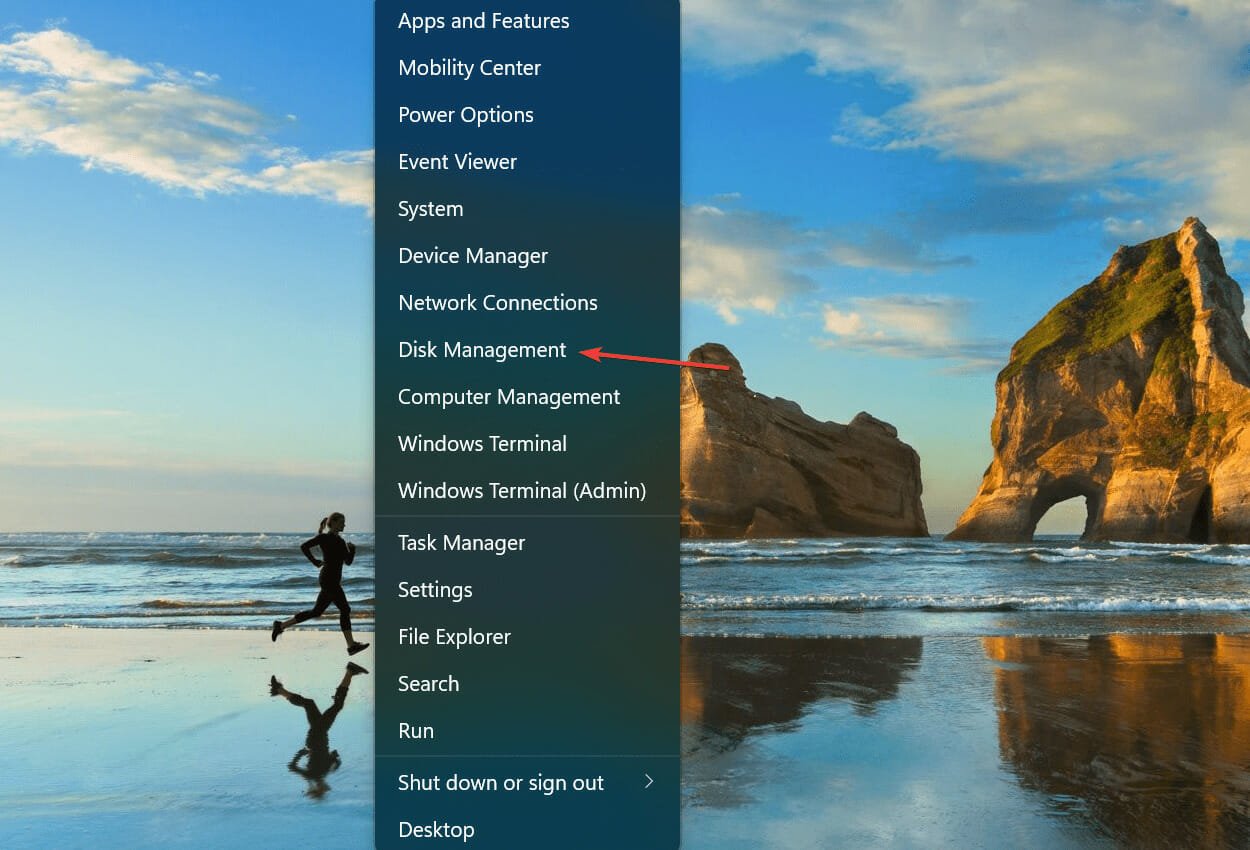
Press Windows + X or right-click on the Start icon to launch the Quick Access/Power User menu, and select Disk Management from the list of options.
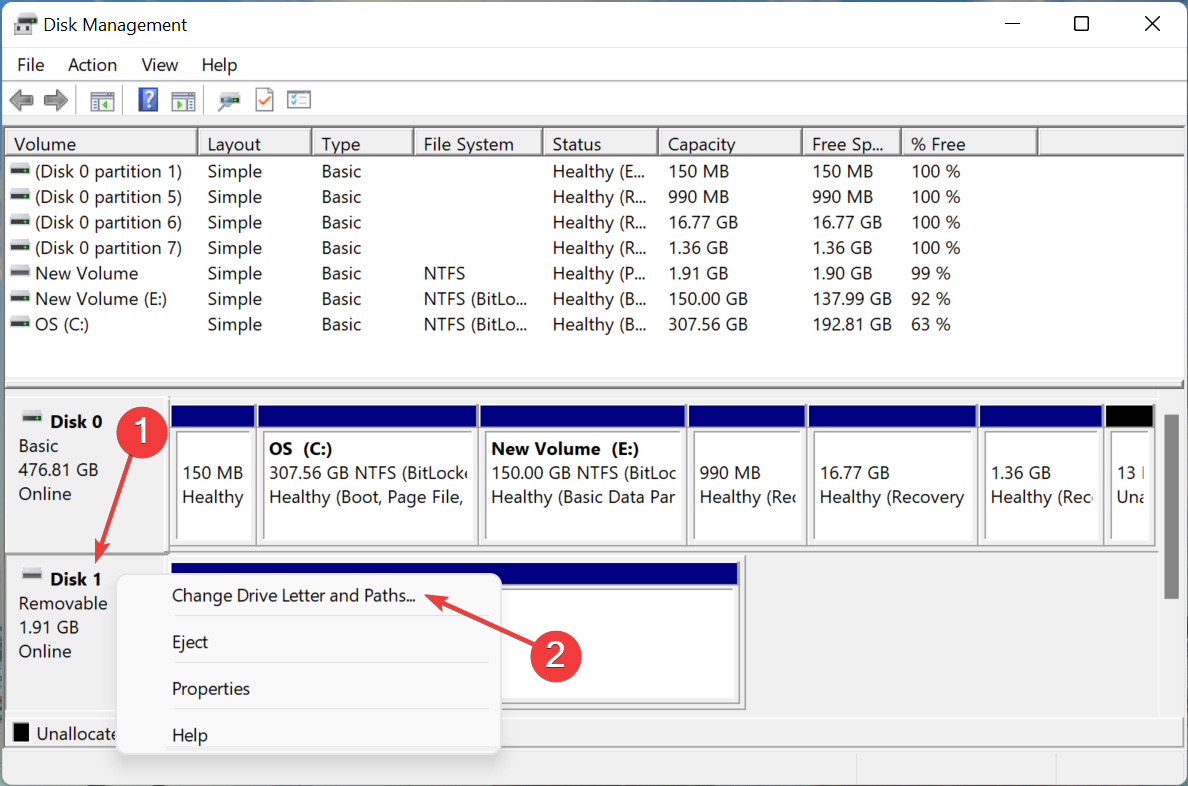
Now, right-click on the problematic SD card, and select Change Drive Letter and Paths from the context menu.
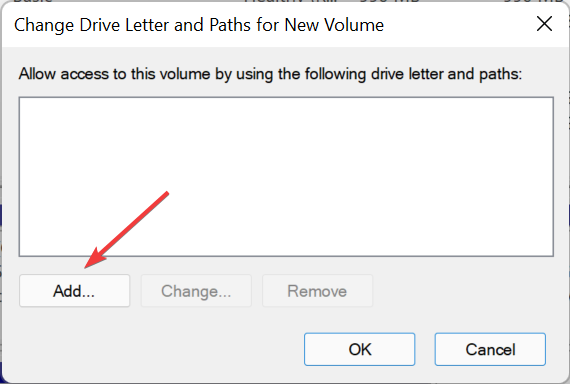
Click on the Add button.
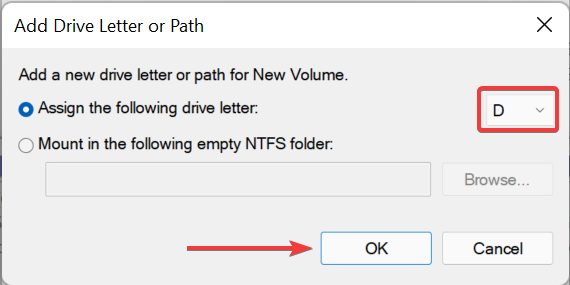
Next, select a drive letter from the dropdown menu or go with the default selection, and click on OK at the bottom to save the changes.
4. Update the SD card driver
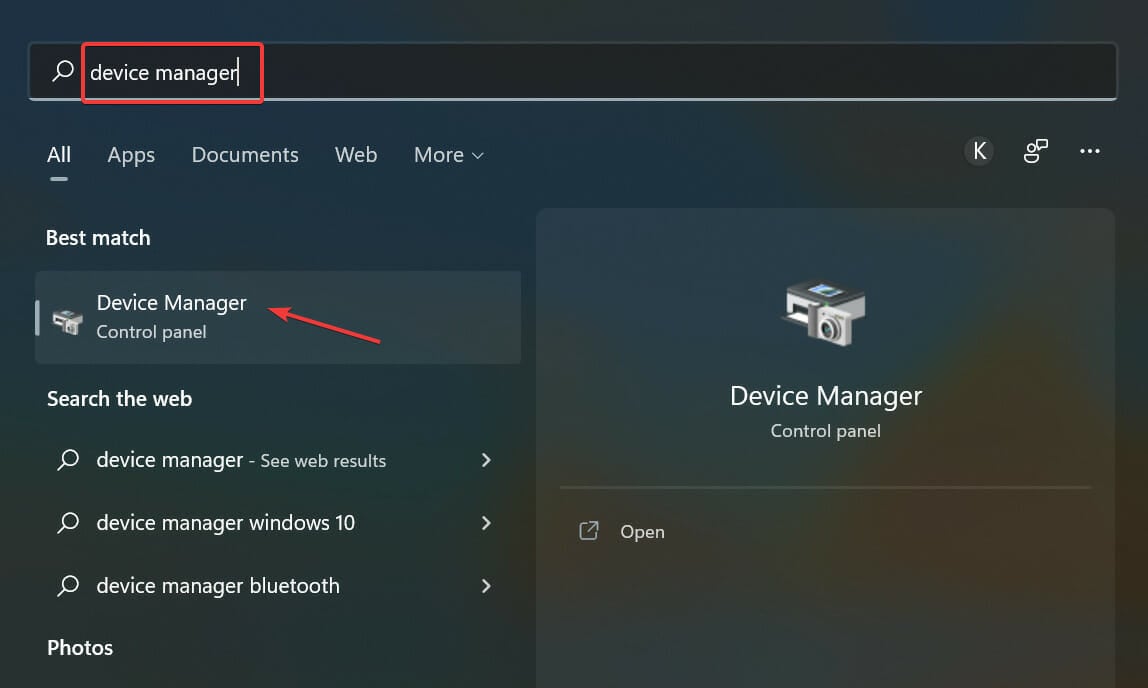
Press Windows + S to launch the Search menu, enter Device Manager in text field, and click on the relevant search result that appears.
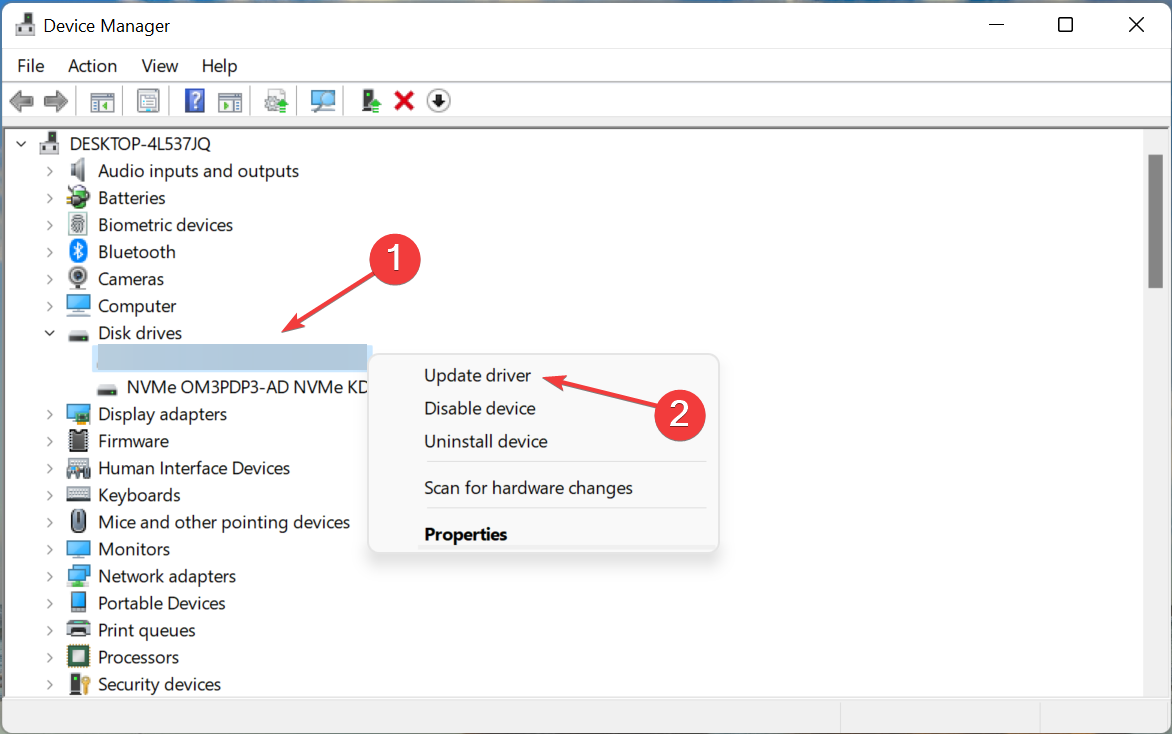
Now, locate the SD card, right-click on it and select Update driver from the context menu.
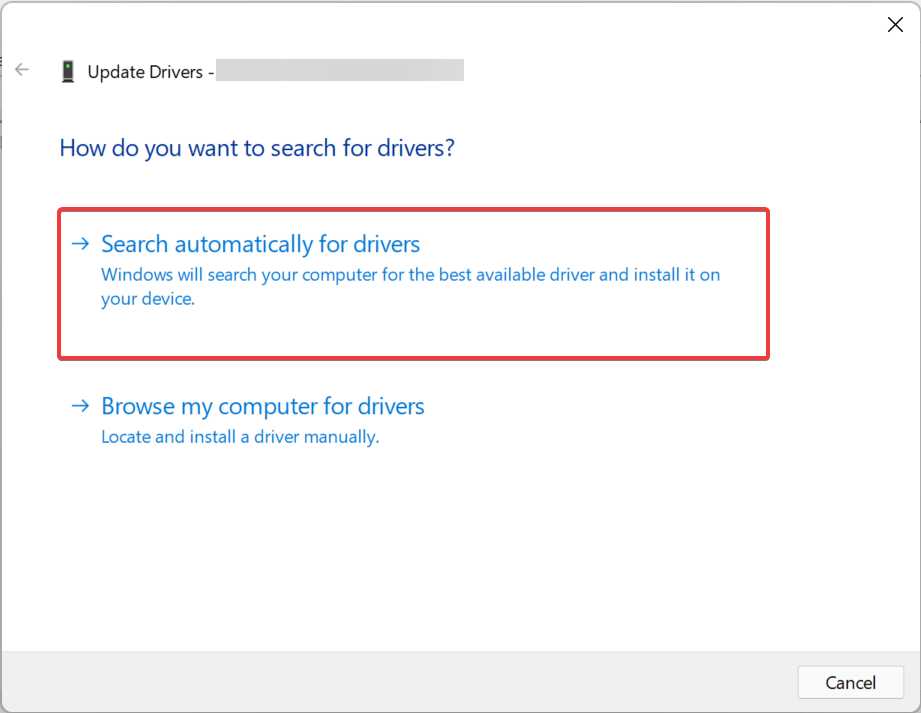
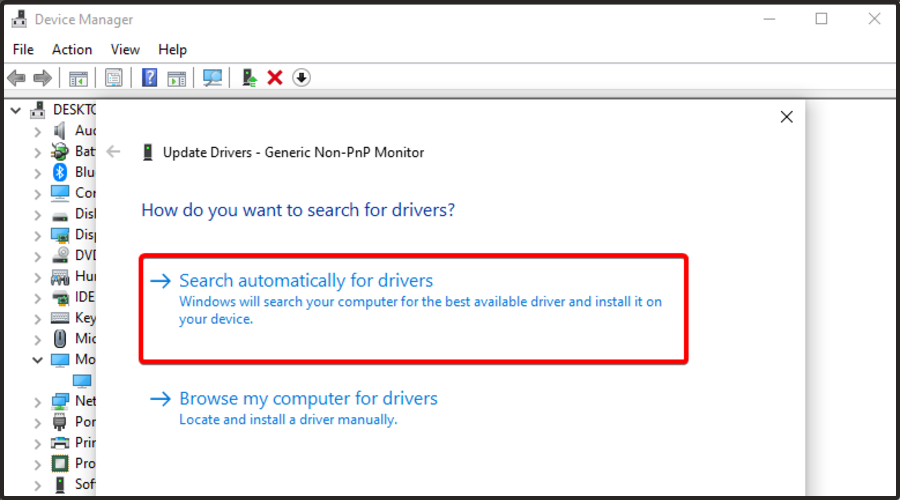
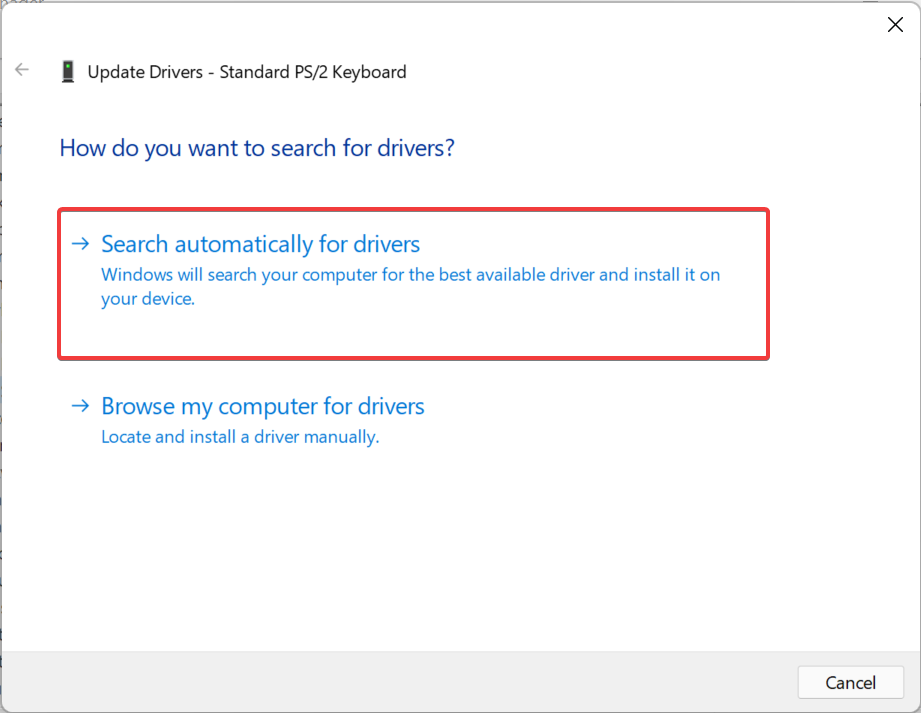
Select Search automatically for drivers in the Update Drivers window.
An outdated driver is just as likely to cause the SD card not recognized in Windows 11 issue. If that’s the case, updating the driver should fix the problem.
With each driver update, certain enhancements in terms of performance, new features, and patches for previously known bugs are introduced.
But the Device Manager method listed here only scans for the versions already downloaded on the computer. The whole exercise might prove futile if you haven’t downloaded one previously. In this case, you can manually install the latest driver version.
Or, you can take the simpler route and let a reliable third-party app take care of the updates. We recommend using Outbyte Driver Updater because it will automatically install the latest version for all the drivers on the system and keep them up-to-date.
Press Windows + S to launch the Search menu, enter Windows Security in the text field, and click on the relevant search result.
Click on Virus & threat protection.
Next, click on Scan options to view all the available scans.
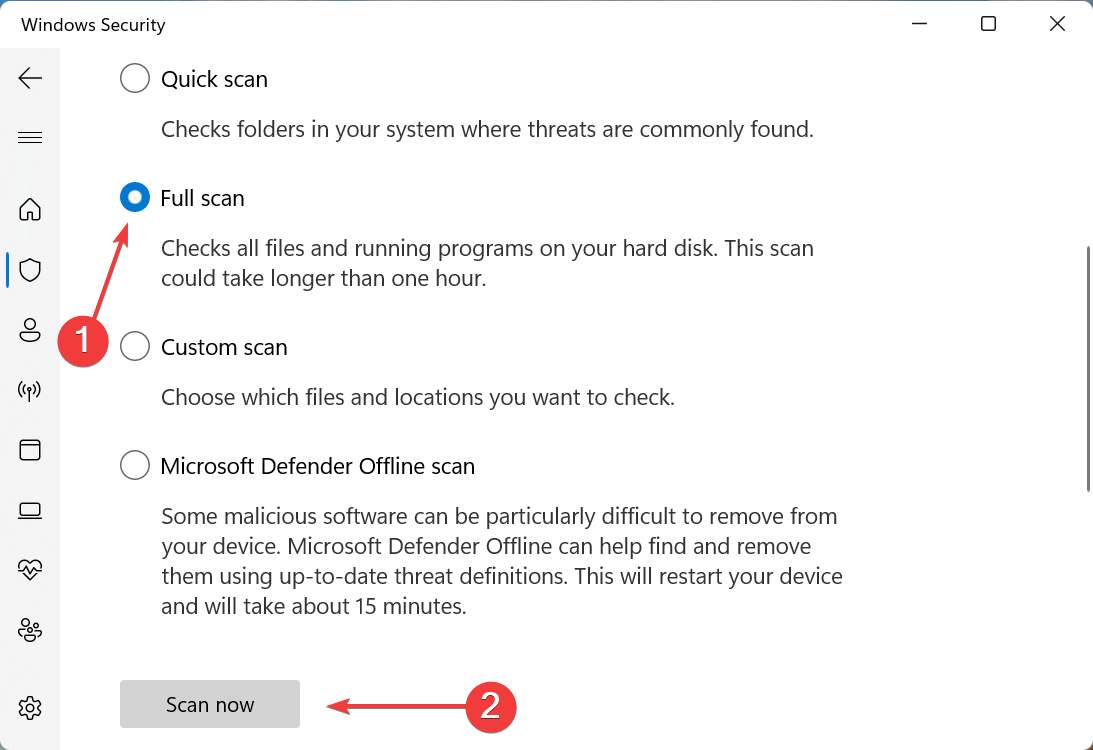
Select the Full scan option and click on the Scan now button at the bottom.
A system infected with malware or virus can malfunction and lead to the SD card not being recognized in Windows 11 issue. If that’s the case, running a scan for it should eliminate the error. Also, you can use a reliable third-party antivirus for the scan.
6. Format the SD card
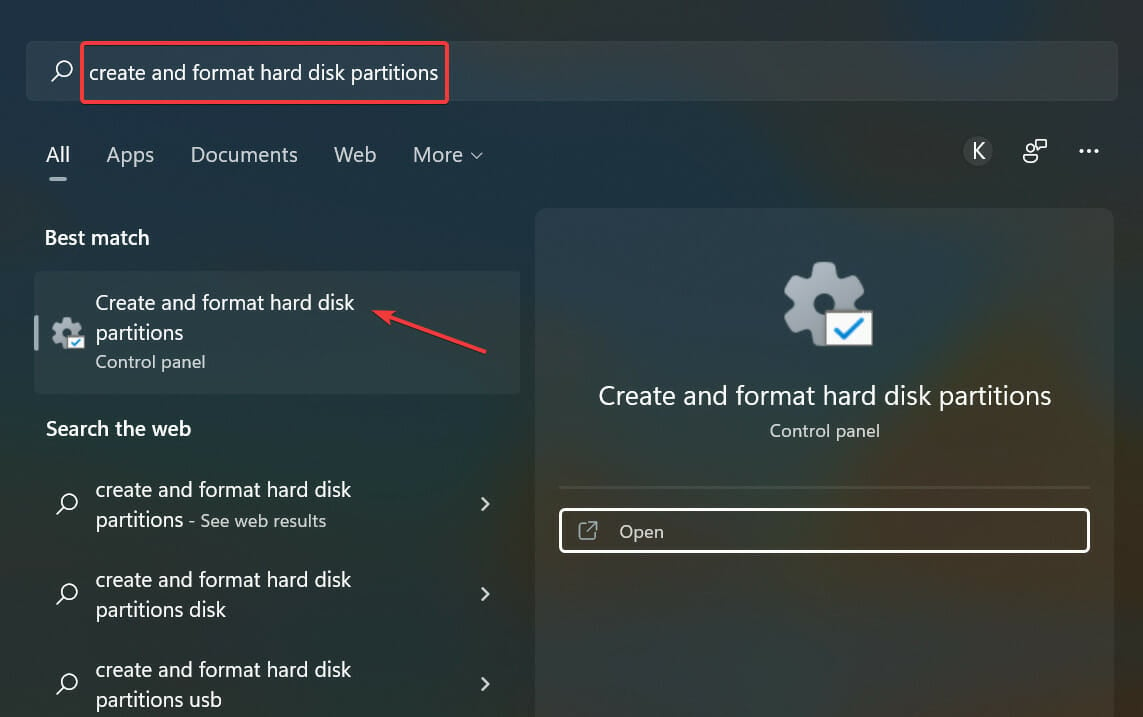
Press Windows + S to launch the Search menu, enter Create and format hard disk partitions, and click on the relevant search result to launch Disk Management.
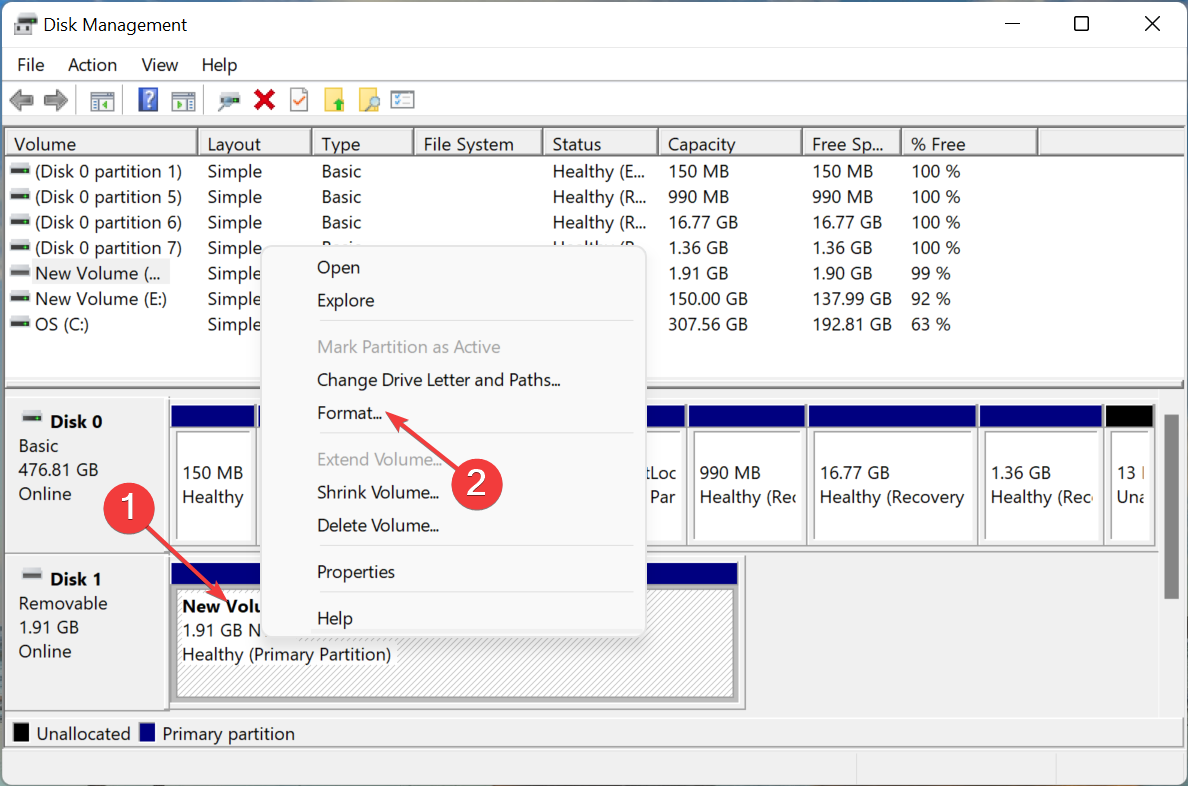
Right-click on the malfunctioning SD card, and select Format from the context menu.
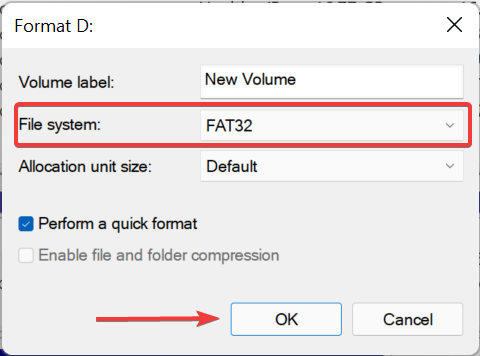
Next, select FAT32 from the File System dropdown menu, enter a name in the Volume Label text field, if required, and click on OK at the bottom.
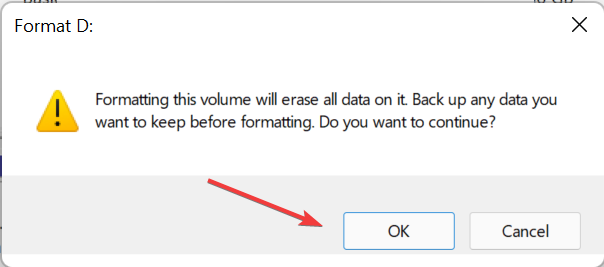
Click OK in the confirmation prompt that pops up.
Wait for the format process to complete.
Doing a format should fix all issues with the SD card and it will now be recognized in Windows 11.
If this too doesn’t help, it’s likely a problem with the card reader, and you would have to get it either repaired or replaced.
In many instances, users tried connecting a new-gen SD card to an old card reader which wasn’t compatible. Here, all you have to do is purchase a reliable and effective card reader to eliminate the SD card not recognized in Windows 11 error.
However, in some cases, when you want to run Ubuntu on Windows 11, you receive different error messages. These errors occur for many reasons, such as upgrading, installation issues, or some missing components in WSL.
To fix Windows 11’s Ubuntu errors, you first need to know what they are. Therefore, before solving them, we explain the most common ones that you can get when running it on Windows 11.
What are 0x8007003, 0x8007019e, and 0x800701bc WslRegisterDistribution Failed errors?
0x80070032 error: 0x80070032 is an error that appears when you want to upgrade WSL to the next version. This error also shows that your Virtual machine platform is disabled.
0x8007019eerror: 0x8007019e error occurs when you don’t have permission to run the command line in Linux. Just like the first error, it shows that WSL is disabled. Also, many users have reported recieving 0x8007019e when trying to install Ubuntu from Microsoft store. However, you can easily troubleshoot it by enabling components in Windows 11. We will provide you with some instructions to solve this error in the next sections.
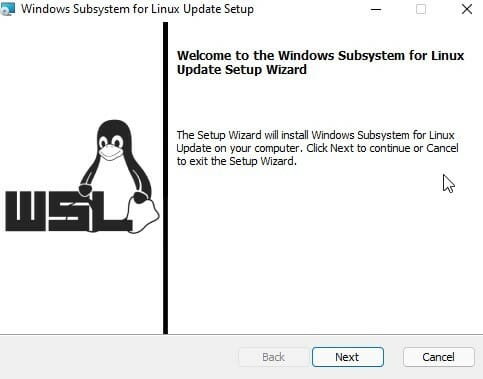
0x800701bc error: 0x800701bc is a Linux Kernel issue when you attempt to install Ubuntu. In this case, you should download WSL2 Linux Kernel. Hopefully, Microsoft provides the latest update on WSL that you can download.
How can I fix Windows 11’s WSL Ubuntu errors?
1. Fix the 0x80070032 error
Reset Microsoft Store
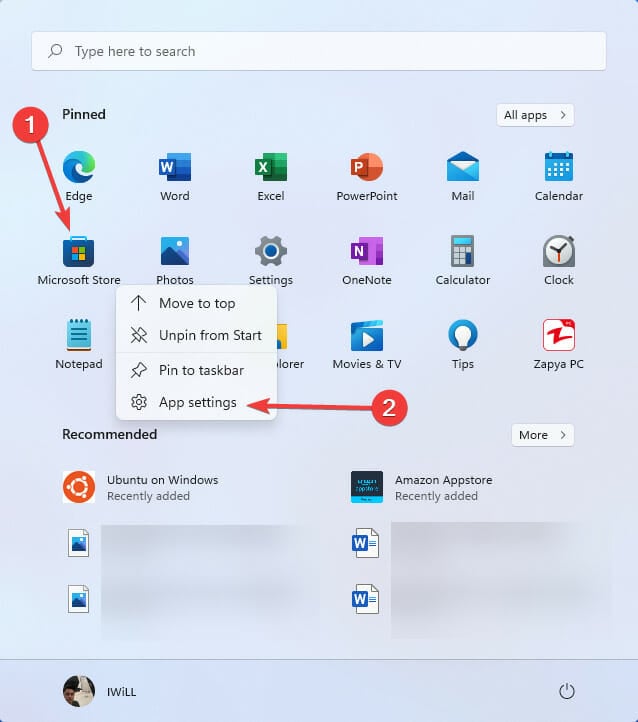
First, open the Start menu. Right-click on Microsoft Store and select App settings.
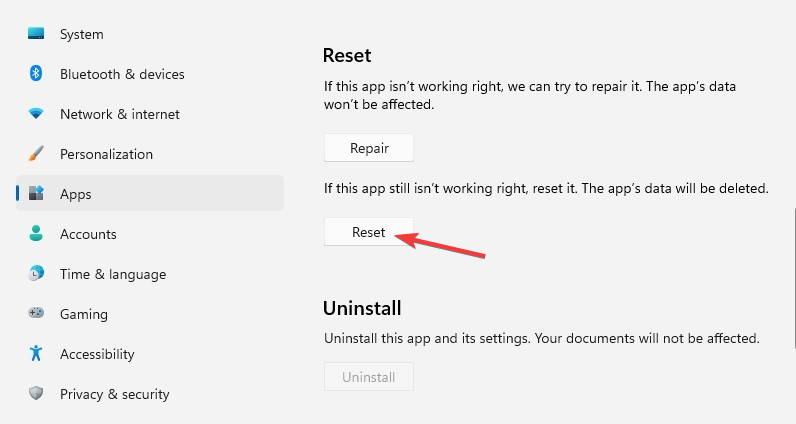
Now scroll down a bit and click on the Reset button.
As we mentioned earlier, 0x80070032 error arises from reinstalling or upgrading WSL. Therefore, we need to reset/reinstall Microsoft Store or clear its cache.
Reinstall Microsoft Store
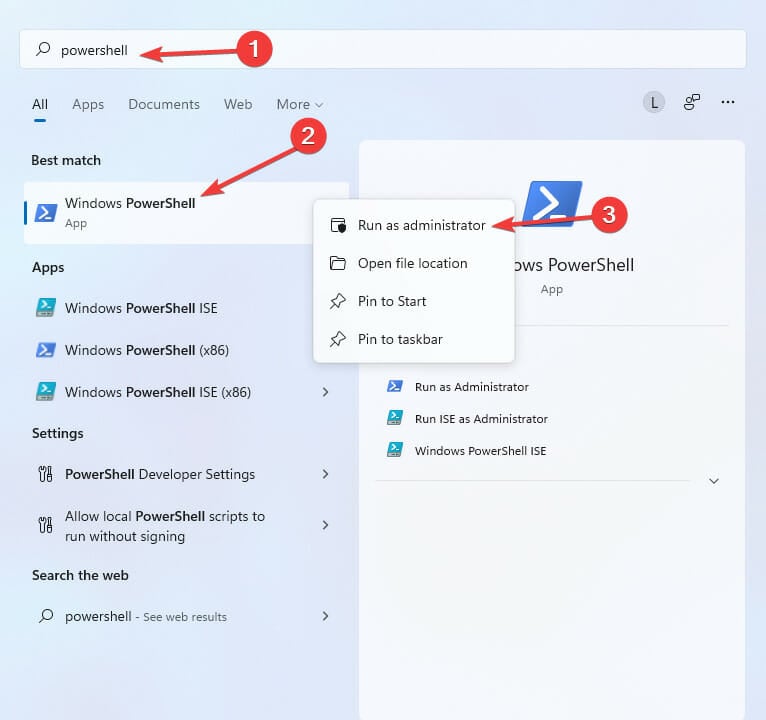
Click on the Start menu and type PowerShell then right-click on it and select Run as an administrator.
Type the following command then hit Enter: get-appxpackage -alluser Microsoft.WindowsStore
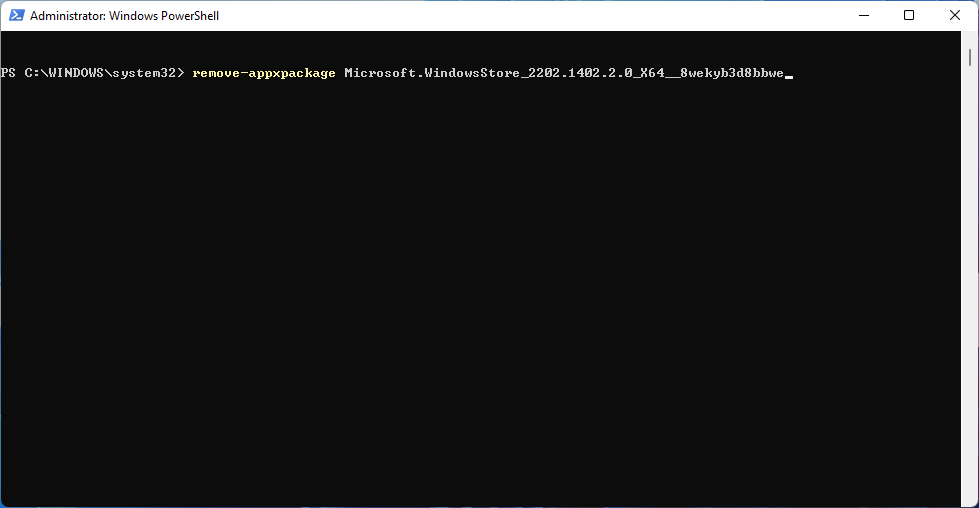
Now, copy the PackageFullName value. In our example, PackageFullName is as below: Microsoft.WindowsStore_2202.1402.2.0_X64__8wekyb3d8bbwe
Type your PackageFullName after remove-appxpackage command then hit Enter. So, in our case, the command line is as below: remove-appxpackage Microsoft.WindowsStore_2202.1402.2.0_X64__8wekyb3d8bbwe
To reinstall Microsoft Store, type the following command and press Enter: Get-AppXPackage *WindowsStore* -AllUsers | Foreach {Add-AppxPackage -DisableDevelopmentMode -Register "$($_.InstallLocation)\AppXManifest.xml"}
When the command is executed, close PowerShell and restart your system.
Sometimes resetting Microsoft Store doesn’t solve this issue, and you have to reinstall Microsoft Store.
Enable Virtual MachinePlatform
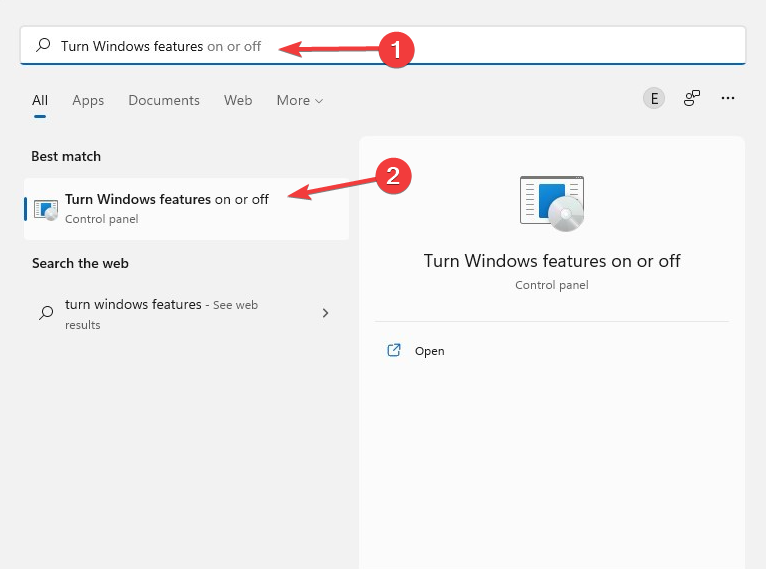
Open the Start menu and type Turn Windows features, then select Turn Windows features on or off.
Scroll down and select the Virtual Machine Platform checkbox. Then, click on OK.
It is necessary to enable Virtual Machine to run WSL. When you install this feature, you can upgrade WSL without any problem.
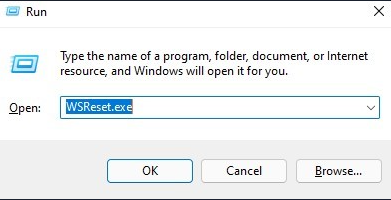
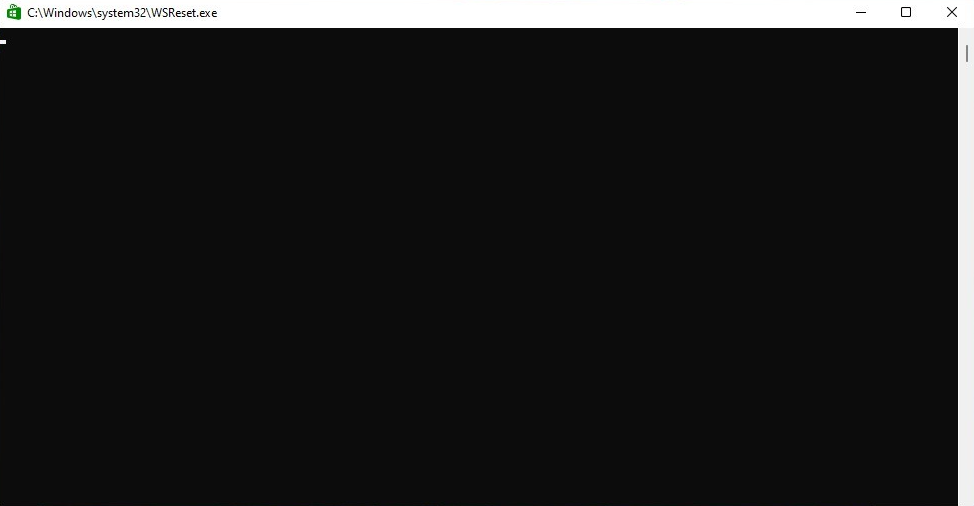
Open Run dialogue by holding down Windows + R keys.
Type wsreset.exe then press Enter.
Now a black window will pop up and close automatically. Finally, when it is completed, it cleans your Microsoft Store cache.
0x8007019e error is one of the common issues. However, you have to enable the WSL feature or use Windows PowerShell to troubleshoot this problem. So, here’s how you do it.
2. Fix the 0x8007019e error
Enable WSL feature
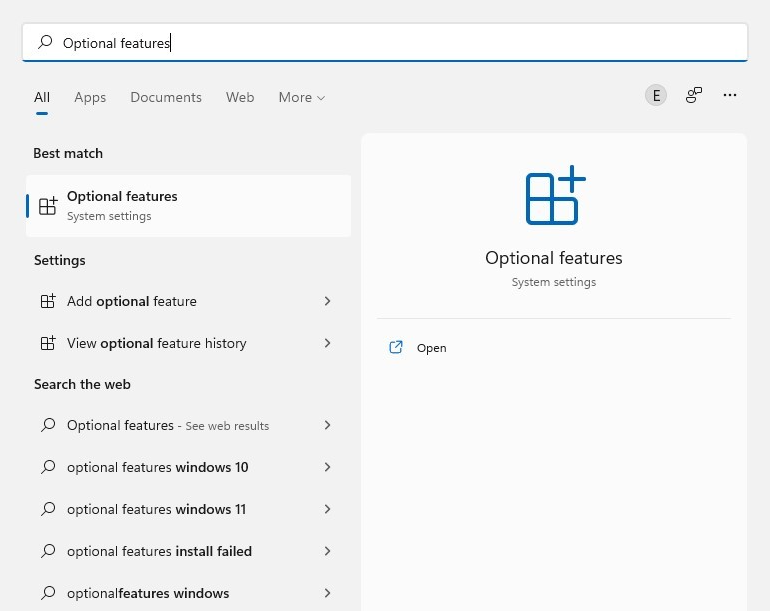
First, open the Start menu and type Optional features then hit Enter.
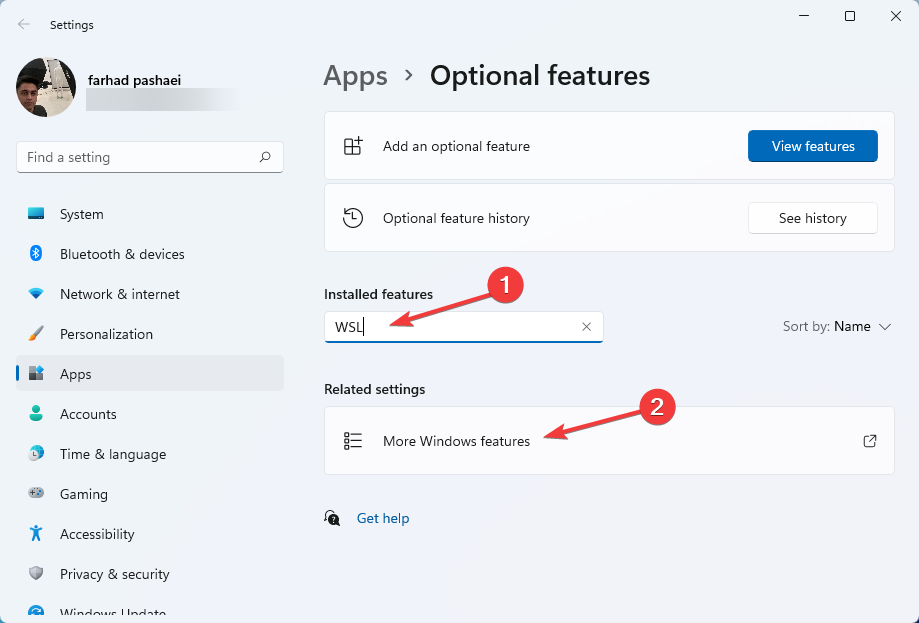
Under the Installed features section, search WSL and select More Windows features.
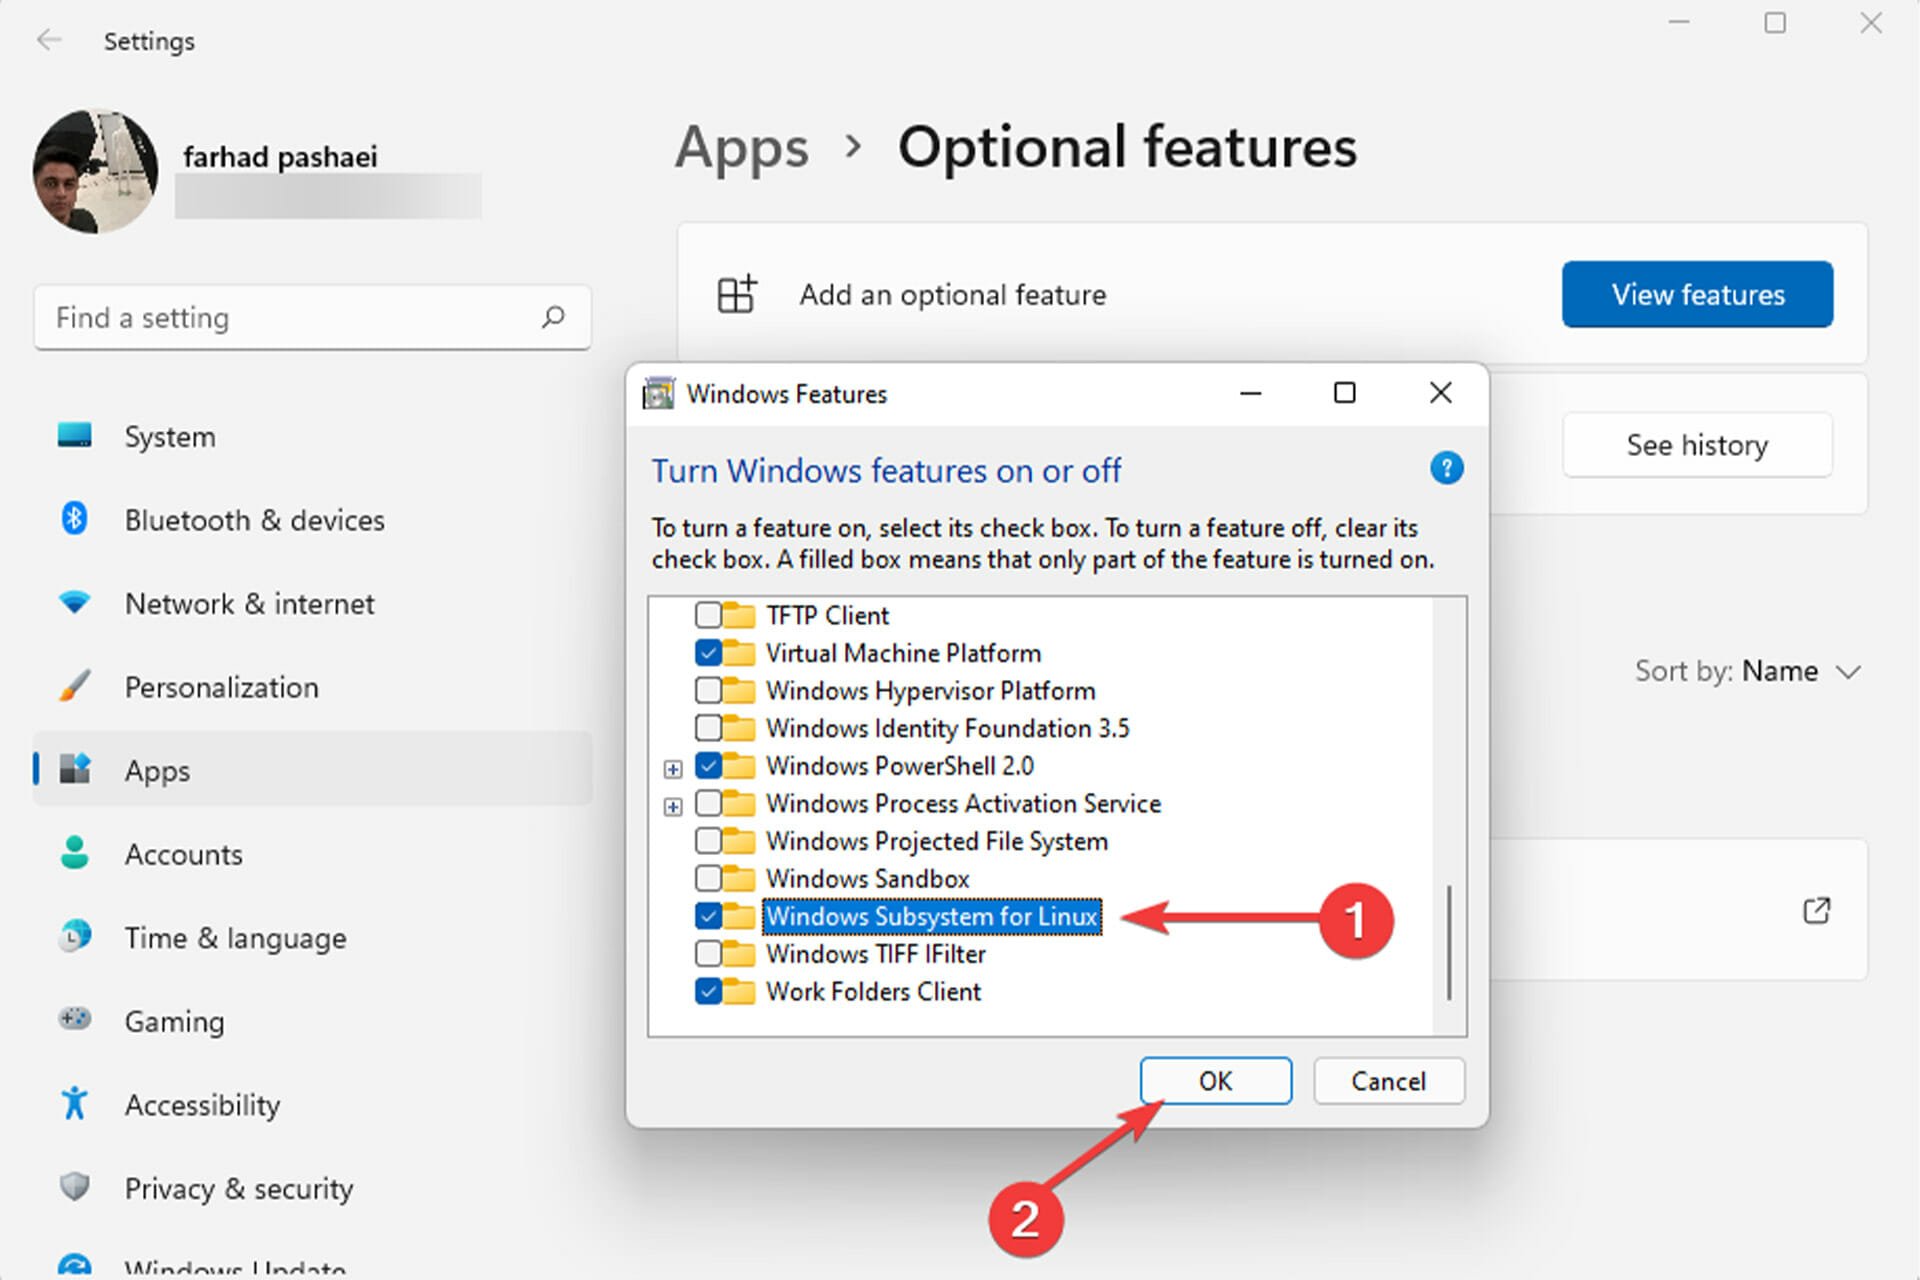
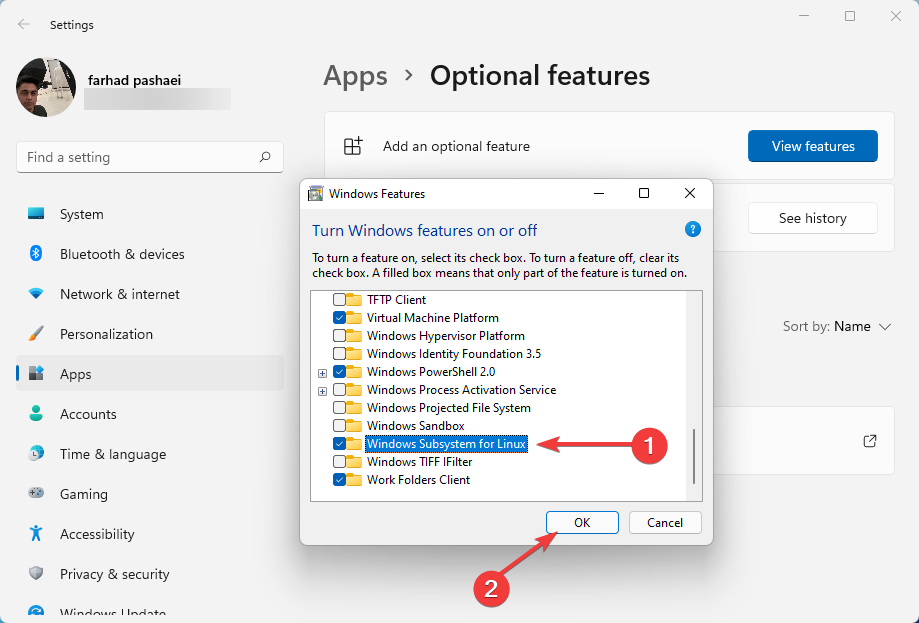
Now, choose Windows Subsystem for Linux and click on OK in the Windows Features box.
After that, Windows will install the required features.
Finally, restart your computer.
Alternatively, you can use Windows PowerShell to enable this feature:
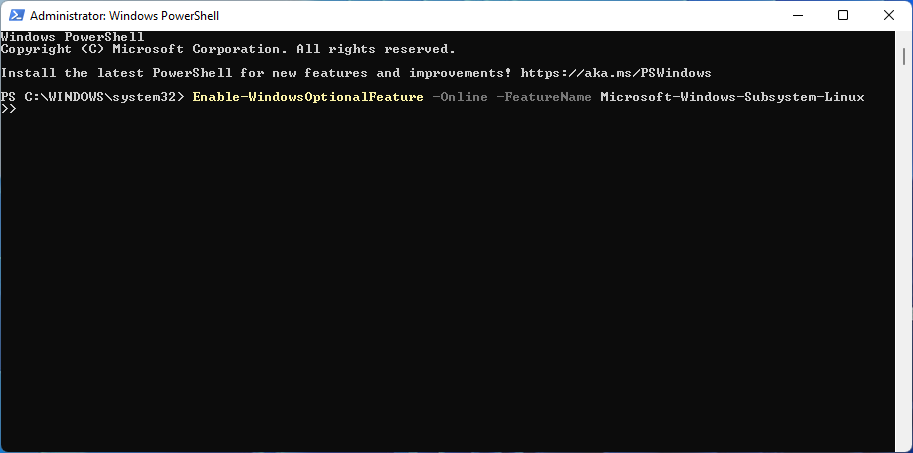
Click the Start menu, type PowerShell, then right-click it and choose Run as administrator.
Type the following command and press Enter: Enable-WindowsOptionalFeature -Online -FeatureName Microsoft-Windows-Subsystem-Linux
After that, type the following letter and hit Enter to restart your computer: Y
In case you’re a Linux developer who occasionally needs to access the Windows world, the WSL capability is like a godsend.
Developers, sysadmins, and enthusiasts who work in both the Microsoft operating system and Linux worlds appreciate the convenience that Windows Subsystem for Linux provides. But WSL, as useful as it is, has been constrained by a number of limitations.
If you’ve ever tried to get graphical apps to function on WSL, you’ll know it was not always as simple as it should be, and it required a few third-party software.
A virtual machine is computer software that creates a virtual environment on a host computer with its own dedicated memory, hardware, storage, network settings used for different purposes. It gives users the ability to run apps, software, along with cloud testing.
Most virtual machines are free to use, but others have subscription fees for one to access premium features for advanced functionalities and mainly for business users.
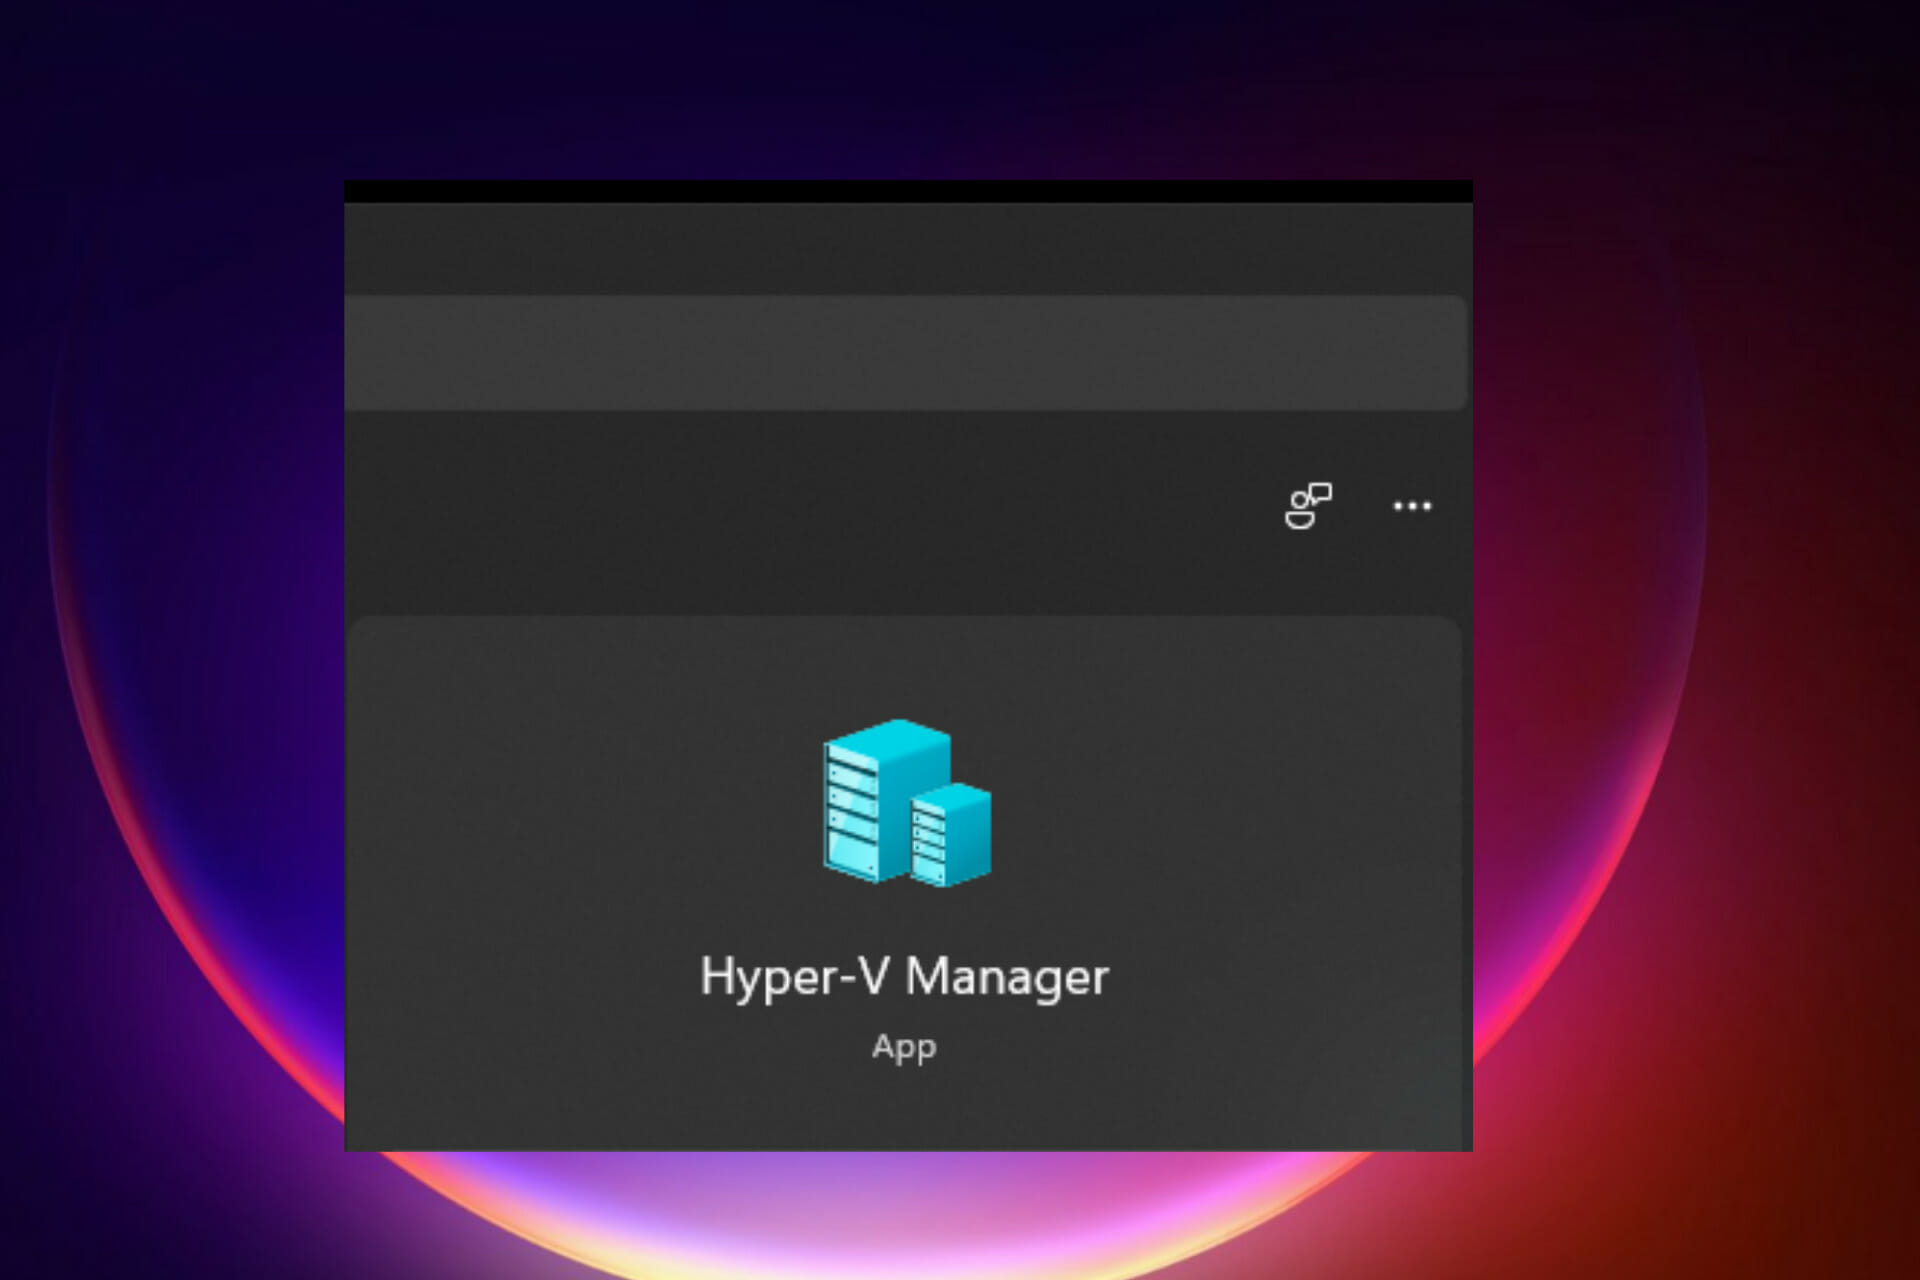
Some of the common virtual machines are Hyper-V which comes inbuilt with the Windows operating systems, while VMware is an enterprise virtual machine built by Vmware cloud company.
For example, VMware Workstation is a desktop hypervisor that runs virtual machines on Windows or Linux.
This guide will look at Windows 11 specifications to run Hyper V and Vmware virtual machines without facing any problems.
What are the uses of Hyper-V and VMware?
Keep in mind the folowing aspects regarding virtual machines:
They help in running several operating systems on one machine.
It is easier to deploy apps and software, reducing workloads, especially during cloud computing configuration.
These VMs help in testing apps and softwares that you are unsure of. You use them to test how the app behaves before the release or installation on your local computer or server.
How can I know my Windows 11 specifications are fit for VMware and Hyper-V?
1. Enable Trusted Platform Module(TPM) Version 2
Alternative 1
Go to the Search box and type Settings, then press Enter.
Open the Settings app and head over to Privacy & Security tab.
Select the Windows Security option.
Choose the Device Security option.
If there are Security Processor details, select it to verify if it’s version 2.0, and if you do not see any processor, you have to enable the TPM. If this step is hard, use the next step.
Alternative 2
Press Windows + R to open the empty search box.
Type tpm.msc and click OK.
If you see a message confirming TPM is ready, verify the version to make sure it’s 2.0. If you see compatible TPM unavailable, you will have to turn it on.
How to turn TPM on
Restart your machine.
Enter the BIOS setup using your boot key, either Esc, F10, F2, F9, and go to the security settings.
Select the TPM Embedded Security and turn it on.
Click Save to update the changes, and Exit the BIOS by restarting the computer.
TPM 2.0 makes sure Windows 11 provides identity protection, BitLocker data protection, and other features.
It stores passwords, certificates, encryption keys from hackers. Most of the computers have these features but are off, and it’s you to turn them on.
2. Enable UEFI to Secure Boot
Restart your computer.
Boot your computer by pressing the relevant keys, either F9, F10, F2, or F1, to enter into BIOS Setup.
Change the Boot mode from Legacy mode to UEFI.
Having secure boots help in preventing malware attacks or software when the machine starts. Many PCs come with this feature, but you have to do it manually if your PC doesn’t support it.
All the changes in the BIOS(Basic Input Output System) get done. Most of these settings vary with the type of PC manufacturer. If this step doesn’t work for your PC, try visiting the manufacturer’s website and check how to change this setting.
Start the computer and press F10to enter into the BIOS Setup.Some computers use F9, F2, F12, F2, DEL, or Esc keys.
Select the Configuration tab.
Choose the Virtualization Technology(VTx) option by moving the down arrow key.
Save the changes by pressing Save and Exit the BIOS.
Restart the machine, and you will be able to use Hyper-V and VMware.
4. RAM of 4GB
The computer must have a minimum Random Access Memory(RAM) of 4 GB. Having more memory makes the machine run fast without hanging problems.
5. 1 gigahertz(GHz) processor
You have to make sure that it is compatible with a 64-bit processor and supports AMD, Intel, and Qualcomm processors.
The processor must have two or more cores. It should have second-level address translation that makes sure Hyper-V retrieves data that turns virtual addresses into physical memory, saving memory and CPU usage.
6. Hard disk storage of 60GB and above
It should have minimum storage of 64GB and above. You have to set more storage for future Updates.
7. Graphics card compatible with DirectX 12
It helps improve multimedia usage, i.e., games, audio, graphics, and network graphics.
8. Good Screen Display
The screen display should have 720 Higher Definition that shows 8 bits per color channel. It makes running with the virtual machine’s monitor mode extensions easier.
How can I benefit from running Hyper-V and VMware?
They are more secure by providing extra layers of security to avoid any cybersecurity attacks. It helps in the easier recovery of your servers, data, and apps in case of a malware or cybersecurity attack. They are more secure by providing extra layers of security to avoid any cybersecurity attacks.
It reduces the cost and time since there is no need to set up physical servers, and it’s fast to set up the apps and software on virtual machines.
Due to little or no server downtime, it improves business functioning, especially the apps. They are easier to move the business functionalities from one virtual machine to another in case of any troubles.
It increases productivity in business since all the business products get deployed in one place.
Due to its recent launch, many people struggle to set up virtual machines on Windows 11.
Everyone is embracing virtualization from businesses and individuals. You have to be careful when setting them up to avoid simple mistakes like improper configuration that can lead to cyberattacks, improper running of the apps, e.t.c.
There are several ways to install Hyper-V on your Windows 11 PC. The Hyper-V and VMware give many opportunities to try a lot of stuff from testing, deployment, etc.
Elden Ring is by far one of the most popular games of 2022, with such a huge and loyal fanbase, it’s actually ridiculous.
The title was developed by From Software, the studio responsible for games such as Dark Souls, Sekiro, and the huge PlayStation classic Bloodborne.
But as much as fans love the game, they pretty much hate it at the same time, because of all the game-breaking bugs and errors they had to struggle with.
However, lots of players are flagging a different type of issue. They say Elden Ring simply won’t show up in their Steam library, for unknown reasons.
Rest assured we have a neat little workaround for you, so you can access your favorite game via Steam and play as much as your heart desires.
What can I do if Elden Ring won’t show up in my Steam library?
1. Add the Elden Ring installation folder to Steam.
Click the Steam button in the top left corner and select Settings.
Select Downloads and then click the Steam library folders button.
Click the Add button in the Storage Manager.
Click the dropdown menu and select Let me choose a location.
Press the Add button.
Choose the folder/drive you want to add and click the Select button.
2. Update your graphics drivers
Press the Windows key, search for Device Manager and open the app.
Expand Display adapters, right-click your GPU and select Update Driver.
Select Search automatically for drivers.
Remember that big-time gaming can be done without crashes, lags, or freezes by keeping all drivers up to date and error-free.
Manual checks are hard to perform, that’s why we recommend using an automated assistant that will scan for fresh driver versions daily.
In case you’re a beginner, you don’t have to worry! Outbyte Driver Updater is smart, simple, engaging and its user interface was built to make your life easier.
To obtain perfect sound quality on your computer a few years ago, you required a specialized sound card. Modern computers have evolved and no longer require sound cards since audio hardware is now built into the motherboard.
Although this built-in audio hardware is adequate, upgrading to a high-end sound card can improve sound quality, particularly if you plan to connect your surround sound system to a Windows 11 PC.
You will be able to enhance the audio experience with the right sound cards for your computer. In this article, we will explore the best Windows 11 sound cards.
What should I look for in a sound card?
If you don’t know the most important factors to consider, finding the most-suited sound card for Windows 11 might be difficult. Here are essential elements to think about when buying one:
Channel audio – Support for 5.1 channel audio should be a benchmark. You can go as high as 7.1 channel audio.
DAC quality – A DAC (digital-to-analog converter) is the critical component that controls audio sampling rate, bit depth, and playback. The higher the digital-to-analog converter quality, the less noise the audio will have.
Many connection ports – Look for a sound card with multiple ports to accommodate all your audio gear. Most headphones and headsets operate perfectly with 3.5mm audio output or input ports on basic sound cards.
Overall sound quality – Good sound cards have an SNR of above 100dB, while the better ones have an SNR of 124dB.
Software options like Virtual Surround Sound, complex audio capabilities like equalization settings, and configurable frequency response are all things to think about.
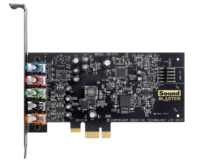
The Sound Blaster Audigy Fx is a tiny step up from your original motherboard’s audio.
It produces top-notch 5.1 cinematic sound for music, movies, and games, thanks to its SBX Pro Studio tech. The device comes with a Sound Blaster Audigy Fx Control Panel that will afford you complete control of SBX Pro Studio’s settings.
A 106dB SNR, 24-bit 192kHz DAC (playback), and a top-level 600-ohm headphone amplifier are all included in the Sound Blaster Audigy Fx.
It also comes with full and half-height metal brackets, allowing you to set up the sound card in a variety of tiny PCs.
Sound Blaster Audigy Fx can produce a perfect audio quality of 106dB SNR through your speakers.
It offers 600 ohms, exceeding the needs of today’s most demanding headphones, so you can delight in movies without disturbing others.
It also has a separate mic and line-in connections, allowing you to pair two distinct audio sources to a Windows 11 computer.
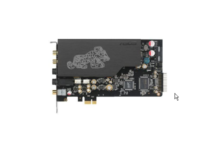
The Essence STX II sound card gives 124dB SNR audio clarity, up to 64 times your normal onboard audio hardware.
A TCXO (temperature-compensated crystal oscillator) clock source prominently features in the Essence STX II. It’s an ultra-precise timing system with minimal jitter.
Instead of pulling power from expansion slots, the Essence STX II has a separate four-pin connector, which means a cleaner power supply. High-fidelity LDO (low-dropout) regulators ensure an optimized power supply.
Its famous MUSES 8820 and 8920 op-amps produce expansive sound imaging and perfect tonality to capture the rich musicality that Essence listeners demand.
You will enjoy the experience of the built-in headphone amplifier that can handle up to 600-ohm impedance. This allows audiophiles to use the best high-impedance headphones to hear the Essence STX II’s pristine sound.
This Sound card is upgraded with Sound Blaster Command application, giving you access to some of the most cutting-edge audio technology in one convenient location.
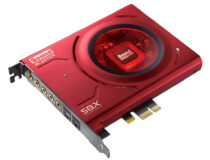
Sound Blaster Z is a great all-around option for your Windows 11 PC entertainment and gaming demands. In addition, you will appreciate the Sound Blaster Beamforming Mic that is included to deliver crystal clear voice transmission.
With this device, you will have audio that is 99.99 percent clean, which is almost a 35 times improvement on the motherboard audio, with an SNR (signal to noise ratio) of 116dB.
Stereo Direct allows you to listen to any music at a staggering 24-bit 192 kHz bit rate, which is clean and unedited. It features SBX Pro Studio sound technology to provide unrivaled audio delivery, including spectacular 3D surround effects for your headsets and speakers.
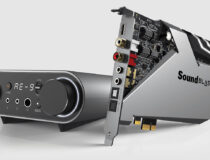
The Sound Blaster AE-9 is a headphone amplifier that brings out the best in any pair of headphones.
It includes the Xamp Headphone Bi-amplifier, which independently amplifies each audio channel, providing exquisite music to every earcup.
With an ultra-low 1-ohm headphone output impedance, this sound card can drive audiophile-grade headphones to 600 ohms.
Sound Blaster AE-9 uses Nichicon capacitors, which employ cutting-edge etching processes to provide a deep bass sound.
It also comes with Sound Blaster’s entire suite of audio upgrades, such as Crystallizer for improved dynamic range, Surround for a more immersive experience, and Bass for more low-end punch.
CrystalVoice Technology, on the other hand, improves voice clarity for crisp recordings and chats during gameplay. The Sound Blaster Command software package for Windows allows you to customize all upgrades completely.
The Sound card supports DTS Connect Encoding and Dolby Digital Live in addition to Sound Blaster’s native processing capabilities.
There you have it – our list of Windows 11 compatible sound cards. Windows 11 is relatively new, and we expect this list to expand as manufacturers improve production for this OS.
The list goes from less pricey to expensive sound cards. If money is not a factor, you may want to buy a sound card that has all the features you admire, but in the end, we expect that your personal preferences guide your final decision.
According to most worldwide gamers, Guild Wars 2: End of Dragons is one of the best masterpieces delivered by ArenaNet.
The adventure stories are breathtaking and place the players back in the precious land of Cantha, after two centuries of in-game time.
However, some users already claimed specific problems with this game. In this matter, we have to consider both high and low FPS that won’t allow you to take advantage of the best Guild Wars 2: End of Dragons experience.
Below you can discover what one user had to say about this annoying situation:
As we all know GW2 is very poorly optimized. The dx11 beta improved the situation a bit though.
But for me, it got worse since EOD. The FPS frequently drop to 5 for 5 to 10 seconds, and sometimes it can happen every minute or so, making the game almost unolayable. The rest of the time it seems pretty smooth, from 60fps to 30 when there are a lots of people around in big events, and I wont complain about that, 30 is still okay. It’s the big drops that make the game super annoying and make me want to stop playing.
We understand how annoying can be to face these annoying issues. That’s why we’ve compiled a list of excellent workarounds that will surely help solve FPS errors.
How can I fix the Guild Wars 2: End of Dragons FPS issues?
1. Update your graphics drivers
Hit the Windows key, type Device Manager, then open the first result.
In the opened window, expand the Display adapters section, then right-click on the driver you need, and choose to Update driver.
Select to Search automatically for drivers.
Now, your OS will scan for any available options and you’ll be notified when the results are finally out.
In order to prevent Guild Wars 2: End of Dragons FPS issues, keep in mind that it is important to always keep your drivers updated.
The above steps are extremely useful, but they can also consume your time. Fortunately, we have another option that will help with updating your drivers and its name is Outbyte Driver Updater.
This software will automatically scan and update all of your drivers, so you won’t have to concern yourself with this kind of process.
Plus, with just a simple click and having complete access to a huge database of drivers.
According to some users, there’s a strange bug in Guild Wars 2: End of Dragons that depends on your hardware and driver version, the lower you put your settings the more FPS drops you encounter.
In case your hardware can theoretically handle it, we strongly recommend running the game in the highest graphics settings you can.
3. Disable background programs
Use the following keyboard shortcut to open Windows Settings: Windows + I.
Go to Privacy.
From the left window pane, click on Background apps.
On the right side of the window, under Background Apps, make sure the Let the apps run in the background option is turned Off.
Because the background apps might interfere with Guild Wars 2: End of Dragons and generate FPS issues, you should try disabling them, especially the programs similar to antivirus software, VPNs, or other games.
A lot has been said about Gorilla Games’ latest title ever since it was released back in February. Horizon Forbidden West has been getting mostly positive reviews, but there are some annoying bugs in it.
We’re about to show you how to fix yet another in-game issue that drives gamers insane. Sometimes, without any apparent explanation, you simply can’t use Aloy’s grapple feature.
Gorilla Games has not released a fix patch for this issue as of this moment, so we’re going to explore a workaround that did the trick for others in the same situation.
What can I do if I can’t grapple in Horizon Forbidden West?
The Pullcaster is a legendary special gear in Horizon Forbidden West that you can use as a grappling hook, primarily used to reach unreachable areas and scale tall structures.
It is arguably one of the most valuable tools in the game that comes in handy during intense combat situations or even while exploring Horizon Forbidden West’s scenic open world.
There are special points within the game where players can deploy the Pullcaster and grapple away towards their objectives.
These points can be seen when you are scanning your surroundings. The game’s UI will let you know when you are hovering above one.
However, if you find yourself unable to do so, here are the steps you can take to restore game functionality and keep on playing.
1. Restart game from last save.
Pause the game and selectRestart from save.
PressXto confirm the action.
2. Restart Horizon Forbidden West completely.
Pause your game, select Quit, and press the X button.
Keep the PlayStation button pressed until you are taken to the home screen.
Highlight Horizon Forbidden West, press the Start button, and select Close Game.
3. Update Horizon Forbidden West
On your PlayStation home screen, highlight the game.
Press the Start button and select Check for updates.
These are the workarounds that have proven to work for other Horizon FOrbidden West players that had to deal with the same in-game glitch.
If Horizon Forbidden West is your favorite game but you would also like to try some other options out there, here’s how the title compares to others:
All Microsoft Edge users should now be seeing version 100 of the web browser as an update. This comes two weeks after version 100 hit the beta channel with Edge Insiders. Yet despite the big version number, there’s nothing major in this release, with Microsoft just noting five changes.
The five changes in version 100 cover the change in the user-agent string, tweaks for Microsoft 365 application protocols, hardware-enforced stack protection, and PDFs. These all have been tested with Edge Insiders over the past few months. Here’s the full change log of added features, from Microsoft.
Three-digit version number in the User-agent string. Microsoft Edge will now send a three-digit version number, such as Edg/100 in the User-Agent header.
Streamlining Microsoft 365 Application Protocol Activations. Microsoft 365 Application Protocol Activations on trusted Microsoft cloud storage services will now launch certain Microsoft 365 applications directly, including SharePoint subdomains and Microsoft OneDrive URLs.
Hardware-enforced Stack Protection. Microsoft Edge will continue supporting more fine-grained protection by combating memory corruption vulnerabilities and by protecting indirect calls.
Open Digitally Signed PDF files. Digital signatures are used extensively to validate the authenticity of a document and changes made in a document. You can use the PDFSecureMode policy to enable digital signature validation for PDF files, directly from the browser, without the need for any add-ins.
Preview PDF files in Microsoft Outlook and File Explorer. Users can view a PDF file in a lightweight and rich read-only preview. This feature is available for Outlook Desktop PDF attachments or for local PDF files using File Explorer.
For folks who usually keep track of policy changes, there’s a bunch added in this release, and some that are also depreciated too. Check Microsoft’s change log for those. As always, Edge should download this update automatically, but if it doesn’t, just head to the Help and Feedback menu in Edge, choose About Microsoft Edge, and then restart the web browser when prompted.
It has been nearly two years since the new Chromium based Microsoft Edge launched, and the browser has slowly made its way to the top. The latest Statcounter report from March has Edge as the #2 browser in the world, with a 9.65% share. That’s behind Chrome, which has 67.29%.
Getting the WMIC alias not found error can be a real hassle when you want to find system information. Windows 10 and 11 systems come with the feature disabled by default, so that could be why it’s happening.
Else, you might be dealing with corrupted WMI repositories. Here’s how to fix that so you can regain access to WMIC:
How can I fix the Wmic alias not found error?
First, run the WMI Diagnosis Utility, which will help you confirm if that is really your issue. If it is indeed, here’s what you need to do:
Run the following command: winmgmt /verifyrepository.
If the results are inconclusive, run: winmgmt /salvagerepository.
Check again wmi repository had been repaired successfully: winmgmt /verifyrepository.
However, if this fails, it means that you will actually have to rebuild the entire WMI Repository from scratch. Don’t be alarmed, we’re here to show you exactly how.
Open the Start menu, search for CMD Prompt and open the app.
To disable and stop the winmgmt service, run: net stop winmgmt.
Remove or rename C:\Windows\System32\wbem\repository.
Open CMD Prompt as Administrator.
In the CMD prompt Navigate to C:\Windows\System32\wbem\.
Run the following command: for /f %s in (‘dir /b *.mof’) do mofcomp %s.
Now run the command: for /f %s in (‘dir /b en-us\*.mfl’) do mofcomp en-us\%s.
Restart your PC.
While Microsoft has removed WMIC from Windows 10 and 11, you can still fix the WMI access denied error after re-enabling the functionality on your PC.
If you encounter the WMI not recognized error, the steps outlined in this article will help you troubleshoot these issues quickly.
That is pretty much all you have to do in order to fix this dreaded error. Upon rebooting your PC, you will no longer have to deal with it.
Was this guide helpful to you? Share your experience with us in the comments section below.
The annoying experience of receiving proxy errors is the same, no matter whether you’re running Windows 11 or another operating system.
Typically, proxy error messages indicate that you are not allowed to enter a specific website or web page. Also, it shows that there are multiple sources of requests in a short time.
For example, if you have attempted several log-ins to your account, the server will block the request and hinder the connection.
So, to fix the Windows 11 proxy error, you need to apply some changes or reset your settings. For this reason, we present you with helpful instructions to fix this problem.
What causes proxy errors?
There are several reasons why these errors occur. When you receive proxy errors, the most common cause is a misconfiguration on your computer’s part, namely in the proxy settings.
However, there are cases in which proxy errors result from websites denying unauthorized access to their pages to keep them safe from attacks.
Simply put, the server blocks requests from the client for security issues.
It’s possible that you’re browsing the web through a rogue proxy server and that websites are flagging you as a potential threat to their systems due to your activity.
How can I fix Windows 11 proxy error?
1. Use Command Prompt
To begin, go to the Start menu and type CMD, then right-click on Command Prompt and select Run as administrator from the menu that appears.
Now, type the following command and then press Enter: ipconfig /flushdns
Next, type this command and hit Enter key again: nbtstat –r
In this step, type the following command and press Enter: netsh int ip reset
Next, type this command and hit Enter key again: netsh winsock reset
Type Exit and press Enter.
Finally, restart your Windows PC. If your problem still exists, we head into the next workaround. So, let’s jump into it.
2. Disable proxy server
Press the Windows + I key combination to open the Settings menu.
In the left pane, choose Network & Internet, then scroll down and click Proxy.
Select Edit next to Use a proxy server option in the Manual proxy setup section.
Toggle off Use a proxy server and click on Save. Then, close Settings.
A proxy error may occur because of changing user IP addresses. So, to solve this, you must toggle it off in Network & internet settings.
3. Use a dedicated software
Reliable troubleshooting software may be your best option if you’re new to computers or have trouble following instructions.
4. Do a network reset
Using the Windows + I keys, go to Settings.
Select Network & internet, then scroll down and click on Advanced network settings.
Now, look for Network reset and select it.
Click Reset now and then Yes to confirm network reset.
Restart your computer.
While it is the simplest way, network reset has shown to be one of the most effective solutions because it restores the default network settings and resolves proxy issues.
5. Reset browser settings
Open up your web browser, for example, Chrome. Then, click on the three-dot menu just on the top right side and select Settings.
Now, select Advanced and scroll down to Reset and clean up option then click it.
Following that, choose Restore settings to their original defaults.
Select Reset settings. Then, you’ll have to wait a little time for the process to complete.
Close Chrome and open it again.
You can troubleshoot proxy errors just by restoring Chrome settings to default. Note that this process cleans up all your cookies.
Proxy errors can be caused by malicious programs or viruses. So, if you’ve lately visited a suspicious website or downloaded any strange software, there’s a chance your computer has been infected.
Install powerful security software like TotalAV and run a scan. Then, leave the software to handle the rest of the work.
TotalAV is capable of real-time protection. Also, ransomware and phishing attacks are all prevented by using this software on the PC.
7. Modify the Registry
Hold down Windows + R keys simultaneously to open Run dialog.
Now, type Regedit in Run and press OK.
Then, navigate to: Computer\HKEY_CURRENT_USER\Software\Microsoft\Windows\CurrentVersion\Internet Settings.
After that, in the right pane, look for Proxy Enable and Proxy Server values.
Right-click on the value and select Delete.
NOTE
Modifying the registry incorrectly would lead to further serious problems. So, make sure you do the process carefully.
8. Disable proxy LAN settings
Open Run dialogue by pressing Windows + R key combination.
Type inetcpl.cpl then hit Enter.
Once the Internet Options window opens up, go to the Connection tab and select LAN settings.
Now, under Proxy server section, uncheck the Use a proxy server for your LAN box and click on OK to save changes.
Then click OK in the Internet Properties window before exiting.
Right-click on Start menu and select Device Manager.
Expand Network adapters, then right-click on your network adapter and choose Uninstall device from the menu that appears.
Restart your computer.
Now it’s time to reinstall network driver. To do this, open up Device Manager again then click on Scan for hardware changes.
It is recommended that you download and run Outbyte Driver Updater if the driver was not able to be installed successfully.
Following the installation of this application, it will scan your computer for and install any missing drivers that are found.
One of the advantages of using this tool is that it will scan your computer for outdated drivers and update them, resulting in a significant boost in the overall performance of your computer.
What are the main types of Windows 11 proxy errors?
For the client side, proxy errors are categorized into 4xx classes. So, to fix Windows 11 proxy errors, you may need to know them from scratch.
400- a Bad Request: It arises from an invalid client request. It is either due to malformed requests or incorrect syntaxes
401- an unauthorized error: This error occurs when a client sends unverified authentication credentials to the server. It is attributed to DNS. You can solve it by clearing browser cookies
402- a payment requirement: This infrequent error mainly functions as a means for digital payment systems. According to Mozilla. developer, it is ” a nonstandard response status code that is reserved for future use”
404. Object not found: This error is a common proxy error that drives from incorrect or dead URLs. This error occurs when a URL changes without redirection
407. Proxy Authentication Required: This error occurs when the server identifies a client as unauthorized access. So, you have to make changes in proxy settings to fix this issue
429 – Too many requests: When a client sends many requests to a server quickly, you see this error. To troubleshoot it, check out this detailed Proxy Error 429 guide.
There are a bunch of ways to fix Windows proxy errors. Some of them are attributed to changing proxy settings, and you can alter the settings, for example, LAN settings, or reset them to the default.
You can also make registry changes, but you must exercise caution when doing so because incorrectly modifying it may result in even more problems.
Please let us know which solution worked best for you in the comments section below.
There isn’t a more important computer peripheral than the computer mouse. And because of its importance, you shouldn’t have to settle for a cheap or terrible mouse. Since its inception, computer mice have gone through radical changes.
Modern computer mice do much more than have two buttons and a scroller. The market for these devices is all over the place with vastly different prices, designs, and functionalities.
What is the best computer mouse?
It all comes down to what you’re looking for. Certain computer mice are better for certain situations. Gaming mice have a ton of buttons on them, for example. These types of mice are great for gamers but ultimately useless for an accountant.
Some people prefer to have a computer mouse that is inexpensive and light on features. They wouldn’t want something complex that can do a million things. Again, it depends on what you, as the user, are looking for.
This guide will break down some of the best computer mice that you can get on your Windows 11 computer. There’s no one singular best mouse for every situation. It depends on what you want, but there are some who come close.
What are the best computer mice available for Windows 11?
Starting off the list of best mice is the Logitech MX Master 3. It’s a wireless mouse that connects to your computer via the accompanying dongle or through a Bluetooth connection.
It has a long battery life, up to 70 full days on a single charge. The MX Master charges rather quickly too with a one-minute charge giving you a full three hours of usage. The mouse can connect up to three different devices and three different operating systems.
This means that you can hop from a Windows 11 computer to a Mac to a Linux machine and not skip a beat. Another notable feature is how ergonomic it is, which to say, it’s very comfortable to use.
The MX Master 3 is shaped so that it conforms to your hand and does not have it bunched up over a small space. There’s a thumbwheel and buttons on the side for intuitive controls.
Price-wise, it’s pretty middle of the road. You won’t have to spend a whole lot for a solid mouse. All in all, it’s a decent package.
If you’re looking for a mouse that’s among the cheapest in the market, Logitech also has you covered with the M100. It’s a wired mouse that connects to your computer via a USB connection.
Unlike some of the other entries on this list, setup is easy and instantaneous. There are no additional drivers that you’ll have to install. It’s simply plug-in and use. The M100 is designed to be ambidextrous so it’ll work in whichever hand you use.
Some mice are strictly suited for right-handed people. Alongside its flexibility, the M100 is sculpted to fit comfortably in your hand with rubber grips on the side and has quiet clicks. You won’t have to deal with annoying loud mechanical clicks.
The M100 being a wired mouse is also a big plus. You won’t have to worry about your device dying from a dead battery because you forgot to charge it nor will you have to worry about a poor connection.
Poor connections are admittedly rare, but nothing is more annoying when they happen. Either way, you can rest easy on the M100.
Microsoft Bluetooth Ergonomic Mouse is a great option for people who don’t want to deal with wires and have a comfortable device. Wire management can be a nightmare, especially if you have a busy desk.
Microsoft’s mouse fits comfortably in your hands with a thumb rest that promotes a natural hand and wrist position. That way, you won’t be twisting your hand in a weird direction.
The mouse also comes in four different colors. You have the standard Matte Black and Glacier White that adorns many electronic devices. There’s also the bright Pastel Blue and Peach for those who want more personality.
You can enhance productivity by customizing the three buttons on its side to app-specific commands. It runs on AAA batteries and, according to Microsoft, will last up to 15 months. The battery life depends on how often you use it and other computing conditions, however.
Like the M100 before, this mouse doesn’t go off to do anything crazy or add lights to the side. It’s a simple device for straightforward usage.
For the gamers out there looking for a great mouse at a decent price, then you should check out the Katar Pro XT from Corsair. It’s a lightweight gaming mouse weighing only a few ounces. Its compact symmetrical shape allows for different types of grips.
In the gaming world, players may adopt different hand grips for certain games. This allows them to input their controls much more quickly than a regular over the hand grip that most people use for computer mice.
The Katar Pro is ideal for a claw or fingertip style of gaming. Speed is the name of the game as this mouse was also made with FPS and MOBA games like League of Legends in mind.
Even the buttons on top of the mouse were designed to be lightning fast. They have a spring-loaded design and a zero gap between the button for faster input.
It may interest you to know that there’s a wireless of the Katar Pro XT. It’s the exact same as the wired version in terms of speed and feature, although a little bit more expensive.
If the Corsair Katar doesn’t do it for you and you want a top-of-the-line gaming mouse, the Razer Basilisk V3 is the best for you. The most obvious aspect of the Basilisk is its rainbow lights.
The lights are called Razer Chroma RGB Lighting Zones and you customize each one from over 16.8 million colors and numerous lighting effects. The lights will also react to games that integrate with Chroma.
The Basilisk is jammed packed with features that are too many lists off in its entirety. So to go over them briefly, you have 11 programmable buttons that can be assigned to macros and other secondary functions like push-to-talk.
It has a 26K DPI sensor that will track your movements down to the slightest touch for pinpoint accuracy. The scrolling wheel can speed through content or enable tactile mode for greater precision.
And on top of all that, it has the ergonomics that Razer is known for. Your hand will be comfortably supported with your fingers in the optimal position for fast gameplay.
The Anker Vertical Ergonomic Optical Mouse has a unique form factor and is unlike any of the entries on this list. In fact, you probably have never even seen a design like this before on a mouse.
Believe it or not, the Anker’s shark fin-like design is indeed ergonomic. It’s supposed to emulate the position your hand is in when you shake someone’s hand. Your arm and wrist sit in a natural position for smoother movement and less strain.
It is wireless and comes with a 2.4G USB receiver that you can plug into your computer to connect that way. The Anker mouse has a high DPI resolution rate for more precise movement tracking and works on a wide variety of surfaces.
A lot of mice have trouble working on glass tables, but Anker’s device doesn’t have this drawback. On the mouse are next and previous buttons that allow you to go back and forth between pages more conveniently than selecting the back arrow on your desktop.
Another great feature is the Anker mouse enters power saving mode after sitting idle for eight minutes, saving precious battery.
The final entry on this list is the Kensington Orbit Trackball Mouse which comes with a scroll ring. A trackball mouse has a giant ball that moves the cursors on the screen without you having to move the whole device around.
The trackball is much easier to move around than a regular mouse and allows for easier scrolling. They’re great for people who have issues with moving a standard mouse around and want something easier on their wrist.
They’re not great for gaming, however. That said, Kensington’s rendition comes with a scroll ring that moves the web page or documents up and down with ease. These types of devices are ambidextrous so left-handed and right-handed people can use this with ease.
It also comes with a detachable rest for your wrist that cradles it in an ergonomic position. The Kensington Trackball Mouse comes with software and drivers that you can download to create a personalized experience.
What are other ways I can enhance my Windows 11 computer?
To go with your new mouse, you should look into getting a customized cursor. Windows 11 already offers a small degree of customization, but you can’t change the overall design or color of the cursor.
You should also look into Rainmeter skins for your desktop computer. Rainmeter adds an overlay to the main screen and can do a variety of things. You can add a GameHUB to serve as a central reservoir for your apps.
And if you’re a big gamer and would love to play Android apps, try out an Android emulator. The Amazon Appstore lets you do the same, but its options are limited since it restricts which apps you can get.
Feel free to leave a comment below if you have any questions on other Windows 11 apps. Also, leave comments about reviews that you’d like to see or information on other Windows 11 features.
FAR: Changing Tides is one of the best video games when it comes to adventurous sail experiences and it is also extremely versatile.
In this matter, this masterpiece is available for both PC and controller (such as PlayStation, Xbox, or Nintendo Switch editions) fans.
Unfortunately, it seems like players’ controllers are sometimes not working when trying to run FAR: Changing Tides.
It is a pretty common error in the overall gaming world, so there are always solutions to fix it with ease and today’s guide will be your main support.
What to do if my controller is not working with FAR: Changing Tides?
1. Unplug the controller then replug it
In case your controller is not working while running FAR: Changing Tides, the first thing to do is try to unplug and replug the device to the computer or the monitor is paired with.
2. Use a different USB cable
If you’re using a wired controller, a broken USB cable can be the cause of the related issues.
In these terms, we recommend trying a cable with no problem and checking to see if the problem is resolved.
3. Update your controller
3.1 PS4
Make sure that the connection between your PS4 and the Internet is stable.
Now, navigate to PS4 Settings.
Click on System Software Update.
Press the X button.
You’ll get a message that informs you if the latest version of your system console has already been installed.
Otherwise, the message will let you know that you should upgrade your system. To install it, click on Upgrade now.
3.2 PS5
Open Settings.
Go to System.
In the System Software section, click on System Software Updates and Settings.
Choose the type of update you want to perform.
Click on the Update button, then wait until your console is updated and restarted.
3.3 Xbox
Make sure your console is connected to the Internet, then press the Xbox button to open the guide.
Select Profile & system (Account icon).
Go to Settings.
Select System.
Navigate to Updates & downloads.
Choose to update the console.
3.4 Nintendo Switch
Go to the Home menu, then select System Settings.
Navigate to the System section, then set the Auto-Update Software option to On.
Now, you’ll be able to view the disk space distribution and how much free space you have.
In case it doesn’t seem like having enough space, make sure you clear some saved data from your controller.
To do so, go back to your Settings menu, and choose the Application Saved Data Management section.
Choose what you want to clear.
Click on Delete.
4.2 PS5
Open PS5Settings.
Navigate to Storage.
There, you’ll be able to view both the Console Storage and the Extended Storage.
Click on each of them and check the free disk space.
If you don’t have enough, make sure you delete other saved data.
To do so, go back to your PS5 Settings, navigate to Saved Data and Game/App Settings.
Choose from Saved Data (PS5) or Saved Data (PS4).
Select Console Storage.
Click on Delete.
Tick the box next to the files you want to delete and select Delete.
4.3 Xbox
Press the Xbox button on your controller to open the guide.
SelectProfile & system.
Go toSettings.
ChooseSystem.
Navigate toStorage.
On theManage storage devicesscreen, select:Clear local saved games.
This deletes games saved to your hard drive, but they’ll still be saved to the cloud.
4.4 Nintendo Switch
Go to theNintendo Switch Settings.
Scroll down toData Management.
ChooseManage Software.
Now, you should be able to see the list of your games, sorted by how much space they take up on your console.
You can free up space in the System Memory using Manage Save Data/Screenshots.
Keep in mind that software data (including downloaded software, software updates, and screenshots) can be stored on the System Memory or a microSD card.
Your controller might sometimes not work when trying to play FAR: Changing Tides due to low disk space.
In this case, it is always recommended to clean your device and delete any saved data that is not important to you.
5. Reset your controller or rebuild its database
5.1 PS4 and PS5
Power off your controller then press and hold the power button.
Release the button after you hear the second beep.
ForPS4, you’ll need to connect your controller viaUSB, then choose to Rebuild Database.
ForPS5, you’ll now boot into Safe Mode. Plug your controller in with the cable, then go down and select Clear Cache and Rebuild Database.
After that, click on Rebuild Database, then on OK.
5.2 Xbox
Hold the power button until it turns off.
Turn it on by holding the power button and wait for two quick beeps.
Release the button and you will be automatically redirected to the Recovery menu.
From here, you canrestore the file system or rebuild the database.
5.3 Nintendo Switch
While your Nintendo Switch console is off, hold down the Volume Up and Volume Down buttons.
Press the Power button.
Continue to hold down the Volume Up and Down buttons until the Recovery menu opens.
There, choose to Initialize the console without deleting save data.
For now, these are the most efficient solutions you can try if your controller is not working while trying to play FAR: Changing Tides. Until we come up with more fixes, the above recommendations will take care of your device.
Also, we are aware of the fact that the PS4 controller is not always connecting to the PC. This issue is extremely annoying because you can’t use the controller at all yet rest assured that we’ve got some simple solutions that you may apply.
Are you facing additional questions? Do not hesitate to share them by leaving a comment in the section below.
If you don’t already know, keep in mind that FAR: Changing Tides places you into an atmospheric vehicle adventure.
This game is about controlling the sails of the ship and exploring the unlimited seas and oceans.
You need to avoid risks & beat puzzles. Captain an amazing ship and start sailing the ocean. This game is about controlling the sails of the ship & exploring the seas.
Far Changing Tides offers new places, puzzles as well as ship mechanics. Keep in mind that you’ll need to avoid risks & beat puzzles.
The whole scenario follows the emotional journey of a boy and his ship as he embarks on a voyage to find a new home.
FAR: Changing Tides is also extremely versatile, being available on PC (on gaming platforms like Steam or Epic Games Launcher) and controllers (like PlayStation or Xbox series).
Many worldwide users seem to be excited to try this game’s features, but they are also interested in discovering if it is possible to perform a cross-play on FAR: Changing Tides.
Can I cross-play on FAR: Changing Tides?
Well, keep in mind that FAR: Changing Tides is just a single-player game. This game doesn’t allow you to take advantage of the local split-screen & online co-op multiplayer modes. Plus, there is no couch & online PVP multiplayer.
When it comes to the cross-play mode, as well as cross-gen play, cross-progression, & cross-gen save, they are not available in Far Changing Tides.
Because the main point of the story is to discover the protagonist alone, on flooded earth, we can understand why producers decided not to include the cross-play and multiplayer modes.
Guild Wars 2: End of Dragons is undoubtedly one of the most exciting adventure video games and users’ feedback didn’t wait to come up on the Internet.
However, if you’re thinking about running it, keep in mind that developers already reported some known bugs on Guild Wars 2: End of Dragons.
They also claimed that they investigated all the known bugs and managed to solve most of them.
Now, let’s see what are the identified problems and how you can fix most of them.
How can I fix Guild Wars 2: End of Dragons bugs?
1. Latest bugs
1.1 The sky scale mount issue
According to some players, they are unable to summon their sky scale mount when the default skin is equipped.
For now, we don’t have enough information regarding this subject, so you’ll have to wait a bit until developers come up with a specific solution.
1.2 Stuck camera
Keep in mind that one of the most common Guild Wars 2: End of Dragons bugs can get your camera stuck.
This seems to happen after dismounting the siege turtle. Developers reported that they are working on a fix.
So, in the meantime, you can mount and dismount your turtle again to solve the issue.
1.3 Unable to enter the queue for PvP matches
Even if this one is rare, some players claimed that they enter a state where they are unable to queue for Player versus Player matches. This specific issue prevents affected users from queuing for a new match.
Engineers are aware of this issue and investigating potential solutions, but there is currently no known way to avoid this rare problem.
For now, if it’s happening to face this problem, we recommend submitting a support ticket to the dedicated team.
1.4 Mount audio memory impacts performance
Simultaneously press on the Windows and I keys to open Windows Settings.
Navigate to System.
Scroll down, then click on About.
On the right window pane, you’ll find your PC’s and OS specs.
This one may appear especially for players that have lower specs hardware. In this case, it is always important to check if your OS meets the game’s minimum requirements. If you don’t know what are those, check the following list:
Of course, the bugs listed above are not the only ones you can encounter while trying to run or play this game.
Like any other game, Guild Wars 2: End of Dragons can generate some other general problems, like not downloading/installing, launching, or not working at all.
Fortunately, there are always solutions to fix any of them, so make sure you check this guide completely to get the best out of this game.
2.1 Turn off background apps
Use the following keyboard shortcut to openWindows Settings:Windows+I.
Go toPrivacy.
From the left window pane, scroll down toBackground apps.
UnderBackground Apps, make sure that theLet apps run in the backgroundsection is turnedOff.
2.2 Temporarily disable antivirus software
Hit theWindowskey, typeControl Panel, then open the first result.
Navigate toSystem and security.
Click onWindows Defender Firewall.
From the left window pane, selectTurn Windows Defender Firewall on or off.
Make sure you check the section shown directly below.
2.3 Update your graphics drivers
Hit theWindowskey, typeDevice Manager, and open the first result.
Expand theDisplay adapterssection, then choose a driver, and selectUpdate driver.
Choose toSearch automatically for drivers.
Wait until your OS scans for newly available options.
If there are any solutions found, you’ll be notified.
Repeat the same process for all the listed display adapters.
The above steps are correct and useful, but you can consume time by performing this process. Fortunately, we have a solution that will automatically update all of your drivers.
Outbyte Driver Updater provides a huge database and if you choose to use it, you’ll be able to update and fix all of your drivers in no time.
Not only that this software will automatically take care of outdated, broken, or corrupted drivers, but it will find any missing device driver.
Hit theWindowskey, typeControl Panel, then open it.
Choose toUninstall a program.
In the opened list, search forGuild Wars 2: End of Dragons, then choose toUninstallit (Just like we show you with the Twitch example directly below).
Now, download and reinstallGuild Wars 2: End of Dragons.
After the processes are finished, check if the related bug is still there.
As you can see, Guild Wars 2: End of Dragons can generate multiple bugs, but you can always find workarounds that will help you get rid of them and enjoy the best experience.
Vanquish is another game affected by a number of issues that sometimes limit the gaming experience. If you play this game as well, do not hesitate to also fix Vanquish game bugs as soon as possible.
For any additional questions or curiosities, make sure you leave a comment in the dedicated section below.
We can all admit that FAR: Changing Tides is an awesome masterpiece that offers unique sail experiences and most of the time it works irreproachably.
However, many users reported that FAR: Changing Tides is sometimes crashing on StartUp and if you also face this issue, do not panic!
Because it is a pretty common situation, we’ve managed to put together several solutions you can try to fix it.
What can I do if FAR: Changing Tides is crashing on StartUp?
1. Check if your OS meets the game requirements
Use the following keyboard shortcut to openWindows Settings:Windows+I.
Navigate toSystem.
Scroll down until you find theAboutsection, then click on it.
Now, you can visualize yourPC and OS specifications.
The first thing you should do is check if your operating system meets the game’s minimum requirements. If you’re not sure what are those, make sure you verify the list below:
Just download and install the software installer package and run it. Keep in mind that you’ll require DirectX 11 or above to run the Far Changing Tides game properly.
11.2 Microsoft Visual C++
Hit the Windows key, type Apps & features, then open the first result.
In the opened list, locate the Microsoft Visual C++ program(s).
Click on each program, then choose to Uninstall them.
In case none of the above solutions worked for you, you’ll probably need to reinstall the game.
As you can see, there are plenty of solutions you can apply if FAR: Changing Tides is crashing on StartUp. We guarantee that at least one would manage to solve your problem without any effort.
If it’s happening to encounter additional related questions, feel free to leave a comment in the dedicated section below.
If you don’t like the default interface of your Windows 11 PC, icon packs give you the chance to change it to meet your preference.
Windows 11 comes with customization options like the use of wallpapers, using your image, skin packs, etc, to change the look of your PC.
If any of them doesn’t satisfy your desired experience, you go for Windows icon packs that will help you achieve it with many tools.
In this guide, we will look at the best Windows 11 icon packs and their features that you can use.
Is it compulsory to use Windows 11 icon packs on my PC?
Having Windows 11 icon packs is not compulsory, but rather it’s normally used for those users who’d like to enhance their PC.
It’s mainly for people who want their PC to look unique and be different from the others. If you have a PC and use the default icons, there is no need to worry.
Simplus is one of the best free Windows 11 icon packs due to its good appearance. Each icon has a resolution of 256PX x 256 PX, and they are available both in JPG and PNG formats.
It adds a minimalistic look to Windows 11 due to its set of shades and looks. It is easier to install due to the documentation instructions, and the whole process is easier. All you need is to download the zipped installation file.
Simplus has light icons that mainly work best for light backgrounds, and it’s easier to sport them. The dark icons work well with light backgrounds and wallpapers, making sorting folders and files easier. The icon design is stylish and straightforward.
Lumicons icon comes with icons, installation instructions to help users who may have problems installing the pack. It supports quick installation through DLL and other tools.
It gives Windows 11 a different look due to the database of colors and shades you can choose from.
Lumicons comes with additional apps that customize all parts of your Windows 11 to meet your taste and a resource hacker app to modify Windows binaries, e.g., images, menus, or strings.
It creates a nice contrast with the Windows 11 theme and the soft edges rhyme with the hard edges of the theme.
This pack consists of many icons, i.e., Adobe CC apps, folder icons, Microsoft Office-like Word, Excel, PowerPoint, desktop icons, Twitch, web browsers, Spotify, Netflix, directories, i.e., Windows System, symbolic and mono apps.
As the name suggests, its icons have some shadow that provides extra shadows behavior to your Windows 11 theme.
It has 46 icons that work well with folders, files each serving different purposes. Shadow 185 pack gives users the ability to change all the folder’s icons.
Even more, it lacks application icons that many people look for when choosing an icon pack. The pack has a large selection that ensures the design is the same across Windows 11.
The Google Material UI inspires its user interface, and all the icons have white colors that indicate the depth of the icons. The icons get a dynamic look through the rounded squares and inner circular designs. It only offers the icons in .png format.
This pack targets users who want to give their Windows 11 PC a retro look, to look like the old Windows 2000 or XP. It makes the PC appearance look like it’s in the late 80s, 90s, and early 2000s.
Its design got inspiration from Nintendo’s NES, which had a vintage and pixelated appearance. The pack divides icons by changing the grids into squares and filling them with the right color giving them a minimalistic look.
It brings back the youthful feeling and only comes in .ico format. It’s a better choice though those having eye problems cant use this pack.
OS X Minimalism iPack has minimal icons that give Windows 11 the look of macOS. When you download the installation package, it comes as a 7Z (compressed).
Therefore, you have to unzip it using unzipping software like WinRAR to extract the pack’s contents and view them. Locate the OS X Minimalism iPack.exe file, then run it to initiate the installation.
The installation of this pack is a bit different, whereby you don’t install each icon manually but rather the whole pack. Once you install the app, the whole look of the PC changes with the new icons.
It patches icons for several apps like Chrome, Command Prompt, Windows Media Player, Firefox, Regedit, calculator, etc. All the icons are in .png format.
It is one of the modern icon packs that exists right now, with over 100 icons. The icons get designed to have an image with a circular background with a specific color.
The pack offers the icons in different file formats, e.g., SVG, PNG, ICO, giving users many options.
Kameleon Icons pack has icons for Windows 11 folders, e.g., Documents, Downloads, Pictures, or Music.
Each has its design making it look good and appealing, giving your PC a sleek feature. It also has the other normal icons, i.e., recycle bin, videos, gaming, and replacement of DLL files.
It also has a premium version that you can upgrade and access over 2,000 icons.
It consists of 51 icons. The pack has icon made from swords, crowns, arrows, shield, castles, bows, as the name suggest. Its inspiration is from how the Kings used to dress during the early days and take care of their kingdom.
It is also a good option for movie lovers who watch movies that involve a lot of shields and fights, i.e., Game of Thrones or Robinhood.
The only issue with this pack is that the icons don’t represent the real folder, i.e., an arrow can represent the documents folder, it’s upon you to remember which icon represents a certain folder. All the icons come either in JPG or ICO format.
The pack consists of icons for Windows applications, web apps, and folders. It has hundreds of icons from Chrome, Facebook, Gmail, Google Play Store, messenger, and not only.
This icon pack is comprehensive, with flat and 3D designs of the icons. Each design gives the shadow of the icon to increase the depth of the colors.
It’s still under development and works better if your Windows 11 PC use Faba Of Sam Hewitt.
Customization helps you improve your experience when using your PC. Some packs may have malware that can affect your machine and lower its performance. Be very careful when downloading any icon pack for your PC and always use a reliable antivirus.
The majority of the icons come as an executable file which hackers enjoy using to carry malicious files. Be very careful with what you download and install.
Most of the icon pack software and files are easier to use with straightforward instructions and guidelines.
If you are interested in knowing how to build your icons without the icons manager, you can download software to help you out.
We hope our guide was useful. Just let us know the pack you use in the comments section.
Hitting the Alt + Tab key is a quick way to navigate through the open applications in Windows and quickly open the desired one. It’s a keyboard shortcut we all love. But many users, after upgrading to Windows 11, have found the Alt + Tab to not be working.
In this case, you can still manually open the desired apps, but those with their hands set on the Alt + Tab keyboard shortcut often find that a problem. For others, too, the shortcut is a much more convenient option.
So, if Alt + Tab is not working in Windows 11, try the methods listed in the following section to eliminate the issue.
What do I do if Alt + Tab is not working in Windows 11?
1. Restart the Windows Explorer process
Press Ctrl + Shift + Esc to launch the Task Manager.
Select the Windows Explorer (explorer.exe) process, right-click on it, and select Restart from the context menu.
More often than not, it’s a trivial bug in the Windows Explorer process that’s causing the Alt + Tab not working issue in Windows 11 here. In this case, restarting the process should fix the error.
2. Try another keyboard
If you have been using the keyboard for long enough, and notice other issues with it, the problem may just as well be with the keyboard. Check if the other shortcuts involving the Alt or Tab key work.
You can also try using another keyboard, and if it works, your earlier keyboard was probably malfunctioning. If the new one doesn’t work, it’s a software issue. In this case, one of the methods listed below should work.
3. Update Windows 11
Press Windows + I to launch the Settings app, and select Windows Update from the tabs listed in the navigation pane on the left.
Next, click on the Check for updates button on the right.
If an update is listed after the scan, click on Download & install to get it.
Sometimes, a bug in Windows Update too might lead to Alt + Tab not working in Windows 11. And, if any such bug is found, a patch for it is released in the subsequent updates. So, updating the OS should fix the issue for you.
Press Windows + S to launch the Search menu, enter Windows Terminal in the text field at the top, right-click on the relevant search result, and select Run as administrator from the context menu.
Click Yes in the UAC (User Account Control) prompt that pops up.
Now, click on the downward-facing arrow at the top, and select Command Prompt. Alternatively, you can hit Ctrl + Shift + 2 to launch Command Prompt in a new tab.
Now, paste the following command and hit Enter to run the DISM (Deployment Image Servicing and Management) tool:Dism /Online /Cleanup-Image /RestoreHealth
Once done, execute the following command to run the SFC(System File Checker) scan:sfc /scannow
Once done, restart the computer and check if the error is fixed.
Returning your computer to a functional state as fast as possible is essential, which is why using dedicated repair software not only will simplify this whole process but is also recommended in most cases.
5. Uninstall conflicting third-party apps
Press Windows + I to launch Settings, and select Apps from the list of tabs in the navigation pane on the left.
Next, click on Apps & features on the right.
Locate the conflicting app, click on the ellipsis next to it, and select Uninstall from the flyout menu.
Again, click on Uninstall in the confirmation prompt.
If the Alt + Tab not working in Windows 11 after installing a third-party app, it’s time you remove it. Many third-party applications are found to conflict with the functioning of the OS and can lead to an error.
Other than that, various third-party Alt + Tab switchers are meant to improve the functionality but start conflicting, and cause a bunch of issues. So, make sure to remove these as well.
6. Update the keyboard and graphics driver
Press Windows + S to launch the Search menu, enter Device Manager in the text field, and click on the relevant search result.
Double-click on the Keyboards entry here to view the devices under it.
Right-click on the malfunctioning keyboard, and select Update driver from the context menu.
Next, select Search automatically for drivers from the two options that appear in the Update Drivers window.
If you are running an outdated version of the driver or haven’t updated it in a long while, it’s time you do so since this too can lead to Alt + Tab not working in Windows 11. Though the OS takes care of the updates, there’s no harm in manually checking for them.
Also, if the above methods don’t work, you can try other ways to update the driver in Windows 11. In many cases, the keyboard manufacturer may not have submitted the driver to Microsoft and directly installed it on their official website, so check there as well.
7. Switch to the old Alt + Tab version
Press Windows + R to launch the Run command, enter regedit in the text field, and either click on OK or hit Enter to launch the Registry Editor.
Click Yes in the UAC (User Account Control) prompt that appears.
Now, paste the following path into the address bar at the top, and hit Enter. Alternatively, you can navigate to it using the pane on the left:HKEY_CURRENT_USER\Software\Microsoft\Windows\CurrentVersion\Explorer
Right-click anywhere on the empty portion on the right, hover the cursor over New, select DWORD (32-bit) Value from the menu, and name the key as AltTabSettings.
Double-click on the AltTabSettings key that you just created to modify it.
Enter 1 under Value Data and click on OK at the bottom to save the changes.
Restart the computer for the changes to come into effect fully.
If nothing else works, you always have the option to revert to the old Alt + Tab viewer since it’s less prone to errors. Here, you will also see the app icons, not preview thumbnails.
Though this is not the best solution, it should keep you going for the time being until Microsoft releases a fix for the Alt + Tab not working issue in Windows 11.
What are some useful keyboard shortcuts in Windows 11?
There are a bunch of useful keyboard shortcuts that would help you perform various actions and open applets quickly rather than going the conventional way.
You can use Windows + I to launch the Settings app, Windows + X will open the Power User/Quick Access menu, Windows + A will give you access to the Action Center, and Windows + Z will help open the Snap Layouts.
Other than these, you can also quickly launch File Explorer by clicking Windows + E, the Run command using the Windows + R, and the Widgets using Windows + W. Also, check out the other useful keyboard shortcuts to make your Windows 11 experience simpler.
FAR: Changing Tides was recently released (1 March 2022) and it is available for Windows computers and for consoles like PlayStation or Xbox editions.
Even if FAR: Changing Tides doesn’t deliver something tangible, that has a story told in audio logs and written lore, this game places you into a wonderful sail set letting you explore various voyage experiences.
Unfortunately, like any other game or program, FAR: Changing Tides can generate many annoying bugs, like not installing, downloading, launching, or not working at all.
There’s nothing worse than not being able to enjoy your favorite video game, so it is always important to know how to deal with specific bugs.
If you’re a FAR: Changing Tides fan, this guide is dedicated only to you! To discover the best solutions you can try to fix game-related problems, make sure you read it completely.
How can I fix the FAR: Changing Tides bugs?
1. PC bugs
1.1 Check if your OS meets the game’s requirements
Use the following keyboard shortcut to open Windows Settings: Windows + I.
Navigate to System.
Scroll down until you find the About section, then click on it.
Now, you can visualize your PC and OS specifications.
Even if some users forget to check these, the FAR: Changing Tides minimum requirements are mandatory if you want to run the game on your PC.
So, checking your computer’s specifications should be the first thing to do if it seems like not working/downloading/installing properly.
If you’re not sure what you should look for, verify the list below and discover the minimum requirements for FAR: Changing Tides:
However, the minimum requirements might sometimes not be enough for the smoothest FAR: Changing Tides experience, so in order to prevent any related bugs, make sure you meet the following recommended aspects:
OS: Windows 10 64-bit
Processor: Intel Core i3-8350K or AMD Ryzen 3 1300X
In the top-left corner of your Steam desktop app, click on Steam.
Choose to Exit the app.
Now, use the following keyboard shortcut to open the Windows run dialog box: Windows + R.
In the opened window, input this command: steam://flushconfig
This command will refresh your Steam files.
Open Steam, try to run FAR: Changing Tides, and check if the bug persists.
For those of you who choose to run FAR: Changing Tides on Steam, keep in mind that you can encounter related bugs because of the gaming platform.
Thus, it is best to restart it and make sure the problem is not caused by Steam. If you didn’t manage to solve your issue, we have more efficient workarounds you should try.
1.3 Run the game through another browser
Some users prefer running FAR: Changing Tides through the Steam browser app. If you’re one of them and you face game-related bugs, trying another browser it’s a reliable idea.
In this case, you would need an option that is designed especially for gamers, and Opera GX is one of the best on the market.
This browser comes with a dark theme by default that is both easy on the eyes and visually appealing. Its UI interface is extremely intuitive and well-organized, so it won’t give you headaches.
The browser has a dedicated tab (called GX Corner) that brings you the latest news from the gaming world.
Plus, it is has a built-in VPN. It is pretty strong and can be used to protect your online privacy.
If you’re wondering if Opera GX is able to boost your gaming performance, keep in mind that it also depends on your PC configuration and the available resources.
In your Steam desktop or browser app, go to Library.
Look for FAR: Changing Tides, then click on it, and choose Properties (Similar to the CS example shown directly below).
From the left window pane, click on Local Files.
Now, look at the right side of the window, and choose to Verify the integrity of the game files…
This workaround also applies if you’re using the Steam gaming platform. Verifying the integrity of your game files would
If you are missing textures or other content in-game or experiencing crashing while playing a game, you can have Steam verify that the game’s files are installed correctly on the computer.
1.5 Run the gaming app in compatibility mode
Right-click on your Steam desktop shortcut, then choose Properties.
Click on the Compatibility tab, then check Run this program in compatibility mode for.
Choose an older Windows OS version for the drop-down menu.
Try running FAR: Changing Tides in Steam and check if the issue persists.
1.6 Update your graphics drivers
Press on the Windows key, type Device Manager, and open the first result.
Expand the Display adapters section, then right-click on the needed element, and choose to Update driver.
Select to Search automatically for drivers.
Wait until your OS scans for newly available options.
If there are any solutions found, you’ll be notified.
You can follow the steps above without any hesitation, but we also have an additional solution to update your graphics drivers in no time.
With Outbyte Driver Updater you’ll be able to update and fix all of your drivers like an expert. This software will constantly update your elements with the latest features.
While you can always manually update your drivers, this software makes this tedious process a breeze by automating it.
Outbyte Driver Updater will automatically take care of broken or corrupted drivers, that can stop you from enjoying a smooth and complete gaming experience. Plus, it is able to find any missing device driver.
Make sure that the connection between your PS4 and the Internet is stable.
Now, navigate to PS4 Settings.
Click on System Software Update.
Press the X button.
You’ll get a message that informs you if the latest version of your system console has already been installed.
Otherwise, the message will let you know that you should upgrade your system. To install it, click on Upgrade now.
2.1.2 PS5
Open Settings.
Go to System.
In the System Software section, click on System Software Updates and Settings.
Choose the type of update you want to perform.
Click on the Update button, then wait until your console is updated and restarted.
2.1.3 Xbox
Make sure your console is connected to the Internet, then press the Xbox button to open the guide.
Select Profile & system (Account icon).
Go to Settings.
Select System.
Navigate to Updates & downloads.
Choose to update the console.
1.3 Nintendo Switch
Go to the Home menu, then select System Settings.
Navigate to the System section, then set the Auto-Update Software option to On.
Your system will automatically download updates.
2.2 Check the disk space and free up some
2.2.1 PS4
Go to Settings.
Scroll down to System Storage Management.
On the opened page you’ll see how the disk space is distributed and how much free space you have.
If you notice you don’t have enough free space, you should delete other saved data.
To do so, go back to your Settings menu, and choose the Application Saved Data Management section.
Choose what you want to clear.
Click on Delete.
2.2.2 PS5
Open PS5 Settings.
Scroll down to Storage.
There, you’ll be able to view both the Console Storage and the Extended Storage.
Click on each of them and check the free disk space.
If you don’t have enough, make sure you delete other saved data.
To do so, go back to your PS5 Settings, navigate to Saved Data and Game/App Settings.
Choose from Saved Data (PS5) or Saved Data (PS4).
Select Console Storage.
Click on Delete.
Tick the box next to the files you want to delete and select Delete.
2.2.3 Xbox
Press the Xbox button on your controller to open the guide.
Select Profile & system.
Go to Settings.
Choose System.
Navigate to Storage.
On the Manage storage devices screen, select: Clear local saved games.
This deletes games saved to your hard drive, but they’ll still be saved to the cloud.
2.2.4 Nintendo Switch
Go to the Nintendo Switch Settings.
Scroll down to Data Management.
Choose Manage Software.
Now, you should be able to see the list of your games, sorted by how much space they take up on your console.
You can free up space in the System Memory using Manage Save Data/Screenshots.
Keep in mind that software data (including downloaded software, software updates, and screenshots) can be stored on the System Memory or on a microSD card.
2.3 Rebuild the database/Restart your console
2.3.1 PS4 and PS5
Completely power off your console.
Press and hold the Power button.
Release the button after you hear the second beep.
ForPS4, you’ll need to connect your controller viaUSB, then choose to Rebuild Database.
ForPS5, you’ll now boot into Safe Mode. Plug your controller in with the cable, then go down and select Clear Cache and Rebuild Database.
After that, click on Rebuild Database, then on OK.
2.3.2 Xbox
Hold the Power button until it turns off.
Turn it on by holding the Power button and wait for two quick beeps.
Release the button and you will be automatically redirected to the Recovery menu.
From here, you can restore the file system or rebuild the database.
2.3.3 Nintendo Switch
While your Nintendo Switch console is off, hold down the Volume Up and Volume Down buttons.
Press the Power button.
Continue to hold down the Volume Up and Down buttons until the Recovery menu opens.
There, choose to Initialize the console without deleting save data.
As you can see, there are plenty of solutions you can use to solve the FAR: Changing Tides bugs, regardless of the device you’re running the game through.
In case you’re aware of additional related workarounds, make sure you share them in the comments section listed below.
In this guide, we will show you 5 ways to check your graphics card on Windows 11. This will help you figure out.
With this info, you’ll know what graphics drivers to use, whether to run certain games or apps, and troubleshoot graphics-related errors.
Sounds good? Here’s how to do it.
How can I check the graphics card in Windows 11?
Check the graphics card using Windows Settings
You can quickly check your graphics card using Windows Settings. Under the Display Settings, you can find out all the available information about your graphics card.
1. Press theWin+Ibuttons to openWindows Settings.
2. Select Display on the right side.
3. Scroll down and click on Advanced display.
4. Here, you will see all information including the graphics card model and manufacturer’s name listed for your internal graphics card.
5. Click on Display adapter properties for Display 1 to find information about the graphics card installed on your PC.
Using System Information Tool
Press the Win + R buttons to open the Run dialogue.
Execute the below command: msinfo32
Expand the Components section.
Select Display from the list.
Here you will all information about the graphics card on your Windows 11 PC.
Using DirectX Diagnostic Tool
Press the Win + R buttons to open the Run dialogue.
Type the below command and hit Enter: dxdiag
Switch to the Display tab.
Here you can find all information related to your graphics card installed on your Windows 11 PC.
Using Device Manager
Open the Start menu.
Search for Device Manager and open it.
Expand the Display adapters option.
Your graphics card will be listed.
To know more about it, double-click on the desired GPU to view detailed info in a separate window.
Using Task Manager
Right-click on the Start menu.
Select Task Manager from the list.
Click on the Performance tab.
Details about all the GPUs, i.e., the integrated and the dedicated graphics card will be listed.
Both will be listed under GPU 0 and GPU 1 in the sidebar.
Click on the one that you want information for.
If you’re on an earlier version of Windows, we also have a similar article on how to check your graphics card in Windows 10. You can also check out the official box packaging where you received your laptop. The graphics card name would definitely be mentioned on it.
It is very important that you have the exact information about the graphics card installed on your computer. This will help you quickly locate the necessary drivers for it, in case things go south.
Let us know in the comments section below which one of the above-mentioned methods is your go-to way of checking graphics card information on your Windows 11 PC.