What is a Pre-Shared Key and how do you get it [VPN]

Nowadays, VPNs have become somewhat of an epitome of privacy and security. Of course, this type of service wouldn’t have reached this level of trust, was it not for strong security measures.

If you’re familiar with VPNs, you probably know that they encrypt traffic. More so, you can’t just waltz yourself inside a VPN server, as you’d most likely need some sort of authentication.

Most services tackle this issue by making you create accounts, which are subsequently whitelisted, so you can access the VPN without an issue. But there’s way more to it than sees the eye.

Pre-shared keys (PSK), for instance, are a great example of additional security measures that you’ve probably never even heard of.

What is a Pre-Shared Key?

A Pre-Shared Key (PSK) is a string of characters (so basically a password) that various services, including VPNs, rely on as an authentication method. However, note that PSKs are not exactly secure by themselves.

After its creation, the PSK needs to be shared with every device that has to use it. However, great caution must be practiced upon sharing the PSK, as revealing it to third-parties might easily jeopardize the security of your connection.

Furthermore, since the PSK needs to be exactly the same on all devices, it’s like a password that you use for multiple accounts (bad idea). All it takes is one device to be compromised for the PSK to become useless, or rather dangerous.

For those reasons, Pre-Shared Keys are used in conjunction with other similar security measures, such as traditional usernames and passwords.

Also, to increase their level of security, they must be long and random, to prevent them from being cracked by brute-forcing.

How to get a preshared key for your VPN?

There’s a lot of confusion when it comes to PSK. Most users believe that you have to acquire the PSK from a special place, but in fact, the PSK can be anything you want if you’re a VPN host.

On the other hand, if you’re about to connect to a VPN server, you might need a PSK, which you can get by asking the VPN server host.

For instance, your workplace might have a dedicated VPN that you can connect to, in order to be on the same network with your colleagues and share company resources. If that’s the case, just ask the network administrator for the Pre-Shared Key.

Last, but not least, you can use third-party tools such as password generators to create complicated keys. They’re usually more secure than coming up with your own password, which, let’s be serious, is almost always something easy to remember.

How to find Shared Secret VPN Windows

You can configure a Pre-Shared Key easily, especially if you’re using Windows’ built-in VPN feature. We’ll teach you how to find the Pre-Shared Key in a few easy steps:

  1. Press the Win key on your keyboard
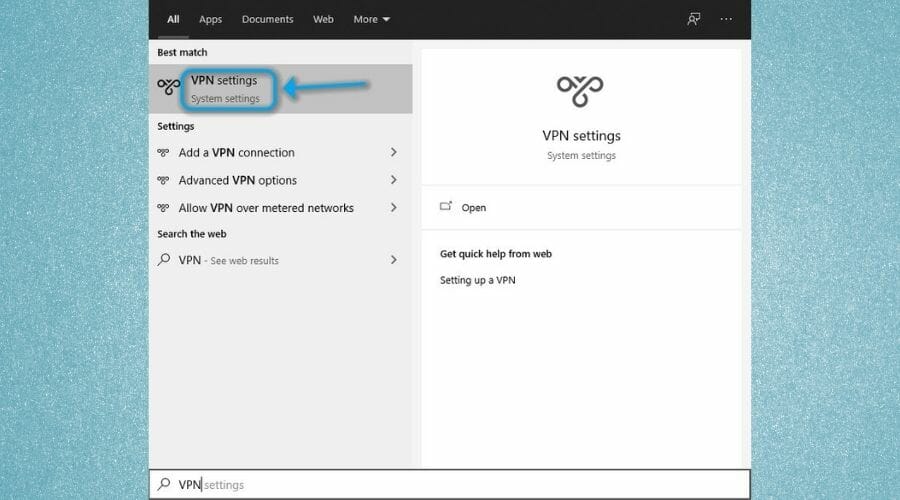
  2. Type VPN
  3. Click VPN settingsStart menu VPN settings
  4. Select your secured VPN connection from the list
  5. Click Advanced options
  6. Press the Edit button
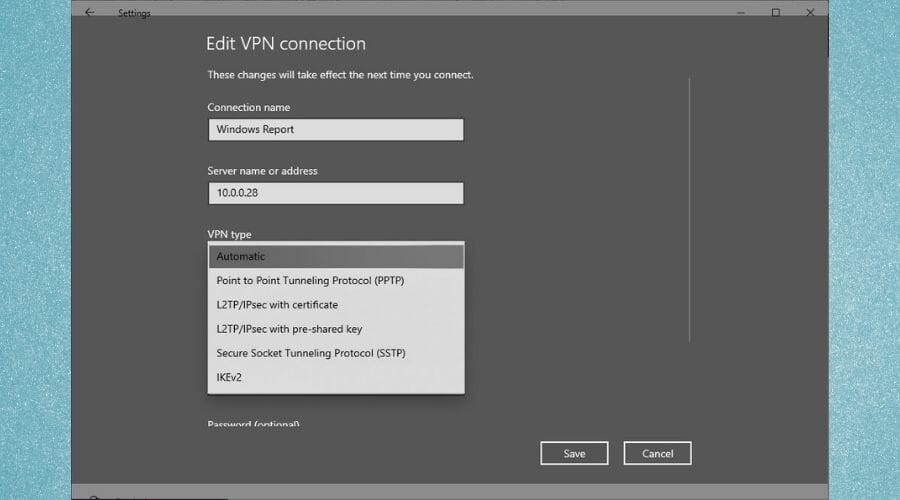
  7. Select L2TP/IPsec with pre-shared key from the VPN type menuL2TP edit VPN connection
  8. Type the PSK in the appropriate field

Alternatively: create a new VPN connection, if necessary, but make sure to choose L2TP/IPsec as the VPN type if your network uses a Pre-Shared Key.

If you were looking for ways to reveal a hidden PSK from an existing VPN connection, there’s no way to do that. Back in the day, you could’ve used an asterisk password revealer, or something similar.

However, those tools haven’t been working for a while, so there’s no way to reveal a PSK that’s been already saved to a VPN connection.

The VPN shared secret is incorrect

If your Pre-Shared Key is not typed correctly in the field we’ve mentioned above, you won’t be able to establish the connection. This could happen for two reasons:

  • You didn’t copy/paste the PSK correctly within the appropriate field
  • The VPN server administrator changed the key, and you need to acquire the new one

Can’t connect to L2TP VPN on Windows 10? Check out our guide to fix the issue quickly.


It’s not uncommon to paste your password all wrong, it happens to everyone once in a while. Just make sure you didn’t include any spaces before or after the PSK.

Final thoughts on VPN Pre-Shared Keys

All things considered, PSKs are quite useful tools that can help you secure a server with an additional security layer. Keep in mind that a PSK is not even near enough to secure things, especially given that multiple devices can use it.

However, setting a long, random PSK and changing it on a regular basis can definitely help you increase the security of your VPN server.

[wl_navigator]
FIX: Cannot communicate with Canon scanner in Windows 10

A scanner is an indispensable device in any office. There’s always a need to do some paperwork. Therefore, the scanner needs to be up and running smoothly.

Unfortunately, many of them are affected by various issues. Cannot communicate with scanner is a common error message that can appear with Canon scanners on Windows 10.

This can be a big problem, and in today’s article we’ll show you how to fix it.

How can I fix the Canon scanner error message in Windows 10?

1. Run the troubleshooter

cannot communicate with scanner canon windows 10
  1. Press Windows Key + I to open the Settings app.
  2. Go to the Update & Security section.
  3. Choose Troubleshoot.
  4. Select Printer and click Run the troubleshooter.
  5. Follow the on-screen instructions to complete it.

2. Update your drivers

According to users, if you keep getting Cannot communicate with scanner message on your Canon scanner, the issue might be outdated drivers.

To fix the problem, it’s advised to visit Canon’s website and download the latest drivers for your scanner. After updating the drivers to the latest version, the issue should be completely resolved.

We strongly recommend using a specialized driver updating tool to fix your drivers in order to avoid damage to your PC by manually downloading the wrong driver versions.

It scans your system and lists all existing and possibly missing drivers. The tool also detects if there is already a new version for current records. If necessary, these can be updated directly via Fortect Driver Updater.

⇒ Get Fortect Driver Updater

3. Reinstall the drivers

cannot communicate with scanner canon windows 10
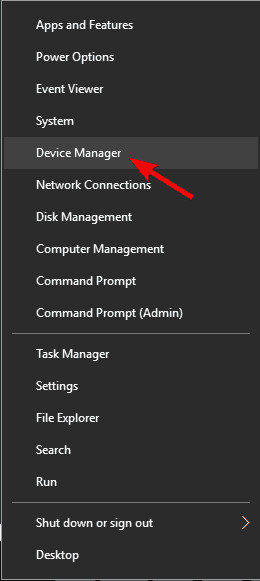
  1. Press Windows Key + I and select Device Manager.
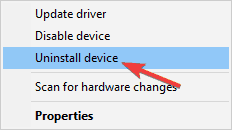
  2. Locate your Canon driver, right-click it and choose Uninstall device.
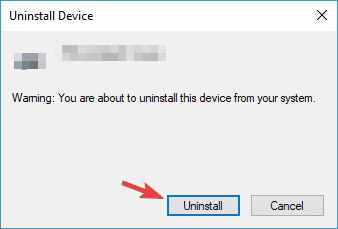
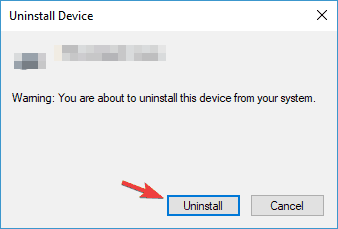
  3. Check Remove driver software for this device and click the Uninstall button.
  4. Click the Scan for hardware changes button, and Windows will install the missing drivers.

4. Perform a Clean boot

cannot communicate with scanner canon windows 10
  1. Press Windows Key + R, type msconfig. and click OK.
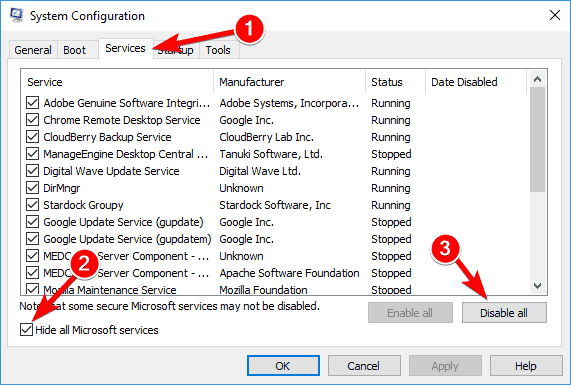
  2. Go to the Services tab.
  3. Check Hide all Microsoft services and click Disable all button.
  4. Go to the Startup tab and click Open Task Manager.
  5. Right-click the first entry on the list and choose Disable.
  6. Do the same for all entries on the list.
  7. Close Task Manager and go back to the System Configuration window.
  8. Click Apply and OK, and restart your PC.

In some instances, third-party applications can interfere with your hardware and cause Cannot communicate with scanner message.

To fix this problem, users are suggesting to disable all startup applications and services. After your PC restarts, check if the problem is still there.

If the issue doesn’t reappear, the cause is one of the disabled applications or services. To find the exact cause, you need to enable disabled applications one by one or in groups until the problem reappears.

5. Enable bidirectional support

cannot communicate with scanner canon windows 10
  1. Press Windows Key + S, type control panel and select it.
  2. Go to Devices and Printers.
  3. Locate your printer and right-click it.
  4. Choose Printer properties from the menu.
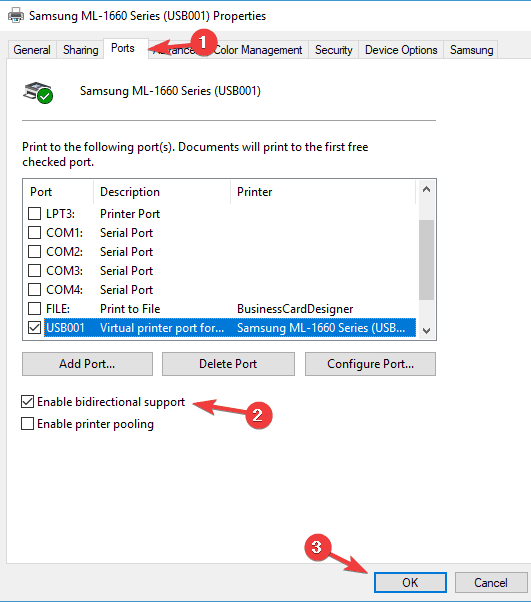
  5. Go to the Ports tab and check Enable bidirectional support.
  6. Click OK to save changes.

6. Move the problematic directories

  1. Go to the C:twain_32 directory.
  2. In there you should see two PIXMA directories and a wiatwain.ds file.
  3. Leave PIXMA and wiatwain.ds alone, and move other files and directories to a new folder on your desktop.
  4. After moving the files and directories, restart your PC.

Once your PC restarts, your printer/scanner will recreate the missing files and the problem with scanning should be completely resolved.

Users claim that they fixed this error on Canon PIXMA MG5420, simply by moving a couple of directories. Although this solution works for the aforementioned model, it might also work for other Canon devices.

7. Switch to the Power-saving mode

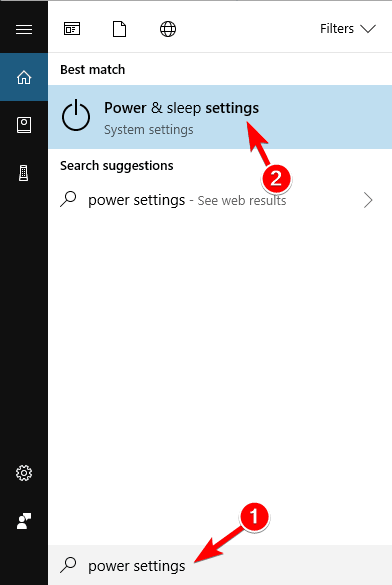
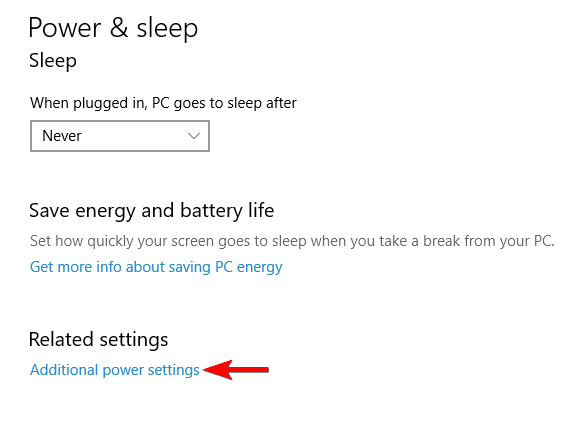
  1. Press Windows Key + S and type power settings.
  2. Select Power & sleep settings.
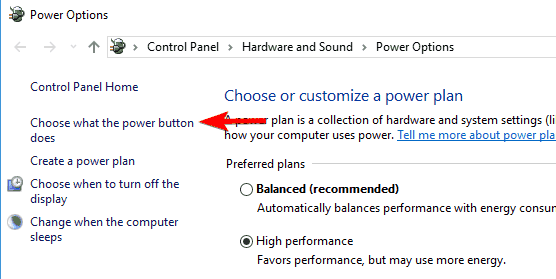
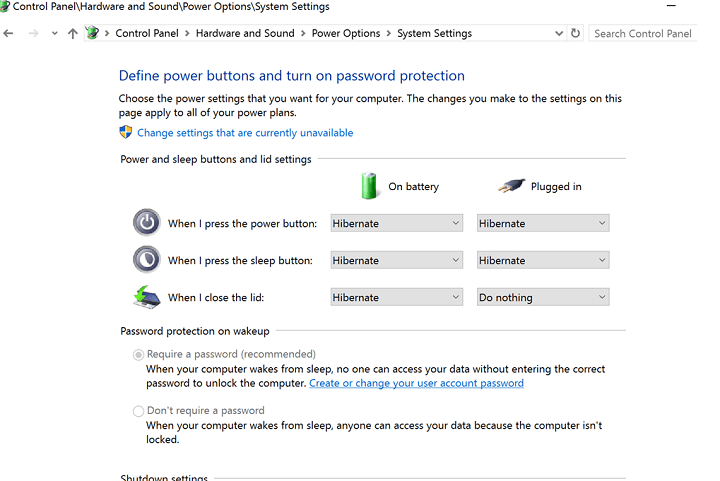
  3. Click on Additional power settings in the Related settings section.
  4. Select Power saver mode from the list.

After doing that, your scanner should start working again. We have to admit that this is an unusual solution, but several users claim that it works, so feel free to try it out.

We hope at least one of these solutions was helpful. In case you have any subject-related questions or suggestions, just reach for the comments section below.

Fingerprint reader not working after sleep in Windows 10/11

One of the best ways to protect your Windows 10 device from unauthorized access is to use a password, or better yet – a fingerprint.

Unfortunately, few users have reported that the fingerprint reader is not working after Windows 10 wakes up from sleep, so let’s fix that.

This issue is particularly common on the following manufacturers’ devices: HP, Lenovo, Asus, Dell.

What can I do if the fingerprint reader is not working?

  1. Download the latest drivers for your fingerprint reader
  2. Check power management settings
  3. Disable and enable Credential Manager service
  4. Disable and enable your fingerprint reader
  5. Lock your device manually
  6. Switch to local account / create a new account
  7. Prevent your PC from turning off USB devices
  8. Uninstall fingerprint software
  9. Remove and recreate your PIN
  10. Update your BIOS

1. Download the latest drivers for your fingerprint reader

If the fingerprint reader isn’t working after you wake up your computer from sleep, maybe it’s time to perform a driver update.

To perform this task, you basically need to go to your laptop manufacturer’s website, look for the most recent drivers, and download them.

If you’d like to avoid the hassle of searching for drivers on your own, you can use a dedicated tool that will do this for you automatically.

After the scan is complete, you get a report on all drivers that need your attention, so feel free to update only the fingerprint reader drivers or the complete driver’s batch.

2. Check power management settings

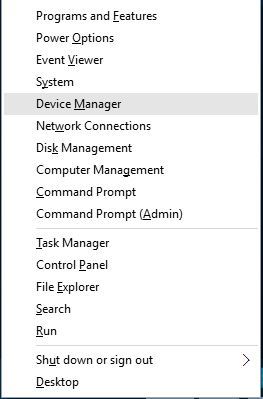
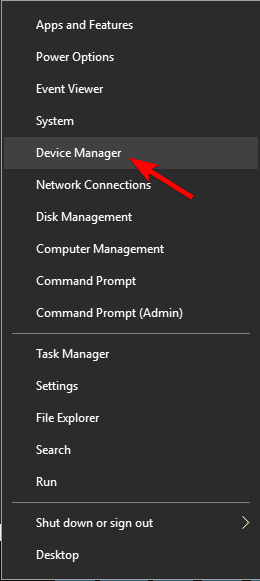
  1. Press Windows Key + X and choose Device Manager from the list.
    device-manager
  2. When Device Manager opens, locate your fingerprint reader. It should be located in Biometric Devices section.
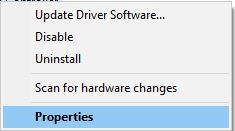
  3. Right-click your fingerprint reader and choose Properties.
    properties-driver
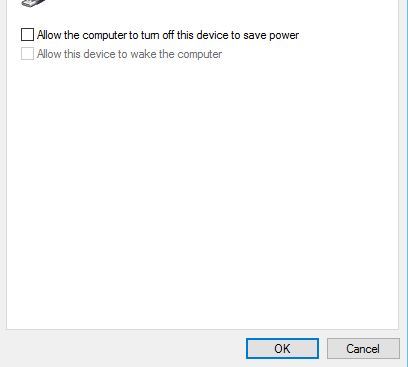
  4. Navigate to the Power Management tab and uncheck Allow the computer to turn off this device to save power.
    allow-computer-to-turn-off-this-device
  5. Click OK to save changes.

If your fingerprint reader isn’t working after you wake up Windows 10 from Sleep Mode, you might want to check its power management settings. To do that, follow the above steps.

3. Disable and enable Credential Manager service

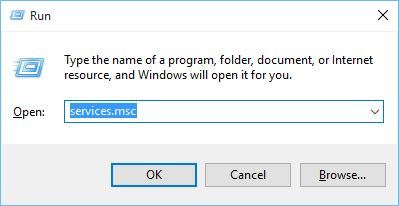
  1. Press Windows Key + R shortcut to open the Run dialog. Type services.msc and click OK or press Enter.
    run-services
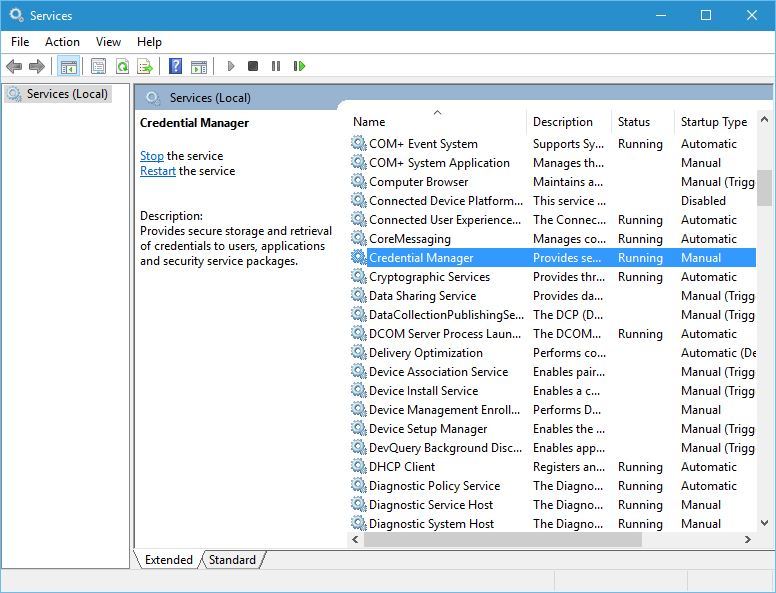
  2. When the Services window opens, locate Credential Manager service and double click it.
    services-credential-manager
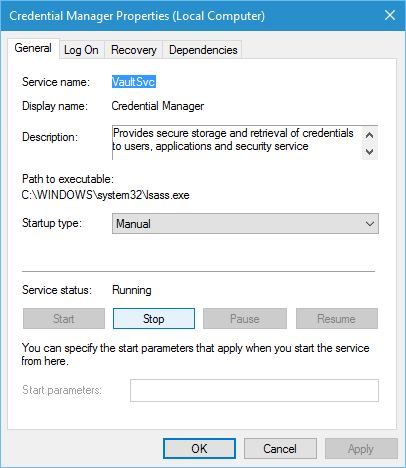
  3. The Credential Manager Properties window will open. Go to the Service status section and click on Stop.
    credential-manager-properties
  4. After you’ve stopped the service, click on Start to restart the service.
  5. Click Apply and OK to save changes.

Sometimes problems with fingerprint readers can be fixed if you restart certain services.

Users have reported that they have managed to fix this issue by disabling and enabling the Credential Manager service, and you can do that as well if you follow the above steps.

4. Disable and enable your fingerprint reader

  1. Open Device Manager.
  2. Locate the Biometric Devices section and expand it.
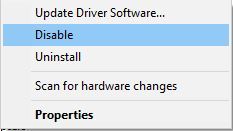
  3. Find your fingerprint reader, right-click it, and choose Disable from the menu.
    device-manager-disable
  4. Right-click the fingerprint reader again, but this time choose Enable.

Certain problems with the fingerprint reader can be fixed simply by disabling it and enabling it back again. To do that, follow the given procedure.

5. Lock your device manually

This is a simple workaround if your fingerprint reader isn’t working after sleep mode.

In order to avoid any problems with the fingerprint reader, just lock your laptop (by pressing Windows Key + L on your keyboard) before you close the lid.

Users have reported that using the Windows Key + L shortcut on the lock screen fixes the problem with the fingerprint reader.

However, we have to mention that you’ll have to use this shortcut every time you put your computer to sleep. This might not be the most practical solution, but users are reporting that it works.

6. Switch to local account / create a new account

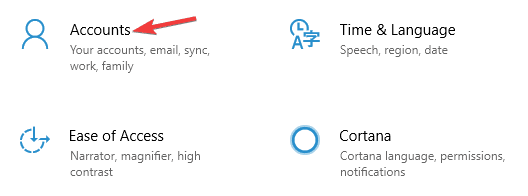
  1. Go to Settings and click on the Account icon.
  2. In your account click Sign in with a local account instead.
  3. You’ll be asked to enter the current password. Now click on Next.
  4. Set your user name, the password for your local account. After doing that, click on Next.
  5. Now click on Sign out and finish.

Some users reported that switching to a local account resolves this issue. And that’s exactly what we’re going to try now. Use the above steps to switch from your regular Microsoft account to a local account.

7. Prevent your PC from turning off USB devices

  1. Open Device Manager.
  2. Go to the Universal Serial Bus controllers section and double click USB Root Hub.
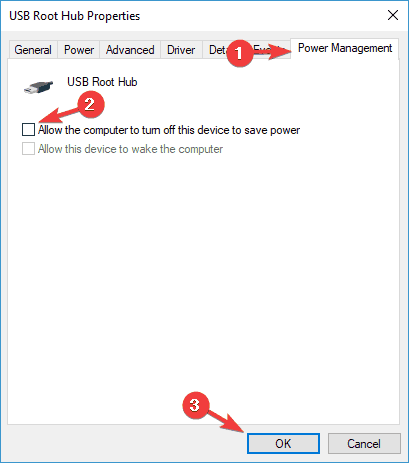
  3. Navigate to the Power Management tab. Now uncheck Allow the computer to turn off this device to save power. Click on OK to save changes.
  4. Repeat these steps for all USB Root Hub devices that you have on your PC.

There’s a chance your computer is set to automatically disable USB devices. If that’s the case, you’ll have to change that.

8. Uninstall fingerprint software

  1. Open the Settings app. You can do that quickly by using Windows Key + I shortcut.
  2. The Settings app will now appear. Navigate to the Apps section.
  3. Locate the fingerprint reader software on the list and select it. Now click the Uninstall button.
  4. Follow the instructions on the screen to complete the uninstallation process.

Reinstallation is a good old solution for just about any problem. And we’re going to give it a try. Uninstall your fingerprint software by following the above procedure.

9. Remove and recreate your PIN

  1. Open the Settings app and navigate to the Accounts section.
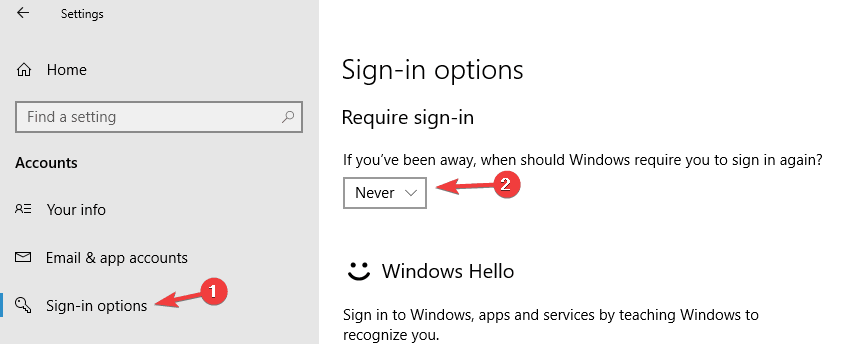
  2. Select Sign-in options from the menu on the left. In the right panel go to the Windows Hello section and click on the Remove button under Fingerprint.

After removing fingerprints, you need to remove your fingerprint driver. Now you need to download and install the latest driver for your fingerprint reader.

Lastly, you need to register two new fingerprints. To do that, follow these steps:

  1. Go to Settings app > Accounts > Sign-in options.
  2. Make sure that you have a PIN set up. If not, set up your PIN now.
  3. Go to the Windows Hello section in the right pane and click on the Setup button.
  4. Follow the instructions on the screen to set up your fingerprint.
  5. After adding a fingerprint, go to the Windows Hello section and click on Add another button.
  6. Follow the instructions on the screen to add another fingerprint.

10. Update your BIOS

And finally, if none of the solutions above resolved the problem, one final thing you can try is updating BIOS.

But remember, this should be your last resort, because updating BIOS is a risky business, and one wrong step can basically render your computer unusable.

If you want to find out more about updating BIOS, check out the link below. But still, if you’re not sure in what you’re doing, ask a professional for help.

Although the fingerprint reader provides the best security for your Windows 10 device, some problems, such as this one, can occur.

If you have any problems with the fingerprint reader and sleep mode, feel free to try some of our solutions.

As always, for more suggestions or questions, Don’t hesitate to reach out for the comments section below.

OneDrive Videos are not Playing: 5 Quick Ways to Fix

One of the great things about OneDrive cloud storage is that you can play videos in it. As such, you don’t need to save the videos to your own hard drive to play them.

Storing videos in OneDrive can save quite a bit of HDD space. However, videos don’t always play in OneDrive.

Some of our readers have stated that some videos pause when playing them in OneDrive. This is how you can fix OneDrive videos that aren’t playing.

Why won’t OneDrive play videos?

Here are some of the main reasons why OneDrive might not play your videos:

  • Corrupt video file – If the video file is not playing in OneDrive, check the original file from the source and see if that is playing. It might have been damaged when it was copied.
  • Incompatible format – You may upload any file type in OneDrive, but it has limited file support for playback. We have a solution below for converting it to a suitable format.
  • Connection problems – A poor internet connection will cause the video to stop playing, so you should check it first.

Now that we know what we’re dealing with, let’s see what we can do if OneDrive is not playing your video.

What can I do if OneDrive won’t play videos?

Before starting any tweaking on the file, consider working around the problem using these simple methods:

  • First of all, make sure that you have a strong internet connection. If that is weaker, try to adjust the resolution and quality of the video to use less bandwidth.
  • Try playing the video offline from your computer. This way, you will use your own video player, and you will no longer rely on an internet connection.
  • Restart your PC. Although it seems pointless, many problems vanish after this simple operation.

If the videos are still not playing, consider performing the solutions below.

1. Clear the cache and cookies from your browser

  1. Open Google Chrome, click the Menu button from the top-right corner of the window, and select Settings.
  2. Select Privacy and security from the left pane, then click on the Clear browsing data option.
  3. Lastly, select the Time range, if you want, check the boxes for the objects you want to delete, and hit the Clear data button.

If you’re opening the video in OneDrive from your browser, make sure you clear the cache and cookies because sometimes, they can interfere with the process.

We described how to do that in Google Chrome, but the process is similar on all the other popular browsers.

2. Convert the video to a compatible format

Although you can upload most video formats to OneDrive, remember that, unfortunately, it supports a limited number of file formats for playback.

These are the supported OneDrive video (and audio) playback formats: MP4, WMV, AVI, ASF, M4A, M4V, MOV, WAV, AAC, WMA, SMI, 3G2, 3GP, ADTS, SAMI, MP3.

You need to convert an incompatible OneDrive video to one of those compatible formats. The best tool for the job is none other than WinX HD Video Converter Deluxe.

Our top recommendation is an easy-to-use yet powerful converter since it can transcode any video to any format, with no CPU overuse/overheating to worry about.

The best widely supported format to convert a video to is probably MP4, but there are plenty of other options.

WinX HD Video Converter Deluxe

WinX HD Video Converter Deluxe

Get started on fixing your OneDrive videos with the help of this tool. There are plenty of compatible formats at your disposal!
Free trial Visit website

3. Check if the video has DRM protection

  1. First, open the video’s folder in File Explorer.
  2. Then right-click a video and select Properties.
  3. Select the Details tab on the Properties window.
  4. Then scroll down to the Protected category shown directly below. A video is DRM protected if you see Yes in that detail category.

Another thing to note is that OneDrive doesn’t play videos with DRM (Digital Rights Management) keys. Thus, a video with a compatible format will still not play in OneDrive if it has a DRM key.

You can remove DRM protection from a video for OneDrive playback with third-party software but note that removing DRM might not be within the terms of use for a digital product.

We have a list containing the best video optimizer software that may help you with that. Most of them have conversion features and can remove the DRM protection in the process.

4. Consider using a different cloud hosting service

If you still can’t play the videos in OneDrive, maybe you should consider replacing it with a different cloud service that doesn’t have as many issues.

We have a handy list containing the best personal cloud storage services that will work seamlessly.

5. Fix the video with a third-party tool

At this point, if none of the solutions above worked, you may also consider that the file uploaded on OneDrive is corrupted. If you have the opportunity, test if the source file is also corrupted.

If yes, you may still use a dedicated tool to fix it. We have a list of the best video repair tools that can save the clip.

Were these tips helpful? Let us know in the comments area below.

Top 5 Surface Duo Tips and tricks to make you a dual-screen believer

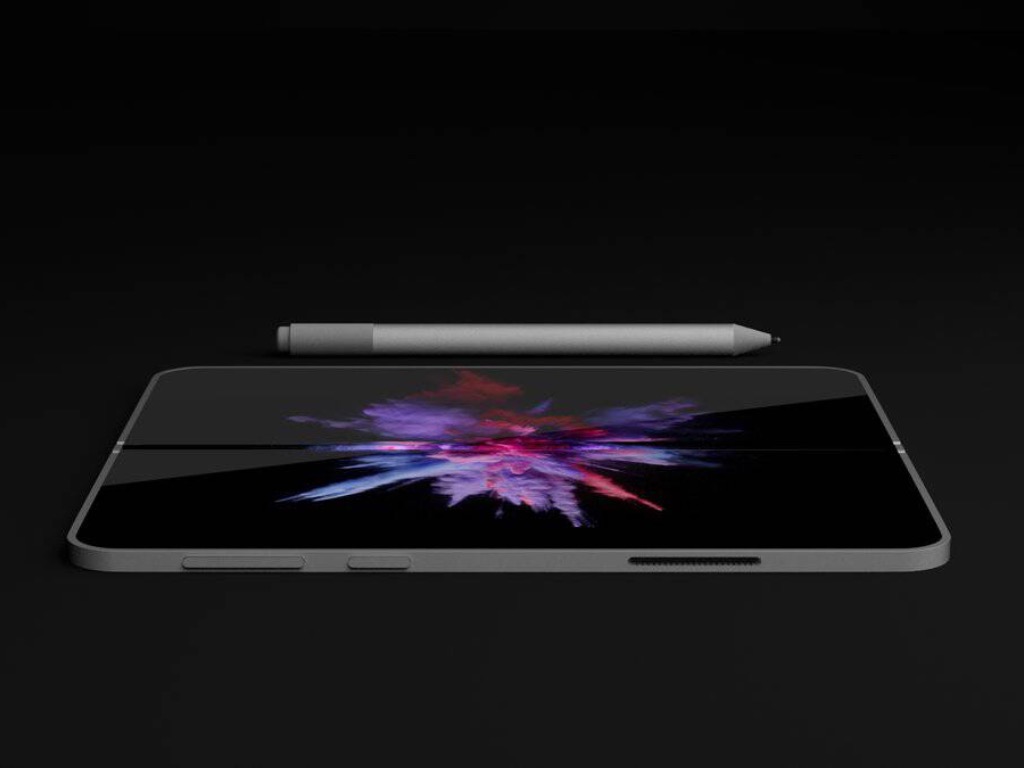
If you just purchased (or are thinking about purchasing) a Surface Duo, then there’s a lot that awaits you. Thanks to its two screens, you’re able to accomplish a lot more than you can with a traditional Android phone. From running Android on one screen, and Windows on another, or using Gboard to ink to reply to texts, here are our top 10 tips and tricks for the Surface Duo.

Tip #1: Use Microsoft Remote desktop to run Windows 10 on your Duo

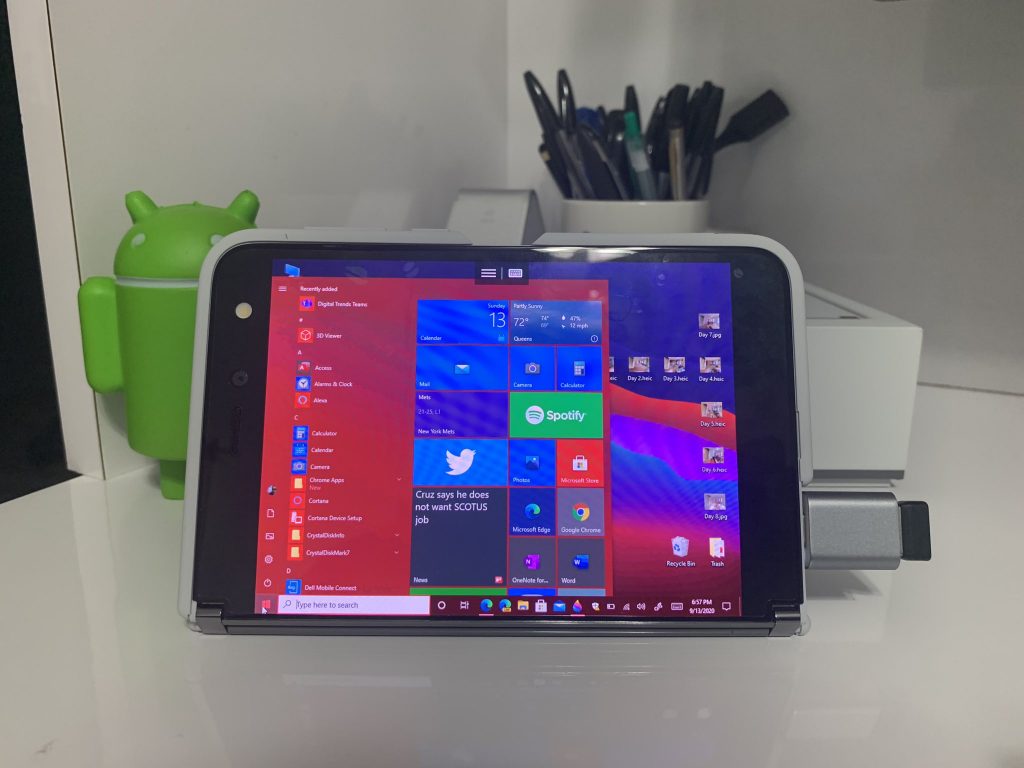
Duo Windows 10

You probably heard the rumors and saw the articles that at one point, a Windows-based OS was the operating system for project Andromeda, the device the Duo is based on. This eventually got canned in favor of Android, but there’s no reason why you can’t run Windows on your Duo.

Thanks to the Microsoft Remote Desktop app, you can run Windows 10 on your Duo through your in-home network. The app is available in the Google Play Store, and while it’s not currently optimized for the Duo, it brings the same desktop experience you’re familiar with over to the Duo’s screens. The app even scales your desktop to fit the Duo’s display so it’s like you have a mini desktop! And, you can fold your Duo’s screen over and get Windows 10 just like you would on a modern Windows 2-in-1!

To set the Remote Desktop up, find your IP address from your PC by opening an elevated admin-level command prompt and typing “IPCONFIG” When you find your IP address (it should be under Wireless LAN adapter Wi-Fi) note it down. Then, click the (+) icon at the top of the app and choose Desktop. Enter your IP address, and your user name (email and Microsoft account password if you’re using a Microsoft Account) and then click Save. You should then be able to tap the entry in the mains screen and connect to your PC from your Duo!

When set up, you can run the Remote Desktop app on one screen, and Android on another. It’s quite an amazing experience to see two of the world’s most popular operating systems running on one device (even if it’s just streaming through the internet.)

Remote Desktop
Remote Desktop
Price:
Free

Tip #2: Use Gboard for handwriting recognition on Surface Duo

Duo Inking

Another great selling point of the Surface Duo is its support for the Surface Pen. That means you can ink on the screen. But, did you know you can turn your inking on the screen into actual text in a text field? With Gboard on Surface Duo, that’s what you’ll be able to do!

To get this setup, you’ll have to install Gboard for free from the Google Play Store. Once installed, follow up the settings you get on the screen to enable the Gboard on Surface Duo. When finished, you can switch to Gboard as an alternative keyboard by tapping the tiny keyboard icon in the lower right corner of the Duo’s screen whenever inside a text box.

Then, from there, click the settings icon on Gboard. You’ll then want to select Languages and choose English (US) QWERTY, then select Handwriting. Now, every time you want to ink in a text field, you can switch between Swiftkey and Gboard with the little keyboard icon in the bottom right of the screen.

Gboard - the Google Keyboard

Tip #3: Turn on the 3 button navigation

Duo Gestures

A lot of early reviewers of the Duo have had issues with the way gestures work on the device. Swiping appears to be quite confusing for some people, which is why we suggest turning on Android’s 3-button navigation. Doing so will give you three icons at the bottom of the screen, functioning as visual buttons. This lets you go home. back and see your open apps more easily.

To turn on the 3 button navigation, go to Settings. Then, from there, head into System. And, then click Gestures followed by System navigation. From there, you can choose the three-button navigation. Just be aware, when enabled, you’ll lose some screen real estate on the bottom of the screen for the buttons.

Tip 4: Speed up your Duo by reducing animations

Duo Developer Options

Another common complaint from a lot of people who have adopted the Surface Duo is its sluggish performance. Although we have yet to experience performance issues, there are a few settings that can be changed to fix the overall performance of Surface Duo. Just be warned, these involve going into Developer options, which isn’t exactly recommended. These settings are for experienced users only.

First, activate Developer Mode by going to Settings, tapping About, and then scrolling down to the Build number. Tap five times on that number, and enter your PIN. You should see a new Developer Options setting under Settings.  Here’s where you want to be at.

We suggest changing a couple of different things. Go to Drawing under Developer Options and then change the Windows animation scale, Transition animation scale, and Animator duration scale to .5x. You can always reset it to 1x later, but you should feel that the Duo is a bit more responsive now.

Tip 5: Get a tablet mode for most Android apps, or make apps look smaller on the screen

Duo Brightness

The Duo is a phone with a super high-resolution display. Most apps are not able to properly adapt to this display resolution and aspect ration. However, you can force apps to adapt by changing your display settings. This makes text and other items smaller on the screen, but it also will force some apps (like Instagram) into their tablet modes and show more text on the screen.

To do this, click Settings followed by Display. Make sure you change the Display Size to small. You should then see apps begin adapting to the change in setting.

Other tips, and join the community!

We can’t give our all our Surface Duo tips and tricks in one page, but there’s a lot more we’d like to discuss. Surface Duo users have put together a nice guide on Reddit with their favorite top tricks. The list includes the ability to use the Duo with a monitor, use GCam on the Duo for better photos, as well as pairing the Duo with a smartwatch for NFC functionality. Check out the full thread on Reddit, and join the discussion.

Outlook for Windows is getting Roaming Signatures next month

Outlook for Windows will finally get cloud syncing support for email signatures next month (via Dr. Windows). The company has posted an update on the Microsoft 365 admin center stating that this feature’s deployment has been delayed, and it’s now timed for a rollout beginning in late October.

Microsoft first revealed the upcoming change in May of this year. The software giant was earlier expected to begin rolling out the cloud syncing option in June and make it available to all Windows desktop clients in late June. The much-anticipated functionality has been delayed several times, and now the company changed the rollout timelines to October. Notably, Microsoft has also updated its Microsoft 365 Roadmap to reflect this change.

With Signature cloud settings, users will be able to configure an email signature and have it saved in the cloud, allowing users to have a consistent experience across devices. The feature will roll out first for Outlook for Windows clients, and it will be available only for Microsoft 365 and Office 365 subscribers. The company plans to bring this functionality to other platforms, including Outlook for Android and Outlook for iOS, at later dates.

Invalid request: video was rejected/authentication expired

YouTube is not only one of the largest video platforms in the world, but also the second largest search engine. It offers a versatile alternative when nothing suitable is on TV.

But many YouTube users encounter the Invalid Request, authentication expired error message while trying to publish videos on the platform.

The issue is typically reported occurring when the user tries to publish them by making the video Public.

You will find in this article suitable solutions to fix this annoying message error.

How can I fix the Invalid request video was rejected error?

1. Enable HTML5 video player on the YouTube website

  1. Go to the dedicated YouTube support page.
  2. Under What is supported by this browser check out which relevant standards your browser already supports.
  3. If your browser does not yet support the HTML5-Player by default, you can submit a request for it there.
  4. Follow the on-screen instructions if you want to use this option.

Until some time ago, Flash Player was mainly used to play YouTube videos. In the meantime, however, it has been replaced by the modern HTML5 video player.

As a result, browsers can have problems with certain YouTube videos if the newer standard is not yet integrated.


2. Refresh your browser

Google Chrome

Invalid request: video was rejected update chrome

  1. Launch the Chrome browser.
  2. Check out the button of the three-point menu in the upper right corner.
  3. If the corresponding icon is colored, an update is available.
  4. Click on the button of the three-point menu, and select Update Google Chrome.
  5. Follow the on-screen instructions, and restart Chrome.

Mozilla Firefox

Invalid request: video was rejected update firefox

  1. Launch the Firefox browser.
  2. Open the main menu of the browser.
  3. Check out the button of three bars on top of each other in the upper right corner.
  4. Click on the question mark symbol, and select About Firefox.
  5. If updates are available, they will be downloaded automatically.
  6. Restart Firefox.

You should always check that you are using the latest version of your web browser. If not, then you should probably update it. Follow the steps above to ensure that your browser is up to date.


3. Don’t log into a different YouTube account while uploading

Invalid request: video was rejected in youtube

You’ll only need to upload the video again and make sure that you’re not logging into a different Google account while the uploading of the video is in progress.

Note: Keep in mind that logging into a different YouTube account from an incognito tab or a different browser will produce the same error since Google will still see the same IP.


4. Delete browser cookies and cache

Google Chrome

fix Invalid request: video was rejected/authentication expired

  1. Launch the Chrome browser.
  2. Open the three-point menu, and use the menu path More Tools.
  3. Go to Clear Browser Data.
  4. Select the time period from which the saved browser data should be deleted.
  5. If you don’t need any of the data anymore, just select Total time.
  6. Now also check the boxes Cookies and other website data and Images and files in cache.
  7. Finally, click on Delete data.

Mozilla Firefox

  1. Launch the Firefox browser.
  2. Open the three-line menu in the upper right corner, and follow the menu path Library.
  3. Go to Chronicle, and click on Delete Newest Chronicle.
  4. Select the time period from which the browser data should be deleted.
  5. If you no longer need all the data, select All in the selection bar, and click Delete data.

So-called cookies and the cache buffer can also cause problems that slow down YouTube. Therefore, try clearing your browser‘s cache and cookies to fix the problems. You can then check again to see if YouTube is working properly again.

If you have any more questions or suggestions, feel free to leave them in the comments section below.

[wl_navigator]

Full Fix: Windows 10 Boot Loop After Update

Windows 10 was a fresh new iteration to the lineup of the Windows operating system for PC, laptops, and other systems.

Windows 10 came with some really nice features that were not only great for desktop users but, this time, Microsoft had actually found a proper way to integrate support for touch-based system on Windows 10, and both desktop, as well as touch experiences, were kept separate from each other this time which allowed users to use Windows 10 the way they want to use it.

But even Windows 10 wasn’t perfect at release. Several bugs made sure that people run into all sorts of issues from time to time.

But Microsoft has been quite active in releasing fixes related to these bugs. One such bug was of an update that made many PC and laptops go on a spin after the update was installed.

The systems on which the update was installed were facing issues related to the boot loop where the PC would keep rebooting and not really going past the boot process.

This made many systems useless and of course, people who were facing this problem were quite pissed. Let us see what caused this issue and how Microsoft managed to fix it.

How do I fix a Boot Loop after a Windows update?

Boot loop in Windows 10 can be quite problematic and prevent you from accessing Windows. Speaking of boot issues, here are some common issues that users reported:

  • Reboot loop Windows 10 – This is a relatively common problem, and it’s usually caused by a problematic update. If you’re having this issue, simply remove the problematic update and install it again.
  • Windows 10 boot loop after reset – Sometimes you might get stuck in boot loop due to your drivers. Outdated drivers can cause this problem, and in order to fix the issue, you need to update them and check if that helps.
  • Windows 10 continuous reboot – Sometimes this issue can occur if you’re having issues with damaged system files. However, you can fix that simply by running a couple of commands in Command Prompt.
  • Windows 10 boot loop automatic repair – Your BIOS settings can also cause this issue to appear. Several users reported that the Secure Boot feature caused this issue, and in order to fix it, you just need to disable this feature.
  • Windows 10 boot loop blue screen, black screen, BSOD – Sometimes a blue screen can appear and force your PC to restart. To fix that, you’ll need to write down the error message and do a bit of research to see how to properly fix the problem.

1. Use Command Prompt

  1. Restart your PC few times during the boot sequence.
  2. Now go to the Troubleshoot > Advanced Options > Command Prompt.
  3. When Command Prompt opens, enter the following commands:
  • C:
  • cd WindowsSystem32config
  • MD backup
  • copy *.* backup
  • cd regback
  • copy *.* ..

Sometimes you might encounter a boot loop due to corrupted system files. However, there’s a way to fix this issue. Windows makes a copy of certain system files, and if anything goes wrong, you can easily restore your system files.

When asked to overwrite the files, just press the A key and then press Enter. After the process is finished, type exit and the issue should be resolved.

2. Use Safe Mode

  1. Let your PC restart a couple of times during the boot sequence.
  2. Now you should be presented with a list of options. Select Troubleshoot > Advanced options > Startup Settings from the menu. Now click Restart to proceed.
  3. Once your PC restarts, you’ll be presented with a list of options. Select Safe Mode with Networking by pressing the appropriate key on your keyboard.

If you’re stuck in a boot loop on your PC, you might be able to solve the problem simply by using Safe Mode. As you know, Safe Mode is a special segment of Windows that runs with default settings, and in case you have a problem with Windows, Safe Mode is a perfect place to start troubleshooting.

Once you enter Safe Mode, check if the problem is still there. If the issue doesn’t appear in Safe Mode, you can use the Safe Mode in order to troubleshoot the issue further.

3. Make sure that your drivers are up to date

If you’re stuck in a boot loop, the problem might be your drivers. According to users, outdated drivers can cause this issue to appear, and in order to fix it, you need to update your drivers to the latest version.

The issue is usually caused by graphics card drivers, but your hard drive or SSD drivers can cause this issue as well.

To be on the safe side, it’s advised to update as many drivers as you can and check if that solves the problem.

Updating your drivers manually can be a tedious task, especially if you have to update multiple drivers. However, you can speed this up by using Fortect Driver Updater.

This is a special application that will scan your PC for outdated drivers and then update them automatically with just a couple of clicks.

More so, if you have drivers that are either broken or missing altogether, Fortect Driver Updater will handle those as well thanks to the massive associated database that powers it.

All you need is a stable Internet connection, a system Restart once FortectDriver Updater does its job, and you’re done.

⇒ Get Fortect Driver Updater

4. Disconnect the unnecessary USB devices

We all use all sorts of USB devices on our PCs, but sometimes these devices can cause a boot loop to occur. However, you can fix the problem simply by disconnecting unnecessary USB devices from your PC.

As a rule of thumb, you should keep only the default devices connected to your PC during the update process.

Devices such as external hard drives, Wi-Fi adapters and similar can cause this issue to appear, so be sure to disconnect them.

Several users reported that a USB dongle for wireless keyboard caused this issue to appear, but after disconnecting it, the issue was resolved completely.

Once the problematic device is disconnected, your PC should be able to boot and the problem with boot loop will be fixed.

5. Disable Secure Boot in BIOS

If you’re stuck in a boot loop after Windows Update, the problem might be your BIOS. The most common cause for this problem is a Secure Boot feature, and in order to fix the issue, you just need to find and disable this feature.

To do that, you just need to follow these steps:

  1. Let your PC restart a couple of times during the boot sequence.
  2. Now choose Troubleshoot > Advanced options > UEFI Firmware Settings. Click the Restart button.
  3. Once your system restarts, you’ll boot directly to BIOS.
  4. Locate Secure Boot feature and disable it. In addition, you can also disable the TPM feature.

After making these changes in BIOS, you should be able to boot to your PC.

6. Disable your Internet connection

According to users, sometimes you might get stuck in boot loop due to your Internet connection.

Sometimes the update process can fail, but if you’re connected to the Internet, your PC will try to download the update again causing you to get stuck in boot loop.

This can be a problem, but you can fix it simply by disabling your Internet connection. If you’re using an Ethernet connection, simply unplug the cable from your PC and try to boot your PC again.

In case you’re using a wireless network, simply turn off your router during the update process.

After you disable your Internet connection, the upgrade process will be completed and you’ll be able to boot to your system.

7. Remove the problematic updates

  1. Start Windows 10 in Safe Mode.
  2. Open the Settings app by using Windows Key + I shortcut.
  3. Now go to the Update & Security section.
    Windows 10 boot loop after reset
  4. Select View update history.
    Windows 10 continuous reboot
  5. You should now see the list of recent updates.
  6. Write down or memorize a couple of recent updates and click Uninstall updates.
    Windows 10 boot loop automatic repair
  7. List of updates will appear.
  8. Double-click the update you want to uninstall and follow the instructions on the screen to complete the process.
    Reboot loop Windows 10

According to users, this issue appeared after installing a certain update. To fix the problem, you just need to find and remove the problematic update.

According to users, KB3081424 was the cause of this problem, but keep in mind that almost any other update can cause this problem to appear. If you’re having issues with the aforementioned update, simply install KB3081436 update and the problem will be resolved.

If you decide to remove an update, keep in mind that Windows 10 might try to install it again automatically. By default, Windows 10 will automatically install the missing updates, so be sure to block Windows from automatically installing the updates.

Being stuck in a boot loop can be a big problem, but we hope you managed to fix this issue using one of our solutions.

How to fix screen problems in Windows 10

Ever since Windows 10 was in its testing phase, users were facing screen problems. We already showed you how to solve black screen and flashing screen problems in Windows 10, but with the final release of the system, new problems appeared.

So, in this article, we’ll try to solve a couple of screen problems in Windows 10.

But first, here are some more examples of this issue:

  • Windows 10 screen flashing on and off – Your screen may not flash constantly, but only in certain time intervals.
  • Windows 10 flickering start menu – There’s a chance your screen will flash only when you open the Start Menu.
  • Black screen windows 10 with the cursor – Black screen usually appears if you have two monitors. Simply detach one of your monitors and the problem should disappear.
  • Windows 10 black screen without cursor – In some cases, you won’t even see a cursor when the black screen appears. This can be caused by your BIOS configuration. To fix the problem, you need to check BIOS configuration and make sure that you’re using only the dedicated graphics.
  • Windows 10 white screen crash – If your computer crashes after a white screen, it’s possible that your graphics card is faulty, so be sure to test it and replace it if needed.

How do I deal with screen problems in Windows 10?

  1. Black screen during Windows 10 installation
  2. Flashing screen in Windows 10
    1. Check if your drivers are compatible
    2. Change monitor refresh rate
    3. Disconnect all the peripherals
    4. Update Windows 
    5. Run the Troubleshooter
    6. Run the SFC scan

1. Black screen during Windows 10 installation

  1. Restart your computer and press the key for entering BIOS (Probably DEL)
  2. Go to Advanced BIOS Features (or something like that)
  3. Select Video Configuration or Internal Graphics
  4. Look for an option Primary Video Adapter
  5. Select PCI to switch to your PCI graphics card
  6. Save changes and exit BIOS

This issue doesn’t usually appear on regular computers. All people who reported black screen during the Windows 10 installation also said that they have two graphics cards or two monitors connected to the computer.

So the solution is very simple, just unplug the second monitor or disconnect the second graphics card, and you should be able to install Windows 10 normally.

While disconnecting the second monitor is easy (you just have to unplug the cable), to disable the second graphics card (probably integrated) you’ll have to go to BIOS.

In most cases, people told us that one of these methods worked, and I hope that it will work for you too. However, if you have black screen problems after you installed Windows 10, check for the solution below.

2. Flashing screen in Windows 10

2.1. Check if your drivers are compatible

Users are having driver compatibility problems ever since upgrading to Windows 10, because a lot of older graphic cards still don’t have compatible drivers.

Also, even if there are Windows 10-compatible drivers for your graphics cards, maybe you didn’t download them.

So reach for the Device Manager and see if your drivers are updated.

Update drivers automatically

Searching for drivers on your own can be time-consuming. So, we advise you to use a tool that will do this for you automatically.

Using an automatic driver updater will certainly save you from the hassle of searching for drivers manually, and it will always keep your system up to date with the latest drivers.

For example, a third-party driver updater and repair tool like Fortect Driver Updater could do the job much faster and better.

Just download and install it on your PC, and launch it to start a full system scan to identify all the outdated, broken, or missing drivers.

Once the scan is finished simply select which drivers you need taken care of, and let Fortect Driver Updater do the rest.

After the new drivers have been downloaded and installed, restart your PC for good measure, and you’re all set.

Concluding here, using automated support to manage drivers and update them accordingly can fix display issues with your Windows 10 PC.

⇒ Get Fortect Driver Updater

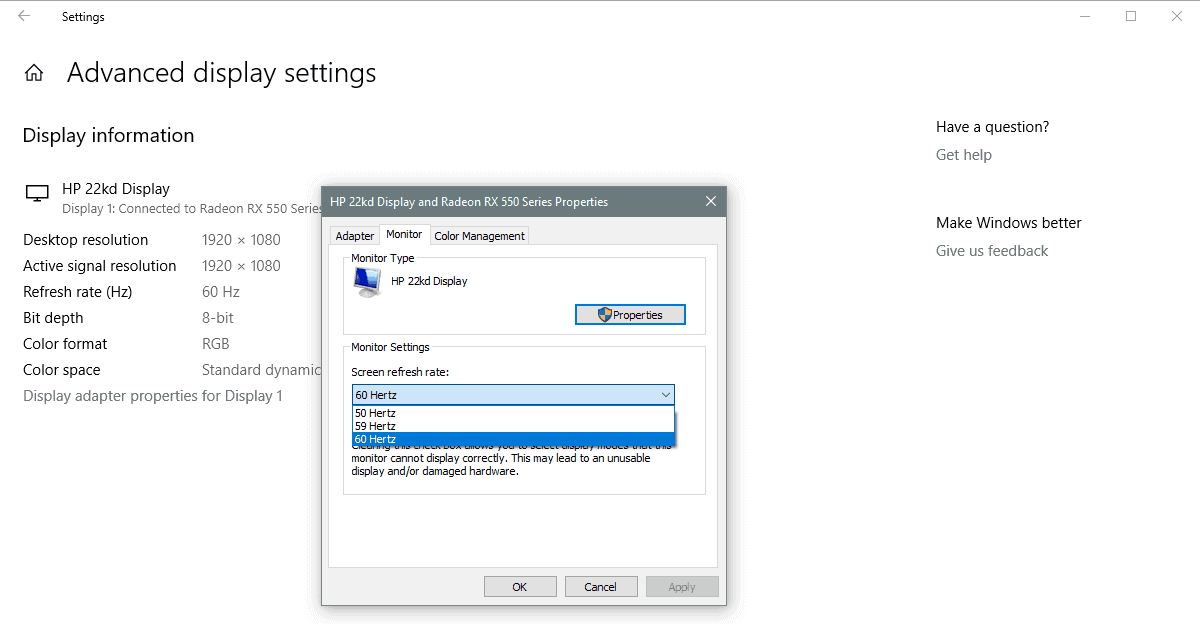
2.2. Change monitor refresh rate

  1. Right-click on Desktop and click on Display Settings
  2. Go to Advanced display settings
  3. Under Related settings, go to Display adapter properties
  4. Go to Monitor tab and select another refresh rate from Screen refresh rate:
  5. Click OK

Some people reported that reducing the monitor refresh rate helped them to get rid of the flashing screen in Windows 10. So it won’t hurt if we try this solution as well.

2.3. Disconnect all the peripherals

Some users reported that certain peripherals may cause the screen issue. To eliminate the doubt, simply disconnect all your peripherals to see if it makes any difference.

If a peripheral indeed causes the problem, search online for some further troubleshooting steps.

2.4. Update Windows 

If this is a widespread problem, Microsoft usually acknowledges it relatively fast. That means the company will release a workaround in form of an update. To make sure you get that update, simply go to Settings > Windows Update, and check for updates.

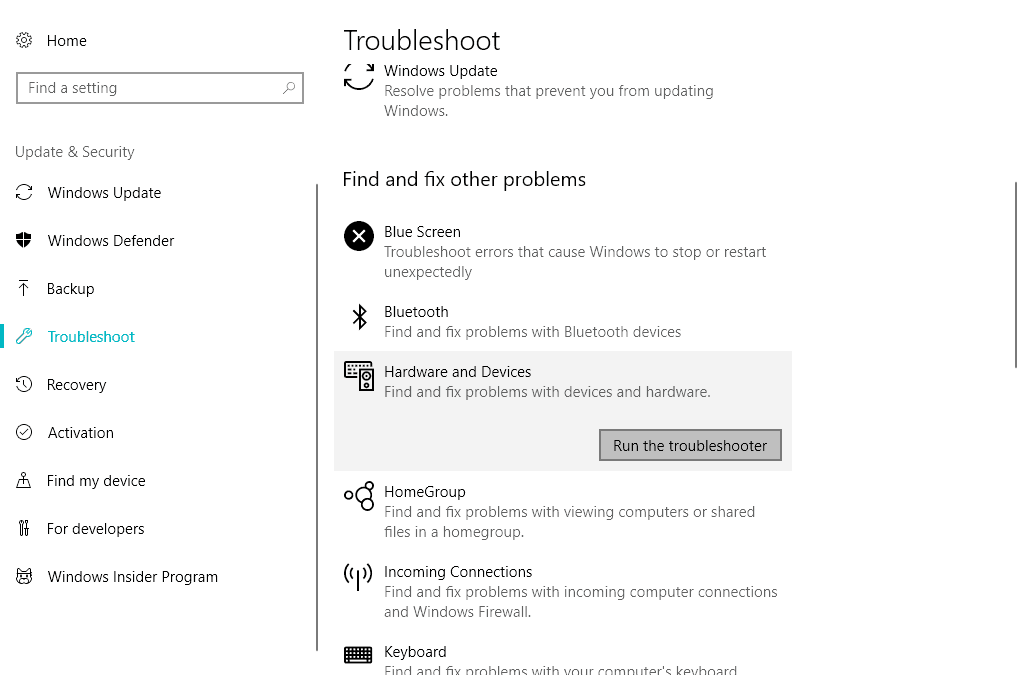
2.5. Run the Troubleshooter

  1. Go to Settings.
  2. Head over to Updates & Security > Troubleshoot. 
  3. Select Hardware & devices, and go to Run the Troubleshooter. 
  4. Follow further on-screen instructions and let the process finish.
  5. Restart your computer.

If none of the previous solutions resolved the issue, let’s turn to troubleshooters. The first one we’re going to try is Windows 10’s own troubleshooting tool.

This feature can help you deal with various system issues, including our problem with the screen.

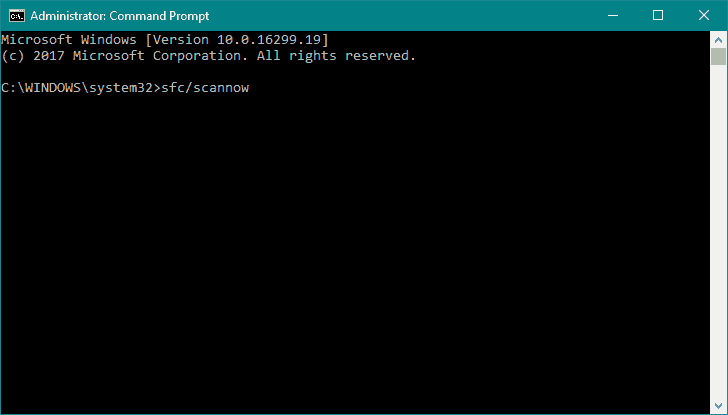
2.6. Run the SFC scan

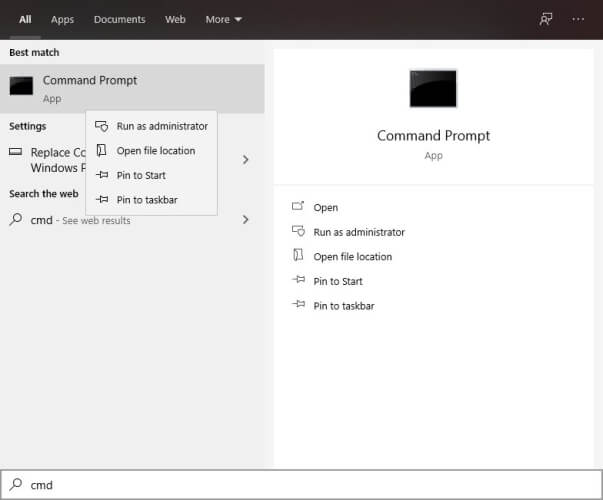
  1. Go to Search, type cmd, right-click Command Prompt, and select Open as Administrator.
  2. Enter the following command, and press Enter: sfc/scannow
  3. Wait for the process to finish.
  4. Restart your computer.

The next troubleshooter we’re going to try is the command-line tool called the SFC scan. As its name says, this tool scans your computer for various system issues. Hopefully, it’ll also be able to resolve our screen problem.

That would be all, I hope this article covered all reported screen problems in Windows 10 so far. But, if none of this solved your problem, you can search for the solution in the above-mentioned black screen and flashing screen articles as well, or you can tell us in the comments if you need further assistance.

If you have any other Windows 10-related issues you can check for the solution in our Windows 10 Fix section. Moreover, if the selection rectangle isn’t working properly, we can help out.

Expeditions Viking Mouse Problem: 4 Fixes That Will Help

Expeditions: Viking is a game that takes you back to 790 AD. A group of Norse warriors lands on the shores of England, and you, as their leader, must guide them. Your choices will dictate how history remembers you.

Players have reported that the game is sometimes affected by various issues limiting the gaming experience. In this article, we will solve the most common Expeditions: Viking mouse problem and show you what triggers to avoid.

Why am I having Expeditions Viking mouse problem?

After investigating the game-related problem, we conclude several elements will trigger mouse issues. At the top of the list are the following:

  • Graphic settings – A few graphic settings will cause lag, especially on lower-performing computers. When activated, you may have issues using your mouse.
  • Driver issues – The most common issues triggering this problem are outdated or corrupted drivers. Since these are essential software that helps link hardware with the OS, we recommend always using up-to-date versions.
  • Mouse settings – If you alter the setting of your mouse from your computer, you may change how it usually functions. It is safe to change settings only if you know what you are doing.
  • Hardware issues – You may be dealing with a bad mouse. In most cases, you should be considering an excellent mouse replacement.

What are other common Expeditions Viking issues?

Expeditions: Viking is a great game but suffers from various issues. Speaking of issues, here are some common problems that users reported:

  • Expeditions Viking crash – Crashes can occur for various reasons, and the most common problem is your antivirus. If the antivirus isn’t the issue, you might have to make a few changes in the config.ini file.
  • Expeditions Viking quest bug – The game itself usually causes this issue, and to fix it, we advise you to download and install the latest patches.
  • Expeditions Viking no sound – Many users reported sound issues while playing the game. If that happens, update your drivers and check if that solves the problem.

How can I fix Expeditions Viking mouse problem?

Before using the solutions below:

  • You should restart Steam. This simple workaround will force some stubborn processes to end and can easily correct the mouse problem.

1. Update your graphics card drivers

  1. Press Windows + R, type dev, and hit Enter.
    expeditions viking mouse problem
  2. Expand the Display adapters category, right-click on your graphics card, and select Update driver.
    expeditions viking mouse problem
  3. Select the Search automatically for drivers option.
    expeditions viking mouse problem

Your graphics card drivers are crucial for gaming, and if you experience any Expeditions Viking mouse problems, this fix may be your first call.

However, the above process is manual; in some cases, you need to find the model of your graphics card and download the latest drivers from the manufacturer’s website.

Downloading drivers manually can sometimes be a complicated process. So, if you want to update your drivers quickly, you might want to use a tool such as Fortect Driver Updater that will update all your drivers automatically.

The product is incredibly easy to use, as you only need to click it 2 or 3 times to go from old and broken drivers to new and functional ones.

⇒ Get Fortect Driver Updater

2. Check your antivirus/firewall

  1. Type windows defender firewall on Windows search, and click on Windows Defender Firewall.
    expeditions viking mouse problem
  2. On the left pane, select Allow an app through Windows Defender Firewall.
    expeditions viking mouse problem
  3. Click the Allow another app button.
    expeditions viking mouse problem
  4. Choose Browse and select the Expeditions: Vikings folder, then click Add.
    expeditions viking mouse problem
  5. Click on the Private and Public checkboxes for the game and click OK.

The process above works for the inbuilt Windows Defender Firewall, but the same principle applies to other firewalls you may use. However, the process and steps may vary slightly.

Also, note that the two directories below should be included in the exceptions list regardless of the antivirus or firewall you use:

steamapps\common\Expeditions Viking_Data\Managed
steamapps\downloading\Expeditions Viking_Data\Managed

3. Perform a Clean boot

  1. Press Windows Key + R and enter msconfig.
  2. Now press Enter or click OK.
    Expeditions viking no sound
  3. When the System Configuration window opens, go to the Services tab.
  4. Now check Hide all Microsoft services and click Disable all.
    Expeditions Viking crash
  5. Now go to the Startup tab and click Open Task Manager.
    Expeditions Viking mouse problem
  6. Select the first entry on the list, right-click it, and choose Disable.
  7. Repeat this step for all entries on the list.
    Expeditions Viking quest bug
  8. Once you disable all startup applications, close Task Manager and go to the System Configuration window.
  9. Now click Apply and OK to save changes.
    Expeditions viking no sound
  10. Restart your PC.

Sometimes third-party applications can interfere with the game and cause various Expeditions: Viking mouse problems.

Once your PC restarts, check if the problem is still there. If not, you might want to enable disabled applications and services individually until you find the one causing the problem.

After you find the problematic application, please remove it from your PC. The best way to do that is to use dedicated uninstaller software.

Such tools scan your PC for any leftover files related to the app you want to remove and permanently remove them.

4. Install the latest Windows updates

  1. Press Windows Key + I to open the Settings app.
  2. Go to the Update & Security section.
    Expeditions Viking mouse problem
  3. Now click the Check for updates button.
    Expeditions Viking crash

Windows will now check for any available updates and download them automatically. Once the updates are downloaded, they’ll be installed when you restart your PC.

According to users, mouse issues with Expeditions Viking and other games can sometimes occur if you don’t have the latest Windows updates installed.

We hope the suggestions above helped you fix the Expeditions Viking mouse problem you’ve encountered.

If you’ve encountered other workarounds to fix this issue, please list the troubleshooting steps in the comment section below.

Photo Backup Software for Windows 10 & 11: Best 5 to use

Most of us have hundreds of images in our computers, and backing up all these files manually can be a tedious task that we don’t perform as often as we should.

But what if there’s a faster way to back up your images? In this article, we’ll show you the best image and photo backup software that will make backing up your images fast and simple.

What is the best image and photo backup software?

Acronis Cyber Protect Home Office

Acronis Cyber Protect Home Office is a well-known file backup software, and it’s one of the best tools on the market. The application allows you to back up your files easily, which can come in handy for image backup.

The software also has dual protection, allowing you to automatically back up your files to the cloud. By doing so, you’ll have two copies of your backup created automatically.

It’s worth mentioning that the application will perform continuous backups in the background without affecting your performance, allowing you to focus on more important tasks.

If you’re looking to automate the backup process, you’ll be pleased to hear that software supports backup scheduling as well as event-based backups.

This is incredibly powerful backup software, and if you want an application that can back up your files or your entire system, Acronis Cyber Protect Home Office is the right way to go.

Acronis Cyber Protect Home Office features:

  • Ability to back up individual files and directories
  • Can clone your active disk
  • Constant backups that don’t interfere with your everyday work
  • Ability to upload backups to the cloud
  • Event-based backups

Acronis Cyber Protect Home Office

A professional backup software that can backup files, photos, system drives and partitions. Try it now!
Check price Visit website

Aomei Backupper

Aomei Backupper image and photo backup software

If you’re looking for image and photo backup software, then Aomei Backupper might come in handy. The software allows you to back up individual files and folders with ease.

Thanks to the file sync feature, you can rest assured that your files are perfectly backed up at all times. In addition to files, you can back up your system drive, disks, partitions, and volumes.

The software also supports scheduled backups, so you can completely automate the backup process. On a side note, event-triggered backups are also available.

It’s important to mention that the software won’t interfere with your system in any way, and thanks to the Hot Backup feature, you can create backups while using your PC.

Aomei Backupper is great backup software, with a wide array of features, so we encourage you to try it out.

Aomei Backupper features:

  • Extensive directory and file backup feature
  • Mirroring sync, two-way sync, and real-time sync
  • Can back up system drives, disks, partitions
  • Command-line support
  • Can store backups on local/external/network drives, NAS, and cloud

Aomei Backupper

Aomei Backupper is a professional backup software that can be used to back up images and other files.
Check price Visit website

Handy Backup

Handy Backup image and photo backup software

Another great software for photo backup is Handy Backup. This application will back up Windows files, directories, apps, photos, videos, documents, and other files. There’s even support for email backup.

Regarding the backups, you can store them on your local or external hard drive or upload them via FTP. There’s also support for NAS, cloud storage services, and WebDAV protocol.

Task scheduling is available, allowing you to automate the backup process completely. Speaking of backups, there’s support for full, incremental, and differential backups.

If you’re backing up files such as images, for example, you’ll be pleased to hear that there’s support for synchronization and data mirroring, so your data will remain perfectly backed up.

Handy Backup is great for file and image backup, and if you’re looking for versatile backup software, we encourage you to try it out.

Handy Backup features:

  • Ability to back up files, apps, photos, videos, documents, and more
  • Task scheduling
  • Can store backups on local/external drive, FTP server, NAS, and cloud storage
  • File encryption and compression
  • File syncing

Handy Backup

Handy Backup is a powerful backup software with a special focus for individual file and image backup.
Check price Visit website

Ashampoo Backup Pro 14

Ashampoo Backup Pro image and photo backup software

Ashampoo Backup Pro is another useful software that might come in handy for image and photo backup. The software can back up selected files and folders, but it can also back up partitions and disks.

In addition, you can use this tool to back up and restore your Windows systems. As for storage, you can store backups on local/external drives, online storage, NAS, and cloud services.

The software supports both full and incremental backups, and it also allows you to create system disk images. Support for versioning and automatic synchronization is also there, which will surely be useful.

As for additional features, we have to mention 256-encryption, file compression, password protection, extensive email reports, and task scheduling features.

Ashampoo Backup Pro is great backup software, and it will be useful if you want to back up your images or an entire PC.

Ashampoo Backup Pro features:

  • Ability to back up individual files and directors
  • System, partition, and disk backup
  • Can store backups on local/external drives, NAS, and cloud services
  • Support for full and incremental backups
  • Automatic synchronization and scheduling support

Ashampoo Backup Pro 14

Ashampoo Backup Pro offers extensive backup features as well the ability to back up photos and individual files.
Check price Visit website

FBackup

FBackup image and photo backup software

If you’re looking for free software to back up your images and photos, FBackup might be just what you need. The software has a simple and friendly user interface, so you can create backups with ease.

FBackup has a mirror backup feature that will allow you to create exact file backups, without compressing them. Regarding the backups, you can store them on both local/external/network drives.

In addition, cloud storage support is also available. The application also allows a certain level of automatization, so you can assign certain actions to occur before and after a backup.

It’s important to mention that the software can back up open files, so the backup process won’t interfere with your everyday tasks.

FBackup is solid backup software, and since it’s completely free to use, there’s no reason not to try it out.

FBackup features:

  • Completely free to use
  • Ability to back up files and directories
  • Supports mirror backups without compression
  • Can store files on local/external/network drives and cloud
  • Simple to use interface

⇒ Get FBackup

Backing up your photos and images doesn’t have to be hard, and if you want to back up your files like a pro, be sure to try any of the tools mentioned in this article.

This is the best Windows 10/11 foldable laptop to buy

The evolutions of portable computers aka laptops is staggering, to say the least. From fitting a large desktop power into your backpack (Dulmont Magnum) to becoming featherweight with the latest Nvidia desktop GPU running inside, the laptops have come a long way.

However, the laptop manufacturers are pushing the technology a notch higher with the introduction of foldable laptops.

Leading the way, it is Lenovo that has taken the first step into the world of foldable laptops. Lenovo unveiled a preview and demo of the world’s first foldable laptop back in May 2019.

Now if you are in the market for the best foldable laptop or simply curious about the future of laptop technology, here is what we know about the upcoming foldable laptops so far.


Here is the best foldable laptop on the market

Lenovo Thinkpad X1 Fold

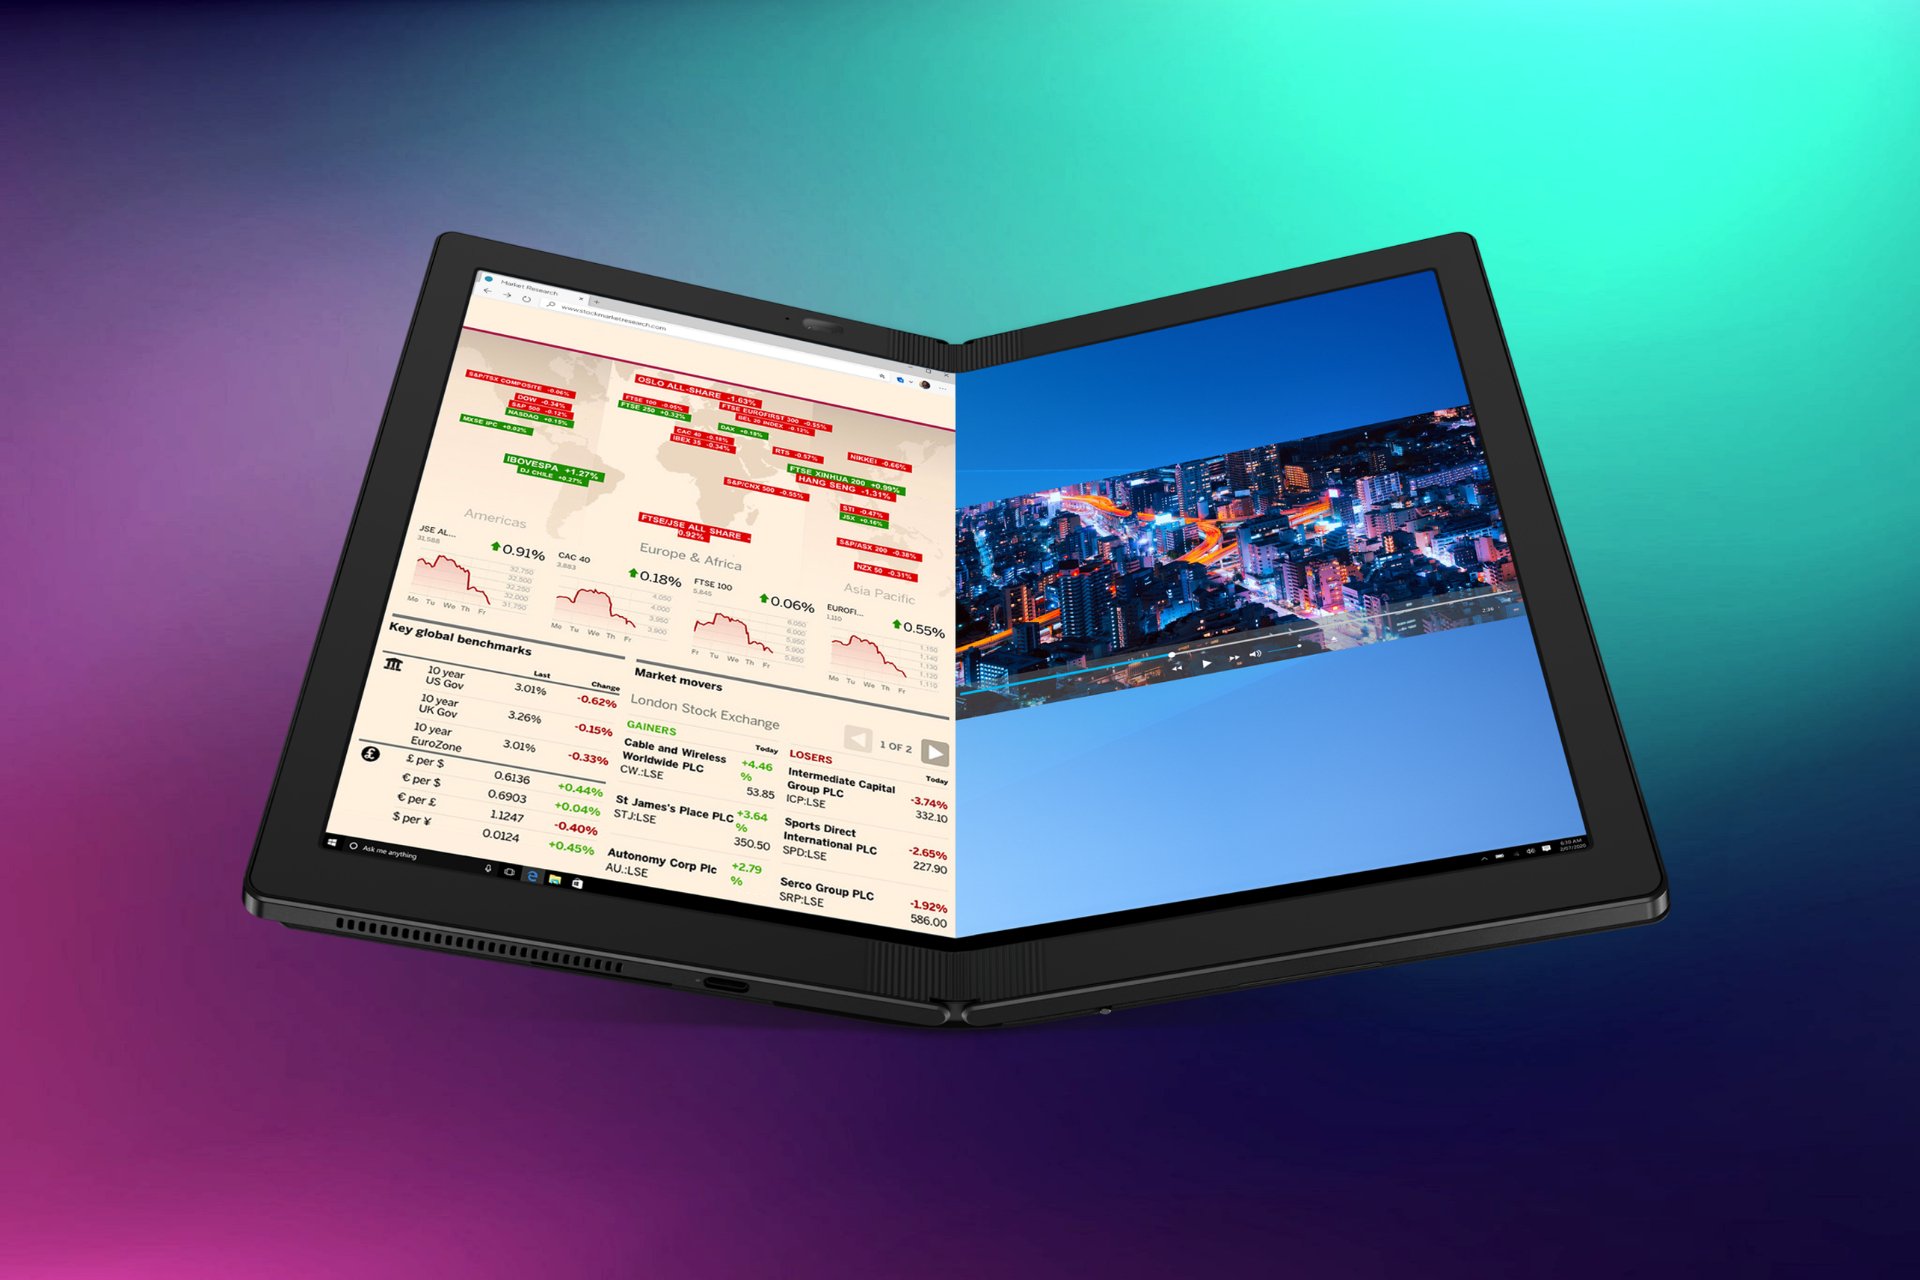
As mentioned earlier, Lenovo has unveiled a working prototype of the world’s first foldable Laptop in May 2019. According to Lenovo, the laptop is made for highly mobile, tech-savvy professionals looking for compact-sized powerhouses to get their work done on the go.

The premium foldable laptop is reported to join the Thinkpad X1 family without any compromises in productivity and reliability.


The specifications

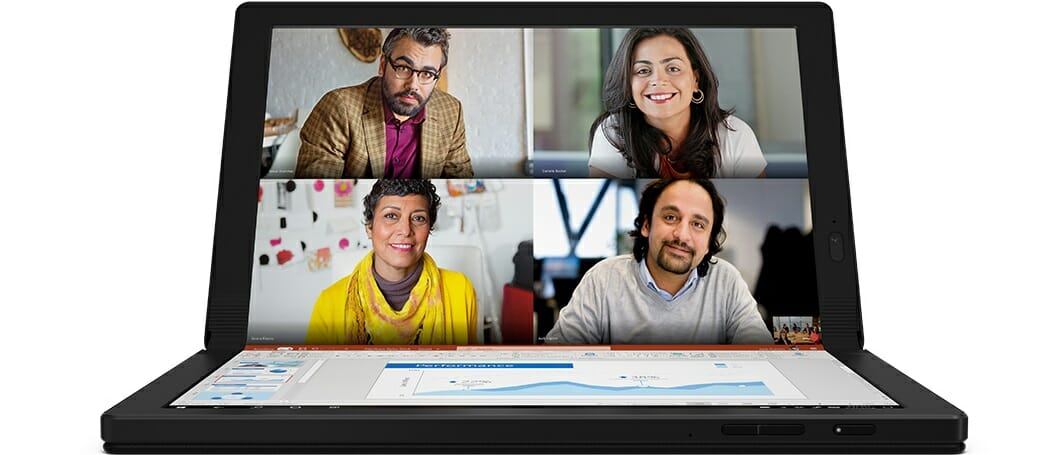
About the specification, nothing much is known except that the laptop will sport a 13.3 inch 2K OLED display that is made in collaboration with LG Display. The display is capable of folding half by reducing the laptop width by 50 percent.

The ThinkPad foldable laptop is also said to pack the latest Intel processors and the Windows OS will keep the lights on. The functional prototype unveiled by Lenovo seems to have responded fine to the inputs.

The biggest advantage of a foldable laptop is the compact form factor it offers. You can fold the laptop and use it as a book with display (provided that the company offers software for it) or simply unfold it use it for watching multi-media content.

On the flip side, the working prototype still does not inspire confidence with its folding mechanism. However, we expect Lenovo to make it better by the time they are ready to launch it. Which is expected to be somewhere in 2021.

On the accessory front, this laptop will come with a built-in kickstand that lets you prop up the display on a table to use with the included wireless keyboard and trackpad.

  • Multiple-uses: laptop, tablet, split-screen experience, or one huge display
  • Enhanced your experience with (optional) keyboard & (optional) pen
  • Powered by Intel® Core™ processors with Intel® Hybrid Technology
  • Designed and tested for performance and durability
  • Delivers whatever your busy day demands
  • Stylish, extremely compact, and portable
  • Built-in ThinkShield security solutions
  • The world’s 1st foldable PC
  • Winner of 43 CES awards
  • 13-inch 2K OLED display
  • Issues with the pixels are expected, especially around the folding region

The folding tech is still a long way to go before it can be called reliable. As of now, only a few smartphone manufacturers are working on a foldable smartphone. But, like everything we expect the technology to improve over time and become reliable.

To answer more questions, we probably need to wait till 2020 to see the first production version of the foldable computer and hopefully, we will have more than one foldable laptop to compare with each other.

What do you think of foldable laptops? Is it just a gimmick or you see real-life use to them. Do let us know your thoughts in the comments.

We’ll update this post as soon as new information is available on new foldable laptop models.

This specific deal is part of our bigger selection of the best laptop deals you can find. You might also want to check out our dedicated Black Friday hub for tech deals.


How to fix the Item is unplayable 0xc00d36e5 error

Some Windows Media Player and Movie Maker users have said in forum posts that an 0xc00d36e5 error arises when they try to play MOV, MP4, and other video formats recorded on camera devices.

A Can’t play error message pops up stating: Item is unplayable, please reacquire the content. 0Xc00d36e5. Users’ videos don’t play when that error message pops up.

This article also covers the following issue:

  • Can’t play item is unplayable please reacquire the content 0xc00d36e5

How can I fix the 0Xc00d36e5 error?

1. Repair the video

It might be the case that the video files error 0Xc00d36e5 arises for are corrupted. Users can fix corrupted videos with Stellar Repair for Video, which they can download by clicking Download on that program’s webpage.

  1. Open the program’s installer to add Stellar Repair for Video to Windows.
  2. Launch Stellar Repair for Video, and click the Add file button on its window.
  3. Select a video file to repair.
  4. Press the Repair button.

Stellar Repair for Video

Don’t lose hope when you see that your video files are corrupted. Retrieve them easily with this amazing tool!
Free trial Visit website

2. Play the video in an alternative media player

Windows Media Player doesn’t support the widest variety of movie file formats without extra codec packs installed.

If the 0xc00d36e5 error arises for video formats other than MOV or MP4 in Windows Media Player, try playing the same clips with 5kPlayer instead.

5kPlayer solution will help you watch your files, supports a mixture of video formats, and work as a music player and Airplay media streamer as well.

This efficient player will run your video files seamlessly at the high quality of 4K, 1080p, or 360° videos. Plus, you can also play MP3, AAC, APE, FLAC music files without any trouble.

Therefore, with this complete UHD video player, you will avoid video formats issues and enjoy videos of maximum quality too.

⇒ Get 5k Player

3. Convert the video to another format

When it comes to converting video files from one file format to another, it is a good idea to choose a tool that will manage the transformation without quality or data loss, and in as little time as possible.

One tool that fits all of these criteria is WinX HD Video Converter Deluxe.

The program makes use of your PC’s GPU to speed up the conversion process, and this also allows it to handle very large videos, such as those that are 4K quality.

Using the program will not be a problem since the interface caters to users of all experience levels, as it is as simplified as possible.

⇒ Get WinX HD Video Converter Deluxe

4. Add the movie file to alternative USB drive

The 0Xc00d36e5 error often arises for users who try to play video files from corrupted external storage devices, such as USB drive. Some users have confirmed they’ve fixed the issue by changing their USB sticks.

So, try moving the video files onto another USB drive and then play them from there. Alternatively, users can copy the files onto the laptop’s or desktop’s hard drive storage and play them from there.

5. Run a SFC Scan

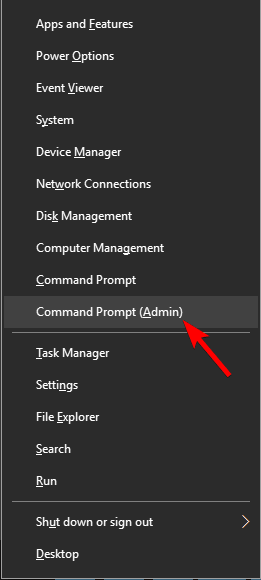
  1. Press the Windows key + X hotkey in Windows 10.
  2. Click Command Prompt (Administrator) to open an elevated Prompt window.
  3. Enter this line in the Command prompt and press the Return button.:
    • DISM.exe /Online /Cleanup-image /Restorehealth
  4. Then enter sfc /scannow in the Command Prompt and press Return to initiate the System File Checker scan.The sfc /scannow command item is unplayable 0xc00d36e5
  5. When the SFC scan is finished, restart Windows 10 if a Command Prompt message states, Windows Resource Protection found corrupt files.

Corrupted system files can also be another factor behind 0Xc00d36e5 errors.

6. Clean Boot Windows 10

  1. Press the Windows key + R hotkey to open the Run accessory.
  2. Enter msconfig in Run and click OK.The System Configuration window item is unplayable 0xc00d36e5
  3. On the General tab, select the Selective Startup option and the Load System Services and Use original boot configuration checkboxes.
  4. On the Services tab, select the Hide all Microsoft services setting.The Services tab item is unplayable 0xc00d36e5
  5. Click the Disable all button.
  6. Press the Apply and OK buttons, and restart Windows.

Some users have also confirmed that they’ve fixed the 0xc00d36e5 error by clean-booting Windows, which might remove conflicting software from the system startup.

Those are a few resolutions that might fix the 0xc00d36e5 error for some users. Users who have fixed the same issue with other resolutions are more than welcome to share their fixes below.

What is Digital TV Tuner Device Registration Application

For those of you that are fans of watching cable TV on your PC, you probably already know what a Digital TV tuner device registration application is.

You use them every day to watch cable content on your PC, and you’re probably happy with it too.


What is a Digital TV tuner device registration app?

For those that don’t, a digital TV tuner device registration application is a scheduled task that is part of the Windows Media Center. It allows you to watch premium digital cable channels from your cable provider straight from your computer.

The app always runs in the background, constantly scanning your PC for TV tuners that may have been attached. The only problem with this type of apps is that they have a bad habit of slowing down a PC.

More so, they are usually picked as threats by third-party antivirus tools, and you’ll find yourself with alert messages every few minutes.

Because of this, it would be wise if you would remove it, and manually activate the TV Tuner whenever you actually need to use it.

The app itself does not pose any type of security threat, but the performance hindrance that it brings overcompensates its usefulness.


For great Windows Media Center alternatives, check out this detailed article. 


1. Do I need to remove the Digital TV tuner device registration app?

  1. Press Ctrl + Shift + Esc
  2. Go to the Processes tab
  3. If you see a process named ehprivjob.exe taking up too much CPU, that is the Digital TV tuner device registration app

The performance issues are not universally true. You should only remove the app if you see it taking up too much CPU.


2. How do I remove a Digital TV tuner device registration app?

  1. Press Windows + R
    • This will open the Run dialog box
  2. Type in appwiz.cpl, and hit Enter
  3. Click on Turn Windows features on or off
  4. Expand the dropdown menu associated with Media Features
  5. Remove the checkpoints next to Windows Media Player and Media Features
  6. Click Yes to confirm your action
  7. Click OK to make the changes take effect

By following these steps, you should now have disabled the Digital TV tuner device registration app from booting up again. However, keep note that now that the program is no longer running, you will need to activate your TV Tuner yourself whenever you want to use it.

Fortunately, this is just a minor inconvenience compared to the performance issues you had when the Digital TV tuner device registration app was constantly running in the background.

Do you usually let the Digital TV tuner device registration app run in the background or did you disable it as well? Tell us more in the comment section below.


[wl_navigator]
How to fix FFXIV error 6001 [Best solutions]

If you’ve encountered the dreaded error 6001 while playing FFXIV and wonder how to fix it, you’ve come to the right place.

Encountering errors mid-game can be downright infuriating, especially if you’re engaged in some time-consuming activity.

In FFXIV, you can do dungeons, and trials, which are both great ways to grind for gear and XP points. The only downside is that they can take quite a while, especially as a new player.

Now imagine you’re mid-dungeon when all of a sudden you get disconnected by a rude error. The only thing you know is that you can no longer establish a connection with the lobby server and the code of the error: 6001.

Usually, you can look up an error by its identification code and find more about it. However, querying for FFXIV error 6001 only brings back countless threads made by players who encountered the same error.

What is error 6001?

Reportedly, a while ago, Square Enix’s servers were targeted by a series of merciless DDoS attacks.

These had a huge impact, with numerous players being disconnected as a result, with no chance of getting back into the game (until the attacks dropped).

More so, not everyone saw the same error code while being disconnected. Apparently, a series of disconnection error codes were encountered by FFXIV players. Namely:

  • 6001
  • 2002
  • 90002
  • 5006
  • 20002

Thus, it’s safe to assume that 6001 is a code for a common disconnection error. It’s most likely used by the Square Enix technical crew to troubleshoot the connection easier.

How to fix error 6001 in FFXIV?

Reconnect to the data center

Some players reported that disconnecting from the data center and immediately connecting to it temporarily solved the issue.

However, given that the error already disconnected you from the game, all you have to do is simply try to log back in.

If you can’t reconnect to the data center you’ve been disconnected from, try our next suggested step.

Choose another data center

If you’re not 100% invested in your current character, have a secondary one, or don’t mind starting from scratch on another server, try switching data centers.

Note that you won’t be able to switch to a Korean data center, as the FFXIV Korean client is different than the global version (NA, EU). You’ll also need a Korean Social Security Number, ID, and phone number to register.

Note that the International (NA, EU) version of the game is also region-blocked in Korea.

Wait it out

Like we said earlier, error 6001 in FFXIV has nothing to do with you or your ISP, and is a server-side Square Enix issue. The most popular error 6001 outburst was during a DDoS attack a while ago.

Therefore, you may not be able to do anything to fix error 6001 other than patiently waiting for an update from company reps.

Check the forums, see if other players encounter the same error, and try not to log in while the server’s down.

Remember, any log-in attempt might put additional strain on the server, which will make it even harder to restore.

Final thoughts on fixing error 6001 on FFXIV

All things considered, you may be out of luck if you encounter error 6001 while playing FFXIV. Sometimes, the issue can occur randomly and can be easily fixed by reconnecting to the data center or choosing a different one.

However, most of the time the issue affects Square Enix’s servers directly, which means that there’s nothing much you can do about it other than waiting for it to pass.

[wl_navigator]

Best Wi-Fi adapters compatible with Linux [USB Wireless]

Wi-Fi connections are great, especially if you want to keep your workspace neat, but in order to use a wireless connection, you need to have a Wi-Fi adapter.

Not all wireless adapters work on all platforms, and this is especially the case for Linux, so in today’s article, we’ll show you the best Linux compatible WiFi adapters.

What is the best Linux compatible WiFi adapter?

TP-Link Nano USB Wifi Dongle

TP-Link Nano USB Wifi Dongle linux compatible wifi adapter

TP-Link Nano USB Wifi Dongle is a USB Wi-Fi adapter, and it can provide you with transfer speeds up to 150Mbps which should be more than enough for basic needs.

The device has a high-gain antenna, so it will provide you with a stable connection and long range. The antenna can be detached, rotated, and adjusted as needed which will be quite handy.

It’s important to mention that the adapter supports both Infrastructure and Ad-Hoc methods. There’s also a WPS button available, so you can easily connect to a Wi-Fi network.

As for the compatibility, the device should work with Windows, Mac, and Linux computers right of the box.

Overall, TP-Link Nano USB Wifi Dongle is a solid Wi-Fi adapter, and if you’re a Linux user, be sure to consider it.

  • Up to 150Mbps transfer speed
  • High-gain antenna
  • WPS button
  • Compatible with Windows, Mac, and Linux
  • Minor driver issues on some Linux computers

EDUP USB WiFi Adapter

EDUP USB WiFi Adapter linux compatible wifi adapter

This adapter uses a 2.4GHz connection and it can provide you with a transfer rate up to 150Mbps. Regarding the range, the device can cover up to 50-150 meters thanks to the high-gain antenna.

As for security, there’s support for 64/128/152bit WEP, WPA/WPA, TKIP, as well as IEEE 802. 1x. The device also supports Soft AP mode, but this feature is only available on Windows computers.

It’s worth mentioning that the adapter is incredibly simple to use, and you just need to install its driver first, and then connect the adapter to your computer and it should start working immediately.

As for the compatibility, it should work on all versions of Windows and Mac as well as on Linux.

EDUP USB WiFi Adapter is a great little Wi-Fi adapter, and since it’s so simple to use, it’s a perfect choice for Linux users.

  • Uses 2.4GHz connection
  • Up to 150Mbps transfer speed
  • Compatible with all versions of Windows and Mac OS
  • High-gain antenna for long range
  • The antenna isn’t rotatable

Cudy AC 650Mbps USB WiFi Adapter

Cudy AC 650Mbps USB WiFi Adapter linux compatible wifi adapter

This is a dual-band 802.11ac Wi-Fi adapter, and it can provide you with up to 433Mbps on a 5GHz network and up to 200Mbps on a 2.4GHz network.

The device has a small form factor, so you can easily connect it to your PC or laptop and completely forget about it. Regarding the size, the device measures 0.79×0.59×0.31 inches.

Cudy AC 650Mbps USB WiFi Adapter can also work in a Soft AP mode, and it can turn your PC into a Wi-Fi hotspot for other wireless devices.

The adapter comes with all the necessary drivers, and as for the compatibility, it should work with Windows, Mac, and Linux computers.

Cudy AC 650Mbps USB WiFi Adapter is a small but powerful adapter, and if you’re looking for a dual-band adapter for Linux, be sure to consider this model.

  • Supports 802.11ac standard
  • 433Mbps on 5GHz, 200Mbps on 2.4GHz network
  • Small form factor
  • Compatible with Windows, Mac, and Linux
  • Speed drops with increased distance for some users

Cudy WU1300S

Cudy WU1300S linux compatible wifi adapter

Cudy WU1300S is an 802.11ac wireless adapter, and it can provide you with up 400Mbps on 2.4GHz and up to 867Mbps on 5GHz networks.

It’s worth mentioning that this is a USB 3.0 device, so if you want to achieve the maximum speed, it’s necessary to connect the device to a USB 3.0 port.

Cudy WU1300S is rather small, and it won’t block other ports on your computer. In fact, you should be able to connect it and completely forget about it due to its small size.

The adapter also supports Soft AP mode, so you can turn your PC into a hotspot with ease. Regarding the compatibility, this device works on Windows, Mac, and Linux computers.

Cudy WU1300S is a great wireless adapter, and it offers amazing speed, small size, plus it’s compatible with Linux, so be sure to consider it.

  • Support for 802.11ac standard
  • Up to 867Mbps on 5GHz and up to 400Mbps on 2.4GHz network
  • USB 3.0 device
  • Small form factor
  • Minor driver issues for some users

Nineplus Wireless USB WiFi Adapter

Nineplus Wireless USB WiFi Adapter linux compatible wifi adapterThis Wi-Fi adapter comes with dual 5dBi high-gain antennas in order to provide you with a high range and stable signal at all times.

The adapter uses 802.11ac standard, and it will provide you with up to 867Mbps on 5GHz and up to 300Mbps on 2.4GHz wireless network.

Keep in mind that this is a USB 3.0 device, and in order to achieve the maximum speeds, you need to connect it to a USB 3.0 port.

The device can also work in Soft AP mode, and turn your PC into a wireless hotspot. Regarding the compatibility, this device works with Windows, Mac, and Linux computers.

Nineplus Wireless USB WiFi Adapter offers great transfer speeds, and it’s a perfect device if you need a fast Wi-Fi adapter for your Linux computer.

  • Support for 802.11ac standard
  • Two high-gain 5dBi antennas
  • Up to 867Mbps/300Mbps on 5GHz/2.4GHz connection
  • Compatible with Windows, Mac, and Linux
  • Some installation issues for Mac users

Choosing the best Wi-Fi adapter for your Linux computer isn’t always easy, but we hope that you found our guide helpful and that you managed to find the right adapter for you.

[wl_navigator]
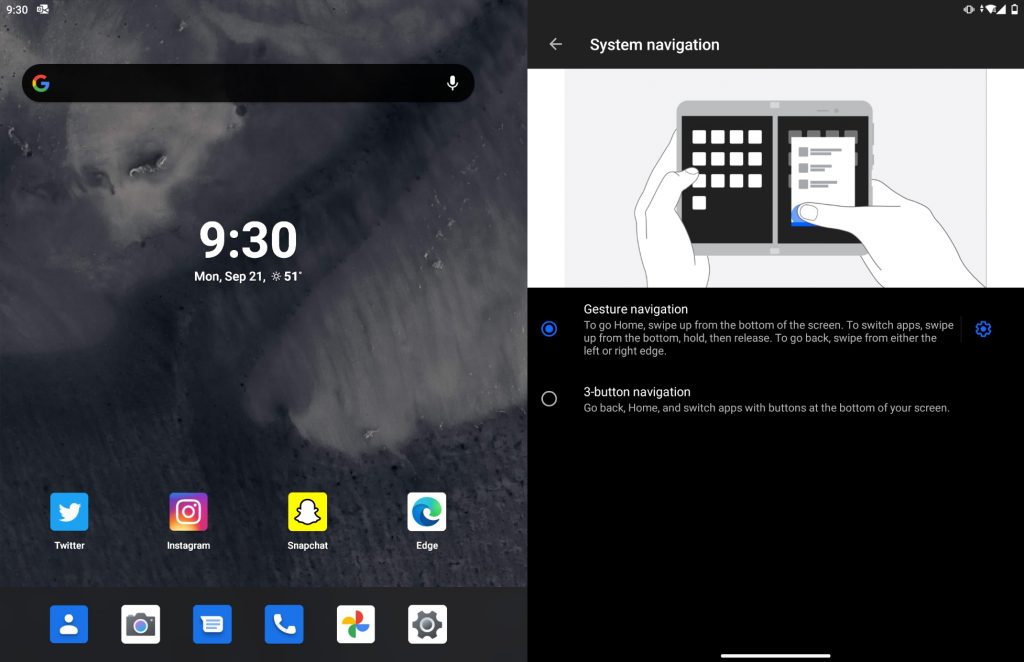
NieR: Automata resolution issues on Windows 10

NieR: Automata is a fun and challenging game to play, but not all players can run it at their monitors’ native resolution on fullscreen.

This is actually a frequent issue affecting quite a significant number of players.

Here’s how one user describes this problem:

When I first played the game, I was wondering why it was so blurry, steam overlay was crazy too, but I was at my native, which is 900p. Every other resolutions get blurry since they’re not my native, but this one too. It’s like you play at 1599×899 for example. The missing pixels are here, stretched to fit your actual screen, and it messes up the actual display I guess!

Some other common display problems that users reported ar the following:

  • NieR Automata won’t go fullscreen – To fix that, you just need to get the FAR mod, configure it and start the game.
  • NieR Automata far not working – When the FAR mod isn’t working,  try running the game in Windowed mode and using the Windowed Borderless Gaming software.
  • NieR Automata fullscreen black bars – You can fix the problem by changing your GPU Scaling settings.
  • NieR Automata fullscreen crash, blurry, not working – You should be able to fix most of them by using one of our solutions.

How to fix NieR: Automata fullscreen resolution bug?

1. Update your drivers

If you’re having NieR: Automata fullscreen issues, the problem might be your graphics card driver. To fix the problem, it’s advised to update your drivers to the latest version.

To do that, you just need to visit your graphics card manufacturer and download the latest driver for your model.

If downloading drivers manually seems like a complicated task, you can always use a third-party tool, such as Fortect Driver Updater to quickly and easily update all drivers on your PC.

It will not only save you time and patience, but you can use it for future similar processes, as well.

Drivers get outdated regularly, and with Outbyte Driver Updater you simply scan your device and get professional recommendations on the best components you can get.

⇒ Get Fortect Driver Updater

2. Use FAR mod

The gamers’ community mentions that many of NieR: Automata’s fullscreen resolution bugs can be easily fixed by using the FAR mod.

It’s completely free to download. Additionally, you just need to follow these steps:

  1. Start the game.
  2. Set the game to run in windowed mode and choose the resolution that matches your monitor’s resolution.
  3. Now press Ctrl + Shift + Backspace to open the FAR control panel.
  4. Go to the Windows Management section.
  5. Enable Borderless, Fullscreen (Borderless Upscale), and Keep Inside Window options.
  6. Restart the game.

This solution might seem a bit complicated, but if you follow the instructions carefully, you should be able to perform it without too much hassle.

3. Use Windowed Borderless Gaming software

Step 1:

  • Start the game and set it to run in windowed mode. (You can make this change from the Screen settings menu in the game).
  • After doing that, download and run Windowed Borderless Gaming software.

Step 2:

  • Start Windowed Borderless Gaming software.
  • Start NeiR: Automata.
  • The game should start in the windowed mode. Now go to your system tray in the bottom right corner and click the Windowed Borderless Gaming. Choose Add window from the menu.
  • Now click NieR: Automata window and the game will switch to the borderless window mode.

As you can see, this is a relatively simple workaround, and even though it won’t run the game in the fullscreen mode, it will allow you to run the game in borderless windowed mode, which is similar enough to the actual fullscreen mode.

Keep in mind that this isn’t a permanent solution, so if this method works for you, you’ll have to repeat it every time you want to start the game.

4. Change your GPU scaling settings

According to users, you might be able to fix this problem simply by turning on GPU scaling for your GPU.

To do that, simply open your graphics card control panel and locate the GPU scaling setting.

Set GPU scaling to the Full panel and save changes. After doing that, the issue should be resolved.

In addition to GPU scaling, some users are recommending to enable the Virtual Super Resolution feature, so you might want to try that as well.

Many users confirmed that this solution works for AMD graphics cards, so be sure to try it out. If you have Nvidia graphics, you should find similar settings in the Nvidia Control Panel.

5. Use the Alt + Enter shortcut

The Alt + Enter shortcut might fix the resolution issue.

Simply change the game settings and start the game in Windowed mode. After doing that, press Alt + Enter and the game will change to the Fullscreen mode.

Again, this is only a workaround, but if it works for you, you’ll have to repeat it every time you want to start the game.

6. Disconnect the second monitor

Many gamers prefer using two monitors during their gameplay sessions, but sometimes a second monitor can cause problems with NieR: Automata.

So just disconnect one monitor and restart the game.

If disconnecting the second monitor seems like a hassle, you can always disable the second monitor from the Settings app and then try to start the game.

This has worked for some users, so why not try it out yourself?

All in all, NieR: Automata is a great game, but a full-screen resolution bug can severely affect your gaming experience. However, you should be able to fix that problem with one of our solutions.

Tell us which one worked for you in the comments section.

How to fix FFXIV error code 10105 [Step-by-step]

If you’ve been playing FFXIV (Final Fantasy XIV) for a while now, you may have experienced the occasional issues, including the dreaded 10105 error.

Apparently this error springs out of nowhere and renders you unable to connect to the game.

To make matters even worse, it’s been noticed that error 10105 generally disconnects users when they’re engaged in difficult trial fights.

Some users even reported that they got logged out of trial-engaged characters, but they could access other characters without issues.

Furthermore, it would appear that error 10105 doesn’t discriminate by platform. It affects PC users, but also players who enjoy it on their PS4, PS3, or Xbox One gaming consoles.

With that in mind, how could we get rid of this pesky FFXIV 10105 error? Stick around to find out.

How to fix FFXIV 10105 error?

Wait it out

Several sources have reported that the issue occurs on Square Enix’s side, so there’s little you could do about it. At some point, this error occurred shortly after the FFXIV game servers were targeted by a DDOS attack.

Thus, it would appear that the most suitable way to bypass the error is to avoid playing the game until someone confirms that it’s been dealt with. Especially if you plan on jumping head-first into a difficult, time-consuming trial.

Use a VPN

Sometimes, the situation can be caused by your ISP’s poor traffic routing or ISP bandwidth throttling. If you suspect that’s the case, you can use a VPN to circumvent your Internet provider’s limitations.

  1. Purchase a Private Internet Access VPN subscription plan.
  2. Download the VPN and install it on your PC
  3. Launch it and log into your account
  4. Connect to a fast server (nearby servers are generally faster)
  5. Launch FFXIV
  6. Check if you still get error 10105

Note that using a VPN while playing FFXIV can also fix packet loss, and reduce in-game ping. If you want to unblock regional restrictions, for instance, using a VPN will also work wonders.

Use Ethernet instead of Wi-Fi

Not only with FFXIV, but whenever possible, make sure to always choose Ethernet over Wi-Fi. Wireless connections are much slower, they’re not as stable, and they’re prone to interference.

Also, Wi-Fi packet loss happens way more often than while using Ethernet.

While we’re on the topic, make sure that your Ethernet cables are not outdated, worn out, or damaged in any way. Bad cables could also have a great impact on how fast and stable your connection can be.

If you just switched to Ethernet, make sure to restart your router, to avoid any address assignment problems.

Flush your DNS

  1. On your Windows PC, launch a CMD instance
  2. Type the following commands, one by one, in this order:

ipconfig /flushdns
ipconfig /registerdns
ipconfig /release
ipconfig /renew
netsh winsock reset
exit

Restart your PC, launch FFXIV, and try connecting to the server once more. Quite often, leaving cache data to build up can lead to various connectivity issues.

Flushing and renewing your DNS address can solve many connection problems, including not being able to log into various games.

Alternatively, you can replace your ISP-assigned DNS addresses with public free ones. For instance, you can use Google’s Public DNS or Cloudflare’s.

You may notice some improvement upon replacing your DNS, but make sure you backup the ISP ones, just in case something goes wrong.

Configure Internet Explorer

  1. Launch Internet Explorer on your PC
  2. Press Alt+X on your keyboard (or click the gear-shaped button)
  3. Select Internet Options from the menuLaunch Internet Explorer Windows 10
    1. General tab:
      1. Click the Delete button in Browsing historyInternet Options delete button
      2. Check all boxesDelete Browsing History Internet Explorer
      3. Click Delete
    2. Security tab:
      1. Move the Security level slider to the lowest pointInternet Explorer security slider
    3. Privacy tab:
      1. Click the Advanced buttonInternet Explorer Advanced button
      2. Select Accept for both First-party and Third-party CookiesInternet Explorer Accept cookies
      3. Click Ok
    4. Advanced tab:
      1. Scroll down to the Security category
      2. Enable the Allow software to run or install […] optionInternet Explorer Advanced tab
      3. Check all the TLS and SSL boxes except SSL 3.0Internet Explorer SSL TLS settings
      4. Click the Apply button, then the Ok one

The reason why you need to configure Internet Explorer is that the game launcher reportedly uses IE to connect to the Internet. Therefore, if there are any settings that restrict the game in any way, you’ll probably have a difficult time connecting.

Apply compatibility settings

  1. Right-click the FFXIV launcher executable
  2. Select Properties from the combo menu
  3. Head over to the Compatibility tab
  4. Select Windows 7 from the Compatibility mode menu
  5. Check the Run this program as an administrator option
  6. Click Apply, then Ok
  7. Restart your PC
  8. Launch FFXIV and check if there’s any improvement

Final thoughts on fixing FFXIV error 10105

All things considered, if you’re getting the unfamous 10105 error while playing FFXIV, there are some easy-to-follow fixes that might help you get back on track.

We also have a fresh guide on FFXIV script error, so you might want to check it out before you leave.

However, note that if the error occurs on Square Enix’s side, there’s pretty much nothing you can do about it other than wait.

Surface Sleep of Death: How to Wake up Microsoft Surface

Surface Pro 4 is part of Microsoft’s versatile Surface Pro family. With all Microsoft’s huge efforts in making the device as stable as possible, the Surface Pro 4 has its share of issues. One that bugged users for a long is the Surface sleep of death.

Several users constantly report this issue while also mentioning that they are faced with a black screen of death or that their device won’t boot. So, let’s find out how you can fix Microsoft Surface’s Sleep of Death.

What can I do if Surface Pro 4 doesn’t wake up from sleep?

Before we start with the slightly tricky solutions, try these quick ones:

  • If your Surface Pro 4 can’t wake up, you might be able to fix this problem by connecting the charger. This is usually the case when the device doesn’t have any charge.
  • To check if other peripherals are the problem, disconnect all the non-critical ones and try waking up your device again.
  • Perform a force restart. To do that, press the Power button and hold it for 30 seconds or more until the display lights up.

If none work, head to the fixes listed next.

1. Install the necessary drivers

If you’re having issues with Sleep Mode and Surface Pro 4, the problem might be your drivers. To fix this problem, you must ensure that all your drivers are updated.

Users suggest installing the latest drivers from Intel and checking if that solves your issue.

Alternatively, to save some time looking for the right driver, we suggest using a third-party application such as Fortect Driver Updater.

This is the quickest and most efficient way to update drivers correctly.

Fortect Driver Updater quickly scans your system to find not all the outdated components. Then, it suggests several alternatives.

If you’re unsure about the right components and less tech-savvy, Fortect Driver Updater will do the job for you.

⇒ Get Fortect Driver Updater

2. Use the keyboard shortcut

A single keyboard shortcut seems to do the trick if your Surface Pro device won’t wake up from sleep. But based on our research, we found several hotkeys that help wake up a Surface device from the Sleep of Death. Try all of the following:

  • Windows + Ctrl + Shift + B
  • Ctrl + Alt + Delete
  • Ctrl + Shift + Esc
  • Some users mentioned that pressing the Volume up and Volume down keys three times quickly fixed the problem.
  • Press Windows + P about three times, wait for a moment, and your screen should appear.

3. Disable the hibernate mode

  1. Right-click the Start button and choose Command Prompt (Admin).
    Surface Pro 4 won't wake from sleep
  2. Paste the following command, and hit Enter:powercfg /h off Surface Pro 4 black screen of death
  3. Restart your device.

Once you turn off the hibernation, put your Surface device to sleep again and try to wake it up.

This solution helps because when the hibernation mode is disabled, your Surface Pro 4 can either go to sleep or shut down completely without being caught in hibernation.

4. Set everything to Hibernate

  1. Go to Search, type power options, and open Power & sleep settings.
    Surface Pro 4 screen not waking up
  2. Choose Additional power settings under Related settings.
    Surface Pro 4 won't wake from sleep
  3. Go to the Choose what the power button does option from the left pane.
    Surface Pro 4 black screen of death
  4. Now set everything to Hibernate.Surface Pro 4 won't wake from sleep
  5. Click on Save changes.

This solution was confirmed by one Reddit user, so we can say it helped at least someone. Hopefully, it will also help you, but if it doesn’t, try the other solutions from this article.

Although it looks strange that we listed two consecutive solutions that negate each other, it makes sense because the cause of the problem is different on different Surface Pro 4 devices.

5. Change the network card settings

  1. Press Windows + X and choose Device Manager from the list.
    Surface Pro 4 won't wake from sleep
  2. Find the Surface Pro 4’s wireless network card, right-click on it, and select Properties.
  3. Now, go to the Power Management tab. tick the checkbox for Allow the computer to turn off this device to save power, and click OK to save the changes.
    Surface Pro 4 not booting up

This solution also solved the problem for a few users who believed the Surface book was dead.

If it does, it means that maybe you’ve altered your wireless network card so as not to allow the Surface Pro 4 to fall asleep to save power.

6. Change the Sign in options

  1. Open the Settings app.
  2. Now, go to Accounts.
    Surface Pro 4 screen not waking up
  3. In the left pane, select Sign-in options. Under Require Sign-in, choose Never.
    Surface Pro 4 not turning on
  4. Restart your Surface device.

Again, this proved helpful for a few users.

Anyway, if your Surface Pro 4 requires sign-in when it wakes up from sleep, errors might eventually appear. So, the solution is to turn off this option in Settings.

That’s about it for our article; one of these solutions should have helped fix Sleep of Death in Microsoft Surface.

Before you leave, find out how to speed up the Internet on a Surface device.

If you have any comments, questions, or suggestions, just let us know in the comment section below.

Remember Andromeda? New reports reveals more about the Windows-based Surface Duo prototype

Microsoft’s Surface Duo, which has recently started shipping in the US, had a very complex development cycle that saw its software move from a Windows-based OS to Android. The original project codenamed Andromeda required Microsoft to optimize Windows for a pocketable dual-screen device, and the task was presumably so challenging that the company eventually opted for using using Android instead.

After previous reports suggested that Microsoft had definitely shelved Andromeda and its “Surface phone” dream, seeing the company unveil the Android-based Surface Duo last year was quite a surprise, to say the least. Microsoft worked with Google to optimize Android for the dual-screen Surface Duo, but we’ve never seen much of what the previous Windows-based “AndromedaOS” looked like.

Today, Zac Bowden from Windows Central finally gave us a glimpse at AndromedaOS with a couple of mockup images that try to recreate the real OS that Bowden saw in pictures and videos. Overall, it’s quite fascinating to see what a Surface Duo running a Windows 10-based OS would have worked, and the company apparently went as far as re-creating the Continuum desktop experience that debuted on Windows 10 Mobile.

Microsoft’s Surface Duo is using Android instead of a Windows-based OS.

AndromedaOS was built on Windows Core OS, a new lightweight and modular version of Windows that powers the HoloLens 2 OS today, as well as the still in development Windows 10X OS expected to ship on Chromebook-like laptops next year. AndromedaOS also leverages Microsoft’s Composable Shell (CShell), which would adapt to single-screen, dual-screen use, as well as the aforementioned Continuum experience.

At the beginning, AndromedaOS was heavily inspired by Microsoft’s old Courier prototype, and it used an interactive journal for its home screen experience. “AndromedaOS featured a user experience built around a journal app, codenamed Jamdani. This app mimicked a real journal, with virtual pages that could be turned and was designed primarily for pen input. You could attach virtual sticky notes, images, and files, and annotate on them,” explained Bowden, adding that this journal experience eventually evolved into Microsoft’s Whiteboard app.

Andromeda Journal
A mockup of the Journal app on AndromedaOS.

The following image shows the Journal/Whiteboard app in the background, with the Start Menu opened in the bottom left corner. You can see the Start button in that corner, as well as a Cortana button in the bottom right corner that also hid the Action Center. This Journal app would always stay in the background, and any apps that users opened would sit on top of it.

Andromeda Start
A mockup of the Start Menu on Andromeda OS, with a button for Cortana on the bottom right corner.

Interestingly, Microsoft wanted its digital assistant to be the entry point for all notifications in Andromeda OS. “Notifications would be sorted into the Action Center, and the Cortana icon would pulsate in the bottom right to alert you when you’ve missed a notification,” explained Bowden. You can see a mockup of this UX below.

Andromeda Ac
Andromeda would have combined Cortana with the Action Center.

Just like how Android works today on Surface Duo, AndromedaOS would have used various gestures to interact with apps on the dual-screen device. “The OS was heavily gesture-based, with a swipe in from the left opening the Start menu, and swipe in from the right opening the Action Center. A swipe down from the top revealed a Control Center for things like Airplane Mode and Bluetooth settings, and a swipe up would reveal Task View or allow the user to drag an app to span it across both screens,” Bowden explained.

Andromeda Dual Apps

The Continuum experience that Microsoft built for AndromedaOS, which was named Productivity mode, was based on Polaris, a version of Windows Core OS for the desktop. This Productivity Mode would be enabled when an Andromeda prototype was docked to an external display, and mimic the experience of using a real Windows 10 PC “with an entirely modern core and no legacy components.” You can see a mockup of this Productivity Mode below.

Andromeda Cshell Continuum

Andromeda never saw the light of day, and Bowden believes that the project was delayed indefinitely around the middle of 2018 after several delays and multiple challenges to solve. “The project was behind schedule and showed no sign of catching up. This, added to the fact that the product had a major app gap problem made the decision to cancel the project the right one. Microsoft did consider emulating Android apps on top of Windows before this, but there was no viable end-user experience that could be built around sideloading Android APKs,” Bowden wrote.

The good news is that some of the work that Microsoft engineers have done on AndromedaOS could be reused for Windows 10X, which Microsoft demoed first on the Surface Neo last year. However, Microsoft has since delayed the Surface Neo and Windows 10X should evolve into a Chrome OS alternative with a heavy focus on web apps, with the ability to stream legacy Win32 apps.

Microsoft spent years working on Andromeda, but the decision to use Android for the Surface Duo was the right call. This solved the app gap problem that AndromedaOS had, and there’s now a growing ecosystem of dual-screen devices from Samsung, Motorola, Huawei, and LG. Android is now a mature platform and Microsoft’s mobile platform of choice, and the Your Phone app on Windows 10 has created unprecedented synergies that we never imagined during the Windows Phone era.

Adapting Windows for new form factors is certainly no easy task, and it remains to be seen if Microsoft can pull it off with Windows 10X after failing to do so with AndromedaOS. We still don’t know much about this new Windows-based OS, but a previous report from ZDNet’s Mary Jo Foley suggested a potential release in the first half of 2021.


Microsoft Teams is rolling out new Spotlight feature to highlight select meetings participants

Microsoft has finally started rolling out the new Spotlight feature in Microsoft Teams, which was initially announced in August 2020. The company says that the new experience is currently available for Windows and macOS desktop clients but is not yet supported on Teams on the web, mobile, or Linux.

The new Spotlight feature brings the ability for presenters to lock an individual video feed for all attendees to see during a Teams meeting. Once selected, the meeting attendee identified as the spotlight will be the main video shown to all other participants.

There are several ways to turn on the new Spotlight experience during Teams meetings. Users can head over to the meeting video grid, right-click on a particular video, and select Spotlight. Alternatively, navigate to the Participants panel simply right click on a particular participant and select Spotlight. Here’s a How-To video that demonstrates the use of this feature below:

This functionality should be a good change for meeting organizers/teachers who want to want to have control over what each participant is seeing during a meeting. The company plans to bring the Spotlight feature to other platforms soon. Do you think that you are going to use this feature on your PC? Let us know in the comments down below.

FIX: Windows 10/11 file sharing not working after update

Some users have posted on Microsoft’s forum about Windows 10 file sharing not working no matter what they try.

They can’t utilize the Share option for file sharing on their local networks after updating Windows 10 to new build versions.

There are some confirmed fixes for that issue, so make sure to read through this article.

What can I do if Windows 10 file sharing isn’t working?

1. Check the required advanced sharing settings are selected

  1. Click the Type here to search taskbar button in Windows 10.
  2. Enter the keyword advanced sharing settings in the search box.
  3. Click Manage advanced sharing settings to open the Control Panel as in the shot directly below.
    the Turn on file and printer sharing option windows 10 file sharing not working
  4. Select the Turn on network discovery radio button.
  5. Then select the Turn on file and printing sharing option.
  6. Press the Save changes button to apply the new settings.

2. Check if Windows’ firewall is blocking file and printer sharing

  1. Open Windows 10’s search tool.
  2. Type firewall in the search utility’s text box.
  3. Click Windows Defender Firewall to open the Control Panel applet in the image directly below.
    The Windows Defender Firewall applet windows 10 file sharing not working
  4. Click Allow an app or feature through the firewall to open the Allowed applications options.
  5. Press the Change settings button.
  6. Make sure the Private and Public checkboxes are selected for File and Printer Sharing.
    Allowed apps options windows 10 file sharing not working
  7. Click OK to close the window.

3. Start the Function Discovery service

  1. Enter services into the search box in Windows 10.
  2. Click Services to open the window in the shot directly below.
    Services window windows 10 file sharing not working
  3. Double-click Function Discovery Resource Publication to open the properties window for it.
    Discovery Resource Publication Properties window windows 10 file sharing not working
  4. Click Automatic on the Startup type drop-down menu.
  5. Press the Start button for the service.
  6. Select the Log on tab.
  7. Select the This account option if it’s not selected.
  8. Click the Apply option to save the new settings.
  9. Select the OK option.

4. Add a Windows credential for a remote server PC

  1. Launch Run with the Windows key + R keyboard shortcut for it.
  2. Type Control Panel into Run, and select the OK option.
  3. Click Credential Manager in the Control Panel.
    Windows Credentials options windows 10 file sharing not working
  4. Select Windows Credentials, and click the Add a Windows credential option.
  5. Enter the network address and login details for your remote server PC.
  6. Click the OK option.

5. Turn SMB 1.0 file sharing on

  1. Open Run’s window.
  2. Input appwiz.cpl in the Open box and click OK to open the uninstaller in Windows 10.
    The uninstaller window windows 10 file sharing not working
  3. Click Turn Windows features on or off to open the window shown directly below.
    Windows Features window windows 10 file sharing not working
  4. Select the SMB 1.0/CIFS File Sharing Support option.
  5. Click the OK button to close Windows Features.

6. Disable Internet Protocol Version 6

  1. First, open the search box in Windows 10.
  2. Enter network in the search utility.
  3. Click View network connections to open the Network Connections Control Panel applet.
  4. Right-click your active network adapter to select Properties.
  5. Deselect the Internet Protocol Version 6 checkbox.
    Wi-Fi Properties window windows 10 file sharing not working
  6. Then click the OK option.
  7. Restart Windows after disabling IPv6.

Those are some potential resolutions that could feasibly fix Windows 10’s file sharing for some users. You can also utilize third-party software for LAN file sharing as an alternative to Windows 10’s Share option.

[wl_navigator]
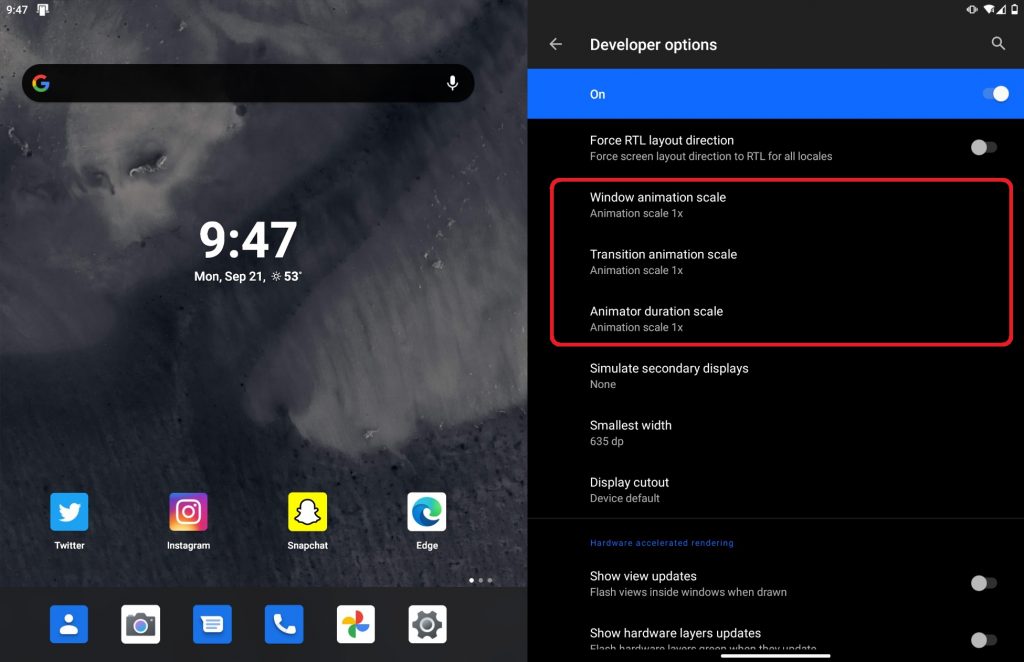
Display Issues After Windows Update: 5 Ways to Fix Them

Many reported display issues after Windows Update, and this can be a problem and prevent you from performing everyday tasks on your PC.

Luckily, this issue can be solved, and in today’s guide, we will show you a couple of solutions you can use to fix this problem.

Why does my Windows 10 look different after the update?

  • Windows Update might’ve installed a new display driver.
  • The current driver is outdated, and it’s not compatible with the current version of Windows.
  • Your resolution isn’t set correctly.

How do I fix my screen after Windows Update?

1. Update drivers automatically

Things are always serious when it comes to drivers. We all know how many issues users had after the initial upgrade to Windows 10. Sadly, it looks like this trend continues with regular updates.

Now, most device drivers will work fine in their generic form or transferred from Windows 7 or 8, but just one faulty driver is enough to invoke a world of conundrums.

In case you are not sure about how to update your display driver, we strongly recommend doing it automatically with a specialized driver updater.

2. Reinstall display drivers

  1. Press the Windows key + I shortcut to open the Settings app.
  2. Select Update & security section.display not working
  3. Highlight Recovery from the left pane.
  4. Click on the Restart Now button.display not working after windows 10 fall creators update
  5. Choose Troubleshoot.
  6. Open Advanced options.
  7. Select Startup Settings and then Restart.
  8. Now, press 4 or F4 to boot your PC in Safe mode.
  9. Once the system boots, right-click on the Start menu and open Device Manager.
  10. Navigate to Monitor.display not working after windows 10 fall creators update
  11. Right-click and uninstall the device.
  12. Restart your PC.

3. Check GPU drivers

  1. Right-click on the Start and, from the Power-user menu, select Device Manager.
  2. Navigate to Display adapters and expand this section.
  3. Right-click on your graphics device and open Properties.
  4. Select the Details tab.
  5. From the drop-down menu, open HardwareIds.display not working after windows 10 fall creators update
  6. Copy the first row and paste it into your browser’s address bar.
  7. The search results should show you the exact drivers you’ll need to install.

Depending on your GPU manufacturer, you need to update graphics drivers by downloading the latest version from one of the following locations:

4. Check the default resolution

  1. Right-click on the desktop and open Display settings.
  2. Make sure that your Screen resolution is set on recommended settings.display not working after windows 10 fall creators update
  3. Change if needed and look for a resolution.

5. Perform a factory reset

Note icon NOTE
Back up your files before using this solution since it can delete all files and applications from the system drive.
  1. Open Start and click on the cog-like icon to open Settings.
  2. Select Update & security.display not working after windows 10 fall creators update
  3. Highlight Recovery from the left-side pane.
  4. Click Get started.display not working after windows 10 fall creators update
  5. Choose whether you want to keep your files or delete everything.
  6. Click Next and then Reset.
  7. After the procedure ends, your monitor should perform just like before.

This is how you can fix display issues after a Windows Update. In case the issues are still there, we have a great guide on how to fix screen problems on Windows 10. For additional solutions, read our article on monitor keeps going black for potential solutions.

Did we miss a solution that worked for you? If so, share it with us in the comment section.

Conditional formatting based on another cell [Google Sheets]

Google Sheets includes various formatting options for users. Its users can apply alternative cell color, bold, italic, underline, and font formatting to spreadsheet cells within Sheets.

Those formatting options visually enhance spreadsheets.

Google Sheets also includes a handy conditional formatting tool that enables users to apply selected formatting styles to cells that match a specified condition.

With that tool, you can apply conditional formatting to a selected cell range that’s based on another cell’s value.

How can I use conditional formatting based on another cell in Google Sheets?

1. Apply conditional formatting based on a single cell value

  1. First, open a blank spreadsheet in Google Sheets.
  2. Next, enter the dummy data shown in the snapshot directly below within the cell range B2:B5.
    Dummy data google sheets conditional formatting based on another cell
  3. Enter the value 450 within cell C2.
  4. Select the cell range B2:B6 by holding the left mouse button and dragging the cursor over them.
  5. Click Format to open that menu.
    Format menu google sheets conditional formatting based on another cell
  6. Then select Conditional formatting to open the sidebar shown directly below.
    Conditional format rules sidebar google sheets conditional formatting based on another cell
  7. Select the greater than option on the Format cells if drop-down menu.
    The greater than option google sheets conditional formatting based on another cell
  8. Enter =C$2 in the Value or formatting text box, which is a reference to cell C2.
  9. Click the Fill color button within the Formatting styles box.
  10. Then select the orange color on the palette.
    color palette google sheets conditional formatting based on another cell
  11. Click the B Bold button.
  12. Press the Done button.

Now cells B2, B4, and B5 within the B2:B6 range will have orange cells and bold text as shown in the screenshot directly below.

Those cells have the selected formatting applied to them as they include higher numbers than the value in C2 the condition is based on.

The orange and bold conditional formatting google sheets conditional formatting based on another cell

Note that cell references must always be entered as a formula with = preceding the reference. They must also always include a $ sign between the column letters and row numbers.

You can apply conditional formatting to cells that include dates. For example, you could select the Date is before option to apply formatting to a cell range that includes dates based on a date in a referenced cell.

The Format cells if menu also includes several text options. The Text is exactly option would apply formatting to cells with text that exactly matches that of a referenced one.


2. Apply conditional formatting based on multiple cell values across columns

  1. Open an empty spreadsheet.
  2. Next, enter the dummy data in columns A, B, C, and D exactly as shown in the snapshot directly below.
    Dummy data for spreadsheet google sheets conditional formatting based on another cell
  3. Select the cell range A2:A4.
  4. Click the Format menu.
  5. Select Conditional formatting to open that tool.
  6. Click the Format cells if menu to select Custom formula is.
  7. Enter this formula in the Value box: =OR(B2<200, C2<200, D2<200).
    The OR formula google sheets conditional formatting based on another cell
  8. Then click Fill color to select red cell formatting.
  9. Click the Done option.

What you’ve done in the example above is to apply red cell formatting to cells A2 and A4 based on all the cell values in their rows (across columns B to D).

As the rows for January and March include cells with values less than 200, red formatting is applied to the Jan and March row headings.

The conditional formatting for the A2:A4 range google sheets conditional formatting based on another cell

The above examples show you how to apply relatively basic conditional formatting to spreadsheets in Google Sheets.

You can enhance your spreadsheets’ presentation in many ways by applying conditional formatting with custom formulas and the other options on the Format cells if drop-down menu.

[wl_navigator]
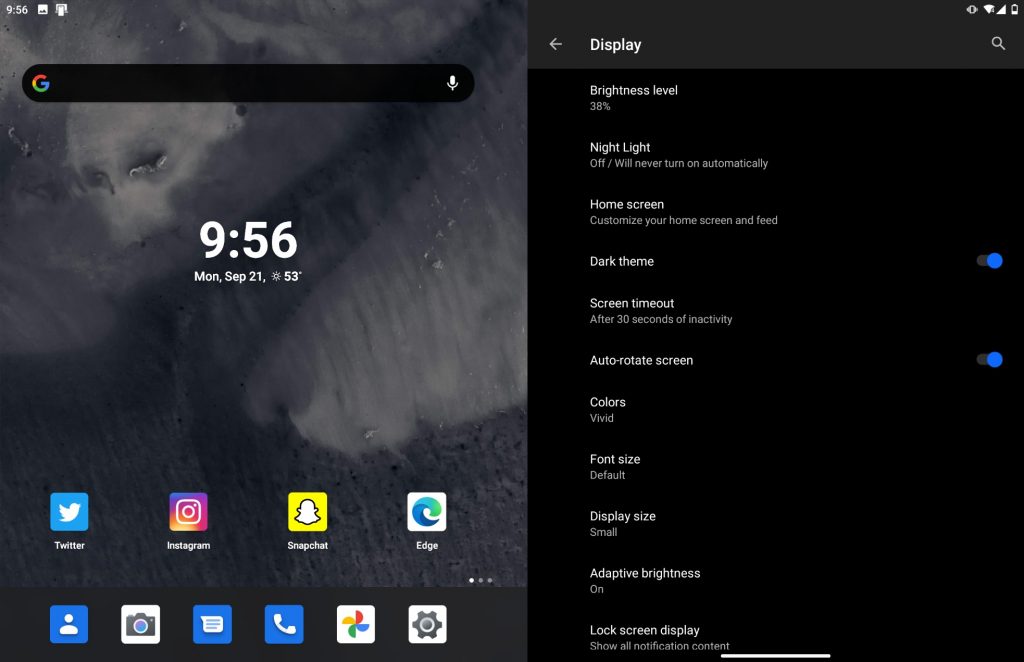
FIX: Bluetooth support service error 1079 on Windows 10

The Bluetooth support service error 1079 states: Error 1079: The account specified for this service is different from the account specified for the other services running in the same process.

Are you getting that error when trying to connect, or pair, Bluetooth devices? If that’s so, it could have something to do with the Local System account starting the services or driver incompatibility.

Bluetooth support service error 1079 can cause many problems on your PC, and speaking of Bluetooth errors, here are some common issues that users reported:

  • Bluetooth support service stopped Windows 7 – This problem can affect almost any version of Windows, and even if you don’t use Windows 10, you should be able to fix this problem using one of our solutions.
  • Error 1068 Bluetooth service – This is another Bluetooth error that you can encounter. This error is usually caused by your drivers, so be sure to keep them up to date.
  • Bluetooth support service missing, disabled, stopped, grayed out – If you’re having problems with Bluetooth support service, you might be able to fix the issue by performing an SFC and DISM scans.
  • Bluetooth support service the system cannot find the path specified – This is another common problem with Bluetooth, and you might be able to fix it simply by keeping your system up to date.
  • Windows could not start the Bluetooth support service error 1079 – This issue can occur if Bluetooth Support service isn’t properly configured. Simply change the configuration of this service and the issue will be resolved.
  • Bluetooth support service error 1053 – This is another common problem with Bluetooth, but you should be able to fix it using one of our solutions.

How do I fix Bluetooth support service error 1079?

1. Update the Bluetooth driver

  1. Press the Win + X keys and select Device Manager on the menu.
    Bluetooth support service stopped Windows 7
  2. Click on Bluetooth Radios listed in Device Manager.
  3. Right-click your Bluetooth adapter and select Update driver.
    Bluetooth support service error 1053
  4. Click the Search automatically for updated driver software option and then press the Next button (Windows will update the Bluetooth driver if there’s more update driver software).
    Bluetooth support service the system cannot find the path specified

Use a tool to upgrade the driver automatically

You can always download the missing driver quicker and easier using a specialized driver updating tool.

These powerful tools can run a system-wide scan and identify the correct drivers needed by your system. You can then download and install them in just a few minutes.

2. Run the Hardware Troubleshooter

  1. Press Windows Key + I to open the Settings app.
  2. Go to Update & Security section.
    Bluetooth support service error 1053
  3. Select Troubleshoot from the menu on the left.
  4. Choose Hardware and Device from the list and click Run the troubleshooter.
    Bluetooth support service the system cannot find the path specified

3. Configure the Bluetooth Support Service

  1. Click the Cortana button on your taskbar and enter services into its search box.
  2. Select Services to open the window in the snapshot directly below.
  3. Double-click on the Bluetooth Support Service.
    Bluetooth support service stopped Windows 7
  4. If the Bluetooth Support Service is disabled, click the Startup type drop-down menu and select Manual from there.
    Error 1068 Bluetooth service
  5. Click the Log On tab at the top of the window and select the This account radio button if the Local System account is currently selected.
    Bluetooth support service missing
  6. Now enter NT AUTHORITYLocalService in the This account text box. Leave both the Password and Confirm password text boxes blank.
  7. Press the Apply and OK buttons to confirm the new Bluetooth Support Service settings.
  8. Switch back to the General tab and press the Start button to restart the Bluetooth Support Service.

4. Switch the Bluetooth device to Discovery Mode

You should also switch on the Bluetooth device you’re attempting to pair with the desktop or laptop, and switch it to its discovery mode.

How you switch it to discovery mode depends largely on the device. Keyboards, mice, and headsets usually have a button you need to hold down for a few secs.

If you’re not sure how to switch a device to discovery mode, check its manual for further details.

5. Install the latest updates

  1. Open the Settings app.
  2. Go to the Update & Security section and click on the Check for updates button.
    Windows could not start the Bluetooth support service error 1079

Note: If any updates are available, Windows will download them automatically in the background. Once the updates are downloaded, restart your PC to install them. After the latest updates are installed, check if the problem is still there.

6. Perform an SFC and DISM scan

Run the SFC scan

  1. Press Windows Key + X and select Command Prompt (Admin) from the list. If Command Prompt isn’t available, you can also use PowerShell (Admin).
    Windows could not start the Bluetooth support service error 1079
  2. Type the sfc /scannow command and press Enter.
    Bluetooth support service disabled
  3. The scan will now start and try to repair corrupted files. This process can take about 15 minutes, so don’t interrupt it.

Run the DISM scan

  1. Start Command Prompt as administrator.
  2. Enter the following command and press Enter to run it: DISM /Online /Cleanup-Image /RestoreHealth
    Error 1068 Bluetooth service
  3. The DISM scan will now start. This scan can take about 20 minutes or more, so don’t interrupt it.

7. Create a new user account

  1. Open the Settings app and go to the Accounts section.
    Error 1068 Bluetooth service
  2. Choose Family & other people from the menu on the left. Now select Add someone else to this PC.
    Bluetooth support service stopped
  3. Choose I don’t have this person’s sign-in information.
    Bluetooth support service the system cannot find the path specified
  4. Click Add a user without a Microsoft account.
  5. Enter the username for the new account and click Next.
    Bluetooth support service stopped Windows 7

Once you create a new user account, switch to it and check if the problem appears. If not, it means that your old user account is corrupted, so we advise you to move all your personal files to the new account and start using it instead of the old one.

Those are a few fixes for error 1079. If you still need to fix Bluetooth, check out this expert guide for further detail.

If you’re facing other problems with your computer or software, you’re going to find a solution in our Tech Troubleshooting section.

News, guides, and tips, you can find all on our Windows 10 Hub.

The Crash Bandicoot 4 video game demo is now live on Microsoft’s Xbox One consoles

The demo for the upcoming Crash Bandicoot 4: It’s About Time video game is now available to play on Microsoft’s family of Xbox One consoles.

The demo is a free bonus for those that pre-order the main game which is due out next month on October 2nd. Pre-order customers also get the Totally Tubular skins for Crash and Coco which will unlock once the game launches.

The Crash Bandicoot 4: It’s About Time demo contains three full levels from the main game that were selected to showcase the various gameplay styles that will be available.

Here’s a short video of the demo’s content:

Have you had a chance to play the demo yet? Share your impressions of it with the community in the comments below and then follow us on Pinterest and Facebook for more Xbox gaming news.

Fix: Canon PIXMA MP160 issues on Windows 10

Windows 10 is without a doubt a great operating system, but it has certain flaws. One of the biggest flaws of Windows 10 is its hardware compatibility, and certain older devices might have problems working with Windows 10.

Canon PIXMA MP160 is a great printer, but here are some of the most common problems that users reported with the device:

  • Canon MP160 error 5 – If you encounter this problem with your printer, you might be able to fix it by updating your drivers. Alternatively, you can try installing the latest drivers and check if that helps.
  • Canon PIXMA MP160 error 2, 5, 16, 5100 – There are various issues that can appear with your printer, and if you encounter any of these problems, you should be able to fix them using our solutions.

How do I fix Canon PIXMA MP160 issues on Windows 10?

1. Reinstall the drivers

  1. Turn off your printer and unplug it.
  2. Press Windows Key + X to open the Power User Menu and select Device Manager from the list.
    Canon MP160 error 5
  3. Locate your printer driver, right-click it, and choose Uninstall.
    Canon PIXMA MP160 error 5
  4. If available, check to Delete the driver software for this device and click Uninstall.
    Canon MP160 error 5

Update the driver automatically

Manually searching for drivers can be tedious and even dangerous if you decide to look for it on a problematic website.

That’s why it’s so much easier, safer, and quicker to use third-party tools such as Fortect Driver Updater to automatically download the missing drivers.

The first step is to download and install Fortect Driver Updater. Next, start the tool. It will begin to scan your PC immediately for any problems with your drivers and will find the best solutions.

After it finishes scanning, all you need to do is to choose which driver to install from the list. Of course, there is also the much easier option to click on the Select All checkbox from the top and install all the drivers simultaneously.

⇒ Get Fortect Driver Updater

2. Download Easy-WebPrint EX Ver. 1.7.0

If Canon PIXMA MP160 isn’t working on your Windows 10 PC you can try downloading Easy-WebPrint EX Ver. 1.7.0.

After that, you should be able to launch the MP Navigator 3.0 and your device should start working.

3. Start scanning from Control Panel

  1. Press Windows Key + S, type control panel, and click on Control Panel from the list of results.
  2. Navigate to Devices and Printers.
    Canon PIXMA MP160 error 2
  3. Go to the Printers section and locate Canon PIXMA MP160.
  4. Right-click your printer and choose Scan.

Create a shortcut on your desktop

Unfortunately, you’ll have to repeat these steps every time you want to scan a document. To make this process a bit easier you can create a shortcut on your Desktop.

Canon MP160 error 5

To do that simply go to Devices and Printers, locate your printer, right-click it, and choose the Create shortcut option.

4. Install the drivers in Compatibility Mode

  1. Download the latest drivers for your device.
  2. Find the driver setup file, right-click it, and choose Properties.
    Canon PIXMA MP160 error 5100
  3. Go to the Compatibility tab and check Run this program in compatibility mode for and then select Windows 10 or the version you are running.
  4. Click Apply and OK.
    Canon MP160 error 5
  5. Run the setup file and install the drivers.

5. Temporarily remove ink jets

  1. Turn off your printer.
  2. Wait for a few seconds and then turn the printer back on again.
  3. Press and hold the Reset button for 5 seconds and then let it go (the Reset button is labeled Stop/Reset and it has a red triangle inside the circle).
  4. Now open your printer cover and wait for the ink jets to shift to the left side.
  5. Take both of them out. Wait for a few seconds and insert the ink jets again. Close the printer cover.
  6. Wait while your printer starts.
  7. Now press the Black button. The button is labeled Black and it has a vertical line in a diamond as its icon.

After doing that, the E4 error should be fixed.

6. Run the printer application as administrator

  1. Locate the TWAIN application and right-click it.
  2. Choose Run as administrator from the menu.
    Canon PIXMA MP160 error 16

Set the application to always run with administrative privileges

  1. Right-click the application and choose Properties from the menu.
  2. Navigate to the Compatibility tab and check Run this program as an administrator. Click on Apply and OK.
    Canon MP160 error 5

7. Install the latest updates

  1. Press the Windows Key + I to open the Settings app.
  2. Navigate to the Update & Security section.
    Canon MP160 error 5
  3. Now click the Check for updates button.
    Canon PIXMA MP160 error 2

Windows will now check for available updates and download them in the background. Once the updates are installed, check if the problem with your printer is still there.

8. Disconnect the printer and shut down your PC

  1. Disconnect the printer from your PC.
  2. Shut down your PC, and disconnect its power cable from the power outlet.
  3. Wait for a few moments and turn your PC back on again.
  4. Once your PC boots, connect the printer once again.

Note: This is a simple workaround, but several users reported that it worked for them, so you might want to try it out. Keep in mind that this is just a temporary solution, so if you encounter this problem again, you might have to repeat it.

9. Clean your ink cartilages

  1. Remove the ink cartridges from your printer.
  2. Turn the printer off by pressing the Power button on it.
  3. Use a kitchen tissue or any other non-fibrous tissue to clean the contacts on the front of the cartridge.
  4. After doing that, press the power button to turn your printer back on again.
  5. Insert the cartridges.

We hope that you managed to fix the problems with your Canon PIXMA MP160 after using one of our solutions. If you have any other suggestions or comments, please leave them in the Comments section below.

What time do Xbox Series X and Xbox Series S pre-orders go live on September 22nd?

8AM seems to be the time to remember for those looking to pre-order either the Xbox Series X or Xbox Series S next gen consoles on September 22nd.

Microsoft has confirmed that pre-orders for the both next gen Xbox consoles will go live in the United States, Canada, United Kingdom, Australia, and New Zealand at 8AM PT, 8AM PT, 8AM BST, 8AM AEST, and 8AM NZST respectively.

Online pre-orders for those in Europe, the Middle East, and Africa are expected to go live at  9AM CEST.

Pre-orders will be taken directly via the Microsoft Store website but also through major retail chains such as Amazon, Best Buy, GameStop, Walmart, Target, EB Games, The Source, JB Hi-Fi, EB Games, Telstra, Harvey Norman, and Spark.

Xbox Series X and Xbox Series S console pre-orders aren’t limited to just the major stores though so it can be worth checking other smaller or local suppliers as well.

Those looking to pay off their next gen Xbox console with a payment plan via Xbox All Access will also be able to do so starting from the same times mentioned above for the respective supported regions. Note that, as of right now, only the United States, United Kingdom, Australia, New Zealand, Denmark, Finland, Norway, and Sweden have Xbox All Access.

Microsoft has confirmed that Xbox All Access will be coming to Canada, France, Poland, and South Korea sometime before the November 10th release but no specific date has been set yet.

While these are the official start times for the Xbox Series X and S pre-orders to go live, it’s expected that some stores may begin early so it’s worth checking your preferred stores in the 24 hours beforehand if you’re worried about missing out. It’s unclear if supplies will run out though so there may not be a reason to worry at all.

Are you planning on pre-ordering the Xbox Series X or Xbox Series S? Let us know which console you’re going to order in the comments below and then follow us on Twitter and Pinterest for more Xbox gaming news.

How to test if your VPN is working [Speed & Leak Check]

Having a VPN on your PC is great for your privacy and security, but do you know how to test if your VPN is working? One of the most commonly-used tests is checking an online IP detection service. If your IP address is different than the one you had before you connected to the VPN, then it probably works, right? Wrong. Many VPN users believe that a simple IP change (which, by the way, can be also achieved without a VPN) means that the VPN is up and running, protecting your connection and privacy at full-force. However, this false sense of security may do more harm than good, especially if your VPN isn’t exactly what it advertises itself to be.  

How to check if your VPN is working?

Check if you’re connected

  1. Locate the VPN icon in your system tray
  2. Double-click it to display the VPN client’s main windowPIA is connected to a US VPN server
  3. Check the dashboard to see if you’re connected

This step might sound silly, but sometimes your VPN connection might suddenly drop. If you’re unfortunate enough to use a VPN without a killswitch, your Windows PC will almost immediately default to your previous, insecure connection.

As a result, you won’t be connected to the VPN server of your choice (even though you thought you were), and your connection won’t be secured and anonymized.

Perform a data leak test

  1. Launch your VPN client (we used Private Internet Access)
  2. Connect to a server of your choice
  3. Launch your favorite web browser
  4. Go to either one of these services:
    1. ipleak
    2. IPX
    3. BrowserLeaks
  5. Run a leak test
  6. Check if any of the following data leaked through your VPN connection:
    1. IP address
    2. DNS
    3. WebRTC
    4. Location
    5. Flash IP
    6. IPv6 geolocation
    7. ISP

Just to make sure, you can run the leak tests on all of the servers we’ve mentioned above. If none of these tests pick any sensitive data from your VPN connection, then your VPN is leak-proof.

However, note that some VPNs might leak data from some of their servers, while others are kept airtight. We’re not telling you to run leak tests every time you connect to a VPN server but is that such a crazy idea? Better safe than sorry, after all.

Bonus: Note that ipleak also has a torrent address detection feature. You add a magnet link to your torrent client of choice and wait for the results. If you see your real IP address in the torrent address testing area, your VPN is not secure.

Run a speed test

  1. Disconnect from your VPN (if connected)
  2. Launch a web browser
  3. Run an online speed test (we use Netflix’s fast.com and Ookla’s Speedtest)
  4. Wait for the results
  5. Launch your VPN client
  6. Connect to your desired server
  7. Run the same speed test
  8. Compare the results to see how your VPN affects your connection speed
  9. Optionally: run the tests on multiple servers to see how location affects your speed

Naturally, speed is an important part of your VPN. Having a secure, but slow VPN can turn simple, mundane activities, such as checking your email into sessions of endlessly waiting for the page to load.

We recommend sticking to only one speed test tool, and switching only if it doesn’t seem to work with your VPN (it’s not unheard of). On the other hand, running tests on multiple servers can help you understand if and how location affects speed.

It’s worth mentioning that certain VPNs enforce speed/bandwidth limits only on some of their servers/locations.

Final thoughts on testing your VPN

All things considered, it’s of utmost importance to understand how your VPN works and test it for leaks at least every once in a while.

Remember, even if your VPN successfully masks your IP, that doesn’t mean it also shields other sensitive data from prying eyes.

Last, but not least, running speed tests on your VPN can help you learn if the VPN limits bandwidth/speed, and also how location can affect your VPN connection speed.

[wl_navigator]
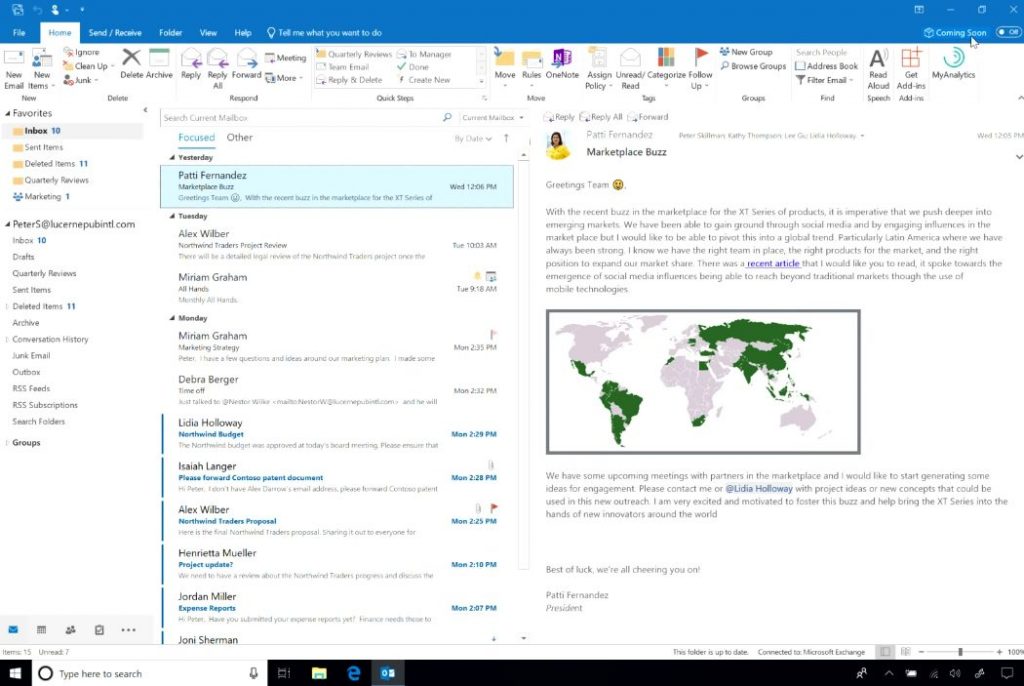
7 Best VPNs With Kill Switch for Windows to Stop IP Leaks

A VPN is mainly designed to ensure your online privacy and safety. That means it must have powerful security features, such as a strong VPN protocol with the highest level of encryption.

However, you should also for a kill switch when it comes to VPNs for Windows PC.

What is a VPN kill switch?

A VPN kill switch (also stylized as killswitch) is a safety feature that automatically cuts off Internet access for your computer’s entire network when the VPN connection gets disrupted.

Its goal is to stop IP leaks when you’re online without a VPN.

If you don’t have a kill switch enabled, your true IP address will be immediately broadcasted online as soon as the VPN connection drops.

Do I need a VPN kill switch?

If you use a VPN to remain anonymous on the web, then yes, you definitely need a VPN kill switch. This way, you can make sure that your online activities won’t be traced back to you.

It’s particularly practical for users who live in countries with harsh Internet censorship.

Many of them resort to virtual private network solutions to bypass government censorship and access blocked websites, such as journalists or whistleblowers.

Which VPN has a kill switch?

ExpressVPN – Best combo with the stealth servers

ExpressVPN is a VPN service that has a kill switch called Network Lock, featuring support for Windows, Mac, Linux, and routers. It stops all traffic flowing in and out of your network as soon as you get disconnected from the VPN.

This way, it hides you from your ISP and maintains your online anonymity. Created by Express VPN International LTD, this tool uses OpenVPN with 256-bit AES military-grade encryption, exclusive DNS servers, IPv6 leak protection, and split tunneling. It allows 5 simultaneous device connections.

What else you must know about ExpressVPN:

  • +3,000 VPN servers in 94 countries
  • No logs or leaks
  • 24/7 live chat and email support
  • 30-day money-back guarantee
  • 7-day free trial for Android and iOS

ExpressVPN

Stop IP leaks by using the automatic kill switch of this dependable VPN.
Check price Visit website

Private Internet Access – Best combo with PIA Mace

Killswitch settings PIA

Private Internet Access (PIA) is a top VPN for Windows 10, which also comes integrated with an automatic kill switch called VPN Killswitch. It’s set to auto mode, which means that it blocks all outside network traffic when the VPN is on.

However, you can set VPN Killswitch to Always in order to block all incoming and outgoing traffic, whether the VPN is on or off. Or you can disable it.

Created by Kape Technologies, PIA is compatible with all major operating systems, including Windows, Mac, Linux, Android, and iOS. You can even set it up on your router to share your VPN account with all connected devices. It allows 10 simultaneous connections.

What else you must know about PIA:

  • +3,300 VPN servers in 48 countries
  • No logs or leaks
  • 24/7 live chat support
  • 30-day money-back guarantee (no free trial)

Private Internet Access

Prevent IP leaks by turning on the kill switch of this reliable VPN.
Check price Visit website

NordVPN – Best combo with Double VPN

When it comes to a VPN kill switch for Windows computers, NordVPN really shines because it has two types of kill switches: for applications and the entire network traffic. The Internet kill switch stops all inbound and outbound connections if the VPN gets interrupted.

Meanwhile, the App Kill Switch terminates specific programs to make sure they won’t expose your true IP address. Made by Tefincom & Co., NordVPN has some of the best security features you can find in a virtual private network solution.

In addition to a kill switch, you can use Double VPN, obfuscated servers, Onion-over-VPN, and dedicated IP addresses. It uses OpenVPN with 256-bit encryption to secure your data.

NordVPN is compatible with all popular platforms, including Windows, Android, Linux, Mac, and iOS. Plus, you can install it at the router level to provide VPN access to all connected devices. It supports 6 simultaneous connections.

What else you must know about NordVPN:

  • +5,100 VPN servers in 59 countries
  • No logs or leaks
  • 24/7 live chat support
  • 30-day money-back guarantee (no free trial)

NordVPN

Remain anonymous even when the VPN connection drops by using the kill switch of this app.
Check price Visit website

Surfshark – Best combo with CleanWeb

Designed by Surfshark LTD, Surfshark is yet another VPN with a kill switch for Windows PC. Simply called Kill Switch, it disables all Internet access when you’re not using the VPN. That means that you will lose network connectivity even after quitting or logging out of the app.

Besides a kill switch, Surfshark brings to the table other awesome security features, such as support for WireGuard and OpenVPN with 256-bit encryption, Shadowsocks proxy, multi-hop VPN connections, obfuscation mode, along with an ad and malware blocker.

The best part about Surfshark is that you can use a single account on any number of devices since it permits unlimited simultaneous connections. It works with Windows, Linux, Mac, iOS, Android, and routers.

What else you must know about Surfshark:

  • +1,700 VPN servers in +63 countries
  • 24/7 live chat and email support
  • 30-day money-back guarantee
  • 7-day free trial for Android and iOS

Surfshark

Protect your online privacy by using the kill switch of this affordable VPN.
Check price Visit website

CyberGhost VPN – Best combo with NoSpy servers

Operated by Kape Technologies, CyberGhost VPN is one of the most efficient VPNs with an Internet kill switch for Windows PC. That’s because it’s the only premium service on this list that offers a free trial for Windows (no credit card).

CyberGhost VPN has an automatic Internet KillSwitch built into the software application, which you can’t turn off no matter what. It’s not a drastic measure because it doesn’t shut off your Internet access when the VPN is off.

But it’s designed to block all connections as soon as you lose access to the CyberGhost VPN network. You can set up CyberGhost VPN not only on Windows but also iOS, Android, Linux, and Mac. It also has OpenVPN manual config for router setup. It can protect up to 7 devices at once.

What else you must know about CyberGhost VPN:

  • +6,500 VPN servers in 89 countries
  • No logs or leaks
  • 24/7 live chat support
  • Up to 45-day money-back guarantee
  • 1-day free trial for Windows and macOS
  • 7-day free trial for Android and iOS

CyberGhost VPN

Protect your online privacy by stopping IP leaks using the kill switch of this VPN.
Check price Visit website

VyprVPN – Best combo with VyprDNS

VyprVPN is a virtual private network solution based in Switzerland provided by Internet privacy and security solution provider Golden Frog.

The solution currently runs over 700 servers in over 70 different locations and provides VPN apps for Windows, Mac, Android, and iOS devices.

VyprVPN has 256-bit encryption and supports a number of VPN protocols, including OpenVPN, IKEv2, L2TP/IPsec, PPTP, and the vendor’s proprietary protocol Chameleon.

The VPN also activates automatically whenever you connect to an unknown or unprotected public network.

Furthermore, it includes a Kill Switch that activates instantly when the VPN is disabled or disconnected to ensure no traffic slips through the cracks.

What else you must know about VyprVPN:

  • VyprDNS to defeat censorship
  • VyprVPN for Business Cloud
  • DNS Leak Protection
  • Split tunneling
  • Public Wi-Fi Protection
  • Ping server monitoring

VyprVPN

Employ system and apps kill switch for an anonimous browsing, torrenting and banking while traveling.
Check price Visit website

IPvanish – Best combo with traffic block

IPVanish is a VPN service based in the United States that currently provides access to over 40,000 IP addresses and over 1,600 P2P-optimized servers in over 75 locations.

When you enable the kill switch feature in your IPVanish app, it acts as a failsafe. If you’re online and discover you don’t have active encryption, the kill switch disconnects your internet connection. 

Connection to the internet is blocked until your VPN encryption can be enabled, preventing you from being exposed to threats.

It also offers its users user-friendly apps with a plethora of features and customization options. IPVanish uses the OpenVPN and IKEv2 protocols to protect your online privacy, and you can choose which OpenVPN port to use to connect – 1194 or 443.

You can also use the Scramble OpenVPN Traffic feature to hide the fact that you’re using a VPN in countries that typically monitor for and block VPNs, such as Iran or China.

What else you must know about IPVanish:

  • Cloud Storage (only in VPN + Storage)
  • VPN Encryption
  • Multiple Connection Protocols
  • P2P Support
  • Data Restoration
  • Wi-Fi Hotspot Privacy

IPVanish

A VPN suited mostly for torrent thanks to its advanced protocols and kill switch on system level.
Check price Visit website

Why a Kill Switch feature is important to VPN?

A kill switch feature is important to a VPN when you lose your internet connection and thus your VPN server encryption.

Your laptop, smartphone, or another device will most likely revert to the public IP address provided by your home ISP.

This means that your online activity and browsing history, as well as your IP address and location, may become visible to and tracked by others at any time.

A VPN kill switch feature adds security by preventing DNS leaks and Wi-Fi packet loss.

Tip icon Tip
To fix any issues with your virtual private network solution, join our VPN Troubleshooting Hub.
Return to our Security VPN section to find out how a VPN improves your online privacy and security.

To recap, a VPN kill switch for Windows 10 is indispensable for privacy-concerned users who want to protect their online anonymity all the time, even in the short time it takes for a VPN to disconnect and reconnect.

If you’re trying to hide your browsing activity from your ISP and block government traffic, you definitely need a VPN kill switch. The virtual private network solutions above are the best in the business, especially when it comes to Internet security and anonymity.

Craftopia packet loss: What is it and how to fix it?

Craftopia is a survival game with a lot of action elements, which brings together a lot of awesome features to provide you with an immersive experience.

It allows you to do farming activities, go hunting, build, automate various tasks, and even battle monsters if you’re into that. Craftopia also features mining and foraging, and get this: you can cast magic spells.

You can play it in both single-player and multiplayer modes, although the title is subtly advertised as being a multiplayer experience. This brings us to the main topic of our article: connectivity issues such as packet loss, jitter, or high ping.

What is packet loss in Craftopia?

Whenever packets of data that get sent throughout your connection get lost and never make it to their destination, we call it packet loss. It’s quite intuitive, come to think of it.

Anyway, this issue seems harmless at first, considering that data packets get lost on the regular. However, we’re here to talk about prolonged periods of leaking packets, which can have a big impact on your gameplay experience.

More often than not, packet loss gets fixed all by itself and you won’t even know you experienced it. This is usually referred to as normal packet loss.

However, when stars align all wrong, you can feel packet loss slowly but steadily wreaking havoc, especially when you’re playing multiplayer games such as Craftopia.

You’ll notice strange behavior such as:

  • Unresponsive menus
  • Sluggish character movement
  • Desyncing with other online players
  • Chat messages might be displayed with great delay
  • Rubberbanding (freezing + sudden teleporting of characters, PC or NPC)
  • Sudden disconnection from the Craftopia game server
  • FPS drops

What can cause packet loss in Craftopia?

There are a lot of things that can trigger a packet loss episode, which is exactly why this issue gets so much bad rap. Given that you can’t immediately know what’s wrong with your connection means there’s no surefire fix for it.

Some causes for leaking packets may be more obvious than others, which makes the problem easier to deal with. Like if you’re using Wi-Fi instead of Ethernet, you might unknowingly increase your odds of experiencing packet loss.

Check out our list of potential causes for packet loss (the severe kind):

  • Network congestion (this is one of the most common causes for leaking packets)
  • Using Wi-Fi instead of Ethernet connections
  • Outdated drivers on your PC (especially if they’re network adapter drivers)
  • Not using the latest version for your router’s firmware
  • Bandwidth throttling (ISP-related)
  • ISP routing traffic improperly
  • Poor subnet management (also ISP-related)
  • Game server issues
  • Subpar Internet plan

As you can see, there are several reasons that may spawn an unfortunate packet loss episode while you’re playing Craftopia. Trust us, this list barely scratches the surface, as we only covered some of the most obvious causes.

How to detect packet loss in Craftopia?

  1. Detect the IP address of the Craftopia server you’re playing on
  2. Launch a CMD instance on your PC
  3. Run the pathping x.x.x.x command (replace x.x.x.x with the IP you extracted earlier)
    CMD pathping
  4. Wait for the pathping test to come to an end
  5. Check if there’s any packet loss and where it occurs

Note that currently Craftopia only lets you join a game via IP address or through Steam. Thus, it may not even be necessary to use third-party tools such as Wireshark to perform IP address extraction.

Just put the IP address you use to connect to the game. Alternatively, if you’re joining via Steam, ask the game host if they’re kind enough to tell you the IP address, so you can check for packet loss. We’re sure they’ll understand.

It’s also worth mentioning that the first hop on the pathping test always belongs to your PC (the one you’re running pathping from). Similarly, the last hop always belongs to the game server host.

Knowing where packet loss occurs can help you rule out certain causes for this issue.

How to fix packet loss in Craftopia?

1. Use a VPN

  1. Purchase a Private Internet Access subscription
  2. Download the PIA installer on your PC
  3. Deploy the VPN client
  4. Launch it and connect to your account
  5. Choose a suitable, fast server (nearby servers are usually the fastest)
  6. Launch Craftopia as usual
  7. Check if you’re still experiencing packet loss symptoms

VPN services such as Kape Technologies’ Private Internet Access can fix packet loss situations quickly by circumventing your default, troublesome ISP connection. But you see, there’s a catch.

Experiencing packet loss in Craftopia? PIA could help you fix it with ease.
Free Trial Visit Website

Since a VPN can only bypass ISP-imposed limitations, it also means that it can’t do much if the problem is on your side, or on the Craftopia server host’s side.

Make sure you confirm that the issue occurs on your ISP’s section of the connection before investing in a VPN subscription plan.

2. Flush your DNS

  1. Hit the Win key on your keyboard
  2. Type CMD and right-click the Command Prompt icon
  3. Select Run as administrator
  4. Type the following commands, one by one, in this precise order:

ipconfig /flushdns
ipconfig /registerdns
ipconfig /release
ipconfig /renew
netsh winsock reset
exit

Restart your computer after closing the Command Prompt window. After your PC fully boots, try launching Craftopia once more, connect to the game server, and see if there’s any improvement.

Oftentimes, flushing your DNS can improve the quality of your connection, thus curbing troublesome issues such as packet loss.

3. Manually troubleshoot your connection

  • Restart Craftopia, your PC, router, and/or modem
  • Check if there’s any worn out/broken component on your network
  • Upgrade the Ethernet cables to a higher Cat standard if possible (e.g. Cat 5 to Cat 6)
  • Switch from using Wi-Fi to Ethernet, if possible (Wi-Fi packet loss happens more frequently)
  • Update your system drivers, especially network-related ones
  • Make sure that your router runs on the latest firmware version
  • Close any background apps or services that might take up a lot of bandwidth (VoIP, torrent clients)
  • Call your ISP and ask them if they can look into the issue (tell them about the pathping test)
  • Contact the Craftopia server host if you notice something wrong on their side
  • Avoid peak hours if you experience network congestion a lot (or use a VPN)
  • Try connecting to another server to rule out any server-side issues
  • Upgrade your Internet plan, if possible

Note that these aren’t guaranteed fixes that will 100% eliminate your packet loss issues in Craftopia.

However, trying our suggestions might improve the quality of your connection, which is guaranteed to reduce the incidence of packet loss, at least on your side.

Final thoughts on fixing Craftopia packet loss

To sum it up, experiencing packet loss in Craftopia can be really annoying and keep you from having a great time. Fortunately, with just a bit of luck, you could easily fix it.

It’s possible that using a VPN such as PIA can get you rid of packet loss, but this fix only works if your ISP is what triggers the event, to begin with.

You could also try flushing your DNS or performing or manual troubleshooting suggestions. However, sometimes packet loss has a mind of its own and you might not be able to fix it all by yourself.

In this case, waiting it out can be the easiest, albeit not the most convenient, approach.

Sea of Thieves, Hunt: Showdown, and Warhammer: Chaosbane are free to play with Xbox Live Gold this weekend

There’s another Free Play Days event for Xbox Live Gold subscribers this weekend. Starting today through Sunday, September 20, Sea of Thieves, Hunt: Showdown, and Warhammer: Chaosbane are free to play with Xbox Live Gold and limited-time discounts are available for all three games in the Xbox Store. As always you can download and install all three games via Xbox.com or using the Microsoft Store on your Xbox console.

It appears Sea of Thieves is everywhere now. Sea of Thieves now boasts over 15 million players since its launch in 2018 and has frequent updates, including the latest content update, Ashen Winds. The epic first person online multiplayer is available on Xbox One and Windows 10 for free for Xbox Game Pass Ultimate subscribers and now Microsoft is allowing Xbox Live Gold subscribers a small window of time to play the game for free this weekend.

Hunt: Showdown was offered as in a previous Free Play Days installment in May 2020 and Warhammer: Choasbane was already offered as a Free Play Days game back in April 2020, so it is surprising to see both being offered again. As Microsoft prepares for the release of the Xbox Series X and Xbox Series S consoles to be launched in November, Xbox Live Gold may be combined with Xbox Game Pass for a more robust online experience.

What game will you be playing this weekend? Let us know in the comments below.

How to change Windows 10’s login screen / background image

The Windows 10 login screen is where you sign in to a user account on your desktop or laptop.

That’s a great place to show off one of your favorite images as a login screen background.

Check out the three methods below for changing the Windows 10 login screen’s background.

How can I change the background image for Windows 10’s login screen?

1. Change the login screen background in Settings

  1. Open the Type here to search utility by clicking the button for it on the left side of the taskbar.
  2. Type the keyword lock screen in the search box.
  3. Click Change your lock screen background to open Settings as in the screenshot directly below.
    Lock screen tab change windows 10 login
  4. Click the Background drop-down menu to open it.
  5. Select the Picture option.
    Browse button change windows 10 login
  6. Press the Browse button.
  7. Select the image you want to include on the Windows 10 login screen background.
  8. Press the Choose picture button to confirm the selection.
  9. To include multiple images on the login screen, select the Slideshow option on the drop-down menu.
    Slideshow album options change windows 10 login
  10. Click the Add a folder button.
  11. Select a folder that includes the slideshow images for your login screen. You might need to manually move the images into a new folder within File Explorer.
  12. Click the Choose this folder option.
  13. Then select the image album on the Lock screen tab in Settings.
  14. Finally, toggle the Show lock screen background picture on the sign-in screen option on if it’s not selected.
    Show lock screen background picture option change windows 10 login
  15. Thereafter, restart Windows 10 to check out your new login screen background.

2. Check out W10 Logon Background Changer

  1. Open the GitHub page for the W10 Logon Background Changer program.
  2. Click Win10BGChanger1.2.1.zip to save the ZIP file for it.
  3. Open the ZIP file for  W10 Loon Background in File Explorer.
  4. Click Extract all on the Compressed Folder Tools tab.
    Compressed Folder Tools tab change windows 10 login
  5. Select the Show extracted files when complete option, and press the Extract button.
    Extract Compressed Folders window change windows 10 login
  6. Click the W10 Logon Background Changer.exe to open the window shown directly below.
    W10 Logon BG Changer window change windows 10 login
  7. Click the button on the right of the Background filename appears here box.
  8. Choose a picture you want to include on the login screen.
  9. Press the Apply Changes button.
  10. You can restore the original background image by clicking the Restore Defaults button.

3. Change Windows 10’s login background to your Windows 10 accent color

  1. Right-click the Start button to select Run on the Win + X menu.
  2. Type regedit in the Open box and press Enter to launch the Registry Editor.
  3. Next, open this registry path:HKEY_LOCAL_MACHINE\Software\Policies\Microsoft\Windows\SystemRegistry Editor window change windows 10 login
  4. Right-click the System key to select New.
  5. Select the DWORD (32-bit) Value option.
  6. Enter DisableLogonBackgroundImage as the DWORD name.
  7. Double-click DisableLogonBackgroundImage to open the window directly below.
    Edit DWORD window change windows 10 login
  8. Enter 1 in the Value data box to replace the default value, and select the OK option.
  9. Now your Windows login screen will have a flat background color that matches your selected accent color. Select an alternative accent color to change the login screen’s background color.

That’s how you can change the login screen background for Windows 10.

The Settings app includes sufficient options for changing the login screen’s background image, but you can also change its background to a flat color with the registry edit outlined above.

[wl_navigator]

Microsoft prepares to go all in on iOS14 for Microsoft 365

If Apple announced the public release of iOS 14 earlier this week, Microsoft is keen to provide details about its suite of Office apps that are fully prepared for the new software update. Here’s a look at everything you need to know about all the changes introduced in the latest update.

First off, Microsoft Outlook and Edge can now be configured as the default apps on iOS 14. This means that users will be able to choose Outlook to replace the default mail app, while Microsoft Edge can take the place of Safari on their devices. However, users first need to update their Microsoft Outlook and Edge apps to get the ability to switch defaults on iOS 14 from the settings menu. To change your default apps, head over to Settings, and scroll down to the respective app (Microsoft Edge or Outlook). On the next screen, tap Default Browser/Email App to set your preferred one as default.

Default Upsell in Device.png

Another important update for Microsoft’s apps is the new support for widgets in iOS14. The company has finally updated Microsoft Outlook and OneDrive with the ability to add widgets to the iOS and iPad home screen for easier access. More specifically, the OneDrive widget will allow users to see their photo memories from the On This Day feature, and the Outlook Calendar widget will provide a quick glimpse of the day.

“With the flexibility to pick your widget size and location, you can stay on top of what matters at a glance with an Outlook Calendar widget to see what’s next in your day with your work, school, and personal account. When using OneDrive with your personal account, you can see your photo memories from the On This Day feature, highlighting photos taken on this day across previous years. If you don’t have any On This Day photos for today, you’ll see the most recent photos that you’ve saved to the cloud,” the company explained.

OneDrive Photo Widget 5 cropped.png

More about upcoming updates

Last but not least, the company has promised to deliver offline editing support for Office files in Fall 2020. With this change, iOS users will be able to download their Word, Excel, or PowerPoint files on iPhone or iPad devices for offline editing.

Microsoft also plans to introduce the new Home experience for OneDrive users later this month. It will let them access their most recently used files, shared libraries, and offline files together regardless of what device they last used.

Moreover, the company is also bringing new capabilities to Big Sur and OneDrive on macOS. The future OneDrive update will add automatic renaming support for those files and folders that contain invalid characters or errors.

If you’re looking to learn more about the new updates coming to Outlook for Mac and more, be sure to register for Microsoft Inspire 2020, which will be held on September 23rd.

Ori and the Will of the Wisps is the latest Xbox Game Studios title to come to Nintendo Switch

Ori and the Will of the Wisps, the sequel to the critically-acclaimed Ori and the Blind Forest game from Moon Studios, is launching on the Nintendo Switch today. The Xbox Game Studios title was released on Xbox One and PC back in March and received even better reviews than its predecessor, which was also released on the Nintendo Switch last year.

Ori and the Will of the Wisps is the second title from indie dev Moon Studios, and it’s a challenging metroidvania game with gorgeous hand-painted artwork that are rarely seen in video games these days. The game is also more demanding than its predecessor, but the good news is that the Nintendo Switch port will run at 60FPS, just like on Xbox One X. “We optimized the hell out of it,” the developers said on Twitter today.

It’s interesting to see more and more Xbox Game Studios titles and high-profile Xbox exclusives launching on the Nintendo Switch. Cuphead was another big Xbox game that launched on the Switch last year, complete with an Xbox Live integration. Ori and the Will of the Wisps will be priced at $29.99 on the Nintendo eShop, and a $149.99 Collectors Edition will also be available with a stained glass style art piece, a collectible art card set, and more.

What are the best VLC Media Player keyboard shortcuts

VLC Media Player is the most popular third-party video player on Windows computers. The player is fast and easy to use, especially thanks to the various shortcuts (or Hotkeys).

While enjoying a movie on VLC, the best VLC keyboard shortcuts will save you two or three clicks to perform simple operations.

Best of all is that you can also tweak these VLC keyboard shortcuts to what suits you the best, thus making it easier than ever to control your movie watching sessions.

The media player has tons of default shortcuts, and you can also add yours as well.

In this guide, we’ll look at the best VLC keyboard shortcuts that will improve your viewing experience using this awesome media player.

VLC keyboard shortcuts on Mac?

The VLC keyboard shortcuts in Mac are identical to their Windows equivalents. For most of the commands in this guide, you can perform the same functions in Mac systems using the exact hotkeys.

However, Mac and Windows keyboards are different, and so it also reflects on a couple of VLC keyboard shortcuts.

Besides, I’ll indicate the Mac equivalents for the shortcuts in the section that follows.

What are the best VLC Media Player keyboard shortcuts?

1. Pause/resume/stop a video

pause-resume-hotkey-best-vlc-keyboard-shortcuts

To pause a video, hit the SPACEBAR on your keyboard. When you’re ready to resume the video, press the same button.

To stop the video completely, press the S key on your keyboard. This time around, playing the video doesn’t resume it but starts from the beginning.


2. Enter and exit Fullscreen mode

fullscreen-best-vlc-keyboard-shortcuts

The F key on your keyboard maximizes the video, putting it in fullscreen mode. The same F key reverts the video from fullscreen to the normal size.

You can also exit fullscreen mode using the ESC key.


3. VLC subtitles keyboard shortcut

subtitle-best-vlc-keyboard-shortcuts

To enable subtitles on your VLC Media Player interface, press the V key on your keyboard. Note that this VLC keyboard shortcut only works with videos that have a subtitle track.

If the video has multiple audio tracks, you can switch between them by pressing the B key.

Note: If you press V while playing a video with no subtitle track, you’ll get the following error: Subtitle Track: N/A. If the subtitle speed doesn’t match the video output, fix it with this guide.


4. VLC playback speed keyboard shortcut

speed-best-vlc-keyboard-shortcuts

The plus (+) button is the VLC speed up keyboard shortcut.

To reduce the speed, press the minus (–) button.

To return the playback to its default speed, press the equals (=) key.


5. Shortcut to take a screenshot

screenshot-best-vlc-keyboard-shortcuts

While watching a video, you can take a screenshot by pressing SHIFT + S.

It’s advisable that you pause the video before you take the screenshot for better focus.

On pressing the shortcut, a screenshot of the current frame will save in the pictures folder of your computer.


6. VLC keyboard shortcut for next chapter

next-previous-best-vlc-keyboard-shortcuts

To navigate to the next chapter when playing videos on VLC Media Player, press the N key on your keyboard.

Alternatively, to go back to the previous chapter, strike the P key.


7. VLC keyboard shortcuts next frame

next-frame-best-vlc-keyboard-shortcuts

The keyboard shortcuts in VLC for navigating to the next/previous frames are tricky.

Different hotkeys move you back and forward to different times:

5 seconds

  • SHIFT + left arrow key – Backward 5 seconds.
  • SHIFT + right arrow key – Forward 5 seconds.

10 seconds

  • ALT + left arrow key – Backward 10 seconds.
  • ALT + right arrow key – Forward 10 seconds.

1 minute

  • CTRL + left arrow key – Backward 1 minute.
  • CTRL + right arrow key – Forward 1 minute.

5 minutes

  • CTRL + ALT + left arrow key – Backward 5 minutes.
  • CTRL + ALT + right arrow key – Forward 5 minutes.

How can I remap VLC keyboard shortcuts?

modify-best-vlc-keyboard-shortcuts

  1. Open VLC Media Player.
  2. Click on Tools on the Menu bar.
  3. From the dropdown, select Preferences.
  4. Click on Hotkeys.
  5. Double-click on a shortcut that you wish to change.
  6. When the Hotkey change dialog box appears, press your preferred shortcut.
  7. Click on the Save

If the new hotkey is already assigned to another process, a dialog box pops up saying Warning: this key or combination is already assigned …

You can, as well, opt to simply remove the shortcut. After double-clicking on the hotkey, click on Unset from the Hotkey change dialog box.

If you try these hotkeys, but they don’t work for you, get your shortcuts working on VLC with this fix.

The default VLC keyboard shortcuts are strategically positioned in ways that are comfortable for most users, so you probably wouldn’t need to change much unless you’re coming from a different media player with different shortcuts.

[wl_navigator]