New Windows 10 Insider build 20175 (Dev Channel) brings pinned sites to the Taskbar

Microsoft has just announced the release of the Windows 10 Insider build 20175 in the Dev Channel (previously Fast Ring), which brings another productivity enhancement for Edge users on Windows 10. After the build 20161 brought the ability to access all tabs open in Microsoft Edge using Alt + Tab, the build 20175 nows bring pinned sites to the Windows 10 taskbar.

This feature will only be available to a subset of Insiders who install this build, and it will also require Microsoft Edge Insider Build 85.0.561.0 or higher. Other new features in this build include the ability to reset your UWP apps using PowerShell, as well as a new Eye Contact feature on the ARM-powered Surface Pro X.

You can find more details about new features, bug fixes and known issues in the build 20175 below:

What’s new in Build 20175

Improving pinned sites in Microsoft Edge

Earlier this month, we announced ALT + TAB between apps and sites, the first of our new productivity enhancements coming to Microsoft Edge on Windows 10. Today, we’re announcing another feature we’ve been working on to make you more efficient when browsing the web: quick access to tabs for your pinned sites. Clicking a pinned site on the Taskbar will now show you all of the open tabs for that site across any of your Microsoft Edge windows, just like you’d expect for any app with multiple open windows. Please let us know what you think!

Clicking a pinned site on the Taskbar will now show you all of the open tabs for that site across any of your Microsoft Edge windows.

This feature is currently rolling out to a subset of Insiders today and requires Microsoft Edge Insider Build 85.0.561.0 or higher (Canary or Dev Channel).

NOTE: Since this is an early preview, existing sites on your Taskbar will not experience this new behavior until you remove and re-pin them.

For more details on our new multitasking improvements, check out our post on the Microsoft Edge blog.

Introducing Reset-AppxPackage

For some time now, you’ve been able to reset your UWP apps in Settings – with today’s build we’re now exposing this ability via PowerShell as well. To do this, you’ll need the appx package name, so your use of the command may look like this:

>> Get-AppxPackage *calculator* | Reset-AppxPackage

The benefit of enabling this via PowerShell is that if needed you will now be able to run the reset commands for certain system components that are not currently listed as available to reset in Settings, for example Start.

Please note by nature of this command, if you choose to run it it will reset your experience back to the default experience and you will lose the associated app data.

Make a more personal connection with Eye Contact on Surface Pro X

Powered by artificial intelligence capabilities of the Microsoft SQ1(TM) processor, Eye Contact helps to adjust your gaze on video calls so you appear to be looking directly in the camera on your Surface Pro X. Windows Insiders can turn this feature on via the Surface app on their Surface Pro X.

Turn on Eye Contact on the Surface Pro X via the Surface app.

Fixes

  • We fixed an issue causing some systems to crash with a HYPERVISOR_ERROR bugcheck.
  • We fixed an issue resulting in tiles sometimes flashing unexpectedly in the Start menu when animating
  • We fixed an issue where the option the set Alt + Tab to “Windows Only” wasn’t working.
  • We fixed an issue that could result in apps unexpectedly appearing black when viewed under Magnifier with a large magnification.
  • We fixed an issue that could result in some stutter when gaming.
  • We fixed an issue resulting in Narrator not working with touch when touching a XAML item.
  • We fixed an issue resulting in Search not closing after selecting certain items in the search results.
  • We fixed an issue resulting in flickers when logging in.
  • We fixed an issue resulting in fonts not displaying correctly in some apps in the last two flights.
  • We fixed an issue that could result in Settings crashing if it’d been opened but minimized to the Windows Update page, and then you navigated to another settings page by clicking a URI.
  • We fixed an issue where clicking a link to System would result in an empty and unclosable Control Panel instance.

Known issues

  • We’re working on a fix for an issue where some Microsoft Store games protected with Easy Anti-Cheat may fail to launch.
  • We’re looking into reports of the update process hanging for extended periods of time when attempting to install a new build.
  • If you are impacted by an issue where when pressing space while using the Korean IME in Edge and Chrome the last character was deleted, this has been fixed in Chromium as part of Bug 1099125. We’ll be removing this from the known issues with the next flight.
  • We’re working on a fix for an issue where the min/max/close buttons are stuck in their original positions after resizing a UWP app. If you move the app window the position should update.
  • We’re investigating reports that the new taskbar experience described above isn’t working for some pinned sites.
  • We’re working on a fix for an issue where sometimes the “close all windows” action in the taskbar doesn’t close not all of the open tabs
  • We’re working on a fix to enable live preview for pinned site tabs.
  • We’re working on enabling the new taskbar experience for existing pinned sites. In the meantime, you can unpin the site from the taskbar, remove it from the edge://apps page, and then re-pin the site.
  • We’re working on a fix for an issue where pinned sites don’t show all open tabs for a domain. In the meantime, you can fix this by pinning the site’s homepage rather than a specific page (e.g. pin microsoft.com rather than microsoft.com/windows).
  • We’re working on a fix for an issue where Alt + Tabbing to a browser tab sometimes moves the previously active browser tab to the front of the Alt + Tab list as well.

For Windows Insiders using the Sticky Notes and the Snip & Sketch apps regularly, you’ll notice that both apps will soon get new icons via updates coming from the Microsoft Store. “Just like with the new Settings icon in the last build, these new icons look great on the Start menu with the theme-aware tiles introduced in Build 20161,” the Windows Insider team said today.

If you want to do a clean install, ISOs for the build 20175 are available to download on this page. Last but not least, Microsoft is warning Windows Insiders running the preview builds 20161 and below that they will expire on July 31. It’s highly recommended to update to a newer build before that date to continue using your PC without issues.

Update: Microsoft acknowledged that a service side issue, which has now been resolved on the backend, prevented some AMD and Intel devices from detecting the new build. If you’re still unable to install the build 20175 on your PC, you need to follow these steps:

  1. Open the Start Menu.
  2. In the search box, type CMD.exe.
  3. On the right menu under Command Prompt, select Run as administrator.
  4. If prompted by UAC, choose Yes.
  5. From the elevated prompt, enter this command, then hit enter: net stop wuauserv
  6. Enter this command, then hit enter: rmdir /s /q C:WindowsSoftwareDistributionSLS
  7. Finally, enter this command, then hit enter: net start wuauserv
  8. Close the Command Prompt window.
  9. Open Settings > Update & Security > Windows Update and check for updates.

Microsoft 365’s new Universal Print feature – what it is and how to use it

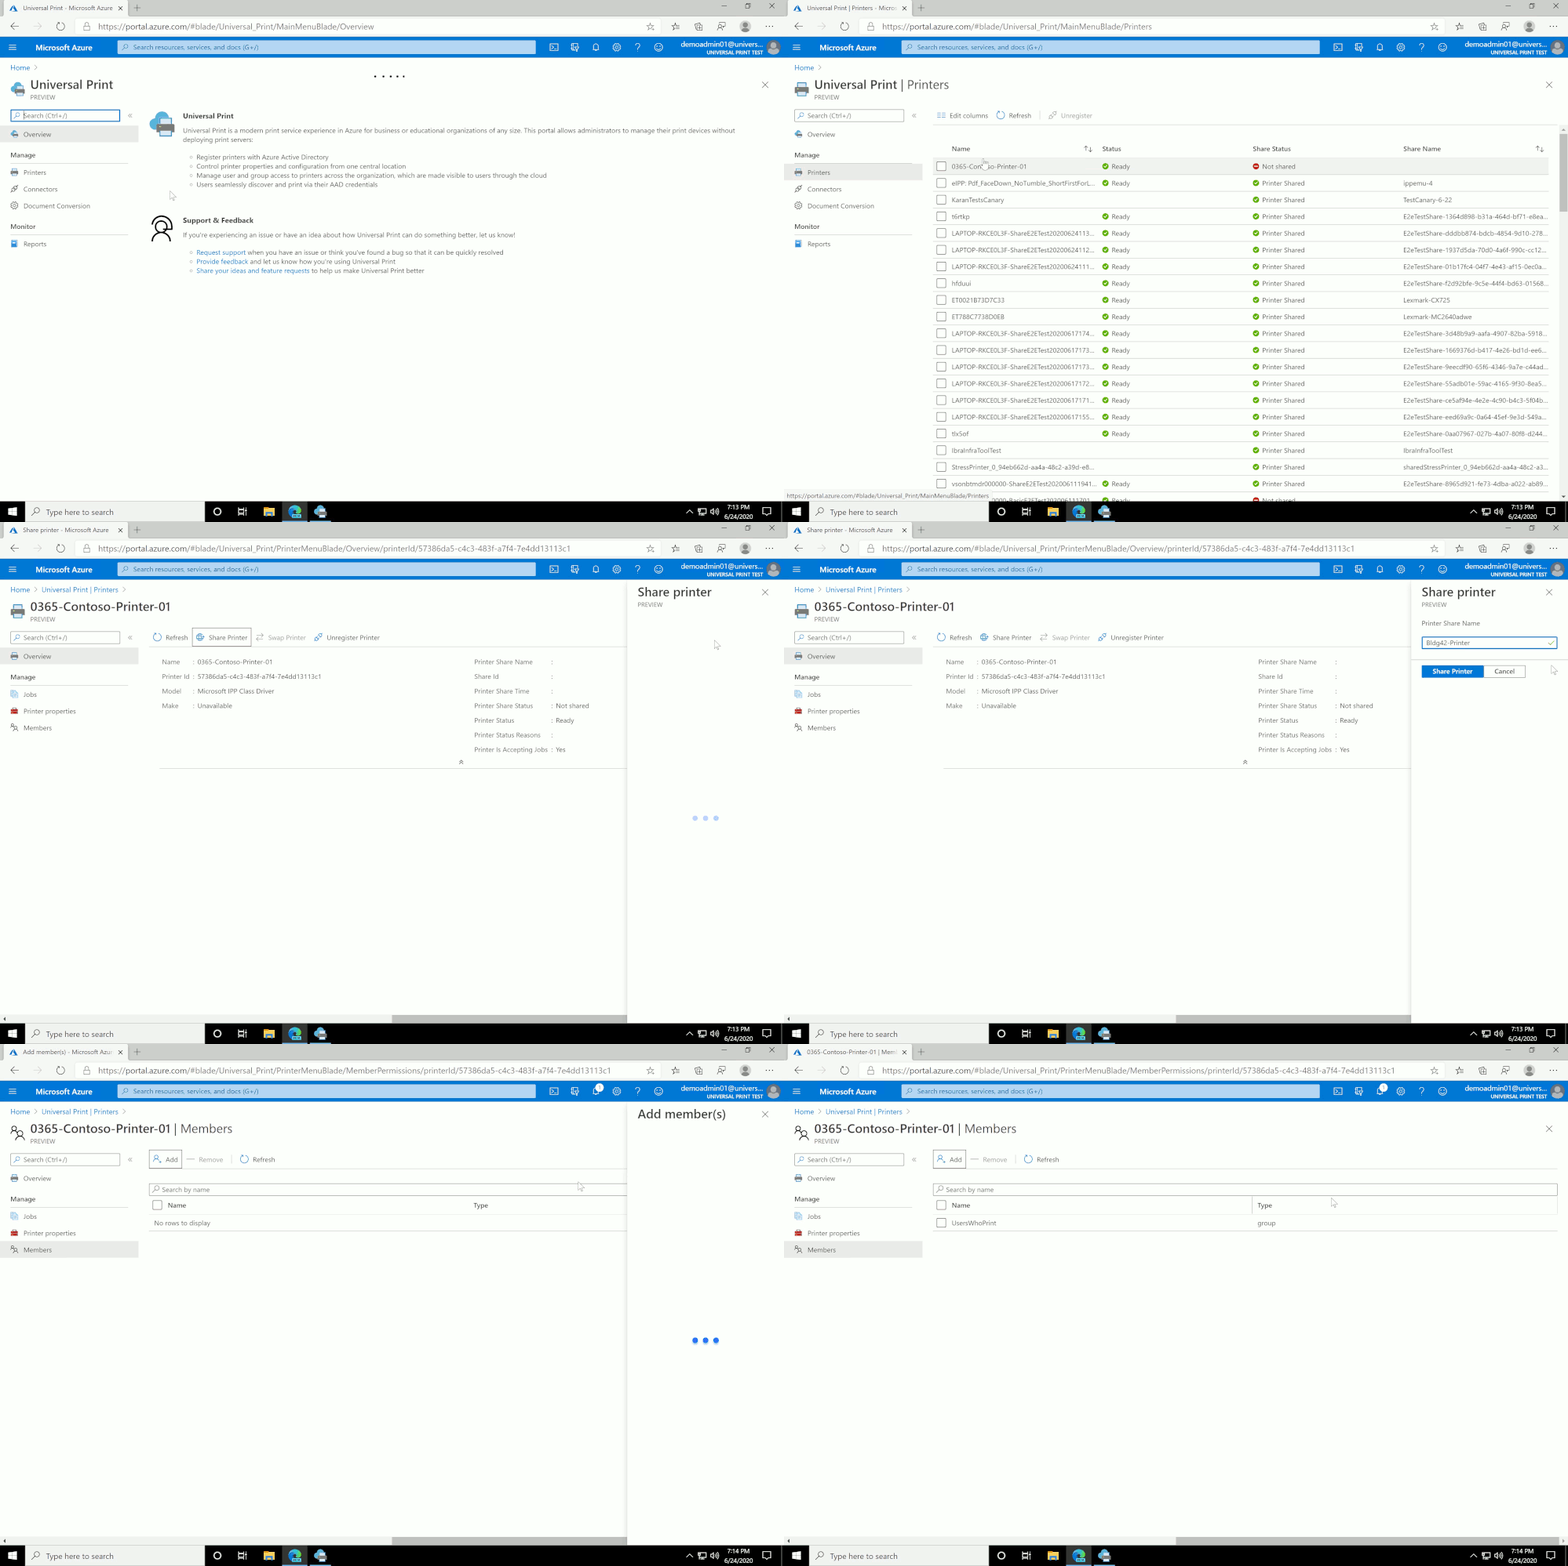
Microsoft has recently announced the public preview of its Universal Print service for Microsoft 365 subscribers. The cloud-based printing solution has been designed to provide a user-friendly printing experience to IT departments. Starting first with Microsoft 365 E5 and A5 tenants, access to the public preview is gradually rolling out to all Microsoft 365 subscribers residing in North America, Europe, and the Asia Pacific regions in the coming months.

Microsoft’s Universal Print will make it easier for IT admins to move key Windows Server print functionality to the Microsoft 365 cloud while simplifying printer management within an organization. Universal Print will provide a unified view of all printers that are registered through the service on a centralized portal, which should eventually enable robust management capabilities. It complies with Microsoft’s data management guidelines to provide print data stored in the cloud, just like it works for other Microsoft Office services.

As for the end-user experience, Universal Print should allow them to find local and remote printers and print them via a single sign-on experience that leverages Azure Active Directory. The service will also eliminate the need to install printer drivers on Windows 10 machines. The company noted that there is no learning curve for end-users to use the Universal Print service, and they can “continue to print from their Windows devices or Office as they always have.”

universal-print-gif.gif

Microsoft’s release schedule for Azure Universal Print indicates that Microsoft 365 subscribers will need to check their eligibility according to the roadmap (shown below) to configure and enable the Universal Print. However, the preview doesn’t work with a trial Microsoft 365 subscription, and it’s up to the Global admin to make changes to their Microsoft 365 subscription. Users who signed up for the Private Preview between January 1 and July 21, 2020, will continue to have access to Universal Print until Universal Print hits General Availability in 2020.

Microsoft universal printer

Microsoft’s cloud printer service should be a welcome addition for Microsoft 365 customers currently working from remote locations during the pandemic. “Many of them have accelerated their adoption of cloud services and Universal Print because employees and teachers working from home can now print to company or school printers from anywhere when connected to the internet,” explained Kristin Carr, group program manager at Microsoft. “While many processes have gone paperless, many critical business processes – especially in education, healthcare, and other industries – still require print.”

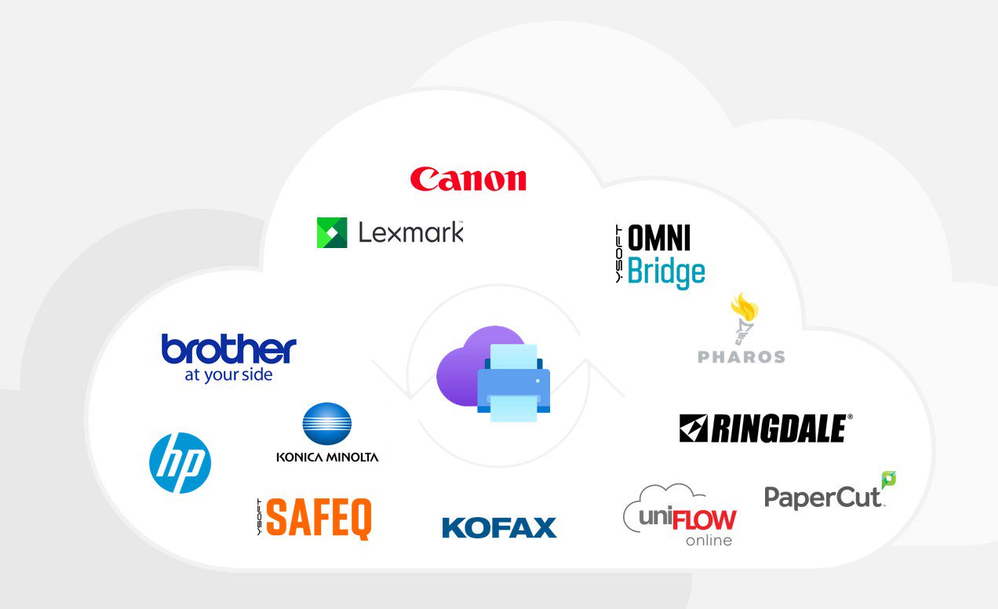
At the moment, the feature only works with a Universal Print proxy application, since native Universal Print support isn’t available right away. However, some popular printer manufacturers, including Canon, HP, Brother, Kofax, Konica Minolta, Lexmark, and others, are currently working to bring native functionality for users. Feel free to check out the official support page to learn more about Microsoft’s Universal Print service.

Outlook Startup is Slow: How to Speed it up

For a single Windows 10/Office 365 app, Outlook seems to be having a lot of startup issues lately. Speaking of which, many have reported slow startup in Outlook.

We already covered slow Outlook, but in this guide, we’re going to focus exclusively on slow startup. So let’s see how we can fix this issue.

Why does Outlook take so long to start up?

  • UE-V Sync Method is set to None in Outlook.
  • The MicrosoftOutlook2016CAWinXX.xml UE-V template is registered.

How do I speed up Outlook startup?

1. Use the default UE-V Sync option

  1. Press Windows key + R and enter gpedit.msc.
     
  2. Now locate Configure Sync Method policy and double-click it.
  3. Set the policy to Enabled and set Sync method to None.

With this method, you only need to use the default UE-V Sync option, which is SyncProvider.

However, you may set it to None and experience and fix slow Outlook startup only if your device has a permanent SettingsStoragePath network connection.

2. Adjust the xml file

  1. Navigate to the following path: %ProgramData%\Microsoft\UEV\InboxTemplates\
  2. Open MicrosoftOutlook2016CAWinXX.xml file.
  3. Make the following changes:  <Version>3</Version>
    <Asynchronous>true</Asynchronous>
  4. Save the file.

However, remember that this method only works for Office 2019 and 2016.

As you can see, if Outlook startup is slow, you need to change the sync settings in the group policy to fix the problem.

More advanced users can adjust the Outlook XML file and change the configuration directly. If you’re having additional problems, you should check our guide on Office 365 running slow.

Did you find a different solution for this problem? If so, share it with us in the comments below.

Full Fix: Parse Error on Kindle Fire

The parse error Kindle Fire issue is standard on the Kindle Fire HD, in which USB debugging is disabled by default.

Also, you should expect this error if you attempt to download and install an app onto the tablet from somewhere other than the Google Play Store.

If you trust the download source and wish to continue with the file installation, but the parse error is hindering your fun, read this guide to the end.

You will learn all you need to know about the parse error on Kindle and, most importantly, how to get rid of it. Some forms of the parse error on Kindle Fire include:

  • There is a problem parsing the package Kindle Fire
  • Problem parsing the package Kindle Fire

What is a parsing error on Kindle Fire?

A parse error on Kindle Fire is a common problem among Kindle Fire users, which comes up when you have corruption in the application installer.

This error is common to users of Android devices and Kindle Fire. This error will sometimes not allow your Kindle to download the books you want.

In the following section, we will look at the causes of the parse error on the Kindle Fire tablet.

Why am I getting a parsing error?

This parsing problem can be a result of two issues. You will often get this error when you attempt to install (or sideload) a third-party app directly from an unknown source instead of the app store.

Other times, it shows up when you download a damaged or corrupt file onto the tablet.

As you can see, this issue involves file downloading onto the tablet. Some other times, when the error pops up, it means you have a damaged app installer.

If you get the parse error on Kindle Fire tablet while installing an app from its downloaded APK, then it means that the app is not compatible with your operating system version.

On the other hand, if the error appears when you download a file, you can get rid of the error by trying other download methods.

The next section explains how to fix the parsing package error in your device. Check it out for more details.

How do I fix the parsing package error?

1. Use a compatible Fire OS

Most times, the parse error on Kindle Fire shows up if the application isn’t compatible with the version of Kindle Fire OS running on your device.

Thankfully, Kindle Fire OS is based on the Android operating system.

Because of this fact, most app installation, uninstallation, and updating processes are identical to Android ones.

  1. Visit the Google Play Store and use the search tab to find the application that you want to install.
    google-play-store
  2. Go down to the Additional Information area and look at the minimum Android version you need to make use of the application.
  3. Since Fire OS is based on Android, you can easily find out the Fire OS edition that will work.
    Below is a table that relates the Android OS to Fire OS.
    Fire HD 8" (2016)Fire OS 5 – based on Android 5.1, API level 22Kindle Fire HDX 8.9″ (2013)Fire OS 4 – based on Android 4.4.2, API level 19
    Fire HD 10" (2015)Fire OS 5 – based on Android 5.1, API level 22Kindle Fire HDX 7″ (2013)Fire OS 4 – based on Android 4.4.2, API level 19
    Fire (2015)Fire OS 5 – based on Android 5.1, API level 22Kindle Fire HD 7″ (2013)Fire OS 4 – based on Android 4.4.2, API level 19
    Fire HDX 8.9" (2014)Fire OS 4 – based on Android 4.4.2, API level 19Kindle Fire HD 8.9″ (2012)Based on Android 4.0.3, API level 15
    Fire HD 6" (2014)Fire OS 5 – based on Android 5.1, API level 22Kindle Fire HD 7″ (2012)Based on Android 4.0.3, API level 15
    Fire HD 8" (2015)Fire OS 5 – based on Android 5.1, API level 22Kindle Fire (2012)Based on Android 4.0.3, API level 15
    Fire HD 7" (2014)Fire OS 4 – based on Android 4.4.2, API level 19Kindle Fire (2011)Based on Android 2.3.3, API level 10
  4. Cross-check the compatible Android version of the app (determined in step 2) against your Fire OS.

If your Fire OS is below the minimum Android version required to run the app correctly, you can get the parse error on your Kindle Fire.

To fix it, update your device to the latest version of Fire OS.

2. Re-download the file with these methods

redownload-ebook

A wrong download sometimes causes the parse error on Kindle Fire. If the issue arises when you download a file, try to download it again but using the following hints:

  1. Download the file on your computer and then email it to yourself. Then, download the file to your tablet.
  2. Get the file downloaded to your PC and transfer it to your Kindle Fire by using a USB cable.
  3. Download the problematic file by using the default browser(Silk browser).
  4. If you’re seeing the parse error after you download via a cellular network, try downloading by using your Wi-Fi connection.

3. Enable installation from unknown sources

unknown-sources-installation
  1. Tap on the Settings app icon at the top right-hand area of the tab home screen to open the device settings page.
  2. Click on More from the menu in Settings.
  3. Go to Device.
  4. Switch the Allow Installation of Applications From Unknown Sources to ON.

Your Kindle Fire OS blocks the installation of apps from sources apart from the Amazon app store and Google Play. An example of such a source is an APK file you got online to sideload onto the device.

4. Enable USB debugging

  1. Swipe down your finger from the top of your tablet screen to reveal the Notification menu. From there, tap on More which is a plus (+) icon.
  2. In Settings, tap on the Security category.
  3. Toggle On the Enable ADB button.

If this or the unknown source setting is the root of the parse error in Kindle Fire, enabling them will fix the issue. With these solutions, you know how to fix parse errors on Kindle Fire.

If all the methods mentioned above fail, another way to resolve this tricky error is to disable your antivirus while installing the app, if you use any.

Users have reported that they fixed this challenge after discovering that an antivirus app was blocking the download or installation.

Sometimes other errors can occur to Kindle Fire, such as the registration error or the device not being recongnised by Windows, but keep in mind that there is always a solution for each of them.

Hopefully, these solutions will help you repair the parsing problem on your Kindle Fire tablet.

Halo Infinite box art and official wallpapers get revealed ahead of tomorrow’s Xbox Games Showcase

We’re now just a day away from Microsoft’s much-anticipated Xbox Games Showcase, and Halo: Infinite is already guaranteed to be the main attraction. We’ll get our first look at the game’s campaign tomorrow, and developer 343 Industries is getting fans ready today by revealing the game’s box art, along with wallpapers in many different formats that Halo fans can download on this page (these might make great Microsoft Teams background images, just sayin – ed.).

As many Halo fans pointed out today, the box art is an obvious homage to the original Halo: Combat Evolved game, with both images showing Master Chief in the center with a Halo ring in the background. The similarities extend to Master Chief’s armor, which design has moved away from the scratched up look with a darker green color seen in Halo 4 and Halo 5: Guardians in favor of something more traditional.

If most Halo enthusiasts seem to be pleased by the box art for Halo Infinite, some eagle-eyed fans also noticed that Master Chief seems to have gained some sort of grappling hook attached to his left forearm in Halo: Infinite. If accurate, that would be a first in a Halo game, opening up more possibilities to move around than the limited dash moves introduced in Halo 5: Guardians.

There are probably many more secrets to uncover in the official box art, but everything will hopefully be revealed during the Xbox Games Showcase tomorrow. Halo: Infinite will be a launch title for the Xbox Series X this holiday season, just like Halo: Combat Evolved was for the original Xbox console that launched in 2001. Let’s home that this new Halo adventure will leave an even bigger mark than the original game.

Outlook asks to choose which account to send email from

Outlook users with multiple accounts might sometimes need to select different accounts to send emails from.

Some users have even posted on the Microsoft forum about Outlook prompts that keep asking them to choose an account to send emails from.

Scroll down to see how you can change accounts used to sent MS Outlook emails.

How can I change the Outlook accounts used to send emails?

1. Use an alternative default account

  1. Select the  File tab in Outlook.
  2. Then click Info.
  3. Click the Account Settings drop-down menu.
    Account Settings choose which account to send the email from
  4. Select Account Settings to open the window shown directly below.
    E-mail tab choose which account to send the email from
  5. Choose an alternative default account on the Email tab.
  6. Click the Set as Default option.
  7. Then click Close to exit the window.

2. Change the default account options further

  1. Click the File tab.
  2. Next, select Options on the left side.
    Outlook Options window choose which account to send the email from
  3. Select the Mail tab on the Options window.
  4. Click the Always use the default account when composing new messages checkbox if it’s not selected.
  5. Click OK to close the window.

3. Select an account with the From button

Users can also select accounts to send emails from by clicking the From button.

After doing so,  you can select an alternative Outlook account listed on the From menu.

Note: You will need to have multiple accounts for a single profile to select them with the From button.


4. Edit the registry to enable a choose Outlook account reminder

  1. Open Run by pressing the Win+R keys.
  2. Type regedit in the Run box, and click the OK button.
  3. Open this key within Registry Editor’s window: HKEY_CURRENT_USER\Software\Policies\Microsoft\office\<version>\outlook\options
  4. Right-click the options key to select New and DWORD (32-bit) Value.
  5. Type forceaccountselection as the new DWORD title.
  6. Double-click forceaccountselection to open its Edit DWORD window.
    Edit DWORD Value window choose which account to send the email from
  7. Enter 1 in the Value data box, and click the OK button.
  8. Thereafter, restart Outlook.

Now Outlook will display a choose an account prompt when you compose a new message.

Then, you’ll need to select an account to send an email from, by using the From button. That prompt will ensure you always remember to send your Outlook emails from the right accounts.

As you can see, it’s straightforward enough to change your Outlook accounts to send messages from.

If you usually utilize the same account for the vast majority of emails, configure that to be the default one. Before you leave, don’t forget to check our guide on what to do if Outlook inbox view has changed.

However, users who utilize alternative accounts with regularity might prefer to enable the choose account prompt by editing the registry.

New optional updates are available for Windows 10 versions 1909, 1903, and 1809

Microsoft yesterday released new optional updates for older versions of Windows 10, including the November 2019 Update (version 1909) and the May 2019 Update (version 1903). These two versions of the OS, which share a common base, are getting builds 18363.997 and 18362.997, respectively.

Here are the quality fixes that Microsoft highlighted for these two builds:

  • Updates an issue that might cause the Magnifier to stop working in Microsoft Excel in certain scenarios. As a result, Microsoft Excel might also stop working.
  • Updates File Explorer to allow you to delete previous terms from the search box.
  • Updates an issue that causes File Explorer to stop working when you browse directories of raw images and other file types.
  • Updates an issue that prevents the system from recognizing the Windows Hello face camera.
  • Updates an issue that might prevent a Windows 10 device from reaching the internet when using a wireless wide area network (WWAN) LTE modem.
  • Updates an issue that prevents family safety features, such as time limits and activity reporting, from working on ARM64 devices.

If you’re still running the Windows 10 October 2018 Update (version 1809), this version of the OS is getting build 17763.1369. The new bits include a fix for the issue that might cause the Magnifier to stop working in Microsoft Excel in certain scenarios, plus other quality fixes.

Microsoft will likely release an optional update for the Windows 10 May 2020 Update (version 2004) before the end of the month, and we’ll see what happens later this week. Keep in mind that these updates are entirely optional, and you will still get all included fixes by installing next month’s Patch Tuesday update.

The driver disconnected while associating [WiFi Connection]

If your laptop is not connecting to your WiFi router and if you tried to get a status report using the netsh wlan show wlanreport command, you might encounter the drive disconnected while associating error.

The error above can occur due to several reasons. For some users, the error was triggered after updating their Windows 10 laptop to a newer version.

Fortunately, the error can be resolve by performing a few troubleshooting tips listed in the article below.

How can I fix the driver disconnected while associating error?

1. Run Network Troubleshooter

driver disconnected while associating
  1. Click on Start and select Settings.
  2. Go to Network and Internet.
  3. Click on Status.
  4. Scroll down to Change your network settings.
  5. Click on Network Troubleshooter.
  6. The Windows network troubleshooter will initiate the scan.
  7. Follow on-screen instructions, and apply any recommended fixes.

The Windows network troubleshooter will fix minor issues with the WiFi adapter. If the issue persists, follow the next set of steps below.

2.  Update network drivers

Update drivers manually

  1. Press Windows Key + R.
  2. Type dvmgmt.msc and click OK.
  3. In Device Manager, expand the Network Adapters category.
  4. Right-click on the wireless network adapter.
  5. Select Update Driver.
  6. Select Search automatically for updated driver software.
  7. Wait for Windows to download and install a newer version of network drivers.

Once installed, reboot the computer. If the issue persists, try resetting the network adapter.

Alternatively, in the 4th step above you can choose to uninstall the network driver and reboot your PC. Windows will automatically install the network adapter driver upon restart. Check to see if the error is resolved afterward.

Update drivers automatically

Another viable and time-saving solution would be to use third-party software that searches for the most suitable drivers for your PC and installs them with a few clicks.

Such driver manager tool like Fortect Driver Updater keeps your Windows OS in optimal condition and aims to help your device function at peak performance.

It is useful software for updating your computer’s drivers. You simply need to scan your system after installing the program. It detects out-of-date drivers and then asks for your permission to update them, ensuring that only the necessary drivers are installed.

After installation, the program will run automatically, so you won’t have to look for its shortcut or the source folder. Outbyte Driver Updater will scan your system for faults or missing drivers and generate a report in a matter of seconds.

3. Disable your antivirus

  1. Expand the system tray.
  2. Right-click on your antivirus icon and select Disable/Turn off temporarily.
  3. Once disabled, try connecting to the network again.

Your antivirus software may cause issues with the network adapter resulting in connectivity issues. Also, check your startup apps tab and disable any unwanted app from the process.

Disable startup apps

driver disconnected while associating
  1. Right-click on the Taskbar.
  2. Select Task Manager.
  3. Open the Startup tab.
  4. Select all the startup apps that are enabled.
  5. Click on Disable.
  6. Do this for all the apps in the startup tab.

Reboot the computer and check if the connectivity issue is resolved. If not, restart the system in Safe Mode to fix the issue.

4. Start in Safe Mode with Networking

driver disconnected while associating
  1. Click on Start and select Settings.
  2. Open the Recovery tab.
  3. Scroll down to the Advanced Startup section.
  4. Click on Restart Now.
  5. Select Troubleshoot.
    Windows 10 WiFI driver error
  6. Click on Advanced Options.
  7. Click on Startup Settings.
  8. Select Restart.
    Windows 10 WiFI driver error
  9. Next, press 7 or the appropriate number to select Enable Safe Mode with Networking.
  10. The system will restart in Safe Mode with networking enabled.
  11. Try connecting to your WiFi network to see if the issue is resolved.

If you are able to connect to the network in Safe Mode, the error is most likely triggered by third-party software installed on your system.

  1. Press Windows Key + R.
  2. Type appwiz.cpl and click OK to open Control Panel.
  3. Select the most recently installed app, and click on Uninstall.

5. Check for Windows updates

driver disconnected while associating
  1. Press Windows key + I to open Settings.
  2. Go to Update & Security.
  3. Check for pending Windows 10 updates.
  4. Download and install the pending updates.

6. Reset Winsock

  1. Press the Windows key.
  2. Type cmd, right-click on Command Prompt, and select Run as Administrator.
  3. In the command prompt window, type the following command one by one and press Enter after each of them:
    netsh winsock reset
    netsh int ip reset
    ipconfig /release
    ipconfig /renew
    ipconfig /flushdns
  4. Close the command prompt and check for any improvements.

Windows 10 comes bundled with essential driver updates from the manufacture. Keeping your Windows 10 PC up to date can fix many compatibility issues.

The driver disconnected while associating WiFi error usually occurs due to your antivirus or third-party software installed on your system. Follow the steps in the article to diagnose and fix the error for good.

[Solved] PS4 NAT Type error / NAT Type Failed

The PS4 NAT Type Failed error is a PlayStation 4 voice chat issue that often arises in Party Chat and when playing games.

When the issue arises, the console displays a NAT Type Failed error message.

NAT is the Network Address Translation that translates public IP addresses to private IP alternatives.

The NAT Type error can be fixed by adjusting network settings to change the NAT type.

How can I fix the PS4 NAT Type Failed error?

1. Reconfigure your PlayStation’s 4 network settings

Get information about your PS4 network

  1. Turn on a PC that’s connected to the same network as your PlayStation 4 (users without PCs can skip to the other resolutions).
  2. Press the Win+ S hotkey.
  3. Next, enter cmd in the search box; and click Command Prompt to open its window.
  4. Type ipconfig /all in the Prompt’s window, and press the Enter key.
    ipconfig/all command ps4 nat error / nat type failed
  5. Note down the Default Gateway, DNS Server, IPv4 Address, and Subnet Mask details listed in the Command Prompt.

Use the information gathered from Command Prompt on your PS4

  1. Turn on your PlayStation 4.
  2. Select Settings to open that menu.
  3. Select the Network and Set up internet connection options.
  4. Chooses the required Wi-Fi or LAN cable connection option.
  5. Press Custom to manually enter the network details you noted down from the Command Prompt.
  6. Select the Do Not Use Proxy Server setting.
  7. After the network settings are updated, you can select the Test Internet Connection option to see what your NAT type is.

2. Enable the Demilitarized Zone Server

  1. To enable the DMZ, open a web browser.
  2. Open your router’s login page by entering the router’s IP address in the browser’s URL bar and pressing Enter.
    TalkTalk router page ps4 nat error / nat type failed
  3. Enter your router login details.
  4. Next, open the DMZ menu, which might be listed on a NAT submenu.
  5. Enter your PS4’s IP address in the DMZ Host IP Address box. To check your PS4’s IP address, you can select Network > View Connection Status within your PlayStation 4.
  6. Select the Open NAT Filtering option if your router has one.
  7. Save the new routers’ settings.
  8. As an optional step, you can also power cycle your router and PlayStation 4 by unplugging them and plugging them back in again.

3. Disable IPV6


To disable IPV6, log in to your router’s firmware as outlined for the second resolution.

Then, you will need to look for an IPV6 setting within your router firmware.

Disable the IPV6 setting, and select to utilize IPV4 instead.


4. Enable your router’s Universal Plug and Play

  1. Log in to your router’s firmware settings page. The required IP address and login details will probably be listed within your router’s manual.
  2. Open the UPnP options within your router firmware.
  3. Enable the UPnP option.
  4. Remember to apply or save the new settings.
    router ps4 nat error / nat type failed
  5. Power cycle your router and PlayStation 4 consoles by turning them off and unplugging them.

5. Change your console’s DNS server to Google DNS

  1. To change your PS4’s DNS settings, turn on the console.
  2. Open the PS4’s Settings menu.
    The Settings menu ps4 nat error / nat type failed
  3. Select the Network and Set up Internet Connection menu options.
  4. Next, select either Use Wi-Fi or Use LAN cable.
  5. Select the Custom option to proceed.
  6. Select the Automatic IP Address Settings option.
  7. Choose Do Not Specify DHCP Host Name option.
  8. Select Manual to open the DNS options shown directly below.
    DNS options ps4 nat error / nat type failed
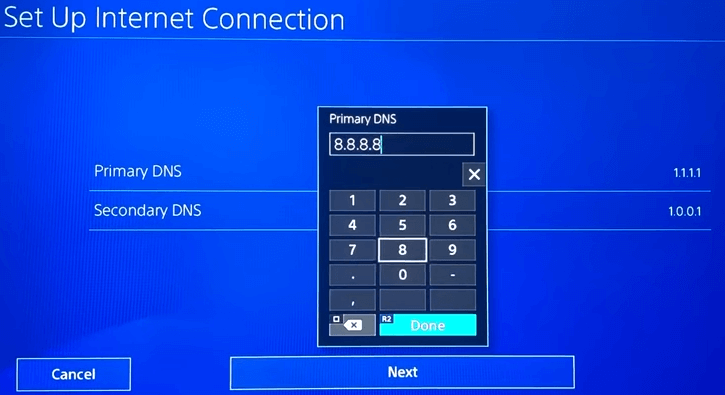
  9. Input 8.8.8.8 within the Primary DNS box.
    Primary DNS box ps4 nat error / nat type failed
  10. Next, input 8.8.4.4 in the Secondary DNS box.
  11. Select Next > Automatic > Do not use to finish.

Those are some of the resolutions that can potentially fix the PS4 NAT Type error. If further potential resolutions are required, you can contact the live chat service at the PlayStation Support site.


[Fixed] This content isn’t available right now on Facebook

The Content isn’t available right now error is a common issue for Facebook users. That issue arises for some users when they try to view certain Facebook profile pages.

Consequently, they can’t view the FB pages the error arises for. If some of your own Facebook pages display the content isn’t available error message, you might be able to fix them with the resolutions below.

How can I fix Facebook’s content isn’t available page error?

1. Check if the Facebook servers are down

Downdetector page facebook this content isn't available right now

There might be a server issue when Facebook doesn’t display pages. To check if there’s an FB server issue, open the Downdetector page for Facebook.

If that page says there’s an FB outage, wait a day or two.


2. Log out and back into your FB account

Account button facebook this content isn't available right now

If the FB servers aren’t experiencing issues, click the Account button at the top right of Facebook.

Select the Log out option. Then log back into FB again, and try opening the page the issue arises for.


3. Publish the page

  1. To check if your FB page is actually published, click Settings at the top right of the page the issue arises for.
  2. Click General on the left of Settings.
  3. If the page isn’t published, click Edit for the Page Visibility option.
    Page Visibility facebook this content isn't available right now
  4. Select the Page published option.
  5. Click the Save Changes button.

4. Remove geographical restrictions for the page

  1. Scroll down to Country Restrictions on the General tab that includes the Page Visibility settings.
  2. Click Edit for Country Restrictions.
  3. Delete the countries the page restrictions are for.
    Country Restrictions facebook this content isn't available right now
  4. Click the Save Changes button.

5. Select the Allow search engines outside Facebook option

  1. Click Facebook‘s Account button.
  2. Select Settings & privacy > Settings to open further options.
  3. Next, click Privacy on the left of Settings.
  4. Click Edit for the Do you want search engines outside of Facebook to link to your Profile? option.
    Privacy tab facebook this content isn't available right now
  5. Check the Allow search engines outside of Facebook to link to your Profile option if it’s not selected.
    Allow search engines outside of Facebook option facebook this content isn't available right now
  6. Click the Close option.

6. Unblock users

  1. Click FaceBook’s Accounts button > Settings & privacy > Settings.
  2. Select the Blocking tab.
    Block user settings facebook this content isn't available right now
  3. Click Unblock beside blocked users listed within the Block users section.

Note that the 3rd, 4th, 5th, and the 6th solution can only be applied by admin for the Facebook page.

If a contact’s Facebook page displays the content isn’t available error message, you’ll need to ask the admin for that page to apply those fixes.

We also have a similar guide on It looks like you were misusing this feature by going too fast message, so don’t forget to check it out.

This issue is somewhat similar to an error performing a query on Facebook message, so don’t miss our guide on it.

Don’t hesitate to get in contact with us. You can do so by leaving a comment in the section found below this guide.

Pre-orders open for NHL 21 video game on Xbox One, Xbox Series X version not happening

The digital pre-orders for the numerous editions of the upcoming NHL 21 video game went live earlier today for Microsoft’s Xbox One family of consoles and they were accompanied by an EA announcement confirming that no native Xbox Series X version is being made.

“For NHL 21, we made the decision to focus on adding innovation and new features rather than the resource-heavy task of porting the game to new console technology,” the official statement reads. “You’ll still be able to play NHL 21 on the next-gen consoles through forward compatibility but we are fully focused on launching NHL 21 on the Xbox One and PS4 and look forward to the opportunities the next-gen systems will bring in the future.”

The lack of a native Xbox Series X version shouldn’t be that devastating to fans of the series. As the statement confirms, the Xbox One version will be playable, like most Xbox One video games, on the next gen console. The Xbox One version will also support 4K Ultra HD when played on an Xbox One X (and the Xbox Series X) so gamers will still be getting a premium experience.

No official NHL 21 video or imagery is available just yet though. Fans will need to wait until August for the title’s official, full reveal.

NHL 21 is available in a Standard Edition, a Deluxe Edition, and an Ultimate Edition. Pre-ordering each version will unlock one, two, or five in-game Unlocked Hockey Bags respectively while the Deluxe and Ultimate Editions will also include a HUT Cover Athlete Choice Pack (Choice 1 of 6) and three days of early access.

Are you a fan of the NHL video games? Does a lack of an Xbox Series X version disappoint you? Let us know in the comments below and then follow us on Pinterest and Twitter for more Xbox gaming content.

NHL® 21 Standard Edition


NHL® 21 Deluxe Edition
Developer:
Electronic Arts
Price:
Free


NHL® 21 Great Eight Edition

How to reset network settings in Windows 10? [Simple Guide]

Network connection issues aren’t entirely uncommon for users with Windows 10 and other platforms.

Resetting network settings is among the more common and effective fixes for a range of internet connectivity issues.

A network reset fix will restore Winsock and TCP/IP (Transmission Control Protocol/Internet Protocol) to their default configurations.

How do I reset my network settings within Windows 10?

1. Reset network via Settings

  1. Press the Windows key + S hotkey.
  2. Type the keyword network status within the search box.
  3. Click Network status to open the window shown directly below.
    Network status reset network settings windows 10
  4. Next, click the Network status link at the bottom of the Status tab.
  5. Press the Reset now button shown directly below.
    Reset now button reset network settings windows 10
  6. Click Yes on the Network reset dialog box that opens.
  7. After your desktop or laptop restarts, click the network icon on your system tray shown in the shot directly below.
    Internet connections
  8. Then select your required network, and press the Connect button for it.

Note: Some users might also need to re-enter proxy LAN settings via the Internet Properties window after resetting networks. To do this, have a look at our Proxy settings not detected guide.


2. Reset TCP/IP and Winsock via the Command Prompt

  1. Click the Type here to search button on Windows 10’s taskbar.
  2. Next, input the keyword cmd in the search box.
  3. Right-click the Command Prompt to open a context menu for it.
    Run as administrator option
  4. Select the Run as administrator option for the Command Prompt.
  5. Type netsh int ip reset into the Command Prompt and press the Enter keyboard key.
    ip reset command reset network settings windows 10
  6. To reset Winsock, enter the netsh winsock reset command; and press the Enter key.
    winsock reset command
  7. Close the Command Prompt after it displays the Winsock reset completed successfully message.
  8. Restart Windows after closing the Command Prompt.

Having trouble opening Command Prompt with admin rights? Check this guide out


3. Disable and Enable the Network Connection

  1. To disable and re-enable a network connection via Control Panel, type network connections in Windows 10’s search box.
  2. Click View network connections to open the window shown directly below.
    Network Connections applet
  3. Right-click your network connection to select Disable.
  4. Wait a minute or so, and then right-click the disabled network connection again to select Enable.

Those are a few alternative ways you can reset network settings in Windows 10 to potentially fix a variety of connectivity issues. If you don’t have Windows 10, you can still reset network settings with the latter two methods.

[wl_navigator]

How to Show Taskbar on Both Monitors in Windows 10? [Guide]

Windows 10 arguably has the best support for multiple displays among all the Windows versions till now.

It offers tons of customization options, allowing users to make their desktop look how they want it to look.

That said, the Windows 10 (build 14332) update allows multi-display users to customize the taskbar. The users can show the taskbar on both monitors in Windows 10.

Furthermore, you can also choose to show or not show the taskbar apps icon on the secondary monitor.

In this article, we show you how to show the taskbar on both monitors in Windows 10 with a few additional customization options.

How can I duplicate Taskbar on the second monitor?

show Taskbar on both monitors

Make sure you have connected one or more displays to your system. Once connected, follow these steps.

  1. Right-click on the Taskbar.
  2. Select Taskbar Settings.
  3. Scroll down to Multiple displays.
  4. Toggle the switch for Show taskbar on all displays.
  5. This will enable and show the taskbar on your second monitor.

If you have more than one monitor, the taskbar will be visible on all the monitors.

You can further customize the taskbar on your second monitor. As I pointed out in the article before, you can enable the taskbar for the second monitor and still choose whether to show the app’s icon or not.

To enable the app icon for the taskbar on the second monitor, click the drop-down menu under Show taskbar button on and select All taskbars.

show Taskbar on both monitors

If you prefer to hide the app icons, select the Main taskbar and taskbar where the window is open or Taskbar where the window is open.

Play with the options to understand what each of these options does.

The Combine buttons on other taskbars option allow you to view and access the open apps as tabs instead of a button.

We recommend you use the Always, hide labels option as it offers more space on your taskbar.

What options are not available for the second monitor?

There isn’t still an option to show system tray and icons to show on multiple displays. So, you have to access it from your main monitor.

We hope to see the feature added to the newer Windows 10 builds when it releases.

A multi-display setup does help you to increase productivity.

By enabling the taskbar on multiple displays, you don’t have to come back to your main monitor to access opened apps on the taskbar.

Keep in mind that the system tray icons aren’t available by default, but we have a guide on how to show system tray icons on all monitors, so don’t miss it.

If you want more monitor management features, such as full taskbar customization, wallpaper management, monitor splitting, or remote control settings, we recommend you try DisplayFusion.

5 Best Blu-ray Players Software for Windows 10

The times when people owned bulky physical Blu-ray players have long passed. We now live in the age of efficiency so most of the users will gravitate to the best and easiest options available to them.

We all have the ability to play Blu-ray’s directly from our Windows 10 laptops. That means we all have a portable cinema in our possession.

To get the best experience out of it, users also need to own a reliable Blu-ray player software. We want that player to be adapted to our specific needs.

Some of us want a simple yet efficient player, others want many customization options. The fact is that we all want a fast player that runs smoothly and is easy to use.

Two other important features are great quality images and an immersive sound experience.

The market offers a wide array of options when it comes to Blu-ray players compatible with Windows 10 PC. In this article, we will explore the best options for both high-end and lower system specifications requirements. 

Top Blu-ray player software for Windows 10

PowerDVD

Topping off our list is a media player that is unparalleled in terms of how efficiently it can handle high-quality videos, and this includes Blu-rays.

Most common media players will either not handle the format at all, show error messages, or run in a very laggy manner at best, but this isn’t the case with Cyberlink PowerDVD 20.

Technology has evolved, and having this tool installed on your Pc doesn’t mean that you are restricted to watching videos in front of the monitor.

Enjoy seamless video casting to any device at home or on the go with the CyberLink Cloud media server, and you can also share this experience with friends and family, even if they don’t have PowerDVD 20.

In short, this isn’t just a video player, it is an entire media center suite.

Here are some of the perks of using PowerDVD 20:

  • A subscription gets you 100GB of free cloud storage for your media
  • Works with Apple TV, Amazon Fire TV, Chromecast, and Roku
  • You can use your home network to turn it into a media center
  • Cast video directly from your mobile device or PC to your TV
  • Great for high-quality video playback on any device

PowerDVD

Play your Blu-ray discs in an unparalleled manner and transform your home into a media center with the help of the world’s #1 movie and media player.
Check price Visit website

Aiseesoft Blu-ray Player

Aiseeesoft Blu-ray Player

Aiseesoft Blu-ray Player offers a viable option for users who have a more powerful computer because of its heavy use of resources. It lacks some important features like HD/3D up-scaling and it doesn’t allow playback of lossless audio.

Considering your time is valuable, it has one of the fastest playback times — only 5 seconds. Once again, keep in mind that this software uses nearly 50% of your CPU.

It can be downloaded for free as a trial version. You can also get the paid version of the tool.

Aiseesoft Blu-ray Playe

Aiseesoft Blu-ray Playe

A lightweight media player that can easily handle Blu-ray disc movies on your PC, now available at a special price.
Check priceVisit website

Aurora Blu-ray Media Player

Aurora Blu-ray Player - Blu-ray players for win 10

Aurora is an easy-to-use Blu-ray player for Windows 10 that can play both protected and unprotected discs. It also supports all video formats – AVCHD, MKV, FLV, and more.

With this tool, you can enjoy multiple audio tracks. It doesn’t need a lot of processing power from your PC. Aurora Blu-ray player uses around 48% of CPU.

Aurora Blu-ray Media Player

Aurora Blu-ray Media Player

A minimalist media player that specializes in Blu-ray playback, now available for both PC and Mac users
Check priceVisit website

AnyMP4 Blu-ray Player

AnyMP4 Blu-Ray Player - Win 10 Blu-ray Players

AnyMP4 Blu-ray Player is a medium-weight, simple Blu-ray player for Windows 10 with a fast loading time.

AnyMP4 offers Dolby and DTS support but lacks lossless audio playback. It uses around 34% of system resources which makes it a good option for users with medium-end PCs.

This tool also has an auto-resume feature that remembers where you stopped a video.

It allows you to change the hue, saturation, and brightness of the video player. Check out more features on their official website.

AnyMP4 Blu-ray Player

AnyMP4 Blu-ray Player

Enjoy high-quality Blu-ray movies on your PC with the help of this lightweight and extremely versatile movie player.
Check priceVisit website

Macgo Blu-ray Player 2.11

Macgo Blu-ray Player

Macgo Blu-ray Player has a wide variety of features and control options.

It offers a wide range of audio and video settings as well as the possibility to change the player’s skin and connects directly to your social media accounts.

This player has a very user-friendly interface. It uses around 45% of your CPU but its price makes it a good option.

Feel free to download the trial version and test its features on your PC right now.

Macgo Windows Blu-ray Player

Macgo Windows Blu-ray Player

Watch Blu-ray quality discs and movies on your PC or laptop with the help of this fantastic media player
Check priceVisit website

Choosing the best Blu-ray player for Windows 10 is a lot easier when you have access to all the information offered in this article.

In this list, we have included a series of options for all types of users. Whether you want a full-on customizable experience, value high quality at the expense of high system resource usage or you need an easy-to-use Blu-ray player with low impact on system resources.

The software tools are also useful if you’re interested in the following subject:

Blu-ray playing software Windows 10 – All entries on this list are perfectly compatible with the Windows 10 OS for efficient Blu-ray playback.

So, which software will you pick? Let us know in the comments below.

Here’s how to remove the Office app from Windows 10

As you probably know Microsoft Office was rebranded as Microsoft 365 and unlike the old suite, this one can be uninstalled easily like any other software.

How do I uninstall the Office app from Windows 10?

1. Use the classic uninstall method

  1. Open Start.
  2. Look for Microsoft 365 in the Programs list.
  3. Right-click on it and click Uninstall.remove my office from windows 10
  4. Alternatively, you can open Settings > Apps > Apps and features. Look for Microsoft 365, expand it and click Uninstall.

This is the classic and easiest way to uninstall any program, provided that you do not encounter any errors.

2. Uninstall Office (Microsoft 365) with PowerShell

  1. Right-click on Start and open PowerShell (Admin).
  2. In the command line, copy-paste the following command and press Enter:
  3. Get-AppxPackage -name “Microsoft.Office.Desktop” | Remove-AppxPackage
  4. After it’s done, restart your PC and look for changes.

3. Use a dedicated uninstall tool

Note that some users stated that, even after they managed to uninstall the Office app, it kept reappearing. So to make sure that all the files related to the app are deleted, we recommend using a dedicated uninstaller such as CCleaner.

The tool is extremely efficient in removing leftover files, folders, and/or Registry entries from unwanted programs. Besides uninstalling the program, CCleaner also scans for whatever trances of the respective app are left in the system.

Moreover, it can also remove plugins and it is able to completely uninstall stubborn/malicious software that you would normally struggle to get rid of.

⇒ Get CCleaner

This should do it. There’s another way to clear all bloatware from your Windows 10 machine, and the highlighted guide will help you. To make sure that Microsoft 365 is completely removed from your system, consider using the Microsoft 365 Uninstall Troubleshooter, a tool designed to help resolve uninstallation problems and ensure that no traces are left behind.

Also, we welcome your feedback in the comments section below. We look forward to hearing from you.

FIX: Can’t uninstall Apple Software Update on Windows 10/11

Apple Software Update is a program that updates Apple software in Windows 10, but not everybody needs it.

However, Apple Software Update doesn’t always uninstall. Some users have stated in forum posts that an error message pops up when they try to uninstall ASU.

That error message states: There is a problem with this Windows installer package. A program required for this install to complete could not be run.

This is how you can uninstall Apple Software Update when that error message pops up in Windows 10.

How to uninstall Apple Software on Windows 10 after Creator Updates?

  1. Open the Program Install and Uninstall Troubleshooter
  2. Activate the Built-in Administrator Account
  3. Repair Apple Software Update
  4. Remove Apple Software Update With CopyTrans Driver Installer
  5. Uninstall Apple Software Update

1. Open the Program Install and Uninstall Troubleshooter

  1. Open this Microsoft webpage in your browser, and press the Download button there.
  2. Next, open your download folder in File Explorer.
  3. Click MicrosoftProgram_Install_and_Uninstall.meta.diagcab to open its window below.
  4. Press the troubleshooter’s Next button.
  5. Select Uninstalling to fix a program that doesn’t uninstall.
  6. Then, select Apple Software Update on the program list, and click the Next button.
  7. Select the Yes, try uninstall option to remove ASU.
  8. If the Yes, try uninstall option doesn’t do the trick, select the try other fixes option.

First, check out the Program Install and Uninstall troubleshooter for Windows 10. That troubleshooter fixes corrupted registry keys that can block software from uninstalling.

You can utilize the Program Install and Uninstall troubleshooter in Windows 10 as described above.

2. Activate the Built-in Administrator Account

  1. Press the Type here to search button on the Windows 10 taskbar to open Cortana.
  2. Enter Command Prompt in the search box.
  3. Right-click Command Prompt to select the Run as administrator option.
  4. Input net user in the Command Prompt, and press the Return key.
  5. Then input this command in the Prompt: net user administrator /active:yes. Don’t forget to press the Enter key after entering the command.
  6. Then restart Windows and sign in with the new admin account you activated.

You can’t always remove all programs within a standard Windows 10 user account.

Thus, switching to an admin account will ensure you have sufficient access rights to uninstall all programs, including Apple Software Update.

Windows 10 includes a built-in admin account that you can activate as presented above.

3. Repair Apple Software Update

  1. Open Run by pressing its Windows key + R hotkey.
  2. Input appwiz.cpl in Run, and press its OK button.
  3. Enter the keyword Apple Software Update in the search box as shown below.
  4. Then select Apple Software Update, and press its Repair button.
  5. Thereafter, click Uninstall to remove the Apple Software Update.

The Programs and Features Control Panel applet includes a Repair option for the Apple Software Update.

o, that option might fix ASU so that you can uninstall it. You can repair Apple Software Update with the help of the above procedure.

4. Remove Apple Software Update with CopyTrans Driver Installer

  1. Download CopyTrans Driver Installer.
  2. Open the CopyTrans Driver ZIP in File Explorer, and press the Extract all button.
  3. Click the Browse button to select a path to extract the ZIP file.
  4. Press the Extract button.
  5. Open CopyTrans Driver Installer from its extracted folder.
  6. Then press the Uninstall button.
  7. Note that CopyTrans will also uninstall the other Apple programs listed on its window if you’ve installed them. So, you might need to reinstall some Apple software after uninstalling ASU.

CopyTrans Driver Installer is another utility that you can remove Apple software with. The program is actually designed to install iPhone, iPod, and iPad drivers.

However, you can also utilize it to completely uninstall Apple Software Update. You can uninstall ASU with CopyTrans Driver Installer as described above.

5. Uninstall Apple Software Update with a third party app

Those are a few resolutions that will probably fix Apple Software Update so that you can uninstall it as required.

There are numerous third-party uninstallers for Windows that uninstall software and their leftovers.

You may even remove browsers extensions and remove remnants of previously uninstalled programs, so make sure to consider it for removing any residues from your PC.

Some of these great third-party uninstallers might also remove ASU when the Windows 10 remover fails to do so.

Will Azure-hosted Minecraft Realms subscriptions cost less?

Microsoft revealed to CNBC that it’s moving Minecraft Realms from AWS to Azure servers. The switch should be complete by January 2021, according to the tech company.

This move makes sense considering the long-standing rivalry between the two cloud services giants. It should also have financial ramifications for Microsoft and Minecraft fans.

Azure to start hosting Minecraft Realms

A Microsoft spokesperson told CNBC that the company will have moved Realms to its own cloud service, Azure, by the end of this year.

Mojang Studios has used AWS in the past, but we’ve been migrating all cloud services to Azure over the last few years. We’ll be fully transitioned to Azure by the end of the year.

Minecraft Realms is an innovative feature in gaming that Microsoft has continued to offer its fans even after acquiring Mojang Studios, the game’s creator. Millions around the world love the game and a section of them are die-hard Realms subscribers.

It’s simply a way for gamers to create private virtual places and interact with each other via popular platforms like Windows 10 PC and Xbox One. After setting up your own private server, you can invite up to 10 players to join in the fun.

The exclusive feature though comes at an extra cost—you have to pay $8 per month to use Minecraft Realms.

Once the migration to Azure is complete, Microsoft will no longer have to pay Amazon a dime for it.  While that could be good news to users of the virtual gaming servers, Microsoft hasn’t uttered a word about reducing prices.

But it makes sense for the company to consider passing on any savings to consumers. Besides, a subscription price cut would be beneficial to Microsoft too as it would encourage more gamers to subscribe.

Do you expect Minecraft Realms subscription costs to come down after the service moves to Azure? Kindly reach for the comments section below and let us know what you think.

[wl_navigator]

New Phishing Scam Pretends to Renew Microsoft Office 365

Unfortunately, the Covid pandemic and working from home is also a good time for attackers to release their malware and phishing nets.

The most recent threat we covered was the return of the Emotet banking trojan, but unfortunately, there are a lot of other vulnerabilities waiting to be exploited by attackers.

Now, it’s not the time to leave your computer unprotected. Ensure you have a powerful antivirus and update it as frequently as possible.

Microsoft renewal scam targets Office 365 users

The specialists from Abnormal Security detected two types of attacks from the same source, a domain called office365family.com, registered on the Wix website builder platform. 

The first type of attack is to send an e-mail telling you that Office 365 is now Microsoft 365 and that you should renew your subscription by the due date.

If you click on the link provided by the phishing attacker in the message, you will be taken to a form to complete with your personal data, just like in the screenshot below.

phishing attack type

The second form of attack is an email warning you that your Microsoft 365 subscription has expired and, again, it needs to be renewed sooner than later.

This time, the Renew now link will take you to a PayPal page where you’re invited to enter your payment credentials.

phishing attack Microsoft 365

This should raise a red flag for anybody, not because Microsoft wouldn’t accept PayPal payments but because the Office account page wouldn’t bring you directly to a PayPal option.

If you want to cancel the Microsoft 365 subscription, follow the steps in this guide.

Of course, either type of scamming will result in losing important information that the attackers will use to steal money from you.

How can I protect myself from phishing attacks?

Phishing attacks prey on the user’s innocence and misinformation. You can easily protect yourself from phishing attacks if you stop clicking on unsolicited e-mails and links and reporting any phishing emails..

Also, it doesn’t hurt to keep yourself informed about the latest threats and attacks.

Have you been the victim of a phishing attack? Tell us your story in the comments section below.

How to disable Open File security warning on Windows 10/11

Your online security is rather important, so getting a message that states Your Internet security settings prevented one or more files is nothing out of the ordinary.

How many times have you tried to browse freely, only to receive a message like this? You know the answer to that better than anyone else.

Open File security warnings can be a bit annoying, and in this article, we’ll show you how to easily disable them on Windows 10.

How can I disable Open File security warning on Windows 10?

1. Change your Internet options

  1. Press Windows Key + S and enter Internet options. Select Internet Options from the list of results.
  2. When the Internet Properties window opens, go to the Security tab and click on the Custom Level button.
  3. A list of settings will appear. Locate Launching applications and unsafe files and select Enable. Now click OK to save changes.

Open File security warning usually appears when trying to run downloaded files, but you can fix this problem simply by changing your Internet options.

This is relatively simple and you can do it by following the above steps. After changing these settings you should be able to run downloaded files without any problems.

2. Disable User Account Control

  1. Press Windows Key + S and enter user. Select Change User Account Control settings from the menu.
  2. When User Account Control Settings window appears, move the slider all the way down to Never notify. Click on OK to save changes.

Once you disable User Account Control, you should see fewer security warnings on your PC. Disabling User Account Control won’t greatly reduce your security, so you can disable it without fear.

If you’re frequently getting an Open File security warning, you might be able to disable it by turning off User Account Control.

This is a security feature of Windows that notifies you when trying to change a setting or perform an action that requires administrative privileges.

Users claim that this feature is the cause behind this security warning, and if you want to disable it, you need to turn off User Account Control.


This guide will help you become an expert in managing User Account Control!


3. Modify your registry

  1. Press Windows Key + R and enter regedit. Press Enter or click OK.
  2. When Registry Editor opens, go to File > Export.
    Select All as Export range, enter the desired File name, choose a safe location and click on Save.
    In case anything goes wrong after modifying your registry, you can easily restore it by running the exported file.
  3. Navigate to the Associations key. If this key isn’t available, you’ll need to create it. To do that, simply right click the Policies key and choose New > Key from the menu.
    Now enter Associations as the name of the key and navigate to it.
  4. Once you navigate to Associations key, look for LowRiskFileTypes in the right pane. If this value isn’t available, you’ll need to create it manually. To do that, right-click the empty space in the right pane and choose New > String Value from the menu.
    Enter
    LowRiskFileTypes as the name of the string. Double click the LowRiskFileTypes to open its properties.
  5. When the Properties window opens, paste the following into the Value data field: .avi;.bat;.cmd;.exe;.htm;.html;.lnk;.mpg;.mpeg;.mov;.mp3;.mp4;.mkv;.msi;.m3u;.rar;.reg;.txt;.vbs;.wav;.zip;.7zIf needed, you can add more extensions in order to disable the security warning for them. After you’re done, click on OK.
  6. After making the changes, close Registry Editor and restart your PC.

Your registry holds sensitive system information, and by modifying it you can disable this security warning from appearing.

Modifying the registry can be potentially dangerous if you’re not careful, so we advise you to be extra cautious.

Once your PC restarts, the problem should be fixed and you won’t see the security warning anymore.

If you don’t want to manually edit your registry, you can download Disable_Open-File_Security_Warning.reg file and run it.

By doing that, you’ll disable the security warning for the specified file types. In case you want to enable the security warning, simply download Enable_Open-File_Security_Warning.reg and run it.

4. Edit your Group Policy

  1. Press Windows Key + R keyboard shortcut and enter gpedit.msc. Press Enter or click OK.
  2. In the left pane navigate to User Configuration > Administrative Templates > Windows Components > Attachment Manager. In the right pane locate Do not preserve zone information in file attachments.
  3. Select Enabled and click on Apply and OK to save changes.
  4. Now click on the Inclusion list for low file types.
  5. Select Enabled and paste the following line in Specify low-risk extensions input field: .avi;.bat;.cmd;.exe;.htm;.html;.lnk;.mpg;.mpeg;.mov;.mp3;.mp4;.mkv;.msi;.m3u;.rar;.reg;.txt;.vbs;.wav;.zip;.7z
  6. Click on Apply and OK to save changes.

You can prevent this security warning from appearing by using Group Policy Editor.

This is a useful application that allows you to change various settings, but unfortunately, it’s available only on Pro and Enterprise versions of Windows.

To use Group Policy, do as described above. Close Group Policy Editor and restart your PC. Once your PC restarts, check if the problem still appears.

Check our handy guide to easily edit the Group Policy like a pro.


5. Use Command Prompt

  1. Press Windows Key + X and choose Command Prompt (Admin) from the menu. If Command Prompt isn’t available, you can use PowerShell (Admin) instead.
  2. When Command Prompt starts, enter the following lines:
    • REG ADD "HKCUSoftwareMicrosoftWindowsCurrentVersionInternet SettingsZones3" /V "1806" /T "REG_DWORD" /D "00000000" /F
    • REG ADD "HKLMSoftwareMicrosoftWindowsCurrentVersionInternet SettingsZones3" /V "1806" /T "REG_DWORD" /D "00000000" /F
    • REG ADD "HKLMSOFTWAREPoliciesMicrosoftInternet ExplorerSecurity" /V "DisableSecuritySettingsCheck" /T "REG_DWORD" /D "00000001" /F

You can also prevent this security message from appearing by using Command Prompt. Many users don’t know this, but you can use Command Prompt to quickly edit your registry.

We have to warn you that modifying the registry can be potentially dangerous, so you’re doing it at your own risk. To fix this problem using Command Prompt, do as described above.

After commands are executed, you might have to restart your PC to apply the changes.


Working in Command Prompt will be like a walk in the park after you read our guide!


6. Unblock the file

  1. Right-click the problematic file and choose Properties from the menu.
  2. When the Properties window opens, go to the General tab and click on the Unblock button.

To stop this security warning from appearing, you might need to unblock your file. Sometimes files can become blocked causing this warning to appear.

To unblock your file, be sure that the file is located in a directory that is associated with your user accounts such as your Desktop or Documents.

If you want to unblock a specific file, complete the above procedure. After doing that, you won’t see the security warning for this file anymore.

7. Uncheck Always ask before opening this file option

  1. Run the problematic file.
  2. You should see an Open File security warning. Uncheck Always ask before opening this file option. Now click on Run to continue.

If you want to disable Open File security warning for a specific file, you can do it simply by unchecking a single option. To do that, follow the above procedure.

After doing that, you should be able to open that file without any security warnings.

This method is simple and straightforward, and it’s rather useful if you want to disable this security warning for a specific file.

8. Take ownership over the problematic file

  1. Locate the file that is giving you this security warning and right-click it. Choose Properties from the menu.
  2. When the Properties window opens, go to the Security tab and click on Advanced.
  3. In the Owner section click on Change.
  4. Select User or Group window will appear. In the Enter the object name to select field enter your user name. Now click on Check Names. If everything is in order, click on OK to save changes.
  5. The owner of the file should now be changed. Now you just have to click on Apply and OK to save changes.

If you’re getting this security warning on your PC, you might be able to disable it for a specific file by taking ownership of that file.

This is relatively simple, and you can do it by following the above procedure.

After taking ownership of the file, you should be able to run it without any security warnings. If you’re an advanced user, you can also use Command Prompt to take ownership of a certain file.

To do that, just follow these steps:

  1. Start Command Prompt or PowerShell as administrator.
  2. When Command Prompt opens, enter:
    • takeown /F <path_to_file>

Of course, be sure to replace the <path_to_file> with an actual path to the problematic file. This method is faster, but it requires you to enter the exact path to the problematic application.

If you’re an advanced user and familiar with Command Prompt, feel free to try this method instead.

9. Change Local intranet settings

  1. Open Internet Options. We showed you how to do that in Solution 1, so be sure to check it for detailed instructions.
  2. When the Internet Properties window opens, go to the Security tab and select Local intranet. Now click on the Sites button.
  3. The local intranet window will now appear. Click on the Advanced button.
  4. Now enter the address of the server in the Add this website to the zone field. You can use the server’s domain or you can use its IP address. Just be sure to enter before the server’s address or domain. Now click on the Add button. After you’re done adding servers, click the Close button.
  5. Save changes and your problem should be resolved completely.

According to users, this security warning can appear if you’re trying to run an application from a network directory.

To fix this problem, you need to add the name or the IP address of the server on which the application is stored in Intranet settings.

This is relatively simple to do, and you can do it by following the above steps.

If you don’t want to use Internet Options, you can make the same changes using the Group Policy Editor. To do that, follow these steps:

  1. Open Group Policy Editor. To see how to do that, check the first step of Solution 4.
  2. When Group Policy Editor starts, navigate to Computer Configuration > Administrative Templates > Windows Components > Internet Explorer > Internet Control Panel > Security Page in the left pane. In the right pane, locate and double click Site to Zone Assignment List.
  3. Now select Enabled and click on the Show button.
  4. In the Value name column enter the IP address or domain name of the server. As for Value, enter 1. After you enter all the necessary addresses, click on OK to save changes.
  5. Now just click on Apply and OK to apply changes.

Both methods will achieve the same results, so you can use any of them. Keep in mind that this solution works only if you’re trying to run an application from a network directory.

10. Use Command Prompt

how to use Command Prompt

  1. Start Command Prompt as administrator.
  2. Use Command Prompt to navigate to the location of the problematic file.
  3. Now enter the following commands:
    • move your_file_name.exe NewName
    • type NewName > your_file_name.exe

If you’re frequently getting this security warning, you might be able to disable it for a specific file by using Command Prompt. To do that you need to follow these above steps.

This is a solid workaround, and it works according to users, so feel free to try it out. Keep in mind that in order to use this solution you need to have a basic understanding of Command Prompt syntax.

11. Check Include all network paths options

  1. Open Internet Options. Navigate to the Security tab, select Local intranet, and click on Sites button.
  2. The local intranet window will appear. Uncheck all options except Include all network paths (UNCs). After doing that, click on OK to save changes.
  3. Optional: Few users suggest that you should check Include all local (intranet) sites not listed in other zones option as well, so you might want to do that.

Few users claim that you can fix this problem simply by checking a few settings in Internet Options. To do that, follow the above procedure.

After doing that, the problem should be fixed and you’ll be able to run files from network directories without any problems.

12. Create a bat file that will run the problematic file

  1. Open Notepad.
  2. Now paste the following code:
    • start c:windowssystem32 notepad.exe

    We used Notepad as an example, but if you want to launch any other application using the bat file, you need to enter the location of the file between the quotes and the file name after it.

  3. Now you just have to save your file. To do that, go to File > Save as.
  4. Set Save as type to All Files and enter script.bat as the file name. Now choose the save directory and click the Save button.
  5. Now you just have to locate script.bat file that you created and run it and the application will start without any security warnings.

According to users, you can avoid this security warning while running a certain application simply by creating a bat file that will start the application for you. To do that, follow these steps:

This is a solid workaround, but it might be a bit complicated since you have to create a bat script for that specific file.

Since this is just a workaround, you’ll have to use the script to start the desired application every time.


Schedule batch files like a real expert! Learn how from our handy guide!


13. Use the icals command

icals command

  1. Open Command Prompt as administrator.
  2. When Command Prompt starts, run the following commands one by one:
    • ICACLS "%programdata%MicrosoftWindowsStart MenuPrograms" /Setintegritylevel (OI)(CI)Medium
    • ICACLS "%userprofile%FavoritesLinks" /Setintegritylevel (OI)(CI)Medium
    • ICACLS "%userprofile%AppDataRoamingMicrosoftInternet ExplorerQuick Launch" /Setintegritylevel (OI)(CI)Medium
    • ICACLS "%userprofile%AppDataRoamingMicrosoftInternet ExplorerQuick LaunchUser pinnedTaskbar" /Setintegritylevel (OI)(CI)Medium

Several reported this security warning while trying to run applications from Start Menu or from the Taskbar.

According to them, you can fix this problem simply by using the icals command. This is relatively simple and you can do it by following the above steps.

After running these commands the security warning should disappear and you won’t see it while trying to run applications from Taskbar or Start Menu.

If you’re having this problem with Desktop shortcuts, you might be able to fix it by running Command Prompt and using ICACLS C:Users<username goes here>Desktop /Setintegritylevel (OI)(CI)M command.

After doing that, you should be able to run shortcuts from your Desktop without problems.

14. Download and use streams utility

how to use streams utility

If you’re getting Open File security warning while opening a specific file, you might be able to fix it by using streams tools. This tool is a part of Sysinternals and you can download it for free from Microsoft’s website.

After you download the tool, you need to start it manually or use Command Prompt to navigate to its directory and enter the following command:

  • streams.exe -accepteula -d <path_to_the_file>application_name.exe

After running this command you’ll remove all zone data from that file and you won’t see any security warnings while running it.

15.  Copy the files to a different location

copy files

According to users, you might be able to fix the problem with the annoying security warning simply by copying the affected files to a new location.

To do that, locate the problematic files and select them. Now copy them to your Desktop.

After doing that, delete the original files from their directory. Now move the files from your Desktop to the original location. After doing that you should be able to run those files without any problems.

Users reported that this workaround works with Internet Explorer favorites, but be sure to try it with other files that are giving you this security warning.


Files are copied too slow? Check our comprehensive guide to solve this issue!


Open File security warning can be rather annoying at times, but you should be able to prevent it from appearing by using one of our solutions.

Moreover, use them when encountering these similar issues too:

  • Open file security warning we can’t verify who created this file – Solve this rather common issue shouldn’t be too complicated. Feel free to change your Internet options or set up the file location as a trusted site and see if this makes any difference.
  • Open file security warning add trusted locations – Countless users have been constantly trying to solve this issue to absolutely no avail. If you’re one of them too, the above tips are pure gold.

[wl_navigator]

OneDrive Fetch files is shutting down, here’s how to use PC Folder backup, and Files on Demand instead

An old trick of OneDrive is known as Fetch files. With the feature, if you have the OneDrive desktop app for Windows installed, you could use it to access all your files on that PC from another computer through OneDrive on the web. You’d also be able to access the files remotely to download copies, stream videos and photos, and more.

Unfortunately, Microsoft has said that after July 31, 2020, this feature will be shut down. Instead, you’ll have to use the OneDrive file or folder sync feature and the PC folder backup feature. Here’s more on how you can still get to your important files.

Step 1: Set up OneDrive

To get started, you’ll want to set up OneDrive for Syncing files in Windows. Once you do this, If you add, change, or delete a file or folder in your OneDrive folder, the file or folder is added, changed, or deleted on the OneDrive website (and the other way around, too.) You’ll also be able to use your synced files directly in File Explorer, even if you’re offline.

The first step is to download and sign in to OneDrive (if you’re not already up and running with it.) You’ll also want to download the latest version of the OneDrive client for Windows 10. After set up, to sign in, click Start, search for OneDrive, and then open it and follow the on-screen steps.

If you’re already signed in to OneDrive, click the Blue or White OneDrive icon in the Windows 10 taskbar. Or, if it is hidden, click the Show hidden icons button and then the OneDrive icon. From there, you’ll then one to click Help and Settings, followed by Settings.

From the Settings page, make sure you’re signed in with the account you want to Sync with. If not, click Add an account. Sign in, and then watch for the on-screen setup prompts.

Step 2: Set up OneDrive Files on Demand to sync files and folders

Once you signed in with your account, look for the screen that says All your files, ready-on demand. This screen will let you see how files are being synced on demand. You’ll be able to access all your files in OneDrive, without having to download them or use storage space on your Windows Device.

If you missed this screen during setup, you can turn on OneDrive Files on Demand later. Just simply select the white or blue OneDrive cloud icon in the Windows taskbar notification area. Then, click Help and Settings. You should then see a box for Settings. Click this, and then choose Settings followed by clicking the checkbox under Files-on-demand.

With Files on Demand, there are some things you need to be aware of. When you visit the File Explorer in Windows 10 and click OneDrive, you’ll see some icons next to your files. There is a blue cloud icon, a checkmark, and a green checkmark. See the table below for what these mean.

Keep in mind that Files on Demand can be turned on and off as needed. You can always make a file or folder for offline use or as online-only by right-clicking it and choosing Always keep on this device or Free up space. You also can hide a folder by clicking the OneDrive icon, going to Settings. From there, next to the location where you want to choose folders, select Choose folders. Clear the checkbox next to the folder you want to keep off your device.

Step 3: Backing up your documents with PC Folder Backup

Accessing your files stored on OneDrive with Files on Demand is one thing, but you can also use OneDrive to back up some of the important files on your computer. Typically, these include the Desktop, Documents, and Pictures folder. With the PC Folder backup feature, you can back up these locations from your PC and view them on your other devices, and sync them, too.

To get started with this feature, you might be prompted to back up your important folders by OneDrive. If you didn’t see it, you can click the OneDrive cloud icon, then select, Help, and Settings, followed by Backup, then Manage Backup. Keep in mind that if you’re not subscribed to Microsoft 365, you’ll be limited to 5GB of Backups, but you’ll get up to 1TB with a subscription.

Anyway, once you click the Manage Backup button,  you’ll get a prompt showing you the Desktop, Pictures, and Documents folder. If there are any files that can’t be backed up, you’ll get an alert on how to fix it before proceeding. Anyway, you can proceed to back things up by clicking Start backup. The backup will happen in the background, and you can click the View upload progress.

Once everything is backed up, you’ll be able to access the files anywhere from your OneDrive. You can stop backing up a folder at any time by clicking Backup and Manage backup in settings.

How else do you use OneDrive?

OneDrive is truly a great service, especially if you’re subscribed to Microsoft 365. Backing up your files is one way to use OneDrive, but you also can it to share your files, and so much more. Check out our OneDrive coverage for more news and information, and keep it tuned to OnMSFT as we keep diving deeper into Microsoft 365.

Inspire 2020: Microsoft to update Teams with focus on firstline workers and meetings

Microsoft is kicking off its digital Inspire partner conference this morning, and the company is using this opportunity to announce some important updates for Microsoft Teams. The collaboration hub had its big moment following the worldwide covid-19 pandemic that profoundly impacted the way we work, and the Teams updates that Microsoft announced this morning focus on firstline worker experience, meetings, and other platform updates.

For firstline workers using Teams every day, a new Walkie Talkie feature is currently in preview on Android devices, and companies like BlueParrot, Klein Electronics, or Samsung have now built specialized hardware for it. Microsoft Teams on RealWear, which is now in public preview, will also allow firstline workers to use completely Teams hands-free.

Microsoft recently added support for Yammer Communities to its Teams mobile apps, allowing all employees to stay connected and see critical message and safety alerts within the app. “Having a direct line of communication with your Firstline Workers during uncertain times is critical to ensuring they feel included, engaged, and informed,” explained CVP of Microsoft 365 Jared Spataro.

For IT admins, Microsoft has also released new Firstline Worker and manager policy packages, as well as Audit logs for Shifts to keep track of activities more easily. Shift schedule assistance is also coming later this year and will make it easier to avoid schedule conflicts while creating team schedules.

Microsoft’s partners have been creating Teams Room devices for quite some time now, but the software giant has been working on new device management and monitoring options for companies willing to delegate the management of Teams Rooms devices to Microsoft. A new Microsoft Teams Room Premium offer will provide 24/7 management and monitoring of Teams Rooms devices to customers willing to pay for the service, which will cost $50 per device per month.

For other customers using the existing Meeting Room service, this one will become Teams Rooms Standard. At $15 per device per month, it will bring new tools to the Teams Admin Center to simplify the management of Teams Rooms devices, including bulk management tasks, and health monitoring.

Microsoft Teams is also evolving a rich platform that supports bots and third-party apps. Customers already using Microsoft’s Power Platform can now build apps and chatbots without leaving Teams. Developers will also be able to integrate third-party services with Teams meetings. “For example, a third-party Agenda app could add a tab with an agenda in the pre-meeting window, a button to open agenda items on the meeting control bar, or a summary file or other type of object in the post-meeting chat window,” explained Spataro.

Third-party apps will soon be able to integrate with Teams meetings.

The last point should be critical in Microsoft’s ongoing competition with Zoom, the easy-to-use video conferencing app that pretty much boomed during the pandemic. Video calls have now become a core Microsoft Teams feature, and the company recently unveiled a new Together mode and many other enhancements for Teams meetings.

Fix: The Folder path contains invalid character for good

The folder path contains invalid character error has been present on all versions of Windows, and Windows 10 is no exception. This error usually appears usually when you try to install or uninstall a certain software, so let’s see how to fix it.

But before we carry on, here are some more examples of this problem:

  • The folder path program files (x86) contains an invalid character 
  • Error 1324 the path program files contain an invalid character 
  • The folder path epic games contain an invalid character 
  • Error 1324 the folder path my documents contain an invalid character 
  • The folder path start menu contains an invalid character 
  • The filename or path contains invalid characters 
  • The folder path league of legends contains an invalid character

How can I fix The folder path contains invalid character error?

Table of contents:

Fix The folder path contains an invalid character in Program Files

1. Delete everything from the TEMP folder

If you’re getting an error message that says The folder path contains an invalid character in Program Files, you might want to delete all files and folders from the TEMP folder. To do that, follow these instructions:

  1. Press Windows Key + R to open Run window. Type %appdata% and press Enter or click OK.
    appdata-run
  2. Navigate to %USERPROFILE%AppDataLocalTemp
    You might have to go one folder up in order to access the Temp folder.
  3. Delete everything from Temp folder and try installing the software again.

2. Change Drive Letters for your CD or DVD drives

Sometimes The folder path contains invalid character in Program Files can be caused by your DVD drive, and it’s advised that you try changing the drive letters. To change drive letters, do the following:

  1. Press Windows Key + S and type Computer Management. Choose Computer Management from the list of results.
    start-computer-management
  2. Click Disk Management in the left pane. A list of your drives should appear in the right pane.
    disk-management
  3. Find your CD / DVD drive, right-click it and choose Change Drive Letters.
    change-drive-letter
  4. Select the drive and click Remove. Make sure to remember the DVD drive letter, you’ll need it later.
    remove-drive-letter
  5. If you have multiple CD / DVD drives, repeat Steps 3 and 4 for all of them.
  6. Restart your computer.
  7. When your computer restarts, go to Computer Management again.
  8. Click Disk Management, find your CD / DVD drive.
  9. Right-click and choose Change Drive Letters. Click Add.
  10. Now assign the same letter to your DVD drive that you removed in Step 4.
  11. Click OK to save the changes. If you have more DVD drives, you’ll have to repeat these steps for all of them.

Fix The folder path contains invalid character when installing iTunes

1. Delete all Apple entries from the registry

If you’re getting The folder path contains invalid character error message while installing iTunes, you might want to remove all Apple entries from your registry. To do that, follow these steps:

  1. Open Registry Editor. You can open Registry Editor by pressing Windows Key + R and typing regedit in the Run window. Click OK or press Enter to start Registry Editor.
    regedit
  2. When Registry Editor opens, go to the following key:
    • HKEY_LOCAL_MACHINESOFTWARE
  3. Find Apple Inc. and Apple Computers Inc., right-click them and choose Delete.
  4. Close Registry Editor, and try installing iTunes again.

2. Make sure you have enough permissions to access specific registry keys

When installing iTunes you might get The folder path contains invalid character error or Could not open key: UNKNOWNComponentsDA42BC89BF25F5BD0AF18C3B9B1A1EE8
b25099274a207264182f8181add555d0 error.

Although these two errors look a lot different, they are both related to registry keys and permissions required to access those keys. To fix these errors, do the following:

  1. Open Registry Editor as administrator. To do that, type regedit in the Search bar, right-click regedit from the list of results, and choose Run as administrator.
    regedit-admin
  2. When Registry Editor opens, go to the following key:
    • HKEY_LOCAL_MACHINESOFTWAREMicrosoftWindowsCurrentVersionInstallerUserDataS-1-5-18Components
  3. Right-click Components and choose Permissions from the menu.permissions-registry
  4. From Group or user names select Users and under Permissions for Users select Full Control.
    permissions-advanced
  5. Click Apply and OK to save the changes.
  6. Close Registry Editor and try reinstalling iTunes again.

Fix The folder path contains invalid character when installing Steam

1. Extract files from the .msi installer

As we already mentioned, The folder path contains invalid character error that occurs when users try to install or uninstall a certain software, and Steam is no exception.

If you’re having this error while installing Steam, you might want to try extracting the files from the Steam .msi installer. To do that, follow these steps:

  1. Download the Steam setup file.
  2. Open Command Prompt. You can open it by pressing Windows Key + X and choosing Command Prompt from the menu.
    command-prompt-start-menu
  3. When Command Prompt stats, you need to type the following:
    • msiexec /a PathToMSIFile /qb TARGETDIR=DirectoryToExtractTo
  4. Remember to replace PathToMSIFile with the location of your Steam setup file and DirectoryToExtractTo with the location where you wish to extract this .msi file.
  5. Run that command. After the .msi file has been extracted, go to its extract location, and run Steam.exe.

2. Delete Valve registry keys

When installing Steam, The folder path contains invalid character error can be caused by Valve registry keys, so let’s try to delete them in order to fix this problem.

  1. Open Registry Editor.
  2. Press Control + F and type Valve into the input field.
  3. Press Find Next.search-registry
  4. When the Valve key is found, right click it and press Delete.
  5. Press F3 to repeat the search. If you find more Valve keys, make sure that you delete them all.
  6. Close Registry Editor and try to install Steam again.

Fix The folder path contains invalid character when installing or uninstalling software

1. Use third-party software to remove problematic programs

A third-party uninstaller removes all traces of software from the registry, so if you’re having The folder path contains invalid character problems while installing or uninstalling certain software, you might want to try a removal tool.

In fact, these tools bring more than powerful removal features to the table. It even raises the stake by adding bonus clean-up utilities to keep your PC uncluttered and optimized.

It deletes the necessary files, all cache from the temp folder, program cache from the application data folder, and any user-specific data.

Since it also eliminates all registry entries from the installation, with no residues remaining on your PC, allowing you to securely reinstall the software or app without facing The folder path contains invalid character error.

The best part is that you get to test their excellent capacities before deciding to close the deal since you benefit from free trials and demo versions.

2. Install the software as a different user

If you’re getting The folder path contains invalid character while installing or uninstalling certain software, you might want to try installing it as a different user.

To do that, first, you need to create a new user on your computer. After you’ve created a new user account, switch to it and try to install the software again.

3. Remove the invalid character using Registry Editor

If installing software as a different user didn’t fix The folder path contains invalid character error, you might want to try removing the invalid character from the registry.

Using this method can sometimes cause damage to your system, so be careful while using it. To remove the invalid character from the registry, follow these steps:

  1. Open Registry Editor. When Registry Editor opens, press Ctrl + F.
  2. Now you need to enter the name of the location, for example, if The folder path contains invalid character error reports an invalid character in Program Files, type Program Files in the Search field.
  1. Press Find, and if the problematic character is found, remove it.
  2. Press F3 to find the next occurrence of the character. Repeat this step until you’ve removed all the problematic characters.
  3. After all invalid characters have been removed, close Registry Editor.

We have to warn you that in order to complete this solution, you need to know what is the character that is causing this error.

If you remove a wrong character, or you don’t know what you’re doing, you might cause damage to your registry. Before you attempt this step, make sure that you create a backup of your registry on your computer.

4. Remove League of Legends references from the registry

The folder path contains invalid character error sometimes appears during League of Legends installation, and according to reports, this error is caused by League of Legends references in your registry.

To fix this issue, you’ll have to delete those references by following these steps:

  1. Open Registry Editor.
  2. Navigate to the following key:
    • HKEY_LOCAL_MACHINESOFTWAREClassesInstallerProducts
      registry-lol
  3. You should see many subkeys. You need to navigate through all of them and delete the ones that have League of Legends references. To delete a key, simply right click it and choose Delete from the menu.

We have to warn you that by deleting these keys you may cause some damage to the registry if you delete the wrong keys. In the worst-case scenario, some programs might stop working if you delete their registry keys by accident, so be careful if you decide to take this step.

To avoid any unnecessary damage, you can create a backup of your registry before you delete those keys.

5. Make sure that you start the installation from the administrator account

Often The folder path contains invalid character error that occurs during the installation of different software, and users have reported this error while trying to install messaging software on their computers.

To fix The folder path contains invalid character error make sure that you start the installation from an administrator account.

Users have reported that they have run installations as administrators (by choosing the Run as Administrator option) from their account, but installation was interrupted by The folder path contains invalid character error.

To fix this issue, it’s advised that you switch to the administrator account and try to run the setup again. Users report that this method has been successful, so it won’t hurt that you try it.


The folder path contains invalid character error is mostly related to your registry, and as you can see, it can make the installation of new software a lot harder.

We did our best to cover most of these issues, and we hope that our solutions were helpful to you. Do let us know how your troubleshooting worked via the comments section below.

[wl_navigator]

How to uninstall Skype on Windows 10 [STEP-BY-STEP GUIDE]

As you know, there are two versions of Skype you can run on Windows 10. One is the dedicated app that you can download and install from the Microsoft Store, and the other is the desktop app for Windows 10 that can be downloaded from the Skype website.

If you have installed Skype and you now want to remove it, check out this small guide where I will show you how to uninstall Skype on Windows 10, for the two versions that are available.

How can I uninstall Skype on Windows 10?

1. Use PowerShell

If you want to uninstall Skype, you might be able to do that by using PowerShell. Keep in mind that this method can only remove the Universal version of Skype and not the desktop application.

If you want to remove the desktop version of Skype, be sure to try a different solution. To remove Skype with PowerShell, you need to do the following:

  1. Press Windows Key + S, enter powershell and right-click PowerShell from the list of results.
  2. Choose Run as administrator from the menu.
    open power shell as admin
  3. When Powershell starts, enter Get-AppxPackage *Microsoft.SkypeApp* | Remove-AppxPackage and press Enter to run it.
    Uninstall Skype via Power Shell

After running this command, the Universal version of Skype should be deleted from your PC.

If PowerShell doesn’t work, another alternative to force-remove Skype is to use a dedicated uninstaller that will not only remove the base program, but also the related files, folders, and residual data.

Uninstaller software are utilities that can do all the above and more. They don’t only handle software such as Skype, it can also deal with tougher programs as well, such as pre-installed Windows 10 programs (bloatware), Store apps, browser extensions, etc.

These tools can even remove malicious apps that you won’t be able to uninstall using the Add or remove programs Utility.

2. Right-click Skype icon and choose Uninstall from the menu

  1. Press Windows Key + S and enter skype. If you have Skype pinned to your Start Menu, you just have to open the Start Menu to find it.
    Uninstall Skype from Start
  2. Locate Skype, right click it and choose Uninstall from the menu.
    Uninstall Skype from Start

If you try to uninstall the desktop version of Skype, you’ll open Programs and Features window. From there you’ll need to find Skype from the list of apps and double click it to remove it.

For detailed instructions on how to do that, be sure to check Solution 3 for detailed instructions.

Uninstall Skype from Start

If you have installed the Skype app and didn’t like the way it looks or works, uninstalling it is very simple.

If you’re trying to remove Universal version of Skype, the process is more straightforward. Instead of opening Programs and Features window, you’ll get a dialog box asking you to confirm whether you want to uninstall Skype.

Now you just have to click the Uninstall button and you’ll remove the Universal version of Skype.

Note: Also, for users that have upgraded to Windows 10, they can find the Skype app in the All Apps screen.

Most users don’t know what to do when the Windows key stops working. Check out this guide and be a step ahead.

3. Use the Settings app

If you want to uninstall Skype, the best course of action would be to use the Settings app. To uninstall Skype using the Settings app, you just need to do the following:

  1. Open the Settings app. You can do that by pressing Windows Key + I shortcut.
  2. When Settings app opens, go to the Apps section.
    Skype uninstall Windows settings
     
    uninstall Skype Windows settings
  3. List of applications will now appear. Select Skype from the list. Now click the Uninstall button. Click Uninstall button again.
    Uninstall Skype Windows settings
    Note: You can locate Skype quickly simply by entering Skype in the search field above.
  4. Follow the instructions on the screen to remove Skype.

We also have to mention that there’s an instant way to open the Apps section. To do that, just follow these steps:

  1. Press Windows Key + X to open Win + X menu. You can also open this menu by right clicking your Start Button.
  2. Now select Apps and Features from the menu.
    open the Settings app

After doing that, you should see the list of all installed applications on your PC.

If you have both desktop and Universal version installed, you can remove them both using the Settings app.

As you can see, this method is simple and straightforward and it’s perfect since it can remove both desktop and Universal version of Skype from your PC.

Sometimes, uninstalling the app is necessary, especially if Skype won’t open on your PC.

4. Use Programs and Features

Another way to remove Skype is to use Programs and Features applet. This method was used in previous versions of Windows, but you can still use it on Windows 10. To access Programs and Features, you just need to follow these steps:

  1. Press Windows Key + S and enter control panel in the Search bar. Select Control Panel from the list of results.
    Uninstall Skype from the Control Panel
  2. When the Control Panel opens, navigate to Programs and Features section.
    Uninstall Skype from the Control Panel
  3. Now you should see the list of all installed desktop applications. Locate Skype and double click it.
    Skype uninstall from the Control Panel
  4. A confirmation dialog will now appear. Click on Yes to proceed.
    Uninstall Skype from the Control Panel
  5. Follow the instructions on the screen to uninstall Skype.

This method is effective just like the first one, but in order to use it, you need to start the Control Panel first. As a result, you need to perform a few extra steps in order to open Programs and Features applet.

Keep in mind that this method only allows you to remove desktop apps. Therefore, if you have the Universal version of Skype installed, you won’t be able to uninstall it using this method.

In fact, you won’t be able to see the Universal version of Skype on the list. If you want to remove Universal version of Skype, you’ll have to use Settings app or any other method to remove it.

If you want more info on how to uninstall programs and apps from Control Panel on Windows 10, check out this detailed guide.

5. Completely remove Skype from your PC

If you want to completely remove Skype from your PC, it’s not enough just to uninstall Skype. Even after you uninstall the application using one of the aforementioned methods, you’ll still have some leftover Skype files on your PC and in your registry.

To completely remove all files associated with the desktop version of Skype, you need to do the following:

  1. Follow the steps from Solution 3 to uninstall the desktop version of Skype.
  2. Now press Windows Key + R and enter %appdata%. Press Enter or click OK.
    delete Skype appdata
  3. Now locate Skype directory, right click it and choose Delete. Keep in mind that removing this directory will remove all your chat logs and received files.
    delete Skype appdata
    If you want to back up your chat logs, you need to open the Skype directory and find the directory named after your Skype username. Now just copy that file to a safe location. After doing that, you can delete the Skype directory and your chat history will remain intact.
    delete Skype appdata

Now you need to delete all remaining files from the Skype directory. To do that, just follow these steps:

  1. Go to C:Program Files (x86) directory.
  2. Locate Skype directory on the list, right click it and choose Delete from the menu.
    delete Skype appdata

Prefer organizing chats instead of wiping everything? Learn how to archive conversations in Skype in our step-by-step guide How To Archive Conversation in Skype.

The last step requires you to delete all Skype registry entries from your PC. This is probably the most advanced part of the solution, so follow the instructions carefully. To remove Skype registry entries, do the following:

  1. Press Windows Key + R and enter regedit. Press Enter or click OK.
    delete Skype registry entries
  2. Note: Modifying the registry can cause certain issues with your PC if you don’t do it properly, therefore it’s recommended to export your registry before making any changes. To do that, just click on File > Export in Registry Editor.
    back up registry
    Set Export range as All, enter the desired name, choose a safe location and then click on Save button.
    back up registry
    In case anything goes wrong after modifying your registry, you can always run the file that you just created in order to restore the registry to the original state.
  3. Press Ctrl + F in Registry Editor or go to Edit > Find.
    back up registry
  4. Enter Skype in the input field and click on Find Next.
    back up registry
  5. Now you need to delete every entry that mentions Skype. To do that, simply select that entry, right click it and choose Delete. When the confirmation message appears, click on Yes.
    back up registry
  6. Now repeat Steps 2 and 3 to find another entry associated with Skype. Delete this entry and repeat these steps until all Skype entries are removed from your registry. Keep in mind that you might have over 50 Skype entries in your registry, so this process can take a while.

If you can’t edit your Windows 10’s registry, read this handy guide and find the quickest solutions to the issue.

If any problems occur after removing these entries, you can easily restore them by running the file you created in Step 2. This is an advanced solution, but if you want to completely remove Skype, this might be the right way to do it.

If you want a software solution that will clean your registry automatically, check out this complete list with the best registry cleaners available right now.

Skype is a great application, but many users experienced various issues with it. Speaking of issues, these are the most common problems that users have with Skype:

  • Can’t uninstall Skype Windows 10 – Many users reported that they are unable to uninstall Skype on their PC. This can be a big problem, but in this article, we’ll show you several methods you can use to remove Skype.
  • The older version of Skype cannot be removed – Many users reported that an older version of Skype can’t be removed. This can be an annoying problem, but you should be able to fix it using one of our solutions.
  • Uninstall Skype error 1603, 2503, 2738 – Several users reported various errors while trying to remove Skype. These errors can interfere with the uninstall process and prevent you from removing Skype.
  • Uninstall Skype toolbar error 2738 – Sometimes certain errors can appear while trying to remove Skype toolbar. However, the problem should disappear after you remove Skype.
  • Skype uninstall hangs – Many users reported that Skype uninstall hangs on their PC. If you have the same problem, simply restart the uninstall process and check if that helps.

FAQs

How do I uninstall Skype on Windows?

Open Settings by pressing Windows + I, select Apps > Installed apps (or Apps & features on older builds), find Skype in the list, click the three dots, and choose Uninstall. Follow the on-screen prompts to complete the removal.

Does uninstalling Skype delete my account?

No. Removing the app only deletes it from your device. Your Skype account, contacts, and chat history remain linked to your Microsoft account unless you close it manually on the Skype website.

How can I remove leftover Skype files after uninstalling?

Press Windows + R, type %appdata%, and delete the Skype folder. You can also check %programfiles% and %programfiles(x86)% for any remaining Skype directories.

Can I reinstall Skype later if needed?

Yes. You can reinstall Skype anytime by downloading it from the Microsoft Store or the official Skype website. Simply sign in with your Microsoft account to restore your chats and contacts.

Skype is a great application, but if you have problems with it and you want to remove it, feel free to try one of our solutions.

If you have any other questions or suggestions, feel free to leave them in the comments section below.

Here’s how you can recover deleted videos on PC

Videos once deleted from your Windows PC are gone for ever. That again is a voluntary action that we often resort to for either freeing up space or remove unwanted clutter.

But then again, there are also times we end up deleting videos that matter a lot to us. Those can be cherished moments of the days gone by that you would perhaps love to hold on to for a long long time.

Imagine having to lose any such videos. That’s dreadful but there is hope though. For there sure are ways you can still get back your treasured videos back.

Restore deleted videos on Windows PC

1. Use a third-party recovery tool

If you’ve deleted your videos, or they ended up on a drive that became corrupted and thus cannot be retrieved using conventional means, the fastest solution would be to recover them with a third-party recovery tool.

One perfect example would be Stellar Data Recovery, a software tool that is guaranteed to recover all of the data, regardless of its type, and how it became un-retrievable.

Need more info on how this recovery tool truly works? Just take your time to check out our detailed Stellar Data Recovery review.

Do note that the recovery includes not just videos, but also photos, text documents, music, software files, and more.

Additionally, you don’t have to worry about encrypted drives, since they aren’t an issue either.

Stellar Data Recovery

Stellar Data Recovery

Retrieve your videos without any loss of quality with the help of this reliable recovery tool, now available at a discount price for a limited time.
Free trial Visit website

2. Use backup and restore

  1. Open Control Panel. To do this, right click on the ‘Start’ button and select Control Panel from the options given.
  2. Select System and Maintenance followed by Backup and Restore.
  3. Click Restore my files. The wizard should help you with the rest of the process.

However, before you get along with this step, make sure the drive or media where you have backed up your videos are connected to the PC.


3. Restore from previous version of the files:

  1. Click on Start and select ‘Computer’.
  2. Select the folder that contained the lost videos. Right-click on it and select ‘Restore previous version‘.
  3. There will be a list of previous versions of the folder shown.
  4. Double click on a previous version of the folder that you believe might contain the video that you wish to restore.
  5. Drag the video file or folder that you are looking to restore to the location where you would like it to be saved once the restoration is complete. It can be on the desktop or another folder.

Using the above steps, you can restore your lost videos though you have the best chance of retrieving your files if those have been deleted fairly recently, or if the PC hasn’t been used many post-deletion.

However, if there has been a lot of read/write operation done as is likely to be if the PC is used even quite frequently, there is a good chance the deleted files might have been overwritten. In that case, it would be quite impossible to retrieve those in its entirety.

There also is a deluge of third-party software that can help recover lost files. However, the user’s discretion is advised in selecting or operating such software as Microsoft may not recommend using those.

 If you’re on Windows 7, take a look at our full guide on data recovery software for Windows 7.

As such, any damage incurred in your system from the use of those isn’t likely to be covered by warranty as well.


[Solved] Facebook app keeps crashing on Android & iPhone

Despite the emergence of several social media apps lately, Facebook continues to be one of the most popular ones, with over 1.5 billion users worldwide.

It’s one of the reasons why the app is constantly being updated. Nevertheless, along with the updates, users also experience frequent crashes.

And while users are advised to keep an eye on the mentioned updates, sometimes it’s not just a faulty app that’s causing the trouble.

So if your Facebook has crashed, froze, or bumped into an error recently, this article should shed some light on the matter.


How can I stop Facebook from constantly crashing?

1. Check the basicsfacebook keeps crashing

Before jumping to other solutions, let’s check the basics.

Namely, Facebook needs a stable Internet connection to work properly. So make sure that your Wi-Fi is still up and running – toggle your Wi-Fi icon on/off to deactivate and reactivate the connection.

If the app is still crashing, quit Facebook completely, as well as other apps. Then force stop the phone by switching it off and powering it on again. This should solve any problems that might have appeared during startup.

And another thing: although unlikely, another app might interfere with the Facebook app. Think of recently installed apps and of anything has changed since.


2. Update the appupdate facebook to stop crashing

  1. Tap the App Store/ Play Store icon from the Home screen.
  2. Search Facebook. If an update is available for Facebook, you will see Update next to the app. The same thing with your other apps that have new updates to install.
  3. Tap the Update button next to Facebook or other apps to update individually.

Although updates should be installed automatically, sometimes you need to perform a manual update. Also, your phone settings, check for details about how Facebook is set to update.


3. Update phone to the latest OS versionupdate phone to latest version

For your iPhone, go to Settings > General > Software Update.

For Android, go to Settings > Software Update.

Software updates can help address device issues that are attributed to system bugs and software glitches. Similar to all apps, successive system updates help correct these bugs, if applicable.


4. Clear some spacehow to stop facebook from crashing

Not enough space on your phone can cause a lot of apps to malfunction, Facebook included.

Clearing the storage will not only better the phone‘s performance but it will also help it function well without lagging.

So make sure to clear the cache from either all apps or from each app individually, and get rid of unnecessary files, photos, or other items stored in your device.


5. Uninstall and reinstall the app

Last but not least, uninstalling the app should allow you get rid of any bugs, just as mentioned in the second solution, only in a more radical manner.

This will force you to install the latest version of the app anyway. So much the better, because for sure you’ll have the updates ready, no cache, no temporary files either.

So at least one of these solutions should help you get back on track with your Facebook activity. If otherwise, you might want to contact Facebook‘s Help Center

We’d like to hear your feedback, so please use the comments section below.


[wl_navigator]

Official Xbox skateboards are being given away to gamers from Australia and New Zealand

Xbox Australia and New Zealand is currently holding a competition on the official XboxANZ Twitter account with the prize being an exclusive skateboard boasting the Xbox logo on the top with a green Skater XL design on the bottom.

The competition is intended to promote the release of the Skater XL video game which is due out later this month. To enter, all Australian and New Zealand gamers need to do is follow the XboxANZ Twitter account and retweet the tweet below.

Official rules and contest details can be read here.

Xbox has developed a strong reputation for high quality and creative merchandise releases ranging from the famous Xbox Onesie and Xbox Controller floatie to the Xbox body wash and Ori and the Will of the Wisps bonsai.

Are you going to enter this Xbox skateboard competition? Let us know in the comments below and then follow us on Pinterest and Twitter for more Xbox gaming news.

Can VPN crash? What happens when a VPN crashes?

VPNs are deemed as these oases of online privacy, and for good reason. They offer you a much-needed shelter when it seems that numerous agencies are out there to grab hold of your personal data.

But besides their immense role in protecting your privacy, VPNs also have a few additional tricks in their sleeve.

Did you know that they can bypass limitations set by your ISP? For instance, you can use a VPN to decrease packet loss, circumvent geoblocking, and even improve in-game ping.

Note that the packet loss and ping decrease fixes only work if your ISP actively throttles your bandwidth. But still, it’s quite impressive how an apparently small tool can handle all that.

But let’s take a look at the less-pleasant side of things.

Can VPNs crash?

It’s a common, and quite unavoidable event that at least once in its runtime, a program will crash. Games, multimedia players, and even our most-beloved Windows operating system occasionally throws us a nasty BSOD.


Getting a BSOD error after an upgrade? Our guide can help you fix the issue.


So why VPN should be different? Well, unfortunately, they aren’t. So, like any other software solution on the market, VPNs can crash, too.

When a game crashes, all you have to do is restart it and load your most recent save right? The same goes for a music player, for example. You restart it and resume playback.

However, if a VPN crashes, things might go downhill quickly.

What happens when a VPN crashes?

1. The client crashes altogether

This situation is actually quite convenient (barely) since you’re able to see that the VPN has encountered a problem and is no longer running. You’re going to understand why in just a few.

Most of the time, you can easily fix this issue by restarting the client. After reloading its dependencies, services, and whatnot, it should be as new.

There are plenty of reasons why a VPN can crash, such as driver conflicts, failed updates, de-syncs, memory allocation issues, you get the point. If it still doesn’t work after launching it again, try restarting your PC or reinstalling the VPN client.

2. The VPN drops your connection silently

This is most dangerous since there’s a chance that you won’t be notified about the situation. The VPN just drops the secure connection, and your PC will most likely revert to its default connection.

More often than not, this error occurs silently, so there’s a risk that you unwillingly leak private information. For instance, you’re torrenting a file, and your VPN connection drops.

Your PC re-establishes your Internet connection by switching to your default, insecure connection. The torrent doesn’t stop downloading or uploading, and your ISP can clearly see that you’re sharing files via torrent.

However, this situation can be easily avoided if you’re using a VPN with a killswitch. Private Internet Access is such a VPN.

  1. Download Private Internet Access
  2. Install it on your PC
  3. Launch it and log into your account
  4. Make sure the killswitch is enabled
  5. Connect to a server of your choice
  6. Enjoy a secure, leakless connection

What a killswitch does is it cuts your Internet connection if it detects that your VPN dropped its connection. Thus, no traffic gets in or out of your PC as long as the killswitch is activated and your VPN is down.

Private Internet Access

Private Internet Access

Want a stable VPN? Try PIA.
$2.85/mo. Buy it now

Private Internet Access is a great VPN service from Kape Technologies that provides you with 24/7 customer support. You can use it to secure your connection and protect your online privacy efficiently.

VPNs can crash, but a killswitch could prevent leaks

All things considered, a killswitch-enabled VPN could help you prevent leaks if your VPN suddenly drops the connection. Just switch the server and it should all be fine.

On the other hand, a killswitch might be pointless if the whole app crashes. For that reason, make sure to keep an eye out for error messages and try restarting the service as quickly as possible after it crashes.

How to Make Windows 10/11 Connect to L2TP VPN: Registry Fix

If you can’t connect to a VPN on Windows using the L2TP protocol you can fix it with an easy Windows 10/11 L2TP VPN registry fix.

This will stop Windows error code 809 which reads The network connection between your computer and the VPN server could not be established because the remote server is not responding.

All you need to do is open the Registry Editor (regedit) and do a bit of tinkering. Find below an easy-to-follow guide with all the steps you need to take.

How to fix Windows 11 L2TP VPN Errors

1. Create a registry backup

Note icon NOTE
Before making any kind of changes to the registry, follow this step so that you can effortlessly restore the original settings later if any errors occur.
create a registry backup
  1. Press Ctrl + R, type regedit, press Enter.
  2. If prompted by UAC (User Account Control), click Yes.
  3. Click inside the address bar and paste the following:

    ComputerHKEY_LOCAL_MACHINESYSTEMCurrentControlSetServicesPolicyAgent
  4. Open the File menu and click Export.
  5. Save the registration file in a safe place.

Afterward, if you need to undo registry changes, just double-click the reg backup file.

2. Using the Registry Editor GUI

  1. Launch Registry Editor with admin rights.
  2. Go to: HKEY_LOCAL_MACHINE\SYSTEM\CurrentControlSet\Services\PolicyAgent
  3. Open the Edit menu > New submenu and click DWORD (32-bit) Value.
  4. Paste AssumeUDPEncapsulationContextOnSendRule as the value name.
  5. At Value data, type 2.
  6. Now, go to:
    HKEY_LOCAL_MACHINE\SYSTEM\CurrentControlSet\Services\RasMan
  7. Open the Edit menu > New submenu and click DWORD (32-bit) Value.
  8. Paste ProhibitIpSec as the value name. At Value data, type 0.
  9. Click OK and restart your PC.

If you can’t access the registry, check out our quick fixes. Or you can make Windows 10 connect to L2tT VPN using CMD instead of reg.

3. Using CMD

fix L2TP VPN connection issue using Command Prompt
  1. Launch Command Prompt as admin.
  2. Paste the following:
    REG ADD HKLM\SYSTEM\CurrentControlSet\Services\PolicyAgent /v AssumeUDPEncapsulationContextOnSendRule /t REG_DWORD /d 0x2 /f
  3. Once the operation completes successfully, also paste:
    REG ADD HKLM\SYSTEM\CurrentControlSet\Services\RasMan\Parameters /v ProhibitIpSec /t REG_DWORD /d 0x0 /f
  4. Restart your PC.

In conclusion, if Windows 10 or 11 can’t complete your L2TP VPN connection due to NAT issues, use the reg hack above to quickly fix your problem.

The first solution is suitable for casual users who prefer using the graphical interface. However, the second solution is faster for advanced users who are accustomed to the command-line interface.

You might be interested in our guide on how to install the VPN for your entire network at home.

If you have questions or other suggestions for the Windows 11 L2TP VPN Registry fix, come forward in the comments below.

Connection Between Computer and VPN Server Interrupted [Fix]

Using a Virtual Private Network (VPN) can enhance your online privacy, & security and allow you to access geographically restricted content.

However, occasionally, you may encounter issues where the connection between your computer and the VPN server is interrupted.

In this guide, we will explore common causes for the interrupted connection and provide troubleshooting steps to help you resolve the issue and restore a reliable VPN connection.

Why does my network disconnect when connected to VPN?

An interruption in the connection between your computer and the VPN server could occur due to various factors. Here are some possible causes:

  • Firewall or antivirus interference – Your firewall or antivirus software may block the VPN connection, causing the interruption. Try turning off the antivirus tool temporarily.
  • VPN server unavailability or congestion – The VPN server you are trying to connect to might be experiencing technical difficulties or high traffic congestion, preventing a successful connection.
  • Exceeded quota – If you use a free VPN, check if you have exceeded the quota. If yes, buy a licensed version or check out other options.
  • Network connectivity issues – Problems with your network connection, such as unstable or weak internet connectivity, can cause the VPN connection to drop or fail.

So, these are some causes of the problem; let us move to the next section to find the solutions.

How can I fix the connection between computer and VPN server interrupted error?

Before engaging in advanced troubleshooting steps, you should consider performing the following checks:

Once you are through these steps, move to the detailed methods to fix the issue.

1. Turn off Windows Defender Firewall

  1. Press the Windows key, type control panel, and click Open.Control Panel start menu Connection between computer and VPN server interrupted
  2. Select Category as View by and click System and Security.System & Security and select Category -
  3. Click Windows Defender Firewall.Windows Defender Firewall
  4. Now click Turn Windows Defender Firewall on or off link.Turn Windows Defender Firewall off or on
  5. Select Turn off Windows Defender Firewall (not recommended) and click OK.Turn off Windows Defender

2. Modify the VPN connection to PPTP

  1. Press Windows + R to open the Run console.ncpa.cpl  Connection between computer and VPN server interrupted
  2. Type ncpa.cpl and click OK to open the Network Connections.
  3. Right-click the VPN connection to open its Properties.
  4. Go to the Security tab; select Point-to-Point Tunneling Protocol (PPTP) for the Type of VPN option.Security
  5. Click OK.

This method works for those whose VPN apps support PPTP.

3. Reinstall WAN Miniports

  1. Press Windows + R to open the Run dialog box.Device Manager Run command Connection between computer and VPN server interrupted
  2. Type devmgmt.msc and click OK to open Device Manager.
  3. Go to Network adapters and click to expand it.
  4. Select the WAN Miniport (IKEv2), right-click, and select Uninstall device.WAP MINIPORT IKE - Uninstall device
  5. Now go to WAN Miniport (IP), right-click, and select Uninstall device.WAN MINIPORRT IP - Uninstall device
  6. Click Action and select Scan for hardware changes to reinstall the drivers.Action scan for hardware changes

4. Restart the Remote Access Connection Manager service

  1. Press Windows + R to open the Run dialog box.Services RUn command Connection between computer and VPN server interrupted
  2. Type services.msc and click OK to open Services.
  3. Locate and right-click Remote Access Connection Manager and select Stop. Wait for the service to be stopped.Stop the services
  4. Now, right-click it again and choose Start.Start

5. Reinstall the VPN client

  1. Press the Windows key, type control panel, and click Open.Control Panel start menu Connection between computer and VPN server interrupted
  2. Select Category for View as and click Uninstall a program.CP Uninstall
  3. Select the VPN app and click Uninstall.VPN uninstall
  4. Go to the VPN’s official website and click Download to install the latest iteration.
  5. Double-click the file and initiate the installation. Follow the onscreen instructions to complete the process.

So, these are methods that you can use to fix the connection between your computer, and the VPN server is interrupted.

If you are looking for solutions for other VPN errors like 807, we recommend you check this informative guide to fix them.

Please feel free to give us any information, tips, and your experience with the subject in the comments section below.

How to screen tint Windows 10 to a warmer color

VDUs (Visual Display Units) emit blue light, which studies show has an impact on sleep. Consequently, some software and OS platforms include screen tint options that reduce blue light.

Those blue light settings are also known as night light options. Read along to find out how you can screen tint Windows 10 to reduce blue light, and protect your eyes.

How to change color temperature in Windows 10?

Turn on warm screen in Windows 10

  1. Click the Cortana Search button.
  2. Enter night light in the search box.
    Windows 10's search utility how to screen tint windows 10
  3. Click Night light to open Settings as shown directly below.
    Night light settings how to screen tint windows 10
  4. Click the Turn on now button.
  5. Then drag the Strength bar left and right to adjust the screen tint. Dragging the bar right will reduce blue light.
  6. To schedule night light, toggle the Schedule night light option on.
    Scheduling options for night light how to screen tint windows 10
  7. Select the Set hours option.
  8. Enter a time in the Turn on box.
  9. Enter a turn off time for night light in the Turn off box.
  10. To schedule night light for sunset, click Location settings if you need to turn on Location Services.
  11. Press the Change button.
  12. Toggle the Location access for this device option on.
    Location access for this device option how to screen tint windows 10
  13. Then you can select the Sunset to sunrise radio button in Settings.

Check out F.lux

  1. Download f.lux.
  2. Open the F.lux setup.exe to install the software.
  3. Enter your nearest city in the location box; and click the OK button.
    Where am I window how to screen tint windows 10
  4. Then drag the bar further to the left to reduce blue light.
    f.lux window how to screen tint windows 10
  5. Alternatively, click the menu button at the top left of the program’s window.
  6. Click Change current color to open the submenu shown directly below.
    Change current color submenu how to screen tint windows 10
  7. Then select an alternative color option there.
  8. You can also apply effects by selecting the Effects and extra color options submenu shown directly below.
    Effects and extra colors submenu how to screen tint windows 10

Note: f.lux will also automatically apply color changes based on the time of day for your location. It will reduce blue light in the evening. So, you don’t need to manually adjust its settings.


These are the fastest methods to add screen tint to reduce blue light with Windows 10’s options and f.lux.

Note that f.lux is also available for Android, iOS, Linux, and Mac platforms.

Thus, you can also utilize that program on mobile devices and Apple desktops.

[wl_navigator]
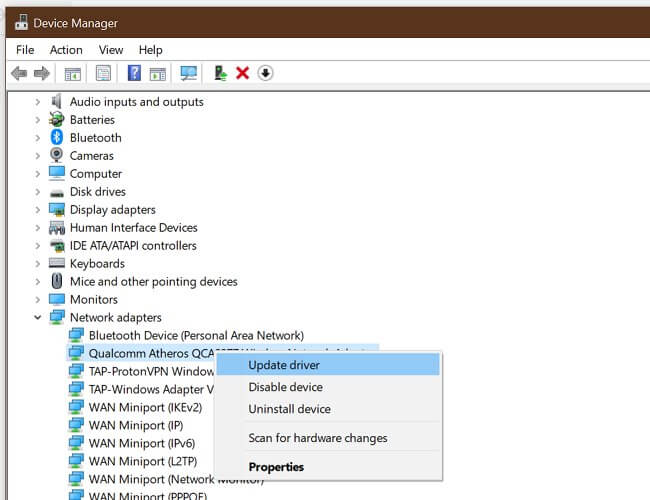
How to fix World of Warcraft internal mail database errors

Running into an internal mail database error when you try to loot or read your mail in World of Warcraft can get extremely frustrating, especially after appearing repeatedly.

Even though this error can be annoying, the fix for it is easy to understand and follow.

Scroll down to see the detailed steps required to resolve the internal mal database errors in World of Warcraft.


How can I fix the internal mail database errors in WoW?

Reset WoW interface to fix mail data error in WoW

  1. If World of Warcraft is running, close it.
  2. Navigate to World of Warcraft’s install directory. It’s usually contained in one of these directories:
    C:\Program Files (x86)\World of Warcraft
    C:\Program Files\World of Warcraft
    C:\Users\Public\Games\World of Warcraft
  3. Open the folder for the version of WoW giving you issues. (_retail_ for the retail version/_classic_ for the classic version).
  4. Rename the Cache, Interface, and WTF folders.
    We suggest you append  _Old to each folder you rename e.g. Cache_Old.

Alternatively, you can delete these folders but we would advise against this. It’s always good practice to have a back-up, just in case your WoW addons reset after an update.
wow-internal-db-mail-error-rename-folders
After renaming or deleting the WoW Cache, Interface and WTF folders, relaunch WoW.

Once launched, WoW will recreate the entire directory structure and reset the interface.

In addition to this and unfortunately, it will disable the open-all feature for your mail.


Vanilla WoW internal mail database error

open-all-feature-wow-internal-mail-error
Much like the real world, World of Warcraft has its own mailing system. It’s a feature that players can use to ship items and communicate with each other.

However, this capability isn’t limited to just player-controlled characters. NPCs (as well as the Auction House) can utilize it to send messages to players too.

It’s a very important part of WoW’s ecosystem.  Nevertheless, an option that has always seemed to be missing from Vanilla WoW is the ability to simultaneously open multiple mail messages.

An open-all feature would eliminate the tedium of collecting gold or items from your inbox on a message-to-message basis.

While this capability doesn’t come with WoW out of the box, it can be added through various WoW interface addons.

Unfortunately, in some cases, these add-ons can be buggy.

WoW’s internal database error is a prime example of this. It’s one of the most common errors caused by Auction House and mail UI addons.


WoW losing gold to mail database error


Players usually encounter WoW internal mail database errors when they attempt to loot mail received from other characters or the Auction House.

Some players have reported that they’ve lost gold or items because of this error.

In some rare instances, this error may occur when trying to send a message to another user.

The most effective way to solve this issue is to disable or uninstall any mail or Auction House addons. However, if your interface files are corrupted, you’ll need to reset the user interface.

WoW addon open all mail internal database error

After you’ve followed the above steps, you can troubleshoot which mail or Auction House addon will work better for you by installing it and testing if it gives you any errors when you try to open all your new messages.

However, it’s important to note that the addon may not necessarily be the problem. This error can occur because of a misuse of the addon or a memory/network resource fault.

This is especially true for users who are prone to experience high latency and frequent disconnects in WoW.

Classic WoW internal mail database error losing gold

Getting a mail database error after resetting WoW’s interface usually happens when you try to send a mail message.

If the character’s name you’re trying to send the mail to may not be available on the current server. You’ll also need to ensure that a subject line was created.

The only way to remedy this error is to wait an hour before you send your next mail message. 


Did any of these solutions work for you? What other mail-based WoW errors have you experienced? Let us know down in the comments.


ESENT errors, false no internet alarms rile Windows 10 users

The Windows 10 May 2020 Update is still a massive mess for some users. It has caused minor as well as major PC issues so far, from audio and Bluetooth bugs to install failure.

Apart from that, users are now reporting seeing multiple ESENT warnings on the Windows 10 Event Viewer. Others, in addition, are getting false no internet warnings on their PCs.

Multiple ESENT warnings bother Widows 10 users

The folks at Windows Latest picked up on the bug, which users are now complaining about on multiple platforms online.

In one of the earliest reports of the bug on the Microsoft Answers forum, the ESENT error appeared 642 times for one user.

What’s more, multiple app crashes and the hanging of Windows 10 machines accompany the ESENT issue for many other users.

I have also suffered from pc hangs and app crashes usually after the machine as resumed from sleep.

Also, it seems that the bug can affect your gaming experience by tampering with video frame rates, according to users’ concerns shared on Reddit.

The latest complaints about this bug are coming from users that recently updated to Windows 10 version 2004.

As for the internet connectivity issue, Microsoft acknowledged it on the TechNet forum. In addition, the Redmond-based company said it had launched an investigation.

 Customers are reporting “no internet” access in the Network Connectivity Status Indicator (NCSI) on Windows 10 2004 devices on devices that in fact can ping internet resources or browse web sites with internet browsers.

The no internet bug is a false alarm anyway, so affected Windows 10 users are still able to connect to the internet.

By the way, if you’re still experiencing some Windows 10 issues, try installing the July 14 Patch Tuesday updates. Some of the bugs may go away even as you wait for Microsoft to fix the remaining stubborn ones.

If Windows 10 2004 is causing you any trouble, feel free to let us know in the comments section below.

[wl_navigator]

Can’t Install/ Run Metatrader On Windows 10? Here’s How to Fix It!

If MetaTrader is not working on your Windows PC, look no further. Many users report issues raging from MT4 showing No Connection, others couldn’t open in after an update or had crashes on launch. Some can’t even install it, even though they meet the system requirements.

Luckily, we found the main causes of these errors and outlined easy-to-follow instructions for fixing the trading platform’s errros. Just follow the guidelines below:

Why MT4 not working on my PC?

Here are a few reasons MetaTrader 4 is not working:

  • Missing app files: The program contains a large chunk of files. And if any of these are missing or corrupt, you won’t be able to launch it.
  • Running an outdated version of the app: With each app update, users get new features, patches for known bugs, and better security. And sometimes, an outdated version may be out of support, thus leading to MetaTrader 4 not running in Windows 10.
  • Third-party conflicts: Your third-party antivirus or firewall can block the connection attempts by MetaTrader 4, flagging it as malware or PUP (Potentially Unwanted Program).
  • Issues with the Internet connection: A slow Internet connection or one that disconnects intermittently can lead to issues with MetaTrader 4, so checking the network connectivity is of prime importance.

What can I do if MetaTrader 4 is not working on Windows 10?

Before we begin, try restarting your PC, checking your internet speed, and checking for pending Windows updates. If you’re still having issues, follow the tips below:

1. Run MetaTrader 4 in compatibility mode

  1. Locate it, right-click on the MetaTrader 4 launcher, and choose Properties from the context menu.
  2. Head to the Compatibility tab, tick the checkbox for Run this program in compatibility mode for, and select Windows 7 from the dropdown menu.compatibility mode to fix metatrader 4 not working on windows 10
  3. Once done, click on Apply and OK to save the changes.save changes

Simply running MetaTrader 4 in compatibility mode should do the trick when it’s not working in Windows 10.

2. Change the file name

  1. Press Windows + E to open File Explorer, and navigate the following path:C:\Program Files\MetaTrader
  2. Locate the terminal.exe file, right-click on it, and choose Rename.
  3. Now, give it a different name, say terminals.exe.rename

A user shared that changing the file name helped when MetaTrader was not working in Windows 10 and threw an error each time.

3. Update MetaTrader 4

  1. Open MetaTrader 4, click on the Help menu, hover the cursor over Check Desktop Updates, and choose Latest Release Version.update to fix metatrader 4 not working on windows 10
  2. Wait for the updates to download and install and check if things work out.

4. Perform a network rescan

  1. Launch MetaTrader 4, and click on the network statistics listed at the bottom right.network
  2. Choose Network Rescan from the listed options.Network Rescan to fix metatrader 4 not working on windows 10

5. Whitelist MetaTrader 4 in the firewall

Note icon NOTE
The steps list the process to whitelist MetaTrader 4 in Windows Defender Firewall. In case you are using a third-party firewall, the process should be similar, but you can head to its official website for the exact steps.
  1. Press Windows + S to open Search, type Allow an app through Windows Firewall in the text field, and click on the relevant search result.allow an app
  2. Click on Change settings.change settings
  3. Now, click on Allow another app.allow another app
  4. Click on the Browse button.browse
  5. Head to the installation path for MetaTrader 4, select the launcher, and click Open.add launcher to fix metatrader 4 not working on windows 10
  6. Click on Add.add to fix metatrader 4 not working on windows 10
  7. Make sure both the Private and Public checkboxes are ticked for MetaTrader 4, and click OK to save the changes.whitelist in firewall to fix metatrader 4 not working on windows 10

Your firewall could often block connection attempts by MetaTrader 4, and it’s, subsequently, not working in Windows 10. So, check if firewall is blocking a program, and then whitelist it to get things running.

6. Uninstall the recent Windows update

  1. Press Windows + I to open Settings, and choose Update & Security.update & security
  2. Click on View update history on the right.view update history
  3. Click Uninstall updates.uninstall updates to fix metatrader 4 not working on windows 10
  4. Select the recent update from the list, and click Uninstall.uninstall to fix metatrader 4 not working on windows 10
  5. Click Yes in the confirmation prompt.confirm

If the MetaTrader 4 stopped working after a Windows Update, we recommend you uninstall the recent version and revert to the previous stable one.

7. Reinstall MetaTrader 4 to a different directory

  1. Press Windows + R to open Run, type appwiz.cpl in the text field, and hit Enter.appwiz.cpl
  2. Select MetaTrader 4 from the list, and click Uninstall.uninstall to fix metatrader 4 not working on windows 10
  3. Tick the Delete user personal data checkbox in the uninstaller setup, and click Next.user personal data
  4. Click Finish to start the uninstall process.finish
  5. Once done, head to MetaTrader 4’s official website and download the setup.download metatrader 4
  6. Next, launch the setup, and follow the on-screen instructions to complete the installation process.reinstall when metatrader 4 not working on windows 10

If nothing previously helped, a complete reinstall of MetaTrader 4 should do the trick when it’s not working in Windows 10. Just make sure to delete all associated remnant files before reinstalling the program.

And if you are looking for a reliable alternative, check our curated list of the best automated trading software for Windows.

For any queries or to share more solutions with us, comment below.

Windows 10X – tell me this isn’t just a huge mess

Reports coming out earlier today have shed new light on the progress and direction of Microsoft’s as yet unreleased “Lite” operating system, Windows 10X. If you remember, the earliest reports of this slimmed down and modern version of Windows 10 started surfacing back in late 2018. While details were scarce, and Microsoft didn’t officially acknowledge Windows 10X until almost a year later with the unveiling of Surface Neo, it’s clear that Windows 10X has already undergone a number of changes of direction before today’s revelations.

First, Windows 10X was thought to be a new “lite” version of Windows, and the way forward for Windows as a whole. Then, it morphed, through news accounts at least, into a “Chromebook killer,” an operating system for low powered, Edu focused devices meant to slow the steamroller that ChromeOS and Chromebooks are becoming in education markets.

At the same time, Microsoft’s hardware counterparts for Windows 10X, Surface Neo (the Courier like dual screen tablet), and the Duo (don’t call it a phone, but it’s a dual screen phone), have undergone direction changes as well. While never officially announced, Duo was at first planned to be a Windows 10X device, too, but when it was officially announced in October 2019, Microsoft made headlines by unveiling it as an Android device. Whether the company couldn’t get Windows 10X to reliably work, or whether they just didn’t want to fight the app battle they lost so badly with Windows Phone all over again, pulling Duo out of the Windows 10X stable meant more changes in direction for the as yet unreleased but already troubled operating system.

Instead of a range of devices (including promised 3rd party OEM devices) all running Windows 10X and leading Microsoft into a new age of lighter and more versatile devices, suddenly the company was hedging its bets, and shifting some of the chips on the table to Android.

With the official announcement of Windows 10X and the Surface Neo, Windows 10X almost inexplicably became the operating system for dual screen devices, making no sense to anyone except perhaps dual screen device marketers. That only lasted until this May, when newly appointed Chief Product Officer for Windows + Devices Panos Panay announced that instead, Windows 10X was to focus on single screen devices that “leverage the power of the cloud… in new ways.”

Now, Windows 10X, instead of coming out this holiday season with the release of Neo, won’t be here until the first half of 2021 at the earliest, and then without Win32 support. Microsoft had been trying to get Win32 apps to run in containers, but according to today’s reports that effort has been shelved for now, and if legacy Windows applications are to run at all in Windows 10X, it will be via an Azure powered Cloud PC service, also slated to release in early 2021. Containerized legacy app support is not now expected until 2022, according to the reports.

Many of us think of Win32 apps as being Photoshop or Office, and maybe a lite device doesn’t really need to run such heavy handed apps, anyway. The problem expands, however, in the enterprise, where legacy Win32 apps, many written years ago and explicitly for internal corporate use, power businesses. There is no return on investment for rewriting these apps, either as web apps (with all of the associated security issues), or even as hosted apps in a Cloud PC service, adding complexity and hosting costs to applications and services that businesses now run for free, having long paid them off. For businesses to embrace Windows 10X, they’ll face a real choice: either bite the bullet and start paying anew for their internal line of business applications, or pass on this “next big thing.”

For businesses to embrace Windows 10X, they’ll face a real choice: either bite the bullet and start paying anew for their internal line of business applications, or pass on this “next big thing.” In one of his Premium posts, Paul Thurrott argues that as long as customers are using Windows apps, even if they’re hosted on Azure and a Cloud PC service, it doesn’t really matter if they ultimately run on a Windows 10X PC or a Chromebook. The problem with this thinking, of course, is if and when enterprises do rewrite apps, or create new ones, there’s nothing to hold them to Win32 or Azure, and in fact there’s much to actually push them away. Running legacy apps in the cloud on Azure is one thing, but running next gen apps written in open source code on AWS on a Chromebook is quite another. If Win32 apps not only don’t run better and are more full-featured (as they do now with Windows 10 running native applications) than web apps, but actually run worse, what’s the point?

Likewise, Google has made significant inroads into the other lucrative market for lite and versatile devices, education. What will Windows 10X offer schools that Google doesn’t already offer with Chrome and Chromebooks? The apps that schools use are going to be web apps written for Chrome, and it’s fine that those apps can run as well on Edge, but is that really a selling point? “We’re almost as good as the other guy, for not much more $$” has never been a winning marketing strategy.

So what are we left with? A new fresh UI that will reportedly be making its way to Windows 10 proper anyway, a break from legacy Win32 apps, one that Microsoft’s biggest customers probably don’t really want, a bet-hedging play into phone/mobile devices where “we might champion Windows 10X but then again screw it maybe we’ll just use Android,” an already fractured device ecosystem where some, but not all dual screen devices will run 10X, and oh right, we’re concentrating on single screen devices anyway.

Not to mention a half hearted attempt to jump into the dual screen hardware arena, with a purported launch of a Duo with 2 year old specs and a mediocre camera, trying to carve out a niche in between a phone and a laptop where most people are fine with just carrying both (and Duo not really meeting the needs of either).

Microsoft already tried to slim down Windows and pull away from legacy Win32 with Windows 10 S, and we all know how that went. Windows 10X doesn’t seem to be much more than a new coat of paint on Windows 10 S, a crippled OS built for we’re not sure who, coming once again late and lame to the party. We’d love to be proven wrong, but at this point, all signs point to Windows 10X becoming not much more than Windows 10S+, and that’s not good.

Microsoft moves one step closer to Windows-as-a-Service through Azure

Microsoft is one step closer to what many have suspected would be a move to elongate the revenue viability of Windows as PC sales have declined for nearly a decade, thanks to Azure.

According to a report from journalist Mary Jo Foley, Microsoft plans to bring a virtualized Windows PC experience to the enterprise as soon as Spring 2021.

Microsoft is currently calling the coming virtualization service “Cloud PC.” Cloud PC won’t replace locally installed Windows (and Office) — for the foreseeable future, anyway. It will be an option for customers who want to use their own Windows PCs made by Microsoft and/or other PC makers basically like thin clients, with Windows, Office and potentially other software delivered virtually by Microsoft.

Foley cites a recent job listing for a program manager for Microsoft’s Cloud PC team as an additional triangulate point to support the claim that the company is moving quickly to introduce a Windows-as-a-Service solution for businesses.

At the heart of this new move is a strategy to “allow organizations to stay current in a more simplistic and scalable manner,” as well as allow Microsoft to add additional features and value to a growing Microsoft 365 monthly subscription while leveraging its massive Azure investment.

Bundle this approach with its current Microsoft Managed Desktop initiative and businesses can begin to reduce their reliance on IT staffing as Microsoft would handle device configuration, security monitoring corporate app deployment, analytics, and end-user support as part of a single or streamlined subscription model with Azure as the carrot instead of Windows.

Microsoft has slowly been moving towards this approach dating back as far back as 2014 through today with offerings such as Windows E3, E5, Microsoft Managed Desktop (MMD) Office 365, and now Microsoft 365 as new subscription-based implementations of its flagship software and solutions.

Microsoft hasn’t publicly committed to a timeline on its new virtual PC solution but sources close to the matter are indicating that the company may be ready to roll it out Spring of 2021.

Emotet Trojan is back with a new Office phishing campaign

The Emotet banking Trojan returned after a 5 months break with a new Microsoft Office phishing scam.

Emotet goes back a long way since 2014 and has intermittently come back with a taste for your banking credentials and stealing your money.

It’s a serious security issue so it’s time to remind you once again to protect yourself with the best antivirus software and to constantly update them to stay protected.

Emotet Trojan was spotted again after a 5 months break

Emotet was detected again by the specialists from Malwarebytes Labs on July 13th and they followed its trail until July 17th when it started to push malware spam.

Malwarebytes experts say that Emotet is using the same techniques as it employed previously.

If you’re targetted, you will receive a malicious email that will contain a URL or an infected Microsoft Office document. 

When you open the document, that will trigger a macro with an error message for you to enable the macro.

After you will enable the macro, WMI will launch PowerShell to retrieve the Emotet binary from one of the remote compromised websites. 

Once the package is executed, that will send a confirmation back to one of Emotet’s command and control servers and it will start doing damage.

Of course, that means stealing your banking passwords and trying to draw money from your account.

How can I protect my computer from Emotet?

The most important thing to do to protect your computer from Emotet or any other malware is to restrain from clicking on links or opening documents that you don’t recognize.

As Emotet is not a new threat, we have an excellent guide on how to protect your computer from Emotet trojan.

If you had any problems with Emotet or any other trojan or malware, tell us your story in the Comments section below. Stay safe!

[wl_navigator]