How to search the web with Bing in Notepad

As part of the ongoing improvements to Windows 10’s Notepad, Microsoft added a built-in web search feature with last year’s Windows 10 October 2018 update. This lets you quickly search for highlighted text, without having to copy-and-paste a selection into your browser.

This is a quick convenience tip but one which is buried in Notepad’s “Edit” menu. To perform a quick search, highlight a word or phrase in your document. You can then press the Ctrl+E keyboard shortcut to launch a new web search for the text.

Search with Bing in Notepad

Notepad will respect your default browser, so you don’t need to worry about Edge suddenly launching itself. You will be stuck with Bing though, as there’s no way to customise the search engine which is used.

Microsoft has embarked on a significant enhancement program for Notepad, years after the program last got an update. Changes coming in future Windows 10 updates include a move to the Microsoft Store, which will decouple Notepad from Windows and enable Microsoft to push future updates through more quickly. Although Search with Bing is a minor feature in comparison, it further improves Notepad’s all-round usability and is easily ignored if you don’t need it.

Windows 10 Telegram app updates with new scheduled messages and theme color options

The official Telegram Desktop app updated this week for Windows 10 devices with the new scheduled messages feature, more customization options, and improved privacy settings.

The scheduled messages feature actually rolled out to the mobile versions of the Telegram app on iOS and Android just over a week ago and allows users to set specific day and times for messages to send or publish. With this update, Telegram pretty much has feature parity among most of its main apps.

Here’s the full release notes containing details on all of the new features:

Scheduled Messages

  • Right click the ‘Send’ button and select ‘Schedule Message’ to automatically send something at a specified time.
  • Schedule reminders for yourself in the ‘Saved Messages’ chat.
  • Get a notification when any of your scheduled messages are sent.

New Colors

  • Customize your app’s appearance by choosing accent colors for the ‘Day’, ‘Night’ and ‘Tinted’ themes.

New Privacy Settings and More

  • Choose who can find you on Telegram when they add your number to their phone contacts.
  • Send a single ????, ????, ????, ????, ???? or ???? to check out what’s new in the animated emoji department.

Telegram is a popular messaging app which prides itself on its privacy and advanced features. Do you use Telegram on your Windows device? Let us know why or why not in the comments below and then follow us on Twitter for more Windows app news.

Telegram Desktop
Telegram Desktop
Price:
Free

Borderlands 3 video game is now live on Microsoft’s Xbox One consoles

The highly-anticipated video game, Borderlands 3, is now available to play on Microsoft’s family of Xbox One consoles.

The video game is the third main entry within the Borderlands franchise and supports online multiplayer for up to four players, local multiplayer for two players, and 4K Ultra HD visuals when played on an Xbox One X console.

Here’s the official game description and launch trailer:

The original shooter-looter returns, packing bazillions of guns and an all-new mayhem-fueled adventure! Blast through new worlds and enemies as one of four brand new Vault Hunters, each with deep skill trees, abilities, and customization. Play solo or join with friends to take on insane enemies, score loads of loot and save your home from the most ruthless cult leaders in the galaxy.

Borderlands 3 is currently available to buy in three different versions. The regular release comes with the base game while the Borderlands 3 Deluxe Edition comes with the game and the Retro Cosmetic Pack, the Neon Cosmetic Pack, the Gearbox Cosmetic Pack, the Toy Box Weapons Pack, and Equippable XP & Loot Drop Boost Mods.

The Borderlands 3 Super Deluxe Edition comes with everything in the Deluxe Edition plus the season pass for future downloadable content.

Have you had a chance to play Borderlands 3 yet on your Xbox One console? Share your thoughts on it with the community in the comments below and then follow us on Pinterest for more Xbox gaming content.

Borderlands 3
Borderlands 3
Developer:
2K
Price:
$8.99


Borderlands 3 Deluxe Edition
Developer:
2K
Price:
Free


Borderlands 3: Super Deluxe Edition
Developer:
2K
Price:
$19.99

Why does the Store tab in the Uplay client disappear?

Users have reported that sometimes the Store tab from within the Uplay client disappears.

Official staff from Ubisoft stated in their forums that this is a temporary problem, and it will be fixed immediately.

Players weren’t very pleased with their answers, as you can see below:

Shouldn’t you guys try to fix it?? I really hope that “alternative” is temporary and a fix is on its way. Also, I just started uplay on its own and store didn’t show up, so its not only from steam or start of a game.

This is indeed a troublesome bug, since a lot of players don’t like the idea of going and making purchases through their browsers.

What makes the Store tab in Uplay disappear?

Further researched revealed why some user’s Store tab disappears.

Apparently , if you own Ubisoft games purchased through Steam, the Store tab disappears.

This happens so that you cannot buy DLCs for those games.

It would seem that there is an issue with purchasing the base game on Steam but trying to buy the DLC through Uplay.

This is because it will not transfer that content, treating them as incompatible.

While the explanation may be good enough, users suggested a different approach.

The suggested that instead of removing the Store app altogether, Ubisoft should filter out the said DLCs.

Fair enough, good reasoning to hide that tab. but, I reckon it would be better to maybe notify the user not being able to buy DLCs through uplay or even block buying DLC for that game that is owned or activated through steam.

One silver lining is that there is a solution if you own any Ubisoft games through Steam, but still can’t see the Store.

Apparently, it is just a visual bug, and simply restarting Uplay will fix the issue.

There is no telling when purchases made between the two platforms may become compatible.

Until then, you’ll just have to either buy all of your Ubisoft games through Uplay or through Steam.

How to fix Gears 5 crashing at startup

The long-awaited Gears of War 5 is here and many players are thrilled. However, the game didn’t work for everybody.

Quite a few users encountered an error that caused Gears 5 to crash on startup.

One user reported the following on the official forum:

Gears 5 is crashing on startup for myself after completing the easy anti cheat splash screen, then the gears splash screen, then it goes full screen with a black background for 1-2 seconds then force closes.

Many players have encountered this issue and no one knows how to fix it. The problem might be caused by a bug that the developers need to address.

Until then, we have a few workarounds that might help you.

What to do if Gears 5 can’t launch

1. Reinstall Gears 5

A faulty installing process of the program might cause the issue. So, uninstall and reinstall the game. Also, make sure you install it in the C directory to avoid errors.

The method will take some time, but it might solve the problem.

2. Update your Windows and graphic drivers

Everyone knows that an outdated Windows causes a lot of issues. One of the main errors is not being able to launch apps. Therefore, we recommend you to keep your Windows up to date.

Also, your graphics drivers should be up to date. To learn how to do that, check out our comprehensive guide.

If Gears 5 finally launches after reinstalling or updating but you still hit online issues, check our guide to Gears of War Reloaded multiplayer not working for network and server fixes.

Conclusion

We remind you that these are only workarounds and the problem might reappear. It remains to be seen what the developers will do. A patch might solve this issue once and for all.

Did you find our methods useful? Do let us know in the comments section below!

RELATED ARTICLES YOU NEED TO CHECK OUT:

How to remove Power BI filters in two easy steps

Users have reported that there is no built-in option for removing filters when using Power BI, and this makes it difficult to navigate, especially in very extensive files with tens or maybe even hundreds of filters.

My report has 12,541 rows and one of the applied filters on the report has filtered it down to 19 rows, now I want to get my report back to its original position ie; 12,541 rows.
I have tried many ways to clear the filter which I applied previously while working on the report. I have tried all possible ways to clear it however, the report isn’t removing the applied filter.

Steps to remove Power BI filters

1. Restart Power BI

Some users confirmed that restarting Power BiI fixed the problem. So, if you haven’t tried this solution yet, please do so as this may quickly fix your problem. If the issue persists, go to the next solution.

2. Create a custom “Removes Filter” button using Bookmarks

  1. Make sure all of your filters are clear before starting
  2. Create a bookmark of your current screen and name it Clear Filters
  3. Link the bookmark to the page
  4. Select Home
  5. Click Image, and upload a picture that will be representative to your task
  6. Place it in an area on your worksheet
  7. Name it Clear Filters
  8. Link the image to the bookmark you’ve previously created
  9. Perform whatever tasks you want, and press this custom button to clear all of your filters

You will basically be creating a “restore point” for your Power BI file. Thus, pressing the button you’ve just created will simply make the file go back to the previous state it was in, when no filter was applied.

Note: This can be considered more of a workaround, and you will have to repeat the process for each different Power BI file that share this issue.

What to do if your Xbox One shuts off randomly

Users are reporting that their Xbox One consoles appear to randomly shut down.

Some describe the problem as follows:

My Xbox one keeps shutting off. I can use apps to watch stuff just fine, but when i go to play a game, my Xbox will just shut off about 15 minutes in. My power brick isn’t turning red or anything.

If you are experiencing any similar issues, you most likely have overheating issues with your console. 

More so, unexpected shut downs can happen because of faulty power supplies, or because of lack of storage.

FIX: My Xbox One keeps turning off by itself

1. Fix overheating issues

Like any other machine that has a fan inside meant to keep it cool,  your Xbox is bound to end up filled with dust at one point or another.

If that’s the case, consider doing a cleanse using a can of compressed air to blow out all the dust through the ventilation shafts.

One thing you should remember is that cans of compressed air can cause your fans to spin past their designed maximum velocity.

As such, try securing them with various objects ( pencils, toothpicks) so that the fans can’t spin and end up damaged.

You should also place your Xbox in an area of the room where it will have plenty of space around it for air to circulate.


Your Xbox One X shut down but you can’t turn it back on? We have the right solutions for you.


2. Check the power supply

  1. Make sure the power supply cable is in good shape
  2. Insure that the power outlet supplying the Xbox is functional
  3. Perform a power cycling by turning your Xbox off, unplugging it for 10 seconds, then plugging it back in and starting again.

3. In Xbox shuts down while streaming

1. Clear persistent storage

  1. Press the Xbox button
  2. Select System
  3. Navigate to Settings
  4. Choose Disc & Blu-ray.
  5. Select Blu-ray.
  6. Go to Persistent storage.
  7. Select Clear persistent storage.
  8. Turn off and unplug your console
  9. Wait 5 minutes.
  10. Plug in and turn on your console
  11. Start streaming the content again and see if the problem persists

2. Switch to a wired Internet connection

Various routers have internal settings that may cause your Xbox to suddenly shut down while streaming.

If you want to test whether that is the case , switch from using a Wi-Fi to a wired connection

4. Leave the serious issues to the professionals

Lastly, it could also be an issue with your console’s ventilator not working at full speed, or not working at all.

If that seems to be the case, do not make any attempts at opening and dismantling the console to clean it piece-by-piece yourself.

Not only would this render your Xbox‘s warranty void, but you may end up making things worse.

Instead, leave it to the professionals or service shops that are authorized by the original manufacturers.

RELATED XBOX POSTS TO CHECK OUT:

FIX: This Theme cannot be applied to the desktop

Those of you that are fans of customizing your desktop are probably used to frequently changing your themes, wallpapers etc.

However, at some point you may be greeted with an error that prevents you from doing so.

This error is usually labeled: This Theme cannot be applied to the desktop Windows 10.

While not a system breaker at all, it can be quite annoying.

What prevents you from applying desktop themes?

These are the most common reasons why you may be encountering this error:

  • Syncing themes across multiple accounts
  • Themes or Desktop Window Manager services may not be running properly
  • The Remove background images (where available) option.

What to do if you can’t apply desktop themes

1. Disable Theme Syncing across your accounts

  1. Press Windows Key + I
  2. Locate and click on Accounts
  3. Go to Sync your Settings tab
  4. Check under the individual sync settings section for the entry called Theme
  5. Drag the slider so that you can disable automatic theme syncing across your accounts
  6. Restart your PC

2. Be sure that Themes and Desktop Window Manager Services are running

  1. Press Windows Key + R
  2. Type control.exe
  3. Once the Control Panel window opens, click on View by
  4. Select Large Icons
  5. Find the Administrative Tools entry
  6. Find the Themes or the Desktop Window Manager service on the list
  7. Right-click it and select Properties
  8. Set Startup type to Automatic

There is a chance you may receive an error message labeled:

Windows could not start the service on Local Computer. Error 1079: The account specified for this service differs from the account specified for other services running in the same process.

If that is the case:

  1. Re-do steps 1 to 7 from above
  2. Go to the Log On tab
  3. Click on the Browse button
  4. Type in your account’s name under the Enter the object name to select entry box
  5. Click OK
  6. Type in your account’s password into the Password box

3. Uncheck the Remove background images (where available) option

  1. Press Windows Key + R
  2. Type control.exe
  3. Once the Control Panel window opens, click on View by
  4. Select Category
  5. Click Ease of Access
  6. Select Optimize visual display
  7. Uncheck the box next to the Remove background images
  8. Apply the changes you have made

Follow these steps, you will be able to once again change your PC’s theme, and make it suit your ever-changing taste.

Posted in Fix

Kibana Server is not Ready yet: 3 Quick Ways to Fix it

Known widely for handling large amounts of data, Kibana is a powerful visualization tool for transforming data into useful pie charts, line graphs, maps, and other forms.

Unfortunately, many users have until now inquired about it, saying that an error has been persisting and that the Kibana server is not ready yet. If the same error is creating trouble for you, follow the instructions given in this article to get rid of it easily.

What can I do if the Kibana server is not ready yet on Windows?

1. Update the Helm Chart values

  1. Firstly, you are to upgrade the values within the Helm Chart in the following way: helm upgrade -f new-values.yml {release name} {package name or path}
  2. The default values for yml for Elastic-stack Helm Chart can be found online.
  3. Replace ElasticSearch_URL environment variable concerning Kibana deployment as: kubectl edit deployment elk-kibanakubectl delete pod <elk-kibana-Pod-name>
  4. Wait until the newly applied values are executed properly by Kubernetes.

If you, while setting up ELK services, face an error, which says that the Kibana server is not ready yet, you can fix it by updating the values within the Helm Chart.

This should fix the Kibana server is not ready yet issue and Kubernetes should execute the values.

2. Delete the versioned indices

Another way to tackle this problem is by deleting the versioned indices and restarting Kibana. It involves the following stages.

Kibana Server Is Not Ready Yet
  1. Firstly, try to delete the versioned indices: curl -XDELETE https://localhost:9200/.kibana_1 systemctl restart cabana
  2. Restart.
  3. If still, this does not work, verify if you have a versioned index.
  4. If there is, delete the original .kibana: curl -XDELETE https://localhost:9200/.kibana
  5. Now, alias it as: curl -X POST "localhost:9200/_aliases" -H 'Content-Type: application/json' -d' { "actions" : [ { "add" : { "index" : ".kibana_1", "alias" : ".kibana" } } ] }'
  6. Restart Kibana again.

3. Match the versions of Elasticsearch and Kibana

Kibana Server Is Not Ready Yet

The simplest way to resolve this issue, in this specific case, is to match the versions of Elasticsearch and Kibana. Sometimes users facing this error are unaware that they are using two different versions of both programs.

So it’s crucial for the removal of this error that you must use the same version of Elasticsearch and Kibana.

Make sure that you are using both Elasticsearch and Kibana 6.5.0, as this will create harmony between both, thereby avoiding the possibility of many errors.

Why are there so many Uplay and Steam compatibility issues?

If you’re an avid fan of Ubisoft titles, you most likely have Uplay installed somewhere on your PC.

Uplay is a proprietary game distribution platform where you can buy Ubisoft games, DLCs and other content.

It is known that Ubisoft games can be brought through other gaming platforms as well, such as Valve’s Steam.

Is Uplay content compatible with Steam?

The problem is that players are reporting having issue with their Ubisoft content which they’ve bot through the other platforms.

An official post from Ubisoft’s support page shed some light on the matter:

In most cases, players will run into compatibility issues if they buy the game from Steam or from the Epic Games Store and the Season Pass (or any other additional content) from the Ubisoft Store.

So, if you’ve downloaded a Ubisoft game through Steam, it is strongly recommended that you also buy the DLCs from Steam.

They went on to add that:

Unless stated otherwise, the game and the content are not going to be compatible. This means that players will not be able to use the extra content they purchased in the main game.

So, unless the publishers clearly specifies that you can download a title and its content form multiple platform, try not to.

Generally, it is strongly recommend that players buy games and extra content for the game from the same digital store.

Players are speculating whether or not this is Ubisoft‘s indirect attempt as protecting it’s own IP.

More so, it seems Ubisoft has released no further comments on the matter for the time being.

Until (or if) this issue gets fixed, game content downloaded from two different platforms will be treated as incompatible.

This means that you need to pay again to get a full feature game on one of the platforms.

Microsoft Apps & Services want to take over Gmail emails

There are a lot or trustworthy email services out there, but unfortunately, the one hosted by Microsoft services aren’t exactly the most popular among them.

As such, it should come as no surprise when users came across a notification stating that:

Microsoft Apps & Services would like to read compose send and permanently delete all your email from Gmail.

A lot of users thought that maybe it was a joke, or maybe even the effects or a virus:

Is this legit or a virus? Don’t understand why it needs permission to permanently delete, etc.

Explanations were soon to follow, stating the Microsoft simply detected that they were using Gmail as their mail client and simply wants to take over.

More so, this in itself wouldn’t be much of an issue, but users reported that they can’t select “No” as an answer.

If they do so, they are usually prompted with an error message, as you can see below:

Thank you for responding so quickly. I am running Gmail through Outlook 2016 and have successfully done so for years. Based on your response, I shouldnt have to accept these permissions. But when I click “deny” I get the send/receive error.

Microsoft Apps & Services want to replace Gmail

What’s curious is that this only seems to happen to users that have Gmail account logged in Outlook. Those that use any other email service don’t seem to be affected at all.

All manner of solutions were tried, from uninstalling and re-installing Outlook, to using the client while “less secure access” is turned off.


Tired of looking at Outlook’s bland interface? How about you try these email clients instead?


As such, if you don’t want to see this error anymore, your only safe bet is to use the browser service of gmail, and use Outlook for pretty much every other email accounts you may have.

This seems to be just one of the many times Microsoft has tried to force features and updates onto users.

If history repeats itself, a pretty sure guess is that user outcry will be soon to follow.

Gears 5 campaign ending is raising a lot of questions [SPOILERS]

Before you start reading this article,  you should know the text contains spoilers. If you haven’t finished the campaign, bookmark this page to read our article later.

When it comes to the campaign mode, all versions of Gears of War were extremely interesting and they enjoyed high popularity among gamers.

Gears 5 is no exception, but the campaign ending raised some eyebrows. At the very end, you can save either JD or Del. So, the campaign can have two endings.

It is interesting to see what will happen in Gears 6. Developers might create two campaigns, one for each ending. Also, they might diminish the importance of these characters in the next campaign.

Gears 5 players are not happy with the campaign ending

Even if Gears 5 gives players a choice, quite a few people are upset with the campaign ending. They think this is a complication of the storyline that doesn’t add anything of value to the plot.

Also, some players said that this is a major downside of the game. According to them, they don’t have to choose between one or the other. This is the authors’ job.

Maybe the creators didn’t come to an agreement on which character should die, so they let the players decide.

However, the campaign ending might not be that important in Gears 6. Still, for the sake of the storyline, it should have some meaning. Otherwise, the authors would not have put this at the end of the campaign.

We don’t know what Gears 6 will have in store for us. So, it remains to be seen how the storyline will develop.

What’s your take on the Gears 5 campaign ending? What character did you save? Let us know in the comments section below!

RELATED STORIES YOU NEED TO CHECK OUT:

Windows 10 now displays the battery level of Bluetooth devices

Bluetooth devices are perfect if you want to get rid of all those messy cables and keep your desk tidy. I, for one, like to connect my Bluetooth speaker to my laptop and listen to music while working.

But there’s something that’s always driving me crazy: my Bluetooth speaker is running out of battery just when I’m listening to one of my favorite songs.

If you really hate it when your Bluetooth device runs out of battery and disconnects from your computer, we’ve got some good news for you.

Windows 10 will display the battery level of Bluetooth devices so that you won’t be caught by surprise by low battery issues.

Insiders can already test this feature

If you’re an Insider, you can already test this new feature by installing Windows 10 build 17639. This build release is available only Insiders who opted into Skip Ahead.

To access the new feature, go to Settings > Devices > Bluetooth & other devices Settings.

windows 10 bluetooth battery level


If you’re having trouble opening the Setting app, take a look at this article to solve the issue.


It is worth mentioning that this new feature won’t be compatible with all Bluetooth devices.

For Bluetooth devices that do support this feature, Windows 10 will update the battery percentage whenever the computer and the device are connected.

Unfortunately, we don’t have a list of Bluetooth devices that won’t support this battery indicator feature.

Otherwise, you’ll just have to connect your Bluetooth device and navigate to Bluetooth & other devices Settings to check if the battery level is displayed.

Being able to check the battery level of Bluetooth devices is very useful if you use many Bluetooth devices with your Windows 10 computer.


Your Bluetooth mouse is not working on Windows 10? Don’t worry, we’ve got the right solution for you.


In this manner, you’ll know when you need to charge them and avoid unpleasant situations where you simply can’t use them because they’ve run out of battery.

Microsoft could also improve this Bluetooth battery indicator by adding alerts. In this manner, users won’t have to open the Settings apps every time they want to check the battery level of their Bluetooth devices.

RELATED STORIES TO CHECK OUT:</p>

How to change Gears 5 game language

Gears 5 officially came out and a lot of gamers are excited to download it and play it.

With great graphics, immersive sound, and a lot of modes, the game promises to be one of the great releases from this year.

Despite some having issues with bugs in Gears 5, and others complaining about multiplayer and the ranking system, the game still enjoys huge popularity between Windows 10 gamers.

But what if you downloaded the game and you want to change the language? Lots of players are asking the same question:

I recently downloaded Gears 4 to catch up on the story but the game is totally in Spanish and the translation is quite awful, I will like to play in English where the VAs are actually talented. is there a way to do this? MS forcing the native language and not giving an option in-game to change it is quite sad.

Keep reading and you’ll find out how you can change Gears 5’s language on your Windows 10 PC.


Looking to rank up faster in Gears 5? Check out this awesome guide and learn how you can do it with ease.


How can I change the language in Gears 5 on Windows 10?

Sometimes, when you download a game, it will run by default with the system language of your OS. If you don’t have an in-game option to change the language, it can became pretty annoying.

Sure, you can change the default language by going to Settings > Time & Language > Region > Regional format, but that’s not always the best solution.

If you want to change the language in Gears 5, you can do it by modifying some files from the appdata folder. Follow the steps to do so:

  1. Open File Explorer. gears 5 language change
  2. Navigate to Gears 5 directory ( usually C:\Users\username\AppData\Loca\lGears5\Saved\Config\PC) change gears 5 language
  3. In the folder, locate GameUserSettings.ini file and double-click it.
  4. After opening the file, find the PreferredLanguageCode= and fill in with your language of choice. For example, if you want the game to be in English, fill in with EN. The result should look like this PreferredLanguageCode=EN.
  5. Now start the game.

After following these steps, Gears 5 should now be in the language of your choosing. 

As you can see, changing the language in Gears 5 is pretty easy. If you want to avoid changing the system language, follow the steps above and you’ll be done in no time.

If you have any additional suggestions or questions, don’t hesitate to leave them in the comments section below.

READ ALSO:

MS Project Not Installing With Office 365 [Fix]

Microsoft Project is a project management application that’s part of the MS Office software series. However, many reported that MS Project is not installing with Office 365.

In today’s guide, we’re going to focus on install issues and show you the best ways to fix this problem.

Why isn’t MS Project not installing with Office 365?

  • Issues with the Office installation can cause this problem.
  • Improper installation methods can also lead to this issue.

Is MS Project part of Office 365 personal?

No, MS Project isn’t available for personal Office users.

To get access to it, you need to purchase a subscription first.

How can I fix MS Project if it’s not installing with Office 365?

1. Uninstall the MSI Office Version

  1. Press the Windows key + R hotkey.
  2. Then open the Windows uninstaller by entering appwiz.cpl in Run and clicking OK.The uninstaller window microsoft project won't install
  3. Select the MSI Office software and click Uninstall.
  4. Select the Yes option to confirm and uninstall the software.
  5. Restart Windows after uninstalling the MS Office software.
  6. Then try installing Microsoft Project.

Removing MS Office with the Windows uninstaller might leave some leftover files and registry entries. Therefore it’s advised to go to Uninstall Office page and download the Recovery Assistant software.

The uninstall Office option microsoft project won't install

After making the changes, check if Microsoft Project is still not downloading on your PC.

2. Install Project with the Office Deployment Tool

  1. Click the Download button on the Office Deployment Tool page.
  2. Open the folder that includes the officedeploymenttool.exe.
  3. Click the officedeploymenttool.exe to extract the Office Deployment Tool.
  4. Open the Click-To-Run Configuration XML Editor page in a browser.Configuration XML Editor microsoft project won't install
  5. Select the required Microsoft Project software on the Product drop-down menu. In addition, select a bit version and language option in the other drop-down menus.
  6. Click the Edit product button.
  7. Then select the configuration code text displayed on the right of the page, and press the Ctrl + C hotkey to copy it.MS Project code microsoft project won't install
  8. Users will then need to open the configuration text file in the folder that they extracted the Office Deployment Tool to.The Configuration file microsoft project won't install
  9. Delete all the text in the configuration file. Then paste the copied code text into the configuration file by pressing the Ctrl + V hotkey.Edited configuration file microsoft project won't install
  10. Click File and then Save to save the edited file.
  11. Then open the Command Prompt by pressing the Windows key + R, entering cmd in Run, and clicking OK.
  12. Open the Office Deployment Tool’s folder by entering cd in the Prompt followed by the full path of the folder you extracted the Office Deployment Tool to.
  13. Optional: Users who aren’t sure what the path of that folder is can select the extracted Office Deployment Tool folders in File Explorer and click Copy path to paste its full path into the Command Prompt or a text document for reference with the Ctrl + V hotkey.The Copy path option microsoft project won't install
  14. Press the Return key after entering the cd command, which should open the Office Deployment Tool’s folder in the Command Prompt.
  15. Then run the following command: setup /configure configuration.xml
    configuration xml command microsoft project won't install

Thereafter, a Microsoft setup window should open that will download files and install Project. It will also remove and redownload Office installations if required. Thus, users might also need to enter product keys again.

That’s how users can fix Project Click-to-run installation errors. Also remember that the 32 or 64-bit Project version must also match the system version of existing MS Office installations.

Microsoft Project is known for its issues, and we already covered MS Project file won’t open issue in one of our earlier guides.

If you’re having further errors, we have a great guide on Microsoft Office issues that we recommend checking out.

What method did you use to fix this issue? Let us know in the comments below.

Gears 5: This is how you can rank up fast

Gears 5 has three main types of Leveling systems and you can take advantage of them to reach a new rank as soon as possible.

If you’re not just a casual player and you like the multiplayer experience, leveling up will get you new aesthetics and bragging rights in your circle of friends.

But, as it’s the case with most of the games, leveling up usually takes a lot of time and effort. Well, that’s not the case today, as we will show you how you climb the leaderboards quickly in Gears 5.

How can I rank up faster in Gears 5?

Starting with the basics, next to your name you’ll find your leaderboard and lobbies number, also called Multiplayer Core Level.

When you play Gears 5 in Horde Mode and Escape Mode, you can raise your Multiplayer Level by doing certain challenges. Doing so, you’ll earn points and level up.

Also, you can level up the unique skills of each character and get improved aesthetics and other specific perks.

But if you want to increase your level as fast as possible, you’ll have to take into consideration a couple of things.


Need a game booster to enjoy the best Gears 5 experience? Check out this list with our top picks.


1. Choosing the best Game Modes

This is a very important thing to keep in mind while trying to level up faster. Some game modes are quicker and and don’t involve much action, while others are meant for improving skills, but don’t offer too much points.

One of the most popular game modes in Gears 5 is Deathmatch. While this is a very fun to play game mode, is not very good for ranking up quickly.

You’ll have to play game modes that help you gather more kills and points faster. The best for that are King Of The Hill and Escalation.

Playing them will keep you on the move at all times, thus gathering more points and leveling up faster.


Looking for the best gaming rig to play Gears 5 on? Check out this article and find some amazing picks.


2. Choosing the right objectives

It’s important that you focus on the right things when playing Gears 5.

As we already said, King Of The Hill and Escalation help you gather a lot of kills and points, but this shouldn’t be your only goal.

Getting a lot of kills ca get you around 150-250 points, which is pretty good, but if you want to level up faster you’ll need to get double or more points.

To do that, you’ll have to choose and finish your objectives. Claiming rings can get you 750-850 points. So this should be your main objective if you want to rank up faster.

3. Using XP boosts

Like many other games, Gears 5 offers boost packs to help you rank up faster.

The Ultimate Edition comes with some boost packs included, but in the Standard Edition you’ll have to buy them from the shop for 250, 600, and 1200 Iron.

The most important thing is not to have the largest amount of boost, but to use them wisely while playing the game modes mentioned above.

This way, you’ll make sure that you get the most out of them. As a reminder, you can look in the top-right of your screen to see if you have any boosts active.


Want to improve gaming performance in Windows 10? Follow this guide and learn how you can do it.


And that’s it. You know now the fastest ways to level up in Gears 5. Remember, objectives are more important than kills and choosing your game mode makes all the difference in the world.

If you’re aware of other ways to quickly rank up in Gears 5, share them in the comments section below so other players can try them.

Also, leave there any other questions that you may have.

READ ALSO:

Microsoft will live stream its October 2 Surface event (but we’ll be there too)

A few weeks after announcing that it will be holding a media event in New York City, Microsoft has followed up to reveal that it will also live stream the event on its social media platforms. The event can be watched in full on Twitter, starting at 10:00 AM ET.

For those who closely follow Microsoft, this announcement should be quite surprising as the last two major Surface hardware events have not been live streamed. Last year’s Surface Headphones, Surface Pro 6, Surface Laptop 2, and Surface Studio 2 reveal was well-covered across Microsoft’s social media channels and blogs — but it never featured live videos. Before that, with the reveal of the Surface Pro 2017 and Surface Pro LTE and the Surface Book 2, Microsoft also didn’t live stream. Instead, the company simply revealed the devices via blog posts or with social media.

Even for this year’s reveal of this year’s Surface Hub 2S, Microsoft didn’t hold a public live stream. The last time Microsoft showcased a Surface event for the entire world to watch live dates back to May of 2017. That was then the unexpected reveal of the original Surface Laptop.

With this year’s event being live-streamed, Microsoft could have a lot of surprises and goodies to reveal, perhaps even the long talked about Surface Centaurus. We might even see a Surface Go with a Core M3 processor or Surface Pro with Intel’s latest Ice Lake processors.

OnMSFT is attending this year’s October 2 Surface event live so be sure to keep it tuned here as the event unfolds live.

How to use priorities in Microsoft Planner

Microsoft Planner has been updated to support a dedicated Priority field on all tasks. Previously, many Planner users manually configured Labels to act as priority options. The use of Labels to represent priorities is now redundant, as Planner’s new field gives you four priority options within the app itself.

Priorities in Microsoft Planner

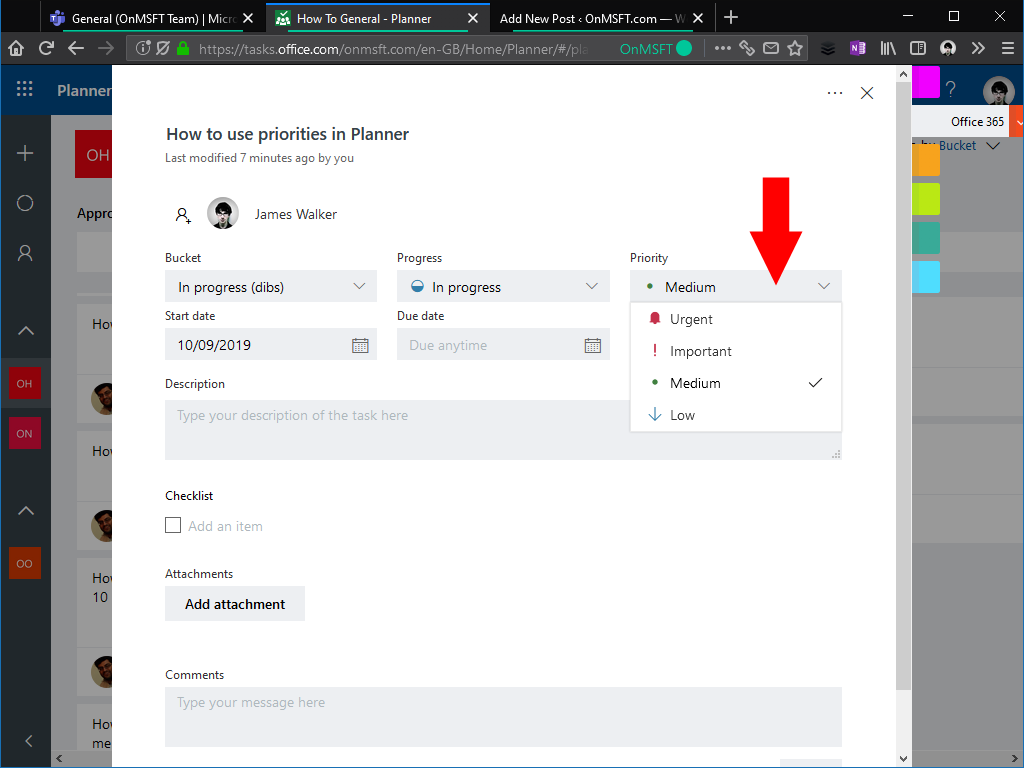
Planner users should now see the Priority field show up on all tasks. The priorities available are labelled as Urgent, Important, Medium and Low. Every task starts off with a default priority of Medium.

Priorities in Microsoft Planner

To change a task’s priority, click it to open the task details view. Use the Priority dropdown to set the new priority. The Urgent and Important priorities will add a new icon to tasks on your Planner board. This means you can always see if you’ve got high-priority tasks to tackle.

Priorities in Microsoft Planner

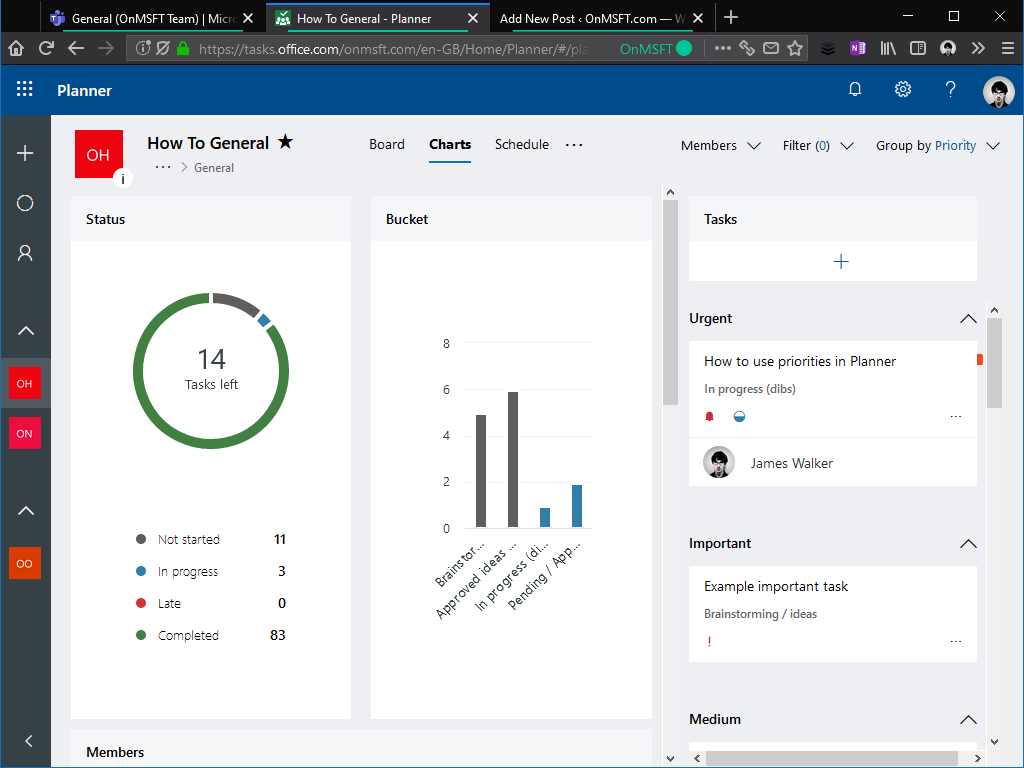
One of the advantages of using built-in priorities instead of Labels is Planner now has extra view options to support Priorities. There’s a new “Group by” option for priorities, which allows you to visualise how many tasks you have within each priority. Urgent tasks show on the left of the board, with low-priority tasks appearing on the right.

Priorities in Microsoft Planner

Priorities also show up in Planner’s Charts screen. The task view on the right-side of the page now separates tasks into groups by their priority, giving you yet more visibility into the relative importance of different tasks.

As with most of Planner’s features, use of Priorities is completely optional. If you don’t need them, or are happy using Labels, you can ignore them and use the default “Medium” priority for each task. Priorities can be helpful in maintaining order on busy boards though, letting everyone see at-a-glance what should be worked on next.

Orange screenshot issue in Windows 10 May 2019 Update linked to Lenovo Vantage, update settings to fix

Earlier this week, some Windows 10 users complained of an issue in the Windows 10 May 2019 Update where screenshots would turn out with an orange hue. Many presumed it was a problem introduced with the KB4512941 cumulative update, but, turns out that the issue was linked to Lenovo Advantage and has now officially been marked as resolved by Microsoft.

As a solution to the problem, Microsoft is recommending for impacted users to visit the Lenovo advantage app and tweak their settings. Apparently, this orange screenshot issue was caused by the Eye Care mode feature of Lenovo Advantage. There is no need to update Windows for the problem, and instead, users should disable Eye Care mode and reset the color temperature in Lenovo Vantage.

In Lenovo Vantage 4, this can be accomplished by going to Hardware Settings, clicking Audio/Visual, and then turning off Eye Care Mode and click on the Reset button. With the Lenovo Vantage version 10, users should go to My Device Settings click to Display & Camera and then click on the reset button for Daytime Color Temperature. Users should also turn off Eye Care Mode, and uncheck the box titled Schedule eye-care mode.

Failed to load sharing screen in Dropbox [SOLVED]

Nowadays, people share documents, pictures and any sort of data easily and securely. There are a lot of apps that allow users to do that efficiently.

Dropbox is popular among users. It is a lightweight tool for managing and storing data that can be used on almost every device.

However, people encountered the “Failed to load sharing screen” error message in Dropbox. This is a major issue because users can’t share data, so, they can’t use Dropbox.

Today we will show you how to make this issue a thing of the past.

Does Dropbox fail to load the sharing screen? Here’s the fix

1. Make sure you run the latest version of Dropbox

Dropbox is plagued by many issues if you don’t have the last version. Don’t forget to update the app periodically to fix or prevent errors.

2. Clear cache

Not only the tool itself needs to run smoothly, but your browser as well. Of course, this is for those who use a browser to open Dropbox.

Here we will show you how to clear your cache in Google Chrome, but the operation is not so different on other browsers.

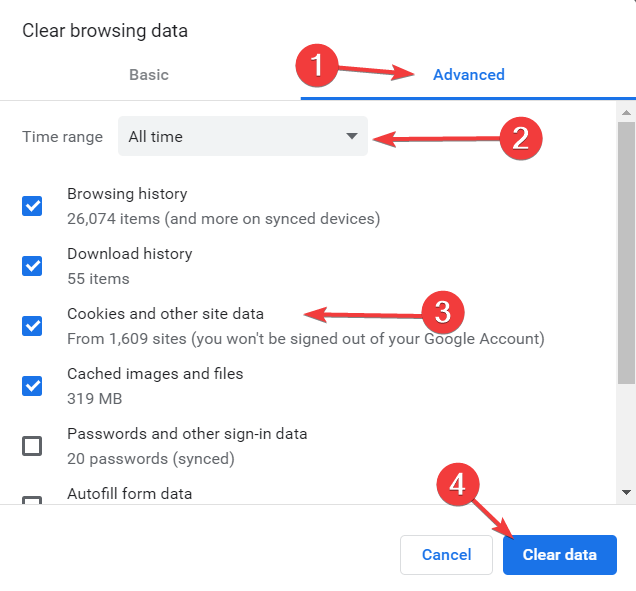
  1. Open the settings menu by clicking on the three vertical dots from the upper-right corner of your window.
  2. Go to More tools, and then click on Clear browsing data.clear browsing data
  3. Under the Advanced tab, choose All time and select the first four checkboxes.
  4. Click on Clear data.chrome clear browsing data

3. Open Dropbox with another browser

If the solutions above didn’t solve the problem, try another browser.

We recommend UR Browser. It is a lightweight and reliable tool to surf the Internet. Moreover, being privacy-oriented, your files will be safe from hackers.

Check out our in-depth review to learn more about UR Browser!

Conclusion

So, for this problem, there are some easy solutions available.

Don’t forget to update Dropbox, clear your cache or install another browser.

Also, if you still encounter errors with Dropbox, we got you covered. Check out this guide to solve them easily.

If you decide Dropbox is not for you, we prepared a list with the best cloud software with encryption because we all know how important privacy is.

Did you find this article helpful? Let us know in the comments section below!

RELATED ARTICLES YOU NEED TO CHECK OUT:


How to use System Restore in Windows 10

System Restore is a recovery feature in the Windows operating system that allows you to restore your PC to an earlier state. By using System Restore, you’ll revert Windows files and settings, system files, installed programs and drivers to their previous state.

System Restore will allow you to restore your system to a working state after making changes to the system files or after installing new software. Bear in mind that System Restore won’t affect files such as your documents, pictures, etc., so you can’t use it to restore files that you’ve recently removed.

In order to restore your PC using System Restore, you need to have a restore point available. You can create restore points manually at any time, but your PC will usually create them on its own when installing new software, driver or system update.

How to create a System Restore point in Windows 10

  1. Press the Start button and search for system restore.
  2. Choose Create a restore point
  3. Click on the Create button to start the process.

How to do a System Restore

To use System Restore, follow these steps:

  1. Press Windows Key and type system restore. Choose Create a restore point option.
    corrupted-system-files-restore-1
  2. Click on System Restore button.
    corrupted-system-files-restore-2
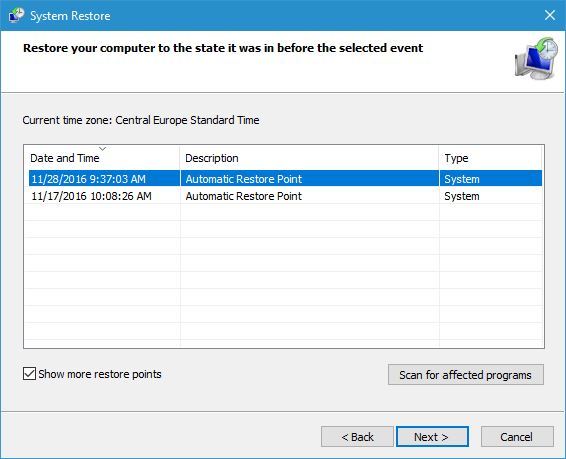
  3. Check Show more restore points. Select the available restore point and click Next.
    corrupted-system-files-restore-3
  4. Follow the instructions to perform the restore.

Although System Restore is a great feature, sometimes issues with it can appear. If you encounter any problems with it, be sure to check our wide collection of troubleshooting guides.

Now that you know how to perform a System Restore, let’s see some of the common questions related to this process.

How long does a system restore take?

A normal operation of restoring the system with the tools already built-in Windows takes somewhere between 15 – 35 minutes. It depends on the size of the restore point, the hardware of the device and the speed of the disk drive.

Does system restore delete files?

First, you should always make a backup copy of your files when performing any outside of the ordinary operation.

Now, are you worried that you would lose files if you do a System Restore? No need to worry – it will not delete any personal files such as documents, images, videos etc.

You will lose some of the programs that are already installed and you would need to re-install them though.

[wl_navigator]

How to make someone a presenter in a Skype conference

Skype is a telecommunications app used both for personal use, as well as within enterprises.

It provides users video chat and voice calls between computers, mobile devices and the Xbox One console via the Internet.

You can make someone a presenter in a Skype conference

As mentioned above, Skype is also an excellent means of communicating between colleagues within work environments.

Because of this, it goes without saying that it boasts plenty of features to enhances this experience.

These features include the ability to allow more than two people to join a chat room, and it can even be used to host conferences.

As you may already know, a conference is usually made up of one presenter, while the others are participants that listen.


If you’re not keen on using Skype for whatever reason, check out these 9 great alternatives.


How to appoint someone as a Skype conference presenter

This step-by-step guide will help you figure out how to appoint a person to be a presenter during a Skype for Business conference.

  1. Launch and log into your Skype for Business client
  2. In the Skype for Business main window, in your Contacts list
  3. Hold down the Ctrl key and click the names of your contacts to select them for your meeting.
  4. Right-click the selection, and click Start a Conference Call
  5. In case you’ve missed out some people, in the participants pane, click Invite More People.
  6. Select someone from the list, and then click OK. Skype for Business will call person for you, adding them to the meeting
  7. Go to the top-right corner of the window during the conference
  8. Select the participants icon from the main meeting window.
  9. From the participants’ list, right-click on the desired attendee and select make a presenter.

Make someone a Skype conference presenter

RELATED STORIES YOU SHOULD CHECK OUT:

How to add multiple contacts at once in Skype for Business

Skype is an excellent communications app tailored both towards personal as well as professional use within enterprises.

However, it does come in two forms, on of which holds special tools that make collaborations within organizations far more easier.

However, one limitation to Skype for Business is its inability to add multiple contacts to your Contact list at once.

Adding multiple contacts not yet available on Skype for Business

Users are quite displeased by the lack of such an obviously useful feature.

Their frustrations are further fueled by the fact that since now Microsoft owns Skype, importing contacts from one program to another should be easy.

For example, users are suggesting that a feature that allows you to import contacts from outlook should be included:

how is this not a feature.. or why can’t I Import from outlook??? Isn’t this owned by the same freaking company?!?!!?

More so, it would seem that the lack of such a useful feature is making people reconsider using Skype for Business and looking for alternatives:

We want to implement SFB in our organization but without an automatic populated list of employees I’m not sure anymore that this would be the solution.

If your company uses Skype for Business, adding hundreds of coworkers to your contact list one by one can become a headache.

While this feature isn’t possible through the Skype app itself, there are a few workarounds you can use.


Displeased by Skype for Business’ lack of features? Use these collaboration software instead.


Workaround to add multiple contacts at once in Skype

1. If your contacts are from within your organization

  1. Create a distribution group which includes all the multiple contacts inside your organization.
  2. Search the distribution group at the Skype for Business client
  3. Add it to the contact list, thus all members of the group will be added in as contacts.

2. If your contacts are from outside your organization

A PowerShell script could theoretically be used in order to achieve this goal.

However, no such command is currently available.

RELATED STORIES YOU SHOULD CHECK OUT:

Microsoft and RockStar Energy join up for the “biggest promo in Gears of War history”

For anyone planning to play the latest Gears of Wars installment until the wee hours, Microsoft’s latest partner promotion might be just the ticket.

To help with those hour-long Horde sessions, Rockstar Energy has stepped in to announce its involvement in the largest promotional program in the history of the Gears franchise.

“Together with Rockstar Energy, we’re looking forward to welcoming more players to Gears of War this year than in any other time during our franchise history,” said Guy Welch, Xbox Marketing Director for Gears of War.

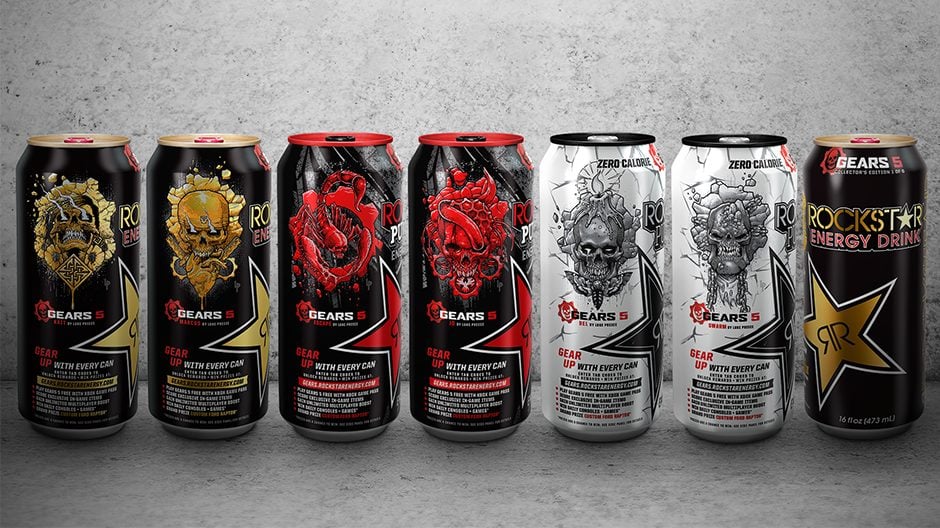
Details include, “every Rockstar Collector’s Edition product includes tab codes that can be redeemed for in-game content. The first two tab codes include 14 days of Xbox Live Gold and 14 days of Xbox Game Pass for Console that can be used to create a new free account or extend an existing user membership.”

There are up to 6 Rockstar Packs gamers could snag with varying degrees of in-game goodies to use such as 1 day of boost and 1 Supply Drop with Scorpion7, Custom Lancer Set, and exclusive Walmart and Circle K only drops.

Other promotional prizes include Xbox One X Limited Edition Consoles, Gears 5 Ultimate Edition games and a Grand Prize custom Gears 5 & Rockstart Energy Ford F-150 Raptor built by Addictive Desert Designs.

Microsoft and RockStar Energy join up for the “biggest promo in Gears of War history”

This Ford F-150 Raptor is a three-ton off-roader built by Addictive Desert Designs. The custom graphics were created by illustrator Luke Preece based on his Collectors Series Can “Punched” 5 of 6 in the design set. The large Hivebuster scorpion is a nod to the Raptor’s roots as a desert off-roader.

From there, ADD upgraded the stock wheels and tires with BF Goodrich Mud-Terrain T/A KM3 tires on DV8 Offroad 886 wheels for added capability and appearance. Finally, the build was completed with ADD Honey Badger Front and Rear Bumpers, Honey Badger Chase Racks, F-150 Rock Slider Side Steps, and Radiance Plus LED Lighting from Rigid.

For all the details, contestants can visit Gears.Rockstarenergy.com.

FIX: Error downloading search features in Windows Photos App

Some users have reported encountering problems with Windows 10‘s default Photos App.

More precisely, they are reporting an error message labeled “Error downloading search features” when clicking on the search bar of the Photos App.

More so, they are reporting that the App does not automatically make a new album or tag people, as it should.

If you are also encountering this problem, you should follow out quick step-by-step guide for a quick fix.

How to fix the downloading search features errors

1. Repair or Reset the Photos App

  1. Press the Windows Key+I
  2. Select Apps
  3. Scroll down until you locate Photos
  4. Click Advanced Options
  5. Click Repair
  6. If Repair doesn’t work, click Reset

Repair or reset Microsoft photos

If the above steps don’t fix your problem, you should consider uninstalling the Photos App completely using Powershell and installing it again.

2. Uninstall Photos using Powershell

  1. Press Windows + X 
  2. Select Windows Powershell with Admin privileges 
  3. Copy the below line and paste in Powershell and press Enter:
get-appxpackage Microsoft.Windows.Photos | remove-appxpackage

Uninstall Photos App using Powershell

Photos App is now completely uninstalled. In order to install it again, you need to use the following Powershell command:

Get-AppxPackage -allusers Microsoft.Windows.Photos | Foreach {Add-AppxPackage -DisableDevelopmentMode -Register “$($_.InstallLocation)AppXManifest.xml”}

Install Photos Apps with Powershell

Alternatively, you could try installing Photos straight from the Microsoft Store

3. Register all your Store Apps again

  1. Press Windows+X
  2. Select Windows Powershell with Admin privileges 
  3. Copy the below line and paste in Powershell and press Enter:
Get-AppXPackage -AllUsers | Foreach {Add-AppxPackage -DisableDevelopmentMode -Register "$($_.InstallLocation)AppXManifest.xml"}

How to re-register all Store Apps

While the problem itself does not actually have a known cause, the solutions listed above should fix any faulty registries that may have appeared during installation.

This means that regardless of whether the problem was there from the beginning or if it appeared during an update, all settings should be set to their default values.

Alternatively, if none of the solutions work, you should consider using other photo and photo album managers.

RELATED STORIES YOU SHOULD CHECK OUT:

How do I fix Gears 5 error 0x80040154 for good?

Players have starting posting on the official Microsoft forums that the latest cumulative update is hindering their gameplay experience with Gears 5.

It would seem that update KB4515384 seems to be triggering an error 0x80040154 whenevr they try launching it.

Several solutions were tried, including:

  • Keeping the system updated
  • Resetting the Store with WSreset
  • Re-installing game services through the Powershell console
  • Using the troubleshooting tool for the Windows Store App
  • Re-installing the Xbox Beta App
  • Creating a local user with admin rights and installing Gears 5 from the store again

Steps to fix Gears 5 error 0x80040154

It would seem that error 0x80040154 is closely linked to Microsoft Security Essentials.

More so, it can also be caused by conflicts between your antivirus program and the program you are trying to run.

As such, users should try some of the more generic solutions towards fixing error 0x80040154:

  • Performing a system restore
  • Uninstalling whatever anti-malware software they may have
  • Uninstalling Microsoft Security essentials (which in turn can be done in a variety of ways)
  • Performing a complete system reset
  • Reinstalling from a USB or DVD
  • Recovering their system from a restore partition
  • Turning their Windows Firewall on
  • Turning on their Windows Defender

No precise explanation exists as to why exactly this error is happening right now.

Additionaly, it would seem that Gears 5 isn’t the only affected game.

Users reported that this problem also seems to affect some games, such as Wolfensteain II.

Gears 5 has barely been released and that players are probably eager to get their hands on it.

As such, any type of error appearing right after launch can be extremely bad for publicity.

RELATED STORIES YOU SHOULD CHECK OUT:

How to create a collection of places in Windows Maps

Windows’ built-in Maps app is a capable application for viewing road, aerial and transport maps. With detailed mapping data sourced from HERE, Maps lets you quickly get directions without having to open a web browser. In this guide, we’ll show you how to research multiple places and add them to a collection for later reference.

The best way to start is by searching for a place. This can be any point on the map, such as a city, hotel or attraction. When you select a place from the search results, an information card will display with details about the location.

Collections in Windows Maps

Below the location’s name, click the “Save” button to add it to a collection. Choose an existing collection or click “New collection” to create another.

Collections in Windows Maps

You can now continue searching for places. Add each one to your collection to track them for later reference. Each new location will open in a new tab in the Maps app, so you won’t unintentionally lose your current context.

Collections in Windows Maps

Once a location has been added to a collection, you’ll see new options on its information card. You can remove it from the collection or add extra notes to its entry. The latter option lets you attach a description and an optional nickname. You can then search for the nickname to quickly find the location, even if you can’t remember its actual name.

Collections in Windows Maps

To view your saved collections, click the favourites icon in the Maps app’s navigation bar. This will open the “Saved places” overlay. Click the “Collections” tab to see a list of all your collections. Clicking a collection will show the places within. Locations will be highlighted on the map with coloured pins.

Collections is a handy feature which can help you plan trips or keep track of places to visit. Your collections will be synchronised to your Microsoft account so you’ll also be able to access them in Bing Maps from any device with a web browser.

Windows 10 Xbox Game Bar to gain ability to display Xbox achievements while playing games

Microsoft is about to make its Xbox Game Bar more useful for PC gamers playing Xbox Live-enabled games. Mike Ybarra, CVP of Xbox Program Management at Microsoft confirmed on Twitter today that the Game Bar will “very soon” allow gamers to check Xbox achievements while playing games.

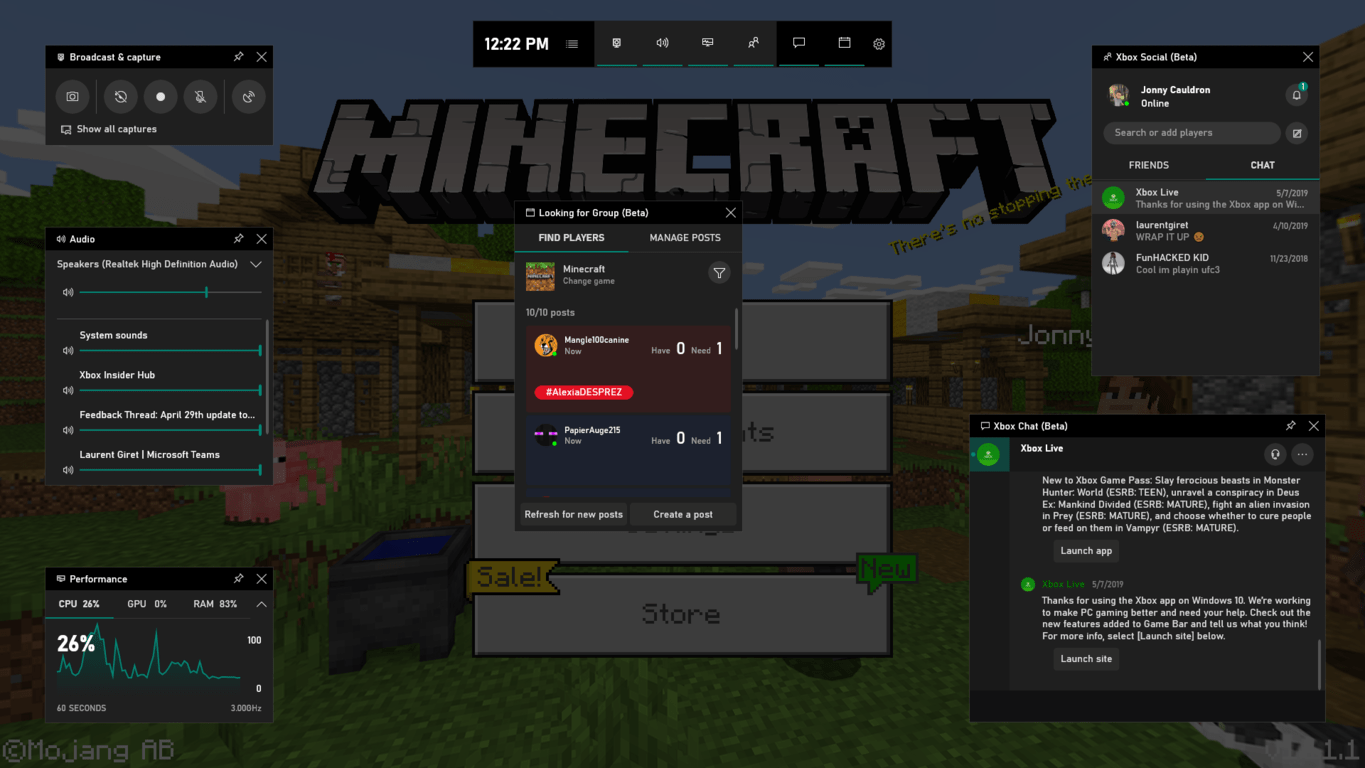
For those unfamiliar, the Xbox Game Bar is gaming overlay built into Windows 10 that you can access by either pressing Win + G, or the Xbox button if you have an Xbox controller plugged into your PC. The Game Bar is highly cutomizable, with different widgets for Game captures and Mixer broadcasting, Audio Settings, Xbox chat, and more. The app integrates with various Xbox social features, though the Xbox Achievements part still belongs to the Xbox Companion app for Windows 10.

The Xbox Game Bar is currently the fastest Xbox experience that Microsoft created for Windows 10, as the Xbox Companion app (formerly “Xbox” app) remains pretty sluggish. The new Xbox beta app, which is based on Electron, is also not as fast as the Xbox Game Bar, and it has a different purpose with a big focus on Xbox Game Pass for PC.

There are now three different Xbox-branded apps on Windows 10, which is definitely a bit confusing, but the good thing about the Xbox Game Bar is that it can be useful for all PC gamers, even those who are not heavily invested into the Xbox ecosystem. And that’s why it’s great to see Microsoft iterating pretty fast on it, with all updates being handled by the Microsoft Store.

How to use FancyZones, Windows 10’s new tiling window manager

Last week, Microsoft released PowerToys, a new project which seeks to add extra productivity features to the Windows desktop. PowerToys will encompass a suite of utilities aimed at power users and enthusiasts, with development direction guided by the community.

The initial release comes with just two modules, a shortcut key guide and FancyZones. We’ve already covered the former, so today we’ll give you a tour through FancyZone’s features.

Introduction to window layout managers

FancyZones brings many of the benefits of tiling window managers to the Windows desktop. The module allows you to define fixed layouts on your display, which app windows then align themselves to.

PowerToys downloads

Windows 10 already has basic support for this. Its Snap feature lets you drag windows to the edge of your monitor. They’ll then be resized to fill a half or a quarter of the screen. That’s where Snap’s functionality ends.

With FancyZones, you can define complex window layouts. You can have four columns, or three rows, or four columns and three rows (for a total of 12 cells) in a custom grid layout. There are few limitations as to the layout you can produce. You get to customise your desktop so you can comfortably work with a multitude of windows at once.

Getting started with FancyZones

You’ll first need to download and install PowerToys from its GitHub page. The installer doesn’t yet carry a Microsoft signature, although subsequent releases will. Run the installer and follow the prompts to install PowerToys.

PowerToys tray icon

Once it’s running, you’ll find a new PowerToys icon in your system tray. Double-click it to open PowerToys’ settings panel, where you can choose which modules to enable. Make sure FancyZones’ toggle button is turned on. Next, click the “FancyZones” page in the left navigation menu.

Defining your zones

The first step in using FancyZones is to configure your window layout. Click the “Edit zones” button to define the window regions on your desktop. You can pick from a number of preset options, use a grid, or setup custom regions in arbitrary locations with the “Custom” tab.

FancyZones settings

At the bottom of the zone editor, there’s an option to add spacing between each zone – this can help you to focus on individual apps. Once you’re done configuring your layout, click the “Apply” button to start using it.

FancyZones settings

You’re now ready to arrange windows with FancyZones! With the default settings, you can use the shift key to drag a window into a zone. While moving an app’s titlebar, hold shift to see the zones you can drag it into. Drop the window over a zone and it will automatically resize to fill the region.

FancyZones settings

Although it’s still in a pre-release state, FancyZones already has several configuration options. Most are fairly self-explanatory but we’ll highlight a few that are worth knowing about.

The option to “Override Windows Snap hotkeys” allows FancyZones to completely replace Windows 10’s Snap functionality. This means hotkeys such as Win+Right will no longer snap windows to half of your monitor, instead moving them between your FancyZones regions.

Using FancyZones

Another option, “Move newly created windows to their last known zone,” allows windows to remember the region in which they were last used. If you always keep Outlook in one region and Edge below it, turning on this option means you won’t need to manually drag those apps into their zones each time they’re launched.

FancyZones is still very new and remains in active development. A backlog of issues and ideas is being maintained, with community input welcomed.

FancyZones settings

One of the most serious issues with FancyZones today is its lack of support for multiple monitors. At present, using the default “new zone editing experience,” only your primary monitor will work with FancyZones. It’s not yet possible to define layouts for your secondary displays, which restricts the app’s usability. The old experience does have limited support for mulitple monitors.

Despite the current limitations, FancyZones brings some much-needed window management functionality to the Windows desktop. The whole PowerToys project is still in very early days, with much more functionality planned to be added over time.

Microsoft was almost sued by Taylor Swift for its controversial “Tay” chatbot

After months of testing and tweaking, Microsoft brought over the Chinese chatbot XiaoIce to the United States in the Spring of 2016 and the company learned some very valuable lessons in a short amount of time, one of them being, pop star Taylor Swift was not a fan.

Chief among Microsoft’s learning lessons with its conversational chatbot known as XioaIce in China and Tay in the United States was that teenagers from the two different nations interacted with the AI-powered services quite differently. In China, some teenagers developed a genuinely reciprocal relationship with the chatbot where upwards of a quarter of an hour was spent sharing personal information with it.

However, in the US, Tay faired much worse, especially when exposed to individuals on Twitter. In a shockingly short amount of time, Tay went from an unjudgmental listening service by design to a hate-spewing racist reciting verbiage it was fed repeatedly from users gaming the algorithm.

Not only did Microsoft have a problem with the way Tay was evolving, but apparently before the company ultimately pulled the plug on the experiment it was about to have issues with the trademark savvy legal team of pop star Taylor Swift.

According to a report from The Guardian, Microsoft President Brad Smith said Taylor Swift’s legal team contacted him via email to inform him that the company’s Tay chatbot name was in violation of federal and state laws having to deal with the pop stars applied trademark.

“I was on vacation when I made the mistake of looking at my phone during dinner. An email had just arrived from a Beverly Hills lawyer who introduced himself by telling me: ‘We represent Taylor Swift, on whose behalf this is directed to you. He went on to state that ‘the name Tay, as I’m sure you must know, is closely associated with our client.’ No, I actually didn’t know, but the email nonetheless grabbed my attention. The lawyer went on to argue that the use of the name Tay created a false and misleading association between the popular singer and our chatbot and that it violated federal and state laws,” Smith adds.

For the moment, it’s unclear at what point in Tay’s US release the email was sent or whether or not the entire experiment was yanked due to the potential of a lengthy legal battle that would pit Microsoft against some of its younger user base.

Nevertheless, Tay was shut down and the Taylor Swift incident remains just a cautionary anecdote for Smith and his upcoming fourth book titled Tools and Weapons. Tay was only available in the US for a brief 18 hours before it was shelved.

KB4515384 brings USB HID device bugs and install error 0xe0000100

Microsoft just released the September 2019 Patch Tuesday updates.

The new updates for all major Windows 10 versions come with some security improvements for Microsoft Edge, Internet Explorer, network technologies and input devices.

KB4515384 already has some weird bugs

The tech giant also addressed some vulnerabilities in some of the versions.  Despite the fact that the updates were just released, some Windows 10 users are already having issues installing them.

Others reported USB HID device problems after installing KB4515384 (OS Build 18362.356) on their PCs. Here’s how one user is describing the problem:

After the USB HID device issue after September 10, 2019—KB4515384 (OS Build 18362.356) windows update, my HID device is no more recognized. It is listed by the usbview.exe application but the application I use to manage this device cannot see it.

And here’s the OPs screenshot: KB4515384 issues

The same user reported another weird issue with Device Manager:

I also notice that in the Device Manager a libusb-win32-devices item containing my device is now listed

KB4515384 bugFor now, there are no confirmed resolutions but we are investigating the problem and we’ll post a fix as soon as it’s available.

If you’re in the same situation, you can try to rollback the windows update to a previous version to check if KB4515384 is causing the problem.

Update error 0xe0000100

Other users complained error 0xe0000100 is preventing them from installing the update.

Cumulative update KB4515384 fails to install with error 0xe0000100. Last month, cumulative update KB4512508 gave the same error. Was really thinking this month would be better. Manually downloading the updates gives the same error.

The weird part is that the Upgrade Assistant says the system is up to date. This could be a server-related error. Waiting for a few hours before making a new update attempt could solve this problem.

Start Menu and Search still don’t work for many

After a set of problems with Start Menu and Search, Microsoft acknowledged the problems and said that will be fixed with the next cumulative updates.

Sadly, for some, the problems still exist, even after installing the new September 2019 Patch Tuesday updates. Here’s what some users are saying after installing KB4515384:

I am getting: Critical Error. Your Start menu isn’t working. We’ll try to fix it the next time you sign in.[Sign out now] I looked everywhere but couldn’t find a fix. SFC and friends did not help. Reregistering the Start Menu using Powershell did not help. The problem goes away if I uninstall the update but obviously that’s not a long-term solution

While for others, Search still doesn’t work and programs are not opening:

Installed the updated on a PC with version 1803. After the update, some programs are not opening. Tried from the start menu and desktop icon and they will not open.

It is possible that this is related to a faulty installation of the update. You can try to manually install KB4515384 and check if the problems persist. 

BSOD and USB errors after updating to KB4515384

BSOD are quite common when it comes to new Windows 10 updates. When Windows 10 v1903 came out, it also had a lot of BSOD problems.

It seems that KB4515384 is also plagued by them. Some users are complaining about BSODs in the new update:

BSOD within a few minutes on 1903. Neat.The CU today. Blue screened while browsing the web

If you’re facing the same issues, you might want to take a look at this guide, as it may help you solve your problem.

Weirdly enough, some users are complaining about USB errors that affect KB4515384:

somehow this update disabled my keyboard with some usb errors”Windows has stopped this device because it has reported problems. (Code 43) A request for the USB device descriptor failed.”

The issue might be related to your drivers. Sometimes, new updates replace your drivers with the default drivers from Windows 10.

If you encounter the same problem, we recommend that you manually update your drivers to the latest version by following the simple steps from this guide.

Latency issues after installing the update

This is not the first time when Windows 10 v1903 suffers from high latency issues, and this is pretty annoying because it can cause stuttering, audio dropouts, and FPS problems in games.

Here’s how one user is describing the problem:

this update broke again ntoskrnl.exe latency issues, it keeps jumping back up to over 710ms for me while it was fine in the previous os build 18362.329 (august optional update) with 0,50ms. Also ndis.sys is still around 400ms, not happy about this update at all.

Other users are reporting 100% CPU usage in some games:

ust broke something else for me lol. 100% CPU usage in some games according to task manager but not third party tools like HWINFO, and CPU-Z where they show 70-80%. 8700k/2080ti/32GBs RAM

The latency issue can affect games, as well as your desktop in some cases. For now there is no known resolution.

If you bump in to the same problem, we recommend that you rollback your Windows to a previous version. You can do so by going in to Settings > Update & Security > Recovery.

Under the Go back to the previous version of Windows 10, click on Get stared and follow the on-screen steps.

The rollback solved the problem for many, and it should solve it for you too. If the rollback was successful, you’ll have to block Windows from automatically updating your system by following this useful guide.

Nvidia graphics card problems

After installing KB4515384, some users are experiencing driver problems:

I literally just installed the newly released NVIDIA driver 436.30 non DCH, then Windows updates decides to forcefully install the older 436.15 DCH along with the cumulative updates today.

While for others, the graphics card seem to be unplugged and Windows doesn’t see it:

Hi, I have a problem. My graphics card which is an Nvidia GTX 1660 Ti is listed by the system as unplugged after I had downloaded and installed the newest windows update (KB4515384) which comes with NET. framework update KB4514359 and Security Update for Adobe Flash Player KB4516115. I did not do anything to the physical card, but the system did not detect it and said that I have to re-plug the card. Can anybody help me? I tried to remove all instances of the card by uninstalling, but I can’t seem to get it back.

This is a pretty annoying problem, and it might be caused by your graphics card drivers. You can try to solve it by installing the latest driver available from the manufacturer’s website.

If you don’t know how to update your Nvidia graphics card, we’ve prepared a useful guide that will help you do it with ease.

If you want the latest GPU drivers, bookmark this page and always stay updated with the latest and greatest.

Performance and language issues

It seems like for many Windows 10 users, KB4515384 slows down their PCs:

I have a Dell Laptop about 2 years old – Intel , lots of RAM with SSD drive. Laptop was running super fast – fast boot, just everything was great, until this latest KP4512941 update.

This is a problem of optimization and you should solve it by running sfc /scannow and DISM. After that, your Windows 10 PC should work properly.

Other users are complaining about the language bar and the inability to use it:

After (automatically) installing 2019-09 Cumulative Update for Windows 10 Version 1903 (KB4515384), the language bar disappeared after login. On the login screen it shows normally and can be used to switch languages. Running ctfmon has no effect. In addition, in the Language options, when choosing ‘Add a keyboard’ for Chinese (Simplified, China), all of the two keyboards are gray and cannot be added. Another new language (tested Chinese Traditional) can be added but when adding a new keyboard all options of keyboards are also gray.

The only solution for now is to uninstall KB4515384. After uninstalling the update, things should go back to normal.

Have you encountered any problems with KB4515384?

Share your experience in the comments section below.

Some Patch Tuesday updates may cause black screen issues

If you’re planning to install the latest Windows 10 updates, take a few minutes to thoroughly think about it.

Indeed, the September 2019 Patch Tuesday updates are out but it’s worth noting that some of them might trigger black screen issues for users.

For exemple, Windows 10 v1809 KB4512578 might cause your PC to start up to a black screen during the first logon.

Microsoft already acknowledged the issue and is working on a fix.

We are investigating reports that a small number of devices may startup to a black screen during the first logon after installing updates.

As a workaround, Microsoft suggests pressing Ctrl+Alt+Delete. You can then select the Power button in the lower right corner of the screen and go to  Restart. Your PC should restart normally.

As you can see, this problem affects only a small number of computers. However, if you want to avoid such issues, you should block automatic updates for the time being.

In the worst-case scenario, Microsoft’s workaround won’t work. You can bookmark these troubleshooting guides on a secondary device in case you might need them later.

Have you experienced any issues after installing this month’s Patch Tuesday updates? Let us know in the comments below.

FIX: Gears 5 Ultra HD Texture won’t download

Gears 5 is an FPS game that comes with plenty of DLCs. One of these DLCs is the Ultra-HD Texture Pack which players can get completely free.

Of course, not everyone can run the game on normal settings, let alone using the Ultra-HD Texture Pack.

One problem, however, is that plenty of users have reported having issues downloading the Texture Pack:

I have Gears 5 Ultimate through GamesPass and when I go into video settings and select install Ultra HD texture pack it immediately jumps to 70% and sticks there. Nothing starts downloading according to network traffic or by checking the Windows Store or Xbox Beta app.

Further discussions revealed that plenty of other players are having this issue, and that it is more a visual bug than a functionality bug.

For example, some users speculated that it may be something server-sided and that if you wait long enough, the download will finish.

Mine was stuck on 70% for a while but it seems to be going up slowly now. It’s probably just a really slow download.

Fix Ultra-HD Texture Pack download issues

The issue is more of a nuisance rather than a bug, but getting around it can be done easily by doing one of the following:

Change the Gears 5 install location

  1. Uninstall Gears 5 through the Windows Apps & features settings page
  2. Restart Windows
  3. Open Settings, select System, and then Storage
  4. Within the Storage page, click the text link Change where new content is saved
  5. Change the drive New apps will save to: to a drive other than the system default
  6. Install Gears 5 again
  7. Run the game, navigate to the Video Options, and install the Ultra Textures
  8. Restart the game after it finishes

If the steps mentioned above don’t work, you could try one of the following:

  1. Wait it out, the download will speed up again eventually
  2. Make sure you free up more disk space on the destination drive than the Ultra-HD Texture Pack actually has
  3. Uninstall and Install the game again

It would seem that the problem is present only on the Steam version of the game.

If you are experiencing any other issues, please do not hesitate to let us know in the comments bellow.

RELATED STORIES YOU SHOULD CHECK OUT:

KB4516066 improves storing and managing files on Windows 10

If you’re running Windows 10 v1709, you can now check for updates. Cumulative update KB4516066 is now available for download for this OS version as part of the September 2019 Patch Tuesday update batch.

KB4516066 changelog

You may be wondering what’s new in this update. Broadly speaking, KB4516066 focuses on improving OS security. More specifically, the patch improve security when using Internet Explorer, networking technologies, and input devices.

At the same time, this patch also brings improvements when it comes to verifying user names and passwords.

The third novelty on the list are the updates for storing and managing files. In other words, you can now manage your Windows 10 files faster and in a more secure manner.

As Microsoft explains, key security changes include:

  • Protection against a new subclass of speculative execution side-channel vulnerabilities, known as Microarchitectural Data Sampling, for 32-Bit (x86) versions of Windows (CVE-2019-11091, CVE-2018-12126, CVE-2018-12127, CVE-2018-12130). Use the registry settings as described in the Windows Client article. (These registry settings are enabled by default for Windows Client OS editions.)
  • Security updates to Internet Explorer, Microsoft Scripting Engine, Windows App Platform and Frameworks, Windows Input and Composition, Windows Media, Windows Fundamentals, Windows Authentication, Windows Datacenter Networking, Windows Storage and Filesystems, the Microsoft JET Database Engine, Windows Kernel, Windows Virtualization, and Windows Server.

Sorry, something went wrong error in SharePoint 2013

Many of use use Office tools frequently, but sometimes issues with Office tools can appear on Windows 10. Users reported Sorry, something went wrong error message in SharePoint 2013, and today we’re going to show you how to fix it.

How can I fix “Sorry, something went wrong” error in SharePoint 2013?

Sorry, something went wrong in SharePoint 2013

Solution 1 – Change the Require content approval settings

According to users, Sorry, something went wrong error message can appear due to your Content approval settings. This error appears when you try to save SharePoint site as a template, and in order to fix this problem, you need to follow these steps:

  1. Click the Gear icon and choose Site settings.
  2. Go to Web Designer Galleries section and click on Solution.
  3. Click the Library tab and click on Library Settings.
  4. Now click on Versioning Settings.
  5. Locate Content approval section and set Require content approval for submitted items to No. Click OK to save changes.
  6. Save the site as a template.
  7. After the template is successfully created, you can enable content approval again.

Solution 2 – Publish display templates

Users reported that this error appears if your display templates aren’t published, so be sure to publish them.

According to users, uploaded display templates won’t work for non-administrators, and they’ll get Sorry, something went wrong error message.

To fix this problem, make sure that display templates are published.

Solution 3 – Delete the recurring calendar appointments

According to users, this error can appear if you import calendars from SharePoint 2003 to SharePoint 2013.

It seems that SharePoint 2013 has issues with recurring appointments, and in order to fix this issue it’s necessary that you delete those appointments.

If you don’t want to permanently delete your appointments, you can restore them by going to the Site Contents > Recycle Bin and choosing the Restore option. After restoring the appointments, the issue should be permanently fixed.


SharePoint online calendar not showing events? Don’t worry, we’ve got you covered.


Solution 4 – Make sure that the time zone is configured

Sometimes this error appears in SharePoint 2013 if your time zone isn’t properly configured. To check time zone settings in SharePoint, do the following:

  1. Open Central Administration > Application Management.
  2. Locate your web application and click the General Settings icon in the Ribbon menu.
  3. Web Application General Settings window will appear.
  4. Check the Default Time Zone.

If the Default Time Zone setting is missing, you need to check if the correct time zone is set on your PC. To do that, follow these steps:

  1. Click the clock in the bottom right corner and choose Date and time settings.
    sorry-something-went-wrong-sharepoint-2013-date-and-time
  2. Go to the Time zone section and check if the time zone is correct.
    sorry-something-went-wrong-sharepoint-2013-time-zone

Alternatively, you can also check your time zone by following these steps:

  1. Press Windows Key + S and enter date.
  2. Select Time and date from the menu.
    sorry-something-went-wrong-sharepoint-2013-date
  3. Locate the Time zone section and check if your current time zone is correct. If not, be sure to change it.
    sorry-something-went-wrong-sharepoint-2013-time-zone-2

Now you just need to go back to Web Application General Settings and set the time zone of your server. Perform iisreset and the problem should be permanently fixed.


Windows 10 won’t let you change your time zone? Check out this guide to solve the problem easily.


Solution 5 – Configure the Root site collection

According to users, this issue can sometimes occur if you don’t have the Root site collection configured.

If you create your collection in /Sites/ instead of Root you might experience this error, therefore we suggest to create a Root site collection and check if that fixes this error.

Solution 6 – Make sure that your domain account has access to SPDataAccess role

Improper configuration can sometimes cause Sorry, something went wrong error to appear. In order to avoid this problem in SharePoint 2013 while using Access Services, you need to grant certain permissions to your domain.

After granting your account access to the SPDataAccess role in SharePoint configuration database (in SQL Server) the issue will be completely resolved.

Solution 7 – Restart the SPTimer service

Users reported that this error appears while adding apps to SharePoint. This error can be problematic, but it can be fixed simply by restarting the SPTimer service (OWSTIMER.EXE).

After restarting the service, the error was completely fixed. In order to avoid these errors in the future, remember to restart SPTimer service every time you make a major configuration change in SharePoint 2013.

Solution 8 – Check App Management Service

This error can appear if the App Management Service isn’t installed, but you can fix it by following these steps:

  1. Open Central Administration as administrator and go to Application Management > Manage Service Application.
  2. Choose New > App Management Service.
  3. Enter the necessary information in Service Application Name, Database Server and Database Name fields.
  4. Select Create new application pool option and enter the name of the application pool.
  5. Click OK to create a new app management service.
  6. After the App Management service is created, go to System Settings > Manage Services on server.
  7. Locate the App Management Service, and under the Action column click Start.
  8. Go back to Manage service applications and check if the Service Application Proxy is started.
  9. Go to Site Settings and click Manage site features in Manage site features section.
  10. Locate Workflows can use app permissions and click Activate button.
  11. Go to Site Settings > Site app permissions.
  12. Copy the client section of the App Identifier between the | and @ characters.
  13. Go to https://{hostname}/{catalog site}/_layouts/15/appinv.aspx.
  14. Paste the client section of the App Identifier to the App ID field and click Lookup.

If you performed all these steps correctly, the error should be completely fixed.

Sorry, something went wrong in SharePoint 2013 search

Solution 1 – Delete the service application and create a new one

If you’re getting this error while using the search application, try deleting the service application. After you delete it, create it again and the problem with search should be fixed.

After creating a new service application, be sure that it’s set as a default for your application.

Solution 2 – Change the access rights

You can fix this problem by adding Everyone to the Members group. Bear in mind that you need to change the rights to Read Only. This isn’t the best solution, and it’s probably not the safest, so use it at your own risk.

Solution 3 – Be sure that Search Service Application is working

Sometimes Search Service Application can stop working and that can cause Sorry, something went wrong error to appear. To fix this problem, do the following:

  1. Go to Central Administration > Manage web Apps.
  2. Highlight Sharepoint – 80 > Service Connections and make sure that Search Service Application is checked.
  3. Click OK to save changes.

Solution 4 – Check if the SharePoint Search Host Controller is running

SharePoint 2013 relies on certain services in order to run properly, and if SharePoint Search Host Controller isn’t running, you might get Sorry, something went wrong error message while using search in SharePoint 2013.

To fix this error, check if SharePoint Search Host Controller is running. To do that, follow these steps:

  1. Press Windows Key + R and enter services.msc. Press Enter or click OK.
    sorry-something-went-wrong-sharepoint-2013-services
  2. When Services window opens, locate the SharePoint Search Host Controller service.
  3. Check the status of the service. If service isn’t running, right click it and choose Start from the menu.
  4. Once you enable this service, close Services window and check if the problem is fixed.

Sorry, something went wrong in SharePoint 2013 workflow

Solution 1 – Create a new workflow with a different name

Users reported that Sorry, something went wrong error message can be caused by deleting and recreating your workflow. To fix this error you need to create a new workflow but use a different name for it.

After creating a new workflow with a different name, the error should be completely fixed.

Solution 2 – Use flushdns command

This error can occur due to your DNS, but you can easily fix it by flushing your DNS. To do that, follow these simple steps:

  1. Press Windows Key + X to open Power User Menu and select Command Prompt (Admin) from the menu.
    sorry-something-went-wrong-sharepoint-2013-command-prompt-admin
  2. When Command Prompt starts, enter the ipconfig /flushdns.
    sorry-something-went-wrong-sharepoint-2013-flushdns

After running the flushdns command, you might want to recycle Workflow and Service Bus services and try to publish workflow again.

If you’re having trouble accessing Command Prompt as an admin, then you better take a closer look at this guide.


If you can’t flush the DNS Resolver Cache in Windows 10, follow the steps in this handy guide to fix the issue.


Solution 3 – Assign db_owner permissions to your user account

If you’re getting this error while using workflow UI, you might want to change your permissions. To do that, go to your databases and assign db_owner permissions to your workflow service account in your database.

Sorry, something went wrong in SharePoint 2013 site collection

Solution – Delete the web application

Users reported this error while creating a site collection in SharePoint 2013, and to fix this problem you need to delete the web application you created. After that, follow these steps:

  1. Open IIS Manager and expand the local server at the top left corner.
  2. Select Application pools.
  3. Select Central Administration.
  4. Select Advanced Settings and click Edit application pool in right column.
  5. Edit shutdown time limit. Set a limit to higher value than the default under process model.

After doing this you should be able to create web applications and site collections without any errors.

Sorry, something went wrong SharePoint 2013 error can be caused by many different things, and it might be hard to fix sometimes, but we hope that you managed to fix it by using one of our solutions.

If you have any other suggestions or questions, don’t hesitate to leave them in the comments section below.

READ ALSO:

September Patch Tuesday brings security updates for Adobe

It’s Patch Tuesday time again and Adobe finally brings some security updates for its products.

In the September Patch Tuesday you’ll find some new changes to Adobe Application Manager and Adobe Flash Player.

Flash Player gets patched for security vulnerability

Even if Microsoft announced that Flash Player will loose support in future Chromium browsers, for now it is still supported and gets security patches.

Now, Adobe has released security updates for Flash Player on Windows, macOS, Linux and Chrome OS, to address some critical vulnerabilities that could lead to Arbitrary Code Execution.

The affected product versions are:

  • Adobe Flash Player Desktop Runtime 32.0.0.238 and earlier 
  • Adobe Flash Player for Google Chrome 32.0.0.238 and earlier
  • Adobe Flash Player for Microsoft Edge and Internet Explorer 11 32.0.0.207  and earlier

The CVE-2019-8070 and CVE-2019-8069 vulnerabilities have priority ratings of 2 and 3 and Adobe recommends users to update their Flash Player immediately.

Update your Adobe Application Manager to prevent security vulnerabilities

There is also a security update for Adobe Application Manager that resolves an insecure library loading vulnerability which could also lead to Arbitrary Code Execution.

The affected product version is Adobe Application Manager (installer) version 10.0.

The CVE-2019-8076 vulnerability has a priority rating of 3 and affect only the installer used with the Adobe Application Manager and has no impact on the existing Application Manager.

Adobe recommends user to update their installation to the latest version.

READ ALSO: