Check out these Windows 95 emulators on Windows 10/11

The Windows we know and love today owes much to Windows 95. Windows 95 transformed the series with the introduction of a taskbar, notification area, and the legendary Start menu. No longer was Windows just a subsidiary addition to DOS; for the first time, it was a full replacement for an increasingly antiquated command-line platform.

Although there are numerous emulators that run DOS software, Windows 95 remains a copyrighted platform. Consequently, there are no emulators you can install on Windows 10 to run ’90s games. However, that doesn’t mean there aren’t any Windows 95 emulators at all. Check out the few websites that include emulators that restore the operating system in all its glory.

Windows 95 in Your Browser

Check out the Windows 95 in your browser with an emulator that can run Windows 95 in another tabThe programmer behind the site developed the emulator largely for the sake of nostalgia more than anything else. However, the developer still concedes that the emulator may or may not violate copyright law.

  1. Click here to open the Windows 95 in your browser website shown in the snapshot directly below. Then press the Start Windows 95 button on the page.windows 95 in your browser
  2. Press the OK button on the pop-up window that opens to launch the emulator. It shouldn’t take any longer than 10 minutes for the emulator to open as in the snapshot below.emscripten windows 95 emulator
  3. When the emulator has loaded, close any background tabs open in your browser. This will reduce lag and ensure the emulator runs at its quickest.
  4. Then click on the emulator‘s display box to move the mouse cursor within Windows 95. You can press Esc to restore the original cursor.
  5. The emulator also has a full-screen mode that you can open by pressing the Fullscreen button at the top right.
  6. Now you can have some fun in the emulator by clicking the Start button and selecting Programs > Accessories > Games to open the submenu in the snapshot below. Select to open Solitaire, Hearts (which isn’t included in Windows 10), Minesweeper or Freecell in Win 95.windows 95 on windows 10
  7. Check out the platform’s Media Player by clicking Start > Programs > Accessories > Multimedia > Media Player. That will open the default Media Player shown in the shot below.windows 95 media player on windows 10
  8. Click File > Open in the Media Player window. Then you can select a few audio clips to playback in the Media Player.
  9. You can customize the desktop by right-clicking it and selecting Properties. That opens the Display Properties window from which you can select alternative wallpapers.


change background windows 95 on windows 10

The Play DOS Games Online Emulator

Play DOS Games Online primarily includes DOS games to play in browsers. However, the website also has its very own Windows 95 emulator that’s the same as the one on the Windows 95 in your browser site. Click here to open the emulator‘s web page.

windows 95 emulator on windows 10

Click within the emulator‘s display to launch Windows 95. It doesn’t take long for this one to get going. Click inside its display to move the cursor in the Windows 95 emulator. You can also press a Fullscreen button to expand the emulator in the browser.

These are two browser emulators that provide a fascinating glimpse at Windows 95. They include most of the accessories, system tools and customization settings from the original operating system, so have a great time going down memory lane.

RELATED STORIES YOU SHOULD CHECK OUT:

Windows Insider program prepares for a reset as development moves to 20H1 (and 19H2)

Yesterday, Microsoft announced that unlike previous releases, the Windows 10 May 2019 Update (19H1) will undergo a full cycle of Release Preview testing. In addition, perhaps due to a reset to more closely align Windows with the Azure development cycle, or as many have speculated, to move to a major/minor release cycle, something that enterprise customers have been clamoring for, the company has been taking the term “Skip Ahead” to heart. Recently, the Windows Insider program released a series of 20H1 builds to the Skip Ahead ring, without in fact releasing a single 19H2 build, as would be customary.

Now today, The Windows Insider team has announced that Insider testing will soon move more completely to the 20H1 branch of Windows development. Current (19H1) Fast Ring testers will be moved to a 20H1 fast ring, as will the current 20H1 Skip Ahead testers. This will create a single 20H1 Fast Ring, which would not be unusual if we weren’t skipping over 19H2. With Skip Ahead and Fast Ring testers soon to be on 20H1, and Slow and Release Preview testers on 19H1, there don’t appear to be any rings left for testing 19H2 builds. Windows Insider team member Brandon LeBlanc promises, however that all will soon be revealed:

We will begin releasing 19H2 bits to Insiders later this spring and will talk more about what that will look like in the near future.

So if you’re in 20H1 Skip Ahead, you’ll soon be joined by 19H1 Fast Ring testers in a new 20H1 Fast Ring. If you’d prefer to stay on 19H1, you’ll need to reset your Windows Insider settings (go to Settings > Update & Security > Windows Insider Settings) to either the Slow or Release Preview Rings. And if you’re just itching to test Windows 10 19H2 (which is shaping up to be the most uneventful new version in the history of Windows), you’ll have to wait a bit to see just where you’ll sit in the scheme of things.

One thing for certain, for a company that likes to toot its own transparency horn, this has been a very confusing couple of days.

Another App is Controlling Your Sound: How to Fix it

We all use multimedia apps on our PCs, but sometimes users can’t start their favorite multimedia apps due to Another app is controlling your sound error.

This can be a problem, and it can even cause issues such as Realtek sound not working on your PC. However, today we’re going to show you how to fix this issue.

Why does Can’t play, another app is controlling your sound message appear?

  • Certain third-party applications or services can cause this issue to appear.
  • The required Windows Audio services aren’t running.
  • Your audio settings are configured to allow applications to take control of your sound device.
  • Sounds settings aren’t configured properly, thus causing the error to appear.
  • In some rare cases a bad Windows update can cause this problem.

How do I fix Another app is controlling your sound error?

1. Pause MS Office Upload Center

  1. Open any Office application.
  2. Go to File > Account.
  3. Under Product Information click on Update Options > Update Now.
  4. If Office isn’t up to date,updates will be downloaded automatically.

Alternatively, you can also download Office updates right from Microsoft’s website.

2. End audiodg.exe

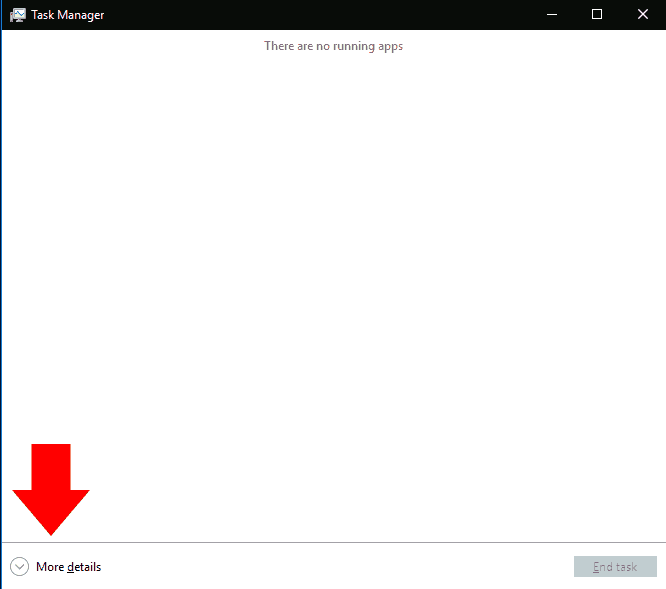
  1. Start Task Manager. To do that quickly, you can press Ctrl + Shift + Esc.
  2. After Task Manager starts, go to Details tab.
  3. Now locate audiodg.exe, right click it and choose End Task from the menu.

3. Check if Windows Audio services are running

  1. Press Windows Key + R and enter services.msc. Press Enter or click OK.
  2. When Services window opens, you’ll see a list of all services. Now locate Windows Audio service and double click it to open its properties.
  3. Check the Startup type and Service status. If everything is in order, Startup type should be set to Automatic and Service status to Running. If not, set Startup type to Automatic and click the Start button to start the service. Now click Apply and OK to save changes.

After starting the Windows Audio service, the problem should be fixed. Few users claim that you can fix this problem simply by stopping the Windows Audio service and restarting it, so feel free to try that as well.

4. Disable your audio driver

  1. Open Device Manager. To do that quickly, just press Windows Key + X and choose Device Manager from the list.
  2. When Device Manager opens, look for your audio driver. It should be located in Sound, video and game controllers section. Once you find your driver, right click it and choose Disable device from the menu.
  3. You’ll get a warning message. Click on Yes to proceed.
  4. Now locate your audio driver once again, right click it and choose Enable device.

After doing that, the problem with your multimedia apps should be resolved. Keep in mind that this is just a workaround and you’ll have to repeat it every time this problem appears.

5. Watch an online video

  1. Connect to your Bluetooth device.
  2. Start Groove Music.
  3. Go to YouTube or any other video hosting site and watch any video.
  4. Stop the video playback and try to play music in Groove Music.
  5. Optional: If the error message appears, just play another YouTube video and then try to play audio in Groove Music.

This is a crude workaround, but it works according to users, so feel free to try it. If this error appears in other multimedia player instead of Groove Music, just follow this solution and use your preferred player instead of Groove Music.

6. Disable applications from taking over your audio

  1. Press Windows Key + S and enter sound. Choose Sound from the list of results.
  2. Locate your audio device, in our example it’s Speakers, right click it and choose Properties.
  3. Navigate to Advanced tab and uncheck Allow applications to take exclusive control of this device option. Now click on Apply and OK to save changes.
  4. After doing that, restart your PC.

Once your PC restarts, other applications won’t be able to take control over your audio device and the problem should be resolved.

7. Remove the problematic updates

  1. Open the Settings app. You can do that quickly by pressing Windows Key + I.
  2. When Settings app opens, navigate to Update & security section.
  3. Click on Update history.
  4. List of installed updates will appear. Memorize the recent updates and click on Uninstall updates.
  5. Installed Updates window will appear. To remove an update, you just have to double click it and follow the instructions on the screen. Few users claim that KB2962407 update caused the problem, so if you see this update on the list, be sure to uninstall it.

After removing the updates, check if the problem is resolved. If removing the updates fixed the issue, you need to prevent the problematic updates from installing again.

To do that, you’ll need to download Show or hide updates troubleshooter from Microsoft. The tool is simple to use, and you can use it to prevent the problematic update from being installed, so feel free to try it.

8. Restore default Sound settings

  1. Repeat Steps 1 and 2 from Solution 6.
  2. Navigate to Advanced tab and click on Restore Default button.
  3. Now click OK to save changes.

After doing that, your Sound settings will restore to default and the problem should be fixed.

Another app is controlling your sound error can prevent you from enjoying in multimedia on your PC. As you can see, this isn’t a serious error, and you should be able to fix it by using one of our solutions.

In case you’re having further problems, we have a great guide on how to fix no sound on Windows 11, so be sure to check it out.

Xbox One 1904 update will be available for Omega Insiders today

The Xbox One 1904 update will be available for Xbox Insiders on the Omega Ring today. This new system update is already available for Xbox Insiders on the Preview Alpha, Beta and Delta rings, and the Omega ring is pretty much the equivalent for the Release Preview Ring in the Windows Insider program. In other words, we’re probably just a couple of days from the public release.

The latest 1904 preview build for the Xbox One will be available to download for both Delta and Omega Insiders starting at 2PM PDT today. Here are the new features included in this update:

  • A new virtual mini keyboard
  • The ability to reprogram the OneGuide button on the Xbox Media Remote
  • A new Restart console button in the Power Center
  • Xbox Game Pass Quests are now accessible right from the dash
  • With Message Requests, Xbox Live messages from your contacts will be separated from messages sent by strangers
  • A new Suggested Uninstall feature will help you choose which games and apps to remove when you need to make space to install new content.

With this new system update heading to the Omega ring, it shouldn’t be long before Microsoft releases it for all Xbox One owners. This could happen as soon as next week, assuming Insiders don’t find any breaking bugs in this latest build.

Destiny 2 Error Codes: Here’s the Meaning & How to Fix Them

Destiny 2 error codes can disrupt gameplay. They stem from various reasons, including:

  • Network Issues: Baboon, Weasel/Hawk, Anteater, Lettuce, Chicken
  • Server Problems
  • Account Issues
  • Platform Glitches
  • Client Problems

In this guide, we’ll look at each category, explain what the errors mean, and show you how to fix them so you can keep playing without trouble.

How can I fix frequent Destiny 2 error codes?

1. Network connectivity issues

1.1. Error Baboon

This error can be caused by packet loss or disconnections between your network and Bungie.

⚙️ To fix it, switch to a wired connection temporarily to rule out WiFi signal strength/stability. If it recurs, force quit Destiny 2 by doing the following based on your platform type:

Xbox 360:

  • Press the Guide button
  • Press Y button to go back to the dashboard

Xbox One:

  • Press Xbox button in the game/app
  • Check that the big app tile is highlighted
  • Press Menu button
  • Select Quit

1.2. Error Weasel/Hawk

Weasel usually indicates a connection issue, often related to packet loss or general connectivity problems between your console/PC and the Destiny 2 servers.

⚙️ To fix it, switch to a wired connection temporarily to rule out the connection as a possible culprit, then power cycle your console if you cannot launch Destiny 2 by holding the power button down for 5 to 10 seconds until it resets.

1.3. Error Lettuce and Anteater

Both errors suggest issues with the player’s network setup, internet connection, or connectivity between their device and the Destiny 2 servers.

⚙️To fix it, check if your internet connection is stable, switch to a wired connection, restart your router and ultimately contact your ISP.

1.4. Error Chicken

This happens when you’re accessing an older version of Destiny 2 after a new update has been made available. To fix it, update Destiny to the latest version by doing this on your console:

⚙️Here’s how you fix it:

Xbox One:

  • Power down your console till it turns off
  • Unplug it from the power outlet for five minutes
  • Plug it back in and relaunch Destiny 2. This forces it to check for and download updates
  • Launch Destiny 2 once the update has been downloaded and installed

1.5. Error Marionberry

This error indicates an issue with your networking setup when the network or parental control settings change either on the network or game console or after a WiFi blip.

It can also show when your router is connected but is in a bad state – faulty firmware or failing hardware. To fix Destiny error code Marionberry, reboot your router by doing the following:

  • Log out from Destiny 2
  • Turn off your console
  • Power cycle your router or modem by turning each off and wait 30 seconds before turning back on one at a time, starting with your modem
  • Turn on your console and relaunch Destiny once your network is back up

1.6. Error Centipede

This is a general networking error caused by loss of server connection.

⚙️ To solve it, switch to a wired connection, or get your NAT to an Open or Type 1 state.

1.7 Error Sheep

This happens when you try to join a fireteam in which a member hasn’t updated to the latest version of Destiny 2.

⚙️ To resolve it, close and restart Destiny to initiate the update.

Note: If the console fails to update Destiny automatically, update it manually. If all players are playing the latest Destiny version, try to resume the game and see if it helps.

1.8. Error Chive

Error Chive in Destiny 2 indicates network connectivity issues, causing instability with the game servers. Players may experience disconnections or lag during gameplay.

⚙️ Troubleshooting involves updating network drivers, ensuring a stable internet connection, and verifying game files.

If issues persist, contacting Bungie support or waiting for a fix in a future update may be necessary.

1.9. Error Broccoli

These errors mean that there’s an issue detecting the player’s GPU and are caused by a driver crash.

⚙️ To fix this, ensure your operating system and graphics card drivers are up to date with the latest version.

1.10. Error Honeydew

This happens if public access to an activity has been overridden manually by Bungie, especially if an issue has been found or an activity is taken offline before a Destiny 2 update.

⚙️ Check for any updates from Bungie’s official pages and sites.

2. Server-side issues

2.1. Error Cabbage

This may happen when your router’s settings block communications to or from Destiny 2 services

⚙️To fix this:

  • Connect your console directly to the router via wired or WiFi connection. You may encounter more issues if you try to connect to Destiny through a router connected to an alternate router. For best results, connect to the router connected to your modem
  • From the router settings page, go to Home > Toolbox > Firewall.
  • Create a new Firewall level within your Router settings. You can call it Destiny 2.
  • From the Router settings page, go to Home > Toolbox > Game & Application Sharingand configure the following settings: Enable UPnP, Disable “Extended Security”, and Disable any “Assigned Games & Applications” settings

2.2. Error Boar

If you get this error, you may lose connection to Xbox Live while downloading patches or loading content. Similarly, if you accidentally cancel the download, you can get the Boar error.

Or if your install comes to a halt, go to Active Downloads or Download Management window on your system and check the progress bar before you cancel the download.

Boar also comes up when using wireless connections, so you can try using a wired connection because losing it will stop the download with no option to resume. Otherwise, delete and restart the download process.

If you’re not downloading a patch or update, you may be having a service issue, which can mean limited or no connectivity to Xbox Live services that causes the error due to failure in loading the content.

Sometimes you can see Boar error in rare cases when there’s a region mismatch between your account and Destiny 2.

⚙️ To fix this:

  • Reinstall Destiny
  • Before launching the game, create a new account and ensure the region of your new account matches that of the game
  • Launch Destiny 2 to download the update
  • After you download it, sign out of your current account and back into the original account and launch Destiny 2

If you continue seeing Boar error, delete and re-install Destiny 2 on your console.

2.3. Error Turtle

If you’re seeing this error for the first time, try playing again and resume what you were doing before the error came up, otherwise exit and relaunch the game.

⚙️ If the error recurs, maintain a wired connection, check for packet loss, and clear the cache on your console. Some users have reported that logging into the network from a different device helps resolve the error.

2.4. Error Mulberry/Toad/Nightingale/Lime

This may arise due to network instability, leading to server connection issues.

⚙️ To fix it:

  • Retry playing or resume previous activity.
  • If error persists, exit and relaunch Destiny 2.
  • Check Bungie’s official channels for updates.

2.5. Error Oyster

Error Oyster in Destiny 2 occurs when content patches or updates fail to download.

⚙️ To fix it:

  • Power cycle network hardware.
  • Ensure a wired connection during downloads.
  • Try deleting and reinstalling the Destiny 2 app if issues persist.

3. Player account issues

3.1. Error Urchin

This error means you cannot launch Destiny 2 due to a restriction placed on your account.

⚙️ To fix this, choose a different activity or go to Destiny Account Restrictions and Banning Policies page.

Note: This error may appear to players trying to access The Reef, and have characters below level 20, yet only those with 20 or higher can access it.

4. Platform-specific issues

4.1. Beaver/Flatworm/Leopard

These errors are caused by failure to connect your console to another player’s console through the internet. This can be due to connection quality problems like packet loss, ISP saturation, or internet congestion, faulty wiring or Wi-Fi setups, and router/network configuration issues.

⚙️ To fix them:

  • Enabling UPnP on the router
  • Opening your NAT to reduce the frequency of the error
  • Switching to a wired connection from a WiFi connection

5. Gaming and matchmaking issues

5.1. Error Bee/Fly/Lion

These three errors are caused by general disconnection issues between you and the routes your traffic passes through the internet to connect to Bungie.

Such issues include packet loss, disconnections between your home network and Bungie like ISP saturation or internet congestion, and faulty connection setup or wiring.

⚙️ To fix it, avoid file sharing, streaming videos or other tasks that use up bandwidth on devices connected to your network, or console apps running in the background.

6. Client-side issues

6.1. Error Buffalo

This error happens to gamers who haven’t signed in with their platform account, the platform’s service is under maintenance, or the subscription has expired.

⚙️To fix it, sign in with the platform account, and renew subscriptions, otherwise maintenance has to be complete before you can play again.

6.2. Error Termite

⚙️ If you get this error, try resuming your game again or whatever you were doing before the error came up. If it recurs, exit Destiny 2 and relaunch the game.

You can also use Scan and Repair tool after which you can download and install the files at the end of the scan and repair process, then relaunch Destiny 2 and try again.

Note: you can also adjust your parental controls on your router to open up player-to-player connectivity. If it recurs, port forwarding and firewall exceptions can alleviate the error.

6.3. Error Tapir

Error Tapir usually occurs on gaming consoles.

⚙️ The quickest way to fix this is to restart your console. If the issue persists after rebooting your device, try to install the latest system and game updates. Hopefully, these two methods will fix the problem.

Wrap up

In case you are facing other issues like the Destiny 2 game stuck on the Initializing screen, first ensure you have a stable internet connection; read this guide to learn more about the solutions.

We also have a guide on Destiny 2 CAT error when no update is available, so don’t miss it for more solutions. We also covered Error code Porpoise in Destiny 2 in our latest guide, so don’t miss it.

Is there a Destiny 2 error code you’re experiencing that hasn’t been listed here? Let us know in the comments section below.

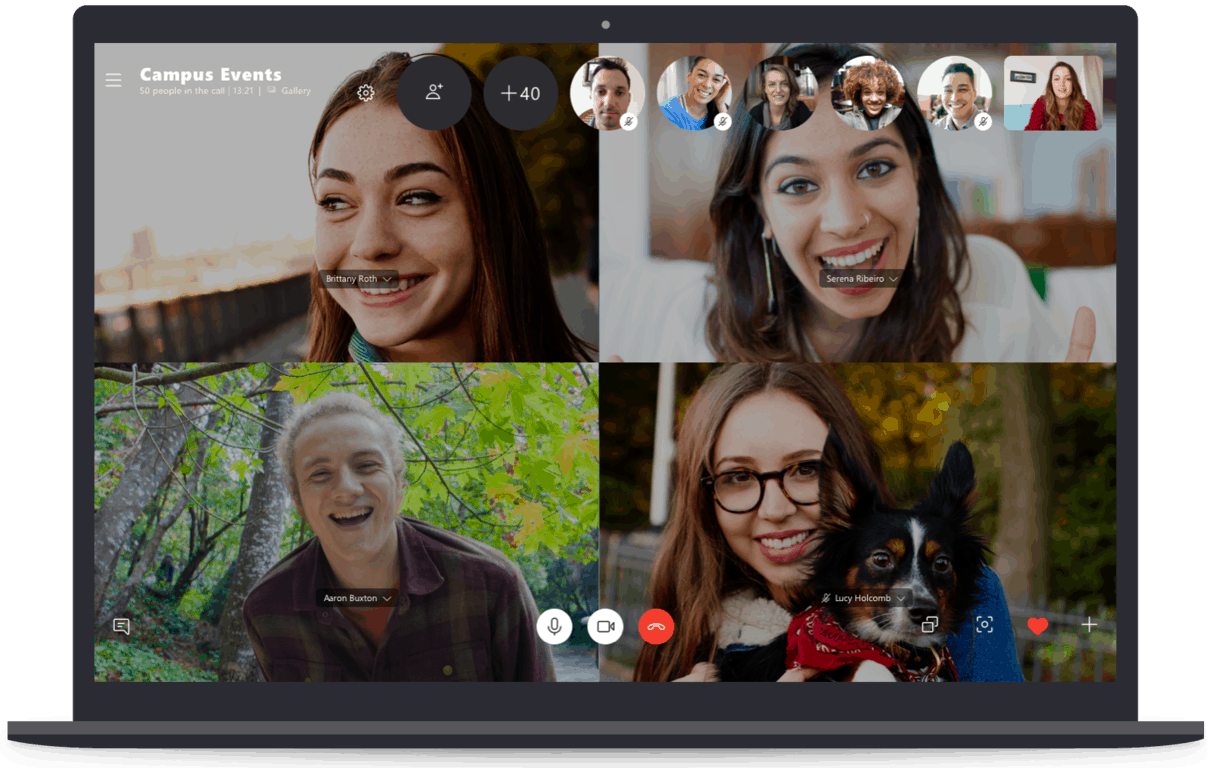
Skype group calls now support up to 50 users

Following some testing with Skype Insiders, Skype is doubling today the maximum number of people in a group call from 25 to 50. The popular communication app is catching up with Facebook Messenger, which has been supporting up to 50 people in a call since a couple of years now.

“Every Skype group with up to 50 people now supports calling, whether you’re ringing just your best friend or 45 coworkers,” the Skype team announced today. You’ll need to install the latest version of Skype on your devices to enjoy this feature, though Microsoft notes in an FAQ that the maximum number of video streams for group video calls will depend on the platform and device.

The ability to call up to 50 people in Skype is pretty nice, but it’s worth noting that Microsoft also changed how group call notifications work to make them less disruptive. Instead of making all your devices ring, the Skype app will now send you a simple notification asking you to join the group call. “If the notification of starting a call is not enough, you can select individual members to ring, or if your group is less than 25 participants, you can ring the entire group,” the Skype team added.

Remastered Halo: Reach game should ship to select Halo Insiders on Xbox and PC later this month

Halo: The Master Chief Collection will finally make its PC debut later this year, and developer 343 Industries had some exciting news to share with Halo Insiders in this week’s Community Update. The Halo: Reach remaster, which will be the first Halo game to ship in the PC version of Halo: MCC later this year is about to ship to select Halo Insiders on Xbox and PC very soon.

“If everything goes according to plan, we hope to flight Halo: Reach on both Xbox and PC with select players later this month”, wrote John Junyszek from the Community Team at 343 Industries. As Halo: Reach is a prequel to the 2001 game Halo: Combat Evolved, Reach currently appears right left to Halo: CE in the current internal builds of Halo: MCC.

Halo: Reach currently appears right left to Halo: CE in current internal builds of Halo: MCC.

There is still time to sign up for the Halo Insider Program if you want to be ready when 343 Industries starts flighting in MCC on Xbox One and PC. “Since the number of signups blew away our expectations, we simply cannot accomodate everyone,” explained Junyszek, adding that those who don’t get selected for the first flight may still get a seat on the next round.

“Our first flight does not represent a final (or even a beta) version of the game – we know there is plenty of work to do,” added Junyszek. If you’re a PC gamer, be aware that the first flight will happen on Steam instead of the Windows 10 Microsoft Store. Halo: MCC will ship on both platforms later this year, and both versions of the game will also use Xbox Live for cross-play multiplayer. It’s worth noting that the Steam version of Halo: MCC will support both Windows 10 and Windows 7, with Windows 8 “still being investigated.”

343 Industries shared more details about the PC version of Halo: MCC in a recent Reddit AMA session. All games in the collection will support uncapped FPS, FOV-sliders and 144hz+ refresh rates, but customization options could vary slighly by title. Mod support is also being worked on in collaboration with the modding community, and 343 Industries really seems to be committed to provide the best experience to PC gamers who have been waiting for years to see Halo: MCC finally land on Windows.

How to disable inactive window scrolling in Windows 10

Windows 10 added a new convenience feature to make it easier to interact with background windows. Named Inactive Window Scrolling, it enables you to scroll the contents of inactive windows by hovering your cursor and using the scroll wheel.

Inactive window scrolling simplifies the Windows desktop experience and addresses a longstanding usability complaint. Previously, scrolling a background window required you to switch to it, perform the scroll, and switch back again, adding two cumbersome steps to your workflow.

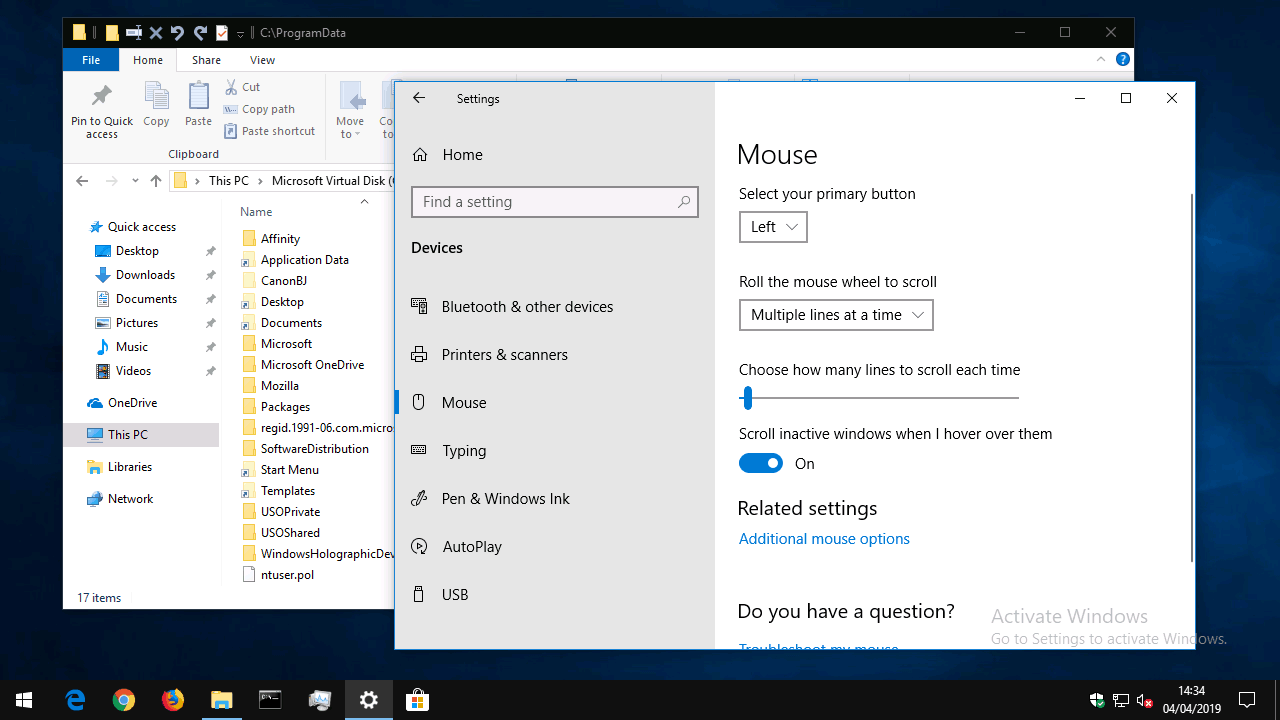
Inactive window scrolling in Windows 10

Inactive window scrolling resolves this issue but isn’t necessarily for everyone – some users may find it confusing if they have difficulty tracking onscreen content or using a mouse precisely. Turning it off – or on, if it’s disabled and you want to use it – is a simple button click.

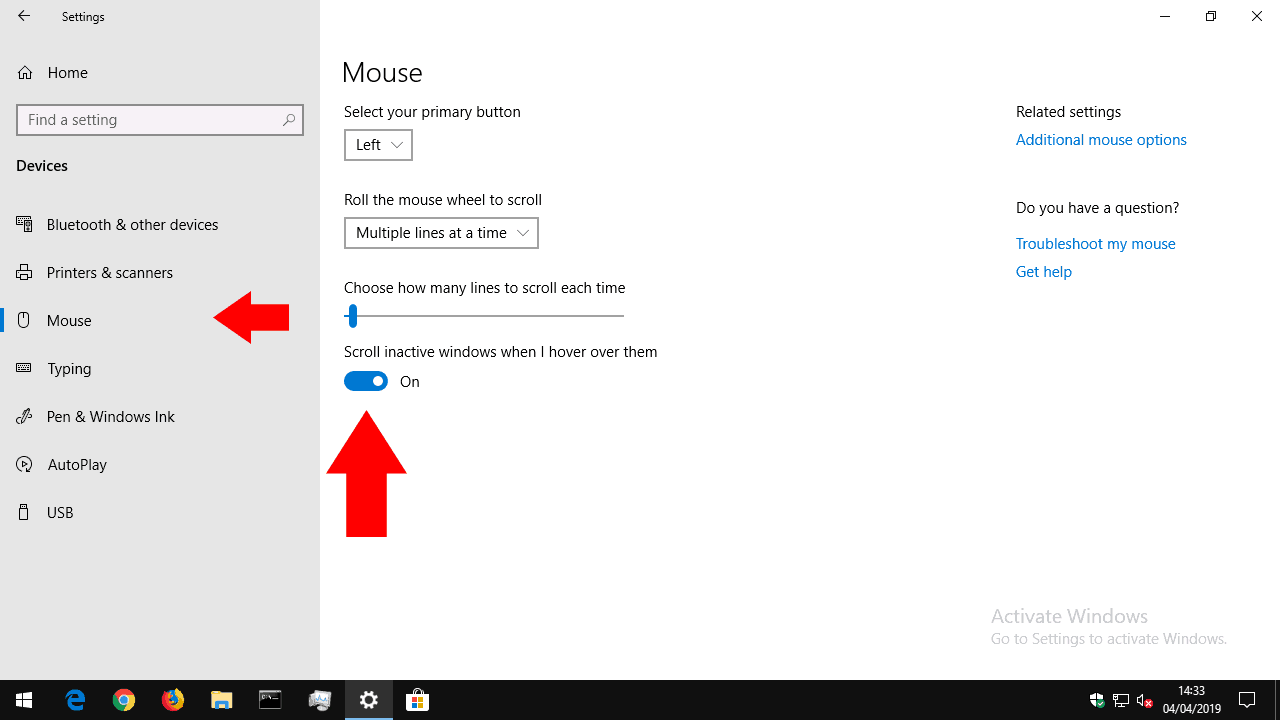
Open the Settings app (Win+I keyboard shortcut) and click the “Devices” category on the homepage. From the sidebar on the left, click or tap the “Mouse” page to view mouse settings.

Inactive window scrolling in Windows 10

At the bottom of the page, toggle the “Scroll inactive windows when I hover over them” option to “off” to disable the feature. Alternatively, turn it on to use inactive window scrolling.

If you turned the feature off, you’ll find background windows no longer respond to mouse wheel scroling – just like in Windows 8.1 and before. Conversely, if you enabled inactive window scrolling, you can now hover your mouse over a background window and use the mouse wheel to scroll its contents.

Here’s how to fix Something went wrong with your extensions error

Microsoft Edge is a great browser, but many users reported Something went wrong with your extensions error message while using it. This can be an annoying issue, so today we’ll try to fix it.

What to do if Microsoft Edge extensions are not working?

  1. Update Windows 10
  2. Update Extensions
  3. Uninstall and Reinstall the Extensions
  4. Terminate, Repair and Reset Microsoft Edge
  5. Reinstall Microsoft Edge

1. Update Windows 10

Microsoft seems to have taken notice of the issue and released an update. However, if you are noticing the error in the recent version of Windows, check for any pending updates.

  1. Click on Start and then select Settings.
  2. Open Update and Security.
    something went wrong with your extensions windows update
  3. Click on Check for updates button. Windows will look for any pending updates and start the download.
  4. The update may take a few minutes to a few hours depending on the size of the update.
  5. After the updates are downloaded, restart your PC to install the updates.

Restart your PC and launch Microsoft Edge. The browser should work normally like before with all the extensions installed..

  • Also Read: 1Password Edge extension is now available on the Windows Store

2. Update Extensions

One way to fix Something went wrong with your extensions error is to keep your extensions up to date. To do that, open the Windows Store and search for the extension you want to update. Click on the Update button next to it install the new update.


3. Uninstall and Reinstall the Extensions

If you’re getting Something went wrong with your extensions error in Edge, try reinstalling the affected extensions.

  1. Launch Microsoft Edge and click on Settings and more.
    Edge Extension Settings
  2. Click on Extensions. Edge will display all installed extensions.
  3. Now select the problematic extension, and click on the Setting.
  4. Scroll down and click on the Uninstall button.Edge Extension Uninstall
  5. Click OK if prompted to confirm the removal of the extension.
  6. Close Edge browser.
  7. Open Windows Store and install the removed extension again.
  8. Open Edge and check if the error is resolved.

4. Terminate, Repair and Reset Microsoft Edge

The Edge browser comes with an option to repair and reset the browser. You can also terminate the browser process completely to perform a hard reset. This can sometimes help with the Something went wrong with your extensions so be sure to try it out by following these steps:

  1. Click on Start and select Settings.
  2. Open the Apps tab.
  3. Under Apps and Features, search for Edge.
    Edge Settings Advanced Options Something went wrong with your extension
  4. Click on Microsoft Edge and select Advanced options.
  5. Scroll down to Apps Permissions and check if the Account info option is turned on.
  6. Scroll down and click Terminate button.
    Reset - Terminate- Repair Microsoft Edge Something went wrong with your extension
  7. Under the Reset section, click on Repair and wait till you see a checkmark beside the Repair button.
  8. Launch Microsoft Edge and check if the browser is working normally without errors.
  9. If not, click on the Reset button in the earlier Apps window. Resetting the browser will delete all the app’s data, including preferences and sign-in details.
  10. Click on the Reset button once more.
  • Also Read: Hundreds of new Microsoft Edge add-ons will land this year

5. Reinstall Microsoft Edge

If the previous solution didn’t fix Something went wrong with your extensions error, you can try to uninstall the browser and reinstall it as a last resort.

  1. Close Microsoft Edge if it is running.
  2. Press Windows Key + R on your keyboard.
  3. In the Run dialogue box, type %LocalAppData% and hit Enter.
    LocalAppData Run Something went wrong with your extension
  4. In the File Explorer, click on the View tab at the top.
  5. From the top-right side, check the Hidden items option. This will show any hidden items in the folder.
  6. Now search for Packages folder and open it.
  7. Inside the Packages folder, look for a package named Microsoft.MicrosoftEdge_8wekyb3d8bbwe.
  8. You can simply copy the package name and paste in the search box to find it.
  9. Right-click on the package and select Delete.
    Delete Microsoft Edge package
  10. Windows will now scan for all the associated items in the package.
  11. When prompted, click on the  Yes button to delete the package.
  12. Click Yes once again for Do you want to permanently delete this folder? message. Click on Skip for any files that  Windows cannot delete.
  13. Restart your PC.

Reinstall Microsoft Edge 

  1. Launch PowerShell — Right-click on Start and select PowerShell (Admin).
    PowerShell User Profile Something went wrong with your extension
  2. In the PowerShell window, type the following command to navigate to your user account.
    • Cd C:\users\username
  3. In the above command change username with your account username.
    PowerShell Install Microsoft Edge Something went wrong with your extension
  4. Copy and paste the following command in PowerShell and hit Enter.
    • Get-AppXPackage -AllUsers -Name Microsoft.MicrosoftEdge | Foreach {Add-AppxPackage -DisableDevelopmentMode -Register “$($_.InstallLocation)AppXManifest.xml” -Verbose}
  5. You should see a success message.

Restart your system once more, and you should have successfully reinstalled Microsoft Edge on your computer.

There you go, these are some methods that can help you fix Something went wrong with your extensions error, so be sure to try them out.

RELATED STORIES YOU MAY LIKE:

No 3D grass on FIFA18? Here’s how to fix the issue on PC

FIFA 18 has inherited a series of bugs from the previous game. Unfortunately, not all players can enjoy 3D grass even on ultra preset. The pitch
looks flat and carpet alike and this is very annoying.

Gamers really hoped that EA would fix this bug. The fact that the issue is still present actually kills a big part of the joy of the game.

Here’s how one user describes this problem:

“Well, we all know that problem started with FIFA17. […] I created a similar post last year for 17. Exactly it wasn’t like this. I just wanted you guys to fix this somehow. You told me IT’S GONNA BE FIXED with patches upcoming. It didn’t. And i accepted this for FIFA 17. I hoped that i won’t have that problem in FIFA 18. And i saw what… Same problem. I know you guys are not gonna fix it, won’t ever try to fix it”

It seems that the flat grass issue is not actually a problem, but rather a choice that EA made. 3D grass is simply not supported on a series of GPU cards. Surprisingly, 3D grass texture is available on a series of low-end GPUs.

How to fix 3D grass issue on FIFA 18

We’re sure that EA will eventually broaden 3D grass support. However, if you don’t want to wait until the company rolls out a patch, we’ve got a quick solution for you. Well, this solution works on the GTX 960M.  But you can try it on other GPUs at your own risk.

There a FIFA mod that enables 3D grass support on PC. All you need to do is download it on your PC, replace the “.ini” file in the patch folder with the one you downloaded and paste the .dll in the main FIFA folder. That’s it, you should be able to play football on 3D grass now.

You can download the FIFA 18 3D grass mod from ModdingWay. Let us know if this fix worked for you. Be aware that modding a game might lead to certain issues and/or limit certain features. We can’t guarantee whether this will work for you, but it’s worth a try.

FIFA-related articles that you should check out:

Posted in Fix

Fix: Outlook Contacts Missing after Windows 10/11 Upgrade

Windows 10 is becoming more and more popular among users. Month after month, statistics confirm that the number of Windows 10 users increases steadily, reaching 25% last month. With features like Cortana, a revamped start menu, and more, Windows 10 has become the favorite OS for many people.

The upgrade procedure is very easy to follow and, pretty much, works on its own. But sometimes, things can go wrong, and one can run into some very weird problems. One of these problems is losing contacts after upgrading to Windows 10.

After upgrading to Windows 10 from Windows 7 SP1, I have lost all emails, my calendar, and all contact lists.  I use these for my home business.  This is unacceptable.  I am not a computer guru but can find my way around.

How can I fix Outlook contacts missing after Windows upgrade?

In this post, we’ll tell you how to fix this issue and get your contacts back. Just follow the steps below, and you will get your contacts back in no time.

On the home screen of the Outlook page, there will be an arrow where you can click to see a dropdown which consists various other features like Mail, People, Calendar, OneDrive, and the rest of the Microsoft apps. You need to click on the one marked as People and there you can see all of your contacts.

If that’s not the case, here’s what you should do if you are using the Outlook application for Windows 10:

  1. Open the Outlook application for Windows 10.
  2. Click on Preferences.
  3. Click on General.
  4. Uncheck Hide on my computer folders. By doing this, there will be no hidden contacts.
  5. Restart Outlook application.

If you’re using Apple devices, you can easily sync iCloud contacts with Outlook and avoid this issue altogether.

What actually happens while upgrading to Windows 10?

When Windows Upgrades from Windows 8 or Windows 7 to Windows 10, it creates a folder called Windows.old which contains all the files used by the previous installation. The Windows.old files help to restore your system to the old version of Windows if you don’t like the new version.

It contains all the system files, installed programs, and each user account’s settings.

To recover the lost contacts and other data, go to C:Windows.oldUsersusernameAppDataLocalMicrosoftOutlook.

There you can find the data of Outlook and other personal data saved there. Usually, the data there is hidden, and you may have to configure Windows to display hidden files and folders. Here’s how you can display the hidden files :

  1. Right-click on the desired folder.
  2. Click on Properties.
  3. Clear the check mark on hidden and click on apply.

With that said, we can conclude this article. If you have any additional questions or suggestions, feel free to tell us in the comments section below.

Windows XP market share is going down for the first time in years

It seems like Microsoft is not yet ready to give up on Windows XP just yet. Many users are still using Windows XP even after it was retired back in 2014.

Last year was full of bumps for the operating system. The latest statistics shared by NetMarketShare show that more and more users are abandoning Windows XP.

Windows XP is hard to kill

Windows XP has been out of support for many years now. Many organizations are still relying on the good old OS exposing themselves and their customers to cyber threats. But things may soon change.

Last year in the month of May, Windows XP even managed to grab a market share of 5.04 percent. The fact that a retired operating system touched a 5 percent market share surprised everyone.

Moreover, in the month of September, the market share collapsed to 3.19 percent and increased again in December to touch 4.54 percent. 

But the market share of Windows XP has been declining since then. As a matter of fact, the lowest market share has been recorded in March this year.

Since its retirement in 2014, that market share turned out to be a game changer for the OS. In the next few months, Windows XP‘s market share is expected to continue its decline.

It’s time to upgrade

It is time to upgrade to the latest version of the operating system. The upgrade is important as the tech giant no longer provides software support and security updates on the platform.

Furthermore, users running outdated OS versions no longer receive third-party app support. The big M is no longer inventing time and energy into fixing the security vulnerabilities in Windows XP. All in all, sticking to Windows XP is a bad idea.

As a quick reminder, Windows 7 enjoyed an increase in its market share in 2019 just like Windows XP.

Microsoft recently announced the end of support deadline for Windows 7 operating system starting January 20. So, as you can see, Windows 10 is the only reliable upgrade option that you currently have.

RELATED ARTICLES YOU NEED TO CHECK OUT:

0xfffd0000 Error in Task Scheduler: 4 Ways to Fix it

Task Scheduler is an incredibly useful tool, but many reported errors 0xfffd0000(-196608) while using it. In case you’re not familiar with this tool, we have a great guide on how to schedule tasks so be sure to check it out.

As for errors, they can prevent Windows from performing necessary options, so it’s crucial that you fix them, and this guide will show you the best ways to do that.

What is 0xFFFD0000?

  • This error code occurs when running scheduled tasks.
  • It appears if the paths in your task aren’t correct.
  • Incorrect task properties can also cause this issue.

How can I fix error 0xfffd0000 on Windows 10?

1. Check scheduled tasks properties

  1. Open Task Scheduler from the Cortana/Search bar.
  2. Under Task Scheduler Library, right-click on the task associated with the error and select Properties.
    Task Scheduler Properties error 0xfffd0000
  3. Open the Actions tab, select the Action and click on Edit.
    Task scheduler Actions tab error 0xfffd0000
  4. In the Edit Action window, under Program/script make sure the path to the program is typed correctly.
    Task Scheduler Edit Action error 0xfffd0000
  5. If not, click on the Browse button, navigate to the application directory and select the .exe file.
  6. For Windows PowerShell it would be set to the following path: C:\Windows\System32\WindowsPowerShell\v1.0\powershell.exe.
  7. In the Add arguments (optional) field, enter the desired arguments as well as the file path to be used. It should look like this.
    -file C:\users\username\scripts\samplescript.ps1
  8. In the above argument, change the following path to the actual scrip path: C:\users\username\scripts\samplescript.ps1
  9. Click OK to save the changes.

Wait for the Task Scheduler to execute the task and see if the 0xfffd0000 error is resolved.

2. Delete and re-create the Task

  1. Open Task Scheduler and click on Task Scheduler Library.
    Task Scheduler Properties
  2. Locate and right-click on the problematic task and select Delete.
  3. Click Yes for Do you want to delete this task message.
  4. Click on Action in the toolbar, and select Create Basic Task.
  5. Re-create the Powershell task and make sure you follow the instructions in the first solution to properly configure the task.
  6. Close the Task Scheduler window.

After recreating your task, the 0xfffd0000 error should be gone completely.

3. Check for file name change

  1. Check the file path used in the task.
  2. If the path to the file has changed, update it
  3. Once you update the path, check the task again.

Another reason for the error 0xfffd0000 can be incorrect file selection, so make sure your file paths are correct.

4. Change folder options

  1. Press Windows Key, type Folder Options and open File Explorer Options.
  2. Go to the View tab.
    File Explorer Options - Hide extension for known file types error 0xfffd0000
  3. Under Advanced settings Scroll down and locate Hide extensions for known files types.
  4. If the option is checked, uncheck the box and click Apply then OK to save the changes.

The 0xfffd0000 error while executing the PowerShell script mostly occurs due to an incorrect path or file name change. By following the solutions in this article, you can fix the error on your Windows 10 PC.

This isn’t the only error you can encounter, and we already covered what to do if Task Scheduler is not running on your PC.

Do let us know which of these solutions helped you fix the error in the comments below.

Email chain rife with sexual harassment claims prompts investigation by Microsoft’s head of HR

An investigative report from Quartz recently uncovered a prevailing environment of sexual harassment that had, until this point, gone unchecked by Microsoft’s HR departments.

There was a peek behind into the company’s troublesome work environment a year ago when a class action lawsuit made its way to the public consciousness with 238 alleged cases of discrimination and sexual harassment over a six-year span first recorded in 2010.

However, Quartz’s report puts the spotlight on just how palpable and contentious some acts employees were made to endure, with an email chain shared amongst the sexually harassed describing cases ranging from derogatory name-calling to death threats.

One female Microsoft employee alleged that during a work trip an employee of a partner company threatened to kill her if she did not perform implied sexual acts.

“I raised immediate attention to HR and management,” she wrote. “My male manager told me that ‘it sounded like he was just flirting’ and I should ‘get over it’. HR basically said that since there was no evidence, and this man worked for a partner company and not Microsoft, there was nothing they could do.”

Another said that she had been called a “bitch” at work more than once, and found it was pervasive in the company. “We did a roundtable with the women when I was in Xbox core [team] & every woman, except for 1, had been called a bitch at work,” the Microsoft employee wrote. “

Before people say this is just an Xbox thing (as I’ve heard that dismissiveness way too many times within Microsoft before) the other eng [engineering] orgs where my experiences happened were Windows & Azure. This is a Microsoft thing, a common one.”

Other shared stories include a woman asked to sit on someone’s lap, repeatedly, while also being in the presence of Microsoft executives and a representative of the company’s HR department.

Sadly, nothing was said at the time, and it doesn’t seem that anything was done afterwards either. If the class action lawsuit was not a strong enough catalyst for the company to address an underlying culture of harassment and discrimination, this new email chain may be just the boiling point to attract enough outside attention to provoke Microsoft.

Microsoft’s head of human resources Kathleen Hogan said she plans to personally review and investigate the claims that were initially passed over by HR while also alerting senior leadership, including the company’s very outspoken chief legal officer Brad Smith and CEO Satya Nadella.

“I would like to offer to anyone who has had such demeaning experiences including those who felt were dismissed by management or HR to email me directly. I will personally look into the situation with my team.”

Hogan’s statement has been independently verified and now places culpability at the company’s highest levels. “This thread has pulled the scab off a festering wound. The collective anger and frustration is palpable. A wide audience is now listening. And you know what? I’m good with that,” one Microsoft employee in the email chain wrote, according to Quartz.

FIX: Desktop Icons Missing in Windows 10

Although Windows 10 is becoming the most popular Windows operating system on the market, there are still certain minor issues that can occur.

Speaking of issues, some users have reported that their icons are missing in Windows 10, so let’s see how to resolve this issue.

According to users, all of their desktop icons are missing when they log in to Windows 10, and if you’re experiencing this issue you might want to check some of our solutions below.

What to do if there are no Desktop Icons in Windows 10

  1. Turn off tablet mod
  2. Unplug your second display
  3. Make sure Show Desktop icons is enabled
  4. Create a new file on your desktop
  5. Sort icons by name
  6. Send files to Desktop
  7. Enable desktop icons from Settings
  8. Turn off Start full screen
  9. Rebuild icon cache

Judging by the feedback we received from our readers, it seems that solutions number 3, 7 and 9 usually yield the best results. However, depending on your system configuration, you may need to try out several solutions to fix this problem.

We’ll list the step-by-step instructions below.


We’ve written extensively on desktop icons missing in Windows 10. Bookmark this page in case you need it later.


Solution 1 – Turn off tablet mode

Windows 10 is designed to work with touchscreen devices and touchscreen monitors and it comes with tablet mode that optimizes Windows 10 for touchscreen devices.

Apparently using tablet mode can sometimes cause your icons to disappear so let’s see how we can turn off tablet mode.

  1. Open Settings > System and choose Tablet mode from the left.
  2. Now locate the Make Windows more touch-friendly when using your device as a tablet and set it to off. desktop icons missing
  3. Your desktop icons should now appear. If that doesn’t work, try turning on and off Tablet mode a few times.

Solution 2 – Unplug your second display

Using two displays can sometimes cause your desktop icons to disappear but you can fix that by unplugging your second display and plugging it back in.

Solution 3 – Make sure Show Desktop icons is enabled

  1. Right click on the empty area on your desktop.
  2. Choose View and you should see Show Desktop icons option.show desktop icons
  3. Try checking and unchecking Show Desktop icons option a few times but remember to leave this option checked.

Solution 4 – Create a new file on your desktop

  1. Right click on empty space on your desktop.
  2. From the menu choose New and select any type of file you wish to create.
  3. Now your file should appear with your other desktop icons.

Corrupted desktop files on Windows 10? Don’t panic! We also have a fix for that!


Solution 5 – Sort icons by name

This problem can occur if you’re using two monitors, but you can fix that simply by sorting your icons. To sort your icons do the following:

  1. Right click on your desktop and choose Sort by.
  2. Next choose Name. After that your icons should be restored.

sort desktop icons

Solution 6 – Send files to Desktop

  1. Use File Explorer to navigate to Desktop folder. You should see all your files and folders still there.
  2. Right click any of the files and choose Send to > Desktop. After doing that all your icons should be restored.

Solution 7 – Enable desktop icons from Settings

There are a series of icons that you can enable right from the Settings page. Now, if these icons are disabled, obviously, they won’t be visible on the screen.

  1. Go to Settings > Personalization > Themes > select Desktop icon settings
  2. A new window will appear on the screen > to enable a particular icon, simply click on the checkbox

enable desktop icons

Solution 8 – Turn off Start full screen

Some users confirmed that disabling the Start full screen option from the Settings page solved the problem. Although this quick workaround may not work for all users, give it a try. If you’re lucky, it may fix the desktop icon issues that you’re having.

Go to Settings > Personalization > Start > toggle off Use Start full screen

start full screen windows 10

Solution 9 – Rebuild icon cache

  1. Go to Start > type ‘file explorer’ > double click on the first result
  2. In the new File Explorer window, go to View and check Hidden Items in order to display hidden files and folders
  3. Navigate to C:Users(User Name)AppDataLocal > scroll all the way downdelete icon cache
  4. Right-click on IconCache.db >  click on Delete > Yes.
  5. Go to Recycle Bin > empty it
  6. Restart your computer.

This solution deletes the IconCache file. When you restart your computer, you may notice that the size of the IconCache.db file is smaller, and the Date Modified is now the current date.

If the IconCache.db file is not available under File Explorer, restart your computer a few times.


Looking for the best icon making tool? Here are our top picks.


That’s about it, I hope this article helped you to get your desktop icons back. If you have any comments or questions, just reach for the comments below.

If you’ve got additional suggestions on how to fix this issue, feel free to list the steps to follow in the comments section.

RELATED STORIES TO CHECK OUT:


Microsoft not yet ready to switch to liquid cooling for Azure servers

Microsoft continues to offer some of the most sophisticated and affordable cloud hosting solutions on the market with its Azure service. Despite how well it excels (no pun intended) in providing top-of-the-line specs and features to many businesses today, the datacenters themselves continue to lag behind on at least some technological advancement.

One area where the Microsoft’s Azure datacenters could see improvement is in the way keeps its servers cool. The company’s principal platform engineer and manager of the thermal team working on its server development, Brandon Rubenstein, noted that, “eventually, we’ll get to the point where some of these chips or GPU solutions will drive us to require liquid cooling,” (via Data Center Knowledge).

Right now, the equipment continues to be air-cooled, and Microsoft still hasn’t committed to a liquid cooled solution. In addition to the reduced power consumption and environmental benefits liquid cooling could offer, it could also help increase server density and potentially reduce system failures.

Part of the reason Microsoft hasn’t adopted liquid cooling in its Azure datacenters is likely due to it waiting on the standardization of such technologies. Rubenstein has predicted that rack-level liquid cooling could be standardized in as little as one or two years, although the company has been experimenting with various methods for its Project Olympus OCP servers.

One can only hope for the standardization and adoption for liquid cooling to take off.

FIFA 18: game crashes, server disconnects, sound won’t work

FIFA 18 is one of the major games released this year. Football fans now have the chance to prove their skills once again and lead their team to victory. This year’s FIFA game is better than other editions of the past, but somehow many fans aren’t satisfied.

For example, the PC version of the game got average reviews on Metacritic. As a matter of fact, many players complained that FIFA 18 is affected by a bevy of issues. They also confirmed that was the main reason why they scored the game so low.

In this article, we’re going to list the most frequent FIFA 18 issues reported by PC and Xbox One gamers. We’ll also list the corresponding workarounds, whenever available. For more information on how to fix common FIFA 18 issues, this article may help you.

FIFA 18 reported bugs

  1. Getting an expired error on the transfer market
  2. Players can’t access EA’s servers
  3. FIFA 18 crashes shortly after the start
  4. Players get kicked out of squad battles games
  5. Icon/Ronaldo edition won’t load
  6. ‘Too many requests’ on the Web App
  7. FUT 18 Friendly Season results are broken
  8. Sound issues

1. Getting an expired error on the transfer market

If you can’t bid on some players on the transfer market, you’re not the only one. Hundreds of players can’t use the transfer market to purchase players and various other items due to an annoying listing expired error.

Here’s how one player describes the issue:

“Can’t “Buy Now” in Fifa 18 from the Transfer Market on Ultimate Team. Always get the error “Sorry Listing Expired” buy it shows that my coins are gone. I have to log out and log back in to see the player I apparently bought. Have to do this EVERY SINGLE TIME I buy a player. Ridiculous! Also due to this I can’t finish the Starter Objectives when you first start up Ultimate Team. Help! I demand some sort of fix! Did not pay $120 to pre-order this and have this happen!”

The good news is that EA already acknowledged the issue and is working on a fix.

2. Players can’t access EA’s servers

Many players can’t even connect to FIFA 18’s servers due to various errors. As a matter of fact, the most frequent error is the ‘INVAILD_REQUEST’ error code which usually occurs on a white background.

“I just get the Fifa18 in Switch version and start to play FUT, however once I login my origin account it show “{“error”:”invalid_request”} under a white background. I can login on my PC and mobile without any problem. Anyone can help?”

Gamers reported that troubleshooting methods such as restarting the console or PC, resetting the account password or creating a new EA account don’t yield any results. However, some players confirmed that changing the nickname fixes the issue. Although this solution may not work for all players, you should try it out and see if it works for you.

  • READ ALSO: Microsoft acknowledges gaming issues in Windows 10 Creators Update

3. FIFA 18 crashes shortly after the start

Other players have been able to play FIFA 18, but their joy quickly turned into despair. The game crashed just a few minutes after they hit the play button. All the game modes are affected by this problem which became more frequent after the title update.

“So I just downloaded the title update and now the game crashes a couple of minutes after I start a match. Anyone else have the same problem? Did 2 games, 1 squad battle and 1 offline seasons match. great update…”

For the time being, there is no clear answer on how to fix this problem. You can check for compatibility issues, update your graphics drivers and disable background apps. Hopefully, one of these workarounds will fix the issue.


For a better gaming experience, we recommend downloading Game Fire for free. It will help with various gaming issues, such as low FPS, lags and slow PC. 


4. Players get kicked out of squad battles games

Getting disconnected from squad battle games is definitely not a nice thing, to say the least. Many players get kicked out even when they are offline, while others get disconnected in midgame.

Even if the game reconnects straight away, that is definitely a very frustrating experience because you may lose contracts, coin boosts, points, etc.

“Is anyone having trouble with being disconnected from the squad battles games even though they are offline? It has happened to me twice and I received 0 points and will not let me replay the games I’m quite upset about this”

5. Icon/Ronaldo edition won’t load

FIFA 18 Ronaldo

Many players are unable to load the Icon/Ronaldo editions of the game. More specifically, when gamers click the “Play” button a circle appears beside the mouse as if it is loading something. However, nothing ever appears and the task manager confirms that FIFA 18 launches for about 10 seconds then closes.

If you’re experiencing this issue, the following workarounds may help you:

  • check your firewall/anti-virus software to make sure that FIFA 18 is allowed as an exception.
  • boot in safe mode with networking
  • clean boot to make sure that no apps and programs are interfering with the game
  • uninstall Microsoft Visual C++ (all of them) and reinstall them
  • repair FIFA 18
  • uninstall and reinstall Origin

READ ALSO: 5 best antiviruses for gaming PCs

6. ‘Too many requests’ on the Web App

Another frequent error that’s preventing FIFA 18 players from enjoying the game affects the Web App. More specifically, when players want to sell or buy players, an error message appears informing them that there are too many requests and the action cannot be completed.

The exact alert that appears is the following: “Too Many Requests: Too many actions have been taken, and use of this feature has been temporarily disabled”. This issue affects only the web app.

“I too have this problem. I have been trading non stop last 12 hours to try and get some coins. Building it up 300 coins at a time… slow and painful but I want a couple of cards now I am getting error messages and “too many requests”.
What is going on? EA please let me know how long this ban is in place for and why I am banned in the first place!”

It appears that this error occurs become EA bans players who trade too frequently in order to make sure that they’re not bots.

7. FUT 18 Friendly Season results are broken

If you like playing FIFA with your friends, don’t expect the results to appear on the season progress, history or overall record. This bug affected FIFA 17 as well, and it appears that FIFA 18 players will also have to deal with it.

“I’m having this issues as well. In FIFA 17, I played over 50 seasons with a friend, it was so fun. But a few months back eveything reset to 0. We’ve waited for FIFA 18, bought the Ronaldo Edition, but the bug still exists.”

The good news is that EA already acknowledged the issue and is working on a fix.

8. Sound issues

When players get into dialogues, the sound on The Journey is sometimes broken or doesn’t work at all. Music is still available in the background but the dialogue is broken.

“Had the same problem: i am on PC. This is now the day after its full release and the audio is still not working.
Sometimes i quit the game on an important scene with no audio and turn it back on and the audio works fine for 2 minutes which confuses me.
I have tried changing the settings multiple times but the journey cutscene audio still isn’t working […]
Music plays every cutscene and i use substitles but they dont work unless the audio is luckily working for a bit. […] im starting to feel like i just wasted 50 quid.”

General troubleshooting steps such as updating the sound drivers, installing the latest updates, and so on, fail to fix the problem.

This brings us to the end of our list. As you can see, FIFA 18 is pretty buggy right now, but we’re sure EA will fix these issues as soon as possible. Don’t forget to install the latest game updates as soon as they’re available.

If you encountered other bugs while playing FIFA 18, use the comment section below to tell us more about your experience.

More gaming-related articles:

Borderlands Handsome Collection, WWE 2K19 and Dead by Daylight are free to play with Xbox Live Gold this weekend

Perhaps in conjunction with the announcement of Borderlands 3, the Xbox team is putting the Borderlands Handsome Collection up on the Free Play Days docket.

Along with Borderlands 2, WWE 2K19 and Dead by Daylight will be free to play this weekend April 5, 2019 through April 7, 2019, for all Xbox Live Gold members.

As with most Free to Play offerings, developers are hoping fans are enticed enough to go out and purchase the full game to port over their newly acquired achievements and progress.

For those interested, here are the pricing for this weekend’s Free to Play weekend.

Players will have roughly 48 hours to run through an estimated 250 hours of gameplay between the titles being offered this weekend.

In addition to offering the game for free to play this weekend, an Xbox One subreddit also found evidence that a free avatar Borderlands 3 bandit mask can be snatched up from the Microsoft Store for the time being.

Borderlands fans will have a chance to brush up on their shooting and looting in the Handsome Jack saga while prepping for a new installment in the franchise later this Fall.

PC version of Minecraft crosses 30 million sales, Xbox One edition available now on Game Pass

Minecraft is the most popular game of all time, and today it has reached a new milestone. As of today, PC version of the game has officially been purchased more than 30 million times since the game was initially launched back in 2009 (via GamesIndustry.biz).

Last year, the game reached a record high of over 91 million active users, having sold more than 154 million copies since its release. One of the highlights of the game are the continuous updates it continues to receive, with the next major release of the Bedrock edition being the one to complete the Village and Pillage set—adding Bamboo Forests, Campfires, Wandering Traders and many other new blocks, mobs, items and features.

In other recent news, the Bedrock edition of Minecraft for the Xbox One has also joined Game Pass today, so members of the $9.99-per-month service will be able to play the game as part of their subscriptions. Normally, the game runs for $19.99 on the platform, so being able to play it for free on a subscription that includes more than 100 other titles is definitely a good deal.

The great thing too is that the version on the Xbox One also features cross-platform multiplayer of the game between Android, iOS, Windows 10, and Nintendo Switch devices. So if you’ve been interested, now might be a good time to give it a try now that it’s free to play for Game Pass users.

‎Minecraft
‎Minecraft
Developer:
Mojang
Price:
$6.99+


Minecraft
Minecraft
Developer:
Mojang
Price:
$6.99


Minecraft for Windows
Developer:
Microsoft Studios
Price:
Free


Minecraft
Minecraft
Developer:
Microsoft Studios
Price:
Free+

How to create a toolbar on your Windows 10 taskbar

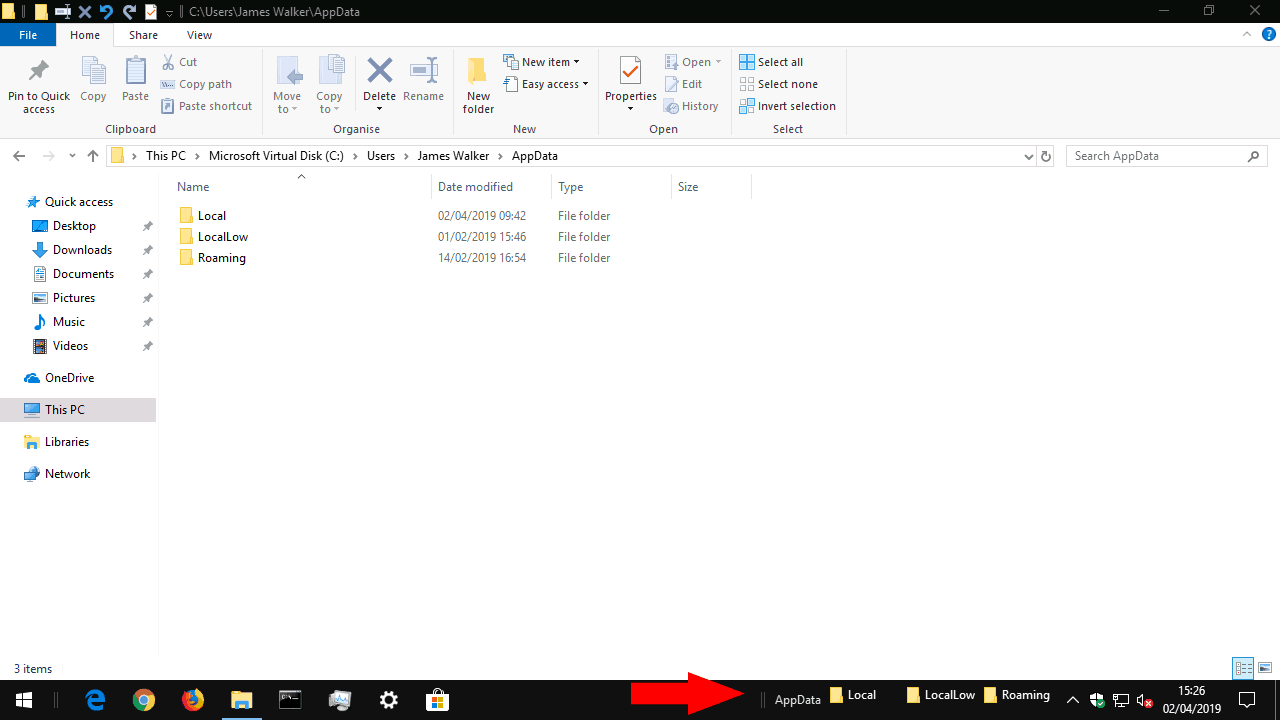
Windows 10’s taskbar is primarily used to launch and switch between applications. You can also add your own toolbars, which let you access the contents of any folder on your PC. If you find yourself frequently opening files within a certain folder, adding a taskbar toolbar can reduce the number of clicks needed to find your content.

Windows 10 taskbar toolbar creation

Toolbars are created by right-clicking the taskbar and hovering over “Toolbars” in the menu which appears. Here, you’ll see three default toolbars which you can add with a single click. Links and Desktop point to their respective folders in your user profile directory, while Address provides a URL input right on your taskbar. Type a URL and press Enter to have it opened in your default browser.

Windows 10 taskbar toolbar creation

To create your own toolbar, click “New toolbar…” from the toolbars menu. Use the file picker to select a folder on your computer. When you press “OK,” the toolbar will be added to your taskbar. Click the “>>” icon next to its name to view the current contents of the folder it points to.

Whenever you add or remove files or folders inside the directory, the contents of the taskbar toolbar will be updated too. This gives you a convenient way to access files in frequently-used folders, without having to open File Explorer and traverse your directory structure.

Windows 10 taskbar toolbar creation

Once you’ve added the toolbar, you can customise it by choosing to show or hide its icon and label. Right-click the taskbar and uncheck the “Lock the taskbar” option. You can then right-click the toolbar and toggle the “Show text”/”Show title” options. With the taskbar unlocked, you can also rearrange toolbars by dragging them. You can use the grab handles next to a toolbar’s name to expand its width, which will place its contents directly onto the taskbar.

Windows 10 taskbar toolbar creation

Once you’re done customising, remember to relock the taskbar with the “Lock the taskbar” option. This will prevent any unintentional repositioning of the items in the future. When you need to remove a toolbar, right-click it and press “Close toolbar.”

Windows Mixed Reality headset use is growing steadily, now accounts for 10% of Steam VR data

Windows Mixed Reality VR headsets are seeing increase usage on Steam according to the company’s latest hardware and software survey. In March 2019, Windows Mixed Reality VR headsets accounted for 10.57% of VR headsets used on Steam, though remaining far behind the Oculus Rift (47.55%) and the HTC VIVE (39.55%). Still, Windows Mixed Reality headsets didn’t exist two years ago, so crossing a double-digit market share in such a short time frame is quite impressive.

The first Windows Mixed Reality headsets launched in Fall 2017, at a time when Microsoft and its hardware partners wanted to democratize the technology. Microsoft still doesn’t have a lot of content on its own Windows Mixed Reality Platform, but a SteamVR bridge quickly addressed this problem. The Windows 10 19H1 update will also bring support for legacy desktop apps in the Windows Mixed Reality environnement, something that was introduced back in February in the preview build 18329.

It’s still early days for Windows Mixed Reality headsets, and as Microsoft is focused on business users with HoloLens 2, the software giant is leaving its hardware partners do the heavy lifting. A couple of weeks ago, we saw HP announce its new high-end Reverb WMR headset featuring a 2160 x 2160 per eye screen resolution and an expanded 114-degree field of view.

Surface Dial won’t turn on? Fix it with these solutions

The Surface Dial is a new interactive tool built to aid the creators such as artists or designers in their creative pursuits, but many users reported that Surface Dial won’t turn on. This can be an issue, and in today’s article, we’ll show you how to fix this problem once and for all.

What to if Surface Dial won’t turn on?

  1. Reset the Surface Dial
  2. Replace batteries

1. Reset the Surface Dial

If Surface Dial won’t turn on, you can fix the issue simply by resetting the device. You can do that by following these steps:

  1. Open the battery lid and physically remove the AAA batteries.
  2. Wait for a few seconds and re-insert the batteries.
  3. Press and hold the button alongside the battery compartment. Do this until the Bluetooth light flashes. The Bluetooth light is on the other side of the battery compartment.
  4. Now restart your PC.
  5. Follow the standard procedure of pairing the Surface Dial with your PC.
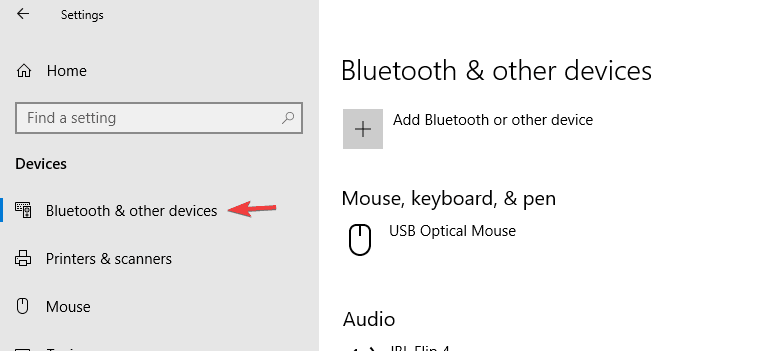
  6. For that, click on Start > Settings > Devices. Under Bluetooth & other devices, toggle the Bluetooth setting to On.
    Surface Dial won't turn on bluetooth and other devices
  7. From the list of nearby Bluetooth devices detected by your PC, select Surface Dial. Follow any on-screen instructions that appear. You are now ready to go.

2. Replace batteries

batteries bluetooth and other devices

Most often, dead batteries are the reason why Surface Dial won’t turn on. Just replacing them should be all that you need to do.

  1. Open the battery lid and make sure the batteries are inserted properly.
  2. Remove the batteries and re-insert them in the right order.
  3. Press the pairing button.
  4. If the LED light does not turn on after 10 secs, you will need a new set of batteries.

This should be all that you can do if your Surface Dial won’t turn on. If the issue persists, it might be of hardware origin. Get in touch with the service center in that case.

READ ALSO:

Open Windows Explorer Folders as Separate Process [How to]

Windows launches File Explorer folders in separate Windows processes by default. In other words, each folder that users will open will have their own separate process. This feature is actually a very practical one.

For example, if Windows freezes randomly due to some folder issues, the rest of the File Explorer processes won’t be affected.

What does launch folder Windows in a separate process mean?

This means that each folder runs as a separate process. This has one benefit, as far as we can tell.

If a folder freezes and you close it from the Task Manager desktop, and taskbar won’t reload like before.

How do I enable a separate process for each folder in Windows Explorer?

Change folder options

  1. Press Windows key + S and type folder options. Select File Explorer Options.
  2. Go to View and enable Launch folder windows in a separate process.
  3. Save changes.

How do I open File Explorer in a new process?

  1. Locate the desired folder.
  2. Right-click it and choose Open in a new window.
  3. It will start as a separate process.

Even if you end the main Windows Explorer process using the taskbar, the Desktop app won’t start. However,  all the open File Explorer windows will be closed.

As you can see, it’s easy to set Windows Explorer to use a separate process for each folder, and it just requires you to make a few small changes.

To optimize your PC even further, read our guide on the best folder settings for Windows 11.

Have you used this feature before? Let us know in the comments below.

Game Install Taking Forever: How to Speed it up

The sheer size of modern games can certainly prolong the installation process. But nonetheless, we can conclude that even Gears of War 4, which is enormous in size and has an abundance of DLCs, will eventually install after a few hours or so.

But what to do when the game install is so long that you’re not even sure if the progress bar is advancing forward? This is especially common when Steam is converting existing game installations.

There are many possible reasons for this, and we made sure to cover them in this article. Irrespective of the cause, you can fix it with the solutions in this guide.

How can I fix my game if it taking forever to install?

1. Quit and try again

A simple but nonetheless viable step when something like this or a running install script occurs, especially if you’re installing digital copies with the Steam client or its peers, is to ensure you have enough storage space. Free up some space, if necessary.

Contemporary games come with many additional patches and updates that can sometimes take up to 10, 20, or more gigabytes.

Basically, for the installation process to finish completely, occasionally, you’ll need to install available updates, too. And that will additionally prolong the installation process.

Therefore, make sure to stop the installation process, clean everything, check all included variables (storage space, permissions, etc.), and start from scratch. Furthermore, if there’s a way, you can start the setup directly and avoid the Steam/Battle.net/Origin client.

2. Run the installer in compatibility mode with administrative permission

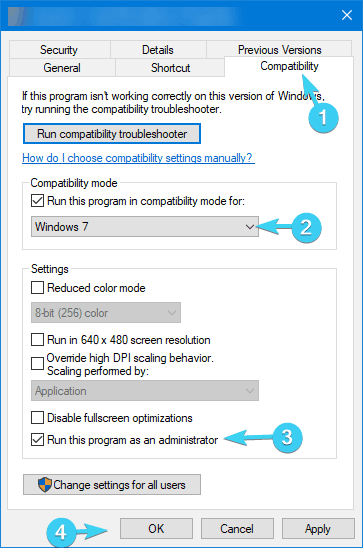
  1. Navigate to the folder where the game setup (Setup.exe, most of the time) is located. It’s either on the installation disk or in the PC storage.
  2. Right-click on the Setup.exe file and open Properties.
  3. Choose the Compatibility tab.
  4. Check the Run this program in compatibility mode for box.
  5. From the drop-down menu, select Windows 7 or Windows 8.
  6. Now, check the Run this program as an administrator box.
  7. Click OK to confirm changes.
    shadow of war stopped working compatibility tab

While we’re at it, it’s worth mentioning that sometimes the incompatibility with the current system version can stall or even prevent the installer from completing the installation. These errors can manifest in different ways like the libvorbisfile.dll not found.

To avoid this, we advise you to run the game in the compatibility mode to an initially predicted system version.

If your game is older, make sure to run it in compatibility mode for Windows 7. Furthermore, the installer needs administrative permission to make changes to your system.

3. Restart Steam and try again

  1. Close the Steam desktop client.
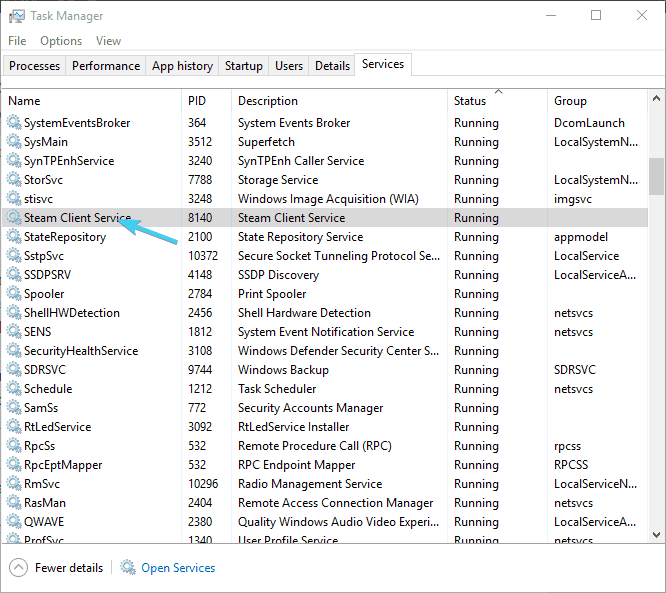
  2. Right-click on the taskbar and open Task Manager.how to use steamflushconfig steam client service restart
  3. Open Details and kill all active Steam-related processes.
  4. Press Windows key + R to summon the Run utility.
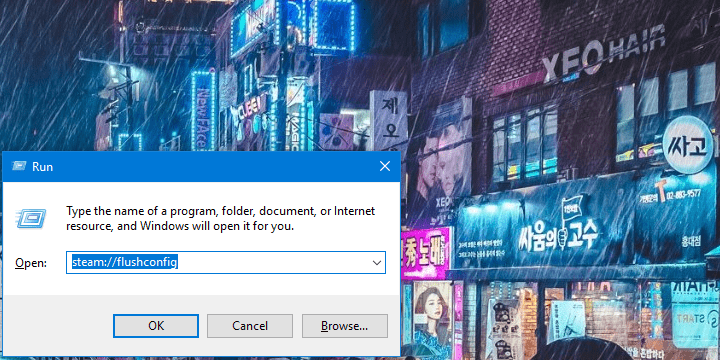
  5. Copy and paste the following command on the command line and press Enter:steam://flushconfig how to use steamflushconfig steam://flushconfig
  6. Wait for some time and restart your PC.

While digital distribution spurs access to a certain game, it also has issues. More than a few users found the Steam client culpable for more than slow installation.

In order to address this, it’s best to restart Steam and move from there. Additionally, you can run the dedicated command in the Run elevated command line. This command will restore Steam to default values, and it’s a good way to avoid reinstallation.

We explained how to run the steam flushconfig command, in our detailed article.

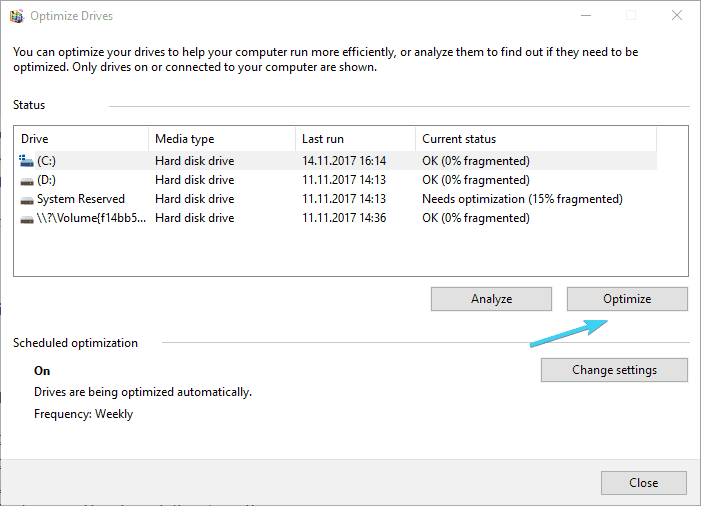
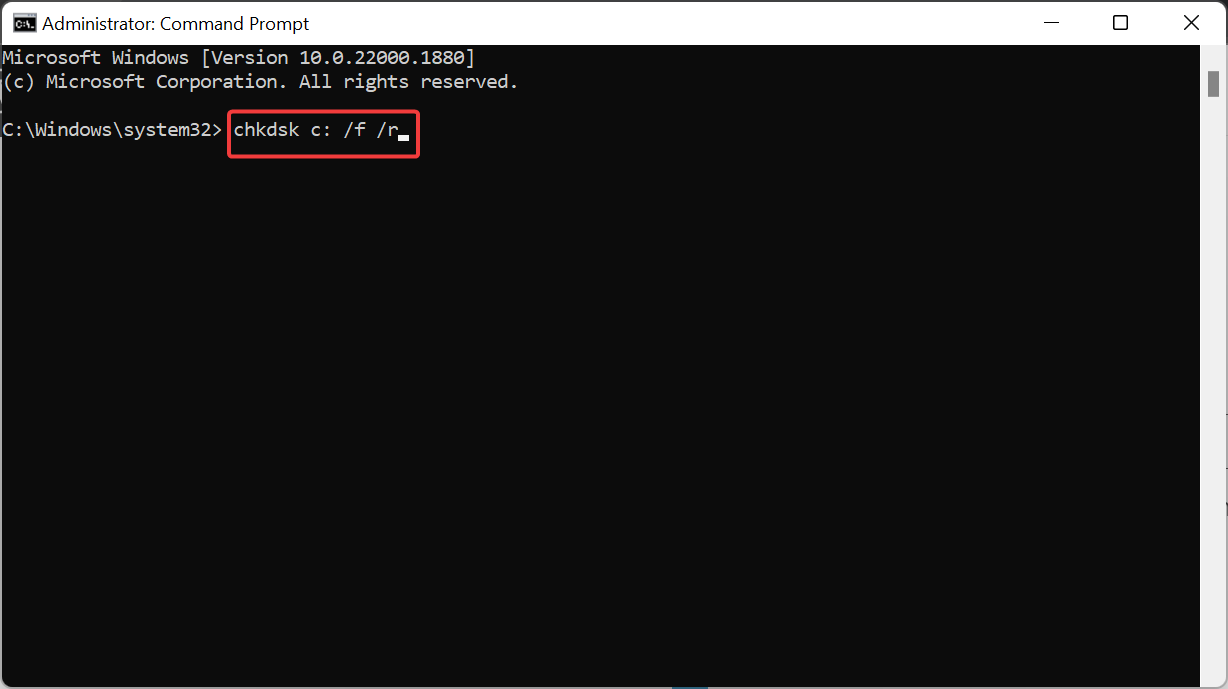
4. Defragment the HDD and check its health

  1. Open This PC or File Explorer.
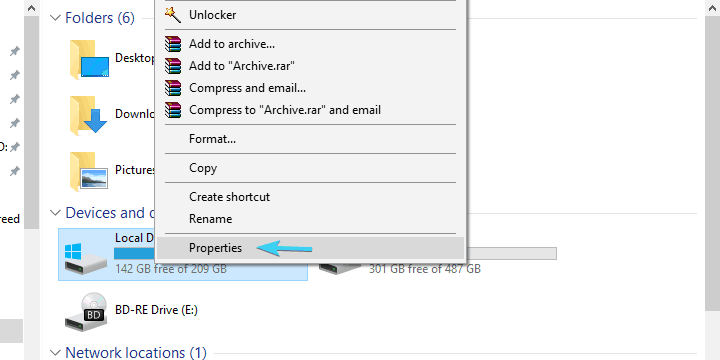
  2. Right-click on the system partition (most of the time C:) and open Properties.game install taking forever system drive's properties
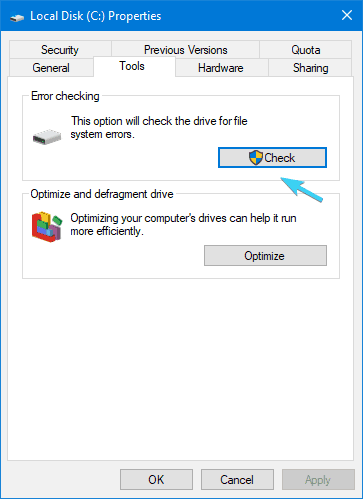
  3. Select the Tools tab.
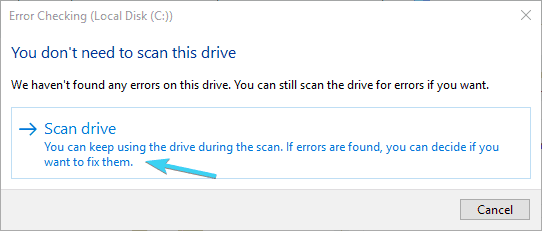
  4. Under the Error Checking section, click on the Check button.game install taking forever check disk for errors
  5. Click Scan drive. This should find and fix all drive errors.game install taking forever scan drive for errors
  6. Now, get back to Tools tab and, under the ”Optimize and defragment drive” click Optimize.
  7. Highlight the system partition drive and click Optimize.game install taking forever defragment drive
  8. The defragmentation process will take some time, depending on the HDD size and the fragmentation levels.

The previous steps should have dealt with the lesser evils, but we have finally reached the worst-case scenario: the HDD failure.

The first symptom of HDD health issues or corruption is substantially decreased reading speeds. Thus, file installation or copying can take more time than usual.

Once your HDD reaches this stadium, it’s too late to fix it most of the time. However, maybe the fragmentation levels are too high, or there are some repairable errors. To address these, you can either turn to a third-party tool or use the built-in system tools.

If, after this, you’re still stuck with the same old overlong installation, we advise you to take a more thorough approach. You can do so by running the Check Disk command in order to confirm the integrity of the disk.

  1. In the Windows Search bar, type cmd, and select Run as administrator under Command Prompt.
  2. In the command line, type the following command and press Enter: chkdsk c: /f /rchkdsk
  3. Wait for the tool to analyze the disk and resolve possible errors.

If, even after that, you’re stuck with the same issue, you can go further by using the HDD troubleshooting tools or repair the HDD altogether.

That should do it. If you have additional solutions or questions about the ones we presented above, feel free to tell us in the comments section below.

Office 2016 won’t print [FIX]

Sometimes when you try to use your printer with Office 2016, it may not respond as you expect it to, or Office 2016 won’t print your documents.

In both cases, you need to figure out what the underlying issue is and we’ve got solutions that can help remedy the problem and get you back printing your documents as you normally do.

Here are some solutions to use when Office 2016 won’t print.

Office 2016 won’t print: How to fix this issue

  1. Check if your printer is listed under Unspecified Device state
  2. Test printing in other documents
  3. Uninstall and reinstall your printer
  4. Update printer drivers
  5. Run the printing troubleshooter
  6. Clear spooler files and restart spooler service
  7. Disable Print in background
  8. Print in clean boot mode
  9. Try printing in WordPad or other programs
  10. Try printing with different drivers
  11. Run Detect and Repair
  12. Boot in Safe Mode then test printing

Solution 1: Check if your printer is listed under Unspecified Device state

  1. Select Start
  2. Click Settingssettings win 10
  3. Choose Devices
  4. Click Printers & Scanners on the left pane
  5. Scroll down to Related Settings
  6. Click Devices and Printersdevices settings win 10
  7. Go to Devices list and locate your printer’s name and icon
  8. Check if it is under Unspecified section

Once you confirm whether it is there or not, do these three things:

  1. Ensure your printer is turned on and connected. Check the power switch if it is turned on, and ensure the printer’s power cable is plugged into an electrical outlet. If you’re on a shared printer or network, ensure all computers and routers are turned on as well. Plug in your power surge protector and turn it on.
  2. Plug in the printer’s USB cable properly to your PC.
  3. For wireless printers, turn on the wireless option from your printer then run the printer’s wireless connectivity test from the menu option.

If these are clear, and you still cannot connect the printer to Windows, then your computer may not be connecting to your wireless network.


Solution 2: Test printing in other documents

Usually, when documents are damaged or have damaged graphics and/or fonts, they can cause printing errors. Before you reinstall drivers or any other software, test Word program’s ability to print.

Here’s how to do this:

  1. Open a new blank Word document
  2. Type one sentence ten times
  3. Try and print the document as it is.
  4. If it prints, change the font, or insert clip art, or shape or table.
  5. Test the print function again.

These tests are meant to check whether Word can print in general, but also give you clues about fonts or graphics it cannot print. If you don’t get errors in the test print document, but Office 2016 won’t print your original document, it may be damaged.

If you can’t print a particular document but you can print others in Word, then your document may be damaged, which means it won’t print even from another computer with Office 2016.


Solution 3: Uninstall and reinstall your printer

Follow these steps to remove your printer:

  1. Select Start
  2. Click Settingssettings win 10
  3. Choose Devices
  4. Click Printers & Scanners on the left panedevices settings win 10
  5. Find your printer and click on it
  6. Select Remove device

Reinstall your printer (wireless or local) using the following steps:

  1. Select Start
  2. Click Settings
  3. Choose Devices
  4. Click Printers & Scanners on the left panedevices settings win 10
  5. Select Add a printer or scanner
  6. Choose the printer you want to add then select Add device

Note: you can print a test page to ensure the printer works correctly. If it is installed but doesn’t work, check the device’s manufacturer website for troubleshooting or driver updates.

To connect to a local printer, plug in the printer’s USB cable to an available USB port on your computer, then turn on the printer and check if Office 2016 will print after doing this.


Solution 4: Update printer drivers

Driver software is needed for most printers to work properly. In the event you updated or upgraded to Windows 10, you may have to update your current printer driver so that it matches or is compatible with the new Windows version.

If you had recent power outages, viruses in your computer, or other issues, the drivers may have also been damaged.

Download and install the latest driver using either of these three ways:

  • Using Windows Update. To do this, go to Device Manager, then expand the Printers option to get the list of devices, right click on your device and choose Update Driver. Select Search automatically for updated driver software.
  • Downloading and installing the driver manually by yourself. Do this if Windows doesn’t automatically find a driver update for your printer, or you don’t have an installation disk. You can check the manufacturer’s website then find the latest driver for your printer.
  • Installing the driver software from the printer’s manufacturer. If you have the installation disc, it may contain the software for installing a driver for your printer.

Once you update the driver for your printer, do the following:

  1. Disconnect the printer’s USB cable from the computer
  2. Click Start
  3. Click Settingssettings
  4. Choose Devices
  5. Click Printers & Scanners on the left pane
  6. Choose the printer you want to add then select Remove device
  7. Go to the search field box on the taskbar, type Print Management and select the corresponding search result
  8. Click All Printers
  9. Find your printer, right-click it and select Delete
  10. Restart your computer
  11. Plug your printer’s USB cable back to your computer and try to install the software and driver again.

Once you complete the steps above, run a test print and see if Office 16 will execute it this time. If these steps didn’t work, try the next solution.

Remember, getting the latest driver also helps when Word mail merge envelopes are not printing


Solution 5: Run the printing troubleshooter

If Office 2016 won’t print, or you cannot connect to your printer, run the troubleshooter by doing the following:

  1. Plug in your printer into the power supply
  2. Turn on the printer
  3. Check the USB connection if using a wired printer, or wireless connection for wireless printers
  4. Download and run the printing troubleshooter

Did this fix the Office 16 won’t print problem? If not, try the next solution.


Solution 6: Clear spooler files and restart spooler service

Here’s how to do this:

  1. Click Start
  2. Type Services in the search box
  3. Select Services from the search results
  4. Find Print Spooler and double click on itprint spooler services
  5. Select Stop
  6. Click OK

That clears the spooler files, so now restart the spooler service using the steps below:

  1. Click Start
  2. In the search box, type %WINDIR%system32spoolprinters%WINDIR%system32spoolprinters
  3. Select it from the search results
  4. Delete all files in that folder
  5. Search again for Services
  6. Double click on Print Spoolerservices print spooler properties
  7. Click Start
  8. Go to the Startup Type list
  9. Select Automatic
  10. Click OK

Check if you can print after doing the above. If not, try another solution.


Solution 7: Disable Print in background

Take the steps below to do this:

  1. Open a Word documentOffice 2016 won’t print
  2. Click on File menu
  3. Click Options
  4. Click AdvancedOffice 2016 won’t print
  5. Uncheck the Print in background option to disable it
  6. Try printing again.

Solution 8: Print in clean boot mode

Performing a clean boot for your computer reduces conflicts related to software that can bring up the root causes of the video streaming failure. These conflicts can be caused by applications and services that start up and run in the background whenever you start Windows normally.

Here’s how to perform a clean boot before printing:

In order to successfully perform a clean boot on Windows 10, you have to be logged on as the administrator, then follow these steps:

  1. Go to the search box
  2. Type msconfigwindows skips bios boot options
  3. Select System Configurationmsconfig
  4. Find the Services tab
  5. Select Hide all Microsoft services box.
  6. Click Disable all
  7. Go to Startup tab
  8. Click Open Task Manager
  9. Close Task manager then click Oktask manager startup
  10. Reboot your computer

You will have a clean boot environment after all these steps are carefully followed, after which you can try and check if Office 2016 won’t print problem is gone.


Solution 9: Try printing in WordPad or other programs

The cause of the Office 2016 won’t print problem may be revealed by its scope. Some may only affect Word, others may affect several, or all Windows-based programs.

You can try to print in other programs as described below and see if it helps:

Test with WordPad:

  1. Click Start
  2. Go to All appsOffice 2016 won’t print
  3. Click Windows AccessoriesOffice 2016 won’t print
  4. Click WordPadOffice 2016 won’t print
  5. In the blank document, type This is a testOffice 2016 won’t print
  6. Go to File MenuOffice 2016 won’t print
  7. Click Print then click OK to print the document
  8. Try to add a different font, shape, or clip art to see if the document will be damaged as well

Once you finish this test with WordPad, test the print function in your browser or other Office 2016 programs, then print a test page.

If you cannot print a test page, or can’t print in several Windows programs, then the problem is with the printer driver, Windows OS, hardware or connectivity issues.

Otherwise, if it is with a font, then a damaged font file may be causing the Office 2016 won’t print problem.

However, if you actually get to print in other programs except for Word, try the next solution.


Solution 10: Try printing with different drivers

Word program is printer-intensive, so any issues with printer drivers affects it first before affecting other programs.

If you want to know whether the printer driver is the cause of the Office 2016 won’t print problem, test different drivers. If the printing issue is caused when you print documents with a particular font or graphics, try another printer.

If you don’t have another printer, contact the device’s manufacture to check if there is an updated driver version, or a different driver for your printer model. If the problem occurs when you print documents with text only, try using a text-only printer driver to test printing from Office 16.

If the Office 16 won’t print problem persists, try the next solution.


Solution 11: Run Detect and Repair

If you still experience the Office 2016 won’t print issue, run Detect and Repair to reinstall missing or damaged program files.

Use the steps below to do this:

  1. Exit Office programs
  2. Right click Start
  3. Select Control Panel
  4. Click Programs
  5. Click Programs and Features
  6. Right click on your version of Microsoft Office (Microsoft Office Word)
  7. Click Change
  8. Click Repair or Repair Word (repair Office)
  9. Click Continue
  10. Click Next

Solution 12: Boot in Safe Mode then test printing

Safe mode starts up your computer with limited files and drivers but Windows will still run. To know whether you’re on Safe mode, you’ll see the words at the corners of your screen.

If the Office 2016 won’t print issue persists, check whether it occurs while your computer is in Safe mode.

There are two versions:

  • Safe mode
  • Safe mode with Networking

The two are similar, though the latter includes network drivers and other services necessary to access the web and other computers in the same network.

Follow these steps to start your computer in Safe Mode:

  1. Click on Start button
  2. Select Settings – the Settings box will open up
  3. Click Update & SecurityOffice 2016 won’t print
  4. Select Recovery from the left pane
  5. Go to Advanced startup
  6. Click Restart now
  7. Select Troubleshoot from the Choose an option screen, then click Advanced options
  8. Go to Startup Settings and click Restart
  9. Once your computer restarts, a list of options will come up.
  10. Choose 4 or F4 to start your computer in Safe Mode

A quicker way to get into Safe Mode is to restart your computer then do the following:

  1. From the Choose an option screen, select Troubleshoot>Advanced options>Startup Settings>Restart
  2. Once your computer restarts, a list of options will come up.
  3. Choose 4 or F4 to start your computer in Safe Mode

Once you’re in Safe Mode, test printing your document.

If the Office 2016 won’t print problem isn’t there while in Safe mode, then your default settings and basic drivers are not contributing to the issue.

Once you’re through and the Office 2016 won’t print issue is sorted, exit safe mode so you can get your computer back to normal mode.

How to exit Safe Mode:

  1. Right click Start button
  2. Select Run
  3. Type msconfigOffice 2016 won’t print
  4. A pop up will open
  5. Go to the Boot tab
  6. Deselect or uncheck Safe Boot option box
  7. Restart your computer

Let us know if any of the above solutions helped fix the Office 2016 won’t print problem. Share with us your experience in the comments section below.

RELATED STORIES TO CHECK OUT:

Borderlands 3 is coming on Xbox One and PC on September 13, you can pre-order it now

Following a reveal event at PAX in Boston last week, developer Gearbox Software announced today that Borderlands 3 will be released on Xbox One, Playstation 4 and Windows on September 13. The much-anticipated new entry in the open-world action RPG series will have to compete against heavy hitters like Gears 5 or the rumoured Call of Duty: Modern Warfare 4, though the loot shooter won’t exactly play in the same category.

“Like previous Borderlands games, Borderlands 3 casts you in the role of a Vault Hunter—a treasure-seeking badass with access to powerful abilities that violently complement the game’s seemingly never-ending arsenal of apocaliscious weapons,” explained Gearbox Software in the announcement post. “The Borderlands are under threat; the fanatical Calypso Twins are uniting the bandit clans and attempting to claim the galaxy’s ultimate power, and only you can stop them.”

Borderlands 3 is already available to pre-order on the Xbox Store, and there are three editions to choose from:

  • The Standard Edition of Borderlands 3 ($59.99)
  • The Deluxe Edition ($79.99), which includes five additional bonus packs
  • The Super Deluxe Edition ($99.99), which includes all Deluxe Edition content plus the game’s Season Pass

In addition to the Borderlands 3 news, Gearbox Software is releasing today Borderlands: Game of the Year Edition, a remastered version of the original game released in 2009. The remaster is Xbox One X Enhanced with 4K Ultra HD and HDR support, and it’s a $29.99 purchase on the Xbox Store (owners of the Steam PC version will get the Game of the Year Edition for free). The Xbox One bundle Borderlands: The Handsome Collection, which includes Borderlands 2 and Borderlands: The Pre-Sequel is also getting free Ultra HD Texture Packs for Xbox One X owners today.

Microsoft revamps its Bounty Program with faster reviews and higher rewards

Microsoft is making improvements to its Bounty Program, a project which rewards hackers for spotting vulnerabilities in its Cloud, Windows, and Azure DevOps services. These improvements not only include higher rewards, but also faster payments as well.

For starters, Microsoft will begin paying spotters as soon as the exploit has been successfully reproduced, as opposed to waiting until the fix has been fully implimented. The company has partnered with HackerOne as its bounty payment processing partner, which will deliver bounty payments in many different options depending on the user’s preference, such as PayPal, cryptocurrency, or a traditional bank transfer.

The Microsoft Bounty Program has also awarded more than $2 million since it started in 2018, and the company is taking things further by increasing the maximum rewards. The highest payment for spotting a vulnerability in the Windows Insider program has been increased from $15,000 to $50,000—and a vulnerability spotted in Azure, Office 365, or another online service will reward up to $20,000, up from the $15,000 it was before.

Microsoft is also making changes to its policies, and will now reward the first researcher to discover a vulerability the full bounty, even if it is already known internally by the company. Previously, reports that have already been internally known would have rewarded only 10% of the eligible reward, so it’s clear that it wants to push for more research when it comes to these issues.

Microsoft and OpenClassrooms team up to prepare students for AI jobs

Microsoft is partnering with OpenClassrooms to train Students and prepare them Jobs relating to artificial intelligence. The Redmond giant notes that the partnership will benefit both students by providing them better access to education, as well as employers which will have greater access to highly talented candidates.

According to its blog post, the demand for development of artificial intelligence is higher than the number of candidates available, so much so that as many as 30% of AI and data skills job openings could be left unfilled by 2022. Microsoft, of course, has been a big investor of AI as a late, so such a partnership could definitely serve to be beneficial especially given that the tech giant currently has the most positions open in the AI department of any other tech company.

“As AI is changing the way we work and the nature of jobs, we have a responsibility to ensure graduates are prepared for the workplace of tomorrow,” says Jean-Philippe Courtois, Executive Vice President and President, Global Sales, Marketing and Operations at Microsoft. “We are excited to partner with OpenClassrooms to help equip people with the skills and opportunities they need to thrive in the digital economy.”

Microsoft is confident that those who complete the program from OpenClassrooms will receive a job within six months of graduation—otherwise, a full reembursment will be issued. Additionally, graduates will also receive a masters-level diploma accredited in Europe though OpenClassrooms, which is also working to make U.S.- and U.K.-based accreditation possible further down the road.

How to check which apps are using your internet connection in Windows 10

If you notice your Internet suddenly slowing to a crawl, chances are that an app on your PC is using your bandwidth in the background. Using Task Manager, you can check which apps are communicating over your local network, which might help you figure out where the bandwidth is going to.

Disabling startup apps using Task Manager

Begin by launching Task Manager using the Ctrl+Shift+Esc keyboard shortcut. If Task Manager opens to its simplified view, click the “More details” button in the bottom-left to expand the window.

You’ll arrive at the Processes tab, which provides information on every app that’s running on your PC – including Windows internal processes. The rightmost column of the table displays the current network usage of each app, in Mbps. Click the column header to sort the running processes by bandwidth usage, highest-to-lowest.

Monitoring network activity in Task Manager

You should remember that this column shows local network activity, not Internet usage. In other words, if you’re backing up files to a network-connected hard drive, that program will be communicating at several hundred Mbps on your network, but won’t be using any Internet bandwidth.

In most cases, an app’s network activity will be purely Internet-based though. If your connection slows down, try and spot an app in Task Manager that’s communicating at around the same rate as your maximum Internet speed. Sometimes, you might find the culprit is a Windows system component, such as “Service Host: Local System,” which is responsible for downloading Windows updates.

Monitoring network activity in Task Manager

If you’d like to see actual data usage details for your apps, switch to the “App history” tab in Task Manager. The Network column here shows you the total network data usage of your apps over the past 30 days.

Windows 10 Data usage settings

Further information can be obtained by opening the Settings app and navigating to Network > Data usage. This screen displays data usage for traditional desktop programs too, whereas Task Manager only includes Microsoft Store applications.

Windows 10 Data usage settings

Finally, you can limit the data usage of Microsoft Store apps from the Data usage Settings page. Under “Background data,” click the “Always” radio button to restrict what apps can do in the background. This will free up more bandwidth for your foreground tasks, but could result in the loss of useful app functionality. Automatic sync processes, live tiles and other background network activity will be prohibited, so you might miss out on incoming notifications and real-time content updates.

Netflix users will be able to watch movies in 4K on Edge

Good news for Netflix fans! Microsoft’s Chromium-based Edge will support 4K Netflix streaming. However, Microsoft plans to offer Netflix in 4K only to those users who are running Windows 10 powered machines.

The news might not be surprising to users as the original version of the browser also offers Netflix in Ultra HD. However, no other Chromium-based browser offers the same capabilities.

Microsoft Edge is expected to arrive with the upcoming Windows 10 version. It will support older Windows versions, including Windows 7 along with macOS and other platforms.

Take a look at this screenshot showing PlayReady support on Edge:

Original Microsoft Edge version failed to impress the users

Microsoft has failed to convince users to switch to the original version of Microsoft Edge browser over the years.

The majority of Windows 10 users were reluctant to use the browser and prefer Mozilla Firefox and Google Chrome over Windows 10’s built-in browser.

It seems like the latest version has been successful in grabbing the attention of Netflix and Windows 10 users alike. The Chromium-based Edge version offers the best features of both (Chrome and Edge) browsers.

Netflix itself recommends using Chromium Edge

netflix ultra HD PC

We already know that 720p streaming quality is currently being supported by Google Chrome and Mozilla Firefox. That is the reason Microsoft Edge is the recommended browser by Netflix itself.

There are some third party extensions that are able to unlock 1080p for unsupported browsers. While these extensions are not reliable as any updates and changes made by Netflix often cause them to stop working.

Alternatively, Windows 10 users can head towards the Microsoft Store to download the official Netflix app. Just in case the download process won’t start, you can use this troubleshooting guide to fix the problem.

The preview version of the upcoming Chromium-based Microsoft Edge browse is going to be released in the next few weeks.

The stable build is expected to be rolled out to the general public later this year.

Right now, the Chromium-based browser does not support Linux. But a new Linux-friendly Edge version is expected to be released very soon. 

RELATED ARTICLES YOU NEED TO CHECK OUT:

KB4490481 gets your Windows 10 PC ready for April Patch Tuesday

Microsoft is back with another Cumulative Update for Windows 10 v1809. The update is currently being rolled out to insiders in the Release Preview ring.

The update boosts the Windows 10 operating system build to 17763.404. Most likely, the role of this patch is to test the Patch Tuesday improvements that are scheduled to be rolled out next week.

Windows 10 v1809’s infamous update history

Windows 10 v1809 has been a devastating update for both Microsoft and Windows 10 users. Most of the users were expecting Microsoft to bring Windows 10 19H1 to the release preview ring. However, the company decided to go instead for a new Windows 10 v1809 update. 

The Redmond giant follows a strict policy of testing upcoming updates in the Release Preview before rolling them out to the general public.

Windows 10 users hoped the company might change this policy this year and test more builds of the next 19H1 update instead.

Well, it seems that the best Patch Tuesday that falls on 9th April won’t bring a new Windows 10 OS version to the table. Expect only regular updates for the OS versions currently supported.

Cumulative update KB4490481 has been released along with a servicing stack update KB4493510. Microsoft has yet to release a changelog for the update.

Users started downloading and installing the update soon after it was released. The Windows 10 Cumulative Update KB4490481 update seems to be a stable one as the went without a glitch. 

However, one of the users reported a little issue with the KB4490481 update download process:

Slight pause at 92% but nothing major. All looks ok.

Download Windows 10 Cumulative Update KB4490481

You can head towards the Settings app to download the Windows 10 Cumulative Update KB4490481. Just check for updates and the update download process should start automatically.

Once again, keep in mind that the update is only available to Windows Insiders enrolled in the Release Review ring. 

RELATED ARTICLES YOU NEED TO CHECK OUT:

Rising Storm 2 Crashes When Joining Game: 4 Easy Fixes

Rising Storm 2: Vietnam often crashes when joining a game, and this is perhaps the most frequent and annoying issue affecting users.

For some, Rising Storm 2 Vietnam is not launching at all. The underlying cause is usually the same, and a quick series of solutions should get things up and running. Keep reading to find out!

What can I do if Rising Storm 2 crashes when joining a game?

Before we head to the slightly complex solutions, try these quick ones:

  • Restart the Steam client or the PC.
  • Open the Task Manager and check if the shadercompiler.exe file is present. If this is the case, the game may be trying to compile shaders. Wait a few minutes for the process to finish, and the game should eventually launch.
  • Install the latest Windows OS updates on your computer. Also, update all the device drivers.
  • Disconnect all USB peripherals.
  • Launch Steam as an administrator.
  • Turn off DxTory.
  • Verify that Easy Anti Cheat has been installed properly.

If none work, head to the fixes listed next.

1. Check the PC specifications

Ensure your PC meets the minimum (preferably recommended) system requirements for Rising Storm 2: Vietnam.

  • CPU: Intel Core i3 @ 2.5GHz or AMD Phenom @ 2.5GHz
  • OS: Windows 7 SP1, Windows 8.1, Windows 10 (64-bit versions only)
  • GPU: NVIDIA GeForce GTX 460 or ATI Radeon HD 5850
  • HDD: 12 GB

Check the PC specifications, and if it doesn’t meet the requirements, you know what’s causing the trouble.

2. Delete the game cache

Often the game cache or other non-critical files may trigger issues when corrupted. And deleting them does the trick!

Delete this game folder where Username is the current user profile: C:\Users\USERNAME\Documents\My Games\Rising Storm 2 Beta\ROGame

Also, delete the Rising Storm 2 directory completely. It should be located in the following path:Documents/ My Games.

3. Verify the integrity of game files

  1. Launch Steam, and go to the game Library.
  2. Right-click on Rising Storm 2, and select Properties.
  3. Go to the Installed Files tab, and click on Verify integrity of game files.verify game file to fix rising storm 2 crashes when joining game
  4. Once done, restart Steam and then launch the game.

Often the problem lies with the game files when Rising Storm 2: Vietnam crashes while joining a server. And for that, Steam offers a built-in repair tool to fix any issues.

4. Install the necessary components

If error 0xc000007b appears on the screen, try downloading, repairing, or reinstalling the following:

That’s it! One of these solutions should help if Rising Storm 2 crashes when joining a game or refuses to launch altogether.

Before you leave, find out how to improve the gaming performance in Windows.

If you’ve encountered other workarounds to fix these annoying game crashes, drop the troubleshooting steps in the comment section below.

Can’t send messages on Windows 10/11 Xbox app or Xbox One

The Xbox app for Windows 10 brings together gamers on both the Xbox One and computers running Windows 10, making it a great tool for cross-platform communication. However, some users are experiencing an issue with the app’s messaging tool, especially this one who took to Reddit:

Unsure of the issue, but for the last month or so the messages tab on the Windows 10 Xbox live app won’t work for me. It says “try again, we had trouble getting your messages”, and when I send a message it says “we couldn’t send this message, try again later”.

Try again. We had trouble getting your conversations

  1. Reset the Xbox app on Windows 10
  2. Reboot your console
  3. Physically power cycle the console

1. Reset the Xbox app on Windows 10

One possible fix to the issue is to open the search bar and look for “Apps & features.” Then, search for the Xbox app, select advanced options and click “Reset.” This should back messages, although you may have to repeat the process every time the error shows up.

2. Reboot your console

Another fix is to restart or power cycle your Xbox One console. Note that the process does not erase any of your games or data.

  1. Press the Xbox button to open the guide.
  2. Select Settings.
  3. Select Restart console.
  4. Select Yes to confirm.

If you’re unable to access the guide or if the console is frozen, press and hold the Xbox button on the console for about 10 seconds until the console turns off. After it does, touch the Xbox button on the console again to restart.

3. Physically power cycle the console

  1. Turn off your console by holding the Xbox button  on the front of the console for approximately 10 seconds. The console will turn off.
  2. Turn your console back on by pressing the Xbox button on the console or the Xbox button  on your controller.
    If you don’t see the green boot-up animation when the console restarts, repeat these steps. Make sure that you hold the power button until the console completely shuts down.

If your console is in Instant-On power mode, the above steps will shut the console completely off. Instant-On mode, or the ability to turn on your console by saying “Xbox on,” won’t be enabled until you restart the console.

Disconnect and reconnect your console’s power cable

  1. Turn off the Xbox One console by pressing the Xbox button on the front of the console for about 10 seconds until it shuts down completely.
  2. Unplug the console’s power cable. Wait 10 seconds.

Be sure to wait 10 seconds. This step resets the power supply.

  1. Plug the console power cable back in.
  2. Press the Xbox button  on your console to turn on the Xbox One.

That should do it. In case you have any additional steps to suggest, make sure to share them with us in the comments section below.

RELATED STORIES YOU SHOULD CHECK OUT:

Why you should block Windows 10 v1903 install this month

Every time Microsoft launches a new upgrade to Windows 10, users have the option to delay it for a few weeks or months.

As a quick reminder, only Windows 10 Pro, Enterprise or Education users can block new updates for months on end.

Unfortunately, Windows 10 Home doesn’t have any update deferral options.

Why should I defer Windows 10 v1903?

The new Windows 10 19H1 will be launched next month — hence the code name Windows 10 April 2019 Update. But before consumers and organizations will be able to download it, you should learn more about it.

In 2018, the update meant for April 2018 was delayed for over 20 days and finally launched in May. Microsoft explained that the delay was due to some finalization problems.

But this is not all for 2018, as the update prepared for October was launched on time indeed, but with some technical issues. This one was immediately stopped, because the manual update was deleting personal user files.

Even though Microsoft tried to stop the update as fast as they could, it still affected millions of users. The issues were of different types, such as ZIP extraction fault, an activation downgrade flaw and a file association problem.

So after all of this, delaying the new update is maybe the best decision, especially for organizations users. Microsoft allows enterprises and education editions to delay Windows 10 update install for months on end.

First update wave is always buggy

As you can see, the first update wave is almost always buggy. The best approach is to simply defer the updates for as long as you can.

In this manner, by the time you hit the update button, Microsoft will have hopefully fixed all the bugs and issues reported by the first users who installed the new OS version.

RELATED STORIES:

Use PC location without the Windows 10/11’s Location Service

While you may always want to let your PC use the Location Service for Windows 10 as a supplementary tool for apps such as Cortana and Weather, enabling the service can somehow invade your privacy, not to mention its large battery consumption.

So, if you still want to get to your destination without a hitch, but without turning on the Location Service for Windows 10, the following steps will guide you accordingly.

Using Location-based apps without switching on Location Service

First off, note that this method works only on Microsoft apps like Maps and Weather, among others. With non-Windows apps, however, you may need to enable the Location Service.

If you are using Windows 10 on your PC, you might have noticed an option called Default location. This tool lets you set a default location, as the name suggests, and all other location-based apps on your PC will recognize it as your current location. That means no other entity will be able to locate since the Location Service remains disabled.

  1. To turn off the Location Service on Windows 10, open Settings on your PC by clicking Win+I buttons at the same time. You may also look for the Settings button in the Win + X menu.
  2. Then press Privacy > Location. You will see a Change button on the right-hand side under Location for this device is on.
    location settings
  3. Select that button and click on the toggle button to turn on the Location Service on your Windows 10 PC.
    location for this device disable
  4. Next, select the Set Default button under Default location option. The Maps app will then appear. You will see the Set default location option on the top-left corner.
  5. Enter an address as your default location. Once a location shows up on the map, click the Change button.
choose your location manually

After that, you shouldn’t be bothered by constant prompts asking for Location services to be enabled in order for the app to function properly. This way, it’ll stick with the address permanently. In case you need to re-enable Location services, just go back to Settings >Privacy > Location and enable it there.

For a detailed walkthrough on setting or adjusting your default location, check out this guide on how to change location in Windows 11.

Do you know of other tricks to use location-based apps without enabling the Location Service on Windows 10? Let us know.

RELATED STORIES YOU NEED TO CHECK OUT:

Media Streaming not Working on Windows 10/11: How to Fix it

Many users prioritize the Windows Media Streaming feature before third-party streaming solutions. That’s an obvious choice if you instead trust built-in Windows features. However, it seems Media Streaming isn’t working for some users in Windows 10.

Supposedly, some of them encountered grayed-out features and could not start it. We prepared a few solutions that should help you substantially to address that. Make sure to check them out below.
What can I do if Media Streaming isn’t working in Windows 10/11?

1. Enable automatic play

  1. Open Windows Media Player.
  2. Click on the Stream drop-down menu near the Menu bar.
  3. From the drop-down menu, choose Automatically allow devices to play my media.Media Streaming not working in Windows 10 allow devices to play my media
  4. Restart Windows Media Player and try again.

First things first, in order to cast or stream any multimedia file via Windows Media Player, you’ll need to enable automatic play. This procedure is simple, and you should be able to make it work quickly.

2. Turn on Search Indexing

  1. In the Search bar, type control and open Control Panel.
    control panel
  2. Choose Uninstall a program under Programs.
    uninstall a
  3. Click Turn Windows Features on or off from the left pane.
  4. Check the box next to a Windows Search Indexing to enable it.
  5. Restart your PC to apply changes.

A few knowledgeable users were reminded that Media Streaming is connected to Windows Search Indexing and, thus, can be affected. If you disabled Windows Search Indexing, we advise you to re-enable it.

This will, hopefully, resolve issues with Media Streaming.

3. Change the Local Group Policy

  1. In the Windows Search Bar, type gpedit.msc, and open Local Group Policy Editor.
  2. Follow this path: Computer Configuration > Administrative Templates > Windows Components > Windows Media Player
  3. Right-click on Prevent Media Sharing and choose Edit.Media Streaming not working in Windows 10 prevent media sharing
  4. Click on Disabled and confirm changes.
  5. Restart your PC and try enabling Media Streaming again.

Local Group Policy is there for configuring and managing various permissions within a system. Now, there are some protective permission settings with the main purpose of preventing unauthorized streaming.

Therefore, you’ll probably want that setting disabled to fix the Media Streaming error. For that, you’ll need Administrative permission on your PC.

4. Check the related services

  1. In the Windows Search bar, type services.msc, and open Services.
  2.  Navigate to UPnP host service, right-click it, and open Properties.Media Streaming not working in Windows 10 reset UPnP Device Host service
  3. Set the Startup type to Automatic, click Stop, and then Start to restart this service. Then click OK.
  4. Now, navigate to the Windows Media Player Network Sharing service and repeat the same procedure.
    Media Streaming not working in Windows 10 reset Windows Media Player Network Sharing Service
  5. Close Services and look for changes.

Like every other Windows component, Media Sharing has more than a few related services that govern everything. Now, by default, once you’ve enabled Media Streaming, they should change status to Active. However, it seems that some of them are, for no apparent reason, permanently disabled.

That occurrence will, consequently, prevent Media Streaming from commencing. Luckily, you can start them manually in a few simple steps.

5. Replace the Media Player cache folder

  1. Copy this path and paste it into the Windows Search bar: %userprofile%appdatalocalmicrosoft
  2. Rename Media Player to Media Player.Old.Media Streaming not working rename Media Player cache folder
  3. Restart your PC and start Windows Media Player.

Windows Media Player stores cache and configuration data in the AppData directory. These files can get corrupted or incomplete and thus provoke a lot of issues with Windows Media Player or, in this distinctive occurrence, Media Streaming through Media Player.

You can delete this folder or its content, but we advise you to rename it and continue your life. The next time you start Windows Media Player, the system will re-create the Media Player folder so you can start from scratch.

That should do it. We certainly do hope you managed to overcome issues with Media Streaming and finally make it work. And once done, learn how to enable DLNA in Windows and stream data across compatible devices on the network.

In the same vein, if you are dealing with Video streaming problems on your PC, check our guide to fix it.

Don’t forget to share your experience with Media Streaming issues with other readers. You can do so in the comments section below.