According to multiple online reports, it seems that there are various issues with Yahoo Messenger in Windows 10, especially with the video calling features. Here are a few potential fixes.
Leaving that aside, let’s talk about the issue at hand. Here’s what the affected user has been saying:
HI, AM UNABLE TO VIDEO CALL IN YAHOO MESSENGER 11 . AM USING WINDOWS 10. FOR AUDIO CALL NO PROBLEM. BUT IN VIDEO CALL VIDEO IS NOT WORKING(web camera). KINDLY HELP ME TO SOLVE THIS PROBLEM.
Others have been reporting that the video call button in grey and they can’t click on it.
Of course, it goes without saying that the very first thing you need to do is to check whether you have the latest graphics drivers installed and, of course, if you’re running the latest version of Yahoo Messenger.
Solution 2 – Reinstall Yahoo Messenger
Also, you can try and reinstall the software, as well. This is one of the quickest ways to fix YM problems.
If all this is good, then you need to try and start the program in Administrator mode. Right click on the .exe file, then select Properties > Compatibility > Change settings for all users, then add a checkbox to run this program as administrator and then click Apply.
Other users affected by this problem have been reporting that they managed to solve it by installing an older version of Yahoo messenger. You can also try refreshing your Windows 10, but make sure that you back up everything up before you proceed.
For the time being, this is all that we know regarding this problem. If you happen to know some other fixes, go ahead and leave your comment below and let us know which these are.
UPDATE: Yahoo shut down its instant messaging tool on July 18, 2018. This means that the tool is no longer available for users. However, Yahoo said that it would soon start work on a better instant messaging tool and more details would be revealed along the way.
The good news is that there are many chat apps available on the market which are compatible with Windows 10. You can check out our guide to learn more about the best chat apps that you can install on your computer.
Some users have been complaining regarding the fact that their Arcsoft MediaTheater 6 won’t play blu-ray discs in Windows 10. Here’s a small fix that you could try to solve the problem.
One Windows Insider user has been complaining that he has been having problems with Arcsoft MediaTheater 6 in Windows 10. He says that when he tried to play a blu-ray disk, the app failed and showed the following message:
Failed to initialize a video overlay. You may update your graphics driver. If the problem persists, your graphics card may not support video overlay. Please check with your graphics card provider.
He also added that the program crashes when he closes the message window. Regardless to say, updating the drivers also didn’t help. Here are some more details from the affected user:
I’m guessing the problem is the now unsupported Arcsoft app (they claim it’s a retired product on this page: Supported Products), and some incompatibility with something graphics related in Windows 10, but I do not have the technical expertise to determine what, or to begin to figure out the solution. If anyone is able to get Arcsoft’sTotalMedia Theater 6 to play blu-ray movies in Windows 10, it would help me to know that’s possible before I purchase a new app of some sort. None of my free apps play blu-ray (VLC player, Windows media classic/64) and I can find no evidence of any free apps that will, so far.
Solutions to fix Arcsoft MediaTheater issues
Solution 1 – Update your graphics drivers
According to the Windows 10 compatibility center, however, it seems that ArcSoft TotalMedia Theatre Version 6 is compatible with the latest Windows version. You can also try to update your graphics drivers.
In order to update any of your drivers, an effective method would be to use dedicated support for managing driver devices.
Therefore, with this driver tool, you control all the drivers’ operations and update the latest versions for graphics or any other driver type from your system.
If the problem persists, you can try to run the program in compatible mode. For that, do the following:
Right-click on the driver setup file and click on ‘properties’
Click on the ‘compatibility’ tab and check the box ‘Run this program in compatibility mode for’ and select Windows 7/8 operating system from the drop down menu and proceed with the installation
Once this is done, restart the computer and check if the issue persists.
Solution 3 – Uninstall Arcsoft MediaTheater
You can also try uninstalling the software and then running the setup in the same compatibility mode. For now, unfortunately, this is all that we know. If you happen to be aware of another fix, do share it with the community by leaving your comment below.
QUICK REMINDER
It is worth mentioning that Arcsoft MediaTheater is no longer supported. In other words, you should not be surprised that the tool is affected by many technical issues and errors on Windows 10. The safest solution is to switch to newer media players. For more information about the best media players that you can use on Windows 10, check out this guide.
Battery life can often become a touchy subject as it’s affected by how you use your Windows 10 PC. Gaming will kill your battery fast, but general web browsing (depending on browser) and word processing will take much longer to deplete the battery. Unfortunately, Microsoft no longer gives an estimated time remaining on their own hardware so it’s tough to say how much battery you have left. It should be noted that this test will not work on Windows 10 desktop PCs for obvious reason and this test is only portable Windows 10 devices, including laptops.
If you are wondering what apps are affecting your battery life on your Windows 10 PC, there are a couple of things you can do. There are several individual options to check what affects your Windows 10 PC’s battery life. First, you can check your what apps may be negatively affecting battery life.
Go to Settings.
Go to System.
Go to Battery.
Under Battery, go to “See which apps are affecting your battery life,” located just under the battery life percentage as show in the picture below.
You’ll be shown a list of Windows 10 apps and how much resources they use. Time periods range from 6 hours, 24 hours, and 1 week, and you can show apps by usage, all apps, or always allowed apps. If you click on any of the apps, you will be given more options to control how the app uses resources Windows 10. You can let Windows manage the app and decide when this app can run in the background. Otherwise, you can reduce the work the app can do when it’s in the background or allow the app to run background tasks. Unless you need a particular app to be run in the background 24/7, it is usually best to let Windows to manage how apps to reduce the amount of resources and battery the app will ultimately use.
To monitor the app you are looking to get a more in-depth view of your battery life, there are more in-depth options available in Windows 10. Here’s what you need to do.
1. Right-click the Start menu to bring up the menu.
2. Pick Windows PowerShell (Admin).
3. Yes to UAC (User Account Control) prompt.
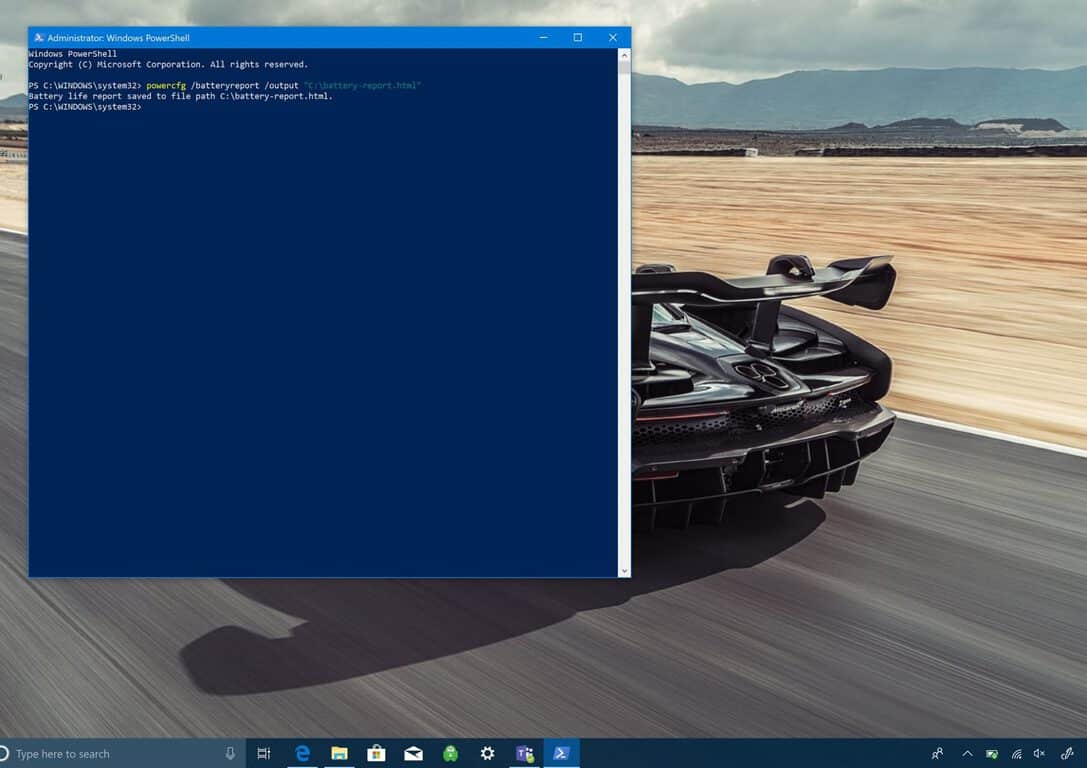
4. In Windows PowerShell, copy and paste “powercfg /batteryreport” into the Windows PowerShell window. In Windows PowerShell, the battery report will be saved in whatever directory you are in. When you open Windows PowerShell, you will be taken to a “C:WINDOWSsystem32.” However, if you want to save the battery report to a specific folder, you can do so by typing the following command: powercfg /batteryreport /output “C:battery-report.html” By typing this command, you will save the battery report to the C: Drive making it easier to find when you need it.
5. Open the battery report. Once the battery report is generated, go to the destination folder and open the file. Look for the file labeled battery-report.html. The file will open in your default browser.
What does my Battery report mean?
Once your battery report is generated, it can be confusing for new Windows 10 users to know exactly what they are looking at. Here’s what to make of your battery report. The first area of your battery report shows the hardware parameters, OS version, and other details specific to your Windows 10 PC. Here are some samples for the Surface Book 2.
The next section is Installed batteries and gives you general information of the battery installed on your computer. The battery information includes the battery name, manufacturer, chemistry, design capacity and full charge capacity.
Recent usage shows the dates and times that you used the battery, along with battery state (active, suspended), power source and remaining battery capacity. Recent usage gives you a record of when you used your Windows 10 laptop went to sleep, became active, and was charged using AC power. Recent usage also indicates the remaining mWh capacity. This is the record of when the laptop went to sleep, became active, as well as when your PC is charged with AC power, along with the corresponding mWh remaining capacity.
Below recent usage, there is also a helpful battery usage graph to help show you how your battery drains over the last three days. At this time, there is not an option to see farther than the previous 3 days in the battery report. Personally, I’d like to see how your battery drains over a full week.
Other areas of the battery report include usage history and battery capacity history. These are good areas to stay updated on for your Windows 10 PC battery health. However, the most important section for most Windows 10 users will be battery life estimates. Battery life estimates are what Windows 10 estimates you can can get on the device with regular usage. This battery feedback is more stable and accurate than the remaining battery estimate that you see when
This feedback is more stable and accurate than the live estimate found by clicking the your computer’s battery icon. Unfortunately, you cannot see the remaining battery life on your Windows 10 PC if you have a Microsoft Surface product by clicking on the battery icon. For whatever reason, Microsoft removed this option. I have a Surface Book 2 and I had issues with battery life, so I recently performed a clean installation of Windows 10 to see if that fixed the battery life issue. I couldn’t get more than 5-6 hours on the Surface Book 2. Now I have much better battery life, but it will take a few more power cycles for me to get a more accurate reading on if my Surface Book 2.
If you are having similar problems, you now know how to get a battery report on your Windows 10 laptop to see how your battery is performing and to make sure there are no battery-related issues.
Mega Man 11 is now live and ready for playing on Microsoft’s Xbox One consoles. The game is a return to classic 2D platforming which features a mix of retro art style and modern 3D models. The game also features several difficulty modes, online leaderboards, and a concept art gallery.
Here’s the official game description and trailer:
Mega Man is back! The newest entry in this iconic series blends classic, challenging 2D platforming action with a fresh look. The stunning new visual style refreshes the series’ iconic colorfulness, combining hand-drawn environments with detailed, 3D character models. To save the day, the Blue Bomber must battle Robot Masters and take their powerful weapons for himself, which now changes the hero’s appearance with new levels of detail. The innovative new Double Gear system lets you boost Mega Man’s speed and power for a new twist on the satisfying gameplay the series is known for.
Mega Man 11 is available either on its own or as part of the Mega Man 30th Anniversary Bundle which comes with 19 Mega Man video games.
Those who purchased the Gold and Ultimate Editions of Assassin’s Creed Odyssey can now play the game on their Xbox One, Xbox One S, or Xbox One X console three days ahead of everyone else.
Assassin’s Creed Odyssey is the latest main entry in the popular Assassin’s Creed video game franchise. The game is set during ancient Greece and, in a first for the series, allows the player to choose between a male or female main character for the entirety of the story campaign.
In addition to being able to play early, Gold players also gain access to the game’s Season Pass and Assassin’s Creed III Remastered (when it releases next year). Ultimate Edition buyers get the same content as those who bought the Gold Edition in addition to a variety of in-game alternate outfit packs.
The advancement in software development is a mandatory thing. If you don’t follow up trends, you get replaced with something else. And that’s what’s Microsoft’s team responsible for Skype development has taken as a rule of thumb. The new Skype is fresh and packs a modern design.
However, not everyone wants to transfer to that flashy instant messenger-like iteration. Some people don’t want to fix what’s not broken. Sadly, they won’t have a choice as the old Skype will be discontinued soon and the new one will replace it.
What’s up with that new version of Skype prompt?
Since the new iteration of Skype for Desktop was introduced, it had a lot of problems. Recently, Skype got better, but it also got more similar to the likes of WhatsApp, Facebook Messenger, or Viber. The all that 15-years-old VoIP-focused application was completely revamped and now it’s, basically, a chat app with a video calling option.
You can still stray away from the update, as Microsoft extended the support for Skype 7 (Classic Skype) for a few months more. This action was instigated by the community backlash, as users were more than satisfied with what the Classic Skype version has to offer.
So until then, don’t worry about the “This version of Skype will be discontinued soon” prompt and just refuse updates. When, eventually, Skype 8.0 takes over, we can only hope that the best features from the old one will find their place in this new release.
Until then, we suggest sending a feedback to the responsible team and ask for the old Skype to last longer. Or to replicate old features on a new release. Either way, we can conclude this article on that note. Make sure to tell us whether you like or dislike Skype 8.0. What the new version lacks? The comments section is just below.
Maybe some of you aren’t aware, but the Windows Insider Hub is no longer a default app bundled in newer Windows 10 Builds. But there’s still solutions on how to get it back, in case you don’t get it in your Windows 10.a
How to enable the Windows Insider Feedback Hub
So, in case you can’t find the Insider Hub and you want to use it again, you need to follow these steps:
Go to Settings->System->Apps & Features
Tap or click Manage Optional Features
Tap or click Add a Feature
Find Insider Hub and then click install
This path is a bit different on the new Windows 10 builds. Namely, you need to navigate to Settings > Apps > Apps & Features and then click on Manage Options Features.
After Windows 10 was officially released, the Insider Hub was once again included in preview Builds, but there are users who have reported that they are still missing it.
According to other users, the Insider Hub is installed, but when loaded, it says the following – ‘please sign in and connect. To use Insider Hub, make sure you’re connected to the internet and signed in with a Microsoft Account that’s registered in the Windows Insider Program.‘ Here’s what somebody suggests to try out:
I have seen some times where Insider Hub App appears to be installed, but it is an old version and will not launch. I tried uninstalling mine and reinstalling it too. I had to restart before it became available to reinstall.
Because Insider Hub is not detecting that your Windows login is a verified MSA and an Insider account, you could also try uninstalling it, Stopping Insider builds, switching to a local Windows Admin account, restarting, switching back to an MSA Windows login, verifying the account with a code or smart phone app, Start Insider builds and another restart, before joining the Fast Ring. Then install Insider Hub and see if it works.
And here’s another idea:
Running setup.exe from the official Windows 10 media, as if you are upgrading to a new version, might also be an idea to try, if you have never done that. If you do this, choose to keep Windows settings and skip past all screens asking for a product key.
The option to Start Windows Insider Builds is in Windows Update, even on clean installs of the official Windows 10 media. I think anyone can join that way, even if their MSA login was not previously registered on the Insider program.
If you happen to know some other solutions for the Insider Hub in Windows 10 to work, do leave your comment below and let us know.
UPDATE: Since the writing of this post, we found a series of additional solutions that may help you to fix the Feedback Hub issues that you’re experiencing.For example, you can reset the Feedback Hub app, as shown in the screenshot below.
If this method didn’t help, you can reset the Feedback Hub app via PowerShell. All you need to do is open PoweShell and run this command: Get-AppXPackage | Foreach {Add-AppxPackage -DisableDevelopmentMode -Register “$($_.InstallLocation)AppXManifest.xml”}
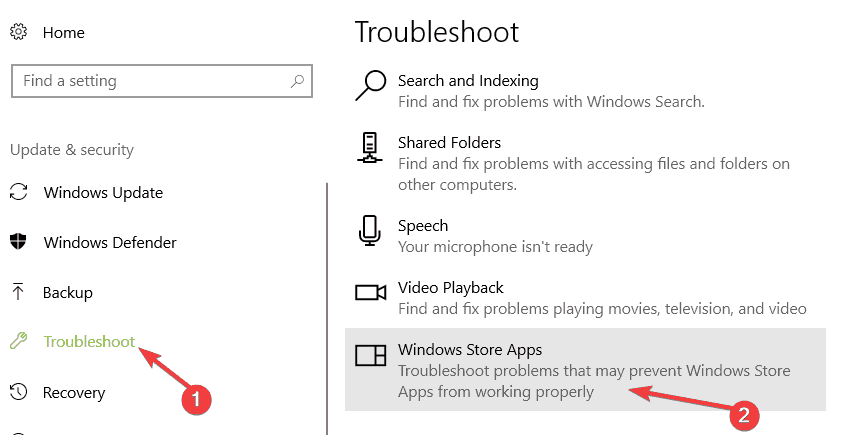
Additionally, you can also run the Windows Store Apps Troubleshooter.
One Lumia user has been complaining that his Lumia 735 MMS APN settings have been removed for Verizon. If you too have a similar problem, here are some more details regarding this.
Here’s what one annoyed Lumia 735 owner has been saying:
Hi, I recently purchased a Lumia 735 that comes originally for Verizon but that after getting an AT&T SIM I am using on this network.
Voice is OK, I updated the Internet APN settings and can use Data with no problem but I cannot find the MMS APN settings to input AT&T settings for MMS and group messaging to work.. Tried to install the Access Point app and it did not work, upgraded to Windows 10 Insider and the Access point option does not appear under Settings > Extras… Any ideas on how to turn this setting on ?
What to do if Lumia MMS APN Settings are Missing
If you are not aware how to set the MMS APN, you need to follow these steps – go to Settings, then to Cellular, after that select Add MMS APN. That’s it! However, there might be more annoying problems, as the same user informs:
In Windows Phone 8.1 release 2 after installing the Access Point APP from the store I get a message that the app is for a newer version of the OS but in Windows 10 Mobile Insider Preview I cannot find the app at all.
You can go ahead and read more regarding these settings on the official page. Furthermore, the guys over at the XDA-Developers forums have come out with a potential fix, so I invite to take a closer look at this thread.
If you still have issues or maybe you have something else to add or you know another fix, do leave your comment below and help others in need.
Speaking of Lumia 735, recent reports suggest that this phone model is gone for good. Many online stores no longer display the Lumia 735 as part of their offer. The good news is that you can still purchase it from other retailers, such as Amazon.
The mobile phone segment is almost dead for Microsoft. Unless the company doesn’t blow users away with the rumored Surface Phone, we’ll soon see all the Windows 10 phone users migrate to another mobile platform.
Naturally, whenever a new Windows version hits the general public, countless glitches and bugs start appearing. And one of the most annoying ones seems to be the problem with the Windows 10 screen which is constantly flashing. While we did try to come up with some potential fixes for the annoying problem with the constantly flashing screen in Windows 10, there are many situations when they won’t work. I also suggest you to have a look at our guide on How to Fix Screen Problems in Windows 10, as well.
One of the potential causes for a flickering display in Windows 10, as it turns out, could be caused by a 3rd party application. According to Microsoft, Norton Antivirus, iCloud, and IDT Audio could be among the software that cause the problem.
Symantec helps out to fix screen flicker in Windows 10
What Microsoft recommends is to boot Windows 10 into Safe Mode and just remove these apps if you have them installed. But the guys over at Symantec have come with a few basic steps that you need to follow, and not have to remove the software. So here’s what you need to do.
Step 1 – Start the computer in Safe mode with Networking
Exit all programs
Press the Ctrl + Shift + Esc keys to open the Task Manager
On the File menu, click New Task (Run…)
Type in msconfig, and then press Enter. If the User Account Control window appears, click Yes or Continue
In the System Configuration window, on the boot tab, check Safe boot and select Network. On Windows XP: In the System Configuration Utility window, on the BOOT.INI tab, check /SAFEBOOT
Click OK
When you are asked to restart the computer, click Restart
On your desktop, right-click the Screen_Fix.exe file, and click Run as administrator
If the User Account Control window appears, click Yes or Continue.The tool runs in the background and you may notice a screen appearing for a split second.
Restart your computer in normal mode.
Step 3 – Restart the computer in Normal mode
Exit all programs
Press the Windows + R keys to open the Run dialog box
Type in msconfig, and then press Enter. If the User Account Control window appears, click Yes or Continue
In the System Configuration window, on the Boot tab, uncheck Safe boot. On Windows XP: In the System Configuration Utility window, on the BOOT.INI tab, uncheck /SAFEBOOT
Click OK
When you are asked to restart the computer, click Restart
Step 4 – Reinstall your Norton product
Download and run the Norton Remove and Reinstall tool to uninstall and reinstall your Norton product
If you have received the Norton product from your service provider, run the Norton Removal Tool
So, that’s about it. It’s nice that Symantec has come up with such a fix and we’re expecting for a similar move from the other software companies which are considered responsible for these annoying flashing screen problems.
Step 5 – Additional solutions
Just in case the solution listed above didn’t work, here are some additional methods that you can use to fix screen flickering in Windows 10:
Reinstall GPU drivers
Update BIOS
Update all your apps and programs
Install the latest Windows updates
Disable Windows Desktop Manager
Reset PC to factory settings or roll back to the previous iteration
Clean reinstall Windows 10.
For detailed instructions on how to perform the steps listed above, check out these two guides:
CCleaner has helped many Windows 10 and Windows 8.1 users tidy up things in their systems, and now it has received an update that further improved the Windows 10 user experience.
The latest software update takes the tool to CCleaner version 5.47.6716 and it brings three important improvements:
Fixed cleaning from the Recycle Bin context menu
Fixed cleaning via commandline
Added a new Edge cleaning rule for cleaning Credit Card data
The previous update was more feature-rich, and added new privacy options and smart cleaning features, namely:
Added a separate control for the reporting of anonymous usage data
Added a link to a Data Factsheet, which explains the data reported from CCleaner, why it’s reported, and what it’s used for
Renamed the ‘Monitoring’ feature to ‘Smart Cleaning’, to better describe its function (intelligent cleaning alerts)
Reworded checkboxes for clarity
If Smart Cleaning is disabled, CCleaner’s background process will close and the feature will not run on startup
Piriform Software has recently released the CCleaner 5.0.8 FINAL and CCleaner 5.0.8 Portable version which were available for download more than a week ago, but only now have I seen the notification. Here’s how the official changelog looks like:
Improved Windows 10 (10240 RTM build) compatibility
Improved Microsoft Edge Cache and Saved Password cleaning
Improved Opera 30 Session cleaning
Added Microsoft Edge Browser Monitoring (CCleaner Professional only)
Added ‘Open CCleaner‘ to System and Browser Monitoring (CCleaner Professional only)
Improved Include and Exclude Wildcard support
Added Foxit Reader 7 and RealTimes cleaning
Improved Avira Antivirus, BlueStacks and Media Player Classic cleaning
Updated various translations
Minor GUI Improvements
Minor bug fixes
Since Windows 10 has been officially released as a free upgrade, CCleaner hasn’t come up with another version to announce ‘full support’ for the new OS, so we’ll have make use of this ‘improved compatibility’ version. But with so many errors out there, it’s almost a given for Piriform to come up with another version. One that happens we will make sure to update the app with the fresh changelog.
As we can see, the new version also comes with improved Microsoft Edge Cache and Saved Password cleaning, which will prove helpful if you resort to CCleaner to clean everything on your device and you don’t clean your browser separately. Furthermore, it has received improved Avira Antivirus, BlueStacks and Media Player Classic cleaning, among other various improvements and bug fixes.
The amount of RAM depends on what you plan on doing because gaming or media editing takes a generous amount. Even background processes are known to consume resources. So, it’s important to determine whether 512 MB or 1 GB RAM is enough for Windows 10.
There is a heavy debate in the online world about whether Windows 10 can operate with less RAM than the minimum announced by Microsoft. In this article, we tried to address this question and let you know how things are going if you plan to install Windows 10.
What are the official Windows 10 specs and system requirements?
According to Microsoft, if you want to upgrade to Windows 10 on your computer, here is the minimum hardware you will need:
RAM: 1 GB for 32-bit or 2 GB for 64-bit
Processor: 1 GHz or faster processor
Hard disk space: 16 GB for 32-bit OS and 20 GB for 64-bit OS
Graphics card: DirectX 9 or later with WDDM 1.0 driver
Display: 800×600
How do I find the computer specifications?
To see the hardware specifications for your computer, right-click on My PC and select Properties.
On the newer versions of the OS, you can head to the About section in Settings and check all the information related to Windows and the hardware.
Can 1GB RAM run Windows 10?
You will be able to install Windows 10 with only 1 GBRAM, but it will not work properly as the OS will not be able to perform heavy operations.
Let’s see what we observed if you use only 1GB:
You will be barely able to use two or three applications at the same time
The boot time will be around 1 minute in general
Navigating through Windows Explorer is quite smooth, as everything opens up nicely and quickly
You browse the internet and read articles on sites that contain lots of images
Youtube runs quite OK, although there might be times when small lags appear
Basic applications like WordPad, for example, work really OK
If you want to try using Windows 10 using only 512 MB of RAM, you should know that the system will run extremely slowly, but it will still work. It will be difficult for Windows 10 to run in such a short space.
Older versions of Windows can do this, but the newer one contains many background processes and tasks that get continuously updated, and they take up more space to run.
But just how slow can Windows 10 go when it comes to PC specifications? Let’s see what we observed is happening if you use only 512 MB:
You will not be able to do much on your computer with this installation because your PC will run out of memory without really doing anything
You will be able to scroll around any folder without major difficulties
There was no noticeable lag running the mouse cursor around
Cortana works really slowly, but it still works
It will take you a little bit longer to open basic applications like WordPad, for example, but you will still be able to type and modify size, style, and colors without having major difficulties
You will still be able to surf the Internet, but if you are trying to see a site that contains lots of images, the system will struggle, and the system might not even respond
Youtube does not really work – you might get the Not responding message
So overall, it is a negative user experience. For some basic activities, it will work all right, but most of the time, the system will run pretty slow, and it will not feel usable.
Can Windows 10 run on 2 GB?
2 GB of RAM is a decent amount of RAM. This means it is adequate to install and run Windows 10 with acceptable performance. But to achieve optimum performance, you will need more. No operating system is optimized for the minimum supported RAM.
Having 2GB of RAM will offer you fluid performance on day-to-day tasks, but things will get different if you run games or want to perform editing tasks.
A good suggestion would be to try turning off Cortana and additional features on Windows 10 if you face any issues. Keep in mind that if you use heavy applications on it, your computer will start to misbehave.
All in all, the more amount of RAM you have, the more smoothly your computer will run.
Microsoft is rebranding is Mixed Reality Viewer Windows 10 app to 3D Viewer, bringing a fresh coat of pain to the UWP app along the way. For those unfamiliar with it, Mixed Reality Viewer is an app that lets you superpose 3D models into the real world using your PC’s camera. This is pretty much Microsoft’s answer to all the fun mixed reality apps available on iOS and Android devices.
Italian blog Aggiornamenti Lumia went hands on with the new 3D Viewer app and noticed several new features and UI changes (via MSPoweruser). First of all, you’ll see a new splash screen after launching the app for the first time, which explains some of its main features. You’ll also see that the hamburger menu has been replaced by a top menu bar, and you can now adjust lighting, shading and more for your 3D models in the right panel.
For now, it seems that the rebranded Mixed Reality Viewer (version 5.1809.20012.0) is only available for Windows Insiders on the Skip Ahead ring. Just like Paint 3D, this is a stock Windows 10 app that reflects Microsoft’s growing interest in 3D and Mixed Reality, though this app is probably better to use on a light tablet like the Surface Go than on a heavier laptop with no rear camera.
Microsoft’s been in the Internet of Things business since the release of Windows IoT a few years ago. Today is no exception, as the Redmond giant has expanded their horizon of services with the release of Robot Operating System, an open source set of tools and libraries for building robots, for Windows. Microsoft plans to brings the new software to robotic devices, such as those used in factories for manufacturing, and even for consumer products, such as automated floor vacuums.
Robots aren’t new for Microsoft, but their integration with ROS software is expected to innovate the complex machinery for manufacturing, as well as well as connected systems used governments and academics. These organizations are investing in what is known as “Industry 4.0” which refers to the next generation of manufacturing, according to Microsoft.
For those of you who are unfamiliar with the Internet of Things, it refers to the connected technology that makes smart home appliances and devices like Philips Hue bulbs, smart televisions, and connected speakers so “smart.” These devices are able to communicate with each other, for example, when you use a Harmon Kardon Invoke with Cortana or another smart speaker to turn off the lights or control the volume on your TV. Smart robots are another example, such as internet-connected floor vacumns.
Internet of Things not only refers to simply consumer products, but also the more complex connected machines and robots used in manufacturing. These devices need to be able to communicate not just with each other, but also must be able to sense the world around them using special sensors.
Microsoft has the perfect example of smart robots, which they showcased at the ROSCon 2018 event, located in Madrid, Spain. At the event, the tech giant demonstrated the ROBOTIS Turtlebot 3, a robot capable recognizing and steering towards whichever person is detected as being the closest in proximity.
In another example, Microsoft showed off many smaller robotic devices capable of controlling an orchestra system. This system of devices is powered though Microsoft’s cloud server Azure, which is built for enterprises which lease resources from the service to power applications through the cloud. This system is controlled though Azure’s IoT Hub.
With this new software, Microsoft should bring advanced capabilities to make manufacturing efficient and effective. Do you believe Microsoft’s integration with ROS software to will innovate the next generation of manufacturing? Show us your thoughts and discussions in the comments below.
Four years ago, Microsoft did something unprecedented in the history of Windows development. By opening the Windows Insider program to all Windows enthusiasts, Microsoft was done with developing the desktop OS in secret, and users were finally given a platform to share their feedback about Windows with the company.
The Windows Insider program is celebrating its 4th anniversary today, and it’s a good time to look back at how the program evolved over the years. Last year, Microsoft announced that the program reached the 10 million members mark, while the new Windows Insider Program for Businesses hit 30K organizations milestone. We don’t hear much about the latter these days (same thing with the #Insiders4Good initiative), but the Windows Insider Program has always been mostly about new Windows 10 features that consumers should care about.
Today's the 4th anniversary of the #WindowsInsiders Program! Thank you everyone who's been here since the beginning, and everyone who's joined along the way. Your feedback has helped shape Windows into the OS it is today, and I can't wait for you to see more of 19H1 ???? pic.twitter.com/HrfYbZHthb
Last year, the opening of the Skip Ahead ring marked a new milestone in the history of the program. For the first time, Microsoft would give select Insiders access to the version of Windows 10 that is two releases away. This added a bit of complexity to the program, as did Microsoft’s decision to start shipping cumulative updates. As Microsoft explained at the time, most businesses are enrolled in the Slow ring, which is why Microsoft is now aiming for “beta quality software in the Slow ring, with alpha quality in the Fast ring.” However, that didn’t really change the low amount of new builds that Microsoft ships to Slow Ring Insiders.
One thing that didn’t change over the years is that you really need to join the Fast Ring (or the Skip Ahead ring) if you want to get access to the fun stuff. It’s pretty great to be able to play with experimental features before everyone else, though in some cases Microsoft eventually removes new features to continue working on them behind closed doors. This is what happened with Windows Sets earlier this year, though the functionality is expected to make a comeback at some point.
The Windows Insider program is certainly not perfect, and we know some of you don’t really dig the Ninja cat obsession and other private jokes, but Microsoft really deserves credit for trying to be more open with the Windows enthusiasts out there. The Windows Insider team is also very dedicated to interacting with Insiders on Twitter, Discord, or Microsoft’s Community website, and you’ll certainly learn a lot by joining the program. Doing so is as simple as opening the Windows 10 Settings app, selecting Update & Security and then going to Windows Insider Program.
As Microsoft and Qualcomm work on the next-generation of mobile computing with Always-Connected-PCs (ACPC’s), a key component will be the development of eSIM technology going forward.
Fortunately, Microsoft and the global leader in Augmented Identity, IDEMIA just announced a partnership that will help offer the convenience of eSIM technology to Windows 10 device users in the near future.
According to the Financial Post, “the partnership will see IDEMIA’s eSim Orchestration Hub used to integrate with mobile network operator (MNO) networks to easily and quickly support eSIM on Windows 10 Enterprise devices.”
“IDEMIA’s eSIM Orchestration Hub is an excellent solution for MNOs looking to support Windows Enterprise eSIM devices without having to undergo significant upgrades to their network. That’s why we partnered with the IDEMIA team to enable faster and easier adoption of eSIM technology in Enterprises worldwide,” said David Lemson, Director of Program Management for Windows IoT and Networking, Microsoft.
As with most things, Microsoft these days, IDEMIA’s eSIM Orchestration Hub is a cloud-hosted platform solution for the management of eSIM devices, which, in theory, should allow for a flexible end-to-end piece of software for IT Pros to manage that can be constantly be maintained.
As ABI Research predicts, Microsoft’s partnership with IDEMIA couldn’t come at a better time, with shipments of eSIM-enabled devices expected to from 224 million in 2018 to 700 million by 2022.
Dell has announced the launch of its new ultra-slim Windows 10 notebook, Dell Inspiron 15 7572, in India. The tailor-made Inspiron allows customers with an option to customize color, software, and services with an intent to offer a more personalized user experience.
The Inspiron 7572 sports a 15.6-inch InfinityEdge LED-Backlit display with a Full HD resolution (1920×1080) and IPS wide-viewing angle. It is powered by Intel 8th gen Corei5/Ci7 Quad Core CPUs with NVIDIA GeForce MX150 discrete graphics option with up to 4GB GDDR5 memory for additional graphics muscle to handle hardcore gaming titles.
It comes with a high-resolution Precision touchpad for more fluid panning as well as pinching and zooming.
The Dell Inspiron 7572 also packs in ‘Dell Cinema’ with CinemaStream and CinemaSound technology for a more spectacular cinematic experience. Of course, all Inspiron laptops feature SmartByte and Waves MaxxAudio Pro for a better video and audio experience.
Exclusively available to purchase on dell.co.in, the Dell Inspiron 7572 is available in silver and gold color options.
Welcome back to our Windows 10 news recap, where we go over the top stories of the past week in the world of Microsoft’s flagship operating system.
AdDuplex: Windows 10 April 2018 update inches closer to 90% usage share
AdDuplex has released its latest stats on the Windows 10 April 2018 update, noting that it is getting close to having 90% share of the Windows 10 market.
Microsoft: Commercial Windows 10 customers will see update sizes drop significantly with x64-only update option
Report: Microsoft shifts focus away from Office Mobile apps for Windows 10
Microsoft’s attempt at proving UWP’s worthiness, the suite of Office Mobile apps, is apparently coming to an end as a new report suggests Microsoft is moving its focus away from the Office Mobile apps on Windows 10. It will continue to focus on the iOS and Android apps, but the Windows 10 apps are now considered to be “legacy”.
Microsoft inches closer to its goal of 1 billion Windows 10 installs; hitting 700 million devices
Microsoft’s goal of stretching Windows 10 to 1 billion installs is getting closer, as the company reaches 700 million Windows 10 devices. The rate of new installs appears to have slowed significantly, with Microsoft rarely announcing any changes in the figures, and company executives reluctant to comment on them at times.
That’s it for this week. We’ll be back next week with more Windows 10 news!
The most famous football (soccer) simulation and the most lucrative EA project is finally here. FIFA 19 is out and it brings enhanced soccer experience to all players around the globe.
However, it’s hard to expect that the game of this scale comes out flawless and without initial issues.
There’s a fair number of bugs, especially on the Windows PC version, and we decided to enlist the major ones and provide applicable solutions.
If you’ve experienced any bugs on FIFA 2019, there’s a good chance you’ll find the way to solve it in the list below.
How to fix the most common FIFA 19 problems
Don’t have time to read the step-by-step tutorial? Watch this video guide and find out the solutions to fix FIFA 19 issues on Windows PC.
1. Can’t download FIFA 19
The first hurdle is the inability to download the game in the first place. Once purchased on Origin, users should be able to download the game immediately.
However, some of them get the purchase error, while the download process crashes for others. This isn’t an uncommon occurrence, so bear with us.
Here’s what you can try to address this:
Check the connection settings.
Restart the download.
Make sure you have enough storage space (50 GB).
Update the Origin client.
Log out and log in again into Origin.
Disable all bandwidth-hogging processes in the background.
Check your Region.
2. FIFA 19 won’t start
On the other hand, having the game installed but not being able to start it is even worse. Some users who successfully downloaded and installed the game weren’t able to run it as they were welcomed by an error.
There are a few things you should confirm before we consider reinstallation.
Follow these steps to troubleshoot the “Fifa 19 won’t start” error on Windows PC:
Make sure you meet the minimum system requirements:
OS: Windows 7/8.1/10 – 64-Bit
CPU: Intel Core i3-2100 @ 3.1GHz or AMD Phenom II X4 965 @ 3.4 GHz
RAM: 8 GB
HDD: At least 50 GB of free space
GPU: NVIDIA GTX 460 1GB or AMD Radeon R7 260
DirectX: DirectX 11 compatible (7 required for DirectX 11)
Input: Keyboard and mouse, dual analog controller
Network: Internet connection required to install and play.
Run the game in the compatibility mode for Windows 7.
Install the latest version of DirectX, VC++, and .NET Framework.
3. Lags and freezes in the FUT mode
FIFA 19 is certainly not an undemanding game. The redesigned looks require more than a capable PC to run the game in a seamless manner.
However, even if you have a gaming rig with a top-notch graphics card and enough RAM, you still need to check the associated software.
Without the proper supporting software, the in-game experience might suffer. Especially in online modes.
In order to address this, we suggest following these steps:
Make sure you have a stable connection. Use LAN cable instead of Wi-Fi.
Check the game files integrity.
Disable the bandwidth-related applications from working in the background.
Disable Origin In-Game for FIFA 19.
Reinstall the game.
More regarding driver updates, you should be aware that your GPU drivers can be updated easily and without much effort. With Outbyte Driver Updater, you have outdated or missing drivers resolved in a few simple steps.
4. My controller doesn’t work in FIFA 19
Playing sports simulations on anything other than a controller means hardship. However, using a controller on a Windows PC requires proper drivers and, for some controllers, even additional software.
On the other hand, FIFA 19 on its own has a few mishaps when it comes to controllers. There seems to be a bug that makes any controller (even Xbox controller) unrecognizable.
If that’s what’s bothering you, follow these steps to resolve it:
Delete your saved profile and re-establish it again.
Update controller’s drivers:
Make sure your controller is plugged in.
Right-click on the Start and open Device Manager.
Expand the “Sound, video, and game controllers” section.
Right-click on the controller and choose “Update driver” from the contextual menu.
5. Ultimate Team crashes to desktop
The FIFA Ultimate Team mode is the bread and butter of recent FIFA games. It’s by far the most popular and competitive mode in FIFA 19, as well.
However, some users reported sudden desktop crashes while playing the match. This, sadly, results in them automatically losing the game. This is a part of EA’s anti-cheat program which doesn’t work as supposed to.
Here’s how to resolve it:
Check the connection.
Don’t use Alt-Tab combination.
Disable Origin In-Game for FIFA 19.
Disable Game mode and disable all notifications.
Press Windows key + I to open Settings.
Choose Gaming.
Select Game Mode from the left pane.
Toggle Game Mode off.
Now, click on the Action Center and enable Focus Assist.
6. FIFA 19 black screen issues
The black screen almost always doesn’t stand for anything good. In this case, we’re probably looking at a driver issue. Thing is, even if you have the latest version of drivers for your graphics card, the GPU still might fail you.
That’s why, instead of turning to Windows Update for a driver update, we suggest navigating to the OEM’s official site and getting your drivers from there.
Since a few years ago, the internet connection is a must if you want to take full advantage of FIFA games. The same goes for FIFA 19. The permanent connection to EA servers is a necessity for more than a few modes.
However, there seems to be a network issue as some players are not able to connect to EA’s dedicated FIFA servers.
This can be resolved by following these steps:
Make sure EA servers are not temporary down. You can check the Server status, here.
Check connection settings (reset your router, use LAN instead of Wi-Fi if possible, reboot the PC).
Make sure Windows Firewall or an antivirus isn’t blocking the game.
8. FIFA 19 Champions Edition won’t unlock
The EA’s recent practice is to offer lots of pre-order content packages and, this year, users can choose between the Ultimate, Champions, and Standard editions of the game.
The Ultimate Edition is the most expensive one. However, some of the users who prepurchased Champions Edition weren’t able to unlock it. They run into an error during the actualization process.
This is a common bug but we assure you that the problem should be addressed by sending a ticket to EA’s support.
9. Can’t log into FIFA Ultimate Team Companion in WebApp
The FUT Companion WebApp allows you to track all important things concerning your Ultimate Team. Starting with the current squad and moving to advanced statistics.
However, some users weren’t able to log into FIFA Ultimate Team Companion for unknown reasons.
We suggest clearing your browser cache or using an alternative browser. In case you have a smartphone, you can get the Companion app on iOS and Android.
10. FIFA 19 match won’t start
If the loading after the initial Lineup tweaks takes forever, we suggest checking your network settings and running the Origin built-in tool to check the integrity of the files.
Of course, this is a common bug, so the eventual resolution is expected in future FIFA 19 updates.
Follow these steps to resolve the match-related issues in the FUT mode:
Disable background applications, notifications, and Game Mode.
Close the game and delete save files from Documents > FIFA 19 concerning MatchDay and Squads. Open the game and enable Live Form in the FUT mode. Finally, navigate to Main Menu > Customize > Edit teams and Update latest squads.
Check the game integrity with the Origin client.
With that, we can wrap this article for the time being. We’ll make sure to add additional issues and solutions as time passes.
In case you have something to add or take, make sure to do so in the comments section below.
Microsoft news recap is a weekly feature highlighting the top Microsoft news stories of the past week. Sit back, grab some coffee, and enjoy the read!
Microsoft will drop support for Skype Classic in November
Over the coming months, Microsoft will begin pushing users of Skype’s classic applications on desktop and mobile over to the new Skype experience, version 8. Support for Skype Classic will come to an end in November.
Microsoft to return to Orlando for Ignite 2019
As Ignite 2018 comes to an end, Microsoft has already announced that the next Ignite conference, in 2019, will be returning to Orlando, Florida. Instead of taking place in late September, it will instead take place in early November.
Volkswagen partners with Microsoft to build new “automotive cloud”
In another win for Microsoft’s Azure platform, the company has teamed up with Volkswagen to create the “Volkswagen Automotive Cloud” which will support Volkswagen’s future connected cars. Little detail is known, but it’s likely this will allow users to purchase services from within their cars, receive software updates, and more.
Microsoft adds Translator to Swiftkey Android app, works with 60 languages
We’ve all seen it. A new update for a piece of software gets released, you’re excited to get all the latest features and see some issues fixed, only to find out it’s going to take a while to download and, eventually, install. Knowing that some of the updates include bits that you don’t even need, but still take time for you to download, can be frustrating. Microsoft thinks it’s found a solution, at least for its commercial customers on Windows 10.
In a normal scenario, Microsoft releases a Windows 10 update as a single bundle that includes both x86 and x64 versions. This makes it simple for the update to be applied to all machines, catering to their specific requirements whereby x86 may be needed. However, many machines don’t need the x86 version, making this part of the update useless. A standard update is around 4.8GB, with the x86 portion taking up around 2.2GB of that.
From now, Microsoft will distribute an x64-only version to enterprise customers (via ZDNet). This brings a significant saving on the total download size, coming in at roughly 2.6GB, compared to the previous 4.8GB. Not only that, but it also reduces the total download size and the overall bandwidth usage, particularly where a customer has systems in multiple regions. Enterprise customers updating to Windows 10 versions 1703, 1709, and 1803, will be able to download the x64-only option, with 1809 coming along shortly when it releases.
To have access to the x64-only option, the customer must be using Windows Server Update Services (WSUS) or have a system connected to System Centre Configuration Manager. The updates are released as Electronic Software Distribution files through WSUS.
There is a downside to this new approach. The updates will only contain the original Release-to-Manufacturer (RTM) version of Windows 10. Cumulative updates that became available after RTM, Features on Demand and language packs are not included, so system administrators will need to install these separately afterward in order for their software to be completely up to date.
Joel Frauenheim from Microsoft said:
Customers who still need x86 feature updates will need to use the combined files originally published, which will continue to be available and do not have the ‘x64’ distinction.
Configuration Manager or other enterprise management solutions can pull the x86 files from that feature update download to deploy as they did before.
While a welcome change for saving bandwidth and improving download times, it can add an additional step to bring a system completely up to date. What do you think to Microsoft’s change in handling updates for Windows 10 x64 enterprise machines?
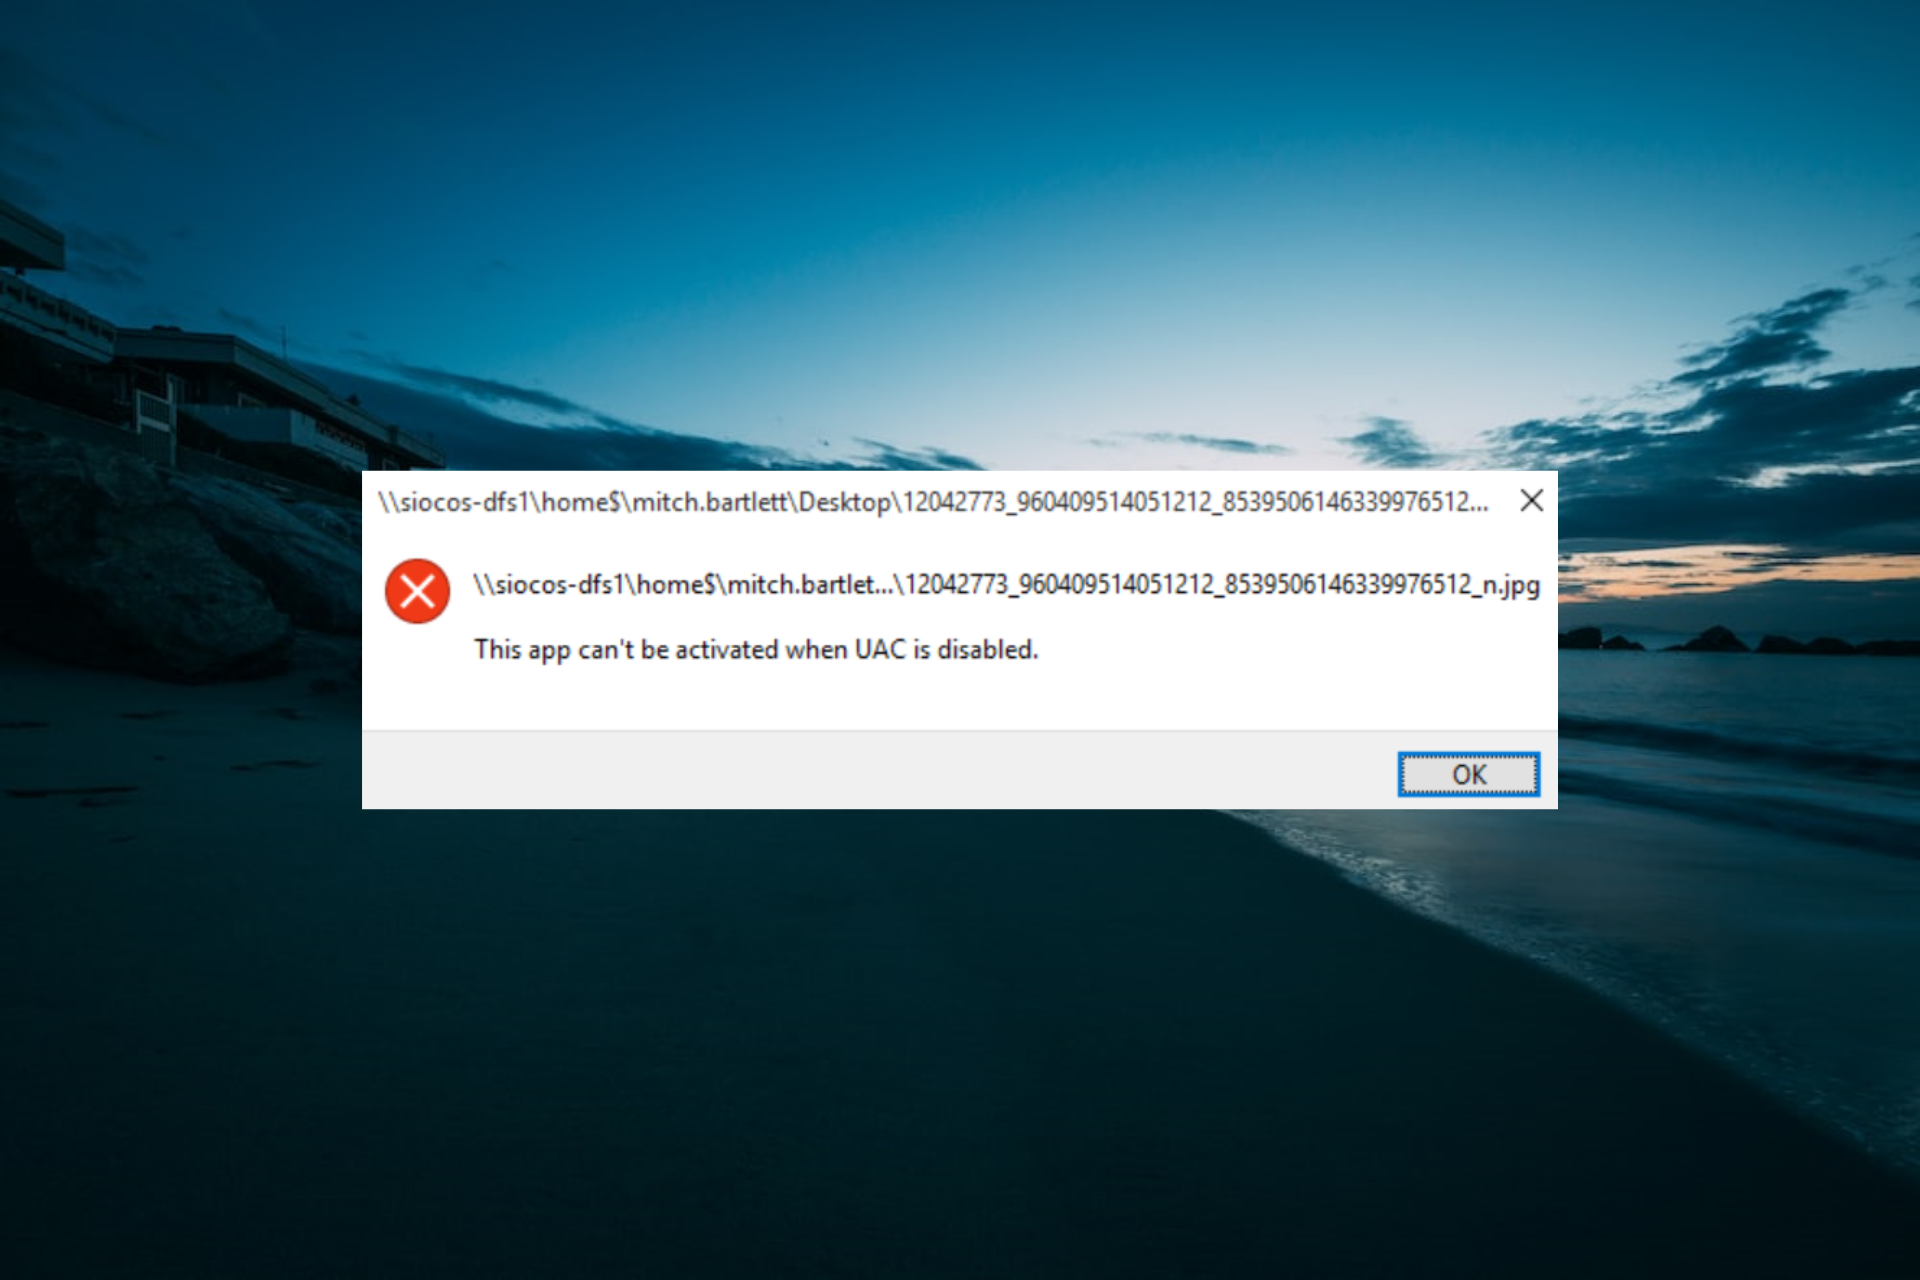
Some users have stated that This app can’t be activated when UAC is disabled error message pops up when they try to open images and other files with UWP apps.
Consequently, the users can’t open their images with the default Photos app in Windows 10. Does the same error message pop up when you open Windows apps? If so, check out the potential fixes below.
What do I do if UAC prevents app activation?
1. Turn On User Account Control
Press the Windows key + R, type useraccountcontrolsettings, and click OK.
Drag the bar from Never notify to Notify me only when applications try to make changes to my computer UAC (default) setting.
Press the OK button.
The error message states the app can’t be activated when UAC is disabled, which is a clear enough hint that the issue pertains to User Account Control settings. So turning User Account Control back on is the most probable fix for the error message.
2. Enable the User Account Control Group Policy Setting
Press the Windows key + R, type gpedit.msc, and click OK.
Navigate to the path below in the left pane: Computer Configuration > Windows Settings > Security Settings > Local Policies > Security Options
Click the User Account Control: Run all administrators in Admin Approval Mode setting to open the User Account Control policy window.
Then select the Enabled radio button.
Finally, click the Apply button, followed by OK.
3. Adjust the EnableLUA DWORD Value
Type regedit in the Run text box and click OK.
Then browse to the path below in the left pane: HKEY_LOCAL_MACHINE\SOFTWARE\Microsoft\Windows\CurrentVersion\Policies\System
Select the System key on the left of the window.
Double-click the EnableLUA DWORD in the right pane.
Set the Value data to 1, and click the OK button.
In some cases, the app can’t be activated because UAC is disabled option can be because the feature is deactivated in your Registry. You can fix this by changing the value, as shown above.
4. Reset the MS Store app
Click the Cortana button on the taskbar, type Powershell in the search box, and click Run as administrator under Windows PowerShell.
Next, type the command below and hit Enter: Get-AppXPackage -AllUsers -Name Microsoft.Services.Store* | Foreach {Add-AppxPackage -DisableDevelopmentMode -Register “$($_.InstallLocation)AppXManifest.xml” -Verbose}
Resetting the MS Store app can often fix numerous app error messages, so that resolution is worth a shot when UWP apps don’t open.
5. Open Your Files With Alternative Desktop Software
This isn’t really a fix, but remember that you can still open images, and other file types, with software that aren’t UWP apps.
This app can’t be activated when UAC is disabled error message only pops up for UWP apps. So instead of trying to open images with Photos, open them with an alternative non-UWP software such as FastStone Image Viewer or Paint.NET.
So that’s how you can get the This app can’t be activated when UAC is disabled error fixed in Windows to kick-start apps.
Turning the UAC back on will usually fix the error message. In addition, resetting Windows to default settings with a factory reset, as covered in this post, might also reactivate your apps.
Feel free to let us know the solution that helped you fix this issue in the comments below.
The newest installment to the Fallout series, Fallout 76, is coming to Xbox One and Windows 10 on November 14, 2018. However, the big news is that Microsoft and Xbox released details on Fallout 76 B.E.T.A. (Break-It Early Test Application) that will be available to play starting October 23, 2018 on Xbox One. As noted in a post on Xbox Wire, Bethesda’s main goal is “to stress test and break the game.”
Bethesda added that servers for Fallout 76 B.E.T.A. will be online during “targeted timeframes, so we can get as many people possible playing at the same time.” The purpose of narrowing the servers for certain timeframes instead of 24 hours a day is to have the most players online and see how Fallout 76 servers react to being under full load and see what issues arise.
“On any given day the game might be up for anywhere from four to eight hours. Focusing as many players as we can into these windows is our prime objective. Then we’ll fix what we need to fix and do it again and again from the start of B.E.T.A. until a few days before launch. We’ll give you as much heads up as possible because we need you to log in during these times and play the game.
We’ll also keep you posted through our official @Fallout and @bethesdastudios on Twitter as well as the Bethesda.net forums and our Bethesda.net Status Page to learn when servers will be online. While the adventures you and your friends will experience will all be unique, you’ll start the same as everyone else: within the safe confines of Vault 76 on Reclamation Day. For the very first time, we’re excited to share how your journey will begin.”
Starting on October 23, 2018, those who pre-ordered Fallout 76 will be able to stream and broadcast their B.E.T.A. gameplay on Mixer, Twitch, and YouTube. Bethesda welcomes your feedback on Fallout 76 B.E.T.A. Bethesda wants to improve gameplay and the overall game experience in Fallout 76, to prepare the game for the official release on November 23, 2018.
Microsoft announced today that its ever more popular Ignite conference, which has just concluded, will be back in Orlando, Florida again next year. Next year, however, instead of late September, the conference will run from November 4th – 8th, and you can already pre-register for the event, which sold out again this year and boasted some 30,000 attendees.
Even if you didn’t get to attend this year’s event, you can register with a Tech Community account and watch all of this year’s sessions, including the Vision Keynote with Satya Nadella and the three technology keynotes, on IT and Azure, Microsoft Dynamics 365, and Microsoft 365.
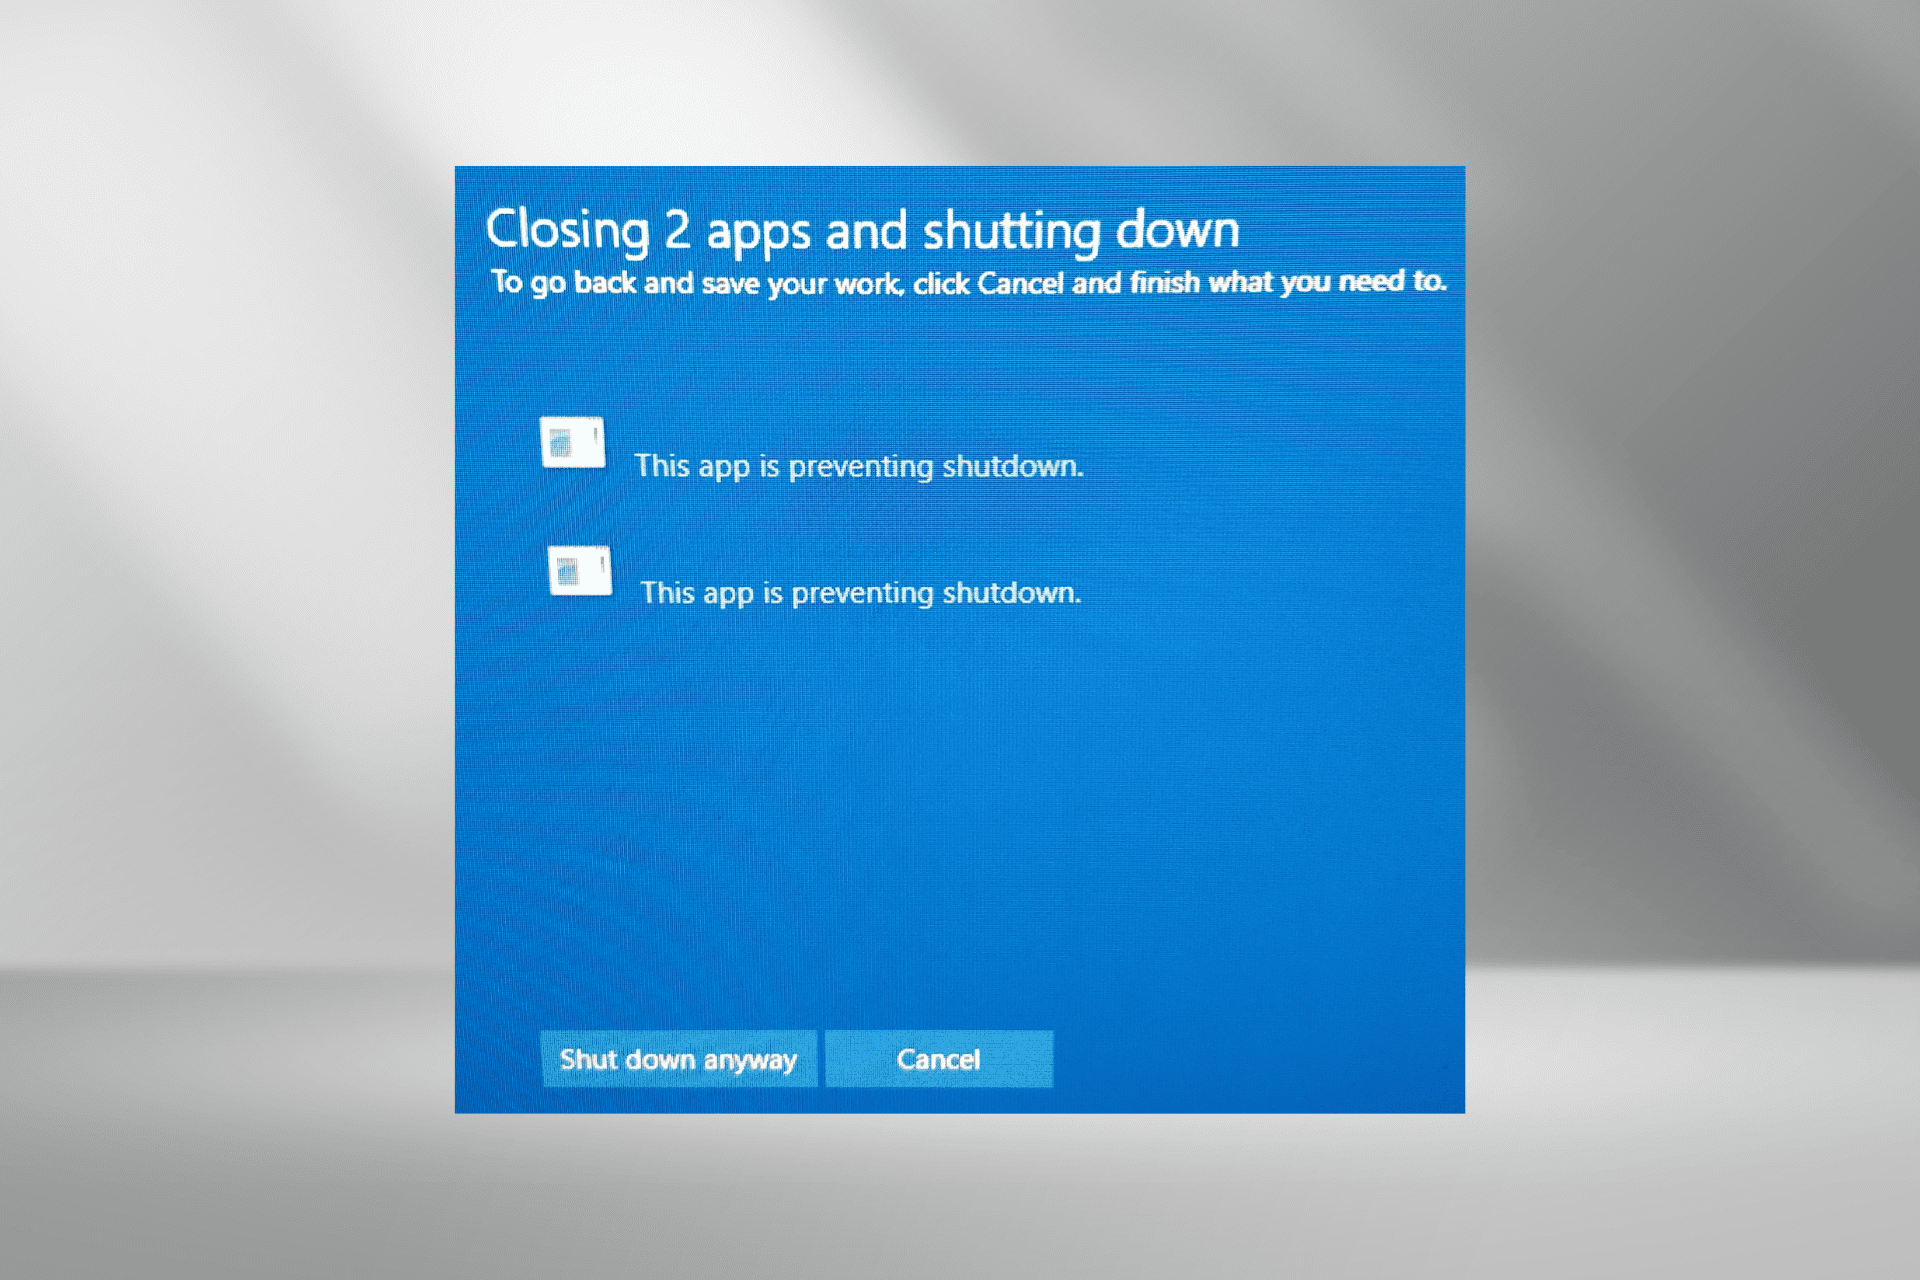
This app is preventing shutdown error message appears when you try to shut down Windows while there are still third-party apps running.
You then see a screen that lists software apps you still need to close, and you can select the Cancel or Shut down anyway option. By selectingCancel, users can manually close the listed apps preventing shutdown. But why does the error appear? Let’s find out!
What does This app is preventing shutdown mean?
This app is preventing shutdown screen appears when applications with unsaved data are still open in Windows.
Word processors, spreadsheets, text editors, and image editing software will usually prompt you to save unsaved documents or images when you click the X button to close their windows.
Then you can select to save and close or close the application without saving anything. So you need to close all applications with unsaved data open in them before shutting down Windows.
How do I fix the This app is preventing shutdown error?
Modify the Registry
Tip
Before you proceed, make sure to create a restore point to be able to revert things in case the process goes wrong.
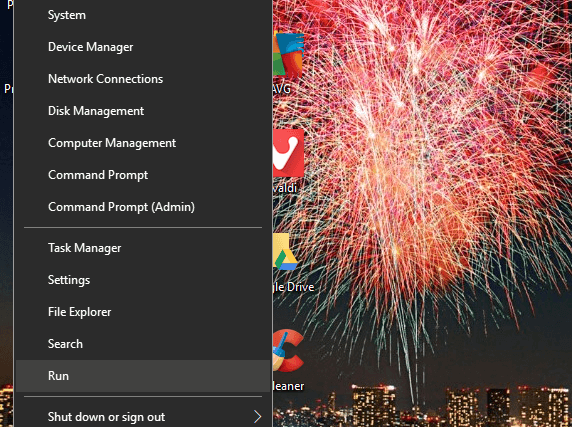
Next, right-click the Start button and select the Run accessory.
Enter regedit, and click the OK button.
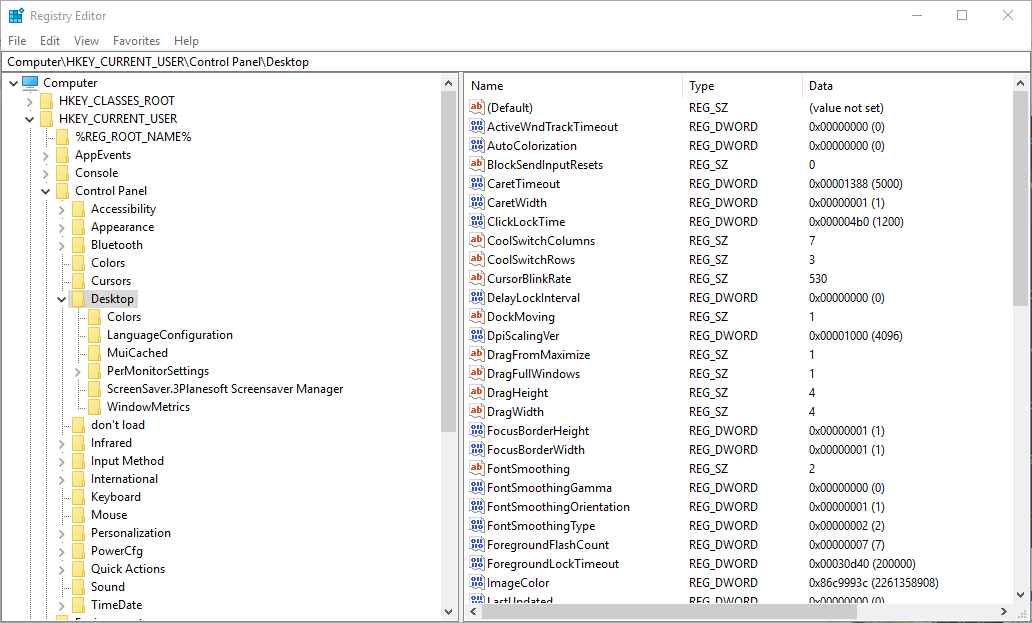
Navigate the following path: Computer\HKEY_CURRENT_USER\Control Panel\Desktop
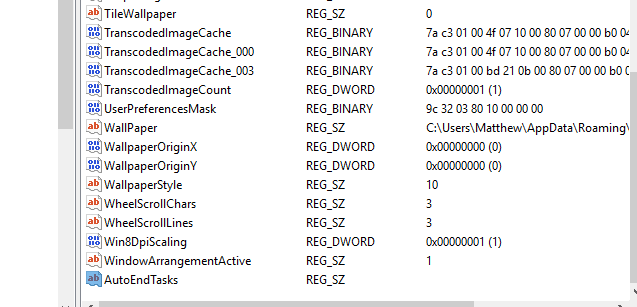
Right-click an empty space on the right side, click New, and select String Value from the context menu.
Enter AutoEndTasks as the string value name.
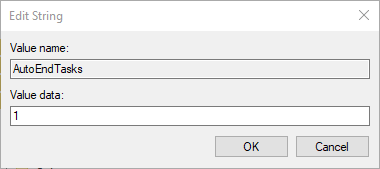
Double-click AutoEndTasks, enter 1 under Value data, and then click OK to save the changes.
Close the Registry Editor window.
Finally, restart your desktop or laptop.
The new AutoEndTasks string value ensures all software closes automatically when you click Shut down. Thus, you’ll no longer need to close programs with unsaved data open in them before shutting down.
Also, when you find that This app is preventing shutdown has no name, the Registry method works well since the changes are applied across the PC.
Remember, however, that the This app is preventing shutdown warning message can also be a handy reminder that you have forgotten to save something. Even more, solving the issue of an app preventing shutdown in Windows is also possible thanks to the tips we’ve detailed in this guide.
On some laptops, a preinstalled touchpad utility called Elara can repeatedly trigger the This app is preventing shutdown message, so check our step by step guide to uninstall Elara if you suspect it is the cause.
Before you leave, do check some quick tips to decrease the boot time in Windows, and have the PC restart, shut down, and turn on quicker.
For any queries or to share other solutions with us, drop a comment below.
What do you do when Microsoft’s promises and reneges on a new software solution? You find some gifted developers who can provide you with an even better experience.
Enter, Stardock.
Back when Windows was going through an identity crisis with Windows 8, Stardock was there to offer users a software solution that made Windows 8 more like Windows 7 and thus a more familiar and welcoming tranistion for many. The company’s Start 8 software brought back the lauded Windows 7 Start Menu alongside Microsoft’s new Widnows 8 interface.
Well, the company is back offering users additional functionality with its Groupy software.
For a bit of reference, the Windows team teased a new tabbed experience that would come in some future update to Windows 10. The new tabbed functionality was called Sets and would allow users to group separate applications into a tabbed interface similar to an internet browser, helping to declutter desktops as well as organize tasks and workflows.
Unfortunately, the Windows team pulled back on that release in its Insider program and will presumably revisit development of it at some future date, but having tested it, I found that I quickly became addicted to the functionality.
Despite Microsoft selling productivity as a multi windowed experience with its titular product Windows over the past 30 years, I personally found that tabbing my workflow boosted my productivity.
Thankfuly, Stardock offers a similar and in most ways, a superior experience with Groupy.
I’ve been testing Groupy for the past few months and it’s become a necessity for me. Using Stardock’s software, I’m able to organize my workflow by ‘tabbing’ all of my open Office docs, Google properites such as Docs, AdWords, YouTube Studio, etc, as well as all of my UWP and PWA apps into neat sections.
As a bit of context, I’ve been testing Chromebook functionality, and as the OS prioritizes a tabbed experience, I can see the appeal of signal clear windows of productivity. The time of moving a mouse between windows becomes shorter, time searching for open windows is reduced and customization is increased, in my opinion. Opining on Microsoft’s Windows 10S experiement paired with Sets, the company could have a decent ChromeOS competitor from a workflow standpoint.
Other benefits of Groupy include:
Key Features
Drag and drop applications together to group them under a common tabbed interface
Organize multiple applications and documents together for convenient access
Group related tabs together for optimal workflow
Save groups of applications together for future usage
Manage tabs in quick and natural ways with the browser-like interface
Add new tabs to existing groups quickly and easily
Mouseover tabs to preview the window contents
Copy files between Explorer tabs. Drag files to the target tab, pause to switch, and then into the target window.
Automatically group instances of the same application together
It’s a bit premature to measure Groupy against the nascent development of Sets, but where Groupy excels over Sets is in its sheer performance. Apps don’t crash when paired, tabbed groups are kept in memory and can be pulled back up and reopened, thus saving me time and enabling to be more productive. Apps also keep their sizing when switching between windows. Another benefit is that Groupy’s presence spans Windows 7, 8.1 and Windows 10.
Perhaps, the best thing about Groupy is that it’s available, now. No waiting, no promises of soon or Insider testing. Users can head to Stardock’s website and either try it for 30-days for free or a one time purchase of $9.99 or $29.99 for a package that includes Object Desktop.
Once purchased, users can install the software on up to five devices (I believe).
My only objection about Groupy is the target window for tabbing applications is a bit large. Users may find themselves accidentally tabbing apps they may have only intended to snap to one of the four grid sections in Windows.
For Insider looking to regain Sets functionality or Windows users looking for more organizational resources, I recommend giving Groupy a try.
According to a report from the Economic Times Microsoft is looking to bring AR, VR, IR, and Machine Learning to the more than 22,000 students in Bengaluru, India (known also as Bangalore) as soon as this month.
In partnership with service regional service provider Tech Avant-Garde, Microsoft is initiating what it’s calling BBMP Roshini, which will provide state-of-the-art technology to the 40 primary and highschools in the BBMP in Bengaluru.
According to a press release, not only will schools be inudated with brand new technology solutions, but training for teachers will be part of the project that center around learning new skills and encourage community participation.
“The teachers will also be trained on the 21st Century skills (classroom of the future) and the parents will be involved in activites of the schools. Experts for the local community will be encouraged to get involved in experimental learning.”
Since this went into effect offically on September 26, 2018, organizers have already started prilimary canvassing activites that include gathering participating teacher and student numbers as well as how the program will impact established infrastructures.
Microsoft has already released three cumulative updates for Windows 10 versions 1803 and 1709, but there’s apparently an issue with the latest patches released on September 20. Indeed, the Redmond giant has just re-released the two updates because of a “missing solution,” and as result Windows 10 users who previously installed the builds 17134.319 or 16299.698 can now download the builds 17134.320 or 16299.699 (via Neowin).
To be clear, these two new builds have the same changelog as the one for the previous builds they’re replacing. Here’s the one for the build 17134.320 (KB4458469), which is rolling out to users running the April 2018 Update:
Addresses an issue that causes the prompt “You’ll need a new app to open” to appear. This occurs when reloading a website on a non-standard port by pressing Enter .
Addresses an issue that causes downloads to fail because Mark of the Web (MOTW) isn’t supported at the download location.
Addresses an issue that prevents the DefaultSearchProvider policy from working when the FirstRunPage policy is in use.
Addresses issue that causes the address bar to lose focus when a new tab is opened and the Allow web content on New Tab page policy is off.
Addresses an issue that prevents the Microsoft Edge Configure Password Manager policy from suppressing the Save password prompt when the policy is disabled.
Addresses an issue that causes downloads to WebDAV locations to fail.
Addresses an issue with the file previewer for .html, .mht, and email (MIME) attachments in Microsoft Outlook.
Addresses an issue that causes Internet Explorer security and certificate dialogs to display prompts in the background instead of the foreground in certain circumstances.
Addresses an issue that may cause the system to become unresponsive when applications call the EnableEUDC API.
Addresses an issue in multi-monitor scenarios that causes a spell checker context menu to appear on the wrong monitor. This issue occurs when the customer right-clicks a misspelled word in Internet Explorer.
Addresses an issue that occurs when entering Japanese characters in a remote desktop session (mstsc.exe).
Addresses an issue that occurs when using low-level mouse hooks with high integrity-level processes.
Addresses an issue that prevents custom keyboard layouts from working correctly.
Makes the visibility policy for the Settings Page available under User Configuration. The GPO is at the following path: User Configuration/Administrative Template/Control Panel/Settings Page Visibility
Addresses an issue that prevents some Bluetooth devices from pairing with Windows.
Addresses an issue in the Universal CRT that returns the expected output or a null character when calling _getch().
Addresses an issue in the Universal CRT that returns unexpected characters when calling the _findfirst() or _findnext() functions.
Addresses an issue in the Universal CRT that prevents some functions from accepting narrow input or producing proper output with certain ANSI Code Pages. This issue affects setargv.obj when using wildcard parsing and calls to get the current module name for debug windows. The issue also affects the following functions:
_chdir()
_exec()
_fullpath()
_loaddll
_popen()
_system()
_spawn() (and variants)
Addresses an issue with evaluating the compatibility status of the Windows ecosystem to help ensure application and device compatibility for all updates to Windows.
Addresses an issue with the diagnostic pipeline for devices enrolled in Windows Analytics when the CommercialID registry key, “HKLM\Software\Microsoft\Windows\CurrentVersion\Policies\DataCollection” is present.
Addresses an issue that prevents the App-V client’s scheduled task from syncing if the Device Guard lockdown policy is enabled.
Addresses an issue that may cause the Local Security Authority Subsystem Service (LSASS) process to stop working when attempting to process a malformed security identifier (SID).
Addresses an issue that causes a delay in unlocking or signing in to a computer that was moved to a different network. For example, a delay occurs when moving from a corporate LAN or WLAN to a home LAN where domain controllers can’t be reached.
Addresses an issue on some laptops that prevents sign-out from completing. The issue occurs when a customer signs out and immediately closes the laptop. As a result, when the laptop is reopened, the device must be restarted.
Addresses an issue that occurs when enabling BitLocker from a local administrator account.
Addresses an issue on devices with fingerprint sensors that were upgraded from Windows 10, version 1709. After the upgrade, users can’t use the fingerprint sensor to log in.
Addresses an issue that causes some systems to take as much as 60 seconds longer to start. This occurs on systems that don’t have a smart card reader installed.
Addresses an issue that prevents customers from logging in to a Windows 10S device with a PIN after upgrading to Windows 10, version 1803. Customers see the error “Your PIN is no longer available due to a change to the security settings on this device.”
Addresses an issue that causes a Direct Access connection to fail when the client authentication certificate is stored in the TPM device.
Addresses an issue that causes the system to log negative events for drivers that are valid and should be trusted. The issue occurs when running Windows Defender Application Control (Device Guard) in audit mode.
Addresses an issue that causes a third-party VPN provider’s user interface to stop working after dynamically unloading Cryptui.dll.
Addresses an issue that causes logging on to a Remote Desktop Session Host Server to occasionally stop responding.
Addresses an issue that causes printing to an open or existing file to fail without displaying an error. This issue occurs when using Microsoft Print to PDF or XPS Document Writer.
Addresses an issue where a daily, repetitive task starts unexpectedly when the task is first created or starts when the task is updated.
Addresses an issue that prevents running subsequent actions when you create multiple actions in a task using Task Scheduler and the task is scheduled under the Stop the existing instance rule.
Addresses an issue with a task that has a repetition setting. The task fails to be scheduled and doesn’t start after disabling and re-enabling the task. The Next Run Time in Task Scheduler displays the correct time, but the task doesn’t start at that time.
Addresses an issue that prevents the debugging of minimized UWP applications.
Addresses an issue with Visual Studio UWP Deployments that displays the error “The operation could not be completed because an unexpected host ID was encountered”.
Addresses an issue that ignores the MM_DONT_ZERO_ALLOCATION flag. This issue leads to degraded performance, and, occasionally, error 0x139 appears.
Addresses an issue that causes NTLTEST, DCLOCATOR, or joining an Active Directory and SAMBA domain to fail when using the NetBIOS domain name. The error is “An Active Directory domain Controller (AD DC) for the domain %domain% could not be contacted”. This also addresses connection issues for applications that use mailslots to communicate.
Addresses an issue that occurs when using encrypted email. If the customer selects Cancel when first asked for a PIN, multiple PIN prompts appear before the prompt finally goes away.
Addresses an issue that prevents the Microsoft Help Viewer from rendering HTML content inside a Windows Help .chm file when the .chm file is stored on a network location.
Addresses an issue in which the lock screen shows a solid color instead of an image specified by a policy before a customer signs in for the first time.
Addresses an issue that causes Microsoft Edge to stop working when printing a PDF in a size 0 window.
Addresses an issue that causes Microsoft Edge to stop working and to close associated webpage tabs. This occurs when certain PDF documents have timing issues when loading.
Addresses an issue with a scheduled task that has an indefinite duration. The task starts immediately after it is created instead of starting at the time specified in the Triggers tab.
Addresses an issue where GetSystemTime() may sometimes return an invalid value after using SetSystemTime() immediately before.
Addresses an issue that occurs when using the “X509HintsNeeded” group policy to prepopulate the Username hint field. The Username hint field is unexpectedly empty when unlocking a machine after a successful logon. Username hint caching is expected to only work for lock and unlock scenarios and is not designed for logoff and logon scenarios.
Addresses an issue that fails to maintain the tile layout after upgrading to Windows 10, version 1803 from Windows 10, versions 1703 and 1607.
Addresses an issue that returns temporary values for the new Japanese Calendar Era.
Addresses an issue in which Background Apps settings the user configured are lost when the device restarts because of incorrect registry ACLs.
Addresses an issue that prevents Microsoft Centennial apps and some OS apps from displaying toast notifications.
Addresses an issue in which all Guest Virtual Machines running Unicast NLB fail to respond to NLB requests after the Virtual Machines restart.
Addresses an issue that prevents dual tunnel AlwaysOn VPN configurations that use trusted network detection from having both tunnels operational.
Next, here is the changelog for the build 16299.699 (KB4457136), now available for users still on the Fall Creators Update. Again, the release notes are identical to those for the build 16299.698:
Addresses an issue with the file previewer for .html, .mht, and email (MIME) attachments in Microsoft Outlook.
Addresses an issue that causes Internet Explorer security and certificate dialogs to display prompts in the background instead of the foreground in certain circumstances.
Addresses an issue that causes downloads to WebDAV locations to fail.
Addresses an issue that causes downloads to fail because Mark of the Web (MOTW) was not supported at the download location.
Addresses an issue that prevents Microsoft Narrator from accessing the contents of Windows Security dialogs displayed by a low integrity level process.
Addresses an issue that, in some cases, prevents installing encrypted .appx packages.
Addresses an issue that may cause the system to become unresponsive when applications call the EnableEUDC API.
Addresses an issue that occurs when entering Japanese characters in a remote desktop session (mstsc.exe).
Addresses an issue with evaluating the compatibility status of the Windows ecosystem to help ensure application and device compatibility for all updates to Windows.
Enables reading the CommercialId registry key written by Windows Analytics onboarding and adds it to the JSON of telemetry events. Additionally, there’s a different server URL (v10c.data instead of v10.data) when the CommercialId is set.
Addresses an issue that prevents the App-V client’s scheduled task from synching if the Device Guard lockdown policy is enabled.
Addresses an issue that causes login to fail when using a smart card to log in to a Remote Desktop Server. The error is “STATUS_LOGON_FAILURE”.
Addresses an issue that causes a delay in unlocking or signing in to a computer that was moved to a different network. For example, a delay occurs when moving from a corporate LAN or WLAN to a home LAN where domain controllers aren’t reachable.
Addresses an issue that occurs when using encrypted email. If the customer selects Cancel when first asked for a PIN, multiple PIN prompts appear before the prompt finally goes away.
Addresses an issue that causes a Direct Access connection to fail when the client authentication certificate is stored in the TPM device.
Addresses an issue on some laptops that prevents sign-out from completing. The issue occurs when a customer signs out and immediately closes the laptop. As a result, when the laptop is reopened, the device must be restarted.
Addresses an issue that causes the system to log negative events for drivers that are valid and should be trusted. The issue occurs when running Windows Defender Application Control (Device Guard) in audit mode.
Addresses an issue that may cause the Local Security Authority Subsystem Service (LSASS) process to stop working when attempting to process a malformed security identifier (SID).
Addresses an issue that causes logging on to a Remote Desktop Session Host Server to occasionally stop responding.
Addresses an issue that causes printing to an open or existing file to fail without displaying an error. This issue occurs when using Microsoft Print to PDF or XPS Document Writer.
Addresses an issue with scheduled tasks that don’t start at the time that they are configured to start on a specific day of the week.
Addresses an issue with a scheduled task that has an indefinite duration. The task starts immediately after it’s created instead of starting at the time specified in the Triggers tab.
Addresses an issue that prevents the running of subsequent actions in a task. This issue occurs when you create multiple actions in a task using Task Scheduler and the task is scheduled under the Stop the existing instance rule.
Addresses an issue with a task that has a repetition setting. The task fails to be scheduled and doesn’t start after disabling and re-enabling the task. The Next Run Time in Task Scheduler displays the correct time, but the task doesn’t start at that time.
Addresses an issue that may cause Service Control Manager (SCM) and Netlogon to stop working when one or more services are configured to run with domain credentials (service accounts).
Addresses an issue where a daily, repetitive task starts unexpectedly when the task is first created or starts when the task is updated.
Addresses an issue in which GetSystemTime() may sometimes return an invalid value after using SetSystemTime() immediately before.
Addresses an issue that occurs when using the “X509HintsNeeded” group policy to prepopulate the Username hint field. The Username hint field is unexpectedly empty when unlocking a machine after a successful logon. Username hint caching is expected to only work for lock and unlock scenarios and is not designed for logoff and logon scenarios.
Addresses an issue that fails to maintain the tile layout after upgrading to Windows 10, version 1709 from Windows 10, versions 1703 and 1607.
This is quite unusual for the company to re-release Windows 10 patches, but this month was pretty exceptional in terms of cumultative updates. Both Windows 10 versions 1803 and 1709 received three new builds this month (Patch Tuesday included), and Microsoft has to be careful about “Windows as a Service” potentially causing update fatigue for some users.
While many developers and IT Pros had their focus drawn to the avalanche of Microsoft news announced during Ignite 2018, across the hill Lenovo unveiled its litany of Data Center Group updates as well.
On-site at Microsoft’s Ignite 2018 conference, PC partner Lenovo took the opportunity to announce updates to its portfolio of hybrid cloud solutions that include:
Lenovo’s addition to the Microsoft Azure Cloud Solutions Provider Program
As of September 14, 2018, Lenovo became a reselling partner of Microsoft’s Azure services to US clients. The new move enables Lenovo to offer its customers a secondary acquisition model that does not require clients to own Lenovo hardware to be a part of Lenovo’s “as-a-Service” platform.
New ThinkAgile MX Certified Nodes to accelerate adoption of Microsoft Windows Server Software-Defined (WSSD) solutions
Lenovo is also looking to boost Windows Server Software-Defined (WSSD) adoption with its new ThinkAgile MX Certified Nodes. Now clients can choose an economically scalable solution for their software-defined storage and hyper-converged needs, alongside their use of Windows Server.
ThinkAgile MX Certified Nodes will be commercially available for worldwide distribution on November 2, 2018, according to Lenovo.
SQL Server
In preparation of end-of-service (EOS) for Windows Server 2008, Lenovo is working with Microsoft to create “go-to-market” solutions that should help clients migrate to new alternatives. While Lenovo didn’t have anything concrete to demo, they are actively participating with Microsoft on its Data Modernization roadshow to clients as well as having a TPC-E benchmark performance and price/performance world record for SQL Server 2017, in their back pocket. Whatever Lenovo comes up with should be more than advantageous for IT Pros to adopt next year.
Hardware Buy Back Program
Ever wonder where outdated Lenovo devices go besides to an unlucky intern? Apparently, back to Lenovo, and the company wants to entice more developers and IT Pros to upgrade their hardware by introducing a new Data Center Buy Back Program. Other details of the Cash Back program include Fair Market Value for competitor hardware. Lenovo’s Data Center Buy-Back Program will also include free shipping, ecological salvage and NAID-certified data sanitation for those concerned with the refurbishing process. ‘
With Lenovo’s hardware buyback program clients will receive cash back on eligible models and some will get additional cash back on the return of Microsoft Windows Server, SQL Server and CALs.
Support for Window’Can s Admin Center with Lenovo XClarity Software
Last but not least, Lenovo is set to provide clients with a management solution to an aging data center. Lenovo is working with Microsoft to modernize old and vulnerable data centers.
There is no word on when Clarity software will be generally as of right now.
The video only lasts for 12 seconds and pretty much consists of nothing but animated logos and flashes of light but it is rather cool nonetheless. Of more interest is the accompanying text in the tweet which reaffirms that the proper reveal of their new Xbox One mouse and keyboard will be shown in the November episode of Microsoft’s Inside Xbox video series.
????WAITING FOR SOMETHING EPIC?
Be sure to tune in to the November edition of #InsideXbox to find out what's on the horizon.
The latest episode of Inside Xbox seemed to suggest that Razer’s products could also be shown at the XO10 event in Mexico in November but it’s almost a guarantee that Inside Xbox will be covering the event as well so gamers will likely be able to see Razer’s Xbox keyboard and mouse both at the show and in the November episode.
Keyboard and mouse functionality will begin being tested over the next few weeks with a proper launch expected soon after. Will you use a keyboard and mouse on your Xbox One? Share your thoughts with the community in the comments below and then follow us on Pinterest for more Xbox content.
As part of the most recent updates, Microsoft has issued a fix that affects the problem with Office documents that hang when you save through a slow network on a domain-joined Windows 8.1 or Windows 8 computer. More details below.
If you have been encountering annoying problems that have to do with the freezing of your Office documents, then you should know that a potential fix has been rolled out.
Microsoft released an update to fix this issue
Update file KB 3001266 fixes the problem where Office documents freeze when saving through a slow network on a domain-joined computer in Windows 8.1 or Windows 8.
Here’s how the error occurs:
You have a domain that has the Dynamic Access Control feature enabled in the Active Directory Administrative Center.
You have a domain-joined computer that is running Windows 8.1, Windows Server 2012 R2, Windows 8, or Windows Server 2012.
A Microsoft Office document is located on a File Classification Infrastructure (FCI)-defined server.
You try to update and save the document through a slow network.
So, if the above happens, then your Microsoft Office document hangs for about one minute before it is saved.
Microsoft also says that while subsequent save operations during the next eight hours do not experience any delay, there will be a delay every eight hours.
There isn’t a hotfix available for download for this problem, so you just need to make sure that you have the November 2014 update rollup for Windows RT 8.1, Windows 8.1, Windows Server 2012 R2, as well as for Windows RT, Windows 8, or Windows Server 2012 running.
[UPDATE] Meanwhile, users have reported some more issues related to Office documents. Even with your system constantly updated, you might still encounter errors. Here are some helpful guides to fix them:
In the vein of crowdsourcing solutions for Windows 10, the Windows team just announced that it’s taking its community-driven approach to the people, so to speak.
A new Windows Insider Program app (WIP) is in the works as a PWA that’ll be left as an open-sourced project to encourage other developers to experiment more with PWA’s.
As reported by Windows Central, the announcement came via a late day session at Microsoft’s Ignite 2018 conference where the details were outlined as followed:
It’s a Progressive Web App.
Dark mode is the default theme.
It will be available on all devices due to its PWA design.
It is open-sourced so that other devs can learn from its design and
leveraging of PWA + Univeral Windows Platform (UWP).
While on the surface the Insider Hub PWA sounds progressive (pun intended), it’s a long overdue resource that mainly serves as a blog and press release content aggregator, as it stands now.
There is no mention of an integrated Feedback Hub where arguably most Insider engagement occurs.
This app has *nothing* to do Feedback Hub. So no. It's based off our Insider website and Feedback Hub.
As the dust settles on TellTale Games massive studio downsizing, gamers are now being informed on the status of previous partnerships and development plans for upcoming or scheduled releases.
Now it seems that TellTale has a parachute plan in place for its titular franchise, The Walking Dead; instead of severing development and hanging the property out to dry, the studio is looking for other studios to step in and finish its final season.
Despite the studios optimism there is a lot that needs to be sorted out before development continues as well as gamers acknowledging that the creative minds by the original content will have no part in this potential release.
As of now, gamers can at least enjoy The Walking Dead Season 4 across all platforms while negotiations take place for the future of the franchise.
The Xbox team has been dangling its new Avatar platform in front of users for a little over a year now.
Xbox Insiders have been toying with the new platform since June of this year, but it appears the developer team is ready to empower all Xbox One users with the new Avatar personalization features.
According to a new Xbox Insider YouTube episode, all Xbox One users can expect to officially see the new Avatar platform as soon as October 2018.
The new Avatar platform is being billed as more inclusive of character diversity with new creative designs, better animations and higher visual fidelity.
Now that there has been a date set for release, the next important question for the development team is, if and how they plan to port paid or exclusive content from the original Avatar platform to the new one.
Blue Screen of Death errors such as ACPI_BIOS_FATAL_ERROR can be caused by faulty hardware or software, and they can sometimes be hard to fix. This error can cause many problems, therefore it’s crucial that you know how to fix it on Windows 10.
BSoD errors are often caused by third-party applications, therefore if you installed or updated any applications before this error appeared, we advise you to find those applications and uninstall them.
We have to mention that antivirus programs and firewalls can often cause these types of errors to appear, therefore we advise you to remove your currently installed antivirus and check if that fixes the problem. Bear in mind that you’ll have to remove all third-party antivirus programs that you have installed since almost any antivirus can cause this problem to appear.
If uninstalling the antivirus didn’t fix the problem that’s because many programs, including antivirus, tend to leave certain files and registry entries after you uninstall them. Even these files can cause BSoD errors to appear, therefore it’s crucial that you use a dedicated removal tool to remove all files associated with your antivirus. Most antivirus companies have these tools for their software available for download, so be sure to download one.
Solution 2 – Update drivers and download the latest Windows 10 updates
In order for Windows 10 to recognize and use your hardware, you have to use appropriate drivers. If your drivers aren’t compatible with Windows 10, or if they are simply outdated or buggy, they might not work well with your PC, and you’ll encounter ACPI_BIOS_FATAL_ERROR Blue Screen of Death error.
These types of errors usually tell you which file is causing the crash, and with little research, you can easily find the driver that is causing this problem. To fix this error all you need to do is to visit your hardware manufacturer’s website and download the latest drivers for your device. If you cannot find which driver is causing this problem, you’ll have to update all drivers by using the same method.
Update drivers automatically
Searching for drivers on your own can be time-consuming. So, we advise you to use a tool that will do this for you automatically. Using an automatic driver updater will certainly save you from the hassle of searching for drivers manually, and it will always keep your system up to date with the latest drivers.
A third-party tool will help you update drivers automatically and prevent PC damage caused by installing the wrong driver versions.After several tests, our team concluded that this is the best-automatized solution.
Using expert software, you will manage all the PC drivers correctly and optimize the system using the latest drivers versions offered by Fortect Driver Updater.
In addition to downloading drivers, it’s just as important that you download the latest updates by using Windows Update. Windows 10 has certain issues with both hardware and software, and these issues can sometimes cause Blue Screen of Death errors to appear.
To prevent these types of errors from appearing it’s important that you keep Windows 10 up to date with latest updates. Many of these updates address hardware and software issues, but they also bring new features and security improvements, therefore if you wish to keep your PC safe and error-free, we strongly advise you to download the latest updates.
Solution 3 – Run the Hardware Troubleshooter
Now, let’s try with Windows 10’s built-in troubleshooters. The first troubleshooter we’re going to try is the ‘unified’ troubleshooter from the Settings page. You can use this troubleshooter to address all sorts of issues within the system. Including BSOD errors.
Here’s how to run Windows 10’s built-in troubleshooter:
Open the Settings app and go to Update & Security section.
Select Troubleshoot from the menu on the left.
Select BSOD from the right pane and click Run the troubleshooter.
Follow the instructions on the screen to complete the troubleshooter.
Solution 4 – Run the SFC scan
The next tool we’re going to try is the SFC scan. This is a command-line tool that scans your computer for potential problems and resolves them if possible. Additionally, it can also be helpful with the BSOD issues.
Here’s how to run the SFC scan in Windows 10:
Right-click on the Start Menu button, and open Command Prompt (Admin).
Enter the following line and press Enter:sfc/scannow
Wait until the process is done (it may take a while).
If the solution is found, it will automatically be applied.
Now, close the Command Prompt and restart your computer.
Solution 5 – Run DISM
We’ll walk you through both standard and the procedure that utilizes the installation media below:
Standard way
Right-click Start and open Command Prompt (Admin).
Paste the following command and press Enter:
DISM /Online /Cleanup-Image /RestoreHealth
Wait until the scan is finished.
Restart your computer and try updating again.
With the Windows installation media
Insert your Windows installation media.
Right-click the Start menu and, from the menu, choose the Command Prompt (Admin).
In the command line, type the following commands and press Enter after each:
Make sure to change an X value with the letter of the mounted drive with Windows 10 installation.
After the procedure is finished, restart your computer.
Solution 6 – Reset Windows 10
Windows 10 reset is similar to clean install, and if the ACPI_BIOS_FATAL_ERROR error is caused by third-party software, you should be able to fix it by resetting Windows 10. Bear in mind that resetting Windows 10 will delete all files and folders from your C partition, so we strongly advise you to back up your important files. After backing up your files, you should also create a bootable USB flash drive because you might need it to complete this process. To perform a Windows 10 reset, do the following:
Restart your computer few times during the boot in order to start Automatic Repair. Alternatively you can hold the Shift key on your keyboard and click the Restart button.
Choose Troubleshoot > Reset this PC > Remove everything. You might get asked to insert Windows 10 installation media, so be sure to do so.
Select Only the drive where Windows is installed > Just remove my files and click the Reset button.
Follow the instructions to complete the reset process.
After you complete Windows 10 reset, you’ll have a new installation without any third-party applications. If the error appears again, it means that the issue is most likely caused by your hardware.
Solution 7 – Check your battery/power supply
Sometimes errors such as ACPI_BIOS_FATAL_ERROR can be caused by your power supply, so you might want to check if it works properly. Several users reported that the cause for this error was their laptop battery, and after replacing the battery the issue was fixed. If you don’t own a laptop, we strongly suggest that you check your power supply unit.
Solution 8 – Check if your hardware is working properly
Almost any hardware component can cause this error, and if you recently installed any new hardware, we advise you to remove it or replace it and check if that fixes the error. If the problem still persists, it might be caused by faulty hardware, therefore we advise you to check all major components such as your motherboard, hard drive, graphic card, network adapter, etc.
ACPI_BIOS_FATAL_ERROR can cause all sorts of problems on your PC, but you can usually fix this error by checking and replacing your power supply unit. If that doesn’t work, feel free to try any other solution from this article.
Blue Screen of Death errors such as PAGE_FAULT_IN_FREED_SPECIAL_POOL are often caused by hardware issues, and they can be rather serious. Since these errors will restart your PC every time they appear, it’s crucial that you know how to fix these errors on Windows 10.
How to fix PAGE_FAULT_IN_FREED_SPECIAL_POOL BSoD error
Fix – PAGE_FAULT_IN_FREED_SPECIAL_POOL Windows 10 error
1. Update Windows 10 and your drivers
Many operating systems have certain issues with hardware and software, and Windows 10 is no exception. Usually some older hardware or software isn’t fully compatible with Windows 10, and that can cause a Blue Screen of Death error to appear and restart your PC. In order to avoid Blue Screen of Death errors it’s recommended that you use Windows Update frequently and download the latest patches. Microsoft is frequently releasing new patches, and many of these patches address both hardware and software issues, therefore if you’re having problems with BSoD errors be sure to update Windows 10.
In addition to downloading Windows updates it’s also important that you keep your drivers updated. Drivers are a key component that allows Windows 10 to recognize and utilize certain hardware, and if your driver is outdated or buggy you’ll encounter a PAGE_FAULT_IN_FREED_SPECIAL_POOL Blue Screen of Death error.
In order to fix this problem you’ll have to update all your drivers, so be sure to visit your hardware manufacturer’s website and download the latest drivers for your hardware. Many users reported that this issue was fixed after updating their chipset drivers, so be sure to update them first and then move to other major components.
Update drivers automatically
Searching for drivers on your own can be time-consuming. So, we advise you to use a tool that will do this for you automatically. Using an automatic driver updater will certainly save you from the hassle of searching for drivers manually, and it will always keep your system up to date with the latest drivers.
Advanced softwares will help you update drivers automatically and prevent PC damage caused by installing the wrong driver versions.After several tests, our team concluded that this is the best-automatized solution.
2. Run the Hardware Troubleshooter
Now, we’re going to turn to Windows 10’s own troubleshooting tools. The first tool we’re going to seek help from is the ‘unified’ troubleshooter. This tool can be used for dealing with various problems, including the BSOD issues.
Here’s how to run the BSOD troubleshooter in Windows 10:
Open the Settings app and go to Update & Security section.
Select Troubleshoot from the menu on the left.
Select BSOD from the right pane and click Run the troubleshooter.
Follow the instructions on the screen to complete the troubleshooter.
3. Run the SFC scan
The SFC scan is a command-line tool that basically scans your computer for potential errors, and resolves them if the solution is available. Among other errors that the SFC scan can help with are the BSOD issues.
Here’s how to run the SFC scan in Windows 10:
Right-click on the Start Menu button, and open Command Prompt (Admin).
Enter the following line and press Enter:sfc/scannow
Wait until the process is done (it may take a while).
If the solution is found, it will automatically be applied.
Now, close the Command Prompt and restart your computer.
4. Run DISM
And the third troubleshooter we’re going to use is DISM. Deployment Image Servicing and Management (DISM) is a powerful tool that reloads the system image. So, it can also resolve potential BSOD errors.
We’ll walk you through both standard and the procedure that utilizes the installation media below:
Standard way
Right-click Start and open Command Prompt (Admin).
Paste the following command and press Enter:
DISM /Online /Cleanup-Image /RestoreHealth
Wait until the scan is finished.
Restart your computer and try updating again.
With the Windows installation media
Insert your Windows installation media.
Right-click the Start menu and, from the menu, choose the Command Prompt (Admin).
In the command line, type the following commands and press Enter after each:
Make sure to change an X value with the letter of the mounted drive with Windows 10 installation.
After the procedure is finished, restart your computer.
5. Remove problematic software
Blue Screen of Death errors can be caused by software, and in order to fix this problem you’ll have to find and remove the problematic software from your PC. Most common cause for BSoD errors is your antivirus, and if you want to fix this error you’ll have to remove all third-party antivirus programs that you have installed.
Bear in mind that antivirus programs tend to leave certain files and registry entries behind after you uninstall them, therefore you’ll need to use dedicated removal tool to remove any files associated with your antivirus program. Many antivirus companies have these tools available for download, so be sure that you download them. Users reported issues with Norton Antivirus, but bear in mind that almost any antivirus program can cause PAGE_FAULT_IN_FREED_SPECIAL_POOL error to appear.
Although antivirus is the often cause for these errors, you should know that almost any application can cause this error to appear. According to users, they had issues with Extreme Tune, and after removing it, the BSoDerror was fixed. It’s worth mentioning that some drivers can cause this issue to appear, and users reported that old printer drivers caused this error. If the driver is causing this issue, you can remove it by following these steps:
Press Windows Key + X to open Power User Menu and select Device Manager from the list.
When Device Manager opens find the problematic driver, right click it and choose Uninstall.
After removing the driver restart your PC.
When your PC restarts, Windows 10 will install the default driver. If the error doesn’t appear again, it means that the faulty driver was the problem. You can continue using the default driver or you can update it, but be sure not to install the same problematic version.
6. Remove overclock settings
By using overclocking software you can change the default settings of your hardware in order to get better performance. Overclocking is an advanced procedure and by overclocking your hardware you can cause permanent damage to your PC if you’re not careful. In addition to permanent damage, overclocking can cause PAGE_FAULT_IN_FREED_SPECIAL_POOL Blue Screen of Death error to appear, and in order to fix this problem you need to disable all overclock settings.
If the PAGE_FAULT_IN_FREED_SPECIAL_POOL error is caused by software, you can fix it by performing Windows 10 reset. You should know that this procedure is similar to clean install, therefore it’s necessary that you back up your files because this process will delete all files from your C partition. We have to mention that you might need a bootable USB flash drive with Windows 10 to complete this step, so be sure to create one by using Media Creation Tool. To perform Windows 10 reset do the following:
Restart your PC while it boots. Repeat this step few times until you start Automatic Repair.
Choose Troubleshoot > Reset this PC > Remove everything. You might get asked to insert Windows 10 installation media, so be ready to do that.
Choose Only the drive where Windows is installed > Just remove my files and click the Reset button.
Follow the steps and complete the reset procedure.
Once you finish Windows 10 reset, check if the problem is resolved. If the BSoD error appears again, it’s most likely that certain hardware component is causing this error.
8. Check your hardware
PAGE_FAULT_IN_FREED_SPECIAL_POOL can be caused by faulty hardware, most commonly RAM, so be sure to test your RAM modules one by one until you find the faulty one. According to users, the error was fixed after finding and replacing the faulty RAM module, but if your RAM is working properly check all other hardware components.
PAGE_FAULT_IN_FREED_SPECIAL_POOL Blue Screen of Death error can cause many problems, but we hope that our solutions helped you fix this error.
Microsoft has released an update to take care of the following problem – ‘folder’s view settings continuously changes between different folder types in Windows’. But later on, problems still persist with the folder’s view changes.
The issue that we’re discussing goes by the ‘codename’ of KB 3016305 and it is part of a bigger update roll-out, KB 3013769. The file has been released for quite a while, but only now have we decided to have a look at it. The official problem is described like this – ‘Folder’s view settings continuously changes between different folder types in Windows‘ and here’s how the symptom has been described:
This issue occurs because Windows 8.1, Windows RT 8.1, or Windows Server 2012 R2 uses the sniffing logic that sends the explorer.exe process into a refresh loop. Therefore, the folder type is refreshed based on the file types in the folder.
The fix applies to a good number of Windows versions, such as the following:
Windows Server 2012 R2 Datacenter, Windows Server 2012 R2 Standard, Windows Server 2012 R2 Essentials, Windows Server 2012 R2 Foundation
Windows 8.1 Enterprise
Windows 8.1 Pro
Windows 8.1
Windows RT 8.1
Folder settings keep changing on Windows PC
Folder settings keep changing – problem reported on Microsoft forum. Find below 3 solutions to fix this issue.
Annoying Folder View Type Automatic Change Problem in Windows – can be fixed with one of the solutions provided in this article.
Folder View and Icon Settings Keep Resetting – try running inbuilt Hardware and Devices troubleshooter to get the problem automatically detected and fixed.
Many times users report the problem has been solved without doing anything special. Just make sure you have set your Automatic Updates on and one of the new updates will fix the problem. You can also check for updates manually.
To access the Windows Update section, you can simply type “update” in the search box. This method works on all Windows versions. Then go to Windows Update, check for updates and install the available ones.
System File Checker (SFC) will scan your system for issues and prompt you with a message about what is causing the problem. Find out more about the SFC scan.
Follow these steps:
Open Command Prompt.
Select “Run as Administrator”.
Type “sfc /scannow” without quotes and hit Enter.
Now check for the issue.
If you get prompted with “windows resource protection found corrupted files but was unable to fix some of them”, you need to look into fixing corrupted files.