Microsoft Word Shortcut Keys: The Complete CheatSheet

Mastering shortcuts on any productivity tool, like Microsoft Word, can streamline your workflow and boost your productivity. In this guide, we will mention the comprehensive cheat sheet to help you use Word with speed and efficiency.

What are the commonly used keyboard shortcuts in Microsoft Word?

1. Frequently used shortcuts

Keyboard ShortcutFunction
Ctrl+O Opens a document
Ctrl + NCreate a new document
Ctrl+S Saves a document
Ctrl+WCloses a document
Ctrl+A Lets you select all the content of a document
Ctrl+XAllows you to cut the selected content to the Clipboard
Ctrl+ZUndo the previous action
Ctrl+YRedo the previous action
Ctrl+C Allows you to copy selected content to the Clipboard
Ctrl+V Lets you paste the content of the Clipboard
Ctrl+BApplies bold formatting to text
Ctrl+IApplies italic formatting to text
Ctrl+UApplies underline formatting to text
Ctrl+Left bracket ([)Decreases the font size by 1 point
Ctrl+Right bracket ([)Increases the font size by 1 point
Ctrl+LAlign the text to the left
Ctrl+EAlign text to the center
Ctrl+RAlign the text to the right
EscLets you cancel a command
Ctrl+Alt+SSplits the document window
Alt+Shift+C or Ctrl+Alt+SRemove the document window split
Alt+W, Q, and then press the Tab key in the Zoom dialog box to go to the value you wantAdjusts the zoom magnification

2. Ribbon keyboard shortcuts

Common keyboard shortcuts

Keyboard ShortcutFunction
Alt+Q and enter the search term Lets you search the document or seek Help
Alt+F Lets you open the File menu to use the Backstage view
Alt + HTakes you to the Home tab to use common formatting commands, paragraph styles, and the Find tool.
Alt+NOpens the Insert tab to insert pictures, tables, shapes, headers, or text boxes
Alt+GOpens the Design tab to let you access colors, themes, and effects
Alt+P
Lets you access the Layout tab to change the page margins, orientation, spacing, and indentation
Alt+S Opens the References tab, which can be used to add a table of contents, citations, and footnotes
Alt+MLets you access the Mailings tab to manage Mail merge tasks and work with envelopes and labels
Alt+R Opens the Review tab, which allows you to use Spell Check, set proofing languages, and track and review changes to your document.
Alt+WOpen the View tab, which lets you choose a document view or mode, such as Read Mode or Outline view. It also has options to set the zoom magnification & manage multiple document windows.

Work in the ribbon with the keyboard

Keyboard ShortcutFunction
Alt or F10Lets you select the active tab on the ribbon, activate the access keys, and use either the access or arrow keys to move to a different tab
Tab key or Shift+Tab Moves the focus to commands on the ribbon
Ctrl+Left or Right arrow key Lets you move between command groupings on the ribbon
Arrow keys Allows you to move among the options on the ribbon.
Ctrl+Shift+F10Shows the tooltip for the ribbon element, which is currently in focus.
Spacebar or Enter Activates the selected button
Down arrow keyOpens the list for the selected command
Alt+Down arrow keyOpens the menu for the selected button
Ctrl+F1Expand or collapse the ribbon
Shift+F10Open the context menu
Left arrow keyNavigate to the submenu when a main menu is open

3. Navigate through, preview and print a document

Navigate through a document

Keyboard ShortcutFunction
Ctrl+Left arrow key Moves the cursor one word to the left side.
Ctrl+Right arrow key Moves the cursor one word to the right side.
Ctrl+Up arrow key Moves the cursor up by one stanza or para
Ctrl+Down arrow keyMoves the cursor down by one para
EndPlace the cursor on the end of current line
Home Takes the cursor to the beginning of the current line
Ctrl+Alt+Page up Positions the cursor to the top of the screen
Ctrl+Alt+Page downPlace the cursor on the bottom of the screen
Page up Scrolls the document view up by one screen, moving the cursor
Page downScrolls the document view down by one screen, moving the cursor
Ctrl+Page down Takes the cursor to the top of the following page
Ctrl+Page upPlace the cursor at the top of the previous page
Ctrl+End Positions the cursor at the end of the document
Ctrl+Home Moves the cursor to the beginning of the document
Shift+F5Takes the cursor to the location of previous correction or revision
Open a document and press Shift+F5Place your cursor on the last revision location made before the document was last closed.
Ctrl+Alt+5, and press the Tab key repeatedly Navigate through floating elements, like text boxes or images.
EscExit the floating shape navigation and go back to standard navigation
Ctrl+FOpens the Navigation task pane to look within the document content
Ctrl+GOpens the Go To dialog box, which allows you to navigate to a certain page, footnote bookmark, table, graphic, comment, or other location
Ctrl+Alt+ZNavigate through the locations of the 4 previous changes made within the document

Preview and print documents

Keyboard ShortcutFunction
Ctrl+PPrint an open document
Ctrl+Alt+ISwitch to print preview
Arrow keysPan around the preview page when zoomed in
Page up or Page downShift to the next preview page when zoomed out
Ctrl+HomeTakes you to the first preview page when zoomed out
Ctrl+EndTakes you to the last preview page when zoomed out

4. Selection

Select text and graphics

Keyboard ShortcutFunction
Shift + Arrow keyLets you select text
Ctrl+Shift+Left arrow keySelects the word to the left
Ctrl+Shift+Right arrow keySelects the word to the right
Shift+Home Select everything from the current position back to the start of the line
Shift+EndSelect from the current position to the end of the line
Ctrl+Shift+Up arrow keySelects everything from the current position to the start of the paragraph.
Ctrl+Shift+Down arrow keySelect from the current position to the end of the paragraph.
Shift+Page upSelect everything from the current position to the top of the screen
Shift+Page downSelect from the current position at the bottom of the screen
Ctrl + Shift + Home Selects everything from the current position to the start of the document
Ctrl + Shift + EndSelect from the current position to the end of the document.
Ctrl+Alt+Shift+Page downSelects everything from the current position to the bottom of the window
Ctrl + ASelect all the content in a document

Extend a selection

Keyboard ShortcutFunction
F8 Enter extend selection mode; clicking a location in the document will expand the current selection to include that location
F8, then the Right or Left arrow keyF8, Left or Right arrow key Select the nearest character to your right or left
Press F8 repeatedlyExpands the text selection through the following stages: the entire word the complete sentence, the entire paragraph, the entire section, and the whole document
Shift + F8Reduce the selection
Ctrl+Shift+F8, then press the arrow keys to navigateChoose a vertical block of text
EscStop expanding the selection

Editing text and graphics

Keyboard shortcutFunction
Ctrl + BackspaceDeletes one word to the left
Ctrl + Delete Deletes one word to the right
Alt+H, F, O Opens the clipboard task pane and activates the Office Clipboard, allowing you to copy & paste across Microsoft 365 apps
Ctrl + X Cuts the selected content to the Clipboard
Ctrl + CCopies the selected content to the Clipboard

Ctrl + VPastes the content of the Clipboard
F2, take the cursor to the destination, then press Enter Moves the selected content to a certain location
Shift + F, moves the cursor to the destination, then press EnterCopies the selected content to a certain location
Alt + F3Opens the new building block to create an AutoText block with highlighted content
Ctrl + F3Cuts the highlighted content to the Spike
Ctrl+Shift+F3Pastes the highlighted content of the Spike
Ctrl+Shift+CCopy the selected formatting
Ctrl+Shift+VPaste the selected formatting
Alt+Shift+RAllows you to copy the header/footer in the document’s previous section
Ctrl+HOpens the Replace dialog box, which allows you to find & replace text, special formatting, and more
Alt+N, J, JLaunches the Object dialog box that lets you insert a file object in the document
Alt+N, MLets you add a SmartArt graphic
Alt+N, WAllows you to add WordArt graphic

5. Align and format

Align & format paragraphs

Keyboard shortcutsFunction
Ctrl+EAlign the paragraph to the center
Ctrl + JJustify the paragraph
Ctrl + LAlign the paragraph to the left
Ctrl + R Align the paragraph to the right
Ctrl + MIndents the paragraph
Ctrl + Shift + MRemoves indent from the para
Ctrl + TCreates a hanging indent
Ctrl+Shift+TRemoves a hanging indent
Ctrl+QLets you remove formatting from a paragraph
Ctrl + 1Adds single space in a para
Ctrl + 2Add double space in a paragraph
Ctrl + 5Adds 1.5-line spacing in a paragraph.
Ctrl+0Add/remove space before a paragraph
Ctrl + Alt + KTurns on Autoformat
Ctrl+Shift+NApplies Normal Style
Ctrl+Alt+1Adds Heading 1 Style
Ctrl+Alt+2Adds Heading 2 style
Ctrl+Alt+3Adds Heading 2 style
Ctrl+Shift+SShow the Apply Styles task pane
Ctrl + Alt + Shift + SBrings up the Styles task pane

Format characters

Keyboard ShortcutsFunction
Ctrl+D or Ctrl+Shift+F Opens the Font dialog box
Ctrl + Shift +>Increases the font size
Ctrl + Shift +< Decreases the font size
Ctrl + ]Increases the font size by 1 point
Ctrl + [Decreases the font size by 1 point
Shift+F3 Lets you switch the highlighted text between upper case, lower case, and title case
Ctrl+Shift+AChanges the selected text to all Upper case
Ctrl+Shift+HHides the highlighted text
Ctrl+Shift+LAdds a bulleted list
Ctrl+Shift+WUnderlines all the selected words but not the spaces between them
Ctrl+Shift+DApplies double-underline formatting to the highlighted text, including spaces
Ctrl+=Turn on the subscript formatting for the selected text or text you type next
Ctrl+Shift+=Apply superscript formatting, which raises the text above the baseline
Ctrl+SpacebarRemove manual character formatting
Ctrl+Shift+QHelps to change the highlighted text to the Symbol font

Manage text formatting

Function

Ctrl+Shift+8 (Don’t use numeric keypad)
Shows all the nonprinting characters
Shift+F1Opens up the Reveal Formatting task pane.

Insert special characters

Keyboard shortcutFunction
Shift+EnterAdds a line break
Ctrl+EnterInserts a page break
Ctrl+Shift+EnterAdds a column break
Ctrl+- (Minus from numeric keypad)Inserts an en dash
Ctrl+Alt+- (Minus from numeric keypad)Adds an em dash
Ctrl+-(Hyphen)Lets you add an optional hyphen
Ctrl+Shift+-(Hyphen )Adds a non-breaking hyphen
Ctrl+Shift+SpacebarInserts a nonbreaking space
Ctrl+Alt+RAdds a registered trademark symbol (®)
Ctrl+Alt+CLet you add a copyright symbol (©)
Ctrl+Alt+TAdds a trademark symbol (™)
Ctrl+Alt+. (Period )Lets you add an ellipsis (…)
Type a character code, then press Alt +X Adds a Unicode character for the specified Unicode (hexadecimal) character code
Alt+the character code (from the numeric keypad)Lets you add the ANSI character for the specified ANSI (decimal) character code

6. Work with web content

Keyboard shortcutFunction
Ctrl+K Lets you add a hyperlink
Alt+Left arrow keyTakes you one page backwards
Alt+Right arrow keyTakes you one page forward

7. Work with tables

Move around in a table

Keyboard shortcutFunction
Tab Takes you to the next cell in the row and selects the content
Shift+TabTakes you to the previous cell in the row and selects the content
Alt+HomeLets you move to the first cell in the row
Alt+End Lets you move to the first cell in the row
Alt+Page up Takes you to the first cell in the column
Alt+Page down Takes you to the last cell in the column
Up arrow Place the cursor in the previous row
Down arrow Place the cursor in the next row
Alt+Shift+Up arrow Takes you one row up
Alt+Shift+Down arrow Takes you one row down

Select table content

Keyboard shortcutFunction
Tab Select the content in the next cell
Shift+TabSelect the content in the previous cell
Shift+Arrow keysExtend selection to adjoining cells
Select the upper or bottom cell of a column, and press Shift+Up or Down arrow togetherLets you select a column
Select the first or last cell in the row, and press Shift+Alt+End/HomeLets you select a row
Alt+5 (from the numeric keypad)Lets you select the whole table

Insert paragraphs and tab characters in a table

Keyboard shortcutFunction
Enter Lets you add a new para in a cell
Ctrl+TabLets you insert a tab character in a cell

8. Review a document

Keyboard shortcutFunction
Ctrl+Alt+MLets you add a comment
Ctrl+Shift+E Enable or disable change tracking
Alt+Shift+CClose the Reviewing Pane

9. Shortcuts related to references, citations, and indexing

Keyboard shortcutFunction
Alt+Shift+OAllows you to mark an entry of table of contents
Alt+Shift+IAllows to mark an entry for the table of authorities
Alt+Shift+F12, SpacebarSelect citation options
Alt+Shift+XAllows to mark an entry for index
Ctrl+Alt+FLets you add a footnote
Ctrl+Alt+DLets you add an endnote
Alt+Shift+> (Right angle bracket ) Takes you to the next footnote
Alt+Shift+< (Left angle bracket ) Takes you to the previous footnote

You can also learn about Windows key alphabet shortcuts to make your work easier on a Windows PC and improve your productivity; to learn more, check out this guide.

10. Work with mail merge and fields

Note icon NOTE
To use the below-mentioned shortcuts, you need first to select the Mailings ribbon tab; to do so, press Alt + M

Perform a mail merge

Keyboard shortcutFunction
Alt+Shift+KOpens preview of the mail merge
Alt+Shift+NMerges a document
Alt+Shift+M Helps you take a print of a merged document.
Alt+Shift+E Lets you edit a mail-merge document
Alt+Shift+F Adds a merge field

Work with fields

Keyboard shortcutFunction
Alt+Shift+DAdds a DATE field
Ctrl+Alt+LInserts a LISTNUM field
Alt+Shift+PAdds a PAGE field.
Alt+Shift+TInsert a TIME field.

11. Work with text in other languages

Set the proofing language

Keyboard shortcutFunction
Alt+R, U, LOpens the  Language dialog box which lets you set the proofing language
Alt+R, L Set default languages.

Use Input Method Editors for East Asian languages

Keyboard shortcutFunction
Alt+~ (Tilde ) Lets you switch to the Japanese Input Method Editor (IME) for a 101-key keyboard, provided it is available
Right Alt Changes to the Korean Input Method Editor (IME) for a 101-key keyboard, if available.
Ctrl+Spacebar Switches to the Chinese Input Method Editor (IME) for a 101-key keyboard, provided it is available

12. Work with document views

Switch the document view

Keyboard shortcutFunction
Alt+W, F Changes to the Read Mode view.
Ctrl+Alt+P Opens the Print Layout view
Ctrl+Alt+O Changes to the Outline view
Ctrl+Alt+NSwitches to the Draft view

Outline a document

Note icon NOTE
To use these shortcuts, you need to press Ctrl+Alt+O to open the Outline view.
Keyboard shortcutFunction
Alt+Shift+Left arrow Promotes a paragraph by increasing the font size
Alt+Shift+Right arrow Demotes a para
Ctrl+Shift+N Demotes a para back to the body text
Alt+Shift+Up arrowMoves the highlighted para up
Alt+Shift+Down arrowMoves the highlighted para down
Alt+Shift+ + ( Plus sign) Expands the text under a heading
Alt+Shift+ - (Minus sign) Collapse the text under a heading
Alt+Shift+AExpand/collapse all text or headings available in a document
/ (Forward slash from the numeric keypad) Display/Hide the character formatting
Alt+Shift+LAllows you to switch between showing the first line of body text and all body text
Alt+Shift+1Displays all headings with the Heading 1 style
Alt+Shift+Heading level numberDisplays all headings with the specified heading level number
Ctrl+Tab Allows you to add a tab character

Move through the document in Read Mode

Keyboard shortcutFunction
HomeTakes you to the beginning of the document
EndTakes you to the end of the document
Type the page number and hit EnterNavigate to a specific page
EscCloses the Edit mode

13. Use function key shortcuts

Keyboard shortcutFunction
F1 Shows the Word help task panel
Shift+F1Shows or hides context-sensitive help or the Reveal Formatting task pane
Ctrl+F1Displays or hides the ribbon
Alt+F1Takes to the next field
Alt+Shift+F1Takes you to the previous field
F2Press the key, and use the arrow keys to place the cursor where you want to move the text or graphic, then press Enter
Shift+F2Press the key, then use the arrow keys to take your cursor where you want to copy the text or graphic, then press Enter
Ctrl+F2Shows the print preview area on the Print tab in the Backstage view.
Alt+Shift+F2Save the document
Ctrl+Alt+F2Launches the Open dialog box
Shift+F3Switches the highlighted text between upper case, lower case, and title case.
Ctrl+F3 Cuts the highlighted content to the Spike and paste them as a group to another location
Ctrl+Shift+F3Paste the contents of the Spike
Alt+F3Allows you to create a new Building Block
F4Repeats the last action
Shift+F4Repeats the last Go To or Find action
Ctrl+F4Closes the current open document
Alt+F4 Close the complete Word application
F5Opens the Go To window
Alt+F5Restores the size of the window as per the document
Shift+F5Places the cursor on the last change made
Ctrl+Shift+F5Opens the Bookmark dialog box
F6Enables you to switch between document, task pane, ribbon and status bar;
Ctrl+F6Takes you to the next document window, if you have
Ctrl+Shift+F6Takes you to the previous document window if you have multiple documents open.
Shift+F6Lets you switch between ribbon, document, task pane, and status bar
Alt+F6Switches from an open dialog box to a document, provided that dialog box supports it.
F7Opens the Editor task pane to spot spelling and grammar errors in selected text or entire document
Shift+F7Opens the Thesaurus task pane
Alt+Shift+F7Opens the Translator task pane.
Alt+F7Takes you to the next grammatical or spelling error
Ctrl+Shift+F7Updates the linked formation in a Word source
Alt+F8Opens Macro dialog box, wherein you can create, run, edit, or delete a macro
F9Updates the selected fields
Shift+F9Switches between a field code and its result
Ctrl+F9Adds an empty field
Ctrl+Shift+F9Unlink the current field
Alt+F9Lets you switch between all field codes and their results
Alt+Shift+F9Executes GOTO BUTTON or MACRO BUTTON from a field displaying field results
F10Enables/Disables KeyTips
Shift+F10Opens the shortcut menu for the selected item
Ctrl+F10Restores or maximizes the document window size
Alt+F10Opens the Selection task pane
Alt+Shift+F10Shows the menu or message for available actions
F11Takes you to the next field
Shift+F11Takes you back to the previous field
Ctrl+F11Locks the current field
Ctrl+Shift+F11Unlocks the current field
Alt+F11Opens the Microsoft Visual Basic for Applications editor
F12Shows the Save As dialog box.
Shift+F12Saves a document
Ctrl+F12Opens the Open dialog box
Ctrl+Shift+F12Opens the Print tab
Alt+Shift+F12Let you choose the Table of Contents button in the Table of Contents container when a container is active

This is the complete cheat sheet, which contains frequently used and advanced shortcuts to help you navigate, format, print, review, and edit your documents faster than ever.

Remembering them all is not an easy task, so you can take a print of all the shortcuts or save this guide as a bookmark to keep them handy.

If you want to learn about Windows 11 keyboard shortcuts, we have a separate guide for it; click on the link to check it out.

In case you have issues like Winword.exe application error or if your Microsoft Word has stopped working on your PC, we have detailed guides.

Mastering shortcut keys is a great way to speed up your workflow in Word. If you’d like to go beyond shortcuts and learn the full basics, check out this guide on how to use Microsoft Word for step-by-step instructions.

If you want to improve your formatting skills further, you can also learn how to apply typographic effects like small caps in Word, which enhance the look of titles and acronyms while keeping your document clean and consistent.

Which are your favorite shortcut keys for Microsoft Word? Share them with our readers in the comments section below.

Google Passkey: Everything You Need to Know

If you’ve ever wanted to simplify your sign-in process, Google Passkey is what you need. Gone are the days when you have to remember complex passwords and add additional layers of security such as 2FA.

Google Passkey works by eliminating the need for passwords and replacing them with biometric authentication or a security key. They are more secure because only you has access to your biometrics and security keys stored in trusted devices.

What are the key features of Google Passkeys?

  • Passwordless – Google Passkeys does not rely on passwords. When you set it up, you’ll be prompted to enter your password to verify your identity but that’s it. Any other time will require you to use biometrics or your chosen authentication method to sign in.
  • Google integration – Google Passkeys are seamlessly integrated into all Google products and services.
  • Cross-platform compatibility – You can easily create Google Passkeys for your devices from Windows, iOS and Android.
  • Enhanced security – Google Passkeys offer more advanced security compared to traditional passwords. Even with password managers, you’re still vulnerable to phishing attacks but with a passkey, there’s reduced password-related data breaches and makes unauthorized access close to impossible.

How do I set up Google Passkeys?

1. Set up Google Passkey

  1. Navigate to your browser and sign into your Google account.
  2. Go to Security Settings > Security.
  3. Select Passkeys under how to sign in.
  4. Click on Create a passkey.
  5. You’ll be prompted to enter your Windows PIN to verify your identity.
  6. You’ll get a confirmation that your passkey has been successfully set and your new device will be listed under the passkey list.
  7. You can test whether the passkey is working by logging out and logging back in.

2. Opt out of Google Passkeys

  1. Navigate to your browser and sign into your Google account.
  2. Go to Security Settings > Security.
  3. Select Passkeys under how to sign in.
  4. Under created passkey, select the X mark then hit Remove to confirm.

For Android devices, Passkeys are created automatically the first time you sign into your Google account.

Troubleshooting common setup issues with Google Passkeys

  • Error setting up – If you encounter issues setting up, your device probably doesn’t meet the minimum system requirements. Check the server status and try later.
  • Device sync issues – Google sometimes goes out of sync when you’ve not logged on for a substantial amount of time. Log back into that device to activate your session and these issues should be resolved.
  • Authentication failure – If your chosen authentication uses biometrics and it fails, your hardware is probably the issue. Clean your camera and move to a well-lit room or clean your screen where you need to place your fingerprint. For Windows users, check if the biometric service has failed.

Passkeys are not a preserve of Google and its products. You can also use passkeys on Windows 11 if you want seamless sign-ins.

Finally, if you don’t like passkeys, you can go back to the traditional method of signing in with a password. However, make sure to regularly check whether your passwords have been compromised to reduce the risk surface area.

Have you used passkeys before? How convenient were they? Would you create passkeys for all your devices? Let us know in the comment section below.

Toshiba Satellite C655 drivers: How to Get and Install

Toshiba Satellite C655 is a very old laptop from 2012 that ran Windows 7 and if you still have it, kudos if it still works! You should know right from the start that this laptop won’t be able to run Windows 11, but you may still try with a Windows 10 OS and pray for driver compatibility. However, there are still a few online websites that provide Windows 7 and 8 drivers for it. Here’s what to do!

How do I get and install drivers for Toshiba Satellite C655?

1. Get the drivers from the Dynabook website

  1. Visit the official Dynabook/Toshiba support page.
  2. Enter your specific model number (e.g., Satellite C655-S5049).
  3. Use the filter options to select your operating system from the list (e.g., Windows 8.1, Windows 7, etc.). Again, there are no drivers for Windows 10.
  4. Check for categories like Graphics Drivers, Audio Drivers, Network & Wireless Drivers, System & Chipset Drivers, etc.
  5. Click on the relevant driver links and download them.
  6. Once downloaded, open each driver file and follow the on-screen instructions to install.
  7. Restart your laptop after each driver installation to apply changes.

This solution helps you keep your Toshiba Satellite C655 running efficiently by ensuring all hardware components have the correct drivers. If the laptop is not connected to the internet, download the drivers using a different device and transfer them using a USB stick. Make sure it’s formatted to a FAT file system, otherwise it might not get recognized.

2. Use Device Manager to update drivers automatically

  1. Press Windows key + X and select Device Manager.
  2. Expand the categories to locate the hardware you need to update (e.g., Network Adapters, Display Adapters, Sound, video and game controllers).
  3. Right-click on the device name and select Update Driver Software.
  4. Choose Search automatically for updated driver software.
  5. Allow Windows to search the internet for updated drivers and follow the on-screen instructions to complete the installation.

Using Device Manager to update your drivers can help ensure that you always have the latest driver versions installed, which can fix compatibility and performance issues. However, as we’ve mentioned above, Toshiba Satellite C655 is an old laptop so this method is a gamble.

3. Install drivers manually via hardware ID

  1. Open Device Manager (Windows key + X > Device Manager).
  2. Locate devices with a yellow exclamation mark under categories like Network Adapters, Display Adapters, Sound, video and game controllers.
  3. Right-click on the device with the yellow exclamation mark and select Properties.
  4. Go to the Details tab and select Hardware Ids from the drop-down menu and copy the first line that appears.
  5. Open your web browser and search for the hardware ID along with driver download.
  6. Look for reputable sites and download the appropriate drivers based on your hardware ID.
  7. Once downloaded, open the driver file and follow the on-screen instructions to install.
  8. Restart your laptop to apply changes.

This method is particularly useful for resolving issues with specific hardware components when other methods fail.

4. Use third-party driver update software

If you didn’t manage to install the right drivers using the methods above, you may still try to use a dedicated driver updater software.

Some tools have impressive databases that might include Toshiba Satellite C655 drivers for your OS. Another advantage of using such tools is that everything is automatic. They scan your system, detect missing or old drivers and you only need one click to install or update them.

We hope that our guide on Toshiba Satellite C655 drivers download and installation helped you pump back the life into your old laptop. We also have a guide on how to install the network adapter driver on Windows 7.

You may also leave a comment below and let others know what driver you need and they might also lend a hand.

Distinguish between the real and the AI with the new Microsoft-backed Real or Not quiz

The line between reality and digital fabrication is increasingly blurred, and Microsoft’s President, Brad Smith, decided to show us how confusing it can be to distinguish between the real and the AI-generated non-real. How?

A website named Real or Not challenges visitors to discern the authenticity of various images. It’s a clever quiz that presents you with 15 pictures and asks you to judge whether each is “Real” or “Artificial.” When you finish the game, the site will score you, and you better score high, or else…

… you can always try again. The site encourages you to try again with a fresh batch of images, pushing you to improve your detection skills.

The intrigue doesn’t stop there. Smith’s promotion of this website raises questions about its ownership and Microsoft’s involvement, which remains a mystery.

This move follows a Microsoft report highlighting the perils of “deepfake” AI imagery, which has garnered significant attention due to its implications for misinformation and online safety. The urgency of addressing this issue is echoed in Smith’s call for a collaborative effort between the public and private sectors to establish regulatory frameworks and policies that foster responsible AI development and usage.

This initiative comes in the wake of viral deepfake images of pop star Taylor Swift, which sparked controversy and debate over the ethical use of AI in creating convincing yet false representations of individuals.

Despite accusations, Microsoft clarified that its Designer AI image creator was not used to generate these images.

Brad Smith’s efforts to promote the Real or Not quiz are more than just a campaign against digital deceit; they are a call to action for all of us to become more discerning consumers of content in an age where seeing shouldn’t always be believing.

You can test your detecting skills here. Or you can always practice them.

How To Log Out of Slack on Desktop and Mobile

Knowing how to log out of Slack is important for maintaining the security of your account, especially on shared or public devices. Whether you’re using Slack on a desktop or mobile device, signing out is a simple process that keeps your information safe.

In this piece, I’ll show you step-by-step how to log out on both devices.

Let’s get started!

How To Log Out of Slack

You can sign out through your desktop or mobile.

On Desktop

Follow the below steps:

  1. Open Slack on your desktop.
  2. Click on the workspace name you want to log out from in the sidebar.
Slack workspace
  1. From the drop-down menu, select Sign Out.
Sign out of Slack
  1. Confirm that you want to sign out.

On Mobile

The steps are similar for iOS and Android.

  1. Open your Slack app.
  2. Swipe to the right from the home tab.
Swipe to the right
  1. Click the three dots beside the workspace you want to log out.
Click the three dots
  1. Hit Sign out.
Sign Out
  1. Confirm that you want to sign out.

Thats it! 

So, now you know how to log out of Slack! It’s a straightforward process that can help you maintain your account’s security. Also, you can learn how to keep your Slack active and leave a channel.

Microsoft will deprecate the Adobe PostScript Type1 font in a future Windows update

According to the latest entry in the official list of deprecation features, Microsoft has decided to deprecate the Adobe PostScript Type1 font from Windows devices. The font has existed in our digital world for many years, so it’s quite the decision if you ask us. But why is it happening now, and how will it affect us all?

About one and a half years ago, Adobe stopped using PostScript Type1 fonts. Adobe took the first step to eradicating these fonts from future software updates. So, if you’re employing Photoshop 23.0, Illustrator 27.3, InDesign 18.2, or any other later versions, those Type 1 fonts are now off the list of possibilities.

This makes Microsoft’s decision to no longer support these fonts in Windows natural.

Now, you may be thinking, “What’s so significant?” For a regular user, this deprecation might not mean much. However, designers, publishers, and people dependent on specific fonts could experience a notable change. The news is good: You have enough time to adjust. Microsoft has stated that it will not occur instantly but instead be included in one future Windows update.

Adobe PostScript Type1 fonts are deprecated and support will be removed in a future release of Windows.

For people who are not very skilled with technology, you can go to Settings > Personalization > Fonts. This will show you what fonts are already installed on your device, and you can make changes to update them accordingly. If you’re a developer or content creator, it’s best to test your apps and files now without those Adobe Type 1 fonts so that, later, everything runs well.

In January 2023, Adobe announced the end of support for PostScript Type1 fonts for their latest software offerings. Remove any dependencies on this font type by selecting a supported font type. To display currently installed fonts, go to Settings > Personalization > Fonts. Application developers and content owners should test their apps and data files with the Adobe Type1 fonts removed. For more information, contact the application vendor or Adobe.

Feature deprecation is not a fresh idea for Microsoft. From Windows Mixed Reality to the Windows Subsystem for Android, this tech titan constantly reevaluates and upgrades its offerings to stay current. The reason for this change is part of ongoing efforts to make Windows more focused and modern. Moving from Adobe Type 1 fonts is just a step toward simplifying and updating the Windows experience.

Here are the Best Equalizer Settings for Spotify

Spotify’s equalizer can completely change the way you hear music. By adjusting the bass, mids, and treble, you can bring out hidden details, make vocals shine, or give your favorite tracks more punch. In this guide, you’ll learn where to find the EQ, how each frequency works, and the best settings for different genres.

Where to Find Spotify’s Equalizer

iOS: Go to Settings → Playback → Equalizer. Toggle it on, pick a preset, or adjust sliders.

Android: Go to Settings → Equalizer. Some phones open the device’s built-in EQ instead of Spotify’s own.

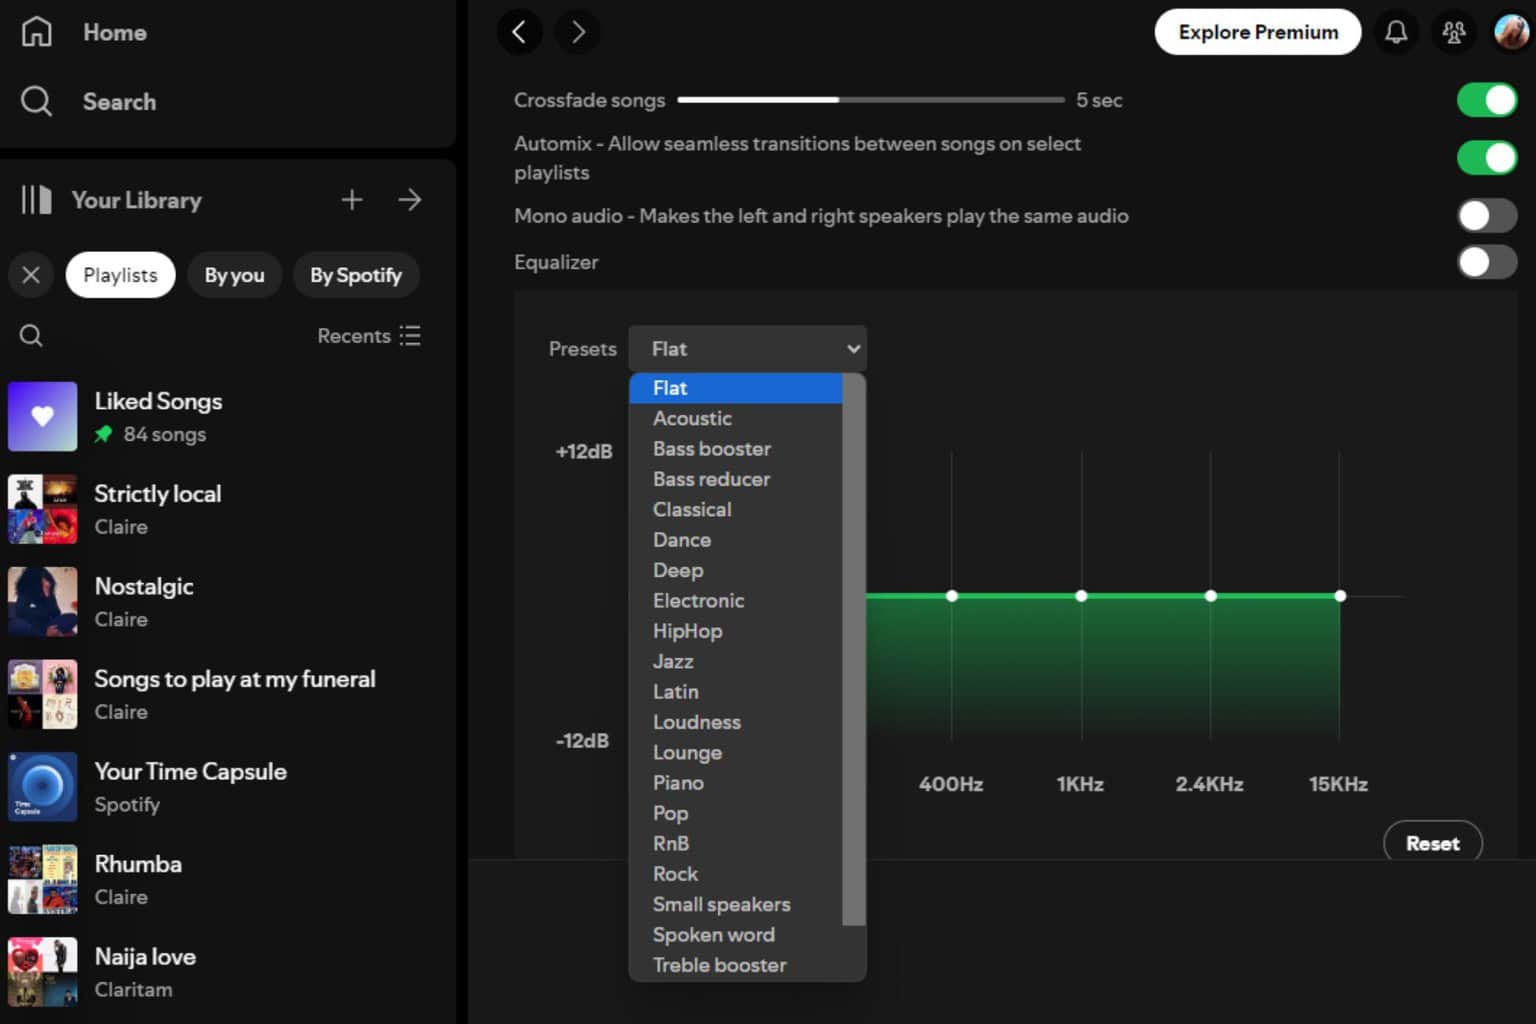
Desktop (Windows/Mac): Click your profile icon → Settings → scroll to Playback → toggle Equalizer on. Choose a preset or adjust manually.

Note: Spotify’s EQ will not apply when using Spotify Connect or casting to another device. Adjust EQ on the device that is actually playing the audio.

Frequency Cheat-Sheet (What Each Band Changes)

  • 60 Hz: Sub-bass thump and kick drum depth
  • 150 Hz: Bass body; too much here sounds boomy
  • 400 Hz: Low-mid “mud” area; trimming adds clarity
  • 1 kHz: Core midrange; affects fullness and vocal tone
  • 2.4 kHz: Presence and attack; sharpness of vocals and instruments
  • 15 kHz: Air and sparkle; too much can sound hissy

Tip: The right EQ balance can vary depending on whether you’re tuning for music, gaming, or TV audio, so it’s worth exploring profiles like the best equalizer settings for gaming or the best equalizer settings for TV to complement your Spotify setup.

Balanced (All-Purpose)

Settings: 60 Hz +2 | 150 Hz +1 | 400 Hz 0 | 1 kHz 0 | 2.4 kHz +1 | 15 kHz +2

Why it works: Adds warmth and sparkle without distorting the original mix.

Best for: General listening, mixed playlists, and switching between genres. For a broader overview of everyday audio profiles, see the guide to the best equalizer settings for music.

Vocals (Singer-Focused)

Settings: 60 Hz −3 | 150 Hz −1 | 400 Hz +2 | 1 kHz +4 | 2.4 kHz +4 | 15 kHz +2

Why it works: Reduces bass rumble and boosts vocal clarity in the 1–4 kHz range.

Best for: Acoustic, pop ballads, folk, and K-pop.

Spoken Word (Podcasts/Audiobooks)

Settings: 60 Hz −4 | 150 Hz −2 | 400 Hz 0 | 1 kHz +3 | 2.4 kHz +4 | 15 kHz +1

Why it works: Cuts low-frequency hum, sharpens the vocal range, and keeps treble controlled.

Best for: Podcasts, audiobooks, interviews. If your Spotify app runs into connection errors such as the No healthy upstream issue on Spotify, address it first so playback tests aren’t disrupted.

Hip-Hop / R&B

Settings: 60 Hz +6 | 150 Hz +3 | 400 Hz 0 | 1 kHz +1 | 2.4 kHz +1 | 15 kHz +1

Why it works: Adds heavy bass impact while keeping vocals and cymbals clear.

Best for: Rap, trap, and R&B.

Pop

Settings: 60 Hz +3 | 150 Hz +2 | 400 Hz +1 | 1 kHz +2 | 2.4 kHz +3 | 15 kHz +4

Why it works: Boosts both ends of the spectrum for an energetic, radio-ready sound.

Best for: Mainstream pop, upbeat tracks, dance-pop.

Rock / Metal

Settings: 60 Hz +4 | 150 Hz +2 | 400 Hz 0 | 1 kHz −1 | 2.4 kHz +1 | 15 kHz +3

Why it works: Strengthens drums and bass while keeping guitars sharp without harshness.

Best for: Rock, hard rock, metal, punk. If you listen while playing, you may also benefit from adjustments inspired by the best equalizer settings for gaming.

EDM / Dance

Settings: 60 Hz +5 | 150 Hz +3 | 400 Hz 0 | 1 kHz −2 | 2.4 kHz +1 | 15 kHz +4

Why it works: Deep sub-bass for club feel, bright highs for crisp drops, scooped mids for space.

Best for: House, techno, trance, festival mixes.

Classical / Jazz / Acoustic

Settings: 60 Hz −1 | 150 Hz +1 | 400 Hz +3 | 1 kHz +2 | 2.4 kHz +3 | 15 kHz +4

Why it works: Adds clarity and space while keeping a natural tonal balance.

Best for: Orchestral, jazz, unplugged acoustic performances. If you’re adjusting EQ for films or live performances on a bigger screen, the best equalizer settings for TV can be a helpful companion read.

Quick Reference: Spotify EQ Settings by Genre

Genre / Use Case60 Hz150 Hz400 Hz1 kHz2.4 kHz15 kHzKey Effect
Balanced (All-Purpose)+2+100+1+2Warmth and sparkle
Vocals (Singer-Focused)−3−1+2+4+4+2Clear, upfront vocals
Spoken Word−4−20+3+4+1Clear speech, no rumble
Hip-Hop / R&B+6+30+1+1+1Deep, impactful bass
Pop+3+2+1+2+3+4Bright, energetic
Rock / Metal+4+20−1+1+3Punchy drums, sharp guitars
EDM / Dance+5+30−2+1+4Club-style bass & highs
Classical / Jazz / Acoustic−1+1+3+2+3+4Clear, spacious detail

Tune It To Your Gear

Headphones & Earbuds: Bass-heavy models often benefit from a slight reduction at 60–150 Hz. Bright models may need a small cut at 15 kHz for smoother highs. Open-back headphones can feel more satisfying with a gentle +1 to +2 dB lift at 60 Hz for added body.

Speakers or Laptops: Add a modest boost at 60–150 Hz for warmth, but keep 400 Hz flat or slightly reduced to avoid muddiness.

Car Audio: Road noise masks lows and low-mids. Try a +3 dB bump at 60–150 Hz, a small −1 dB cut at 400 Hz for clarity, and +2 dB around 2.4–15 kHz for extra detail.

Fast Fixes for Common Problems

  • Boomy bass: Reduce 150 Hz by 1–2 dB; trim 60 Hz if needed.
  • Muddy sound: Lower 400 Hz slightly.
  • Harsh vocals or guitars: Reduce 2.4 kHz by 1–2 dB.
  • Dull highs: Increase 15 kHz by 1–2 dB.
  • Sibilance (“S” sounds): Lower 15 kHz slightly.

Quick Setup Checklist

  • Start from Flat and adjust one slider at a time.
  • Keep changes small for natural sound.
  • Match settings to your gear and environment.
  • Save different EQ setups for headphones, speakers, and car.
  • Watch for desktop app improvements that can enhance your experience, such as new features highlighted in the latest Spotify desktop update with The Jam and other changes.

Best Aim Assist Settings for MW2: 5 Tips to Improve Your Aim

Navigating the world of Modern Warfare 2 can be a bit overwhelming, especially when it comes to fine-tuning your aim assist settings for peak performance. Let’s dive into the best aim assist settings for MW2 to help you stay competitive and accurate in every match.

What are the best aim assist settings in MW2?

1. Adjusting the default general settings

  1. Go to the Settings menu by pressing the Options/Menu button on your controller.
  2. Navigate to the Controller tab.
  3. Scroll to the Aiming section and turn on the Target Aim Assist setting.
  4. Find the Aim Assist Type dropdown menu and switch it to either Default or Black Ops for a balanced aim slowdown near targets.
  5. Look for the Aim Response Curve Type option and set it to Dynamic for smoother targeting based on stick movement speed.
  6. Under Aiming, find ADS Sens Multiplier, and set it to 1.00, or experiment with values between 0.75 to 0.85.
  7. Ensure ADS Sensitivity Transition Timing is set to Instant for quicker aiming adjustments.
  8. Scroll down to Custom Sensitivity Per Zoom settings and keep them at default initially. Adjust as needed based on your gameplay experience.

By using these default settings, you will have a highly responsive aim assist that helps you stay accurate and competitive. The Dynamic Aim Response Curve Type ensures smoother transitions, making it easier to track moving targets.

2. Fine-tuning Deadzone for Sticks and Buttons

  1. Navigate to the Controller settings.
  2. Under the Aiming section, set Left Stick Min to 0.00 for minimal stick drift.
  3. Set Right Stick Min to 0.00 for precise aiming without delay.
  4. Set both Left Stick Max and Right Stick Max to 0.85 to avoid oversteering when moving your character or aiming.
  5. Under the Aiming section, set both L2 Button Deadzone and R2 Button Deadzone to 0.00 for immediate response when shooting or aiming.

Properly configuring deadzones will result in more responsive controls, allowing for more precise aim adjustments and quicker reactions.

3. Sensitivity settings for better control

  1. Go to Controller settings and find the Sensitivity section.
  2. Set Horizontal Stick Sensitivity to 6 for balanced horizontal aiming speed.
  3. Set Vertical Stick Sensitivity to 6 to match horizontal movements, ensuring consistency in all directions.
  4. Ensure all Sensitivity Multiplier settings are set to 1.00 for consistent sensitivity across different gameplay scenarios (third-person, ground vehicles, air vehicles, etc.).
  5. Adjust all Vertical Aim Axis settings to Standard for intuitive up and down aiming controls.

Starting with these sensitivity settings as a baseline helps in achieving a balanced playstyle. You can always fine-tune based on personal preference or specific feedback from your gameplay experience.

4. Community insights from Reddit

  1. Experiment with different aim assist types
    • Many players on forums like Reddit suggest trying all aim assist types (Default, Precision, Focusing, Black Ops) to find the one that feels most natural.
    • Users report Precision offers strong aim slowdown close to the target for accurate players, while Black Ops provides a longer aim assist duration.
  2. Community-recommended settings adjustments
    • Regularly check forums for updates and insights from experienced players.
    • Adjust settings based on new strategies or discovered preferences shared by the community.

Engaging with community insights lets you benefit from the collective experience of seasoned players, potentially giving you the edge in tight matches.

5. General tips for controllers

  1. Use a Comfortable Controller Layout – Ensure you are comfortable with your button layout. Some prefer the Tactical layout which swaps melee and crouch/prone buttons for better control during combat.
  2. Regularly clean and maintain your controller – Regular cleaning and maintenance of your controller can prevent stick drift and ensure consistent performance.
  3. Stay updated with patch notes – Periodically check for game updates that might affect aim assist and controller settings.

Following these general tips can help maintain your performance and adaptability in the game, ensuring your settings always give you a competitive advantage.

By keeping your settings optimized and staying engaged with the community, you can ensure your aim assist settings in MW2 remain top-notch.

If MW2 is stuck in the loading screen, click the highlighted link to find our guide on how to fix it. We also have a nifty guide on how to fix mouse lag in MW2 if you’re not playing with a controller.

Leave a comment in the dedicated section below if you have any other questions or suggestions.

How To Fix Xbox Error 0x87dd0006 Easily

Many gamers reported that they can’t sign in to their Xbox accounts due to the Xbox assist 0x87dd0006 error code. This is a well-known issue, and in today’s guide, we’re going to show you the best methods that you can use to fix it and get back to your gaming sessions.

How to Fix Can’t Sign Into Xbox Live 0x87dd0006 Error?

1. Check the status of Xbox Live services

  1. Visit the Xbox Live Status page.
  2. Check if there’s any outage.
  3. If there is, it means that the issue is caused by the server, and your only option is to wait until Microsoft fixes the issue.

2 Unplug your Ethernet

  1. Disconnect your Ethernet cable from the console.
  2. Try logging in a few times with your cable disconnected.
  3. Reconnect the Ethernet cable.
  4. Try to log in again.

In case you’re having issues with the network cable, be sure to check our guide on Xbox not working with Ethernet cable for more solutions.

3. Make sure that your billing information is correct

  1. Visit the Microsoft account page and click on Sign In.
  2. Go to Payment & billing section and select Payment options.
  3. Select Edit profile option and change the desired information.

On Xbox Series X:

  1. Press the Xbox button to open the Guide.
  2. Select Profile & System.
  3. Navigate to Settings and choose Account.
  4. Head over to the Payment & billing section.
  5. Select Edit info.

On Xbox One:

  1. Scroll left on the Home screen to open the Guide.
  2. Choose Settings and select All Settings.
  3. In the Account section select Payment & billing.
  4. Choose Change billing address.
  5. Edit your billing information. You can skip billing information that doesn’t need editing simply by pressing the B button on your controller and choosing Next.
  6. After the desired information is changed, select Save info to save changes.

On Xbox 360:

  1. Go to Settings and select Account.
  2. Select Manage Payment Options.
  3. Select the payment option that you want to update.
  4. Make changes to the billing information.
  5. After you’re done, select OK to save changes.

Incorrect payment information can lead to all sorts of Xbox billing errors, so be sure to keep it up to date.

Note icon NOTE
Some users are claiming that to fix this error your billing information on Microsoft Live and Xbox website needs to match, therefore be sure to check the billing address on both websites.

4. Insert the game disc

  1. Take any Xbox game disc.
  2. Now insert the disc in the console.
  3. Once the disc is inserted, try to sign in again.

If you weren’t able to perform these steps, you might want to check our Xbox isn’t reading discs guide.

5. Delete and download your profile

  1. Press the Xbox button on your controller.
  2. Navigate to Profile & System and select Settings.
  3. Go to Account and select Remove accounts.
  4. Select the account you want to remove and choose Remove.

You can add the account by doing the following:

  1. Press the Xbox button to open the guide.
  2. Now select Profile & System and go to Add or Switch.
  3. Select Add New and enter your Microsoft account credentials.
  4. Configure your security preferences.

On Xbox One:

  1. On the Home screen, scroll left to open the Guide.
  2. Choose Settings and select All Settings.
  3. Go to Account and choose Remove accounts.
  4. Select the account that you want to remove and choose the Remove option.
  5. After you’re done, select Close.

Now you need to add your account again by following these steps:

  1. Open the Guide by scrolling left on the Home screen.
  2. On the Sign in tab, go all the way down and select Add & manage.
  3. Select Add new.
  4. Enter your Microsoft account login information and select Enter.
  5. Read and accept Microsoft Service Agreement and Privacy Statement.
  6. Follow the instructions on the screen to configure Sign-In & Security preferences.

On Xbox 360:

  1. Go to Settings and select System.
  2. Choose Storage.
  3. If you have any external storage devices attached to your console, select All Devices. If you don’t have any external storage devices, select Hard Drive.
  4. Choose Profiles.
  5. Select the profile that you want to delete and choose the Delete option.
  6. Choose the Delete Profile Only option to delete your profile without deleting achievements or saved games. If you want, you can also use Delete Profile and Items option, but this option will delete both saved games and achievements from your console.

After your profile is deleted, you need to download it again by following these steps:

  1. Press the Guide button on your controller.
  2. Select the Download Profile option. If this option isn’t available, you need to be sure that you’re signed out of all Xbox profiles.
  3. Select the Download Profile button.
  4. Enter your Microsoft account login information.
  5. Choose the storage location for your profile and wait until your profile is downloaded.

6. Restart your modem / router

  1. Turn off your Xbox.
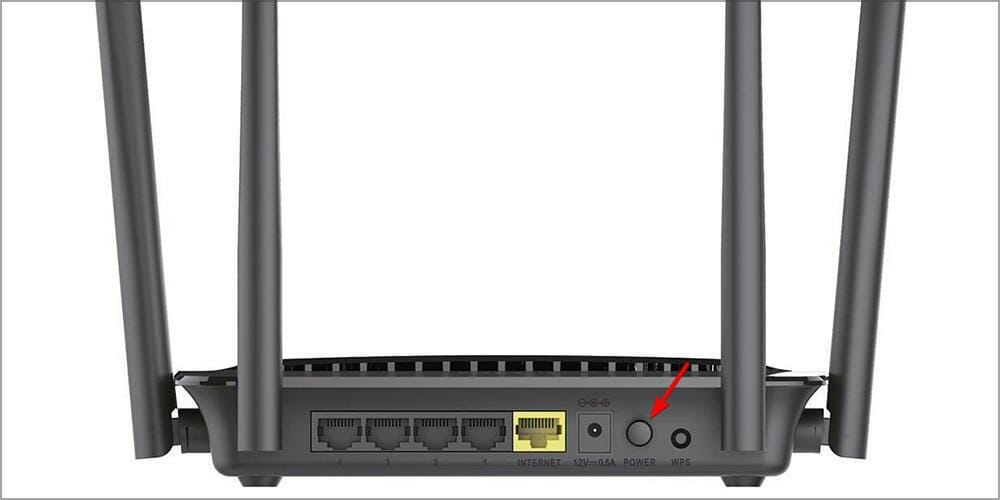
  2. Press the power button on your modem to turn it off.
  3. After your modem turns off, wait for 30 seconds or more.
  4. After that, press the power button on your modem and wait until it turns on completely.
  5. Turn on your Xbox and check if the error is resolved.

In some instances, updating your router firmware can help with this issue, so you might want to consider doing that.

7. Update your controller

  1. Press the Xbox button.
  2. Navigate to Profile & System and select Settings.
  3. Navigate to Devices & connections and select Accessories.
  4. Select the controller that you want to update, and choose three dots icon beneath it.
  5. Select your firmware version. If new firmware is available, download it and follow the instructions on the screen.

On Xbox One:

  1. Press the Menu button and select Settings.
  2. Select Devices & streaming. Now navigate to Accessories.
  3. Select the controller that you want to update and navigate to three dots beneath it.
  4. Select the Firmware version and update it.
  5. Wait until the controller update is installed.

Keep in mind that only controllers purchased after June 2015 can install updates wirelessly. These types of controllers have a circular 3.5mm port on the bottom, and you can easily recognize them.

If your controller doesn’t support wireless updates, you’ll have to install the update using the USB cable. To do that, follow these steps:

  1. Connect your controller to your console using the USB cable.
  2. Instructions should appear now on the screen.
  3. If the instructions don’t appear, you need to press the Menu button and navigate to Settings.
  4. Navigate to Devices & streaming, select Accessories and choose the Update option.

You can also update your controller using the PC. To update your controller you need to follow these steps:

  1. Download Xbox Accessories app from Windows Store.
  2. Start the Xbox Accessories app and connect your Xbox One Wireless Controller using the USB cable or Xbox Wireless Adapter.
  3. After you connect your controller, you should see Update Required message if there’s a mandatory update available.
  4. Install the update.

For detailed information about this process, we suggest you visit our how to update Xbox controller guide.

8. Unplug your console

  1. Press the Xbox button.
  2. Now go to Profile & system and select Settings.
  3. Navigate to the General tab and select Power mode & startup.
  4. Choose Full shutdown.
  5. Select Shut down.
  6. Disconnect the console from the power outlet.
  7. Leave it disconnected for 5 minutes or so.
  8. Connect the console to the power outlet and press the Power button to start it.

9. Check your network configuration

Sometimes the 0x87dd0006 error can be caused by your network hardware configuration. Users reported issues with various wireless routers, therefore if you’re having this problem you might want to try changing your settings.

This is an advanced procedure, therefore be sure to check your router and modem manual before making any changes. For additional troubleshooting, check our Your network is behind the port-restricted NAT guide.

10. Update your console

  1. Press the Xbox button.
  2. Select Profile & system and navigate to Settings.
  3. Head over to System and choose Updates.
  4. Select Console update available to install missing updates.

If your update fails, be sure to check our Xbox update failed guide to see how to fix it.

11. Sign out of every services and forget your Wi-Fi

  1. Press Xbox button and select Profile & system.
  2. Choose the Sign out option.
  3. Go to Profile & system again and naviagate to Settings.
  4. Select General and choose Network settings.
  5. Select Go offline.
  6. Select your wireless network. Choose Forget wireless network option.
  7. Wait for a few moments and connect again.
  8. Sign in to your Microsoft account and check if the problem is gone.

How do I sign in to Xbox?

  1. Press the Xbox button and select Profile & System.
  2. Select the Sign in option.
  3. Enter your Microsoft account email and password.
  4. Follow the instructions on the screen to complete the process.

What is Xbox Game Pass?

This is a special type of subscription that gives you access to various titles as long as you keep paying the monthly fee. The list of available items includes more than 100 different games, and you can buy them permanently at a discount.

For many users, this is a great deal, since they get the ability to try many titles and get an Xbox Live Gold subscription in the same bundle.

What is Xbox error 0x87dd0006?

This is a network error, and if you encounter it, you won’t be able to use your console to access online content. The main cause is usually a server issue.

In some instances, your network connection or incorrect billing information can cause you can’t sign into Xbox live 0x87dd0006 error, so it’s advised that you check them.

Is it better to use Ethernet or wireless connection on Xbox?

In most instances, it’s usually better to use an Ethernet, if possible. Wired connection is more stable, and less prone to interference and latency issues.

On the other hand, if you want to keep your space wire-free, you can use Wi-Fi on your Xbox, but you might encounter various problems based on signal strength and interference.

As long as your router is close to your console, you shouldn’t have too many problems while gaming.

Error 0x87dd0006 can cause major problems since you won’t be able to sign in and play your favorite games online. In most cases, you just have to wait for Microsoft to address this issue.

You can also try to restart your console and network connection as a workaround. In some instances, updating your billing information can help.

If you have any more questions, feel free to post them in the comments section below and we’ll make sure to take a look.

KB5040557 to the Dev Channel makes Windows 11 more environmentally friendly

The newest Windows 11 update, build 26120.1340 (KB5040557), to the Insider Dev Channel is making PCs more environmentally friendly. Microsoft just released the build, and with it, the company decided to focus on energy-saving capabilities.

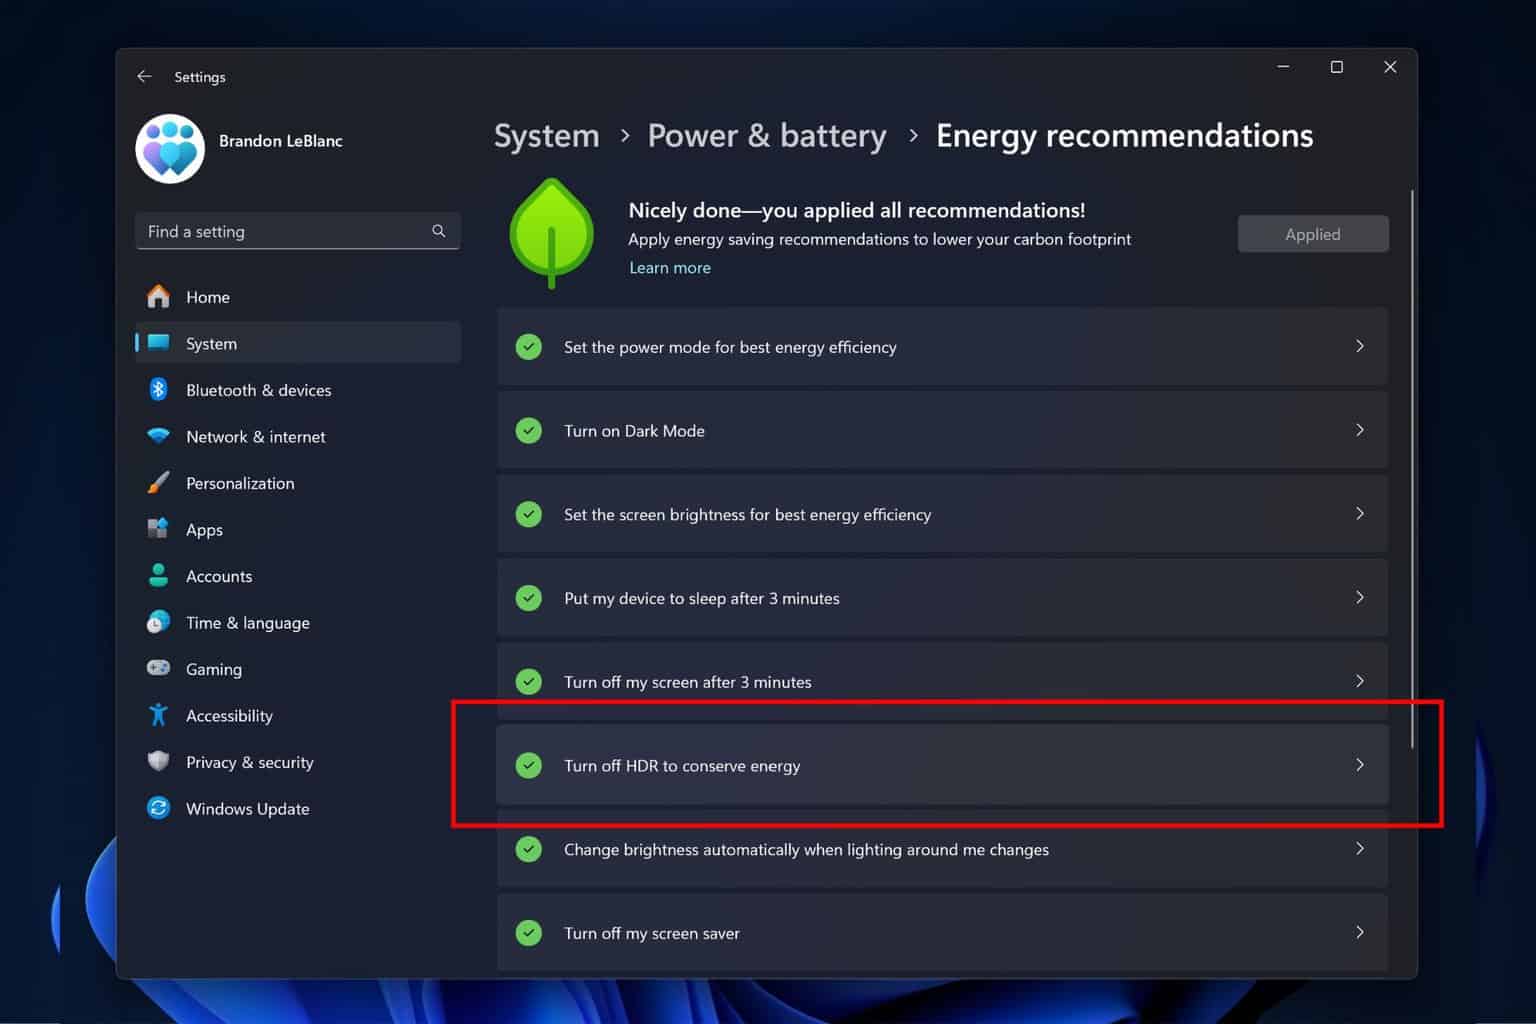
For example, when your laptop battery reaches 20% and the Energy Saver is set as “Always On,” you will receive a prompt to connect. For people who have HDR displays, a fresh suggestion is available in Power & Battery settings that says to turn off HDR to save energy.

KB5040557 also brings a mouse update in the Settings under Bluetooth & Devices. You can switch off enhanced mouse pointer precision for people who don’t like it. You can also change your mouse’s scrolling direction now.

The update improves the ability of people who use voice access to spell and fix mistakes with voice. Picture yourself dictating at a quicker pace without stumbling on your words. It’s like conversing with your PC, but now it understands you better.

But it’s not all good news. Some known problems exist, such as Windows Sandbox not launching or Task Manager crashing when you navigate between pages. Also, if you add languages or optional features, you could encounter error 0x800f081f.

You can read KB5040557’s full changelog here. If you’re part of the Windows Insider Program, don’t forget to download the latest KB5040555, a small but essential build for the Beta Channel.

Best Xbox DNS Settings To Use For Gaming

If you’re an avid Xbox gamer, you know that every millisecond counts. Optimizing your DNS settings can significantly reduce lag and improve your overall gaming experience, so let’s see what are the best Xbox DNS settings you can use.

What are the best Xbox DNS settings to use?

1. Changing DNS Settings on Xbox

  1. Open the guide by pressing the Xbox button on your controller.
  2. Go to Profile & system > Settings > General > Network settings.
    network settings xbox
  3. Select Advanced settings from the Network screen options.
    advanced network settings xbox
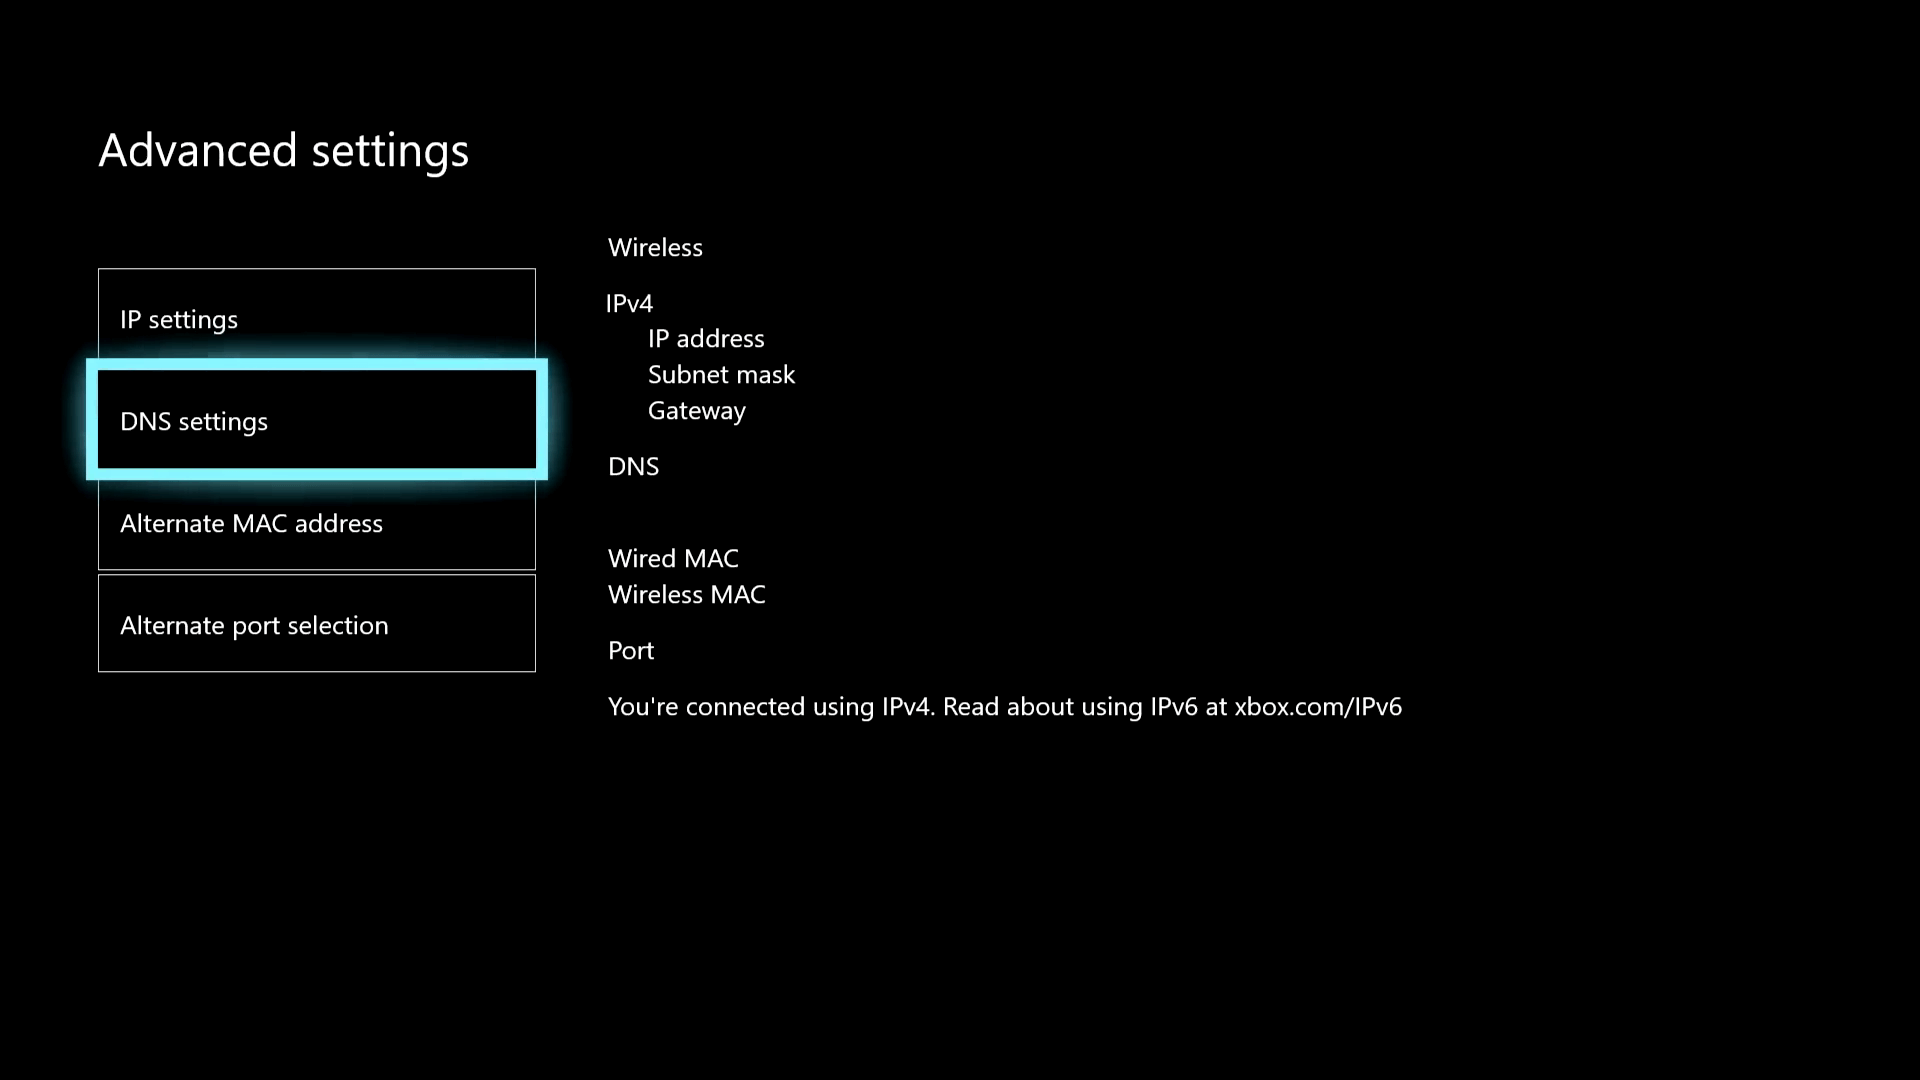
  4. Select DNS settings.
    choose dns settings xbox
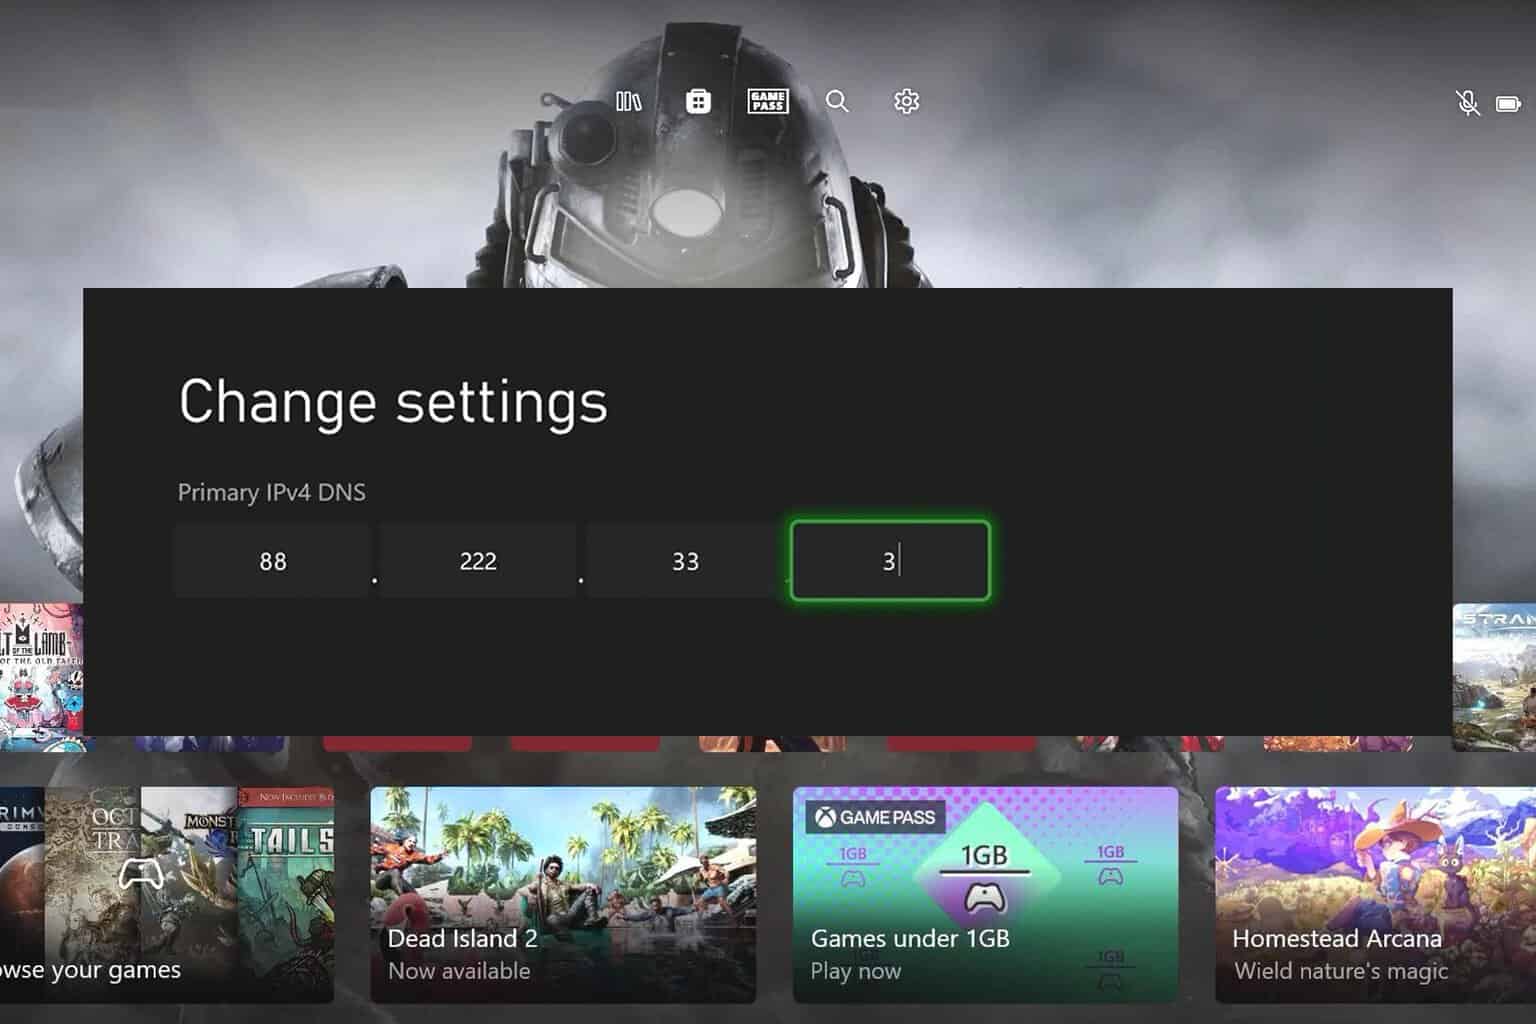
  5. Choose Manual.
  6. Enter the primary and secondary DNS settings. Here are some recommended DNS servers:
    • Cloudflare
      • Primary DNS: 1.1.1.1
      • Secondary DNS: 1.0.0.1
    • Google Public DNS
      • Primary DNS: 8.8.8.8
      • Secondary DNS: 8.8.4.4
    • Quad9
      • Primary DNS: 9.9.9.9
      • Secondary DNS: 149.112.112.112

To find the fastest server, be sure to ping each address from the Command Prompt on your PC with the ping command.

2. Use smart DNS services

  1. Subscribe to a Smart DNS service like NextDNS or a VPN provider offering smart DNS functionality.
  2. Follow the service provider’s instructions to configure the smart DNS on your router or directly on your Xbox.
  3. Enter the provided DNS addresses into your Xbox DNS settings.

Smart DNS services offer additional features like ad blocking, privacy protection, and access to geo-restricted content. This can enhance your gaming experience by providing a secure and fast DNS resolution.

By following these detailed solutions, you can optimize your Xbox’s DNS settings to achieve faster and more stable connections, and help you with high package loss on Xbox Series X|S.

Changing the DNS can also help if streaming lags on the Xbox app, and we have an entire guide dedicated to it.

7 Best Microphone Settings for Windows 11

Poor voice quality in meetings or in-game chat is often a result of microphone issues. Surprisingly, most of these can quickly be fixed by configuring the best microphone settings in Windows 11!

These usually pertain to the microphone’s audio enhancements, audio levels, boost, sensitivity, and audio channel. Problems with even one of these can affect the overall microphone quality, no matter how costly the overall setup. And once you get things in order, the sound quality witnesses a substantial improvement on Windows 11!

How do I make my microphone sound better on Windows 11?

1. Enable audio enhancements

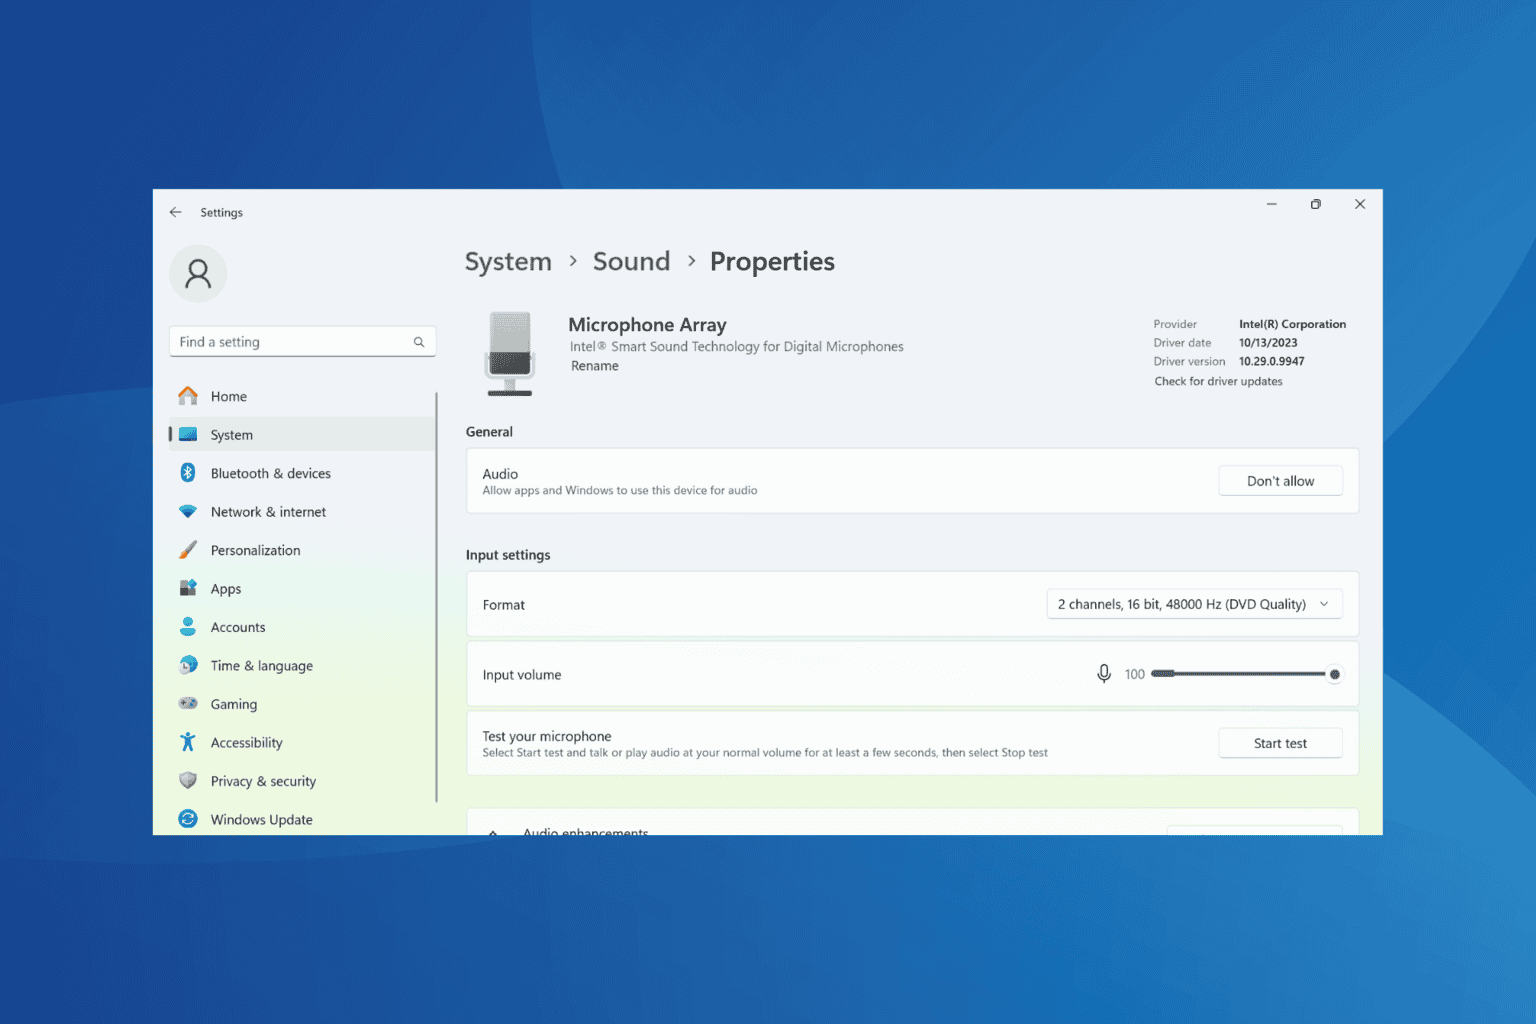
  1. Press Windows + I to open Settings, go to System from the navigation pane, and then click on Sound on the right.settings
  2. Select your microphone under the Input entry.
  3. Now, select Device Defaults Effect from under the Audio enhancements dropdown menu.audio enhancements, the best microphone settings for windows 11

Audio enhancements, though an easy way to improve the microphone’s sound quality in Windows 11, can often result in other issues or cause the microphone to stop working altogether. If this is the case with you, disable audio enhancements right away!

2. Adjust the microphone levels

  1. Press Windows + I to open Settings, navigate to the System tab, choose Sound, and select your microphone from the list under Input.
  2. Now, adjust the Input volume slider and set it at the optimal levels. It’s different for each microphone. input volume

For most of you with basic microphones, setting input volume to 100% is the best setting for Windows 11. Although, for anyone with a professional or high-end microphone, the input volume should be 60-80%!

3. Select the best audio channel

  1. Press Windows + I to open Settings, go to System, select Sound, and choose your microphone from the list.
  2. Now, select 2 channels, 16 bit, 48000 Hz (DVD Quality) or 2 channels, 16 bit, 44100 Hz (CD Quality), whichever is available. If both are available, pick the former microphone audio format.best microphone format settings for Windows 11

4. Disable other connected microphones

  1. Press Windows + S to open Search, type Control Panel, and click on the relevant result.
  2. Click on Hardware and Sound.hardware and sound
  3. Click on Sounds.
  4. Navigate to the Recording tab, individually right-click on the microphones not in use, and choose Disable.disable other microphones

Often, audio issues arise when the OS or third-party apps pick up another microphone instead of the one you intend to use. A simple trick here is to disable all the other microphones. Also, you could set the microphone in use as the default device!

    5. Configure exclusive mode

    1. Press Windows + S to open Search, type Sound in the text field, and click on the relevant result.
    2. Go to the Recording tab, right-click on the microphone in use, and select Properties.microphone properties
    3. Head to the Advanced tab, and tick the checkboxes for Allow applications to take exclusive control of this device and Give exclusive mode applications priority. exclusive mode, best microphone settings for windows 11
    4. Finally, click on Apply and OK to save the changes.

    6. Use the app’s built-in audio enhancements

    Many of the common audio and video conferencing apps have built-in audio enhancements and dedicated settings to improve the microphone’s sound output in Windows 11. For example, Skype and Discord.

    discord voice and video
    Voice and Video settings in Discord

    From the built-in audio settings, you can quickly adjust the microphone’s input volume, input sensitivity, echo cancellation, noise suppression, gain control, and other critical parameters. Besides, you may even find a dedicated built-in audio troubleshooter.

    So, make use of these to enhance the microphone’s audio quality and experience better sound!

    7. Download a third-party microphone enhancement app

    When it comes to the best microphone settings in Windows 11, the most useful ones are often offered by third-party software. You could choose a top-rated audio equalizer tool to begin with. Also, many couple it with an effective noise-cancellation software for improved results.

    Choose whatever works best for you. But don’t forget, software with a paid subscription will always deliver better results than one that is free!

    How can I troubleshoot microphone issues in Windows 11?

    • Test the microphone in Windows 11: Press Windows + I to open Settings > go to System > select Sound > choose your microphone from the list > click on the Start test button > click Stop test > check the results.
    • Run the microphone troubleshooter: Press Windows + I to open Settings > go to System > select Troubleshoot > choose Other troubleshooters > click on Run next to Audio.
    • Update the microphone driver: Open Device Manager > right-click on the microphone under Audio input and output > choose Update driver > select Search automatically for drivers.
    • Terminate third-party apps using the microphone: Open Task Manager > identify any apps using the microphone > select the app(s) > click on End task.
    testing microphone
    Running microphone test on Windows 11

    With these tips and recommended best settings, you should be able to improve the microphone’s audio in Windows 11 and previous iterations of the OS.

    Before you leave, find out how to enable microphone boost in Windows 11 and experience louder audio!

    Which microphone setting worked best for you? Share with our readers in the comments section.

    Microsoft Edge tests ‘Sidebar visibility’ Settings and removes Copilot auto-open option

    Microsoft introduces new settings for greater control over the Sidebar for users in the Edge Canary version and removes a setting that gives the ability to control preventing Copilot from automatically opening in the sidebar.

    Microsoft Edge by default comes with a sidebar that will always be displayed. The sidebar comes with the ability to open and play games including apps such as Search, Drop, Skype, Whatsapp, and others. Microsoft gives total control over customizing top sites in the sidebar as well as allows sidebar apps to show notifications.

    Sidebar Visibility Settings

    Some users, may not want the sidebar to appear always or turn it off. Edge got you covered with “Always show sidebar” toggle.

    If you want the Sidebar to be hidden and accessibile whenever you click copilot icon, which gives screen space on right side, Microsoft is now offering a new option for the same in Edge included in new “Sidebar Visibility Settings”. These are being tested in Edge Canary.

    Always on: The default setting. “Sidebar will always show”
    Auto hidden: “Sidebar will show when using the side pane; you can access it from the Copilot icon”
    Off: Sidebar will never show

    Microsoft Edge Sidebar Visibility Settings. Image Credit: WindowsReport.

    Edge loses “automatically open Copilot in the sidebar” setting

    Microsoft Edge by default can open Copilot automatically in the sidebar, which is useful for generating page summaries and other tasks that Copilot can handle on the active page without the user needing to do this manually.

    Edge has a relevant setting enabled by default in Copilot Sidebar settings when you visit edge://settings/sidebar and click Copilot, titled “Automatically open Copilot in the sidebar”.

    Edge copilot Sidebar Settings. Image Credit: WindowsReport

    Today, WindowsReport noticed Microsoft has removed this setting from all versions of Edge, including stable.

    Automatically open the Copilot in the sidebar setting removed. Image Credit: WindowsReport.

    This seems more like a server-side change than an update-related one. Now users have lost the ability to prevent Copilot from automatically opening in the sidebar.

    If you’re a Microsoft Edge user, you should be happy to know Edge has now a market share of close to 14% with Chrome losing its users.

    Additionally, Microsoft is mimicking Chrome Settings for Edge with a search bar on the right including spacial changes to the left navigation and soon, you can use the Esc key to exit Fullscreen mode in Edge. Android Edge has received the Workspaces feature in Canary.

    Google Chrome Helper Renderer High CPU Usage: 5 Ways to Fix

    Dealing with high CPU usage from Google Chrome Helper (Renderer) can be frustrating, especially when it slows down your entire system. Fortunately, there are several effective solutions to tackle this issue and improve your browsing experience.

    How can I fix Helper Renderer high CPU usage in Google Chrome?

    Before we start, a few users suggested that using an adblocker can help, so be sure to download and install one. Also, ensure that you have the latest Chrome updates installed.

    1. Disable hardware acceleration

    1. Open Chrome and click the three dots (menu) at the top right corner of the browser.
    2. Select Settings from the dropdown menu.
      google chrome settings menu
    3. Scroll down and click System on the left-hand side.
      system settings chrome
    4. Find Use hardware acceleration when available and toggle it off.
      use hardware acceleration when available disable
    5. Click the Relaunch button to restart Chrome and apply the changes.

    2. Clean up extensions

    1. Open Google Chrome, and open the menu.
    2. Navigate to Extensions and click Manage Extensions.
      extensions manage extensions chrome
    3. Review the list of installed extensions.
    4. Toggle off or click Remove for extensions you no longer need or use.
      remove or disable extensions

    3. Disable Google Chrome Helper

    1. Open the Chrome menu and go to Settings.
    2. Click Privacy and Security on the left sidebar.
      privacy and security chrome
    3. Scroll down and choose Site Settings.
      site settings optionchrome most visited sites not showing
    4. Go to Additional permissions and click Unsandboxed plug-in access.
    5. Toggle the option Do not allow any site to use a plugin to access your computer.

    4. Monitor and end high-usage processes

    1. Open Google Chrome and click the Menu icon.
    2. Navigate to More tools and click Task Manager.
      more tools task manager
    3. Identify processes consuming high resources.
    4. Select the process and click End process.
      end process chrome

    5. Clear browser cache

    1. Open Google Chrome.
    2. Click the three dots (menu) at the top right corner.
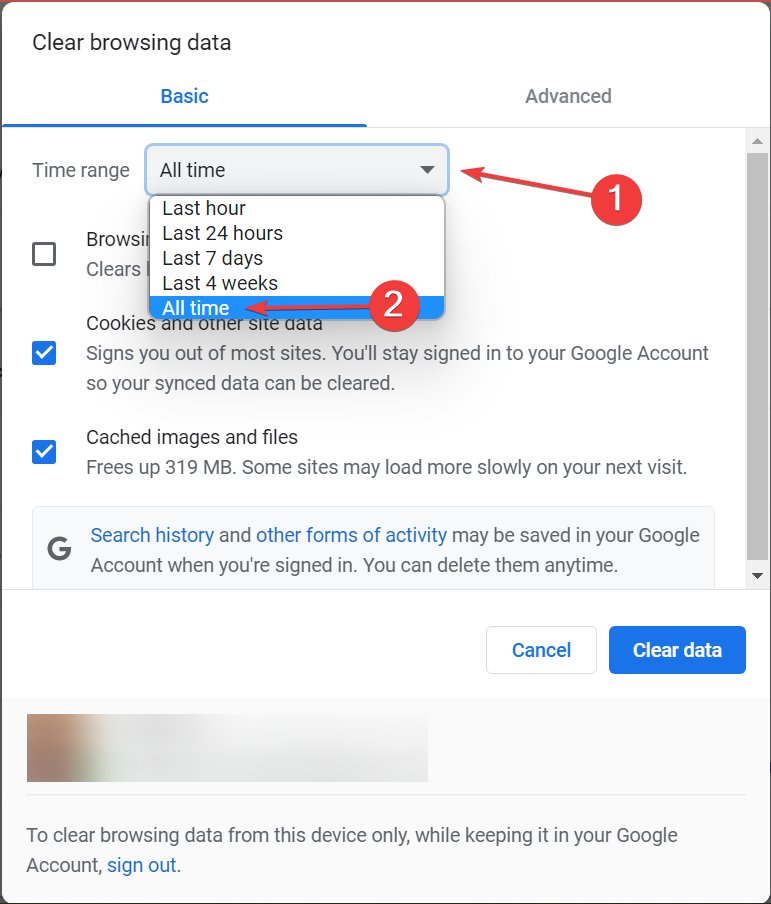
    3. Navigate to More tools and click Clear browsing data.
      clear browsing data chrome
    4. Choose All time as the time range.
      clear browsing data in google chrome
    5. Check the boxes for Cached images and files and Cookies and other site data.
    6. Click Clear data.

    By following these steps, you will minimize the CPU usage of Google Chrome Helper, enhancing your browsing experience.

    Unfortunately, Chrome is known for its resource consumption, and we already wrote about high CPU usage in Chrome as well as high memory usage by Chrome.

    That’s not all, many also experienced high disk usage in Chrome, but we have a guide that addresses this issue.

    Best Equalizer Settings for TV: 7 Tips for Optimal Sound Quality

    Achieving crystal-clear sound on your TV can significantly enhance your viewing experience, whether you’re watching movies, sports, or your favorite TV shows. Here are some practical steps to optimize your TV’s audio settings for the best sound quality.

    How do I tweak equalizer settings for best TV sound?

    1. Adjust TV’s sound settings

    1. Press the menu button on your TV remote and find the sound or audio options.
    2. Try different sound modes such as Cinema, Sports, or Dialogue Boost. Switch between modes while watching various content until you find the one you prefer.
    3. Before switching modes, disable Dolby Audio Processing if your TV has this feature. This setting can be found under the Audio section.

    Switching sound modes helps tailor the sound profile to different types of content, enhancing your overall viewing experience.

    2. Customize the equalizer

    1. In the sound menu, look for the equalizer settings.
    2. Frequencies might be labeled like 100Hz (bass), 1kHz (mid-range), and 10kHz (treble).
    3. Lower bass frequencies and increase treble frequencies to make dialogue clearer.
    4. Increase bass frequencies for a more impactful movie experience.

    By customizing the equalizer, you can fine-tune the sound to match your preference, whether it’s clearer dialogue or a more immersive movie environment.

    3. Enable advanced sound processing options

    1. In the audio settings, look for advanced sound processing options like virtual surround or Dolby Atmos.
    2. Enable these settings to see if they enhance your TV audio.

    Advanced sound processing can create a more immersive audio experience by simulating surround sound. However, for the full effect, you also need surround sound speakers.

    4. Switch on Auto Volume

    1. In the sound settings menu, find the auto volume option.
    2. Turn Auto Volume on to reduce sudden loud bursts of sound from commercials or action scenes.

    Auto volume helps maintain a consistent audio level, preventing sudden loud noises from disrupting your viewing experience.

    5. Optimal Equalizer Settings for movies

    1. Start with bass (100Hz) and treble (10kHz) at default (usually middle or zero).
    2. Increase mid-range frequencies: Raise 330Hz and 1kHz to +5 for clearer dialogue.
    3. Fine-tune high frequencies: Adjust 3.3kHz to around +3 for balanced sound.
    4. Play content typical of your viewing habits and adjust settings accordingly.

    Using these settings as a starting point helps balance bass and dialogue, providing a richer audio experience for movies.

    6. Connect external speakers or soundbars

    1. Look at the back of your TV for Audio Out ports (HDMI ARC/eARC, optical, 3.5mm AUX).
    2. Use HDMI ARC for the simplest connection and best quality. If not available, opt for optical or 3.5mm AUX.
    3. Plug in your external speakers or soundbar using the chosen cable.
    4. In the sound menu, select the appropriate audio output (e.g., HDMI ARC). Enable HDMI-CEC if using HDMI for automatic audio switching.

    Connecting external speakers or a soundbar generally improves sound quality over built-in TV speakers.

    7. Experiment with sound bars

    1. Place the soundbar under or above your TV for the best audio direction.
    2. If available, use the soundbar’s accompanying app to customize audio settings.
    3. Similar to the TV, many soundbars come with equalizer settings for further fine-tuning. Make sure you adjust them to your preferences.

    Soundbars often provide a significant audio boost and greater control over sound customization compared to TV speakers alone.

    By following these steps, you can enhance your TV’s audio quality, making for a more enjoyable and immersive viewing experience. Regularly updating your TV’s firmware and checking for new audio features can also help maintain optimal sound quality.

    However, note that the sound quality depends very much on the quality of the speakers and also on the environment. All the objects in the room absorb and reflect the sound. Make sure that the TV room has as few objects as possible, and remove any obstacles between you and the speakers.

    For a fully customized listening experience, explore our detailed guides on the best equalizer settings to boost immersion in gaming audio, the optimal equalizer adjustments for richer, more balanced music playback, and the ideal Spotify equalizer settings for crystal-clear, high-quality streaming sound.

    That being said, you might also want to know how to get sound from your PC to the TV. If you connected your laptop to the TV and you don’t get any sound through the HDMI, click the highlighted link to fix it.

    If you want to share other tips on the best equalizer settings for TV, write them down in the comments below.

    Intel Speed Shift Technology: Everything you Need to Know

    Ever wondered how to squeeze more performance out of your Intel processor? Intel Speed Shift Technology might be the key. This guide will walk you through understanding, enabling, and optimizing this feature to boost your PC’s performance.

    What is Intel Speed Shift and what does it do?

    1. Understanding Intel Speed Shift Technology

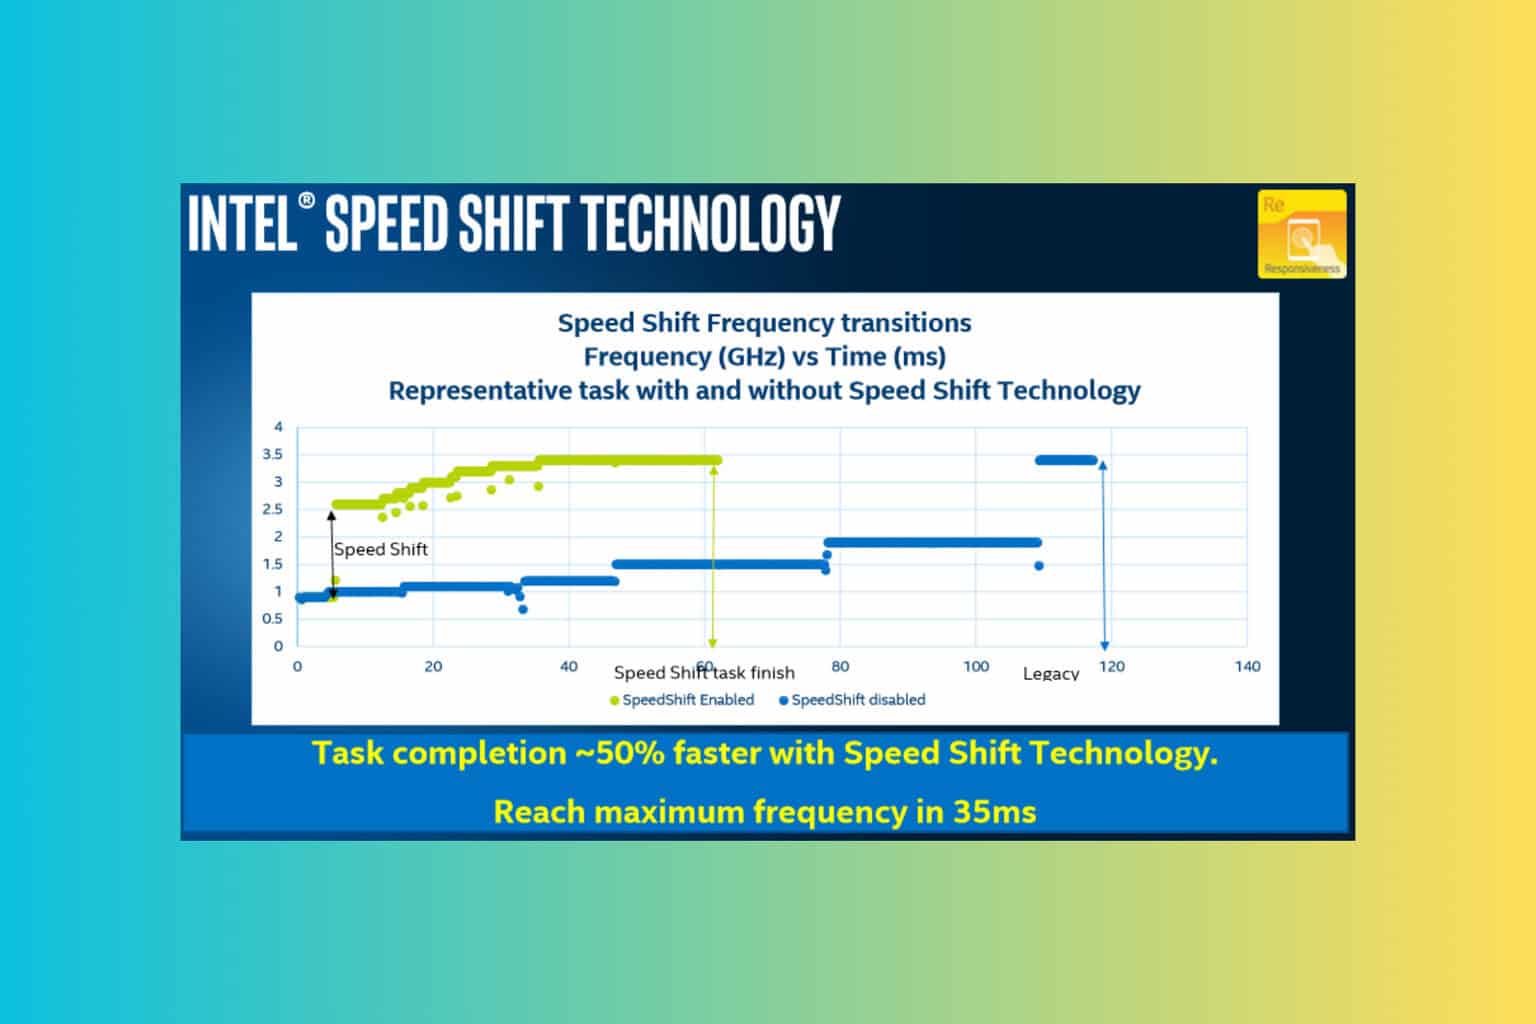
    Intel Speed Shift technology, also known as Hardware P-states (HWP), is built into many modern Intel processors. It basically allows the processor to more quickly select its optimal operating frequency and voltage, leading to quicker responsiveness with short-duration performance shifts. This essentially means your system can respond faster to performance demands.

    This feature allows the CPU to handle power state transitions autonomously, reducing the latency associated with these changes compared to when the operating system handles them. This results in improved performance and power efficiency.

    Intel Speed Shift is typically enabled or disabled in the motherboard’s BIOS settings. By default, it should be enabled, but it’s worth checking. You may also disable it, but it’s a pretty useful feature.

    2. Enabling Intel Speed Shift in BIOS

    1. Restart your computer and press the key (usually F2, F12, Del, or Esc) to enter the BIOS setup during the initial boot process.
    2. In the BIOS menu, find the section related to CPU configurations or advanced system settings (the exact location will vary depending on your motherboard manufacturer).
    3. Look for the Intel Speed Shift Technology or HWP setting and change it to Enabled. If you do not see this setting, make sure your BIOS is updated to the latest version, as older versions might not support this feature.
    4. Save your changes and exit the BIOS setup (this is usually done by pressing F10).

    By enabling Intel Speed Shift in your BIOS, you allow your processor to manage its performance states more efficiently, leading to quicker responses and potentially better performance in application workloads.

    3. Monitoring and adjusting Speed Shift performance

    Tools like HWInfo or Intel’s own Performance Maximizer can be used to monitor the performance states of your CPU. This helps you see how Speed Shift is influencing power and performance.

    In some advanced CPU management software (like Quick CPU), you can adjust the Speed Shift settings, such as minimum and maximum allowed performance states, and energy performance preferences.

    You can create different performance profiles that cater to various scenarios, such as high performance for gaming or power saving for everyday tasks. This can further optimize how Speed Shift manages CPU states.

    Should I disable Intel Speed Shift?

    Some users recommend keeping Intel SpeedStep enabled and disabling Intel Speed Shift. However, we listed a few benefits of this technology and how to troubleshoot eventual issues with it. Basically, monitoring your PC and assessing its performance changes will tell you whether you disable Intel Speed Shift.

    1. Benefits:
      • Improved responsiveness, especially in tasks requiring short bursts of high performance, like web browsing or light gaming.
      • Better power efficiency leading to potentially longer battery life in laptops.
      • Enhanced overall system performance in multitasking environments.
    2. Troubleshooting:
      • If you encounter issues with stability or performance, try updating your BIOS and CPU drivers.
      • Ensure that other power management settings, like Enhanced Intel SpeedStep Technology, are appropriately configured to work alongside Speed Shift.
      • If problems persist, consider disabling Speed Shift or reverting to default BIOS settings and observe any changes.

    If you want to monitor the PC performance, check our list of the best system information tools. You might also be interested in how to limit the CPU usage of a process on your computer.

    To keep your system running smoothly, regularly update your BIOS and CPU drivers. Also, periodically check your BIOS settings to ensure optimal configurations.

    For any other questions or suggestions, drop us a line in the comments section below.

    How to Check Power Supply Wattage on Your PC Without Opening It

    If you’re trying to check PSU wattage on your PC without cracking open the case, keep reading . Knowing your power supply’s wattage is key when upgrading your GPU, fixing crashes, or figuring out if your system has enough juice. While Windows 10 or 11 won’t show you the number directly, there are easy ways to estimate or track it down using software tools or a few clever tricks. Let’s walk through them so you don’t have to go digging around your cables.

    How do I check the PSU wattage?

    1. Check the manufacturer’s website

    If you know the model of your PC or PSU, you’re in luck. Here’s how to look it up:

    1. Find the exact model number of your desktop or PSU (check stickers on the case or receipts).
    2. Visit the official website of the PC or PSU brand (e.g., HP, Dell, Corsair).
    3. Search for your model to view the specs.
    4. Look under “Power Supply” or “Technical Specs” to see the wattage.

    This is one of the most accurate methods, especially for branded prebuilt PCs.

    2. Refer to the original documentation

    Still have your PC’s manual or PSU packaging? Here’s what to do:

    1. Dig out the user manual, spec sheet, or warranty documents.
    2. Look for hardware or electrical specs.
    3. Check for terms like “PSU,” “Power Supply,” or a wattage number (like 500W or 750W).

    Original documentation is often more reliable than guessing based on performance.

    3. Use your Dell Service Tag (for Dell PCs)

    If you’re using a Dell system, they make it easy:

    1. Locate your Service Tag (usually on a sticker at the back or bottom of the case).
    2. Go to Dell’s support page.
    3. Enter your tag and open the system configuration tab.
    4. Scroll through the parts list to find PSU wattage details.

    Dell’s online config tools give you a breakdown of your system’s exact components.

    💡 Note: You won’t find PSU wattage in tools like Device Manager or System Info. But you can use PSU testing software to monitor voltages and detect power delivery issues.

    4. Look for the PSU model number from outside

    Some cases (especially with transparent panels or grills) expose the PSU label:

    1. Check the back or underside of your case for the PSU label.
    2. Note the PSU model number (e.g., Corsair RM750x).
    3. Google the model to find the exact wattage on the manufacturer’s site.

    If you can see it without unscrewing anything, this is a fast and easy option.


    Can software detect PSU wattage?

    Unfortunately, no. PSU wattage isn’t readable via sensors—only the power draw of other components can be monitored. Tools like HWiNFO or Speccy can show how much power your CPU or GPU uses, but not the supply’s max output.

    If your PC won’t turn on at all, the issue could be deeper. Use this step-by-step guide to troubleshoot motherboards not getting power.


    TL;DR – What’s the best way?

    Your best bets for checking PSU wattage without opening your PC are:

    • Look for a label through vents or side panels.
    • Check your original documentation.
    • Visit the manufacturer’s site with your model number.
    • Use Dell’s Service Tag lookup if applicable.

    If your PC is randomly shutting down or freezing, don’t just assume it’s a power issue. You might be dealing with a faulty PSU. Here’s how to fix common Windows 10 power supply problems quickly.

    And if you’re planning a GPU upgrade, like the NVIDIA GeForce RTX 4090, you’ll want to make sure your PSU is up to the task. Here’s a guide to the best PSUs for RTX 4090 builds.

    MemTest64 Memory Locking Failed: 3 Ways to Get it Working

    Running into the Memtest64 Memory Locking Failed error can be quite frustrating, especially when you’re trying to diagnose potential memory issues. Fortunately, there are several methods you can try to resolve this problem and get MemTest64 running smoothly.

    How can I fix the MemTest64 memory locking failed error?

    Before we try anything else, make sure you close any unnecessary applications to free up RAM. You can also try removing memory sticks and testing them one by one or resetting your BIOS to default.

    1. Reduce the amount of allocated memory

    1. Open MemTest64.
    2. Navigate to the settings where you can allocate memory for testing.
    3. Instead of selecting the maximum available memory, reduce it. Try setting it to about 50-60% of your total RAM.
      tested memory
    4. Start the test and monitor the results.

    2. Run MemTest64 in Safe Mode

    1. Open the Start Menu and Power button. Press and hold Shift and while holding it, choose Restart.
      restart button start menu
    2. Next, choose Troubleshoot and then Startup Settings. Click on Restart.
      advanced options startup settings
    3. Once the PC restarts, select the desired version of Safe Mode by pressing the appropriate key.
      safe mode list
    4. After the Safe Mode starts, open MemTest64.
    5. Allocate the desired amount of memory and start the test.

    3. Check for page file usage

    1. Press Ctrl + Shift + Esc to open Task Manager.
    2. Go to the Performance tab. Check the Memory section for page file usage.
      paged memory task manager
    3. If page file usage is high, reduce the amount of memory allocated in MemTest64 or disable some background processes.
    4. Run MemTest64 again.

    If the issue persists, you can try using a different RAM stress test software and check if that helps.

    By following these steps, you should be able to resolve the Memtest64 memory locking failed error and successfully test your system’s memory.

    To learn more about this tool, don’t miss our guide on MemTest64 to learn what it can do and how to properly use it.

    Copilot will be able to take your prompt and draft it into a video using Clipchamp

    Clipchamp is about to become the world’s most affordable and used video editing platform, as Microsoft is enhancing it with… that’s right, you guessed it, AI. Well, Copilot, but it’s still AI.

    According to the latest entry in the Microsoft 365 Roadmap, the Redmond-based tech giant is adding AI-based video drafting in both Microsoft Copilot and Clipchamp. With it, users will be able to type in a prompt describing what video they want to make, and Clipchamp will write a script, search for high-quality stock footage, and assemble a video project with music, voiceovers, text, and even transitions.

    You can take that video project draft and continue working on it in the Clipchamp app when it is done. Microsoft says this feature will be of great use to all those seeking to generate and create informational videos, video messaging, how-to videos, demos, and even presentations.

    Here’s what the entry says:

    Clipchamp brings video creation skills to Copilot. Type your prompt and Clipchamp will write a bespoke script, source high quality stock footage, and assemble a video project with music, voiceover, text overlays and transitions. Open your video project draft in the Clipchamp app to continue to edit, export, and share. This feature is great for informational videos, video messaging, how-to videos, demos, and video presentations.

    The feature is set to be released in September, and it could be the one that makes Clipchamp and Copilot popular among regular users. As Microsoft describes it, it gives users everything they need to create a video from nothing, and they don’t have to have any expertise regarding the creation of it.

    This is not the first time Microsoft has enhanced Clipchamp with AI features: earlier this year, the platform was enhanced with the tech to help users quickly remove background noise from videos.

    SharePoint will be enhanced with Data Access Governance to provide admins with a map of the current permission landscape

    There is good news and bad news for organizations using SharePoint as their go-to platform for internal management: Microsoft will enhance it with Data Access Governance (DAG) that admins can use to understand the tenant’s current permission landscape and make informed decisions in case of a cybersecurity threat.

    According to the latest entry in the Microsoft 365 Roadmap, Data Access Governance will provide a report that reflects the permissions state of not only the SharePoint tenancy but also the return sites.

    DAG will be able to tell when sites are being accessed via memberships and unique permissions or when they’re accessed due to a potential attack. If the accessing is malicious, it will be flagged as oversharing, effectively labeling it as a threat that admins can notice and take action to solve.

    Here’s what the entry says:

    SharePoint admins can now use Data Access Governance (DAG) to understand their tenant’s current permission landscape and make better decisions regarding applications based on permissions such as Copilot. DAG now provides a report that will reflect the latest state of permissions in the entire tenant and return sites that have a greater count of permissioned users than the SharePoint admin specified number. This count considers users accessing sites via site membership and users accessing via unique permissions, as well and acts like a potential threshold for oversharing. Along with the permissioned user count, the report also provides information on the number of existing sharing links (Anyone and People-in-your-org) in those sites and enables SharePoint admins to identify potential root causes for oversharing.

    Good news: If your organization’s infrastructure relies on SharePoint, this will greatly increase security and make it safer. Bad news: If your infrastructure relies on many permissions, SharePoint might flag it as a security risk.

    However, this setting’s management might be customizable, allowing organizations to designate as many permissions as they see fit.

    In other news, the Redmond-based tech giant recently announced that the platform is getting a content pane that will facilitate communication between organizations and their employees.

    Google Meet Backgrounds for Free – How To Change Them Easily

    Looking for Google Meet backgrounds for free? Having an appealing and professional backdrop can make a difference during virtual meetings. If you want to add a touch of personality or maintain privacy, try changing your background.

    I’ll show you the steps to use both built-in and custom options, so let’s begin.

    How To Change Google Meet Backgrounds for Free

    Using Built-in Options

    You can change the Google Meet background before and during the meetings.

    Before the meeting, follow these instructions:

    1. Tap on the invite link.
    2. Click the Apply visual effects button.
    Apply Visual Effects
    1. Pick a background of your choice and it’ll change automatically.
    Select a background

    To do so during the meeting:

    1. Go to Google Meet and start a new meeting or join an existing one.
    2. Hover over to your self-view and tap Apply visual effects.
    Apply virtual effects
    1. Different effects will appear on the right side of the screen. Click backgrounds and scroll down to access the categories.
    Backgrounds
    1. Select a background and it’ll change automatically.
    Background will change

    Using Free Virtual Backgrounds

    You can also personalize your background with free photos from reliable third-party sites like Pinterest. Here’s what to do:

    1. Go to Pinterest and search for Google Meet backgrounds.
    1. Click on a photo you like, right-click on it, and tap Save image as… to download it.
    Save image as…
    1. Go to your meeting and tap on the add photo icon.
    Add photo
    1. Select the photo you downloaded, then hit Open.
    upload photo
    1. Your Google Meet background will change.
    Your background will change

    Changing your Google Meet backgrounds for free is an easy way to enhance your video call experience. Whether you opt for built-in backgrounds or personalized images from reliable sites like Pinterest, you can transform your virtual meetings anytime.

    Remember that there’s a limit to maximum participants in Google Meet so if you want more people to see your wallpaper, you may have to upgrade your subscription.

    MemTest64: How to Use it to Test if The RAM is Stable?

    Memory stability is crucial for a smooth computing experience, and testing your system’s memory can help identify and resolve potential issues and this is why many use MemTest64. If you’re not familiar with this tool, today we’ll tell you everything you need to know about it.

    What is MemTest64 and how can I use it?

    What is MemTest64?

    MemTest64 is a free and lightweight tool that can check the health of your RAM. Unlike similar tools, it works inside Windows, so you don’t have to run it from a flash drive or restart your PC.

    It supports all modern CPUs and various algorithms and you can even control how much memory you want to test.

    How can I download MemTest64?

    1. Go to the TechPowerUp website and click on Download MemTest64.
      download memtest64
    2. Extract the downloaded ZIP file to a folder on your computer.
    3. Double-click on the MemTest64 executable file to run the program.

    How can I use MemTest64?

    1. Once the program starts, a window will appear showing your memory information.
    2. Click on the Start button to begin testing your system memory.
      memtest64 running
    3. You can specify how much memory you want to test by adjusting the slider or entering the value manually.
    4. Allow the test to run; it will indicate any detected errors in real-time.

    How reliable is MemTest64?

    Although useful MemTest64 might not be the best choice for testing long-term stability. For that, you might need to use a different RAM stress software.

    Speaking of which, many have encountered MemTest64 memory locking failed error while using it, but we covered this issue in another guide.

    If you want to perform a RAM test on Windows 11, you can use the built-in tool, but you’re better off using Memtest64 or any other RAM testing software simply because it’s more reliable.

    Have you ever used this tool? If so, share your experience in the comments section.

    Host Process for Windows Services Using Microphone [Solved]

    Often, when you turn on the computer, a pop-up appears on the desktop that reads, Host Process for Windows Services is using your microphone. When you head to the Privacy & Security settings, it lists Currently in use under the Host Process for Windows Services entry!

    Besides, for some, the Windows host process (Rundll32) may be the one automatically accessing the microphone. In both these cases, you may notice echo or active apps may lose access to the microphone.

    Before you move to the software-based solutions, try another microphone, connect the mic to another port on the device, or install the latest Windows updates.

    What can I do if the Host Process for Windows Services is using microphone?

    Tip icon Tip
    As long as the issue doesn’t affect the PC’s or microphone’s core functioning, I recommend you don’t modify any critical settings as it may lead to other problems. Windows services or Rundll32 using the microphone is a common scenario!

    1. Turn off Listen to this device

    1. Press Windows + S to open Search, type Control Panel in the text field, and click on the relevant result.
    2. Click on Hardware and Sound.control panel
    3. Click on Sound.
    4. Navigate to the Recording tab, right-click on the default built-in microphone, and choose Properties.properties
    5. Now, go to the Listen tab, untick the checkbox for Listen to this device, and click on Apply and OK to save the changes.disable listen to this device to fix host process for windows services using microphone
    6. Reboot the PC and verify you still get the Host Process for Windows Services is using your microphone error message.

    2. Disable the conflicting service using the microphone

    1. Perform a clean boot, re-enable all the services one at a time, and identify the one using the microphone.
    2. Press Windows + R to open Run, type services.msc in the text field, and hit Enter.services.msc
    3. Locate the service identified earlier, right-click on it, and choose Properties.
    4. Select Disabled from the Startup type dropdown menu, and click on Stop under Service status.disable to fix host process for windows services using microphone
    5. Finally, click Apply and OK to save the changes, and then check for improvements.

    Remember, while accessing the services.msc console, you shouldn’t disable any of the core Windows services, like Windows Audio and Windows Audio Endpoint Builder. Doing so may cause the other sound-related tasks to stop working!

    3. Re-enable the Let apps use your microphone setting

    1. Press Windows + I to open Settings, go to Privacy & security from the navigation pane, and click on Microphone on the right.
    2. Now, disable and re-enable the toggle for Let apps access your microphone.re-enable app permissions

    4. Disable Cortana (for Windows 10)

    1. Press Windows + I to open Settings, and click on Privacy & security.
    2. Choose Voice activation, and then disable the toggle for Let Cortana respond to “Cortana” keyword.disable to fix host process for windows services using microphone
    3. Finally, reboot the PC and check for improvements.

    If you don’t use the voice-based virtual assistant, perhaps consider disabling Cortana for good to get rid of all such issues. Microsoft is, anyway, depreciating Cortana in newer versions of Windows!

    5. Reinstall the microphone driver

    1. Press Windows + X to open the Power User menu, and select Device Manager.
    2. Expand the Audio inputs and outputs entry, right-click on the affected microphone, and select Uninstall device.microphone driver
    3. Again, click on Uninstall in the confirmation prompt.
    4. Finally, reboot the PC for the changes to come into effect and verify whether the Host Process for Windows Services using microphone pop-up disappears.

    6. Run the SFC and DISM scans

    1. Press Windows + R to open Run, type cmd, and hit Ctrl + Shift + Enter.run as admin
    2. Click Yes in the UAC prompt.
    3. Paste the following DISM commands individually and hit Enter after each: DISM /Online /Cleanup-Image /CheckHealth DISM /Online /Cleanup-Image /ScanHealth DISM /Online /Cleanup-Image /RestoreHealth
    4. Now, execute this command to run the SFC scan: sfc /scannowsfc scan to fix host process for windows services using microphone
    5. Finally, reboot the PC.

    7. Perform a system restore

    1. Press Windows + S to open Search, type Create a restore point, and click on the relevant result.
    2. Click the System Restore button.system restore
    3. Select the Choose a different restore point option, and click on Next.another restore point
    4. Pick the oldest restore point from the list, one created before the issue first appeared, and click on Next.restore to fix host process for windows services using microphone
    5. Verify the details, click on Finish, and then wait for the restore to complete. It typically takes 15-45 minutes.

    If the previous solutions didn’t work, a system restore would revert the PC’s configuration to an older date when the Host Process for Windows Services using microphone problem didn’t exist!

    The Host Process for Windows Services is using your microphone pop-up indicates microphone use by one of the active services, and can be verified through Settings. Remember, it’s a generic name, and any of the service(s) could be to blame for the pop-up. But the above-listed solutions will work in every case.

    Before you leave, discover how to easily remove static noise from the microphone and experience clearer audio!

    Which fix worked for you? Share with our readers in the comments section.

    ThinkBook Gen 5 Hybrid is in its own league, as it can run both Windows 11 and Android

    Think about a future where your laptop is not stuck with only one operating system. Lenovo makes this dream come true with its newest innovation, the ThinkBook Gen 5 Hybrid. It’s a tech trendsetter, causing quite a sensation in China; everyone is talking about it.

    This isn’t just any typical laptop—this hybrid combines Android and Windows 11 into one fantastic package. Android resides within the screen, while Windows 11 finds its place in the base. It’s like having two devices in one.

    The ThinkBook Gen 5 Hybrid is a power monster, featuring an Intel Core Ultra 7 155H processor, up to 32GB RAM, and an impressive base with a whopping 1TB storage. The screen also doesn’t lack anything: it has a Qualcomm Snapdragon 8+ Gen 1 processor, up to 12GB RAM, and can be found in models with 256 GB of storage.

    An excellent 14-inch 2.8 K OLED touchscreen that supports pen input is included. Android can be used separately or together with Windows 11, giving you unmatched flexibility. This hybrid has shared storage and can utilize your device’s cameras, making it highly versatile.

    Here is the twist: such innovation is not inexpensive. The ThinkBook Gen 5 Hybrid costs approximately $2,200 in China. It may be costly, but for a device that works as an Android tablet and Windows 11 laptop together, this could be worth it to certain customers. The inquiry is: Is dual-OS the future? Lenovo appears to believe there’s a demand for it, and we can only wait and see if they’re correct.

    So, what do you say? Does the simplicity of two operating systems in one tool attract you, or is it merely a showy feature?

    Until then, you should know Lenovo also has its own Copilot+ PC if you prefer something lighter but similarly powerful.

    How To Learn Microsoft Office – Reliable Resources and Methods

    Wondering how to learn Microsoft Office for your home, school, or work needs? Keep reading!

    Microsoft Office, now rebranded as Microsoft 365, is a suite of productivity and data tools that help you with documentation, data entry, and more. However, learning how to use them can be challenging.

    Luckily, you can acquire the necessary MS Office skills while studying or working. Just follow the learning strategy I detailed below.

    Microsoft 365/Microsoft Office Basics to Start With

    Microsoft Office comes in different editions depending on your subscription. To find out which services are available, log in to the Microsoft 365 portal using the registered email.

    In this portal, you get the following features:

    1. The Apps menu on the left side shows all accessible apps from your subscription.
    all apps
    1. The Admin menu gives you access to the Microsoft 365 admin center, the central portal to control all the users, teams, and subscriptions. This feature is only available for paid Microsoft 365 business standard or higher package subscribers.
    admin center
    1. Microsoft also allows you to install some apps on a PC or Mac for offline use. To learn which ones, click on the Install and more button in the top right corner. Now, select the Install Microsoft 365 apps option to download them.
    install apps
    1. Microsoft 365 home portal is your gateway to all the online MS Office apps.
    2. The Quick access section will show all the documents and files you’ve interacted with using your registered MSFT email.
    quick access

    How To Learn Microsoft Office

    Now that you know how to access all the entitled apps, here’s how to perfect your skills in Microsoft 365:

    Learn Microsoft Office Yourself

    All MSFT apps come with enough information bubbles for all user interface functions. The ribbon menu at the top contains most of the functionalities you need.

    When you hover your mouse cursor on a command button, the relevant MSFT app shows the name of the function, linked shortcut keys, and its description.

    For example, you can hover the cursor on the Conditional Formatting button in Excel to see an explanation of the command.

    details of commands

    By clicking the Tell me more link on the pop-up description, you’ll open the Help page. It’ll contain all the visual walkthroughs you need to learn this Excel skill.

    Conditional formatting help

    So, you can follow those steps or watch videos inside the Excel desktop app when setting up Conditional Formatting rules for the first time.

    However, the Tell me more hyperlink isn’t available for all Excel command buttons. So, to understand those functions better, you can open the left-side Help panel from the Help tab on the ribbon menu.

    vlookup

    There’s also an efficient search tool. You can type in the name of the command button or function to access detailed walkthroughs and videos.

    Use the Microsoft Learn Portal

    Use the Microsoft Learn Portal

    If you wish to learn Microsoft 365 at advanced levels for professional purposes with an online certification, you should check out the MSFT Learn portal.

    Its online course includes the following training content:

    • MSFT 365 apps and services
    • MSFT 365 compliance and security capabilities
    • MSFT 365 licensing, support, and pricing
    • Certification.

    If you prefer virtual instructor-led learning, you can sign up for the Microsoft 365 Fundamentals course for free.

    Access Resources in the Microsoft 365 Training Portal

    Access Resources in the Microsoft 365 Training Portal

    The Microsoft 365 Training program helps you learn the following MSFT apps from the basic to intermediate level:

    • Outlook
    • OneDrive
    • Word
    • Excel
    • PowerPoint
    • OneNote
    • SharePoint
    • Microsoft Teams
    • Access.

    For the above tools, you can access the following learning content types:

    • Video walkthroughs on basic functionalities.
    • Training templates to figure out what you can create with PowerPoint, Excel, and Word.
    • Small business tips to integrate MSFT.
    • Training on MSFT for collaborative and remote work.
    • Microsoft 365 apps for the web learning resources.
    • Exclusive training content for MSFT 365 admins and IT professionals.
    • Modern workplace training with Microsoft Office.

    Sign Up for Free or Paid Online Certifications

    If you wish to learn how to utilize Microsoft Office apps with real-world business or academic examples, you can go for online learning courses.

    IT CEOs, CTOs, consultants, and individual experts have created relatable online courses on various platforms. You can sign up and complete them for free or for a small fee.

    Coursera: Learn Essential Microsoft Office Skills

    Coursera Learn Essential Microsoft Office Skills

    This Coursera learning path for Microsoft Office includes 100+ resources of different types and use cases as outlined below:

    • Courses
    • Professional Certificates
    • Specializations
    • Guided Projects.

    The learning items are available in 15+ languages, including English, Spanish, French, German, Japanese, Arabic, and more.

    Moreover, you’ll find training materials related to your field with these content filters:

    • Business
    • Data Science
    • Personal Development
    • IT
    • Social Sciences
    • Language Learning
    • Computer Science
    • Health.

    According to my in-depth research, these courses will help you get started with most of the MSFT apps quickly:

    Udemy: Microsoft 365 (Office) Courses

    Udemy Microsoft 365 (Office) Courses

    Udemy is another trusted source for training courses on the Microsoft 365 suite. It offers an app-specific filtering tool where you can choose any of the following preferences to narrow down courses:

    • Microsoft Word
    • MSFT Power Apps
    • Power Automate
    • Access
    • SharePoint
    • Teams
    • Exchange Server
    • Outlook
    • PowerPoint
    • Excel
    • Active Directory
    • PowerShell
    • Windows Server.

    Moreover, this learning board contains 370 courses and projects. You can also use the main filtering tool to view them by Topic, Video Duration, Ratings, Subcategory, and more.

    Here are the top learning pathways on Microsoft Office:

    Alison: Free Microsoft Office Courses With a Certificate

    alison

    Alison offers 26 free Microsoft Office learning courses with digital certificates at the end of each training material. The course developers have designed the learning material to suit the following subjects:

    • Microsoft
    • Data Analysis
    • Excel
    • STEM
    • Productivity
    • Data Science
    • Data Entry
    • Data Management
    • Database
    • Microsoft Access

    Here are the highlighted courses you can complete on Alison to become an MSFT 365 expert in the least possible time:

    • Master Microsoft 365
    • SharePoint Online
    • Mastering the Basics of Microsoft Excel
    • Microsoft Word for Administrative Professionals
    • The Complete Guide to Microsoft Access 2021
    • Basics of Data Analysis with Excel
    • Microsoft Project 2013 Basic
    • Introduction to Administering Office 365 for Small Business
    • Power Query and Power Pivot in Microsoft Excel
    • Designing Animated PowerPoint Slides

    Pluralsight: Gow Your Microsoft Office Skills

    pluralsight

    If you’re looking for a premium online learning pathway suitable for advanced IT and data analytics, check out Pluralsight. It offers 13 training resources led by experts in online delivery events.

    The top courses to get started with are listed below:

    Follow Microsoft 365 Blog Sites

    You can also follow various Microsoft Office blogs for scenario-specific walkthrough articles. Microsoft MVPs mostly own and create the content on them so you can trust them.

    I recommend these ones:

    Use the Microsoft Copilot AI

    copilot

    You can get a Microsoft Copilot Pro subscription to integrate the AI-copilot app with most of the Microsoft 365 suite. Its paid plans start from $20.00/user/month for individuals and $30.00/user/month for business users.

    You can get real-time assistance with software walkthroughs and project explanations on these apps:

    • Word
    • Excel
    • PowerPoint
    • Teams.

    Summary

    Now you know how to learn Microsoft Office with various free and paid resources. They’ll help you acquire functional Microsoft 365 skills you can use in business and professional capacities.

    How did you learn Microsoft Office? Comment below to let us know.

    Microsoft Word Label Templates: How to Create, Use and Download

    Creating and printing labels in Microsoft Word can be a breeze if you know the right steps. Whether you need to print a full sheet, use pre-installed templates, or create custom labels, there are several methods to suit your needs. Microsoft has a small collection of pre-made labels and you can find some in Word as well. However, you may also check out the much larger collection from WordLabel.

    How do I manage label templates in Word?

    1. Create and print labels using Microsoft Word

    1. Start Microsoft Word from your program list or desktop shortcut.
    2. Click on the Mailings tab in the menu bar, then select Labels.
    3. In the Envelopes and Labels window, click on the Options button. 
    4. Select your label vendor from the drop-down list (e.g., Avery, Microsoft, etc.).
    5. Choose the product number that matches your label sheets.
    6. Enter the text or address in the Address box.
    7. Highlight the text and use the formatting options to change font and paragraph settings.
    8. Choose Full page of the same label or Single label depending on your needs.
    9. Confirm all selections by clicking OK.
    10. Click Print if ready to print, or New Document to review and edit before printing.

    This solution enables you to create and print labels directly from Word, maintaining a professional look without needing third-party software.

    2. Download and use pre-installed label templates in Word

    1. Start Word and click the Mailings tab in the menu bar.
    2. Select Labels from the Mailings tab.
    3. In the Labels window, click on the Options button.
    4. From the Label Options window, choose your label vendor (e.g., Avery, Microsoft).
    5. Find and select the product number that aligns with your label sheets.
    6. Confirm your selections by clicking OK.
    7. Click New Document to open a new document ready with your label template.
    8. Fill in your label information, then print as needed.

    Using pre-installed templates offers a quick and easy way to get started with label printing without manually setting up dimensions.

    3. Create a new custom label template in Microsoft Word

    1. Start Microsoft Word and go to Mailings in the menu bar.
    2. Click Labels and select the Options button.
    3. Now, click New Label.
    4. Name your label template in the Label name field.
    5. Confirm your page size is set correctly (usually Letter or A4).
    6. Fill in the height and width of the labels.
    7. Enter the top margin, side margin, vertical pitch, and horizontal pitch.
    8. Specify the number of labels across and down on the sheet.
    9. Click OK to save your new label template.
    10. Click New Document to start designing your labels.

    Creating custom templates is particularly useful for unique label sizes or configurations that aren’t available in pre-installed options.

    4. Using Avery Templates in Microsoft Word

    1. Go to the Avery website.
    2. Use the search bar to find the template that matches your label product number.
    3. Download the template in Microsoft Word format.
    4. Open the downloaded file in Microsoft Word.
    5. Enter your label information in the template.
    6. Print your labels directly from Word.

    Of course, you can try any other label distribution service you may like, but Avery has pretty good reviews.

    5. Print labels from a mailing List

    1. Start Microsoft Word.
    2. Click Mailings and select Start Mail Merge, then click Labels.
    3. Choose your label vendor from the list.
    4. Select the correct product number for your labels.
    5. Click Select Recipients and choose your data source (e.g., Excel file).
    6. Place merge fields where you want the data to appear on your labels.
    7. Click Preview Results to see how your labels will look.
    8. Click Finish & Merge and choose Print Documents.

    Mail merge is ideal for printing labels from a database or list, saving time by automatically filling in label information.

    By following these steps, you can easily create and print labels using Microsoft Word. For future label printing, keep your templates organized and always double-check your label dimensions to avoid misalignment.

    After getting the right dimensions and shapes, you can customize them with your logo, graphics and text however you want. Did you know that you may also print labels from Excel? Click the highlighted link to learn how to do that.

    We also have a guide on Microsoft Word brochure templates, so don’t miss it for more information. Our latest guide has information on how to use a calendar template for 2024 in Word, so you might want to check it out.

    We hope that our guide on Microsoft Word Label Templates offers all the needed information, but feel free to drop a comment below if you have any other question.

    Microsoft Edge’s market share has grown to reach almost 14%, while Chrome loses ground

    Amidst the vibrant universe of internet browsers, Microsoft Edge is gradually nearing a 14% market share, while Google Chrome keeps its dominating position. According to the latest stats, the browser had 13.74% of all desktop users by July 2024, rising from its previous standing of 10.76%. This development is essential because, considering how much control Google Chrome has, it dropped from 68.50% to 64.72% in market share, which is quite a change.

    The exciting part is the situation where these changes are happening. Mozilla Firefox, which holds the fourth position and has a market share of 6.64%, could experience an increase in users because of Chrome’s plan to phase out Manifest V2 extensions.

    This might impact content blockers such as uBlock Origin, making users shift towards browsers that still maintain support for these extensions. For example, Firefox may not be getting rid of Manifest V2 extensions. This could be appealing to people who want to keep using the same browsing features they have now.

    Now, we cannot overlook the surprising contender in this situation: Microsoft Edge. The rise of Edge might be disputed because it comes from Microsoft’s energetic promotion efforts, but it is nevertheless considerable. The increase in the market share portion for Microsoft Edge shows a larger pattern of users looking into options apart from Chrome—maybe they desire improved performance or privacy characteristics or wish to attempt something fresh and different.

    In addition, Microsoft is not only advancing in the desktop browser market. Windows 11 has now surpassed 30% for the first time since its release, showing a constant uptake by users. This might influence Edge’s increase, as integration between the operating system and browser could provide a smoother experience for Windows users.

    If you are a devoted Chrome user, an admirer of Firefox, or someone who wants to explore what Edge has to offer, it becomes evident that the browser wars continue. Maybe this competition could result in enhanced features and new ideas for all of us. Isn’t a bit of rivalry always beneficial?

    Plus, we believe Edge might actually be better than Chrome in dozens of areas, including speed, and interface.

    Best Rufus Settings For Easy Windows 11 Installation

    Creating a bootable USB drive for Windows 11 isn’t hard, especially if you’re using Rufus. Speaking of which, today we’re going to show you the best Rufus settings for Windows 11.

    What are the best Rufus settings for Windows 11?

    Adjust Rufus settings

    1. Open Rufus.
    2. Choose GPT for the Partition scheme and UEFI (non-CSM) for the Target system.
      partition scheme and target system rufus
    3. Select Windows 11 ISO and click on Start.
    4. Enable the Remove requirement for 4GB+ RAM, Secure Boot and TPM 2.0 option if you are installing on unsupported hardware.
    5. Check the Remove requirement for an online Microsoft account if you prefer creating a local account during the installation.
    6. If you enabled the previous option, enable Create a local account with username and specify the username if desired.
      windows 11 settings rufus

    Choosing the right settings in Rufus helps ensure a smooth installation process and it lets you install Windows 11 without TPM and Secure Boot.

    What format is best for a bootable USB drive Windows 11?

    When creating a bootable drive for Windows 11, it’s suggested that you use the NTFS file format.

    Should I use NTFS or FAT32 in Rufus?

    In most cases, you should use NTFS since it’s a newer format. However, if you’re working with older PCs that don’t support NTFS then FAT32 is a better choice.

    What is the best way to create Windows 11 bootable USB?

    While Rufus is preferred by many due to its customization options, using the Windows Media Creation tool is the simplest way to create a bootable USB.

    To learn about different methods, we suggest reading our guide on how to create a Windows 11 bootable drive.

    Should I select GPT or MBR in Rufus?

    For newer systems that support UEFI, GPT is the better option. For legacy devices, you should use MBR.

    By following these methods, you can create a reliable bootable USB drive for Windows 11. While Rufus is great, if you want something more advanced, Ventoy might come in handy.

    To learn more, you should visit our Ventoy vs Rufus guide for in-depth analysis.

    How to Set Double Space in Microsoft Word: 4 Easy Ways

    Double spacing in Microsoft Word can make your documents more readable and professional. The quickest way to double the line spacing in Word is by pressing Ctrl + 2 on selected text.

    How do I set and create double space in Word?

    1. Use the keyboard shortcut

    1. Select the text that you want to double space. If you want to double space the entire document, press Ctrl + A to select all text.
    2. Press Ctrl + 2 on your keyboard to instantly change the line spacing to double.

    Using the keyboard shortcut is a quick method to apply double spacing without navigating through the menus, especially useful when working on lengthy documents.

    2. Format the paragraph for double spacing

    1. Open Microsoft Word and either create a new document or open an existing document.
    2. Click on the Home tab located at the top of the Word window.
    3. Look for the Paragraph group, and click on the small arrow in the lower right corner. This will open the Paragraph dialog box.
    4. In the Paragraph dialog box, look for the Line spacing drop-down menu. Click on it and select Double from the list.
    5. Click OK to apply the double spacing to your selected text or to the entire document if no text is selected.

    Applying double spacing through the Paragraph dialog box ensures that every part of your document adheres to the selected line spacing, making it easy to read and edit.

    3. Set louble spacing as default

    1. Open a new or existing Word document.
    2. Again, click on the Home tab and then the small arrow in the Paragraph group to open the Paragraph dialog box.
    3. Set the Line spacing to Double as previously explained.
    4. Click on the Set As Default button at the bottom of the dialog box.
    5. Choose whether to set this as the default setting for your current document only or for all documents based on the Normal template.
    6. Click OK to confirm.

    Setting double spacing as the default ensures that all new documents you create will automatically have double spacing, saving you time in formatting.

    4. Format styles for double spacing

    1. Open Microsoft Word and your document.
    2. Click on the Home tab.
    3. In the Styles group, right-click on the Normal style and select Modify.
    4. In the Modify Style dialog box, find the Formatting section.
    5. Click on the Double Space button (represented by a double-spaced icon) or set Line spacing to Double.
    6. Click OK to apply changes.

    Modifying the Styles allows you to standardize the double spacing across various sections of your document, making it consistent and professional.

    By following these comprehensive solutions, you’ll be able to achieve the desired double spacing format and improve the overall readability and professionalism of your Microsoft Word documents. Remember to save your settings to avoid repetitive formatting tasks in the future.

    If you’re looking for more tips, here’s how to create an customize a Word table of contents. If something goes wrong, you can always reset the Microsoft Word settings to default.

    Did you manage to set the line spacing to double in Word by using our guide? Let us know in the comments below.

    Copilot is now available in Microsoft Forms for all commercial users

    Microsoft has enhanced Copilot AI to develop improved quizzes and surveys within Microsoft Forms. As you might already know, the platform has been enhanced with AI for quite some time now, and it generates quizzes, forms, and surveys in seconds using user data.

    Whether a teacher wants to create an engaging learning environment, a company collects customer feedback, or someone is planning their next family gathering, Copilot will be there to help.

    According to the blog post, when you create a new form or quiz or revisit an existing one, Copilot welcomes you with a banner that says, “Copilot has suggestions for enhancing your form.” By clicking “View,” it becomes easy to make your form more than just functioning correctly—it can look good as well.

    Copilot starts with the theme. Depending on your form, the AI model suggests different themes, and you can select the one that best matches your idea.

    Copilot will then jump into settings and may give you hints about changes that could enhance your form. For example, it might propose allowing respondents to store and modify their responses or adding a clock to ensure everything is on time.

    When you are ready to send your work to someone, Copilot assists in creating a message that can enhance response rates. It also helps you make choices about who will get your form, such as limiting it only to those inside your company. However, there is one condition: To access Copilot’s capabilities in Microsoft Forms, the business must possess a Copilot for Microsoft 365 license.

    This release began in the last part of July for users who are involved with business. This includes enterprise and education sections.

    The Onyx Boox Go 10.3 Is an Almost Perfect eReader: Review

    Retailing at less than $400 on Amazon, the Onyx Boox Go 10.3 is an incredibly thin, lightweight, tablet-sized monochrome eReader, which may lack flashy headline-grabbing features, but is otherwise a brilliant and simple device that has one job, and does it really well. If you want a large format eReader with sharp text and pressure-sensitive Wacom drawing layer, but don’t mind the lack of built-in screen lighting, it’s well worth considering. 

    Onyx Boox Go 10.3 – My honest review

    Design and feel

    On most gadgets, I can overlook the touchy-feely aspect of a product—but with an eReader, it really does matter; you’ll potentially spend many hours a day with this in your hand.

    One of the biggest concerns I had coming into this review was that it might be flimsy or plastic to the touch; it is quite thin and light after all at only 375g or 13.2oz. But to my surprise, it actually feels solid, well-built, and the leather touch back only adds to the overall premium feel. It’s not tacky but it gives better grip than plastic or metal would, and despite the large 10.3-inch screen, you can comfortably hold it in one hand.

    Thin USB-C port

    At 235 x 183 x 4.6mm, it’s barely thicker than the USB-C port on the bottom; the only button you’ll find is the power in the top right. There are also two speaker grills on the base, but other than that, it’s extremely minimal. 

    The metal chassis is rounded and smooth, while the screen has about 1cm of bezels on the top and right edge, and about 2cm on the bottom and left edge. Half of that left edge is lighter white with the BOOX brand on the top left, but it’s very discreet. It’s a classy looking device no matter how you look at it, though I do wonder how long I’ll be able to keep that white faux leather backing clean.

    Specifications

    The Go 10.3 features a 2.4GHz 8-core CPU, 4GB of RAM, and 64GB of internal storage, which should be plenty.

    The display is a monochrome Carta 1200 eInk screen, running at 2480 x 1860 resolution with capacitive touch, and it is the whitest eReader screen I’ve come across yet, giving a super paper-like look. At 300 PPI (pixels per inch), the Onyx Boox Go 10.3 offers outstanding details. 

    The front is an etched glass panel that lies completely flat with the case. The actual display layer feels flush, too; there’s no discernible gap or ghosting. The text is crisp with superb contrast. 

    Included in the box is a Boox stylus, and the screen is pressure-sensitive thanks to the Wacom digitizer, but doesn’t support tilt. The stylus itself is a little basic and plasticky with these odd vertical indentations running down the shaft. It doesn’t seem to fit the otherwise premium design, but it’s fine for taking notes and making quick sketches. It doesn’t have a secondary function button or eraser, but it can attach magnetically to the chassis. 

    There’s also a faux leather folio case that attaches magnetically, with sleep-wake functionality. 

    However, the one major feature omission from the Boox Go 10.3 is a front light. There is no lighting of any kind, so the eInk screen relies entirely on ambient light for you to be able to read. The name would suggest this is for use on the go, and you’re almost certainly going to have light when you travel or are in a hotel. But that might be a deal breaker for you if you like to read at night without disturbing your partner.

    The 3700mAh battery should offer plenty of battery life, especially considering the lack of built-in lighting. 

    Adding books to the Onyx Book Go 10.3

    Adding content to your device is the number one pain point for a lot of eReaders. There’s no Micro SD card storage expansion on the Go 10.3, so you can’t load one up and slot it in. But this is one area where Boox has really nailed it, with their official support site listing no less than nine different ways to transfer files. The easiest by far is the BooxDrop transfer app, which runs a mini web server and lets you use a web browser from any local networked device to just drag and drop over the network. No login is required.

    You’ll also find a send2boox website, which lets you do the same job remotely, but that does require you to login. There’s also a mobile app and Windows desktop app, with MacOS version in development.

    Lastly, you can use the USB-C cable, which might be better for larger files. But in practice, I found the BooxDrop transfer app to be blazingly fast. You can just drag and drop multiple files at a time, with progress bars for feedback.

    This is how simple getting stuff onto an eReader should be. 

    OS, Apps, and Google Play

    Like all eReaders, you do have to temper your expectations when it comes to user interaction and app choices. If this is your first eReader, know that touch responsiveness can be slow in general UI interactions. This isn’t a fault of the Boox Go 10.3 in particular, it’s just the nature of the beast when it comes to slow-refreshing e-ink screens. 

    Typing can be quite frustrating; this isn’t a drop-in replacement for a tablet, and you shouldn’t treat it as one. But if you learn to trust the accuracy of the keyboard, you can overcome that limitation. However, I did experience a few bugs with the keyboard, where it sometimes refused to place my typed text into the search bar of Google Play.  

    The same expectation management applies to app selection. I found the standard system reader app to do everything I wanted it to, and I have yet to come across a file type it couldn’t read. I tried comic book CBZs, PDF, MOBI, EPUB, and more, and they were all quick to load, and I was able to turn pages without delay. Speed is not the selling point of this Go 10.3, but for the intended purpose, it’s outstanding.

    You have full access to Google Play for third-party apps, and Boox includes some automatic app optimization methods depending on the type of app. Web browsing is reasonable, though it’s going to depend on how ad-heavy the site you’re browsing is.

    Slower-paced games like word games should run fine. I found the A2 refresh setting felt best for that, but it’s easy to swap around the refresh modes and experiment if don’t like the automatic setting. 

    For the sake of testing, I installed YouTube. The sound played fine, but even with the recommended highest refresh setting, the video was… mostly unwatchable. It also crashed the OS on occasion when I tried to go back to the main screen. Obviously, you wouldn’t buy an eReader to watch videos on—just use your smartphone. It is possible, but I would probably only use it to take notes from a recorded lecture, not general media consumption. 

    For core functionality such as note-taking, I wouldn’t bother installing third-party apps because the stylus won’t be as well supported, if at all. You shouldn’t need to unless you’re already heavily invested in some sort of cloud-syncing system.

    Just because you can install third-party apps doesn’t mean you should.

    Battery life

    When setting up the device, I left everything at the default, which turned out to be quite frustrating as it would fully power off the device after only 15 minutes. It then takes 30 seconds to power it on again, and the automatic sleep-wake won’t work when the device is fully powered off. So that was the first setting to adjust. Then I found I needed to tweak the Wi-Fi settings because it would stay connected, causing me to lose about 5-10% battery overnight. You may need to tweak things to get them to your preference. 

    Even so, battery life has been amazing. After a week of testing for a few hours daily I’ve yet to need recharge. Of course, it’s going to vary greatly depending on what you do. With minimal screen refresh from reading only a few hours a day and minimal Wi-Fi usage, you could easily go for a month.

    AI and voice features

    Those of you who like to step away from your book for a moment but keep reading will appreciate the built-in Google text-to-speech (TTS) engine; it’s not entirely robotic. 

    There’s a built-in AI chatGPT-like assistant; it’s free, as well, but you need to make a Boox account to save more than a few chats. 

    There’s also speech-to-text feature for text notes which was hit-and-miss for me. Sometimes it would correctly format the sentence with a full stop and capital letter, and sometimes it just … didn’t. 

    Should you buy the Onyx Boox Go 10.3?

    An an eReader, the Onyx Boox Go 10.3 excels where it truly matters: it has a large, paper-white, ultra-sharp screen with incredible contrast, which makes all your text or comic books look beautiful. It’s a pleasure to read on, and it’s fantastically responsive to page turns. 

    Outside of reading books, it doesn’t perform quite as well. It’s fine for the occasional note-taking, sketching, or annotating PDFs with quick load times, but the input lag isn’t as good as, say, the Remarkable 2. If you want something purely for digital drawing on the go, the Boox 10.3 isn’t the best choice.

    But while we’re drawing comparisons to what I would say is the biggest competitor, it’s well worth mentioning that the Remarkable 2 has a mere 8GB of built-in storage, and that’s not expandable. For anyone with lots of PDFs they need access to on the go, that’s just not enough. The Onyx Boox Go 10.3 is a little cheaper and has eight times as much storage, which should be enough for plenty of large PDFs. 

    I mentioned the lack of screen light; in reality, this wasn’t as much an issue for me as I thought it would be. That said, neither my wife nor I are that sensitive to light, so she didn’t care if I left a neon light on the back of the bed. Those with a light-sleeping partner who can’t even a small blue LED in the corner of their eye should look at something with lighting built-in. 

    For reading all kinds of content and the occasional note-taking or drawing, the Onyx Boox Go 10.3 is superb choice.

    In the meantime, you might also be interested in our list of the best eBook readers for Windows.

    Do you already own an Onyx Boox Go 10.3? Share your experience in the comments below.

    Fixed: Pokemon Showdown Couldn’t Connect to Server

    Pokemon shutdown needs online access to be able to load and function. It means that you must connect to the internet or Wi-Fi before you can use Pokemon shutdown.

    However, it is because a Shutdown requires you to connect to other players online to set up a private battle. These issues can be due to several reasons, and it affects the whole game.

    Hence, this article will address the causes and easy fixes you can use to solve the Pokemon showdown couldn’t connect to server.

    How can I fix the Pokemon Showdown couldn’t connect to the server?

    1. Allow Pokemon through Firewall

    1. Press the Windows key + I to launch the Settings app.
    2. Select Update and Security and select Windows Security.
    3. Click Firewall & Network Protection, then select Domain network, Private network, or Public network, and turn each off.
    4. Toggle off the Microsoft Defender Firewall.

    2. Update Windows

    1. Press the Windows key + I to launch the Settings app.
    2. Then select the Windows update option.
    3. Click Check for updates.
    4. If there’s any update available, download and install it.
    5. After the update is complete, restart your PC and try connecting Pokemon Showdown again.

    3. Check your internet connection

    You can restart your router to allow it to refresh and sync smoothly. Perform a power cycle by unplugging the router from its power source and plugging it in after a while.

    Pokemon games are accessible on your browsers. However, you can learn how to play Pokemon browser games on our page. Also, a third-party Pokémon GO app that you can download for Windows 10 is available.

    Why can’t I connect to Pokemon Showdown server?

    • Firewall network restrictions: It is a network security tool that checks and scrutinizes all incoming and outgoing network traffic from the server and the client. Also, it detects and blocks threats from malware and hijackers. However, the Firewall can block Pokémon Showdown from connecting to the HTTP if any irregularities are detected.
    • Showdown server is down: Another reason why Pokemon showdown isn’t connecting is the server breakdown. It means that the Pokemon server is down or undergoing maintenance. When this happens, the entire game might not work in general and users won’t be able to access it.
    • Network issues: To be able to connect to Pokemon showdown, you need to have an internet or a Wi-Fi connection. Hence, not having a stable internet connection can prompt the ‘Pokémon showdown not connecting’ issue.
    • Outdated Windows: If your Windows is not up-to-date, it can cause Pokemon to not connect to its servers. It can cause the Pokemon Showdown not working issues.

    How can I play Pokemon from my browser?

    Playing Pokémon in a browser is the ultimate game-changer. Opera GX is a browser that adds performance-turning options that a PC gamer can enjoy fully optimized.

    You may access GX control and restrict how much memory and CPU use your system allots when playing Pokemon games in a browser of any sort by opening the GX Control sidebar.

    You may also tune up your online gaming with the built-in music apps that can be toggled on the same screen where you play Pokemon games.

    Opera GX

    Optimized to save laptop battery and to use low resources when playing Pokemon games.

    To wrap things up, if you’re facing the Pokemon showdown couldn’t connect to server issue, try checking your internet connection, updating Windows, and making sure the game isn’t blocked by your firewall. By taking these steps, you can get back to enjoying Pokemon Showdown without any interruptions.

    If you have any questions or need further assistance, drop a comment down below!

    Posted in Fix

    Best DS4Windows Settings: 9 Tips for a Great Controller Experience

    Navigating the world of DS4Windows (DualShock4Windows) settings can be a bit overwhelming, but the right configurations can significantly enhance your gaming experience. Whether you’re into racing games, first-person shooters, or just want more precise control, these settings will help you get the most out of your DS4 controller.

    What are the best settings for DualShock4Windows?

    1. Adjusting gyro sensitivity for driving games

    1. Open DS4Windows and go to the Profile tab.
    2. Select the profile you want to edit or create a new one.
    3. In the profile settings, navigate to the Gyro tab.
    4. Ensure that the Sixaxis X and Z deadzones are set to reasonable values (e.g., 0.08 or 0.10). Avoid setting them too high, as it will render the gyro non-functional.
    5. Set the Gyro to control the LS X-axis for steering.
    6. Fine-tune the Sixaxis X Anti-Deadzone to eliminate any in-game deadzone if needed (start with 0.10 and adjust based on the game’s response).
    7. Save and apply the profile.

    This solution helps make your steering more responsive by ensuring that your gyro input is accurately translated into in-game steering commands, especially useful for racing games.

    2. Setting up two stage triggers

    1. Open DS4Windows and navigate to the Profile tab.
    2. Select your active profile or create a new one.
    3. Go to the Triggers tab and enable Two Stage Triggers.
    4. Choose the trigger you want to modify (L2 or R2).
    5. Set the Soft Pull action for the initial trigger press (e.g., light acceleration).
    6. Set the Full Pull action for a complete press (e.g., heavy acceleration or braking).
    7. Choose the Two Stage Mode that best suits your needs: Normal, Exclusive, Hair Trigger, Hip Fire, or Hip Fire Exclusive.
    8. Save and apply the profile.

    This setting allows you to assign two different actions to a single trigger, enhancing gameplay by providing more nuanced control over actions like acceleration and braking.

    3. Adjusting joystick sensitivity for FPS games

    1. Open DS4Windows and go to the Profile tab.
    2. Select your preferred profile or create a new one.
    3. In the profile settings, navigate to the Sticks tab.
    4. Adjust the sensitivity for the LS (Left Stick) and RS (Right Stick) to your liking. Increase the sensitivity if you need quicker response times.
    5. Experiment with the Output Curve settings for the sticks: try Enhanced Precision or Custom curves for more accurate aiming.
    6. Save and apply the profile.

    By adjusting the stick sensitivity and output curves, you can significantly improve your aiming precision in first-person shooter games.

    4. Using the gyro as a mouse

    1. Open DS4Windows and navigate to the Profile tab.
    2. Select or create a profile.
    3. In the profile settings, go to the Gyro tab.
    4. Set the Gyro option to As Mouse.
    5. Adjust the Smooth Weight to refine the gyro’s responsiveness (e.g., 0.500 for smoother control).
    6. Save and apply the profile.

    Using the gyro as a mouse allows for more intuitive and precise camera control in various games, as tilting the controller will move the camera.

    5. Enabling touchpad toggle for mouse emulation

    1. Open DS4Windows and go to the Profile tab.
    2. Select or create a profile.
    3. Navigate to the Touchpad tab.
    4. Enable the Use Touchpad as Mouse option.
    5. Check the Enable Touchpad Toggle option to enable/disable the touchpad using the PS button.
    6. Save and apply the profile.

    This allows you to toggle the touchpad’s mouse functionality on and off with the PS button, giving you flexibility during gameplay.

    6. Configuring steering wheel emulation

    1. Open DS4Windows and go to the Profile tab.
    2. Select the profile you’ll use for racing games or create a new one.
    3. Navigate to the Options screen within the profile settings.
    4. Enable the Steering Wheel Emulation option.
    5. Calibrate the controller by setting the wheel center point and the left/right 90-degree positions.
    6. Adjust the Steering Wheel Range to match the game requirements (e.g., 360 degrees for EuroTruckSimulator).
    7. Save and apply the profile.

    Enabling steering wheel emulation transforms your DS4 into a precise steering tool, perfect for racing games that support steering wheels.

    7. Setting up macros and special actions

    1. Open DS4Windows and go to the Profile tab.
    2. Select the profile you want to edit or create a new one.
    3. Navigate to the Special Actions tab.
    4. Select Record Macro and choose a trigger key (e.g., Cross).
    5. Record the desired macro actions (e.g., a sequence of key presses).
    6. Adjust delays and configure options like Repeat while held for continuous actions.
    7. Save and apply the profile.

    Using macros and special actions can automate complex sequences, enhancing your efficiency and gameplay experience.

    8. Enabling UDP Server for Gamepad Status

    1. Open DS4Windows and go to the Settings tab.
    2. Enable the UDP Server option.
    3. Set the Listen Address (default is 127.0.0.1 for local use).
    4. Select the UDP Port (default is 26760).
    5. Save and restart DS4Windows if necessary.

    This option allows other applications like CemuHook or PadTest to read the gamepad status, providing more integration options for your DS4 controller.

    9. Configuring DS4Windows for FPS optimization

    1. Open DS4Windows and go to the Profile tab.
    2. Select or create a profile for FPS games.
    3. Adjust the Output Curves for the right stick to Enhanced Precision for improved aiming.
    4. Increase the sensitivity setting for the right stick in both DS4Windows and in-game settings.
    5. Ensure VSync is turned off in your game settings to reduce input lag.
    6. Save and apply the profile.

    These settings help fine-tune your controller for better performance in first-person shooter games, making your aim more responsive and precise.

    By tweaking these settings, you can tailor your DS4 controller to suit your gaming style perfectly. For future reference, remember to regularly update DS4Windows and check for any new features or settings that could further enhance your gaming experience.

    Best Settings For VMware and Windows 10 For Performance

    Using the best settings for VMware and Windows 10 VMs can significantly enhance your productivity and system performance, so here are the settings that you might change.

    What are the best settings for VMware running Windows 10?

    1. Change basic settings

    1. Open VMware Workstation.
    2. Select your virtual machine and click Edit virtual machine settings.
       edit virtual machine settings 3
    3. Go to the Processors section and set the number of processors and cores. Typically 2 processors and 2 cores work well.
      processors virtual machine settings
    4. Go to the Memory section and allocate 4 GB of RAM (4096 MB).
      memory virtual machine settings
    5. Change the Bus type to SCSI for a performance boost.
    6. Enable Pre-allocate disk space to improve disk I/O performance.

    2. Change advanced settings

    1. Go to VM > Settings, click Options, then Advanced. Check Disable memory page trimming.
      disable mamory page trimming
    2. Check Enable Template Mode (for Cloning).
      enable template mode
    3. Select Clean up disks after shutting down this virtual machine to automate disk cleanup.
      clean up disks after shutting down

    3. Adjust .vmx file

    1. Shut down the virtual machine completely.
    2. At the bottom, locate the Configuration file path.
       virtual machine details
    3. Navigate to the Configuration file path, and locate your VM’s vmx file.
      vmx file
    4. Right-click the file and open it with Notepad.
    5. Add the following lines:
      scsi0:0.virtualSSD = 1
      prefvmx.useRecommendedLockedMemSize = TRUE
      sched.mem.pshare.enable = FALSE
      MemAllowAutoScaleDown = FALSE

      By following these detailed steps, you’ll be able to set up and optimize a Windows 10 virtual machine in VMware Workstation Player efficiently.

      If you want to run Windows 11 in a VM, we have a special guide that explains how to do that step by step, so don’t miss it.

      To learn more, don’t hesitate to check our guides on how to clone a virtual machine in VMware and how to delete a virtual machine in VMware.

      Fix: Valorant Win64 Shipping Not Responding

      Getting errors like Valorant win64 shipping not responding or couldn’t start valorant-win64-shipping.exe? We got you covered. It’s caused by firewall interference, corrupt drivers, or damaged files and is easy to fix.

      Below we’ll walk you through simple troubleshooting steps.

      How do I fix the Valorant win64 Shipping exe error?

      Begin by restarting your computer. Intuitive, yes, but such simple fixes are often all it takes. Also, stop unnecessary background apps and run a system scan.

      If you’re still getting the wind64 shipping error, follow the advanced steps below.

      1. Set Valorant as an exception to the Firewall

      1. Open Control Panel.
      2. Click on System and Security.System and security -Control Panel start menu -Error Code 403 in Roblox
      3. Select Windows Defender Firewall.Windows-Defender-Firewall-control-panel
      4. On the left sidebar, click Allow an app or feature through Windows Defender Firewall.allow app or feature firewall
      5. Select Allow another app.Allow another app
      6. Click on the Browse button.
      7. Navigate to the Valorant installation folder (usually C:\Riot Games\Valorant\.
      8. Select the file named Valorant.exe and click Open.
      9. Click Add.
      10. Check both the Private and Public boxes.
      11. Click OK to save the changes.

      2. Repair the game files

      1. Open the Riot Client.
      2. Locate Valorant in the list of installed games.
      3. Click on the gear icon next to the Play button.
      4. Select the Repair button.repair valorant game files
      5. Wait for the verification process to complete.

      3. Update your graphics card driver

      1. Left-click on Start on your Taskbar, type device manager into the search bar to launch it.
      2. Expand Display Adapters, right-click the GPU driver, then select Update driver.
      3. Then select Search automatically for drivers and restart your PC.

      Your device may be unable to launch the Valorant game if it uses an outdated graphics card driver. Hence, check out the various ways to update drivers in Windows.

      You can also use a specialized driver updating tool that will find all outdated drivers and install their updates quickly and safely.

      4. Enable TPM 2.0 and Secure the Boot

      1. Left-click on the Start button, click the Power icon, and press the shift key + Restart to reboot your PC to Windows Recovery Environment (WinRE).
      2. Go to Troubleshoot from here and choose Advanced options.
      3. Next, click on UEFI Firmware Settings.
      4. Locate the Trusted Platform Module (TPM) under the Security tab and turn it on.
      5. Find Secure Boot and turn it on as well. The UEFI settings frequently vary between different PCs.

      You can check your motherboard manual for specific instructions on enabling TPM 2.0. Also, consider enabling the secure boot while in User mode on Windows 11.

      5. Install pending Windows updates

      1. Click on Start on your Taskbar, type Check for updates, and launch it.
      2. Click on Check for updates.
      3. If you have any pending updates, go ahead to install them then restart your system.

      There are some cases when Windows Update may not work or load. If you encounter such, follow our guide to fixing it.

      6. Run the game as administrator permanently

      1. Right-click the Valorant icon and select Run as administrator.
      2. Alternatively, right-click the Valorant icon again and choose Properties.
      3. Select the Compatibility tab, check the Run this program as an administrator box, and press OK.

      7. Reinstall Valorant

      1. Press the Windows button, type control in the search bar, and click on Control Panel in the search results.
      2. Next, click on Programs.
      3. Then, click on Programs and Features.
      4. Select the game and click on Uninstall.
      5. Visit the Valorant official website to download the latest version of the game. Follow the on-screen instructions to install the software.

      You can work through any of the advanced solutions above to fix your Valorant win64 shipping not responding message.

      Users can also check for proven VPNs for Valorant to fix lag issues. Also, gamers who experience Vanguard Windows 11 errors when running the anti-cheat software with Valorant may explore the fixes provided in our article.

      What causes the Valorant win64 Shipping exe error?

      There can be several reasons why you are experiencing Valorant win64 shipping not responding, and some users claim it can happen mostly when you have an old operating system or an outdated graphics card driver. Some other factors responsible for this are:

      • Apps running in the background – Users have reported that when apps run in the background, it can block Valorant from running well, hence the reason for the Valorant win64 shipping not responding. Check some fixes to turn off background apps on Windows 11.
      • Application error – Some games do not open after they are updated, so this is likely to be why your Valorant game has errors.
      • Antivirus application or third-party software is blocking Valorant – If you haven’t already, you should add the game as an exception to fix the issue. Check this list of the best anti-malware and antivirus to troubleshoot this.
      • Corrupt or deleted files – Some of the potential files for the game may have been deleted or corrupted during installation.

      If you have any questions or suggestions, do not hesitate to use the comments section below.
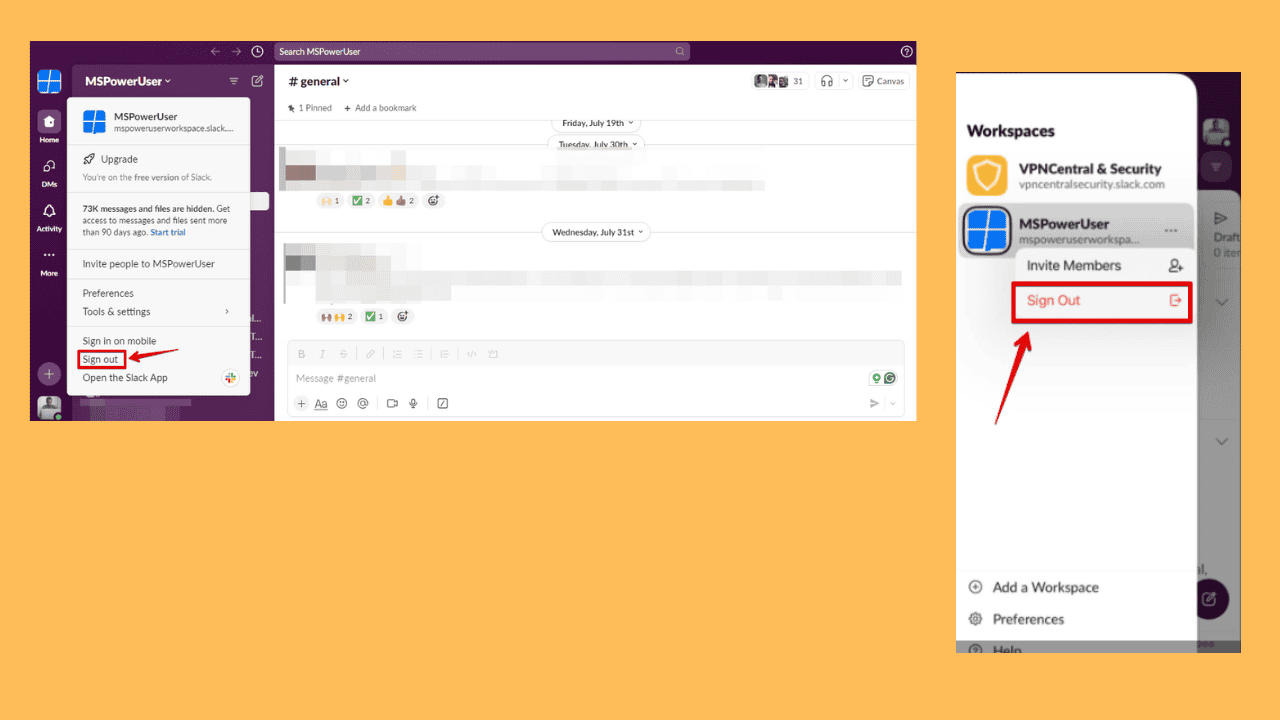
      What is my Proxy & How do I Find it?

      You’ve probably heard about proxies and their role in enhancing your privacy or just boosting your network performance. Well, we’ll be discussing how to find out your proxy and the various settings you can tweak for an improved overall performance.

      Not everyone needs a proxy because its main purposes are to mask your browsing activities, performance improvement, security and sometimes, troubleshooting. It basically acts as your middleman between your internet and device for a specific purpose.

      All these can be achieved without a proxy by using private browsers or VPNs but let’s take a closer look at situations that require a proxy.

      What are the different types of proxies?

      • Forward Proxy – This is the most common one and found on browsers. It works by being the first recipient of requests then forwards them to the internet. If the site is found to be malicious or a phishing site, you’ll receive a warning.
      • SOCKS Proxy – This is the most versatile proxy as it operates on a transport layer and handles different protocols. Since it handles a variety of protocols, it also requires authentication so that only authorized users can have access. You can learn more about how to set up SOCKS proxy in our detailed article.
      • HTTP and HTTPs proxies – Both are used for web filtering but the HTTPs is used for encrypted data and ensures its security during transfer.

      How do I find and set up my proxy?

      1. Find your proxy

      1. Press Windows + S to open the Search menu, enter Internet Options in the text field, and click on the relevant search result.internet options
      2. Navigate to the Connections tab and click on the LAN settings button.lan settings
      3. You will find the proxy address and other information listed under the Proxy server.proxy address

      You can also check your proxy online using free sites like the Whatismyproxy site.

      Note icon NOTE
      WindowsReport is not affiliated with Whatismyproxy so do your due diligence before visiting the site for your device’s security.

      2. Set up a proxy server

      2.1 Automatic setup

      1. Click on the Search text box in the taskbar, type proxy, and select Proxy settings.
      2. Toggle on the Automatically detect settings.
      3. If you have a preferred proxy URL, then enable Script Address, paste the URL, and click Save.

      2.2 Manual setup

      1. Press the Start Menu icon and select Settings.settings windows 11
      2. Click on Network & Internet on the left pane, then scroll down and click Proxy on the right pane.Network proxy settings
      3. Select Edit next to Use a proxy server option in the Manual proxy setup section, toggle on Use a proxy server, enter the IP address and Port if available and click on Save.Disable proxy server

      If you’re not sure what server to use, there are hundreds of free public proxy servers but beware of the associated security risks and performance metrics as they’re usually overloaded.

      3. Reset proxy settings

      1. Press Windows + S to open the Search menu, enter Command Prompt in the text field, and click on Run as administrator.command prompt
      2. Click Yes in the UAC prompt.
      3. Now, paste the following command and hit Enter to reset the proxy settings:netsh winhttp reset proxyreset proxy

      4. Force disable proxy

      1. Create a restore point or backup the registry before making any edits.
      2. Press Windows + R to open the Run command, type regedit, and hit Enter or click the OK button.
        Err_proxy_connection_failed Windows 10
      3. Navigate to the path below:
        Computer\HKEY_LOCAL_MACHINE\SOFTWARE\Policies\Microsoft\Windows\CurrentVersion\Internet Settings
        Can't change proxy settings Windows 10
      4. Double-click the ProxySettingsPerUser DWORD and set its value to 1.
      5. If the DWORD isn’t available, right-click the right pane, choose New, DWORD (32-bit) Value, and name it ProxySettingsPerUser.
        proxy server keeps turning on windows 10
      6. Now double-click it and set its value to 1.
      7. If the above does not work, make the following changes in the same location:
        • Change ProxyEnable value to 0
        • Change ProxyHttp1.1 value to 0
        • Remove ProxyOverride key
        • Remove ProxyServer key
      8. Restart your PC for the changes to take effect.

      This process comes in handy when your proxy keeps turning on and you need it disabled.

      What are the benefits of a proxy?

      • Anonymity – If you’re using public Wi-Fi, a proxy can help mask your real IP address and prevent tracking websites from tracing any online activities to you for targeted ads.
      • Bypass geo-restrictions – Some media content is only available in select locations so a proxy can help you access this restricted content.
      • Faster load times – A proxy monitors your activity and caches your frequently visited sites by reducing the load time. This can also save you some data if you’re on limited bandwidth.
      • Security – Some proxies can prevent data interception when you’re browsing and protect you from malicious attacks. This is done by filtering out suspicious websites while fetching so they won’t appear in your results.

      As much as proxy servers have their benefits, they also run into issues from time to time. You may get the something is wrong with your proxy server. Needless to say, you need proxy server tools for the best performance.

      You can also explore simple browser based solutions that help you reach restricted sites by using tools such as KProxy free for quick access without extra configuration.

      That’s a wrap but do let us know how you use your proxy and in what situation you frequently need it for in the comment section below.