8 Simple Solutions to Fix the Xbox Error E68

Although your Xbox is an amazing gaming console, sometimes it can encounter certain errors. One error that users reported is Xbox error E68, and this error will prevent your console from starting.

Since this error can be serious, we will show you how to fix it today.

How can I fix Xbox error E68?

1. Remove your hard drive

According to Microsoft, this error can occur due to a hardware problem. Sometimes, the problem can be your hard drive, while in other cases, some other component can be faulty.

To fix this problem you need to remove your hard drive from the console and check if that solves the issue. To do that, follow these steps:

  1. Turn off your Xbox and unplug all accessories that you have attached.
  2. Position your console horizontally and open the hard drive cover release.
  3. Remove your hard drive.
  4. After doing that, reconnect each accessory.
  5. Close the hard drive cover and turn your console back on without inserting the hard drive.

If the problem persists while your hard drive is removed, it means that some other component is faulty and you’ll have to repair or replace your Xbox.

On the other hand, if there’s no red light around the power button when you start your console, you can turn it off again and reinstall the hard drive.

If the problem appears after reinserting the hard drive, it means that your hard drive is faulty, and you should replace it to fix this problem.

Many users reported that replacing the hard drive fixed the problem for them. Therefore, be sure to check your hard drive first, since it’s the most likely cause of error E68.

2. Remove all USB devices from your console

According to users, USB devices such as thumb drives, cooling fans, and, in rare cases, controllers can cause this error to appear, especially if they are faulty or not connected properly.

To check if USB accessories are the problem, remove your hard drive, as we showed in the previous solution.

After that, disconnect all USB accessories from your Xbox and try to turn it on without a hard drive or any accessories.

If the problem appears again, it means that your console is faulty. If the problem is resolved, it means that one of your accessories or hard drives isn’t working correctly.

To find out which accessory is causing this issue, we advise you to try using them one by one until you find the one that is faulty.

3. Check your video cable

Few users reported fixing this issue simply by moving the switch on their video cable. According to them, you can move the switch on your video card to the TV or HDTV position.

To fix error E68, simply move the switch to the HDTV position and back to the TV position. After doing that, Xbox error E68 should be fixed.

4. Remove unnecessary USB accessories

Sometimes, this error can be caused by USB accessories attached to your console. If you have multiple accessories attached, you might want to consider removing some of the unnecessary devices.

It seems that many accessories are putting too much stress on your Xbox, and after removing the devices you don’t need, the issue should be resolved.

5. Format your hard drive

There are a few reports by users saying that they fixed error E68 on their Xbox simply by removing the hard drive, attaching it to their computer, and formatting it.

Keep in mind that you’ll need a special accessory to attach Xbox hard drive to your PC.

Formatting the hard drive will remove all your files from the hard drive, therefore we advise you to back them up.

Some users claim that they can’t see the Xbox hard drive in This PC section, but the drive is available from the Disk Management tool.

To open Disk Management tool on Windows 10, do the following:

  1. Press Windows Key + X to open Win + X menu and choose Disk Management.
    xbox-error-e68-disk-management-1
  2. When Disk Management opens, you should see your Xbox hard drive. Sometimes it might be listed as Unallocated hard drive.
  3. Right-click it and choose the Format option.
    xbox-error-e68-disk-management-2
  4. Set the format options and click the OK button to start the format process.

After formatting the drive, connect it again with your Xbox and check if the error is resolved.

Keep in mind that formatting will remove all files from your hard drive, therefore be sure to back up your saved games and downloaded content.

Users reported that this is just a temporary solution, so you might have to perform it again in the near future.

6. Delete and redownload your profile

If everything’s alright with your hard drive, we’ll go and re-download your Xbox profile, just in case. Here’s how to do that:

  1. Press the Guide button on your controller.
  2. Go to Settings and select System Settings.
  3. Go to Storage > All Devices > Gamer Profiles.
  4. Select the gamertag that you want to delete.
  5. Select Delete.
  6. Select Delete Profile Only. (This deletes the profile but leaves saved games and achievements.)

7. Clear the system cache

Clearing the system cache is basically a solution for everything, so we’re going to try it here, as well. Here’s how to clear the Xbox One system cache:

  1. Press the Guide button on your controller.
  2. Go to Settings and select System Settings.
  3. Select Storage or Memory.
  4. Highlight any storage device, and then press Y  on your controller (you can select any storage device, because the system will clear the cache for all of them).
  5. Select Clear System Cache.
  6. Confirm the action.
  7. Restart your console

8. Power cycle your console

If other solutions don’t work, you might want to perform a factory reset. This option usually deletes all files from your console and resets it to its original state.

This means that you’ll delete all your accounts, saved games, settings, and files.

If you want to keep your files, we strongly suggest that you back them up to a USB flash drive before starting the reset process. To reset your Xbox to factory settings, do the following:

  1. Open the guide by scrolling left on the Home screen.
  2. Select Settings and go to All Settings.
  3. Choose System > Console info & updates.
  4. Select Reset console.
  5. You should see two options available: Reset and keep my games & apps and Reset and remove everything. We suggest that you use the first option since this option will only reset your console and delete potentially corrupted data without deleting games and other large files.
  6. If that option doesn’t work and the problem still persists, be sure to use Reset and remove everything option. This option will delete all downloaded games, saved games, accounts, and applications, therefore if you want to preserve some of your files, we suggest that you back them up before using this option.

In most cases, the cause for error E68 is usually your hard drive.

If your hard drive is working properly, it means that there’s some other hardware malfunction and you might want to consider sending your Xbox to Microsoft’s repair center.

For more useful solutions, take a closer look at our guide dedicated to fixing system error code E106 on Xbox One.

Windows 10 build 19592 updates file indexing logic

The Windows Insider Program has released the first preview build with its new lead, Amanda Langowski, in charge.

Windows 10 Insider Preview Build 19592 is now live in the Fast ring. It introduces a whole bunch of enhancements and fixes for beta testers to explore.

Updates to the Windows 10 Indexer

Build 19592 comes with only a single general improvement, which relates to the way the Windows Search Platform works. According the build’s release notes, one objective of the update is to improve the logic behind file indexing.

The Windows Search Platform (Indexer) has been updated with improved logic to help find better times to perform indexing of your files and avoiding heavily indexing while you are using your machine.

Indexing runs in the background as you use your computer, except for when you are executing it for the first time.

The updated Indexer will now be finding an optimal time to index files, ensuring that the process does not consume unnecessarily high proportions of CPU resources.

Also with the update, the Indexer will not be paying a lot of attention to content that does not affect your search experience.

Hopefully, these improvements will make your Windows 10 searches a lot faster.

Fast ring insiders will also be testing multiple fixes that build 19592 introduces. These include:

ARM devices bugcheck

According to Microsoft, some ARM devices would get a bugcheck in the middle of an upgrade. Such glitches, especially the Blue Screen of Death (BSoD) error, are common when trying to update Windows 10 on an incompatible device.

This update fixes that problem. Microsoft has also lifted the block on this build. That means insiders using ARM devices can upgrade without a problem.

Corruption repair

From now, affected Windows 10 machines can be running corruption repair (DISM) to completion. The process will no longer be stalling at 84.9%.

Update, Shutdown, and Restart

Updating Windows 10 never ended well for some insiders.

After a successful installation and rebooting their PCs, they would still see Update and Shutdown and Update and Restart on the Start Menu. The issue is no more, thanks to build 19592.

Error code 0x80070003

Windows 10 updates would fail for some Fast ring insiders. They would get error 0x80070003 instead. The latest preview build has fixed the issue.

Settings crashing

This build resolves an issue that would cause Settings to crash when you paused updates.

Black Window

The update solves the problem of a dark Window coming up while the user is sharing an app in Microsoft Teams.

FIX: Xbox error PBR9002

You can purchase all sorts of content on your Xbox, including movies, shows, games, and DLCs, but sometimes certain errors can occur while purchasing content online.

Users reported Xbox error PBR9002, and today we’re going to show you how to fix this error.

  1. Add a different payment option
  2. Add a new account
  3. Make sure that your region settings are correct
  4. Contact Microsoft support
  5. Delete and redownload your profile
  6. Clear the system cache
  7. Power cycle your console

Fix – Xbox error PBR9002

Xbox error PBR9002, how to fix it?

Solution 1 – Add a different payment option

Error PBR9002 can prevent you from buying content online, but you should be able to fix that simply by adding a new payment method. This is a simple procedure, and in order to do it you need to follow these steps:

  1. Login to your Microsoft account using any web browser.
  2. Navigate to Services & subscriptions section.
  3. In the Xbox Live section, locate Paid with and choose Change how you pay option.
  4. Now select Add a new way to pay and then click Next.
  5. Follow the instructions on the screen to add a new payment option.

To add a new payment option on Xbox 360, do the following:

  1. Make sure that you’re signed in to your Xbox with a Microsoft account.
  2. Go to Settings and choose Account.
  3. Select Manage Payment Options.
  4. Select Add Credit Card or Add PayPal option and follow the instructions on the screen to add a payment method.

To add a payment option on Xbox One, do this:

  1. Sign in to Xbox One with your Microsoft account.
  2. Scroll left on the Home screen to open the Guide.
  3. Select Settings > All Settings.
  4. In the Account section choose Payment & billing.
  5. Select Add credit card or Add PayPal.
  6. Follow the instructions on the screen and enter your billing information.

After adding new payment option for Xbox Live this error should be resolved completely.

Solution 2 – Add a new account

According to users, one potential workaround is to create a new account and use it to purchase the desired content.

This isn’t the best solution, but according to users, it allows you to purchase items from the Store, so you might want to consider creating a new account.

Solution 3 – Make sure that your region settings are correct

According to users, error PBR9002 occurs due to region locking, and you might encounter it if you try to purchase content that isn’t available in your region or if you change your region.

To fix this problem, you need to make sure that your region settings and billing information are correct. To change your region settings on Xbox One, do the following:

  1. Make sure that you’re signed in to your Microsoft account.
  2. Scroll left on the Home screen to open the Guide.
  3. Select Settings > All Settings > System.
  4. Choose Language & location.
  5. Select your new location from the list and choose Restart now.

To change the region on Xbox 360, do the following:

  1. Sign in to your Microsoft account on your Xbox 360.
  2. Open Settings and choose System.
  3. Go to Console Settings > Language and Locale > Locale.
  4. Select the locale that you want to use.

Keep in mind that certain services such as Xbox Live won’t work unless they are supported in the new region.

Although your Xbox profile information will be preserved if you choose to change your region, the money from your Microsoft account will not, so you might want to spend it before changing your region.

You should know that you won’t be able to change your region if you did so in the last three months, or if your account is currently suspended or if you have a balance due on your Xbox subscription.

To change your billing information, do the following:

  1. In any web browser log in to your Microsoft account.
  2. Select Payment & billing and select Billing info.
  3. Now select Edit profile and make changes to your billing address.

To change the billing address on Xbox One, follow these steps:

  1. Scroll left on the Home screen and select Settings.
  2. Select All Settings > Account > Payment & billing.
  3. Now select Change billing address.
  4. Edit your billing information.
  5. If you don’t need to update certain billing information, you can simply press B and choose Next.
  6. After you’re done, select Save info.

You can change the billing information on your Xbox 360, by following these instructions:

  1. Make sure that you’re signed in to your console.
  2. Go to Settings and select Account.
  3. Select the payment option that you want to update.
  4. Update the billing information and select OK to save changes.

After making sure that both your region and billing information is correct, try to make the purchase again.

Solution 4 – Contact Microsoft support

Sometimes it can happen that your card is flagged, and in order to fix this problem you might have to call Microsoft support and ask them if they could fix the issue.

Solution 5 – Delete and redownload your profile

The next thing we’re going to try is re-downloading your Xbox profile. Here’s exactly what you need to do:

  1. Press the Guide button on your controller.
  2. Go to Settings and select System Settings.
  3. Go to Storage > All Devices > Gamer Profiles.
  4. Select your gamertag that you want to delete.
  5. Select Delete.
  6. Select Delete Profile Only. (This deletes the profile but leaves saved games and achievements.)

Solution 6 – Clear the system cache

Clearing the system cache is a universal solution for all sorts of issues in Xbox One, so it might be helpful when resolving this problem, as well. Here’s how to clear the cache data in Xbox One:

  1. Press the Guide button on your controller.
  2. Go to Settings and select System Settings.
  3. Select Storage or Memory.
  4. Highlight any storage device, and then press Y  on your controller (you can select any storage device, because the system will clear the cache for all of them).
  5. Select Clear System Cache.
  6. Confirm the action.
  7. Restart your console

Solution 7 – Power cycle your console

If other solutions don’t work, you might want to perform a factory reset. This option will usually delete all files from your console and reset it to the original state.

This means that you’ll delete all your accounts, saved games, settings and files. If you want to keep your files, we strongly suggest that you back them up to a USB flash drive before starting the reset process.

To reset your Xbox to factory settings, do the following:

  1. Open the guide by scrolling left on the Home screen.
  2. Select Settings and go to All Settings.
  3. Choose System > Console info & updates.
  4. Select Reset console.
  5. You should see two options available: Reset and keep my games & apps and Reset and remove everything. We suggest that you use the first option since this option will only reset your console and delete potentially corrupted data without deleting games and other large files. If that option doesn’t work and the problem still persists, be sure to use Reset and remove everything option. This option will delete all downloaded games, saved games, accounts, and applications, therefore if you want to preserve some of your files, we suggest that you back them up before using this option.

Xbox error PBR9002 will prevent you from purchasing content online, but you should be able to fix it by using one of our solutions.

If the problem still persists, you might want to call Microsoft support and ask them to unblock your card.

  • What happens when you reset your Xbox One?
The simple reset will simply refresh your console. The factory settings reset will delete all user data, including accounts, games and apps, saved games, settings etc. 

[wl_navigator]

What to do if your Xbox One eject button is not working

There have often been instances of the Xbox One eject button getting stuck.

This might be outright frustrating when you need to change your disks in a jiffy though the thing to keep in mind is that the solution to this is really simple and easy.

And it does not take much time either.

So, let’s get started right away.

Solution for Xbox One eject button issues

How to release the eject button manually

  • Before you start, you will do good to know the process is similar to how you release the disk of a CD ROM drive using a detangled paper clip. Using the same, look for a tiny hole just beside the Eject button. It’s marked out with a yellow or orange lining to help locate the spot.
  • Now insert the clip and press gently. You can use any other thin but long object for the purpose though it has to be thin enough to fit into the tiny hole while stiff enough to be able to withstand some amount of pressure.
  • When you press into the hole, the clip (or anything else that you are using) sinks into the hole a little and you will know that’s it. The CD too gets ejected simultaneously.

However, it is happening way too frequently, that is the Eject button is failing quite often and you are having to resort to the workaround described here to release the disk.

Try restarting the device and see if the issue has been resolved.

Also, keep your Xbox One updated with all the latest updates

Else, this might be a hardware issue that needs attention. Get in touch with the service guys in that case to get it resolved.

Then again, this shouldn’t too big a deal as the disk drive release mechanism might be at fault if it isn’t with the Eject release button on the gaming console’s casing.

This should be it. Hope you are able to release your disks if using the method described here just in case the eject button on your Xbox One isn’t working.

FIX: Intel Services Manager crash in Windows 10/11

We all know that after updating to Windows 10 it is possible to experience various bugs and issues due to system incompatibility problems.

Similar and by keeping this in mind, we might also get an Intel Service Manager Crash Report alert which will basically prompt us to make some changes within our system in order to address this problem.

So, in case you have recently received the Intel services manager crash error on your system, then you should follow the steps from below in order to learn how to easily address this stressful and annoying issue.

Basically, you will be able to fix your problem by applying a few updates, though if the error persists you will have to dig deeper in finding what’s the real cause; anyway, we will talk more about this during the guidelines from below.

Now, usually, the Inter-Services Manager Crash Report error is being displayed after a reboot of your system or after you apply a new Windows 10 update.

You might get numerous alerts on that matter, or you should be able to temporarily address the problem by restarting your device. Anyway, for a proper troubleshooting solution, check the lines below.

How do I Fix Intel services manager crash error?

1. Update your system drivers

As was have already pointed out, in Windows 10 most of the problems are related to incompatibility issues. Well, in this case, the problem might be caused due to some reasons or by a driver’s corruption in your system.

So, the best way in which you can fix your errors will be in getting the latest drivers and updates from your manufacturer’s official website. Also, it is recommended to update your BIOS chipset driver too, as there might be some problems related to the same.

We advise also considering opting for specialized software that can scan for updates as antivirus scans for threats on your behalf.

Once your drivers are up to date, check if the problem is resolved. Usually, this process is fixing the Windows 10 Intel Services Manager Crash errors; but if on your device you are still experiencing the same alert, then try to apply the next guidelines.

A computer cannot handle video cards, computer programs, sound cards, or other hardware; they must be managed by a driver. You can manually update drivers if you have a thorough understanding of the drivers your PC requires.

The Fortect Driver Updater utility is the best alternative to ensure you are set up with the most needed recent drivers.  

Fortect Driver Updater can assist you in automatically updating drivers and preventing PC harm caused by installing the incorrect driver version. It keeps up with the latest modifications, preventing the system from experiencing latency, system failures, and BSoD issues.

2. Disable Intel App Center

  • Go to your Start Screen.
  • From there press Wind + R dedicated keyboard keys.win + r
  • The Run box will be displayed.
  • On the same enter msconfig.
  • Go to the Startup tab and just uncheck the Intel App Center box in order to disable the same.
  • Apply the changes, click Ok and then reboot your device.

3. Scan your computer

In rare situations, the Intel-related crash error might be caused by malware. Well, in that case, you should download an anti-malware program (such as Malwarebytes) and install the same on your device. Then run a full scan and wait while the antimalware program is removing infected files or tools from your system. Finally, check to see if the problem is still there.

In addition to the guidelines from above, you can anytime send a report of your problem to the Intel official support page by using this link. So, that was all for now as those were the troubleshooting solutions to apply when dealing with Intel services manager crash Error in Windows 10.

Let us know which of our solutions helped you best by leaving us a message in the comments section below.

What to do when Xbox One guide won’t open

If you’ve been using your Xbox controller and then out of nowhere, the Xbox One guide won’t open, it can be frustrating.

The Xbox One guide lets you review and change settings, check messages and notifications, update your profile, see the latest in your activity feed, check progress and/or achievements, start and join parties, track your clubs, find out what your friends are doing, and broadcast your game with Mixer.

When the guide won’t open, then you may not be able to fulfill these tasks.

Here’s what to do when your Xbox One guide won’t open and you really need to get gaming again.

Xbox One guide won’t load? Try these 3 fixes

  1. Perform a full system reboot
  2. Check Xbox Live status
  3. Check with a technician

1. Perform a full system reboot

If your Xbox One guide won’t open, performing a system reboot usually fixes the chop as it is really the first line of action you can take, especially when you don’t know what else to do.

Usually, when you turn off your console, it goes to a standby mode, which means the next time you want to use it, you simply boot and it will awake fast.

The full system reboot works in a rather similar way to how you reboot your computer when it has a problem – you shut it down and start again.

This usually solves some problems because like the Xbox One, your computer, too, gets slowed by other programs running in the background so a refresh is a good thing.

The Xbox One needs a refresh after all the gaming, too, right?

fix xbox one guide

Rebooting, however, doesn’t solve all problems like if a game or app stops working, but it should be your first line of action when your Xbox One guide won’t open.

However, it’s not every day that the normal happens, so here’s how to perform a full system reboot when your Xbox One guide won’t open:

  1. Hold the power button down for several seconds to turn off the Xbox One completely. If you want to know that it has shut down, the light on the power brick turns to amber, not white.
  2. Turn on the Xbox One again. You can use the power button on the controller to do this.

Try and check whether the guide is working again.

Did a full system reboot help restore your Xbox One guide to normal functioning? If not, try the next solution.


2. Check Xbox Live status

Sometimes the status of Xbox Live could affect the Xbox One’s system functions. In order to check the status of Xbox Live, whether it is running or not, go to the Xbox support page, which shows you the status at the top left corner of the webpage.

Xbox One guide won’t open xbox live status

Did this help fix the chop? If not, see the next solution.


3. Check with a technician

If performing a full system reboot, or full power cycle, doesn’t help, and you’ve checked that the Xbox Live status is okay, yet Xbox One guide won’t open, you can take it for repair.

Check with a qualified technician who understands the Xbox One system so that you don’t end up with worse problems.

Some users also go online to the Xbox forums to check whether problems similar to what they’re experiencing exist and see if they got extra solutions to resolve the issue such as when the Xbox One guide won’t open.

You can also check the Xbox Support page online to set up a repair for your Xbox One.

There you go, you should be able to load your guide by now. Do share your experience with us in the comments section below.

[wl_navigator]

Xbox error code 0x82d40003 [FIXED by EXPERTS]

The Xbox One error code 0x82d40003 is one that can appear for some players when they try to launch digitally distributed games.

Consequently, users can’t play Xbox One games, due to the lack of usage rights, particularly when the Game Share feature is enabled.

We found a multitude of reports stating that error prevents them from playing the games they own or they got through the Game Share feature.

I am receiving the error 0x82D4003 on a few of my Xbox‘s. I have the family sharing enabled.
Here is the scenario:
XBOX
#1 – My Home Xbox
XBOX #2 – Child 1’s Xbox – SEE’S THE ERROR
The XBOX #3 – Child 2’s Xbox – SEE’S THE ERROR
The game we are launching is Fortnight….although other’s would probably have the problem. Does anyone know the proper configuration and/or limitations with this setup?

Learn how to fix the error by following the solutions below.

How can I fix error code 0x82d40003?

1. Is Xbox Live down?

  1. Note that error 0x82d40003 might be due to Xbox Live service outages. To check if that’s the case, open the Xbox Live Status page in a web browser, here.
  2. That page highlights the Xbox Live status with a series of ticks. If Xbox Live is currently down, users will need to wait for Microsoft to resolve the service outage.

The Xbox Live status page

2. Sign in with the account that purchased the game

  1. The error 0x82d40003 error message states, Sign in with the account that purchased the game or app, which is a suggested resolution for fixing usage rights. To log in with the profile that downloaded the game, press the Xbox button on the console’s controller.
  2. On the Sign-in menu, select to sign in with email, Skype, or mobile.
  3. Then enter the required password for the account that purchased the game.
  4. Select one of the sign-in preference options.
  5. Users who utilize Kinect will need to select the Sign-in manually option.
  6. Next, open Settings to select the All Settings option.
  7. Select the Personalization tab on the left.
  8. Select the My home Xbox option.
  9. Then users can select the Make this my home Xbox setting.
  10. Thereafter, users can log in to their regular accounts again.

3. Reinstall the Xbox Game

  1. Some Xbox One players have confirmed that they’ve fixed error 0x82d40003 by reinstalling the games the issue arises for. Users can reinstall Xbox games by pressing the Xbox button to open the guide menu.
  2. There select Games & apps to open the game library.
  3. Select a game that doesn’t launch, and press the Start button.gamepad xbox one Xbox error code 0x82d40003
  4. Next, select the Manage game option on the menu that opens.
  5. Select the Uninstall all option to thoroughly uninstall the game.
  6. Select Uninstall all again to confirm.
  7. Thereafter, navigate to Ready to install on the Manage game menu.
  8. Press the Install all button to reinstall the game.
  9. Thereafter, try launching the game.

Those were 3 solutions that should fix the Xbox One error code 0x82d40003. Tell us in the comments section below whether they helped you or not.

How to fix State of Decay 2 bugs on Windows 10/11

State of Decay 2 is one of the most popular games of the moment. This open-world zombie survival game is available on Windows 10 computers, as well as Xbox consoles.

Unfortunately, various errors and technical issues may sometimes limit your gaming experience preventing you from fully enjoying the game.

In this post, we’ll list a series of solutions that you can use to fix common State of Decay 2 bugs on your Windows 10 computer.

State of Decay 2 bug fixes

  1. State of Decay 2 won’t download or install
  2. State of Decay 2 crashes with error 0x803F8001
  3. State of Decay 2 crashes after launch
  4. Error ‘You must sign in to continue’
  5. Multiplayer is unavailable

1. State of Decay 2 won’t download or install

  1. Restart the Microsoft Store app, especially if the download process suddenly stops halfway through.
  2. Check the system requirements: Make sure that your computer meets at least the minimum system requirements necessary to run the game:
    • OS: Windows 10 x64
    • Integrated Keyboard
    • Integrated Mouse
    • DirectX Version 11
    • Memory: 8 GB
    • Video Memory: 2 GB
    • Processor: AMD FX-6300 | Intel i5-2500 2.7GHz
    • Graphics: NVIDIA GeForce GTX 760 | AMD Radeon HD 7870
  3. Update your Windows 10 computer: Install the latest OS version on your machine to benefit from the latest improvements and fixes.
  4. Opt-out of the Windows Insider Program: If you’re enrolled in the Windows Insider Program, the best solution is to temporarily opt-out of it and install a stable version of the OS. Microsoft is aware that some Insiders may experience issues with State of Decay 2 and is working on a fix.
  5. If you preordered the game, make sure that your purchase was not refunded. Back in April, some preorders were cancelled and refunded following a general issue. If this is the case, then you need to purchase the game again.

2. State of Decay 2 crashes with error 0x803F8001

If error 0x803F8001 prevents you from launching the game, try installing any free app from the Microsoft Store. Then restart your computer and launch State of Decay 2 again.

3. State of Decay 2 crashes after launch

fix State of Decay 2 bugs

If the game crashes on launch or soon after launch, here are a few suggestions to fix the problem:

  1. Make sure your computer meets the minimum system requirements to properly launch the game.
  2. Install the latest display drivers (outdated display drivers may cause your Windows 10 games to crash).
  3. Check your antivirus settings: If your antivirus blocks the game, make sure to add it to the list of exceptions in order to whitelist it. Keep in mind that certain antivirus solutions may blacklist the game again when you update the title.
  4. Switching from a local account to a Microsoft account may also help you fix the problem.
  5. Uninstall and reinstall State of Decay 2: If nothing worked, maybe re-installing the game will help you fix the problem (especially if you encountered pre-order issues).
  6. Set your keyboard layout to English (US) and install the English (US) pack.
  7. Run the Windows 10 Store App Troubleshooter: Go to Settings > Update & Security > Troubleshoot > select Windows Store Apps > run the troubleshooter.
  8. Reset State of Decay 2: Go to Apps & Features > locate and select State of Decay 2 > click on Advanced Options > select Reset.
  9. Move the game to a different drive: Keep in mind that low disk space may prevent you from launching the game. Free up some space on the drive where you initially installed the game or move it to a different drive. To move the game, simply go to Apps & Features  > select State of Decay 2 > select the Move button > choose the new driver.
  10. Open the installation folder for State of Decay 2 > right click on the game executable file > Properties > Compatibility > tick the box next to Run this program as an administrator

4. Error ‘You must sign in to continue’ blocks the game launch

Sometimes, Windows 10 may ask you to sign in to continue using the game, although you already signed in. Here are a few solutions to fix the problem:

  1. Launch PowerShell, enter the following command and hit Enter: Get-AppXPackage -AllUsers | Foreach {Add-AppxPackage -DisableDevelopmentMode -Register “$($_.InstallLocation)AppXManifest.xml”}
  2. Run SFC to fix corrupted or missing file systems: Launch Command Prompt > enter sfc /scannow >hit Enter.

5. Multiplayer is unavailable

The multiplayer button is unavailable if you signed in to another PC using the same account. Make sure that you’ve signed out everywhere else and then hit the multiplayer button again.

If you encountered other State of Decay 2 issues, let us know in the comments below and we’ll try to find a solution for you as soon as possible.

Xbox Live error code 0x800c0005 on Xbox One [TECHNICIAN FIX]

Some users have said that a 0x800c0005 error code appears when they try to join the Xbox Live party.

That error can also arise when users try to play music videos or songs on their Xbox One consoles.

Error 0x800c0005 is often a net connection issue between Xbox and other service or due to incompatible NAT (Network Address Translation) types.

One user stated on the Microsoft’s Xbox Support Forum:

It never shows me who is in the party or give me an option to join. I then tried to start my own party where I got the error code 0x800c0005.

Find out how to resolve the error below.

How do I fix Xbox One Party encountered an error 0x800c0005?

1. Restart the Xbox

  1. Users can refresh the NAT type by restarting the Xbox console. So, try restarting the Xbox by pressing the Xbox button to open Guide.
  2. Select Settings on the Guide.
  3. Select the Restart console option.
  4. Then click Yes to confirm the restart.
  5. Users can then check their NAT Type by pressing the Xbox button and selecting Settings > All Settings.
  6. Select Network to open a Network Settings screen that displays the NAT Type within the Current Network Status column.
  7. If the NAT Type is Open, further fixes will not usually be required.

Xbox's Network settings xbox live error code 0x800c0005

2. Adjust the Router’s IPv6 Settings

  1. Error 0x800c0005 can arise when the Xbox console can’t get a Teredo IP address, and users can fix that by enabling Teredo tunneling on their routers’ settings pages. To do that, press the Windows key + S hotkey.
  2. Input cmd in the search box, and click Command Prompt to open the CP.
  3. Enter ipconfig in the Command Prompt, and press the Return key.The ipconfig command xbox live error code 0x800c0005
  4. Copy the Default Gateway number with the Ctrl + C hotkey.
  5. Open a web browser.
  6. Then paste the Default Gateway number in the URL bar with the Ctrl + V hotkey to open the router configuration site.
  7. Log in to the router configuration site. Users who aren’t sure what login details to enter can check the router’s manual and web support site for further details.
  8. Thereafter, look for Allow Teredo tunneling and Allow IPv6 tunneling settings. Enable both those settings if the router configuration site includes them.

3. Refresh the NAT Table

  1. Refreshing the NAT table, by turning the UPnP protocol off and back on, is another potential resolution for error 0x800c0005. To do that, log in to the router’s configuration site with an IP address as outlined above.Talk Talk router configuration login page xbox live error code 0x800c0005
  2. Then turn the Enable UPnP setting off within the UPnP settings section. Users can refer to their router manuals for more specific details on where exactly the UPnP setting is within their router configuration UI.
  3. Save the new settings.
  4. Then unplug the network router.
  5. Restart the Xbox console if it’s on.
  6. Log back into the router configuration site to turn the UPnP setting back on, and save the changed settings.
  7. Check that the Zero Config setting is on if there is one.
  8. Thereafter, plug the network router back in to restart it.
  9. Alternatively, make sure that the router’s firmware is up to date and stick to a wired connection.

Those are some of the resolutions that might fix error 0x800c0005 for some users.

However, if further resolutions are required, check out the Virtual Agent on Microsoft’s Customer Support page for the Xbox.

  • What is error 0x8004005?
Error 0x80004005 is an unspecified error and appears usually when you cannot access Shared Folders, Drives, Virtual Machines, and also when the Windows Updates cannot be installed.
  • What can I do if my Xbox account has been locked?

First, check if the Xbox Live servers are online. Then, delete your profile and perform a power cycle. If the problem persists, we have the perfect guide to help you fix this problem.

[wl_navigator]

How to see who is in a channel and online on Slack

Slack is an instant-messaging app that enables users to organize discussions within more specific channels. Thus, Slack channels are like forum threads that you can set up for more specific topics.

Each Slack channel includes invited members. This is how you can see who the invited members of a channel are and if they’re online in Slack.

How can I see channel members and their status?

1. Open the channel member list

  1. The View member list provides an overview of users within a channel. To open that list, select a channel on the left of Slack.
  2. Then click the View member list button shown directly below.
    View member list slack how to see who is online and who is in a channel
  3. After clicking View member list, an About this channel sidebar opens on the right of Slack. Click Members on that sidebar to expand that category as below.
    About this channel slack how to see who is online and who is in a channel
  4. That list shows you all members within the channel. Click a user to open a box for them from which you select Call and Message options.
  5. There is a status indicator beside each member in the list. A green dot highlights that a user is online. A gray circle highlights that a user is currently unavailable (away).

2. Search the member list

  1. You can search the member list by clicking the See All Members button at the bottom of it. That button will open the search window in the snapshot directly below.
    Slack members search box slack how to see who is online and who is in a channel
  2. Enter a keyword in the search box, and press the Return key.
  3. The search utility will then display users that match the keyword. Thereafter, you can click a user to open a profile box for them.

3. Set a status

  1. You can also configure your own status in Slack via the member list. To do so, open a channel member list you’re in.
  2. Then double-click your user name there to open the profile window.
    The profile window slack how to see who is online and who is in a channel
  3. Click the Set status button to open the options shown directly below.
    Set a status window slack how to see who is online and who is in a channel
  4. There you can select status icons for things like vacationing and in a meeting.
  5. To set up a custom status, click the emoji button on the left of the text box.
  6. Select an icon from the panel shown below.
    Set a status window slack how to see who is online and who is in a channel
  7. Then enter some status text for it.
  8. Click the Save button.

So, the members list in Slack provides a handy overview of users within a channel. There you can check who is in the channel and whether a member is active or not. In addition, you can configure your own status from there.

Need help locating your workspace address? Check our guide on how to find your Slack workspace URL for quick access tips.

If you have any other questions and suggestions, feel free to leave them in the comments section below and we’ll be sure to check them out.

Is Project Scarlett compatible with Oculus Rift S?

For those of you who don’t know, Project Scarlett is a new console revealed at E3 2019.

Among the mind-blowing 120 FPS, 8K resolutions, and the elimination of load speeds, the console is reportedly based on custom Ryzen Zen2 CPU and Navi GPU architecture.

Because there’s still plenty of time until the console’s launch, a lot of speculation has started emerging regarding other features this next-gen console may have.

One burning question is whether or not Project Scarlett is compatible with Oculus Rift S.

As most of you may already know, Oculus already has heavy support from Valve’s Steam and they have already made their claim on the VR market so far.

Project Scarlett and Windows Mixed Reality

While logic may dictate that Microsoft may try to push their own Windows Mixed Reality into the VR market more, that doesn’t necessarily mean that Project Scarlett would support Windows Mixed Reality exclusively.

The difference between the current Xbox hardware and Project Scarlett is that Project Scarlett will run using a universal OS called Windows Core OS.

Windows Core OS is essentially a modular platform, so any function and any device Microsoft builds for it will be compatible.

This shift from Windows API to a universal OS is due to the game industry’s tendency to shift towards building games and apps for consoles, PCs, xCloud, and VR simultaneously.

Thus, they save time by building the base software framework and applying small tweaks depending on the supported hardware, rather than creating the software on PC, then spending months porting the data to all the other platforms.

So, is Project Scarlett compatible with Oculus Rift S?

Since Oculus Rift S requires Windows 10 as an OS and as long as Project Scarlett will run using the Windows Core OS, there should be no issue with the two of them being compatible with each other.

[wl_navigator]

Fix Xbox 360 Kinect Red Light issues [STEP-BY-STEP GUIDE]

The Kinect is an Xbox 360 accessory that enables users to utilize the console without a game controller.

However, that accessory seemingly occasionally displays a red light instead of green on startup. When it does, the Kinect might not work as it’s supposed to.

One Xbox 360 user had issues with it and shared concerns on the official Microsoft Xbox Support forum.

My xbox360 kinect sensor is not starting up, when i power up the console, the sensor has a blinking green light and on screen i see a message starting up sensor.., this remains for about 2-3 minutes post which the light tu’rns into steady red and the message on screen is kinect could not start sensor, please make sure sensor is at room temperature.

My room temperature is fine and there is no issues there, have tried connecting/reconnecting multiple times but with no success. Can someone help here ?

Learn how to fix Xbox 360 Kinect red light issue by following the troubleshooting steps below.

How can I fix Xbox 360 Kinect not starting?

1. Place the Kinect on a Level Surface

  1. The Kinect displays a red light and a C0051209 error code when it’s not on level surfaces. Users can fix that error by turning off the Xbox 360.
  2. Then make sure the Kinect is on a flat, level surface.Xbox Kinect xbox 360 kinect red light
  3. Turn on the console after placing the Kinect on an alternative surface.
  4. The red light might also come on if the room’s too hot or cold for the Kinect. The ideal temp for the Kinect is about 70°F (21°C ), so adjust the heating as required to ensure it’s about 70°F.

2. Update Xbox 360 Software

  1. Kinect red lights might come on when users need to update their Xbox 360 software. Then an Update Required error message will appear when users try to run games.
  2. When that error message appears, select the Yes and Restart options to update the game console.

A disc xbox 360 kinect red light

3. Check the Kinect’s Cables

  1. The Kinect might light up red when it’s loosely connected. To check the cable connections, turn off the Xbox 360 console.
  2. First, check the console’s power cord is fully plugged in.
  3. Then check that the USB cord is fully connected with the console. Pull the USB cord out and plug it firmly back in if it’s seemingly already connected.
  4. Xbox 360 S and E users plug the Kinect cable into the console’s AUX port shown directly below.Xbox 360 E xbox 360 kinect red light
  5. There should be a green light on the USB cord when it’s fully connected. If not, users might need to get a replacement USB cord for the console from the Xbox Online Service Center.
  6. Thereafter, turn on the Xbox 360.

The above resolutions will usually fix Microsoft Kinect red light issues. However, if those resolutions don’t fix the red light, users might need to return their Kinects for repairs.

Those repairs will be free of charge for Kinect that is still within warranty periods.

Xbox Live error 800704DC on profile download [EXPERT FIX]

Downloading the profile on your Xbox console allows you to keep your data synchronized between the consoles irrespective of where you play.

Sometimes while downloading your Xbox Live profile you see an error code. The error reads Sorry, Xbox Live profiles can’t be downloaded right now. Please try again later. Status Code: 800704DC.

Fix it by following the steps we provided below.

Why do I get an error code when downloading profile on Xbox?

1. Re-Associate the Child Account to the Parent Account

  1. Sign into your Microsoft Account, here.
  2. Go to the Family tab > Add a Family Member.
  3. Select Add a child.
  4. Now you need to enter the email address of the child account that you want to re-associate with the parent account.
  5. Click on Send an Invite.
    Add a Child - Xbox Profile Download error
  6. Sign out of your Microsoft account and sign in to the Child account.
  7. Click on Sign in and accept.
  8. Now on your Xbox try to download the profile and check if the error is resolved.

The above solution should help you resolve the Xbox Live error code 801540A9.


2. Remove your Profile From all Xbox Consoles

  1. Go to Xbox.com  website and click on Sign in.
  2. Find and select My Account (look in the upper right corner).
    My Account - Xbox Live Profile Download error
  3. Under the Safety section, click on Remove my profile from all Xbox 360 consoles.
  4. Under the Visited Console section, select Require profile download.
  5. Now on your Xbox consoler, try to download the profile again and check for any improvements.

3. Reset Microsoft Account Password

  1. Go to the Microsoft account password reset page.
  2. You need to select a reason for resetting the password.
  3. Enter your Microsoft Account email password and also fill the captcha.
  4. Click on Next.
    Remove Xbox Account - Profile Download error
  5. Now you need to verify that the account belongs to you. Select one of the methods and send the security code.
  6. Enter the 4 digit security code you received from Microsoft and click Next.
  7. Enter your new password and click on Next to reset the password.
  8. On your Xbox close, try to login with your new password and check for any improvements.

4. Remove Any Existing Profile

  1. On your Xbox Home Screen, go to Settings.
  2. Select System.
  3. Select Storage and select Profiles.
  4. Now select the Xbox profile you want to delete.
  5. Select Delete and select one of the two options below:
    Remove Profile Xbox Profile Download error
    Delete
    Profile Only – This deletes the Xbox profile but leaves saved games achievements.
    Delete Profile and Items – This deletes the profile and the game data associated with it.
  6. Select  Delete Profile only option and delete your profile.
  7. Now try to login with your primary profile again and check for any improvements.

There you go, you should have eliminated the error code 800704DC safely by using one of these solutions.

Do you know any other methods to clear out issues while downloading your Xbox profile? Feel free to share them in the comments section below.

[wl_navigator]

Fix the Xbox error code 0x80a40008 like a PRO

Many Xbox One users reported an issue regarding the ability to sign in to their account on the console.

Error message Try Again Later. There was a problem and we couldn’t connect.(0x80a40008) pops up, denying access.

Apparently, this error message is related to a connectivity or account issue.

One user shared his concerns on the official support forum.

It now seems the only people that get this code are the ones with the Xbox One Update Preview. I still after 2 days cannot access my account without it prompting me Try Again Later.

There was a problem and we couldn’t connect.(0x80a40008). I’ve contacted Xbox Support and they sent me an email to a thread that’s non-existent. If anyone has a solution, please put it down below. 

Attempting to fix this Xbox issue requires you to follow our solutions, listed below.

What can I do if I can’t sign in to Xbox Live?

1. Review your log in details and check the Xbox server status

  1. Make sure to input a valid email and password. If you’re not sure if your password is correct, try resetting it and then attempt to sign in.
  2. Check the server status on the official Microsoft Xbox website, here.

Check Xbox Live status Xbox error code 0x80a40008


Did you know that you need to open certain router ports to access Xbox Live? Do that with these configuration tools.


3. Check your network connection

  1. Press the Xbox button > open Settings.
  2. Choose All settings > Network > Network settings.
  3. Select the Test network connection option.test network Xbox error code 0x80a40008
  4. If you get the Everything is good message, try signing in again.
  5. Use a wired connection instead of Wifi.
  6. Contact your internet provider if your internet is running slower than usual.

4. Remove and add your account back to Xbox

  1. Press the Xbox button > select System
  2. Access Settings > Account > Remove Accountsremove account xbox Xbox error code 0x80a40008
  3. Choose the account to remove > select Remove
  4. Select Close and restart your console
  5. Turn off the console from the Xbox Power button of the console
  6. Leave the console off for about 10 seconds
  7. Turn the console back on
  8. Press the Xbox button on your Controller
  9. Select Sign in > then choose Add & manage 
  10. Enter the account login information and check the privacy settings
  11. Choose a color for the profile > then select Next
  12. Confirm the gamerpic > choose Next
  13. Choose between Save my password or Keep asking for my password

We hope that our tutorial helped you fix the Xbox One connectivity issue. If you know other working solutions, please share them in the comment section below.

Fix Xbox One error 0x87dd001e with these easy steps

A number of people have reported seeing the Xbox One error 0x87dd001e after the console lost its axes to wireless. If you’re also experiencing this issue, you’re no doubt very frustrated. But don’t worry, it can be fixed.

Before moving forward and trying repair solutions that work in situations where the problem occurs locally, make sure you aren’t facing a temporary issue with the Xbox server. Once this option is ruled out, network status glitches and corrupted temporary folders step in as potential culprits.

Therefore, waste no more time and use the following solutions to resolve this problem.

What can I do when getting Xbox One error 0x87dd001e?

1. Perform a full power cycle of your console

perform a full power cycle

Firstly, you should power cycle your console. This procedure will successfully help you to eliminate the majority of temporary files that might cause this sort of issue, so you know what you have to do.

Immediately hold the Power button on the console for 10 seconds or until the power shuts down completely. Unplug the power cord from the back of the console. Plug the power cord back in after waiting around 5 minutes to ensure that the procedure is successful, then restart the console.

Do so by pressing the Xbox button on your console to turn it on and you should now see the green boot-up animation.


2. Reset the alternate MAC address

Network - Network settings

  1. Press the Xbox button to bring up the guide overlay.
  2. Then, select System > Settings.
  3. Choose All Settings from the context menu.
  4. Once you manage to get inside the Settings menu, go to Network settings.
  5. From the Network menu, move to the Advanced Settings menu on the left-hand side.
  6. With the Advanced settings menu selected, choose the Alternate MAC address from the list of available options.
  7. Don’t hesitate to hit the Clear button.
  8. Up next, hit the Restart button to apply the changes.
  9. At the next startup sequence, log-in with your account once again and see if the error persists.

So, if you still get the Xbox One error 0x87dd001e, then we strongly recommend that you clear the alternate MAC address from the Xbox One settings menu. This solution is effective if the ISP that’s being used is providing a dynamic IP.


You can’t open Xbox One guide? Take a look at this step-by-step procedure to find a solution.


3. Factory reset your Xbox One

how to reset console

  1. Press the home button on your Xbox One controller.
  2. Navigate to the System Menu and select Settings.
  3. Go to System > Console info.
  4. Select Reset console next.
  5. At this point, you have the option to either Reset and remove everything or Reset and keep my games & apps (you may also cancel and back out if you’re undecided).
  6. Select the Reset and keep my games & apps section.
  7. Hit the X button to start the procedure.
  8. Once you’ve selected that, the console will proceed with erasing content, which could take several minutes.
  9. Your console will eventually restart automatically.

We have also managed to identify several user reports in which a factory reset resolved the issue entirely. The best part is that Microsoft makes this very easy to do, whether you want to keep your games and apps installed, or give your console a fresh start.

Anyway, if you choose to keep them installed, note that the procedure will still remove all personal files and associations from the console. All your saved games, achievements, settings, and accounts are though synced up with Xbox Live.

This happens automatically when connected to the Internet, so be sure to go online before initiating the reset. That’s a procedure you can apply any time things go awry, so bookmark this page as you never know when you might need to apply it again.

If you have any other questions or suggestions, don’t hesitate to let us know in the comments section below.

[wl_navigator]

Xbox error code 0x80a40019 [STEP-BY-STEP GUIDE]

Some Xbox One users encountered an issue when trying to connect to Xbox Live. The error code 0x80a40019 occurs, leaving the user unable to sign in.

Apparently, this is a common network connectivity issue.

One user was vocal about the problem on the support forum.

Did anyone figure out why? Error code(0x80a40019) an how to fix problem..been not able to play. An not very happy..need help..ty

In order to fix this issue, you should follow our simple steps presented below.

How do I resolve Xbox Live sign-in errors on Xbox One?

1. Check the Xbox Live status and perform a hard rest on your console

  1. Check the server status on the official Microsoft Xbox website, here.Xbox error code 0x80a40019
  2. Press the Xbox One power button for 8 to 10 seconds until it shuts down.
  3. Unplug the console from the power socket for at least 3 minutes.
  4. Turn the Xbox back on.
  5. Attempt to sign in to Xbox Live.
  6. If it still doesn’t work, try again in a few minutes.

2. Test and improve the network connection

  1. Press the Xbox button > open Settings.
  2. Choose All settings > Network > Network settings.
  3. Select the Test network connection option.Xbox error code 0x80a40019
  4. If everything seems to be fine, try connecting to Xbox Live again.
  5. Use a wired connection instead of a wireless network.
  6. Perform a hard reset on your modem/router.
  7. Contact your internet provider if you notice that your internet is running slower than usual and let them know about the issue.

We’ve written extensively about Xbox Live issues on Xbox One. Check out these guides for more information.


3. Perform a system update

  1. Press the Xbox button on your controller > open Settings.
  2. Go to All Settings > System.
  3. Select Console info & updates.
  4. Choose Update console.
  5. If there is any available update found, perform the update and restart the console.Xbox error code 0x80a40019

4. Change the system language to English

  1. Press the Xbox button on your controller > open Settings.
  2. Go to All Settings > System.
  3. Select the Location section > open Language & location.
  4. Open the Language settings and choose English.
  5. Restart the console and see if it fixed the issue.Xbox error code 0x80a40019

We hope that our guide on fixing the Xbox One error code 0x80a40019  helped you surpass this issue. If you liked this article, let us know in the comment section below.

  • How can I fix Xbox error code 0x80a40019?
Start by checking the Xbox Live status and perform a hard rest on your console. If that doesn’t work, follow our expert guide to fix the 0x80a40019 error.
  • How do I check my Xbox service status?

To check the status of Xbox Live, open a browser on your computer or smartphone and go to the Xbox Live Service Status page. You will see there if the service is down.

[wl_navigator]

FIX: Windows 10/11 install error 0x0000005D in VirtualBox

Are you trying to install Windows 10 in VirtualBox and you are getting the following error: Your PC needs to restart. Please hold down the power button. Error Code: 0x0000005D?

This error occurs when you are trying to run or install a version of windows that is not supported by your system’s processor.

To install Windows 10 on your PC, the processor must support the Physical Address Extension (PAE), NX and SSE2 features.

Most of the systems support these features, so if this error occurs it is likely because the NX (No eXecute bit) feature is not activated on the system. You will find this feature as XD (eXecute Disabled) within the BIOS settings.

How can I fix error code 0x0000005D to install Windows 10?

1. Change BIOS settings

  1. You need to reboot your computer.
  2. After reboot, you need to press the F2 key to access the BIOS.
  3. In the BIOS section, select the Advanced feature.
  4. Select the CPU Configuration feature.
  5. Check for the No-Execute Memory Protection option and click on it.
  6. Change this feature to Enabled (by default, it is disabled).
  7. Reboot your system and begin the process of installing Windows 10 in VirtualBox normally.

2. Change settings in Motherboard menu

  1. You need to set up the Base memory to 4096 MB.
  2. In the Boot order section, you need to check the boxes next to the CD/DVD and Hard Disk features.
  3. Switch the Chipset to PIIX3.
  4. Set up the Pointing device feature to PS/2 Mouse.
  5. In the Extended features section, you need to check the box next to the Enable I/O APIC feature.

Find all about the best virtual machines for Windows 10 in this simple guide.


3. Change settings in Display tab

  1. Video Memory has to be set to 256 MB.
  2. Toggle Monitor count to 1.
  3. Go to the Extended features section, check the boxes next to the Enable 3D Acceleration and Enable 2D Video Acceleration features.
  4. In the System tab, navigate to Acceleration menu, look for the Hardware virtualization section, then check the boxes next to the Enable VT-x/AMD-V and Enable Nested Paging features.
  5. Go to the System tab, navigate to the Processor menu, then set the Processor(s) to 4 CPUs (or how many you have in your system) and set the Execution Cap to 100%.
  6. Finally, check the box next to the PAE/NX feature in the Extended features section.

If all these settings are correct, you should be able to fix the error code 0x0000005D and install Windows 10 in VirtualBox.

If you have any other questions or suggestions, don’t hesitate to leave them in the comments section below.

[wl_navigator]

Fix error code 0x90010108 on Xbox One with these steps

Many Xbox One users are recently reporting getting the error code 0x90010108. Assuming that’s your case as well, you are going to need a couple of pieces of information to fix this.

Firstly, there are times when this error is essentially triggered by a Microsoft Server issue. Your console isn’t able to validate your library media due to a server issue. If that’s the case, the only thing you can do is to have patience and let the Microsoft engineers do their job.

However, you may address firmware glitches and OS corruption scenarios. Here is a brief list of solutions that appear to be working for the 0x90010108 error, so don’t postpone applying them.

What can I do when getting 0x90010108 Xbox error?

1. Perform a full reboot of your Xbox One system

reboot Xbox One system

Press and hold the Power button on your console for about 8-10 seconds while the system is on. Do so until the console shuts off. Then, you may hit the same button again and it will start and display the green start-up screen.

This process never erases any of your games or data, so there’s nothing to worry about. If the manual button reboot doesn’t work for any reason, then you may also power cycle it the old-fashioned way.

Quickly power down the console, unplug it, wait for at least 10 seconds, plug everything back in and power it back on. Just cross your fingers and hope the error code 0x90010108 goes away!


2. Hard reset your console

hard reset console

  1. With your console fully turned on, press the Xbox button to open the guide.
  2. Navigate to System > Settings > System > Console Info.
  3. While inside the Console Info menu, select Reset console.
  4. On the Reset your console? screen, choose Reset and keep my games & apps.
  5. Hit the X button and the console will begin the process of resetting itself to the default settings.
  6. As soon as it’s finished, your Xbox One will restart automatically.

If the power cycle method doesn’t work, or it works for a while and the error code 0x90010108 reappears, don’t worry. There are other solutions you may apply next. Hard resetting your console is also an effective fix.

Applying a full reboot means that your data is preserved and this procedure doesn’t have to be any different. You’re about to reset your console’s OS to its factory defaults, but you may keep your games and apps safe.


Xbox One guide won’t open? Don’t worry, we’ve got a quick way to help you out.


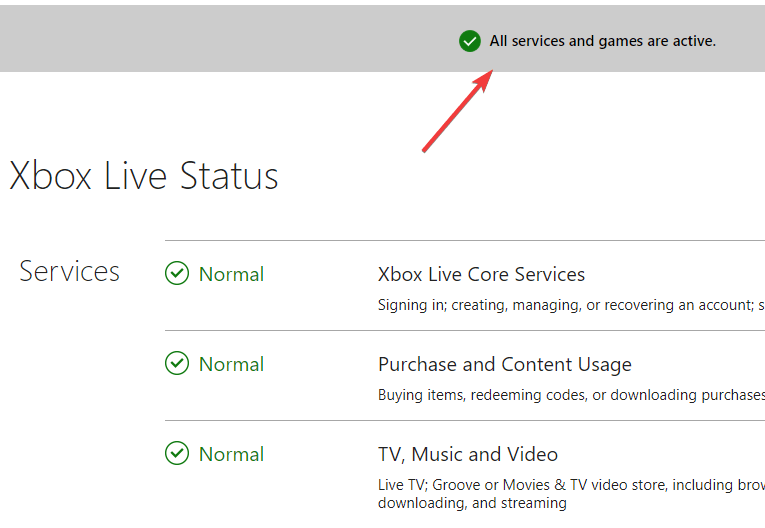
3. Check the Xbox Live Service Status

Xbox Live

  1. At first, go to the official Xbox Live Service Status page.
  2. The page will show if the service is down, as well as the status of your account, Social and Gaming, Xbox TV, Music or Video, Apps, and more.
  3. Make sure all Xbox Live services are labeled Normal.
  4. Depending on the duration of the outage, you can check it every 30 minutes for a new update.

Are you receiving the same error? Then, consider the option of a server issue preventing any of the fixes above from working. To confirm that, check the status of Xbox Live and see if the core services are currently working fine.
Hopefully, one of the solutions above worked for you. If you have any questions or suggestions, don’t hesitate to leave us a comment below!

[wl_navigator]

How to fix c101ab80 playback error on Xbox [EXPERT FIX]

Renting digital movies is something that added another layer of service to the Xbox console. Users can rent the movie from the Microsoft Video app and play it on a big screen via the console.
However, not if the c101ab80 playback error appears. Namely, certain users who rented movies were met with this error and unable to play.

Here’s how one user explained the problem on the Microsoft’s Support forum.

Hi, I rented a movie thought Microsoft video on my xbox and when I try to play it I get the error code c101ab80. Can anyone tell me how I can either play the movie or get my money back? Thank you

Learn how to fix this error by following the instructions below.

What can I do if Xbox is not playing movies?

1: Reinstall the app

  1. Open Home.
  2. Choose My games & apps.
  3. Select the Movies & TV app.
  4. Press the Menu button and choose Uninstall.Xbox c101ab80 Playback Error
  5. Confirm uninstall and reboot your console.
  6. Navigate to Store and choose the Movies & TV section.
  7. Install Movies & TV.

Most users didn’t know they can turn PC into a TV for Xbox. Learn how now


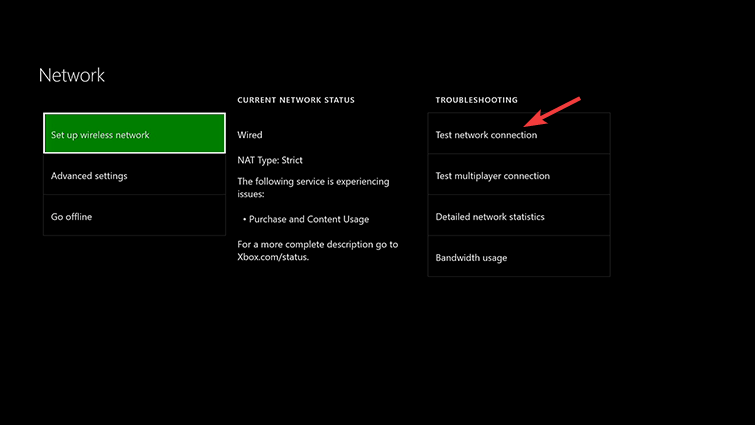
2: Test the Xbox Live services

  1. Press the Xbox button and open System.
  2. Choose Settings.
  3. Select Network.
  4. Open Network settings.Xbox c101ab80 Playback Error
  5. From the Troubleshooting menu, select Test network connection.

3: Delete your profile and re-download it

  1. Press the Xbox button and open System.
  2. Choose Settings.
  3. Select Accounts.
  4. Select Remove accounts.
  5. Highlight your account and remove it.
  6. Reboot your console.
  7. Press the Xbox button and open Sign in.
  8. Choose Add & manage.
  9. Choose to Add new account.
  10. Accept the Terms of Use and choose Privacy options.
  11. Configure your account and try playing rented movies again from the Movies & TV app.

If none of the suggested steps helped you, consider contacting support or asking for a refund.

Fix Access Denied When Editing Hosts File in Windows 10/11

Sometimes in order to fix a certain problem or to block a certain website on your Windows 10 PC, you have to edit the hosts file. Editing hosts file is a relatively advanced procedure, and a number of users reported Access denied message while trying to edit the hosts file on Windows 10.

The hosts file is located in your Windows 10 installation directory, and it’s protected from unauthorized access, but if you need to edit the hosts file, you can avoid “Access denied” message by following one of our solutions.

What can I do if I have no permission to edit hosts file?

1. Run Notepad as administrator

  1. Press Windows key + S, enter Notepad. Right-click Notepad from the list of results and choose Run as administrator.
  2. Once Notepad opens, choose File > Open.
  3. Navigate to C:\Windows\System32\drivers\etc folder and make sure to change Text Documents (*.txt) to All Files. Select hosts and click Open.
    hosts-open
  4. Make the changes you want and save them.

If you use Notepad as your text editor, you need to run it as administrator before you can edit the hosts file. To run Notepad as administrator and to edit the hosts file, do the following:

We have to mention that this solution should work with any other text editor, so if you don’t use Notepad, just run your desired text editor as administrator and you should be able to edit hosts file without any problems.

Alternatively, you can start Command Prompt as administrator and use it to start Notepad and edit the hosts file. To do that, follow these instructions:

  1. Click the Start button, type cmd and select Run as administrator from the results.
  2. Once the Command Prompt opens, enter the following lines and press Enter after each line:
    • cd C:\Windows\System32\drivers\etc
    • notepad hosts
      cmd-notepad
  3. Notepad will now open the hosts file, and you should be able to make the necessary changes.

2. Copy the hosts file to a different location

  1. Go to C:\Windows\System32\drivers\etc and locate hosts file.
  2. Copy it to your Desktop, or any other folder that you can easily access.
  3. Open the hosts file on your Desktop with Notepad or any other text editor.
  4. Make the necessary changes and move the hosts file back to C:\Windows\System32\drivers\etc directory.

3. Make sure hosts isn’t set to Read-only

  1. Go to C:\Windows\System32\drivers\etc.
  2. Locate the hosts file, right-click it and choose Properties from the menu.
  3. Go to the Attributes section and make sure the Read-only option isn’t checked.
    read-only
  4. Click Apply and OK to save changes.

Now you should be able to make the necessary changes to the hosts file. After you’re finished, it might be a good idea to set hosts file back to Read-only mode again.

Sometimes, all your documents are read-only, including your hosts file. If you want to change them properly, you can find more info about that in this quick guide.

4. Change the security settings for hosts

  1. Press Win + E to open File Manager and navigate to C:\Windows\System32\drivers\etc.
  2. Locate hosts file, right-click it and choose Properties.
  3. Navigate to the Security tab and click the Edit button.
    hosts-edit
  4. You should see the list of users and groups on your PC that have access to the hosts file. If your user name or group is on the list, click it and make sure that it has Permissions set to Full control. If your user name isn’t on the list, click the Add button.
  5. Enter the user name or the group name in the Enter the object names to select the field and click Check Names and OK.
    add-new-user
  6. A new user or group will be added to the list. Now you need to select the newly added group or user and check the Full control option below.
  7. Click Apply and OK to save changes.

5. Use the hidden administrator account

  1. Click the Start button, type cmd and select Run as administrator from the results.
  2. When Command Prompt opens, enter net user administrator /active:yes and press Enter. This will activate the hidden administrator account.
    cmd-admininistrator-enable
  3. After you have activated the administrator account, you can switch to it, and try editing the hosts file.

Most system files are protected, therefore you need an administrator account in order to make changes to them. Since hosts are one of the system files, it requires an administrator account in order to edit it.

If you don’t use an administrator account, you can enable a hidden administrator account and use it to make the changes to the hosts file.

After you made the changes to the hosts file, you can come back to your original account, start Command Prompt as administrator again and enter net user administrator /active:no to disable the hidden administrator account.

Here are some more examples of this problem:

  • Can’t edit hosts file Windows 10 – If you can’t edit the hosts file in Windows 10, it’s probably because you don’t have required permissions. We’ll explore that problem here
  • Hosts file being used by another process  – This is another common issue that prevents users from editing the host file.
  • Don’t have permission to save hosts file Windows 10 – This is the same case as the first error message.

The hosts file is a system file, so it’s protected, and usually, it’s not advised that you edit it, but if you decide to do so, it’s always good to know how to reset hosts file to default in Windows 10 in case anything goes wrong.

If you have any more questions, feel free to leave them in the comments section below.

Slack Won’t Update: How to Check and Install Updates

Seeing that Slack won’t update is no joy. It doesn’t appear to be a widespread problem, yet such cases do occasionally.

The point is that the company is gradually rolling out various updates to ensure your experience gets a lot snappier and free of any broken features. And when Slack is not updating, you will miss out on a few of these. So, keep reading to find out the fixes!

What can I do when Slack won’t update?

1. Check your Internet connectionSlack will not update check Internet

  1. Sign in to your Slack workspace.
  2. Visit https://my.slack.com/help/test.
  3. Now, note the results for WebSocket (Flannel [Primary]) and WebSocket (Flannel [Backup]).
  4. Here you should see a checked circle icon.

The Slack client for Windows and Mac automatically checks for updates from time to time. Therefore, a reliable and fast Internet connection is required.

Your job is to make sure it has one or correct the issue if you see the warning icon with the error message, Slack does not connect to the Internet.

2. Manually look for Slack updates

  1. Launch Slack.
  2. Click the hamburger menu at the top left, choose Help, and click on Check for Updates.check for updates to fix slack won't update

If you’d like to skip the waiting and manually update Slack, there’s a dedicated option. Remember, the above steps are for the Windows Slack client.

3. Keep track of the updates

Older versions of the Slack desktop app can result in connection issues and bugs of all kinds but don’t overthink it.

Slack usually announces updates that are rolling out gradually over a few weeks, so venturing on a wild goose chase and trying to find one that doesn’t even exist isn’t the best thing to do.

Make sure instead to keep track of the updates by heading over to the Updates and Changes page for each of its clients. Here’s where you may find them, depending on which client you’re using.

Updates bring several improvements and make bugs less frustrating, so it isn’t pleasant to see that sometimes Slack won’t update. If that’s the issue you’re also dealing with, try the above tips as they work every time.

Before you leave, find out the best apps that support encrypted messages.

Do tell us if you have any further questions or suggestions in the comments section below.

FIX: Microsoft Teams Live Events not available

Microsoft Teams is one of the most popular and well-recognized collaborative tools used today. It encompasses everything you would expect from such a service, ranging from instant chat, file transfer, video conferences, and more.

One other neat feature that has arrived for some time now is something called Live Events.

With Teams live events, users in your organization can broadcast video and meeting content to large online audiences. So basically they, are video conferences with a much larger audience.

Unfortunately, plenty of users have reported that this feature isn’t available to them yet. More precisely, they cannot broadcast Live Events to public audiences. Either it doesn’t appear at all where it should be, or the interface menu is greyed out, and therefore unselectable.

I just saw that one feature I’ve been really anticipating the arrival of, Live Events, is now available in Teams as a ‘preview’, however the option for a “Public” event is grayed out with the disclaimer that some settings are disabled by the IT administrator. I am the IT administrator, but I can’t find how to change the setting, if I can at all during preview.

Apparently, the problem stems from permission that needs to be given by the company’s IT administrator.

How can I enable Live Events in Microsoft Teams?

Set up the Live Events Policy

The audience for your Live Events needs to be set from the Admin Center, otherwise, common users will only be able to choose from a restricted pool of options.

Thus, follows these steps to enable the public viewing of Live Events:

  1. Go to the Microsoft Teams & Skype for Business Admin Center
  2. Select Meetings from the left menu
  3. Choose Live Event Policies
  4. Select Atendee Visibility Mode
  5. Choose Everyone

Public Live Events
By enabling this feature, your Live Events will be available to the general public, meaning even users that aren’t part of your network.

All they need to do is join the live event, and then the program will try launching Teams first if they already have it installed. If they don’t, they’ll have the option to join online and then either to sign in or join anonymously.

One thing you need to remember is that, for those that join anonymously, their video feed fills the entire screen, and they won’t see the Teams navigation bar on the left.

Once these steps have been followed, any user that is part of your network and has all the appropriate rights will be able to broadcast Live Events to the general public.

Do you think Live Events is useful in Microsoft Teams? Let us know in the comment section below.

  1. Go to Meetings and select Schedule a new meeting
  2. Go to the top left-hand corner drop-down menu and add a New live event.
  3. Then fill in the required information about the event details and that’s it.
  • Can you use Microsoft Teams for webinars?

Thanks to the Live Events feature, Microsoft Teams is now a reliable webinar solution. All you need to do is schedule a live event and you’ll then be able to connect to as many people as possible.

  • Where are Microsoft Teams live events recordings stored?

Once the broadcast is over, Microsoft Teams live events recordings are available in the meeting details. Event owners can then download the recordings and upload them to Microsoft Stream to share them with an ever greater number of persons.

[wl_navigator]

Microsoft’s M12 venture fund adds fraud and abuse prevention platform Arkose Labs to portfolio

Microsoft’s M12 Venture arm announced yesterday that it was investing in Arkose Labs, a San Francisco-based startup developing a fraud and abuse prevention platform for protecting web and mobile apps. The company was previously backed by PayPal, and it’s already counting Microsoft, GitHub, and EA as its customers.

Arkose Labs was founded in Brisbane, Australia by game designer Matthew Ford, whose experience in games can be felt in the product. Arkose Enforce, the company’s challenge response mechanism uses unique visual puzzles that can’t be solved by machine vision algorithms. You can see below how Arkose Lab’s Enforcement Challenge currently works on Microsoft.com.

“Having worked closely with Microsoft as a customer for a number of years, we know that addressing fraud long-term for the broader ecosystem is a goal we share. They are a fantastic partner, and they recognize the major opportunity we have to address organized fraud and help businesses and consumers around the globe,” said Arkose Labs Founder and CEO Kevin Gosschalk.

Fix 0x00028002 network error with these solutions

The 0x00028002 error seems to be affecting a lot of people when trying to connect to a local network. This often happens to those who tend to put their computer into sleep mode without doing regular startups.

Common glitches aren’t though the only reasonable explanation for this network error and the list further extends to outdated wireless adapter drivers or faulty routers. In case you are not aware of the process to resolve any of these, we can only encourage you to follow the solutions that are given below.

What can I do if getting 0x00028002 network error?

1. Delete the wireless network profile

delete the wireless network profile
  1. Head into Settings > Network & Internet to get started.
  2. Then, select the Wi-Fi category.
  3. Click the Manage known networks link from the right side.
  4. Under Manage known networks, you’ll see a list of every Wi-Fi network you’ve connected to. Click the network you want to delete.
  5. Click Forget. The wireless network profile will be deleted next.
  6. Find the wireless network that you want to forget by using the search, sort, and filtering options.
  7. Click it and then click Forget.

Several affected users have confirmed that the issue was resolved after they followed a quick guide on how to forget the wireless network. You may do the same, so apply the steps above, or if you’d like, type netsh wlan show profiles in the Command Prompt to manage and delete wireless network profiles.

After establishing the connection again, the temp files causing this glitch should be cleared and you should no longer be bothered by the 0x00028002 network error.

2. Update the wireless adapter driver

  1. Press the keyboard shortcut Windows Key + R to open up a Run dialogue box. 
  2. Type devmgmt.msc and press Enter to open up Device Manager. 
  3. Once the User Account Control window pops up, click Yes to grant administrative privileges.
  4. You need to scroll down through the list of installed applications and expand the drop-down menu associated with Network Adapters. 
  5. Right-click your Wireless adapter driver and choose Update driver. 
  6. Click Search automatically for drivers
  7. Assuming that a new driver version is found, follow the instructions to complete the procedure.
  8. Restart the computer when this happens. 

If setting up the network again was no good, maybe it’s time to update the wireless adapter driver to the latest version. Your wireless network disconnecting regularly or running very slow are signs you might have missed up to now. 

This can’t go on forever, so installing the most recent driver for your device is usually the best bet since it has all the latest fixes for your device and removes network errors such as 0x00028002.

If this updating process seems to take too long, you can always rely on automated driver tools for any task related to your PC drivers.

You can therefore install, repair or update old drivers efficiently without getting system errors because of drivers incompatibility.

⇒ Get Fortect Driver Updater

3. Perform a system restore

restore point
  1. Start your computer and log on as an administrator.
  2. Click the Start button and select All Programs > Accessories > System Tools.
  3. Click System Restore.
  4. In the new window, select the Restore my computer to an earlier time option.
  5. Click Next.
  6. Select the most recent system restore point from the On this list, then click a restore point list.
  7. Click Next on the confirmation window.
  8. Lastly, maintain the changes by restarting your computer.

Taking your computer back to an earlier date could also do the trick when it comes to getting rid of the 0x00028002 error. You just need to select a restore point from a list (see restore points as snapshots of your Windows system files, program files, registry settings, and hardware drivers) and then restart.

Keep though in mind that the procedure removes any software and hardware updates installed from that point to the present. Some programs and certain hardware may now work and require reinstallation after the System Restore operation is complete.

No luck with any of the solutions mentioned above? You should also do a check on all the cables on the modem and router to see if one is loose. Also, consider a faulty router as the core of this 0x00028002 network error.

Therefore, to confirm a hardware router issue, try connecting the Ethernet cable directly to your affected machine and see if the problem is still occurring.

The steps above should help get you back on your feet in no time. However, if you happen to know any other solutions for the issue, share them with us by using the comments area below.

How to join the Microsoft Teams developer preview on desktop and mobile

Microsoft Teams is always getting updated, but what if you want early access and to play with new areas of Teams before everyone else? Much like the Windows Insider or Xbox Insider Program, you can enroll Microsoft Teams into a developer preview to get early access to new features. Here’s how.

Some important notes

Before we get into the details, we want to mention that this developer preview applies to both the Teams web app, as well as the desktop app on MacOS, Windows, and Linux. You even can opt your iOS and Android versions of Teams into the developer preview, too. However, opting one instance of Teams into the developer preview does not opt all instances into it. If you want all your devices on the Teams developer preview, you’ll need to do each one separately.

We also want to warn you that features in the developer preview may not be complete and could be subject to change. Any new features you see are mainly provided for beta-testing only, and might not make it to the regular version of Teams. It’s also worth noting that enabling the developer preview will only affect your own Microsoft Teams app. You won’t need to worry about affecting your entire organization.

On Windows 10, Linux, MacOS, and the web app

To get started with enrolling in the Teams developer preview on Windows 10, MacOS, and the web, you’ll want to tap or click on your profile picture in the upper right corner of the screen. Once done, scroll down with your mouse and click the About option. You’ll then want to click developer preview on the bottom. Read the terms, and then click the purple switch to developer preview button.

This will then cause Teams to quit, and refresh.  You’ll be forced to login once again, so sign in with your usual credentials. You can then search for updates by clicking your profile picture once more and then clicking Check for updates. Teams will check for updates in the background and prompt you to restart the app when it is ready to install the latest developer preview.

On iOS and iPad OS

To enroll Teams in the Teams developer preview on iOS and iPad OS, you’ll want to tap the hamburger menu on the left side of your screen. You then need to tap on Settings and click About. You can then switch the toggle switch on the bottom of your screen for Developer preview to the “ON” position. You’ll want to accept the terms, and then click Switch on the top right of your screen. You’ll then have to restart the app.

On Android

The process of enrolling Teams in the developer preview on Android is quite similar to iOS. You’ll want to tap the hamburger menu in the top left corner of the screen. You’ll then want to tap Settings and then About. You can then agree to the terms and click Switch and have the app restart.

Final notes, and turning the developer preview off

In the event that you want to exit the developer preview, it’s pretty easy to do so. There is no need to uninstall your app or to restart from fresh. You can just use the same menu as before, and follow the steps to turn it back off.

To keep up to date with all the latest Microsoft Teams information, and read our weekly features, we suggest for you to check out our news hub. We also remind you that you can check this Microsoft article to see all the new features in the Teams developer preview.

Legacy Control Panel on Windows 10 could soon be hidden in favor of new Settings app

For many years now, Microsoft has been continuing to include two different Settings experiences on Windows 10. If the new simplified Settings app is now front and center, while the legacy Control Panel can still be found in the Start Menu under Windows System > Control Panel.

Many power users likely prefer to use the Legacy Control panel with its Windows 7-style icons and expansive settings options. However, according to recent findings from Microsoft MVP Rafael Rivera (via Windows Central), Microsoft could be planning to hide the Legacy Control panel in future versions of Windows 10.

Rivera, a “reverse engineer by night,” uses a tool he wrote called Mach2 to scan Feature switches in Windows 10 preview builds. Rivera’s scan of the preview build 19587 published last week revealed inactive feature IDs related to the Legacy Control Panel (HideSystemControlPanel, SystemControlPanelFileExplorerRedirect, and SystemControlPanelHotkeyRedirect), suggesting that the app may soon become a hidden feature on Windows 10 PCs.

Over the years, Microsoft has beefed up the Windows 10 Settings app to integrate more options from the legacy Control Panel, though the Windows 7-style app can still be useful for power users. The company has yet to announce any change regarding this legacy app, so it’s probably not going away anytime soon.

As you may recall, a previous attempt to replace the beloved Paint app with the UWP-based Paint 3D didn’t go so well, and the backlash forced Microsoft to do a 180°. After years of neglect, the company also started updating legacy Windows apps such as NotePad or Task Manager. Hiding the old Control panel may now look like a weird choice, but the presence of two different settings apps on Windows 10 has also been a regular point of criticism. Do you think Microsoft would be right to hide the legacy Control Panel in favor of the new Windows 10 Settings app, or do you think this would be a mistake? Sound off in the comments below.

Microsoft donates box lunches, masks, will donate more, Brad Smith says

Microsoft President Brad Smith tweeted out that Microsoft will donate 30,000 box lunches for local families in need, 35,000 bottles of hand sanitizer, and 240,000 masks to Washington state medical facilities to combat the COVID-19 (coronavirus) pandemic.

Microsoft has already taken steps to help stop the spread of coronavirus by closing all of its Microsoft Store retail stores and having most employees work from home. In addition, Microsoft Bing provides a resource hub showing the latest COVID-19 news, with an interactive map showing all of the latest information, including active coronavirus cases, fatalities, and cases in which people recovered from the virus.

Microsoft also teamed up with the CDC to make their Coronavirus Self-Checker Tool, powered by Microsoft Azure, available to everyone. In a previous tweet, Smith noted that Microsoft worked with the WA Department of Health to secure supplies for medical staff, including medical protective suits, medical skull caps, infrared thermometers, and 15,000 protection goggles.
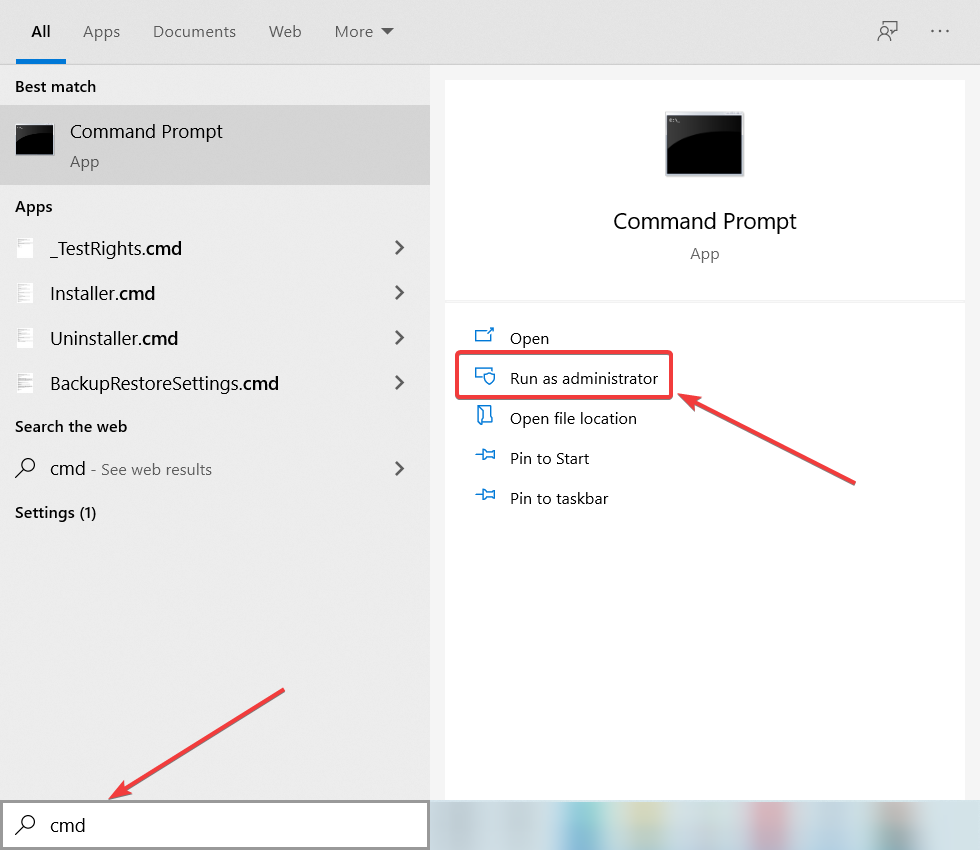
What else could Microsoft do to help fight the spread of the coronavirus? Let us know in the comments.

FIX: Broadband modem is experiencing connectivity problems

When talking about Windows 10 based systems we are first thinking about portable devices like laptops and tablets.

Well, whether we are referring to the same or to classic computers, nowadays using an Internet connection is a must as everything we do is related to online activity.

Thus, almost every time you are using your Windows 10 device an Internet connection must be enabled so that you can access online content, use social media platforms, check your email, and so on.

But in some situations, you might experience issues with your network features in terms that you can’t manage to use your internet connection.

One of the most frustrating problems reported by Windows 10 users is referring to the Your broadband modem is experiencing connectivity error message.

This issue is usually caused by your router so you need to investigate the router or broadband modem issues in order to address the problems and for being able to enable internet access once more.

So, by checking the guidelines below you can learn how to easily fix the error in Windows 10.

Your broadband modem is experiencing connectivity problems error messages can be problematic, and in this article, we’re going to cover the following issues:

  • Your broadband modem is experiencing connectivity issues Windows 10
    • This error message will prevent you from accessing the Internet on your PC.
    • Keep in mind that this error can appear on almost any version of Windows, but it can be easily resolved.
  • Connection between access point and Internet is broken
    • This is another relatively common problem related to your modem.
    • If you’re having this problem, be sure to try some of our solutions.
  • Broadband modem not working
    • This is a relatively common problem, and in order to fix it, it’s highly recommended to check your modem settings.
    • If that doesn’t help, you might have to restart or reset your modem to fix the problem.

How do I fix broadband modem connectivity issues?

1. Perform a System Restore

  1. In Search bar enter system restore.
  2. From the list of results choose Create a restore point.
  3. When System Properties window opens, click on System Restore button.
    Your broadband modem is experiencing connectivity issues Windows 10
  4. Select Choose a different restore point and click on Next.
    Your broadband modem is experiencing connectivity issues Windows 10
  5. If available, check Show more restore points.
  6. Now select the desired restore point and click on Next.
    Connection between access point and internet is broken
  7. Follow the instructions on the screen to complete the restore process.

We all know that there is a general problem when talking about Windows 10 and its official updates. Well, one of these updates might be the cause why you are experiencing the error message.

So, first of all you should try to remove the most recent update in order to restore your system. Once you restore your system, the problem should be fixed and your modem will start working again.

If you don’t have a restore point ready or if it fails to restore your system, unfortunately, you are back to square one.

However, it doesn’t have to be that way because you can also fix any issues with your system by using a dedicated third-party repair tool.

These kinds of tools are easy to use and they will fix your problems automatically with just a few clicks from our part.

2. Check your antivirus

Sometimes Your broadband modem is experiencing connectivity problems error can appear due to your antivirus software.

Certain antivirus applications can interfere with your operating system and cause this problem to occur.

To fix the issue, it’s advised to disable your antivirus and check if that solves the problem. If your antivirus is the problem, you might want to uninstall it.

There are several ways to do that, but the best way is to download the dedicated removal tool from your antivirus developer.

Many antivirus companies offer these tools for free, so feel free to download one for your antivirus.

After you uninstall your antivirus, check if the problem still appears. If not, you might want to consider switching to a different antivirus solution.

There are many great antivirus tools that will deliver support for connectivity issues, so do not hesitate on safeguarding and choose the best antivirus programs out there.

3. Set your router as WAP

If you’re getting Your broadband modem is experiencing connectivity problems message, the problem might be related to your router.

Several users reported that they fixed the issue after setting their router as WAP.

This is a bit advanced solution, so before you make any changes to your router, we strongly advise checking your router’s manual for detailed instructions.

After setting up your router as WAP, restart it and check if that solves the problem.

Few users reported that this solution worked for them, so feel free to try it out.

4. Check your firewall settings

  1. Open Control Panel.
    • To do that, press Windows Key + S, enter control panel, and select Control Panel from the list.
  2. When Control Panel opens, select Windows Defender Firewall.
    Your broadband modem is experiencing connectivity issues Windows 7
  3. Once the Windows Defender Firewall window opens, in the left pane click on Advanced settings.
    Connection between access point and internet is broken
  4. From the left pane select Windows Defender Firewall.
  5. In the right pane check if Outbound connections that do not match a rule are allowed setting is enabled for Domain and Private profiles.
  6. If not, click on Windows Defender Firewall Properties.
    Broadband modem not working
  7. Now click on Domain Profile tab and set Outbound connections to Allow.
    Your broadband modem is experiencing connectivity issues Windows 10
  8. Navigate to Private Profile tab and set Outbound connections to Allow.
  9. Click on Apply and OK to save the changes.
    Connection between access point and internet is broken

According to users, Your broadband modem is experiencing connectivity problems error can appear due to your firewall. To fix the problem, you need to find Outbound connections that do not match a rule are allowed setting and enable it.

After making these changes the issues with your router should be resolved.

5. Update your network driver

  1. Press Windows Key + X to open the Power User menu.
  2. Now select Device Manager from the list.
    Broadband modem not working
  3. When Device Manager opens, locate your network adapter, right-click it and choose Uninstall device from the menu.
    Your broadband modem is experiencing connectivity issues Windows 8
  4. When the confirmation menu appears, click on Uninstall.
    Connection between access point and internet is broken

If you’re getting Your broadband modem is experiencing connectivity problems error message, you might be able to fix the issue by updating your network drivers.

To do that, simply visit your motherboard or network adapter manufacturer’s website and download the latest drivers for your device. Once you install the driver, the problem should be completely resolved.

Few users are also recommending reinstalling your network driver in order to fix this issue. 

After you uninstall your driver, restart the PC. Once your PC restarts, Windows will install the default driver and the problem should be resolved.

If needed, install the latest driver for your network adapter and check if that solves the issue.

According to users, the problem might be your nForce drivers, but after uninstalling them the issue should be completely resolved.

Updating drivers manually can be very tricky for most users and it can be very easy to get it wrong so we recommend using a dedicated tool to do that automatically.

The solution recommended below is very light and easy to use and it updates and repairs your drivers in a single action and record time.

⇒ Get Fortect Driver Updater

6. Check your Wi-Fi Adapter

According to users, Your broadband modem is experiencing connectivity problems error message can appear due to problems with your Wi-Fi adapter.

To fix the problem, you need to check your Wi-Fi settings and make sure that Microsoft Network Adapter Multiplexor Protocol is enabled.

Few users reported that this error started occurring because this protocol wasn’t enabled. If the protocol is disabled on your PC, be sure to enable it once again.

Now you’ll be presented with a list of options. Select Protocol from the list and the issue should be resolved.

7. Use Command Prompt

  1. Press Windows key + S, type cmd, and select Run as administrator to open Command Prompt with full privileges.
  2. When Command Prompt starts, run the following commands one by one:
    • ipconfig /release
      ipconfig /all
      ipconfig /flushdns
      ipconfig /renew
      netsh int ip set dns
      netsh winsock reset

According to users, you might be able to fix Your broadband modem is experiencing connectivity problems message simply by using Command Prompt.

After running all these commands, close Command Prompt and check if the problem still persists.

8. Restart your router

If you’re still getting Your broadband modem is experiencing connectivity problems error, you might be able to fix it simply by restarting your router. To do that, just press the power button on your router to turn it off.

Wait for 30 seconds or more and press the power button again to turn your router on. Now, wait while your router boots. After your router boots, check your PC and see if the problem still appears.

9. Reset your router

In some cases, Your broadband modem is experiencing connectivity problems error message can appear due to your router’s configuration. To fix this issue, you need to reset your router.

There are several ways to do that, and one of the easiest ways is to log in to your router and look for Reset section. You should be able to reset your router by clicking the Reset button.

Keep in mind that you might have to use administrative login to access this option.

To see how to properly reset your router, it’s highly recommended to check your router’s instruction manual for detailed instructions.

If you can’t find the Reset option in the router’s configuration, you can reset the router simply by pressing and holding the hidden Reset button on your router.

Simply press and hold this button for a couple of seconds and your router will revert to the default configuration.

Keep in mind that you’ll need to configure your Wi-Fi network and other settings again if you choose to reset your router to default.

By following these guidelines, you can fix the broadband modem connectivity issues in Windows systems.

If you are still experiencing network issues, don’t hesitate and point that out during the comments field from below and we will try to help you as soon as possible.

FIX: Microsoft Teams can’t find contacts

If you work in a group environment and need to constantly stay in contact with others, then you will need the right tool for the job. One great solution for staying in touch with a workgroup is Microsoft Teams.

This unified platform supports all the features that you may need, from instant chatting to file transfers and video hosting.

Unfortunately, it is still plagued with some bugs and issues. For example, plenty of users have been complaining on the official forums that Microsoft Teams is incapable of syncing all of their contacts from other platforms, especially Outlook.

When I add a contact under My Contacts in Outlook, in the past Skype for business would lookup against this list for Skype Call, email integration etc, Since Teams replaced SFB, I am not seeing any new contacts I have added in Outlook, in Teams.   

This is a well-known issue that has been with Microsoft Teams for some time. Unfortunately, there is no direct solution to this problem.

However, a workaround does exist, and while it may take a bit of extra time, it will save you a few headaches in the long run, especially if you own hundreds of contacts.

How can I find all of my contacts on Microsoft Teams?

1. Use a third-party service

There are several online services that offer the possibility of connecting collaboration tools between each other.

Zapier is one such service that allows you to do this in a matter of minutes and without a single line of code, letting you connect Microsoft Outlook and Microsoft Teams, with as many as 20 possible integrations.

Besides Outlook and Microsoft Teams, it is also one of the many ways you can also connect other services as well, such as:

2. Import contacts to Skype for Business, then to Teams

It would seem that Microsoft Teams has an issue with importing contacts from Outlook. However, it doesn’t seem to have this issue with contacts from Skype for Business.

Thus, one workaround solution would be to first import all of your contacts from Outlook to Skype and then import them from Skype to Microsoft Teams.

Unfortunately, importing contacts to Skype from Outlook can be daunting, but at least it is possible, unlike directly importing from Outlook to Microsoft Teams.

Closing thoughts

The issue of importing contacts from other services to Microsoft Teams has been around for some time already. Unfortunately, Microsoft doesn’t seem to be giving any signs that this issue will be fixed any time soon.

Until then, your only choice is to either use third-party services to connect the two apps or import your contacts into services that are compatible with Teams first.

Did you find this article useful? Let us know in the comment section below.

[wl_navigator]

Error 651: Connection Failed on Windows 10 [Full Fix]

If you are using a wireless connection or a cable Internet connection and you upgraded to Windows 10, you might experience some issues regarding the Connection Failed error 651 that prevents you from using your Internet connection as you should.

What is error 651 in Windows 10? This is an error usually caused by a Registry issue and will prevent the tool from recognizing your router or hub device.

If you are using other devices to connect to your wireless Internet connection, they will work. This is mainly an issue affecting your Windows 10 system.

You don’t have to worry anymore – in this guide, we will list the steps to follow in order to fix error code 651. This will only take you a couple of minutes of your time, so don’t hesitate to follow the instructions listed below.

How do I fix Connection Failed error 651?

1. Enter Safe Boot

  1. You will need to restart your Windows 10 and log in to your Safe Mode with the networking features in order to apply the following changes.
  2. While in Safe mode you need press and hold the Windows key + R keyboard shortcut.
  3. A Run window will appear.
  4. Write in the Run window the following command MSCONFIG.
  5. Press the Enter button on the keyboard.
  6. Now another window will show and you will need to left-click on the Boot tab situated in the upper side of that window.
  7. In the topic Boot options, you need to left-click on Safe boot.safe boot windows pc
  8. Check the box next to Network under the Options section of the page.
  9. Reboot your Windows 10 device and check if you still have the Connection Failed error 651 appearing in your system.

2. Disable all startup services

  1. Press and hold the Windows button and the R button.
  2. In the Run window that appeared write MSCONFIG.
  3. Press the Enter button on the keyboard.
  4. Left-click on the Boot tab.
  5. Uncheck the box next to Safe mode.
  6. Left-click on the General tab.
  7. From the features, you have there you need to go to Selective Startup.
  8. Uncheck the features to clear the selections.
  9. Left-click on the Services feature and left-click again on the Disable all button.disable startup programs
  10. Left-click on the Startup tab and disable each item you have on that list.
  11. Reboot your Windows 10 device.
  12. After the device reboots go again to the MSCONFIG window as you did above.
  13. Left-click on the Services tab.
  14. Left-click on the Hide all Microsoft services feature.Hide all Microsoft services
  15. Left-click on the OK button you have on that window.
  16. Reboot your PC again.
  17. Check to see if you still have this issue.
  18. If you don’t have this error anymore it means that one of your startup apps is causing the issue.
  19. If you still have these issues go back to the MSCONFIG window.
  20. Left-click on the General tab.
  21. Left-click on the Normal Startup feature.
  22. Choose to Reboot the Windows 10 device.

3. Rename the rasppoe.sys file

  1. When your Windows 10 powers up on the start screen, you need to left-click on the Desktop icon.
  2. While in your desktop you need to double click on the My Computer icon to open it.
  3. Double click on the C:/ drive to open it.
  4. In the C:/ drive double click on the Windows folder to open it.
  5. In the Windows folder find the System 32 folder and double click on it to open.
  6. In the System 32 folder double click on the Drivers folder to open it.
  7. In the Drivers folder, you will need to search for the rasppoe.sys file.
  8. Rename that file rasppoe.sys.
    Note: You can rename the file rasppoe.sys_backup so that you will still have it when you are done.rename rasppoe.sys windows 10
  9. Download a new rasppoe.sys file from the Internet and copy it in that specific folder where you had the old one.
  10. After you download this file you should unzip the contents and then copy it to your Drivers folder.
  11. Reboot the Windows 10 device and see if you still have this issue.

Note: If you want to put the old rasppoe.sys file in the Drivers folder you can delete the one you downloaded and rename the old one you saved above. Rename the rasppoe.sys_backup file to rasppoe.sys and reboot the device.

4. Run the Network Troubleshooter

  1. Go to Start > type control panel > open Control Panel.
  2. In the search box, type troubleshoot > select Troubleshooting > click on View All to list all the troubleshooting tools.View All
  3. Select and run the following troubleshooters: Incoming connections, Internet Connections, and Network Adapter. fix error 651 windows pc
  4. Restart your computer and check your Internet connection.

If your Internet connection remains unavailable, try running the built-in Network troubleshooter. You can launch it from the Control Panel or the Settings page.

To run the Internet Troubleshooter, you may also go to Settings > Update & Security > Troubleshooter and select Internet Connections.

5. Reset TCP/IP

  1. Type cmd in the search box > right-click on Command Prompt > select Run as administrator.
  2. Enter the netsh int ip reset reset.log command > wait for the scanning process to complete.
  3. Restart your computer and check your Internet connection.

If the problem persists, try resetting your TCP/IP. Here are the steps to follow.

If you’re having trouble accessing Command Prompt as an admin, then you better take a closer look at this detailed guide.

6. Update your network drivers

  1. Launch Device Manager > locate your network adapter driver > right-click on it.
  2. Select the option Update driver.update network adapter driver
  3. Restart your computer and check your Internet connection.

Outdated network drivers may also trigger error 651. To fix the problem, make sure that you’ve installed the latest network drivers on your machine.

⇒ Get Fortect Driver Updater

7. Disable autotuning

  1. Launch Command Prompt as Administrator.
  2. Enter the Netsh interface tcp set global autotuning=disabled command > hit Enter > test your connection.

AutoTuning is a feature that’s meant to improve the performance of apps and programs relying on TCP. However, in some cases, this tool may do more harm than good, and disabling it may help you fix error code 651.

So you now know how to fix your Windows 10 error 651. Please write us below if this article was helpful and if it fixed the Connection Failed error in Windows 10.

Be sure that there are several procedures that can help you solve the Internet connection errors you might be facing these days.

Take a closer look at our Windows 10 errors hub as well as it is filled with more useful guides.

A new Yu-Gi-Oh! video game is now live on Microsoft’s Xbox One consoles

A new video game based on the hit Yu-Gi-Oh! anime series is now live and ready to play on Microsoft’s family of Xbox One consoles.

Yu-Gi-Oh! Legacy of the Duelist : Link Evolution is a digital card game that supports solo play and online multiplayer matches for one versus one card battles. The game features over 10,000 cards from the Yu-Gi-Oh! series and tutorial for those new to the franchise.

Here’s the official game description and trailer:

It’s Time to Duel!

Experience over 20 years of Yu-Gi-Oh! history with Yu-Gi-Oh! Legacy of the Duelist: Link Evolution!

Build your Deck from over 10,000 cards and take on the most iconic Duelists from the Yu-Gi-Oh! universe. Relive the stories from the original animated Yu-Gi-Oh! series through Yu-Gi-Oh! ARC-V and challenge the newest generation of Duelists from the virtual world of Yu-Gi-Oh! VRAINS!

  • New Link Monster cards, not only changing the way how seasoned Duelists play their cards, but where they play them
  • Faithful to the TV show, relive moments and Duels from every version of the animated series
  • New Duelists can learn the Yu-Gi-Oh! TRADING CARD GAME with the beginner’s tutorial
  • Take on the roles of the animated series villains with Reverse Duels
  • Compete in Battle Pack Sealed Pack and Draft play!
  • Includes all the downloadable content from the previously released Yu-Gi-Oh! Legacy of the Duelist

Are you a Yu-Gi-Oh! fan? Let us know what Yu-Gi-Oh! game you’d recommend in the comments below and then follow us on Pinterest for more Xbox gaming content.

Fix: Microsoft Teams Files Are Not Visible

If you work in an office environment, you probably know just how important communication is. You can discuss topics with your teammates faster and easier, and depending on what tools you use, job assignments can be made easier as well.

One great tool that greatly simplifies the way we communicate in an office environment is Microsoft Teams.

It is part of the Microsoft Office suite, but it can also be used separately from it, as it is one of the few services that are actually free of charge.

However, it isn’t free from bugs and issues, as users have been reporting on official forums that they are having problems seeing files within Microsoft Teams:

[…]What I find odd is that the files for the O365 group don’t show up in the Team file area. Shouldn’t they since I linked the two together? Would seem silly to go to teams for conversations but then have to go back to your group to see the files
And to make it even more confusing – if I’m in teams – and I pick Files from the left hand menu – I can see all of the Group files that we put out there. But if I pick teams from the left menu and go into the channel I created for the group – and select Files from within the channel – I don’t see any[…]
.

As a summary, users that belong to a specific channel cannot see certain files. While this problem may seem rather serious, it is merely a matter of folder positioning.

In this step-by-step guide, we will show you how to avoid such problems and make files visible in Microsoft Teams again.

How can I make files appear in Microsoft Teams again?

1. Rearrange the files and folders in SharePoint

As mentioned above, solving this issue is just a matter of understanding how Microsoft Teams works and how folder positioning can affect it.

First of all, Microsoft Teams file transfers and hosting services are supported by SharePoint. You’ll also notice in your TeamsFromLeftMenu picture that the file view says General on it.

This is because that is represents the file folder for your General channel, and the more you create channels, the more folders appear in SharePoint.

If you examine your SharePoint, you’ll notice that there are folders representing all channels that Microsoft Teams has. You can see your files in Files view because you are set to see all the available files, not just the ones for a specific Channel.

Moving the files into the channel’s folder to avoid issues like the ones mentioned above. Now, anyone part of that channel or group will be able to see the files that have been shared.

2. Wait for the permissions to implement themselves

People outside of a Group cannot see the content of a channel without being part of it first. However, it is a known fact that giving someone permission to join a Group takes some time to commence.

As such, your only option is just to wait until Microsoft Teams processes your request.

By knowing these basic things, you and your teammates should be able to see all the files that have been shared in Microsoft Teams.

Did you find this article useful? Let us know in the comment section below.

  • Create a library, give all the team members permission, and add the library as a tab.
  • Open the file in SharePoint and hit the Share button to create the link. Go to Microsoft Teams, add a new tab, and select Website. Now paste the link and add the new tab to all the teams you want to share the file with.

In case you want to keep an eye on the recordings stored by Microsoft Teams meetings, check out this guide to know the recording’s location.

You won’t be receiving optional Windows 10 updates from May

The global COVID-19 pandemic has impacted enterprises and their customers in major ways. Microsoft and Windows 10 users are no exception.

No wonder the company announced that it will not be releasing optional non-security updates for the OS as from May.

Affected update categories

Microsoft will be halting the release of class C and D updates. The files are always available for manual download the third and fourth weeks of the month. You may also get them via a Windows Update, although you still have to initiate the installation yourself.

Starting in May 2020, we are pausing all optional non-security releases (C and D updates) for all supported versions of Windows client and server products (Windows 10, version 1909 down through Windows Server 2008 SP2).

Class C and D updates are preview releases that Microsoft uses to provide visibility and testing of the scheduled non-security upgrades for the next month.

They are optional, meaning that not all users download them every time. There is usually no harm in not installing the updates because they do not resolve Windows 10 security issues.

With that said, optional updates do fix vital OS problems sometimes, so their unavailability will impact some users for sure. For example, a Windows 10 hardware issue, such a soundcard malfunction, may not always go away without a patch.

In other cases, Windows 10 apps or features like Search have glitches that require an update to fix.

Users avoid such issues by always backing up their files and data before a executing a major Windows 10 upgrade.

The pause is temporary though. So, the updates may resume as soon the COVID-19 situation allows Microsoft operations to return to normal. Hopefully, that comes sooner, rather than later.

Patch Tuesday updates remain available

Microsoft said that it will continue releasing Patch Tuesday files on schedule. These are mandatory upgrades that fix identified Windows 10 security issues.

It is easy to understand the company’s decision to prioritize OS security in the wake of the coronavirus disease.

The pandemic has changed how people work, with tens of thousands of Microsoft employees working from home. It also affected the availability of workers and the ability to quickly mobilize resources.

In the meantime, the Microsoft Edge team also is suspending updates to the Chromium-based browser.

Google made a similar move in reaction to changing work schedules. The company announced that it will not be releasing Chrome 81 to stable in the foreseeable future.


How to fix System call failed Explorer.exe error in Windows

Explorer.exe System call failed is one of the troublesome Windows niggles that can render your system virtually useless.

Before the error message is flashed on the screen, the icons disappear and when the user clicks on the Start button the Explorer.exe System call failed error is displayed.

Needless to say, one would mistake it to be a malware or a virus attack but in reality its none. Neither is it a case of Windows operating system gone bad.

Before we start with the actual troubleshooting, lets take some time to perform some basic checks. Try recalling whether you had done any changes to the system.

Also, try switching your account and see if its the same error persists. Try restarting the computer.

As observed in forums this error is usually suspected to be caused by drive errors. Bad sectors in your Primary hard disk will cause severe performance issues.

One can also try connecting an external drive and see it it’s being read.


We’ve written extensively about explorer.exe issues before. Bookmark this page in case you need it later.


Here’s how to solve System call failed error on Explorer.exe

1) Clean Boot


Clean Boot is somewhat similar to the safe mode. In the clean boot, the Windows is started with a minimal set of drivers and programs in the startup.

Since none of the software is opened automatically in the background the Clean Boot will let you avoid the software conflicts.

  • Go to start, search for msconfig
  • Select System Configuration from the results
  • Click on the Checkbox that says Hide all Microsoft Services (In case of Windows 10 CU select Diagnostic Startup)
  • Go to the Startup tab in the System Configuration and click on Open Task Manager
  • Select the programs individually and then click on Disable
  • Close the Task Manager and restart the computer

Windows won’t boot? Here’s how to fix the issue in no time!


2) Alternate method


Now in this step, you can troubleshoot each drive for errors and you can also check the computer’s primary hard disk for performance issues.

Also, consider comparing the same with the external hard disk.

  • Open the Windows File System
  • Right Click on the desired drive and then select Properties
  • Now go to the Tools tab>Error-Checking>Check now. Type in your admin credentials if asked for
  • Ensure that you check the Automatically fix file system errors so that the system will not only check the drive for disk error, but will also fix the issues if any
  • In order to perform a deep scan, select Scan for and then attempt the recovery of bad sectors. In this mode, the scan will attempt to fix the physical errors and will take longer to complete the task.
  • Select Automatically fix file system errors and Scan if you prefer checking both file errors and physical errors. That being said if any bad sectors are found on the hardisk the data will be lost.

Also, you can try out the EaseUS software which promises to fix your hard disk without causing any loss of data.

If the Explorer.exe System call failed error still persists even after the scanner shows zero errors, it’s time you get the hard disk checked physically, but we hope you won’t have to. Do let us know if any of these solutions worked for you and if you happen to come across different workarounds, feel free to share them in the comments section below.

Quick Fix: Microsoft Teams Browser Version Is Not Supported

Internet Explorer 11, Microsoft Edge, RS2 or later, Chrome, Firefox, and Safari 11.1+. There’s, though, a problem centering around Microsoft Teams browser versions that are not supported.

Teams fully supports these Internet browsers on paper, with exceptions for calling and meetings. In reality, the browsers’ behavior has a lot to be desired. That’s why you’re still asking for expanded support for other browsers or looking for solutions when the supposedly compatible browser proves unsupported.

Hopefully, we will see some improvements soon. In the meantime, here are some things you can do to correct the browser compatibility issues yourself.

What can I do if Teams browser version is not supported?

1. Manually check for Microsoft Teams updates

  1. Click your profile picture at the top of the app.
  2. Then, select Check for updates.update microsoft teams
  3. If a new update is found, it will be downloaded and installed when the computer is idle.
  4. After updating the service, delete Microsoft Teams.
  5. Add Microsoft Teams again.

Teams desktop client updates are released every two weeks after rigorous internal testing. Updates can take up to a few minutes of your time, but they are known for solving bugs and software vulnerabilities and making the user experience better in the long run.

You get why keeping your software up-to-date is critical, so manually double-checking that everything is fine cannot hurt.

2. Use Incognito mode

Use Incognito mode
  1. On your computer, open Chrome.
  2. Click More at the top right.
  3. Then, click New Incognito Window.
  4. A new window appears. In the top corner, check for the Incognito icon.
  5. To stop private browsing, click Close at the top right (Windows or Chrome OS).
  6. At the top left, you need to click Close (Mac).
Note icon NOTE
The above steps are for Google Chrome. They vary slightly depending on your web browser.

If you don’t want your browser to remember your activity, browse the web privately in Incognito mode. Who would have thought this could also help Microsoft Teams recognize your browser version? It has been repeatedly verified and proven to work.

For a step-by-step guide on how to start private browsing in various browsers, do check out our dedicated guide.

If your current Microsoft Teams browser version isn’t included in the official support list, go to the next solutions.

3. Use a supported browser

Microsoft Teams supported browser


Can you complain with such a generous choices list at your disposal? Check it out closely: Limits and specifications for Microsoft Teams and go for one of the compatible Internet browsers.

4. Enjoy a rich Microsoft teams experience via the Android mobile app

Microsoft Teams Android mobile
  1. Go to your mobile device.
  2. Visit the official Microsoft’s download page.
  3. Follow the download link there.
  4. You may also download it directly from Google Play Store.
  5. Now, simply install Microsoft Teams on your Android device.

Tired of seeing the same Your browser version isn’t supported error over and over again? You can have a rich experience via the mobile app too, at least until the browser version you are used to gets supported. We would encourage you to try it out by following the steps described above.

Teams is mainly aimed at being a corporate collaboration platform, so you’re not supposed to deal with browser issues daily. When they do occur, you know how to solve them.

Before you go, you might want to check our guide on how to solve the Microsoft Teams vertical scroll bar missing on your PC.

If you have any other questions or suggestions, please leave them in the comments section below.

  • Users don’t have the option to start a meeting, but they can join one.
  • The microphone might not work.
  • Camera sharing is not available.
  • Users may not be able to share their screen.
  • Incoming call notifications might not be available.
  • Microsoft Teams won’t reconnect automatically to a meeting should the connection drop.

Fix your Windows 10 PC with the cumulative update KB4541335 

Have you been experiencing problems with your Windows 10 version 1903 or 1909 lately? Microsoft has released cumulative update KB4541335 to address some issues affecting the operating systems.

Remember that, unlike Patch Tuesday updates, today’s files are optional. So your PC will not automatically get them unless you install them through one of the methods available for Windows 10 users.

The quickest way to get the CU is via the Windows Update channel, a feature that is built into Windows 10. Simply locate Settings, Update & Security, and then Windows Update.

You could also go to the Microsoft Update Catalog to manually download the CU. Windows Server Update Services (WSUS) is the other available channel.

Highlights of the update

Apart from bug fixes, KB4541335 has a couple of enhancements for your OS.

If the update works as expected, you will no longer experience difficulty printing to a document repository. It also resolves the failure of some Windows 10 applications to close.

Some users experienced problems with the mute button when using the Your Phone app. The update fixes this issue.

Other non-security patches are:

  • Updates an issue that causes calendar dates to appear on the wrong day of the week in the clock and date region of the notification area when you select the Samoa time zone.
  • Updates an issue that causes applications to close unexpectedly when a user enters East Asian characters after changing the keyboard layout.
  • Updates a performance issue in applications that occurs when content that is protected by digital rights management (DRM) plays or is paused in the background.
  • Updates an issue that causes applications to close unexpectedly when a user enters East Asian characters after changing the keyboard layout.

Last week, Microsoft released KB4541331 to fix some of the above issues in Windows 10 version 1809, Windows Server 1809, and Windows Server 2019. None of these problems had anything to do with Windows 10 security.

No issues with the KB4541335

Microsoft said it is not aware of any glitches that the update may cause. As you may have experienced in the past, that assertion does not guarantee that the installation will always go as planned.

The good news for you is that there are ways to avoid some of the problems that arise from installing erratic Windows 10 cumulative updates.

For starters, be sure to have a restore point to which your system can revert in case of install complications.