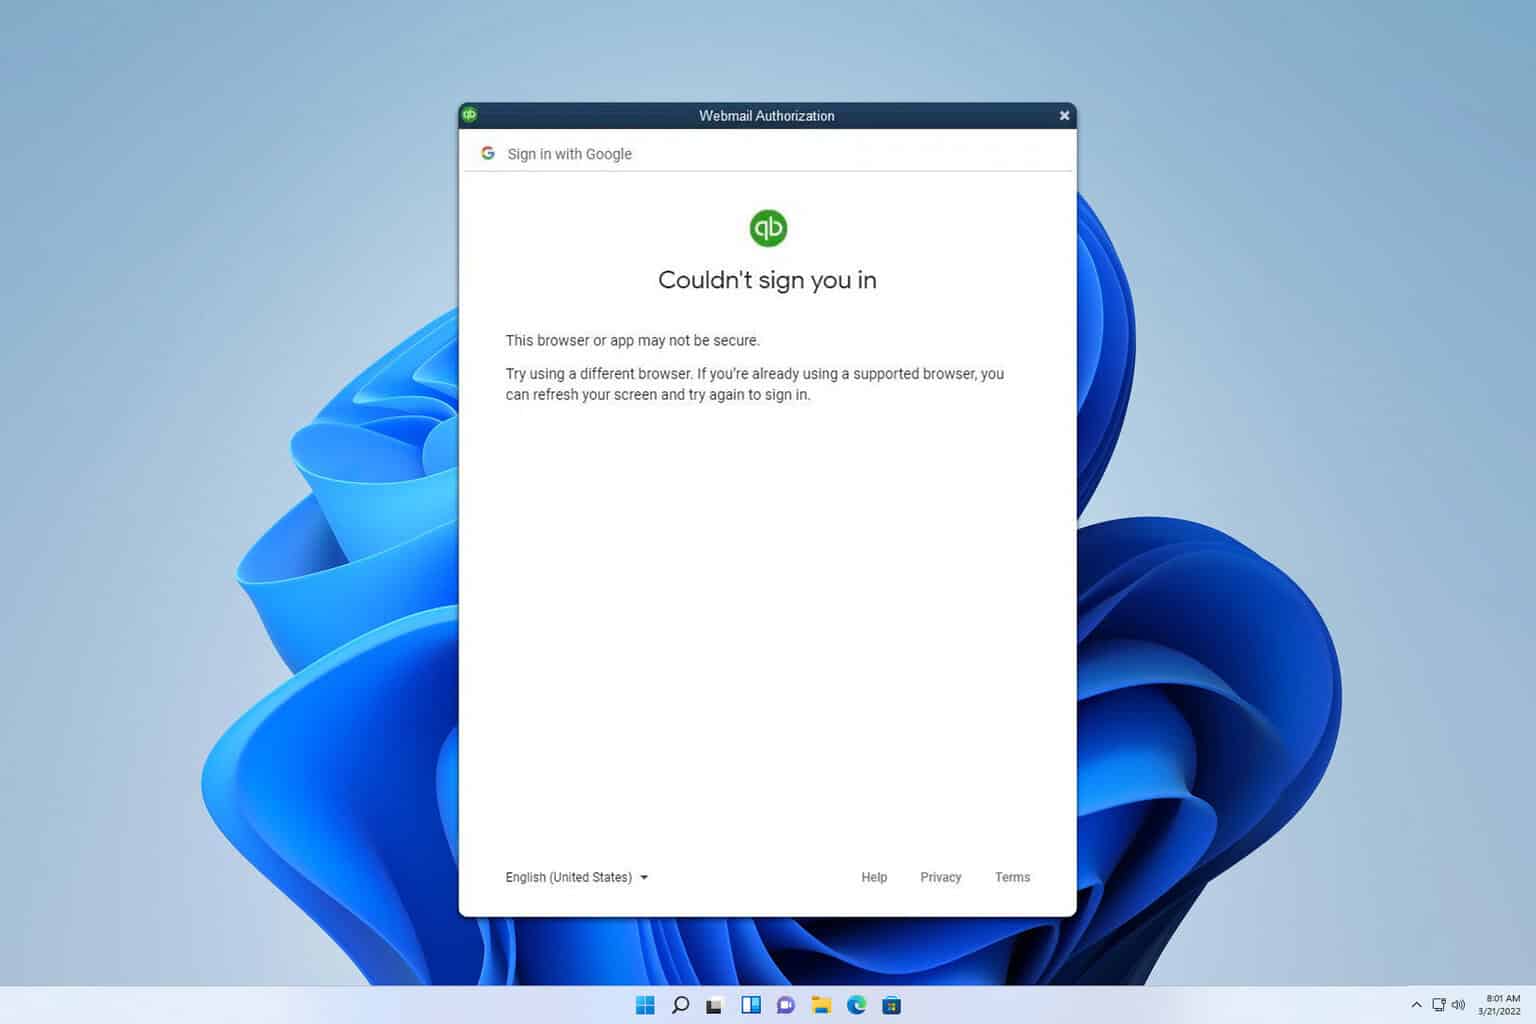
Many reported that Gmail is not working with QuickBooks, and this makes sending invoices almost impossible. However, there are a few methods you can use to fix this issue.
What can I do Gmail is not working with QuickBooks?
Before we try anything else, try running QuickBooks Desktop as an administrator. Creating a new Gmail account can also help.
1. Update the app and try adding your account again
Open QuickBooks as administrator.
Go to Help and choose Update QuickBooks Desktop.
Go to the Options tab and check Mark All. Save changes.
Next, go to the Update now tab and select Reset Update.
Lastly, click on Get Updates.
After the software is updated, add your account again by following these steps:
In QuickBooks, go to Edit and choose Preferences.
Select Send forms, and then go to WebMail.
Select your email and click on Delete.
Next, go to Add, enter your email ID and email provider, and follow the instructions on the screen.
2. Enable Use of enhanced security setting
Enable two-step verification for your Google account.
Open QuickBooks choose Edit and then select Preferences.
Choose Send Forms and then Web Mail.
Select your Gmail account and click on Edit.
Select Use enhanced security and click OK.
If this feature is already available, disable it and then enable it again.
Excel lets you enable macros to automate repetitive tasks, saving time and increasing productivity. However, for security reasons, Excel disables macros by default. If you want to take advantage of this feature, you’ll have to manually activate them.
Here’s how!
How To Enable Macros on Excel
Follow the below steps:
Launch Excel, open any workbook, and click on the File tab in the top-left corner.
Select Options from the drop-down menu.
In the Excel Options window, select Trust Center from the left-hand side.
Click on the Trust Center Settings button located at the bottom right.
Select Macro Settings from the left panel. You’ll find four options related to macros. Choose Enable all macros. Be aware that this option allows all macros to run, including potentially harmful ones.
After selecting your desired macro setting, click OK to save the changes and close the Trust Center window. Finally, close the Excel Options window to finish the process.
That’s it!
Overall, Excel lets you enable macros to automate your tasks. The steps above will help you fully utilize Excel’s powerful macro feature and streamline your workflow.
Microsoft has announced the rollout of Windows 11 Builds 22621.4247 and 22631.4247 to Insiders in the Release Preview Channel under KB5043145. The update will be available to users on Windows 11, version 22H2 (Build 22621) and version 23H2 (Build 22631).
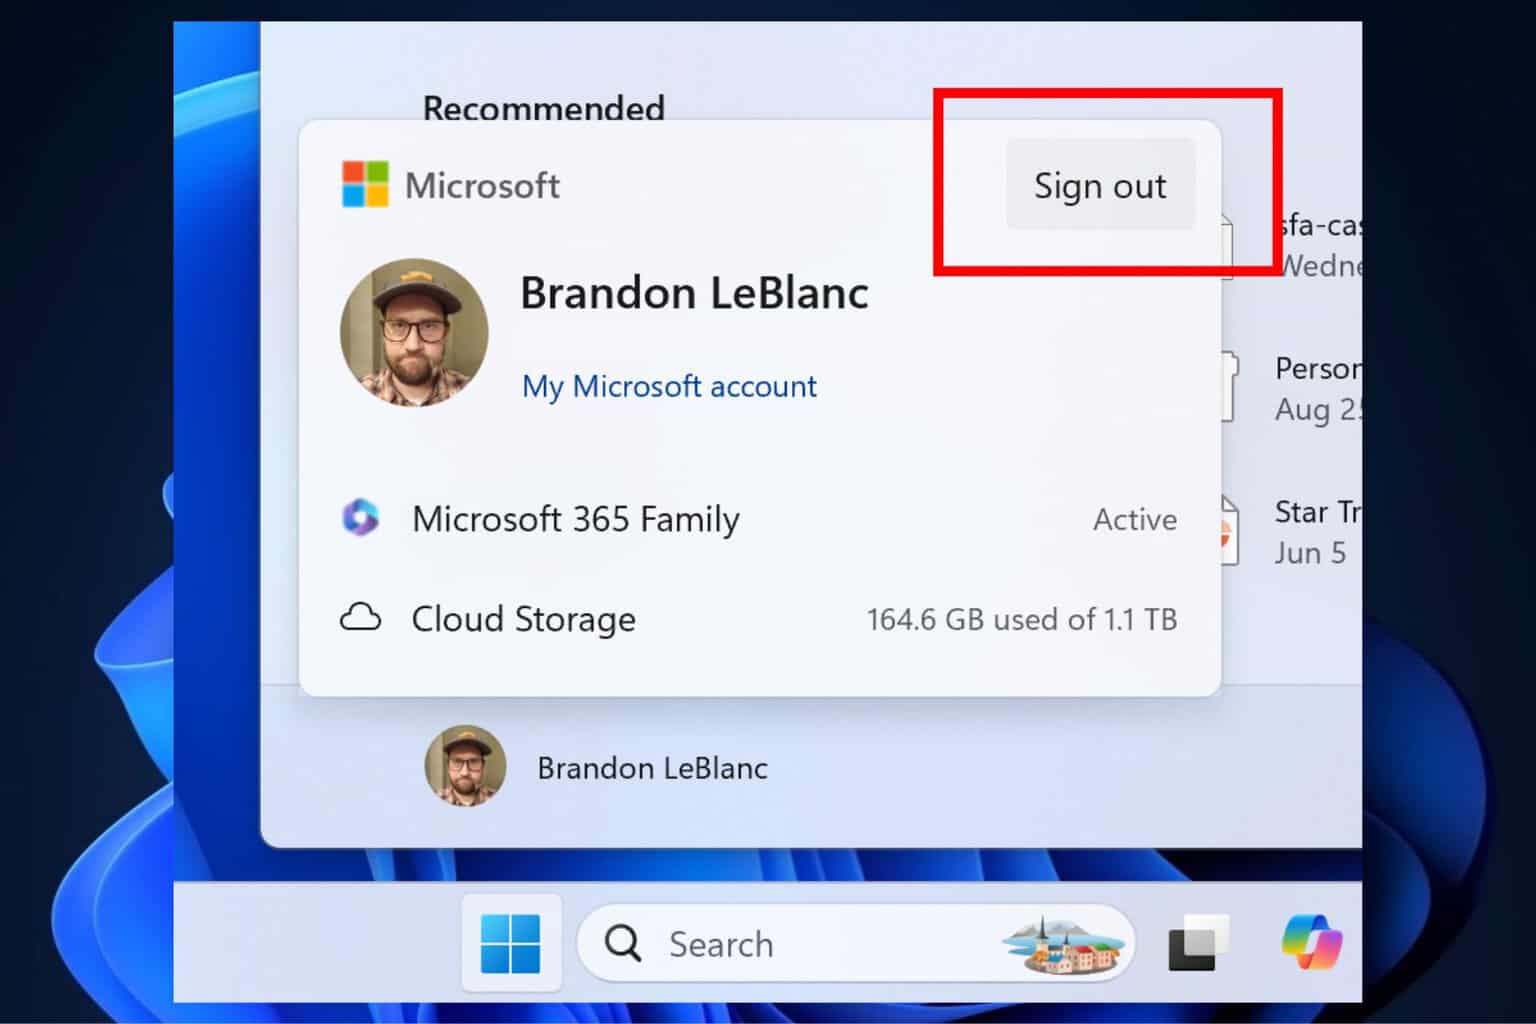
The “Sign out” option is now on the account manager when you open the Start menu. A new feature allows users to share local files directly from the search results in the taskbar search box.
The Delivery Optimization Settings page now matches the Windows 11 design. The search box has been removed from the Windows Share window, and media controls now show in the lower part of the lock screen at its centre when media is playing.
It’s also worth mentioning that with KB5043145, Microsoft Edge sometimes stops responding when using IE mode, and there is inconsistent data between TCP_INFO_v1 and GetPerTcpConnectionEstats. This could affect the accuracy of file synchronization services that use TCP connection performance analysis tools.
This update brings COSA profiles up to date for certain mobile operators. It also fixes an issue that prompts for your PIN each time you open an encrypted email in Outlook and other encrypted email apps.
Work Folders files fail to sync when Microsoft Defender for Endpoint is on, and Microsoft Edge sometimes stops responding when using IE mode.
After you join two or more tables that include some identical values, you need to eliminate duplicates in Excel. Luckily, that’s a pretty simple task and we have some methods that will help you.
How do I remove duplicates in Excel?
Open the Excel file that contains the data you want to clean up.
Click and drag to select the range of cells that you want to check for duplicates. If your data includes headers, make sure to include them in your selection.
Click on the Data tab in the Excel ribbon at the top of the screen.
In the Data Tools group, click on Remove Duplicates.
A dialog box will appear. If your data has headers, make sure the My data has headers option is checked.
Select the columns you want to check for duplicates. By default, all columns are selected. If you want to check for duplicates based on specific columns, uncheck the others.
Click the OK button. Excel will remove the duplicate rows and display a message showing how many duplicate values were removed and how many unique values remain.
Check your data to ensure that the duplicates have been removed as expected.
How do I filter my data to find duplicates?
Using Conditional Formatting:
If you want to highlight duplicates before removing them, you can use conditional formatting. Go to Home > Conditional Formatting > Highlight Cells Rules > Duplicate Values.
Using Advanced Filter:
If you prefer not to delete duplicates permanently, you can use the Advanced Filter to extract unique values. Go to Data > Sort & Filter > Advanced, select Copy to another location, and check Unique records only.
By following these steps, you can efficiently clean up your data and eliminate duplicates from your Excel sheet.
If you have any specific questions or need further assistance, feel free to ask in the comments below. Moreover, you can learn how to deal with the green triangle error indicator in Excel.
If you want to highlight a text with background color in Microsoft Word, but you don’t want to click the dedicated ribbon icon, you can press the Ctrl + Alt + H shortcut on the keyboard. There is also the Alt + H + I shortcut to change the highlight color first. Read below if you need detailed instructions.
How do I highlight text in Word using the keyboard shortcut?
Adding and removing highlights using the keyboard shortcut
Start Microsoft Word and open the document where you want to highlight text.
Use your mouse to click and drag over the text you want to highlight. Alternatively, you can use the keyboard by holding down the Shift key and using the arrow keys to select the text.
Press Ctrl + Alt + H to apply the default highlight color to the selected text.
If you want to change the highlight color, press Alt + H, then I. Use the arrow keys to navigate through the color options and press Enter to select a color.
To remove the highlight, select the highlighted text and press Ctrl + Alt + H again.
Highlight text using the highlight painter
You can also use the highlight painter by pressing Ctrl + Alt + H without selecting any text first. This changes your cursor to a highlighter, allowing you to click and drag over the text you want to highlight.
However, as soon as you select the text you want to highlight, the cursor turns back to normal, so you will have to apply the shortcut again for another selection.
How do I customize the highlight shortcut in Word?
If the Ctrl + Alt + H shortcut seems hard to apply and you want to use another, you can customize that in Word.
You can set them in Word Options > Customize > Keyboard Shortcuts. Then, go to the Tools menu and select the Highlight option. Here, you can assign another keyboard shortcut for highlighting. Just be careful to select a shortcut that you don’t use already.
To count distinct values in Excel, you need to add the unique values with the first of the duplicate value. Although it sounds complicated, you will see that there are a few simple formulas to apply to your table.
How do I count distinct Excel values?
1. Using the COUNTIF function
Select the range where you want to count distinct values.
Enter the formula: =SUM(1/COUNTIF(A2:A10, A2:A10))
Make sure to replace A2:A10 with your actual range.
Press Ctrl + Shift + Enter to make it an array formula. Excel will add curly braces {} around the formula.
This is the most simple method of counting distinct values in Excel. If you have empty cells in the column, you need to add an IF condition to exclude them. Example: =SUM(IF(A2:A10<>””,1/COUNTIF(A2:A10, A2:A10), 0)). Again, replace the A2:A10 with the range you actually want to count.
If the values in your range are text, apply the following formula and replace the A2:A10 range with your actual interval: =SUM(IF(ISTEXT(A2:A10),1/COUNTIF(A2:A10, A2:A10),""))
2. Counting distinct case sensitive values
Select the range where you want to count distinct values.
Enter the following formula to determine the distinct case sensitive values: =IF(SUM((--EXACT($A$2:$A2,$A2)))=1,"Distinct","")
Now, apply the formula to count the distinct values: =COUNTIF(B2:B10, "distinct")
Press Ctrl + Shift + Enter after each array formula to validate it.
This method is ideal when you have text values and you want to consider them different based on case sensitivity. This way, two values written as Two and TWO will be considered distinct.
3. Using the UNIQUE Function (Excel 365 and Excel 2019)
Select a cell where you want the result.
Enter the formula: =COUNTA(UNIQUE(A2:A10))
Replace A2:A10 with your actual range.
Press Enter. This will count the number of distinct values in the range.
The COUNTA function also excludes the blank cells in your range so you won’t need to worry about that.
4. Using a Pivot Table
Select your data range.
Go to the Insert tab and click on PivotTable.
Choose where you want the PivotTable report to be placed.
Drag the field you want to count into the Rows area.
Drag the same field into the Values area.
Click on the drop-down arrow next to the field in the Values area and select Value Field Settings.
Choose Distinct Count and click OK.
If you change the values in your range, make sure to refresh the Pivot Table. To do that, click the Refresh button on the Analyze tab, in the Data group.
5. Using Power Query
Select your data range.
Go to the Data tab and click on From Table/Range.
In the Power Query Editor, select the column you want to count distinct values for.
Go to the Transform tab and click on Group By.
In the Group By dialog box, select Advanced.
Add a new aggregation and set it to Count Rows.
Click OK and then Close & Load.
6. Using Advanced Filters
Select the column you want to count distinct values in.
Go to the Data tab and click on Advanced in the Sort & Filter group.
Select Copy to another location.
Specify the List range and Copy to range.
Check Unique records only and click OK.
Use the COUNTA function as in Solution 2 to count the unique values in the new range.
These methods should help you count distinct values in Excel efficiently. If you didn’t know, you may also use natural language queries to retrieve data from an Excel table. Just go through our guide on how to use Ideas in Excel to find out how to do that.
Adding a signature on your Microsoft Word document before sending it to the concerned party is a huge convenience and takes away all the manual printing and scanning work.
Depending on your preferred signature choice, you can easily add a signature on Word using various methods. Each can be used in different professional settings and all have their pros and cons.
How do I add a signature in Microsoft Word?
1. By adding a signature manually
On a blank paper, create your signature in a bold pen.
Scan the document, save it in picture format (JPG or PNG) and transfer it to your PC.
Open a blank word document or the document you wish to append your signature.
Navigate to the top menu and select Insert > Pictures.
Select your scanned signature and hit Enter.
Resize the picture to your desired size then drag it to your preferred position.
2. By using the draw feature
Open a blank word document or the document you wish to append your signature.
Navigate to the top menu and select Draw.
Select your preferred pen size and click on it.
Place the cursor where you want to append your signature and draw out your signature. Your mouse may bot bring out the best and precise stroke so you can use your tablet as a drawing pad for your PC especially if it has a stylus. Once done, you can resize it to fit your document.
3. By adding a digital signature
Open a blank word document or the document you wish to append your signature.
Navigate to the top menu and select Insert.
On the far end to the right, click on Signature Line.
Enter your details as needed then hit Enter.
Your signature will now appear in your document at the bottom.
Go to the Add-ins store and search for a signature plugin then hit Add.
Click Continue.
Most come with a free trial so test them out before you decide which one to purchase.
Additional tips for the best signature
Use a clear background – For handwritten signatures, ensure you are signing on a clear background preferably white to match with most documents.
Save your signature – Store your signature in Microsoft Word for future use. This will ensure consistency throughout your documents that may require your signature.
Preview your document – Before sharing your signed Word document, preview it and ensure the signature is correctly placed. Sometimes, your Word signature is not showing on the other end. If possible, convert it to PDF format to prevent further editing.
That’s all we had for adding signatures on Word. Have you tried any of the above methods? Which one do you prefer and why? Let us know in the comment section below.
Whether you’re performing a search on your system or within an application, you ay run into an ERROR_NO_MORE_SEARCH_HANDLES error that indicates No more internal file identifiers are available.
You’ll most likely encounter this error during a search query in File Explorer for special characters or other applications that perform extensive file or resource searches. You’ll notice that your system slows down or the application in question becomes unresponsive or crashes.
This error can be triggered if you have too many processes running in the background with little to no system resources to handle this load. If it is app-related, it could be a case of compatibility issues or an issue with memory management.
How do I fix the ERROR_NO_MORE_SEARCH_HANDLES?
1. End superfluous processes
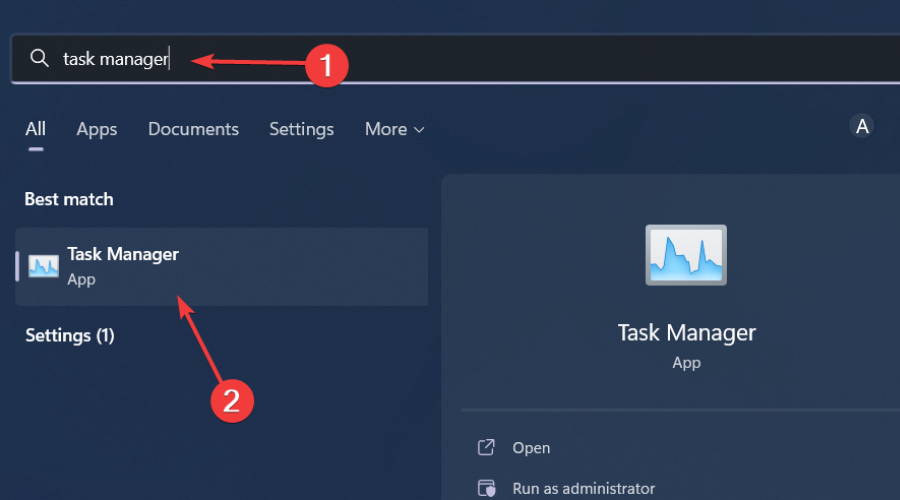
Hit the Windows key, type Task Manager in the search bar, and click Open.
Navigate to the Processes tab, and find any unnecessary processes.
Right-click on it and select End task.
Repeat this step until you remain with only necessary ones.
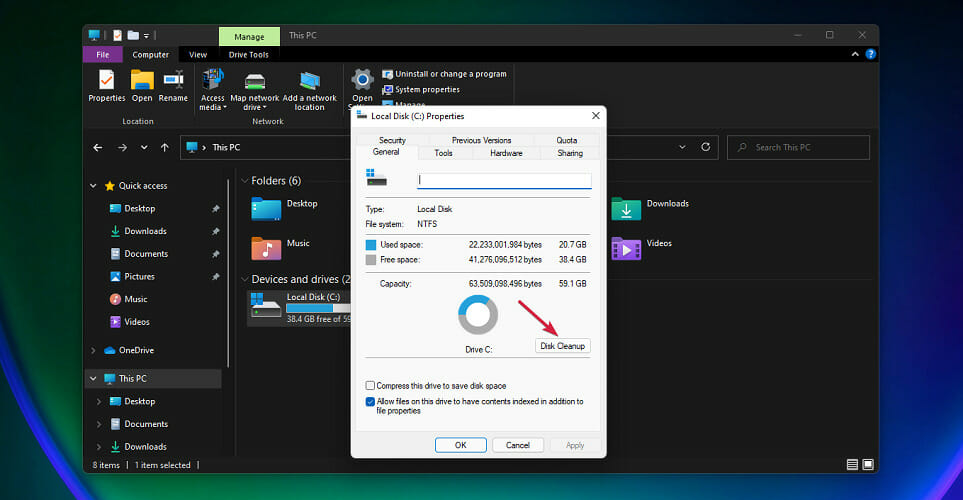
Get rid of bloatware – Regular Disk Cleanups and disk defragmentation will help keep your drive in top shape and avoid apps scrambling for available resources.
Also, if you’re searching on Windows 11, we have a few tips to optimize your search so check out our detailed article. Hopefully, one of the above solutions has helped you get rid of ERROR_NO_MORE_SEARCH_HANDLES.
Do let us know if you have any other recommendations in the comment section below.
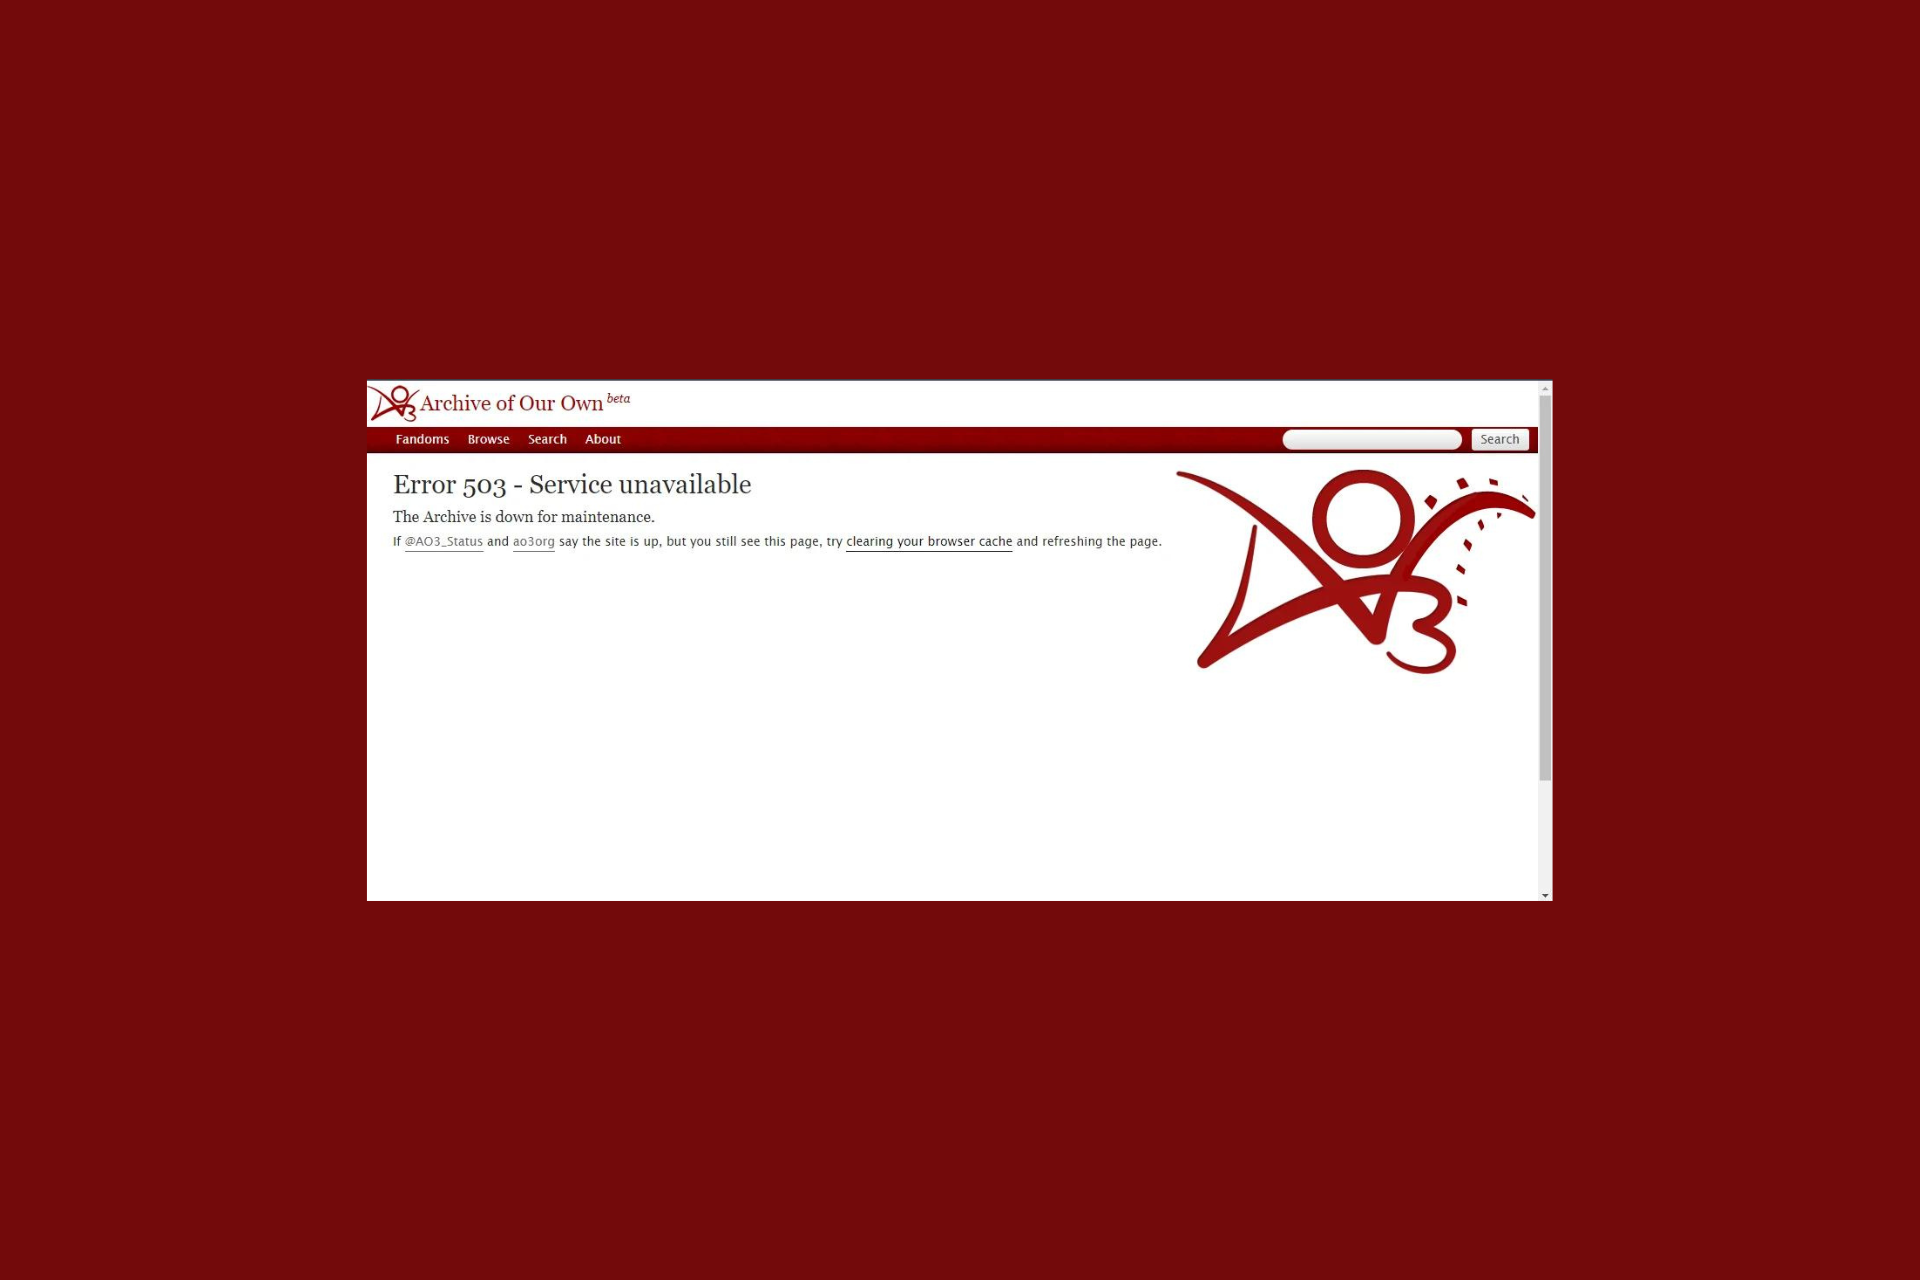
If you are unable to access the AO3 website and encounter error 503 services unavailable, it could be a server issue or your internet connection might not be working properly.
To fix it, press F5 to reload the page, and then check the website’s server status; you can find tweets from the official website on X. If there are none, check your network to ensure your device has a stable internet connection.
How can I fix the AO3 error 503?
1. Clear browser cache
Launch your preferred browser. Here, we are using Google Chrome for example.
Go to the three-dot icon and select Settings.
On the Settings page, navigate to Privacy and security.
Click Delete browsing data.
On the Delete browsing data pop-up, select All time for Time range, then select Browsing history, Download history, Cookies and other site data, and Cached image and files, then click Delete data.
Relaunch your browser and navigate to the website again. You might be prompted to login to the website.
If this doesn’t help, try using any other browser like Mozilla Firefox, Microsoft Edge, Opera, etc.
2. Disable browser extensions temporarily
Launch your preferred browser. Here, we are using Google Chrome for example.
Go to the three-dot icon and select Extensions, then click Manage Extensions.
Locate each extension one by one, toggle off the switch next to it to disable.
Once the issue is resolved, you can reverse engineer these steps to enable extensions.
Unplug the router’s power adapter from the power outlet and router to disconnect it completely.
Wait for 30 seconds or 1 minute, this will let the residual power to dissipate and help reset the device.
Attach the power adapter to the router and plug it back into the outlet.
Now wait for router to reboot, which might take a few minutes. Once done, the lights on the router will start blinking.
You can also try using a reliable VPN and select a different location, if issues are limited to your region. However, if nothing has worked so far, you can try reaching out to AO3 support or their community forums for assistance.
This site can’t be reached error is one of the most common website issues and could appear if your internet service provider has blocked the website or if you have wrong Windows settings; read this guide to learn the solutions to fix it.
How can I avoid getting AO3 503 error?
If you want to avoid getting AO3 503 error, you can try these few things:
Check AO3 status – You must regularly visit the AO3 status page or social media for updates on issues and maintenance notices.
Off-peak use – Try using AO3 off-peak hours to minimize the chances of encountering 503 error.
Download content – Save stories offline to read them during server maintenance and outages, so that you have something to read when AO3 is temporarily down.
Keep your device optimized – Make sure your computer, laptop or phone is working fine and has a stable internet connection.
Limit server requests – Don’t make too many requests at once to avoid overloading the website’s servers.
Enable notifications – Sign up for alerts to get the information about outages, service changes, to prevent issues like AO3 503 error.
In conclusion, AO3 error 503 is annoying but you can avoid this by keeping these tips in mind. However, if the server is working fine and issue is at your hand, you can try clearing cache, disabling extension or power cycling the router to fix this problem.
If you see Hmmm… can’t reach this page message while opening any other website, it could be due to issues with your DNS or network connection.
Another issue that users generally face while visiting their favorite website page is unresponsive, it could be due to outdated browser, extensions or page bugs, read this guide to learn about the solutions.
Did the solutions and tips work to help you with AO3 error 503? If so, share it with our readers in the comments section below.
69 (0x45) ERROR_TOO_MANY_SESS can be frustrating, especially during important tasks. This error occurs due to issues in system resources, such as too many active sessions. It can also be linked to faulty system files, drivers, or corrupted configurations.
I’ll show you how to restore your PC in just a few steps, so let’s get into it!
How To Fix ERROR_TOO_MANY_SESS
Here are the solutions:
Run SFC and DISM
System File Checker (SFC) and Deployment Imaging Service and Management Tool (DISM) are built-in utilities that scan and repair corrupted or missing system files, which might be triggering the ERROR_TOO_MANY_SESS. Follow the below steps:
Type the following command and hit Enter: sfc /scannow
Wait for the scan to complete. If it detects any corrupted files, it’ll automatically attempt to fix them.
Type the following command and press Enter: DISM /Online /Cleanup-Image /RestoreHealth
Allow the process to finish. Once both scans are complete, restart your system to check if the error persists.
Update Drivers
Outdated or corrupt drivers can often lead to errors like ERROR_TOO_MANY_SESS. To update them:
Press Windows + X and select Device Manager from the menu.
Locate the problematic device (such as network adapters or display drivers). Right-click on the device and select Update driver.
Choose Search automatically for drivers and follow the prompts.
Roll Back Drivers
If the ERROR_TOO_MANY_SESS started after a recent driver update, rolling back to a previous version may resolve the issue. Updates can sometimes introduce bugs or compatibility issues that result in system errors. Here’s what to do:
Right-click on the Start menu and tap Device Manager to open it.
Right-click on the device you want to roll back the driver and select Properties.
Tap the Driver tab and click on Roll Back Driver.
If the option to roll back is unavailable, it means there’s no previous version to restore. In such cases, try reinstalling the driver.
Restore Your System
If the ERROR_TOO_MANY_SESS is recent and you can’t pinpoint the exact cause, performing a System Restore can help. This method will revert your system to a previous state before the error occurred.
Here are the steps to perform it:
Press Windows + S and type System Restore, then select Open from the result.
Click on System Restore.
Choose a restore point from a date before the error started and hit Next.
Tap Finish to complete the process, and your computer will restart.
This should restore your system settings and resolve the ERROR_TOO_MANY_SESS if recent changes caused it.
Reinstall Windows
As a last resort, try reinstalling Windows. This will remove all files and reset your system to its default state, potentially fixing any deep-seated issues.
Here’s how:
Back up all important files and data; this process will erase everything on your system drive.
Create a bootable USB or DVD, and restart your computer using this media.
Follow the on-screen instructions to reinstall Windows.
Once the installation is complete, reinstall the necessary drivers and restore your backed-up data.
These fixes should help you resolve the ERROR_TOO_MANY_SESS issue on your Windows. Start with less engaging methods like running SFC/DISM or updating your drivers before trying more detailed steps like reinstalling the operating system.
We covered a somewhat similar network issue in our ERROR_RECEIVE_PARTIAL article, so don’t miss it.
ERROR_SEM_IS_SET, or system error code 102 (0x66), as Microsoft puts it, is accompanied by the message ‘The semaphore is set and cannot be closed.‘ Users have reported this frustrating issue after upgrading their Configuration Manager from 2010 to 2013.
When they tried to install a management point (MP) on a secondary site, the installation process failed, and the message “Child process exited with non-zero code 102” was showcased.
What is ERROR_SEM_IS_SET?
ERROR_SEM_IS_SET’s log file displays messages such as “The semaphore is set and cannot be closed. ” This is important because semaphores originate from computer science and refer to a protected variable or abstract data type used to control access to shared resources in a multiprogramming environment.
They were invested to prevent situations where multiple processes compete for shared resources, leading to unpredictable outcomes, such as lagging, security issues, or freezing.
What causes ERROR_SEM_IS_SET?
It was discovered that the issue causing ERROR_SEM_IS_SET was related to the performance counters of the server’s SMS notification server.
The rolesetup.exe process, a Configuration Manager component, invoked the unlodctr.exe command to unload performance counters for the SMS notification server. However, the process failed.
How to Fix it:
To resolve ERROR_SEM_IS_SET, administrators are advised to:
Open Command Prompt with admin rights.
Run the following command: cd \\windows\\system32
Wait for it to succeed, and then run the command: lodctr /R
If these steps don’t work, you can also try to:
Uninstall the Management Point role from the Configuration Manager console.
Delete the CCM name instance from Windows Management Instrumentation (WMI).
You’ll need to open WBEMTest.
Connect to root.
Select enum classes.
Choose Recursive, and then OK.
Go to Query Results.
Look for _NAMESPACE, then double-click it.
Select Instances.
Highlight _NAMESPACE.name=”ccm” value and delete it.
Then, after you successfully delete the CCM name instance, install the MP again.
106 (0x6A) ERROR_SEM_USER_LIMIT “Insert the diskette for drive %1” often signals an issue with system resources or user connections. It’s typically caused by an overload of simultaneous user logins or system configuration problems. You may encounter this error when attempting to open programs or connect multiple users to the system.
Fortunately, I can show you how to resolve it in a few steps.
Let’s get into it!
How To Fix ERROR_SEM_USER_LIMIT
Here are the solutions:
Update or Reinstall Drivers
Outdated or incompatible drivers can sometimes trigger the ERROR_SEM_USER_LIMIT.
Locate the device causing the error (usually marked with a yellow triangle). Right-click the device and select Update driver.
Tap Search automatically for drivers, then follow the on-screen instructions.
If no updates are available, choose Uninstall device and restart your computer.
Windows will automatically reinstall the driver upon reboot. Confirm if the ERROR_SEM_USER_LIMIT error is resolved.
Roll Back Your Driver
If the error started occurring after updating your driver, rolling it back to a previous version might fix the issue. Here are the steps to follow:
Open Device Manager by pressing Windows + X.
Right-click on the driver with an issue and select Properties.
On the Driver tab, click Roll Back Driver. If the button is greyed out, reinstall it.
Restart your computer and check if the error persists.
Run System File Checker (SFC)
The System File Checker (SFC) scans for and repairs corrupted system files, which might be the source of the ERROR_SEM_USER_LIMIT error. Follow these steps:
Press Windows + X, and click Windows PowerShell (Admin).
Type sfc /scannow and press Enter. Wait for the scan to complete.
If corrupted files are found, the system will repair them automatically. After the scan is complete, restart your computer.
Run CHKDSK
The CHKDSK (Check Disk) utility checks for errors on your hard drive and fixes them. It can eliminate the ERROR_SEM_USER_LIMIT if it’s related to disk corruption. Here are the steps:
Open Windows PowerShell (Admin).
Type chkdsk /f /r in the command window and press Enter. If prompted to schedule a check upon reboot, press Y and hit Enter.
The CHKDSK utility will scan your drive and repair any errors it finds.
Perform a System Restore
A System Restore allows your computer to revert to a previous version when it was functioning correctly. It’s practical if the ERROR_SEM_USER_LIMIT began after a recent system change or update. Here’s what to do:
Press the Windows icon + I, then tap System.
Tap About, then select System Protection.
Click System Restore.
Tap Next.
Choose a restore point, then click Next.
Click Finish.
Restart your computer once the restore process is complete. Check if the error was solved.
Reinstall Windows
If none of the above methods work, reinstalling Windows could help. However, the process will erase all data on your system drive. Don’t forget to back up important files before proceeding. Here are the steps:
Go to the official Microsoft website and download the Windows Media Creation Tool for your Windows version.
Press ( F12, Esc, or F2, depending on your device) to enter the Boot Menu.
Pick the USB drive or DVD as the boot source and follow the on-screen instructions.
Overall, ERROR_SEM_USER_LIMIT can disrupt your system’s performance, but you can resolve it with the right troubleshooting methods. In extreme cases, reinstalling Windows provides a clean slate to eliminate persistent issues.
Many users have complained about getting Sorry this account is not able to play online. See ea.com/unable-to-connect for more information. Error Code: 524 when launching STAR WARS Battlefront II and Star Wars Battlefront via the EA Games launcher app.
This could happen if you were underage (under 13) when you initially configured the Xbox Profile or if your account was banned or deactivated. Because of this, you cannot join multiplayer games on EA releases. It could also appear if your network settings are not correct.
First, check the server status of the EA game; if it is up and running, try restarting your device and relaunching the game. Also, ensure your internet connection is working properly.
How can I get rid of error code 524 on EA?
1. Check your account status
Go to the EA help page and sign in to your EA account.
Click Manage My Account.
Click Ban history from the options.
If there is none, then your account is active.
You can also check your email to confirm you haven’t received any messages about the ban or blocked EA account. If your account is blocked, you need to clear your browser cache, reset your EA account password, reset the password for the email address, and turn on EA login verification (optional).
2. Age up the EA account
When you create a child account, EA keeps track of your age. Once your child naturally reaches the age up age, which is typically 13, EA will send an automatic email notification with instructions to migrate your saved games, logs, and other account information to an unrestricted account.
If that doesn’t happen in your case, you can contact EA for support for further assistance.
Go to the Manage My Account section and select Ban My History or any other option.
Choose any of the topics listed or click See all help topics.
You will be taken to this page, locate & click Chat with Us.
On the following page, under Select your console, choose the device and click Next.
Next, enter your details, such as your name, email address, and subject. You can also attach an image of the error you are facing, then click Send.
Your case ID will be created, and you will either be connected to an advisor or might see a waiting time to contact the advisor.
Here, you can talk to the agent and might have to submit age-proof documents, such as a picture of a legal document showing the child’s date of birth, for verification; then, you will be able to play Star Wars Battlefront 2 multiplayer. Also, keep your child’s Origin Name, Gamertag, etc. with you to help identify the account.
4. Create a new Xbox One profile
When your console boots up, locate Who’s playing today?, and choose Add new.
Enter the email address of your Microsoft account or a new one, then follow the on-screen instructions. Remember, please enter a valid birthday date that is at least 18 years old.
Choose a gamertag for the account, or create a new one for free.
Check the Microsoft Service Agreement and Privacy Statement and select I Accept.
Follow the steps to configure your sign-in, security, and PIN preferences to complete the setup.
Now launch Star Wars Battlefront 2 and see if the error code 524 appears again.
As EA doesn’t allow players under 13 years old to access online multiplayer mode, creating another profile is a feasible option if you are new and don’t have saved games on the previous account.
If you are not able to connect to the EA server, you can try restarting the game or checking the server status. However, if these don’t help, read this guide for other solutions.
Did we miss a step that helped you fix the EA error code 524? If so, feel free to share it with our readers in the comments section below. We will add it to the list.
You can hide YouTube thumbnails on Firefox if you find them distracting, especially if you’re trying to focus on educational or work-related videos. Luckily, there’s an extension just for that! I’ll show you how to install and use it on Firefox to create a cleaner browsing experience.
Let’s begin.
How To Hide YouTube Thumbnails on Firefox
Follow the below steps:
Launch Firefox and click on the Menu (three horizontal lines) in the upper-right corner.
Select Add-ons and themes from the dropdown menu.
Type Hide YouTube Thumbnails into the search bar at the top, then click on the extension’s name to go to its details page.
Click the Add to Firefox button.
A pop-up will appear, asking for permission. Click Add to confirm the installation.
Once the installation is complete, tap on the extension button and click Manage extension.
Ensure the extension is enabled, click the three dots, and tap Options.
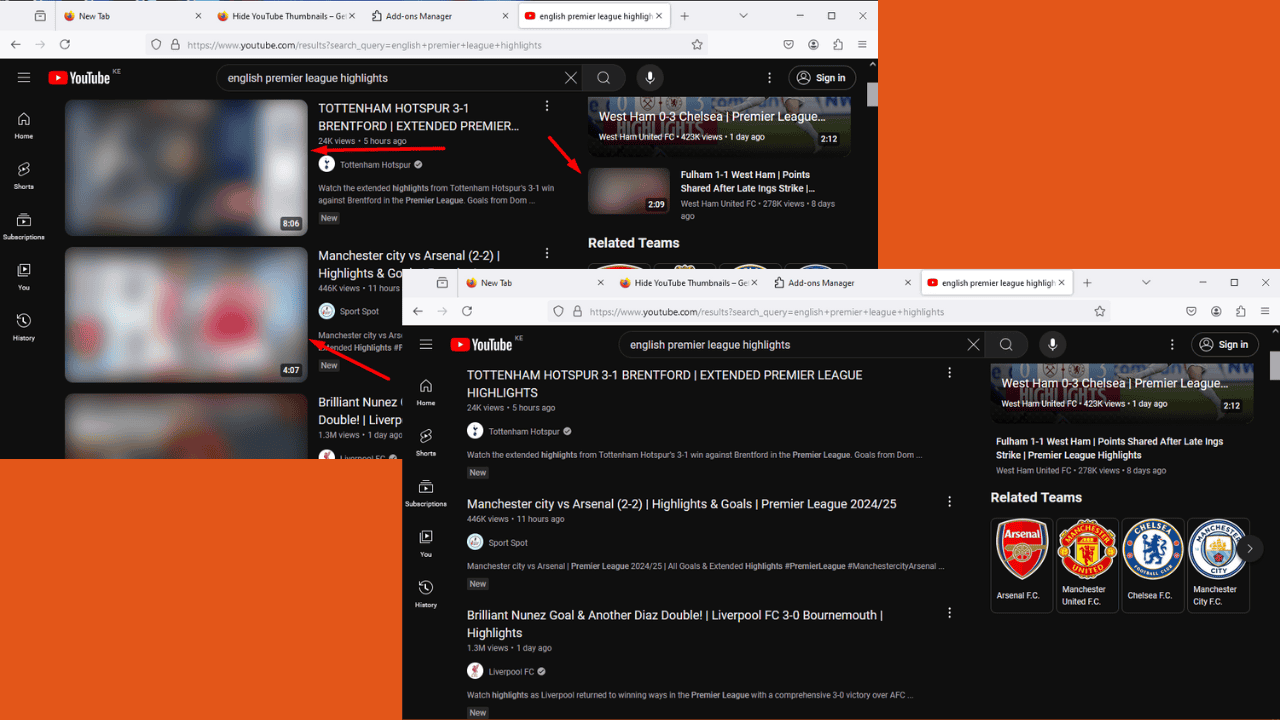
Under Options, select the thumbnail display mode. For this example, I’ll choose Blurred. You can also select which page type to disable it on.
Once done with the settings, head over to YouTube. You’ll realize all the thumbnails are blurred.
You can also change the options to Hidden. All the thumbnails will be invisible.
The Hide YouTube thumbnails Firefox extension helps you create a focused environment. It’s also perfect if you just want a cleaner interface.
You’ll soon be able to see the type of your SSD directly from Windows 11’s Task Manager windows. Spotted by tech enthusiast @phantomofearth, known for unveiling undocumented features in Windows 11 Insider builds, the capability is now live in the latest Beta build, and it will allow you to see exactly the type of SSD you have.
Currently, there is little more informative than the Task Manager’s current view of your drives, which only tells you whether a drive is an SSD or an HDD. The upcoming Windows 11 feature will let you know if an SSD is an M.2 NVMe drive, an M.2 SATA drive, or something else.
More Task Manager changes coming soon: disks will be labeled by type (NVMe, SATA etc.) in the Performance page – in the left pane and below graphs.
In addition to the change for SSD drives, Windows 11 will soon let you know the type of HDD you have if you have one still installed on your machine. Another feature coming soon will let you sort drives based on their types.
It isn’t clear when these features will be released to the general public, but they should soon be part of a future Windows 11 Insider build.
According to tech enthusiasts, if you’re in the Windows Insider program, you can get an early look at the new Task Manager functionality by installing an SSD.dll file from the ViveTool app. However, this hacky workaround could lead to potential issues, so proceed cautiously.
But it’s worth noting that you don’t need any third-party apps or Windows Insider builds to see the type of SSD drive you have installed in your system.
You can view that information by heading to Settings > System > Storage > Advanced Storage Settings > Disk & Volumes and then clicking on Properties next to your drive.
Use a different browser or device. If you were using Chrome, try Firefox or another browser. Also, try Discord on PC if you have problems with mobile.
Contact support. Open Discord > Tap the help button > Submit a request.
These solutions should get your Discord videos back to normal. Otherwise, it’s time to move on to more detailed instructions below.
How To Fix Discord Videos Not Playing
Here are four methods that should work:
Flush DNS
If incorrect DNS settings are causing Discord videos not to play, flushing the DNS can resolve the issue by clearing the cache and resetting it to default. Here are the steps to follow:
Press Windows + X, then tap Windows PowerShell (Admin).
Click Yes for administrative permission. Type ipconfig /flushdns then press Enter.
Close the window and reopen Discord to check if videos are now playing.
Disable Hardware Acceleration
Discord uses high CPU and GPU power. This can sometimes lead to issues like videos not playing, as certain features may be interrupted. To fix this, you should disable hardware acceleration within the app. Here are the steps:
Open Discord and click on the Settings icon next to your username.
Scroll on the left panel and tap on Voice & Video.
Scroll the right panel and toggle off Hardware Acceleration.
Restart Discord and confirm if the video can play.
Disable Discord in the Task Manager
Sometimes, a simple restart isn’t enough. If videos still don’t play, try ending all Discord-related tasks in Task Manager and restarting the app. Follow the below steps:
Right-click on the Start Menu and select Task Manager.
In the Processes tab, select each Discord process and click End task.
Clear Discord Cache
A corrupted cache can sometimes prevent videos from loading or playing correctly. To clear it:
Press Windows + R, type %appdata% in the Run dialog box, and hit Enter.
Locate the Discord folder and open it.
Find the Cache folders and delete all their contents.
Open Discord and confirm whether the videos can play.
So, now you know how to deal with Discord videos not playing. Try the basic fixes first and proceed to the more detailed solutions if that doesn’t work.
Many users are wondering where are Excel autosave files stored on Windows 10, especially if they need to recover a lost file, so today we’ll show you how to find autosave files.
Where are Excel AutoSave files stored in Windows 10?
1. UnsavedFiles directory
Press Windows key + R and type %localappdata%.
Navigate to Microsoft\Office\UnsavedFiles
In there, you should find all your autosave files.
2. Check the location in Excel
Open Excel options.
Next, go to the Save tab. Locate AutoRecover file location.
Navigate to that location to recover your files.
By default, the location should be C:\Users\Your_username\AppData\Roaming\Microsoft\Excel\
Now that you know where are Excel recovery files stored, you will never lose your files again. To prevent this from happening, be sure to turn on AutoSave in Excel.
Creating bold text directly within Excel formulas isn’t natively supported. However, you can achieve a similar effect using a combination of formatting and VBA (Visual Basic for Applications). Here’s how to achieve this.
How do I add Excel bold text in a formula?
1. Using VBA to bold text in formulas
Open Excel and press Alt + F11 to opens the VBA editor.
In the VBA editor, go to Insert and select Module.
Copy and paste the following VBA code into the module window: Function BoldText(rng As Range) As String BoldText = rng.Value rng.Font.Bold = True End Function
Press Alt + Q to close the VBA editor and return to Excel.
In a cell, type =BoldText(A1) (assuming you want to bold the text in cell A1).
2. Using conditional formatting
Open your Excel sheet and highlight the cells where you want to apply the bold formatting.
Go to the Home tab, click on Conditional Formatting, and select New Rule.
Choose Use a formula to determine which cells to format.
Enter a formula that evaluates to TRUE for the cells you want to bold. For example, =A1=”Bold”.
Click on Format, go to the Font tab, and select Bold, then click OK.
Click OK again to apply the rule.
In conclusion, you can’t insert bold text in formula in the output in Excel without programming. The conditional formatting is, however, a workaround for this conundrum.
We should also mention the manual bold technique. Just click on the cells that contain the text you need to bold and press Ctrl + B or use the Bold button to do that.
Microsoft has released a new preview build of Windows 11 to its Dev and Beta channels. The update adds a feature to the operating system’s Snipping Tool that users have requested for some time: an option to change the default folder where screenshots are saved.
The Snipping Tool, introduced in Windows 10 and replaced by Snip & Sketch in that OS before making its way to Windows 11, enables users to capture screenshots of their display, annotate them, and share them with others.
However, while the app includes a variety of ways to capture screenshots, it doesn’t allow users to change the folder where those screenshots are saved.
The new version of Snipping Tool — 11.2408.13.0 — adds a new option in the app’s settings that lets users specify a new folder for screenshots and screen recordings.
We are rolling out an update for Snipping Tool (version 11.2408.13.0 and newer) to Windows Insiders in the Canary and Dev Channels that introduces the ability to change the folder that original screenshots and screen recordings are automatically saved to. Just go to app settings in Snipping Tool to select a new default folder to try it out!
Microsoft says the feature is rolling out to Windows Insiders in the Canary and Dev channels and will soon be available on the stable channel as well.
Wondering how to use your phone as a Bluetooth speaker for your PC? It’s simple.
Turning your phone into a Bluetooth speaker is convenient when traditional speakers aren’t available. With the help of the AudioRelay app, you can use your mobile device to play audio from your computer. I’ll take you through the steps!
How To Use Phone as Bluetooth Speaker for PC
You can use the AudioRelay app through Wi-Fi or USB cable.
Via Wi-Fi Connection
Follow the below steps:
Go to the official AudioRelay website, download the app, and install it on your device. Remember to pick an app that’s compatible with your device.
Go to the Google Play Store, search for AudioRelay, tap Install, and launch it.
Ensure both devices are connected to the same Wi-Fi network.
Launch the AudioRelay app on your Windows and note down the IP address.
Launch the app on your mobile and add the Windows IP address under Connect by address. Tap Connect.
Go back to your Windows app and expand the Audio device menu.
Select Speakers (2 – High Definition Audio Device System default) under Output devices.
Play the audio on your PC, and your mobile will produce the sound.
Via USB Tethering
If you can’t access a Wi-Fi network, use a USB cable. Follow the below steps:
Connect your phone to the PC through a USB cable.
Activate your USB tethering on mobile. Open Settings > Connections > Hotspot and Tethering > Enable USB Tethering.
Open the Audiorelay app on your phone, tap Settings, and then turn on the USB tethering button.
So, now you can use your phone as a Bluetooth speaker for PC and enjoy the sound anywhere on the go.
Whether connected through Wi-Fi or USB tethering, the AudioRelay app makes it easy to stream your tunes. You can now enjoy your favorite music, videos, or podcasts without external speakers.
Microsoft Flight Simulator 2020 is certainly one of the landmark flight simulators out there and many fans didn’t believe it can be improved too much. Others feared that the next iteration will be turned into an arcade-like game without too much substance.
But now that we’ve seen Microsoft Flight Simulator 2024, it goes way beyond anyone’s expectation while remaining a technical flight simulator that can easily be used as a training tool for upcoming pilots in real life.
What is new in Microsoft Flight Simulator 2024?
Career Mode
First of all, there is a new Career Mode because the users demanded more interactions and tasks to perform in the simulator. We will not call it a game because the developers themselves insisted that this is a simulator, not a game. However, the Career Mode introduces that kind of game-like challenges that gamers certainly enjoy.
You will pick a place on the world map and you will have a mentor that will interact with your avatar for debriefing in cut-scenes along the way. You will also have a home headquarters and there you will see the missions you are assigned to, as well as the certifications and specializations you can work on to evolve your career as a pilot. Yes, you will actually need to pass certain exams to get those certificates. There are 3 millions of daily missions that refresh daily and you can pick from.
There is a certifications tree so, for instance, you can’t just jump over to flying a jumbo jet while you didn’t master the basics of light airplanes. However, if you’re a veteran pilot, don’t worry because the Career Mode can be avoided.
By advancing your career, you will be able to buy your own plane and start your aviation company, hire staff and pilots, and basically run your own business. Although this is not the main purpose of MSFS 2024, gamers will be happy to have a goal-oriented part to this incredible simulator.
There is also a Challenge League section with 3 missions updated weekly where you will compete with other users around the world. Moreover, in the Career Mode you will also have inworld missions such as taking photos of your environment, which can be exciting for some.
MSFS 2024 new aircraft
First, you should know that all the aircraft included in the MSFS 2020, are also in MSFS 2024, but some of them have been improved or redesigned. For instance, in the Standard edition, you will get to fly with 30 new aircraft and 40 redesigned/upgraded ones. These numbers go up to 45 new ones and 50 upgraded in the Aviator editions (read below to see all the available editions of the game).
The image provided by Microsoft highlights all the new additions, from which we would highlight the Northrup Grumman A-10C II, the controversial Boeing 737 MAX8, Airbus A321LR, and if you want to fly with a blimp, Airship Industries A600 is there to meet your demands. How about the monster Airbus A330 743L Beluga XL? You will be able to fly it right in the Standard edition as well.
Airbus A330 743L Beluga XLin MSFS 2024
But that’s not all, because you will also be able to fly a hot air balloon and simply enjoy the view.
Here’s a list of the new aircraft you will enjoy in the Standard, Deluxe and Premium Deluxe editions as highlighted by Microsoft:
MSFS 2024 Standard: AeroElvira Optica, Air Tractor AT-802, Airbus A321LR, Airbus A330 (-200, -300, P2F), Airbus A330 743L Beluga XL, Airbus A400M Atlas, Airbus Helicopter H125, Airship Industry Skyship 600, Archer Midnight, Boeing 737 MAX 8, Boeing 747-81 (-8F), Cessna 400 Corvalis TT, CGS Hawk Arrow II, Cirrus Vision SF50, De Haviland Canada CL415, De Haviland Canada DHC-6 Twin Otter, Draco X, Erickson S-64F Aircrane, Fairchild Republic A-10 Thunderbolt II, Heart Aerospace ES-30, Hot Air Balloon, FlyDoo, Jetson One, Joby S4, Magni Gyro M-24 Orion, MX Aircraft Company MXS-R, Pilatus Pc-12 NGX, Powrachute Sky Rascal, Robinson R66, Stemme S12G, Zivko Edge 540.
MSFS Premium Deluxe: Airbus Helicopter H225, Beechcraft C90 GTX King Air, Boeing 747-400 Global Supertanker, Boeing 747-400 LCE Dreamlifter, Boeing C-17 Globemaster III, Boeing CH740 Chinook, Pilatus PC-24, Pipistral Taurus M, Saab 340B, Zlin Aviation Savage Norden
MSFS 2024 in-game improvements
As we’ve mentioned above, the developers have outdone themselves in the game graphics and physics department. They characterize MSFS 2024 as the most detailed re-creation of planet Earth to date.
According to Microsoft,Tte simulation features enhanced digital elevation maps, over 500 TIN (triangular irregular network) cities and more than 100,000 square kilometers of countryside photogrammetry allow for visually stunning digital twin experiences.
MSFS 2024 includes more than 150 airports and 2,000 glider airports, 10,000 heliports, 2,000 points of interest on the world map. Because you will also be able to do utilitarian missions, the developers hand-crafter 900 oil rigs to access with a helicopter.
Although you have detailed view of only 150 airports and 10,000 heliports, the procedural system in the software generates all 40,000 airports, and 80,000 helipads to fly by. MSFS also features 1.5 billion buildings, and nearly 3 trillion trees.
But that’s not nearly all, because the simulation doesn’t stop at the flying simulation, but you can also get off the plane and explore the biomes around the plane. There are 27 highly detailed biomes to explore, with hundreds of species of vegetations and other natural elements, and all of them are influenced by seasonal changes in the environment.
And where there is vegetation, there are also animals, including the wild and livestock in and around the farms in al biomes.
Also, there is real-life traffic, both in the air, but also on the ground. The airports are full of people, the highways and roads are populated by cars, utility vehicles etc. Basically, Flight Simulator 2024 reaches a top level of graphics immersion.
MSFS 2024 requirements
For Microsoft Flight Simulator 2024, Microsoft has issued 3 types of configurations, including an Ideal Spec sheet besides the classic minimum and recommended ones that we see for any game. This is due to the fact that MSFS 2024 made a huge graphics-related quality jump.
You can still run it with a 4 GB of video memory graphics card and 16 GB of RAM. But if you really want to enjoy the high quality detail and smooth graphics and motion flow, you will need a 12 GB VRAM discrete graphics card and 64 GB of RAM, alongside of an Intel i7 14700K or AMD Ryzen 7 7900X CPU.
Being a huge game, the developers left some of the plane data in the cloud, so you will also require a strong internet connection, from 10 Mbps to 100 Mbps, according to the level of in-game settings.
Game editions and prices
As you can see, there are 4 editions of Microsoft Flight Simulator 2024: Standard, Deluxe, Premium Deluxe and Aviator. Let’s break down what you will get in each one:
Microsoft Flight Simulator 2024 Standard – 30 new MSFS aircraft, 40 upgraded aircraft and 150 upgraded airports – $69.99
Microsoft Flight Simulator 2024 Deluxe – 35 new MSFS aircraft, 45 upgraded aircraft and 155 upgraded airports – $99.99
Microsoft Flight Simulator 2024 Premium Deluxe – 45 new MSFS aircraft, 50 upgraded aircraft and 160 upgraded airports – $129.99
Microsoft Flight Simulator 2024 Aviator – 45 new MSFS aircraft, 50 upgraded aircraft, 30 payware aircraft and 160 upgraded airports – $199.99
Apart from these, you can also buy a MSFS 2024 Limited Collector’s Edition that includes a metal box, a model plane, and a lot more perks from the Aerosoft website for $309.39.
The game will be available on PC (Steam) and Xbox Series X|S starting November 19, but you can preorder it now from the MSFS 2024 website.
We hope that we provided all needed information about the new Microsoft Flight Simulator 2024, but if you have any questions, hit the comments section below.
Microsoft Copilot for Sales, an AI assistant in Microsoft Teams, has added new abilities to assist sellers in preparing and cooperating with customer information. Microsoft also introduced new features that streamline users’ experiences in Outlook, Teams, and the Copilot Studio.
In a blog post, Microsoft introduces a new email banners feature in Outlook that will allow sellers to update CRM (customer relationship management) data without leaving their inboxes. The banners will appear on up to two emails from external customers per day and allow users to perform tasks such as adding new leads, contacts, and accounts and saving emails and attachments to the CRM.
Banners are contextual to the email and will only show actions that are relevant to the message. Clicking an action will take the user to the appropriate page in Copilot for Sales.
In Teams, first-time users of Copilot for Sales who start from Microsoft Teams can connect to their CRM right from Teams without signing in to Outlook. Additionally, users will be able to use a zero-click sign-in for Copilot for Sales extensions using Microsoft Entra ID.
Suppose an organization’s Copilot administrator has already enabled a third-party CRM connector using Microsoft Entra ID. In that case, users can view data and insights from the CRM app without explicitly signing in.
In the Copilot Studio, users can access sample certified connector plugins that help them understand how to build new extensions for Copilot for Sales without having to download separate solutions from the Microsoft Dynamics 365 and Salesforce AppExchange stores.
This month, we’re enabling features to streamline your experiences in Outlook, Teams, and Copilot Studio. First up: we’re enabling email banners* that allow you to quickly update CRM data – right from the email message! Next, users signing in to Copilot for Sales for the first time can connect to their CRM directly from Teams rather than first having to sign in to Outlook. We also enabled zero-click sign-in for Copilot for Sales extensions using Entra ID, and finally, we’re making it easy to use the sample certified connector plugin – right from within Copilot Studio!
The alterations follow a series of modifications made to Copilot for Sales in the past few months. In June, a fresh feature was included that allowed customers to participate in a planned meeting with the seller.
The language improvements, on the other hand, suggest that the AI model now understands more ways to update CRM opportunities with monetary value, timeline, and stage changes. For these features, Copilot for Sales could only assist in four languages, but now it can help in 10 languages.
Microsoft intends to introduce Copilot for Sales support into OneNote on iPad, along with integration linked to LinkedIn Sales Navigator.
If you ever encounter an MTG Arena network error, you won’t be able to play the game at all or log into it, and this can be a major problem. Luckily, this can be fixed with these solutions.
How do I fix the MTG Arena network error?
Before trying anything else, try using a VPN and check if that helps.
1. Delete the log folders
Make sure that the game is closed. If you have its launcher running, such as Steam, close it as well.
Navigate to the Logs file location. By default should be: C:\Program Files\Wizards of the Coast\MTGA\MTGA_Data\Logs\
If you’re a Steam user, the location is C:\Program Files (x86)\Steam\steamapps\common\MTGA\MTGA_Data\Logs
Delete everything from the Logs folder and try to run the game again.
2. Delete the raw card database file
Navigate to C:/Program Files/Wizards of the Coast/MTGA/MTGAData/Downloads/Raw
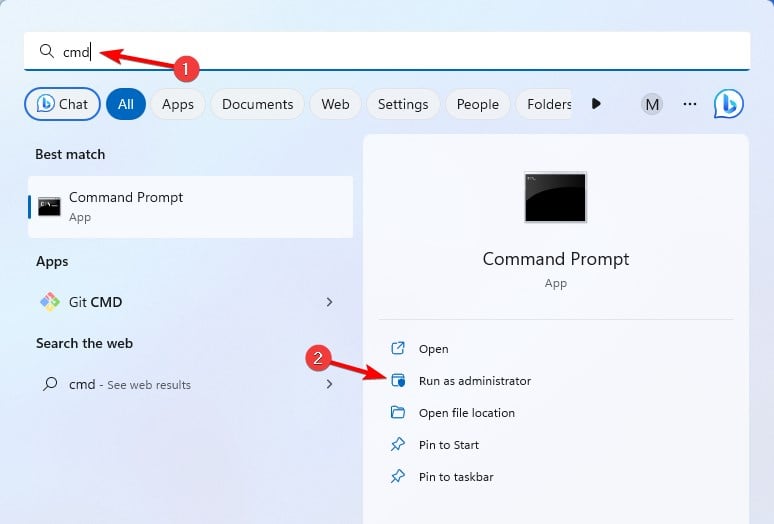
Press Windows key + S, type cmd, and choose Run as administrator.
Run the following commands: ipconfig /flushdns ipconfig /registerdns ipconfig /release ipconfig /renew netsh winsock reset
Check if the problem is resolved.
5. Disable IPv6
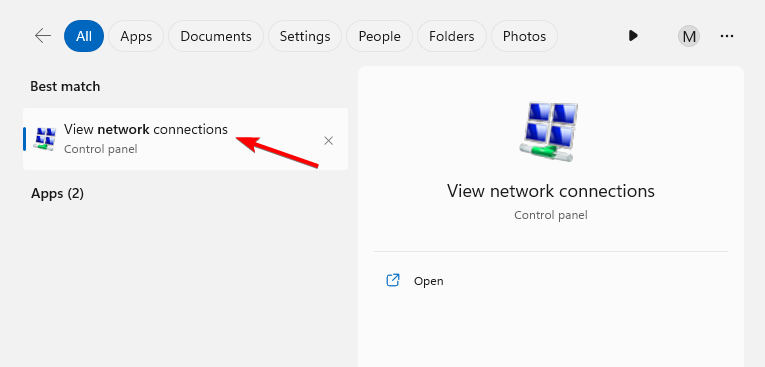
Press the Windows key + S and type view network connections. Select View network connections from the menu.
Next, locate your current network, right-click it, and choose Properties.
Locate Internet Protocol Version 6 (TCP/lPv6) and disable it.
Save changes.
These are just some of the methods that you can use if you’re unable to join the event, get a collection, or submit a deck due to an MTG Arena network error.
Aloha Browser is a privacy-focused web browser with built-in VPN support. It’s available for mobile and desktop platforms, making it an attractive choice for users seeking secure browsing.
I’ll show you how to download and install it using the official and third-party websites, so let’s jump right in!
How To Download and Install Aloha Browser
You can download the browser from the official or a third-party website.
Via the Official Website
This is the most secure way to get the browser. Follow the below steps:
Identify your device (Mobile & tablet or desktop), tap on your operating system, and the downloads will start automatically.
Once downloaded, open the file, and the installation process will begin automatically.
The browser will launch after the installation.
Using the official site ensures you get the latest and most secure version.
Via a Third-Party Website
You can also download Aloha Browser from a third-party website, though this method comes with risks. Since the desktop versions were introduced recently, third-party sites like Softonic offer only mobile downloads.
Be aware that unofficial sources may expose your device to malware or compromised software. Before installing, ensure you’ve enabled app installation from unknown sources in your settings.
All things considered, the Aloha Browser is an excellent option for users seeking secure and private browsing with its fast performance and built-in VPN. For the safest experience, I recommend downloading and installing the browser from the official website.
Also, learn to set up and use other browsers, including Thorium, Opera Mini, and Arc.
It’s been a while since Microsoft released any new patch to the Windows Insider Program, but the Redmond-based tech giant has returned with the new KB5043185 for the Dev Channel. This build brings new features to Windows 11, including a quick and effective way to sign off on the operating system and enhanced capabilities for File Explorer.
First, one of the standout features in KB5043185 is the ability to access files shared with you directly from File Explorer quickly. This includes files shared via email, Teams chat, and more, and it works whether you’re signed into Windows with a personal Microsoft account or a commercial Microsoft Entra ID account.
There’s a new “Shared” tab in File Explorer at the top of the Home page, and you can see a broader set of file types in the Recent, Favorites, and Shared sections on the homepage.
If you’re using Windows Sandbox, KB5043185 includes the Windows Sandbox Client Preview, now updated via the Microsoft Store to deliver new features more frequently. This update introduces runtime clipboard redirection to copy and paste text and images between the host and guest, audio and video input control to control which apps in the sandbox can access your camera and microphone, and the ability to share folders with the host at runtime.
Microsoft is also releasing a super early version of command-line support in the Windows Sandbox Client Preview, which allows you to run commands in the sandbox from outside the app.
KB5043185 also includes several changes and improvements. For example, the Microsoft 365 app will be pinned to the taskbar for quick access on new PCs or new user accounts on managed commercial devices running Windows 11 Enterprise, Education, or Pro logged in with a Microsoft Entra ID or domain.
Media controls will now appear at the lower bottom centre of the lock screen when media is being played. Microsoft has also updated the new account manager on the Start menu, making the sign-out option visible and adding a list of signed-in users under a “…” button.
The system tray in Windows 11 has been simplified in the latest build, highlighting just the date and time. The notifications bell icon is now based on your Do Not Disturb (DND) status—if DND is on, the icon won’t appear, and you can access your notifications by clicking the date and time.
Microsoft says it’s testing this new system tray design and that users can revert to the old design by toggling the options in Settings > Date and Time and Settings > System > Notifications.
In other changes and improvements, with KB5043185, Microsoft has added a new section for touch screen edge gestures to Settings > Bluetooth & Devices > Touch in Windows 11, and there’s now an option to turn off the suggestions to disable notifications from specific apps.
You can disable the notification by pressing the “…” button or by going to the list of notification senders in Settings > System > Notifications and turning them off.
The popular Tab Groups feature, once removed due to low usage, is returning to Firefox thanks to feedback from the user community. Here’s our hands-on experience with Mozilla’s initial work on Firefox Tab Grouping in Nightly.
Grouping tabs into related groups declutters the tab bar, allowing you to open more tabs related to your work. Tab grouping has become a standard native feature in modern browsers like Google Chrome and Microsoft Edge, for both desktop and mobile.
After introducing Tab Groups in Firefox as “Firefox Panorama”, Mozilla later removed it citing low usage. However, the demand for this feature has increased among users of Chrome, leading to its inclusion in Chrome with color coding and the ability to assign names to tab groups. The feature is later available in chromium-based Microsoft Edge. The tab groups can be collapsed to save space.
WindowsReport has been able to enable and group tabs in the Nightly version of Firefox. Please note that this is still an early implementation, and work is ongoing.
How to enable the Tab Groups feature in Fiefox
Launch the latest Firefox Nightly.
Visit about:config.
Find and turn on the following Pref value to true. browser.tabs.groups.enabled
Restart Firefox.
How to group Tabs in Firefox
To start grouping tabs, you’ll find an “Add Tab to New Tab Group” option in the Tab Context menu. When you select this option after right-clicking a tab, Firefox adds a color code and underlines below the tab title to indicate that it belongs to a group. You can make nearby tabs part of the group by dragging and dropping manually.
Image credit: WindowsReport.
Similarly to ungroup or remove a tab from a group, drag it out of the group.
To group multiple tabs, simply right-click and select the “Select All Tabs” option and then choose the “Add Tabs to New Tab Group” option. You can also select desired tabs by pressing the Ctrl key. Groups with a larger number of tabs can be collapsed and expanded like in Edge and Chrome browsers.
Image credit:WindowsReport.
As of now, you can’t assign names to Tab Groups and group pinned tabs in Firefox. Tab groups will not be saved automatically, and they will not be available the next time you restart Firefox, even when the browser is configured to launch the previous session in Settings.
Video:
In the future, Mozilla will likely integrate Tab groups into “Firefox View” and the “List All Tabs” dropdown arrow.
After a relative silence, Microsoft unveiled the Windows 11 Insider Preview Build 22635.4225 (KB5043186) for the Beta Channel in the Insider Program. This latest update brings various new features, changes, and bug fixes for Insiders testing the OS.
One of the best new features being gradually rolled out to some Windows Insiders in the Beta Channel is the ability to share content to an Android device directly from the context menu in File Explorer and on the desktop.
In the Insider Program, the Redmond-based tech giant has been teasing the streamlining of Android devices with Windows 11 for quite a while now, so it’s nice to see that the company wants users to transfer files between these devices quickly. The Phone Link app must be installed and configured to use the feature on the PC. Users are also encouraged to leave feedback.
KB5043186 allows you to configure the Microsoft Copilot key. According to Microsoft, you can choose to have the Copilot critical launch an app that’s MSIX packaged and signed, meaning that the app meets security and privacy requirements.
The setting can be found in Settings > Personalization > Text input. Microsoft notes that adjusting the setting will not affect your keyboard if it doesn’t have a Copilot key.
KB5043186 also includes several fixes for everyone in the Beta Channel. For example, Microsoft says it fixed an issue that caused some Insiders to experience a bug check when closing Notepad during the last flight.
It’s also worth mentioning that after installing the latest build to the Beta Channel, Windows Installer will prompt for your credentials every time you need to repair an application with it.
There are three known issues. If you click or tap on a letter in the Start menu’s All Apps list, it may break. If you encounter this issue, Microsoft recommends rebooting or restarting explorer.exe to fix it.
Some Insiders might notice the system tray appearing unexpectedly in the wrong location after upgrading to the build, and some might see the volume icon in the system tray appearing unexpectedly in the wrong location after upgrading to the build.
SSL handshake failed error code 525 occurs when trying to access certain web pages, and today we’re going to show you how to fix this problem if you’re a web administrator.
What is HTTP status code 525?
This is a Cloudflare-specific HTTP response and it occurs if the SSL handshake between Cloudflare and the origin web server can’t be completed.
How can I fix the SSL handshake failed error code 525?
1. Add SSLProxyCACertificateFile to your configuration
Replace OpenSSL with LibreSSL and check if that helps.
Now that you know what causes SSL handshake failure, you can go ahead and fix it. Keep in mind that even if you see this error as an end user, this is a server issue, and only the server administrator can fix it.
When working on an Excel sheet, it is essential to know where the autosave files are stored in case you forgot to save.
Saving files as you go is essential but some situations precede these task and you may end up with an unsaved document if the power goes off abruptly or your device randomly shuts down. To access the autosave location, you must have enabled the autosave option in Excel.
Where are AutoSave Excel files stored?
1. By using the AppData folder
Launch File Explorer by clicking the Windows + E keys combination.
Navigate to the following location: C:\Users\Your_username\AppData\Local\Microsoft\Excel\UnsavedFiles
If you can’t see it, it may be hidden. Go back to File Explorer, right-click on it, and select Properties.
Navigate to the General tab, uncheck the Hidden box, click Apply, then OK.
In the next dialog box, check the Apply changes to this folder, subfolders and files option box, then hit OK.
Go back to File Explorer, click on View>Show>Hidden, and ensure the tick is there.
You’ll now be able to see a list of Excel files.
2. By using Excel’s built-in recovery option
Launch Microsoft Excel on your device and navigate to the File tab from the menu.
In newer Excel versions, click on Open. In older versions, you’ll need to click on Recent.
Select Recent to open a list of recent documents.
Click the Recover Unsaved Workbooks button.
An Open window will then appear that includes a list of unsaved Excel documents.
Launch File Explorer by clicking the Windows + E keys combination.
Navigate to the address bar and type%temp%then hit Enter.
Use .xlsx or .xlsb. as your search terms to quickly find your autosave files.
Once the search is complete, click Search options to sort by size. You can now select the date modified to arrange them by most recent and find your unsaved excel files.
And it’s not just about recovering Excel sheets. If you’d like to access your Word autosave files, we have a dedicated article on various ways to find your unsaved documents.
While these options may work Excel autosave may not be working so these files may not be available. As always, remember to backup your files to avoid losing data. You can also restore previous versions if possible.
That’s it from us but do let us know if you have any other ways to access your autosave files in the comment section below.
At WindowsReport we’re gamers and that means we’re always on the lookout for new ways to enhance your gaming experience so here is what Ropro for Firefox can do for you if you play on Roblox.
What is Ropro for Firefox?
Gamers are always looking for new ways to enhance their gaming experience and there’s no shortage of browser extensions for Roblox that can do that for you. To add onto that list, Ropro is a strong contender if you’re looking to:
Create and customize your avatar
Create and change themes for your game
Monitor and keep track of your play time to better manage your time
Enhanced search function to quickly find your games
Leave and join new servers. You can also sort server by regions and get recommendations for the best connection
Enhanced interaction with other players by liking their profiles
View mutuals on other servers
These are just some of the perks you get on the free tier so for more, you can upgrade to the paid versions which range from $3.99 to $7.99 a month.
How do I install the Ropro for Firefox extension?
Launch your Firefox browser and go to the Firefox Browser add-ons website.
Search for Ropro, select the one you want from the search results, and then click Add to Firefox.
The extension will be downloaded and installed. Click Add to allow the extension to access browser tabs, and browser activity during navigation.
You might also get a prompt to allow this extension to work in a private session. To enable it, place a checkmark and click Okay.
What can I do if i can’t install Ropro on Firefox?
Unfortunately, Ropro may not be available on the Firefox addons page depending on your version of the browser. If this is the case, you can download it from GitHub or switch to another browser and download Ropro for Chrome.
If you’re successful in installing it and passed the verification stage but it’s not working as it should, try the preliminary troubleshooting steps like clearing browser cache and cookies, refreshing the browser and disabling conflicting extensions.
That’s it for this article but do let us know your experience with the Ropro extension. Has it made your gaming experience better? In what way? Let us know in the comment section below.
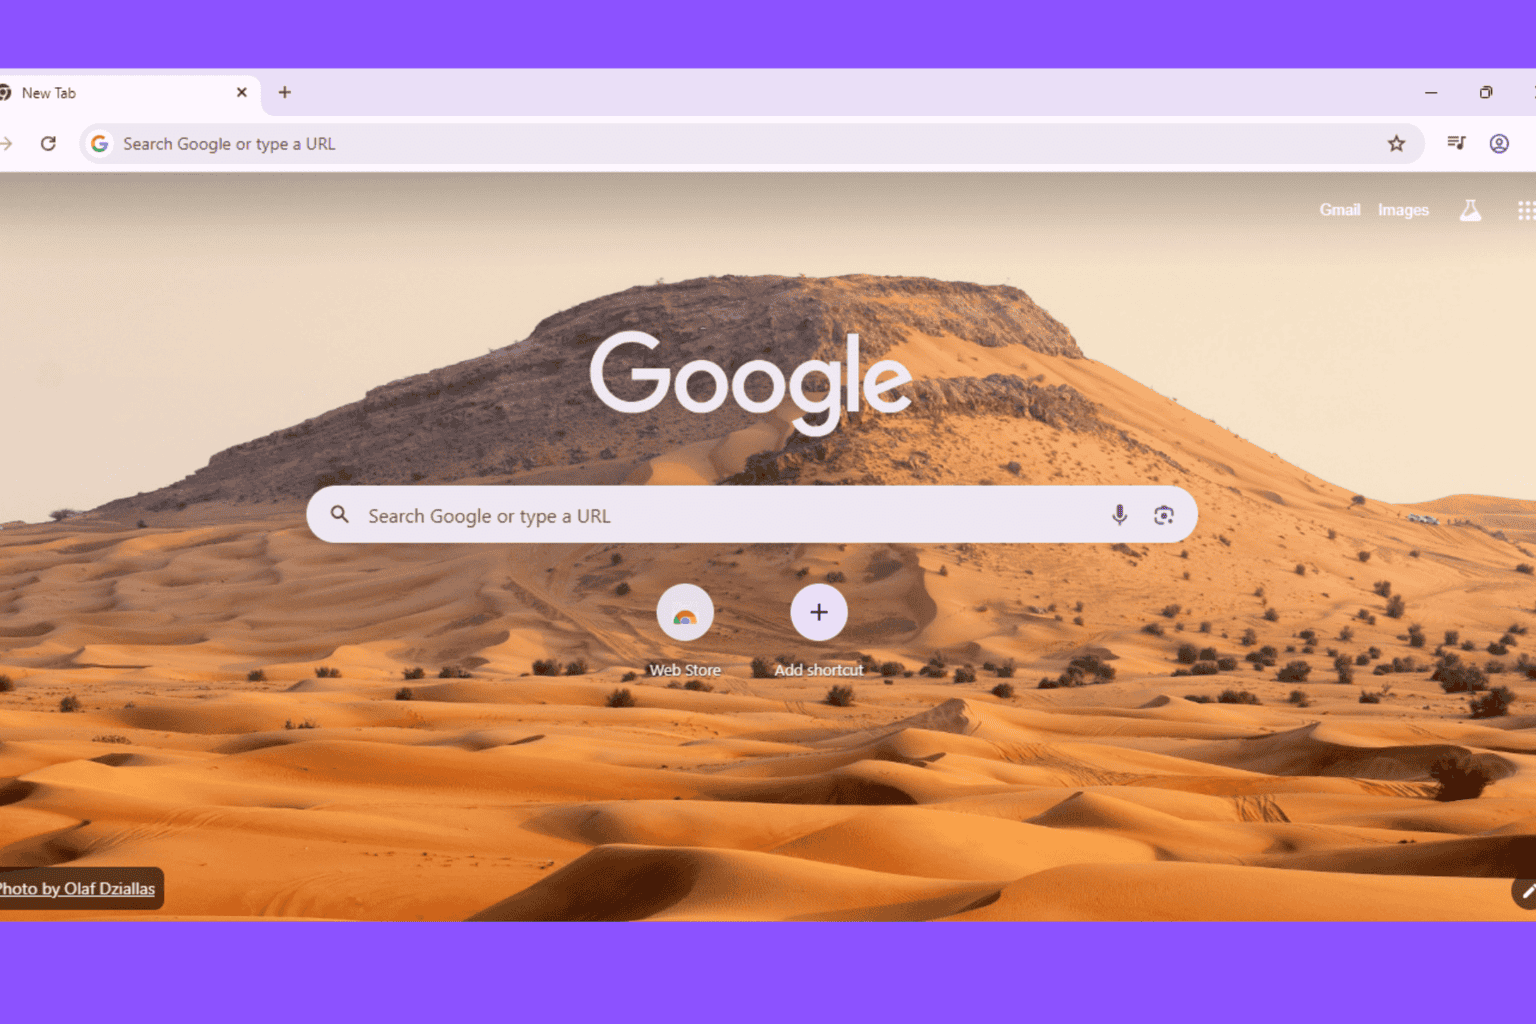
Google is making an important change to the way themes in Chrome appear across devices when signed in and when sync is turned off.
At present, when you sync Chrome settings across devices, your theme is also included. This means that if you change your theme on one device, it will be automatically applied to all synced devices.
However, this can be inconvenient if you prefer different themes on different devices. Google is now considering this and is working to allow users to have separate themes for their local profile and Google Account.
Image credit:WindowsReport.
Chrome to Keep themes separate for local and Google Accounts
A local theme applied to your Chrome browser on a specific device remains unchanged unless you manually change it. Similarly, an account theme is the theme associated with your Google account. It syncs across all devices where you are signed in with the same account.
When you turn off sync, the account theme will be removed, and the local theme will be restored. This ensures that your local theme preferences are preserved even if you stop syncing your account.
Soon there will be a flag named SeparateLocalAndAccountThemes for users to test in Chrome Canary. When enabled, it “keeps the local and the account theme separate if sync is turned off”. The commit message spotted by us reveals this.
This change will allow users to personalize their browsing experience by using different themes on different devices. Local themes will remain consistent on a device, even if the account theme changes or sync is turned off. Users can modify themes on their local devices without affecting the theme on other devices.
Managing two sets of themes might be confusing for some users. Let us hope that Chrome may offer a setting or something for users to manage the theme separation feature they are working on for local and account profiles.
Excel lets you turn on AutoSave to prevent data loss by saving your work automatically as you go. If you’re prone to forgetting to hit save or worry about system crashes, you can rely on AutoSave to keep your documents safe.
It also ensures you always have a recent version of your work. I’ll show you how to enable this feature, so let’s get started!
How To Turn on AutoSave in Excel
Follow the below steps:
Launch Excel and open the target file.
Check the AutoSave toggle at the top left corner. It should be visible in Microsoft 365 connected to OneDrive or SharePoint. Toggle it “On.” When it’s on, you should see a shield on top.
If the AutoSave switch in the top left corner is unavailable, it indicates that you’re using an older version of Excel. Tap File.
Click Options.
Select Save under Excel Options.
Tick the “Save AutoRecover information every” box. The default duration is always 10 minutes; change it to 1 minute and press OK. This will save your work automatically every minute you write.
Turning on AutoSave in Excel is a simple but effective way to safeguard your work and prevent data loss. Follow the steps outlined, and you’ll never have to worry about losing important work again. To learn more about this feature, don’t miss out guide on where are Excel autosave files saved.
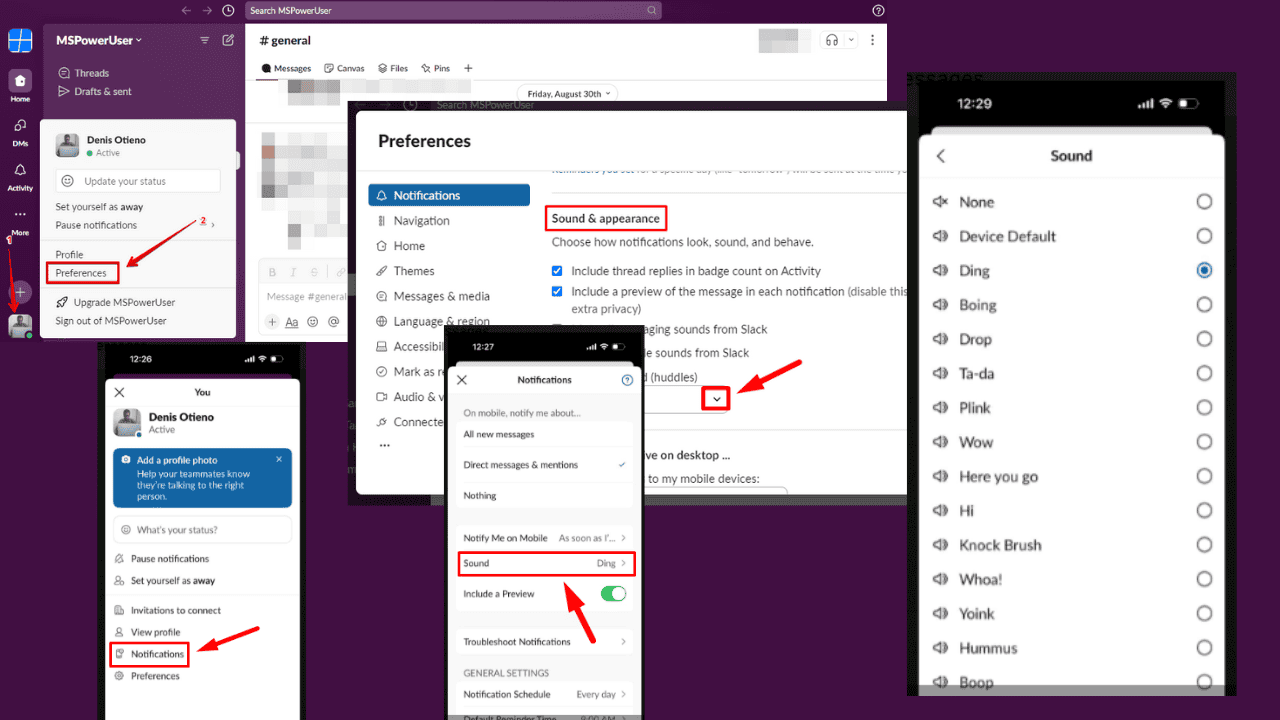
Knowing how to change the Slack notification sound is important if you want to personalize the tone. It’s a simple process that can make your workspace feel more comfortable and less disruptive. I’ll show you how to do it on your Desktop and Mobile.
Let’s begin!
How To Change Slack Notification Sound
The desktop and mobile versions have slightly different steps. Learn to customize it on both devices below.
On Desktop
Follow these steps:
Launch the Slack app on your desktop.
Click on your profile icon in the bottom-left corner, then select “Preferences” from the menu.
Scroll to the “Sound & appearance” section in the Preferences window. You’ll find an option labeled “Notification sound.” Click on the dropdown menu to select a tone.
That’s it! Your notification sound will be updated automatically.
Launch the Slack app and tap your profile picture in the top right corner.
Tap Notifications.
Click Sound.
Select a tone of your choice. Slack will update it automatically.
It’s that simple!
So, now you know how to change your Slack notification sound. It’s a great way to personalize your experience and make your workspace more manageable.
There’s still more to learn about Slack. You can find out how to change email addresses, add new emojis or create your own, and add a person to a conversation.
Wondering how to sort data in Excel in alphabetical order? It’s simple.
When you manage a list of names or organize data for analysis, sorting helps you quickly find the necessary information. I’ll show you how to sort your Excel data alphabetically to make your workflow more efficient and organized.
Let’s get started!
How To Sort Data Alphabetically in Excel
Here are the instructions:
Open Excel, create or go to the data you want to sort, and select it.
Tap Data.
Click Sort Ascending.
Your data will be automatically arranged in alphabetical order.
That’s all!
Excel alphabetical order comes in handy when organizing and managing information. These steps will help you arrange your data alphabetically to make it easier to analyze.
While Microsoft hasn’t announced the official release date for Windows 11 24H2 yet, Google is preparing to add support for the new operating system version to Chrome. In addition, Google has identified and is working to address video frame rate drops that have been affecting Chrome users in multi-monitor setups on Windows 11 24H2 Preview version.
The initiative to support Windows 24H2/26100 in Chrome comes from a previous effort to integrate support for the 23H2 Windows version. The new version, released to the Windows Insider Release Preview Channel, prompted Google to address a significant bug (360354541) related to video playback frame drops in multi-monitor setups with different refresh rates.
Chrome Gears Up for Windows 24H2: Addressing Video Frame Rate Issues in Multi-Monitor setups
The problem arises in setups where each monitor operates at a different refresh rate (e.g., 75Hz and 240Hz). When playing a 60fps video, users experience consistent stuttering and dropped frames, reducing the effective frame rate to about 45-50fps.
The primary impact of video frame drops in multi-monitor setups is a degraded viewing experience. When videos stutter or experience inconsistent playback, it can be frustrating and distracting.
To fix this issue, Google plans to use the Win11 DCompositionWaitForCompositorClock API. This API allows Chrome to get real-time information about the screen’s refresh rate, so it can adjust accordingly. This should make videos play more smoothly and reduce any stuttering.
A key part of this update is adding the 24H2 enum to Chromium. As one developer noted, “We normally only add a new version if there is some code in Chromium that needs to have conditional behavior on the version.” The current patch, which uses build number comparison, will be updated to include the 24H2 enum before moving forward with the change.
It’s important to note that Microsoft has not yet announced the official release date for Windows 11 24H2. This means that while preparations are underway, the exact timeline for when users can expect full support in Chrome remains uncertain.
For these features to work, Chrome may collect some data such as your browsing history. For instance, for Search Your History, powered by AI, Chrome explicitly mentions that ‘Your searches, best matches, and their page contents are sent to Google and may be seen by human reviewers to improve this feature.
Chrome’s AI Data Collection via extensions
Following AI-powered History Search, Google is working to build an extension API that allows specific extensions to gather data from the browser. This data can include profile-specific information that extensions couldn’t access before. The goal is to improve AI-driven features within these extensions.
Chrome’s new flag available in Canary,’ Enables AI Data collection via extension’ allows specific extensions to collect data from the browser process. This data may contain profile-specific information that was previously unavailable to extensions.
Image Credit:WindowsReport.
The feature might encourage developers to create new extensions that leverage AI capabilities. Existing extensions could benefit from access to more data, enabling them to offer more advanced features or perform tasks more effectively.
By allowing extensions to collect more detailed data, Google aims to improve Chrome’s AI features. However, this also raises important questions about privacy and data security, as the collected data could be sensitive.
Google would need to implement strong safeguards to ensure that data is collected and used responsibly. It is also important for the company to be transparent about the types of data being collected, how it’s used, and how users can control their privacy settings.