Possible LEGO Star Wars: The Skywalker Saga video game release date announced by mistake

The LEGO Star Wars: The Skywalker Saga Xbox One video game was announced back in 2019 yet, even with the reveal of its cover artwork last week, the release date has still been a secret and only mentioned officially as being sometime in late-2020.

That changed with a recent episode of This Week! In Star Wars, the official Star Wars YouTube channel’s news show. In it, an October 20th release date for LEGO Star Wars: The Skywalker Saga was announced. Interestingly, no official social channels or websites associated with the game posted about this date and, after numerous fans started sharing this date on social media, the entire video was deleted from YouTube.

This date could have just been an error by those involved in the episode or it could be the actual release date for the game that the parties involved simply weren’t ready to reveal yet, possibly saving the announcement for an online reveal after the cancellation of this year’s E3.

Another possibility is that October 20th was the originally-planned release date for LEGO Star Wars: The Skywalker Saga but due to the COVID-19 pandemic a date change is expected.

On the bright side, even if this game’s release date is pushed back even later, Star Wars fans still have a lot of fun to be had on Xbox One consoles due to recent content updates for Jedi: Fallen Order and Star Wars Battlefront II.

What do you think? Do you think this will be the actual date of the game’s release? Share your thoughts with the community in the comments below and then follow us on Pinterest and Twitter for more Xbox gaming news.

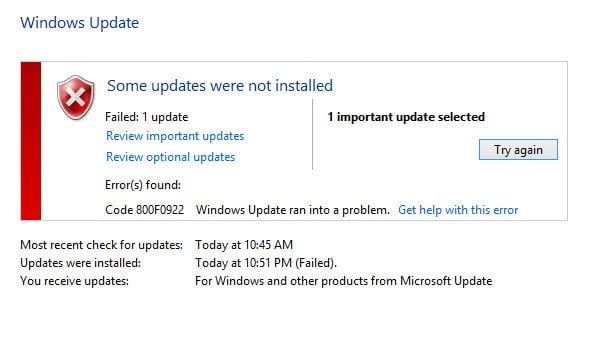
Error code 800f0922 in Windows 10/11 [FIX]

Do you want to learn how to fix the error code 800f0922 in Windows 10 or Windows 8.1?

Well, reading the lines below will clarify everything there is to know about the error code 800f0922 and the steps that you will need to take in order to fix this issue in Windows 10 or Windows 8.1.
How to fix windows 8.1, Windows 10 error code 800f0922
When you run a specific application you might get the error code 800f0922 and then the program will close automatically.

Also, another symptom of this error is that when you try to do your everyday activity on Windows 10 or Windows 8.1 the operating system will slow a bit the keyboard and the mouse inputs thus making it very hard to work on your operating system.

How can I solve the error code 800f0922 in Windows 10?

  1. Create a backup key for Windows
  2. Run an antivirus scan
  3. Initialize a Disk Cleanup
  4. Check for outdated/bad drivers
  5. Restore your system to a previous version
  6. Uninstall the problematic application
  7. Run an sfc/scannow
  8. Update/reinstall Windows

First option: Create a backup key for Windows

  1. Left-click on the Start button you have on the start screen.
  2. In the search box you are presented there you need to type Command.
  3. Press and hold the button Ctrl and the button Shift.
  4. While still holding down the buttons above press on the Enter button.
  5. A User account control window will pop up where you will need to left click or tap on the Yes button.
  6. You will need to write regedit in the window.
  7. Press the Enter button on the keyboard.
  8. A Registry Editor window should open.
  9. Select Windows 8.1 or Windows 10 from the Registry Editor by left-clicking on it.
  10. In the upper left side of the Registry Editor window, you will need to left-click on the File feature.
  11. From the File menu left click on the Export option.
  12. In the next window, you will need to choose the directory where you want to place the backup key for Windows 10, 8.1.
  13. In the box next to File Name you will have to enter a name for the backup you are going to make.
  14. In the box next to Export range select the feature Selected branch by left-clicking on it.
  15. Left-click or tap on the Save button.
  16. After you chose to save the backup file it will appear with a .reg extension.
  17. Now after you made a backup copy of the registries you will need to left-click on the link below.
    Download here app for fixing error code 800f0922
  18. After you left clicked or tap on the above link choose the Save File feature and install it in your system.
  19. Run the application by double-clicking (left-clicking) on the executable file and follow the instructions on the screen.
  20. After the application finishes reboot the Windows 8.1 device or Windows 10 and see if you still have the error code 800f0922.
    Note: If something does not go according to plan when you ran the application above you just need to restore the backup file you made in the first steps of this method.

Second option: Run an antivirus scan

Run a complete virus and malware scan in your Windows 10 or Windows 8.1 device.
Note: This scan should include your Windows 10, 8.1 partition as well as the other partitions you may have.

Third option: Initialize a Disk Cleanup

  1. Left-click or tap on the Start button.
  2. Write in the search box from the Start menu the following command without the quotes.
  3. Press and hold the Ctrl button and the Shift button.
  4. While still holding the buttons above you need to press Enter.
  5. Left-click or tap on Yes in the next window that appears.
  6. Write in the window that appears the following command cleanmgr without the quotes.
  7. Press the Enter button on the keyboard.
  8. You now have started the Disk cleanup feature in Windows.
  9. You will get to a certain point in the process where you will have to check the boxes next to the categories you wish to clean.
    Note: I suggest you check all the boxes with all categories present there.
  10. Left-click or tap on the OK button.

Fourth option: Check for outdated/bad drivers

  1. Left-click or tap on the Start button in Windows 10, 8.1.
  2. Type in the search box you have present there the following command Device Manager.
  3. Left-click or tap on the Device manager icon.
  4. Look on the left for any drivers that may have a yellow marking on them and if you find any you will need to update them to fit your Windows 8.1 operating system.
    Note: You can search on the manufacturer’s website for the drivers required to run Windows properly.

Fifth option: Restore your system to a previous version

  1. Left-click or tap on the Start button.
  2. In the search box from the Start menu, you will need to write System Restore.
  3. Press the Enter button on your keyboard.
  4. Left-click or tap on the System Restore icon.
  5. You might get prompted by a window where you will need to place in the administrator account and the password to proceed with this step.
  6. You will have an onscreen step by step explanation on how you can choose a restore point.
  7. Choose to restore the Windows 8.1 device by left-clicking on the Restore button.
  8. After the restore is completed reboot your Windows 8.1 or Windows 10 one more time.
  9. Check to see if you are having the same issues with error code 800f0922.

Sixth option: Uninstall the problematic application

If you get the error code 800f0922 in Windows 8.1 only when a specific application is opened then I would suggest uninstalling the application and installing it again from the Windows Store feature.

Seventh option: Run an sfc/scannow

  1. Left-click on the Start button you have in the Windows 8.1 system.
  2. In the Search box window, you will need to write commands without the quotes.
  3. Press and hold the Ctrl button and the Shift button.
  4. While still pressing the buttons above you need to hit the Enter button on the keyboard.
  5. Left-click or tap on Yes if you get prompted by a message.
  6. In the black window that appeared you will need to write: sfc /scannow.
  7. Press the Enter button on the keyboard.
  8. You will have to wait a bit for the file checker to do its job but after it is finished have a look if you still have the same error code 800f0922.

Eight option: Update/reinstall Windows

You will need to update or reinstall your Windows 8.1 or Windows 10 operating system if all the above steps did not solve your issue with error code 800f0922.
Note: I would first suggest updating your Windows 8.1 system and if it doesn’t work then you can reinstall it.

There you go, you now have a few more methods on how to fix error code 800f0922 in Windows 8.1 and Windows 10. Also please write us below for any issues or questions you might have during this tutorial.

  • What does system error mean?
A system error is a software malfunction that causes the operating system to stop working properly. Read on how to fix the fatal system errors in Windows 10.

[wl_navigator]

Microsoft Teams to let you pop meetings in separate windows

The year 2020 looks excellent for Microsoft Teams so far, considering the numerous improvements coming to it. Soon, the platform will start supporting popping out meetings and calling in multiple windows.

Just the other day, Microsoft promised to modify Teams to allow the simultaneous appearance of up to nine meeting participants on screen.

Multi-window experiences to support multi-tasking

The upcoming feature will enable you to pop out conferencing sessions in Teams into separate windows. The idea is to let you multi-task, which means accomplishing more within less time.

A similar capability is coming to the Office 365-powered Phone System feature. It will allow users of the calling function in Teams to have multiple call windows at the same time.

Multi-window experiences are coming to Teams meetings and calling. Users will have the ability to pop out meetings and calling into separate windows to help them optimize their workflow. These experiences can be turned on directly within Teams for PC and Mac clients.

Once the feature is available, you will be able to access it right away without having to update anything. Just sign in to Teams on your personal computer or Mac and you are good to go.

You should be able to explore the multi-window experiences in Teams meetings and calling sometime in June.

Microsoft’s already pushing multi-window chat in Teams

Last month, Microsoft started delivering the ability to pop out chat conversions into multiple windows within Teams. The update is on its way to your account if you do not have it yet. The company said it expects to have updated all users with the feature by the end of this month.

Enhancements like the upcoming update enable Microsoft Teams to pose a more serious threat to the dominance of Zoom in the area of VoIP conferencing. Overall, Teams is doing great considering that it currently has over 44 million daily users.


Xfinity HBO Go not working? Try these solutions

Many have tried to use their HBO Go app in vain. They chose Comcast Xfinity as their provider and this immediately resulted in an error.

There’s not even a login screen, but only a message that states: Signed Out. We’re having trouble verifying your access to HBO Go with your TV provider. If you continue to have this issue, contact your TV provider for assistance.

If that’s happening to you as well, be sure of the fact that we have a few confirmed solutions, so try them out in the given order.

Hopefully, one of them will help you regain access to the HBO Go app.

What can I do if Xfinity HBO Go is not working?

1. Try to use a different browser

Xfinity HBO Go often works with no hiccups when using the Brave Browser. Being a security-focused browser is what differentiates it from the numerous choices at your disposal.

Although it’s difficult to establish a direct connection between that and the HBO Go app itself, you may try this nifty trick too.

Moreover, keep in mind that enjoying it in Chrome, Firefox, Safari, etc. requires Flash to be installed.

Disney Now users who frequently experience similar issues with Xfinity logins confirm this solution as working.

Opera

Opera

Opera is one of the fastest browsers on the market, and it boasts several tools that make it great for streaming.
Free downloadVisit website

2. Sign in  with a secondary username

HBO GO sign in

On some occasions, simply signing in with a secondary username does wonders. That’s no challenging task for you.

However, if you have forgotten the email for your TV provider, contact Xfinity directly for the info.

3. Reinstall the HBO Go app

HBO GO app
  1. To begin the procedure, turn on your Roku device.
  2. Access the home screen menu on your TV screen.
  3. Navigate to My Channels next and look for HBO Go.
  4. Highlight the channel by using your remote and then press the STAR button.
  5. Choose the Remove channel option.
  6. Restart your device once you complete uninstalling the app.

4. Try a different streaming service

Xfinity isn’t the only streaming service out there, with other giants having a big chunk of the market, such as Disney+, Netflix, amazon Prima, Hulu, and more.

So, if you tried all of the solutions mentioned above and still can’t make Xfinity to work properly, then maybe you should consider switching your strea

If you’re looking for a streaming service that has a permanent catalog of well-established IPs and amazing TV shows, there are definitely others to choose from.

⇒ Get Disney+

If the above trick made no difference, you can try to reinstall the HBO Go app on your device. There are times when this procedure solves the problem for good.

However, do note that the steps usually vary from one handset to another.

Other users have also mentioned that signing in on a different platform has helped them fix the issue. HBO Go seems to work flawlessly in iOS, so don’t hesitate to give it a try if you own an appropriate device.

Were the above solutions helpful in solving your Xfinity HBO Go issue? Let us know in the comments area below.

How to use Shifts in Microsoft Teams to manage work hours, schedules, and more

If your IT administrator has enabled it, you might notice a “Shifts” experience in Microsoft Teams. This is a schedule management tool that’s intended for managers and firstline workers (who are those folks who come into contact directly with customers or the general public.) It is included with Teams plans for no additional cost and replaces Microsoft’s old Staff Hub experience, too.

But, it is not just for firstline workers. With Shifts, managers are able able to put together schedules, swap out shifts, create groups, put in time-off requests, and even keep a time clock. The feature can be quite useful for small businesses as it is heavily optimized for the Microsoft Teams experience. Here’s a comprehensive look at how you can get started with it to manage you and your employee’s work hours and schedules.

Opening the Shifts app and getting started with managing new shifts

To get started, you’ll have to open the Shifts app. It’s built into the left side of Teams. If you don’t see it there, you’ll have to click … More apps and find it on the list. Once there, you’ll see a list of Shifts assigned to you for the current week. If nothing is there, then you need to have a manager or admin assign a shift to you, or ask them to add one through the app.

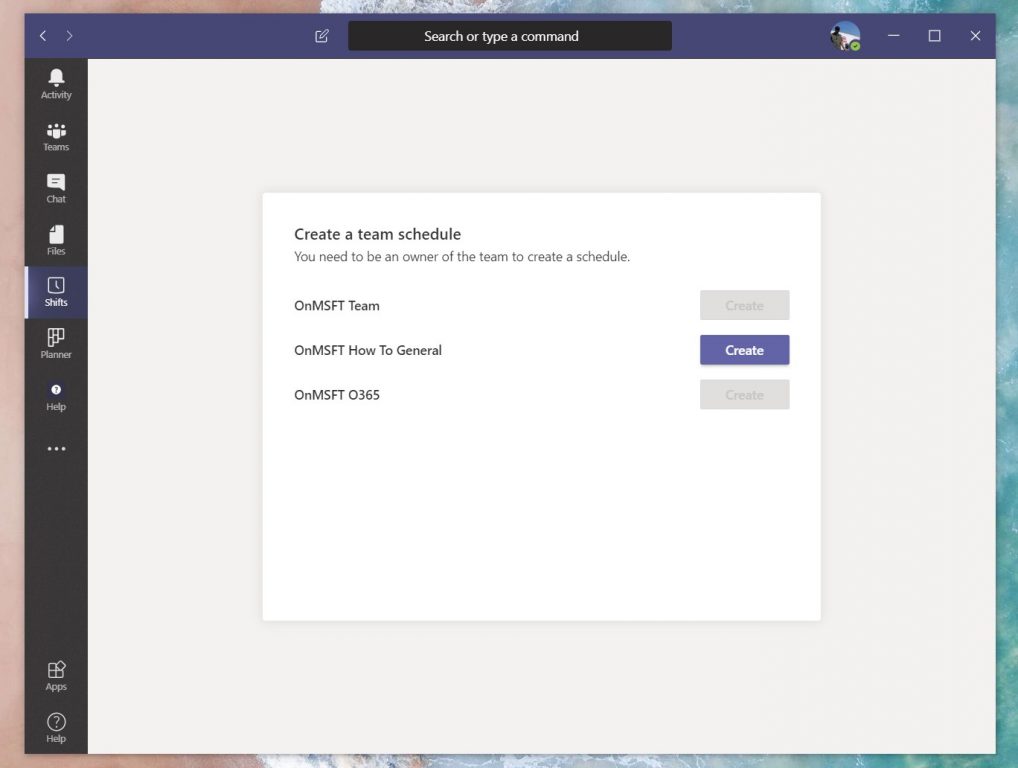
We’re about to discuss how managers or admins can do that next, but keep in mind, that these next steps are typically intended for managers or those with the right admin permissions only. Managers can only create a schedule in Shifts if they’re set an owner of the Office 365 Team. Everyone else will still have access to Shifts, but will only have options to see their own shift for the week or manage time off and other requests.

If you are a manager and have the proper permissions, to continue with creating a shift, you’ll want to choose Create from the list of teams on the page. Once you select Create you’ll be asked to select a time zone for the shift. If you happen to be working globally, as we are here at OnMSFT, you might want to choose a time zone that everyone can understand. As we’re writing about Microsoft, we use the Pacific time zone, which the Redmond, Seattle, company is based in.

You’ll then want to give Teams some time to create a schedule. When done, you’ll be prompted to take a tour. This shows you how you can add team members, create shifts, and more. We’ll get into those in the next sections.

How managers can create shifts and schedules

Managers and those with the right Office 365 permissions can create shifts and schedules for employees with Shifts in Microsoft Teams. This can be done by clicking the “add people to the group” button. This icon shows up as a picture of a person on the far right side of the screen. You’ll be able to add anyone to the shift and schedule as long as they have a valid profile under your Office 365 plan.

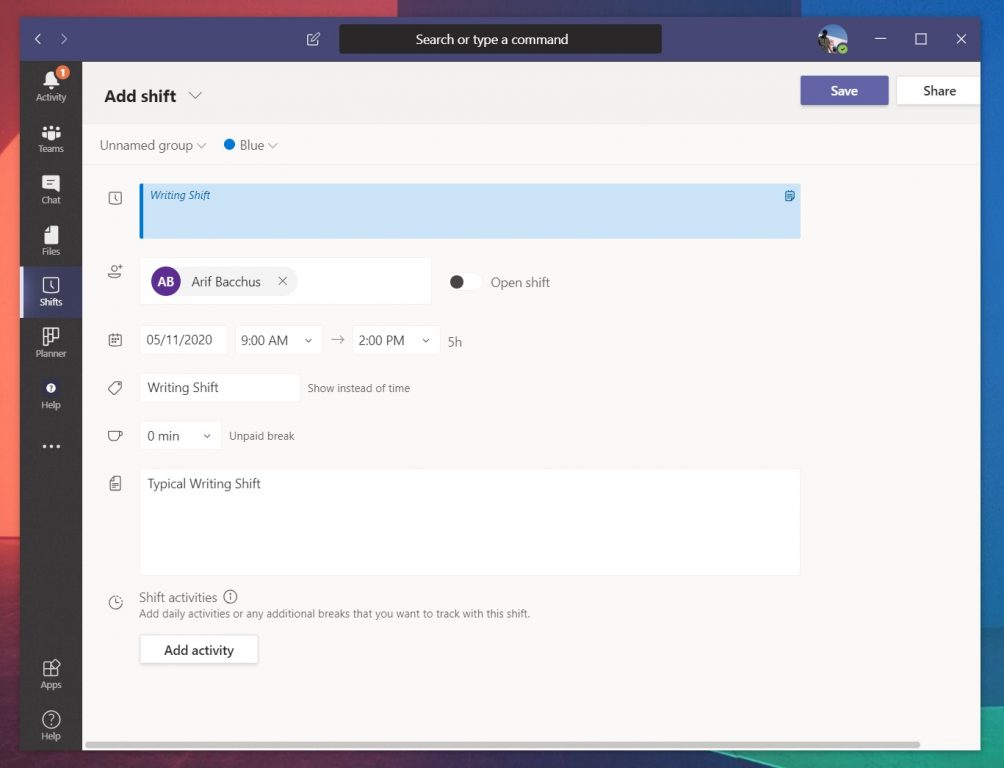
Once someone is “added” to the group, you can create a shift for them. To do this, just double click on an empty slot in their schedule for the week. By default, this schedule will be divided up into the days of the week. From there, you can double-click a specific day and fill out some details about the specific shift. This includes Start and finish times, a color for a specific theme (or activity) some notes about what the shift is for. You also can add some more specific activities not covered by clicking the Add Activity button.

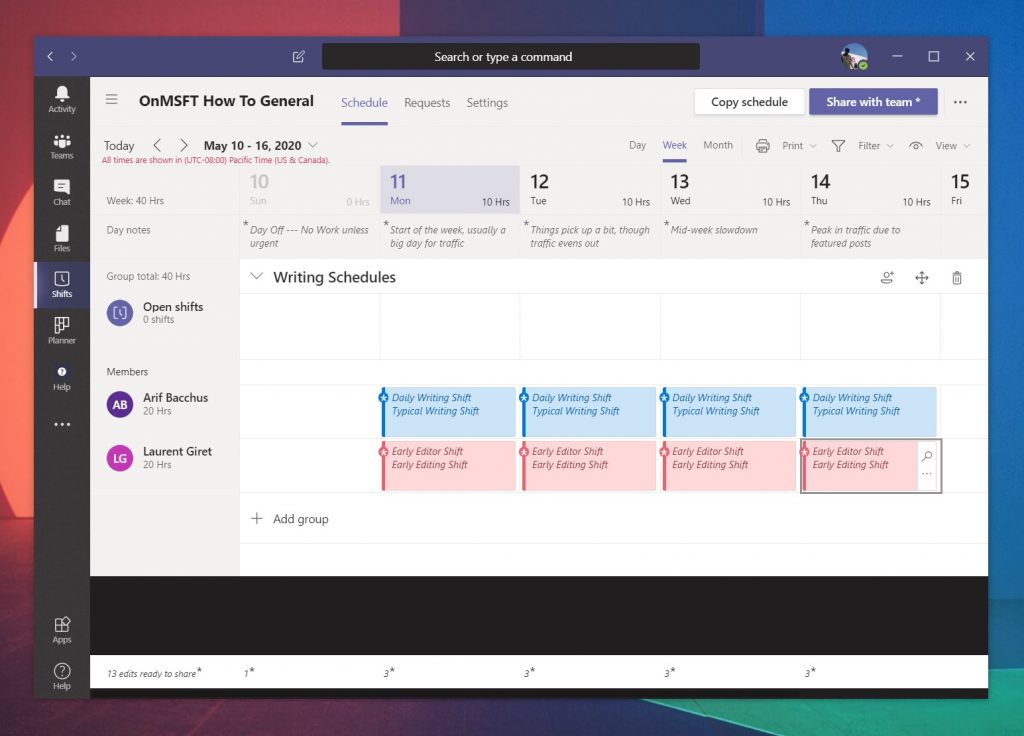
Once done, the shift can be added to the schedule by clicking the Save button. You always can go back and edit the details by right-clicking in the schedule and choosing Edit Shift. If you want to copy it over to another day, too, (which we do because we have a lot of similar writing shifts here at OnMSFT,) you can right-click, choose Copy and then right-click where you want to place the shift and choose Paste. 

If you’re looking to customize the schedule a bit, you can enter a name or additional details into the box above the shift slots. You also can add some notes under the Day Notes section to give your self some additional information.

You also can create some open shifts by clicking the Open Shifts area. This will let you create “free” shifts before you assign them to your other members. When you create an open shift, you’ll be able to assign it to team members. Simply click the … under it, and choose Assign open shift. 

There are also additional controls to filter the view by members, to print the current view, or change the view based on shifts, availability, or groups. You even can change to a day, week, or month view, if need be.

Sharing shifts with your Team

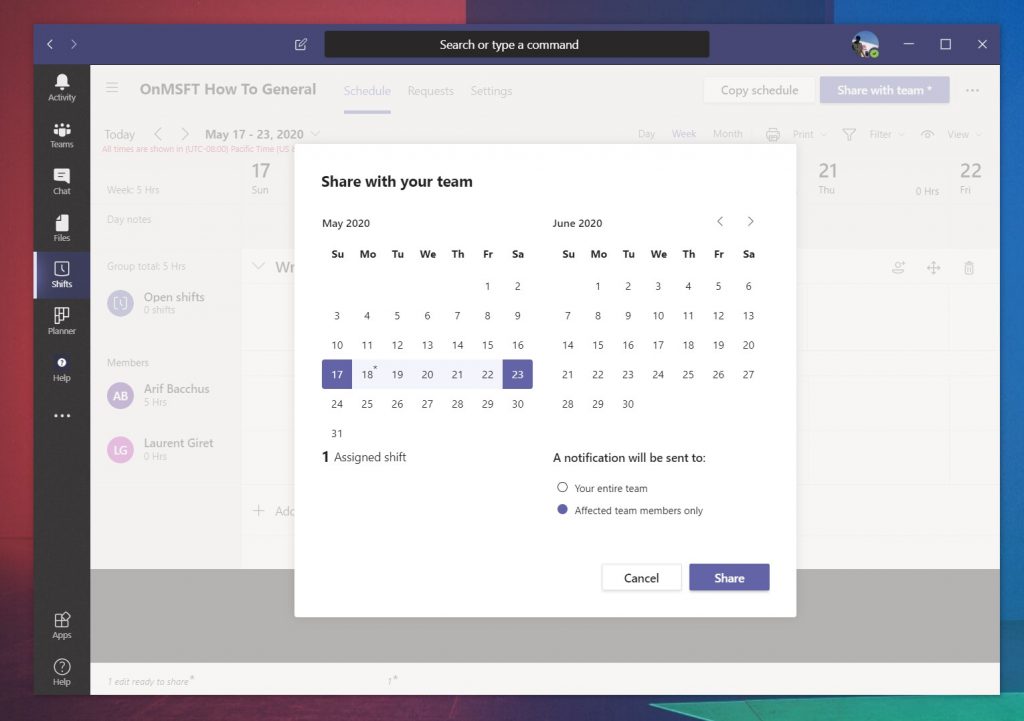
Once a shift is created, it doesn’t become official or appear in your employee’s version of Teams until it’s shared. You can do this by clicking the purple Share with team button at the top right of the screen. This will then give you additional controls on how to share it with team members. You’ll see some options to select the days that you want to share with team members. Feel free to select a range you want to include. They’ll also be checkboxes to notify the entire team (which is everyone listed on the schedule) or just the people who have been affected (the people who you just assigned shifts.)

Managing or making time off and other requests

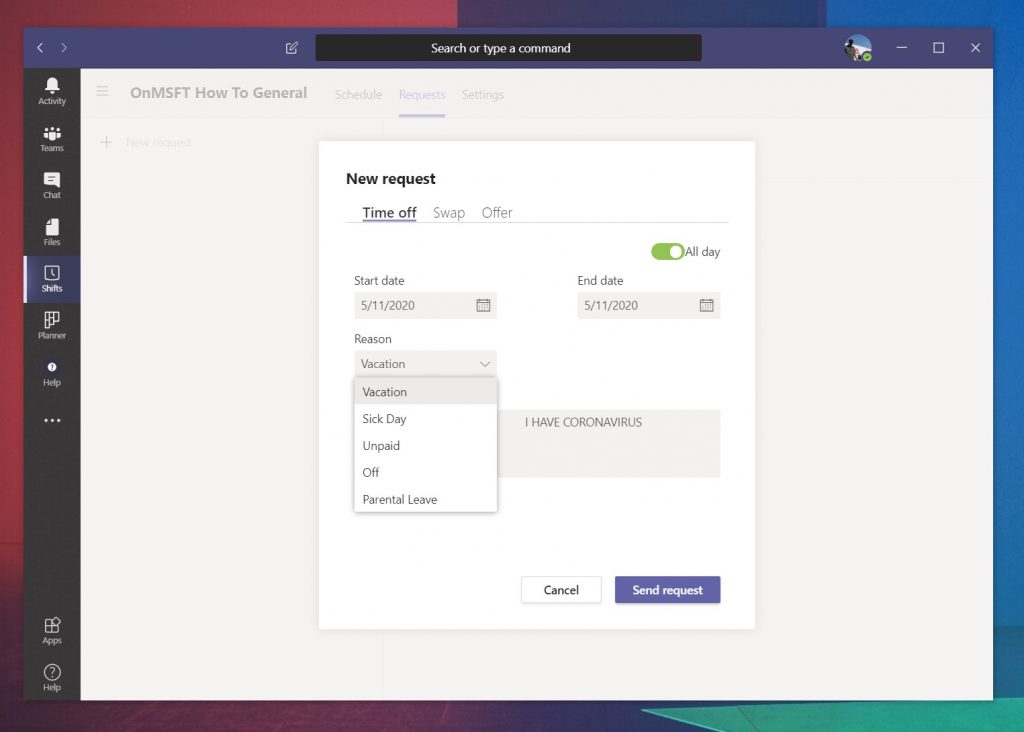
Shift and schedules created, your Teams users and employees will have new options to see their schedule when clicking the Shifts section of Teams. In addition to viewing their schedule, though, they also can request time off and put in other requests. This is done by clicking the icon in the top right corner of the screen that is shaped like a clock with a question mark.

Users can put in a request for time off, and then check the status of it. They also can cancel it, if need be. They also can request to swap their shift or make an offer for another too. There’s a nice UI which lets them pick a reason, leave a note for this, as seen above.

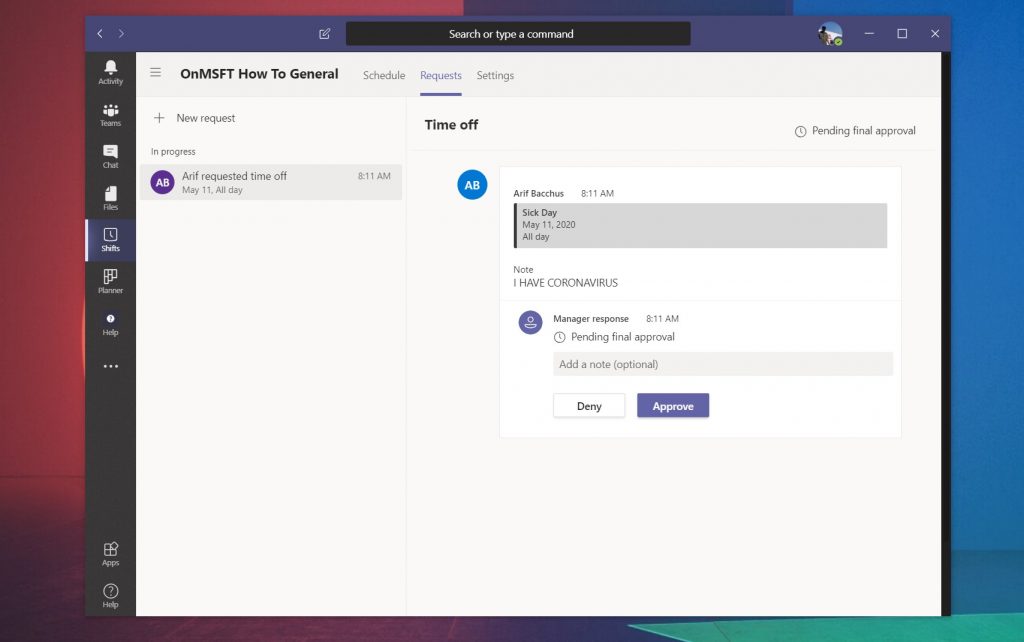
As a manager or admin, it will be up to you to approve these requests. You can do this by clicking the Requests tab under Shifts. You’ll see it under In progress. You can then check on it on the right side of the screen. There will be options for you to approve or deny it, as we have left above. When you approve as a manager, the user will get notified about it.

Setting up the Time Clock in Shifts

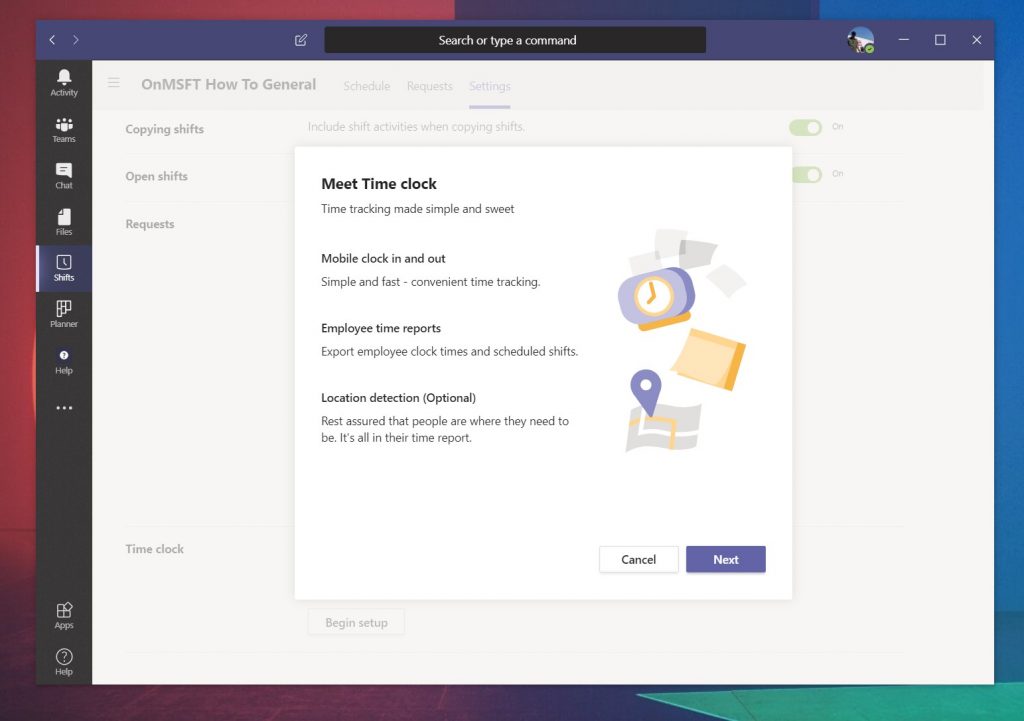
The final aspect of Shifts in Teams that we’ll be covering is the Time Clock. This Time Clock option will let your employees clock in and out using their mobile devices. As a manager, you also can set up optional location detection, too. This will detect where employees are when they clock in and out. These settings can be changed or removed at any time by clicking the Settings tab in Shifts in Teams. You’ll see a Begin setup button there to set it up.

Your employees can use the Time Clock in Microsoft Teams on their iOS or Android mobile devices. When they click it, they’ll be able to come on the clock, and then come off the clock for breaks by revisiting the Teams app. They’ll have an option to confirm it, too. You’ll then be able to export it as an Excel spreadsheet and check it out and download the report of clock in and outs via the same Time Clock Section we mentioned above.

How will you use Shifts?

As you can see, Shifts in Teams is a pretty comprehensive solution. If you don’t have access to payroll services like ADP, it can be used to help keep track of work hours, and so much more. It’s also simple to setup, and doesn’t take too long to get used to.  Did you find out guide helpful? Let us know in the comments below, and be sure to stay tuned to OnMSFT this week as we dive deeper into the Shifts experience.

Hostel Management Software [Best Free & Paid in 2026]

In this age, hostel management software is more of a necessity than a convenience. These days most people (especially the younger generation) prefer to book accommodation in advance and online, and by not having modern hostel management software a company has everything to lose.

That said, not one software meets every size. As a result, we have plenty of hostel management systems to choose from. From the most premium and feature-rich solutions to the very basic software that costs nothing, you can easily find the software to manage your property the way you want without extending your budget.

Apart from the fact that hostel management software offers the flexibility of making a reservation online from anywhere, there are other advantages of embracing modern technology for your business.

Some of the premium property management solutions are business partners with services that connect your business to multiple channels offering maximum booking.

In addition, it also brings in the convenience of simplified payments for deposits, analytics and reporting, accounting and compliance, and automation of tasks to save money and better utilization of human resources.

Today, we take a look at the best free software for hostel management. Most of the software in this article are open source solutions and can be used with hotels and hostels alike.

And if you are looking for more premium hostel management software, we have listed a couple of best-paid solutions as well.

What is the best hostel management tool?

Sirvoy

hostel management software

Sirvoy is one the best software when it comes to property management including hostels, hotels, motels, B&Bs, lodges & guest houses.

It comes with a package of tools such as a Property Management System, Booking Engine, and a built-in Channel Manager.

Booking Engine includes a calendar overview, printable PDF invoices, statistics, history log, and the housekeeping schedule.

The Channel Manager is one of the most useful features if you have lots of properties listed on multiple platforms such as Booking, Airbnb, Agoda, and many more.

The pricing starts at 9$/month which is a bargain given the features available and the constant updated Sirvoy system gets. Besides that, there is 24/7 customer support and training available in case you have any questions or technical problems.

Sirvoy

Allows your visitors to book online using any device, and reservations are totally commission-free for your website.
Free trial Visit website

HotelDruid

HotelDruid

HotelDruid is a free and open-source hotel management software. It offers web-based access to customers and property owners to make and accept reservations, manage room availability and documents.

The software is free to use for everyone. However, the free version needs to be hosted on your server. The company also offers a fully managed version of HotelDruid allowing you to focus on your business rather than managing your own server.

The users can configure the number and properties of rooms, periods and rates. You can add extra costs, special offers and restrictions on the rate and the rooms can be automatically assigned with user-defined rules.

Other features offered by the software include customizable documents for receipts, invoices, emails and forms, inventory management, multi-user access with privilege system, online payment feature through PayPal and multi-language support.

The premium version of HotelDruid offers direct technical support, automatic upgrade to a new version, online booking and secure payments, synchronization with Booking, Expedia and other reservation portals, secure 256-bit encryption and a fully managed hosting platform.

⇒ Get HotelDruid 

Abacre Cloud Hotel Management System

Abacre Cloud Hotel Mangement System

Abacre Cloud Hotel Management System is a free hotel management solution and runs on Windows computers. The software can be integrated with your hotel’s website to make reservations, payments and more.

Abacre Cloud Hotel Management System is claimed to be 100% free, but a premium version of the non-cloud software exists on the developer’s website with no clear information about the differences between the two versions.

Abacre Cloud Hotel Management System supports multiple currency formats and tax settings. The software can auto-fill common tax-related information for some states and provinces.

The user interface is easy to use for both making reservations and managing it. For optimal security, database files are encrypted with a password; you can assign different role permission to each user account and different visibility options for different users.

For managers and owners, the software offers a rich set of reports showing complete information about sales, payment and automatic tax calculations. You can customize the reports through different parameters.

Abacre Cloud Hotel Management System also comes with features to help you with reconciling cash drawer operation, ability to export daily data, manage shifts with an employee swipe card or employee barcode card for login/logoff, worker time report, inventory adjustment, order management and manage other miscellaneous booking related operations.

Abacre Cloud Hotel Management System is an excellent choice for managing hotels and hostels on your Windows computer.

⇒ Get Abacre Cloud Hotel Management System 

NoBeds

NoBeds

NoBeds is a completely free hotel management software solution compatible with Windows, iOS and Android devices. If you want, you can only use the cloud-based version of the same to access data from anywhere.

NoBeds also offers premium plans with additional feature such as increased channels synchronization, autocomplete feature, analytics and data recovery options.

The user needs to register to download the software. The installation is a pretty straightforward process. You can use the mobile app if you prefer the convenience of your smartphone.

The dashboard shows a quick status of bookings like arrivals, departures, balance, occupancy status for the week and next week and, current booking details, occupancy, and sales reports, and referral sources.

From the left sidebar, you can navigate through different options including the booking menu, an availability calendar that shows the booking status and occupancy in detail for current and future dates and the Tasks tab for creating new tasks and checking the pending and complete status of any tasks.

You can also access Accounting related information such as New entry, transaction status, and sales report, tweak software settings, tweak channels and view charts from the sidebar.

NoBeds is an excellent choice for small hospitality businesses to manage properties and get online reservations. The premium plans offer more features and are suitable for scaling.

⇒ Get NoBeds 

OTA Hotel Management

OTA Hotel Management software

OTA Hotel Management by e-novate is a free open-source Hotel Management solution for hostels and hotel managers. The software is based on HotelIMIS and it was released in June 2011.

The software is severely limited by features when compared to the commercial paid version of the hotel management software offered by the same developers.  However, for a free version, it checks all the boxes in the basic feature category.

OTA Hotel Management comes with a real-time online booking engine to accept online reservations along with the ability to manage package rates. The software can be translated into multiple languages including Korean, Chinese and Vietnamese.

The dashboard is simple and clean, and the feature doesn’t overwhelm first-time users. You can manage Walk-ups, express reservations and guest check-in from the Book tab.

The admin can also schedule a task for maintenance, room service, etc. and assign a task to each profile. In addition, you can also add a guest profile, create an invoice and export it, manage housekeeping service and generate reports.

OTA Hotel Management is a free service and offers all the basic features to run your hostel or hotel efficiently. However, the premium version of the tool offers more features and makes the process easier.

⇒ Get OTA Hotel Management 

Premium Hostel Management Solutions

If the free hostel management software doesn’t seem to meet your requirement, here are some of the best premium hostel management software that you should consider.

Sabeeapp

Sabeeapp
  • Price – 15-day free trial / Premium

Sabeeapp is one of the most highly rated and tailor-made software solution for independent hotels, resorts, apartments, and hostels.

It offers front desk system to manage your reservations, invoices, communication, housekeeping, and payments. The channel manager helps to keep your availability and rate always in sync on OTAs and your official website.

⇒ Get Sabeeapp 

CloudBeds

CloudBeds

CloudBeds is another popular all-in-one hospitality management system that works similarly to Sabeeapp. It is a premium solution, but you can request a demo on the official website.

You can quickly preview the current status of booking and reservations, occupancy and payment information on the dashboard. Seamless integration with third-party channels means more reservations.

The software syncs with the hotel’s business websites and offers a seamless reservation experience. The users can assign and unassign reservations on the fly, export and import reservations, set up taxes and policies as per their requirement and keep track of reservations sources and referrals.

⇒ Get CloudBeds 

Beds24.com

Beds24

Beds24.com is a powerful PMS offering flexible and easy use cloud-solution for property managers. It is a premium software and offers a no-obligation free trial to try the software without any risk.

Beds24 seamlessly integrates with third-party channel managers offering better online distribution and reducing the overbooking situations.

The property management system offers a customizable dashboard, a powerful calendar showing real-time availability, bookings, prices, and status of your rooms automated invoicing and reporting and more.

You can also connect to more than one payment gateway to collect payments online or from the walk-in reservation. The payment gateway can accept Credit and debit cards, PayPal and Bitcoin payment and works with payment gateways like Stripe, Authorize.net, Realex, PayPal and more.

⇒ Get beds24.com 

Conclusion

Running a successful hospitality business is a time-consuming task. However, by using a good hostel management software, you can easily reduce the workload and save time and money.

The hostel management software offers channel managers, reservation management options including booking, payment, cancellation, occupancy reports and more.

All the free software in this article offers essential features to run a hospitality business with ease. However, if you want more features like more channel manager integration, payment processing systems, priority support, and additional features, the premium software makes more sense.

Have you used any hotel management software before? Do let us know your experience in the comments below.

How to remove stuff in your Keep Watching Hulu collection

Keep Watching is a collection of recently seen TV shows and movies available in your Hulu account if you’re using the latest app.

It is similar to the web browsing history that you might be familiar with, and that is useful when looking for particular information used in the past.

The collection can be found in the Hulu Home dashboard. Nevertheless, note that the Keep Watching collection is a different feature that the All Watch History, available in the main site.

Keep Watching is useful when you want to pick up where you left a show or a movie. Naturally, you can manage this content, so keep reading to see how.


How can I remove items from my Hulu watch history?

1. Access Hulu from a web browserhulu history

  1. Navigate to Keep Watching
  2. Hover over a show or movie thumbnail for more options
  3. Click the X icon to remove the title from the history
  4. Click Done

2. Access Hulu from the mobile appaccess hulu on mobile

  1. Navigate to Keep Watching or All Watch History
  2. Tap the more options (three dots) on a show or movie thumbnail to open the menu
  3. Tap Remove from Watch History
  4. Confirm your choice

3. Access Hulu via Living Roomaccess hulu via living room

  1. Navigate to the Details page of a show or movie
  2. Select Manage Movie or Manage Series
  3. Select Remove from Watch History
  4. Confirm your choice

Of course, in all of the above-mentioned situations, you can undo/cancel your option if necessary.

One thing should be added here, namely that when it comes to TV shows,  the Keep Watching collection stores only the main thumbnail and not the individual episodes.

If you want to remove episodes from your collection, you’ll have to do it via the Details page of that series and/or add it to My Stuff for more info.

If you’re using the classic Hulu app, you have the Watchlist feature instead of My Stuff that allows you to manage individual content.


[wl_navigator]

Hulu Keeps Logging you out? Here are 6 Ways to Fix it

It appears that one of the most common account-related issues with Hulu is that the service keeps logging you out from your account.

Repeated account log offs have been reported with various browsers, operating systems, or devices (such as smart TVs or Xbox gaming console).

Why does Hulu keep logging me out and how to stop it?

1. Update the Hulu app

If you’re streaming videos while using Hulu on an Android device, the repeated log-out issue might pop in because the app is outdated. To fix this, go to Play Store, find the Hulu app, and click on Update, if available.

2. Update your web browser

Similarly, Hulu might keep deleting your account details because of missing important updates in the web browser you’re using on your mobile device.

Try the same recommendations as above to update your web browser.

3. Change the browser

When an error persists after some fixes have been applied, we recommend reproducing it in a similar environment, in this case in a different web browser. Consider changing to Opera One which is a secure browser, has fraud & malware protection and has extensive add-on support.

So try to switch between any browsers you’re comfortable using, and see if the issue is fixed.

⇒ Get Opera One

4. Clear cookies and cache

fix hulu account log off

If the updates were not installed automatically when available or using the previous solution, the device might be running low storage space. Make sure to clean up some space by clearing the cached data from the Storage section of the Settings menu.

To be even more precautious, search for the app and make sure there is no leftover cached date still stored.

The same goes if you’re on your PC or laptop. For most browsers, the cookies and cache can be found in the main menu (the upper right-hand corner of your browser) > Settings > Privacy & Security section.

5. Log out of the Hulu account on any other device

Hulu only allows a maximum of two simultaneous logins on different devices. So log out of your Hulu account on any other device.

If you’ve also logged in using a social media account like Facebook, the service will appear as active in the settings of the respective account, and you have to remove it.

6. Scan your device for possible other issues

Hopefully, you won’t have to use this solution, but we’re mentioning it just in case. It is well known that malware can affect the performance of your device. Consequently, we recommend the use of trustworthy antivirus software.

In this specific situation, run a scan and see if it finds out something suspicious. The unwanted files should be removed and your apps and services should run smoothly once again.

Before you leave, don’t miss our guide on Hulu switch profile error, since it can provide you with additional insight into login issues. For a black screen, check out what could have been the issue and how to fic it.

If the issue is not fixed yet, consider switching to another provider such as Disney+, one of the biggest streaming services in the US, offering its users an unlimited range of exclusive content and original movies.

⇒ Get Disney+

Did you manage to keep yourself signed into your Hulu account? Leave us a note in the comments section below.

How to save your Autodesk SketchBook Pro work in Dropbox

Storage space never seems enough for content creators who are constantly looking for options to share and keep their drafts, sketches, ideas, and final creations.

On this note, Dropbox is one of the best known cloud-based storage space apps. Flexible in terms of syncing accounts and accessing options from a variety of devices, Dropbox is also compatible with a multitude of file types.

Therefore, if you’re using a SketchBook Pro and you are fully enjoying the drawing experience, it’s highly recommended that you save and back-up your work.

SketchBook Pro and Dropbox supported formats

Both SketchBook Pro and Dropbox support TIFF, BMP, GIF, JPEG, PNG, and PSD formats. Pay attention to the format you choose, as the image quality can be altered.

Consequently, to save your work fully-layered, we recommend saving your files as TIFF or PSD.

To further save them in Dropbox, check out the following steps, depending on your main operating system.


How to quickly save your SketchBook Pro work in Dropbox

1. Save to Dropbox from SketchBook Pro on Windows-based or Mac devices

  1. First, save your work. With your sketch open, in the menu bar, select File > Save As > select TIFF Files (if not selected by default) > Save.save Autodesk SketchBook Pro to Dropbox PC
  2. Open Dropbox and log into your Dropbox account.
  3. From the Dropbox menu go to the Files section.
  4. In the right-side menu, select the Upload files option, then select your sketch and upload it.save sketchbook pro dropbox account

Take a look at this feature article to learn more about several features of AutoDesk SketchBook.


2. Save to Dropbox from SketchBook Pro on Android devices

  1. Save your sketch to the device gallery (it will be saved in PSD format).
  2. In the toolbar, tap on the Menu icon > the Gallery icon.
  3. Tap the icon in the lower right-hand corner to open the menu with export options and select Export PSD.save Autodesk SketchBook Pro to Dropbox android
    4. Tap the same icon to open the sharing options and choose Add to Dropbox to upload your image in cloud.

3. Save to Dropbox from SketchBook Pro on iOS devices

  1. Save your sketch to the device gallery (it will be saved in PSD format).
  2. In the toolbar, tap on the Menu icon > the Gallery icon and select an option.
  3. Tap the icon in the lower right-hand corner to open the menu with export options and select Export PSD.
  4. Tap the same icon to open the sharing options and open the More menu.
  5. Turn on Save to Dropbox then tap Done.

No matter the device, uploading simple TIFF or PSD files takes only a few seconds. Uploading time can increase for compressed files containing an entire gallery.

Now you can get on with your next drawings since you know how to upload your work to Dropbox and free your storage space.


[wl_navigator]

Can’t use Dropbox as a music player? Here are some solutions

Widely known as a cloud storage space for all types of files, Dropbox can also keep large files with your favorite music to your account. Ideally, there’s o need to download the music back on your device if you want to listen to it.

However, Dropbox hasn’t been developed to act as a music player app by definition. While you can listen to songs one at a time, streaming the files requires a third-party music player.


How can I play music from Dropbox?

1. How to upload music to your Dropbox account?

If you’re using the desktop app, you can simply drag and drop your file into the cloud.

If you’re using the web app, you will open Dropbox and use the Upload function in the Files folder.dropbox upload music files

If you’re using the mobile app (available for both Android and iOS), open Dropbox, select the folder where you want your music stored and open it, then click Upload and select the specific file music that you need to save.


2. How to stream music from Dropbox?stream music dropbox

  1. Sign in to your Dropbox account.
  2. Single-click an audio file and its preview page will open.
  3. Click on the preview to play it.

Note that this will only play the respective file. You can move to fast-forward or rewind the same file, while the app is open. Alternatively, the best way to stream your music from your Dropbox account is to find a media players integrated with Dropbox:

  1. Jukebox (PC)
  2. Clementine (PC)
  3. CloudPlayer (Android, iOS)
  4. Evermusic (iOS)
  5. Sound Weaver (iOS) (paid)
  6. iTunes (you have to sync your Dropbox music files on all your devices)

Hopefully, you’ll find the best music player so that you can fully enjoy your music without overloading the memory of your devices.


[wl_navigator]

Use Dropbox to keep and share Pastelink files

Pastelink is a web service that allows you to anonymously publish text with hyperlinks enabled. You can also create your own files containing ideas, bookmarks, conversations, and then publish it in the form of a shareable hyperlink.

Further on, you can save the respective hyperlink in your Dropbox account, for instance, to access it across multiple devices and further edit it anytime you want.

If you are familiar with Google Keep or Microsoft’s OneNote, you’ll have no problem using Pastelink. Unlike the two mentioned note-taking tools, Patelink is only available as a web app.


How to use Dropbox to share Pastelink files?

1. Create a Pastelink file

  1. Go to Pastelink.net to start creating a file. You don’t have to subscribe.
  2. Click on Start Now.
  3. At this point, a blank page will open where you can start writing whatever you want.
    • Use the few instructions on the right side of the file to insert hyperlinks to various webpages that are of interest to you.
    • You can choose if the respective hyperlink is active or not for anyone to open.create pastelink file
  4. Next, select privacy settings. You have several available filters. Then press Publish.
  • Visibility: controls if search engines can see your file or if a password is needed to access.
  • Link Options: links can be displayed as they are written or they can be shown as an array of numbers or references.
  • Referrer Info: prevents the destination websites from seeing where the visits came from.
  • Passcode: allows visibility and later edits.
  • More options: create a custom URL to keep the file easily traceable.

how to create patelink files

save pastelink file

2. Share the Pastelink files with Dropbox

  1. Open Dropbox and log into your Dropbox account.
  2. From the Dropbox menu go to the Files section.
  3. Under Create new file you have the option to paste a link for web content. Paste here the URL of your Pastelink file. copy pastelink in dropbox
  4. Add a name to your file (it will have the .web extension added by default) and then click on Save shortcut.
  5. Click on the Share box and from here you can either share using Dropbox or connect other apps such as Gmail, Slack, WhatsApp, where the link is copied automatically and you only have to add some text.

Note that the files you create using Pastelink are editable by anyone if you don’t set a passcode; alternatively, if you set a passcode, make sure to keep it at hand for whenever you want to modify your file.

Passcodes are not replaceable.


[wl_navigator]

FIX: State of Decay 2 error code 2 in Windows 10/11

If you’re even in the slightest a fan of zombie survival games, you’ve probably heard of State of Decay 2. This game, in comparison to some others, incorporates teamwork (co-op mode is its selling point) with RPG elements. However, the aforementioned co-op multiplayer mode is of no use if you can’t reach your friends. And that’s what seems to happen to some users who run into an error with the code 2.

Today, we enlisted some of the common solutions for the issue, provided both by the developer and avid community participants. In case you’re troubled by the error code 2, make sure to check them out below.

How to fix the error code 2 on State of Decay 2 for Windows 10

  1. Log out and log in again
  2. Check the connection
  3. Make sure servers are up
  4. Change Firewall inbound/outbound rules
  5. Reinstall the game

1: Log out and log in again

Since this is a known bug since the game is introduced, a large part of the community was affected. As we learned, there’s a simple solution for this issue. At least, it worked for some users. Yes, it’s just logout-login sequence. Of course, this goes with the presumption that your connection and everything else is spot on.

We need to mention date and region settings as well. Inspect those and make sure that your system time is properly set. If in doubt, navigate to Settings and set Automatic Date and Time.

In case you tried to log out of the game and log in again, and the problem is persistent, try out additional steps.

2: Check the connection

If your friends are able to connect to a co-op mode and access the server, while you’re stuck with the error, the problem is of local nature. The first thing you need to inspect is the connection and related issues which plague it. You don’t need extremely speedy bandwidth, but there are some terms you’ll need to meet in order to enjoy the game’s full potential.

Firstly, check for connectivity issues in other games, if possible. If everything is fine, move to step 3 on the list. If not, make sure to follow these steps and troubleshoot the connection for possible errors:

  • Switch to a wired connection.
  • Restart your modem and/or router.
  • Check Xbox Networking. Open Settings > Gaming > Xbox Networking. Wait for the check and click on ‘Fix it’ in case some errors occur.state of decay 2 error code 2
  • Flush DNS.
    1. Press Windows key + R to summon the Run elevated command line.
    2. In the command line, type ipconfig /flushdns, and press Enter.state of decay 2 error code 2
  • Check your PING on different servers.
  • Update router/modem firmware.
  • Consider configuring Port Forwarding and UPnP on the router.

3: Make sure servers are up

This game is, due to its 2-4 co-op multiplayer nature, not in need of dedicated servers. This is something certain users find strange, but we reckon it’s not as important. This game isn’t a huge PvP game so the dedicated servers are not a necessity. Also, if we look at games with dedicated servers, like Gears of War 4, they still have a variety of issues and server lags.

The important thing is to check whether the server used by this game is up. They tend to go down unexpectedly and that might be the reason for the error code 2 in State of Decay 2. You can check the server’s status, here.

4: Change Firewall inbound/outbound rules

As we already said, the lack of dedicated servers isn’t the main issue for this game. However, when it comes to Peer-2-peer connection, you’ll need to make sure that the firewall policy allows outbound and blocks the inbound connection. This is the case by default, but there’s a possibility that you or some third-party tool changed that. In order to play this and similar games, we’ll need you to reset the Firewall Policy to its default values.

Here’s how to do it in a few simple steps on Windows 10:

    1. In the Windows Search bar, type CMD and open Command Prompt as admin.state of decay 2 error code 2
    2. In the command-line, type the following command and press Enter:
      • netsh advfirewall show currentprofilestate of decay 2 error code 2
    3. If the inbound is allowed and outbound not, you’re good to go. Otherwise, copy-paste this command and press Enter to reset the rules:
      • netsh advfirewall set currentprofile firewallpolicy blockinbound,allowoutboundstate of decay 2 error code 2
    4. After that, reset your PC and try connecting to your friends for a co-op again.

5: Reinstall the game

Finally, if none of the previous steps helped you overcome the error at hand, we advise you to reinstall the game. This, of course, can be a time-consuming endeavor, but at the time, we’re not aware of any final alternative. You might have better luck starting from scratch.

Just don’t forget to clear all the files from the installation folder and the App Data folder. Also, make sure that your account and subscriptions are properly set. As a final note, sending a ticket to developers and providing the log files might help.

That’s it. Don’t forget to share alternative solutions for the error code 2 in the comments section below.

[wl_navigator]

Can You Download Fitbit App For Windows 10 Without Store

In order to use Fitbit you need to use the accompanying app, and many are wondering if is it possible to download Fitbit app for Windows 10 without the store.

In today’s guide we’re going to answer this and many other questions regarding FitBit, so let’s get started.

Do you need to download an app for Fitbit?

Yes, in order to use Fitbit properly, you first need to download its app so it can communicate with your device. You can also use the browser, but the app offers more convenience.

How do I download Fitbit app for Windows 10 without store?

Is the Fitbit app no longer on the Microsoft Store?

Fitbit app is no longer available for the Windows platform, and it can’t be downloaded on your PC.

The software was officially discontinued in November 2022 and it’s no longer available for download.

If you want to use Fitbit app, you can get it from the Play Store or App Store for your phone.

Is there a Fitbit desktop app?

No, there isn’t a desktop app of Fitbit available anymore. As previously stated, it was discontinued.

Even though the Windows app isn’t available anymore, you can still use the web app to check your progress on any device, including your PC.

Can I update my Fitbit on my computer?

Unfortunately, this is no longer possible since there’s no companion app for Windows.

The only way to update it is to use the iOS or Android app on your phone.

Even though the Windows app is no longer available, that doesn’t mean you can’t use your Fitbit wristband to stay in shape. We have an extensive list of fitness apps for Windows that might come in handy, so be sure to check them out.

Have you ever used the Fitbit app on your PC? If so, let us know in the comments section below.

How to cancel your WeTransfer subscription in a few steps

WeTransfer is largely known as a simple and fast service for sharing files of up to 2GB. Prior registration or other form filling actions are not required at this stage.

Also, WeTransfer offers a large variety of other features in its premium version. Once you subscribe, you can cancel your subscription hasslefree anytime.

WeTransfer Plus, the premium version, allows files sharing of up to 20GB/transfer and the service stores your documents for as long as you continue as a subscriber. Not to mention that this plan is add-free.

What paid plan suits you best?

The paid plan comes in two options, monthly and yearly.

Besides being charged through the payment provider of your choice, none of the plans expire after the first month/year but are renewed automatically. You are notified beforehand of the charge.


How do I cancel my WeTransfer subscription?

Useful information before canceling

Before canceling your WeTransfer subscription, here are a couple of things you will surely miss:

  1. The enhanced transfer capacity of 20GB/operation.
    • If you need it regularly, it should be an important detail to reflect upon.
  2. Unlimited storage period for your large files.
    • As mentioned, Wetransfer Plus will keep your files for one week, one month, or the duration of your subscription.
  3. The capacity of up to 50 recipients/transfer can always come in as handy.

 Cancel the WeTrasfer subscription

If you decide to cancel your WeTransfer subscription, you only have to go to the Payment section in your Plus account and click on the Cancel subscription option.

Should you regret your decision and decide to restore your WeTransferPro plan, you are welcome to do that without any problems.

Looking to explore more file-sharing options? Read this guide for the best file sharing tools in Windows 10.


We recommend the use of a reliable antivirus at all times to prevent this.

  • How long does it take for WeTransfer to send?

The actual sending process is very fast, up to a few seconds or a few minutes, depending on the total size of your files. The files are stored for 7 days, in the core plan, and for an unlimited time in the paid plan.

  • How can I send large files over the Internet?

You can use file-sharing services like WeTransfer or you can try a cloud storage space to upload your files. Alternatively, file compression software is a good idea for small documents. Other solutions are USB flash drives or use a VPN.


[wl_navigator]

System reboot fails after DISM? Fix it with these steps

While a DISM scan is easy to perform, users have sometimes complained about a reboot failure. A reboot might be required after a DISM scan to enable all the changes. An error at this very last step of the recovery process is rare but possible.

Normally, the system will reboot by itself as the logical final step of the recovery process.


What can I do if the system reboot fails after DISM?

1. Unplug other drives and devices

First of all, before performing the DISM scan, unplug all other external hard drives and devices. They might interfere with the entire repair and restoration process. Then, repeat the scan and see if it works all the way through.


2. Check for updates

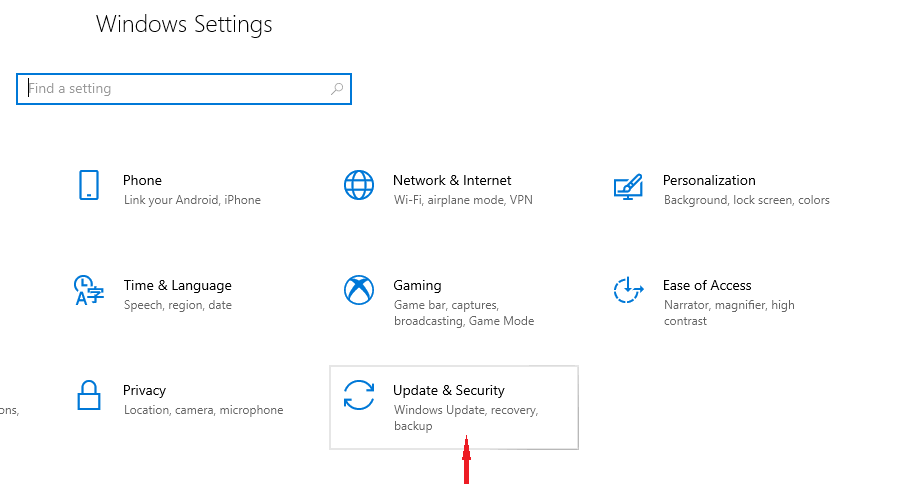
  1. Open the Start menu, click on the Settings app, and then select Update & Security. failed DSIM reboot solution
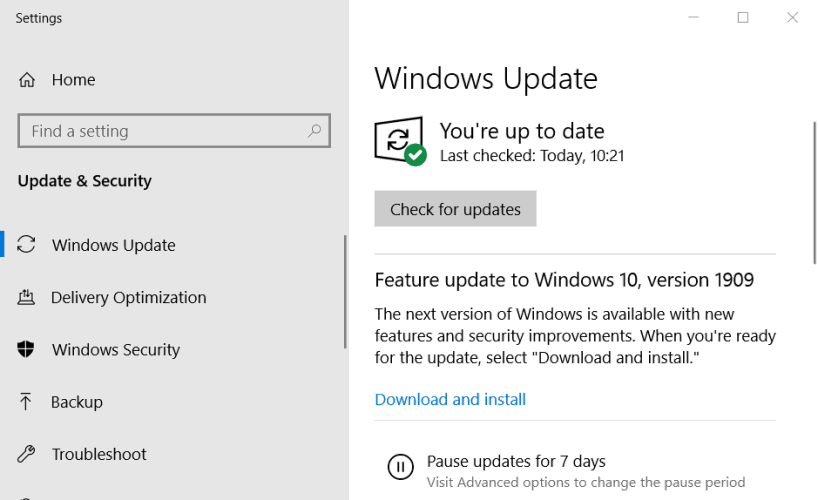
  2. Click Check for updates.

failed DSIM system reboot

Usually, Windows is updated automatically. But if any updates are missing, this action should solve the problem. Wait for the process to finish and try to run the scan again.


Your Check for updates button is missing in Windows 10? Check this quick guide


3. Check your antivirus

While we advise for the use of a reliable antivirus program, some of its features might interfere with a system repair process. What you need to do in this case is to detect the critical feature(s) and disable it/them.

If you can’t find such a feature, you can also disable the antivirus altogether while performing again the DISM scan.


4. Disable proxy server

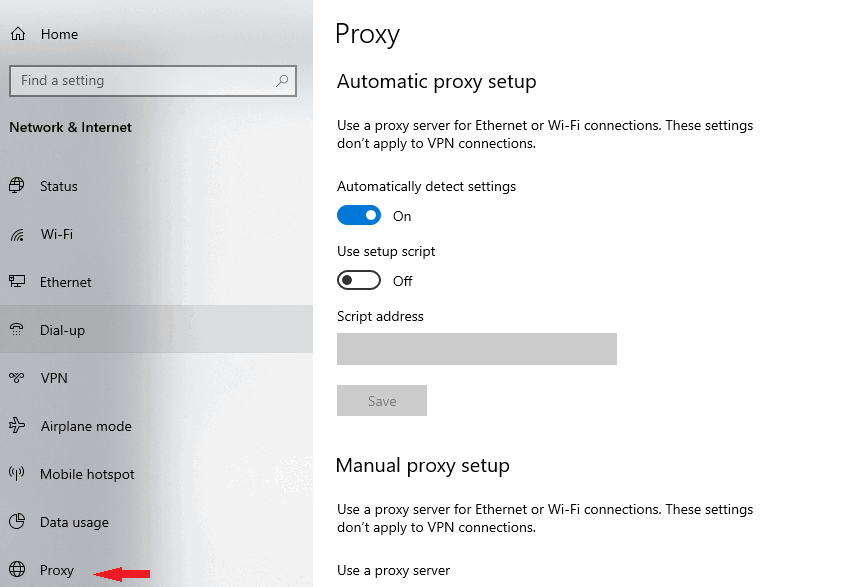
  1. Open the Settings app and go to the Network & Internet option.
  2. Open the Proxy menu.failed DSIM reboot in windows 10
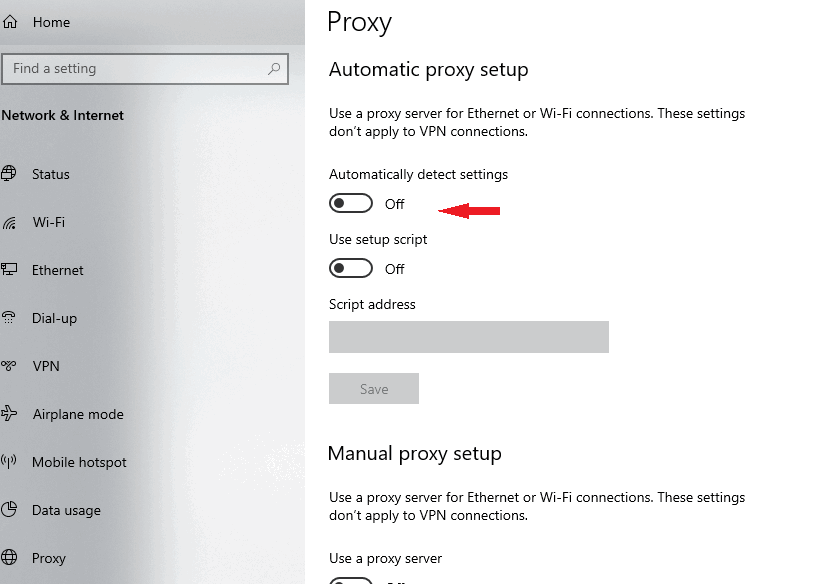
  3. Disable all settings in the right pane and click Save.how to fix failed DSIM reboot

Proxy servers are commonly used to protect Internet connections and provide an increased level of security and privacy while browsing.

On the other hand, a proxy is also known to get in the way of many processes, which is why we made the above recommendation. Perform the DISM scan again and see if your device reboots normally.

Note: If you can’t open Settings on your Windows 10 PC, follow this thorough article and get rid of the problem quickly.


5. Check DISM file for corrupt components

    1. Search for Command Prompt in the search bar and open it.
    2. Click on Run as an administrator in the right panel.
    3. Type DISM /Online /Cleanup-Image /CheckHealth.
    4. Hit Enter and wait for the results.

If the check-up finds something faulty, you will have to recover the DISM.exe file from a Windows 10 ISO file.

Note: If DISM failed on your Windows 10 PC, don’t worry, we’ve got the perfect guide for you.


If you can’t run Command Prompt as admin, take a look at this handy guide to fix the issue.


6. Run the DISM scan from a Windows ISO file

Many systems errors can be solved while working offline.  The solution would be to run the DISM scan from the ISO file. This is done by copying the Install.wim file on your hard drive. While you’re doing this, pay attention to a few details:

      1. After the file is copied to your hard drive, disable the Read-only option by right-clicking on the file
        • Select Properties then uncheck the Read-only option and click OK.
      2. Open Command Prompt and run the following command:

DISM /Online /Cleanup-Image /RestoreHealth /source:WIM:X:SourcesInstall.wim:1 /LimitAccess

Here, pay attention to the capital letter for the Install.wim file. Additionally, you have to replace the X with the letter that matches the drive where you installed the file. Try to perform the DISM scan again and it will hopefully be a successful one.


If you have any other questions or suggestions, don’t hesitate to reach for the comments section below.


[wl_navigator]

FIX: DISM error 2 in Windows 10/11 PC

The DISM or Deployment Image Servicing and Management tool, also known as the System Update Readiness tool, helps fix some Windows corruption errors that may cause updates and service packs not to install, like if a file is damaged.

This tool can be used to service a Windows image or prepare a WinRE (Windows Recovery Environment) and/or WinPE (Windows Preinstallation Environment) image, but, it can also be used to service .wim (Windows image) or .vhd/.vhdx (virtual hard disk).

Whenever you try to use the DISM command line and get the DISM error 2 displayed as a message, you may not know the first thing to do in such a case, but there are solutions you can try as outlined below, to fix the error.

How to fix DISM error 2

  1. Temporarily disable or uninstall your antivirus
  2. Check your DISM version
  3. Refresh the DISM tool
  4. Reset your PC with Keep my files option
  5. Use Disk Cleanup tool

1. Temporarily disable or uninstall your antivirus

Sometimes your security software can get in the way of some of the processes on your computer, so in the case of a DISM error 2 issues, you can temporarily disable the antivirus, or uninstall it, and if the issue persists, you can unmount the image and check the result again.

Remember to reinstall or enable your antivirus once you’re done.

2. Check your DISM version

Ensure you’re using the correct version of DISM that is installed with the Windows ADK. Also, do not mount images to protected folders like the UserDocuments folder.

If DISM processes are interrupted, temporarily disconnect from the network, and consider running commands from WinPE instead.

3. Refresh the DISM tool

  • Right click Start and then select Command Prompt (Admin)
dism error 2
  • Type this command: exe/image:C /cleanup-image /revertpendingactions. This will revert pending tasks, and this includes any Windows updates that are pending
  • Boot your computer and then run in recovery command prompt
  • Execute this command: exe /online/Cleanup-Image /StartComponentCleanup. This cleans up the component store and helps everything to run properly again

Restart and then run an SFC scan in Safe Mode by doing the following:

  • Click Start and then go to the search field box and type CMD
  • Go to Command Prompt on the search results
  • Right click and select Run as Administrator
dism error 2
  • Type sfc/scannow
dism error 2
  • Press Enter
  • Restart your computer and then run this command: dism.exe /online /Cleanup-Image /RestoreHealth

If this doesn’t help, try the next solution.

4. Reset your PC with Keep my files option

If you’ve tried the system restore and it doesn’t work, reset your PC with Keep my files option.

Performing a reset allows you to choose which files you want to keep, or remove, and then reinstalls Windows, so follow the steps below:

  • Click Start
  • Click Settings
dism error 2
  • Click Update & Security
dism error 2
  • Click Recovery on the left pane
dism error 2
  • Click Reset this PC
dism error 2
  • Click Get started
dism error 2
  • Select Keep my files option

Note: all your personal files will be deleted and settings reset. Any apps you installed will be removed, and only pre-installed apps that came with your PC will be reinstalled.

5. Use Disk Cleanup tool

Since DISM tool won’t work or brings up DISM error 2, and Disk Cleanup can’t release much space, use the Disk Defragmenter to rearrange fragmented data on the system by doing the following:

  • Log in as Administrator
  • Click Start and select File Explorer
  • Expand This PC
  • Right click on Local Disk (C:) and click Properties
  • Go to Tools tab
dism error 2
  • Under Optimize and defragment drive, select Optimize
dism error 2
  • Click Apply and then press enter or click OK

Have you managed to fix DISM error 2 on your computer using any of these solutions? Let us know by leaving a comment in the section below.

Download LibreOffice: Latest Version for Windows 10/11

If you don’t have the popular Microsoft Office suite of products installed on your Windows device, you are probably looking for alternatives. Besides such cloud products as Google Docs, LibreOffice is one of the best solutions at your disposal.

The best part of using LibreOffice is the fact that it is available absolutely for free. And the software suite has kept getting better and better with every release.

If interested, you can also have a look and download the latest version of the OpenOffice desktop app for Windows 8 and Windows 8.1 systems.

Right now, you may also get LibreOffice from Microsoft Store, but it is not free. The sum goes to supporting partners for publishing in the store, and a part is a donation to the foundation behind LibreOffice. You can still download the standalone version for free.

We were pleasantly surprised by its features. Not only is LibreOffice free, but also open-source, so all bright minds can contribute to its improvement.

Here’s why LibreOffice on Windows is great

The most recent version of LibreOffice (you can snag the download link at the end of the article) brings many new features that are mainly aimed at those using the service for the first time – yours indeed is also included.

First, LibreOffice significantly improves Microsoft Office’s native OpenXML and .docs format. It also includes new improvements for importing and exporting Microsoft’s legacy RTF files. There’s also the ability to import filters for AbiWord documents and Apple Keynote presentations.

Windows business users now get a simplified custom install dialog and can centrally manage and lock down program configuration with Group Policy Objects via Active Directory.

Calc, the LibreOffice alternative to Excel, has also seen essential improvements in speed. Also, the user interface now seems cleaner and easier to work with. Sadly, not even Android or iOS cloud apps don’t exist as of now.

windows 8.1 libre office

Trust me, if you haven’t used LibreOffice yet, then you are missing out big time. Of all the free alternatives available to Microsoft Office and Apple’s iWork, we dare say that this one is the best.

What is the latest LibreOffice Version?

The latest version is LibreOffice 7.5.5, but the developers are preparing to launch the 7.6 iteration of the software.

Here are the most important improvements for this version:

  • Added PDF export.
  • Titles and tags were added.
  • The page number from the status bar now uses a range when the view spans several pages.
  • You can highlight the elements on a page by hovering over their name in the Navigator sidebar deck.
  • Great improvements in spell-checking in several languages

Read the full release notes for LibreOffice 7.5.5 to learn more about the many improvements introduced in this version.

⇒ Get LibreOffice

Go ahead and check out the official page on LibreOffice’s website for the detailed release notes since there are quite plenty.

You might also like to check our list of the best ODC to DOC converters.

What do you think about LibreOffice? Let us know about your experience in the comments section below.

Error 1500 Another installation is in progress [FIX]

When a software installation has hung, you might get the following error message when installing a program: Error 1500. Another installation is in progress. You must complete that installation before continuing this one.

This is due either to a couple of MSI installers running at the same time or an In-progress key left from an earlier installation. These are a few ways you can fix error 1500 in Windows 10.

How can I fix Windows 10 error 1500?

  1. Close Background Software Processes
  2. Remove the Installation Reference with the Registry Editor
  3. Stop and Restart Windows Installer
  4. Run the System File Checker Tool in Windows
  5. Run the Windows Update and Windows Store App troubleshooters
  6. Manually reset the Windows Updates Components

1. Close Background Software Processes

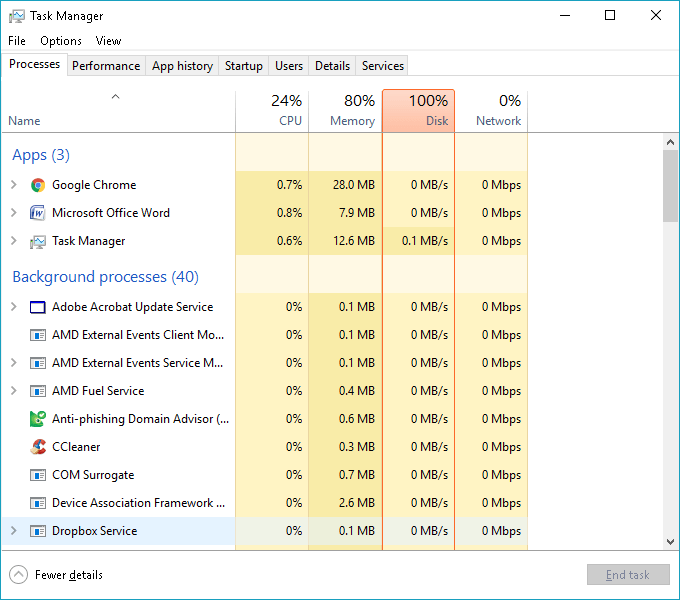
  • Firstly, you could try closing the background installer process with Task Manager. So right-click the taskbar and select Task Manager to open its window below.

  • Click the Process tab at the top of the Task Manager window if it isn’t already selected.
  • Next, find msiexec.exe, installer.exe, and setup.exe listed under Background processes.
  • Select those processes and click their End task buttons.
  • In addition, you might also be able to find and close those processes from Task Manager’s Details tab.
  • Then open the software setup again to add the program to Windows.

2. Remove the Installation Reference with the Registry Editor

Did the first fix work? If not, you can try a fix that will delete an active installation status registry reference. This is how you can fix error 1500 with the Registry Editor.

  • First, press the Win key + R hotkey to open Run; and then you can input Regedit to open the Registry Editor window below.

  • Next, go to the following registry subkey: HKEY_Local_MachineSoftwareMicrosoftWindowsInstallerInProgress.
  • Select the InProgress subkey and double-click its (Default) string. Erase that value’s contents and press OK.
  • Now you can close the Registry Editor and open the software’s installer again.

3. Stop and Restart Windows Installer

  • Stopping and restarting the Windows Installer, an essential component for adding various programs to Windowscould also do the trick. To do that, first, enter services into the Cortana search box and select Services.
  • Now scroll to Windows Installer and double-click it to open the window below.

  • Click the Startup type drop-down menu and select Disabled from that menu. Alternatively, you can press the Stop button.
  • Next, press the Apply and OK buttons to confirm the new setting.
  • Now you should restart Windows 10.
  • After restarting Windows, open the Services and Windows Installer Properties windows again.
  • Press the Start button on the Windows Installer Properties window. Or you can select Manuel from the Startup type drop-down menu.
  • Press the Apply > OK buttons to close the Windows Installer Properties window.

4. Run the System File Checker Tool in Windows

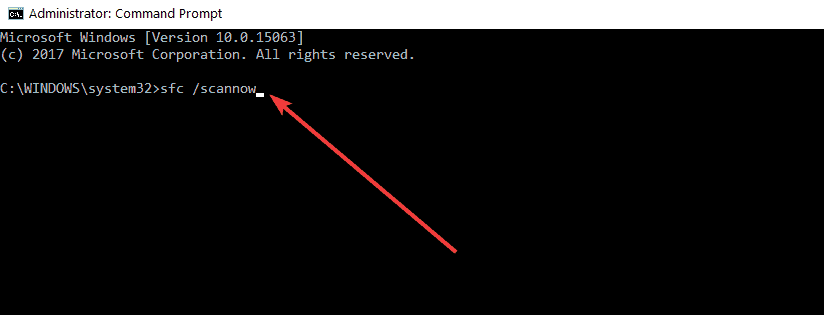
The System File Checker, otherwise sfc /scannow, tool might also fix files pertaining to error 1,500. To run a system file check, press the Win key + X keyboard shortcut and select Command Prompt (Admin) from the menu. Enter sfc /scannow into the Command Prompt window and press Return.

That will start a System File Checker scan in the Command Prompt, which might take a while.

5. Run the Windows Update and Windows Store App troubleshooters

If this error occurs when you try to install apps from the Microsoft Store, try running Windows 10‘s built-in troubleshooter. Go to Start > type settings > double-click on the first result.

Now, navigate to Update & Security and select Troubleshoot. Scroll down to Windows Store Apps and run the troubleshooter.

Troubleshooting

Follow the on-screen instructions to fix this problem. Go back to Troubleshoot and this time run the Windows Update Troubleshooter and then restart your computer.

Troubleshooting Windows update

6. Manually reset the Windows Updates Components

If the problem persists, try resetting the Windows Update Components. This solution will fix corrupted or missing Windows Update files. Here are the steps to follow:

  1. Launch Command Prompt as administrator
  2. Type the following commands and hit Enter after each one to stop all the Windows Update Components:
    • net stop wuauserv
    • net stop cryptSvc
    • net stop bits
    • net stop msiserver
  3. Now, rename the SoftwareDistribution folder by entering the following commands:
    • ren C:WindowsSoftwareDistribution SoftwareDistribution.old
    • ren C:WindowsSystem32catroot2 Catroot2.old
  4. Restart the Update Components that you previously stopped at step 2. To do this, enter the following commands:
    • net start wuauserv
    • net start cryptSvc
    • net start bits
    • net start msiserver
  5. Close Command Prompt, restart your computer and check if the error persists.

Those are a few of the best fixes for error 1500. They’ll probably fix it, but you could also try a clean boot and reregistering the MSI via Command Prompt.

  • How do I force stop installation?

Look for any msiexec.exe processes in Task Manager, and end it. After that, you can try to run another install.

  • Why does Windows Installer keep popping up?
If the Windows Installer pops up, this might be caused by Windows configuration problems, by the Windows Update prompting you to install updates or, unfortunately, by virus or malware.

[wl_navigator]

Installation Failed in the Second Boot Phase: 5 Fixes to Use

The installation failed in the second boot phase usually happens if an upgrade is unsuccessful, so it is helpful to understand at what point the error occurred during the upgrade.

This article reviews all the essential elements and recommends the best solutions for this OS installation error.

Note that some error codes during the upgrade phase take the form of 0xC1900101 (result code), with an extend code of 0x4000D. These are not the same as the second boot phase error.

Why does Installation failed in the second boot phase message appear?

There are different stages of the OS upgrade process. Users have pointed out that the major triggers are as follows:

  • Bad installation files – These are files missing some essential elements or have been corrupted before use.
  • Hard drive issues – The most common hard drive issues that will trigger this problem are bad sectors or insufficient space
  • Hardware failures – You will experience failure if you have a faulty hard drive or memory module, often triggering the installation failed in the second boot phase error.
  • Driver-related issues – Drivers are an essential link between software and hardware. You may expect errors if they are bad, corrupt, or incompatible.
  • Viruses – You may expect a few complications, especially on systems without an antivirus, including this installation error.

That said, we will now cover the best solution on Windows 10.

How can I fix Installation failed in the second boot phase error?

Before going into any of our recommended solutions, there are a few preliminary steps you should try:

  • Detach peripherals – Remove external hardware, such as docks and USB devices.
  • Create space – Make sure you delete all unnecessary files from your storage

1. Run hard drive scans

1.1 How to run the chkdsk scan

  1. Press Windows + R, type CMD and hit Ctrl + Shift + Enter.
    the installation failed in the second boot phase
  2. Type the command below and hit Enter (make sure to use the drive alphabet in place of C):
    chkdsk C: /f
  3. Wait for the command to complete.

1.2 How to run a health check and SFC

  1. Press Windows + R, type CMD and hit Ctrl + Shift + Enter.the installation failed in the second boot phase
  2. Type the command below and hit Enter.
    DISM /Online /Cleanup-Image /RestoreHealth
  3. When it executes, run the script below:
    sfc /scannow

2. Update Windows

  1. Press Windows + I to open the system Settings.
  2. Click on Update & Security.
    the installation failed in the second boot phase
  3. Select Windows update from the left pane and choose Check for updates.
    the installation failed in the second boot phase

An update is an important step before an upgrade. It guarantees all essential files, so you do not have errors during the process.

3. Update drivers

Since there may be many drivers to update, we suggest you perform this process automatically. The best solution is Fortect Driver Updater. You can fix driver issues with a few clicks and get the latest updates.

You usually must go to the manufacturer’s website and download drivers. This process is stressful because you must do this for every driver you need, one at a time. The software saves you time. It also ensures you do not download the wrong drivers.

⇒ Get Fortect Driver Updater

4. Perform a System Reset

  1. Press Windows + I to open the Settings app.
  2. Click Update & Security.
    the installation failed in the second boot phase
  3. Click Recovery on the left pane.
    the installation failed in the second boot phase
  4. Select Reset this PC.
  5. Click Get Started and choose an option to Keep my files, or Remove everything.

5. Upgrade using Windows 10 ISO file

  1. Download the official ISO media for Windows 10 from Microsoft.
  2. Right-click Start and select Command Prompt (Admin).
    the installation failed in the second boot phase
  3. Stop BITS, Cryptographic, MSI Installer, and Windows Update Services by typing these commands. Press Enter after each one:
    net stop wuauserv
    net stop cryptSvc
    net stop bits
    net stop msiserver
  4. Rename the SoftwareDistribution and Catroot2 using the following commands. Remember to hit Enter after each command.
    ren C:\Windows\SoftwareDistribution SoftwareDistribution.old
    ren C:\Windows\System32\catroot2 Catroot2.old
  5. Restart the BITS, Cryptographic, MSI Installer, and Windows Update Services by running the following commands:
    net start wuauserv
    net start cryptSvc
    net start bits
    net start msiserver
  6. Exit the Command Prompt and restart your computer.

After doing all this, uninstall your security software and activate Microsoft Defender (Microsoft’s default virus protection) so that your computer is not vulnerable to attacks from the internet.

That is as much as we will cover in its guide. You would find success using any of these solutions. Since we have not written them in any particular order, we encourage you to try what seems the most appropriate.

Let us know which solutions worked for you by commenting in the section below.

How to fix Outlook error 0x8004010f in Windows 10/11

Some Outlook 2010/2013 users might encounter an 0x8004010 error. The full error message states, 0x8004010F: Outlook data file cannot be accessed.

This is one of the more prevalent Outlook error messages that might pop up when users try to send emails with the software. Consequently, users can’t send or receive emails when that error arises.

How can I fix error 0x8004010f?

1. Set up a new Outlook profile

  1. The 0x8004010f error is usually due to corrupted Outlook user profiles, and users can fix it by setting up new Outlook profiles based on default data files. To do that in Windows 10, open Run with the Windows key + R hotkey.
  2. Input Control Panel in Run, and click the OK button.
  3. Click the Control Panel > button to select All Control Panel Items.Control Panel window outlook error 0x8004010f windows 10
  4. Then click Mail, and press the Show Profiles button on the Mail window that opens.
  5. Click the Properties button, and select the Data Files option.Data Files tab outlook error 0x8004010f windows 10
  6. Note down the name of the default data file on the Data Files tab, and click the Close button.
  7. Next, open the Mail Setup window from the Control Panel again.
  8. Click Show Profiles, and then press the Add button, which will open a New Account window.
  9. Select the Manual setup or additional server types option, and click the Next button.
  10. Select the POP or IMAP (or Internet E-mail) option, and press the Next button.
  11. Then enter the required email account details in POP and IMAP Account settings.Add New Account window outlook error 0x8004010f windows 10
  12. Select the Existing Outlook Data File option, and click the Browse button. Select the Outlook data file previously noted from the Data Files tab.
  13. Press the Next button, and click Close > Finish.
  14. To turn the new profile into the default one, open Mail from the Control Panel again.
  15. Select the Show Profiles option.
  16. Select the Always use this profile option. Then select the new profile on the drop-down menu under that option.
  17. Click the OK button to exit Mail.

2. Disable Antivirus Utilities

  1. Antivirus utilities might also conflict with Outlook to trigger error 0x8004010f. To disable antivirus software, remove them from the system startup by right-clicking the taskbar and selecting Task Manager.
  2. Select the Start-up tab in the image directly below.The Start-up tab outlook error 0x8004010f windows 10
  3. Select the antivirus software, and click the Disable button.
  4. Then restart Windows, and try to send an email with Outlook after restarting.

3. Turn Off Windows Defender Firewall

  1. To ensure Windows Defender Firewall is not blocking Outlook in any way, press the Windows key + S hotkey.
  2. Then enter ‘firewall’ in the search box, and select to open Windows Defender Firewall.The Windows Defender Firewall window outlook error 0x8004010f windows 10
  3. Click Turn Windows Defender Firewall on or off on the left side of the Control Panel window.Turn off WDF options outlook error 0x8004010f windows 10
  4. Click both Turn off Windows Defender Firewall radio buttons to disable WDF.
  5. Click the OK button to exit the window.

That’s how users can fix error 0x8004010f more specifically for Outlook 2010/2013. Then users can send and receive messages with Outlook once again.

  • How do I repair Outlook?

You can repair Outlook or any other program using Control Panel. If you still have problems with the software, read our Outlook troubleshooting section.

GIMP for Windows 10/11 [Review & Dowload Link]

When thinking of photo editing software, there are only a few names that really come in mind. For me, there is Photoshop, ACDSee , and, of course, GIMP.

Although all of them work pretty well, each of us has his own preference, and for those of you who like to use GIMP for image editing, you will be thrilled to know that it is compatible with Windows 10, Windows 8.

The latest version of GIMP is fully compatible with Microsoft’s new operating system, and it has also received many improvements from the last version, which had some issues.

Also, as in terms of features, it is comparable with Adobe’s Photoshop, but it is much more resource-friendly, which makes for a great Windows 8, Windows 10 program.

GIMP for Windows 10, Windows 8 – A quick walkthrough

Keep in mind that unlike other photo editing apps like Fotor for Windows 10, Windows 8, or Fresh Paint, Gimp for Windows 10 Windows 8 is not an app, but a full Desktop program.

This is the same one that is compatible with Windows XP and Windows 7, so if you were looking for a dedicated app, then you will be disappointed as there is no official app at the time of this writing. H

owever, there is a GIMP Guide app available on the Microsoft Store, for those interested in learning how to use GIMP .

gimp-for-windows-8-review

Moving on to the actual program, GIMP for Windows 10, Windows 8 is exactly the same as the versions for the old Windows operating systems.

Also, for those who are just starting to use GIMP, you will probably have to watch a few tutorials before you start working.


You might be interested in our article about 9 best image optimization software for PC


After installing GIMP on Windows 10, Windows 8, you will notice that it starts in multiple window format, which allows the user to move each element on the screen and place them where ever they want. While this feature is great for multiple monitor setups, I don’t think it is ideal for a single monitor.

Luckily, this can be easily changed under Windows -> Single-Window Mode.

gimp-for-windows-8

The tools are pretty similar to Photoshop, allowing users of GIMP to create or edit photos very quickly and efficiently.

Also, a difference I noticed when using GIMP on Windows 10, Windows 8 is the overall smoothness and speed with which images open and tools work.

One of my favorite tools that GIMP for Windows 10, Windows 8 provides is the angle measurement feature, perfect for those who do precision work.

GIMP also supports hundreds of plug-ins and scripts that give you access to an even bigger list of image editing options. You can add new brushes to the tool, as well as new gradients, colors, patterns and splashes. You can check out the full list of supported plug-ins in the GIMP Plugin Registry.

Perhaps some of the most popular GIMP plug-ins are Layer Effects and Layer via Copy/Cut.

These two tools bring a useful feature from Photoshop into GIMP, allowing designers who work with layers to copy, cut, and paste areas from one layer or a group of layers.

You can also create new layers using the areas you previously selected.

Overall, GIMP for Windows 10, Windows 8 offers all the goodies that users are familiar with, but with the added bonus of Windows 8 support and the speed that it has.

Now you know that GIMP runs on Windows 10, Windows 8 without a hitch, which means that you can start editing photos just like before.

How to recover deleted audio files on your Windows PC

Music induces joy and its wonders into our life; whether music, podcast, audio learning materials, or audio file. Are you wondering how to recover deleted audio files that you have accidentally or intentionally removed from your PC? Do not worry, this post is meant for you.

Sometimes audio files are lost, corrupted, or deleted due to reasons associated with file transfer, virus corruption, accidental deletion, or any other reasons. However, what this means is that we lost our valued audio files in mp3, wav, aiff, wma, or other formats.

Meanwhile, we understand how important it is to recover deleted audio files on your Windows PC,  especially when you do not have a backup for your files. So, we have come up with methods that you can use to recover deleted audio files on your Windows PC.

  • Restore from Recycle Bin
  • Use Recovery Software

How to recover deleted audio files

1. Restore from Recycle Bin

recover deleted audio filesRecycle Bin is a Windows tool found on every Windows Operating System which keeps deleted items. However, it is easy to restore deleted files most especially deleted audio files if the Recycle Bin is not cleared up.

You can recover deleted audio files on your Windows PC, all you have to do is to access the Recycle Bin and restore the deleted audio file from there. Here’s how to do this:

  1. Double-click on the Recycle Bin icon on the Desktop
  2. Locate and select the audio file(s) you want to recover.
  3. Right-click on the selected audio file(s), and then select “Restore”
  4. Wait for the restoration process to be complete.
  5. Exit the Recycle Bin after you have finished restoring the audio files

It is recommended that you note the original location of the audio files so as to know where they will end up after you restore them. But, if you do not know its original location, after restoration, you can search for it by typing the audio file name in the Windows search bar.

However, if you do not see the audio files in the Recycle Bin, that means it has been permanently deleted; you need recovery tools to recover permanently deleted audio files.


2.  Use recovery tools

recover deleted audio filesRecovery tools are computer programs that are used to recover permanently deleted files on your Windows PC. We have free and premium recovery tools, which you can use to recover deleted audio files on your Windows PC.

For best results, we recommend using Stellar Data Recovery Professional edition. It can easily identify any audio file type (including other types of files as well) from HDD, SSD, and even USB sticks. It is also amazing that you can use it to recover files from a malfunctioning hard-drive or a lost partition. Must try.

You can also use Recuva, a recovery tool developed by Piriform which is easy to use. The free software has simplified GUI wizard, which makes it easy to search for common file types most especially audio files. However,  you can run the program from your Windows PC and from an external storage device e.g. USB drive.

You can also use Recuva to scan your corrupt or formatted hard drive so as to recover deleted audio files. Recuva is compatible with Windows OS (Windows 10, Windows 8 (including Windows 8.1), Windows 7, Windows Vista, Windows XP, and even Windows Server versions).

Meanwhile, you can download Recuva’s free version at Piriform Download Center. Although, Recuva’s Pro version with extended capabilities is available at a price of $19.95.

Other recovery tools which we recommend for recovering deleted audio files include:

In conclusion, it is advisable that you regularly back up your audio files on an external storage device or upload online on file-sharing tools for Windows.

Some of the recovery tools we mentioned are simple to use and free; others offer extended capabilities at a premium price.

However, you can recover deleted audio files on your PC; by either restoring from Recycle Bin or using data recovery tools.

Do you have any questions? Feel free to ask us by commenting below.

[wl_navigator]

Display not compatible with Windows 10 upgrade [FIXED]

With Windows 10 Creators Update, Microsoft tries to cover some missing features while maintaining the overall usability of their latest OS.

The release name is enough to conclude in which direction the company wants to move with the Creators Update.

But, besides that fresh and charming bundle of features, Creators Update has a lot of issues. Even though the release hit the general rollout a week ago, users around the world have already experienced a lot of issues.

Besides standard problems within the system, some users reported an issue that is quite specific and decisive when it comes to the Creators Update installation.

Namely, some of the users received an error that informs them that their display isn’t compatible with the update. Because of that, they were unable to download and install the Creators Update.

Luckily, there are some workarounds you can try out before giving up. So, if you started on the wrong foot with the Creators Update, the list of the solutions below should help you to overcome this issue.

How can I fix Display not compatible update error?

Update GPU drivers

When it comes to main troublemakers in the Windows 10 department, drivers sit undisputed at the throne. Namely, major reasons for the update issues are related to malfunctioning/inadequate drivers.

And you can bet your life that drivers managed to somehow wrap around this Creators Update issue, as well.

What you need to do is to check GPU drivers or alternative Display adapters within Device Manager and take necessary measures. Follow these instructions to troubleshoot your drivers:

  1. Right-click the Start menu and choose the Device Manager from the list.
  2. Move on to Display Adapters.
  3. Under Display Adapters, right-click on your GPU and choose Update driver.Device Manager
  4. If the updates are available, wait for the completion, restart the PC and check for updates.

Additionally, if the problem is persistent, you should use the manual approach instead of auto-update trough Windows Update. On some occasions, the generic drivers provided by Microsoft won’t suit the system needs.

Moreover, with the official drivers, you can obtain additional software for better control over your GPU. And this is how.

  1. Download appropriate drivers from one of those links depending on your GPU manufacturer:
  2. Install drivers and restart the PC.
  3. Try updating to Creators Update again.

Uninstall secondary, mirror drivers

Most of the time, the remote assistance/access tools install additional drivers on your system. Those mirror drivers enable others to access your PC and make changes with your permission. However, those are the best-known culprits for the update error we are addressing today.

So, your best bet to resolve this issue is to get rid of the remote access programs like Team Viewer temporarily, and then clean up the drivers.

Upgrade with the Media Creation T00l

Besides the standard over-the-air update, you can use an alternative way to upgrade to Creators Update. This way is indeed a bit lengthier but you’ll be able to overcome the display compatibility bug and get the latest update.

We’re talking about the Media Creation tool that is easily obtainable from this link. Once you get it, the rest is quite simple and won’t be hard to follow. This is how to perform an update over Media Creation Tool:

  1. Download the Media Creation Tool from this link.
  2. Launch the Media Creation Tool.
  3. Accept the Terms of Agreement.
  4. Choose Upgrade This PC Now and click Next.
  5. After the process is finished, your PC should be updated.

That should do it. In case you have any questions or additional solutions, feel free to share them with us and our readers in the comments section below.

[wl_navigator]

How to Download f.lux on Windows [Microsoft Store]

Windows offers many built-in tools and settings to personalize the user experience. But for features, users rely on third-party apps, given the advanced functioning and simpler UI. And that’s the reason f.lux became a popular download choice in Windows.

The app, though, has an alternative built-in setting in Windows, i.e., Night Light, which remains a favorite amongst users. The app, f.lux, is quick to download, set up, and use. It works on all iterations of the OS, including Windows 7, Windows 10, and Windows 11.

What is F Lux software used for?

In case you don’t know, F.lux is an app that helps you protect your eyes when using a computing device by warming up the display and eliminating blue light, the type of light responsible for strained eyes and other issues with sleep and vision.

It is indeed helpful for the eyes, especially if you’re the type who uses a computer for 5-6 hours daily.

F.lux released its app in the Microsoft Store a while back. Meanwhile, Windows got itself updated with Night Light. Users have a choice.

The easiest one is to use the already built-in Night light settings from Windows. Installing F.lux, however, offers a bit more options and functionality.

How do I download f.lux in Windows?

  1. Open any browser, go to the official page of f.lux on Microsoft Store, and click on Get in Store app.f.lux
  2. Click Open Microsoft Store in the prompt that appears.
  3. Click the Get button to download the app.get f.lux for windows

While it hasn’t been updated in a while, the app still works as intended. If you configure and use f.lux, make sure to disable Night Light. They don’t work together well!

Besides, you can download f.lux from the official website as well though we recommend the Microsoft Store since it will list out any compatibility issues or similar problems.

And once you have downloaded f.lux in Windows 10, all that’s left is to set the time and colors. The app will do the rest!

Before you leave, find out the best Windows apps you must download today for a better OS experience.

For any queries or to share your feedback on f.lux, drop a comment below.

The device is unreachable: error 0x80070141 [FIXED]

System errors, such as ERROR_DEVICE_UNREACHABLE, can affect almost any PC. This error usually appears when trying to transfer files from smartphone to your PC.

You can easily recognize this error by its The device is unreachable error message, and today we’re going to show you how to fix it on Windows 10.

How can I fix ERROR_DEVICE_UNREACHABLE error?

Solution 1 – Check your phone settings

According to users, this error message appears when trying to connect your iPhone with a Windows 10 PC.

To fix this problem, users are suggesting checking your phone settings. To do that, navigate to Settings > Photos & Camera section and enable Photo Sharing feature on your phone.

Some users are also recommending turning on both My Photo Stream and iCloud Photo Sharing features in the Photos & Camera section.

After doing that, you should be able to transfer files from your iPhone without any problems.

If you’re looking for an alternative solution to transfer files between your iPhone and the PC, check out this list with the best software that will certainly help you transfer data fast and securely.

Solution 2 – Connect your phone to a USB 2.0 port

If you’re getting The device is unreachable error message while trying to transfer files from your phone, you might want to try using USB 2.0 port instead.

Some older phones might not be fully compatible with USB 3.0, and if that’s the case, you’ll have to transfer your files using USB 2.0 port.

Keep in mind that USB 2.0 is significantly slower, but at least you should be able to transfer your files without any errors. Users reported this problem with iPhone 5S, but it can also appear with any other smartphone.

If your USB 3.0 isn’t working properly or is not recognized by your Windows 10 PC, check out this guide to fix it.

Solution 3 – Copy the files directly to your PC

Users reported this error while trying to copy files from their phone to a NAS drive. As a potential workaround, users are suggesting to copy your files directly to your PC and then move them to NAS.

This process can take longer because you have to move your files twice, but it’s a decent workaround so be sure to try it out.

Solution 4 – Rename files or directories

According to users, they experienced this error while trying to access files using Calibre app. It seems that the problem is the long file path, and you can fix it by changing the file path or renaming the file you’re trying to access.

Windows has a certain limitation in terms of file path length, and if you’re exceeding this limitation you’ll encounter this and many other errors.

To fix the problem, rename your files or move them to a different directory and try to access them again.

Solution 5 – Try a different USB cable

If you’re experiencing this problem, we advise you to try a different USB cable. Sometimes your cable might be damaged and that can cause this and other errors to appear.

To check if your cable is the problem, we strongly recommend you to try using a different cable. In some cases certain devices work best with their default USB cable, so try using the original cable and check if the problem still appears.

If that doesn’t work, you might want to consider purchasing a new USB cable.

Solution 6 – Set your phone to work as a Media Device

Users reported this error message while trying to transfer files from their Android devices. According to them, the issue occurs because their device is set to connect to a PC as a camera.

To fix the problem, you need to navigate to Settings section on your phone and look for Storage option. From there you can choose Connect as a Media Device option for your device.

Keep in mind that these options might be available only if your device is connected to a PC, so be sure to connect it beforehand.

Solution 7 – Reinstall your device

According to users, this error occurs when trying to transfer files from iPhone to Windows 10. As a workaround, users are suggesting reinstalling your device. To do that, follow these simple steps:

  1. Make sure that your phone is connected to your PC.
  2. Press Windows Key + X and choose Device Manager from the menu.
  3. When Device Manager opens, click on Scan for hardware changes icon. You might have to repeat this step a few times before your iPhone is listed in Device Manager. In addition, you might want to try uninstalling your iPhone from Device Manager and scanning for hardware changes.
  4. Optional: Make sure that iTunes is updated to the latest version.
  5. Restart your PC and reconnect your phone.
  6. Make sure to set this PC as trusted device once you connect your phone.

Now you should be able to transfer files without any problems. If this error appears again, you might want to try reconnecting your iPhone to your PC.

If that doesn’t work, you should try repeating this solution. As you can see, this is a temporary solution, so you might have to repeat it if the error occurs again.

Solution 8 – Use PhotoSync app

If you’re constantly getting this error message while trying to transfer files from your phone, you might want to try using the PhotoSync app. This is a simple application that allows you to transfer files from your phone to PC by using a Wi-Fi connection.

Keep in mind that this is just a workaround and that transferring files via Wi-Fi is significantly slower than transferring them over a USB connection.

Solution 9 – Try connecting your phone to a different USB port

Users reported this error message while transferring files from their iPhones. According to users, one potential workaround requires you to disconnect your iPhone and connect it to a different USB port.

To do that, disconnect another USB device and connect your iPhone to its port. After doing that, the issue should be resolved. This is an unusual solution, but it works according to users, so be sure to try it out.

We have to mention that this is just a workaround, so you’ll have to repeat it if the error occurs again.

Solution 10 – Copy files one by one

According to users, this problem only appears when trying to copy multiple files at once. However, you should be able to avoid this error by copying files one by one.

This is just a workaround and it’s useful if you want to copy just a couple of files. However, if you need to copy dozens of files, you might want to consider using a different solution.

If copy-paste doesn’t work on your Windows 10 PC, you may want to take a look at this article that will help you solve the problem.

The device is unreachable error can prevent you from transferring files from your smartphone to a PC. This isn’t a serious error, and you should be able to fix it by using one of our solutions.

If you have any more questions, don’t hesitate to leave them in the comments section below.

Popular Red Dead Redemption 2 video game is now playable for free for Xbox Game Pass subscribers

Arguably the biggest video games coming to Microsoft’s Xbox Game Pass subscription service this month is Red Dead Redemption 2 and it’s live right now for all active subscribers.

Red Dead Redemption 2 launched on Xbox One consoles back in October 2018 and quickly earned over $725 million in its first three days of launch and sold over 17 million copies within its first week.

The game is an open-world action-adventure title which has won acclaim from players and the gaming media for its immersive environments, impressive graphics, and amount of gameplay content that can be explored. Red Dead Redemption 2 also comes with the Red Dead Online multiplayer game which allows players to interact with each other and explore the world of Red Dead together.

Are you going to give Red Dead Redemption 2 a try now that it’s on Game Pass? Let us know in the comments and then follow us on Pinterest for more Xbox gaming news.

Xbox Game Pass Ultimate


Red Dead Redemption 2
Developer:
Rockstar Games
Price:
Free


Windows 10/11 is no longer supported on this PC [FIXED]

Windows 10 Creators Update has the potential to become the most controversial and revolutionary update for Windows 10 so far.

Even before the update was officially released, it was clear that Microsoft plans to shift the course and motivate its users to consider changes in their hardware department.

In order to keep up with the latest trends.

First, it’s clear that the Creators Update is aimed at touch-enabled devices, with all the new 3D and design features.

Therefore, it also promotes Microsoft’s touchscreen devices like the Surface Book or Surface Pro 4 to users of regular PCs and laptops. But that’s a discussion for another time.

What we’re going to talk about here is the issue that still prevents the Creators Update from installing on some computers. Almost four months after its official release.

That problem is the error message Windows 10 is no longer supported on this PC. Uninstall this app now because it isn’t compatible with Windows 10.

This issue hit the Windows 10 world by storm these days, as everyone seems to be talking about it lately.

If you’re unfortunate enough to be affected by this problem, keep reading this article to find out what’s going on. If you’re not affected by this problem, keep reading this article to find out what’s going on.

What does it mean?

Long story short, the Creators Update doesn’t support Intel Clover Trail processors. So, if your computer is powered by one of the processors from this series, unfortunately, you won’t be getting new updates for Windows 10.

The error message is a bit confusing. It tells you to uninstall this app, but there’s no app at all. It’s the hardware problem solely, as Microsoft already cut support for Clover Trail-based computers.

Although everyone is shocked by this error code, it should come as no surprise, as Microsoft announced that the Creators Update won’t support processors from this series earlier this year.

It just seems that nobody actually paid attention to the statement, until now.

Here’s the complete list of now-unsupported Intel Clover Trail processors:

  • Atom Z2760
  • Atom Z2520
  • Atom Z2560
  • Atom Z2580

However, Microsoft isn’t the only side to blame in this dispute. Namely, all of the above-mentioned processors are already on Intel’s End of Interactive Support list.

This means the manufacturer won’t be releasing any driver or firmware updates for these CPUs in the future. 

Windows 10 processor
image source: ZDNet

Microsoft’s philosophy here is obvious. The company simply doesn’t want its latest software to run on hardware unsupported by manufacturers.

Redmond even promised it will try to find a solution that satisfies everyone, by working with Intel on potential updates.

But as we lack more details on this matter, it all seems unlikely now.

Will you keep getting security updates?

It had been previously known that Microsoft will support Windows 10 version 1607 (Anniversary Update) until the first quarter of 2018. That implemented a sort of panic into heads of users of income devices.

However, Microsoft recently announced it will extend support for Windows 10 version 1607 until 2023. 

That means you’ll be able to receive all security patches and updates, just like users of other Windows 10 versions. You just won’t be receiving any new features for the system, that will come with the future major updates.

If you ask me, that’s enough time for you to upgrade your configuration or get a new computer.

Whether you like it or not, using an Intel Clover Trail computer in 2023 will probably be impossible, because all the apps, programs, and services will probably require a stronger configuration.

What can you do about it?

The most straightforward answer would be to upgrade your configuration or get a new one. As I already mentioned above, you have no other choice. And if you don’t feel like upgrading now, you have three more years to do so. First of all, security will become an issue.

We live in a dangerous era for our online security, and the last thing you want is having a completely unprotected computer. And another problem is, of course, possible incompatibility with apps and services.

Unfortunately, there’s no way to install Windows 10 Creators Update on Intel Clover Trail-powered computers right now. Once again, Microsoft said it will look for the compatibility solution, but we can confirm none of that right now.

So, if that does happen, and Microsoft and Intel find a way to deliver you the Creators Update, you should get it through Windows Update automatically. At the end of the day, all you really can do is wait.

Will the problem affect computers in the future?

All of this gives us a strong reason to believe that the same scenario will repeat with other hardware in the future.

We already know that Microsoft isn’t a fan of old hardware, so as soon as a manufacturer stops supporting a certain piece of hardware, we should expect Microsoft to react quickly, and remove Windows 10 support for computers powered by that hardware.

Perhaps the best way to track if your hardware is still eligible for future Windows 10 major updates is to be on the lookout for how long will a manufacturer support your current CPU.

What do you think about Microsoft’s strategy of not supporting older hardware? Is your computer at risk of not receiving future updates? Let us know in the comments below.

  • When did Windows 11 come out?
It didn’t and we still don’t have any information on when a new Windows OS will be launched. Until then, Microsoft has promised major updates every 6 months.
  • Can you install Windows 10 on old computer?
It doesn’t really matter how old is your computer as long as it has the minimum requirements to run Windows 10. If you’re looking for a new computer but you’re low on budget, look at our list with cheapest Windows 10 laptops.

[wl_navigator]

Microsoft video shows you everything that’s new with Surface Book 3

Microsoft Mechanics released a new video this week showing you everything you wanted to know about Surface Book 3, and it shows you that this is one powerful machine. Available for preorder now, the new Surface Book 3 is designed to give users the most power in any Surface device along with the flexibility and versatility that comes along with the Book 3’s unique detachable design.

The video wants you to know that this machine is for professionals. It’s fast, powerful and in its most powerful configurations can support complex 3D designs, produce graphical content with real-time ray tracing and advanced shading, and even run GPU-intensive machine learning and AI workloads locally on the device. Surface Book 3 has options for discreet GPUs with Nvidia GeForce or more powerful Nvidia Quadro GPUs for businesses that require specific certifications for professional-grade apps.

Like most laptops being released today, the new Surface Book 3 uses Intel’s newest 10th generation Core i5 or Core i7 processors along with options to choose up to a whopping 32 gigabytes of RAM. Of course, processors and RAM aren’t the only hardware changes as the Surface Book 3. The Book 3 now includes a new USB-C 3.1 Gen 2 port and an updated Surface port that supports 120-watt power delivery. With the new Surface port, users can now connect 2x4K displays using the new Surface Dock.  You also get faster SSD drives, a new TPM 2.0 security chip for enterprise security,  as well as Wi-Fi 6 and Bluetooth 5.

Whether you choose the 13-inch or 15-inch model, both sizes include the Surface Book’s familiar hinge and detachable display that now uses an improved detachable mechanism that is up to 2 times faster compared to previous models. The video does point out that the detachable tablet also includes Intel’s Iris Plus graphics and houses a color-calibrated 3000 by 2000 pixel display for the 13-inch model and 3240 by 2160 pixel resolution for the 15-inch model.

The new Surface Book 3 wasn’t the only new Surface device unveiled this week. Be sure to check out our post about the Surface Go 2 and let us know if you consider either one of these devices.

FIX: Sling TV error 8-4612 & error 5-419

Sling TV is an obvious choice when you put a high price on channel flexibility and reliable streams. However, Sling TV errors such as 8-4612 and 5-419 are nothing out of the ordinary.

They can make you question your decision to replace your cable subscription with this video streaming service.

Many users complain about the fact that they cannot connect to Sling over Wi-Fi. The Sling TV error 8-4612 that they are seeing often points to an Internet issue.

Others get a 5-419 error instead and no channel will load. One case or another, don’t let these problems pile up and change your otherwise pleasant Sling TV experience.

Here are the suggested steps you should follow in order to solve Sling TV 8-4612 and 5-419 errors.

How can I fix Sling TV error 8-4612 & error 5-419?

1. Make sure that Sling TV is not down

possible Sling TV outage
Don’t imagine the worst when a simple Sling outage may lead to 8-4612 and 5-419 errors. Verify if that’s your case too.


2. Restart Sling TV

try to restart Sling TV

Play by the book and continue with an easy troubleshooting tip that works most of the time. Even if Sling is not down, occasional streaming issues do happen.

All you need to do is to close out of the Sling app and then relaunch it. This should make any temporary streaming hiccups go away.


3. Force stop Sling TV app processes

  1. Press Ctrl+Shift+Esc keyboard shortcut to open the Task Manager.open Task Manager
  2. A list of all running applications and background processes on your system are found in the Processes tab. While there, select the Sling TV app process.
  3. Click on End Task next.
  4. Relaunch the app and see if the error is still there or if you can go back to your action and adventure plans.

Sling TV app

The above steps may be applied on your Windows 10 PC. However, the procedure slightly varies if you are enjoying Android TV.

You basically need to open Settings, select Apps, then the Sling TV app. Press the Force Stop button, then launch the app back.

When it comes to Apple TV, press the Home button on your remote. Scroll through the app and swipe up when you see Sling TV.

Finally, return to the home screen and relaunch the app.


Can’t open Task Manager? Don’t worry, we’ve got the right solution for you.


4. Check your Internet connection when getting Sling TV error 8-4612

check Internet connection

If available, try using a wired Internet connection and see if things are any better. Anyway, if only wireless is available, try connecting to a different Wi-Fi network.

The Internet speed is also essential if you want to properly enjoy that great selection of Sling TV channels. You need to get streams of over 1.0 Mbps, so a quick test will give you the answers you’re looking for.

You should better use the best tools to test Internet speed if you want accurate results.


5. Reload channels when getting Sling TV error 5-419

Sling TV reload channels

Check if you get the Sling TV error 5-419 on every single channel. If not, a trick that has been confirmed to work is to remove the channels in question, reboot your Internet router and reload the channels.

Are things any better now? If you know any other solutions, feel free to share them with us in the comments area below.

[wl_navigator]

Inside Xbox recap: Did Microsoft over-promise and under deliver?

Microsoft just wrapped up its much-anticipated Inside Xbox livestream, which was a bit shorter than an hour. Overall, Microsoft showed a lot of unannounced games shipping on Xbox Series X, but Xbox fans looking to see real gameplay footage may have been a bit disappointed, to say the least.

Indeed, most of what we’ve seen during today’s livestream was cinematic trailers, not live demos of Xbox Series X games. Microsoft’s promise of first “Xbox Series X gameplay reveal” was a bit ambiguous, but Xbox fans probably expected more than cutscenes captured in-engine.

The Game Awards creator Geoff Keighley took the temperature with a Twitter poll, and as of this writing 44.6% of respondents gave the show a “D or Lower” grade. Twitter user Arun-1910 seems to have captured the global sentiment: “A lot of what was shown didn’t look next gen or was just cinematics/cutscenes.”

Well, to be fair, the livestream started really well with a trailer for Bright Memory Infinite, a brand new futuristic FPS from FYQD-Studio in China. This is definitely the type of photorealistic graphics we expect from next-gen games, and this title in particular looks like Titanfall 2 on steroids.

This is one of the few “real” gameplay trailers we saw today, and you can watch it below:

Microsoft also showed today an interesting trailer for the upcoming racing Dirt 5, which also had some extra time at the end of the stream with an interview with Development Director Robert Karp. Dirt 5 will feature various environments with changing weather, which are visible in the trailer below. Again, this is a cinematic trailer captured in-engine, with no real gameplay footage.

Interestingly, Dirt 5 will support four-player split-screen, something that has become really rare on console games. Moreover, the game’s Development Director mentioned that the Xbox Series X version of the game will allow players to choose between 4K/60FPS or 120FPS at a probably lower resolution.

Second Extinction is another impressive-looking game that was announced today. The 3 player co-op FPS will let you fight off mutated dinosaurs, and the trailer was one of the few featuring real gameplay footage

Ubisoft’s much-anticipated Assassin’s Creed: Valhalla also had its “World premiere of gameplay debut” today, but again, what we got was a cinematic trailer with “footage representative of expected Xbox Series X gameplay.” It was pretty disappointing, and you can watch it for yourself below:

Microsoft showed many other games today, but some of them didn’t really look like next-gen games, such as the top-down Action RPG The Ascent. We understand that Microsoft didn’t want to focus exclusively on AAA developers today, but gamers were probably expecting the contrary: ambitious, photorealistic games that really show what next-gen consoles can deliver.

Microsoft highlighted today that the biggest developers are already working on Xbox Series X games, and we should expect “hundreds” of new titles optimized for the new console in 2021

We have no doubt that Xbox Series X games are going to look better than ever, but overall, it seems that Microsoft probably over-promised and under-delivered today. There was a segment about Madden NFL 21 with no gameplay footage, and gamers were probably expecting to see previously-announced games like Cyberpunk 2077 or Watch Dogs: Legion today, but that didn’t happen. But again, what was really disappointing is the lack of more real Xbox Series X gameplay footage, despite Microsoft teasing it repeatedly ahead of the event.

Unfortunately, Microsoft set today a pretty low-bar for all the upcoming digital events planned for this spring and summer, and it will be interesting to see if Sony does thing differently with its PlayStation 5 reveal. We hope the Xbox 20/20 July update that will focus on Xbox Game Studios titles will be more interesting, but Microsoft really needs to listen to Xbox fans: less trailers, more live gameplay, please?

4 best preamplifier software plugins

The best preamplifier software solutions help individuals boost the low level signals of a device to the baseline level of your recording equipment. For example, you can amplify the gain of your microphone signal.

However, you shouldn’t confuse preamplifier software with hardware. A software solution isn’t as powerful as physical gear, so you shouldn’t expect great results using this method. Nevertheless, you can experiment with some interesting dedicated plugins.

Before proceeding, you should know that a preamplifier (preamp, the hardware term) is a type of amplifier that increases the volume of very weak signals before applying gain.

It’s useful for producing a powerful output signal with high gain from low noise and distortion, which can be further processed or forwarded to an amplifier and loudspeaker. For example, you can amplify your voice.

In this article, we listed 4 preamplifier software tools that you can experiment with on your Windows PC to get the best possible sound out of your microphone.

What are the best preamplifier software plugins to grab?

Waves Scheps 73

Waves Scheps 73

Waves Scheps 73 is a preamplifier software plugin for microphones, which can be used for recording, mixing or mastering music. With mono and stereo preamp components as well as a three-band equalizer, it was modeled after the classic 1073 preamp and its original specifications.

To be more precise, it comes with a fixed high-frequency band of 12kHz and a high-pass filter of 18dB/octave. Furthermore, you can toggle low and mid-range bands with cut and boost controls.

A mid-range band of 10kHz was identified in the 1073 preamp’s design, but it could only be used on the channel strip of the 1078 successor until it was successfully integrated into this plugin.

To resemble the original preamp, Waves Scheps 73 features authentic saturation and harmonic distortion, ranging from pleasant warmth to heavy drive.

And, to closely examine the audio processing source, you can take advantage of an advanced monitor for the left, right, mono, and stereo channels.

Plus, you can apply various equalization settings to the middle and side stereo content. It’s all thanks to Waves MS Matrix, a plugin that can create MS output from left-right input, or the other way around.

Neve Preamp

Neve Preamp

Neve Preamp is also a preamplifier software plugin modeled after the original 1073 preamp, simulating its characteristics and equalization settings. It’s available for all users who wish to record, mix or master a clean and warm sound through an UA Audio Interface.

Delivered in a simple graphical interface with two knobs, the plugin gives you the possibility to control the preamp through a red knob and the output through a grey one. To toggle microphone and line input mode, you just have to flip a switch.

Recordings can be made with low DSP usage, which means that you can create classic Neve consoles from any DAWs. The plugin may also be used by those who own UAD-2 hardware and wish to mix music and customize equalization options for tone shaping.

Neve Preamp promises to bring the original sound, grit, and behavior of the 1073 preamplifier. It emphasizes your music with saturation and elaborate non-linear circuit behaviors, whether you’re processing acoustic guitar, vocals, drums, bass, or synths.

IK Multimedia EQ73

IK Multimedia EQ73

The 1073 preamp was so popular and heavily used throughout music recording history, that it was incorporated into many preamplifier software plugins, including IK Multimedia EQ73. It faithfully reproduces the sound, clarity and warmth of the classical 1073 preamp.

The plugin proposes a DAW software solution by emulating all the 1073’s original features, including equalization curves, tone shaping, saturation, grit, distortion, circuit designs, gain stages, preamp behavior, as well as interaction between the preamplifer and equalizer.

The equalizer of the IK Multimedia EQ73 comes with three bands to breathe life into any type of tracks, like high-end air or low-end punch. It works with any audio source and type, such as guitars, vocals, snares, overheads, kicks, and bass.

The plugin supports up to 192kHz sampling rates, full-latency compensation, and high-quality oversampling. It’s compatible with the T-RackS CS standalone software program and can be integrated with a VST 2, VST 3 or AAC host.

Acustica Audio GOLD3

Acustica Audio GOLD3

Acustica Audio GOLD3 is a preamplifier software suite with rich features. It comes with 6 distinct equalizers, 7 preamplifiers, 2 compressors, and enhanced routing control. The components of the package can be used as separate plugin processors.

The standalone module with preamps is called GOLD3 PRE and includes a total of 52 preamplifiers.

Based on a wide range of rare preamplifier hardware equipment, the preamp plugins enrich your sound with vintage warmth brought by the harmonic distortion and frequency/phase response of the associated circuits.

The first audio processing task of GOLD3 PRE involves the input preamp. There are three mutually exclusive preamplifiers available for the line, mic and bus, along with an option to switch it off.

This processing stage is followed by output preamps and controls. Each plugin included in the Acustica Audio GOLD3 package has a zero latency version (called “ZL”) which can be enabled during tracking.

Conclusion on the best preamplifier software

Although the power of a piece of equipment can’t be matched by a software solution, you can experiment with the preamplifier software plugins on the list to find the vintage and warm sound you’re looking for.

Therefore, you should check out the plugins on this list when it comes to Waves Scheps 73, Neve Preamp, IK Multimedia EQ73, and Acustica Audio GOLD3.

[wl_navigator]

How to sign up and preview Microsoft’s new Family Safety App on iOS and Android

When Microsoft introduced the rebranded Microsoft 365 subscriptions a few months ago, it also announced a new app known as Family Safety. Designed to help parents and adults track their children and keep them safe, the company promised a preview would be coming soon. Now, that time is approaching so here’s how you can sign up and preview the app once it becomes available.

What are some features of Family Safety?

Before getting into anything, we’ll just explain some things the app can do for you once you successfully sign up for the preview. The biggest feature of the app is content filters, you’ll be able to create a safe space for your kids to explore online, and set web and search filters on Microsoft Edge. You’ll also have the chance to set screen time limits on apps and games. There’s even activity reporting, as well as location awareness to help you track the location of where your family members are heading.

Step 1: Create a family group

Before you’re able to sign up for downloading the app, you’ll have to create a family group under a Microsoft Account. You can do that by clicking here, and selecting Create a family group. Once you do that, they’ll be a couple of prompts to follow, where you can input the phone numbers and emails of anyone you want to join the group. This process shouldn’t take long, and the person who you’re sending the invite to the family group will need to have a Microsoft Account. If they don’t have one, you can create one for them here.

Step 2: Fill out a preview form

Family group created, you can now sign up for the preview of the Family Safety app. To do this, you’ll want to click this link here. You should only fill out the form once. Acknowledge that you created a family group, and then provide your family and device information such as email, and type of phone and the number of members you want to use the app. When done, you’ll have to click Submit. Microsoft will then reserve a spot for you and the members of your family, so make sure you got the emails correct.

Step 3: Wait!

With the form filled out, you’ll have to wait a bit for Microsoft to email you with the invite and links to download the app. The company says that there are a few restrictions, so not everyone might get an invite. The preview is currently limited to 10,000 users on iOS and 10,000 users on Android. It also isn’t available in China, Japan, countries and regions with right to left written languages, and U.S. embargoed countries and territories. If you and your family get selected, each member of the family will get an email with instructions to download the preview. Invites are sent on a rolling basis, so not everyone might get their invites right away.

Send feedback when you download

If you get selected and are able to download the app, it’s important that you give your feedback to Microsoft. As part of previewing the app, the company requests that you give your feedback on how it is working for you. If you encounter a bug or other issue, you can shake your device, or tap Menu, and then Help & Feedback.


CCleaner Problems With Windows 10: Best Ways to Fix Them

CCleaner is one of the most popular tools for cleaning and optimizing your Windows computer. Unfortunately, quite a number of users are facing some CCleaner problems with Windows 10.

In this article, we’ll list the most common CCleaner issues you may encounter on your PC, as well as the corresponding workarounds to help you get the tool up and running again.

Is CCleaner OK for Windows 10?

Inevitably, a lot of dead weight accumulates on your computer: temporary files, broken shortcuts, corrupt files, and other problems.

Hence, it would be best to have a top PC cleaner in CCleaner to keep your Windows 10 device clean and prevent technical issues. This not only prevents problems but also creates valuable spaces for other activities.

How can I fix CCleaner problems with Windows 10?

1. CCleaner not opening

1.1. Disable antivirus and firewall

  1. Press the Windows key, type windows defender, and select the Windows Defender Firewall option.
    windows defender ccleaner problems with windows 10
  2. Find and click Turn Windows Defender Firewall on or off on the left pane.
    turn windows
  3. In the Customize Settings window, select the Turn off Windows Defender Firewall (not recommended) radio buttons for both the Private and Public network settings.
  4. Click OK to disable Windows Firewall.
    turn off
  5. Next, press the Windows key, type virus, and select Virus & threat protection.
    virus and ccleaner problems with windows 10
  6. Click the Manage settings link.
    manage settings
  7. Finally, toggle the switch under Real-time protection backward to disable it.
    real time

If CCleaner is not opening on your computer, disable your antivirus and firewall. If you have a third-party antivirus, you can turn it off by right-clicking the icon on the taskbar and selecting Disable.

1.2. Remove CCleaner entries from your registry

  1. Press the Windows key + R, type regedit, and click OK.
    regedit ccleaner problems with windows 10
  2. Navigate to the path below in the left pane: HKEY_LOCALMACHINE\SOFTWARE\Microsoft\Windows NT\CurrentVersion\Image File Execution Options\path
  3. Now, right-click the CCleaner key and select Delete.

Sometimes, you might be dealing with the CCleaner not opening problems on your Windows 10 PC because of leftover CCleaner files in your registry.

2. CCleaner will not uninstall

2.1. End CCleaner process Task Manager

  1. Press the Windows key + X and select Task Manager.
    task manager
  2. Right-click all CCleaner processes.
  3. Now, select End task.
    end task ccleaner problems with windows 10
  4. Finally, try uninstalling the app again.

2.2. Use its uninstaller.exe

  1. Press the Windows key + E to open File Explorer.
  2. Navigate to either C:\Programs files or C:\Program files(x86).
  3. Now, open the CCleaner installation folder and locate uninstall.exe or uninst000.exe.
    uninstall
  4. Finally, run the file and follow the instructions.

Some users have been having problems trying to uninstall the CCleaner on Windows 10. With the two solutions above, you can remove the app easily.

3. CCleaner is not responding

3.1. Run the app as an admin

  1. Right-click the CCleaner icon.
  2. Select the Run as administrator.
    run as
  3. Finally, check if the app works well.

3.2. Disable antivirus temporarily

Another solution, if you are dealing with CCleaner not responding problems, is to disable your antivirus and firewall temporarily. We have shown how to do this in solution 1.

4. CCleaner is not working

  1. Right-click the CCleaner icon and select Properties.
    properties ccleaner problems with windows 10
  2. Click the Security tab at the top.
  3. Now, click the Edit button.
    security
  4. Check the box before Full Control under the Allow section.
    full control
  5. Finally, click the OK button.

In some cases, CCleaner might not work correctly if it does not have the necessary permissions. The solution is to grant it complete control and restart the app.

If this does not work, you can temporarily disable your antivirus and firewall.

5. CCleaner keeps starting with Windows

5.1. Disable from within the app

  1. Launch CCleaner and click Options in the left pane.
  2. Now, select Settings.
  3. Finally, uncheck the box for Run CCleaner when computer starts.
    run option ccleaner problems with windows 10

CCleaner has a built-in option that allows it to start with your PC. It would be best if you disabled this option to stop it from doing so.

5.2. Stop it from Settings

  1. Press the Windows key + I and select the Apps option.
    apps ccleaner problems with windows 10
  2. Click Startup in the left pane.
  3. Now, toggle the switch for CCleaner backward to disable it.
    disable option

If CCleaner keeps starting with Windows 10, it is because it is part of your startup apps. The solution to this is to remove it from there.

That’s for the common CCleaner problems on Windows 10 and their fixes. Most of these solutions work interchangeably for other issues. So, you can always try them.

Similarly, if CCleaner won’t install on your PC, check our detailed guide to fix it quickly.

Feel free to let us know the solution that helped you solve the problem in the comments below.

Windows Media Player cannot find the file [TECHNICIAN FIX]

Windows Media Player cannot find the file is an error message that some Windows 10 users reported encountering.

Apparently, this error message pops up, especially while trying to burn a CD, although it might happen when users try and play a media file.

After inserting a CD into the CD-ROM, Windows Media Player does not allow the user to go through with the process.

Here’s how one user described the error on the Microsoft Answers forum.

When I insert a CD into my drive I get the following message: Windows Media Player cannot find the file. If you are trying to play, burn, or sync an item that is in your library, the item might point to a file that has been moved, renamed, or deleted.

In order to fix this issue, you should follow the steps we provided below.

Why Windows Media Player can’t find the file when burning music?

1. Perform a file format check

  1. Open the Control Panel > select View by Large Icons.
  2. Click Administrative Tools.PC softAdministrative tools windows media player cannot find the file
  3. Open Services.
  4. Find Windows Media Player Network Sharing Service, right-click on it and select Stop.Windows Media Player Network Sharing Service windows media player cannot find the file
  5. Open the following location C:Users your username AppDataLocalMicrosoftMedia Player.
  6. Find these files: CurrentDatabase_***.wmdb and LocalMLS_*.wmdb and delete them.
  7. Go back to the Services window > right click on Windows Media Player Network Sharing Service and select Start.
  8. Open the Windows Media Player and see if this made any change.

Looking for the best free software to burn your music files and finally ditch WMP? Here are the best options.


2. Check the music location

  1. Press the Organize button located in the top left corner and select Options.Options WMP windows media player cannot find the file
  2. Open the Rip Music tab > under the Rip music to this location section you will find where your ripped music is stored.
  3. If there is no valid location to rip the music, click Change, and select a valid location.

change default rip location windows media player cannot find the file

If this doesn’t work you’ll need to include a folder manually. To do so, follow these steps:

  1. Open This PC.
  2. In the left pane, right-click Music > select Proprieties.Music Properties windows media player cannot find the file
  3. Open the Location tab > click Move.
  4. Select the folder where you store your music and then apply changes.
  5. Open Windows Media Player and see if you can now rip your CD.

We hope that you found our quick guide on fixing the Windows Media Player error helpful. If you liked this article, leave a comment in the comment section below.

  • Why my Windows Media Player is not working properly?
Try to close the process from Task Manager and open the program again.
  • How do I fix corrupted files?
If you have reasons to believe that you have corrupted files, you will need to run an SFC scan. If you don’t know how to do that, read our System File Checker guide.

[wl_navigator]

FIX: Hulu keeps buffering, freezing and crashing

Hulu is one of the best alternatives to Netflix for online movies. Yet, like any streaming service, Hulu’s video playback can buff (or freeze) intermittently for some users.

Videos can become unwatchable when they keep on buffering with regularity. If you need to fix Hulu video buffering, check out some of these potential resolutions for Hulu buffering.


This is how you can fix Hulu video buffering in Windows

1. Power cycle the router

First, try power cycling your router when a Hulu video buffs. Turn off your desktop or laptop. Power off and unplug the router. Wait a few minutes before plugging the router back in and turning it on.

Then turn on your Windows PC again.

Router hulu keeps buffering

2. Clear brower cache data

Corrupted browser data can generate Hulu playback issues within browser software.

  1. To clear Chrome’s cache data, click the Customize and control Google Chrome button.
  2. Press the Ctrl + Shift + Del keyboard shortcut to open the Clear browsing data options shown directly below.
    Clear browsing data options hulu keeps buffering
  3. Select All time on the Time range drop-down menu.
  4. Click the Cached images and files option there to select it.
  5. Select the Cookies and other site data option.
  6. Click the Clear data button.

3. Reinstall the Hulu app

If you’re utilizing the Hulu UWP app, trying reinstalling it to ensure its update.

  1. Click Windows 10’s Type here to search button to open that utility.
  2. Input apps in the search box.
  3. Select Apps & features to open Settings as in the shot directly below.
    Apps & features tab hulu keeps buffering
  4. Select the Hulu app listed there, and click the Uninstall button for it.
  5. Restart Windows before you reinstall Hulu.
  6. Then click Get on the Hulu’s MS Store page to install the latest version of that app.

4. Disable VPN

VPN connections can generate laggy video playback.

  1. To disable VPN, right-click the Start button and select Run (or press the Windows key + R hotkey).
  2. Type ncpa.cpl in the Open box, and click the OK option.
    Network Connections tab hulu keeps buffering
  3. Next, right-click your VPN connection to select Disable.

5. Give your internet connection a boost

Hulu buffering can often be due to a slow internet connection. To check your net speed, open the fast.com page. That page will tell you what your connection’s speed is as in the snapshot below.

Fast.com page hulu keeps buffering

The minimum recommended internet speed for Hulu is 3.0 Mbps and 8.0 Mbps for its live streams. If your net speed is below 3.0 Mbps, try to give it a boost.

To do that, turn off any other devices you might have connected to internet, such as mobiles and consoles. Close superfluous background software in Windows with Task Manager.

If you have an Ethernet cable, connect your PC to router with that cable for an Ethernet connection.


6. Update Windows and browser software

Keep your system and browser software as update as possible to ensure compatibility with the latest Hulu services.

  1. To check for Chrome updates, click the Customize and control Google Chrome button in that browser.
  2. Click the Help submenu.
  3. Select the About Google Chrome to check for updates. The browser will automatically update if it’s not the latest version.
  4. Then restart Google Chrome after the update.
  5. To update Windows 10 to the latest build, open the search utility.
  6. Input the keyword updates in the Type here to search box.
  7. Click Check for updates to open the Settings tab as shown directly below.
    Check for updates option hulu keeps buffering
  8. You can click Check for updates to download any available patch updates.
  9. If there’s a new build update available, click Download and install to upgrade to the latest Windows 10 version.

Those are some of the ways you can feasibly fix, or at least reduce, Hulu video buffering. Then Hulu video playback will be somewhat smoother with less buffering.

However, the best way to eradicate Hulu buffering is to invest in high-speed Wi-Fi if your current connection isn’t a fast one. This can save you from this and other connection errors.

Hence, if Hulu still does not respond, we suggest checking out the Disney+ streaming platform, which provides high-quality videos on a wide range of TV shows, originals, movies from Pixar, Marvel, Star Wars, Disney, National Geographic.

The streaming platform will automatically adapt to the device in use and the internet connection speed, delivering the best way to enjoy watching beyond failures.  

⇒Get Disney+ now


[wl_navigator]

Error 0x800710d2 on Windows 10/11: Here’s how to fix it

Errors in Windows 10 aren’t uncommon. Occasional system crashes, BSoDs, system slowdowns, and update problems are only a few among the many problems a Windows 10 user may have to deal with.

In this long list of Windows 10 problems, one of the less common problems is the error code 0x800710d2.

You may come across error code 0x800710d2 if you’re using a PIN password to log into your Windows account. Normally, this error shows up when trying to boot the system or wake it up from Sleep mode.

But it may also show up when trying to do something else, such as trying to create a provisioning package. The reason this error shows up is because of failure in the transmission of resource data.

The natural solution here, or so it would seem, would be to remove the PIN code and use regular passwords instead. However, there are many benefits to using PIN codes.

Not only are PIN codes easier to remember and log in with (because they are only 4 digits long), supplementing your Windows account password with a PIN code is also considered to be a great security measure to prevent unauthorized access to your account.

The solution? Restart the system, login with your password, and reset the PIN code. That’s the short version. Here’s a detailed step by step guide on how to do that:

  1. Press the Windows key and in the search bar, type Control Panel. Select and open Control Panel,
  2. Navigate to Control Panel > Power Options > Change plan settings,
  3. Look for Put the computer to sleep option and expand the drop-down menu on its right,
  4. Select Never and hit Save changes to confirm the change.

Power & sleep

Normally, disabling the sleep mode will help resolve the issue altogether.  But it is wise to reset the PIN code too.

  1. Press the Windows key and in the search bar, type Settings. Select and open Settings,
  2. Navigate to Settings > Accounts > Sign-in options,
  3. Look for the PIN tab and select Remove to remove the current PIN password,
  4. You will have to confirm this decision by entering your regular password in the confirmation window. Once you’re done, hit OK to finish the process.

  5. To add a new PIN code, click on the Add button in the PIN section,
  6. Enter a new PIN code (twice) and press OK to set it up,
  7. Once you’re through, your PIN password will have been reset.

  • What is my windows pin?
On the log screen in Windows, click your username and hit the I forgot my password text under the field. If you use a PIN to sign in, you can reset your PIN instead.

[wl_navigator]